
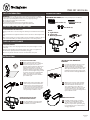
Screws (6)Wall Anchors (6)
Star Knobs (2)
PARTS
A - Light Fixture
B - Solar Panel
C - Mounting Bracket
CAUTIONS: BATTERY INSTRUCTIONS
PRE INSTALLATION
WARNING:
•Do not expose the light to re or intense heat.
•Do not immerse in water.
•Your motion light and solar panel are both weather-resistant.
•Never look directly into the solar motion light when illuminated.
HARDWARE INCLUDED (note: some parts may be pre-assembled)
USE RECHARGEABLE BATTERIES ONLY.
•Always purchase the correct size and grade of battery most suitable for the intended
use.
•Remove batteries from equipment which is not to be used for an extended period of
time.
•Dispose of the battery in accordance with local, state and federal regulations. (Do not
burn or discard the battery in a municipal water system or other body of water.)
CARE AND MAINTENANCE
CARE & MAINTENANCE
•From time to time, ensure the plug between the solar panel and light is securely
connected.
•The solar panel should be cleaned with a damp cotton cloth on a regular basis.
This will ensure optimal performance and battery charging.
•Never let any abrasive material come into contact with the solar panel.
MOUNTING THE LIGHT FIXTURE
ON THE MOUNTING BRACKET
Place the light xture on the mounting
bracket and secure the light xture in
place with the star knobs.
5
INSTALLING THE MOUNTING
BRACKET
Locate the mounting bracket six to eight
feet above ground on a solid surface
capable of supporting the light xture
and secure enough so that it will not move
when exposed to vibrations or wind. The
light xture must be high enough to allow
for motion detection and light distribution.
3
Mark the hole locations of the mounting
bracket, then set the mounting bracket
aside. Check that the marked areas are
clear of obstacles such as cables and
electrical lines. Drill holes for the enclosed
screws and wall anchors. Insert the wall
anchors then secure the mounting bracket
in place with the screws.
4
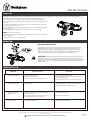
INSTALLING THE SOLAR PANEL
Ensure your solar panel is placed so
that its exposure to the sun is optimized.
Be aware of objects such as trees or
property overhangs that may impede the
panel’s ability to generate a charge. To
adjust the solar panel loosen the wing
nut and position the panel. When desired
position is achieved, tighten wing nut until
secure.The solar panel is equipped with a
9.84 ft. connecting wire, so the Light
Fixture and solar panel can be installed
up to 9.84 ft. apart.
1
Mark the hole locations of the Base, then
set the solar panel aside. Check that the
marked areas are clear of obstacles such
as cables and electrical lines. Drill holes
for the enclosed screws and wall anchors.
Insert the wall anchors then secure the
solar panel in place with the screws.
2
A
INSTALLATION
ITEM: SR11AC01H-06
SAFETY INFORMATION
Read all safety precautions and installation instructions carefully
before installing or servicing this xture. Failure to comply with these instructions
could result in a potentially fatal electric shock and/or property damage.
CONNECTING THE WIRES
Carefully route the power cord of the
solar panel to the light xture and plug
into the socket located on the light.
Only use solar panels for power charging.
It is not allowed to access other external
charging equipment.
6
B
C
02/06/2018
1/2 E

For additional help and information regarding installation, contact Customer Service at 1-844-551-0680, 8am-5pm,CST Monday – Friday
, WESTINGHOUSE, are trademarks of Westinghouse Electric Corporation. Used under license by Sky Rich Star Limited. All Rights Reserved.
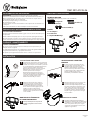
REPLACING THE BATTERIES
WARNING:
Do not dispose batteries in municipal waste stream or by fire as batteries may
explode. Do not open, short circuit, or mutilate batteries. Dispose of batteries in accordance
with Local, State, and Federal regulations. Do not mix old and new batteries. Do not mix alkaline,
standard (Carbon-Zinc), or rechargeable (Nickel Cadmium or Nickel Hydride) batteries with
Lithium batteries.
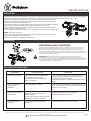
OPERATION
TROUBLESHOOTING
Before the solar security light can operate to its full capacity, the solar panel needs to be in sunlight for 8-12 hours to fully charge the battery. Turn the light switch
to the “OFF” position. After charge, turn the light switch to “AUTO” or “ON” position.
•Loosen the wing screw to adjust the motion sensor head toward desired detection area.
The side light heads can be adjusted independently in a variety of ways for optimal lighting
coverage.
•
•Turn the light switch to “AUTO” position, the light will turn on automatically at night when
motion is detected.
•Turn the light switch to “ON” position, the light can be used as a standard light.
NOTE: Avoid aiming the control at:
•Objects that change temperature rapidly to prevent false triggering, such as heating vents
and air conditioners.
•Moving objects such as trees and street trac.
!
PROBLEM
Lights will not come on.
Lights ash on and o.
Lights come on for no
apparent reason.
Lights stay “ON”.
A. Light switch is turned o.
B. Cable connection is loose.
C. Motion sensor head is not aimed correctly.
A. Low battery..
A. Motion sensor maybe sensing moving objects
such as trees, trac, etc.
A. Light switch set to ON.
A. Turn light switch to ON or AUTO.
B. The solar panel needs to be in sunlight for 8-12 hours
to fully charge the battery.
C. Re-aim the motion sensor to cover the desired area.
A. With light switch set to “OFF”, allow to charge in full
sunlight for 8-12 hours before further use.
A. Reposition motion sensor.
A. Turn light switch to “AUTO”.
POSSIBLE CAUSE SOLUTION
To set the amount of ON time you want the lights to stay on after the motion is detected,
set the time switch to 30”, 60” or 120”
OPERATION
Use a Phillips head screwdriver to remove the 4 screws holding the battery cover in place.
Gently pull battery pack away from the light xture and disconnect the battery connector.
Replace old battery pack with a new 6V AA Ni-Mh 2000mAh rechargeable battery pack.
Connect the battery connector and insert battery pack into the light xture. Replace the
battery cover by aligning it properly and replacing the 4 screws removed earlier.
ITEM: SR11AC01H-06
02/06/2018
2/2 E
B. Heat being reected from other objects may
be turning the motion sensor on and o.
B. Reposition motion sensor.
30” 60” 120”
ON OFF
AUTO

PRECAUCIONES: INSTRUCCIONES SOBRE BATERÍAS
ANTES DE LA INSTALACIÓN
ADVERTENCIA: Lea atentamente todas las precauciones de seguridad e
instrucciones de instalación antes de instalar o dar mantenimiento al dispositivo. La
falta de cumplimiento de estas instrucciones puede resultar en choque eléctrico
potencialmente mortal o daño a la propiedad.
•No exponga la lámpara al fuego o al calor intenso.
•No la sumerja en el agua.
•Tanto la lámpara con sensor de movimiento como el panel solar son resistentes a la
intemperie.
•Nunca mire directamente a la luz de la lámpara cuando esté encendida.
USE SOLO BATERÍAS RECARGABLES.
•Siempre compre las baterías del tamaño y grado correctos, las más adecuadas para el
uso planeado.
•Retire las baterías del equipo que no se use por un período prolongado de tiempo.
•Deseche la batería de acuerdo con las regulaciones locales, estatales y federales. (No
queme ni deseche la batería en un sistema de agua municipal u otro cuerpo de agua.)
CUIDADO Y MANTENIMIENTO
CUIDADO Y MANTENIMIENTO
•De vez en cuando, asegúrese de que el enchufe que conecta el panel solar y la
lámpara esté bien asegurado.
•Se debe limpiar el panel solar con regularidad con un paño de algodón húmedo. Esto
asegurará el funcionamiento y carga óptima de la batería.
•No permita que ningún material abrasivo entre en contacto con el panel solar.
MONTAJE DE LA LÁMPARA EN
EL SOPORTE DE MONTAJE
Coloque la lámpara en el soporte de
montaje y asegúrela con las roscas
estrella.
5
INSTALACION DEL SOPORTE DE
MONTAJE
Coloque el soporte de montaje de seis a
ocho pies sobre el nivel del suelo, en una
supercie sólida capaz de soportar la
lámpara y sucientemente segura para
que no se mueva por vibraciones o viento.
La lámpara debe estar lo sucientemente
alta para permitir la detección de
movimiento y la distribución de la luz.
3
Marque las ubicaciones de los agujeros del
soporte de montaje y deje a un lado el
soporte de montaje. Verique que las áreas
marcadas estén libres de obstáculos como
cables y líneas eléctricas. Perfore agujeros
para los tornillos y anclajes de pared que
se adjuntan. Inserte los anclajes de pared y
después asegure el panel solar en su lugar
con los tornillos.
4
INSTALACIÓN DEL PANEL SOLAR
Asegúrese que el panel solar esté colocado de tal
forma que su exposición al sol sea óptima. Tenga
cuidado con los objetos como árboles o partes de
la casa que impidan la capacidad del panel para
generar carga. Para ajustar el panel solar,
aoje la tuerca mariposa y posicione el panel.
Cuando la haya colocado en la posición
deseada, apriete la tuerca mariposa
rmemente hasta que quede segura. El
panel solar está equipado con un cable de
conexión de 9.84 pies así que la lámpara y el
panel solar se pueden instalar a una
distancia de hasta 9.84 pies entre sí.
1
Marque las ubicaciones de los agujeros
de la base; luego deje a un lado el panel
solar. Verique que las áreas marcadas
estén libres de obstáculos como cables y
líneas eléctricas. Perfore agujeros para los
tornillos y anclajes de pared que se
adjuntan. Inserte los anclajes de pared y
después asegure el panel solar en su lugar
con los tornillos.
2
INSTALACIÓN
ITEM: SR11AC01H-06
CONEXIÓN DE LOS ALAMBRES
Conduzca cuidadosamente el Cable de
Alimentación del Panel Solar a la Iluminación
y enchúfelo en el enchufe ubicado en la Luz.
Utilice sólo paneles solares para cargar la
energía. No está permitido el acceso a otro
equipo de carga externo.
6
INFORMACIÓN DE SEGURIDAD
02/06/2018
1/2 S
A
B
C
Tornillos (6)
Anclajes de
Pared (6)
Roscas estrella (2)
HERRAJES INCLUIDO
(nota: algunas partes quizá ya pudieran estar ensambladas)
PARTES
A - La Lámpara
B - Panel Solar
C - Soporte De Montaje

, WESTINGHOUSE, are trademarks of Westinghouse Electric Corporation. Used under license by Sky Rich Star Limited. All Rights Reserved.
CÓMO REEMPLAZAR LAS BATERÍAS
ADVERTENCIA: No deseche las baterías en el basurero municipal ni las incinere ya que
pueden explotar. No abra, haga corto circuito ni mutile las baterías. Deseche las baterías de
acuerdo con las regulaciones locales, estatales y federales. No mezcle baterías nuevas con baterías
viejas. No mezcle baterías alcalinas, estándar (carbón-zinc) o baterías recargables (níquel-cadmio
o níquel-hidruro metálico) con baterías de litio.
Antes de que la luz del sensor solar pueda funcionar a toda su capacidad, el panel solar debe permanecer a la luz del sol de 8 a 12 horas para cargar totalmente
la batería. Gire el interruptor de la lámpara a la posición “OFF”. Después cargar, gire el interruptor de la lámpara a la posición “AUTO” u “ON”.
•Afloje el tornillo del ala para ajustar la cabeza del sensor de movimiento hacia el área de detección
deseada. Las cabezas de las luces laterales se pueden ajustar de forma indepen diente de diversas
formas para una cobertura de iluminación óptima.
• Gire el interruptor de la lámpara a la posición “AUTO” y la lámpara se encenderá automáticamente
de noche cuando se detecte movimiento.
•Gire el interruptor de la lámpara a la posición “ON” y la lámpara se puede usar como una lámpara común.
NOTA: Evite apuntar el sensor a:
•Objetos que cambian la temperatura rápidamente para evitar el encendido en falso, como ductos de
ventilación de la calefacción o aire acondicionado.
•Objetos con movimiento como árboles o tráfico en la calle.
!
•Para determinar el tiempo de encendido durante el que usted quiere que las luces queden encendidas
después de que se detecte movimiento, ajuste el interruptor de tiemo en 30”, 60” o 120”.
Use un destornillador Phillips (estrella) para retirar los 4 tornillos que sostienen la tapa de las
baterías. Retire con cuidado el paquete de baterías de la lámpara y desconecte el conector de
las baterías. Reemplace el paquete de baterías usadas por un paquete nuevo de baterías
recargables 6V Ni-Mh 2000mAh. Conecte el conector de baterías e inserte el paquete de baterías
en la lámpara. Vuelva a colocar la tapa de las baterías alineándola adecuadamente y vuelva a colocar
los 4 tornillos que retiró anteriormente.
ITEM: SR11AC01H-06
Para obtener ayuda e información adicional acerca de la instalación, comuníquese con Servicio a clientes al 1-844-551-0680 de lunes a viernes de 8:00 A.M. a 5:00 P.M. en el horario del centro de EE. UU.
PROBLEMA
Las luces no se encienden.
Las luces se encienden y
apagan de forma
intermitente.
Las luces se encienden sin
razón aparente.
Las luces permanecen
encendidas.
A. El interruptor de la lámpara está apagado.
B. El cable de conexión está suelto.
C. La cabeza del sensor de movimiento no
apunta correctamente.
A. Se están agotando las baterías.
A. El sensor de movimiento puede estar
percibiendo objetos en movimiento como
árboles, el tráfico, etc.
A. El interruptor de la lámpara está en la
posición ON.
A. Gire el interruptor de la lámpara a la posición ON o AUTO.
C. Reacomode el sensor de movimiento para que cubra el área
deseada.
A. Con el interruptor de la lámpara en la posición “OFF”, permita
que se cargue la lámpara a plena luz del sol durante 8 a 12 horas
días antes de volver a usarla.
A. Cambie la posición del sensor de movimiento.
A. Gire el interruptor de la luz a la posición “AUTO”.
POSIBLE CAUSA SOLUCIÓN
SOLUCIÓN DE PROBLEMAS
OPERACIÓN
OPERACIÓN
02/06/2018
2/2 S
B. Reposicione el sensor de movimiento.
B. El calor que se refleja de otros objetos puede
estar activando el sensor de movimiento.
B. El panel solar debe permanecer a la luz del sol de 8 a 12
horas para cargar totalmente la batería.
30” 60” 120”
ON OFF
AUTO
-
 1
1
-
 2
2
-
 3
3
-
 4
4


Westinghouse SR11AC01H-06 Manual de usuario
- Tipo
- Manual de usuario
- Este manual también es adecuado para
en otros idiomas
Artículos relacionados
Otros documentos
-
Defiant DFI-0452-WH Guía del usuario
-
Defiant DFI-7148-BK Instrucciones de operación
-
Sunforce 150 LED Triple Head Solar Motion Light Manual de usuario
-
-
-
Sunforce 82121 Manual de usuario
-
Philips R6B4RTU20/27 Product Datasheet
-