Fagor SFA8CEX Manual de usuario
- Categoría
- Secadoras de ropa eléctricas
- Tipo
- Manual de usuario

EN INSTALLATION & OPERATING INSTRUCTIONS
FR GUIDE D’INSTALLATION & D’UTILISATION
ES MANUAL DE INSTALACIÓN Y UTILIZACIÓN
Condenser tumble dryer
Sèche-linge à condenseur
Secadora de condensación

2
CONTENTS
EN
1 / FOR THE USER’S ATTENTION
• Important safety instructions ______________________________ 3
• Energy savings ________________________________________ 5
2 / DESCRIPTION OF YOUR APPLIANCE
• General presentation of the tumble dryer ____________________ 6
3 / INSTALLING YOUR TUMBLE DRYER
• The appliance’s surroundings ____________________________ 8
• Levelling ______________________________________________ 8
• Built-in installation ______________________________________ 9
• Combined washer/dryer installation ________________________ 9
• Modifying the door opening direction ______________________ 9
• Electrical connection ____________________________________ 10
• Replacing the electric power cable ________________________ 10
4 / PREPARING YOUR ITEMS
• Checking the condition of your textiles______________________ 11
• Inserting the items in the drum ____________________________ 11
5 / OPERATING INSTRUCTIONS AND PROGRAMMING
• Presentation of the control panel __________________________ 12
• Programming a drying cycle ______________________________ 12
• Your drier’s programs ____________________________________ 16
6 / USER-MAINTENANCE INSTRUCTIONS
• Cleaning the filter ______________________________________ 17
• Emptying the condensation container ______________________ 17
• Direct evacuation of water condenser ______________________ 18
• Cleaning the condenser __________________________________ 19
• Cleaning the appliance __________________________________ 19
7 / TROUBLESHOOTING ______________________________________ 20
8 / AFTER-SALES SERVICE ____________________________________ 21
• Changing the bulb ______________________________________ 21
Warning :
Please read the user guide carefully before turning on your appliance so that you can
learn how to use it as quickly as possible.

3
1 / FOR THE USER’S ATTENTION
EN
WARNING :
To reduce the risk of fire, electric shock, or injury to persons when using your appliance,
follow basic precautions, including the following:
— Read all instructions before using the appliance.
— Do not dry articles that have been previously cleaned in, washed in, soaked in, or spotted with
gasoline, dry-cleaning solvents, or other flammable or explosive substances, as they give off
vapours that could ignite or explode.
— Do not allow children to play on or in the appliance. Close supervision of children is necessary
when the appliance is used near children.
— Before the appliance is removed from service or discarded, remove the door to the drying com-
partment.
— Do not reach into the appliance if the drum is moving.
— Do not install or store this appliance where it will be exposed to the weather.
— Do not tamper with controls.
— Do not repair or replace any part of the appliance or attempt any servicing unless specifically
recommended in the user-maintenance instructions or in published user-repair instructions that
you understand and have the skills to carry out.
— Do not use fabric softeners or products to eliminate static unless recommended by the manufac-
turer of the fabric softener or product.
— Do not use heat to dry articles containing foam rubber or similarly textured rubber-like materials.
— Clean lint screen before or after each load.
— Keep area around the exhaust opening and adjacent surrounding areas free from the accumula-
tion of lint, dust, and dirt.
— The interior of the appliance should be cleaned periodically by qualified service personnel.
— Do not place items exposed to cooking oils in your dryer. Items contaminated with cooking oils
may contribute to a chemical reaction that could cause a load to catch fire.
•
Grounding instructions
— This appliance must be grounded. In the event of malfunction or breakdown, grounding will
reduce the risk of electric shock by providing a path of least resistance for electric current.
— This appliance is equipped with a cord having an equipment-grounding conductor and a groun-
ding plug. The plug must be plugged into an appropriate outlet that is properly installed and groun-
ded in accordance with all local codes and ordinances.
WARNING :
Improper connection of the equipment-grounding conductor can result in a risk of electric
shock. Check with a qualified electrician or service representative or personnel if you are in
doubt as to whether the appliance is properly grounded.
Do not modify the plug provided with the appliance: if it will not fit the outlet, have a proper out-
let installed by a qualified electrician.
SAVE THESE INSTRUCTIONS
• IMPORTANT SAFETY INSTRUCTIONS

4
EN
1 / FOR THE USER’S ATTENTION
Important :
Keep these operating instructions with
your appliance. If you should sell your
machine or give it to someone else, ensure
that the operating instructions are provided.
Please take note of these safety instructions
before installing and using your appliance.
They have been written for your safety and
that of others.
•
SAFETY INSTRUCTIONS
•
Installation
— When you receive the appliance, unpack it or
have it unpacked immediately. Check that it
has not suffered any damage during trans-
port. Express any reservations in writing on
the delivery slip and keep a copy.
Never connect a damaged appliance.
If your appliance is damaged, please contact
your dealer.
— Before connecting your appliance, please
refer to the installation instructions.
— Your tumble dryer must be kept disconnec-
ted from the mains supply throughout the
whole installation process.
— The electrical connection details shown on
your appliance’s information plate must match
those of the local mains supply.
— Once your appliance has been installed, the
electrical plug must remain accessible.
— Do not alter or try to alter the appliance’s
characteristics. This could be dangerous.
— If your installation requires alteration, only
entrust the electrical and plumbing work to
qualified electricians and plumbers.
— The appliance must not be installed behind a
locking door, a sliding door or a door with hin-
ges on the opposite side to those on the dryer.
— Your appliance is designed for normal
domestic use. Do not use it for commercial or
industrial purposes or for any purpose other
than the one for which it has been designed
•
Children’s safety
— This appliance must only be used by adults.
Do not let children play with the appliance and
keep pets away from it.
— Keep young children away from the
appliance when it is operating.
— Keep the packaging materials out of chil-
dren’s reach (e.g.: plastic bags, polystyrene,
etc.) because they can be dangerous for chil-
dren : risk of suffocation.
— This appliance is not intended for use by per-
sons (including children) with reduced physi-
cal, sensory or mental capabilities, or lack of
experience and knowledge, unless they are
supervised or instructed concerning use of
the appliance by the person responsible for
their safety.
•
Use
Important :
Your tumble dryer is designed for
domestic use only, for drying textiles suitable
for tumble drying.
Important :
You must observe the following instruc-
tions. We decline any responsibility and res-
cind the guarantee if these recommendations
are ignored : failure to observe them can
result in material damage and physical injury.
— Use your appliance in accordance with its
method of use, thereby avoiding injury to your-
self and damage to your items. Do not use sol-
vents in the appliance (risk of fire and explo-
sion).
— Strictly comply with the care instructions on
your laundry.
— If you have to open the door of the drum
during the drying cycle, ensure that you do not
touch the drum immediately, as it is very hot.

5
EN
1 / FOR THE USER’S ATTENTION
— Substances contained in soiling such as oil, acetone, alcohol, petrol, kerosene, stain removers,
turpentine or wax must be removed before drying in your machine (by using an adapted warm water
washing programme with additional detergent for example).
— Precautions for using stain-removing products : any preliminary treatment by solvent, stain-remo-
ver, aerosol, such as acetone, alcohol, gasoline, kerosene, turpentine is prohibited because these
products are very inflammable. If your laundry requires this type of treatment, this must be done
before washing. Similarly, we recommend that you do not use these products near to the dryer or,
in general, near any electrical appliance in a poorly ventilated room in order to avoid any risk of an
explosion.
— If any incidents occur, which you cannot resolve using the troubleshooting advice we provide (see
“TROUBLESHOOTING”), contact our Technical Service Center.
— Before disposing of your worn-out appliance, make it unusable. Unplug and cut off the power
cable flush with the appliance and make the door lock inoperable.
— For your safety’s sake, if you wish to change your appliance’s power cable, contact a qualified
electrician.
— If any operating anomalies occur, disconnect your appliance and call our Technical Service
Center.
•ENERGY SAVINGS
— Spin your textiles at high speeds ; the residual dampness will be low, as will your energy
consumption. Even synthetic textiles must be spun before drying.
— Place the maximum load in your machine ; this will optimize the energy used. When doing so,
comply with the indications on volume provided in this instruction manual.
— The drying time and the energy consumption are both increased by a high ambient temperature
and too small a room.
— Clean the filter after each drying cycle.
— Clean the condenser twice a month.

6
EN
2 / DESCRIPTION OF YOUR APPLIANCE
• GENERAL PRESENTATION OF THE TUMBLE DRYER
Fig. 01
BB
DD
FF
CC
EE
Control panel
Condensate container
Condenser grill
Filter
Information plate
(Reference for After-Sales)
Adjustable feet
FF
EE
DD
CC
BB
AA

7
EN
3 / INSTALLING YOUR TUMBLE DRYER
WARNING :
WARNING - Risk of fire
— Clothes dryer installation must be performed by a qualified installer.
— Install the clothes dryer according to the manufacturer’s instructions and local codes.
— Do not install a clothes dryer with flexible plastic venting materials. If flexible metal (foil type) duct
is installed, it must be of a specific type identified by the appliance manufacturer as suitable for use
with clothes dryers. Flexible venting materials are known to collapse, be easily crushed, and trap
lint. These conditions will obstruct clothes dryer airflow and increase the risk of fire.
— To reduce the risk of severe injury or death, follow all installation instructions.
SAVE THESE INSTRUCTIONS
• IMPORTANT SAFETY INSTRUCTIONS
•
Grounding instructions
— This appliance must be grounded. In the event of malfunction or breakdown, grounding will
reduce the risk of electric shock by providing a path of least resistance for electric current.
— This appliance is equipped with a cord having an equipment-grounding conductor and a groun-
ding plug. The plug must be plugged into an appropriate outlet that is properly installed and groun-
ded in accordance with all local codes and ordinances.
WARNING :
Improper connection of the equipment-grounding conductor can result in a risk of electric
shock. Check with a qualified electrician or service representative or personnel if you are in
doubt as to whether the appliance is properly grounded.
Do not modify the plug provided with the appliance: if it will not fit the outlet, have a proper out-
let installed by a qualified electrician.
SAVE THESE INSTRUCTIONS

8
3 / INSTALLING YOUR TUMBLE DRYER
EN
Fig. 03
Fig. 02
• THE APPLIANCE’S SURROUNDINGS
Important :
We strongly advise against :
— Installing your appliance on a carpeted floor.
If you cannot avoid this, take all possible mea-
sures not to obstruct the circulation of air at
its base.
— Installing your dryer in a location where it
can be subject to being splashed with water.
— Installing your dryer in a small closed room
(if this is the case, open the door or the win-
dow during drying)
— Installing your dryer in a poorly ventilated
room. The temperature in the room must
remain below 30°C during drying.
1 cm mini
Advice :
Your tumble dryer releases heat. If you place it next to another appliance or a unit, we
advise you always to leave a space in-between to assist in air circulation (Fig. 02).
Important :
Use a level to check that the appliance
is horizontal :
Your dryer is fitted with 4 adjustable feet
(Fig.03).
To adjust the stability and levelness :
— Tip it slightly backwards
— Screw one or more of the feet in or out using
a spanner or a screwdriver to adjust their
height to suit the shape of the floor
(Fig.03)
— Set your dryer back on its feet and check
that it is stable.
• LEVELLING
0.4 inches minimum

9
EN
3 / INSTALLING YOUR TUMBLE DRYER
E
F
B
C
A
A
B
E
F
C
Fig. 04
Fig. 05
Left-hand Door
Right-hand door
• BUILT-IN INSTALLATION
An adaptation kit is available from your dealer. This is used to mount your tumble dryer above your
washing machine.
• MODIFYING THE DOOR OPENING DIRECTION
Important :
Check with your dealer that the kit is compatible with your washing machine. For safety rea-
sons, fitting must be performed by a qualified professional.
Important :
If you are fitting the appliance underneath a worktop, you must either keep the original
laminated top, or replace it with a slimmer version using a kit available for this purpose from your
dealer. For safety reasons, the appliance must never be operated without a top.
• COMBINED WASHER/DRYER INSTALLATION
If you wish, you can alter the direction the door opens as follows
(Fig. 04 or 05).
— Remove the 4 screws in the front panel holding the hinges and
.
— Reverse the hinge and fasten it back on.
— Refit the door on the hinge .
— Reverse the hinge and fasten it back on.
— Reverse the positions of the lock and the cover on the machine’s front face.
— Reverse the positions of the bolt .
CC
EEFF
BB
AA
AA
BBAA

10
EN
3 / INSTALLING YOUR TUMBLE DRYER
• ELECTRICAL CONNECTION
Danger :
To make the electrical connection to your appliance :
— Do not use an extension, an adapter, a multiple socket or a programmable timer.
— The plug must be easily accessible but be out of children’s reach.
— If there's any doubt about the condition of your installation, contact your installer or a qualified
Brandt-approved professional.
— Never eliminate the electrical Earthing system.
The Dryer comes with a 16AWG Cord and NEMA 6-15P plug
It should be connected to a 240V, 15A, 60Hz AC 2 Phases + wire grounding power outlet (NEMA
6-15R) is necessary.
We cannot be held responsible for any incident caused by poor electrical installation.
Advice :
In order to easily find your appliance’s reference numbers in the future, we recommend
that you note them down on the “After-Sales Service and Consumer Relations” page (this page
also explains where to find these on your appliance).
Your appliance complies with UL 2158 (Electric clothes Dryer).
• REPLACING THE ELECTRIC POWER CABLE
Important :
To ensure your safety, this must be carried out by the manufacturer's after-sales service
team or a qualified professional.
The dryer must be installed in accordance with all local codes or, in the absence of a local code :
— in the U.S.A., in accordance with the National Electric Code, ANSI/NFPA 70 - latest edition/State
and Municipal codes and/or local codes.
— in Canada, in accordance with the Canadianl Electric Code, C22.1 - latest edition/Provincial and
Municipal codes and/or local codes.

11
EN
4 / PREPARING YOUR ITEMS
• CHECKING THE CONDITION OF YOUR TEXTILES
— Open the door by pushing (press where the
label is)
(Fig. 06)
.
— Check that the filter is in its housing .
— Insert washed and spun clothes loosely in
the drum
wwiitthhoouutt ffoollddiinngg iitt oorr ppiilliinngg iitt uupp..
— Take care not to let any fabrics get caught in
the door.
— Close the door.
••
Recommended volumes :
The maximum capacity of the dryer is 8 kg.
— To reduce creasing and optimize drying
times, we recommend you do not overload
the machine.
• INSERTING YOUR ITEMS IN THE DRUM
Fig. 06
Advice :
If, before you insert your clothes in the
tumble dryer, you notice any stains, even
after washing, do not dry the items concer-
ned. As a general rule, stains that have been
ironed or tumble-dried can no longer be
removed.
Please refer to the instructions for treating
stubborn stains provided in most washing
machine instruction manuals and, in particu-
lar, wash the stained items again.
••
Preparing your items :
— Close all zippers and snap buttons.
— Remove any loose buttons, pins or hook
fasteners.
— Knot any belts, apron strings, etc...
— Empty pockets.
— Always adhere to the manufacturer's ins-
tructions when using softening products.
Important :
Do not tumble-dry the following
articles :
— Clothing including rubber like materials (for
example: shower caps, waterproof clothing
and textiles, linings, pillows etc.)
— Chlorofibres (Thermolactyl* for example)
*Registered trademark
— Items containing underwiring that could
become detached
— Bulky items (duvets, eiderdowns, etc...)
— Laundry that has not been spun
— Laundry cleaned with inflammable chemi-
cals.
Important :
Check the labels on your textiles
Normal
drying
Gentle
drying
Do not tumble dry

12
EN
5 / OPERATING INSTRUCTIONS AND PROGRAMMING
• PRESENTATION OF THE CONTROL PANEL
• PROGRAMMING A DRYING CYCLE
• Starting the appliance :
Check that the power cable is plugged in.
The
appliance will not start unless the door is pro-
perly closed.
Press the “On/Off” button .
Select your program (see the table “Your
dryer’s programs” on the following pages) by
turning the programs dial (it turns in both
directions). The indicator light shows you the
program you have selected.
Press “Start/Pause” and the program will
start.
The screen tells you the time remaining,
which becomes more precise as the drying
cycle progresses.
• “ MEMO ACTIV’ ” function :
Your dryer remembers the programs that you
use most often.
After a few drying cycles, the program dis-
played when you switch on your machine is the
one that you have used most often.
GG
AA
HH
Program progress
Time remaining
Anti-creasing
Anti-creasing
Beeper
Beeper
Delay Timer
Delay Timer
Extra Drying
Extra Drying
Time
Time
Anti-creasing Beeper
Delay Timer
Extra Drying
Time
Anti-creasing Beeper
Delay Timer
Extra Drying
Time
Anti-creasing Beeper
Delay Timer
Extra Drying
Time
Anti-creasing Beeper
Delay Timer
Extra Drying
Time
Anti-creasing Beeper
Delay Timer
Extra Drying
Time
Anti-creasing Beeper
Delay Timer
Extra Drying
Time
Anti-creasing Beeper
Delay Timer
Extra Drying
Time
Anti-creasing Beeper
Delay Timer
Extra Drying
Time
Anti-creasing Beeper
Delay Timer
Extra Drying
Time
Anti-creasing Beeper
Delay Timer
Extra Drying
Time
Anti-creasing Beeper
Delay Timer
Extra Drying
Time
Pause Stop
Pause Stop
Pause Stop
Pause Stop
Pause Stop
Pause Stop
Pause Stop
Pause Stop
Pause Stop
Pause Stop
+
-
Pause
Pause
Stop
Stop
Pause Stop
Pause Stop
Pause Stop
Programs dial
Anti-creasing
Beeper
Extra drying time
Delay timer “-”
Delay timer “+”
Start/Pause
On/Off
HH
GG
FF
EE
DD
CC
BB
AA
WARNING :
To reduce the risk of fire, electric shock, or injury to persons, read the IMPORTANT SAFETY
INSTRUCTIONS before operating this appliance.
Pause
Stop
Pause - Drying - Cooling down - End of program
Program progress :
+
-
Pause Stop
Air Dry - Wool
Air Dry - Wool
Air Dry
Air Dry
Ultra - Delicates
Ultra - Delicates
Delicates
Delicates
Anti-creasing
Anti-creasing
Beeper
Beeper
Delay Timer
Delay Timer
Start/Pause
Start/Pause
On/Off
On/Off
Extra Drying
Extra Drying
Time
Time
REGULAR
REGULAR
SFA-8CE
Dry
Dry
Heavy Duty
Heavy Duty
Dry
Dry
Extra Dry
Extra Dry
COTTON
COTTON
Perm. Press
Perm. Press
Damp Dry
Damp Dry
Damp Dry
Damp Dry
AA BB CC DD
EE
GG HHFF

13
EN
5 / OPERATING INSTRUCTIONS AND PROGRAMMING
Program stop
Time remaining
Time remaining until drying cycle begins
Delayed start
• Delaying a program’s start :
Select your program using the program dial
. The indicator light shows you the program
you have selected.
Press the ”Delay timer +” button to delay
the start of your program thirty minutes at a
time until you reach the desired delay time
(max 23 ½ hours). To decrease the differed
starting time, press the “Delay timer -” button
.
Confirm by pressing the “Start/Pause” button
.
The display shows you how much time
remains before your program starts.
Once the time delay has expired, the program
actually starts. The screen tells you the time
remaining, which becomes more precise as
the drying cycle progresses.
• Adding or removing an item during
drying :
Press “Start/Pause” to interrupt drying or
open the door.
Insert or remove the item or items and close the
door.
Press the “Start/Pause” button to resume
drying.
• Altering programming or drying
during operation :
If you have entered the wrong program, you
can change your selection during the cycle.
Press “Start/Pause” to interrupt drying.
Select another program using the program
dial.
Press the “Start/Pause” button to resume
drying.
GG
GG
GG
GG
GG
EE
FF
AA
Advice :
Consult the Programs table on the next page to determine the program needed for the
type of items being dried.
Anti-creasing Beeper
Delay Timer
Extra Drying
Time
Anti-creasing Beeper
Delay Timer
Extra Drying
Time
Anti-creasing
Anti-creasing
Beeper
Beeper
Delay Timer
Delay Timer
Extra Drying
Extra Drying
Time
Time
Anti-creasing Beeper
Delay Timer
Extra Drying
Time
Anti-creasing Beeper
Delay Timer
Extra Drying
Time
Anti-creasing Beeper
Delay Timer
Extra Drying
Time
Anti-creasing Beeper
Delay Timer
Extra Drying
Time
Anti-creasing Beeper
Delay Timer
Extra Drying
Time
Anti-creasing Beeper
Delay Timer
Extra Drying
Time
Anti-creasing Beeper
Delay Timer
Extra Drying
Time
Anti-creasing Beeper
Delay Timer
Extra Drying
Time
Anti-creasing Beeper
Delay Timer
Extra Drying
Time
Pause Stop
Pause Stop
+
-
Pause
Pause
Stop
Stop
Pause Stop
Pause Stop
Pause Stop
Pause Stop
Pause Stop
Pause Stop
Pause Stop
Pause Stop
Pause Stop
Pause Stop
Pause Stop
Anti-creasing Beeper
Delay Timer
Extra Drying
Time
Anti-creasing
Anti-creasing
Beeper
Beeper
Delay Timer
Delay Timer
Extra Drying
Extra Drying
Time
Time
Anti-creasing Beeper
Delay Timer
Extra Drying
Time
Anti-creasing Beeper
Delay Timer
Extra Drying
Time
Anti-creasing Beeper
Delay Timer
Extra Drying
Time
Anti-creasing Beeper
Delay Timer
Extra Drying
Time
Anti-creasing Beeper
Delay Timer
Extra Drying
Time
Anti-creasing Beeper
Delay Timer
Extra Drying
Time
Anti-creasing Beeper
Delay Timer
Extra Drying
Time
Anti-creasing Beeper
Delay Timer
Extra Drying
Time
Anti-creasing Beeper
Delay Timer
Extra Drying
Time
Anti-creasing Beeper
Delay Timer
Extra Drying
Time
Pause Stop
+
-
Pause
Pause
Stop
Stop
Pause Stop
Pause Stop
Pause Stop
Pause Stop
Pause Stop
Pause Stop
Pause Stop
Pause Stop
Pause Stop
Pause Stop
Pause Stop
Pause Stop

14
EN
5 / OPERATING INSTRUCTIONS AND PROGRAMMING
Additional time
Remarks :
The “Anti-creasing” and "Beeper" options remains selected from one program to the next. You
can simply press the button to deactivate these options, even during a program.
• Stopping the appliance :
At the end of the program, the “Filter”
and “Tank Full” lights flash alternately
to remind you that you must clean the filter
and empty the water collection tank after
every drying cycle :
Press the “On/Off” button and empty
your dryer.
Clean the filter and empty the water collec-
tion tank (see the “REGULAR MAINTE-
NANCE” section).
• “Anti-creasing” option :
The “Anti-creasing” option fluffs the textiles
every 10 minutes for up to 24 hours, until the
door is opened or the machine is turned off.
It begins as soon as the drying finishes and
prevents the clothes from settling in the
machine. To select this function, press the
“Anti-creasing” . An indicator lights up to
show that this option has been activated.
• “Beeper” option :
Press the
““BBuuzzzzeerr””
button . At the end of
drying, three beeps will sound every 10 minu-
tes for one hour until the door is opened or
the appliance is stopped. The indicator light
corresponding to this option lights up at the
bottom of the screen, indicating that the buz-
zer is activated.
• “Additional Drying” option :
This function enables you to add drying time
at the end of a program in units of 10 minutes
by successively pressing the “Extra Drying
Time” button .
Press the “Start/Pause” button. The additio-
nal drying time is added at the end of the
selected program.
DD
CC
BB
HH
Pause Stop
Pause Stop
Pause Stop
Pause Stop
Pause Stop
Pause Stop
Pause Stop
Pause Stop
Pause Stop Pause Stop
Pause Stop
Pause Stop
Pause Stop
Pause Stop
Pause Stop
Pause Stop
Pause Stop
Pause Stop
Pause Stop
Pause Stop
Pause Stop
Pause Stop
Pause Stop Pause Stop
Pause Stop
Pause Stop
Pause Stop
Pause Stop
End of program
The “Filter” and “Tank Full” lights flash
“Anti-creasing” option
“Beeper” option
Anti-creasing Beeper
Delay Timer
Extra Drying
Time
Anti-creasing Beeper
Delay Timer
Extra Drying
Time
Anti-creasing Beeper
Delay Timer
Extra Drying
Time
Anti-creasing Beeper
Delay Timer
Extra Drying
Time
Anti-creasing Beeper
Delay Timer
Extra Drying
Time
Anti-creasing Beeper
Delay Timer
Extra Drying
Time
Anti-creasing Beeper
Delay Timer
Extra Drying
Time
Anti-creasing Beeper
Delay Timer
Extra Drying
Time
Anti-creasing Beeper
Delay Timer
Extra Drying
Time
Anti-creasingAnti-creasing BeeperBeeper
Delay TimerDelay Timer
Extra DryingExtra Drying
TimeTime
Anti-creasing Beeper
Delay Timer
Extra Drying
Time
Anti-creasing Beeper
Delay Timer
Extra Drying
Time
Pause Stop
Pause Stop
Pause Stop
Pause Stop
Pause Stop
Pause Stop
Pause Stop
Pause Stop
+
-
PausePause StopStop
Pause Stop
Pause Stop
Pause Stop
Pause Stop
Pause Stop
Anti-creasing Beeper
Delay Timer
Extra Drying
Time
Anti-creasing Beeper
Delay Timer
Extra Drying
Time
Anti-creasing Beeper
Delay Timer
Extra Drying
Time
Anti-creasing Beeper
Delay Timer
Extra Drying
Time
Anti-creasing Beeper
Delay Timer
Extra Drying
Time
Anti-creasing Beeper
Delay Timer
Extra Drying
Time
Anti-creasingAnti-creasing BeeperBeeper
Delay TimerDelay Timer
Extra DryingExtra Drying
TimeTime
Anti-creasing Beeper
Delay Timer
Extra Drying
Time
Anti-creasing Beeper
Delay Timer
Extra Drying
Time
Anti-creasing Beeper
Delay Timer
Extra Drying
Time
Anti-creasing Beeper
Delay Timer
Extra Drying
Time
Anti-creasing Beeper
Delay Timer
Extra Drying
Time
Pause Stop
Pause Stop
Pause Stop
Pause Stop
+
-
PausePause StopStop
Pause Stop
Pause Stop
Pause Stop
Pause Stop
Pause Stop
Pause Stop
Pause Stop
Pause Stop
Pause Stop
Anti-creasing Beeper
Delay Timer
Extra Drying
Time
Anti-creasing Beeper
Delay Timer
Extra Drying
Time
Anti-creasing Beeper
Delay Timer
Extra Drying
Time
Anti-creasing Beeper
Delay Timer
Extra Drying
Time
Anti-creasing Beeper
Delay Timer
Extra Drying
Time
Anti-creasing Beeper
Delay Timer
Extra Drying
Time
Anti-creasing Beeper
Delay Timer
Extra Drying
Time
Anti-creasing Beeper
Delay Timer
Extra Drying
Time
Anti-creasing Beeper
Delay Timer
Extra Drying
Time
Anti-creasing Beeper
Delay Timer
Extra Drying
Time
Anti-creasing Beeper
Delay Timer
Extra Drying
Time
Anti-creasingAnti-creasing BeeperBeeper
Delay TimerDelay Timer
Extra DryingExtra Drying
TimeTime
Pause Stop
Pause Stop
Pause Stop
Pause Stop
+
Pause Stop
Pause Stop
Pause Stop
Pause Stop
Pause Stop
Pause Stop
Pause Stop
Pause Stop
-
PausePause StopStop
Pause Stop
Anti-creasing Beeper
Delay Timer
Extra Drying
Time
Anti-creasing Beeper
Delay Timer
Extra Drying
Time
Anti-creasing Beeper
Delay Timer
Extra Drying
Time
Anti-creasing Beeper
Delay Timer
Extra Drying
Time
Anti-creasing Beeper
Delay Timer
Extra Drying
Time
Anti-creasing Beeper
Delay Timer
Extra Drying
Time
Anti-creasing Beeper
Delay Timer
Extra Drying
Time
Anti-creasing Beeper
Delay Timer
Extra Drying
Time
Anti-creasingAnti-creasing BeeperBeeper
Delay TimerDelay Timer
Extra DryingExtra Drying
TimeTime
Anti-creasing Beeper
Delay Timer
Extra Drying
Time
Anti-creasing Beeper
Delay Timer
Extra Drying
Time
Anti-creasing Beeper
Delay Timer
Extra Drying
Time
Pause Stop
Pause Stop
Pause Stop
+
-
PausePause StopStop
Pause Stop
Pause Stop
Pause Stop
Pause Stop
Pause Stop
Pause Stop
Pause Stop
Pause Stop
Pause Stop
Pause Stop

15
EN
Program stop
The ”Tank Full” light illuminates.
5 / OPERATING INSTRUCTIONS AND PROGRAMMING
• Cooling cycle :
All programs finish with a cooling cycle that
lasts for a few minutes to allow the washing to
cool gradually.
Important :
Do not stop your dryer before this cycle
has finished.
• During the cycle :
Your tank is full during the drying cycle.
The appliance stops during the program.
The “Tank Full” and “Pause” turns on, the
time remaining flashes.
Proceed to empty your water collection tank
(see the “REGULAR MAINTENANCE” sec-
tion).
Press “Start/Pause” to restart your pro-
gram.
GG
Pause Stop
Pause Stop
Pause Stop
Pause Stop
Pause Stop
Pause Stop
Pause Stop
Pause Stop
Pause Stop Pause Stop
Pause Stop
Pause Stop
Pause Stop
Pause Stop
Anti-creasing Beeper
Delay Timer
Extra Drying
Time
Anti-creasing Beeper
Delay Timer
Extra Drying
Time
Anti-creasing Beeper
Delay Timer
Extra Drying
Time
Anti-creasing Beeper
Delay Timer
Extra Drying
Time
Anti-creasing Beeper
Delay Timer
Extra Drying
Time
Anti-creasing Beeper
Delay Timer
Extra Drying
Time
Anti-creasing Beeper
Delay Timer
Extra Drying
Time
Anti-creasing Beeper
Delay Timer
Extra Drying
Time
Anti-creasing Beeper
Delay Timer
Extra Drying
Time
Anti-creasing Beeper
Delay Timer
Extra Drying
Time
Anti-creasing Beeper
Delay Timer
Extra Drying
Time
Anti-creasing Beeper
Delay Timer
Extra Drying
Time
Pause Stop
Pause Stop
Pause Stop
Pause Stop
Pause Stop
Pause Stop
Pause Stop
Pause Stop
Pause Stop
Pause Stop
Pause Stop
Pause Stop
Pause Stop
Pause Stop
Cooling cycle
Important :
A power failure cancels the current program. In this case, you have to reset all the pro-
gramming operations.
Advice :
As a safety measure, you are advised to unplug the power cable when you are not using
the appliance.
Anti-creasing Beeper
Delay Timer
Extra Drying
Time
Anti-creasing Beeper
Delay Timer
Extra Drying
Time
Anti-creasing Beeper
Delay Timer
Extra Drying
Time
Anti-creasing Beeper
Delay Timer
Extra Drying
Time
Anti-creasing Beeper
Delay Timer
Extra Drying
Time
Anti-creasing Beeper
Delay Timer
Extra Drying
Time
Anti-creasing Beeper
Delay Timer
Extra Drying
Time
Anti-creasing Beeper
Delay Timer
Extra Drying
Time
Anti-creasing Beeper
Delay Timer
Extra Drying
Time
Anti-creasing Beeper
Delay Timer
Extra Drying
Time
Anti-creasing Beeper
Delay Timer
Extra Drying
Time
Anti-creasing Beeper
Delay Timer
Extra Drying
Time
Pause Stop
Pause Stop
Pause Stop
Pause Stop
Pause Stop
Pause Stop
Pause Stop
Pause Stop
Pause Stop
Pause Stop
Pause Stop
Pause Stop
Pause Stop
+
-
Pause
Pause
Stop
Stop
Anti-creasing Beeper
Delay Timer
Extra Drying
Time
Anti-creasing Beeper
Delay Timer
Extra Drying
Time
Anti-creasing Beeper
Delay Timer
Extra Drying
Time
Anti-creasing Beeper
Delay Timer
Extra Drying
Time
Anti-creasing Beeper
Delay Timer
Extra Drying
Time
Anti-creasing
Anti-creasing
Beeper
Beeper
Delay Timer
Delay Timer
Extra Drying
Extra Drying
Time
Time
Anti-creasing Beeper
Delay Timer
Extra Drying
Time
Anti-creasing Beeper
Delay Timer
Extra Drying
Time
Anti-creasing Beeper
Delay Timer
Extra Drying
Time
Anti-creasing Beeper
Delay Timer
Extra Drying
Time
Anti-creasing Beeper
Delay Timer
Extra Drying
Time
Anti-creasing Beeper
Delay Timer
Extra Drying
Time
Pause Stop
Pause Stop
Pause Stop
Pause Stop
Pause Stop
Pause Stop
Pause Stop
+
-
Pause
Pause
Stop
Stop
Pause Stop
Pause Stop
Pause Stop
Pause Stop
Pause Stop
Pause Stop

16
EN
5 / OPERATING INSTRUCTIONS AND PROGRAMMING
• YOUR DRYER’S PROGRAMS
Regular programs Type of textile Drying results
COTTON
Extra Dry
Cotton Dry
Dry
Cotton Dry
Damp Dry
Cotton Slightly damp
Heavy Duty
Cotton Damp
REGULAR TEXTILES
Dry
Regular textiles Dry
Damp Dry
Regular textiles Slightly damp
Other drying programs
Permanent Press
Synthetic,
easy iron
Dry
Delicates
Delicate, synthetic Dry
Ultra Delicates
Very delicate: silk, light
synthetic lingerie ...
Dry
Refreshing and airing your textiles after prolonged storage
Air Dry
Other textiles 15 minutes
Air Dry - Wool
Woollens already dry 6 minutes

17
EN
6 / USER-MAINTENANCE INSTRUCTIONS
Important :
Please remember that the filter must
be cleaned after every drying.
The filter is located in the lower part of your
dryer.
Clean it as follows:
— Remove it from its housing by pulling it
upwards
(Fig. 07)
— Open the filter
(Fig. 08)
— Clean it by removing the thin coating of fluff
covering it
(Fig. 09)
Ensure that there is no fluff accumulating
round the dryer.
Important :
Do not wash filter with water (Fig. 10)
..
— Re-insert it in its housing, pushing it well in.
• CLEANING THE FILTER
Fig. 07
Fig. 08
Fig. 09
Fig. 10
• EMPTYING THE CONDENSATION
CONTAINER
Fig. 11
Fig. 12
This is located at the top of your appliance. It
collects the water extracted from your items
as they are dried.
— To empty it, release it from its housing by
pulling it towards you
(Fig. 11).
Important :
The condensation container must be
emptied after each drying cycle (Fig.12).
Important :
Risk of frost : if there is a risk of frost,
empty the condensation container.
Important :
Moving the appliance : empty the
condensation container if you wish to move
or tilt your appliance.
— Empty the container
(Fig. 12).

18
EN
6 / USER-MAINTENANCE INSTRUCTIONS
• DIRECT EVACUATION OF WATER CONDENSER
90 cm maxi
Fig. 15
Fig. 13
Fig. 14
Fig. 17
Fig. 16
To avoid having to empty the collection tank every
time you use the appliance, you have a kit (*) for
removing the water from the condenser directly into
the drain (hose and deflector). To fit this :
— Take off the existing pipe and push it inside the
appliance
(Fig. 13).
— Clip the deflector with the top of the pump
(Fig. 14).
— Connect the hose from the kit to the end connector
on the appliance
(Fig. 15)
You can connect the other end of the hose either :
- To a ventilated trap
(Fig. 16
).
- Or a sink trap
(Fig. 17)
.
When connecting to a trap, you must remove the fil-
ler plug. Then press home the rubber tip. If neces-
sary, add a clamp connection
(Fig. 17
).
Important :
The deflector must be positioned before the
drain hose connection to avoid any water splashes
when taking off the hose.
Déflecteur
Encart
Tuyau
Remarks :
(*) This kit is provided with the appliance
or is available near your After-sales service
under the ref. 57X3184 (according to model).
Deflector
Hose
Insert

19
EN
Important :
When refitting the condenser, ensure that it is pushed in firmly right to the back of its hou-
sing when locking it in
6 / USER-MAINTENANCE INSTRUCTIONS
Fig. 21
• CLEANING THE CONDENSER
Fig. 18
Fig. 19
Fig. 20
Important :
The condenser must be cleaned twice a
month.
Important :
Unplug the power cable from the socket
before cleaning the condenser.
— Open the grill at the front of the appliance.
— Release the condenser
(Fig.18)
.
— Remove it carefully
(Fig.19).
— Remove any fluff from the condenser.
— Clean it with water only under the tap
(Fig.20)
.
— After cleaning, ensure that none of the tubes are
“blocked” and that the fins are clean.
— Rub it superficially.
— Re-insert the condenser and lock it in place. Close
the grill.
Advice :
To clean the control panel, the access to the
drum and the casing, use only a sponge or a damp
cloth and some soapy water.
— Ensure that there is no fluff accumulating round
the dryer.
— Clean the door seal with a damp cloth.
— Clean the filter housing with your vacuum cleaner
once a year.
You should
nnoott uussee,,
under any circumstances
(Fig
21)
:
— Abrasive powders
— Metal or plastic sponges
— Alcohol-based products (alcohol, thinners, etc.)
• CLEANING THE APPLIANCE

20
EN
7 / TROUBLESHOOTING
Advice :
Some incidents may arise when you are using your dryer. Here are the points you should
check.
Fault : Check whether :
The dryer does not start :
- The plug is in the socket
- The On/Off button is pressed in
- The door is properly closed
- The condenser is correctly locked in place.
The drying times are too long :
- The filter in the drum is clogged with fluff
- The laundry has been spun enough beforehand
(500rpm minimum, but spinning at 850rpm provides
better drying times)
- The condenser is not clogged.
- The air inlets and outlets are unobstructed enough to
ensure correct air circulation.
- The drying program selected matches the type of
items in the drum.
The laundry is too damp :
- The filter in the drum is clogged with fluff
- The type of drying has been selected correctly (too
low) : switch to the next programme up or increase
the drying time.
- The condenser is not blocked by fluff.
The laundry is too dry, too creased :
- The drying time selected is too long : the drying time
is better to be too short than too long: this avoids the
laundry becoming too dry and difficult to iron.
The items are unevenly dried :
- The types of textiles in the load are too different (e.g.
sheets together with jeans)
- The laundry has been laid correctly ‘unfolded’ in the
dryer
- The drum is not overloaded.
The synthetic items are loaded with
static electricity :
- The laundry has been dried too much
- You have used softener during washing. By using this
product, you can reduce most of the problems with
static electricity.
The “Tank Full” indicator light is lit :
- The condensate container is full : once you have emp-
tied it, re-insert it correctly, pushing it completely into
its housing
The “Tank Full” indicator light illumi-
nates although the tank is empty :
- The container has been properly inserted: push it in
completely.
- The condenser is tightly locked on the two sides.

EN
8 / AFTER-SALES SERVICE
Fig. 22
21
Fig. 23
Any work on your appliance must be perfor-
med by a brand approved qualified professio-
nal. When you call, mention your appliance’s
full reference (model, type, serial number).
These details are shown on the manufacturer’s
information plate
(Fig. 22).
ORIGINAL PARTS
During any maintenance work, ask that only
cceerrttiiffiieedd oorriiggiinnaall rreeppllaacceemmeenntt ppaarrttss bbee uusseedd
.
••
INTERVENTIONS
• CHANGING THE BULB
You can replace the light bulb (type E14-
15W/230V) yourself
(Fig. 23)
.
Important :
Unplug the power cord before chan-
ging the bulb.
To do this :
— Unscrew the glass cover located to the left
inside the appliance.
— Unscrew the extinguished bulb and replace it.
— Screw on the glass cover tightly.
Important :
The bulb must be replaced when the
appliance is cooled down.

22
SOMMAIRE
FR
Important :
Avant de mettre votre appareil en marche, veuillez lire attentivement ce guide d’uti-
lisation afin de vous familiariser plus rapidement avec son fonctionnement.
1 / A L’ATTENTION DE L’UTILISATEUR
• Importantes mesures de sécurité __________________________ 23
• Economies d’énergie ____________________________________ 25
2 / DESCRIPTION DE VOTRE APPAREIL
• Présentation générale du sèche-linge ______________________ 26
3 / INSTALLATION DE VOTRE SÈCHE-LINGE
• Environnement de l’appareil ______________________________ 28
• Mise à niveau __________________________________________ 28
• Encastrement __________________________________________ 29
• Montage en colonne ____________________________________ 29
• Modification du sens d’ouverture de la porte ________________ 29
• Alimentation électrique __________________________________ 30
• Remplacement du cordon d’alimentation électrique __________ 30
4 / PREPARATION DU LINGE
• Vérifiez l’état de vos textiles ______________________________ 31
• Introduction du linge dans le tambour ______________________ 31
5 / UTILISATION ET PROGRAMMATION
• Présentation du bandeau de commande ____________________ 32
• Programmation d’un cycle de séchage______________________ 32
• Les programmes de votre sèche-linge ______________________ 36
6 / ENTRETIEN EFFECTUE PAR L’UTILISATEUR
• Nettoyage du filtre ______________________________________ 37
• Vidange du bac de récupération __________________________ 37
• Evacuation directe de l’eau de condensation ________________ 38
• Nettoyage du condenseur ________________________________ 39
• Nettoyage de l’appareil __________________________________ 39
7 / INCIDENTS POUVANT SURVENIR ____________________________ 40
8 / SERVICE APRÈS-VENTE ____________________________________ 41
• Changement de l’ampoule ________________________________ 41

23
1 / A L’ATTENTION DE L’UTILISATEUR
FR
AVERTISSEMENT :
Pour réduire les risques d’incendie, de choc électrique ou de blessure quand on utilise l’ap-
pareil, prendre les précautions élémentaires et :
— Lire toutes les instructions avant d’utiliser l’appareil.
— Ne pas faire sécher des articles qui ont été nettoyés ou lavés avec de l’essence, des solvants
pour nettoyage à sec ou d’autres substances inflammables ou explosives, ou que l’on a fait trem-
per dans ces produits. Ces produits dégagent des vapeurs qui peuvent s’enflammer ou exploser.
— Ne pas permettre aux enfants de jouer sur ou dans l’appareil. Surveiller étroitement les enfants
lorsqu’ils se trouvent près de l’appareil qui fonctionne.
— Avant de mettre l’appareil hors service ou de le jeter, retirer la porte.
— Ne pas mettre la main dans l’appareil lorsque le tambour bouge.
— Ne pas installer, ni placer cet appareil dans un endroit où il sera exposé aux intempéries.
— Ne pas neutraliser les commandes.
— Ne pas réparer ni remplacer les pièces de l'appareil ou procéder à l'entretien de celui-ci sauf si
les instructions visant l'entretien et les réparations qui doivent être effectuées par l'utilisateur le spé-
cifient, si vous comprenez bien ces instructions et si vous possédez les connaissances nécessai-
res.
— Ne pas utiliser d'assouplissant ou de produits antistatiques sauf si les fabricants de ces produits
le recommandent.
— Ne pas utiliser de chaleur pour le séchage des articles contenant du caoutchouc mousse ou d'au-
tres matériaux similaires texturés caoutchouteux.
— Nettoyer le filtre à charpie avant ou après chaque utilisation.
— La zone autour de l'évent doit être exempte d'accumulations de charpie, de poussière et de
saleté.
— L'intérieur de l'appareil doit être nettoyé régulièrement par un technicien qualifié.
— Ne pas mettre d’articles tachés d’huiles de cuisson dans la sécheuse. L’huile de cuisson pourrait
provoquer une réaction chimique entraînant l’inflammation des vêtements dans la sécheuse.
•
Mise à la terre
— Cet appareil doit être mis à la terre. En cas de mauvais fonctionnement ou de panne de l'appareil,
la mise à la terre réduit les risques de choc électrique en offrant un parcours de moindre résistance
au courant électrique.
— Cet appareil est pourvu d'un cordon à conducteur de terre et d'une fiche avec mise à la terre.
Brancher la fiche dans une prise installée adéquatement et mise à la terre conformément à tous les
codes et règlements locaux.
AVERTISSEMENT :
Une mauvaise connexion du conducteur de terre peut entraîner des risques de choc élec-
trique. Consulter un électricien ou un technicien qualifié si vous n'êtes pas certain que l'appareil
est mis à la terre adéquatement.
Ne pas modifier la fiche de l'appareil. Si elle ne pénètre pas bien dans la prise, faire installer une
prise adéquate par un électricien qualifié.
CONSERVER CES INSTRUCTIONS
• IMPORTANTES MESURES DE SECURITE

24
FR
1 / A L’ATTENTION DE L’UTILISATEUR
Important :
Conservez cette notice d'utilisation
avec votre appareil. Si l'appareil devait être
vendu ou cédé à une autre personne, assu-
rez-vous que la notice d'utilisation l'accom-
pagne. Merci de prendre connaissance de
ces conseils avant d'installer et d'utiliser
votre appareil. Ils ont été rédigés pour votre
sécurité et celle d'autrui.
•
Installation
— A la réception de l'appareil, déballez-le ou
faites-le déballer immédiatement. Vérifiez que
votre appareil n'ait pas subi de dégâts pendant
le transport. Faites les éventuelles réserves
par écrit sur le bon de livraison dont vous gar-
dez un exemplaire.
— Ne branchez jamais un appareil endom-
magé. Si votre appareil est endommagé,
adressez-vous à votre revendeur.
— Avant de procéder au branchement, veuillez
vous reporter aux instructions figurant dans
votre Guide d'Installation.
— Pendant toute la durée de l'installation, le
sèche-linge doit être maintenu débranché du
secteur.
— Les données de branchements électriques
indiquées sur la plaque signalétique de votre
appareil, et celles du secteur doivent corres-
pondre.
— Une fois votre appareil installé, la prise doit
rester accessible.
— Ne modifiez pas ou n'essayez pas de modi-
fier les caractéristiques de cet appareil. Cela
représenterait un danger pour vous.
— Si votre installation nécessite des modifica-
tions, ne confiez les travaux électriques qu'à
un électricien qualifié.
— L’appareil ne doit pas être installé derrière
une porte à verrouillage ou une porte coulis-
sante.
— Votre appareil est destiné à un usage
domestique normal. Ne l'utilisez pas à des fins
commerciales ou industrielles ou pour d'au-
tres buts que celui pour lequel il a été conçu.
•
Sécurité des enfants
— Cet appareil doit être utilisé par des adultes.
Ne laissez pas les enfants jouer avec l’appareil
et éloignez les animaux domestiques.
— Eloignez les jeunes enfants de l'appareil pen-
dant son fonctionnement.
— Après avoir déballé votre appareil, laissez les
emballages hors de portée des enfants.
— Tenez tous les matériaux d’emballage hors
de portée des enfants (ex. : sacs en plastique,
polystyrène etc.) car ils peuvent être dange-
reux pour les enfants : Risque d’étouffement.
— Cet appareil n’est pas prévu pour être utilisé
par des personnes (y compris les enfants)
dont les capacités physiques, sensorielles ou
mentales sont réduites, ou des personnes
dénuées d’expérience ou de connaissance,
sauf si elles ont pu bénéficier, par l’intermé-
diaire d’une personne responsable de leur
sécurité, d’une surveillance ou d’instruction
concernant l’utilisation de l’appareil.
•
Utilisation
Important : votre sèche-linge est conçu
pour un usage exclusivement domesti-
que, pour sécher des textiles séchables en
machine.
Important : r
espectez impérativement
les consignes suivantes. Nous décli-
nons toute responsabilité et garantie en cas
de non respect de ces recommandations pou-
vant entraîner des dégâts matériels ou corpo-
rels.
— Les substances contenues dans les salissu-
res, telles que l’huile, l’acétone, l’acool, l’es-
sence, le kérosène, les détachants, la térében-
thine, la cire doivent être éliminées préalable-
ment au séchage dans votre appareil (par
exemple à l’aide d’un programme de lavage à
l’eau chaude approprié, et avec une quantité
supplémentaire de détergent).

25
FR
1 / A L’ATTENTION DE L’UTILISATEUR
— Précautions d’utilisation de produits détachants : tout traitement préalable par solvant, déta-
chant, aérosol, tels que acétone, alcool, essence, kérosène, térébentine est interdit ; ces produits
étant très inflammables. De même, nous vous recommandons de ne pas utiliser ces produits à
proximité de votre sèche-linge et plus généralement d’appareils électriques dans une pièce mal
aérée, et ce, afin d’éviter tout risque d’explosion éventuelle.
— Utilisez votre appareil conformément au mode d’emploi, ceci lui évitera des dommages ainsi qu’à votre
linge. N’utilisez pas de dissolvants dans l’appareil (risque d’incendie et d’explosion).
— Conformez- vous scrupuleusement aux étiquettes d’entretien de votre linge.
— Si vous deviez ouvrir Ia porte du tambour pendant le cycle de séchage, veillez à ne pas toucher
immédiatement le tambour, car il est très chaud.
— Si des incidents se produisent et que vous ne pouvez les résoudre grâce aux conseils que nous
vous préconisons (voir chapitre “INCIDENTS POUVANT SURVENIR”), faites appel à un profession-
nel qualifié.
— Avant de vous séparer de votre appareil usagé rendez-le inutilisable. Débranchez et coupez le
câble d’alimentation au ras de l’appareil. Rendez la fermeture de la porte inutilisable.
— Pour votre sécurité, si vous désirez changer le cordon d’alimentation de votre appareil faites
appel à un professionnel qualifié.
— En cas d’anomalies de fonctionnement débranchez l’appareil et appelez votre Service Après-
Vente.
•ECONOMIES D’ENERGIE
— Essorez vos textiles à grande vitesse, I’humidité résiduelle sera faible, ainsi que votre consom-
mation d’énergie. Même les textiles synthétiques doivent être essorés avant le séchage.
— Chargez votre machine au maximum, ainsi vous utiliserez de manière optimale l’énergie. Faites le
en respectant les indications de volume que nous vous donnons dans ce guide.
— Une température ambiante élevée ainsi qu’une pièce trop petite augmente le temps de séchage
et la consommation d’électricité.
— Nettoyez le filtre après chaque cycle de séchage.
— Nettoyez le condenseur deux fois par mois.

26
FR
2 / DESCRIPTION DE VOTRE APPAREIL
Tableau de commande
Bac de récupération d’eau
Grille condenseur
Filtre
Plaque signalétique
(Référence S.A.V)
Pieds réglables
FF
EE
DD
CC
BB
AA
• PRESENTATION GENERALE DU SECHE-LINGE
Fig. 01
BB
AA
DD
FF
CC
EE

27
3 / INSTALLATION DE VOTRE SÈCHE-LINGE
FR
AVERTISSEMENT :
AVERTISSEMENT - Risque d’incendie
— Les sécheuses doivent être installées par un installateur qualifié.*
— Les sécheuses doivent être installées selon les instructions du fabricant et les codes locaux. "
— Ne pas raccorder de matériaux d’évacuation en plastique à une sécheuse. Si une gaine métalli-
que flexible (de type pellicule métallique) est installée, elle doit être d’un type recommandé par le
fabricant pour utilisation avec la sécheuse. Les matériaux d’évacuation en plastique ont tendance
à s’affaisser, et ils sont faciles à écraser et retiennent la charpie. Ces conditions obstrueront la cir-
culation de l’air et augmenteront le risque d’incendie.
— Afin de réduire le risque de blessure grave ou de mort, suivre toutes les instructions d’installa-
tion. "
CONSERVER CES INSTRUCTIONS
• IMPORTANTES MESURES DE SECURITE
•
Mise à la terre
— Cet appareil doit être mis à la terre. En cas de mauvais fonctionnement ou de panne de l'appareil,
la mise à la terre réduit les risques de choc électrique en offrant un parcours de moindre résistance
au courant électrique.
— Cet appareil est pourvu d'un cordon à conducteur de terre et d'une fiche avec mise à la terre.
Brancher la fiche dans une prise installée adéquatement et mise à la terre conformément à tous les
codes et règlements locaux.
AVERTISSEMENT :
Une mauvaise connexion du conducteur de terre peut entraîner des risques de choc élec-
trique. Consulter un électricien ou un technicien qualifié si vous n'êtes pas certain que l'appareil
est mis à la terre adéquatement.
Ne pas modifier la fiche de l'appareil. Si elle ne pénètre pas bien dans la prise, faire installer une
prise adéquate par un électricien qualifié.
CONSERVER CES INSTRUCTIONS

28
FR
3 / INSTALLATION DE VOTRE SÈCHE-LINGE
Fig. 03
Fig. 02
• ENVIRONNEMENT DE L’APPAREIL
Important :
Nous vous déconseillons fortement :
— D'installer votre appareil sur un sol en
moquette. Si vous ne pouvez l’éviter, prenez
toutes les dispositions pour ne pas gêner la
circulation de l’air à sa base.
— D’installer votre sèche-linge dans un lieu où
il pourrait être soumis à des projections d’eau.
- D’installer votre sèche-linge dans une petite
pièce fermée (si c’était le cas, ouvrez la porte
ou la fenêtre pendant le séchage).
- D’installer votre sèche-linge dans une pièce
insuffisamment aérée, la température de la
pièce doit rester inférieure à 30°C pendant le
séchage.
1 cm mini
Conseil :
V
otre sèche-linge dégage de la chaleur si vous le placez à côté d’un autre appareil ou d’un
meuble, nous vous conseillons de toujours laisser entre eux un espace pour faciliter la circula-
tion de l’air (Fig. 02).
Important :
Vérifiez à l’aide d’un niveau que l’appa-
reil est horizontal :
Votre sèche-linge est équipé de 4 pieds régla-
bles (
Fig.03).
Pour régler son horizontalité et
sa stabilité :
— Basculez-le légèrement vers l’arrière.
— En fonction de la configuration du sol, vissez
ou dévissez, à l’aide d’une clé ou d’un tourne-
vis , un ou plusieurs pieds pour le ou les régler
en hauteur
(Fig.03).
— Remettez votre sèche-linge sur ses pieds et
vérifiez sa stabilité.
• MISE A NIVEAU

29
FR
3 / INSTALLATION DE VOTRE SÈCHE-LINGE
• ENCASTREMENT
Un kit d’adaptation est disponible auprès de votre revendeur. Ce kit permet de fixer votre sèche-
linge sur le dessus de votre lave-linge.
E
F
B
C
A
A
B
E
F
C
Fig. 04
Fig. 05
• MODIFICATION DU SENS D’OUVERTURE DE LA PORTE
Si vous le souhaitez, vous pouvez modifier le sens d’ouverture de la porte en procédant de la façon
suivante :
(Fig. 04 ou 05).
— Retirez du panneau avant les 4 vis qui fixent les charnières et
.
— Inversez et fixez la charnière .
— Repositionnez la porte sur la charnière .
— Inversez et fixez la charnière
.
— Inversez le verrou avec le cache-verrou sur la façade.
— Inversez sur la porte le pène .
CC
EEFF
BB
AA
AA
BBAA
Important :
Vérifiez auprès de votre revendeur que le kit de superposition est compatible avec votre
lave-linge. Pour des raisons de sécurité, le montage doit être réalisé par un professionnel quali-
fié.
Important :
Si vous encastrez l’appareil sous un plan de travail, vous devez soit conserver le dessus
stratifié d’origine, soit le remplacer par un kit moins épais prévu à cet effet et disponible auprès
de votre revendeur. En aucun cas, pour des raisons de sécurité, l’appareil ne doit fonctionner
sans dessus.
• MONTAGE EN COLONNE
Porte à gauche
Porte à droite

30
FR
3 / INSTALLATION DE VOTRE SÈCHE-LINGE
• ALIMENTATION ELECTRIQUE
Danger :
P
our l’installation électrique de votre appareil :
—
N’utilisez pas de prolongateur, adaptateur, prise multiple ni de programmateur électrique différé.
—
La prise de courant doit être facilement accessible mais elle doit rester hors de portée des
enfants.
—
En cas d’incertitude sur l’état de votre installation faites appel à votre installateur ou à un pro-
fessionnel qualifié dépositaire de la marque.
—
Ne supprimez jamais la mise à la terre.
Le Sèche-linge est équipé d’un cordon avec fiche NEMA 6.15P
Il doit être connecté à une prise 240V,15A, 60Hz AC 2 Phase + Terre NEMA 6.15R
Nous ne pouvons pas être tenus pour responsable de tout incident causé par une mauvaise ins-
tallation électrique.
• REMPLACEMENT DU CORDON D’ALIMENTATION ELECTRIQUE
Important :
Pour votre sécurité, cette opération doit impérativement être effectuée par le service
après-vente du fabricant ou un professionnel qualifié.
Conseil :
Afin de retrouver aisément à l’avenir les références de votre appareil, nous vous conseil-
lons de les noter en page “Service après vente et relations consommateurs” (cette page vous
explique également où les trouver sur votre appareil).
Votre appareil est conforme à la norme UL 2158 (sècheuses électriques)
Le sèche-linge doit être installé conforme aux codes locaux :
— Aux U.S.A., conforme au code électrique ANSI/NFPA 70 - dernière édition et à tous les codes
locaux.
— Au Canada, conforme au code électrique national C22.1 - dernière édition et à tous les codes
locaux.

31
FR
4 / PREPARATION DU LINGE
• VERIFIEZ L’ETAT DE VOS TEXTILES
— Ouvrez la porte en poussant
(Fig.06).
— Controlez que le filtre est dans son loge-
ment.
— Introduisez le linge lavé et essoré dans le
tambour sans le tasser ni le plier.
— Refermez la porte.
••
Charges préconisées :
La capacité maximale de l’appareil est de 8 kg.
— Pour limiter le froissage et optimiser les
temps de séchage, nous vous conseillons de
ne pas surcharger le tambour.
• INTRODUCTION DU LINGE DANS LE TAMBOUR
Fig. 06
Conseil :
Si, avant d’introduire votre linge dans
le sèche-linge, vous constatez, même après
lavage, la présence de taches, ne séchez
pas les pièces de linge concernées car, en
règle générale, les taches qui ont été repas-
sées ou séchées en sèche-linge ne peuvent
plus être enlevées.
Reportez-vous éventuellement aux recettes
pour le traitement des taches difficiles qui
vous sont données dans la plupart des gui-
des d’utilisation de lave-linge et, surtout,
lavez de nouveau le linge taché.
••
Préparez vos textiles :
— Fermez les fermetures à glissières et à pres-
sion.
— Retirez les boutons mal cousus, les épin-
gles, les agrafes.
— Nouez les ceintures, les rubans de tablier,
etc...
— Videz les poches.
— En cas d’utilisation de produits assouplis-
sants, respectez les préconisations du fabri-
cant.
Séchage
normal
Séchage
doux
Pas de séchage en tambour
Important :
Vérifiez l’étiquetage de vos textiles
Important :
Ne séchez pas dans votre
sèche-linge :
— Les articles comprenant des matériaux tels
que le caoutchouc (par exemple : bonnet de
douche, textile et vêtement étanche, dou-
blure, oreillers, etc ...)
— Les chlorofibres (Thermolactyl* par exem-
ple) *Marque déposée
— Les pièces de linge dotées d’armatures ris-
quant de se détacher
— Les articles volumineux (couettes, édre-
dons, etc...)
— Le linge non essoré
— Le linge ayant subi des nettoyages avec des
produits chimiques inflammables.

32
FR
5 / UTILISATION ET PROGRAMMATION
• PRÉSENTATION DU BANDEAU DE COMMANDE
• PROGRAMMATION D’UN CYCLE DE SÉCHAGE
• Mise en marche de l’appareil :
Vérifiez que le cordon électrique est branché.
La mise en marche ne peut être effectuée que
si la porte est bien fermée.
Appuyez sur “Marche/Arrêt”
Choisissez votre programme (cf. tableau “Les
programmes de votre sèche-linge” pages sui-
vantes) en tournant le bouton de program-
mes (il tourne dans les deux sens). Le
voyant allumé indique votre choix.
Appuyez sur “Départ/Pause” , le pro-
gramme commence.
L’afficheur vous informe du temps restant,
avec un degré de précision qui s’affine tout
au long du cycle de séchage.
• Fonction “ MEMO ACTIV’ ” :
Votre séche-linge mémorise les programmes
les plus utilisés.
Après quelques cycles de séchage, le pro-
gramme affiché à la mise en marche de l’appa-
reil correspond au programme le plus utilisé.
GG
AA
HH
+
-
Pause Stop
Air Dry - Wool
Air Dry - Wool
Air Dry
Air Dry
Ultra - Delicates
Ultra - Delicates
Delicates
Delicates
Anti-creasing
Anti-creasing
Beeper
Beeper
Delay Timer
Delay Timer
Start/Pause
Start/Pause
On/Off
On/Off
Extra Drying
Extra Drying
Time
Time
REGULAR
REGULAR
SFA-8CE
Dry
Dry
Heavy Duty
Heavy Duty
Dry
Dry
Extra Dry
Extra Dry
COTTON
COTTON
Perm. Press
Perm. Press
Damp Dry
Damp Dry
Damp Dry
Damp Dry
AA BB CC DD
EE
GG HHFF
Bouton de programmes
Anti-froissage
Sonnerie
Complément de séchage
Départ différé “-”
Départ différé “+”
Départ/Pause
Marche/Arrêt
HH
GG
FF
EE
DD
CC
BB
AA
Déroulement du programme
Temps restant
Anti-creasing
Anti-creasing
Beeper
Beeper
Delay Timer
Delay Timer
Extra Drying
Extra Drying
Time
Time
Anti-creasing Beeper
Delay Timer
Extra Drying
Time
Anti-creasing Beeper
Delay Timer
Extra Drying
Time
Anti-creasing Beeper
Delay Timer
Extra Drying
Time
Anti-creasing Beeper
Delay Timer
Extra Drying
Time
Anti-creasing Beeper
Delay Timer
Extra Drying
Time
Anti-creasing Beeper
Delay Timer
Extra Drying
Time
Anti-creasing Beeper
Delay Timer
Extra Drying
Time
Anti-creasing Beeper
Delay Timer
Extra Drying
Time
Anti-creasing Beeper
Delay Timer
Extra Drying
Time
Anti-creasing Beeper
Delay Timer
Extra Drying
Time
Anti-creasing Beeper
Delay Timer
Extra Drying
Time
Pause Stop
Pause Stop
Pause Stop
Pause Stop
Pause Stop
Pause Stop
Pause Stop
Pause Stop
Pause Stop
Pause Stop
+
-
Pause
Pause
Stop
Stop
Pause Stop
Pause Stop
Pause Stop
AVERTISSEMENT :
Pour réduire les risques d'incendie, de choc électrique et de blessure, lire les IMPORTAN-
TES MESURES DE SÉCURITÉ avant d'utiliser cet appareil.
Pause
Stop
Pause, Séchage, Refroidissement, Fin du programme
Déroulement du programme :

33
FR
5 / UTILISATION ET PROGRAMMATION
• Départ différé d’un programme :
Sélectionnez votre programme à l’aide du bou-
ton de programme . Le voyant allumé indi-
que votre choix.
Appuyez sur la touche “Départ différé +”
afin de retarder le départ de votre programme,
de 30 minutes en 30 minutes jusqu’à obten-
tion du temps différé choisi (maxi 23h30). Pour
diminuer le temps de départ différé, appuyez
sur la touche “Départ différé -”
Validez par un appui sur la touche
“Départ/Pause” .
L’afficheur devient fixe et vous informe du
temps restant avant le départ de votre pro-
gramme.
La phase de départ différé terminée le pro-
gramme démarre réellement, l’afficheur vous
informe du temps restant avec un degré de
précision qui s’affine tout au long du cycle de
séchage.
• Mettre ou enlever une pièce pen-
dant le séchage :
Appuyez sur “Départ/Pause” pour interrom-
pre le séchage ou ouvrez la porte directement.
Mettez ou enlevez la ou les pièces de textile,
refermez la porte.
Appuyez sur la touche “Départ/Pause”
pour relancer le séchage.
• Modification d’une programmation
ou d’un séchage en cours :
Si vous vous êtes trompé de programme, il
vous est possible de modifier la sélection en
cours de cycle.
Appuyez sur “Départ/Pause” pour inter-
rompre le séchage,
Choisissez un autre programme.
Appuyez sur la touche “Départ/Pause”
pour relancer le séchage.
GG
GG
GG
GG
GG
EE
FF
AA
Conseil :
Consultez le tableau des programmes, pages suivantes, pour déterminer celui dont vous
avez besoin selon le type de linge.
Temps restant avant le départ du cycle de
séchage
Départ différé
Anti-creasing Beeper
Delay Timer
Extra Drying
Time
Anti-creasing Beeper
Delay Timer
Extra Drying
Time
Anti-creasing
Anti-creasing
Beeper
Beeper
Delay Timer
Delay Timer
Extra Drying
Extra Drying
Time
Time
Anti-creasing Beeper
Delay Timer
Extra Drying
Time
Anti-creasing Beeper
Delay Timer
Extra Drying
Time
Anti-creasing Beeper
Delay Timer
Extra Drying
Time
Anti-creasing Beeper
Delay Timer
Extra Drying
Time
Anti-creasing Beeper
Delay Timer
Extra Drying
Time
Anti-creasing Beeper
Delay Timer
Extra Drying
Time
Anti-creasing Beeper
Delay Timer
Extra Drying
Time
Anti-creasing Beeper
Delay Timer
Extra Drying
Time
Anti-creasing Beeper
Delay Timer
Extra Drying
Time
Pause Stop
Pause Stop
+
-
Pause
Pause
Stop
Stop
Pause Stop
Pause Stop
Pause Stop
Pause Stop
Pause Stop
Pause Stop
Pause Stop
Pause Stop
Pause Stop
Pause Stop
Pause Stop
Arrêt du programme
Temps restant
Anti-creasing Beeper
Delay Timer
Extra Drying
Time
Anti-creasing
Anti-creasing
Beeper
Beeper
Delay Timer
Delay Timer
Extra Drying
Extra Drying
Time
Time
Anti-creasing Beeper
Delay Timer
Extra Drying
Time
Anti-creasing Beeper
Delay Timer
Extra Drying
Time
Anti-creasing Beeper
Delay Timer
Extra Drying
Time
Anti-creasing Beeper
Delay Timer
Extra Drying
Time
Anti-creasing Beeper
Delay Timer
Extra Drying
Time
Anti-creasing Beeper
Delay Timer
Extra Drying
Time
Anti-creasing Beeper
Delay Timer
Extra Drying
Time
Anti-creasing Beeper
Delay Timer
Extra Drying
Time
Anti-creasing Beeper
Delay Timer
Extra Drying
Time
Anti-creasing Beeper
Delay Timer
Extra Drying
Time
Pause Stop
+
-
Pause
Pause
Stop
Stop
Pause Stop
Pause Stop
Pause Stop
Pause Stop
Pause Stop
Pause Stop
Pause Stop
Pause Stop
Pause Stop
Pause Stop
Pause Stop
Pause Stop

34
FR
5 / UTILISATION ET PROGRAMMATION
Temps supplémentaire
Remarque :
Les options “Sonnerie” et “Anti-froissage” restent sélectionnées d’un programme à l’au-
tre. Un simple appui sur les touches vous permet de désélectionner les options.
• Arrêt de l’appareil :
En fin de programme, les voyants “Filtre”
et
““BBaacc pplleeiinn””
clignotent par alter-
nance pour vous rappeler que vous devez
nettoyer le filtre et vider le bac de récupéra-
tion d’eau après chaque cycle de séchage:
Appuyez sur la touche “Marche/Arrêt”.
Videz votre sèche-linge.
Nettoyez le filtre et videz le bac de récupéra-
tion d’eau (voir façon de procéder dans le
chapitre “ENTRETIEN COURANT”).
• Option “Anti-froissage” :
L’option “Anti-froissage” permet le brassage
du textile toutes les 10 minutes pendant 24
heures, jusqu’à ouverture de la porte ou arrêt
de l’appareil. Elle intervient dès que le
séchage est terminé, et évite au textile de se
tasser. Pour la sélectionner, appuyer sur la
touche “Anti-froissage” . Le voyant allumé
indique que l’option est activée.
• Option “Sonnerie” :
Appuyez sur la touche “Sonnerie” . A la
fin du séchage 3 bips retentiront toutes les 10
minutes pendant 1 heure jusqu’à l’ouverture
de la porte ou l’arrêt de l’appareil.
• Option “Complément de séchage” :
Cette fonction vous permet d’ajouter du
temps de séchage à la fin d’un programme
par plage de 10 minutes en appuyant succes-
sivement sur la touche “Complément de
séchage” . Appuyez sur la touche
“Départ/Pause”. Le complément de séchage
est adapté au textile du programme sélec-
tionné.
DD
CC
BB
HH
Pause Stop
Pause Stop
Pause Stop
Pause Stop
Pause Stop
Pause Stop
Pause Stop
Pause Stop
Pause Stop Pause Stop
Pause Stop
Pause Stop
Pause Stop
Pause Stop
Pause Stop
Pause Stop
Pause Stop
Pause Stop
Pause Stop
Pause Stop
Pause Stop
Pause Stop
Pause Stop Pause Stop
Pause Stop
Pause Stop
Pause Stop
Pause Stop
Fin du programme
Les voyants “Filtre” et “Bac plein” clignotent
Option “Anti-froissage”
Option “Sonnerie”
Anti-creasing Beeper
Delay Timer
Extra Drying
Time
Anti-creasing Beeper
Delay Timer
Extra Drying
Time
Anti-creasing Beeper
Delay Timer
Extra Drying
Time
Anti-creasing Beeper
Delay Timer
Extra Drying
Time
Anti-creasing Beeper
Delay Timer
Extra Drying
Time
Anti-creasing Beeper
Delay Timer
Extra Drying
Time
Anti-creasing Beeper
Delay Timer
Extra Drying
Time
Anti-creasing Beeper
Delay Timer
Extra Drying
Time
Anti-creasing Beeper
Delay Timer
Extra Drying
Time
Anti-creasingAnti-creasing BeeperBeeper
Delay TimerDelay Timer
Extra DryingExtra Drying
TimeTime
Anti-creasing Beeper
Delay Timer
Extra Drying
Time
Anti-creasing Beeper
Delay Timer
Extra Drying
Time
Pause Stop
Pause Stop
Pause Stop
Pause Stop
Pause Stop
Pause Stop
Pause Stop
Pause Stop
+
-
PausePause StopStop
Pause Stop
Pause Stop
Pause Stop
Pause Stop
Pause Stop
Anti-creasing Beeper
Delay Timer
Extra Drying
Time
Anti-creasing Beeper
Delay Timer
Extra Drying
Time
Anti-creasing Beeper
Delay Timer
Extra Drying
Time
Anti-creasing Beeper
Delay Timer
Extra Drying
Time
Anti-creasing Beeper
Delay Timer
Extra Drying
Time
Anti-creasing Beeper
Delay Timer
Extra Drying
Time
Anti-creasingAnti-creasing BeeperBeeper
Delay TimerDelay Timer
Extra DryingExtra Drying
TimeTime
Anti-creasing Beeper
Delay Timer
Extra Drying
Time
Anti-creasing Beeper
Delay Timer
Extra Drying
Time
Anti-creasing Beeper
Delay Timer
Extra Drying
Time
Anti-creasing Beeper
Delay Timer
Extra Drying
Time
Anti-creasing Beeper
Delay Timer
Extra Drying
Time
Pause Stop
Pause Stop
Pause Stop
Pause Stop
+
-
PausePause StopStop
Pause Stop
Pause Stop
Pause Stop
Pause Stop
Pause Stop
Pause Stop
Pause Stop
Pause Stop
Pause Stop
Anti-creasing Beeper
Delay Timer
Extra Drying
Time
Anti-creasing Beeper
Delay Timer
Extra Drying
Time
Anti-creasing Beeper
Delay Timer
Extra Drying
Time
Anti-creasing Beeper
Delay Timer
Extra Drying
Time
Anti-creasing Beeper
Delay Timer
Extra Drying
Time
Anti-creasing Beeper
Delay Timer
Extra Drying
Time
Anti-creasing Beeper
Delay Timer
Extra Drying
Time
Anti-creasing Beeper
Delay Timer
Extra Drying
Time
Anti-creasing Beeper
Delay Timer
Extra Drying
Time
Anti-creasing Beeper
Delay Timer
Extra Drying
Time
Anti-creasing Beeper
Delay Timer
Extra Drying
Time
Anti-creasingAnti-creasing BeeperBeeper
Delay TimerDelay Timer
Extra DryingExtra Drying
TimeTime
Pause Stop
Pause Stop
Pause Stop
Pause Stop
+
Pause Stop
Pause Stop
Pause Stop
Pause Stop
Pause Stop
Pause Stop
Pause Stop
Pause Stop
-
PausePause StopStop
Pause Stop
Anti-creasing Beeper
Delay Timer
Extra Drying
Time
Anti-creasing Beeper
Delay Timer
Extra Drying
Time
Anti-creasing Beeper
Delay Timer
Extra Drying
Time
Anti-creasing Beeper
Delay Timer
Extra Drying
Time
Anti-creasing Beeper
Delay Timer
Extra Drying
Time
Anti-creasing Beeper
Delay Timer
Extra Drying
Time
Anti-creasing Beeper
Delay Timer
Extra Drying
Time
Anti-creasing Beeper
Delay Timer
Extra Drying
Time
Anti-creasingAnti-creasing BeeperBeeper
Delay TimerDelay Timer
Extra DryingExtra Drying
TimeTime
Anti-creasing Beeper
Delay Timer
Extra Drying
Time
Anti-creasing Beeper
Delay Timer
Extra Drying
Time
Anti-creasing Beeper
Delay Timer
Extra Drying
Time
Pause Stop
Pause Stop
Pause Stop
+
-
PausePause StopStop
Pause Stop
Pause Stop
Pause Stop
Pause Stop
Pause Stop
Pause Stop
Pause Stop
Pause Stop
Pause Stop
Pause Stop

35
FR
Arrêt du programme
Le voyant “Bac plein” s’allume
5 / UTILISATION ET PROGRAMMATION
Important :
Après une coupure de courant le programme en cours s’annule. Vous devez dans ce cas
recommencer toutes les opérations de programmation.
• Phase de refroidissement :
Chaque programme se termine par une phase
de refroidissement de quelques minutes afin
de permettre le refroidissement progressif du
linge.
Important :
N’arrêtez pas votre sèche-linge avant la fin
de ce cycle.
• En cours de cycle :
Votre bac est plein pendant le cycle de
séchage.
L’appareil s’arrête en cours de programme.
Les voyants
““BBaacc pplleeiinn””
et
““PPaauussee””
sont
allumés, le temps restant clignote.
Procédez à la vidange de votre bac de récupé-
ration d’eau. (voir façon de procéder dans le
chapitre “ENTRETIEN COURANT”).
Appuyez sur “Départ/Pause” pour relan-
cer votre programme.
GG
Pause Stop
Pause Stop
Pause Stop
Pause Stop
Pause Stop
Pause Stop
Pause Stop
Pause Stop
Pause Stop Pause Stop
Pause Stop
Pause Stop
Pause Stop
Pause Stop
Anti-creasing Beeper
Delay Timer
Extra Drying
Time
Anti-creasing Beeper
Delay Timer
Extra Drying
Time
Anti-creasing Beeper
Delay Timer
Extra Drying
Time
Anti-creasing Beeper
Delay Timer
Extra Drying
Time
Anti-creasing Beeper
Delay Timer
Extra Drying
Time
Anti-creasing Beeper
Delay Timer
Extra Drying
Time
Anti-creasing Beeper
Delay Timer
Extra Drying
Time
Anti-creasing Beeper
Delay Timer
Extra Drying
Time
Anti-creasing Beeper
Delay Timer
Extra Drying
Time
Anti-creasing Beeper
Delay Timer
Extra Drying
Time
Anti-creasing Beeper
Delay Timer
Extra Drying
Time
Anti-creasing Beeper
Delay Timer
Extra Drying
Time
Pause Stop
Pause Stop
Pause Stop
Pause Stop
Pause Stop
Pause Stop
Pause Stop
Pause Stop
Pause Stop
Pause Stop
Pause Stop
Pause Stop
Pause Stop
Pause Stop
Conseil :
Par mesure de sécurité, il est conseillé de débrancher le cordon électrique lorsque vous
n’utilisez pas l’appareil.
Phase de refroidissement
Anti-creasing Beeper
Delay Timer
Extra Drying
Time
Anti-creasing Beeper
Delay Timer
Extra Drying
Time
Anti-creasing Beeper
Delay Timer
Extra Drying
Time
Anti-creasing Beeper
Delay Timer
Extra Drying
Time
Anti-creasing Beeper
Delay Timer
Extra Drying
Time
Anti-creasing Beeper
Delay Timer
Extra Drying
Time
Anti-creasing Beeper
Delay Timer
Extra Drying
Time
Anti-creasing Beeper
Delay Timer
Extra Drying
Time
Anti-creasing Beeper
Delay Timer
Extra Drying
Time
Anti-creasing Beeper
Delay Timer
Extra Drying
Time
Anti-creasing Beeper
Delay Timer
Extra Drying
Time
Anti-creasing Beeper
Delay Timer
Extra Drying
Time
Pause Stop
Pause Stop
Pause Stop
Pause Stop
Pause Stop
Pause Stop
Pause Stop
Pause Stop
Pause Stop
Pause Stop
Pause Stop
Pause Stop
Pause Stop
+
-
PausePause StopStop
Anti-creasing Beeper
Delay Timer
Extra Drying
Time
Anti-creasing Beeper
Delay Timer
Extra Drying
Time
Anti-creasing Beeper
Delay Timer
Extra Drying
Time
Anti-creasing Beeper
Delay Timer
Extra Drying
Time
Anti-creasing Beeper
Delay Timer
Extra Drying
Time
Anti-creasingAnti-creasing BeeperBeeper
Delay TimerDelay Timer
Extra DryingExtra Drying
TimeTime
Anti-creasing Beeper
Delay Timer
Extra Drying
Time
Anti-creasing Beeper
Delay Timer
Extra Drying
Time
Anti-creasing Beeper
Delay Timer
Extra Drying
Time
Anti-creasing Beeper
Delay Timer
Extra Drying
Time
Anti-creasing Beeper
Delay Timer
Extra Drying
Time
Anti-creasing Beeper
Delay Timer
Extra Drying
Time
Pause Stop
Pause Stop
Pause Stop
Pause Stop
Pause Stop
Pause Stop
Pause Stop
+
-
PausePause StopStop
Pause Stop
Pause Stop
Pause Stop
Pause Stop
Pause Stop
Pause Stop

36
FR
5 / UTILISATION ET PROGRAMMATION
• LES PROGRAMMES DE VOTRE SECHE-LINGE
Programmes quotidiens Nature du textile Résultat de séchage
COTON COTTON
Séchage+ Extra Dry
Coton
(jeans, peignoirs, ...)
Sec
Prêt à ranger Dry
Coton Sec
Prêt à repasser Damp Dry
Coton Légèrement humide
Repassage machine Heavy Duty
Coton Humide
TOUS TEXTILES REGULAR TEXTILES
Prêt à ranger Dry
Textiles courants Sec
Prêt à repasser Damp Dry
Textiles courants Légèrement humide
Autres programmes de séchage
Chemises Permanent Press
Synthétique,
facile à repasser
Sec
Fibres modernes Delicates
Délicat, synthétique Sec
Délicat
Ultra - Delicates
très délicat : soie,
lingerie synthétique
léger ...
Sec
Rafraîchir et aérer vos textiles après un rangement prolongé
Aération fraîcheur Air Dry
Autres textiles 15 minutes
Aère Laine Air Dry - Wool
Laines 6 minutes

37
FR
6 / ENTRETIEN EFFECUTE PAR L’UTILISATEUR
Important :
Nous vous rappelons que le filtre doit
être nettoyé après chaque cycle.
Il est situé dans la partie inférieure de l’ouver-
ture de votre sèche-linge.
Pour le nettoyer, procédez comme suit :
— Enlevez-le de son logement en tirant de bas
en haut
(Fig. 07)
— Ouvrez le filtre
(Fig. 08)
— Nettoyez-le en le débarrassant de la mince
couche de peluche qui le recouvre
(Fig. 09)
Veillez à ce qu’il n’y ait pas d’accumulation
de bourre autour du sèche-linge.
Important :
Il ne doit surtout pas être passé sous
l’eau (Fig. 10)
..
— Remettez-le en place dans son logement en
le poussant bien à fond.
• NETTOYAGE DU FILTRE
Fig. 07
Fig. 08
Fig. 09
Fig. 10
Il est situé en haut de votre appareil. Il récu-
père l’eau extraite du linge pendant le
séchage.
— Pour le vider, dégagez-le de son logement
en le tirant vers vous
(Fig. 11).
Important :
Le bac de récupération doit être vidé
après chaque cycle de séchage (Fig.12).
Important :
Risque de gel : En cas de risque de
gel, videz le bac de récupération de l’eau.
Important :
Déplacement de l’appareil : Videz le
bac de récupération d’eau si vous voulez
déplacer ou basculer votre appareil.
— Videz le bac
(Fig. 12)
..
• VIDANGE DU BAC DE RECUPERATION
Fig. 11
Fig. 12

38
FR
6 / ENTRETIEN EFFECUTE PAR L’UTILISATEUR
• EVACUATION DIRECTE DE L’EAU DE CONDENSATION
90 cm maxi
Fig. 15
Fig. 13
Fig. 14
Afin de vous éviter de vider le bac de récupération
d’eau à chaque utilisation, vous avez à votre dispo-
sition un kit (*) permettant l’évacuation directe de
l’eau du condenseur vers les égouts (Tuyau +
Déflecteur). Pour cela :
— Déboîtez le tuyau existant et poussez-le vers l’inté-
rieur de l’appareil
(Fig. 13).
— Clippez le déflecteur au dessus de la pompe
(Fig.
14).
— Raccorder le tuyau du kit sur l’embout de l’appareil
(Fig. 15).
Vous pouvez raccorder l’extrémité du tuyau d’éva-
cuation soit :
- Sur un siphon ventilé
(Fig. 16
).
- Sur un siphon d’évier
(Fig. 17
).
Lors d’un raccordement sur un siphon, vous devez
retirer l’obturateur du siphon. Emmanchez ensuite
l’embout caoutchouc à fond. Si nécessaire, ajoutez
un collier de serrage
(Fig. 17
).
Important :
Le déflecteur doit être impérativement posi-
tionné avant le branchement du tuyau d’évacuation
pour éviter toute projection en cas de déboîtement
du tuyau.
Fig. 17
Fig. 16
Remarque :
(*) Ce kit est fourni avec l’appareil ou est
disponible auprès de votre Service Après-Ventes
sous la réf. 57X3184 (selon modèle)
Déflecteur
Encart
Tuyau

39
FR
Important :
Lors du remontage du condenseur, maintenez le condenseur plaqué au fond de son logement
pendant l’opération de verrouillage.
6 / ENTRETIEN EFFECUTE PAR L’UTILISATEUR
Conseil :
Pour le nettoyage du tableau de bord, de
l’accès au tambour, de la carrosserie, utilisez une
éponge ou un chiffon humidifié avec de l’eau et du
savon liquide uniquement.
— Veillez à ce qu’il n’y ait pas d’accumulation de
bourre autour du séche-linge.
— Nettoyez le joint de porte avec un chiffon humide.
— Nettoyez le logement du filtre avec votre aspira-
teur une fois par an.
Dans tous les cas, proscrire
(Fig.21)
:
— Les poudres abrasives
— Les éponges métalliques ou plastiques
— Les produits à base d'alcool (alcool, diluant etc ...).
Fig. 21
• NETTOYAGE DE L’APPAREIL
Important :
Le condenseur doit être nettoyé deux fois
par mois.
Important :
Débranchez le cordon d’alimentation avant le
nettoyage du condenseur.
— Basculez la grille située à l’avant de l’appareil.
— Déverrouillez le condenseur
(Fig.18).
— Retirez-le délicatement
(Fig.19).
— Débarrassez le condenseur des peluches.
— Nettoyez-le uniquement avec de l’eau sous le robi-
net
(Fig.20).
— Assurez-vous, après le nettoyage que tous les tubes
sont ”débouchés” et que les ailettes sont propres.
— Frottez-le sommairement.
— Remettez en place le condenseur, le verrouiller et
reclipper la grille.
• NETTOYAGE DU CONDENSEUR
Fig. 18
Fig. 19
Fig. 20

40
FR
7 / INCIDENTS POUVANT SURVENIR
Conseil :
Quelques incidents peuvent survenir lors de l'utilisation de votre sèche-linge, voici des
points à vérifier.
Problèmes : Vérifiez si :
Le sèche-linge ne démarre pas :
- la prise de courant est branchée.
- la touche “On/Off” est enfoncée.
- la porte est bien fermée
- le condenseur est bien verrouillé.
Les temps de séchage sont trop
longs :
- le filtre dans le tambour n’est pas encrassé.
- la charge de linge est assez essorée (500 tours/min
minimum, mais un essorage à 850 tours/min donne
de meilleurs temps de séchage).
- la température dans la pièce n’est pas trop élevée,
surtout si cette dernière est petite : au besoin, ouvrir
la porte ou la fenêtre.
- le condenseur n’est pas encrassé.
- les entrées et les sorties d’air sont assez dégagées
pour assurer une circulation correcte.
- le programme de séchage sélectionné correspond au
type de linge mis dans le tambour.
Le linge est trop humide :
- le filtre dans le tambour n’est pas encrassé.
- la sélection du type de séchage est correcte : passez
au programme supérieur.
- le condenseur n’est pas bouché par des peluches.
Le linge est trop sec, trop froissé :
- le programme de séchage sélectionné correspond au
type de linge mis dans le tambour.
Le séchage n’est pas homogène :
-
la charge de linge n’est pas composée de textiles dont
la nature est trop différente (ex. : drap avec blue-jean).
- le linge a bien été mis ”déplié” dans le tambour.
- le tambour n’est pas trop chargé.
Les pièces de linge en synthétique
sont chargées d’électricité
statique :
- le linge n’est pas trop sec.
- vous avez utilisé de l’assouplissant lors du lavage,
l’usage de ce produit permettant de réduire en
grande partie les problèmes d’électricité statique.
Le voyant “bac plein” est allumé :
- le bac de récupération d’eau est plein : après l’avoir
vidé, remettez-le correctement en place en le réem-
boitant à fond dans son logement
Le voyant “bac plein” s’allume
alors que le bac est vide :
- le bac est correctement emboîté : poussez-le bien à fond.
- le condenseur est bien verrouillé des deux côtés.

41
FR
8 / SERVICE APRÈS-VENTE
Les éventuelles interventions sur votre appa-
reil doivent être effectuées par un profession-
nel qualifié dépositaire de la marque. Lors de
votre appel, mentionnez la référence complète
de votre appareil (modèle, type, numéro de
série). Ces renseignements figurent sur la pla-
que signalétique
(voir Fig. 22).
PIÈCES D’ORIGINE
Lors d’une intervention d’entretien, deman-
dez l'utilisation exclusive de
pièces déta-
chées certifiées d’origine.
••
INTERVENTIONS
Fig. 22
• CHANGEMENT DE L’AMPOULE
Vous pouvez procéder au changement de l’am-
poule (type E14-15W/230V) par vous-même
(Fig. 23).
Important :
Débranchez le cordon d’alimentation
avant le changement de l’ampoule.
Pour cela :
—
Dévissez le cache en verre situé à gauche à
l’intérieur de l’appareil.
—
Dévissez l’ampoule défectueuse et chan-
gez-la.
—
Revissez le cache en verre à fond.
Important :
Le changement de l’ampoule doit être
effectué à FROID.
Fig. 23

42
ÍNDICE
ES
Importante :
Antes de poner en marcha su aparato, lea detenidamente este manual de instalación
y utilización para familiarizarse cuanto antes con su funcionamiento.
1 / A LA ATENCIÓN DEL USUARIO
• Importantes medidas de seguridad ________________________ 43
• Ahorro de energía ______________________________________ 44
2 / DESCRIPCIÓN DE SU APARATO
• Presentación general de la secadora ______________________ 46
3 / INSTALACIÓN DE SU SECADORA
• Entorno del aparato______________________________________ 48
• Puesta a nivel __________________________________________ 48
• Encastre ______________________________________________ 49
• Montaje en columna ____________________________________ 49
• Modificación del sentido de la apertura de la puerta __________ 49
• Alimentación eléctrica____________________________________ 50
4 / PREPARACIÓN DE LA ROPA
• Comprobación del estado de sus tejidos ____________________ 51
• Introducción de la ropa en el tambor ______________________ 51
5 / LA PROGRAMACIÓN
• Presentación del panel de control __________________________ 52
• Programación de un ciclo de secado ______________________ 52
• Los programas de su secadora. __________________________ 56
6 / MANTENIMIENTO NORMAL
• Limpieza del filtro ______________________________________ 57
• Desagüe del recipiente de recuperación ____________________ 57
• Evacuación directa del agua de condensación ______________ 58
• Limpieza del condensador ________________________________ 59
• Limpieza del aparato ____________________________________ 59
7 / INCIDENTES QUE PUEDEN OCURRIR ________________________ 60
8 / SERVICIO POSVENTA ______________________________________ 61
• Cambio de la bombilla. __________________________________ 61

43
1 / A LA ATENCIÓN DEL USUARIO
ES
ADVERTENCIA :
Para reducir los riesgos de incendio, electrocución o sufrir heridas al utilizar el aparato,
adopte todas las precauciones elementales y :
— Lea todas las instrucciones antes de utilizar el aparato.
— No seque artículos que hayan sido limpiados o lavados con gasolina, disolventes para limpieza
en seco o cualquier otra sustancia inflamable o explosiva, o que se hayan puesto a remojo en esos
productos. Esos productos desprenden vapores que podrían inflamarse o explotar.
— No permita a los niños que jueguen sobre o dentro del aparato. Vigile atentamente a los niños
cuando se encuentren cerca del aparato y éste esté funcionando.
— Antes de tirar el aparato o desecharlo, quite la puerta.
— No introduzca la mano en el aparato mientras se esté moviendo el tambor.
— No instale ni coloque el aparato en un lugar donde quede expuesto a la intemperie.
— No neutralice los mandos.
— No repare o cambie piezas del aparato ni realice operaciones de mantenimiento a no ser que las
instrucciones relativas al mantenimiento y la sustitución de piezas indiquen que se puede hacer, y
si usted comprende bien esas instrucciones y posee los conocimientos necesarios.
— No utilice suavizantes o productos antiestáticos salvo que así lo recomienden los fabricantes de
esos productos.
— No utilice calor para secar artículos que contengan gomaespuma u otros materiales gomosos de
textura similar.
— Limpie el filtro recogehilos antes y después de cada uso.
— La zona que rodea el respiradero debe estar libre de acumulaciones de hilos, polvo y suciedad.
— El interior del aparato debe ser limpiado periódicamente por un técnico cualificado.
— No introduzca artículos manchados con aceites de cocción en la secadora. El aceite de cocción
podría provocar una reacción química y activar la inflamación de las ropas en la secadora
•
Puesta a tierra
— Este aparato debe tener una conexión a tierra. En caso de mal funcionamiento o de avería del
aparato, la puesta a tierra reduce los riesgos de electrocución al ofrecer a la corriente eléctrica un
recorrido con menor resistencia.
— Este aparato cuenta con un cable conductor de tierra y un enchufe con puesta a tierra. Enchúfelo
en una toma instalada adecuadamente y con puesta a tierra, de acuerdo con todos los códigos y
normativas locales
ADVERTENCIA :
Una mala conexión del conductor de tierra puede conllevar riesgos de electrocución.
Consulte a un electricista o a un técnico cualificado si no tiene la seguridad de que el aparato
está conectado a tierra adecuadamente. No modifique el enchufe del aparato. Si no penetra bien
en la toma, pida a un electricista homologado que coloque una toma adecuada.
CONSERVE ESTAS INSTRUCCIONES
• IMPORTANTES MEDIDAS DE SEGURIDAD

44
ES
1 / A LA ATENCIÓN DEL USUARIO
Importante :
Conserve este manual de utilización
con su aparato. Si el aparato se vendiera o
cediese a otra persona, asegúrese de que le
acompaña el manual de utilización. Le agra-
decemos que tenga en cuenta estos conse-
jos antes de instalar y utilizar su aparato. Los
hemos redactado por su seguridad y la de
sus familiares.
•
INSTRUCCIONES DE SEGURIDAD
•
Instalación
— Cuando reciba el aparato, desembálelo
inmediatamente. Compruebe si el aparato ha
sufrido daños durante el transporte. Realice
las posibles reservas por escrito en la orden
de entrega de la que guardará un ejemplar.
No enchufe nunca un aparato dañado. Si su
aparato está dañado, diríjase a su proveedor.
— Antes de proceder a enchufar su aparato,
consulte las instrucciones que figuran en su
Manual de instalación.
— En todo el periodo de duración de la instala-
ción, la secadora debe mantenerse desenchu-
fada de la red.
— No enchufe nunca el conducto de evacua-
ción a un conducto de chimenea (riesgo de
descarga de gases de combustión), ni a una
VMC (Ventilación Mecánica Controlada).
— Los datos sobre los enchufes eléctricos indi-
cados en la placa descriptiva de su aparato, y
los datos relativos al sector deben ser equiva-
lentes.
— Una vez que se haya instalado su aparato, la
toma debe permanecer accesible.
— No modifique ni intente modificar las carac-
terísticas de este aparato. Esto supondría un
peligro para usted.
— Si su instalación necesita modificaciones,
confíe las obras eléctricas e hidráulicas sólo a
un electricista y a un fontanero cualificados.
— El aparato no debe instalarse detrás de una
puerta con pestillo, una puerta corredera o
una puerta con una bisagra en el lado opuesto
a la puerta de la secadora.
— Su aparato está destinado a un uso domés-
tico normal. No lo utilice con fines comerciales
o industriales o con otros objetivos distintos al
objetivo para el que ha sido creado.
•
Seguridad de los niños
— Este aparato deben utilizarlo adultos. No
deje a los niños jugar con el aparato y aleje del
mismo a los animales domésticos.
— Mantenga a los niños pequeños alejados del
aparato durante su funcionamiento.
— Una vez que haya desembalado su aparato,
mantenga los embalajes fuera del alcance de
los niños.
— Mantenga todos los materiales del embalaje
fuera del alcance de los niños. (p. ej. bolsas de
plástico, poliestireno, etc.), porque pueden
resultar peligrosos para los niños: Riesgo de
asfixia.
— No está previsto que usen este aparato per-
sonas (incluidos niños) cuyas capacidades
físicas, sensoriales o mentales estén reduci-
das, ni personas que no tengan experiencia o
conocimiento, salvo si han estado bajo el
control o han recibido formación previa refe-
rente al uso del aparato por parte de una per-
sona responsable de su seguridad.
•
Utilización
Importante :
Su secadora se ha creado para un uso
exclusivamente doméstico, para secar teji-
dos secables a máquina.
Importante :
Respete obligatoriamente las siguien-
tes instrucciones. No nos hacemos responsa-
bles ni garantes en caso de que no se respe-
ten estas recomendaciones y se produzcan
daños materiales o físicos.
— Utilice su aparato de acuerdo con el manual
de utilización, esto le evitará daños tanto a
usted como a su ropa. No utilice disolventes
en el aparato (riesgo de incendio y de explo-
sión).

45
ES
1 / A LA ATENCIÓN DEL USUARIO
— Si tuviera que abrir la puerta del tambor durante el ciclo de secado, tenga cuidado de no tocar
inmediatamente el tambor, porque estará muy caliente.
— Antes de realizar el secado en su aparato, es necesario eliminar las sustancias que contienen las
manchas, como el aceite, la acetona, el alcohol, la gasolina, el queroseno, los quitamanchas, la tre-
mentina o la cera (por ejemplo, utilizando un programa de lavado con agua caliente adecuado y
con una cantidad adicional de detergente).
— Precauciones de uso de productos antimanchas: está prohibido aplicar cualquier tratamiento
previo con disolventes, productos antimanchas o aerosoles, como acetona, alcohol, gasolina, que-
roseno o aguarrás, ya que estos productos son muy inflamables. Asimismo, le recomendamos que
no utilice estos productos cerca de su secadora y, en general, de aparatos eléctricos en una habi-
tación mal ventilada para evitar el riesgo de que se produzca una explosión.
— Siga fielmente las etiquetas de mantenimiento de su ropa.
— Si se producen incidentes y no los puede resolver siguiendo los consejos que le damos (ver capí-
tulo “INCIDENTES QUE PUEDEN OCURRIR”), póngase en contacto con un profesional cualifi-
cado.
— Antes de deshacerse de su aparato usado, déjelo inutilizable. Desenchufe y corte el cable de ali-
mentación a ras del aparato. Deje la cerradura de la puerta inutilizable.
— Por su seguridad, si desea cambiar el cable de alimentación de su aparato, llame a un profesio-
nal cualificado.
— En caso de anomalías en el funcionamiento, desenchufe el aparato y llame al Servicio Post-venta.
•AHORRO DE ENERGÍA
— Centrifugue sus tejidos a gran velocidad, la humedad residual será escasa, así como su consumo
de energía. Incluso los tejidos sintéticos deben ser centrifugados antes del secado.
— Cargue su máquina al máximo, así utilizará de manera óptima la energía. Hágalo respetando las
indicaciones de volumen que le ofrecemos en este manual.
— Una temperatura ambiente elevada, así como una prenda demasiado pequeña aumentan el
tiempo de secado y el consumo de electricidad.
— Limpie el filtro después de cada ciclo de secado.
— Limpie el condensador dos veces al mes.

46
ES
2 / DESCRIPCIÓN DE SU APARATO
• PRESENTACIÓN GENERAL DE LA SECADORA
Fig. 01
BB
DD
FF
CC
EE
Panel de control
Recipiente de recuperación de
agua (depósito)
Rejilla del condensador
Filtro
Placa descriptiva
(Referencia Servicio Posventa)
Patas ajustables
FF
EE
DD
CC
BB
AA

47
ES
3 / INSTALACIÓN DE SU SECADORA
ADVERTENCIA :
ADVERTENCIA - Peligro de incendio
— La instalación de la secadora debe ser realizada por un instalador cualificado.
— Instale la secadora de acuerdo con las instrucciones del fabricante y la normativa local.
— No instale una secadora con materiales de ventilación de plástico flexible. Si instala un conducto
metálico flexible (tipo hoja metálica), debe ser de un tipo especial identificado por el fabricante del
aparato como apto para secadoras. Los materiales flexibles de ventilación se atascan, se aplastan
fácilmente y acumulan pelusas. Esto hace que se obstruya el flujo de aire de la secadora y aumenta
el riesgo de incendio.
— Para reducir el riesgo de lesiones graves o muerte, siga todas las instrucciones de instalación.
CONSERVE ESTAS INSTRUCCIONES
•
Puesta a tierra
— Este aparato debe tener una conexión a tierra. En caso de mal funcionamiento o de avería del
aparato, la puesta a tierra reduce los riesgos de electrocución al ofrecer a la corriente eléctrica un
recorrido con menor resistencia.
— Este aparato cuenta con un cable conductor de tierra y un enchufe con puesta a tierra. Enchúfelo
en una toma instalada adecuadamente y con puesta a tierra, de acuerdo con todos los códigos y
normativas locales
ADVERTENCIA :
Una mala conexión del conductor de tierra puede conllevar riesgos de electrocución.
Consulte a un electricista o a un técnico cualificado si no tiene la seguridad de que el aparato
está conectado a tierra adecuadamente. No modifique el enchufe del aparato. Si no penetra bien
en la toma, pida a un electricista homologado que coloque una toma adecuada.
CONSERVE ESTAS INSTRUCCIONES
• IMPORTANTES MEDIDAS DE SEGURIDAD

48
3 / INSTALACIÓN DE SU SECADORA
ES
Fig. 03
Fig. 02
• ENTORNO DEL APARATO
Importante :
Le aconsejamos encarecidamente que
no haga lo siguiente :
— Instalar su aparato sobre un suelo con
moqueta. Si no queda más remedio, tome
todas las medidas para no impedir la circula-
ción del aire en su base.
— Instalar su secadora en un lugar en el que
pueda estar sometida a proyecciones de
agua.
— Instalar su secadora en una habitación
pequeña cerrada (llegado el caso, abra la
puerta o la ventana durante el secado).
— Instalar su secadora en una habitación poco
aireada, la temperatura de la habitación debe
ser inferior a 30º C durante el secado.
1 cm mini
Consejo :
Su secadora desprende calor si la coloca al lado de otro aparato o de un mueble, le aconse-
jamos que deje siempre un espacio entre ellos para facilitar la circulación del aire
(Fig. 02).
Importante :
Compruebe si el aparato está horizon-
tal con ayuda de un nivel :
Su secadora está equipada con 4 patas ajus-
tables
(Fig. 03)
. Para ajustar su horizontalidad
y su estabilidad:
— Vuélquela ligeramente hacia atrás.
— En función de la configuración del suelo,
atornille o desatornille, con ayuda de una llave
o de un destornillador, una pata o varias patas
para ajustar su altura
(Fig. 03).
— Coloque la secadora sobre las patas y com-
pruebe su estabilidad.
• PUESTA A NIVEL

49
ES
3 / INSTALACIÓN DE SU SECADORA
• ENCASTRE
Existe un kit de adaptación que puede solicitar al vendedor. Este kit permite fijar la secadora sobre
la parte superior de la lavadora.
• MODIFICACIÓN DEL SENTIDO DE APERTURA DE LA PUERTA
Importante :
Pregunte al vendedor si el kit de superposición es compatible con su lavadora. Por moti-
vos de seguridad, el montaje lo debe realizar un profesional cualificado.
Importante :
Si encastra el aparato debajo de una encimera, deberá conservar la parte superior estra-
tificada original. Por motivos de seguridad, el aparato no debe funcionar nunca sin la parte de
arriba.
• MONTAJE EN COLUMNA
Si lo desea, puede modificar el sentido de apertura de la puerta procediendo de la siguiente
manera :
(Fig. 04 u 05).
— Retire antes del tablero los 4 tornillos que fijan las bisagras y
.
— Invierta y fije la bisagra .
— Vuelva a colocar la puerta en la bisagra .
— Invierta y fije la bisagra B.
— Invierta el pestillo con el cubrepestillo sobre la parte delantera.
— Invierta el pestillo sobre la puerta.
CC
EEFF
BB
AA
BBAA
E
F
B
C
A
A
B
E
F
C
Fig. 04
Fig. 05
PUERTA A LA IZQUIERDA
PUERTA A LA DERECHA

50
ES
3 / INSTALACIÓN DE SU SECADORA
• ALIMENTACIÓN ELÉCTRICA
Peligro :
Para la instalación eléctrica de su aparato :
—
No utilice prolongadores, adaptadores, tomas múltiples ni programadores eléctricos diferidos.
—
La toma de corriente debe estar fácilmente accesible pero debe permanecer fuera el alcance
de los niños.
—
En caso de que desconozca el estado de su instalación, póngase en contacto con su instala-
dor o con un profesional cualificado autorizado de la marca.
—
No suprima nunca la conexión a tierra.
La secadora está equipada con un cable con enchufe NEMA 6.15PIl que debe ser enchufado en
una toma 240V, 15A, 60Hz AC 2 Fase + Tierra NEMA 6.15R
No nos hacemos responsables de cualquier incidente provocado por una mala instalación eléc-
trica.
Consejo :
Con el objetivo de encontrar con facilidad en un futuro las referencias de su aparato, le
aconsejamos que las anote en la página "Servicio posventa y atención al consumidor" (esta
página explica igualmente dónde encontrarlas en su aparato).
El aparato es conforme con la norma UL 2158 (secadoras eléctricas).
• SUSTITUCIÓN DEL CABLE DE ALIMENTACIÓN ELÉCTRICA
Importante :
Por su propia seguridad, esta operación deberá obligatoriamente efectuarla el servicio
post-venta del fabricante o un profesional cualificado.
La secadora debe ser instalada de acuerdo con los códigos locales:
— En EE.UU., de acuerdo con el código eléctrico ANSI/NFPA 70, última edición, y con todos los
códigos locales.
— En Canadá, de acuerdo con el código eléctrico nacional C22.1, última edición, y con todos los
códigos locales.

51
ES
4 / PREPARACIÓN DE LA ROPA
• COMPROBACIÓN DEL ESTADO DE SUS TEJIDOS
— Abra la puerta empujando (presione a nivel
de la etiqueta)
(Fig. 06)
.
— Controle si el filtro está en su lugar.
— Introduzca la ropa lavada y centrifugada en
el tambor sin aplastarla ni arrugarla.
— Tenga cuidado de que no quede ropa
enganchada en la puerta.
— Vuelva a cerrar la puerta.
••
Cargas preconizadas :
La capacidad máxima del aparato es de 8 kg.
— Para limitar las arrugas y optimizar el
tiempo de secado, le aconsejamos que no
sobrecargue la secadora
• INTRODUCCIÓN DE LA ROPA EN EL TAMBOR
Fig. 06
Consejo :
Si antes de introducir su ropa en la
secadora, observa, incluso después del
lavado, la presencia de manchas, no seque
las prendas en cuestión, porque por regla
general, las manchas que se han planchado
o secado en la secadora no pueden elimi-
narse.
Llegado el caso, consulte las recomendacio-
nes para el tratamiento de manchas difíciles
que se ofrecen en la mayoría de los manua-
les de utilización de lavadoras, y sobre todo,
vuelva a lavar la ropa manchada.
••
Prepare sus tejidos :
— Cierre los cierres de corredera y de presión.
— Retire los botones mal cosidos, los alfileres,
los corchetes.
— Anude los cinturones, las cintas de delantal,
etc.
— Vacíe los bolsillos.
— Si se utiliza un producto acondicionador,
respete las indicaciones del fabricante.
Importante :
No seque en su secadora :
— Los artículos que contengan materiales
como la goma (por ejemplo: gorros de baño,
telas y ropas impermeables, forros, almoha-
das, etc.)
— Las clorofibras (Thermolactyl* por ejemplo)
*Marca registrada
— La ropa con aros, ballenas o armaduras que
puedan soltarse
— Los artículos voluminosos (colchones, edre-
dones, etc.)
— La ropa no centrifugada
— La ropa sometida a lavados con productos
químicos inflamables.
Secado
normal
Secado
suave
Sin secado en el tambor
Importante :
Compruebe la etiqueta de sus tejidos

52
ES
5 / LA PROGRAMACIÓN
• PRESENTACIÓN DEL PANEL DE MANDOS
• PROGRAMACIÓN DE UN CICLO DE SECADO
• Puesta en funcionamiento del
aparato :
Compruebe si el cable eléctrico está enchu-
fado.
La puesta en marcha sólo puede efec-
tuarse si la puerta está bien cerrada.
Pulse “Marcha/Paro”
Seleccione su programa (ver tabla “Los pro-
gramas de su secadora” en las páginas
siguientes) girando el Selector de programa
(puede girar en ambos sentidos). El indi-
cador luminoso encendido le indicará su
selección.
Pulse “Inicio/Pausa” , y empezará el pro-
grama.
La pantalla le indica el tiempo restante, con
un grado de precisión que se va haciendo
más exacto según avanza el ciclo de secado.
• Función “ MEMO ACTIV’ ” :
Su secadora memoriza los programas más uti-
lizados.
Tras unos cuantos ciclos de secado, el aparato
presentará el programa más utilizado al ponerlo
en marcha.
GG
AA
HH
+
-
Pause Stop
Air Dry - Wool
Air Dry - Wool
Air Dry
Air Dry
Ultra - Delicates
Ultra - Delicates
Delicates
Delicates
Anti-creasing
Anti-creasing
Beeper
Beeper
Delay Timer
Delay Timer
Start/Pause
Start/Pause
On/Off
On/Off
Extra Drying
Extra Drying
Time
Time
REGULAR
REGULAR
SFA-8CE
Dry
Dry
Heavy Duty
Heavy Duty
Dry
Dry
Extra Dry
Extra Dry
COTTON
COTTON
Perm. Press
Perm. Press
Damp Dry
Damp Dry
Damp Dry
Damp Dry
AA BB CC DD
EE
GG HHFF
Desarrollo del programa
Tiempo restante
Selector de programa
Antiarrugas
Señal Acústica
Complemento de secado
Retardo Horario “-”
Retardo Horario “+”
Inicio/Pausa
Marcha/Paro
HH
GG
FF
EE
DD
CC
BB
AA
Anti-creasingAnti-creasing BeeperBeeper
Delay TimerDelay Timer
Extra DryingExtra Drying
TimeTime
Anti-creasing Beeper
Delay Timer
Extra Drying
Time
Anti-creasing Beeper
Delay Timer
Extra Drying
Time
Anti-creasing Beeper
Delay Timer
Extra Drying
Time
Anti-creasing Beeper
Delay Timer
Extra Drying
Time
Anti-creasing Beeper
Delay Timer
Extra Drying
Time
Anti-creasing Beeper
Delay Timer
Extra Drying
Time
Anti-creasing Beeper
Delay Timer
Extra Drying
Time
Anti-creasing Beeper
Delay Timer
Extra Drying
Time
Anti-creasing Beeper
Delay Timer
Extra Drying
Time
Anti-creasing Beeper
Delay Timer
Extra Drying
Time
Anti-creasing Beeper
Delay Timer
Extra Drying
Time
Pause Stop
Pause Stop
Pause Stop
Pause Stop
Pause Stop
Pause Stop
Pause Stop
Pause Stop
Pause Stop
Pause Stop
+
-
PausePause StopStop
Pause Stop
Pause Stop
Pause Stop
ADVERTENCIA :
Antes de utilizar este aparato, para reducir los riesgos de incendio, electrocución o sufrir
heridas, lea el capítulo “IMPORTANTES MEDIDAS DE SEGURIDAD”.
Pause
Stop
Pause, Secado, refrigeración, Fin de programa
Desarrollo del programa :

53
ES
5 / LA PROGRAMACIÓN
Detención del programa
Tiempo restante
Tiempo restante antes del inicio del ciclo de
secado
Retardo horario
•
Retardo horario de un programa
:
Seleccione el programa mediante el Mando de
programa . El indicador luminoso encen-
dido le indicará su elección.
Pulse el botón “Retardo Horario +” para
retrasar el inicio de su programa, de 30 en 30
minutos hasta obtener el tiempo diferido ele-
gido (máximo 23h30). Para disminuir el tiempo
de inicio diferido, pulse el mando “Retardo
Horario -”
Para validar su elección, pulse el botón
“Inicio/Pausa” .
La pantalla queda fija, indicándole el tiempo
que falta para el inicio de su programa.
Una vez que termine la fase de retardo hora-
rio el programa arranca realmente. La pantalla
le indica el tiempo restante, con un grado de
precisión que se va haciendo más exacto
según avanza el ciclo de secado.
• Meter o sacar una prenda durante
el secado :
Pulse“Inicio/Pausa” para interrumpir el
secado o abra la puerta directamente.
Meta o saque la prenda o las prendas de ropa y
cierre la puerta.
Pulse el botón “Inicio/Pausa” para relanzar
el secado.
• Modificación de una programación
o de un secado en curso :
Si se ha equivocado de programa, puede
modificar la selección en el transcurso del
ciclo.
Pulse“Inicio/Pausa” para interrumpir el
secado
Elija otro programa.
Pulse el botón “Inicio/Pausa” para relanzar
el secado.
GG
GG
GG
GG
GG
EE
FF
AA
Consejo :
Consulte el tablero de programas en la página siguiente para determinar el que necesita
según el tipo de ropa.
Anti-creasing Beeper
Delay Timer
Extra Drying
Time
Anti-creasing Beeper
Delay Timer
Extra Drying
Time
Anti-creasing
Anti-creasing
Beeper
Beeper
Delay Timer
Delay Timer
Extra Drying
Extra Drying
Time
Time
Anti-creasing Beeper
Delay Timer
Extra Drying
Time
Anti-creasing Beeper
Delay Timer
Extra Drying
Time
Anti-creasing Beeper
Delay Timer
Extra Drying
Time
Anti-creasing Beeper
Delay Timer
Extra Drying
Time
Anti-creasing Beeper
Delay Timer
Extra Drying
Time
Anti-creasing Beeper
Delay Timer
Extra Drying
Time
Anti-creasing Beeper
Delay Timer
Extra Drying
Time
Anti-creasing Beeper
Delay Timer
Extra Drying
Time
Anti-creasing Beeper
Delay Timer
Extra Drying
Time
Pause Stop
Pause Stop
+
-
Pause
Pause
Stop
Stop
Pause Stop
Pause Stop
Pause Stop
Pause Stop
Pause Stop
Pause Stop
Pause Stop
Pause Stop
Pause Stop
Pause Stop
Pause Stop
Anti-creasing Beeper
Delay Timer
Extra Drying
Time
Anti-creasing
Anti-creasing
Beeper
Beeper
Delay Timer
Delay Timer
Extra Drying
Extra Drying
Time
Time
Anti-creasing Beeper
Delay Timer
Extra Drying
Time
Anti-creasing Beeper
Delay Timer
Extra Drying
Time
Anti-creasing Beeper
Delay Timer
Extra Drying
Time
Anti-creasing Beeper
Delay Timer
Extra Drying
Time
Anti-creasing Beeper
Delay Timer
Extra Drying
Time
Anti-creasing Beeper
Delay Timer
Extra Drying
Time
Anti-creasing Beeper
Delay Timer
Extra Drying
Time
Anti-creasing Beeper
Delay Timer
Extra Drying
Time
Anti-creasing Beeper
Delay Timer
Extra Drying
Time
Anti-creasing Beeper
Delay Timer
Extra Drying
Time
Pause Stop
+
-
Pause
Pause
Stop
Stop
Pause Stop
Pause Stop
Pause Stop
Pause Stop
Pause Stop
Pause Stop
Pause Stop
Pause Stop
Pause Stop
Pause Stop
Pause Stop
Pause Stop

54
ES
5 / LA PROGRAMACIÓN
Tiempo suplementario
Observación :
Las opciones “Antiarrugas” y “Aviso Fin” se mantienen seleccionadas de un programa a
otro. Para deseleccionar estas opciones sólo tiene que pulsar la tecla correspondiente, incluso
en el transcurso del programa.
• Parada del aparato :
Al final del programa, los indicadores lumino-
sos de "Filtro" y "Vaciar depósito"
parpadean alternativamente para recordarle
que debe limpiar el filtro y vaciar el comparti-
mento de recuperación de agua después de
cada ciclo de secado.
Pulse el botón “Marcha/Paro”.
Vacíe la
secadora.
Limpie el filtro y vacíe el compartimento de
recuperación de agua (ver forma de proceder
en el capítulo “MANTENIMIENTO COR-
RIENTE”).
• Opción “Antiarrugas” :
La opción “Antiarrugas” permite remover la
ropa cada 10 minutos durante 24 horas, hasta
que se abra la puerta del aparato. Comienza
cuando ha finalizado el secado y evita que la
ropa se aplaste. Para seleccionarla, pulse la
tecla “Antiarrugas” . El piloto encendido
indica que la opción está activada.
• Opción “Aviso Fin” :
Pulse el botón “Aviso Fin” . Al final del
secado, sonarán 3 pitidos cada 10 minutos
durante 1 hora hasta que se abra la puerta o
se pare el aparato. Se enciende en la parte
inferior de la pantalla el piloto correspon-
diente a esta acción, indicando que el timbre
está activado.
• Opción “Secado Extra” :
Esta función le permite añadir tiempo de
secado al final de un programa por intervalo
de 10 minutos pulsando sucesivamente el
botón “Secado Extra” .
Pulse el botón “Inicio/Pausa”. El comple-
mento de secado se adapta al tejido del pro-
grama seleccionado.
DD
CC
BB
HH
Pause Stop
Pause Stop
Pause Stop
Pause Stop
Pause Stop
Pause Stop
Pause Stop
Pause Stop
Pause Stop Pause Stop
Pause Stop
Pause Stop
Pause Stop
Pause Stop
Pause Stop
Pause Stop
Pause Stop
Pause Stop
Pause Stop
Pause Stop
Pause Stop
Pause Stop
Pause Stop Pause Stop
Pause Stop
Pause Stop
Pause Stop
Pause Stop
Fin de programa
Los indicadores luminosos “Filtro” y “
Vaciar
depósito
” parpadean.
Opción “Antiarrugas”
Opción “Aviso Fin”
Anti-creasing Beeper
Delay Timer
Extra Drying
Time
Anti-creasing Beeper
Delay Timer
Extra Drying
Time
Anti-creasing Beeper
Delay Timer
Extra Drying
Time
Anti-creasing Beeper
Delay Timer
Extra Drying
Time
Anti-creasing Beeper
Delay Timer
Extra Drying
Time
Anti-creasing Beeper
Delay Timer
Extra Drying
Time
Anti-creasing Beeper
Delay Timer
Extra Drying
Time
Anti-creasing Beeper
Delay Timer
Extra Drying
Time
Anti-creasing Beeper
Delay Timer
Extra Drying
Time
Anti-creasingAnti-creasing BeeperBeeper
Delay TimerDelay Timer
Extra DryingExtra Drying
TimeTime
Anti-creasing Beeper
Delay Timer
Extra Drying
Time
Anti-creasing Beeper
Delay Timer
Extra Drying
Time
Pause Stop
Pause Stop
Pause Stop
Pause Stop
Pause Stop
Pause Stop
Pause Stop
Pause Stop
+
-
PausePause StopStop
Pause Stop
Pause Stop
Pause Stop
Pause Stop
Pause Stop
Anti-creasing Beeper
Delay Timer
Extra Drying
Time
Anti-creasing Beeper
Delay Timer
Extra Drying
Time
Anti-creasing Beeper
Delay Timer
Extra Drying
Time
Anti-creasing Beeper
Delay Timer
Extra Drying
Time
Anti-creasing Beeper
Delay Timer
Extra Drying
Time
Anti-creasing Beeper
Delay Timer
Extra Drying
Time
Anti-creasingAnti-creasing BeeperBeeper
Delay TimerDelay Timer
Extra DryingExtra Drying
TimeTime
Anti-creasing Beeper
Delay Timer
Extra Drying
Time
Anti-creasing Beeper
Delay Timer
Extra Drying
Time
Anti-creasing Beeper
Delay Timer
Extra Drying
Time
Anti-creasing Beeper
Delay Timer
Extra Drying
Time
Anti-creasing Beeper
Delay Timer
Extra Drying
Time
Pause Stop
Pause Stop
Pause Stop
Pause Stop
+
-
PausePause StopStop
Pause Stop
Pause Stop
Pause Stop
Pause Stop
Pause Stop
Pause Stop
Pause Stop
Pause Stop
Pause Stop
Anti-creasing Beeper
Delay Timer
Extra Drying
Time
Anti-creasing Beeper
Delay Timer
Extra Drying
Time
Anti-creasing Beeper
Delay Timer
Extra Drying
Time
Anti-creasing Beeper
Delay Timer
Extra Drying
Time
Anti-creasing Beeper
Delay Timer
Extra Drying
Time
Anti-creasing Beeper
Delay Timer
Extra Drying
Time
Anti-creasing Beeper
Delay Timer
Extra Drying
Time
Anti-creasing Beeper
Delay Timer
Extra Drying
Time
Anti-creasing Beeper
Delay Timer
Extra Drying
Time
Anti-creasing Beeper
Delay Timer
Extra Drying
Time
Anti-creasing Beeper
Delay Timer
Extra Drying
Time
Anti-creasingAnti-creasing BeeperBeeper
Delay TimerDelay Timer
Extra DryingExtra Drying
TimeTime
Pause Stop
Pause Stop
Pause Stop
Pause Stop
+
Pause Stop
Pause Stop
Pause Stop
Pause Stop
Pause Stop
Pause Stop
Pause Stop
Pause Stop
-
PausePause StopStop
Pause Stop
Anti-creasing Beeper
Delay Timer
Extra Drying
Time
Anti-creasing Beeper
Delay Timer
Extra Drying
Time
Anti-creasing Beeper
Delay Timer
Extra Drying
Time
Anti-creasing Beeper
Delay Timer
Extra Drying
Time
Anti-creasing Beeper
Delay Timer
Extra Drying
Time
Anti-creasing Beeper
Delay Timer
Extra Drying
Time
Anti-creasing Beeper
Delay Timer
Extra Drying
Time
Anti-creasing Beeper
Delay Timer
Extra Drying
Time
Anti-creasingAnti-creasing BeeperBeeper
Delay TimerDelay Timer
Extra DryingExtra Drying
TimeTime
Anti-creasing Beeper
Delay Timer
Extra Drying
Time
Anti-creasing Beeper
Delay Timer
Extra Drying
Time
Anti-creasing Beeper
Delay Timer
Extra Drying
Time
Pause Stop
Pause Stop
Pause Stop
+
-
PausePause StopStop
Pause Stop
Pause Stop
Pause Stop
Pause Stop
Pause Stop
Pause Stop
Pause Stop
Pause Stop
Pause Stop
Pause Stop

55
ES
Interrupción del programa
“El indicador luminoso “Vaciar depósito" se
enciende”
5 / LA PROGRAMACIÓN
• Fase de refrigeración :
Cada programa se termina con una fase de
refrigeración de unos minutos para que la
ropa se enfríe de manera progresiva.
Importante :
No detenga la secadora antes de que
haya finalizado este ciclo.
• Transcurso de ciclo :
Su compartimento está lleno durante el ciclo
de secado.
El aparato se detiene en el transcurso del pro-
grama.
El indicador luminoso "Vaciar depósito" y
““PPaauussaa””
está encendido, el resto del tiempo
parpadea.
Proceda al vaciado del compartimento de
recuperación de agua (ver forma de proceder
en el capítulo "MANTENIMIENTO COR-
RIENTE").
Pulse el botón “Inicio/Pausa” para relanzar
el secado.
GG
Pause Stop
Pause Stop
Pause Stop
Pause Stop
Pause Stop
Pause Stop
Pause Stop
Pause Stop
Pause Stop Pause Stop
Pause Stop
Pause Stop
Pause Stop
Pause Stop
Anti-creasing Beeper
Delay Timer
Extra Drying
Time
Anti-creasing Beeper
Delay Timer
Extra Drying
Time
Anti-creasing Beeper
Delay Timer
Extra Drying
Time
Anti-creasing Beeper
Delay Timer
Extra Drying
Time
Anti-creasing Beeper
Delay Timer
Extra Drying
Time
Anti-creasing Beeper
Delay Timer
Extra Drying
Time
Anti-creasing Beeper
Delay Timer
Extra Drying
Time
Anti-creasing Beeper
Delay Timer
Extra Drying
Time
Anti-creasing Beeper
Delay Timer
Extra Drying
Time
Anti-creasing Beeper
Delay Timer
Extra Drying
Time
Anti-creasing Beeper
Delay Timer
Extra Drying
Time
Anti-creasing Beeper
Delay Timer
Extra Drying
Time
Pause Stop
Pause Stop
Pause Stop
Pause Stop
Pause Stop
Pause Stop
Pause Stop
Pause Stop
Pause Stop
Pause Stop
Pause Stop
Pause Stop
Pause Stop
Pause Stop
Fase de refrigeración
Consejo :
Por motivos de seguridad, es aconsejable desenchufar el cable eléctrico cuando no se
esté utilizando el aparato.
Importante :
Después de un corte de corriente, el programa en curso se anula. En este caso, deberá rei-
niciar todas las operaciones de programación.
Anti-creasing Beeper
Delay Timer
Extra Drying
Time
Anti-creasing Beeper
Delay Timer
Extra Drying
Time
Anti-creasing Beeper
Delay Timer
Extra Drying
Time
Anti-creasing Beeper
Delay Timer
Extra Drying
Time
Anti-creasing Beeper
Delay Timer
Extra Drying
Time
Anti-creasing Beeper
Delay Timer
Extra Drying
Time
Anti-creasing Beeper
Delay Timer
Extra Drying
Time
Anti-creasing Beeper
Delay Timer
Extra Drying
Time
Anti-creasing Beeper
Delay Timer
Extra Drying
Time
Anti-creasing Beeper
Delay Timer
Extra Drying
Time
Anti-creasing Beeper
Delay Timer
Extra Drying
Time
Anti-creasing Beeper
Delay Timer
Extra Drying
Time
Pause Stop
Pause Stop
Pause Stop
Pause Stop
Pause Stop
Pause Stop
Pause Stop
Pause Stop
Pause Stop
Pause Stop
Pause Stop
Pause Stop
Pause Stop
+
-
Pause
Pause
Stop
Stop
Anti-creasing Beeper
Delay Timer
Extra Drying
Time
Anti-creasing Beeper
Delay Timer
Extra Drying
Time
Anti-creasing Beeper
Delay Timer
Extra Drying
Time
Anti-creasing Beeper
Delay Timer
Extra Drying
Time
Anti-creasing Beeper
Delay Timer
Extra Drying
Time
Anti-creasing
Anti-creasing
Beeper
Beeper
Delay Timer
Delay Timer
Extra Drying
Extra Drying
Time
Time
Anti-creasing Beeper
Delay Timer
Extra Drying
Time
Anti-creasing Beeper
Delay Timer
Extra Drying
Time
Anti-creasing Beeper
Delay Timer
Extra Drying
Time
Anti-creasing Beeper
Delay Timer
Extra Drying
Time
Anti-creasing Beeper
Delay Timer
Extra Drying
Time
Anti-creasing Beeper
Delay Timer
Extra Drying
Time
Pause Stop
Pause Stop
Pause Stop
Pause Stop
Pause Stop
Pause Stop
Pause Stop
+
-
Pause
Pause
Stop
Stop
Pause Stop
Pause Stop
Pause Stop
Pause Stop
Pause Stop
Pause Stop

56
ES
5 / LA PROGRAMACIÓN
• LOS PROGRAMAS DE SU SECADORA
Programas quotidiens Tipo de tejido
Resultado
del secado
ALGODÓN COTTON
Secado Extra Extra Dry
Algodón Seco
Listo para guardar Dry
Algodón Seco
Listo para planchar Damp Dry
Algodón Poco húmedo
Planchado a máquina Heavy Duty
Algodón Húmedo
TODOS LOS TEJIDOS REGULAR TEXTILES
Listo para guardar Dry
Tejidos corrientes Seco
Listo para planchar Damp Dry
Tejidos corrientes Poco húmedo
Otros programas de secado
Camisas Permanent Press
Sintético,
fácil planchado
Seco
Sintético Delicates
Delicado, sintético Seco
Delicado
Ultra - Delicates
Muy delicado: seda,
lencería sintética
fina...
Seco
Refresque y airee sus tejidos cuando lleven mucho tiempo guardados
Ventilación frescor Air Dry
Otros tejidos 15 minutos
Ventilación de lana Air Dry - Wool
Lanas secas 6 minutos

57
ES
6 / MANTENIMIENTO NORMAL
Importante :
Le recordamos que debe limpiar el fil-
tro después de cada ciclo de secado o de
vapor.
Está situado en la parte inferior de la apertura
de su secadora.
Para limpiarlo, proceda como sigue :
— Sáquelo de su compartimento tirando de
abajo hacia arriba
(Fig. 07)
— Abra el filtro
(Fig. 08)
— Límpielo quitando la pequeña capa de
pelusa que lo recubre
(Fig. 09)
Preste atención para que la borra no se acu-
mule alrededor de la secadora.
Importante :
Sobre todo, no debe exponerse al
agua (Fig. 10)
..
— Vuelva a colocarlo en su compartimento
empujando bien a fondo.
• LIMPIEZA DEL FILTRO
Fig. 07
Fig. 08
Fig. 09
Fig. 10
Está situado encima de su aparato. Recupera
el agua que suelta la ropa durante el secado.
— Para vaciarlo, sáquelo de su lugar tirando
hacia usted
(Fig. 11).
— Vacíe el recipiente o recupere el agua para
el depósito de vapor.
(Fig. 12).
Importante :
El recipiente de recuperación debe
vaciarse después de cada ciclo de secado
Importante :
Riesgo de helada : en el caso de que
exista riesgo de helada, vacíe el comparti-
mento de recuperación de agua.
Importante :
Si desea mover o volcar el aparato,
vacíe el compartimento de recuperación de
agua.
• DESAGÜE DEL COMPARTIMENTO DE
RECUPERACIÓN
Fig. 11
Fig. 12

58
ES
6 / MANTENIMIENTO NORMAL
• EVACUACIÓN DIRECTA DEL AGUA DE CONDENSACIÓN
90 cm maxi
Fig. 15
Fig. 13
Fig. 14
Fig. 17
Fig. 16
Déflecteur
Encart
Tuyau
Deflector
Tubo
Placa
Observación :
(*) Este kit se incluye con el aparato o
está disponible en el Servicio Técnico con la ref.
57X3184 (según modelo).
Con el objetivo de no tener que vaciar el comparti-
mento de recuperación de agua cada vez que se uti-
liza, tiene a su disposición un kit (*) para la evacua-
ción directa del agua del condensador hacia las
tuberías de drenaje (Tubo + Deflector). Para ello :
— Desencaje el tubo existente y presiónelo en el inter-
ior del aparato
(Fig. 13).
— Enganche el deflector encima de la bomba
(Fig. 14)
— Empalme el tubo del kit a la boquilla del aparato
(Fig.
15)
Tiene dos opciones para empalmar el extremo del
tubo de evacuación :
— en un sifón ventilado
(Fig. 16
).
— en un sifón de desagüe
(Fig. 17
).
Durante el empalme en un sifón, debe retirar el obtu-
rador del sifón. A continuación, enmangue la
boquilla de caucho completamente. En caso nece-
sario, añada una abrazadera para tubos
(Fig. 17
).
Importante :
El deflector debe colocarse imperativamente
antes que la acometida del tubo de evacuación
para evitar proyecciones en caso de que desen-
caje el tubo.

59
ES
6 / MANTENIMIENTO NORMAL
Fig. 21
Fig. 18
Fig. 19
Fig. 20
Importante :
El condensador debe limpiarse dos veces al
mes.
Importante :
Desenchufe el cable de alimentación antes
de limpiar el condensador.
— Vuelque la rejilla situada en la parte delantera del
aparato.
— Abra el condensador
(Fig. 18)
.
— Retírelo delicadamente
(Fig. 19
.
— Retire las pelusas del condensador.
— Límpielo únicamente con agua en el grifo
(Fig. 20)
.
—
Asegúrese, después de la limpieza, de que todos
los tubos están “destapados” y de que las aletas
están limpias.
— Frótelo brevemente.
— Vuelva a poner el condensador en su sitio, ciérrelo y
vuelva a encajar la rejilla.
• LIMPIEZA DEL CONDENSADOR
Importante :
Cuando esté montando el condensador de nuevo, mantenga el condensador sujeto en el
fondo de su compartimento durante la operación de cierre..
Consejo :
Para la limpieza del panel de control, del
acceso al tambor, de la carrocería, utilice sola-
mente una esponja o un trapo húmedo con agua y
jabón líquido.
— Preste atención para que la borra no se acumule
alrededor de la secadora.
— Limpie la junta de puerta con un trapo húmedo.
— Limpie el soporte del filtro con la aspiradora una
vez al año.
Están prohibidos en todos los casos
(Fig. 21)
:
— Los polvos abrasivos
— Las esponjas metálicas o plásticas
— Los productos a base de alcohol (alcohol, diluyen-
tes, etc.)
• LIMPIEZA DEL APARATO

60
ES
7 / INCIDENTES QUE PUEDEN OCURRIR
Consejo :
Se pueden producir algunos incidentes durante la utilización de su secadora, compruebe
los siguientes puntos.
Averías : Compruebe si :
La secadora no se pone en mar-
cha :
- la toma de corriente está enchufada.
- el botón Marcha/Paro está pulsado.
- la puerta está bien cerrada.
- el condensador está bien cerrado
Los tiempos de secado son dema-
siado largos :
- el filtro en el tambor está cargado de pelusas.
- la carga de ropa está bastante centrifugada (500 vuel-
tas/min. mínimo, pero un centrifugado de 850/min. da
mejores tiempos de secado).
- la temperatura de la habitación puede ser demasiado
alta, en especial si es pequeña: si es necesario, abrir la
puerta o la ventana.
-
el condensador está sucio
- el programa de secado seleccionado corresponde al
tipo de ropa introducido en el tambor.
La ropa está demasiado húmeda :
- el filtro en el tambor está cargado de pelusas.
- la selección del tipo de secado es correcta (dema-
siado suave): pase a un programa superior o aumente
el tiempo de secado.
- el condensador está tapado por pelusas
La ropa está demasiado seca,
demasiado arrugada :
- el tiempo de secado seleccionado es más largo:
mejor elegir una duración de secado demasiado
corta antes que larga, así evitará que la ropa esté
demasiado seca o que sea demasiado difícil plan-
charla.
El secado no es homogéneo :
- la carga de ropa no está compuesta de tejidos diferen-
tes (ej. paño con vaqueros azules)
- la ropa se ha introducido bien “extendida” en el tambor.
- el tambor no está demasiado cargado.
Las prendas sintéticas están car-
gadas de electricidad estática :
- la ropa no está demasiado seca.
- ha utilizado suavizante para el lavado, el uso de este
producto permite reducir en gran medida los proble-
mas de electricidad estática.
El indicador luminoso "recipiente
lleno” está encendido :
- el recipiente de recuperación de agua está lleno: una
vez que lo haya vaciado, vuelva a colocarlo correcta-
mente en su sitio encajándolo en el fondo de su com-
partimento.
El indicador luminoso “recipiente
lleno” se encenderá cuando el reci-
piente esté vacío :
- el recipiente se ha encajado correctamente: empújelo
bien a fondo.
- el condensador está bien cerrado por los dos lados.

ES
8 / SERVICIO POSVENTA
••
INTERVENCIONES
Fig. 22
61
• CAMBIO DE LA BOMBILLA
Fig. 23
Las posibles intervenciones en su aparato
debe realizarlas un profesional cualificado
autorizado de la marca. En su llamada, men-
cione la referencia completa de su aparato
(modelo, tipo, número de serie). Estos datos
aparecen en la placa descriptiva
(Fig. 22)
.
PIEZAS DE ORIGEN
Durante una intervención de mantenimiento,
pida que se utilicen exclusivamente piezas
sueltas certificadas de origen.
El cambio de la bombilla (tipo E14-15W/230V)
puede realizarlo usted mismo
(Fig. 23).
Importante :
Desenchufe el cable de alimentación
antes de cambiar la bombilla.
Para ello :
—
Destornille la cubierta situada a la izquierda
en el interior del aparato.
—
Destornille la bombilla defectuosa y cám-
biela.
—
Atornille la cubierta
Importante :
La bombilla se debe cambiar en FRÍO.

62
NOTAS
ES

63
NOTAS
ES

B7311B - 11/08
SFA-8CE - SFA-8CELX
-
 1
1
-
 2
2
-
 3
3
-
 4
4
-
 5
5
-
 6
6
-
 7
7
-
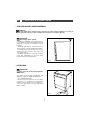 8
8
-
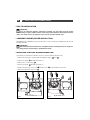 9
9
-
 10
10
-
 11
11
-
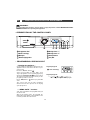 12
12
-
 13
13
-
 14
14
-
 15
15
-
 16
16
-
 17
17
-
 18
18
-
 19
19
-
 20
20
-
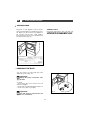 21
21
-
 22
22
-
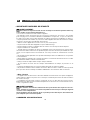 23
23
-
 24
24
-
 25
25
-
 26
26
-
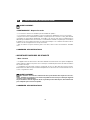 27
27
-
 28
28
-
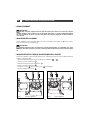 29
29
-
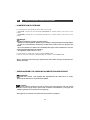 30
30
-
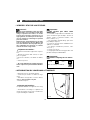 31
31
-
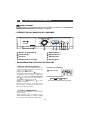 32
32
-
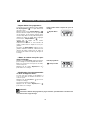 33
33
-
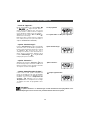 34
34
-
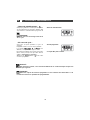 35
35
-
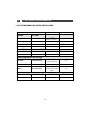 36
36
-
 37
37
-
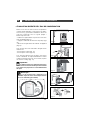 38
38
-
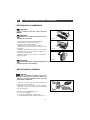 39
39
-
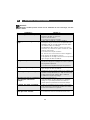 40
40
-
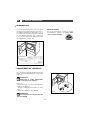 41
41
-
 42
42
-
 43
43
-
 44
44
-
 45
45
-
 46
46
-
 47
47
-
 48
48
-
 49
49
-
 50
50
-
 51
51
-
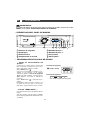 52
52
-
 53
53
-
 54
54
-
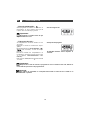 55
55
-
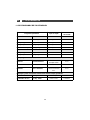 56
56
-
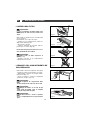 57
57
-
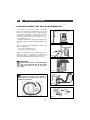 58
58
-
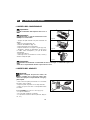 59
59
-
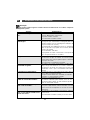 60
60
-
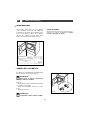 61
61
-
 62
62
-
 63
63
-
 64
64


Fagor SFA8CEX Manual de usuario
- Categoría
- Secadoras de ropa eléctricas
- Tipo
- Manual de usuario
en otros idiomas
- français: Fagor SFA8CEX Manuel utilisateur
- English: Fagor SFA8CEX User manual
Artículos relacionados
Otros documentos
-
Thomson TR608C El manual del propietario
-
Groupe Brandt TST130ES El manual del propietario
-
Haier ProSoft 6-1 Manual de usuario
-
Groupe Brandt EG13 El manual del propietario
-
LG WD1406RD5 Manual de usuario
-
-
-
Beko DV 1160 Manual de usuario
-
Teka TKS3 690 C Manual de usuario
-
Electrolux EDC77570W Manual de usuario