Vox VX50 AG El manual del propietario
- Categoría
- Amplificador de instrumentos musicales
- Tipo
- El manual del propietario

1
En
Ja
Fr
De
Es
© 2017 VOX AMPLIFICATION LTD.
Published 4/2017 Printed in Vietnam
1 Harrison Close, Knowlhill, Milton Keynes, MK5 8PA. UK
www.voxamps.com
Vox Amplification Ltd.
En
Thank you for purchasing the VOX VX50 AG
ACOUSTIC GUITAR AMPLIFIER. To help you
get the most out of your new instrument, please
read this manual carefully.
Precautions
Location
Using the unit in the following locations can result in a mal-
function.
• In direct sunlight
• Locations of extreme temperature or humidity
• Excessively dusty or dirty locations
• Locations of excessive vibration
• Close to magnetic fields
Power supply
Please connect the designated AC adapter to an AC outlet of
the correct voltage. Do not connect it to an AC outlet of voltage
other than that for which your unit is intended.
Interference with other electrical devices
Radios and televisions placed nearby may experience reception
interference. Operate this unit at a suitable distance from radios
and televisions.
Handling
To avoid breakage, do not apply excessive force to the switches
or controls.
Care
If the exterior becomes dirty, wipe it with a clean, dry cloth. Do
not use liquid cleaners such as benzene or thinner, or cleaning
compounds or flammable polishes.
Keep this manual
After reading this manual, please keep it for later reference.
Keeping foreign matter out of your equipment
Never set any container with liquid in it near this equipment. If
liquid gets into the equipment, it could cause a breakdown, fire,
or electrical shock. Be careful not to let metal objects get into the
equipment. If something does slip into the equipment, unplug
the AC adapter from the wall outlet. Then contact your nearest
VOX dealer or the store where the equipment was purchased.
IMPORTANT NOTICE TO CONSUMERS
This product has been manufactured according to strict
specifications and voltage requirements that are applicable
in the country in which it is intended that this product
should be used. If you have purchased this product via the
internet, through mail order, and/or via a telephone sale,
you must verify that this product is intended to be used in
the country in which you reside.
WARNING: Use of this product in any country other
than that for which it is intended could be dangerous and
could invalidate the manufacturer’s or distributor’s war-
ranty. Please also retain your receipt as proof of purchase
otherwise your product may be disqualified from the
manufacturer’s or distributor’s warranty.
THE FCC REGULATION WARNING
(for USA)
NOTE: This equipment has been tested and found to com-
ply with the limits for a Class B digital device, pursuant
to Part 15 of the FCC Rules. These limits are designed to
provide reasonable protection against harmful interference
in a residential installation. This equipment generates, uses,
and can radiate radio frequency energy and, if not installed
and used in accordance with the instructions, may cause
harmful interference to radio communications. However,
there is no guarantee that interference will not occur in a
particular installation. If this equipment does cause harmful
interference to radio or television reception, which can be
determined by turning the equipment off and on, the user
is encouraged to try to correct the interference by one or
more of the following measures:
● Reorient or relocate the receiving antenna.
● Increase the separation between the equipment and
receiver.
●
Connect the equipment into an outlet on a circuit different
from that to which the receiver is connected.
● Consult the dealer or an experienced radio/TV techni-
cian for help.
If items such as cables are included with this equipment, you
must use those included items.
Unauthorized changes or modification to this system can void
the user’s authority to operate this equipment.
Notice regarding disposal (EU only)
When this “crossed-out wheeled bin” symbol is
displayed on the product, owner’s manual, bat-
tery, or battery package, it signifies that when you
wish to dispose of this product, manual, package
or battery you must do so in an approved manner.
Do not discard this product, manual, package or
battery along with ordinary household waste.
Disposing in the correct manner will prevent harm
to human health and potential damage to the
environment. Since the correct method of disposal will
depend on the applicable laws and regulations in your
locality, please contact your local administrative body for
details. If the battery contains heavy metals in excess of the
regulated amount, a chemical symbol is displayed below
the “crossed-out wheeled bin” symbol on the battery or
battery package.
* All product names and company names are the trademarks or
registered trademarks of their respective owners.
P. 7
P. 9
P. 11
P. 13
P. 15

2
Fr
Merci d’avoir choisi le AMPLIFICATEUR DE
GUITARE ACOUSTIQUE VX50 AG de VOX.
Afin de pouvoir exploiter au mieux toutes les
possibilités offertes par l’instrument, veuillez
lire attentivement ce manuel.
Précautions
Emplacement
L’utilisation de cet instrument dans les endroits suivants
peut en entraîner le mauvais fonctionnement.
• En plein soleil
• Endroits très chauds ou très humides
• Endroits sales ou fort poussiéreux
• Endroits soumis à de fortes vibrations
• A proximité de champs magnétiques
Alimentation
Branchez l’adaptateur secteur mentionné à une prise sec-
teur de tension appropriée. Evitez de brancher l’adapta-
teur à une prise de courant dont la tension ne correspond
pas à celle pour laquelle l’appareil est conçu.
Interférences avec d’autres appareils électriques
Les postes de radio et de télévision situés à proximité
peuvent par conséquent souffrir d’interférences à la récep-
tion. Veuillez dès lors faire fonctionner cet appareil à une
distance raisonnable de postes de radio et de télévision.
Maniement
Pour éviter de les endommager, manipulez les com-
mandes et les boutons de cet instrument avec soin.
Entretien
Lorsque l’instrument se salit, nettoyez-le avec un chiffon
propre et sec. Ne vous servez pas d’agents de nettoyage
liquides tels que du benzène ou du diluant, voire des
produits inflammables.
Conservez ce manuel
Après avoir lu ce manuel, veuillez le conserver soigneu-
sement pour toute référence ultérieure.
Evitez toute intrusion d’objets ou de liquide
Ne placez jamais de récipient contenant du liquide près
de l’instrument. Si le liquide se renverse ou coule, il risque
de provoquer des dommages, un court-circuit ou une
électrocution. Veillez à ne pas laisser tomber des objets
métalliques dans le boîtier (trombones, par ex.). Si cela se
produit, débranchez l’alimentation de la prise de courant
et contactez votre revendeur VOX le plus proche ou la
surface où vous avez acheté l’instrument.
Note concernant les dispositions (Seulement EU)
Quand un symbole avec une poubelle barrée
d’une croix apparait sur le produit, le mode
d’emploi, les piles ou le pack de piles, cela
signifie que ce produit, manuel ou piles doit
être déposé chez un représentant compétent,
et non pas dans une poubelle ou toute autre
déchetterie conventionnelle. Disposer de
cette manière, de prévenir les dommages
pour la santé humaine et les dommages po-
tentiels pour l’environnement. La bonne méthode
d’élimination dépendra des lois et règlements appli-
cables dans votre localité, s’il vous plaît, contactez
votre organisme administratif pour plus de détails.
Si la pile contient des métaux lourds au-delà du
seuil réglementé, un symbole chimique est affiché
en dessous du symbole de la poubelle barrée d’une
croix sur la pile ou le pack de piles.
REMARQUE IMPORTANTE POUR LES CLIENTS
Ce produit a été fabriqué suivant des spécifications sévères
et des besoins en tension applicables dans le pays où ce
produit doit être utilisé.
Si vous avez acheté ce produit via l’internet, par vente par
correspondance ou/et vente par téléphone, vous devez
vérifier que ce produit est bien utilisable dans le pays
où vous résidez.
ATTENTION: L’utilisation de ce produit dans un pays
autre que celui pour lequel il a été conçu peut être
dangereuse et annulera la garantie du fabricant ou du
distributeur. Conservez bien votre récépissé qui est la
preuve de votre achat, faute de quoi votre produit ne
risque de ne plus être couvert par la garantie du fabricant
ou du distributeur.
* Tous les noms de produits et de sociétés sont des marques
commerciales ou déposées de leur détenteur respectif.
De
Vielen Dank, dass Sie sich für einen VX50 AG
AKUSTIKGITARREN-VERSTÄRKER von VOX
entschieden haben. Bitte lesen Sie sich diese Anlei-
tung vollstädig durch, um bei der Bedienung alles
richtig zu machen.
Vorsichtsmaßnahmen
Aufstellungsort
Vermeiden Sie das Aufstellen des Geräts an Orten, an denen
• es direkter Sonneneinstrahlung ausgesetzt ist;
• hohe Feuchtigkeit oder Extremtemperaturen auftreten
können;
• Staub oder Schmutz in großen Mengen vorhanden sind;
• das Gerät Erschütterungen ausgesetzt sein kann.
• in der Nähe eines Magnetfeldes.
Stromversorgung
Schließen Sie das optionale Netzteil nur an eine geeignete
Steckdose an. Verbinden Sie es niemals mit einer Steckdose
einer anderen Spannung.
Störeinflüsse auf andere Elektrogeräte
Dieser kann bei in der Nähe aufgestellten Rundfunkempfän-
ger oder Fernsehgeräten Empfangsstörungen hervorrufen.
Betreiben Sie solche Geräte nur in einem geeigneten Abstand
von diesem Erzeugnis.
Bedienung
Vermeiden Sie bei der Bedienung von Schaltern und Reglern
unangemessenen Kraftaufwand.
Reinigung
Bei auftretender Verschmutzung können Sie das Gehäuse
mit einem trockenen, sauberen Tuch abwischen. Verwenden
Sie keinerlei Flüssigreiniger wie beispielsweise Reinigungs-
benzin, Verdünner oder Spülmittel. Verwenden Sie niemals
brennbare Reiniger.
Bedienungsanleitung
Bewahren Sie diese Bedienungsanleitung gut auf, falls Sie sie
später noch einmal benötigen.
Flüssigkeiten und Fremdkörper
Stellen Sie niemals Behältnisse mit Flüssigkeiten in der Nähe
des Geräts auf. Wenn Flüssigkeit in das Gerät gelangt, können
Beschädigung des Geräts, Feuer oder ein elektrischer Schlag
die Folge sein.
Beachten Sie, dass keinerlei Fremdkörper in das Gerät ge-
langen. Sollte ein Fremdkörper in das Gerät gelangt sein, so
trennen Sie es sofort vom Netz. Wenden Sie sich dann an Ihren
VOX-Fachhändler.

3
Hinweis zur Entsorgung (Nur EU)
Wenn Sie das Symbol mit der „durchgekreuzten
Mülltonne“ auf Ihrem Produkt, der dazugehöri-
gen Bedienungsanleitung, der Batterie oder dem
Batteriefach sehen, müssen Sie das Produkt in der
vorgeschriebenen Art und Weise entsorgen. Dies
bedeutet, dass dieses Produkt mit elektrischen
und elektronischen Komponenten nicht mit dem
normalen Hausmüll entsorgt werden darf. Für
Produkte dieser Art existiert ein separates, gesetz-
lich festgelegtes Entsorgungssystem. Gebrauchte elektri-
sche und elektronische Geräte müssen separat entsorgt
werden, um ein umweltgerechtes Recycling sicherzustel-
len. Diese Produkte müssen bei benannten Sammelstellen
abgegeben werden. Die Entsorgung ist für den Endver-
braucher kostenfrei! Bitte erkundigen sie sich bei ihrer
zuständigen Behörde, wo sie diese Produkte zur fachge-
rechten Entsorgung abgeben können. Falls ihr Produkt
mit Batterien oder Akkumulatoren ausgerüstet ist, müssen
sie diese vor Abgabe des Produktes entfernen und separat
entsorgen (siehe oben). Die Abgabe dieses Produktes bei
einer zuständigen Stelle hilft ihnen, dass das Produkt
umweltgerecht entsorgt wird. Damit leisten sie persönlich
einen nicht unerheblichen Beitrag zum Schutz der Umwelt
und der menschlichen Gesundheit vor möglichen negati-
ven Effekten durch unsachgemäße Entsorgung von Müll.
Batterien oder Akkus, die Schadstoffe enthalten, sind auch
mit dem Symbol einer durchgekreuzten Mülltonne ge-
kennzeichnet. In der Nähe zum Mülltonnensymbol befin-
det sich die chemische Bezeichnung des Schadstoffes. Cd
oder NiCd steht für Cadmium, Pb für Blei und Hg für
Quecksilber.
WICHTIGER HINWEIS FÜR KUNDEN
Dieses Produkt wurde unter strenger Beachtung von Spe-
zifikationen und Spannungsanforderungen hergestellt,
die im Bestimmungsland gelten. Wenn Sie dieses Produkt
über das Internet, per Postversand und/oder mit telefo-
nischer Bestellung gekauft haben, müssen Sie bestätigen,
dass dieses Produkt für Ihr Wohngebiet ausgelegt ist.
WARNUNG: Verwendung dieses Produkts in einem an-
deren Land als dem, für das es bestimmt ist, verwendet
wird, kann gefährlich sein und die Garantie des Herstellers
oder Importeurs hinfällig lassen werden. Bitte bewahren
Sie diese Quittung als Kaufbeleg auf, da andernfalls das
Produkt von der Garantie des Herstellers oder Importeurs
ausgeschlossen werden kann.
* Alle Produkt- und Firmennamen sind Warenzeichen oder
eingetragene Warenzeichen der betreffenden Eigentümer.
Es
Gracias por comprar el AMPLIFICADOR DE
GUITARRA ACÚSTICA VOX VX50 AG . Por favor,
lea este manual atentamente y guárdelo para futuras
consultas.
Precauciones
Ubicación
El uso de la unidad en las siguientes ubicaciones puede dar
como resultado un mal funcionamiento:
• Expuesto a la luz directa del sol
• Zonas de extremada temperatura o humedad
• Zonas con exceso de suciedad o polvo
• Zonas con excesiva vibración
• Cercano a campos magnéticos
Fuente de alimentación
Por favor, conecte el adaptador de corriente designado a una
toma de corriente con el voltaje adecuado. No lo conecte a una
toma de corriente con voltaje diferente al indicado.
Interferencias con otros aparatos
Las radios y televisores situados cerca pueden experimentar
interferencias en la recepción. Opere este dispositivo a una
distancia prudencial de radios y televisores.
Manejo
Para evitar una rotura, no aplique excesiva fuerza a los con-
mutadores o controles.
Cuidado
Si exterior se ensucia, límpiese con un trapo seco. No use líqui-
dos limpiadores como disolvente, ni compuestos inflamables.
Guarde este manual
Después de leer este manual, guárdelo para futuras consultas.
Mantenga los elementos externos alejados del equipo
Nunca coloque ningún recipiente con líquido cerca de este
equipo, podría causar un cortocircuito, fuero o descarga
eléctrica. Cuide de que no caiga ningún objeto metálico
dentro del equipo. Si cae algo dentro del equipo, desenchufe
el adaptador de CA de la toma de corriente. A continuación,
póngase en contacto con el distribuidor VOX más cercano o
con el establecimiento donde compró el producto.
Nota respecto a residuos y deshechos (solo UE)
Cuando aparezca el símbolo del cubo de basura
tachado sobre un producto, su manual de usuario,
la batería, o el embalaje de cualquiera de éstos,
significa que cuando quiere tire dichos artículos
a la basura, ha de hacerlo en acuerdo con la nor-
mativa vigente de la Unión Europea. No debe
verter dichos artículos junto con la basura de casa.
Verter este producto de manera adecuada ayudará
a evitar daños a su salud pública y posibles daños
al medioambiente. Cada país tiene una normativa especí-
fica acerca de cómo verter productos potencialmente tó-
xicos, por tanto le rogamos que se ponga en contacto con
su oficina o ministerio de medioambiente para más detal-
les. Si la batería contiene metales pesados por encima del
límite permitido, habrá un símbolo de un material quími-
co, debajo del símbolo del cubo de basura tachado.
NOTA IMPORTANTE PARA EL CONSUMIDOR
Este producto ha sido fabricado de acuerdo a estrictas
especificaciones y requerimientos de voltaje aplicables
en el país para el cual está destinado. Si ha comprado
este producto por internet, a través de correo, y/o venta
telefónica, debe usted verificar que el uso de este producto
está destinado al país en el cual reside.
AVISO: El uso de este producto en un país distinto al cual
está destinado podría resultar peligroso y podría invalidar
la garantía del fabricante o distribuidor. Por favor guarde
su recibo como prueba de compra ya que de otro modo el
producto puede verse privado de la garantía del fabricante
o distribuidor.
* Todos los nombres de productos y compañías son marcas
comerciales o marcas registradas de sus respectivos propie-
tarios.

4
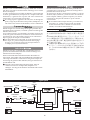
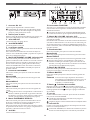
Signal path
INSTRUMENT
AUX IN
HEADPHONE
MIC
Power
amp
REVERB
PHANTOM
Switch
REVERB
CHORUS
LINE OUT
VOLUME
VOLUME
Equalizer
MASTER
Equalizer
Limiter
PHASE
-1
CLIP
indicator
CLIP
indicator
15V
About
Nutube is a new vacuum tube developed by KORG INC. and Nori-
take Itron Corporation and that utilizes technology from vacuum
uorescent displays.
As with conventional vacuum tubes, the Nutube is constructed with
an anode, grid and lament, and operates as a complete triode tube.
Furthermore, it generates the response and same rich harmonic
characteristics of conventional vacuum tubes.
If a strong impact is applied to this unit, noise at the high-fre-
quency range may be heard from the speakers, headphones, etc.
This is due to the structure of the Nutube; it is not a malfunction.
À propos de
Nutube désigne une nouvelle lampe développée par KORG INC.
et Noritake Itron Corporation, et meant à prot la technologie des
acheurs uorescents.
Tout comme les lampes conventionnelles, la Nutube comporte une
anode, une grille et un lament, et fonctionne comme une triode à
part entière. En outre, elle produit la réponse et les riches harmo-
niques typiques des lampes conventionnelles.
Si l’unité subit un choc important, le son des haut-parleurs,
du casque, etc. pourrait comporter du bruit dans la plage
de l’aigu. Ceci est dû à la structure de la lampe Nutube et
n’indique pas un dysfonctionnement.
Infos über
Nutube ist eine neue, von KORG INC. und Noritake Itron Cor-
poration entwickelte Elektronenröhre mit der Technologie von
Vakuum-Fluoreszenz-Displays.
Wie konventionelle Elektronenröhren besteht die Nutube aus
einer Anode, einem Gier und einer Glühkathode und arbeitet als
vollwertige Triodenröhre. Somit bietet sie die gleiche Ansprache
und erzeugt die gleichen saen Obertöne, die typisch für konven-
tionelle Röhren sind.
Wird das Gerät einem heftigen Stoß ausgeset, kann ein
schrilles Geräusch aus Lautsprechern, Kopörer o. ä.
erklingen - dies liegt an der Struktur der Nutube und ist keine
Fehlfunktion.
Acerca de
Nutube es una nueva válvula desarrollada por KORG INC.
y Noritake Itron Corporation que utiliza la tecnología de las
pantallas uorescentes de vacío.
Al igual que las válvulas convencionales, Nutube se compone
de ánodo, rejilla y lamento, y funciona como una válvula de
triodo completa. Además, genera la respuesta y las mismas
características de riqueza de armónicos que las válvulas
convencionales.
Si esta unidad sufre un impacto fuerte, por los altavoces,
auriculares, etc., podría escucharse ruido en la banda
de altas frecuencias. Esto es debido a la estructura de
Nutube, no un fallo de funcionamiento.
とは?
Nutubeは、株式会社コルグとノリタケ伊勢電子株式会社
が、蛍光表示管の技術を応用して開発した新しい真空管で
す。
Nutubeは従来の真空管と同じく、アノード・グリッド・フィラ
メントの構造を持ち、完全な3極真空管として動作します。
また従来の真空管と同様、真空管特有の豊かな倍音やレス
ポンスを生み出します。
本製品に強い衝撃を加えたとき、高音域のノイズがス
ピーカー、ヘッドホンなどから聞こえる場合がありま
す。これはNutubeの構造によるもので、故障ではあ
りません。

5
保証規定(必ずお読みください)
本保証書は、保証期間中に本製品を保証するもので、付属品類
(ヘッドホンなど)は保証の対象になりません。保証期間内に本製
品が故障した場合は、保証規定によって無償修理いたします。
1. 本保証書の有効期間はお買い上げ日より1か年です。
2. 次の修理等は保証期間内であっても有償となります。
•消耗部品(電池、スピーカー、真空管、フェーダーなど)の交
換。
•お取扱い方法が不適当のために生じた故障。
•天災(火災、浸水等)によって生じた故障。
•故障の原因が本製品以外の他の機器にある場合。
•不当な改造、調整、部品交換などにより生じた故障または損
傷。
•保証書にお買い上げ日、販売店名が未記入の場合、または字
句が書き替えられている場合。
•本保証書の提示がない場合。
尚、当社が修理した部分が再度故障した場合は、保証期間外で
あっても、修理した日より3か月以内に限り無償修理いたしま
す。
3. 本保証書は日本国内においてのみ有効です。
ThiswarrantyisvalidonlyinJapan.
4. お客様が保証期間中に移転された場合でも、保証は引き続き
お使いいただけます。詳しくは、お客様相談窓口までお問い合
わせください。
5. 修理、運送費用が製品の価格より高くなることがありますの
で、あらかじめお客様相談窓口へご相談ください。発送にかか
る費用は、お客様の負担とさせていただきます。
6. 修理中の代替品、商品の貸し出し等は、いかなる場合において
も一切行っておりません。
本製品の故障、または使用上生じたお客様の直接、間接の損害に
つきましては、弊社は一切の責任を負いかねますのでご了承くだ
さい。
本保証書は、保証規定により無償修理をお約束するためのもの
で、これよりお客様の法律上の権利を制限するものではありませ
ん。
■お願い
1. 保証書に販売年月日等の記入がない場合は無効となります。
記入できないときは、お買い上げ年月日を証明できる領収書
等と一緒に保管してください。
2. 保証書は再発行致しませんので、紛失しないように大切に保
管してください。
保証書
VOX VX50 AG
本保証書は、保証規定により無償修理をお約束す
るものです。
お買い上げ日 年 月 日
販売店名.
アフターサービス
修理または商品のお取り扱いについてのご質問、ご相談は、お客様
相談窓口へお問い合わせください。
お客様相談窓口
受付時間:月曜~金曜10:00~17:00(祝祭日、窓口休業日を除く)
※PHS等一部の電話ではご利用できません。固定電話また
は携帯電話からおかけください。
サービス・センター:
〒168-0073東京都杉並区下高井戸1-18-16 2F
輸入販売元: KORGImportDivision
〒206-0812東京都稲城市矢野口4015-2
www.korg-kid.com

6
Ja
このたびは、VOXアコースティック・ギター・アンプ VX50
AGをお買い上げいただきまして、まことにありがとうござい
ます。本製品を末永くご愛用いただくためにも、取扱説明書を
よくお読みになって、正しい方法でご使用ください。
安全上のご注意
ご使用になる前に必ずお読みください
ここに記載した注意事項は、製品を安全に正しくご使用いただき、あなた
や他の方々への危害や損害を未然に防ぐためのものです。
注意事項は誤った取り扱いで生じる危害や損害の大きさ、または切迫の
程度によって、内容を「警告」、「注意」の2つに分けています。これらは、あ
なたや他の方々の安全や機器の保全に関わる重要な内容ですので、よく
理解した上で必ずお守りください。
火災・感電・人身障害の危険を防止するには
図記号の例
記号は、注意(危険、警告を含む)を示して
います。記号の中には、具体的な注意内容が描
かれています。左の図は「一般的な注意、警告、
危険」を表しています。
記号は、禁止(してはいけないこと)を示
しています。記号の中には、具体的な注意内容
が描かれることがあります。左の図は「分解禁
止」を表しています。
記号は、強制(必ず行うこと)を示してい
ます。記号の中には、具体的な注意内容が描か
れることがあります。左の図は「電源プラグを
コンセントから抜くこと」を表しています。
以下の指示を守ってください
警告
この注意事項を無視した取り扱いをすると、
死亡や重傷を負う可能性があります。
・ ACアダプターのプラグは、必ずAC100Vの電源コンセン
トに差し込む。
・ ACアダプターのプラグにほこりが付着している場合は、
ほこりを拭き取る。
感電やショートの恐れがあります。
・ 本製品はコンセントの近くに設置し、ACアダプターのプ
ラグへ容易に手が届くようにする。
・ 次のような場合には、直ちに電源を切ってACアダプター
のプラグをコンセントから抜く。
○ACアダプターが破損したとき
○異物が内部に入ったとき
○製品に異常や故障が生じたとき
修理が必要なときは、お客様相談窓口へ依頼してください。
・ 本製品を分解したり改造したりしない。
・ 修理、部品の交換などで、取扱説明書に書かれているこ
と以外は絶対にしない。
・ ACアダプターのコードを無理に曲げたり、発熱する機器
に近づけない。また、ACアダプターのコードの上に重いも
のをのせない。
コードが破損し、感電や火災の原因になります。
・ 大音量や不快な程度の音量で長時間使用しない。
大音量で長時間使用すると、難聴になる可能性があります。
万一、聴力低下や耳鳴りを感じたら、専門の医師に相談して
ください。
・ 本製品に異物(燃えやすいもの、硬貨、針金など)を入れな
い。
・ 温度が極端に高い場所(直射日光の当たる場所、暖房機器
の近く、発熱する機器の上など)で使用や保管をしない。
・ 振動の多い場所で使用や保管をしない。
・ ホコリの多い場所で使用や保管をしない。
・ 風呂場、シャワー室で使用や保管をしない。
・ 雨天時の野外のように、湿気の多い場所や水滴のかかる場
所で、使用や保管をしない。
・ 本製品の上に、花瓶のような液体が入ったものを置かな
い。
・ 本製品に液体をこぼさない。
・ 濡れた手で本製品を使用しない。
注意
この注意事項を無視した取り扱いをすると、
傷害を負う可能性または物理的損害が発生する可能性があります。
・ 正常な通気が妨げられない所に設置して使用する。
・ ラジオ、テレビ、電子機器などから十分に離して使用する。
ラジオやテレビ等に接近して使用すると、本製品が雑音を
受けて誤動作する場合があります。また、ラジオ、テレビ等
に雑音が入ることがあります。
本製品をテレビ等の横に設置すると、本製品の磁場によっ
てテレビ等の故障の原因になることがあります。
・ 外装のお手入れは、乾いた柔らかい布を使って軽く拭く。
・ ACアダプターをコンセントから抜き差しするときは、必
ずプラグを持つ。
・ 長時間使用しないときは、ACアダプターをコンセントから
抜く。
・ 指定のACアダプター以外は使用しない。
・ 他の電気機器の電源コードと一緒にタコ足配線をしない。
本製品の定格消費電力に合ったコンセントに接続してくだ
さい。
・ スイッチやツマミなどに必要以上の力を加えない。
故障の原因になります。
・
外装のお手入れに、ベンジンやシンナー系の液体、コンパ
ウンド質、強燃性のポリッシャーを使用しない。
・ 不安定な場所に置かない。
本製品が落下してお客様がけがをしたり、本製品が破損したり
する恐れがあります。
・ 本製品の上に乗ったり、重いものをのせたりしない。
本製品が落下または損傷してお客様がけがをしたり、本製
品が破損したりする恐れがあります。
・ 本製品の隙間に指などを入れない。
お客様がけがをしたり、本製品が破損したりする恐れがあ
ります。
*すべての製品名および会社名は、各社の商標または登録商標です。

7
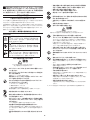
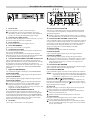
1.
DC 19V jack
Connect the included AC adapter to this jack.
The AC adapter is designed specically for the VX50 AG. Do not
use any other adapter, otherwise a malfunction may occur.
2.
Cord hook
Wrap the AC adapter cord around this hook to prevent the AC
adapter from being accidentally disconnected.
3.
LINE OUT jack
Connect your PA system to this jack.
4.
INSTRUMENT jack
Connect your guitar to this jack.
5.
PHASE switch
Use this switch to reverse the phase of the input to the INSTRUMENT
jack.
This counteracts low-frequency range phase interference with the in-
put from the MIC jack and suppresses howling in the low-frequency
range.
6.
INSTRUMENT VOLUME knob, CLIP indicator
Use this knob to adjust the volume level of the guitar. The CLIP in-
dicator lights up if the volume level of the connected musical instru-
ment is too high. Clipping could distort the sound and reduce the
sound delity. To avoid clipping, use the INSTRUMENT VOLUME
knob to adjust the volume level.
7.
INSTRUMENT equalizer
Use this knob to adjust the sound of the INSTRUMENT channel.
BASS knob
Use this knob to adjust the sound in the low-frequency range.
MIDDLE knob
Use this knob to adjust the sound in the mid-frequency range.
TREBLE knob
Use this knob to adjust the sound in the high-frequency range.
As each knob is turned to the right, the range corresponding to
the knob will be emphasized. However, if a range is overempha-
sized, feedback (howling) will be more likely to occur.
8.
INSTRUMENT EFFECTS knob
Use this knob to adjust the depth of the chorus, reverb or
chorus+reverb eect for the instrument connected to the INSTRU-
MENT jack.
Use this knob to select the eect type and adjust the eect param-
eters. When this knob is fully turned to the left, all eects are o.
9.
MIC jack
Connect your microphone to this jack.
10.
PHANTOM switch
Turn this switch on when a condenser microphone that requires
phantom power is connected.
Be sure to turn o the PHANTOM switch when a microphone that
does not require phantom power is connected.
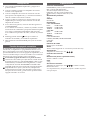
Panel description and functions
4 56
7
8
91011121314
15
16 17
2 1 3
11.
MIC VOLUME knob, CLIP indicator
Use this knob to adjust the volume level of the microphone con-
nected to the MIC jack.
This indicator lights up if the volume level of the connected micro-
phone is too high. Clipping could distort the sound and reduce the
sound delity. To avoid clipping, use the MIC VOLUME knob to
adjust the volume level.
12.
MIC equalizer
Use this knob to adjust the sound of the MIC channel.
BASS knob
Use this knob to adjust the sound in the low-frequency range.
TREBLE knob
Use this knob to adjust the sound in the high-frequency range.
As each knob is turned to the right, the range corresponding to
the knob will be emphasized. However, if a range is overempha-
sized, feedback (howling) will be more likely to occur.
13.
MIC REVERB knob
Use this knob to adjust the depth of the reverb eect for the input
connected to the MIC jack.
14.
MASTER knob
Use this knob to adjust the overall volume level of the VX50 AG.
Tip The power amp section of the VX50 AG is equipped with a
limiter. Playing with the MASTER knob turned up will create
a compressed sound and keep it clean.
15.
button, power indicator
Hold down the buon to turn on the VX50 AG (the power indi-
cator lights up). To turn o the amp, hold down the
buon until
the power indicator turns o.
16.
jack
Connect headphones to this jack. Adjust the output level of this jack
by using the MASTER knob.
When a device is connected to this jack, no sound will be output
from the internal speaker.
Be sure to connect a stereo mini plug to this jack.
17.
AUX IN jack
Connect the analog output of an audio device to this jack.This jack
is stereo mini jack.
The MASTER knob as well as the equalizer and eects knobs do
not aect the sound of a device connected to the AUX IN jack.

8
Setup
1. Turn the MASTER knob on the amp to the minimum position.
2. Connect the included AC adapter and power cord.
3. Connect the DC plug of the AC adapter to the DC 19V jack
on the rear panel of the amp, and then connect the plug of the
power cord to an AC outlet.
4. Secure the cord with the cord hook on the amp to prevent the
DC plug from being disconnected.
5. If a guitar will be used, connect the cable from the guitar to the
INSTRUMENT jack.
If a microphone will be used, connect it to the MIC jack. If a con-
denser microphone that requires phantom power will be used,
set the PHANTOM switch to ON.
If an audio player will be used, connect it to the AUX IN jack.
6. Hold down the button until the power indicator lights up
and the amp turns on.
7. Slowly raise the MASTER knob to adjust the overall volume.
Auto power-o function
The amp has an auto power-o function. With this function, the
amp automatically turns o if there is no operation or input for ap-
proximately 4 hours. When the amp turns o, operating a knob or
switch does not turn it back on. After the amp is turns o, turn it
on again.
The auto power-o function cannot be disabled.
When there is input only to the AUX IN jack, when the input level
to the INSTRUMENT jack or MIC jack is extremely low or chang-
es insignicantly, or when you turn down the INSTRUMENT
VOLUME knob or the MIC VOLUME knob the auto power-o
function may be activated.
Depending on the seings and environment, the amp may inter-
pret noise as input, even if there is no performance, and the auto
power-o function may not be activated.
Specications
Input/output jacks:
INSTRUMENT: 1/4” phone jack (unbalanced)
MIC: XLR jack (balanced)
AUX IN: 1/8” stereo mini phone jack
LINE OUT: 1/4” phone jack (unbalanced)
(Headphones): 1/8” stereo mini phone jack
Phantom power:
+15 V
Valve:
Nutube 6P1
Effects:
INSTRUMENT channel
CHORUS, REVERB, CHORUS+REVERB
MIC channel
REVERB
Equalizer:
INSTRUMENT channel
BASS: ±10dB@100Hz
MIDDLE: ±12dB@700Hz
TREBLE: ±10dB@10kHz
MIC channel
BASS: ±10dB@170Hz
TREBLE: ±10dB@7kHz
Output power:
Maximum approx. 50W RMS
Speaker:
VOX Original 8
”
speaker with tweeter (2-way coaxial)
Power supply:
AC adapter (DC 19V )
Current consumption:
3.42A
Dimensions (W x D x H):
354 mm × 208mm × 313mm / 13.94”× 8.19” × 12.32“
Weight:
4.1 kg / 9.04 lbs.
Included items:
AC adapter (DC 19V ), power cord, Owner’s Manual
* Specications and appearance are subject to change with-
out notice for improvement.

9
1.
Prise DC19V
Branchez l’adaptateur secteur fourni à cee prise.
Cet adaptateur secteur est spécialement conçu pour
alimenter le VX50 AG. N’utilisez aucun autre adaptateur
secteur, car cela risquerait d’endommager l’ampli.
2.
Crochet pour câble secteur
Enroulez le câble de l’adaptateur secteur autour de ce crochet
pour éviter toute déconnexion accidentelle.
3.
Prise LINE OUT
Cee prise permet d’envoyer le signal à la sono.
4.
Prise INSTRUMENT
C’est ici que vous branchez votre guitare.
5.
Commutateur PHASE
Ce commutateur permet d’inverser la phase du signal trans-
mis à la prise INSTRUMENT.
Cela permet de contrebalancer les interférences de phase
aectant la plage du grave du signal d’entrée de la prise MIC
et de supprimer le Larsen dans la plage du grave.
6.
Commande INSTRUMENT VOLUME, témoin CLIP
Cee commande règle le niveau d’entrée de la guitare. Le
témoin CLIP s’allume si le niveau de l’instrument de musique
est trop élevé. Cela risque d’entraîner une saturation et
d’engendrer une distorsion du signal d’entrée. En cas de satu-
ration, corrigez le réglage de la commande INSTRUMENT
VOLUME.
7.
Égaliseur INSTRUMENT
Ces commandes règlent le timbre du canal INSTRUMENT.
Commande BASS
Cee commande règle la plage du grave du signal d’entrée.
Commande MIDDLE
Cee commande règle la plage médium du signal d’entrée.
Commande TREBLE
Cee commande règle la plage de l’aigu du signal d’entrée.
Quand vous tournez une de ces commandes à droite,
la plage de fréquence correspondante est accentuée.
Toutefois, si la plage de fréquence est trop accentuée, cela
augmente les risques d’eet Larsen.
8.
Commande INSTRUMENT EFFECTS
Cee commande règle l’intensité de l’eet de chorus, de
réverbération ou l’eet combiné de chorus+réverb. appliqué
au signal de l’instrument branché à la prise INSTRUMENT.
Cee commande permet de choisir le type d’eet voulu et de
régler les paramètres de l’eet. Pour couper tous les eets,
tournez cee commande à fond à gauche.
9.
Prise MIC
C’est ici que vous branchez votre microphone.
Description des commandes et fonctions
4 56
7
8
91011121314
15
16 17
2 1 3
10.
Commutateur PHANTOM
Actionnez ce commutateur pour activer l’alimentation fantôme
si vous utilisez un microphone à condensateur nécessitant une
alimentation fantôme.
Veillez à désactiver l’alimentation fantôme avec le commuta-
teur PHANTOM si vous branchez un microphone dynamique.
11.
Commande MIC VOLUME, témoin CLIP
Cee commande règle le niveau d’entrée du microphone connecté
à la prise MIC. Le témoin CLIP s’allume si le niveau de un micro
est trop élevé. Cela risque d’entraîner une saturation et d’engen-
drer une distorsion du signal d’entrée. En cas de saturation,
corrigez le réglage de la commande MIC VOLUME.
12.
Égaliseur MIC
Ces commandes règlent le timbre du canal MIC.
Commande BASS
Cee commande règle la plage du grave du signal d’entrée.
Commande TREBLE
Cee commande règle la plage de l’aigu du signal d’entrée.
Quand vous tournez une de ces commandes à droite, la plage
de fréquence correspondante est accentuée. Toutefois, si la
plage de fréquence est trop accentuée, cela augmente les
risques d’eet Larsen.
13.
Commande MIC REVERB
Cee commande règle l’intensité de l’eet de réverbération appli-
qué au signal du micro branché à la prise MIC.
14.
Commande MASTER
Cee commande règle le niveau de volume général du VX50 AG.
Astuce La section ampli de puissance du VX50 AG est équipée
d’un limiteur. Le jeu avec la commande MASTER sur un
niveau élevé compresse le son en conservant sa clarté.
15.
Bouton , témoin d’alimentation
Maintenez le bouton enfoncé pour mere le VX50 AG sous
tension (le témoin d’alimentation s’allume). Pour mere l’ampli
hors tension, maintenez son bouton
enfoncé jusqu’à ce que le
témoin d’alimentation s’éteigne.
16.
Prise
Branchez un casque à cee prise. Réglez le niveau du signal de
sortie de cee prise avec la commande MASTER.
Quand une che est branchée à cee prise, le haut-parleur
interne ne produit aucun son.
Veillez à brancher une mini-che stéréo à cee prise.
17.
Prise AUX IN
Branchez la sortie analogique d’une source audio à cee prise.
Cee prise d’entrée est de type minijack stéréo.
La commande MASTER ainsi que les commandes de l’égali-
seur et des eets n’aectent pas le signal de la source connec-
tée à la prise AUX IN.

10
Conguration
1. Réglez la commande MASTER de l’ampli sur le minimum.
2. Branchez l’adaptateur secteur et le câble d’alimentation
fournis.
3. Branchez la fiche de l’adaptateur secteur à la prise DC 19V sur
le panneau arrière de l’ampli, puis reliez la fiche secteur du
câble d’alimentation à une prise de courant.
4. Fixez le câble de l’adaptateur secteur à l’aide du crochet
pour câble secteur de l’ampli afin d’éviter un débranchement
accidentel de la fiche de l’adaptateur secteur.
5. Si vous utilisez une guitare, branchez-la à la prise
INSTRUMENT à l’aide d’un câble pour guitare.
Si vous souhaitez utiliser un microphone, branchez-le à la
prise MIC. Si vous utilisez un microphone à condensateur
nécessitant une alimentation fantôme, activez l’alimentation
fantôme de l’ampli avec son commutateur PHANTOM.
Si vous souhaitez utiliser un lecteur audio, branchez-le à la
prise AUX IN.
6. Maintenez enfoncé le bouton jusqu’à ce que le témoin
d’alimentation s’allume, confirmant la mise sous tension de
l’ampli.
7. Augmentez progressivement le volume en tournant la
commande MASTER.
Fonction de coupure automatique de l’alimentation
Cet ampli est doté d’une fonction de coupure automatique de l’ali-
mentation. L’alimentation est automatiquement coupée si aucune
commande de l’ampli n’est actionnée et si aucun signal n’est reçu
pendant environ 4 heures. Une fois que l’alimentation de l’ampli
est coupée par cee fonction, l’ampli ne réagit plus aux manipula-
tions de ses commandes et commutateurs. Pour utiliser à nouveau
l’ampli, remeez-le sous tension.
La fonction de coupure automatique de l’alimentation ne
peut pas être désactivée.
La fonction de coupure automatique de l’alimentation peut
s’activer quand un signal est transmis uniquement à la prise
AUX IN, quand le niveau du signal d’entrée à la prise INS-
TRUMENT ou MIC est très bas ou varie très peu, ou quand
vous réglez la commande INSTRUMENT VOLUME ou MIC
VOLUME sur le minimum.
Selon les réglages et l’environnement, l’ampli pourrait
interpréter le bruit présent à l’entrée comme un signal, et cela
même en l’absence de jeu. Dans ce cas il se pourrait que la
fonction de coupure automatique de l’alimentation ne s’active
pas.
Fiche technique
Prises d’entrée/de sortie:
INSTRUMENT: Prise 6,3mm (asymétrique)
MIC: XLR (symétrique)
AUX IN: Prise mini-jack stéréo de 3,5 mm
LINE OUT: Prise 6,3mm (asymétrique)
(Casque): Prise mini-jack stéréo de 3,5 mm
Alimentation fantôme:
+15 V
Lampe:
Nutube 6P1
Effets:
Canal INSTRUMENT
CHORUS, REVERB, CHORUS+REVERB
Canal MIC
REVERB
Égaliseur:
Canal INSTRUMENT
BASS: ±10dB@100Hz
MIDDLE: ±12dB@700Hz
TREBLE: ±10dB@10kHz
Canal MIC
BASS: ±10dB@170Hz
TREBLE: ±10dB@7kHz
Puissance de sortie:
Environ max. 50 W RMS
Haut-parleur:
Haut-parleur VOX de 8
”
original avec tweeter (coaxial à 2 voies)
Alimentation:
Adaptateur secteur (DC 19V )
Consommation électrique:
3,42A
Dimensions (L x P x H):
354 mm × 208mm × 313mm
Poids:
4,1 kg
Accessoires fournis:
Adaptateur secteur(DC 19V ), Câble d’alimentation,
Manuel d’utilisation
* Les caractéristiques et l’aspect du produit sont susceptibles d’être
modiés sans avis préalable en vue d’une amélioration.

11
1.
DC19V-Buchse
Buchse zum Anschluss des im Lieferumfang enthaltenen Neteils.
Das Neteil ist speziell auf den VX50 AG ausgelegt. Verwen-
den Sie kein anderes Neteil, andernfalls könnten Störungen
auftreten.
2.
Kabelhalter
Wickeln Sie das Neteil-Kabel um diesen Halter, sodass es nicht
versehentlich gelöst werden kann.
3.
LINE OUT-Buchse
Diese Buchse kann mit der Beschallungsanlage verbunden werden.
4.
INSTRUMENT-Buchse
Buchse zum Anschluss Ihrer Gitarre.
5.
PHASE-Schalter
Schalter zur Phasenumkehr am Eingang der INSTRUMENT-
Buchse.
Dies wirkt niederfrequenten Phaseninterferenzen mit dem Ein-
gangssignal an der MIC-Buchse entgegen und unterdrückt Jaulen
im tiefen Frequenzbereich.
6.
INSTRUMENT VOLUME-Regler, CLIP-Anzeige
Regler zum Einstellen des Eingangspegels der Gitarre.
Diese CLIP-Anzeige leuchtet, wenn der Pegel der angeschlossenen
Quelle zu hoch ist. Das führt zu Übersteuerung und beeinträch-
tigt die Klangqualität des eingehenden Signals. Wenn bei Ihnen
Übersteuerung auftri, müssen Sie die INSTRUMENT VOLUME-
Regler ändern.
7.
INSTRUMENT equalizer
Regler zur Klangeinstellung des INSTRUMENT-Kanals.
BASS-Regler
Regler zur Klangeinstellung im tiefen Frequenzbereich.
MIDDLE-Regler
Regler zur Klangeinstellung im mileren Frequenzbereich.
TREBLE-Regler
Regler zur Klangeinstellung im hohen Frequenzbereich.
Durch Drehen der Regler nach Rechts wird der entsprechende
Frequenzbereich betont. Betonen Sie keinen Frequenzbereich
zu stark, sonst kann es zu Rückkopplungen (jaulen) kommen.
8.
INSTRUMENT EFFECTS-Regler
Regler zum Einstellen der Tiefe von Chorus, Reverb oder von
beiden Eekten gleichzeitig für das an der INSTRUMENT-Buchse
angeschlossene Instrument.
Regler zur Auswahl des Eekyps und zum Einstellen der Eekt-
parameter. Wird dieser Regler ganz nach links gedreht, sind alle
Eekte deaktiviert.
9.
MIC jack
Buchse zum Anschluss Ihres Mikrofons.
Beschreibung und Funktion des Bedienfelds
4 56
7
8
91011121314
15
16 17
2 1 3
10.
PHANTOM-Schalter
Mit diesem Schalter aktivieren(ON) Sie gegebenenfalls die Phan-
tomspeisung für ein angeschlossenes Kondensatormikrofon.
Achten Sie darauf, den PHANTOM-Schalter zu deaktivieren,
bevor Sie ein Mikrofon anschließen, das keine Phantomspei-
sung benötigt..
11.
MIC VOLUME-Regler, CLIP-Anzeige
Regler zum Einstellen des Eingangspegels des an der MIC-Buchse
angeschlossenen Mikrofons. Diese CLIP-Anzeige leuchtet, wenn
der Pegel der angeschlossenen Quelle zu hoch ist. Das führt zu
Übersteuerung und beeinträchtigt die Klangqualität des eingehen-
den Signals. Wenn bei Ihnen Übersteuerung auftri, müssen Sie
die MIC VOLUME-Regler ändern.
12.
MIC equalizer
Regler zur Klangeinstellung des MIC-Kanals.
BASS-Regler
Regler zur Klangeinstellung im tiefen Frequenzbereich.
TREBLE-Regler
Regler zur Klangeinstellung im hohen Frequenzbereich.
Durch Drehen der Regler nach Rechts wird der entsprechende
Frequenzbereich betont. Betonen Sie keinen Frequenzbereich
zu stark, sonst kann es zu Rückkopplungen (jaulen) kommen.
13.
MIC REVERB-Regler
Regler zum Einstellen der Tiefe des Reverb-Eekts für das an der
MIC-Buchse angeschlossene Mikrofon.
14.
MASTER-Regler
Dieser Regler dient zur Einstellung der Gesamtlautstärke des VX50
AG.
Tipp Die Endstufe des VX 50 AG ist mit einem Limiter ausgestat-
tet. Wenn Sie mit aufgedrehtem MASTER-Regler spielen,
wird der Sound komprimiert und bleibt klar.
15.
(Netztaste), POWER-Anzeige
Halten Sie die -Taste gedrückt, um den VX50 AG einzuschalten
(Power-Anzeige leuchtet). Halten Sie zum Ausschalten des Verstär-
kers die
-Taste gedrückt, bis die Power-Anzeige erlischt.
16.
(Kopfhörerbuchse)
Buchse zum Anschluss eines Kopörers. Den Ausgangspegel
dieser Buchse regeln Sie mit dem MASTER-Regler.
Wenn an dieser Buchse ein Gerät angeschlossen ist, wird der
verstärkereigene Lautsprecher stummgeschaltet.
Sie müssen an dieser Buchse ein Stereo-Mini-Stecker anschließen.
17.
AUX IN jack
Diese Buchse können Sie mit dem analogen Ausgang eines
Audiogeräts verbinden.Es handelt sich dabei um eine Stereo-
Miniklinkenbuchse
. Der MASTER-Regler sowie die Equalizer- und Eekt-Regler
wirken sich nicht auf den Klang eines an der AUX IN-Buchse
angeschlossenen Geräts aus.

12
Einrichtung
1. Drehen Sie den MASTER-Regler des Verstärkers auf die
Minimaleinstellung.
2. Schließen Sie das Netzteil und Netzkabel (im Lieferumfang
enthalten) an.
3. Verbinden Sie den DC-Stecker des Netzteils mit der DC
19V-Buchse an der Rückseite des Verstärkers und stecken Sie
den Stecker des Netzkabels in eine Steckdose.
4. Sichern Sie das Kabel mit dem Kabelhalter am Verstärker, um
ein versehentliches Abziehen des Steckers zu verhindern.
5. Falls Sie eine Gitarre verwenden, verbinden Sie das
Gitarrenkabel mit der INSTRUMENT-Buchse.
Falls Sie ein Mikrofon verwenden, verbinden Sie das Mikrofon-
kabel mit der MIC-Buchse. Falls Sie ein Kondensatormikrofon
verwenden, das Phantomspeisung benötigt, stellen Sie den
PHANTOM-Schalter auf ON.
Schließen Sie gegebenenfalls einen Audioplayer an der AUX
IN-Buchse an.
6. Halten Sie die -Taste gedrückt, bis die Power-Anzeige
leuchtet und der Verstärker eingeschaltet ist.
7. Drehen Sie den MASTER-Regler langsam, um die Lautstärke
einzustellen.
Automatische Abschaltfunktion
Der Verstärker besit eine automatische Abschaltfunktion. Diese
Funktion schaltet den Verstärker automatisch aus, wenn ca. 4
Stunden lang keine Betätigung oder Eingabe erfolgt. Nach dem
Ausschalten lässt sich der Verstärker durch Bedienen von Reglern
oder Schaltern nicht wieder einschalten. Wurde der Verstärker
ausgeschaltet, müssen Sie ihn wieder einschalten.
Die automatische Abschaltfunktion kann nicht deaktiviert werden.
Die automatische Abschaltfunktion kann nicht deaktiviert
werden.
Wenn nur an der AUX IN-Buchse ein Signal anliegt, wenn
der Eingangspegel an der INSTRUMENT- oder MIC-Buchse
extrem niedrig ist oder sich kaum ändert oder wenn Sie den
INSTRUMENT VOLUME- oder MIC VOLUME-Regler herun-
ter drehen, kann womöglich die automatische Abschaltfunkti-
on auslösen.
Andererseits kann der Verstärker je nach Einstellungen und
Umgebung Rauschen als Eingangssignal interpretieren, so
dass die automatische Abschaltfunktion womöglich nicht
auslöst, obwohl Sie nicht spielen.
Technische Daten
Eingangs-/Ausgangsbuchsen:
INSTRUMENT: 6,3 mm Klinkenbuchse „unsymmetrisch“
MIC: XLR „symmetrisch“
AUX IN: 3,5 mm Stereo-Miniklinkenbuchse
LINE OUT: 6,3 mm Klinkenbuchse „unsymmetrisch“
(Kopörer): 3,5 mm Stereo-Miniklinkenbuchse
Phantomspeisung:
+15 V
Elektronenröhre:
Nutube 6P1
Effects:
INSTRUMENT-Kanal
CHORUS, REVERB, CHORUS+REVERB
MIC-Kanal
REVERB
Equalizer:
INSTRUMENT-Kanal
BASS: ±10dB@100Hz
MIDDLE: ±12dB@700Hz
TREBLE: ±10dB@10kHz
MIC-Kanal
BASS: ±10dB@170Hz
TREBLE: ±10dB@7kHz
Ausgangsleistung der Endstufe:
Maximal ca. 50 W RMS
Lautsprecher:
VOX Original 8"-Lautsprecher mit Hochtöner (2-Wege koaxial)
Stromversorgung:
AC-Neteil (DC 19V )
Leistungsaufnahme:
3,42A
Abmessungen (B x T x H):
354 mm × 208mm × 313mm
Gewicht:
4,1 kg
Lieferumfang:
AC-Neteil (DC 19V ), Nekabel, Bedienungsan-
leitung
* Änderungen der technischen Daten und des Designs ohne
vorherige Ankündigung vorbehalten.

13
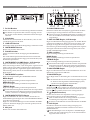
Descripción del panel y funciones
4 56
7
8
91011121314
15
16 17
2 1 3
1.
Conector DC 19V
Conecte aquí el adaptador de corriente incluido.
El adaptador de corriente está especícamente diseña-
do para el VX50 AG. No utilice ningún otro adaptador
porque se puede producir una avería.
2.
Gancho para el cable
Enrolle el cable del adaptador alrededor de este gancho para
evitar que el adaptador se desconecte accidentalmente.
3.
Jack LINE OUT
Conecte este jack a un equipo de PA.
4.
Jack INSTRUMENT
Conecte la guitarra a este jack.
5.
Conmutador PHASE
Este conmutador se utiliza para invertir la fase de la entrada
del jack INSTRUMENT.
Esto contrarresta las interferencias de fase de las bajas fre-
cuencias con la entrada del jack MIC y suprime los acoples en
dicho rango de bajas frecuencias.
6.
Mando INSTRUMENT VOLUME, indicador CLIP
Utilice este mando para ajustar el nivel de volumen de la
guitarra. El indicador CLIP se ilumina si el nivel de volumen
del instrumento musical conectado es demasiado alto. Si se
da este caso de saturación, puede producirse distorsión y
reducirse la delidad del sonido. Para evitar la saturación,
utilice el mando INSTRUMENT VOLUME para ajustar el
nivel del volumen.
7.
Ecualizador INSTRUMENT
Utilice estos mandos para ajustar el sonido del canal INS-
TRUMENT.
Mando BASS
Utilice este mando para ajustar las frecuencias graves del
sonido.
Mando MIDDLE
Utilice este mando para ajustar las frecuencias medias del
sonido.
Mando TREBLE
Utilice este mando para ajustar las frecuencias agudas del
sonido.
El rango de frecuencias correspondiente a cada mando se
enfatiza a medida que el mando se gira hacia la derecha.
No obstante, si un rango de frecuencias se enfatiza excesi-
vamente, puede producirse realimentación (acoples).
8.
Mando INSTRUMENT EFFECTS
Utilice este mando para ajustar la intensidad de los efectos
de chorus, reverberación o chorus+reverberación para el
instrumento conectado al jack INSTRUMENT.
Utilice este mando para seleccionar el tipo de efecto y ajustar
los parámetros de los efectos. Si se gira por completo hacia la
izquierda, se desactivan todos los efectos.
9.
Jack MIC
Conecte un micrófono a este jack.
10.
Conmutador PHANTOM
Appuyez sur ce commutateur pour activer l’alimentation fantôme
si vous utilisez un microphone à condensateur nécessitant une
alimentation fantôme.
Asegúrese de desactivar el conmutador PHANTOM cuando
conecte un micrófono que no requiera alimentación phantom.
11.
Mando MIC VOLUME, indicador CLIP
Utilice este mando para ajustar el nivel de volumen del micrófono
conectado al jack MIC.
El indicador CLIP se ilumina si el nivel de volumen del micrófono
conectado es demasiado alto. Si se da este caso de saturación, pue-
de producirse distorsión y reducirse la delidad del sonido. Para
evitar la saturación, utilice el mando MIC VOLUME para ajustar el
nivel del volumen.
12.
Ecualizador MIC
Utilice estos mandos para ajustar el sonido del canal MIC.
Mando BASS
Utilice este mando para ajustar las frecuencias graves del sonido.
Mando TREBLE
Utilice este mando para ajustar las frecuencias agudas del sonido.
El rango de frecuencias correspondiente a cada mando se
enfatiza a medida que el mando se gira hacia la derecha. No
obstante, si un rango de frecuencias se enfatiza excesivamente,
puede producirse realimentación (acoples).
13.
Mando MIC REVERB
Utilice este mando para ajustar la intensidad del efecto de reverbe-
ración para el micrófono conectado al jack MIC.
14.
Mando MASTER
Utilice este mando para ajustar el nivel de volumen general del
VX50 AG.
Sugerencia La sección de la etapa de potencia del VX50 AG
está equipada con un limitador. Cuando se toca con
el mando MASTER subido del todo, el sonido se
comprime y se mantiene limpio.
15.
Botón , indicador de encendido
Mantenga pulsado el botón
para encender el VX50 AG (el
indicador de encendido se iluminará). Para apagar el amplicador,
mantenga pulsado el botón
hasta que se apague el indicador
de encendido.
16.
Jack
Conecte unos auriculares a este jack. Ajuste el nivel de salida de
este jack con el mando MASTER.
Cuando hay algún dispositivo conectado a este jack, por el
altavoz interno no sale sonido.
Asegúrese de que el conector introducido sea un minijack estéreo.
17.
Jack AUX IN
Conecte a este jack la salida analógica de un dispositivo de audio
externo. Es un minijack estéreo.
Ni el mando MASTER ni los mandos de ecualización y efectos
afectan al sonido del dispositivo conectado al jack AUX IN.

14
Conguración
1. Gire el mando MASTER del amplificador y póngalo en la
posición mínima.
2. Conecte el cable de corriente en el adaptador de corriente
incluido con el amplificador.
3. Conecte el adaptador de corriente al conector DC 19V del
panel posterior del amplificador, y a continuación enchufe el
cable de corriente a una toma de corriente.
4. Asegure el cable en el gancho que a tal propósito hay en el
amplificador para evitar que se desconecte el conector del
adaptador de corriente.
5. Si va a utilizar una guitarra, conecte el cable de la guitarra al
jack INSTRUMENT.
Si va a utilizar un micrófono, conéctelo al jack MIC. Si utiliza
un micrófono de condensador que requiera alimentación phan-
tom, ponga el conmutador PHANTOM en ON (activado).
Si va a utilizar un reproductor de audio, conéctelo al jack AUX
IN.
6. Mantenga pulsado el botón hasta que se ilumine el
indicador de encendido y se encienda el amplificador.
7. Suba lentamente el mando MASTER para ajustar el volumen
general.
Función de apagado automático
El amplicador tiene una función de apagado automático. Con
esta función, el amplicador se apaga automáticamente si no se
lleva a cabo ninguna acción ni hay entrada de sonido durante
aproximadamente 4 horas. Una vez apagado el amplicador, no se
volverá a encender aunque se accione un mando o un conmutador.
Después de que se haya apagado, vuelva a encenderlo.
La función de apagado automático no se puede desactivar.
Cuando solo entra sonido por el jack AUX IN, cuando el nivel
de entrada que llega a los jacks INSTRUMENT o MIC es extre-
madamente bajo o cambia de forma insignicante, o cuando
se baja del todo el mando INSTRUMENT VOLUME o MIC
VOLUME, puede activarse la función de apagado automático.
Dependiendo de los ajustes y del entorno, el amplicador
puede interpretar un ruido como entrada de sonido, incluso
aunque no se esté tocando, y puede ocurrir que la función de
apagado automático no se active.
Especicaciones
Jacks de entrada/salida:
INSTRUMENT: jack de 6,3 mm (sin balancear)
MIC: conector XLR (balanceado)
AUX IN: minijack estéreo de 3,5 mm
LINE OUT : jack de 6,3 mm (sin balancear)
(Auriculares) : minijack estéreo de 3,5 mm
Alimentación phantom:
+15 V
Válvula:
Nutube 6P1
Ecualizador:
Canal INSTRUMENT
BASS: ±10dB@100Hz
MIDDLE: ±12dB@700Hz
TREBLE: ±10dB@10kHz
Canal MIC
BASS: ±10dB@170Hz
TREBLE: ±10dB@7kHz
Efectos:
Canal INSTRUMENT
CHORUS, REVERB, CHORUS+REVERB
Canal MIC
REVERB
Potencia de salida
Máxima aprox. 50 W RMS
Altavo
Altavoz VOX Original de 8” con tweeter (coaxial de 2 vías)
Alimentación
Adaptador de corriente (CC 19V )
Consumo de corriente
3,42A
Dimensiones (ancho x profundo x alto)
354 mm × 208mm × 313mm
Peso
4,1 kg
Accesorios incluidos:
Adaptador de corriente (CC 19V ), Cable de corriente,
Manual del usuario
* Las especicaciones y el aspecto est sujetas a cambios sin previo
aviso por mejora.

15
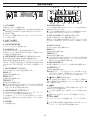
各部の名称と機能
4 56
7
8
91011121314
15
16 17
2 1 3
1.
DC19V端子
付属のACアダプターを接続します。
ACアダプターは本機専用です。他の製品で使用すると故
障の原因となりますので、絶対に使用しないでください。
2.
コ ード・フック
ACアダプターが簡単にはずれないように、ここにACアダプター
のコードをかけます。
3.
LINE OUT端子
PA機器などを接続します。
4.
INSTRUMENT端子
アコースティック・ギターを接続します。
5.
PHASEスイッチ
INSTRUMENT端子の入力音の位相を反転します。
MIC端子の入力との低域の位相干渉の改善や、低音域のハウリ
ングを抑える効果があります。
6.
INSTRUMENT VOLUMEノブ、CLIPインジケーター
INSTRUMENT端子に接続した楽器の音量を調節します。
接続した楽器の音量が大きすぎると、CLIPインジケーターが点
灯します。その場合、音が歪むなど、楽器本来の音を再生できな
くなります の で、
INSTRUMENT
VOLUMEノブを調節してくだ
さい。
7.
INSTRUMENTイコライザー
INSTRUMENTチャンネルの音色を調節します。
BASSノブ
低音域の音色を調節します。
MIDDLEノブ
中音域の音色を調節します。
TREBLEノブ
高音域の音色を調節します。
ノブを右に回すほどそれぞれのノブに対応した音域が強
調されますが、強調しすぎるとフィードバック(ハウリング)
を起こしやすくなる場合があります。
8.
INSTRUMENT EFFECTSノブ
INSTRUMENT端子に接続した入力へのコーラス、リバーブ、
コーラス+リバーブの効果の深さを調節します。
ノブの位置によって、エフェクト・タイプの切り替えと、エフェクト・
パラメーターの調節をします。左に回しきると、エフェクトがオフ
になります。
9.
MIC端子
マイクを接続します。
10.
PHANTOMスイッチ
ファンタム電源を必要とするコンデンサー・マイクをMIC端子に
接続するときにオンにします。
ファンタム電源を必要としないマイクを接続するときは、
必ずPHANTOMスイッチをオフにしてください。
11.
MIC VOLUMEノブ、CLIPインジケーター
MIC端子に接続したマイクの音量を調節します。
接続したマイクの音量が大きすぎると、CLIPインジケーターが点
灯します。その場合には、MICVOLUMEノブを調節してくださ
い。
12.
MICイコライザー
MICチャンネルの音色を調節します。
BASSノブ
低音域の音色を調節します。
TREBLEノブ
高音域の音色を調節します。
ノブを右に回すほどそれぞれのノブに対応した音域が強
調されますが、強調しすぎるとフィードバック(ハウリング)
を起こしやすくなる場合があります。
13.
MIC REVERBノブ
MIC端子に接続した入力へのリバーブ効果の深さを調節します。
14.
MASTERノブ
全体的な音量を調節します。
Tip
本機はパワー・アンプ部にリミッターを内蔵しており、
MASTERノブをあげて演奏するとコンプレッションの効
いたサウンドになり、クリーンなサウンドを保ちます。
15.
ボ タ ン 、電 源 イ ン ジ ケ ー タ ー
ボタンを長押しすると電源インジケーターが点灯し、電源が入
ります。電源を切るときは電源インジケーターが消えるまで、
ボタンを長押しします。
16.
端子
ヘッドホンを使用する場合にこの端子に接続します。出力レベル
はMASTERノブで調節します。
この端子に接続すると、内蔵スピーカーから音は出ませ
ん。
端子には、必ずステレオ・ミニ・プラグを接続してください。
17.
AUX IN端子
オーディオ・プレイヤーなどを接続します。ステレオ・ミニ端子で
す。
AUXIN端子に接続した機器の音は、MASTERノブ、イコ
ライザー、エフェクト等の設定は影響しません。

16
セットアップ
1.
本機のMASTERノブを最小レベルに設定します。
2.
付属のACアダプターと電源コードを接続します。
3.
ACアダプターのDCプラグをリア・パネルのDC19V端
子に接続し、電源コードのプラグをコンセントに接続し
ます。
4.
DCプラグが抜けないようにコードを本機のコード・
フックに固定します。
アース端子付きコンセントに接続する場合は
電源コードのプラグが三芯のためにコンセントに接続でき
ない場合は、2P-3P 変換器を取り付けます。そして、コン
セントのアース端子にアース線を接続し、2P-3P 変換器の
プラグを差し込みます。
アース接続は、コンセントにプラグを差し込む前に行っ
てください。また、アース接続を外すときは、コンセン
トからプラグを抜いてから行ってください。
2P-3P 変換器のアース線の U 字端子にカバーが付いて
いる場合は、カバーをはずしてください。
5.
ギターを接続する場合には、ギターに接続したケーブル
をINSTRUMENT端子に接続します。
マイクを使用する場合は MIC 端子に接続します。ファン
タム電源を必要とするコンデンサー・マイクを接続する場
合には、PHANTOM スイッチを ON にしてください。
オーディオ・プレーヤーを使用する場合は、AUXIN 端子
に接続します。
6.
電源インジケーターが点灯するまで ボタンを長押しし
て、電源を入れます。
7.
MASTERノブをゆっくりと回して、音量を調節します。
オート・パワー・オフ機能
本機には、オート・パワー・オフ機能が搭載されています。オー
ト・パワー・オフ機能は、入力のない状態が約4時間続くと、自
動的に電源が切れる機能です。電源が切れると、ノブやスイッ
チを操作しても復帰しません。電源を入れ直してください。
オート・パワー・オフ機能を無効にすることはできません。
AUXIN端子のみへの入力時や、INSTRUMENT端子、
MIC端子への入力音の音量や変化が極端に小さい場合
や、INSTRUMENTVOLUMEノブ、MICVOLUMEノブ
を絞っている場合には、オート・パワー・オフ機能が動作す
る場合があります。
演奏していない状態でも、設定や環境によってはノイズに
反応して、オート・パワー・オフ機能が動作しない場合があ
ります。
仕様
入出力端子:
INSTRUMENT端子:標 準 フ ォ ー ン ・ ジ ャ ッ ク
(アンバランス)
MIC端子:XLRジャック(バランス)
AUXIN端子: ステレオ・ミニ・フォーン・ジャック
LINEOUT端子: 標準フォーン・ジャック(アンバランス)
端子:ステレオ・ミニ・フォーン・ジャック
ファンタム電源:
+15V
真空管:
Nutube6P1
エフェクト:
INSTRUMENTチャンネル
コーラス、リバーブ、コーラス+リバーブ
MICチャンネル
リバーブ
イコライザー:
INSTRUMENTチャンネル
BASS: ±10dB@100Hz
MIDDLE: ±12dB@700Hz
TREBLE: ±10dB@10kHz
MICチャンネル
BASS: ±10dB@170Hz
TREBLE: ±10dB@7kHz
パワーアンプ出力:
最大約50WRMS
スピーカー:
VOXオリジナル8インチ・スピーカーwithツイーター
(コアキシャル2way)
電源:
ACアダプター(DC19V )
消費電流:
3.42A
外形寸法(W×D×H):
354mm×208mm×313mm
質量:
4.1kg
付属品:
ACアダプター、電源コード、取扱説明書
※仕様および外観は、改良のため予告なく変更することが
あります 。
-
 1
1
-
 2
2
-
 3
3
-
 4
4
-
 5
5
-
 6
6
-
 7
7
-
 8
8
-
 9
9
-
 10
10
-
 11
11
-
 12
12
-
 13
13
-
 14
14
-
 15
15
-
 16
16


Vox VX50 AG El manual del propietario
- Categoría
- Amplificador de instrumentos musicales
- Tipo
- El manual del propietario
En otros idiomas
- français: Vox VX50 AG Le manuel du propriétaire
- English: Vox VX50 AG Owner's manual
- Deutsch: Vox VX50 AG Bedienungsanleitung
- 日本語: Vox VX50 AG 取扱説明書
Documentos relacionados
-
Vox VX50 KB El manual del propietario
-
Vox VX50 BA El manual del propietario
-
-
-
-
-
-
-
-
 VOX Amplification LTD VX50 GTV El manual del propietario
