
PROFESSIONAL SINGLE DISC MACHINES
IT MANUALE USO E MANUTENZIONE
EN USE AND MAINTENANCE MANUAL
ES MANUAL DE USO Y MANTENIMIENTO
FR MANUEL D’UTILISATION ET D’ENTRETIEN
DOC. 10077752 REV. AA 01-2018
ROS 17 ORB 115V


ITALIANO .................................................................................1
ENGLISH .................................................................................19
ESPAÑOL ................................................................................37
FRANÇAIS ..............................................................................55
ITENESFR

1
IT
INDICE
INDICE ..............................................................................................................................1
SIMBOLOGIA UTILIZZATA NEL MANUALE ...................................................................2
SCOPO E CONTENUTO DEL MANUALE .......................................................................2
DESTINATARI ...................................................................................................................2
CONSERVAZIONE DEL MANUALE USO E MANUTENZIONE ......................................2
PRESA IN CONSEGNA DELL’APPARECCHIO ...............................................................2
PREMESSA ......................................................................................................................2
DATI PER L’IDENTIFICAZIONE .......................................................................................3
DESCRIZIONE TECNICA .................................................................................................3
USO INTESO – USO PREVISTO .....................................................................................3
SICUREZZA ......................................................................................................................3
TARGA MATRICOLA ........................................................................................................3
DATI TECNICI ...................................................................................................................3
NORME GENERALI DI SICUREZZA................................................................................4
SIMBOLOGIA UTILIZZATA NELL’APPARECCHIO .........................................................9
CONOSCENZA DELL’APPARECCHIO ............................................................................9
MOVIMENTAZIONE DELL’APPARECCHIO IMBALLATO ...........................................9
COME SBALLARE L’APPARECCHIO .......................................................................10
COME TRASPORTARE L’APPARECCHIO ...............................................................10
COMPONENTI PRINCIPALI DELL’APPARECCHIO .................................................10
COMPONENTI PRINCIPALI MANUBRIO DI COMANDO .........................................10
COMPONENTI PRINCIPALI PIANTONE...................................................................10
PREPARAZIONE DELL’APPARECCHIO .......................................................................11
INSERIMENTO DELLA SPAZZOLA ..........................................................................11
INSERIMENTO SERBATOIO SOLUZIONE (OPZIONALE) .......................................11
INSERIMENTO SOLUZIONE DETERGENTE (OPZIONALE) ...................................12
LAVORO .........................................................................................................................13
AL TERMINE DEL LAVORO ..........................................................................................14
MANUTENZIONE ............................................................................................................15
SMALTIMENTO...............................................................................................................18
RISOLUZIONE GUASTI .................................................................................................18
ITALIANO

2
IT
Simbolo di avvertimento:
Leggere attentamente le sezioni precedute da questo simbolo attenendosi scrupolosamente a quanto indicato, per la
sicurezza dell’operatore e dell’apparecchio.
Simbolo pericolo di esplosione:
Indica che la batteria se non trattata secondo le direttive indicate dal manuale del costruttore può esplodere in
determinate condizioni.
Simbolo di luogo al coperto:
Le procedure precedute dal seguente simbolo devono essere effettuate rigorosamente in un luogo al coperto ed
all’asciutto.
Simbolo di avvertimento carrelli in movimento:
Indica di movimentare il prodotto imballato con idonei carrelli di movimentazione conformi alle disposizioni di legge.
Simbolo del libro aperto con la i:
Indica che bisogna consultare le istruzioni per l’uso.
Le descrizioni contenute nella presente pubblicazione non s’intendono impegnative. L’azienda pertanto, si riserva il diritto di
DSSRUWDUHLQTXDOXQTXHPRPHQWROHHYHQWXDOLPRGL¿FKHDRUJDQLGHWWDJOLIRUQLWXUHGLDFFHVVRULFKHHVVDULWLHQHFRQYHQLHQWLSHU
un miglioramento o per qualsiasi esigenza di carattere costruttivo o commerciale. La riproduzione anche parziale dei testi e dei
disegni, contenuti nella presente pubblicazione, è vietata ai sensi di legge.
/¶D]LHQGDVLULVHUYDLOGLULWWRGLDSSRUWDUHPRGL¿FKHGLFDUDWWHUHWHFQLFRHRGLGRWD]LRQH/HLPPDJLQLVRQRGDLQWHQGHUVL
GLSXURULIHULPHQWRHQRQYLQFRODQWLLQWHUPLQLGLGHVLJQHGRWD]LRQH
Simbolo del libro aperto:
Indica all’operatore di leggere il manuale d’uso prima di utilizzare l’apparecchio.
Simbolo guanti di protezione:
Indica all’operatore di indossare sempre dei guanti protettivi per evitare lesioni gravi alle mani.
SIMBOLOGIA UTILIZZATA NEL MANUALE
SCOPO E CONTENUTO DEL MANUALE
DESTINATARI
CONSERVAZIONE DEL MANUALE USO E MANUTENZIONE
PRESA IN CONSEGNA DELL’APPARECCHIO
PREMESSA
Questo manuale ha lo scopo di fornire al cliente tutte le informazioni necessarie per utilizzare l’apparecchio nel modo più
adeguato, autonomo e sicuro possibile. Esso comprende informazioni inerenti l’aspetto tecnico, la sicurezza, il funzionamento, il
fermo dell’apparecchio, la manutenzione, i ricambi e la rottamazione. Prima di effettuare qualsiasi operazione sull’apparecchio, gli
RSHUDWRULHGLWHFQLFLTXDOL¿FDWLGHYRQROHJJHUHDWWHQWDPHQWHOHLVWUX]LRQLFRQWHQXWHQHOSUHVHQWHPDQXDOH,QFDVRGLGXEELVXOOD
corretta interpretazione delle istruzioni, interpellare il più vicino centro assistenza, per ottenere i necessari chiarimenti.
,OPDQXDOHLQRJJHWWRqULYROWRVLDDOO¶RSHUDWRUHVLDDLWHFQLFLTXDOL¿FDWLDOODPDQXWHQ]LRQHGHOO¶DSSDUHFFKLR*OLRSHUDWRULQRQGHYRQR
HIIHWWXDUHRSHUD]LRQLULVHUYDWHDLWHFQLFLTXDOL¿FDWLQRQULVSRQGHGLGDQQLGHULYDQWLGDOODPDQFDWDRVVHUYDQ]DGLTXHVWRGLYLHWR
Il manuale Uso e Manutenzione deve essere conservato nelle immediate vicinanze dell’apparecchio, dentro l’apposita busta, al
riparo da liquidi e quant’altro ne possa compromettere lo stato di leggibilità.
Al momento della presa in consegna è indispensabile controllare immediatamente di aver ricevuto tutto il materiale indicato sui
documenti di accompagnamento, ed inoltre che l’apparecchio non abbia subito danni durante il trasporto. In caso affermativo, far
FRQVWDWDUHDOORVSHGL]LRQLHUHO¶HQWLWjGHOGDQQRVXELWRDYYHUWHQGRQHOFRQWHPSRLOQRVWURXI¿FLRJHVWLRQHFOLHQWL6ROWDQWRDJHQGR
in questo modo e tempestivamente sarà possibile avere il materiale mancante e il risarcimento dei danni.
4XDOVLDVLDSSDUHFFKLRSXzIXQ]LRQDUHEHQHHODYRUDUHFRQSUR¿WWRVROWDQWRVHXVDWRFRUUHWWDPHQWHHPDQWHQXWRLQSLHQDHI¿FLHQ]D
effettuando la manutenzione descritta nella documentazione allegata. Preghiamo perciò di leggere con attenzione questo manuale
G¶LVWUX]LRQHHGLULOHJJHUORRJQLTXDOYROWDQHOO¶XVDUHO¶DSSDUHFFKLRVRUJHUDQQRGHOOHGLI¿FROWj,QFDVRGLQHFHVVLWjULFRUGLDPRFKH
il nostro servizio di assistenza, organizzato in collaborazione con i nostri concessionari, è sempre a disposizione per eventuali

3
IT
DATI PER L’IDENTIFICAZIONE
Per l’assistenza tecnica o per la richiesta di parti di ricambio, citare sempre il modello, la versione e il numero di matricola posto
sull’apposita targhetta matricolare.
DESCRIZIONE TECNICA
USO INTESO – USO PREVISTO
SICUREZZA
TARGA MATRICOLA
4XHVW¶DSSDUHFFKLR q VWDWR FRVWUXLWR SHU OD SXOL]LD SURIHVVLRQDOH GL SDYLPHQWL GXUL H YLQLOLFL SHU VXSHU¿FL LQWHUQHGDHVHJXLUVL
seguendone le istruzioni. /¶DSSDUHFFKLRGHYHHVVHUHXVDWRVRORSHUWDOHVFRSR.
Quest’apparecchio è stato concepito e costruito per la pulizia
di pavimenti lisci e compatti, in ambiente commerciale, civile ed
LQGXVWULDOHLQFRQGL]LRQLGLYHUL¿FDWDVLFXUH]]DGDSDUWHGLXQ
RSHUDWRUHTXDOL¿FDWR
3HUHYLWDUHLQIRUWXQLODFROODERUD]LRQHGHOO¶RSHUDWRUHqHVVHQ]LDOH1HVVXQSURJUDPPDGLSUHYHQ]LRQHLQIRUWXQLSXzHVVHUHHI¿FDFH
senza la collaborazione totale della persona direttamente responsabile del funzionamento dell’apparecchio. La maggior parte degli
incidenti che avvengono in un’azienda, sul lavoro o nei trasferimenti, sono causati dall’inosservanza delle più elementari regole
di prudenza. Un operatore attento e prudente è la miglior garanzia contro gli infortuni e si rivela indispensabile per completare
qualsiasi programma di prevenzione.
La targa matricola è posizionata nella parte inferiore del
telaio macchina, in essa sono riportate le caratteristiche
generali dell’apparecchio in particolar modo il numero di serie
dell’apparecchio. Il numero di serie è un’informazione molto
importante che deve essere sempre fornita congiuntamente ad
ogni richiesta di assistenza o di acquisto ricambi.
L’apparecchio è adatto ad essere utilizzato esclusivamente in
ambienti chiusi o comunque coperti.
ATTENZIONE: L’apparecchio non è adatto a un uso
sotto la pioggia o sotto getti d’acqua.
DATI TECNICI 80 ROS 17
Larghezza di lavoro mm - inch 430-16,9
Numero orbite disco trascinatore orb./min. 1400
Potenza nominale motore basamento W 1100
Tensione nominale motore basamento V 115
Frequenza motore basamento Hz 60
Pendenza superabile a pieno carico % 2
Capacità serbatoio soluzione (opzionale) l - gal 15 - 3,96
Ruote posteriori (diametro / larghezza)
mm - inch
200/50
7,8/1,96
Lunghezza apparecchio mm - inch 565 - 22,25
Altezza dell’apparecchio al carter basamento mm - inch 325 - 12,8
Altezza dell’apparecchio al timone mm - inch 1160 - 45,7
Larghezza dell’apparecchio mm - inch 450 - 17,7
Peso dell’apparecchio in ordine di marcia (priva di serbatoio
soluzione)
kg - Lb 41 - 90,4
Livello di vibrazione alla mano m/s
2
1,9

4
IT
Prima di utilizzare la monospazzola per la prima volta, leggere e
seguire queste avvertenze di sicurezza. Conservare le presenti
avvertenze di sicurezza per consultarle in un secondo momento o per
darle a successivi proprietari.
• Prima della messa in funzione leggere il manuale d'uso della macchina.
• Le targhette di avvertimento sulla macchina forniscono importanti indicazioni
per un uso sicuro.
• Osservare sempre sia le indicazioni riportate sulle istruzioni, sia le norme
vigenti in materia di sicurezza-antinfortunistica.
• Tenere le pellicole di imballaggio fuori dalla portata dei bambini. Pericolo di
DV¿VVLD
PERICOLO: Indica un pericolo imminente che determina lesioni gravi o
la morte.
AVVERTIMENTO: Indica una probabile situazione pericolosa che
potrebbe determinare lesioni gravi o la morte.
PRUDENZA: Indica una probabile situazione pericolosa che potrebbe
causare lesioni leggere.
ATTENZIONE: Indica una probabile situazione pericolosa che potrebbe
determinare danni alle cose.
AVVERTENZE DI SICUREZZA
LIVELLI DI PERICOLO
PERICOLO:
• Per ridurre il rischio di incendio, scossa elettrica o lesioni, prima dell'uso si
prega di leggere e seguire tutte le istruzioni sulla sicurezza e le segnalazioni
di attenzione. Questa macchina è progettata per essere sicura quando è
XWLOL]]DWD SHU IXQ]LRQL GL SXOL]LD VHFRQGR TXDQWR VSHFL¿FDWR 1HO FDVR LQ
FXLVLYHUL¿FKLQRGDQQLDFRPSRQHQWLHOHWWULFLRPHFFDQLFLqQHFHVVDULRIDU
riparare la macchina presso un centro di assistenza competente oppure al
costruttore prima dell'uso, per evitare ulteriori danni alla macchina o lesioni
¿VLFKHDOOXWLOL]]DWRUH
• 3ULPD GL FROOHJDUH OD PDFFKLQD DOOD SUHVD GHOOD FRUUHQWH YHUL¿FDUH FKH
i dati elettrici riportati sulla targhetta corrispondano a quelli della rete di
alimentazione. /DPDFFKLQDGHYHHVVHUHDOLPHQWDWDHVFOXVLYDPHQWHGD
corrente alternata e con una tensione pari a quella riportata nella targa
ALLACCIAMENTO ALLA RETE ELETTRICA

5
IT
matricola.
• La presa per il cavo di alimentazione deve essere provvista di messa a terra
regolamentare.
• Il cavo di allacciamento alla rete di alimentazione consegnato con la macchina
deve essere utilizzato per il suddetto apparecchio e non per altri apparecchi.
• Prima di ogni utilizzo controllare eventuali danni sulla linea di allacciamento
e sulla spina di alimentazione. Se la linea è danneggiata contattare
immediatamente un tecnico per ripristinare il corretto funzionamento.
• Allacciare l'apparecchio solo ad un collegamento elettrico installato da un
installatore elettrico in conformità alla norma IEC 60364-1.
• Non toccare mai la spina di alimentazione con le mani bagnate.
• Prestare attenzione che il cavo di allacciamento alla rete o il cavo prolunga
non vengano danneggiati passandovi sopra, schiacciandoli, tirandoli o simili.
Proteggere il cavo dal calore e dal contatto con oli o spigoli taglienti.
•
Accertarsi regolarmente che il cavo di allacciamento alla rete non sia
danneggiato ad esempio con la formazione di crepe o invecchiamento. Nel
caso in cui venga rilevato un danneggiamento è necessario che il cavo venga
sostituito prima di riutilizzare l'apparecchio.
• La protezione contro gli spruzzi d'acqua e la resistenza meccanica deve
essere garantita anche dopo l'eventuale sostituzione di giunti del cavo di
allacciamento alla rete o del cavo prolunga.
• 1RQ SXOLUH ODSSDUHFFKLR FRQ WXER ÀHVVLELOH R XQ JHWWR GDFTXD DG DOWD
pressione (rischio di corto circuito o di altri guasti di tipo elettrico).
ATTENZIONE:
• Il transitorio d'inserzione causa una diminuzione di tensione temporanea.
• In condizioni di rete sfavorevoli le altre apparecchiature possono essere
danneggiate.
• 7DOLGDQQLVRQRSUHYLVWLVHOLPSHGHQ]DGLUHWHqLQIHULRUHDȍ
PERICOLO:
• È vietato l'uso con il cavo o la spina danneggiati. Per scollegare dalla
presa elettrica, afferrare la spina, non il cavo. Non maneggiare la spina o la
macchina con le mani bagnate. Disattivare tutti i comandi prima di eseguire
lo scollegamento dalla presa elettrica.
• Non tirare la macchina né trasportarlo per il cavo, non usare il cavo come
manico, non chiudere una porta sul cavo, né tirare il cavo intorno a bordi o
USO - IMPIEGO

6
IT
DQJROLDI¿ODWL1RQSDVVDUHODPDFFKLQDVRSUDLOFDYR7HQHUHLOFDYRORQWDQR
GDVXSHU¿FLULVFDOGDWH
• Prestare maggiore attenzione quando si effettua la pulizia su scale.
• La macchina non deve essere usata o tenuta all’esterno in condizioni di
umidità o esposta direttamente alla pioggia.
• La temperatura d’immagazzinamento deve essere compresa tra i -25°C e i
+55°C.
• Condizioni d’impiego: temperatura ambiente compresa tra lo 0°C e i 40°C
con umidità relativa tra 30 e 95%.La macchina è stato sviluppato solo per
la pulizia a secco e non deve essere utilizzata o conservata all’aperto in
condizioni di umidità.
• Prima dell’uso assicurarsi del perfetto stato e del funzionamento sicuro della
macchina e delle attrezzature di lavoro ed in particolare controllare il cavo di
prolunga. Nel caso in cui lo stato non sia integro, staccare subito la spina di
alimentazione dalla presa di rete, la macchina non deve essere usata.
• In caso di utilizzo della macchina in ambienti a rischio (per esempio stazioni
di servizio) devono essere rispettate le relative norme di sicurezza. È vietato
usare la macchina in ambienti a rischio di esplosione.
• Determinate sostanze possono formare insieme all’aria di aspirazione vapori
e miscele esplosive.
AVVERTIMENTO:
• Tenere i capelli, abiti larghi, le dita e tutte le parti del corpo lontano da aperture
e da parti in movimento.
• Non avvicinarsi alla macchina con indumenti che possono impigliarsi,
EVITARE l’uso di sciarpe, scialli, foulard e abiti larghi.
• /¶XVRGHOODPDFFKLQDqFRQVHQWLWDDLEDPELQLDOGLVRSUDGHJOLDQQL
H DSHUVRQH FRQFDSDFLWj ¿VLFKHVHQVRULDOL RPHQWDOL ULGRWWHR SULYH
GL HVSHULHQ]D H FRQRVFHQ]D SXUFKp VLDQR VRUYHJOLDWH R DEELDQR
ULFHYXWR LVWUX]LRQL FRQFHUQHQWL O¶XVR LQ VLFXUH]]D GHOO¶DSSDUHFFKLR H
FRPSUHQGDQRLULVFKLFRQQHVVL
• È necessario sorvegliare i bambini per assicurarsi che non giochino con
l’apparecchio.
• È vietato ai bambini eseguire senza sorveglianza la pulizia e la manutenzione
spettante all’utilizzatore.
• Questa macchina è destinata ad essere utilizzata esclusivamente in ambienti
chiusi.
• Non lasciare incustodita la macchina quando è collegata alla presa di corrente.

7
IT
Staccare la spina di alimentazione dalla presa quando non è in uso e prima
della manutenzione.
• In caso di basse temperature è necessario che la macchina non venga
utilizzata all’aperto.
• 1RQ XWLOL]]DUH OD PDFFKLQD VX VXSHU¿FL DYHQWL XQ¶LQFOLQD]LRQH VXSHULRUH D
quella indicata dalla targa matricola.
• Accertarsi sempre che i piani di lavoro, solette e rampe, siano in grado di
sopportare il peso della macchina.
• La macchina non è adatta alla pulizia di pavimenti sconnessi o con dislivelli.
Non utilizzare la macchina su pendii.
• In caso di pericolo agire tempestivamente nella rimozione della spina
presente nel cavo di alimentazione dalla presa di rete.
PRUDENZA:
• (YLWDUH GL ODYRUDUH VX SH]]L GL FRUGD ¿OL GL IHUUR FDYL TXHVWL SRWUHEEHUR
impigliarsi nella spazzola e creare attriti.
• La macchina è adatta per la pulizia di moquette o pavimenti tessili, se
XWLOL]]DWDFRQJOLDFFHVVRULVSHFL¿FL
• Le operazioni di lucidatura devono essere eseguite in zone vietate al
passaggio di persone non addette. Segnalare le zone di lavoro con appositi
cartelli segnalatori.
• Attenzione, non consentire al cavo di alimentazione di entrare in contatto con
la spazzola rotante.
• La macchina non provoca vibrazioni dannose.
• Non appoggiare contenitori di liquidi sulla macchina.
• In caso d’incendio usare estintori a polvere. Non usare acqua.
• Evitare che la spazzola oppure il disco trascinatore lavori con la macchina
ferma per non provocare danni al pavimento.
• La macchina deve essere conservata esclusivamente in ambienti chiusi.
• Utilizzare sempre la macchina conformemente alla destinazione d’uso
tenendo in considerazione le condizioni locali e prestando attenzione durante
il lavoro all’eventuale presenza di terzi, soprattutto i bambini.
• 1RQODVFLDUHPDLLQFXVWRGLWRODPDFFKLQD¿QRDTXDQGRQRQORVLGLVDWWLYDH
si scollega la spina di alimentazione dalla presa di rete.
• Per evitare un uso non permesso della macchina, l’alimentazione deve
essere interrotta, spegnere la macchina e scollegare il cavo di alimentazione
dalla presa.
• La macchina lasciata incustodita deve essere protetta da movimenti non
intenzionali.

IT
PERICOLO:
• Prima di pulire e di effettuare la manutenzione della macchina e prima di
sostituire eventuali componenti, spegnere la macchina e scollegare la spina
di alimentazione dalla presa di rete.
• Le riparazioni devono essere eseguite esclusivamente da centri di assistenza
autorizzati o da personale esperto in questo settore, che abbia familiarità
con tutte le norme di sicurezza vigenti in materia.
• Rispettare il controllo di sicurezza secondo le disposizioni locali per
apparecchi ad uso commerciale.
• Lavorare sulla macchina indossando sempre guanti protettivi idonei.
PRUDENZA:
• Quando si dovessero riscontrare anomalie nel funzionamento della
macchina, accertarsi che non siano dipendenti dalla mancata manutenzione
ordinaria. In caso contrario richiedere l’intervento del centro assistenza
autorizzato.
• In caso di sostituzione di pezzi, richiedere i ricambi ORIGINALI ad un
concessionario e/o Rivenditore Autorizzato.
• Ripristinare tutti i collegamenti elettrici dopo qualsiasi intervento di
manutenzione.
• Ogni anno fare controllare la macchina da un centro di assistenza autorizzato.
• Provvedere allo smaltimento dei materiali di consumo attenendosi
scrupolosamente alle norme di legge vigenti. Quando, dopo anni di prezioso
lavoro, la Vostra macchina dovrà essere messa a riposo, provvedere allo
smaltimento appropriato dei materiali in esso contenuti, tenendo conto
che la macchina è stata costruita con l’impiego di materiali integralmente
riciclabili.
• Qualora si riscontrasse un danneggiamento del cavo di alimentazione
bisogna fermare la macchina, se si è in fase di lavoro, togliere la spina dalla
rete di alimentazione e far sostituire immediatamente il cavo da un centro
assistenza autorizzato.
• 8VDUHVRORGLVFKLIRUQLWLFRQODPDFFKLQDRTXHOOLVSHFL¿FDWLQHOPDQXDOH
di istruzioni. L’uso di altri dischi può compromettere la sicurezza.
MANUTENZIONE

9
IT
6LPERORPHVVDDWHUUDGHOO¶DSSDUHFFKLR
Indica il punto di messa a terra dell’impianto elettrico dell’apparecchio.
Simbolo massima pendenza:
Indica la massima pendenza superabile.
SIMBOLOGIA UTILIZZATA NELL’APPARECCHIO
CONOSCENZA DELL’APPARECCHIO
MOVIMENTAZIONE DELL’APPARECCHIO IMBALLATO
/¶DSSDUHFFKLR q FRQWHQXWR LQ XQR VSHFL¿FR LPEDOOR JOL HOHPHQWL
dell’imballaggio (sacchetti di plastica, graffe etc.) essendo potenziali
fonti di pericolo non devono rimanere alla portata di bambini,
d’incapaci etc.
La massa complessiva dell’apparecchio con l’imballo è di 45 kg
-99,2Lb (peso apparecchio a vuoto più imballo).
Le dimensioni dell’imballo sono le seguenti:
PRUDENZA:
Impiegare esclusivamente accessori e ricambi autorizzati dal produttore.
Accessori e ricambi originali garantiscono che l'apparecchio possa essere impiegato
in modo sicuro e senza disfunzioni.
PRUDENZA:
Utilizzare come cavi prolunga
esclusivamente i materiali indicati
esplicitamente dal produttore
(contattare rivenditore autorizzato)
oppure modelli qualitativamente
superiori. Nell'impiego di un cavo
prolunga osservare la sezione minima
dello stesso.
LUNGHEZZA DEL CAVO
SEZIONE CAVO
<16A <25A
Fino a 20m 1.5mm
2
2.5mm
2
Da 20m a 50m 2.5mm
2
4.0mm
2
ACCESSORI E RICAMBI
CAVI PROLUNGA
X%
80 ROS 17
A mm - inch 490 - 19,3
B mm - inch 610 - 24
C mm - inch 1190 - 46,85

10
IT
COME SBALLARE L’APPARECCHIO
/¶DSSDUHFFKLR qFRQWHQXWR LQXQR VSHFL¿FR LPEDOORSHU ULPXRYHUH
l’apparecchio dall’imballo eseguire quanto segue:
1. Posizionare la parte bassa dell’imballo esterno a contatto con il
pavimento.
ATTENZIONE: Movimentare il prodotto imballato con mezzi
idonei di sollevamento conformi alle disposizioni di legge
ATTENZIONE 8WLOL]]DUH FRPH ULIHULPHQWR OH SLWWRJUD¿H
stampate sul cartone.
2. Rimuovere le reggie di fermo.
3. Aprire l’imballo esterno.
ATTENZIONE: Si consiglia di indossare sempre dei guanti
protettivi per evitare lesioni gravi alle mani.
4. Rimuovere gli accessori opzionali contenuti nell’imballo.
5. 6¿ODUHGDOFDUWRQHO¶DSSDUHFFKLR
ATTENZIONE: Durante questa operazione accertarsi che non
vi siano oggetti o persone nelle vicinanze dell’apparecchio.
ATTENZIONE: Per rimuovere l’apparecchio dal cartone non
utilizzare il manubrio di comando, si potrebbe danneggiare
durante l’operazione.
ATTENZIONE: Si consiglia di tenere da parte tutti i
componenti inerenti all’imballaggio per un eventuale trasporto
dell’apparecchio.
COME TRASPORTARE L’APPARECCHIO
Per trasportare l’apparecchio in sicurezza eseguire quanto segue:
1. Effettuare le fasi per mettere in sicurezza l’apparecchio (leggere
paragrafo “MESSA IN SICUREZZA DELL’APPARECCHIO”).
2. Utilizzando un piano inclinato fare salire l’apparecchio sulla
pedana, spingendola in retromarcia.
3. Adagiare il basamento sopra la pedana.
4. 8WLOL]]DQGRGHOOHUHJJLH¿VVDUHO¶DSSDUHFFKLRDOODSHGDQD
5. Ora è possibile trasportare l’apparecchio in tutta sicurezza.
ATTENZIONE: Si consiglia di indossare sempre dei guanti
protettivi per evitare lesioni gravi alle mani.
ATTENZIONE: Per il trasporto in veicoli, assicurare
O¶DSSDUHFFKLR VHFRQGR OH GLUHWWLYH LQ YLJRUH DI¿QFKp QRQ
possa scivolare e ribaltarsi.
COMPONENTI PRINCIPALI DELL’APPARECCHIO
COMPONENTI PRINCIPALI MANUBRIO DI COMANDO
,FRPSRQHQWLEDVLODULGHOO¶DSSDUHFFKLRV¶LGHQWL¿FDQRFRPHVHJXH
1. Manubrio di comando.
2. Basamento.
3. Carter basamento.
4. Spazzola. (ACCESSORIO)
5. Disco trascinatore.
6. Prolunga. (ACCESSORIO)
7. serbatoio soluzione.
,FRPSRQHQWLGHOPDQXEULRVLLGHQWL¿FDQRFRPHVHJXH
1. Leva presenza operatore.
2. Leva comando interruttore generale (posizionate sotto le
impugnature del manubrio).
3. Leva regolazione inclinazione manubrio.
4. Leva comando valvola distribuzione detergente.
5. Disgiuntore termico protezione motore.
6. Cavo di alimentazione.
7. Interruttore comando kit spray
COMPONENTI PRINCIPALI PIANTONE
,FRPSRQHQWLGHOPDQXEULRVLLGHQWL¿FDQRFRPHVHJXH
1. Supporto superiore serbatoio soluzione.
2. Supporto inferiore serbatoio soluzione.
3. aggancio anti strappo per cavo di alimentazione .
4. Avvolgi cavo inferiore.
1
6
2-3
7
4-5
4
1
6
3
2
5
1
1 2
4
3
2
1
1 2
7

11
IT
Per inserire la spazzola/disco trascinatore nel corpo basamento
dell’apparecchio eseguire quanto segue:
1. 9HUL¿FDUHFKHODVSLQDSUHVHQWHQHOFDYRGLDOLPHQWD]LRQH
sia scollegata dalla presa (3) della rete di alimentazione ()LJ),
in caso contrario provvedere a scollegarla.
ATTENZIONE: Si consiglia di indossare sempre dei guanti
protettivi per evitare lesioni gravi alle mani.
ATTENZIONE: Per evitare danni al cavo di alimentazione,
scollegare la spina dalla presa di rete tirando direttamente la
VSLQDDQ]LFKpLOFDYR
2. 9HUL¿FDUHFKHLOPDQXEULRGLFRPDQGRVLDLQSRVL]LRQHYHUWLFDOH
in caso contrario premere la leva sgancio (4) ()LJ) e ruotare
in posizione verticale il manubrio ()LJ). Quando il manubrio è
nella posizione verticale rilasciare la leva sgancio (4).
PREPARAZIONE DELL’APPARECCHIO
INSERIMENTO DELLA SPAZZOLA
3. Inclinare all’indietro l’apparecchio ()LJ), bloccare una
delle ruote posteriori e traslare verso l’indietro il piantone di
comando
4. 6YLWDUHHULPXRYHUH OHFKLDYHWWH GL¿VVDJJLRH LOSLDWWHOOR GL
centraggio ()LJ).
Per inserire il serbatoio soluzione al manubrio effettuare quanto
segue:
1. Fissare il manubrio in una posizione di circa 45° rispetto il terreno
()LJ).
2. Svitando il pomello di chiusura (1) ()LJ) posizionare le staffe
superiori oltre la metà del piantone ()LJ) (se esse non sono
già posizionate).
INSERIMENTO SERBATOIO SOLUZIONE
3. Adagiare il serbatoio soluzione sul piantone, facendo in modo
che la parte inferiore del serbatoio vada ad ancorarsi con la staffa
¿VVDSUHVHQWHVXOSLDQWRQH)LJ).
4. Tenendo il serbatoio con una mano fare scendere la staffa mobile
¿QR DFKH LOVHUEDWRLR VROX]LRQHULVXOWL EORFFDWRDO SLDQWRQH
()LJ).
5. Bloccare la posizione della staffa mobile (3) agendo sul pomello
di chiusura (1) ()LJ).
5. Inserire il disco trascinatore, fare attenzione a centrare i
SHUQLGL¿VVDJJLRSUHVHQWLVXOODPDFFKLQDFRQLIRULGHOGLVFR
trascinatore.Di seguito inserire il piattello di centraggio quindi
DYYLWDUHDIRQGROHFKLDYHWWHGL¿VVDJJLR
ATTENZIONE: Per ottenere un corretto serraggio delle chiavette, utilizzare una pinza.
1
2
3 4
1
4
2
5
3
6
1 2 3
1

12
IT
Riempire il serbatoio soluzione solo quando il piantone è in posizione
verticale, eseguendo quanto segue:
1. Rimuovere il tappo serbatoio soluzione (1) ()LJ).
2. Riempire con acqua pulita, ad una temperatura non superiore a
50°C.
3. Aggiungere nel serbatoio il detersivo liquido nella concentrazione
e con le modalità indicate sull’etichetta dal fabbricante del
detersivo. Per evitare la formazione di un’eccessiva quantità
di schiuma che andrebbe a danneggiare i componenti interni
dell’apparecchio usare la minima percentuale di detersivo.
4. Inserire il tappo serbatoio soluzione (1) ()LJ).
ATTENZIONE: Si consiglia di indossare sempre dei guanti
protettivi per evitare lesioni gravi alle mani.
ATTENZIONE: Si consiglia di aspirare a tratti la schiuma
carica di sporcizia, aspirandola con un aspirapolvere per
liquidi.
RIEMPIMENTO SOLUZIONE DETERGENTE
6. Inserire il tubo distribuzione acqua (4) nel foro presente sul
basamento (5) ()LJ).
7
10
7
9
8 .Inserire il tubo soluzione detergente (7) nel foro presente nel
serbatoio soluzione ()LJ).
7. Inserire la catenella tirante rubinetto serbatoio soluzione (6) nel
gancio presente nella maniglia comando rubinetto (7) ()LJ).
9 .Collegare il tubo soluzione detergente (7) con l’attacco rapido del
¿OWURSHVFDQWHHVSLQJHUORVXOIRQGRGHOVHUEDWRLR)LJ).
1
4
7
2
5
6
1 1
2
5 4
6
7
3 3
1

13
IT
Prima di iniziare a lavorare è necessario eseguire quanto segue:
1. Prima dell’uso si devono controllare lo stato regolare e la
sicurezza di servizio dell’apparecchio con le attrezzature di
lavoro, specialmente il cavo di alimentazione e il cavo di prolunga.
Se lo stato non è perfetto, l’uso dell’apparecchio è vietato.
2. Inserire la spina (2) del cavo di alimentazione (3) nella presa (4)
della rete di alimentazione )LJ
3. Sbloccare il manubrio di comando dalla posizione verticale.
Premere la leva di fermo (5) piantone di comando secondo la
direzione indicata dalla freccia ()LJ) e ruotare il piantone di
comando verso di voi ()LJ).
ATTENZIONE: Durante questa operazione non appoggiare il
piede sopra l’apparecchio.
LAVORO
4. 5XRWDUH YHUVR GL YRL LO SLDQWRQH GL FRPDQGR ¿QR D WURYDUH OD
posizione ottimale, tale posizione deve dare una sensazione di
comfort nell’utilizzo dell’apparecchio.)LJ
5. Trovata la posizione ideale di utilizzo, rilasciare la leva di fermo
(5) piantone di comando per bloccare il manubrio.
6. Ruotare verso di voi la leva presenza operatore (6) ()LJ).
7. Premere le leve comando interruttore generale (7), posizionate
sotto le impugnature presenti il manubrio ()LJ).
8. L’apparecchio ora inizierà a muoversi.
9. Applicare una piccola dose di soluzione detergente sul
pavimento, premendo la leva (8) ()LJ), .
10. Guidare l’apparecchio con la spazzola rotante da sinistra verso
destra o in senso contrario.
11. Subito dopo guidare l’apparecchio analogamente in senso
contrario, ma in modo tale che circa un quarto della larghezza di
lavoro si sovrapponga a quella precedente.
Si può lavorare muovendo anche la macchina avanti e indietro
12. Si consiglia di aspirare a tratti la schiuma carica di sporcizia,
aspirandola con un aspirapolvere per liquidi.
ATTENZIONE: Lavorare assecondando lenti movimenti a
destra e a sinistra, possibilmente indietreggiando in modo che
l’operatore si trovi sempre nella zona di pavimento non
ancora pulita.
ATTENZIONE: Mantenere sempre il cavo di alimentazione
posteriormente all’operatore, facendo attenzione a non
lavorare con l’apparecchio in prossimità dello stesso per non
danneggiarlo.
ATTENZIONE: Non insistere troppo sulla stessa zona per non
rischiare di rovinare il pavimento, anche in funzione del tipo di
spazzola o di disco abrasivo prescelto.
ATTENZIONE: Se si ha la necessità di lavorare in spazi
ristretti si può ruotare il piantone di comando in posizione
verticale.
2
3
4
6
5
7
1
4
2
5
3
6

14
IT
Al termine del lavoro e prima di qualsiasi tipo di manutenzione
eseguire le seguenti operazioni:
1. Scollegare la spina (1) presente nel cavo di alimentazione (2)
dalla presa (3) della rete di alimentazione ()LJ).
ATTENZIONE: Si consiglia di indossare sempre dei guanti
protettivi per evitare lesioni gravi alle mani.
ATTENZIONE: Per evitare danni al cavo di alimentazione,
scollegare la spina dalla presa di rete tirando direttamente la
VSLQDDQ]LFKpLOFDYR
2. Ruotare il manubrio di comando sia in posizione verticale,
premere la leva sgancio (4) ()LJ) e ruotare in posizione
verticale il manubrio ()LJ). Quando il manubrio è nella
posizione verticale rilasciare la leva sgancio (4).
AL TERMINE DEL LAVORO
ATTENZIONE: Durante questa operazione non appoggiare il
piede sopra l’apparecchio.
3. Inclinare l’apparecchio e portare l’apparecchio nel luogo adibito
alla manutenzione ed effettuare tutte le procedure elencate nel
paragrafo “INTERVENTI DI MANUTENZIONE PERIODICA
CONSIGLIATA” indicate nella colonna “AL TERMINE DEL
LAVORO”.
4. Terminati gli interventi di manutenzione portare l’apparecchio nel
luogo adibito al suo riposo.
ATTENZIONE: Parcheggiare l’apparecchio in luogo chiuso,
VXXQDVXSHU¿FLHSLDQDQHOOHYLFLQDQ]HGHOO¶DSSDUHFFKLRQRQ
vi devono essere oggetti che possono rovinare o rovinarsi al
contatto con l’apparecchio stesso.
1. Se si intende utilizzare il sistema spray azionare la leva dell’interruttore comando pompa (8) presente sul manubrio di comando.
ATTENZIONE: Spingendo la leva (8) in avanti si aziona la pompa in modo intermittente (Fig.7).
ATTENZIONE: Spingendo la leva (8) all’indietro si aziona la pompa in modo continuo.
2. Guidare la macchina con la spazzola rotante da sinistra verso destra o in senso contrario.
3. Subito dopo guidare la macchina analogamente in senso contrario, ma in modo tale che circa un quarto della larghezza di lavoro
si sovrapponga a quella precedente.
4. Si consiglia di aspirare a tratti la schiuma carica di sporcizia, aspirandola con un aspirapolvere per liquidi (kit serbatoio soluzione
opzionale).
ATTENZIONE/DSULPDYROWDFKHXQRSHUDWRUHXWLOL]]DODPDFFKLQDGHYHSUHQGHUHFRQ¿GHQ]DFRQLPRYLPHQWLGDLPSULPHUH
DO WLPRQH SHU RWWHQHUH XQD VXI¿FLHQWH VLFXUH]]D VXOOD GLUH]LRQDOLWj GL PRYLPHQWR GHOOD PDFFKLQD TXLQGL QRQ D]LRQDUH OD
macchina in prossimità di persone o di ostacoli.
ATTENZIONE: Lavorare assecondando lenti movimenti a destra e a sinistra, possibilmente indietreggiando in modo che
l’operatore si trovi sempre nella zona di pavimento non ancora pulita.
ATTENZIONE: Mantenere sempre il cavo di alimentazione posteriormente all’operatore, facendo attenzione a non lavorare
con la macchina in prossimità dello stesso per non danneggiarlo.
ATTENZIONE: Non insistere troppo sulla stessa zona per non rischiare di rovinare il pavimento, anche in funzione del tipo di
spazzola o di disco abrasivo prescelto.
ATTENZIONE: Se si ha la necessità di lavorare in spazi ristretti si può ruotare il piantone di comando in posizione verticale.
7
1
2
3 4
1 2 3

15
IT
L’accurata pulizia della spazzola/disco trascinatore garantisce una
migliore pulizia del pavimento oltre ad una maggior durata del motore
spazzola. Per pulire il disco trascinatore eseguire quanto segue:
1. Portare l’apparecchio nel luogo adibito allo scarico delle acque
sporche.
ATTENZIONE: Il luogo adibito a quest’operazione deve
essere conforme alla normativa vigente di rispetto ambientale.
2. 9HUL¿FDUHFKHODVSLQDSUHVHQWHQHOFDYRGLDOLPHQWD]LRQH
sia scollegata dalla presa (3) della rete di alimentazione ()LJ),
in caso contrario provvedere a scollegarla.
ATTENZIONE: Si consiglia di indossare sempre dei guanti
protettivi per evitare lesioni gravi alle mani.
ATTENZIONE: Per evitare danni al cavo di alimentazione,
scollegare la spina dalla presa di rete tirando direttamente la
VSLQDDQ]LFKpLOFDYR
&21752//2(38/,=,$'(//$63$==2/$',6&275$6&,1$725(
3. 9HUL¿FDUH FKH LOPDQXEULR GL FRPDQGR VLDLQ SRVL]LRQH YHUWLFDOH
in caso contrario premere la leva sgancio (4) ()LJ) e ruotare in
posizione verticale il manubrio ()LJ). Quando il manubrio è nella
posizione verticale rilasciare la leva sgancio (4).
4. Inclinare all’indietro l’apparecchio ()LJ), bloccare una delle ruote
posteriori e traslare verso l’indietro il piantone di comando.
5. $OOHQWDUH OH FKLDYHWWH GL ¿VVDJJLR TXLQGL ULPXRYHUH LO SLDWWHOOR
di centraggio.Ora è possibile rimuovere la spazzola/disco
trascinatore )LJ.
6. Pulire sotto un getto d’acqua la spazzola/disco trascinatore e
rimuovere eventuali impurità presenti nelle setole della spazzola,
RVXOOD VXSHU¿FLHGHO GLVFRWUDVFLQDWRUH 9HUL¿FDUH O¶XVXUDGHOOH
setole e in caso di consumo eccessivo sostituire la spazzola (la
sporgenza delle setole non deve essere inferiore a 10 mm).
INTERVENTI DI MANUTENZIONE CONSIGLIATA
MANUTENZIONE
1
2
3 4
1 2 3
4 5
TIPOLOGIA DI MANUTENZIONE
AL TERMINE DEL
LAVORO
SETTIMANALE
PRIMA DI UN
LUNGO PERIODO
DI NON UTILIZZO
TRASPORTO
Controllo e pulizia disco trascinatore X X X
Controllo e pulizia serbatoio soluzione X X X
&RQWUROORHSXOL]LD¿OWURVLVWHPDGLSHVFDJJLRVROX]LRQHGHWHUJHQWH X X
Controllo e pulizia ugello nebulizzatore soluzione detergente X X

16
IT
L’accurata pulizia del serbatoio soluzione garantisce una migliore pulizia del pavimento. Per pulire il serbatoio soluzione eseguire
quanto segue:
1. Portare l’apparecchio nel luogo adibito alla manutenzione.
ATTENZIONE: Il luogo adibito a quest’operazione deve essere conforme alla normativa vigente di rispetto ambientale.
2. 9HUL¿FDUHFKHODVSLQDSUHVHQWHQHOFDYRGLDOLPHQWD]LRQHVLDVFROOHJDWDGDOODSUHVDGHOODUHWHGLDOLPHQWD]LRQH
()LJ), in caso contrario provvedere a scollegarla.
ATTENZIONE: Queste operazioni devono essere eseguite utilizzando dei guanti per proteggersi dal possibile contatto
con bordi o punte di oggetti metallici.
ATTENZIONE: Per evitare danni al cavo di alimentazione, scollegare la spina dalla presa di rete tirando direttamente la
VSLQDDQ]LFKpLOFDYR
3. 9HUL¿FDUHFKHLOVHUEDWRLRVROX]LRQHVLDYXRWRLQFDVRFRQWUDULRSURYYHGHUHDVYXRWDUOR
4. Rimuovere il tappo serbatoio soluzione (4) ()LJ).
5. Rimuovere il tubo distribuzione acqua (5) nel foro presente sul basamento (6) ()LJ).
CONTROLLO E PULIZIA SERBATOIO SOLUZIONE
1
2
3
1
6
4
5
2
3
1. Scollegare il tubo soluzione detergente (7) dall’innesto rapido (8) ()LJ).
ATTENZIONE: Si consiglia di indossare sempre dei guanti protettivi per evitare lesioni gravi alle
mani.
2. Rimuovere il tubo soluzione detergente (7) dal foro presente nel serbatoio soluzione ()LJ).
3. Rimuovere la catenella tirante rubinetto serbatoio soluzione (8) dal gancio presente nella maniglia
comando rubinetto (9) ()LJ).
4. Svitando il pomello di chiusura (10) ()LJ) traslare le staffe superiori oltre i fermi presente nel
serbatoio.
5. Rimuovere il kit serbatoio soluzione dall’apparecchio, per sollevarlo utilizzare la maniglia presente
sul serbatoio.
6. Sciacquare l’interno con un getto d’acqua, se necessario utilizzare una spatola per rimuovere la
melma accumulata nel fondo del serbatoio.
ATTENZIONE3RUUHDWWHQ]LRQHDQRQSHUGHUHLO¿OWURGLSHVFDJJLRVROX]LRQHGHWHUJHQWH
7. Adagiare il serbatoio soluzione sul piantone, facendo in modo che la parte inferiore del serbatoio
YDGDDGDQFRUDUVLFRQODVWDIID¿VVDSUHVHQWHVXOSLDQWRQH)LJ).
8. 7HQHQGR LO VHUEDWRLR FRQ XQD PDQR IDUH VFHQGHUH OD VWDIID PRELOH ¿QR D FKH LO VHUEDWRLR
soluzione risulti bloccato al piantone ()LJ).
7
4
7
9
5 6
1. Bloccare la posizione della staffa mobile (12) agendo sul pomello di chiusura (10) ()LJ).
2. Inserire il tubo distribuzione acqua (5) nel foro presente sul basamento (6) ()LJ).
3. Inserire la catenella tirante rubinetto serbatoio soluzione (8) nel gancio presente nella maniglia
comando rubinetto (9) ()LJ).
10
7
11
12
9

17
IT
1. Inserire il tubo soluzione detergente (7) nel foro presente nel serbatoio soluzione ()LJ).
2. &ROOHJDUH LO WXER GHO ¿OWUR GL SHVFDJJLR VROX]LRQH GHWHUJHQWH DOO¶LQQHVWR UDSLGR )LJ).
3RQHQGRDWWHQ]LRQHFKHLO¿OWURGLSHVFDJJLRULPDQJDDOO¶LQWHUQRGHOVHUEDWRLRVROX]LRQH
3. Inserire il tappo serbatoio soluzione (4) ()LJ).
10
10
6
5
11
9
12
7
13
7
14
4
15
3HUSXOLUHLO¿OWURGLSHVFDJJLRGHOODVROX]LRQHGHWHUJHQWHHVHJXLUHTXDQWRVHJXH
1. Portare l’apparecchio nel luogo adibito alla manutenzione.
ATTENZIONE: Il luogo adibito a quest’operazione deve essere conforme alla normativa vigente di rispetto ambientale.
2. 9HUL¿FDUHFKHODVSLQDSUHVHQWHQHOFDYRGLDOLPHQWD]LRQHVLDVFROOHJDWDGDOODSUHVDGHOODUHWHGLDOLPHQWD]LRQH)LJ), in caso contrario
provvedere a scollegarla.
ATTENZIONE: Queste operazioni devono essere eseguite utilizzando dei guanti per proteggersi dal possibile contatto con bordi o punte di
oggetti metallici.
ATTENZIONE3HUHYLWDUHGDQQLDOFDYRGLDOLPHQWD]LRQHVFROOHJDUHODVSLQDGDOODSUHVDGLUHWHWLUDQGRGLUHWWDPHQWHODVSLQDDQ]LFKpLOFDYR
3. 9HUL¿FDUHFKHLOVHUEDWRLRVROX]LRQHVLDYXRWRLQFDVRFRQWUDULRSURYYHGHUHDVYXRWDUOR
4. Rimuovere il tappo serbatoio soluzione (4) ()LJ).
5. Scollegare il tubo soluzione detergente (5) dall’innesto rapido (6) ()LJ).
ATTENZIONE: Si consiglia di indossare sempre dei guanti protettivi per evitare lesioni gravi alle mani.
6. 3XOLUHLO¿OWURVRWWRXQJHWWRGLDFTXDFRUUHQWHVHQHFHVVDULRULPXRYHUHOHLPSXULWjSUHVHQWLVXGLHVVR
7. Ripetere le operazioni al contrario per rimontare il tutto.
CONTROLLO E PULIZIA FILTRO DI PESCAGGIO SOLUZIONE DETERGENTE
1
2
3
1
4
2
5
6
3
Per pulire l’ugello nebulizzatore della soluzione detergente eseguire quanto segue:
1. Portare l’apparecchio nel luogo adibito alla manutenzione.
ATTENZIONE: Il luogo adibito a quest’operazione deve essere conforme alla normativa vigente di rispetto ambientale.
2. 9HUL¿FDUHFKHODVSLQDSUHVHQWHQHOFDYRGLDOLPHQWD]LRQHVLDVFROOHJDWDGDOODSUHVDGHOODUHWHGLDOLPHQWD]LRQH)LJ),
in caso contrario provvedere a scollegarla.
ATTENZIONE: Queste operazioni devono essere eseguite utilizzando dei guanti per proteggersi dal possibile contatto con
bordi o punte di oggetti metallici.
CONTROLLO E PULIZIA UGELLO NEBULIZZATORE SOLUZIONE DETERGENTE

IT
RISOLUZIONE GUASTI
In questo capitolo vengono riportati i problemi più ricorrenti legati all’uso dell’apparecchio. Se non riuscite a risolvere i problemi con le
informazioni seguenti, vi preghiamo di contattare il centro assistenza più vicino a voi.
SMALTIMENTO
Procedere alla rottamazione dell’apparecchio presso un demolitore o
centro di raccolta autorizzato.
Prima di rottamare l’apparecchio è necessario rimuovere e separare
i seguenti materiali e inviarli alle raccolte differenziate nel rispetto
della Normativa vigente d’igiene ambientale:
• Dischi trascinatori o spazzole
• Parti elettriche ed elettroniche*
• Parti in plastica
• Parti metalliche
(*) In particolare, per la rottamazione delle parti elettriche ed
elettroniche, rivolgersi al distributore.
4
2 3
1 6
2
3 5
1
ATTENZIONE: Per evitare danni al cavo di alimentazione, scollegare la spina dalla presa di rete tirando direttamente la
VSLQDDQ]LFKpLOFDYR
3. 9HUL¿FDUHFKHLOVHUEDWRLRVROX]LRQHVLDYXRWRLQFDVRFRQWUDULRSURYYHGHUHDVYXRWDUOR
4. 5LPXRYHUHODJKLHUD¿VVDJJLRXJHOOR)LJ).
5. Rimuovere l’ugello nebulizzatore (5), ponendo attenzione a non perdere la rondella (6) ()LJ).
ATTENZIONE: Si consiglia di indossare sempre dei guanti protettivi per evitare lesioni gravi alle mani.
6. Pulire l’ugello sotto un getto di acqua corrente, se necessario rimuovere le impurità presenti su di esso.
7. Ripetere le operazioni al contrario per rimontare il tutto.
PROBLEMA POSSIBILE CAUSA SOLUZIONE
L’APPARECCHIO NON SI ACCENDE
Il cavo prolunga non è connesso alla rete di
alimentazione.
9HUL¿FDUH FKH OD VSLQD SUHVHQWH QHO FDYR
prolunga sia inserita nella presa della rete
di alimentazione.
Il cavo prolunga non è connesso al cavo di
alimentazione dell’apparecchio.
9HUL¿FDUHFKHODVSLQDSUHVHQWHQHOFDYRGL
alimentazione dell’apparecchio sia inserita
nella presa presente nel cavo prolunga.
/H VSHFL¿FKHHOHWWURQLFKH GHOO¶DSSDUHFFKLR
FRUULVSRQGDQRFRQOHVSHFL¿FKHHOHWWURQLFKH
della rete di alimentazione.
9HUL¿FDUH FKH OH VSHFL¿FKH HOHWWURQLFKH
dell’apparecchio corrispondano con
OH VSHFL¿FKH HOHWWURQLFKH GHOOD UHWH GL
alimentazione, controllare i dati tecnici
presenti nella targa matricola.
Cavo prolunga danneggiato.
9HUL¿FDUH FKH LO FDYR SUROXQJD QRQ VLD
danneggiato, se è danneggiato provvedere
a sostituirlo.
Surriscaldamento del motore basamento.
9HUL¿FDUHFKHODSURWH]LRQHWHUPLFDVLWXDWD
nella parte posteriore del manubrio, non sia
attiva. In caso affermativo attendere alcuni
minuti per il raffreddamento, poi premere il
pulsante disgiuntore termico per riattivare
l’alimentazione e il funzionamento del
motore
SOLUZIONE DETERGENTE SUL DISCO
TRASCINATORE NON SUFFICIENTE
Quantità di soluzione detergente presente
nel serbatoio soluzione non idonea al lavoro
che si vuole compiere.
Controllare che la quantità di soluzione
detergente presente nel serbatoio soluzione
sia corretta con il lavoro da svolgere, se
necessario riempire il serbatoio soluzione.

19
EN
CONTENTS
CONTENTS .....................................................................................................................19
SYMBOLS USED IN THE MANUAL ..............................................................................20
PURPOSE AND CONTENT OF THE MANUAL .............................................................20
TARGET GROUP ............................................................................................................20
STORING THE USE AND MAINTENANCE MANUAL ...................................................20
ON DELIVERY OF THE APPLIANCE ............................................................................20
INTRODUCTORY COMMENT ........................................................................................20
IDENTIFICATION DATA ..................................................................................................21
TECHNICAL DESCRIPTION ..........................................................................................21
INTENDED USE ..............................................................................................................21
SAFETY ..........................................................................................................................21
SERIAL NUMBER PLATE ..............................................................................................21
TECHNICAL DATA..........................................................................................................21
GENERAL SAFETY REGULATIONS .............................................................................22
SYMBOLS USED ON THE APPLIANCE........................................................................27
GETTING TO KNOW THE APPLIANCE ........................................................................27
HANDLING THE PACKED APPLIANCE ....................................................................27
HOW TO UNPACK THE APPLIANCE .......................................................................27
HOW TO TRANSPORT THE APPLIANCE ................................................................28
MAIN COMPONENTS OF THE APPLIANCE ............................................................28
MAIN COMPONENTS OF THE CONTROL HANDLEBAR........................................28
MAIN COMPONENTS OF THE COLUMN ................................................................28
PREPARATION OF THE APPLIANCE ...........................................................................29
INSERTING THE BRUSH ..........................................................................................29
INSERTING THE SOLUTION TANK (OPTIONAL) ....................................................29
INSERTING THE DETERGENT SOLUTION (OPTIONAL) .......................................30
WORK .............................................................................................................................31
AT THE END OF THE WORK .........................................................................................32
MAINTENANCE ..............................................................................................................33
DISPOSAL ......................................................................................................................36
TROUBLESHOOTING ....................................................................................................36
ENGLISH
19

20
EN
Warning symbol:
Carefully read the sections marked with this symbol and observe the indications, for the safety of the operator and the
appliance.
Explosion risk symbol:
indicates that the battery may explode in certain conditions, if not handled in accordance with the directives indicated in
the manufacturer's manual.
Covered place symbol:
the operations preceded by this symbol must always be carried out in a dry, covered area.
:DUQLQJV\PEROWKDWWKHFDUULDJHLVPRYLQJ
Indicates that the packed product should be handled with suitable lifting means that comply with the legal requirements.
2SHQERRNV\PEROZLWKDQL
Indicates the need to consult the instruction manual.
7KHGHVFULSWLRQVFRQWDLQHGLQWKLVGRFXPHQWDUHQRWELQGLQJ7KHFRPSDQ\WKHUHIRUHUHVHUYHVWKHULJKWWRPDNHDQ\PRGL¿FDWLRQV
at any time to elements, details, or accessory supply, as considered necessary for reasons of improvement or manufacturing/
commercial requirements. The reproduction, even partial, of the text and drawings contained in this document is prohibited by law.
7KHFRPSDQ\UHVHUYHVWKHULJKWWRPDNHDQ\WHFKQLFDODQGRUVXSSO\PRGL¿FDWLRQV7KHLPDJHVDUHVKRZQDVDUHIHUHQFH
RQO\DQGDUHQRWELQGLQJDVWRWKHDFWXDOGHVLJQDQGRUHTXLSPHQW
Open book symbol:
Tells the operator to read the manual before using the appliance.
Protective gloves symbol:
Always wear protective gloves, to avoid the risk of serious injury to your hands.
SYMBOLS USED IN THE MANUAL
PURPOSE AND CONTENT OF THE MANUAL
TARGET GROUP
STORING THE USE AND MAINTENANCE MANUAL
ON DELIVERY OF THE APPLIANCE
INTRODUCTORY COMMENT
The aim of this manual is to provide customers with all the information needed to use the appliance in the safest, most appropriate
and most autonomous way. It includes information concerning technical aspects, safety, operation, appliance downtime,
PDLQWHQDQFHVSDUHSDUWVDQGVFUDSSLQJ2SHUDWRUVDQGTXDOL¿HGWHFKQLFLDQVPXVWUHDGWKHLQVWUXFWLRQVLQWKLVPDQXDOFDUHIXOO\
before carrying out any operation on the appliance. If in doubt about the correct interpretation of instructions, contact your nearest
&XVWRPHU6HUYLFH&HQWUHWRREWDLQWKHQHFHVVDU\FODUL¿FDWLRQV
7KLVPDQXDOLVDLPHGDWRSHUDWRUVDQGTXDOL¿HGWHFKQLFLDQVUHVSRQVLEOHIRUDSSOLDQFHPDLQWHQDQFH2SHUDWRUVPXVWQRWSHUIRUP
RSHUDWLRQVWKDWVKRXOGEHFDUULHGRXWE\TXDOL¿HGWHFKQLFLDQVFDQQRWEHKHOGOLDEOHIRUGDPDJHVUHVXOWLQJIURPIDLOXUHWRFRPSO\
with this prohibition
.
The Use and Maintenance Manual must be stored in its special pouch close to the appliance, protected from liquids and anything
else that could compromise its legibility.
When the machine is delivered to the customer, an immediate check must be performed to ensure all the material mentioned in the
shipping documents has been received, in addition to verifying that the equipment has not been damaged during transportation.
,IWKLVLVWKHFDVHWKHFDUULHUPXVWDVFHUWDLQWKHH[WHQWRIWKHGDPDJHDWRQFHLQIRUPLQJRXUFXVWRPHUVHUYLFHRI¿FH,WLVRQO\E\
prompt action of this type that the missing material can be obtained, and compensation for damage successfully claimed.
Any type of equipment can only work properly and effectively if used correctly and kept in full working order by performing the
maintenance operations described in the attached documentation. You should therefore read this instruction manual carefully,
FRQVXOWLQJ LW DJDLQ LI GLI¿FXOWLHV VKRXOG DULVH ZKLOH XVLQJ WKH PDFKLQH ,I QHFHVVDU\ UHPHPEHU WKDW RXU DVVLVWDQFH VHUYLFH
(organised in collaboration with our dealers) is always available for advice or direct intervention.
20

21
EN
IDENTIFICATION DATA
For technical assistance or to request replacement parts, always give the model, the version and serial number written on the
serial number plate.
TECHNICAL DESCRIPTION
INTENDED USE
SAFETY
SERIAL NUMBER PLATE
7KLVDSSOLDQFHKDVEHHQEXLOWIRUWKHSURIHVVLRQDOFOHDQLQJRILQGRRUKDUGYLQ\OÀRRUVWREHFDUULHGRXWE\IROORZLQJWKHLQVWUXFWLRQV
7KHDSSOLDQFHPXVWRQO\EHXVHGIRUWKLVSXUSRVH
7KLVDSSOLDQFHZDVGHVLJQHGDQGEXLOWWREHXVHGE\DTXDOL¿HG
RSHUDWRUWRFOHDQVPRRWKFRPSDFWÀRRULQJLQWKHFRPPHUFLDO
residential and industrial sectors, in proven safety conditions.
Operator cooperation is paramount for accident prevention. No accident prevention programme can be effective without the full
co-operation of the operator who is directly responsible for machine operation. The majority of occupational accidents that happen
both in the workplace or whilst moving are caused by failure to respect the most basic safety rules. An attentive, careful operator is
most effective guarantee against accidents and is fundamental in order to implement any prevention programme.
The serial number plate is located on the lower part of the
machine chassis, and indicates the general characteristics
of the appliance, in particular the appliance's serial number.
The serial number is a very important piece of information
and should always be provided together with any request for
assistance or when purchasing spare parts.
The appliance is only suitable for use in indoor - or at least
covered - areas.
ATTENTION: The appliance is not suitable for use in the
rain, or under jets of water.
21
TECHNICAL DATA 80 ROS 17
Working width mm - inch 430-16,9
Number of orbit orb./min. 1400
Brush head motor rated power W 1100
Brush head motor nominal voltage V 115
Brush head motor frequency Hz 60
Maximum gradient with full load % 2
Solution tank capacity (optional) l - gal 15 - 3,96
Rear wheels (diameter / width)
mm - inch
200/50
7,8/1,96
Appliance length mm - inch 565 - 22,25
height of the appliance to the brush head carter mm - inch 325 - 12,8
Height of the appliance to the shaft mm - inch 1160 - 45,7
Appliance width mm - inch 450 - 17,7
Appliance service weight (without solution tank) kg - Lb 41 - 90,4
Hand vibration level m/s
2
1,9

22
EN
%HIRUH XVLQJ WKH VLQJOH GLVF PDFKLQH IRU WKH ¿UVW WLPH UHDG DQG
comply with these safety warnings. Keep these safety warnings for
consultation in the future or to hand them over to successive owners.
• Before commissioning, read the machine's user manual.
• The warning plates on the machine provide important instructions for its
safe use.
• Always comply with both the directions on the instructions, as well as
current safety standards.
• .HHSWKHSDFNLQJ¿OPRXWRIWKHUHDFKRIFKLOGUHQ5LVNRIDVSK\[LDWLRQ
DANGER: Indicates an imminent danger that could cause serious injury
or death.
WARNING: Indicates a probable dangerous situation that could cause
serious injury or death.
CAUTION: Indicates a probable dangerous situation that could cause
minor injuries.
ATTENTION: Indicates a probable dangerous situation that could
damage objects.
SAFETY WARNINGS
DANGER LEVELS
DANGER:
• 7RUHGXFHWKHULVNRI¿UHHOHFWULFVKRFNVRULQMXU\SOHDVHUHDGDQGFRPSO\
with all the safety instructions and warning indications carefully. This machine
has been designed to be safe when it is used for cleaning in the manner
VSHFL¿HG ,I GDPDJH WR HOHFWULFDO RU PHFKDQLFDO FRPSRQHQWV LV IRXQG WKH
machine must be repaired at the relative authorised service centre or else
at the manufacturer before use, in order to prevent further damage to the
machine or physical injury to the user.
• Before connecting the machine to the electricity socket, make sure the
electrical information on the plate corresponds to that of the mains supply.
7KHPDFKLQHPXVWRQO\EHSRZHUHGZLWKDOWHUQDWLQJFXUUHQWDQGZLWKD
YROWDJHHTXDOWRWKDWVKRZQRQWKHVHULDOQXPEHUSODWH.
• The power supply cable outlet must have an earth connection in compliance
CONNECTION TO THE ELECTRICITY GRID
22

23
EN
with the regulatory standards.
• The cable for connecting to the mains that is supplied with the machine should
be used for the above-mentioned appliance and not for other appliances.
• Before using, check for any damage on the connection cable and on the
power plug. If the cable is damaged, immediately contact a technician for
restoring normal functioning.
• Connect the appliance only to an electrical connection installed by an electrical
installer in conformity with IEC 60364-1.
• Never touch the power plug with wet hands.
• Make sure that the cable to the mains or the extension cable have not been
damaged by having been walked on, crushed, pulled or the like. Protect the
cable from heat and from contact with oils or sharp edges.
• Regularly check that the cable connecting to the mains is not damaged, for
example with signs of ageing or cracks. If damage is found, the cable should
be replaced before using the appliance again.
• Protection against splashes of water and the mechanical strength need to
be ensured also after any replacement of the joints of the power cable or the
extension cable.
• Do not clean the appliance with a hose or a jet of high pressure water (risk of
short-circuit or other electrical faults).
ATTENTION:
• The procedure causes short-term reduction in voltage.
• In unfavourable grid conditions the other appliances could be damaged.
• 7KLVGDPDJHFRXOGRFFXULIWKHJULGLPSHGDQFHLVOHVVWKDQȍ
DANGER:
• Never use with a damaged cable or plug. When removing from an electrical
socket, pull the plug and not the cable. Do not handle the plug or the
machine with wet hands. Deactivate all the controls before connecting or
disconnecting from the electrical socket.
• Do not pull or transport the machine by the cable, do not use the cable as a
handle, do not close a door on the cable, and do not pull the cable around
sharp edges or corners. Do not pass the machine over the cable. Keep the
cable away from hot surfaces.
• Be careful when cleaning on stairs.
• The machine must not be used or stored outdoors in damp conditions or
directly exposed to rain.
• The storage temperature must be between -25°C and +55°C.
USO - EMPLOYMENT
23

24
EN
• Conditions of use: ambient temperature between 0°C and 40°C with a relative
humidity between 30 and 95%. The machine has been developed only for
dry cleaning and it should not be used or kept outdoors in moist conditions.
• Before using, make sure the machine and the work equipment and in
particular the extension cable are in a good condition. If there is any damage,
immediately pull out the power plug from the mains socket, the machine
should not be used.
• :KHQWKHPDFKLQHLVEHLQJXVHGLQKD]DUGRXVORFDWLRQVIRUH[DPSOH¿OOLQJ
stations) the relative safety regulations must be followed. It is forbidden to
use the machine in areas with a risk of explosion.
• Certain substances can form explosive vapours and mixtures together with
intake air.
WARNING:
• .HHSKDLUORRVHFORWKLQJ¿QJHUVDQGDOOERG\SDUWVDZD\IURPRSHQLQJVDQG
from moving parts.
• Do not approach the machine with clothes that could get entangled: AVOID
the use of scarves, shawls, wraps and loose clothing.
• 8VHRIWKHPDFKLQHLVSHUPLWWHGIRUFKLOGUHQRYHU\HDUVRIDJHDQG
SHRSOHZLWKUHGXFHGSK\VLFDOVHQVRULDODQGPHWDOFDSDFLWLHVRUSHRSOH
ZLWKQRH[SHULHQFHRUXQGHUVWDQGLQJDVORQJDVWKH\DUHVXSHUYLVHGRU
KDYHUHFHLYHGLQVWUXFWLRQVUHJDUGLQJWKHVDIHXVHRIWKHDSSOLDQFHDQG
XQGHUVWDQGWKHUHODWHGULVNV
• Children must be supervised to make sure they do not play with the appliance.
• Children should not do any cleaning or maintenance that is the responsibility
of the user without supervision.
• This machine should only be used in enclosed areas.
• Never leave the machine unattended when it is connected to the mains. Pull
out the power plug from the mains socket when not in use and before any
maintenance.
• In low temperatures, the machine should not be used out in the open.
• Do not use the machine on surfaces with a slope greater than the one
indicated on the serial number plate.
• $OZD\V PDNH VXUH WKDW WKH ZRUN VXUIDFHV ÀRRUV DQG UDPSV DUH DEOH WR
withstand the weight of the machine.
• 7KHPDFKLQHLVQRWVXLWDEOHIRUFOHDQLQJURXJKRUXQHYHQÀRRUV'RQRWXVH
the machine on slopes.
• In the event of danger, quickly remove the power cable plug from the mains
socket.
24

25
EN
CAUTION:
• Avoid working over pieces of rope, wire, cables: these can be caught in the
brush and create friction.
• 7KHPDFKLQHLVGHVLJQHGWRFOHDQFDUSHWVRUIDEULFÀRRULQJLIXVHGZLWKWKH
VSHFL¿FDFFHVVRULHV
•
Polishing operations should only be carried out in areas where the passage
of unauthorised persons is prohibited. Signal the presence of work areas with
suitable signs.
• Attention: do not let the power cable come into contact with the rotating brush.
• The machine does not cause harmful vibrations.
• Do not place any liquid containers on the machine.
• ,QWKHHYHQWRID¿UHXVHDSRZGHUH[WLQJXLVKHU'RQRWXVHZDWHU
• Avoid the brush or the pad holder works with the machine at standstill, so as not
WRGDPDJHWKHÀRRU
• The machine must be kept only in enclosed areas.
• Always use the machine in compliance with its intended use, taking into
consideration local conditions and looking out for the presence of others when
working, especially children.
• Never leave the appliance unattended until it has been switched off and the
plug has been taken out of the mains socket.
• To prevent unauthorised use of the machine, the power supply should be cut
off, switch off the machine and pull out the power cable from the socket.
• If the machine is left unattended, it must be protected from any accidental
movements.
DANGER:
• Before cleaning and carrying out maintenance on the machine and before
replacing any components, switch off the machine and pull out the power
plug from the mains socket.
• Repairs should only be carried out by authorised service centres or by
SHUVRQQHOZKRDUHH[SHUWVLQWKLV¿HOGDQGZKRDUHIDPLOLDUZLWKDOOWKH
current safety norms.
• Observe the safety check as per local provisions for commercial appliances.
• Always wear suitable protective gloves when working with the machine.
MAINTENANCE
25

26
EN
CAUTION:
• If the machine does not work properly, check this is not caused by failure
to carry out routine maintenance. Otherwise, ask for intervention of the
authorised technical assistance centre.
• If you need to replace any components, request the ORIGINAL spare parts
from an Authorised Retailer or dealer.
• Restore all electrical connections after any maintenance interventions.
• Have the machine checked by an authorised technical assistance centre
every year.
• When disposing of consumable materials, observe the laws and regulations
in force. When your machine has reached the end of its long working life,
dispose of the materials it contains in an appropriate
manner, and bearing
in mind that the machine itself was constructed using fully recyclable
materials.
• If the power supply cable gets damaged, the machine must be stopped
if it is operating. Disconnect the plug from the power supply, and have
the cable replaced immediately by an authorised service centre.
• 2QO\XVHWKHGLVFVVXSSOLHGZLWKWKHPDFKLQHRUWKRVHVSHFL¿HGLQWKH
Instruction Manual. The use of other discs could compromise safety
levels.
CAUTION:
Only use accessories and spare parts that have been authorised by the
manufacturer. Original accessories and spare parts ensure the appliance can
be used safely and without any fault.
CAUTION:
Only use the materials expressly
recommended by the manufacturer
as cable extensions (contact an
authorised retailer) or else high quality
models. When using an extension,
respect its minimum cross-section.
CABLE LENGTH
CABLE SECTION
<16A <25A
Up to 20m 1.5mm
2
2.5mm
2
From 20m to 50m 2.5mm
2
4.0mm
2
ACCESSORIES AND SPARE PARTS
EXTENSION CABLES
26

27
EN
$SSOLDQFHVHDUWKV\PERO
Indicates the earth connection point of the appliance's electric system.
Maximum gradient symbol:
Indicates the maximum gradient.
SYMBOLS USED ON THE APPLIANCE
GETTING TO KNOW THE APPLIANCE
HANDLING THE PACKED APPLIANCE
HOW TO UNPACK THE APPLIANCE
Since the packaging elements (plastic bags, staples, etc.) are a
potential source of danger, they should not be left within the reach of
children, disabled persons, etc.
The overall weight of the appliance with packaging is 45 kg 99,2Lb
(weight of empty machine plus packaging).
The dimensions of the package are as follows:
7KH DSSOLDQFH LV FRQWDLQHG LQ VSHFL¿F SDFNDJLQJ WR UHPRYH WKH
appliance from the packaging proceed as follows:
1. Place the lower part of the outer packaging in contact with the
ÀRRU
ATTENTION: Indicates that the packed product should be
handled with suitable lifting devices that comply with the legal
requirements
ATTENTION: Use the pictograms printed on the box as
reference.
2. Remove the holding straps.
3. Open the outer packaging.
ATTENTION: You are advised to always wear protective
gloves, to avoid the risk of serious injury to your hands.
4. Remove the optional accessories contained in the packing.
5. Remove the appliance from the box.
ATTENTION: During this operation, check there are no
people or objects near the appliance.
ATTENTION: To remove the appliance from the box do not
use the control handlebar since it could be damaged.
ATTENTION: it is recommended that all the packaging
components be kept for any future transportation of the
appliance.
27
X%
80 ROS 17
A mm - inch 490 - 19,3
B mm - inch 610 - 24
C mm - inch 1190 - 46,85

EN
HOW TO TRANSPORT THE APPLIANCE
To safely transport the appliance, proceed as follows:
1. Do what is required to make sure the appliance is in a safe
condition (see “APPLIANCE SAFETY”).
2. Using a chute, bring the appliance up onto the pallet, pushing
it backwards.
3. Lay the brush head on top of the pallet.
4. 8VLQJWKHVWUDSV¿[WKHDSSOLDQFHWRWKHSDOOHW
5. Now the appliance can be transported safely.
ATTENTION: You are advised to always wear protective
gloves, to avoid the risk of serious injury to your hands.
ATTENTION: When transporting the appliance on vehicles,
secure it according to the directives in force so that it cannot
slide or tip over.
MAIN COMPONENTS OF THE APPLIANCE
MAIN COMPONENTS OF THE CONTROL HANDLEBAR
The basic components of the appliance are as follows:
1. Control handlebar.
2. Brush head.
3. Brush head carter.
4. Brush. (ACCESSORY)
5. Pad holder.
6. Power cable (ACCESSORY)
7. Solution tank kit.
7KHKDQGOHEDUFRPSRQHQWVDUHLGHQWL¿HGDVIROORZV
1. dead man's lever.
2. Control lever main switch (positioned under the grip of the
handlebar).
3. Handlebar tilt adjustment lever.
4. Detergent distribution valve control lever.
5. Brush head motor thermal circuit breaker.
6. Power cable.
7. Spray kit control switch
MAIN COMPONENTS OF THE COLUMN
7KHKDQGOHEDUFRPSRQHQWVDUHLGHQWL¿HGDVIROORZV
1. Upper support solution tank kit.
2. Lower support solution tank kit.
3. Attachement for power cable
4. Lower cable tidy.
1
6
2-3
7
4-5
4
1
6
3
2 5
1
1 2
4
3
2
1
1 2
7

29
EN
To insert the brush/pad holder into the brush head body of the
appliance, proceed as follows:
1. Check that the plug (1) on the power cable (2) has been taken
out of the socket (3) of the mains supply ()LJ), and if not,
disconnect it.
ATTENTION: You are advised to always wear protective
gloves, to avoid the risk of serious injury to your hands.
ATTENTION: To prevent damaging the power cable,
disconnect the plug from the mains socket by directly pulling
the plug and not the cable.
2. Check that the handlebar is in the vertical position, if not, press
the uncoupling lever (4) ()LJ) and turn the handlebar to the
vertical position ()LJ). When the handlebar is vertical, release
the uncoupling lever (4).
PREPARATION OF THE APPLIANCE
INSERTING THE BRUSH
3. Tip the appliance back ()LJ), block one of the rear wheels and
shift the control column backwards.
4. 8QVFUHZDQGUHPRYHWKH¿[LQJOXJVDQGFHQWHULQJSODWH)LJ).
To insert the solution tank onto the handlebars, proceed as follows:
1. Secure the handlebar in a position at about 45° with respect to
the ground ()LJ).
2. Unscrewing the closing knob (1) ()LJ) position the upper
brackets beyond half of the column ()LJ) (if it has not already
been positioned).
INSERTING THE SOLUTION TANK
3. Put the solution tank on the column, so that the bottom of the tank
LVDQFKRUHGWRWKH¿[HGEUDFNHWRQWKHFROXPQLWVHOI)LJ).
4. Holding the tank with one hand, move the mobile bracket (3)
down until the solution tank is locked to the column ()LJ).
5. Lock the position of the mobile bracket (3) by tightening the
closing knob (1) ()LJ).
6. Insert the water distribution pipe (4) in the hole on the brush head
(5) ()LJ).
5. Turn the brush anti-clockwise to secure it to the
hub ()LJ). Insert the drive disc, be careful to
center the fastening pins on the machine with the
drive holes. Then insert the centering plate and
WKHQVFUHZGRZQWKH¿[LQJNH\VVHFXUHO\
29
1
2
3 4
1
4
2
5
3
6
1 2 3
1

30
EN
Fill the solution tank only when the column is in vertical position, by
proceeding as follows:
1. Remove the solution tank cap (1) ()LJ).
2. Fill with clean water, at a temperature no higher than 50°C.
3. Add the liquid detergent to the tank in the concentration and
manner indicated on the detergent manufacturer's label. The
formation of excess foam could damage the internal components
of the appliance, so only use the minimum amount of detergent
needed.
4. Insert the solution tank cap (1) ()LJ).
ATTENTION: You are advised to always wear protective
gloves, to avoid the risk of serious injury to your hands.
ATTENTION: We recommend that you vacuum at intervals
the dirt-loaded foam with a vacuum cleaner for liquids.
INSERTING THE DETERGENT SOLUTION
7. Insert the solution tank tap tie chain (6) in the coupling in the tap control handle (7) ()LJ).
7
10
7
9
8 .Iinsert the cleaning solution tube (7) into the hole in the
solution tank ()LJ).
&RQQHFWWKHFOHDQLQJVROXWLRQWXEHZLWKWKHTXLFNUHOHDVH¿OWHU
attachment and push it to the bottom of the tank. (Figure 10).
30
1
4
7
2
5
6
1 1
2
5 4
6
7
3 3
1

31
EN
Before beginning to work, it is necessary to:
1. Before using, the appliance must be in order and safe to use
with the work equipment, especially the power cable and the
extension cable. If everything is not in order, the appliance must
not be used.
2. Insert the plug (2) of the power supply cable (3) in the mains
supply socket (4) )LJ.
3. Release the control handlebar from the vertical position. Press the
control column stop lever (5) in the direction indicated by the arrow
()LJ) and turn the control column towards yourself ()LJ).
ATTENTION: During this operation, do not rest your foot on the
appliance.
WORK
4. 7XUQ WKH FRQWURO FROXPQ WRZDUGV \RX XQWLO \RX ¿QG WKH EHVW
position, this position should be comfortable when using the
appliance.
5. Once the ideal position has been found, release the control
column stop lever (5) to lock the handlebar.
6. Turn the dead man's handle towards you (6) ()LJ).
7. Press the control levers main switch (7), located under the grips
on the handlebar ()LJ).
8. The appliance will now start to move.
9. $SSO\ D VPDOO DPRXQW RI GHWHUJHQW VROXWLRQ WR WKH ÀRRU E\
pressing the lever (8) ()LJ),
10. Push the appliance with the brush rotating from left to right or
vice versa.
11. Immediately afterwards, push the appliance in the same way but
in the opposite direction, so that about one quarter of the working
width overlaps the previous one.
You can work by moving the car back and forth.
12. We recommend that you vacuum up the dirt-loaded foam at
intervals with the aid of a vacuum cleaner for liquids.
.
ATTENTION: Work in slow movements to the right and left,
possibly moving back so that the operator always stands on
DQDUHDRIWKHÀRRU\HWWREHFOHDQHGXS
ATTENTION: Keep the power supply cable behind the
operator, taking care not to operate the appliance in its vicinity
in order not to damage it.
ATTENTION: Do not insist too much on the same area so as
WR DYRLG GDPDJLQJ WKH ÀRRU DOVR LQ IXQFWLRQ RI WKH W\SH RI
EUXVKRUDEUDVLYHÀRRUSDGFKRVHQ
ATTENTION: If you need to work in tight spaces you can turn
the control column to the vertical position.
31
2
3
4
6
7
1
4 5
3
6
5
2

32
EN
At the end of the work, and before carrying out any type of
maintenance, perform the following operations:
1. Disconnect the plug (1) of the power supply cable (2) in the mains
supply socket (3) ()LJ).
ATTENTION: You are advised to always wear protective
gloves, to avoid the risk of serious injury to your hands.
ATTENTION: To prevent damaging the power cable,
disconnect the plug from the mains socket by directly pulling
the plug and not the cable.
2. Turn the handlebar to the vertical position, press the uncoupling
lever (4) ()LJ) and turn the handlebar to the vertical position
()LJ). When the handlebar is vertical, release the uncoupling
lever (4).
AT THE END OF THE WORK
ATTENTION: During this operation, do not rest your foot on
the appliance.
3. Tip the appliance back and take it to the maintenance
area and carry out all the procedures listed in the section
“RECOMMENDED PERIODIC MAINTENANCE” indicated in the
column “AT THE END OF THE WORK”.
4. 2QFHWKHPDLQWHQDQFHZRUNLV¿QLVKHGWDNHWKHDSSOLDQFHWRWKH
designated machine storage place.
ATTENTION: Park the appliance in an enclosed place, on a
ÀDWVXUIDFHQHDUWKHDSSOLDQFHWKHUHPXVWEHQRREMHFWVWKDW
could either damage it, or be damaged through contact with it.
1. If you intend to use the spray system, operate the lever of pump control switch (8) on the control
handlebar.
ATTENTION: Pushing the lever (8) forwards starts the pump in intermittent mode (Fig.7).
ATTENTION: Pushing the lever (8) backward starts the pump in continuous mode.
2. Push the machine with the brush rotating from left to right or vice versa.
3. Immediately afterwards, push the machine in the same way but in the opposite direction, so that
about one quarter of the working width overlaps the previous one.
4. We recommend that you vacuum up the dirt-loaded foam at intervals with the aid of a vacuum cleaner
for liquids (optional solution tank kit).
ATTENTION:7KH¿UVWWLPHDQRSHUDWRUXVHVWKHPDFKLQHKHVKHVKRXOGEHFRPHIDPLOLDUZLWKWKH
PRYHPHQWVWREHLPSDUWHGWRWKHVKDIWLQRUGHUWREHFRQ¿GHQWHQRXJKZLWKWKHGLUHFWLRQDOLW\RI
movement of the machine, and should therefore not operate the machine near people or
obstacles.
ATTENTION: Work in slow movements to the right and left, possibly moving back so that the
RSHUDWRUDOZD\VVWDQGVRQDQDUHDRIWKHÀRRU\HWWREHFOHDQHGXS
ATTENTION: Keep the power supply cable behind the operator, taking care not to operate the
machine in its vicinity in order not to damage it.
ATTENTION:'RQRWLQVLVWWRRPXFKRQWKHVDPHDUHDVRDVWRDYRLGGDPDJLQJWKHÀRRUDOVRLQ
IXQFWLRQRIWKHW\SHRIEUXVKRUDEUDVLYHÀRRUSDGFKRVHQ
ATTENTION: If you need to work in tight spaces you can turn the control column to the vertical
position.
7
32
1
2
3 4
1 2 3

33
EN
&DUHIXOFOHDQLQJRIWKHEUXVKJXDUDQWHHVEHWWHUFOHDQLQJRIWKHÀRRU
as well as a longer brush motor life. To clean the pad holder, proceed
as follows:
1. Take the appliance to the dedicated dirty water drainage area.
ATTENTION: The place this operation is carried out should
comply with current environmental protection regulations.
2. Check that the plug (1) on the power cable (2) has been taken out
of the socket (3) of the mains supply()LJ), and if not, disconnect
it.
ATTENTION: You are advised to always wear protective
gloves, to avoid the risk of serious injury to your hands.
ATTENTION: To prevent damaging the power cable,
disconnect the plug from the mains socket by directly pulling
the plug and not the cable.
CONTROL AND CLEANING OF THE BRUSH
3. Check that the handlebar is in the vertical position, if not, press
the uncoupling lever (4) ()LJ) and turn the handlebar to the
vertical position ()LJ). When the handlebar is vertical, release
the uncoupling lever (4).
4. Tip the appliance back ()LJ), block one of the rear wheels and
shift the control column backwards.
5. /RRVHQWKH¿[LQJNH\VWKHQUHPRYHWKHFHQWHULQJSODWH1RZ\RX
FDQUHPRYHWKHEUXVKSDGKROGHU ()LJ).
6. Remove the brush from the appliance ()LJ).
7. Clean the brush/pad holder under running water and remove any
impurities present in the bristles of the brush or on the surface of
the Check the bristles. If they are excessively worn, replace the
brush (the bristles should protrude by at least 10mm).
8. Repeat the operations in reverse order to reassemble all the
parts.
RECOMMENDED MAINTENANCE OPERATIONS
MAINTENANCE
33
1
2
3 4
1 2 3
4 5
TYPE OF MAINTENANCE
AT THE END OF
THE WORK
WEEKLY
BEFORE A LONG
PERIOD OF NON-
USE
TRANSPORT
Checking and cleaning the pad holder X X X
Checking and cleaning the solution tank X X X
&KHFNLQJDQGFOHDQLQJWKHGHWHUJHQWVROXWLRQGUDXJKW¿OWHUV\VWHP X X
Checking and cleaning the detergent solution spray nozzle X X

34
EN
&DUHIXOO\FOHDQLQJWKHVROXWLRQWDQNHQVXUHVWKHÀRRULVFOHDQHGSURSHUO\3URFHHGDVIROORZVWRFOHDQ
the solution tank:
1. Take the device to the dedicated maintenance area.
ATTENTION: the place designated for this operation must comply with current environmental
protection regulations.
2. Check that the plug (1) on the power cable (2) has been taken out of the socket (3) of the mains
supply()LJ), and if not, disconnect it.
ATTENTION: these operations must be carried out using protective gloves to avoid any possible
contact with the edges or tips of metal objects.
ATTENTION: To prevent damaging the power cable, disconnect the plug from the mains socket
by directly pulling the plug and not the cable.
3. Make sure the solution tank is empty, otherwise empty it completely.
4. Remove the solution tank cap (4) ()LJ).
5. Remove the water distribution pipe (5) in the hole on the brush head (6) ()LJ).
CHECKING AND CLEANING THE SOLUTION TANK
1
2
3
1
6
4
5
2
3
1. Disconnect the detergent solution pipe (7) from the quick coupling (8) ()LJ).
ATTENTION: users are advised to always wear protective gloves, to avoid the risk of serious
injury to hands.
2. Remove the detergent solution pipe (7) from the hole in the solution tank ()LJ).
3. Remove the solution tank tap tie-rod chain (8) in the coupling in the tap control handle (9) ()LJ).
4. Turning the closing knob (10) ()LJ) shift the top brackets beyond the stops in the tank.
5. Remove the solution tank kit from the appliance, to lift it use the handle on the tank.
6. Rinse the inside with a jet of water, if necessary use a spatula to remove the sludge that has
accumulated at the bottom of the tank.
ATTENTION:%HFDUHIXOQRWWRORVHWKHGHWHUJHQWVROXWLRQGUDXJKW¿OWHU
7. 3XWWKHVROXWLRQWDQNRQWKHFROXPQVRWKDWWKHERWWRPRIWKHWDQNLVDQFKRUHGWRWKH¿[HGEUDFNHW
(11) on the column itself ()LJ).
8. Holding the tank with one hand, move the mobile bracket (12) down until the solution tank is locked
to the column ()LJ).
7
4
7
9
5 6
1. Lock the position of the mobile bracket (12) by tightening the closing knob (10) ()LJ).
2. Insert the water distribution pipe (5) in the hole on the brush head (6) ()LJ).
3. Insert the solution tank tap tie chain (8) in the coupling in the tap control handle (9) ()LJ).
10
7
11
12
9
34

35
EN
1. Insert the detergent solution pipe (7) into the hole in the solution tank ()LJ).
2. &RQQHFWWKHGHWHUJHQWVROXWLRQGUDXJKW¿OWHUWRWKHTXLFNFRXSOLQJ)LJ). Make sure that the
GUDXJKW¿OWHUVWD\VLQVLGHWKHVROXWLRQWDQN
3. Insert the solution tank cap (4) ()LJ).
10
10
6
5
11
9
12
7
13
7
14
4
15
3URFHHGDVIROORZVWRFOHDQWKHGHWHUJHQWVROXWLRQGUDXJKW¿OWHU
1. Take the device to the dedicated maintenance area.
ATTENTION: the place designated for this operation must comply with current environmental protection regulations.
2. Check that the plug (1) on the power cable (2) has been taken out of the socket (3) of the mains supply()LJ), and if not, disconnect it.
ATTENTION: these operations must be carried out using protective gloves to avoid any possible contact with the edges or tips of metal objects.
ATTENTION: To prevent damaging the power cable, disconnect the plug from the mains socket by directly pulling the plug and not the cable.
3. Make sure the solution tank is empty, otherwise empty it completely.
4. Remove the solution tank cap (4) ()LJ).
5. Disconnect the detergent solution pipe (5) from the quick coupling (6) ()LJ).
ATTENTION: users are advised to always wear protective gloves, to avoid the risk of serious injury to hands.
6. &OHDQWKH¿OWHUXQGHUUXQQLQJZDWHULIQHFHVVDU\UHPRYHDQ\LPSXULWLHV
7. Repeat the operations in reverse order to reassemble all the parts.
CHECKING AND CLEANING THE DETERGENT SOLUTION DRAUGHT FILTER
1
2
3
1
4
2
5
6
3
To clean the detergent solution spray nozzle proceed as follows:
1. Take the device to the dedicated maintenance area.
ATTENTION: the place designated for this operation must comply with current environmental protection regulations.
2. Check that the plug (1) on the power cable (2) has been taken out of the socket (3) of the mains supply()LJ), and if not, disconnect it.
ATTENTION: these operations must be carried out using protective gloves to avoid any possible contact with the edges or tips of metal objects.
ATTENTION: To prevent damaging the power cable, disconnect the plug from the mains socket by directly pulling the plug and not the cable.
3. Make sure the solution tank is empty, otherwise empty it completely.
CHECKING AND CLEANING THE DETERGENT SOLUTION SPRAY NOZZLE
35

36
EN
TROUBLESHOOTING
This chapter lists the most common problems linked with the use of the appliance. If you are unable to resolve the problems with the
information given here, please contact your nearest assistance centre.
DISPOSAL
To dispose of the appliance, take it to a demolition centre or an
authorised collection centre.
Before scrapping the appliance, it is necessary to remove and
separate out the following materials, then send them to the
appropriate collection centres in accordance with applicable
environmental hygiene regulations:
• Pad holders or brushes
• Electric and electronic parts*
• Plastic parts
• Metallic parts
(*) In particular, contact your distributor when scrapping electric and
electronic parts.
4
2 3
1 6
2
3 5
1
4. 5HPRYHWKHULQJQXW¿[LQJWKHQR]]OH)LJ).
5. Remove the spray nozzle (5), being careful not to lose the washer (6) ()LJ).
ATTENTION: users are advised to always wear protective gloves, to avoid the risk of serious injury to hands.
6. Clean the nozzle under a jet of running water, if necessary remove any impurities.
7. Repeat the operations in reverse order to reassemble all the parts.
36
PROBLEM POSSIBLE CAUSE SOLUTION
THE APPLIANCE DOES NOT SWITCH ON
The power cable extension is not connected
to the mains socket.
Check that the plug on the extension cable
has been inserted into the mains supply
socket.
The power cable extension is not connected
to the appliance's power cable.
Check that the plug on the cable of the
appliance has been inserted into the socket
on the extension cable.
7KHHOHFWULFDOVSHFL¿FDWLRQVRIWKHDSSOLDQFH
should correspond to the electrical
VSHFL¿FDWLRQVRIWKHSRZHUVXSSO\QHWZRUN
0DNHVXUHWKDWWKHHOHFWULFDOVSHFL¿FDWLRQV
of the appliance correspond to the electrical
VSHFL¿FDWLRQVRIWKHSRZHUVXSSO\QHWZRUN
check the technical information on the serial
number plate.
Extension cable damaged.
Check the extension cable is not damaged,
and if it is, replace it.
Overheating of the brush head motor.
Make sure that the thermal breaker on the
back of the handlebar has not tripped. If it
has, wait a few minutes until it has cooled
GRZQWKHQSUHVVWKHVSHFL¿FFLUFXLWEUHDNHU
button to reactivate the power supply and
motor operation
INSUFFICIENT DETERGENT SOLUTION
ON THE PAD HOLDER
The amount of detergent in the solution tank
LVLQVXI¿FLHQWIRUWKHZRUNWKDWQHHGVGRLQJ
Make sure that the amount of detergent
VROXWLRQLQWKHVROXWLRQWDQNLVVXI¿FLHQWIRU
the work to be carried out, and if necessary
¿OOWKHVROXWLRQWDQN

37
ES
ÍNDICE
ÍNDICE ............................................................................................................................37
SIMBOLOGÍA UTILIZADA EN EL MANUAL ..................................................................38
OBJETIVO Y CONTENIDO DEL MANUAL ....................................................................38
DESTINATARIOS ............................................................................................................38
CONSERVACIÓN DEL MANUAL DE USO Y MANTENIMIENTO .................................38
RECEPCIÓN DE LA MÁQUINA .....................................................................................38
ADVERTENCIA PREVIA.................................................................................................38
DATOS DE IDENTIFICACIÓN ........................................................................................39
DESCRIPCIÓN TÉCNICA ...............................................................................................39
USO INDICADO - USO PREVISTO ................................................................................39
SEGURIDAD ...................................................................................................................39
PLACA DE LA MATRÍCULA ...........................................................................................39
DATOS TÉCNICOS .........................................................................................................39
NORMAS GENERALES DE SEGURIDAD .....................................................................40
SIMBOLOGÍA UTILIZADA EN LA MÁQUINA ................................................................45
CONOCIMIENTO DE LA MÁQUINA...............................................................................45
DESPLAZAMIENTO DE LA MÁQUINA EMBALADA .................................................45
DESEMBALAJE DE LA MÁQUINA ............................................................................45
TRANSPORTE DE LA MÁQUINA..............................................................................46
COMPONENTES PRINCIPALES DE LA MÁQUINA .................................................46
COMPONENTES PRINCIPALES DEL MANILLAR DE MANDO ...............................46
COMPONENTES PRINCIPALES DE LA COLUMNA ................................................46
PREPARACIÓN DE LA MÁQUINA.................................................................................47
INSERCIÓN DEL CEPILLO ............................................................................................47
MONTAJE DEL TANQUE DE SOLUCIÓN (OPCIONAL) ...........................................47
LLENADO DE SOLUCIÓN DETERGENTE (OPCIONAL) .........................................48
USO .................................................................................................................................49
AL FINALIZAR EL TRABAJO ........................................................................................50
MANTENIMIENTO ..........................................................................................................51
DESGUACE ....................................................................................................................54
RESOLUCIÓN DE AVERÍAS ..........................................................................................54
ESPAÑOL
37

ES
Símbolo de advertencia:
Leer atentamente las secciones precedidas por este símbolo respetando estrictamente lo que indican, para la seguridad
del operador y de la máquina.
Símbolo de peligro de explosión:
Indica que la batería, si no es tratada según las directivas indicadas en el manual de fabricante, puede explotar en
determinadas condiciones.
Símbolo de lugar cubierto:
Los procedimientos precedidos del siguiente símbolo deben ser realizados rigurosamente en un lugar cubierto y seco.
Símbolo de advertencia carros en movimiento:
Indica desplazamiento del producto embalado con carros de transporte adecuados conformes con las disposiciones
legales.
Símbolo del libro abierto con la i:
Indica que se deben consultar las instrucciones de uso.
Las descripciones contenidas en esta publicación no se consideran vinculantes. Por tanto, la empresa se reserva el derecho
GHDSRUWDUHQFXDOTXLHUPRPHQWRODVHYHQWXDOHVPRGL¿FDFLRQHVHQyUJDQRVGHWDOOHVVXPLQLVWURVGHDFFHVRULRVTXHFRQVLGHUH
conveniente para una mejora o debido a cualquier exigencia de carácter constructivo o comercial. La reproducción, incluso
parcial, de los textos y de los diseños contenidos en esta publicación está prohibida por la ley.
/DHPSUHVDVHUHVHUYDHOGHUHFKRGHDSRUWDUPRGL¿FDFLRQHVGH FDUiFWHUWpFQLFR\RGHHTXLSDPLHQWR/DVLPiJHQHV
GHEHQFRQVLGHUDUVHXQDVLPSOHUHIHUHQFLD\QRVRQYLQFXODQWHVHQWpUPLQRVGHGLVHxR\HTXLSDPLHQWR
Símbolo de libro abierto:
Indica al operador que debe leer el manual de uso antes de utilizar la máquina.
Símbolo guantes de protección:
Indica al operador que siempre debe llevar guantes de protección para evitar lesiones graves en las manos.
SIMBOLOGÍA UTILIZADA EN EL MANUAL
OBJETIVO Y CONTENIDO DEL MANUAL
DESTINATARIOS
CONSERVACIÓN DEL MANUAL DE USO Y MANTENIMIENTO
RECEPCIÓN DE LA MÁQUINA
ADVERTENCIA PREVIA
Este manual tiene el objetivo de suministrar al cliente toda la información necesaria para utilizar la máquina de la manera más adecuada,
autónoma y segura posible. El mismo contiene información acerca de los aspectos técnicos, la seguridad, el funcionamiento, el período
de inactividad de la máquina, el mantenimiento, las piezas de repuesto y el desguace. Antes de efectuar cualquier operación en la
PiTXLQDORVRSHUDGRUHV\ORVWpFQLFRVFXDOL¿FDGRVGHEHQOHHUDWHQWDPHQWHODVLQVWUXFFLRQHVFRQWHQLGDVHQHOSUHVHQWHPDQXDO(Q
caso de dudas sobre la interpretación correcta de las instrucciones, solicitar al centro de asistencia más cercano las aclaraciones
necesarias.
(VWHPDQXDOHVWiGLULJLGRWDQWRDORSHUDGRUFRPRDORVWpFQLFRVFXDOL¿FDGRVHQFDUJDGRVGHOPDQWHQLPLHQWRGHODPiTXLQD/RV
RSHUDGRUHVQRGHEHQUHDOL]DUODVRSHUDFLRQHVUHVHUYDGDVDORVWpFQLFRVFXDOL¿FDGRVQRUHVSRQGHUiSRUGDxRVGHULYDGRVGHOD
inobservancia de esta prohibición.
El Manual de Uso y Mantenimiento debe conservarse en un lugar cercano a la máquina, dentro del sobre correspondiente,
protegido de líquidos y todo lo que puede afectar su legibilidad.
En el momento de la recepción de la máquina, es indispensable asegurarse inmediatamente de haber recibido todo el material
indicado en los documentos de expedición y, además, de que la máquina no haya sufrido daños durante el transporte. En la
D¿UPDWLYDKiJDVHFRQVWDWDUSRUHOWUDQVSRUWLVWDHOGDxRVXIULGRDYLVDQGRDOPLVPRWLHPSRQXHVWURGHSDUWDPHQWRGHDVLVWHQFLD
clientes. Sólo actuando tempestivamente será posible obtener el material que falta y la indemnización del daño.
Todas las máquinas pueden funcionar bien y trabajar provechosamente tan solo con usarlas correctamente y manteniendo su
SOHQDH¿FLHQFLDTXHVHREWLHQHVLJXLHQGRHOPDQWHQLPLHQWRGHVFULWRHQODGRFXPHQWDFLyQDQH[D3RUORWDQWRVROLFLWDPRVTXH
se lea cuidadosamente este manual de instrucciones y volver a leerlo cada vez que durante el empleo de la máquina ocurriesen
GL¿FXOWDGHV(QFDVRGHQHFHVLGDGUHFRUGDPRVTXHQXHVWURVHUYLFLRGHDVLVWHQFLDTXHHVWiRUJDQL]DGRHQFRODERUDFLyQFRQ
nuestros concesionarios, queda siempre a disposición para eventuales consejos o intervenciones directas.

39
ES
DATOS DE IDENTIFICACIÓN
Para la asistencia técnica o para solicitar partes de recambio, citar siempre el modelo, la versión y el número de matrícula que se
encuentra en la correspondiente placa de matrícula.
DESCRIPCIÓN TÉCNICA
USO INDICADO - USO PREVISTO
SEGURIDAD
PLACA DE LA MATRÍCULA
(VWDPiTXLQDKDVLGRFRQVWUXLGDSDUDODOLPSLH]DSURIHVLRQDOGHSDYLPHQWRVGXURV\YLQtOLFRVSDUDVXSHU¿FLHVLQWHUQDVTXHGHEH
realizarse siguiendo las instrucciones. /DPiTXLQDGHEHXVDUVHVyORSDUDHVWD¿QDOLGDG.
Esta máquina se ha diseñado y fabricado para la limpieza de
pavimentos lisos y compactos, en locales comerciales, civiles e
LQGXVWULDOHVHQFRQGLFLRQHVGHVHJXULGDGYHUL¿FDGDSRUSDUWH
GHXQRSHUDGRUFXDOL¿FDGR
Para evitar accidentes, la colaboración del operador es esencial. Ningún programa de prevención de accidentes puede ser
H¿FD]VLQODFRODERUDFLyQWRWDOGHODSHUVRQDGLUHFWDPHQWHUHVSRQVDEOHGHOIXQFLRQDPLHQWRGHODPiTXLQD/DPD\RUSDUWHGHORV
accidentes que ocurren en una empresa, en el trabajo o en los traslados, se deben al incumplimiento de las reglas de prudencia
más elementales. Un operador atento y prudente es la mejor garantía contra los accidentes y resulta indispensable para completar
cualquier programa de prevención.
La placa de matrícula se encuentra en la parte inferior del
chasis de la máquina y contiene las características generales
de la máquina, en particular, su número de serie. El número
de serie es una información muy importante que se debe
comunicar en cualquier pedido de asistencia o compra de
repuestos.
La máquina es apta para ser usada exclusivamente en
ambientes cerrados o cubiertos.
ATENCIÓN: La máquina no es apta para usar bajo la
lluvia o chorros de agua.
39
DATOS TÉCNICOS 80 ROS 17
Anchura de trabajo mm - inch 430-16,9
Número de órbitas orb./min. 1400
Potencia nominal del motor de bancada W 1100
Tensión nominal del motor de bancada V 115
Frecuencia del motor de bancada Hz 60
Pendiente superable con plena carga % 2
Capacidad tanque de solución (opcional) l - gal 15 - 3,96
Ruedas traseras (diámetro / anchura)
mm - inch
200/50
7,8/1,96
Longitud de la máquina mm - inch 565 - 22,25
Altura de la máquina al cárter de la bancada mm - inch 325 - 12,8
Altura de la máquina al timón mm - inch 1160 - 45,7
Ancho de la máquina mm - inch 450 - 17,7
Peso de la máquina en orden de marcha (sin tanque de solución) kg - Lb 41 - 90,4
Nivel de vibración a la mano m/s
2
1,9

40
ES
Antes de utilizar el monocepillo por primera vez, leer y respetar estas
advertencias de seguridad. Conservar las presentes advertencias de
seguridad para consultarlas en otro momento y para entregarlas a los
propietarios siguientes.
• Antes de la puesta en funcionamiento, leer el manual de uso de la máquina.
• Las placas de advertencia en la máquina suministran indicaciones
importantes para un uso seguro.
• Respetar siempre tanto las indicaciones citadas en las instrucciones, como
las normas vigentes en materia de seguridad-de prevención de accidentes.
• Mantener las películas de embalaje fuera del alcance de los niños. ¡Peligro
GHDV¿[LD
PELIGRO: Indica un peligro inminente que determina lesiones graves o la
muerte.
ADVERTENCIA: Indica una situación peligrosa probable que podría
determinar lesiones graves o la muerte.
PRUDENCIA: Indica una situación peligrosa probable que podría causar
lesiones leves.
ATENCIÓN: Indica una situación peligrosa probable que podría determinar
daños a las cosas.
ADVERTENCIAS DE SEGURIDAD
NIVELES DE PELIGRO
PELIGRO:
• Para reducir el riesgo de incendio, choque eléctrico o lesiones, leer y respetar
todas las instrucciones sobre la seguridad y las indicaciones de atención antes
de usar. Esta máquina ha sido diseñada para trabajar de modo seguro cuando
VHXWLOL]DSDUDODVIXQFLRQHVGHOLPSLH]DTXHVHHVSHFL¿FDQ(QFDVRGHGHWHFWDU
daños en los componentes eléctricos o mecánicos, la máquina debe ser reparada
por un centro de asistencia competente o por el fabricante antes de usar, para
evitar otros daños en la máquina o lesiones físicas al usuario.
• $QWHVGHFRQHFWDUODPiTXLQDDODWRPDGHFRUULHQWHYHUL¿FDUTXHORVGDWRV
técnicos indicados en la placa correspondan a los de la red de alimentación. La
PiTXLQDGHEHVHUDOLPHQWDGDH[FOXVLYDPHQWHFRQFRUULHQWHDOWHUQD\FRQ
CONEXIÓN A LA RED ELÉCTRICA
40

41
ES
una tensión igual a la que se detalla en la placa matrícula.
• La toma para el cable de alimentación debe estar equipada con una puesta a
tierra reglamentaria.
• El cable de conexión a la red de alimentación suministrado con la máquina debe
ser utilizado para dicha máquina y no para otras.
• Antes de cada uso, controlar eventuales daños en la línea de conexión y en la
clavija de alimentación. Si la línea está dañada, contactar de inmediato con un
técnico para restablecer el funcionamiento correcto.
• Conectar la máquina solo a una conexión eléctrica instalada por un montador
eléctrico en conformidad con la norma IEC 60364-1.
• Nunca tocar la clavija de alimentación con las manos mojadas.
• Prestar atención a que el cable de conexión a la red o el cable de prolongación no
se dañen al pasarlos por encima, aplastarlos, tirar de los mismos, etc. Proteger el
cable del calor y del contacto con aceites o aristas cortantes.
• Asegurarse periódicamente de que el cable de conexión a la red no esté dañado,
por ejemplo, debido a la formación de grietas o envejecimiento. En caso de que
se detecte un daño, se debe sustituir el cable antes de volver a utilizar la máquina.
• La protección contra las salpicaduras de agua y la resistencia mecánica debe
garantizarse incluso después de la eventual sustitución de empalmes del cable
de conexión a la red o del cable de prolongación.
• 1ROLPSLDUODPiTXLQDFRQWXERÀH[LEOHRXQFKRUURGHDJXDGHDOWDSUHVLyQULHVJR
de cortocircuito u otros fallos de tipo eléctrico).
ATENCIÓN:
• El transitorio de activación determina una disminución temporal de tensión.
• En condiciones de red desfavorables, los demás equipos pueden dañarse.
• 'LFKRVGDxRVVHSUHYpQVLODLPSHGDQFLDGHUHGHVLQIHULRUDȍ
PELIGRO:
• Se prohíbe el uso si el cable o la clavija están dañados. Para desconectar
de la toma eléctrica, aferrar la clavija y no el cable. No manipular la clavija ni
la máquina con las manos mojadas. Desactivar todos los mandos antes de
desconectarlo de la toma eléctrica.
• No tirar del cable ni transportar la máquina tirando de él, no usar el cable
como asa, no cerrar una puerta sobre el cable ni exponerlo a bordes o
DULVWDV D¿ODGDV 1R SDVDU OD PiTXLQD VREUH HO FDEOH 0DQWHQHU HO FDEOH
DOHMDGRGHVXSHU¿FLHVFDOLHQWHV
USO - EMPLEO
41

42
ES
• Prestar mayor atención cuando se limpian las escaleras.
• La máquina no se debe usar ni guardar en lugares abiertos en condiciones
de humedad ni se la debe exponer directamente a la lluvia.
• La temperatura de almacenamiento debe estar comprendida entre los -25°C
y los +55°C.
• Condiciones de uso: temperatura ambiente comprendida entre 0°C y 40°C
con humedad relativa entre 30 y 95%. La máquina ha sido desarrollada solo
para la limpieza en seco y no debe ser utilizada o conservada al aire libre en
condiciones de humedad.
• Antes del uso, asegurarse del perfecto estado y del funcionamiento seguro
de la máquina y de los accesorios de trabajo y, en especial, controlar el
cable de prolongación. En caso de que el estado no sea bueno, desconectar
GHLQPHGLDWRODFODYLMDGHDOLPHQWDFLyQGHODWRPDGHUHGODPiTXLQDQR
debe ser utilizada.
• En caso de uso de la máquina en ambientes de riesgo (por ejemplo, estaciones
de servicio), deben respetarse las normas de seguridad correspondientes.
Se prohíbe utilizar la máquina en lugares con peligro de explosión.
• Determinadas sustancias pueden originar junto con el aire de aspiración
vapores y mezclas explosivas.
ADVERTENCIA:
• Mantener el cabello, las prendas sueltas, los dedos y todo el cuerpo lejos de
aberturas o piezas móviles.
• No acercarse a la máquina con indumentaria que pueda engancharse,
EVITAR el uso de bufandas, chalinas, pañuelos y prendas amplias.
• /D PiTXLQD SXHGH VHU XVDGD SRU QLxRV PD\RUHV GH DxRV \ SRU
SHUVRQDVFRQFDSDFLGDGHVItVLFDVVHQVRULDOHVRPHQWDOHVUHGXFLGDV
RVLQH[SHULHQFLDVyORVLVRQYLJLODGRV\KDQUHFLELGRLQVWUXFFLRQHV
VREUHHOXVRVHJXURGHODPiTXLQD\FRPSUHQGDQORVULHVJRVTXHGH
HOORGHULYDQ
• Los niños deben ser vigilados para asegurarse de que no jueguen con la
máquina.
• Los niños no deben limpiar ni manipular el aparato sin supervisión.
• Esta máquina ha sido diseñada para ser utilizada exclusivamente en
ambientes cerrados.
• No dejar la máquina sin vigilancia cuando se encuentra conectada a la toma
de corriente. Desconectar la clavija de alimentación de la toma de corriente
cuando no está siendo utilizada y antes del mantenimiento.
• En caso de bajas temperaturas, la máquina no debe ser utilizada al aire libre.
42

43
ES
• 1RHPSOHDUODPiTXLQDHQVXSHU¿FLHVFRQLQFOLQDFLyQVXSHULRUDODLQGLFDGD
en la placa de la matrícula.
• Asegurarse siempre de que los planos de trabajo, plataformas y rampas,
puedan soportar el peso de la máquina.
• La máquina no es apta para la limpieza de pavimentos irregulares o con
desniveles. No utilizar la máquina en pendientes.
• En caso de peligro, desconectar de inmediato la clavija presente en el cable
de alimentación de la toma de red.
PRUDENCIA:
• Evitar trabajar sobre pedazos de cuerda, cables de hierro o cables en
general: estos podrían quedar atrapados en el cepillo y generar fricción.
• La máquina es apta para la limpieza de moquetas o pavimentos textiles, si
VHXWLOL]DFRQORVDFFHVRULRVHVSHFt¿FRV
• Las operaciones de pulido deben realizarse en zonas prohibidas al paso de
personal no encargado. Indicar las zonas de trabajo con los correspondientes
carteles señalizadores.
• Atención, no permitir que el cable de alimentación entre en contacto con el
cepillo giratorio.
• La máquina no provoca vibraciones perjudiciales.
• No apoyar recipientes de líquidos sobre la máquina.
• En caso de incendio, emplear un extinguidor de polvo. No emplear agua.
• Evitar que el cepillo o el disco de arrastre trabajen con la máquina detenida
para no provocar daños en el pavimento.
• La máquina debe ser conservada en ambientes cerrados.
• Utilizar la máquina siempre en conformidad con el uso previsto, teniendo en
cuenta las condiciones del lugar y prestando atención durante el trabajo a la
eventual presencia de terceros, especialmente si son niños.
• Nunca se debe dejar la máquina sin vigilancia mientras está activada y la
clavija de alimentación está conectada a la toma de red.
• Para evitar un uso no permitido de la máquina, cortar la alimentación, apagar
la máquina y desconectar el cable de alimentación de la toma de corriente.
• La máquina sin vigilancia debe ser protegida de movimientos no intencionales.
PELIGRO:
• Antes de limpiar y realizar el mantenimiento de la máquina y antes de sustituir
componentes, apagar la máquina y desconectar la clavija de alimentación
de la toma de red.
MANTENIMIENTO
43

44
ES
• Las reparaciones se deben realizar solamente en los centros de asistencia
autorizados o por personal experto en este sector y que estén familiarizados
con todas las normas de seguridad vigentes en materia.
• Respetar el control de seguridad según las disposiciones locales para
máquinas de uso comercial.
• Intervenir en la máquina utilizando siempre guantes de protección adecuados.
PRUDENCIA:
• Si se detectan anomalías en el funcionamiento de la máquina, asegurarse de
que no sean causadas por la falta de mantenimiento ordinario. De lo contrario,
solicitar la intervención del centro de asistencia autorizado.
• Si fuese necesario sustituir algunas piezas, solicitar repuestos ORIGINALES
a un concesionario y/o Revendedor Autorizado.
• Restablecer todas las conexiones eléctricas después de cualquier intervención
de mantenimiento.
• Hacer controlar la máquina por un centro de asistencia autorizado todos los
años.
• Realizar la eliminación de los materiales de consumo respetando
escrupulosamente las normas de ley vigentes. Cuando su máquina deba
ser desguazada, después de muchos años de excelente trabajo, eliminar
adecuadamente los materiales que contiene, teniendo en cuenta que ha sido
fabricada con materiales totalmente reciclables.
• Si se detectaran daños en el cable de alimentación, se debe parar la máquina.
Si se encuentra en fase de trabajo, quitar la clavija de la red de alimentación y
hacer sustituir el cable inmediatamente en un centro de asistencia autorizado.
• 8WLOL]DU VyOR GLVFRV VXPLQLVWUDGRV FRQ OD PiTXLQD R ORV HVSHFL¿FDGRV HQ
el manual de instrucciones. El uso de otros discos puede comprometer la
seguridad.
PRUDENCIA:
Utilizar exclusivamente accesorios y piezas de repuesto autorizadas
por el fabricante. Los accesorios y las piezas de repuesto originales
garantizan que la máquina pueda utilizarse de manera segura y sin fallos
de funcionamiento.
ACCESORIOS Y PIEZAS DE REPUESTO
44

45
ES
6tPERORGHWRPDGHWLHUUDGHODPiTXLQD
Indica el punto de toma de tierra de la instalación eléctrica de la máquina.
6tPERORGHLQFOLQDFLyQPi[LPD
Indica la máxima pendiente superable.
SIMBOLOGÍA UTILIZADA EN LA MÁQUINA
CONOCIMIENTO DE LA MÁQUINA
DESPLAZAMIENTO DE LA MÁQUINA EMBALADA
DESEMBALAJE DE LA MÁQUINA
/DPiTXLQDVHHQWUHJDHQXQHPEDODMHHVSHFt¿FRORVHOHPHQWRVGHO
mismo (bolsas de plástico, grapas etc.) siendo una posible fuente de
peligro, no deben permanecer al alcance de niños, de minusválidos,
etc.
La masa total de la máquina con embalaje es de 45 kg 99,2Lb (peso
de la máquina vacía más el embalaje).
Las dimensiones del embalaje son las siguientes:
/DPiTXLQDVHHQWUHJDHQXQHPEDODMHHVSHFt¿FRSDUDGHVHPEDODUOD
proceder del siguiente modo:
1. Apoyar la parte inferior del embalaje exterior en el suelo.
ATENCIÓN: Desplazar el producto embalado con medios de
elevación adecuados conformes con las disposiciones
legales
ATENCIÓN: Tomar como referencia las imágenes impresas
en la caja.
2. Retirar los bloques de sujeción.
3. Abrir el embalaje exterior.
ATENCIÓN: Se recomienda utilizar siempre guantes de
protección para evitar lesiones graves en las manos.
4. Retirar los accesorios opcionales contenidos en el embalaje.
5. Sacar del cartón la máquina.
ATENCIÓN: Durante esta operación, asegurarse de que no
haya objetos o personas cerca de la máquina.
ATENCIÓN: Para desembalar la máquina del cartón, no
utilizar el manillar de mando debido a que podría dañarse
durante la operación.
ATENCIÓN: se recomienda conservar todos los materiales
del embalaje para un posible transporte de la máquina.
PRUDENCIA:
Utilizar como cables de prolongación
únicamente los materiales indicados
explícitamente por el fabricante
(contactar con el revendedor
autorizado) o modelos de calidad
superior. Al utilizar un cable de
prolongación, observar la sección
mínima del mismo.
LONGITUD DEL CABLE
SECCIÓN DEL
CABLE
<16A <25A
Hasta 20 m 1,5 mm
2
2,5 mm
2
De 20 m a 50 m 2,5 mm
2
4,0 mm
2
CABLES DE PROLONGACIÓN
45
X%
80 ROS 17
A mm - inch 490 - 19,3
B mm - inch 610 - 24
C mm - inch 1190 - 46,85

46
ES
TRANSPORTE DE LA MÁQUINA
Para transportar la máquina en condiciones seguras, proceder del
siguiente modo:
1. Seguir las fases para poner la máquina en condiciones seguras
(leer el apartado “CONDICIONES DE SEGURIDAD DE LA
MÁQUINA”).
2. Utilizando un plano inclinado, subir la máquina al pallet
empujándola marcha atrás.
3. Colocar la bancada sobre el pallet.
4. 8WLOL]DQGRXQRVEORTXHV¿MDUODPiTXLQDDOSDOOHW
5. Ahora se puede transportar en condiciones seguras la máquina.
ATENCIÓN: Se recomienda utilizar siempre guantes de
protección para evitar lesiones graves en las manos.
ATENCIÓN: Para el transporte en vehículos, asegurar la
máquina según las directivas en vigor para que no se pueda
deslizar ni volcar.
COMPONENTES PRINCIPALES DE LA MÁQUINA
COMPONENTES PRINCIPALES DEL MANILLAR DE MANDO
/RVFRPSRQHQWHVEiVLFRVGHODPiTXLQDVHLGHQWL¿FDQGHOVLJXLHQWH
modo:
1. Manillar de mando.
2. Bancada.
3. Cárter de la bancada.
4. Cepillo (ACCESSORIO)
5. Disco de arrastre
6. Cable de alimentación (ACCESSORIO)
7. Kit tanque de solución
/RVFRPSRQHQWHVGHOPDQLOODUVHLGHQWL¿FDQGHOVLJXLHQWHPRGR
1. Palanca presencia de operador.
2. Palanca de mando del interruptor general (situada bajo las
empuñaduras del manillar).
3. Palanca regulación inclinación manillar.
4. Palanca de mando de la válvula de distribución del detergente.
5. Disyuntor térmico de protección del motor de bancada.
6. Cable de alimentación.
7. Interruptor de control del kit de pulverización
COMPONENTES PRINCIPALES DE LA COLUMNA
/RVFRPSRQHQWHVGHOPDQLOODUVHLGHQWL¿FDQGHOVLJXLHQWHPRGR
1. Soporte superior del tanque de solución.
2. Soporte inferior del tanque de solución.
3. gancho para cable
4. Enrollacable inferior.
46
1
6
7
4-5
4
1
6
3
2 5
1
1 2
4
3
2
1
1 2
7
2-3

47
ES
Para introducir el cepillo/disco de arrastre en el cuerpo de bancada
de la máquina, proceder del siguiente modo:
1. Comprobar que la clavija (1) que se encuentra en el cable de
alimentación (2) esté desconectada de la toma (3) de la red de
alimentación ()LJHQFDVRFRQWUDULRGHVFRQHFWDUOD
ATENCIÓN: Se recomienda utilizar siempre guantes de
protección para evitar lesiones graves en las manos.
ATENCIÓN: Para evitar daños en el cable de alimentación,
desconectar la clavija de la toma de red, tirando directamente
de la clavija y no del cable.
2. Comprobar que el manillar de mando se encuentre en posición
YHUWLFDOHQFDVRFRQWUDULRSUHVLRQDUODSDODQFDGHGHVHQJDQFKH
(4) ()LJ) y girar el manillar llevándolo a la posición vertical
()LJ). Cuando el manillar alcanza la posición vertical, soltar la
palanca de desenganche (4).
PREPARACIÓN DE LA MÁQUINA
INSERCIÓN DEL CEPILLO
3. Inclinar hacia atrás la máquina ()LJ), bloquear una de las
ruedas traseras y mover hacia atrás la columna de mando.
4. 'HVHQURVFDU\TXLWDUORVSDORVGH¿MDFLyQ\ODSODFDGHFHQWUDGR
()LJ).
5. Insertar el disco conductor, tener cuidado para centrar los
SDVDGRUHVGHVXMHFLyQSUHVHQWHVHQODPiTXLQDFRQORVRUL¿FLRV
de disco trascinatore.Di seguido inserte la placa de centrado y
DSULHWHORVSDORVGH¿MDFLyQ)LJ).
Para colocar el tanque de solución en el manillar, proceder del
siguiente modo:
1. Fijar el manillar en una posición de unos 45° con respecto al
terreno ()LJ).
2. Desenroscando la manivela de cierre (1) ()LJ) colocar los
estribos superiores por encima de la mitad de la columna ()LJ)
(si no están ya colocados).
MONTAJE DEL TANQUE DE SOLUCIÓN
3. Colocar el tanque de solución en la columna, haciendo que la
SDUWHLQIHULRUGHOGHSyVLWR VHDQFOHHQHO HVWULER¿MR TXHVH
encuentra en la columna ()LJ).
4. Manteniendo el tanque con una mano, hacer descender el estribo
móvil (3) hasta que el tanque de solución quede bloqueado en la
columna ()LJ).
5. Bloquear la posición del estribo móvil (3) utilizando la manivela
de cierre (1) ()LJ).
47
1
2
3 4
1
4
2
5
3
6
1 2 3
1

ES
Rellenar el tanque solución solo cuando la columna esté en posición
vertical, realizando lo siguiente:
1. Retirar el tapón del tanque de solución (1) ()LJ).
2. Llenar con agua limpia a una temperatura que no supere los 50
°C.
3. Agregar el detergente líquido en el tanque respetando la
concentración y las modalidades indicadas en la etiqueta por
el fabricante del detergente. Para evitar la formación de una
cantidad excesiva de espuma que podría dañar los componentes
internos de la máquina, emplear el porcentaje mínimo de
detergente.
4. Montar el tapón del tanque de solución (1) ()LJ).
ATENCIÓN: Se recomienda utilizar siempre guantes de
protección para evitar lesiones graves en las manos.
ATENCIÓN: Se aconseja aspirar en tramos la espuma
cargada de suciedad con un aspirador para líquidos.
LLENADO DE SOLUCIÓN DETERGENTE
6. ,QWURGXFLUHOWXERGHGLVWULEXFLyQGHODJXDHQHORUL¿FLRGHOD
bancada (5) ()LJ).
7. Enganchar la cadena tirante del grifo del tanque de solución (6)
al gancho que se encuentra en la manilla de mando del grifo
(7) ()LJ).
7
10
7
9
,QVHUWHHOWXERGHVROXFLyQHQHORUL¿FLRGHOGHSyVLWR
(Fig.9).
9 .Conecte el tubo de la solución de limpieza (7) con el accesorio
GHO¿OWURGH OLEHUDFLyQUiSLGD\ HPS~MHORKDVWD ODSDUWHLQIHULRU GHO
tanque. (Figura 10).
1
4
7
2
5
6
1 1
2
5 4
6
7
3 3
1

49
ES
Antes de comenzar el trabajo respetar los pasos siguientes:
1. Antes de usar se debe controlar el estado y la seguridad de
servicio de la máquina con las herramientas de trabajo, en
especial del cable de alimentación y del cable de alargue. Si la
máquina no se encuentra en perfecto estado, se prohíbe su uso.
2. Introducir la clavija (2) del cable de alimentación (3) en la toma
(4) de la red de alimentación )LJ.
3. Desbloquear el manillar de mando de la posición vertical. Presionar
la palanca de retención (5) de la columna de mando según la
GLUHFFLyQGHOD ÀHFKD)LJ) y girar la columna de mando hacia
sí mismo ()LJ).
ATENCIÓN: Durante esta operación no apoyar el pie sobre la
máquina.
USO
4. Girar la columna de mando hacia sí mismo hasta alcanzar la
posición ideal que debe ofrecer una sensación de comodidad
durante el uso de la máquina.
5. Una vez alcanzada la posición ideal, soltar la palanca de
retención (5) de la columna de mando para bloquear el manillar.
6. Girar hacia sí mismo la palanca de presencia de operador (6)
()LJ).
7. Presionar las palancas de mando del interruptor general (7)
situadas bajo las empuñaduras del manillar ()LJ).
8. Ahora la máquina comenzará a moverse.
9. Aplicar una pequeña dosis de solución detergente sobre el
pavimento presionando la palanca (8) ()LJ),
10. Conducir la máquina con el cepillo giratorio de izquierda a
derecha o en sentido contrario.
11. Inmediatamente después, conducir la máquina de la misma forma
en sentido contrario, pero de manera que aproximadamente un
cuarto de la anchura de trabajo se superponga a la precedente.
Se puede trabajar moviendo la cámara de ida y vuelta
12. Se aconseja aspirar por tramos la espuma llena de suciedad,
aspirándola con un aspirador para líquidos (kit tanque solución
opcional).
ATENCIÓN: Trabajar realizando movimientos lentos a
derecha e izquierda, si es posible hacia atrás, de manera que
el operador se encuentre siempre sobre una zona de suelo
aún no limpiada.
ATENCIÓN: Mantener siempre el cable de alimentación
detrás del operador, procurando no trabajar con la máquina
cerca del mismo para no dañarlo.
ATENCIÓN: No insistir demasiado sobre la misma zona para
QR FRUUHU HO ULHVJR GH DUUXLQDU HO SDYLPHQWR WDPELpQ HQ
función del tipo de cepillo o de disco abrasivo escogido.
ATENCIÓN: Si es necesario trabajar en espacios reducidos,
es posible girar la columna de mando llevándola a la posición
vertical.
49
2
3
4
6
5
7
1
4
2
5
3
6

50
ES
$O ¿QDOL]DU HO WUDEDMR \ DQWHV GH UHDOL]DU FXDOTXLHU WLSR GH
manutención, realizar las operaciones siguientes:
1. Desconectar la clavija (1) del cable de alimentación (2) de la
toma (3) de la red de alimentación ()LJ).
ATENCIÓN: Se recomienda utilizar siempre guantes de
protección para evitar lesiones graves en las manos.
ATENCIÓN: Para evitar daños en el cable de alimentación,
desconectar la clavija de la toma de red, tirando directamente
de la clavija y no del cable.
2. Comprobar que el manillar de mando se encuentre en posición
YHUWLFDOGHORFRQWUDULRSUHVLRQDUODSDODQFDGHGHVHQJDQFKH
()LJ) y girar el manillar llevándolo a la posición vertical ()LJ).
Cuando el manillar alcanza la posición vertical, soltar la palanca
de desenganche (4).
AL FINALIZAR EL TRABAJO
ATENCIÓN: Durante esta operación no apoyar el pie sobre la
máquina.
3. ,QFOLQDU OD PiTXLQD OOHYDUOD DO OXJDU HVSHFt¿FR SDUD HO
mantenimiento y realizar todos los procedimientos indicados
en el apartado “INTERVENCIONES DE MANTENIMIENTO
PERIÓDICO ACONSEJADO” en la columna “AL FINALIZAR EL
TRABAJO”.
4. 8QDYH]¿QDOL]DGDVODVLQWHUYHQFLRQHVGHPDQWHQLPLHQWROOHYDU
la máquina al lugar dispuesto para su reposo.
ATENCIÓN: Aparcar la máquina en un lugar cerrado, sobre
XQDVXSHU¿FLHSODQD\OLVDFHUFDGHODPLVPDQRGHEHKDEHU
objetos que puedan dañarla o dañarse al entrar en contacto
con la misma.
1. Si se pretende utilizar el sistema spray, accionar la palanca del interruptor de mando de la bomba (8)
que se encuentra en la parte superior del manillar de mando.
ATENCIÓN: Empujando hacia delante la palanca (8) se acciona la bomba en modo intermitente
(Fig.7).
ATENCIÓN: Empujando hacia atrás la palanca (8) se acciona la bomba en modo continuo.
2. Conducir la máquina con el cepillo girando de izquierda a derecha o en sentido contrario.
3. Inmediatamente después, conducir la máquina de la misma forma en sentido contrario, pero de
manera que aproximadamente un cuarto de la anchura de trabajo se superponga a la precedente.
4. Se aconseja aspirar por tramos la espuma llena de suciedad, aspirándola con un aspirador de
líquidos (kit tanque solución opcional).
ATENCIÓN/DSULPHUDYH]TXHXQRSHUDGRUPDQHMDODPiTXLQDGHEHDGTXLULUFRQ¿DQ]DFRQORV
PRYLPLHQWRVTXHGHEHWUDQVPLWLUDOWLPyQSDUDREWHQHUXQDVHJXULGDGVX¿FLHQWHVREUHODGLUHFFLyQ
del movimiento de la máquina, por tanto, no accionar la máquina cerca de personas u obstáculos.
ATENCIÓN: Trabajar realizando movimientos lentos a derecha e izquierda, si es posible hacia
atrás, de manera que el operador se encuentre siempre sobre una zona de suelo aún no
limpiada.
ATENCIÓN: Mantener siempre el cable de alimentación detrás del operador, prestando atención
a no trabajar con la máquina en las cercanías del mismo para no dañarlo.
ATENCIÓN: No insistir demasiado sobre la misma zona para no correr el riesgo de arruinar el
SDYLPHQWRWDPELpQHQIXQFLyQGHOWLSRGHFHSLOORRGHGLVFRDEUDVLYRHVFRJLGR
ATENCIÓN: Si es necesario trabajar en espacios reducidos, es posible girar la columna de
mando llevándola a la posición vertical.
7
50
1
2
3 4
1 2 3

51
ES
Una minuciosa limpieza del cepillo garantiza una mejor limpieza del
pavimento y una mayor duración del motor del cepillo. Para limpiar
el disco de arrastre, proceder del siguiente modo:
1. &RORFDUODPiTXLQDHQHOOXJDUHVSHFt¿FRSDUDHOYDFLDGRGHODV
aguas residuales.
ATENCIÓN (O OXJDU HVSHFt¿FR SDUD HVWD RSHUDFLyQ GHEH
estar en conformidad con la normativa vigente de respeto al
medio ambiente.
2. Comprobar que la clavija (1) que se encuentra en el cable de
alimentación (2) esté desconectada de la toma (3) de la red de
alimentación ()LJHQFDVRFRQWUDULRGHVFRQHFWDUOD
ATENCIÓN: Se recomienda utilizar siempre guantes de
protección para evitar lesiones graves en las manos.
ATENCIÓN: Para evitar daños en el cable de alimentación,
desconectar la clavija de la toma de red, tirando directamente
de la clavija y no del cable.
&21752/</,03,(=$'(/&(3,//2DISCO DE ARRASTRE
3. Comprobar que el manillar de mando se encuentre en posición
YHUWLFDOHQFDVRFRQWUDULRSUHVLRQDUODSDODQFDGHGHVHQJDQFKH
(4) ()LJ) y girar el manillar llevándolo a la posición vertical
()LJ). Cuando el manillar alcanza la posición vertical, soltar la
palanca de desenganche (4).
4. Inclinar hacia atrás la máquina ()LJ), bloquear una de las
ruedas traseras y mover hacia atrás la columna de mando.
5. $ÀRMDUORV SDORV GH¿MDFLyQ DFRQWLQXDFLyQ UHWLUDU ODSODFD GH
centraggio.Ora es posible retirar el cepillo de alimentador / Disco
de arrastre ()LJ).
6. Extraer el cepillo de la máquina ()LJ).
7. Limpiar bajo un chorro de agua el cepillo/ disco de arrastre y
retirar eventuales impurezas presentes en las cerdas del cepillo.
RGHODVXSHU¿FLHGHOGLVFRGHDUUDVWUH&RPSUREDUHOGHVJDVWH
de las cerdas y, en caso de que éste sea excesivo, sustituir el
cepillo (las cerdas deben sobresalir más de 10 mm).
8. Para el montaje, repetir las operaciones indicadas para el
desmontaje, pero en sentido inverso.
INTERVENCIONES DE MANTENIMIENTO ACONSEJADO
MANTENIMIENTO
51
1
2
3 4
1 2 3
4
5
TIPO DE MANTENIMIENTO
AL FINALIZAR EL
TRABAJO
SEMANAL
ANTES DE UN
LARGO PERÍODO
DE INACTIVIDAD
TRANSPORTE
Control y limpieza del disco de arrastre X X X
Control y limpieza del tanque de solución X X X
&RQWURO\OLPSLH]D¿OWURVLVWHPDGHUHFXSHUDFLyQVROXFLyQGHWHUJHQWH X X
Control y limpieza boquilla nebulizador solución detergente X X

52
ES
Una minuciosa limpieza del tanque solución garantiza una mejor limpieza del pavimento. Para limpiar el tanque solución, realizar lo siguiente:
1. &RORFDUODPiTXLQDHQHOOXJDUHVSHFt¿FRSDUDHOPDQWHQLPLHQWR
ATENCIÓN: El lugar previsto para esta operación debe estar en conformidad con la normativa vigente de respeto al medio ambiente.
2. Comprobar que la clavija (1) que se encuentra en el cable de alimentación (2) esté desconectada de la toma (3) de la red de alimentación ()LJHQFDVRFRQWUDULR
desconectarla.
ATENCIÓN: Estas operaciones deben realizarse utilizando guantes para protegerse del posible contacto con bordes o puntas de objetos metálicos.
ATENCIÓN: Para evitar daños en el cable de alimentación, desconectar la clavija de la toma de red, tirando directamente de la clavija y no del cable.
3. Controlar que el tanque solución esté vacío, de lo contrario proceder a vaciarlo.
4. Retirar el tapón del tanque de solución (4) ()LJ).
5. ([WUDHUHOWXERGHGLVWULEXFLyQGHODJXDGHORUL¿FLRGHODEDQFDGD)LJ).
CONTROL Y LIMPIEZA DEL TANQUE DE SOLUCIÓN
1
2
3
1
6
4
5
2
3
1. Desconectar el tubo solución detergente (7) de la conexión rápida (8) ()LJ).
ATENCIÓN: Se recomienda utilizar siempre guantes de protección para evitar lesiones graves en las manos.
2. 5HWLUDUHOWXERVROXFLyQGHWHUJHQWHGHORUL¿FLRSUHVHQWHHQHOWDQTXHVROXFLyQ)LJ).
3. Retirar la cadena tirante del grifo del tanque solución (8) del gancho que se encuentra en la manilla de mando del grifo (9) ()LJ).
4. Desenroscando la manivela de cierre (10) ()LJ), trasladar los estribos superiores más allá de los retenes presentes en el tanque.
5. Retirar el kit tanque solución del aparato, para elevarlo, utilizar la manilla presente en el tanque.
6. Enjuagar el interior con un chorro de agua, si es necesario utilizar una espátula para quitar el lodo acumulado en el fondo del tanque.
ATENCIÓN3UHVWDUDWHQFLyQDQRSHUGHUHO¿OWURGHUHFXSHUDFLyQVROXFLyQGHWHUJHQWH
7. &RORFDUHOWDQTXHVROXFLyQHQODFROXPQDKDFLHQGRTXHODSDUWHLQIHULRUGHOWDQTXHVHDQFOHHQHOHVWULER¿MRTXHVHHQFXHQWUDHQ
la columna ()LJ).
8. Manteniendo el tanque con una mano, hacer descender el estribo móvil (12) hasta que el tanque solución quede bloqueado en la
columna ()LJ).
9. Bloquear la posición del estribo móvil (12) utilizando la manivela de cierre (10) ()LJ).
10. ,QWURGXFLUHOWXERGHGLVWULEXFLyQGHODJXDHQHORUL¿FLRGHODEDQFDGD)LJ).
11. Enganchar la cadena tirante del grifo del tanque solución (8) al gancho que se encuentra en la manilla de mando del grifo (9) ()LJ).
7
4
7
9
5 6
10
7
11
12
9
10
10
6
5
11
9
12
52

53
ES
1. ,QWURGXFLUHOWXERVROXFLyQGHWHUJHQWHHQHORUL¿FLRSUHVHQWHHQHOWDQTXHVROXFLyQ)LJ).
2. &RQHFWDUHOWXERGHO¿OWURGHUHFXSHUDFLyQVROXFLyQGHWHUJHQWHDODFRQH[LyQUiSLGD)LJ).
3UHVWDQGRDWHQFLyQDTXHHO¿OWURGHUHFXSHUDFLyQSHUPDQH]FDHQHOLQWHULRUGHOWDQTXHVROXFLyQ
3. Montar el tapón del tanque solución (4) ()LJ).
7
13
7
14
4
15
3DUDOLPSLDUHO¿OWURGHUHFXSHUDFLyQGHODVROXFLyQGHWHUJHQWHDFWXDUGHHVWDPDQHUD
1. &RORFDUODPiTXLQDHQHOOXJDUHVSHFt¿FRSDUDHOPDQWHQLPLHQWR
ATENCIÓN: El lugar previsto para esta operación debe estar en conformidad con la normativa vigente de respeto al medio ambiente.
2. Comprobar que la clavija (1) que se encuentra en el cable de alimentación (2) esté desconectada de la toma (3) de la red de alimentación ()LJ
en caso contrario, desconectarla.
ATENCIÓN: Estas operaciones deben realizarse utilizando guantes para protegerse del posible contacto con bordes o puntas de objetos
metálicos.
ATENCIÓN: Para evitar daños en el cable de alimentación, desconectar la clavija de la toma de red, tirando directamente de la clavija y no
del cable.
3. Controlar que el tanque solución esté vacío, de lo contrario proceder a vaciarlo.
4. Retirar el tapón del tanque de solución (4) ()LJ).
5. Desconectar el tubo solución detergente (5) de la conexión rápida (6) ()LJ).
ATENCIÓN: Se recomienda utilizar siempre guantes de protección para evitar lesiones graves en las manos.
6. /LPSLDUHO¿OWUREDMRXQFKRUURGHDJXDFRUULHQWHVLHVQHFHVDULRUHWLUDUODVLPSXUH]DVSUHVHQWHVHQHOPLVPR
7. Para el montaje, repetir las operaciones indicadas para el desmontaje, pero en sentido inverso.
CONTROL Y LIMPIEZA DEL FILTRO DE RECUPERACIÓN SOLUCIÓN DETERGENTE
1
2
3
1
4
2
5
6
3
Para limpiar la boquilla nebulizadora de la solución detergente, actuar de esta manera:
1. &RORFDUODPiTXLQDHQHOOXJDUHVSHFt¿FRSDUDHOPDQWHQLPLHQWR
ATENCIÓN: El lugar previsto para esta operación debe estar en conformidad con la normativa vigente de respeto al medio ambiente.
2. Comprobar que la clavija (1) que se encuentra en el cable de alimentación (2) esté desconectada de la toma (3) de la red de alimentación ()LJHQ
caso contrario, desconectarla.
ATENCIÓN: Estas operaciones deben realizarse utilizando guantes para protegerse del posible contacto con bordes o puntas de objetos
metálicos.
ATENCIÓN: Para evitar daños en el cable de alimentación, desconectar la clavija de la toma de red, tirando directamente de la clavija y no del
cable.
CONTROL Y LIMPIEZA BOQUILLA NEBULIZADOR SOLUCIÓN DETERGENTE
53

54
ES
RESOLUCIÓN DE AVERÍAS
En este capítulo se presentan los problemas más habituales relacionados con el uso de la máquina. En caso de no solucionar los problemas
con la siguiente información, contactar con el centro de asistencia más cercano.
DESGUACE
Proceder al desguace de la máquina en un centro de eliminación o
de recogida autorizado. Antes de realizar el desguace de la máquina
se deben quitar y separar los siguientes materiales y enviarlos a
los centros de recogida diferenciada, respetando la normativa de
higiene ambiental vigente:
• Discos de arrastre o cepillos
• Piezas eléctricas y electrónicas*
• Partes de plástico
• Partes metálicas
(*) En especial, para la eliminación de las piezas eléctricas y
electrónicas, dirigirse al distribuidor.
4
2 3
1 6
2
3 5
1
3. Controlar que el tanque solución esté vacío, de lo contrario proceder a vaciarlo.
4. 5HWLUDUHODQLOORURVFDGRGH¿MDFLyQERTXLOOD)LJ).
5. Retirar la boquilla nebulizadora (5), prestando atención a no perder la arandela (6) ()LJ).
ATENCIÓN: Se recomienda utilizar siempre guantes de protección para evitar lesiones graves en las manos.
6. Limpiar la boquilla bajo un chorro de agua corriente, si es necesario, retirar las impurezas presentes en el mismo.
7. Para el montaje, repetir las operaciones indicadas para el desmontaje, pero en sentido inverso.
54
PROBLEMA POSIBLE CAUSA SOLUCIÓN
LA MÁQUINA NO SE ENCIENDE
El cable de alargue no está conectado a la
toma de red.
Comprobar que la clavija que se encuentra
en el cable de alargue esté conectada a la
toma de la red de alimentación.
El cable de alargue no está conectado al
cable de alimentación de la máquina.
Comprobar que la clavija que se encuentra
en el cable de alimentación de la máquina
esté conectada a la toma del cable de
alargue.
/DV HVSHFL¿FDFLRQHV HOpFWULFDV GH OD
máquina corresponden con las de la red de
alimentación.
9HUL¿FDUTXHODVHVSHFL¿FDFLRQHVHOpFWULFDV
de la máquina correspondan con las de la
red de alimentación, controlar los datos
técnicos de la placa matrícula.
Cable de alargue dañado.
Comprobar que el cable de alargue no esté
GDxDGRVLORHVWiVXVWLWXLUOR
Sobrecalentamiento del motor de bancada.
Comprobar que la protección térmica
que se encuentra en la parte trasera
del manillar no se haya activado. En
caso de que se haya activado, aguardar
algunos minutos para que se enfríe y
luego presionar el pulsador del disyuntor
térmico para reactivar la alimentación y el
funcionamiento del motor
SOLUCIÓN DETERGENTE EN EL DISCO
DE ARRASTRE NO SUFICIENTE
La cantidad de solución detergente
contenida en el tanque de solución no es
adecuada para el trabajo que se desea
realizar.
Comprobar que la cantidad de solución
detergente contenida en el tanque de
solución sea adecuada para el trabajo que
GHEH UHDOL]DUVH VL HV QHFHVDULR OOHQDU HO
tanque de solución.

55
FR
INDEX
INDEX..............................................................................................................................55
SYMBOLES UTILISÉS DANS CE MODE D’EMPLOI ....................................................56
OBJET ET CONTENU DU MANUEL ..............................................................................56
DESTINATAIRES ............................................................................................................56
CONSERVATION DU MANUEL D’UTILISATION ET D’ENTRETIEN ............................56
PRISE EN CHARGE DE L’APPAREIL ...........................................................................56
AVANT-PROPOS ............................................................................................................56
DONNÉES POUR L’IDENTIFICATION ...........................................................................57
CARACTÉRISTIQUES TECHNIQUES ...........................................................................57
UTILISATION ENVISAGÉE – UTILISATION PRÉVUE ..................................................57
SÉCURITÉ ......................................................................................................................57
PLAQUE MATRICULE ....................................................................................................57
DONNÉES TECHNIQUES ..............................................................................................57
NORMES GÉNÉRALES DE SÉCURITÉ ........................................................................58
SYMBOLES UTILISÉS DANS L’APPAREIL ..................................................................63
CONNAISSANCE DE L’APPAREIL ................................................................................64
MANUTENTION DE L’APPAREIL EMBALLÉ ............................................................55
DÉBALLAGE DE L’APPAREIL ...................................................................................55
TRANSPORT DE L’APPAREIL ..................................................................................55
COMPOSANTS PRINCIPAUX DE L’APPAREIL ........................................................56
COMPOSANTS PRINCIPAUX DU GUIDON DE COMMANDE .................................56
COMPOSANTS PRINCIPAUX DE LA COLONNE DE DIRECTION ..........................56
PRÉPARATION DE L’APPAREIL ...................................................................................57
INSERTION DE LA BROSSE ....................................................................................57
INTRODUCTION DU RÉSERVOIR DE SOLUTION (EN OPTION) ..........................57
INTRODUCTION DE LA SOLUTION DÉTERGENTE (EN OPTION) ........................58
EMPLOI DE LA MACHINE .............................................................................................59
À LA FIN DU TRAVAIL ...................................................................................................60
ENTRETIEN ....................................................................................................................61
ÉLIMINATION .................................................................................................................64
RÉSOLUTION PANNES .................................................................................................64
FRANÇAIS
55

56
FR
Symbole d’avertissement :
Lire attentivement les sections précédées de ce symbole en respectant scrupuleusement ce qui y est indiqué, pour la
sécurité de l'opérateur et de l'appareil.
Symbole danger d'explosion :
Il indique que si la batterie n'est pas traitée conformément aux directives indiquées dans le manuel du constructeur, elle
risque d'exploser dans certaines conditions.
Symbole d'endroit à l'abri :
Les procédures précédées du symbole suivant doivent être effectuées rigoureusement dans un endroit à l'abri et sec.
6\PEROHG¶DYHUWLVVHPHQWGHFKDULRWVHQPRXYHPHQW
Indique qu'il faut manutentionner le produit emballé avec des chariots de manutention appropriés conformes aux
dispositions légales.
Symbole du livre ouvert avec le i :
Indique qu'il faut consulter le mode d'emploi.
Les descriptions contenues dans cette publication ne sont pas contraignantes. La société se réserve donc le droit d'apporter à
WRXWPRPHQWGpYHQWXHOOHV PRGL¿FDWLRQVDX[ RUJDQHVGpWDLOVHW IRXUQLWXUHVGDFFHVVRLUHVTXHOOH MXJHUDRSSRUWXQHV SRXUGHV
améliorations ou pour tout autre exigence de caractère constructif ou commercial. La reproduction même partielle des textes et
des dessins contenus dans cette publication est interdite par la loi.
/DVRFLpWpVHUpVHUYHOHGURLWGDSSRUWHUGHVPRGL¿FDWLRQVjFDUDFWqUHWHFKQLTXHHWRXUHODWLYHVDX[pTXLSHPHQWV/HV
LPDJHVVRQWIRXUQLHVjVLPSOHWLWUHGH[HPSOHHWQHVRQWSDVFRQWUDLJQDQWHVSRXUOHGHVLJQHWOHVpTXLSHPHQWV
Symbole du livre ouvert :
Il indique à l'opérateur de lire le manuel d'utilisation et d'entretien avant d'utiliser l'appareil.
Symbole gants de protection :
Il indique que l’opérateur doit toujours porter des gants de protection pour éviter des lésions graves aux mains.
SYMBOLES UTILISÉS DANS CE MODE D'EMPLOI
OBJET ET CONTENU DU MANUEL
DESTINATAIRES
CONSERVATION DU MANUEL D'UTILISATION ET D'ENTRETIEN
PRISE EN CHARGE DE L'APPAREIL
AVANT-PROPOS
Ce manuel a l’objet de fournir au client toutes les informations nécessaires pour utiliser l’appareil de la manière la plus appropriée,
autonome et sûre possible. Il comprend des informations concernant l'aspect technique, la sécurité, le fonctionnement, l'arrêt de
l’appareil, l'entretien, les pièces de rechange et la mise au rebut. Avant d'effectuer toute opération sur l’appareil, les opérateurs et
OHVWHFKQLFLHQVTXDOL¿pVGRLYHQWOLUHDWWHQWLYHPHQWOHVLQVWUXFWLRQVFRQWHQXHVGDQVFHPDQXHO(QFDVGHGRXWHVVXUOLQWHUSUpWDWLRQ
correcte des instructions, consulter le service après-vente le plus proche, pour obtenir les éclaircissements nécessaires.
/HPDQXHOHQTXHVWLRQVDGUHVVHjORSpUDWHXUHWDX[WHFKQLFLHQVTXDOL¿pVSRXUOHQWUHWLHQGHO¶DSSDUHLO/HVRSpUDWHXUVQHGRLYHQW
SDVHIIHFWXHUGRSpUDWLRQVUpVHUYpHVDX[WHFKQLFLHQVTXDOL¿pVQHVWSDVUHVSRQVDEOHGHVGRPPDJHVGpULYDQWGXQRQUHVSHFW
de cette interdiction.
Le manuel d'utilisation et d'entretien doit être conservé à proximité de l'appareil, dans sa pochette, à l'abri de liquides et de toute
autre substance pouvant compromettre sa lisibilité.
Au moment de la livraison, contrôler immédiatement si on a reçu toute la marchandise telle qu'elle est indiquée sur les documents
et que l'appareil n'a pas été endommagée au cours du transport. Si c'est le cas, faire constater au transporteur l'importance du
dommage subi et informer en même temps notre service de gestion de la clientèle. Il sera possible d'obtenir le matériel manquant
et l'indemnisation des dommages uniquement en respectant cette procédure dans les meilleurs délais.
7RXWDSSDUHLOSHXWIRQFWLRQQHUFRUUHFWHPHQWHWWUDYDLOOHUDYHFSUR¿WXQLTXHPHQWVLOHVWXWLOLVpFRUUHFWHPHQWHWPDLQWHQXHQSOHLQH
HI¿FDFLWp HQ HIIHFWXDQW OHQWUHWLHQ GpFULW GDQV OD GRFXPHQWDWLRQHQDQQH[H 1RXV YRXV SULRQV GH ELHQYRXORLUOLUH FH PDQXHO
GXWLOLVDWLRQHWGHQWUHWLHQ HWGH OHUHOLUH FKDTXHIRLV TXHORUV GHOXWLOLVDWLRQ GHODSSDUHLO GHVGLI¿FXOWpV VXUJLVVHQW(QFDVGH
besoin, nous vous rappelons que notre service après-vente travaille en collaboration étroite avec nos concessionnaires et reste à
votre disposition pour tout conseil et demande d'intervention directe.
56

57
FR
DONNÉES POUR L'IDENTIFICATION
Pour contacter le service après-vente technique ou pour demander des pièces de rechange, toujours signaler le modèle, la version
et le numéro de série indiqués sur la plaque signalétique.
CARACTÉRISTIQUES TECHNIQUES
UTILISATION ENVISAGÉE – UTILISATION PRÉVUE
SÉCURITÉ
PLAQUE MATRICULE
Cet appareil a été construit pour le nettoyage professionnel des sols durs et vinyliques en intérieur, à effectuer en suivant les
instructions. /¶DSSDUHLOGRLWrWUHXWLOLVpXQLTXHPHQWGDQVFHEXW.
Cet appareil a été conçu et fabriqué pour le nettoyage de sols
lisses et compacts, dans un environnement commercial, civil
HWLQGXVWULHO GDQVGHV FRQGLWLRQVGHVpFXULWp YpUL¿pHSDU XQ
RSpUDWHXUTXDOL¿p
Pour éviter des accidents, la collaboration de l'opérateur est essentielle. Aucun programme de prévention d'accidents ne peut
rWUHHI¿FDFHVDQVODFROODERUDWLRQWRWDOHGHODSHUVRQQHGLUHFWHPHQWUHVSRQVDEOHGXIRQFWLRQQHPHQWGHO¶DSSDUHLO/DSOXSDUWGHV
accidents qui se produisent dans une entreprise, au travail ou pendant les déplacements, sont causés par le non-respect des
règles de prudence les plus élémentaires. Un opérateur attentif et prudent est la meilleure garantie contre les accidents et il est
indispensable pour compléter tout programme de prévention.
La plaque matricule est placée dans la partie inférieure du
châssis de la machine, présente les caractéristiques générales
de l'appareil, en particulier son numéro de série. Le numéro de
série est une information très importante qui doit toujours être
fournie en même temps que toute demande d'assistance ou
d'achat de pièces de rechange.
ATTENTION : /DSSDUHLO QHVW SDV DGDSWp j XQH
utilisation sous la pluie ou sous des jets d'eau.
57
DONNÉES TECHNIQUES 80 ROS 17
Largeur de travail mm - inch 430-16,9
Nombre d’orbites orb./min. 1400
Puissance nominale du moteur du carter W 1100
Tension nominale du moteur du carter V 115
Fréquence du moteur du carter Hz 60
Pente maximale à pleine charge % 2
Capacité du réservoir de solution (en option) l - gal 15 - 3,96
Roues arrière (diamètre/largeur)
mm - inch
200/50
7,8/1,96
Longueur de la machine mm - inch 565 - 22,25
Hauteur de l’appareil au carter mm - inch 325 - 12,8
Hauteur de l’appareil au guidon mm - inch 1160 - 45,7
Largeur de l'appareil mm - inch 450 - 17,7
Poids de l'appareil en ordre de marche (sans réservoir de solution) kg - Lb 41 - 90,4
Niveau de vibration à la main m/s
2
1,9

FR
Lire et observer ces avertissements liés à la sécurité avant la première
utilisation de la monobrosse. Conserver ces avertissements sur la
VpFXULWpD¿QGHSRXYRLUOHVFRQVXOWHUXOWpULHXUHPHQWRXOHVFpGHUDX[
propriétaires successifs.
• Avant la mise en marche, lire la notice d’utilisation de la machine.
• Les étiquettes d’avertissement situées sur la machine fournissent
d’importantes indications pour une utilisation sûre.
• Toujours suivre les indications données dans les instructions ainsi que les
normes en vigueur en matière de sécurité.
• Conserver les plastiques de l’emballage hors de portée des enfants. Risque
G¶DVSK\[LH
DANGER: Cette signalisation indique un danger imminent pouvant
provoquer des blessures graves voire la mort.
AVERTISSEMENT: Cette signalisation indique une situation de danger
probable, pouvant provoquer des blessures graves voire la mort.
PRUDENCE: Cette signalisation indique une situation de danger probable,
pouvant provoquer des blessures légères.
ATTENTION : Cette signalisation indique une situation de danger probable,
pouvant provoquer des dommages aux objets.
AVERTISSEMENTS CONCERNANT LA SÉCURITÉ
NIVEAUX DE DANGER
DANGER :
• Pour réduire le risque d’incendie, de choc électrique ou de lésions, avant l’utilisation
veiller à lire et suivre toutes les instructions sur la sécurité et les signalisations
d’attention. Cette machine est conçue pour être sûre lorsqu’elle est utilisée pour
GHVIRQFWLRQVGHQHWWR\DJHVHORQFHTXLHVWVSpFL¿p(QFDVGHGRPPDJHVDX[
composants électriques ou mécaniques, il faut faire réparer la machine par un
VHUYLFHDSUqVYHQWHFRPSpWHQWRXSDUOHIDEULFDQWDYDQWO¶XWLOLVDWLRQD¿QG¶pYLWHU
d’autres dommages à la machine ou des blessures à l’utilisateur.
• $YDQWGHEUDQFKHUOD PDFKLQHVXUODSULVHGHFRXUDQWYpUL¿HU VLOHV GRQQpHV
pOHFWULTXHV¿JXUDQWVXUODSODTXHFRUUHVSRQGHQWjFHOOHVGXUpVHDXG¶DOLPHQWDWLRQ
/DPDFKLQHGRLWH[FOXVLYHPHQWrWUHDOLPHQWpHHQFRXUDQWDOWHUQDWLIHWDYHF
XQHWHQVLRQpJDOHjFHOOHLQGLTXpHVXUODSODTXHVLJQDOpWLTXH
• La prise pour le câble d’alimentation doit avoir la mise à terre réglementaire.
BRANCHEMENT AU RÉSEAU DE DISTRIBUTION ÉLECTRIQUE

59
FR
• Le câble secteur fourni avec la machine doit exclusivement être utilisé avec cette
machine et non pas avec d’autres.
• $YDQW FKDTXH XWLOLVDWLRQ YpUL¿HU TXH OD OLJQH GH EUDQFKHPHQW QHVW SDV
HQGRPPDJpH DLQVL TXH OD ¿FKH GDOLPHQWDWLRQ 6L OD OLJQH HVW HQGRPPDJpH
contacter immédiatement un technicien pour effectuer les réparations nécessaires.
• L’installation électrique et le branchement de l’appareil doivent exclusivement être
effectués par un installateur électrique, conformément à la norme CEI 60364-1.
• 1HMDPDLVWRXFKHUOD¿FKHG¶DOLPHQWDWLRQDYHFOHVPDLQVPRXLOOpHV
• Faire attention à ne pas endommager le câble de raccordement au réseau ou le
câble de la rallonge en passant dessus, en les écrasant, en les tirant ou autre.
Protéger le câble de la chaleur et des contacts avec les huiles ou les arêtes
coupantes.
• 9pUL¿HUUpJXOLqUHPHQWVLOHFkEOHVHFWHXUQ¶HVWSDVHQGRPPDJpH[¿VVXUHVRX
vieillissement). Si on détecte des traces d’endommagement, il faut remplacer le
câble avant d’utiliser à nouveau l’appareil.
• Le dispositif de protection contre les jets d’eau et la résistance mécanique doivent
être en parfait état, même après un éventuel remplacement des joints du câble
secteur ou du câble d’extension.
• 1HSDVQHWWR\HUO¶DSSDUHLODYHFXQWX\DXÀH[LEOHRXXQMHWG¶HDXjKDXWHSUHVVLRQ
(risque de court-circuit ou d’autres pannes électriques).
ATTENTION :
• Le régime transitoire d’insertion provoque une chute de tension temporaire.
• Si les conditions du réseau sont défavorables, les autres appareils électriques
peuvent subir des dommages.
• &HVGRPPDJHVVRQWSUpYXVVLO¶LPSpGDQFHGXUpVHDXHVWLQIpULHXUHjȍ
DANGER :
• ,O HVW LQWHUGLW G¶XWLOLVHU O¶DSSDUHLO DYHF OH FkEOH RX OD ¿FKH HQGRPPDJpV 3RXU
OH GpEUDQFKHUGH ODSULVHpOHFWULTXHVDLVLU OD¿FKHQRQSDVOHFkEOH 1HSDV
PDQLSXOHUOD¿FKHRXODPDFKLQHDYHFOHVPDLQVPRXLOOpHV'pVDFWLYHUWRXWHVOHV
commandes avant de débrancher l’appareil de la prise électrique.
• Ne pas tirer la machine ni la transporter par le câble, ne pas utiliser le câble
comme poignée, ne pas fermer une porte sur le câble ni tirer le câble autour de
bords ou d’angles aiguisés. Ne pas passer la machine sur le câble. Maintenir le
câble éloigné de surfaces chaudes.
• Faire beaucoup plus d’attention lorsque le nettoyage s’effectue sur des échelles.
UTILISATION - EMPLOI
59

60
FR
• La machine ne doit pas être utilisée ou conservée à l’extérieur dans des
conditions d’humidité ou exposée directement à la pluie.
• La température de stockage doit être comprise entre -25 °C et +55 °C.
• Conditions d’emploi : température ambiante comprise entre 0 °C et 40 °C avec
une humidité relative comprise entre 30 et 95 %. La machine a uniquement
été développée pour le nettoyage à sec et ne doit pas être utilisée ou rangée à
l’extérieur, dans des conditions humides.
• Avant l’utilisation, s’assurer que la machine est en parfait état de marche et
remplit les conditions de sécurité, ainsi que les équipements de travail. Contrôler
tout particulièrement le câble de la rallonge. Au cas où la machine ne serait pas
HQSDUIDLWpWDWGpEUDQFKHULPPpGLDWHPHQWOD¿FKHG¶DOLPHQWDWLRQGHODSULVHGH
secteur. La machine ne doit pas être utilisée.
• En cas d’utilisation de la machine dans un milieu à risque (une station-service,
par exemple), il faut respecter les normes de sécurité. Il est interdit d’utiliser la
machine dans des endroits potentiellement explosifs.
• Certaines substances peuvent former des vapeurs et des mélanges explosifs
lorsqu’elles entrent en contact avec l’air aspiré.
AVERTISSEMENT :
• Maintenir les cheveux, les vêtements longs, les doigts et toutes les parties du
corps éloignés des ouvertures et des parties en mouvement.
• Ne pas s’approcher de la machine avec des vêtements qui pourraient
s’accrocher. ÉVITER de porter des écharpes, des châles, des foulards et des
vêtements larges.
• /¶XWLOLVDWLRQGHODPDFKLQHHVWDXWRULVpHDX[HQIDQWVDXGHVVXVGHDQV
HWDX[SHUVRQQHVDYHFGHVFDSDFLWpVSK\VLTXHVVHQVRULHOOHVRXPHQWDOHV
UpGXLWHVRXVDQVGHO¶H[SpULHQFHHWGHVFRQQDLVVDQFHVjFRQGLWLRQTX¶HOOHV
VRLHQW VXUYHLOOpHV RX TX¶HOOHV DLHQW UHoX GHV LQVWUXFWLRQV FRQFHUQDQW
O¶XWLOLVDWLRQHQWRXWHVpFXULWpGHODPDFKLQHHWTX¶HOOHVFRPSUHQQHQWOHV
ULVTXHVOLpVjFHWWHXWLOLVDWLRQ
• Les enfants doivent être surveillés pour s’assurer qu’ils ne jouent pas avec
l’appareil.
• Il est interdit aux enfants de réaliser le nettoyage et l’entretien concernant
l’utilisateur sans surveillance.
• Cette machine est destinée à être utilisée exclusivement dans des locaux
fermés.
• Ne jamais laisser la machine sans surveillance quand elle est branchée à la
SULVHGHFRXUDQW'pEUDQFKHUOD¿FKHG¶DOLPHQWDWLRQGHODSULVHVHFWHXUORUVTXH
60

61
FR
la machine n’est pas utilisée et avant l’entretien.
• En cas de basses températures, il ne faut pas utiliser la machine à l’extérieur.
• Ne pas utiliser la machine sur des surfaces ayant une inclinaison supérieure à
celle indiquée par la plaque signalétique.
• 9pUL¿HUWRXMRXUVTXHOHVSODQVGHWUDYDLOVROVHWUDPSHVVRQWHQPHVXUHGH
supporter le poids de la balayeuse.
• La machine n’est pas destinée au nettoyage de sols accidentés ou irréguliers.
Ne pas utiliser la machine en pente.
• (QFDVGHGDQJHUGpEUDQFKHULPPpGLDWHPHQWOD¿FKHGXFkEOHG¶DOLPHQWDWLRQ
de la prise secteur.
PRUDENCE:
• eYLWHUGHSDVVHUVXUGHVPRUFHDX[GHFRUGH¿OVGHIHUFkEOHVLOVSRXUUDLHQW
s’entortiller dans la brosse et entraver le glissement.
• La machine a été conçue pour le nettoyage de moquettes ou de sols textiles, si
HOOHHVWXWLOLVpHDYHFOHVDFFHVVRLUHVVSpFL¿TXHV
• Les opérations de polissage devront être effectuées dans des zones interdites
au passage des personnes non autorisées. Signaler les zones de travail avec
des panneaux appropriés.
• Attention : ne pas permettre au câble d’alimentation d’entrer en contact avec la
brosse tournante.
• La machine ne provoque pas de vibrations nuisibles.
• Ne pas mettre de récipients contenant des liquides sur la machine.
• En cas d’incendie, utiliser un extincteur à poudre. Ne pas utiliser d’eau.
• Éviter de faire fonctionner la brosse ou le disque entraîneur lorsque la machine
est à l’arrêt pour ne pas endommager le sol.
• Cette machine doit être rangée exclusivement dans des locaux fermés.
• Toujours utiliser la machine pour l’usage prévu, en tenant compte des conditions
locales et en prenant garde à l’éventuelle présence de tiers, notamment
d’enfants, en phase de travail.
• Ne jamais laisser la machine sans surveillance tant qu’elle n’est pas désactivée
et débranchée du réseau d’alimentation.
• Pour éviter une utilisation non admise de la machine, l’alimentation doit être
coupée, éteindre la machine et débrancher le câble d’alimentation de la prise.
• La machine laissée sans surveillance doit être protégée contre les mouvements
imprévus.
61

62
FR
DANGER :
• Avant le nettoyage et l’entretien de la machine ou avant le remplacement de
SLqFHVpWHLQGUHODPDFKLQHHWGpEUDQFKHUOD¿FKHG¶DOLPHQWDWLRQGHODSULVH
secteur.
• Les réparations doivent être effectuées exclusivement par des services
après-vente agréés ou des experts dans le domaine, connaissant bien toutes
les règles de sécurité en vigueur en la matière.
• Respecter le contrôle de sécurité selon les dispositions locales pour les
appareils à usage commercial.
• Toujours porter les gants de protection pour travailler avec la machine.
PRUDENCE:
• 6LODPDFKLQHQHIRQFWLRQQHSDVFRUUHFWHPHQWYpUL¿HUVLFHQHVWSDVGjXQ
entretien ordinaire mal réalisé. Dans le cas contraire, demander l'intervention
du service après-vente agréé.
• Si on doit remplacer des pièces, commander des pièces de rechange
D’ORIGINE chez un concessionnaire et/ou un revendeur agréé.
• Rétablir tous les branchements électriques après un entretien.
• Une fois par an, faire contrôler la machine par un service après-vente agréé.
• Éliminer les consommables en suivant scrupuleusement les lois en vigueur.
Lorsqu'après des années de grand travail votre machine doit être mise au
rebut, procéder à l'élimination appropriée des matériaux qu'elle contient,
en tenant compte du fait que tous les matériaux qui la composent sont
entièrement recyclables.
• Si le câble d’alimentation est endommagé, arrêter la machine (si elle est en
marche), la débrancher de la prise et faire remplacer immédiatement le câble
par un service après-vente agréé.
• 1¶XWLOLVHUTXHOHVGLVTXHVIRXUQLVDYHFODPDFKLQHRXFHX[VSpFL¿pVGDQVOH
manuel d’instructions. L’emploi de disques différents peut compromettre la
sécurité de la machine.
ENTRETIEN
62

63
FR
Symbole de mise à la terre de l’appareil :
Il indique le point de mise à la terre de l’installation électrique de l'appareil.
Symbole de pente maximale :
Il indique la pente maximale.
SYMBOLES UTILISÉS DANS L'APPAREIL
CONNAISSANCE DE L'APPAREIL
MANUTENTION DE L'APPAREIL EMBALLÉ
/DSSDUHLOHVWFRQWHQXGDQVXQHPEDOODJHVSpFL¿TXHOHVpOpPHQWV
d'emballage (sachets en plastique, agrafes, etc.) sont des sources
potentielles de danger et ne doivent pas être laissés à la portée des
enfants, des personnes handicapées, etc.
Le poids total de l'appareil avec l'emballage est de 45 kg 99,2Lb
(poids de l'appareil à vide plus l'emballage).
Les dimensions de l'emballage sont les suivantes :
PRUDENCE :
N’utiliser que les pièces de rechange et accessoires autorisés par le
fabricant. Les pièces de rechange et accessoires d’origine garantissent
XQHPSORLVUHWHI¿FDFHGHO¶DSSDUHLO
PRUDENCE :
Utiliser exclusivement comme
câbles de rallonge les matériaux
indiqués clairement par le fabricant
(s’adresser au distributeur agréé)
ou des modèles supérieurs en ce
qui concerne la qualité. Lors de
l’emploi d’un câble de rallonge,
observer la section minimale
de celui-ci.
LONGUEUR DU CÂBLE
SECTION DU
CÂBLE
<16A <25A
Jusqu’à 20 m 1,5 mm
2
2,5 mm
2
De 20 m à 50 m 2,5 mm
2
4,0 mm
2
ACCESSOIRES ET PIÈCES DE RECHANGE
CÂBLES DE RALLONGE
63
X%
80 ROS 17
A mm - inch 490 - 19,3
B mm - inch 610 - 24
C mm - inch 1190 - 46,85

64
FR
DÉBALLAGE DE L'APPAREIL
/¶DSSDUHLOHVWFRQWHQXGDQVXQHPEDOODJHVSpFL¿TXHSRXUGpSRVHU
l’appareil de l’emballage, agir comme suit :
1. Positionner la partie basse de l'emballage extérieur au contact
du sol.
ATTENTION :0DQLSXOHUOHSURGXLWHPEDOOpDYHFGHVPR\HQV
GHOHYDJHDSWHVHWFRQIRUPHVDX[GLVSRVLWLRQVOpJDOHV
ATTENTION 8WLOLVHU FRPPH UpIpUHQFH OHV SLFWRJUDSKLHV
LPSULPpHVVXUOHFDUWRQ
2. Déposer les feuillards.
3. Retirer l’emballage extérieur.
ATTENTION :,OHVWFRQVHLOOpGHWRXMRXUVSRUWHUGHVJDQWVGH
SURWHFWLRQSRXUpYLWHUGHVHEOHVVHUJUDYHPHQWOHVPDLQV
4. Déposer les accessoires en option contenus dans l’emballage.
5. Désolidariser l'appareil du carton.
ATTENTION :$XFRXUVGHFHWWHRSpUDWLRQYpUL¿HUODEVHQFH
GREMHWVRXGHSHUVRQQHVjSUR[LPLWpGHODSSDUHLO
ATTENTION : 3RXU GpSRVHU O¶DSSDUHLO GX FDUWRQ QH SDV
utiliser le guidon de commande, il pourrait s'endommager
SHQGDQWO¶RSpUDWLRQ
ATTENTION : LO HVW FRQVHLOOp GH JDUGHU WRXV OHV pOpPHQWV
GHPEDOODJHSRXUXQpYHQWXHOWUDQVSRUWGHODSSDUHLO
TRANSPORT DE L'APPAREIL
Pour transporter l’appareil en sécurité, agir comme suit :
1. Effectuer les phases pour mettre l'appareil en sécurité (lire
paragraphe « MISE EN SÉCURITÉ DE L'APPAREIL »).
2. En utilisant un plan incliné, faire monter l'appareil sur la palette en
la poussant en marche arrière.
3. Poser le carter sur la palette.
4. Fixer l'appareil à la palette à l'aide des feuillards.
5. Il est alors possible de transporter l’appareil en toute sécurité.
ATTENTION :,OHVWFRQVHLOOpGHWRXMRXUVSRUWHUGHVJDQWVGH
SURWHFWLRQSRXUpYLWHUGHVHEOHVVHUJUDYHPHQWOHVPDLQV
ATTENTION : 3RXU OH WUDQVSRUW GDQV GHV YpKLFXOHV ¿[HU
ODSSDUHLOVHORQOHVGLUHFWLYHVHQYLJXHXUD¿QTXLOQHSXLVVHQL
glisser, ni se retourner.
COMPOSANTS PRINCIPAUX DE L'APPAREIL
COMPOSANTS PRINCIPAUX DU GUIDON DE COMMANDE
/HVFRPSRVDQWVGHEDVHGHODSSDUHLOVLGHQWL¿HQWFRPPHVXLW
1. Guidon de commande.
2. Carter.
3. Carter.
4. Brosse. (ACCESSOIRE)
5. Disque entraîneur
6. Câble d'alimentation (ACCESSOIRE)
7. réservoir de solution
Les composants du guidon sont les suivants :
1. Levier de présence opérateur.
2. Levier de commande de l'interrupteur général (placé sous les
poignées du guidon).
3. Levier de réglage de l'inclinaison du guidon.
4. Levier de commande de la vanne de distribution du détergent.
5. Disjoncteur thermique de protection du moteur du carter.
6. Câble d'alimentation.
7. Interrupteur de commande de la trousse
COMPOSANTS PRINCIPAUX DE LA COLONNE DE DIRECTION
Les composants du guidon sont les suivants :
1. Support supérieur réservoir de solution.
2. Support inférieur réservoir de solution.
3. Crochet pour cable
4. Enrouleur inférieur du câble.
64
1
6
2-3
7
4-5
4
1
6
3
2
5
1
1 2
4
3
2
1
1 2
7

65
FR
Pour insérer la brosse dans le corps carter de l'appareil, effectuer
ce qui suit :
1. 9pUL¿HU VL OD ¿FKH VLWXpH VXU OH FkEOH GDOLPHQWDWLRQ
est débranchée de la prise (3) de secteur ()LJ ), sinon la
débrancher.
ATTENTION :,OHVWFRQVHLOOpGHWRXMRXUVSRUWHUGHVJDQWVGH
SURWHFWLRQSRXUpYLWHUGHVHEOHVVHUJUDYHPHQWOHVPDLQV
ATTENTION : 3RXU pYLWHU OHV GRPPDJHV DX FkEOH
GDOLPHQWDWLRQ GpEUDQFKHU OD SULVH GX VHFWHXU HQ WLUDQW
GLUHFWHPHQWODSULVHHWQRQOHFkEOH
2. 9pUL¿HUVLOHJXLGRQGHFRPPDQGHHVWHQSRVLWLRQYHUWLFDOHGDQV
le cas contraire appuyer sur le levier de décrochage (4) ()LJ) et
tourner le guidon en position verticale ()LJ). Lorsque le guidon
est en position verticale, relâcher le levier de décrochage (4).
PRÉPARATION DE L'APPAREIL
INSERTION DE LA BROSSE
3. Incliner en arrière l'appareil ()LJ), bloquer une des roues arrière
et déplacer vers l'arrière la colonne de direction.
4. 'pYLVVHU HW HQOHYHU OHV EDJXHWWHV GH ¿[DWLRQ HW OD SODTXH GH
centrage ()LJ).
5. Insérer le disque d’entraînement, prendre soin de centrer les
WLJHVGH¿[DWLRQSUpVHQWVVXUODPDFKLQHDYHFOHVWURXVGXGLVTXH
trascinatore.Di suivie d’insérer la plaque de centrage et serrer les
EDJXHWWHVGH¿[DWLRQ)LJ).
Pour monter le réservoir de solution sur le guidon, agir comme suit :
1. Fixer le guidon à environ 45° par rapport au sol ()LJ).
2. Dévisser la poignée de fermeture (1) ()LJ ) pour placer
les brides supérieures au-delà de la moitié de la colonne de
direction ()LJ) (si elles ne sont pas encore en position).
INTRODUCTION DU RÉSERVOIR DE SOLUTION
3. Poser le réservoir de solution sur la colonne de direction, de
manière à ce que la partie inférieure du réservoir reste prise par
ODEULGH¿[HGHODFRORQQHGHGLUHFWLRQ)LJ).
4. En saisissant le réservoir avec une main, faire descendre avec
l'autre la bride mobile (3) jusqu'à ce que le réservoir de solution
resté bloqué sur la colonne de direction ()LJ).
5. Bloquer la position de la bride mobile (3) au moyen de la poignée
de fermeture (1) ()LJ).
65
1
2
3 4
1
4
2
5
3
6
1 2 3
1

66
FR
Remplir le réservoir de solution seulement quand la colonne de
direction est en position verticale, en agissant comme suit :
1. Déposer le bouchon du réservoir de solution (1) ()LJ).
2. Remplir d'eau propre à une température inférieure à 50 ºC.
3. Ajouter dans le réservoir le liquide détergent dans la concentration
et selon les modalités indiquées sur l'étiquette du fabricant. Pour
éviter la formation d'une quantité excessive de mousse qui dirait
endommager les composants internes de l'appareil, utiliser le
pourcentage de détergent.
4. Insérer le bouchon du réservoir de solution (1) ()LJ).
ATTENTION :,OHVWFRQVHLOOpGHWRXMRXUVSRUWHUGHVJDQWVGH
SURWHFWLRQSRXUpYLWHUGHVHEOHVVHUJUDYHPHQWOHVPDLQV
ATTENTION : LO HVW FRQVHLOOp GDVSLUHU SDU PRPHQWV OD
PRXVVH UHPSOLH GH VDOHWp DX PR\HQ GXQ DVSLUDWHXU SRXU
liquides.
INTRODUCTION DE LA SOLUTION DÉTERGENTE
6. Insérer le tuyau de distribution de l'eau (4) dans le trou du
carter (5) ()LJ).
7. Insérer la chaîne tirant le robinet du réservoir de solution (6) dans
le crochet de la poignée de commande du robinet (7) ()LJ).
7
10
7
9
8 .Insérez le tube de solution de nettoyage (7) dans le trou
du réservoir de solution (Fig.9).
&RQQHFWWKHFOHDQLQJVROXWLRQWXEHZLWKWKHTXLFNUHOHDVH¿OWHU
attachment and push it to the bottom of the tank. (Figure 10).
66
1
4
7
2
5
6
1 1
2
5 4
6
7
3 3
1

67
FR
Avant de commencer à employer la machine, il faut effectuer ce qui suit :
1. Avant l'utilisation, il faut contrôler l'état régulier et la sécurité
de service de l'appareil avec les équipements de travail, en
particulier le câble d'alimentation et le câble de rallonge. Si l'état
n'est pas parfait, l'utilisation de l'appareil est interdite.
2. ,QWURGXLUHOD¿FKHGXFkEOHGDOLPHQWDWLRQGDQVODSULVH
de secteur )LJ.
3. Débloquer le guidon de commande de la position verticale.
Appuyer sur le levier d'arrêt (5) de la colonne de direction selon
ODGLUHFWLRQLQGLTXpHSDUODÀqFKH)LJ) et tourner la colonne de
direction vers soi ()LJ).
ATTENTION :3HQGDQWFHWWHRSpUDWLRQQHSDVSRVHUOHSLHG
sur l'appareil.
EMPLOI DE LA MACHINE
4. Tourner vers soi la colonne de direction jusqu'à trouver la position
optimale, cette position doit être confortable pour l’utilisation de
l’appareil.
5. Une fois la position idéale d'utilisation trouvée, relâcher le levier
d'arrêt (5) de la colonne de direction pour bloquer le guidon.
6. Tourner vers soi le levier de présence opérateur (6) ()LJ).
7. Appuyer sur les leviers de commande de l'interrupteur
général (7), placés sous les poignées du guidon ()LJ).
8. L’appareil commencera alors à se déplacer.
9. Appliquer une petite dose de solution détergente sur le sol, en
appuyant sur le levier (8) ()LJ).
10. Guider l'appareil avec la brosse rotative de gauche à droite ou
dans le sens contraire.
11. Tout de suite après avoir guidé l'appareil de la même façon dans
OHVHQVFRQWUDLUHD¿QTXHQYLURQXQTXDUWGHODODUJHXUGHWUDYDLO
se superpose à la largeur précédente.
12. Il est conseillé d'aspirer par moments la mousse remplie de
saleté au moyen d'un aspirateur pour liquides (kit de réservoir
de solution en option).
ATTENTION : /D SUHPLqUH IRLV TXXQ RSpUDWHXU XWLOLVH
l'appareil, il doit se familiariser avec les mouvements à
LPSULPHUjODFRORQQHSRXUREWHQLUXQHVpFXULWpVXI¿VDQWHVXU
ODGLUHFWLRQQDOLWpGHPRXYHPHQWGHODSSDUHLOHQVXLWHQHSDV
DFWLRQQHUODSSDUHLOjSUR[LPLWpGHSHUVRQQHVRXGREVWDFOHV
ATTENTION :7UDYDLOOHUHQUpDOLVDQWGHVPRXYHPHQWVOHQWVj
droite et à gauche, et dans la mesure du possible à reculons
SRXUTXHORSpUDWHXUVHWURXYHWRXMRXUVGDQVOD]RQHGXVROTXL
QDSDVHQFRUHpWpQHWWR\pH
ATTENTION : 7RXMRXUV PDLQWHQLU OH FkEOHGDOLPHQWDWLRQ j
ODUULqUHGHORSpUDWHXUHQIDLVDQWDWWHQWLRQjQHSDVWUDYDLOOHU
ORUVTXHOD PDFKLQH VH WURXYHSUqVGHFHOXLFLSRXUpYLWHUGH
l'endommager.
ATTENTION : 6LO HVW QpFHVVDLUH GH WUDYDLOOHU GDQV GHV
HVSDFHV pWURLWV LO HVW SRVVLEOH GH WRXUQHU OD FRORQQH GH
direction en position verticale.
67
2
3
4
6
5
7
1
4
2
5
3
6

FR
$ OD ¿Q GX WUDYDLO HW DYDQW WRXW W\SH G¶HQWUHWLHQ H[pFXWHU OHV
opérations suivantes :
1. 'pEUDQFKHUOD¿FKHGXFkEOHGDOLPHQWDWLRQGHODSULVH
de secteur ()LJ).
ATTENTION :,OHVWFRQVHLOOpGHWRXMRXUVSRUWHUGHVJDQWVGH
SURWHFWLRQSRXUpYLWHUGHVHEOHVVHUJUDYHPHQWOHVPDLQV
ATTENTION : 3RXU pYLWHU OHV GRPPDJHV DX FkEOH
GDOLPHQWDWLRQ GpEUDQFKHU OD SULVH GX VHFWHXU HQ WLUDQW
GLUHFWHPHQWODSULVHHWQRQOHFkEOH
2. Tourner le guidon de commande en position verticale, appuyer
sur le levier de décrochage (4) ()LJ ) et tourner le guidon en
position verticale ()LJ ). Lorsque le guidon est en position
verticale, relâcher le levier de décrochage (4).
À LA FIN DU TRAVAIL
ATTENTION :3HQGDQWFHWWHRSpUDWLRQQHSDVSRVHUOHSLHG
sur l'appareil.
3. Incliner l'appareil et amener l'appareil à l'endroit destiné à
l'entretien et effectuer toutes les procédures énumérées au
paragraphe « INTERVENTIONS D'ENTRETIEN PÉRIODIQUE
CONSEILLÉ» indiquées dans la colonne « À LA FIN DE
L'EXPLOITATION ».
4. Une fois les interventions d'entretien terminées, amener l'appareil
à l'endroit prévu pour le rangement.
ATTENTION 5DQJHUODSSDUHLO GDQV XQHQGURLW IHUPp VXU
une surface plane et lisse. Il ne doit y avoir aucun objet
susceptible d'endommager l'appareil ou de s'endommager à
VRQFRQWDFWjSUR[LPLWpGHFHOXLFL
1. Si on a l'intention d'utiliser le système de spray, enclencher le levier de l'interrupteur de commande de la pompe (8)
situé sur le guidon de commande.
ATTENTION : Si on pousse le levier (8) en avant, la pompe fonctionnera en mode intermittent (Fig.7).
ATTENTION : Si on pousse le levier (8) en arrière, la pompe fonctionnera en mode continu.
2. Conduire la machine avec la brosse tournante de gauche à droite ou en sens inverse.
3. Tout de suite après, conduire la machine en sens inverse de manière à ce qu'environ un quart de la largeur de travail
se superpose à celle précédente.
4. Il est conseillé d'aspirer par moments la mousse remplie de saleté au moyen d'un aspirateur pour liquides (kit de
réservoir de solution en option).
ATTENTION :/DSUHPLqUHIRLVTXXQRSpUDWHXUXWLOLVHODPDFKLQHLOGRLWVHIDPLOLDULVHUDYHFOHVPRXYHPHQWVj
UpDOLVHUVXUOHJXLGRQSRXUREWHQLUXQHPDvWULVHVXI¿VDQWHGHODPDQ°XYUDELOLWpGHODPDFKLQH,OQHGRLWGRQFSDV
HPSOR\HUODPDFKLQHjSUR[LPLWpGHSHUVRQQHVRXGREVWDFOHV
ATTENTION :7UDYDLOOHUHQUpDOLVDQWGHVPRXYHPHQWVOHQWVjGURLWHHWjJDXFKHHWGDQVODPHVXUHGXSRVVLEOHj
UHFXORQVSRXUTXHORSpUDWHXUVHWURXYHWRXMRXUVGDQVOD]RQHGXVROTXLQDSDVHQFRUHpWpQHWWR\pH
ATTENTION :7RXMRXUVPDLQWHQLUOH FkEOH GDOLPHQWDWLRQjODUULqUH GH ORSpUDWHXU HQIDLVDQWDWWHQWLRQ j QHSDV
WUDYDLOOHUORUVTXHODPDFKLQHVHWURXYHSUqVGHFHOXLFLSRXUpYLWHUGHOHQGRPPDJHU
ATTENTION :1H SDVWURS LQVLVWHUVXU ODPrPH ]RQH SRXU QH SDVULVTXHU GHGpWpULRUHU OHVRO QRWDPPHQW HQ
fonction du type de brosse ou de disque abrasif choisi.
ATTENTION :6LOHVWQpFHVVDLUHGHWUDYDLOOHUGDQVGHVHVSDFHVpWURLWVLOHVWSRVVLEOHGHWRXUQHUODFRORQQHGH
direction en position verticale.
7
1
2
3 4
1 2 3

69
FR
Le nettoyage minutieux de la brosse/Disque entraîneur garantit un
meilleur nettoyage du sol ainsi qu'une plus grande durée du moteur
de brosse. Pour nettoyer le disque entraîneur, agir comme suit :
1. Amener l'appareil dans l'endroit prévu pour la vidange des eaux
sales.
ATTENTION : /H ORFDO GHVWLQp j FHWWH RSpUDWLRQ GRLW rWUH
conforme aux normes en vigueur en matière de respect de
l'environnement.
2. 9pUL¿HU VL OD ¿FKH VLWXpH VXU OH FkEOH GDOLPHQWDWLRQ
est débranchée de la prise (3) de secteur ()LJ ), sinon la
débrancher.
ATTENTION :,OHVWFRQVHLOOpGHWRXMRXUVSRUWHUGHVJDQWVGH
SURWHFWLRQSRXUpYLWHUGHVHEOHVVHUJUDYHPHQWOHVPDLQV
ATTENTION : 3RXU pYLWHU OHV GRPPDJHV DX FkEOH
GDOLPHQWDWLRQ GpEUDQFKHU OD SULVH GX VHFWHXU HQ WLUDQW
GLUHFWHPHQWODSULVHHWQRQOHFkEOH
&2175Ð/((71(772<$*('(/$%5266(',648((175$,1(85
3. 9pUL¿HUVLOHJXLGRQGHFRPPDQGHHVWHQSRVLWLRQYHUWLFDOHGDQV
le cas contraire appuyer sur le levier de décrochage (4) ()LJ) et
tourner le guidon en position verticale ()LJ). Lorsque le guidon
est en position verticale, relâcher le levier de décrochage (4).
4. Incliner en arrière l'appareil ()LJ), bloquer une des roues arrière
et déplacer vers l'arrière la colonne de direction.
5. 'HVVHUUHU OHV EDJXHWWHV GH ¿[DWLRQ SXLV UHWLUHU OD SODTXH GH
centraggio.Ora il est possible de retirer la brosse d’alimentation /
Disque entraîneur()LJ).
6. Désolidariser la brosse de l'appareil ()LJ).
7. Nettoyer la brosse/ disque entraîneur sous un jet d'eau et enlever
les éventuelles impuretés présentes dans les brins de la brosse
RXGH ODVXUIDFHGX GLVTXHG¶HQWUDvQHPHQW 9pUL¿HUOXVXUH GHV
brins et en cas d'usure excessive, remplacer la brosse (la saillie
des brins ne doit pas être inférieure à 10 mm).
8. Répéter les opérations en sens inverse pour remonter le tout.
INTERVENTIONS D'ENTRETIEN CONSEILLÉ
ENTRETIEN
TYPE D’ENTRETIEN
À LA FIN DU
TRAVAIL
HEBDOMADAIRE
AVANT UNE
LONGUE PÉRIODE
D’INACTIVITÉ
TRANSPORT
Contrôle et nettoyage du disque entraîneur X X X
Contrôle et nettoyage du réservoir de solution X X X
&RQWU{OH HW QHWWR\DJH GX ¿OWUH GX V\VWqPH GDVSLUDWLRQ GH OD
solution détergente
X X
Contrôle et nettoyage de la buse du nébuliseur de solution détergente X X
69
1
2
3 4
1 2 3
4 5

70
FR
Le nettoyage soigneux du réservoir de solution garantit un meilleur nettoyage du sol. Pour nettoyer le
réservoir de solution, procéder comme suit :
1. Amener l’appareil dans le local prévu pour l’entretien.
ATTENTION/HORFDOGHVWLQpjFHWWHRSpUDWLRQGRLWrWUHFRQIRUPHjODUpJOHPHQWDWLRQHQYLJXHXU
en matière de respect de l’environnement.
2. 9pUL¿HUVLOD¿FKHVLWXpHVXUOHFkEOHGDOLPHQWDWLRQHVWGpEUDQFKpHGHODSULVHGHVHFWHXU
()LJ), sinon la débrancher.
ATTENTION : FHV RSpUDWLRQV GRLYHQW rWUH HIIHFWXpHV HQ XWLOLVDQW GHV JDQWV SRXU VH SURWpJHU
FRQWUHWRXWFRQWDFWDYHFGHVERUGVRXSRLQWHVG¶REMHWVPpWDOOLTXHV
ATTENTION :3RXUpYLWHUG¶HQGRPPDJHUOHFkEOHG¶DOLPHQWDWLRQGpEUDQFKHUGLUHFWHPHQWOD¿FKH
GHODSULVHVHFWHXUVDQVWLUHUVXUOHFkEOH
3. 9pUL¿HUVLOHUpVHUYRLUGHVROXWLRQHVWYLGHDXWUHPHQWOHYLGHU
4. Retirer le bouchon du réservoir de solution (4) ()LJ).
5. Retirer le tuyau de distribution de l'eau (5) du trou du carter (6) ()LJ).
CONTRÔLE ET NETTOYAGE DU RÉSERVOIR DE SOLUTION
1
2
3
1
6
4
5
2
3
1. Détacher le tuyau de la solution détergente (7) du raccord à serrage rapide (8) ()LJ).
ATTENTION,O HVWFRQVHLOOpGHWRXMRXUV SRUWHUGHVJDQWVGH SURWHFWLRQSRXUpYLWHUGHV OpVLRQV
graves aux mains.
2. Retirer le tuyau de la solution détergente (7) du trou situé dans le réservoir de solution ()LJ).
3. Retirer la chaîne tirant le robinet du réservoir de solution (8) du crochet de la poignée de commande
du robinet (9) ()LJ).
4. Dévisser la vis de serrage croisillon (10) ()LJ) et déplacer les brides supérieures au-delà des
pOpPHQWVGHEORFDJH¿JXUDQWVXUOHUpVHUYRLU
5. Déposer le kit réservoir de solution de l'appareil. Pour le soulever, utiliser la poignée située sur le
réservoir.
6. Rincer l’intérieur au jet d’eau, le cas échéant utiliser une spatule pour éliminer la bourbe accumulée
sur le fond su réservoir.
ATTENTION)DLUHDWWHQWLRQjQHSDVSHUGUHOH¿OWUHGDVSLUDWLRQGHODVROXWLRQGpWHUJHQWH
7. Disposer le réservoir de solution sur la colonne de direction et faire en sorte que la partie inférieure
GXUpVHUYRLUVRLWLPPRELOLVpHJUkFHjODEULGH¿[HVLWXpHVXUODFRORQQHGHGLUHFWLRQ)LJ).
8. Immobiliser le réservoir avec une main et faire descendre la bride mobile (12) avec l'autre, jusqu'à ce
que le réservoir de solution soit bloqué sur la colonne de direction ()LJ).
7
4
7
9
5 6
1. Bloquer la position de la bride mobile (12) au moyen de la vis de serrage croisillon (10) ()LJ).
2. Insérer le tuyau de distribution de l'eau (5) dans le trou du carter (6) ()LJ).
3. Insérer la chaîne tirant le robinet du réservoir de solution (8) dans le crochet de la poignée de
commande du robinet (9) ()LJ).
10
7
11
12
9
70

71
FR
1. Introduire le tuyau de la solution détergente (7) dans le trou situé dans le réservoir de solution
()LJ).
2. 5DFFRUGHUOH WX\DXGX¿OWUH GDVSLUDWLRQGHOD VROXWLRQGpWHUJHQWH DXUDFFRUGj VHUUDJHUDSLGH
(8) ()LJ)DLUHDWWHQWLRQjFHTXHOH¿OWUHGDVSLUDWLRQUHVWHjOLQWpULHXUGXUpVHUYRLUGHVROXWLRQ
3. Insérer le bouchon du réservoir de solution (4) ()LJ).
10
10
6
5
11
9
12
7
13
7
14
4
15
3RXUQHWWR\HUOH¿OWUHGDVSLUDWLRQGHODVROXWLRQGpWHUJHQWHSURFpGHUFRPPHVXLW
1. Amener l’appareil dans le local prévu pour l’entretien.
ATTENTION/HORFDOGHVWLQpjFHWWHRSpUDWLRQGRLWrWUHFRQIRUPHjODUpJOHPHQWDWLRQHQYLJXHXUHQPDWLqUHGHUHVSHFWGHO¶HQYLURQQHPHQW
2. 9pUL¿HUVLOD¿FKHVLWXpHVXUOHFkEOHGDOLPHQWDWLRQHVWGpEUDQFKpHGHODSULVHGHVHFWHXU)LJ), sinon la débrancher.
ATTENTION :FHVRSpUDWLRQVGRLYHQWrWUHHIIHFWXpHVHQXWLOLVDQWGHVJDQWVSRXUVHSURWpJHUFRQWUHWRXWFRQWDFWDYHFGHVERUGVRXSRLQWHV
G¶REMHWVPpWDOOLTXHV
ATTENTION :3RXUpYLWHUG¶HQGRPPDJHUOHFkEOHG¶DOLPHQWDWLRQGpEUDQFKHUGLUHFWHPHQWOD¿FKHGHODSULVHVHFWHXUVDQVWLUHUVXUOHFkEOH
3. 9pUL¿HUVLOHUpVHUYRLUGHVROXWLRQHVWYLGHDXWUHPHQWOHYLGHU
4. Retirer le bouchon du réservoir de solution (4) ()LJ).
5. Détacher le tuyau de la solution détergente (5) du raccord à serrage rapide (6) ()LJ).
ATTENTION,OHVWFRQVHLOOpGHWRXMRXUVSRUWHUGHVJDQWVGHSURWHFWLRQSRXUpYLWHUGHVOpVLRQVJUDYHVDX[PDLQV
6. 1HWWR\HUOH¿OWUHVRXVOHDXFRXUDQWHHWpOLPLQHUOHVVDOHWpVpYHQWXHOOHPHQWSUpVHQWHV
7. Répéter les opérations en sens inverse pour remonter l’ensemble.
CONTRÔLE ET NETTOYAGE DU FILTRE D'ASPIRATION DE LA SOLUTION DÉTERGENTE
1
2
3
1
4
2
5
6
3
Pour nettoyer la buse du nébuliseur de solution détergente, procéder de la façon suivante :
1. Amener l’appareil dans le local prévu pour l’entretien.
ATTENTION/HORFDOGHVWLQpjFHWWHRSpUDWLRQGRLWrWUHFRQIRUPHjODUpJOHPHQWDWLRQHQYLJXHXUHQPDWLqUHGHUHVSHFWGHO¶HQYLURQQHPHQW
2. 9pUL¿HUVLOD¿FKHVLWXpHVXUOHFkEOHGDOLPHQWDWLRQHVWGpEUDQFKpHGHODSULVHGHVHFWHXU)LJ), sinon la débrancher.
ATTENTION :FHVRSpUDWLRQVGRLYHQWrWUHHIIHFWXpHVHQXWLOLVDQWGHVJDQWVSRXUVHSURWpJHUFRQWUHWRXWFRQWDFWDYHFGHVERUGVRXSRLQWHVG¶REMHWV
PpWDOOLTXHV
ATTENTION :3RXUpYLWHUG¶HQGRPPDJHUOHFkEOHG¶DOLPHQWDWLRQGpEUDQFKHUGLUHFWHPHQWOD¿FKHGHODSULVHVHFWHXUVDQVWLUHUVXUOHFkEOH
CONTRÔLE ET NETTOYAGE DE LA BUSE DU NÉBULISEUR DE SOLUTION DÉTERGENTE
71

72
FR
RÉSOLUTION PANNES
Ce chapitre reporte les problèmes les plus courants liés à l'utilisation de l’appareil. Dans le cas où les informations suivantes ne permettraient
pas de résoudre les problèmes, contacter le centre d'assistance le plus proche.
ÉLIMINATION
Procéder à la mise au rebut de l'appareil auprès d'un démolisseur ou
d'un centre de collecte agréé.
Avant d'éliminer l'appareil, retirer et séparer les matériaux suivants et
les envoyer aux centres de collecte et de tri en respectant les normes
en vigueur en matière d'hygiène environnementale :
• Disques entraîneurs ou brosses
• Parties électriques et électroniques*
• Pièces en plastique
• Pièces métalliques
(*) En particulier, pour la mise au rebut des pièces électriques et
électroniques, s'adresser au distributeur.
4
2 3
1 6
2
3 5
1
3. 9pUL¿HUVLOHUpVHUYRLUGHVROXWLRQHVWYLGHDXWUHPHQWOHYLGHU
4. 5HWLUHUOpFURXPROHWpTXL¿[HODEXVH)LJ).
5. Retirer la buse du nébuliseur (5), en prenant garde à ne pas perdre la rondelle (6) ()LJ).
ATTENTION,OHVWFRQVHLOOpGHWRXMRXUVSRUWHUGHVJDQWVGHSURWHFWLRQSRXUpYLWHUGHVOpVLRQVJUDYHVDX[PDLQV
6. Nettoyer la buse sous l'eau courante et éliminer les saletés éventuellement présentes.
7. Répéter les opérations en sens inverse pour remonter l’ensemble.
72
PROBLÈME CAUSE POSSIBLE SOLUTION
L’APPAREIL NE S'ALLUME PAS
La rallonge n'est pas branchée à la prise
de secteur.
9pUL¿HUVLOD¿FKHGHODUDOORQJHHVWEUDQFKpH
à la prise du réseau d'alimentation.
La rallonge n'est pas branchée au câble
d'alimentation de l'appareil.
9pUL¿HU VL OD ¿FKH GX FkEOH GDOLPHQWDWLRQ
de l'appareil est branchée à la prise de la
rallonge.
/HV VSpFL¿FDWLRQV pOHFWURQLTXHV GH
ODSSDUHLO FRUUHVSRQGHQWDX[ VSpFL¿FDWLRQV
électroniques du réseau d'alimentation.
9pUL¿HUTXHOHVVSpFL¿FDWLRQVpOHFWURQLTXHV
de l'appareil correspondent aux
VSpFL¿FDWLRQV pOHFWURQLTXHV GX UpVHDX
d'alimentation, contrôler les données
techniques présentes sur la plaque
matricule.
Rallonge endommagée.
9pUL¿HU VLOD UDOORQJHHVWHQGRPPDJpH VL
c'est le cas la remplacer.
Surchauffe du moteur du carter.
9pUL¿HU VL OD SURWHFWLRQ WKHUPLTXH VLWXpH
dans l'arrière du guidon, est activée. Si ce
n'est pas le cas, attendre quelques minutes
jusqu'à ce qu'elle refroidisse, puis appuyer
sur le bouton du disjoncteur thermique pour
réactiver l'alimentation et le fonctionnement
du moteur
SOLUTION DÉTERGENTE
INSUFFISANTE SUR LE DISQUE
ENTRAÎNEUR
Quantité de solution détergente présente
dans le réservoir de solution inadéquate
pour le travail à réaliser.
Contrôler si la quantité de solution
détergente présente dans le réservoir
de solution est correcte pour le travail à
effectuer, si nécessaire remplir le réservoir
de solution.

-
 1
1
-
 2
2
-
 3
3
-
 4
4
-
 5
5
-
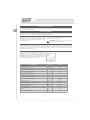 6
6
-
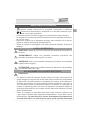 7
7
-
 8
8
-
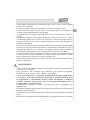 9
9
-
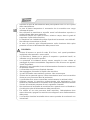 10
10
-
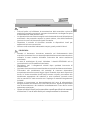 11
11
-
 12
12
-
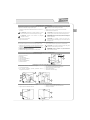 13
13
-
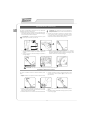 14
14
-
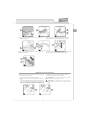 15
15
-
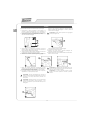 16
16
-
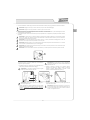 17
17
-
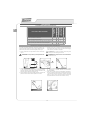 18
18
-
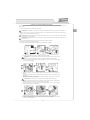 19
19
-
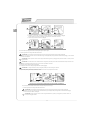 20
20
-
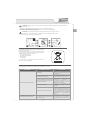 21
21
-
 22
22
-
 23
23
-
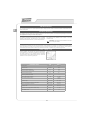 24
24
-
 25
25
-
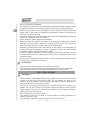 26
26
-
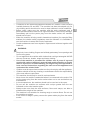 27
27
-
 28
28
-
 29
29
-
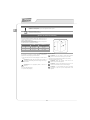 30
30
-
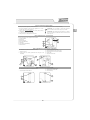 31
31
-
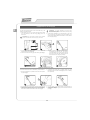 32
32
-
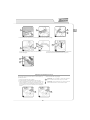 33
33
-
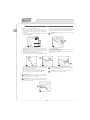 34
34
-
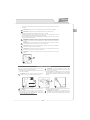 35
35
-
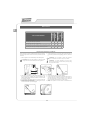 36
36
-
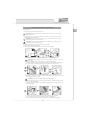 37
37
-
 38
38
-
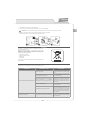 39
39
-
 40
40
-
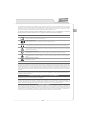 41
41
-
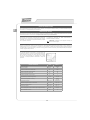 42
42
-
 43
43
-
 44
44
-
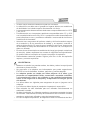 45
45
-
 46
46
-
 47
47
-
 48
48
-
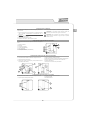 49
49
-
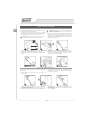 50
50
-
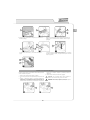 51
51
-
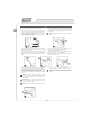 52
52
-
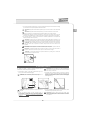 53
53
-
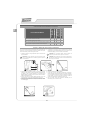 54
54
-
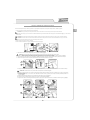 55
55
-
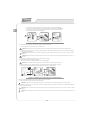 56
56
-
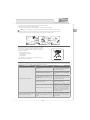 57
57
-
 58
58
-
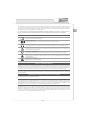 59
59
-
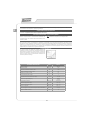 60
60
-
 61
61
-
 62
62
-
 63
63
-
 64
64
-
 65
65
-
 66
66
-
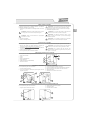 67
67
-
 68
68
-
 69
69
-
 70
70
-
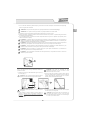 71
71
-
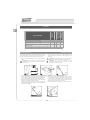 72
72
-
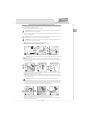 73
73
-
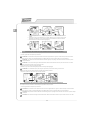 74
74
-
 75
75
-
 76
76


Minuteman ROS 17 ORB 115V Manual de usuario
- Tipo
- Manual de usuario
- Este manual también es adecuado para
en otros idiomas
- français: Minuteman ROS 17 ORB 115V Manuel utilisateur
- italiano: Minuteman ROS 17 ORB 115V Manuale utente
- English: Minuteman ROS 17 ORB 115V User manual
Otros documentos
-
Beta 1898/K40 Instrucciones de operación
-
Stoelting VB35/VB60/VB80/VB90/VB120/VB160 Manual de usuario
-
Lavor FIT Manual de usuario
-
Nobles Scout 7 Instrucciones de operación
-
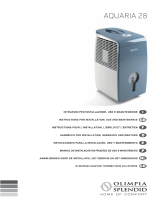 Olimpia Splendid Aquaria 28 Manual de usuario
-
Olimpia Splendid Aquaria 22 Manual de usuario
-
 Oleo-Mac AG 38 B45 El manual del propietario
-
 Olimpia Splendid Nexya S4 E Cassette Inverter Commercial El manual del propietario
-
-
EMS AirFlow Master Operating Instructions Manual


