
Useand CareManual
AIREACOND_OfON£[}OPASAS/_BITAC_O_ES
Manualde Usey Mantenimien_e
Remote Contro!
AW-12CRi FMi
Mechanical Control
Thank you for purch_ng _ _ room aJt conditton_, Ple_e _ad this "U_ _nd Ca_ Manual" y
before installing _d using this _p!_ano& Keep this manua_ for f_ure r_erence,
Muchase gracias po_ comprar un aire acond_cio_ado _al Laa ate_tamente e_"Manu,a_de Uso y
Man_enimier_to _ ar_es de i_sta_ar y uti_zar _ste proda_to, Cow.rye ÷_te maa_a_ papa consu_tado e_ ÷_f#turo
ForService Cal! ! 877 465 3566
Papa@tsnsr servici0 teen c0, Hamsa_ 1 877 485 3586

Page,
AirConditionerSafety
_ntroduction and Pa_s ildentification
Electrical Specifications
Tips Before Installation
installation Instructions
Operating _nstructiens
Care and Maintenance
Trouble Shooting Guide
Warranty .....................
,°. 2-3
.., 4-5
.... 8-12
,13-16
...... 17
...... i8
....... i9
Page
tntrod_cci6n ........................
Id.entificaci6n de las Piezas ...........
Especificaciones E!_ctricas ...........
Consejos Antes_ela Instalacion ........
Instrucciones de !nsta!a¢i_n ............
Instrucciones de Operaci_n ...........
Cuidado y Mantenimiento .................
Guia para la SolutiOn _e Prob!emas ..........
..... 20
..... 21
..... 22
...... 23
,, 24-28
.. 29-32
...... 33
...... 34

t"
What YouNeedto KnowAbout Safety !nstrucions
Warning and |tape,ant Safety instructions appearing in this manua! a_enot meant to cover
aiI possible conditions and situations that may occur. Common sense, caution, and care
must be e×ercised when operating or cleaning tools and equipment.
A_ways contact your denies distributor, service agent, or manufacturer about problems or
conditions you do not understand.
This isthe safety alert symbol tt s usedto a./ettyouto potential personal injury hazards.
a_l safety messagesthat feiiow this symbolto avoid poss_blsiaiu_yor death
DANBEB n .........
educatesa, imminently hazardoL_ssituatior} _@ich,ir nO|
avoided, wil! resu!t in death o_serious inury,
WARNINGindicates a potent:ia!iyhazardoussituation which if not
avoided could result in deatil or serious injury
CAUTIONindicated a potentia_iyha,__.ardouss tuat:ionwhich, if not
avoided, mayrose,It in rnlne_'or moddate !aiu_y.
i CAUTIONu_._ _,ithoutthe safety alert symbolindicated a
v,'h_ch,if net avoided may LresultInpotentia!ly hazardoussituation ,
: ........................ property damage.
PORTANT I STRUCTIONS
To reduce the risk of fire, electricai
shock, or injury when using your air
conditioner, follow these basic precautions:
• Pl_g into a greunded
3*prong out!at.
,, Be net use an extension c,ard.
= Be net remove
ground prong.
• Unpiug air conditioning
before servicing,
, Use two or more people to move
and instate air conditioner.
THESE INSTRUCTIONS

The air c{:_r_dit;io{}ershould be con_led tOthe
appropd_e electdea receptacle es _how_ _ the
cha_ on Page 6 {Receptacle and Fuse Types}
• The use d a time_de_sy fiJse or tireeode_ay c#cu_
brea_,er ff__scommef_d_,
Alt wideg must c_'_p_y with loea_and _atio_al
e_ectr_calcedes and be in.ailed by a que_ifie_
e_ectnci_ if you have any qa_tioas contact
a qualified elee_raeiaz_,
Power ;Supply Cord
ELECTRIC S_OCK NAZA_O
P_u_r_to _ 9rounded 3-_)r_g outlet,
• Do _t reme,_egro_Jndprong,
Do _t use a_ adapter.
Do _ot use ar_extensior_ cord,
• Failure to foflow these instru_!en_ ea_
_sult in death, fire, or e_ctric.sl shock,
_ UL Thie p_ r_sf@ly cc_d _#_s s_a_-_Fthe at1 e[es_f_r_s t;ha_
Te test your power s_pp_y cerd:
4 P_e_ &_ rele_e R_GET O_slet_for c;{mk Re_el:bu_tc¢_w_Jtat_sh
EXCESSIVE WEI6BT HAZARO
Use two or more _o_e to move and
install air oer_ffioner.
Fol!ate to _o so can result !_ back ot
et_r inju_,
Remove packaging materials
Remove arid pr_erly dispose of packag_n_ materials
Remove tape and glue residue from surteces before
turnillg on the ai_'coed_tio!_e{. Rub a smai_ amount
o_ }iq_td dish _yaap over the adbe@ve w_h you_ fl_3ge_
Wipe with warm water and @y
Do not use sharp i_st_uments rabMng alcohol
flammable fiu_ds or abras4ee c!eaners to _emeve
tape ot gl_e_ These products oa_ da¢[_age the
sumacs of your air co_di_ior_e_,
•, Handle a_r conditione_ w_th care°

Thank you for choosi_g this room air cond_ioner te c_l your heme This USE' AND CARE MANUAL
provides info\_mation neee.sea_, fer _heproper care and mainfenenee d your r_ew r_m ai_r_n
ff propedy ma_atained_ yoer air cond:'t_e,'_er wilt g_ve you malty year.s d trouble free operatie_ To avoid
_stellat_on' ,read imstructiens ca _[ore starting, ThLs manuai contains _nfermat_on for the
t_etatJaben and operation of yeu__r_x_m air c_ondidoner.
: PARTIDENTIFICATION
Mechanical control model
A_r |nlet
Auto Ajar Cow,rot Panel Fresh
Nete:
The figures in this man_a! a_, bas_ on the extema_ view of a standard model,
Consequentty, the shape may differ from tha_ of the air conditioner yo_ have selected,

PART IDENTIFICATION
Remote control mode|
Control Pa_l
Retake Controller
Note:
The figures in this manual am based on the external view of a standa_ model,
Consequentfyi the Shiape may dt_t from that of the air conditioner you have selected

1 Al_wide9 must _3mp_y with !o_ and nationa_
electrical cedee and must be insta le_ by a
_icensed e_ectdcian. _fyo_ have any q_eatio_s
regardi_g the fo!_o_#lg ir_structions, _ata_ a
Hceesed e_ectdoia;n
2, Check avai!ab!e power _uppty and resolve ar_y
BEFORE installing and opera_in;g
this unit,
& For ye_r safety and protection, this unit is
grounded through the power cord when
p_ugged into a ma_chi_9 wail outlet If yea ,are
net sure whether yoer waft outlet is properly
grounded, p|ease co_sult a |fcensee
electrician_
4_ The walt outiet (3-pin) mast match the plug
(3_pie) on the power _rd supp!ied with _he unit
DO NOT _se p_ugadapters or extensior_ cords,
See (Table t) for receptacle and fuse informa[bn
5 The rating pl_e oa the unit cen_Jns etect_caf
arid other technic| data, The rating ptate is
_ocated on the front of _h,ebase pan Make sure
to use the correct power suppiy a_cordiag to the
rating pla_e of your' air conditioner
If the air ,conditioner has a serta_ plate rating
of tt5 volts and up t_ and i_elud_n# 75 amps,
the _,_nitmaybe on a fuse or circuit breaker
with o!:her devices, However the maximum
amps On a|! devices for that fuse or drcuit
breaker can _ot exceed the arnps of the fuse
for [he circuit breaker.
!f the air cOnditiOner' has a serial p_ate rating
ef 115 volts and greater than 75 amps it
must have its own fu_ or circuit breaker,
and eo other device or ,unit she_!d be
operated oa the fuse or circuit breaker..
!f the air conditioner has a sofia! ptete rating
d 230 vo_ts_ it must have its r_c_nfuse or
circuit breaker_ and no other de'vice or _t
should be opera|ed or_ the f_sse or circuit
breaker
To, avoid the pOS:gi_bt!i_y Of persoaal ieju_,
disconnect power to the unit before i_stal_ing
COOUNG CAPACITY 12K
RATED VOLTS _ 1:25
AMPS
teK
250
15
!5
WALL OUT_T i::
FU$_ S|Z_ t5 15
Table i

Y¢_arR®m Air Conditioner unit is designed to
b_ hi#Hy efficien_ and save energy Foi_owthese
re_mmendatio_e for grea_erefficiency.
1 Se!ec__hermosta__[_isg _ha_sui/tayc4.Jr
eomfo_ needs an_ _eavethe _,het-moa_ala_
tha_chose_ _tin 9
2:,The air filter is ve_lefficTenI# remeviag aid_ome
panicles, Keep _heair filter clean, Typically, _he _lterz
sh_J!d be c_eanedonce a raonth,,More
ffequeet c!eaniw,j may be necessary depending
on euldoor al_d ndoor ar qua!_ty:
3. Use @apes curtaiss, or shades to keep direct
s#rdight _rom heatihg your reom_ but DO N©T
obstruct the air condit oner, Allow _hree (3} inches
around unit [o c rculate
4_StaA your ar co_d]ti4x_erbefore ouAoor
ar becomes ho_'cold and #ncomfoAabie° This
avoi,ds an init_a_perkedo_d scomfoA whWe
the _nlts cool ego heat r_goff _he room.
5, When so}door tem_ra{ure is cool
enough use HIGN o_ LOW FAN
O_y:. This eir¢#late_ i_d_ot ai_ #tovid #g
some ¢ool _g ce_far_ and uti_ize_ !es_
electricity i_a_ when operating o_ a
c_ ng se4_in_
Your RoomAr Cend _ioaerwas d_igmed
for easy #sia_la_ionn a single or doub_eohung
wiadew, NOT_: This unit is NOT des_gne_for
verti@l (slider ty_)wi_ows
NOT_: Save _e sh_pping ear,on a_d gacking
matedats fo_"_ature stor_4e or t_anspo_ of[he ueiL
Piease check thecontents of_heh_rdware kit_ai_st
me cerresr_ndiag rnc_del check _ist, prior Io
es[a !atiea of _he u_it.
See fists be_owo(Ftg_A)
@_ 3/4_ Screens!_0)
Top C_a_ei(1 }
FI)_ !8e i'_@}@
O Lt×;kWashes(4)
_ 1o12 x174B_ts(4)
_!_ Sh:utte_C]_mp{2}
(C:o
Foam(1}
NOTE::Sa_l#s screw(s) fo_ spare u_o
$oois Needed forWindow installatiom
Screw Drivers: Both Ph_Hips and Fiat Head
Power Od!|: 1/8 _nch diameter dril_ bit
Penc_f
* Measurin 9 Tape
, Scissors
Carpenter s Level

M
Because the _m_ressor is _ted on me
_e[ro_s side of the _nit _Ln_-_htside} [n_s s_ee
w_ _ heawer a_d more awkward _o man, pu_e_@,
hadequate suu_rt on con[tel s#de of the unit
_n resu_[ _ personal hjury ar_e aamaqe to you_
anit and oreDedy Therefore tl is r#commende[J
to have sc me£'_e asses[ you _Junrl_ tr_e installation
of th_s ur_!
!_ Select the Best Lo_tiion
A Ybur r®m aircenditior_er was designed to
#[ easily ate a single or douNe hung window Howeve_
snce window designs 'vary, i_may be eecessaPj to
make s_amemod_@t;oas for safe a_ prope_
iastal_at[ion
B. Make sure window a_ frame is s_ruet_ra_y
sound arid free from d_ _d rotted wa(_
C. For maximum efficiency_ i_stait the ar oa_ tioner
on side of the house o_ buid_ 9 whch _aeo_s r_e_e
shade Lhae s_ntighL ]f the unt _s r_ direct sus_ight ,
it S adviaabie to _vide an awaing over the _it.
O Provide S!_ffieiente£earancearound the cabinet
to a]!ow for ample ar circulation through _heuniL
See _'Fig,B} The rear d [he ua}t s_td be outdoors
and net n a 9arage nor inside d a haydn 9
Keep u_t as far away as _oss b_efrom obstacles and
obs_uc_[o_s asd a_leas[ 30_above the 8oar e¢
#ro_d. C_aiee and other objects withia a room
should be prevented #era b!eek_ 9 the air flow,
W'i_dow o_ing requirements
Be certain [he proper eiectrica! out_et is wiLh_a reach
d _he ir_staiiation Use a_ly a single outlet circ_it rated
at p_r c_rree_; (_..e tab@ 1 on page 6} AI! w_ring
should _ ia a_erdaa.ce wi[h local and national
e!ectricat oedes,
R You_ unit 'was desigaed _oevaporate condensation
#ader r_ermal _nd_ens However, u_der ex£reme
humidly c,o_ditior_s, excess condensati@_ may cause
the base_an to evedtow to [he euB_ide.
The unit should be i_s[a_led where con,de_satiar_
_un_offcannot ddp oe _des_da_'_s ot _eighbo_ _
AW-t2C_! FM
228 !:5 24.
AW - ! 8 CR3F_'_
AW_!@OM3FM
26.5'iB5_*26.£'

2, Preparation to Remove the
Air Conditioner S_ide,,Out Chassis
A Remove to¢a_d (4) Phiti_osscrews securin 9
the chassis to the _binet There are (2} serews
o,r_each side The set of screws cioses_ fo the
front of the unit secure the f_o#t pane_ to the
caWnet, The set of _ew cioses_ _othe rear of
the unit _e the _bi_et to the chassis,.
See (Fig, t)
B, Remove _he front panel sss÷mbfy from the
cabinet by geai_y palling i1:,
C, Grasp the pu_Ihandle a_the front of the
s!ide-out ehass s and carefully s!ide _he
air _nditi_ner out d _he cabinet, See (Fig: 2),
Please seek aests_nce for this procedure°
Note: Screws must be reinstalled #pen
completion of the window installa#on te
secure slide-out chas_s;
3, Assembly of the upper & lower chennels te
the cabinet
A _ U' Shard Top Cha_nei: Stick the double
adhedng sea _othe ° L" shaped top cha_ae_ and
then _nstalmthe "U' shaped top chan_el to the
cab Re{as shown in (Fig, 3_ using (5} 1/4" screws,
B r'_" Shaped Bottom Charnel _sta_led as shown
h (Fg 3) using _[4}I/4' se_ev#s,
NOTE: Foe fSK _ the #otto_ cttahne# has
been f_tery.#'_stalt_, and their shapes may differ
£_0_ the others_ but their functiens a_ sim_lar.
(_u_ains) to the cab_net_
Siide the sh_ers into the top and bo_om
charnels as shown in (Fig. 4), The shuttets are
idenffied (on each fra_e) as "left'"& "r_ght!L AAach
the shut,era to the cabime_using (4} lf4" screws
or_each s_de,
_K ba_,b_ _t_t_alted}#

& _nsta_ation of Mounting Brackets and
First Seaiing Strip
NOTE: Windows come i# a variety of different
st=y:tes,Therefere_ it may t_ ne_ssa_ _o modify
or mp_ve your pa_iouJar i_statla_:ioa
A, At_.achthe bracket assembly _a_°angle :support
bracke_ (Ffg 5) _si_g (2} ! !/2"' bolts
Two bo_tsperbracket Secul_ewith the (2)
1/4," I_k washers a_d (2) 1/4"nuts. DO NOT
immediately tighte_ these bo_tsas it m_y be
_ecessa_ to adjust the depth of tha bracket
aese_bly_ dependin# on the de_th of your window silt_
See (Fig 7_ ins_a!!Shetwo leveling screws into the
90'_suppad brackets. Test the bracket a_semNy i_ the
windaw before ca binet instaii_ion,ff the leveting
screws are drstan_d too far' away from the wal_to
provide s_ability_ it may be necessary for you [o fill
this _rea with a sotid piece of wood See (\F)#,8)°
B_Measure the inside window sill width and find the
center as shown in (F_g 6)_A_ign the V;s!etin each
bracket on these maAs and maun_ _,hebrackets So_he
sii_using :3/4,_ screws prooded Brackets shouid
pe_ndicu!ar to the i_side wir_dow s#L ,See (Fig. 6),
C. For proper o.mdens_ioo ru_Off it wil_be aecessaq/
to adjus_ the angle/pitch of the window b_cket_ This _s
ac,_mplished by adjusti_9 _e distance of the leveling
screw on _he oute_ wal!. The maximum ang!e@itch
should not exceed more th_ 3/16", See (Fig: 7),
D, Cut t_e seal strip to fit _be u#de_side of _he bottom
window sash Remove the peel_ff backing ,an the
seal and attach i_to this sash_ See (F@: 9).
{TOPVIEW)
!;
!;
!;
!;
!;
!;
!;
!;
!;
!;
5
F#g,6
Fig 7
Fig 8

& Insta|_atten of _he cabinet
A Align one hole n the bottom d the cabinet with one
hole in Re bracket ass.embiy. Secure the caMn,et to the
bracket using (3) 114',sctewe provided Repeat the
same proc_ure o,r_the oppo_te side of the cabinet
See, (Fig, 10),
B Ensure the °U_shaped mounting channel is
posi_oned in freestof the sash. The '_U_'shaped
bottom channel d lhe cabinet should be positioned
in the track, provided oe the bracke_ assembly Put_
the wndow down G_ti_ it resLs iust behind the fron_
of the %? shaped mounting charlneL See (F_g. 1I),
C Check {o make sure that the cabinet is sleeted
s gh_ly dowr_wa_d on _e outside if ne_ssa_,
re-adjust euppoA bracket as shown in (F:_g,7)
7_ Secure Shu_ers
A Carefully s!tde '[he air (_r_ditioner ;back_atothe
cabinet (Piease seek assista;_ee for this procedure)
8 Re_rlstali _he sl_deoouFchassis security screws
(removed earlier) on bo_h sJ_es of the cabineL
see(F g
Secure the top of the _ames to tl_e window sash with
(2) 3/4_ screws
C Now, eecure boltom frame d abutters using oee
shutte_ _:Icmp and ef_e 3_4'_screw on each side(F_g., t2)_
8, Reinsta||ing Front Panel Assembly
A Position the f_ont pane_ on the cabi_et sta_Rg at the
top, The _ro#t par_e__ock_abs m_s| be ir_seded into the
rata ning slots ie the cabinet, Repeat this procedure on
ai! sides
B Secure the front gd!_e_,othe cabineI using the Phfl_ps
screws removed ea_iedF_g, 11),
_g 12

& Complete the inslalialion
A. Cu_the foam to fit [he opening be[ween the _op d
the inside and o___sidewind_. See (Fig. 13).
B. Some ins_Ha_ions may require a,_ditioaal s÷a_hg
around the window and ar conditioner Check for ;any
air leaks and sea] where ne_essaryo
Fi9 !3
C. In very h#mid areas the wa_er' remora! may be
excessive enough _o ovedlow _he unit or increase the
noise d th_ air conditioner, tf this occurs yo_ may wish
_oattach a drain hose (n_ tnc!uded) _o the drain plu#
a_l_wing conden_tiens I_omn off _nven_ently_
See (F_g. I4)
Fi9 14

MECHANICALCONTROLMODEL
MODE
The mode knob co_rols fa_ speed_ and c_iii19
epeede_ To set _e_ired coo_ing _empe_ature simply
ro_e the mode kr_obdiai to the appropriate
THERMOSTAT
The thermostat autematicai_y conVeis the _oii#g
cycle (compressor) d _e air conditioner _o maintain
room temperature, However, the fan motor wi![
continue to operate after the compressor (c_lin9
LOW FAN wt ;Icirculate the ar at a minh_um s_ed
MED FAN will @rcu_a_ethe air a_a mid_!e speed
HIGH FAN wi_ c_rculate the ,airat a maximum speed
LOW COOL provides cooling automatically with
minimum air circulatio_ Recommended for niger-
time use.
MED COOL provides coo_ing automatically with
middle air circulation, Recommended fo_ night-
time use
HIGH COOL provides coo_in_#automatically with
quick c_!in 9 ot fo_ extremely hat days. Once room
is cooled° reduce se_ieg to LOW COOL
OFF will compJe_e!yshut-off the un!t.
NO_E: After setting the mode, a_lew 3
m_nates before _w_ching to another mode
Fresh Air Ventilation is _s_Ja!y kept in the c_osed
position, Use o#!_ when clearing smoke aad@r
odors from the r_m_ Pul__oope_,
_;i_ 15
When a_n# FAN c.o_ol, _'um _10w_yat_c_n9
uni!:1oad]usL
'Whe_usin9 THERMOS:TAT _ sure ¢ea!low
three mrnu_es_fore changingtemperature
Adjus/#_gtoe quickty may caus\ean overload
res_l_in#iea blown fu_°
F_h A_ Ve_ be_#e__
FIn 18

_C_ _'TDP_I_¢ _ _'_'_ _,.,v_ ,_ .........._, _ _
Sutton
The air ¢oe_i_ion÷_wi_ibe s_led whe_ _ isenergized
O_wf[! be stupid whe_ _t_ _ opera_on_ if you press
_his_ton.
_e batten
_ch _ime Mode bu_on ispressed, the o_e_atioa
mode is cha_ged #_sequence:
COOLING _AN ONCf' ENERGY SAVING COOUNG
Mo_e:
Coe_ingi with fa_ speed Lo,_,, b'led High}_Comp_eseo_
cycles te ma ntail_ Temperature, Set Point, F_n remsir_s
on at se!_ted s#e¢_ dudng e_pt'e5_; OFF @tie,
CeaSing (_4e _a_i S[_d)_ Cempresse_ cycles te a'_am_eir_
Tempe{a_ure Set Pio_t_ _a#'_spee_ ie cereuses3 from ream
t_perat&ire _a_ remsir_s _ dur_#g eornFess£ OF_ c_s_e,
Fan Only: G_rcula_as a_qd_ilterss _oom air at sei_e_ speed,
Energy Saving (with _S#_sp_d Low, Mad, Hgh):
Fan cycles ON and OFF vdth compresses over a wider
E_e_y _v}ag with Auto Fan Speed); Fen ey_bs ON a_d
OFF wi_h cam p_*es_r _t e wide_ range O_tem_a_u_e .:Fae
speed dur[eg ON eyrie e de_r_dee_ on _oem tempe[a_re
I_dic_ion symbo_ _ LED e_ coatml pane|:
|._:
L_ on _,,_ro! panel _flhe en w_en _e re e'v;@em<_#_s n _ls_d
NOT_: After se{ti_s9 ,the mode a_!ow three 4:3minutes before _w _c_ing to ar_,other mode, In the FAN ONLY Mode.
Room Temperature display range ie from _':'C (32'T) to SS'_C19_F}. Room Temperature below 32K the
Tempe_s_e display L0, ROO_ Temperature above 99':% the TemperEAu_e dis_ley N1.
Fee Spee_ Butto_; Used _o selec_ On#speed _'_seqeeeee auto, low, medium, a_d high
H_8_ H ghentfa_ speed for maximum oool_ng
_edium N_rmat _en speed for a_e_age ceol#_g
Le_ ho'¢,_'e_arid q_jietest sp_e_ 9_'@ate¢dehum[dificabo_'_
A_te Wowke ih ©0@[mge_d E_rgy-S_vi_ mode t.o _a_yJa_ epe_J based on room _e_q_bJre,
Time_ B#t|on: Used [o eel or caz_cei _imer operation
W_'mn _he unA [s in operates0 you can set: OFF T_MER. When tl_e uni_ is OFK you ca# set ON TIMER. Timer
sort{rig range is 0 _e 24 hours.
_fthe OFF T_MER _s set, the time LEO _isp_ays the remeia_Bg time to turn off the unit for or'_y 12 secor_ds,
then LED shifts to disp!:ay set temperalum. !_you press T_MER button within the 12 se¢0eds, OFF TIMER
w_li be ceecelied
_fthe ON TIMER is set _he timer LED displays tl_e _eme[_in9 time to turn or_ the uniL ff you want to
canoe! ON TIMER, press TIMER buth)_°l.
_ Button
Used to set room temperature ta COOUNG mode e_ used to set time }r_T_MER mede_
NOTE: 'l_mpeta_ure settii_g r_nge is from 19 C ,B6 F) to 31 _C (BSF)

Remote contro!
O
#
Power B_ON
The _li_e wiltbe s_ w_n it is
e_g_:ed or wiB_ s_o_,_edw_n iXis
in _ra_n, _ you press |h_ huron,
+ ,,,_BUTTONS
Used _ se_m te_a_u_ in COOU_
m@ or :_s_ _o_ t_rr_ in Ti M_R _de,
High BUTTON
Us_ _ se_ct _heh_h fa_ _ _°
Mid
Us_ _ select #_eMN _an,s_J _de_
Low BUTTON
U_ _#se_ct _e bow fan _ r_
Al;_o BUTTON
UB_ _ selec__e A_ {ans_ mo_
Used _ose_:e_can_ t_mero_a_i_,
Pow_ =Saver BU_ON
Us_ _ se_ct _he_r_efgyo_,¢_ngntodeo
SWING BU_ON
Used to select st_ or stop ve_c,al air

Howto |nse_ the Batteries
Remove the battery cover according t_ the arrow direction
Insert _ew batteries makin# sure _hatthe (÷} and (-)of
batte N are ma_ched _rrect_y
Reai_ach _he _v'er t_y s_idir_#it back into position,
NOt_'
batteries.. Repl_c_ _tte_tes _th _e_ #ae_ ## the sa_#e type
p#epe_iy:
HOW tO Use
To operate the teem air cor_d_tionet, 8ira
_he remo_e co#_ro_to _hesigma! rec_p_er
The remote _n_ro_ wiI! operate the 8it
conditioeer at a distance of up to 23 feet
'whe# poir_ia# at eig_! receptor d iadeor
unit
- \

When servicing _heair _ndit_oa_r, be _ure te
turn the mode switch _e#le "OFF" _s_t_or_ and
disconr_ec_ #le power oord Item the electrical outleL
1_DO NOT use gaso_i_e_b,enz!_'_e,_htnnero_
ogler cl_emica_son _heair conditioner as these
substances may cause _amage _e[ne _aint fir_sh
and deformation d plastic pa_s
2 Never at_emp_ _opou_ wate_ diredly iH
fron_ of #_e _rdt as this will cause deterioration d
the electrica_ insu_aflono
Cleaning 'the A_r Fiffe_
Removal of Air Filter
If the air _iiter_cemes clogged wish dust, airdiow
is ebstrac_ed and reduces efficiency, The air f#ter
sh,ou_dbe cleaned on_ a month, More frequent
c,_eaer_gmay be ne_,ssa_ depending on outdoor
and indoor ar quality+
Air _ilter Rome-ca|:
The air fil_er on the a_ave rnode_ is bested
beh_r_dthe a_rintake #o_t gt_ite.
To remove the air fllter_ open _he air inlet
gd!le and take the a# fl_[e_r,
To reinstali _he ai_51te_,reverse tae above
DO NOT 'forget to ins_l! the air filter, if the air
conditioner is left te operale w_tho_ _heair filter,
duai is not remove_ from th÷ r_m and may
cause your air condit:_ner to fail
Wher_ _heat f!_er inlet grille a_# @binet ate dirty
wipe with iukewarm 'water (be_ow 40'_C/104_),
Use d miM detergen_ is recommended.
1,,Reraove dus_cadged ir__e fi_ter by
tapping it or vacuum clean it:,
2 Wash _hefa_terwe# with _ukewarm water be_ew
40tO (104°F} wMe robbing _gh_y: To ge_be_er
resu!is_ wash it with soapy wa_eror a neutral
deanin 9 agent
3..Rinse the fi_te_wet_using c|eae wste_ then
dry complete!y.
Er=d_-Sease_ Care
1. Operate _hefan a!one far half a day to d_ out
the, inside of the unit
2 Turn off power and remove p}_g from wa_! _cket
3 C_ean filter
,4_Store in a d_ _oca_en,

Fr÷_uen_:¢_ a problem _sm_nor a_d a se{vice cal_ may not _ necessary, use th_st[au_eshoof_ng guide _or a
PROBLEM POSSI6LE CAUSE SUGGESTED SOLUTION
A_roondR_o_er wi_ No power to the u;r_t Check cor_nect on of power cord _o
power eou rr3_.
Check< fuse or ci_#_lt breaker.
Set IFAN CONTROL to pos_ton ,other
tha_ "OFP
tneffic:iee_ or no _ol_ng
Clean or fef_a_ air rioter:
Cheek with denier to determine £roper un_
Bilked air flow Remove o_3s_ru¢[_o_ from gr_[ of
outdoor iouvers,
Power !nterruption sellt_ngs Let fan run _o _es_art compressor
@,a_ge too quickly, or (i_ appro×im_'e_y 10 mi#u_es).
compressor over,cad tr_pped
Noisy unit Loose pars Tigh![e_ loose _arts,
]na,dequate s_p_t. Provide additional sup#o_ to unit.
Odors
Formation of moid mildew, or
a/gee on we_ surfaces
C:or_densation run_,off is aetna
dU#r_g ho_ _nd humid w@_her
Wa_er ddpp_g _nside
!c_ or fro_t build-u#
Remove dra_n P_u9 and dra!n base pan.
Replace drain plug
&_d f_e×ible [ubir_g to redirect wa_er flaw
{See F_go i4_ Page t2)
Un_ is not pr,eper_y angled [o Unit must be installed on a_ an#!e for proper
al!ow water b0 drai_ og_side condensation rumofL Ct_ck the unit and
When ou_oer _em_rat#re is a_)pro×imately
65_F or be_l_,, frost may form when unit is in
_Aing m_e Sw_tch unii_to FAN {eniy)
_erat_on un_i__rost melts
R_meve a_d clean filter,
NOTE:
_tdrcu_ breaka{ is t_ipped repeatedly, or fuse is bto_v_ m_re _t_n or_ce_ contact a #cense_ Iechn_ien.

For one year f_m the date of purchase by the original _er, a_ part which
fails in matedats or workmanship under norma! use, the part wll be replaced.
During this per od_ atl parts and service wiI be provided free of charge, so
!on# as the air conditioner has been instailed and operated in accordance with
the written instruction, s _n this manual.This war_nty ineludes in home servic&
For the second through the third year from date of original purchase, this
warranty wil| pr_ide a replacement compressor free of charge due to
product failur& The customer will be responsible for the labor charges related
to replacing the compressor in years two through three The consumer is
responsible for the service labor and possible freight charges for shipping
the unit. Cost _ move the air conditioner to the servicers' shop and back to
the user's home may be required and are the user's responsibility.
• This warranty does not apply if damage occurs because of accident,
imp_per handling or operation, shipping damage, abuse, misuse,
unauthorized repairs made or attempted, ceremonial use of the product
or any other use for which it was not intended.
• This warranty does not apply to damage to _e produc't caused by accident,
fire, floods, acts of wa_ terrodsm_ or acts of God
• This warranty does not cover service trips to your home to educate -_u on
the use of the product, or Ioss of food and drink due to spoilage°
o This warranty does not apply outside the continental United States,
e ALL WARRANTIES, EXPRESSED OR _MPLIED, LAST FOR 3 YEARS FROM
THE DATE OF ORfGi_NAL PURCHASE THS WARRANTY DOES iNOT C_'ER
LiABiLiTY FOR INCIDENTAL OR CONSEQUENTIAL DAMAGES FOR ANY
CAUSE WNATSOEV ER_
o This warranty is to the original c_wner for products purchased for home use
within the USA. Some state do not anew the exclusive or Imitation of
incidental damages° This warranty gives 'you specific rights, and you may
also have other rights which may vary from state to state. To know what
your lega! rights at& consult your local or state consumers affairs office
or your state's Attamey GeneraL

Gradas po__elegir eate _ a¢ _do #ara enfria¢ su hc_ar. Este MANUAL DE USO Y MAN TO
#topofciona ta inform_c'i_R necesada pars cuida_ y mat_te¢,,eren forms adecuada su _uevo sire acon do
Fundona_ sin pt_oM_mas du_nte mug71osa't_osd te bdnda e_mante_#miento apropiad& Pars evitar
pmblemas al #_s_alarto ?secsmp_e_amente tas instn_eciones antes @ comenzar Este rnanua_ contiene
infotme#_n acerca de l# #_q*alad_3ny et fcmcianar#iento del site aeondic_onado pa_ hat)
I,.II_] liIi[/l>O I l;_,_li,,!il_,I
Modeio Mec£nico
Panel Frontal Gab!sere
Fltro de Aire Outlet de A_re
Nots:
Las ira#genes de es[e ma#_al eatan basadas en la vista e×_ema _e ua models es_nda_
En consec#eneta, ee probable que !a forms sea di_ereate a II dei site aeo_dieio_ade
qae usted seleccie_e

_lden, t_flcac_onde las Piezas
Mode|o de Remote conttolador
Fi]tro de Aire
Pane| de Centre{ Contro_ Remote
0o
Nots:
Las im6genes de este manua_ estan basadas en _avista extema de un mode_o es_nda_
En consecuencia es probsbie que _sforma sea diferente a _ade_ sire scond cionsde
que usted seleccioa{_.

1_Todos_ cablesdebencarnpbconI_ c6dJgos
el_c_ricos_a]es ynscionales¥bs debeinsta_ar
une_ectridsta Hcenciado, Si flene preg_ntas
re_scionadas con tas siguientes insttuccione&
compel quese an un e,iec_ddst_ tiee_ciado_
2, Vedfique e_sumi_is_re de e_e_g_a dispenib_e y
_esueiva cuaiqL_ier problems c_e _os@bles ANTES
de i_s_e!at y hace_ funcier_ar ee_a _nidad
3, Pars su seguddad y pretecci#n esta u_dad esN
_nectads a tierra a _rav_s de_cable de a_im,entaci0n
e_ando se lo enchufa aun toma_ente de pared
pfovisto de conexi6_ a _ierra. Si no est_ segu_o de
que el bmsco_dente de #ared cuen_ cen _a
_nexbn a be_ra apropiada, consu_te con un
e_ectric_sta _icenciado_
4, El tomacordee:_e de pared (de 3 c#avijas) debe
_incJdir _n e_enc_ufe (de 3 cfaviias) de_ cab!e de
a_imentacian sum nistrade _n !a unidad NO utilice
adap_dores de enchufe ni cabies de e×$ensi6n
Co_su!te !a Table 1 papa obte_er informaci6r'_ ac_erca
de _eceptacubs y fusib_
Si e_ _tu!o def sire acondic_onado #_dica 1 t5
voltios y has_a 75 amperios, _a unidad ee
puede coeectar a un cot_citcu_to o f_stb_e
_fl_zado per o_s dispes_tivoso No obs_ante_
_a sums de _os ampedos m_ximos de todos
!as disposit_vos conec_ados a cliche
cortacircuito o fusible no deben excede_ _os
amperios de! misrao;
St el r6t_a_ode_a_re _and!c_oaado indies 115
voltioS y m_,sde 7,5 ampe_oS_ debe tene_ s_
_ropb fusible e codadrcuito y ao se deber_
_nectar nieg_n etrod sposifive o unidad a d_eho
fusible e cortacire_ito
Pa'r_ eviler _esbees f_si@s0 deseo_'_eete e_
euministro de energ_a de l:a anidad
ant÷s de i_staiada o teparada,
5 _1retulo de _aunidad centiene dates e_!ctricos y
t_cnioes, Dicho r{_tulose e_cuentra en e_lade
de.the de la unida&
AMPER_OS
TA[_A,NOD_EL_US_BLE 15
15
Table 1

S# _Mdad de Aire A¢ondic_o_ad_ #ara HabiLac_ones
se ha disen_do papa_ogr_r un a_torendi_iemo y
ahotra_ et_etg a electrica. Sga _assiguieH_es
sagerel_¢ias pats I_rar un mayor rendlmie_to
El _re A_dicionado pars HaNtac©nes se ha
diseg4._dode m_o ta:lqua resute fec! su ns_alac_4n
er_ventar_aa armadas se#cilas o dobI_es.NOTA: _
u_dad NO se ha dise_do pats vemanaa vetttcales
{de lpo _esfzante}.
M
1 &tuste el [e_mos[ato a u_ hive/qua ie resale
sgtadabte y dOje!oer_e! _ivel seleccionado,
2. E! fllro es may e£cie_e a/a herade e/rnm_r
paAicuias qae se desplazan pew'el sire Ma_[e_ga
fmpie el fitto de ai_ Per _ 9eneraL e! #_m _ebor(_
limpia_e una vez ai _s. Es probab!e Rue sea
r_sar_a timpiado co_ m6s frecue_cia dependiendo
de _acalidad dei sire e×[edor e interior
& Paede _tlizar _apices, cortinas o pant_las pars
e,_*itarqua la !uz directs de/sol _lienl.e su hab _c_#n,
pero NO obstruya el sire ac_ndici,onado Permits
qua e! sire circule a_r_edor de ta undad sin
obatru_iones,
4 _ncienda el ai#e acondic:ionado an_es de qua la
tem[_ratura e×_erior sea d;emasiado elevada y
desagradab]e. De esta manera evitar_ sufdr calor
mienl'as la _r_idad e_fr[ a la habffacioao
5. Cua;ndo la _emperatura e×_rior es _os_fic_eatemer_e
fre_'a_ ut lice s61oH{GH _AN (ver_£1adotal @_x_mo)o
LOW FAN (v_nt lador at ml _imo) _sto hace qua el ape
interior ck'c_ie a u_a tem#era_rs agradsble y _;_3_su_e
meno_ ener_ a electica qua si hiciera fu_c_onar ta
_nldad coma enfria_or de ak÷o
Pars ewtar pmbte_r_asdu_e i_s_aci_'m o el
f,_nc_o_amier_l:ode ia ar_tdad, lea comp_e_ament_
las ins_rucciones
NOTA: _:msarve !a c@ade _au_nidady bs ma_edales
de empsq_e para a_macenarla o [ransportsda e_ e_
_u_,uro.Ante8 de i_stalar la u_idad camera e!
oon_eaido de! jeego de herrajes _n la Ii_la de co_roi
d÷l mode[o corres_oadie_te. Cat,suite las s_juiea_es
fstaa _Fig, !)
¢_ '?era!iosde !.,4"_13}
Carla!! Ie_or(!)_0_ _ _K;.¢_rtir_aLa[l_ai0_echa
,O_ Ara#dela_dePres_ 4}
@ T_e_casdel 4"(4)
_} E_#iadra 2
'spa }[a_et'_ y"
Pat_s de ¢*_ivelac.k_n{_}
Deb!e _1_ Adlbesi_a (1)
(_ig, i )
N_la: Tomllo Exceden_ Para d Use de Rese_a,
_ramteff_s N_esa_tas para la |nsta[a¢lan _ Ve_ffal
Desletnlladeres: Phtltps y de ¢a_za _laa_
Taladro el£¢tdco: bt_a de t_8 pul_ada de _{tmetr_
Cimta m6t_lca

Oebidoauuee_f_moreso_seencuent_ade{lado
ae ,_os @nt_ro_es, a _a de_@ch_ oe a un_dad }, eat@
laao ser<_mos oesado y rues dif_c_de man pu/ar,
Si _aun_Gauno se sos[_er_eb_ende d_cholade
#u_en proaucwse lesio_es_'isk'_s y daces a a
unldad 7 a su oteo_edad. Poe_Iotaste, le
recomea_amos qua pare msta_a_es_aUnldad
solicite ayuda a o_ras aeneas.
1 Se_ecciiose la Meier Ub_caciSn
A. Ei a_re acendido_ado pare habi_dones __ie_eun
dise_o _ se facl_ta su c_mocaclon en ventanas
b&t_adaa sar_¢";i/_aso richter. No _)bs_ante_ de#_|de a
_ue _os dBe_4os de ventana sen _an vanaeos es
probable eue sea necesado realizer a gun.as
m_#icac_enes pars _ograr una _nsfLalaci_n segura y
adec_ad&
_t comente prop_o (tea _b_a 1 en g gins 22) _n
c_cu_o e×c/usivo pare e_sire acondi¢ienado, Tod_
_oscables deber_n cump_r _n los c<_igos eb_lr_cos
_.}ca_e_y nadonales
F. La _.m_,dades!_ d_aaa pare evapcear _ac_r_donsac_5_
baje c_dicio_es flora'sales, No o , baje ce_d_ciones
Qeextrema hulaedad, e_ probaMe qua _;,_COnde_s_c_6n
e×ces_vat_a98 qua I,_baede_a base se des_×)rde _a_xae_
e_en<)r Par/o lam_o_aur_Kt_ddeber(_ n.sta/a_seer__n lager
eende ta descaLga de _ con_er_sa_¢n no _ee _bre e_
eas_ _._e#earlobes f_ieh las propte_ades _ecir_as
B Aseg#rese de qua la ventana y e_ marco _ngan
una estructura firme y qua la readers ne est,, raiada
C Pare I_ra_ e! m_×ir_)o_e_dim_ento,instaie e_ate
acondic:_o_ad,_de__adode is casa o edifcio donde
hays :m_s_mb_a qua sol Si !a u#idad se encon_a_a
expues[a a _a[uz de__, es aconsejaMe _ocade ua
teldo ÷ncima
D_D,e_es_cisnte espacio alrededo{ del gabi#ete papa
permi_.iruna ampl_acircu_aci6_de aJre a travels de la
unidad Vea (Fig2}. La pa_e _s_edor de la unid_d
debere dar ai sire libra y no aen ga_aje ni ai ia_edor de
_n e@_icJo,Mamer_ga !a umdad _0mas _ejo_posible de
obst6cu_os que puedan causat obs_rucc_on_ y par to
meno_ a 30" de_aive_de_p_8oo de_auelo Debe_an
tomarse preea_¢_enes pars ev_tarqua las _inas o
cua_q#_erotto ob_e_odeetro de una habitat n
obstruya# e_flu_ede a_re. _eqei$ites _a[a las abe_r#s _e ventanas
_co_s#_ !a sl#aiente ta_la_
Ab_ m._x_ma
AW 12CR!_M1
AW 12C_1 FM
22,8" _5,7" '24,t"
27,6"
378 _
158"
AW !80R3FM
AWi aC_S_M
26,5"_i&5" "26,9"
31 _2'
43,0"
t9,0 _

2_C(,_moquitare_atmaz6ndes_izabtedelaireaco_dicionado
A, Quite!os4tomiHosPhiHpsquesejeta_el a_mazx_n
a_gabinete Hay2tomiHosdecarla!ado,LostomH_o
s q_eesNnruescercade1#e_ltede _aunidadsujetan
e!pa_e!fron_a!a!gabi#ete,,LestornH_o,squeest_nm
dscercade_apartetraserade !aunidadsujetane_
gabOneSea_armaz_nVea_a(Fig 1}o
B.Quiteei pane!#ontal de!gabinetetirando
suavemente de _L
C, Tome e! mango que es_ae_ ef fren_e del
armaz6n des izab e y saau÷ con cuidado e!
aire acondicionado de_ gabine_e, Yea _a (Fig, 2),
No:ta: una vez fina!izada /a tnsta!ac_n en la
ventana debe velvet a cotQcar los
tornillos para sujetar el armaz6n deslizable.
Pida=ayu(la pata tealizar este procedimiento,
3. Montaje de los canates superior e
el gabiaete
A, Canal Supedor en Forma de L: Aguante el
dobie sei!o adhesiva a!cana! superio_en fo_ma
de L, con 5torniilos de 1/4", _nataie el canai
superior en forma de L sobre e_ gabinete, ta_
como se indica en ia Fin. 3.
B, _nstale e! Cana_ ;Inferior en farina de U, tat
como se _d_ca e_ a Fig. 3,
Nota: Para los de !8K e! canal de
bo;_6n se ha insfalado en la f_b#ca y su forma
ser_ distinto a o_,s, pero susfucciones son
Fig t
................../:i?I
F_g 2
4 Mon_:aje de lasi persianas !aterales (corti_as)
Desiice las persianas por_os canales superior
e _nferior, ta_ como s÷ indtca en la Fig_ 4_
En carla marco las _ersia_as se iden_if_can
como "izquierda _y "derecha' Sujete !as
pers_anas a_gab_ nete con 4 tornHios de 1/4"
de cada ladm

5, lnsta_ac_nde_os8oportesHorizontalesyde
ia PrimetaTitaAdhesive
Salladora
NOTA: Exista u_a gran var_adad de estiiosde v
ea_a_as, Per _o tanto, es probable que se
a necesario modifica_ o me_orar sw propia insta_aci6n,
A. Sujetee_ sopo_te horizontal a los soportesen
esc#adra (Fig, 5) con 2 peraosde 1 1/2:% Hay
dos pernos per soporte° Aseg_talos con _as 2
arande_as de pres_6n de ! !4" y _as 2 tuercas de 1/4 _'
NO aiuste estos pemos de inmediato ya que es
pesib_e qua sea necesario ajustaf _adistancia del
sepo_e ensamb_ado, dependieado de ta profun
didad gel embta! de ta venia#a, Vea _a (Fig, 7}_
tnsta!e los des tomi!!os de mire!mean en los sop
orte_ en escuadrao A mode de pruebe, coloque
e_ soporte ensamblado e# _a veata_a antes de
insta!ar e! gabieete, Si lOiStoraH!ms de nive!acbn
est_n demasiade lejos, de _a pared come pare
preporcionar estabiHdad_ es probable que sea
necesario cemplementat
dicha area con un race de madera Vea ia (Fig. 8).
Be Mida el anchodet i_ter_or de_ umbral de _a
ventana ydefina e! centre, ta] ¢em_ _e indite en
!a F_g. 6 Alinee !a _a_ura en V de eada soporte
ensamblado sobre estasm areas y mon_e _oe
Soportes a! umbra! con _ostemil!osde 314"
preporcioaados, Los sogortes deber_n q uedar
petpendicu_ares a_umbra! tn_emo de la ventaea
Vea la (Fig 6),
C Pare permitir una descarga adecuada de la c
oadeesaoi6_o ser_aecesario ajustar ]a i_ciinaci6a
de los sopottes en la veece_a, Pare else, ajuste ]a
distaneia del torniHo de nivelaci6n en _a pared
exterior La incH_ac_,n _×ima no deber6ser
superior a 3lIW Yea _a(Fig 7),
D, Co4e ]a prime_a seiio para que quepa an ia
patte lnferiorde_ marco d:e _a ventana Quite el
revestimieato de la tire y _9ue_a a_marco,
Vaa is (_ig. 9),
V_STA8U?{R:@R_
[, &,/.::: 0 @ 8, g, _, O ,>
Fig 6
F_g 7
Fig. 8
_I
Uti!ice an race de madera para prepomionar
estabiHdad, _sito ser_necesario cuande e!
_mbra_ de _a ventana sob#esa_ga touche de_
£iano de ia pared_ Vea ia (Fig, 8)

& [nsta[acbn del gabtnete
A. A|inee un _gojero de la parts #'ffedo_ dei
gab_aete con un agujero de] soporte ensamWa
do, Sojete el gab[note a_ soporte ensamb_ado
con 3 de Wasto_nit_os de t/4" proporc_onadoso
Rep_ta o_mismo procodimiento dol otto _ado de_
gabinete Vea ]a(Fig, 10)_
B. Aso##:rese de que e! canal do montaje en
farina de L es_delante de_marco, E] cana_ en
farina de U de ]a porte inferior del gabinete de
bersq_edar en e! rie_ de! sopode ensamS!ado
B,aje !a yen:tara hastaque apoyei#sto deters
de !a porte de!antera det caeaide mo_taje en
farina _eL. Vea In(Fig tl).
Fig.10
C. Aaeg_rese deque el gabinete est_levemen_e
inanimate haci8 abajo ea ia porte e×tem_
Si es necesarie vue!va a aiustare! sopod, e_
tal came ae indicaen _aFig, 7o
7 Asegarelas Persianas
A 'V_elva a co_ocar con c_idado e[ airo
acondicioaado en e_gabinete (Pida ayuda pars
reaHzar este p_ocodimiento.)
B,_Vuelva a insta_ar !as torniHosde! armaz_n
des]izab_e {que so qaitaronanteriormonto} de
ambos _ados de] ga#i nete Vea _a (Fig,, ! 2) Asegure
la porte s_perior de !as marcos a! marco _e _a
veatana con 2 tornii!os de 314'L
C, A_ora asegure e_marco inferior' de las persiaaas
con #_a grapa y ur_ tornitlo de 3/4" de ,coda ]ado
(_[9. i2:)
& C6mo Velvet a I_stalar e] Panel Frontal
A, Coioque el pane_ frontai on el gab;neto
oomoezando pot [a porte de ardba. Las trabas
de[ panel frontal _eben insertarse en Las_an_ras
de sujec_n de_gabinete_ Repita este prooedimiento
de redes !as _ados
B,.Ase#ure la reii!]a ['rontai a! gab ne_e con los
tomii]os Philips qua quit6_nteriormente {Fig, 1)_

9, Finalice la Jnstalac_n
A Comte la espuma para que quepa en _a abeGu_a
entre _aparte super'iordel interior y exteriorde !a
ventana Vea ta (Fig, t3).
B Es probable que algunas _staiacie_se8 necesiten
tira se[ladora adicionai a_rededorde ia ventana y e_
aiFe acondicionado Vedfiquesi hay a_gu_a _rdida
de airey s_le_a si es n÷cesado,
C, En zoaas de mucha humedado es po_lb_e que }a
descarga deagua haga que la unidad desbordeo
que el a#e acor_dicIonado haga rnes ruido. Si esto
sucede, puedeacoplar _na manguera dedesag_e
(no i_ciuida) a! tap6n de drenaje para que _as
condensac_ones se descargee_ bJem Yea _a
(F_g_ 14),
Fig 33

MODE (Modo}
La ped_a de m_o _ntmlBa las velocidades de
venti_ador y de eafriamiento Para fijar aria temperatura
de enfr_amiento simp_emente haga rotar la per tlay
_quela en e_hive! deseado Vea _aFig, _5.
THERMOSTAT (Termostato)
El termostato ten,roSa automd_i_amente ÷i title de
enfriamiento (oompresot} del a#e au3ndicio_ado para
maniene_r !a tempe{atura del ambiente. 1to obstan_e, el
motor del verltiiador coniin_ard funcionando un8 vez
f!na!Jz_do e! fuacionam_ento del compresot (ci¢!o de,
enffiamiento} Vea I:aFig. i5.
LOW FAN (Ventilador a_M_nimo} hare que e_aire
¢i_cu_ea "u_ave_ocidad m lmima si_ enfriar
M£D FAN (Ven_:iiado_al Madiano)ha_a que e! aire
ci_cu_ea una ve_ocidad reed ana sin enfdat
HGH FAN (Ventilador a! M_ximo) har_ que el aire
circuie a una ve_ocidad maxima sir en#ia_.
LOW' COOL (Fr[ o M inimo} enftia el ambiente
au_om_icam,ente con #ha circu#_ok_ m mma de aite
r÷comienda durante !a _oche.
MSD COOL (_to Mediano) en#a el ambiente
aut[omSticamente con una circu_aci,_aqmeSiana de aire
Se tecomieada du_an_.e_a_oche.
H_GH COOL (Fr_oM_ximo} eaff:ia et ambiente
autemtsticamente de manera r_ida o dura_e d !as de
_k_r ntensoo Una vez qua Ishab_ac_,n es_ ff_a,
reduzca e_n_ve] a LOW COOL,
OFF (Apagad_} apags la unidad compJe_mente
Oeci_ Set._tor
Cenl_l 6omt_l de
de M_o To,mosS:ate
h%a_ gi[ar _r_t_m_ei_t_p_ra _ermil_r que is _da_
?_ ada_e a _iva_
C_and_ _ih_ THE a_re_ _ es_erar _es
minut._s ar_tes de _mb!ar _a_rr_perah_a S_!a cambia
demas,_do ra_idees po_ib_ 0_,e e_usB v r_ sobrecatga y
que_e e fumb_
Vent_laci(_ de atre fresco se ra a nqa_ener en _a
posici6n _rrado, Usando s6_opara iim_iar h_mos
yto odo_es de la hab,ilaci_')n,tire a c_menzar. "Vea_a

Bstesireacondiconadosepuedeoperarfaci_mente
con[osbotonesde1pane_deconhoias:_comatambb#
cor_e_co_tro_remo_o
Be_en
S presiona este bot_n_ encende_L_el sire scondicionado,
Cua_do e_are acend cionado es_a de ca_ef_cciem se pet
imp_entsr ee_e betan 3 m autos despu_,s
Bo_oRMode (Mode)
Cads vez quese presioea ei bot_JnMODE, ei mo_o
de opetsc_n cambia en eetae secuencia_
COOLING (Enffiamien_o} FAN ONLY ($6_o ve_[itador}
ENERGY SA?,/iNG (Aho_ro de Energ a} COOLING
Pane| de Control
NOTA: Despu_s de se_ece ena_ un n_vet_espere 3
m_nu_os entes de pasara o_re
Con e! mode deFAN ONLY, E1recin_o de !a tempera_#ra
Dehab tac;6n set8 Desde 0 "C(32°F} has_a 38c(gg:F).
La [empetatura de _ah_bitaci6n essuper or a32F
la temperature i_cer_ L0
La temperature de _ahabitae <1_es superior s 99F
la/i÷mperatura leoere HI
S m_o!os d_e! indicador _e! panei _e! cont_o|:
@ Ve_t lad0r ÷n :t_' E_fr_mie_0,
velo_id ada _om4_Jic_
Be_#_nFag Speed (Ve_ecidad del Ventitader}
Se uti!iza para se_eccionar _ave[oc Pad de! ventilador
e_ secue_e a: au_em_iea beta, media y a_ta_
V_nt_taao_ en
velocidad _#_i_
Be_n Ti_er (Temper zadeO
Se uti_iza papa p_ogramaro eance_ar e_
funcionam onto de__emporizadot
C_ando la _nida_ eaten f_r_cionam @n_e_puede
seleccionar OF_ T_M_R (Apa#ar Tempo_izador)
C_a#de la u_idad ee_a#ag_da, p_ede seieccionar
ON T_MER (Enceader Tempodzadof).
_ _a_go de horns pars p_ogramar el tom perizade_
es de0 a24 horns.
velc_ude# _a
O |_ MesSier _o_a p[a,_aa_a_a
Las Iucea del n4 cadet LED anter_tmen_.e
me_cionadas s_ eric ende_ c_lando se _san los
S seine€ions OFF T_MER,, :a#antaiia de! _empor zador indicar_dutan_:e 12 se #undos
el tempe restante pars e! apagade de la unidad y lunge indicar_a _:emperatura iliad&
S presiona ei bo_n T_MER denote de esos i2 seg_'_doe, _e deeactivat_la funei0n OFF T_M_R_
S selections ON T_MER, la pants;Is dot _empo_izador r_dleareel tempo res{ante pars e!
eneend de de _aunidad. Si desea canceler ia fancien ON TIMER presione ef bet_,n TIMBR_
Bet_r_ _
Se uti_iz.apars fi_ar la temperature ambience en mode COOLING o pars pregramar _ahera en mo_e
TIMER,
NOTA: el range de _e_nperat_res escila entre I9eC(66 _F} y 3t°C (88_F)°

Control remote
Power (Encend_do!A_agado}
El aparat,a se encende_ s es_ apagade
o _pagar¢_cwando es_ en o_erac_n
bet6n,
Bot6n Mode (Modo)
UtiHce este bot6r_ para selecc_o_ar
Bot6n +-
Boto!nes de aj_s_e de _smpe_atu_a optima
para a_ustar _atemepra[wra del cwar_o.
o#rima para progtamar la hera.
Bot6n High
Pata aj_s_ar el #_odo a_ta ve]oc_dad de
yen! _ador..
Bot6n Mid
Para a_ustar e_mode mediana (_ mismo
baja} veloc d,a_ de ve_ti_ador,
Bot6n Low
Para ajustare_ mode baja velocidad #e
veniHador,
Boton Auto
Para a_ustar el mode a_to ve_ocida_ de
yes,tirade r..
Bot6n Timer (Tempor!zador)
Pata poaero cance_a_la operaci,t_ detimer,
Bot#,n Power Saver
Papa ajus_ar ef mode _e e_ergia-ahor_o
Bot6n Swing (Osctlaci_n)
@e_tJiiza para comen;zat o termi#ar e_
_o_t_ie_[o de las ve_e_asae_tas vert_ca_eso
• Des#u_s de se_eccionar u_ nive_ ÷spe_e 3 minu_osantes de pasar aotro.
' Espere 3 m nutos antes de recomenzar et apara_o.

Control remoto
• Col_6n _ las p|_
R_re la tapa _ _ en et se_ _ la flechao
V_lva a t_lar _ _ otra
a su _6n_
* C _o use
Pafa opers_ e| airs acondickmado, apunte e| controlador
remoto la set, at del teceptor.
E| controiador remoto se ra a operar _ aire acondtciondo
una diatanda hasta23 pies cuando apunta a _asa_ar
de! re_tor de la uni_d_
\

1 NO_l_i_egaselina bendna_disobente u otros
p_od_ctosqumcas e_ e!a#'ea_on_ticio_adeya qua
estas m_s_aac_tsp_tede_da_*ar elaca_ado de pi#tu_a
7 _forma_ lespiezas de ptes_ico,
2 N_nca derrame ag_a dire¢la_ent:e en e/frante de la
urfi_a_ya q_e da_ar_a el ais!arai_eea_#_
NO olvide i_s_lar el fiitro de aire_ Si el ai_
acondicio_do f_ci_a si_ el fl|t_o de aire,
el pone no se pu_e eliminar de la
habita¢i0_ y es posib|e qua la _nlead se
C_ande |a rejtl|e de enttada de aite y el
gabiaete est_n sacios, iiimpielos ¢o_ a_ua
templedia (per _baje de ios 40 °CMO4°F}.
8¢ recomienda el _So _e _n detergente suave
Llrnpieza del Filt_o d_ A#e
Ext_a_¢i_r_ _l $tltto dl¢ Alte
S e_f_bo de _ire se obs_ruve _:or_ p_ve. el fit@ de aire
[_u_da obs_ru_do __educe e! rer_J_[_icr_o de ta _lsidad, B
r I_to _e alre debate. !_mpiarse una vez a rues Es pr_ab_e
_ue sea r_ecesario Im]_iarP3 con m_s fiecuer_cia
C_me Q#_r el Filtre de Aii'e:
E [iBro de aite _ _os m_Jek_s anlr_dorrne_te mcrictonados
_ er_¢:t;_÷n1_,aae_¢_ _e _ar_ilB_ de _nlrada dn _i_# d_l_nteta
Ps_aqu_Iar_olome el ma_go de_tN_ _b_csdeenla earle
s_ pe{_r de/_ le#_ta de e_trad_ d_ a_re _ deal _celo _¢_a
arr_ba
PAra velvet a instalar/o reAl:_ce bs preced_m_enta_ anlen_r._s
Limpiea del Ft_o d_ Alre
t, E! m_e e! pOIvOacumutado en el fil_o Pare
e_!oa_!_que!e uaos 9olpes s_aves o una
8spi_dora dom_stica
io #'o_asuavemea[e, Pare obtener mqores resuilado_0
Iveio _n agua _abonosa o csa _n prod_cto de
3. Eli'_jU@gUe b_eael filir'o tea agua Ilmpia 7tue#o
Cui#ado de Fin _e Temperada
t Hag,a func_onar et ven_ilador detente rnedb d_a
para que se 5eque ei n_edo_de b unidad,
2 A_g#elo y desen@de!o dei temacerrbnte de
3_Limpie e/filifo
4 Almadmeto en un lugar aeco

Generalmenlelosproblemassensenciibsyesprobableqaenoseanecesarbliamaraun&_cnTco
Esta9ulapuedeayudadoareso_verbs,
PROBLEMA
Elaite _ondicionado
_O _13nCiORa
Enf_a pace o _da
Unidad ruidosa
CAU:SA POS [BLE;
La unidad no _cibe
suministro electrico.
Fil_ro de atre _cio,.
Capacidad inadecuada
Fbje de a_re _#slruid,o
Carte de en_g[a e_ctrica,
se cembbde alva!
demasiado r¢;pido o se
dispa_6ef interrupter per
sob_ecarga de_ com£resor
Piezas suell[a s,
Soporte inadecuado.
Formect6n de mo_ u ]loe_s
5_obre !as _upedfde_
hAmedas,
ES no_a! ia d_c:arga de
Gotea ague duera coadensacba cuaado el
china es _lido _ _medo
Gotea ague _entro La u_idad no _l_bien inciina
da come pare _rmHir el
Se forraa hielo o Baja temperature exterior.
escercha
El fit_ro _ eke de la mtdad
es|;_s_oio_
SOLUCi6N SUGERtDA
Verifique si ef ca_e de ali_ntaebn e
stoco_ectado al tom_o{rie_le,
Verifique el fumble o el c_'[acircuito,
Fije el _AN _NTROL (conltol del
ve_ti!ador) en urea _stcbn que r_o _a
O_F
Liimple o ree_#lace el filtro ® atre
Hab!e co_ e! t_e_e_a_te #are
determiner cuOl es la cap_dad
adecuada para _a_iJcaciem
Quite lads o_rueei#a do la rejtb o de
_as _ersta_as exterIetes
Haga funcionar el veB_ilador para
reiniciar ei cam preset (el)
apreximadame_te 10 minubs).
Ajuste fas piezas aaelt_s,
Proporctone sopor_e a_iclo, aal a _a unid_
Qut[e el _a_n de dr_aje y la b_de,ia
bare
Utiiice tuber_as fle×iWes papa desviar et
fiuja de agua
La _nidad debe instala_se _ un _igero
d_snive! pars perm_t_ u_a _sca_ga
a_eo_ada _e la co_,de_sackm Vet fTque
_a unWad y rea_ce los aj_es_es
_cesa_os
Cua_do la te_eperabra exterior _a ide#or a
los _5°F es posiNe que se ferme escarcha si
la unidad fu_clona ea medc>de enfhamieeto
Cambie el _uae_onamien_ode la u_idad a FAN
(sola_aeale) h_sta q_e la e%a_cha se de.ira
NOT,A;
Si el ooAecitcui&oin_errd#pe la cor_ler_teva_ias veces o el bslbte _ qaema mas de ureavez, oomun_quese
eo_ un t#-cni_ li_nc_a,de,

1. Garantia completa de un aSo
Per us ale a parfir de la fecha en de compra de! dueffo original,
cualquier parle que faHe materia_es o ejecuci6n bajo e! use no_mal cila
unidad serA substituida, Durante este pedodo, redes _as piezas y seH[cio
serAn proporcionados gratuitamente, sJempre y cuando el acondicionador
de aire ha estade instaiado y fi_ncionado de acuerdo con Ias instrucciones
escrffas on este manual, Incluye de ta garantia en ei se_icio casero
2. Limitada segunda a garantia de tercer aSo
Para e_ segundo con e_ tercer aSo a partir de ta fecha de _a comp_a
origina_ esta garantia proporc[onara un compresor det reemptazo
gratuitamente debido a producir una fa_ta Et diente va a set responsabIe
papa el cargo relatado dei labuor de cambiar el compresor de dos a t_s
aSos, El consumidor es responsable de los gastos de! trabaio y de
posible gasto de sewicio para embarcar las unWadeso El gasto para
mover el acondicienador de aire a los servisiadores hace compras y de
nuevo a _osusuarios a casa, come puede ser requeddo yes ia,
responsabHidad de_os usuados.
3. Qua no se cubre
• Esta garantia no apiica daSo si ocurrido debido a acc[dente,. _adirecci6n o
la operaci6n incorrect& e_dafio do envio el abuso, e_use er_6neo,
desautorizados reparada o procurada, o ei use comercia_ del producto,
o ning_n otro use para el cual no fuera pensado.
o E:sta garantia no aplica daSe a_ producto causado per aocdente,
y _as inundaciones, o los actos de la guerra de] terrodsmo o de! a.cto de dies
o Esta garanda no cubre viajes de_ senAcio a su hogar para educafie en
el use del producte, p6rdida de al_mento y bebida debido a _os desperdic_os
que esta garanda no se apHca fuera del continente _os Estados Un dos,
TODAS _S GARANT[AS, EXPRESADAS O IMPUCADAS, DURAN PeR 3
LA
GARANTiA NO CUBRE LA RESPONSAB_LIDAD PeR LOS DA_-_O8 FORTUITOS
O CONSECUENTES PARA CUALQUIER CAUSA
Esta garanfia est_ al due_o odginal _ara los productos comprados para et
use casero dentro de USA
Un cier_o estado no permite _a exdusiva o la limitaci6n de daSos
fortuitos. Esta garantia _eda los derechos especificas_ y usted puede tamb_6n
tenet otros derechos que £uedan var_ar de estade a! estado Para saber cua/es
son, eonsuffan sus derechos _egates a su oficina de los consumidores de ios
asuntos o ,gene_a_ _eca_o de[ estado de_ abogado de su estado.


© 20_ A_', Ke_on AJt C_d_tio#er Co.. Ltd. ane Ke]on USA lnc:. AI_rigntg re_e_edo
Ke_on Air Conditioner Co.. Ltd.
No.12 Q_aodong Ro_d
Ro_ggu_. Shunde, Gu_ngdo_ China 528o303
Kelon USA, Inc.
17005 Evergreen Pla_ B_dg A
Qty of Industry CA 91745
Version No.819043294_0t
Transcripción de documentos
Useand CareManual AIREACOND_OfON£[}O PASAS/_BITAC_O_ES Manual de Use y Mantenimien_e Remote Contro! AW-12CRi FMi Mechanical Control Thank you for purch_ng _ _ room aJt conditton_, Ple_e _ad this "U_ before installing _d using this _p!_ano& Keep this manua_ for f_ure r_erence, _nd Ca_ Manual" Muchase gracias po_ comprar un aire acond_cio_ado _al Laa ate_tamente e_ "Manu,a_ de Uso y Man_enimier_to _ ar_es de i_sta_ar y uti_zar _ste proda_to, Cow.rye ÷_te maa_a_ papa consu_tado e_ ÷_f#turo For Service Cal! ! 877 465 3566 Papa@tsnsr servici0 teen c0, Hams a_ 1 877 485 3586 y Page, Air ConditionerSafety ,°. 2-3 _ntroduction and Pa_s ildentification .., 4-5 Electrical Specifications Tips Before Installation installation Instructions .... 8-12 ,13-16 Operating _nstructiens Care and Maintenance ...... 17 Trouble Shooting Guide ...... i8 Warranty ....... ..................... i9 Page tntrod_cci6n ........................ ..... 20 ........... ..... 21 Especificaciones E!_ctricas ........... ..... 22 Consejos Antes _ela Instalacion ........ ...... 23 Instrucciones de !nsta!a¢i_n ............ ,, 24-28 Instrucciones de Operaci_n .. 29-32 Id.entificaci6n de las Piezas ........... Cuidado y Mantenimiento ................. ...... 33 Guia para la SolutiOn _e Prob!emas .......... ...... 34 What You Need to Know About Safety !nstruct"ions Warning and |tape,ant Safety instructions appearing in this manua! a_e not meant to cover aiI possible conditions and situations that may occur. Common sense, caution, and care must be e×ercised when operating or cleaning tools and equipment. A_ways contact your denies distributor, service agent, or manufacturer about problems or conditions you do not understand. This is the safety alert symbol tt s used to a./ettyou to potential personal injury hazards. a_l safety messagesthat feiiow this symbol to avoid poss_blsiaiu_yor death DANBEB educatesa,n imminently hazardoL_s ......... situatior} _@ich,ir nO| avoided, wil! resu!t in death o_ serious in ury, WARNING indicates a potent:ia!iyhazardoussituation which if not avoided could result in deatil or serious injury CAUTIONindicated a potentia_iyha,__.ardous s tuat:ionwhich, if not avoided, may rose,It in rnlne_'or moddate !aiu_y. i : ................. ....... CAUTIONu_._ _,ithout the safety alert symbol indicated a potentia!ly hazardous situation v,'h_ch, , if net avoided may LresultIn property damage. PORTANT I STRUCTIONS To reduce the risk of fire, electricai shock, or injury when using your air conditioner, follow these basic precautions: • Pl_g into a greunded 3*prong out!at. ,, Be net use an extension c,ard. = Be net remove • Unpiug air conditioning before servicing, ground prong. , Use two or more people to move and instate air conditioner. THESE INSTRUCTIONS The air c{:_r_dit;io{}er should be con_led tO the appropd_e electdea receptacle es _how_ _ the cha_ on Page 6 {Receptacle and Fuse Types} Power ;Supply Cord • The use d a time_de_sy fiJse or tireeode_ay c#cu_ brea_,er ff_ _scommef_d_, Alt wideg must c_'_p_y with loea_and _atio_al e_ectr_calcedes and be in.ailed by a que_ifie_ e_ectnci_ if you have any qa_tioas contact a qualified elee_raeiaz_, _ UL Thie p_ r_sf@ly cc_d _#_s s_a_-_Fthe at1 e[es_f_r_s t;ha_ Te test your power s_pp_y cerd: 4 P_e_ &_ rele_e R_GET O_slet_for c;{mk Re_el: bu_tc¢_w_Jtat_sh ELECTRIC S_OCK NAZA_O P_u_r_to _ 9rounded 3-_)r_g outlet, • Do _t reme,_e gro_Jndprong, Do _t use a_ adapter. Do _ot use ar_ extensior_ cord, • Failure to foflow these instru_!en_ ea_ _sult in death, fire, or e_ctric.sl shock, Remove Remove packaging arid pr_erly materials dispose of packag_n_ materials Remove tape and glue residue from surteces before turnillg on the ai_'coed_tio!_e{. Rub a smai_ amount EXCESSIVE WEI6BT Use two or more _o_e HAZARO to move and install air oer_ffioner. Fol!ate to _o so can result !_ back ot et_r inju_, o_ }iq_td dish _yaap over the adbe@ve w_h you_ fl_3ge_ Wipe with warm water and @y Do not use sharp i_st_uments rabMng alcohol flammable fiu_ds or abras4ee c!eaners to _emeve tape ot gl_e_ These products oa_ da¢[_age the sumacs of your air co_di_ior_e_, •, Handle a_r conditione_ w_th care° Thank you for choosi_g provides info\_mation ff propedy this room air cond_ioner neee.sea_, fer _he proper te c_l your heme care and mainfenenee This USE' AND CARE MANUAL d your r_ew r_m ma_atained_ yoer air cond:'t_e,'_er wilt g_ve you malty year.s d trouble _stellat_on' t_etatJaben ,read imstructiens and operation ca _[ore starting, ThLs manuai ai_r_n free operatie_ contains To avoid _nfermat_on for the of yeu__ r_x_m air c_ondidoner. : PART IDENTIFICATION Mechanical control model A_r |nlet Auto Ajar Cow,rot Panel Fresh Nete: The figures in this man_a! a_, bas_ Consequentty, the shape may differ on the extema_ view of a standard model, from tha_ of the air conditioner yo_ have selected, PART IDENTIFICATION Remote control mode| Retake Controller Control Pa_l Note: The figures in this manual am based on the external view of a standa_ model, Consequentfyi the dt_t from that of the air conditioner you have selected Shiape may 1 Al_ wide 9 must _3mp_y with !o_ and nationa_ electrical cedee and must be insta le_ by a _icensed e_ectdcian. _f yo_ have any q_eatio_s regardi_g the fo!_o_#lg ir_structions, _ata_ a Hceesed e_ectdoia;n 2, Check avai!ab!e power _uppty and resolve ar_y BEFORE installing and opera_in;g this unit, & For ye_r safety and protection, this unit is grounded through the power cord when p_ugged into a ma_chi_9 wail outlet If yea ,are net sure whether yoer waft outlet is properly grounded, p|ease co_sult a |fcensee electrician_ 4_ The walt outiet (3-pin) mast match the plug (3_pie) on the power _rd supp!ied with _he unit DO NOT _se p_ugadapters or extensior_ cords, If the air ,conditioner has a serta_ plate rating of tt5 volts and up t_ and i_elud_n# 75 amps, the _,_nit maybe on a fuse or circuit breaker with o!:her devices, However the maximum amps On a|! devices for that fuse or drcuit breaker can _ot exceed the arnps of the fuse for [he circuit breaker. !f the air cOnditiOner' has a serial p_ate rating ef 115 volts and greater than 75 amps it must have its own fu_ or circuit breaker, and eo other device or ,unit she_!d be operated oa the fuse or circuit breaker.. !f the air conditioner has a sofia! ptete rating d 230 vo_ts_ it must have its r_c_nfuse or circuit breaker_ and no other de'vice or _t should be opera|ed or_ the f_sse or circuit breaker See (Table t) for receptacle and fuse informa[bn 5 The rating pl_e oa the unit cen_Jns etect_caf arid other technic| data, The rating ptate is To, avoid the pOS:gi_bt!i_y Of persoaal ieju_, disconnect power to the unit before i_stal_ing _ocated on the front of _h,ebase pan Make sure to use the correct power suppiy a_cordiag to the rating pla_e of your' air conditioner COOUNG CAPACITY RATED VOLTS _ AMPS WALL OUT_T FU$_ S|Z_ 12K teK 1:25 250 !5 15 t5 15 i:: Table i Y¢_arR®m Air Conditioner unit is designed to b_ hi#Hy efficien_ and save energy Foi_ow these re_mmendatio_e for grea_er efficiency. 1 Se!ec__hermosta_ _[_isg _ha_sui/tayc4.Jr eomfo_ needs an_ _eavethe _,het-moa_al a_ Your RoomAr Cend _ioaer was d_igmed for easy #sia_la_ionn a single or doub_eohung wiadew, NOT_: This unit is NOT des_gne_ for verti@l (slider ty_)wi_ows tha_chose_ _tin 9 2:,The air filter is ve_lefficTenI # remeviag aid_ome panicles, Keep _heair filter clean, Typically, _he _lterz sh_J!d be c_eaned once a raonth,, More ffequeet c!eaniw,j may be necessary depending on euldoor al_d ndoor ar qua!_ty: 3. Use @apes curtaiss, or shades to keep direct s#rdight _rom heatihg your reom_ but DO N©T obstruct the air condit oner, Allow _hree (3} inches around unit [o c rculate NOT_: Save _e sh_pping ear,on a_d gacking matedats fo_"_ature stor_4e or t_anspo_ of [he ueiL Piease check thecontents of_he h_rdware kit_ai_st me cerresr_ndiag rnc_del check _ist, prior Io es[a !atiea of _he u_it. See fists be_owo(Ftg_A) 4_ StaA your ar co_d]ti4x_er before ouAoor ar becomes ho_'cold and #ncomfoAabie° This avoi,ds an init_a_perked o_ d scomfoA whWe the _nlts cool ego heat r_goff _he room. 5, When so}door enough tem_ra{ure @_ Sh:utte_C]_mp{2} Top C_a_ei(1 } ai_ #tovid #g some ¢ool _g ce_far_ and uti_ize_ !es_ electricity i_a_ when operating o_ a c_ _!_ (C:o is cool use HIGN o_ LOW FAN O_y:. This eir¢#late_ i_d_ot 3/4 _ Screens!_0) FI)_ !8e i'_@}@ ng se4_in_ O Lt×;kWashes(4) _ 1o12 x174B_ts(4) Foam(1 } NOTE::Sa_l#s screw(s) fo_ spare u_o $oois Needed forWindow installatiom Screw Drivers: Both Ph_Hips and Fiat Head Power Od!|: 1/8 _nch diameter dril_ bit Penc_f * Measurin 9 Tape , Scissors Carpenter s Level M Be certain [he proper eiectrica! d _he ir_staiiation Because the _m_ressor is _ted on me _e[ro_s side of the _nit _Ln_-_ht side} [n_s s_ee w_ _ heawer a_d more awkward _o man, pu_e_@, hadequate suu_rt on con[tel s#de of the unit _n resu_[ _ personal hjury ar_e aamaqe to you_ anit and oreDedy Therefore tl is r#commende[J to have sc me£'_e asses[ you _Junrl_ tr_e installation of th_s ur_! out_et is wiLh_a reach Use a_ly a single outlet circ_it rated at p_r c_rree_; (_..e tab@ 1 on page 6} should _ ia a_erdaa.ce e!ectricat oedes, R You_ unit 'was desigaed _o evaporate #ader r_ermal _nd_ens However, humidly AI! w_ring wi[h local and national condensation u_der ex£reme c,o_ditior_s, excess condensati@_ may cause the base_an to evedtow to [he euB_ide. The unit should be i_s[a_led where con,de_satiar_ _un_offcannot ddp oe _des_da_'_s ot _eighbo_ _ !_ Select the Best Lo_tiion A Ybur r®m air cenditior_er was designed to #[ easily ate a single or douNe hung window Howeve_ snce window designs 'vary, i_ may be eecessaPj to make s_amemod_@t;oas for safe a_ prope_ iastal_at[ion B. Make sure window a_ frame is s_ruet_ra_y sound arid free from d_ _d rotted wa(_ C. For maximum efficiency_ i_stait the ar oa_ tioner on side of the house o_ buid_ 9 whch _aeo_s r_e_e shade Lhae s_ntighL ]f the unt _s r_ direct sus_ight , it S adviaabie to _vide an awaing over the _it. O Provide S!_ffieiente£earance around the cabinet to a]!ow for ample ar circulation through _he uniL See _'Fig,B} The rear d [he ua}t s_td be outdoors and net n a 9arage nor inside d a haydn 9 Keep u_t as far away as _oss b_efrom obstacles and obs_uc_[o_s asd a_ leas[ 30 _ above the 8oar e¢ #ro_d. C_aiee and other objects withia a room should be prevented #era b!eek_ 9 the air flow, W'i_dow o_ing requirements AW-t2C_! 228 !:5 FM 24. AW - ! 8 CR3F_'_ AW_!@OM3FM 26.5'iB5_*26.£' 2, Preparation to Remove the Air Conditioner S_ide,,Out Chassis A Remove to¢a_d (4) Phiti_osscrews securin 9 the chassis to the _binet There are (2} serews o,r_each side The set of screws cioses_ fo the front of the unit secure the f_o#t pane_ to the caWnet, The set of _ew cioses_ _o the rear of the unit _e the _bi_et to the chassis,. See (Fig, t) B, Remove _he front panel sss÷mbfy from the cabinet by geai_y palling i1:, C, Grasp the pu_Ihandle a_ the front of the s!ide-out ehass s and carefully s!ide _he air _nditi_ner out d _he cabinet, See (Fig: 2), Please seek aests_nce for this procedure° Note: Screws must be reinstalled #pen completion of the window installa#on te secure slide-out chas_s; 3, Assembly of the upper & lower chennels te the cabinet A _ U' Shard Top Cha_nei: Stick the double adhedng sea _o the ° L" shaped top cha_ae_ and then _nstalmthe "U' shaped top chan_el to the cab Re{ as shown in (Fig, 3_ using (5} 1/4" screws, B r'_" Shaped Bottom Charnel _sta_led as shown h (Fg 3) using _[4}I/4' se_ev#s, NOTE: Foe fSK _ the #otto_ been f_tery.#'_stalt_, £_0_ the others_ but cttahne# has and their shapes may differ their functiens a_ sim_lar. (_u_ains) to the cab_net_ Siide the sh_ers into the top and bo_om charnels as shown in (Fig. 4), The shuttets are idenffied (on each fra_e) as "left'"& "r_ght!L AAach the shut,era to the cabime_ using (4} lf4" screws or_ each s_de, _K ba_,b_ _t_t_alted}# & _nsta_ation of Mounting Brackets First Seaiing Strip and {TOPVIEW) NOTE: Windows come i# a variety of different st=y:tes,Therefere_ it may t_ ne_ssa_ _o modify or mp_ve your pa_iouJar i_statla_:ioa A, At_.achthe bracket assembly _a _°angle :support bracke_ (Ffg 5) _si_g (2} ! !/2"' bolts Two bo_tsperbracket Secul_e with the (2) 1/4," I_k !; !; !; !; !; !; !; !; !; !; 5 washers a_d (2) 1/4"nuts. DO NOT immediately tighte_ these bo_ts as it m_y be _ecessa_ to adjust the depth of tha bracket aese_bly_ dependin# on the de_th of your window silt_ See (Fig 7_ ins_a!!She two leveling screws into the 90'_suppad brackets. Test the bracket a_semNy i_ the windaw before ca binet instaii_ion, ff the leveting screws are drstan_d too far' away from the wal_to provide s_ability_ it may be necessary for you [o fill F#g,6 this _rea with a sotid piece of wood See (\F)#, 8)° B_ Measure the inside window sill width and find the center as shown in (F_g 6)_A_ign the V;s!etin each bracket on these maAs and maun_ _,hebrackets So_he sii_ using :3/4,_ screws prooded Brackets shouid pe_ndicu!ar to the i_side wir_dow s#L ,See (Fig. 6), C. For proper o.mdens_ioo ru_Off it wil_ be aecessaq/ to adjus_ the angle/pitch of the window b_cket_ This _s Fig 7 ac,_mplished by adjusti_9 _e distance of the leveling screw on _he oute_ wal!. The maximum ang!e@itch should not exceed more th_ 3/16", See (Fig: 7), D, Cut t_e seal strip to fit _be u#de_side of _he bottom window sash Remove the peel_ff backing ,an the seal and attach i_to this sash_ See (F@: 9). Fig 8 & Insta|_atten of _he cabinet A Align one hole n the bottom d the cabinet with one hole in Re bracket ass.embiy. Secure the caMn,et to the bracket using (3) 114',sctewe provided same proc_ure See, (Fig, 10), Repeat the o,r_the oppo_te side of the cabinet B Ensure the °U_shaped mounting channel is posi_oned in freestof the sash. The '_U_'shaped bottom channel d lhe cabinet should be positioned in the track, provided oe the bracke_ assembly Put_ the wndow down G_ti_ it resLs iust behind the fron_ of the %? shaped mounting charlneL See (F_g. 1I), C Check {o make sure that the cabinet is sleeted s gh_ly dowr_wa_d on _e outside if ne_ssa_, re-adjust euppoA bracket as shown in (F:_g,7) 7_ Secure Shu_ers A Carefully s!tde '[he air (_r_ditioner ;back_ato the cabinet (Piease seek assista;_ee for this procedure) 8 Re_rlstali _he sl_deoouFchassis security screws (removed earlier) on bo_h sJ_es of the cabineL see (F g Secure the top of the _ames to tl_e window sash with (2) 3/4_ screws C Now, eecure boltom frame d abutters using oee shutte_ _:Icmp and ef_e 3_4'_screw on each side(F_g., t2)_ 8, Reinsta||ing Front Panel Assembly A Position the f_ont pane_ on the cabi_et sta_Rg at the top, The _ro#t par_e__ock _abs m_s| be ir_seded into the rata ning slots ie the cabinet, Repeat this procedure on ai! sides B Secure the front gd!_e _,othe cabineI using the Phfl_ps screws removed ea_iedF_g, 11), _g 12 & Complete the inslalialion A. Cu_ the foam to fit [he opening be[ween the _op d the inside and o___sidewind_. See (Fig. 13). B. Some ins_Ha_ions may require a,_ditioaal s÷a_hg around the window and ar conditioner Check for ;any air leaks and sea] where ne_essaryo Fi9 !3 C. In very h#mid areas the wa_er' remora! may be excessive enough _o ovedlow _he unit or increase the noise d th_ air conditioner, tf this occurs yo_ may wish _o attach a drain hose (n_ tnc!uded) _o the drain plu# a_l_wing conden_tiens I_omn off _nven_ently_ See (F_g. I4) Fi9 14 MECHANICAL CONTROL MODEL MODE The mode knob co_rols fa_ speed_ and c_iii19 epeede_ To set _e_ired coo_ing _empe_ature simply ro_e the mode kr_obdiai to the appropriate THERMOSTAT The thermostat autematicai_y conVeis the _oii#g cycle (compressor) d _e air conditioner _o maintain room temperature, However, the fan motor wi![ continue to operate after the compressor (c_lin9 LOW FAN wt ;Icirculate the ar at a minh_um s_ed MED FAN will @rcu_a_ethe air a_ a mid_!e speed HIGH FAN wi_ c_rculate the ,air at a maximum speed LOW COOL provides cooling minimum air circulatio_ time use. automatically _;i_ 15 with Recommended for niger- MED COOL provides coo_ing automatically with middle air circulation, Recommended fo_ nighttime use HIGH COOL provides coo_in_#automatically with quick c_!in 9 ot fo_ extremely hat days. Once room is cooled° reduce se_ieg to LOW COOL When a_n# FAN c.o_ol, _'um _10w_yat_c_n9 uni!: 1oad]usL 'Whe_ usin9 THERMOS:TAT _ sure ¢e a!low three mrnu_es _fore changingtemperature Adjus/#_g toe quickty may caus\ean overload res_l_in# iea blown fu_° OFF will compJe_e!y shut-off the un!t. NO_E: After setting the mode, a_lew 3 m_nates before _w_ching to another mode Fresh Air Ventilation is _s_Ja!y kept in the c_osed position, Use o#!_ when clearing smoke aad@r odors from the r_m_ Pul__o ope_, F_h A_ Ve_ be_#e_ _ FIn 18 _C_ _'TDP_I_¢ _ _'_'_ _,.,v_ ,_ .......... _, _ _ Sutton The air ¢oe_i_ion÷_wi_i be s_led whe_ _ is energized O_wf[! be stupid whe_ _t_ _ opera_on_ if you press _his_ton. _e batten _ch _ime Mode bu_on is pressed, the o_e_atioa mode is cha_ged #_sequence: COOLING _AN ONCf' ENERGY SAVING COOUNG Mo_e: Coe_ingi with fa_ speed Lo,_,, b'led High}_ Comp_eseo_ cycles te ma ntail_ Temperature, Set Point, F_n remsir_s on at se!_ted s#e¢_ dudng e_pt'e5_; CeaSing (_4e _a_i S[_d)_ Cempresse_ cycles Tempe{a_ure Set Pio_t_ _a#'_ spee_ ie cereuses3 t_perat&ire _a_ remsir_s _ I_dic_ion symbo_ _ LED e_ coatml pane|: OFF @tie, te a'_am_eir_ from ream dur_#g eornFess£ |._: OF_ c_s_e, Fan Only: G_rcula_as a_qd _ilterss _oom air at sei_e_ speed, Energy Saving (with _S#_sp_d Low, Mad, Hgh): Fan cycles ON and OFF vdth compresses over a wider E_e_y _v}ag with Auto Fan Speed); Fen ey_bs ON a_d OFF wi_h cam p_*es_r _t e wide_ range O_tem_a_u_e speed dur[eg ON eyrie e de_r_dee_ .:Fae L_ on _,,_ro! panel _flhe en w_en _e re e'v;@em<_#_s n _ls_d on _oem tempe[a_re NOT_: After se{ti_s9 ,the mode a_!ow three 4:3 minutes before _w _c_ing to ar_,other mode, In the FAN ONLY Mode. Room Temperature display range ie from _':'C (32'T) to SS'_C 19_F}. Room Temperature below 32K the Tempe_s_e Fee Spee_ H_8_ _edium Le_ A_te display L0, ROO_ Temperature Butto_; above 99':% the TemperEAu_e dis_ley N1. Used _o selec_ On#speed _'_seqeeeee auto, low, medium, a_d high H ghentfa_ speed for maximum oool_ng N_rmat _en speed for a_e_age ceol#_g ho'¢,_'e_arid q_jietest sp_e_ 9_'@ate¢dehum[dificabo_'_ Wowke ih ©0@[mg e_d E_rgy-S_vi_ mode t.o _a_yJa_ epe_J based on room _e_q_bJre, Time_ B#t|on: Used [o eel or caz_cei _imer operation W_'mn _he unA [s in operates0 you can set: OFF T_MER. When tl_e uni_ is OFK you ca# set ON TIMER. Timer sort{rig range is 0 _e 24 hours. _f the OFF T_MER _s set, the time LEO _isp_ays the remeia_Bg time to turn off the unit for or'_y 12 secor_ds, then LED shifts to disp!:ay set temperalum. !_ you press T_MER button within the 12 se¢0eds, OFF TIMER w_li be ceecelied _f the ON TIMER is set _he timer LED displays canoe! ON TIMER, press TIMER buth)_°l. _ tl_e _eme[_in9 time to turn or_ the uniL ff you want to Button Used to set room temperature NOTE: 'l_mpeta_ure ta COOUNG mode e_ used to set time }r_T_MER mede_ settii_g r_nge is from 19 C ,B6 F) to 31 _C (BSF) Remote contro! # O Power B_ON The _li_e wilt be s_ w_n it is e_g_:ed or wiB_ s_o_,_edw_n iXis in _ra_n, _ you press |h_ huron, + ,,,_BUTTONS Used _ se_m te_a_u_ in COOU_ m@ or :_s_ _o_ t_rr_ in Ti M_R _de, High BUTTON Us_ _ se_ct _he h_h fa_ _ _° Mid Us_ _ select #_e MN _an, s_J _de_ Low BUTTON U_ _#se_ct _e bow fan _ r_ Al;_o BUTTON UB_ _ selec_ _e A_ Used _o se_:e_ can_ {ans_ mo_ t_mero_a_i_, Pow_ =Saver BU_ON Us_ _ se_ct _he _r_efgyo_,¢_ngntodeo SWING BU_ON Used to select st_ or stop ve_c,al air Howto |nse_ the Batteries Remove the battery cover according t_ the arrow direction Insert _ew batteries makin# sure _hat the (÷} and (-)of batte N are ma_ched _rrect_y Reai_ach _he _v'er t_y s_idir_#it back into position, NOt_' batteries.. Repl_c_ _tte_tes _th _e_ #ae_ ## the sa_#e type p#epe_iy: HOW tO Use To operate the teem air cor_d_tionet, 8ira _he remo_e co#_ro_to _he sigma! rec_p_er The remote _n_ro_ wiI! operate the 8it conditioeer at a distance of up to 23 feet 'whe# poir_ia# at eig_! receptor d iadeor unit - \ When servicing _he air _ndit_oa_r, be _ure te turn the mode switch _e#le "OFF" _s_t_or_ and disconr_ec_ #le power oord Item the electrical outleL 1_ DO NOT use gaso_i_e_b,enz!_'_e,_htnner o_ ogler cl_emica_s on _he air conditioner as these substances may cause _amage _e [ne _aint fir_sh and deformation d plastic pa_s DO NOT 'forget to ins_l! the air filter, if the air conditioner is left te operale w_tho_ _he air filter, duai is not remove_ from th÷ r_m and may cause your air condit:_ner to fail Wher_ _he at f!_er inlet grille a_# @binet ate dirty wipe with iukewarm 'water (be_ow 40 '_C/104_), Use d miM detergen_ is recommended. 2 Never at_emp_ _o pou_ wate_ diredly iH fron_ of #_e _rdt as this will cause deterioration d the electrica_ insu_aflono Cleaning 'the A_r Fiffe_ Removal of Air Filter If the air _iiter _cemes clogged wish dust, airdiow is ebstrac_ed and reduces efficiency, The air f#ter sh,ou_d be cleaned on_ a month, More frequent c,_eaer_gmay be ne_,ssa_ depending on outdoor and indoor ar quality+ Air _ilter 1,,Reraove dus_ cadged ir__e fi_ter by tapping it or vacuum clean it:, 2 Wash _he fa_terwe# with _ukewarm water be_ew 40tO (104°F} wMe robbing _gh_y: To ge_ be_er resu!is_ wash it with soapy wa_er or a neutral deanin 9 agent Rome-ca|: The air fil_er on the a_ave rnode_ is bested 3..Rinse the fi_te_wet_ using c|eae wste_ then dry complete!y. beh_r_dthe a_r intake #o_t gt_ite. To remove the air fllter_ open _he air inlet gd!le and take the a# fl_[e_r, To reinstali _he ai_ 51te_,reverse tae above Er=d_-Sease_ Care 1. Operate _he fan a!one far half a day to d_ out the, inside of the unit 2 Turn off power and remove p}_g from wa_! _cket 3 C_ean filter ,4_Store in a d_ _oca_en, Fr÷_uen_:¢_ a problem _sm_nor a_d a se{vice cal_ may not _ PROBLEM POSSI6LE A_r oondR_o_er wi_ necessary, use th_s t[au_eshoof_ng CAUSE No power to the u;r_t SUGGESTED Check guide _or a SOLUTION cor_nect on of power cord _o power eou rr3_. Check< fuse or ci_#_lt breaker. Set IFAN CONTROL tha_ "OFP tneffic:iee_ or no _ol_ng Clean or fef_a_ to pos_ton ,other air rioter: Cheek with denier to determine Bilked Noisy unit Odors Wa_er ddpp_g _nside air flow £roper un_ Remove o_3s_ru¢[_o_ from gr_[ of outdoor iouvers, Power !nterruption sellt_ngs @,a_ge too quickly, or compressor over,cad tr_pped Let fan run _o _es_art compressor (i_ appro×im_'e_y 10 mi#u_es). Loose pars ]na,dequate s_p_t. Tigh![e_ loose _arts, Provide additional sup#o_ Formation of moid mildew, or a/gee on we_ surfaces Remove dra_n P_u9 and dra!n base pan. Replace drain plug C:or_densation run_,off is aetna dU#r_g ho_ _nd humid w@_her &_d f_e×ible [ubir_g to redirect {See F_go i4_ Page t2) Un_ is not pr,eper_y angled [o al!ow water b0 drai_ og_side Unit must be installed condensation rumofL !c_ or fro_t build-u# to unit. wa_er flaw on a_ an#!e for proper Ct_ck the unit and When ou_oer _em_rat#re is a_)pro×imately 65_F or be_l_,, frost may form when unit is in _Aing m_e Sw_tch unii_to FAN {eniy) _erat_on un_i_ _rost melts R_meve a_d clean filter, NOTE: _t drcu_ breaka{ is t_ipped repeatedly, or fuse is bto_v_ m_re _t_n or_ce_ contact a #cense_ Iechn_ien. For one year f_m the date of purchase by the original _er, fails in matedats or workmanship under norma! use, the part During this per od_ atl parts and service wiI !on# as the air conditioner has been instailed the written instruction, s _n this manual.This For the second warranty product through wil| pr_ide failur& to replacing the third year from a replacement The customer the compressor be provided free of charge, so and operated in accordance with war_nty ineludes in home servic& date of original compressor will be responsible in years a_ part which wll be replaced. purchase, free of charge this due to for the labor charges related two through three The consumer is responsible for the service labor and possible freight charges for shipping the unit. Cost _ move the air conditioner to the servicers' shop and back to the user's • home This warranty may be required does not apply and are the user's responsibility. if damage because imp_per handling or operation, shipping unauthorized repairs made or attempted, or any other use for which occurs of accident, damage, abuse, misuse, ceremonial use of the product it was not intended. • This warranty does not apply to damage to _e produc't fire, floods, acts of wa_ terrodsm_ or acts of God • This warranty does not cover service trips caused to your home by accident, to educate -_u on the use of the product, or Ioss of food and drink due to spoilage° o This warranty does not apply outside the continental United States, e ALL WARRANTIES, EXPRESSED OR _MPLIED, LAST FOR 3 YEARS FROM THE DATE OF ORfGi_NAL PURCHASE THS WARRANTY DOES iNOT C_'ER LiABiLiTY CAUSE FOR INCIDENTAL WNATSOEV OR CONSEQUENTIAL DAMAGES FOR ANY ER_ o This warranty is to the original c_wner for products purchased for home use within the USA. Some state do not anew the exclusive or Imitation of incidental damages° This warranty gives 'you specific rights, and you may also have other rights which may vary from state to state. To know what your lega! rights or your state's at& consult Attamey your GeneraL local or state consumers affairs office Gradas po__elegir eate _ a¢ _do #ara enfria¢ su hc_ar. Este MANUAL DE USO Y MAN #topofciona ta inform_c'i_R necesada pars cuida_ y mat_te¢,,eren forms adecuada su _uevo sire acon Fundona_ sin pt_oM_mas du_nte mug71os a't_osd te bdnda e_mante_#miento apropiad& Pars evitar pmblemas al #_s_alarto ?se csmp_e_amente tas instn_eciones antes @ comenzar Este rnanua_ contiene infotme#_n acerca de l# #_q*alad_3ny et fcmcianar#iento del site aeondic_onado pa_ hat) I,.II_] Modeio liIi[/l>O I l;_,_li,,!il_,I Mec£nico Panel Frontal Gab!sere Fltro de Aire Outlet de A_re Nots: Las ira#genes de es[e ma#_al eatan basadas en la vista e×_ema _e ua models es_nda_ En consec#eneta, ee probable que !a forms sea di_ereate a II dei site aeo_dieio_ade qae usted seleccie_e TO do _lden, t_flcac_onde las Piezas Mode|o de Remote conttolador Fi]tro de Aire Pane| de Centre{ Contro_ Remote 0o Nots: Las im6genes de este manua_ estan basadas en _a vista extema de un mode_o es_nda_ En consecuencia es probsbie q ue _sforma sea diferente a _a de_ sire scond cionsde que usted seleccioa{_. 1_Todos_ cablesdebencarnpbconI_ c6dJgos el_c_ricos _a]es y nscionales¥ bs debeinsta_ar un e_ectridsta Hcenciado, Si flene preg_ntas e_ando se lo enchufa aun toma_ente de pared pfovisto de conexi6_ a _ierra. Si no est_ segu_o de Si e_ _tu!o def sire acondic_onado #_dica 1 t5 voltios y has_a 75 amperios, _a unidad ee puede coeectar a un cot_citcu_to o f_stb_e _fl_zado per o_s dispes_tivoso No obs_ante_ _a sums de _os ampedos m_ximos de todos !as disposit_vos conec_ados a cliche cortacircuito o fusible no deben excede_ _os amperios de! misrao; St el r6t_a_ode_ a_re _and!c_oaado indies 115 voltioS y m_,sde 7,5 ampe_oS_ debe tene_ s_ _ropb fusible e codadrcuito y ao se deber_ _nectar nieg_n etrod sposifive o unidad a d_eho fusible e cortacire_ito que el bmsco_dente de #ared cuen_ cen _a _nexbn a be_ra apropiada, consu_te con un e_ectric_sta _icenciado_ Pa' r_ eviler _esbees f_si@s0 deseo_'_eete e_ euministro de energ_a de l:a anidad ant÷s de i_staiada o teparada, re_scionadas con tas siguientes insttuccione& compel quese an un e,iec_ddst_ tiee_ciado_ 2, Vedfique e_sumi_is_re de e_e_g_a dispenib_e y _esueiva cuaiqL_ier problems c_e _os@bles ANTES de i_s_e!at y hace_ funcier_ar ee_a _nidad 3, Pars su seguddad y pretecci#n esta u_dad esN _nectads a tierra a _rav_s de_ cable de a_im,entaci0n 4, El tomacordee:_e de pared (de 3 c#avijas) debe _incJdir _n e_ enc_ufe (de 3 cfaviias) de_ cab!e de a_imentacian sum nistrade _n !a unidad NO utilice adap_dores 5 _1 retulo de _aunidad centiene dates e_!ctricos y t_cnioes, Dicho r{_tulo se e_cuentra en e_ lade de.the de la unida& de enchufe ni cabies de e×$ensi6n Co_su!te !a Table 1 papa obte_er informaci6r'_ ac_erca de _eceptacubs y fusib_ AMPER_OS TA[_A,NO D_EL_US_BLE 15 15 Table 1 S# _Mdad de Aire A¢ondic_o_ad_ #ara HabiLac_ones se ha disen_do papa _ogr_r un a_to rendi_iemo y ahotra_ et_etg a electrica. Sga _assiguieH_es sagerel_¢ias pats I_rar un mayor rendlmie_to 1 &tuste el [e_mos[ato a u_ hive/qua ie resale sgtadabte y dOje!o er_ e! _ivel seleccionado, El _re A_dicionado pars HaNtac©nes se ha diseg4._dode m_o ta:l qua resute fec! su ns_alac_4n er_ ventar_aa armadas se#cilas o dobI_es.NOTA: _ u_dad NO se ha dise_do pats vemanaa vetttcales {de lpo _esfzante}. M Pars ewtar pmbte_r_asdu_e i_s_aci_'m o el f,_nc_o_amier_l:ode ia ar_tdad, lea comp_e_ament_ las ins_rucciones 2. E! fllro es may e£cie_e a/a hera de e/rnm_r paAicuias qae se desplazan pew'el sire Ma_[e_ga fmpie el fitto de ai_ Per _ 9eneraL e! #_m _ebor(_ limpia_e una vez ai _s. Es probab!e Rue sea r_sar_a timpiado co_ m6s frecue_cia dependiendo de _acalidad dei sire e×[edor e interior & Paede _tlizar _apices, cortinas o pant_las pars e,_*itarqua la !uz directs de/sol _lienl.e su hab _c_#n, pero NO obstruya el sire ac_ndici,onado Permits qua e! sire circule a_r_edor de ta undad sin obatru_iones, 4 _ncienda el ai#e acondic:ionado an_es de qua la tem[_ratura e×_erior sea d;emasiado elevada y desagradab]e. De esta manera evitar_ sufdr calor mienl'as la _r_idad e_fr[ a la habffacioao NOTA: _:msarve !a c@a de _au_nidady bs ma_edales de empsq_e para a_macenarla o [ransportsda e_ e_ _u_,uro.Ante8 de i_stalar la u_idad camera e! oon_eaido de! jeego de herrajes _n la Ii_la de co_roi d÷l mode[o corres_oadie_te. Cat,suite las s_juiea_es fstaa _Fig, !) ¢_ '?era!ios de !.,4"_13} Carla!! Ie_or (!)_0_ _ _K;.¢_rtir_a La[l_ai0_echa ,O_ Ara#dela_de Pres_ 4} @ T_e_casdel 4" (4) 5. Cua;ndo la _emperatura e×_rior es _os_fic_eatemer_e fre_'a_ ut lice s61oH{GH _AN (ver_£1adotal @_x_mo)o LOW FAN (v_nt lador at ml _imo) _sto hace qua el ape interior ck'c_ie a u_a tem#era_rs agradsble y _;_3_su_e meno_ ener_ a electica qua si hiciera fu_c_onar ta _nldad coma enfria_or de ak÷o _} E_#iadra Deb!e _1_ 2 Adlbesi_a (1) 'spa }[a_et'_ y" Pat_s de ¢*_ivelac.k_n{_} (_ig, i ) N_la: Tomllo _ramteff_s Exceden_ N_esa_tas Desletnlladeres: Taladro el£¢tdco: Cimta m6t_lca Para d Use de Rese_a, para la |nsta[a¢lan _ Ve_ffal Phtltps y de ¢a_za _laa_ bt_a de t_8 pul_ada de _{tmetr_ Oebidoa uuee_f_moreso_ seencuent_a de{lado ae ,_os @nt_ro_es, a _a de_@ch_ oe a un_dad }, eat@ laao ser<_mos oesado y rues dif_ c_ de man pu/ar, Si _a un_Gauno se sos[_er_eb_en de d_cho lade #u_en proaucwse lesio_es_'isk'_s y daces a a unldad 7 a su oteo_edad. Poe_Io taste, le recomea_amos qua pare msta_a_es_a Unldad solicite ayuda a o_ras aeneas. 1 Se_ecciiose la Meier Ub_caciSn A. Ei a_re acendido_ado pare habi_dones __ie_eun dise_o _ se facl_ta su c_mocaclon en ventanas b&t_adaa sar_¢";i/_aso richter. No _)bs_ante_ de#_|de a _ue _os dBe_4os de ventana sen _an vanaeos probable realizer eue sea necesado m_#icac_enes adec_ad& es _t comente prop_o (tea _b_a 1 en g gins 22) _n c_cu_o e×c/usivo pare e_ sire acondi¢ienado, Tod_ _oscables deber_n cump_r _n los c<_igos eb_lr_cos _.}ca_e_y nadonales F. La _.m_,dad es!_ d_aaa e_en<)r Par/o lam_o_a ur_Kt_d deber(_ n.sta/a_se er_ _n lager eende ta descaLga de _ con_er_sa_¢n no _ee _bre e_ eas_ _._e#earlobes f_ieh las propte_ades _ecir_as a gun.as pars _ograr una _nsfLalaci_n segura y B Aseg#rese de qua la ventana y e_ marco _ngan una estructura firme y qua la readers ne est,, raiada C Pare I_ra_ e! m_×ir_)o _e_dim_ento, instaie e_ate acondic:_o_ad,_de_ _ado de is casa o edifcio donde hays :m_s _mb_a qua sol Si !a u#idad se encon_a_a expues[a a _a [uz de__, es aconsejaMe _ocade ua teldo ÷ncima D_D,e_es_cisnte espacio alrededo{ del gabi#ete papa permi_.iruna ampl_a circu_aci6_ de aJre a travels de la unidad Vea (Fig2}. La pa_e _s_edor de la unid_d debere dar ai sire libra y no aen ga_aje ni ai ia_edor de _n e@_icJo,Mamer_ga !a umdad _0mas _ejo_posible de obst6cu_os que puedan causat obs_rucc_on_ y par to meno_ a 30" de_ aive_de_ p_8oo de_auelo Debe_an tomarse preea_¢_enes pars ev_tar qua las _inas o cua_q#_erotto ob_e_odeetro de una habitat n obstruya# e_flu_e de a_re. _eqei$ites _a[a las abe_r#s _co_s#_ !a sl#aiente ta_la_ AW 12CR!_M1 AW 12C_1 Ab_ m._x_ma FM _e ventanas AW !80R3FM AWi aC_S_M 22,8" _5,7" '24,t" 26,5" _i&5" "26,9" 27,6" 31 _2' 378 _ 43,0" 158" pare evapcear _ac_r_donsac_5_ baje c_dicio_es flora'sales, No o , baje ce_d_ciones Qe extrema hulaedad, e_ probaMe qua _;,_ COnde_s_c_6n e×ces_va t_a98 qua I,_baede_a base se des_×)rde _a_xa e_ t9,0 _ 2_C(,_mo quitare_atmaz6ndes_izabte delaireaco_dicionado A, Quite !os4 tomiHosPhiHpsquesejeta_el a_mazx_n a_gabinete Hay2 tomiHosde carla!ado,Los tomH_o s q_eesNnruescercade1#e_ltede _aunidadsujetan e!pa_e!fron_a!a! gabi#ete,,LestornH_o,s queest_nm dscercade _apartetraserade !aunidad sujetane_ gabOneSe a_armaz_nVea_a(Fig 1}o B. Quiteei pane!#ontal de!gabinetetirando suavemente de _L C, Tome e! mango que es_ae_ ef fren_e del armaz6n des izab e y saau÷ con cuidado e! aire acondicionado de_ gabine_e, Yea _a (Fig, 2), No:ta: una vez fina!izada /a tnsta!ac_n en la ventana debe velvet a cotQcar los tornillos para sujetar el armaz6n deslizable. Pida= ayu(la 3. Montaje el gabiaete pata tealizar de los canates ..... ............. /:i? I este procedimiento, superior e F_g 2 A, Canal Supedor en Forma de L: Aguante el dobie sei!o adhesiva a!cana! superio_en fo_ma de L, con 5torniilos de 1/4", _nataie el canai superior en forma de L sobre e_ gabinete, ta_ como se indica en ia Fin. 3. B, _nstale e! Cana_ ;Inferior en farina como se _d_ca e_ a Fig. 3, de U, tat Nota: Para los de !8K e! canal de bo;_6n se ha insfalado en la f_b#ca y su forma ser_ distinto a o_,s, pero susfucciones son 4 Mon_:aje de lasi persianas Fig t !aterales (corti_as) Desiice las persianas por_os canales superior e _nferior, ta_ como s÷ indtca en la Fig_ 4_ En carla marco las _ersia_as se iden_if_can como "izquierda _y "derecha' Sujete !as pers_anas a_gab_ nete con 4 tornHios de 1/4" de cada ladm 5, lnsta_ac_nde_os8oportesHorizontalesyde ia PrimetaTitaAdhesive V_STA8U?{R:@R_ [, &,/.::: Salladora 0 @ 8, NOTA: Exista u_a gran var_adad de estiiosde v ea_a_as, Per _o tanto, es probable que se a necesario modifica_ o me_orar sw propia insta_aci6n, A. Sujetee_ sopo_te horizontal a los soportesen esc#adra (Fig, 5) con 2 peraosde 1 1/2:% Hay dos pernos per soporte° Aseg_talos con _as 2 arande_as de pres_6n de ! !4" y _as 2 tuercas de 1/4 _' NO aiuste estos pemos de inmediato ya que es pesib_e qua sea necesario ajustaf _adistancia del sepo_e ensamb_ado, dependieado de ta profun didad gel embta! de ta venia#a, Vea _a (Fig, 7}_ tnsta!e los des tomi!!os de mire!mean en los sop orte_ en escuadrao A mode de pruebe, coloque e_ soporte ensamblado e# _a veata_a antes de insta!ar e! gabieete, Si lOiStoraH!ms de nive!acbn est_n demasiade lejos, de _a pared come pare preporcionar estabiHdad_ es probable que sea necesario cemplementat dicha area con un race de madera Vea ia (Fig. 8). Be Mida el anchodet i_ter_or de_ umbral de _a ventana ydefina e! centre, ta] ¢em_ _e indite en !a F_g. 6 Alinee !a _a_ura en V de eada soporte ensamblado sobre estasm areas y mon_e _oe Soportes a! umbra! con _os temil!osde 314" preporcioaados, Los sogortes deber_n q uedar petpendicu_ares a_ umbra! tn_emo de la ventaea Vea la (Fig 6), Fig 6 F_g 7 C Pare permitir una descarga adecuada de la c oadeesaoi6_o ser_aecesario ajustar ]a i_ciinaci6a de los sopottes en la veece_a, Pare else, ajuste ]a distaneia del torniHo de nivelaci6n en _a pared exterior La incH_ac_,n _×ima no deber6ser superior a 3lIW Yea _a (Fig 7), D, Co4e ]a prime_a seiio para que quepa an ia patte lnferiorde_ marco d:e _a ventana Quite el revestimieato de la tire y _9ue_a a_ marco, Vaa is (_ig. 9), _I Uti!ice an race de madera para prepomionar estabiHdad, _sito ser_necesario cuande e! _mbra_ de _a ventana sob#esa_ga touche de_ £iano de ia pared_ Vea ia (Fig, 8) Fig. 8 g, _, O ,> & [nsta[acbn del gabtnete A. A|inee un _gojero de la parts #'ffedo_ dei gab_aete con un agujero de] soporte ensamWa do, Sojete el gab[note a_ soporte ensamb_ado con 3 de Wasto_nit_os de t/4" proporc_onadoso Rep_ta o_ mismo procodimiento dol otto _ado de_ gabinete Vea ]a(Fig, 10)_ B. Aso##:rese de que e! canal do montaje en farina de L es_delante de_ marco, E] cana_ en farina de U de ]a porte inferior del gabinete de bersq_edar en e! rie_ de! sopode ensamS!ado B,aje !a yen:tara hastaque apoyei#sto deters de !a porte de!antera det caeaide mo_taje en farina _eL. Vea In(Fig tl). C. Aaeg_rese deque el gabinete est_levemen_e inanimate haci8 abajo ea ia porte e×tem_ Si es necesarie vue!va a a iustare! sopod, e_ tal came ae indicaen _a Fig, 7o 7 Asegarelas Persianas A 'V_elva a co_ocar con c_idado e[ airo acondicioaado en e_ gabinete (Pida ayuda pars reaHzar este p_ocodimiento.) B,_Vuelva a insta_ar !as torniHosde! armaz_n des]izab_e {que so qaitaronanteriormonto} de ambos _ados de] ga#i nete Vea _a (Fig,, ! 2) Asegure la porte s_perior de !as marcos a! marco _e _a veatana con 2 tornii!os de 314'L C, A_ora asegure e_ marco inferior' de las persiaaas con #_a grapa y ur_ tornitlo de 3/4" de ,coda ]ado (_[9. i2:) & C6mo Velvet a I_stalar e] Panel Frontal A, Coioque el pane_ frontai on el gab;neto oomoezando pot [a porte de ardba. Las trabas de[ panel frontal _eben insertarse en Las _an_ras de sujec_n de_ gabinete_ Repita este prooedimiento de redes !as _ados B,. Ase#ure la reii!]a ['rontai a! gab ne_e con los tomii]os Philips qua quit6_nteriormente {Fig, 1 )_ Fig.10 9, Finalice la Jnstalac_n A Comte la espuma para que quepa en _a abeGu_a entre _aparte super'iordel interior y exteriorde !a ventana Vea ta (Fig, t3). B Es probable que algunas _staiacie_se8 necesiten tira se[ladora adicionai a_rededorde ia ventana y e_ aiFe acondicionado Vedfiquesi hay a_gu_a _rdida de airey s_le_a si es n÷cesado, Fig 33 C, En zoaas de mucha humedado es po_lb_e que }a descarga deagua haga que la unidad desbordeo que el a#e acor_dicIonado haga rnes ruido. Si esto sucede, puedeacoplar _na manguera dedesag_e (no i_ciuida) a! tap6n de drenaje para que _as condensac_ones se descargee_ bJem Yea _a (F_g_ 14), MODE (Modo} Oeci_ Set._tor La ped_a de m_o _ntmlBa las velocidades de venti_ador y de eafriamiento Para fijar aria temperatura de enfr_amiento simp_emente haga rotar la per tlay _quela en e_ hive! deseado Vea _aFig, _5. THERMOSTAT (Termostato) El termostato ten,roSa automd_i_amente ÷i title de enfriamiento (oompresot} del a#e au3ndicio_ado para maniene_r !a tempe{atura del ambiente. 1to obstan_e, el motor del verltiiador coniin_ard funcionando un8 vez f!na!Jz_do e! fuacionam_ento del compresot (ci¢!o de, enffiamiento} Vea I:a Fig. i5. LOW FAN (Ventilador a_ M_nimo} hare que e_ aire ¢i_cu_ea "u_a ve_ocidad m lmima si_ enfriar Cenl_l de M_o 6omt_l de To,mosS:ate M£D FAN (Ven_:iiado_al Madiano)ha_a que e! aire ci_cu_e a una ve_ocidad reed ana sin enfdat HGH FAN (Ventilador a! M_ximo) har_ que el aire circuie a una ve_ocidad maxima sir en#ia_. LOW' COOL (Fr[ o M inimo} enftia el ambiente au_om_icam,ente con #ha circu#_ok_ m mma de aite r÷comienda durante !a _oche. MSD COOL (_to Mediano) en#a el ambiente aut[omSticamente con una circu_aci,_aqmeSiana de aire Se tecomieada du_an_.e_a_oche. H_GH COOL (Fr_oM_ximo} eaff:ia et ambiente autemtsticamente de manera r_ida o dura_e d !as de _k_r ntensoo Una vez qua Ishab_ac_,n es_ ff_a, reduzca e_ n_ve] a LOW COOL, OFF (Apagad_} apags la unidad compJe_mente Vent_laci(_ de atre fresco se ra a nqa_ener en _a posici6n _rrado, Usando s6_o para iim_iar h_mos yto odo_es de la hab,ilaci_')n, tire a c_menzar. "Vea_a h%a_ gi[ar _r_t_m_ei_t_ p_ra _ermil_r que is _da_ ?_ ada_e a _iva_ C_and_ _ih_ THE a_re_ _ es_erar _es minut._s ar_tes de _mb!ar _a _rr_perah_a S_!a cambia demas,_do ra_idees po_ib_ 0_,e e_usB v r_ sobrecatga y que_e e fumb_ Bstesireacondiconadosepuedeoperarfaci_mente con[osbotonesde1pane_deconhoias:_ comatambb# cor_e_co_tro_remo_o Pane| de Control Be_en S presiona este bot_n_ encende_L_el sire scondicionado, Cua_do e_ are acend cionado es_a de ca_ef_cciem se pet imp_entsr ee_e betan 3 m autos despu_,s Bo_oR Mode (Mode) Cads vez quese presioea ei bot_Jn MODE, ei mo_o de opetsc_n cambia en eetae secuencia_ COOLING (Enffiamien_o} FAN ONLY ($6_o ve_[itador} ENERGY SA?,/iNG (Aho_ro de Energ a} COOLING NOTA: Despu_s de se_ece ena_ un n_vet_espere 3 m_nu_os entes de pasara o_re Con e! mode deFAN ONLY, E1 recin_o de !a tempera_#ra Dehab tac;6n set8 Desde 0 "C(32°F} has_a 38c(gg:F). La [empetatura de _a h_bitaci6n essuper or a32F la temperature i_cer_ L0 La temperature de _ahabitae <1_es superior s 99F la/i÷mperatura leoere HI S m_o!os @ Ve_t lad0r ÷n velo_id ada _om4_Jic_ Be_#_nFag Speed (Ve_ecidad del Ventitader} Se uti!iza para se_eccionar _ave[oc Pad de! ventilador e_ secue_e a: au_em_iea beta, media y a_ta_ Be_n Ti_er (Temper zadeO Se uti_iza papa p_ogramaro eance_ar e_ funcionam onto de_ _emporizadot d_e! indicador _e! panei _e! cont_o|: :t_' E_fr_mie_0, V_nt_taao_ en velocidad _#_i_ velc_ude# _a O C_ando la _nida_ eaten f_r_cionam @n_e_puede seleccionar OF_ T_M_R (Apa#ar Tempo_izador) C_a#de la u_idad ee_a#ag_da, p_ede seieccionar ON T_MER (Enceader Tempodzadof). _ _a_go de horns pars p_ogramar el tom perizade_ es de0 a24 horns. |_ MesSier _o_a p[a,_aa_a_a Las Iucea del n4 cadet LED anter_tmen_.e me_cionadas s_ eric ende_ c_lando se _san los S seine€ions OFF T_MER,, :a #antaiia de! _empor zador indicar_dutan_:e 12 se #undos el tempe restante pars e! apagade de la unidad y lunge indicar_a _:emperatura iliad& S presiona ei bo_n T_MER denote de esos i2 seg_'_doe, _e deeactivat_la S selections ON T_MER, la pants;Is dot _empo_izador r_dleareel tempo res{ante pars e! eneend de de _a unidad. Si desea canceler ia fancien ON TIMER Bet_r_ _ Se uti_iz.a pars fi_ar la temperature TIMER, NOTA: el range de _e_nperat_res funei0n OFF T_M_R_ presione ef bet_,n TIMBR_ ambience en mode COOLING o pars pregramar escila entre I9eC(66 _F} y 3t°C (88_F)° _a hera en mo_e Control remote Power (Encend_do!A_agado} El aparat,a se encende_ s es_ apagade o _pagar¢_ cwando es_ en o_erac_n bet6n, Bot6n Mode (Modo) UtiHce este bot6r_ para selecc_o_ar Bot6n +- Boto!nes de aj_s_e de _smpe_atu_a optima para a_ustar _a temepra[wra del cwar_o. o#rima para progtamar la hera. Bot6n High Pata aj_s_ar el #_odo a_ta ve]oc_dad de yen! _ador.. Bot6n Mid Para a_ustar e_ mode mediana (_ mismo baja} veloc d,a_ de ve_ti_ador, Bot6n Low Para ajustare_ mode baja velocidad veniHador, #e Boton Auto Para a_ustar el mode a_to ve_ocida_ de yes,tirade r.. Bot6n Timer (Tempor!zador) Pata poaero cance_a_la operaci,t_ detimer, Bot#,n Power Saver Papa ajus_ar ef mode _e e_ergia-ahor_o Bot6n Swing (Osctlaci_n) @e_tJiiza para comen;zat o termi#ar e_ _o_t_ie_[o de las ve_e_as ae_tas vert_ca_eso • Des#u_s de se_eccionar u_ nive_ ÷spe_e 3 minu_osantes ' Espere 3 m nutos antes de recomenzar et apara_o. de pasar aotro. Control remoto • Col_6n _ las p|_ R_re la tapa _ _ V_lva a t_lar _ en et se_ _ la flechao _ otra a su _6n_ * C _o use Pafa opers_ e| airs acondickmado, apunte e| controlador remoto la set, at del teceptor. E| controiador remoto se ra a operar _ aire acondtciondo una diatanda hasta23 pies cuando apunta a _asa_ar de! re_tor de la uni_d_ \ NO olvide i_s_lar el fiitro de aire_ Si el ai_ acondicio_do f_ci_a si_ el fl|t_o de aire, el pone no se pu_e eliminar de la habita¢i0_ y es posib|e qua la _nlead se 1 NO _l_i_egaselina bendna_disobente u otros p_od_ctosqumcas e_ e! a#'e a_on_ticio_ade ya qua estas m_s_aac_tsp_tede_da_*ar elaca_ado de pi#tu_a 7 _forma_ les piezas de ptes_ico, 2 N_nca derrame ag_a dire¢la_ent:e en e/frante de la urfi_a_ ya q_e da_ar_a el ais!arai_eea_#_ Llrnpieza del Filt_o d_ A#e Ext_a_¢i_r_ _l $tltto dl¢ Alte S e_ f_bo de _ire se obs_ruve [_u_da obs_ru_do _ _educe _ue sea r_ecesario _:or_ p_ve. el fit@ de aire e! rer_J_[_icr_o r I_to _e alre debate. !_mpiarse de ta _lsidad, una vez a rues B Es pr_ab_e E [iBro de aite _ Limpiea del Ft_o d_ Alre t, E! m_e e! pOIvOacumutado en el fil_o Pare e_!oa_!_que!e uaos 9olpes s_aves o una 8spi_dora dom_stica Im]_iarP3 con m_s fiecuer_cia io #'o_a suavemea[e, Pare obtener mqores resuilado_0 Iveio _n agua _abonosa o csa _n prod_cto de C_me Q#_r el Filtre de Aii'e: _ C_ande |a rejtl|e de enttada de aite y el gabiaete est_n sacios, iii mpielos ¢o_ a_ua templedia (per _baje de ios 40 °CMO4°F}. 8¢ recomienda el _So _e _n detergente suave _os m_Jek_s er_¢:t;_÷n1_,aae_¢_ anlr_dorrne_te _e _a r_ilB_ de _nlrada mcrictonados dn _i_# d_l_nteta 3. Eli'_jU@gUe b_ea el filir'o tea agua Ilmpia 7 tue#o Ps_aqu_Iar_o lome el ma_go de_tN_ _b_csdeenla earle s_ pe{_r de/_ le#_ta de e_trad_ d_ a_re _ deal _celo _¢_a arr_ba PAra velvet a instalar/o reAl:_ce bs preced_m_enta_ anlen_r._s Cui#ado de Fin _e Temperada t Hag,a func_onar et ven_ilador detente rnedb d_ a para que se 5eque ei n_edo_de b unidad, 2 A_g#elo y desen@de!o dei temacerrbnte de 3_Limpie e/filifo 4 Almadmeto en un lugar aeco Generalmenlelosproblemassensenciibsyes probableqaenoseanecesarbliamaraun&_cnTco Esta9ula puedeayudadoareso_verbs, PROBLEMA El aite _ondicionado _O _13nCiORa CAU:SA La unidad suministro POS [BLE; no _cibe electrico. SOLUCi6N SUGERtDA Verifique si ef ca_e de ali_ntaebn stoco_ectado al tom_o{rie_le, e Verifique el fumble o el c_'[acircuito, Fije el _AN _NTROL (conltol del ve_ti!ador) en urea _stcbn que r_o _a O_F Enf_a pace o _da Fil_ro de atre _cio,. Liimple o ree_#lace Capacidad Hab!e co_ e! t_e_e_a_te #are determiner cuOl es la cap_dad adecuada para _a _iJcaciem Fbje inadecuada de a_re _#slruid,o Carte de en_g[a e_ctrica, se cembbde alva! demasiado r¢;pido o se dispa_6ef interrupter per sob_ecarga de_ com£resor Unidad ruidosa Piezas suell[a s, Soporte inadecuado. ES no_a! ia d_c:arga de coadensacba cuaado el china es _lido _ _medo Gotea ague _entro La u_idad no _l_bien da come pare _rmHir Se forraa hielo o escercha Baja temperature Quite lads o_rueei#a do la rejtb _as _ersta_as exterIetes o de Haga funcionar el veB_ilador para reiniciar ei cam preset (el) apreximadame_te 10 minubs). Ajuste fas piezas aaelt_s, Proporctone sopor_e a_iclo, aal a _a unid_ Formect6n de mo_ u ]loe_s 5_obre !as _upedfde_ hAmedas, Gotea ague duera el filtro ® atre inciina el exterior. Qut[e el _a_n de dr_aje bare y la b_de,ia Utiiice tuber_as fle×iWes fiuja de agua papa desviar et La _nidad debe instala_se _ un _igero d_snive! pars perm_t_ u_a _sca_ga a_eo_ada _e la co_,de_sackm Vet fTque _a unWad y rea_ce los aj_es_es _cesa_os Cua_do la te_eperabra exterior _a ide#or a los _5°F es posiNe que se ferme escarcha si la unidad fu_clona ea medc>de enfhamieeto Cambie el _uae_onamien_ode la u_idad a FAN (sola_aeale) h_sta q_e la e%a_cha se de.ira El fit_ro _ eke de la mtdad es|;_s_oio_ NOT,A; Si el ooAecitcui&o in_errd#pe la cor_ler_teva_ias veces o el bslbte _ qaema mas de urea vez, oomun_quese eo_ un t#-cni_ li_nc_a,de, 1. Garantia completa de un aSo Per us ale a parfir de la fecha en de compra de! dueffo original, cualquier parle que faHe materia_es o ejecuci6n bajo e! use no_mal cila unidad serA substituida, Durante este pedodo, redes _as piezas y seH[cio serAn proporcionados gratuitamente, sJempre y cuando el acondicionador de aire ha estade instaiado y fi_ncionado de acuerdo con Ias instrucciones escrffas on este manual, Incluye de ta garantia en ei se_icio casero 2. Limitada segunda a garantia de tercer aSo Para e_ segundo con e_ tercer aSo a partir de ta fecha de _a comp_a origina_ esta garantia proporc[onara un compresor det reemptazo gratuitamente debido papa el cargo aSos, posible mover a producir relatado El consumidor gasto dei labuor es responsabHidad de dos a t_s de! trabaio las unWadeso de aire a los servisiadores a casa, va a set responsabIe el compresor de los gastos para embarcar el acondicienador Et diente de cambiar responsable de sewicio nuevo a _os usuarios una fa_ta come puede El gasto para hace compras ser requeddo y de yes y de ia, de_os usuados. 3. Qua no se cubre • Esta garantia no apiica daSo si ocurrido debido a acc[dente,. _a direcci6n la operaci6n incorrect& e_ dafio do envio el abuso, e_ use er_6neo, desautorizados reparada o procurada, o ei use comercia_ del producto, o ning_n otro use para el cual no fuera pensado. o o E:sta garantia no aplica daSe a_ producto causado per aocdente, y _as inundaciones, o los actos de la guerra de] terrodsmo o de! a.cto de dies o Esta garanda no cubre viajes de_ senAcio a su hogar para educafie en el use del producte, p6rdida de al_mento y bebida debido a _os desperdic_os que esta garanda no se apHca fuera del continente _os Estados Un dos, TODAS _S GARANTiA GARANT[AS, NO CUBRE O CONSECUENTES EXPRESADAS O IMPUCADAS, DURAN PeR 3 LA LA RESPONSAB_LIDAD PeR LOS DA_-_O8 FORTUITOS PARA CUALQUIER Esta garanfia est_ al due_o use casero dentro de USA odginal CAUSA _ara los productos comprados para et Un cier_o estado no permite _a exdusiva o la limitaci6n de daSos fortuitos. Esta garantia _e da los derechos especificas_ y usted puede tamb_6n tenet otros derechos que £uedan var_ar de estade a! estado Para saber cua/es son, eonsuffan sus derechos _egates a su oficina de los consumidores de ios asuntos o ,gene_a_ _eca_ o de[ estado de_ abogado de su estado. © 20_ A_', Ke_on AJt C_d_tio#er Ke_on Air Conditioner Co.. Ltd. Co.. Ltd. No.12 Q_aodong Ro_d Ro_ggu_. Shunde, Gu_ngdo_ China 528o303 ane Ke]on USA lnc:. AI_ rigntg re_e_edo Kelon USA, Inc. 17005 Evergreen Pla_ B_dg A Qty of Industry CA 91745 Version No.819043294_0t-
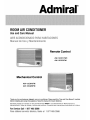 1
1
-
 2
2
-
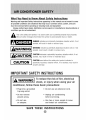 3
3
-
 4
4
-
 5
5
-
 6
6
-
 7
7
-
 8
8
-
 9
9
-
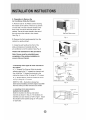 10
10
-
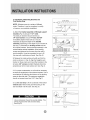 11
11
-
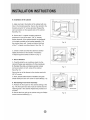 12
12
-
 13
13
-
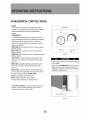 14
14
-
 15
15
-
 16
16
-
 17
17
-
 18
18
-
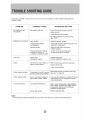 19
19
-
 20
20
-
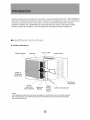 21
21
-
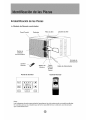 22
22
-
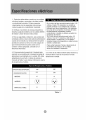 23
23
-
 24
24
-
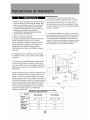 25
25
-
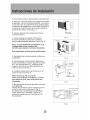 26
26
-
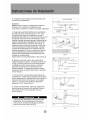 27
27
-
 28
28
-
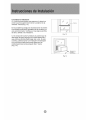 29
29
-
 30
30
-
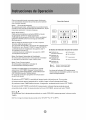 31
31
-
 32
32
-
 33
33
-
 34
34
-
 35
35
-
 36
36
-
 37
37
-
 38
38
-
 39
39


Admiral AW-12CM1FM Guía del usuario
- Tipo
- Guía del usuario
- Este manual también es adecuado para
En otros idiomas
- English: Admiral AW-12CM1FM User guide
Documentos relacionados
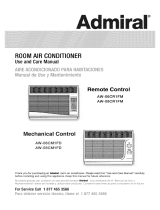
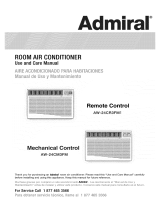
Otros documentos
-
Kenmore 58076081700 Manual de usuario
-
Haier CPN14XC9 El manual del propietario
-
Westinghouse LTV-32w1 El manual del propietario
-
Hive Heating & Cooling Manual de usuario
-
LG LWHD1500ER El manual del propietario
-
-
-
Home Decorators Collection 244334-410-H60 Guía de instalación
-
Electrolux EL7020B El manual del propietario