Advanced Solutions TH061 Manual de usuario
- Categoría
- Medir, probar
- Tipo
- Manual de usuario

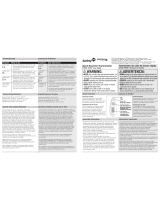
6-12 months
+
1 year
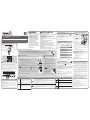
D
B
C
E
A
Battery
Cover
AAA
Batteries
(2)
Screw
F G
H
WARNING
• NEVER allow a child to play with this
thermometer. It is not a toy. This is a
sensitive electronic device and may
be damaged if not used properly
under parental supervision.
• ALWAYS supervise your child when
using thermometer. NEVER allow
your child to use it alone or without
close parental supervision.
• Avoid sudden impact and dust.
• Keep batteries out of child’s reach.
Swallowing a battery could be fatal.
Batteries should not be charged or
placed into extreme heat as they may
explode.
• Do not disassemble.
BATTERY CAUTION
• DO NOT mix old and new batteries.
• DO NOT mix alkaline, standard (carbon zinc) or rechargeable
(nickel-cadmium) batteries.
• Non-rechargeable batteries are not to be recharged.
• Rechargeable batteries are to be removed from the unit
before being charged.
• Rechargeable batteries are only to be charged under adult
supervision.
• Only batteries of the same or equivalent type as
recommended are to be used.
• Batteries are to be inserted with the correct polarity.
• Exhausted batteries are to be removed from the unit.
• The supply terminals are not to be short-circuited.
• Check that all contact surfaces are clean and bright before
installing batteries.
• Used batteries should be disposed of properly.
• Remove batteries when stored for long periods of non-use.
Thank you for purchasing this Advanced Solutions™ thermometer.
We’re proud to be your choice to help you keep your child healthy and safe. Please
be sure to read all warnings, instructions and notations before using this product.
User’s Guide TH061
TALKING Ear Thermometer
TALKING Ear Thermometer
Basics of Your Thermometer
Normal Body Temperature
Memory Function
Trouble Shooting
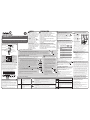
normal ear, oral
temp range
Time
Temperature
Unit of Measure (
˚F/˚C)
Talking “On”
Low Battery
Ear Mode Symbol
Measuring in Progress
Memory
Date
Memory #
Object Mode
Tiempo
Temperatura
Unidad de medida (
˚F/˚C)
Parlante “Encendido”
Batería baja
Símbolo de modo de oído
Medición en curso
Memoria
Fecha
Memoria #
Modo de objetos
Probe Tip Cap
Probe Tip
Illuminated Display
ON/MEASURE Button
Memory Button
Fever Light
TM
Ring
Sound Button
Temperature readings are different from person to person and also vary
depending upon the body location from which the temperature is measured.
Ear temperatures tend to be comparable to oral temperatures and
approximately 1˚ lower than rectal temperatures for the same individual.
Temperature readings can also be affected by other factors, including exercise,
consuming hot or cold food/beverages prior to taking a reading, and technique.
“Normal” temperature refers to each individual’s average temperature while
healthy. You may want to measure and record your child’s temperature a few
times when he or she is well, so that you will know what is normal for your
own child. On average, temperature ranges are as follows:
Thermometer stores the last 30 measurements in memory. When a new
reading is taken, the oldest memory (30) is deleted and the newest reading
becomes 1.
To Scroll Through Memory:
With the unit on, press and release M to see the most recent reading. The
temperature will display with 1 below it, with the object or ear mode icon
and the date and time of measurement. Press M again to see the next
reading in memory. It will have a 2 below it, to indicate that it is the second
oldest reading.
Repeat to see additional readings
Hint: To scroll faster through memory, you may want to turn off sound.
TEMPERATURE
METHOD
Ear or Oral
NORMAL
TEMPERATURE
97.0° to 99.5°F
FEVER
RANGE
99.6°F +
Situation Recommended Action Display Recommended Action Display Recommended Action
I believe my
child has a fever,
but reading is
normal/low
The reading
seems too high
• Confirm that probe tip is clean. (see Care and Maintenance)
• Confirm that the ear canal is free of excessive amount of earwax.
• Review instructions for correct positioning of probe tip in ear (Step
2 with illustrations)
•
Be sure to measure temp from the same ear for all three measurements.
• If thermometer has been in a cold environment, wait 15 minutes
& try again.
• If child recently consumed cold food/drink, wait 15 minutes & try
again.
• Other factors can temporarily raise body temperature
(e.g.,exercise, bundling under covers, ear against the pillow).
Wait 15 minutes & try again.
• If thermometer has been in a hot environment, wait 15 minutes &
try again.
• If child recently consumed hot food/drink, wait 15 minutes & try
again.
• Probe may not have been inserted into the ear correctly. Proper probe placement in the ear canal is essential for an accurate
reading. Review probe placement instructions (Step 2 with illustrations) and try again.
• Batteries may be low. Replace batteries and try again.
• If thermometer has been stored in a cold environment, wait 15 minutes to allow thermometer to reach room temperature, then try again.
• If you are measuring an object temperature, confirm that the thermometer is in Object Temperature mode. A reading below
93.5˚F in Ear Temperature mode will cause the LO message display.
• If thermometer has been mishandled, you may have irreversibly damaged product. Confirm other possible solutions (above)
before discarding.
• Turn thermometer off, wait one minute, then turn on again. Listen for two beeps before placing thermometer in position and
re-take temp.
• If thermometer has been stored in a hot environment, wait 15 minutes to allow thermometer to reach room temperature, then try again.
• If you are measuring an object temperature, confirm that the thermometer is in Object Temperature mode. A reading above
109.4˚F in Ear Temperature mode will cause the HI message display.
• If thermometer has been mishandled, you may have irreversibly damaged Product. Confirm other possible solutions (above)
before discarding.
• Batteries are low. Replace them. (See Battery Information section)
• Illuminates red to indicate fever. Consult Fever Light
TM
Ring section for details.
• Do not return this product to the place of purchase. If any parts are missing,
email consumer@djgusa.com, call Consumer Relations at (800)544-1108, or
fax at (800)207-8182. You can also visit our website at www.safety1st.com.
Have ready the model number (TH061) and date code (manufacture date located
on package).
• I
nstall new batteries and re-try function before calling Consumer Relations on electronics.
No Fever
Fever (99.6°F or above)
1. Ear Mode is the default setting. Confirm that the Ear Mode symbol appears in the display.
Press and hold M and S buttons at the same time for 5 seconds to switch between Ear and
Object mode.
2. Position thermometer probe properly in ear canal:
• 6 - 12 months: Have child lay flat with the head sideways, so that the ear is facing
upwards. Gently pull the ear straight back (Figure B).
• 1 year +: Stand behind and slightly to the side of the child/adult.
Gently pull the ear up and back to straighten the ear canal (Figure C).
3. Insert the thermometer until the probe tip seals the ear canal. Be sure to aim/point the
thermometer tip straight into the ear canal.
4. Press and hold the ON/MEASURE button for approximately 1 second. During measuring,
will appear (Figure D). Thermometer will beep to indicate measurement taken.
5. Remove thermometer from ear. If no fever is present the icon appears on display
screen with the temperature. FEVER ALERT: If child has an elevated temperature of 99.6˚F
or above, the Fever Light
TM
ring will illuminate red and appears on display screen.
6. Be sure to clean probe tip after use.
7. It is recommended to take three readings (from the same ear) and to use the highest one.
Wait two minutes between readings, so that thermometer has time to re-acclimate to room
temperature.
8. Thermometer will shut-off automatically after 1 minute.
1. If the object to be measured is food or beverage,
be sure to mix thoroughly before measuring
temperature to eliminate any “hot spots.”
Wait 30 seconds.
2. Confirm that the Object Mode symbol appears
in the display. Press and hold M and S buttons
at the same time for 5 seconds to switch
between Ear and Object mode.
3. Place probe tip within 2 inches (5 cm) of object to be
measured. NOTE: DO NOT make contact with food,
beverage or bath surface.
4. Press and hold the ON/MEASURE button for
approximately 1 second. During measuring,
will appear (Figure E).
Thermometer will beep to
indicate measurement taken.
5. Move thermometer away from
object and the temperature with
the object symbol will appear for
1 minute, and a backlight
illuminates for 5 seconds.
6. Thermometer will shut off automatically after
1 minute.
Ear Temperature
How to Measure Temperature
Object Temperature
Please read this section carefully and all the way through before using the thermometer. Ensure that
thermometer is at room temperature, waiting 15 minutes if necessary.
Remove probe tip cap. To power thermometer on, press and hold ON/MEASURE button. All segments are displayed for 1 second.
Two beeps are heard, followed by a display of the last temperature measured (Figure A). Backlight goes off after 5 seconds.
Fever Light
TM
Ring
Set Up Thermometer
Optional Talking Mode
Care and Maintenance
One (1) Year Limited Warranty
Technical Specifications
How to Replace the Batteries
The Fever Light
TM
Ring illuminates red to indicate that the
measured ear temperature is over 99.6˚F. In addition to this,
if your child has a fever, will display.
High or prolonged fever requires medical attention, especially
for young children. Contact your physician. A fever chart is
included on the product.
Note: Fever Light
TM
Ring was designed to alert parents to fever, so
it illuminates in Ear Mode only.
To enter the set-up mode, power thermometer on, then press and hold
S button until a language option appears on display. If talking is enabled
during set-up, you will hear the options, too. To scroll through the options
for each selection, use the S button. To choose an option, press M.
Language:
Volume:
Fahrenheit
and Celsius:
Date:
Time:
Press S to toggle between English and Spanish ,
and press M to make a selection.
Press
S
to toggle between five volume levels
to
,
and press M to make a selection.
Press S to toggle between °F and °C,
and press M to make a selection.
Press S to toggle through year options,
and press M to make a selection.
Press S to toggle through month options,
and press M to make a selection.
Press S to toggle through day options,
and press M to make a selection.
Press S to toggle through hour options,
and press M to make a selection.
Press S to toggle through minute options,
and press M to make a selection.
Note: Thermometer has a 24-hour clock (e.g., 10:00 am = 10:00 and
10:00 pm = 22:00).
After minutes are set, thermometer will exit set-up mode and
automatically shut off.
While the thermometer is powered on, press and release S to turn
the talking feature on or off. If the
icon displays in the lower right
corner of screen, then talking option is enabled. If that icon is not
visible, then thermometer will not “talk,” though it will still beep.
Cleaning Probe and Tip:
•
Clean before and after each measurement for the most accurate readings.
• Use an alcohol swab or an ear swab dipped in isopropyl alcohol.
Cleaning Thermometer Body:
• Use a soft, dry cloth to clean thermometer body.
Notes:
• DO store thermometer in a dry place at room temperature with the
protective cap in place.
• DO take special care not to scratch the probe lens or display window.
• DO NOT use abrasive cleaning agents, thinners or benzene for cleaning.
• DO NOT expose thermometer to extreme temperatures,
humidity or direct sunlight.
• DO NOT submerge any part of the product in water.
Dorel Juvenile Group, Inc. warrants to the original purchaser that
this product (Thermometer), is free from material and workmanship
defects when used under normal conditions for a period of one (1)
year from the date of purchase. Should the product contain defects
in material or workmanship Dorel Juvenile Group, Inc., will repair or
replace the product, at our option, free of charge. Purchaser will be
responsible for all costs associated with packaging and shipping the
product to Dorel Juvenile Group Consumer Relations Department at
the address noted on the front of this document and all other freight
or insurance costs associated with the return. Dorel Juvenile Group
will bear the cost of shipping the repaired or replaced product to
the purchaser. Product should be returned in its original package
accompanied by a proof of purchase, either a sales receipt or other
proof that the product is within the warranty period. This warranty is
void if the owner repairs or modifies the product or the product has
been damaged as a result of misuse.
This warranty excludes any liability other than that expressly
stated previously, including but not limited to, any incidental or
inconsequential damages.
SOME STATES DO NOT ALLOW THE EXCLUSION OR LIMITATION
OF INCIDENTAL OR CONSEQUENTIAL DAMAGES, SO THE ABOVE
LIMITATION OR EXCLUSION MAY NOT APPLY TO YOU.
THIS WARRANTY GIVES YOU SPECIFIC LEGAL RIGHTS, AND YOU
MAY ALSO HAVE OTHER RIGHTS THAT MAY VARY FROM STATE TO
STATE.
Measurement Range:
Human Body: 93.2 °F to 109.4 °F
Temp between 96.8 °F to 102.2 °F --- +/-0.4 °F
Temp below 96.8 °F, or over 102.2 °F --- +/-0.5 °F
Object Mode: 32.0 °F - 212.0 °F
Temp < 68.0 °F --- +/-1.8 °F
Temp > 68.0 °F --- 5%
Operation Environment: 60.8°F to 104°F
Storage Environment: -4°F to 122°F
Test Protocol: Unit must be tested using black box test equipment at
supplier.
• When the “ ” icon appears
while the unit is ON, (Figure F),
the batteries are nearly exhausted,
but a few measurements may
still be taken.
• When the “ ” icon appears
while the unit is powering up,
(Figure G), the batteries are
exhausted and need to be
replaced.
To Replace Batteries:
1 Use a Phillips head screwdriver
to loosen battery cover screw.
Remove cover (Figure H).
2 Turn unit upside down and carefully shake batteries out.
3 Insert two AAA (or equivalent) batteries, correctly positioned
with positive “+” and negative “-” as shown in illustration.
4 Place the battery cover on the thermometer and tighten the screw
to secure it in place.
Notes: All settings will be erased when battery is replaced.
Expected battery life is 200+ readings.
©2013 Cosco Management, Inc.
All Rights Reserved. Todos derechos reservados. www.djgusa.com
(800) 544-1108 www.safety1st.com
Made in CHINA. Hecho en CHINA.
Styles and colors may vary. Los estilos y los colores pueden variar.
Distributed by (distribuido por) Dorel Juvenile Group, Inc.,
2525 State St., Columbus, IN 47201-7494
Dorel Distribution Canada, 873 Hodge, St. Laurent, QC H4N 2B1
06/06/13 4358-6047B

+
1 año
D
C
E
A
Tapa
Baterías
AAA
(2)
Tornillo
F G
H
B
6-12 meses
AVISO PRECAUCIÓN
• NUNCA permita que los niños
jueguen con el termómetro. No es un
juguete. Es un dispositivo electrónico
delicado que puede dañarse si no se
usa de la manera apropiada bajo la
supervisión de un adulto.
• SIEMPRE supervise a los niños
cuando use el termómetro. NUNCA
deje que los niños lo usen solos o sin
la supervisión de un adulto.
• Evite los impactos bruscos y la
exposición al polvo.
• Mantenga las baterías fuera del alcance
de los niños. Tragar una batería podría
resultar fatal. No recargue las baterías
ni las exponga a altas temperaturas
porque pueden explotar.
• No desarme el termómetro.
• NO mezcle las baterías usadas con las nuevas.
• NO mezcle las baterías alcalinas con las estándares (zinc-
carbono) y las recargables (níquel-cadmio).
• Las baterías no recargables no se pueden recargar.
• Las baterías recargables deben quitarse de la unidad antes de
ponerlas a cargar.
• Las baterías recargables sólo deben recargarse bajo la
supervisión de un adulto.
• Sólo se recomienda utilizar baterías del mismo tipo o equivalente.
• Las baterías deben colocarse de acuerdo con la polaridad
correspondiente.
• Las baterías agotadas deben quitarse de la unidad.
• Los terminales de alimentación no deben estar en corto.
• Verifique que todas las superficies de contacto estén limpias y
brillantes antes de colocar las baterías.
• Las baterías usadas deben desecharse como corresponde.
• Quite las baterías cuando deja el termómetro sin usar durante
un largo período de tiempo.
Gracias por comprar este termómetro Advanced Solutions™. Estamos orgullosos
de ser su elección para ayudarle a mantener a su hijo sano y seguro. Asegúrese
de leer todas las advertencias, instrucciones y notas antes de utilizar este producto.
Guía para el Usuario TH061
PARLANTE Termómetro de oído
PARLANTE Termómetro de oído
Conceptos Básicos de su Termómetro
Temperatura Corporal Normal
Función de Memoria
Límites normales
de temperatura
oral y del oído
Time
Temperature
Unit of Measure (
˚F/˚C)
Talking “On”
Low Battery
Ear Mode Symbol
Measuring in Progress
Memory
Date
Memory #
Object Mode
Tiempo
Temperatura
Unidad de medida (
˚F/˚C)
Parlante “Encendido”
Batería baja
Símbolo de modo de oído
Medición en curso
Memoria
Fecha
Memoria #
Modo de objetos
Tapa de la Punta de la Sonda
Punta de la Sonda
Pantalla Iluminada
Botón de
ENCENDIDO/MEDICIÓN
Botón de memoria
Indicador
Fever Light
TM
Botón de sonido
Las mediciones de temperatura varían de persona a persona y también varían según la
parte del cuerpo en la cual se tome la temperatura. Las temperaturas del oído suelen a
ser similares a las temperaturas orales, y aproximadamente 1 °F (0.5 °C) menos que
las temperaturas rectales para una misma persona. Las lecturas de temperatura también
pueden verse afectadas por otros factores, tales como el ejercicio, el consumo de alimentos
o bebidas calientes o frías antes de tomar la temperatura, y la técnica de medición
.
La temperatura “normal” se refiere a la temperatura media de cada persona en buen
estado de salud. Tal vez le convenga tomar y anotar la temperatura de su hijo cuando
esté en buen estado de salud unas cuantas veces, para saber cuál es su temperatura
normal. En promedio, los límites de temperatura son los siguientes:
El termómetro guarda las últimas 30 mediciones en la memoria. Cuando
se hace una nueva medición, se borra la última medición almacenada (30)
y la nueva lectura aparece en la posición 1.
Cómo recorrer la memoria: Con la unidad encendida, presione M para
ver la medición más reciente. La temperatura aparecerá con el número
1 debajo, el símbolo de modo de oído u objetos y la hora y la fecha de
la medición. Presione M nuevamente para ver la siguiente lectura en la
memoria. Ésta aparecerá con el número 2 debajo, para indicar que se trata
de la segunda lectura más reciente. Continuar de la misma manera para
ver las lecturas siguientes.
Consejo: Para recorrer la memoria más rápido, apague el sonido.
MÉTODO DETEM-
PERATURA
Oído u Oral
LÍMITESNOR-
MALES
LÍMITESDE
FIEBRE
Situación Acción Recomendada Pantalla Acción Recomendada Pantalla Acción Recomendada
Creo que mi hijo
tiene fiebre, pero
la medición es
normal o baja
La medición
parece
demasiado alta
• Confirme que la punta de la sonda esté limpia. (Consulte “Cuidado y mantenimiento”)
• Confirme que el canal auditivo esté libre de cantidades excesivas de cera.
• Revise las instrucciones para colocar la punta de la sonda correctamente en el
oído (Paso 2, con ilustraciones)
• Asegúrese de medir la temperatura del mismo oído para las tres mediciones.
• Si el termómetro ha estado en un ambiente frío, espere 15 minutos y vuelva a
tomar la temperatura.
• Si el niño ha consumido bebidas o alimentos fríos, espere 15 minutos y vuelva
a tomar la temperatura.
• Otros factores pueden aumentar temporalmente la temperatura del cuerpo (por
ejemplo, hacer ejercicio, estar cubierto por mantas, apoyar la oreja contra la
almohada). Espere 15 minutos y vuelva a tomar la temperatura.
• Si el termómetro ha estado en un ambiente caluroso, espere 15 minutos y
vuelva a tomar la temperatura.
• Si el niño ha consumido bebidas o alimentos calientes, espere 15 minutos
y vuelva a tomar la temperatura.
• Es posible que no haya colocado la sonda en el oído correctamente. La colocación correcta de la sonda en el conducto auditivo es esencial
para una lectura precisa. Revise las instrucciones de colocación de la sonda (Paso 2, con ilustraciones) y vuelve a tomar la temperatura.
• Las baterías pueden estar agotadas. Reemplace las baterías y vuelva a tomar la temperatura.
• Si el termómetro ha estado guardado en un ambiente frío, espere 15 minutos para permitir que alcance la temperatura ambiente y
vuelva a tomar la temperatura.
• Si está midiendo la temperatura de un objeto, confirme que el termómetro está en el modo de temperatura en el objeto. Una lectura por
debajo de 34.0°C en el modo de orejas de temperatura hará que la pantalla de mensajes LO.
• Si el termómetro ha sido manejado de manera incorrecta, es posible que haya sufrido daños irreversibles. Antes de desecharlo,
pruebe otras soluciones (vea más arriba).
• Apague el termómetro, espere un minuto y vuelva a encenderlo. Debe oír dos “bips” antes de colocar el termómetro en posición y
volver a tomar la temperatura.
• Si el termómetro ha estado guardado en un ambiente caluroso, espere 15 minutos para permitir que alcance la temperatura ambiente y
vuelva a tomar la temperatura.
• Si está midiendo la temperatura de un objeto, confirmar que el termómetro está en el modo de temperatura en el objeto. Una lectura
por encima de 43.0°C en el modo de orejas de temperatura hará que la pantalla de mensajes HI.
• Si el termómetro ha sido manejado de manera incorrecta, es posible que haya sufrido daños irreversibles. Antes de desecharlo, pruebe
otras soluciones).
• Las baterías tienen poca carga. Reemplácelas. (Vea la sección “Cómo reemplazar
las baterías”)
• Se ilumina en rojo para indicar la fiebre. Consulte la sección “Indicador Fever
Light™” para más detalles.
• No devuelva este producto al lugar donde lo adquirió. Si falta alguna pieza, envíe un
mensaje de correo electrónico aconsumer@djgusa.com, llame al Departamento de
Relaciones con el Consumidor al (800) 544-1108, o envíe un fax al (800) 207-8182.
También puede visitar nuestro sitio web en www.safety1st.com. Tenga a mano el número
de modelo (TH061) y el código de fecha (fecha de fabricación) indicado en el paquete.
• Antes de llamar al Departamento de Relaciones con el Consumidor para consultas
sobre artefactos de electrónicos, coloque baterías nuevas y trate de hacer funcionar
el producto otra vez.
No Sin fiebre
Con fiebre (99.6°F (37.6°C) o más)
1. Por defecto, el termómetro está configurado en modo de oído. Confirme que el símbolo de
modo de oído aparezca en la pantalla. Mantenga presionados los botones M y S al mismo
tiempo durante 5 segundos para alternar entre el modo de oído y el modo de objetos.
2. Coloque la sonda del termómetro correctamente en el canal auditivo:
• 6 a 12 meses: El niño debe permanecer acostado con la cabeza hacia un lado, para
que la oreja quede hacia arriba. Tire de la oreja hacia atrás con cuidado (Figura B).
• 1 año +: Párese detrás del niño o adulto, ligeramente hacia un lado. Tire suavemente
de la oreja hacia arriba y hacia atrás para enderezar el conducto auditivo (Figura C).
3. Inserte el termómetro hasta que la punta de la sonda selle el conducto auditivo. Asegúrese
de apuntar/orientar la punta del termómetro directamente hacia el canal auditivo.
4. Mantenga presionado el botón de ENCENDIDO/MEDICIÓN durante aproximadamente 1
segundo. Durante la medición, aparecerá
en la pantalla (Figura D). Cuando la
medición haya finalizado, se oirá un “bip”.
5. Retire el termómetro del oído. Si el niño tiene fiebre la pantalla aparecerá el símbolo
con la temperatura. ALERTA DE FIEBRE: Si el niño tiene una temperatura elevada de 37.6
°C o más, el anillo Fever Light™ se iluminará de color rojo y aparece en pantalla.
6. Asegúrese de limpiar la punta de la sonda después de cada uso.
7. Se recomienda tomar tres mediciones (en el mismo oído) y considerar la más alta.
Espere dos minutos entre mediciones para que el termómetro alcance la temperatura
ambiente.
8. Al cabo de 1 minuto, el termómetro se apagará automáticamente.
1. Si el objeto a medir es un alimento o una bebida, asegúrese
de mezclarlo bien antes de medir la temperatura para
eliminar las “zonas calientes”. Espere 30 segundos.
2. Confirme que el símbolo de modo de objetos aparece
en la pantalla. Mantenga presionados los botones M y
S al mismo tiempo durante 5 segundos para alternar
entre el modo de oído y el modo de objetos.
3. Coloque la punta de la sonda a no más de 2 pulgadas
(5 cm) del objeto a medir. NOTA: NO permita que la
sonda entre en contacto con el alimento, la bebida o el
agua del baño.
4. Mantenga presionado el botón de ENCENDIDO/
MEDICIÓN durante aproximadamente 1 segundo.
Durante la medición, aparecerá
en la pantalla (Figura E). Cuando
la medición haya finalizado, se
oirá un “bip.”
5. Aleje el termómetro del objeto y en la
pantalla aparecerá la temperatura y el
símbolo de objeto durante 1 minuto. La
luz de fondo se encenderá por 5 segundos.
6. Al cabo de 1 minuto, el termómetro se apagará
automáticamente.
Temperatura del Oído
Cómo Tomar la Temperatura
Object Temperature
Antes de usar el termómetro, lea atentamente esta sección en su totalidad. Asegúrese de que el termómetro
esté a la temperatura ambiente. Si es necesario, espere 15 minutos.
Retire la tapa de la punta de la sonda. Para encender el termómetro, mantenga presionado el botón de ENCENDIDO/MEDICIÓN. Se
muestran durante 1 segundo todos los segmentos de la pantalla. Se oyen dos “bips” y luego aparece en la pantalla la última medición
de la temperatura (Figura A). La luz de fondo se apaga al cabo de 5 segundos.
Indicador Fever Light
TM
Configuración del termómetro
Modo parlante opcional
Cuidado y Mantenimiento
Garantía Limitada Durante un (1) Año
Especificaciones Técnicas
Cómo Reemplazar las Baterías
El indicador Fever Light™ se ilumina de color rojo para indicar
que la temperatura del oído supera los 99.6˚F (37.6˚C).
Además, si su hijo tiene fiebre, aparecerá en la pantalla.
La presencia de fiebre alta y prolongada requiere atención médica,
especialmente en el caso de niños pequeños. Consulte a su médico.
El producto incluye una tabla de valores de fiebre.
Nota: Anillo de luz fiebre fue diseñado para alertar a los padres a la
fiebre, por lo que se ilumina en el modo de oído solamente.
Para ingresar al modo de configuración, encienda el termómetro y luego
mantenga presionado el botón
S
hasta que en la pantalla aparezca la opción de
elegir un idioma. Si el parlante está activado, durante la configuración, usted
también podrá oír las opciones. Para recorrer las opciones, utilice el botón
S
.
Para elegir una opción, presione el botón M.
Idioma:
Volumen:
Fahrenheit /
Centígrados:
Fecha:
Hora:
Presione S para alternar entre inglés y español
y luego presione M para seleccionar la opción elegida.
Presione S para alternar entre cinco niveles de volumen
y
y luego presione M para seleccionar la opción elegida.
Presione
S
para alternar entre °F y °C y luego presione
M
y para seleccionar la opción elegida.
Presione
S
para alternar entre las opciones de años
y luego presione
M
para seleccionar la opción elegida.
Presione
S
para alternar entre las opciones de meses
y luego presione
M
para seleccionar la opción elegida.
Presione
S
para alternar entre las opciones de días
y luego presione
M
para seleccionar la opción elegida.
Presione
S
para alternar entre las opciones de horas
y luego presione
M
para seleccionar la opción elegida.
Presione
S
para alternar entre las opciones de minutos
y luego presione
M
para seleccionar la opción elegida.
Nota: El termómetro tiene un reloj de 24 horas (por ej.: 10:00 am =
10:00 y 10:00 pm = 22:00).
Después de ingresar los minutos, el termómetro saldrá del modo de
configuración y se apagará automáticamente.
Mientras el termómetro está encendido, mantenga presionado el botón
S para encender o apagar la función parlante. Si el símbolo aparece
en la esquina derecha inferior de la pantalla, la opción parlante está
activada. Si el símbolo no aparece en ningún lado, el termómetro no
“hablará”, pero sí hará “bips”.
Cómo Limpiar la Sonda y la Punta:
• Límpielas antes y después de cada medición para obtener las lecturas más precisas.
• Utilice un paño o un bastoncillo de algodón embebidos en alcohol isopropílico.
Cómo Limpiar el Cuerpo del Termómetro:
• Use un paño suave y seco para limpiar el cuerpo del termómetro.
Notas:
• GUARDE el termómetro en un lugar seco a temperatura ambiente, con la tapa
protectora colocada.
• TENGA cuidado especial de no rayar la superficie de la lente de la sonda
o la pantalla.
• NO UTILICE productos de limpieza abrasivos, solventes o bencina.
• NO EXPONGA el termómetro a temperaturas extremas, humedad o luz directa del sol.
• NO sumerja en agua ninguna parte del producto.
La firma Dorel Juvenile Group, Inc. asegura al comprador original que este
producto (Termómetro), está garantizado contra materiales defectuosos o
mano de obra deficiente durante un (1) año a partir de la fecha de compra,
si se utiliza en condiciones normales. Si el producto presentara materiales
defectuosos o mano de obra deficiente, Dorel Juvenile Group, Inc.
reparará o sustituirá el producto, a nuestra discreción, de manera gratuita.
El comprador cubrirá todos los costes relacionados con el envase y envío
del producto al Departamento de Relaciones con el Consumidor de Dorel
Juvenile Group, a la dirección que aparece al inicio de este documento,
y los demás costes de transportación o aseguramiento relacionados
con el envío. Dorel Juvenile Group cubrirá los costes de devolución al
comprador del producto reparado o sustituido. El producto debe enviarse
en su envase original junto con una prueba documental de la compra,
ya sea el recibo de venta u otro medio demostrativo de que el producto
aún esté dentro del período de garantía. Esta garantía quedará anulada
si el propietario hubiera reparado o modificado el producto, o si éste se
hubiera dañado como consecuencia del uso incorrecto.
Esta garantía excluye cualesquiera otras responsabilidades ajenas a la
expresada más arriba, entre otras los daños incidentales o consecuentes.
EN ALGUNOS ESTADOS NO SE PERMITEN LAS EXCLUSIONES
O LIMITACIONES REFERENTES A LOS DAÑOS INCIDENTALES O
CONSECUENTES, DE MODO QUE LA LIMITACIÓN O EXCLUSIÓN ANTES
EXPUESTA QUIZÁS NO SE APLIQUE EN SU CASO PARTICULAR.
ESTA GARANTÍA LE OTORGA DERECHOS LEGALES ESPECÍFICOS Y ES
POSIBLE QUE USTED TAMBIÉN CUENTE CON OTROS DERECHOS QUE
PUDIERAN VARIAR EN DISTINTOS ESTADOS.
Límites de medición:
Cuerpo humano: 34.8˚C a 43˚C
Temperaturas entre 36 °C a 39 °C --- +/-0.2 °C
Temperaturas debajo 36 °C, o más 39 °C --- +/-0.2 °C
Object Mode: 0 °C - 99.9 °C
Temperaturas < 20 °C --- +/-1 °C
Temperaturas > 20 °C --- 5%
Entorno de operación: 16 ˚C a 40 ˚C
Entorno de almacenamiento: -20 ˚C a 50 ˚C
Protocolo de prueba: La unidad debe ser probada con un
equipo de prueba de caja negra del proveedor.
• Si el símbolo “ ”
aparece cuando la unidad está
ENCENDIDA (Figura F), las
baterías están casi agotadas, pero
aún permiten tomar varias
mediciones adicionales.
• Si el símbolo “ ” aparece
al encender la unidad (Figura G),
las baterías están agotadas y
deben ser reemplazadas.
Cómo Reemplazar las Baterías:
1 Use un destornillador Phillips
para aflojar el tornillo de la
tapa del compartimento de
baterías. Retire la tapa (Figura H).
2 Invierta la unidad y sacúdala cuidadosamente para retirar las
baterías.
3 Inserte dos baterías AAA y colóquelas adecuadamente con los
lados “+” y “–” como se muestra en la ilustración.
4 Ponga la tapa en el termómetro y asegúrela.
Notas: La configuración se borrará cuando se reemplacen las
baterías. La vida esperada de la batería es de 200 lecturas +.
©2013 Cosco Management, Inc.
All Rights Reserved. Todos derechos reservados. www.djgusa.com
(800) 544-1108 www.safety1st.com
Made in CHINA. Hecho en CHINA.
Styles and colors may vary. Los estilos y los colores pueden variar.
Distributed by (distribuido por) Dorel Juvenile Group, Inc.,
2525 State St., Columbus, IN 47201-7494
Dorel Distribution Canada, 873 Hodge, St. Laurent, QC H4N 2B1
06/06/13 4358-6047B
Medición en curso Modo de objetos
Unidad de medida (˚F/˚C)
Fecha
Tiempo
Temperatura
Parlante “Encendido”
Batería baja
Símbolo de modo
de oído
Memoria
Memoria #
Solución de Problemas
36.1° à 37.5°C 37.6°C +
-
 1
1
-
 2
2


Advanced Solutions TH061 Manual de usuario
- Categoría
- Medir, probar
- Tipo
- Manual de usuario
en otros idiomas
- English: Advanced Solutions TH061 User manual
Artículos relacionados
Otros documentos
-
 Safety 1st 49659 Manual de usuario
-
 Safety 1st TH084 Manual de usuario
-
 Safety 1st TH051 Manual de usuario
-
Summer Ear Thermometer Manual de usuario
-
-
HoMedics Deluxe One-Second Ear Thermometer El manual del propietario
-
-
-
 Safety 1st TH104 Manual de usuario
-
Zoom H4 next Guía del usuario


