Sylvania LC195SL8 El manual del propietario

Tipo
El manual del propietario
NEED HELP?
PLEASE CALL TOLL FREE!
1-800-968-3429
OR VISIT OUR WEB SITE AT
www.Sylva niaConsumerElectronics.com
_ _L _
19"Digital LCD
Owner's Man
LClgSSL8
LC
The model and serial numbers of this unit may be found on the cabinet,
You should record and retain those numbers for future reference, Model No.:
[] Precautions
Serial No,:
WARNING: TO REDUCETHE RISKOF FIREOR ELECTRICSHOCK, DO NOT EXPOSETHIS APPARATUS
TO RAIN ORMOISTURE.
CAUTION
CAUTION: TO REDUCE THE RISK OF ELECTRIC
SHOCK, DO NOT REMOVE COVER (OR BACK). NO USER
SERVICEABLE PARTS INSIDE. REFERSERVICING TO
QUALIFIED SERVICEPERSONNEL,
The lightning flash with arrowhead symbol, within an
equilateral triangle, is intended to alert the user to the
presence of uninsulated "dangerous voltage"within the
apparatus's enclosure that may be of sufficient magnitude
to constitute a risk of electric shock to persons.
The exclamation point within an equilateral triangle is
intended to alert the user to tile presence of important
operating and maintenance (servicing) instructions in
tile literature accompanying tile apparatus.
The caution marking is located on the rear or bottom of the cabinet.
Important Safeguards
1o READ INSTRUCTIONS - All the safety and operating instructions
should be read before the apparatus is operated.
2o RETAIN INSTRUCTIONS -The safety and operating instructions
should be retained for future reference.
3o HEED WARNINGS - All warnings on the apparatus and in the
operating instructions should be adhered to.
4o FOLLOW INSTRUCTIONS - All operating and use instructions
should be followed.
So CLEANING - Unplug this apparatus from the wall outlet before
cleaning. Do not use liquid cleaners or aerosol cleaners. Use a
damp cloth for cleaning.
EXCEPTION: An apparatus that is meant for uninterrupted service
and, that for some specific reason, such as the possibility of the
loss of an authorization code for a CATV converter, is not intended
to be unplugged by the user for cleaning or any other purpose,
may exclude the reference to unplugging the apparatus in the
cleaning description otherwise required in item 5.
6o ATTACHMENTS - Do not use attachments not recommended by
the apparatus manufacturer as they may cause hazards.
7o WATER AND MOISTURE - Do not use this apparatus near water,
for example, near a bath tub, wash bowl, kitchen sink, or laundry
tub, in a wet basement, or near a swimming pool, and the like.
8o ACCESSORIES - Do not place this apparatus
on an unstable cart, stand, tripod, bracket, or
table. The apparatus may fall, causing serious
injury to someone, and serious damage to
the apparatus. Useonly with a cart, stand,
tripod, bracket, or table recommended by the
manufacturer, or sold with the apparatus.
Any mounting of the apparatus should follow
the manufacturer's instructions and should
use a mounting accessory recommended by the manufacturen
An apparatus and cart combination should be moved with care.
Quick stops, excessive force, and uneven surfaces may cause the
apparatus and cart combination to overturn.
AMEUBLES - Cet appareil ne dolt 6tre plat6 que sur un meuble
(avec ou sans roulettes) recommand_ par le fabricant Si vous I'
installez sur un meuble _ roulettes, d_placez les deux ensembles
avec precaution. Un arr6t brusque, I'utilisation d'une force
excessive et des surfaces irr_guli_res risquent de d_stabiliser I'
ensemble et de le renverser.
9, VENTILATION - Slots and openings in the cabinet and the back
or bottom are provided for ventilation and to ensure reliable
operation of the apparatus and to protect it from overheating,
these openings must not be blocked or covered. The openings
should never be blocked by placing the apparatus on a bed, sofa,
carpet, rug, or other similar surface. This apparatus should never
be placed near or over a radiator or heat register. This apparatus
should not be placed in a built-in installation such as a bookcase
or rack unless proper ventilation is provided or the manufacturer's
instructions have been adhered to.
EN
10o POWER SOURCES -This apparatus should be operated only from
the type of power source indicated on the marking label. If you
are not sure of the type of power supply to your home, consult
your apparatus dealer or local power company. For apparatuses
intended to operate from battery power, or other sources, refer to
the operating instructions.
1 loGROUNDING OR POLARIZATION -This apparatus is equipped
with a polarized alternating<urrent line plug (a plug having one
blade wider than the other). This plug will fit into the power outlet
only one way. This isa safety feature. If you are unable to insert the
plug fully into the outlet, try reversing the plug. If the plug should
still fail to fit, contact your electrician to replace your obsolete
outlet. Do not defeat the safety purpose of the polarized plug.
12o POWER-CORD PROTECTION - Power-supply cords should be
routed so that they are not likely to be walked on or pinched by
items placed upon or against them, paying particular attention to
cords at plugs, convenience receptacles, and the point where they
exit from the apparatus.
1% OUTDOOR ANTENNA GROUNDING - If an outside antenna or
cable system is connected to the apparatus, be sure the antenna or
cable system is grounded so as to provide some protection against
voltage surges and built-up static charges. Article 810 of the
National Electrical Code, ANSI/NFPA No. 70, provides information
with respect to proper grounding of the mast and supporting
structure, grounding of the lead-in wire to an antenna discharge
unit, size of grounding conductors, location of antenna-discharge
unit, connection to grounding electrodes, and requirements for
the grounding electrode. (Fig. A)
FIGUREA
(NEC ART 250, PART H)
14, LIGHTNING - For added protection for this apparatus during a
lightning storm, or when it is left unattended and unused for long
periods of time, unplug it from the wall outlet and disconnect
the antenna or cable system.This will prevent damage to the
apparatus due to lightning and power-line surges.
I _oPOWER LINES - An outside antenna system should not be located
in the vicinity of overhead power lines or other electric light of
power circuits, or where it can fall into such power lines or circuits.
When installing an outside antenna system, extreme care should
be taken to keep from touching such power lines or circuits as
contact with them might be fatal.
16, OVERLOADING - Do not overload wall outlets and extension
cords as this can result in a risk of fire or electric shock.
17OBJECT AND LIQUID ENTRY - Never push objects of any kind into
this apparatus through openings as they may touch dangerous
voltage points or short out parts that could result in a fire or electric
shock. Never spill liquid of any kind on the apparatus.
18o SERVICING - Do not attempt to service this apparatus yourself as
opening or removing covers may expose you to dangerous voltage
or other hazards. Refer all servicing to qualified service personnel.
19o DAMAGE REQUIRING SERVICE - Unplug this apparatus from the
wall outlet and refer servicing to qualified service personnel under
the following conditions:
a. When the power supply cord or plug is damaged or frayed.
b. If liquid has been spilled, or objects have fallen into the apparatus.
c. If the apparatus has been exposed to rain or water.
d. If the apparatus does not operate normally by following the
operating instructions. Adjust only those controls that are
covered by the operating instructions, as improper adjustment
of other controls may result in damage and will often require
extensive work by a qualified technician to restore the apparatus
to its normal operation.
e. If the apparatus has been dropped or damaged in any way.
fi When the apparatus exhibits a distinct change in performance,
this indicates a need for service.
2eo REPLACEMENT PARTS - When replacement parts are required, be
sure the service technician uses replacement parts specified by
the manufacturer that have the same characteristics as the original
part. Unauthorized substitutions may result in fire, electric shock,
injury to persons or other hazards.
21o SAFETY CHECK- Upon completion of any service or repairs to this
apparatus, ask the service technician to perform routine safety
checks to determine that the apparatus is in proper operating
condition.
22 HEAT-This apparatus product should be situated away from heat
sources such as radiators, heat registers, stoves, or other products
(including amplifiers) that produce heat.
iP
_) LAMP IN LCD CONTAINS MERCURY, DISPOSE ACCORDING TO LOCAL, STATE OR FEDERAL LAW.
CAUTION: To prevent electric shock, match wide blade of plug to wide slot, fully insert.
ATTENTION: Pour _viter les chocs electriques, introduire la lame la plus large de la fiche dans la borne
correspondante de la prise et pousser jusqu'au fond.
FCC WARNING This apparatus may generate or use radio frequency energy. Changes or modifications to this apparatus may 1
cause harmful interference unless the modifications are expressly approved in the manual. The user could
ose the authority to operate this apparatus if an unauthorized change or modification is made.
RADIO-TV INTERFERENCE
This apparatus has been tested and found to comply with the limits for a Class B digital device, pursuant to Part 15 of the FCC
Rules. These limits are designed to provide reasonable protection against harmful interference in a residential installation.
This apparatus generates, uses, and can radiate radio frequency energy and, if not installed and used in accordance with the
instructions, may cause harmful interference to radio communications. However, there is no guarantee that interference will not
occur in a particular installation. If this apparatus does cause harmful interference to radio or television reception, which can be
determined by turning the apparatus off and on, the user is encouraged to try to correct the interference by one or more of the
following measures:
1) Reorient or relocate the receiving antenna.
2) Increase the separation between the apparatus and receiver.
3) Connect the apparatus into an outlet on a circuit different from that to which the receiver is connected.
4) Consult the dealer or an experienced radio/TV technician for help.
This Class B digital apparatus complies with Canadian ICES-003. /
Cet appareil num_rique de la classe B est conforme & la norme NMB-003 du Canada.
J
Note to CATV system installer:
This reminder is provided to call the CATV system installer's attention to Article 820-40 of the NEC that provides guidelines
for proper grounding and, in particular, specifies that the cable ground should be connected to the grounding system of the
building as close to the point of cable entry as practical
ii•
i n ¸
LOCATION AND HANDLING
Do not install the unit in direct sunlight, near strong magnetic fields, or in a place subject to dust or strong vibration.
• Avoid a place with drastic temperature changes.
Install the unit in a horizontal position. Do not place anything directly on top or bottom of the unit. Depending on your external devices,
noise or disturbance of the picture and/or sound may be generated if the unit is placed too close to them. In this case, please ensure
enough space between the external devices and the unit
Depending on the environment, the temperature of this unit may increase slightly.This is not a malfunction.
TO AVOID THE HAZARDS OF ELECTRICAL SHOCK AND FIRE
Do not handle the power cord with wet hands.
Do not pull on the power cord when disconnecting it from an AC outlet. Grasp it by the plug.
Do not put your fingers or objects into the unit.
NOTE ABOUT RECYCLING
• This unit's packaging materials are recyclable and can be reused. Please dispose of any materials in accordance with
your local recycling regulations.
Batteries should never be thrown away or incinerated but disposed of in accordance with your local regulations
concerning chemical wastes.
EN
[] Supplied Accessories
owner's manual remote control batteries
(1EMN22419A) /_ _ (NF604UD) (AAx2)
If you need to replace these accessories, please refer to the part No. with the illustrations and call our toll free
customer support line found on the cover of this manual.
Depending on your antenna system, you may need different types of combiners (mixers) or separators (splitters).
Contact your local electronics store for these items.
Phillips pan screw for
attaching the stand x 2
(FPH34140)
[]Attaching the Stand
You must attach the stand to the unit to display upright. Be sure the front and rear of the stand match the proper direction,
Turnthemainunitoverandplace 2 Insert the stand all the way to the 3 Drive Phillips pan screws in the 2
it onto a table which has a soft main unit slowly, threaded holes with a screwdriver
cloth draped over it. Make sure Make sure not to put the AC cord tightly.
not to damage the screen, between the stand and the unit.
Note:
When attaching the stand, ensure that all screws are tightly fastened. If the stand is not properly attached, it could cause the unit to fall,
resulting in injuries as well as damage to the unit.
Make sure to use a table which con support the weight of this unit and is larger than this unit.
Make sure the table is in a stable location.
[] Symbols Used in this Manual
The following is the description for the symbols used
in this manual, Description refers to:
: Digital TV operation
:_ : Analog TV operation
If neither symbol appears under the function
heading, operation is applicable to both,
[] Trademark Information
Manufactured under license from Dolby Laboratories.
"Dolby"and the double-D symbol are trademarks of
Dolby Laboratories.
Product that have earned ENERGYSTAR®are designed
to protect the environment through superior energy
efficiency.
[]Tilt Stand
You can adjust the stand to change the angle
of the TV (-3° to 8°).
EN
_Features [] Contents
DTV/TV/CATV
- You can use your remote control to select channels which
are broadcast in digital format and conventional analog
format. Also, cable subscribers can access their cable TV
channels.
Information Display (DTV only)
- You can display the title, contents and other information
of the current DTV program on the TV screen.
Auto Channel Scan
-This unit automatically scans and memorizes channels
available in your area, eliminating difficult setup
procedures.
V-chip
-This feature allows you to block children's accessto
inappropriate programs.
Closed Caption Decoder
- Built-in closed caption decoder displays text for closed
caption supported programming.
MTS/SAP Tuner
- Audio can be selected from the remote control.
Auto Shut Off Function
- If there is no signal input from the antenna terminal and
no operation for 1Sminutes, the unit will turn itself off
automatically.
Sleep Timer
-This feature will automatically turned off the power of the
unit at aspecific time.
Choices for On-screen Language
- Select your on-screen language:
English, Spanish or French.
Stereo Sound Function
PLL Frequency Synthesized Tuning
- Provides free and easy channel selection and lets you tune
directly to any channel using the channel number buttons
on the remote control.
PC Input
Component Video Input
S-video Input
AV Input
Digital Audio Coaxial Output
© 2007 Funai Electric Co., Ltd.
NTROD( CT ON
Precautions.......................................................... 2
ImportantSafeguards................................................. 2
SuppliedAccessories.................................................. 4
AttachingtheStand.................................................. 4
SymbolsUsedinthisManual........................................... 4
TrademarkInformation............................................... 4
TiltStand............................................................ 4
Features............................................................. S
Buttonsonthe RemoteControl........................................ 6
InstallingtheBatteries................................................ 6
ControlPanel........................................................ 7
RearPauel........................................................... 7
i
P R EPAR A O N
BasicConnection..................................................... g
ExternalDeviceConnection............................................ 9
N AL SETNG
InitialSetup......................................................... 11
MainMenu......................................................... 11
AutoChannelScan................................................... 12
LanguageSelection.................................................. 12
WA]CH NG TV
ChannelSelection................................................... 13
VolumeAdjustment................................................. 13
SwitchingEachMode................................................ 13
SwitchingAudioMode............................................... 14
SleepTimer......................................................... 14
ScreenInformation.................................................. 15
TVScreenDisplayMode.............................................. 16
OPT ONAL SE/_ NG
ChannelAdd/Delete................................................. 18
PictureAdjustment.................................................. 19
ClosedCaption...................................................... 19
DTVClosedCaption.................................................. 20
DTVCCStyle......................................................... 21
BackLightSetting................................................... 22
ColorTemperature................................................... 22
V-chip.............................................................. 23
PCSettings......................................................... 26
iii'!!i_
} 2
i
i'
TROt BLESHOOT/NG
TroubleshootingGuide............................................... 27
Maintenance........................................................ 28
NFORMAF ON
Glossary............................................................ 29
CableChannelDesignations.......................................... 29
GeneralSpecifications................................................ 29
ElectricalSpecification............................................... 29
OtherSpecifications............................................. 29
LimitedWarranty............................................. Backcover
{}
i
i
All rights reserved. No part of this manual may be reproduced, copied, transmitted, disseminated, transcribed, downloaded
or stored in any storage medium, in any form or for any purpose without the express prior written consent of Funai.
Furthermore, any unauthorized commercial distribution of this manual or any revision hereto is strictly prohibited.
Information in this document is subject to change without notice. Funai reserves the right to change the content herein without
the obligation to notify any person or organization of such changes.
FIJNAIwith the I'_ design is a registered trademark of Funai Electric Co., Ltd and may not be used in any way without the express
written consent of Funai. All other trademarks used herein remain the exclusive property of their respective owners. Nothing
contained in this manual should be construed as granting, by implication or otherwise, any license or right to use any of the
trademarks displayed herein. Misuse of any trademarks or any other content in this manual is strictly prohibited. Funai shall
aggressively enforce its intellectual property rights to the fullest extent of the law.
iiiiiii_ii
EN
[] Buttons on the Remote Control
1
3
1. POWER(p11)
Press to turn the unit on and off.
2. MUTE _< (p13)
Press to turn the sound on and off.
3. SLEEP*J (pl 4)
Press to activate the sleep timer.
4. Number buttons(p13)
Pressto select channels.
-lENT.
Pressto shift the minor channel
from the major channel.
+100
Pressto select 100 or higher
channels, (CATV)
Pressto search if there are minor
channels on the currently selected
major channel, (DTV)
5. CH.A/V (p13)
Press to select channels and the
external input modes.
6. VOL. I (p13)
Press to adjust the volume,
7. ENTER(pl I)
Press to decide the command of
setting when the main menu is
displayed,
8. SETUP(pit)
Press to display the main menu,
9. <II_ IA I. (pl I)
Press to move left/right/up/
clown through the items,
10. RETURN _
Press to return to previous menu
operation,
1I. INPUT (pl 3)
Press to access connected
external devices like a DVD player
or VCR,
Press to switch between the
digital mode (DTV) and analog
mode,
12. DISPLAY i (pl 5)
Digital Mode (DTV)
Press to display the channel
information, signal type and TV
setting.
Analog Mode (TV)
Press to display the channel
number, signal type and TV
setting.
External Input Mode
Press to display the external
input modes, signal type and TV
setting,
13. AUDIO J_(p14)
Digital Mode (DTV)
Press to select the audio
language.
Analog Mode (TV)
Press to select the audio mode,
14. SCREEN MODE_3(p16)
Press to select aspect ratio
available for the TV screen,
15. CH. RECALL © (pl 3)
Pressto return to previous channel,
[] Installing the Batteries
Install the batteries (AA x 2) matching the polarity indicated inside battery compartment of the remote control,
Battery Precautions:
Be sure to follow the correct polarity as indicated in the battery compartment. Reversed batteries may cause damage to the device.
Do not mix different types of batteries together (e.g., Alkaline and Carbon-Zinc) or old batteries with fresh ones.
If the device is not to be used for a long period of time, remove the batteries to prevent damage or in,jury from possible battery leakage.
Do not try to recharge batteries; they can overheat and rupture.
EN
[] Control Panel
[] Rear Panel
rear of this unit
1,
=1 2.
=2
-3
=4
-5
side of the unit
,6
7
,8
-2
side of the unit
'4
side of the unit
,5
'6
.7
POWER (pl 1)
Press to turn the unit on and off.
INPUT SELECT (pl 3)
Pressto accessconnectedexternaldeviceslikea
DVD player or VCR.
Press to decide the command of setting when the
menu is displayed.
3. CHANNELA/V(p13)
Press to select channels or move up/down through the
main menu items.
4. VOLUME _/(p13)
Press to adjust the volume or move right ( _)/left (_)
through the main menu items,
5. SETUP (p11)
Press to display the main menu.
6. infrared sensor window
Receives infrared rays transmitted from the remote
control.
7. power on indicator
Lights up when power is on.
8. standby indicator
Lights up in standby mode.
-1 1. PC input jack (plO)
VGA cable connection for PC,
2. audio input jack for PC connection (pl0)
Mini-plug audio cable connection for PC.
3. antenna input jack (p8)
RF coaxial cable connection for your antenna or
cable/satellite box.
4. headphone jack
Headphone connection for personal listening.
5. component video and audio input jack (p9)
Component video and RCA audio connection for
external devices.
6. audio input jack (p9)
RCA audio connection for external devices.
.3
7. video input jack (pl0)
RCA video connection for external devices.
8. S-videoinput jack(p9)
S-video connection for external devices.
9. coaxial digital audio output jack (plO)
Coaxial digital audio connection for a decoder or an
audio receiver.
10. AC power cord
Connect to a standard AC outlet to supply power to
this unit.
.8
,9
|0
EN
[] Basic Connection
Thissectiondescribeshowto c0nnecttheunittoanantenna,cable/satellitebox,etc.
Note:
Besureyourantenna or other device is connected properly beforeplugging in the power cord.
[Antenna Connection]
Connect the RFcoaxial cable on your home outlet to the antenna input jack of this unit.
e.g.)
VHF/UHF_
antenna _ "
RFcoaxial cable
rear of this unit
cableTV
company
* Once connections are completed, turn on the unit and begin initial setup.
Channel scanning is necessary for the unit to memorize all available channels in your area.
(Refer to "Initial Setup" on page 11,)
Note:
For your safety and to avoid damage to this unit, please unplug the RFcoaxial cablefrom theantenna input jack before moving the
unit.
Ifyou usean antenna to receive analog TV,it should also work for DTVreception. Outdoor or attic antennas will bemore effective than
settop versions.
Toeasilyswitch your reception source between antenna and cable, install an antenna selector.
Ifyou connect to thecable system directly, contact the CATVinstaller.
[Connection to Cable Box or Satellite Box]
Use an RF coaxial cable to connect the antenna input jack of the unit to the antenna output jack of the cable/satellite box.
e.g.)
satellite dish
iiiiiiiiiiiiiiiiiiiiiiiiii_ i i¸ ANT N
RFcoaxial cable
iiii
co0x,01c0ble
'c b,eTv'
company
cable/satellite box
rear of this unit
*Required cables and connecting methods differ depending on the cable/satellite box.
For more information, please contact your cable/satellite provider.
EN
[] External Device Connection
[Component Video Connection]
Component video connection offers better picture quality for video devices connected to the unit.
Use a component video cable to connect the unit to external video devices equipped with component video output
jacks.
If you connect to the unit's component video input jacks, connect an RCA audio cable to the audio L/R jacks of
VIDEO2.
e.g.)
component video cable
rear of this unit
DVDplayer with
the component video jacks
AUDIO OUT
I L R
iill!ill
ii!ii_!,!_
!;b
iiiii:_i
Note:
This unit accepts 480i/480p /720p / 1080i video signals.
[S-video Connection]
S-video connection offers good picture quality for video devices connected to the unit.
Use an S-video cable to connect the unit to external video devices equipped with S-video output jack.
If you connect to the unit's S-video input jack, connect an RCA audio cable to the audio L/R jacks of VIDEOI.
e,g,)
AUDIO OUT S-VIDEO
I_ _1 OUT
DVD player with
the S-video output jack
rear of this unit
}i!iiiiii
JO
iTJ
ii:_!!ili
Note:
fyou connect to theS-videoinput jack and the video input jack at thesame time, the S-videoconnection will have priority.
]
di:ii: !ijii_!!!!gii_:;
EN
[Video Connection]
RCA video connection offers standard picture quality for video devices connected to the unit.
If you connect to the unit's video input jack, connect an RCA audio cable to the audio L/R jacks of VIDE01.
When the audio jack of the video device is monaural, connect an RCA audio cable to the audio L input jack.
e.g.)
VCR
rear of this unit
camcorder
AUDIO OUT VIDEO
L R ] OUT
Note:
fyou connect to theS-videoinputjack and the video inputjack at thesame time, the S-videoconnection will have priority.
[Digital Audio Output Connection (for digital broadcasting only)]
If you connect this unit to an external digital audio device, you can enjoy multi-channel audio like 5.1ch digital
broadcasting sound.
e.g.)
rear of this unit
I
Dolby Digital
decoder
DIGITAL AUDIO
COAXIAL IN
digital audio coaxial cable
[PC Connection]
This unit is equipped with a PCinput jack. If you connect this unit to your PC,you can use this unit as a computer
monitor.
e.g.)
VGA cable should be
with ferrite core. _ VGA cable
rear of this unit
personal computer
Note: 1
Pleasepurchase the VGAcable that has aferrite core. I
1
EN
[] Initial Setup
Thissectionwill guideyouthroughthe unit'sinitialsettingwhichincludes
selectingalanguageforyouron-screenmenuand"AUTOPRESETCH",which
automaticallyscansandmemorizesviewable channels,
Before youbegin:
Makesureifthe unitisconnectedto antenna orcable.
1 After making all the necessary connections,
press [POWER] to turn on the unit.
This operation may take a few moments.
2 Use [Cursor / Y] to select the on-screen language
from the choices on the right side of theTV screen.
(ENGLISH / ESPANOL / FRAN(_AIS)
or
_SELECT LANGUAGE ENGLISHpRANOAIS
SELECCIONE EL ICIOMA ESPA_JOL
CHOISIR LA LANGUE
SELECT:_,,T SET:ENTER
SELECCIONE:_,, T AJUSTE:ENTER
CHOIX:_,, T VALICER: ENTER
"INITIAL SETUP" menu on step 3 will be displayed in
the selected language after you press [ENTER].
3 Use [Cursor / V] to select"AUTO PRESETCH(TV/DTV)"
for TV channels or"AUTO PRESETCH(CATV)" for CATV
channels, then press [ENTER].
or
- INITIALSETUP-
PLEASECONNECTANTENNA OR CACLE
OR SATELLITETOTHIS UNIT
AUTO PRESETCH (TV_DTV)
AUTO PRESETCH (CAW)
Scanning and memorizing the channels automatically
start.
25
AUTO PRESETCH(TV/CT_
When the scanning and memorizing are completed,
the lowest memorized channel in the broadcasting
will be displayed.
Note:
Ifyou connect thecable system directly, contact the CATV
installer.
lfyou press[POWER] or [SETUP]during "AUTOPRESETCH',
thissetting will be canceled.
Theinitial auto channel scan function con beexecuted for
either TV/DTVor CATVonly once. lf you wont to scanboth
TV/DTVand CATV,you needto select "CHANNELSETUP"in
themain menu to scanand memorize other channels after
initial presetting iscornpleted. (Refertopage 12.)
Youcan cancel or exit theinitial "AUTOPRESETCH" menu by
pressing [SETUP].
When nochannel con be received by"AUTOPRESETCH",
"NOTVSIGNALS"is displayed on the TVscreen.
If there isno signal input from the antenna terminal and
no operation for severalsecondsafter you turn on the unit,
"HELPFULHINTS"appears. Follow theinstructions listed on
theTVscreen.
-HELPFUL HINTS-
1 PLEASECHECKTOSEEIF THE
ANTENNA _CABLE _SATELLITEIS
PROPERLYCONNECTED
2 DID YOUPERFORM'AUTO PRESET CN"?
3 PLEASEREFERTOFRONT PAGEOFTHE
OWNER'S MANUALOR REARPANELFOR
SUPPORTLINE INFORMATION
[] Main Menu
Thissectiondescribestheoverviewofthe mainmenudisplayedwhenyou
press[SETUP].Formoredetails,seethereferencepagefor eachitem. ....
Themainmenuconsistsofthefunction settingitemsbelow.
i
Press [SETUP].
e.g.) digital TV mode
- TVSETUP -
PICTURE
CHANNELSETUP
V-CHIP SETUP
LANGUAGE [ENGLISH]
CAPTION [OFP]
DACK LIGHT [SRIGHT]
COLORTEMP [NORMAL]
DTVCC
PICTURE
You can adjust the picture quality.
(Refer to "Picture Adjustment" on page 19.)
CHANNEL SETUP
You can automatically scan the viewable channels and
remove those that are undesired.
(Refer to "Auto Channel Scan" on page 12.)
V-CHIP SETUP
You can set the viewing limitations.
(Refer to "V-chip" on page 23.)
LANGUAGE
You can change the language (English, Spanish,
French) displayed on the main menu.
(Refer to "Language Selection" on page 12.)
CAPTION
You can change the display format for closed caption,
which displays the dialogue of a TV program or other
information across the TV screen.
(Refer to "Closed Caption" on page 1g.)
i 5
iT:J
EN
BACK LIGHT
You can set the desired brightness mode.
(Refer to "Back Light Setting"on page 22.)
COLOR TEMR
You can adjust color temperature ("NORMAU', "WARM",
"COOU').
(Refer to "Color Temperature" on page 22.)
DTVCC
In addition to the basic closed caption described
on page 18, DTV has its own closed caption called
DTVCC.
(Refer to "DTV Closed Caption" on page 20.)
PC SETTING
You can adjust the position, stability and clarity of the
PC screen.
This menu will appear only in PC mode, and can only
be set when the unit detects the PC input signal.
(Refer to"PC Settings"on page 26.)
_Auto Channel Scan
Ifyouswitchwires(e.g.,betweenantennaandCAW)orifyoumovethe
unittoa differentareaafter the initialsetting,orifyourestorethe DTV
channelyoudeleted,youwill needtoperformautochannelscan.
Before youbegin:
Makesureifthe unit isconnectedto antenna orcable.
1 Press [SETUP] to display the main menu.
2 Use [Cursor / V] to select"CHANNEL SETUP",
then press [ENTER].
e.g.) digital TV mode
or
- TV SETUP -
PICTURE
CHANNEL SETUP
V-CHiP SETUP
LANGUAGE [ENGLISH]
CAPTION [OFF]
RACK LIGHT [RREGHTj
COLOR TEMR [NORMAL]
DWOC
3 Use [Cursor / V] to select your desired preset type,
then press [ENTER].
e.g.) digital TV mode
or
-CHANNELSETUP-
ADD_)ELETE(DW)
_-AUTOPRESETCH(UT_
AUTO PRESETCH(W_DT_
AUTO PRESETCH(GATV]
! CAW takes appr0x5Omin
When aerial antenna is connected,
select "AUTO PRESET CH(TV)", "AUTO PRESETCH(DTV)"
or"AUTO PRESET CH(TV/DTV)".
When connected to CATV, select
"AUTO PRESET CH (CATV)'t
Scanning and memorizing the channels automatically
start.
e.g.) digital TV mode
D25
AUTO PRESETCH(DTV)
I J J J
When the scanning and memorizing are completed,
the lowest memorized channel will be displayed.
When you selected "AUTO PRESETCH(TV/DTV)", the
lowest memorized analog channel will be displayed
when the scanning and memorizing are completed.
If there is no analog channel, the lowest memorized
digital channel will be displayed.
No te:
Ifyou connect thecable system directly, contact the CATV
installer.
Ifyou press[POWER] or [SETUP]during auto channel scan,
thesetting will be canceled.
When nochannel can be received byauto channel scan,
"NOTVSIGNALS"will be displayed on the TVscreen.
Channel settings will besaved evenif the power fails.
Ifyou have Spanish or Frenchmenus and need English,
press[SETUP]. Use[Cursor A iV] to select "IDIOMA"
or "LANGAGE"Press[ENTER]to select "ENGLISH".Press
[SETUP]to remove the main menu.
With regard only to thedigital channel, evenafter the
scanning iscomplete if you unplug theACpower cord
before turning off the unit by pressing [POWER], the
channel setting may belost.
[] Language Selection
YoucanchooseEnglish,Spanish,orFrenchasyouron-screenlanguage.
1 Press [SETUP] to display the main menu.
Use [Cursor• IV] to select"LANGUAGE",
then press [ENTER] repeatedly to change the setting.
e.g.) digital TV mode
or
- W SETUP -
PICTURE
CHANNELSETUP
V-CHIP SETUP
LANGUAGE [ENGUSR]
CAPTION [OFF]
SACK LIGHT [BRIGHT]
COLOR TEMP [NORMA_
UTVCC
Press [SETUP] to exit.
EN
[] Channel Selection
Selectchannelsbyusing[CH. / V] or[theNumberbuttons].
Use [CH.• IV] or [the Number buttons] to select the
memorized channels,
or _.._j or _ '_
Using [the Number buttons]
-When selecting analog channel 12
-When selecting digital channel 12-1
ENT
Be sure to press l-lENT.] before entering the minor
channel number,
Press [CH. RECALl Q] to return to the previously
viewed channel,
When you select a channel larger than 100, press
[+1OO] first. Then use [the Number buttons] to press
the lower 2-digit numbers,
Only [the Number buttons] can be used to select the
non-memorized channels,
About digital TV broadcasting:
With its high definition broadcast, digital broadcasting
far surpasses analog broadcasting in both its picture
and sound quality,
What is the minor channel?
By using high compression technology, digital
broadcasting offers a service that enables multiple
signals to send simultaneously, Therefore, you can
select more than one program per major channel since
digital broadcasting technology distinguishes between
multiple channels broadcast by a single network.
NTSC(analog mode) [AirTime] ATSC(digital mode)
18:00
18:30
19:00
19:30
20:00
20:30
major channel minor channel
:change automatically
=:> :change manually by using [CH. A/V]
Note:
"NOSIGNAL"will appear on the TVscreen after theminor
channel broadcast is over,
[] Volume Adjustment
Thissectiondescribeshowto adjustthe volume.
Themutefunction,whichturnsthesoundoffand on,isalsodescribed.
Use [VOL. / _] to adjust the audio volume,
or
VOLUME 20
IIIIII ..........
i,?i_
ii!iiii_!i
iizi!;il
The volume bar will be displayed at the bottom of the
TV screen when adjusting the volume,
The volume bar display will automatically disappear in
a few seconds.
Press [MUTE _] to turn off and on the sound,
MUTE
MUTE 20
IIIIII ..........
"MUTE" is displayed on the TV screen for a few
seconds,
Press [MUTE_N] again or use [VOL. _ / ]torecover
the original volume.
[] Switching Each Mode
Youcaneasilyswitchwiththe remotecontroltothe DTV(ATSC)and TV
(NTSC)orto accessexternaldeviceswhentheyare connectedto the unit.
ii:iii!
Press [INPUT] repeatedly to cycle through the input
modes,
i;!i:iiii
IC>
iT:J
ii:_!!:iiNPUT
i
To use the video or S-video input jack on the unit,
select "VIDEOI ",
To use the component video input jacks on the unit,
select "VIDEO2",
To use the PC input jack on the unit, select"PC",
Note:
Whenyou switch the analog mode to the digital mode,
it may take a while until the digital channel selection is
completed. "NOWSCANNING"isdisplayed while switching
themodes.
EN
[] Switching Audio Mode [] Sleep Timer
Thissectiondescribeshowto switchthe audiointhe analogmodeandhow Thesleeptimercanbesettoautomaticallyturnofftheunitafteran
to switchthe audiolanguageinthedigitalmode. incrementalperiodoftime.
While receiving an MTSbroadcast, press[AUDIO b]
repeatedly to cycle through the available audio channel.
AUDIO
MAIN
SAP
MONO
: Outputs main-audio
: Outputs second audio program
: Outputs mono-audio
The information display will automatically disappear
in a few seconds.
Press [AUDIO J_]to display the currently selected
language and the number of available languages.
AUDIO
2 Press [AUDIO,b] repeatedly to cycle through the
available audio languages.
AUDIO
Available languages differ depending on the
broadcast. "OTHER" is displayed when the audio
language cannot be acquired, or the acquired
languages are other than English, Spanish or French.
The information display will automatically disappear
in a few seconds.
Note:.Pressing[AUDIO .b] doesnot control external audio devices.
Press [SLEEP _.)] to set the sleep timer.
SLEEP
SLEEP OFF
Sleep timer display appears on theTV screen.
Press [SLEEP _] repeatedly to change the amount of
time until shut off,
SLEEP
SLEEP 120MIN
You can set your unit to turn off after a set period of
time (from 30 to 120 minutes).
Each press of [SLEEP _)] will increase the time by 30
minutes.
After set up, the sleep timer display can be called up
for checking by pressing [SLEEP _.)].
To Cancel the Sleep Timer
Press [SLEEP %)] repeatedly until "SLEEP OFF" is
displayed on the TV screen.
No te:
The sleep timer setting display will automatically disappear
in a few seconds.
When you disconnect the unit from the AC outlet or when o
power failure occurs, the sleep timer setting will be canceled.
EN
[] Screen Information
Youcandisplaythe currentlyselectedchannelorotherinformationsuchas
the audiomodeontheTVscreen.
Intheanalogmode,the currentchannelnumberisdisplayed.
Press [DISPLAY i].
¢B 25
DISPLAY
The current channel number is displayed at the top-
right corner of the TV screen.
To clear the display, press [DISPLAY i] again.
i,?i_
Inthedigitalmode,the detailedbroadcastinginformationforthe current
channelsuchas programtitle, programguidesaredisplayed.
!
Press [DISPLAY i] repeatedly to cycle through the
available display modes.
DISPLAY
Broadcasting Information
The following information is displayed.
I program title
2 signal quality indicator
3 program rating
4 channel number
5 broadcast station
6 audio language
(Refer to "Switching Audio Mode"on page 14.)
Program Guide
The program guide added to broadcasting information
is displayed.
guide
No re:
When theprogram guide consists of more than 6lines, use
[CursorA /T] to scroll.
"No description provided" is displayed when theprogram
guide isnot provided.
While the program guide is displayed, the closedcaption
function is interrupted.
In external input mode, the following screen isdisplayed;
e.g.) Whenan external device isconnected to VIDEO1input
jack.
[ VIOl011
Theinformation display will automatically disappear in a
few seconds when the dosed coption is on.
ii:iii!
i i ¸
ii115
iTJ
EN
F TV Screen Display Mode
3-5typesofdisplaymodescanbeselectedwhenthe broadcastingstation
issending4:3or16:9videosignaloranexternaldeviceisconnectedtothe
unit.And2typesofdisplaymodescanbeselectedfor PCinputsignal.
Press [SCREEN MODE _] repeatedly to switch the TV
aspect ratio,
SCREEN
MODE
For 4:3 video signal
Q 0
© o =>FO 03
!
-,1°÷°1oo
For 16:9 video signal
: digital mode
=_>: analog/external input mode
SIDEBAR
Select to display a 4:3 picture at its original size.
The black bars appear on the left and right sides of the
screen.
FULL
Select to display a 4:3 picture to fill the screen.
Select to reduce the black bars on top and bottom.
WIDE
Digital mode:
Select to display a 4:3 picture to fill the screen and
shrink"FULL" picture horizontally.
Analog/external input mode:
Select to display a 4:3 picture to fill the screen and
stretch "FULL" picture horizontally.
,,_ :digital mode
_> :analog / external input mode
FULL
Select to display a 16:9 picture to fill the screen,
SIDE CUT
Select to display a 16:9 picture to fill the screen and
stretch "FULL" picture horizontally, The left and right
sides of the picture will be cropped out,
ZOOM _'_vaiP_i_I_i_h _/_c'_ xl I_-_I/)_ _od_orfly
Select to enlarge a 16:9 picture without distorting the
aspect ratio.
MOVIE
Select to reduce the black bars on top and bottom.
EXPAND _',u_iP_b._ ,_ _/oO' x_m_4 ,od <:>ly
Select to reduce the black bars on the left and right
sides.
Note:
Youmay not switch the display mode depending on the
prograrn.
EN
i,?i_
For PC input signal
800 x 600 SVGA
1,024 x 768 XGA
Display a vertically stretched picture without distortinc
the aspect ratio.
The black bars appear on the left and right sides of the
screen.
848 x 480 WVGA
1,280 x 720
1,280 x 768 WXGA
1,360 x 768
720 x 400 BIOS
Display a horizontally stretched picture without
distorting the aspect ratio.
The black bars appear on the top and bottom sides of
the screen.
ii:iii!
i i ¸
ii115
IO
ii:!!ii_i
1,440 x 900 WXGA+
Display a picture in its original size.
No te:
You can change the screenresolution on yourPC.
EN
[] Channel Add/Delete
Thechanneladd/deletefunctionletsyouaddthechannelthatwasnot
addedbytheautochannelscandueto the receptionstatusat theinitial
setting.Youcanals0deletetheunnecessarychannels.
1 Press [SETUP] to display the main menu.
Press [SETUP] to exit.
2 Use [Cursor /V] to select"CHAN NELSETUP",
then press [ENTER].
e.g.) digital TV mode
or
- TV SETUP -
PICTURE
CHANNEL SETUP
V-CHFPSETUP
LANGUAGE [ENGLISH]
CAPTION [OFF]
BACK LIGHT [BRIGHTj
COLOR TEMP [NORMAL]
DWCC
Note:
• "ADD/DELETE(DTV)" or "ADD/DELETE" menu will disappear
automatically in a few seconds.
• In the digital mode (DTV), you can add or delete channels
only for major channel
• Once you delete a DTV channel, you cannot recover the
channel without performing auto channel scan again.
(Refer to "Auto Channel Scan" on page 12.)
3 Use [Cursor / V] to select"ADD/DELETE(DTV)" or
"ADD/DELETE", then press [ENTER].
e.g.) digital TV mode
or
-CHANNELSETUP-
ADDIDELETE([/W)
AUTO PRESETCH(DTV)
AUTO PRESETCH(TV/DTV)
AUTO PRESETCH(CATV/
! CAW takes appr0x 50rain
Select the channel you want to add or delete.
(Refer to "Channel Selection" on page 13.)
e.g.) digital TV mode
D25
ADD_DELETE:DTV
Use [Cursor _1/11_] to select"ADD" or"DELETE".
To add or delete another channels, repeat steps 4-5.
Color of channel number displayed at the right top of
the TV screen indicates;
- Blue: The selected channel will be added.
- Red: The selected channel will be deleted.
EN
[] Picture Adjustment
Youcanadjustbrightness,contrast,color,tint andsharpness.
1 Press [SETUP] to display the main menu.
[] Closed Caption
Youcanviewclosedcaptioning(co)forTVprograms,moviesandnews.
Closedcaptionrefertotext ofdialogueordescriptionsdisplayedon-screen
forthehearingimpaired.
Press [SETUP] to display the main menu.
i,?i_
2 Use [Cursor /V] to select"PICTURE",
then press [ENTER].
e.g,) digital TV mode
or
- WSETUP -
PICTURE
CHANNEL SETUP
V-CHIP SETUP
LANGUAGE [ENGLISH]
CAPTION [OPP]
BACK LIGHT [BRIGHT]
COLOR TEMR [NORMAL]
DTVCC
3 Use [Cursor / V] to select the picture quality type
you want to adjust.
Use [Cursor•/V] to select"CAPTlON', then press
[ENTER] repeatedly to change the setting.
e,g,) digital TV mode
OF
- TVSETUP -
PICTURE
CNANNEL SETUP
V-CHIP SETUP
LANGUAGE [ENGLISH]
_-CAPTION [OFF]
SACK LIGHT [BRIGHT]
GOLOR TEMP [NORMAL]
DTVCG
iizi!ill
!p,
ii!ii_!!_
ii:i:il
or
Use [Cursor _1 / I_] to adjust the quality.
i
Cursor _1 Cursor I_
BRIGHTNESS to decreasebrightness to increase brightness
CONTRAST to decreasecontrast to increase contrast
COLOR to decreasecolor to brighten color
TINT to add red to add green
SHARPNESS to makesoft to make clear
Press [SETUP] to exit.
Note"
Thepicture adjustmentsetting display will automatically
disappear in a few seconds.
InPCmode, you can select only "BRIGHTNESS"or
CONTRAST"
ii !!i,i_iii
Caption Mode
CAPTION1 and TEXT1;
aretheprimarycaptionandtextservices.
The captioning or text is displayed in the same
language as the program's dialogue
(up to 4 lines of script on the TV screen, where it does
not obstruct relevant parts of the picture).
CAPTION2 and TEXT2_
i
are rarely available and broadcasters use them
only in special conditions, such as when "CAPTION I"
or "TEXTI" is not available.
There are 3 display modes according to programs:
Paint-on mode: Displays input characters on theTV
screen immediately.
Pop-on mode: Once characters are stored in
memory, they are displayed all at
once,
Roll-up mode: Displays the characters continuously
by scrolling (max. 4 lines).
iiii_ii:ii
EN
[] DTV Closed Caption
Inadditionto the basicclosedcaptiondescribedonpage19,DTVhasits
ownclosedcaptioncalledDTVCCUsethismenuto changethe settingsfor
DTVCC,
3 Press [SETUP] to exit. 1 Press [SETUP] to display the main menu.
Note;
To show the closed caption on your TVscreen, broadcast
signal must contain the closed caption data.
Not all TVprograms and commercials have the closed
caption or all types of the dosed caption.
Captions and texts may not match the TV voice exactly.
Changing channels may delay the dosed caption for a few
seconds.
• Adjusting ormuting the volume may delay the closed
caption for a few seconds.
• Abbreviations, symbols and other grammatical shortcuts
may be used in order to keep pace with the on-screen
action. This is not a problem with the unit.
The caption or text characters will not be displayed while
the main menu or functions display is shown.
Ifa black box appears on the TV screen, this means that
the closed caption is set to the text mode. To dear the box,
select "CAPTION 1","CAPTION 2" or "OFF".
If the unit receives poor quality television signals, the
captions may contain errors, or there might be no captions
at alL Some possible causes of poor quality signals are:
- Automobile ignition noise
- Electric motor noise
- Weak signal reception
- Multiplex signal reception (ghosts or screen flutter)
The unit retains the dosed caption setting if the power fails.
When the unit receives a spedal effects playback signal
(l.e.,Searcb, Slow and Still) from a VCR'svideo output
channel (CH3 or CH4), the unit may not display the correct
caption or text.
2 Use [Cursor A IV] to select"DTVCC",
then press [ENTER].
e.g.) digital TV mode
or
- W SETUP -
PICTURE
CHANNEL SETUP
V-CHIP SETUP
LANGUAGE [ENOL[SR]
CAPTION [OFF]
BACK LIGHT [BRIGHT]
COLOR TEMP [NORMAL]
_VSO
Use [Cursor A IV] to select"CAPTION SERVICE",
then press [ENTER] repeatedly to change the setting.
or
-DWCC -
_-CAPTIONSERVICE [OFF]
USER SETTING [OFF]
CAPTION SIZE [MIDDLE]
FONT STYLE [STYLEU8]
CHARACTEREDGE [NONE]
FORE OPACITY [SOLID]
FORE COLOR [WHITE]
BACKOPACITY [SOLID]
BACK COLOR FBLACKI
CAPTION SERVICE
OFF
SERVICE1-6
Select if you do not want
DTVCC. This is the default.
Select one of these before
changing any other item in
"CAPTION" menu. Choose
"SERVICE1/6" under normal
circumstances.
Press [SETUP] to exit.
Note:
"CAPTION SERVICE" tflatyou can switch differs depending
on the broadcast description.
EN
[] DTVCC Style
YoucanchangethestyleofDTVCCsuchasfont,colororsize,etc,
1 Press [SETUP] to display the main menu.
2 Use [Cursor /V] to select'DTVCC',
then press [ENTER].
e.g.) digital TV mode
or
- TV SETUP -
PICTURE
CHANNEL SETUP
V-CHIP SETUP
LANGUAGE [ENGLISH]
CAPTION [OFF]
BACK UGHT [BRIGHT]
COLOR TEMP [NORMAL]
DWCC
3 Use [Cursor /V] to select"USER SETTING",
then press [ENTER] repeatedly to set to "ON".
Items in the dotted box are available only when
"USER SETTING" is"ON".
or
- DTVCC-
CAPTION SERVICE [SERVICE16]
FONT STYLE [STYLED8]
CHARACTER EDGE [NONE]
POREOPACITY [SOLID]
POREDOLOR [WHITE] i
i BACK OPACITY [SOLID]
_BAC}<COLOR rBLACKI
Use [Cursor / V] to select an item, then press
[ENTER] repeatedly to change the setting for the item.
or
- DTVCO-
CAPTION SERVICE [SERVICE1/6]
USER SETTING [ON]
CAPTION SIZE [MIONLE]
PONT STYLE [STYLED8]
CHARACTER EDGE [NONE]
POREOPACITY [SOLID]
PORECOLOR [WHITE]
BACK OPACITY [SOLID]
B_CR DOLOR BLACK
CAPTION SIZE
FONT STYLE
CHARACTER EDGE
FORE OPACITY
FORE COLOR
BACK OPACITY
BACK COLOR
Press [SETUP] to exit.
CAPTION SIZE
Closed captioning font size can be changed as below.
FONT STYLE
Font style of the displayed caption can be switched as
below.
CHARACTER EDGE
Edge type of the displayed caption can be switched
as below.
FORE COLOR, BACK COLOR
Font and background color of the displayed caption
can be switched as below.
FORE OPACITY, BACK OPACITY
Text and background opacity of the displayed caption
can be switched as below.
MIDDLE, LARGE,SMALL
STYLE1/8 Proportional font used in the
menu screen
STYLE2/8 Monospaced with serifs
Proportionally spaced with
STYLE3/8 serifs
STYLE4/8 Monospaced with serifs
Proportionally spaced
STYLES/8 without serifs
STYLE6/8 Casual font type
STYLE7/8 Cursive font type
STYLES/8 Small capitals
NONE,RAISED,DEPRESSED,UNIFORM,
SHADOW LEFT,SHADOW RIGHT
SOLID,TRANSLUCENT,FLASH
WHITE,BLACK,RED,GREEN,BLUE,
YELLOW,MAGENTA,CYAN,TRANSPARENT
SOLID,TRANSLUCENT,FLASH
BLACK,RED,GREEN,BLUE,YELLOW,
MAGENTA,CYAN,TRANSPARENT,WHITE
i,?i_
ii!iiii_!i
iill!ill
!p,
EN
[] Back Light Setting
Youcansetthe desiredbrightnessmode,
[] Color Temperature
YoucanadjustcolortemperatureoftheTVscreen.
1 Press [SETUP] to display the main menu. 1 Press [SETUP] to display the main menu.
2 Use [Cursor / V] to select"BACK LIGHT",
then press [ENTER] repeatedly to change the setting.
e.g.) digital TV mode
or
- T2 SETUP -
PICTURE
CHANNEL SETUP
V-CHFPSETUP
LANGUAGE [ENGLISH]
CAPTION [OFF]
BACK UGHT [BRIGHT]
COLOR TEMP [NORMAL]
DWCC
Use [Cursor /V] to select"COLOR TEM P:',
then press [ENTER] repeatedly to change the setting.
e.g.) digital TV mode
- W SETUP -
PICTURE
CHANNEL SETUP
WCH]P SETUP
LANGUAGE [ENGLISH]
CAPTEON [OFF]
Oi _ BACK LIGHT [BREGHT]
COLOR TEM£ [NORMAL]
DTVCC
Press [SETUP] to exit.
EN
V-chil
V-chipreadsthe ratingsfor programs,thendeniesaccesstothe programs
which exceedthe rating levelyouset.With thisfunction,you canblock
certain programminginappropriateforchildren.
1 Press [SETUP] to display the main menu.
2 Use [Cursor /V] to select"V-CHIP SETUP",
then press [ENTER].
e.g.) digital TV mode
or
- TV SETUP -
PICTURE
CHANNEL SETUP
V-CHiP SETUP
LANGUAGE [ENGUSH]
CAPTION [OFF]
BACK LIGHT [BRIGHT]
COLOR TEMP [NORMAL]
DTV CC
Use [the Number buttons] to enter the 4-digit
numbers for your password.
PASSWORD
When you have not set up your password, enter 0000.
When the password is correct, the following
"V-CHIP SETUP" menu is displayed.
See the following description for setting each item.
e.g.) digital TV mode
A..."A.TV Rating" =bpage 23 .v.CHiPSETUP- ]
B'""B.MPAA Rating"=bpage 24 , TVRATING | .A
MPAARATING I B
C..."C.Change Password" DOWNLOABABLERATING
CHANGEPASSWORD-- C
=bpage 25
J
Use [Cursor• Iv] to select"TV RATING", then press
[ENTER].
e.g.) digital TV mode
or
- V- CHiP SETUP-
TV RATING
MPAARATING
DOWNLOABABLERATING
CHANGEPASSWORD
Use [Cursor• Iv] to select the desired rating, then
press [ENTER] repeatedly to switch between "VIEW"
and "BLOCK".
or _TV-Y [VIEW]
TV.Y7 ( ) [VIEW]
TV-G [VIEW]
TV-PG( ) [VIEW]
TV-14 ( ) IVIEW]
TV-MA( ) [VIEW]
Rating Category
TV-Y Appropriate for all children lower
TV-Y7 Appropriate for all children 7 and _ %
older
TV-G General audience
TV-PG Parental guidance suggested
TV-14 Unsuitable for children under 14 _
TV-MA Mature audience only higher
i,i'i_
ii!iiii_!i
iizi!;il
!p,
ii!ii_!,!_
!;b
iiiii:_i
};!iiiiii
IO
iTJ
ii:_!!ili
Note:
"DOWNLOADABLERATING"will beavailable when the unit
receivesa digital broadcast using the new rating system.
Whenyou select a rating and set it to "BLOCK;'the higher
ratings will be blocked automatically. Thelower ratings will
beavailable for viewing.
Whenyou set the highest rating to "VIEW",all ratings turn
to "VIEW" automatically.
If the"PROTECTEDPROGRAM"messageappears during
your TVviewing, change to achannel that isnot blocked.
Then,you can access"V-CHIPSETUP"menu and change the
setting to allow all TVviewing.
Toblock any inappropriate programming, setyour fimits in
both "TVRATING"and "MPAARATING".
TheV-chip setting will beretained after apower failure
(exceptthe accesscode reverts to 0000).
.........
EN
MPAARatingisthe ratingsystemcreatedby MPAA(Motion Picture
Association0fAmerica).
To Set the Sub Ratings
As for TV-Y7, TV-PG, TV-14 or TV-MA, you can further
set the sub ratings to block specific elements of
programming. To set the sub ratings, follow the steps
below.
1 Use [Cursor / V] to select the desired main
rating, then press [ENTER] twice to show its sub
ratings.
or
_-w-Y [WEW]
TV-Y7 ( ) [VIEW]
TV-G [VIEW]
TV-PG(OLSV) [BLOCK]
TV-14 (OLSV) [BLOCK]
TV-MA(LSV) [BLOCK]
Use [Cursor• Iv] to select"MPAA RATING",
then press [ENTER].
e.g.) digital TV mode
or
- V- CHIPSETUP-
TV RATING
_" MPABBATING
DOWNLOADABLERATING
CHANGEPASSWORD
Use [Cursor• Iv], then press [ENTER] repeatedly to
change the setting.
2 Use [Cursor / V], then press [ENTER] repeatedly
to change the setting.
e.g.) TV-PG
or
TV-PG [BLOCK]
b,D [BLOCK]
L [BLOCK]
S [BLOCK]
V [BLOCK]
Sub Rating
FV
V
S
L
D
Category
Fantasy Violence
Violence
Sexual Situation
Coarse Language
Suggestive Dialogue
Rating
TV-Y7
TV-PG
TV-14
TV-MA
TV-PG, TV-14
or
G [VIEW]
Pa [VIEW]
PG-13 [VIEW]
_R [BLOCK]
NCa7 [BLOCK]
X [BLOCK]
Rating Category
G General audience
PG Parental guidance suggested
PG-13 Unsuitable for children under 13
R Restricted; under 17 requires accompanying
3arent or adult guardian
NC-17 No one under 17 admitted
X Mature audience only
Press [SETUP] to exit.
Note: I
Blocked sub ratings will appear beside the main rating
category in "TV RATING" menu. I
You cannot block a sub rating (D, L, Sor V) if the main rating
is set to "VIEW'[ I
Changing the category to "BLOCK" or "VIEW" automatically
changes all its sub ratings to the same ("BLOCK" or "VIEW").
EN
Althoughthe default code"0000"issuppliedwith theunit,youcanset
yourownpassword.
Use [Cursor /V] to select"CHANGE PASSWORD",
then press [ENTER].
e.g.) digital TV mode
or
- V -CHIP SETUP-
TV RATING
MPAARATING
DOWNLOADABLERATING
CHANGE PASSWORD
Press [the Number buttons] on the remote control to
enter the new 4-digit password.
Enter password again in "CONFIRM PASSWORD"
space.
_ k._ _/ NEW PASSWORD
_7<._ \8_ _ CONFIRM PASSWORD
i,?i_
i¸i¸i¸¸¸11
ii!ii_!,!_
ii:i:il
Press [SETUP] to exit.
Note:
Make sure new password and confirm password must be
exactly the same. If they are different, the space is cleared
for reentering.
Your password will be erased and return to the default
(0000) when a power failure occurs. If you forget the
password, unplug the power cord for 10 seconds to restore
the password to 0000.
ii !!i,i_iii
i i ¸
iiiii!i_
i0
i?:J
[] PC Settings
Thisfunctionletsyouadjustthe PCscreenposition,clockandphaseduring
PCinput,
1 Press [SETUP] to display the main menu.
2 Use [Cursor /V] to select"PC SETTING",
then press [ENTER].
e.g.) PC mode
or
- WSETUP -
PICTURE
CHANNEL SETUP
V-CHIP SETUP
LANGUAGE [ENGLISH]
CAPTION [OFF]
BACK LIGHT [SR]GH_
COLOR TEMR [NORMAL]
_*PCSETTING
Adjust the setting.
AUTO ADJUSTMENT
Use [Cursor •/V] to select "AUTO ADJUSTMENT",
then press [ENTER].
or
- PCSETTING-
AUTOADJUSTMENT
HORIZONTALPOSITION [ 15]
VERTICALPOSITION [ q 5]
CLOCK [ 4]
PHASE [ O]
CLOCK, PHASE
Use [Cursor •Iv] to select an item,
then use [Cursor "9/1_] to adjust the "CLOCK" setting
to stabilize the PC screen and the "Phase" setting to
improve the clarity of the PCscreen.
Cursor <1 Cursor I_
CLOCK
to decrease setting value to increase setting value
PHASE
Press [SETUP] to exit.
Note:
Adjust the "PHASE"setting after the "CLOCK"setting has
beenproperly adjusted.
Youmay not obtain on appropriate screenwith auto
adjustment for some signals. In this case, adjust the settings
manually.
The Horizontal/Vertical position, clock and phase of
the PCscreen are automatically adjusted in a few
seconds.
HORIZONTAL POSITION, VERTICAL POSITION
Use [Cursor •Iv] to select an item,
then use [Cursor </1_] to adjust the PC screen position.
Cursor <1 Cursor I_
HORIZONTAL
to move PC screen left to move PC screen right
POSITION
VERTICAL
to move PC screen down to move PC screen up
POSITION
EN
[]Troubleshooting Guide
If the unit does not perform properly when operated as instructed in this owner's manual, check the following chart
once before calling for service.
No power
No picture or sound
No color
Sound OK, picture poor
Picture distorted
Weak picture
Lines or streaks in picture
Picture blurred
Ghosts in picture
Bars on TV screen
Picture rolls vertically
Different color marks on TV
screen
Poor reception on some
channels
Picture OK, sound poor
No reception of digital signals
i L¸¸
Be sure the power cord is plugged in. ::
If a power failure occurs, unplug the power cord for 30 minutes to allow the unit to
reset itself.
Check if the power is on,
Check the outlet connection,
Check the antenna or cable connection to the main unit,
When the outside antenna is used, check the wire condition and connection,
View other TV channels, The problem might be limited to the broadcasting station,
Turn off the power and wait for about 1 minute, then turn it on again,
Check the antenna or cable connection to the main unit,
When the outside antenna is used, check the wire condition and connection,
View other TV channels, The problem might be limited to the broadcasting station,
Adjust the"COLOR" in the main menu,
Check the antenna or cable connection to the main unit,
When the outside antenna is used, check the wire condition and connection,
Electrical interference from nearby appliances may affect picture quality,
Adjust"CONTRAST"and "BRIGHTNESS" in the main menu,
View other TV channels, The problem might be limited to the broadcasting station,
When the outside antenna is used, check the wire condition and connection,
View other TV channels, The problem might be limited to the broadcasting station.
Check the antenna or cable connection to the main unit,
When the outside antenna is used, check the wire condition and connection,
Adjust"CONTRAST"and "BRIGHTNESS" in the main menu,
View other TV channels, The problem might be limited to the broadcasting station, :
When the outside antenna is used, check the wire condition and connection,
Electrical interference from nearby appliances may affect picture quality,
View other TV channels, The problem might be limited to the broadcasting station.
When the outside antenna is used, check the wire condition and connection.
View other TV channels. The problem might be limited to the broadcasting station.
Check the antenna or cable connection to the main unit.
When the outside antenna is used, check the wire condition and connection.
Electrical interference from nearby appliances may affect picture quality.
View other TV channels. The problem might be limited to the broadcasting station.
When the outside antenna is used, check the wire condition and connection.
Electrical interference from nearby appliances may affect picture quality.
When the outside antenna is used, check the wire condition and connection.
Electrical interference from nearby appliances may affect picture quality.
View other TV channels. The problem might be limited to the broadcasting station.
Move the unit away from nearby electric appliances. Turn off the power and wait
30 minutes before turning it back on.
View other TV channels. The problem might be limited to the broadcasting station.
Check the antenna or cable connection to the main unit.
When the outside antenna is used, check the wire condition and connection.
Electrical interference from nearby appliances may affect picture quality.
View other TV channels. The problem might be limited to the broadcasting station.
Make sure auto channel scan has been completed. (Refer to "Auto Channel Scan"
on page 12.)
Auto channel scan must be completed when you set up the unit for the first time
or move it to a location where previously unavailable channels are broadcast.
The selected channel may not be broadcasting.
When auto channel scan is interrupted and not completed, some channels will not
be received. Make sure to complete. (Refer to "Auto Channel Scan" on page 12.)
EN
Theenteredchannelnumber
changesautomatically
Remotecontroldoesnotwork
Manydigitalchannelshavealternatechannelnumbers,Theunitchangesthe
numbersautomaticallytotheonessignifyingthebroadcastingstations,Theseare
thenumbersusedforanalogbroadcasts,
•Checktheantennaorcableconnectiontothemainunit,
•Checkthebatteriesoftheremotecontrol,
•Checkifthereisanobstaclebetweentheinfraredsensorwindowandtheremote
control,
•Testthesignaloutput,IfOK,thenpossibleinfraredsensortrouble.
(Referto"IRSignalCheck"onpage28.)
•Aimtheremotecontroldirectlyattheinfraredsensorwindowonthefrontoftheunit,
Reducethedistancetotheunit,
Re-insertthebatterieswiththeirpolarities(+/-signs)asindicated,
•Whenthereisaninfrared-equippeddevicesuchasPCnearthisunit,itmay
interrupttheremotecontrolsignalofthisunit,
Movetheinfrared-equippeddeviceawayfromthisunit,changetheangleofthe
infraredsensororturnofftheinfraredcommunicationfunction,
Problems with Closed Caption Feature
Misspelled captions are Closed captioning production companies may broadcast programs without
displayed, correcting the misspelling in a live broadcast,
Captions are not entirely Captions that are delayed a few seconds behind the actual dialogue are common
displayed, or captions are for live broadcasts, Most captioning production companies can display a dialogue
delayed behind the dialogue, to a maximum of 220 words per minute. If a dialogue exceeds that rate, selective
editing is used to insure that the captions remain up-to-date with the current TV
screen dialogue,
Captions are displayed as a Interference from buildings or weather conditions may cause captioning to be
white box. incomplete,
No caption is displayed in the Broadcasting station may shorten the program to insert advertisement, The closed
closed caption-supported caption decoder cannot read the information of the shortened program,
program,
No caption is displayed The videotape may be illegally copied, or the caption signal might not have been
when playing the videotape read during copying.
containing captions.
Black box is displayed in the The text mode is selected for caption, Select "CAPTION I ","CAPTION 2" or "OFF".
TV screen.
Note:
TheLCDpanel is manufactured toprovide many yearsof usefullife. Occasionally afew non active pixels may appear as a fixedpain tof
blue, green or red. Thisis not to be considered a defect in the LCDscreen.
Some functions are not available in specific modes,but this isnot a malfunction. Read the description in this owner's manual for more
details on correct operations.
[] Maintenance
_1 [il,'_
Wipethe front panelandother exteriorsurfaces0fthe unit withasoft
clothimmersedin lukewarmwater andwrung dry.
Neveruseasolventoralcohol.Donotsprayinsecticideliquid nearthe unit.
Suchchemicalsmaycausedamageanddiscolorationto theexposedsurfaces.
Wipethepanel0fthe unitwith asoft cloth.Beforecleaningthepanel,
disconnectthe powercord.
Shouldyour unit becomeinoperative,donottry to correctthe problem
yourself.Therearenouserserviceablepartsinside.Turnoffthe unit,
unplug thepowercordandcall ourtoll free customersupport linefoundon
the coverofthis manualto locateanauthorized servicecenter.
If theremotecontrol isnotworkingproperly,youcanuseanAMradioor
digitalcamera(includingacellular phonewithbuilt-incamera)toseeif it
issendingoutan infraredsignal.
With an AM radio:
TunetheAMradiostation toa non-broadcasting _._
frequency.Pointthe remotecontroltowardsit,
pushany buttonandlisten.Ifthe soundfromthe f
radioflutters,it isreceivingthe remotecontrol's
infraredsignal.
With a digital camera
(including built-in cell phone cameras):
Pointadigitalcameratowardstheremotecontrol.
Pushanybuttonontheremotecontrolandlook
throughthe digitalcamera.Ifthe infraredlight
appearsthroughthe camera,the remotecontrolis
working.
EN
tTGIossary
ATSC Component Video
Acronym that stands for Advanced This isavideo signalformat that conveys
Television Systems Committee and the eachof 3principal colorsof light (red,blue
name of the digital broadcasting standards andgreen) through different signal linesThis
Aspect Ratio
The width of aTVscreen relative to its
height Conventional TVs are 4:3 (in other
words, theTV screen is almost square);
widescreen models are 16:9(the TV screen
is almost twice aswide as its height)
NTSC
Acronym that stands for National Television
Systems Committee and the name of the
current analog broadcasting standards
allows the viewers to experience picture colors Password
as original as it is.There are several signal
formats, including Y/ Pb / Pr and Y / Cb / Cc
Dolby Digital
The system developed by Dolby Laboratories
to compress digital sound It offers stereo
sound (2oh) or multi-channel audio
HDTV (high definition TV)
Ultimate digital format that produces high
resolution and high picture quality
i71_
[] Other Specifications
Terminals:
Antennainput: VHF/UHF/CATV 75fl unbalanced(F-type)
S-videoinput: Mini DIN4-pinjackx1 Y:lVp-p (75Q)
C:286mVp-p(75fl)
Videoinput: RCAjackx1 1Vp-p(7S_))
Audioinput: RCAjackx4 2Vrms
Componentvideoinput:
RCAjackx3
PCinput: DSub15pinx I (RGB)
Y: IVp-p (7Sfl)
Pb:7O0mVpp (75_)
Pr:7OOmVp-p(75_)
[] Cable Channel Designations
Ifyousubscribeto cableTV,the channelsaredisplayedas1-135.Cablecompaniesoftendesignatechannelswithlettersorletter-numbercombinations.
Pleasecheckwithyourlocalcablecompany.Thefollowingisachartof commoncablechanneldesignations.
_A
TVDispEay 1 2 3 4 5 6 7 8 9 10 11 12 13 14 15 16 17 18 19 20 21
w÷5 w+6
TVDisplay 22 23 24 25 26 27 28 29 30 31 32 33 34 35 36 37 38 39 40 41 42
TVDJspEay 43 44 45 46 47 48 49 50 51 52 53 54 55 56 57 58 59 60 61 62 63
W+41
TVDispEay64 65 66 67 68 69 70 71 72 73 74 75 76 77 78 79 80 81 82 83 84
TVDispEay 85 86 87 88 89 90 91 92 93 94 95 96 97 98 99 100 101 102 103 104 105
TVDispEay 106 107 108 109 110 111 112 113 114 115 116 117 118 119 120 121 122 123 124 125 126
Minijack o3.Smmx 1(audio)
Coaxialdigital audiooutput:
RCAjackxl 500mVp-p(75_)
Headphone: % inches (3.Smm)
Remote control: Digitalencodedinfraredlightsystem
Operating temperature:
41°F(5°C)to 104°F(4O°C)
Power requirements:
120VAC+/I0%, 6OHz+/- 0.5%
Power consumption (maximum):
55W
LCD: 19incheswideXGApluspanel
Dimensions: <without stand> <with stand>
H:14.4inches(364mm) H:16.0inches(404.Smm)
W:lg.3inches(49Omm) w:lg.3inches(490mm)
D:3.7inches(93ram) D:7.7inches (194.5mm)
Weight: 102 Ibs. (4.6kg)
EN
Designsandspecificationsaresubjecttochangewithoutnoticeand
without ourlegalobligation.
Ifthere isadiscrepancybetween languages,the default languagewill
beEnglish.
[] General Specifications
TV format: ATSC/ NTSC-MTVstandard
Closed caption system:
§15.122/FCC(digitalCO) §15.119/FCC(anal0gCC)
Channel coverage (ATSC/NTSC):
Terrestrial VHF: 2~13 UHF:14~69
CATV 2~13,A~W, W+1~W+94 (analogW+1~W+84),
A-S~A-I, SA
Tuning system: Channelfrequencysynthesizedtuning system
Channel access: Directaccesskeyboard,
Programmablescan,andupldown
[] Electrical Specification
Sound output: 1W,8flx2
TVDisplay 127 128 129 130 131 132 133 134 135
ii !!i,i_iii
i i ¸
iiiii!i_
A stored 4-digit number that allows access
to parental control features.
SAP (secondary audio program)
Second-audio channel delivered separately
from main-audio channel.This audio channel is
used as an alternate in bilingual broadcasting.
S-video
Offers higher quality inqages by delivering
each signal, color (c) and luminance (y)
independently of each other through
separate cables.
SYLVANIA
LIMITED WARRANTY
FUNAI CORR will repair this product, free of charge in the USA in the event of defect in materials or
workmanship as follows:
DURATION:
PARTS: FUNAI CORP.will provide parts to replace defective parts without charge for one (1) year
from the date of original retail purchase. Certain parts and LCD image burn-in are excluded
from this warranty.
LABOR: FUNAI CORP.will provide the labor without charge for a period of ninety (90) days from the
date of original retail purchase.
LIMITS AND EXCLUSIONS:
THIS WARRANTY IS EXTENDED ONLYTOTHE ORIGINAL RETAIL PURCHASER. A PURCHASE RECEIPT OR
OTHER PROOF OF ORIGINAL RETAIL PURCHASE WILL BE REQUIRED TOGETHER WITH THE PRODUCTTO
OBTAIN SERVICE UNDER THIS WARRANTY.
This warranty shall not be extended to any other person or transferee.
This warranty is void and of no effect if any serial numbers on the product are altered, replaced, defaced,
missing or if service was attempted by an unauthorized service center.This limited warranty does not
apply to any product not purchased and used in the United States.
This warranty only covers failures due to defects in material or workmanship which occur during
normal use. It does not cover damage which occurs in shipment, or failures which are caused by repairs,
alterations or products not supplied by FUNAI CORP.,or damage, which results from accident, misuse,
abuse, mishandling, misapplication, alteration, faulty installation, improper maintenance, commercial use
such as hotel, rental or office use of this product, or damage which results from fire, flood, lightning or
other acts of God.
THIS WARRANTY DOES NOT COVER PACKING MATERIALS, ANY ACCESSORIES(EXCEPT REMOTE CONTROL),
ANY COSMETIC PARTS,COMPLETE ASSEMBLY PARTS, DEMO OR FLOOR MODELS.
FUNAI CORR AND ITS REPRESENTATIVESOR AGENTS SHALL IN NO EVENT BELIABLE FOR ANY GENERAL,
INDIRECT OR CONSEQUENTIAL DAMAGES ARISING OUT OF OR OCCASIONED BYTHE USEOF OR THE
INABILITY TO USETHIS PRODUCT. THIS WARRANTY IS MADE IN LIEU OF ALL OTHER WARRANTIES, EXPRESS
OR IMPLIED, AND OF ALL OTHER LIABILITIES ON THE PART OF FUNAI, ALL OTHER WARRANTIES INCLUDING
THE WARRANTY OF MERCHANTABILITY AND FITNESS FOR A PARTICULAR PURPOSE, ARE HEREBY
DISCLAIMED BY FUNAI AND ITS REPRESENTATIVESIN THE UNITED STATES.
ALL WARRANTY INSPECTIONS AND REPAIRSMUST BE PERFORMED BYAN AUTHORIZED SERVICECENTER.
THIS WARRANTY ISONLY VALID WHEN THE UNIT ISCARRIED-IN TO AN AUTHORIZED SERVICECENTER.
THE PRODUCT MUST BEACCOMPANIED BYA COPY OF THE ORIGINAL RETAIL PURCHASE RECEIPT.IF NO
PROOF OF PURCHASE ISATTACHED, THE WARRANTY WILL NOT BE HONORED AND REPAIRCOSTSWILL BE
CHARGED.
IMPORTANT:
THIS LIMITED WARRANTY GIVES YOU SPECIFIC LEGAL RIGHTS. YOU MAY HAVE OTHER RIGHTS THAT VARY
FROM STATETO STATE.IF,AT ANYTIME DURING THE WARRANTY PERIOD, YOU ARE UNABLE TO OBTAIN
SATISFACTION WITH THE REPAIROF THIS PRODUCT, PLEASECONTACT FUNAI CORP.
ATTENTION:
FUNAI CORR RESERVESTHE RIGHT TO MODIFY ANY DESIGN OF THIS PRODUCT
WITHOUT PRIOR NOTICE.
WARRANTY STATEMENT REGARDING NON AUTHORIZED REPAIRS:
To obtain warranty service, you must take the product, or deliver the product freight prepaid, in either its
original packaging or packaging affording an equal degree of protection, to any AUTHORIZED SERVICE
CENTER. FUNAI CORP.will not reimburse you for any service done by unauthorized service providers
without prior written approval.
To locate your nearest AUTHORIZED SERVICE CENTER or for general service inquiries,
please contact us at:
FUNAI CORPORATION
Customer Service
Tel : 1-800-968-3429
www.SylvaniaConsu merElectronics.com
19900 Van Ness Avenue, Torrance, CA 90501
Printed in China A81N7UH / A81N2UH
1EMN22419A *'_'**
ConPantalla irT_evisi6n Dinl
-'--,.,,_e_9pulga_
Manual del USuar
LCI gSSL8
AYUDA?
LLAME AL TELEFONO GRATUTITO!
1-800-968-3429
VISITE NUESTRO SlTIO WEB EN
www.SylvaniaConsumerElectronics.com
El modelo y el numero de serie de esta unidad se pueden encontrar
en la caja. Debera anotar y guardar el modelo y el nOmero de serie
para consultarlos, si los necesita, en el futuro.
Nomero de modelo:
Nomero de serie:
[] Precauciones
ADVERTENCIA: PARAREDUClRELRIESGODEQUESEPRODUZCAUNINCENDIO0 SEREClBAUNADESCARGA
EL¢CTRICA,NOEXPONGAESTEAPARATOA LALLUVlANIA LA HUMEDAD.
CAUTION
AVISO'PARAREDUCIRELRIESGODESUFRIRUNADESCARGAELI_CTRICA
NOQUITELACUBIERTA(0 ELPANELPOSTERIOR).ENELINTERIORDEL
APARATONOHAYPIEZASQUEDEBAMANIPULARELUSUARIO.SOLICITEEL
El simbolo del rayo con punta de flecha, en el interior de un
_lk tri_ngulo equil_tero, tiene la finalidad de avisar al usuado
de la presencia de"tensi6n peligrosa"dentro de la caja del
aparato que podrfa ser de suficiente intensidad como para
constituir un desgo para las personas en caso de que _stas
recibiesen una descarga el_ctrica.
,_EI signo de exclamaci6n dentro de un tri_ngulo equil_tero
tiene la finalidad de avisar al usuario de la presencia de
material impreso que acompaffa alaparato.
instruccionesde utilizaci6n y mantenimiento (servicio)enel
SERVlCIODEREPARACIONESALPERSONALDESERVlCIOCUALIFICADO.
La marca de aviso est_ situada en la parte inferior o posterior de la caja.
Importante para su Seguridad
1o LEA LAS INSTRUCCIONES - Deben leerse todas las instrucciones 11o PUESTA A TIERRA O POLARIZACION - Este aparato est_ equipado
de seguridad y de funcionamiento antes de utilizar el aparato.
2o CONSERVE LAS INSTRUCCIONES - Las instrucciones de seguridad
y de funcionamiento deben conservarse para futura consulta.
3o HAGA CASO DE LAS ADVERTENCIAS -Todas las advertencias que
aparezcan en el aparato yen las instrucciones de funcionamiento
deben ser tenidas en cuenta.
4o SIGA LAS INSTRUCCIONES - Deben seguirse todas las
instrucciones de funcionamiento y de uso.
5o LIMPIEZA _Desenchufe este aparato de la toma de pared antes
de su limpieza. No utilice limpiadores liquidos ni limpiadores en
aerosol. Utilice un paffo hOmedo para la limpieza.
EXCEPCION: Un aparato destinado a su servicio interrumpido y
que, por alguna raz6n especiflca, pore emplo la posibilidad de
p6rd da de un c6d go de autor zac 6n para un convert dor de
CATV, no debe ser desenchufado para su limpieza o cualquier
otro fin, puede excluir la referencia a desenchufar el aparato en la
descripci6n de limpieza requerida en el elemento 5.
6o CONEXIONES- No utilice conexiones no recomendadas por el
fabricante del aparato, dado que podrfan provocar riesgos.
7o AGUA Y HUMEDAD - No utilice este aparato cerca de agua, por
ejemplo, cerca de una baffera, un lavabo, un fregadero o una pila
de lavado de ropa, en un suelo hOmedo o cerca de una piscina o
lugares similares.
8o ACCESORIOS - No coloque este aparato
sobre un mueble con ruedas, un soporte,
un trfpode, un soporte vertical o una
mesa inestables. El aparato puede caerse,
provocando lesiones graves a alguien y
serios daffos en el propio aparato. Utilicelo
solamente con un mueble con ruedas,
soporte, tffpode, soporte vertical o mesa
recomendados por el fabricante o vendidos
iunto con el aparato. Cualquier instalaci6n del aparato debe seguir
as instrucciones del fabricante y debe utilizar un accesorio de
montaje recomendado por el fabricante. Elcon junto de aparato
y mueble con ruedas debe moverse con precauci6n. Las paradas
bruscas, la fuerza excesiva o las superficies irregulares pueden provocar
la caida del conjunto de aparato y mueble con ruedas.
9o VENTILACION - El mueble y la parte trasera o inferior del aparato
incluyen ranurasy aberturas para ventilaci6n; para garantizar un
funcionamiento fiable del aparato y para protegerlo de un posible
sobrecalentamiento, dichas aberturas no deben bloquearse ni
taparse. Lasaberturas no deben bloquearse nunca colocando el
aparato sobre una cama, un sof& una alfombra u otra superficie
similar. Este aparato no debe colocarse nunca cerca o encima de
un radiador o una rejilla de aire caliente. Este aparato no debe
colocarse en una instalaci6n empotrada, por ejemplo una librerfa
o estanteffa, a menos que se facilite la ventilaci6n adecuada o que
se hayan seguido las instrucciones del fabricante.
1_o FUENTES DE ALIMENTACION - Este aparato debe utilizarse
solamente con el tipo de fuente de alimentaci6n indicada en la
etiqueta de f_brica. Si no est_ seguro del tipo de suministro de
alimentaci6n el_ctrica de su hogar, consulte con el distribuidor
de su aparato o con la empresa el_ctrica local. Para aparatos
destinados afuncionar con alimentaci6n por pilas u otras fuentes,
consulte las instrucciones de funcionamiento.
ES
con un enchufe de Ifnea de corriente alterna polarizada (un
enchufe con un contacto piano mas ancho que el otro). Este
enchufe encajara en la toma de corriente solamente en un sentido.
Esto es una caracteffstica de seguridad. Si no puede insertar el
enchufe totalmente en la toma, intente invertir la posici6n del
enchufe. Si el enchufe sigue sin enca ar, p6ngase en contacto con
un electr c sta para sust tu r su toma obsoleta. No subest me la
finalidad de seguridad del enchufe polarizado.
12o PROTECCION DEL CABLE DE ALIMENTACION - Los cables de
alimentaci6n el6ctrica deben extenderse de manera que resulte
improbable que nadie los pise o que queden pinzados por
elementos colocados encima o contra ellos, prestando especial
atenci6n a enchufes de los cables, sus tomas de corriente y su
punto de salida del aparato.
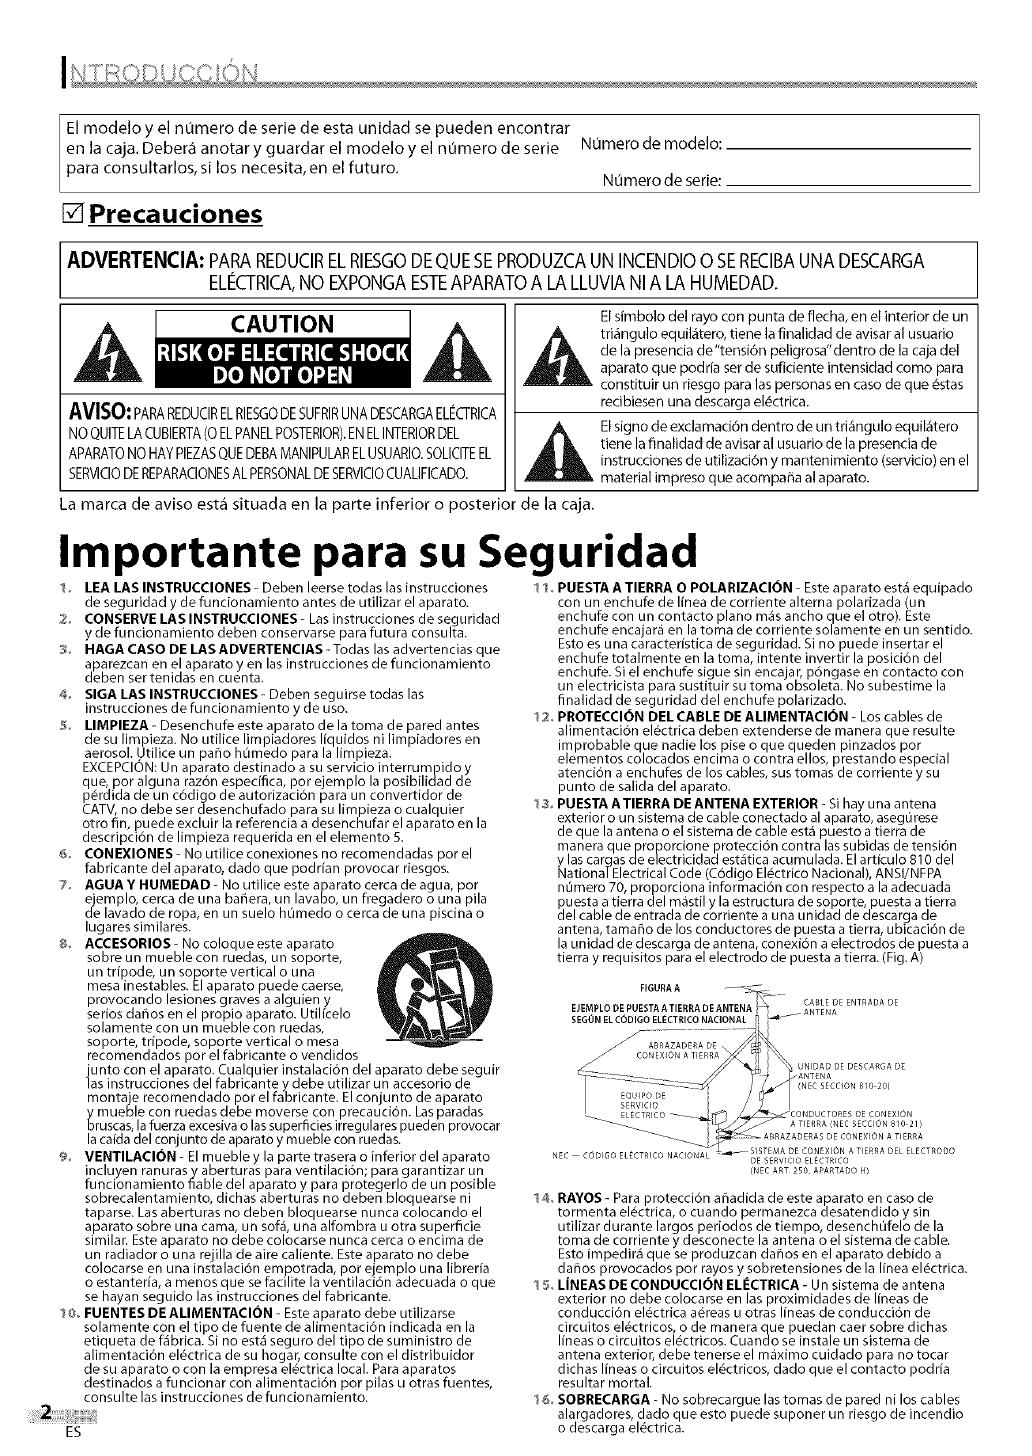
13o PUESTA ATIERRA DE ANTENA EXTERIOR - Si hay una antena
exterior o un sistema de cable conectado al aparato, asegOrese
de que la antena o el sistema de cable est_ puesto a tierra de
manera que proporcione protecci6n contra las subidas de tensi6n
ylas cargas de electricidad est_tica acumulada. Elarticulo 810 del
Nationa/Electrical Code (C6digo El_ctrico Nacional), ANSI/NFPA
nOmero 70, proporciona informaci6n con respecto a la adecuada
c_Uestaa tierra del mastil y la estructura de soporte, puesta atierra
el cable de entrada de corriente a una unidad de descarga de
antena, tamaffo de los conductores de puesta atierra, ubicaci6n de
la unidad de descarga de antena, conexi6n a electrodos de puesta a
tierra y requisitos para el electrodo de puesta a tierra. (Fig. A)
EjEMPLO DE PUEIs::RA:I:RRA DEANT_ENA_ _-"
SEGON EL CODIGO ELECTRICO NACIONAL
(NEC SECCION 810 20)
CONDUCTORES DE CONEXION
A TIERRA (NEC SECCION 810 21)
NEC CODIGO ELECTRICO NACIONA
18o RAYOS - Para protecci6n affadida de este aparato en caso de
tormenta el_ctrica, o cuando permanezca desatendido y sin
utilizar durante largos periodos de tiempo, desenchOfelo de la
toma de corriente y desconecte la antena o el sistema de cable.
Esto impedir_ que se produzcan daffos en el aparato debido a
daffos provocados por rayos y sobretensiones de la linea el_ctrica.
15o LINEAS DE CONDUCCION ELI_CTRICA - Un sistema de antena
exterior no debe colocarse en las proximidades de lineas de
conducci6n el_ctrica a_reas u otras lineas de conducci6n de
circuitos el_ctricos, o de manera que puedan caer sobre dichas
lineas o circuitos el_ctricos. Cuando se instale un sistema de
antena exterior, debe tenerse el maximo cuidado para no tocar
dichas lineas o circuitos el_ctricos, dado que el contacto podria
resultar mortal.
16o SOBRECARGA - No sobrecargue las tomas de pared ni los cables
alargadores, dado que esto puede suponer un riesgo de incendio
o descarga el_ctrica.
7ENTRADA DE OBJETOS Y LIQUIDOS - No fuerce la entrada de
ob etos de ningOn tipo en el interior de este aparato a trav_s de sus
aberturas, dado que pueden tocar puntos peligrosos de tensi6n
o provocar un cortocircuito, Io cual podfia dar lugar a incendio o
descarga el_ctrica.
Nunca derrame liquidos de ningOn tipo sobre el aparato.
18o REPARACION - No intente reparar usted mismo este aparato, ya
que el hecho de abrir o extraer las cubiertas puede exponerle a
tensi6n peligrosa u otros riesgos. De e toda reparaci6n en manos
de personal de serv c o t_cn co cual ficado.
19o DAI_IOS QUE EXIGEN UNA REPARACION - Desenchufe este
aparato de la toma de pared y II_velo a un servicio de reparaci6n
cualificado en las situaciones siguientes:
a. Cuando el cable o el enchufe de distribuci6n de corriente est_
daffado o desgastado.
b. Si se ha derramado Ifquido o han cafdo objetos en el interior del
aparato.
c. Si el aparato ha estado expuesto a Iluvia o agua.
d. Si el aparato no funciona normalmente cuando se siguen
las instrucciones de funcionamiento. Ajuste Onicamente
los controles a los que se refieran las instrucciones de
funcionamiento, dado que el ajuste inadecuado de otros
controles puede provocar daffos y a menudo exigir_ una gran
cantidad de traba o por parte de un t_cnico cualificado para que
el aparato pueda volver a func onar normalmente.
e. Si el aparato se ha caido o ha sufrido cualquier tipo de daffo.
f. Cuando el aparato deje de funcionar con normalidad, esto indica
que necesita una reparaci6n.
20° PIEZAS DE REPUESTO - Cuando se necesiten piezas de repuesto,
asegOrese de que el personal de servicio t_cnico utiliza piezas
de repuesto especificadas por el fabricante y de las mismas
caracterfsticas que la pieza original.
Las sustituciones no autorizadas pueden provocar incendio,
descarga el_ctrica, lesiones personales u otros riesgos.
21o COMPROBACION DE SEGURIDAD - AI finalizar cualquier servicio
o reparaci6n de este aparato, pida al personal de servicio t_cnico
que realice unas comprobaciones de seguridad de rutina para
determinar que elaparato esta en condiciones correctas de
funcionamiento.
22 CALOR - Este aparato debe situarse lejos de fuentes de calor tales
como radiadores, re illas de aire caliente, estufas u otros productos
nclu dos ampl ficaclores em sores de calor.
LA LUZ (_) DE LA LCD CONTIENE MERCURIC), DESHAGASE DE ELLA CUMPLIENDO LA LEY LOCAL, ESTATAL O FEDERAL•
CUIDADO" Para evitar la descarga el_ctrica, haga coincidir el contacto ancho del enchufe con la ranura ancha e
inserte firmemente.
ADVERTENCIA DE I.A FCC
Este aparato puede generar o utilizar energfa radioelectrica. Los cambios o las rnodificaciones que se hagan
en este aparato podr_n causar interferencias a menos que estos sean aprobados expresamente en este
manual. El usuario podra perder la autorizaci6n que tiene para utilizar este aparato si hace alg0n cambio o
modificaci6n que no haya sido autorizado.
INTERFERENCIA DE RADIO Y TV
iliii
Este aparato ha sido probado y ha demostrado cumplir con los limites existentes para los dispositivos digitales de la Clase B, de
conformidad con el Apartado 15 de las Normas de la FCC. Este aparato genera, utiliza y puede radiar energfa radioelectdca, y, si
no se instala y utiliza de acuerdo con las instrucciones, puede causar interferendas perjudidales en las comunicaciones por radio.
Sin embargo, no existen garantfas de que no se produzcan intefferencias en una instalaci6n particular. Si este aparato causa .....
interferencias perjudiciales en la recepci6n de la radio o la televisi6n, Io que se puede determinar apagando y luego encendiendo
el aparato, al usuario se le recomienda intentar eliminar la interferencia tomando una, o m_s, de las medidas siguientes:
1) Cambie la orientaci6n y la ubicaci6n de la antena de recepci6n.
2) Aumente la separaci6n entre el aparato y el receptor.
3) Conecte el aparato en una toma de corriente o drcuito que sean diferentes de aquellos a los que esta conectado el receptor.
4) Consulte a su concesionario o t_cnico en radio/TV con experiencia para solicitar su ayuda.
IEsteaparato digital de la clase B cumple con la norma canadiense ICES-O03.
Nota para el instalador del sistema CATV:
Esta recordatorio se facilita para Ilamar la atenciOn del instMador del sistema CATV sobre el Artfculo 820-40 de la NEC,que
proporciona pautas para una apropiada puesta a tierra, yen particular especifica que la toma de tierra del cable debe estar
conectada M sistema de puesta _ tierra del edificio Io mds cerca posible de! punto de entrada de! cable.
CO/OCACION Y MANEJO
No instale la unidad expuesta a la luz solar directa, cerca de campos magneticos o en lugares expuestos al polvo o a vibraciones fuertes.
Evite colocar la unidad donde se produzcan cambios extremos de temperatura.
Instale la unidad en una posici6n horizontal y estable. No ponga nada directamente encima o debajo de la unidad. Dependiendo de los
dispositivos externos, es posible que se produzcan ruidos y alteraciones en la imagen y/o sonido si la unidad se coloca demasiado cerca
de ellos. En este caso, deje un buen espacio entre los dispositivos externos y la unidad.
Dependiendo del medio ambiente, la temperatura de esta unidad puede aumentar un poco, pero esto no indica ningOn fallo de
funcionamiento.
PARA EVITAR PEI.IGROS DE DESCARGA EI.ECTRICA O INCENDIO
No maneje el cable de alimentaci6n con las manos mojadas.
No tire del propio cable cuando Io desconecte de una toma de CA. Sujete la clavija y tire de ella.
No meta sus dedos ni otros objetos en la unidad.
NOTA ACERCA DEL RECICLADO
Los materiales de embalaje de esta unidad son reciclables y pueden volver a utilizarse. Disponga de ellos seg0n los
reglamentos de reciclado locales.
Las baterias y las pilas nunca deberan tirarse a la basura ni incinerarse, sino que se deber_ disponer de elias segOn
los reglamentos locales relacionados con la basura quimica.
ES
[] Accesorios Suministrados
manual delusuario
(1EMN22419A)
mando a distancia
(NF604UD)
pilas
(AAx 2)
tornillo phillips para
enganchar el soporte x 2
(FPH34140)
Si necesita cambiar estos accesorios, consulte el n0mero de pieza que aparece junto a los ilustraciones y Ilame a
nuestro tel@fono de atenci6n al cliente, que encontrar_ en la portada de este manual.
Seg0n su sistema de antena, puede necesitar tipos diferentes de combinadores (mezcladores) o separadores
(divisores). Para obtener estos elementos, acuda a su establecimiento de electr6nica local.
[] Conectar el Soporte
Tiene que poner el soporte a la unidad para que se muestre recta. Compruebe que la porte trasera y la delantera del
soporte coinciden en la direcci6n apropiada.
De la vueha a la unidad principal y
sitOela sobre una mesa que tengan
un tejido suave encima. Compruebe
que no daF_ala pantalla.
2 Introduzca el soporte del todo en 3
la unidad principal lentamente.
Compruebe que el cable de
alimentaci6n de CA no est@ entre
el soporte y la unidad.
Ponga tornillos phillips en los
dos agujeros con rosca con
un destornillador y apriete
firmemente.
Nota:
AI poner el soporte, compruebe que todos los tornillos estdn bien apretados. Si el soporte no estd bien puesto, podrfa hater que se caiga la
unidad con el resultado de heridas osf corr;o do5os a lo unidad.
Asegdrese de utilizar una mesa que pueda soportar el peso de la unidad y que sea mds grande que la unidad.
Asegdlrese de que la mesa se encuentra en posici6n estable.
[] Simbolos Utilizados en este Manual
Esta es la descripci6n de los simbolos utilizados en
este manual, La descripci6n se refiere a:
: Funcionamiento de TV digital
: Funcionamiento de TV anal6gica
Si no aparece ninguno de los simbolos bajo el
encabezamiento de funci6n, el funcionamiento es
aplicable a ambos.
[] Informaci6n sobre Marcas Registradas
Fabricado bajo licencia de Dolby Laboratories."Dolby"
y el simbolo de la doble D son marcas comerciales de
Dolby Laboratories,
Los Productos que han conseguido el ENERGYSTAR®
est_n disehados para proteger el medio ambiente
a trav_s de una mejor eficiencia en el consumo de
energia,
[] Base Inclinable
Puede ajustar la base para cambiar el _ngulo del
televisor (-3° a 8°).
i
8 °
ES
[] Caracteristicas [] Contenido
DTV/TV/CATV
- Puede utilizar su mando adistanda para selecdonar
canales emitidos en formato digital y formato analdgico
convencional. Ademas, los suscriptores de cable pueden
acceder a sus canales de televisidn por cable.
Visualizacidn de Informacidn (solamente DTV)
- Puede visualizar el tftulo, el contenido y otra informacidn
del actual programa DTV en la pantalla del televisor.
Exploracidn Autom_tica de Canales
- Estaunidad explora y memoriza autom_ticamente los
canales disponibles en su zona, eliminando complicados
procedimientos de configuracidn.
V-chip
- Esta funcidn le permite bloquear el acceso de los nihos a
programas inapropiados.
Decodificador de Subtitulos
- Eldecodificador de subtitulos incorporado rnuestra el
texto de la programacidn que contiene subtitulos.
Sintonizador MTS/SAP
- Puede selecdonarse audio desde el mando a distancia.
Funcidn de Apagado Autom_tico
- Si no hay entrada de serial desde el terminal de antena y
no se realiza ninguna operacidn durante 15 minutos, la
unidad se apagara autom_iticamente.
Temporizador de Apagado
- Esta funcidn apagar_ autom_ticamente la unidad auna
hora especificada.
Opciones para Idioma de Pantalla
- Seleccione el idioma que aparecera en la pantalla:
Ingles, Espaflol o Franc_s.
Funcibn de Sonido Est_reo
Sintonizacibn de Frecuencia PLLSintonizada
- Proporciona una seleccidn de canales gratuita y sendlla
y le permite sintonizar directamente con cualquier canal
mediante los botones de numero de canal del mando a
distancia.
Entrada PC
Entrada de Video en Componentes
Entrada de S-video
Entrada AV
Salida de Audio Digital Coaxial
© 2007 Funai Electric Co., Ltd.
Precauciones......................................................... 2
ImportanteparasuSeguridad......................................... 2
AccesoriosSuministrados.............................................. 4
ConectarelSoporte................................................... 4
SimbolosUtilizadosenesteManual.................................... 4
InformacidnsobreMarcasRegistradas.................................. 4
BaseInclinable....................................................... 4
Caracteristicas........................................................ 5
BotnesenelMandoaDistancia........................................ d
InstalacidndelasPilas................................................ d
PaneldeControl...................................................... 7
PanelTrasero........................................................ 7
i
}2:
J_
ConexidnBasica...................................................... 8
ConexidndeDispositivoExtemo........................................ 9
fNCAL ....
ConflguracidnInitial................................................. 11
MenuPrincipal...................................................... 11
ExploracidnAutom_iticadeCanales.................................... 12
SelecciondeIdioma.................................................. 12
P/\R/\ V L/\ T L VS(}N
!
SeleccidndeCanal................................................... 13
AjustedeVelumen.................................................. 13
ParaCambiarentreCadaMode........................................ 13
ParaCambiarelMododeAudio....................................... 14
l"emperizaderdeApagade............................................ 14
InfermacidndePantalla.............................................. lS
ModedeVisualizacidndePantalladelTelevisor......................... 1d
AJUSTE OPC ONAL
Agregar/B0rrarCanales.............................................. 18
AjustedeImagen.................................................... 19
Subtitulos.......................................................... 19
SubtitulosenDI"V.................................................... 20
EstiloD]'VCC......................................................... 21
AjustedeLuzdeFondu............................................... 22
TemperaturadeColor................................................ 22
V-chip.............................................................. 23
AjustesdePC........................................................ 26
S L C;(_)N RO L MAS
GuiadeS01ucidndeProblemas........................................ 27
Mantenimiento..................................................... 28
Glosario............................................................ 29
DenominacionesdeCanalesdeCable.................................. 29
EspecificacionesGenerales............................................ 29
EspecificacidnEl_ctrica............................................... 29
OtrasEspecificaciones................................................ 29
GarantiaLimitada.......................................... Tapatrasera
ii:!_
Todos los derechos reservados. No se permite la reproducci6n total o parcial de este manual, ni su copia, transmisiOn, difusi6n,
transcripcidn, descarga o almacenamiento en ning0n soporte de almacenamiento, en forma alguna o con fin alguno sin la
autorizaci6n expresa y previa pot escrito de Funai. Adem_is, toda distribuci6n comercial no autorizada de este manual o toda
revisi6n del mismo queda estrictamente prohibida.
Lainformaci6n contenida en este documento puede ser objeto de cambios sin previo aviso. Funai se reserva el derecho de
cambiar el contenido de este documento sin la obligacidn de notificar dichos cambios a ninguna persona u organizacidn.
F'UNAIcon el dise_o I'_ es una marca comercial registrada de Funai Electric Co., Ltd y no se puede utilizar en modo alguno sin la
autorizaci6n expresa por escrito de Funai.Todas las restantes marcas comerciales utilizadas en este documento siguen siendo
propiedad exclusiva de sus respectivos propietarios. Nada de Io contenido en este manual debe set entendido como concesi6n,
implfcita o de otto tipo, de cualquier licencia o derecho de uso de cualquiera de las marcas comerciales en 51visualizadas. El uso
indebido de cualquier marca comercial o de cualquier otro contenido de este manual queda estrictamente prohibido. Funai har_i
cumplir energicamente sus derechos de propiedad intelectual dentro de los limites maximos establecidos por la ley.
ES
[] Botnes en el Mando a Distancia
1
3
[] Instalaci6n de las Pilas
1. POWER(p. 11)
Presione para activar y desactivar la
unidad,
2. MUTE D_(p, 13)
Presione para activar y desactivar el
sonido.
3. SLEEP*J(p. 14)
Presione para activar el
temporizador de apagado.
4. Botones num@ricos (p, 13)
•Presioneparaseleccionarlos
canales,
-lENT.
•Presioneparasepararelcanal
menor delcanalmayor.
+100
•Presioneparaseleccionarelcanal
IO0 o superiores,(CATV)
•Presionepara buscarsihay los
canalesmenores en elcanal
mayor actualmenteseleccionado.
(DTV)
5. CH.i/V (p, 13)
Presione para seleccionar los canales
y el modo de entrada extemo.
6. VOL._ / (p. 13)
Presione para ajustar el volumen.
7. ENTER(p. 11)
Presione para decidir el comando
de ajuste cuando aparezca el men0
principal,
8. SETUP(p, 11)
PresioneparavisualizarelmenÙ
principal.
9. _ll_lilV(p. 11)
Presionepara desplazarsepor los
elementos a izquierda/derecha/
arriba/abajo.
10. RETURN _
Presionepara volvera laoperaci6n
de menO anterior.
11. INPUT (p, 13)
Presione para acceder a
dispositivos extemo conectado,
como un reproductor de DVD o
aparato de video (VCR),
Presione para cambiar entre el
modo digital (DTV) y el modo
anal6gico,
12. DISPLAY i (p, 15)
Modo Digital (DTV)
Presione para mostrar la
informaci6n de canal, el tipo de
serial y el ajuste deTV.
Modo Anal6gico (TV)
Presione para mostrar el numero
de canal, el tipo de serial y el
a] uste de TV,
Modo de Entrada Externa
Presione para mostrar el modo
de entrada externa, el tipo de
serial y el ajuste deTV.
13. AUDIO, b(p, 14)
Modo Digital (DTV)
Presione para seleccionar el
idioma de audio,
Modo Anal6gico (TV)
Presione para seleccionar el
modo de audio,
14. SCREEN MODE_P(p, 16)
Presione para seleccionar las
relaciones de aspecto disponibles
para la pantalla del televisor.
15. CH. RECALL © (p, 13)
Presione para volver al canal
anterio.
Instale las pilas (AA x 2) de manera que coincida la polaridad indicada en el interior del compartimento de las pilas del mando
a distancia.
Precauciones Sobre las Pilas:
Aseg_resedeseguir la polaridad correcta segQnIoindicado enet compartimento delaspilas. Unas pilas enposici6n invertida pueden
causar daf_osenel dispositivo.
No mezde diferentes tipos depilas (por ejemplo, alcalinas y de carbono-zine) ni pilas viejas con pilas nuevas.
Siel dispositivo no seva a usarduran teun periodo prolongado de tiempo, quite las pilas para evitar daffos olesionespor posiblesfugas de
laspilas,
No intente reeargar laspilas; podr/an sobrecalentarsey romperse.
ES
[] Panel de Control
[] Panel Trasero
=1
=2
parte lado de
la unidad
6
7
8
-2
parte lado de
la unidad
'4
parte lado de la unidad
,5
'6
.7
1. POWER(p, 11)
Presione pard activar y desactivar la unidad,
2. INPUT SELECT (p. 13)
Presione pard accedera dispositivosexterno
conectado, como un reproductor de DVD o aparato
de video (VCR),
Presione pard decidir el commando de ajuste
cuando aparezca el men&
3. CHANNELA/V (p. 13)
Presione pard seleccionar candles o desplazarse arriba/
abajo por los elementos del menO principal,
4. VOLUME _I (p, 13)
Presione pard ajustar el volumen o pard moverse a
derecha ( _)/izquierda (_) pot los elementos del menÙ
principal ....
S. SETUP (p. 11) .....
Presione para visualizar el menQ principal,
6. ventana del sensor de infrarrojos
Recibe los rayos infrarrojos transmitidos desde el
mando a distancia,
7. indicador de encendido
Se ilumina en modo encendido,
8. indicador de espera
Se ilumina en el modo de espera,
i
-1 1. toma de entrada de PC (p, 10)
Conexi6n del cable VGA pard PC, ....
2.tomadeentradadeaudioparaco°exi ndePC,p,0,
Conexi6n de cable de audio con mini-enchufe pard PC.
3. toma de entrada de antena (p. 8)
Conexi6n de cable coaxial RFpard su antena o caja de
cable/sat61ite,
4. toma de auriculares
Conexi6n de auricular pard escucha personal,
5. toma de entrada de video en componentes y audio (p. 9)
Conexi6n de video en componentes y de audio RCA
pard dispositivos externo.
6. toma de entrada de audio (p, 9)
Conexi6n de audio RCA para dispositivos extemo,
'3 7. toma de entrada de video (p, 10)
Conexi6n de video RCA pard dispositivos externo.
8. toma de entrada de S-video (p. 9)
Conexi6n de S-video pard dispositivos externo,
9. toma de salida de audio digital y coaxial (p, 10)
Conexi6n de audio digital y coaxial pard decodificador
o receptor de audio.
10. cable de alimentaci6n de CA
Con@ctelo a una toma est_ndar de CA pard suministrar
alimentaci6n el@ctrica a esta unidad,
.8
,9
|0
ES
[] Conexi6n B6sica
Enestasecci6nsedescribec6m0conectarlaunidadaunaantena,cajadecable/sat_lite,etc.
Nota:
Aseqdresedeque su antena uotra dispositivo estd conectada correctamente antes deenchufar el cablede alirnentaci6n.
[Conexi6n de Antena]
Conecte el cable coaxial RF de su toma de corriente a la toma de entrada de antena de esta unidad,
p.ej.)
anten_
VHF/UHF _ _
@
@
parte trasera de
la unidad
cable coaxial RF
empresa de
TV por cable
_Una vez completadas las conexiones, encienda la unidad e inicie la configuraci6n inicial.
La exploraci6n de canales es necesaria para que la unidad memorice todos los canales disponibles en su zona,
(Consuhe"Configuraci6n Inicial"en p_gina 1I),
Nota:
Parasu seguridady para evitar daf_osenla unidad, desenchufe elcable coaxial RFdela toma deentrada de antena antes de mover la
unidad.
Siutiliza una antena para recibir televisi6n anal6gica, _sta deber/a funcionar tambi_n para recepci6n deDTV.Las antenas de exterior o de
tejado serdn mds eficacesque lasde versionesdesobremesa.
Paracambiar fdcilmente su fuente de recepci6n entre antena y cable,instale un selector de antena.
Siseconecta directamente al sistema decable,pOngase encontacto con elinstalador de CATV.
[Conexi6n a Caja de Cable o Caja de Sat_lite]
Utilice un cable coaxial RFpara conectar la toma de entrada de antena de la unidad a la toma de salida de antena de la
caja de cable/sat&lite,
p.ej.)
plato de
sat_lite
caja de cable/sat_lite
parte trasera de
la unidad
cable coaxial RF
%os cables necesarios y los m6todos de conexi6n varian segOn la caja de cable/sat_lite,
Para m_s informaci6n, p6ngase en contacto con su proveedor de cable/sat61ite,
ES
[] Conexi6n de Dispositivo Externo
[Conexi6n de Video en Componentes]
La conexi6n de video en componentes ofrece una mejor calidad de imagen para dispositivos de video conectados a la
unidad.
Utilice un cable de video en componentes para conectar la unidad a dispositivos de video extemos equipados con
tomas de salida de video en componentes.
Si se conecta alas tomas de entrada de video en componentes de la unidad, conecte el cable de audio RCA alas
tomas de audio L/R (izquierda/derecha) de VIDE02.
p.ej.)
parte trasera de la unidad
AUDIO OUT
reproductordeDVDconlastomas _l L R ]
de salida de video en componentes
Noto:
Estaunidad acepta sef_alesde vfdeo de480i / 480p / 720p / 1080L
[Conexi6n de S-video]
La conexi6n S-video ofrece una buena calidad de imagen para dispositivos de video conectados a la unidad.
Utilice un cable S-video para conectar la unidad a dispositivos de video externos equipados con toma de salida de
S-video.
Si se conecta a la toma de entrada de S-video de la unidad, conecte el cable de audio RCA alas tomas de audio L/R
(izquierda/derecha) de VIDE01.
p.ej.)
reproductor de DVD
con la toma de salida de S-video
: AUDIO OUT S-VIDEO
; L R ] OUT
parte trasera de la unidad
ii!i!_ii!_
_i!_>i,__
iii_i_ii!!
i!iii>!
Nota:
si seconecta a la toma deentrada de S-videoy a la toma de entrada devfdeo al mismo tiempo, tendrd prioridad la conexi6n S-video.
ES
[Conexi6n de Video]
La conexi6n de video RCA ofrece una calidad normal de imagen para dispositivos de video conectados a la unidad.
Si Io conecta a la toma de entrada de video de la unidad, conecte el cable de audio RCA alas tomas de audio L/R de
VIDE01.
Cuando la toma de audio del dispositivo de video sea monoaural, conecte el cable de audio RCA a la toma de entrada
de audio L (izquierda).
p.ej.)
parte trasera de la unidad
c&mara videojuego
de video
aparato de video
AUDIO OUT VIDEO
/ L R OUT
cable de video RCA
cable de audio RCA
Nota:
si seconecta a la toma deentrada de S-video v a ta toma de entrada devfdeo al mismo tiempo, tendrg prioridad la conexi6n S-video.
[Conexi6n de Salida de Audio Digital (solamente para la emisi6n digital)]
Si conecta esta unidad a un dispositivo de audio digital externo, podr_ disfrutar de audio multicanal, como el sonido de
emisiones digitales de 5+1 canales (5.1ch).
p.ej.)
parte trasera de la unidad
decodificador
Dolby Digital
cable coaxial de audio digital
[Conexion de PC]
Esta unidad est_ equipado con una toma de entrada de PC. Si conecta la unidad a su ordenador, puede utilizarlo como
monitor.
p.ej.)
El cableVGA debe tener
el nOcleo de ferrita.
cableVGA
parte trasera de
la unidad
computadora personal
Note: ]
Porfavor, compre el cable VGAquetenga el n(lcleo deferrita.
ES
[] Configuraci6n Inicial
Estasecci6nleguiar_atray,sdelajusteinitialdelaunidad,queincluyela
selectiondeunidiomaparasusment_sdepantallay'PREA.AUTOCA:',que
exploraymemorizaautom_ticamenteloscanalesvisibles.
Antes de empezar:
Asegtiresedequelaunidadest_conectadaalaantenao alcable,
1 Despu_s de hacer todas las conexiones necesarias,
presione [POWER] para encender la unidad.
Esta operaci6n tardar_ unos momentos.
Utilice [Cursor / V] para seleccionar el idioma de
pantalla entre las opciones de la derecha de la pantalla
del televisor.
(ENGLISH / ESPANOL / FRANC_AIS)
o
_SELECTLANGUAGE ENGLISH
SELECCIONEELIDIOMA ESPANOL
CHOISIRLALANGUE FRANQA]S
SELECT:_,T SET:ENTER
SELECCIONE:A,T AJUSTE:ENTER
CHOIX:_,T VALIDER:ENTER
Aparecer_ en pantalla el menO "INSTALACION INICIAL"
en el paso 3, en el idioma seleccionado despu_s de
presionar [ENTER].
Utilice [Cursor / V] para seleccionar
"PREA. AUTO CA.(TV/DTV)" para canales de televisi6n o
"PREA. AUTO CA.(CATV)" para canales de CATV, y luego
presione [ENTER].
o
-INSTALAC[ONFNIC[AL-
CONECTELAANTENA0 CASLE0
8ATEUTEENESTAUNIDA_I
PREAAUTOCA(T_CW)
PREAAUTOCA(CAW)
Comienza autom_ticamente la exploraci6n y la
memorizaci6n de los canales.
25
PREAAUTOCA(WiDTV)
|
Cuando la exploraci6n y la memorizaci6n han
finalizado, se muestra el canal memorizado m,is bajo
de la emisi6n.
Nora:
Sise conecta directamenteal sistema decable,p6ngase en
contacto con el instalador de CATV.
Sipresiona [POWER] o [SETUP]duran te "PREA.AUTO CA.",
secancetard este ajuste.
Lafunddn de exploraddn automdtica inicial decanales
puede ejecutarse,para TV/DTVo CATV,solamente una
vez.Sideseaexplorar ambos (TV/DTVy CATV),deberd
selecdonar "AJUSTEDECANAL"en elmen dprincipal para
explorar ymemorizar otros canales una vezfinalizado et
preajuste initiaL (Consultela pdgina 12.)
Puedecancelar o salir del mend initial "PREA.AUTO CA."
presionando [SETUP].
Cuando no pueda recibirsening_n canal mediante
"PREA.AUTO CA.",enla pantalla del televisor aparece
"NOHAYSERIALDETV'_
Sinohay entrada desehal desdeel terminal deantena yno se
produce ninguna operacidn durante variossegundos despu@s
deencenderla unidad,aparecerd "SUGERENCIASUTILES"
Sigatasinstruccionesdela pantalla del televisor.Sigatas
instrucdones dela _antalla del televisor.
-$UGERENCIASUTILES-
1 VERIFIOUEANTENA CABLE/ SATELITE
ESTABIENCONECTADO
2 VERIFIGUE"PREAAUTOCA:ESTA
BENAJUSTADO
3 LEALA PAGINAFRONTALDEL MANUAL
DELUSUARIO 0 PANELTRASEROPARA
EL NO TELDEAYUDAALOS
CLIENTES
[] Mend Principal
Enestasecci6nsedescribenlosaspectosgeneralesdel menuprincipal
queaparecealpresionar[SETUP].Param_isdetalles,consultela p_igina
dereferenciadecadaelemento.Elment_principalsecomponedelos
siguienteselementosdeajustedefuncion.
] <M
Presione [SETUP].
p. ej.) modo TV digital
- INSTALAQONTV -
IMAGEN
AJUSTEDECANAL
AJUSTEDEV-CHIP
IDIOMA [ESPA_]OL]
TITULO [OFE]
LUZDE FONDO IRRILLO]
TENPE DECOLOR [NORMAL]
DTVCC
_i:ii;
bO
_ii;_!i:iii
IMAGEN
Puede ajustar la calidad de la imagen.
(Consulte"Ajuste de Imagen"en p,igina 19.)
AJUSTE DE CANAL
Puede explorar autom_ticamente los canales visibles
y eliminar los no deseados.
(Consulte "Exploraci6n Automc_tica de Canales" en
p_gina 12.)
AJUSTE DE V-CHIP
Puede ajustar las limitaciones de visi6n.
(Consulte"V-chip"en p_gina 23.)
IDIOMA
Puede cambiar el idioma (Ingles, Espar_ol, Franc&s)
visualizado en el menu principal.
(Consulte"Selecci6n de Idioma"en p_gina 12.)
T|TULO
Puede cambiar el formato de visualizaci6n para
subtitulos, que muestran el dkilogo de un programa
de televisi6n u otra informaci6n en la pantalla del
televisor.
(Consulte"Subtitulos"en p_gina 19.) .........
ES
LUZ DE FONDO
Puede ajustar el modo de brillo deseado.
(Consulte"Ajuste de Luz de Fondo"en p_gina 22.)
TENPE. DE COLOR
Puede ajustar la,temperatura de color ("NORMAL",
"CALIENTE", "FRIO").
(Consulte"Temperatura de Color"en p_gina 22.)
DTVCC
Adem_s de los subtitulos b_sicos descritos en
la p_gina 18, DTV tiene sus propios subtitulos
denominados DTVCC.
(Consulte"Subtitulos en DTV"en p_gina 20.)
REGLAGE DU PC
Puedo ajustar la posici6n, la estabilidad y la claridad
de la pantalla del PC.
Este menu aparecer_ s61o en modo PC y unicamente
puede ajustarse cuando la unidad detecta la seffal de
entrada de PC.
(Consulte"Ajustes de PC'en p,Sgina 26.)
[] Exploracibn Autom6tica de Canales
Sicambialoscables(porejemplo, entreantenayCAW)osimuevela
unidadaotro lugardespu_sdelajuste inicial, osi recuperauncanalDTV
eliminado,tendr_ querealizarla exploraci6nautom_iticadecanales.
Antes de empezar:
Asegurese de que launidad est_ conectada a la antena o al cable.
1 Presione [SETUP] para visualizar el menO principal.
2 Utilice [Cursor / V] para seleccionar
"AJUSTE DE CANAL", y luego presione [ENTER].
p. ej.) modo TV digital
- ENSTALACI6NTV -
IMAGEN
0 _*AJUSTEBE CANAL
AJUSTEBEV-CHIP
DIOMA [ESPANOq
TITULO [OFF]
LUZDE FONDO [BRILLO]
TENPE DE COLOR [NORMAL]
OWCC
Comienza autom_ticamente la exploraci6n y la
memorizaci6n de los canales.
p. ej.) modo TV digital
D25
PREA AUTO CA (DW)
Cuando la exploraci6n , la memorizaci6n han
finalizado, se muestra el canal memorizado m_s bajo.
Cuando haya seleccionado,
"PREA. AUTO CA. (TV/DTV)", se mostrar_ el canal
anal6gico memorizado m_s bajo cuando la
exploraci6n y la memorizaci6n hayan finalizado.
Cuando no haya ningOn canal anal6gico, se mostrar_
el canal digital memorizado m_s bajo.
Nota:
Siseconecta directamente al sistema decable,p6ngase en
contacto con elinstalador de CATV
Sipresiona [POWER] o[SETUP]duran tela exploration
automdtica decanales, secancelard esteajuste.
Cuando no pueda redbirse ningdn canal mediante la
exploraddn automdtica de canales,en la pantalla del
televisor aparece "NOHAYSENALDETV'_
Elajuste det canal seguardard induso si seproduzca un
carte deenergfa.
Si tiene mends el ingles o en franc_sy necesita en espahol,
presione [SETUP].Utilice [Cursor •/V] para seleccionar
"LANGUAGE"o "LANGAGE':Pmsione[ENTER] para
seleccionar "ESPAZ_IOL':Presione[SETUP] para eliminar el
mend principal
Solamente con respectoal canal digital induso despu@s
de finalizar la exploraci6n, si desenchufa elcable
de alimentaci6n deCA antes deapagar el aparato
presionando [POWER], el ajuste del canal puede perderse.
[] Selecci6n de Idioma
Puedeelegir Ingles,Espa_olo Franc_scomoidiomadepantalla.
1 Presione [SETUP] para visualizar el menu principal.
3 Utilice [Cursor / V] para seleccionar su tipo de
presintonia deseado, y luego presione [ENTER].
p. ej.) modo TV digital
o
-AJUSTEDECANAL-
AGREGARJBORRAR(DT_
_"PREA AUTOCA (DTV)
PREA AUTOCA (TV_DW)
PREA AUTOCA (CAT_
! CAW demofa unos50rain
Cuando tenga una antena a@rea conectada, seleccione
"PREA. AUTO CA. (TV)", "PREA. AUTO CA. (DTV)" o
"PREA. AUTO CA. (TV/DTV)".
Cuando est_ conectado a CATV, seleccione
"PREA. AUTO CA. (CATV)".
Utilice [Cursor• IV] para seleccionar"lDIOMA", y
luego presione [ENTER] repetidamente para cambiar
el ajuste, p. ej.) modo TV digital
- INSTALACIONTV -
IMAGEN
AJUSTEDECANAL
AJUSTEDEV-CHIP
DDMA [ESPANOL]
0 TITULO [OFF]
LUZDE FONDO [BR$LO]
TENPE DECOLOR [NORMAL]
DTVCC
Presione [SETUP] para salir.
ES
[] Seleccidn de Canal [] Ajuste de Volumen
Seleccioneloscanalesutilizando [CH.A / V] o[losbotonesnumericos]. Enestaseccidnsedescribecdmoajustar elvolumen. Tambi_nsedescribe
lafuncidndesilenciamiento,queactivay desactivael sonido.
Utilice [CH.A IV] o [los botones num6ricos] para
seleccionar los canales memorizados
o \_/ o _ _ _&i
Utilizando [los botones num_ricos]
- Cuando seleccione el canal analdgico 12
Utilice[VOL. " / ]para
ustar el volumen de audio.
VOLUMEN 20
IIIIII ..........
La barra de volumen se mostrar_ en la parte inferior i
de la pantalla del televisor cuando ajuste el volumen.
La barra de volumen desaparecer_ autom_ticamente
dentro de unos segundos.
- Cuando seleccione el canal digital 12-I
ENZ
Aseg0rese de presionar [-IENT.] antes de introducir el
numero de canal menor,
Presione [CH. RECALl ©] para volver al canal
anteriormente visualizado.
Cuando seleccione un canal superior a 100,
presione [+100] primero. A continuacidn, utilice
[los botones num_ricos] para presionar los numeros
inferiores de 2 dfgitos.
%1o pueden utilizarse [los botones num_ricos] para
seleccionar los canales sin memorizar.
Acerca de la emisi6n de televisi6n digital:
Con su emisi6n de alta definici6n, [a emisi6n digital
es muy superior a la emisidn anal6gica en su calidad
tanto de imagen como de sonido.
zQu_ es el canal menor?
Mediante una tecnologia de alta compresidn, la
emisidn digital ofrece un servicio que permite el envfo
simult_neo de m01tiples sefiales. Par tanto, puede
seleccionar m_s de un programa par canal mayor, dado
que la tecnologia de emisi6n digital distingue entre
mOltiples canales emitidos par una determinada red.
NTSC [Hora de emisi6n] ATSC
(mode anal6_ (modo digital)
18:00
18:30
19:00
19:30
20:00
20:30
canal mayor canal menor
: cambia autom_ticamente
_:> : cambia manualmente mediante [CH. A/V]
Nota: ..
Aparecerd "SIN SENAL" en la pan talla del televisor una vez
terminada la emisidn del canal menor.
Presione [MUTE D_] para activar y desactivar el sonido,
NUTE
MUDE 20
IIIIII ..........
"MUDE"aparece en la pantalla del televisor durante
unossegundos
i_i!i
Presione nuevamente [MUTE a_<]o utilice [VOL." I ]
para recuperar el volumen original.
i171
1117!1
[] Para Cambiar entre Cada Modo
Puedecambiarf_icilmenteentreDTV(ATSC)yTV(NTSC)oaccedera
dispositivosexterno conel mandoadistanciacuandoest_nconectadosa
unidad
Presione [INPUT] repetidamente para cambiar los
modos de entrada.
INPUT
i
ICO
Para utilizar la toma de entrada de video o de S-video
de la unidad, seleccione "AUXI ".
Para utilizar las tomas de entrada de video en
componentes de la unidad, seleccione "AUX2".
Para utilizar la toma de entrada de PC en la unidad,
seleccione "PC".
No ta:
Cuando carrlbie detmodo analdgico al digital, puede
tardar unpoco en finalizar laseteccidndecanales digitales.
Durante el carrlbio derrlodo serrluestra "ESCANEANDO':
iiiTi:ii:
ES
[] Para Cambiar el Modo de Audio []Temporizador de Apagado
Enestasecci6nsedescribec6m0cambiarelaudioenel m0doanal6gic0y Eltemp0rizadordeapagadopuedeconfigurarseparaapagar
c6m0cambiarel idi0madeaudioenel mododigital, autom_ticamentelaunidaddespu_sdeunperiodoincrementaldetiempo.
Durante la recepci6n de una emisi6n MTS, presione
[AUDIO b] repetidamente para recorrer los canales de
audio disponibles.
AUDIO
MAIN
SAP
MONO
: Emite el audio principal
: Emite un segundo programa de audio
: Emite audio en mono
La visualizaci6n de informaci6n desaparecer5
automSticamente dentro de unos segundos.
1 Presione [AUDIO J_]para visualizar el idioma
actualmente seleccionado y el numero de idiomas
disponibles.
AUDIO
2 Presione [AUDIO J_]repetidamente para recorrer los
idiomas de audio disponibles.
AUDIO
• Los idiomas disponibles difieren segQnla emisi6n.
Semuestra'OTRO"cuando no puede obtenerse el
idioma de audio o si los idiomas obtenidos no son
Ingles,Epa_ol o Franc@s.
• La visualizaci6n de informaci6n desaparecer_
autom_ticamente dentro de unos segundos.
Nota:
Presionando [AUDIO b] nosecontroladispositivos de
audioextemo.
1 Presione [SLEEP _3] para ajustar el temporizador de
apagado.
SLEEP
REPOSAR OFF
La visualizaci6n del temporizador de apagado
aparece en la pantalla del televisor.
Presione [SLEEP _)] repetidamente para cambiar el
tiempo que debe transcurrir hasta el apagado.
SLEEP
REPOSAR 120MIN
Puede preparar su unidad para que se apague
despu@s de transcurrir un periodo de tiempo (de 30 a
120 minutos).
•Cada presi6n de [SLEEP _)] aumentar_ el tiempo en
30 minutos.
Despu@s del ajuste, puede visualizarse el
temporizador de apagado, para su comprobaci6n,
presionando [SLEEP _)].
Para Cancelar el Temporizador de Apagado
Presione [SLEEP _3] repetidamente hasta que aparezca
"REPOSAR OFF"en la pantalla del televisor.
No ta:
La visualizaciOn de ajuste del temporizador de apagado
desaparecer4 autom4ticamente dentro de unos segundos.
• Cuando desconecte la unidad de la toma de CA o cuando
se produzca un fallo de suministro el#ctrico, el ajuste det
temporizador de apagado quedar4 anulado.
ES
©
[] Informacibn de Pantalla
Puedevisualizarel canalactualmenteseleccionadouotrainformaci6n,por
ejemplo el mododeaudio,enla pantalladeltelevisor,
Enel modeanaldgicosevisualizael numerodelcanalactual.
Enel modedigitalsevisualizalainformacidndeemisidndetalladapara
el canalactualcome,perejemplo, eltitulo del programay lasguiasde
programas.
Presione [DISPLAY i].
DISPLAY
CA 25
Se muestra el n0mero del canal actual en la esquina
superior derecha de la pantalla del televisor.
Para borrar la visualizacidn, presione [DISPLAY i]
nuevamente.
Presione [DISPLAY i] repetidamente pare recorrer los
modes de visualizacidn disponibles.
DISPLAY
INFOF
GUf
Informaci6n de Emisi6n
Se muestra la siguiente informaci6n.
1 titulo de programa
2 indicador de calidad de la serial
3 clasificacidn del programa
4 numero de canal
S emisora
6 idioma de audio
(Consulte"Para Combiar el Mode de Audio" en p_gina 14.)
ii!iiii_!
Guia de Programas
Se muestra la guia de programas ariadida a
informacidn de emisidn.
Guia de
programas,
Nora:
Cuando le gufa deprogremas tenga mds de6tfneas, utilice
[Cursor / V] pare desplazarse.
Sevisualize "No seproporciona descripddn." cuando no se
facilita la gufa deprograrnas.
Mientras sevisualize la gufa deprogramas se interrumpe ta
funcidn desubt/tulos.
En el mode de entrada externa, semuestra la siguiente
pantalla;
p. ej.) Cuando se ha conectado un dispositivo externo a la
toma de entrada VIDE01.
Lavisualizaddn deinformaddn desaparecerd
automdticamente dentro deunos segundos cuando los
subtftulos estdn activados.
i iii;!i
ES
[] Modo de Visualizacibn de
Pantalla del Televisor
Losmodosdevisualizaci6ndeltipo3-5puedenseleccionarsecuando
lacadenadeemisoraenviaunaserialdevideo4:3 o 16:9ocuandoun
dispositivoexternoest_conectadoalaunidad.Ypuedenseleccionarse2
tiposdemodosdevisualizaci6nparasefialesdeentradaPC,
Presione [SCREEN MODE _ repetidamente para
cambiar la relaci6n del aspecto del televisor.
SCREEN
MODE
Para sepal de video 4:3
0 0
0 0 >(D (D
o÷ol
!
-1°o o°j
Para sepal de video 16:9
© ©
,,_ : modo digital
=_>: modo de entrada anal6gica/externa
SIDEBAR
Seleccionar para mostrar la imagen 4:3 en su tamar_o
original, Las barras negras aparecen a la derecha ya la
izquierda de la pantalla,
TOTAL
Seleccionar para mostrar la imagen 4:3 para llenar la
pantalla,
CI NE $"aSx_ k _'_d _odo d_,, :_d,_,_r_,_k_/k:_ _x_r_,_
Seleccionar para reducir las barras negras superior e
inferior.
ANCHA
Modo digital."
Seleccionar para mostrar la imagen 4:3 para llenar la
pantalla y encoger la imagen "TOTAL" horizontalmente,
Modo de entrada anal6gica/externa:
Seleccionar para mostrar la imagen 4:3 para llenar la
pantalla y ampliar la imagen "TOTAL" horizontalmente,
ES
,,_ :modo digital
_:> :modo de entrada anal6gica/externa
TOTAL
Seleccionar para mostrar la imagen 16:9 para llenar la
pantalla,
CORTES LATERALS
Seleccionar para mostrar la imagen 16:9 para llenar la
pantalla y ampliar la imagen "TOTAL" horizontalmente,
Los lados izquierdo y derecho de la imagen ser_n
recortados.
ZOOM _"c :>o/ e el rodo de e _t,u:ta a _al6yic iex e _asol_ ne te
Seleccionar para aumentar la imagen 16:9 sin
distorsionar la proporci6n de aspecto.
CINE
Seleccionar para reducir las barras negras superior e
inferior,
AMPL|A #:Ispo_bl el<:>dodee_1:idaasa(6ica,¢xte__asda e te
Seleccionar para reducir las barras negras a los lados
izquierdo y derecho,
Nota:
Seg_n elprograma, esposible queel modo de visualizaci(m
no cambie.
©
ii!iii>!
Para sepal de entrada PC
+40x +0WA
800 x 600 SVGA
1,024 x 768 XGA
Visualizaci6n de una imagen que se extiende
verticalmente sin distorsionar la proporci6n de
aspecto+
Las barras negras aparecen a la derecha y a la izquierda
de la pantalla+
848 x 480 WVGA
1,280 x 720
1,280 x 768 WXGA
1,360 x 768
720 x 400 BIOS
Visualizaci6n de una imagen que se extiende
horizontalmente sin distorsionar la proporci6n de
aspecto.
Las barras negras aparecen en la parte superior e
inferior de la pantalla.
_S
i c>
1,440 x 900 WXGA+
Visualizaci6n de una imagen en su tama_o original.
Note:
Puedecambiar la resoluci6n depantalla desu PC.
ES
[] Agregar/Borrar Canales
Lafunci6ndeagregar/borrarcanaleslepermiteagregarel canalqueno
sehayaagregarmediantelaexploraci6nautombticadecanalesdebido
al estadodelarecepci6nenelajuste initial.Tambi_npuedeeliminarlos
canalesinnecesarios.
I Presione [SETUP] para visualizar el menO principal,
Presione [SETUP] para salir.
2 Utilice [Cursor I V] para seleccionar
"AJUSTE DE CANAU', y luego presione [ENTER],
p. ej.) modo TV digital
o
- INSTALACIONTV -
IMAGEN
_-AJUSTE DE CANAL
AJUSTE DE V-CHIP
IClOMA [ESPANOL]
TITULO [OFF]
LUZ DE FONDO [BRILLO]
TENPE DE GOLOR [NORMAL]
DTVCC
Nora:
ElmenO "AGREGAR/BORRAR(DTV)" o "AGREGAR/BORRAR"
desaparecerd automdticamente dentro deunos segundos.
Enetmodo digital (DTV),podrd agregar oborrar canales
solamente en el canal mayor.
Una vezborrado un canal DTV,no podrd recuperar el canal
sin realizar nuevamente la explorad6n automdtica de
canales.
(Consulte"Exploraddn Automdtka deCanales"enpdqina 12.)
3 Utilice [Cursor I V] para seleccionar
"AGREGAR/BORRAR(DTV)" o "AGREGAR/BORRAR", y
luego presione [ENTER],
p. ej.) modo TV digital
o
-AJUSTEDECANAL-
_"AGREGAR_BORRAR(DTV)
PREA AUTO CA (DT_
PREA AUTO CA (TV_DTV)
PREA AUTO CA (CAW)
! CATVdemoraunos 50rain
4 Seleccione el canal que desea agregar o borrar.
(Consulte'Selecci6n de Canal"en p,_gina 13.)
p. ej.) modo TV digital
D25
AGREGAR_BORRAR:DTV
Utilice [Cursor _I II_] para seleccionar"AGREGAR"o
"BORRAR",
_\_ 0
Para agregar o borrar otros canales, repita los pasos
4-5,
El color del nOmero de canal visualizado en la parte
superior derecha de la pantalla del televisor indica,
- Azul: Se agregar_ el canal seleccionado.
- Rojo: Se borrar_ el canal seleccionado,
ES
[]Ajuste de Imacjen
Puedeajustarel brillo, el contraste,el color,el matizylanitidez.
U
[] Su bt it u Ios
Puedeverlossubtitulos(cc)paraprogramasdetelevision,peliculase
informativos.
Subtituloserefierealtextodedi_logoodescripcionesvisualizadasen
po,,o,,aporoper,ona,conprob,ema,ouditivo .
I Presione [SETUP] para visualizar el men0 principal. I Presione [SETUP] para visualizar el menu principal.
2 Utilice [Cursor / V] para seleccionar"lMAGEN", y
luego presione [ENTER].
p. ej.) modo TV digital
o
- INSTALAC[ONTV -
_" [MAGEN
AJUSTEDECANAL
AJUSTEDEV-CHIP
DIOMA [ESPANOL]
TITULO [OFF]
LUZDE FONCO [BRILLO]
TENP£ DECOLOR [NORMAL]
DTVCC
Utilice [Cursor / V] para seleccionar el tipo de
calidad de imagen que desea ajustar.
Utilice [Cursor /V] para seleccionar'TITULO", y
luego presione [ENTER] repetidamente para cambiar
el ajuste.
p. ej.) modo TV digital
- INSTALACIONTV -
IMAGEN
AJUSTEDECANAL
AJUSTEDEV-CHIP
D[OMA [ESPANOL]
TITULO [OFF]
LUZDE FONDO [BRELLO]
0 TENPE DECOLOR [NORMAL]
CTVCC
iF}
i
Utilice [Cursor <1/1_] para ajustar la calidad.
t_ O
CLARIDAD
CONTRASTE
COLOR
MATIZ
AGUDEZA
Cursor <1
_arareducir elbrillo
_arareducirel contraste
garareducir elcolor
paraagregar rojo
aarasuavizar
Cursor I_
aara aumentar el brillo
aaraaumentar el contrast_
aaraintensificar el color
aara agregar verde
aara aclarar
Presione [SETUP] para salir.
No ta:
La visualizaci6n de a]uste de imagen desaparecerd
automdticamente dentro de unos segundos.
$6Io puede seleccionar "CLARIDAD" o "CONTRASTE" en
modo PC.
Modo de Subtitulos
SUBTIT1 y TEXTO1;
son los servicios primarios de subtitulos y texto.
Los subtitulos o el texto se muestran en el mismo
idioma que el di_logo del programa (hasta 4 lineas de
escritura sobre la pantalla del televisor, sin tapar zonas
relevantes de la imagen).
SU T,T TEXTO ,
est_n raramente disponibles y las emisoras los utilizan
solamente en condiciones espedales, por ejemplo
cuando'SUBTITl" o'TE×TOI" no est_n disponibles.
Hay 3 modos de visualizaci6n segOn los programas:
Modo"Paint-on"; Visualiza inmediatamente en la
pantalla del televisor los caracteres
introducidos.
Modo"Pop-on"; Una vez que los caracteres son
almacenados en memoria, se
muestran todos a la vez.
Modo"Roll-up"; Muestra los caracteres
continuadamente mediante
desplazamiento de lineas (m_ximo
4 lineas).
ES
[] Subtitulos en DTV
Adem_sdelossubtitulos b_isicosdescritosenla p_gina19,DTVtiene sus
propi0ssubtitul0sdenominadosDTVCC.Utiliceestementi paracambiarla
configuraci0ndeDTVCC.
3 Presione [SETUP] para salir, I Presione [SETUP] para visualizar el menO principal.
Nora:
Para mostrar los subtftulos en ta pontolla de su televisor, la
sehal de emisi6n debe contener los dotos de los subtftulos.
No todos los programas y anuncios de TV contienen
subt[tulos o todo tipo de subt[tulos.
Los subt[tulos y textos pueden no coincidir exactamen te con
la voz del televisor
El carnbio de canales puede retrosar los subdtulos unos
segundos.
Ajustar o silendar et volumen puede retrasar los subdtulos
unos segundos.
Pueden utilizarse obreviaciones, s[rnbolos y otros
abreviaturas gramoticales para sincronizar el texto con
la accidn en pantalla. Esto no supone un problema de la
unidad.
Los subdtulos o carocteres de texto no se visualizardn
mientras se muestren el men_ principal o lo visualizad6n de
fundones.
• Si aparece un recuodro negro en la pantalla del televisor,
esto significa que los subdtulos estdn configurados en el
modo texto. Para borrar ese recuadro, seleccione "SUBTIT1"
"SUBTIT2" u "OFF".
• Sila unidad redbe seSales de televisi6n de catidad
defidente, los subt[tulos podrdn contener errores, o es
posible que no aparezcan los subdtulos. Algunas posibles
causas de sehales de calidad deficiente son:
- Ruido de ignici6n de automdviles
- Ruido de motor el_ctrico
- Recepci6n de serial d_bil
- Recepd6n de seSal multiplex (irrldgenes fantasmas o
fluctuaciones en pantalla)
Lo unidad conserva lo configuraddn de subt[tulos si se
produce un torte de suministro el_ctrico.
Cuando lo unidad redbe una seSal de reproduccidn con
efectos especiates (es dedr, d_squedo, cdmara lento e
imagen congelada) del canal de salida de video det VCR
(CA3 o CA4), la unidad podria dejar de mostrar el t[tulo
texto correcto.
2 Utilice [Cursor A IV] para seleccionar'DTVCC", y luego
presione [ENTER].
p, ej,) modo TV digital
o
- INSTALACIONTV -
IMAGEN
AJUSTEDECANAL
AJUSTEDEV-CHIP
DIOMA [ESPANOL]
TITULO [OFF]
LUZDE FONDO [BRILLO]
TENPE DECOLOR [NORMAL]
OTVCC
Utilice [Cursor A IV] para seleccionar
"SERVICIO TITULO", y luego presione [ENTER]
repetidamente para cambiar el ajuste,
-DTVCC -
_- SERVECIOTITULO [OFF]
CONRG USUARID [OFF]
TAMA_OTITULO [MEOIANO]
ESTILOFUENTE [ESTILOI/8]
BOROECARACTER [NINGUNO]
OPACOADELANTE [RELLENA]
COLORADELANTE [BLANCO]
OPACOATRAS [RELLENA]
COLORFONO0 FNEGRO]
SERVICIO TITULO
OFF
SIRVE1-6
Selecci6nelo si no desea
DTVCC. Este es el ajuste
predeterminado.
Seleccione uno de
ellos antes de cambiar
cualquier otro elemento
del menO "TITU LO"
Seleccione "SIRVE1/6" en
circunstancias normales.
Presione [SETUP] para salir,
No ta:
"SERVICIOTITULO"sepuede cambiar dependiendo dela
descripci6n dela ernisi6n.
ES
_c
[] Estilo DTVCC
Puedecambiarelestil0 deDTVCC,por ejempl0fuente,color0tamaff0, etc.
I Presione [SETUP] para visualizar el menu principal.
2 Utilice [Cursor I V] para seleccionar"DTVCC"y luego
presione [ENTER].
p. ej.) modo TV digital
o
- INSTALACIONTV -
IMAGEN
AJUSTEDECANAL
AJUSTEDEV-CHIP
IDIOMA [ESPNdOL]
TITULO [OFF]
LUZDE FONDO [BRILLO]
TENPE DECOLOR [NORMAL]
_"DWCC
3 Utilice [Cursor I V] para seleccionar
"CONFIG. USUARID", y luego presione [ENTER]
repetidamente para ajustarlo en "ON".
Los elementos del recuadro de puntos est,_n
disponibles solamente cuando"CONFIG. USUARID"
est_ en "ON".
o
- DTVCC-
SERVICIOTITULO [SIRVEI '6]
ESTILOFU£NTE [£STILOI/8]
BORD£ CARACTER [NINGUNO]
OPACOADELANTE [RELLENA]
COLORADELANTE [BLANCO]
OPACOATRAS [RELLENA]
Utilice [Cursor I V] para seleccionar un elemento y
luego presione [ENTER] repetidamente para cambiar el
ajuste del elemento.
o
- DTVCC-
SERVIC]OTITULO [SIRVEI '6]
CONRG USUARiD [ON]
_. TAMANOTITULO [MEDIANO]
ESTILOFUENTE [£STILOI/8]
BORCECARACTER [NINGUNO]
OPACOADELANTE [N£LLENA]
COLORADELANTE [BLANCO]
OPACOATRAS [RELLENA]
COLORFONDO ENEGRO]
TAMAI_IO TITULO
El tamaffo de fuente de los subtitulos puede elegirse
entre los siguientes.
ESTILO FUENTE
El estilo de fuente del subtitulo mostrado puede
elegirse entre los siguientes.
8ONCECARACTE.
El tipo de borde del subtitulo mostrado puede
elegirse entre los siguientes.
COLOR ADELANTE, COLOR FONDO
El color de fuente y de fondo del subtitulo rnostrado
puede elegirse entre los siguientes.
OPACO ADELANTE, OPACO ATRAS
La opacidad del texto y del fondo del subtitulo
mostrado puede elegirse entre las siguientes,
TAMAI_IOTITULO MEDIANO, GRANDE,PEQUEg!O
ESTIL01/8 Fuente proporcional utilizada
en la pantalla de menO
ESTIL02/8 A un espacio con remates
ESTIL03/8 Espacio proporcional con
remates
ESTIL04/8 A un espacio con remates
ESTIL05/8 Espacio proporcional sin
rernates
ESTIL06/8 Tipo de fuente informal
ESTIL07/8 Tipo de fuente cursiva
ESTIL08/8 MinQsculas
NINGUNO, ELEVADO, HUNDIDO,
UNIFORME, SOMBRA IZQ., SOMBRA DER
RELLENA, TRANSLUCIDA, DESTELLO
BLANCO, NEGRO, ROJO, VERDE,
AZUL, AMARILLO, MAGENTA, CYAN,
TRANSPARENTE
RELLENA, TRANSLUCIDA, DESTELLO
NEGRO, ROJO, VERDE, AZUL, AMARILLO,
MAGENTA, CYAN, TRANSPARENTE,
BLANCO
ESTILO FUENTE
BORDE CARACTER
OPACO ADELANTE
COLOR ADELANTE
OPACO ATRAS
COLOR FONDO
Presione [SETUP] para salir.
ES
F_Ajuste de Luz de Fondo
Puedeajustarel mododebrillodeseado.
[] Temperatura de Color
Puedeajustarlatemperaturadecolordelapantalladeltelevisor,
1 Presione [SETUP] para visualizar el menu principal. 1 Presione [SETUP] para visualizar el menu principal.
2 Utilice [Cursor /V] para seleccionar"LUZ DE FONDO",
y luego presione [ENTER] repetidamente para cambiar
el ajuste.
p. ej.) modo TV digital
- INSTALAQONTV -
IMAGEN
AJUSTE DECANAL
AJUSTEDEV-CHIP
ICIOMA [ESPANOL]
TITULO [OFF]
LUZDE FONDO [BRILLO]
TENPE DECOLOR [NORMAL]
DWCC
o
Utilice [Cursor• Iv] para seleccionar
"TENPE. DE COLOR", y luego presione [ENTER]
repetidamente para cambiar el ajuste.
p. ej.) modoTV digital
- INSTALACIONTV -
IMAGEN
AJUSTEDECANAL
AJUSTEDEV-CHIP
IDEOMA [ESPAttOL]
TITULO [OFF]
LUZDE FONDO [BR$LO]
'> TENPE [}ECOLOR [NORMAL]
CTVCC
3 Presione [SETUP] para salir.
Presione [SETUP] para salir.
ES
V-chi.l
V-chip lee las clasesde los programas, y niega el accesoa los programas
que exceden el nivel de clasificaci6n establecido. Conesta funci6n, puede
bloquear determinados programas inapropiados para niEos.
ii!iiii_!
I Presione [SETUP] para visualizar el menQ principal.
2 Utilice [Cursor I V] para seleccionar
"AJUSTE DEV-CHIP", y luego presione [ENTER].
p.ej.)modo TV digital
o
- INSTALACIONTV -
IMAGEN
AJUSTEDE CANAL
_"AJUSTEDEV-CHIP
[D]OMA [ESPA_OL]
TITULO [OFF]
LUZDE FONDO [BRILLO]
TENPE DECOLOR [NORMAL]
DWCC
Utilice [los botones Num_ricos] para introducir los
numeros de 4 digitos de su contrasefia.
CODIGODEACCESO
Cuando no haya configurado su contrasefia,
introduzca 0000.
Cuando la contraseEa sea correcta, se muestra el
siguiente menQ de"AJUSTE DE V-CHIP".
Consulte la siguiente descripci6n para ajustar cada elemento.
p. ej.) modo TV digital
A "A. Clase de TV" =>p_gina 23 -AJUSTEDEV-CHIP-
B "B. Clase de MPAA"
CLASE DEW
,=bp_gina 24 CLASEDEMPAA
CLASE DESCARGADA
C "C, Cambiar Contrasefia" CAMBIARCODIGO
=bp_gina 25
LA
_B
fVota:
"CLASE DESCARGADA" estard disponible cuando la unidad
reciba una emisiOn digital utilizando el nuevo sistema de
dasificaddn.
Cuando seteccione una clasificaddn y la ajuste en "BLOQ.',
las clasificaciones mds altas quedardn bloqueadas
automdticamente. Las clasificadones mds bajas estardn
disponibles para su visi6n.
Cuando seleccione la dasificacidn mds alta en "MIRAR',
todas las dases cambian automdticamente a "MIRAR'f
Si aparece el rnensaje "PROGRAMA PROHIBIDO" rnientras estd
viendo la televisidn, carnbie a un canal que no est_ bloqueado.
Luego, podrd acceder al men(t "AJUSTEDE V-CHIP" y cambiar el
ajuste para poder ver todos los canales de televisi6n.
Para bloquear cualquier prograrna inapropiado, establezca
sus Ifmites tanto en "CLASE DE TV" como en "CLASE DE MPAA'_
Elajuste V-chip se nrantendrd despu_s de producirse un torte en el
suministro el_ctrico (pero el c6digo de acceso vudve a 0000).
4 Utilice [Cursor / V] para seleccionar"CLASE DETV'; y
luego presione [ENTER].
p. ej.) modo TV digital
o
- AJUSTE DEV-CHIP-
_"CLASEDETV
CLASE DE MPAA
CLASE DESCARGADA
CAMBIARCODIGO
Utilice [Cursor / V] para seleccionar la clasificaci6n
deseada y luego presione [ENTER] repetidamente para
cambiar entre "MIRAR" y "BLOQ.".
o
_3
TV-Y [MIRAR]
TV-Y7 ( ) [MiRAR]
TV-G [MIRAR]
TV-PG( ) [MiRAR]
TV-14 ( ) [MiRAR]
TV-MA( ) [MiRAR]
Clasificaci6n Categoria
TV-Y Apto para todos los nifios inferior
TV-Y7 Apto para todos los nifios desde d %
los 7 afios
TV-G Todos los pOblicos
TV-PG Se sugiere orientaci6n de los padres
TV-14 No apto niflos menores de 14 aflos %
TV-MA Exclusivamente para p0blico adulto superior
i 7ii
i
ES
ClasedeMPAAeselsistemadeclasificaci6ncreadoparlaMPAA(Motion
PictureAssociationof America).
Poro Ajustor los Subcotegor/os
En Io referente a TV-Y7, TV-PG, TV-14 6 TV-MA, puede
seguir ajustando los subcategorias para bloquear
elementos especificos de la programaci6n. Para ajustar
los subcategorias, siga los pasos indicados.
1 Utilice [Cursor /V] para seleccionar la
clasificaci6n principal deseada y luego presione
[ENTER] dos veces para mostrar sus subcategorias,
Utilice [Cursor• IV] para seleccionar"CLASE DE MPAA"
y luego presione [ENTER].
o
p. ej.) modo TV digital
-AJUSTEDEV-CHIP-
CLASEDETV
_" CLASEDE MPAA
CLASEDESCARGADA
CAMBIARCODIGO
o _-TV-Y [MIRAR]
TV-Y7( )[MIRAR]
TV-G [MRAR]
TV-PG(OLSV) [BLOQ]
TV-14 (DLSV)[BLOQ]
TV-MA(LSV) [BLOO]
2 Utilice [Cursor I V] y luego presione [ENTER]
repetidamente para cambiar el ajuste.
p. ej.) TV-PG
o
TV-PG [BLOQ]
D [BLO0]
L [BLO0]
S [BLO0]
V [BLOQ]
SubclasificaciOn
FV
V
S
L
D
Categoria
Fantasia Violencia
Violencia
Situaci6n sexual
Lenguaje grosero
Di_logo sugerente
Clasificaci6n
TV-Y7
TV-PG
TV-14
TV-MA
TV-PG,TV-14
6 Presione [SETUP] para salir.
Utilice [Cursor• Iv], y luego presione [ENTER]
repetidamente para cambiar el ajuste,
o
G [M[RAR]
PG [M[RAR]
PGq3 [M[RAR]
'> R [BLOO]
NOq7 [g[OO]
X [sLoo]
Clasificaci6n Categoria
G Todos los pOblicos
PG Se sugiere orientaci6n de los padres
PG-13 No apto para nifros menores de 13 afros
Restringido; menores de 17 afros tienen
R que estar acompafrados por un progenitor
o un tutor adulto
NC-17 No apto para menores de 17 afros
X Exclusivarnente para pOblico adulto
Presione [SETUP] para salir.
_ota:
Las subcategorias bloqueadas aparecerdnjunto a la
categoria de dasificaddn principal en el mend
"CLASE DE TV'.
• No podrd bloquear una subcategoria (D, L, So V) si le dase
principal estd ajustada en "MIRAFC
• AI cambiar la categoria a "BLOQ." o "MIRAR', cambia
automdticamente todas sos subcategorias a to mismo
("BLOQ." o "MIRAR").
ES
Aunqueelc6digopredeterminado"0000"vieneincorporadoconla unidad,
ustedpuedeajustarsu propiacontrasefia.
Utilice [Cursor / V] para seleccionar
"CAMBIAR CODIGO"y luego presione [ENTER].
p. ej.) modo TV digital
o
-AJUSTEDE V-CHIP-
CLASE DEW
CLA£E DEMPAA
CLASE DESCARGADA
CAM£1ARCO[}IGO
Presione [los botones Num_ricos] del mando a
distancia para introducir la nueva contrasefia de
4 d ig itos.
Vuelva a introducir la contrasefia en el espacio
"CODIGO CONFIRMADO".
CODIGO NUEVO
CODIGO CONFIRMADO
bZ
ii!iiii_!
i?
i
Presione [SETUP] para salir.
fVota:
AsegOrese de que la nueva contrasehay la contraseffa de
confirmaci6n son exactamente iguales. Si son diferentes, el
espacio queda en blanco para volver a introdudrla.
• Su con traseha se borrard y volverd a la predeterminada
(0000) cuando se produzca un fallo en la alimentaciOn.
Si olvida la contrasef_a, desenchufe el cable de alimentadOn
durante 10 sequndos para restaurar la contraseha en 0000.
ES
[]Ajustes de PC
Estafuncionleperrniteajustarla positiondelapantalladelordenador,el
reloj ylafasedurantelaentrada PC.
I Presione [SETUP] para visualizar el menO principal.
2 Utilice [CursorA/V] para seleccionar
"REGLAGE DU PC", y luego presione [ENTER].
p. ej.) modo PC
o
- INSTALACK_NTV -
IMAGEN
AJUSTEDE CANAL
AJUSTEDE V-CHIP
IDIOMA [ESPANOL]
TITULO [OFF]
LUZDE FONO0 ISRILLO]
TENPE DECOLOR [NORMAL]
REGLAGEDU PC
REGLAGE DU FLOU, MISE EN PHASE
Utilice [Cursor A/V] para seleccionar un elemento,
y luego utilice [Cursor _II_] para hacer ajustar el
"REGLAGE DU FLOU" y estabilizar la pantalla del
ordenador y el ajuste "MISE EN PHASE" mejorando asi la
claridad de la pantalla del ordenador.
Cursor _1 Cursor I1_
REGLAGEDU
FLOU _aradisminuir el valor para aumentar el valor
MISE EN del ajuste de ajuste
PHASE
Presione [SETUP] para salir.
3 Haga el ajuste.
AJUSTEMENT AUDIO
Utilice [Cursor AIY] para seleccionar
"AJUSTEMENT AUDIO", y luego presione [ENTER].
o
- REGLAGEDU PC-
_"AJUSTMENTAUDIO
POSmON HORIZONTALE [ 15]
PosmoN VERT]CALE [ -15]
REGLAGEDU FLOU [ -5]
MISE ENPHASE [ 0]
Nora: I
Ajuste laopci6n "MISEENPHASE"despu_s dehaber ajustado
correctamente la opcidn "REGLAGEDU FLOU" I
Con el ajuste automdtico puede que no obtenga una
pantalla apropiada peru algunas sef}ales.En este caso,
ajuste tasopciones manualmente.
Se ajustan autom,_ticamente la posici6n Horizontal/
Vertical, el reloj y la fase de la pantalla del ordenador
dentro de unos sequndos.
POSITION HORIZONTALE, POSITION VERTICALE
Utilice [Cursor A/V] para seleccionar un elemento, y
luego utilice [Cursor _II_] para ajustar la posici6n de
pantalla.
Cursor _1 Cursor I_
para mover la pantalla para mover la pantalla
POSITION del ordenador hacia la del ordenador hacia la
HORIZONTALE izquierda derecha
para mover la pantalla para mover la pantalla
POSITION del ordenador hacia del ordenador hacia
VERTICALE abajo arriba
ES
---
Guia de Solucibn de Problemas
Si la unidad no funciona correctamente cuando se siguen las instrucciones de este manual del usuario, compruebe la
siguiente tabla antes de llamar al servicio t6cnico.
No hay corriente
No hay imagen ni sonido
No hay color
Sonido correcto, imagen
deficiente
Imagen distorsionada
Imagen d_bil
AsegOrese de que el cable de alimentaci6n est_ enchufado.
Si se produce un corte de alimentaci6n, desenchufe el cable de alimentaci6n durante 30
minutos para permitir que la unidad se reinicie.
Compruebe si la unidad esta encendido.
Compruebe la conexi6n electrica.
Compruebe la conexi6n de antena o de cable con la unidad principal.
Cuando se utilice la antena exterior, compruebe el estado del cable y de la conexi6n.
Vea otros canales de televisi6n. El problema podria limitarse a una emisora.
Apague la unidad y espere aproximadamente 1 minuto para volver a encenderlo.
Compruebe la conexi6n de antena o de cable con la unidad principal.
Cuando se utilice la antena exterior, compruebe el estado del cable y de la conexi6n.
Vea otros canales de televisi6n. El problema podria limitarse a una emisora.
Ajuste"COLOR"en el menO principal.
Compruebe la conexi6n de antena o de cable con la unidad principal.
Cuando se utilice la antena exterior, compruebe el estado del cable y de la conexi6n.
La interferencia electrica de aparatos cercanos puede afectar a la calidad de la imagen.
Ajuste'CONTRASTE'y'CLARIDAD'en el menu principal.
Vea otros canales de televisi6n. El problema podria limitarse a una emisora.
Cuando se utilice la antena exterior, compruebe el estado del cable y de la conexi6n.
Vea otros canales de televisi6n. El problema podria limitarse a una emisora.
Compruebe la conexi6n de antena o de cable con la unidad principal.
Cuando se utilice la antena exterior, compruebe el estado del cable y de la conexi6n.
Ajuste"CONTRASTE'y'CLARIDAD'en el menu principal.
Vea otros canales de televisi6n. El problema podria limitarse a una emisora.
Lineas o rayas en la imagen Cuando se utilice la antena exterior, compruebe el estado del cable y de la conexi6n.
La interferencia el_ctrica de aparatos cercanos puede afectar a la calidad de la imagen.
Vea otros canales de televisi6n. El problema podria limitarse a una emisora.
Imagen borrosa Cuando se utilice la antena exterior, compruebe el estado del cable y de la conexi6n.
Vea otros canales de televisi6n. El problema podria limitarse a una emisora.
Im_igenes fantasmas en la imagen • Compruebe la conexi6n de antena o de cable con la unidad principal.
Cuando se utilice la antena exterior, compruebe el estado del cable y de la conexi6n.
La interferencia el_ctrica de aparatos cercanos puede afectar a la calidad de la imagen.
Vea otros canales de televisi6n. El problema podria limitarse a una emisora.
Barras en la pantalla del televisor Cuando se utilice la antena exterior, compruebe el estado del cable y de la conexi6n.
La interferencia el_ctrica de aparatos cercanos puede afectar a la calidad de la imagen.
La imagen se desplaza Cuando se utilice la antena exterior, compruebe el estado del cable y de la conexi6n.
verticalmente La interferencia el_ctrica de aparatos cercanos puede afectar a la calidad de la imagen.
Vea otros canales de televisi6n. El problema podria limitarse a una emisora.
Marcas de diferente color en la Separe la unidad de los aparatos electricos cercanos. Apague la unidad y espere
pantalla del televisor aproximadamente 30 minutos para volver a encenderla.
Vea otros canales de televisi6n. El problema podria limitarse a una emisora.
Recepci6n deficiente en Compruebe la conexi6n de antena o de cable con la unidad principal.
determinados canales Cuando se utilice la antena exterior, compruebe el estado del cable y de la conexi6n.
La interferencia el_ctrica de aparatos cercanos puede afectar a la calidad de la imagen.
Vea otros canales de televisi6n. El problema podria limitarse a una emisora.
Imagen correcto, sonido ,Vea otros canales de televisi6n. El problema podria limitarse a una emisora.
deficiente
No se reciben seflales digitales AsegOrese de que la exploraci6n automatica de canales ha finalizado. (Consulte
"Exploraci6n Automatica de Canales"en pagina 12.)
La exploraci6n autom_tica de canales debe haberse finalizado cuando configure
la unidad por primera vez o cuando la traslade a un lugar donde se emitan canales
anteriormente no disponibles.
Esposible que el canal seleccionado no se est_ emitiendo.
Cuando la exploraci6n automatica de canales se interrumpe y no se finaliza, algunos
canales no se recibiran. Aseg0rese de finalizar. (Consulte'Exploraci6n Automatica de
Canales"en pagina 12.)
il!iiii!_
El nOmero de canal introducido
cambia autom_itica mente
El mando a distancia no funciona
Muchos canales digitales tienen nOmeros de canal alternativos. La unidad cambia dichos
nOmeros autom_ticamente a los correspondientes alas emisoras activas. Estos son los
nOmeros utilizados para emisiones anal6gicas.
Compruebe la conexi6n de antena o de cable con la unidad principal.
Compruebe las pilas del mando a distancia.
Compruebe si hayalgOnobst_culo entre laventana del sensorde infrarrojos y el mando a distancia.
Pruebe la salida de la serial. Sies correcta, es posible que haya algOn problema con el
sensor de infrarrojos.
(Consulte"Comprobaci6n de la Serial de Infrarrojos (IR)"en p_igina 28.)
Con el mando a distancia, apunte directamente hacia la ventana del sensor de infrarrojos
en la parte delantera de la unidad.
Reduzca la distancia con respecto a la unidad.
Reinserte las pilas con sus polaridades (signos +/-) como indicadas.
Cuando hay un dispositivo provisto de infrarrojos como un ordenador cerca de
esta unidad, puede interferir con la serial del mando a distancia de esta unidad.
Retire dicho dispositivo con infrarrojos alej_ndolo de la unidad, cambie el ,ingulo
del sensor de infrarrojos y desactive la funci6n que habilita la comunicaci6n por
infrarroios.
Problemas con la Funci6n de Subtitulos
Aparecen subtitulos con faltas de Las empresas de producci6n de subtitulos pueden emitir programas sin corregir la
ortografia, ortografia en una emisi6n en directo.
Los subtitulos no se muestran • Los subtitulos que seretrasan unos segundos con respecto al di_logo real son habituales en las
enteros, o aparecen retrasados emisiones en directo. La mayoria de lasempresas de producci6n de subtitulos pueden mostrar
con respecto al dialogo, un dialogo hasta un m_ximo de 220 palabras pot minuto. Si un di_logo supera ese limite, se
utiliza una edicion selectiva para garantizar que los subtitulos semantienen actualizados con el
di_logo de la pantalla del televisor en cada momento.
Los subtitulos aparecen en un • Las interferencias procedentes de edificios o condiciones climatol6gicas pueden hacer
recuadro blanco, que los subtitulos aparezcan incompletos.
No aparece ningOn subtitulo La emisora puede acortar el programa para insertar publicidad. El decodificador de
en el programa de soporte de subtitulos no puede leer la informaci6n del programa acortado.
subtRulos.
No aparece ningOn subtitulo Esposible que la cinta de vfdeo se haya copiado ilegalmente o que la serial de subtftulos
cuando se reproduce una cinta de no se haya leido durante lacopia.
video con subtRulos.
Aparece un recuadro negro en la Se ha seleccionado el modo texto para subtRulos. Seleccione"SUBTITI","SUBTIT2" u
pantalla del televisor. "OFF't
Note:
Elpanel LCDha sido fabricado demanera que puede tener muchos afros de vida dtil. Ocasionalmente, pueden aparecerp/xeles inactivos,
como un punto fijo decolor azul, verde o rojo. Estono debeconsiderarse un defecto dela pantalla LCD.
Algunas funciones no estdn disponibtes en modos especfficos,pero esto no esun fallo de funcionamiento. Paramds detalles sobrelas
operaciones correctas, lea la descripci6n deeste manual det usuario.
[] Mantenimiento
Limpieel paneldelanteroyotrassuperficiesexterioresdelaunidadcon
untraposuaveinmersoenaguatempladay bienescurrido.
Noutilice nuncadisolventeni alcohol.Nosuelteliquidoinsecticidaen
aerosolcercadelaunidad. Estosproductosquimicospuedencausardafios
ydecoloracionenlassuperficiesexpuestas.
_ _ II_I'_11
Limpieel panelconunpatioblando.Antesdelimpiarelpaneldesconecte
el cabledelaalimentaci6n.
_,_,,_1_ T'_'_iI
Sisuunidaddejadefuncionar,nointentecorregirelproblemausted
mismo.Ensuinterior nocontienepiezasque puedanserreparadasporel
usuario.Apaguelaunidad, desenchufeel cabledealimentacifn yIlame
anuestrotel_fono gratuito deatencional cliente, queencontrar_ienla
portadadeestemanualparaIocalizaruncentrodeservicioautorizado.
Sielmandoadistancianofuncionacorrectamente,puedeutilizar una
radioAMounacSmaradigital (inclusountel_fono movil conc_imara
incorporada)paracomprobarsiest_ienviando unaserialdeinfrarrojos.
Con una radio AM:
Sintonicela emisoraderadioAMenunafrecuencia
denoemision.Apunteconel mandoadistancia
haciaella,presionecualquierbot6nyescuche, f
Sielsonidodela radio flucttia, significaqueest_i
recibiendola serialdeinfrarrojos del mandoa
distancia.
Con una cfimara digital
(incluidas lascfimaras incorporadas en tel6fonos m6viles):
Apunteconlac_imaradigitalhaciael mandoa
distancia.Presionecualquierbot6ndelmandoa
distanciaymireenelvisordelac_maradigital.
Silaluzinfrarrojaapareceenlacbmara,el mandoa
distanciafunciona.
ES
_c
[] Glosario
ATSC
Acr6nimo de"Advanced Television Systems
Committee" (Comit_ de sistemas avanzados
de televisi6n) y el nombre de unas normas de
emisi6n digital.
Contrase_a
Un nOmero almacenado de 4 digitos que
permite el acceso alas funciones de control
parental.
Dolby Digital
El sistema desarrollado por Dolby
Laboratories para comprimir el sonido
digital. Ofrece un sonido est@eo (2 canales)
o audio multicanal.
HDTV (televisi6n de alta definici6n)
Reciente formato digital que produce una alta
resoluci6n y una elevada calidad de imagen.
NTSC
Acr6nimo de "National Television Systems
Committee"(Comite de sistemas nacionales
de televisi6n) y el hombre de unas normas
de emisi6n digital.
Relaci6n de Aspecto
La anchura de una pantalla de televisi6n
con respecto a su altura. Los televisores
convencionales son de 4:3 (en otras
palabras, la pantalla del televisor es casi
cuadrada); los modelos de pantalla ancha
son de 16:9 (la pantalla del televisor es casi
dos veces m_s ancha que alta).
SAP (programa de audio secundario)
Segundo canal de audio transmitido por
separado del canal de audio principal. Este
canal de audio se utiliza como altemativo
en la emisiOn bilingOe.
S-video
Ofrece im_genes de mayor calidad al
transmitir cada serial, color (c) y luminancia
(y) de manera independiente entre si a
traves de cables separados.
Video en Componentes
Setrata de un formato de serial de video que
transmite cada uno de los 3 colores principales
de luz (rojo, azul y verde) atraves de diferentes
lineas de serial. Esto permite a los espectadores
experimentar colores de imagen muy similares
a los originales. Existen diversos formatos de
serial, incluidos el denominado Y/ Pb / Pry el
denominado Y/ Cb / Cr.
_iiii_!iii
i_ili
i! 111!1
[] Denominaciones de Canales de Cable
Sisesuscribealatelevisi6npotcable,loscanalessemuestrancomo1-135.Lasempresasdecableamenudodenominanloscanalesconletrasocombinacionesde
letra-n_mero.Compruebeestedetalleconsuempresalocaldecable.Latablasiguienteincluyelasdenominacionesdecanaldecablehabituales.
P_ta,a deT_ 1 2 3 4 5 6 7 9 10 11 12 13 14 15 16 17 18 19 20 21
Pa/_talladeT_ 22 23 24 25 26 27 28 29 30 31 32 33 34 35 36 37 38 39 40 41 42
Par_talladeT_, 43 44 45 46 47 48 49 50 51 52 53 54 55 56 57 58 59 60 61 62 63
P_ta,a deT_ 64 65 66 67 68 69 70 71 72 73 74 75 76 77 78 79 80 81 82 83 84
Pa/italladeT% 85 86 87 88 89 90 91 92 93 94 95 96 97 98 99 100 101 102 103 104 105
Pa/italladeT_, 106 107 108 109 110 111 112 113 114 115 116 117 118 119 120 121 122 123 124 125 126
Par_talladeT_ 127 128 129 130 131 132 133 134 135
[] Especificaciones Generales
Formato de TV: ATSC/NTSC-MTVest_ndar
Subtitulos (CC) sistema:
§15.122/FCC(Subtitulosdigitales)
§15.119/FCC(Subtitulosanal6gicos)
Cobertura de canales (ATSC/NTSC):
Terrestre VHF: 2~13 UHF:14~69
CATV 2~13, A~W,W+l~W+94 (anal6gicoW+l~W+84),
A-S~A-I, SA
Sistemadesint0nizaci6n:Sistemadesintonizaci6nsintetizadade
frecuenciade canales
Accesoaloscanales:Tecladodeaccesodirecto,exploraci6n
programabley arribalabajo
[] Especificaci6n El ctrica
Salida de sonido: 1W,80x2
Losdisefiosylasespecificacionespuedenserobjetodemodificaciones
sin previoavisoysin obligacioneslegalespornuestraparte.
Siseproduceunadiscrepanciaentre idiomas,elidiomapredeterminado
ser_iel Ingles.
[] Otras Especificaciones
Terminales:
Entradadeantena: VHF/UHF/CATV 75Qdesequilibrad0s(tip0F)
EntradadeS-video: MinitomaDINde4patillasxlY:IVp-p (75_)
C:286mVp-p(7SQ)
Entradadevideo: TomaRCAx1
Entradadeaudio:TomaRCAx4
Entradadevideoencomponentes:
TomaRCAx3
IVp-p (750)
2Vrms
Y: 1Vp-p(7SQ)
Pb:700mVp-p(7S_)
Pr: 700mVp-p(75_)
EntradaPC: D-Subde15patillasx I (RGB)
Minitoma _a3,5mmx I (audio)
Salidadeaudio digital coaxial:
TomaRCAx I 500mVp-p(75_)
Auricular: _I_pulg. (3,Smm)
Mando a distancia:Sistemadeluzinfrarroja codificadadigitalmente
Temperatura de funcionamiento:
41°F(5°C)a104°F(40°C)
Potencia: 120VAC+/- I0%, 60Hz+/- 0.5%
Consumo de potencia (m_ximo):
SSW
LCD: PanelXGAplusde19pulg.deancho
Dimensiones: <sinsoporte> <consoporte>
Altura: 14,4pulg.(364mm) 16,0pulg.(404,5mm)
Ancho:19,3pulg.(490ram) 19,3pulg.(490ram)
Profundidad: 3,7 pulg.(93ram) 7,7 pulg.(194,5mm)
Peso: 10,2Ibs. (4,6kg)
ES
SYLVANIA
GARANT|A LIMITADA
FUNAI CORR reparar_ este producto, de forma gratuita en Estados Unidos, en caso de defecto de materiales o
fabricaci6n, del modo siguiente:
DURACION:
PIEZAS: FUNAI CORP. suministrar_ piezas de repuesto de las piezas defectuosas de forma gratuita
durante un (1) afro desde la fecha de compra minorista original. Determinadas piezas y el
efecto de persistencia de la imagen en la pantalla LCD est_n excluidas de esta garantfa.
MANODEOBRA:FUNAI CORP. suministrar_ la mano de obra de forma gratuita durante un periodo de
noventa (90) dfas desde la fecha de compra minorista original.
L|MITES Y EXCLUSIONES:
ESTA GARANT[A SE EXTIENDE SOLAMENTE AL COMPRADOR MINORISTA ORIGINAL. UN RECIBO
DE COMPRA U OTRA PRUEBA DE COMPRA MINORISTA ORIGINAL SERA EXIGIDA JUNTO CON EL
PRODUCTO PARA OBTENER SERVIClO BAJO ESTA GARANT[A.
Esta garantfa no se extender_ a ninguna otra persona o beneficiario.
Esta garantfa quedarg invalidada y sin efecto en caso de alteraci6n, sustituci6n, borrado o p_rdida de
los nOmeros de serie del producto o si se intent6 una reparaci6n pot parte de un centro de servicio no
autorizado. Esta garantfa limitada no se aplica a ningOn producto no comprado y utilizado en Estados Unidos.
Esta garantfa solamente cubre los fallos debidos a defectos de material o fabricaci6n que se produzcan
durante su uso normal. No cubre dafos producidos durante el transporte, ni dafos ocasionados pot
reparaciones, alteraciones o productos no suministrados pot FUNAI CORP.,o dafos resultantes de accidente,
uso indebido, abuso, trato indebido, aplicaci6n indebida, alteraci6n, instalaci6n defectuosa, mantenimiento
inadecuado, uso comercial (pot ejemplo, el uso de este producto en hoteles, establecimientos de alquiler u
oficinas)o dafos resultantes de incendio, inundaci6n, tormenta el_ctrica o cat_strofes naturales.
ESTAGARANT[A NO CUBRE LOS MATERIALES DE EMBALAJE, NINGON TIPO DE ACCESORIOS (EXCEPTO EL
MANDO A DISTANCIA), NINGUNA PIEZA DE ADORNO, PIEZAS DE MONTAJE COMPLETAS, MODELOS DE
DEMOSTRACION 0 DETALLER.
FUNAI CORP.Y SUSREPRESENTANTES0 AGENTESNO SERANEN NINGON CASOCONSIDERADOS RESPONSABLES
DEDANOS GENERALES,INDIRECTOS0 CONSECUENClALES,RESULTANTESDE0 PROVOCADOSPOR ELUSO0
LA IMPOSIBILIDAD DE USO DE ESTEPRODUCTO.ESTAGARANT{A SUSTITUYEA CUALQUIEROTRA GARANT{A,
EXPRESA0 IMPL{ClTA,Y CUALQUIEROTRA RESPONSABILIDADCIVIL PORPARTEDE FUNAI, CUALQUIEROTRA
GARANT{A QUE INCLUYALA GARANT{A DE COMERClABILIDAD E IDONEIDAD PARAUN FINCONCRETO,QUEDAN
PORLA PRESENTEEXCLUIDASPORDE FUNAI Y SUSREPRESENTANTESEN ESTADOSUNIDOS.
TODAS LAS INSPECCIONES Y REPARAClONES BAJO GARANT[A DEBEN SEREFECTUADAS POR UN CENTRO
DE SERVICIO AUTORIZADO.
ESTAGARANT[A ESVALIDA EXCLUSIVAMENTE CUANDO ELAPARATO SEA ENTREGADO A UN CENTRO DE
SERVICIO AUTORIZADO.
EL PRODUCTO DEBE IRACOMPANADO POR UNA COPIA DEL RECIBO DE COMPRA MINORISTA ORIGINAL. SI
NO SEADJUNTA PRUEBA DE COMPRA, LA GARANT[A NO SEAPLICARA Y SECOBRARAN LOS COSTES DE LA
REPARACION.
IMPORTANTE:
ESTAGARANT[A LIMITADA LEOTORGA DERECHOS LEGALES ESPEC[FICOS.ESPOSIBLE QUE SEA USTED
BENEFIClARIO DE OTROS DERECHOS QUE VAR[EN DE UN ESTADO A OTRO. SI, EN CUALQUIER MOMENTO
DURANTE EL PERIODO DE GARANT[A, NO PUEDE USTED OBTENER SATISFACCION CON RESPECTOA LA
REPARACION DE ESTEPRODUCTO, LE ROGAMOS QUE SEPONGA EN CONTACTO CON FUNAI CORP.
ATENCION:
FUNAI CORR SE RESERVA EL DERECHO DE MODIFICAR CUALQUIER DISENO DE ESTE
PRODUCTO SIN PREVlO AVlSO.
DECLARACION DE GARANT|A CON RESPECTO A REPARACIONES NO AUTORIZADAS:
Para obtener servicio de garantfa, debe usted aceptar el producto, o hacer entrega del producto con
portes pagados, ya sea en su embalaje original o en un embalaje que proporcione el mismo grado de
protecci6n, a cualquier CENTRO DE SERVICIO AUTORIZADO. FUNAI CORP. no efectuar_ reembolso pot
ningOn servicio realizado pot proveedores de servicio no autorizados sin autorizaci6n previa pot escrito.
Para Iocalizar su CENTRO DE SERVlCIO AUTORIZADO m_s pr6ximo o para solicitudes generales
de servicio, puede ponerse en contacto con nosotros en:
FUNAI CORPORATION
Servicio de atenci6n al cliente
Tel : 1-800-968-3429
www.SylvaniaConsu merElectronics.com
19900 Van Ness Avenue, Torrance, CA 90501
A81 N7UH / A81 N2UH
  • Page 1 1
  • Page 2 2
  • Page 3 3
  • Page 4 4
  • Page 5 5
  • Page 6 6
  • Page 7 7
  • Page 8 8
  • Page 9 9
  • Page 10 10
  • Page 11 11
  • Page 12 12
  • Page 13 13
  • Page 14 14
  • Page 15 15
  • Page 16 16
  • Page 17 17
  • Page 18 18
  • Page 19 19
  • Page 20 20
  • Page 21 21
  • Page 22 22
  • Page 23 23
  • Page 24 24
  • Page 25 25
  • Page 26 26
  • Page 27 27
  • Page 28 28
  • Page 29 29
  • Page 30 30
  • Page 31 31
  • Page 32 32
  • Page 33 33
  • Page 34 34
  • Page 35 35
  • Page 36 36
  • Page 37 37
  • Page 38 38
  • Page 39 39
  • Page 40 40
  • Page 41 41
  • Page 42 42
  • Page 43 43
  • Page 44 44
  • Page 45 45
  • Page 46 46
  • Page 47 47
  • Page 48 48
  • Page 49 49
  • Page 50 50
  • Page 51 51
  • Page 52 52
  • Page 53 53
  • Page 54 54
  • Page 55 55
  • Page 56 56
  • Page 57 57
  • Page 58 58
  • Page 59 59
  • Page 60 60

Sylvania LC195SL8 El manual del propietario

Tipo
El manual del propietario

En otros idiomas