MTD 21AA45M5099 El manual del propietario
- Categoría
- Mini cultivadores
- Tipo
- El manual del propietario

Operator's Manual
I:Rl FI'SlVl N
208cc Engine
Rear Tine Tiller
Model No. 247.29932
CAUTION: Before using
this product, read this
manual and follow aJl
safety rules and operating
instructions.
* SAFETY
* ASSEMBLY
* OPERATION
* MAINTENANCE
* PARTS LIST
* ESPANOL
Sears Brands Management Corporation, Hoffman Estates, iL 60179, U.S.A.
Visit our web site: www.craftsman.com
FORMNO.769-05425C
2/1/2011

WarrantyStatement..................................Pac
SafetyInstructions....................................Pac
SafetyLabels............................................Pac
Assembly..................................................Pac
Operation..................................................Pac
ServiceandMaintenance.........................Pac
Off-SeasonStorage..................................Pac
e2
es3-6
e7
es8-10
es11-17
es18-22
e23
Troubleshooting........................................Page24
PartsList...................................................Page26-39
LabelMap.................................................Page40
RepairProtectionAgreement...................Page43
Espa_ol.....................................................Page44
ServiceNumbers......................................BackCover
CRAFTSMAN TWO YEAR FULL WARRANTY
FORTWOYEARSfromthedateofpurchase,this productiswarrantedagainstanydefectsinmaterialor workmanship.Defectiveproductwill
receivefreerepairor freereplacementifrepairisunavailable.
For warranty coverage details to obtain repair or replacement, visit the web site: www.craftsman.com
This warranty covers ONLY defects in material and workmanship. Warranty coverage does NOT include:
• Expendableitemsthatcanwearoutfromnormalusewithinthewarrantyperiod,suchas
blades,tines,orbelts.
Productdamageresultingfromuserattemptsat productmodificationor repairorcausedbyproductaccessories.
Repairsnecessarybecauseof accidentorfailuretooperateor maintaintheproductaccordingtoall suppliedinstructions.
Preventivemaintenance,or repairsnecessaryduetoimproperfuelmixture,contaminatedor stalefuel.
Thiswarrantyisvoidifthisproductiseverusedwhileprovidingcommercialservicesor if rentedtoanotherperson.
Thiswarrantygivesyouspecificlegalrights,andyoumayalsohaveotherrightswhichvaryfromstatetostate.
Sears Brands Management Corporation, Hoffman Estates, IL 60179
EngineSeries: 208cc
EngineOilType: 10w30
EngineOilCapacity: 20ounces
Fuel: UnleadedGasoline
SparkPlug: F6RTC
SparkPlugGap: .030"
ModelNumber.................................................................
Serial Number .................................................................
Dateof Purchase.............................................................
Recordthemodelnumber,serialnumber
anddateof purchaseabove
©SearsBrands,LLC 2

Thissymbolpointsoutimportantsafetyinstructionswhich,if not
followed,couldendangerthepersonalsafetyand/orpropertyof
yourselfandothers.Readandfollowall instructionsin thismanual
beforeattemptingtooperatethismachine.Failuretocomplywith
theseinstructionsmayresultin personalinjury.Whenyouseethis
symbol,HEEDITSWARNING!
CALIFORNIA PROPOSITION 65
EngineExhaust,someof itsconstituents,andcertainvehicle
componentscontainoremitchemicalsknowntoStateofCalifornia
tocausecancerandbirthdefectsorotherreproductiveharm.Bat-
tery posts,terminals,andrelatedaccessoriescontainleadand lead
compounds,chemicalsknowntotheStateof Californiatocause
cancerandreproductiveharm.Washhandsafterhandling.
Thismachinewasbuilttobeoperatedaccordingtothesafeopera-
tionpracticesin thismanual.Aswithanytypeofpowerequipment,
carelessnessorerroronthepartoftheoperatorcan resultin
seriousinjury.Thismachineiscapableofamputatingfingers,hands,
toesandfeetandthrowingdebris.Failureto observethefollowing
safetyinstructionscouldresultin seriousinjuryordeath.
Your Responsibility=Restrict theuseofthis powermachineto
personswhoread,understandandfollowthewarningsand instruc-
tionsin thismanualandon themachine.
SAVETHESEINSTRUCTIONS!
TRAINING
• Read,understand,andfollowall instructionson themachineand
in themanual(s)beforeattemptingtoassembleandoperate.
Keepthis manualina safeplaceforfutureand regularreference
andfororderingreplacementparts.
• ReadtheOperator'sManualand followallwarningsand safety
instructions.Failuretodosocanresultin seriousinjurytothe
operatorand/orbystanders.Forquestions,call1-800-4MY-HOME.
• Befamiliarwithall controlsandtheirproperoperation.Knowhow
tostopthemachineanddisengagethemquickly.
• Neverallowchildrenunder14yearsofagetooperatethis
machine.Children14andovershouldreadandunderstandthe
instructionsandsafeoperationpracticesin thismanualandon
themachineandbe trainedandsupervisedbyanadult.
• Neverallowadultstooperatethis machinewithoutproper
instruction.
• Keepbystanders,pets,andchildrenatleast75feetfromthe
machinewhileitisin operation.Stopmachineifanyoneenters
thearea.
• Neverrunanengineindoorsor ina poorlyventilatedarea.Engine
exhaustcontainscarbonmonoxide,anodorlessanddeadlygas.
PREPARATION
• Thoroughlyinspecttheareawheretheequipmentistobeused.
Removeall rocks,bottles,cans,or otherforeignobjectswhich
couldbepickedupor thrownandcausepersonalinjuryor
damageto themachine.
• Alwayswearsafetyglassesor safetygogglesduringoperation
andwhileperformingan adjustmentor repair,to protectyour
eyes.Thrownobjectswhichricochetcancauseseriousinjuryto
theeyes.
• Wearsturdy,rough-soledworkshoesandclose-fittingslacksand
shirts.Loosefittingclothesor jewelrycanbecaughtin movable
parts.Neveroperatethismachineinbarefeetorsandals.
• Beforestarting,checkallboltsandscrewsforpropertightnessto
besurethemachineisinsafeworkingcondition.Also,visually
inspectmachineforanydamageatfrequentintervals.
• Disengageclutchleversandshift(if provided)intoneutral("N")
beforestartingtheengine.
• Neverleavethismachineunattendedwiththeenginerunning.
• Neverattempttomakeanyadjustmentswhiletheengineis
running,exceptwherespecificallyrecommendedintheoperator's
manual.
• Maintainor replacesafetyandinstructionslabels,asnecessary.
3

SafeHandlingof Gasoline:
Toavoidpersonalinjuryor propertydamageuseextremecarein
handlinggasoline.Gasolineisextremelyflammableandthevaporsare
explosive.Seriouspersonalinjurycanoccurwhengasolineisspilled
onyourselfor yourclotheswhichcanignite.Washyourskinand
changeclothesimmediately.
• Useonlyan approvedgasolinecontainer.
• Neverfillcontainersinsidea vehicleor ona truckor trailerbed
witha plasticliner.Alwaysplacecontainersonthegroundaway
fromyourvehiclebeforefilling.
• Whenpractical,removegas-poweredequipmentfromthetruck
ortrailerand refuelitontheground.Ifthisisnotpossible,then
refuelsuchequipmenton a trailerwitha portablecontainer,rather
thanfroma gasolinedispensernozzle.
• Keepthenozzleincontactwiththerimofthefueltankor
containeropeningatalltimesuntilfuelingiscomplete.Donotuse
a nozzlelock-opendevice.
• Extinguishallcigarettes,cigars,pipesandothersourcesof
ignition.
• Neverfuelmachineindoors.
• Neverremovegascapor addfuelwhiletheengineishotor run-
ning.Allowenginetocoolatleasttwo minutesbeforerefueling.
• Neveroverfillfueltank.Filltankto nomorethan1/2inchbelow
bottomoffillernecktoallowspaceforfuelexpansion.
• Replacegasolinecapandtightensecurely.
• Ifgasolineisspilled,wipeitoff theengineandequipment.Move
unittoanotherarea.Wait5 minutesbeforestartingtheengine.
• Toreducefirehazards,keepmachinefreeofgrass,leaves,or
otherdebrisbuild-up.Cleanupoil orfuelspillageandremoveany
fuelsoakeddebris.
• Neverstorethemachineorfuelcontainerinsidewherethereisan
openflame,sparkor pilotlightasonawaterheater,spaceheater,
furnace,clothesdryerorothergasappliances.
OPERATION
• Donotputhandsorfeetnear rotatingparts.Contactwiththe
rotatingpartscanamputatehandsand feet.
• Donotoperatemachinewhileundertheinfluenceofalcoholor
drugs.
• Neveroperatethismachinewithoutgoodvisibilityor light.Always
be sureofyourfootingandkeepa firmholdonthehandles.
• Keepbystandersawayfromthemachinewhileitisinoperation.
Stopthemachineif anyoneentersthearea.
• Becarefulwhentillinginhardground.Thetines maycatchinthe
groundandpropelthetillerforward.Ifthis occurs,letgoofthe
handlebarsanddo notrestrainthemachine.
• Exerciseextremecautionwhenoperatingonor crossinggravel
surfaces.Stayalertforhiddenhazardsortraffic.Donotcarry
passengers.
• Neveroperatethemachineat hightransportspeedsonhardor
slipperysurfaces.
• Exercisecautiontoavoidslippingor falling.
• Lookdownand behindandusecarewhenin reverseor pulling
machinetowardsyou.
• Starttheengineaccordingtothe instructionsfoundinthis manual
and keepfeetwellawayfromthetinesatall times.
• Afterstrikingaforeignobjector ifyourmachineshouldstartmak-
inganunusualnoiseor vibration,immediatelyshuttheengineoff.
Disconnectthesparkplugwire,grounditagainsttheengineand
performthefollowingsteps:
a. Inspectfordamage.
b. Repairor replaceanydamagedparts.
c. Checkforanyloosepartsandtightento assurecontinued
safeoperation.
• Disengageall clutchlevers(iffitted)and stopenginebeforeyou
leavetheoperatingposition(behindthe handles).Waituntil
thetinescometoa completestopbeforeuncloggingthetines,
makinganyadjustments,or inspections.
• Neverrunanengineindoorsorina poorlyventilatedarea.Engine
exhaustcontainscarbonmonoxide,an odorlessanddeadlygas.
• Mufflerandenginebecomehotandcancausea burn.Donot
touch.
• Usecautionwhentillingnearfences,buildingsandunderground
utilities.Rotatingtinescancausepropertydamageor personal
injury.
• Donotoverloadmachinecapacitybyattemptingtotillsoiltoo
deepattoofastofa rate.
• Ifthemachineshouldstartmakinganunusualnoiseor vibration,
stoptheengine,disconnectthesparkplugwireandgroundit
againsttheengine.Inspectthoroughlyfordamage.Repairany
damagebeforestartingandoperating.
• Keepallshields,guards,andsafetydevicesinplaceandoperat-
ing properly.
• Neverpick uporcarrymachinewhiletheengineisrunning.
• Useonlyattachmentsandaccessoriesapprovedbythemanu-
factureras listedin thePartsListpagesofthisoperator'smanual.
Failuretodosocanresultin personalinjury.
• Ifsituationsoccurwhichare notcoveredinthis manual,usecare
andgoodjudgement.ContactCustomerSupportat 1-800-4MY-
HOMEforassistanceandthenameof thenearestservicedealer
MAINTENANCE & STORAGE
• Keepthemachine,attachmentsandaccessoriesin safeworking
order.
• Allowthemachinetocoolat leastfiveminutesbeforestoring.
Nevertamperwithsafetydevices.Checktheirproperoperation
regularly.
• Checkboltsandscrewsforpropertightnessatfrequentintervals
to keepthemachineinsafeworkingcondition.Also,visually
inspectmachineforanydamage.
• Beforecleaning,repairing,or inspecting,stoptheengineand
makecertainthetinesandall movingpartshavestopped.
Disconnectthesparkplugwireandgrounditagainsttheengineto
preventunintendedstarting.
4

• Donotchangetheenginegovernorsettingsor over-speedthe
engine.Thegovernorcontrolsthemaximumsafeoperatingspeed
ofengine.
Maintainorreplacesafetyandinstructionlabels,asnecessary.
Followthismanualforsafeloading,unloading,transporting,and
storageof thismachine.
Alwaysreferto theoperator'smanualforimportantdetailsifthe
machineisto bestoredforan extendedperiod.
If thefueltankhastobe drained,do thisoutdoors.
Observeproperdisposallawsandregulationsforgas,oil,etc.to
protecttheenvironment.
AccordingtotheConsumerProductsSafetyCommission(CPSC)
andtheU.S.EnvironmentalProtectionAgency(EPA),thisproduct
hasan AverageUsefulLifeof seven(7)years,or 130hoursof
operation.Attheendof theAverageUsefulLifehavethemachine
inspectedannuallybyanauthorizedservicedealertoensurethat
allmechanicalandsafetysystemsareworkingproperlyandnot
wornexcessively.Failuretodo socanresultinaccidents,injuries
ordeath.
DO NOT MODIFY ENGINE
Toavoidseriousinjuryordeath,donotmodifyenginein anyway.
Tamperingwiththegovernorsettingcanleadto a runawayengineand
causeittooperateatunsafespeeds.Nevertamperwithfactorysetting
ofenginegovernor.
NOTICE REGARDING EMISSIONS
EngineswhicharecertifiedtocomplywithCaliforniaandfederal
EPAemissionregulationsforSORE(SmallOff RoadEquipment)are
certifiedtooperateonregularunleadedgasoline,andmayinclude
thefollowingemissioncontrolsystems:EngineModification(EM),
OxidizingCatalyst(CO),SecondaryAirInjection(SAI)and ThreeWay
Catalyst(TWO)if soequipped.
SPARK ARRESTOR
Thismachineis equippedwithan internalcombustionengineand
shouldnotbe usedonor nearanyunimprovedforest-covered,
brushcoveredor grass-coveredlandunlesstheengine'sexhaust
systemisequippedwitha sparkarrestormeetingapplicablelocalor
statelaws(ifany)
Ifa sparkarrestorisused,itshouldbe maintainedin effectiveworking
orderbytheoperator.IntheStateofCaliforniatheaboveis required
bylaw(Section4442oftheCaliforniaPublicResourcesCode).Other
statesmayhavesimilarlaws.Federallawsapplyonfederallands.
A sparkarrestorforthemufflerisavailablethroughyournearestSears
PartsandRepairServiceCenter.

SAFETY SYMBOLS
Thispagedepictsanddescribessafetysymbolsthatmayappearonthisproduct. Read,understand,andfollowall instructionson themachine
beforeattemptingtoassembleandoperate.
i
i
READ THE OPERATOR'S MANUAL(S)
Read, understand, and follow all instructions in the manual(s) before attempting to assemble and
operate
WARNING-- ROTATING TINES
Do not put hands or feet near rotating parts. Contact with the rotating parts can amputate
hands and feet.
WARNING-- ROTATING TINES
Do not put hands or feet near rotating parts. Contact with the rotating parts can amputate
hands and feet.
WARNING--GASOLINE ISFLAMMABLE
Allow the engine to cool at least two minutes before refueling.
WARNING-- CARBON MONOXIDE
Never run an engine indoors or in a poorly ventilated area. Engine exhaust contains carbon
monoxide, an odorless and deadly gas.
WARNING-- HOT SURFACE
Engine parts, especially the muffler, become extremely hot during operation. Allow engine
and muffler to cool before touching.
WARNING: YourResponsibility--Restricttheuseofthispowermachinetopersonswhoread,understandandfollowthe
warningsandinstructionsinthis manualandonthemachine.
SAVETHESEINSTRUCTIONS!
6

7

IMPORTANT:Thisunitisshippedwithoutgasolineoroil intheengine.
Becertaintoserviceenginewithgasolineandoilasinstructedinthe
Operationsectionofthis manualbeforeoperatingyourmachine.
NOTE:Referenceto rightand lefthandsideoftheTillerisobserved
fromtheoperatingposition.
OPENING CARTON
1. Removethe staples,breaktheglueonthetopflaps,orcut the
tapeattheendofthecartonand peelitalongthetopflapto open.
2. Removeall looseparts.
3. Cutthecornersandlaythecartondownfiat.
4. Removeloosepackingmaterial.
REMOVING UNIT FROM CARTON
1. Usethehandlebartoliftand pullthetillerbackwardstoa flat
area.Checkthecartonthoroughlyforlooseparts.
2. Extendthecontrolcableandlayiton thefloor.Becardul notto
bendor kinkthecontrolcable.
LOOSE PARTS IN CARTON
• HandlebarAssembly
• Tiller
• EngineOil
• Operator'sManual
• ShiftRod
• DepthStake
Beforeassembly,disconnectthesparkplugwireandgroundit
againsttheenginetopreventunintendedstarting.
ATTACHING THE DEPTH STAKE
1. Tipthetillerforwardsothatitrestson thefrontcounterweight.
2. Unthreadthe"T"knobfromthetopofthedepthstakeand remove
theflat washerand hexbolt. Removethecotterpinfromtheclevis
pin.SeeFigure1.
3. Raisethefineshieldhingeflapassemblyandinsertthedepth
stakeassemblyin theslot,underthefineshieldandupthrough
thefine shieldassembly.
4. Inserttheclevispinthroughthetineshieldanddepthstake
assemblies.Secureit withthecotterpin.
5. Insertthehexboltintothetopholeofthedepthstakeassembly.
Placetheflat washeronthehexboltandthreadtheT-knobonto
thehexbolt.Tightensecurely.SeeFigure1.
6. Tipthetillerbackdownsothat itrestsonthetines.
f
Fiat Washer
Bolt
Pin
DepthStake
Figure1
J
f
Bolts & Flange
Lock Nuts
Handle
Y
Figure2
Bracket
ATTACHING THE HANDLE ASSEMBLY
1. Removethetoptwo boltsand flangelocknutsfromthehandle
mountingbrackets,butdonotremovethebottomboltandnut.
See Figure2.
2. Placethehandleassemblyin positionbetweenthe handle
mountingbrackets.
3. Lineup theholesinthehandlewiththeholesin thebracketand
securewiththehardwarepreviouslyremoved.
8

ATTACHING THE CONTROL ROD
1. Makesurethehandleassemblyisinthehighestposition.Referto
theOperationSection.
2. Removethehairpinclipsfromthecontrolrod,puttherubber
washersin place.
3. Inserttheshorter,angledendofthecontrolrodthroughthe
indicatorbracketontheshiftcoverandsecureitwiththeprevi-
ouslyremovedhairpinclip.SeeFigure3.
4. Insertthelongerendofthecontrolrodthroughtheholeinthe
gearselectorhandleandsecurewitha cotterpin.
ATTACHING THE CLUTCH CABLE
1. Removethethreadedeyeboltandnutfromthecableend.
2. Routetheclutchcabletotherightsideofthehandlemounting
bracketsandunderneaththehandle.
3. Pushthecablethroughtheholeinthecenterofthehandleand
snapin theplasticfitting.SeeFigure4.
4. Removetheslot headscrew,nutandtwo fiatwashersfromthe
clutchbail.SeeFigure5.
5. Fastenthethreadedeyeboltontothebailbysecuringitfromthe
topwiththeslotheadscrew,flatwashersandlocknut.
6. Threadtheeyeboltandnutremovedearlierintotheinternally
threadedtubeattheendofthecable.Thethreadengagement
shouldbeabout3/4".Tightenthenutagainstthetubeattheend
ofthecable.SeeFigure5.
NOTE:Donotovertightentheclutchcable.Toomuchtensionmay
causeitto break.Becertaintochecktheclutchcableadjustment
beforeoperatingthetiller.
Rubber
idler PulleyRod )
J
J
Figure3
Internally
Threaded
Tube
Slot Head Screw,
Nut & Fiat Washer
Figure4
ff Head Screw _'_
Washers
Contro!
Nut
Threaded
Tube
Figure5
9

ADJUSTMENTS f "_
Priortooperatingyourtiller,carefullyreadand followall instructions
below.Performalladjustmentstoverifyyourtillerisoperatingsafely
_andpropery.
Checktheadjustmentoftheclutchcableasfollows:
1. Positionthetillersothefrontcounterweightisagainsta solid
object,suchasa wall.
2. Withthegearselectionleverin NEUTRAL,starttheengine.Refer
toStartingtheEngineintheOperationsection.
3. Standingontherightsideofthetiller,examinethe belt(insidethe
beltcover).It shouldnotbe turning.
4. Ifthe beltturnswithouttheclutchcontrolengaged,adjustit by
unthreadingtheinternallythreadedtubeattheendofthecablea
fewturnsclockwise(whenstandingin theoperator'sposition)and
thenretightenthenutagainstthetube.SeeFigure6.
5. NowmovetheshiftlevertotheFORWARDposition.
6. Carefullyengagetheclutchbyliftingtheclutchcontrolagainstthe
handle.Thewheelsshouldspin.
7. Ifthewheelsdo notspinwiththetillerin forward,adjustby
unthreadingthetubeattheendofthecableafewturnscounter-
clockwise(whenstandingin theoperator'sposition)andthen
retightenthenutagainstthetube.SeeFigure6.
8. Recheckbothadjustments,andreadjustasnecessary.
NOTE:A secondarycableadjustmentisavailableifyoureachthe
pointthatadditionaladjustmentisneeded.Removethebeltcoverand
movethehexnutsattheotherendofthecabletowardstheendofthe
casing.Thenreadjustthehexnutsatthehandle.
Checktheadjustmentoftheidlerpulleyrodasfollows:
1. Disconnectandgroundthesparkplugwireagainsttheengine.
2. Withtheengineoffandtheclutchcontroldisengaged,shiftthe
gearselectionhandletoeachforwardmode.
3. Confirmthattheindicatorbracketdoesnottouchtheidlerpulley
rodwiththeclutchcontroldisengaged.
4. Toreadjustthe idlerpulleyrod,removethebeltcoverasde-
scribedunderBeltReplacementintheServiceandMaintenance
section.
5. Removethe hairpinclipandspringwasherfromtheidlerpulley
rod.SeeFigure7.
6. Movetheidlerpulleyrodtothelowerholeintheidlerbracket.
7. Replacethespringwasherandhairpinclip.
8. Checktheclearanceoftheidlerpulleyrodtothe indicatorbracket
byshiftingtoeachforwardmode.
f
Control
Fiat Washers
Nut
Threaded
Tube
Figure6
Rod
RubberWasher,
,,_f_ Indicator Bracket
idlerPulleyRod J
Figure7
J
10

Gear Selection
Handle
Handle Adjustment
Lock
Clutch Control
Air Filter
Fuel Cap
Muffler
Depth Stake
OU Fill Cap
& Dipstick
Rear Tine Shield
Side Shield
Figure8
J
Nowthat youhavesetup yourtillerforoperation,getacquaintedwith
itscontrolsandfeatures.Thesearedescribedonthenexttwopages
andillustratedon thispage.Thisknowledgewillallowyoutouseyour
newequipmenttoits fullestpotential.
RECOIL STARTER HANDLE
Thishandleisusedto starttheengine.
THROTTLE CONTROL
Thethrottlecontrolis locatedonthesideoftheengine.Itregulatesthe
spreadoftheengineandwillshutoff theenginewhenmovedintothe
STOPposition.
Theoperationofanytillercanresultinforeignobjectsbeingthrown
intotheeyes,whichcandamageyoureyesseverely.Alwayswear
safetyglassesduringoperationor whileperforminganyadjustments
or repairs.
CHOKE CONTROL
Thechokecontrolisfoundon thesideoftheengineandisactivated
bymovingthelevertotheCHOKEposition.Activatingthechoke
controlclosesthechokeplateon thecarburetorandaidsin startingthe
engine.
CHOKE RUN
I÷l
Meets ANSi Safety Standards
CraftsmanTillersconformtothesafetystandardoftheAmericanNationalStandardsInstitute(ANSI).
11

AiR FILTER
Theair filterisa deviceontheengineair intakethatpreventsdustand
dirtenteringtheengine.SeeFigure8.
MUFFLER
Engineexhaustexitstheengineviathemuffler.SeeFigure8.
OIL FILL CAP & DIPSTICK
Engineoil levelcanbecheckedand oiladdedthroughtheoil fill. See
Figure8.
NOTE:ThisunitwasshippedWITHOUToilintheengine.Oilis
includedintheplasticbag packedwiththemanualinwiththeunit.
Addtheoil asdirectedin theGas& OilFillUpsection.Checktheoil
levelbeforeeachoperationtoensureadequateoil is intheengine.
Forfurtherinstructions,refertothestepsintheEngineMaintenance
sectionof thismanual.
GEAR SELECTION HANDLE
Thegearselectionhandleislocatedonthefrontof thehandle
assembly.It isusedtoselectNEUTRAL,REVERSE,oroneof the
FORWARDmodes.SeeFigure8.
CLUTCH CONTROL
Theclutchcontrolislocatedbeneaththehandle.Squeezingtheclutch
handleagainstthehandleengagesthewheelandthedrivemecha-
nisms.SeeFigure8.
DEPTH STAKE
Thislevercontrolsthetillingdepthofthetines.Pullthecotterpinout
fromtheclevispintoadjustthetillingdepthto fivedifferentsettings.
SeeFigure8.
HANDLE ADJUSTMENT LOCK
Thehandlemaybeadjustedto theheightdesiredbyunlockingthe
HandleAdjustmentLock,thenmovingthehandlebarstothedesired
positionandthenre-lockingtheHandleAdjustmentLock.
SeeFigure8.
REAR TINE SHIELD
Therearfineshieldprotectstheoperatorfromflyingdebriswhilealso
smoothingoutfreshlytilledsoil.SeeFigure8.
SIDE SHIELD
Thesideshieldis usedtomaintainclearevenrowsandmaybe
adjustedtooneoffivedifferentpositions.SeeFigure8.
TINES
Yourfiller'stinesarea seriesofhoesarrangedon a revolvingpower-
drivenshaft.
12

GAS AND OIL FILL-UP
Oil (one bottle shipped with unit)
FirstTimeUse
1. Removeoilfilldipstick.
2. Withthetilleron levelground,usea funneltoemptyentire
contentsofoil bottleprovidedintotheengine.
3. Replaceoilfilldipstickandtighten.
Subsequent Uses
OnlyusehighqualitydetergentoilratedwithAPIserviceclassifica-
tionSF,or SG.Selecttheoil'sSAEviscositygradeaccordingtothe
expectedoperatingtemperature.Followthechartbelow.
Imlm _llm lOw
_ _ )Ow
mm m_O
_30
40 l_
20w40.20w50 _ _ _ _
I I
15w40, 15w50 =row =m_ mm,_ ,,,ml _w= 1link,.
® 10w40
10w30 mlm_ _m
(°C)-300 -200 -100 0° 100 200 300400
(°F)-200 0° 20U 40U 60U 800 100U
Ambient Temperature
1. SingleViscosity
2. Multi Viscosity
Althoughmulti-viscosityoils(5W30,10W30,etc.)improvestarting
in coldweather,theywillresultinincreasedoil consumptionwhen
usedabove32°F.Checkyourengineoil levelmorefrequentlytoavoid
possibleenginedamagefromrunninglowon oil.
1. Checktheoillevelmakingcertainnotto rubthedipstickalong
theinsidewallsoftheoil filltube.Thiswouldresultina false
dipstickreading.Wipedipstickcleanwithcloth.Replacedipstick
intotheoil fillerneck,butdo notscrewit in.Removeandcheck
oil level.Refillto FULLmarkon dipstick,ifnecessary.Capacityis
approximately20oz.Overfillingwillcausetheenginetosmoke
profuselyandwillresultin poorengineperformance.
2. Replaceoilfilldipstickandtighten.
3. KeepoillevelatFULL.Runningtheenginewithtoolittleoilcanresult
in permanentenginedamage.
Useextremecarewhenhandlinggasoline.Gasolineisextremely
flammableandthevaporsareexplosive.Neverfuelmachineindoors
orwhiletheengineis hotor running.Extinguishcigarettes,cigars,
pipes,andothersourcesof ignition.
Gasoline
1. Removefuelcapfromthefueltank.
2. Makesurethecontainerfromwhichyouwillpourthegasolineis
cleanandfreefrom rustorforeignparticles.Neverusegasoline
thatmaybestalefromlongperiodsofstorageinitscontainer.
Gasolinethathasbeensittingforanyperiodlongerthanfour
weeksshouldbeconsideredstale.
Alcoholblendedfuels(calledgasoholor usingethanolor methanol)
canattractmoisturewhichleadsto separationandformationofacids
duringstorage.Acidicgascandamagethefuelsystemofanengine
whileinstorage.
Toavoidengineproblems,thefuelsystemshouldbeemptiedbefore
storagefor30 daysor longer.Drainthegastank,starttheengine
andletitrununtilthefuellinesandcarburetorareempty.Usefresh
fuelnextseason.SeeSTORAGEInstructionsforadditionalinforma-
tion.
Neveruseengineor carburetorcleanerproductsinthefueltankor
permanentdamagemayoccur.
3. Fillfueltankwithclean,fresh,unleadedregulargasolineonly.Do
notusegasolinecontainingMETHANOL.Replacefuelcap.
NOTE:Checkthefuellevelperiodicallytoavoidrunningoutof
gasolinewhileoperatingthetiller.
TO START ENGINE
1. Attachsparkplugwireandrubberbootto sparkplug.
2. Filltanktonomorethan 1/2inchbelowbottomoffillerneckto
providespaceforfuelexpansion.
3. PlacethegearselectionleverinNEUTRAL.
4. Movethechokeleveron theenginetoCHOKEI'=,1position.(A
warmenginemaynotrequirechoking.)SeeFigure9.
5. Movethrottlecontrolto START/RUN(Rabbit)_ position.See
Figure9.
6. Standingon thesideoftheunit,graspstarterhandleandpull
ropeoutuntilyoufeela drag.
Figure9
J
13

7. Pulltheropewitha rapid,continuous,fullarmstroke.Keepafirm
griponthe starterhandle.Lettheroperewindslowly.
8. Repeat,if necessary,untilenginestarts.Whenenginestarts,
movechokecontrolgraduallytowardtheRUNI_'I position..
9. Ifenginefalters,movechokecontrolbacktowardtheCHOKE
I'_1 positionand repeatsteps5 though8.
10. ALWAYSkeepthethrottlecontrolintheSTART/RUN(Rabbit
positionwhenoperatingthetiller.
TO STOP ENGINE
1. Tostopthewheelsandtines,releasetheClutchControl.
2. Movethrottlecontrollevertoslow(turtle)_ position.Whenever
possible,graduallyreduceenginespeedbeforestoppingengine.
3. MovethrottlecontrollevertoSTOP_ orOFFposition.
4. Disconnectsparkplugwireandgrounditagainsttheengineto
preventaccidentalstartingwhiletheequipmentisunattended.
TO ENGAGE DRIVE & TINES
Donotpushdownon thehandlebarstotry tomakethetillertill more
deeply.Thispreventsthewheelsfromholdingthetillerbackandcan
allowthetinesto rapidlypropelthetiller,whichcouldresultinlossof
control,propertydamage,or personalinjury.
1. Forforwardmotionofthewheelsusethegearselectionhandleand
forpowertothetinespulltheClutchControlupagainstthe
handlebar.
2. Whentilling,letthewheelspullthemachinewhilethetinesdig.
Walkslowlybehindthetillerallowingittomoveat itsownpace
whilekeepinga securegripon thehandlebarwithyourelbows
flexed.
3. Releasethebailtostopthewheelsandtines.
To move in reverse: (Do not till in reverse)
a. ReleasetheClutchControl.Thenlift thehandlebaruntilthe
tinesareoff theground.
b. Pullbackonthegearselectionhandle,andwalkbackwards
withthe machine.
Note:Inreversemode,thetineswillreverserotation.
TURNING THE TILLER
1. Practiceturningthetillerinalevel,openarea.Beverycarefultokeep
yourfeetandlegsawayfromthetines.
2. Tobeginaturn, liftthehandlebarsuntilthetinesareoutofthe
groundandtheengineandtinesarebalancedoverthewheels.
3. Withthetillerbalanced,pushsidewayson thehandlebartosteer
inthedirectionoftheturn.Afterturning,slowlylowerthetinesinto
thesoiltoresumetilling.
SETTING THE DEPTH
Becertainsparkplugwireisdisconnectedandgroundedagainstthe
enginewhenperforminganyadjustments.
Tillingdepthiscontrolledbythedepthstakewhichcanbeadjustedto
fivedifferentsettings.Adjustthesideshieldsasyouadjustthedepth
stake.
• Whenusingthetillerforthefirsttime,usethe secondadjustment
holefromthetop(1"oftillingdepth).
• Whenbreakingupsodandfor shallowcultivation,usethesetting
whichgives1"oftillingdepth(secondholefromthetop). Place
thesideshieldsintheirlowestposition.
• Forfurtherdepth,raisethedepthstakeandsideshieldsandalso
makeoneortwo morepassesoverthearea.
• Whentillingloosesoil,thedepthstakemaybe raisedtoits
highestposition(usebottomadjustmenthole)togivethedeepest
tillingdepth.Raisethesideshieldstotheirhighestposition.
• Totransporttiller,lowerthedepthstake(usetopadjustment
hole).
Toadjustthedepthstake,removetheclevispinandcotterpin.Move
thedepthstaketothedesiredsettingandsecurewiththeclevispin
andcotterpin.SeeFigure10.
Toadjustthesideshields,removethewingnuts.Movethesideshield
E
Use this position
for the first }ort Position
Figure10
14

tothedesiredpositionandreplacethewingnuts.Tightensecurely.
SeeFigure11.
ADJUSTING THE HANDLE HEIGHT
Thehandleshouldbe adjustedsothatwhenthetilleris digging3-4"
intothesoil,thehandlefallstoaboutwaste-high.Toadjusthandle,
simplyunlocktheHandleAdjustmentLock,thenmovethehandlebars
tothedesiredpositionandthenre-locktheHandleAdjustmentLock.
CLEARING THE TINES
Beforeclearingthetinesbyhand,stoptheengine,allowall moving
partsto stopanddisconnectthe sparkplugwire.Failureto followthis
warningcouldresultin personalinjury.
to2" deep.Usingtheshallowtillingdepthhelpspreventinjuryto
theplantswhoserootsoftengrowclosetothesurface.Ifneeded,
lift up onthehandlebarsslightlytopreventthetinesfromdigging
toodeeply.(Cultivatingon a regularbasisnotonlyeliminates
weeds,italsoloosensandaeratesthesoilforbettermoisture
absorptionandfasterplantgrowth.)Wateringthegardenareaa
fewdayspriorto tillingwillmaketillingeasier,as willlettingthe
newlyworkedsoilsetfora dayor twobeforemakinga final,deep
tillingpass.
Choosing the Correct Wheel & Tine Speeds
f
• Thetineshavea self-clearingactionwhicheliminatesmostofthe
tanglingofdebris.However,occasionallydrygrass,stringystalks
ortoughvinesmaybecometangled.Followtheseproceduresto
helpavoidtanglingandtoclearthetines,ifnecessary.
• Toreducetangling,setthedepthregulatordeepenoughtoget
maximum"chopping"actionasthetineschopthematerialagainst
theground.Also,try totill undercropresiduesorcovercrops
whiletheyaregreen,moistandtender.
• Whiletilling,try swayingthehandlebarsfromsidetoside(about
6"to12").This"fishtailing"actionoftenclearsthetinesofdebris.
TILLING TIPS & TECHNIQUES
Beforetilling,contactyourtelephoneor utilitiescompanyandinquire
l ifundergroundequipmentor linesareusedonyourproperty.Donot
_tillnearburiedelectriccables,telephonelines,pipesor hoses.
Tilling Depth
• Thisisa DDT(dual-directionfine)tiller.Asthewheelspull
forward,thetinesrotatebackward.Asthewheelspullrearward,
thetines rotateforward.Thiscreatesan"uppercut"fineaction
whichdigsdeeply,uprootingsoilandweeds.Don'toverloadthe
engine,butdigasdeeplyaspossibleoneachpassOn later
passes,thewheelsmaytendto spinin thesoftdirt. Helpthem
alongbyliftingup slightlyon thehandlebar(onehand,palmup,
worksmosteasily).
• Avoidthetemptationtopushdownon thehandlebarsinan
attempttoforcethetillerto digdeeper.Doingsotakestheweight
offthepoweredwheels,causingthemtolosetraction.Without
thewheelstoholdthetillerback,thetineswillattempttopropel
towardstheoperatororawayfromtheoperator.
• Whencultivating(breakingupthesurfacesoilaroundtheplants
todestroyweeds,SeeFigure12),adjustthetinestodigonly1"
Deep tilling position
Figure11
f
Figure12
J
15

Withexperience,youwillfindthetillingdepthandtillingspeed
combinationthatisbestforyourgarden.Settheenginethrottleleverat
a speedtogivetheengineadequatepowerandyetallowit tooperate
attheslowestpossiblespeeduntilyouhaveachievedthemaximum
tillingdepthyoudesire.Fasterenginespeedsmaybedesirable
whenmakingfinalpassesthroughtheseedbedorwhencultivating.
Selectiond thecorrectenginespeed,in relationtothetillingdepth,
willensurea sufficientpowerleveltodothejob withoutcausingthe
enginetolabor.
Suggested Tilling Patterns
• Whenpreparingaseedbed,go overthesamepathtwiceinthe
firstrow,thenoverlapone-halfthetillerwidthontherestofthe
passes.SeeFigure13.
• Whenfinishedinonedirection,makea secondpassata right
angle,SeeFigure14.Overlapeachpassforthebestresults(in
veryhardground,itmaytakethreeorfourpassestothoroughly
pulverizethesoil.)
• if thegardensizewillnotpermitlengthwiseandthencrosswise
tilling,thenoverlapthefirstpassesbyone-halfa tillerwidth,fol-
lowedbysuccessivepassesatone-quarterwidth.SeeFigure15.
Tilling on a Slope
Donotoperatethetilleron a slopetoosteepforsafeoperation.Till
slowlyand besureyouhavegoodfooting.Neverpermitthetillerto
freewheeldownslopes.Failuretofollowthiswarningcouldresultin
personalinjury.
1. Tillonlyonmoderateslopes,neveronsteepgroundwherethefooting
isdifficult.
2. Tillingupanddownslopesisrecommendedoverterracing.Tilling
verticallyona slopeallowsmaximumplantingareaandalso
leavesroomforcultivating.
NOTE:Whentillingonslopes,besurethecorrectoil levelismain-
tainedintheengine(checkeveryone-halfhourofoperation).The
inclineoftheslopewillcausetheoiltoslantawayfromits normal
levelandthiscanstarveenginepartsofrequiredlubrication.Keepthe
motoroil levelatthefullpointatall times.
Figure13
iim_mlm Imlmlml_i
/ i
Figure14
Tilling Up and Down a Slope
1. Tokeepsoilerosiontoa minimum,besuretoaddenoughorganic
mattertothe soilsothatit hasgoodmoistureholdingtextureand
tryto avoidleavingfootprintsor wheelmarks.
2. Whentillingvertically,try tomakethefirstpassuphillasthetiller
digsmoredeeplygoinguphillthanitdoesdownhill,in softsoilor
weeds,youmayhavetoliftthehandlebarsslightlywhilegoingup-
hill.Whengoingdownhill,overlapthefirstpassbyaboutone-half
thewidthofthetiller.
Terrace Gardening
16
Figure15

1. Tocreateaterrace,startatthetopoftheslopeandworkdownGo
backandforthacrossthefirstrow.SeeFigure16.
2. Eachsucceedinglowerterraceisstartedbywalkingbelowthe
terraceyouarepreparing.Foraddedstabilityofthetiller,always
keeptheuphillwheelinthesoft,newlytilledsoil.Donottillthe
last12"ormoreofthedownhilloutsideedgeofeachterrace.This
untilledstriphelpspreventtheterracesfrombreakingapartand
washingdownhill.Italsoprovidesawalkingpathbetweenthe
rows,
Loading & Unloading the Tiller
Loadingandunloadingthetillerintoa vehicleispotentiallyhazard-
ousanddoingsoisnotrecommendedunlessabsolutelynecessary,
asthis couldresultin personalinjuryor propertydamage.
ifyoumustloador unloadthetiller,followtheguidelinesgivenbelow:
• Beforeloadingor unloadingthetiller,stoptheengine,waitforall
partstostopmoving,disconnectthesparkplugwireand letthe
engineandmufflercool.
• Thetilleristooheavyandbulkytobesafelyliftedbyoneperson.
Twoor morepeopleshouldsharetheload.
Usesturdyrampsandmanually-- withtheengineshutoff -- roll
thetillerintoandoutofthevehicle.Twoor morepeopleare
neededtodothis.
• Therampsmustbestrongenoughto supportthecombined
weightofthetillerandanyhandlers.Therampsshouldprovide
goodtractiontopreventslipping;theyshouldalsohavesiderails
toguidethetilleralongtheramps;andtheyshouldhavea locking
devicetosecurethemtothevehicle.
Thehandlersshouldwearsturdyfootwearthatwillhelpto prevent
slipping.
• Positiontheloadingvehiclesothattherampangleisasflat
aspossible(theless inclinetotheramp,thebetter).Turnthe
vehicle'sengineoff andapplytheparkingbrake.
• Whengoingup theramps,standinthenormaloperatingposition
andpushthetilleraheadof you.Havea personateachsideto
turnthewheels.
• Whengoingdowntheramps,walkbackwardwiththetiller
followingyou.Keepalertforanyobstaclesbehindyou. Positiona
personateachwheelto controlthespeedofthetiller.Nevergo
downtherampstiller-first,asthetillercouldtipforward.
• Placewoodenblocksonthedownhillsideofthewheelsifyou
needto stopthetillerfrom rollingdowntheramp.Also,usethe
blockstotemporarilykeepthetillerin placeonthe ramps(if
necessary),andto chockthewheelsinplaceafterthetilleris in
thevehicle.
• Afterloadingthetiller,preventitfromrollingchockingthewheels
withblocksand securelytiethetillerdown.
f
I' REPEAT
Figure16
J
17

MAINTENANCE SCHEDULE
Beforeperforminganytypeofmaintenance/service,disengageall
controlsandstoptheengine.Waituntilallmovingpartshavecometo
acompletestop.Disconnectsparkplugwireandgrounditagainstthe
enginetopreventunintendedstarting.Alwayswearsafetyglassesduring
operationorwhileperforminganyadjustmentsor repairs.
Followthemaintenanceschedulegivenbelow.Thischartdescribes
serviceguidelinesonly.UsetheServiceLogcolumntokeeptrackof
completedmaintenancetasks.Tolocate the nearest SearsService
Centeror toscheduleservice,simplycontactSearsat
1-800-4-MY-HOME®.
EachUse
1st2 hours
1st5 hours
Every10hours
Every25hours
Every30hours
Every50hours
Every100hours
BeforeStorage
.
2.
3.
4.
1.
2.
1.
1.
2.
1.
2.
3.
1.
1.
2.
1.
Engineoillevel
Looseormissinghardware
Engineandaroundmuffler
Aircleaner
Drivebelttension
Nutsand Bolts
Engineoil
Drivebelttension
Unit
Sparkplug
Tinesforwear
Tirepressure
Engineoill-
Aircleaner
SparkPlug
Fuelsystem
= =
1. Check
2. Tightenor_place
3. Clean
4. Check
1. Check
2. Check
1. Change
1. Check
2. Lubricate
1. Check
1. Check
2. Check
1. Change
1. Change
2. Change
1. Runengineuntilit stopsfromlackof
fueloradda gasolineadditivetothe
gasin thetank.
Changeoileverytwentyfivehourswhenoperatingengineunderheavyloadorin hightemperatures.
Alwaysstopengineanddisconnectsparkplugwirebeforeperforming
lanymaintenanceor adjustments.Alwayswearsafetyglassesduring
[operationorwhileperforminganyadjustmentsor repairs.
ENGINE MAINTENANCE
DONOTcheckforsparkwithsparkplugremoved.DONOTcrank
enginewithsparkplug removed.
GENERAL RECOMMENDATIONS
• Alwaysobserveallsafetyrulesfoundonproductlabelsandin
thisoperator'smanualwhenperforminganymaintenance.Safety
rulescanbefoundonthe productlabelsandin thisOperator's
Manualbeginningonpage3.
• Thewarrantyon thistillerdoesnotcoveritemsthathavebeen
subjectedto operatorabuseor negligence.Toreceivefullvalue
fromwarranty,operatormustmaintaintheequipmentas
instructedhere.
• Someadjustmentswillhavetobe madeperiodicallytomaintain
yourunitproperly.
• Periodicallycheckall fastenersandmakesurethesearetight.
Iftheenginehasbeenrunning,themufflerwillbeveryhot. Becareful
nottotouchthemuffler.
Thesparkplugmustbesecurelytightened.Animproperlytightened
sparkplugcanbecomeveryhotandmaydamagetheengine.
Checking the Spark Plug
Toensureproperengineoperation,thesparkplugmustbeproperly
gappedandfreeofdeposits.Checkthesparkplugevery25hoursand
replaceitevery100hours.
18

1. Removethesparkplugbootandusea sparkplugwrenchto
removetheplug.See Figure17.
2. Visuallyinspectthesparkplug.Discardthesparkplugifthereis
apparentwear,orifthe insulatoriscrackedor chipped.Cleanthe
sparkplugwitha wirebrushifitisto be reused.
3. Measurethepluggapwitha feelergauge.Correctas necessary
bybendingsideelectrode.SeeFigure18.Thegapshouldbeset
to0.030in.
4. Checkthatthe sparkplugwasherisingoodconditionandthread
thesparkplugin byhandtopreventcrossthreading.
5. Afterthesparkplugisseated,tightenwitha sparkplugwrenchto
compressthewasher.
NOTE:Wheninstallinganewsparkplug,tighten1/2turnafterthe
sparkplugseatstocompressthewasher.Whenreinstallinga used
sparkplug,tighten1/8-1/4turnafterthesparkplugseatsto compress
thewasher.
Neverusegasolineorlowflashpointsolventsforcleaningtheair
ceanereement.A fre orexpos oncoud resut.
Servicing the Air Cleaner
Theair cleanerpreventsdamagingdirt, dust,etc.,fromenteringthe
carburetorand beingforcedintotheengineandisimportanttoengine
lifeandperformance.Neverruntheenginewithoutanaircleaner
completelyassembled.Checktheaircleanerbeforeeachuse.
Paperfilterscannotbecleanedandmustbe replacedoncea year
orevery 100operatinghours;moreoftenifusedin extremelydusty
conditions.
1. Pressthetabontheairfiltercover,lift thecoverandremovethe
airfilter.SeeFigure19.
2. Discardold airfilter.
3. Installnewairfilter.
4. Closethecover.
NOTE:Ifthefilteristornordamagedin anyway,replaceit.
Donotsprayenginewithwatertocleanbecausewatercould
contaminatefuel. Usingagardenhoseorpressurewashingequip-
mentcanalsoforcewaterintothemuffleropening.Waterthat passes
throughthemufflercanenterthecylinder,causingdamage.
Accumulationofdebrisaroundmufflercouldcausea fire.Inspectand
cleanbeforeeveryuse.
Figure17
,Electrode
0.02-0.03 in.
===_1_====0.60-0.80 rnrn
Figure18
J
Air Filter
Cover
Filter
Cleaning the Engine
If theenginehasbeenrunning,allowitto coolforatleasthalfan hour
beforecleaning.Periodicallyremovedirtbuild-upfromtheengine.
Cleanaroundthe muffler.Cleanwitha brushor compressedair.
Figure19
J
19

Check Engine Oil
1. Checkoil beforeeachuse.Stopengineandwaitseveralminutes
beforecheckingoil level.Withengineon levelground,theoilmust
beto FULLmarkon dipstick.
2. Removeoil filldipstickandwipecleanwithcloth.
3. Replacedipstickintotheoilfillerneck,butdonotscrewitin.
Removeandcheckoil level.Levelshouldbeat FULLmark.
4. If needed,addoil slowly- recheck.Donotoverfill.
5. Wipedipstickclean,replacebutdonottighten.Removeand
checkoil level.Oillevelshouldbeat FULLlineondipstick.
6. Replaceandtightendipstickfirmlybeforestartingengine.
DONOTusenon-detergentoilor 2-strokeengineoil.Itcouldshorten
theengine'sservicelife.
Change Engine Oil
• SAE10W-30is recommendedforgeneral,all temperatureuse.
Whenaddingoiltotheengine,referto viscositychart inthe
operationsection.Usea 4-stroke,oranequivalenthighdeter-
gent,premiumqualitymotoroilcertifiedtomeetor exceedU.S.
automobilemanufacturer'srequirementsforserviceclassification
SG,SR MotoroilsclassifiedSG,SFwillshowthisdesignationon
thecontainer.
• Changeengineoil afterthefirstfivetoeighthoursofoperation,
andeveryfifty hoursoreveryseasonthereafter.Changeoil every
twentyfivehourswhenoperatingengineunderheavyloadorin
hightemperatures.
Drain
Figure 20
4. Replaceandtightentheoildrainendcap.
5. Whenengineisdrainedofalloil,placeenginelevel.Refillwith
approximately20oz.offreshoil.Fillto FULLlineondipstick.
Donotoverfill.Referto CheckEngineOil inthis SERVICE&
MAINTENANCEsection.
6. Replacesparkplugwirebeforestarting.
Beforetippingengineor equipmenttodrainoil,drainfuelfromtank by
runningengineuntilfueltankisempty.
Usedmotoroil maycauseskincancerifrepeatedlyleftin contactwith
theskinforprolongedperiods.Althoughthis isunlikelyunlessyou
handleusedoil ona dailybasis,itisstilladvisabletothoroughlywash
yourhandswithsoapandwateras soonaspossibleafter handling
usedoil.
To Drain Oil
1. Drainthefuelfromthetankbyrunningtheengineuntilthefuel
tankisempty.Besurefuelfillcapissecure.
2. WithengineOFFbutstillwarm,disconnectsparkplugwireand
keepitawayfromsparkplug.
3. Removeoil drainendcaplocatedatthebaseoftheengine,and
drainoil intoanappropriatereceptacle.SeeFigure20.
Usedoilisa hazardouswasteproduct.Disposeofusedoil properly
IDonotdiscardwithhouseholdwaste.Checkwithyourlocalauthori-
_tiesor SearsServiceCenterforsafedisposal/recyclingfacilities.
2O

Transmission Lubrication
Thetransmissionispre-lubricatedand sealedatthefactory,itrequires
nocheckingunlessthetransmissionisdisassembled.Tofillwith
grease,laytherighthalfofthetransmissiononitsside,add22 ounces
ofBenalene920grease,andassembletheleft halftoit. Seean
authorizedSearsServiceCenterto havethetransmissionlubricatedor
toscheduleservice,simplycontactSearsat 1-800-4-MY-HOME®.
LUBRICATION
Afterevery10operatinghours,oilor greasethelubricationpoints.Use
cleanlubricatingoil (#30weightmotoroil issuitable)andcleangeneral
purposegrease(greasecontaininga metallubricantispreferred,if
available).SeeFigure21.
• Removethewheels,cleanthewheelshaftandapplya thin
coatingofgrease.
• Greasetheback,frontandsidesofthedepthregulatorlever.
• Removethetinesandcleanthefineshaft.Usea fileor sandpa-
pertogentlyremoveanyrust,burrsor roughspots(especially
aroundtheholesintheshaft).Applygreasetotheendsofthe
shaftbeforeinstallingthetines.
• Oilthethreadsonthehandlebaradjustmentlockandthe
handlebarattachingscrews.
• Oilthepivotpointontheclutchhandleandtheclutchcable.
TIRE PRESSURE
Checktheair pressureinbothtires.Theairpressureshouldbe
between15-20PSI.Keepbothtiresequallyinflatedtohelpprevent
machinefrompullingtoone side.
HARDWARE
Checkforlooseor missinghardwareafterevery10operatinghours
andtightenor replace-- asneeded-- beforereusingthetiller.Be
suretocheckthescrewsunderneaththetillerhoodthatsecurethe
transmissioncoverandtheDepthRegulatorLeverto thetransmission.
Beforeperforminganytypeofmaintenanceonthemachine,waitfor
all partsto stopmovinganddisconnectthesparkplugwire.Failure
tofollowthis instructioncouldresultinpersonalinjuryor property
damage.
BELT REPLACEMENT
Yourtillerhasbeenengineeredwitha beltdesignedfor longlife
andoptimalperformance.Useonlya factoryauthorizedbeltasan
"over-the-counter"beltmaynotperformsatisfactorily.Theprocedure
requiresaveragemechanicalabilityandcommonlyavailabletools.
Toreplacethe Drivebelt,followthesesteps:
1. Removethebeltcoverfromtheleftsideofthetillerbyremoving
thetwoscrewsfromthetopofthebeltcover.SeeFigure22.
2. Removethehexcapnutandflatwasherfromthefrontsideofthe
beltcover.Removethehexheadscrewatthebackofthecover.
SeeFigure22.
21
Handlebar
Hardware
Lever
Tin_
Figure21
Screws
Nut andwasher
Figure22

3. Removethebeltkeeperassemblylocatedbehindtheengine
pulleybyremovingthetwohexboltsandlockwashers.See
Figure23.
4. Removetheidlerpulleybyremovingtheboltandnut.
SeeFigure23.
5. Removetheoldbeltandinstallthenewbelt.Followtheinstruc-
tionsinreverseordertore-installthebeltkeeperandbeltcover.
SeeFigure23.
NOTE:Uponreassembly,makecertainthebeltisroutedovertheidler
pulleyandinsideofthebeltkeepersbytheenginepulley.
TINES
Thetineswillwearwithuseand shouldbe inspectedatthebeginning
ofeachtillingseasonandafterevery30 operatinghours.Thetines
canbereplaced.Referto thePartsListsectionofthismanualforpart
numbers.
Tine inspection
Withuse,thetineswillbecomeshorter,narrowerandpointed.Badly
worntineswillresultina lossof tillingdepth,andreducedeffective-
nesswhenchoppingupandturningunderorganicmatter.
Removing/Installing a Tine Assembly
1. Removethetineshieldendcoversand sideshieldsbyremoving
thethreewingnutsoneachsidethatsecurethem.
2. Afineassemblyconsistsofa lefthandfineanda righthandfine.
NOTE:Thefineassemblymovesina counter-rotatingmotionwith
thesharpedgesof thetinespositionedtoenterthesoilfirstwhen
counter-rotating.Notethis positionof thetinesforreinstallationofthe
newfineassemblies.
3. Toremoveafineassembly,simplyremovetheinternalcotterpin
securingtheclevispin.SeeFigure24.
4. Removetheclevispin andslidetheassemblytotheoutsideof
theunitandoff ofthefineshaft.
5. Beforereinstallingthefineassembly,inspectthetineshaftfor
rust,roughspotsorburrs.Lightlyfileor sand,asneeded.Applya
thincoatofgreasetotheshaft.
6. Installeachtineassemblysothatthecutting(sharp)edgeofthe
tineswillenterthesoilfirstwhenthetillermovesforward.Keep
in mindthatthesetinesarecounter-rotating,sosecurethefine
assemblytothetineshaftusingtheclevispinandinternalcotter
pin.
ADJUSTMENTS
Handle
Thehandlemaybeadjustedtothedesiredheight.RefertotheOpera-
tionsectionfordetails.
Belt Kee
Engine Pulley
Figure23
J
ClevisPin
/
f
.............
7
Internal
Cotter Pin
J
Figure24
Clutch Cable
RefertotheAssemblysectionforinstructionson adjustingtheclutch
cable.
idler Pulley Rod
RefertotheAssemblysectionforinstructionson adjustingtheidler
pulleyrod.
22

Neverstoretillerwithfuelin tankindoorsor in poorlyventilatedareasI
wherefuelfumesmayreachanopenflame,spark,or pilotlightason
a furnace,waterheater,cothesdryer,orgasapp ance. 1
Neverleaveengineunattendedwhileitis running.
PREPARING THE ENGINE
Enginesstoredbetween30and 90daysneedto betreatedwitha
gasolinestabilizerandenginesstoredover90daysneedto bedrained
offueltopreventdeteriorationandgumfromforminginfuelsystemor
on essentialcarburetorparts.Ifthegasolineinyourenginedeterio-
ratesduringstorage,youmayneedtohavethecarburetor,andother
fuelsystemcomponents,servicedor replaced.
1. Removeallfuelfromtankbyrunningengineuntilit stopsfrom
lackoffuel.
2. Changetheoil.SeeChangeEngineOil inSERVICEAND
MAINTENANCEsection.
3. Removesparkplugand pourabouta 1/2ounceof engineoilinto
thecylinder.Replacesparkplugandcrankit slowlytodistribute
oil.
4. Cleandebrisfromaroundtheengineandthemuffler.Touchup
anydamagedpaint,andcoatotherareasthatmayrustwitha light
filmofoil.
5. Storein a clean,dryandwellventilatedareaawayfromanyap-
pliancethatoperateswitha flameorpilotlight,suchasa furnace,
waterheater,orclothesdryer.Alsoavoidanyareawitha spark
producingelectricmotor,orwherepowertoolsare operated.
6. Ifpossible,alsoavoidstorageareaswithhighhumidity,because
that promotesrustandcorrosion.
7. Keeptheenginelevelinstorage.Tiltingcancausefuelor oil
leakage.
PREPARING THE TILLER
Whenthetillerwon'tbe usedforan extendedperiod,prepareitfor
storageasfollows:
1. Cleanthetillerandengine.
2. Followthelubricationrecommendationsandcheckforlooseparts
and hardware.
3. Storethetillerina clean,dryarea.
4. Neverstorethetillerwithfuelinthefueltankinan enclosedarea
wheregasfumescouldreachan openflameor spark,or where
ignitionsourcesare present(spaceheaters,hotwaterheaters,
furnaces,etc.).
23

Beforeperforminganytyped maintenance/service,disengageallcontrolsandstoptheengine.Waituntilall
movingpartshavecometoacompletestop.Disconnectsparkplugwireandgrounditagainsttheenginetoprevent
unintendedstarting.Alwayswearsafetyglassesduringoperationorwhileperforminganyadjustmentsorrepairs.
Enginefailstostart
Enginerunserratically
Engineoverheats
Enginedoesnotshutoff
Wheels/Tineswillnotturn
Tinesturn, butwheelsdon't
Wheelsturn,buttinesdon't
Poortillingperformance
1. Sparkplugwiredisconnected.
2. EngineThrottleControlLeverincorrectlyset.
3. Fueltankemptyor stalefuel.
4. Dirtyairfilter.
5. Defectiveor incorrectlygappedsparkplug.
6. Misadjustedthrottlecontrol.
7. Dirtorwater infueltank.
1. Defectiveor incorrectlygappedsparkplug.
2. Dirtyairfilter(s).
3. Carburetoroutofadjustment.
4. Stalegasoline.
5. Dirtorwaterinfueltank.
6. Enginecoolingsystemclogged.
1. Enginecoolingsystemclogged.
2. Carburetoroutofadjustment.
3. Oillevelis low.
1. Misadjustedthrottlecontrolor ignitionswitch.
1. Improperuseofcontrols.
2. Worn,broken,or misadjusteddrivebelt(s).
3. Internaltransmissionwearor damage.
4. Boltlooseintransmissionpulley.
1. Boltlooseintransmissionpulley.
2. Internaltransmissionwearor damage.
1. Tineholdermountinghardwaremissing.
2. Boltlooseintransmissionpulley.
3. Internaltransmissionwearor damage.
1. Worntines.
2. ImproperDepthRegulatorsetting.
3. Incorrectthrottlesetting.
4. ForwardDriveBeltslipping.
1. Reconnectwire.
2. Putleverin STARTposition.
3. Filltankwithclean,freshgasoline.
4. Cleanor replacefilter.
5. Clean,adjustgap,or replace.
6. ContactyourSearsParts& RepairCenter.
7. ContactyourSearsParts& RepairCenter.
1. Clean,adjustgap,or replace.
2. Cleanor replace.
3. ContactyourSearsParts& RepairCenter.
4. Replacewithfreshgasoline.
5. ContactyourSearsParts& RepairCenter.
6. Cleanair coolingsystem.
1. Cleanair coolingarea.
2. ContactyourSearsParts& RepairCenter.
3. Checkoil level.
1. ContactyourSearsParts& RepairCenter.
1. ReviewOperationsection.
2. Replaceoradjustbelts.
3. ContactyourSearsParts& RepairCenter.
4. Tightenbolt.
1. Tightenbolt.
2. ContactyourSearsParts& RepairCenter.
1. Replacehardware.
2. Tightenbolt.
3. ContactyourSearsParts& RepairCenter.
1. ReplaceTines.
1. See"TillingTips& Techniques."
1. SeeService& MaintenanceSection.
1. SeeService& MaintenanceSection.
NEED MORE HELP?
Yo_Y[_fi_d_@e a_sw_ am_morn on mana_emy_ife_{_om- f_)_'free_
Find this and all your other product manuals online.
Get answers from our team of home experts.
Get a personalized maintenance ptan for your home.
Fred information and tools to help with home projects.

25

Craftsman Tiller B Model No. 247.29932
6
14
26
21
28
7
10
4.6
\
/
49
\
26

Craftsman Tiller B IViodel No. 247.29932
747-1152 ShiftRod
2 649-0034-0691 LowerHandleTubeAssembly 30
3 649-0041-0691 UpperHandleAssembly 31
4 710-0946 Screw,1/4-20x 0.625 32
5 710-3005 HexHeadScrew,3/8-16:1.25 33
6 710-3056 HexHeadScrew,5/16-18x3.25 34
7 911-0415 ClevisPin,.375X 1.75 35
8 712-0324 HexLockNut,1/4-20 36
9 712-0379 FlangeLockNut,3/8-24 37
10 912-0429 HexLockNut,5/16-18 38
11 714-0147 CotterPin,.125X 1.75Internal 39
12 720-0210A SmallTeeKnob 40
13 720-0278A FoamGrip,.970x 11.0 41
14 720-0313 Grip,.1875x 1.00 42
15 726-0273 BatteryClamp,5/16 43
16 726-0317 CableTie,8.5 LG 44
17 735-0246A EndPlug 45
18 936-0117 Washer,Fiat,.385x.620x .033 46
19 736-0242 Washer,Bell,.340x .872x .060 47
20 736-3090 Washer,Flat,.260x.720x .060 48
21 938-0958 Spacer,.50x.190x .360LG 49
22. 747-1219-0637 ClutchBail 50
23 784-0190 HandleAdjustmentCrank 51
24 784-0191 HexNutRetainerBracket 52
25 786-0120-0637 TillerDepthControl 53
26 786-0181-0691 ShaftRodLever 54
27 735-0127 Washer,.33IDx .87ODx .125 55
28 914-0104 CotterPin,.072x 1.12LG
686-0044B-0691
710-0176
710-3008
710-3022
710-04482
712-04063
712-04065
712-0421
926-0106
736-0204
938-0849
747-0432
750-0885A
786-0090A-0691
786-0113A-0691
786-0176-0691
786-0177-0691
786-0178A-0691
786-0179-0637
786-0180-0637
710-0506
912-3066
936-0921
731-1595
936-0179
710-0376
750-0194
EndCoverAssembly
HexHeadScrew,5/16-18x 2.75
HexHeadScrew,5/16-18x .75
HexHeadScrew,3/8-16x2.75
HexHeadFlange,3/8-16x .875
FlangeLockNut,5/16-18
FlangeLockNut,3/8-16
WingNut,5/16-18W/Bell Washer
SpeedNutCap,1/4ROD
Washer,Flat,.344x .62x .033
Screw,Hex,5/16-18x .75
TillerFlapRod
Spacer,.322x .625x 2.00
SideShield
RearTineShield
RH HandleMountBracket
LHHandleMountBracket
TineShield
FRTTineShieldBracket
FRTTineShieldSpacerBracket
HexHeadScrew,1/2-20x5.50
HexNut,1/2-20
Washer,Lock,1/2
Counterweight
Washer,Flat,1/2x 1.25x .100
HexHeadScrew,5/16-18x 1.00
Hub,.636IDx 1.00ODx .94
27

Craftsman Tiller- Model No. 247.29932
28
\
5
©
6
22
24
15
\
25
43
32
28

Craftsman Tiller B IViodel No. 247.29932
686-0111-0637 BeltCoverBracketAssembly
2 710-1039 HexHeadScrew,3/8-24x 1.00
3 710-0237 HexHeadScrew,5/16-24x .625
4 710-0412 HexHeadScrew,1/4-28x .75 31
5 710-0502A Screw,3/8-16x 1.250 32
6 710-0599 Screw,1/4-20x 0.500 33
7 710-3005 HexHeadScrew,3/8-16x 1.25 34
8 710-0805 HexHeadScrew,5/16-18x 1.50 35
9 712-0266A Jam LockNut,3/8-16 36
10 742-0305A-0637 ArticulatingTine 37
11 914-0104 CotterPin,.072DIA.x 1.13LG 38
12 936-0104 Washer,Lock,5/16
13 936-0119 Washer,Lock,5/16 40
14 936-0176 Washer,Fiat,.265x .938x .120 41
15 984-0160-0637 TineAdaptorAssembly 42
16 936-0271 Washer,Spring,.317x .625x .020 43
17 936-0329 Washer,Lock,1/4 44
18 936-0452 Washer,Bell,.396x 1.140x .095 45
19 938-0876 ShoulderNut,7/16-20 46
20 746-1117 ClutchCable 47
21 747-1159 IdlerPulleyRod 48
22 954-0434 Belt,4L x58.16LG 49
23 756-0405 FiatIdlerPulleyw/Flanges,3.75O.D. 50
24 756-0971 EnginePulley,InnerHalf 51
25 756-0972 EnginePulley,OuterHalf 52
26 756-1162 inputPulley,4Lx8.594 53
27 786-0064A IdlerPulleyBracket
786-0185A-0637 BeltKeeperBracket
29 786-0187-0637 ShiftCoverBracket
30 786-0193-0637 IdlerBeltKeeper
686-0109A
710-0653
710-1017
712-0392
915-0120
936-3020
784-0158A-0691
784-0208D-0691
ShiftCrankAssembly
Screw,1/4-20:0.375
Screw,1/4-14:0.625
LockNut,Cap,1/4-28
SpiralPin,3/16x 1.00
Washer,Fiat,.271x .630x .065
BeltCover
ShiftCover
39 634-04654
710-0606
712-04064
911-0415
714-04043
986-04074A
712-3054
936-0169
Wheel,16x4.6x8
HexHeadScrew,1/4-20x 1.50
FlangeLockNut,1/4-20
ClevisPin,.375x 1.75
CotterPin,BowTie
CompleteGearCaseAssembly
HexLockNut,3/8-24
Washer,Lock,3/8
936-0208
936-0253
938-0688
938-0689
912-3010
731-07556
952Z170-VOB
Washer,Fiat,.51x 1.5x0.07
Washer,Bell,.525x 1.00x .050
Screw,Shoulder,3/8-24x 1/2x .325
Screw,Shoulder,3/8-24x 1/2x .180
HexNut,5/16-18
Cap
ReplacementEngine
29

Craftsman Tiller B IViodel No. 247.29932
16
29\ 37
11
5O
46
18
/
44
38
/
16
30
29
/
40
12
/
/
16
30

Craftsman Tiller B IViodel No. 247.29932
611-0021 ShaftAssembly,Tine,18T
2 611-0128 ShaftAssembly,Jack 28
3 611-0129 ShaftAssembly,Shiftinput 29
4 611-04074A ShaftAssembly,Wheel,33T 30
5 617-0058 GearAssembly,30TReverseIdler 31
6 617-0059 GearAssembly,30TTineIdler 32
7 617-0060 SprocketAssembly,9TTineinput 33
8 617-0061 SprocketAssembly,10TWheelinput 34
9 617-0062 GearAssembly,11T 35
10 686-0108A-0637 RHChainCaseHousingAssembly 36
11 710-0376 HexHeadScrew,5/16-18x 1.00 37
12 710-0599 Screw,1/4-20x 0.500 38
13 710-0604A Screw,:5/16-18x0.625 39
14 710-3008 HexHeadScrew,5/16-18x .75 40
15 711-1349 inputShaft,.75 41
16 712-0378 Nut,Hex,7/16-20 42
17 712-3004A Nut,FlangeLock,5/16-18 43
18 913-0367 EndlessChain,#420x50 Links 44
19 913-0484 EndlessChain,#50 x54 Links 45
20 716-0865 SnapRing,.500 46
21 717-0853A ClutchCollar 47
22 717-1582 GearSpur,44T 48
23 717-1583 GearSpur,30T
24 717-1584 GearSpur,30T
25 717-1585 GearSpur,44T
26 717-1587 GearSpur,44T
717-1594
921-0378
721-0379
786-0238
726-0277
932-0496
936-0163
936-0171
936-0226
936-0351
736-0407
736-0518
736-3088
686-04129-0637
GearSpur,16T
ShaftSeal,1.0
ShaftSeal,.75
PositionerGearBracket
TaperedCapPlug
CompressionSpring,.230OD
Washer,Fiat,1.03x 1.62x .03
Washer,Lock,7/16
Washer,Flat,.474x .879x .064
Washer,Fiat,.760IDx 1.50OD
Washer,Bell,.45x 1.00x .062
Washer,Thrust,.445x 1.92x .060
Washer,Flat,1.595x .635x .062
LHChainCaseHousing
950-0671
738-0645
738-0648
738-04424
941-0600
941-0420
741-0421
941-0563
Spacer,.75x2.0x .50
ShaftDetent,.5DIA
Shaft,Jack,.625x2.385
Shaft,Jack,.6250x 5.0050
BallBearing,17x40x 12:6203
FlangeBearing,1.0x2.5x 1.38
FlangeBearing,.75x2.5x 1.38
BallBearing,17x40 x 12:6203
49 741-0862 Ball,Detent,.250
50 750-0258 Spacer,.315x .750x .375LG
51 950-0570 Spacer,1.0IDx2.00D x.5 LG
52 750-0664 Spacer,.505IDx .88ODx .440
31

Craftsman Engine IViodel 170=VOB For Tiller IViodel 247.29932
17
2O
31
m
20
21
22
23
30
31
32
34
35
36
37
951-11285
712-04214
751-12294
710-05002
951-10806
712-04213
710-05102
951-12135
951-10794
951-10794
951-12136
D = O 0
ExhaustPipeGasket
Nut,M8
MufflerAssembly
Bolt
Air CleanerHousing
Nut
Self-TappingBoltM4.2x16
SilencerPlate
Air CleanerAssembly
Air CleanerAssembly
Air CleanerCover
32

Craftsman Engine IViodel 170-VOB For Tiller IViodel 247.29932
29
m
28
29
a
b
C
d
e
f
g
h
I
J
k
I
951-10797
951-11571
951-11177
N/A
N/A
N/A
N/A
N/A
N/A
N/A
N/A
N/A
N/A
N/A
D = I! q!
CarburetorAssembly
CarburetorGasketPlate
ControlLever,Choke
ChokeShaft
ChokePlate
ThrottleShaft
ThrottlePlate
ScrewM3x5
LockWasher
IdleJetAssembly
Gasket,ThrottlePlate
IdleSpeedAdjustingScrew
MixtureScrew
CarburetorBody
m
I11
n
0
P
q
r
s
t
U
V
W
X
N/A
N/A
N/A
N/A
N/A
N/A
951-11589
N/A
951-11348
710-04945
951-11349
710-04938
951-12119
D = I! O
FloatPin
EmulsionTube
NeedleValve
MainJet
NeedleValveSpring
Float
FuelBowlGasket
FuelBowl
FuelBowlGasket
FuelBowlMountingBolt
FuelDrainPlugGasket
FuelDrainPlug
CarburetorKit- Major
(Incl Ref.I,m,n,o,p,q,r,s,u&w)
33

Craftsman Engine IViodel 170=VOB For Tiller IViodel 247.29932
|56
34

Craftsman Engine IViodel 170=VOB For Tiller IViodel 247.29932
m
44
45
46
47
48
49
5O
51
52
53
54
55
56
57
58
59
6O
61
62
63
64
65
65a
66
67
68
69
112
113
951-11253
951-11632
951-12007
951-11633
710-04915
951-11113
951-11573
951-11356
736-04461
951-11574
714-04074
951-11575
951-11369
951-12160
951-10307
951-11576
715-04092
715-04089
951-11371
951-12125
710-04932
951-11377
951-11577
951-11578
951-12155
736-04440
710-04906
951-10370
951-11283
D = B
PistonRingSet
PistonPinSnapRing
Piston
PistonPin
BoltM6x12
AirShield
ConnectingRodAssembly
GovernorArmShaft
Washer5.2xl.9
GovernorSeal
CotterPin
CamshaftAssy.
RadialBallBearing,6205
CrankshaftAssembly
WoodruffKey
GovernorGear/ShaftAssembly
DowelPin7x14
DowelPin9x14
CrankcaseCoverGasket
CoverComp,LeftCrankcase
BoltM8x32
Oil FillerPlugAss'y
O-Ring
OilSeal,25x41.25x6
ShortBlock
(InclRef.4,20,25,26,38,
40,41,44-47,50-70)
Washer10x16x1.5
Oil DrainPlug
Oil DrainPlug& WasherAssembly
Oil FillPlugAssembly
35

Craftsman Engine Model 170=VOB For Tiller Model 247.29932
1
1
1
11
42
40
I
5
36

Craftsman Engine IViodel 170=VOB For Tiller IViodel 247.29932
m
1
2
3
3a
4
5
6
7
8
9
10
11
12
13
14
15
16
17
18
710-04968
951-11054
731-07059
726-04101
951-11565
951-11892
751-11124
751-11123
951-11893
710-04902
951-11895
951-12000
951-12002
951-12003
951-12004
951-11894
710-04933
951-10668A
951-10292
D = B 0
BoltM6x16
ValveCover
BreatherHose
HoseClamp
ValveCoverGasket
RockerArmAssembly
Nut,PivotLocking
AdjustingNut,Valve
RockerArm
Bolt,Pivot
PushRodGuide
Retainer,In.ValveSpring
Adjuster,ExhValve
Retainer,Ex.ValveSpring
ValveSpring
IntakeValveSeal
BoltM8x55
CylinderHeadAssembly
(InclRef.4,6-15,17,20,
25,26,38,42& 43)
SparkPlug/F6Rtc
m
19
19
24
25
26
27
38
39
4O
41
42
43
114
710-05276
951-10657
710-05101
951-11567
951-11568
951-11569
951-11572
951-10648
951-11899
715-04090
951-10647A
951-10647A
951-11063A
951-10819
951-12120
951-12121
D = O
MufflerStudM8x36
MufflerStudAssembly
StudM6x110
CarburetorInsulatorGasket
CarburetorInsulator
CarburetorGasket
Gasket,CylinderHead
PushRod
Tappet
DowelPin10x16
ValveKit
ValveKit
ValveCoverKit
CylinderHeadServiceKit
(InclRef.4,15,16& 38)
GasketKit,External
(InclRef.4,20,25,26,27,29& 68)
GasketKit,Complete
(InclRef.4,20,25,26,27,29,38,52,
53,62,66,68& 70)
37

Craftsman Engine IViodel 170=VOB For Tiller IViodel 247.29932
72
73
74
75
78
7g
8O
m
7O
71
72
73
74
75
76
77
79
80
81
82
109
110
111
951-12126
951-10792
710-04919
951-10805
951-10909
951-10911
712-04209
710-04915
951-11583
736-04455
710-04974
951-12127
712-04212
710-04918
951-11109
D = O O
Oil Seal25x41.25x6
IgnitionCoilAssembly
BoltM6x25
Flywheel
Fan,Cooling
Pulley,Starter
Nut,Special,M14x1.5
BoltM6x12
BlowerHousing
FlatWasher
BoltM6xlO
RecoilStarter
Nut,M6
BoltM6x20
BlowerHousingShield
38

Craftsman Engine IViodel 170=VOB For Tiller IViodel 247.29932
O3
O2
107
m
1
83
84
85
86
87
88
9O
91
92
93
94
95
710-04968
951-11067
951-12131
710-04928
951-11585
951-10664
951-10665
951-11106
712-04212
710-04908
951-10650
951-11700
710-04915
D = O
BoltM6x16
ThrottleControlKnob
PrimerBracket
BoltM6x12
GovernorSpring
ThrottleLinkageSpring
ThrottleLinkage
GovernorArm
NutM6
GovernorArmBolt
FuelLineKit
FuelHoseClamp
BoltM6x12
m
96
97
98
1CO
101
101a
102
103
104
106
107
108
951-11914
710-04905
710-04915
951-11903
951-10656
951-11913
951-11904
951-11912
951-10917A
951-11933
951-12159
951-10651
D = O O
DipstickDecorationCover
Bolt
BoltM6x12
Oil FillTubeO-Ring
Oil FillTube
Oil FillTubeAssembly
Oil FillTubeO-Ring
DipstickAssembly
FuelCapAssembly
FuelLevelIndicator
FuelTank
FuelTankNipple
39

Craftsman Tiller IViodel No. 247.29932
777D14192
777120451 777D14193
777S33508
777S33382
Operation Of This Equipment May Create Sparks That
Start Fires Around Dry Vegetation. A Spark Arrestor May Be
Required.The Operator Should Contact Local Fire Agencies
For Laws Or Regulations TO Fire Prevention Requirements.
777120358
777D13770
777i23259
777123174
777D14196
777123106
777X43688
DONOT
USEE85 ORFUEL
CONTAININGMORE
THAN10% ETHANOL
4O

(Thispageapplicableinthe U.S.A.andCanadaonly.)
Sears Brands Management Corporation (Sears), the California Air Resources Board (CARD)
and the United States Environmental Protection Agency (U.S. EPA)
Emission Control System Warranty Statement (Owner's Defect Warranty Rights and Obligations)
EMISSIONCONTROLWARRANTYCOVERAGEISAPPLICABLETOCERTI-
FIEDENGINESPURCHASEDINCALIFORNIAIN1995ANDTHEREAF-
TER,WHICHARE USEDINCALIFORNIA,ANDTOCERTIFIEDMODEL
California and United States Emission
TheCaliforniaAirResourcesBoard(CARD),U.S.EPAand Searsarepleased
toexplainthe EmissionControlSystemWarrantyonyourmodelyear2000and
latersmalloff-roadengine(SORE).InCalifornia,newsmalloff-roadengines
mustbedesigned,builtand equippedto meettheState'sstringentanti-smog
standards.Elsewherein theUnitedStates,newnon-road,spark-ignition
enginescertifiedformodelyear1997andlatermustmeetsimilarstandardsset
forthbythe U.S.EPA.Searsmustwarranttheemissioncontrolsystemonyour
YEAR1997ANDLATERENGINESWHICHAREPURCHASEDANDUSED
ELSEWHEREINTHEUNITEDSTATES(ANDAFTERJANUARY1,2001 IN
CANADA).
Control Defects Warranty Statement
enginefortheperiodsoftime listedbelow,providedtherehasbeennoabuse,
neglector impropermaintenanceofyoursmalloff-roadengine.Youremis-
sioncontrolsystemincludespartssuchasthecarburetor,aircleaner,ignition
system,mufflerand catalyticconverter.Alsoincludedmaybeconnectorsand
otheremissionrelatedassemblies.Whereawarrantableconditionexists,Sears
will repairyoursmalloff-roadengineatnocostto youincludingdiagnosis,parts
andlabor.
Sears Emission Control Defects Warranty Coverage
Smalloff-roadenginesarewarrantedrelativeto emissioncontrolpartsdefects
foraperiodofoneyear,subjecttoprovisionssetforthbelow.Ifanycovered
Owner's Warranty
Asthe smalloff-roadengineowner,youareresponsiblefortheperformanceof
therequiredmaintenancelistedin yourOperatingandMaintenanceInstruc-
tions.Searsrecommendsthatyouretainallyourreceiptscoveringmaintenance
onyoursmalloff-roadengine,butSearscannotdenywarrantysolelyfor the
lackofreceiptsorforyourfailuretoensuretheperformanceof allscheduled
maintenance.Asthe smalloff-roadengineowner,youshouldhoweverbe
awarethat Searsmaydenyyouwarrantycoverageifyoursmalloff-roadengine
ora parthasfaileddueto abuse,neglect,impropermaintenanceor unap-
parton yourengineis defective,the partwillbe repairedorreplacedbySears.
Responsibilities
provedmodifications.Youareresponsiblefor presentingyoursmalloff-road
engineto anAuthorizedSearsServiceDealerassoonas aproblemexists.The
undisputedwarrantyrepairsshouldbecompletedina reasonableamountof
time,notto exceed30days.Ifyouhaveanyquestionsregardingyourwarranty
rightsandresponsibilities,youshouldcontactaSearsServiceRepresentative
at 1-800-469-4663.Theemissionwarrantyisa defectswarranty.Defectsare
judgedonnormalengineperformance.Thewarrantyis notrelatedtoan in-use
emissiontest.
Sears Emission Control Defects Warranty Provisions
ThefollowingarespecificprovisionsrelativetoyourEmissionControlDefectsWarrantyCoverage.ItisinadditiontotheSearsenginewarrantyfornon-regulated
enginesfoundin theOperatingandMaintenanceInstructions.
1. WarrantedParts
Coverageunderthiswarrantyextendsonlytothe partslistedbelow(the
emissioncontrolsystemsparts)tothe extentthesepartswerepresenton
the enginepurchased.
a. FuelMeteringSystem
• Coldstartenrichmentsystem
• Carburetorand internalparts
• FuelPump
b. AirlnductionSystem
• Aircleaner
• Intakemanifold
c. IgnitionSystem
• Sparkplug(s)
• Magnetoignitionsystem
d. CatalystSystem
• Catalyticconverter
• Exhaustmanifold
• Air injectionsystemor pulsevalve
e. MiscellaneousItemsUsedin AboveSystems
• Vacuum,temperature,position,timesensitivevalves
andswitches
• Connectorsandassemblies
2. LengthofCoverage
Searswarrantstothe initialownerand eachsubsequentpurchaserthat
the WarrantedPartsshallbefreefromdefectsin materialsandworkman-
shipwhichcausedthefailureofthe WarrantedPartsforaperiodofone
yearfromthe datethe engineis deliveredtoa retailpurchaser.
3. NoCharge
Repairor replacementof anyWarrantedPartwill beperformedat no
chargetothe owner,includingdiagnosticlaborwhichleadstothe
determinationthataWarrantedPartisdefective,ifthe diagnosticworkis
performedatanAuthorizedSearsServiceDealer.Foremissionswarranty
servicecontactyournearestAuthorizedSearsServiceDealeraslistedin
the "YellowPages"under"Engines,Gasoline,""GasolineEngines,""Lawn
Mowers,"orsimilarcategory.
4. Claimsand CoverageExclusions
Warrantyclaimsshall befiledin accordancewiththe provisionsofthe
SearsEngineWarrantyPolicy.Warrantycoverageshall beexcludedfor
failuresof WarrantedPartswhicharenotoriginalSearspartsor because
ofabuse,neglector impropermaintenanceassetforth inthe Sears
EngineWarrantyPolicy.Searsisnotliableto coverfailuresof Warranted
Partscausedby theuseof add-on,non-original,or modifiedparts.
5. Maintenance
AnyWarrantedPartwhichis notscheduledforreplacementasrequired
maintenanceor whichis scheduledonlyfor regularinspectiontothe effect
of"repairor replaceasnecessary"shallbe warrantedasto defectsforthe
warrantyperiod.AnyWarrantedPartwhich isscheduledfor replacement
asrequiredmaintenanceshallbewarrantedasto defectsonlyforthe
periodoftime uptothe firstscheduledreplacementforthat part.Any
replacementpartthat isequivalentinperformanceand durabilitymay
beusedin the performanceofanymaintenanceor repairs.Theowneris
responsibleforthe performanceof allrequiredmaintenance,asdefinedin
the SearsOperatingandMaintenanceInstructions.
6. ConsequentialCoverage
Coveragehereundershallextendtothefailureofanyenginecomponents
causedbythe failureofanyWarrantedPartstillunderwarranty.
Inthe USAandCanada,a 24hourhotline,1-800-469-4663,hasamenuofpre-recordedmessagesofferingyouenginemaintenanceinformation.
GD0C-100188Rev.B
41

Look For Relevant Emissions Durability Period and
Air index information On Your Engine Emissions Label
Engines that are certified to meet the California Air Resources Board (CARB) Tier 2 Emission Standards must
display information regarding the Emissions Durability Period and the Air Index. Sears Brands Management
Corporation makes this information available to the consumer on our emission labels.
The Emissions Durability Period describes the number of hours of actual running time for which the engine is
certified to be emissions compliant, assuming proper maintenance in accordance with the Operating & Mainte-
nance Instructions. The following categories are used:
Moderate: Engine is certified to be emission compliant for 125 hours of actual engine running time.
Intermediate: Engine is certified to be emission compliant for 250 hours of actual engine running time.
Extended: Engine is certified to be emission compliant for 500 hours of actual engine running time.
For example, a typical walk-behind lawn mower is used 20 to 25 hours per year. Therefore, the Emissions
Durability Period of an engine with an intermediate rating would equate to 10 to 12 years.
The Air index is a calculated number describing the relative level of emissions for a specific engine family. The
lower the Air Index, the cleaner the engine. This information is displayed in graphical form on the emissions label.
After July 1,2000, Look For Emissions Compliance Period
On Engine Emissions Compliance Label
After July 1, 2000 certain Sears Brands Management Corporation engines will be certified to meet the United
States Environmental Protection Agency (USEPA) Phase 2 emission standards. For Phase 2 certified engines, the
Emissions Compliance Period referred to on the Emissions Compliance label indicates the number of operating
hours for which the engine has been shown to meet Federal emission requirements.
For engines less than 225 cc displacement, Category C = 125 hours, B = 250 hours and A = 500 hours.
For engines of 225 cc or more, Category C = 250 hours, B = 500 hours and A = 1000 hours.
This isa generic representation of the emission label typically found on a certified engine.
FAMILYYBSXS.3192VA 274812
GDOC-100182Rev.B
42

Congratulationson makingasmartpurchase.YournewCraftsman@
productisdesignedandmanufacturedforyearsofdependableopera-
tion.Butlikeall products,itmayrequirerepairfromtimetotime.That's
whenhavinga RepairProtectionAgreementcansaveyoumoneyand
aggravation.
Here'swhattheRepairProtectionAgreement*includes:
* Expert service byour 10,000professionalrepairspecialists
o Unlimitedserviceandno chargeforpartsand laboron all
coveredrepairs
o Product replacementupto$1500if yourcoveredproductcan'tbe
fixed
• Discountof 10%fromregularpriceofserviceand relatedinstalled
partsnotcoveredbytheagreement;also,10%off regularpriceof
preventivemaintenancecheck
• Fasthelp byphone- wecallitRapidResolution- phonesupport
froma Searsrepresentative.Thinkof usasa"talkingowner's
manual."
OnceyoupurchasetheAgreement,a simplephonecallisall thatit
takesforyouto scheduleservice.Youcancallanytimedayor night,or
scheduleaserviceappointmentonline.
TheRepairProtectionAgreementisa risk-freepurchase.If youcancel
foranyreasonduringtheproductwarrantyperiod,wewillprovideafull
refund.Or,a proratedrefundanytimeaftertheproductwarrantyperiod
expires.PurchaseyourRepairProtectionAgreementtoday!
Somelimitationsand exclusionsapply. Forpricesand additional
informationin the U.S.A.call 1-800-827-6655.
*CoverageinCanadavaries on some items.Forfull details call
SearsCanadaat 1-800-361-6665.
SearsInstallation Service
ForSearsprofessionalinstallationofhomeappliances,garagedoor
openers,waterheaters,andothermajorhomeitems,in theU.S.A.or
Canadacall1-800-4-MY-HOME®.
43

Declaraci6n de garantia ........................ Pb,gina 44
Medidas importantes de seguridad ..... Pb,ginas 45-48
Armado ................................................. Pb,ginas 49-51
Funcionamiento .................................... Pb,ginas 52-58
Servicio y Mantenimiento ..................... P_.ginas 59-63
Almacenamiento fuera de temporada.. Pb,gina 64
Soluci6n de problemas ......................... P_,gina 65
Acuerdo de protecci6n para reparaciones Pb,gina 68
NQmero de servicio ............................... Cubierta posterior
CRAFTSMAN DE DOS AI_IOS DE GARANTiA
PORDOSAnOS apartirdela fechade compra,esteproductoest_garantizadocontracualquierdefectodematerialo manode obra.El
productodefectuosorecibir_la reparaci6no lasustituci6ngratuitasila reparaci6nnoest_disponible.
Para detalies sobre la garantia de cobertura para obtener la reparaci6n o reernplazo, visite el sitio web: www.
craftsman.corn
Esta garantia cubre los defectos SOLO de rnateriales y fabricaci6n. Cobertura de la garantia
NO incluye:
• Elementosreutilizablesquepuedengastarseporel usonormaldentrodelperiododegarantia,talescomo
• cuchillas,dientes,o cinturones.
• Productoda_osresultantesde losintentosdelusuariodemodificaci6ndelproducto,reparaci6no causadospotaccesoriosdeproductos.
• Reparacionesnecesariasdebidoal accidenteo pot nooperaro mantenerel productosegQnlasinstruccionesprovistas.
• El mantenimientopreventivoo reparacionesnecesariasdebidoa unamezclaincorrectade combustible,combustiblecontaminadoo
pasado.
Estagarantiaes inv_lidasiesteproductose utilizaai mismotiempola prestaci6nde servicioscomerciaieso si sealquilaaotrapersona.
Estagaranfialeotorgaderechoslegaiesespedficos,yustedtambi_npuedetenetotrosderechosquevariandeestadoa estado.
Sears Brands Management Corporation, Hoffman Estates, IL 60179
Seriedel motor: 208cc
Tipodeaceitedelmotor: 10W30
Capacidadde aceitedel motor: 20onzas
Combustible: Gasoiinasinplomo
Bujia: F6RTC
Separaci6ndelasbujias: .030"
N_mero demodelo ..........................................................
N_merodeserie..............................................................
Fechadeeompra.............................................................
Registreel nQmerodemodelo,nQmerode serie
y fechade compram_sarriba
©SearsBrands,LLC 44

Lapresenciadeestesimboloindicaquesetratadeinstruccionesde
seguridadimportantesquesedebenrespetarparaevitarponerenpeligro
suseguridadpersonaly/omaterialyladeotraspersonas.Leaycumpla
todaslasinstruccionesdeestemanualantesdeintentaroperaresta
m&quina.Sinorespetaestasinstruccionespuedeprovocarlesiones
personales.Cuandoveaestesimbolo,ipresteatenci6nalaadvertencia!
Estam&quinaest&diseSadaparaserutilizadarespetandolasnormas
deseguridadcontenidasenestemanual.AIigualqueconcualquiertipo
deequipomotorizado,undescuidooerrorporpartedeloperadorpuede
producirlesionesgraves.Estam_quinaescapazdeamputardedos,
manosypiesydearrojarresiduos.Denorespetarlasinstruccionesde
seguridadsiguientessepuedenproducirlesionesgravesolamuerte.
PROPOSICION 55 DE CALIFORNIA
Elescapedelmotorde esteproducto,algunosde suscomponentesy
algunoscomponentesdelvehiculocontieneno liberansustanciasquimicas
queel estadode Californiaconsideraquepuedenproducirc_ncer,
defectosdenacimientouotrosproblemasreproductivos.Loshomesdela
bateriay losaccesoriosalinescontienenplomoy compuestosde plomo,
sustanciasquimicasquesegQnIoestablecidoporel Estadode California
causanc&ncery daSosen el sistemareproductivo.L&veselas manos
despuesdeestarencontactoconestoscomponentes.
Su responsabilidad--Lirnite el usodeestarn_.quinarnotorizada
alas personasquelean,cornprendanycurnplanlasadvertenciase
instruccionesqueaparecenenestemanualyen la rn_.quina.
i6UARDEESTASINSTRUCCIONES!
CAPACITACION
• Lea,cornprenday respetetodaslasinstruccionesquefiguranen
la rn_.quinayen el o losrnanualesantesde procedera arrnarlay
hacerlafuncionar.Guardeestemanualen unlugarseguropara
consultasfuturasyperi6dicas,asi cornoparasolicitarrepuestos.
• Leael manualdeloperadorysigatodaslasadvertenciase
instruccionesdeseguridad.Deno hacerlo,puedeocasionar
heridasde gravedadal operadory/o alosobservadores.Ante
cualquierduda,Ilarneal 1-800-4MY-HOME.
• Farniliarfcesecontodosloscontrolesysucorrecto
funcionarniento.Sepac6rnodetenerla rn_.quinayc6rno
desconectarloscontrolesr_.pidarnente.
• Noperrnitanuncaque losni_osrnenoresde 14a_osutilicen
estarn_.quina.Losni_osde 14a_osen adelantedebenleery
entenderlasinstruccionesde operaci6ny norrnasdeseguridad
contenidaseneste manualyen larn_.quinaydebenser
entrenadosy supervisadospor unadulto.
• Nuncaperrnitaquelosadultosoperenestarn_.quinasinrecibir
antesla instrucci6napropiada.
• Mantengaa losobservadores,rnascotasy ni_osal rnenosa 25
metrosde la rn_.quinarnientrasest,.en funcionarniento.Detenga
la rn_.quinasialguienseacerca.
• Nuncaenciendael motorenespacioscerradosoen unazona
conpocaventilaci6n.Elescapedelmotorcontienernon6xidode
carbono,ungasinodoroy letal.
PR E PARATIVO S
• Reviserninuciosarnenteel &readondesevaa usarel equipo.
Retiretodaslaspiedras,botellas,latasy otrosobjetosextra_os
que puedanserlevantadoso arrojadoscausandolesiones
personaleso da_osa la rn_.quina.
• Paraprotegerselosojos,utilicesiernpregalaso anteojosde
seguridadrnientrasoperalarn_.quinao rnientraslaajustao
repara.Losobjetosarrojadosquerebotanpuedenproducir
lesionesocularesgraves.
• Utilicezapatosde trabajoresistentes,desuelafuerte,y
pantalonesycarnisasajustados.Lasprendassueltasy las
alhajassepuedenengancharen laspiezasrn6viles.Nuncaopere
estarn_.quinaestandodescalzoo consandalias.
• Antesdeencenderla rn_quinacontrolequetodoslospernosy
tornillosest_nbienajustadosparagarantizarquela rn_.quinase
encuentraencondicionessegurasdeoperaci6n.Adern_.s,realice
unainspecci6nvisualde la rn_.quinaa intervalosfrecuentespara
controlarsila rnisrnaest,.da_ada.
• Antesdearrancarel motor,desenganchelaspalancasdel
ernbragueydespl_.celas(en casode haber)a la posici6nneutral
("N").
• Nuncadeje larn_.quinaenfuncionarnientosinvigilancia.
• Nuncaintenterealizarajustesrnientrasel motorest,.enrnarcha,
exceptoen loscasosespecificarnenterecornendadosen el
manualdeloperador.
• Mantengao reernplacelasetiquetasdeseguridade instrucciones
segQnseanecesario.
45

Manejo seguro de la gasolina:
Paraevitarlesionespersonalesy da_osmaterialestengamuchocuidadoal
manipularlagasolina.Lagasolinaes sumamenteinflamableysusvapores
puedencausarexplosiones.Si se derramagasolinaencimaosobrela ropa
sepuedelesionargravementeyaquese puedeincendiar.Lavesela piely
c_mbiesede ropade inmediato.
• Utilices61olosrecipientesparagasolinaautorizados.
• NuncaIlenelosrecipientesen el interiordeunveh[culoocami6no
cajaderemolquecon unrecubrimientopl&stico.Coloquesiemprelos
recipientesenel pisoy lejosdelveh[culoantesde Ilenarlos.
• Cuandoseafactible,retireel equipoagasolinadelcami6no remolquey
Ileneloenel suelo.Siesto noes posible,Ileneelequipoen unremolque
concontenedorport_til,envezdedesdeuna boquilladispensadorade
gasolina.
• Mantengalaboquillaencontactoconel hordedeltanquede
combustibleo de laaberturadelrecipienteen todomomento,hasta
terminarde cargar.No utiliceundispositivoparaabrir/cerrarla boquilla.
• Apaguetodoslos cigarrillos,cigarros,pipasyotrasfuentesde
combusti6n.
• Nuncacarguecombustibleen lam&quinaenun espaciocerrado.
• Nuncasaquela tapadela gasolinani agreguecombustiblemientrasel
motorest&calienteoen marcha.Permitaque el motorseenfr[epot Io
menosdos minutosantesdevolveracargarcombustible.
• Nuncalleneenexcesoeltanquede combustible.Lleneel tanqueno
m&sdeY2pulgadapordebajodela basedelcuellodeltap6ndecarga,
paradejarespacioparalaexpansi6ndelcombustible.
• Vuelvaacolocarla tapadel combustibley ajL]stelabien.
• Limpiela gasolinaquese puedahaberderramadosobreel motoro el
equipo.Trasladela m_quinaa otrazona.Espere5minutosantesde
encenderel motor.
• Parareducirel riesgode incendio,mantengala m&quinalimpiade
pasto,hojasy deacumulaci6nde otrosescombros.Limpielosderrames
deaceiteocombustibleysaquetodoslos escombrosembebidosde
combustible.
• Nuncaguardela m_quinaoel recipientede combustibleenun espacio
cerradodondehayafuego,chispasoluz piloto,comoporejemplode
calentadoresdeagua,calefactoresdeambientes,hornos,secadoresde
ropauotrosaparatosagas.
FUNCIONANIIENTO
• Nocoloquelas manosni los piescercadepiezasgiratorias.Elcontacto
conlas piezasgiratoriaspuedeocasionarenla amputaci6nde manos
opies.
• No utilicela m_quinabajola influenciadelalcoholo lasdrogas.
• Nuncaopereestam_quinasino haybuenavisibilidadoiluminaci6n.
Siempredebeestarsegurodequeest_bien afirmadoysujetando
firmementelasmanijas.
• Mantengaa lostranseL]ntesalejadosde la m&quinamientrasla misma
est&enfuncionamiento.Detengalam_quinasi alguienseacerca.
• Tengacuidadoal labrarunterrenoduro.Losdientespuedenclavarseen
latierra e impulsarlacultivadorahaciaadelante.Si estoocurre,suelteel
manubrioy dejela m_quinalibre.
• Seasumamenteprecavidocuandooperela m&quinasobreuna
superficiecongravao al cruzarla.Mantengasealerta porsi se
presentanpeligrosocultosotr&nsito.Notransportepasajeros.
• Nuncautilicela m&quinaaaltasvelocidadesdedesplazamientosobre
superficiesdurasoresbaladizas.
• Tengacuidadoparaevitarresbalaro caerse.
• Mirehaciaabajoy haciaatr&sy tengacuidadocuandosedesplaceen
marchaatr&so cuandojalede lam_quinahaciausted.
• Arranqueel motordeacuerdocon lasinstruccionesdel manualyaleje
los piesde losdientesentodo momento.
• Si golpeaalgOnunobjetoextraSoosi la m&quinacomienzaaemitir
un sonidopococomOnoavibrar,apagueel motordeinmediato.
Desconecteelcablede la buj[a,p6ngalohaciendomasacontrael motor
y sigalos pasossiguientes:
a. Inspeccionela m&quinaparaversi est_daSada.
b. Repareoreemplacelas piezasdaSadas.
c. Controlesihaypiezasflojasy ajQstelasparaasegurarque la
m&quinafuncionedemaneraseguray continua.
• Desenganchetodaslas palancasdeembrague(silas hay)y detengael
motorantesdedejarla posici6nde operaci6n(detr&sde lasmanijas).
Esperehastaquelosdientesse detengancompletamenteantesde
limpiarlos,haceralgQnajusteo inspeccionarlos.
• Nuncaenciendael motorenespacioscerradosoen unazonaconpoca
ventilaci6n.Elescapedelmotorcontienemon6xidodecarbono,ungas
inodoroy letal.
• Elsilenciadory el motorse calientany puedencausarquemaduras.No
los toque.
• Tengaprecauci6ncuandolabreterrenocercadevallas,edificiosy
serviciossubterr_neos.LosdientesrotatoriospuedencausardaSos
materialesolesionespersonales.
• No sobrecarguela capacidadde la m_quinaintentandolabrarel sueloa
un niveldemasiadoprofundoo a unavelocidaddemasiador@ida.
• Si la m&quinaarrancahaciendounsonidoo unavibraci6nrata, detenga
el motor,desconecteel cable dela buj[ay conecteloamasacontrael
motor.Inspeccionelam&quinaminuciosamenteparaver siest&daSada.
Reparetodoslos daSosantesde encendery operarla m&quina.
• Mantengatodoslos escudos,protectoresy dispositivosde seguridaden
su lugaryen correctofuncionamiento.
• Nuncalevanteotransportelam_quinacuandoel motorest_ encendido.
• Utilices61odispositivosdesujeci6noaccesoriosaprobadosporel
fabricantequefiguranenlas paginasde lalista depiezasdeeste
manualdeloperador.Si noIohace,puedenproducirselesiones
personales.
• Si se presentansituacionesquenoest&nprevistasen estemanual,sea
cuidadosoy useel sentidocomL]n.P6ngaseencontactoconAsistencia
al Clienteparasolicitarayudayel hombredeldistribuidordeservicio
m_s cercano.
MANTENINIIENTO Y ALMACENANIIENTO
• Mantengalam_quina,losaditamentosy accesoriosen condicionesde
funcionamientoseguro.
• Dejeque la m_quinaseenfr[eporIomenoscincominutosantes
de guardarla.Nuncaalterelos dispositivosdeseguridad.Controle
peri6dicamentequefuncionancorrectamente.
• Verifiquefrecuentementequelospernosytornillosestenajustados
correctamenteparaasegurarsedeque la m_quinaestetrabajandode
manerasegura.Adem_s,hagaunainspecci6nvisualdela m_quinapara
verificarsiest_daSada.
• Antesde limpiar,repararorevisar,detengael motoryasegOresedeque
los dientesytodaslaspartesm6vilessehandetenido.Desconecteel
cabledela buj[ay p6ngalohaciendomasacontrael motorparaevitarque
seenciendaaccidentalmente.
• No cambielaconfiguraci6ndelreguladordel motorni Iohagafuncionar
ademasiadavelocidad.Elreguladordelmotorcontrolala velocidad
m_ximadefuncionamientosegurodelmotor.
• Mantengaoreemplacelasetiquetasdeseguridady deinstrucciones
segOnseanecesario.
• Sigalas instruccionesdeestemanualparacargar,descargar,transportar
y almacenarde maneraseguraestam_quina.
• Si la m_quinasevaa almacenarporunper[odoprolongado,consulte
siempreel manualdeloperadorparaobtenerinformaci6nimportante.
• Si debevaciareltanquedecombustible,h_galoal airelibre.
46

,, Observelareglamentaci6nylasnormasrespectoalaeliminaci6n
correctadegasolina,aceite,etc.paraprotegerelmedicambiente.
• SegOnlaComisi6ndeSeguridaddeProductosparaelConsumidorde
losEstadosUnidos(CPSC)ylaAgenciadeProtecci6nAmbientaldelos
EstadosUnidos(EPA),esteproductotieneunavidaOtilmediadesiete
(7)a_os6130horasdefuncionamiento.AIfinalizarlavidaQtilmedia
hagainspeccionaranualmenteestaunidadporundistribuidordeservicio
autorizadoparacerciorarsedequetodoslossistemasmec_nicosyde
seguridadfuncionancorrectamenteynotienenexcesivodesgaste.Sino
Iohace,puedenproducirseaccidentes,lesionesolamuerte.
NO MODIFIQUE EL MOTOR
Paraevitarlesionesgraveso la muerte,no modifiqueel motorbajo ninguna
circunstancia.Si alteralaconfiguraci6ndel regulador,elmotorse puede
desbocaryfuncionaravelocidadesquenoson seguras.Nuncamodifiquela
configuraci6ndef_bricadelreguladordelmotor.
AVISO REFERIDO A EMISIONES
Losmotoresque est_ncertificadosycumplenconlas regulacionesde
emisionesfederalesEPAy de CaliforniaparaSORE(EquiposSmallOff Road
Equipment)est&ncertificadosparaoperarcongasolinacomL]nsin plomoy
puedenincluirlos siguientessistemasde controlde emisiones:Modificaci6n
de motor(EM),catalizadoroxidante(OC),inyecci6ndeairesecundaria(SAI)
y catalizadorde tresvias (TWO)si est&nequipadosdeesa manera.
AMORTIGUADOR DE CHISPAS
Estam&quinaest&equipadaconun motorde combusti6ninternay no
debesetutilizadaenunterrenoagrestecubiertopot bosque,malezaso
hierbani cercadelmismoexceptoqueel sistemade escapedel motor
esteequipadoconunamortiguadordechispasquecumplaconlas leyes
localeso estatalescorrespondientes(encasode existir).
Si se utilizaunamortiguadordechispasel operadorIodebemanteneren
condicionesde usoadecuadas.Enel EstadodeCalifornialas medidas
anteriormentemencionadassonexigidasporley (Arficulo4442delC6digode
RecursosPQblicosde California).Esposibleque existanleyessimilaresen
otrosestados.Lasleyesfederalesse aplicanenterritoriosfederales.
Podr&obtenerunamortiguadorde chispasparael silenciadoren elcentrode
serviciode piezasy reparacionesSearsm_scercano.
47

SiIVIBOLOS DE SEGURIDAD
Enestap_ginasepresentanydescribenlossimbolosdeseguridadquepuedenaparecerenesteproducto.Lea,entienday cumplatodaslas
instruccionesincluidasen la m_quinaantesdeintentararmarlay utilizarla.
J'?i
LEA LOS MANUALES DEL OPERADOR
Lea, entienda y cumpla todas las instrucciones incluidas en los manuales antes de intentar armar la
unidad y utilizarla.
ADVERTENCIA- DIENTES GIRATORIOS
No coloque las manos ni los pies cerca de piezas giratorias. El contacto con las piezas giratorias puede
ocasionar en la amputaci6n de manos o pies.
ADVERTENCIA- DIENTES GIRATORIOS
No coloque las manos ni los pies cerca de piezas giratorias. El contacto con las piezas giratorias puede
ocasionar en la amputaci6n de manos o pies.
ADVERTENCIA- LA GASOLINA ES INFLAMABLE
Deje que el motor se enfrie por Io menos dos minutos antes de cargar combustible.
ADVERTENCIA - MONOXIDO DE CARBONO
Nunca encienda el motor en espacios cerrados o en una zona con poca ventilaci6n. El escape del
motor contiene mon6xido de carbono, un gas inodoro y letal.
ADVERTENCIA -- SUPERFICIECALIENTE
Las piezas del motor, especialmente el silenciador, serecalientan durante la operaci6n. Deje que el
motor y el silenciador seenfrien antes de tocarlos.
ADVERTENCIA: Suresponsabilidad--Limiteel usode estam&quinamotorizadaalas personasquelean,comprendany
cumplanlasadvertenciase instruccionesque aparecenen estemanualyen lam&quina.
iGUARI)EESTASINSTRUCCIONES!
48

IMPORTANTE:Estaunidadseenviasingasolinani aceJteenel mo-
tor.Antesdeoperarlarn_.quinacargueeJmotorcongasolinay aceite
cornoseindicaen la secci6nFuncionarnientodeestemanual
NOTA:Lasreferenciasa losladosderechoe izquierdodela cultiva-
dorasehacenobservandola rn_.quinadesdelaposici6nde operaci6n.
APERTURA DE LA CAJA DE CARTON
1. Retirelasgrapas,rornpaelpegarnentodelasaletassuperiores
ocorte lacintadelextrernodela cajaytirea Iolargode la aleta
superiorparaabrirla.
2. Saquetodaslaspiezassueltas.
3. Cortea Iolargodelasesquinas,extiendalacajahaciaabajoen
forrnaplana.
4. Quiteel materialdeernpaquesuelto.
COIVlO SACAR LA UNIDAD DE LA CAJA
1. Usela barradecontrolparaelevarytirardela cultivadorahacia
atr_.shastaunAreaplana.Inspeccionerninuciosarnentela caja
paradetectarsihaypiezassueltas.
2. Estireel cablede controlyexti_ndaloenel piso.Tengacuidado
de nodoblarni torcerel cabledecontrol.
PIEZAS SUELTAS DENTRO DE LA CAJA
• Montajede lasbarrasde control
• Cultivadora
• Aceitedel motor
• Manualdel Operador
• Varillade carnbio
• Estacade profundidad
Antesdel rnontaje,desconecteelcablede labujfay p6ngalo
haciendornasacontrael motorparaevitarqueseencienda
accidentalrnente.
ACOPLE DE LA ESTACA DE PROFUNDIDAD
1. Inclinela cultivadorahaciaadelantehastaquedescansesobreel
contrapesofrontal.
2. Desenrosquela perillaen "T"de lapartesuperiorde la estaca
de profundidady retirelaarandelaplanay el pernohexagonal.
Saqueel elpasadorde chavetadel pasadorde horquilla.Veala
Figura1.
3. Levanteel rnontajede la aletaconbisagrasdelprotectorde
dientese inserteel rnontajede laestacade profundidaden la
ranura,debajodel protectory paraarribaa travesdel rnontaje
protectordedientes.
4. Inserteel pasadorde horquillaen losrnontajesdel protectorde
dientesyde laestacade profundidad.Asegureconel pasadorde
chaveta.
5. Inserteunpernohexagonalen el orificiosuperiordel rnontaje
de laestacadeprofundidad.Coloquelaarandelaplanasobre
el pernohexagonalyenrosquelaperillaen "T"enel perno
f
PeriJJa
en "T"
Pasador de
Estaca de
profundidad
Arandelapiana
__ Perno
hexagonal
Figura1
J
f
Pernos y tuercas
de seguridad
con brida
Figura2
Montaje de Ja
rnanija
/ Soportede la
rnanija
hexagonal.Ajustebien.Veala Figura1.
6. Inclinelacultivadorahaciaatr_.snuevarnentehastaquedescanse
sobrelosdientes.
INSTALACION DE LA MANIJA
1. Retirelosdospernossuperioresy lastuercasde seguridadcon
rebordedelossoportesdernontajede larnanija,perono retireel
pernoyla tuercainferiores.Veala Figura2.
2. Posicionelaunidadde la rnanijaentrelasrn_nsulasde rnontaje
de la rnanija.
3. Alineelosorificiosen larnanijaconlosorificiosenla rn_nsulay
fijelosconlosherrajesqueacabadeextraer.
49

ACOPLE DE LA VARILLA DE CONTROL
1. AsegQresede quela unidadde larnanijaestaenla posici6nm_.s
alta.Remitaseala Secci6nde Funcionamiento.
2. Retirelosbrochesdehorquilladela varilladecontrol,coloquelas
arandelasde gomaen sulugar.
3. Inserteel extrernom&scorto,anguladode la varillade controla
travesde la m_nsuladelindicadorsobrela cubiertadecambios
yasegureconel brochede horquillaquequitaraanteriormente.
Veala Figura3.
4. Inserteel extremom_.slargodela varilladecontrola traves
delorificiode la manijaselectorade cambiosyasegureconun
pasadordechaveta.
ACOPLE DEL CABLE DEL EMBRAGUE
1. Quiteel pernodeojo roscadoyla tuercadelextremodel cable.
2. Conduzcael cabledelembragueporel ladoderechode las
m_nsulasde montajedela manijay pordebajode lamanija.
3. Empujeel cablea travesdelorificiodelcentrodela manijae
introduzcaa presi6nel accesoriopl_.stico.Veala Figura4.
4. Retireel tornillode cabezaranurada,latuercay lasdosaran-
delasplanasdelganchodel embrague.Veala Figura5.
5. Fijeel pernode ojo roscadoalganchosujet_.ndolodesdearriba
conel tornillodecabezaranurada,lasarandelasplanasyla
tuercade seguridad.
6. Enrosqueel pernode ojoy latuercaquequitaraanteriorrnenteen
el tuboconroscainternaqueest,.enel extrernodelcable.Debe
enroscaruntrozodealrededorde3/4".Aprietelatuercacontrael
tuboen elextremodel cable.Veala Figura5.
NOTA:Noajustedemasiadoelcablede embrague.Demasiada
tensi6npodriaromperlo.AsegQresede comprobarel ajustedel cable
deembragueantesde hacerfuncionarla cultivadora.
,,o°o°,o °
\ //
_ M_nsula del
indicador
- Pasadorde
ta
poleaIoca /
Figura3
Tubo con
rosca
interna
TornUlo de cabeza
ranurada, tuerca y
arandela plana
Accesorio
pl_stico
Figura4
f
Control de
embrague
TornUlo de
ranurada
Arandelas
planas
Tuerca
Tuerc8
Tubocon
rosca
interna
Figura5
5O

AJUSTES
Antesdeoperarsucultivadora,leaatentamenteycumplatodas
lasinstruccionesqueaparecenacontinuaci6n.Realicetodoslos
ajustesparaverificarquela unidadest&operandoconseguridady
correctamente.
Compruebeel ajustedel cabledelembraguedela siguienteforma:
1. Posicionela cultivadoraparaqueelcontrapesofrontalquede
contraunobjetos61ido,talcomounapared.
2. Conlapalancaselectorade cambiosen NEUTRAL,arranqueel
motor.RemitaseaArranquedel Motoren laSecci6nFunciona-
miento.
3. Desdeel ladoderechodela cultivadora,examinelacorrea
(dentrode lacubiertadela correa).Nodebeestargirando.
4. Si lacorreagirasinelcontrolde embragueconectado,ajuste
desenroscandoalgunasvueltasenel sentidode lasagujas
del reloj(paradoen laposici6ndeloperador)eltubocon rosca
internay luegovolviendoaajustarla tuercacontrael tubo.Veala
Figura6.
5. Muevaahorala palancade cambiosa laposici6nFORWARD
(Marchadirecta).
6. Concuidadoengancheel embraguelevantandoel controldel
embraguecontralamanija.Lasruedasdebengirar.
7. Si lasruedasnogirancuandolacultivadoraest,.en marchahacia
adelante,ajustedesenroscandoalgunasvueltasen sentidocon-
trarioalas agujasdel reloj(paradoen la posici6ndeloperador)el
tuboen elextremodel cabley luegovolviendoaajustarla tuerca
contrael tubo.Yeala Figura6.
8. Vuelvaa comprobarlosajustesy repitasi esnecesario.
NOTA:Sedisponede unajustede cablesecundariosiIlegaa un
puntodondehacefaltaunajusteadicional.Retirelacubiertade la
correay muevalastuercashexagonalesdelotroextremodelcable
haciaelfinalde lacarcasa.Luegoreajustelastuercashexagonalesde
la manija.
Compruebeel ajustede lavarillade la poleaIocade la siguiente
forma:
1. Descon6ctelosy hagamasaconelcablede la bujiacontrael
motor.
2. Conel motorapagadoyel controldelembraguedesenganchado,
pasela manijaselectoradecambiosportodaslasposicionesde
marchadirecta.
3. Verifiqueque lam6nsuladelindicadornotoquela varillade la
poleaIocaconel controldel embraguedesenganchado.
4. Parareajustarlavarillade la poleaIoca,retirelacubiertade la
correacomosedescribeen Reemplazode Correaen la Secci6n
de Servicioy Mantenimiento.
5. Retireel brochede horquillay laarandelade resortedela varilla
de lapoleaIoca.Veala Figura7.
6. Muevalavarillade lapoleaIocaal orificiom_.sbajode lam6nsula
intermedia.
f
.
d_
embrague
Control
Tornillo de cabeza "_
ranurada
Arandelas
planas
Tuerca
Tu_rc8
internamente
Roscado
Tubo
Figura6
J
Varilla de
_ control
Arandela de _ _
goma _ _S Nl_nsula del
indicador
Figura7
J
Compruebeelespaciolibreentrelavarilladela poleaIocay la
m6nsuladelindicadorcambiandoacadaunade lasmarchas
directas.
7. Vueivaa co[ocarla arandeiade resorteyel brochede horquilla.
51

Manija selectora
de cambios
Traba de ajuste de
manija ernbrague
Silenciacior
Filtro de aire
Tap6n de
Estaca de
profundidad
Tap6. de
llenacio yvarilla
del nivel de
aceite
Protector
lateral
Protector de
dientes trasero
Figura8
J
Ahoraquetienelacultivadorapreparadaparafuncionar,farniliaricese
conloscontrolesy funciones.Encontrar_.lasdescripcionesen las
siguientesdosp_.ginasy lasilustracionesen_sta.Esteconocirniento
le perrnitir_,utilizarsunuevoequipoa surn_.xirnacapacidad.
MANIJA DEL ARRANCADOR DE
RETROCESO
Estarnanijaseutilizaparaarrancarel motor.
CONTROL DEL REGULADOR
Elcontroldel reguladorest,.ubicadoen la partelateraldel motor.
Regulalavelocidaddel motor,yIoapagacuandoseIocolocaen la
posici6nSTOP(detenci6n).
AIoperarunacultivadoraes posiblequearrojeobjetosextra_osa
losojos,Iocualpodriacausarleslesionesgraves.Utilicesiernpre
losanteojosdeseguridadconesta unidado protectoresparaojos
rnientraslabray rnientrasrealizaajusteso reparaciones.
CONTROL DE OBTLIRACION
Elcontroldelcebadorseencuentraenla partelateraldel motor,y
seactivahaciendogirarla palancaa la posici6nCHOKE(cebador).
AIactivarel controldel cebadorsecierrala placadelcebadordel
carburadoryestoayudaa ponerenrnarchael motor.
CHOKE RUN
I÷l
Curnple con los est_ndares de seguridad de ANSI
LascultivadorasCraftsmancurnplenconlasnorrnasde seguridaddel InstitutoNacionalArnericanode Norrnalizaci6n(ANSI).
52

FILTRO DE AIRE
Elfiltrode aireesundispositivode latomadeairedel motorque
impidelaentradade polvoysuciedadenel motor.Veala Figura8.
SILENCIADOR
Elescapedel motorsaledel motora travesdel silenciador.Yeala
Figura8.
TAPON DE LLENADO Y VARILLA DEL NIVEL
DE ACEITE
EsposiNecontrolarel niveldeaceitedel motor,asicomotambi_n
agregaraceite,a travesdel Ilenadode aceite.Veala Figura8.
NOTA:EstaunidadseentregaSINaceiteenel motor.Se incluye
aceiteen la bolsapl_.sticaempacadaconel manualde la unidad.
Agregueaceitecomoseindicaen lasecci6nCargade gasolinay
deaceite.Controleel nivelde aceiteantesde cadaoperaci6npara
asegurarsede quehayaaceitesuficienteen el motor.Param_.s
informaci6n,consultelasinstruccionesdela secci6nMantenimiento
delmotorde estemanual.
MANIJA SELECTORA DE CAIVIBIOS
La manijaselectoradecambiosest,. ubicadaenla partefrontal
delmontajede lamanija.SeutilizaparaseleccionarNEUTRAL,
REVERSE(Marchaatr_.s),o unode losmodosde FORWARD
(Marchadirecta).Veala Figura8.
ESTACA DE PROFUNDIDAD
Estapalancacontrolala profundidadde labranzade losdientes.Tire
del pasadordechavetahaciaafueradelpasadorde horquillapara
ajustarle profundidadde lalabranzaa cincoajustesdiferentes.Veala
Figura8.
TRABA DE AJUSTE DE LA iVlANIJA
Lamanijapuedeajustarsea laalturadeseadadestrabandolatraba
de ajustede lamanija,luegomoviendolasbarrasde la manijaa la
posici6ndeseaday luegovolviendoa trabarla trabadeajustedela
manija. Veala Figura8.
PROTECTOR DE DIENTES TRASERO
Elprotectorde dientestraseroprotegeal operadorde losdeshechos
quevuelanyal mismotiempoaplananelsueloreci_nlabrado.Veala
Figura8.
PROTECTOR LATERAL
Elprotectorlateralsirveparamantenerhilerasdefinidasyparejasy se
puedeajustarenunade cincoposicionesdiferentes.Veala Figura8.
DIENTES
Losdientesdela cultivadorasonunaseriedeazadasalineadasen un
eje giratoriodepotencia.
CONTROL DE ENIBRAGUE
Elcontroldel embragueest,.ubicadodebajodela manija.Para
engranarlosmecanismosdelas ruedasyde latransmisi6nseaprieta
el controldelembraguecontrala manija.Veala Figura8.
53

LLENADO DE GASOUNA Y ACEITE
Aceite (se env(a una botella con la unidad)
Primeruso
1. Saquela varilladelniveldeaceite.
2. Conlacultivadorasobreterrenonivelado,utiliceunernbudopara
vaciardentrodel motortodoel contenidodela botellade aceite
surninistradaconlaunidad.
3. Vuelvaa colocarla varilladeIlenadodeaceiteyajQstela.
Usos posteriores
Usesolarnenteun aceitedetergentedealtacalidadcuyadasificaci6n
de servicioAPIseaSFo SG.Seleccioneelgradode viscosidadSAE
delaceitesegQnlaternperaturadeoperacbnesperada.Curnplala
ta.blaqueaparecea continuaci6n.
mini Immm lOw
Loscombustiblesconrnezclade alcohol(queseIlarnangasohol,
o queutilizanetanolo rnetanol)puedenatraerla hurnedad,Io
queconducea la separaci6ny forrnaci6nde_.cidosdurante
el alrnacenarniento.ElgasacidicopuededaSarel sisternade
combustibledeun motorduranteel alrnacenarnientodelrnisrno.
Paraevitarproblernasconel motor,el sisternadecombustible
debeservaciadoantesde alrnacenarla rn_.quinadurante30
diaso rn_.s.Vacieel tanquedenafta,enciendael motory d_jelo
funcionarhastaquelaslineasdecombustibleyel carburadorest_n
vados. Lasiguienteternporadausecombustiblenuevo.Consulte
lasInstruccionesde ALMACENAMIENTOsideseainforrnaci6n
adicional.
_ _ )Ow
mm m_O
mmm30
40 =_
20w40.20w50 _ _ _ _
I I
15w40, 15w50
10w40 _,u_w,_ml,_ _wmuw_lb_.
N
10w30 __ _
(°6)-300 -200 -100 0° 100 200 300400
(°F)-20 o 0o 20U 40U 60U 800 100U
Ternperatutaarnbiente
4. Viscosidadmonogrado
5. Viscosidadmultigrado
Aunquelosaceitesde viscosidadrnQltiple(5W30,10W30,etc.)
rnejoranelencendidocuandoel clirnaest,.frio,losrnisrnos
incrernentanelconsurnodeaceitecuandoseusana rn_.sde32°E
Cornpruebeelnivelde aceiteconmayorfrecuenciaparaevitarda_os
debidoa queel motortrabajeconunnivelde aceitebajo.
1. Cornpruebeelnivelde aceiteasegur_.ndosequela varilladel
nivelde aceiteno roceconlasparedesinterioresdeltubode
Ilenadode aceite.Dehacerlosepuedeproducirunalecturafalsa
de lavarilladel niveldeaceite.Sequelavarillade rnedici6ncon
un trapo.Vuelvaa colocarlaen el cuellodeIlenadodeaceitepero
no laatornille.Saquelavarillayverifiqueelniveldeaceite.Llene
hastalarnarca FULL(lleno)dela varilladelnivelde aceite,si
esnecesario.Lacapacidadesde aproximadarnente20onzas.
Llenarloenexcesohacequeel motorechernuchohurnoy
disrninuyeel rendirniento.
2. Vuelvaa colocarla varilladeIlenadode aceiteyajQstela.
3. Mantengael niveldeaceiteenla rnarcaFULL.Si poneel
motoren rnarchaconrnuypocoaceitele puedecausarda_os
ITengarnuchocuidadoal trabajarcongasolina.Lagasolinaes
surnarnenteinfiarnableysusvaporespuedencausarexplosiones.
Nuncacarguecombustibleenla rn_.quinaenun espaciocerrado
o cuandoelmotorest,.calienteo en rnarcha.Apaguecigarrillos,
ci arros, i as otrasfuentesdecornbusti6n.
Gasolina
1. Saquela tapadelcombustibledeldep6sitodel rnisrno.
Nousenuncaproductosdelirnpiezapararnotoresocarburadores
enel dep6sitodecombustible,sepuedenocasionarda_os
perrnanentes.
2. Verifiquequeel recipientedelquevaa verterla gasolinaest6
lirnpioy librede 6xidoo deobjetosextra_os.Nousenunca
gasolinaque puedaestarviejaporhaberestadoalrnacenada
en surecipienteporlargosperiodos.Lagasolinaqueha estado
estacionadapor unperiodosuperiora cuatrosernanasdebe
considerarsevieja.
3. Lleneeltanquede combustibles61ocongasolinanormalsin
plorno,lirnpiay fresca.NousegasolinaquecontengaMETANOL.
Vuelvaa colocarlatapade combustibleensulugar.
NOTA:Verifiqueperi6dicarnenteel nivelde combustibleparaevitar
quedarsesingasolinarnientrasest,.operandolacultivadora.
PARA ENCENDER EL MOTOR
1. Conecteel cablede la bujiay la rnangade gornaa larnisrna.
2. Lleneeldep6sitoconnorn_.sde 1/2pulgadapordebajode la
parteinferiordelcuellode Ilenadoparaofrecerespacioparala
expansi6ndelcombustible.
F L
Figura 9
J
54

3. Coloquela palancaselectoradecarnbiosen NEUTRAL.
4. Muevalapalancadelcebadordelmotora laposici6nCHOKEI'o,I .
(Sielmotorest&tibiopuedenosernecesariocebarlo).Veala
Figura9.
5. Muev_palanca decontroldel reguladora laposici6nSTART/
RUN_ (encendido/ funcionando,representadoporuna
liebre).VealaFigura9.
6. Situadoal ladode launidad,tomela rnanijadel arrancadorytire
dela cuerdahastaquesientauntir6n.
7. Tirede lacuerdade rnanerar&piday continua.Mantengaun
ajuste firrnesobrela rnanijadelarrancador.Dejequela cuerda
seenrollelentarnente.
8. Repitaestepaso,de sernecesario,hastaque seenciendael
motor.Cuandoel motorarranque,rnupy_el controldelcebador
gradualrnentehastala posici6nRUNiT/.
9. Siel motorfalla,vuelvael controldelcebadora laposici6n
CHOKEI'_1 y repitalospasos5a8.
10. MantengaSIEMPREel controldelestranguladorenposici6n
START/RUN(encendido/ funcionando)rnientrasoperela
cultivadora.
PARA DETENER EL MOTOR
1. Paradetenerlasruedasy losdientes,suelteelcontroldel
ernbrague.
2. Muevalapalancadecontroldel reguladorhastala posici6n
SLOW(lento,representadopor unatortuga)=_,. Siernpreque
seaposible,reduzcagradualrnentelavelocidaddel motorantes
dedetenerlo.
3. Muevalapal :a decontroldel reguladora laposici6nSTOP
(detenci6n)[ u OFF(apagado).
4. Desconecteel cabledela bujiayhagarnasaconel motorpara
evitarque seenciendaaccidentalrnenteelequipoaldejarlosin
vigilancia.
Noernpujehaciaabajosobrelasbarrasdecontrolparaintentarhacer
que lacultivadoralabrernAsprofundo.Estoevitaque lasruedas
retenganla cultivadoray puedaperrnitira losdientespropulsarla
cultivadorar_.pidarnentehaciaadelante,Iocualpodriaocasionarla
p_rdidade control,da_osrnaterialeso lesionespersonales.
DAR LA VUELTA CON LA CULTIVADORA
1. Practiquedarla vueltaconlacultivadoraenun _reaabiertay
nivelada.Tengacuidadopararnantenerlospiesy laspiernas
lejosde losdientes.
2. Paracornenzaravoltear,levantelasbarrasde controlhastaque
losdientesseseparendel sueloyel motory losdientesest_n
balanceadosporencirnade lasruedas.
3. Conla cultivadoraequilibrada,ernpujehaciael costadosobrela
barradecontrolenla direcci6nenqueseest_volteando.Luego
dedarla vuelta,introduzcalentarnentelosdientesenel suelo
parareiniciarla labranza.
Cerci6resede queelcabledela bujiaest_desconectadoy
haciendornasacontrael motorantesde realizarcualquierajuste.
AJUSTE DE LA PROFUNDIDAD
Laprofundidadde labranzaest_controladaporlaestacade
profundidadque sepuederegularencincoposicionesdiferentes.
Ajustelosprotectoreslateralesal regularla estacadeprofundidad.
• Cuandouselacultivadorapor prirneravez,utiliceel segundo
orificiodeajustede arriba(1"deprofundidadde labranza).
• Parafracturarel c_spedyparacultivosuperficial,utilicela
posici6nqueofrece1"de profundidadde labranza(segundo
orificiodearriba).Coloquelosprotectoreslateralesen su
posici6nrn_sbaja.
• Paramayorprofundidad,levantelaestacay losprotectores
lateralesytarnbi_nhagaunao dospasadasrn_ssobreel_rea.
• Paralabrartierrasuelta,puedelevantarla estacade profundidad
a suposici6nrnasalta(utiliceel orificiode regulaci6ninferior)
paraobtenerlamayorprofundidadde labranza.Subalos
protectoreslateralesa suposici6nrn_salta.
• Paratransportarlacultivadora,bajelaestacade profundidad
(utiliceel orificiode de regulaci6nsuperior).
Pararegularla estacade profundidad,retireel pasadorde horquillay
elpasadorde chaveta.Muevalaestacade profundidada la posici6n
deseaday fijeconel pasadodehorquillay el pasadordechaveta.Vea
la Figura10.
PARA ENGRANAR LA TRANSIVIISI()N Y LOS DIENTES
1. Paraunrnovirnientohaciaadelantede lasruedas,utilicela
rnanijaselectorade carnbiosy parapropulsarlosdientestiredel
controldelernbraquehaciaarribacontralabarradecontrol.
2. Cuandorealicela labranza,dejequelasruedastirende la
rn&quinarnientraslosdientescavan.Carninelentarnentedetr&s
dela cultivadoraperrnitiendoquesernuevaa supropioritrno
rnanteniendola barrade controlbiensujetaconloscodos
fiexionados.
3. Sueltelarnanijaparadetenerlasruedasy losdientes.
Para conducir hacia arras: (No realice labranza
mientras se desplaza marcha arras.)
a. Libereel controldelernbrague.Luegolevantela barrade
controlhastaquelosdientesseseparendelsuelo.
b. Tirehaciaatr_sde larnanijaselectorade carnbiosy carnine
retrocediendoconla rn_quina.
Nota:Enrnodornarchaatr_s,losdientesinvertir_nla
rotaci6n.
Utilice esta Posici6n de
posici6n para la transporte
Pasador de 3'
horquilla 5"
Pasador d_
chaveta
Figura10
55

Pararegularlosprotectoreslaterales,saquelastuercasdernariposa.
MuevaelprotectorlateralalaposM6ndeseadayvuelvaacolocarlas
tuercasdernariposa.Ajustebien.VealaFigura11.
AJUSTE DE LA ALTURA DE LA MANIJA
La rnanijadebeajustarseparaquecuandola culfivadoraest_
labrandoaunaprofundidadde3-4"enel suelo,la rnanijaseencuentre
aproxirnadarnentea la alturade lacintura.Paraajustarlarnanija,
sirnplernentedestrabelatrabade ajustede rnanija,luegornuevalas
barrasde la rnanijaala posM6ndeseadayvuelvaatrabarla trabade
ajustede rnanija.
Antesdedespejarlosdientesa rnano,detengael motor,dejeque
todaslaspartesen rnovirnientosedetenganydesconecteelcable
dela bujia.Si noseobservaestaadvertendasepuedenprodudr
es ores persona es.
LIMPIEZA DE LOS DIENTES
• Losdientestienenunaacci6nautolirnpiantequeelirninala mayor
partede losdesechosqueseenredan.Sinembargo,a veces
sepuedenenredarpastoseco,tallosfibrososo enredaderas
resistentes.Sigaestosprocedirnientosparaayudara evitar
queseforrnenmaracasen losdientesy paralirnpiarlos,sies
necesario.
• Parareducirel enrnara_adode elernentosen losdientes,ajuste
el reguladorconun valorde profundidadsuficienteparaIograr
unarn_.xirnaacci6nde corteyaquelosdientes"pican"los
rnaterialescontrael suelo.Asirnisrno,tratede realizarla labranza
debajode losresiduosdecosechaocultivosde cobertura
rnientrasest_.nverdes,h[3rnedosytiernos.
• Mientrasrealizala labranza,tratede balancearlasbarrasde
controlde unladoalotro(aproxirnadarnenteentre6"y 12").La
acci6nde"coleado"a rnenudodespejalosdientesdesprendiendo
losdesechos.
Antesdela labranza,p6ngaseen contactoconla cornpa_ia
telef6nicao de serviciosy preguntesiseencuentraequiparniento
o lineassubterr_.neasen suterreno.Norealicelabranzacercade
dondehaycablesel_ctricos,lineastelef6nicas,ca_oso rnangueras
enterrados.
SUGERENCIAS Y Ti_CNICAS DE LABRANZA
la profundidad de la labranza
• Estaes unacultivadorade labranzacondone direcci6n(DDT).
A rnedidaquelasruedastiranhaciaadelante,losdientesrotan
haciaatr_.s.A rnedidaquelasruedastitan haciaatr_.s,los
dientesrotanhaciaadelante.Estocreaunaacci6nde "gancho"
de losdientesquecavanen profundidad,arrancandode raiz
sueloyrnalezas.Nosobrecargueelmotor,encarnbiocave
tanprofundarnentecornopuedaen cadapasada.Enpasadas
posterioreslasruedaspuedentendera girarsobrelatierra
suelta.AyQdelaslevantandoligerarnentelabarradecontrol(una
rnano,la palrnahaciaarriba,funcionaconrnuchafacilidad).
• Evitela tentaci6nde hacerpresi6nsobrelasbarrasdecontrol
paraforzara lacultivadoraa cavarrn_.sprofundo.Estoquita
pesoa lasruedasconpotencia,haci_ndolesperdertracci6n.
Sinlasruedaspararetenerlacultivadora,losdientesintentar_.n
propulsarlacultivadorahaciaeloperadoro distanci_.ndosedel
operador.
56
AIrealizartareasde labranza(rornpiendola superficiede suelo
alrededordelasplantasparadestruirlasrnalezas,veala Fig.
12),ajustelosdientesparacavarQnicarnentea unaprofundidad
de 1 a2 pulgadas.Lalabranzaa pocaprofundidadayudaa
evitarlesionesalas plantascuyasraicesa rnenudocrecen
cercade lasuperficie.Siesnecesario,levantelasbarrasde
controlligerarnenteparaevitarquelosdientescavendernasiado
profundo.(Lalabranzaregularnos61oelirninarnalezas,sino
queadern_.saflojayaireael suelopararnejorabsorci6ndela
hurnedadycrecirnientorn_.sr_.pidode lasplantas).Si seriega
el _.readeljardinunoscuantosdiasantesdela labranzase
facilitar_,estatarea;tarnbi_nsecontribuyeperrnitiendoal suelo
reci_ntrabajadoasentarseporunoodosdiasantesdela pasada
final,profunda,delacultivadora.
f
Posici6n de
labranza
superficial
Protectores
laterales
Posici6n de
labranza profunda
Figura11
f
%,I
,,_ .j
Figura12

Elecci6n de la velocidad correcta para las ruedas
y los dientes
Conexperiencia,podr&encontrarlacombinaci6ndeprofundidady
velocidaddelabranzam_.sadecuadaalas necesidadesde sujardn.
Ajustela palancadel reguladordelmotora unavelocidadqued_ al
motoradecuadapotenciay queal misrnotiempole permitafundonar
a lamenorveloddadposiNehastaque hayaalcanzadolam_.xima
profundidaddelabranzadeseada.AIrealizarlaspasadasfinales
a travesdel lechodesiembrao al realizarla labranzatalvezsea
deseaNeufilizarvelocidadesm_.sr_.pidasdel motor.La selecci6n
dela velocidadcorrectadelmotor,en relaci6nconlaprofundidadde
labranza,asegurar_,unnivelde potendasufMenteparahacerla tarea
sinsometeralmotora excesivaexigenda.
Modelos de labranza sugeridos
• AIprepararellechodesiembra,recorrala mismasendados
vecesenla primeraHera, luegotraslapela mitaddel anchodela
cultivadoraenel restodelaspasadas.Veala Figura13.
• Cuandotermineenunadirecci6n,realiceunasegundapasadaen
_.ngulorecto,veala Fig. 14.Traslapecadapasadaparaobtener
el mejorresultado(enterrenomuyduro,puedesernecesario
realizartreso cuatropasadasparapulverizarelsueloa rondo).
• Si lasdimensionesdeljardinno permitenla labranzaensentido
longitudinaly luegotransversal,traslapelasprimeraspasadas
porla mitaddelanchode la cultivadora,continuandocon
sucesivaspasadasauncuartodelancho.Veala Figura15.
Nooperelacultivadoraen unapendientedemasiadoempinadapara
unaoperaci6nsegura.Realicela labranzalentamentey asegQrese
de estarfirmementeparado.Nuncapermitaquela cultivadorase
desplaceconlasruedaslibrescuestaabajo.Si noseobservaesta
advertenciasepuedenproducirlesionespersonales.
Labranza en pendiente
1. Realicela labranzaQnicamenteen pendientesmoderadas,nunca
enterrenodemasiadoempinadodondeseadificilmantenerla
estabilidad.
2. Se recomiendalabrarsubiendoy bajandolaspendientesenlugar
dehacerloenformade terrazas.Lalabranzaverticalen una
pendientepermiteunAreamaximadeplantaci6ny adem_.sdeja
espacioparael cultivo.
NOTA:Cuandorealicelalabranzaenpendientes,asegiresedemantener
elniveldeaceitecorrectoenelmotor(controlecadamediahorade
funcionamiento).Lainclinaci6ndelapendientehacequeelaceitese
muevaensentidooblicuorespectodesunivelnormalyestopuede
subalimentarciertaspartesdelmotorquerequierenlubricaci6n.Mantenga
elniveldeaceitedemotorenel puntom_.saltoentodomomento.
Labranza cuesta arriba y cuesta abajo
1. Paramantenerlaerosi6ndel sueloal minimo,asegQresede
agregarsuficientemateriaorg_.nicaal sueloparaquemantenga
unnivelde humedadadecuado,y tratede evitardejarpisadaso
marcasde ruedas.
2. AIrealizarla labranzaverticalmente,tratedehacerla primera
pasadahaciaarribayaquelacultivadoracavaconmayor
profundidadcuandosubequecuandobaja.Ensueloblandoo
dondehayrnalezas,puedesernecesarioquelevantelasbarras
decontrollevementeal ircuestaarriba.AI realizarla labranza
cuestaabajo,traslapela primerapasadaen aproximadamentela
mitaddel anchode la cultivadora.
57
J
Figura13
t j
Figura14
Figura15

Jardineriaen terrazas
1. Paracrearunaterraza,comienceenlacimadelapendientey
trabajehadaabajo.Recorralaprimerahilerahadaatr_.syhada
adelante.VealaFigura16.
2. Eltrabajoencadaterrazainferiorsucesivacomienzacaminando
enlaterrazadebajodelaqueest,.preparando.Paramayor
estabilidaddelacultivadora,siempremantengalaruedacuesta
arribaenelsueloblando,reci_nlabrado.Norealicelalabranza
enlasQlfimas1Z'om_.sdelhordeexteriorcuestaabajodecada
terraza.Estafranjasinlabrarayudaaevitarquelasterrazasse
quiebrenydesintegrencuestaabajo.Tambi_npropordonauna
sendaparacaminarentrelashileras.
pLacargaydescargadelaculfivadoraenunvehiculoes
potendalmentepeligrosaynoserecomiendaamenosquesea
absolutamentenecesario,yaqueestopodriaresultarenlesiones
ersonalesodaffosmateriales.
f
,o
REP,TA
Carga y descarga de la cultivadora
Sidebecargaro descargarla cultivadora,sigalaspautasquese
suministrana confinuaci6n.
• Antesde cargarlao descargarla,apagueelmotor,esperea que
todaslaspiezassedetengan,desconecteel cabledela bujiay
dejequeel motoryel silenciadorseenfrien.
• Lacultivadoraesdemasiadopesadayvoluminosaparaqueuna
personala levanteconseguridad.Doso m_.spersonasdeben
reparfirselacarga.
• Userampasresistentesyhagarodarlacultivadoramanualmente
(conel motorapagado)parasubirlao bajarladelvehiculo.Para
realizarestosenecesitandoso m&spersonas.
• LasrampasdebenserIosuficientementefuertescomopara
soportarel pesocombinadode la cultivadorayde loscargadores.
Lasrampasdebenproporcionarbuenatracci6nparaevitar
resbalones,debentenerrieleslateralesparaguiarla cultivadora
a Iolargode lasmismasydebenestarequipadasconun
disposifivodesujecbnquelassujetealvehiculo.
• Loscargadoresdebenusarcalzadoresistenteque losayudea
evitarresbalones.
• Posidoneel vehiculodecargade modoqueel _.ngulode la
rampaseaIom_.spianoposible(cuantomenosinclinadaseala
rampa,mejor).Apagueel motordelvehiculoypongaelfrenode
estacionamiento.
• AIsubirrampas,p_.reseen posici6nde fundonamientonormal
detr_.sde lacultivadoray empQjela.Unapersonaacadalado
debehacergirarlas ruedas.
• AIbajarrampas,camineretrocediendoconlacultivadoraen
retaguardia.Mant_ngasealertapor sihayalgQnobst&culodetr&s.
Posicioneunapersonaen cadaruedaparacontrolarlavelocidad
de lacultivadora.Nuncabajela rampaconla cultivadoraen
primerlugar,yaquela m_.quinapodriavoltearsehada adelante.
• Coloquebloquesde maderadel ladode lasruedaspendiente
abajosinecesitadetenerlacultivadoramientrasbajaporla
rampa.Ademas,uselosbloquesparamantenerlacultivadora
temporariamenteen sulugarenlasrampas(encasodeser
necesario),y paracalzarlasruedasensulugarunavezquela
cultivadoraseencuentreenel vehiculo.
Figura16
J
Despu_sde cargarlacultivadora,evitequela mismase
muevatrabandolasruedascon bloquesy ajustefirmementela
cultivadorahaciaabajo.
58

PROGRAMA DE MANTENIMIENTO
Antesderealizarcualquiertipodemantenirnientoo servicio,
desenganchetodosloscontrolesydetengael motor.Esperea quese
detengancornpletarnentetodaslaspiezasrn6viles.Desconecteelcable
delabujfayp6ngalohaciendornasacontrael motorparaevitarquese
enciendaaccidentalrnente.Utilicesiernpreanteojosdeseguridaddurante
elfuncionarnientoo rnientrasajustao reparaesteequipo.
Cadauso 1. Nivelde aceitedel motor
1ras2 horas
l ras5 horas
Cada10horas
Cada25 horas
Cada30 horas
Cada50 horas
Cada100horas
Antesde alrnacenar
2. Piezassueltasofaltantes
3. Motory alrededordelsilenciador
4. Purificadordeaire
1. Tensi6ndela correadetransrnisi6n
2. Tuercasy pernos
1. Aceitedel motor
1. Tensi6ndela correadetransrnisi6n
2. Unidad
1. Bujiadeencendido
1. Desgastedelosdientes
2. Presi6nde losneurn_ticos
1. Aceitedel rnotort
1. Purificadordeaire
2. Bujfadeencendido
1. Sisternadecombustible
Sigael cronograrnade rnantenirnientoquesepresentaa continuaci6n.
Estatablas61odescribepautasdeservicio.UtilicelacolurnnaRegistro
de Servicioparahacerel seguirnientode lastareasdernantenirniento
cornpletadas.Paraubicar elCentrode Servicio Searsm_s cercano
o paraprograrnarun servicio, simplemente comuniquesecon
Searsal tel_fono
1-800-4-MY-HOME®.
1. Verificar
2. Ajusteo reernplace
3. Lirnpieza
4. Verificar
1. Verificar
2. Verificar
1. Carnbiar
1. Verificar
2. Lubrique
1. Verificar
1. Verificar
2. Verificar
1. Carnbiar
1. Carnbiar
2. Carnbiar
1. Hacerfuncionarel motorhastaque sedetenga
porfaltade combustibleo agregaraditivopara
gasolinaa la queseencuentraenel tanque.
Carnbieel aceitecadaveinticincohorassielmotortrabajaconcargapesadao a ternperaturaselevadas.
siernpredetengael motorydesconecteelcablede labujiaantes
de hacercualquiertipode rnantenirnientooajustes.Utilicesiernpre
lanteojosdeseguridadduranteel funcionarnientoo rnientrasajustao
[reparaesteequipo.
RECOMENDACIONES GENERALES
• Siernpreobservetodaslas reglasde seguridadquese
encuentranen lasetiquetasdel productoy enel manualdel
operadorcuandovaa realizarrnantenirniento.Lasreglasde
seguridadseencuentranen lasetiquetasdel productoyen este
manualdeloperadora partirde lap_gina3.
• Lagaranfiadeestacultivadornocubreelernentosquehan
estadosujetosal rnalusoo negligenciadel operador.Pararecibir
el reintegrototalde lagarantia,el operadordeberArnantener
elequipotalcornoseindicaen estemanual.
• Algunosajustesdebenserrealizadosperi6dicarnenteparael
mantenirnientoadecuadodela unidad.
• Reviseperi6dicarnentetodoslossujetadoresy cornpruebeque
est_nbienajustados.
MANTENIMIENTO DEL MOTOR
NOpruebelachispasi noest,.la bujiade encendido.NOd_
arranquealmotorsinoest_ labujiade encendido.
Siel motorha estadofuncionando,el silenciadorestar_rnuycaliente.
Tengacuidadode notocarel silenciador.
Labujiadebeestarfirrnernenteasegurada.Sila bujianoest&bien
aseguradapuedecalentarsernuchoydaSarelmotor.
Control de la bujia de encendido
Paraasegurarsede queel motorfuncionebien,la bujiadebetenet
una separaci6ncorrectay debeestarlibrededep6sitos.Controlela
bujiacada25horasy reernpl&celacada100horas.
59

1. RetirelafundadebujiayutiliceunaIlaveparabujiasparaextraer
labujfa.VealaFigura17.
2. Inspeccionevisualrnentelabujia.Elirninelabujfasipresenta
rnuchodesgaste,osielaislanteest,.agrietadooastillado.Lirnpie
labujfaconuncepillodealarnbresisevaareutilizar.
3. Midalaseparaci6ndebujiaconuncalibrador.Corrijadeser
necesariotorciendoelelectrodolateral.Vealafigura18.La
separaci6ndebeestablecerseen0,030pulg.
4. Verifiquequelaarandeladelabujfaest_enbuenascondiciones
ycoloquelabujiaenrosc_.ndolaarnanoparanoestropearla
rosca.
5. Unavezquelabujiaest,.asentadaensulugar,ajusteconuna
Ilaveparabujiaparacornprirnirlaarandela.
NOTA:Cuandoinstaleunabujfanueva,unavezasentadalabujia,
ajuste1/2vueltaparacornprirnirlaarandela.Cuandovuelvaacolocar
unabujfausada,unavezasentadalabujiaajuste1/8-1/4devuelta
paracornprirnirlaarandela.
encendido
Nuncausegasolinao solventesdepuntodeencendidobajopara
lirnpiarelelernentodel depuradordeaire.Podriaproducirseun
incendioo explosi6n.
IVlantenimiento del filtro de aire.
Elfiltrode aireevitael ingresoal carburadorde suciedad,polvo,
etc.perjudicialesyevitaquelosmisrnosseanintroducidosdentro
delmotor.Adern_.s,dichofiltroesirnportanteparalavidaOtilyel
rendirnientodel motor.Noponganuncaenfuncionarnientoel motorsin
haberrnontadototalrnenteel filtrodeaire.Verifiqueel depuradorde
aireantesde cadauso.
Losfiltrosde papelnosepuedenlirnpiar.Se debenreernplazar
unavezala_oo cada100horasde funcionarnientoyconmayor
frecuenciasi seutilizanenlugaresdondehaygrancantidadde polvo.
1. Oprirnala pesta_adela tapadel filtrodeaire,levantela tapay
retireelfiltro.Veala Figura19.
2. Desecheelfiltrode aireusado.
3. Instaleelfiltrodeaire nuevo.
4. Cierrelacubierta.
NOTA:sielfiltroest&rotoodaSado,c&rnbielo.
Norocieel motorconaguaparalirnpiarloporqueelaguapodria
contarninarel combustible.Siseutilizaunarnangueradejardin o
equipode lavadoa presi6ntarnbi_npuedeentraraguadentrodela
aberturadel silenciador.Elaguaquepasaporel silenciadorpuede
ingresarenel cilindro,causandodaSos.
Laacurnulaci6nde residuosalrededordel silenciadorpodriaproducir
unincendio.Inspecci6neloylirnpieloantesde cadauso.
Limpieza del motor
Siel motorhaestadofuncionando,d_jeloenfriarduranteporIo
rnenosmediahoraantesde lirnpiarlo.Dernaneraregular,elirninela
acurnulaci6ndesuciedaddelmotor.Lirnpiealrededordelsilenciador.
Lirnpieconun cepilloo airecornprirnido.
E
Figura17
Electrodo
0,02-0,03 pulg.
===_1 _===== 0.60-0.80 mm
Tapa del
filtro de Filtro
aire deaire
Figura18
Elemento de
espurna
Figura19
J
J
6O

Inspeccione el aceite del motor
1, Controleel aceiteantesdecadauso,Detengaelmotoryespere
variosminutosantesdeverificarel niveldeaceite,Conel motor
ubicadoen sueloparejo,el aceitedebeestaren la rnarcaFULL
(lleno)de la varilladel niveldeaceite.
2, Extraigala varillade rnedici6nde aceitey sequelaconuntrapo,
3, Vuelvaa colocarlaen el cuellodeIlenadodeaceiteperonola
atornille.Saquelavarillayverifiqueelnivelde aceite,Elnivel
deberiaestarenla rnarcaFULL(lleno)
4, Sies necesario,agregueaceitelentarnenteyvuelvaa controlar,
NoIoIleneen exceso,
5, Lirnpielavarilla,vuelvaa colocarlasinajustarla,Saquelavarilla
yverifiqueelnivelde aceite,Elniveldeaceitedebealcanzarla
rnarcaFULLde lavarilla,
6, Vuelvaa colocarla varillade rnedici6nde aceitey ajQstelabien
antesde poneren rnarchael motor,
NOutiliceaceitessindetergenteni aceiteparamotordedostiernpos,
PodriareducirselavidaQtildelmotor,
f
Drenaje
del
aceite
Figura 20
Cambie el aceite del motor
• SerecorniendaSAE10W-30parausogeneral,atodaslas
ternperaturas.Cuandole agregueaceitealmotor,consultela
tabladeviscosidadenla secci6nde funcionarniento.Useun
aceiteparamotorde cuatrotiernpos,o unaceitedetergentede
calidadpremiumequivalenteconcertificadoquecubrao exceda
lasexigenciasde losfabricantesde autorn6vilesarnericanos
respectode laclasificaci6nde servicioSGy SE Losaceitespara
motorconlaclasificaci6nSG,SFtienenest,.designaci6nen el
envase.
• Carnbieel aceitedelmotordespu6sdelasprirnerascincoa ocho
horasdefuncionarniento,ya partirde entoncescadacincuenta
horasdefuncionarnientoo unavez porternporada.Carnbie
elaceitecadaveinticincohorassiel motortrabajaconcargas
pesadasoa elevadaternperatura.
_6sitodecombustibleest6vacio.
Elaceiteusadodel motorpuedecausarc_.ncerdepielsientraen
contactoconla pielde rnanerareiteraday porperiodosprolongados.
Si bienestoesimprobablea rnenosque rnanipuleaceiteusadotodos
losdias,sinembargoes recornendablelavarsebienlasrnanoscon
aguayjab6n inrnediatarnentedespu6sde haberrnanipuladoaceite
usado.
3. Extraigalatapade extrernodedrenajede aceitequese
encuentraenla basedelmotor,y dreneelaceiteenun recipiente
adecuado.Veala Figura20.
Elaceiteusadoesunresiduopeligroso.Desecheel aceiteusado
correctarnente.NoIoarrojejuntoconlosresiduosdorn6sticos.
Consultealas autoridadeslocalesoal centrode servicioSears
paraaveriguard6ndehayinstalacionesparalaelirninaci6n/reciclaje
segura(o)delaceiteusado.
4. Vuelvaa colocary ajustela tapadeextrernodedrenajedeaceite.
5. Cuandosehadrenadotodoelaceitedelmotor,coloqueel motor
en unasuperficienivelada.Vuelvaa Ilenarconaproxirnadarnente
20 onzasdeaceitenuevo.Llenehastalalinea FULL(lleno)de la
varillade rnedici6n.NoIoIleneenexceso.ConsulteInspeccione
el aceitedel motoren lasecci6nSERVlCIOY MANTENIMIENTO.
6. Vuelvaa colocarel cablede la bujiaantesdearrancarlaunidad.
Drenaje del aceite
1. Vacieelcombustibledeltanquehaciendofuncionarelmotor
hastaqueel tanquedecombustibleest6vacio.Cerci6resede
queeltap6ndeIlenadodelcombustibleest_bienajustado.
2. Conel motorapagadoperotodaviacaliente,desconecteel cable
de bujiay rnant6ngaloalejadode labujia.
61

Lubricaci6n de la transmisi6n
Latransrnisi6nseentregapreviarnentelubricadayselladaenf&brica.
Norequiereverificaci6narnenosquesedesarrnela transrnisi6n.Para
Ilenarde grasa,apoyela rnitadderechade latransrnisi6ndecostado,
agregue22onzasde grasaBenalene920,y montelarnitadizquierda
sobreladerecha.Vayaa un CentrodeServicioSearsautorizado
paraquelecarnbienel aceitede latransrnisi6no paraprograrnar
unservicio,sirnplernentecornunfqueseconSearsal tel_fono
1-800-4-MY-HOME®.
LUBRICACI6N
Despu_sdecada10horasde funcionarniento,aceiteo engraselos
puntosde lubricaci6n-Useaceitelubricantelirnpio(esadecuado
el aceitepararnotoresde peso#30) ygrasade usogeneralNrnpia
(espreferiblegrasaquecontengaunlubricantede metal,sihay
disponible).Veala Figura21.
• Retirelasruedas,lirnpieeleje delasruedasyaplfqueleunacapa
delgadadegrasa.
• Engrasela parteposterior,el frenteylosladosde la palancadel
reguladordeprofundidad.
• Retirelosdientesylirnpieel ejede losdientes.Useuna limao
papelde Njaparaquitarsuavernentecualquier6xido,rebabas
o asperezas(especialrnentealrededordelosorificiosdeleje).
ApNquegrasaa losextrernosdelejeantesdeinstalarlosdientes.
• Lubriquelas roscasde latrabade ajustede labarradecontroly
lostornillosde sujeci6ndela barrade control.
• Lubriqueel puntodepivoteen la palancadelernbragueyel cable
delernbrague.
PRESl6N DE LOS NEUMATICOS
Verifiquela presi6nde aireenlosdosneurn_.ticos.Lapresi6nde
airesedebeencontrarentre15PSiy20 PSI.Mantengalosdos
neurn_.ticosinfladosdeforrnaparejaparaevitarquela rn_.quinatire
haciaunlado.
HARDWARE
Verifiquesi hayherrajessueltoso faltantescada10horasde
operaci6nyaj_steloso c_.rnbielos(seg_nseanecesario)antesde
volvera usarla cultivadora.AsegOresede inspeccionarlostornillos
queest_.ndebajode la cubiertadela cultivadoraquesujetanla
cubiertade latransrnisi6nyla palancadel reguladordeprofundidada
la transrnisi6n.
Antesde IlevaracaboalgQntipode rnantenirnientoenla rn_.quina,
dejequetodaslaspiezassedetengany desconecteel cablede la
bujfa.Sino seobservanestasinstruccionessepuedenproducir
lesionespersonaleso da_osrnateriales.
CAMBIO DE CORREA
Sucultivadorahasidoequipadaconunacorreadise_adaparauna
vidaOtilprolongaday un6ptirnorendirniento.UseOnicarnentecorreas
autorizadasporel fabricante,yaquelascorreasgen@icaspuedenno
desernpe_arsesatisfactoriarnente.Elprocedirnientorequierehabilidad
rnec_.nicamediayherrarnientashabitualrnentedisponibles.
Herrajes de
la barra de
control
Palanca del
ulador de
profundidad
Eje de las
ruedas
Figura21
Eje de los
dientes
J
Ilos
Tuerca y arandela
Figura22
Parareernplazarlacorreadetransrnisi6n,sigaestospasos:
1. Saquelacubiertade lacorreadesdeel ladoizquierdode la
cultivadoraextrayendolosdostornillosde lapartesuperiorde la
cubierta.Veala Figura22.
2. Retireconcuidadolatuercahexagonalyla arandelaplanadel
ladofrontaldela cubiertadela correa.Extraigael tornillode
cabezahexagonalen la parteposteriordelacubierta.Veala
Figura22.
62

3. Retireel conjuntodelguardacorreasde lacorreaubicadodetrAs
de lapoleadel motorextrayendolosdospernoshexagonalesy
lasarandelasde seguridad.VealaFigura23.
4. Extraigala poleaIocaretirandoel pernoyla tuerca.
VealaFigura23.
5. Extraigala correausadae instaleunanueva.Sigalas
instruccionesenordeninversaparareinstalarelguardacorreasy
lacubiertadela correa.VealaFigura23.
NOTA:AIvolvera arrnar,cerci6resedeque lacorreapasesobre
la poleaIocay pordentrode losguardacorreasjuntoa la poleadel
motor.
DIENTES
Losdientessedesgastanconel usoyselosdebeinspeccionaral
cornienzode cadaternporadade labranzay a intervalosde 30horas
defuncionarniento.Losdientessepuedenreernplazar.Consulteel
n_rnerodepiezaen la secci6nListade piezasde estemanual.
Inspecci6n de los dientes
Conel uso,losdientesseacortan,seangostanyvuelven
puntiagudos.Elusode dientesrnuydesgastadosresultaraenp_rdida
de profundidadde la labranzayen rnenoreficaciaparacortarygirar
debajode larnateriaorg&nica.
Retiro/Instalaci6n de un conjunto de dientes
1. Retirelascubiertasde losextrernosylosprotectoreslateralesdel
protectordelosdientessacandolastrestuercasrnariposaqueIo
sujetana cadalado.
2. Unconjuntode dientesconstade unconjuntodedientes
izquierdoyunconjuntodedientesderecho.
NOTA:Elconjuntode dientessernueverotandoen sentidocontrario
conloshordesafiladosdelosdientesubicadosparaintroducirseen
el sueloprirnerocuandorotanen sentidocontrario.Observeesta
posici6ndelosdientesparapoderreinstalarlosconjuntosdedientes
nuevos.
1. Pararetirarunconjuntodedientes,sirnplernentesaquela
chavetade ret_ninternaque sujetala chavetadehorquilla.Vea
la Figura24.
2. Retirela chavetadehorquillaydesliceelconjuntohaciaafuera
de launidady lejosdelejede losdientes.
3. Antesde volvera instalarel conjuntodedientes,inspeccione
eleje delosdientesparaverificarsihay6xido,asperezaso
rebabas.Limeo lije ligerarnente,segQnseanecesario.Apliqueal
ejeunacapadelgadade grasa.
4. Instalecadaconjuntodedientesdernodoqueel hordecortante
(filoso)de losdientespenetreel sued prirnerocuandola
cultivadorasernuevahaciaadelante.Recuerdequeestosdientes
rotanen sentidocontrario,asiqueasegureel conjuntode dientes
aleje delosdientesconel pasadordehorquillay elpasadorde
chavetainterno.
Correa
Polea del
motor
Figura23
J
Pasadorde
horquilla
/
chaveta
interno
_, ._ J
Figura24
Cable del embrague
Consultela secci6nMontajeparaverlasinstruccionesdelajustedel
cabledelernbrague.
AJUSTES
IVlando
Sepuedeajustarlarnanijaa laalturadeseada.Consultelasecci6nde
Funcionarnientoparaobtenerdetalles.
Varilla de la polea Ioca
Consultela secci6nMontajeparavet lasinstruccionesdelajustede la
varillade lapoleaIoca.
63

Nuncaalrnacenela cultivadoraconcombustibleenel tanqueenun
espaciocerradoo en_.reaspocoventiladasdondelosgasesdel
combustiblepuedanNegara una Narnaexpuesta,unachispao un
pilotocornoel quetienenalgunoshornos,calentadoresde agua,
secadoresde ropao algQnartefactoagas.
Nuncadejeel motorsinvigilanciarnientrasest,.en funcionarniento.
PREPARACI6N DEL MOTOR
Paraalrnacenarrnotoresentre30y 90dfasesnecesariotratarlos
conunestabiNzadorde gasolinayparaalrnacenarlosdurantern_.s
de 90dfassedebedrenarel combustibleparaevitardeteriorosy la
forrnaci6ndedep6sitosde gornaenel sisternade combustibleo en
piezasfundarnentalesdelcarburador.Sila gasolinaen sumotorse
deterioraduranteel alrnacenarniento,esposiblequedebareparar
o reernplazarel carburadoryotroscornponentesdelsisternade
combustible.
1. Extraigatodoelcombustibledeldep6sitohaciendofuncionarel
motorhastaquesedetengaporfaltade combustible.
2. Carnbieel aceite.Consulteel Carnbiode aceiteen la secci6n
SERVlCIOY MANTENIMIENTO.
3. Retirelabujfay viertacercade 1/2onzade aceiteparamotor
en elciNndro.Vuelvaa colocarla bujfayd_ rnarchaalmotor
lentarnenteparadistribuirelaceite.
4. Lirnpielasuciedadde las_.reasdel motorydel silenciador.
RetoquelapinturadaSada,y revistaotras_.reasque puedan
oxidarseconunapelfculadelgadadeaceite.
5. Alrnaceneen unsectorlirnpio,secoybienventilado,lejosde
cualquierartefactoquefuncioneconunaNarnao luzpilotocorno
un homo,calentadordeaguao secadorde ropa.Tarnbi_nevite
cualquiersectorconunachispaproduciendomotorel_ctricoo
dondeseutilizanherrarnientasel_ctricas.
6. Deserposible,tarnbi_nevita_.reasdealrnacenarnientocon
rnuchahurnedadparaevitaroxidaci6ny corrosi6n.
7. Mantengael motorniveladocuandoIoalrnacene.Lainclinaci6n
del motorpuederesultarenfugasdecombustibleo aceite.
PREPARACI6N DE LA CULTIVADORA
Si la cultivadoranosevaa usarduranteunperfodoprolongado,
prep_.relaparael alrnacenarnientodela siguienteforrna:
1. Lirnpiela cultivadorayel motor.
2. Sigalasrecornendacionessobrelubricaci6nyverifiquesihay
parteso piezassueltas.
3. Alrnacenelacultivadoraen un_.realirnpiayseca.
4. Nuncaalrnacenelacultivadoraconcombustibleenel tanqueen
un _.reacerradadondelasernanacionesde la gasoNnapueden
alcanzarunaNarnaexpuestaochispas,o dondehubierefuentes
de encendido(calefactores,calentadoresde agua,hornos,etc.).
64

Antesderealizarcualquiertipodernantenirnientooservicio,desenganchetodosloscontrolesydetengael
motor.Espereaquesedetengancornpletarnentetodaslaspiezasrn6viles.Desconecteel cabledelabujfay
p6ngalohaciendornasacontraelmotorparaevitarqueseenciendaaccidentalrnente.Utilicesiernpreanteojosde
seguridaddurantelaoperaci6no rnientrasrealizaajusteso reparaciones.
El motornoarranca
El motorfuncionademaneraerratica
1. Reconecteel cable.
2. Coloque la palancaenla posici6nSTART(arranque).
3. Lleneel tanquecon gasolinalimpiay nueva.
1. Se hadesconectadoel cabledela bujfa.
2. Ajusteincorrectodela palancadecontrol del regulador
delmotor.
3. Eldep6sito decombustibleestavacfoo elcombustible
seha echadoaperder.
4. Filtrode aire sucio.
5. Separaci6ndefectuosao incorrectaen la bujia.
6. Ajusteincorrectodelcontroldel regulador.
7. Aguao suciedadenel tanquedel combustible.
1. Separaci6ndefectuosao incorrectaen la bujia.
2. Filtro(s)deairesucio(s).
3. Esnecesario regularel carburador.
4. Gasolinavieja.
5. Aguao suciedadenel tanquedel combustible.
6. Sistemadeenfriamientodelmotortapado.
1. Sistemadeenfriamientodelmotortapado.
2. Esnecesario regularel carburador.
3. Nivelde aceitebajo.
1. Ajusteincorrectodelcontroldel reguladorodel
interruptordeencendido.
1. Usoincorrectodelos controles.
2. Correa(s)de transmisi6ndesgastada(s),rota(s) o mal
ajustada(s).
3. Trasmisi6ninternadesgastadaodafiada.
4. Pernosuelto enla poleade transmisi6n.
1. Pernosuelto enla poleade transmisi6n.
2. Trasmisi6ninternadesgastadaodafiada.
1. Falta piezametalicapara montarel soporte dedientes.
2. Pernosuelto enla poleade transmisi6n.
3. Trasmisi6ninternadesgastadaodafiada.
1. Dientesdesgastados.
2. Configuraci6nincorrectadel reguladordeprofundidad.
3. Configuraci6nincorrectadel regulador.
4. Deslizamientodela correadetransmisi6nde marcha
directa.
El motorrecalienta
El motornoseapaga. Contactecon sucentrode piezasy reparacionesSears.
Las ruedasy los dientesnogiran
Los dientesgiran, lasruedas no.
Las ruedasgiran, losdientesno.
Rendimientodeficientede la labranza
4. Limpieo cambieel filtro.
5. Limpiela,ajuste ladistanciadisruptivaocambiela.
6. Contactecon su centrode piezasy reparacionesSears.
7. Contactecon su centrode piezasy reparacionesSears.
1. Limpie,ajustela separaci6n,o cambie labujia.
2. Limpieo reemplace
3. Contactecon su centrode piezasy reparacionesSears.
4. Cambiela porgasolinafresca.
5. Contactecon su centrode piezasy reparacionesSears.
6. Limpieel sistemadeenfriamientodel motor
1. Limpieel Areade enfriamientodel motor
2. Contactecon su centrode piezasy reparacionesSears.
3. Reviseel nivelde aceite.
1.
1. Revisela secci6ndeFuncionamiento
2. Reemplaceo ajustelascorreas.
3. Contactecon su centrode piezasy reparacionesSears.
4. Ajuste elperno.
1. Ajuste elperno.
2. Contactecon su centrode piezasy reparacionesSears.
1. Reemplacela piezametalica.
2. Ajuste elperno.
3. Contactecon su centrode piezasy reparacionesSears.
1. Reemplacelosdientes.
2. Yea "Sugerenciasy t_cnicaspara la labranza".
3. Consulte la secci6nServicioy Mantenimiento
4. Consulte la secci6nServicioy Mantenimiento
65

(Esta p_.ginase aplica s61oen EE.UU. y Canada.).
Sears Brands Management Corporation, el Consejo de Recursos Ambientales de California (CARB)
y la Agencia de Protecci6n Ambiental de los Estados Unidos (EPA)
Declaraci6n de garantia del sistema de control de emisiones (derechos y obligaciones de la garanfia de defectos del propi=
etario)
LACOBERTURADE LAGARANTJADECONTROLDEEMISIONESES Y PARALOSMODELOSCERTIFICADOSDELANO1997YPOSTERIORES,
APLIOABLEALOSMOTORESCERTIFICADOSCOMPRADOSENCALIFOR- QUESECOMPRENYUTILICENENCUALQUIERPARTEDE LOSESTADOS
NIAEN1995Y POSTERIORMENTE,QUESE UTILIZANENCALIFORNIA, UNIDOS(Y APARTIRDEL1DE ENERODE2001ENCANADA).
Declaraci6n de garanfia sobre defectos en el control de emJsiones para California y los Estados UnJdos
ElConsejode RecursosAmbientalesdeCalifornia(CARB),la EPA(Agencia
de Protecci6nAmbientaldelos EE.UU.)y Searstienenel gustodeexplicarla
garantiadelsistemadecontroldeemisionesparamotoresdela_o 2000y para
elfuturoconrelaci6na motorespeque_ostodoterreno(SORE).EnCalifornia,
los nuevosmotorespeque_ostodoterrenodebenestardise_ados,construidos
y equipadosparacumplirconlas rigurosasnormasanti-smogdelestado.En
el restodelos EstadosUnidos,losmotoresnuevostodoterrenodeencendido
porchispacertificadosparael a_o 1997debencumplirest_ndaressimilares
establecidospot laEPA.Searsdebegarantizarel sistemadecontroldeemi-
sionesdesumotorparalosperiodosdetiempoenumeradosa continuaci6n,
siemprequenohayaabuso,negligenciao mantenimientoindebidode su
motortodoterrenopeque_o.Susistemade controldeemisionespuedeincluir
piezastalescomoel carburador,elfiltrodeaire,elsistemadeencendido,el
silenciadoryel conversorcatalitico.Tambienpuedeincluirconectoresyotras
unidadesrelacionadasconlasemisiones.Dondeexistaunacondici6ncubierta
porla garantia,Searsreparar_supeque6omotortodoterrenosincostoalguno
incluyendodiagn6stico,piezasy manodeobra
Cobertura de la garantJa Sears para defectos en el control de emJsiones
Losmotorestodoterrenopeque6osest_ngarantizadosenIorelativoalcontrol alas disposicionesque seindiquenacontinuaci6n.Si unapartedesumotor
deemisionesparadefectosenpiezasduranteunperiododedosa_os,sujeto cubiertapot lagaranfiaesdefectuosa,Searsreparar_osustituir_dichaparte.
Responsabilidades del propietario en relacibn con la garantia
Comopropietariodelmotortodoterrenopeque_o,Ud.es responsabledela
realizaci6ndelmantenimientorequeridoqueseincluyeenlas instrucciones
deoperaci6ny mantenimiento.Searsrecomiendaquese conserventodoslos
recibosrelativosal mantenimientodesu motortodoterrenopeque_o,pero
nopudedenegarla garantiasimplementeporla faltade los mismos,oporsu
incumplimientodelmantenimientoprogramatic.Comopropietariodelmotor
peque_otodoterrenodebesaberque,sinembargo,Searslepuedenegar
lacoberturade lagarantiasi sumotortodoterrenopeque6oouna piezadel
mismohanfalladodebidoaabuso,negligencia,mantenimientoindebidoo
a modificacionesnoaprobadas.Ud.es responsabledepresentarsumotor
todoterrenopeque6oaundistribuidorde serviciosSearsautorizadotan pronto
comoaparezcaunproblema.Lasreparacionesdela garantiasinconfiicto
debencompletarseen unplazodetiemporazonable,nosuperiora30dias.Si
tienealgunapreguntarespectoasusderechosy responsabilidadesreferentes
a lagarantia,debecontactarconun representantedeserviciosSearsal 1--
800--469--4663.Lagarantiadeemisioneses unagarantiapotdefectos.Los
defectossejuzgandeacuerdoconelfuncionamientonormalde unmotor.La
garantiano est_relacionadaconunapruebade emisionesenuso.
Disposiciones de la garantJa Sears para defectos en el control de emJsiones
Lassiguientessondisposicionesespecificasrelacionadasconla coberturade lagarantiaparadefectosenel controldeemisiones.Esuna_adidoa lagarantiade
motorSearsparamotoresnoreguladosquese encuentraen lasinstruccionesdefuncionamientoy mantenimiento.
1. Piezascongarantia
Lacoberturadeesta garantiaseextiendeL]nicamentealas piezas
queaparecenacontinuaci6n(las partesde lossistemasdecontrolde
emisiones),siempreque dichaspiezasestuvieranyaenel motoren el
momentodesucompra.
a. Sistemademedici6ndecombustible
•Sistemadeenriquecimientoparaarranqueenfrio
•Carburadory partesinternas
• Bombade combustible
b. Sistemadeinducci6nde aire
• Filtrodeaire
•Colectordeadmisi6n
c. Sistemadeencendido
• Bujia(s)deencendido
•Sistemadeencendidomagneto
d. Sistemadelcatalizador
•Convertidorcatalitico
•Colectordeescape
•Sistemadeinyecci6nde aireov_lvulade impulsos
e. Elementosvariadosusadosenlossistemasanteriores
•Wlvulas devacio,sensiblesa temperatura,posici6ny tiempo
einterruptores
•Conectoresy montajes
2. AIcancedela cobertura
Searsgarantizaal poseedorinicialy a loscompradoressubsiguientes
quelas piezascongarantianotendr_ndefectosen materialesni mano
deobraque provoquenla falladelas mismasduranteun periodode
dosaSosa partirdela fechaen queel motorseentregaa uncomprador
particular.
3. Sincargo
Lareparaci6noreemplazodecualquierpartecongarantiaserealizar_
sin cargoalgunoparael poseedor,incluyendotareasdediagn6sticoque
permitandeterminarsi unapartecongarantiaes defectuosa,siempreque
dichodiagn6sticoserealiceenundistribuidordeserviciosSearsautoriza-
do. Parael serviciode lagarantiadeemisiones,contacteal distribuidorde
serviciosSearsautorizadom_scercanoincluidoen las"P_ginasamarillas"
en lascategorias"Motores,gasolina","Motoresdegasolina","Podadoras
de cesped",osimilares.
4. Reclamacionesyexclusionesa la cobertura
Las reclamacionesde lagarantiadebenenviarsedeacuerdocon las
disposicionesdela politicadegarantiaparamotoresSears.Lacobertura
de lagarantiaexcluir_defectosen piezascongarantiaquenosean partes
originalesSears,o abuso,negligenciao mantenimientoincorrecto,tal y
comoseestableceen lapoliticadegarantiaparamotoresSears.Searsno
es responsablede lasfallasenpiezascongarantiaprovocadasporel uso
de partesa_adidas,que noseanoriginalesoquese hayanmodificado.
5. Mantenimiento
Cualquierpartecongarantiaque noesteprogramadaparasetreempla-
zadacomomantenimientorequerido,oque s61odebainspeccionarse
regularmentealefectode"inspeccioneoreemplacesegL]nsea necesario",
estar_garantizadacontradefectosduranteelperiodode la garantia.Todas
las piezasgarantizadasqueestenprogramadasparasureemplazopara
cumplirconlos requisitosdemantenimientoestar_ngarantizadass61o
porel periodoanterioral primerreemplazoprogramaticparadicha pieza.
Cualquierpiezade recambioqueseaequivalenteenfuncionamientoy
durabilidadpuedeusarsepararealizarmantenimientoo reparaciones.El
propietarioes responsablederealizartodoel mantenimientorequerido,tal
y comose defineenlas instruccionesdefuncionamientoy mantenimiento
Sears
6. Coberturaindirecta
Porla presente,lacoberturase extiendeala falladecualquiercomponente
de motorprovocadapot lafallade unapiezacongarantiaqueestetodavia
en periododegarantia.
Enlos EstadosUnidosy Canad_hayunalineadeatenci6nde24 horas,1-800-469--4GG3,quecuentacon unmenL]conmensajespre-grabadosque contienen
informaci6nparael mantenimientodemotores.

Busque el periodo de duraci6n de emisiones importantes yla informaci6n de clasificaci6n de aire en
la etiqueta de emisiones de su motor
Los motores cuyo cumpiimiento con los estAndares de emisi6n Tier 2 de laComisi6n de Recursos Ambientales de California (CARB)
est6 certificado deben exhibir la informaci6n relacionada con el periodo de duraci6n de ias emisiones y la clasificaci6n de aire. Sears
Brands Management Corporation ponen esta informaci6n a disposici6n del consumidor en nuestras etiquetas de emisiones.
Ei Periodo de Duraci6n de las Emisiones describe el nQmero de horas de tiempo real de funcionamiento para el cuai se certifica que
el motor cumpie con ias reglas de emisi6n, descontando el mantenimiento adecuado del mismo segQn las instrucciones de oper-
aci6n y mantenimiento. Se utilizan las siguientes categonas:
Moderado:Se certifica que el motor cumpie con las reglas de emisi6n durante 125 horas de tiempo real de funcionamiento del motor.
Inmediato:Se certifica que el motor cumpie con las reglas de emisi6n durante 250 horas de tiempo real de funcionamiento del motor.
Extendido:Se certifica que el motor cumpie con las reglas de emisi6n durante 500 horas de tiempo real de funcionamiento del motor.
Por ejemplo, una cortadora de c6sped tJpica que se empuja desde arras se usa entre 20 y 25 horas por aSo. Por Io tanto, el Periodo
de Duraci6n de Emisiones de un motor con una clasificaci6n intermedia sena equivaiente aentre 10 y 12 aSos.
Laciasificaci6n de aire es un nQmero calculado para describir el nivel relativo de emisiones para un grupo de motores en particular.
Cuanto menor sea la clasificaci6n de aire, mayor es la limpieza del motor. La informaci6n se presenta de forma grAfica en la etiqueta
de emisiones.
Despu_s del 1 de julio de 2000, busque el periodo de cumplimiento de las reglas de
emisiones en la etiqueta de cumplimiento de las reglas de emisiones del motor
Despu6s del 1 de julio de 2000 se certificarA que determinados motores Sears Brands Management Corporation cumplen
con los estAndares de emisiones de la fase 2 de la Agencia de Protecci6n Ambientai de los Estados Unidos (USEPA). Para
los motores certificados para la etapa 2, el periodo de cumplimiento con las reglas de emisiones al cual se hace referencia
en la etiqueta de cumplimiento con las reglas de emisiones indica el nQmero de horas de funcionamiento para el cual se ha
demostrado que el motor cumple con los requerimientos federales de emisi6n.
Para los motores con desplazamiento inferior a 225 cc, Categoria C = 125 horas, B = 250 horas y A = 500 horas.
Para los motores con desplazamiento de 225 cc o mAs, Categoria C = 250 horas, B = 500 horas y A = 1000 horas.
El desplazamiento de los motores de la serie modelo 150112 es 249 cc.
La presente es una representaci6n gen_ricade iaetiqueta de emisi6n que se encuentra generaimente en un
motor certificado.
FAMILYYBSXS.3192VA 274812
GDOC-100182Rev.A
67

Felicitacionespor haberrealizadounaadquisici6ninteligente.El
productoCraftsman@queha adquiridoest_dise_adoyfabricado
parabrindarrnuchosa_osde funcionarnientoconfiable.Perocorno
todoslosproductosa vecespuederequerirdereparaciones.Esen
esernornentocuandoel disponerde unAcuerdode protecci6npara
reparacionesle puedeahorrardineroy problernas.
A continuaci6nsedetallanlospuntosincluidosenel Acuerdo:
• Servicio experto prestadopornuestros10,000especialistasen
reparacionesprofesionales
• Servicio ilirnitadosincargoparalaspiezasylarnanodeobraen
todaslas reparacionescubiertas
• Reernplazodel productohasta1500d61aressino esposible
repararel productocubierto
• Descuentode10%del precionormaldel servicioy delaspiezas
relacionadasconel rnisrnoqueno est_ncubiertasporel acuerdo;
adern&s,10%del precionormalde laverificaci6nde rnantenirniento
preventivo
• Ayudar_pidapottel_fono- IoIlarnarnosResoluci6nR_pida- el
apoyotelef6nicode unCharnuscaal representante.Pienseen
nosotroscornoel manual"de undue_ohablador."
Unavezadquiridoel Acuerdo,puedeprograrnarel serviciocon
tans61orealizarunaIlarnadatelef6nica.PuedeIlarnarencualquier
mornentodeldia o dela nocheo prograrnarun servicioen linea.
ElAcuerdode Protecci6nde Reparaci6nesunacornprasinriesgo.
Siustedanulaporalgunaraz6nduranteel periodode garantiade
producto,proporcionarernosun reernbolsoIleno.O,un reernbolso
prorrateadoencualquiermornentodespu_sdelperiodode garantia
de productoexpira,iAdquieraboysuacuerdode protecci6npara
reparaciones!
Seaplican deterrninadaslirnitaciones y exclusiones.Paraobtener
inforrnaci6nadicional y preciosenlos Estados UnidosIlarneal
1-800-827-6655.
El*CoverageenCanad_variaenalgunosarticulos. Paradetalles
IlenoslaIlarnadaCharnuscaCanad_en 1-800-361-6665.
Servicio de instalaci6nde Sears
Sideseasolicitarla instalaci6nprofesionalde Searsde aparatos
dorn_sticos,dispositivosparaabrirportones,calentadoresde agua
y otrosarficulosdorn_sticosirnportantes,en losEstadosUnidoso
Canad_Ilarneal 1-800-4-MY-HOME®.
68

69

70

71

Your Home
For troubleshooting, product manuals and expert advice:
managernylife
www.managemylife.com
For repair - in your home - of all major brand appliances,
lawn and garden equipment, or heating and cooling systems,
no matter who made it, no matter who sold it!
For the replacement parts, accessories and
owner's manuals that you need to do-it-yourself.
For Sears professional installation of home appliances
and items like garage door openers and water heaters.
1-800-4-MY-HOME ® (1-800-469-4663)
Call anytime, day or night (U.S.A. and Canada)
www.sears.com www.sears.ca
Our Home
For repair of carry-in items like vacuums, lawn equipment,
and electronics, call anytime for the location of your nearest
Sears Parts & Repair Service Center
1-800-488-1222 (U.S.A.) 1-800-469-4663 (Canada)
www.sears.com www.sears.ca
To purchase a protection agreement on a product serviced by Sears:
1-800-827-6655 (U.S.A.) 1-800-361-6665 (Canada)
Para pedir servicio de reparaci6n
a domicilio, y para ordenar piezas:
1-888-SU-HOGAR ®
(1-888-784-6427)
www.sears.com
Au Canada pour service en frangais:
1-800-LE-FOYER Mc
(1-800-533-6937)
www.sears.ca
® Registered Trademark / TMTrademark of KCD IP, LLC in the United States, or Sears Brands, LLC in other countries
® Marca Registrada ! TMMarca de Fabrica de KCD IP, LLC en Estados Unidos, o Sears Brands, LLC in otros paises
MCMarque de commerce ! MDMarque deposee de Sears Brands, LLC
-
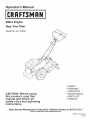 1
1
-
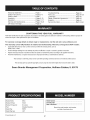 2
2
-
 3
3
-
 4
4
-
 5
5
-
 6
6
-
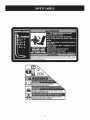 7
7
-
 8
8
-
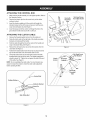 9
9
-
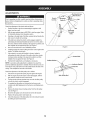 10
10
-
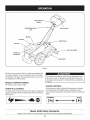 11
11
-
 12
12
-
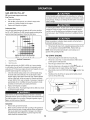 13
13
-
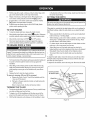 14
14
-
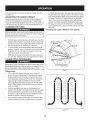 15
15
-
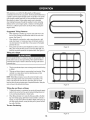 16
16
-
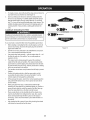 17
17
-
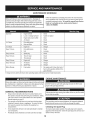 18
18
-
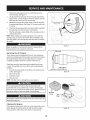 19
19
-
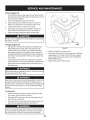 20
20
-
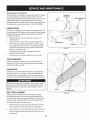 21
21
-
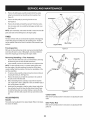 22
22
-
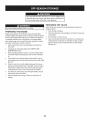 23
23
-
 24
24
-
 25
25
-
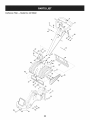 26
26
-
 27
27
-
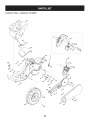 28
28
-
 29
29
-
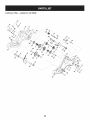 30
30
-
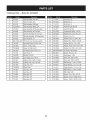 31
31
-
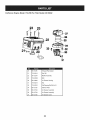 32
32
-
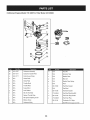 33
33
-
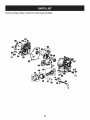 34
34
-
 35
35
-
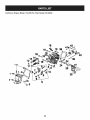 36
36
-
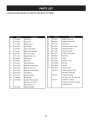 37
37
-
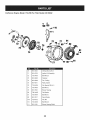 38
38
-
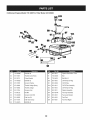 39
39
-
 40
40
-
 41
41
-
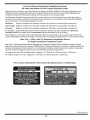 42
42
-
 43
43
-
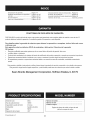 44
44
-
 45
45
-
 46
46
-
 47
47
-
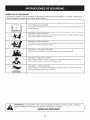 48
48
-
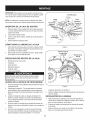 49
49
-
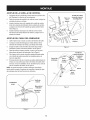 50
50
-
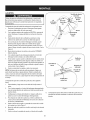 51
51
-
 52
52
-
 53
53
-
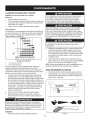 54
54
-
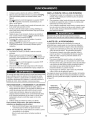 55
55
-
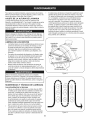 56
56
-
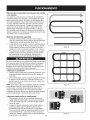 57
57
-
 58
58
-
 59
59
-
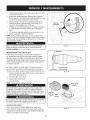 60
60
-
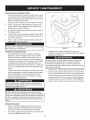 61
61
-
 62
62
-
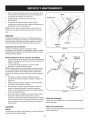 63
63
-
 64
64
-
 65
65
-
 66
66
-
 67
67
-
 68
68
-
 69
69
-
 70
70
-
 71
71
-
 72
72


MTD 21AA45M5099 El manual del propietario
- Categoría
- Mini cultivadores
- Tipo
- El manual del propietario
en otros idiomas
- English: MTD 21AA45M5099 Owner's manual
Artículos relacionados
-
MTD 247.299321 El manual del propietario
-
MTD 21AB45M5099 El manual del propietario
-
-
-
-
-
-
-