La página se está cargando...

Master Gear 1.0
RU
127670

EG-Konformitätserklärung
im Sinne der EG-Richtlinie 2006/42/EG über Maschinen
Name und Anschrift des Herstellers
BlitzRotary GmbH
Hüfinger Str.55
78199 Bräunlingen, Germany
Diese Erklärung bezieht sich nur auf die Maschine in dem Zustand, in dem
sie in
Ver
kehr gebracht
wurde; vom Endnutzer
nachträglich angebrachte Teile und/oder nachträglich vorgenommene Eingriffe bleiben unberücksichtigt. Die Erklärung
verliert ihre Gültigkeit, wenn das Produkt ohne Zustimmung umgebaut oder verändert wird.
Hiermit erklären wir, dass die nachstehend beschriebene Maschine
Produktbezeichnung Hubtisch
Serien- / Typenbezeichnung
Maschinen-/Seriennummer: .........................
Baujahr: .........................
allen einschlägigen Bestimmungen der Maschinenrichtlinie 2006/42/EG entspricht. Die Maschine entspricht zusätzlich den
Bestimmungen der Richtlinien 2014/30/EU über elektromagnetische Verträglichkeit (Schutzziele wurden gemäß Anhang I,
Nr. 1.5.1 der Maschinenrichtlinie 2006/42/EG eingehalten).
Angewandte harmonisierte Normen
Sicherheitsanforderungen an Hubtische
Sicherheit von Maschinen - Grundbegriffe
Elektrische Ausrüstung von Maschinen
DIN EN 1494:2009-05
EN ISO 12100:2011-03
EN 60204-1:2009 -10
DIN EN 349:2008-09
Sicherheit von Maschinen-Mindestabstände
Angewandte sonstige technische Normen und Spezifikationen
DGUV Regel 100-500
Betreiben von Arbeitsmitteln
DGUV V3
Unfallverhütungsvorschrift elektrische Anlagen und Betriebsmittel
Bevollmächtigter für die Zusammenstellung der relevanten technischen Unterlagen:
BlitzRotary GmbH, Hüfinger Str. 55, 78199 Bräunlingen
Ort: Bräunlingen
Datum :
25.10.2019
______________________
Doris Wochner-McVey
Geschäftsführerin
Hier Typenschild einkleben
Typ
Baujahr
Seriennummer

3
Betriebsanleitung
9 Allgemeines ..................................... 14
10 Anhang ............................................. 14
Inhaltsverzeichnis
Sicherheit ........................................... 4
2 Schutzeinrichtungen ......................... 6
3 Inbetriebnahme ................................. 7
4 Bedienung .......................................... 8
5 Außerbetriebnahme .......................... 9
6 Prüfung .............................................. 9
6.3
7 Inspektion / Wartung ........................11
8 Fehlerdiagnose ................................ 13
4
5
8
mit Auszug 9
23
24
Prüfliste...........................

4
Betriebsanleitung
1 Sicherheit
1.1 Sicherheitshinweise in dieser
Anleitung
Gefahr
Vorsicht
1.3 Bestimmungsgemäße Verwendung
1.4 Gefahren durch Zubehör
1.5 Emissionen
1.2 Gefährlichkeit dieser Maschine
Dieses Gerät wurde mit Schutzeinrichtungen
ausgerüstet und einer Sicherheits- und Abna
meprüfung unterzogen. Dennoch drohen bei
Fehlbedienung oder Missbrauch Gefahren für
Leib und Leben des Bedieners oder Dritter für
das Gerät und andere Sachwerte des Be
treibers.
DerGefahrenbereichbendetsichinnerhalb
der äußeren Begrenzung des Gerätes. Jede
Person, die mit der
• Last darf nicht über die Tischplatte überste-
hen, ausgenommen sind Lasten auf spe-
ziell gefertigten Sonderaufnahmen (siehe
Anhang)
• Fahrzeug-BaureihenspezischeSonder-
aufnahmen sind zwingend zu verwenden.
• Unbeabsichtigte Lageveränderungen müs-
sen verhindert werden.

5
Betriebsanleitung
1.6 Gefahrenquellen
Gefahr
1.7 Zugelassene Bediener
1.8 Persönliche Schutzausrüstung
1.9 Sicherheitsmaßnahmen am Aufs-
tellort
1.10 Verhalten im Notfall

6
Betriebsanleitung
1.11 Bildsymbole
Verbot
verboten!
Verbot:
Verbot
Verbot:
(Flächen-
last)!
kg
kg
kg
kg
1
2
3 4
5 6
7
2 Schutzeinrichtungen
2.1 Blende im Zylinderanschluß
2.2 Senkbremsventil
2.4 Faltenbalg (otional)
2.5 Feststeller der Räder (betrifft nur
fahrbare Geräte)
2.6 Kontaktleiste (optional)
BegrenztdenDurchußbeiBruchderHydrau
likleitungen.
FesteingestellteBegrenzungdesDurchusses
(Senkgeschwindigkeit)
2.3 Überdruckventil
Festeingestellte Begrenzung auf Nenndruck.

7
Betriebsanleitung
3 Inbetriebnahme
3.1 Aufstellen / Montieren
Vorsicht
Haben Sie die Betriebsanleitung und
vor allem die Sicherheitshinweise ge
lesen und verstanden? Dann dürfen
Sie das Gerät jetzt in Betrieb nehmen.

8
Betriebsanleitung
Bedienung
4 Bedienung
Gefahr
4.1 Heben
4.2 Senken
4.3 Verschieben/Kippen

9
Betriebsanleitung
5 Außerbetriebnahme
6 Prüfung
6.1 Prüfung vor der ersten Inbetriebnahme
6.2 Regelmäßige Prüfungen
• Verwenden Sie zum Prüfen die um-
seitigePrüiste.
• Fotokopieren Sie sich die Liste.
• NotierenSieaufderPrüisteoben
rechts
• Lfd.-Nr.(Prüisten-Nr.)
• Gerätetyp
• Serien-Nr.
• Haken Sie jeden Punkt ab, wenn er in
Ordnung ist.
• Nehmen Sie das Gerät erst wieder in
Betrieb, wenn alle Punkte abgehakt
sind.
HeftenSiediePrüistenachAbschlußder
Prüfung hinter den Anhang in dieser Betrieb
sanleitung.

10
6.3 Prüiste
Betriebsanleitung
Prüiste

11
Betriebsanleitung
7 Inspektion / Wartung
7.1 Wartungsplan
7.2 Reinigen
7.3 Mechanik
7.4 Hydraulikeinheit warten
WARNUNG!
• Ihr Hubgerät regelmäßig
• insbesondere die Aufkleber (Bildsymbole)
am Gerät. Sollten die Aufkleber nicht mehr
lesbar sein, so bestellen Sie neue. Bestell-Nr.
siehe Ersatzteilliste.
• dieLaufächenderLaufrollen.
Dieses Gerät ist mit einem biologisch ab-
baubarem Hydrauliköl auf synthetischer
Basis befüllt.
DiesesHydraulikölerfülltdieAuagender
Wassergefährdungsklasse 0. Trotzdem sind
die oben genannten Hinweise unbedingt zu
beachten. Es ist nicht mit Wasser mischbar!
Das biologisch abbaubare Hydrauliköl ist
mit Mineralölen (Hydrauliköl) mischbar,
verliert dann aber seine biologische Ab-
baubarkeit!
Folgende Ölsorte können Sie verwenden:
ELF XPD 98064 (im Gerät vorhanden!)

12
Betriebsanleitung
7.5 Wechselintervalle
7.6 Ölstandskontrolle
7.7 Ölwechsel
7.8 Entlüftung der Hydraulik
7.9 Kontrolle der Hydraulikschläuche
Fahren Sie das Gerät in die unterste Stel
lung.
Lesen Sie den Ölstand an dem
Ölschauglas ab.
Der Pegel muß sich im obersten Drittel
desÖlschauglasesbenden.
Füllen Sie, wenn nötig, Öl nach.

13
Betriebsanleitung
8 Fehlerdiagnose
Gefahr
8.1 Gerät senkt sich von allein ab.
8.2 Gerät hebt nicht auf maximale
Höhe
8.3 Gerät hebt nicht beim ersten Hub
8.4 Pumpe baut keinen Druck mehr
auf
8.5 Betriebsstörungen / Wartung der
Ventile

14
Betriebsanleitung
9 Allgemeines
9.1 Transportschäden
9.2 Gewährleistung
9.3 Bestellen von Ersatzteilen
10 Anhang

15
Betriebsanleitung

16
Betriebsanleitung
4 8
3 9
34/35
2 7
4 9
4 7
3 8
2 6
3 3
11
4 4
7 3
7 4
80
7 5
2 9
13
5 2
2 1
1
14
12
6
7
3 7
2 4
3
2
4 1
4 2
47
7 0
4 8
10
4
4 3
3 2 ( 2 x )
3 1 ( 2 x )
7
4 64 4
4 0
7
5 5
3 1
5
4 6 (2 x )
4 4 (2 x )
4 8 (2 x )
9
5 1
5 0/
5 2
Y
Z
X
W
3 7
(2 x )
7 8
7 9
a
76

17
Betriebsanleitung

18
Betriebsanleitung
,
,

19
Betriebsanleitung

20
Betriebsanleitung

21
Betriebsanleitung

22
Betriebsanleitung
1
2
3
4
5
6
7
8
9
10
11
12
13
14
15
16

23
Betriebsanleitung

24
Betriebsanleitung
kg
kg
kg
kg

Master Gear 1.0
Master Gear S3 1.0
Operating Instructions
MG10-SMS
Rev.D 10/2019

EC Declaration of Conformity
according to EC directive 2006/42/EC on machinery
Name and address of the manufacturer
BlitzRotary GmbH
Hüfinger Str.55
78199 Bräunlingen, Germany
This declaration relates exclusively to the machinery in the state in which it was placed on the market, and excludes
components which are added and/or operations carried out subsequently by the final user. The declaration is no more valid,
if the product is modified without agreement.
Herewith we declare, that the machinery described below
Product denomination Lift Tables
Model- / Type
Master Gear 1.0 with extract;
Machinery-/Serial number: ..........................
Year of manufacture: ..........................
is complying with all essential requirements of the Machinery Directive2006/42/EC.
In addition the partly completed machinery is in conformity with the EC Directives 2014/30/EU relating to electromagnetic
compatibility (Protection objectives have been met in accordance with Annex I No. 1.5.1 of the Machinery Directive
2006/42/EC).
Harmonised Standards used
Lift tables - Safety requirements
Safety of Machinery- Basic concepts
Electrical equipment of machines
DIN EN 1494:2009-05
EN ISO 12100:2011-03
EN 60204-1:2009-10
DIN EN 349:2008-09
Safety of machinery - Minimum gaps
Other technical standards and specifications used
DGUV Regel 100-500
management of working appliances
DGUV V3
law accident prevention regulation of electric facilities and equipment
The person authorised to compile the relevant technical documentation
BlitzRotary GmbH, Hüfinger Str. 55, 78199 Bräunlingen
Place: Bräunlingen
Date :
25
.10.2019
______________________
Doris Wochner-McVey
Managin Dirg e ctor
Hier Typenschild einkleben
Typ
Baujahr
Seriennummer

27
Operating Instruction
Contents
28
28
28
28
28
28
29
29
29
1 Safety
1.1 Safety instructions in this manual
1.2 Dangerous of this machine
1.3 Regulatory Application
1.4 Dangers from accessories
1.5 Emissions
1.6 Potential hazards
1.7 Approved operators
1.8 Personal protective equipment
Safety measures at the place of
1.9 installation 29
29 1.10 Behaviour in an emergency
1.11 Icons 30
30
30
30
30
30
30
30
31
2 Safety Facilities
2.1 Aperture restriction in cylinder inlet
2.2 Lowering brake valve
2.3 One Way Flow Restriction Valve
2.4 Folding bellows (optional)
2.5 Wheel locks (only for mobile devices)
2.6 Contact Frame (optional)
3 Commissioning
3.1 Setting up /Assembly 31
32
32
32
4 Operation
4.1 Lifting
4.2 Lowering brake valve
4.3 Shiftling/Tilting 32
33 5 Taking out of use
6 Inspection 33
33
33
34
35
35
35
35
35
36
36
36
36
36
37
6.1 Inspection before first use
6.2 Regular checks
6.3 Checklist
7 Inspection / Maintenance
7.1 Maintenance Plan
7.2 Cleaning
7.3 Mechanics
7.4 Maintenance of the hydraulic
7.5 Change intervals
7.6 Oil level check
7.7 Oil changes
7.8 Bleeding the hydraulics
7.9 Checking the hydraulic hoses
8 Fault Finding
8.1 Machine lowers on ist own 37
8.2 Machine will not raise to maximum height 37
37
37
37
38
Machine does not raise with the pump
8.3 stroke
8.4 Pump produces no pressure
8.5 Breakdown/Maintenance of the valves
9 General information
9.1 Transport damages 38
38 9.2 Warranty
9.3 Order spare parts 38
10 38
38
39
42
43
47
Appendix
Technical data
Dimension sheet 1.0
Spare parts list
Dimension sheet 1.0 with extension
Hydraulic plan
Labels
48

28
Operating Instruction
1 Safety
1.1 Safety Hints in these Instruction
Danger
Caution
1.2 Dangers of this machine
1.3 Regulatory Application
1.4 Danger through accessories
1.5 Emissions

29
Operating Instruction
1.6 Source of Danger
Danger
1.7 Qualied Operators
1.8 Personal Safety Equipment
1.9 Safety Measures in the Work Place
1.10 Conduct In An Emergency
• be over 18 years old
• be instructed in the operation of the ma-
chine
• have proved to the firm that he is capable
of operating the machine
• have read and understood the operating
instructions
• must observe the operating instructions

30
Operating Instruction
1.11 Picture Symbols
Prohibited
Prohibited
Prohibited
forbidden!
Prohibited
(sur-
face load)!
3:
kg
kg
kg
kg
1
2
3 4
5 6
7
2 Safety Facilities
2.1 Aperture restriction in cylinder inlet
2.2 Lowering Brake Valve (when on
hand)
2.3 One Way Flow Restriction Valve
(when on hand)
Attention
2.4 Folding Screen (when on hand)
2.5 Securing Device On Wheels
(transportable machines only)
2.6 Contact Frame (when on hand)

31
Operating Instruction
3. Taking into use
3.1 Setting up / Assembly
Caution
Fig.7:
Fig.8:
Have you read the operating instruc-
tions and above all the safety points
and above all understood them? Then
you can take the machine into use.

32
Operating Instruction
4 Operation
Danger
4.1 Lifting
4.2 Lowering
4.3 Shifting/Tilting

33
Operating Instruction
5 Taking out of use
6 Inspection
6.1 Inspection before the rst use
6.2 Regular testing

34
Operating Instruction
6.3 Check List

3
5
Operating Instruction
7 Inspection / Maintenance
7.1 Maintenance Plan
7.2 Cleaning
7.3 Mechanical
7.4 Maintenance of the hydraulics
This machine is lled with bio-oil on syn-
thetic base.
The biological removable hydraulic-oil is
mixable with mineral-oil, but then it will
loosen his biological removability.
WARNING!

36
Operating Instruction
7.5 Oil Change Intervals
7.6 Checking the oil level
7.7 Oil Change
7.8 Bleeding the hydraulics
7.9 Control of the hydraulic hoses

37
Operating Instruction
8 Fault Finding
Danger
8.1 Machine lowers on its own
8.2 Machine will not raise to max-
imum height
8.3 Machine does not raise with the
rst pump stroke
8.4 Pump produces no pressure
8.5 Breakdown / Maintenance of the
valves

38
Operating Instruction
9 General
9.1 Transport Damage
9.2 Warranty
9.3 Ordering of spare parts
10 Appendix
Master Gaear 1.0
670± 20
310
Master Gear 1.0 with extract

3
9
Operating Instruction
Master Gear 1.0

40
Operating Instruction
4 8
3 9
34/35
2 7
4 9
4 7
3 8
2 6
3 3
11
4 4
7 3
7 4
80
7 5
2 9
13
5 2
2 1
1
14
12
6
7
3 7
2 4
3
2
4 1
4 2
47
7 0
4 8
10
4
4 3
3 2 ( 2 x )
3 1 ( 2 x )
7
4 64 4
4 0
7
5 5
3 1
5
4 6 (2 x )
4 4 (2 x )
4 8 (2 x )
9
5 1
5 0/
5 2
Y
Z
X
W
3 7
(2 x )
7 8
7 9
a
76
Master Gear 1.0

41
Operating Instruction
Master Gear 1.0

42
Operating Instruction
,
,
Master Gear 1.0

43
Dimension sheet Master Gear 1.0 with extract
Operating Instruction

44
Master Gear 1.0 with extract
Operating Instruction

45
Master Gear 1.0 with extract
Operating Instruction
Pos. Stk. Benennung
1 1 Grundrahmen 113577YN
2 4 Erhöhung Rollenplatte 128043
3 2 Lenkrolle 114856
4 2 Lenkrolle mit Bremse 113811
5 2 Steckbolzen 123337Y
6 1 Scherenarm 113725Y
7 10 Rolle 113727Y
8 4 Lagerhülse 113604Y
9 1 Scherenarm 113732Y
10 2 Scherenarm 113565Y
11 1 Achse 113570Y
12 2 Achse 113720Y
13 1 Verstellrahmen 113554Y
14 1 Scherenarm 113729Y
15 1 Rahmen 113588Y
16 1 Kippmechanik 113569Y
17 1 Zugspindel für
Querverstellung
113556Y
18 2 Lagerbolzen 113517Y
19 1 Zugspindel für
Längsverstellung
113557Y
20 1 Winkel mit Markierung 113562Y
21 2 Scheibe
B41-12
22 1 Lagerung 113741Y
23 4 Sicherheitsmutter
B33-12
24 2 Sechskantmutter
B30-16
25 2 Sechskantschraube
B11-16x80
26 4 Scheibe 114124
27 1 Tisch 113509Y
28 2 Sechskantschraube B11-12x55
29 18 Gleitlager SF-1 2020
30 16 Gleitlager SF-1 2015
31 4 Sechskantmutter B33-16
32 8 Scheibe B42-10
33 4 Sechskantschraube B11 10x90
34 20 Sicherheitsmutter B33-10
35 4 Steckbolzen 113728Y
36 16 Scheibe 703412
37 16 Sechskantschraube 128459
38 2 Hydraulikzylinder 113799Y
39 18 Scheibe B41-8
40 2 Sechskantmutter B33-8
41 4 Gewindestift 701251
42 4 Sechskantschraube B11-8x20
43 2 Gewindestift B22-8x8
44 4 Sechskantschraube B11-6x16
45 4 Sechskantmutter B33-6
46 2 Sicherungsleiste 113560Y
47 2 Gleitlager mit Bund SF-1 2512
48 1 Typenschild
49 2 Aufkleb.Tragfähig. 1000 KG 3209500
50 1 Aufkleber Längsverstellung 115231
51 1 Aufkleber Kippverstellung 115232
52 1 Aufkleber Querverstellung 115230
53 1 Aufkleber klappbares Pedal 115229
54 2 Aufkleber Sicherheit 115227
55 1 Aufkleber Entlüftung 115228
56 1 Lasche 115571Y
57 1 Sechskantschraube 700216
58 1 Verschlußschraube 705526
59 1 Unverlierbarkeitsscheibe 706705
60 4 Scheibe B42-16
61 4 Axial-Rillenkugellager 51101
62 1 Rahmen 128029
63 2 Führung 128020
64 1 Schiebegriff 128037
65 4 Anschlagsblech 128021
66 1 Fußpumpe siehe 113990Y 113990B
67 2 Anschlag 128022
68 8 Sechskantschraube 700201
69 2 U-Scheibe 101021
70 2 Sechskantschraube 700250
71 6 Sechskantschraube 700207
72 8 Sechskantmutter 703313
73 2 Sechskantschraube 700208
74 2 Sterngriffschraube 117387
75 2 Kunststoffkappe 128027
76 4 Sechskantschraube 700205
77 1 Stütze links 123340Y
78 1 Stütze rechts 123344Y
79 1 Hydraulikschlauch 128197
80 1 Ermetoverschraubung MG10-9801-4
81 2 Ermetoverschraubung MG10-9801-1
82 1 Hydraulikschlauch MG10-9801-2
84 8 Scheibe 703410
85 Aufkleber Blitz 708685
86 Aufkleber Rotary BQ-MG10-1

39
Operating Instruction
1
2
3
4
5
6
7
8
9
10
11
12
13
14
15
16
46

47
Operating Instruction
Hydraulic plan
Designation
1 pipe fracture safeguard
2 lowering brake valve
3 drain valve
4 pressure relief valve
5 pressure relief valve
6 foot pump
7 filters
R oil drain screw

41
Operating Instruction
kg
kg
kg
kg
48

Master Gear 1.0
Master Gear S3 1.0
Mode d’emploi
MG10-SMS
Rev.D 10/2019

Déclaration de conformité CE
selon la directive de la CE 2006/42/CE
relative aux machines
Nom et adresse du fabricant
BlitzRotary GmbH
Hüfinger Str.55
78199 Bräunlingen, Germany
Cette déclaration porte exclusivement sur la machine dans l'état auquel elle est mise sur la marché et exclut les
composants qui y sont ajoutés et/ou les opérations effectuées ultérieurement par l'utilisateur final. La déclaration perd sa
validité si le produit est modifié sans accord préalable.
Nous déclarons par la présente, que la machine décrite ci-dessous
Dénomination du produit Table élévatrice
Modèle/Type
Master Gear 1.0 avec extractible;
Machine/Numéro de série: .........................
Année de fabrication: .........................
est conforme aux exigences essentielles de la Directive relative aux Machines 2006/42/CE.
De plus, les machines partiellement complétées sont conformes aux directives de la CE 2014/30/EU relatives aux
compatibilités électromagnétiques (Les objectifs de protection ont été respectés selon l'Annexe I No. 1.5.1 des Directives
relatives aux Machines 2006/42/EC).
Standards normalisés utilisés
Table élévatrice – Exigences de sécurité
Sécurité de Machinerie - Concepts de Base
Equipement électrique des machines
DIN EN 1494:2009-05
EN ISO 12100:2011
EN 60204-1:2009
DIN EN 349:2008-09
Sécurité de Machinerie - Jours minimum
Autres normes techniques et spécifications utilisés
DGUV Regel 100-500
fournitures d'exploitation de gestion
DGUV V3
une législation empêchant les accidents et les appareils électriques
La personne autorisée à rassembler la documentation technique pertinente
BlitzRotary GmbH, Hüfinger Str. 55, 78199 Bräunlingen
: Bräunlingen
:
25.10.2019
______________________
Doris Wochner-McVey
Directeur
Hier Typenschild einkleben
Typ
Baujahr
Seriennummer

51
Mode d’emploi
Sommaire
1
Sécurité
52
1.1 Consignes de sécurité dans ce manuel
52
1.2
Danger de cette machine 52
1.3
Usage prévu
1.4 Dangers liés aux accessoires
1.5 Émissions
1.6 Dangers potentiels
1.7 Utilisateurs autorisés
52
52
52
53
53
1.8
1.9
Équipement de protection individuelle
53
Mesures de sécurité sur le lieu
d'installation
53
1.10 Comportement en cas d'urgence
53
1.11
54
2
54
2.1
54
2.2
54
2.3
Pictogrammes
Prescriptions de Securite
Plaque d'orifice dans le raccord du
cylindre
Soupape de descente (utilisable de
suite)
Soupape anti retour (utilisable de
suite)
54
2.4
54
2.5
Soufflet (en option)
Verrouillage des roues (uniquement
pour les appareils mobiles)
54
2.6
54
3
Bande de contact (en option)
Mise en service
55
3.1 Montage
55
4 Utilisation
56
4.1 Levée
56
4.2 Descente
56
4.3
56
5
Déplacement/inclinaison
Mise hors service 57
6
57
6.1
Controles
Inspection avant la première mise en
service
57
6.2 Contrôles réguliers
57
6.3
58
7
Liste de contrôle
Controle & Service
59
7.1 Programme de maintenance
59
7.2 Nettoyage
59
7.3 Mécanique
59
7.4 Entretien de l'unité hydraulique
59
7.5 Intervalles de changement
60
7.6 Contrôle du niveau d'huile
60
7.7 Vidanges d'huile
60
7.8 Purge de l'hydraulique
60
7.9
60
8
61
8.1
61
61
8.3
61
8.4
61
8.5
61
9
La plate-forme ne monte pas a la
premi ere sollicitation
La pompe hydraulique n'a plus de
pres sion
Perturbations & entretien des
soupapes
Generalites
62
9.1 Dommages de transport
62
9.2 Garantie
62
9.3 Commander des pièces de rechange
62
10
62
62
63
66
67
71
Annexes
Demensions
Plan de masse 1.0
Liste des pièces de rechange
Plan de masse 1.0 avec rallonge
plan hydraulique
Autocollants
72

52
Mode d’emploi
1 Securite
1.1 Signication des remarques utili-
sees dans ce manuel
Danger
Prudence
1.2 Endroits devant etre consideres
comme dan gereux
1.3 Dispositions concernant
l’utilisation
•
•
•
1.4 Dangers causes par les accessoires
•
•
1.5 Nuisances

53
Mode d’emploi
1.6 Source of Danger
Danger
•
•
1.7 Utilisateurs autorises
1.8 Materiel de protection de
l’utilisateur
1.9 Mesures de securite a prendre sur
le lieu de travail
1.10 Conduite a adopter en cas
d’urgence

54
Mode d’emploi
1.11 Pictogrammes
. Interdiction
interdit
Défense
Interdiction
Répartir
kg
kg
kg
kg
1
2
3 4
5 6
7
2 Prescriptions de securite
2.1 Limiteur de debit place sur le rac-
cord du verin
2.2 Soupape de descente (utilisable
de suite)
2.3 Soupape anti retour (utilisable de
suite)
Attention !
2.4 Soufet de protection (utilisable
de suite)
2.5 Dispositif de blocage des roues
(valable seulement pour les
modèles roulants)

55
3. Mise en service
3.1 Montage
Prudence
Mode d’emploi
•
• pans
•
Fig.7:
Fig.8:
Avez-vous déjà lu et compris le mode
d‘emploi ( surtout les prescriptions de
sécurité ) ? Dans l‘armative, vous
osez utiliser l‘appareil.

56
Mode d’emploi
4 Utilisation
Danger
•
4.1 Levée
4.2 Descente
4.3 Déplacement/inclinaison

57
Mode d’emploi
5 Mise hors service
6 Controles
6.1 Verication avant la premiere mise en
service
6.2 Controles reguliers
Des contrôles réguliers de l‘appareil
doivent être conduits par une personne
compétente au moins toutes les années.
• Employez pour cela les ches de
CONTROLE ci-après.
• Photocopiez-vous lesdites ches.
• Notez en haut et à droite de chaque
page :
• le numéro de page
• le type de l‘appareil
• le numéro de série de l‘appareil.
• Cocher chaque rubrique déclarée en
ordre.
• Si toutes les rubriques sont déclarées en
ordre, l‘appareil est prêt à reprendre du
service.

58
Mode d’emploi
6.3 Feuille de controle

5
9
Mode d’emploi
7 Controle & Service
7.1 Periodicite
7.2 Nettoyage
Danger
7.3 Mecanique
7.4 Entretien & Service du groupe hy-
draulique
Danger
Cet appareil est ajoutez avec l’huile hydrau-
lique biologique.
L’huile hydraulique bio-dégradable peut
être mélangée à de l’huile hydraulique (ou
des huiles hydrauliques), mais la capacité
de bio-dégradation est ainsi annulée.
AVERTISSEMENT !
d'
Pour tous les travaux de réparation, d’entretien et de nettoyage dans l
e
d’inspection.
d'ori

60
Mode d’emploi
7.5 Periodicite des services
7.6 Contrôle du niveau d’huile
7.7 Vidange de l’huile
7.8 Purge du système hydraulique
7.9 Contrôle des tuyauteries hydrau-
liques

61
Mode d’emploi
8 En cas de panne
Danger
8.1 La plate-forme descend sous son
propre poids
8.2 La plate-forme n’atteint pas sa
hauteur maximale
8.3 La plate-forme ne monte pas a la
premiere sollicitation
8.4 La pompe hydraulique n’a plus de
pression
8.5 Perturbations & entretien des sou
papes

62
Mode d’emploi
9 Generalites
9.1 Degats de transport
9.2 Garantie
9.3 Commande de pieces de rechange
10 Annexes
Master Gear 1.0
670 ± 20
310
Master Gear 1.0 avec extractible

63
Mode d’emploi
Master Gear 1.0

64
Mode d’emploi
4 8
3 9
34/35
2 7
4 9
4 7
3 8
2 6
3 3
11
4 4
7 3
7 4
80
7 5
2 9
13
5 2
2 1
1
14
12
6
7
3 7
2 4
3
2
4 1
4 2
47
7 0
4 8
10
4
4 3
3 2 ( 2 x )
3 1 ( 2 x )
7
4 64 4
4 0
7
5 5
3 1
5
4 6 (2 x )
4 4 (2 x )
4 8 (2 x )
9
5 1
5 0/
5 2
Y
Z
X
W
3 7
(2 x )
7 8
7 9
a
76
Master Gear 1.0

65
Mode d’emploi
Master Gear 1.0

66
Mode d’emploi
,
,
Master Gear 1.0

67
Cotes Master Gear 1.0 avec extractible
Mode d’emploi

68
Master Gear 1.0 avec extractible
Mode d’emploi

69
Master Gear 1.0 avec extractible
Mode d’emploi
Pos.
pcs. Désignation
1
1 Châssis de base
113577YN
2
4 Augmenter la plaque de
roulement
128043
3
2 Castor
114856
4
2 Roulette pivotante avec frein
113811
5
2 Steckbolzen
123337Y
6
1 Bras de ciseaux
113725Y
7
10 Rôle
113727Y
8
4 Manchon de roulement
113604Y
9
1 Bras de ciseaux
113732Y
10
2 Bras de ciseaux
113565Y
11
1 Axe
113570Y
12
2 Axe
113720Y
13
1 Cadre de réglage
113554Y
14
1 Bras de ciseaux
113729Y
15
1 Cadre
113588Y
16
1 Mécanisme d'inclinaison
113569Y
17
1 Broche de traction pour
ajustement transversal
113556Y
18
2 Boulon de roulement
113517Y
19
1 Broche de traction pour
réglage longitudinal
113557Y
20
1 Angle avec marque
113562Y
21
2 Disque
B41-12
22
1 Espace de rangement
113741Y
23
4 Écrou de sécurité
B33-12
24
2 Écrou hexagonal
B30-16
25
2 Boulon à tête hexagonale
B11-16x80
26
4 Disque
114124
27
1 Table
113509Y
28
2 Boulon à tête hexagonale
B11-12x55
29
18 Palier coulissant
SF-1 2020
30
16 Palier coulissant
SF-1 2015
31
4 Écrou hexagonal
B33-16
32
8 Disque
B42-10
33
4 Boulon à tête hexagonale
B11 10x90
34
20 Écrou de sécurité
B33-10
35
4 Steckbolzen
113728Y
36
16 Disque
703412
37
16 Boulon à tête hexagonale
128459
38
2 Cylindres hydrauliques
113799Y
39
18 Disque
B41-8
40
2 Écrou hexagonal
B33-8
41
4 Vis de réglage
701251
42
4 Boulon à tête hexagonale
B11-8x20
43
2 Vis de réglage
B22-8x8
44
4 Boulon à tête hexagonale
B11-6x16
45
4 Écrou hexagonal
B33-6
46
2 Bande de fusible
113560Y
47
2 Palier lisse avec collier
SF-1 2512
48
1 Étiquette de type
49
2 Étiquette 1000 kg
3209500
50
1 Réglage longitudinal de
l'étiquette
115231
51
1 Réglage de l'inclinaison de
l'étiquette
115232
52
1 Réglage transversal des
étiquettes
115230
53
1 Pédale pliante pour
étiquettes
115229
54
2 Label de sécurité
115227
55
1 Ventilation des étiquettes
115228
56
1 Rabat
115571Y
57
1 Boulon à tête hexagonale
700216
58
1 Vis
705526
59
1 Rondelle captive
706705
60
4 Disque
B42-16
61
4 Butées à billes
51101
62
1 Cadre
128029
63
2 Guider
128020
64
1 Poignée de poussée
128037
65
4 Plaque d'arrêt
128021
66
1 Pompe à pied voir 113990Y
113990B
67
2 Attaque
128022
68
8 Boulon à tête hexagonale
700201
69
2 Machine à laver
101021
70
2 Boulon à tête hexagonale
700250
71
6 Vis à six pans
700207
72
8 Écrou hexagonal
703313
73
2 Boulon à tête hexagonale
700208
74
2 Vis à poignée étoile
117387
75
2 Casquette en plastique
128027
76
4 Boulon à tête hexagonale
700205
77
1 Soutien gauche
123340Y
78
1 Support à droite
123344Y
79
1 tuyau hydraulique
128197
80
1 Ermeto
MG10-9801-4
81
2 Ermeto
MG10-9801-1
82
1 Tuyau hydraulique
MG10-9801-2
84
8 Disque
703410
85 Étiquette Blitz 708685
86 Étiquette Rotary BQ-MG10-1

59
Mode d’emploi
1
2
3
4
5
6
7
8
9
10
11
12
13
14
15
16
70

71
Mode d’emploi
Annexes
plan hydraulique
Désignation
1 Dispsitif de sécurité en cas de rupture de
flexible
2 Soupape de freinaged’abaissement
3 Soupape de purge
4 Soupape de décharge
5 Soupape de décharge
6 pompe à pied
7 filtre
R Bouchon de vidange d'huile

61
Mode d’emploi
kg
kg
kg
kg
72

Master Gear 1.0
Master Gear S3 1.0
Istruzione per l ´uso
MG10-SMS
Rev.D 10/2019

Dichiarazione di conformità CE
Secondo la Direttiva Macchine 2006/42/CE
Nom et adresse du fabricant
BlitzRotary GmbH
Hüfinger Str.55
78199 Bräunlingen, Germany
La presente dichiarazione si applica esclusivamente al macchinario nelle condizioni di inserimento sul mercato, e
non comprende componenti aggiuntive e/o interventi eseguiti in seguito dall’utente finale. La dichiarazione viene
invalidata in caso di modifiche apportate all’apparecchio in assenza di previo accordo.
Si dichiara di seguito che l’apparecchio sottodescritto
Denominazione apparecchio Carrello elevatore
Modello/tipo
Master Gear 1.0 con estraibile;
Numero di serie: .........................
Anno di produzione: .........................
È conforme ai requisiti essenziali previsti dalla Direttiva Macchine 2006/42/CE.
Inoltre, l’apparecchio parzialmente completato è conforme alle Direttive 2014/30/EU sulla compatibilitá
elettromagnetica (Sono state installate protezioni come indicato nell’allegato I N° 1.5.1 della Direttiva Macchine
2006/42/CE).
Standard armonizzati utilizzati
Carrello elevatore – Requisiti di sicurezza
Sicurezza macchine - Concetti di base
Attrezzature elettriche macchinari
DIN EN 1494:2009-05
EN ISO 12100:2011
EN 60204-1:2009
DIN EN 349:2008-09
Sicurezza macchine – Luci minime
Altri standard e specifiche tecnici utilizzati
DGUV Regel 100-500
gestioni materiali di esercizio
DGUV V3
normativa prevenzione incidenti dispositivi e attrezzature elettriche
Persona autorizzata a compilare la documentazione tecnica rilevante
BlitzRotary GmbH, Hüfinger Str. 55, 78199 Bräunlingen
Luogo: Bräunlingen
Data:
25.10.2019
______________________
Doris Wochner-McVey
Amministratore Delegato
Hier Typenschild einkleben
Typ
Baujahr
Seriennummer

75
Istruzione per l ´uso
Indice
1
76
1.1
Sicurezza
Avvertenze di sicurezza contenute
in questo manuale 76
1.2
Pericolosità di questa macchina 76
1.3
Destinazione d'uso 76
1.4
Pericoli derivanti da accessori 76
1.5
Emissioni 76
1.6
Potenziali pericoli 77
1.7
Operatori autorizzati 77
77
Dispositivi di protezione
1.8
individuale
Misure di sicurezza nel luogo di
1.9
installazione 77
77
Comportamento in caso di
1.10
emergenza
1.11
Simboli 78
2
78
2.1
Guardiani
Piastra d'orifizio nel collegamento
del cilindro 78
2.2
valvola di abbassamento del freno 78
2.3
valvola a farfalla di non ritorno 78
2.4
78
2.5
Soffietto (opzionale)
Dispositivo di bloccaggio delle
ruote (solo per dispositivi mobili) 78
2.6
78
3
Striscia di contatto (opzionale)
Messa in servizio 79
3.1
Montaggio 79
4
Uso 80
4.1
Sollevamento 80
4.2
Abbassamento 80
4.3
80
5
81
6
81
6.1
Spostare/inclinare
Spegnimento
Verifiche
Ispezione prima della prima messa
in servizio 81
6.2
Controlli regolari 81
6.3
82
7
Elenco di controllo
Ispezione / Manutenzione 83
7.1
Tabella di manutenzione 83
7.2
Pulitura 83
7.3
Meccanica 83
7.4
Manutenzione dell'unità idraulica 83
7.5
Intervalli di cambio 84
7.6
Controllo del livello dell'olio 84
7.7
Cambio olio 84
7.8
Spurgo dell'impianto idraulico 84
7.9
84
8
Controllo dei tubi idraulici
Individuazione guasti 85
8.2
85
8.3
85
8.4
85
8.5
85
9
L'apparecchio non raggiunge
L'altezza massima
L'apparecchio non si solleva al
promo impulso
La pompa non accumula più
pressione
Difetti di
funzionamento/manutenzione
valvole
Varie 86
9.1
danni da trasporto 86
9.2
garanzia 86
9.3
Ordina i pezzi di ricambio 86
10
86
86
87
90
91
95
allegato
Dati tecnici
Foglio quotato 1.0
Elenco dei pezzi di ricambio
Foglio quotato 1.0 con prolunga
schema idraulico
cartelli adesivi 96

76
Istruzione per l ´uso
1 Sicrezza
1.1 Indicationi per la sicurezza in
queste istruzioni
Pericolo
Se non si pone massima attenzione
si possono ripotare ferite molto
gravi, a volte anche mortali
Attenzione
Si possono riportare ferite.
Possono essere causati danni
all ´apparecchio o ad altre cose.
1.2 pericolosita´ di questa macchina
1.3 Utilizzo
•
•
1.4 Pericoli derivanti dagli accessori
1.5 Emissioni

77
Istruzione per l ´uso
1.6 Fonti di Pericolo
Pericolo
•
1.7 Personale Ammesso
1.8 Equipaggiamento per la protezione
delle persone
1.9 Norme di sicurezza sul luogo del
montaggio
1.10 In caso di pericolo

78
Istruzione per l ´uso
1.11 Simboli
Vietato
Vietato
Vietato
Vietato
Vietato
kg
kg
kg
kg
1
2
3 4
5 6
7
2 Dispositivi di Sicurezza
2.1 Guarnizione nel collegamento dei
cilindri
2.2 Valvola freno di abbassamento (se
presente)
2.3 Valvola a farfalla anti riusso (se
presente)
Attenzione!
2.4 Sofetto (se presente)
Impedisce il passaggio sotto il piano
sollevato
2.5 Dispositivo di bloccaggio delle
ruote (riguarda solamente apparec
chi spostabili)
2.6 Piastra di conatto (se presente)

79
Istruzione per l ´uso
3 Messa in fuzzione
3.1 Montaggio
Attenzione
•
Fig.7:
Fig.8:
Avete letto e capito le istruzioni per l
‘uso ed in particolare le norme per la
sicurezza? Allora potete far funzionare
l ‘apparecchio.

80
Istruzione per l ´uso
4 Uso
Pericolo
4.1 Sollevamento
4.2 Abbassamento
4.3 Spostamento/inclinazione

81
Istruzione per l ´uso
5 Spegnimento
•
6 Veriche
6.1 Verice precedenti la prima messa in
funzione
6.2 Controlli regolari
•

82
Istruzione per l ´uso
6.3 Elenco di controllo
Data

83
Istruzione per l ´uso
Ispezione/manutenzione
7 Ispezione/manutenzione
7.1 Tabella di matenzione
7.2 Pulizia
Pericolo
7.3 Meccanica
7.4 Manutezione unita´ idraulica
Apparecchio est ajoutez con l ´olio idrau-
lico biologique
ATTENZIONE!
'i
'i

84
Istruzione per l ´uso
7.5 Cambio d ´olio
7.6 Controllo livello dell ´olio
7.7 Cambio dell ´olio
7.8 Disaerazione sistema idraulico
7.9 Contollo tubi/manichette
idrauliche

85
Istruzione per l ´uso
8 Individuazione guasti
Pericolo
Osservare le norme di siccurezza.
8.1 L ´apparecchio si abbassa da solo
8.2 L ´apparecchio non raggiunge l
´altezza massima
8.3 L ´apparecchio non si solleva al
primo impulso
8.4 La pompa non produce pressione
8.5 Difetti di funzionamento/manuten-
zione valvole

86
Istruzione per l ´uso
9 Varie
9.1 Danni dovuti al trasporto
9.2 Garanzia
9.3 Ordinazione di pezzi di ricambio
10 Appendice
.
670 ± 20
.
310
Master Gear 1.0 con estraibile

87
Istruzione per l ´uso
Master Gear 1.0

88
Istruzione per l ´uso
4 8
3 9
34/35
2 7
4 9
4 7
3 8
2 6
3 3
11
4 4
7 3
7 4
80
7 5
2 9
13
5 2
2 1
1
14
12
6
7
3 7
2 4
3
2
4 1
4 2
47
7 0
4 8
10
4
4 3
3 2 ( 2 x )
3 1 ( 2 x )
7
4 64 4
4 0
7
5 5
3 1
5
4 6 (2 x )
4 4 (2 x )
4 8 (2 x )
9
5 1
5 0/
5 2
Y
Z
X
W
3 7
(2 x )
7 8
7 9
a
76
Master Gear 1.0

89
Istruzione per l ´uso
Master Gear 1.0

90
,
,
Istruzione per l ´uso
Master Gear 1.0

91
Foglio d’ingombro Master Gear 1.0 con estraibile
Istruzione per l ´uso

92
Master Gear 1.0 con estraibile
Istruzione per l ´uso

93
Master Gear 1.0 con estraibile
Istruzione per l ´uso
Pos.
pcs. Individuazione
1
1 Telaio di base
113577YN
2
4 Aumentare la piastra del
rotolo
128043
3
2 rotella
114856
4
2 Ruota girevole con freno
113811
5
2 Steckbolzen
123337Y
6
1 Braccio a forbice
113725Y
7
10 Ruolo
113727Y
8
4 Manicotto del cuscinetto
113604Y
9
1 Braccio a forbice
113732Y
10
2 Braccio a forbice
113565Y
11
1 Asse
113570Y
12
2 Asse
113720Y
13
1 Cornice di regolazione
113554Y
14
1 Braccio a forbice
113729Y
15
1 Telaio
113588Y
16
1 Meccanismo di
inclinazione
113569Y
17
1 Mandrino di trazione per
regolazione trasversale
113556Y
18
2 Bullone del cuscinetto
113517Y
19
1 Mandrino di trazione per
regolazione longitudinale
113557Y
20
1 Angolo con segno
113562Y
21
2 Disco
B41-12
22
1 Conservazione
113741Y
23
4 Dado di sicurezza
B33-12
24
2 Dado esagonale
B30-16
25
2 Bullone esagonale
B11-16x80
26
4 Disco
114124
27
1 tavolo
113509Y
28
2 Bullone esagonale
B11-12x55
29
18 Cuscinetto scorrevole
SF-1 2020
30
16 Cuscinetto scorrevole
SF-1 2015
31
4 Dado esagonale
B33-16
32
8 Disco
B42-10
33
4 Bullone esagonale
B11 10x90
34
20 Dado di sicurezza
B33-10
35
4 Steckbolzen
113728Y
36
16 Disco
703412
37
16 Bullone esagonale
128459
38
2 Cilindri idraulici
113799Y
39
18 Disco
B41-8
40
2 Dado esagonale
B33-8
41
4 Vite di fermo
701251
42
4 Bullone esagonale
B11-8x20
43
2 Vite di fermo
B22-8x8
44
4 Bullone esagonale
B11-6x16
45
4 Dado esagonale
B33-6
46
2 Striscia di fusibili
113560Y
47
2 Cuscinetto a strisciamento
con colletto
SF-1 2512
48
1 Digitare l'etichetta
49
2 Etichetta 1000 kg
3209500
50
1 Etichetta regolazione
longitudinale
115231
51
1 Regolazione
dell'inclinazione
dell'etichetta
115232
52
1 Regolazione trasversale
dell'etichetta
115230
53
1 Pedale pieghevole per
etichette
115229
54
2 Sicurezza dell'etichetta
115227
55
1 Etichetta di ventilazione
115228
56
1 falda
115571Y
57
1 Bullone esagonale
700216
58
1 Vite
705526
59
1 Rondella prigioniera
706705
60
4 Disco
B42-16
61
4 Cuscinetti a sfere di spinta
51101
62
1 Telaio
128029
63
2 Guida
128020
64
1 Maniglia a spinta
128037
65
4 Piastra di arresto
128021
66
1 Pompa a pedale vedi
113990Y
113990B
67
2 attacco
128022
68
8 Bullone esagonale
700201
69
2 Rondella
101021
70
2 Bullone esagonale
700250
71
6 Vite esagonale
700207
72
8 Dado esagonale
703313
73
2 Bullone esagonale
700208
74
2 Vite con impugnatura a
stella
117387
75
2 Tappo di plastica
128027
76
4 Bullone esagonale
700205
77
1 Supporto lasciato
123340Y
78
1 Supporto a destra
123344Y
79
1 tubo idraulico
128197
80
1 Ermeto
MG10-9801-4
81
2 Ermeto
MG10-9801-1
82
1 Tubo idraulico
MG10-9801-2
84
8 Disco
703410
85
Etichetta Blitz
708685
86
Etichetta Rotary
BQ-MG10-1

Istruzione per l ´uso
1
2
3
4
5
6
7
8
9
10
11
12
13
14
15
16
94

95
Istruzione per l ´uso
Appendice
schema idraulico
Istruzione per l ´uso
Individuazione
1 Protezione antirottura del tubo
2 Valvola del freno di abbassamento
3 valvola di scarico
4 Valvola di sfogo
5 Valvola di sfogo
6 pompa a pedale
7 filtri
R Vite di scarico dell’olio

96
Istruzione per l ´uso
kg
kg
kg
kg

Master Gear 1.0
Master Gear S3 1.0
Manual de Servicio
MG10-SMS
Rev.D 10/2019

Declaración CE de Conformidad
de conformidad con la directiva europea
2006/42/CE relativa a las máquinas
Nombre y dirección del fabricante
BlitzRotary GmbH
Hüfinger Str.55
78199 Bräunlingen, Germany
Esta declaración se refiere únicamente a las máquinas en el estado en el que colocaron en el mercado, y excluye los
componentes añadidos y/o las operaciones realizadas porteriormente por el usuario final. La declaración pierde su validez si
el producto es modificado sin autorización.
Declaramos, que la máquina descrita a continuación
Denominación del producto Mesa elevadora
Modelo / tipo
Master Gear 1.0 con extraíble;
Maquinaria / número de serie: .........................
Año de fabricación: .........................
Cumple con todos los requisitos esenciales de la directiva 2006/42/CE relativa a las máquinas.
Además, la parcialmente completa maquinaria está en conformidad con las directivas europeas 2014/30/EU relativas a la
compatibilidad electromagnética (los objetivos de protección se han cumplido de conformidad con el Anexo I N°. 1.5.1 de la
directiva 2006/42/CE relativa a las máquinas).
Normas armonizadas autorizadas
Mesa elevadora - Requisitos de seguridad
Seguridad de máquinas- conceptos básicos
Equipamiento eléctrico de máquinas
DIN EN 1494:2009-05
EN ISO 12100:2011
EN 60204-1:2009
DIN EN 349:2008-09
Seguridad de máquinas – distancias mínimas
Altri standard e specifiche tecnici utilizzati
DGUV Regel 100-500
gestión de los aparatos de trabajo
DGUV V3
regulación de la ley de prevención de accidentes de las instalaciones eléctricas
y equipo eléctrico
La persona autorizada para elaborar la correspondiente documentación técnica
BlitzRotary GmbH, Hüfinger Str. 55, 78199 Bräunlingen
Luogo: Bräunlingen
Data: 25.10.2019
______________________
Doris Wochner-McVey
Director general
Hier Typenschild einkleben
Typ
Baujahr
Seriennummer

99
Manual de Servicio
Indice
1 100
1.1
Seguridad
Directrices de seguridad en este
manual 100
1.2
Peligro de este aparato
100
1.3
Uso previsto
100
1.4
Peligros por accesorios
100
1.5
Emisiones
100
1.6
Fuentes de peligro
101
1.7
Operadores autorizados
101
1.8 101
1.9
Protección personal
Medidas de seguridad en el lugar
de instalación. 101
1.10
Acutación en caso de emergencia.
101
1.11
2
Iconos
Dispositivos de seguridad
102
102
2.1 102
2.2 102
2.3
Diaframgma en la salida del
cilindro hidráulico
Válvula de frenada de la bajada (si
existe)
Válvula estranguladora de retorno
(si existe) 102
2.4 102
2.5 102
2.6 102
3
Fuelles (opcional)
Bloqueo de las rueda (solo para
dispositivos móviles)
Barra de contacto de seguridad
(opcional)
Puesta en marcha
103
3.1
Montaje
103
4
Manejo
104
4.1
Elevar
104
4.2
Bajar
104
4.3 104
5 105
6 105
6.1
Desplazamiento / inclinación
Paro del aparato
Comprobaciones
Comprobación previa a la primera
pusta en marcha 105
6.2
Comprobación periódicas
105
6.3 106
7
Lista de chequeo
Inspección / Mantenimiento
107
7.1
Programa de mantenimiento
107
7.2
Limpienza
107
7.3 107
7.4
Mecánica
Mantenimiento de la unidad
hidráulica 107
7.5
Intervalos de cambio de aceite
108
7.6
Contol del nivel de aceite
108
7.7
Cambio de aceite
108
7.8 108
7.9 108
8
Purgue el sistema hidráulica
Comprobación de las mangueras
hidráulicas
Diagnóstico de fallos
109
8.1 109
8.2
El aparato baja por sí solo
El aparato no eleva hasta altura
máxima 109
8.3
El aparato no responde al primer
golpe con el pedal de subida 109
8.4
8.5
La bomba deja de generar presión
109
Funcionamiento defectuoso /
109
9
Manteni miento de las válvulas
General
110
9.1
Daños de transporte
110
9.2
Garantía
110
9.3
Pedido de repuestos
110
10 110
110
111
114
115
119
Anexo
Datos técnicos
Hoja de dimensiones 1.0
Lista de piezas de repuesto
Hoja de dimensiones 1.0 con
extracto
Plan hidráulico
etiquetas adhesivas
120

100
Manual de Servicio
1 Seguridad
1.1 Directrices de seguridad en este
manual
Peligro
Cuidado
1.2 Peligros de este aparato
1.3 Empleo preceptivo
•
1.4 Peligros por accesorios
.
1.5 Emisiones

101
Manual de Servicio
1.6 Fuentes de peligro
Peligro
Ningún dispositivo de
seguridad debe ser jamás
•
1.7 Operadores autorizados
1.8 Protección personal
1.9 Medidas de seguridad en l lugar de
trabajo
1.10 Actuación en caso de
emergencias

102
Manual de Servicio
1.11 Símbolos gràcos
Prohibición
2. prohibido
Prohibición
Prohibido
Prohibición
(carga
de supercie)!
kg
kg
kg
kg
1
2
3 4
5 6
7
2 Dispositivos de seguridad
2.1 Diaframgma en la salida del cil-
indro hidráulico
2.2 Válvula de frenada de la bajada (si
existe)
2.3 Válvula estranguladora de retorno
(si existe)
Atención!
2.4 Fuelle (si existe)
2.5 Bloqueo de las ruedas
(solamente mesas con ruedas)
2.6 Barra de contacto de seguridad (si
existe)

103
Manual de Servicio
3 Puesta en marcha
3.1 Montaje
Cuidado
Lleve guantes protectores para el
montaje de los muelles.
Fig.7:
Fig.8:
Ha leido y entendido las instrucciones
de servicio, y sobre todo las directrices
de seguridad? En caso armativo,
puede poner en marcha el aparato.

104
Manual de Servicio
4 Manejo
Peligro
•
4.1 Elevar
4.2 Bajar
4.3 Desplazamiento/inclinación

Manual de Servicio
5 Paro del aparato
6 Comprobaciones
6.1 Comprobación previa a la prim-
era pusta en marcha.
6.2 Comprobaciones periódicas
10
5

106
Manual de Servicio
6.3 Lista de chequeo
。
Año

Manual de Servicio
7 Inspecciones / Mantenimiento
7.1 Plan de mantenimiento
7.2 Limpienza
Peligro
7.3 Mecánica
7.4 Mantenimiento de la unidad
hidráulica
Este aparato viene de fábrica con aceite
hidráulico sintético biodegradable.
El aceite hidráulico biodegradable es mis-
cible con el aceite mineral, pero entonces
pierda sus propiedades biodegradables.
AVISO
10
7

108
Manual de Servicio
7.5 Intervalos de cambio de aceite
7.6 Contol del nivel de aceite
7.7 Cambio de aceite
7.8 Purgue el sistema hidráulico
7.9 Inspecciones de las hidráulicas

109
Manual de Servicio
8 Localización de problemas
Peligro
8.1 El aparato baja solo
8.2 El aparato no eleva hasta altura
máxima
8.3 El aparato no responde al primer
golpe con el pedal de subida.
8.4 La bomba ya no produce presión
8.5 Funcionamiento defectuoso / Man-
tenimiento de las válvulas

110
Manual de Servicio
9 General
9.1 Averias en el transporte
9.2 Garantía
9.3 Demanda de piezas de recambio
10 Anexo
Master Gear 1.0 con extraíble

11
1
Manual de Servicio
Master Gear 1.0

112
Manual de Servicio
4 8
3 9
34/35
2 7
4 9
4 7
3 8
2 6
3 3
11
4 4
7 3
7 4
80
7 5
2 9
13
5 2
2 1
1
14
12
6
7
3 7
2 4
3
2
4 1
4 2
47
7 0
4 8
10
4
4 3
3 2 ( 2 x )
3 1 ( 2 x )
7
4 64 4
4 0
7
5 5
3 1
5
4 6 (2 x )
4 4 (2 x )
4 8 (2 x )
9
5 1
5 0/
5 2
Y
Z
X
W
3 7
(2 x )
7 8
7 9
a
76
Master Gear 1.0

113
Manual de Servicio
Master Gear 1.0

114
Manual de Servicio
,
,
Master Gear 1.0

115
Hoja de medidas Master Gear 1.0 con extraíble
Manual de Servicio

116
Master Gear 1.0 mit Auszug
Manual de Servicio

117
Master Gear 1.0 mit Auszug
Manual de Servicio
Pos.
pcs. Denominación
1
1 Marco base
113577YN
2
4 Aumentar placa de rollo
128043
3
2 Castor
114856
4
2 Rueda giratoria con freno
113811
5
2 Punta de bloqueo
123337Y
6
1 Brazo de tijera
113725Y
7
10 Radillo
113727Y
8
4 Casquillo de cojinete
113604Y
9
1 Brazo de tijera
113732Y
10
2 Brazo de tijera
113565Y
11
1 Escribir
113570Y
12
2 Escribir
113720Y
13
1 Marco de ajuste
113554Y
14
1 Brazo de tijera
113729Y
15
1 Cuadro
113588Y
16
1 Mecanismo de inclinación
113569Y
17
1 Husillo de tracción para
ajuste transversal
113556Y
18
2 Perno de rodamiento
113517Y
19
1 Husillo de tracción para
ajuste longitudinal.
113557Y
20
1 Ángulo con marca
113562Y
21
2 Disco
B41-12
22
1 Almacenamiento
113741Y
23
4 Tuerca de seguridad
B33-12
24
2 Tuerca hexagonal
B30-16
25
2 Tornillo de cabeza
Hexagonal
B11-16x80
26
4 Disco
114124
27
1 Mesa
113509Y
28
2 Tornillo de cabeza
Hexagonal
B11-12x55
29
18 Cojinete deslizante
SF-1 2020
30
16 Cojinete deslizante
SF-1 2015
31
4 Tuerca hexagonal
B33-16
32
8 Disco
B42-10
33
4 Tornillo de cabeza
Hexagonal
B11 10x90
34
20 Tuerca de seguridad
B33-10
35
4 Punta de bloqueo
113728Y
36
16 Disco
703412
37
16 Tornillo de cabeza
Hexagonal
128459
38
2 Cilindros hidraulicos
113799Y
39
18 Disco
B41-8
40
2 Tuerca hexagonal
B33-8
41
4 Tornillo de ajuste
701251
42
4 Tornillo de cabeza
Hexagonal
B11-8x20
43
2 Tornillo de ajuste
B22-8x8
44
4 Tornillo de cabeza
Hexagonal
B11-6x16
45
4 Tuerca hexagonal
B33-6
46
2 Tira de fusibles
113560Y
47
2 Cojinete liso con collar
SF-1 2512
1 Etiqueta de tipo
49
2 Etiqueta 1000 kg
3209500
50
1 Ajuste longitudinal de
etiqueta
115231
51
1 Ajuste de inclinación de
etiqueta
115232
52
1 Ajuste transversal de
etiqueta
115230
53
1 Pedal plegable de
etiquetas
115229
54
2 Etiqueta de seguridad
115227
55
1 Etiqueta de ventilación
115228
56
1 Solapa
115571Y
57
1 Tornillo de cabeza
Hexagonal
700216
58
1 Tornillo
705526
59
1 Lavadora cautiva
706705
60
4 Disco
B42-16
61
4 Rodamientos axiales de
bolas
51101
62
1 Cuadro
128029
63
2 Guía
128020
64
1 Empuñadura
128037
65
4 Placa de parada
128021
66
1 Bomba de pie ver
113990Y
113990B
67
2 Ataque
128022
68
8 Tornillo de cabeza
Hexagonal
700201
69
2 Lavadora
101021
70
2 Tornillo de cabeza
Hexagonal
700250
71
6 Tornillo hexagonal
700207
72
8 Tuerca hexagonal
703313
73
2 Tornillo de cabeza
Hexagonal
700208
74
2 Tornillo de estrella
117387
75
2 Tapa de plástico
128027
76
4 Tornillo de cabeza
Hexagonal
700205
77
1 Apoyo dejado
123340Y
78
1 Apoyo a la derecha
123344Y
79
1 manguera hidráulica
128197
80
1 Ermeto
MG10-9801-4
81
2 Ermeto
MG10-9801-1
82
1 Manguera hidráulica
MG10-9801-2
84
8 Disco
703410
85
Etiqueta Blitz
708685
86
Etiqueta Rotary
BQ-MG10-1

118
Manual de Servicio
1
2
3
4
5
6
7
8
9
10
11
12
13
14
15
16

119
Manual de Servicio
Anexo
plan hidraúlico
Manual de Servicio
Denominación
1 Protección de fractura del
2 válvula de freno de descenso
3 Válvula de drenaje
4 Válvula de descarga
5 Válvula de descarga
6 Bomba de pie
7 filtros
R Tornillo de drenaje de aceite

120
Manual de Servicio
kg
kg
kg
kg

Master Gear 1.0
Master Gear S3 1.0
Инструкции по эксплуатации
RU
MG10-SMS
Rev.D 10/2019

EC Declaration of Conformity
according to EC directive 2006/42/EC on machinery
Name and address of the manufacturer
BlitzRotary GmbH
Hüfinger Str.55
78199 Bräunlingen, Germany
This declaration relates exclusively to the machinery in the state in which it was placed on the market, and excludes
components which are added and/or operations carried out subsequently by the final user. The declaration is no more valid,
if the product is modified without agreement.
Herewith we declare, that the machinery described below
Product denomination Lift tables
Model- / Type
Master Gear 1.0 with extract;
Machinery-/Serial number: ..........................
Year of manufacture: ..........................
is complying with all essential requirements of the Machinery Directive2006/42/EC.
In addition the partly completed machinery is in conformity with the EC Directives 2014/30/EU relating to electromagnetic
compatibility (Protection objectives have been met in accordance with Annex I No. 1.5.1 of the Machinery Directive
2006/42/EC).
Harmonised Standards used
Lift tables - Safety requirements
Safety of Machinery- Basic concepts
Electrical equipment of machines
DIN EN 1494:2009-05
EN ISO 12100:2011-03
EN 60204-1:2009-10
DIN EN 349:2008-09
Safety of machinery - Minimum gaps
Other technical standards and specifications used
DGUV Regel 100-500
management of working appliances
DGUV V3
law accident prevention regulation of electric facilities and equipment
The person authorised to compile the relevant technical documentation
BlitzRotary GmbH, Hüfinger Str. 55, 78199 Bräunlingen
Place: Bräunlingen
Date :
25
.10.2019
______________________
Doris Wochner-McVey
Managin Dirg e ctor
Hier Typenschild einkleben
Typ
Baujahr
Seriennummer

123
Инструкции по эксплуатации
Содержание
1
124
1.1
безопасность
Инструкции по технике
безопасности в этом
руководстве
124
1.2
Опасность этой машины
124
1.3
Использование по назначению
124
1.4
Опасности из-за аксессуаров
124
1.5
выбросы
124
1.6
опасность
125
1.7
125
1.8
125
1.9
125
1.10
Авторизованные серверы
Средства индивидуальной
защиты
Меры безопасности на месте
установки
Поведение в чрезвычайной
ситуации
125
1.11
иконки
126
2
126
2.1
защитные устройства
Отверстие в соединении
цилиндра
126
2.2
клапан опускания
126
2.3
регулятор скорости
126
2.4
126
2.5
126
2.6
126
3
Сильфон (необязательно)
Блокировка колес (только для
мобильных устройств)
Контактная полоска
(опционально)
ввод в эксплуатацию
127
3.1
127
4
Настройка / монтаж
операция
128
4.1
повышение
128
4.2
ниже
128
4.3
128
5
129
6
129
6.1
Переместить / наклон
снятие с эксплуатации
экзамен
Тест перед первым
использованием
129
6.2
Регулярные экзамены
129
6.3
130
7
131
7.1
контрольный список
Инспекция / Техническое
обслуживание
График технического
обслуживания
131
7.2
чистый
131
7.3
131
7.4
механика
Обслуживание гидравлического
блока
131
7.5
интервалы замены
132
7.6
Проверка уровня масла
132
7.7
замена масла
132
7.8
132
7.9
132
8
Прокачка гидравлики
Проверка гидравлических
шлангов
диагностика неисправностей
133
8.1
133
8.2
133
8.3
133
8.4
133
8.5
133
9
Устройство опускается само
собой.
Устройство не поднимается на
максимальную высоту
Устройство не поднимается с
первого хода
Насос прекращает создание
давления
Неисправность / обслуживание
клапанов
общий
134
9.1
повреждения во время
транспортировки
134
9.2
гарантия
134
9.3
Заказ запчастей
134
10
приложение
Спецификации
Размерный лист 1,0
Перечень запасных частей
134
134
135
138
Размерный лист 1,0 с экстрактом
139
143
гидравлический план
самоклеящиеся этикетки
144

12
4
Инструкции по эксплуатации
1 Безопасность
1.1 Подсказки безопасности в
данных инструкциях
Опасно
Осторожно
1.2 Опасности данного механизма
•
•
•
•
•
1.3 Нормы по использованию
•
•
•
•
•
1.4 Опасность из-за аксессуаров
•
•
•
1.5 Вредные выбросы

12
5
Инструкции по эксплуатации
1.6 Источники опасности
Опасно
•
•
•
•
•
•
•
•
•
1.7 Квалифицированные операторы
•
•
•
•
•
1.8 Оборудование защиты
персонала
•
•
•
•
1.9 Меры безопасности на рабочем
месте
1.10 Поведение в экстренных
случаях

12
6
Инструкции по эксплуатации
1.11 Графические символы
1:
2:
Запрещено
Запрещено
Запрещено
4. запрещено!
Запрещено
6.
(поверхностная
нагрузка)!
3:
kg
kg
kg
kg
1
2
3 4
5 6
7
2 Средства безопасности
2.1 Ограничение отверстия на
выпуске цилиндра
2.2 Тормозной клапан опускания
(если имеется)
2.3 Однонаправленный клапан
ограничения потока
(если имеется)
Внимание
2.4 Сворачиваемый экран (если
имеется)
2.5 Защитное устройство на колесах
(только транспортируемые
механизмы)
2.6 Контактная рама (если имеется)

12
7
Инструкции по эксплуатации
Подготовка к использованию
3 Подготовка к
использованию
3.1 Установка / сборка
Осторожно
4:
5:
6:
•
• лт
•
•
•
•
:
:
Вы прочли и поняли инструкции
по эксплуатации и все указанные
выше требования по безопасности?
Только после этого можно
передавать механизм в
эксплуатацию.

12
8
Инструкции по эксплуатации
4 Работа
9:
Опасно
•
•
•
•
4.1 Подъем
4.2 Опускание
4.3 Сдвиг/наклон

12
9
Инструкции по эксплуатации
5 Вывод из эксплуатации
•
•
•
•
•
•
•
6 Инспекции
6.1 Инспекция перед первым
применением
•
•
6.2 Периодическое тестирование
•
•
•
•
•
•
•
•

130
Инструкции по эксплуатации
6.3 Проверочный список
номер
инспекции

13
1
Инструкции по эксплуатации
7 Инспекция /
техобслуживание
7.1 План техобслуживания
7.2 Очистка
•
•
•
7.3 Механика
7.4 Техобслуживание гидравлики
Опасно
Данный механизм заправляется
биомаслом на синтетической основе
Биологически разлагаемое
гидравлическое масло является
смесью с минеральным маслом, но оно
допускает биологическое разложение.
Внимание!

132
Инструкции по эксплуатации
7.5 Интервалы замены масла
7.6 Проверка уровня масла
7.7 Замена масла
•
•
•
•
7.8 Прокачка гидравлики
7.9 Контроль гидравлических
шлангов
•
•
•
•
•

13
3
Инструкции по эксплуатации
8 Поиск неисправностей
Опасно
1:
8.1 Механизм самопроизвольно
опускается
8.2 Механизм не поднимает на
максимальную высоту
8.3 Механизм не поднимает на
первом ходе насоса
8.4 Насос не создает давление
8.5 Поломка / техобслуживание
клапанов

134
Инструкции по эксплуатации
9 Общие положения
9.1 Повреждения при
транспортировке
9.2 Гарантия
9.3 Заказ запасных частей
10 Приложение
670 ± 20мм
310
Главный редуктор 1.0 с удлинителем

135
Инструкции по эксплуатации
Master Gear 1.0

13
6
Инструкции по эксплуатации
4 8
3 9
34/35
2 7
4 9
4 7
3 8
2 6
3 3
11
4 4
7 3
7 4
80
7 5
2 9
13
5 2
2 1
1
14
12
6
7
3 7
2 4
3
2
4 1
4 2
47
7 0
4 8
10
4
4 3
3 2 ( 2 x )
3 1 ( 2 x )
7
4 64 4
4 0
7
5 5
3 1
5
4 6 (2 x )
4 4 (2 x )
4 8 (2 x )
9
5 1
5 0/
5 2
Y
Z
X
W
3 7
(2 x )
7 8
7 9
a
76
1.0

13
7
Инструкции по эксплуатации
1.0

13
8
Инструкции по эксплуатации
,
,
1.0

139
Габаритный чертеж Главный редуктор 1.0 с удлинителем
Инструкции по эксплуатации

140
Главный редуктор 1.0 с удлинителем
Инструкции по эксплуатации

141
Главный редуктор 1.0 с удлинителем
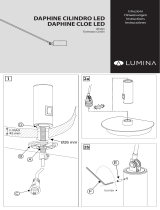
Инструкции по эксплуатации
Pos. pcs.
1 1 базовая рама 113577YN
2 4 подъём роликовой плиты 128043
3 2 направляющий ролик 114856
4 2 направляющий ролик с
тормозом
113811
5 2 шкворень 123337Y
6 1 раздвижной кронштейн 113725Y
7 10 ролик 113727Y
8 4 опорная втулка 113604Y
9 1 раздвижной кронштейн 113732Y
10 2 раздвижной кронштейн 113565Y
11 1 ось шасси 113570Y
12 2 ось шасси 113720Y
13 1 передвижная рама 113554Y
14 1 раздвижной кронштейн 113729Y
15 1 рама 113588Y
16 1 механизм наклона 113569Y
17 1 ходовой вал для
поперечной регулировки
113556Y
18 2 болт крышки подшипника 113517Y
19 1 ходовой вал для
продольной регулировки
113557Y
20 1 угол с отметкой 113562Y
21 2 диск B41-12
22 1 опорный узел 113741Y
23 4 контргайка B33-12
24 2 шестигранная гайка B30-16
25 2 шестигранный болт B11-16x80
26 4 диск 114124
27 1 стол 113509Y
28 2 шестигранный болт B11-12x55
29 18 подшипник скольжения SF-1 2020
30 16 подшипник скольжения SF-1 2015
31 4 шестигранная гайка B33-16
32 8 диск B42-10
33 4 шестигранный болт B11 10x90
34 20 контргайка B33-10
35 4 шкворень 113728Y
36 16 диск 703412
37 16 шестигранный болт 128459
38 2 гидроцилиндр 113799Y
39 18 диск B41-8
40 2 шестигранная гайка B33-8
41 4 резьбовая шпилька 701251
42 4 шестигранный болт B11-8x20
43 2 резьбовая шпилька B22-8x8
44 4 шестигранный болт B11-6x16
45 4 шестигранная гайка B33-6
46 2 предохранительная
планка
113560Y
47 2 подшипник скольжения с
буртиком
SF-1 2512
48 1 заводская табличка
49 2 наклейка „1000 кг“ 3209500
50 1 наклейка „продольная
регулировка“
115231
51 1 наклейка „регулировка
наклона“
115232
52 1 наклейка „поперечная
регулировка“
115230
53 1 наклейка „откидная
педаль“
115229
54 2 наклейки „техника
безопасности“
115227
55 1 наклейка „клапан
вентиляции“
115228
56 1 петля 115571Y
57 1 шестигранный болт 700216
58 1 резьбовая заглушка 705526
59 1 болт с защитой от
самоотвинчивания
706705
60 4 диск B42-16
61 4 упорный
шарикоподшипник
51101
62 1 рама 128029
63 2 кулисса 128020
64 1 подвижная рукоятка 128037
65 4 упорная планка 128021
66 1 насос с педальным
приводом см. 113990Y
113990B
67 2 упор 128022
68 8 шестигранный болт 700201
69 2 подкладная шайба 101021
70 2 шестигранный болт 700250
71 6 шестигранный болт 700207
72 8 шестигранная гайка 703313
73 2 шестигранный болт 700208
74 2 винт со звездообразной
рукояткой
117387
75 2 пластмассовый колпачок 128027
76 4 шестигранный болт 700205
77 1 опора слева 123340Y
78 1 опора справа 123344Y
79 1 гидравлический шланг 128197
80 1 герметичная резьбовая
втулка
MG10-9801-4
81 2 герметичная резьбовая
втулка
MG10-9801-1
82 1 гидравлический шланг MG10-9801-2
84 8 диск 703410
85 наклейка „Blitz“ 708685
86 наклейка „Rotary“ BQ-MG10-1

142
Инструкции по эксплуатации
1
2
3
4
5
6
7
8
9
10
11
12
13
14
15
16

143
Инструкции по эксплуатации
Приложение
гидравлическая схема
обозначение
1 устройство защиты от разрывов
труб
2 клапан опускания тормоза
3 сливной клапан
4 предохранительный клапан
5 предохранительный клапан
6 ножной насос
7 фильтры
R маслосливная пробка

144
Инструкции по эксплуатации
kg
kg
kg
kg


BlitzRotary GmbH
Hüfinger Straße 55
78199 BRÄUNLINGEN
DEUTSCHLAND
Telefon +49.771.9233.0
Telefax +49.771.9233.99
www.blitzrotary.com
/