Crofton Premium 6.3 qt Manual de usuario
- Categoría
- Ollas a presión
- Tipo
- Manual de usuario

ID: #07177
m
y
h
a
n
s
e
c
o
n
t
r
o
l
.
c
o
m
C
E
R
T
I
F
I
E
D
User-friendly
Manual
User Manual
Manual
del usuario
6.3 QT (6L) PRESSURE COOKER
OLLA A PRESIÓN DE 6.3 QT (6L)
English .......Page 06
Español ......Página 29

Contents
Overview ................................................................................. 3
Use ............................................................................................ 4
Scope of delivery/device parts ............................................... 6
General information ................................................................ 7
Reading and storing the instruction manual ...........................7
Explanation of symbols ................................................................7
Safety ....................................................................................... 8
Proper use ...................................................................................... 8
Safety notes ................................................................................... 8
Safety systems .............................................................................. 12
Checking the pressure cooker and product contents .......... 12
Use ...........................................................................................13
Cleaning the pressure cooker for the first time ...................... 13
Adding food .................................................................................. 13
Closing the pressure cooker.......................................................14
Pressure cooking ......................................................................... 14
Reducing the pressure in the pressure cooker .......................15
Opening the pressure cooker .................................................... 15
Pressures and cooking times .................................................16
Pressures .......................................................................................16
Cooking times ............................................................................... 16
Notes on preparing food and cooking times ..........................18
Cleaning, care, and storage .................................................. 20
Cleaning the pressure cooker ................................................... 20
Cleaning and replacing the sealing ring ................................ 20
Cleaning the valves ..................................................................... 21
Maintenance and storage .......................................................... 21
Replacement parts and other accessories ............................22
Troubleshooting .................................................................... 23
Technical data ....................................................................... 25
Disposal .................................................................................. 26
Disposing of the packaging .......................................................26
Disposing of the pressure cooker ..............................................26
Warranty card .........................................................................27
Warranty conditions .............................................................. 28

1
2 3 4
6
7
8
10
11
12
13
14
15
5
9
A
16
3
USA

4
USA
17 12
2
13
16
CB
D
E
3
6
6

5
USA
16
2
19
J K
2
GF
18
H
I
16
20

6
Scope of delivery⁄device parts
1
Valve cap pressure control valve
2
Safety valve (red)
3
Locking slider
4
Lid handle
5
Pot handle
6
Closing mark
7
Pot
8
Bottom
9
Replacement sealing ring for pressure level indicator (silicone cap), 2×
10
Safety window
11
Side handle
12
Lid
13
Pressure level indicator
14
Indicator: Remove the valve cap
15
Pressure scale
16
Pressure control valve
17
Sealing ring
18
Rings of the pressure level indicator
19
Stewing insert
20
Insert support
USA

AFTER SALES SUPPORT
USA
General information
7
USA
1-877-386-8264
tm3service@outlook.com
General information
Reading and storing the user manual
This user manual accompanies this 6.3 Qt (6l) pressure cooker. It
contains important information on start-up and handling.
For improved readability, the 6.3 Qt (6l) pressure cooker will be re-
ferred to only as pressure cooker below.
Before using the pressure cooker, read the user manual carefully. This partic-
ularly applies for the safety notes. Failure to comply with this user manual may
result in severe injury or damage to the pressure cooker.
When abroad, you must also observe country-specific guidelines and laws.
Store the user manual for further use. If you pass the pressure cooker on to
third parties, be absolutely sure to include this user manual.
A PDF version of this user manual can be downloaded from the Internet via
www.schnellkochtopf24.de.
Explanation of symbols
The following symbols and signal words are used in this user manual, on the
pressure cooker or on the packaging.
WARNING!
This signal symbol/word designates a hazard
with moderate degree of risk which may lead
to death or severe injury if not avoided.
CAUTION!
This signal word designates a hazard with low
risk which may result in minor or moderate in-
jury if not avoided.
NOTICE!
This signal symbol/word warns against poten-
tial damages to property.
This symbol provides you with useful additional information on the
product or using it.
This symbol indicates that the
pressure cooker is suitable for use on
electrical stovetops.
This symbol indicates that the
pressure cooker is suitable for use on
gas stovetops.

Safety
USA
AFTER SALES SUPPORT
8
USA
1-877-386-8264
tm3service@outlook.com
This symbol indicates that the
pressure cooker is suitable for use on
ceramic glass stovetops.
This symbol indicates that the
pressure cooker is suitable for use on
induction stovetops.
This symbol indicates that the
pressure cooker is suitable for use on
halogen stovetops.
Safety
Proper use
The pressure cooker is only designed for quickly cooking food under pressure.
It is only intended for private use and not suitable for commercial purposes.
Only use the pressure cooker as described in this user manual. Using it in any
other way is deemed improper and may result in damage to property or even
personal injury. The pressure cooker is not a children’s toy.
The manufacturer or vendor cannot be held liable for damages incurred
through improper or incorrect use.
Safety notes
WARNING!
Danger of suffocation!
If children play with the packaging wrapper or small parts,
they could catch themselves when playing, slip them over their
head or swallow them and choke.
− Keep packaging wrapper and the small parts away from
children.

AFTER SALES SUPPORT
USA
Safety
9
USA
1-877-386-8264
tm3service@outlook.com
WARNING!
Risk of injury!
Pressure is produced inside the pressure cooker when it is
heated.
− Close the pressure cooker properly and completely before
you heat it.
− Do not open the pressure cooker forcefully, especially if it
is under pressure.
− Make sure that the pressure has diminished completely
before you open the pressure cooker.
− Keep the pressure cooker away from children if it is under
pressure.
− Do not leave the pressure cooker unattended while it is
operating or after using it.
− Be very careful when moving pressure cooker if it is under
pressure.
WARNING!
Fire and burn hazard!
Hot fat may catch fire and burn at high temperatures. Grease
fires cannot be extinguished with water; in fact, contact with
water may result in severe burns.
− While heating fat in the pressure cooker, never leave it
unattended.
− Never attempt to extinguish grease fires with water.
− Use a fire blanket or a special fire extinguisher for extin-
guishing grease fires.

Safety
USA
AFTER SALES SUPPORT
10
USA
1-877-386-8264
tm3service@outlook.com
WARNING!
Scalding and burn hazard!
While cooking under pressure, hot steam is released from the
pressure control valve and the parts of the pressure cooker will
become hot. You could burn yourself if you come into contact
with the steam or hot parts.
− Avoid direct physical contact with the steam that is emitted.
− Do not touch the hot parts of the pressure cooker with
bare fingers.
− Only use the handles to hold the hot pressure cooker and
the lid.
− Also always use thermally insulating oven gloves or pot
holders to hold the pressure cooker and the lid.
− Let the pressure cooker and the lid cool off completely
before each cleaning.
WARNING!
Risk of injury and burn hazard due to explosion!
If the pressure cooker or parts of the lid are damaged and you
continue to use these parts or if you use the pressure cooker
improperly, this may result in severe injuries as the result of an
explosion or burns.
− Stop using the pressure cooker if the parts of the pressure
cooker exhibit cracks or breaks or are deformed. Only
replace damaged parts with corresponding original spare
parts. Contact the manufacturer at the service address
specified on the warranty card.
− Check to make sure the safety valve, the pressure control
valve, and the lid sealing ring are clean and functional
before each use.
− Except for the specified cleaning and care, do not modify
any part of the safety systems of the pressure cooker
(safety closure and lid valves).

AFTER SALES SUPPORT
USA
Safety
11
USA
1-877-386-8264
tm3service@outlook.com
− Do not use the pressure cooker for frying and deep frying
with oil when it is under pressure.
− When preparing pasty contents, gently shake the pressure
cooker before you open it after cooking.
− Never fill the pressure cooker more than the indicated
maximum fill amount (2/3 of the nominal volume).
− When preparing food like rice or dry vegetables that
expand during the cooking process, fill the pressure cooker
to no more than half of the nominal volume.
CAUTION!
Scalding hazard!
When cooking cold cuts with a synthetic casing, the casing may
expand and pop when being cooked under pressure. When
cooking meat with skin, the meat expands during the cooking
process and if you puncture it, hot water may spray out of it.
Contact with hot spraying water may scald you.
− Always puncture cold cuts with a synthetic casing before
you cook them to prevent them from popping.
− Do not puncture meat with skin after cooking it; instead
always let it shrink down.
NOTICE!
Risk of damage!
Using the pressure cooker with unsuitable heat sources or fail-
ure to sufficiently fill the pressure cooker may cause damage to
the pressure cooker.
− Only use the heat sources specified in this user manual
(see chapter “Explanation of symbols”).
− Do not use the pressure cooker in hot ovens.
− Always observe the minimum fill amount for the pressure
cooker.
− Never heat the pressure cooker under pressure unless you
have previously filled the pressure cooker with water.

Checking the pressure cooker a nd product cont ents
USA
AFTER SALES SUPPORT
12
USA
1-877-386-8264
tm3service@outlook.com
Safety systems
Safety window
If the pressure in the pressure cooker is too high, the sealing ring
17
in the
lid
12
will push out through the safety window
10
(see fig. A). This will re-
lease any excess steam.
Safety valve
The safety valve
2
in the lid
12
will show whether the pressure cooker is
under pressure (see fig.A). If the safety valve is visibly protruding from the lid,
pressure has built up in the pressure cooker. The pressure cooker is now locked
and can no longer be opened (see fig. F).
As soon as the pressure in the pressure cooker is diminishing, the safety valve
will lower back into the lid. If the safety valve is no longer protruding from the
lid, the pressure cooker is no longer locked and you can open it.
Checking the pressure cooker and
product contents
NOTICE!
Risk of damage!
If you are not cautious when opening the packaging with a
sharp knife or other pointy objects, you may quickly damage
the pressure cooker.
− For this reason, be very careful when opening it.
1. Take the pot
7
and the lid
12
out of the packaging.
2. Check whether the delivery is complete (see fig. A, B, and K as well as the
list on p.6).
3. Check whether the pressure cooker or individual parts thereof exhibit da-
mages. If this is the case, do not use the pressure cooker. Contact the manu-
facturer at the service address specified on the warranty card.

AFTER SALES SUPPORT
USA
Use
13
USA
1-877-386-8264
tm3service@outlook.com
Use
Cleaning the pressure cooker for the first time
− Clean all parts of the pressure cooker before first use as described in the
chapter “Cleaning, care, and storage”.
Adding food
NOTICE!
Risk of damage!
The pressure cooker may be damaged if you do not fill the
pressure cooker sufficiently or excessively or if you do not add
any liquid or too little.
− Always add 8.45 – 10.14 fl.oz. (250-300ml) of liquid to the
pressure cooker regardless of the quantity of food.
− Follow the minimum fill amount of at least ⁄ of the nominal
volume and maximum fill amount of ½ of the nominal
volume for food that expands or ⁄ of the nominal volume
for all other meals.
The fill amounts consist of liquid + food.
NOTICE!
Risk of damage!
If you put salt in cold water contained in the pressure cooker,
this may damage the bottom of the pot.
− Always be sure to only add salt to water if it is already boiling.
1. Add the liquid needed to form steam (water, stock or sauce) to the pot
7
.
2. Add the food.
3. Close the pressure cooker as described in the chapter “Closing the pressure
cooker”.

Use
USA
AFTER SALES SUPPORT
14
USA
1-877-386-8264
tm3service@outlook.com
Closing the pressure cooker
− Place the lid
12
on the pot
7
. The closing marks
6
on the lid and the
pot handle
5
must be across from one another (see fig. E).
− Push the lid handle
4
and the handle of the pressure cooker so that they
are over one another. The locking slider
3
will audibly lock into place.
The pressure cooker is closed and you can now heat it.
Pressure cooking
NOTICE!
Risk of damage!
The pressure cooker may be damaged if the heat supplied to it
is not reduced in the presence of overpressure.
− In the event of overpressure, a red ring will become visible
on the pressure level indicator and the pot will release
steam. In this case, immediately reduce the heat supplied
from the heat source until the red ring is no longer visible.
1. Turn the valve cap
1
of the pressure control valve
16
to the position
indicating the suitable pressure level for the food added (see the chapter
“Pressures and cooking times”).
2. Place the closed pressure cooker with the selected pressure level on the stove.
3. Set the stove to the maximum heat.
Pressure will build up in the pressure cooker. The red safety valve
2
and
the pressure level indicator
13
will display the build-up of pressure in the
pressure cooker (see fig.F and fig. G).
Depending on the amount of food added, it will take a few minutes for the
pressure cooker to reach the set pressure. If pressure is continually released
by the pressure control valve
16
and the green rings on the pressure level
indicator
18
are visible, the set pressure level has been reached. The cook-
ing time will then begin.
4. Now set the stove to low heat.
5. Leave the pressure cooker on the stove for the cooking time indicated in the
recipe (see chapter “Pressures and cooking times” and, if applicable, your
own recipe).
6. Once the cooking time has passed, turn the stove off.
7. Release the pressure in the pressure cooker as described in the chapter
“Reducing the pressure in the pressure cooker”.

AFTER SALES SUPPORT
USA
Use
15
USA
1-877-386-8264
tm3service@outlook.com
Reducing the pressure in the pressure cooker
WARNING!
Scalding hazard!
The steam that is emitted is very hot. The steam is emitted from
the top of the pressure cooker.
− Keep your hands, head, and body away from the area
where the steam is released.
There are two ways to reduce the pressure in the pressure cooker:
− Let the pressure cooker cool off: This is particularly recommended when
preparing foamy and pasty meals.
− Slowly release the pressure via the pressure control valve
16
(see fig. H).
Letting the pressure cooker cool off
1. Set the pressure cooker on a heat-resistant base, e.g. on a cold
stovetop.
2. After cooking, wait until the safety valve
2
has completely receded into the
lid
12
(see fig. A).
3. If the safety valve is no longer protruding from the pressure cooker, open the
pressure cooker as described in the chapter “Opening the pressure cooker”.
Slowly reducing the pressure via the pressure control valve
1. Slowly turn the valve cap
1
of
the pressure control valve
16
gradually to
position 0.
2. If the safety valve
2
is no longer protruding from the lid
12
, open the
pressure cooker as described in the chapter “Opening the pressure cooker”.
Opening the pressure cooker
1. Push the locking slider
3
towards the lid
12
(see fig.C).
2. Using the lid handle
4
, turn the lid couterclockwise (see fig. D).
The closing marks on the lid and the pot handle
5
must be across from one
another (see fig. E).
3. Lift the lid off of the pot
7
.

Pressures and cooking times
USA
AFTER SALES SUPPORT
16
USA
1-877-386-8264
tm3service@outlook.com
Pressures and cooking times
Pressures
Position Pressure
1 Low
2 Fast
Pressure release
Removing and
cleaning the valve
Cooking times
The following cooking times are approximate values as the exact cooking times
always depend on the quality and the amount of the food to be cooked.
Frozen foods do not have to be thawed before cooking. Extending the cooking
time is sufficient.
Soups and stews
Food Cooking time
(minutes)
Pressure
Bean soup 20 2
Pea soup (peas not soaked) 20 – 25 2
Vegetable soup 4 – 8 2
Semolina soup 3 – 5 2
Goulash soup 10 – 15 2
Potato soup 5 – 6 2
Bone broth 20 – 25 2
Minestrone 8 – 10 2
Rice soup 6 – 8 2
Beef broth 35 – 40 2
Boiling hen 25 – 35 2
Tomato soup with rice 6 – 8 2
Cabbage stew 15 2

AFTER SALES SUPPORT
USA
Pressures and cooking times
17
USA
1-877-386-8264
tm3service@outlook.com
Food Cooking time
(minutes)
Pressure
Lentils (soaked) 13 – 15 2
Pichelsteiner stew 20 2
Serbian beef 8 – 10 2
Vegetables
Food Cooking time
(minutes)
Pressure
Cauliflower 3 – 7 I
Green peas 3 – 5 I
Carrots 3 – 7 I
Stuffed peppers 6 – 8 I
Mushrooms 6 – 8 I
Red beets 15 – 25 I
Cabbage 5 – 15 I
Spinach 3 – 4 I
Beans 6 – 10 2
Potatoes 6 – 8 2
Jacket potatoes 6 – 12 2
Celery root 12 – 15 2
Meat
Food Cooking time
(minutes)
Pressure
Knuckle of pork 30 – 40 2
Goulash 15 – 20 2
Ground beef 5 – 10 2
Chicken 20 – 25 2
Veal strips 6 2
Roast veal 15 – 20 2
Veal fricassee 5 2
Turkey drumstick 25 – 35 2

Pressures and cooking times
USA
AFTER SALES SUPPORT
18
USA
1-877-386-8264
tm3service@outlook.com
Food Cooking time
(minutes)
Pressure
Roast beef 40 – 50 2
Spareribs 10 – 12 2
Roulades 15 – 20 2
Marinated beef 30 – 35 2
Roast pork 25 – 30 2
Roasted pork shank 25 – 35 2
Braised leg of venison 25 – 30 2
Fish
Food Cooking time
(minutes)
Pressure
Steamed fish with potatoes 6 – 8 I
Fish in white wine sauce with potatoes 6 – 8 I
Haddock 4 – 6 I
Notes on preparing food and cooking times
Soups and stews with roasted meat
− Leave the pressure cooker open when cooking foamy meals; remove the
foam before closing the pressure cooker.
− If the cooking times for the ingredients (e.g. meat and vegetables) do not
differ considerably: sear the meat and add the vegetables when deglazing it.
− If the cooking times for the ingredients vary greatly: stop cooking the meat
and for the last minutes, add the vegetables. This will ensure that the meat
and vegetables are finished at the same time.
Vegetables
TIP: First select a shorter cooking time. It can always be cooked further.
The finer the vegetables are cut, the shorter the cooking time.
− If you would like your vegetables crisp: Reduce the cooking time.
− Extend the cooking time for larger quantities.

AFTER SALES SUPPORT
USA
Pressures and cooking times
19
USA
1-877-386-8264
tm3service@outlook.com
Meat
− Always roast meat in the pressure cooker without the lid and only add the
required liquid when deglazing the meat.
− Cut through pieces of meat that are too large, sear them and stack them
until they are finished cooking.
Fish
− As fish stock is very sticky: Immediately take off the lid as soon as the
pressure in the pressure cooker has been completely released.
Frozen food
− You do not have to thaw frozen food before cooking it in the pressure cook-
er; instead, extend the cooking time slightly.
Stewing insert
You can steam or stew food with the stewing insert
19
. This will preserve
water-soluble vitamins and nutrients in the food while it is cooked.
− Set the insert stand
20
on the bottom of the pot
7
and put the stewing
insert on it.
− Add enough liquid so that it does not penetrate the stewing insert.
− Place the food you would like to steam or stew in the stewing insert.
− Close the pressure cooker as described in the chapter “Closing the pressure
cooker”.

Cleaning, care, and storage
USA
AFTER SALES SUPPORT
20
USA
1-877-386-8264
tm3service@outlook.com
Cleaning, care, and storage
NOTICE!
Improper cleaning!
If you do not clean the pressure cooker properly, you could
damage it or parts of it.
− Clean the pressure cooker after each use.
− Do not use any aggressive cleaners such as alkaline or
chlorine-based cleaners and do not use sharp or metallic
cleaning utensils such as knives, hard scrapers or similar.
− Use lemon or vinegar to remove stains from the bottom of
the pot.
− Do not in any case put the lid in the dishwasher.
Cleaning the pressure cooker
1. Let the pot
7
, the lid
12
as well as the stewing insert
19
and the
insert stand
20
cool off completely.
2. Take the sealing ring
17
out of the lid (see fig. B).
3. Clean the pot, the lid, the stewing insert, and the insert stand with hot water
and liquid detergent or put the pressure cooker, the stewing insert, and the
insert stand in the dishwasher without the lid.
4. Clean the sealing ring, the safety valve
2
, and the pressure control valve
16
as described in the chapters “Cleaning and replacing the sealing ring” and
“Cleaning the valves”.
5. Let all parts dry completely.
Cleaning and replacing the sealing ring
1. Wipe the sealing ring
17
off and rinse it under running water
(see fig.B).
2. Let the sealing ring dry completely.
3. Put the sealing ring back in the lid
12
(see fig. B).
4. In the event of normal use of the lid, replace the sealing ring once a year, but
no later than when it has become hard or dark.

AFTER SALES SUPPORT
USA
Cleaning, care, and storage
21
USA
1-877-386-8264
tm3service@outlook.com
Cleaning the valves
Cleaning the safety valve
1. Rinse the safety valve
2
under running water (see fig. B).
2. With a pointy object, check whether the pin on the safety valve can be
pushed in or whether the safety valve may be plugged (see fig. J).
The safety valve on the bottom of the lid should move easily and must not
stuck in place.
Cleaning the pressure control valve
1. Push and turn the valve cap
1
of the pressure control valve
16
to the
position for removing the valve cap
14
and pull the valve cap up and off the
lid
12
.
2. Pull the pressure control valve
16
up and off (see fig. I).
3. Clean the pressure control valve under running water.
4. Clean the bottom part of the pressure control valve on the inside of the lid
(see fig. J).
5. Put the pressure control valve back in the lid.
6. Put the valve cap back into the lid.
Make sure that the grooves of the pressure control valve and the grooves of
the valve cap are each placed in the corresponding guide in the lid.
7. Turn the valve cap of the pressure control valve and check that you have
inserted the pressure control valve and valve cap correctly and that they are
able to move normally.
Maintenance and storage
Checking that the handles are secure
− Regularly check whether the pot handle
5
and the side handle
11
are
still secure
(see fig.A)
.
− If one of the handles is loose, use a commercially available cross-slotted
screwdriver to tighten it.
Storing the pressure cooker
− Once clean, always store the pot
7
and the cleaned lid
12
in a clean, dry
area like a kitchen cabinet.
− Do not place the lid on the pot, instead e.g. turn it over and then set it on
the pot.

Replacement parts and other accessories
USA
AFTER SALES SUPPORT
22
USA
1-877-386-8264
tm3service@outlook.com
Replacing the sealing ring of the pressure level indicator
Regularly check the condition of the sealing ring
9
of the pressure level
indicator
13
and replace it with a new one if necessary.
− Pull the sealing ring on the bottom side of the lid
12
off of the pressure
level indicator.
− Push the new sealing ring all the way over the pressure level indicator so
that it is securely seated in the guide groove of the pressure level indicator.
Replacement parts and other accessories
Repairs may only be performed by authorized persons.
− In the event of a repair, contact our customer service team at the service
address specified on the warranty card.
You can order the following replacement parts and accessories on the website
www.schnellkochtopf24.de:
Replacement part/accessory Article number
Sealing ring 507048000
Pressure control valve 507026000
Stewing insert 507010000
Silicone cap 507042000

AFTER SALES SUPPORT
USA
Troubleshooting
23
USA
1-877-386-8264
tm3service@outlook.com
Troubleshooting
Fault Possible cause/solution
It takes a very long
time to parboil food.
Not enough heat is being supplied.
− Set the stove to maximum heat.
The red safety valve
is not raised during
cooking and no
steam is emitted
from the safety
valve.
This is normal during the first minutes of cooking while the
pressure builds up in the pressure cooker.
If this occurs while cooking, check the following:
• Is enough heat being supplied?
− If necessary, increase the amount of heat supplied.
• Is there enough liquid in the pressure cooker?
− If necessary, increase the amount of liquid.
• Is the valve cap of the pressure control valve set to
the “Reduce pressure” position?
− Turn it to the desired pressure.
• Is the pressure cooker well sealed?
− If necessary, close it again.
• Is the sealing ring or edge of the pot damaged?
− Stop cooking and, if necessary, replace the sealing ring
or stop using the pressure cooker.
The red safety valve
is raised while cook-
ing and no steam
is emitted from the
safety valve.
1. To reduce the pressure, hold the pressure cooker un-
der cold water.
2. Open the pressure cooker.
3. Clean the pressure control valve and the safety valve.
Steam is emitted
around the edge of
the lid.
Check the following:
• Is the lid closed?
− If necessary, close the lid again.
• Has the sealing ring been properly inserted in the lid?
− Stop cooking and, if necessary, insert the sealing ring
properly.
• Is the sealing ring functioning properly or does it
have to be replaced?
− Stop cooking and, if necessary, replace the sealing ring.
• Are the lid, pressure control valve and safety valve clean?
− Stop cooking and, if necessary, clean the pressure
control valve and the safety valve.
• Is the edge of the pot in proper condition?
− Stop cooking and, if necessary, stop using the pres-
sure cooker.

Troubleshooting
USA
AFTER SALES SUPPORT
24
USA
1-877-386-8264
tm3service@outlook.com
Fault Possible cause/solution
The lid won't open.
The safety valve has not lowered all the way down.
− Release the pressure in the pressure cooker.
− If necessary, cool the pressure cooker under cold
water.
The food has
burned onto the
pot while cooking
or is not done.
Check the following:
• Was the cooking time too long or too short?
• Is the output of the heat source correct?
• Has the pressure control valve been set to the correct
cooking level?
• Was enough liquid added?
The food is burned
onto the pot after
cooking.
− Let the pressure cooker soak in water for a while
before you clean it.
One of the safety
systems (safety
valve, sealing ring
in the safety win-
dow) triggers.
1. Turn off the heat supply.
2. Let the pressure cooker cool off.
3. Open the pressure cooker.
4. Check and clean the pressure control valve, the safety
valve, and the sealing ring.
A handle on the
pressure cooker is
loose.
− Use a commercially-available cross-slotted screw-
driver to tighten the handle.

AFTER SALES SUPPORT
USA
Technical data
25
USA
1-877-386-8264
tm3service@outlook.com
Technical data
Type: 6.3 Qt (6l) pressure cooker
Article number: 93596
Pressure cooker:
Material:
Body: non-rusting stainless steel 1810SUS304,
material number14301
Handles: plastic
Bottom:
non-rusting stainless steel 1810SUS430,
material number14016
Material thicknesses:
Bottom: approx. 0.20" (5.2mm)
Wall: approx. 0.05" (1.2mm)
Diameter:
Bottom: approx. 7.48" (19cm)
Wall: approx. 8.66" (22cm)
Nominal volume: 202.88 fl.oz. (6l)
Fill amount (max. ⁄): 135.26 fl.oz. (4l)
Height: approx. 6.5" (16.5cm)
Weight: approx. 71.96 oz. (2040g)
Lid:
Material: non-rusting stainless steel 1810SUS304,
material number14301
Material thickness: approx. 0.05" (1.2mm)
Weight: approx. 34.57 oz. (980g)
Pressures/working pressure
(pressure control valve):
progressively adjustable spring valve
from 8.7 psi (60kPa) to 14.5 psi (100kPa),
max. 43.51 psi (300kPa)
Stewing insert including insert
support:
Material: non-rusting stainless steel 1810SUS304,
material number14301

Disposal
USA
AFTER SALES SUPPORT
26
USA
1-877-386-8264
tm3service@outlook.com
Disposal
Disposing of the packaging
The packaging consists of recyclable materials. Please dispose of them in an
environmentally-friendly manner and sorted into single-type materials via the
designated collection bins.
Dispose of the cardboard packaging sorted into single-type materials by
making them available to the collection service for waste paper.
Dispose of the packaging wrapper in accordance with the applicable laws and
regulations for your country.
Disposing of the pressure cooker
Should the pressure cooker no longer be capable of being used at some point
in time, dispose of it in accordance with the regulations in force in your state or
country.
Please ensure your recycling information does apply to the local regulations
and the EPA recommendations (www.epa.gov).

USA
WARRANTY CARD
Description of malfunction
Return your completed warranty
card together with the faulty
product to:
TM3 Service
533 Church Street #252
Nashville TN 37203
USA
tm3service@outlook.com
Your details:
Name
Address
Email
Date of purchase*
* We recommend you keep the receipt with this warranty card.
Location of purchase
6.3 QT (6L) PRESSURE COOKER
3
YEARS WARRANTY
AFTER SALES SUPPORT
MODEL:
6.3 Qt (6L) Pressure Cooker
PRODUCT CODE:
93596
11/2016
[email protected]1-877-386-8264
USA
Toll-free hotline
Operating hours:
10 am – 6 pm EST

USA
Warranty conditions
Dear Customer,
The ALDI warranty offers you extensive benefits compared to the statutory
obligation arising from a warranty:
Warranty period: 3 years from date of purchase.
6 months for wear parts and consumables under nor-
mal and proper conditions of use (e.g. rechargeable
batteries).
Costs: Free repair/exchange or refund.
No transport costs.
ADVICE: Please contact our service hotline by phone, e-mail or
fax before sending in the device. This allows us to pro-
vide support in the event of possible operator errors.
In order to make a claim under the warranty, please send us:
• together with the faulty item, the original receipt and the warranty
card properly completed.
• the faulty product with all components included in the packaging.
The warranty does not cover damage caused by:
• Accident or unanticipated events (e.g. lightning, water, fire).
• Improper use or transport.
• Disregard of the safety and maintenance instructions.
• Other improper treatment or modification.
After the expiry of the warranty period, you still have the possibility to have
your product repaired at your own expense. If the repair or the estimate of
costs is not free of charge you will be informed accordingly in advance.
This warranty does not limit the statutory obligation of the seller arising from
a warranty. The period of warranty can only be extended in accordance with
a legal standard. In countries where a (compulsory) warranty and/or spare
part storage and/or a system for compensation are/is required by law, the
statutory minimum conditions apply. In the event that a product is received
for repair, neither the service company nor the seller will assume any liability
for data or settings possibly stored on the product by the customer.

SERVICIO DE POSVENTA
USA
Contenido
29
USA
1-877-386-8264
tm3service@outlook.com
Contenido
Conjunto .................................................................................................. 4
Uso ........................................................................................................... 5
Volumen de suministro/partes del producto ...................................... 30
Generalidades ........................................................................................ 31
Leer y guardar este manual del usuario .............................................. 31
Descripción de símbolos ......................................................................... 31
Seguridad ...............................................................................................32
Uso previsto ..............................................................................................32
Indicaciones de seguridad .....................................................................32
Sistemas de seguridad ............................................................................36
Comprobación de la olla a presión y del volumen de suministro ...... 36
Utilización ...............................................................................................37
Primera limpieza de la olla a presión.................................................... 37
Introducción de alimentos ..................................................................... 37
Cierre de la olla a presión .......................................................................38
Cocción a presión .....................................................................................38
Reducción de la presión en la olla a presión .......................................39
Apertura de la olla a presión .................................................................. 39
Niveles de presión y tiempos de cocción ............................................. 40
Niveles de presión................................................................................... 40
Tiempos de cocción ................................................................................ 40
Notas sobre la preparación y los tiempos de cocción ........................42
Limpieza, cuidado y almacenamiento ................................................. 44
Limpieza de la olla a presión ..................................................................44
Limpieza y sustitución de la junta hermética ......................................44
Limpieza de las válvulas .........................................................................45
Mantenimiento y almacenamiento .......................................................45
Repuestos y otros accesorios ............................................................... 46
Búsqueda de fallos ................................................................................47
Datos técnicos........................................................................................ 49
Eliminación ............................................................................................ 50
Eliminación del embalaje ...................................................................... 50
Eliminación de la olla a presión ............................................................ 50
Tarjeta de garantía ................................................................................51
Condiciones de garantía ........................................................................52

SERVICIO DE POSVENTA
Volumen de suministro/ partes del producto
USA
30
USA
1-877-386-8264
tm3service@outlook.com
1
Caperuza de la válvula reguladora de presión
2
Válvula de seguridad (roja)
3
Pasador de cierre
4
Pieza de agarre de tapa
5
Pieza de agarre de olla
6
Marca de cierre
7
Olla
8
Fondo
9
2 juntas de repuesto para indicador de nivel de presión (tapón de silicona)
10
Ventana de seguridad
11
Agarre lateral
12
Tapa
13
Indicador de nivel de presión
14
Indicación: retirar la caperuza de la válvula
15
Escala de niveles de presión
16
Válvula reguladora de presión
17
Junta hermética
18
Anillos del indicador de nivel de presión
19
Cestillo para rehogar
20
Soporte para cestillo
Volumen de suministro⁄
partes del producto

SERVICIO DE POSVENTA
USA
Generalidades
31
USA
1-877-386-8264
tm3service@outlook.com
Generalidades
Leer y guardar este manual del usuario
Este manual del usuario pertenece a esta olla a presión de 6.3 Qt
(6l) Contiene información importante relacionada con la puesta
en marcha y el manejo.
Para incrementar la inteligibilidad, la olla a presión de 6.3 Qt (6l) se
denominará únicamente en lo sucesivo: olla a presión.
Lea detenidamente el manual del usuario, especialmente las indicaciones de
seguridad, antes de usar la olla a presión. La inobservancia de este manual del
usuario puede provocar lesiones graves o daños en la olla a presión.
Para el extranjero, respete también las directivas y leyes de cada país.
Guarde el manual del usuario para su uso posterior. En caso de ceder la olla
a presión a terceros, es necesario que también entregue este manual del
usuario.
Este manual del usuario se puede descargar como archivo PDF a través de la
dirección de Internet www.schnellkochtopf24.de.
Descripción de símbolos
En este manual del usuario, en la olla a presión o en el embalaje se utilizan los
siguientes símbolos y términos de advertencia.
¡ADVERTENCIA!
Este término/símbolo de advertencia hace
referencia a un grado de riesgo medio que,
si no se evita, puede provocar la muerte o
lesiones graves.
¡ATENCIÓN!
Este símbolo/término de advertencia hace
referencia a un grado de riesgo bajo que, si no
se evita, puede resultar en una lesión leve o
moderada.
¡AVISO!
Este término/símbolo de advertencia avisa de
posibles daños materiales.
Este símbolo ofrece información adicional práctica sobre el
producto o su utilización.
Este símbolo señala que
la olla a presión está indicada para usar en
cocinas eléctricas.

SERVICIO DE POSVENTA
Seguridad
USA
32
USA
1-877-386-8264
tm3service@outlook.com
Este símbolo señala que
la olla a presión está indicada para usar en
cocinas de gas.
Este símbolo señala que
la olla a presión está indicada para usar en
cocinas vitrocerámicas.
Este símbolo señala que
la olla a presión está indicada para usar en
cocinas de inducción.
Este símbolo señala que
la olla a presión está indicada para usar en
cocinas halógenas.
Seguridad
Uso previsto
La olla a presión está concebida únicamente para cocinar alimentos de un modo
rápido y a presión. Solo es apta para uso privado, no para el ámbito industrial.
Utilice la olla a presión solo como se describe en este manual del usuario. Cual-
quier otro uso se considera inapropiado, y puede provocar daños materiales o
incluso personales. La olla a presión no es un juguete.
El fabricante o distribuidor no se hacen responsables de daños producidos por
uso inapropiado o erróneo.
Indicaciones de seguridad
¡ADVERTENCIA!
Riesgo de asfixia!
Si los niños juegan con la lámina de embalaje o las piezas pe-
queñas, pueden quedar atrapados con la cabeza cubierta, o
pueden ingerir las piezas, y asfixiarse entonces.
− Mantenga la lámina de embalaje y las piezas pequeñas
fuera del alcance de los niños.

SERVICIO DE POSVENTA
USA
Seguridad
33
USA
1-877-386-8264
tm3service@outlook.com
¡ADVERTENCIA!
¡Riesgo de lesiones!
Al calentarse, se genera presión en el interior de la olla a presión.
− Cierre bien la olla a presión antes de calentarla.
− No abra la olla a presión a la fuerza, sobre todo si está aún
sometida a presión.
− Asegúrese de que haya desaparecido toda la presión an-
tes de abrir la olla a presión.
− Mantenga la olla a presión alejada de niños si está someti-
da a presión.
− No deje de vigilar la olla a presión durante la cocción a presión.
− Mueva la olla a presión con mucho cuidado si está someti-
da a presión.
¡ADVERTENCIA!
¡Peligro de incendio y quemaduras!
La grasa caliente puede inflamarse y arder con altas temperaturas.
Los fuegos por grasa no se extinguen con agua, y pueden provocar
quemaduras graves en caso de contacto con agua.
− Si calienta grasa en la olla a presión, no la deje nunca des-
atendida.
− Nunca intente extinguir los fuegos por grasa con agua.
− Apague los fuegos por grasa con un paño extintor o un
extintor especial para fuegos por grasa.

SERVICIO DE POSVENTA
Seguridad
USA
34
USA
1-877-386-8264
tm3service@outlook.com
¡ADVERTENCIA!
¡Riesgo de escaldadura y quemaduras!
Durante la cocción a presión, sale vapor caliente de la válvula
reguladora de presión y las piezas de la olla a presión se calien-
tan. Si entra en contacto con el vapor o las piezas calientes, se
puede quemar.
− Evite el contacto corporal directo con el vapor saliente.
− No toque directamente con los dedos las piezas calientes
de la olla a presión.
− Tome la olla a presión caliente y la tapa únicamente por
los agarres.
− Además utilice siempre guantes de cocina termoaislantes o
agarradores para tomar la olla a presión y la tapa.
− Antes de cada limpieza, deje que la olla a presión y la tapa
se enfríen por completo.
¡ADVERTENCIA!
¡Riesgo de lesiones y quemaduras por explosión!
Si la olla a presión o piezas de la tapa están dañadas y las sigue
usando, o si usa la olla a presión de forma indebida, se pueden
provocar lesiones graves o quemaduras por explosión.
− No utilice más la olla a presión si sus componentes tienen
grietas o fisuras, o se han deformado. Los componentes daña-
dos solo deben sustituirse por piezas de repuesto originales y
adecuadas. Contacte con el fabricante a través de la dirección
de servicio técnico indicada en la tarjeta de garantía.
− Antes de cada uso, compruebe la limpieza y el funciona-
miento de la válvula de seguridad, la válvula reguladora
de presión y la junta hermética de la tapa.
− Excepto para las tareas indicadas de limpieza y cuidado,
no modifique nada de los sistemas de seguridad en la olla
a presión (cierre de seguridad y válvulas de la tapa).

SERVICIO DE POSVENTA
USA
Seguridad
35
USA
1-877-386-8264
tm3service@outlook.com
− No utilice la olla a presión para asar y freír con aceite si
está a presión.
− Si prepara comidas pastosas, sacuda un poco la olla a pre-
sión antes de abrirla tras la cocción.
− Nunca llene la olla a presión por encima de la cantidad
indicada de llenado máximo (2/3 del volumen nominal).
− Al preparar alimentos como arroz o verdura deshidratada
que se hinche durante la cocción, llene la olla a presión
hasta la mitad del volumen nominal como máximo.
¡ATENCIÓN!
Riesgo de escaldadura
Si cocina embutido con tripa artificial, esta puede hincharse y
reventar durante la cocción a presión. Al cocinar carne con piel,
si se hincha durante la cocción y la pincha, puede salir un chorro
de agua caliente.
Si entra en contacto con este chorro, se puede quemar.
− Antes de su cocción, perfore siempre el embutido de tripa
artificial para evitar que reviente.
− No pinche la carne con piel tras la cocción, y deje siempre
que se deshinche.
¡AVISO!
¡Riesgo de daños!
Si usa la olla a presión con fuentes de calor inapropiadas o no la llena
suficientemente, se pueden provocar daños en la olla de presión.
− Utilice solo las fuentes de calor indicadas en este manual
del usuario (véase el capítulo “Descripción de símbolos”).
− No utilice la olla a presión en hornos calientes.
− Tenga en cuenta siempre la cantidad de llenado mínimo
de la olla a presión.
− Nunca caliente la olla a presión sin haberla llenado de
agua antes.

SERVICIO DE POSVENTA
Comprobación de la olla a presión y del volumen de suministro
USA
36
USA
1-877-386-8264
tm3service@outlook.com
Sistemas de seguridad
Ventana de seguridad
En caso de presión excesiva en la olla a presión, la junta hermética
17
de la
tapa
12
sale a través de la ventana de seguridad
10
(véase la fig. A). Así se
puede escapar el exceso de vapor.
Válvula de seguridad
La válvula de seguridad
2
en la tapa
12
muestra si la olla a presión está a
presión (véase la fig.A). Cuando se ve que la válvula de seguridad sobresale de
la tapa, la olla a presión ya está a presión. La olla a presión está entonces blo-
queada y no puede abrirla (véase la fig. F).
En cuanto desaparezca la presión de la olla a presión, se mete de nuevo la vál-
vula de seguridad en la tapa. Cuando la válvula de seguridad ya no sobresale
de la tapa, la olla a presión ya no está bloqueada y puede abrirla.
Comprobación de la olla a presión y del
volumen de suministro
¡AVISO!
¡Riesgo de daños!
Si abre el embalaje con un cuchillo afilado o con otros objetos
puntiagudos sin tener cuidado, la olla a presión puede dañar-
se rápidamente.
− Por tanto, al abrir el embalaje, proceda con sumo cuidado.
1. Saque la olla
7
y la tapa
12
del embalaje.
2. Compruebe que el suministro esté completo (véase la fig. A, B y K, y la lista
de la pág. 6).
3. Compruebe si la olla a presión o sus piezas presentan daños. Si así fuera, no
utilice la olla a presión. Contacte con el fabricante a través de la dirección de
servicio técnico indicada en la tarjeta de garantía.

SERVICIO DE POSVENTA
USA
Utilización
37
USA
1-877-386-8264
tm3service@outlook.com
Utilización
Primera limpieza de la olla a presión
− Antes del primer uso, limpie todos los componentes de la olla a presión
como se describe en el capítulo “Limpieza, cuidado y almacenamiento”.
Introducción de alimentos
¡AVISO!
¡Riesgo de daños!
Si llena la olla a presión poco o demasiado, o si hay poco o nin-
gún líquido en su interior, se pueden provocar daños en la olla
a presión.
− Para la formación de vapor, llene la olla a presión siempre
con 8.45 – 10.14 fl. oz. (250-300ml) de líquido, con inde-
pendencia de la cantidad de comida.
− Tenga en cuenta los límites de llenado máximo de, al me-
nos, ⁄ del volumen nominal y, como máximo, ½ del volu-
men nominal en el caso de alimentos que se hinchen, y de
⁄ del volumen nominal para todos los demás alimentos.
Las cantidades de llenado se componen de líquido + alimentos cocinados.
¡AVISO!
¡Riesgo de daños!
Si añade sal al agua fría dentro de la olla a presión, se pueden
producir daños en el fondo de la olla.
− Incorpore la sal siempre cuando el agua esté ya hirviendo.
1. Llene la olla
7
con el líquido (agua, caldo o salsa) necesario para la forma-
ción de vapor.
2. Agregue los alimentos.
3. Cierre la olla a presión como se describe en el capítulo “Cierre de la olla a presión”.

SERVICIO DE POSVENTA
Utilización
USA
38
USA
1-877-386-8264
tm3service@outlook.com
Cierre de la olla a presión
− Coloque la tapa
12
sobre la olla
7
. Las marcas de cierre
6
sobre la tapa y la
pieza del agarre de la olla
5
deben quedar superpuestas (véase la fig. E).
− Mueva la pieza del agarre de la tapa
4
y la de la olla a presión para que
coincidan. Entonces se escucha cómo encaja el pasador de cierre
3
.
La olla a presión está cerrada y ya puede calentarla.
Cocción a presión
¡AVISO!
¡Riesgo de daños!
En caso de exceso de presión, si no se reduce el fuego, se pue-
den provocar daños en la olla a presión.
− Ante un exceso de presión, se ve un anillo rojo en el in-
dicador de nivel de presión y la olla expulsa vapor. En tal
caso, reduzca el fuego de la cocina de inmediato hasta
que ya no se vea más el anillo rojo.
1. Gire la caperuza
1
de la válvula reguladora de presión
16
a la posición
que indique el nivel de presión adecuado para los alimentos del interior
(consulte el capítulo “Niveles de presión y tiempos de cocción”).
2. Coloque la olla a presión cerrada con el nivel de presión escogido en el fuego.
3. Encienda el fuego al nivel máximo.
Así se forma la presión en la olla a presión. La válvula de seguridad roja
2
y
el indicador de nivel de presión
13
muestran la formación de presión en la
olla a presión (véase la fig.F y la fig. G).
Según la cantidad de llenado, la olla a presión tarda algunos minutos en
alcanzar el nivel de presión ajustado. Cuando sale vapor permanentemente
de la válvula reguladora de presión
16
y se pueden ver los anillos verdes
del indicador de nivel de presión
18
, se ha alcanzado el nivel de presión. En
ese momento comienza el tiempo de cocción.
4. Ponga ahora el fuego en un nivel bajo.
5. Deje la olla a presión en el fuego durante el tiempo de cocción indicado en la
receta (véase el capítulo “Niveles de presión y tiempos de cocción” y, dado el
caso, consulte su propia receta).
6. Cuando haya finalizado el tiempo de cocción, apague el fuego.
7. Aminore la presión de la olla como se describe en el capítulo “Reducción de
la presión en la olla a presión”.

SERVICIO DE POSVENTA
USA
Utilización
39
USA
1-877-386-8264
tm3service@outlook.com
Reducción de la presión en la olla a presión
¡ADVERTENCIA!
¡Riesgo de escaldadura!
El vapor emitido está muy caliente, y sale hacia arriba.
− Mantenga manos, cabeza y cuerpo apartados del área de
salida del vapor.
Tiene dos opciones para reducir la presión en la olla presión:
− Dejar que se enfríe la olla a presión: Se recomienda especialmente para
platos con espuma y pastosos.
− Reducir la presión lentamente con la válvula reguladora de presión
16
(véase la fig. H).
Dejar que se enfríe la olla a presión
1. Coloque la olla a presión sobre una superficie resistente al calor, p. ej. sobre
una
placa de cocina
fría.
2. Tras la cocción, espere hasta que la válvula de seguridad
2
se haya hundi-
do por completo en la tapa
12
(véase la fig. A).
3. Cuando la válvula de seguridad ya no sobresalga de la tapa de la olla a pre-
sión, ábrala como se describe en el capítulo “Apertura de la olla a presión”.
Reducir la presión lentamente con la válvula reguladora de
presión
1. Gire la caperuza
1
de la
válvula reguladora de presión
16
de forma lenta y
gradual a la posición 0.
2. Cuando la válvula de seguridad
2
ya no sobresalga de la tapa
12
, ábrala
como se describe en el capítulo “Apertura de la olla a presión”.
Apertura de la olla a presión
1. Empuje el pasador de cierre
3
hacia la tapa
12
(véase la fig.C).
2. Gire la tapa por la pieza del agarre
4
en sentido contrario a las agujas del
reloj (véase la fig. D). Las marcas de cierre sobre la tapa y la pieza del agarre
de la olla a presión
5
deben quedar superpuestas (véase la fig. E).
3. Retire la tapa de la olla
7
.

SERVICIO DE POSVENTA
Niveles de presión y tiempos de cocción
USA
40
USA
1-877-386-8264
tm3service@outlook.com
Niveles de presión y tiempos de cocción
Niveles de presión
Posición Nivel de presión
1 Nivel lento
2 Nivel rápido
Reducción de
presión
Retirada y limpieza
de la válvula
Tiempos de cocción
Los siguientes tiempos de cocción son valores orientativos, puesto que los tiem-
pos de cocción exactos dependen siempre de la calidad y la cantidad de los
alimentos cocinados.
Los alimentos congelados no se deben descongelar antes de la cocción. Basta
con aumentar algo el tiempo de cocción.
Sopas y pucheros
Comida/Alimento Tiempo de cocción
(minutos)
Nivel de
presión
Sopa de frijoles 20 2
Sopa de guisantes (guisantes no puestos en
remojo)
20 – 25 2
Sopa de verdura 4 – 8 2
Sopa de sémola 3 – 5 2
Sopa de gulash 10 – 15 2
Sopa de papas 5 – 6 2
Caldo de hueso 20 – 25 2
Minestrone 8 – 10 2
Sopa de arroz 6 – 8 2
Caldo de carne de vacuno 35 – 40 2
Gallina en caldo 25 – 35 2
Sopa de tomate con arroz 6 – 8 2

SERVICIO DE POSVENTA
USA
Niveles de presión y tiempos de cocción
41
USA
1-877-386-8264
tm3service@outlook.com
Comida/Alimento Tiempo de cocción
(minutos)
Nivel de
presión
Puchero de col 15 2
Lentejas (puestas en remojo) 13 – 15 2
Puchero Pichelsteiner 20 2
Vacuno serbio 8 – 10 2
Verdura
Comida/Alimento Tiempo de cocción
(minutos)
Nivel de
presión
Coliflor 3 – 7 I
Guisantes verdes 3 – 5 I
Zanahorias 3 – 7 I
Pimientos rellenos 6 – 8 I
Setas 6 – 8 I
Remolacha colorada 15 – 25 I
Col 5 – 15 I
Espinacas 3 – 4 I
Frijoles 6 – 10 2
Papas 6 – 8 2
Papas sin pelar 6 – 12 2
Apionabo 12 – 15 2
Carne
Comida/Alimento Tiempo de cocción
(minutos)
Nivel de
presión
Codillo de cerdo 30 – 40 2
Gulash 15 – 20 2
Carne picada 5 – 10 2
Pollo 20 – 25 2
Carne de ternero en tiras finas 6 2
Asado de ternero 15 – 20 2
Fricasé de ternero 5 2

SERVICIO DE POSVENTA
Niveles de presión y tiempos de cocción
USA
42
USA
1-877-386-8264
tm3service@outlook.com
Comida/Alimento Tiempo de cocción
(minutos)
Nivel de
presión
Muslo de pavo 25 – 35 2
Asado de vacuno 40 – 50 2
Costillas 10 – 12 2
Filetes rellenos 15 – 20 2
Asado adobado 30 – 35 2
Asado de cerdo 25 – 30 2
Codillo 25 – 35 2
Pata de corzo estofada 25 – 30 2
Pescado
Comida/Alimento Tiempo de cocción
(minutos)
Nivel de
presión
Pescado al vapor con papas 6 – 8 I
Pescado en salsa de vino blanco con papas 6 – 8 I
Eglefino 4 – 6 I
Notas sobre la preparación y los tiempos de cocción
Sopas y pucheros con carne asada
− Cocine los alimentos espumosos con la olla a presión abierta y retire la
espuma antes de cerrar la olla a presión.
− Si los tiempos de cocción de los ingredientes (p. ej. de la carne y la verdura)
no divergen mucho entre sí: Dore la carne y añada la verdura con el líquido.
− Con tiempos de cocción muy distintos de los ingredientes: Interrumpa el
proceso de cocción de la carne y añada la verdura en los últimos minutos.
Así se acabarán de hacer carne y verdura a la vez.
Verdura
CONSEJO: Elija primero un tiempo de cocción menor. Siempre se puede
continuar después con la cocción.
Cuanto más fina esté cortada la verdura, menor será el tiempo de cocción.
− Si le gusta la verdura “crujiente”: Reduzca el tiempo de cocción.
− Alargue el tiempo de cocción con cantidades mayores.

SERVICIO DE POSVENTA
USA
Niveles de presión y tiempos de cocción
43
USA
1-877-386-8264
tm3service@outlook.com
Carne
− Dore la carne siempre en la olla a presión sin tapa y añada el líquido nece-
sario después.
− Corta trozos de carne muy grandes, dórelos y colóquelos superpuestos para
terminar de cocinarlos.
Pescado
− Como el caldo del pescado se pega mucho: Retire la tapa en cuanto la pre-
sión de la olla a presión haya desaparecido del todo.
Alimentos congelados
− Antes de cocinarlos en la olla a presión, no se deben descongelar los ali-
mentos congelados; en su lugar, alargue un poco los tiempos de cocción.
Cestillo para rehogar
Los alimentos se pueden rehogar o preparar al vapor con el cestillo para reho-
gar
19
. De esta forma se mantienen las vitaminas y nutrientes hidrosolubles
de los alimentos durante la cocción.
− Coloque el soporte del cestillo
20
en el fondo de la olla
7
y ponga el
cestillo para rehogar encima.
− Incorpore líquido en la olla de forma que no cubra el cestillo para rehogar.
− Meta en el cestillo para rehogar los alimentos que desea rehogar o preparar
al vapor.
− Cierre la olla a presión como se describe en el capítulo “Cierre de la olla a presión”.

SERVICIO DE POSVENTA
Limpieza, cuidado y almacenamiento
USA
44
USA
1-877-386-8264
tm3service@outlook.com
Limpieza, cuidado y almacenamiento
¡AVISO!
¡Limpieza inadecuada!
Si limpia la olla a presión de forma inadecuada, puede dañar
la olla o las piezas.
− Limpie la olla a presión tras cada uso.
− No use productos de limpieza agresivos, como limpiadores
con lejía o cloro, ni objetos de limpieza afilados o metáli-
cos, como cuchillos y espátulas duras, y objetos similares.
− Retire las manchas del fondo de la olla con limón o vina-
gre.
− Nunca meta la tapa en el lavavajillas.
Limpieza de la olla a presión
1. Deje que la olla
7
, la tapa
12
, el cestillo para rehogar
19
y el soporte del
cestillo
20
se enfríen por completo.
2. Retire la junta hermética
17
de la tapa (véase la fig. B).
3. Limpie la olla, la tapa, el cestillo para rehogar y el soporte del cestillo con
agua caliente y lavavajillas líquido, o meta la olla a presión, el cestillo para
rehogar y el soporte del cestillo sin la tapa en el lavavajillas.
4. Limpie la junta hermética, la válvula de seguridad
2
y la válvula regulado-
ra de presión
16
como se describe en los capítulos “Limpieza y sustitución
de la junta hermética” y “Limpieza de las válvulas”.
5. Deje que todos los componentes se sequen del todo.
Limpieza y sustitución de la junta hermética
1. Pase un paño por la junta hermética
17
y enjuáguela con agua corriente
(véase la fig.B).
2. Deje que la junta hermética se seque bien.
3. Vuelva a colocar la junta hermética en la tapa
12
(véase la fig. B).
4. Si usa la tapa con normalidad, sustituya la junta hermética cada año o, como
muy tarde, cuando se endurezca o vuelva oscura.

SERVICIO DE POSVENTA
USA
Limpieza, cuidado y almacenamiento
45
USA
1-877-386-8264
tm3service@outlook.com
Limpieza de las válvulas
Limpieza de la válvula de seguridad
1. Enjuague la válvula de seguridad
2
con agua corriente (véase la fig. B).
2. Con un objeto puntiagudo, compruebe si la espiga de la válvula de seguridad
se puede hundir o si la válvula de seguridad está obstruida (véase la fig. J).
La válvula de seguridad en la parte inferior de la tapa debería estar floja, y
no debe quedar fija.
Limpieza de la válvula reguladora de presión
1. Presione y gire la caperuza de
1
de la válvula reguladora de presión
16
a
la posición de retirada de la caperuza de la válvula
14
y suba la caperuza de
la válvula para sacarla de la tapa
12
.
2. Saque la válvula reguladora de presión
16
hacia arriba (véase la fig. I).
3. Limpie la válvula reguladora de presión con agua corriente.
4. Limpie la parte inferior de la válvula reguladora de presión que se encuentra
en el interior de la tapa (véase la fig. J).
5. Vuelva a meter la válvula reguladora de presión en la tapa.
6. Coloque de nuevo la caperuza de la válvula en la tapa.
Asegúrese de que los surcos de la válvula reguladora de presión y los de la
caperuza de la válvula queden en las guías correspondientes de la tapa.
7. Gire la caperuza de la válvula reguladora de presión y compruebe si la vál-
vula reguladora de presión y la caperuza de la válvula han quedado bien
montadas y que se mueva con normalidad.
Mantenimiento y almacenamiento
Comprobación de la fijación de los agarres
− Revise periódicamente que la pieza del agarre de la olla
5
y el agarre
lateral
11
estén bien fijos
(véase la fig.A)
.
− Si uno de los agarres está flojo, apriételo con un destornillador de estrella
convencional.
Almacenamiento de la olla a presión
− Guarde la olla
7
limpia y la tapa
12
limpia siempre en un lugar limpio y
seco, p. ej. en un armario de cocina.
− No cierre la olla con la tapa; déjela, p. ej., al revés sobre la olla.

SERVICIO DE POSVENTA
Repuestos y otros accesorios
USA
46
USA
1-877-386-8264
tm3service@outlook.com
Sustitución de la junta del indicador de nivel de presión
Controle periódicamente el estado de la junta del indicador de nivel de
presión
13
y sustituya la junta, en caso necesario, por una de repuesto
9
.
− Saque la junta por el lado inferior de la tapa
12
del indicador de nivel de
presión.
− Meta toda la junta de repuesto a través del indicador de nivel de presión de
forma que quede fija en la ranura guía del indicador de nivel de presión.
Repuestos y otros accesorios
Las reparaciones solo pueden ser realizadas por personas autorizadas.
− En caso de reparación, contacte con el servicio al cliente a través de la direc-
ción de servicio técnico indicada en la tarjeta de garantía.
En el sitio web www.schnellkochtopf24.de se pueden solicitar los siguientes
repuestos y accesorios:
Repuesto/Accesorio Número de artículo
Junta hermética 507048000
Válvula reguladora de presión 507026000
Cestillo para rehogar 507010000
Tapón de silicona 507042000

SERVICIO DE POSVENTA
USA
Búsqueda de fallos
47
USA
1-877-386-8264
tm3service@outlook.com
Búsqueda de fallos
Fallo Posible causa/Solución
El tiempo de calenta-
miento dura mucho.
La energía suministrada es insuficiente.
− Encienda el fuego al nivel máximo.
La válvula roja de
seguridad no sube
durante la cocción
y no sale vapor
de la válvula de
seguridad.
Durante los primeros minutos es normal, pues se está ge-
nerando presión en la olla a presión.
Si ocurre durante la cocción, compruebe lo siguiente:
• ¿La fuente de calor es suficiente?
− En caso necesario, suba la energía suministrada.
• ¿Es suficiente la cantidad de líquido en la olla a presión?
− En caso necesario, aumente la cantidad de líquido.
• ¿La caperuza de la válvula reguladora de presión está
en la posición “Reducción de la presión”?
− Gírela al nivel de presión deseado.
• ¿La olla a presión está bien cerrada?
− En caso necesario, ciérrela de nuevo.
• ¿Están dañados el borde de la olla o la junta hermética?
− Finalice el proceso de cocción y, en caso necesario, sustitu-
ya la junta hermética o no use más la olla a presión.
La válvula roja de
seguridad sube du-
rante la cocción y no
sale vapor de la vál-
vula de seguridad.
1. Ponga la olla a presión bajo agua fría para reducir la
presión.
2. Abra la olla a presión.
3. Limpie la válvula reguladora de presión y la de seguridad.
El vapor sale por
el perímetro de la
tapa.
Compruebe:
• ¿La tapa está cerrada?
− En caso necesario, ciérrela de nuevo.
• ¿La junta hermética está bien metida en la tapa?
− Finalice el proceso de cocción y, dado el caso, meta
bien la junta hermética.
• ¿La junta hermética está en buen estado, o se debe
sustituir?
− Finalice el proceso de cocción y sustituya la junta
hermética en caso necesario.
• ¿La tapa, la válvula reguladora de presión y la de
seguridad están limpias?
− Finalice el proceso de cocción y, en caso necesario, limpie
la válvula reguladora de presión y la de seguridad.
• ¿El borde de la olla está en buen estado?
− Finalice el proceso de cocción y, dado el caso, deje de
usar la olla a presión.

SERVICIO DE POSVENTA
Búsqueda de fallos
USA
48
USA
1-877-386-8264
tm3service@outlook.com
Fallo Posible causa/Solución
La tapa no se
puede abrir.
La válvula de seguridad no está bajada del todo.
− Reduzca la presión de la olla a presión.
− Dado el caso, enfríe la olla a presión con agua fría.
El alimento cocina-
do se ha quemado
tras la cocción, o no
se ha hecho.
Compruebe:
• ¿El tiempo de cocción fue insuficiente o excesivo?
• ¿Es correcta la potencia de la fuente de calor?
• ¿La válvula reguladora de presión está ajustada al
nivel de cocción correcto?
• ¿La cantidad de líquido fue suficiente?
El alimento cocina-
do se ha pegado
tras la cocción.
− Deje un rato la olla a presión remojada con agua
antes de limpiarla.
Uno de los sistemas
de seguridad (vál-
vula de seguridad,
junta hermética
en la ventana de
seguridad) se ha
activado.
1. Apague la fuente energética.
2. Deje que la olla a presión se enfríe.
3. Abra la olla a presión.
4. Revise y limpie la válvula reguladora de presión, la de
seguridad y la junta hermética.
Un agarre de la olla
a presión está flojo.
− Apriete el agarre con un destornillador de estrella
convencional.

SERVICIO DE POSVENTA
USA
Datos técnicos
49
USA
1-877-386-8264
tm3service@outlook.com
Datos técnicos
Tipo: olla a presión de 6.3 Qt (6l)
Número de artículo: 93596
olla a presión:
Material:
Estructura: acero inoxidable1810SUS304, n.º
material14301
Agarres: plástico
Fondo:
acero inoxidable1810SUS430, n.º
material14016
Grosores de los materiales:
Fondo: aprox. 0.20" (5.2mm)
Pared: aprox. 0.05" (1.2mm)
Diámetro:
Fondo: aprox. 7.48" (19cm)
Pared: aprox. 8.66" (22cm)
Volumen nominal: 6.3 Qt (6l)
Cantidad de llenado (máx. 2/3): 135.26 fl. oz. (4l)
Altura: aprox.6.5" (16.5cm)
Peso: aprox. 71.96oz. (2040g)
Tapa:
Material: acero inoxidable1810SUS304,
n.º material14301
Grosor del material: aprox. 0.05" (1.2mm)
Peso: aprox. 34.57oz. (980g)
Niveles de presión/Presión operativa
(válvula reguladora de presión):
válvula de resorte continua ajustable
de 8.7psi (60kPa) a 14.5psi (100kPa),
máx. 43.51psi (300kPa)
Cestillo para rehogar con soporte de
cestillo:
Material: acero inoxidable1810SUS304,
n.º material14301

SERVICIO DE POSVENTA
Eliminación
USA
50
USA
1-877-386-8264
tm3service@outlook.com
Eliminación
Eliminación del embalaje
El embalaje está formado por materiales reciclables. Elimínelo de forma respe-
tuosa con el medio ambiente y por tipos de material en los contenedores previs-
tos para ello.
Elimine el cartón en el contenedor de papel.
El embalaje de lámina puede ser eliminado de acuerdo con las disposiciones de
su estado o país en materia de desechos.
Eliminación de la olla a presión
Cuando la olla a presión no se utiliza más, elimínela de acuerdo con las disposi-
ciones de su estado o país en materia de desechos.
Asegúrese de que la información sobre reciclaje corresponda a la normativa lo-
cal y las recomendaciones de la EPA (www.epa.gov).

TARJETA DE GARANTÍA
Descripción del defecto:
Envíe la tarjeta de garantía
rellenada junto con el producto
defectuoso a:
TM3 Service
533 Church Street #252
Nashville TN 37203
USA
tm3service@outlook.com
Sus detalles:
Nombre
Dirección
E-Mail
Fecha de compra*
Recomendamos guardar el recibo junto con esta tarjeta de garantía.
Lugar de compra
OLLA A PRESIÓN DE 6.3 QT (6L)
3
AÑOS DE GARANTÍA
SERVICIO DE POSVENTA
NO DEL MODELO:
OLLA A PRESIÓN DE 6.3 Qt (6L)
CÓDIGO DEL PRODUCTO:
93596
11/2016
1-877-386-8264
USA
USA
Línea directa gratuita
Disponibilidad:
10 am – 6pm EST

USA
Condiciones de garantía
Estimado cliente:
La garantía de ALDI le ofrece amplias ventajas en comparación a la obliga-
ción legal a la que está sujeta una garantía:
Periodo de garantía: 3 años a partir de la fecha de compra.
6 meses para piezas de desgaste y consumibles bajo
condiciones normales y reglamentarias de uso (p. ej.
baterías recargables).
Costes: Reparación/sustitución gratuita a reembolso.
Sin costes de transporte.
Aviso: Rogamos póngase en contacto con su servicio de
asistencia directa por teléfono, e-mail o fax antes de
enviar al aparato. Esto nos permitirá ofrecerle sopor-
te en caso de posibles errores de operador.
A fin de reclamar en el marco de la garantía, rogamos nos envie:
• junto con el producto defectuoso el tiquet de caja original y la
tarjeta de garantía completamente rellenada.
• el producto defectuoso con todos los componentes incluidos en el
volumen de suministro.
La garantía no cubre daños causados por:
• Accidente o sucesos imprevistos (p. ej. rayos, agua, fuego).
• Uso o transporte inadecuados.
• Inobservancia de las instrucciones de seguridad y mantenimiento.
• Otro tipo de manejo o modificación inadecuado.
Una vez expirado el periodo de garantía, usted seguirá teniendo la posibilidad
de reparar su aparato a cargo propio. Si la reparación o la estimación de costes
no es gratuita, se le informará correspondientemente y por adelantado.
Esta garantía no limita la obligación legal del vendedor originada por una
garantía. El periodo de garantía solamente se podrá alargar conforme a las
normas legales. En los países en que la ley exija una garantía (obligatoria) y/o el
almacenamiento de piezas de recambio y/o un sistema de compensación, serán
de aplicación las condiciones legales mínimas. Al recibir un producto para su re-
paración, ni la compañía de servicios ni el vendedor asumirán responsabilidad
alguna por los datos o los ajustes que el cliente haya podido almacenar en el
producto.

DISTRIBUTED BY • DISTRIBUIDO POR:
ALDI INC., BATAVIA, IL 60510
www.aldi.us
USA
AFTER SALES SUPPORT • SERVICIO DE POSVENTA
tm3service@outlook.com
1-877-386-8264
MODEL:
6.3 Qt (6L) Pressure Cooker
PRODUCT CODE:
93596
11/2016
USA
YEARS WARRANTY
AÑOS DE GARANTÍA
-
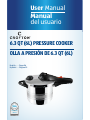 1
1
-
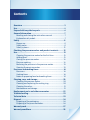 2
2
-
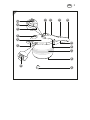 3
3
-
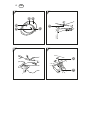 4
4
-
 5
5
-
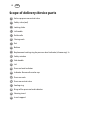 6
6
-
 7
7
-
 8
8
-
 9
9
-
 10
10
-
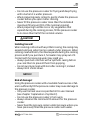 11
11
-
 12
12
-
 13
13
-
 14
14
-
 15
15
-
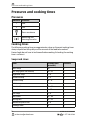 16
16
-
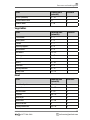 17
17
-
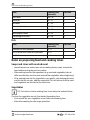 18
18
-
 19
19
-
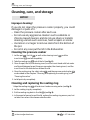 20
20
-
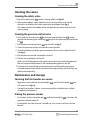 21
21
-
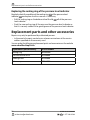 22
22
-
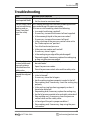 23
23
-
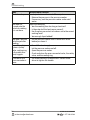 24
24
-
 25
25
-
 26
26
-
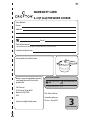 27
27
-
 28
28
-
 29
29
-
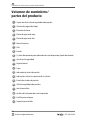 30
30
-
 31
31
-
 32
32
-
 33
33
-
 34
34
-
 35
35
-
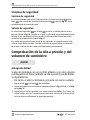 36
36
-
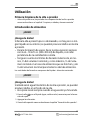 37
37
-
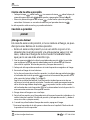 38
38
-
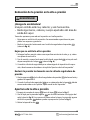 39
39
-
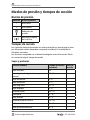 40
40
-
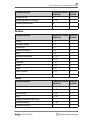 41
41
-
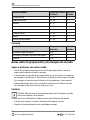 42
42
-
 43
43
-
 44
44
-
 45
45
-
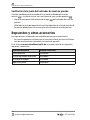 46
46
-
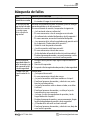 47
47
-
 48
48
-
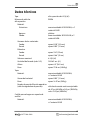 49
49
-
 50
50
-
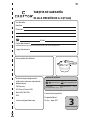 51
51
-
 52
52
-
 53
53


Crofton Premium 6.3 qt Manual de usuario
- Categoría
- Ollas a presión
- Tipo
- Manual de usuario
en otros idiomas
- English: Crofton Premium 6.3 qt User manual
Artículos relacionados
Otros documentos
-
Elite EPC-807 Guía del usuario
-
Fagor America Fagor Rapida Pressure Cooker Manual de usuario
-
Redmond RMC-PM190A El manual del propietario
-
ALDI easy home Manual de usuario
-
-
 Zavor 124678 Guía del usuario
-
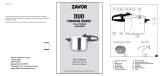 Zavor .Pressure Cooker514 Manual de usuario
-
-
Fagor 918060251 Guía del usuario

