Little Tikes DiscoverSounds® Activity Garden™ Manual de usuario
- Categoría
- Muebles de bebe
- Tipo
- Manual de usuario

623417M
XIM623417 - 12/11
www.littletikes.com
www.littletikes.co.uk
www.littletikes.fr
www.littletikes.nl
www.littletikes.pl
Debe ser armado por un adulto / Zusammenbau durch einen Erwachsenen erforderlich.
In elkaar te zetten door een volwassene / Konieczny jest monta przez osoby dorosłe
W x12
X x15
Tool required / Outil requis / Herramienta necesaria
Erforderliches Werkzeug / Benodigd gereedschap
Narzędzia niezbędne
A
B
C (2)
D
E
F
G
H
I
J
L
K
M
O
V (4)
T (3)
U (4)
P
Q
R
S
B
B
D
D
1
2
5
E
A
A
C
H
I
K
D
J
1
2
3
4
1
2
6
ENGLISH
DISCOVERSOUNDS® ACTIVITY GARDEN™
Ages 6 months and up
Please save sales receipt for proof of purchase.
WARNING:
ADULT ASSEMBLY REQUIRED.
• Keep these instructions for future reference.
• Prior to assembly, this package contains small parts: hardware which
is a choking hazard and may contain sharp edges and sharp points.
Keep away from children until assembled.
• Never place product near a window where cords from blinds or
drapes can strangle a child. Also, never place the product near phone
cords, computer cords, or baby monitor cords.
X x1
X x2
1
X x2
Wall with
Shutters
A. Small arch
B. Ball return
C. Shutters (2)
D. Shutter door
wall
E. Window box
Ściana z okiennicami
A. Łuk mały
B. Rynna na kulki
C. Okiennice (2)
D. Ściana
E. Skrzynka na kwiaty
Mur avec volets
A. Petite voûte
B. Renvoi de la
balle
C. Volets (2)
D. Paroi de la
porte à jalousie
E. Jardinière
Wand mit
Fensterläden
A. Kleiner Bogen
B. Ballrückgabe
C. Fensterläden (2)
D. Wand mit
Fensterönung
E. Fensterkasten
Muur met luiken
A. Kleine boog
B. Balteruggave
C. Luiken (2)
D. Muur
E. Vensterbank
Pared con
contraventanas
A. Arco pequeño
B. Recipiente de bolas
C. Contraventanas (2)
D. Pared de las
contraventanas
E. Alfeizar de la ventana
Wall with Front
Door
F. Large arch
G. Mailbox
H. Mailbox base
I. Door with
xylophone
J. (2) Arch supports
K. Front door wall
L. Telescope
M. Telescope base
N. Telescope nut
O. Telescope screw
Ściana z drzwiami
frontowymi
F. Łuk duży
G. Skrzynka na listy
H. Podstawa skrzynki
na listy
I. Drzwi z cymbałkami
J. Podpory łuku (2)
K. Ściana frontowa
L. Teleskop
M. Podstawa teleskopu
N. Nakrętka mocująca
teleskop
O. Śruba mocująca
teleskop
Muur met voordeur
F. Grote boog
G. Brievenbus
H. Brievenbusbasis
I. Deur met xylofoon
J. Boogsteunen (2)
K. Muur voor
voordeur
L. Telescoop
M. Telescoopbasis
N. Telescoopmoer
O. Telescoopbout
Mur avec porte avant
F. Grande voûte
G. Boîte aux lettres
H. Socle de la boîte
aux lettres
I. Porte avec
xylophone
J. (2) supports de
voûte
K. Paroi de la porte
avant
L. Télescope
M. Socle du télescope
N. Écrou du télescope
O. Vis du télescope
Wand mit Haustür
F. Großer Bogen
G. Briefkasten
H. Briefkastenbasis
I. Tür mit Xylofon
J. Bogenstützen (2)
K. Wand mit
Türönung
L. Teleskop
M. Teleskopbasis
N. Mutter für
Teleskop
O. Schraube für
Teleskop
Pared con puerta
frontal
F. Arco grande
G. Buzón
H. Base del buzón
I. Puerta con xilófono
J. Soportes del arco (2)
K. Marco de la puerta
frontal
L. Telescopio
M. Base del telescopio
N. Tuerca del telescopio
O. Tornillo del telescopio
BATTERY SAFETY INFORMATION:
• Keep these instructions for future reference.
• Replace with 3 AA “LR6” (4.5 volts) alkaline batteries (not included).
(Rechargeable batteries may be substituted.)
• The voltage of a fully-charged, rechargeable battery is often lower
than that of a fresh alkaline battery. Therefore, it is recommended
that alkaline batteries be used instead of rechargeable batteries for
best performance and longer play time.
• Install batteries with the correct polarity (+ and -).
• To avoid battery leakage:
1. Follow the toy and battery manufacturer’s installation instructions.
2. Do not mix old and new batteries.
3. Do not mix standard (carbon-zinc), alkaline or rechargeable (nickel-
cadmium or nickel-metalhydride) batteries. Do not mix dierent
brands of batteries. Only batteries of the same or equivalent type as
recommended are to be used.
4. When toy is not used for an extended period of time, remove
batteries to prevent possible leakage and damage to the unit.
5. Remove dead or exhausted batteries from product.
6. Dispose of dead batteries properly; do not bury. Do not dispose of
batteries in re as they may leak or explode.
• Make sure cover is properly installed on unit at all times.
• Do not attempt to recharge non-rechargeable batteries.
• Rechargeable batteries are to be removed from the toy before
recharging.
• Charging of rechargeable batteries should be done only by an adult.
• The supply terminals are not to be short circuited.
NOTE: If the unit stops working or doesn’t work as it should, remove
the batteries for a few minutes and then re-insert them. If there is still a
problem, install new batteries.
FCC COMPLIANCE
NOTE: This equipment has been tested and found to comply with the
limits for a Class B digital device, pursuant to Part 15 of the FCC Rules.
These limits are designed to provide reasonable protection against
harmful interference in a residential installation. This equipment
generates, uses and can radiate radio frequency energy and, if not
installed and used in ac
cordance with the instructions, may cause
harmful interference to radio communications. However, there is no
guarantee that interference will not occur in a particular installation. If
this equipment does cause harmful interference to radio or television
reception, which can be determined by turning the equipment o and
on, the user is encouraged to try to correct the interference by one or
more of the following measures:
• Reorient or relocate the receiving antenna.
• Increase the separation between the equipment and receiver.
Slide & Play
Center Walls
P. Arch for slide
Q. Play center
R. Slide
S. Play center base
T. (3) Letter blocks
U. (4) Balls
V. Wall knobs
Parois du toboggan et
du centre récréatif
P. Voûte pour le
toboggan
Q. Centre récréatif
R. Toboggan
S. Socle du centre
récréatif
T. (3) blocs avec lettre
U. (4) balles
V. Boutons de paroi
Rutsche und
Spielcenterwand
P. Bogen für
Rutsche
Q. Spielcenter
R. Rutsche
S. Spielcenterbasis
T. Sortierformen für
den Briefkasten
(3)
U. Bälle (4)
V. Wandknöpfe
Speelmuren
P. Glijbaanboog
Q. Speelunit
R. Glijbaan
S. Basis speelunit
T. Letterblokken (3)
U. Ballen (4)
V. Muurknoppen
Przesuń & Play
Ściany Center
P. Łuk nad
zjeżdżalnią
Q. Centrum
R. Zjeżdżalnia
S. Centrum bazy
T. Literki (3)
U. Kulki (4)
V. Nakrętki
montażowe
Paredes con tobogán
y Centro de juegos
P. Arco de tobogán
Q. Centro de juegos
R. Tobogán
S. Base del centro de
juegos
T. Bloques de letras (3)
U. Bolas (4)
V. Pomos de las
paredes
Wall with Shutters Assembly / Ensemble de mur avec volets / Ensamblaje de la pared con contraventanas
Zusammenbau der Wand mit Fensterläden / De muur met luiken in elkaar zetten / Montaż ściany z okiennicami
Place ball return (B) onto shutter door wall (D) as shown.
Poser le renvoi de la balle (B) sur la paroi de la porte à jalousie (D) tel que
montré.
Coloque el recipiente de bolas (B) sobre la pared de las contraventanas (D),
como se muestra en la foto.
Die Ballrückgabe (B) wie dargestellt auf die Wand mit der Fensterönung
(D) setzen.
Plaats de balteruggave (B) op de muur (D) zoals wordt getoond.
Umieścić rynnę na kulki (B) na progu ściany (D), jak pokazano na ilustracji.
Place window box (E) onto ball return (B) as shown.
Poser la jardinière (E) sur le renvoi de la balle (B) tel que montré.
Coloque el alfeizar (E) sobre el recipiente de bolas (B), como se muestra
en la foto.
Den Fensterkasten (E) wie dargestellt auf die Ballrückgabe (B) setzen.
Plaats de vensterbank (E) op de balteruggave (B) zoals wordt getoond.
Umieścić skrzynkę na kwiaty (E) na rynnie na kulki (B), jak pokazano na
ilustracji.
Secure using screws (X) x2 in locations shown.
La retenir à l’aide de 2 vis (X) aux endroits indiqués.
Fíjelo con 2 tornillos (X) en los lugares señalados.
Wie dargestellt mit den Schrauben (X) x 2 in der angegebenen
Position sichern.
Schroef de delen aan elkaar met behulp van 2 schroeven (X).
Zamocować za pomocą wkrętów (X) x 2 we wskazanych miejscach.
1. Place shutters (C) x2 onto assembled window box (E)
with preferred face outward as shown.
2. Place small arch (A) onto shutters and shutter door
wall (D). Hold in p
lace.
1. Plaats de 2 luiken (C) op de in elkaar gezette
vensterbank (E) met de juiste kant naar voren.
2. Plaats de kleine boog (A) op de luiken en de muur (D).
Houd beide op hun plek.
1. Umieścić okiennice (C) x 2 na uprzednio przymocowanej skrzynce
na kwiaty (E) preferowaną stroną na zewnątrz, jak pokazano na
ilustracji.
2. Umieścić łuk mały (A) na okiennicach i ścianie (D) i przytrzymać.
1. Poser les 2 volets (C) sur la jardinière (E) assemblée avec
le côté préféré orienté vers l’extérieur comme montré.
2. Poser la petite voûte (A) sur les volets et la paroi de la
porte à jalousie (D). La retenir en place.
1. Coloque las 2 contraventanas (C) sobre el alfeizar (E) con
el lado preferido hacia fuera, como se muestra en la foto.
2. Coloque el arco pequeño (A) sobre las contraventanas
(D)
y la pared y manténgalo sujeto.
1. Die Fensterläden (C) x 2 wie dargestellt mit der bevorzugten
Seite nach außen auf den montierten Fensterkasten (E) setzen.
2. Den kleinen Bogen (A) auf die Fensterläden und die Wand mit
der Fensterönung (D) setzen. In Position halten.
Secure using screws (X) x2 in locations shown.
Le retenir à l’aide de 2 vis (X) aux endroits indiqués.
Fíjelo con 2 tornillos (X) en los lugares señalados.
Wie dargestellt mit den Schrauben (X) x 2 in der
angegebenen Position sichern.
Schroef de boog vast met behulp van 2 schroeven (X).
Zamocować za pomocą wkrętów (X) x 2 we wskazanych
miejscach.
Wall with Front Door Assembly / Ensemble de mur avec porte avant / Ensamblaje de la pared con puerta frontal
Zusammenbau der Wand mit Haustür / Muur met voordeur in elkaar zetten / Montaż ściany frontowej
1. Place door with xylophone (I) onto front
door wall (K).
2. Place mailbox base (H) onto door with
xylophone and front door wall as
shown. Hold in place.
1. Poser la porte avec le xylophone (I) sur
la paroi de la porte avant (K).
2. Poser le socle de la boîte aux lettres
(H) sur la porte avec le xylophone et la
paroi de la porte avant tel que montré.
Le retenir en place.
1. Coloque la puerta con el xilófono (I) en la
pared de la puerta frontal (K).
2. Coloque el buzón (H) sobre la puerta con
el xilófono y la pared de la puerta frontal,
como se muestra en la foto, y sujételo.
1. Plaats de deur met de xylofoon (I) in
opening van de muur (K).
2. Plaats de brievenbusbasis (H) op de
deur met de xylofoon en de muur, zoals
wordt getoond. Houd alles op z’n plek.
1. Umieścić drzwi z cymbałkami (I) na
ścianie frontowej (K).
2. Umieścić podstawę skrzynki na listy (H)
na drzwiach z cymbałkami i ścianie
frontowej, jak pokazano na ilustracji i
przytrzymać.
1. Die Tür mit dem Xylofon (I) auf die
Wand mit der Türönung (K) setzen.
2. Die Briefkastenbasis (H) wie dargestellt
auf die Tür mit dem Xylofon und die
Wand mit der Türönung setzen. In
Position halten.
Secure using screws (X) x1 in locations shown.
Le retenir à l’aide de 1 vis (X) aux endroits indiqués.
Fíjelo con 1 tornillo (X) en el lugar señalado.
Wie dargestellt mit der Schraube (X) x 1 in der
angegebenen Position sichern.
Schroef de delen aan elkaar met behulp van 1 schroef (X).
Zamocować wkrętem (X) x 1 we wskazanym miejscu.
N (V)

7
8
10
12
13
14
16
G
J
F
M
L
L
O
N
P
R
K
1
2
X x2
X x2
1
2
11
21
22
J
S
17
9
1
3
6
4
W x6
x2
15
X x6
1
2
5
64
3
2
5
Place mailbox (G) onto mailbox base (H) as shown.
Secure using screws (X) x2 in locations shown.
Poser la boîte aux lettres (G) sur le socle de la boîte aux
lettres (H) tel que montré.
Solidier à l’aide de 2 vis (X) aux endroits indiqués.
Coloque el buzón (G) en la base del buzón (H), como se
muestra en la foto.
Fíjelo con 2 tornillos (X) en los lugares señalados.
Den Briefkasten (G) wie dargestellt auf die Briefkastenbasis
(H) setzen.
Wie dargestellt mit den Schrauben (X) x 2 in der
angegebenen Position sichern.
Plaats de brievenbus (G) op de brievenbusbasis (H) zoals
wordt getoond.
Schroef de brievenbus vast met behulp van 2 schroeven (X).
Umieścić skrzynkę na listy (G) na podstawie skrzynki na listy
(H), jak pokazano na ilustracji.
Zamocować za pomocą wkrętów (X) x 2 we wskazanych
miejscach.
Place each piece of arch supports (J) and place around notch on front door wall (K) as shown.
Poser chaque support de voûte (J) et les poser sur l’encoche de la paroi de porte avant (K) tel
que montré.
Coloque los soportes del arco (J) en las hendiduras a cada lado de la pared de la puerta frontal
(K), como se muestra en la foto.
Die Teile der Bogenstützen (J) zusammensetzen und jeweils wie dargestellt seitlich auf die
Wand mit der Türönung (K) setzen.
Plaats elk deel van de boogsteun (J) in de daarvoor voorziene inkeping van de muur (K), zoals
wordt getoond.
Każdy z elementów podpory łuku (J) umieścić na ścianie frontowej (K), jak pokazano na
ilustracji.
Secure using screws (W) x6 in locations shown. Repeat for
other arch support (J).
Poser 6 vis (W) aux endroits indiqués. Répéter pour chaque
support de voûte (J).
Fije con 6 tornillos (W) en los lugares señalados. Repita este
paso para el otro soporte del arco (J).
Wie dargestellt mit den Schrauben (W) x 6 in der
angegebenen Position sichern. Bei der anderen Bogenstütze
(J) wiederholen.
Schroef de steun vast met behulp van 6 schroeven (W) op de
getoonde plekken. Herhaal dit voor de andere boogsteun (J).
Zamocować za pomocą wkrętów (W) x 6 we wskazanych
miejscach. Czynności powtórzyć dla drugiej podpory łuku (J).
1. Place large arch (F) onto arch supports (J). Hold in place.
2. Secure using screws (X) x2 in locations shown.
1. Poser la grosse voûte (F) sur les supports de voûte (J). La
retenir en place.
2. Solidier à l’aide de 2 vis (X) aux endroits indiqués.
1. Coloque el arco grande (F) sobre los soportes del arco (J) y
manténgalo sujeto.
2. Fíjelo con 2 tornillos (X) en los lugares señalados.
1. Den großen Bogen (F) auf die Bogenstützen (J) setzen. In
Position halten.
2. Wie dargestellt mit den Schrauben (X) x 2 in der
angegebenen Position sichern.
1. Plaats de grote boog (F) op de boogsteunen (J). Houd ze op
hun plek.
2. Schroef de grote boog vast met behulp van 2 schroeven (X).
1. Umieścić łuk duży (F) na uprzednio zamocowanych
podporach łuku (J) i przytrzymać.
2. Zamocować za pomocą wkrętów (X) x 2 we wskazanych
miejscach.
Telescope Assembly / Ensemble de télescope / Ensamblaje del telescopio / Zusammenbau des Teleskops / De telescoop in elkaar zetten / Montaż teleskopu
Attach telescope base (M) onto telescope (L) with square side facing
outward as shown.
Poser le socle du télescope (M) sur le télescope (L) en orientant le côté
carré vers l’extérieur tel que montré.
Acople la base del telescopio (M) al telescopio (L) con el lado cuadrado
mirando hacia fuera, como se muestra en la foto.
Die Teleskopbasis (M) so an dem Teleskop (L) anbringen, dass die Seite
mit dem Quadrat wie dargestellt nach außen zeigt.
Bevestig de telescoopbasis (M) aan de telescoop (L). Het vierkant moet
naar voren wijzen.
Przymocować podstawę teleskopu (M) do teleskopu (L) tak, aby
kwadratowy bok podstawy był skierowany na zewnątrz.
Place assembled telescope (L), circle side facing outward, onto front door wall (K)
as shown. Align holes.
Poser le télescope assemblé (L), en orientant le cercle vers l’extérieur sur la paroi de
la porte avant (K) tel que montré. Aligner les trous.
Coloque el conjunto del telescopio (L), con el lado del círculo mirando hacia fuera,
sobre la pared de la puerta frontal (K), como se muestra en la foto. Alinee los agujeros.
Das zusammengebaute Teleskop (L) wie dargestellt so an der Wand mit der
Türönung anbringen, dass die Seite mit dem Kreis nach außen zeigt. Die Löcher
zur Deckung bringen.
Plaats de in elkaar gezette telescoop (L) met het rondje naar voren op de muur (K)
zoals wordt getoond. De gaten horen op één lijn te liggen.
Umieścić zmontowany teleskop (L) skierowany okrągłą „soczewką” na zewnątrz na
ścianie frontowej (K), jak pokazano na ilustracji. Ustawić, aby otwory znajdowały
się w jednej linii.
Insert telescope screw (O) through opening. Secure using telescope nut (N) as shown.
Insérer la vis du télescope (O) dans l’ouverture. La retenir à l’aide d’un écrou de
télescope (N) tel que montré.
Inserte el tornillo del telescopio (O) a través de la abertura. Fije con la tuerca del
telescopio (N), como se muestra en la foto.
Die Schraube für das Teleskop (O) durch die Önung stecken. Mit der Mutter (N) wie
dargestellt festschrauben.
Steek de telescoopbout (O) door de opening. Draai de telescoopmoer (N) vast, zoals
wordt getoond.
Przełożyć śrubę mocującą teleskop (O) przez otwór. Zamocować za pomocą nakrętki
mocującej teleskop (N), jak pokazano na ilustracji.
Slide & Play Center Wall Assembly / Ensemble de toboggan et de paroi du centre récréatif
Ensamblaje de la pared del centro de juegos deslizante / Zusammenbau der Rutsche und der Spielcenterwand
De glijbaan en speelunit in elkaar zetten / Przesuń & Play Center montażu na ścianie
Insert arch for slide (P) into slide (R) as shown.
Insérer la voûte pour toboggan (P) dans le toboggan (R) tel que montré.
Inserte el arco del tobogán (P) en el tobogán (R), como se muestra en la foto.
Den Bogen für die Rutsche (P) wie dargestellt auf die Rutsche (R) setzen.
Plaats de boog voor de glijbaan (P) op de glijbaan (R), zoals wordt getoond.
Umieścić łuk (P) na zjeżdżalni (R), jak pokazano na ilustracji.
Secure using screws (X) x6 in locations shown.
La retenir à l’aide de 6 vis (X) aux endroits indiqués.
Fije con 6 tornillos (X) en los lugares señalados.
Wie dargestellt mit den Schrauben (X) x 6 in der angegebenen
Position sichern.
Schroef de delen met behulp van 6 schroeven (X) aan elkaar.
Zamocować za pomocą wkrętów (X) x 6 we wskazanych miejscach.
Slide & Play Center Wall Assembly /Ensemble de toboggan et de paroi du centre récréatif / Ensamblaje de la pared del centro de juegos deslizante
Zusammenbau der Rutsche und der Spielcenterwand /
De glijbaan en activiteitenunit in elkaar zetten /
Przesuń & Play Center montażu na ścianie
Apply decals 21 & 22 as shown.
Appliquer les décalcomanies 21 et 22 tel que montré.
Coloque las pegatinas 21 y 22, como se muestra en la foto.
Die Aufkleber 21 und 22 wie dargestellt anbringen.
Plak stickers 21 en 22 op de getoonde plekken.
Nakleić naklejki 21 i 22, jak pokazano na ilustracji.
Play center (Q) slides into play center base (S). To adjust position of play center (Q),
press tab in on both sides of play center base (S) and lift.
Le centre récréatif (Q) se glisse dans le socle du centre récréatif (S). Pour régler la
position du centre récréatif (Q), appuyer sur la patte des deux côtés du socle du centre
récréatif (S) et soulever.
El centro de juegos (Q) se desliza en la base del mismo (S). Para regular la posición del
centro de juegos (Q), apretar la lengüeta a ambos lados de la base del mismo (S) y
levantar.
Position 1
Position 1
Posición 1
Position 1
Stand 1
Pozycja 1
Position 2
Position 2
Posición 2
Position 2
Stand 2
Pozycja 2
Position 3
Position 3
Posición 3
Position 3
Stand 3
Pozycja 3
Das Spielcenter (Q) lässt sich auf die Basis des Spielcenters (S) schieben. Um die Position des
Spielcenters (Q) zu verändern, die Laschen auf beiden Seiten der Spielcenterbasis (S) nach innen
drücken und anheben.
De speelunit (Q) schuift in de basis van de speelunit (S). Druk de pinnen aan beide zijden van de
basis (S) in en til de speelunit omhoog om de stand aan te passen.
Zagraj w centrum (Q) slajdy do gry centrum bazy (S). Aby dostosować położenie grać centrum
(Q), naciśnij klawisz Tab w po obu stronach grać centrum bazy (S) i winda.
La página se está cargando ...

• Nunca coloque el producto cerca de una ventana donde los cables de
las persianas o cortinas pueden llegar a estrangular al niño. Tampoco
deben colocar nunca el producto cerca de los cables del teléfono, el
ordenador o el monitor para bebés.
ESPAÑOL
DISCOVERSOUNDS® ACTIVITY GARDEN™
Edades: Mayores de 6 meses en adelante
Por favor guarde el recibo de venta como prueba de compra.
ADVERTENCIA :
ES NECESARIA LA SUPERVISI ÓN ADULTA.
• Guarde estas instrucciones para referencia futura.
INFORMACION DE SEGURIDAD DE LA BATERIA:
• Guarde estas instrucciones para referencia futura.
• Reemplace con 3 baterías alcalinas “AA” (LR6) (no incluidas). (Las
baterías recargables pueden susbtituirse.)
• El voltaje de una pila recargable completamente cargada es
frecuentemente más bajo que el de una pila alcalina nueva. Por
lo tanto se recomienda que se utilicen pilas alcalinas en vez de
recargables para un mejor rendimiento y período más largo de
juego.
• Instale las pilas con la polaridad correcta (+ y -).
• Para evitar derrame de las baterías:
1. Siga las instrucciones de instalación de los fabricantes del juguete y
las baterías.
2. No mezcle baterías nuevas y usadas.
3. No mezcle baterí as estandar (zinc-carbono), alcalinas o recargables
(níquel-cadmio o níquel-metalhidruro). No mezcle diferentes marcas
de baterías. Sólo deben usarse baterías similares o equivalentes a las
recomendadas.
4. Quite las pilas si el juguete no se va a utilizar por un período largo de
tiempo para evitar posibles fugas y que se dañe la unidad.
5. R etire del producto las pilas descargadas o agotadas.
6. Deshágase de las pilas agotadas de manera adecuada; no las
entierre. No las deseche en el fuego ya que pueden producir fugas o
explotar.
• Asegúrese que la cubierta está instalada correctamente en la unidad
en todo momento.
• No trate de recargar baterías no recargables.
• No intente recargar pilas no recargables.
• Las pilas recargables deben quitarse del juguete antes de cargarse.
• Sólo un adulto debe cargar las pilas recargables.
• No se les debe causar un circuito a las terminales de suministro.
NOTA: Si la unidad deja de funcionar o no funciona como debiera, quite
las baterías por unos minutos y l
uego vuelva a colocarlas. Si todavía
hubiera problemas instale baterías nuevas.
CONFORMIDAD CON LOS REQUISITOS DE LA FCC
NOTA: Este equipo ha sido probado y se encontró que cumple con los
límites para la Clase B del dispositivo digital, de conformidad con el
Apartado 15 del Reglamento FCC. Estos límites son designados para
proporcionar una protección razonable contra interferencia dañina
en una instalación residencial. Este equipo genera, usa y puede radi
ar
energía de radio frecuencia y, de no ser instalado y empleado de
acuerdo a las instrucciones, puede causar interferencia dañina para las
comunicaciones de radio. De cualquier forma, no hay garantía de que la
interferencia no ocurra en una instalación en particular. Si este equipo
causa interferencia dañina a la recepción de radio o televisión, lo cual
puede ser determinado apagando y encendiendo el equipo, el usuario es
alentado a tratar de corregir la interferencia a través de una o más de las
siguientes medidas:
• Reoriente o reubique la antena receptora.
• Aumente la separación entre el equipo y el receptor.
• Conecte el equipo a una salida de circuito diferente a aquella en la
que el receptor se encuentre conectado.
• Consulte al vendedor o a un técnico experimentado en radio/
televisión para ayuda.
Este dispositivo cumple con el Apartado 15 del Reglamento FCC.
La operación está sujeta a las siguientes dos condiciones: (1) Este
dispositivo pu
ede no causar interferencia dañina, y (2) este dispositivo
debe aceptar cualquier interferencia recibida, incluyendo interferencia
que pueda causar un funcionamiento no deseado.
expresamente para su conformidad por la parte responsable, podría
invalidar la autoridad del usuario para operar el equipo.
Este aparato digital de Clase B cumple con la norma canadiense ICES-003.
SERVICIO AL CLIENTE
www.littletikes.es
Spain:
MGAE Little Tikes Iberia, S.L.
Avda. Del Juguete s/n
03440 lbi (Alicante)
Spain
Tel : 902212152
Mexico:
Handell S.A. de C.V.
Gobernador José Guadalupe Covarrubias #78
Col. San Miguel Chapultepec,
C.P. 11850, M
éxico, D.F.
Tel: 01-800-426-3355
Impreso en China.
© The Little Tikes Company, una compañía de MGA Entertainment. LITTLE TIKES® es una marca
registrada de Little Tikes en EE.UU. y otros países. Todos los logotipos, nombres, personajes,
representaciones, imágenes, eslóganes y apariencia del embalaje son propiedad de Little Tikes.
Conserve esta dirección y embalaje para referencia ya que contiene información importante. El
en el paquete. Instrucciones incluidas. Antes de darle este producto al niño quítele todo el embalaje,
incluyendo etiquetas, amarres y costuras.
GARANTIA
La compañía Little Tikes fabrica juguetes divertidos de alta calidad. Le garantizamos al comprador original
que este producto está libre de defectos de material o mano de obra por un año * a partir de la fecha de
compra (se requiere el recibo de compra fechado como prueba). A exclusiva elección de la compañía Little
Tikes, el único remedio disponible bajo esta garantía será el reemplazo de la parte defectuosa del producto
o el reembolso del precio de compra de dicho producto. Esta garantía es válida solamente si el producto
ha sido montado y mantenido según las instrucciones. Esta garantía no cubre abuso, accidente, aspectos
cosméticos tales como el descoloramiento o las rayas como consecuencia de un uso normal, ni ningún
otro problema que no surja de defectos de material o mano de obra. *El período de garantía es de tres (3)
meses para guarderías o compradores comerciales.
Fuera de EE.UU. y Canadá: Póngase en contacto con el lugar de compra para el servicio de garantía. Esta
según el país/estado. Algunos países/estados no permiten la exclusión o limitación de daños concomitantes
o consecuentes, por lo cual la limitación o exclusión mencionada puede no aplicarse a usted.
DEUTSCH
DISCOVERSOUNDS® ACTIVITY GARDEN™
Alter: ab 6 Monaten
Bitte den Kassenzettel als Kaufbeleg aufbewahren.
ACHTUNG:
SICHERHEITSHINWEISE ZU BATTERIEN:
KUNDENSERVICE :
www.littletikes.com
Zapf Creation AG
Mönchrödener Str. 13
D-96472 Rödental
Tel: +49 (0) 9563 7251-0
POLSKI
BEZPIECZNE KORZYSTANIE Z BATERII:
może prowadzić do unieważnienia uprawnień użytkownika do obsługi
tego urządzenia.
Serwis Konsumenta Little Tikes
www.littletikes.pl
MGA Entertainment Poland Sp. z o.o.
ul. Grottgera 15a
76-200 Słupsk
Polska
tel. + 48 59 847 44 17
NEDERLANDS
DISCOVERSOUNDS® ACTIVITY GARDEN™
Leeftijd: ouder dan 6 maanden
Bewaar a.u.b. uw kassabon als bewijs van aankoop.
LET OP:
IN ELKAAR TE ZETTEN DOOR EEN VOLWASSENE.
• Bewaar deze handleiding voor referentie.
• Vóór montage bevat het pakket kleine onderdelen:
bevestigingsmiddelen die verstikkingsgevaar opleveren en die
scherpe randen en punten kunnen hebben. Buiten bereik van
kinderen houden totdat de montage is voltooid.
VEILIGHEIDSINFORMATIE VOOR BATTERIJEN:
• Bewaar deze handleiding voor referentie.
• Gebruikt 3 “AA” (LR6) alkalibatterijen (niet inbe
grepen). (Substitutie van
oplaadbare batterijen is mogelijk.)
• De spanning van een volledig opgeladen, oplaadbare batterij is vaak
lager dan die van een nieuwe alk alinebatterij. Voor betere prestaties
en langer spelen is het dus raadzaam om alkalinebatterijen te
gebruiken in plaats van oplaadbare batterijen.
• L et bij het aanbrengen van de batterijen op de juiste polariteit
(+ en -).
• Om lekkage van batterijen te voorkomen:
1. Volg de aanwijzigingen van de fabrikant van het speelgoed en van
de batterij op bij de installatie van de batterij.
2. Gebruik geen oude en nieuwe batterijen door elkaar.
3. Gebruik geen gewone (koolstof-zink), alkali- en oplaadbare batterijen
(nikkelcadmium of nikkelmetaalhydride) door elkaar. Gebruik geen
batterijen van verschillend fabrikaat door elkaar. Alleen aanbevolen of
equivalente batterijen mogen worden gebruikt.
4. Wanneer het speelgoed lang niet wordt gebruikt, verwijdert u de
batterijen om mogelijke lekkage en schade aan het speelgoed te
voorkomen.
5. Haal lege of uitgeputte batterijen uit het product.
6. Voer een lege batterij volgens voorschrift af; niet begraven. Gooi
• Zorg ervoor dat het deksel altijd goed is gemonteerd.
• Probeer niet-oplaadbare batterijen niet op te laden.
• Verwijder oplaadbare batterijen uit het speelgoed voordat u ze
oplaadt.
• Oplaadbare batterijen mogen uitsluitend door een volwassene
worden opgeladen.
• Zorg ervoor dat geen kortsluiting optreedt tussen de
voedingsklemmen.
OPMERKING: Als het apparaat stopt met werken of niet goed meer
werkt, verwijder de batterijen ge
durende enkele minuten en breng
ze weer aan. Als het probleem aanhoudt, dient u nieuwe batterijen te
installeren.
OPMERKING: dit product is getest en voldoet aan de voorschriften voor
een digitaal apparaat van klasse B, overeenkomstig Deel 15 van de FCC-
regels. Deze voorsch riften zijn opgesteld om een redelijke bescherming
te bieden tegen schadelijke storing bij gebruik binnenshuis. Dit product
genereert en gebruikt radiofrequentie-energie, of kan deze uitstralen.
Als het product niet volgens de instructies wordt geïnstalleerd en
gebruikt, kan h et schadelijke storingen voor radiocommunicaties
veroorzaken. Er kan echter geen garantie worden gegeven dat bepaalde
installaties storingsvrij zullen functioneren. Als het product wel storing
veroorzaakt in radio- of televisieontvangst (wat u kunt vaststellen
door het apparaat uit en aan te z etten) raden wij de gebruiker aan de
maatregelen:
•
• Vergroot de afstand tussen het product en de radio of televisie.
• Sluit het apparaat aan op een stopcontact van een andere groep dan
de groep waarop de radio of televisie is aangesloten.
• Vraag advies aan de verkoper of aan een ervaren radio-/
televisietechnicus.
Dit product is in overeenstemming met Deel 15 van de FCC-regels. Voor het
gebruik moet worden voldaan aan twee voorwaarden: (1) dit product mag
geen schadelijke interferentie veroorzaken, en (2) dit product moet elke
ontvangen interferentie aa
nvaarden, met inbegrip van interferentie die de
werking negatief zou kunnen beïnvloeden.
Let op: wijzigingen die niet zijn goedgekeurd door de fabrikant kunnen
ertoe leiden dat de gebruiker het recht verspeelt om dit product te mogen
gebruiken.
CONSUMENTEN SERVICE
www.littletikes.nl
Little Tikes
MGA Entertainment,
PO Box 85,
1171 AB Badhoevedorp
The Netherlands
Sloterweg 303A-1
1171 VC Badhoevedorp
The Netherlands
Tel: +31 20 354 80 34
Fax: +31 20 659 80 34
© The Little Tikes Company, onderdeel van MGA Entertainment. LITTLE TIKES® is een handelsmerk van
Little Tikes in de V.S. en andere landen. Alle logo’s, namen, symbolen, gelijkenissen, afbeeldingen,
slogans en verpakkingsvormen zijn het eigendom van Little Tikes. Het adres en de verpakking
bevatten belangrijke informatie, bewaar beide dus goed. Verwijder al het verpakkingsmateriaal,
inclusief labels, touwtjes en nietjes voordat u dit product aan een kind geeft. De inhoud, met inbegrip
Inclusief gebruiksaanwijzing.
GARANTIE
The Little Tikes Company vervaardigt leuk speelgoed van hoge kwaliteit. Wij garanderen de
oorspronkelijke koper dat dit product gedurende één jaar* vanaf de datum van aankoop vrij zal
zijn van materiaal- en productiefouten (gedateerde verkoopbon is vereist als bewijs van aankoop).
Naar keuze van The Little Tikes Company bestaan de enige rechtsmiddelen die beschikbaar zijn in
het kader van deze garantie uit vervanging van het defecte onderdeel van het product of restitutie
van de verkoopprijs van het product. Deze garantie is alleen geldig als het product is gemonteerd
en onderhouden volgens de instructies. Deze garantie omvat geen misbruik, ongevallen,
cosmetische kwesties zoals verkleuring of krassen als gevolg van normale slijtage, of enige andere
oorzaak dan materiaal- en productiefouten. *De garantieperiode bedraagt drie (3) maanden voor
kinderdagverblijven of zakelijke klanten.
Conserve este manual ya que contiene información importante.
¡Cuidemos el medio ambiente!
El símbolo de cubo de basura en ruedas, indica que el producto no debe ser desechado
con otros desperdicios domésticos. Por favor use puntos de recolección designados
o instalaciones de reciclaje al desechar el artículo. No maneje las pilas usadas como
desperdicio doméstico. Llévelas a las instalaciones de reciclaje designadas.
Bewaar deze handleiding goed, er staat belangrijke informatie in.
Zorg voor het milieu!
Het kliko-pictogram betekent dat dit product niet bij het gewone huis-, tuin- en
keukenafval mag worden gezet. Geef het product af bij een chemokar of breng het
naar een KCA-inzamelpunt. Gooi lege batterijen niet weg samen met het gewone
huis-, tuin- en keukenafval. Breng ze naar een chemokar of een inzamelpunt voor klein
chemisch afval.
• Antes de ensamblar los componentes, recuerde que el paquete
contiene piezas pequeñas con las que los niños podrían
atragantarse. Asimismo, posee bordes afilados y puntas aguzadas.
Hasta no terminar de ensamblar todas las piezas, mantenga alejados
a los niños.
• Należy zatrzymać niniejszą instrukcję do późniejszego
wykorzystania.
• Opakowanie zawiera małe elementy: części metalowe mogą grozić
zadławieniem, ponadto mogą posiadać ostre krawędzie i czubki. Do
momentu zakończenia montażu nie udostępniać zabawki dzieciom.
• Nigdy nie ustawiać produktu w pobliżu okna, przy którym sznurki z
żaluzji, rolet lub zasłon mogą doprowadzić do zadzierzgnięcia
dziecka. Ponadto nie ustawiać produktu w pobliżu przewodów
telefonicznych, komputerowych ani elektronicznej niani.
ZGODNOŚĆ Z REGUŁAMI FEDERALNEJ KOMISJI ŁĄCZNOŚCI (FCC)
UWAGA: Urządzenie to zostało przetestowane i spełnia wymagania
określone dla urządzeń cyfrowych Klasy B, zgodnie z Częścią 15 Reguł
FCC. Wymagania te określono w celu zapewnienia odpowiedniej
ochrony przed wystąpieniem szkodliwych zakłóceń w instalacjach
domowych. Urządzenie to generuje, wykorzystuje i może emitować
energię w postaci fal radiowych i - o ile nie zostało zainstalowane oraz
nie jest wykorzystywane zgodnie z instrukcją - może powodować
szkodliwe zakłócenia komunikacji radiowej. Zakłócenia takie mogą
jednak również wystąpić po prawidłowym zainstalowaniu urządzenia i
podczas prawidłowej eksploatacji. Jeżeli urządzenie to jest powodem
wystąpienia szkodliwych zakłóceń, co można sprawdzić przez jego
wyłączenie
i ponowne włączenie, zaleca się, aby użytkownik spróbował
zminimalizować zakłócenia poprzez następujące działania:
• przekierowanie anteny odbiornika lub przeniesienie jej w inne
miejsce,
• zwiększenie odległości pomiędzy urządzeniem a odbiornikiem,
• podłączenie urządzenia pod gniazdo zasilające, będące częścią
innego obwodu, niż obwód, do którego podłączony jest odbiornik,
• Należy zatrzymać niniejszą instrukcję do późniejszego wykorzysta-
nia.
• Produkt wymaga 3 baterii alkalicznych typ AA „LR6” 4,5V (nie
załączono). Baterie alkaliczne można zastąpić akumulatorkami.
• Napięcie prądu z akumulatorków często jest niższe od napięcia ze
świeżej baterii alkalicznej. Zabawka będzie lepiej i dłużej działać,
jeżeli zamiast akumulatorków zostaną użyte baterie alkaliczne.
• Baterie instalować zgodnie z oznaczeniem (+ i -).
• Aby zapobiec wyciekowi baterii:
1. Przestrzegać zaleceń producenta zawartych w instrukcji instalacji
baterii.
2. Nie instalować równocześnie baterii nowych z używanymi.
3. Nie instalować baterii alkalicznych z bateriami
cynkowo-węglowymi, akumulatorkami niklowo-kadmowymi lub
niklowo-metalowo-wodorywymi. Nie instalować jednocześnie
baterii różnych marek. Używać wyłącznie baterii tego samego typu
zgodnych z zaleceniami producenta.
4. Jeśli zabawka nie będzie używana przez dłuższy okres czasu, należy z
niej wyciągnąć baterie. Inaczej może dojść do wycieku i uszkodzenia
zabawki.
5. Baterie wyczerpane należy usunąć z zabawki.
6. Usunięte baterie utylizować w prawidłowy sposób: nie zakopywać,
nie wrzucać do ognia, ponieważ można spowodować wyciek lub
wybuch.
• Dopilnować, aby pokrywa gniazda baterii była zawsze na miejscu.
• Nie wolno ładować baterii, które nie są przeznaczone do ponownego
ładowania.
• Przed przystąpieniem do ładowania akumulatorków należy je wyjąć
z zabawki.
• Ładowanie akumulatorków powinno się odbywać wyłącznie przez
osobę dorosłą.
• Nie powodować zwarcia pomiędzy bateriami.
UWAGA: Jeżeli urządzenie przestanie działać lub działa nieprawidłowo,
należy na kilka minut wyciągnąć baterie, po czym zainstalować je
ponownie. Jeżeli problem się powtarza – zainstalować nowe baterie.
ZUSAMMENBAU DURCH EINEN ERWACHSENEN
ERFORDERLICH.
• Diese Anleitung für mögliche Rückfragen bitte aufbewahren.
• Die Verpackung enthält für den Zusammenbau benötigte Kleinteile,
die verschluckt werden können oder möglicherweise scharfe
Spitzen oder Kanten besitzen. Bitte von Kindern fernhalten, bis der
Zusammenbau vollständig beendet ist.
• Dieses Produkt nicht in der Nähe eines Fensters aufstellen, wo
Schnüre einer Jalousie oder Gardine herabhängen.
Strangulationsgefahr! Das Produkt auch nicht in der Nähe von
Telefon-, Computer- oder sonstigen Elektrokabeln aufstellen.
• Plaats dit product nooit in de buurt van een raam. Een kind zou
verstrikt kunnen raken in de touwtjes van jaloezieën of gordijnen.
Plaats dit product ook nooit in de buurt van telefoon-, computer-,
of babyfoonsnoeren.
• Diese Anleitung für mögliche Rückfragen bitte aufbewahren.
• Die Batterien durch 3 x 1,5 Volt Alkali-Mignonzellen AA (LR6), nicht
enthalten, ersetzen. (Wiederaufladbare Batterien können ersatzweise
verwendet werden.)
• Die Leistung einer voll aufgeladenen wiederaufladbaren Batterie ist oft
geringer als die einer neuen Alkali-Batterie. Für optimale Funktion und
längere Spieldauer wird daher der Gebrauch von Alkali-Batterien anstelle
von wiederaufladbaren Batterien empfohlen.
• Die Batterien in der angegebenen Polrichtung (+/-) einlegen.
• Um ein Auslaufen der Batterien zu vermeiden:
1. Beim Einlegen der Batterien die Anweisungen des Spielwaren- und des
Batterieherstellers beachten.
2. Nicht alte und neue Batterien zusammen einlegen. (Immer alle Batterien
zur gleichen Zeit auswechseln.)
3. Niemals verschiedene Batterietypen, z. B. Standard- (Zink-Kohle), Alkali-
oder wiederaufladbare Batterien (Nickel-Cadmium- oder
Nickel-Metallhydrid-Zellen), miteinander kombinieren. Nicht Batterien
unterschiedlicher Fabrikate zusammen einlegen. Nur Batterien desselben
oder eines entsprechenden Batterietyps wie empfohlen verwenden.
4. Um ein Auslaufen der Batterien und Schäden am Produkt zu vermeiden,
die Batterien immer aus dem Spielzeug herausnehmen, wenn es längere
Zeit nicht benutzt wird.
5. Alte oder verbrauchte Batterien immer aus dem Spielzeug entfernen.
6. Batterien sicher und vorschriftsgemäß entsorgen. Nicht verbrennen –
Explosionsgefahr!
• Darauf achten, dass die Batteriefachabdeckung stets richtig eingesetzt ist.
• Nicht-wiederaufladbare Batterien dürfen nicht aufgeladen werden.
• Wiederaufladbare Batterien vor dem Aufladen immer aus dem Produkt
herausnehmen.
• Das Aufladen wiederaufladbarer Batterien sollte nur unter Aufsicht eines
Erwachsenen durchgeführt werden.
• Die Anschlussklemmen dürfen nicht kurzgeschlossen werden.
BITTE BEACHTEN: Wenn das Produkt nicht mehr funktioniert oder nicht mehr
so, wie es sollte, müssen die Batterien ein paar Minuten lang
herausgenommen und dann wieder eingelegt werden. Sollte das Problem
dann noch immer bestehen, müssen neue Batterien eingelegt werden.
WICHTIGER HINWEIS
Veränderungen an diesem Produkt dürfen nur mit ausdrücklicher
Genehmigung des Herstellers vorgenommen werden.
Dieses digitale Gerät der Klasse B erfüllt den kanadischen Standard ICES-003.
Gedruckt in China. D.R.©2011 The Little Tikes Company
© The Little Tikes Company, eine Firma von MGA Entertainment. LITTLE TIKES® ist in den USA und anderen
Ländern ein Warenzeichen von Little Tikes. Alle Logos, Namen, Charaktere, Ähnlichkeiten, Bilder, Claims und
das Erscheinungsbild der Verpackung sind in Besitz von Little Tikes. Diese Adresse und die Verpackung für
Rückfragen bitte aufbewahren. Sie enthält wichtige Informationen. Abweichungen des Inhalts in Farbe und
Gestaltung gegenüber den Darstellungen auf der Verpackung vorbehalten. Anleitung enthalten. Bitte
entfernen Sie die gesamte Verpackung sowie jegliche Anhänger, Befestigungen und Fäden, bevor das Produkt
in die Hände eines Kindes gelangt.
GARANTIE
Es gelten die gesetzlichen Garantiebestimmungen.
Diese Anleitung bitte für mögliche Rückfragen bitte aufbewahren.
Sie enthält wichtige Informationen.
„Umweltschutz ist Ehrensache!“
Hinweis zur Entsorgung:
Dieses Produkt ist mit dem Symbol für die selektive Entsorgung von elektrischer
Ausrüstung versehen (WEEE). Das heißt, dass dieses Produkt der EU Direktive
2002/96/EC entsprechend entsorgt werden muss, um die entstehenden
Umweltschäden zu minimieren. Weitere Informationen erhalten Sie bei Ihrer
lokalen oder regionalen Behörde. Aus diesem selektiven Entsorgungsprozess
ausgeschlossene elektronische Produkte stellen wegen der Präsenz gefährlicher
Substanzen eine Gefahr für die Umwelt und die Gesundheit dar.
Alte und verbrauchte Batterien gehören nicht in den Hausmüll. Bitte am
Wertstoffhof oder der dafür vorgesehenen Recyclingstelle abgeben.
OSTRZEŻENIE:
WYMAGANY MONTAŻ PRZEZ OSOBĘ DOROSŁĄ.
Buiten de Verenigde Staten en Canada: Neem contact op met uw verkoper voor meer informatie
over de garantieservice. Deze garantie biedt u specifieke wettelijke rechten. Bovendien hebt u
mogelijk nog andere rechten. Deze kunnen echter van land tot land of van staat tot staat verschillen.
In sommige landen en staten is uitsluiting of beperking van incidentele of gevolgschade niet
toegestaan, dus is de bovenstaande beperking of uitsluiting mogelijk niet op u van toepassing.
Dit digitale apparaat van klasse B voldoet aan de Canadese norm ICES-003.
OGRÓDEK MUZYCZNE ODKRYCIA
Wiek: 6 MIESIĘCY +
Prosimy o zachowanie dowodu zakupu.
Prosimy o zachowanie niniejszej instrukcji, ponieważ zawiera ważne informacje.
Wydrukowano w Chinach D.R. © 2011 The Little Tikes Company
© The Little Tikes Company, spółka należąca do MGA Entertainment. LITTLE TIKES® jest
znakiem handlowym spółki Little Tikes w Stanach Zjednoczonych i pozostałych krajach.
Logo LITTLE TIKES®, nazwy, czcionki, podobieństwa, wizerunki, hasła marketingowe i
wygląd opakowań są własnością Little Tikes. Prosimy
o zachowanie niniejszego opakowania wraz z adresem, ponieważ zawiera istotne
informacje. Zawartość opakowania może się różnić w zakresie specykacji i kolorów od
zabawki zaprezentowanej na opakowaniu. Załączono instrukcję. Przed udostępnieniem
zabawki dziecku, należy usunąć wszelkie materiały opakowaniowe wraz z zawieszkami,
mocowaniami, spinaczami i szwami.
GWARANCJA OGRANICZONA
Little Tikes jest producentem wysokiej jakości zabawek. Gwarantujemy pierwotnemu
nabywcy, że produkt ten jest wolny od wad materiałowych lub wad wykonania przez
okres jednego roku* od dnia zakupu (roszczenia gwarancyjne będą rozpatrywane
wyłącznie za okazaniem dowodu zakupu z datą zakupu). Zależnie od decyzji Spółki
Little Tikes, roszczenie gwarancyjne zostanie zaspokojone albo poprzez wymianę
wadliwego elementu produktu albo poprzez zwrot ceny zakupu. Gwarancja
zachowuje ważność wyłącznie, jeżeli produkt został zmontowany i był
konserwowany zgodnie z instrukcjami. Niniejsza gwarancja nie obejmuje
przypadków użycia produktu niezgodnego z przeznaczeniem, zniszczenia w wyniku
wypadku oraz naturalnego zużycia produktu poprzez blaknięcie koloru lub
zadrapania, nie obejmuje również żadnych innych defektów nie wynikłych z wad
materiałowych lub wad wykonania.
Dbajmy o środowisko! Symbol przekreślonego kubła na śmieci oznacza, że produkt
ten nie może zostać wyrzucony wraz z innymi domowymi śmieciami. Aby pozbyć
się zabawki proszę ją oddać do wyznaczonego punktu odbioru lub zakładu
zajmującego się recyklingiem urządzeń elektrycznych.
Zużytych baterii nie wolno traktować na równi z domowymi śmieciami. Należy je
zdawać do wyznaczonego punktu odbioru lub zakładu zajmującego się
recyklingiem urządzeń elektrycznych.
• zasięgnięcie porady u sprzedawcy lub doświadczonego technika
RTV.
Urządzenie spełnia wymagania określone w Części 15 Reguł FCC.
Korzystając z urządzenia należy wziąć pod uwagę następujące
okoliczności: (1) urządzenie nie może powodować szkodliwych
zakłóceń i (2) urządzenie odbiera wszelkie zakłócenia, w tym również
takie, które powodują jego niepożądane działanie.
Richt de ontvangstantenne op een andere manier of plaats deze
ergens anders.
Transcripción de documentos
Debe ser armado por un adulto / Zusammenbau durch einen Erwachsenen erforderlich. In elkaar te zetten door een volwassene / Konieczny jest monta przez osoby dorosłe Tool required / Outil requis / Herramienta necesaria Erforderliches Werkzeug / Benodigd gereedschap Narzędzia niezbędne Wall with Shutters Assembly / Ensemble de mur avec volets / Ensamblaje de la pared con contraventanas Zusammenbau der Wand mit Fensterläden / De muur met luiken in elkaar zetten / Montaż ściany z okiennicami X x2 2 1 D D W x12 E 1 2 X x15 623417M XIM623417 - 12/11 A C (2) www.littletikes.com www.littletikes.co.uk www.littletikes.fr www.littletikes.nl www.littletikes.pl B E D ENGLISH DISCOVERSOUNDS® ACTIVITY GARDEN™ Ages 6 months and up Please save sales receipt for proof of purchase. Wall with Shutters A. Small arch B. Ball return C. Shutters (2) D. Shutter door wall E. Window box Wand mit Fensterläden A. Kleiner Bogen B. Ballrückgabe C. Fensterläden (2) D. Wand mit Fensteröffnung E. Fensterkasten J J I WARNING: ADULT ASSEMBLY REQUIRED. • Keep these instructions for future reference. • Prior to assembly, this package contains small parts: hardware which is a choking hazard and may contain sharp edges and sharp points. Keep away from children until assembled. • Never place product near a window where cords from blinds or drapes can strangle a child. Also, never place the product near phone cords, computer cords, or baby monitor cords. BATTERY SAFETY INFORMATION: • Keep these instructions for future reference. • Replace with 3 AA “LR6” (4.5 volts) alkaline batteries (not included). (Rechargeable batteries may be substituted.) • The voltage of a fully-charged, rechargeable battery is often lower than that of a fresh alkaline battery. Therefore, it is recommended that alkaline batteries be used instead of rechargeable batteries for best performance and longer play time. • Install batteries with the correct polarity (+ and -). • To avoid battery leakage: 1. Follow the toy and battery manufacturer’s installation instructions. 2. Do not mix old and new batteries. 3. Do not mix standard (carbon-zinc), alkaline or rechargeable (nickelcadmium or nickel-metalhydride) batteries. Do not mix different brands of batteries. Only batteries of the same or equivalent type as recommended are to be used. 4. When toy is not used for an extended period of time, remove batteries to prevent possible leakage and damage to the unit. 5. Remove dead or exhausted batteries from product. 6. Dispose of dead batteries properly; do not bury. Do not dispose of batteries in fire as they may leak or explode. • Make sure cover is properly installed on unit at all times. • Do not attempt to recharge non-rechargeable batteries. • Rechargeable batteries are to be removed from the toy before recharging. • Charging of rechargeable batteries should be done only by an adult. • The supply terminals are not to be short circuited. NOTE: If the unit stops working or doesn’t work as it should, remove the batteries for a few minutes and then re-insert them. If there is still a problem, install new batteries. FCC COMPLIANCE NOTE: This equipment has been tested and found to comply with the limits for a Class B digital device, pursuant to Part 15 of the FCC Rules. These limits are designed to provide reasonable protection against harmful interference in a residential installation. This equipment generates, uses and can radiate radio frequency energy and, if not installed and used in accordance with the instructions, may cause harmful interference to radio communications. However, there is no guarantee that interference will not occur in a particular installation. If this equipment does cause harmful interference to radio or television reception, which can be determined by turning the equipment off and on, the user is encouraged to try to correct the interference by one or more of the following measures: • Reorient or relocate the receiving antenna. • Increase the separation between the equipment and receiver. H L K M P S R V (4) T (3) Mur avec porte avant F. Grande voûte G. Boîte aux lettres H. Socle de la boîte aux lettres I. Porte avec xylophone J. (2) supports de voûte K. Paroi de la porte avant L. Télescope M. Socle du télescope N. Écrou du télescope O. Vis du télescope Wand mit Haustür Muur met voordeur F. Großer Bogen F. Grote boog G. Brievenbus G. Briefkasten H. Briefkastenbasis H. Brievenbusbasis I. Tür mit Xylofon I. Deur met xylofoon J. Bogenstützen (2) J. Boogsteunen (2) K. Muur voor K. Wand mit voordeur Türöffnung L. Telescoop L. Teleskop M. Teleskopbasis M. Telescoopbasis N. Telescoopmoer N. Mutter für O. Telescoopbout Teleskop O. Schraube für Teleskop N (V) O Slide & Play Center Walls P. Arch for slide Q. Play center R. Slide S. Play center base T. (3) Letter blocks U. (4) Balls V. Wall knobs Q U (4) Pared con contraventanas A. Arco pequeño B. Recipiente de bolas C. Contraventanas (2) D. Pared de las contraventanas E. Alfeizar de la ventana Ściana z okiennicami A. Łuk mały B. Rynna na kulki C. Okiennice (2) D. Ściana E. Skrzynka na kwiaty Wall with Front Door F. Large arch G. Mailbox H. Mailbox base I. Door with xylophone J. (2) Arch supports K. Front door wall L. Telescope M. Telescope base N. Telescope nut O. Telescope screw F G Mur avec volets A. Petite voûte B. Renvoi de la balle C. Volets (2) D. Paroi de la porte à jalousie E. Jardinière Muur met luiken A. Kleine boog B. Balteruggave C. Luiken (2) D. Muur E. Vensterbank Parois du toboggan et du centre récréatif P. Voûte pour le toboggan Q. Centre récréatif R. Toboggan S. Socle du centre récréatif T. (3) blocs avec lettre U. (4) balles V. Boutons de paroi Rutsche und Speelmuren Spielcenterwand P. Glijbaanboog P. Bogen für Q. Speelunit Rutsche R. Glijbaan Q. Spielcenter S. Basis speelunit R. Rutsche T. Letterblokken (3) S. Spielcenterbasis U. Ballen (4) T. Sortierformen für V. Muurknoppen den Briefkasten (3) U. Bälle (4) V. Wandknöpfe B B Place ball return (B) onto shutter door wall (D) as shown. Poser le renvoi de la balle (B) sur la paroi de la porte à jalousie (D) tel que montré. Coloque el recipiente de bolas (B) sobre la pared de las contraventanas (D), como se muestra en la foto. Die Ballrückgabe (B) wie dargestellt auf die Wand mit der Fensteröffnung (D) setzen. Plaats de balteruggave (B) op de muur (D) zoals wordt getoond. Umieścić rynnę na kulki (B) na progu ściany (D), jak pokazano na ilustracji. 3 Place window box (E) onto ball return (B) as shown. Poser la jardinière (E) sur le renvoi de la balle (B) tel que montré. Coloque el alfeizar (E) sobre el recipiente de bolas (B), como se muestra en la foto. Den Fensterkasten (E) wie dargestellt auf die Ballrückgabe (B) setzen. Plaats de vensterbank (E) op de balteruggave (B) zoals wordt getoond. Umieścić skrzynkę na kwiaty (E) na rynnie na kulki (B), jak pokazano na ilustracji. 4 A A 1 D Pared con puerta frontal F. Arco grande G. Buzón H. Base del buzón I. Puerta con xilófono J. Soportes del arco (2) K. Marco de la puerta frontal L. Telescopio M. Base del telescopio N. Tuerca del telescopio O. Tornillo del telescopio Secure using screws (X) x2 in locations shown. La retenir à l’aide de 2 vis (X) aux endroits indiqués. Fíjelo con 2 tornillos (X) en los lugares señalados. Wie dargestellt mit den Schrauben (X) x 2 in der angegebenen Position sichern. Schroef de delen aan elkaar met behulp van 2 schroeven (X). Zamocować za pomocą wkrętów (X) x 2 we wskazanych miejscach. 2 X x2 C Secure using screws (X) x2 in locations shown. Le retenir à l’aide de 2 vis (X) aux endroits indiqués. 1. Place shutters (C) x2 onto assembled window box (E) 1. Die Fensterläden (C) x 2 wie dargestellt mit der bevorzugten Fíjelo con 2 tornillos (X) en los lugares señalados. with preferred face outward as shown. Seite nach außen auf den montierten Fensterkasten (E) setzen. Ściana z drzwiami 2. Place small arch (A) onto shutters and shutter door 2. Den kleinen Bogen (A) auf die Fensterläden und die Wand mit Wie dargestellt mit den Schrauben (X) x 2 in der frontowymi wall (D). Hold in place. der Fensteröffnung (D) setzen. In Position halten. angegebenen Position sichern. F. Łuk duży 1. Poser les 2 volets (C) sur la jardinière (E) assemblée avec 1. Plaats de 2 luiken (C) op de in elkaar gezette Schroef de boog vast met behulp van 2 schroeven (X). G. Skrzynka na listy le côté préféré orienté vers l’extérieur comme montré. vensterbank (E) met de juiste kant naar voren. Zamocować za pomocą wkrętów (X) x 2 we wskazanych H. Podstawa skrzynki 2. Poser la petite voûte (A) sur les volets et la paroi de la 2. Plaats de kleine boog (A) op de luiken en de muur (D). miejscach. na listy porte à jalousie (D). La retenir en place. Houd beide op hun plek. I. Drzwi z cymbałkami J. Podpory łuku (2) 1. Coloque las 2 contraventanas (C) sobre el alfeizar (E) con 1. Umieścić okiennice (C) x 2 na uprzednio przymocowanej skrzynce el lado preferido hacia fuera, como se muestra en la foto. na kwiaty (E) preferowaną stroną na zewnątrz, jak pokazano na K. Ściana frontowa 2. Coloque el arco pequeño (A) sobre las contraventanas (D) ilustracji. L. Teleskop y la pared y manténgalo sujeto. 2. Umieścić łuk mały (A) na okiennicach i ścianie (D) i przytrzymać. M. Podstawa teleskopu N. Nakrętka mocująca teleskop Wall with Front Door Assembly / Ensemble de mur avec porte avant / Ensamblaje de la pared con puerta frontal O. Śruba mocująca Zusammenbau der Wand mit Haustür / Muur met voordeur in elkaar zetten / Montaż ściany frontowej teleskop 5 Paredes con tobogán y Centro de juegos P. Arco de tobogán Q. Centro de juegos R. Tobogán S. Base del centro de juegos T. Bloques de letras (3) H U. Bolas (4) V. Pomos de las paredes Przesuń & Play Ściany Center K P. Łuk nad zjeżdżalnią Q. Centrum 1. Place door with xylophone (I) onto front 1. R. Zjeżdżalnia door wall (K). S. Centrum bazy 2. Place mailbox base (H) onto door with 2. T. Literki (3) xylophone and front door wall as U. Kulki (4) shown. Hold in place. V. Nakrętki montażowe 1. Poser la porte avec le xylophone (I) sur 1. la paroi de la porte avant (K). 2. 2. Poser le socle de la boîte aux lettres (H) sur la porte avec le xylophone et la paroi de la porte avant tel que montré. Le retenir en place. I 6 1 Coloque la puerta con el xilófono (I) en la pared de la puerta frontal (K). Coloque el buzón (H) sobre la puerta con el xilófono y la pared de la puerta frontal, como se muestra en la foto, y sujételo. Die Tür mit dem Xylofon (I) auf die Wand mit der Türöffnung (K) setzen. Die Briefkastenbasis (H) wie dargestellt auf die Tür mit dem Xylofon und die Wand mit der Türöffnung setzen. In Position halten. 1. Plaats de deur met de xylofoon (I) in opening van de muur (K). 2. Plaats de brievenbusbasis (H) op de deur met de xylofoon en de muur, zoals wordt getoond. Houd alles op z’n plek. 1. Umieścić drzwi z cymbałkami (I) na ścianie frontowej (K). 2. Umieścić podstawę skrzynki na listy (H) na drzwiach z cymbałkami i ścianie frontowej, jak pokazano na ilustracji i przytrzymać. X x1 Secure using screws (X) x1 in locations shown. Le retenir à l’aide de 1 vis (X) aux endroits indiqués. Fíjelo con 1 tornillo (X) en el lugar señalado. Wie dargestellt mit der Schraube (X) x 1 in der angegebenen Position sichern. Schroef de delen aan elkaar met behulp van 1 schroef (X). Zamocować wkrętem (X) x 1 we wskazanym miejscu. 7 8 X x2 G J 9 J 1 10 1 W x6 F 2 1 x2 2 3 5 4 2 Place mailbox (G) onto mailbox base (H) as shown. Secure using screws (X) x2 in locations shown. Poser la boîte aux lettres (G) sur le socle de la boîte aux lettres (H) tel que montré. Solidifier à l’aide de 2 vis (X) aux endroits indiqués. Coloque el buzón (G) en la base del buzón (H), como se muestra en la foto. Fíjelo con 2 tornillos (X) en los lugares señalados. Den Briefkasten (G) wie dargestellt auf die Briefkastenbasis (H) setzen. Wie dargestellt mit den Schrauben (X) x 2 in der angegebenen Position sichern. Plaats de brievenbus (G) op de brievenbusbasis (H) zoals wordt getoond. Schroef de brievenbus vast met behulp van 2 schroeven (X). Umieścić skrzynkę na listy (G) na podstawie skrzynki na listy (H), jak pokazano na ilustracji. Zamocować za pomocą wkrętów (X) x 2 we wskazanych miejscach. Secure using screws (W) x6 in locations shown. Repeat for other arch support (J). Poser 6 vis (W) aux endroits indiqués. Répéter pour chaque support de voûte (J). Fije con 6 tornillos (W) en los lugares señalados. Repita este paso para el otro soporte del arco (J). Wie dargestellt mit den Schrauben (W) x 6 in der angegebenen Position sichern. Bei der anderen Bogenstütze (J) wiederholen. Schroef de steun vast met behulp van 6 schroeven (W) op de getoonde plekken. Herhaal dit voor de andere boogsteun (J). Zamocować za pomocą wkrętów (W) x 6 we wskazanych miejscach. Czynności powtórzyć dla drugiej podpory łuku (J). Place each piece of arch supports (J) and place around notch on front door wall (K) as shown. Poser chaque support de voûte (J) et les poser sur l’encoche de la paroi de porte avant (K) tel que montré. Coloque los soportes del arco (J) en las hendiduras a cada lado de la pared de la puerta frontal (K), como se muestra en la foto. Die Teile der Bogenstützen (J) zusammensetzen und jeweils wie dargestellt seitlich auf die Wand mit der Türöffnung (K) setzen. Plaats elk deel van de boogsteun (J) in de daarvoor voorziene inkeping van de muur (K), zoals wordt getoond. Każdy z elementów podpory łuku (J) umieścić na ścianie frontowej (K), jak pokazano na ilustracji. Telescope Assembly / Ensemble de télescope / Ensamblaje del telescopio / Zusammenbau des Teleskops / De telescoop in elkaar zetten / Montaż teleskopu 12 11 X x2 1. Place large arch (F) onto arch supports (J). Hold in place. 2. Secure using screws (X) x2 in locations shown. 1. Poser la grosse voûte (F) sur les supports de voûte (J). La retenir en place. 2. Solidifier à l’aide de 2 vis (X) aux endroits indiqués. 1. Coloque el arco grande (F) sobre los soportes del arco (J) y manténgalo sujeto. 2. Fíjelo con 2 tornillos (X) en los lugares señalados. 1. Den großen Bogen (F) auf die Bogenstützen (J) setzen. In Position halten. 2. Wie dargestellt mit den Schrauben (X) x 2 in der angegebenen Position sichern. 1. Plaats de grote boog (F) op de boogsteunen (J). Houd ze op hun plek. 2. Schroef de grote boog vast met behulp van 2 schroeven (X). 1. Umieścić łuk duży (F) na uprzednio zamocowanych podporach łuku (J) i przytrzymać. 2. Zamocować za pomocą wkrętów (X) x 2 we wskazanych miejscach. Slide & Play Center Wall Assembly / Ensemble de toboggan et de paroi du centre récréatif Ensamblaje de la pared del centro de juegos deslizante / Zusammenbau der Rutsche und der Spielcenterwand De glijbaan en speelunit in elkaar zetten / Przesuń & Play Center montażu na ścianie 13 L 14 K L 6 15 X x6 P O M 5 3 N 1 Attach telescope base (M) onto telescope (L) with square side facing outward as shown. Poser le socle du télescope (M) sur le télescope (L) en orientant le côté carré vers l’extérieur tel que montré. Acople la base del telescopio (M) al telescopio (L) con el lado cuadrado mirando hacia fuera, como se muestra en la foto. Die Teleskopbasis (M) so an dem Teleskop (L) anbringen, dass die Seite mit dem Quadrat wie dargestellt nach außen zeigt. Bevestig de telescoopbasis (M) aan de telescoop (L). Het vierkant moet naar voren wijzen. Przymocować podstawę teleskopu (M) do teleskopu (L) tak, aby kwadratowy bok podstawy był skierowany na zewnątrz. Place assembled telescope (L), circle side facing outward, onto front door wall (K) as shown. Align holes. Poser le télescope assemblé (L), en orientant le cercle vers l’extérieur sur la paroi de la porte avant (K) tel que montré. Aligner les trous. Coloque el conjunto del telescopio (L), con el lado del círculo mirando hacia fuera, sobre la pared de la puerta frontal (K), como se muestra en la foto. Alinee los agujeros. Das zusammengebaute Teleskop (L) wie dargestellt so an der Wand mit der Türöffnung anbringen, dass die Seite mit dem Kreis nach außen zeigt. Die Löcher zur Deckung bringen. Plaats de in elkaar gezette telescoop (L) met het rondje naar voren op de muur (K) zoals wordt getoond. De gaten horen op één lijn te liggen. Umieścić zmontowany teleskop (L) skierowany okrągłą „soczewką” na zewnątrz na ścianie frontowej (K), jak pokazano na ilustracji. Ustawić, aby otwory znajdowały się w jednej linii. Insert telescope screw (O) through opening. Secure using telescope nut (N) as shown. Insérer la vis du télescope (O) dans l’ouverture. La retenir à l’aide d’un écrou de télescope (N) tel que montré. Inserte el tornillo del telescopio (O) a través de la abertura. Fije con la tuerca del telescopio (N), como se muestra en la foto. Die Schraube für das Teleskop (O) durch die Öffnung stecken. Mit der Mutter (N) wie dargestellt festschrauben. Steek de telescoopbout (O) door de opening. Draai de telescoopmoer (N) vast, zoals wordt getoond. Przełożyć śrubę mocującą teleskop (O) przez otwór. Zamocować za pomocą nakrętki mocującej teleskop (N), jak pokazano na ilustracji. R Insert arch for slide (P) into slide (R) as shown. Insérer la voûte pour toboggan (P) dans le toboggan (R) tel que montré. Inserte el arco del tobogán (P) en el tobogán (R), como se muestra en la foto. Den Bogen für die Rutsche (P) wie dargestellt auf die Rutsche (R) setzen. Plaats de boog voor de glijbaan (P) op de glijbaan (R), zoals wordt getoond. Umieścić łuk (P) na zjeżdżalni (R), jak pokazano na ilustracji. Slide & Play Center Wall Assembly /Ensemble de toboggan et de paroi du centre récréatif / Ensamblaje de la pared del centro de juegos deslizante Zusammenbau der Rutsche und der Spielcenterwand / De glijbaan en activiteitenunit in elkaar zetten / Przesuń & Play Center montażu na ścianie 17 16 21 22 Position 1 Position 1 Posición 1 Position 1 Stand 1 Pozycja 1 Position 2 Position 2 Posición 2 Position 2 Stand 2 Pozycja 2 S Apply decals 21 & 22 as shown. Appliquer les décalcomanies 21 et 22 tel que montré. Coloque las pegatinas 21 y 22, como se muestra en la foto. Die Aufkleber 21 und 22 wie dargestellt anbringen. Plak stickers 21 en 22 op de getoonde plekken. Nakleić naklejki 21 i 22, jak pokazano na ilustracji. Play center (Q) slides into play center base (S). To adjust position of play center (Q), press tab in on both sides of play center base (S) and lift. Le centre récréatif (Q) se glisse dans le socle du centre récréatif (S). Pour régler la position du centre récréatif (Q), appuyer sur la patte des deux côtés du socle du centre récréatif (S) et soulever. El centro de juegos (Q) se desliza en la base del mismo (S). Para regular la posición del centro de juegos (Q), apretar la lengüeta a ambos lados de la base del mismo (S) y levantar. Das Spielcenter (Q) lässt sich auf die Basis des Spielcenters (S) schieben. Um die Position des Spielcenters (Q) zu verändern, die Laschen auf beiden Seiten der Spielcenterbasis (S) nach innen drücken und anheben. De speelunit (Q) schuift in de basis van de speelunit (S). Druk de pinnen aan beide zijden van de basis (S) in en til de speelunit omhoog om de stand aan te passen. Zagraj w centrum (Q) slajdy do gry centrum bazy (S). Aby dostosować położenie grać centrum (Q), naciśnij klawisz Tab w po obu stronach grać centrum bazy (S) i winda. Position 3 Position 3 Posición 3 Position 3 Stand 3 Pozycja 3 4 2 6 Secure using screws (X) x6 in locations shown. La retenir à l’aide de 6 vis (X) aux endroits indiqués. Fije con 6 tornillos (X) en los lugares señalados. Wie dargestellt mit den Schrauben (X) x 6 in der angegebenen Position sichern. Schroef de delen met behulp van 6 schroeven (X) aan elkaar. Zamocować za pomocą wkrętów (X) x 6 we wskazanych miejscach. ESPAÑOL DISCOVERSOUNDS® ACTIVITY GARDEN™ Edades: Mayores de 6 meses en adelante Por favor guarde el recibo de venta como prueba de compra. ADVERTENCIA : ES NECESARIA LA SUPERVISI ÓN ADULTA. • Guarde estas instrucciones para referencia futura. • Antes de ensamblar los componentes, recuerde que el paquete contiene piezas pequeñas con las que los niños podrían atragantarse. Asimismo, posee bordes afilados y puntas aguzadas. Hasta no terminar de ensamblar todas las piezas, mantenga alejados a los niños. • Nunca coloque el producto cerca de una ventana donde los cables de las persianas o cortinas pueden llegar a estrangular al niño. Tampoco deben colocar nunca el producto cerca de los cables del teléfono, el ordenador o el monitor para bebés. INFORMACION DE SEGURIDAD DE LA BATERIA: • Guarde estas instrucciones para referencia futura. • Reemplace con 3 baterías alcalinas “AA” (LR6) (no incluidas). (Las baterías recargables pueden susbtituirse.) • El voltaje de una pila recargable completamente cargada es frecuentemente más bajo que el de una pila alcalina nueva. Por lo tanto se recomienda que se utilicen pilas alcalinas en vez de recargables para un mejor rendimiento y período más largo de juego. • Instale las pilas con la polaridad correcta (+ y -). • Para evitar derrame de las baterías: 1. Siga las instrucciones de instalación de los fabricantes del juguete y las baterías. 2. No mezcle baterías nuevas y usadas. 3. No mezcle baterías estandar (zinc-carbono), alcalinas o recargables (níquel-cadmio o níquel-metalhidruro). No mezcle diferentes marcas de baterías. Sólo deben usarse baterías similares o equivalentes a las recomendadas. 4. Quite las pilas si el juguete no se va a utilizar por un período largo de tiempo para evitar posibles fugas y que se dañe la unidad. 5. Retire del producto las pilas descargadas o agotadas. 6. Deshágase de las pilas agotadas de manera adecuada; no las entierre. No las deseche en el fuego ya que pueden producir fugas o explotar. • Asegúrese que la cubierta está instalada correctamente en la unidad en todo momento. • No trate de recargar baterías no recargables. • No intente recargar pilas no recargables. • Las pilas recargables deben quitarse del juguete antes de cargarse. • Sólo un adulto debe cargar las pilas recargables. • No se les debe causar un circuito a las terminales de suministro. NOTA: Si la unidad deja de funcionar o no funciona como debiera, quite las baterías por unos minutos y luego vuelva a colocarlas. Si todavía hubiera problemas instale baterías nuevas. CONFORMIDAD CON LOS REQUISITOS DE LA FCC NOTA: Este equipo ha sido probado y se encontró que cumple con los límites para la Clase B del dispositivo digital, de conformidad con el Apartado 15 del Reglamento FCC. Estos límites son designados para proporcionar una protección razonable contra interferencia dañina en una instalación residencial. Este equipo genera, usa y puede radiar energía de radio frecuencia y, de no ser instalado y empleado de acuerdo a las instrucciones, puede causar interferencia dañina para las comunicaciones de radio. De cualquier forma, no hay garantía de que la interferencia no ocurra en una instalación en particular. Si este equipo causa interferencia dañina a la recepción de radio o televisión, lo cual puede ser determinado apagando y encendiendo el equipo, el usuario es alentado a tratar de corregir la interferencia a través de una o más de las siguientes medidas: • Reoriente o reubique la antena receptora. • Aumente la separación entre el equipo y el receptor. • Conecte el equipo a una salida de circuito diferente a aquella en la que el receptor se encuentre conectado. • Consulte al vendedor o a un técnico experimentado en radio/ televisión para ayuda. Este dispositivo cumple con el Apartado 15 del Reglamento FCC. La operación está sujeta a las siguientes dos condiciones: (1) Este dispositivo puede no causar interferencia dañina, y (2) este dispositivo debe aceptar cualquier interferencia recibida, incluyendo interferencia que pueda causar un funcionamiento no deseado. expresamente para su conformidad por la parte responsable, podría invalidar la autoridad del usuario para operar el equipo. Este aparato digital de Clase B cumple con la norma canadiense ICES-003. SERVICIO AL CLIENTE www.littletikes.es Spain: MGAE Little Tikes Iberia, S.L. Avda. Del Juguete s/n 03440 lbi (Alicante) Spain Tel : 902212152 Mexico: Handell S.A. de C.V. Gobernador José Guadalupe Covarrubias #78 Col. San Miguel Chapultepec, C.P. 11850, México, D.F. Tel: 01-800-426-3355 Impreso en China. © The Little Tikes Company, una compañía de MGA Entertainment. LITTLE TIKES® es una marca registrada de Little Tikes en EE.UU. y otros países. Todos los logotipos, nombres, personajes, representaciones, imágenes, eslóganes y apariencia del embalaje son propiedad de Little Tikes. Conserve esta dirección y embalaje para referencia ya que contiene información importante. El en el paquete. Instrucciones incluidas. Antes de darle este producto al niño quítele todo el embalaje, incluyendo etiquetas, amarres y costuras. GARANTIA La compañía Little Tikes fabrica juguetes divertidos de alta calidad. Le garantizamos al comprador original que este producto está libre de defectos de material o mano de obra por un año * a partir de la fecha de compra (se requiere el recibo de compra fechado como prueba). A exclusiva elección de la compañía Little Tikes, el único remedio disponible bajo esta garantía será el reemplazo de la parte defectuosa del producto o el reembolso del precio de compra de dicho producto. Esta garantía es válida solamente si el producto ha sido montado y mantenido según las instrucciones. Esta garantía no cubre abuso, accidente, aspectos cosméticos tales como el descoloramiento o las rayas como consecuencia de un uso normal, ni ningún otro problema que no surja de defectos de material o mano de obra. *El período de garantía es de tres (3) meses para guarderías o compradores comerciales. Fuera de EE.UU. y Canadá: Póngase en contacto con el lugar de compra para el servicio de garantía. Esta según el país/estado. Algunos países/estados no permiten la exclusión o limitación de daños concomitantes o consecuentes, por lo cual la limitación o exclusión mencionada puede no aplicarse a usted. Conserve este manual ya que contiene información importante. ¡Cuidemos el medio ambiente! El símbolo de cubo de basura en ruedas, indica que el producto no debe ser desechado con otros desperdicios domésticos. Por favor use puntos de recolección designados o instalaciones de reciclaje al desechar el artículo. No maneje las pilas usadas como desperdicio doméstico. Llévelas a las instalaciones de reciclaje designadas. DEUTSCH DISCOVERSOUNDS® ACTIVITY GARDEN™ Alter: ab 6 Monaten Bitte den Kassenzettel als Kaufbeleg aufbewahren. ACHTUNG: ZUSAMMENBAU DURCH EINEN ERWACHSENEN ERFORDERLICH. • Diese Anleitung für mögliche Rückfragen bitte aufbewahren. • Die Verpackung enthält für den Zusammenbau benötigte Kleinteile, die verschluckt werden können oder möglicherweise scharfe Spitzen oder Kanten besitzen. Bitte von Kindern fernhalten, bis der Zusammenbau vollständig beendet ist. • Dieses Produkt nicht in der Nähe eines Fensters aufstellen, wo Schnüre einer Jalousie oder Gardine herabhängen. Strangulationsgefahr! Das Produkt auch nicht in der Nähe von Telefon-, Computer- oder sonstigen Elektrokabeln aufstellen. SICHERHEITSHINWEISE ZU BATTERIEN: • Diese Anleitung für mögliche Rückfragen bitte aufbewahren. • Die Batterien durch 3 x 1,5 Volt Alkali-Mignonzellen AA (LR6), nicht enthalten, ersetzen. (Wiederaufladbare Batterien können ersatzweise verwendet werden.) • Die Leistung einer voll aufgeladenen wiederaufladbaren Batterie ist oft geringer als die einer neuen Alkali-Batterie. Für optimale Funktion und längere Spieldauer wird daher der Gebrauch von Alkali-Batterien anstelle von wiederaufladbaren Batterien empfohlen. • Die Batterien in der angegebenen Polrichtung (+/-) einlegen. • Um ein Auslaufen der Batterien zu vermeiden: 1. Beim Einlegen der Batterien die Anweisungen des Spielwaren- und des Batterieherstellers beachten. 2. Nicht alte und neue Batterien zusammen einlegen. (Immer alle Batterien zur gleichen Zeit auswechseln.) 3. Niemals verschiedene Batterietypen, z. B. Standard- (Zink-Kohle), Alkalioder wiederaufladbare Batterien (Nickel-Cadmium- oder Nickel-Metallhydrid-Zellen), miteinander kombinieren. Nicht Batterien unterschiedlicher Fabrikate zusammen einlegen. Nur Batterien desselben oder eines entsprechenden Batterietyps wie empfohlen verwenden. 4. Um ein Auslaufen der Batterien und Schäden am Produkt zu vermeiden, die Batterien immer aus dem Spielzeug herausnehmen, wenn es längere Zeit nicht benutzt wird. 5. Alte oder verbrauchte Batterien immer aus dem Spielzeug entfernen. 6. Batterien sicher und vorschriftsgemäß entsorgen. Nicht verbrennen – Explosionsgefahr! • Darauf achten, dass die Batteriefachabdeckung stets richtig eingesetzt ist. • Nicht-wiederaufladbare Batterien dürfen nicht aufgeladen werden. • Wiederaufladbare Batterien vor dem Aufladen immer aus dem Produkt herausnehmen. • Das Aufladen wiederaufladbarer Batterien sollte nur unter Aufsicht eines Erwachsenen durchgeführt werden. • Die Anschlussklemmen dürfen nicht kurzgeschlossen werden. BITTE BEACHTEN: Wenn das Produkt nicht mehr funktioniert oder nicht mehr so, wie es sollte, müssen die Batterien ein paar Minuten lang herausgenommen und dann wieder eingelegt werden. Sollte das Problem dann noch immer bestehen, müssen neue Batterien eingelegt werden. WICHTIGER HINWEIS Veränderungen an diesem Produkt dürfen nur mit ausdrücklicher Genehmigung des Herstellers vorgenommen werden. Dieses digitale Gerät der Klasse B erfüllt den kanadischen Standard ICES-003. KUNDENSERVICE : www.littletikes.com Zapf Creation AG Mönchrödener Str. 13 D-96472 Rödental Tel: +49 (0) 9563 7251-0 Gedruckt in China. D.R.©2011 The Little Tikes Company © The Little Tikes Company, eine Firma von MGA Entertainment. LITTLE TIKES® ist in den USA und anderen Ländern ein Warenzeichen von Little Tikes. Alle Logos, Namen, Charaktere, Ähnlichkeiten, Bilder, Claims und das Erscheinungsbild der Verpackung sind in Besitz von Little Tikes. Diese Adresse und die Verpackung für Rückfragen bitte aufbewahren. Sie enthält wichtige Informationen. Abweichungen des Inhalts in Farbe und Gestaltung gegenüber den Darstellungen auf der Verpackung vorbehalten. Anleitung enthalten. Bitte entfernen Sie die gesamte Verpackung sowie jegliche Anhänger, Befestigungen und Fäden, bevor das Produkt in die Hände eines Kindes gelangt. GARANTIE • zasięgnięcie porady u sprzedawcy lub doświadczonego technika RTV. Urządzenie spełnia wymagania określone w Części 15 Reguł FCC. Korzystając z urządzenia należy wziąć pod uwagę następujące okoliczności: (1) urządzenie nie może powodować szkodliwych zakłóceń i (2) urządzenie odbiera wszelkie zakłócenia, w tym również takie, które powodują jego niepożądane działanie. Es gelten die gesetzlichen Garantiebestimmungen. Diese Anleitung bitte für mögliche Rückfragen bitte aufbewahren. Sie enthält wichtige Informationen. „Umweltschutz ist Ehrensache!“ Hinweis zur Entsorgung: Dieses Produkt ist mit dem Symbol für die selektive Entsorgung von elektrischer Ausrüstung versehen (WEEE). Das heißt, dass dieses Produkt der EU Direktive 2002/96/EC entsprechend entsorgt werden muss, um die entstehenden Umweltschäden zu minimieren. Weitere Informationen erhalten Sie bei Ihrer lokalen oder regionalen Behörde. Aus diesem selektiven Entsorgungsprozess ausgeschlossene elektronische Produkte stellen wegen der Präsenz gefährlicher Substanzen eine Gefahr für die Umwelt und die Gesundheit dar. Alte und verbrauchte Batterien gehören nicht in den Hausmüll. Bitte am Wertstoffhof oder der dafür vorgesehenen Recyclingstelle abgeben. POLSKI OGRÓDEK MUZYCZNE ODKRYCIA Wiek: 6 MIESIĘCY + Prosimy o zachowanie dowodu zakupu. OSTRZEŻENIE: WYMAGANY MONTAŻ PRZEZ OSOBĘ DOROSŁĄ. • Należy zatrzymać niniejszą instrukcję do późniejszego wykorzystania. • Opakowanie zawiera małe elementy: części metalowe mogą grozić zadławieniem, ponadto mogą posiadać ostre krawędzie i czubki. Do momentu zakończenia montażu nie udostępniać zabawki dzieciom. • Nigdy nie ustawiać produktu w pobliżu okna, przy którym sznurki z żaluzji, rolet lub zasłon mogą doprowadzić do zadzierzgnięcia dziecka. Ponadto nie ustawiać produktu w pobliżu przewodów telefonicznych, komputerowych ani elektronicznej niani. BEZPIECZNE KORZYSTANIE Z BATERII: • Należy zatrzymać niniejszą instrukcję do późniejszego wykorzystania. • Produkt wymaga 3 baterii alkalicznych typ AA „LR6” 4,5V (nie załączono). Baterie alkaliczne można zastąpić akumulatorkami. • Napięcie prądu z akumulatorków często jest niższe od napięcia ze świeżej baterii alkalicznej. Zabawka będzie lepiej i dłużej działać, jeżeli zamiast akumulatorków zostaną użyte baterie alkaliczne. • Baterie instalować zgodnie z oznaczeniem (+ i -). • Aby zapobiec wyciekowi baterii: 1. Przestrzegać zaleceń producenta zawartych w instrukcji instalacji baterii. 2. Nie instalować równocześnie baterii nowych z używanymi. 3. Nie instalować baterii alkalicznych z bateriami cynkowo-węglowymi, akumulatorkami niklowo-kadmowymi lub niklowo-metalowo-wodorywymi. Nie instalować jednocześnie baterii różnych marek. Używać wyłącznie baterii tego samego typu zgodnych z zaleceniami producenta. 4. Jeśli zabawka nie będzie używana przez dłuższy okres czasu, należy z niej wyciągnąć baterie. Inaczej może dojść do wycieku i uszkodzenia zabawki. 5. Baterie wyczerpane należy usunąć z zabawki. 6. Usunięte baterie utylizować w prawidłowy sposób: nie zakopywać, nie wrzucać do ognia, ponieważ można spowodować wyciek lub wybuch. • Dopilnować, aby pokrywa gniazda baterii była zawsze na miejscu. • Nie wolno ładować baterii, które nie są przeznaczone do ponownego ładowania. • Przed przystąpieniem do ładowania akumulatorków należy je wyjąć z zabawki. • Ładowanie akumulatorków powinno się odbywać wyłącznie przez osobę dorosłą. • Nie powodować zwarcia pomiędzy bateriami. UWAGA: Jeżeli urządzenie przestanie działać lub działa nieprawidłowo, należy na kilka minut wyciągnąć baterie, po czym zainstalować je ponownie. Jeżeli problem się powtarza – zainstalować nowe baterie. ZGODNOŚĆ Z REGUŁAMI FEDERALNEJ KOMISJI ŁĄCZNOŚCI (FCC) UWAGA: Urządzenie to zostało przetestowane i spełnia wymagania określone dla urządzeń cyfrowych Klasy B, zgodnie z Częścią 15 Reguł FCC. Wymagania te określono w celu zapewnienia odpowiedniej ochrony przed wystąpieniem szkodliwych zakłóceń w instalacjach domowych. Urządzenie to generuje, wykorzystuje i może emitować energię w postaci fal radiowych i - o ile nie zostało zainstalowane oraz nie jest wykorzystywane zgodnie z instrukcją - może powodować szkodliwe zakłócenia komunikacji radiowej. Zakłócenia takie mogą jednak również wystąpić po prawidłowym zainstalowaniu urządzenia i podczas prawidłowej eksploatacji. Jeżeli urządzenie to jest powodem wystąpienia szkodliwych zakłóceń, co można sprawdzić przez jego wyłączenie i ponowne włączenie, zaleca się, aby użytkownik spróbował zminimalizować zakłócenia poprzez następujące działania: • przekierowanie anteny odbiornika lub przeniesienie jej w inne miejsce, • zwiększenie odległości pomiędzy urządzeniem a odbiornikiem, • podłączenie urządzenia pod gniazdo zasilające, będące częścią innego obwodu, niż obwód, do którego podłączony jest odbiornik, może prowadzić do unieważnienia uprawnień użytkownika do obsługi tego urządzenia. Serwis Konsumenta Little Tikes www.littletikes.pl MGA Entertainment Poland Sp. z o.o. ul. Grottgera 15a 76-200 Słupsk Polska tel. + 48 59 847 44 17 Wydrukowano w Chinach D.R. © 2011 The Little Tikes Company © The Little Tikes Company, spółka należąca do MGA Entertainment. LITTLE TIKES® jest znakiem handlowym spółki Little Tikes w Stanach Zjednoczonych i pozostałych krajach. Logo LITTLE TIKES®, nazwy, czcionki, podobieństwa, wizerunki, hasła marketingowe i wygląd opakowań są własnością Little Tikes. Prosimy o zachowanie niniejszego opakowania wraz z adresem, ponieważ zawiera istotne informacje. Zawartość opakowania może się różnić w zakresie specyfikacji i kolorów od zabawki zaprezentowanej na opakowaniu. Załączono instrukcję. Przed udostępnieniem zabawki dziecku, należy usunąć wszelkie materiały opakowaniowe wraz z zawieszkami, mocowaniami, spinaczami i szwami. GWARANCJA OGRANICZONA Little Tikes jest producentem wysokiej jakości zabawek. Gwarantujemy pierwotnemu nabywcy, że produkt ten jest wolny od wad materiałowych lub wad wykonania przez okres jednego roku* od dnia zakupu (roszczenia gwarancyjne będą rozpatrywane wyłącznie za okazaniem dowodu zakupu z datą zakupu). Zależnie od decyzji Spółki Little Tikes, roszczenie gwarancyjne zostanie zaspokojone albo poprzez wymianę wadliwego elementu produktu albo poprzez zwrot ceny zakupu. Gwarancja zachowuje ważność wyłącznie, jeżeli produkt został zmontowany i był konserwowany zgodnie z instrukcjami. Niniejsza gwarancja nie obejmuje przypadków użycia produktu niezgodnego z przeznaczeniem, zniszczenia w wyniku wypadku oraz naturalnego zużycia produktu poprzez blaknięcie koloru lub zadrapania, nie obejmuje również żadnych innych defektów nie wynikłych z wad materiałowych lub wad wykonania. Prosimy o zachowanie niniejszej instrukcji, ponieważ zawiera ważne informacje. Dbajmy o środowisko! Symbol przekreślonego kubła na śmieci oznacza, że produkt ten nie może zostać wyrzucony wraz z innymi domowymi śmieciami. Aby pozbyć się zabawki proszę ją oddać do wyznaczonego punktu odbioru lub zakładu zajmującego się recyklingiem urządzeń elektrycznych. Zużytych baterii nie wolno traktować na równi z domowymi śmieciami. Należy je zdawać do wyznaczonego punktu odbioru lub zakładu zajmującego się recyklingiem urządzeń elektrycznych. NEDERLANDS DISCOVERSOUNDS® ACTIVITY GARDEN™ Leeftijd: ouder dan 6 maanden Bewaar a.u.b. uw kassabon als bewijs van aankoop. LET OP: IN ELKAAR TE ZETTEN DOOR EEN VOLWASSENE. • Bewaar deze handleiding voor referentie. • Vóór montage bevat het pakket kleine onderdelen: bevestigingsmiddelen die verstikkingsgevaar opleveren en die scherpe randen en punten kunnen hebben. Buiten bereik van kinderen houden totdat de montage is voltooid. • Plaats dit product nooit in de buurt van een raam. Een kind zou verstrikt kunnen raken in de touwtjes van jaloezieën of gordijnen. Plaats dit product ook nooit in de buurt van telefoon-, computer-, of babyfoonsnoeren. VEILIGHEIDSINFORMATIE VOOR BATTERIJEN: • Bewaar deze handleiding voor referentie. • Gebruikt 3 “AA” (LR6) alkalibatterijen (niet inbegrepen). (Substitutie van oplaadbare batterijen is mogelijk.) • De spanning van een volledig opgeladen, oplaadbare batterij is vaak lager dan die van een nieuwe alkalinebatterij. Voor betere prestaties en langer spelen is het dus raadzaam om alkalinebatterijen te gebruiken in plaats van oplaadbare batterijen. • Let bij het aanbrengen van de batterijen op de juiste polariteit (+ en -). • Om lekkage van batterijen te voorkomen: 1. Volg de aanwijzigingen van de fabrikant van het speelgoed en van de batterij op bij de installatie van de batterij. 2. Gebruik geen oude en nieuwe batterijen door elkaar. 3. Gebruik geen gewone (koolstof-zink), alkali- en oplaadbare batterijen (nikkelcadmium of nikkelmetaalhydride) door elkaar. Gebruik geen batterijen van verschillend fabrikaat door elkaar. Alleen aanbevolen of equivalente batterijen mogen worden gebruikt. 4. Wanneer het speelgoed lang niet wordt gebruikt, verwijdert u de batterijen om mogelijke lekkage en schade aan het speelgoed te voorkomen. 5. Haal lege of uitgeputte batterijen uit het product. 6. Voer een lege batterij volgens voorschrift af; niet begraven. Gooi • Zorg ervoor dat het deksel altijd goed is gemonteerd. • Probeer niet-oplaadbare batterijen niet op te laden. • Verwijder oplaadbare batterijen uit het speelgoed voordat u ze oplaadt. • Oplaadbare batterijen mogen uitsluitend door een volwassene worden opgeladen. • Zorg ervoor dat geen kortsluiting optreedt tussen de voedingsklemmen. OPMERKING: Als het apparaat stopt met werken of niet goed meer werkt, verwijder de batterijen gedurende enkele minuten en breng ze weer aan. Als het probleem aanhoudt, dient u nieuwe batterijen te installeren. OPMERKING: dit product is getest en voldoet aan de voorschriften voor een digitaal apparaat van klasse B, overeenkomstig Deel 15 van de FCCregels. Deze voorschriften zijn opgesteld om een redelijke bescherming te bieden tegen schadelijke storing bij gebruik binnenshuis. Dit product genereert en gebruikt radiofrequentie-energie, of kan deze uitstralen. Als het product niet volgens de instructies wordt geïnstalleerd en gebruikt, kan het schadelijke storingen voor radiocommunicaties veroorzaken. Er kan echter geen garantie worden gegeven dat bepaalde installaties storingsvrij zullen functioneren. Als het product wel storing veroorzaakt in radio- of televisieontvangst (wat u kunt vaststellen door het apparaat uit en aan te zetten) raden wij de gebruiker aan de maatregelen: • Richt de ontvangstantenne op een andere manier of plaats deze ergens anders. • Vergroot de afstand tussen het product en de radio of televisie. • Sluit het apparaat aan op een stopcontact van een andere groep dan de groep waarop de radio of televisie is aangesloten. • Vraag advies aan de verkoper of aan een ervaren radio-/ televisietechnicus. Dit product is in overeenstemming met Deel 15 van de FCC-regels. Voor het gebruik moet worden voldaan aan twee voorwaarden: (1) dit product mag geen schadelijke interferentie veroorzaken, en (2) dit product moet elke ontvangen interferentie aanvaarden, met inbegrip van interferentie die de werking negatief zou kunnen beïnvloeden. Let op: wijzigingen die niet zijn goedgekeurd door de fabrikant kunnen ertoe leiden dat de gebruiker het recht verspeelt om dit product te mogen gebruiken. Dit digitale apparaat van klasse B voldoet aan de Canadese norm ICES-003. CONSUMENTEN SERVICE www.littletikes.nl Little Tikes MGA Entertainment, PO Box 85, 1171 AB Badhoevedorp The Netherlands Sloterweg 303A-1 1171 VC Badhoevedorp The Netherlands Tel: +31 20 354 80 34 Fax: +31 20 659 80 34 © The Little Tikes Company, onderdeel van MGA Entertainment. LITTLE TIKES® is een handelsmerk van Little Tikes in de V.S. en andere landen. Alle logo’s, namen, symbolen, gelijkenissen, afbeeldingen, slogans en verpakkingsvormen zijn het eigendom van Little Tikes. Het adres en de verpakking bevatten belangrijke informatie, bewaar beide dus goed. Verwijder al het verpakkingsmateriaal, inclusief labels, touwtjes en nietjes voordat u dit product aan een kind geeft. De inhoud, met inbegrip Inclusief gebruiksaanwijzing. GARANTIE The Little Tikes Company vervaardigt leuk speelgoed van hoge kwaliteit. Wij garanderen de oorspronkelijke koper dat dit product gedurende één jaar* vanaf de datum van aankoop vrij zal zijn van materiaal- en productiefouten (gedateerde verkoopbon is vereist als bewijs van aankoop). Naar keuze van The Little Tikes Company bestaan de enige rechtsmiddelen die beschikbaar zijn in het kader van deze garantie uit vervanging van het defecte onderdeel van het product of restitutie van de verkoopprijs van het product. Deze garantie is alleen geldig als het product is gemonteerd en onderhouden volgens de instructies. Deze garantie omvat geen misbruik, ongevallen, cosmetische kwesties zoals verkleuring of krassen als gevolg van normale slijtage, of enige andere oorzaak dan materiaal- en productiefouten. *De garantieperiode bedraagt drie (3) maanden voor kinderdagverblijven of zakelijke klanten. Buiten de Verenigde Staten en Canada: Neem contact op met uw verkoper voor meer informatie over de garantieservice. Deze garantie biedt u specifieke wettelijke rechten. Bovendien hebt u mogelijk nog andere rechten. Deze kunnen echter van land tot land of van staat tot staat verschillen. In sommige landen en staten is uitsluiting of beperking van incidentele of gevolgschade niet toegestaan, dus is de bovenstaande beperking of uitsluiting mogelijk niet op u van toepassing. Bewaar deze handleiding goed, er staat belangrijke informatie in. Zorg voor het milieu! Het kliko-pictogram betekent dat dit product niet bij het gewone huis-, tuin- en keukenafval mag worden gezet. Geef het product af bij een chemokar of breng het naar een KCA-inzamelpunt. Gooi lege batterijen niet weg samen met het gewone huis-, tuin- en keukenafval. Breng ze naar een chemokar of een inzamelpunt voor klein chemisch afval.-
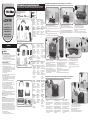 1
1
-
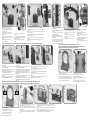 2
2
-
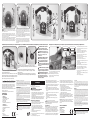 3
3
-
 4
4


Little Tikes DiscoverSounds® Activity Garden™ Manual de usuario
- Categoría
- Muebles de bebe
- Tipo
- Manual de usuario
En otros idiomas
- français: Little Tikes DiscoverSounds® Activity Garden™ Manuel utilisateur
- English: Little Tikes DiscoverSounds® Activity Garden™ User manual
- Deutsch: Little Tikes DiscoverSounds® Activity Garden™ Benutzerhandbuch
- Nederlands: Little Tikes DiscoverSounds® Activity Garden™ Handleiding
- polski: Little Tikes DiscoverSounds® Activity Garden™ Instrukcja obsługi
Documentos relacionados
-
 Little Tikes ACTIVITY GARDEN 632624M Manual de usuario
-
 Little Tikes DiscoverSounds® Workshop Manual de usuario
-
 Little Tikes DiscoverSounds Shape, Sort & Scatter Manual de usuario
-
 Little Tikes Tikes Kitchen & Restaurant™ Manual de usuario
-
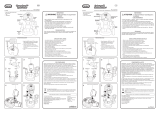 Little Tikes DiscoverSounds® Sports Center Manual de usuario
-
Little Tikes 652059 Manual de usuario
-
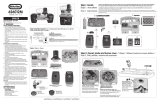 Little Tikes Cook 'n Grow™ Kitchen Manual de usuario
-
Little Tikes 488023C3 Guía del usuario
-
 Little Tikes Play 'n Scoot™ Pirate Ship Manual de usuario
-
 Little Tikes Deluxe Home & Garden Playhouse Manual de usuario


Otros documentos
-
Gardenline 94137 Assembly Instructions Manual
-
National Tree Company DF-000024X Manual de usuario
-
Telcoma DOMOPARK El manual del propietario
-
National Geographic 114/900 Reflector Telescope AZ El manual del propietario
-
Celestron 21049 Guía del usuario
-
-
Bresser Junior 8850900 El manual del propietario
-
Bresser 8843202 El manual del propietario
-
Barska 900114 El manual del propietario
-