Oster 3862 Manual de usuario
- Categoría
- Planchas de gofres
- Tipo
- Manual de usuario

–––
F
OLD
–––
IMPORTANT SAFEGUARDS
When using electrical appliances, basic safety precautions should always be followed,
including the following:
READ ALL INSTRUCTIONS BEFORE USE
• Do not touch hot surfaces.
• To protect against electric shock, do not immerse cord, plug or any part of the Waffle/
Sandwichmaker in water or other liquid.
• Close supervision is always necessary when it is used by or near children.
• Unplug unit from outlet when not in use and before cleaning. Allow hot surface to cool
before putting on or taking off parts.
•
Do not operate this or any appliance with a damaged cord or plug or in abnormal state.
If
its main cord is damaged, it must be replaced by the manufacturer or the nearest service
agent or qualified person.
•
Do not let the cord hang over edge of table or counter, or touch hot surface.
• Do not place on or near a hot gas or electric burner or in a heated oven.
• Do not use the appliance for other than its intended use.
• Make sure that your outlet voltage corresponds to the voltage stated on the rating label of
the Waffle/Sandwichmaker.
• Any examination, repair or adjustment for the appliance should be made by the
authorized service agent.
• If the supply cord is damaged, it must be replaced by the manufacturer or its service agent
or similar qualified person in order to avoid a hazard.
THIS UNIT IS FOR HOUSEHOLD USE ONLY
SPECIAL INSTRUCTIONS
This appliance has a polarized plug (one blade is wider than the other). To reduce the risk of
electric shock, this plug will fit in a polarized outlet only one way. If the plug does not fit fully
in the outlet, reverse the plug. If it still does not fit, contact a qualified electrician. Do not
modify the plug in any way.
SAVE THESE INSTRUCTIONS
W
ELCOME
Congratulations on your purchase of an OSTER
®
Waffle/Sandwichmaker
! To learn
more about OSTER
®
products, please visit us at www.oster.com.
Your new appliance will surely make crispy, hot, golden waffles/sandwiches in just minutes
for a quick meal anytime of the day.
Your OSTER
®
Waffle/Sandwichmaker is thermostatically controlled to help you prepare
waffles to perfection. Your unit is portable so you can make waffles/sandwiches in your
kitchen or right at the table. The non-stick grids make clean-up easy. We know that you
will love your new OSTER
®
Waffle/Sandwichmaker. It’s a great addition to any kitchen.
HOW TO USE YOUR OSTER
®
WAFFLE/SANDWICHMAKER
CHANGING WAFFLE AND SANDWICH PLATES
• To release plates, push the button on the inside of the unit. The front of the plate will lift
slightly. Pull plate towards you to slide out of locked position.
•
When putting plates in, make sure the hinges are aligned with the metal inserts on the plates.
Start by placing the rear hinge insert in first and pressing down on the plate until you hear the
plate click into place.
English-4English-3
V
ARIATIONS
Pecan or Macadamia Nut Waffles: Sprinkle 1 Tbsp. (15 ml) finely chopped
pecans or macadamia
nuts over preheated waffle grids. Pour 3/4 cup (200 ml)
batter over nuts and close
Waffle/Sandwichmaker. Bake as directed.
Bacon Waffles: Cook bacon strips. Pour 3/4 cup (200 ml) batter over waffle grids.
Cut 1 strip bacon in half, lay over batter and close Waffle/Sandwichmaker. Bake as directed.
Cheese Waffles: Fold in 1-1/2 cups (375 ml) shredded cheddar cheese into batter.
Bake as directed. Serve with syrup or your favorite creamed entrée.
Blueberry Waffles: Fold 2 cups (500 ml) fresh blueberries into batter. Pour 3/4 cup (200 ml)
batter over grids. Bake until golden.
Chocolate Chip Waffles: Fold 1 cup (250 ml) chocolate chips into batter. Bake as directed.
LEMON SWEET WAFFLES
1 cup butter or margarine (softened) 3-1/4 cups flour
1-1/2 cups sugar 1 packet of vanilla sugar
2 eggs 1-3/4 cups water
1/8 tsp. baking powder grated rind of 1 lemon
In a large bowl, beat butter, sugars and eggs together. Add all dry ingredients along with
water and lemon rind, and blend until smooth. Pour approximately 3/4 cup batter into
waffle iron. Bake as directed.
YIELD: 8 – 10 WAFFLES
ALOHA
DESSERT WAFFLES
A pretty dessert that is guaranteed to please your guests
8 prepared Macadamia Nut Waffles 1 can (6 oz. or 170 g) frozen orange juice concentrate, thawed
1 cup (250 ml) sugar 1/2 cup (125 ml) flaked coconut
3 Tbsp. (45 ml) cornstarch 1/3 cup (75 ml) Maraschino cherries, chopped
1 can (8 oz. or 277 g) crushed 1/4 cup (50 ml) 150 Proof rum
pineapple, drained reserving juice vanilla ice cream
cold water
In a large sauté pan, combine sugar and cornstarch. Measure pineapple juice and enough cold
water to equal 1-1/4 cups (300 ml). Combine water mixture, orange juice and sugar mixture.
Cook over medium heat until thickened, stirring constantly. Add coconut, cherries and pineapple.
Heat through. Keep warm on low heat. Slowly pour rum over top of mixture. Carefully ignite.
Place a scoop of vanilla ice cream over each waffle. When flame dies, spoon sauce over ice cream.
Serve immediately.
Y
IELD: 5 WAFFLES
CHOCOLATE BROWNIE WAFFLES
Here’s a no-fuss dessert idea!
1/4 cup (50 ml) shortening or oil 1 Tbsp. (15 ml) baking powder
2/3 cup (150 ml) sugar 1/4 tsp. (1 ml) salt
2 squares (1 ounce or 28 g each) 1-1/4 cups (300 ml) milk
baking chocolate, melted 1/2 tsp. (2 ml) vanilla
3 egg yolks 1/2 cup (125 ml) chopped nuts
1-1/2 cups (375 ml) all-purpose flour 3 egg whites, stiffly beaten
Preheat Waffle/Sandwichmaker. In a large mixing bowl, cream shortening and sugar
at medium-low until fluffy. Add chocolate and egg yolks. Beat well. Add milk
alternately with combined dry ingredients. Mix well. Add vanilla and nuts. By hand, gently
fold in beaten egg white. Pour 3/4 cup (200 ml)
batter over grids.
Close Waffle/Sandwichmaker and bake until steam no longer escapes,
about 3-5 minutes.
Waffle will crisp as it cools. Repeat. Serve hot or cold with vanilla ice cream,
chocolate syrup and chopped walnuts or pecans.
YIELD: 6 WAFFLES
English-5 English-6
User Manual
Wafflemaker with
Sandwich Plates
Manual de Instrucciones
Waflera con
Sandwich Plates
Manuel d’Instructions
Gaufrier avec
Plaques à Sandwiches
MODEL/MODELO
MODÈLE
3862
Español-1 Español-3 Español-4Español-2
English-2
RECIPES
MONTE CRISTO SANDWICHES
4 slices firm-textured sliced bread, white or whole wheat For the batter:
Dijon mustard 4 large eggs
4 ounces sliced smoked ham, such as Black Forest or Westphalian 1/2 cup milk
4 ounces sliced Swiss cheese Salt to taste
4 ounces sliced roasted turkey breast
Make the batter: In a shallow bowl, whisk 4 large eggs with the 1/2 cup milk and salt.
Meanwhile, spread one side of each slice of bread with some of the mustard.
Top 2 of the slices with some of the ham, cheese, and turkey. Top each with 1 slice of
the remaining bread, pressing down to form 2 compact sandwiches.
Dip each sandwich on both sides into the batter, coating evenly. Add the sandwiches
to OSTER
®
Sandwichmaker. Cook for 5 minutes until golden brown.
YIELD: 2 SANDWICHES
QUICK WAFFLES
3 eggs 2 cups flour
1 cup milk 1/2 tsp. salt
1/2 cup melted butter or margarine 1 Tbsp. baking powder
1 Tbsp. vanilla (optional) 2 tsp. sugar
Beat whole eggs in a bowl until thick. Beat milk, melted butter and vanilla into eggs.
In a separate bowl, combine remaining ingredients. Sift into egg mixture, and mix well.
Bake as directed. Y
IELD: 6 – 8 WAFFLES
Variation: Cinnamon – Apple.
Add 1 apple peeled and shredded, 1 tsp. vanilla
and 1/2 tsp. cinnamon to batter.
EXTRA
-S
PECIAL
WHOLE
WHEAT WAFFLES
Feed the gang with these at Sunday Brunch
1 cup (250 ml) milk* 3 eggs (or equivalent)
1 cup (250 ml) water 1 package (1/4 ounce or 7 g)
1/4 cup (50 ml) butter or margarine active dry yeast
1/4 cup (50 ml) honey 1/2 tsp. (2 ml) salt
2-2/3 cups (650 ml) whole wheat flour
*low-fat or skim milk may be used
Heat milk, water, butter and honey at 120°F (48°C). In large mixing bowl, combine flour, eggs,
yeast, salt and warmed milk mixture. Mix at low to moisten, then medium-high for 1 minute.
Cover and refrigerate several hours or overnight, stirring occasionally.
Preheat Waffle/Sandwichmaker. Pour 3/4 cup (200 ml) over grids. Close Waffle/Sandwichmaker,
bake until steam no longer escapes, about 3 – 5 minutes. Repeat. Serve while hot with your
favorite topping. Y
IELD
: 7 WAFFLES
LIGHT ’N CRISP WAFFLES
2 egg yolks 1/2 tsp. (2 ml) salt
2 cups (500 ml) milk 1/3 cup (75 ml) oil
2 cups (500 ml) all-purpose flour 2 egg whites, stiffly beaten
1 Tbsp. (15 ml) baking powder
Preheat Waffle/Sandwichmaker. Put all ingredients, except egg whites, in a large mixing bowl.
Beat on low until moistened. Increase to medium, mix until smooth. By hand, gently fold in
beaten egg whites. Pour 3/4 cup (200 ml) batter over grids. Close Waffle/Sandwichmaker, bake
until steam no longer escapes, about 3 – 5 minutes. Repeat. Serve while hot with your favorite
topping. Y
IELD: 5 WAFFLES
P
REPARING WAFFLES
1.
Close unit and plug into outlet. Use only voltage
specified on bottom of unit.
The Power On light (Red)
will come on. The Ready light (Amber) will not come on.
C
AUTION: Touch unit only by handles during use or directly after use.
2. The unit is ready for use when the Ready light comes on.
3. Open unit and pour approximately 3/4 cup waffle batter onto grids. For best results,
pour batter in a circle around outer edge of Wafflemaker. Close cover. It is very typical
to have a small amount of batter run over grid and down unit. However, if an excessive
amount of batter runs over, use less batter.
4. Cover will rise slightly as waffles begin to bake. Do not open cover while steam
is escaping. Most waffle recipes bake in approximately 4 to 5 minutes. Waffles are
generally done when steam no longer escapes from sides and front of unit.
5. When waffles are done, remove with a plastic fork or wooden tongs.
N
OTE: The Ready light may cycle on and off during cooking. This indicates that
the thermostat is maintaining the unit at the proper cooking temperature.
6. Close cover and wait for Ready light to come on before preparing another batch
of waffles.
PREPARING SANDWICHES
1. Plug the power cord into the AC outlet.
2. Before use, please preheat the Sandwichmaker for 5 to 8 minutes. The red power on
lamp will be on. When the amber lamp goes on, it means the Sandwichmaker
temperature is ready.
3. Coat the inner plate of the machine with butter or margarine to prevent sticking.
4. After preheat, open the Sandwichmaker, place a piece of bread of approximately 1/2-inch
thickness on inner lower plate. Coat one side of the bread with butter or margarine and
place on the plate against this side.
English-1
P.N. 111895
–––
F
OLD
––– –––
F
OLD
–––
–––
F
OLD
–––
–––
F
OLD
–––
–––
F
OLD
–––
–––
F
OLD
–––
For product questions contact:
Sunbeam Consumer Service
USA : 1.800.334.0759
Canada : 1.800.667.8623
www.oster.com
©2003 Sunbeam Products, Inc. All rights reserved.
OSTER
®
is a registered trademark of Sunbeam Products, Inc.
Distributed by Sunbeam Products, Inc., Boca Raton, FL 33431
Pour les questions de produit:
Sunbeam Consumer Service
États-Unis : 1.800.334.0759
Canada : 1.800.667.8623
www.oster.com
©2003 Sunbeam Products, Inc. Tous droits réservés.
OSTER
®
est une marque déposée de Sunbeam Products, Inc.
Distribué par Sunbeam Products, Inc., Boca Raton, Florida 33431
Para preguntas sobre los productos llame:
Sunbeam Consumer Service
EE.UU. : 1.800.334.0759
Canadá : 1.800.667.8623
www.oster.com
©2003 Sunbeam Products, Inc. Todos los derechos reservados.
OSTER
®
es una marca registrada de Sunbeam Products, Inc.
Distribuido por Sunbeam Products, Inc., Boca Raton, FL 33431
Printed in China Imprimé en Chine Impreso en China
5. Add filling on it, taking care not to overfill.
6.
Put another piece of bread over the filling, and coat top with butter
or margarine
.
7. Close the Sandwichmaker slowly.
8. After about 2 to 3 minutes, open the machine and remove sandwich. Sandwichmaker can
be stopped at any time by unplugging the power cord from the AC outlet.
CAUTION
:
1. When it is difficult to close the machine, it means that too much filling was added.
You should reduce the filling or replace with thinner bread to prevent damaging
the Waffle/Sandwichmaker.
2. When removing sandwich from machine, do not use any utensil that may damage
the non-stick coating. Use wood or plastic suitable for high temperatures.
CLEANING INSTRUCTIONS
1. Unplug and allow unit to cool before cleaning.
2. Wipe outside with soft, dry cloth when Waffle/Sandwichmaker is cold.
Never use metal polish.
3. You can remove the heating plate to clean with soft cloth, warm water and dishwashing
liquid. Before resetting it, you should allow it to dry thoroughly.
4. If Waffle/Sandwichmaker is used frequently, accumulated bread crumbs should be
removed at least once a week. Make sure any accumulation under plates is completely
removed before using the Waffle/Sandwichmaker again.
HINTS FOR TASTY WAFFLES
1. Do not over-mix waffle batter. Beating egg whites separately and folding them gently
into the batter surely will create a lighter, crispier waffle.
2. Completely bake waffles before removing from unit.
3.
Don’t open the Wafflemaker while steam is escaping from sides and front of the unit.
4. Why not freeze prepared waffles for those busy days ahead? Just bake the waffles
as directed. Cool on a wire rack and wrap in moisture-proof paper or plastic.
Quickly reheat in your toaster oven, broiler or microwave oven.
WAFFLE/SANDWICH MAKING
Prepare your own waffles/sandwiches from scratch with any of the OSTER
®
recipes listed
on the following pages, or use any of your own family favorites. For those busy days,
why not have a prepared mix handy for a meal in a matter of minutes?
CREATIVE
W
AFFLES
Let your imagination be your guide to many exciting and tasty meals with your
OSTER
®
Waffle/Sandwichmaker. Here are just a few suggestions:
B
REAKFAST AND
BRUNCH
Top crispy waffles/sandwiches with:
Butter, Syrup, Honey, Molasses, Apple Butter, Pie Filling,
Whipped Cream, Yogurt, Fruit Preserves, Fresh Fruit
D
ESSERT
Serve dessert waffles hot or cold. Prepare a richer batter such as Belgian-Style Waffles
or Chocolate Brownie Waffles. Top with your favorite sweet and tasty ingredients which
might include:
Sweetened Fresh Berries, Ice Cream, Powdered Sugar,
Chopped Nuts, Sundae Sauces, Fruit Yogurt
Visit us at www.oster.com
–––
F
OLD
–––
–––
F
OLD
–––
–––
F
OLD
–––
–––
F
OLD
–––
–––
F
OLD
–––
One-Year Limited Warranty
S
unbeam Products, Inc., or if in Canada, Sunbeam Corporation (Canada) Limited (collectively “Sunbeam”)
warrants that for a period of one year from the date of purchase, this product will be free from defects in
material and workmanship. Sunbeam, at its option, will repair or replace this product or any component
of the product found to be defective during the warranty period. Replacement will be made
with a new
or remanufactured product or component. If the product is no longer available, replacement
may be made
with a similar product of equal or greater value. This is your exclusive warranty.
This warranty is valid for the original retail purchaser from the date of initial retail purchase and
is not transferable. Keep the original sales receipt. Proof of purchase is required to obtain warranty
performance. Sunbeam dealers, service centers, or retail stores selling Sunbeam products do not have
the right to alter, modify or any way change the terms and conditions of this warranty.
This warranty does not cover normal wear of parts or damage resulting from any of the following:
negligent use or misuse of the product, use on improper voltage or current, use contrary to the operating
instructions, disassembly, repair or alteration by anyone other than Sunbeam or an authorized Sunbeam
service center. Further, the warranty does not cover: Acts of God, such as fire, flood, hurricanes and
tornadoes.
What Are the Limits on Sunbeam’s Liability?
Sunbeam shall not be liable for any incidental or consequential damages caused by the breach of any
express, implied or statutory warranty or condition.
Except to the extent prohibited by applicable law, any implied warranty or condition of merchantability
or fitness for a particular purpose is limited in duration to the duration of the above warranty.
Sunbeam disclaims all other warranties, conditions or representations, express, implied, statutory
or otherwise.
Sunbeam shall not be liable for any damages of any kind resulting from the purchase, use or misuse of, or
inability to use the product including incidental, special, consequential or similar damages or loss of profits, or
for any breach of contract, fundamental or otherwise, or for any claim brought against purchaser by any other
party.
Some provinces, states or jurisdictions do not allow the exclusion or limitation of incidental
or consequential damages or limitations on how long an implied warranty lasts, so the above
limitations or exclusion may not apply to you.
This warranty gives you specific legal rights, and you may also have other rights that vary from
province to province, state to state or jurisdiction to jurisdiction.
How to Obtain Warranty Service
In the U.S.A. –
If you have any question regarding this warranty or would like to obtain warranty service,
please call 1.800.334.0759 and a convenient service center address will be provided to you.
In Canada –
If you have any question regarding this warranty or would like to obtain warranty service,
please call 1.800.667.8623 and a convenient service center address will be provided to you.
In the U.S.A., this warranty is offered by Sunbeam Products, Inc., located in Boca Raton,
Florida 33431. In Canada, this warranty is offered by Sunbeam Corporation (Canada) Limited,
located at 5975 Falbourne Street, Mississauga, Ontario L5R 3V8.
PLEASE DO NOT RETURN THIS PRODUCT TO ANY OF
THESE ADDRESSES OR TO THE PLACE OF PURCHASE.
Waffle
Plates
Safety Locking
Handles
Rear Hinge
Insert
Sandwich
Plates
Outer Hinge
Insert
Plate Release
Button
FEATURES OF YOUR OSTER
®
WAFFLE/SANDWICHMAKER
Planchas
para Wafles
Asas con Traba
de Seguridad
Separador de la
Bisagra Trasera
Planchas para
Sandwiches
Separador de la
Bisagra Externa
Botón para Quitar
las Planchas
PIEZAS DE LA WAFLERA/SANDWICHERA OSTER
®
CÓMO PREPARAR WAFLES
1. Cierre la unidad y enchúfela en el tomacorriente. Use sólo el voltaje que se indica
en la parte inferior de la unidad. Se encenderá la luz de encendido (rojo). La luz
Listo (amarillo) no se encenderá.
P
RECAUCIÓN
:
Sólo toque la unidad por las asas durante el uso o inmediatamente
después del uso.
2. La unidad estará lista para usarse cuando la luz de Listo se encienda.
3. Abra la unidad y vierta aproximadamente 3/4 de taza de masa de wafles sobre
las rejillas. Para obtener óptimos resultados, vierta la masa formando un círculo
alrededor del borde exterior de la Waflera. Cierre la tapa. Es normal que una
pequeña cantidad de masa se escurra por la rejilla y por debajo de la unidad.
Sin embargo, si se derrama mucha masa, deberá usar menos cantidad.
4. La tapa se levantará levemente a medida que los wafles comiencen a cocinarse.
No abra la tapa mientras salga vapor. La mayoría de las recetas de wafles toma
en prepararse de 4 a 5 minutos aproximadamente. Por lo general los wafles están
listos cuando ya no sale más vapor por los costados y el frente de la unidad.
5. Cuando los wafles estén listos, quítelos con un tenedor de plástico o con unas pinzas
de madera.
N
OTA
:
Es posible que la luz de Listo se encienda y se apague durante la cocción.
Esto indica que el termostato mantiene la unidad en la temperatura
apropiada de cocción.
6. Cierre la tapa y espere que la luz de Encendido se encienda antes de preparar
más wafles.
CÓMO PREPARAR SANDWICHES
1. Enchufe la unidad en un tomacorriente de CA.
2. Antes de usar, caliente la Sandwichera durante 5 a 8 minutos. Se encenderá la luz
roja. La luz amarilla se encenderá cuando la Sandwichera alcance la temperatura
apropiada.
3. Unte la plancha interna de la unidad con mantequilla o margarina para evitar que
los alimentos se adhieran.
4. Luego de calentar la Sandwichera, ábrala y coloque una rebanada de pan de
aproximadamente _ pulgada de grosor sobre la plancha inferior interna. Unte un
lado del pan con mantequilla o margarina y colóquelo sobre la plancha contra ese
lado.
5. Agregue el relleno, tratando de no excederse en la cantidad.
6. Coloque otra rebanada de pan sobre el relleno y úntela con mantequilla o
margarina.
7. Cierre la Sandwichera lentamente.
8. Después de 2 a 3 minutos, abra la unidad y quite el sandwich. Puede detener la
Sandwichera en cualquier momento desenchufándola del tomacorriente de CA.
P
RECAUCIÓN
:
1. Si le resulta difícil cerrar la unidad es que ha puesto demasiado relleno. Debe reducir
el relleno o usar un pan más delgado para evitar dañar la Waflera/Sandwichera.
2. Para quitar el sandwich de la unidad no use ningún utensilio que pueda dañar el
recubrimiento antiadherente. Use utensilios de madera o plástico, aptos para
temperaturas altas.
INSTRUCCIONES DE LIMPIEZA
1. Desenchufe la unidad y deje enfriar antes de limpiar.
2.
Limpie el exterior con un paño suave y seco cuando la Waflera/Sandwichera esté fría.
Nunca use lustre para metales.
3. Puede quitar la plancha de calentamiento y limpiarla con un paño suave, agua tibia
y detergente. Vuelva a colocarla una vez que esté completamente seca.
4. Si usa la Waflera/Sandwichera con frecuencia, deberá quitar las migas de pan que
se acumulen, por lo menos una vez a la semana. Verifique que no queden migas
debajo de las planchas antes de volver a usar la Waflera/Sandwichera.
CONSEJOS PARA WAFLES SABROSOS
1. No mezcle en forma excesiva la masa de wafles. Para obtener wafles más livianos
y crocantes, bata las claras de huevo por separado y viértalas suavemente sobre
la masa para wafles.
2. Cocine completamente los wafles antes de retirarlos de la unidad.
3. No abra la Waflera mientras el vapor esté escapando por los lados y por el frente
de la unidad.
4. ¿Por qué no congelar wafles preparados para los días en que esté muy ocupada?
Simplemente cocine los wafles como se indica. Déjelos enfriar sobre una rejilla
de alambre y envuélvalos en papel o plástico a prueba de humedad. Recaliéntelos
rápidamente en su horno tostador, asador u horno microondas.
PRECAUCIONES IMPORTANTES
Cuando use algún aparato eléctrico siempre deben seguirse precauciones básicas
de seguridad incluyendo las siguientes:
LEA TODAS LAS INSTRUCCIONES ANTES DE USAR
• No toque superficies calientes.
• Como protección contra una descarga eléctrica, no sumerja el cable, el enchufe o cualquier otra pieza
de la Waflera/Sandwichera en agua u otros líquidos.
• Nunca deje la unidad sin supervisión si la utilizan los niños o si la misma se utiliza cerca de ellos.
• Desenchufe el electrodoméstico del tomacorriente cuando no esté en uso y antes de limpiar.
Deje que la unidad se enfríe antes de quitar o agregar piezas.
•
No opere este electrodoméstico o cualquier otro si el cable o enchufe está dañado o en malas condiciones.
Si el cable principal está dañado, solicite al fabricante, el agente de servicio más cercano o una
persona calificada que lo cambie.
• No permita que el cable cuelgue por sobre el mostrador o la mesa ni toque superficies calientes.
• No lo coloque cerca o sobre una estufa a gas o eléctrica o en el horno caliente.
• No use el electrodoméstico para un propósito distinto para el cual fue diseñado.
• Verifique que el voltaje del tomacorriente corresponda al voltaje especificado en la etiqueta
de clasificación de la Waflera/Sandwichera.
• Sólo un agente de servicio autorizado puede realizar una revisión, reparación o ajuste al
electrodoméstico.
• Si el cable de alimentación está dañado, el fabricante, su agente de servicio o una persona igualmente
calificada debe reemplazarlo para evitar peligros.
ESTA UNIDAD ES PARA USO DOMÉSTICO SOLAMENTE
INSTRUCCIONES ESPECIALES
Este electrodoméstico posee un enchufe polarizado (una pata es más ancha que la otra). Para reducir el
riesgo de una descarga eléctrica, este enchufe se introduce en el tomacorriente polarizado de una sola
manera. Si el enchufe no se puede introducir por completo en el tomacorriente, gírelo. Si aún así no
logra colocarlo, comuníquese con un electricista calificado. No haga ninguna modificación al enchufe.
GUARDE ESTAS INSTRUCCIONES
B
IENVENIDOS
¡Felicitaciones por la compra de la Waflera/Sandwichera OSTER
®
! Para mayor información sobre
los productos OSTER
®
, visítenos en www.oster.com.
Con su nuevo electrodoméstico podrá preparar wafles y sandwiches crocantes, calientes y dorados
en sólo unos minutos y así saborear una rápida comida en cualquier momento del día.
Su Waflera/Sandwichera OSTER
®
está controlada por termostato para ayudarle a preparar wafles
a la perfección. La unidad es portátil, por lo que podrá preparar wafles/sandwiches en la cocina
o directamente en la mesa. Las rejillas antiadherentes facilitan la limpieza. Sabemos que le
encantará su nueva Waflera/Sandwichera OSTER
®
. Es un gran complemento para su cocina.
CÓMO USAR LA WAFLERA/SANDWICHERA OSTER
®
CÓMO CAMBIAR LAS PLANCHAS PARA WAFLES Y SANDWICHES
• Para quitar las planchas, presione el botón del interior de la unidad. La parte delantera
de la plancha se levantará levemente. Deslice la plancha hacia usted para destrabarla.
• Al colocar nuevamente las planchas, verifique que las bisagras estén alineadas con los
separadores de metal. Primero coloque el separador de la bisagra trasera y presione sobre
la plancha hasta que escuche un “clic” que le indicará que la plancha está en su lugar.
CÓMO PREPARAR WAFLES/SANDWICHES
Prepare sus propios wafles/sandwiches con ingredientes nuevos usando cualquiera de
las recetas OSTER
®
listadas en las siguientes páginas o use cualquiera de sus favoritas.
Para aquellos días en que esté muy ocupada, ¿por qué no tener masa ya lista para
preparar una comida en cuestión de minutos?
WAFLES CREATIVOS
Deje que su imaginación sea su guía para cocinar muchas comidas sabrosas y deliciosas
usando su Waflera/Sandwichera OSTER
®
. Aquí damos algunas sugerencias:
DESAYUNO Y
D
ESAYUNO-ALMUERZO
Recubra los wafles/sandwiches crocantes con:
Mantequilla, Almíbar, Miel, Melaza, Pasta de Manzana, Relleno de Pastel,
Crema Batida, Yogur, Frutas en Conserva, Fruta Fresca
POSTRES
Sirva los wafles de postre calientes o fríos. Prepare una masa más abundante, tal como
la de wafles estilo Belga o wafles de pastelillo de chocolate. Cúbralos con sus ingredientes
dulces y sabrosos favoritos que pueden incluir los siguientes:
Moras o Fresas Culces, Helado, Azúcar en Polvo, Nueces Picadas,
Salsas de Frutas para Helados, Yogurt de Frutas.
RECETAS
SANDWICHES MONTECRISTO
4 rebanadas de pan de textura firme, blanco o de trigo integral Para la masa:
Mostaza Dijon 4 huevos grandes
4 onzas de jamón ahumado en lonjas, 1/2 taza de leche
como Black Forest o Westphalian sal a gusto
4 onzas de queso suizo en lonjas
4 onzas de pechuga de pavo asado en lonjas
Preparación de la masa: En un tazón poco profundo, bata 4 huevos grandes con
1/2 taza de leche y sal. Mientras tanto, unte un lado de cada rebanada de pan con
un poco de mostaza.
Coloque en 2 de las rebanadas un poco de jamón, queso y pavo. Coloque la rebanada
de pan restante sobre cada una, presionando para formar dos sandwiches compactos.
Unte cada lado del sandwich con la masa, recubriéndolo en forma pareja.
Coloque los sandwiches en la Sandwichera OSTER
®
. Cocine durante 5 minutes
o hasta que estén dorados.
R
INDE
: 2 SANDWICHES

–––
F
OLD
–––
English-1
IMPORTANT SAFEGUARDS
When using electrical appliances, basic safety precautions should always be followed,
including the following:
READ ALL INSTRUCTIONS BEFORE USE
• Do not touch hot surfaces, use the handles.
• To protect against electric shock, do not place cord, plug or appliance
in water or any other liquid.
• Close supervision is always necessary when this or any appliance is used
by or near children.
• Unplug from outlet when not in use and before cleaning. Allow to cool
before cleaning the appliance.
• Do not operate this or any appliance with a damaged cord or plug
or after the appliance malfunctions or has been damaged in any manner.
Return appliance to an Authorized Service Center for examination,
repair or adjustment.
• The use of accessory attachments not recommended by the appliance
manufacturer may cause fire, electrical shock or injury.
• Do not use outdoors.
• Do not let cord hang over edge of table or counter, or touch hot surfaces.
• Do not place on or near a hot gas or electric burner, in a heated oven
or in a microwave oven.
• Do not use the appliance for other than intended use.
• When using this appliance, provide adequate air space above and on all sides
for air circulation. On surfaces where heat may cause a problem, an insulated
hot pad is recommended.
• Do not leave unit unattended during use.
THIS UNIT IS FOR HOUSEHOLD USE ONLY
EXTENSION CORD USE
A short power-supply cord is provided to reduce the risk resulting from
becoming
entangled in or tripping over a longer cord. An extension cord may be used if care is
exercised in its use. If an extension cord is used, the electrical
rating of the cord must be
at least as great as the electrical rating of the appliance.
The extension cord should be
arranged so that it will not drape over the countertop
or tabletop where it can be pulled on
by children or tripped over unintentionally.
SPECIAL INSTRUCTIONS
This appliance has a polarized plug (one blade is wider than the other). To reduce the risk
of electric shock, this plug will fit in a polarized outlet only one way. If the plug does not
fit fully in the outlet, reverse the plug. If it still does not fit, contact a qualified electrician.
Do not modify the plug in any way.
SAVE THESE INSTRUCTIONS
English-5English-4
RECIPES
QUICK WAFFLES
3 eggs 2 cups flour
1 cup milk 1/2 tsp. salt
1/2 cup melted butter or margarine 1 Tbsp. baking powder
1 Tbsp. vanilla (optional) 2 tsp. sugar
Beat whole eggs in a bowl until thick. Beat milk, melted butter and vanilla into eggs. In a
separate bowl, combine remaining ingredients. Sift into egg mixture, and mix well. Bake as
directed. Y
IELD: 6 – 8 WAFFLES
Variation: Cinnamon –Apple.
Add 1 apple peeled and shredded, 1 tsp. vanilla and 1/2 tsp.
cinnamon to batter.
BLENDER CORNMEAL WAFFLES
Enjoy a crisp waffle that’s prepared in seconds
1 egg (or equivalent) 2 Tbsp. (30 ml) cornmeal
3/4 cup (200 ml) milk* 2 tsp. (10 ml) baking powder
1/4 cup (50 ml) vegetable oil 2 tsp. (10 ml) sugar
1 cup (250 ml) all-purpose flour 1/4 tsp. (1 ml) salt
*low-fat or skim milk may be used
Preheat Waffle Maker. Put all ingredients into blender container. Cover and process at a
medium-high speed until dry ingredients are moistened. Do not over-blend. Pour 3/4 cup
(200 ml) batter over grids. Close Waffle Maker. Bake until steam no longer escapes,
about3–5 minutes. Repeat. Serve while hot with warmed syrup. Y
IELD: 3 WAFFLES
EXTRA-SPECIAL WHOLE WHEAT WAFFLES
Feed the gang with these at Sunday Brunch
1 cup (250 ml) milk* 3 eggs (or equivalent)
1 cup (250 ml) water 1 package (1/4 ounce or 7 g)
1/4 cup (50 ml) butter or margarine active dry yeast
1/4 cup (50 ml) honey 1/2 tsp. (2 ml) salt
2-2/3 cups (650 ml) whole wheat flour
*low-fat or skim milk may be used
Heat milk, water, butter and honey at 120°F (48°C). In large mixing bowl, combine flour,
eggs, yeast, salt and warmed milk mixture. Mix at low to moisten, then medium-high for
1 minute. Cover and refrigerate several hours or overnight, stirring occasionally.
Preheat Waffle Maker. Pour 3/4 cup (200 ml) over grids. Close waffle maker, bake until steam
no longer escapes, about 3 – 5 minutes. Repeat. Serve while hot with your favorite topping.
Y
IELD: 7 WAFFLES
LIGHT ’N CRISP WAFFLES
2 egg yolks 1/2 tsp. (2 ml) salt
2 cups (500 ml) milk 1/3 cup (75 ml) oil
2 cups (500 ml) all-purpose flour 2 egg whites, stiffly beaten
1 Tbsp. (15 ml) baking powder
Preheat Waffle Maker. Put all ingredients, except egg whites, in a large mixing bowl. Beat on
low until moistened. Increase to medium, mix until smooth. By hand, gently fold in beaten
egg whites. Pour 3/4 cup (200 ml) batter over grids. Close Waffle Maker, bake until steam no
longer escapes, about 3 – 5 minutes. Repeat. Serve while hot with your favorite topping.
Y
IELD: 5 WAFFLES
English-6
User Manual
Waffle Maker
Manual de Instrucciones
Waflera
Manuel d’Instructions
Gaufrier
MODELS/MODELOS
MODÈLES
3883, 3884
Español-1 Español-3 Español-4
PRECAUCIONES IMPORTANTES
Al utilizar aparatos electrodomésticos, es conveniente mantener ciertas
precauciones relacionadas con la seguridad, entre otras las siguientes:
LEA TODAS LAS INSTRUCCIONES
• No toque las superficies que estén calientes. Para ello, utilice las asas.
• Para evitar una descarga eléctrica, nunca sumerja en agua u otro líquido
el cable de conexión, el enchufe o el electrodoméstico.
• Se debe extremar la vigilancia cuando los niños usen o estén cerca
de un aparato electrodoméstico.
•
Desenchufe el aparato cuando no lo esté utilizando así como antes de limpiarlo.
•
Nunca utilice un aparato cuyo cable de conexión o enchufe estén dañados,
ni tampoco después de un funcionamiento defectuoso, o si por alguna razón
el aparato estuviese averiado. Devuelva al aparato al Centro de Servicio Autorizado
por Oster más cercano para que lo revisen, lo reparen o lo ajusten.
• El empleo de accesorios no recomendados por el fabricante del aparato podría
causar un incendio, una descarga eléctrica o heridas.
• No deberá usarse en exteriores.
• No permita que el cable de conexión cuelgue sobre el borde de una mesa,
o de un mostrador, ni que esté en contacto con superficies calientes.
• No ponga el aparato cerca de estufas eléctricas, de gas, dentro de un horno
caliente o en el interior de un homo de microondas.
• No use el electrodoméstico para un propósito distinto para el que fue diseñado.
• Cuando use el aparato, asegúrese de que haya suficiente espacio tanto en su
parte superior como a los lados, y permitir así la libre circulación del aire.
En el caso de superficies en las que exista el problema de exceso de calor,
se recomienda el empleo de una cubierta protectora contra el calor.
• Nunca deje la unidad funcionando sola, sin vigilancia.
E
STA
U
NIDAD
E
S
S
ÓLO PARA
U
SO
D
OMÉSTICO
U
SO DE UN
C
ABLE
E
LÉCTRICO
C
ORTO
Se incluye un cable de tensión corto para evitar que se enrede o que cause tropiezos
.
Un cable de extensión puede usarse con cuidado. Si se usa una cable de extensión,
la potencia eléctrica marcada en el cable de extensión debe ser por lo menos igual
o mayor a la potencia eléctrica del aparato. El cable de extensión debe colocarse
de manera que no cuelgue del mostrador o de la mesa, donde pueda causar
tropiezos accidentalmente.
I
NSTRUCCIONES
E
SPECIALES
Este aparato cuenta con una clavija polarizada (una pata es más ancha que
la otra). Para reducir el riesgo de descarga eléctrica, esta clavija entra sólo de
una manera en un enchufe polarizado. Si la clavija no encaja en el enchufe,
simplemente colóquela al revés. Si aún así no encaja, llame a un electricista
calificado. De ninguna manera intente modificar esta medida de seguridad.
GUARDE ESTAS INSTRUCCIONES
BIENVENIDO
¡Felicidades! Ya es propietario de una Waflera OSTER.
®
Con ella podrá preparar wafles calientes y doraditos en unos cuantos minutos
y comerlos a cualquier hora del día.
Prepare wafles para el desayuno o para la comida; complételos con fruta fresca,
crema batida, o simplemente póngales mantequilla y jarabe.
Aún los postres quedarán más sabrosos con wafles calientes preparados con
una mezcla de galletas de chocolate y nuez (brownies), acompañados con helado
y cubiertos con jarabes, nueces picadas y crema batida.
El control por termostato de su Waflera OSTER
®
le permitirá obtener wafles
perfectos. La unidad es portátil, así que podrá preparar wafles en la cocina,
o directamente en la mesa. Sus parrillas antiadherentes facilitan su limpieza.
Estamos seguros de que estará encantado con su nueva Waflera OSTER.
®
Será una ayuda muy valiosa en su cocina.
CÓMO USAR SU WAFLERA OSTER
®
PREPARACIÓN PARA EL USO DE SU WAFLERA
1. Abra la unidad levantando la asa superior.
2. Antes de usarla por primera vez, limpie las
planchas para cocer con un trapo o una esponja,
humedecidos con agua jabonosa caliente. NO
SUMERJA LA UNIDAD EN AGUA. Enjuáguela
con un trapo húmedo o esponja y séquela.
3. Cuando la use por primera vez, “cure” las
parrillas frotándolas ligeramente con aceite para
cocinar. Si en usos posteriores, los alimentos
quedan adheridos, “cure” nuevamente la unidad.
PREPARACIÓN DE WAFLES
1.
Cierre la unidad y enchúfela en la toma de corriente.
Use sólo el voltaje
especificado en la parte inferior de la unidad. Se encenderá la luz
de Encendido (Rojo). La luz Listo (Amarillo) no se encenderá.
Precaución:
Tome la unidad solamente por las asas mientras esté en
funcionamiento o inmediatamente después de usarla.
2. Los ajustes del Cuadrante de Control de Temperatura abarcan desde “min”
para wafles claros a “max” para wafles oscuros.
3. La unidad está lista para usarse cuando se encienda la luz Listo.
4.
Abra la unidad y vierta aproximadamente 3/4 de taza
de masa para wafles en
las parrillas. Para obtener los mejores resultados, vierta la masa en un círculo
alrededor del borde externo de la waflera.
(Vea la Ilustración)
Cierre la tapa.
Es típico que
una pequeña cantidad de masa se derrame sobre la parrilla
y
se salga de la unidad. Sin embargo, si se derrama una cantidad excesiva
de masa, use menos masa.
Español-2
5.
La tapa se levantará ligeramente a medida que los wafles comienzan a cocinarse.
No abra la tapa mientras esté escapando vapor. La mayoría de las recetas de
wafles se cocina en aproximadamente 5 minutos en el ajuste bajo, 4-1/4 minutos
en el ajuste mediano y 4 minutos en el ajuste alto. Generalmente, los wafles
están listos cuando ya no sale más vapor por los lados y el frente de la unidad.
6. Cuando los wafles estén listos, quítelos con un tenedor de plástico
o con unas pinzas de madera.
Nota:
Es posible que la luz de Listo, se prenda y se apague
durante la cocción.
Esto indica que el termostato
mantiene la unidad en la temperatura
apropiada de cocción.
7. Cierre la tapa y espere que la luz de Encendido se apague antes de preparar
otra cantidad de wafles.
CUIDADO Y LIMPIEZA
1.
Desenchufe y deje que la unidad se enfríe antes de limpiarla.
2. Limpie las parrillas de la waflera con un trapo o esponja humedecidos
con agua jabonosa caliente. NO SUMERJA LA UNIDAD EN AGUA.
Enjuáguela con un trapo húmedo o esponja y séquela.
3. Para remover comidas pegadas, use una esponja de nilón para refregar o un
limpiador que no sea abrasivo. Las esponjas de viruta de acero o los
limpiadores abrasivos dañarán la superficie antiadherente.
4. Guárdela cerrada.
5. Cualquier tipo de servicio requerido deberá ser efectuado por un servicio
autorizado.
6. Este artefacto es sólo para uso doméstico.
CONSEJOS PARA WAFLES SABROSOS
1. No mezcle en forma excesiva la masa de wafles. Para obtener wafles más
livianos y crocantes, bata las claras de los huevos por separado y viértalas
suavemente sobre la masa para wafles.
2. Cocine completamente los wafles antes de retirarlos de la unidad.
3.
No abra la waflera mientras el vapor esté escapando por los lados y por el frente
de la unidad.
4.
¿Por qué no congelar wafles preparados para los días en que está muy ocupado?
Simplemente cocine los wafles como se indica. Déjelos enfriar sobre una rejilla
de alambre y envuélvalos en papel o plástico a prueba de humedad. Recaliéntelos
rápidamente en su horno tostador, asador u horno microondas.
CÓMO PREPARAR WAFLES
Prepare sus propios wafles con ingredientes nuevos usando cualquiera de las
recetas OSTER
®
listadas en las siguientes páginas o use cualquiera de sus
favoritas. Para aquellos días en que está muy ocupado, ¿Por qué no tener
a la mano masa ya lista para preparar una comida en cuestión de minutos?
WAFLES CREATIVOS
Deje que su imaginación sea su guía para cocinar muchas
comidas sabrosas
y emocionantes usando su Waflera OSTER.
®
Aquí están algunas sugerencias:
DESAYUNO Y DESAYUNO-ALMUERZO
Cubra los wafles crocantes con:
Mantequilla, almíbar, miel, melaza, pasta de manzana, relleno de pastel,
crema batida, yogur, frutas en conserva, fruta fresca.
POSTRES
Sirva los wafles calientes o fríos. Prepare una masa más abundante, tal como la
de wafles estilo Belga o wafles de pastelillo de chocolate y nueces. Cúbralos con
sus ingredientes dulces y sabrosos que pueden incluir los siguientes:
Moras o fresas dulces, helado, azúcar en polvo, nueces picadas,
salsas de frutas para helados, yogur de frutas.
RECETAS
WAFLES RÁPIDOS
3 huevos 2 tazas de harina
1 taza de leche 1/2 cucharadita de sal
1/2 taza de mantequilla o margarina derretida 1 cucharada de levadura
1 cucharada de vainilla (opcional) 2 cucharaditas de azúcar
Bata los huevos en un tazón hasta que espesen. Bata la leche, la mantequilla
derretida y la vainilla e incorpore en los huevos. En un tazón separado,
combine los demás ingredientes. Tamícelos en la mezcla de huevos y mezcle bien.
Cocine tal como se indica.
RINDE: 6-8 WAFLES
Variación: Canela – Manzana.
Agregue a la mezcla 1 manzana pelada y en tiras,
1 cucharadita de vainilla y 1/2 cucharadita de canela.
WAFLES DE CEREAL DE MAÍZ EN LICUADORA
Disfrute un crocante wafle preparado en segundos
1 huevo (o equivalente) 2 cucharaditas (10 ml) de levadura
3/4 de taza (200 ml) de leche* 2 cucharaditas (10 ml) de azúcar
1/4 de taza (50 ml) de aceite vegetal 1/4 de cucharadita (1 ml) de sal
1 taza (250 ml) de harina para todo propósito
2 cucharadas (30 ml) de cereal de maíz
*puede usarse leche con bajo contenido de grasa o descremada
Ponga a calentar la Waflera. Ponga todos los ingredientes en la licuadora.
Cúbrala y procese a una velocidad entre mediana y alta hasta que los
ingredientes secos queden humedecidos. No la licúe demasiado. Vierta
3/4 de taza (200 ml) de masa sobre las rejillas. Cierre la Waflera. Cocine
hasta que el vapor deje de escapar, de 3 a 5 minutos. Repita. Sírvalos mientras
están calientes con almíbar tibio. RINDE: 3 WAFLES
English-3
CARE AND CLEANING
1. Unplug and allow unit to cool before cleaning.
2. Clean waffle grids with cloth or sponge dampened with hot, soapy water. DO NOT
IMMERSE UNIT IN WATER. Rinse with dampened cloth or sponge and wipe dry.
3. To remove cooked-on foods, use a nylon scrub pad or non-abrasive cleanser.
A steel wool pad or abrasive cleaners will damage the non-stick surface.
4. Store in closed position.
5. Any servicing required should be performed only by an authorized service facility.
6. This appliance is for household use only.
HINTS FOR TASTY WAFFLES
1. Do not over-mix waffle batter. Beating egg whites separately and folding them gently
into the batter surely will create a lighter, crispier waffle.
2. Completely bake waffles before removing from unit.
3. Don’t open the Waffle Maker while steam is escaping from sides and front of the
unit.
4. Why not freeze prepared waffles for those busy days ahead? Just bake the waffles
as directed. Cool on a wire rack and wrap in moisture-proof paper or plastic.
Quickly reheat in your toaster oven, broiler or microwave oven.
WAFFLE MAKING
Prepare your own waffles from scratch with any of the OSTER
®
recipes listed on the
following pages, or use any of your own family favorites. For those busy days,
why not have a prepared mix handy for a meal in a matter of minutes?
CREATIVE WAFFLES
Let your imagination be your guide to many exciting and tasty meals with your
OSTER
®
Waffle Maker. Here are just a few suggestions:
BREAKFAST AND BRUNCH
Top crispy waffles with:
Butter, Syrup, Honey, Molasses, Apple Butter, Pie Filling,
Whipped Cream, Yogurt, Fruit Preserves, Fresh Fruit
DESSERT
Serve dessert waffles hot or cold. Prepare a richer batter such as Belgian-Style Waffles
or Chocolate Brownie Waffles. Top with your favorite sweet and tasty ingredients which
might include:
Sweetened Fresh Berries, Ice Cream, Powdered Sugar,
Chopped Nuts, Sundae Sauces, Fruit Yogurt
WELCOME
Congratulations! You are now the owner of an OSTER
®
Waffle Maker.
Your new appliance will surely make crispy, hot, golden waffles in just minutes
for a quick meal anytime of the day.
Prepare waffles for breakfast or brunch and pile them high with fresh fruits, whipped
cream or just plain butter and warmed syrup.
Even desserts are more exciting with piping hot Brownie Waffles topped with ice cream,
sauce toppings, chopped nuts and whipped cream.
Your OSTER
®
Waffle Maker is thermostatically controlled to help you prepare waffles
to perfection. Your unit is portable so you can make waffles in your kitchen or right
at the table. The non-stick grids make clean-up easy. We know that you will love your
new OSTER
®
Waffle Maker. It’s a great addition to any kitchen.
HOW TO USE YOUR OSTER
®
WAFFLE MAKER
PREPARING YOUR WAFFLE MAKER FOR USE
1. Open unit by lifting the upper handle.
2. Before using for the first time, clean cooking plates
with cloth or sponge, dampened with hot, soapy water.
DO NOT IMMERSE UNIT IN WATER. Rinse with
dampened cloth or sponge and wipe dry.
3. When using for the first time, “season” the grids by
rubbing lightly with cooking oil. Should sticking occur
in later usage, reseason your unit.
PREPARING WAFFLES
1.
Close unit and plug into outlet. Use only voltage
specified on bottom of unit.
The On light (Red)
will come on. The Ready light (Yellow) will not come on.
C
AUTION: Touch unit only by handles during use or directly after use.
2. Temperature Control Dial settings range from min for light waffles to max for
dark waffles.
3. The unit is ready for use when the Ready light comes on.
4. Open unit and pour approximately 3/4 cup waffle batter onto grids. For best results,
pour batter in a circle around outer edge of waffle maker. (See Illustration)
Close cover. It is very typical to have a small amount of batter run over grid and
down unit. However, if an excessive amount of batter runs over, use less batter.
5. Cover will rise slightly as waffles begin to bake. Do not open cover while steam
is escaping. Most waffle recipes bake in approximately 5 minutes on the low setting,
4-1/2 minutes on the medium setting and 4 minutes on the high setting. Waffles are
generally done when steam no longer escapes from sides and front of unit.
6. When waffles are done, remove with a plastic fork or wooden tongs.
N
OTE: The Ready light may cycle on and off during cooking. This indicates that
the thermostat is maintaining the unit at the proper cooking temperature.
7. Close cover and wait for Ready light to come on before preparing another batch
of waffles.
English-2
P.N. 111320
VARIATIONS
Pecan or Macadamia Nut Waffles: Sprinkle 1 Tbsp. (15 ml) finely chopped
pecans
or macadamia nuts over preheated waffle grids. Pour 3/4 cup (200 ml)
batter over nuts
and close Waffle Maker. Bake as directed.
Bacon Waffles: Cook bacon strips. Pour 3/4 cup (200 ml) batter over waffle grids.
Cut 1 strip bacon in half, lay over batter and close Waffle Maker. Bake as directed.
Cheese Waffles: Fold in 1-1/2 cups (375 ml) shredded cheddar cheese into batter.
Bake as directed. Serve with syrup or your favorite creamed entrée.
Blueberry Waffles: Fold 2 cups (500 ml) fresh blueberries into batter.
Pour 3/4 cup (200 ml) batter over grids. Bake until golden.
Chocolate Chip Waffles: Fold 1 cup (250 ml) chocolate chips into batter. Bake as directed.
LEMON SWEET WAFFLES
1 cup butter or margarine (softened) 3-1/4 cups flour
1-1/2 cups sugar 1 packet of vanilla sugar
2 eggs 1-3/4 cups water
1/8 tsp. baking powder grated rind of 1 lemon
In a large bowl, beat butter, sugars and eggs together. Add all dry ingredients along with
water and lemon rind, and blend until smooth. Pour approximately 3/4 cup batter into
waffle iron. Bake as directed.
YIELD: 8 – 10 WAFFLES
ALOHA DESSERT WAFFLES
A pretty dessert that is guaranteed to please your guests
8 prepared Macadamia Nut Waffles 1 can (6 oz. or 170 g) frozen orange juice concentrate, thawed
1 cup (250 ml) sugar 1/2 cup (125 ml) flaked coconut
3 Tbsp. (45 ml) cornstarch 1/3 cup (75 ml) Maraschino cherries, chopped
1 can (8 oz. or 277 g) crushed 1/4 cup (50 ml) 150 Proof rum
pineapple, drained reserving juice vanilla ice cream
cold water
In a large sauté pan, combine sugar and cornstarch. Measure pineapple juice and enough cold
water to equal 1-1/4 cups (300 ml). Combine water mixture, orange juice and sugar mixture.
Cook over medium heat until thickened, stirring constantly. Add coconut, cherries and
pineapple. Heat through. Keep warm on low heat. Slowly pour rum over top of mixture.
Carefully ignite. Place a scoop of vanilla ice cream over each waffle. When flame dies, spoon
sauce over ice cream. Serve immediately. Y
IELD: 5 WAFFLES
CHOCOLATE BROWNIE WAFFLES
Here’s a no-fuss dessert idea!
1/4 cup (50 ml) shortening or oil 1 Tbsp. (15 ml) baking powder
2/3 cup (150 ml) sugar 1/4 tsp. (1 ml) salt
2 squares (1 ounce or 28 g each) 1-1/4 cups (300 ml) milk
baking chocolate, melted 1/2 tsp. (2 ml) vanilla
3 egg yolks 1/2 cup (125 ml) chopped nuts
1-1/2 cups (375 ml) all-purpose flour 3 egg whites, stiffly beaten
Preheat Waffle Maker. In a large mixing bowl, cream shortening and sugar
at medium-low until fluffy. Add chocolate and egg yolks. Beat well. Add milk
alternately with combined dry ingredients. Mix well. Add vanilla and nuts.
By hand, gently fold in beaten egg white. Pour 3/4 cup (200 ml)
batter over grids.
Close Waffle Maker and bake until steam no longer escapes,
about 3-5 minutes.
Waffle will crisp as it cools. Repeat. Serve hot or cold with vanilla ice cream,
chocolate syrup and chopped walnuts or pecans.
YIELD: 6 WAFFLES
P.N. 111867
–––
F
OLD
––– –––
F
OLD
–––
–––
F
OLD
–––
–––
F
OLD
–––
–––
F
OLD
–––
–––
F
OLD
–––
Visit us at www.oster.com
One-Year Limited Warranty
S
unbeam Products, Inc., or if in Canada, Sunbeam Corporation (Canada) Limited (collectively
“Sunbeam”) warrants that for a period of one year from the date of purchase, this product will be
free from defects in material and workmanship. Sunbeam, at its option, will repair or replace this
product or any component of the product found to be defective during the warranty period.
Replacement will be made with a new or remanufactured product or component. If the product
is no longer available, replacement may be made with a similar product of equal or greater value.
This is your exclusive warranty.
This warranty is valid for the original retail purchaser from the date of initial retail purchase and
is not transferable. Keep the original sales receipt. Proof of purchase is required to obtain warranty
performance. Sunbeam dealers, service centers, or retail stores selling Sunbeam products do not
have the right to alter, modify or any way change the terms and conditions of this warranty.
This warranty does not cover normal wear of parts or damage resulting from any of the following:
negligent use or misuse of the product, use on improper voltage or current, use contrary to the
operating instructions, disassembly, repair or alteration by anyone other than Sunbeam or an
authorized Sunbeam service center. Further, the warranty does not cover: Acts of God, such as fire,
flood, hurricanes and tornadoes.
What Are the Limits on Sunbeam’s Liability?
Sunbeam shall not be liable for any incidental or consequential damages caused by the breach
of any express, implied or statutory warranty or condition.
Except to the extent prohibited by applicable law, any implied warranty or condition of
merchantability or fitness for a particular purpose is limited in duration to the duration of the
above warranty.
Sunbeam disclaims all other warranties, conditions or representations, express, implied, statutory
or otherwise.
Sunbeam shall not be liable for any damages of any kind resulting from the purchase, use or misuse of, or
inability to use the product including incidental, special, consequential or similar damages or loss of profits,
or for any breach of contract, fundamental or otherwise, or for any claim brought against purchaser by
any other party.
Some provinces, states or jurisdictions do not allow the exclusion or limitation of incidental
or consequential damages or limitations on how long an implied warranty lasts, so the above
limitations or exclusion may not apply to you.
This warranty gives you specific legal rights, and you may also have other rights that vary from
province to province, state to state or jurisdiction to jurisdiction.
How to Obtain Warranty Service
In the U.S.A. –
If you have any question regarding this warranty or would like to obtain warranty service,
please call 1.800.334.0759 and a convenient service center address will be provided to you.
In Canada –
If you have any question regarding this warranty or would like to obtain warranty service,
please call 1.800.667.8623 and a convenient service center address will be provided to you.
In the U.S.A., this warranty is offered by Sunbeam Products, Inc., located in Boca Raton,
Florida 33431. In Canada, this warranty is offered by Sunbeam Corporation (Canada) Limited,
located at 5975
Falbourne Street
, Mississauga, Ontario L5R 3V8.
PLEASE DO NOT RETURN THIS PRODUCT TO ANY OF
THESE ADDRESSES OR TO THE PLACE OF PURCHASE.
–––
F
OLD
–––
–––
F
OLD
–––
–––
F
OLD
–––
–––
F
OLD
–––
–––
F
OLD
–––
For product questions contact:
Sunbeam Consumer Service
USA : 1.800.334.0759
Canada : 1.800.667.8623
www.oster.com
©2003 Sunbeam Products, Inc. All rights reserved.
OSTER
®
is a registered trademark of Sunbeam Products, Inc.
Distributed by Sunbeam Products, Inc., Boca Raton, FL 33431
Pour les questions de produit:
Sunbeam Consumer Service
États-Unis : 1.800.334.0759
Canada : 1.800.667.8623
www.oster.com
©2003 Sunbeam Products, Inc. Tous droits réservés.
OSTER
®
est une marque déposée de Sunbeam Products, Inc.
Distribué par Sunbeam Products, Inc., Boca Raton, Florida 33431
Para preguntas sobre los productos llame:
Sunbeam Consumer Service
EE.UU. : 1.800.334.0759
Canadá : 1.800.667.8623
www.oster.com
©2003 Sunbeam Products, Inc. Todos los derechos reservados.
OSTER
®
es una marca registrada de Sunbeam Products, Inc.
Distribuido por Sunbeam Products, Inc., Boca Raton, FL 33431
Printed in China Imprimé en Chine Impreso en China
3883 3884 Waffle Maker Text ! 7/15/03 12:37 PM Page 1

–––
F
OLD
–––
IMPORTANT SAFEGUARDS
When using electrical appliances, basic safety precautions should always be followed,
including the following:
READ ALL INSTRUCTIONS BEFORE USE
• Do not touch hot surfaces.
• To protect against electric shock, do not immerse cord, plug or any part of the Waffle/
Sandwichmaker in water or other liquid.
• Close supervision is always necessary when it is used by or near children.
• Unplug unit from outlet when not in use and before cleaning. Allow hot surface to cool
before putting on or taking off parts.
•
Do not operate this or any appliance with a damaged cord or plug or in abnormal state.
If
its main cord is damaged, it must be replaced by the manufacturer or the nearest service
agent or qualified person.
•
Do not let the cord hang over edge of table or counter, or touch hot surface.
• Do not place on or near a hot gas or electric burner or in a heated oven.
• Do not use the appliance for other than its intended use.
• Make sure that your outlet voltage corresponds to the voltage stated on the rating label of
the Waffle/Sandwichmaker.
• Any examination, repair or adjustment for the appliance should be made by the
authorized service agent.
• If the supply cord is damaged, it must be replaced by the manufacturer or its service agent
or similar qualified person in order to avoid a hazard.
THIS UNIT IS FOR HOUSEHOLD USE ONLY
SPECIAL INSTRUCTIONS
This appliance has a polarized plug (one blade is wider than the other). To reduce the risk of
electric shock, this plug will fit in a polarized outlet only one way. If the plug does not fit fully
in the outlet, reverse the plug. If it still does not fit, contact a qualified electrician. Do not
modify the plug in any way.
SAVE THESE INSTRUCTIONS
W
ELCOME
Congratulations on your purchase of an OSTER
®
Waffle/Sandwichmaker
! To learn
more about OSTER
®
products, please visit us at www.oster.com.
Your new appliance will surely make crispy, hot, golden waffles/sandwiches in just minutes
for a quick meal anytime of the day.
Your OSTER
®
Waffle/Sandwichmaker is thermostatically controlled to help you prepare
waffles to perfection. Your unit is portable so you can make waffles/sandwiches in your
kitchen or right at the table. The non-stick grids make clean-up easy. We know that you
will love your new OSTER
®
Waffle/Sandwichmaker. It’s a great addition to any kitchen.
HOW TO USE YOUR OSTER
®
WAFFLE/SANDWICHMAKER
CHANGING WAFFLE AND SANDWICH PLATES
• To release plates, push the button on the inside of the unit. The front of the plate will lift
slightly. Pull plate towards you to slide out of locked position.
•
When putting plates in, make sure the hinges are aligned with the metal inserts on the plates.
Start by placing the rear hinge insert in first and pressing down on the plate until you hear the
plate click into place.
English-4English-3
V
ARIATIONS
Pecan or Macadamia Nut Waffles: Sprinkle 1 Tbsp. (15 ml) finely chopped
pecans or macadamia
nuts over preheated waffle grids. Pour 3/4 cup (200 ml)
batter over nuts and close
Waffle/Sandwichmaker. Bake as directed.
Bacon Waffles: Cook bacon strips. Pour 3/4 cup (200 ml) batter over waffle grids.
Cut 1 strip bacon in half, lay over batter and close Waffle/Sandwichmaker. Bake as directed.
Cheese Waffles: Fold in 1-1/2 cups (375 ml) shredded cheddar cheese into batter.
Bake as directed. Serve with syrup or your favorite creamed entrée.
Blueberry Waffles: Fold 2 cups (500 ml) fresh blueberries into batter. Pour 3/4 cup (200 ml)
batter over grids. Bake until golden.
Chocolate Chip Waffles: Fold 1 cup (250 ml) chocolate chips into batter. Bake as directed.
LEMON SWEET WAFFLES
1 cup butter or margarine (softened) 3-1/4 cups flour
1-1/2 cups sugar 1 packet of vanilla sugar
2 eggs 1-3/4 cups water
1/8 tsp. baking powder grated rind of 1 lemon
In a large bowl, beat butter, sugars and eggs together. Add all dry ingredients along with
water and lemon rind, and blend until smooth. Pour approximately 3/4 cup batter into
waffle iron. Bake as directed.
YIELD: 8 – 10 WAFFLES
ALOHA
DESSERT WAFFLES
A pretty dessert that is guaranteed to please your guests
8 prepared Macadamia Nut Waffles 1 can (6 oz. or 170 g) frozen orange juice concentrate, thawed
1 cup (250 ml) sugar 1/2 cup (125 ml) flaked coconut
3 Tbsp. (45 ml) cornstarch 1/3 cup (75 ml) Maraschino cherries, chopped
1 can (8 oz. or 277 g) crushed 1/4 cup (50 ml) 150 Proof rum
pineapple, drained reserving juice vanilla ice cream
cold water
In a large sauté pan, combine sugar and cornstarch. Measure pineapple juice and enough cold
water to equal 1-1/4 cups (300 ml). Combine water mixture, orange juice and sugar mixture.
Cook over medium heat until thickened, stirring constantly. Add coconut, cherries and pineapple.
Heat through. Keep warm on low heat. Slowly pour rum over top of mixture. Carefully ignite.
Place a scoop of vanilla ice cream over each waffle. When flame dies, spoon sauce over ice cream.
Serve immediately.
Y
IELD: 5 WAFFLES
CHOCOLATE BROWNIE WAFFLES
Here’s a no-fuss dessert idea!
1/4 cup (50 ml) shortening or oil 1 Tbsp. (15 ml) baking powder
2/3 cup (150 ml) sugar 1/4 tsp. (1 ml) salt
2 squares (1 ounce or 28 g each) 1-1/4 cups (300 ml) milk
baking chocolate, melted 1/2 tsp. (2 ml) vanilla
3 egg yolks 1/2 cup (125 ml) chopped nuts
1-1/2 cups (375 ml) all-purpose flour 3 egg whites, stiffly beaten
Preheat Waffle/Sandwichmaker. In a large mixing bowl, cream shortening and sugar
at medium-low until fluffy. Add chocolate and egg yolks. Beat well. Add milk
alternately with combined dry ingredients. Mix well. Add vanilla and nuts. By hand, gently
fold in beaten egg white. Pour 3/4 cup (200 ml)
batter over grids.
Close Waffle/Sandwichmaker and bake until steam no longer escapes,
about 3-5 minutes.
Waffle will crisp as it cools. Repeat. Serve hot or cold with vanilla ice cream,
chocolate syrup and chopped walnuts or pecans.
YIELD: 6 WAFFLES
English-5 English-6
User Manual
Wafflemaker with
Sandwich Plates
Manual de Instrucciones
Waflera con
Sandwich Plates
Manuel d’Instructions
Gaufrier avec
Plaques à Sandwiches
MODEL/MODELO
MODÈLE
3862
Español-1 Español-3 Español-4Español-2
English-2
RECIPES
MONTE CRISTO SANDWICHES
4 slices firm-textured sliced bread, white or whole wheat For the batter:
Dijon mustard 4 large eggs
4 ounces sliced smoked ham, such as Black Forest or Westphalian 1/2 cup milk
4 ounces sliced Swiss cheese Salt to taste
4 ounces sliced roasted turkey breast
Make the batter: In a shallow bowl, whisk 4 large eggs with the 1/2 cup milk and salt.
Meanwhile, spread one side of each slice of bread with some of the mustard.
Top 2 of the slices with some of the ham, cheese, and turkey. Top each with 1 slice of
the remaining bread, pressing down to form 2 compact sandwiches.
Dip each sandwich on both sides into the batter, coating evenly. Add the sandwiches
to OSTER
®
Sandwichmaker. Cook for 5 minutes until golden brown.
YIELD: 2 SANDWICHES
QUICK WAFFLES
3 eggs 2 cups flour
1 cup milk 1/2 tsp. salt
1/2 cup melted butter or margarine 1 Tbsp. baking powder
1 Tbsp. vanilla (optional) 2 tsp. sugar
Beat whole eggs in a bowl until thick. Beat milk, melted butter and vanilla into eggs.
In a separate bowl, combine remaining ingredients. Sift into egg mixture, and mix well.
Bake as directed. Y
IELD: 6 – 8 WAFFLES
Variation: Cinnamon – Apple.
Add 1 apple peeled and shredded, 1 tsp. vanilla
and 1/2 tsp. cinnamon to batter.
EXTRA
-S
PECIAL
WHOLE
WHEAT WAFFLES
Feed the gang with these at Sunday Brunch
1 cup (250 ml) milk* 3 eggs (or equivalent)
1 cup (250 ml) water 1 package (1/4 ounce or 7 g)
1/4 cup (50 ml) butter or margarine active dry yeast
1/4 cup (50 ml) honey 1/2 tsp. (2 ml) salt
2-2/3 cups (650 ml) whole wheat flour
*low-fat or skim milk may be used
Heat milk, water, butter and honey at 120°F (48°C). In large mixing bowl, combine flour, eggs,
yeast, salt and warmed milk mixture. Mix at low to moisten, then medium-high for 1 minute.
Cover and refrigerate several hours or overnight, stirring occasionally.
Preheat Waffle/Sandwichmaker. Pour 3/4 cup (200 ml) over grids. Close Waffle/Sandwichmaker,
bake until steam no longer escapes, about 3 – 5 minutes. Repeat. Serve while hot with your
favorite topping. Y
IELD
: 7 WAFFLES
LIGHT ’N CRISP WAFFLES
2 egg yolks 1/2 tsp. (2 ml) salt
2 cups (500 ml) milk 1/3 cup (75 ml) oil
2 cups (500 ml) all-purpose flour 2 egg whites, stiffly beaten
1 Tbsp. (15 ml) baking powder
Preheat Waffle/Sandwichmaker. Put all ingredients, except egg whites, in a large mixing bowl.
Beat on low until moistened. Increase to medium, mix until smooth. By hand, gently fold in
beaten egg whites. Pour 3/4 cup (200 ml) batter over grids. Close Waffle/Sandwichmaker, bake
until steam no longer escapes, about 3 – 5 minutes. Repeat. Serve while hot with your favorite
topping. Y
IELD: 5 WAFFLES
P
REPARING WAFFLES
1.
Close unit and plug into outlet. Use only voltage
specified on bottom of unit.
The Power On light (Red)
will come on. The Ready light (Amber) will not come on.
C
AUTION: Touch unit only by handles during use or directly after use.
2. The unit is ready for use when the Ready light comes on.
3. Open unit and pour approximately 3/4 cup waffle batter onto grids. For best results,
pour batter in a circle around outer edge of Wafflemaker. Close cover. It is very typical
to have a small amount of batter run over grid and down unit. However, if an excessive
amount of batter runs over, use less batter.
4. Cover will rise slightly as waffles begin to bake. Do not open cover while steam
is escaping. Most waffle recipes bake in approximately 4 to 5 minutes. Waffles are
generally done when steam no longer escapes from sides and front of unit.
5. When waffles are done, remove with a plastic fork or wooden tongs.
N
OTE: The Ready light may cycle on and off during cooking. This indicates that
the thermostat is maintaining the unit at the proper cooking temperature.
6. Close cover and wait for Ready light to come on before preparing another batch
of waffles.
PREPARING SANDWICHES
1. Plug the power cord into the AC outlet.
2. Before use, please preheat the Sandwichmaker for 5 to 8 minutes. The red power on
lamp will be on. When the amber lamp goes on, it means the Sandwichmaker
temperature is ready.
3. Coat the inner plate of the machine with butter or margarine to prevent sticking.
4. After preheat, open the Sandwichmaker, place a piece of bread of approximately 1/2-inch
thickness on inner lower plate. Coat one side of the bread with butter or margarine and
place on the plate against this side.
English-1
P.N. 111895
–––
F
OLD
––– –––
F
OLD
–––
–––
F
OLD
–––
–––
F
OLD
–––
–––
F
OLD
–––
–––
F
OLD
–––
For product questions contact:
Sunbeam Consumer Service
USA : 1.800.334.0759
Canada : 1.800.667.8623
www.oster.com
©2003 Sunbeam Products, Inc. All rights reserved.
OSTER
®
is a registered trademark of Sunbeam Products, Inc.
Distributed by Sunbeam Products, Inc., Boca Raton, FL 33431
Pour les questions de produit:
Sunbeam Consumer Service
États-Unis : 1.800.334.0759
Canada : 1.800.667.8623
www.oster.com
©2003 Sunbeam Products, Inc. Tous droits réservés.
OSTER
®
est une marque déposée de Sunbeam Products, Inc.
Distribué par Sunbeam Products, Inc., Boca Raton, Florida 33431
Para preguntas sobre los productos llame:
Sunbeam Consumer Service
EE.UU. : 1.800.334.0759
Canadá : 1.800.667.8623
www.oster.com
©2003 Sunbeam Products, Inc. Todos los derechos reservados.
OSTER
®
es una marca registrada de Sunbeam Products, Inc.
Distribuido por Sunbeam Products, Inc., Boca Raton, FL 33431
Printed in China Imprimé en Chine Impreso en China
5. Add filling on it, taking care not to overfill.
6.
Put another piece of bread over the filling, and coat top with butter
or margarine
.
7. Close the Sandwichmaker slowly.
8. After about 2 to 3 minutes, open the machine and remove sandwich. Sandwichmaker can
be stopped at any time by unplugging the power cord from the AC outlet.
CAUTION
:
1. When it is difficult to close the machine, it means that too much filling was added.
You should reduce the filling or replace with thinner bread to prevent damaging
the Waffle/Sandwichmaker.
2. When removing sandwich from machine, do not use any utensil that may damage
the non-stick coating. Use wood or plastic suitable for high temperatures.
CLEANING INSTRUCTIONS
1. Unplug and allow unit to cool before cleaning.
2. Wipe outside with soft, dry cloth when Waffle/Sandwichmaker is cold.
Never use metal polish.
3. You can remove the heating plate to clean with soft cloth, warm water and dishwashing
liquid. Before resetting it, you should allow it to dry thoroughly.
4. If Waffle/Sandwichmaker is used frequently, accumulated bread crumbs should be
removed at least once a week. Make sure any accumulation under plates is completely
removed before using the Waffle/Sandwichmaker again.
HINTS FOR TASTY WAFFLES
1. Do not over-mix waffle batter. Beating egg whites separately and folding them gently
into the batter surely will create a lighter, crispier waffle.
2. Completely bake waffles before removing from unit.
3.
Don’t open the Wafflemaker while steam is escaping from sides and front of the unit.
4. Why not freeze prepared waffles for those busy days ahead? Just bake the waffles
as directed. Cool on a wire rack and wrap in moisture-proof paper or plastic.
Quickly reheat in your toaster oven, broiler or microwave oven.
WAFFLE/SANDWICH MAKING
Prepare your own waffles/sandwiches from scratch with any of the OSTER
®
recipes listed
on the following pages, or use any of your own family favorites. For those busy days,
why not have a prepared mix handy for a meal in a matter of minutes?
CREATIVE
W
AFFLES
Let your imagination be your guide to many exciting and tasty meals with your
OSTER
®
Waffle/Sandwichmaker. Here are just a few suggestions:
B
REAKFAST AND
BRUNCH
Top crispy waffles/sandwiches with:
Butter, Syrup, Honey, Molasses, Apple Butter, Pie Filling,
Whipped Cream, Yogurt, Fruit Preserves, Fresh Fruit
D
ESSERT
Serve dessert waffles hot or cold. Prepare a richer batter such as Belgian-Style Waffles
or Chocolate Brownie Waffles. Top with your favorite sweet and tasty ingredients which
might include:
Sweetened Fresh Berries, Ice Cream, Powdered Sugar,
Chopped Nuts, Sundae Sauces, Fruit Yogurt
Visit us at www.oster.com
–––
F
OLD
–––
–––
F
OLD
–––
–––
F
OLD
–––
–––
F
OLD
–––
–––
F
OLD
–––
One-Year Limited Warranty
S
unbeam Products, Inc., or if in Canada, Sunbeam Corporation (Canada) Limited (collectively “Sunbeam”)
warrants that for a period of one year from the date of purchase, this product will be free from defects in
material and workmanship. Sunbeam, at its option, will repair or replace this product or any component
of the product found to be defective during the warranty period. Replacement will be made
with a new
or remanufactured product or component. If the product is no longer available, replacement
may be made
with a similar product of equal or greater value. This is your exclusive warranty.
This warranty is valid for the original retail purchaser from the date of initial retail purchase and
is not transferable. Keep the original sales receipt. Proof of purchase is required to obtain warranty
performance. Sunbeam dealers, service centers, or retail stores selling Sunbeam products do not have
the right to alter, modify or any way change the terms and conditions of this warranty.
This warranty does not cover normal wear of parts or damage resulting from any of the following:
negligent use or misuse of the product, use on improper voltage or current, use contrary to the operating
instructions, disassembly, repair or alteration by anyone other than Sunbeam or an authorized Sunbeam
service center. Further, the warranty does not cover: Acts of God, such as fire, flood, hurricanes and
tornadoes.
What Are the Limits on Sunbeam’s Liability?
Sunbeam shall not be liable for any incidental or consequential damages caused by the breach of any
express, implied or statutory warranty or condition.
Except to the extent prohibited by applicable law, any implied warranty or condition of merchantability
or fitness for a particular purpose is limited in duration to the duration of the above warranty.
Sunbeam disclaims all other warranties, conditions or representations, express, implied, statutory
or otherwise.
Sunbeam shall not be liable for any damages of any kind resulting from the purchase, use or misuse of, or
inability to use the product including incidental, special, consequential or similar damages or loss of profits, or
for any breach of contract, fundamental or otherwise, or for any claim brought against purchaser by any other
party.
Some provinces, states or jurisdictions do not allow the exclusion or limitation of incidental
or consequential damages or limitations on how long an implied warranty lasts, so the above
limitations or exclusion may not apply to you.
This warranty gives you specific legal rights, and you may also have other rights that vary from
province to province, state to state or jurisdiction to jurisdiction.
How to Obtain Warranty Service
In the U.S.A. –
If you have any question regarding this warranty or would like to obtain warranty service,
please call 1.800.334.0759 and a convenient service center address will be provided to you.
In Canada –
If you have any question regarding this warranty or would like to obtain warranty service,
please call 1.800.667.8623 and a convenient service center address will be provided to you.
In the U.S.A., this warranty is offered by Sunbeam Products, Inc., located in Boca Raton,
Florida 33431. In Canada, this warranty is offered by Sunbeam Corporation (Canada) Limited,
located at 5975 Falbourne Street, Mississauga, Ontario L5R 3V8.
PLEASE DO NOT RETURN THIS PRODUCT TO ANY OF
THESE ADDRESSES OR TO THE PLACE OF PURCHASE.
Waffle
Plates
Safety Locking
Handles
Rear Hinge
Insert
Sandwich
Plates
Outer Hinge
Insert
Plate Release
Button
FEATURES OF YOUR OSTER
®
WAFFLE/SANDWICHMAKER
Planchas
para Wafles
Asas con Traba
de Seguridad
Separador de la
Bisagra Trasera
Planchas para
Sandwiches
Separador de la
Bisagra Externa
Botón para Quitar
las Planchas
PIEZAS DE LA WAFLERA/SANDWICHERA OSTER
®
CÓMO PREPARAR WAFLES
1. Cierre la unidad y enchúfela en el tomacorriente. Use sólo el voltaje que se indica
en la parte inferior de la unidad. Se encenderá la luz de encendido (rojo). La luz
Listo (amarillo) no se encenderá.
P
RECAUCIÓN
:
Sólo toque la unidad por las asas durante el uso o inmediatamente
después del uso.
2. La unidad estará lista para usarse cuando la luz de Listo se encienda.
3. Abra la unidad y vierta aproximadamente 3/4 de taza de masa de wafles sobre
las rejillas. Para obtener óptimos resultados, vierta la masa formando un círculo
alrededor del borde exterior de la Waflera. Cierre la tapa. Es normal que una
pequeña cantidad de masa se escurra por la rejilla y por debajo de la unidad.
Sin embargo, si se derrama mucha masa, deberá usar menos cantidad.
4. La tapa se levantará levemente a medida que los wafles comiencen a cocinarse.
No abra la tapa mientras salga vapor. La mayoría de las recetas de wafles toma
en prepararse de 4 a 5 minutos aproximadamente. Por lo general los wafles están
listos cuando ya no sale más vapor por los costados y el frente de la unidad.
5. Cuando los wafles estén listos, quítelos con un tenedor de plástico o con unas pinzas
de madera.
N
OTA
:
Es posible que la luz de Listo se encienda y se apague durante la cocción.
Esto indica que el termostato mantiene la unidad en la temperatura
apropiada de cocción.
6. Cierre la tapa y espere que la luz de Encendido se encienda antes de preparar
más wafles.
CÓMO PREPARAR SANDWICHES
1. Enchufe la unidad en un tomacorriente de CA.
2. Antes de usar, caliente la Sandwichera durante 5 a 8 minutos. Se encenderá la luz
roja. La luz amarilla se encenderá cuando la Sandwichera alcance la temperatura
apropiada.
3. Unte la plancha interna de la unidad con mantequilla o margarina para evitar que
los alimentos se adhieran.
4. Luego de calentar la Sandwichera, ábrala y coloque una rebanada de pan de
aproximadamente _ pulgada de grosor sobre la plancha inferior interna. Unte un
lado del pan con mantequilla o margarina y colóquelo sobre la plancha contra ese
lado.
5. Agregue el relleno, tratando de no excederse en la cantidad.
6. Coloque otra rebanada de pan sobre el relleno y úntela con mantequilla o
margarina.
7. Cierre la Sandwichera lentamente.
8. Después de 2 a 3 minutos, abra la unidad y quite el sandwich. Puede detener la
Sandwichera en cualquier momento desenchufándola del tomacorriente de CA.
P
RECAUCIÓN
:
1. Si le resulta difícil cerrar la unidad es que ha puesto demasiado relleno. Debe reducir
el relleno o usar un pan más delgado para evitar dañar la Waflera/Sandwichera.
2. Para quitar el sandwich de la unidad no use ningún utensilio que pueda dañar el
recubrimiento antiadherente. Use utensilios de madera o plástico, aptos para
temperaturas altas.
INSTRUCCIONES DE LIMPIEZA
1. Desenchufe la unidad y deje enfriar antes de limpiar.
2.
Limpie el exterior con un paño suave y seco cuando la Waflera/Sandwichera esté fría.
Nunca use lustre para metales.
3. Puede quitar la plancha de calentamiento y limpiarla con un paño suave, agua tibia
y detergente. Vuelva a colocarla una vez que esté completamente seca.
4. Si usa la Waflera/Sandwichera con frecuencia, deberá quitar las migas de pan que
se acumulen, por lo menos una vez a la semana. Verifique que no queden migas
debajo de las planchas antes de volver a usar la Waflera/Sandwichera.
CONSEJOS PARA WAFLES SABROSOS
1. No mezcle en forma excesiva la masa de wafles. Para obtener wafles más livianos
y crocantes, bata las claras de huevo por separado y viértalas suavemente sobre
la masa para wafles.
2. Cocine completamente los wafles antes de retirarlos de la unidad.
3. No abra la Waflera mientras el vapor esté escapando por los lados y por el frente
de la unidad.
4. ¿Por qué no congelar wafles preparados para los días en que esté muy ocupada?
Simplemente cocine los wafles como se indica. Déjelos enfriar sobre una rejilla
de alambre y envuélvalos en papel o plástico a prueba de humedad. Recaliéntelos
rápidamente en su horno tostador, asador u horno microondas.
PRECAUCIONES IMPORTANTES
Cuando use algún aparato eléctrico siempre deben seguirse precauciones básicas
de seguridad incluyendo las siguientes:
LEA TODAS LAS INSTRUCCIONES ANTES DE USAR
• No toque superficies calientes.
• Como protección contra una descarga eléctrica, no sumerja el cable, el enchufe o cualquier otra pieza
de la Waflera/Sandwichera en agua u otros líquidos.
• Nunca deje la unidad sin supervisión si la utilizan los niños o si la misma se utiliza cerca de ellos.
• Desenchufe el electrodoméstico del tomacorriente cuando no esté en uso y antes de limpiar.
Deje que la unidad se enfríe antes de quitar o agregar piezas.
•
No opere este electrodoméstico o cualquier otro si el cable o enchufe está dañado o en malas condiciones.
Si el cable principal está dañado, solicite al fabricante, el agente de servicio más cercano o una
persona calificada que lo cambie.
• No permita que el cable cuelgue por sobre el mostrador o la mesa ni toque superficies calientes.
• No lo coloque cerca o sobre una estufa a gas o eléctrica o en el horno caliente.
• No use el electrodoméstico para un propósito distinto para el cual fue diseñado.
• Verifique que el voltaje del tomacorriente corresponda al voltaje especificado en la etiqueta
de clasificación de la Waflera/Sandwichera.
• Sólo un agente de servicio autorizado puede realizar una revisión, reparación o ajuste al
electrodoméstico.
• Si el cable de alimentación está dañado, el fabricante, su agente de servicio o una persona igualmente
calificada debe reemplazarlo para evitar peligros.
ESTA UNIDAD ES PARA USO DOMÉSTICO SOLAMENTE
INSTRUCCIONES ESPECIALES
Este electrodoméstico posee un enchufe polarizado (una pata es más ancha que la otra). Para reducir el
riesgo de una descarga eléctrica, este enchufe se introduce en el tomacorriente polarizado de una sola
manera. Si el enchufe no se puede introducir por completo en el tomacorriente, gírelo. Si aún así no
logra colocarlo, comuníquese con un electricista calificado. No haga ninguna modificación al enchufe.
GUARDE ESTAS INSTRUCCIONES
B
IENVENIDOS
¡Felicitaciones por la compra de la Waflera/Sandwichera OSTER
®
! Para mayor información sobre
los productos OSTER
®
, visítenos en www.oster.com.
Con su nuevo electrodoméstico podrá preparar wafles y sandwiches crocantes, calientes y dorados
en sólo unos minutos y así saborear una rápida comida en cualquier momento del día.
Su Waflera/Sandwichera OSTER
®
está controlada por termostato para ayudarle a preparar wafles
a la perfección. La unidad es portátil, por lo que podrá preparar wafles/sandwiches en la cocina
o directamente en la mesa. Las rejillas antiadherentes facilitan la limpieza. Sabemos que le
encantará su nueva Waflera/Sandwichera OSTER
®
. Es un gran complemento para su cocina.
CÓMO USAR LA WAFLERA/SANDWICHERA OSTER
®
CÓMO CAMBIAR LAS PLANCHAS PARA WAFLES Y SANDWICHES
• Para quitar las planchas, presione el botón del interior de la unidad. La parte delantera
de la plancha se levantará levemente. Deslice la plancha hacia usted para destrabarla.
• Al colocar nuevamente las planchas, verifique que las bisagras estén alineadas con los
separadores de metal. Primero coloque el separador de la bisagra trasera y presione sobre
la plancha hasta que escuche un “clic” que le indicará que la plancha está en su lugar.
CÓMO PREPARAR WAFLES/SANDWICHES
Prepare sus propios wafles/sandwiches con ingredientes nuevos usando cualquiera de
las recetas OSTER
®
listadas en las siguientes páginas o use cualquiera de sus favoritas.
Para aquellos días en que esté muy ocupada, ¿por qué no tener masa ya lista para
preparar una comida en cuestión de minutos?
WAFLES CREATIVOS
Deje que su imaginación sea su guía para cocinar muchas comidas sabrosas y deliciosas
usando su Waflera/Sandwichera OSTER
®
. Aquí damos algunas sugerencias:
DESAYUNO Y
D
ESAYUNO-ALMUERZO
Recubra los wafles/sandwiches crocantes con:
Mantequilla, Almíbar, Miel, Melaza, Pasta de Manzana, Relleno de Pastel,
Crema Batida, Yogur, Frutas en Conserva, Fruta Fresca
POSTRES
Sirva los wafles de postre calientes o fríos. Prepare una masa más abundante, tal como
la de wafles estilo Belga o wafles de pastelillo de chocolate. Cúbralos con sus ingredientes
dulces y sabrosos favoritos que pueden incluir los siguientes:
Moras o Fresas Culces, Helado, Azúcar en Polvo, Nueces Picadas,
Salsas de Frutas para Helados, Yogurt de Frutas.
RECETAS
SANDWICHES MONTECRISTO
4 rebanadas de pan de textura firme, blanco o de trigo integral Para la masa:
Mostaza Dijon 4 huevos grandes
4 onzas de jamón ahumado en lonjas, 1/2 taza de leche
como Black Forest o Westphalian sal a gusto
4 onzas de queso suizo en lonjas
4 onzas de pechuga de pavo asado en lonjas
Preparación de la masa: En un tazón poco profundo, bata 4 huevos grandes con
1/2 taza de leche y sal. Mientras tanto, unte un lado de cada rebanada de pan con
un poco de mostaza.
Coloque en 2 de las rebanadas un poco de jamón, queso y pavo. Coloque la rebanada
de pan restante sobre cada una, presionando para formar dos sandwiches compactos.
Unte cada lado del sandwich con la masa, recubriéndolo en forma pareja.
Coloque los sandwiches en la Sandwichera OSTER
®
. Cocine durante 5 minutes
o hasta que estén dorados.
R
INDE
: 2 SANDWICHES

–––
F
OLD
–––
IMPORTANT SAFEGUARDS
When using electrical appliances, basic safety precautions should always be followed,
including the following:
READ ALL INSTRUCTIONS BEFORE USE
• Do not touch hot surfaces.
• To protect against electric shock, do not immerse cord, plug or any part of the Waffle/
Sandwichmaker in water or other liquid.
• Close supervision is always necessary when it is used by or near children.
• Unplug unit from outlet when not in use and before cleaning. Allow hot surface to cool
before putting on or taking off parts.
•
Do not operate this or any appliance with a damaged cord or plug or in abnormal state.
If
its main cord is damaged, it must be replaced by the manufacturer or the nearest service
agent or qualified person.
•
Do not let the cord hang over edge of table or counter, or touch hot surface.
• Do not place on or near a hot gas or electric burner or in a heated oven.
• Do not use the appliance for other than its intended use.
• Make sure that your outlet voltage corresponds to the voltage stated on the rating label of
the Waffle/Sandwichmaker.
• Any examination, repair or adjustment for the appliance should be made by the
authorized service agent.
• If the supply cord is damaged, it must be replaced by the manufacturer or its service agent
or similar qualified person in order to avoid a hazard.
THIS UNIT IS FOR HOUSEHOLD USE ONLY
SPECIAL INSTRUCTIONS
This appliance has a polarized plug (one blade is wider than the other). To reduce the risk of
electric shock, this plug will fit in a polarized outlet only one way. If the plug does not fit fully
in the outlet, reverse the plug. If it still does not fit, contact a qualified electrician. Do not
modify the plug in any way.
SAVE THESE INSTRUCTIONS
W
ELCOME
Congratulations on your purchase of an OSTER
®
Waffle/Sandwichmaker
! To learn
more about OSTER
®
products, please visit us at www.oster.com.
Your new appliance will surely make crispy, hot, golden waffles/sandwiches in just minutes
for a quick meal anytime of the day.
Your OSTER
®
Waffle/Sandwichmaker is thermostatically controlled to help you prepare
waffles to perfection. Your unit is portable so you can make waffles/sandwiches in your
kitchen or right at the table. The non-stick grids make clean-up easy. We know that you
will love your new OSTER
®
Waffle/Sandwichmaker. It’s a great addition to any kitchen.
HOW TO USE YOUR OSTER
®
WAFFLE/SANDWICHMAKER
CHANGING WAFFLE AND SANDWICH PLATES
• To release plates, push the button on the inside of the unit. The front of the plate will lift
slightly. Pull plate towards you to slide out of locked position.
•
When putting plates in, make sure the hinges are aligned with the metal inserts on the plates.
Start by placing the rear hinge insert in first and pressing down on the plate until you hear the
plate click into place.
English-4English-3
V
ARIATIONS
Pecan or Macadamia Nut Waffles: Sprinkle 1 Tbsp. (15 ml) finely chopped
pecans or macadamia
nuts over preheated waffle grids. Pour 3/4 cup (200 ml)
batter over nuts and close
Waffle/Sandwichmaker. Bake as directed.
Bacon Waffles: Cook bacon strips. Pour 3/4 cup (200 ml) batter over waffle grids.
Cut 1 strip bacon in half, lay over batter and close Waffle/Sandwichmaker. Bake as directed.
Cheese Waffles: Fold in 1-1/2 cups (375 ml) shredded cheddar cheese into batter.
Bake as directed. Serve with syrup or your favorite creamed entrée.
Blueberry Waffles: Fold 2 cups (500 ml) fresh blueberries into batter. Pour 3/4 cup (200 ml)
batter over grids. Bake until golden.
Chocolate Chip Waffles: Fold 1 cup (250 ml) chocolate chips into batter. Bake as directed.
LEMON SWEET WAFFLES
1 cup butter or margarine (softened) 3-1/4 cups flour
1-1/2 cups sugar 1 packet of vanilla sugar
2 eggs 1-3/4 cups water
1/8 tsp. baking powder grated rind of 1 lemon
In a large bowl, beat butter, sugars and eggs together. Add all dry ingredients along with
water and lemon rind, and blend until smooth. Pour approximately 3/4 cup batter into
waffle iron. Bake as directed.
YIELD: 8 – 10 WAFFLES
ALOHA
DESSERT WAFFLES
A pretty dessert that is guaranteed to please your guests
8 prepared Macadamia Nut Waffles 1 can (6 oz. or 170 g) frozen orange juice concentrate, thawed
1 cup (250 ml) sugar 1/2 cup (125 ml) flaked coconut
3 Tbsp. (45 ml) cornstarch 1/3 cup (75 ml) Maraschino cherries, chopped
1 can (8 oz. or 277 g) crushed 1/4 cup (50 ml) 150 Proof rum
pineapple, drained reserving juice vanilla ice cream
cold water
In a large sauté pan, combine sugar and cornstarch. Measure pineapple juice and enough cold
water to equal 1-1/4 cups (300 ml). Combine water mixture, orange juice and sugar mixture.
Cook over medium heat until thickened, stirring constantly. Add coconut, cherries and pineapple.
Heat through. Keep warm on low heat. Slowly pour rum over top of mixture. Carefully ignite.
Place a scoop of vanilla ice cream over each waffle. When flame dies, spoon sauce over ice cream.
Serve immediately.
Y
IELD: 5 WAFFLES
CHOCOLATE BROWNIE WAFFLES
Here’s a no-fuss dessert idea!
1/4 cup (50 ml) shortening or oil 1 Tbsp. (15 ml) baking powder
2/3 cup (150 ml) sugar 1/4 tsp. (1 ml) salt
2 squares (1 ounce or 28 g each) 1-1/4 cups (300 ml) milk
baking chocolate, melted 1/2 tsp. (2 ml) vanilla
3 egg yolks 1/2 cup (125 ml) chopped nuts
1-1/2 cups (375 ml) all-purpose flour 3 egg whites, stiffly beaten
Preheat Waffle/Sandwichmaker. In a large mixing bowl, cream shortening and sugar
at medium-low until fluffy. Add chocolate and egg yolks. Beat well. Add milk
alternately with combined dry ingredients. Mix well. Add vanilla and nuts. By hand, gently
fold in beaten egg white. Pour 3/4 cup (200 ml)
batter over grids.
Close Waffle/Sandwichmaker and bake until steam no longer escapes,
about 3-5 minutes.
Waffle will crisp as it cools. Repeat. Serve hot or cold with vanilla ice cream,
chocolate syrup and chopped walnuts or pecans.
YIELD: 6 WAFFLES
English-5 English-6
User Manual
Wafflemaker with
Sandwich Plates
Manual de Instrucciones
Waflera con
Sandwich Plates
Manuel d’Instructions
Gaufrier avec
Plaques à Sandwiches
MODEL/MODELO
MODÈLE
3862
Español-1 Español-3 Español-4Español-2
English-2
RECIPES
MONTE CRISTO SANDWICHES
4 slices firm-textured sliced bread, white or whole wheat For the batter:
Dijon mustard 4 large eggs
4 ounces sliced smoked ham, such as Black Forest or Westphalian 1/2 cup milk
4 ounces sliced Swiss cheese Salt to taste
4 ounces sliced roasted turkey breast
Make the batter: In a shallow bowl, whisk 4 large eggs with the 1/2 cup milk and salt.
Meanwhile, spread one side of each slice of bread with some of the mustard.
Top 2 of the slices with some of the ham, cheese, and turkey. Top each with 1 slice of
the remaining bread, pressing down to form 2 compact sandwiches.
Dip each sandwich on both sides into the batter, coating evenly. Add the sandwiches
to OSTER
®
Sandwichmaker. Cook for 5 minutes until golden brown.
YIELD: 2 SANDWICHES
QUICK WAFFLES
3 eggs 2 cups flour
1 cup milk 1/2 tsp. salt
1/2 cup melted butter or margarine 1 Tbsp. baking powder
1 Tbsp. vanilla (optional) 2 tsp. sugar
Beat whole eggs in a bowl until thick. Beat milk, melted butter and vanilla into eggs.
In a separate bowl, combine remaining ingredients. Sift into egg mixture, and mix well.
Bake as directed. Y
IELD: 6 – 8 WAFFLES
Variation: Cinnamon – Apple.
Add 1 apple peeled and shredded, 1 tsp. vanilla
and 1/2 tsp. cinnamon to batter.
EXTRA
-S
PECIAL
WHOLE
WHEAT WAFFLES
Feed the gang with these at Sunday Brunch
1 cup (250 ml) milk* 3 eggs (or equivalent)
1 cup (250 ml) water 1 package (1/4 ounce or 7 g)
1/4 cup (50 ml) butter or margarine active dry yeast
1/4 cup (50 ml) honey 1/2 tsp. (2 ml) salt
2-2/3 cups (650 ml) whole wheat flour
*low-fat or skim milk may be used
Heat milk, water, butter and honey at 120°F (48°C). In large mixing bowl, combine flour, eggs,
yeast, salt and warmed milk mixture. Mix at low to moisten, then medium-high for 1 minute.
Cover and refrigerate several hours or overnight, stirring occasionally.
Preheat Waffle/Sandwichmaker. Pour 3/4 cup (200 ml) over grids. Close Waffle/Sandwichmaker,
bake until steam no longer escapes, about 3 – 5 minutes. Repeat. Serve while hot with your
favorite topping. Y
IELD
: 7 WAFFLES
LIGHT ’N CRISP WAFFLES
2 egg yolks 1/2 tsp. (2 ml) salt
2 cups (500 ml) milk 1/3 cup (75 ml) oil
2 cups (500 ml) all-purpose flour 2 egg whites, stiffly beaten
1 Tbsp. (15 ml) baking powder
Preheat Waffle/Sandwichmaker. Put all ingredients, except egg whites, in a large mixing bowl.
Beat on low until moistened. Increase to medium, mix until smooth. By hand, gently fold in
beaten egg whites. Pour 3/4 cup (200 ml) batter over grids. Close Waffle/Sandwichmaker, bake
until steam no longer escapes, about 3 – 5 minutes. Repeat. Serve while hot with your favorite
topping. Y
IELD: 5 WAFFLES
P
REPARING WAFFLES
1.
Close unit and plug into outlet. Use only voltage
specified on bottom of unit.
The Power On light (Red)
will come on. The Ready light (Amber) will not come on.
C
AUTION: Touch unit only by handles during use or directly after use.
2. The unit is ready for use when the Ready light comes on.
3. Open unit and pour approximately 3/4 cup waffle batter onto grids. For best results,
pour batter in a circle around outer edge of Wafflemaker. Close cover. It is very typical
to have a small amount of batter run over grid and down unit. However, if an excessive
amount of batter runs over, use less batter.
4. Cover will rise slightly as waffles begin to bake. Do not open cover while steam
is escaping. Most waffle recipes bake in approximately 4 to 5 minutes. Waffles are
generally done when steam no longer escapes from sides and front of unit.
5. When waffles are done, remove with a plastic fork or wooden tongs.
N
OTE: The Ready light may cycle on and off during cooking. This indicates that
the thermostat is maintaining the unit at the proper cooking temperature.
6. Close cover and wait for Ready light to come on before preparing another batch
of waffles.
PREPARING SANDWICHES
1. Plug the power cord into the AC outlet.
2. Before use, please preheat the Sandwichmaker for 5 to 8 minutes. The red power on
lamp will be on. When the amber lamp goes on, it means the Sandwichmaker
temperature is ready.
3. Coat the inner plate of the machine with butter or margarine to prevent sticking.
4. After preheat, open the Sandwichmaker, place a piece of bread of approximately 1/2-inch
thickness on inner lower plate. Coat one side of the bread with butter or margarine and
place on the plate against this side.
English-1
P.N. 111895
–––
F
OLD
––– –––
F
OLD
–––
–––
F
OLD
–––
–––
F
OLD
–––
–––
F
OLD
–––
–––
F
OLD
–––
For product questions contact:
Sunbeam Consumer Service
USA : 1.800.334.0759
Canada : 1.800.667.8623
www.oster.com
©2003 Sunbeam Products, Inc. All rights reserved.
OSTER
®
is a registered trademark of Sunbeam Products, Inc.
Distributed by Sunbeam Products, Inc., Boca Raton, FL 33431
Pour les questions de produit:
Sunbeam Consumer Service
États-Unis : 1.800.334.0759
Canada : 1.800.667.8623
www.oster.com
©2003 Sunbeam Products, Inc. Tous droits réservés.
OSTER
®
est une marque déposée de Sunbeam Products, Inc.
Distribué par Sunbeam Products, Inc., Boca Raton, Florida 33431
Para preguntas sobre los productos llame:
Sunbeam Consumer Service
EE.UU. : 1.800.334.0759
Canadá : 1.800.667.8623
www.oster.com
©2003 Sunbeam Products, Inc. Todos los derechos reservados.
OSTER
®
es una marca registrada de Sunbeam Products, Inc.
Distribuido por Sunbeam Products, Inc., Boca Raton, FL 33431
Printed in China Imprimé en Chine Impreso en China
5. Add filling on it, taking care not to overfill.
6.
Put another piece of bread over the filling, and coat top with butter
or margarine
.
7. Close the Sandwichmaker slowly.
8. After about 2 to 3 minutes, open the machine and remove sandwich. Sandwichmaker can
be stopped at any time by unplugging the power cord from the AC outlet.
CAUTION
:
1. When it is difficult to close the machine, it means that too much filling was added.
You should reduce the filling or replace with thinner bread to prevent damaging
the Waffle/Sandwichmaker.
2. When removing sandwich from machine, do not use any utensil that may damage
the non-stick coating. Use wood or plastic suitable for high temperatures.
CLEANING INSTRUCTIONS
1. Unplug and allow unit to cool before cleaning.
2. Wipe outside with soft, dry cloth when Waffle/Sandwichmaker is cold.
Never use metal polish.
3. You can remove the heating plate to clean with soft cloth, warm water and dishwashing
liquid. Before resetting it, you should allow it to dry thoroughly.
4. If Waffle/Sandwichmaker is used frequently, accumulated bread crumbs should be
removed at least once a week. Make sure any accumulation under plates is completely
removed before using the Waffle/Sandwichmaker again.
HINTS FOR TASTY WAFFLES
1. Do not over-mix waffle batter. Beating egg whites separately and folding them gently
into the batter surely will create a lighter, crispier waffle.
2. Completely bake waffles before removing from unit.
3.
Don’t open the Wafflemaker while steam is escaping from sides and front of the unit.
4. Why not freeze prepared waffles for those busy days ahead? Just bake the waffles
as directed. Cool on a wire rack and wrap in moisture-proof paper or plastic.
Quickly reheat in your toaster oven, broiler or microwave oven.
WAFFLE/SANDWICH MAKING
Prepare your own waffles/sandwiches from scratch with any of the OSTER
®
recipes listed
on the following pages, or use any of your own family favorites. For those busy days,
why not have a prepared mix handy for a meal in a matter of minutes?
CREATIVE
W
AFFLES
Let your imagination be your guide to many exciting and tasty meals with your
OSTER
®
Waffle/Sandwichmaker. Here are just a few suggestions:
B
REAKFAST AND
BRUNCH
Top crispy waffles/sandwiches with:
Butter, Syrup, Honey, Molasses, Apple Butter, Pie Filling,
Whipped Cream, Yogurt, Fruit Preserves, Fresh Fruit
D
ESSERT
Serve dessert waffles hot or cold. Prepare a richer batter such as Belgian-Style Waffles
or Chocolate Brownie Waffles. Top with your favorite sweet and tasty ingredients which
might include:
Sweetened Fresh Berries, Ice Cream, Powdered Sugar,
Chopped Nuts, Sundae Sauces, Fruit Yogurt
Visit us at www.oster.com
–––
F
OLD
–––
–––
F
OLD
–––
–––
F
OLD
–––
–––
F
OLD
–––
–––
F
OLD
–––
One-Year Limited Warranty
S
unbeam Products, Inc., or if in Canada, Sunbeam Corporation (Canada) Limited (collectively “Sunbeam”)
warrants that for a period of one year from the date of purchase, this product will be free from defects in
material and workmanship. Sunbeam, at its option, will repair or replace this product or any component
of the product found to be defective during the warranty period. Replacement will be made
with a new
or remanufactured product or component. If the product is no longer available, replacement
may be made
with a similar product of equal or greater value. This is your exclusive warranty.
This warranty is valid for the original retail purchaser from the date of initial retail purchase and
is not transferable. Keep the original sales receipt. Proof of purchase is required to obtain warranty
performance. Sunbeam dealers, service centers, or retail stores selling Sunbeam products do not have
the right to alter, modify or any way change the terms and conditions of this warranty.
This warranty does not cover normal wear of parts or damage resulting from any of the following:
negligent use or misuse of the product, use on improper voltage or current, use contrary to the operating
instructions, disassembly, repair or alteration by anyone other than Sunbeam or an authorized Sunbeam
service center. Further, the warranty does not cover: Acts of God, such as fire, flood, hurricanes and
tornadoes.
What Are the Limits on Sunbeam’s Liability?
Sunbeam shall not be liable for any incidental or consequential damages caused by the breach of any
express, implied or statutory warranty or condition.
Except to the extent prohibited by applicable law, any implied warranty or condition of merchantability
or fitness for a particular purpose is limited in duration to the duration of the above warranty.
Sunbeam disclaims all other warranties, conditions or representations, express, implied, statutory
or otherwise.
Sunbeam shall not be liable for any damages of any kind resulting from the purchase, use or misuse of, or
inability to use the product including incidental, special, consequential or similar damages or loss of profits, or
for any breach of contract, fundamental or otherwise, or for any claim brought against purchaser by any other
party.
Some provinces, states or jurisdictions do not allow the exclusion or limitation of incidental
or consequential damages or limitations on how long an implied warranty lasts, so the above
limitations or exclusion may not apply to you.
This warranty gives you specific legal rights, and you may also have other rights that vary from
province to province, state to state or jurisdiction to jurisdiction.
How to Obtain Warranty Service
In the U.S.A. –
If you have any question regarding this warranty or would like to obtain warranty service,
please call 1.800.334.0759 and a convenient service center address will be provided to you.
In Canada –
If you have any question regarding this warranty or would like to obtain warranty service,
please call 1.800.667.8623 and a convenient service center address will be provided to you.
In the U.S.A., this warranty is offered by Sunbeam Products, Inc., located in Boca Raton,
Florida 33431. In Canada, this warranty is offered by Sunbeam Corporation (Canada) Limited,
located at 5975 Falbourne Street, Mississauga, Ontario L5R 3V8.
PLEASE DO NOT RETURN THIS PRODUCT TO ANY OF
THESE ADDRESSES OR TO THE PLACE OF PURCHASE.
Waffle
Plates
Safety Locking
Handles
Rear Hinge
Insert
Sandwich
Plates
Outer Hinge
Insert
Plate Release
Button
FEATURES OF YOUR OSTER
®
WAFFLE/SANDWICHMAKER
Planchas
para Wafles
Asas con Traba
de Seguridad
Separador de la
Bisagra Trasera
Planchas para
Sandwiches
Separador de la
Bisagra Externa
Botón para Quitar
las Planchas
PIEZAS DE LA WAFLERA/SANDWICHERA OSTER
®
CÓMO PREPARAR WAFLES
1. Cierre la unidad y enchúfela en el tomacorriente. Use sólo el voltaje que se indica
en la parte inferior de la unidad. Se encenderá la luz de encendido (rojo). La luz
Listo (amarillo) no se encenderá.
P
RECAUCIÓN
:
Sólo toque la unidad por las asas durante el uso o inmediatamente
después del uso.
2. La unidad estará lista para usarse cuando la luz de Listo se encienda.
3. Abra la unidad y vierta aproximadamente 3/4 de taza de masa de wafles sobre
las rejillas. Para obtener óptimos resultados, vierta la masa formando un círculo
alrededor del borde exterior de la Waflera. Cierre la tapa. Es normal que una
pequeña cantidad de masa se escurra por la rejilla y por debajo de la unidad.
Sin embargo, si se derrama mucha masa, deberá usar menos cantidad.
4. La tapa se levantará levemente a medida que los wafles comiencen a cocinarse.
No abra la tapa mientras salga vapor. La mayoría de las recetas de wafles toma
en prepararse de 4 a 5 minutos aproximadamente. Por lo general los wafles están
listos cuando ya no sale más vapor por los costados y el frente de la unidad.
5. Cuando los wafles estén listos, quítelos con un tenedor de plástico o con unas pinzas
de madera.
N
OTA
:
Es posible que la luz de Listo se encienda y se apague durante la cocción.
Esto indica que el termostato mantiene la unidad en la temperatura
apropiada de cocción.
6. Cierre la tapa y espere que la luz de Encendido se encienda antes de preparar
más wafles.
CÓMO PREPARAR SANDWICHES
1. Enchufe la unidad en un tomacorriente de CA.
2. Antes de usar, caliente la Sandwichera durante 5 a 8 minutos. Se encenderá la luz
roja. La luz amarilla se encenderá cuando la Sandwichera alcance la temperatura
apropiada.
3. Unte la plancha interna de la unidad con mantequilla o margarina para evitar que
los alimentos se adhieran.
4. Luego de calentar la Sandwichera, ábrala y coloque una rebanada de pan de
aproximadamente _ pulgada de grosor sobre la plancha inferior interna. Unte un
lado del pan con mantequilla o margarina y colóquelo sobre la plancha contra ese
lado.
5. Agregue el relleno, tratando de no excederse en la cantidad.
6. Coloque otra rebanada de pan sobre el relleno y úntela con mantequilla o
margarina.
7. Cierre la Sandwichera lentamente.
8. Después de 2 a 3 minutos, abra la unidad y quite el sandwich. Puede detener la
Sandwichera en cualquier momento desenchufándola del tomacorriente de CA.
P
RECAUCIÓN
:
1. Si le resulta difícil cerrar la unidad es que ha puesto demasiado relleno. Debe reducir
el relleno o usar un pan más delgado para evitar dañar la Waflera/Sandwichera.
2. Para quitar el sandwich de la unidad no use ningún utensilio que pueda dañar el
recubrimiento antiadherente. Use utensilios de madera o plástico, aptos para
temperaturas altas.
INSTRUCCIONES DE LIMPIEZA
1. Desenchufe la unidad y deje enfriar antes de limpiar.
2.
Limpie el exterior con un paño suave y seco cuando la Waflera/Sandwichera esté fría.
Nunca use lustre para metales.
3. Puede quitar la plancha de calentamiento y limpiarla con un paño suave, agua tibia
y detergente. Vuelva a colocarla una vez que esté completamente seca.
4. Si usa la Waflera/Sandwichera con frecuencia, deberá quitar las migas de pan que
se acumulen, por lo menos una vez a la semana. Verifique que no queden migas
debajo de las planchas antes de volver a usar la Waflera/Sandwichera.
CONSEJOS PARA WAFLES SABROSOS
1. No mezcle en forma excesiva la masa de wafles. Para obtener wafles más livianos
y crocantes, bata las claras de huevo por separado y viértalas suavemente sobre
la masa para wafles.
2. Cocine completamente los wafles antes de retirarlos de la unidad.
3. No abra la Waflera mientras el vapor esté escapando por los lados y por el frente
de la unidad.
4. ¿Por qué no congelar wafles preparados para los días en que esté muy ocupada?
Simplemente cocine los wafles como se indica. Déjelos enfriar sobre una rejilla
de alambre y envuélvalos en papel o plástico a prueba de humedad. Recaliéntelos
rápidamente en su horno tostador, asador u horno microondas.
PRECAUCIONES IMPORTANTES
Cuando use algún aparato eléctrico siempre deben seguirse precauciones básicas
de seguridad incluyendo las siguientes:
LEA TODAS LAS INSTRUCCIONES ANTES DE USAR
• No toque superficies calientes.
• Como protección contra una descarga eléctrica, no sumerja el cable, el enchufe o cualquier otra pieza
de la Waflera/Sandwichera en agua u otros líquidos.
• Nunca deje la unidad sin supervisión si la utilizan los niños o si la misma se utiliza cerca de ellos.
• Desenchufe el electrodoméstico del tomacorriente cuando no esté en uso y antes de limpiar.
Deje que la unidad se enfríe antes de quitar o agregar piezas.
•
No opere este electrodoméstico o cualquier otro si el cable o enchufe está dañado o en malas condiciones.
Si el cable principal está dañado, solicite al fabricante, el agente de servicio más cercano o una
persona calificada que lo cambie.
• No permita que el cable cuelgue por sobre el mostrador o la mesa ni toque superficies calientes.
• No lo coloque cerca o sobre una estufa a gas o eléctrica o en el horno caliente.
• No use el electrodoméstico para un propósito distinto para el cual fue diseñado.
• Verifique que el voltaje del tomacorriente corresponda al voltaje especificado en la etiqueta
de clasificación de la Waflera/Sandwichera.
• Sólo un agente de servicio autorizado puede realizar una revisión, reparación o ajuste al
electrodoméstico.
• Si el cable de alimentación está dañado, el fabricante, su agente de servicio o una persona igualmente
calificada debe reemplazarlo para evitar peligros.
ESTA UNIDAD ES PARA USO DOMÉSTICO SOLAMENTE
INSTRUCCIONES ESPECIALES
Este electrodoméstico posee un enchufe polarizado (una pata es más ancha que la otra). Para reducir el
riesgo de una descarga eléctrica, este enchufe se introduce en el tomacorriente polarizado de una sola
manera. Si el enchufe no se puede introducir por completo en el tomacorriente, gírelo. Si aún así no
logra colocarlo, comuníquese con un electricista calificado. No haga ninguna modificación al enchufe.
GUARDE ESTAS INSTRUCCIONES
B
IENVENIDOS
¡Felicitaciones por la compra de la Waflera/Sandwichera OSTER
®
! Para mayor información sobre
los productos OSTER
®
, visítenos en www.oster.com.
Con su nuevo electrodoméstico podrá preparar wafles y sandwiches crocantes, calientes y dorados
en sólo unos minutos y así saborear una rápida comida en cualquier momento del día.
Su Waflera/Sandwichera OSTER
®
está controlada por termostato para ayudarle a preparar wafles
a la perfección. La unidad es portátil, por lo que podrá preparar wafles/sandwiches en la cocina
o directamente en la mesa. Las rejillas antiadherentes facilitan la limpieza. Sabemos que le
encantará su nueva Waflera/Sandwichera OSTER
®
. Es un gran complemento para su cocina.
CÓMO USAR LA WAFLERA/SANDWICHERA OSTER
®
CÓMO CAMBIAR LAS PLANCHAS PARA WAFLES Y SANDWICHES
• Para quitar las planchas, presione el botón del interior de la unidad. La parte delantera
de la plancha se levantará levemente. Deslice la plancha hacia usted para destrabarla.
• Al colocar nuevamente las planchas, verifique que las bisagras estén alineadas con los
separadores de metal. Primero coloque el separador de la bisagra trasera y presione sobre
la plancha hasta que escuche un “clic” que le indicará que la plancha está en su lugar.
CÓMO PREPARAR WAFLES/SANDWICHES
Prepare sus propios wafles/sandwiches con ingredientes nuevos usando cualquiera de
las recetas OSTER
®
listadas en las siguientes páginas o use cualquiera de sus favoritas.
Para aquellos días en que esté muy ocupada, ¿por qué no tener masa ya lista para
preparar una comida en cuestión de minutos?
WAFLES CREATIVOS
Deje que su imaginación sea su guía para cocinar muchas comidas sabrosas y deliciosas
usando su Waflera/Sandwichera OSTER
®
. Aquí damos algunas sugerencias:
DESAYUNO Y
D
ESAYUNO-ALMUERZO
Recubra los wafles/sandwiches crocantes con:
Mantequilla, Almíbar, Miel, Melaza, Pasta de Manzana, Relleno de Pastel,
Crema Batida, Yogur, Frutas en Conserva, Fruta Fresca
POSTRES
Sirva los wafles de postre calientes o fríos. Prepare una masa más abundante, tal como
la de wafles estilo Belga o wafles de pastelillo de chocolate. Cúbralos con sus ingredientes
dulces y sabrosos favoritos que pueden incluir los siguientes:
Moras o Fresas Culces, Helado, Azúcar en Polvo, Nueces Picadas,
Salsas de Frutas para Helados, Yogurt de Frutas.
RECETAS
SANDWICHES MONTECRISTO
4 rebanadas de pan de textura firme, blanco o de trigo integral Para la masa:
Mostaza Dijon 4 huevos grandes
4 onzas de jamón ahumado en lonjas, 1/2 taza de leche
como Black Forest o Westphalian sal a gusto
4 onzas de queso suizo en lonjas
4 onzas de pechuga de pavo asado en lonjas
Preparación de la masa: En un tazón poco profundo, bata 4 huevos grandes con
1/2 taza de leche y sal. Mientras tanto, unte un lado de cada rebanada de pan con
un poco de mostaza.
Coloque en 2 de las rebanadas un poco de jamón, queso y pavo. Coloque la rebanada
de pan restante sobre cada una, presionando para formar dos sandwiches compactos.
Unte cada lado del sandwich con la masa, recubriéndolo en forma pareja.
Coloque los sandwiches en la Sandwichera OSTER
®
. Cocine durante 5 minutes
o hasta que estén dorados.
R
INDE
: 2 SANDWICHES

CONOZCA ACERCA DE SU BATIDORA MANUAL
La Batidora Manual O
STER
®
ha sido diseñada para ayudarla a preparar
deliciosos platillos.
FUNCIÓN DE POTENCIA EXTRA BURST OF POWER
®
La Función de Potencia Extra B
URST OF
P
OWER
®
le permite aumentar la potencia
a la velocidad seleccionada, al presionar un botón. Durante tareas de mezcla
especialmente pesadas, presione el botón para manipular la batidora con facilidad.
Una vez que libera el botón, la batidora regresará a su velocidad original.
CONTROL DE A
PAGADO
/ENCENDIDO DE
VELOCIDAD
–BOTÓN
EYECTOR DE
ASPAS PARA
B
ATIR
Esta Batidora Manual O
STER
®
presenta una combinación de
control de apagado/encendido de velocidad y botón
eyector
de aspas para batir. Este diseño le permite fác
ilmente seleccionar
la velocidad y quitar las aspas para batir y otros accesorios.
Empuje adelante sobre la lengüeta del pulgar para encender
la mezcladora y seleccionar la velocidad deseada (1 al 6).
Cuando el control de velocidad esté en la
posición apagado,
presione hacia abajo la
lengüeta del pulgar
para expulsar
las
aspas para batir
u otros accesorios. Es posible que
no escuche ningún clic.
BATIDORES
El diseño de los batidores permiten resultados
completos y rápidos para todos los tipos de mezclas.
Los batidores pueden lavarse en lavadora de platos.
(Vea Figura A)
ASPAS PARA BATIR EURO
Ideal para batir crema, preparar coberturas,
huevos revueltos y mucho más. (Vea Figura B)
GANCHOS PARA AMASAR
Utilice estos ganchos para trabajar con las masas
para pan,
pizza, donas u otras mezclas pesadas.
Para mejores resultados,
utilice una velocidad más baja.
(Vea Figura C)
ASA
ERGONÓMICA
El asa de la batidora ha sido diseñada para ofrecer mayor
comodidad y prevenir la fatiga de la mano durante
una tarea pesada o prolongada. (Vea Figura D)
L
EARNING A
BOUT Y
OUR
HAND
MIXER
The O
STER
®
Hand Mixer has been designed to assist you in preparing delicious foods.
B
URST OF
POWER
®
F
EATURE
The B
URST OF
P
OWER
®
feature allows for an added boost to
the selected speed setting at the press of the button. During
especially heavy mixing tasks, press the button to drive
through the mixture with ease. Once the button is released,
the mixer will return to the original speed setting.
O
N
/OFF
SPEED
CONTROL – BEATER EJECT BUTTON
This O
STER
®
Hand Mixer features a combination On/Off
Speed Control – Beater Eject Button. This design allows
for easy speed selection and ejection of beaters or other
attachments. Press forward on the thumb tab to turn the
mixer on and to select the desired speed setting
(1 through 6)
.
When the speed control is in the off position you can
push down on the thumb tab to release the beaters or
other attachments. There may not be a noticeable click.
BEATERS
The beater design allows for thorough, fast mixing
results for all types of batters. The beaters are
dishwasher safe. (See Figure A)
E
URO B
EATERS
Ideal for whipping cream, making frosting, scrambling
eggs and much more. (See Figure B)
D
OUGH H
OOKS
Use these hooks to knead bread dough, pizza dough
or other heavy batters and doughs. Use at lower speeds
for best results. (See Figure C)
C
OMFORT
H
ANDLE
The handle has been designed for comfort to prevent
hand fatigue during heavy or long mixing tasks.
(See Figure D)
––– F
OLD
–––
English-1
IMPORTANT SAFEGUARDS
When using electrical appliances, basic safety precautions should
always be followed, including the following:
READ ALL INSTRUCTIONS BEFORE USE
• To protect against risk of electrical shock, do not put hand mixer in water or
other liquid. This may cause personal injury and/or damage to the product.
• Close supervision is necessary when hand mixer is used by or near children,
or incapacitated persons.
• Unplug from outlet while not in use, before putting on or taking off parts
and before cleaning.
•
Avoid contact with moving parts. Keep hands, hair, clothing,
as well as
spatulas and other utensils away from beaters during operation to reduce
the risk of injury to persons and/or damage to the hand mixer.
• Do not operate hand mixer with a damaged cord or plug, after the appliance
malfunctions, or if it is dropped or damaged in any manner. Return appliance
to the nearest Authorized Sunbeam Service Center for examination,
repair or electrical or mechanical adjustment.
• Do not use with an extension cord.
• The use of attachments not recommended or sold by Sunbeam Products
may cause fire, electrical shock or injury.
• Do not let cord hang over edge of table or countertop.
• Do not let cord touch hot surfaces, including a stove.
• Do not use outdoors or for commercial purposes.
• Remove beaters from hand mixer before washing them.
• Do not place hand mixer on or near a hot burner or in a heated oven.
• Do not use hand mixer for other than intended use.
• Do not leave hand mixer unattended while it is operating.
T
HIS
UNIT FOR
H
OUSEHOLD
U
SE
O
NLY
FOR PRODUCTS PURCHASED IN THE U.S. AND CANADA ONLY
To reduce the risk of electrical shock, this appliance has a polarized plug
(one blade is wider than the other). This plug fits a polarized outlet only one way;
if the plug does not fit fully into the outlet, reverse the plug. If it still does not fit,
contact a qualified electrician. Do not attempt to defeat this safety feature.
E
XTENSION
C
ORD
U
SE
A short power-supply cord is provided to reduce the risk resulting from
becoming entangled in or tripping over a longer cord. An extension cord may
be used if care is exercised in its use. If an extension cord is used, the electrical
rating of the cord must be at least as great as the electrical rating of the appliance.
The extension cord should be arranged so that it will not drape over the countertop
or tabletop where it can be pulled on by children or tripped over unintentionally.
SAVE THESE INSTRUCTIONS
English-5English-4 English-6
User Manual
Hand Mixer
Manual de Instrucciones
Batidora Manual
Manuel d’Instructions
Mélangeur à Main
MODEL/MODELO
MODÈLE
2498
Español-1 Español-3 Español-4Español-2
English-3English-2
P.N. 111805
––– F
OLD
–––
––– F
OLD
–––
––– F
OLD
–––
––– F
OLD
–––
––– F
OLD
–––
––– F
OLD
–––––– F
OLD
–––
––– F
OLD
–––
––– F
OLD
–––
––– F
OLD
–––
––– F
OLD
–––
PRECAUCIONES IMPORTANTES
Cuando use algún aparato eléctrico siempre deben seguirse las
precauciones básicas de seguridad incluyendo las siguientes:
LEA TODAS LAS INSTRUCCIONES ANTES DE USAR
• Para protegerse contra una descarga eléctrica, no coloque la Batidora
Manual en agua o en otros líquidos. Esto puede ocasionar lesiones
personales o daños al producto.
• Es necesario una supervisión continua cuando la Batidora Manual es usada
por o cerca de niños o personas incapacitadas.
• Desconéctela del tomacorriente cuando el aparato no esté en uso, antes
de poner o quitar partes y antes de limpiar el electrodoméstico.
• Evite el contacto con las partes en movimiento. Mantenga las manos,
cabello, ropa así como también, las espátulas y
otros utensilios lejos de
los batidores durante el funcionamiento
del aparato, para reducir el riesgo
de lesiones personales o daños a la Batidora Manual.
•
No opere la Batidora Manual con un cordón dañado o después
de que el
aparato ha funcionado inadecuadamente o ha sido dañado de cualquier
manera. Regrese el aparato a un Centro de Servicio Autorizado Sunbeam
para su examen, reparación o ajuste eléctrico o mecánico.
• No use con un cable de extensión.
• El uso de accesorios o aditamentos que no sean recomendados o vendidos
por Sunbeam Products, puede causar incendios, descargas eléctricas o
lesiones personales.
• No permita que el cordón cuelgue sobre el borde de la mesa o del mostrador.
• No permita que el cordón entre en contacto con superficies calientes,
incluyendo la estufa.
• No se use en exteriores o para propósitos comerciales.
• Quite los batidores de la Batidora Manual antes de lavarlos.
• No coloque la Batidora Manual sobre o cerca de quemadores de estufas
de gas o dentro de un horno caliente.
•
No use la Batidora Manual más que para lo que ha sido diseñada.
•
N
o opere la Batidora Manual sin continua supervisión.
E
STA UNIDAD ES SÓLO PARA USO DOMÉSTICO
SÓLO PARA PRODUCTOS COMPRADOS EN ESTADOS UNIDOS Y CANADÁ
Para reducir el riesgo de descarga eléctrica, este aparato cuenta con una clavija
polarizada (una pata es más ancha que la otra). Esta clavija entra sólo de una
manera en un enchufe polarizado. Si la clavija no encaja en el enchufe simplemente
colóquela al revés. Si aún así no encaja llame a un electricista calificado.
De ninguna manera intente modificar esta medida de seguridad.
USO DE UN CABLE ELÉCTRICO CORTO
Se incluye un cable de tensión corto para evitar que se enrede o que cause tropiezos
.
Un cable de extensión puede usarse con cuidado. Si se usa una cable de extensión,
la potencia eléctrica marcada en el cable de extensión debe ser por lo menos igual
o mayor a la potencia eléctrica del aparato. El cable de extensión debe colocarse
de manera que no cuelgue del mostrador o de la mesa, donde pueda causar
tropiezos accidentalmente.
GUARDE ESTAS INSTRUCCIONES
WELCOME
Congratulations on your purchase of an
O
STER
®
Hand Mixer!
To learn more about
O
STER
®
products, please visit us at www.oster.com.
F
EATURES OF YOUR HAND MIXER
1. On/Off Speed Control –
Beater Eject Button
2. Thumb Tab
3. BURST OF POWER
®
Button
4. Beaters
5. Dough Hook
6. Collar on Dough Hook
7. Large Drive Hole
8. Euro Beaters
9. Heel Rest
U
SING Y
OUR H
AND
MIXER
Before using your mixer for the first time, wash the beaters in hot/soapy water,
or the dishwasher. Rinse and dry.
Be sure speed control is in the “OFF” or “0” position and unplugged from an
electrical outlet. Insert beaters one at a time, by placing stem end of beaters into
the opening drive holes on the bottom of the mixer. Turn beater slightly and
push in until beater clicks into position. Beaters are interchangeable.
When using the optional dough hooks, the dough hook
with the collar on the
stem (see feature drawing)
towards the tip fits into the large drive hole on the
mixer. The dough hook without the collar on the stem fits into the smaller drive
hole. If dough hooks do not click into the drive holes, reverse and try again.
M
IXING
Turn mixer on and refer to speed guide for correct setting. Slowly guide mixer
around sides and through center of bowl, going in the same direction. Be careful
not to overbeat the mixture. Overbeating tends to make some mixtures tough.
Whenever scraping of the bowl is required, stop the mixer and scrape sides and
bottom of bowl with a rubber spatula as needed. Turn speed control to “OFF”
or “0” and rest mixer on its heel rest while adding ingredients. Be sure to
position beaters over mixing bowl so any drippings will fall back into
mixing bowl.
When mixing is complete, set speed control to “1”, and raise beaters slowly from
batter to clean off clinging food. Be sure to turn unit to “0” before raising
beaters completely out of mixing bowl.
B
URST OF
POWER
®
Feature
The B
URST OF
P
OWER
®
feature allows for an added boost to the selected speed
setting at the press of the button. During especially heavy mixing tasks,
press the button to drive through the mixture with ease. Once the button
is released, the mixer will return to the original speed setting.
E
JECTING
B
EATERS OR
D
OUGH HOOKS
Be sure speed control is at the “OFF” or “0” position and cord is removed from
electrical outlet. Scrape off any excess batter with a rubber spatula. Grasp the
stems of the beaters with your hand and press the beater eject button. Beaters
will release into your hand.
S
PEED G
UIDE FOR
H
AND M
IXER
S
PEED M
IXING
TASKS
1/2 Stir Use when stirring liquid ingredients or when mixing dry
and liquid ingredients together alternately in a recipe.
Use when preparing any of the ready-prepared or
packaged instant puddings.
3 Mix Use when a recipe calls for combining ingredients
together. Use for quick breads or muffins that require
a brisk action, just enough to blend.
4 Blend Use when preparing cake mixes or for directions calling
for medium speed. Use to cream butter and sugar
together.
5 Beat Use when preparing a frosting from a recipe or package.
Use when whipping cream for desserts.
6 Whip Use to mash potatoes to develop a light and fluffy
texture. Use when whipping egg whites.
BURST OF
P
OWER
®
During especially heavy mixing tasks, press the button
to drive through the mixture with ease.
CARING FOR
Y
OUR M
IXER
C
LEANING
Wash the beaters before and after every use. Beaters and Dough Hooks may
be washed in a dishwasher. After removing cord from electrical outlet, clean
mixer head with a damp cloth and wipe dry. DO NOT IMMERSE MIXER IN
WATER. This may cause electric shock, injury, or damage to the product.
Avoid the use of abrasive cleaners that will damage the finish of your mixer.
The motor of your mixer has been carefully lubricated at the factory and does
not require any additional lubricant.
S
TORAGE
Store the hand mixer on its heel rest in a clean, dry location such as a cabinet
or shelf. Store beaters in a drawer.
M
AINTENANCE
Other than the recommended cleaning, no further user maintenance should be
necessary. If for any reason your hand mixer should require repairs, do not try to
fix it yourself. Send it to the nearest Authorized Sunbeam Appliance Service Center.
1. Control de Velocidad Encendido/
Apagado – Botón para Expulsar
los Batidores
2. Lengüeta del Pulgar
3. Botón B
URST OF
P
OWER
®
4. Batidores
5. Ganchos para Amasar
6. Aro en las Aspas para Amasar
7. Agujero de Arrastre Grande
8. Aspas para Batir Euro
9. Apoyo del Talón
BIENVENIDOS
¡Felicitaciones en su compra de una Batidora Manual
O
STER
®
. Para aprender
más sobre productos
O
STER
®
, por favor visítenos a www.oster.com!
CARACTERÍSTICAS DE SU BATIDORA MANUAL
One-Year Limited Warranty
S
unbeam Products, Inc., or if in Canada, Sunbeam Corporation (Canada) Limited (collectively “Sunbeam”)
warrants that for a period of one year from the date of purchase, this product will be free from defects
in material and workmanship. Sunbeam, at its option, will repair or replace this product or any
component
of the product found to be defective during the warranty period. Replacement will be made
with a new
or remanufactured product or component. If the product is no longer available, replacement
may be made
with a similar product of equal or greater value. This is your exclusive warranty.
This warranty is valid for the original retail purchaser from the date of initial retail purchase and
is not transferable. Keep the original sales receipt. Proof of purchase is required to obtain warranty
performance. Sunbeam dealers, service centers, or retail stores selling Sunbeam products do not have
the right to alter, modify or any way change the terms and conditions of this warranty.
This warranty does not cover normal wear of parts or damage resulting from any of the following:
negligent use or misuse of the product, use on improper voltage or current, use contrary to the
operating instructions, disassembly, repair or alteration by anyone other than Sunbeam or an
authorized Sunbeam service center. Further, the warranty does not cover: Acts of God, such as fire,
flood, hurricanes and tornadoes.
What Are the Limits on Sunbeam’s Liability?
Sunbeam shall not be liable for any incidental or consequential damages caused by the breach
of any express, implied or statutory warranty or condition.
Except to the extent prohibited by applicable law, any implied warranty or condition of merchantability
or fitness for a particular purpose is limited in duration to the duration of the above warranty.
Sunbeam disclaims all other warranties, conditions or representations, express, implied, statutory or otherwise.
Sunbeam shall not be liable for any damages of any kind resulting from the purchase, use or misuse of, or
inability to use the product including incidental, special, consequential or similar damages or loss of profits,
or for any breach of contract, fundamental or otherwise, or for any claim brought against purchaser by any
other party.
Some provinces, states or jurisdictions do not allow the exclusion or limitation of incidental
or consequential damages or limitations on how long an implied warranty lasts, so the above
limitations or exclusion may not apply to you.
This warranty gives you specific legal rights, and you may also have other rights that vary from
province to province, state to state or jurisdiction to jurisdiction.
How to Obtain Warranty Service
In the U.S.A. –
If you have any question regarding this warranty or would like to obtain warranty service,
please call 1.800.334.0759 and a convenient service center address will be provided to you.
In Canada –
If you have any question regarding this warranty or would like to obtain warranty service,
please call 1.800.667.8623 and a convenient service center address will be provided to you.
In the U.S.A., this warranty is offered by Sunbeam Products, Inc., located in Boca Raton,
Florida 33431. In Canada, this warranty is offered by Sunbeam Corporation (Canada) Limited,
located at 5975
Falbourne Street
, Mississauga, Ontario L5R 3V8.
PLEASE DO NOT RETURN THIS PRODUCT TO ANY OF
THESE ADDRESSES OR TO THE PLACE OF PURCHASE.
Visit us at www.oster.com
N
OTE
:
Handmixer design may vary from picture. Some models include
dual B
URST OF
P
OWER
®
buttons for both left and right hand use.
N
OTA
:
El diseño de la Batidora Manual puede variar de la pictura.
Algunas modelos incluyen botones dobles BURST OF POWER
®
para ambos usos,
de la mano izquierda y derecha.
For product questions contact:
Sunbeam Consumer Service
USA : 1.800.334.0759
Canada : 1.800.667.8623
www.oster.com
©2003 Sunbeam Products, Inc. All rights reserved.
OSTER
®
and BURST OF POWER
®
are registered trademarks of Sunbeam Products, Inc.
Distributed by Sunbeam Products, Inc., Boca Raton, FL 33431
Pour les questions de produit:
Sunbeam Consumer Service
États-Unis : 1.800.334.0759
Canada : 1.800.667.8623
www.oster.com
©2003 Sunbeam Products, Inc. Tous droits réservés.
OSTER
®
et BURST OF POWER
®
sont marques déposées de Sunbeam Products, Inc.
Distribué par Sunbeam Products, Inc., Boca Raton, Florida 33431
Para preguntas sobre los productos llame:
Sunbeam Consumer Service
EE.UU. : 1.800.334.0759
Canadá : 1.800.667.8623
www.oster.com
©2003 Sunbeam Products, Inc. Todos los derechos reservados.
OSTER
®
y BURST OF POWER
®
son marcas registradas de Sunbeam Products, Inc.
Distribuido por Sunbeam Products, Inc., Boca Raton, FL 33431
Printed in China Imprimé en Chine Impreso en China
1
5
2
3
7
4
8
6
F
IGURE
A
F
IGURE
B
F
IGURE
C
F
IGURE
D
F
IGURA
A
F
IGURA
B
F
IGURA
C
F
IGURA
D
9
1
5
2
3
7
4
8
6
9
Transcripción de documentos
– – – FOLD – – – – – – FOLD – – – YOUR OSTER® WAFFLE/SANDWICHMAKER – – – FOLD – – – OF Safety Locking Handles RECIPES Add filling on it, taking care not to overfill. Put another piece of bread over the filling, and coat top with butter or margarine. Close the Sandwichmaker slowly. After about 2 to 3 minutes, open the machine and remove sandwich. Sandwichmaker can be stopped at any time by unplugging the power cord from the AC outlet. Sunbeam Products, Inc., or if in Canada, Sunbeam Corporation (Canada) Limited (collectively “Sunbeam”) warrants that for a period of one year from the date of purchase, this product will be free from defects in material and workmanship. Sunbeam, at its option, will repair or replace this product or any component of the product found to be defective during the warranty period. Replacement will be made with a new or remanufactured product or component. If the product is no longer available, replacement may be made with a similar product of equal or greater value. This is your exclusive warranty. Cheese Waffles: Fold in 1-1/2 cups (375 ml) shredded cheddar cheese into batter. Bake as directed. Serve with syrup or your favorite creamed entrée. Blueberry Waffles: Fold 2 cups (500 ml) fresh blueberries into batter. Pour 3/4 cup (200 ml) batter over grids. Bake until golden. Chocolate Chip Waffles: Fold 1 cup (250 ml) chocolate chips into batter. Bake as directed. This warranty is valid for the original retail purchaser from the date of initial retail purchase and is not transferable. Keep the original sales receipt. Proof of purchase is required to obtain warranty performance. Sunbeam dealers, service centers, or retail stores selling Sunbeam products do not have the right to alter, modify or any way change the terms and conditions of this warranty. LEMON SWEET WAFFLES 1 cup butter or margarine (softened) 3-1/4 cups flour 1-1/2 cups sugar 1 packet of vanilla sugar 2 eggs 1-3/4 cups water 1/8 tsp. baking powder grated rind of 1 lemon In a large bowl, beat butter, sugars and eggs together. Add all dry ingredients along with water and lemon rind, and blend until smooth. Pour approximately 3/4 cup batter into waffle iron. Bake as directed. YIELD: 2 SANDWICHES QUICK WAFFLES TASTY WAFFLES BRUNCH One-Year Limited Warranty VARIATIONS MONTE CRISTO SANDWICHES CLEANING INSTRUCTIONS 3. Unplug and allow unit to cool before cleaning. Wipe outside with soft, dry cloth when Waffle/Sandwichmaker is cold. Never use metal polish. You can remove the heating plate to clean with soft cloth, warm water and dishwashing liquid. Before resetting it, you should allow it to dry thoroughly. If Waffle/Sandwichmaker is used frequently, accumulated bread crumbs should be removed at least once a week. Make sure any accumulation under plates is completely removed before using the Waffle/Sandwichmaker again. FOR 3 eggs 2 cups flour 1 cup milk 1/2 tsp. salt 1/2 cup melted butter or margarine 1 Tbsp. baking powder 1 Tbsp. vanilla (optional) 2 tsp. sugar Beat whole eggs in a bowl until thick. Beat milk, melted butter and vanilla into eggs. In a separate bowl, combine remaining ingredients. Sift into egg mixture, and mix well. Bake as directed. YIELD: 6 – 8 WAFFLES Variation: Cinnamon – Apple. Add 1 apple peeled and shredded, 1 tsp. vanilla and 1/2 tsp. cinnamon to batter. This warranty does not cover normal wear of parts or damage resulting from any of the following: negligent use or misuse of the product, use on improper voltage or current, use contrary to the operating instructions, disassembly, repair or alteration by anyone other than Sunbeam or an authorized Sunbeam service center. Further, the warranty does not cover: Acts of God, such as fire, flood, hurricanes and tornadoes. What Are the Limits on Sunbeam’s Liability? Sunbeam shall not be liable for any incidental or consequential damages caused by the breach of any express, implied or statutory warranty or condition. YIELD: 8 – 10 WAFFLES ALOHA DESSERT WAFFLES A pretty dessert that is guaranteed to please your guests 8 prepared Macadamia Nut Waffles 1 cup (250 ml) sugar 3 Tbsp. (45 ml) cornstarch 1 can (8 oz. or 277 g) crushed pineapple, drained reserving juice cold water EXTRA-SPECIAL WHOLE WHEAT WAFFLES Feed the gang with these at Sunday Brunch WAFFLE/SANDWICH MAKING Prepare your own waffles/sandwiches from scratch with any of the OSTER® recipes listed on the following pages, or use any of your own family favorites. For those busy days, why not have a prepared mix handy for a meal in a matter of minutes? CREATIVE WAFFLES AND Pecan or Macadamia Nut Waffles: Sprinkle 1 Tbsp. (15 ml) finely chopped pecans or macadamia nuts over preheated waffle grids. Pour 3/4 cup (200 ml) batter over nuts and close Waffle/Sandwichmaker. Bake as directed. Bacon Waffles: Cook bacon strips. Pour 3/4 cup (200 ml) batter over waffle grids. Cut 1 strip bacon in half, lay over batter and close Waffle/Sandwichmaker. Bake as directed. 4 slices firm-textured sliced bread, white or whole wheat For the batter: Dijon mustard 4 large eggs 4 ounces sliced smoked ham, such as Black Forest or Westphalian 1/2 cup milk 4 ounces sliced Swiss cheese Salt to taste 4 ounces sliced roasted turkey breast Make the batter: In a shallow bowl, whisk 4 large eggs with the 1/2 cup milk and salt. Meanwhile, spread one side of each slice of bread with some of the mustard. Top 2 of the slices with some of the ham, cheese, and turkey. Top each with 1 slice of the remaining bread, pressing down to form 2 compact sandwiches. Dip each sandwich on both sides into the batter, coating evenly. Add the sandwiches to OSTER® Sandwichmaker. Cook for 5 minutes until golden brown. CAUTION: 1. When it is difficult to close the machine, it means that too much filling was added. You should reduce the filling or replace with thinner bread to prevent damaging the Waffle/Sandwichmaker. 2. When removing sandwich from machine, do not use any utensil that may damage the non-stick coating. Use wood or plastic suitable for high temperatures. Plate Release Button 1. 2. Rear Hinge Insert Sandwich Plates 4. Outer Hinge Insert HINTS 1. PREPARING WAFFLES HOUSEHOLD USE ONLY 2. 3. 4. Do not over-mix waffle batter. Beating egg whites separately and folding them gently into the batter surely will create a lighter, crispier waffle. Completely bake waffles before removing from unit. Don’t open the Wafflemaker while steam is escaping from sides and front of the unit. Why not freeze prepared waffles for those busy days ahead? Just bake the waffles as directed. Cool on a wire rack and wrap in moisture-proof paper or plastic. Quickly reheat in your toaster oven, broiler or microwave oven. 1 cup (250 ml) milk* 3 eggs (or equivalent) 1 cup (250 ml) water 1 package (1/4 ounce or 7 g) 1/4 cup (50 ml) butter or margarine active dry yeast 1/4 cup (50 ml) honey 1/2 tsp. (2 ml) salt 2-2/3 cups (650 ml) whole wheat flour *low-fat or skim milk may be used Heat milk, water, butter and honey at 120°F (48°C). In large mixing bowl, combine flour, eggs, yeast, salt and warmed milk mixture. Mix at low to moisten, then medium-high for 1 minute. Cover and refrigerate several hours or overnight, stirring occasionally. Preheat Waffle/Sandwichmaker. Pour 3/4 cup (200 ml) over grids. Close Waffle/Sandwichmaker, bake until steam no longer escapes, about 3 – 5 minutes. Repeat. Serve while hot with your favorite topping. YIELD: 7 WAFFLES Let your imagination be your guide to many exciting and tasty meals with your OSTER® Waffle/Sandwichmaker. Here are just a few suggestions: BREAKFAST – – – FOLD – – – FEATURES READ ALL INSTRUCTIONS BEFORE USE FOR 2. 3. 4. 5. 6. Close unit and plug into outlet. Use only voltage specified on bottom of unit. The Power On light (Red) will come on. The Ready light (Amber) will not come on. CAUTION: Touch unit only by handles during use or directly after use. The unit is ready for use when the Ready light comes on. Open unit and pour approximately 3/4 cup waffle batter onto grids. For best results, pour batter in a circle around outer edge of Wafflemaker. Close cover. It is very typical to have a small amount of batter run over grid and down unit. However, if an excessive amount of batter runs over, use less batter. Cover will rise slightly as waffles begin to bake. Do not open cover while steam is escaping. Most waffle recipes bake in approximately 4 to 5 minutes. Waffles are generally done when steam no longer escapes from sides and front of unit. When waffles are done, remove with a plastic fork or wooden tongs. NOTE: The Ready light may cycle on and off during cooking. This indicates that the thermostat is maintaining the unit at the proper cooking temperature. Close cover and wait for Ready light to come on before preparing another batch of waffles. PREPARING SANDWICHES Except to the extent prohibited by applicable law, any implied warranty or condition of merchantability or fitness for a particular purpose is limited in duration to the duration of the above warranty. 1 can (6 oz. or 170 g) frozen orange juice concentrate, thawed 1/2 cup (125 ml) flaked coconut 1/3 cup (75 ml) Maraschino cherries, chopped 1/4 cup (50 ml) 150 Proof rum vanilla ice cream Sunbeam disclaims all other warranties, conditions or representations, express, implied, statutory or otherwise. Sunbeam shall not be liable for any damages of any kind resulting from the purchase, use or misuse of, or inability to use the product including incidental, special, consequential or similar damages or loss of profits, or for any breach of contract, fundamental or otherwise, or for any claim brought against purchaser by any other party. In a large sauté pan, combine sugar and cornstarch. Measure pineapple juice and enough cold water to equal 1-1/4 cups (300 ml). Combine water mixture, orange juice and sugar mixture. Cook over medium heat until thickened, stirring constantly. Add coconut, cherries and pineapple. Heat through. Keep warm on low heat. Slowly pour rum over top of mixture. Carefully ignite. Place a scoop of vanilla ice cream over each waffle. When flame dies, spoon sauce over ice cream. Serve immediately. Some provinces, states or jurisdictions do not allow the exclusion or limitation of incidental or consequential damages or limitations on how long an implied warranty lasts, so the above limitations or exclusion may not apply to you. This warranty gives you specific legal rights, and you may also have other rights that vary from province to province, state to state or jurisdiction to jurisdiction. YIELD: 5 WAFFLES How to Obtain Warranty Service CHOCOLATE BROWNIE WAFFLES Here’s a no-fuss dessert idea! LIGHT ’N CRISP WAFFLES DESSERT 3. Coat the inner plate of the machine with butter or margarine to prevent sticking. • To release plates, push the button on the inside of the unit. The front of the plate will lift slightly. Pull plate towards you to slide out of locked position. In the U.S.A. – If you have any question regarding this warranty or would like to obtain warranty service, please call 1.800.334.0759 and a convenient service center address will be provided to you. 1/4 cup (50 ml) shortening or oil 1 Tbsp. (15 ml) baking powder 2/3 cup (150 ml) sugar 1/4 tsp. (1 ml) salt 2 squares (1 ounce or 28 g each) 1-1/4 cups (300 ml) milk baking chocolate, melted 1/2 tsp. (2 ml) vanilla 3 egg yolks 1/2 cup (125 ml) chopped nuts 1-1/2 cups (375 ml) all-purpose flour 3 egg whites, stiffly beaten Preheat Waffle/Sandwichmaker. In a large mixing bowl, cream shortening and sugar at medium-low until fluffy. Add chocolate and egg yolks. Beat well. Add milk alternately with combined dry ingredients. Mix well. Add vanilla and nuts. By hand, gently fold in beaten egg white. Pour 3/4 cup (200 ml) batter over grids. Close Waffle/Sandwichmaker and bake until steam no longer escapes, about 3-5 minutes. Waffle will crisp as it cools. Repeat. Serve hot or cold with vanilla ice cream, YIELD: 6 WAFFLES chocolate syrup and chopped walnuts or pecans. 2 egg yolks 1/2 tsp. (2 ml) salt 2 cups (500 ml) milk 1/3 cup (75 ml) oil 2 cups (500 ml) all-purpose flour 2 egg whites, stiffly beaten 1 Tbsp. (15 ml) baking powder Preheat Waffle/Sandwichmaker. Put all ingredients, except egg whites, in a large mixing bowl. Beat on low until moistened. Increase to medium, mix until smooth. By hand, gently fold in beaten egg whites. Pour 3/4 cup (200 ml) batter over grids. Close Waffle/Sandwichmaker, bake until steam no longer escapes, about 3 – 5 minutes. Repeat. Serve while hot with your favorite topping. YIELD: 5 WAFFLES Serve dessert waffles hot or cold. Prepare a richer batter such as Belgian-Style Waffles or Chocolate Brownie Waffles. Top with your favorite sweet and tasty ingredients which might include: Sweetened Fresh Berries, Ice Cream, Powdered Sugar, Chopped Nuts, Sundae Sauces, Fruit Yogurt English-1 – – – FOLD – – – IMPORTANT SAFEGUARDS 5. 6. 7. 8. When using electrical appliances, basic safety precautions should always be followed, including the following: Waffle Plates • Do not touch hot surfaces. • To protect against electric shock, do not immerse cord, plug or any part of the Waffle/ Sandwichmaker in water or other liquid. • Close supervision is always necessary when it is used by or near children. • Unplug unit from outlet when not in use and before cleaning. Allow hot surface to cool before putting on or taking off parts. • Do not operate this or any appliance with a damaged cord or plug or in abnormal state. If its main cord is damaged, it must be replaced by the manufacturer or the nearest service agent or qualified person. • Do not let the cord hang over edge of table or counter, or touch hot surface. • Do not place on or near a hot gas or electric burner or in a heated oven. • Do not use the appliance for other than its intended use. • Make sure that your outlet voltage corresponds to the voltage stated on the rating label of the Waffle/Sandwichmaker. • Any examination, repair or adjustment for the appliance should be made by the authorized service agent. • If the supply cord is damaged, it must be replaced by the manufacturer or its service agent or similar qualified person in order to avoid a hazard. THIS UNIT IS 1. SPECIAL INSTRUCTIONS This appliance has a polarized plug (one blade is wider than the other). To reduce the risk of electric shock, this plug will fit in a polarized outlet only one way. If the plug does not fit fully in the outlet, reverse the plug. If it still does not fit, contact a qualified electrician. Do not modify the plug in any way. SAVE THESE INSTRUCTIONS WELCOME Congratulations on your purchase of an OSTER® Waffle/Sandwichmaker! To learn more about OSTER® products, please visit us at www.oster.com. Your new appliance will surely make crispy, hot, golden waffles/sandwiches in just minutes for a quick meal anytime of the day. Your OSTER® Waffle/Sandwichmaker is thermostatically controlled to help you prepare waffles to perfection. Your unit is portable so you can make waffles/sandwiches in your kitchen or right at the table. The non-stick grids make clean-up easy. We know that you will love your new OSTER® Waffle/Sandwichmaker. It’s a great addition to any kitchen. Top crispy waffles/sandwiches with: Butter, Syrup, Honey, Molasses, Apple Butter, Pie Filling, Whipped Cream, Yogurt, Fruit Preserves, Fresh Fruit 1. Plug the power cord into the AC outlet. ® HOW TO USE YOUR OSTER WAFFLE/SANDWICHMAKER CHANGING WAFFLE AND SANDWICH PLATES 2. Before use, please preheat the Sandwichmaker for 5 to 8 minutes. The red power on lamp will be on. When the amber lamp goes on, it means the Sandwichmaker temperature is ready. English-3 English-2 4. After preheat, open the Sandwichmaker, place a piece of bread of approximately 1/2-inch thickness on inner lower plate. Coat one side of the bread with butter or margarine and place on the plate against this side. • When putting plates in, make sure the hinges are aligned with the metal inserts on the plates. Start by placing the rear hinge insert in first and pressing down on the plate until you hear the plate click into place. English-4 In Canada – If you have any question regarding this warranty or would like to obtain warranty service, please call 1.800.667.8623 and a convenient service center address will be provided to you. In the U.S.A., this warranty is offered by Sunbeam Products, Inc., located in Boca Raton, Florida 33431. In Canada, this warranty is offered by Sunbeam Corporation (Canada) Limited, located at 5975 Falbourne Street, Mississauga, Ontario L5R 3V8. PLEASE DO NOT RETURN THIS PRODUCT TO ANY OF THESE ADDRESSES OR TO THE PLACE OF PURCHASE. English-5 English-6 – – – F OLD – – – – – – F OLD – – – Español-1 Printed in China Imprimé en Chine Español-2 Español-3 Español-4 Impreso en China • Para quitar las planchas, presione el botón del interior de la unidad. La parte delantera de la plancha se levantará levemente. Deslice la plancha hacia usted para destrabarla. • Al colocar nuevamente las planchas, verifique que las bisagras estén alineadas con los separadores de metal. Primero coloque el separador de la bisagra trasera y presione sobre la plancha hasta que escuche un “clic” que le indicará que la plancha está en su lugar. Distribuido por Sunbeam Products, Inc., Boca Raton, FL 33431 ©2003 Sunbeam Products, Inc. Todos los derechos reservados. OSTER® es una marca registrada de Sunbeam Products, Inc. CÓMO CAMBIAR LAS PLANCHAS PARA WAFLES Y EE.UU. : 1.800.334.0759 Canadá : 1.800.667.8623 Pour les questions de produit: Sunbeam Consumer Service ©2003 Sunbeam Products, Inc. All rights reserved. OSTER® is a registered trademark of Sunbeam Products, Inc. Distributed by Sunbeam Products, Inc., Boca Raton, FL 33431 www.oster.com USA : 1.800.334.0759 Canada : 1.800.667.8623 For product questions contact: Sunbeam Consumer Service 3. No abra la Waflera mientras el vapor esté escapando por los lados y por el frente de la unidad. Coloque en 2 de las rebanadas un poco de jamón, queso y pavo. Coloque la rebanada de pan restante sobre cada una, presionando para formar dos sandwiches compactos. CONSEJOS PARA WAFLES SABROSOS Preparación de la masa: En un tazón poco profundo, bata 4 huevos grandes con 1/2 taza de leche y sal. Mientras tanto, unte un lado de cada rebanada de pan con un poco de mostaza. 3. Puede quitar la plancha de calentamiento y limpiarla con un paño suave, agua tibia y detergente. Vuelva a colocarla una vez que esté completamente seca. 2. La unidad estará lista para usarse cuando la luz de Listo se encienda. 1. Desenchufe la unidad y deje enfriar antes de limpiar. INSTRUCCIONES DE LIMPIEZA DE LA Sirva los wafles de postre calientes o fríos. Prepare una masa más abundante, tal como la de wafles estilo Belga o wafles de pastelillo de chocolate. Cúbralos con sus ingredientes dulces y sabrosos favoritos que pueden incluir los siguientes: Moras o Fresas Culces, Helado, Azúcar en Polvo, Nueces Picadas, Salsas de Frutas para Helados, Yogurt de Frutas. DESAYUNO Y Manuel d’Instructions DESAYUNO-ALMUERZO Manual de Instrucciones Deje que su imaginación sea su guía para cocinar muchas comidas sabrosas y deliciosas usando su Waflera/Sandwichera OSTER®. Aquí damos algunas sugerencias: WAFLES CREATIVOS User Manual CÓMO PREPARAR SANDWICHES CÓMO PREPARAR WAFLES/SANDWICHES 1. Enchufe la unidad en un tomacorriente de CA. Prepare sus propios wafles/sandwiches con ingredientes nuevos usando cualquiera de las recetas OSTER® listadas en las siguientes páginas o use cualquiera de sus favoritas. Para aquellos días en que esté muy ocupada, ¿por qué no tener masa ya lista para preparar una comida en cuestión de minutos? 3862 MODEL/MODELO MODÈLE Recubra los wafles/sandwiches crocantes con: Mantequilla, Almíbar, Miel, Melaza, Pasta de Manzana, Relleno de Pastel, Crema Batida, Yogur, Frutas en Conserva, Fruta Fresca 5. Agregue el relleno, tratando de no excederse en la cantidad. WAFLERA/SANDWICHERA OSTER® Para la masa: 4 huevos grandes 1/2 taza de leche sal a gusto R ECETAS POSTRES 8. Después de 2 a 3 minutos, abra la unidad y quite el sandwich. Puede detener la Sandwichera en cualquier momento desenchufándola del tomacorriente de CA. 6. Coloque otra rebanada de pan sobre el relleno y úntela con mantequilla o margarina. Separador de la Bisagra Trasera PIEZAS P.N. 111895 Unte cada lado del sandwich con la masa, recubriéndolo en forma pareja. Coloque los sandwiches en la Sandwichera OSTER®. Cocine durante 5 minutes o hasta que estén dorados. RINDE: 2 SANDWICHES 2. Cocine completamente los wafles antes de retirarlos de la unidad. 5. Cuando los wafles estén listos, quítelos con un tenedor de plástico o con unas pinzas de madera. 1. No mezcle en forma excesiva la masa de wafles. Para obtener wafles más livianos y crocantes, bata las claras de huevo por separado y viértalas suavemente sobre la masa para wafles. 4. La tapa se levantará levemente a medida que los wafles comiencen a cocinarse. No abra la tapa mientras salga vapor. La mayoría de las recetas de wafles toma en prepararse de 4 a 5 minutos aproximadamente. Por lo general los wafles están listos cuando ya no sale más vapor por los costados y el frente de la unidad. 4. Si usa la Waflera/Sandwichera con frecuencia, deberá quitar las migas de pan que se acumulen, por lo menos una vez a la semana. Verifique que no queden migas debajo de las planchas antes de volver a usar la Waflera/Sandwichera. 4 rebanadas de pan de textura firme, blanco o de trigo integral Mostaza Dijon 4 onzas de jamón ahumado en lonjas, como Black Forest o Westphalian 4 onzas de queso suizo en lonjas 4 onzas de pechuga de pavo asado en lonjas 2. Limpie el exterior con un paño suave y seco cuando la Waflera/Sandwichera esté fría. Nunca use lustre para metales. P RECAUCIÓN : Sólo toque la unidad por las asas durante el uso o inmediatamente después del uso. SANDWICHES MONTECRISTO 2. Para quitar el sandwich de la unidad no use ningún utensilio que pueda dañar el recubrimiento antiadherente. Use utensilios de madera o plástico, aptos para temperaturas altas. 1. Si le resulta difícil cerrar la unidad es que ha puesto demasiado relleno. Debe reducir el relleno o usar un pan más delgado para evitar dañar la Waflera/Sandwichera. 7. Cierre la Sandwichera lentamente. PRECAUCIÓN: Separador de la Bisagra Externa Planchas para Sandwiches 4. Luego de calentar la Sandwichera, ábrala y coloque una rebanada de pan de aproximadamente _ pulgada de grosor sobre la plancha inferior interna. Unte un lado del pan con mantequilla o margarina y colóquelo sobre la plancha contra ese lado. Botón para Quitar las Planchas 3. Unte la plancha interna de la unidad con mantequilla o margarina para evitar que los alimentos se adhieran. Asas con Traba de Seguridad Planchas para Wafles LEA TODAS LAS INSTRUCCIONES ANTES DE USAR Visit us at www.oster.com 4. ¿Por qué no congelar wafles preparados para los días en que esté muy ocupada? Simplemente cocine los wafles como se indica. Déjelos enfriar sobre una rejilla de alambre y envuélvalos en papel o plástico a prueba de humedad. Recaliéntelos rápidamente en su horno tostador, asador u horno microondas. 6. Cierre la tapa y espere que la luz de Encendido se encienda antes de preparar más wafles. N OTA : Es posible que la luz de Listo se encienda y se apague durante la cocción. Esto indica que el termostato mantiene la unidad en la temperatura apropiada de cocción. SANDWICHES CÓMO USAR LA WAFLERA/SANDWICHERA OSTER ® www.oster.com ¡Felicitaciones por la compra de la Waflera/Sandwichera OSTER®! Para mayor información sobre los productos OSTER®, visítenos en www.oster.com. Con su nuevo electrodoméstico podrá preparar wafles y sandwiches crocantes, calientes y dorados en sólo unos minutos y así saborear una rápida comida en cualquier momento del día. Su Waflera/Sandwichera OSTER® está controlada por termostato para ayudarle a preparar wafles a la perfección. La unidad es portátil, por lo que podrá preparar wafles/sandwiches en la cocina o directamente en la mesa. Las rejillas antiadherentes facilitan la limpieza. Sabemos que le encantará su nueva Waflera/Sandwichera OSTER®. Es un gran complemento para su cocina. Para preguntas sobre los productos llame: Sunbeam Consumer Service 3. Abra la unidad y vierta aproximadamente 3/4 de taza de masa de wafles sobre las rejillas. Para obtener óptimos resultados, vierta la masa formando un círculo alrededor del borde exterior de la Waflera. Cierre la tapa. Es normal que una pequeña cantidad de masa se escurra por la rejilla y por debajo de la unidad. Sin embargo, si se derrama mucha masa, deberá usar menos cantidad. BIENVENIDOS GUARDE ESTAS INSTRUCCIONES ©2003 Sunbeam Products, Inc. Tous droits réservés. OSTER® est une marque déposée de Sunbeam Products, Inc. Distribué par Sunbeam Products, Inc., Boca Raton, Florida 33431 Este electrodoméstico posee un enchufe polarizado (una pata es más ancha que la otra). Para reducir el riesgo de una descarga eléctrica, este enchufe se introduce en el tomacorriente polarizado de una sola manera. Si el enchufe no se puede introducir por completo en el tomacorriente, gírelo. Si aún así no logra colocarlo, comuníquese con un electricista calificado. No haga ninguna modificación al enchufe. www.oster.com 1. Cierre la unidad y enchúfela en el tomacorriente. Use sólo el voltaje que se indica en la parte inferior de la unidad. Se encenderá la luz de encendido (rojo). La luz Listo (amarillo) no se encenderá. ESTA UNIDAD ES PARA USO DOMÉSTICO SOLAMENTE INSTRUCCIONES ESPECIALES États-Unis : 1.800.334.0759 Canada : 1.800.667.8623 CÓMO PREPARAR WAFLES • No toque superficies calientes. • Como protección contra una descarga eléctrica, no sumerja el cable, el enchufe o cualquier otra pieza de la Waflera/Sandwichera en agua u otros líquidos. • Nunca deje la unidad sin supervisión si la utilizan los niños o si la misma se utiliza cerca de ellos. • Desenchufe el electrodoméstico del tomacorriente cuando no esté en uso y antes de limpiar. Deje que la unidad se enfríe antes de quitar o agregar piezas. • No opere este electrodoméstico o cualquier otro si el cable o enchufe está dañado o en malas condiciones. Si el cable principal está dañado, solicite al fabricante, el agente de servicio más cercano o una persona calificada que lo cambie. • No permita que el cable cuelgue por sobre el mostrador o la mesa ni toque superficies calientes. • No lo coloque cerca o sobre una estufa a gas o eléctrica o en el horno caliente. • No use el electrodoméstico para un propósito distinto para el cual fue diseñado. • Verifique que el voltaje del tomacorriente corresponda al voltaje especificado en la etiqueta de clasificación de la Waflera/Sandwichera. • Sólo un agente de servicio autorizado puede realizar una revisión, reparación o ajuste al electrodoméstico. • Si el cable de alimentación está dañado, el fabricante, su agente de servicio o una persona igualmente calificada debe reemplazarlo para evitar peligros. 2. Antes de usar, caliente la Sandwichera durante 5 a 8 minutos. Se encenderá la luz roja. La luz amarilla se encenderá cuando la Sandwichera alcance la temperatura apropiada. Cuando use algún aparato eléctrico siempre deben seguirse precauciones básicas de seguridad incluyendo las siguientes: PRECAUCIONES IMPORTANTES Wafflemaker with Sandwich Plates Waflera con Sandwich Plates Gaufrier avec Plaques à Sandwiches – – – FOLD – – – – – – FOLD – – – – – – FOLD – – – – – – FOLD – – – – – – FOLD – – – 5. 6. 7. 8. YOUR OSTER® WAFFLE/SANDWICHMAKER When using electrical appliances, basic safety precautions should always be followed, including the following: READ ALL INSTRUCTIONS BEFORE USE Waffle Plates • Do not touch hot surfaces. • To protect against electric shock, do not immerse cord, plug or any part of the Waffle/ Sandwichmaker in water or other liquid. • Close supervision is always necessary when it is used by or near children. • Unplug unit from outlet when not in use and before cleaning. Allow hot surface to cool before putting on or taking off parts. • Do not operate this or any appliance with a damaged cord or plug or in abnormal state. If its main cord is damaged, it must be replaced by the manufacturer or the nearest service agent or qualified person. • Do not let the cord hang over edge of table or counter, or touch hot surface. • Do not place on or near a hot gas or electric burner or in a heated oven. • Do not use the appliance for other than its intended use. • Make sure that your outlet voltage corresponds to the voltage stated on the rating label of the Waffle/Sandwichmaker. • Any examination, repair or adjustment for the appliance should be made by the authorized service agent. • If the supply cord is damaged, it must be replaced by the manufacturer or its service agent or similar qualified person in order to avoid a hazard. THIS UNIT IS FOR CLEANING INSTRUCTIONS 1. Unplug and allow unit to cool before cleaning. 2. Wipe outside with soft, dry cloth when Waffle/Sandwichmaker is cold. Never use metal polish. 3. You can remove the heating plate to clean with soft cloth, warm water and dishwashing liquid. Before resetting it, you should allow it to dry thoroughly. 4. If Waffle/Sandwichmaker is used frequently, accumulated bread crumbs should be removed at least once a week. Make sure any accumulation under plates is completely removed before using the Waffle/Sandwichmaker again. Rear Hinge Insert Sandwich Plates Outer Hinge Insert HINTS HOUSEHOLD USE ONLY SAVE THESE INSTRUCTIONS WELCOME Congratulations on your purchase of an OSTER® Waffle/Sandwichmaker! To learn more about OSTER® products, please visit us at www.oster.com. Your new appliance will surely make crispy, hot, golden waffles/sandwiches in just minutes for a quick meal anytime of the day. Your OSTER® Waffle/Sandwichmaker is thermostatically controlled to help you prepare waffles to perfection. Your unit is portable so you can make waffles/sandwiches in your kitchen or right at the table. The non-stick grids make clean-up easy. We know that you will love your new OSTER® Waffle/Sandwichmaker. It’s a great addition to any kitchen. Prepare your own waffles/sandwiches from scratch with any of the OSTER® recipes listed on the following pages, or use any of your own family favorites. For those busy days, why not have a prepared mix handy for a meal in a matter of minutes? PREPARING SANDWICHES Top crispy waffles/sandwiches with: Butter, Syrup, Honey, Molasses, Apple Butter, Pie Filling, Whipped Cream, Yogurt, Fruit Preserves, Fresh Fruit BREAKFAST HOW TO USE YOUR OSTER WAFFLE/SANDWICHMAKER • To release plates, push the button on the inside of the unit. The front of the plate will lift slightly. Pull plate towards you to slide out of locked position. BRUNCH 4. After preheat, open the Sandwichmaker, place a piece of bread of approximately 1/2-inch thickness on inner lower plate. Coat one side of the bread with butter or margarine and place on the plate against this side. Sweetened Fresh Berries, Ice Cream, Powdered Sugar, Chopped Nuts, Sundae Sauces, Fruit Yogurt English-2 English-3 English-1 Sunbeam shall not be liable for any incidental or consequential damages caused by the breach of any express, implied or statutory warranty or condition. Except to the extent prohibited by applicable law, any implied warranty or condition of merchantability or fitness for a particular purpose is limited in duration to the duration of the above warranty. 1 can (6 oz. or 170 g) frozen orange juice concentrate, thawed 1/2 cup (125 ml) flaked coconut 1/3 cup (75 ml) Maraschino cherries, chopped 1/4 cup (50 ml) 150 Proof rum vanilla ice cream Sunbeam disclaims all other warranties, conditions or representations, express, implied, statutory or otherwise. Sunbeam shall not be liable for any damages of any kind resulting from the purchase, use or misuse of, or inability to use the product including incidental, special, consequential or similar damages or loss of profits, or for any breach of contract, fundamental or otherwise, or for any claim brought against purchaser by any other party. In a large sauté pan, combine sugar and cornstarch. Measure pineapple juice and enough cold water to equal 1-1/4 cups (300 ml). Combine water mixture, orange juice and sugar mixture. Cook over medium heat until thickened, stirring constantly. Add coconut, cherries and pineapple. Heat through. Keep warm on low heat. Slowly pour rum over top of mixture. Carefully ignite. Place a scoop of vanilla ice cream over each waffle. When flame dies, spoon sauce over ice cream. Serve immediately. Some provinces, states or jurisdictions do not allow the exclusion or limitation of incidental or consequential damages or limitations on how long an implied warranty lasts, so the above limitations or exclusion may not apply to you. This warranty gives you specific legal rights, and you may also have other rights that vary from province to province, state to state or jurisdiction to jurisdiction. YIELD: 5 WAFFLES How to Obtain Warranty Service CHOCOLATE BROWNIE WAFFLES In the U.S.A. – If you have any question regarding this warranty or would like to obtain warranty service, please call 1.800.334.0759 and a convenient service center address will be provided to you. Here’s a no-fuss dessert idea! 1/4 cup (50 ml) shortening or oil 1 Tbsp. (15 ml) baking powder 2/3 cup (150 ml) sugar 1/4 tsp. (1 ml) salt 2 squares (1 ounce or 28 g each) 1-1/4 cups (300 ml) milk baking chocolate, melted 1/2 tsp. (2 ml) vanilla 3 egg yolks 1/2 cup (125 ml) chopped nuts 1-1/2 cups (375 ml) all-purpose flour 3 egg whites, stiffly beaten Preheat Waffle/Sandwichmaker. In a large mixing bowl, cream shortening and sugar at medium-low until fluffy. Add chocolate and egg yolks. Beat well. Add milk alternately with combined dry ingredients. Mix well. Add vanilla and nuts. By hand, gently fold in beaten egg white. Pour 3/4 cup (200 ml) batter over grids. Close Waffle/Sandwichmaker and bake until steam no longer escapes, about 3-5 minutes. Waffle will crisp as it cools. Repeat. Serve hot or cold with vanilla ice cream, YIELD: 6 WAFFLES chocolate syrup and chopped walnuts or pecans. LIGHT ’N CRISP WAFFLES 2 egg yolks 1/2 tsp. (2 ml) salt 2 cups (500 ml) milk 1/3 cup (75 ml) oil 2 cups (500 ml) all-purpose flour 2 egg whites, stiffly beaten 1 Tbsp. (15 ml) baking powder Preheat Waffle/Sandwichmaker. Put all ingredients, except egg whites, in a large mixing bowl. Beat on low until moistened. Increase to medium, mix until smooth. By hand, gently fold in beaten egg whites. Pour 3/4 cup (200 ml) batter over grids. Close Waffle/Sandwichmaker, bake until steam no longer escapes, about 3 – 5 minutes. Repeat. Serve while hot with your favorite topping. YIELD: 5 WAFFLES Serve dessert waffles hot or cold. Prepare a richer batter such as Belgian-Style Waffles or Chocolate Brownie Waffles. Top with your favorite sweet and tasty ingredients which might include: 3. Coat the inner plate of the machine with butter or margarine to prevent sticking. • When putting plates in, make sure the hinges are aligned with the metal inserts on the plates. Start by placing the rear hinge insert in first and pressing down on the plate until you hear the plate click into place. 8 prepared Macadamia Nut Waffles 1 cup (250 ml) sugar 3 Tbsp. (45 ml) cornstarch 1 can (8 oz. or 277 g) crushed pineapple, drained reserving juice cold water Feed the gang with these at Sunday Brunch DESSERT 2. Before use, please preheat the Sandwichmaker for 5 to 8 minutes. The red power on lamp will be on. When the amber lamp goes on, it means the Sandwichmaker temperature is ready. SANDWICH PLATES AND What Are the Limits on Sunbeam’s Liability? ALOHA DESSERT WAFFLES A pretty dessert that is guaranteed to please your guests 1 cup (250 ml) milk* 3 eggs (or equivalent) 1 cup (250 ml) water 1 package (1/4 ounce or 7 g) 1/4 cup (50 ml) butter or margarine active dry yeast 1/4 cup (50 ml) honey 1/2 tsp. (2 ml) salt 2-2/3 cups (650 ml) whole wheat flour *low-fat or skim milk may be used Heat milk, water, butter and honey at 120°F (48°C). In large mixing bowl, combine flour, eggs, yeast, salt and warmed milk mixture. Mix at low to moisten, then medium-high for 1 minute. Cover and refrigerate several hours or overnight, stirring occasionally. Preheat Waffle/Sandwichmaker. Pour 3/4 cup (200 ml) over grids. Close Waffle/Sandwichmaker, bake until steam no longer escapes, about 3 – 5 minutes. Repeat. Serve while hot with your favorite topping. YIELD: 7 WAFFLES Let your imagination be your guide to many exciting and tasty meals with your OSTER® Waffle/Sandwichmaker. Here are just a few suggestions: This warranty does not cover normal wear of parts or damage resulting from any of the following: negligent use or misuse of the product, use on improper voltage or current, use contrary to the operating instructions, disassembly, repair or alteration by anyone other than Sunbeam or an authorized Sunbeam service center. Further, the warranty does not cover: Acts of God, such as fire, flood, hurricanes and tornadoes. YIELD: 8 – 10 WAFFLES EXTRA-SPECIAL WHOLE WHEAT WAFFLES CREATIVE WAFFLES This warranty is valid for the original retail purchaser from the date of initial retail purchase and is not transferable. Keep the original sales receipt. Proof of purchase is required to obtain warranty performance. Sunbeam dealers, service centers, or retail stores selling Sunbeam products do not have the right to alter, modify or any way change the terms and conditions of this warranty. LEMON SWEET WAFFLES 3 eggs 2 cups flour 1 cup milk 1/2 tsp. salt 1/2 cup melted butter or margarine 1 Tbsp. baking powder 1 Tbsp. vanilla (optional) 2 tsp. sugar Beat whole eggs in a bowl until thick. Beat milk, melted butter and vanilla into eggs. In a separate bowl, combine remaining ingredients. Sift into egg mixture, and mix well. Bake as directed. YIELD: 6 – 8 WAFFLES Variation: Cinnamon – Apple. Add 1 apple peeled and shredded, 1 tsp. vanilla and 1/2 tsp. cinnamon to batter. WAFFLE/SANDWICH MAKING warrants that for a period of one year from the date of purchase, this product will be free from defects in material and workmanship. Sunbeam, at its option, will repair or replace this product or any component of the product found to be defective during the warranty period. Replacement will be made with a new or remanufactured product or component. If the product is no longer available, replacement may be made with a similar product of equal or greater value. This is your exclusive warranty. 1 cup butter or margarine (softened) 3-1/4 cups flour 1-1/2 cups sugar 1 packet of vanilla sugar 2 eggs 1-3/4 cups water 1/8 tsp. baking powder grated rind of 1 lemon In a large bowl, beat butter, sugars and eggs together. Add all dry ingredients along with water and lemon rind, and blend until smooth. Pour approximately 3/4 cup batter into waffle iron. Bake as directed. YIELD: 2 SANDWICHES TASTY WAFFLES 1. Close unit and plug into outlet. Use only voltage specified on bottom of unit. The Power On light (Red) will come on. The Ready light (Amber) will not come on. CAUTION: Touch unit only by handles during use or directly after use. 2. The unit is ready for use when the Ready light comes on. 3. Open unit and pour approximately 3/4 cup waffle batter onto grids. For best results, pour batter in a circle around outer edge of Wafflemaker. Close cover. It is very typical to have a small amount of batter run over grid and down unit. However, if an excessive amount of batter runs over, use less batter. 4. Cover will rise slightly as waffles begin to bake. Do not open cover while steam is escaping. Most waffle recipes bake in approximately 4 to 5 minutes. Waffles are generally done when steam no longer escapes from sides and front of unit. 5. When waffles are done, remove with a plastic fork or wooden tongs. NOTE: The Ready light may cycle on and off during cooking. This indicates that the thermostat is maintaining the unit at the proper cooking temperature. 6. Close cover and wait for Ready light to come on before preparing another batch of waffles. 1. Plug the power cord into the AC outlet. ® FOR Sunbeam Products, Inc., or if in Canada, Sunbeam Corporation (Canada) Limited (collectively “Sunbeam”) Cheese Waffles: Fold in 1-1/2 cups (375 ml) shredded cheddar cheese into batter. Bake as directed. Serve with syrup or your favorite creamed entrée. Blueberry Waffles: Fold 2 cups (500 ml) fresh blueberries into batter. Pour 3/4 cup (200 ml) batter over grids. Bake until golden. Chocolate Chip Waffles: Fold 1 cup (250 ml) chocolate chips into batter. Bake as directed. QUICK WAFFLES 1. Do not over-mix waffle batter. Beating egg whites separately and folding them gently into the batter surely will create a lighter, crispier waffle. 2. Completely bake waffles before removing from unit. 3. Don’t open the Wafflemaker while steam is escaping from sides and front of the unit. 4. Why not freeze prepared waffles for those busy days ahead? Just bake the waffles as directed. Cool on a wire rack and wrap in moisture-proof paper or plastic. Quickly reheat in your toaster oven, broiler or microwave oven. PREPARING WAFFLES This appliance has a polarized plug (one blade is wider than the other). To reduce the risk of electric shock, this plug will fit in a polarized outlet only one way. If the plug does not fit fully in the outlet, reverse the plug. If it still does not fit, contact a qualified electrician. Do not modify the plug in any way. AND 4 slices firm-textured sliced bread, white or whole wheat For the batter: Dijon mustard 4 large eggs 4 ounces sliced smoked ham, such as Black Forest or Westphalian 1/2 cup milk 4 ounces sliced Swiss cheese Salt to taste 4 ounces sliced roasted turkey breast Make the batter: In a shallow bowl, whisk 4 large eggs with the 1/2 cup milk and salt. Meanwhile, spread one side of each slice of bread with some of the mustard. Top 2 of the slices with some of the ham, cheese, and turkey. Top each with 1 slice of the remaining bread, pressing down to form 2 compact sandwiches. Dip each sandwich on both sides into the batter, coating evenly. Add the sandwiches to OSTER® Sandwichmaker. Cook for 5 minutes until golden brown. 1. When it is difficult to close the machine, it means that too much filling was added. You should reduce the filling or replace with thinner bread to prevent damaging the Waffle/Sandwichmaker. 2. When removing sandwich from machine, do not use any utensil that may damage the non-stick coating. Use wood or plastic suitable for high temperatures. One-Year Limited Warranty VARIATIONS Pecan or Macadamia Nut Waffles: Sprinkle 1 Tbsp. (15 ml) finely chopped pecans or macadamia nuts over preheated waffle grids. Pour 3/4 cup (200 ml) batter over nuts and close Waffle/Sandwichmaker. Bake as directed. Bacon Waffles: Cook bacon strips. Pour 3/4 cup (200 ml) batter over waffle grids. Cut 1 strip bacon in half, lay over batter and close Waffle/Sandwichmaker. Bake as directed. MONTE CRISTO SANDWICHES CAUTION: Plate Release Button SPECIAL INSTRUCTIONS CHANGING WAFFLE Safety Locking Handles RECIPES Add filling on it, taking care not to overfill. Put another piece of bread over the filling, and coat top with butter or margarine. Close the Sandwichmaker slowly. After about 2 to 3 minutes, open the machine and remove sandwich. Sandwichmaker can be stopped at any time by unplugging the power cord from the AC outlet. – – – FOLD – – – OF – – – FOLD – – – FEATURES – – – FOLD – – – – – – FOLD – – – – – – FOLD – – – IMPORTANT SAFEGUARDS English-4 In Canada – If you have any question regarding this warranty or would like to obtain warranty service, please call 1.800.667.8623 and a convenient service center address will be provided to you. In the U.S.A., this warranty is offered by Sunbeam Products, Inc., located in Boca Raton, Florida 33431. In Canada, this warranty is offered by Sunbeam Corporation (Canada) Limited, located at 5975 Falbourne Street, Mississauga, Ontario L5R 3V8. PLEASE DO NOT RETURN THIS PRODUCT TO ANY OF THESE ADDRESSES OR TO THE PLACE OF PURCHASE. English-5 English-6 – – – F OLD – – – – – – F OLD – – – Español-1 Printed in China Imprimé en Chine Español-2 Español-3 Español-4 Impreso en China • Para quitar las planchas, presione el botón del interior de la unidad. La parte delantera de la plancha se levantará levemente. Deslice la plancha hacia usted para destrabarla. • Al colocar nuevamente las planchas, verifique que las bisagras estén alineadas con los separadores de metal. Primero coloque el separador de la bisagra trasera y presione sobre la plancha hasta que escuche un “clic” que le indicará que la plancha está en su lugar. Distribuido por Sunbeam Products, Inc., Boca Raton, FL 33431 ©2003 Sunbeam Products, Inc. Todos los derechos reservados. OSTER® es una marca registrada de Sunbeam Products, Inc. CÓMO CAMBIAR LAS PLANCHAS PARA WAFLES Y N OTA : Es posible que la luz de Listo se encienda y se apague durante la cocción. Esto indica que el termostato mantiene la unidad en la temperatura apropiada de cocción. SANDWICHES www.oster.com EE.UU. : 1.800.334.0759 Canadá : 1.800.667.8623 Para preguntas sobre los productos llame: Sunbeam Consumer Service GUARDE ESTAS INSTRUCCIONES États-Unis : 1.800.334.0759 Canada : 1.800.667.8623 ESTA ©2003 Sunbeam Products, Inc. All rights reserved. OSTER® is a registered trademark of Sunbeam Products, Inc. Distributed by Sunbeam Products, Inc., Boca Raton, FL 33431 www.oster.com USA : 1.800.334.0759 Canada : 1.800.667.8623 For product questions contact: Sunbeam Consumer Service 4 rebanadas de pan de textura firme, blanco o de trigo integral Mostaza Dijon 4 onzas de jamón ahumado en lonjas, como Black Forest o Westphalian 4 onzas de queso suizo en lonjas 4 onzas de pechuga de pavo asado en lonjas 3. Puede quitar la plancha de calentamiento y limpiarla con un paño suave, agua tibia y detergente. Vuelva a colocarla una vez que esté completamente seca. 2. Limpie el exterior con un paño suave y seco cuando la Waflera/Sandwichera esté fría. Nunca use lustre para metales. 1. Desenchufe la unidad y deje enfriar antes de limpiar. INSTRUCCIONES 1. Cierre la unidad y enchúfela en el tomacorriente. Use sólo el voltaje que se indica en la parte inferior de la unidad. Se encenderá la luz de encendido (rojo). La luz Listo (amarillo) no se encenderá. DE LIMPIEZA R ECETAS 1. Si le resulta difícil cerrar la unidad es que ha puesto demasiado relleno. Debe reducir el relleno o usar un pan más delgado para evitar dañar la Waflera/Sandwichera. Sirva los wafles de postre calientes o fríos. Prepare una masa más abundante, tal como la de wafles estilo Belga o wafles de pastelillo de chocolate. Cúbralos con sus ingredientes dulces y sabrosos favoritos que pueden incluir los siguientes: Moras o Fresas Culces, Helado, Azúcar en Polvo, Nueces Picadas, Salsas de Frutas para Helados, Yogurt de Frutas. PRECAUCIÓN: Separador de la Bisagra Externa 8. Después de 2 a 3 minutos, abra la unidad y quite el sandwich. Puede detener la Sandwichera en cualquier momento desenchufándola del tomacorriente de CA. 6. Coloque otra rebanada de pan sobre el relleno y úntela con mantequilla o margarina. Separador de la Bisagra Trasera 4. Luego de calentar la Sandwichera, ábrala y coloque una rebanada de pan de aproximadamente _ pulgada de grosor sobre la plancha inferior interna. Unte un lado del pan con mantequilla o margarina y colóquelo sobre la plancha contra ese lado. DE LA WAFLERA/SANDWICHERA OSTER® DESAYUNO-ALMUERZO Manual de Instrucciones WAFLES CREATIVOS User Manual Prepare sus propios wafles/sandwiches con ingredientes nuevos usando cualquiera de las recetas OSTER® listadas en las siguientes páginas o use cualquiera de sus favoritas. Para aquellos días en que esté muy ocupada, ¿por qué no tener masa ya lista para preparar una comida en cuestión de minutos? 1. Enchufe la unidad en un tomacorriente de CA. PIEZAS Y Manuel d’Instructions Deje que su imaginación sea su guía para cocinar muchas comidas sabrosas y deliciosas usando su Waflera/Sandwichera OSTER®. Aquí damos algunas sugerencias: 2. Antes de usar, caliente la Sandwichera durante 5 a 8 minutos. Se encenderá la luz roja. La luz amarilla se encenderá cuando la Sandwichera alcance la temperatura apropiada. Cuando use algún aparato eléctrico siempre deben seguirse precauciones básicas de seguridad incluyendo las siguientes: PRECAUCIONES IMPORTANTES DESAYUNO 3. Unte la plancha interna de la unidad con mantequilla o margarina para evitar que los alimentos se adhieran. Asas con Traba de Seguridad Planchas para Wafles LEA TODAS LAS INSTRUCCIONES ANTES DE USAR Recubra los wafles/sandwiches crocantes con: Mantequilla, Almíbar, Miel, Melaza, Pasta de Manzana, Relleno de Pastel, Crema Batida, Yogur, Frutas en Conserva, Fruta Fresca 5. Agregue el relleno, tratando de no excederse en la cantidad. Botón para Quitar las Planchas MODEL/MODELO MODÈLE 3862 POSTRES 7. Cierre la Sandwichera lentamente. Planchas para Sandwiches Para la masa: 4 huevos grandes 1/2 taza de leche sal a gusto SANDWICHES MONTECRISTO 2. Para quitar el sandwich de la unidad no use ningún utensilio que pueda dañar el recubrimiento antiadherente. Use utensilios de madera o plástico, aptos para temperaturas altas. CÓMO PREPARAR WAFLES • No toque superficies calientes. • Como protección contra una descarga eléctrica, no sumerja el cable, el enchufe o cualquier otra pieza de la Waflera/Sandwichera en agua u otros líquidos. • Nunca deje la unidad sin supervisión si la utilizan los niños o si la misma se utiliza cerca de ellos. • Desenchufe el electrodoméstico del tomacorriente cuando no esté en uso y antes de limpiar. Deje que la unidad se enfríe antes de quitar o agregar piezas. • No opere este electrodoméstico o cualquier otro si el cable o enchufe está dañado o en malas condiciones. Si el cable principal está dañado, solicite al fabricante, el agente de servicio más cercano o una persona calificada que lo cambie. • No permita que el cable cuelgue por sobre el mostrador o la mesa ni toque superficies calientes. • No lo coloque cerca o sobre una estufa a gas o eléctrica o en el horno caliente. • No use el electrodoméstico para un propósito distinto para el cual fue diseñado. • Verifique que el voltaje del tomacorriente corresponda al voltaje especificado en la etiqueta de clasificación de la Waflera/Sandwichera. • Sólo un agente de servicio autorizado puede realizar una revisión, reparación o ajuste al electrodoméstico. • Si el cable de alimentación está dañado, el fabricante, su agente de servicio o una persona igualmente calificada debe reemplazarlo para evitar peligros. Pour les questions de produit: Sunbeam Consumer Service Preparación de la masa: En un tazón poco profundo, bata 4 huevos grandes con 1/2 taza de leche y sal. Mientras tanto, unte un lado de cada rebanada de pan con un poco de mostaza. 4. Si usa la Waflera/Sandwichera con frecuencia, deberá quitar las migas de pan que se acumulen, por lo menos una vez a la semana. Verifique que no queden migas debajo de las planchas antes de volver a usar la Waflera/Sandwichera. P RECAUCIÓN : Sólo toque la unidad por las asas durante el uso o inmediatamente después del uso. UNIDAD ES PARA USO DOMÉSTICO SOLAMENTE INSTRUCCIONES ESPECIALES Coloque en 2 de las rebanadas un poco de jamón, queso y pavo. Coloque la rebanada de pan restante sobre cada una, presionando para formar dos sandwiches compactos. CONSEJOS PARA WAFLES SABROSOS 2. La unidad estará lista para usarse cuando la luz de Listo se encienda. Este electrodoméstico posee un enchufe polarizado (una pata es más ancha que la otra). Para reducir el riesgo de una descarga eléctrica, este enchufe se introduce en el tomacorriente polarizado de una sola manera. Si el enchufe no se puede introducir por completo en el tomacorriente, gírelo. Si aún así no logra colocarlo, comuníquese con un electricista calificado. No haga ninguna modificación al enchufe. www.oster.com 1. No mezcle en forma excesiva la masa de wafles. Para obtener wafles más livianos y crocantes, bata las claras de huevo por separado y viértalas suavemente sobre la masa para wafles. 3. Abra la unidad y vierta aproximadamente 3/4 de taza de masa de wafles sobre las rejillas. Para obtener óptimos resultados, vierta la masa formando un círculo alrededor del borde exterior de la Waflera. Cierre la tapa. Es normal que una pequeña cantidad de masa se escurra por la rejilla y por debajo de la unidad. Sin embargo, si se derrama mucha masa, deberá usar menos cantidad. P.N. 111895 Unte cada lado del sandwich con la masa, recubriéndolo en forma pareja. Coloque los sandwiches en la Sandwichera OSTER®. Cocine durante 5 minutes o hasta que estén dorados. RINDE: 2 SANDWICHES 2. Cocine completamente los wafles antes de retirarlos de la unidad. 4. La tapa se levantará levemente a medida que los wafles comiencen a cocinarse. No abra la tapa mientras salga vapor. La mayoría de las recetas de wafles toma en prepararse de 4 a 5 minutos aproximadamente. Por lo general los wafles están listos cuando ya no sale más vapor por los costados y el frente de la unidad. BIENVENIDOS ©2003 Sunbeam Products, Inc. Tous droits réservés. OSTER® est une marque déposée de Sunbeam Products, Inc. Distribué par Sunbeam Products, Inc., Boca Raton, Florida 33431 3. No abra la Waflera mientras el vapor esté escapando por los lados y por el frente de la unidad. 5. Cuando los wafles estén listos, quítelos con un tenedor de plástico o con unas pinzas de madera. ¡Felicitaciones por la compra de la Waflera/Sandwichera OSTER®! Para mayor información sobre los productos OSTER®, visítenos en www.oster.com. Con su nuevo electrodoméstico podrá preparar wafles y sandwiches crocantes, calientes y dorados en sólo unos minutos y así saborear una rápida comida en cualquier momento del día. Su Waflera/Sandwichera OSTER® está controlada por termostato para ayudarle a preparar wafles a la perfección. La unidad es portátil, por lo que podrá preparar wafles/sandwiches en la cocina o directamente en la mesa. Las rejillas antiadherentes facilitan la limpieza. Sabemos que le encantará su nueva Waflera/Sandwichera OSTER®. Es un gran complemento para su cocina. Visit us at www.oster.com 4. ¿Por qué no congelar wafles preparados para los días en que esté muy ocupada? Simplemente cocine los wafles como se indica. Déjelos enfriar sobre una rejilla de alambre y envuélvalos en papel o plástico a prueba de humedad. Recaliéntelos rápidamente en su horno tostador, asador u horno microondas. 6. Cierre la tapa y espere que la luz de Encendido se encienda antes de preparar más wafles. CÓMO USAR LA WAFLERA/SANDWICHERA OSTER® – – – FOLD – – – – – – FOLD – – – CÓMO PREPARAR SANDWICHES – – – FOLD – – – CÓMO PREPARAR WAFLES/SANDWICHES – – – FOLD – – – – – – FOLD – – – Wafflemaker with Sandwich Plates Waflera con Sandwich Plates Gaufrier avec Plaques à Sandwiches 5. 6. 7. 8. YOUR OSTER® WAFFLE/SANDWICHMAKER When using electrical appliances, basic safety precautions should always be followed, including the following: READ ALL INSTRUCTIONS BEFORE USE Waffle Plates • Do not touch hot surfaces. • To protect against electric shock, do not immerse cord, plug or any part of the Waffle/ Sandwichmaker in water or other liquid. • Close supervision is always necessary when it is used by or near children. • Unplug unit from outlet when not in use and before cleaning. Allow hot surface to cool before putting on or taking off parts. • Do not operate this or any appliance with a damaged cord or plug or in abnormal state. If its main cord is damaged, it must be replaced by the manufacturer or the nearest service agent or qualified person. • Do not let the cord hang over edge of table or counter, or touch hot surface. • Do not place on or near a hot gas or electric burner or in a heated oven. • Do not use the appliance for other than its intended use. • Make sure that your outlet voltage corresponds to the voltage stated on the rating label of the Waffle/Sandwichmaker. • Any examination, repair or adjustment for the appliance should be made by the authorized service agent. • If the supply cord is damaged, it must be replaced by the manufacturer or its service agent or similar qualified person in order to avoid a hazard. THIS UNIT IS FOR CLEANING INSTRUCTIONS 1. Unplug and allow unit to cool before cleaning. 2. Wipe outside with soft, dry cloth when Waffle/Sandwichmaker is cold. Never use metal polish. 3. You can remove the heating plate to clean with soft cloth, warm water and dishwashing liquid. Before resetting it, you should allow it to dry thoroughly. 4. If Waffle/Sandwichmaker is used frequently, accumulated bread crumbs should be removed at least once a week. Make sure any accumulation under plates is completely removed before using the Waffle/Sandwichmaker again. Rear Hinge Insert Sandwich Plates Outer Hinge Insert HINTS HOUSEHOLD USE ONLY SAVE THESE INSTRUCTIONS WELCOME Congratulations on your purchase of an OSTER® Waffle/Sandwichmaker! To learn more about OSTER® products, please visit us at www.oster.com. Your new appliance will surely make crispy, hot, golden waffles/sandwiches in just minutes for a quick meal anytime of the day. Your OSTER® Waffle/Sandwichmaker is thermostatically controlled to help you prepare waffles to perfection. Your unit is portable so you can make waffles/sandwiches in your kitchen or right at the table. The non-stick grids make clean-up easy. We know that you will love your new OSTER® Waffle/Sandwichmaker. It’s a great addition to any kitchen. Prepare your own waffles/sandwiches from scratch with any of the OSTER® recipes listed on the following pages, or use any of your own family favorites. For those busy days, why not have a prepared mix handy for a meal in a matter of minutes? PREPARING SANDWICHES Top crispy waffles/sandwiches with: Butter, Syrup, Honey, Molasses, Apple Butter, Pie Filling, Whipped Cream, Yogurt, Fruit Preserves, Fresh Fruit BREAKFAST HOW TO USE YOUR OSTER WAFFLE/SANDWICHMAKER • To release plates, push the button on the inside of the unit. The front of the plate will lift slightly. Pull plate towards you to slide out of locked position. BRUNCH 4. After preheat, open the Sandwichmaker, place a piece of bread of approximately 1/2-inch thickness on inner lower plate. Coat one side of the bread with butter or margarine and place on the plate against this side. Sweetened Fresh Berries, Ice Cream, Powdered Sugar, Chopped Nuts, Sundae Sauces, Fruit Yogurt English-2 English-3 English-1 Sunbeam shall not be liable for any incidental or consequential damages caused by the breach of any express, implied or statutory warranty or condition. Except to the extent prohibited by applicable law, any implied warranty or condition of merchantability or fitness for a particular purpose is limited in duration to the duration of the above warranty. 1 can (6 oz. or 170 g) frozen orange juice concentrate, thawed 1/2 cup (125 ml) flaked coconut 1/3 cup (75 ml) Maraschino cherries, chopped 1/4 cup (50 ml) 150 Proof rum vanilla ice cream Sunbeam disclaims all other warranties, conditions or representations, express, implied, statutory or otherwise. Sunbeam shall not be liable for any damages of any kind resulting from the purchase, use or misuse of, or inability to use the product including incidental, special, consequential or similar damages or loss of profits, or for any breach of contract, fundamental or otherwise, or for any claim brought against purchaser by any other party. In a large sauté pan, combine sugar and cornstarch. Measure pineapple juice and enough cold water to equal 1-1/4 cups (300 ml). Combine water mixture, orange juice and sugar mixture. Cook over medium heat until thickened, stirring constantly. Add coconut, cherries and pineapple. Heat through. Keep warm on low heat. Slowly pour rum over top of mixture. Carefully ignite. Place a scoop of vanilla ice cream over each waffle. When flame dies, spoon sauce over ice cream. Serve immediately. Some provinces, states or jurisdictions do not allow the exclusion or limitation of incidental or consequential damages or limitations on how long an implied warranty lasts, so the above limitations or exclusion may not apply to you. This warranty gives you specific legal rights, and you may also have other rights that vary from province to province, state to state or jurisdiction to jurisdiction. YIELD: 5 WAFFLES How to Obtain Warranty Service CHOCOLATE BROWNIE WAFFLES In the U.S.A. – If you have any question regarding this warranty or would like to obtain warranty service, please call 1.800.334.0759 and a convenient service center address will be provided to you. Here’s a no-fuss dessert idea! 1/4 cup (50 ml) shortening or oil 1 Tbsp. (15 ml) baking powder 2/3 cup (150 ml) sugar 1/4 tsp. (1 ml) salt 2 squares (1 ounce or 28 g each) 1-1/4 cups (300 ml) milk baking chocolate, melted 1/2 tsp. (2 ml) vanilla 3 egg yolks 1/2 cup (125 ml) chopped nuts 1-1/2 cups (375 ml) all-purpose flour 3 egg whites, stiffly beaten Preheat Waffle/Sandwichmaker. In a large mixing bowl, cream shortening and sugar at medium-low until fluffy. Add chocolate and egg yolks. Beat well. Add milk alternately with combined dry ingredients. Mix well. Add vanilla and nuts. By hand, gently fold in beaten egg white. Pour 3/4 cup (200 ml) batter over grids. Close Waffle/Sandwichmaker and bake until steam no longer escapes, about 3-5 minutes. Waffle will crisp as it cools. Repeat. Serve hot or cold with vanilla ice cream, YIELD: 6 WAFFLES chocolate syrup and chopped walnuts or pecans. LIGHT ’N CRISP WAFFLES 2 egg yolks 1/2 tsp. (2 ml) salt 2 cups (500 ml) milk 1/3 cup (75 ml) oil 2 cups (500 ml) all-purpose flour 2 egg whites, stiffly beaten 1 Tbsp. (15 ml) baking powder Preheat Waffle/Sandwichmaker. Put all ingredients, except egg whites, in a large mixing bowl. Beat on low until moistened. Increase to medium, mix until smooth. By hand, gently fold in beaten egg whites. Pour 3/4 cup (200 ml) batter over grids. Close Waffle/Sandwichmaker, bake until steam no longer escapes, about 3 – 5 minutes. Repeat. Serve while hot with your favorite topping. YIELD: 5 WAFFLES Serve dessert waffles hot or cold. Prepare a richer batter such as Belgian-Style Waffles or Chocolate Brownie Waffles. Top with your favorite sweet and tasty ingredients which might include: 3. Coat the inner plate of the machine with butter or margarine to prevent sticking. • When putting plates in, make sure the hinges are aligned with the metal inserts on the plates. Start by placing the rear hinge insert in first and pressing down on the plate until you hear the plate click into place. 8 prepared Macadamia Nut Waffles 1 cup (250 ml) sugar 3 Tbsp. (45 ml) cornstarch 1 can (8 oz. or 277 g) crushed pineapple, drained reserving juice cold water Feed the gang with these at Sunday Brunch DESSERT 2. Before use, please preheat the Sandwichmaker for 5 to 8 minutes. The red power on lamp will be on. When the amber lamp goes on, it means the Sandwichmaker temperature is ready. SANDWICH PLATES AND What Are the Limits on Sunbeam’s Liability? ALOHA DESSERT WAFFLES A pretty dessert that is guaranteed to please your guests 1 cup (250 ml) milk* 3 eggs (or equivalent) 1 cup (250 ml) water 1 package (1/4 ounce or 7 g) 1/4 cup (50 ml) butter or margarine active dry yeast 1/4 cup (50 ml) honey 1/2 tsp. (2 ml) salt 2-2/3 cups (650 ml) whole wheat flour *low-fat or skim milk may be used Heat milk, water, butter and honey at 120°F (48°C). In large mixing bowl, combine flour, eggs, yeast, salt and warmed milk mixture. Mix at low to moisten, then medium-high for 1 minute. Cover and refrigerate several hours or overnight, stirring occasionally. Preheat Waffle/Sandwichmaker. Pour 3/4 cup (200 ml) over grids. Close Waffle/Sandwichmaker, bake until steam no longer escapes, about 3 – 5 minutes. Repeat. Serve while hot with your favorite topping. YIELD: 7 WAFFLES Let your imagination be your guide to many exciting and tasty meals with your OSTER® Waffle/Sandwichmaker. Here are just a few suggestions: This warranty does not cover normal wear of parts or damage resulting from any of the following: negligent use or misuse of the product, use on improper voltage or current, use contrary to the operating instructions, disassembly, repair or alteration by anyone other than Sunbeam or an authorized Sunbeam service center. Further, the warranty does not cover: Acts of God, such as fire, flood, hurricanes and tornadoes. YIELD: 8 – 10 WAFFLES EXTRA-SPECIAL WHOLE WHEAT WAFFLES CREATIVE WAFFLES This warranty is valid for the original retail purchaser from the date of initial retail purchase and is not transferable. Keep the original sales receipt. Proof of purchase is required to obtain warranty performance. Sunbeam dealers, service centers, or retail stores selling Sunbeam products do not have the right to alter, modify or any way change the terms and conditions of this warranty. LEMON SWEET WAFFLES 3 eggs 2 cups flour 1 cup milk 1/2 tsp. salt 1/2 cup melted butter or margarine 1 Tbsp. baking powder 1 Tbsp. vanilla (optional) 2 tsp. sugar Beat whole eggs in a bowl until thick. Beat milk, melted butter and vanilla into eggs. In a separate bowl, combine remaining ingredients. Sift into egg mixture, and mix well. Bake as directed. YIELD: 6 – 8 WAFFLES Variation: Cinnamon – Apple. Add 1 apple peeled and shredded, 1 tsp. vanilla and 1/2 tsp. cinnamon to batter. WAFFLE/SANDWICH MAKING warrants that for a period of one year from the date of purchase, this product will be free from defects in material and workmanship. Sunbeam, at its option, will repair or replace this product or any component of the product found to be defective during the warranty period. Replacement will be made with a new or remanufactured product or component. If the product is no longer available, replacement may be made with a similar product of equal or greater value. This is your exclusive warranty. 1 cup butter or margarine (softened) 3-1/4 cups flour 1-1/2 cups sugar 1 packet of vanilla sugar 2 eggs 1-3/4 cups water 1/8 tsp. baking powder grated rind of 1 lemon In a large bowl, beat butter, sugars and eggs together. Add all dry ingredients along with water and lemon rind, and blend until smooth. Pour approximately 3/4 cup batter into waffle iron. Bake as directed. YIELD: 2 SANDWICHES TASTY WAFFLES 1. Close unit and plug into outlet. Use only voltage specified on bottom of unit. The Power On light (Red) will come on. The Ready light (Amber) will not come on. CAUTION: Touch unit only by handles during use or directly after use. 2. The unit is ready for use when the Ready light comes on. 3. Open unit and pour approximately 3/4 cup waffle batter onto grids. For best results, pour batter in a circle around outer edge of Wafflemaker. Close cover. It is very typical to have a small amount of batter run over grid and down unit. However, if an excessive amount of batter runs over, use less batter. 4. Cover will rise slightly as waffles begin to bake. Do not open cover while steam is escaping. Most waffle recipes bake in approximately 4 to 5 minutes. Waffles are generally done when steam no longer escapes from sides and front of unit. 5. When waffles are done, remove with a plastic fork or wooden tongs. NOTE: The Ready light may cycle on and off during cooking. This indicates that the thermostat is maintaining the unit at the proper cooking temperature. 6. Close cover and wait for Ready light to come on before preparing another batch of waffles. 1. Plug the power cord into the AC outlet. ® FOR Sunbeam Products, Inc., or if in Canada, Sunbeam Corporation (Canada) Limited (collectively “Sunbeam”) Cheese Waffles: Fold in 1-1/2 cups (375 ml) shredded cheddar cheese into batter. Bake as directed. Serve with syrup or your favorite creamed entrée. Blueberry Waffles: Fold 2 cups (500 ml) fresh blueberries into batter. Pour 3/4 cup (200 ml) batter over grids. Bake until golden. Chocolate Chip Waffles: Fold 1 cup (250 ml) chocolate chips into batter. Bake as directed. QUICK WAFFLES 1. Do not over-mix waffle batter. Beating egg whites separately and folding them gently into the batter surely will create a lighter, crispier waffle. 2. Completely bake waffles before removing from unit. 3. Don’t open the Wafflemaker while steam is escaping from sides and front of the unit. 4. Why not freeze prepared waffles for those busy days ahead? Just bake the waffles as directed. Cool on a wire rack and wrap in moisture-proof paper or plastic. Quickly reheat in your toaster oven, broiler or microwave oven. PREPARING WAFFLES This appliance has a polarized plug (one blade is wider than the other). To reduce the risk of electric shock, this plug will fit in a polarized outlet only one way. If the plug does not fit fully in the outlet, reverse the plug. If it still does not fit, contact a qualified electrician. Do not modify the plug in any way. AND 4 slices firm-textured sliced bread, white or whole wheat For the batter: Dijon mustard 4 large eggs 4 ounces sliced smoked ham, such as Black Forest or Westphalian 1/2 cup milk 4 ounces sliced Swiss cheese Salt to taste 4 ounces sliced roasted turkey breast Make the batter: In a shallow bowl, whisk 4 large eggs with the 1/2 cup milk and salt. Meanwhile, spread one side of each slice of bread with some of the mustard. Top 2 of the slices with some of the ham, cheese, and turkey. Top each with 1 slice of the remaining bread, pressing down to form 2 compact sandwiches. Dip each sandwich on both sides into the batter, coating evenly. Add the sandwiches to OSTER® Sandwichmaker. Cook for 5 minutes until golden brown. 1. When it is difficult to close the machine, it means that too much filling was added. You should reduce the filling or replace with thinner bread to prevent damaging the Waffle/Sandwichmaker. 2. When removing sandwich from machine, do not use any utensil that may damage the non-stick coating. Use wood or plastic suitable for high temperatures. One-Year Limited Warranty VARIATIONS Pecan or Macadamia Nut Waffles: Sprinkle 1 Tbsp. (15 ml) finely chopped pecans or macadamia nuts over preheated waffle grids. Pour 3/4 cup (200 ml) batter over nuts and close Waffle/Sandwichmaker. Bake as directed. Bacon Waffles: Cook bacon strips. Pour 3/4 cup (200 ml) batter over waffle grids. Cut 1 strip bacon in half, lay over batter and close Waffle/Sandwichmaker. Bake as directed. MONTE CRISTO SANDWICHES CAUTION: Plate Release Button SPECIAL INSTRUCTIONS CHANGING WAFFLE Safety Locking Handles RECIPES Add filling on it, taking care not to overfill. Put another piece of bread over the filling, and coat top with butter or margarine. Close the Sandwichmaker slowly. After about 2 to 3 minutes, open the machine and remove sandwich. Sandwichmaker can be stopped at any time by unplugging the power cord from the AC outlet. – – – FOLD – – – OF – – – FOLD – – – FEATURES – – – FOLD – – – – – – FOLD – – – – – – FOLD – – – IMPORTANT SAFEGUARDS English-4 In Canada – If you have any question regarding this warranty or would like to obtain warranty service, please call 1.800.667.8623 and a convenient service center address will be provided to you. In the U.S.A., this warranty is offered by Sunbeam Products, Inc., located in Boca Raton, Florida 33431. In Canada, this warranty is offered by Sunbeam Corporation (Canada) Limited, located at 5975 Falbourne Street, Mississauga, Ontario L5R 3V8. PLEASE DO NOT RETURN THIS PRODUCT TO ANY OF THESE ADDRESSES OR TO THE PLACE OF PURCHASE. English-5 English-6 – – – F OLD – – – – – – F OLD – – – Español-1 Printed in China Imprimé en Chine Español-2 Español-3 Español-4 Impreso en China • Para quitar las planchas, presione el botón del interior de la unidad. La parte delantera de la plancha se levantará levemente. Deslice la plancha hacia usted para destrabarla. • Al colocar nuevamente las planchas, verifique que las bisagras estén alineadas con los separadores de metal. Primero coloque el separador de la bisagra trasera y presione sobre la plancha hasta que escuche un “clic” que le indicará que la plancha está en su lugar. Distribuido por Sunbeam Products, Inc., Boca Raton, FL 33431 ©2003 Sunbeam Products, Inc. Todos los derechos reservados. OSTER® es una marca registrada de Sunbeam Products, Inc. CÓMO CAMBIAR LAS PLANCHAS PARA WAFLES Y N OTA : Es posible que la luz de Listo se encienda y se apague durante la cocción. Esto indica que el termostato mantiene la unidad en la temperatura apropiada de cocción. SANDWICHES www.oster.com EE.UU. : 1.800.334.0759 Canadá : 1.800.667.8623 Para preguntas sobre los productos llame: Sunbeam Consumer Service GUARDE ESTAS INSTRUCCIONES États-Unis : 1.800.334.0759 Canada : 1.800.667.8623 ESTA ©2003 Sunbeam Products, Inc. All rights reserved. OSTER® is a registered trademark of Sunbeam Products, Inc. Distributed by Sunbeam Products, Inc., Boca Raton, FL 33431 www.oster.com USA : 1.800.334.0759 Canada : 1.800.667.8623 For product questions contact: Sunbeam Consumer Service 4 rebanadas de pan de textura firme, blanco o de trigo integral Mostaza Dijon 4 onzas de jamón ahumado en lonjas, como Black Forest o Westphalian 4 onzas de queso suizo en lonjas 4 onzas de pechuga de pavo asado en lonjas 3. Puede quitar la plancha de calentamiento y limpiarla con un paño suave, agua tibia y detergente. Vuelva a colocarla una vez que esté completamente seca. 2. Limpie el exterior con un paño suave y seco cuando la Waflera/Sandwichera esté fría. Nunca use lustre para metales. 1. Desenchufe la unidad y deje enfriar antes de limpiar. INSTRUCCIONES 1. Cierre la unidad y enchúfela en el tomacorriente. Use sólo el voltaje que se indica en la parte inferior de la unidad. Se encenderá la luz de encendido (rojo). La luz Listo (amarillo) no se encenderá. DE LIMPIEZA R ECETAS 1. Si le resulta difícil cerrar la unidad es que ha puesto demasiado relleno. Debe reducir el relleno o usar un pan más delgado para evitar dañar la Waflera/Sandwichera. Sirva los wafles de postre calientes o fríos. Prepare una masa más abundante, tal como la de wafles estilo Belga o wafles de pastelillo de chocolate. Cúbralos con sus ingredientes dulces y sabrosos favoritos que pueden incluir los siguientes: Moras o Fresas Culces, Helado, Azúcar en Polvo, Nueces Picadas, Salsas de Frutas para Helados, Yogurt de Frutas. PRECAUCIÓN: Separador de la Bisagra Externa 8. Después de 2 a 3 minutos, abra la unidad y quite el sandwich. Puede detener la Sandwichera en cualquier momento desenchufándola del tomacorriente de CA. 6. Coloque otra rebanada de pan sobre el relleno y úntela con mantequilla o margarina. Separador de la Bisagra Trasera 4. Luego de calentar la Sandwichera, ábrala y coloque una rebanada de pan de aproximadamente _ pulgada de grosor sobre la plancha inferior interna. Unte un lado del pan con mantequilla o margarina y colóquelo sobre la plancha contra ese lado. DE LA WAFLERA/SANDWICHERA OSTER® DESAYUNO-ALMUERZO Manual de Instrucciones WAFLES CREATIVOS User Manual Prepare sus propios wafles/sandwiches con ingredientes nuevos usando cualquiera de las recetas OSTER® listadas en las siguientes páginas o use cualquiera de sus favoritas. Para aquellos días en que esté muy ocupada, ¿por qué no tener masa ya lista para preparar una comida en cuestión de minutos? 1. Enchufe la unidad en un tomacorriente de CA. PIEZAS Y Manuel d’Instructions Deje que su imaginación sea su guía para cocinar muchas comidas sabrosas y deliciosas usando su Waflera/Sandwichera OSTER®. Aquí damos algunas sugerencias: 2. Antes de usar, caliente la Sandwichera durante 5 a 8 minutos. Se encenderá la luz roja. La luz amarilla se encenderá cuando la Sandwichera alcance la temperatura apropiada. Cuando use algún aparato eléctrico siempre deben seguirse precauciones básicas de seguridad incluyendo las siguientes: PRECAUCIONES IMPORTANTES DESAYUNO 3. Unte la plancha interna de la unidad con mantequilla o margarina para evitar que los alimentos se adhieran. Asas con Traba de Seguridad Planchas para Wafles LEA TODAS LAS INSTRUCCIONES ANTES DE USAR Recubra los wafles/sandwiches crocantes con: Mantequilla, Almíbar, Miel, Melaza, Pasta de Manzana, Relleno de Pastel, Crema Batida, Yogur, Frutas en Conserva, Fruta Fresca 5. Agregue el relleno, tratando de no excederse en la cantidad. Botón para Quitar las Planchas MODEL/MODELO MODÈLE 3862 POSTRES 7. Cierre la Sandwichera lentamente. Planchas para Sandwiches Para la masa: 4 huevos grandes 1/2 taza de leche sal a gusto SANDWICHES MONTECRISTO 2. Para quitar el sandwich de la unidad no use ningún utensilio que pueda dañar el recubrimiento antiadherente. Use utensilios de madera o plástico, aptos para temperaturas altas. CÓMO PREPARAR WAFLES • No toque superficies calientes. • Como protección contra una descarga eléctrica, no sumerja el cable, el enchufe o cualquier otra pieza de la Waflera/Sandwichera en agua u otros líquidos. • Nunca deje la unidad sin supervisión si la utilizan los niños o si la misma se utiliza cerca de ellos. • Desenchufe el electrodoméstico del tomacorriente cuando no esté en uso y antes de limpiar. Deje que la unidad se enfríe antes de quitar o agregar piezas. • No opere este electrodoméstico o cualquier otro si el cable o enchufe está dañado o en malas condiciones. Si el cable principal está dañado, solicite al fabricante, el agente de servicio más cercano o una persona calificada que lo cambie. • No permita que el cable cuelgue por sobre el mostrador o la mesa ni toque superficies calientes. • No lo coloque cerca o sobre una estufa a gas o eléctrica o en el horno caliente. • No use el electrodoméstico para un propósito distinto para el cual fue diseñado. • Verifique que el voltaje del tomacorriente corresponda al voltaje especificado en la etiqueta de clasificación de la Waflera/Sandwichera. • Sólo un agente de servicio autorizado puede realizar una revisión, reparación o ajuste al electrodoméstico. • Si el cable de alimentación está dañado, el fabricante, su agente de servicio o una persona igualmente calificada debe reemplazarlo para evitar peligros. Pour les questions de produit: Sunbeam Consumer Service Preparación de la masa: En un tazón poco profundo, bata 4 huevos grandes con 1/2 taza de leche y sal. Mientras tanto, unte un lado de cada rebanada de pan con un poco de mostaza. 4. Si usa la Waflera/Sandwichera con frecuencia, deberá quitar las migas de pan que se acumulen, por lo menos una vez a la semana. Verifique que no queden migas debajo de las planchas antes de volver a usar la Waflera/Sandwichera. P RECAUCIÓN : Sólo toque la unidad por las asas durante el uso o inmediatamente después del uso. UNIDAD ES PARA USO DOMÉSTICO SOLAMENTE INSTRUCCIONES ESPECIALES Coloque en 2 de las rebanadas un poco de jamón, queso y pavo. Coloque la rebanada de pan restante sobre cada una, presionando para formar dos sandwiches compactos. CONSEJOS PARA WAFLES SABROSOS 2. La unidad estará lista para usarse cuando la luz de Listo se encienda. Este electrodoméstico posee un enchufe polarizado (una pata es más ancha que la otra). Para reducir el riesgo de una descarga eléctrica, este enchufe se introduce en el tomacorriente polarizado de una sola manera. Si el enchufe no se puede introducir por completo en el tomacorriente, gírelo. Si aún así no logra colocarlo, comuníquese con un electricista calificado. No haga ninguna modificación al enchufe. www.oster.com 1. No mezcle en forma excesiva la masa de wafles. Para obtener wafles más livianos y crocantes, bata las claras de huevo por separado y viértalas suavemente sobre la masa para wafles. 3. Abra la unidad y vierta aproximadamente 3/4 de taza de masa de wafles sobre las rejillas. Para obtener óptimos resultados, vierta la masa formando un círculo alrededor del borde exterior de la Waflera. Cierre la tapa. Es normal que una pequeña cantidad de masa se escurra por la rejilla y por debajo de la unidad. Sin embargo, si se derrama mucha masa, deberá usar menos cantidad. P.N. 111895 Unte cada lado del sandwich con la masa, recubriéndolo en forma pareja. Coloque los sandwiches en la Sandwichera OSTER®. Cocine durante 5 minutes o hasta que estén dorados. RINDE: 2 SANDWICHES 2. Cocine completamente los wafles antes de retirarlos de la unidad. 4. La tapa se levantará levemente a medida que los wafles comiencen a cocinarse. No abra la tapa mientras salga vapor. La mayoría de las recetas de wafles toma en prepararse de 4 a 5 minutos aproximadamente. Por lo general los wafles están listos cuando ya no sale más vapor por los costados y el frente de la unidad. BIENVENIDOS ©2003 Sunbeam Products, Inc. Tous droits réservés. OSTER® est une marque déposée de Sunbeam Products, Inc. Distribué par Sunbeam Products, Inc., Boca Raton, Florida 33431 3. No abra la Waflera mientras el vapor esté escapando por los lados y por el frente de la unidad. 5. Cuando los wafles estén listos, quítelos con un tenedor de plástico o con unas pinzas de madera. ¡Felicitaciones por la compra de la Waflera/Sandwichera OSTER®! Para mayor información sobre los productos OSTER®, visítenos en www.oster.com. Con su nuevo electrodoméstico podrá preparar wafles y sandwiches crocantes, calientes y dorados en sólo unos minutos y así saborear una rápida comida en cualquier momento del día. Su Waflera/Sandwichera OSTER® está controlada por termostato para ayudarle a preparar wafles a la perfección. La unidad es portátil, por lo que podrá preparar wafles/sandwiches en la cocina o directamente en la mesa. Las rejillas antiadherentes facilitan la limpieza. Sabemos que le encantará su nueva Waflera/Sandwichera OSTER®. Es un gran complemento para su cocina. Visit us at www.oster.com 4. ¿Por qué no congelar wafles preparados para los días en que esté muy ocupada? Simplemente cocine los wafles como se indica. Déjelos enfriar sobre una rejilla de alambre y envuélvalos en papel o plástico a prueba de humedad. Recaliéntelos rápidamente en su horno tostador, asador u horno microondas. 6. Cierre la tapa y espere que la luz de Encendido se encienda antes de preparar más wafles. CÓMO USAR LA WAFLERA/SANDWICHERA OSTER® – – – FOLD – – – – – – FOLD – – – CÓMO PREPARAR SANDWICHES – – – FOLD – – – CÓMO PREPARAR WAFLES/SANDWICHES – – – FOLD – – – – – – FOLD – – – Wafflemaker with Sandwich Plates Waflera con Sandwich Plates Gaufrier avec Plaques à Sandwiches 5. 6. 7. 8. YOUR OSTER® WAFFLE/SANDWICHMAKER When using electrical appliances, basic safety precautions should always be followed, including the following: READ ALL INSTRUCTIONS BEFORE USE Waffle Plates • Do not touch hot surfaces. • To protect against electric shock, do not immerse cord, plug or any part of the Waffle/ Sandwichmaker in water or other liquid. • Close supervision is always necessary when it is used by or near children. • Unplug unit from outlet when not in use and before cleaning. Allow hot surface to cool before putting on or taking off parts. • Do not operate this or any appliance with a damaged cord or plug or in abnormal state. If its main cord is damaged, it must be replaced by the manufacturer or the nearest service agent or qualified person. • Do not let the cord hang over edge of table or counter, or touch hot surface. • Do not place on or near a hot gas or electric burner or in a heated oven. • Do not use the appliance for other than its intended use. • Make sure that your outlet voltage corresponds to the voltage stated on the rating label of the Waffle/Sandwichmaker. • Any examination, repair or adjustment for the appliance should be made by the authorized service agent. • If the supply cord is damaged, it must be replaced by the manufacturer or its service agent or similar qualified person in order to avoid a hazard. THIS UNIT IS FOR CLEANING INSTRUCTIONS 1. Unplug and allow unit to cool before cleaning. 2. Wipe outside with soft, dry cloth when Waffle/Sandwichmaker is cold. Never use metal polish. 3. You can remove the heating plate to clean with soft cloth, warm water and dishwashing liquid. Before resetting it, you should allow it to dry thoroughly. 4. If Waffle/Sandwichmaker is used frequently, accumulated bread crumbs should be removed at least once a week. Make sure any accumulation under plates is completely removed before using the Waffle/Sandwichmaker again. Rear Hinge Insert Sandwich Plates Outer Hinge Insert HINTS HOUSEHOLD USE ONLY SAVE THESE INSTRUCTIONS WELCOME Congratulations on your purchase of an OSTER® Waffle/Sandwichmaker! To learn more about OSTER® products, please visit us at www.oster.com. Your new appliance will surely make crispy, hot, golden waffles/sandwiches in just minutes for a quick meal anytime of the day. Your OSTER® Waffle/Sandwichmaker is thermostatically controlled to help you prepare waffles to perfection. Your unit is portable so you can make waffles/sandwiches in your kitchen or right at the table. The non-stick grids make clean-up easy. We know that you will love your new OSTER® Waffle/Sandwichmaker. It’s a great addition to any kitchen. Prepare your own waffles/sandwiches from scratch with any of the OSTER® recipes listed on the following pages, or use any of your own family favorites. For those busy days, why not have a prepared mix handy for a meal in a matter of minutes? PREPARING SANDWICHES Top crispy waffles/sandwiches with: Butter, Syrup, Honey, Molasses, Apple Butter, Pie Filling, Whipped Cream, Yogurt, Fruit Preserves, Fresh Fruit BREAKFAST HOW TO USE YOUR OSTER WAFFLE/SANDWICHMAKER • To release plates, push the button on the inside of the unit. The front of the plate will lift slightly. Pull plate towards you to slide out of locked position. BRUNCH 4. After preheat, open the Sandwichmaker, place a piece of bread of approximately 1/2-inch thickness on inner lower plate. Coat one side of the bread with butter or margarine and place on the plate against this side. Sweetened Fresh Berries, Ice Cream, Powdered Sugar, Chopped Nuts, Sundae Sauces, Fruit Yogurt English-2 English-3 English-1 Sunbeam shall not be liable for any incidental or consequential damages caused by the breach of any express, implied or statutory warranty or condition. Except to the extent prohibited by applicable law, any implied warranty or condition of merchantability or fitness for a particular purpose is limited in duration to the duration of the above warranty. 1 can (6 oz. or 170 g) frozen orange juice concentrate, thawed 1/2 cup (125 ml) flaked coconut 1/3 cup (75 ml) Maraschino cherries, chopped 1/4 cup (50 ml) 150 Proof rum vanilla ice cream Sunbeam disclaims all other warranties, conditions or representations, express, implied, statutory or otherwise. Sunbeam shall not be liable for any damages of any kind resulting from the purchase, use or misuse of, or inability to use the product including incidental, special, consequential or similar damages or loss of profits, or for any breach of contract, fundamental or otherwise, or for any claim brought against purchaser by any other party. In a large sauté pan, combine sugar and cornstarch. Measure pineapple juice and enough cold water to equal 1-1/4 cups (300 ml). Combine water mixture, orange juice and sugar mixture. Cook over medium heat until thickened, stirring constantly. Add coconut, cherries and pineapple. Heat through. Keep warm on low heat. Slowly pour rum over top of mixture. Carefully ignite. Place a scoop of vanilla ice cream over each waffle. When flame dies, spoon sauce over ice cream. Serve immediately. Some provinces, states or jurisdictions do not allow the exclusion or limitation of incidental or consequential damages or limitations on how long an implied warranty lasts, so the above limitations or exclusion may not apply to you. This warranty gives you specific legal rights, and you may also have other rights that vary from province to province, state to state or jurisdiction to jurisdiction. YIELD: 5 WAFFLES How to Obtain Warranty Service CHOCOLATE BROWNIE WAFFLES In the U.S.A. – If you have any question regarding this warranty or would like to obtain warranty service, please call 1.800.334.0759 and a convenient service center address will be provided to you. Here’s a no-fuss dessert idea! 1/4 cup (50 ml) shortening or oil 1 Tbsp. (15 ml) baking powder 2/3 cup (150 ml) sugar 1/4 tsp. (1 ml) salt 2 squares (1 ounce or 28 g each) 1-1/4 cups (300 ml) milk baking chocolate, melted 1/2 tsp. (2 ml) vanilla 3 egg yolks 1/2 cup (125 ml) chopped nuts 1-1/2 cups (375 ml) all-purpose flour 3 egg whites, stiffly beaten Preheat Waffle/Sandwichmaker. In a large mixing bowl, cream shortening and sugar at medium-low until fluffy. Add chocolate and egg yolks. Beat well. Add milk alternately with combined dry ingredients. Mix well. Add vanilla and nuts. By hand, gently fold in beaten egg white. Pour 3/4 cup (200 ml) batter over grids. Close Waffle/Sandwichmaker and bake until steam no longer escapes, about 3-5 minutes. Waffle will crisp as it cools. Repeat. Serve hot or cold with vanilla ice cream, YIELD: 6 WAFFLES chocolate syrup and chopped walnuts or pecans. LIGHT ’N CRISP WAFFLES 2 egg yolks 1/2 tsp. (2 ml) salt 2 cups (500 ml) milk 1/3 cup (75 ml) oil 2 cups (500 ml) all-purpose flour 2 egg whites, stiffly beaten 1 Tbsp. (15 ml) baking powder Preheat Waffle/Sandwichmaker. Put all ingredients, except egg whites, in a large mixing bowl. Beat on low until moistened. Increase to medium, mix until smooth. By hand, gently fold in beaten egg whites. Pour 3/4 cup (200 ml) batter over grids. Close Waffle/Sandwichmaker, bake until steam no longer escapes, about 3 – 5 minutes. Repeat. Serve while hot with your favorite topping. YIELD: 5 WAFFLES Serve dessert waffles hot or cold. Prepare a richer batter such as Belgian-Style Waffles or Chocolate Brownie Waffles. Top with your favorite sweet and tasty ingredients which might include: 3. Coat the inner plate of the machine with butter or margarine to prevent sticking. • When putting plates in, make sure the hinges are aligned with the metal inserts on the plates. Start by placing the rear hinge insert in first and pressing down on the plate until you hear the plate click into place. 8 prepared Macadamia Nut Waffles 1 cup (250 ml) sugar 3 Tbsp. (45 ml) cornstarch 1 can (8 oz. or 277 g) crushed pineapple, drained reserving juice cold water Feed the gang with these at Sunday Brunch DESSERT 2. Before use, please preheat the Sandwichmaker for 5 to 8 minutes. The red power on lamp will be on. When the amber lamp goes on, it means the Sandwichmaker temperature is ready. SANDWICH PLATES AND What Are the Limits on Sunbeam’s Liability? ALOHA DESSERT WAFFLES A pretty dessert that is guaranteed to please your guests 1 cup (250 ml) milk* 3 eggs (or equivalent) 1 cup (250 ml) water 1 package (1/4 ounce or 7 g) 1/4 cup (50 ml) butter or margarine active dry yeast 1/4 cup (50 ml) honey 1/2 tsp. (2 ml) salt 2-2/3 cups (650 ml) whole wheat flour *low-fat or skim milk may be used Heat milk, water, butter and honey at 120°F (48°C). In large mixing bowl, combine flour, eggs, yeast, salt and warmed milk mixture. Mix at low to moisten, then medium-high for 1 minute. Cover and refrigerate several hours or overnight, stirring occasionally. Preheat Waffle/Sandwichmaker. Pour 3/4 cup (200 ml) over grids. Close Waffle/Sandwichmaker, bake until steam no longer escapes, about 3 – 5 minutes. Repeat. Serve while hot with your favorite topping. YIELD: 7 WAFFLES Let your imagination be your guide to many exciting and tasty meals with your OSTER® Waffle/Sandwichmaker. Here are just a few suggestions: This warranty does not cover normal wear of parts or damage resulting from any of the following: negligent use or misuse of the product, use on improper voltage or current, use contrary to the operating instructions, disassembly, repair or alteration by anyone other than Sunbeam or an authorized Sunbeam service center. Further, the warranty does not cover: Acts of God, such as fire, flood, hurricanes and tornadoes. YIELD: 8 – 10 WAFFLES EXTRA-SPECIAL WHOLE WHEAT WAFFLES CREATIVE WAFFLES This warranty is valid for the original retail purchaser from the date of initial retail purchase and is not transferable. Keep the original sales receipt. Proof of purchase is required to obtain warranty performance. Sunbeam dealers, service centers, or retail stores selling Sunbeam products do not have the right to alter, modify or any way change the terms and conditions of this warranty. LEMON SWEET WAFFLES 3 eggs 2 cups flour 1 cup milk 1/2 tsp. salt 1/2 cup melted butter or margarine 1 Tbsp. baking powder 1 Tbsp. vanilla (optional) 2 tsp. sugar Beat whole eggs in a bowl until thick. Beat milk, melted butter and vanilla into eggs. In a separate bowl, combine remaining ingredients. Sift into egg mixture, and mix well. Bake as directed. YIELD: 6 – 8 WAFFLES Variation: Cinnamon – Apple. Add 1 apple peeled and shredded, 1 tsp. vanilla and 1/2 tsp. cinnamon to batter. WAFFLE/SANDWICH MAKING warrants that for a period of one year from the date of purchase, this product will be free from defects in material and workmanship. Sunbeam, at its option, will repair or replace this product or any component of the product found to be defective during the warranty period. Replacement will be made with a new or remanufactured product or component. If the product is no longer available, replacement may be made with a similar product of equal or greater value. This is your exclusive warranty. 1 cup butter or margarine (softened) 3-1/4 cups flour 1-1/2 cups sugar 1 packet of vanilla sugar 2 eggs 1-3/4 cups water 1/8 tsp. baking powder grated rind of 1 lemon In a large bowl, beat butter, sugars and eggs together. Add all dry ingredients along with water and lemon rind, and blend until smooth. Pour approximately 3/4 cup batter into waffle iron. Bake as directed. YIELD: 2 SANDWICHES TASTY WAFFLES 1. Close unit and plug into outlet. Use only voltage specified on bottom of unit. The Power On light (Red) will come on. The Ready light (Amber) will not come on. CAUTION: Touch unit only by handles during use or directly after use. 2. The unit is ready for use when the Ready light comes on. 3. Open unit and pour approximately 3/4 cup waffle batter onto grids. For best results, pour batter in a circle around outer edge of Wafflemaker. Close cover. It is very typical to have a small amount of batter run over grid and down unit. However, if an excessive amount of batter runs over, use less batter. 4. Cover will rise slightly as waffles begin to bake. Do not open cover while steam is escaping. Most waffle recipes bake in approximately 4 to 5 minutes. Waffles are generally done when steam no longer escapes from sides and front of unit. 5. When waffles are done, remove with a plastic fork or wooden tongs. NOTE: The Ready light may cycle on and off during cooking. This indicates that the thermostat is maintaining the unit at the proper cooking temperature. 6. Close cover and wait for Ready light to come on before preparing another batch of waffles. 1. Plug the power cord into the AC outlet. ® FOR Sunbeam Products, Inc., or if in Canada, Sunbeam Corporation (Canada) Limited (collectively “Sunbeam”) Cheese Waffles: Fold in 1-1/2 cups (375 ml) shredded cheddar cheese into batter. Bake as directed. Serve with syrup or your favorite creamed entrée. Blueberry Waffles: Fold 2 cups (500 ml) fresh blueberries into batter. Pour 3/4 cup (200 ml) batter over grids. Bake until golden. Chocolate Chip Waffles: Fold 1 cup (250 ml) chocolate chips into batter. Bake as directed. QUICK WAFFLES 1. Do not over-mix waffle batter. Beating egg whites separately and folding them gently into the batter surely will create a lighter, crispier waffle. 2. Completely bake waffles before removing from unit. 3. Don’t open the Wafflemaker while steam is escaping from sides and front of the unit. 4. Why not freeze prepared waffles for those busy days ahead? Just bake the waffles as directed. Cool on a wire rack and wrap in moisture-proof paper or plastic. Quickly reheat in your toaster oven, broiler or microwave oven. PREPARING WAFFLES This appliance has a polarized plug (one blade is wider than the other). To reduce the risk of electric shock, this plug will fit in a polarized outlet only one way. If the plug does not fit fully in the outlet, reverse the plug. If it still does not fit, contact a qualified electrician. Do not modify the plug in any way. AND 4 slices firm-textured sliced bread, white or whole wheat For the batter: Dijon mustard 4 large eggs 4 ounces sliced smoked ham, such as Black Forest or Westphalian 1/2 cup milk 4 ounces sliced Swiss cheese Salt to taste 4 ounces sliced roasted turkey breast Make the batter: In a shallow bowl, whisk 4 large eggs with the 1/2 cup milk and salt. Meanwhile, spread one side of each slice of bread with some of the mustard. Top 2 of the slices with some of the ham, cheese, and turkey. Top each with 1 slice of the remaining bread, pressing down to form 2 compact sandwiches. Dip each sandwich on both sides into the batter, coating evenly. Add the sandwiches to OSTER® Sandwichmaker. Cook for 5 minutes until golden brown. 1. When it is difficult to close the machine, it means that too much filling was added. You should reduce the filling or replace with thinner bread to prevent damaging the Waffle/Sandwichmaker. 2. When removing sandwich from machine, do not use any utensil that may damage the non-stick coating. Use wood or plastic suitable for high temperatures. One-Year Limited Warranty VARIATIONS Pecan or Macadamia Nut Waffles: Sprinkle 1 Tbsp. (15 ml) finely chopped pecans or macadamia nuts over preheated waffle grids. Pour 3/4 cup (200 ml) batter over nuts and close Waffle/Sandwichmaker. Bake as directed. Bacon Waffles: Cook bacon strips. Pour 3/4 cup (200 ml) batter over waffle grids. Cut 1 strip bacon in half, lay over batter and close Waffle/Sandwichmaker. Bake as directed. MONTE CRISTO SANDWICHES CAUTION: Plate Release Button SPECIAL INSTRUCTIONS CHANGING WAFFLE Safety Locking Handles RECIPES Add filling on it, taking care not to overfill. Put another piece of bread over the filling, and coat top with butter or margarine. Close the Sandwichmaker slowly. After about 2 to 3 minutes, open the machine and remove sandwich. Sandwichmaker can be stopped at any time by unplugging the power cord from the AC outlet. – – – FOLD – – – OF – – – FOLD – – – FEATURES – – – FOLD – – – – – – FOLD – – – – – – FOLD – – – IMPORTANT SAFEGUARDS English-4 In Canada – If you have any question regarding this warranty or would like to obtain warranty service, please call 1.800.667.8623 and a convenient service center address will be provided to you. In the U.S.A., this warranty is offered by Sunbeam Products, Inc., located in Boca Raton, Florida 33431. In Canada, this warranty is offered by Sunbeam Corporation (Canada) Limited, located at 5975 Falbourne Street, Mississauga, Ontario L5R 3V8. PLEASE DO NOT RETURN THIS PRODUCT TO ANY OF THESE ADDRESSES OR TO THE PLACE OF PURCHASE. English-5 English-6 – – – F OLD – – – – – – F OLD – – – Español-1 Printed in China Imprimé en Chine Español-2 Español-3 Español-4 Impreso en China • Para quitar las planchas, presione el botón del interior de la unidad. La parte delantera de la plancha se levantará levemente. Deslice la plancha hacia usted para destrabarla. • Al colocar nuevamente las planchas, verifique que las bisagras estén alineadas con los separadores de metal. Primero coloque el separador de la bisagra trasera y presione sobre la plancha hasta que escuche un “clic” que le indicará que la plancha está en su lugar. Distribuido por Sunbeam Products, Inc., Boca Raton, FL 33431 ©2003 Sunbeam Products, Inc. Todos los derechos reservados. OSTER® es una marca registrada de Sunbeam Products, Inc. CÓMO CAMBIAR LAS PLANCHAS PARA WAFLES Y N OTA : Es posible que la luz de Listo se encienda y se apague durante la cocción. Esto indica que el termostato mantiene la unidad en la temperatura apropiada de cocción. SANDWICHES www.oster.com EE.UU. : 1.800.334.0759 Canadá : 1.800.667.8623 Para preguntas sobre los productos llame: Sunbeam Consumer Service GUARDE ESTAS INSTRUCCIONES États-Unis : 1.800.334.0759 Canada : 1.800.667.8623 ESTA ©2003 Sunbeam Products, Inc. All rights reserved. OSTER® is a registered trademark of Sunbeam Products, Inc. Distributed by Sunbeam Products, Inc., Boca Raton, FL 33431 www.oster.com USA : 1.800.334.0759 Canada : 1.800.667.8623 For product questions contact: Sunbeam Consumer Service 4 rebanadas de pan de textura firme, blanco o de trigo integral Mostaza Dijon 4 onzas de jamón ahumado en lonjas, como Black Forest o Westphalian 4 onzas de queso suizo en lonjas 4 onzas de pechuga de pavo asado en lonjas 3. Puede quitar la plancha de calentamiento y limpiarla con un paño suave, agua tibia y detergente. Vuelva a colocarla una vez que esté completamente seca. 2. Limpie el exterior con un paño suave y seco cuando la Waflera/Sandwichera esté fría. Nunca use lustre para metales. 1. Desenchufe la unidad y deje enfriar antes de limpiar. INSTRUCCIONES 1. Cierre la unidad y enchúfela en el tomacorriente. Use sólo el voltaje que se indica en la parte inferior de la unidad. Se encenderá la luz de encendido (rojo). La luz Listo (amarillo) no se encenderá. DE LIMPIEZA R ECETAS 1. Si le resulta difícil cerrar la unidad es que ha puesto demasiado relleno. Debe reducir el relleno o usar un pan más delgado para evitar dañar la Waflera/Sandwichera. Sirva los wafles de postre calientes o fríos. Prepare una masa más abundante, tal como la de wafles estilo Belga o wafles de pastelillo de chocolate. Cúbralos con sus ingredientes dulces y sabrosos favoritos que pueden incluir los siguientes: Moras o Fresas Culces, Helado, Azúcar en Polvo, Nueces Picadas, Salsas de Frutas para Helados, Yogurt de Frutas. PRECAUCIÓN: Separador de la Bisagra Externa 8. Después de 2 a 3 minutos, abra la unidad y quite el sandwich. Puede detener la Sandwichera en cualquier momento desenchufándola del tomacorriente de CA. 6. Coloque otra rebanada de pan sobre el relleno y úntela con mantequilla o margarina. Separador de la Bisagra Trasera 4. Luego de calentar la Sandwichera, ábrala y coloque una rebanada de pan de aproximadamente _ pulgada de grosor sobre la plancha inferior interna. Unte un lado del pan con mantequilla o margarina y colóquelo sobre la plancha contra ese lado. DE LA WAFLERA/SANDWICHERA OSTER® DESAYUNO-ALMUERZO Manual de Instrucciones WAFLES CREATIVOS User Manual Prepare sus propios wafles/sandwiches con ingredientes nuevos usando cualquiera de las recetas OSTER® listadas en las siguientes páginas o use cualquiera de sus favoritas. Para aquellos días en que esté muy ocupada, ¿por qué no tener masa ya lista para preparar una comida en cuestión de minutos? 1. Enchufe la unidad en un tomacorriente de CA. PIEZAS Y Manuel d’Instructions Deje que su imaginación sea su guía para cocinar muchas comidas sabrosas y deliciosas usando su Waflera/Sandwichera OSTER®. Aquí damos algunas sugerencias: 2. Antes de usar, caliente la Sandwichera durante 5 a 8 minutos. Se encenderá la luz roja. La luz amarilla se encenderá cuando la Sandwichera alcance la temperatura apropiada. Cuando use algún aparato eléctrico siempre deben seguirse precauciones básicas de seguridad incluyendo las siguientes: PRECAUCIONES IMPORTANTES DESAYUNO 3. Unte la plancha interna de la unidad con mantequilla o margarina para evitar que los alimentos se adhieran. Asas con Traba de Seguridad Planchas para Wafles LEA TODAS LAS INSTRUCCIONES ANTES DE USAR Recubra los wafles/sandwiches crocantes con: Mantequilla, Almíbar, Miel, Melaza, Pasta de Manzana, Relleno de Pastel, Crema Batida, Yogur, Frutas en Conserva, Fruta Fresca 5. Agregue el relleno, tratando de no excederse en la cantidad. Botón para Quitar las Planchas MODEL/MODELO MODÈLE 3862 POSTRES 7. Cierre la Sandwichera lentamente. Planchas para Sandwiches Para la masa: 4 huevos grandes 1/2 taza de leche sal a gusto SANDWICHES MONTECRISTO 2. Para quitar el sandwich de la unidad no use ningún utensilio que pueda dañar el recubrimiento antiadherente. Use utensilios de madera o plástico, aptos para temperaturas altas. CÓMO PREPARAR WAFLES • No toque superficies calientes. • Como protección contra una descarga eléctrica, no sumerja el cable, el enchufe o cualquier otra pieza de la Waflera/Sandwichera en agua u otros líquidos. • Nunca deje la unidad sin supervisión si la utilizan los niños o si la misma se utiliza cerca de ellos. • Desenchufe el electrodoméstico del tomacorriente cuando no esté en uso y antes de limpiar. Deje que la unidad se enfríe antes de quitar o agregar piezas. • No opere este electrodoméstico o cualquier otro si el cable o enchufe está dañado o en malas condiciones. Si el cable principal está dañado, solicite al fabricante, el agente de servicio más cercano o una persona calificada que lo cambie. • No permita que el cable cuelgue por sobre el mostrador o la mesa ni toque superficies calientes. • No lo coloque cerca o sobre una estufa a gas o eléctrica o en el horno caliente. • No use el electrodoméstico para un propósito distinto para el cual fue diseñado. • Verifique que el voltaje del tomacorriente corresponda al voltaje especificado en la etiqueta de clasificación de la Waflera/Sandwichera. • Sólo un agente de servicio autorizado puede realizar una revisión, reparación o ajuste al electrodoméstico. • Si el cable de alimentación está dañado, el fabricante, su agente de servicio o una persona igualmente calificada debe reemplazarlo para evitar peligros. Pour les questions de produit: Sunbeam Consumer Service Preparación de la masa: En un tazón poco profundo, bata 4 huevos grandes con 1/2 taza de leche y sal. Mientras tanto, unte un lado de cada rebanada de pan con un poco de mostaza. 4. Si usa la Waflera/Sandwichera con frecuencia, deberá quitar las migas de pan que se acumulen, por lo menos una vez a la semana. Verifique que no queden migas debajo de las planchas antes de volver a usar la Waflera/Sandwichera. P RECAUCIÓN : Sólo toque la unidad por las asas durante el uso o inmediatamente después del uso. UNIDAD ES PARA USO DOMÉSTICO SOLAMENTE INSTRUCCIONES ESPECIALES Coloque en 2 de las rebanadas un poco de jamón, queso y pavo. Coloque la rebanada de pan restante sobre cada una, presionando para formar dos sandwiches compactos. CONSEJOS PARA WAFLES SABROSOS 2. La unidad estará lista para usarse cuando la luz de Listo se encienda. Este electrodoméstico posee un enchufe polarizado (una pata es más ancha que la otra). Para reducir el riesgo de una descarga eléctrica, este enchufe se introduce en el tomacorriente polarizado de una sola manera. Si el enchufe no se puede introducir por completo en el tomacorriente, gírelo. Si aún así no logra colocarlo, comuníquese con un electricista calificado. No haga ninguna modificación al enchufe. www.oster.com 1. No mezcle en forma excesiva la masa de wafles. Para obtener wafles más livianos y crocantes, bata las claras de huevo por separado y viértalas suavemente sobre la masa para wafles. 3. Abra la unidad y vierta aproximadamente 3/4 de taza de masa de wafles sobre las rejillas. Para obtener óptimos resultados, vierta la masa formando un círculo alrededor del borde exterior de la Waflera. Cierre la tapa. Es normal que una pequeña cantidad de masa se escurra por la rejilla y por debajo de la unidad. Sin embargo, si se derrama mucha masa, deberá usar menos cantidad. P.N. 111895 Unte cada lado del sandwich con la masa, recubriéndolo en forma pareja. Coloque los sandwiches en la Sandwichera OSTER®. Cocine durante 5 minutes o hasta que estén dorados. RINDE: 2 SANDWICHES 2. Cocine completamente los wafles antes de retirarlos de la unidad. 4. La tapa se levantará levemente a medida que los wafles comiencen a cocinarse. No abra la tapa mientras salga vapor. La mayoría de las recetas de wafles toma en prepararse de 4 a 5 minutos aproximadamente. Por lo general los wafles están listos cuando ya no sale más vapor por los costados y el frente de la unidad. BIENVENIDOS ©2003 Sunbeam Products, Inc. Tous droits réservés. OSTER® est une marque déposée de Sunbeam Products, Inc. Distribué par Sunbeam Products, Inc., Boca Raton, Florida 33431 3. No abra la Waflera mientras el vapor esté escapando por los lados y por el frente de la unidad. 5. Cuando los wafles estén listos, quítelos con un tenedor de plástico o con unas pinzas de madera. ¡Felicitaciones por la compra de la Waflera/Sandwichera OSTER®! Para mayor información sobre los productos OSTER®, visítenos en www.oster.com. Con su nuevo electrodoméstico podrá preparar wafles y sandwiches crocantes, calientes y dorados en sólo unos minutos y así saborear una rápida comida en cualquier momento del día. Su Waflera/Sandwichera OSTER® está controlada por termostato para ayudarle a preparar wafles a la perfección. La unidad es portátil, por lo que podrá preparar wafles/sandwiches en la cocina o directamente en la mesa. Las rejillas antiadherentes facilitan la limpieza. Sabemos que le encantará su nueva Waflera/Sandwichera OSTER®. Es un gran complemento para su cocina. Visit us at www.oster.com 4. ¿Por qué no congelar wafles preparados para los días en que esté muy ocupada? Simplemente cocine los wafles como se indica. Déjelos enfriar sobre una rejilla de alambre y envuélvalos en papel o plástico a prueba de humedad. Recaliéntelos rápidamente en su horno tostador, asador u horno microondas. 6. Cierre la tapa y espere que la luz de Encendido se encienda antes de preparar más wafles. CÓMO USAR LA WAFLERA/SANDWICHERA OSTER® – – – FOLD – – – – – – FOLD – – – CÓMO PREPARAR SANDWICHES – – – FOLD – – – CÓMO PREPARAR WAFLES/SANDWICHES – – – FOLD – – – – – – FOLD – – – Wafflemaker with Sandwich Plates Waflera con Sandwich Plates Gaufrier avec Plaques à Sandwiches READ ALL INSTRUCTIONS BEFORE USE 2. Clean waffle grids with cloth or sponge dampened with hot, soapy water. DO NOT IMMERSE UNIT IN WATER. Rinse with dampened cloth or sponge and wipe dry. Prepare waffles for breakfast or brunch and pile them high with fresh fruits, whipped cream or just plain butter and warmed syrup. • Do not touch hot surfaces, use the handles. • To protect against electric shock, do not place cord, plug or appliance in water or any other liquid. • Close supervision is always necessary when this or any appliance is used by or near children. • Unplug from outlet when not in use and before cleaning. Allow to cool before cleaning the appliance. • Do not operate this or any appliance with a damaged cord or plug or after the appliance malfunctions or has been damaged in any manner. Return appliance to an Authorized Service Center for examination, repair or adjustment. • The use of accessory attachments not recommended by the appliance manufacturer may cause fire, electrical shock or injury. 4. Store in closed position. Your OSTER Waffle Maker is thermostatically controlled to help you prepare waffles to perfection. Your unit is portable so you can make waffles in your kitchen or right at the table. The non-stick grids make clean-up easy. We know that you will love your ® new OSTER Waffle Maker. It’s a great addition to any kitchen. 6. This appliance is for household use only. HINTS HOW TO USE YOUR OSTER WAFFLE MAKER PREPARING YOUR WAFFLE MAKER FOR USE 1. Open unit by lifting the upper handle. 3. Don’t open the Waffle Maker while steam is escaping from sides and front of the unit. 2. Before using for the first time, clean cooking plates with cloth or sponge, dampened with hot, soapy water. DO NOT IMMERSE UNIT IN WATER. Rinse with dampened cloth or sponge and wipe dry. 4. Why not freeze prepared waffles for those busy days ahead? Just bake the waffles as directed. Cool on a wire rack and wrap in moisture-proof paper or plastic. Quickly reheat in your toaster oven, broiler or microwave oven. 3. When using for the first time, “season” the grids by rubbing lightly with cooking oil. Should sticking occur in later usage, reseason your unit. WAFFLE MAKING CAUTION: Touch unit only by handles during use or directly after use. 3. The unit is ready for use when the Ready light comes on. BREAKFAST 4. Open unit and pour approximately 3/4 cup waffle batter onto grids. For best results, pour batter in a circle around outer edge of waffle maker. (See Illustration) Close cover. It is very typical to have a small amount of batter run over grid and down unit. However, if an excessive amount of batter runs over, use less batter. A short power-supply cord is provided to reduce the risk resulting from becoming entangled in or tripping over a longer cord. An extension cord may be used if care is exercised in its use. If an extension cord is used, the electrical rating of the cord must be at least as great as the electrical rating of the appliance. The extension cord should be arranged so that it will not drape over the countertop or tabletop where it can be pulled on by children or tripped over unintentionally. This appliance has a polarized plug (one blade is wider than the other). To reduce the risk of electric shock, this plug will fit in a polarized outlet only one way. If the plug does not fit fully in the outlet, reverse the plug. If it still does not fit, contact a qualified electrician. Do not modify the plug in any way. 7. Close cover and wait for Ready light to come on before preparing another batch of waffles. SAVE THESE INSTRUCTIONS English-1 English-2 English-3 egg yolks cups (500 ml) milk cups (500 ml) all-purpose flour Tbsp. (15 ml) baking powder 1 can (6 oz. or 170 g) frozen orange juice concentrate, thawed 1/2 cup (125 ml) flaked coconut 1/3 cup (75 ml) Maraschino cherries, chopped 1/4 cup (50 ml) 150 Proof rum vanilla ice cream Sunbeam disclaims all other warranties, conditions or representations, express, implied, statutory or otherwise. Sunbeam shall not be liable for any damages of any kind resulting from the purchase, use or misuse of, or inability to use the product including incidental, special, consequential or similar damages or loss of profits, or for any breach of contract, fundamental or otherwise, or for any claim brought against purchaser by any other party. Some provinces, states or jurisdictions do not allow the exclusion or limitation of incidental or consequential damages or limitations on how long an implied warranty lasts, so the above limitations or exclusion may not apply to you. This warranty gives you specific legal rights, and you may also have other rights that vary from province to province, state to state or jurisdiction to jurisdiction. CHOCOLATE BROWNIE WAFFLES How to Obtain Warranty Service Here’s a no-fuss dessert idea! 1/4 cup (50 ml) shortening or oil 2/3 cup (150 ml) sugar 2 squares (1 ounce or 28 g each) baking chocolate, melted 3 egg yolks 1-1/2 cups (375 ml) all-purpose flour LIGHT ’N CRISP WAFFLES 2 2 2 1 Except to the extent prohibited by applicable law, any implied warranty or condition of merchantability or fitness for a particular purpose is limited in duration to the duration of the above warranty. In a large sauté pan, combine sugar and cornstarch. Measure pineapple juice and enough cold water to equal 1-1/4 cups (300 ml). Combine water mixture, orange juice and sugar mixture. Cook over medium heat until thickened, stirring constantly. Add coconut, cherries and pineapple. Heat through. Keep warm on low heat. Slowly pour rum over top of mixture. Carefully ignite. Place a scoop of vanilla ice cream over each waffle. When flame dies, spoon sauce over ice cream. Serve immediately. YIELD: 5 WAFFLES YIELD: 7 WAFFLES Serve dessert waffles hot or cold. Prepare a richer batter such as Belgian-Style Waffles or Chocolate Brownie Waffles. Top with your favorite sweet and tasty ingredients which might include: Sweetened Fresh Berries, Ice Cream, Powdered Sugar, Chopped Nuts, Sundae Sauces, Fruit Yogurt NOTE: The Ready light may cycle on and off during cooking. This indicates that the thermostat is maintaining the unit at the proper cooking temperature. 3 eggs (or equivalent) 1 package (1/4 ounce or 7 g) active dry yeast 1/2 tsp. (2 ml) salt Preheat Waffle Maker. Pour 3/4 cup (200 ml) over grids. Close waffle maker, bake until steam no longer escapes, about 3 – 5 minutes. Repeat. Serve while hot with your favorite topping. DESSERT 6. When waffles are done, remove with a plastic fork or wooden tongs. 8 prepared Macadamia Nut Waffles 1 cup (250 ml) sugar 3 Tbsp. (45 ml) cornstarch 1 can (8 oz. or 277 g) crushed pineapple, drained reserving juice cold water Heat milk, water, butter and honey at 120°F (48°C). In large mixing bowl, combine flour, eggs, yeast, salt and warmed milk mixture. Mix at low to moisten, then medium-high for 1 minute. Cover and refrigerate several hours or overnight, stirring occasionally. BRUNCH Sunbeam shall not be liable for any incidental or consequential damages caused by the breach of any express, implied or statutory warranty or condition. ALOHA DESSERT WAFFLES *low-fat or skim milk may be used Top crispy waffles with: Butter, Syrup, Honey, Molasses, Apple Butter, Pie Filling, Whipped Cream, Yogurt, Fruit Preserves, Fresh Fruit 5. Cover will rise slightly as waffles begin to bake. Do not open cover while steam is escaping. Most waffle recipes bake in approximately 5 minutes on the low setting, 4-1/2 minutes on the medium setting and 4 minutes on the high setting. Waffles are generally done when steam no longer escapes from sides and front of unit. SPECIAL INSTRUCTIONS AND What Are the Limits on Sunbeam’s Liability? A pretty dessert that is guaranteed to please your guests Feed the gang with these at Sunday Brunch Let your imagination be your guide to many exciting and tasty meals with your OSTER® Waffle Maker. Here are just a few suggestions: This warranty does not cover normal wear of parts or damage resulting from any of the following: negligent use or misuse of the product, use on improper voltage or current, use contrary to the operating instructions, disassembly, repair or alteration by anyone other than Sunbeam or an authorized Sunbeam service center. Further, the warranty does not cover: Acts of God, such as fire, flood, hurricanes and tornadoes. 3-1/4 cups flour 1 packet of vanilla sugar 1-3/4 cups water grated rind of 1 lemon In a large bowl, beat butter, sugars and eggs together. Add all dry ingredients along with water and lemon rind, and blend until smooth. Pour approximately 3/4 cup batter into waffle iron. Bake as directed. YIELD: 8 – 10 WAFFLES EXTRA-SPECIAL WHOLE WHEAT WAFFLES CREATIVE WAFFLES 2. Temperature Control Dial settings range from min for light waffles to max for dark waffles. LEMON SWEET WAFFLES 1 cup butter or margarine (softened) 1-1/2 cups sugar 2 eggs 1/8 tsp. baking powder 2 Tbsp. (30 ml) cornmeal 2 tsp. (10 ml) baking powder 2 tsp. (10 ml) sugar 1/4 tsp. (1 ml) salt 1 cup (250 ml) milk* 1 cup (250 ml) water 1/4 cup (50 ml) butter or margarine 1/4 cup (50 ml) honey 2-2/3 cups (650 ml) whole wheat flour This warranty is valid for the original retail purchaser from the date of initial retail purchase and is not transferable. Keep the original sales receipt. Proof of purchase is required to obtain warranty performance. Sunbeam dealers, service centers, or retail stores selling Sunbeam products do not have the right to alter, modify or any way change the terms and conditions of this warranty. Chocolate Chip Waffles: Fold 1 cup (250 ml) chocolate chips into batter. Bake as directed. Preheat Waffle Maker. Put all ingredients into blender container. Cover and process at a medium-high speed until dry ingredients are moistened. Do not over-blend. Pour 3/4 cup (200 ml) batter over grids. Close Waffle Maker. Bake until steam no longer escapes, about 3 – 5 minutes. Repeat. Serve while hot with warmed syrup. YIELD: 3 WAFFLES Prepare your own waffles from scratch with any of the OSTER® recipes listed on the following pages, or use any of your own family favorites. For those busy days, why not have a prepared mix handy for a meal in a matter of minutes? 1. Close unit and plug into outlet. Use only voltage specified on bottom of unit. The On light (Red) will come on. The Ready light (Yellow) will not come on. Blueberry Waffles: Fold 2 cups (500 ml) fresh blueberries into batter. Pour 3/4 cup (200 ml) batter over grids. Bake until golden. BLENDER CORNMEAL WAFFLES 1 egg (or equivalent) 3/4 cup (200 ml) milk* 1/4 cup (50 ml) vegetable oil 1 cup (250 ml) all-purpose flour *low-fat or skim milk may be used “Sunbeam”) warrants that for a period of one year from the date of purchase, this product will be free from defects in material and workmanship. Sunbeam, at its option, will repair or replace this product or any component of the product found to be defective during the warranty period. Replacement will be made with a new or remanufactured product or component. If the product is no longer available, replacement may be made with a similar product of equal or greater value. This is your exclusive warranty. Cheese Waffles: Fold in 1-1/2 cups (375 ml) shredded cheddar cheese into batter. Bake as directed. Serve with syrup or your favorite creamed entrée. Enjoy a crisp waffle that’s prepared in seconds 2. Completely bake waffles before removing from unit. PREPARING WAFFLES EXTENSION CORD USE TASTY WAFFLES Sunbeam Products, Inc., or if in Canada, Sunbeam Corporation (Canada) Limited (collectively Bacon Waffles: Cook bacon strips. Pour 3/4 cup (200 ml) batter over waffle grids. Cut 1 strip bacon in half, lay over batter and close Waffle Maker. Bake as directed. Variation: Cinnamon – Apple. Add 1 apple peeled and shredded, 1 tsp. vanilla and 1/2 tsp. cinnamon to batter. 1. Do not over-mix waffle batter. Beating egg whites separately and folding them gently into the batter surely will create a lighter, crispier waffle. ® THIS UNIT IS FOR HOUSEHOLD USE ONLY FOR 2 cups flour 1/2 tsp. salt 1 Tbsp. baking powder 2 tsp. sugar Beat whole eggs in a bowl until thick. Beat milk, melted butter and vanilla into eggs. In a separate bowl, combine remaining ingredients. Sift into egg mixture, and mix well. Bake as directed. YIELD: 6 – 8 WAFFLES 5. Any servicing required should be performed only by an authorized service facility. ® • Do not use outdoors. • Do not let cord hang over edge of table or counter, or touch hot surfaces. • Do not place on or near a hot gas or electric burner, in a heated oven or in a microwave oven. • Do not use the appliance for other than intended use. • When using this appliance, provide adequate air space above and on all sides for air circulation. On surfaces where heat may cause a problem, an insulated hot pad is recommended. • Do not leave unit unattended during use. 3 eggs 1 cup milk 1/2 cup melted butter or margarine 1 Tbsp. vanilla (optional) 3. To remove cooked-on foods, use a nylon scrub pad or non-abrasive cleanser. A steel wool pad or abrasive cleaners will damage the non-stick surface. Even desserts are more exciting with piping hot Brownie Waffles topped with ice cream, sauce toppings, chopped nuts and whipped cream. Pecan or Macadamia Nut Waffles: Sprinkle 1 Tbsp. (15 ml) finely chopped pecans or macadamia nuts over preheated waffle grids. Pour 3/4 cup (200 ml) batter over nuts and close Waffle Maker. Bake as directed. QUICK WAFFLES 1. Unplug and allow unit to cool before cleaning. Your new appliance will surely make crispy, hot, golden waffles in just minutes for a quick meal anytime of the day. One-Year Limited Warranty VARIATIONS RECIPES CLEANING AND – – – FOLD – – – Congratulations! You are now the owner of an OSTER Waffle Maker. – – – FOLD – – – CARE ® When using electrical appliances, basic safety precautions should always be followed, including the following: – – – FOLD – – – – – – FOLD – – – – – – FOLD – – – WELCOME IMPORTANT SAFEGUARDS 1/2 tsp. (2 ml) salt 1/3 cup (75 ml) oil 2 egg whites, stiffly beaten 1 Tbsp. (15 ml) baking powder 1/4 tsp. (1 ml) salt 1-1/4 cups (300 ml) milk 1/2 tsp. (2 ml) vanilla 1/2 cup (125 ml) chopped nuts 3 egg whites, stiffly beaten Preheat Waffle Maker. Put all ingredients, except egg whites, in a large mixing bowl. Beat on low until moistened. Increase to medium, mix until smooth. By hand, gently fold in beaten egg whites. Pour 3/4 cup (200 ml) batter over grids. Close Waffle Maker, bake until steam no longer escapes, about 3 – 5 minutes. Repeat. Serve while hot with your favorite topping. YIELD: 5 WAFFLES Preheat Waffle Maker. In a large mixing bowl, cream shortening and sugar at medium-low until fluffy. Add chocolate and egg yolks. Beat well. Add milk alternately with combined dry ingredients. Mix well. Add vanilla and nuts. By hand, gently fold in beaten egg white. Pour 3/4 cup (200 ml) batter over grids. Close Waffle Maker and bake until steam no longer escapes, about 3-5 minutes. Waffle will crisp as it cools. Repeat. Serve hot or cold with vanilla ice cream, YIELD: 6 WAFFLES chocolate syrup and chopped walnuts or pecans. English-4 English-5 In the U.S.A. – If you have any question regarding this warranty or would like to obtain warranty service, please call 1.800.334.0759 and a convenient service center address will be provided to you. In Canada – If you have any question regarding this warranty or would like to obtain warranty service, please call 1.800.667.8623 and a convenient service center address will be provided to you. In the U.S.A., this warranty is offered by Sunbeam Products, Inc., located in Boca Raton, Florida 33431. In Canada, this warranty is offered by Sunbeam Corporation (Canada) Limited, located at 5975 Falbourne Street, Mississauga, Ontario L5R 3V8. PLEASE DO NOT RETURN THIS PRODUCT TO ANY OF THESE ADDRESSES OR TO THE PLACE OF PURCHASE. English-6 – – – F OLD – – – – – – F OLD – – – Español-1 Printed in China Imprimé en Chine Español-2 GUARDE ESTAS INSTRUCCIONES Impreso en China Este aparato cuenta con una clavija polarizada (una pata es más ancha que la otra). Para reducir el riesgo de descarga eléctrica, esta clavija entra sólo de una manera en un enchufe polarizado. Si la clavija no encaja en el enchufe, simplemente colóquela al revés. Si aún así no encaja, llame a un electricista calificado. De ninguna manera intente modificar esta medida de seguridad. Distribuido por Sunbeam Products, Inc., Boca Raton, FL 33431 OSTER® es una marca registrada de Sunbeam Products, Inc. ©2003 Sunbeam Products, Inc. Todos los derechos reservados. 3. 4. INSTRUCCIONES ESPECIALES www.oster.com 2. Se incluye un cable de tensión corto para evitar que se enrede o que cause tropiezos. Un cable de extensión puede usarse con cuidado. Si se usa una cable de extensión, la potencia eléctrica marcada en el cable de extensión debe ser por lo menos igual o mayor a la potencia eléctrica del aparato. El cable de extensión debe colocarse de manera que no cuelgue del mostrador o de la mesa, donde pueda causar tropiezos accidentalmente. EE.UU. : 1.800.334.0759 Canadá : 1.800.667.8623 Para preguntas sobre los productos llame: Sunbeam Consumer Service USO DE UN OSTER® est une marque déposée de Sunbeam Products, Inc. 1. CABLE ELÉCTRICO CORTO ESTA UNIDAD ES SÓLO Distribué par Sunbeam Products, Inc., Boca Raton, Florida 33431 PARA ©2003 Sunbeam Products, Inc. Tous droits réservés. www.oster.com États-Unis : 1.800.334.0759 Canada : 1.800.667.8623 Pour les questions de produit: Sunbeam Consumer Service Distributed by Sunbeam Products, Inc., Boca Raton, FL 33431 OSTER® is a registered trademark of Sunbeam Products, Inc. ©2003 Sunbeam Products, Inc. All rights reserved. www.oster.com USA : 1.800.334.0759 Canada : 1.800.667.8623 For product questions contact: Sunbeam Consumer Service DE 4. 2. 3. WAFLES 1. WAFLES CUIDADO Y WAFLES SABROSOS CEREAL DE MAÍZ EN LICUADORA Bata los huevos en un tazón hasta que espesen. Bata la leche, la mantequilla derretida y la vainilla e incorpore en los huevos. En un tazón separado, combine los demás ingredientes. Tamícelos en la mezcla de huevos y mezcle bien. Cocine tal como se indica. RINDE: 6-8 WAFLES 3 huevos 2 tazas de harina 1 taza de leche 1/2 cucharadita de sal 1/2 taza de mantequilla o margarina derretida 1 cucharada de levadura 1 cucharada de vainilla (opcional) 2 cucharaditas de azúcar WAFLES RÁPIDOS MODELS/MODELOS MODÈLES RECETAS Sirva los wafles calientes o fríos. Prepare una masa más abundante, tal como la de wafles estilo Belga o wafles de pastelillo de chocolate y nueces. Cúbralos con sus ingredientes dulces y sabrosos que pueden incluir los siguientes: Moras o fresas dulces, helado, azúcar en polvo, nueces picadas, salsas de frutas para helados, yogur de frutas. LIMPIEZA 7. Cierre la tapa y espere que la luz de Encendido se apague antes de preparar otra cantidad de wafles. Manuel d’Instructions Manual de Instrucciones POSTRES Nota: Es posible que la luz de Listo, se prenda y se apague durante la cocción. Esto indica que el termostato mantiene la unidad en la temperatura apropiada de cocción. Cubra los wafles crocantes con: Mantequilla, almíbar, miel, melaza, pasta de manzana, relleno de pastel, crema batida, yogur, frutas en conserva, fruta fresca. 6. Cuando los wafles estén listos, quítelos con un tenedor de plástico o con unas pinzas de madera. DESAYUNO 5. La tapa se levantará ligeramente a medida que los wafles comienzan a cocinarse. No abra la tapa mientras esté escapando vapor. La mayoría de las recetas de wafles se cocina en aproximadamente 5 minutos en el ajuste bajo, 4-1/4 minutos en el ajuste mediano y 4 minutos en el ajuste alto. Generalmente, los wafles están listos cuando ya no sale más vapor por los lados y el frente de la unidad. BIENVENIDO DE Variación: Canela – Manzana. Agregue a la mezcla 1 manzana pelada y en tiras, 1 cucharadita de vainilla y 1/2 cucharadita de canela. 1. Desenchufe y deje que la unidad se enfríe antes de limpiarla. 2. Limpie las parrillas de la waflera con un trapo o esponja humedecidos con agua jabonosa caliente. NO SUMERJA LA UNIDAD EN AGUA. Enjuáguela con un trapo húmedo o esponja y séquela. 3. Para remover comidas pegadas, use una esponja de nilón para refregar o un limpiador que no sea abrasivo. Las esponjas de viruta de acero o los limpiadores abrasivos dañarán la superficie antiadherente. 4. Guárdela cerrada. 5. Cualquier tipo de servicio requerido deberá ser efectuado por un servicio autorizado. 6. Este artefacto es sólo para uso doméstico. ¡Felicidades! Ya es propietario de una Waflera OSTER®. Con ella podrá preparar wafles calientes y doraditos en unos cuantos minutos y comerlos a cualquier hora del día. Prepare wafles para el desayuno o para la comida; complételos con fruta fresca, crema batida, o simplemente póngales mantequilla y jarabe. Aún los postres quedarán más sabrosos con wafles calientes preparados con una mezcla de galletas de chocolate y nuez (brownies), acompañados con helado y cubiertos con jarabes, nueces picadas y crema batida. El control por termostato de su Waflera OSTER® le permitirá obtener wafles perfectos. La unidad es portátil, así que podrá preparar wafles en la cocina, o directamente en la mesa. Sus parrillas antiadherentes facilitan su limpieza. Estamos seguros de que estará encantado con su nueva Waflera OSTER.® Será una ayuda muy valiosa en su cocina. PRECAUCIONES IMPORTANTES PARA 111320 P.N.P.N. 111867 Disfrute un crocante wafle preparado en segundos 1 huevo (o equivalente) 2 cucharaditas (10 ml) de levadura 3/4 de taza (200 ml) de leche* 2 cucharaditas (10 ml) de azúcar 1/4 de taza (50 ml) de aceite vegetal 1/4 de cucharadita (1 ml) de sal 1 taza (250 ml) de harina para todo propósito 2 cucharadas (30 ml) de cereal de maíz *puede usarse leche con bajo contenido de grasa o descremada No mezcle en forma excesiva la masa de wafles. Para obtener wafles más livianos y crocantes, bata las claras de los huevos por separado y viértalas suavemente sobre la masa para wafles. Cocine completamente los wafles antes de retirarlos de la unidad. No abra la waflera mientras el vapor esté escapando por los lados y por el frente de la unidad. ¿Por qué no congelar wafles preparados para los días en que está muy ocupado? Simplemente cocine los wafles como se indica. Déjelos enfriar sobre una rejilla de alambre y envuélvalos en papel o plástico a prueba de humedad. Recaliéntelos rápidamente en su horno tostador, asador u horno microondas. CONSEJOS Visit us at www.oster.com Ponga a calentar la Waflera. Ponga todos los ingredientes en la licuadora. Cúbrala y procese a una velocidad entre mediana y alta hasta que los ingredientes secos queden humedecidos. No la licúe demasiado. Vierta 3/4 de taza (200 ml) de masa sobre las rejillas. Cierre la Waflera. Cocine hasta que el vapor deje de escapar, de 3 a 5 minutos. Repita. Sírvalos mientras están calientes con almíbar tibio. RINDE: 3 WAFLES CÓMO PREPARAR WAFLES CÓMO USAR SU WAFLERA OSTER® PREPARACIÓN PARA EL USO DE SU WAFLERA LEA TODAS LAS INSTRUCCIONES Español-4 Prepare sus propios wafles con ingredientes nuevos usando cualquiera de las recetas OSTER® listadas en las siguientes páginas o use cualquiera de sus favoritas. Para aquellos días en que está muy ocupado, ¿Por qué no tener a la mano masa ya lista para preparar una comida en cuestión de minutos? 1. Abra la unidad levantando la asa superior. 2. Antes de usarla por primera vez, limpie las planchas para cocer con un trapo o una esponja, humedecidos con agua jabonosa caliente. NO SUMERJA LA UNIDAD EN AGUA. Enjuáguela con un trapo húmedo o esponja y séquela. 3. Cuando la use por primera vez, “cure” las parrillas frotándolas ligeramente con aceite para cocinar. Si en usos posteriores, los alimentos quedan adheridos, “cure” nuevamente la unidad. Al utilizar aparatos electrodomésticos, es conveniente mantener ciertas precauciones relacionadas con la seguridad, entre otras las siguientes: 3883 3884 Waffle Maker Text ! 7/15/03 12:37 PM Page 1 Español-3 Cierre la unidad y enchúfela en la toma de corriente. Use sólo el voltaje especificado en la parte inferior de la unidad. Se encenderá la luz de Encendido (Rojo). La luz Listo (Amarillo) no se encenderá. Precaución: Tome la unidad solamente por las asas mientras esté en funcionamiento o inmediatamente después de usarla. Los ajustes del Cuadrante de Control de Temperatura abarcan desde “min” para wafles claros a “max” para wafles oscuros. La unidad está lista para usarse cuando se encienda la luz Listo. Abra la unidad y vierta aproximadamente 3/4 de taza de masa para wafles en las parrillas. Para obtener los mejores resultados, vierta la masa en un círculo alrededor del borde externo de la waflera. (Vea la Ilustración) Cierre la tapa. Es típico que una pequeña cantidad de masa se derrame sobre la parrilla y se salga de la unidad. Sin embargo, si se derrama una cantidad excesiva de masa, use menos masa. PREPARACIÓN USO DOMÉSTICO • No toque las superficies que estén calientes. Para ello, utilice las asas. • Para evitar una descarga eléctrica, nunca sumerja en agua u otro líquido el cable de conexión, el enchufe o el electrodoméstico. • Se debe extremar la vigilancia cuando los niños usen o estén cerca de un aparato electrodoméstico. • Desenchufe el aparato cuando no lo esté utilizando así como antes de limpiarlo. • Nunca utilice un aparato cuyo cable de conexión o enchufe estén dañados, ni tampoco después de un funcionamiento defectuoso, o si por alguna razón el aparato estuviese averiado. Devuelva al aparato al Centro de Servicio Autorizado por Oster más cercano para que lo revisen, lo reparen o lo ajusten. • El empleo de accesorios no recomendados por el fabricante del aparato podría causar un incendio, una descarga eléctrica o heridas. • No deberá usarse en exteriores. • No permita que el cable de conexión cuelgue sobre el borde de una mesa, o de un mostrador, ni que esté en contacto con superficies calientes. • No ponga el aparato cerca de estufas eléctricas, de gas, dentro de un horno caliente o en el interior de un homo de microondas. • No use el electrodoméstico para un propósito distinto para el que fue diseñado. • Cuando use el aparato, asegúrese de que haya suficiente espacio tanto en su parte superior como a los lados, y permitir así la libre circulación del aire. En el caso de superficies en las que exista el problema de exceso de calor, se recomienda el empleo de una cubierta protectora contra el calor. • Nunca deje la unidad funcionando sola, sin vigilancia. – – – FOLD – – – – – – FOLD – – – – – – FOLD – – – Y User Manual DESAYUNO-ALMUERZO Deje que su imaginación sea su guía para cocinar muchas comidas sabrosas y emocionantes usando su Waflera OSTER.® Aquí están algunas sugerencias: WAFLES CREATIVOS – – – FOLD – – – – – – FOLD – – – 3883, 3884 Waffle Maker Waflera Gaufrier 5. 6. 7. 8. YOUR OSTER® WAFFLE/SANDWICHMAKER When using electrical appliances, basic safety precautions should always be followed, including the following: READ ALL INSTRUCTIONS BEFORE USE Waffle Plates • Do not touch hot surfaces. • To protect against electric shock, do not immerse cord, plug or any part of the Waffle/ Sandwichmaker in water or other liquid. • Close supervision is always necessary when it is used by or near children. • Unplug unit from outlet when not in use and before cleaning. Allow hot surface to cool before putting on or taking off parts. • Do not operate this or any appliance with a damaged cord or plug or in abnormal state. If its main cord is damaged, it must be replaced by the manufacturer or the nearest service agent or qualified person. • Do not let the cord hang over edge of table or counter, or touch hot surface. • Do not place on or near a hot gas or electric burner or in a heated oven. • Do not use the appliance for other than its intended use. • Make sure that your outlet voltage corresponds to the voltage stated on the rating label of the Waffle/Sandwichmaker. • Any examination, repair or adjustment for the appliance should be made by the authorized service agent. • If the supply cord is damaged, it must be replaced by the manufacturer or its service agent or similar qualified person in order to avoid a hazard. THIS UNIT IS FOR CLEANING INSTRUCTIONS 1. Unplug and allow unit to cool before cleaning. 2. Wipe outside with soft, dry cloth when Waffle/Sandwichmaker is cold. Never use metal polish. 3. You can remove the heating plate to clean with soft cloth, warm water and dishwashing liquid. Before resetting it, you should allow it to dry thoroughly. 4. If Waffle/Sandwichmaker is used frequently, accumulated bread crumbs should be removed at least once a week. Make sure any accumulation under plates is completely removed before using the Waffle/Sandwichmaker again. Rear Hinge Insert Sandwich Plates Outer Hinge Insert HINTS HOUSEHOLD USE ONLY SAVE THESE INSTRUCTIONS WELCOME Congratulations on your purchase of an OSTER® Waffle/Sandwichmaker! To learn more about OSTER® products, please visit us at www.oster.com. Your new appliance will surely make crispy, hot, golden waffles/sandwiches in just minutes for a quick meal anytime of the day. Your OSTER® Waffle/Sandwichmaker is thermostatically controlled to help you prepare waffles to perfection. Your unit is portable so you can make waffles/sandwiches in your kitchen or right at the table. The non-stick grids make clean-up easy. We know that you will love your new OSTER® Waffle/Sandwichmaker. It’s a great addition to any kitchen. Prepare your own waffles/sandwiches from scratch with any of the OSTER® recipes listed on the following pages, or use any of your own family favorites. For those busy days, why not have a prepared mix handy for a meal in a matter of minutes? PREPARING SANDWICHES Top crispy waffles/sandwiches with: Butter, Syrup, Honey, Molasses, Apple Butter, Pie Filling, Whipped Cream, Yogurt, Fruit Preserves, Fresh Fruit BREAKFAST HOW TO USE YOUR OSTER WAFFLE/SANDWICHMAKER • To release plates, push the button on the inside of the unit. The front of the plate will lift slightly. Pull plate towards you to slide out of locked position. BRUNCH 4. After preheat, open the Sandwichmaker, place a piece of bread of approximately 1/2-inch thickness on inner lower plate. Coat one side of the bread with butter or margarine and place on the plate against this side. Sweetened Fresh Berries, Ice Cream, Powdered Sugar, Chopped Nuts, Sundae Sauces, Fruit Yogurt English-2 English-3 English-1 Sunbeam shall not be liable for any incidental or consequential damages caused by the breach of any express, implied or statutory warranty or condition. Except to the extent prohibited by applicable law, any implied warranty or condition of merchantability or fitness for a particular purpose is limited in duration to the duration of the above warranty. 1 can (6 oz. or 170 g) frozen orange juice concentrate, thawed 1/2 cup (125 ml) flaked coconut 1/3 cup (75 ml) Maraschino cherries, chopped 1/4 cup (50 ml) 150 Proof rum vanilla ice cream Sunbeam disclaims all other warranties, conditions or representations, express, implied, statutory or otherwise. Sunbeam shall not be liable for any damages of any kind resulting from the purchase, use or misuse of, or inability to use the product including incidental, special, consequential or similar damages or loss of profits, or for any breach of contract, fundamental or otherwise, or for any claim brought against purchaser by any other party. In a large sauté pan, combine sugar and cornstarch. Measure pineapple juice and enough cold water to equal 1-1/4 cups (300 ml). Combine water mixture, orange juice and sugar mixture. Cook over medium heat until thickened, stirring constantly. Add coconut, cherries and pineapple. Heat through. Keep warm on low heat. Slowly pour rum over top of mixture. Carefully ignite. Place a scoop of vanilla ice cream over each waffle. When flame dies, spoon sauce over ice cream. Serve immediately. Some provinces, states or jurisdictions do not allow the exclusion or limitation of incidental or consequential damages or limitations on how long an implied warranty lasts, so the above limitations or exclusion may not apply to you. This warranty gives you specific legal rights, and you may also have other rights that vary from province to province, state to state or jurisdiction to jurisdiction. YIELD: 5 WAFFLES How to Obtain Warranty Service CHOCOLATE BROWNIE WAFFLES In the U.S.A. – If you have any question regarding this warranty or would like to obtain warranty service, please call 1.800.334.0759 and a convenient service center address will be provided to you. Here’s a no-fuss dessert idea! 1/4 cup (50 ml) shortening or oil 1 Tbsp. (15 ml) baking powder 2/3 cup (150 ml) sugar 1/4 tsp. (1 ml) salt 2 squares (1 ounce or 28 g each) 1-1/4 cups (300 ml) milk baking chocolate, melted 1/2 tsp. (2 ml) vanilla 3 egg yolks 1/2 cup (125 ml) chopped nuts 1-1/2 cups (375 ml) all-purpose flour 3 egg whites, stiffly beaten Preheat Waffle/Sandwichmaker. In a large mixing bowl, cream shortening and sugar at medium-low until fluffy. Add chocolate and egg yolks. Beat well. Add milk alternately with combined dry ingredients. Mix well. Add vanilla and nuts. By hand, gently fold in beaten egg white. Pour 3/4 cup (200 ml) batter over grids. Close Waffle/Sandwichmaker and bake until steam no longer escapes, about 3-5 minutes. Waffle will crisp as it cools. Repeat. Serve hot or cold with vanilla ice cream, YIELD: 6 WAFFLES chocolate syrup and chopped walnuts or pecans. LIGHT ’N CRISP WAFFLES 2 egg yolks 1/2 tsp. (2 ml) salt 2 cups (500 ml) milk 1/3 cup (75 ml) oil 2 cups (500 ml) all-purpose flour 2 egg whites, stiffly beaten 1 Tbsp. (15 ml) baking powder Preheat Waffle/Sandwichmaker. Put all ingredients, except egg whites, in a large mixing bowl. Beat on low until moistened. Increase to medium, mix until smooth. By hand, gently fold in beaten egg whites. Pour 3/4 cup (200 ml) batter over grids. Close Waffle/Sandwichmaker, bake until steam no longer escapes, about 3 – 5 minutes. Repeat. Serve while hot with your favorite topping. YIELD: 5 WAFFLES Serve dessert waffles hot or cold. Prepare a richer batter such as Belgian-Style Waffles or Chocolate Brownie Waffles. Top with your favorite sweet and tasty ingredients which might include: 3. Coat the inner plate of the machine with butter or margarine to prevent sticking. • When putting plates in, make sure the hinges are aligned with the metal inserts on the plates. Start by placing the rear hinge insert in first and pressing down on the plate until you hear the plate click into place. 8 prepared Macadamia Nut Waffles 1 cup (250 ml) sugar 3 Tbsp. (45 ml) cornstarch 1 can (8 oz. or 277 g) crushed pineapple, drained reserving juice cold water Feed the gang with these at Sunday Brunch DESSERT 2. Before use, please preheat the Sandwichmaker for 5 to 8 minutes. The red power on lamp will be on. When the amber lamp goes on, it means the Sandwichmaker temperature is ready. SANDWICH PLATES AND What Are the Limits on Sunbeam’s Liability? ALOHA DESSERT WAFFLES A pretty dessert that is guaranteed to please your guests 1 cup (250 ml) milk* 3 eggs (or equivalent) 1 cup (250 ml) water 1 package (1/4 ounce or 7 g) 1/4 cup (50 ml) butter or margarine active dry yeast 1/4 cup (50 ml) honey 1/2 tsp. (2 ml) salt 2-2/3 cups (650 ml) whole wheat flour *low-fat or skim milk may be used Heat milk, water, butter and honey at 120°F (48°C). In large mixing bowl, combine flour, eggs, yeast, salt and warmed milk mixture. Mix at low to moisten, then medium-high for 1 minute. Cover and refrigerate several hours or overnight, stirring occasionally. Preheat Waffle/Sandwichmaker. Pour 3/4 cup (200 ml) over grids. Close Waffle/Sandwichmaker, bake until steam no longer escapes, about 3 – 5 minutes. Repeat. Serve while hot with your favorite topping. YIELD: 7 WAFFLES Let your imagination be your guide to many exciting and tasty meals with your OSTER® Waffle/Sandwichmaker. Here are just a few suggestions: This warranty does not cover normal wear of parts or damage resulting from any of the following: negligent use or misuse of the product, use on improper voltage or current, use contrary to the operating instructions, disassembly, repair or alteration by anyone other than Sunbeam or an authorized Sunbeam service center. Further, the warranty does not cover: Acts of God, such as fire, flood, hurricanes and tornadoes. YIELD: 8 – 10 WAFFLES EXTRA-SPECIAL WHOLE WHEAT WAFFLES CREATIVE WAFFLES This warranty is valid for the original retail purchaser from the date of initial retail purchase and is not transferable. Keep the original sales receipt. Proof of purchase is required to obtain warranty performance. Sunbeam dealers, service centers, or retail stores selling Sunbeam products do not have the right to alter, modify or any way change the terms and conditions of this warranty. LEMON SWEET WAFFLES 3 eggs 2 cups flour 1 cup milk 1/2 tsp. salt 1/2 cup melted butter or margarine 1 Tbsp. baking powder 1 Tbsp. vanilla (optional) 2 tsp. sugar Beat whole eggs in a bowl until thick. Beat milk, melted butter and vanilla into eggs. In a separate bowl, combine remaining ingredients. Sift into egg mixture, and mix well. Bake as directed. YIELD: 6 – 8 WAFFLES Variation: Cinnamon – Apple. Add 1 apple peeled and shredded, 1 tsp. vanilla and 1/2 tsp. cinnamon to batter. WAFFLE/SANDWICH MAKING warrants that for a period of one year from the date of purchase, this product will be free from defects in material and workmanship. Sunbeam, at its option, will repair or replace this product or any component of the product found to be defective during the warranty period. Replacement will be made with a new or remanufactured product or component. If the product is no longer available, replacement may be made with a similar product of equal or greater value. This is your exclusive warranty. 1 cup butter or margarine (softened) 3-1/4 cups flour 1-1/2 cups sugar 1 packet of vanilla sugar 2 eggs 1-3/4 cups water 1/8 tsp. baking powder grated rind of 1 lemon In a large bowl, beat butter, sugars and eggs together. Add all dry ingredients along with water and lemon rind, and blend until smooth. Pour approximately 3/4 cup batter into waffle iron. Bake as directed. YIELD: 2 SANDWICHES TASTY WAFFLES 1. Close unit and plug into outlet. Use only voltage specified on bottom of unit. The Power On light (Red) will come on. The Ready light (Amber) will not come on. CAUTION: Touch unit only by handles during use or directly after use. 2. The unit is ready for use when the Ready light comes on. 3. Open unit and pour approximately 3/4 cup waffle batter onto grids. For best results, pour batter in a circle around outer edge of Wafflemaker. Close cover. It is very typical to have a small amount of batter run over grid and down unit. However, if an excessive amount of batter runs over, use less batter. 4. Cover will rise slightly as waffles begin to bake. Do not open cover while steam is escaping. Most waffle recipes bake in approximately 4 to 5 minutes. Waffles are generally done when steam no longer escapes from sides and front of unit. 5. When waffles are done, remove with a plastic fork or wooden tongs. NOTE: The Ready light may cycle on and off during cooking. This indicates that the thermostat is maintaining the unit at the proper cooking temperature. 6. Close cover and wait for Ready light to come on before preparing another batch of waffles. 1. Plug the power cord into the AC outlet. ® FOR Sunbeam Products, Inc., or if in Canada, Sunbeam Corporation (Canada) Limited (collectively “Sunbeam”) Cheese Waffles: Fold in 1-1/2 cups (375 ml) shredded cheddar cheese into batter. Bake as directed. Serve with syrup or your favorite creamed entrée. Blueberry Waffles: Fold 2 cups (500 ml) fresh blueberries into batter. Pour 3/4 cup (200 ml) batter over grids. Bake until golden. Chocolate Chip Waffles: Fold 1 cup (250 ml) chocolate chips into batter. Bake as directed. QUICK WAFFLES 1. Do not over-mix waffle batter. Beating egg whites separately and folding them gently into the batter surely will create a lighter, crispier waffle. 2. Completely bake waffles before removing from unit. 3. Don’t open the Wafflemaker while steam is escaping from sides and front of the unit. 4. Why not freeze prepared waffles for those busy days ahead? Just bake the waffles as directed. Cool on a wire rack and wrap in moisture-proof paper or plastic. Quickly reheat in your toaster oven, broiler or microwave oven. PREPARING WAFFLES This appliance has a polarized plug (one blade is wider than the other). To reduce the risk of electric shock, this plug will fit in a polarized outlet only one way. If the plug does not fit fully in the outlet, reverse the plug. If it still does not fit, contact a qualified electrician. Do not modify the plug in any way. AND 4 slices firm-textured sliced bread, white or whole wheat For the batter: Dijon mustard 4 large eggs 4 ounces sliced smoked ham, such as Black Forest or Westphalian 1/2 cup milk 4 ounces sliced Swiss cheese Salt to taste 4 ounces sliced roasted turkey breast Make the batter: In a shallow bowl, whisk 4 large eggs with the 1/2 cup milk and salt. Meanwhile, spread one side of each slice of bread with some of the mustard. Top 2 of the slices with some of the ham, cheese, and turkey. Top each with 1 slice of the remaining bread, pressing down to form 2 compact sandwiches. Dip each sandwich on both sides into the batter, coating evenly. Add the sandwiches to OSTER® Sandwichmaker. Cook for 5 minutes until golden brown. 1. When it is difficult to close the machine, it means that too much filling was added. You should reduce the filling or replace with thinner bread to prevent damaging the Waffle/Sandwichmaker. 2. When removing sandwich from machine, do not use any utensil that may damage the non-stick coating. Use wood or plastic suitable for high temperatures. One-Year Limited Warranty VARIATIONS Pecan or Macadamia Nut Waffles: Sprinkle 1 Tbsp. (15 ml) finely chopped pecans or macadamia nuts over preheated waffle grids. Pour 3/4 cup (200 ml) batter over nuts and close Waffle/Sandwichmaker. Bake as directed. Bacon Waffles: Cook bacon strips. Pour 3/4 cup (200 ml) batter over waffle grids. Cut 1 strip bacon in half, lay over batter and close Waffle/Sandwichmaker. Bake as directed. MONTE CRISTO SANDWICHES CAUTION: Plate Release Button SPECIAL INSTRUCTIONS CHANGING WAFFLE Safety Locking Handles RECIPES Add filling on it, taking care not to overfill. Put another piece of bread over the filling, and coat top with butter or margarine. Close the Sandwichmaker slowly. After about 2 to 3 minutes, open the machine and remove sandwich. Sandwichmaker can be stopped at any time by unplugging the power cord from the AC outlet. – – – FOLD – – – OF – – – FOLD – – – FEATURES – – – FOLD – – – – – – FOLD – – – – – – FOLD – – – IMPORTANT SAFEGUARDS English-4 In Canada – If you have any question regarding this warranty or would like to obtain warranty service, please call 1.800.667.8623 and a convenient service center address will be provided to you. In the U.S.A., this warranty is offered by Sunbeam Products, Inc., located in Boca Raton, Florida 33431. In Canada, this warranty is offered by Sunbeam Corporation (Canada) Limited, located at 5975 Falbourne Street, Mississauga, Ontario L5R 3V8. PLEASE DO NOT RETURN THIS PRODUCT TO ANY OF THESE ADDRESSES OR TO THE PLACE OF PURCHASE. English-5 English-6 – – – F OLD – – – – – – F OLD – – – Español-1 Printed in China Imprimé en Chine Español-2 Español-3 Español-4 Impreso en China • Para quitar las planchas, presione el botón del interior de la unidad. La parte delantera de la plancha se levantará levemente. Deslice la plancha hacia usted para destrabarla. • Al colocar nuevamente las planchas, verifique que las bisagras estén alineadas con los separadores de metal. Primero coloque el separador de la bisagra trasera y presione sobre la plancha hasta que escuche un “clic” que le indicará que la plancha está en su lugar. Distribuido por Sunbeam Products, Inc., Boca Raton, FL 33431 ©2003 Sunbeam Products, Inc. Todos los derechos reservados. OSTER® es una marca registrada de Sunbeam Products, Inc. CÓMO CAMBIAR LAS PLANCHAS PARA WAFLES Y N OTA : Es posible que la luz de Listo se encienda y se apague durante la cocción. Esto indica que el termostato mantiene la unidad en la temperatura apropiada de cocción. SANDWICHES www.oster.com EE.UU. : 1.800.334.0759 Canadá : 1.800.667.8623 Para preguntas sobre los productos llame: Sunbeam Consumer Service GUARDE ESTAS INSTRUCCIONES États-Unis : 1.800.334.0759 Canada : 1.800.667.8623 ESTA ©2003 Sunbeam Products, Inc. All rights reserved. OSTER® is a registered trademark of Sunbeam Products, Inc. Distributed by Sunbeam Products, Inc., Boca Raton, FL 33431 www.oster.com USA : 1.800.334.0759 Canada : 1.800.667.8623 For product questions contact: Sunbeam Consumer Service 4 rebanadas de pan de textura firme, blanco o de trigo integral Mostaza Dijon 4 onzas de jamón ahumado en lonjas, como Black Forest o Westphalian 4 onzas de queso suizo en lonjas 4 onzas de pechuga de pavo asado en lonjas 3. Puede quitar la plancha de calentamiento y limpiarla con un paño suave, agua tibia y detergente. Vuelva a colocarla una vez que esté completamente seca. 2. Limpie el exterior con un paño suave y seco cuando la Waflera/Sandwichera esté fría. Nunca use lustre para metales. 1. Desenchufe la unidad y deje enfriar antes de limpiar. INSTRUCCIONES 1. Cierre la unidad y enchúfela en el tomacorriente. Use sólo el voltaje que se indica en la parte inferior de la unidad. Se encenderá la luz de encendido (rojo). La luz Listo (amarillo) no se encenderá. DE LIMPIEZA R ECETAS 1. Si le resulta difícil cerrar la unidad es que ha puesto demasiado relleno. Debe reducir el relleno o usar un pan más delgado para evitar dañar la Waflera/Sandwichera. Sirva los wafles de postre calientes o fríos. Prepare una masa más abundante, tal como la de wafles estilo Belga o wafles de pastelillo de chocolate. Cúbralos con sus ingredientes dulces y sabrosos favoritos que pueden incluir los siguientes: Moras o Fresas Culces, Helado, Azúcar en Polvo, Nueces Picadas, Salsas de Frutas para Helados, Yogurt de Frutas. PRECAUCIÓN: Separador de la Bisagra Externa 8. Después de 2 a 3 minutos, abra la unidad y quite el sandwich. Puede detener la Sandwichera en cualquier momento desenchufándola del tomacorriente de CA. 6. Coloque otra rebanada de pan sobre el relleno y úntela con mantequilla o margarina. Separador de la Bisagra Trasera 4. Luego de calentar la Sandwichera, ábrala y coloque una rebanada de pan de aproximadamente _ pulgada de grosor sobre la plancha inferior interna. Unte un lado del pan con mantequilla o margarina y colóquelo sobre la plancha contra ese lado. DE LA WAFLERA/SANDWICHERA OSTER® DESAYUNO-ALMUERZO Manual de Instrucciones WAFLES CREATIVOS User Manual Prepare sus propios wafles/sandwiches con ingredientes nuevos usando cualquiera de las recetas OSTER® listadas en las siguientes páginas o use cualquiera de sus favoritas. Para aquellos días en que esté muy ocupada, ¿por qué no tener masa ya lista para preparar una comida en cuestión de minutos? 1. Enchufe la unidad en un tomacorriente de CA. PIEZAS Y Manuel d’Instructions Deje que su imaginación sea su guía para cocinar muchas comidas sabrosas y deliciosas usando su Waflera/Sandwichera OSTER®. Aquí damos algunas sugerencias: 2. Antes de usar, caliente la Sandwichera durante 5 a 8 minutos. Se encenderá la luz roja. La luz amarilla se encenderá cuando la Sandwichera alcance la temperatura apropiada. Cuando use algún aparato eléctrico siempre deben seguirse precauciones básicas de seguridad incluyendo las siguientes: PRECAUCIONES IMPORTANTES DESAYUNO 3. Unte la plancha interna de la unidad con mantequilla o margarina para evitar que los alimentos se adhieran. Asas con Traba de Seguridad Planchas para Wafles LEA TODAS LAS INSTRUCCIONES ANTES DE USAR Recubra los wafles/sandwiches crocantes con: Mantequilla, Almíbar, Miel, Melaza, Pasta de Manzana, Relleno de Pastel, Crema Batida, Yogur, Frutas en Conserva, Fruta Fresca 5. Agregue el relleno, tratando de no excederse en la cantidad. Botón para Quitar las Planchas MODEL/MODELO MODÈLE 3862 POSTRES 7. Cierre la Sandwichera lentamente. Planchas para Sandwiches Para la masa: 4 huevos grandes 1/2 taza de leche sal a gusto SANDWICHES MONTECRISTO 2. Para quitar el sandwich de la unidad no use ningún utensilio que pueda dañar el recubrimiento antiadherente. Use utensilios de madera o plástico, aptos para temperaturas altas. CÓMO PREPARAR WAFLES • No toque superficies calientes. • Como protección contra una descarga eléctrica, no sumerja el cable, el enchufe o cualquier otra pieza de la Waflera/Sandwichera en agua u otros líquidos. • Nunca deje la unidad sin supervisión si la utilizan los niños o si la misma se utiliza cerca de ellos. • Desenchufe el electrodoméstico del tomacorriente cuando no esté en uso y antes de limpiar. Deje que la unidad se enfríe antes de quitar o agregar piezas. • No opere este electrodoméstico o cualquier otro si el cable o enchufe está dañado o en malas condiciones. Si el cable principal está dañado, solicite al fabricante, el agente de servicio más cercano o una persona calificada que lo cambie. • No permita que el cable cuelgue por sobre el mostrador o la mesa ni toque superficies calientes. • No lo coloque cerca o sobre una estufa a gas o eléctrica o en el horno caliente. • No use el electrodoméstico para un propósito distinto para el cual fue diseñado. • Verifique que el voltaje del tomacorriente corresponda al voltaje especificado en la etiqueta de clasificación de la Waflera/Sandwichera. • Sólo un agente de servicio autorizado puede realizar una revisión, reparación o ajuste al electrodoméstico. • Si el cable de alimentación está dañado, el fabricante, su agente de servicio o una persona igualmente calificada debe reemplazarlo para evitar peligros. Pour les questions de produit: Sunbeam Consumer Service Preparación de la masa: En un tazón poco profundo, bata 4 huevos grandes con 1/2 taza de leche y sal. Mientras tanto, unte un lado de cada rebanada de pan con un poco de mostaza. 4. Si usa la Waflera/Sandwichera con frecuencia, deberá quitar las migas de pan que se acumulen, por lo menos una vez a la semana. Verifique que no queden migas debajo de las planchas antes de volver a usar la Waflera/Sandwichera. P RECAUCIÓN : Sólo toque la unidad por las asas durante el uso o inmediatamente después del uso. UNIDAD ES PARA USO DOMÉSTICO SOLAMENTE INSTRUCCIONES ESPECIALES Coloque en 2 de las rebanadas un poco de jamón, queso y pavo. Coloque la rebanada de pan restante sobre cada una, presionando para formar dos sandwiches compactos. CONSEJOS PARA WAFLES SABROSOS 2. La unidad estará lista para usarse cuando la luz de Listo se encienda. Este electrodoméstico posee un enchufe polarizado (una pata es más ancha que la otra). Para reducir el riesgo de una descarga eléctrica, este enchufe se introduce en el tomacorriente polarizado de una sola manera. Si el enchufe no se puede introducir por completo en el tomacorriente, gírelo. Si aún así no logra colocarlo, comuníquese con un electricista calificado. No haga ninguna modificación al enchufe. www.oster.com 1. No mezcle en forma excesiva la masa de wafles. Para obtener wafles más livianos y crocantes, bata las claras de huevo por separado y viértalas suavemente sobre la masa para wafles. 3. Abra la unidad y vierta aproximadamente 3/4 de taza de masa de wafles sobre las rejillas. Para obtener óptimos resultados, vierta la masa formando un círculo alrededor del borde exterior de la Waflera. Cierre la tapa. Es normal que una pequeña cantidad de masa se escurra por la rejilla y por debajo de la unidad. Sin embargo, si se derrama mucha masa, deberá usar menos cantidad. P.N. 111895 Unte cada lado del sandwich con la masa, recubriéndolo en forma pareja. Coloque los sandwiches en la Sandwichera OSTER®. Cocine durante 5 minutes o hasta que estén dorados. RINDE: 2 SANDWICHES 2. Cocine completamente los wafles antes de retirarlos de la unidad. 4. La tapa se levantará levemente a medida que los wafles comiencen a cocinarse. No abra la tapa mientras salga vapor. La mayoría de las recetas de wafles toma en prepararse de 4 a 5 minutos aproximadamente. Por lo general los wafles están listos cuando ya no sale más vapor por los costados y el frente de la unidad. BIENVENIDOS ©2003 Sunbeam Products, Inc. Tous droits réservés. OSTER® est une marque déposée de Sunbeam Products, Inc. Distribué par Sunbeam Products, Inc., Boca Raton, Florida 33431 3. No abra la Waflera mientras el vapor esté escapando por los lados y por el frente de la unidad. 5. Cuando los wafles estén listos, quítelos con un tenedor de plástico o con unas pinzas de madera. ¡Felicitaciones por la compra de la Waflera/Sandwichera OSTER®! Para mayor información sobre los productos OSTER®, visítenos en www.oster.com. Con su nuevo electrodoméstico podrá preparar wafles y sandwiches crocantes, calientes y dorados en sólo unos minutos y así saborear una rápida comida en cualquier momento del día. Su Waflera/Sandwichera OSTER® está controlada por termostato para ayudarle a preparar wafles a la perfección. La unidad es portátil, por lo que podrá preparar wafles/sandwiches en la cocina o directamente en la mesa. Las rejillas antiadherentes facilitan la limpieza. Sabemos que le encantará su nueva Waflera/Sandwichera OSTER®. Es un gran complemento para su cocina. Visit us at www.oster.com 4. ¿Por qué no congelar wafles preparados para los días en que esté muy ocupada? Simplemente cocine los wafles como se indica. Déjelos enfriar sobre una rejilla de alambre y envuélvalos en papel o plástico a prueba de humedad. Recaliéntelos rápidamente en su horno tostador, asador u horno microondas. 6. Cierre la tapa y espere que la luz de Encendido se encienda antes de preparar más wafles. CÓMO USAR LA WAFLERA/SANDWICHERA OSTER® – – – FOLD – – – – – – FOLD – – – CÓMO PREPARAR SANDWICHES – – – FOLD – – – CÓMO PREPARAR WAFLES/SANDWICHES – – – FOLD – – – – – – FOLD – – – Wafflemaker with Sandwich Plates Waflera con Sandwich Plates Gaufrier avec Plaques à Sandwiches 5. 6. 7. 8. YOUR OSTER® WAFFLE/SANDWICHMAKER When using electrical appliances, basic safety precautions should always be followed, including the following: READ ALL INSTRUCTIONS BEFORE USE Waffle Plates • Do not touch hot surfaces. • To protect against electric shock, do not immerse cord, plug or any part of the Waffle/ Sandwichmaker in water or other liquid. • Close supervision is always necessary when it is used by or near children. • Unplug unit from outlet when not in use and before cleaning. Allow hot surface to cool before putting on or taking off parts. • Do not operate this or any appliance with a damaged cord or plug or in abnormal state. If its main cord is damaged, it must be replaced by the manufacturer or the nearest service agent or qualified person. • Do not let the cord hang over edge of table or counter, or touch hot surface. • Do not place on or near a hot gas or electric burner or in a heated oven. • Do not use the appliance for other than its intended use. • Make sure that your outlet voltage corresponds to the voltage stated on the rating label of the Waffle/Sandwichmaker. • Any examination, repair or adjustment for the appliance should be made by the authorized service agent. • If the supply cord is damaged, it must be replaced by the manufacturer or its service agent or similar qualified person in order to avoid a hazard. THIS UNIT IS FOR CLEANING INSTRUCTIONS 1. Unplug and allow unit to cool before cleaning. 2. Wipe outside with soft, dry cloth when Waffle/Sandwichmaker is cold. Never use metal polish. 3. You can remove the heating plate to clean with soft cloth, warm water and dishwashing liquid. Before resetting it, you should allow it to dry thoroughly. 4. If Waffle/Sandwichmaker is used frequently, accumulated bread crumbs should be removed at least once a week. Make sure any accumulation under plates is completely removed before using the Waffle/Sandwichmaker again. Rear Hinge Insert Sandwich Plates Outer Hinge Insert HINTS HOUSEHOLD USE ONLY SAVE THESE INSTRUCTIONS WELCOME Congratulations on your purchase of an OSTER® Waffle/Sandwichmaker! To learn more about OSTER® products, please visit us at www.oster.com. Your new appliance will surely make crispy, hot, golden waffles/sandwiches in just minutes for a quick meal anytime of the day. Your OSTER® Waffle/Sandwichmaker is thermostatically controlled to help you prepare waffles to perfection. Your unit is portable so you can make waffles/sandwiches in your kitchen or right at the table. The non-stick grids make clean-up easy. We know that you will love your new OSTER® Waffle/Sandwichmaker. It’s a great addition to any kitchen. Prepare your own waffles/sandwiches from scratch with any of the OSTER® recipes listed on the following pages, or use any of your own family favorites. For those busy days, why not have a prepared mix handy for a meal in a matter of minutes? PREPARING SANDWICHES Top crispy waffles/sandwiches with: Butter, Syrup, Honey, Molasses, Apple Butter, Pie Filling, Whipped Cream, Yogurt, Fruit Preserves, Fresh Fruit BREAKFAST HOW TO USE YOUR OSTER WAFFLE/SANDWICHMAKER • To release plates, push the button on the inside of the unit. The front of the plate will lift slightly. Pull plate towards you to slide out of locked position. BRUNCH 4. After preheat, open the Sandwichmaker, place a piece of bread of approximately 1/2-inch thickness on inner lower plate. Coat one side of the bread with butter or margarine and place on the plate against this side. Sweetened Fresh Berries, Ice Cream, Powdered Sugar, Chopped Nuts, Sundae Sauces, Fruit Yogurt English-2 English-3 English-1 Sunbeam shall not be liable for any incidental or consequential damages caused by the breach of any express, implied or statutory warranty or condition. Except to the extent prohibited by applicable law, any implied warranty or condition of merchantability or fitness for a particular purpose is limited in duration to the duration of the above warranty. 1 can (6 oz. or 170 g) frozen orange juice concentrate, thawed 1/2 cup (125 ml) flaked coconut 1/3 cup (75 ml) Maraschino cherries, chopped 1/4 cup (50 ml) 150 Proof rum vanilla ice cream Sunbeam disclaims all other warranties, conditions or representations, express, implied, statutory or otherwise. Sunbeam shall not be liable for any damages of any kind resulting from the purchase, use or misuse of, or inability to use the product including incidental, special, consequential or similar damages or loss of profits, or for any breach of contract, fundamental or otherwise, or for any claim brought against purchaser by any other party. In a large sauté pan, combine sugar and cornstarch. Measure pineapple juice and enough cold water to equal 1-1/4 cups (300 ml). Combine water mixture, orange juice and sugar mixture. Cook over medium heat until thickened, stirring constantly. Add coconut, cherries and pineapple. Heat through. Keep warm on low heat. Slowly pour rum over top of mixture. Carefully ignite. Place a scoop of vanilla ice cream over each waffle. When flame dies, spoon sauce over ice cream. Serve immediately. Some provinces, states or jurisdictions do not allow the exclusion or limitation of incidental or consequential damages or limitations on how long an implied warranty lasts, so the above limitations or exclusion may not apply to you. This warranty gives you specific legal rights, and you may also have other rights that vary from province to province, state to state or jurisdiction to jurisdiction. YIELD: 5 WAFFLES How to Obtain Warranty Service CHOCOLATE BROWNIE WAFFLES In the U.S.A. – If you have any question regarding this warranty or would like to obtain warranty service, please call 1.800.334.0759 and a convenient service center address will be provided to you. Here’s a no-fuss dessert idea! 1/4 cup (50 ml) shortening or oil 1 Tbsp. (15 ml) baking powder 2/3 cup (150 ml) sugar 1/4 tsp. (1 ml) salt 2 squares (1 ounce or 28 g each) 1-1/4 cups (300 ml) milk baking chocolate, melted 1/2 tsp. (2 ml) vanilla 3 egg yolks 1/2 cup (125 ml) chopped nuts 1-1/2 cups (375 ml) all-purpose flour 3 egg whites, stiffly beaten Preheat Waffle/Sandwichmaker. In a large mixing bowl, cream shortening and sugar at medium-low until fluffy. Add chocolate and egg yolks. Beat well. Add milk alternately with combined dry ingredients. Mix well. Add vanilla and nuts. By hand, gently fold in beaten egg white. Pour 3/4 cup (200 ml) batter over grids. Close Waffle/Sandwichmaker and bake until steam no longer escapes, about 3-5 minutes. Waffle will crisp as it cools. Repeat. Serve hot or cold with vanilla ice cream, YIELD: 6 WAFFLES chocolate syrup and chopped walnuts or pecans. LIGHT ’N CRISP WAFFLES 2 egg yolks 1/2 tsp. (2 ml) salt 2 cups (500 ml) milk 1/3 cup (75 ml) oil 2 cups (500 ml) all-purpose flour 2 egg whites, stiffly beaten 1 Tbsp. (15 ml) baking powder Preheat Waffle/Sandwichmaker. Put all ingredients, except egg whites, in a large mixing bowl. Beat on low until moistened. Increase to medium, mix until smooth. By hand, gently fold in beaten egg whites. Pour 3/4 cup (200 ml) batter over grids. Close Waffle/Sandwichmaker, bake until steam no longer escapes, about 3 – 5 minutes. Repeat. Serve while hot with your favorite topping. YIELD: 5 WAFFLES Serve dessert waffles hot or cold. Prepare a richer batter such as Belgian-Style Waffles or Chocolate Brownie Waffles. Top with your favorite sweet and tasty ingredients which might include: 3. Coat the inner plate of the machine with butter or margarine to prevent sticking. • When putting plates in, make sure the hinges are aligned with the metal inserts on the plates. Start by placing the rear hinge insert in first and pressing down on the plate until you hear the plate click into place. 8 prepared Macadamia Nut Waffles 1 cup (250 ml) sugar 3 Tbsp. (45 ml) cornstarch 1 can (8 oz. or 277 g) crushed pineapple, drained reserving juice cold water Feed the gang with these at Sunday Brunch DESSERT 2. Before use, please preheat the Sandwichmaker for 5 to 8 minutes. The red power on lamp will be on. When the amber lamp goes on, it means the Sandwichmaker temperature is ready. SANDWICH PLATES AND What Are the Limits on Sunbeam’s Liability? ALOHA DESSERT WAFFLES A pretty dessert that is guaranteed to please your guests 1 cup (250 ml) milk* 3 eggs (or equivalent) 1 cup (250 ml) water 1 package (1/4 ounce or 7 g) 1/4 cup (50 ml) butter or margarine active dry yeast 1/4 cup (50 ml) honey 1/2 tsp. (2 ml) salt 2-2/3 cups (650 ml) whole wheat flour *low-fat or skim milk may be used Heat milk, water, butter and honey at 120°F (48°C). In large mixing bowl, combine flour, eggs, yeast, salt and warmed milk mixture. Mix at low to moisten, then medium-high for 1 minute. Cover and refrigerate several hours or overnight, stirring occasionally. Preheat Waffle/Sandwichmaker. Pour 3/4 cup (200 ml) over grids. Close Waffle/Sandwichmaker, bake until steam no longer escapes, about 3 – 5 minutes. Repeat. Serve while hot with your favorite topping. YIELD: 7 WAFFLES Let your imagination be your guide to many exciting and tasty meals with your OSTER® Waffle/Sandwichmaker. Here are just a few suggestions: This warranty does not cover normal wear of parts or damage resulting from any of the following: negligent use or misuse of the product, use on improper voltage or current, use contrary to the operating instructions, disassembly, repair or alteration by anyone other than Sunbeam or an authorized Sunbeam service center. Further, the warranty does not cover: Acts of God, such as fire, flood, hurricanes and tornadoes. YIELD: 8 – 10 WAFFLES EXTRA-SPECIAL WHOLE WHEAT WAFFLES CREATIVE WAFFLES This warranty is valid for the original retail purchaser from the date of initial retail purchase and is not transferable. Keep the original sales receipt. Proof of purchase is required to obtain warranty performance. Sunbeam dealers, service centers, or retail stores selling Sunbeam products do not have the right to alter, modify or any way change the terms and conditions of this warranty. LEMON SWEET WAFFLES 3 eggs 2 cups flour 1 cup milk 1/2 tsp. salt 1/2 cup melted butter or margarine 1 Tbsp. baking powder 1 Tbsp. vanilla (optional) 2 tsp. sugar Beat whole eggs in a bowl until thick. Beat milk, melted butter and vanilla into eggs. In a separate bowl, combine remaining ingredients. Sift into egg mixture, and mix well. Bake as directed. YIELD: 6 – 8 WAFFLES Variation: Cinnamon – Apple. Add 1 apple peeled and shredded, 1 tsp. vanilla and 1/2 tsp. cinnamon to batter. WAFFLE/SANDWICH MAKING warrants that for a period of one year from the date of purchase, this product will be free from defects in material and workmanship. Sunbeam, at its option, will repair or replace this product or any component of the product found to be defective during the warranty period. Replacement will be made with a new or remanufactured product or component. If the product is no longer available, replacement may be made with a similar product of equal or greater value. This is your exclusive warranty. 1 cup butter or margarine (softened) 3-1/4 cups flour 1-1/2 cups sugar 1 packet of vanilla sugar 2 eggs 1-3/4 cups water 1/8 tsp. baking powder grated rind of 1 lemon In a large bowl, beat butter, sugars and eggs together. Add all dry ingredients along with water and lemon rind, and blend until smooth. Pour approximately 3/4 cup batter into waffle iron. Bake as directed. YIELD: 2 SANDWICHES TASTY WAFFLES 1. Close unit and plug into outlet. Use only voltage specified on bottom of unit. The Power On light (Red) will come on. The Ready light (Amber) will not come on. CAUTION: Touch unit only by handles during use or directly after use. 2. The unit is ready for use when the Ready light comes on. 3. Open unit and pour approximately 3/4 cup waffle batter onto grids. For best results, pour batter in a circle around outer edge of Wafflemaker. Close cover. It is very typical to have a small amount of batter run over grid and down unit. However, if an excessive amount of batter runs over, use less batter. 4. Cover will rise slightly as waffles begin to bake. Do not open cover while steam is escaping. Most waffle recipes bake in approximately 4 to 5 minutes. Waffles are generally done when steam no longer escapes from sides and front of unit. 5. When waffles are done, remove with a plastic fork or wooden tongs. NOTE: The Ready light may cycle on and off during cooking. This indicates that the thermostat is maintaining the unit at the proper cooking temperature. 6. Close cover and wait for Ready light to come on before preparing another batch of waffles. 1. Plug the power cord into the AC outlet. ® FOR Sunbeam Products, Inc., or if in Canada, Sunbeam Corporation (Canada) Limited (collectively “Sunbeam”) Cheese Waffles: Fold in 1-1/2 cups (375 ml) shredded cheddar cheese into batter. Bake as directed. Serve with syrup or your favorite creamed entrée. Blueberry Waffles: Fold 2 cups (500 ml) fresh blueberries into batter. Pour 3/4 cup (200 ml) batter over grids. Bake until golden. Chocolate Chip Waffles: Fold 1 cup (250 ml) chocolate chips into batter. Bake as directed. QUICK WAFFLES 1. Do not over-mix waffle batter. Beating egg whites separately and folding them gently into the batter surely will create a lighter, crispier waffle. 2. Completely bake waffles before removing from unit. 3. Don’t open the Wafflemaker while steam is escaping from sides and front of the unit. 4. Why not freeze prepared waffles for those busy days ahead? Just bake the waffles as directed. Cool on a wire rack and wrap in moisture-proof paper or plastic. Quickly reheat in your toaster oven, broiler or microwave oven. PREPARING WAFFLES This appliance has a polarized plug (one blade is wider than the other). To reduce the risk of electric shock, this plug will fit in a polarized outlet only one way. If the plug does not fit fully in the outlet, reverse the plug. If it still does not fit, contact a qualified electrician. Do not modify the plug in any way. AND 4 slices firm-textured sliced bread, white or whole wheat For the batter: Dijon mustard 4 large eggs 4 ounces sliced smoked ham, such as Black Forest or Westphalian 1/2 cup milk 4 ounces sliced Swiss cheese Salt to taste 4 ounces sliced roasted turkey breast Make the batter: In a shallow bowl, whisk 4 large eggs with the 1/2 cup milk and salt. Meanwhile, spread one side of each slice of bread with some of the mustard. Top 2 of the slices with some of the ham, cheese, and turkey. Top each with 1 slice of the remaining bread, pressing down to form 2 compact sandwiches. Dip each sandwich on both sides into the batter, coating evenly. Add the sandwiches to OSTER® Sandwichmaker. Cook for 5 minutes until golden brown. 1. When it is difficult to close the machine, it means that too much filling was added. You should reduce the filling or replace with thinner bread to prevent damaging the Waffle/Sandwichmaker. 2. When removing sandwich from machine, do not use any utensil that may damage the non-stick coating. Use wood or plastic suitable for high temperatures. One-Year Limited Warranty VARIATIONS Pecan or Macadamia Nut Waffles: Sprinkle 1 Tbsp. (15 ml) finely chopped pecans or macadamia nuts over preheated waffle grids. Pour 3/4 cup (200 ml) batter over nuts and close Waffle/Sandwichmaker. Bake as directed. Bacon Waffles: Cook bacon strips. Pour 3/4 cup (200 ml) batter over waffle grids. Cut 1 strip bacon in half, lay over batter and close Waffle/Sandwichmaker. Bake as directed. MONTE CRISTO SANDWICHES CAUTION: Plate Release Button SPECIAL INSTRUCTIONS CHANGING WAFFLE Safety Locking Handles RECIPES Add filling on it, taking care not to overfill. Put another piece of bread over the filling, and coat top with butter or margarine. Close the Sandwichmaker slowly. After about 2 to 3 minutes, open the machine and remove sandwich. Sandwichmaker can be stopped at any time by unplugging the power cord from the AC outlet. – – – FOLD – – – OF – – – FOLD – – – FEATURES – – – FOLD – – – – – – FOLD – – – – – – FOLD – – – IMPORTANT SAFEGUARDS English-4 In Canada – If you have any question regarding this warranty or would like to obtain warranty service, please call 1.800.667.8623 and a convenient service center address will be provided to you. In the U.S.A., this warranty is offered by Sunbeam Products, Inc., located in Boca Raton, Florida 33431. In Canada, this warranty is offered by Sunbeam Corporation (Canada) Limited, located at 5975 Falbourne Street, Mississauga, Ontario L5R 3V8. PLEASE DO NOT RETURN THIS PRODUCT TO ANY OF THESE ADDRESSES OR TO THE PLACE OF PURCHASE. English-5 English-6 – – – F OLD – – – – – – F OLD – – – Español-1 Printed in China Imprimé en Chine Español-2 Español-3 Español-4 Impreso en China • Para quitar las planchas, presione el botón del interior de la unidad. La parte delantera de la plancha se levantará levemente. Deslice la plancha hacia usted para destrabarla. • Al colocar nuevamente las planchas, verifique que las bisagras estén alineadas con los separadores de metal. Primero coloque el separador de la bisagra trasera y presione sobre la plancha hasta que escuche un “clic” que le indicará que la plancha está en su lugar. Distribuido por Sunbeam Products, Inc., Boca Raton, FL 33431 ©2003 Sunbeam Products, Inc. Todos los derechos reservados. OSTER® es una marca registrada de Sunbeam Products, Inc. CÓMO CAMBIAR LAS PLANCHAS PARA WAFLES Y N OTA : Es posible que la luz de Listo se encienda y se apague durante la cocción. Esto indica que el termostato mantiene la unidad en la temperatura apropiada de cocción. SANDWICHES www.oster.com EE.UU. : 1.800.334.0759 Canadá : 1.800.667.8623 Para preguntas sobre los productos llame: Sunbeam Consumer Service GUARDE ESTAS INSTRUCCIONES États-Unis : 1.800.334.0759 Canada : 1.800.667.8623 ESTA ©2003 Sunbeam Products, Inc. All rights reserved. OSTER® is a registered trademark of Sunbeam Products, Inc. Distributed by Sunbeam Products, Inc., Boca Raton, FL 33431 www.oster.com USA : 1.800.334.0759 Canada : 1.800.667.8623 For product questions contact: Sunbeam Consumer Service 4 rebanadas de pan de textura firme, blanco o de trigo integral Mostaza Dijon 4 onzas de jamón ahumado en lonjas, como Black Forest o Westphalian 4 onzas de queso suizo en lonjas 4 onzas de pechuga de pavo asado en lonjas 3. Puede quitar la plancha de calentamiento y limpiarla con un paño suave, agua tibia y detergente. Vuelva a colocarla una vez que esté completamente seca. 2. Limpie el exterior con un paño suave y seco cuando la Waflera/Sandwichera esté fría. Nunca use lustre para metales. 1. Desenchufe la unidad y deje enfriar antes de limpiar. INSTRUCCIONES 1. Cierre la unidad y enchúfela en el tomacorriente. Use sólo el voltaje que se indica en la parte inferior de la unidad. Se encenderá la luz de encendido (rojo). La luz Listo (amarillo) no se encenderá. DE LIMPIEZA R ECETAS 1. Si le resulta difícil cerrar la unidad es que ha puesto demasiado relleno. Debe reducir el relleno o usar un pan más delgado para evitar dañar la Waflera/Sandwichera. Sirva los wafles de postre calientes o fríos. Prepare una masa más abundante, tal como la de wafles estilo Belga o wafles de pastelillo de chocolate. Cúbralos con sus ingredientes dulces y sabrosos favoritos que pueden incluir los siguientes: Moras o Fresas Culces, Helado, Azúcar en Polvo, Nueces Picadas, Salsas de Frutas para Helados, Yogurt de Frutas. PRECAUCIÓN: Separador de la Bisagra Externa 8. Después de 2 a 3 minutos, abra la unidad y quite el sandwich. Puede detener la Sandwichera en cualquier momento desenchufándola del tomacorriente de CA. 6. Coloque otra rebanada de pan sobre el relleno y úntela con mantequilla o margarina. Separador de la Bisagra Trasera 4. Luego de calentar la Sandwichera, ábrala y coloque una rebanada de pan de aproximadamente _ pulgada de grosor sobre la plancha inferior interna. Unte un lado del pan con mantequilla o margarina y colóquelo sobre la plancha contra ese lado. DE LA WAFLERA/SANDWICHERA OSTER® DESAYUNO-ALMUERZO Manual de Instrucciones WAFLES CREATIVOS User Manual Prepare sus propios wafles/sandwiches con ingredientes nuevos usando cualquiera de las recetas OSTER® listadas en las siguientes páginas o use cualquiera de sus favoritas. Para aquellos días en que esté muy ocupada, ¿por qué no tener masa ya lista para preparar una comida en cuestión de minutos? 1. Enchufe la unidad en un tomacorriente de CA. PIEZAS Y Manuel d’Instructions Deje que su imaginación sea su guía para cocinar muchas comidas sabrosas y deliciosas usando su Waflera/Sandwichera OSTER®. Aquí damos algunas sugerencias: 2. Antes de usar, caliente la Sandwichera durante 5 a 8 minutos. Se encenderá la luz roja. La luz amarilla se encenderá cuando la Sandwichera alcance la temperatura apropiada. Cuando use algún aparato eléctrico siempre deben seguirse precauciones básicas de seguridad incluyendo las siguientes: PRECAUCIONES IMPORTANTES DESAYUNO 3. Unte la plancha interna de la unidad con mantequilla o margarina para evitar que los alimentos se adhieran. Asas con Traba de Seguridad Planchas para Wafles LEA TODAS LAS INSTRUCCIONES ANTES DE USAR Recubra los wafles/sandwiches crocantes con: Mantequilla, Almíbar, Miel, Melaza, Pasta de Manzana, Relleno de Pastel, Crema Batida, Yogur, Frutas en Conserva, Fruta Fresca 5. Agregue el relleno, tratando de no excederse en la cantidad. Botón para Quitar las Planchas MODEL/MODELO MODÈLE 3862 POSTRES 7. Cierre la Sandwichera lentamente. Planchas para Sandwiches Para la masa: 4 huevos grandes 1/2 taza de leche sal a gusto SANDWICHES MONTECRISTO 2. Para quitar el sandwich de la unidad no use ningún utensilio que pueda dañar el recubrimiento antiadherente. Use utensilios de madera o plástico, aptos para temperaturas altas. CÓMO PREPARAR WAFLES • No toque superficies calientes. • Como protección contra una descarga eléctrica, no sumerja el cable, el enchufe o cualquier otra pieza de la Waflera/Sandwichera en agua u otros líquidos. • Nunca deje la unidad sin supervisión si la utilizan los niños o si la misma se utiliza cerca de ellos. • Desenchufe el electrodoméstico del tomacorriente cuando no esté en uso y antes de limpiar. Deje que la unidad se enfríe antes de quitar o agregar piezas. • No opere este electrodoméstico o cualquier otro si el cable o enchufe está dañado o en malas condiciones. Si el cable principal está dañado, solicite al fabricante, el agente de servicio más cercano o una persona calificada que lo cambie. • No permita que el cable cuelgue por sobre el mostrador o la mesa ni toque superficies calientes. • No lo coloque cerca o sobre una estufa a gas o eléctrica o en el horno caliente. • No use el electrodoméstico para un propósito distinto para el cual fue diseñado. • Verifique que el voltaje del tomacorriente corresponda al voltaje especificado en la etiqueta de clasificación de la Waflera/Sandwichera. • Sólo un agente de servicio autorizado puede realizar una revisión, reparación o ajuste al electrodoméstico. • Si el cable de alimentación está dañado, el fabricante, su agente de servicio o una persona igualmente calificada debe reemplazarlo para evitar peligros. Pour les questions de produit: Sunbeam Consumer Service Preparación de la masa: En un tazón poco profundo, bata 4 huevos grandes con 1/2 taza de leche y sal. Mientras tanto, unte un lado de cada rebanada de pan con un poco de mostaza. 4. Si usa la Waflera/Sandwichera con frecuencia, deberá quitar las migas de pan que se acumulen, por lo menos una vez a la semana. Verifique que no queden migas debajo de las planchas antes de volver a usar la Waflera/Sandwichera. P RECAUCIÓN : Sólo toque la unidad por las asas durante el uso o inmediatamente después del uso. UNIDAD ES PARA USO DOMÉSTICO SOLAMENTE INSTRUCCIONES ESPECIALES Coloque en 2 de las rebanadas un poco de jamón, queso y pavo. Coloque la rebanada de pan restante sobre cada una, presionando para formar dos sandwiches compactos. CONSEJOS PARA WAFLES SABROSOS 2. La unidad estará lista para usarse cuando la luz de Listo se encienda. Este electrodoméstico posee un enchufe polarizado (una pata es más ancha que la otra). Para reducir el riesgo de una descarga eléctrica, este enchufe se introduce en el tomacorriente polarizado de una sola manera. Si el enchufe no se puede introducir por completo en el tomacorriente, gírelo. Si aún así no logra colocarlo, comuníquese con un electricista calificado. No haga ninguna modificación al enchufe. www.oster.com 1. No mezcle en forma excesiva la masa de wafles. Para obtener wafles más livianos y crocantes, bata las claras de huevo por separado y viértalas suavemente sobre la masa para wafles. 3. Abra la unidad y vierta aproximadamente 3/4 de taza de masa de wafles sobre las rejillas. Para obtener óptimos resultados, vierta la masa formando un círculo alrededor del borde exterior de la Waflera. Cierre la tapa. Es normal que una pequeña cantidad de masa se escurra por la rejilla y por debajo de la unidad. Sin embargo, si se derrama mucha masa, deberá usar menos cantidad. P.N. 111895 Unte cada lado del sandwich con la masa, recubriéndolo en forma pareja. Coloque los sandwiches en la Sandwichera OSTER®. Cocine durante 5 minutes o hasta que estén dorados. RINDE: 2 SANDWICHES 2. Cocine completamente los wafles antes de retirarlos de la unidad. 4. La tapa se levantará levemente a medida que los wafles comiencen a cocinarse. No abra la tapa mientras salga vapor. La mayoría de las recetas de wafles toma en prepararse de 4 a 5 minutos aproximadamente. Por lo general los wafles están listos cuando ya no sale más vapor por los costados y el frente de la unidad. BIENVENIDOS ©2003 Sunbeam Products, Inc. Tous droits réservés. OSTER® est une marque déposée de Sunbeam Products, Inc. Distribué par Sunbeam Products, Inc., Boca Raton, Florida 33431 3. No abra la Waflera mientras el vapor esté escapando por los lados y por el frente de la unidad. 5. Cuando los wafles estén listos, quítelos con un tenedor de plástico o con unas pinzas de madera. ¡Felicitaciones por la compra de la Waflera/Sandwichera OSTER®! Para mayor información sobre los productos OSTER®, visítenos en www.oster.com. Con su nuevo electrodoméstico podrá preparar wafles y sandwiches crocantes, calientes y dorados en sólo unos minutos y así saborear una rápida comida en cualquier momento del día. Su Waflera/Sandwichera OSTER® está controlada por termostato para ayudarle a preparar wafles a la perfección. La unidad es portátil, por lo que podrá preparar wafles/sandwiches en la cocina o directamente en la mesa. Las rejillas antiadherentes facilitan la limpieza. Sabemos que le encantará su nueva Waflera/Sandwichera OSTER®. Es un gran complemento para su cocina. Visit us at www.oster.com 4. ¿Por qué no congelar wafles preparados para los días en que esté muy ocupada? Simplemente cocine los wafles como se indica. Déjelos enfriar sobre una rejilla de alambre y envuélvalos en papel o plástico a prueba de humedad. Recaliéntelos rápidamente en su horno tostador, asador u horno microondas. 6. Cierre la tapa y espere que la luz de Encendido se encienda antes de preparar más wafles. CÓMO USAR LA WAFLERA/SANDWICHERA OSTER® – – – FOLD – – – – – – FOLD – – – CÓMO PREPARAR SANDWICHES – – – FOLD – – – CÓMO PREPARAR WAFLES/SANDWICHES – – – FOLD – – – – – – FOLD – – – Wafflemaker with Sandwich Plates Waflera con Sandwich Plates Gaufrier avec Plaques à Sandwiches – – – FOLD – – – – – – FOLD – – – – – – FOLD – – – USING YOUR HAND MIXER 6 SPEED 1/2 3 4 MIXING Turn mixer on and refer to speed guide for correct setting. Slowly guide mixer around sides and through center of bowl, going in the same direction. Be careful not to overbeat the mixture. Overbeating tends to make some mixtures tough. The beater design allows for thorough, fast mixing results for all types of batters. The beaters are dishwasher safe. (See Figure A) EURO BEATERS Stir Mix Blend Whip 6 Beat 5 BURST OF One-Year Limited Warranty Sunbeam Products, Inc., or if in Canada, Sunbeam Corporation (Canada) Limited (collectively “Sunbeam”) warrants that for a period of one year from the date of purchase, this product will be free from defects in material and workmanship. Sunbeam, at its option, will repair or replace this product or any component of the product found to be defective during the warranty period. Replacement will be made with a new or remanufactured product or component. If the product is no longer available, replacement may be made with a similar product of equal or greater value. This is your exclusive warranty. MIXING TASKS Use when stirring liquid ingredients or when mixing dry and liquid ingredients together alternately in a recipe. Use when preparing any of the ready-prepared or packaged instant puddings. This warranty is valid for the original retail purchaser from the date of initial retail purchase and is not transferable. Keep the original sales receipt. Proof of purchase is required to obtain warranty performance. Sunbeam dealers, service centers, or retail stores selling Sunbeam products do not have the right to alter, modify or any way change the terms and conditions of this warranty. Use when a recipe calls for combining ingredients together. Use for quick breads or muffins that require a brisk action, just enough to blend. This warranty does not cover normal wear of parts or damage resulting from any of the following: negligent use or misuse of the product, use on improper voltage or current, use contrary to the operating instructions, disassembly, repair or alteration by anyone other than Sunbeam or an authorized Sunbeam service center. Further, the warranty does not cover: Acts of God, such as fire, flood, hurricanes and tornadoes. Use when preparing cake mixes or for directions calling for medium speed. Use to cream butter and sugar together. Use when preparing a frosting from a recipe or package. Use when whipping cream for desserts. What Are the Limits on Sunbeam’s Liability? Sunbeam shall not be liable for any incidental or consequential damages caused by the breach of any express, implied or statutory warranty or condition. Use to mash potatoes to develop a light and fluffy texture. Use when whipping egg whites. Except to the extent prohibited by applicable law, any implied warranty or condition of merchantability or fitness for a particular purpose is limited in duration to the duration of the above warranty. POWER® During especially heavy mixing tasks, press the button to drive through the mixture with ease. Sunbeam disclaims all other warranties, conditions or representations, express, implied, statutory or otherwise. CARING FOR YOUR MIXER BURST OF POWER® Feature COMFORT HANDLE Some provinces, states or jurisdictions do not allow the exclusion or limitation of incidental or consequential damages or limitations on how long an implied warranty lasts, so the above limitations or exclusion may not apply to you. This warranty gives you specific legal rights, and you may also have other rights that vary from province to province, state to state or jurisdiction to jurisdiction. How to Obtain Warranty Service In the U.S.A. – If you have any question regarding this warranty or would like to obtain warranty service, please call 1.800.334.0759 and a convenient service center address will be provided to you. STORAGE Store the hand mixer on its heel rest in a clean, dry location such as a cabinet or shelf. Store beaters in a drawer. EJECTING BEATERS OR DOUGH HOOKS F IGURE C Be sure speed control is at the “OFF” or “0” position and cord is removed from electrical outlet. Scrape off any excess batter with a rubber spatula. Grasp the stems of the beaters with your hand and press the beater eject button. Beaters will release into your hand. The handle has been designed for comfort to prevent hand fatigue during heavy or long mixing tasks. (See Figure D) Sunbeam shall not be liable for any damages of any kind resulting from the purchase, use or misuse of, or inability to use the product including incidental, special, consequential or similar damages or loss of profits, or for any breach of contract, fundamental or otherwise, or for any claim brought against purchaser by any other party. CLEANING When mixing is complete, set speed control to “1”, and raise beaters slowly from batter to clean off clinging food. Be sure to turn unit to “0” before raising beaters completely out of mixing bowl. Wash the beaters before and after every use. Beaters and Dough Hooks may be washed in a dishwasher. After removing cord from electrical outlet, clean mixer head with a damp cloth and wipe dry. DO NOT IMMERSE MIXER IN WATER. This may cause electric shock, injury, or damage to the product. Avoid the use of abrasive cleaners that will damage the finish of your mixer. The motor of your mixer has been carefully lubricated at the factory and does not require any additional lubricant. The BURST OF POWER® feature allows for an added boost to the selected speed setting at the press of the button. During especially heavy mixing tasks, press the button to drive through the mixture with ease. Once the button is released, the mixer will return to the original speed setting. DOUGH HOOKS POWER® Button SPEED GUIDE FOR HAND MIXER Before using your mixer for the first time, wash the beaters in hot/soapy water, or the dishwasher. Rinse and dry. BURST OF POWER® FEATURE 3 2 Be sure speed control is in the “OFF” or “0” position and unplugged from an electrical outlet. Insert beaters one at a time, by placing stem end of beaters into the opening drive holes on the bottom of the mixer. Turn beater slightly and push in until beater clicks into position. Beaters are interchangeable. The BURST OF POWER® feature allows for an added boost to the selected speed setting at the press of the button. During especially heavy mixing tasks, press the button to drive through the mixture with ease. Once the button is released, the mixer will return to the original speed setting. 1 When using the optional dough hooks, the dough hook with the collar on the stem (see feature drawing) towards the tip fits into the large drive hole on the mixer. The dough hook without the collar on the stem fits into the smaller drive hole. If dough hooks do not click into the drive holes, reverse and try again. ON/OFF SPEED CONTROL – BEATER EJECT BUTTON 5 This OSTER® Hand Mixer features a combination On/Off Speed Control – Beater Eject Button. This design allows for easy speed selection and ejection of beaters or other attachments. Press forward on the thumb tab to turn the mixer on and to select the desired speed setting (1 through 6). When the speed control is in the off position you can push down on the thumb tab to release the beaters or other attachments. There may not be a noticeable click. F IGURE A 9 Whenever scraping of the bowl is required, stop the mixer and scrape sides and bottom of bowl with a rubber spatula as needed. Turn speed control to “OFF” or “0” and rest mixer on its heel rest while adding ingredients. Be sure to position beaters over mixing bowl so any drippings will fall back into mixing bowl. BEATERS 7 OF Use these hooks to knead bread dough, pizza dough or other heavy batters and doughs. Use at lower speeds for best results. (See Figure C) 5. Dough Hook 6. Collar on Dough Hook 7. Large Drive Hole 8. Euro Beaters 3. BURST – – – FOLD – – – LEARNING ABOUT YOUR HAND MIXER WELCOME READ ALL INSTRUCTIONS BEFORE USE FEATURES OF YOUR HAND MIXER To protect against risk of electrical shock, do not put hand mixer in water or other liquid. This may cause personal injury and/or damage to the product. Close supervision is necessary when hand mixer is used by or near children, or incapacitated persons. Unplug from outlet while not in use, before putting on or taking off parts and before cleaning. Avoid contact with moving parts. Keep hands, hair, clothing, as well as spatulas and other utensils away from beaters during operation to reduce the risk of injury to persons and/or damage to the hand mixer. Do not operate hand mixer with a damaged cord or plug, after the appliance malfunctions, or if it is dropped or damaged in any manner. Return appliance to the nearest Authorized Sunbeam Service Center for examination, repair or electrical or mechanical adjustment. Do not use with an extension cord. The use of attachments not recommended or sold by Sunbeam Products may cause fire, electrical shock or injury. Do not let cord hang over edge of table or countertop. Do not let cord touch hot surfaces, including a stove. Do not use outdoors or for commercial purposes. Remove beaters from hand mixer before washing them. Do not place hand mixer on or near a hot burner or in a heated oven. Do not use hand mixer for other than intended use. Do not leave hand mixer unattended while it is operating. F IGURE B Ideal for whipping cream, making frosting, scrambling eggs and much more. (See Figure B) 4 1. On/Off Speed Control – Beater Eject Button 2. Thumb Tab 9. Heel Rest 4. Beaters – – – FOLD – – – IMPORTANT SAFEGUARDS The OSTER® Hand Mixer has been designed to assist you in preparing delicious foods. Congratulations on your purchase of an OSTER® Hand Mixer! To learn more about OSTER® products, please visit us at www.oster.com. When using electrical appliances, basic safety precautions should always be followed, including the following: • • • • • • • • • • • • • • 8 THIS UNIT FOR HOUSEHOLD USE ONLY FOR PRODUCTS PURCHASED IN THE U.S. AND CANADA ONLY To reduce the risk of electrical shock, this appliance has a polarized plug (one blade is wider than the other). This plug fits a polarized outlet only one way; if the plug does not fit fully into the outlet, reverse the plug. If it still does not fit, contact a qualified electrician. Do not attempt to defeat this safety feature. EXTENSION CORD USE A short power-supply cord is provided to reduce the risk resulting from becoming entangled in or tripping over a longer cord. An extension cord may be used if care is exercised in its use. If an extension cord is used, the electrical rating of the cord must be at least as great as the electrical rating of the appliance. The extension cord should be arranged so that it will not drape over the countertop or tabletop where it can be pulled on by children or tripped over unintentionally. N OTE : Handmixer design may vary from picture. Some models include dual BURST OF POWER® buttons for both left and right hand use. SAVE THESE INSTRUCTIONS In Canada – If you have any question regarding this warranty or would like to obtain warranty service, please call 1.800.667.8623 and a convenient service center address will be provided to you. MAINTENANCE In the U.S.A., this warranty is offered by Sunbeam Products, Inc., located in Boca Raton, Florida 33431. In Canada, this warranty is offered by Sunbeam Corporation (Canada) Limited, located at 5975 Falbourne Street, Mississauga, Ontario L5R 3V8. Other than the recommended cleaning, no further user maintenance should be necessary. If for any reason your hand mixer should require repairs, do not try to fix it yourself. Send it to the nearest Authorized Sunbeam Appliance Service Center. PLEASE DO NOT RETURN THIS PRODUCT TO ANY OF THESE ADDRESSES OR TO THE PLACE OF PURCHASE. F IGURE D English-1 English-2 English-3 English-4 English-5 English-6 – – – FOLD – – – – – – FOLD – – – Español-1 Printed in China Imprimé en Chine Español-2 Español-3 Distribuido por Sunbeam Products, Inc., Boca Raton, FL 33431 OSTER® y BURST OF POWER® son marcas registradas de Sunbeam Products, Inc. • ©2003 Sunbeam Products, Inc. Tous droits réservés. 4. Batidores 3. Botón BURST Se incluye un cable de tensión corto para evitar que se enrede o que cause tropiezos. Un cable de extensión puede usarse con cuidado. Si se usa una cable de extensión, la potencia eléctrica marcada en el cable de extensión debe ser por lo menos igual o mayor a la potencia eléctrica del aparato. El cable de extensión debe colocarse de manera que no cuelgue del mostrador o de la mesa, donde pueda causar tropiezos accidentalmente. No use con un cable de extensión. No opere la Batidora Manual con un cordón dañado o después de que el aparato ha funcionado inadecuadamente o ha sido dañado de cualquier manera. Regrese el aparato a un Centro de Servicio Autorizado Sunbeam para su examen, reparación o ajuste eléctrico o mecánico. USO DE UN Español-4 F IGURA D N OTA : El diseño de la Batidora Manual puede variar de la pictura. ® Algunas modelos incluyen botones dobles BURST OF POWER para ambos usos, de la mano izquierda y derecha. GUARDE ESTAS INSTRUCCIONES Impreso en China • El uso de accesorios o aditamentos que no sean recomendados o vendidos por Sunbeam Products, puede causar incendios, descargas eléctricas o lesiones personales. ©2003 Sunbeam Products, Inc. Todos los derechos reservados. • www.oster.com EE.UU. : 1.800.334.0759 Canadá : 1.800.667.8623 Para preguntas sobre los productos llame: Sunbeam Consumer Service OF P.N. 111805 ASA ERGONÓMICA 8. Aspas para Batir Euro 7. Agujero de Arrastre Grande Utilice estos ganchos para trabajar con las masas para pan, pizza, donas u otras mezclas pesadas. Para mejores resultados, utilice una velocidad más baja. (Vea Figura C) 6. Aro en las Aspas para Amasar 5. Ganchos para Amasar F IGURA C GANCHOS PARA AMASAR 8 F IGURA B El diseño de los batidores permiten resultados completos y rápidos para todos los tipos de mezclas. Los batidores pueden lavarse en lavadora de platos. (Vea Figura A) SÓLO PARA PRODUCTOS COMPRADOS EN ESTADOS UNIDOS Y CANADÁ BATIDORES 7 PARA USO DOMÉSTICO 9 • No use la Batidora Manual más que para lo que ha sido diseñada. ©2003 Sunbeam Products, Inc. All rights reserved. Visit us at www.oster.com El asa de la batidora ha sido diseñada para ofrecer mayor comodidad y prevenir la fatiga de la mano durante una tarea pesada o prolongada. (Vea Figura D) 9. Apoyo del Talón POWER® 2. Lengüeta del Pulgar 1. Control de Velocidad Encendido/ Apagado – Botón para Expulsar los Batidores CABLE ELÉCTRICO CORTO Ideal para batir crema, preparar coberturas, huevos revueltos y mucho más. (Vea Figura B) 4 Distribué par Sunbeam Products, Inc., Boca Raton, Florida 33431 OSTER® et BURST OF POWER® sont marques déposées de Sunbeam Products, Inc. www.oster.com ASPAS PARA BATIR EURO Para reducir el riesgo de descarga eléctrica, este aparato cuenta con una clavija polarizada (una pata es más ancha que la otra). Esta clavija entra sólo de una manera en un enchufe polarizado. Si la clavija no encaja en el enchufe simplemente colóquela al revés. Si aún así no encaja llame a un electricista calificado. De ninguna manera intente modificar esta medida de seguridad. • Evite el contacto con las partes en movimiento. Mantenga las manos, cabello, ropa así como también, las espátulas y otros utensilios lejos de los batidores durante el funcionamiento del aparato, para reducir el riesgo de lesiones personales o daños a la Batidora Manual. États-Unis : 1.800.334.0759 Canada : 1.800.667.8623 ESTA UNIDAD ES SÓLO • Desconéctela del tomacorriente cuando el aparato no esté en uso, antes de poner o quitar partes y antes de limpiar el electrodoméstico. Pour les questions de produit: Sunbeam Consumer Service Distributed by Sunbeam Products, Inc., Boca Raton, FL 33431 Esta Batidora Manual OSTER® presenta una combinación de control de apagado/encendido de velocidad y botón eyector de aspas para batir. Este diseño le permite fácilmente seleccionar la velocidad y quitar las aspas para batir y otros accesorios. Empuje adelante sobre la lengüeta del pulgar para encender la mezcladora y seleccionar la velocidad deseada (1 al 6). Cuando el control de velocidad esté en la posición apagado, presione hacia abajo la lengüeta del pulgar para expulsar las aspas para batir u otros accesorios. Es posible que no escuche ningún clic. • No opere la Batidora Manual sin continua supervisión. • Es necesario una supervisión continua cuando la Batidora Manual es usada por o cerca de niños o personas incapacitadas. OSTER® and BURST OF POWER® are registered trademarks of Sunbeam Products, Inc. • Para protegerse contra una descarga eléctrica, no coloque la Batidora Manual en agua o en otros líquidos. Esto puede ocasionar lesiones personales o daños al producto. www.oster.com USA : 1.800.334.0759 Canada : 1.800.667.8623 6 • No coloque la Batidora Manual sobre o cerca de quemadores de estufas de gas o dentro de un horno caliente. F IGURA A MODEL/MODELO MODÈLE CONTROL DE APAGADO/ENCENDIDO DE VELOCIDAD – BOTÓN EYECTOR DE ASPAS PARA BATIR 5 • Quite los batidores de la Batidora Manual antes de lavarlos. • No se use en exteriores o para propósitos comerciales. FUNCIÓN DE POTENCIA EXTRA BURST OF POWER ¡Felicitaciones en su compra de una Batidora Manual OSTER . Para aprender más sobre productos OSTER®, por favor visítenos a www.oster.com! User Manual ® La Batidora Manual OSTER® ha sido diseñada para ayudarla a preparar deliciosos platillos. BIENVENIDOS • No permita que el cordón cuelgue sobre el borde de la mesa o del mostrador. 2498 Hand Mixer Manual de Instrucciones Batidora Manual Manuel d’Instructions Mélangeur à Main La Función de Potencia Extra BURST OF POWER® le permite aumentar la potencia a la velocidad seleccionada, al presionar un botón. Durante tareas de mezcla especialmente pesadas, presione el botón para manipular la batidora con facilidad. Una vez que libera el botón, la batidora regresará a su velocidad original. CARACTERÍSTICAS DE SU BATIDORA MANUAL 3 2 1 LEA TODAS LAS INSTRUCCIONES ANTES DE USAR For product questions contact: Sunbeam Consumer Service Cuando use algún aparato eléctrico siempre deben seguirse las precauciones básicas de seguridad incluyendo las siguientes: • No permita que el cordón entre en contacto con superficies calientes, incluyendo la estufa. ® PRECAUCIONES IMPORTANTES CONOZCA ACERCA DE SU BATIDORA MANUAL – – – FOLD – – – – – – FOLD – – – – – – FOLD – – – – – – FOLD – – – – – – FOLD – – –-
 1
1
-
 2
2
-
 3
3
-
 4
4
-
 5
5
-
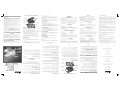 6
6
-
 7
7
-
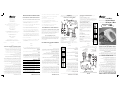 8
8


Oster 3862 Manual de usuario
- Categoría
- Planchas de gofres
- Tipo
- Manual de usuario
en otros idiomas
- English: Oster 3862 User manual
Artículos relacionados
-
Oster 3883 Manual de usuario
-
Sunbeam CKSTWF2000 Manual de usuario
-
-
-
-
Oster CKSTWFBF10-0NP Manual de usuario
-
-
-
-
Otros documentos
-
-
-
-
Bella Rotating Belgian Waffle Maker Manual de usuario
-
Nostalgia NMWF5LPPNK Manual de usuario
-
 Continental Electric CE23831 Manual de usuario
-
Black & Decker G48TD Manual de usuario
-
 Continental Electric CP43569 Manual de usuario
-
Silvercrest 399022 El manual del propietario
-

