Miniland digimonitor 3.5" plus Manual de usuario
- Categoría
- Monitores de video para bebés
- Tipo
- Manual de usuario

digimonitor 3.5" plus
Español
English
Polski
Русский
Deutsch
Italiano
Português
Français
11
21
70
80
50
60
30
40


Para descargar la aplicación eMyBaby,
en primer lugar, acceda a la tienda de aplicaciones correspondiente.
To download the eMyBaby app,
go to the corresponding app store.
Para descarregar a aplicação eMyBaby,
em primeiro lugar aceda à respectiva loja de aplicações.
Pour télécharger l’application eMyBaby,
accédez d’abord à la boutique d’applications correspondante.
Um die Anwendung eMyBaby runterzuladen,
gehen Sie bitte zuerst im entsprechenden AppStore.
Per scaricare l’applicazione eMyBaby è necessario,
come prima cosa, accedere al market delle applicazioni.
W celu pobrania aplikacji eMyBaby
najpierw należy wejść do odpowiedniego sklepu z aplikacjami.
Haga click sobre el icono de Play Store, según
se indica en la imagen:
Click on the icon in the Play Store, as shown
in the picture:
Clique no ícone da Play Store, conforme se indica
na imagem:
Cliquez sur l’icône Play Store, comme indiqué
sur l’image:
Klicken Sie auf das Play Store Symbol, wie im
Bild gezeigt:
Fare click sull’icona di Play Store così come indicato
dall’immagine:
Należy kliknąć na ikonkę Play Store, jak pokazano
na obrazku:
Кликните на иконке Play Store, как показано
на изображении:
Для того, чтобы загрузить приложение eMyBaby,
в первую очередь нужно перейти в соответствующую библиотеку приложений.
1

Una vez dentro de Play Store, debe buscar la aplicación.
Para ello, en la barra de búsqueda debe teclear emybaby
tal y como se indica en la imagen:
Then search for the app in the store. Go to the search bar
and write emybaby, as shown in the picture:
Uma vez dentro da Play Store, deve procurar a aplicação.
Para tal, na barra de procura deve digitar emybaby,
tal como indicado na imagem:
Une fois dans Play Store, vous devez chercher l’application.
À cette n, vous devez taper emybaby dans la barre de
recherche, comme indiqué sur l’image:
Wenn Sie sich im AppStore be nden, suchen Sie dort bitte
die Anwendung. Um dies zu tun, geben Sie in der Suchleiste
das Wort „emybaby“ ein, so wie in der Abbildung dargestellt:
Dopo aver effettuato l’accesso nell’AppStore, bisognerà
cercare l’applicazione digitando “emybaby” nella barra di
ricerca, così come indicato dall’immagine:
Ahora deberá instalar la aplicación:
Now install the app:
Agora deverá instalar a aplicação: l’application:
Vous devrez alors installer l’application:
Jetzt können Sie die Anwendung installieren:
Procedere all’installazione dell’applicazione:
Teraz należy zainstalować aplikację:
Теперь Вам необходимо установить приложение:
Po wejściu do Play Store należy odszukać aplikację.
W tym celu w pasku wyszukiwania należy wpisać emybaby,
jak pokazano na obrazku:
Теперь Вы должны найти приложение в библиотеке
Play Store. Для этого в строке поиска Вы должны
набрать emybaby, как это показано на изображении:
2
3

4
5
Una vez instalada, aparecerá el icono de la aplicación de
eMyBaby en su pantalla principal. Pulse para entrar.
Once it is installed, the eMyBaby app icon will appear on
your home screen. Click to open the app.
Uma vez instalada, aparecerá o ícone da aplicação da
eMyBaby no seu ecrã principal. Pressione para entrar.
Une fois installée, l’icône de l’application eMyBaby apparaîtra
sur votre écran principal. Appuyez dessus pour entrer.
Nach der Installierung erscheint auf Ihrem Hauptbildschirm
das App-Symbol von eMyBaby.
Klicken Sie dieses Symbol, um zur Anwendung zu gelangen.
Una volta installata, l’icona dell’applicazione eMyBaby
comparirà sulla schermata principale. Fare click su di essa
per entrare.
Po zainstalowaniu aplikacji na ekranie głównym pojawi się
ikonka aplikacji eMyBaby. Należy ją wcisnąć aby wejść.
После того, как приложение eMyBaby будет
установлено, на Вашей главной странице появится
соответствующая иконка. Нажмите ее для входа.
Al abrirse la aplicación, aparecerá la imagen que se
muestra a continuación.
The app will open and the following picture will appear.
Quando a aplicação se abre, aparece a imagem que se
mostra em seguida.
En ouvrant l’application, l’image qui est montrée ci-dessous
apparaîtra.
Beim Öffnen der Anwendung, erscheint das weiter unter
wiedergegebene Bild.
Una volta aperta l’applicazione, si vedrà l’immagine
seguente.
Po otwarciu aplikacji pojawi się obrazek pokazany poniżej.
Należy wprowadzić nazwę użytkownika i hasło.
Когда Вы откроете приложение, Вы увидите
изображение, представленное ниже.

1
2
En el caso de tener un móvil o tablet de Apple, debe
descargar la aplicación desde la AppStore, cuyo icono
se muestra en la imagen:
If you have an iPhone or iPad, you should go to the
AppStore, to the following icon:
Caso tenha um telemóvel ou tablet da Apple, deve
descarregar a aplicação a partir da AppStore, cujo
ícone se apresenta na imagem:
Si vous avez un téléphone portable ou une tablette
d’Apple, vous devez télécharger l’application à partir
de l’AppStore, dont l’icône est montrée sur l’image:
Falls Sie über ein Handy oder Tablet von Apple
verfügen, dann müssen Sie die Anwendung beim
AppStore, dessen Symbol im folgenden Bild erscheint,
runterladen:
Se si possiede uno smartphone o un tablet Apple, sarà
necessario scaricare l’applicazione dall’AppStore;
l’icona corrispondente è quella mostrata nell’immagine:
W przypadku telefonów komórkowych lub tabletów
Apple należy pobrać aplikację z AppStore, którego
ikonkę pokazano na obrazku:
В случае если у Вас мобильный телефон или
планшет марки Apple, Вам необходимо загрузить
приложение, иконку которого Вы видите на
изображении, из AppStore:
Una vez dentro de AppStore, debe buscar la aplicación.
Para ello, en la barra de búsqeda debe teclear emybaby
tal y como se indica en la imagen:
Then search for the app in the store. Go to the search
bar and write emybaby, as shown in the picture:
Uma vez dentro da AppStore, deve procurar a aplicação.
Para tal, na barra de procura deve digitar emybaby, tal
como indicado na imagem:
Une fois dans AppStore, vous devez chercher
l’application. À cette n, vous devez taper emybaby dans
la barre de recherche, comme indiqué sur l’image:
Wenn Sie sich im AppStore be nden, suchen Sie dort
bitte die Anwendung. Um dies zu tun, geben Sie in der
Suchleiste das Wort „emybaby“ ein, so wie in der
Abbildung dargestellt:

Dopo aver effettuato l’accesso nell’AppStore, bisognerà cercare l’applicazione
digitando “emybaby” nella barra di ricerca, così come indicato dall’immagine:
Po wejściu do AppStore należy odszukać aplikację. W tym celu w pasku
wyszukiwania należy wpisać emybaby, jak pokazano na obrazku:
Теперь Вы должны найти приложение в библиотеке AppStore. Для этого в строке
поиска Вы должны набрать emybaby, как это показано на изображении:
3
4
Tras buscar la aplicación, pulse el botón marcado
en rojo para descargarla.
Tras la instalación, en su pantalla principal aparecerá el
icono de eMyBaby. Púlselo.
Once you have found the app, click on the button
highlighted in red in order to download it.
When it is installed, the eMyBaby icon will appear on the
home screen. Click on it.
Depois de ter encontrado a aplicação, pressione o botão
marcado a vermelho para a descarregar.
Após a instalação, no seu ecrã principal aparecerá o
ícone da eMyBaby. Pressione-o.
Après avoir trouvé l’application, appuyez sur le bouton
marqué en rouge pour la télécharger.
Une fois installée, l’icône eMyBaby apparaîtra sur votre
écran principal. Appuyez dessus.
Suchen Sie bitte die Anwendung, und drücken Sie
anschließend den rot markierten Button, um die
Anwendung runterzuladen.
Nach der Installierung erscheint auf Ihrem
Hauptbildschirm das App-Symbol von eMyBaby.
Drücken Sie bitte dieses Symbol.
Una volta trovata l’applicazione, cliccare sul pulsante
rosso per scaricarla.
Quando l’installazione sarà completata, l’icona di
eMyBaby comparirà sullo schermo. Fare click su di essa.
Po wyszukaniu aplikacji należy wcisnąć przycisk
oznaczony na czerwono w celu pobrania aplikacji.
Po zainstalowaniu na ekranie głównym pojawi się ikonka
eMyBaby. Należy ją wcisnąć.
После того, как приложение будет Вами найдено,
нажмите кнопку, выделенную красным цветом, чтобы
его загрузить.
После того, как Вы установите приложение, на Вашей
главной странице появится иконка приложения
eMyBaby. Нажмите ее.

5
Al abrirse la aplicación, aparecerá la imagen que se muestra a continuación.
The app will open and the following picture will appear.
Quando a aplicação se abre, aparece a imagem que se mostra em seguida.
En ouvrant l’application, l’image qui est montrée ci-dessous apparaîtra.
Beim Öffnen der Anwendung, erscheint das weiter unter wiedergegebene Bild.
Una volta aperta l’applicazione, si vedrà l’immagine seguente.
Po otwarciu aplikacji pojawi się obrazek pokazany poniżej.
Когда Вы откроете приложение, Вы увидите изображение, представленное ниже.

4
13
2
10
12
14
13
17
765
9
11
8
15
16
1
j
k
A B C D E F G

2
I
III IIIV
V
VIIVI
XI
XII
IX
VIII
X
3
2
3
1
4

11
ESPAÑOL
ÍNDICE
1. Introducción
2. Contenido
3. Instrucciones de seguridad
4. Características del producto
5. Instrucciones de uso
6. Mantenimiento
7. Identicación y resolución de problemas
8. Especicaciones técnicas
9. Información sobre la eliminación de las baterías y
el producto
1. INTRODUCCIÓN
Le felicitamos por haber adquirido este vigilabebés
con monitor inalámbrico a color, que incorpora la
tecnología más avanzada. Estamos seguros de
que quedará totalmente satisfecho con la calidad
y las características de este producto, aunque le
recomendamos no obstante que lea cuidadosamente
estas instrucciones con el n de obtener los mejores
resultados de su compra.
Este vigilabebés le permite transmitir señales de
audio/vídeo en modo inalámbrico para su recepción
en el monitor a color, lo cual es perfecto para un
gran número de situaciones como, por ejemplo, la
vigilancia de bebés, de niños de corta edad o de
ancianos.
NOTA: Las características descritas en este
manual de usuario están sujetas a modicaciones
sin previo aviso.
2. CONTENIDO
1 Cámara (unidad del bebé)
1 Monitor (unidad de los padres)
2 Adaptadores de CA/CC
1 Batería de litio (Li-ion) recargable para el monitor
1 Cinta para el cuello
1 Bolsa para transporte y almacenaje
1 Trípode
Manual de Instrucciones y garantía
• Si faltara cualquiera de los elementos arriba
indicados, póngase en contacto con su
distribuidor.
3. INSTRUCCIONES DE SEGURIDAD
Lea cuidadosamente este manual de instrucciones
antes de utilizar su vigilabebés por primera vez y
consérvelo para poder utilizarlo como referencia en
el futuro.
3.1. INSTRUCCIONES DE SEGURIDAD GENERALES:
Cuando se utilicen aparatos eléctricos es necesario
cumplir algunas precauciones de seguridad básicas
en todo momento:
1. Es necesario extremar las precauciones cuando
niños o ancianos utilicen cualquier producto, o cuando
se utilice cerca de ellos. Mantenga el aparato lejos del
alcance de los niños mientras no se esté utilizando.
2. Este producto no debe utilizarse como el único
medio de vigilancia, no siendo en ningún caso un
sustituto de la supervisión responsable de los niños,
adultos o propiedades por parte de los adultos.
3. Utilice el vigilabebés sólo con los adaptadores de
CA incluidos con la unidad (5.0 V, 800 mA)
4. Utilice sólo baterías del tipo recomendado (Li-ion
3,7 V – 1200mAh). No intente cargar ningún otro tipo
de baterías en su monitor.
5. Este producto contiene piezas de pequeño tamaño.
Es necesario proceder con cuidado a la hora de
desempaquetar y montar el producto.
6. NO permita que los niños jueguen con los
materiales del embalaje, como por ejemplo bolsas de
plástico. Es necesario proceder con cuidado a la hora
de desempaquetar y montar el producto.
7. NO utilice el aparato si el cable o el enchufe
estuvieran dañados. Si el funcionamiento de su
monitor de vigilancia de bebés no fuera correcto o si
tuviera cualquier tipo de daños, póngase en contacto
con el centro de servicio autorizado de Miniland para
solicitar la inspección y la reparación del mismo con
el n de evitar cualquier posible riesgo.
8. NO intente reparar o ajustar ninguna de las
funciones eléctricas o mecánicas de la unidad, ya que
en ese caso la garantía quedaría anulada.
9. Compruebe el voltaje de su vivienda con el n
de asegurarse de que corresponda al régimen del
aparato indicado en las especicaciones del mismo.
10. Si no va a utilizar el vigilabebés durante un
período de tiempo prolongado, desenchufe siempre el
adaptador de corriente. Para desconectar el aparato
de la red eléctrica, sujete el transformador y retire el
enchufe de la toma. No tire nunca directamente del
cable.
11. Este producto está diseñado exclusivamente para
el uso en interiores. La unidad no debe exponerse a la
lluvia, humedad o goteos o salpicaduras de líquidos.
No coloque nunca ningún objeto lleno de líquido,
como por ejemplo un vaso o un jarrón, encima o al
lado de su vigilabebés. El monitor de vigilancia de
bebés no debe utilizarse cerca del agua.
PRECAUCIÓN
• Este vigilabebés está diseñado para proporcionar
tranquilidad a los padres cuando no les es posible
estar en la misma habitación que el bebé. Este
producto no debe reemplazar la supervisión
responsable de un adulto. Es necesario que uno de
los padres permanezca cerca del monitor mientras
se esté utilizando. El vigilabebés no es un dispositivo
médico y no debe conarse a él el bienestar del bebé.
Es importante que visite periódicamente la habitación
del bebé con el n de asegurarse de que todo esté
bien.
• No utilice nunca este vigilabebés en aquellos
casos en los que la vida o la salud del bebé u otras
personas, o la integridad de un inmueble, dependan
de su funcionamiento. El fabricante no aceptará
ninguna responsabilidad o reclamación alguna por
fallecimiento, lesiones personales o daños materiales
resultantes del malfuncionamiento o del uso indebido
del producto.
• El uso indebido de este vigilabebés inalámbrico
podría dar lugar a acciones legales.
• Utilice este producto de manera responsable.
IMPORTANTE: Tenga en cuenta que cualquier
cambio o modicación en el equipo no efectuada
por el servicio técnico de Miniland no estará
cubierta por la garantía del producto.
3.2. CONSEJOS PARA LAS RADIO INTERFERENCIAS
Este equipo ha sido sometido a pruebas y cumple
con los requisitos de la Directiva RED 2014/53/

12
ESPAÑOL
UE. Estos requisitos están diseñados para ofrecer
una protección razonable contra las interferencias
dañinas en una instalación residencial. Si la
unidad no se instala y utiliza de acuerdo con las
instrucciones, podría causar interferencias dañinas
en las radiocomunicaciones.
Tenga en cuenta, sin embargo, que no es posible
garantizar que no vayan a producirse interferencias
en una instalación especíca. Si el vigilabebés
provocara interferencias en la recepción de la radio o
la televisión, lo cual puede determinarse apagándolo
y encendiéndolo, se recomienda al usuario que
intente subsanar la interferencia tal como se indica
a continuación:
• Reoriente o cambie el receptor de posición.
• Aumente la distancia entre el equipo en cuestión y
el vigilabebés.
• Enchufe el equipo en un enchufe diferente del
utilizado para el receptor.
• Consulte con el departamento de Atención del
Cliente de Miniland.
Con el n de asegurar el cumplimiento de la Directiva
RED 2014/53/UE, este equipo tiene cables blindados
especiales. La operación con un equipo no aprobado
o con cables no blindados probablemente provocará
interferencias en la recepción radiofónica o televisiva.
3.3. ELECCIÓN DE UN LUGAR ADECUADO
• Coloque el dispositivo electrónico en un lugar
alejado de los niños con el n de evitar posibles
accidentes.
• Los niños podrían enredarse en los cables. La
unidad del bebé debe situarse a una distancia de
aproximadamente 1 – 1.5 metros de la cuna del bebé.
No coloque nunca la unidad del bebé en el interior
de la cuna, la cama o el corralito. Asegúrese de que
la unidad, los cables y el adaptador estén lejos del
alcance del bebé y de otros niños de corta edad.
• Coloque el vigilabebés en un lugar en el que el
aire pueda circular libremente. No lo coloque sobre
edredones o mantas blandas ni en las esquinas de
armarios, estanterías, etc.
• Coloque el vigilabebés en un lugar alejado de
las fuentes de calor como radiadores, chimeneas,
cocinas y la luz solar directa.
• Coloque la unidad del bebé alejada de aparatos de
televisión, repetidores y radios. Las señales de radio
intensas generadas por estos elementos podrían
causar ruidos o incluso la aparición de sonidos e
imágenes en el monitor. Si esto ocurriera, traslade la
cámara a otro lugar.
• Este monitor puede colocarse encima de una mesa
utilizando el soporte para mesa retráctil situado en
la parte posterior del monitor. Cuando no lo utilice,
simplemente pliéguelo hacia el interior de la parte
posterior del monitor hasta escuchar un “clic” que le
indicará que ya está totalmente plegado.
4. CARACTERÍSTICAS Y FUNCIONES DEL PRODUCTO
4.1. FUNCIONES Y CONTROLES DEL MONITOR
(FIGURA 1)
MONITOR (FIGURA 1.1)
1. Indicador LED de encendido/enlace
2. Micrófono
3. LED indicador de carga
4. Pantalla LCD
5. Botón de encendido/apagado
6. Altavoz
7. Enganche para cinta del cuello
8. Botón de ajuste ▲
9. Botón zoom/menú
10. Botón de ajuste ▼
11. Botón aceptar/modo Scan
12. Botón para hablar con el bebé
13. Conector salida AV
14. Conector mini USB alimentación/PC
15. Soporte abatible
16. Tapa del compartimento de la batería
17. Antena retráctil
DISPLAY
Iconos de la pantalla (FIGURA 1.2)
a. Cobertura
b. Volumen seleccionado en el monitor
c. Visión nocturna
d. Nanas
e. Modo VOX
f. Cámara seleccionada
g. Luz de compañía
h. Nivel de transmisión
i. Nivel de batería
j. Icono hablar con el bebé
k. Icono alerta activada
Iconos del Menú (FIGURA 1.3)
A. Menú selección/añadir/eliminar cámara
B. Menú de ajustes de cámara
C. VOX/Standby
D. Nivel de transmisión
E. Alarma
F. Función Vibración
G. Brillo de pantalla
4.2. FUNCIONES Y CONTROLES DE LA CÁMARA
(FIGURA 2)
I. Antena retráctil
II. Sensor de luz
III. Botón de encendido
IV. Accesorio para colgar
V. Altavoz
VI. Botón de emparejamiento
VII. Conector de alimentación Mini USB
VIII. Micrófono
IX. LED de encendido / Emparejamiento
X. Lente de la cámara
XI. Infrarrojo
XII. Accesorio de trípode
5. INSTRUCCIONES DE USO
5.1. ANTES DEL USO
5.1.1. ALIMENTACIÓN DE LA UNIDAD DE LOS
PADRES Y USO DE LA BATERÍA
El monitor, o unidad de los padres, de este vigilabebés
está diseñado para utilizarse con la batería o con el
adaptador CA/CC suministrado. La batería recargable
debe cargarse durante al menos ocho horas antes
de utilizar la unidad por primera vez o si no se ha
utilizado durante un período de tiempo prolongado.
Su vigilabebés se suministra con una batería Li-
ion recargable de 3.7V 1200mAh para el monitor.
Recomendamos utilizar la batería en el monitor
con el n de poder recibir la señal de audio/vídeo

13
ESPAÑOL
procedente de la cámara en cualquier lugar. Conecte
el monitor al adaptador enchufado a la red eléctrica
siempre que sea posible, con el n de mantener la
batería cargada.
INSTALACIÓN DE LA BATERÍA (FIGURA 3)
1. Desatornille y retire la tapa del compartimento de la
batería (16) situada en la parte posterior de la unidad.
2. Inserte la batería Li-ion (suministrada).
3. Coloque de nuevo la tapa de la batería en su lugar
y fíjela con el tornillo.
Precaución: Utilice sólo baterías del tipo
recomendado ya que, en caso contrario, existe
el riesgo de explosión. Deshágase de las baterías
gastadas de manera responsable.
Nota: Cuando no utilice las dos unidades, se
recomienda apagarlas con el n de ahorrar
batería.
CARGA DE LA BATERÍA
Inserte la batería recargable de acuerdo a las
instrucciones indicadas en el apartado anterior.
Conecte el conector del adaptador de corriente a la
toma mini USB situada en el lateral de la unidad (14).
Utilice sólo el adaptador suministrado. Enchufe el
adaptador a la red eléctrica.
Mientras el monitor permanezca conectado a la red
eléctrica y en carga, el LED indicador de carga (3)
permanecerá encendido en rojo.
Si el cargador permanece conectado a la red pero se
ha completado el proceso de carga, el LED indicador
de carga (3) se iluminará en verde.
Cuando el nivel de carga de la batería sea muy bajo,
el icono de nivel de batería (i) parpadeará en rojo y
comenzará a emitir un bip cada 30 segundos.
Nota: retire la batería cuando no vaya a utilizar el
aparato durante un período de tiempo prolongado.
5.1.2. ALIMENTACIÓN DE LA UNIDAD DEL BEBÉ
La cámara o unidad del bebé, de este vigilabebés
está diseñada para utilizarse con el adaptador de CA/
CC suministrado.
1. Localice la toma del conector (VII) en la parte
posterior de la unidad del bebé.
2. Conecte el cable del adaptador a la toma mini USB
de la cámara. Utilice sólo el adaptador suministrado.
3. Enchufe el adaptador a la red eléctrica.
Advertencia: Peligro de Estrangulación –
Mantenga el cable lejos del alcance del bebé. NO
coloque NUNCA una cámara con cables a menos
de 1 metro de la cuna. No utilice nunca cables
alargadores con adaptadores de CA. Utilice sólo
los adaptadores de CA suministrados.
5.2. OPERACIÓN
5.2.1. ENCENDIDO/APAGADO DE LAS UNIDADES
5.2.1.1. MONITOR:
Mantenga pulsado el botón de encendido (5), situado
en la parte superior del monitor, para encenderlo o
apagarlo. El indicador LED de encendido/enlace
(1) se iluminará o apagará dependiendo de si usted
enciende o apaga la unidad.
5.2.1.2. CÁMARA.
Para encender o apagar la cámara, mantenga
pulsado el botón de encendido (III) durante dos
segundos. El LED de alimentación (IX) se iluminará
o apagará dependiendo de si usted enciende o apaga
la unidad.
Cuando haya instalado y encendido la cámara, podrá
ver las imágenes y escuchar los sonidos captados en
la habitación de su bebé a través del monitor.
5.2.2. VOLUMEN DEL MONITOR
Pulse el botón de ajuste (8) si desea incrementar
el volumen de su monitor o el botón de ajuste
(10) si desea reducirlo, eligiendo entre los 5 niveles
disponibles.
5.2.3. HABLAR AL BEBÉ
Usted puede hablarle a su bebé desde la unidad
de los padres (por ejemplo para tranquilizarlo y que
perciba que ya va a acudir a su lado) o a su pareja (si
él o ella está en la habitación del bebé).
Pulse y mantenga pulsado el botón para hablar con el
bebé (12) y hable frente al monitor.
Suelte el botón cuando acabe de hablar para volver a
escuchar el sonido de la habitación del bebé.
Tenga en cuenta que no podrá escuchar a su bebé
mientras esté hablándole; para escucharle tendrá que
dejar de pulsar este botón.
5.2.4. ZOOM
Puede aumentar el tamaño de la imagen visualizada
realizando un zoom de cuatro posiciones.
Para acceder a esta función siga los siguientes pasos:
1. Presione el botón zoom . El cuadrante izquierdo
superior de la imagen aparecerá recuadrado en
blanco.
2. Presione los botones de ARRIBA y ABAJO
para cambiar el cuadrante seleccionado.
3. Pulse el botón para aumentar la imagen del
cuadrante seleccionado.
4. Pulse el botón zoom y regresará al proceso de
selección de cuadrante, por si desea hacer zoom
sobre otro de los cuadrantes.
5. Presione de nuevo el botón zoom para salir de
la función zoom.
5.2.5. VISIÓN NOCTURNA INFRARROJA
(AUTOMÁTICA)
La función de visión nocturna infrarroja permite a
la cámara captar imágenes de su bebé o del área
monitorizada en condiciones de oscuridad o de poca
luz.
En este modo sólo se mostrarán imágenes en blanco
y negro en el monitor y sólo podrán verse los objetos
situados a menos de 2 metros de distancia.
La cámara monitoriza constantemente el nivel de luz
y cambia automáticamente al modo infrarrojo cuando
la luz es insuciente para la visión normal.
5.2.6. ADVERTENCIA DE FUERA DE ALCANCE
Si el monitor se sitúa a una distancia de la cámara
superior a la admisible (vea las características
técnicas), el indicador LED de encendido/enlace de
la cámara (IX) y el monitor (1) parpadearán en rojo,
el símbolo de cobertura (a) aparecerá en rojo y la
pantalla mostrará el logo de MINILAND.

14
ESPAÑOL
Acerque el monitor a la cámara para volver a ver
la imagen correctamente.
5.2.7. MENÚ PRINCIPAL
Mantenga pulsado el botón Menú/Atrás para poder
realizar los ajustes de las principales funciones y
características de su vigilabebés.
5.2.7.1. MENU DE CÁMARA
5.2.7.1.1. SELECCIÓN DE LA CÁMARA
El dispositivo está diseñado para permitir la
observación de diferentes zonas con hasta cuatro
cámaras. Para seleccionar la cámara que desee ver,
siga los pasos que se indican a continuación:
1. Pulse la tecla Menú/Atrás durante tres segundos
para hacer aparecer el menú.
2. Pulse la tecla ARRIBA o la tecla ABAJO
hasta que el icono de cámara se resalte y pulse a
continuación la tecla para entrar en el sub-menú.
3. Pulse la tecla ARRIBA o la tecla ABAJO hasta
que el icono de VER cámara se resalte y pulse a
continuación la tecla .
4. Pulse la tecla ARRIBA o la tecla ABAJO para
seleccionar la cámara que desee visualizar y pulse a
continuación la tecla para conrmar la selección.
Nota 1: Solo se podrán visualizar las cámaras que
hayan sido emparejadas al monitor.
Nota 2: Hay una manera más rápida de cambiar la
cámara a visualizar. Pulse directamente la tecla
para ir viendo cíclicamente las cámaras que estén
emparejadas: CAM1/CAM2/CAM3/CAM4/MODO
SCAN.
5.2.7.1.2. MODO SCAN
Esta función le permite ver de manera consecutiva y
cíclica los canales de cámara emparejados, mostrando
las imágenes de cada cámara durante 12 segundos.
Esta función solo puede utilizarse cuando hay más
de una unidad de cámara emparejada. Para entrar en
este modo:
1. Pulse la tecla Menú/Atrás durante tres segundos
para hacer aparecer el menú.
2. Pulse la tecla ARRIBA o la tecla ABAJO
hasta que el icono de cámara se resalte y pulse a
continuación la tecla para entrar en el sub-menú.
3. Pulse la tecla ARRIBA o la tecla ABAJO hasta
que el icono de VER cámara se resalte y pulse a
continuación la tecla .
4. Pulse la tecla ARRIBA o la tecla ABAJO y
seleccione el icono de SCAN .
5. Pulse la tecla para conrmar.
Nota 1: Si una de las cámaras está fuera de alcance
o si no está encendida, el monitor le avisará de ello y
el modo Scan se detendrá.
Nota 2: El modo Scan puede activarse o desactivarse
pulsando la tecla mientras se visualiza la pantalla
principal si tiene más de una cámara conectada a su
monitor.
5.2.7.1.3. AÑADIR CÁMARA
Este producto está diseñado para permitir la
observación de distintas zonas con hasta 4 cámaras
(canal 1, 2, 3 ó 4 asignado a distintas cámaras). El
monitor y la cámara original salen de fábrica con el
canal 1 programado. Si necesita añadir una cámara
extra, deberá seguir el siguiente proceso:
1. Pulse la tecla Menú/Atrás durante tres segundos
para hacer aparecer el menú.
2. Pulse la tecla ARRIBA o la tecla ABAJO
hasta que el icono de cámara se resalte y pulse a
continuación la tecla para entrar en el sub-menú.
3. Pulse la tecla ARRIBA o la tecla ABAJO
hasta que el icono de añadir cámara se resalte y
pulse a continuación la tecla .
4. Pulse la tecla ARRIBA o la tecla ABAJO para
seleccionar el canal donde desea añadir la nueva
cámara y conrme la selección pulsando la tecla .
5. Mientras el indicador LED de encendido/enlace (1)
esté parpadeando, pulse el botón de emparejamiento
en la cámara (VI).
6. Una vez emparejada, el indicador LED dejará de
parpadear y las imágenes de la cámara se mostrarán
inmediatamente en la pantalla de la unidad de
monitor.
7. Si el emparejamiento no se hubiera efectuado
correctamente, repita los pasos arriba indicados.
Nota 1: Sólo se podrá seleccionar los canales en los
que no se haya emparejado aún ninguna cámara.
Nota 2: No es posible acceder a este submenú si 4
cámaras han sido ya emparejadas.
Puede que, por diversos motivos, se pierda
la conexión entre el monitor y una cámara ya
enlazada. En ese caso, repita el proceso explicado
anteriormente para enlazar de nuevo la cámara con
el monitor.
5.2.7.1.4. ELIMINAR CÁMARA
Para eliminar una de las cámaras conectadas, siga
los pasos que se indican a continuación:
1. Pulse la tecla Menú/Atrás durante tres segundos
para hacer aparecer el menú.
2. Pulse la tecla ARRIBA o la tecla ABAJO
hasta que el icono de cámara se resalte y pulse a
continuación la tecla para entrar en el sub-menú.
3. Pulse la tecla ARRIBA o la tecla ABAJO
hasta que el icono de eliminar cámara
se resalte y pulse a continuación la tecla .
4. Pulse la tecla ARRIBA o la tecla ABAJO para
seleccionar la cámara que desea eliminar y conrme
la selección pulsando la tecla .
Nota 1: Si solo tiene una cámara emparejada con el
monitor, no podrá eliminarla ni acceder a este menú.
Nota 2: Es necesario eliminar un canal antes de
emparejarlo a una nueva unidad de cámara.
5.2.7.2. MENU DE AJUSTES DE CÁMARA
5.2.7.2.1. NANAS
La unidad del bebé puede reproducir una suave nana
para ayudar a su bebé a conciliar el sueño. Para
activar esta función:
1. Pulse la tecla Menú/Atrás durante tres segundos
para hacer aparecer el menú.
2. Pulse la tecla ARRIBA o la tecla ABAJO hasta
que el icono de menú de ajustes de cámara se
resalte y pulse a continuación la tecla para entrar
en el sub-menú.

15
ESPAÑOL
3. Pulse la tecla ARRIBA o la tecla ABAJO
hasta que el icono de Nana se resalte y pulse a
continuación la tecla .
4. Pulse la tecla ARRIBA o la tecla ABAJO
para seleccionar una de las cinco nanas disponibles,
silencio o reproducción en bucle (el ajuste
predeterminado es OFF).
5. Cuando se haya seleccionado la melodía, pulse la
tecla y aparecerá el control de volumen. Pulse la
tecla ARRIBA o la tecla ABAJO para seleccionar
el nivel de volumen desde el 1 hasta el 3 y pulse la
tecla .
6. Presione la tecla Menú/Atrás tres veces para
volver a la pantalla principal.
7. En la parte superior de la pantalla LCD se mostrará
el icono de Nana (d).
Tenga en cuenta que la conguración de las
nanas solo se producirá en la cámara que se esté
visualizando en ese momento.
Nota: La función de reproducción en bucle de las
nanas reproduce cíclicamente todas las nanas.
5.2.7.2.2. VOLUMEN DE LA CÁMARA
Este menú le permitirá congurar el nivel de volumen
con el que se reproducirá en la cámara la voz de los
padres, al emplear la función bidireccional.
Para congurar el volumen de la cámara siga los
siguientes pasos:
1. Pulse la tecla Menú/Atrás durante tres segundos
para hacer aparecer el menú;
2. Pulse la tecla ARRIBA o la tecla ABAJO
hasta que el icono de menú de ajustes de cámara
se resalte y pulse a continuación la tecla para
entrar en el sub-menú.
3. Pulse la tecla ARRIBA o la tecla ABAJO hasta
que el icono de volumen de cámara se resalte y
pulse a continuación la tecla .
4. Pulse la tecla ARRIBA o la tecla ABAJO
para seleccionar uno de los tres niveles de volumen
disponibles (LOW/MID/HIGH) en función de sus
necesidades.
5. Conrme la selección pulsando la tecla .
Tenga en cuenta que la conguración del volumen
se llevará a cabo únicamente para la cámara cuya
imagen se esté visualizando en el monitor en ese
momento.
5.2.7.2.3. LUZ DE COMPAÑÍA
La unidad del bebé tiene una suave luz de compañía
que proporcionará confort al bebé y le permitirá ver en
una habitación oscura.
Para activar la luz de compañía, siga los siguientes
pasos:
1. Pulse la tecla Menú/Atrás durante tres segundos
para hacer aparecer el menú;
2. Pulse la tecla ARRIBA o la tecla ABAJO hasta
que el icono de menú de ajustes de cámara se
resalte y pulse a continuación la tecla para entrar
en el sub-menú.
3. Pulse la tecla ARRIBA o la tecla ABAJO hasta
que el icono de luz de compañía se resalte y pulse
a continuación la tecla
.
4. Pulse la tecla ARRIBA o la tecla ABAJO y
seleccione ON u OFF dependiendo de si desea
activar o desactivar esta función.
5. Conrme la selección pulsando la tecla .
Tenga en cuenta que la conguración de la luz de
compañía se llevará a cabo únicamente para la
cámara cuya imagen se esté visualizando en el
monitor en ese momento.
5.2.7.3. VOX/STANDBY MENU
5.2.7.3.1. MODO DE AHORRO DE ENERGÍA O
SÓLO AUDIO (STANDBY)
Con el modo de ahorro de energía o sólo audio
(Standby), usted puede elegir el tiempo máximo
que la imagen del monitor permanece activa (1,
3 ó 5 minutos); después de este tiempo la imagen
desaparece con el n de ahorrar energía, aunque
se sigue escuchando el sonido. Para reactivar la
imagen, simplemente pulse cualquier botón.
Para activar este modo debe hacer lo siguiente:
1. Pulse la tecla Menú/Atrás durante tres segundos
para hacer aparecer el menú;
2. Pulse la tecla ARRIBA o la tecla ABAJO hasta
que el icono de menú VOX/Standby se resalte y
pulse a continuación la tecla para entrar en el
sub-menú.
3. Pulse la tecla ARRIBA o la tecla ABAJO
hasta que el icono de Standby se resalte y pulse a
continuación la tecla .
4. Pulse la tecla ARRIBA o la tecla ABAJO y
seleccione la opción deseada entre 1, 3 ó 5 minutos u
OFF para desactivar esta función.
5. Conrme la selección pulsando la tecla .
6. Presione la tecla Menú/Atrás dos veces para
volver a la pantalla principal.
5.2.7.3.2. AJUSTE VOX
Este modo le permite controlar la activación por
sonido de su vigilabebés. Si usted activa el modo
VOX en el monitor y no se produce ningún sonido
alrededor de la cámara, ésta dejará de transmitir. La
pantalla del monitor se apaga cuando la cámara no
está transmitiendo.
Cuando la cámara detecte cualquier sonido con una
intensidad superior al nivel de sensibilidad ajustado,
comenzará a transmitir de nuevo la señal al monitor.
Para desactivar esta función y ver el área vigilada
continuamente, desconecte el modo VOX en el
monitor.
• Modo VOX DESACTIVADO: La cámara transmite
continuamente, lo que le permite monitorizar
continuamente a su bebé o el área que desee
proteger.
• Modo VOX ACTIVADO: La cámara sólo transmite
cuando detecta un sonido de intensidad suciente, lo
que dependerá del nivel seleccionado, alrededor de
la cámara.
Para activar esta función, en primer lugar asegúrese
de haber ajustado el modo de ahorro

16
ESPAÑOL
de energía en 1/3 ó 5 minutos (consulte el punto
5.2.7.3.1). Seleccione 1/3 ó 5 si desea que
la cámara deje de transmitir una vez transcurridos 1/3
ó 5 minutos si no se produce ningún
sonido alrededor de ella.
Una vez ajustado el tiempo de espera, para activar el
modo VOX siga los pasos que se indican
a continuación:
1. Pulse la tecla Menú/Atrás durante tres segundos
para hacer aparecer el menú.
2. Pulse la tecla ARRIBA o la tecla ABAJO hasta
que el icono de menú VOX/Standby se resalte
y pulse a continuación la tecla para entrar en el
sub-menú.
3. Pulse la tecla ARRIBA o la tecla ABAJO
hasta que el icono de VOX se resalte y pulse a
continuación la tecla .
4. Pulse la tecla ARRIBA o la tecla ABAJO
y seleccione el nivel de sensibilidad deseado:
OFF/1/2/3 (el ajuste predeterminado es OFF). Ajuste
la sensibilidad en el nivel “1” si su bebé suele dormir
tranquilamente y cuando llora no lo hace con fuerza,
en el nivel “3” si su bebé tiende a emitir ruidos
mientras duerme o emite ruidos bastante fuertes
antes de ponerse a llorar o en el nivel “2” si considera
que el comportamiento de su bebé no corresponde a
ninguno de los dos patrones anteriores.
5. Conrme la selección pulsando la tecla .
6. Presione la tecla Menú/Atrás dos veces para
volver a la pantalla principal.
Si desea ver a su bebé en un momento
determinado, aunque no haya ruidos alrededor,
puede activar la emisión de la cámara de forma
remota pulsando cualquier botón.
5.2.7.4. NIVEL DE TRANSMISIÓN
Puede modicar desde este menú el nivel de potencia
emitido por la cámara, eligiendo entre las opciones
alta/baja. Cuando se sitúa en la posición alta (HI),
la cobertura cubrirá una distancia de 250 metros en
campo abierto con la potencia original. Cuando se
sitúa en la posición baja (LOW), la distancia máxima
de transmisión se reduce a aproximadamente 120
metros en campo abierto, al disminuir la potencia de
emisión.
Para congurar el nivel de transmisión siga los
siguientes pasos:
1. Pulse la tecla Menú/Atrás durante tres segundos
para hacer aparecer el menú.
2. Pulse la tecla ARRIBA o la tecla ABAJO hasta
que el icono de nivel de transmisión se resalte y
pulse a continuación la tecla .
3. Pulse la tecla ARRIBA o la tecla ABAJO y
seleccione el nivel de transmisión deseado: HIGH o
LOW.
4. Conrme la selección pulsando la tecla .
5. Presione la tecla Menú/Atrás para volver a la
pantalla principal.
5.2.7.5. AJUSTE DE LA ALARMA
Para congurar la alerta, siga los siguientes pasos:
1. Pulse la tecla Menú/Atrás
durante tres segundos
para hacer aparecer el menú.
2. Pulse la tecla ARRIBA o la tecla ABAJO hasta
que el icono de la alarma se resalte y pulse a
continuación la tecla .
3. Pulse la tecla ARRIBA o la tecla ABAJO para
congurar el temporizador de la alerta (pulse la tecla
ARRIBA para incrementar o la tecla ABAJO para
reducir).
4. Conrme la selección pulsando la tecla .
5. Presione la tecla Menú/Atrás para volver a la
pantalla principal.
Nota 1: Cuando la alerta esté en marcha, en la pantalla
LCD se mostrará el icono de un reloj (k).
Nota 2: Si desea eliminar la alarma siga los pasos 1,
2 y 3 arriba mencionados y ajuste el tiempo a 00:00.
El icono del reloj desaparecerá de su pantalla.
Nota 3: Cuando la alerta esté sonando, presione
cualquier tecla para cancelarla. Si no hay respuesta, el
aparato le avisará durante 7 minutos y posteriormente
dejará de sonar.
5.2.7.6. FUNCIÓN VIBRACIÓN
Esta función permite a los papás conseguir un
ambiente silencioso en los momentos en que
necesiten tranquilidad y es de gran ayuda en
entornos ruidosos y para aquellas personas que
tengan problemas de audición.
Cuando el sonido en la habitación del bebé supere el
umbral que marca el nivel de sensibilidad congurado,
el monitor vibrará en cuatro ocasiones para avisar a
los padres.
Para activar la función vibración, siga los siguientes
pasos:
1. Pulse la tecla Menú/Atrás durante tres segundos
para hacer aparecer el menú.
2. Pulse la tecla ARRIBA o la tecla ABAJO hasta
que el icono de la función vibración se resalte y
pulse a continuación la tecla .
3. Pulse la tecla ARRIBA o la tecla ABAJO para
activar o desactivar esta función.
4. Conrme la selección pulsando la tecla .
5. Presione la tecla Menú/Atrás para volver a la
pantalla principal.
Tenga en cuenta que la conguración de la función
vibración se llevará a cabo únicamente para la
cámara cuya imagen se esté visualizando en el
monitor en ese momento.
NOTA: Para que el monitor vibre cuando el
volumen en la habitación del bebé supere un
cierto umbral, es imprescindible que el modo VOX
esté activo.
5.2.7.7. LUMINOSIDAD
Para modicar la luminosidad de la pantalla de su
monitor, siga los siguientes pasos:
1. Pulse la tecla Menú/Atrás durante tres segundos
para hacer aparecer el menú.
2. Pulse la tecla ARRIBA o la tecla ABAJO hasta
que el icono de luminosidad se resalte y pulse a
continuación la tecla .
3. Pulse la tecla ARRIBA o la tecla ABAJO

17
ESPAÑOL
y elija el nivel de luminosidad deseado entre los 5
disponibles.
4. Conrme la selección pulsando la tecla .
5. Presione la tecla Menú/Atrás para volver a la
pantalla principal.
5.2.8. eMyBaby
5.2.8.1. REGISTRO
1. En primer lugar regístrese en la página web de
eMyBaby. Para ello, abra su navegador y vaya a
www.emybaby.com y haga click en el botón CREAR
CUENTA.
2. Rellene los campos con sus datos personales y,
habiendo aceptado los términos y condiciones de
uso, pulse el botón ACTIVAR CUENTA.
3. Recibirá en la dirección de correo electrónico
que haya indicado durante el registro un mensaje
de vericación. Cuando haga click en el enlace que
contiene el mensaje de correo, volverá usted a la
página de eMyBaby y podrá acceder introduciendo su
usuario y contraseña tras pulsar el botón ACCEDER.
5.2.8.2. PARA VER LA IMAGEN EN EL PC EN EL
QUE ESTÁ CONECTADO EL VIGILABEBÉS
1. Para poder ver la imagen que transmite la cámara
en su PC, deberá conectar el monitor (pantalla) al
puerto USB de su ordenador mediante un cable
miniUSB-USB (no incluido).
El monitor debe estar encendido, si la batería está
agotada, cárguela.
2. Tras acceder con su usuario y contraseña a
eMyBaby, seleccione la opción VIGILABEBÉS en el
ESCRITORIO.
3. Seleccione ahora el digimonitor 3.5” plus.
4. Podrá elegir entre dos opciones. Elija “Solamente
en el ordenador donde tiene conectado el vigilabebés
mediante el cable USB”.
5. Si todo funciona correctamente deberá ver
automáticamente a su bebé en la pantalla de su
ordenador. Si tiene algún problema con la imagen
consulte las instrucciones de visualización online
pulsando sobre LEER INSTRUCCIONES.
5.2.8.3. PARA VER LA IMAGEN A DISTANCIA A
TRAVÉS DE eMyBaby
Si desea ver a su bebé a distancia, ya sea en su pc,
tablet o Smartphone, siga los siguientes pasos:
NOTA: para ver la imagen que está captando la
cámara de forma remota a través de eMyBaby,
el monitor debe estar conectado a su PC. Es
imprescindible emitir señal a través de eMyBaby
desde el PC al que está conectado el monitor de
su vigilabebés.
Si no se realiza este paso previo, no podrá recibir
la señal en cualquier otro dispositivo (PC, tablet
o móvil).
1. Conecte el vigilabebés a su PC según los pasos
indicados anteriormente, conectando el monitor al
puerto USB de su ordenador mediante un cable
miniUSB-USB (no incluido).
2. Acceda a la página web eMyBaby (www.emybaby.
com) con su nombre de usuario y contraseña
(regístrese como se ha indicado anteriormente en
caso de que no los tuviera) y seleccione la opción
VIGILABEBÉS.
3. Escoja digimonitor 3.5’’ plus de entre los distintos
modelos de vigilabebés.
4. Podrá elegir entre dos opciones. Elija “Ver desde
cualquier lugar a través de otro ordenador, tablet o
smartphone”.
5. La primera vez que acceda a este servicio, se le
pedirá que introduzca el número de pedido de su
producto. Este número tiene la forma MNLXX-XXXXX
y lo encontrará en el interior del compartimento de la
batería del monitor.
6. Una vez introducido el código, accederá a una
pantalla en la que encontrará dos opciones distintas:
Emitir y Recibir señal. Para poder ver la imagen
que está captando la cámara remotamente en su
dispositivo móvil, deberá pulsar en primer lugar el
botón Emitir.
7. Haga click ahora sobre el icono que aparece
en el centro de la imagen. Cuando su ordenador
comience a emitir aparecerá la siguiente imagen en
su pantalla:
Pasos a realizar si desea ver la imagen desde
otro ordenador:
1. Conecte el vigilabebés a su PC según los pasos
indicados anteriormente, conectando el monitor
al puerto USB de su ordenador mediante un cable
miniUSB-USB (no incluido).
2. En el PC en el que desee ver la imagen de
forma remota, acceda a la página web eMyBaby
(www.emybaby.com) con su nombre de usuario y
contraseña y seleccione la opción VIGILABEBÉS.
3. Escoja digimonitor 3.5” plus de entre los distintos
modelos de vigilabebés.
4. Podrá elegir entre dos opciones. Elija “Ver desde
cualquier lugar a través de otro ordenador, tablet o
smartphone”.
5. Para ver la imagen que está captando la cámara
remotamente en su dispositivo móvil, deberá pulsar
ahora el botón Recibir señal. Si todo funciona
correctamente deberá ver automáticamente a su
bebé en la pantalla de su ordenador. Si tiene algún
problema con la imagen consulte las instrucciones
de visualización online pulsando sobre el icono
LEER
INSTRUCCIONES.
Pasos a realizar si desea ver la imagen desde un
dispositivo móvil (tablet o teléfono móvil):
Aplicación eMyBaby
Miniland ha desarrollado la aplicación eMyBaby, que
está disponible para iOS y Android, y se descarga de
manera sencilla y gratuita.
Para descargar la aplicación eMyBaby, en
primer lugar acceda a la tienda de aplicaciones
correspondiente o descárguela directamente
escaneando el código QR correspondiente de los
que se muestran a continuación:

18
ESPAÑOL
Para instalar la aplicación, siga las instrucciones al principio de este manual.
1. Una vez instalada la aplicación, ábrala. Entre en LOG IN e introduzca su usuario y contraseña para acceder,
en caso de que ya esté registrado, o regístrese si no lo había hecho antes. Recuerde que recibirá un mensaje
de vericación en la dirección de correo electrónico indicada durante el registro.
2. En el menú principal, seleccione la opción VIGILABEBÉS.
3. Escoja digimonitor 3.5” plus de entre los distintos modelos de vigilabebés.
4. Pulse sobre el icono de PLAY para ver la imagen captada por la cámara desde su dispositivo móvil.
Navegador del dispositivo
También podrá ver la imagen de la cámara accediendo a la web eMyBaby a través del navegador de su
dispositivo móvil. Esta opción le será especialmente útil si su dispositivo móvil no es iOS o Android.
1. En el navegador de su dispositivo acceda a la página eMyBaby (www.emybaby.com) con su nombre de
usuario y contraseña. Seleccione la opción VIGILABEBÉS en el menú principal.
2. Escoja digimonitor 3.5” plus de entre los distintos modelos de vigilabebés.
3. Podrá elegir entre dos opciones. Elija “Ver desde cualquier lugar a través de otro ordenador, tablet o
smartphone”.
4. Pulse el botón Recibir señal. Si todo funciona correctamente deberá ver automáticamente a su bebé en la
pantalla de su dispositivo móvil.
6. MANTENIMIENTO
• Limpie las supercies de la cámara y del monitor con un trapo suave que no deje pelusas.
• Si las unidades se ensuciaran, utilice un trapo ligeramente húmedo para limpiar las supercies, teniendo
cuidado de evitar la entrada de agua por ninguna de las aperturas.
• No utilice nunca productos de limpieza o disolventes.
7. IDENTIFICACIÓN Y RESOLUCIÓN DE PROBLEMAS
Problema Causa posible Solución
No hay recepción
en el monitor
La cámara no está encendida Pulse y mantenga pulsado el Botón de
encendido (III) durante 2 segundos
El monitor no está encendido Pulse y mantenga pulsado el botón de
encendido (5)
Cámara: no se ha enchufado
el adaptador de corriente
Enchufe el adaptador de corriente
Monitor: No se ha enchufado
el adaptador de corriente
Enchufe el adaptador de corriente
El monitor está fuera de su
campo de alcance
Acerque el monitor a la cámara
Se ha perdido la conexión
entre el monitor y una
cámara ya emparejada
Empareje de nuevo la cámara con el
monitor.
Consulte la sección 5.2.7.1.3.
Se ha seleccionado una
cámara que no es la correcta
Cambie el número de cámara que está
visualizando.
Consulte la sección 5.2.7.1.1.
Sólo se muestran
imágenes en blanco
y negro
Compruebe si la cámara
está en el modo de visión
nocturna/infrarroja
Para ver las imágenes en color,
aumente el nivel de luz en el lugar
en el que se encuentre la cámara y
asegúrese de que nada está tapando
el sensor de luz de la cámara (II)
No es posible escuchar
la voz de los padres en
la unidad del bebé
El ajuste del volumen
de la unidad parental es
demasiado bajo
Ajuste el volumen en el nivel más alto

19
ESPAÑOL
Problema Causa posible Solución
La cámara no transmite No se ha encendido la cámara Pulse y mantenga pulsado el botón
(III) durante 2 segundos
Cámara: no se ha enchufado
el adaptador de corriente
Enchufe el adaptador de corriente
El modo VOX o el modo de
ahorro de energía (Standby)
está activado
Para ver el área vigilada continuamente,
desconecte el modo VOX o el modo de
ahorro de energía en el monitor
No es posible escuchar
al bebé en la unidad de
los padres
El ajuste del volumen de la
unidad de los padres es
demasiado bajo
Ajuste el volumen en el nivel más alto
Interferencias o
recepción insatisfactoria
Es posible que otros dispositivos
electrónicos estén interriendo con
la señal
Aléjelos del dispositivo.
Despliegue la antena retráctil de la parte
posterior de la cámara (I)
La cámara y el monitor podrían estar
a una distancia excesiva
Acerque el monitor a la cámara.
Despliegue la antena de la parte posterior de
la cámara (I)
El monitor no está lo sucientemente
cargado
Enchufe el adaptador de corriente
La cámara o el monitor podrían estar
demasiado cerca de muchos
objetos de metal
Aléjelos del dispositivo
No es posible cargar la
batería en la unidad de
los padres
No se ha enchufado el
adaptador de CA/CC
Enchufe el adaptador de corriente
Se ha utilizado una batería no
recargable
Sólo pueden utilizarse baterías
recargables (batería Li-ion de 3.7 V, 1200
mAh): compruebe la batería y si fuera
necesario cámbiela por la suministrada con
el aparato
Si la unidad del
bebé ha perdido
la conexión con la
unidad parental
La cámara y el monitor podrían
estar a una distancia excesiva
Acerque el monitor a la cámara.
Se ha perdido momentáneamente
la conexión entre las dos unidades
Restablezca las unidades
desconectándolas de la alimentación
eléctrica.
Espere unos 15 segundos antes de
conectarlas de nuevo.
Deje pasar un minuto para que la
unidad del bebé y la unidad parental
se sincronicen
Se ha perdido la conexión
entre las dos unidades
Empareje de nuevo la cámara y el monitor.
Consulte la sección 5.2.7.1.3.
8. ESPECIFICACIONES TÉCNICAS
Frequencia 2.4GHz FHSS
Cobertura 240m (línea recta y espacio abierto)
Nº de canales congurables 4
Alimentación (unidad de los padres)
Input: 100-240VAC 50/60Hz
Output: 5V 800mA
Batería recargable del monitor 3.7V 1200 mAh
Alimentación (unidad del bebé)
Input: 100-240 VCA 50/60Hz
Output: 5V 800mA
Tiempo de funcionamiento con la batería
totalmente cargada (unidad parental)
Aproximadamente 5 horas
Tamaño de la pantalla LCD 3.5''
Formato de cable adaptador de Jack a RCA
compatible
Figura 4
Formato de cable miniUSB-USB compatible Cable USB para transferencia de datos

20
ESPAÑOL
9. INFORMACIÓN SOBRE LA ELIMINACIÓN DE LAS BATERÍAS Y EL PRODUCTO
• Recuerde que es necesario eliminar el producto de manera responsable con el medio ambiente,
retirando antes la pila.
• No mezcle los productos que lleven el símbolo de un contenedor de basura tachado con la
basura doméstica normal.
• Para la recogida y el tratamiento adecuados de estos productos, llévelos a los puntos de
recogida designados por sus autoridades locales. También puede ponerse en contacto con
el establecimiento en el que adquirió el producto.
Por medio de la presente Miniland S.A. declara que el “89174 digimonitor 3.5’’ plus”
cumple con los requisitos esenciales y cualesquiera otras disposiciones aplicables o
exigibles de la Directiva 2014/53/UE.

21
ENGLISH
INDEX
1. Introduction
2. Contents
3. Safety instructions
4. Product features
5. Instructions for use
6. Maintenance
7. Troubleshooting
8. Technical specications
9. Information on disposal of batteries and product
1. INTRODUCTION
Congratulations for purchasing this wireless color baby
monitor, which incorporates the latest technology.
We are sure you will be completely satised with the
quality and features of this product. Nevertheless, we
recommend you to read these instructions carefully to
get the best results from your purchase.
This baby monitor allows you to transmit audio/video
signals wirelessly to be received on the color monitor,
which is ideal for many situations such as, monitoring
of babies, young children or the elderly.
NOTE: the features described in this user manual
may be subject to change without notice.
2. CONTENTS
1 Camera (baby unit)
1 Monitor (parents’ unit)
2 AC/DC Adapters
1 rechargeable Lithium battery (Li-ion) for the monitor
1 Neck strap
1 Transport and storage pouch
1 Tripod
Guarantee Card and Instruction Manual
• If any of the aforementioned elements is missing,
get in touch with your distributor.
3. SAFETY INSTRUCTIONS
Read this instruction manual carefully before using
your baby monitor for the rst time and keep it for
reference use in the future.
3.1. GENERAL SAFETY INSTRUCTIONS:
When using electrical equipment it is necessary to
take certain basic safety precautions at all times:
1. It is necessary to exercise caution when any
product is used by or in the vicinity of children or
elderly persons. Keep the appliance out of reach of
children.
2. This product should not be used as the sole means
of surveillance, not being under any circumstances
a substitute for responsible supervision of children,
elderly persons or property by adults.
3. This unit should only be used with the AC power
adapters included in this package (rated
5.0V, 800mA).
4. Only use batteries of the recommended type (Li-ion
3.7 V– 1200mAh). Do not try to charge any other type
of batteries on your monitor.
5. This product contains small parts. Exercise care
when unpacking and assembling the product.
6. DO NOT allow children to play with the packaging
materials such as plastic bags. Exercise care when
unpacking and assembling the product.
7. DO NOT use the appliance if the cord or plug is
damaged. If your baby monitor is not operating
properly or has suffered any damage, contact
the authorized Miniland service center to request
inspection and repair of the appliance in order to avoid
any possible risk.
8. DO NOT attempt to repair or adjust any of the
electrical or mechanical functions of the unit since, if
you do, the guarantee will be made void.
9. Check the voltage of your home in order to
ensure that it matches the voltage indicated in the
specications of the appliance.
10. If you are not going to use the baby monitor for a
long period of time, always unplug the power adapter.
To disconnect the appliance from the mains, hold the
transformer and remove the plug from the socket.
Never pull on the cord itself.
11. This product is designed for indoor use only. The
unit should not be exposed to rain, moisture, dripping
or splashing. No objects lled with liquid should be
placed on top of, or beside the product, such as
a glass or vase. This item should not be used near
water.
CAUTION
• This baby monitor is designed to give parents peace
of mind when they are unable to be in the same room
as their baby. This product is not a substitute for
supervision by adults. It is necessary for one parent to
stay near the monitor when in use. The baby monitor
is not a medical device and you should not entrust
the welfare of your baby to it. It is important that you
regularly visit the baby’s room in person to ensure that
everything is in order.
• Never use this baby monitor in cases in which the life
or health of the baby or other people, or the integrity of
a building, depend on its operation. The manufacturer
accepts no liability or claim for death, personal injury
or property damage resulting from the malfunction or
misuse of the product.
• Misuse of this Wireless Baby Monitor could result
in legal action.
• Use this product responsibly.
IMPORTANT: Please note that any change or
modication to the equipment not performed by
the Miniland technical service will not be covered
by the product guarantee.
3.2. RADIO INTERFERENCE TIPS
This equipment has been subjected to tests and
complies with the requirements of the RED Directive
2014/53/EU. These requirements are designed
to provide reasonable protection from harmful
interference at residential premises. If the unit is
not installed and used in line with the instructions,
this could cause harmful interference to the radio
communications. However, bear in mind that it is not
possible to ensure that interferences are not going
to occur at a specic installation. If the baby monitor
causes interferences to radio or TV reception, which
may be determined by turning it off and on, the user is
recommended to try and rectify the interference in the
manner indicated below
• Reorient or change the position receiver.
• Increase the distance between the equipment in
question and the baby monitor.
• Connect the equipment to a different socket from
that used for the receiver.

22
• Consult the Customer Care department.
To ensure compliance with the RED Directive 2014/53/
EU, this equipment has special shielded cables.
Operating with unapproved equipment or using
unshielded cables will probably cause interference to
radio or TV reception.
3.3. CHOOSING THE RIGHT PLACE
• Place the electronic device somewhere out of the
reach of children so as to avoid accidents.
• The baby unit must be situated at least 1 and 1.5
meters away from the baby’s cot. Never place the
baby unit inside the cot, bed or playpen, nor secure
the tripod to them. Make sure that the unit, the cables
and the adapter are well out of the reach of the baby
and other young children.
• Put the baby monitor in a place where the air can
circulate freely. Do not place it on duvets or soft
blankets nor in the corners of cupboards, shelves etc.
• Place the baby monitor well away from heat sources
like radiators, chimneys, kitchens and direct sunlight.
• Keep the Camera away from TV appliances,
repeaters and radios. The intense radio signals
generated by these elements could cause noise
or even sounds or images to be broadcast on
the monitor. Should this occur, move the camera
somewhere else.
4. PRODUCT CHARACTERISTICS
4.1. MONITOR CONTROLS AND FUNCTIONS
(FIGURE 1)
MONITOR (FIGURE 1.1)
1. ON/pairing LED indicator
2. Microphone
3. Charge indicator
4. LCD Screen
5. ON/OFF button
6. Loudspeaker
7. Neck strap hook
8. Set button▲
9. Zoom/Menu/Back button
10. Set button ▼
11. OK/Scan
12. Baby talk button
13. AV output connector
14. Mini USB power/PC connector
15. Folding support
16. Battery compartment cover
17. Retractable antenna
DISPLAY
Screen Icons (FIGURE 1.2)
a. Signal level
b. Volume selected on the monitor
c. Night vision
d. Lullabies
e. VOX Mode
f. Selected camera
g. Night light
h. Transmission level
i. Battery level
j. Talk to the baby
k. Alert ON
Menu Icons (FIGURE 1.3)
A. Select/Add/Remove camera menu
B. Camera Settings Menu
C. VOX/Standby
D. Transmission level
E. Alert
F. Vibration
G. Screen conguration: luminosity
4.2. CAMERA CONTROLS AND FUNCTIONS
(FIGURE 2)
I. Retractable antenna
II. Photo sensor
III. Power button
IV. Hanging attachment
V. Speaker
VI. Link button
VII. Mini USB power connector
VIII. Microphone
IX. ON/link LED
X. Camera lens
XI. Infrared
XII. Tripod attachment
5. USAGE INSTRUCTIONS
5.1. BEFORE USE
5.1.1. PARENTS’ UNIT POWER SUPPLY AND
BATTERY USAGE
The monitor, the parents’ unit, of this baby monitor
is designed for use with the battery or with the AC/
DC adapter supplied. The rechargeable battery must
be charged for at least eight hours before using the
unit for the rst time or if it has not been used for a
prolonged time period.
Your baby monitor comes with a rechargeable, 3.7V
1200mAh Li-ion battery for the monitor. We would
recommend using the battery in the monitor so as
to be able to receive the audio/video signal from the
camera anywhere. Connect the monitor to the adaptor
plugged into the mains whenever possible so as to
keep the battery charged.
BATTERY INSTALLATION (FIGURE 3)
1. Unscrew and remove the battery compartment
cover (16) situated at the rear of the unit.
2. Insert the Li-ion battery (supplied).
3. Put the battery cover back in its place and secure
it with the screw.
Precaution: Only use batteries of the
recommended type as otherwise there is a risk
of explosion. Dispose of worn out batteries
responsibly.
Note: When you don’t use the two units, it is
recommended to turn them off in order to save
the battery.
CHARGING THE BATTERY
Insert the rechargeable battery in accordance with the
instructions stated in the previous section.
Connect the AC adapter connector to the mini-USB
socket situated on the side of the unit
(14). Only use the adapter supplied. Plug in the
adapter to the mains.
Whilst the monitor is connected to the mains and
charging, the charging indicator LED (3) will be lighted
in red.
ENGLISH

23
If the charger remains connected to the mains but
the charging process is complete, the charging LED
indicator (3) will light in green.
When the level of battery is low, the battery level icon
(i) will begin to blink in red and the monitor will start to
beep every 30 seconds.
Note: remove the battery when the appliance is
not going to be used for a prolonged time period.
5.1.2. BABY UNIT POWER SUPPLY
The camera or baby unit of this baby monitor is
designed for use with the AC/DC adapter supplied.
1. Place the connector socket (VII) at the rear of the
baby unit.
2. Connect the adapter cable to the mini-USB socket
of the camera. Only use the adapter supplied.
3. Plug in the adapter to the mains.
Warning: Danger of Strangulation – Keep the
cable out of reach of the baby. NEVER place a
camera with cables less than 1 metre away from
the cot. Never use extension cables with AC
adapters. Only use the AC adapters supplied.
5.2. OPERATION
5.2.1. TURNING THE UNITS ON/OFF
5.2.1.1. MONITOR:
Keep the ON button pressed (5) situated on the upper
part of the monitor to turn it on and off. The ON/pairing
LED indicator (1) will go on and off depending on whether
you turn the unit on or off.
5.2.1.2. CAMERA:
To turn the camera on or off, keep the on button (III)
pressed in for two seconds. The power
LED (IX) will go on and off depending on whether you
turn the unit on or off.
When you have installed the camera and turned it
on, you can see the images and listen to the sounds
captured in your baby’s room via the monitor.
5.2.2. MONITOR VOLUME
Press the set button
(8) if you wish to increase the
volume of your monitor or the set button (10) if you
wish to turn it down, choosing between the 5 levels
available.
5.2.3. TALK TO THE BABY
You may talk to your baby from the parents’ unit (for
example, to calm it down and so it understands you’ll
be with it in a moment) or to your partner (if he or she
is in the baby’s room).
Press the button and keep it pressed in to talk to the
baby (12) and talk in front of the monitor. Release the
button when you have nished talking to listen to the
sound from the baby’s room again.
Bear in mind that you can’t listen to your baby whilst
you’re talking to it; to listen to it, you will have to stop
pressing this button.
5.2.4. ZOOM
You may increase the size of the image viewed,
carrying out a four-position zoom.
To use this function, follow the next steps:
1. Press the zoom button . to access the zoom
function. The upper left quarter of the image will
appear in the white section.
2. Press the set UP
(8) or DOWN (10) keys to
change the selected quarter.
3. Press the button to increase the image of the
selected quarter.
4. Press the zoom button and you will return to the
quarter selection process in case you wish to zoom
onto another of the quarters.
5. Press the zoom button again to exit the zoom
function.
5.2.5. INFRARED NIGHT VISION (AUTOMATIC)
The infrared night vision function enables the camera
to capture images of your baby or of the monitored
area when it is dark or there is little light.
In this mode images will only be shown on the monitor
in black and white and you will only be able to see
images situated less than 2 meters away.
The camera constantly monitors the light level and
automatically switches to infrared mode when there is
not enough light for normal vision.
5.2.6. OUT OF RANGE WARNING
If the monitor is located at a distance away from the
camera which is greater than that allowed (see the
technical characteristics), the on/link LED indicator
of the camera (IX) and the monitor (1) will ash in
red, the coverage symbol (a) will appear red and the
screen will display the “MINILAND” logo screen.
Bring the monitor closer to the camera to see the
image correctly again.
5.2.7. MAIN MENU
Keep the Menu/Back button pressed in order
to make adjustments to the main functions and
characteristics of your baby monitor.
5.2.7.1. CAMERA MENU
5.2.7.1.1. CHOOSING THE CAMERA
This product is designed to allow the observation of
different areas with up to 4 cameras. To choose the
camera you want to see, follow the next steps:
1. Press for 3 seconds the Menu/Back button and
the menu will pop up;
2. Press the UP key or DOWN key until the
camera icon is highlighted then press the key
enter into the sub-menu.
3. Press the UP key or DOWN key until the SEE
camera icon is highlighted and then press the
key.
4. Press the UP key or DOWN key to select the
camera that you want to see and conrm the selection
with the key.
Note 1: You will only be able to select the cameras
that have already been paired with the monitor.
Note 2: There is a faster way to change the camera
you are viewing. Directly press key to cycle
through paired cameras: CAM1 / CAM2 / CAM3 /
CAM4 / SCAN MODE.
5.2.7.1.2. SCAN MODE
This function automatically cycles through your paired
camera channels to display each camera for 12
seconds. This function can be used only when you
have more than 1 camera unit paired.
To enter in this mode:
ENGLISH

24
1. Press for 3 seconds the Menu/Back
key and the
menu will pop up.
2. Press the UP key or DOWN key until the
camera icon is highlighted then press the key
enter into the sub-menu.
3. Press the UP key or DOWN key until the
SEE camera icon is highlighted and then press the
key.
4. Press the UP key or DOWN key and select
the SCAN icon .
5. Press the key to conrm.
Note 1: When one of the cameras is out of range or is
not switch on, the monitor will warn you and the Scan
Mode will stop.
Note 2: The Scan mode can be turned on or off by
pressing the button while viewing the main screen.
5.2.7.1.3. PAIRING CAMERA
This product is designed to allow the observation of
different areas with up to 4 cameras (channels 1, 2, 3
or 4 assigned to different cameras). The monitor and
the original camera leave the factory with channel 1
programmed. If you need to add an extra camera,
follow the process set out below.
1. Press for 3 seconds the Menu/Back key and the
menu will pop up.
2. Press the UP key or DOWN key until the
camera icon is highlighted then press the key
enter into the sub-menu.
3. Press the UP key or DOWN key until the
add camera icon is highlighted and then press the
key.
4. Press the UP key or DOWN key to select the
channel where you want to add the new camera and
conrm the selection with the key.
5. While the ON/pairing LED indicator (1) is ashing in
green, press the link button on the camera (VI).
6. Once paired, the LED indicator will stop ashing
and the image of the camera will show immediately
on the monitor unit screen.
7. If unsuccessful, please repeat above steps.
Note 1: You will only be able to select the channels
where no camera has been paired yet.
Note 2: It is not possible to enter this submenu if 4
cameras have already been paired.
For various reasons you may lose the connection
between the monitor and a camera which is already
connected. Should this be the case, repeat the
process explained above to connect the camera with
the monitor again.
5.2.7.1.4. DELETE CAMERA
To delete one of the cameras connected, follow the
next steps:
1. Press for 3 seconds the Menu/Back key and the
menu will pop up.
2. Press the UP key or DOWN key until the
camera icon is highlighted then press the key
enter into the sub-menu.
3. Press the UP key or DOWN key until the
remove camera icon is highlighted and then
press the
key.
4. Press the UP key or DOWN key to select the
camera you want to delete and conrm the selection
with the key.
Note 1: If you only have one camera paired to the
monitor, you won’t be able to remove it and you won’t
be allowed to enter this submenu.
Note 2: A channel needs to be deleted before pairing
to a new camera unit.
5.2.7.2. CAMERA SETTINGS MENU
5.2.7.2.1. LULLABIES
You can soothe the baby to sleep by playing a gentle
lullaby from the baby unit. To activate this function:
1. Press for 3 seconds the Menu/Back key and the
menu will pop up.
2. Press the UP key or DOWN key until the
camera settings menu icon is highlighted then
press the key enter into the sub-menu.
3. Press the UP key or DOWN key until the
lullaby icon is highlighted then press the key
enter into the sub-menu.
4. Press the UP key or DOWN key to select
one of the 5 available lullabies, silence or loop
reproduction (default OFF).
5. When you have selected the tune, press the key
and the volume control will appear. Press the UP /
DOWN key to select the level of volume from 1 to 3
and press the key.
6. Press the Menu/Back key three times to return
to the main screen.
7. Lullaby icon (d) will be displayed at the top of the
LCD screen.
Keep in mind that the conguration of the lullabies will
take place only on the camera that is being watched
in that moment.
Note: Lullaby loop function plays in cycle all the
lullabies.
5.2.7.2.2. CAMERA VOLUME
This menu will allow you to congure the volume level
at which the parents’ voices will be reproduced on the
camera by using the two-way function.
In order to congure the camera volume, follow the
next steps:
1. Press for 3 seconds the Menu/Back key and the
menu will pop up.
2. Press the UP key or DOWN key until the
camera settings menu icon is highlighted. Then
press the key enter into the sub-menu.
3. Press the UP key or DOWN key until the
camera volume icon is highlighted. Then, press
the key;
4. Press the UP key or DOWN key, choose
whichever of the three camera volume levels available
(HIGH/MID/LOW) you prefer.
5. Conrm the selection pressing the key.
Bear in mind that the volume will only be congured
for the camera whose image you are viewing on the
monitor at that time.
5.2.7.2.3. NIGHT LIGHT
The baby unit has a nightlight which emits a soft light,
ENGLISH

25
providing your baby with comfort and allowing it to see
in a dark room.
To activate the night light, please, follow the next
steps:
1. Press for 3 seconds the Menu/Back
key and the
menu will pop up.
2. Press the UP key or DOWN key until the
camera settings menu icon is highlighted. Then
press the key enter into the sub-menu.
3. Press the UP key or DOWN key until the
nightlight icon is highlighted. Then, press the
key;
4. Press the UP key or DOWN key, select ON/
OFF to activate or deactivate this function.
5. Conrm the selection pressing the key.
Bear in mind that the volume will only be congured
for the camera whose image you are viewing on the
monitor at that time.
5.2.7.3. VOX/STANDBY MENU
5.2.7.3.1. STANDBY SETTING
With the Standby mode you can choose the maximum
time the monitor image remains active (1, 3 or 5
minutes); after this time the image disappears but the
sound continues to be heard in order to save energy.
To reactivate the image, just press any key.
To activate this mode you should:
1. Press for 3 seconds the Menu/Back key and the
menu will pop up.
2. Press the UP key or DOWN key until the VOX/
Standby menu icon is highlighted. Then press the
key to enter into the sub-menu.
3. Press the UP key or DOWN key until the
Standby icon is highlighted. Then, press the
key.
4. Using the UP key or DOWN key, select the
option desired between 1min/3min/5min or OFF to
deactivate this feature.
5. Conrm the selection pressing the key.
6. Press the Menu/Back key twice to return to the
main screen.
5.2.7.3.2. VOX SETTING
This mode lets you control the sound activation of
your baby monitor. If you enable the
VOX mode on the monitor and there is no sound
around the camera, the latter will stop transmitting.
However, it will keep picking up the sounds using a
minimum amount of power. The monitor screen will go
off if the camera is not transmitting. When the camera
detects any sound higher than the sensitivity setting,
it will start transmitting the signal to the monitor again.
To disable this function and see the monitored area
continuously, you must disable the
VOX mode on the monitor.
• VOX mode disabled: The camera transmits
continuously, allowing it to constantly monitor your
baby or the area you wish to monitor
• VOX mode enabled: The camera only transmits
when a sound is detected with sufcient intensity -
depending on the level selected - around the camera.
To activate this function, rst of all make sure you
have set the standby mode to 1/3 or 5 minutes (see
point 5.2.7.3.1). Choose 1/3 or 5 if you want your
camera to stop transmitting the image after 1/3 or 5
minutes if there is no sound around.
Once the standby time is set, to activate VOX mode,
please, follow the next instructions:
1. Press for 3 seconds the Menu/Back key and the
menu will pop up.
2. Press the UP key or DOWN key until the VOX/
Standby menu icon is highlighted. Then press the
key to enter into the sub-menu.
3. Press the UP key or DOWN key until the VOX icon
is highlighted. Then, press the key.
4. Press the UP key or DOWN key, select the
sensitivity level desired: OFF/1/2/3 (default OFF). Set
sensitivity to “1” for a baby that sleeps peacefully and
cries quietly and “3” if the baby tends to make noise
while sleeping or makes fairly loud noises before
actually crying, or set it to “2” level if you consider
that your baby’s behavior does not t either of the two
previous patterns.
5. Conrm the selection pressing the key.
6. Press the Menu/Back key twice to return to the
main screen.
If you wish to see your baby at a certain time,
even if there is no noise about, you can enable
the camera transmission remotely by pressing
any button.
5.2.7.4. TRANSMISSION LEVEL
On this menu you can change the power level
transmitted by the camera, choosing from amongst
the high/low options. When at the high position (HI),
coverage will extend 250 meters in open country with
the original power. When at the low position (LOW),
the maximum transmission distance is reduced to
around 120 meters in open country as the transmitting
power is reduced.
To congure the transmission level, follow the next
steps:
1. Press for 3 seconds the Menu/Back key and the
menu will pop up.
2. Press the UP key or DOWN key until the
transmission level menu icon is highlighted. Then
press the key.
3. Using the UP key or DOWN key, select the
transmission level desired: HIGH or LOW.
4. Conrm the selection pressing the key.
5. Press the Menu/Back key to return to the main
screen.
5.2.7.5. ALERT SETTING
To set the alert, follow the next instructions:
1. Press for 3 seconds the Menu/Back key and the
menu will pop up.
2. Press the UP key or DOWN key until the alert
icon is highlighted. Then press the key.
3. Press the UP key or DOWN key to set the
alarm time (press UP key to increment and DOWN
to count down).
4. Conrm the selection pressing the key.
ENGLISH

26
5. Press the Menu/Back
key to return to the main
screen.
Note 1: Once the alert is running, an alarm clock icon
(k) will be displayed on the LCD screen.
Note 2: If you want to remove the alarm follow the
steps 1 to 3 mentioned above and set the time to
00:00. The clock icon will disappear.
Note: When the alert is ringing, press any key to
cancel it. If there is no answer, the ringing will last 7
minutes and then stop.
5.2.7.6. VIBRATION FUNCTION
This function allows parents to achieve a silent
environment when they need peace and quiet and it is
a great help in noisy environments and for people who
have hearing problems.
When the sound in the baby’s room exceeds the
threshold marked by the sensitivity level congured,
the monitor will vibrate on four occasions to warn the
parents.
To activate the vibration function, follow the next
steps:
1. Press for 3 seconds the Menu/Back key and the
menu will pop up;
2. Press the UP key or DOWN key until the
vibration setting menu icon is highlighted. Then
press the key.
3. Using the UP key or DOWN key, select ON/
OFF if you want to activate or deactivate this feature.
4. Conrm the selection pressing the key.
5. Press the Menu/Back key to return to the main
screen.
Bear in mind that the vibration function will only be
congured for the camera whose image you are
viewing on the monitor at that time.
NOTE: In order for the monitor to vibrate when
the volume in the baby’s room exceeds a certain
threshold, it is vital for the VOX mode to be active.
5.2.7.7. LUMINOSITY
To modify the luminosity of your monitor, follow the
next steps:
1. Press for 3 seconds the Menu/Back key and the
menu will pop up.
2. Press the UP key or DOWN key until the
luminosity setting menu icon is highlighted. Then
press the key.
3. Using the UP key or DOWN key, choose the
luminosity level you prefer from amongst the ve
available.
4. Conrm the selection pressing the key.
5. Press the Menu/Back key to return to the main
screen.
5.2.8. eMyBaby
5.2.8.1. REGISTRATION
1. First of all register on the eMyBaby website. To do
so, open your browser, go to www.emybaby.com
and click on the CREATE ACCOUNT tab.
2. Complete the elds with your personal data and
after having accepted the terms and conditions of use,
click on the ACTIVATE ACCOUNT tab.
3. You will receive a message of conrmation at
the e-mail address you provided in the registration
process. Clicking on the link containing the e-mail
message will take you back to the eMyBaby page,
where you need to enter your username and
password after clicking on the SIGN IN tab.
5.2.8.2. IN ORDER TO VIEW THE IMAGE ON THE
PC TO WHICH THE BABY MONITOR
IS CONNECTED
1. In order to view the image from the camera on your
computer you rst need to make a few adjustments
to the monitor.
a. Go to the main menu and click on the adjustments
icon.
b. Click on monitor adjustments. Click on “USB
Output” from the options displayed on the list.
c. Once you are in, select the icon from the three
options available.
In this manner, when you connect the monitor to the
computer, you will no longer see the monitor image
and you will be able to see your baby on the computer.
2. In order to see the image transmitted by the camera
on your PC, you should connect the monitor (screen)
to the USB port on your computer using a mini USB-
USB cable (not included). The monitor should be
switched on; if the battery is at, recharge it.
3. After accessing eMyBaby using your username
and password, select the BABY MONITOR option in
DASHBOARD.
4. Now select the digimonitor 3.5” plus model.
5. There are two options to choose from. Choose
“USB Camera computer connected”.
6. If everything is working correctly you should
automatically see your baby on the computer screen.
If there is a problem with the image, consult the
online viewing instructions by clicking on the READ
INSTRUCTIONS icon.
5.2.8.3. IN ORDER TO VIEW THE IMAGE AT A
DISTANCE BY MEANS OF eMyBaby
Follow the instructions below if you wish to view your
baby at a distance on your PC, tablet or Smartphone.
Note: the monitor should be connected to your PC
in order to see the image captured by the camera
at a distance on eMyBaby. eMyBaby must transmit
a signal via the PC to which your baby monitor
screen is connected. If you do not follow this step
you will not be able to receive a signal on any
other appliance (PC, tablet or mobile device).
1. Connect the baby monitor to your PC in accordance
with the aforementioned steps, connecting the monitor
to the USB port on your computer using a mini USB-
USB cable (not included).
2. Access the eMyBaby (www.emybaby.com)
website using your username and password (register
as instructed above if you do not possess a username
and password) and select the BABY MONITOR
option.
3. Select digimonitor 3.5” plus from the different
models of baby monitor.
4. There are two options to choose from. Choose
“View from anywhere through another computer,
tablet or smartphone”.
ENGLISH

27
5. The rst time you access this service you will be
asked to provide the product order number. This
number is displayed in the MNLXX-XXXXX format
and is found inside the monitor battery compartment.
6. Entering this code will lead you to a screen
displaying two options: Emit and Receive signal. In
order to see the remote image captured on the camera
on your mobile device, click on the Emit button.
7. Then click on the
icon in the center of the image.
The following image will appear on your screen when
your computer begins to transmit:
Steps to follow if you wish to view the image from
another computer:
1. Connect the baby monitor to your PC in accordance
with the aforementioned steps, connecting the monitor
to the USB port on your computer using a mini USB-
USB cable (not included).
2. Access the eMyBaby website (www.emybaby.com)
using your username and password and select the
BABY MONITOR option on the PC on which you wish
to see the remote image.
3. Select digimonitor 3.5” plus from the different
models of baby monitor.
4. There are two options to choose from. Choose
“View from anywhere through another computer,
tablet or smartphone”.
5. In order to view the remote image captured on the
camera on your mobile device, click on the Receive
signal button. If everything is working correctly you
should automatically see your baby on the computer
screen. If there is a problem with the image, consult
the online viewing instructions by clicking on the
READ INSTRUCTIONS icon.
Steps to follow if you wish to see the image on a
mobile device (tablet or mobile phone):
ENGLISH
eMyBaby application
Miniland has developed the eMyBaby application, available for iOS and Android and simple and free-of-charge
to download.
The eMyBaby app can be downloaded from the app store or download it directly by scanning the QR code:
1. Once you have installed the application, open it. Click on LOG IN and enter your username and password
if you are already registered, or register if you are not. Remember you will receive a message of conrmation
at the e-mail address you provided when registering.
2. Select the BABY MONITOR option on the main menu.
3. Select digimonitor 3.5” plus from the different models of baby monitor.
4. Click on the PLAY icon to see the image captured by the camera on your mobile device.
Mobile browser
You can also view the camera image by accessing the eMyBaby website via the browser on your mobile
device. This option will be particularly useful if your mobile device is not iOS or Android.
1. Access the eMyBaby (www.emybaby.com) website on your browser using your username and password.
Select the BABY MONITOR option on the main menu.
2. Select the digimonitor 3.5” plus from the different models of baby monitor.
3. There are two options to choose from. Choose “View from anywhere through another computer, tablet or
smartphone, tablet or smartphone”.
4. Click on the Receive signal button. If everything is working correctly you should automatically see your baby
on your mobile screen.
6. MAINTENANCE
• Clean the surfaces of the camera and monitor with a soft, lint-free cloth.
• If the units become dirty, use a lightly dampened cloth to wipe surfaces, taking care to not allow water into
any openings.
• Never use cleaning agents or solvents.

28
ENGLISH
7. TROUBLESHOOTING
Problem Possible Cause Solution
No reception on the
monitor
Camera not turned on Press and hold down button (III) for 2 seconds
Monitor not turned on Press and hold down the power button (5)
Camera: not plugged in to the
power adapter
Plug in the power adapter
Monitor: The power adapter is not
plugged
Plug in the power adapter
Monitor out or range Move the monitor closer to the camera
Connection lost between the
monitor and a camera already
linked
Link the camera with the monitor again.
See section 5.2.7.1.3.
A wrong camera has been selected
Change the camera number you are
watching. See section 5.2.7.1.1.
Only black and white
images are displayed
Check whether the camera is in
night vision/infrared mode
In order to view the images in colour,
increase the level of light in the room
the camera is in or check there is
nothing covering the camera´s light
sensor (II)
You cannot hear the
parents’ voice in the
baby unit
The volume setting of the baby unit
is too low
Set the volume to the highest level
The camera does not
transmit
The camera is not turned on Press and hold down button (III) for 2 seconds
Camera: the power adapter is not
plugged in
Plug in the power adapter
VOX mode or Standby mode are
active
To see the monitored area continuously,
disconnect the VOX or Standby mode on the
Monitor
You cannot hear the
baby on the parent unit
The volume setting of the parent
unit is too low
Set the volumen to the highest level
Interference or poor
reception
Other electronic devices may be
interfering with the signal
Move them away from the device
The camera and monitor may be too
far apart
Move the monitor closer to the camera
The battery power may be too low Plug in the power adapter
The camera or monitor may be placed
too close to many metal objects
Move them away from the device
You cannot charge the
battery in the parent unit
The AC/DC adapter is not plugged
in
Plug in the adapter
A non-rechargeable battery
has been used
Only rechargeable batteries can be used (3,7
V – 1200mAh Li-ion battery). test the battery
and, where necessary, change it for the one
supplied with the appliance
If the Baby Unit has lost
its link with the Parent
Unit
The camera and monitor may be
too far apart
Move the monitor closer to the camera
The link between both units has
been lost momentarily
Reset the units by disconnecting them from
the electrical power. Wait about 15 seconds
before reconnecting. Allow up to one minute
for the Baby Unit and the Parent Unit to
synchronize.
The link between both units has
been lost
Pair the camera and monitor again. See
5.2.7.1.3.

29
ENGLISH
8. TECHNICAL SPECIFICATIONS
Frequency 2.4GHz FHSS
Operating Range 240m (straight line and open space)
Nº of congurable channels 4
Power (parent unit)
Input: 100-240VAC 50/60Hz
Output: 5V 800mA
Rechargeable battery for monitor 3.7V 1200 mAh
Power (baby unit)
Input: 100-240 VCA 50/60Hz
Output: 5V 800mA
Operating time with battery fully charged (parent
unit)
Approximately 5 hours
LCD Screen size 3.5''
Jack to RCA compatible adaptor cable format Figure D
MiniUSB-USB compatible cable USB cable for data transfer
9. INFORMATION ON DISPOSAL OF BATTERIES AND PRODUCT
• Remember to dispose of the product in an environmentally responsible way, removing the
battery rst.
• Do not mix products bearing the symbol of a crossed out bin with normal household waste.
• For proper collection and processing of these products, take them to the collection points
designated by local authorities. You can also contact the store where you purchased the product.
Hereby, Miniland S.A. declares that this “89174 digimonitor 3.5’’ plus” is in compliance
with the essential requirements and other relevant provisions of Directive 2014/53/EU.

30
ÍNDICE
1. Introdução
2. Conteúdo
3. Instruções de segurança
4. Características e funções do produto
5. Instruções de utilização
6. Manutenção
7. Identicação e resolução de problemas
8. Especicações técnicas
9. Informação sobre a eliminação das baterias e do
produto
1. INTRODUÇÃO
Felicitamo-lo pelo facto de ter adquirido este vigia-
bebés com monitor sem os a cores, que incorpora
a tecnologia mais avançada. Temos a certeza de
que cará totalmente satisfeito com a qualidade
e as características deste produto, embora lhe
recomendemos que leia cuidadosamente estas
instruções para obter os melhores resultados da sua
compra.
Este vigia-bebés permite a transmissão de sinais de
áudio/vídeo no modo sem os que são recebidos
no monitor a cores, o que é ideal para um grande
número de situações como, por exemplo, a vigilância
de bebés, de crianças de tenra idade ou de idosos.
NOTA: As características descritas neste manual
do utilizador estão sujeitas a modicações sem
aviso prévio.
2. CONTEÚDO
1 Câmara (unidade do bebé)
1 Monitor (unidade dos pais)
2 Adaptadores de CA/CC
1 Bateria de lítio (Li-ião) recarregável para o monitor
1 Fita para o pescoço
1 Saco para transporte e armazenamento
1 Tripé
Manual de Instruções e garantia
• Se faltar algum dos elementos acima indicados,
entre em contacto com o seu distribuidor.
3. INSTRUÇÕES DE SEGURANÇA
Leia atentamente este manual de instruções antes de
utilizar o seu vigia-bebés pela primeira vez e guarde-o
para o poder utilizar para consultas no futuro.
3.1. INSTRUÇÕES DE SEGURANÇA GERAIS:
Quando forem utilizados aparelhos elétricos, devem-
se ter algumas precauções de segurança básicas a
todo o momento:
1. É necessário intensicar as precauções quando
crianças ou idosos utilizarem qualquer produto,
ou quando qualquer produto for utilizado perto
deles. Mantenha o aparelho afastado do alcance
das crianças enquanto o mesmo não estiver a ser
utilizado.
2. Este produto não deve ser utilizado como único
meio de vigilância, não sendo, em caso nenhum, um
substituto da supervisão responsável das crianças,
adultos ou propriedades por parte dos adultos.
3. Utilize o vigia-bebés apenas com os adaptadores de
CA incluídos com a unidade (5.0V, 800 mA).
4. Utilize apenas baterias do tipo recomendado (Li-ião
3,7 V – 1200mAh). Não tente carregar nenhum outro
tipo de bateria no seu monitor.
5. Este produto contém peças de tamanho reduzido.
É necessário proceder cuidadosamente quando se
tratar de desembalar e montar o produto.
6. NÃO permita que as crianças brinquem com os
materiais de embalagem como, por exemplo, sacos
de plástico. Deve-se proceder cuidadosamente
quando se tratar de desembalar e montar o produto.
7. NÃO utilize o aparelho se o cabo ou a cha
estiverem danicados. Se o funcionamento do seu
monitor de vigilância de bebés não for o correto ou
se o monitor tiver qualquer tipo de danos, entre em
contacto com o centro de assistência autorizado da
Miniland para solicitar a inspeção e a reparação do
mesmo, tendo em vista evitar qualquer eventual risco.
8. NÃO tente reparar ou ajustar nenhuma das funções
elétricas ou mecânicas da unidade, dado que nesse
caso a garantia caria anulada.
9. Verique a voltagem da sua habitação tendo em
vista certicar-se de que a mesma corresponde ao
regime do aparelho indicado nas especicações do
mesmo.
10. Se não tiver intenção de utilizar o vigia-bebés
durante um longo período de tempo, desconecte
sempre o adaptador de corrente. Para desconectar
o aparelho da rede elétrica, pegue no transformador
e retire a cha da tomada. Nunca puxe diretamente
pelo cabo.
11. Este produto foi concebido exclusivamente para
ser usado no interior. A unidade não deve ser exposta
à chuva, humidade, gotejamentos ou salpicos de
líquidos. Nunca coloque nenhum objeto cheio de
líquido como, por exemplo, um copo ou um jarro,
em cima ou ao lado do seu vigia-bebés. O monitor
de vigilância de bebés não deve ser utilizado perto
da água.
CUIDADO
• Este vigia-bebés foi concebido para proporcionar
tranquilidade aos pais quando não lhes é possível
estar no mesmo quarto que o bebé. Este produto
não deve substituir a supervisão responsável de um
adulto. É necessário que um dos pais se mantenha
perto do monitor enquanto o mesmo estiver a ser
utilizado. O vigia-bebés não é um dispositivo médico
e não se deve conar ao mesmo o bem-estar do bebé.
É importante que visite periodicamente o quarto do
bebé para se certicar de que tudo está bem.
• Nunca utilize este vigia-bebés nos casos em que
a vida ou a saúde do bebé ou de outras pessoas,
ou a integridade de um imóvel dependam do seu
funcionamento. O fabricante não aceitará qualquer
responsabilidade ou reclamação por falecimento,
lesões pessoais ou danos materiais resultantes do
mau funcionamento ou do uso indevido do produto.
• O uso indevido deste vigia-bebés sem os poderá
dar lugar a ações legais.
• Utilize este produto de forma responsável.
IMPORTANTE: Tenha em conta que qualquer
alteração ou modicação no equipamento não
efetuada pelo serviço técnico da Miniland não
estará coberta pela garantia do produto.
3.2. CONSELHOS PARA AS INTERFERÊNCIAS
RADIOELÉTRICAS
Este equipamento foi submetido a testes e satisfaz os
requisitos da Diretiva RED 2014/53 UE.
PORTUGUÊS

31
Estes requisitos foram concebidos para oferecerem
uma proteção razoável contra as interferências
daninhas numa instalação residencial. Se a unidade
não for instalada e utilizada de acordo com as
instruções, poderá provocar interferências daninhas
nas radiocomunicações.
No entanto, tenha em conta que não é possível
garantir que não ocorrerão interferências numa
instalação especíca. Se o vigia-bebés provocar
interferências na receção de rádio ou de televisão, o
que pode ser determinado desligando-o e ligando-o,
recomenda-se ao utilizador que tente corrigir a
interferência da forma indicada em seguida:
• Reoriente o recetor ou mude a posição do mesmo.
• Aumente a distância entre o equipamento em
questão e o vigia-bebés.
• Conecte a cha do equipamento a uma tomada
diferente da utilizada para o recetor.
• Consulte o departamento de Atendimento do Cliente
da Miniland.
Tendo em vista garantir o cumprimento da
Diretiva RED 2014/53/UE, este equipamento tem
cabos blindados especiais. A operação com um
equipamento não aprovado ou com cabos não
blindados provavelmente provocará interferências na
receção radiofónica ou televisiva.
3.3. ESCOLHA DE UM LUGAR ADEQUADO
• Coloque o dispositivo eletrónico num lugar afastado
das crianças para evitar eventuais acidentes.
• As crianças poder-se-ão enredar nos cabos. A
unidade do bebé deve ser colocada a uma distância
de aproximadamente 1 – 1.5 metros do berço do
bebé. Nunca coloque a unidade do bebé no interior
do berço, da cama ou do parque. Certique-se de que
a unidade, os cabos e o adaptador cam afastados do
alcance do bebé e de outras crianças de tenra idade.
• Coloque o vigia-bebés num lugar em que o ar possa
circular livremente. Não o coloque sobre edredões
ou mantas moles nem nas esquinas de armários,
estantes, etc.
• Coloque o vigia-bebés num lugar afastado das
fontes de calor como radiadores, lareiras, fogões e
a luz solar direta.
• Coloque a unidade do bebé afastada de aparelhos
de televisão, repetidores e rádios. Os sinais de rádio
intensos gerados por estes elementos poderão
provocar ruídos ou até mesmo o aparecimento de
sons e imagens no monitor. Se tal acontecer, transra
a câmara para outro lugar.
• Este monitor pode ser colocado em cima de uma
mesa utilizando o suporte para mesa retrátil situado
na parte traseira do monitor. Quando não o utilizar,
basta que o dobre para o interior da parte traseira do
monitor até ouvir um “clique” que lhe indicará que o
mesmo já está totalmente dobrado.
4. CARACTERÍSTICAS E FUNÇÕES DO PRODUTO
4.1. FUNÇÕES E CONTROLOS DO MONITOR
(FIGURA 1)
MONITOR (FIGURA 1.1)
1. Indicador LED de ativação/ligação
2. Microfone
3. LED indicador de carga
4. Ecrã LCD
5. Botão de ligar/desligar
6. Altifalante
7. Engate para ta do pescoço
8. Botão de ajuste ▲
9. Botão zoom/menu
10. Botão de ajuste ▼
11. Botão aceitar/modo Scan
12. Botão para falar com o bebé
13. Conector saída AV
14. Conector mini-USB alimentação/PC
15. Suporte rebatível
16. Tampa do compartimento da bateria
17. Antena retrátil
VISOR
Ícones na tela (FIGURA 1.2)
a. Cobertura
b. Volume selecionado no monitor.
c. Visão noturna
d. Canções de Embalar
e. Modo VOX
f. Câmara selecionada
g. Luz de companhia
h. Nível de transmissão
i. Nível de bateria
j. Ícone falar com o bebé
k. Ícone alerta ativado
Ícones do Menu (FIGURA 1.3)
A. Menu seleção/adicionar/eliminar câmara
B. Menu de ajustes de câmara
C. VOX/Standby
D. Nível de transmissão
E. Alarme
F. Função Vibração
G. Brilho do ecrã
4.2. FUNÇÕES E CONTROLOS DA CÂMARA
(FIGURA 2)
I. Antena retrátil
II. Sensor de luz
III. Botão de ligação
IV. Acessório para suspensão
V. Altifalante
VI. Botão de emparelhamento
VII. Conector de alimentação Mini-USB
VIII. Microfone
IX. LED de ligação/Emparelhamento
X. Lente da câmara
XI. Infravermelho
XII. Acessório de tripé
5. INSTRUÇÕES DE UTILIZAÇÃO
5.1. ANTES DA UTILIZAÇÃO
5.1.1. ALIMENTAÇÃO DA UNIDADE DOS PAIS E
USO DA BATERIA
O monitor, ou unidade dos pais deste vigia-bebés
foi concebido(a) para ser utilizado(a) com a bateria
ou com o adaptador CA/CC fornecido. A bateria
recarregável deve ser carregada durante pelo
menos oito horas antes da utilização da unidade pela
primeira vez ou se a mesma não tiver sido utilizada
durante um longo período de tempo.
O seu vigia-bebés é fornecido com uma bateria Li-
ião recarregável de 3.7V 1200mAh para o monitor.
Recomendamos que a bateria seja utilizada no
PORTUGUÊS

32
monitor para que o sinal de áudio/vídeo proveniente
da câmara possa ser recebido em qualquer lugar.
Conecte o monitor ao adaptador conectado à rede
elétrica sempre que seja possível, tendo em vista
manter a bateria carregada.
INSTALAÇÃO DA BATERIA (FIGURA 3)
1. Desaparafuse e retire a tampa do compartimento
da bateria (16) situada na parte traseira da unidade.
2. Insira a bateria Li-ião (fornecida).
3. Coloque novamente a tampa da bateria no seu
lugar e xe-a com o parafuso.
Cuidado: Utilize apenas baterias do tipo
recomendado; caso contrário, existe o risco de
explosão. Descarte as baterias gastas de forma
responsável.
Nota: Quando não utilizar as duas unidades,
recomenda-se que as desligue para poupar
bateria.
CARGA DA BATERIA
Insira a bateria recarregável de acordo com as
instruções indicadas na secção anterior.
Conecte o conector do adaptador de corrente à
tomada mini-USB situada na parte lateral da unidade
(14). Utilize apenas o adaptador fornecido. Conecte a
cha do adaptador à rede elétrica.
Enquanto o monitor se mantiver conectado à rede
elétrica e em carga, o LED indicador de carga (3)
manter-se-á aceso em cor vermelha.
Se o carregador continuar conectado à rede mas
o processo de carga tiver sido concluído, o LED
indicador de carga (3) cará acesa em cor verde.
Quando o nível de carga da bateria estiver muito
baixo, o ícone de nível de bateria (i) piscará em cor
vermelha e começará a emitir um bip de 30 em 30
segundos.
Nota: retire a bateria quando não tiver intenção
de utilizar o aparelho durante um longo período
de tempo.
5.1.2. ALIMENTAÇÃO DA UNIDADE DO BEBÉ
A câmara ou unidade do bebé deste vigia-bebés foi
concebida para ser utilizada com o adaptador de CA/
CC fornecido.
1. Localize a tomada do conector (VII) na parte
traseira da unidade do bebé.
2. Conecte o cabo do adaptador à tomada mini-USB
da câmara. Utilize apenas o adaptador fornecido.
3. Conecte a cha do adaptador à rede elétrica.
Advertência: Perigo de Estrangulamento –
Mantenha o cabo afastado do alcance do bebé.
NUNCA coloque uma câmara com cabos a menos
de 1 metro do berço. Nunca utilize cabos de
extensão com adaptadores de CA. Utilize apenas
os adaptadores de CA fornecidos.
5.2. OPERAÇÃO
5.2.1. LIGAR/DESLIGAR AS UNIDADES
5.2.1.1. MONITOR:
Mantenha pressionado o botão de ligação (5), situado
na parte superior do monitor, para o ligar ou desligar.
O indicador LED de ativação/ligação (1) acender-se-á
ou apagar-se-á, conforme você ligue ou desligue a
unidade.
5.2.1.2. CÂMARA
Para ligar ou desligar a câmara, mantenha o botão
de ligação (III) pressionado durante dois segundos.
O LED de alimentação (IX) acender-se-á ou apagar-
se-á, conforme você ligue ou desligue a unidade.
Quando tiver instalado a câmara e ligado a mesma,
poderá ver as imagens e ouvir os sons captados no
quarto do seu bebé através do monitor.
5.2.2. VOLUME DO MONITOR
Pressione o botão de ajuste
(8) se quiser aumentar
o volume do seu monitor ou o botão de ajuste (10)
se quiser diminuí-lo, escolhendo um dos 5 níveis
disponíveis.
5.2.3. FALAR AO BEBÉ
Pode falar ao seu bebé a partir da unidade dos pais
(por exemplo para o tranquilizar e para que perceba
que já vai estar ao seu lado) ou ao seu par (se o
mesmo estiver no quarto do bebé).
Pressione e mantenha pressionado o botão para falar
com o bebé (12) e fale frente ao monitor.
Liberte o botão quando acabar de falar para voltar a
ouvir o som do quarto do bebé.
Tenha em conta que não poderá ouvir o seu bebé
enquanto estiver a falar-lhe; para o ouvir, terá que
deixar de pressionar este botão.
5.2.4. ZOOM
Pode aumentar o tamanho da imagem visualizada
efetuando um zoom de quatro posições.
Para aceder a esta função, dê os passos abaixo:
1. Pressione o botão zoom . O quadrante esquerdo
superior da imagem aparecerá enquadrado em
branco.
2. Pressione os botões PARA CIMA e PARA
BAIXO para alterar o quadrante selecionado.
3. Pressione o botão para aumentar a imagem do
quadrante selecionado.
4. Pressione o botão zoom e regressará ao
processo de seleção de quadrante, para o caso de
querer fazer zoom sobre outro quadrante.
5. Pressione novamente o botão zoom para sair
da função zoom.
5.2.5. VISÃO NOTURNA INFRAVERMELHA
(AUTOMÁTICA)
A função de visão noturna infravermelha permite
que a câmara capte imagens do seu bebé ou da
área monitorizada em condições de escuridão ou de
pouca luz.
Neste modo as imagens aparecerão a preto e branco
no monitor e só se poderão ver os objetos situados a
menos de 2 metros de distância.
A câmara monitoriza constantemente o nível de luz
e muda automaticamente para o modo infravermelho
quando a luz é insuciente para a visão normal.
5.2.6. ADVERTÊNCIA DE FORA DE ALCANCE
Se o monitor for colocado a uma distância da
câmara superior à admissível (veja as características
técnicas), o indicador LED de ativação/ligação da
câmara (IX) e o monitor (1) piscarão em cor vermelha,
PORTUGUÊS

33
o símbolo de cobertura (a) aparecerá em cor
vermelha e o ecrã mostrará o logótipo da MINILAND.
Aproxime o monitor à câmara para voltar a ver
corretamente a imagem.
5.2.7. MENU PRINCIPAL
Mantenha o botão Menu/Voltar
pressionado para
poder efetuar os ajustes das principais funções e
características do seu vigia-bebés.
5.2.7.1. MENU DE CÂMARA
5.2.7.1.1. SELEÇÃO DA CÂMARA
O dispositivo foi concebido para permitir a observação
de diferentes zonas com um máximo de quatro
câmaras. Para selecionar a câmara que deseja ver, dê
os passos indicados em seguida:
1. Pressione a tecla Menu/Voltar durante três
segundos para fazer aparecer o menu.
2. Pressione a tecla PARA CIMA ou a tecla PARA
BAIXO até que o ícone câmara que realçado
e em seguida pressione a tecla para entrar no
submenu.
3. Pressione a tecla PARA CIMA ou a tecla PARA
BAIXO até que o ícone VER câmara que
realçado e em seguida pressione a tecla .
4. Pressione a tecla PARA CIMA ou a tecla PARA
BAIXO para selecionar a câmara que deseja
visualizar e em seguida pressione a tecla para
conrmar a seleção.
Nota 1: Só poderão ser visualizadas as câmaras que
tenham sido emparelhadas com o monitor.
Nota 2: Há uma forma mais rápida de alteração da
câmara a visualizar. Pressione diretamente a tecla
para ir vendo ciclicamente as câmaras que
estejam emparelhadas: CAM1/CAM2/CAM3/CAM4/
MODO SCAN.
5.2.7.1.2. MODO SCAN
Esta função permite-lhe ver de forma consecutiva e
cíclica os canais de câmara emparelhados, mostrando
as imagens de cada câmara durante 12 segundos.
Esta função só pode ser utilizada quando há mais do
que uma unidade de câmara emparelhada. Para entrar
neste modo:
1. Pressione a tecla Menu/Voltar durante três
segundos para fazer aparecer o menu.
2. Pressione a tecla PARA CIMA ou a tecla PARA
BAIXO até que o ícone câmara que realçado
e em seguida pressione a tecla para entrar no
submenu.
3. Pressione a tecla PARA CIMA ou a tecla PARA
BAIXO até que o ícone VER câmara que
realçado e em seguida pressione a tecla .
4. Pressione a tecla PARA CIMA ou a tecla PARA
BAIXO e selecione o ícone SCAN ;
5. Pressione a tecla para conrmar.
Nota 1: Se uma das câmaras estiver fora de alcance
ou se não estiver ligada, o monitor avisá-lo-á e o
Modo Scan parará.
Nota 2: O modo Scan pode ser ativado ou desativado
pressionando a tecla enquanto se visualiza o ecrã
principal se tiver mais do que uma câmara conectada
ao seu monitor.
5.2.7.1.3. ADICIONAR CÂMARA
Este produto foi concebido para permitir a observação
de diferentes zonas com um máximo de 4 câmaras
(canal 1, 2, 3 ou 4 atribuído a diferentes câmaras).
O monitor e a câmara original saem de fábrica com o
canal 1 programado. Se necessitar de adicionar uma
câmara extra, deverá seguir este procedimento.
1. Pressione a tecla Menu/Voltar durante três
segundos para fazer aparecer o menu.
2. Pressione a tecla PARA CIMA ou a tecla PARA
BAIXO até que o ícone câmara que realçado
e em seguida pressione a tecla para entrar no
submenu.
3. Pressione a tecla PARA CIMA ou a tecla PARA
BAIXO até que o ícone adicionar câmara que
realçado e em seguida pressione a tecla .
4. Pressione a tecla PARA CIMA ou a tecla PARA
BAIXO para selecionar o canal onde deseja
adicionar a nova câmara e conrme a seleção
pressionando a tecla .
5. Enquanto o indicador LED de ativação/
ligação (1) estiver a piscar, pressione o botão de
emparelhamento na câmara (VI).
6. Uma vez emparelhada, o indicador LED deixará
de piscar e as imagens da câmara aparecerão
imediatamente no ecrã da unidade do monitor.
7. Se o emparelhamento não tiver sido efetuado de
forma correta, repita os passos indicados acima.
Nota 1: Só poderá selecionar os canais com os quais
ainda não tenha sido emparelhada nenhuma câmara.
Nota 2: Não é possível aceder a este submenu se já
tiverem sido emparelhadas 4 câmaras.
Pode acontecer que, por diversos motivos, se
perca a conexão entre o monitor e uma câmara já
ligada. Nesse caso, repita o processo anteriormente
explicado para ligar novamente a câmara ao monitor.
5.2.7.1.4. ELIMINAR CÂMARA
Para eliminar uma das câmaras conectadas, dê os
passos indicados em seguida:
1. Pressione a tecla Menu/Voltar durante três
segundos para fazer aparecer o menu.
2. Pressione a tecla PARA CIMA ou a tecla PARA
BAIXO até que o ícone câmara que realçado
e em seguida pressione a tecla para entrar no
submenu.
3. Pressione a tecla PARA CIMA ou a tecla PARA
BAIXO até que o ícone eliminar câmara que
realçado e em seguida pressione a tecla .
4. Pressione a tecla PARA CIMA ou a tecla PARA
BAIXO para selecionar a câmara que deseja
eliminar e conrme a seleção pressionando a tecla
.
Nota 1: Se só tiver uma câmara emparelhada com
o monitor, não poderá eliminá-la nem aceder a este
menu.
Nota 2: É necessário eliminar um canal antes de o
emparelhar com uma nova unidade de câmara.
PORTUGUÊS

34
5.2.7.2. MENU DE AJUSTES DE CÂMARA
5.2.7.2.1. CANÇÕES DE EMBALAR
A unidade do bebé pode reproduzir uma suave
canção de embalar para ajudar o seu bebé a conciliar
o sonho. Para ativar esta função:
1. Pressione a tecla Menu/Voltar
durante três
segundos para fazer aparecer o menu.
2. Pressione a tecla PARA CIMA
ou a tecla PARA
BAIXO
até que o ícone menu de ajustes de câmara
que realçado e em seguida pressione a tecla
para entrar no submenu.
3. Pressione a tecla PARA CIMA
ou a tecla PARA
BAIXO
até que o ícone Canção de Embalar
que realçado e em seguida pressione a tecla
.
4. Pressione a tecla PARA CIMA
ou a tecla PARA
BAIXO
para selecionar uma das cinco canções
de embalar disponíveis, silêncio ou reprodução em
circuito (o ajuste predeterminado é OFF).
5. Depois de ter selecionado a melodia, pressione a
tecla
e aparecerá o controlo de volume. Pressione
a tecla PARA CIMA
ou a tecla PARA BAIXO
para selecionar o nível de volume desde 1 até 3 e
pressione a tecla
.
6. Pressione a tecla Menu/Voltar
três vezes para
voltar ao ecrã principal.
7. Na parte superior do ecrã LCD aparecerá o ícone
Canção de Embalar (d).
Tenha em conta que a conguração das canções de
embalar só cará ativada na câmara que esteja a ser
visualizada nesse momento.
Nota: A função de reprodução em circuito das
canções de embalar reproduz ciclicamente todas as
canções de embalar.
5.2.7.2.2. VOLUME DA CÂMARA
Este menu permite-lhe a conguração do nível de
volume com que a voz dos pais será reproduzida na
câmara, ao utilizar a função bidirecional.
Para congurar o volume da câmara, dê os passos
abaixo:
1. Pressione a tecla Menu/Voltar
durante três
segundos para fazer aparecer o menu.
2. Pressione a tecla PARA CIMA
ou a tecla PARA
BAIXO
até que o ícone menu de ajustes de câmara
que realçado e em seguida pressione a tecla
para entrar no submenu.
3. Pressione a tecla PARA CIMA
ou a tecla PARA
BAIXO
até que o ícone volume de câmara
que realçado e em seguida pressione a tecla
.
4. Pressione a tecla PARA CIMA
ou a tecla PARA
BAIXO
para selecionar um dos três níveis de
volume disponíveis (LOW/MID/HIGH) em função das
suas necessidades.
5. Conrme a seleção pressionando a tecla
.
Tenha em conta que a conguração do volume só
cará ativada para a câmara cuja imagem esteja a
ser visualizada no monitor nesse momento.
5.2.7.2.3. LUZ DE COMPANHIA
A unidade do bebé tem uma luz suave de companhia
que proporcionará conforto ao bebé e lhe permitirá
ver num quarto escuro.
Para ativar a luz de companhia, dê os passos abaixo:
1. Pressione a tecla Menu/Voltar
durante três
segundos para fazer aparecer o menu.
2. Pressione a tecla PARA CIMA
ou a tecla PARA
BAIXO
até que o ícone menu de ajustes de câmara
que realçado e em seguida pressione a tecla
para entrar no submenu.
3. Pressione a tecla PARA CIMA
ou a tecla PARA
BAIXO
até que o ícone luz de companhia que
realçado e em seguida pressione a tecla
.
4. Pressione a tecla PARA CIMA
ou a tecla PARA
BAIXO
e selecione ON ou OFF, conforme deseje
ativar ou desativar esta função.
5. Conrme a seleção pressionando a tecla
.
Tenha em conta que a conguração da luz de
companhia só cará ativada para a câmara cuja
imagem esteja a ser visualizada no monitor nesse
momento.
5.2.7.3. VOX/STANDBY MENU
5.2.7.3.1. MODO DE POUPANÇA DE ENERGIA OU
SÓ ÁUDIO (STANDBY)
Com o modo de poupança de energia ou só áudio
(Standby), pode escolher o tempo máximo durante
o qual a imagem do monitor se mantém ativa (1,
3 ou 5 minutos); decorrido este tempo, a imagem
desaparece para poupar energia, mesmo que
continue a ouvir o som. Para reativar a imagem, basta
que pressione qualquer botão.
Para ativar este modo, deve fazer o seguinte:
1. Pressione a tecla Menu/Voltar
durante três
segundos para fazer aparecer o menu.
2. Pressione a tecla PARA CIMA
ou a tecla PARA
BAIXO
até que o ícone menu VOX/Standby
que realçado e em seguida pressione a tecla
para
entrar no submenu.
3. Pressione a tecla PARA CIMA
ou a tecla PARA
BAIXO
até que o ícone Standby que realçado
e em seguida pressione a tecla
.
4. Pressione a tecla PARA CIMA
ou a tecla PARA
BAIXO
e selecione a opção desejada de entre 1,
3 ou 5 minutos ou OFF para desativar esta função.
5. Conrme a seleção pressionando a tecla
.
6. Pressione a tecla Menu/Voltar
duas vezes para
voltar ao ecrã principal.
5.2.7.3.2. AJUSTE VOX
Este modo permite-lhe o controlo da ativação por som
do seu vigia-bebés. Se ativar o modo VOX no monitor
e não for emitido nenhum som nas proximidades da
câmara, esta deixará de transmitir. O ecrã do monitor
apaga-se quando a câmara não está a transmitir.
Quando a câmara detetar algum som com uma
intensidade superior ao nível de sensibilidade
ajustado, começará a transmitir novamente o sinal
para o monitor.
Para desativar esta função e ver a área continuamente
vigiada, desative o modo VOX no monitor.
• Modo VOX DESATIVADO: A câmara transmite
continuamente, o que lhe permite monitorizar
continuamente o seu bebé ou a área que deseja
proteger.
PORTUGUÊS

35
• Modo VOX ATIVADO: A câmara só transmite quando
deteta um som de intensidade suciente, o que
dependerá do nível selecionado, nas proximidades
da câmara.
Pra activar esta função, antes de mais, assegure-se
de que deniu o modo de espera para 1/3
ou 5 minutos (ver ponto 5.2.7.3.1).
Escolher 1/3 ou 5 se desejar que a sua câmara deixe
de transmitir imagem após 1/3 ou 5 minutos se não
houver som em redor.
Uma vez denido o tempo de espera, para activar o
modo VOX, executar as seguintes instruções:
1. Pressione a tecla Menu/Voltar
durante três
segundos para fazer aparecer o menu.
2. Pressione a tecla PARA CIMA ou a tecla PARA
BAIXO até que o ícone menu VOX/Standby
que realçado e em seguida pressione a tecla
para entrar no submenu.
3. Pressione a tecla PARA CIMA ou a tecla PARA
BAIXO até que o ícone VOX que realçado e
em seguida pressione a tecla .
4. Pressione a tecla PARA CIMA ou a tecla PARA
BAIXO e selecione o nível de sensibilidade
desejado: OFF/1/2/3
(predenido: OFF). Denir a sensibilidade em “1” para
um bebé que durma tranquilamente
e chore baixinho e “3” se o bebé tem tendência a
fazer ruído enquanto dorme faz ruídos
bastantes altos antes de começar a chorar mesmo,
ou deni-la como nível “2” se considera que o
comportamento do seu bebé não cabe nos dois
padrões anteriormente descritos.
5. Conrme a seleção pressionando a tecla .
6. Pressione a tecla Menu/Voltar duas vezes para
voltar ao ecrã principal.
Se quiser ver o seu bebé num determinado
momento, mesmo que não haja ruídos nas
proximidades, pode ativar a emissão da câmara
de forma remota pressionando qualquer botão.
5.2.7.4. NÍVEL DE TRANSMISSÃO
Pode modicar o nível de potência emitido pela
câmara a partir deste menu, escolhendo uma das
opções: alta/baixa. Quando o situar na posição alta
(HI), a cobertura cobrirá uma distância de 250 metros
em campo aberto com a potência original. Quando o
situar na posição baixa (LOW), a distância máxima
de transmissão é reduzida para aproximadamente
120 metros em campo aberto, quando a potência de
emissão diminuir.
Para congurar o nível de transmissão, dê os passos
abaixo:
1. Pressione a tecla Menu/Voltar durante três
segundos para fazer aparecer o menu.
2. Pressione a tecla PARA CIMA ou a tecla PARA
BAIXO até que o ícone nível de transmissão
que realçado e em seguida pressione a tecla .
3. Pressione a tecla PARA CIMA ou a tecla PARA
BAIXO e selecione do nível de transmissão
desejado: HIGH ou LOW.
4. Conrme a seleção pressionando a tecla .
5. Pressione a tecla Menu/Voltar para voltar ao
ecrã principal.
5.2.7.5. AJUSTE DO ALARME
Para congurar o alerta, dê os passos abaixo:
1. Pressione a tecla Menu/Voltar durante três
segundos para fazer aparecer o menu.
2. Pressione a tecla PARA CIMA ou a tecla PARA
BAIXO até que o ícone do alarme que realçado
e em seguida pressione a tecla .
3. Pressione a tecla PARA CIMA ou a tecla PARA
BAIXO para congurar o temporizador do alerta
(pressione a tecla PARA CIMA ou a tecla PARA
BAIXO para diminuir).
4. Conrme a seleção pressionando a tecla .
5. Pressione a tecla Menu/Voltar para voltar ao
ecrã principal.
Nota 1: Quando o alerta estiver em funcionamento,
no ecrã LCD aparecerá o ícone de um relógio (k).
Nota 2: Se quiser eliminar o alarme, dê os passos 1, 2
e 3 acima mencionados e ajuste o tempo para 00:00.
O ícone do relógio desaparecerá do seu ecrã.
Nota 3: Quando o alerta estiver a soar, pressione
qualquer tecla para o cancelar. Se não houver
resposta, o aparelho avisá-lo-á durante 7 minutos e
depois deixará de soar.
5.2.7.6. FUNÇÃO VIBRAÇÃO
Esta função permite que os pais consigam um
ambiente silencioso nos momentos em que
necessitem de tranquilidade e é de grande ajuda
no caso de ambientes ruidosos e de pessoas que
tenham problemas auditivos.
Quando o som no quarto do bebé ultrapassar o limiar
traçado pelo nível de sensibilidade congurado, o
monitor vibrará quatro vezes para avisar os pais.
Para ativar a função vibração, dê os passos abaixo:
1. Pressione a tecla Menu/Voltar durante três
segundos para fazer aparecer o menu.
2. Pressione a tecla PARA CIMA ou a tecla PARA
BAIXO até que o ícone da função vibração
que realçado e em seguida pressione a tecla .
3. Pressione a tecla PARA CIMA ou a tecla PARA
BAIXO para ativar ou desativar esta função.
4. Conrme a seleção pressionando a tecla .
5. Pressione a tecla Menu/Voltar para voltar ao
ecrã principal.
Tenha em conta que a conguração da função
vibração só cará ativada para a câmara cuja imagem
esteja a ser visualizada no monitor nesse momento.
NOTA: Para que o monitor vibre quando o volume
no quarto do bebé ultrapassar um certo limiar, é
imprescindível que o modo VOX esteja ativo.
5.2.7.7. LUMINOSIDADE
Para modicar a luminosidade do ecrã do seu
monitor, dê os passos abaixo:
1. Pressione a tecla Menu/Voltar durante três
segundos para fazer aparecer o menu.
2. Pressione a tecla PARA CIMA ou a tecla PARA
PORTUGUÊS

36
BAIXO
até que o ícone luminosidade que
realçado e em seguida pressione a tecla .
3. Pressione a tecla PARA CIMA ou a tecla
PARA BAIXO e escolha o nível de luminosidade
desejado, de entre os 5 disponíveis.
4. Conrme a seleção pressionando a tecla .
5. Pressione a tecla Menu/Voltar para voltar ao
ecrã principal.
5.2.8. eMyBaby
5.2.8.1. REGISTRO
1. Em primeiro lugar registe-se na página da Internet
da eMyBaby. Para tal, abra o seu navegador, vá a
www.emybaby.com e pressione o botão CRIAR
CONTA.
2. Preencha os campos com os seus dados pessoais
e, depois de aceitar os termos e condições de
utilização, pressione o botão ACTIVAR CONTA.
3. Receberá uma mensagem de vericação no
endereço de e-mail que tiver indicado durante o
registo. Quando pressionar a ligação que contém a
mensagem de e-mail, voltará à página da eMyBaby e
poderá aceder introduzindo o seu nome de utilizador
e palavrapasse e pressionando em seguida o botão
ACEDER.
5.2.8.2. PARA VER A IMAGEM NO PC A QUE O
VIGIA-BEBÉS ESTÁ LIGADO
1. Para poder ver a imagem que a câmara transmite
no seu PC, deverá conectar o monitor
(ecrã) à porta USB do seu computador mediante um
cabo miniUSB-USB (não incluído). O monitor deve
estar ligado. Se a bateria estiver gasta, carregue-a.
2. Depois de ter acedido com o seu nome de
utilizador e palavra-passe à eMyBaby, seleccione a
opção INTERCOMUNICADOR no AMBIENTE DE
TRABALHO.
3. Seleccione agora o digimonitor 3.5” plus.
4. Poderá escolher uma de duas opções. Escolha
“Somente no computador ao qual tem o vigia-bebés
conectado mediante o cabo USB”.
5. Se tudo funcionar correctamente, deverá ver
automaticamente o seu bebé no ecrã do seu
computador. Se tiver algum problema com a imagem,
consulte as instruções de visualização online,
pressionando o ícone LEIA AQUI AS INSTRUÇÕES.
5.2.8.3. PARA VER A IMAGEM À DISTÂNCIA
ATRAVÉS DA eMyBaby
Se desejar ver o seu bebé à distância, no seu pc,
tablet ou Smartphone, dê os passos seguintes:
NOTA: para ver a imagem que a câmara está a
captar de forma remota através da eMyBaby,
o monitor deve estar conectado ao seu PC. É
imprescindível que se emita sinal através da
eMyBaby a partir do PC ao qual o monitor do seu
vigia-bebés está conectado.
Se não for dado este passo prévio, não poderá
receber o sinal em qualquer outro dispositivo (PC,
tablet ou móvel).
1. Conecte o vigia-bebés ao seu PC seguindo os
passos anteriormente indicados, conectando o
monitor à porta USB do seu computador mediante
um cabo miniUSB-USB (não incluído).
2. Aceda à página da Internet eMyBaby
(www.emybaby.com) com o seu nome de utilizador
e palavra-passe (registe-se tal como anteriormente
indicado caso não os tenha) e seleccione a opção
INTERCOMUNICADOR.
3. Escolha digimonitor 3.5” plus de entre os diferentes
modelos de vigia-bebés.
4. Poderá escolher uma de duas opções. Escolha
“Ver a partir de qualquer lugar através de outro
computador, Tablet ou smartphone”.
5. Da primeira vez que aceder a este serviço, ser-
lhe-á pedido que introduza o número de pedido do
seu produto. Este número tem a forma MNLXX-
XXXXX e encontrá-lo-á no
interior do compartimento da bateria do monitor.
6. Uma vez introduzido o código, acederá a um ecrã
em que encontrará duas opções diferentes: Emitir
e Receber sinal. Para poder ver a imagem que a
câmara está a captar remotamente no seu dispositivo
móvel, deverá pressionar em primeiro lugar o botão
Emitir.
7. Pressione agora o ícone que aparece no centro
da imagem. Quando o seu computador começar a
emitir, aparecerá a imagem seguinte no seu ecrã:
Passos a dar se desejar ver a imagem a partir de
outro computador:
1. Conecte o vigia-bebés ao seu PC seguindo os
passos anteriormente indicados, conectando o
monitor à porta USB do seu computador mediante
um cabo miniUSB-USB
(não incluído).
2. No PC em que deseje ver a imagem de forma
remota, aceda à página da Internet eMyBaby
(www.emybaby.com) com o seu nome de
utilizador e palavra-passe e seleccione a opção
INTERCOMUNICADOR.
3. Escolha digimonitor 3.5” plus de entre os diferentes
modelos de vigia-bebés.
4. Poderá escolher uma de duas opções. Escolha
“Ver a partir de qualquer lugar através de outro
computador, Tablet ou smartphone”.
5. Para ver a imagem que a câmara está a captar
remotamente no seu dispositivo móvel, deverá
pressionar agora o botão Receber sinal. Se tudo
funcionar correctamente, deverá ver automaticamente
o seu bebé no ecrã do seu computador. Se tiver algum
problema com a imagem, consulte as instruções de
visualização online pressionando o ícone LEIA
AQUI AS INSTRUÇÕES.
Passos a dar se desejar ver a imagem a partir de
um dispositivo móvel (tablet ou telemóvel):
Aplicación eMyBaby
A Miniland desenvolveu a aplicação eMyBaby, que
está disponível para iOS e Android e é descarregada
de forma simples e gratuita.
Para descarregar a aplicação eMyBaby, em primeiro
lugar aceda à respectiva loja de aplicações ou
descarregá-la directamente digitalizando o respectivo
código QR:
PORTUGUÊS

37
Para instalar a aplicação, siga as instruções indicadas no início deste manual.
1. Uma vez instalada a aplicação, abra-a. Entre em LOG IN e introduza o seu nome de utilizador e palavra-
passe para aceder, caso já esteja registado, ou registe-se se não o tiver feito anteriormente. Lembre-se de que
receberá uma mensagem de vericação no endereço de e-mail indicado durante o registo.
2. No menu principal, seleccione a opção INTERCOMUNICADOR.
3. Escolha digimonitor 3.5” plus de entre os diferentes modelos de vigia-bebés.
4. Pressione o ícone PLAY
para ver a imagem captada pela câmara a partir do seu dispositivo móvel.
Navegador do dispositivo
Também poderá ver a imagem da câmara acedendo ao sítio da Internet eMyBaby através do navegador do seu
dispositivo móvel. Esta opção ser-lhe-á especialmente útil se o seu dispositivo móvel não for iOS ou Android.
1. No navegador do seu dispositivo aceda à página eMyBaby (www.emybaby.com) com o seu nome de
utilizador e palavra-passe. Seleccione a opção INTERCOMUNICADOR no menu principal.
2. Escolha digimonitor 3.5” plus de entre os diferentes modelos de vigia-bebés.
3. Poderá escolher uma de duas opções. Escolha “Ver a partir de qualquer lugar através de outro computador,
Tablet ou smartphone”.
4. Pressione o botão Receber sinal. Se tudo funcionar correctamente, deverá ver automaticamente o seu bebé
no ecrã do seu dispositivo móvel.
6. MANUTENÇÃO
• Limpe as superfícies da câmara e do monitor com um pano macio que não deixe penugens.
• Se as unidades se sujarem, utilize um pano ligeiramente húmido para limpar as superfícies, tendo o cuidado
de evitar a entrada de água por alguma das aberturas.
• Nunca utilize produtos de limpeza ou solventes.
PORTUGUÊS
7. IDENTIFICAÇÃO E RESOLUÇÃO DE PROBLEMAS
Problema Causa possível Solução
Não há receção
no monitor
A câmara não se liga
Pressione e mantenha pressionado o Botão
de ligação (III) durante 2 segundos
O monitor não se acende
Pressione e mantenha pressionado o botão
de ligação (5)
Câmara: não foi conectado o
adaptador de corrente
Conecte a cha do adaptador de corrente
Monitor: não foi conectado o
adaptador de corrente
Conecte a cha do adaptador de corrente
O monitor está fora do seu
campo de alcance
Aproxime o monitor à câmara
Perdeu-se a conexão
entre o monitor e uma
câmara já emparelhada
Emparelhe novamente a câmara com o
monitor.
Consulte a secção 5.2.7.1.3.
Foi selecionada uma
câmara que não é a correta
Altere o número de câmara que está
a visualizar.
Consulte a secção 5.2.7.1.1.
Só aparecem imagens a
preto e branco
Verique se a câmara
está no modo de visão
noturna/infravermelha
Para ver as imagens a cores, aumente o
nível de luz no lugar em que a câmara se
encontre e
certique-se de que não há nada a tapar o
sensor de luz da câmara (II)
Não é possível ouvir
a voz dos pais na
unidade do bebé
A regulação do volume
da unidade parental está
demasiado baixo
Ajuste o volume para o nível mais alto

38
PORTUGUÊS
Problema Causa possível Solução
A câmara não transmite
A câmara não se ligou
Pressione e mantenha pressionado o botão
(III) durante 2 segundos
Câmara: o adaptador de corrente
não se conectou
Conecte a cha do adaptador de corrente
O modo VOX ou o modo de
poupança de energia (Standby)
está ativado
Para ver a área vigiada continuamente,
desconecte o modo VOX ou o modo de
poupança de energia no monitor
Não é possível ouvir o
bebé na unidade dos
pais
A regulação do volume da
unidade dos pais está
demasiado baixa
Ajuste o volume para o nível
mais alto
Interferências ou
receção insatisfatórias
É possível que outros dispositivos
eletrónicos estejam a interferir com
o sinal
Afaste-os do dispositivo
A câmara e o monitor poderão
estar a uma distância excessiva
Aproxime o monitor à câmara
O nível de carga da bateria poderá
estar demasiadamente baixo
Conecte a cha do adaptador de corrente
A câmara ou o monitor
poderão estar demasiadamente
perto de muitos objetos metálicos
Afaste-os do dispositivo
Não é possível carregar
a bateria na unidade
dos pais
O adaptador de CA/CC não foi
conectado
Conecte a cha do adaptador de corrente
Foi utilizada uma bateria
não recarregável
Só se podem utilizar baterias
recarregáveis (bateria Li-ião de 3.7 V, 1200
mAh): verique a bateria e, se for necessário,
substitua-a pela fornecida com o aparelho
Se a unidade do
bebé tiver perdido
a ligação à unidade
parental
A câmara e o monitor
poderão estar a uma distância
excessiva
Aproxime o monitor à câmara
Perdeu-se momentaneamente a
ligação entre as duas unidades
Restabeleça as unidades
desconectando-as da alimentação elétrica.
Aguarde cerca de 15 segundos antes de as
conectar novamente. Deixe passar um minuto
para que a unidade do bebé e a unidade
parental se sincronizem
Perdeu-se a ligação
entre as duas unidades
Emparelhe novamente a câmara e o
monitor. Consulte a secção 5.2.7.1.3.
8. ESPECIFICAÇÕES TÉCNICAS
Frequência 2.4GHz FHSS
Alcance operacional 240m (linha recta e espaço aberto)
N.º de canais conguráveis 4
Alimentação (unidade dos pais)
Input: 100-240VAC 50/60Hz
Output: 5V 800mA
Bateria recarregável para o monitor 3.7V 1200 mAh
Alimentação (unidade do bebé)
Input: 100-240 VCA 50/60Hz
Output: 5V 800mA
Tempo de funcionamento com a bateria
totalmente carregada (unidade dos pais)
Aproximadamente 5 horas
Tamanho da tela LCD 3.5''

39
PORTUGUÊS
Formato de cabo adaptador de Jack a
RCA compatível
Figura D
Formato de miniUSB-USB compatível Cabo de dados USB
9. INFORMAÇÕES SOBRE A ELIMINAÇÃO DAS PILHAS E DO PRODUTO
• Lembre-se de eliminar o produto de uma maneira ambientalmente responsável, remover
primeiro a bateria.
• Não misturar produtos com um símbolo de contentor de lixo barrado com o lixo doméstico normal.
• Para uma recolha e tratamento apropriados destes produtos, levá-los para os pontos de
recolha designados pelas autoridades locais. Também contactar a loja onde comprou o produto.
Miniland S.A. declara que este “89174 digimonitor 3.5” plus” está conforme com os
requisitos essenciais e outras disposições da Directiva 2014/53/UE.

40
SOMMAIRE
1. Introduction
2. Contenu
3. Consignes de sécurité
4. Caractéristiques et fonctions du produit
5. Guide de l’utilisateur
6. Nettoyage
7. Identication et résolution de problèmes
8. Spécications techniques
9. Information sur le retrait de la batterie et le produit
1. INTRODUCTION
Nous vous remercions d’avoir choisi cet écoute-
bébé avec moniteur à écran couleur sans ls, doté
des technologies améliorées. Nous sommes ainsi
convaincus que vous serez totalement satisfait avec la
qualité et les caractéristiques que vous offre ce produit.
Néanmoins, nous vous conseillons vivement de lire
attentivement ces instructions an de tirer le meilleur
parti de cet achat.
Cet écoute-bébé permet de transmettre des signaux
audio/vidéo en mode sans ls, qui apparaissent sur
le moniteur à écran couleur, ce qui est parfait dans
un grand nombre de situations, comme, par exemple,
pour surveiller des bébés, des enfants en bas âge ou
des personnes âgées.
NOTA: Les caractéristiques décrites dans ce
guide de l’utilisateur pourraient être modiées
sans préavis.
2. CONTENU
1 Caméra (unité bébé)
1 Moniteur (unité parents)
2 Adaptateurs CA/CC
1 Batterie au lithium (lithium-ion) rechargeable pour
le moniteur
1 Lanière de cou
1 Sac de transport et stockage
1 Trépied
Mode d’emploi et garantie
• Si un élément susmentionné venait à manquer,
prenez contact avec votre distributeur.
3. CONSIGNES DE SÉCURITÉ
Lisez attentivement ce guide de l’utilisateur avant
d’utiliser votre écoute-bébé pour la première fois et
gardez-le pour le consulter ultérieurement.
3.1. CONSIGNES GÉNÉRALES DE SÉCURITÉ:
Lors de l’utilisation d’appareils électriques, il convient
de prendre à tout moment les mesures de sécurité
de base:
1. Il est nécessaire de renforcer les précautions
lorsqu’un produit est utilisé par un enfant ou une
personne âgée ou près d’eux. Conservez l’appareil
hors de la portée des enfants lorsqu’il n’est pas utilisé.
2. Ce produit ne doit pas être utilisé comme seul
moyen de surveillance, ne remplaçant, en aucun
cas, la surveillance d’un adulte responsable sur des
enfants, adultes ou propriétés.
3. N’utilisez l’écoute-bébé qu’avec les adaptateurs CA
qui accompagnent l’unité (5.0V, 800 MA)
4. N'utilisez que des batteries du type recommandé
(Li-ion 3,7 V – 1200 mAh). N'essayez de charger
aucun autre type de batteries dans votre écran.
5. Ce produit contient de petites pièces. Il convient
donc de prendre les précautions nécessaires lors du
déballage et du montage du produit.
6. NE laissez PAS les enfants jouer avec les matériaux
d’emballage, tels que les sacs en plastique. Il convient
donc de prendre les précautions nécessaires lors du
déballage et du montage du produit.
7. N’utilisez PAS l’appareil si le câble ou la che
sont endommagés. Si votre moniteur de surveillance
du bébé ne fonctionne pas correctement ou est
endommagé, prenez contact avec le centre de service
agréé de Miniland, an de solliciter l’inspection et
la réparation de celle-ci, en vue d’éviter d’éventuels
risques.
8. N’essayer PAS de réparer ou de régler toute
fonction électrique ou mécanique de l’unité, car la
garantie serait annulée dans ce cas-là.
9. Vériez la tension électrique de votre habitation,
an de vous assurer qu’elle correspond au régime de
l’appareil indiqué dans ses spécications.
10. Si vous n’allez pas utiliser l’écoute-bébé pendant
une longue période de temps, débranchez toujours
l’adaptateur d’alimentation. Pour débrancher
l’appareil de la prise, xez le transformateur et retirez
la che de la prise. Ne le retirez jamais directement
du câble.
11. Ce produit est spécialement conçu pour l’usage
interne. L’unité ne doit pas être exposée à la pluie, à
l’humidité ou aux égouttements ou éclaboussures de
liquides. Ne placez jamais d’objets remplis de liquide,
tels qu’un verre ou un vase, au-dessus ou à côté de
votre écoute-bébé. Le moniteur de surveillance du
bébé ne doit pas être utilisé près de l’eau.
PRÉCAUTIONS
• Cet écoute-bébé est spécialement conçu pour
tranquilliser les parents lorsqu’ils ne peuvent pas
être présents dans la même pièce que le bébé. Ce
produit ne remplace, en aucun cas, la surveillance
d’un adulte responsable. Il convient que l’un des
parents reste à côté du moniteur lorsqu’il est utilisé.
L’écoute-bébé n’est pas un dispositif médical, ne
devant par conséquent, en aucun cas, lui coner la
responsabilité du bien-être du bébé. Il est important
de visiter régulièrement la pièce où se trouve le bébé
an de s’assurer que tout va bien.
• N’utilisez jamais cet écoute-bébé dans les cas dont
la vie ou la santé du bébé ou d’autres personnes
ou l’intégrité d’un bien immobilier dépendent de
son fonctionnement. Le fabricant décline toute
responsabilité ou n’accepte aucune réclamation
découlant du décès, de tout préjudice corporel ou
matériel, suite au mauvais fonctionnement ou à
l’utilisation incorrecte du produit.
• L’utilisation incorrecte de cet écoute-bébé sans ls
pourrait donner lieu à des actions en justice.
• Utilisez ce produit de manière responsable.
IMPORTANT : Toute adaptation ou modication
apportée à l’équipement, n’ayant pas été effectuée
par le service technique de Miniland, ne sera pas
couverte par la garantie du produit.
3.2. CONSEILS POUR ÉVITER LES INTERFÉRENCES
RADIOÉLECTRIQUES
Cet équipement a été soumis à des tests et répond
aux exigences de la directive européenne 2014/53/
UE dite "RED".
FRANÇAIS

41
Ces exigences ont été établies an d’offrir une
protection raisonnable contre l’interférence
préjudiciable dans une installation domestique. Si
l’unité n’est pas installée et utilisée conformément
aux instructions fournies, elle pourrait causer toute
interférence préjudiciable aux radiocommunications.
Il est cependant impossible de garantir l’absence
totale d’interférence dans une installation spécique.
Si l’écoute-bébé provoque une interférence lors de la
réception de la radio ou de la télévision, en l’éteignant
et en le rallumant, il est recommandé à l’utilisateur
d’essayer de remédier à l’interférence, comme
indiqué ci-après:
• Réorientez ou changez le récepteur de place.
• Augmentez la distance entre l’équipement en
question et l’écoute-bébé.
• Branchez l’appareil à une prise différente de celle
utilisée pour le récepteur.
• Contactez le département de Service Clients de
Miniland.
Cet équipement possède des câbles blindés
spéciaux, an d’assurer le respect de la directive
européenne 2014/53/UE dite "RED". L’opération à
l’aide d’un équipement non-agréé ou de câbles non
blindés est susceptible de causer toute interférence
lors de la réception radiophonique ou télévisuelle.
3.3. CHOIX D’UN EMPLACEMENT ADÉQUAT
• Placez le dispositif électronique dans un endroit
éloigné des enfants an d’éviter d’éventuels
accidents.
• Les enfants pourraient s’emmêler dans les
câbles. L’unité bébé doit être placée à une distance
d’approximativement 1 – 1.5 mètres du berceau du
bébé. Ne placez jamais l’unité bébé à l’intérieur du
berceau, du lit ou du parc. Assurez-vous que l’unité,
les câbles et l’adaptateur restent hors de la portée du
bébé et d’autres enfants en bas âge.
• Placez l’écoute-bébé dans un endroit où l’air peut
circuler librement. Ne le posez ni sur des couettes
ou des couvertures tendres, ni dans les coins des
armoires, étagères, etc.
• Placez l’écoute-bébé dans un endroit éloigné des
sources de chaleur, telles que les radiateurs, les
cheminées, les cuisines et la lumière solaire directe.
• Placez l’unité bébé loin des appareils de télévision,
des répéteurs et des radios. Les signaux radio
intenses, émis par ces éléments, pourraient provoquer
des bruits, voire l’émission de sons et l’apparition
d’images sur le moniteur. Si cela se produisait, posez
la caméra ailleurs.
• Ce moniteur peut être placé au-dessus d’une table,
en utilisant le support pour table pliante, situé à
l’arrière du moniteur. Si vous ne l’utilisez pas, repliez-
le vers l’intérieur de la partie arrière du moniteur,
jusqu’à ce que vous entendiez un «clic », qui vous
indiquera qu’il est totalement plié.
4. CARACTÉRISTIQUES ET FONCTIONS DU
PRODUIT
4.1. FONCTIONS ET COMMANDES DU MONITEUR
(FIGURE 1)
MONITEUR (FIGURE 1.1)
1. Voyant d’alimentation/de liaison
2. Microphone
3. Voyant de charge
4. Écran LCD
5. Bouton ON/OFF
6. Haut-parleur
7. Attache crochet pour lanière de cou
8. Bouton de réglage ▲
9. Bouton zoom/menu
10. Bouton de réglage ▼
11. Bouton accepter/mode Scan
12. Bouton pour parler avec bébé
13. Connexion à la sortie AV
14. Connecteur mini USB alimentation/PC
15. Support rabattable
16. Couvercle du compartiment de la batterie
17. Antenne rabattable
AFFICHEUR
Icônes sur l'écran (FIGURE 1.2)
a. Couverture du signal
b. Volume sélectionné sur le moniteur.
c. Vision nocturne
d. Berceuses
e. Mode VOX
f. Caméra sélectionnée
g. Veilleuse
h. Puissance de transmission
i. Niveau de la batterie
j. Icône parler avec bébé
k. Icône alerte activée
Icônes du Menu (FIGURE 1.3)
A. Menu sélection/ajouter/supprimer une caméra
B. Menu de réglage de la caméra
C. VOX (déclenchement à la voix)/Stand-by
D. Puissance de transmission
E. Alarme
F. Fonction vibration
G. Luminosité de l’écran
4.2. FONCTIONS ET COMMANDES DE LA CAMÉRA
(FIGURE 2)
I. Antenne rabattable
II. Capteur de lumière
III. Bouton Marche
IV. Accessoire pour accrocher
V. Haut-parleur
VI. Bouton d’appairage
VII. Connecteur d’alimentation mini USB
VIII. Microphone
IX. Voyant d’alimentation / d’appairage
X. Lentille de la caméra
XI. Infrarouge
XII. Accessoire pour trépied
5. GUIDE DE L’UTILISATEUR
5.1. AVANT UTILISATION
5.1.1. ALIMENTATION DE L’UNITÉ PARENTS ET
UTILISATION DE LA BATTERIE
Le moniteur ou l’unité parents de cet écoute-bébé
est spécialement conçu pour être utilisé avec la
batterie ou l’adaptateur CA/CC fourni avec le produit.
La batterie rechargeable doit être chargée pendant
au moins huit heures avant d’utiliser l’unité pour la
première fois, ou si elle n’a pas été utilisée pendant
une longue période de temps.
Votre écoute-bébé est fourni avec une batterie en
FRANÇAIS

42
lithium-ion rechargeable de 3.7V 1200mAh pour le
moniteur. Nous vous conseillons vivement d’utiliser
la batterie avec le moniteur, an d’obtenir le signal
audio/vidéo provenant de la caméra à n’importe quel
endroit. Connectez le moniteur à l’adaptateur branché
à la prise dans la mesure du possible, en vue de
maintenir la batterie chargée.
INSTALLATION DE LA BATTERIE (FIGURE 3)
1. Dévissez et retirez le couvercle du compartiment de
la batterie (16), situé à l’arrière de l’unité.
2. Introduisez la batterie en lithium-ion (fournie avec
le produit).
3. Remettez le couvercle de la batterie à sa place et
vissez-le.
Précautions à prendre : N’utilisez que les batteries
recommandées par le fabricant. Dans le cas
contraire, il existe des risques d’explosion. Jetez
les batteries usagées de manière responsable.
Note : Si vous n’utilisez pas les deux unités, il est
recommandé de les éteindre, an de réaliser des
économies d’énergie de la batterie.
RECHARGEMENT DE LA BATTERIE
Introduisez la batterie rechargeable, en suivant les
instructions indiquées au paragraphe précédent.
Branchez le connecteur de l’adaptateur d’alimentation
à la prise mini USB, située dans la partie latérale de
l’unité (14). N’utilisez que l’adaptateur qui vous a été
fourni avec le produit. Branchez l’adaptateur à la
prise.
Le voyant de charge (3) reste allumé en rouge lorsque
le moniteur est branché à la prise an d’être chargé.
Si le chargeur reste branché à la prise, une fois le
processus de chargement terminé, le voyant de
charge (3) s’allumera en vert.
Quand le niveau de chargement de la batterie est très
bas, l’icône du niveau de la batterie (i) clignotera en
rouge et commencera à émettre un bip toutes les 30
secondes.
Note : retirez la batterie si vous n’utilisez plus
l’appareil pendant une longue période de temps.
5.1.2. ALIMENTATION DE L’UNITÉ BÉBÉ
La caméra ou l’unité bébé de cet écoute-bébé
est spécialement conçue pour être utilisée avec
l’adaptateur CA/CC fourni avec le produit.
1. Recherchez l’entrée du connecteur (VII) à l’arrière
de l’unité bébé.
2. Branchez le câble de l’adaptateur à la prise mini
USB de la caméra. N’utilisez que l’adaptateur qui
vous a été fourni avec le produit.
3. Branchez l’adaptateur à la prise.
Attention : Risques d’étranglement – Veuillez
conserver le câble hors de la portée du bébé. NE
placez JAMAIS une caméra avec des câbles à
moins d’1 mètre du berceau. N’utilisez jamais de
rallonges électriques avec des adaptateurs CA.
N’utilisez que les adaptateurs CA fournis avec le
produit.
5.2. OPÉRATION
5.2.1. MARCHE/ARRÊT DES UNITÉS
5.2.1.1. MONITEUR:
Maintenez le bouton ON/OFF (5) enfoncé, situé au-
dessus du moniteur, an de l’allumer ou de l’éteindre.
Le voyant marche/arrêt (1) s’allumera ou s’éteindra, si
vous allumez ou éteignez l’unité.
5.2.1.2. CAMÉRA:
Maintenez le bouton marche (III) enfoncé pendant
deux secondes, an d’allumer ou d’éteindre la
caméra. Le connecteur d’alimentation (IX) s’allumera
ou s’éteindra, si vous allumez ou éteignez l’unité.
Une fois la caméra installée et allumée, vous pourrez
voir les images et écouter les sons provenant de la
chambre de votre bébé à travers le moniteur.
5.2.2. VOLUME DU MONITEUR
Appuyez sur le bouton de réglage
(8), si vous
souhaitez augmenter le volume de votre moniteur ou
sur le bouton de réglage (10), si vous souhaitez le
réduire, en choisissant parmi 5 niveaux disponibles.
5.2.3. PARLER AVEC BÉBÉ
Vous pouvez parler avec votre bébé à partir de l’unité
parents (par exemple, pour le tranquilliser et pour
qu’il comprenne que vous allez bientôt aller le voir)
ou avec votre conjoint (e) (si il ou elle se trouve dans
la chambre du bébé).
Appuyez ou maintenez le bouton enfoncé pour parler
avec bébé (12) et parlez face au moniteur.
Relâchez le bouton lorsque vous nissez de parler,
an de pouvoir entendre à nouveau le son provenant
de la chambre du bébé.
Notez que vous ne pourrez pas entendre votre bébé
pendant que vous parlez. Vous devrez ainsi relâcher
ce bouton pour l’écouter.
5.2.4. ZOOM
Vous pouvez augmenter la taille de l’image afchée, en
effectuant un zoom de quatre positions.
Veuillez suivre les instructions suivantes, an
d’accéder à cette fonction :
1. Appuyez sur le bouton zoom . Le quart supérieur
gauche de l’image apparaîtra encadré en blanc.
2. Appuyez sur les boutons HAUT y et BAS pour
changer le quart de l’image sélectionné.
3. Appuyez sur le bouton pour augmenter le quart
de l’image sélectionné.
4. Appuyez sur le bouton zoom et vous retournerez
au mode de sélection du quart de l’image, dans le cas
où vous souhaitez effectuer un zoom sur un autre
quart.
5. Appuyez de nouveau sur le bouton zoom pour
sortir de la fonction zoom.
5.2.5. VISION NOCTURNE INFRAROUGE
(AUTOMATIQUE)
Le mode vision nocturne infrarouge permet à la
caméra d’obtenir des images de votre bébé ou de
la zone de surveillance dans l’obscurité ou dans des
conditions de faible luminosité.
Dans ce mode, seules les images en noir et blanc
seront afchées à l’écran et vous ne pourrez voir que
les objets situés à moins de 2 mètres de distance.
La caméra surveille constamment le niveau de
FRANÇAIS

43
lumière et passe automatiquement en mode
infrarouge lorsque la lumière est insufsante pour la
vision normale.
5.2.6. AVERTISSEMENT SUR LA HORS DE PORTÉE
Si le moniteur se situe à une distance de la caméra
supérieure à celle admissible (voir les caractéristiques
techniques), le voyant d’alimentation/de liaison de la
caméra (IX) et le moniteur (1) clignoteront en rouge,
le symbole de la couverture du signal (a) apparaîtra
en rouge et l’écran afchera le logo de MINILAND.
Rapprochez le moniteur de la caméra an de
revoir l’image de manière correcte.
5.2.7. MENU PRINCIPAL
Maintenez le bouton Menu/Retour
enfoncé pour
procéder aux réglages des principales fonctions de
votre écoute-bébé.
5.2.7.1. MENU DE LA CAMÉRA
5.2.7.1.1. SÉLECTION DE LA CAMÉRA
Le dispositif est spécialement conçu pour permettre
l’observation de différentes zones, pouvant être
connecté à quatre caméras maximum. Veuillez suivre
les instructions indiquées ci-après pour sélectionner
la caméra que vous souhaitez visualiser :
1. Appuyez sur la touche Menu/Retour pendant trois
secondes pour que le menu s’afche.
2. Appuyez sur la touche HAUT ou la touche BAS
jusqu’à ce que l’icône de la caméra s’afche et
appuyez ensuite sur la touche pour avoir accès
au sous-menu.
3. Appuyez sur la touche HAUT ou la touche BAS
jusqu’à ce que l’icône VOIR caméra s’afche et
appuyez ensuite sur la touche .
4. Appuyez sur la touche HAUT ou la touche BAS
pour sélectionner la caméra que vous souhaitez
visualiser et appuyez ensuite sur la touche an de
conrmer la sélection.
Note 1 : Vous ne pourrez visualiser que les caméras
qui ont été reliées au moniteur.
Note 2 : Il existe une manière plus rapide de changer
la caméra que vous souhaitez visualiser. Appuyez
directement sur la touche pour voir cycliquement
les caméras reliées: CAM1/CAM2/CAM3/CAM4/
MODO SCAN.
5.2.7.1.2. MODE SCAN
Cette fonction vous permet de voir, de manière
successive et cyclique, les canaux de la caméra
associés, tout en afchant les images de chaque
caméra pendant 12 secondes. Cette fonction ne peut
être utilisée que lorsqu’il existe plus d’une unité de
caméra reliée. Pour accéder à ce mode, veuillez suivre
les instructions ci-après :
1. Appuyez sur la touche Menu/Retour pendant trois
secondes pour que le menu s’afche.
2. Appuyez sur la touche HAUT ou la touche BAS
jusqu’à ce que l’icône de la caméra s’afche et
appuyez ensuite sur la touche pour avoir accès
au sous-menu.
3. Appuyez sur la touche HAUT ou la touche BAS
jusqu’à ce que l’icône VOIR caméra s’afcheet
appuyez ensuite sur la touche .
4. Appuyez sur la touche HAUT ou la touche BAS
et sélectionner l’icône SCAN .
5. Appuyez sur la touche pour conrmer.
Note 1 : Si l’une des caméras est hors de portée ou
n’est pas allumée, le moniteur vous l’indiquera et le
Mode Scan s’arrêtera.
Note 2 : Le mode Scan peut être activé ou désactivé
en appuyant sur la touche pendant que vous
visualisez l’écran principal, s’il existe plus d’une
caméra branchée à votre moniteur.
5.2.7.1.3. AJOUTER UNE CAMÉRA
Ce produit est spécialement conçu pour permettre
l’observation de différentes zones, pouvant être
connecté à quatre caméras maximum (canal 1, 2, 3
ou 4 attribué à différentes caméras). Le moniteur et
la caméra d’origine sortent de l’usine avec le canal
1 programmé. Si vous souhaitez ajouter une caméra
supplémentaire, veuillez suivre les instructions
suivantes:
1. Appuyez sur la touche Menu/Retour
pendant trois
secondes pour que le menu s’afche.
2. Appuyez sur la touche HAUT ou la touche BAS
jusqu’à ce que l’icône de la caméra s’afche et
appuyez ensuite sur la touche pour avoir accès
au sous-menu.
3. Appuyez sur la touche HAUT ou la touche BAS
jusqu’à ce que l’icône ajouter caméra s’afche
et appuyez ensuite sur la touche .
4. Appuyez sur la touche HAUT ou la touche BAS
pour sélectionner le canal où vous souhaitez
ajouter la nouvelle caméra et conrmez la sélection
en appuyant sur la touche .
5. Appuyez sur le bouton d’appairage de la caméra
(VI) pendant que le voyant d’alimentation/de liaison
(1) clignote.
6. Une fois ajoutée, le voyant ne clignotera plus et les
images de la caméra seront immédiatement afchées
sur l’écran de l’unité du moniteur.
7. Si la connexion n’a pas été correctement effectuée,
répétez les étapes indiquées ci-dessus.
Note 1 : Vous ne pourrez sélectionner que les canaux
qui n’ont pas encore été associés à une caméra.
Note 2 : Il n’est pas possible d’avoir accès à ce sous-
menu si 4 caméras ont déjà été reliées.
Vous risquez de perdre la connexion entre le moniteur
et une caméra déjà reliée pour diverses raisons. Dans
ce cas-là, répétez les étapes décrites ci-dessus an
de connecter la caméra au moniteur.
5.2.7.1.4. SUPPRIMER UNE CAMÉRA
Si vous souhaitez supprimer l’une des caméras
branchées, veuillez suivre les instructions indiquées
ci-après :
1. Appuyez sur la touche Menu/Retour pendant trois
secondes pour que le menu s’afche.
2. Appuyez sur la touche HAUT ou la touche BAS
jusqu’à ce que l’icône de la caméra s’afche et
appuyez ensuite sur la touche pour avoir accès
au sous-menu.
FRANÇAIS

44
3. Appuyez sur la touche HAUT
ou la touche BAS
jusqu’à ce que l’icône supprimer caméra
s’afche et appuyez ensuite sur la touche .
4. Appuyez sur la touche HAUT ou la touche BAS
pour sélectionner la caméra que vous souhaitez
supprimer et conrmez la sélection en appuyant sur
la touche .
Note 1 : Si vous n’avez qu’une caméra reliée au
moniteur, vous ne pourrez ni la supprimer, ni avoir
accès à ce menu.
Note 2 : Il est nécessaire de supprimer un canal avant
de l’associer à une nouvelle unité de caméra.
5.2.7.2. MENU RÉGLAGE DE LA CAMÉRA
5.2.7.2.1. BERCEUSES
L’unité bébé peut reproduire une berceuse douce
an d’aider votre bébé à trouver le sommeil. Veuillez
suivre les instructions suivantes pour activer cette
fonction :
1. Appuyez sur la touche Menu/Retour pendant trois
secondes pour que le menu s’afche.
2. Appuyez sur la touche HAUT ou la touche BAS
jusqu’á ce que l’icône du menu réglage de la
caméra s’afche et appuyez ensuite sur la touche
pour avoir accès au sous-menu.
3. Appuyez sur la touche HAUT ou la touche BAS
jusqu’à ce que l’icône Berceuse s’afche et
appuyez ensuite sur la touche .
4. Appuyez sur la touche HAUT ou la touche
BAS pour sélectionner l’une des cinq berceuses
disponibles, le mode silence ou la lecture en boucle
(le réglage par défaut est OFF).
4. Une fois la mélodie sélectionnée, appuyez sur
la touche et la fonction de réglage du volume
s’afchera. Appuyez sur la touche HAUT ou la
touche BAS pour sélectionner le niveau de volume
souhaité allant de 1 à 3 et appuyez sur la touche .
6. Appuyez sur la touche Menu/Retour trois fois
pour retourner à l’écran principal.
7. L’icône Berceuse (d) s’afchera dans la partie
supérieure de l’écran LCD.
Les berceuses ne pourront être sélectionnées que
pour la caméra dont l’image apparaît sur le moniteur
à ce moment-là.
Note: Le mode de lecture en boucle des berceuses
reproduit cycliquement toutes les berceuses.
5.2.7.2.2. VOLUME DE LA CAMÉRA
Ce menu vous permettra de sélectionner le niveau de
volume pour reproduire la voix des parents, à l’aide de
la fonction bidirectionnelle.
Veuillez suivre les instructions suivantes pour
sélectionner le volume de la caméra:
1. Appuyez sur la touche Menu/Retour pendant trois
secondes pour que le menu s’afche.
2. Appuyez sur la touche HAUT ou la touche BAS
jusqu’à ce que l’icône du menu réglage de la caméra
s’afche et appuyez ensuite sur la touche pour
avoir accès au sous-menu.
3. Appuyez sur la touche HAUT ou la touche BAS
jusqu’à ce que l’icône du volume de la caméra
s’afche et appuyez ensuite sur la touche
.
4. Appuyez sur la touche HAUT ou la touche BAS
pour sélectionner l’un des trois niveaux de volume
disponibles (LOW/MID/HIGH) en fonction de vos
besoins.
5. Conrmez la sélection en appuyant sur la touche
.
Le volume ne pourra être sélectionné que pour la
caméra dont l’image apparaît sur le moniteur à ce
moment-là.
5.2.7.2.3. VEILLEUSE
L’unité bébé possède une veilleuse qui offre du
confort au bébé et lui permet de voir l’environnement
qui l’entoure dans une chambre sombre.
Veuillez suivre les instructions suivantes pour activer
la veilleuse :
1. Appuyez sur la touche Menu/Retour pendant trois
secondes pour que le menu s’afche.
2. Appuyez sur la touche HAUT ou la touche BAS
jusqu’à ce que l’icône du menu réglage de la
caméra s’afche et appuyez ensuite sur la touche
pour avoir accès au sous-menu.
3. Appuyez sur la touche HAUT ou la touche BAS
jusqu’à ce que l’icône de la veilleuse s’afche et
appuyez ensuite sur la touche .
4. Appuyez sur la touche HAUT ou la touche BAS
et sélectionnez ON ou OFF si vous souhaitez
activer ou désactiver cette option.
5. Conrmez la sélection en appuyant sur la touche
.
La veilleuse ne pourra être sélectionnée que pour la
caméra dont l’image apparaît sur le moniteur à ce
moment-là.
5.2.7.3. MENU VOX/STAND-BY (déclenchement à
la voix)
5.2.7.3.1. MODE D’ÉCONOMIE D’ÉNERGIE OU
MODE AUDIO UNIQUEMENT (STAND-BY)
Vous pouvez choisir le temps maximal pour que
l’image reste active (1, 3 ou 5 minutes), à l’aide
du mode d’économie d’énergie ou du mode audio
uniquement (Stand-by). Une fois ce temps écoulé,
l’image disparaît en vue d’économiser de l’énergie,
tout en vous permettant d’entendre encore le son.
Appuyez sur quelconque bouton pour afcher de
nouveau l’image.
Veuillez suivre les instructions suivantes pour activer
ce mode :
1. Appuyez sur la touche Menu/Retour pendant trois
secondes pour que le menu s’afche.
2. Appuyez sur la touche HAUT ou la touche BAS
jusqu’à ce que l’icône du menu VOX/Stand-by
s’afche et appuyez ensuite sur la touche pour
avoir accès au sous-menu.
3. Appuyez sur la touche HAUT ou la touche BAS
jusqu’à ce que l’icône Stand-by s’afche et
appuyez ensuite sur la touche .
4. Appuyez sur la touche HAUT ou la touche
BAS et sélectionnez l’option souhaitée (1, 3 ou 5
FRANÇAIS

45
minutes ou OFF) pour désactiver cette fonction.
5. Conrmez la sélection en appuyant sur la touche
.
6. Appuyez sur la touche Menu/Retour deux fois
pour retourner à l’écran principal.
5.2.7.3.2. RÉGLAGE VOX
Ce mode permet de contrôler le déclenchement
à la voix de votre écoute-bébé. Si vous activez
le mode VOX sur le moniteur et aucun son n’est
émis à proximité de la caméra, celle-ci cessera sa
transmission. L’écran du moniteur s’éteindra lorsque
la caméra cessera de transmettre.
Si la caméra détecte un son avec une intensité
supérieure au niveau de sensibilité déni, elle
commencera à retransmettre le signal vers le
moniteur.
Déconnectez le mode VOX sur le moniteur an de
désactiver cette fonction et de voir continuellement la
zone surveillée.
• Mode VOX DÉSACTIVÉ : La caméra transmet
continuellement, ce qui permet de contrôler
constamment votre bébé ou la zone que vous
souhaitez protéger.
• Mode VOX ACTIVÉ : La caméra ne transmet que
lorsqu’elle détecte un son d’une intensité sufsante,
ce qui dépendra du niveau sélectionné, à proximité
de la caméra.
Pour activer cette fonction, avant toute chose, assurez-
vous que vous avez réglé le mode veille
sur 1 / 3 ou 5 minutes (voir paragraphe 5.2.7.3.1).
Choisissez 1 / 3 ou 5 si vous voulez que votre caméra
cesse de transmettre l’image après 1 / 3 ou 5 minutes
s’il n’y a plus de son autour.
Dès lors que le mode veille a été réglé, pour activer le
Mode VOX, suivez les instructions
indiquées ci-après :
1. Appuyez sur la touche Menu/Retour pendant trois
secondes pour que le menu s’afche.
2. Appuyez sur la touche HAUT ou la touche BAS
jusqu’à ce que l’icône du menu VOX/Stand-by
s’afche et appuyez ensuite sur la touche pour
avoir accès au sous-menu.
3. Appuyez sur la touche HAUT ou la touche
BAS jusqu’à ce que l’icône VOX s’afche et
appuyez ensuite sur la touche .
4. Appuyez sur la touche HAUT ou la touche BAS
et sélectionnez le niveau de sensibilité sonore
souhaité : OFF / 1 / 2 / 3 (réglé sur OFF par défaut).
Réglez la sensibilité sur « 1 » pour un bébé qui dort
paisiblement et qui ne pleure pas très fort, et sur « 3
» si le bébé a tendance à faire du bruit pendant son
sommeil ou qu’il fait des bruits relativement forts avant
de se mettre véritablement à pleurer, ou bien réglez sur
le niveau « 2 » si vous considérez que le comportement
de votre bébé ne correspond ni à l’un, ni à l’autre des
deux précédents schémas.
5. Conrmez la sélection en appuyant sur la touche
.
6. Appuyez sur la touche Menu/Retour deux fois
pour retourner à l’écran principal.
Si vous souhaitez voir votre bébé à un moment
donné, même s’il n’y a pas de bruits à proximité,
vous pouvez activer la caméra à distance en
appuyant sur quelconque bouton.
5.2.7.4. PUISSANCE DE TRANSMISSION
Vous pouvez modier à partir de ce menu le niveau de
puissance émis par la caméra, en choisissant parmi
les options haute/basse. Lorsqu’elle se situe sur la
position haute (HI), le niveau du signal couvrira une
distance de 250 mètres à l’air libre avec la puissance
d’origine. Lorsqu’elle se situe sur la position basse
(LOW), la distance maximale de transmission se
limite à approximativement 120 mètres à l’air libre, en
réduisant la puissance d’émission.
Veuillez suivre les instructions suivantes an de
sélectionner la puissance de transmission :
1. Appuyez sur la touche Menu/Retour pendant trois
secondes pour que le menu s’afche.
2. Appuyez sur la touche HAUT ou la touche BAS
jusqu’à ce que l’icône de la puissance de transmission
s’afche et appuyez ensuite sur la touche .
3. Appuyez sur la touche HAUT ou la touche BAS
y seleccione del nivel de transmisión deseado : HIGH
o LOW. et sélectionnez la puissance de transmission
souhaitée : HIGH ou LOW.
4. Conrmez la sélection en appuyant sur la touche
.
5. Appuyez sur la touche Menu/Retour pour
retourner à l’écran principal.
5.2.7.5. RÉGLAGE DE L’ALARME
Veuillez suivre les instructions suivantes pour régler
l’alarme:
1. Appuyez sur la touche Menu/Retour pendant trois
secondes pour que le menu s’afche.
2. Appuyez sur la touche HAUT ou la touche BAS
jusqu’à ce que l’icône de l’alarme s’afche et
appuyez ensuite sur la touche .
3. Appuyez sur la touche HAUT ou la touche
BAS pour sélectionner le minuteur (appuyez sur
la touche HAUT pour augmenter ou sur la touche
BAS pour diminuer).
4. Conrmez la sélection en appuyant sur la touche
.
5. Appuyez sur la touche Menu/Retour pour
retourner à l’écran principal.
Note 1 : Lorsque l’alarme se déclenche, l’icône de
l’horloge (k) apparaît sur l’écran LCD.
Note 2 : Si vous souhaitez éliminer l’horloge, suivez les
étapes 1, 2 et 3 indiquées ci-dessus et réglez le temps
au niveau 00:00. L’icône de l’horloge disparaîtra alors
de votre écran.
Note 3 : Lorsque l’alarme sonne, appuyez sur la
touche pour l’arrêter. Si vous n’obtenez pas de
réponse, l’appareil vous avisera pendant 7 minutes et
s’arrêtera de sonner ensuite.
5.2.7.6. FONCTION VIBRATION
Cette fonction permet aux parents d’obtenir un
environnement paisible lorsqu’ils ont besoin de
tranquillité, étant extrêmement utile dans des
FRANÇAIS

46
environnements bruyants et pour les personnes
malentendantes.
Lorsque le son franchit le seuil qui dénit le niveau
de sensibilité sonore sélectionné dans la chambre du
bébé, le moniteur vibrera quatre fois an de prévenir
les parents.
Veuillez suivre les instructions suivantes pour
sélectionner la fonction vibration.
1. Appuyez sur la touche Menu/Retour
pendant trois
secondes pour que le menu s’afche.
2. Appuyez sur la touche HAUT ou la touche BAS
jusqu’à ce que l’icône de la fonction vibration
s’afche et appuyez ensuite sur la touche .
3. Appuyez sur la touche HAUT ou la touche BAS
pour activer ou désactiver cette fonction.
4. Conrmez la sélection en appuyant sur la touche
.
5. Appuyez sur la touche Menu/Retour pour
retourner à l’écran principal.
La fonction vibration ne pourra être sélectionnée que
pour la caméra dont l’image apparaît sur le moniteur
à ce moment-là.
NOTE : Il est important que le mode VOX soit
actif an que le moniteur vibre lorsque le volume
franchit un seuil qui a été déni dans la chambre
du bébé.
5.2.7.7. LUMINOSITÉ
Veuillez suivre les instructions suivantes pour modier
la luminosité de l’écran de votre moniteur :
1. Appuyez sur la touche Menu/Retour pendant trois
secondes pour que le menu s’afche.
2. Appuyez sur la touche HAUT ou la touche BAS
jusqu’à ce que l’icône luminosité s’afche et
appuyez ensuite sur la touche .
3. Appuyez sur la touche HAUT ou la touche BAS
et sélectionnez le niveau de luminosité souhaité
parmi les 5 options disponibles.
4. Conrmez la sélection en appuyant sur la touche
.
5. Appuyez sur la touche Menu/Retour pour
retourner à l’écran principal.
5.2.8. eMyBaby
5.2.8.1. ENREGISTREMENT
1. En premier lieu, s’enregistrer sur le site web
d’eMyBaby. Pour ce faire, ouvrez votre navigateur,
allez à www.emybaby.com et cliquez sur le bouton
CRÉER COMPTE.
2. Remplissez les champs avec vos données
personnelles et, après avoir accepté les termes
et conditions d’utilisation, appuyez sur le bouton
ACTIVER COMPTE.
3. Vous recevrez un message de vérication à
l’adresse e-mail que vous avez indiquée pendant
l’enregistrement. Lorsque vous cliquerez sur le lien
qui contient le message, vous reviendrez au site
d’eMyBaby et vous pourrez accéder en introduisant
votre identiant et votre mot de passe après avoir
appuyé sur le bouton ACCÉDER
5.2.8.2. POUR VOIR L’IMAGE SUR LE PC QUI EST
CONNECTÉ À L’ÉCOUTE-BÉBÉ
1. Pour pouvoir voir l’image que transmet la caméra
sur votre PC, vous devrez connecter l’écran au
port USB de votre ordinateur au moyen d’un câble
miniUSB-USB (non inclus).
L’écran doit être allumé. Si la batterie est vide,
rechargez-la.
2. Après avoir accéder à eMyBaby avec votre
identiant et votre mot de passe, sélectionnez l’option
ÉCOUTE-BÉBÉ dans le BUREAU.
3. Sélectionnez alors le digimonitor 3.5” plus.
4. Vous pourrez choisir entre deux options.
Choisissez « Uniquement sur l’ordinateur auquel est
relié le système de surveillance de bébés au moyen
du câble USB ».
5. Si tout fonctionne correctement, vous devriez voir
automatiquement votre bébé sur l’écran de votre
ordinateur. S’il y a un quelconque problème avec
l’image, consultez les instructions de visualisation
on line en appuyant sur l’icône LISEZ ICI LES
INSTRUCTIONS
5.2.8.3. POUR VOIR L’IMAGE À DISTANCE GRÂCE
eMyBaby
Si vous souhaitez voir votre bébé à distance, que ce
soit sur votre PC, votre tablette ou votre smartphone,
suivez les étapes suivantes:
NOTE: pour voir à distance l’image que capte
la caméra grâce à eMyBaby, l’écran doit être
connecté à votre PC. Il est indispensable d’émettre
un signal grâce à eMyBaby à partir du PC auquel
est connecté l’écran de votre écoute-bébé. Si
vous n’effectuez pas cette étape préalable, vous
ne pourrez pas recevoir le signal sur un autre
dispositif (PC, tablette ou téléphone portable).
1. Connectez l’écoute-bébé à votre PC en suivant les
étapes indiquées précédemment, en reliant l’écran
au port USB de votre ordinateur au moyen d’un câble
miniUSB-USB (non inclus).
2. Accédez au site Web d’eMyBaby (www.emybaby.
com) avec votre identiant et votre mot de passe
(enregistrez-vous comme indiqué précédemment
si vous n’en disposez pas) et sélectionnez l’option
ÉCOUTE-BÉBÉ.
3. Choisissez digimonitor 3.5” plus parmi les différents
modèles d’écoute-bébé.
4. Vous pourrez choisir entre deux options. Choisissez
« Voir ailleurs, à partir d’un autre ordinateur, tablette
ou smartphone ».
5. La première fois que vous accédez à ce service,
il vous sera demandé d’introduire le numéro de
commande de votre produit. Ce numéro se présente
sous la forme MNLXX-XXXXX
et vous le trouverez à l'intérieur du compartiment de
la batterie de l'écran.
6. Une fois le code introduit, vous accéderez à un
écran dans lequel vous trouverez deux options
distinctes : Envoyer et Recevoir signal. Pour pouvoir
voir à distance l’image que capte la caméra sur votre
dispositif portable, vous devrez appuyer d’abord sur
le bouton Envoyer.
7. Cliquez alors sur l’icône qui apparaît au centre
de l’image. Lorsque votre ordinateur
FRANÇAIS

47
commencera à émettre, l’image suivante apparaîtra
sur votre écran:
Étapes à effectuer si vous souhaitez voir l’image
sur un autre ordinateur :
1. Connectez l’écoute-bébé à votre PC en suivant
les étapes indiquées précédemment, en reliant le
moniteur au port USB de votre ordinateur au moyen d’un
câble miniUSB-USB (non inclus).
2. Sur PC sur lequel vous souhaitez voir l’image à
distance, accédez au site Web d’eMyBaby
(www.emybaby.com) avec votre identiant et votre
mot de passe et sélectionnez l’option ÉCOUTE-
BÉBÉ.
3. Choisissez digimonitor 3.5” plus parmi les différents
modèles d’écoute-bébé.
4. Vous pourrez choisir entre deux options. Choisissez
« Voir ailleurs, à partir d’un autre ordinateur, tablette
ou smartphone » .
5. Pour pouvoir voir à distance l’image que capte la
caméra, sur votre dispositif portable, vous devrez
alors appuyer sur le bouton Recevoir signal. Si
tout fonctionne correctement, vous devriez voir
automatiquement votre bébé sur l’écran de votre
ordinateur. S’il y a un quelconque problème avec
l’image, consultez les instructions de visualisation
on line en appuyant sur l’icône LISEZ ICI LES
INSTRUCTIONS.
Étapes à suivre si vous souhaitez voir l’image
sur un dispositif portable (tablette ou téléphone
portable) :
FRANÇAIS
Application eMyBaby
Miniland a développé l’application eMyBaby, qui est disponible pour iOS et Android, et qui se télécharge de
forme simple et gratuite.
Pour télécharger l’application eMyBaby, accédez d’abord à la boutique d’applications correspondante ou la
décharger directement en scannant le code QR correspondant:
Pour installer l’application, suivez les instructions indiquées au début de ce manuel.
1. Une fois l’application installée, ouvrez-la. Entrez à LOG IN (ACCÉDER) et introduisez votre identiant et
votre mot de passe pour accéder si vous êtes déjà enregistré, ou enregistrezvous si vous ne l’avez pas fait
auparavant. Rappelez-vous que vous recevrez un message de vérication à l’adresse e-mail que vous avez
indiquée durant l’enregistrement.
2. Dans le menu principal, sélectionnez l’option BABY MONITOR (ÉCOUTE-BÉBÉ).
3. Choisissez digimonitor 3.5” plus parmi les différents modèles d’écoute-bébé.
• Appuyez sur l’icône PLAY pour voir l’image captée par la caméra sur votre dispositif portable.
Navigateur du dispositif
Vous pourrez également voir l’image de la caméra en accédant au site Web d’eMyBaby par le biais du navigateur
de votre dispositif portable. Cette option vous sera particulièrement utile si votre dispositif portable n’est pas iOS
ou Android.
1. Dans le navigateur de votre dispositif, accédez au site d’eMyBaby (www.emybaby.com) avec votre identiant
et votre mot de passe. Dans le menu principal, sélectionnez l’option ÉCOUTE-BÉBÉ.
2. Choisissez digimonitor 3.5” plus parmi les différents modèles d’écoute-bébé.
3. Vous pourrez choisir entre deux options. Choisissez « Voir ailleurs, à partir d’un autre ordinateur, tablette ou
smartphone » .
4. Appuyez sur le bouton Recevoir signal. Si tout fonctionne correctement, vous devriez voir automatiquement
votre bébé sur l’écran de votre dispositif portable.
6. NETTOYAGE
• Nettoyez les parties de la caméra et du moniteur avec un chiffon doux non pelucheux.
• Si les unités sont sales, utilisez un chiffon légèrement humide pour nettoyer les parties, en évitant toute entrée
d’eau à travers les ouvertures de l’appareil.
• N’utilisez jamais de détergents ou de solvants.

48
FRANÇAIS
7. IDENTIFICATION ET RÉSOLUTION DE PROBLÈMES
Problème Possible Cause Solution
Aucune connexion
établie sur le moniteur
La caméra ne s’allume pas
Appuyez et maintenez le bouton marche (III)
enfoncé pendant 2 secondes
Le moniteur ne s’allume pas
Appuyez et maintenez le bouton marche (5)
enfoncé
Caméra : l’adaptateur
d’alimentation n’a pas été branché
Branchez l’adaptateur d’alimentation
Moniteur : l’adaptateur
d’alimentation n’a pas été branché
Branchez l’adaptateur d’alimentation
Le moniteur est hors de portée Rapprochez le moniteur de la caméra
La connexion a été perdue entre
le moniteur et l’une des caméras
déjà reliée
Reliez la caméra au moniteur.
Consultez la section 5.2.7.1.3.
La caméra souhaitée n’a pas été
sélectionnée
Modiez le numéro de la caméra que vous
êtes en train de visualiser.
Consultez la section 5.2.7.1.1.
Seules des images
en noir et blanc
apparaissent
Vériez si la caméra est en mode
vision nocturne/infrarouge
Pour voir les images en couleur, augmentez
le niveau de lumière à l’endroit où se trouve
la caméra et
vériez si rien ne couvre le capteur de lumière
de la caméra (II)
Il n’est pas possible
d’entendre la voix des
parents sur l’unité bébé
Le réglage du volume de l’unité
parents est trop bas
Réglez le volume au plus haut niveau
La caméra ne transmet
rien
La caméra n’a pas été allumée
Appuyez et maintenez le bouton (III) enfoncé
pendant 2 secondes
Caméra: l’adaptateur d’alimentation
n’a pas été branché
Branchez l’adaptateur d’alimentation
Le mode VOX ou le mode
d’économie d’énergie (Stand-by)
est actif
Pour voir continuellement la zone surveillée,
déconnectez le mode VOX ou le mode
d’économie d’énergie sur le moniteur
Il n’est pas possible
d’entendre le bébé sur
l’unité parents
Le réglage du volume de l’unité
parents est trop bas
Réglez le volume au plus haut niveau
Interférences ou
réception insatisfaisante
Il est possible que d’autres
dispositifs électroniques interfèrent
avec le signal
Éloignez-les du dispositif
La caméra et le moniteur se
trouvent à une distance trop
grande
Rapprochez le moniteur de la caméra
Le niveau de charge de la batterie
est trop bas
Branchez l’adaptateur d’alimentation
La caméra ou le moniteur se
trouvent trop près de plusieurs objets
métalliques
Éloignez-les du dispositif
Il n’est pas possible de
charger la batterie de
l’unité parents
L’adaptateur CA/CC n’a pas été
branché
Branchez l’adaptateur d’alimentation
Une batterie non rechargeable a
été utilisée
Seules des batteries rechargeables peuvent
être utilisées (batterie en lithium-ion de 3.7
V, 1200 mAh): vériez la batterie et s’il est
nécessaire de la remplacer par celle qui a été
fournie avec l’appareil

49
FRANÇAIS
La connexion a été
perdue entre l’unité
bébé et l’unité parents
La caméra et le moniteur se
trouvent à une distance trop
grande
Rapprochez le moniteur de la caméra
La connexion a été
momentanément perdue entre les
deux unités
Rétablissez la connexion entre les unités en
les déconnectant de la prise.
Attendez environ 15 secondes avant de les
reconnecter.
Patientez une minute an que l’unité bébé et
l’unité parents se synchronisent.
La connexion a été perdue entre
les deux unités
Relier la caméra et le moniteur.
Consultez la section 5.2.7.1.3.
8. SPÉCIFICATIONS TECHNIQUES
Fréquence 2.4GHz FHSS
Portée de fonctionnement 240m (en ligne droite et sur un espace ouvert)
Nombre de canaux congurables 4
Puissance (Unité Parentale)
Input: 100-240VAC 50/60Hz
Output: 5V 800mA
Batterie rechargeable pour le moniteur 3.7V 1200 mAh
Puissance (Unité Bébé)
Input: 100-240 VCA 50/60Hz
Output: 5V 800mA
Durée de fonctionnement avec la
batterie totalement chargée (Unité
Parentale)
Environ 5 heures
Taille de l’écran LCD 3.5''
Format de câble adaptateur de Jack à
RCA compatible
Figure D
Format de câble miniUSB-USB compatible Câble de données USB
9. INFORMATIONS RELATIVES À LA MISE AU REBUT DES BATTERIES ET DU PRODUIT
• N’oubliez pas que vous devez éliminer le produit de manière responsable, dans le respect de
l’environnement, en retirant d’abord la batterie.
• Ne mélangez pas des produits portant le symbole d’une poubelle barrée par une croix avec les
ordures ménagères courantes.
• Pour une collecte et un traitement appropriés de ces produits, apportez-les dans un des points
de collecte indiqués par les autorités locales. Vous pouvez également contacter le magasin dans
lequel vous avez acheté le produit.
Par la présente Miniland S.A. déclare que l’appareil “89174 digimonitor 3.5” plus” est conforme aux
exigences essentielles et aux autres dispositions pertinentes de la 2014/53/UE.

50
INHALT
1. Einführung
2. Lieferumfang
3. Sicherheitsnormen
4. Eigenschaften und Funktionen des Produktes
5. Bedienungsanleitung
6. Wartung
7. Störungen und deren mögliche Behebung
8. Technische Daten
9. Informationen über die Entsorgung der Batterien und
des Gerätes
1. EINFÜHRUNG
Herzlichen Glückwunsch zum Kauf dieses Baby-
Überwachungssystems mit drahtlosem Farbmonitor.
Dieses System beinhaltet die neueste Technologie.
Wir sind überzeugt, dass Sie mit der Qualität und den
Eigenschaften dieses Produkts voll und ganz zufrieden
sein werden. Lesen Sie bitte diese Anleitung sorgfältig
durch, um die besten Ergebnisse aus Ihrem Kauf zu
erhalten.
Dieses Baby-Überwachungssystem ermöglicht es
Ihnen, Audio- und Videosignale drahtlos auf den
Farbmonitor zu übertragen. Dies ist ideal für eine
Vielzahl von Situationen, wie beispielsweise die
Überwachung von Babys, Kleinkindern oder älteren
Menschen.
HINWEIS: Die in dieser Anleitung angegebenen
Eigenschaften können jederzeit und ohne
vorherige Ankündigung geändert werden.
2. LIEFERUMFANG
1 Kamera (Baby-Einheit)
1 Monitor (Eltern-Einheit)
2 AC-DC-Adapter
1 Auadbare Lithium-Batterie (Li-ion) für den Monitor
1 Tragriemen
1 Tasche für den Transport und die Aufbewahrung
1 Stativ
Bedienungsanleitung und Garantie
• Sollte eines der oben beschriebenen Teile fehlen,
setzen Sie sich bitte mit Ihrem Lieferanten in
Verbindung.
3. SICHERHEITSNORMEN
Lesen Sie bitte diese Anleitung sorgfältig durch,
bevor Sie Ihr Baby-Überwachungssystem zum ersten
Mal benutzen und bewahren sie die Anleitung für
zukünftige Konsultationen auf.
3.1. ALLGEMEINE SICHERHEITSNORMEN:
Bei der Verwendung von Elektrogeräten müssen
gewisse grundlegende Sicherheitsnormen beachtet
werden:
1. Es ist notwendig, spezielle Vorsicht walten zu lassen,
wenn Kinder oder ältere Menschen ein elektrisches
Produkt verwenden oder dieses in der Nähe von
solchen Personen zum Einsatz kommt. Halten Sie
das Produkt von Kindern fern, wenn Sie sich nicht
anwesend sind.
2. Dieses Produkt darf ausschließlich zur Überwachung
verwendet werden. Es ist auf keinen Fall ein Ersatz für
eine verantwortungsvolle Überwachung von Kindern
oder älteren Menschen.
3. Betreiben Sie das Baby-Überwachungssystem
ausschließlich mit den mitgelieferten AC-DC-Adaptern
(5.0 V, 800 mA).
4. Verwenden Sie nur die empfohlene Batterie (Li-ion
3,7 V - 1200mAh). Versuchen Sie
nicht, andere Batterien mit Ihrem Gerät aufzuladen.
5. Dieses Produkt enthält eine Reihe von kleinen
Teilen. Achten Sie darauf, dass beim Auspacken und
Montieren des Gerätes keine Teile verloren gehen.
6. Lassen Sie Kinder NICHT mit Verpackungsmaterialien
wie Kunststoffbeutel usw. spielen. Achten Sie beim
Auspacken und Montieren des Produktes darauf.
7. Benutzen Sie das Gerät NICHT, wenn das Kabel
oder der Stecker defekt sind. Falls das Gerät nicht
einwandfrei funktioniert oder irgendeinen Schaden
aufweist, setzen Sie sich bitte mit dem Kundendienst
von Miniland in Verbindung, um es zu reparieren und
unnötige Risiken zu vermeiden.
8. Versuchen Sie NICHT, das Gerät eigenhändig zu
reparieren oder deren elektrischen oder mechanischen
Eigenschaften zu verändern, andernfalls wird die
Garantie annulliert.
9. Kontrollieren Sie, ob die Spannung in Ihrem Haus
mit derjenigen des Gerätes übereinstimmt, die unter
den technischen Daten desselben angegeben ist.
10. Sollten Sie das Baby-Überwachungssystem
während einer längeren Zeitspanne nicht verwenden,
stecken Sie den AC-DC-Adapter aus. Um diesen
auszustecken, ziehen sie am Transformator und
niemals am Kabel.
11. Dieses Gerät darf ausschließlich in Innenbereichen
betrieben werden. Es darf nicht dem Regen, der
Feuchtigkeit oder Spritzwasser oder anderen
Flüssigkeiten ausgesetzt werden. Stellen Sie niemals
ein mit Flüssigkeit gefüllter Behälter (Glas oder
Vase) auf das oder in unmittelbarer Nähe des Baby-
Überwachungsgerätes. Der Monitor des Gerätes darf
nicht in der Nähe von Wasser benutzt werden.
VORSICHTSMASSNAHMEN
• Dieses Gerät wurde speziell entwickelt, um
Eltern zu ermöglichen, ihr Baby auf Distanz zu
überwachen. Es ist auf keinen Fall ein Ersatz für eine
verantwortungsvolle Überwachung des Kindes.
Eines del Elternteile sollte sich stets in der Nähe des
Monitors benden. Das Baby-Überwachungssystem ist
kein medizinisches Gerät, das das Wohlbenden des
Babys gewährleisten könnte! Es ist wichtig, regelmäßig
im Kinderzimmer nachzuschauen, ob dort alles in
Ordnung ist.
•Verwenden Sie niemals das Baby-Überwachungsgerät
in Fällen, wo das Leben oder die Gesundheit des
Babys oder anderen Personen, oder die Integrität
des Gebäudes vom Gerät abhängig sein könnten.
Der Hersteller übernimmt keine Haftung für Tod,
körperlichen oder materiellen Schäden, die durch
eine Fehlfunktion oder einen Missbrauch des Gerätes
verursacht wurden.
•Die unsachgemäße Verwendung dieses Baby-
Überwachungssystems könnte rechtliche Folgen
haben.
• Benutzen Sie dieses Gerät auf eine
verantwortungsvolle Weise.
WICHTIGER HINWEIS: Beachten Sie bitte, dass
Änderungen oder Modikationen am Gerät,
die nicht durch den technischen Dienst von
Miniland durchgeführt wurden, nicht von der
Produktgarantie gedeckt sind.
DEUTSCH

51
3.2. BEMERKUNGEN ZU ETWAIGEN
FUNKSTÖRUNGEN
Dieses Gerät wurde im Werk geprüft und erfüllt die
Anforderungen der Richtlinie RED 2014/53/EU. Diese
Anforderungen sollen einen angemessenen Schutz
gegen störende Interferenzen (Funkstörungen) in
einer Wohnumgebung gewährleisten. Wenn das
Gerät nicht ordnungsgemäß installiert und gemäß den
Anweisungen verwendet wird, können Störungen des
Funkverkehrs auftreten.
Beachten Sie jedoch, dass trotzdem Störungen in einer
bestimmten Installation auftreten können. Sollte das
Baby-Überwachungssystem Störungen des Radio-
oder Fernsehempfangs verursachen (dies kann man
durch Aus- und Einschalten des Gerätes nachweisen),
versuchen Sie die Störung wie nachstehend
beschrieben zu beseitigen:
• Ändern Sie die Ausrichtung oder den Standort des
Empfängers.
• Vergrößern Sie den Abstand zwischen dem betroffenen
Gerät und dem Baby-Überwachungssystem.
• Schließen Sie das Gerät und den Empfänger an
verschiedenen Steckdosen an.
• Stellen Si sich mit dem Kundendienst von Miniland
in Verbindung.
Um die Einhaltung der Richtlinie RED 2014/53/EU
zu gewährleisten, verwendet dieses Gerät speziell
abgeschirmte Kabel. Der Betrieb des Gerätes mit
nicht zugelassenen oder nicht abgeschirmten Kabeln
wird wahrscheinlich zu Störungen des Radio- oder
Fernsehempfangs führen.
3.3. WAHL EINES GEEIGNETEN AUFSTELLORTES
FÜR DAS GERÄT
• Stellen Sie das elektronische Gerät nicht in der Nähe
von Kindern auf, um mögliche Unfälle zu vermeiden.
• Kinder können sich in den Kabeln verwickeln.
Die Baby-Einheit sollte in einem Abstand von 1 bis
1.5 Metern von der Babykrippe aufgestellt werden.
Stellen Sie die Baby-Einheit niemals im Inneren der
Babykrippe, des Kinderbettes oder Laufstalls auf.
Achten Sie darauf, dass die Einheit, die Kabel und der
Adapter sich außerhalb der Reichweite des Babys und
anderen Kleinkindern benden.
• Stellen Sie das Baby-Überwachungssystem in einem
Ort auf, an dem die Luft frei zirkulieren kann. Das Gerät
darf nicht auf weichen Kissen, Decken, Steppdecken
usw. oder Ecken von Schränken, Regalen, usw.
aufgestellt werden.
• Stellen Sie das Baby-Überwachungssystem fern von
Wärmequellen wie Heizungen, Kamine, Kochherde
und direkter Sonneneinstrahlung auf.
• Stellen Sie die Babyeinheit fern von Fernsehgeräten,
Radios und Umsetzern (Repeater) auf. Die intensiven
Funksignale, die diese Geräte erzeugen, können
Rauschen oder Bildverzerrungen auf dem Monitor
verursachen. Sollte dies der Fall sein, stellen Sie die
Kamera an einem anderen Ort auf.
• Der Monitor kann auf einem Tisch aufgestellt werden.
Verwenden Sie hierzu das ausklappbare Stützelement,
das sich auf der Rückseite Teil des Monitors bendet.
Wenn Sie dieses Stützelement nicht mehr benötigen,
klappen Sie es gegen die Rückseite des Monitors,
bis Sie ein „Klick“ hören, welches anzeigt, dass die
Vorrichtung korrekt zurückgeklappt wurde.
4. EIGENSCHAFTEN UND FUNKTIONEN DES
PRODUKTES
4.1. FUNKTIONEN UND KONTROLLELEMENTE
DES MONITORS (ABBILDUNG 1)
MONITOR (ABBILDUNG 1.1)
1. EIN-AUS LED-Anzeige
2. Mikrofon
3. LED-Ladeanzeige
4. LCD-Bildschirm
5. EIN/AUS-Taste
6. Lautsprecher
7. Befestigung für das Tragband
8. Einstelltaste ▲
9. Zoom/Menü-Taste
10. Einstelltaste ▼
11. OK/Scan-Modus-Taste
12. Sprechtaste (um mit dem Baby zu sprechen)
13. AV-Ausgang
14. Mini-USB/PC-Anschluss
15. Klappbare Halterungsvorrichtung
16. Deckel des Batteriefachs
17. Ausziehbare Antenne
DISPLAY
Display-Symbole (ABBILDUNG 1.2)
a. Signalstärke
b. An der Monitor eingestellte Lautstärke
c. Nachtsicht-Funktion
d. Nachtliedchen
e. VOX-Modus
f. Angewählte Kamera
g. Nachtlichtlein
h. Übertragungsniveau
i. Batteriezustand
j. Symbol „mit dem Baby sprechen“
k. Symbol „ Alarm aktiviert“
Menü-Symbole (ABBILDUNG 1.3)
A. Menü „Kamera Wählen/Hinzufügen/Löschen“
B. Menü „Einstellungen der Kamera“
C. VOX/Standby
D. Übertragungsniveau
E. Alarm
F. Vibrationsfunktion
G. Helligkeit des Bildschirms
4.2. FUNKTIONEN UND KONTROLLELEMENTE
DER KAMERA (ABBILDUNG 2)
I. Einziehbare Antenne
II. Lichtsensor
III. EIN-Taste
IV. Tragvorrichtung
V. Lautsprecher
VI. Synchronisationstaste (Pairing)
VII. Mini-USB- Anschluss
VIII. Mikrophon
IX. EIN/PAIRING LED-Anzeige
X. Linse der Kamera
XI. Infrarot
XII. Anschluss für das Stativ
DEUTSCH

52
5. BEDIENUNGSANLEITUNG
5.1. VOR DEM GEBRAUCH
5.1.1. SPEISUNG DER ELTERN-EINHEIT UND
BENUTZUNG DER BATTERIE
Der Monitor (Eltern-Einheit) dieses Baby-
Überwachungsgerätes kann sowohl mit der Batterie als
auch mit dem mitgelieferten AC/DC-Adapter betrieben
werden. Die Batterie muss für mindestens während
acht Stunden aufgeladen werden, bevor das Gerät zum
ersten Mal verwendet wird oder für eine lange Zeit nicht
benutzt worden ist.
Das Baby-Überwachungssystem wird mit einer Lithium-
Ionen-Batterie von 3.7 V, 1200mAh für den Monitor
geliefert. Es wird empfohlen, den Monitor mit der Batterie
zu betreiben, um das Audio/Video-Signal der Kamera
überall empfangen zu können. Wenn immer möglich,
verbinden Sie den Monitor mit dem AC-DC-Adapter,
damit die Batterie stets aufgeladen ist.
EINSETZEN DER BATTERIE (ABBILDUNG 3)
1. Lösen Sie die Schraube und entfernen Sie die
Abdeckung des Batteriefaches (16), das sich auf der
Rückseite des Gerätes bendet.
2. Legen Sie die Lithium-Ionen-Batterie (mitgeliefert) ein.
3. Setzen Sie den Deckel auf und ziehen Sie die
Schraube an.
VORSICHT: Verwenden Sie ausschließlich
Batterien des empfohlenen Typs, andernfalls
besteht die Gefahr einer Explosion der Batterie.
Entsorgen Sie die verbrauchten Batterien auf eine
verantwortungsvolle Weise.
HINWEIS: Wenn Sie nicht beide Einheiten gleichzeitig
benutzen, ist es ratsam, diese auszuschalten, um die
Batterien zu schonen.
AUFLADEN DER BATTERIE
Legen Sie die auadbare Batterie wie oben beschrieben
in das Batteriefach ein.
Stecken Sie das Kabel des AC-DC-Adapters in den
Mini-USB-Anschluss der Einheit ein (14). Benutzen Sie
ausschließlich den empfohlenen Adapter. Verbinden Sie
den Adapter mit einer Steckdose.
Während der Monitor ans Netz angeschlossen ist und
die Batterie aufgeladen wird, leuchtet die rote Lade-LED
(3).
Wenn das Ladegerät ans Netz angeschlossen ist und
der Ladeprozess der Batterie beendet wurde, leuchtet
die rote Lade-LED (3) in grüner Farbe.
Wenn die Batterie stark entladen ist, wird das Batterie-
Symbol (i) rot blinken und das Gerät alle 30 Sekunden
einen Piepton erzeugen.
HINWEIS: Entfernen Sie die Batterie, wenn Sie das
Gerät während einer längeren Zeit nicht benutzen
5.1.2. SPEISUNG DER BABY-EINHEIT
Die Kamera (Baby-Einheit) dieses Baby-
Überwachungssystems darf nur mit dem mitgelieferten
AC-DC-Adapter verwendet werden.
1. Lokalisieren Sie den entsprechenden Anschluss (IX)
auf der Rückseite der Baby-Einheit.
2. Verbinden Sie das Kabel des Adapters mit dem
Mini-USB-Anschluss der Kamera. Benutzen Sie
ausschließlich den mitgelieferten Adapter.
3. Verbinden Sie den Adapter mit einer Steckdose.
VORSICHT: Ertickungsgefahr! – Halten Sie das Kabel
fern von der Reichweite des Babys! Stellen Sie die
Kamera NIEMALS näher als 1 Meter von der Krippe
auf! Verwenden Sie NIEMALS Verlängerungskabel
mit integriertem Netzadapter, sondern ausschließlich
den mitgelieferten AC-DC-Adapter!
5.2. BETRIEB
5.2.1. EIN- UND AUSSCHALTEN DER EINHEITEN
5.2.1.1. MONITOR:
Halten Sie die EIN- oder AUS-Taste (5) gedrückt, die sich
an der oberen Seite des Monitors bendet, wenn Sie
diesen Ein- bzw. Ausschalten möchten. Die EIN/AUS-
LED-Anzeige (1) leuchtet oder erlischt, je nachdem das
Gerät ein- oder ausgeschaltet ist.
5.2.1.2. KAMERA:
Um die Kamera ein- oder auszuschalten, halten Sie die
EIN/AUS-Taste (III) während ca. 2 Sekunden gedrückt.
Die entsprechende LED (IX) leuchtet oder erlischt, je
nachdem das Gerät ein- oder ausgeschaltet ist.
Nach der Installation und dem Einschalten der Kamera,
können Sie die im Kinderzimmer aufgenommen Bilder
und Klänge auf dem Monitor sehen.
5.2.2. LAUTSTÄRKE DES MONITORS
Drücken Sie die Einstelltaste
(8), um die Lautstärke
zu erhöhen und die Einstelltaste (10) wenn sie
diese reduzieren möchten. Es gibt 5 verschiedene
Lautstärkestufen.
5.2.3. MIT DEM BABY SPRECHEN
Sie können mit Ihrem Baby über die Eltern-Einheit
sprechen (zum Beispiel, um es zu beruhigen und ihm zu
signalisieren, dass Sie gleich zu ihm gehen werden). Sie
können auch mit Ihrem Partner sprechen, falls er sich im
Kinderzimmer bendet.
Halten Sie die Taste „mit dem Baby sprechen“ (12)
gedrückt und sprechen Sie in den Monitor.
Lassen Sie diese Taste los, wenn Sie mit dem Sprechen
aufgehört haben und die Geräusche im Kinderzimmer
wieder hören wollen.
Beachten Sie bitte, dass Sie Ihr Baby nicht hören können,
solange Sie zu ihm sprechen. Um es zu hören, müssen
Sie die entsprechende Taste wieder loslassen.
5.2.4. ZOOM
Sie können das auf dem Monitor angezeigte Bild
vergrößern oder verkleinern. Benutzen Sie dazu die
Zoom-Funktion, die über vier verschiedene Stufen
verfügt.
Um die Zoom-Funktion zu aktivieren, gehen Sie bitte
folgendermaßen vor:
1. Drücken Sie die Zoom-Taste . Im oberen linken
Quadranten des Bildes erscheint ein weißes Feld.
2. Drücken Sie die Tasten HINAUF und HINUNTER
um den gewählten Quadranten zu ändern.
3. Drücken Sie die Taste um das Bild des gewählten
Quadranten zu Vergrößern.
4. Drücken Sie die Zoom-Taste um wieder zum
Einstellungsmodus der Quadranten zu gelangen (falls Sie
das Bild eines anderen Quadranten zoomen möchten).
5. Drücken Sie erneut die Zoom-Taste um die Zoom-
Funktion wieder zu verlassen.
DEUTSCH

53
5.2.5. INFRAROT-NACHTSICHT (AUTOMATISCHE
FUNKTION)
Die Infrarot-Nachtsicht-Funktion ermöglicht es der
Kamera, Bilder von Ihrem Baby oder des überwachten
Bereiches in dunklen oder schwach beleuchteten
Umgebungen zu erfassen.
In diesem Modus werden auf dem Bildschirm nur
Schwarz-Weiß-Bilder und Objekte, die weniger als 2
Meter von der Kamera entfern sind. angezeigt.
Die Kamera überwacht ständig die Lichtverhältnisse
und schaltet automatisch auf den Infrarot-Nachtsicht-
Modus um, wenn das Licht für normale Aufnahmen nicht
ausreicht.
5.2.6. MELDUNG BEIM ÜBERSCHREITEN DER
ZULÄSSIGEN REICHWEITE
Falls der Monitor die maximal zulässige Distanz zur
Kamera überschreitet (siehe technische Daten), wird die
LED „EIN-AUS/Synchronisation“ (Pairing) der Kamera
(IX) und des Monitors (1) rot blinken, und das Symbol
„Reichweite“ (a) auf dem Bildschirm auf rot wechseln,
während auf dem Bildschirm das Logo von MINILAND
erscheint.
Bringen Sie den Monitor näher an die Kamera,
bis auf dem Bildschirm wieder ein sauberes Bild
angezeigt wird.
5.2.7. HAUPTMENÜ
Halten Sie die Taste Menü/Zurück
gedrückt, um
die Hauptfunktionen und –Eigenschaften Ihres Baby-
Überwachungssystems einstellen zu können.
5.2.7.1. MENÜ DER KAMERA
5.2.7.1.1. WAHL EINER KAMERA
An das Baby-Überwachungssystem können bis vier
verschiedene Kameras angeschlossen werden, mit
denen Sie verschiedene Bereiche überwachen können.
Um eine bestimmte Kamera anzuwählen, gehen Sie bitte
folgendermaßen vor:
1. Drücken Sie die Taste Menü/Zurück während ca. 3
Sekunden, um das Menü zu öffnen.
2. Drücken Sie die Taste HINAUF oder die Taste
HINUNTER bis das Symbol der Kamera
aueuchtet und drücken Sie danach die Taste um
zum entsprechenden Untermenü zu gelangen.
3. oder die Taste HINUNTER bis das Symbol
„Kamera SEHEN“ aueuchtet und drücken Sie
danach die Taste .
4. Drücken Sie die Taste HINAUF oder die Taste
HINUNTER um die gewünschte Kamera anzuwählen
und drücken Sie danach die Taste um die Wahl zu
bestätigen.
Hinweis 1: Sie können nur die Bilder der Kameras
sehen, die vorher mit dem Monitor synchronisiert
wurden.
Hinweis 2: Es gibt eine raschere Methode, um eine
Kamera anzuwählen: durch Drücken der Taste
können Sie zyklisch die Kameras sehen, die mit dem
Monitor synchronisiert sind:
CAM1/CAM2/CAM3/CAM4/SCAN-MODUS.
5.2.7.1.2. SCAN-MODUS
Mit dieser Funktion können Sie nacheinander und
auf zyklische Weise die Kanäle der mit dem Monitor
synchronisierten Kameras sehen. Das Bild jeder Kamera
erscheint auf dem Bildschirm während ca. 12 Sekunden.
Diese Funktion kann nur verwendet werden, wenn mehr
als eine mit dem Monitor gekoppelt ist. Um zu dieser
Funktion zu gelangen, gehen Sie bitte folgendermaßen
vor:
1. Drücken Sie die Taste Menü/Zurück während ca. 3
Sekunden, um das Menü zu öffnen.
2. Drücken Sie die Taste HINAUF oder die Taste
HINUNTER bis das Symbol der Kamera
aueuchtet und drücken Sie danach die Taste um
zum Untermenü zu gelangen.
3. Drücken Sie die Taste HINAUF oder die Taste
HINUNTER bis das Symbol „Kamera SEHEN“
aueuchtet und drücken Sie danach die Taste .
4. Drücken Sie die Taste HINAUF oder die Taste
HINUNTER und wählen Sie das Symbol „SCAN“ .
5. Drücken Sie die Taste um die Einstellung zu
bestätigen.
Hinweis 1: Wenn eine der Kameras ich außerhalb der
Reichweite bendet oder nicht eingeschaltet ist, wir der
Monitor dies melden, und den Scan-Modus automatisch
unterbrechen.
Hinweis 2: Der Scan-Modus kann aktiviert oder
deaktiviert werden, indem Sie während der Betrachtung
des Hauptbildschirmes die Taste drücken (falls mehr
als eine Kamera mit dem Monitor synchronisiert ist).
5.2.7.1.3. EINE KAMERA HINZUFÜGEN
Dieses Produkt ist in der Lage, verschiedene Bereiche
mit bis zu 4 verschiedenen Kameras zu überwachen
(über die Kanäle 1, 2, 3 und 4). Der Monitor und die
Kamera verlassen das Werk mit programmiertem Kanal
1. Wenn Sie eine zusätzliche Kamera anschließen
möchten, gehen Sie bitte folgendermaßen vor:
1. Drücken Sie die Taste Menü/Zurück während ca. 3
Sekunden, um das Menü zu öffnen.
2. Drücken Sie die Taste HINAUF oder die Taste
HINUNTER bis das Symbol der Kamera
aueuchtet und drücken Sie danach die Taste um
zum Untermenü zu gelangen.
3. Drücken Sie die Taste HINAUF oder die Taste
HINUNTER bis das Symbol „Kamera HINZUFÜGEN“
aueuchtet und drücken Sie danach die Taste .
4. Drücken Sie die Taste HINAUF oder die Taste
HINUNTER um den Kanal anzuwählen, auf dem Sie
die neue Kamera hinzufügen möchten und bestätigen
Sie die Einstellung mit der Taste .
5. Während die EIN-AUS LED-Anzeige blinkt, drücken
Sie die Synchronisierungstaste der Kamera (VI).
6. Sobald die Kamera mit dem Monitor synchronisiert ist,
hört de LED-Anzeige auf zu blinken, und das Bild der neu
angekoppelten Kamera erscheint auf dem Bildschirm
des Monitors.
7. Falls der Synchronisierungsvorgang nicht korrekt
ausgeführt wurde, wiederholen Sie bitte die oben
beschriebenen Schritte.
Hinweis 1: Es können nur diejenigen Kanäle angewählt
werden, mit denen noch keine Kamera synchronisiert
wurde.
Hinweis 2: Dieses Untermenü kann nicht aufgerufen
DEUTSCH

54
werden, wenn bereit 4 Kameras mit dem Monitor
synchronisiert wurden.
Aus verschiedenen Gründen kann es vorkommen,
dass die Verbindung zwischen dem Monitor und einer
bereits mit ihm synchronisierten Kamera verloren
geht. In diesem Fall, wiederholen Sie bitte den oben
beschriebenen Vorgang, um die entsprechende Kamera
erneut mit dem Monitor anzukoppeln.
5.2.7.1.4. EINE KAMERA ENTFERNEN
Um eine der angeschlossenen Kamera zu entfernen,
gehen Sie bitte folgendermaßen vor:
1. Drücken Sie die Taste Menü/Zurück
während ca. 3
Sekunden, um das Menü zu öffnen.
2. Drücken Sie die Taste HINAUF oder die Taste
HINUNTER bis das Symbol der Kamera
aueuchtet und drücken Sie danach die Taste um
zum Untermenü zu gelangen.
3. Drücken Sie die Taste HINAUF oder die Taste
HINUNTER bis das Symbol „Kamera ENTFERNEN“
aueuchtet und drücken Sie danach die Taste .
4. Pulse la tecla ARRIBA o la tecla ABAJO um
die Kamera, die Sie entfernen möchten, anzuwählen und
bestätigen Sie die Einstellung mit der Taste .
Hinweis 1: Wenn nur eine Kamera mit dem Monitor
synchronisiert ist, dann können weder diese Kamera
entfernt noch dieses Untermenü aufgerufen werden.
Hinweis 2: Es muss ein Kanal gelöscht werden, bevor
eine zusätzliche Kamera mit dem Monitor synchronisiert
werden kann.
5.2.7.2. EINSTELLUNGSMENÜ DER KAMERA
5.2.7.2.1. NACHTLIEDCHEN
Die Baby-Einheit kann ein Nachtliedchen wiedergeben,
um Ihr Baby in den Schlaf zu wiegen. Um diese Funktion
zu aktivieren, gehen Sie bitte folgendermaßen vor:
1. Drücken Sie die Taste Menü/Zurück während ca. 3
Sekunden, um das Menü zu öffnen.
2. Drücken Sie die Taste HINAUF oder die Taste
HINUNTER bis das Symbol des Menüs für die
Einstellungen der Kamera aueuchtet und drücken
Sie danach die Taste um zum Untermenü zu
gelangen.
3. Drücken Sie die Taste HINAUF oder die Taste
HINUNTER bis das Symbol „NACHTLIEDCHEN“
aueuchtet und drücken Sie danach die Taste .
4. Drücken Sie die Taste HINAUF oder die Taste
HINUNTER um eines der 5 zur Verfügung stehenden
Nachtliedchen, Ruhe (OFF) oder zyklische Wiedergabe
anzuwählen (die Standard-Einstellung ist OFF).
5. Nachdem Sie eine Melodie gewählt haben, drücken
Sie die Taste um sur Einstellungsfunktion der
Lautstärke zu gelangen. Drücken Sie die Taste HINAUF
oder die Taste HINUNTER um die Lautstärke
zwischen den Niveaus 1 und 3 einzustellen, und drücken
Sie danach die Taste .
6. Drücken Sie die Taste Menü/Zurück drei Mal, um
zum Hauptbildschirm zurückzukehren.
7. Auf der oberen Seite des LCD-Bildschirms erscheint
ras Symbol „Nachtliedchen“ (d).
Beachten Sie bitte, dass das angewählte Nachtliedchen
nur von der Kamera, die im Moment aktiv ist,
wiedergegeben wird.
Hinweis: Die Funktion „endlose Wiedergabe“ wiedergibt
alle vorhandenen Nachtliedchen auf eine zyklische
Weise.
5.2.7.2.2. LAUTSTÄRKE DER KAMERA
In diesem Menü kann die Lautstärke, mit der die Kamera
die Stimme der Eltern wiedergeben wird, eingestellt
werden. Das System verwendet eine bidirektionale
Funktion für die Kontrolle der Lautstärke.
Um die Lautstärke der Kamera einzustellen, gehen Sie
bitte folgendermaßen vor:
1. Drücken Sie die Taste Menü/Zurück während ca. 3
Sekunden, um das Menü zu öffnen.
2. Drücken Sie die Taste HINAUF oder die
Taste HINUNTER bis das Symbol „Menü für die
Einstellungen der Kamera“ aueuchtet und drücken
Sie danach die Taste um zum Untermenü zu
gelangen.
3. Drücken Sie die Taste HINAUF oder die Taste
HINUNTER bis das Symbol „Lautstärke der Kamera“
aueuchtet und drücken Sie danach die Taste .
4. Drücken Sie die Taste HINAUF oder die Taste
HINUNTER um eines der 3 zur Verfügung stehenden
Lautstärkeniveaus einzustellen: TIEF/MITTEL/HOCH
(LOW/MID/HIGH).
5. Bestätigen Sie die Einstellung mit der Taste .
Beachten Sie bitte, dass die eingestellte Lautstärke
nur von der Kamera, die im Moment mit dem Monitor
verbunden ist, wahrgenommen wird.
5.2.7.2.3. NACHTLICHTLEIN
Das System verfügt über ein Nachtlichtlein, das Ihr
Baby beruhigen wird, da es das Kinderzimmer sanft
beleuchtet.
Um das Nachtlichtlein zu aktivieren, gehen Sie bitte
folgendermaßen vor:
1. Drücken Sie die Taste Menü/Zurück während ca. 3
Sekunden, um das Menü zu öffnen.
2. Drücken Sie die Taste HINAUF oder die
Taste HINUNTER bis das Symbol „Menü für die
Einstellungen der Kamera“ aueuchtet und drücken
Sie danach die Taste um zum Untermenü zu
gelangen.
3. Drücken Sie die Taste HINAUF oder die Taste
HINUNTER bis das Symbol „NACHTLICHTLEIN“
aueuchtet und drücken Sie danach die Taste .
4. Drücken Sie die Taste HINAUF oder die Taste
HINUNTER und stellen Sie „ON” oder „OFF“ ein,
wenn Sie diese Funktion aktivieren bzw. deaktivieren
möchten.
5. Bestätigen Sie die Einstellung mit der Taste .
Beachten Sie bitte, dass das aktivierte Nachtlichtlein
nur bei der Kamera, die im Moment mit dem Monitor
verbunden ist, leuchten wird.
5.2.7.3. MENÜ VOX/STANDBY
5.2.7.3.1. ENERGIESPARMODUS ODER NUR AUDIO
(STANDBY)
Mit dem Energiespar- oder nur Audio-Modus (Standby),
können Sie die maximale Zeit, während der das
DEUTSCH

55
Monitorbild aktiv ist (1, 3 oder 5 Minuten) einstellen;
nach dieser Zeit wird das Bild auf dem Bildschirm
verschwinden, um Energie zu sparen, wobei das
Audiosignal weiterhin zu hören ist. Um das Bild wieder
zu aktivieren, drücken Sie eine beliebige Taste des
Monitors.
Um diesen Modus zu aktivieren, gehen Sie bitte
folgendermaßen vor:
1. Drücken Sie die Taste Menü/Zurück
während ca. 3
Sekunden, um das Menü zu öffnen.
2. Drücken Sie die Taste HINAUF oder die Taste
HINUNTER bis das Symbol „Menü VOX/Standby“
aueuchtet und drücken Sie danach die Taste
um zum Untermenü zu gelangen.
3. Drücken Sie die Taste HINAUF oder die Taste
HINUNTER bis das Symbol „Standby“ aueuchtet
und drücken Sie danach die Taste .
4. Drücken Sie die Taste HINAUF oder die Taste
HINUNTER und wählen Sie die gewünschte Option 1,
3 oder 5 Minuten. Wählen Sie „OFF“, um diese Funktion
zu deaktivieren.
5. Bestätigen Sie die Einstellung mit der Taste .
6. Drücken Sie die Taste Menü/Zurück zwei Mal, um
zum Hauptbildschirm zurückzukehren.
5.2.7.3.2. VOX-EINSTELLUNG
Dieser Modus ermöglicht es Ihnen, das Baby-
Überwachungssystem mit der Stimme zu steuern. Wenn
Sie auf dem Monitor den VOX-Modus aktivieren, dann
wird die Kamera kein Bild übertragen, solange es im
überwachten Bereich still ist. Der Bildschirm schaltet sich
automatisch aus, wenn die Kamera kein Signal sendet.
Sobald die Kamera ein beliebiges Geräusch wahrnimmt,
das einen Pegel hat, der über der eingestellten
Empndlichkeitsgrenze der Kamera liegt, wird diese
sofort wieder das Bild auf den Monitor übertragen.
Um diese Funktion zu deaktivieren, um den überwachten
Bereich permanent auf dem Bildschirm zu sehen,
deaktivieren Sie am Monitor den VOX-Modus.
• VOX-Modus DEAKTIVIERT: Die Kamera überträgt
ständig, sodass sie Ihr Baby oder den überwachten
Bereich kontinuierlich auf dem Bildschirm sehen können.
• VOX-Modus AKTIVIERT: Die Kamera überträgt nur
dann, wenn sie ein Geräuschpegel wahrnimmt, der über
der eingestellten Empndlichkeitsgrenze der Kamera
liegt.
Um diese Funktion zu aktivieren, müssen Sie sich
zunächst vergewissern, dass Sie den Standby Modus
auf 1, 3 oder 5 Minuten eingestellt haben (siehe Punkt
5.2.9.2.2). Wählen Sie 1, 3 oder 5 aus, wenn Sie
wünschen, dass Ihre Kamera nach 1, 3 oder 5 Minuten,
wenn kein Geräusch erkannt wurde, die Übertragung
unterbricht.
Wenn die Standby Zeit eingestellt ist, um den VOX
Modus zu aktivieren, befolgen Sie bitte die
folgenden Anweisungen:
1. Drücken Sie die Taste Menü/Zurück während ca. 3
Sekunden, um das Menü zu öffnen.
2. Drücken Sie die Taste HINAUF oder die Taste
HINUNTER
bis das Symbol „Menü VOX/Standby“
aueuchtet und drücken Sie danach die Taste
um zum Untermenü zu gelangen.
3. Drücken Sie die Taste HINAUF oder die Taste
HINUNTER bis das Symbol „VOX“ aueuchtet
und drücken Sie danach die Taste .
4. Drücken Sie die Taste HINAUF oder die Taste
HINUNTER und stellen Sie das gewünschte
Empndlichkeitsniveau ein: OFF / 1 / 2 / 3 (voreingestellt
ist OFF). Stellen Sie die Empndlichkeit auf “1” bei einem
Baby, das friedlich schläft und leise weint und auf “3”,
wenn das Baby dazu neigt, während des Schlafes Lärm
zu machen oder ziemlich laute Geräusche von sich gibt,
bevor es tatsächlich zu weinen beginnt, oder setzen
Sie den Pegel auf “2”, wenn das Verhalten Ihres Babys
weder zum einen noch anderen Pegel passt.
5. Bestätigen Sie die Einstellung mit der Taste .
6. Drücken Sie die Taste Menü/Zurück zwei Mal, um
zum Hauptbildschirm zurückzukehren.
Hinweis: Wenn Sie Ihr Baby zu einem bestimmten
Zeitpunkt sehen möchten, obwohl es in seiner
Umgebung keinen Lärm gibt, können Sie die Kamera
jederzeit durch Drücken einer beliebigen Taste auf
dem Monitor wieder aktivieren.
5.2.7.4. ÜBERTRAGUNGSNIVEAU
Sie können mit diesem Menü die Übertragungsleistung
der Kamera einstellen. Es stehen zwei Niveaus zur
Verfügung: HOCH / TIEF (HIGH / LOW). Im Modus
HIGH, beträgt die Reichweite der Kamera auf offenem
Feld ca. 250 Meter und im Modus LOW ca. 120 Meter,
da die Kamera mit einer tieferen Sendeleistung arbeitet.
Um das Übertragungsniveau einzustellen, gehen Sie bitte
folgendermaßen vor:
1. Drücken Sie die Taste Menü/Zurück während ca. 3
Sekunden, um das Menü zu öffnen.
2. Drücken Sie die Taste HINAUF oder die Taste
HINUNTER bis das Symbol „Übertragungsniveau“
aueuchtet und drücken Sie danach die Taste um
zum Untermenü zu gelangen.
3. Drücken Sie die Taste HINAUF oder die Taste
HINUNTER und wählen Sie das gewünschte
Übertragungsniveau: HIGH oder LOW.
4. Bestätigen Sie die Einstellung mit der Taste .
5. Drücken Sie die Taste Menü/Zurück um zum
Hauptbildschirm zurückzukehren.
5.2.7.5. EINSTELLUNG DER ALARMFUNKTION
Um die Alarmfunktion einzustellen, gehen Sie bitte
folgendermaßen vor:
1. Drücken Sie die Taste Menü/Zurück während ca. 3
Sekunden, um das Menü zu öffnen.
2. Drücken Sie die Taste HINAUF oder die Taste
HINUNTER bis das Symbol „Alarm“ aueuchtet
und drücken Sie danach die Taste .
3. Drücken Sie die Taste HINAUF oder die Taste
HINUNTER um den Timer der Alarm einzustellen
(drücken Sie die Taste HINAUF um die Zeit zu erhöhen
und die Taste HINUNTER um die Zeit zu reduzieren).
4. Bestätigen Sie die Einstellung mit der Taste .
5. Drücken Sie die Taste Menü/Zurück um zum
Hauptbildschirm zurückzukehren.
DEUTSCH

56
Hinweis 1: Wenn die Alarmfunktion aktiv ist, erscheint
auf dem LCD-Bildschirm das Symbol einer Uhr (k).
Hinweis 2: Wenn Sie die Alarmfunktion deaktivieren
möchten, wiederholen Sie die oben beschriebenen
Schritte 1, 2 und 3 und stellen Sie für die Zeit den Wert
„00:00“ ein. Das Symbol der Uhr wird vom Bildschirm
verschwinden.
Hinweis 3: Wenn das Alarmsignal ertönt, drücken Sie
eine beliebige Taste, um es auszuschalten. Wenn Sie
dies nicht tun, wird das Gerät während 7 Minuten ein
Alarmsignal erzeugen und dieses danach automatisch
ausschalten.
5.2.7.6. VIBRATIONSFUNKTION
Mit dieser Funktion können Eltern bei Bedarf eine
ruhige Atmosphäre schaffen. Sie ist besonders hilfreich
in lärmigen Umgebungen und für Personen, die
Hörprobleme haben.
Wenn der Lärmpegel im Kinderzimmer die eingestellte
Grenze überschreitet, wird der Monitor vier vibrieren, um
die Eltern zu warnen.
Um die Vibrationsfunktion zu aktivieren, gehen Sie bitte
folgendermaßen vor:
1. Drücken Sie die Taste Menü/Zurück
während ca. 3
Sekunden, um das Menü zu öffnen.
2. Drücken Sie die Taste HINAUF oder die Taste
HINUNTER bis das Symbol „Vibrationsfunktion“
aueuchtet und drücken Sie danach die Taste .
3. Drücken Sie die Taste HINAUF oder die Taste
HINUNTER um diese Funktion zu aktiviere oder zu
deaktivieren.
4. Bestätigen Sie die Einstellung mit der Taste .
5. Drücken Sie die Taste Menü/Zurück um zum
Hauptbildschirm zurückzukehren.
Beachten Sie bitte, dass die Vibrationsfunktion nur von
der Kamera, die im Moment mit dem Monitor verbunden
ist, ausgelöst wird.
HINWEIS: Damit der Monitor vibrieret, wenn der
Lärm im Kinderzimmer einen bestimmten Pegel
überschreitet, ist es unerlässlich, dass der VOX-
Modus aktiv ist.
5.2.7.7. HELLIGKEIT
Um die Helligkeit des Bildschirms des Monitors
einzustellen, gehen Sie bitte folgendermaßen vor:
1. Drücken Sie die Taste Menü/Zurück während ca. 3
Sekunden, um das Menü zu öffnen.
2. Drücken Sie die Taste HINAUF oder die Taste
HINUNTER bis das Symbol „HELLIGKEIT“
aueuchtet und drücken Sie danach die Taste .
3. Drücken Sie die Taste HINAUF oder die Taste
HINUNTER aueuchtet und drücken Sie danach die
Taste.
4. Bestätigen Sie die Einstellung mit der Taste .
5. Drücken Sie die Taste Menü/Zurück um zum
Hauptbildschirm zurückzukehren.
5.2.8. eMyBaby
5.2.8.1. ANMELDUNG
1. Melden Sie sich zuerst auf der Webseite eMyBaby
an. Öffnen Sie zu diesem Zweck Ihren Webbrowser und
üben Sie Zugriff auf www.emybaby.com aus. Klicken
Sie auf den Button KONTO ERÖFFNEN.
2. Füllen Sie die Textfelder mit Ihren persönlichen
Daten aus, akzeptieren Sie die Geschäfts- und
Benutzungsbedingungen und drücken Sie dann auf den
Button KONTO AKTIVIEREN.
3. Sie werden zur Bestätigung eine E-Mail an die
Adresse empfangen, die Sie beim
Anmeldungsvorgang angegeben haben. Durch
Anklicken des mitgesendeten Links kehren Sie auf die
Webseite von eMyBaby zurück und können nun Zugriff
auf Ihr Konto ausüben, indem Sie Ihren Benutzernamen
und das Kennwort eingeben und auf den Button
ZUGANG drücken.
5.2.8.2. FÜR DEN BILDEMPFANG IM PC, AN DEN DAS
BABYÜBERWACHUNGSGERÄT ANGESCHLOSSEN
IST
1. Um das von der Kamera zu Ihrem Computer
übertragene Bild empfangen zu können, müssen
Sie den Monitor (Bildschirm) an den USB-Anschluss
des Computers anschließen. Benutzen Sie dazu ein
miniUSB-USB Kabel (nicht mitgeliefert). Der Monitor
muss eingeschaltet sein. Sollte die Batterie leer sein, so
muss sie wieder aufgeladen werden.
2. Nachdem Sie Ihren Benutzernamen und das
Kennwort auf eMyBaby eingegeben haben, wählen Sie
die Option BABYMONITOR auf dem DESKTOP.
3. Wählen Sie nun das Gerätemodell Digimonitor
3.5”plus.
4. Sie haben die Wahl zwischen zwei Optionen.
Wählen „Sie Nur im Computer, an welchen das
Babyüberwachungsgerät mittels USB kabel
angeschlossen ist“.
5. Bei fehlerfreiem Betrieb können Sie Ihr Baby nun
automatisch auf dem Bildschirm des Computers sehen.
Sollten Sie Probleme mit dem Bildempfang haben, so
rufen Sie die Online-Anleitungen auf, indem Sie auf das
Symbol LESEN SIE HIER DIE ANLEITUNGEN drücken.
5.2.8.3. FÜR DIE FERNÜBERTRAGUNG DER BILDER
ÜBER eMyBaby
Für die Fernübertragung der Bilder zu Ihrem PC, Tablet
oder Smartphone, befolgen Sie diese Schritte:
ANMERKUNG: Um das von der Kamera
aufgezeichnete Bild im Modus der Fernübertragung
über eMyBaby sehen zu können, muss der Monitor
an Ihren PC angeschlossen sein. Das Signal muss
unbedingt vom PC aus, an den der Monitor Ihres
Babyüberwachungsgeräts angeschlossen ist, über
eMyBaby gesendet werden.
Wird dieser erste Schritt unterlassen, so kann das
Signal in keinem anderen Gerät (PC, Tablet oder
Mobiltelefon) empfangen werden.
1. Schließen Sie das Babyüberwachungsgerät gemäß
den zuvor beschriebenen Anweisungen an Ihren PC an.
Der Monitor ist mittels eines miniUSB-USB Kabels (nicht
mitgeliefert) an einen USB-Anschluss des Computers
anzuschließen.
2. Üben Sie Zugriff auf die Webseite eMyBaby (www.
emybaby.com) aus, indem Sie Ihren Benutzernamen
und das Kennwort eingeben (melden Sie sich wie im
vorher beschriebenen Fall an, wenn Sie noch nicht
angemeldet sein sollten) und wählen Sie die Option
BABYMONITOR.
DEUTSCH

57
3. Wählen Sie unter den verschiedenen angezeigten
Modellen von Babyüberwachungsgeräten Digimonitor
3.5” plus aus.
4. Sie haben die Wahl zwischen zwei Optionen. Wählen
Sie „Sie können Ihr Baby überall sehen, sei es auf
einem anderen Computer, einem Tablet oder einem
Smartphone“.
5. Wenn Sie zum ersten Mal Zugriff auf diesen
Service ausüben, werden Sie um die Eingabe Ihrer
Produktbestellnummer gebeten. Diese Nummer hat das
Format MNLXX-XXXXX.
Sie können sie im Inneren des Batteriefaches des
Monitors nden.
6. Nach Eingabe des Codes gelangen Sie zu einer
Bildäche, auf der Sie zwei verschiedene Optionen
vornden werden: Senden und Signal empfangen. Um
das von der Kamera aufgezeichnete Bild im Modus der
Fernübertragung in Ihrem Ferngerät sehen zu können,
müssen Sie zuerst auf den Button Senden drücken.
7. Drücken Sie auf das Symbol
das in der Bildmitte
erscheint. Wenn Ihr Computer mit der Übertragung
beginnt, erscheint das folgende Symbol auf Ihrem
Bildschirm:
Befolgen Sie diese Schritte, um das Bild von einem
anderen Computer aus empfangen zu können:
1. Schließen Sie das Babyüberwachungsgerät gemäß
den zuvor beschriebenen Anweisungen an Ihren PC
an. Schließen Sie zu diesem Zweck den Monitor mittels
eines miniUSB-USB Kabels (nicht mitgeliefert) an den
USB-Anschluss Ihres Computers an.
2. Üben Sie im PC, in dem Sie das Bild im Modus der
Fernübertragung empfangen möchten, Zugriff auf
die Webseite eMyBaby (www.emybaby.com) aus.
Geben Sie zu diesem Zweck Ihren Benutzernamen
und das Kennwort ein und wählen Sie die Option
BABYMONITOR.
3. Wählen Sie zwischen den verschiedenen Modellen
von Babyüberwachungsgeräten Digimonitor 3.5” plus
aus.
4. Sie haben die Wahl zwischen zwei Optionen. Wählen
Sie „Sie können Ihr Baby überall sehen, sei es auf
einem anderen Computer, einem Tablet oder einem
Smartphone“.
5. Um das von der Kamera übertragene Bild im
Modus der Fernübertragung in hrem Ferngerät sehen
zu können, müssen Sie jetzt auf den Button Signal
empfangen drücken.
Bei fehlerfreiem Betrieb müssten Sie jetzt Ihr Baby
automatisch auf dem Bildschirm Ihres Computers sehen
können. Sollten Sie Probleme mit dem Bildempfang
haben, so rufen Sie die Online-Anleitungen auf,
indem Sie auf das Symbol LESEN SIE HIER DIE
ANLEITUNGEN drücken.
Befolgen Sie diese Schritte, um das Bild von einem
Ferngerät aus empfangen (Tablet oder Mobiltelefon)
zu können:
DEUTSCH
App eMyBaby
Miniland hat die App eMyBaby entwickelt, die für iOS- und Android-Geräte zur Verfügung steht und kostenlos
heruntergeladen werden kann.
Um die Anwendung eMyBaby runterzuladen, gehen Sie bitte zuerst im entsprechenden AppStore oder laden Sie sie
direkt herunter, indem Sie den entsprechenden QR Code scannen:
Um diese App zu installieren, folgen Sie bitte den Anweisungen, die sich am Anfang dieses Handbuches
benden.
1. Öffnen Sie die App nach ihrer Installation. Gehen Sie zu ZUGANG und geben Sie Ihren Benutzernamen und
Ihr Kennwort ein, wenn Sie bereits angemeldet sind, oder melden Sie sich an, wenn Sie noch nicht angemeldet
sind. Vergessen Sie nicht, dass Ihnen eine Email zur Bestätigung an die von Ihnen bei der Anmeldung
angegebene Adresse zugeschickt wird.
2. Im Hauptmenü wählen Sie die Option BABYMONITOR. Wählen Sie zwischen den verschiedenen Modellen
von Babyüberwachungsgeräten Digimonitor 3.5” plus aus.
3. Drücken Sie auf das Symbol PLAY um das von der Kamera aufgezeichnete Bild sehen zu können.
Webbrowser des Geräts
Sie können das von der Kamera aufgezeichnete Bild auch sehen, indem Sie über den Webbrowser Ihres
Mobilgeräts Zugriff auf die Webseite eMyBaby ausüben. Diese Option wird besonders nützlich für Sie sein,
wenn Sie über kein iOS- oder Android-Gerät verfügen.
1. In Ihrem Webbrowser üben Sie Zugriff auf die Webseite eMyBaby(www.emybaby.com) aus und geben Sie
Ihren Benutzernamen und Ihr Kennwort ein. Wählen Sie die Option BABYMONITOR im Hauptmenü.
2. Wählen Sie zwischen den verschiedenen Modellen von Babyüberwachungsgeräten digimonitor 3.5” plus aus.
3. Sie haben die Wahl zwischen zwei Optionen. Wählen Sie „Von jedem beliebigen Ort aus, an welchem ein

58
DEUTSCH
Internetanschluss vorhanden ist, unabhängig davon, wo Sie sich gerade benden, in einem anderen Computer,
Tablet oder im Smartphone“.
4. Drücken Sie auf den Button Signal empfangen. Bei fehlerfreiem Betrieb müssten Sie Ihr Baby jetzt automatisch
auf dem Bildschirm Ihres Mobilgeräts sehen können.
6. WARTUNG
• Reinigen Sie die Oberächen der Kamera und des Monitors mit einem feuchten, fusselfreien Tuch.
• Achten Sie bei dieser Reinigung darauf, dass kein Wasser in die Öffnungen der Geräte gelangt.
• Verwenden Sie NIEMALS Reinigungs- oder Lösemittel.
7. STÖRUNGEN UND DEREN MÖGLICHE BEHEBUNG
Problem Mögliche Ursache Behebung
Der Monitor empfängt
kein Signal
Die Kamera ist nicht eingeschaltet
Halten Sie die EIN-Taste (III) während ca. 2
Sekunden gedrückt
Der Monitor ist nicht eingeschaltet
Halten Sie die EIN-Taste (5) während ca. 2
Sekunden gedrückt
Der AC-DC-Adapter der Kamera ist
nicht eingesteckt
Stecken Sie den entsprechenden Adapter ein
Der AC-DC-Adapter des Monitors
ist nicht eingesteckt
Stecken Sie den entsprechenden Adapter ein
Der Monitor bendet sich
außerhalb der zulässigen
Reichweite
Bringen Sie den Monitor näher an die Kamera
Die Verbindung zwischen
dem Monitor und der mit ihm
synchronisierten Kamera wurde
unterbrochen
Synchronisieren Sie erneut die Kamera mit
dem Monitor. Siehe Abschnitt 5.2.7.1.3.
Es wurde eine nicht gültige
Kamera angewählt
Wählen Sie die gültige Kamera an.
Siehe Abschnitt 5.2.7.1.1.
Der Bildschirm zeigt
nur Schwarz-Weise-
Bilder an
Kontrollieren Sie, ob die Kamera
nicht im Nachtsicht/Infrarot-Modus
arbeitet
Um das Bild in Farbe zu sehen, erhöhen Sie
die Beleuchtung des Ortes, in dem sich die
Kamera bendet und kontrollieren Sie, ob sein
Lichtsensor (II) nicht durch einen Gegenstand
abgedeckt wird
Die Stimme der Eltern
wird nicht von der Baby-
Einheit empfangen
Die Lautstärke der Eltern-Einheit
ist zu niedrig eingestellt
Erhöhen Sie die Lautstärke der Eltern-Einheit
Die Kamera überträgt
kein Signal
Die Kamera ist nicht eingeschaltet
Halten Sie die Taste (III) während ca. 2
Sekunden gedrückt
Der AC-DC-Adapter der Kamera ist
nicht eingesteckt
Stecken Sie den Adapter ein
Der VOX- oder der Energiespar-
Modus (Standby)
ist aktiviert
Um den überwachten Bereich auf dem
Bildschirm zu sehen, muss der
VOX- oder der Energiespar-Modus am Monitor
deaktiviert sein
Die Stimme des
Babys wird nicht von
der Eltern-Einheit
empfangen
Die Lautstärke der Eltern-Einheit ist
zu niedrig eingestellt
Erhöhen Sie die Lautstärke der Eltern-Einheit
Auftreten von
Interferenzen oder
schlechter Empfang
Möglicherweise sind andere
elektronische Geräte in Betrieb, die
das Signal stören
Erhöhen Sie die Distanz zu diesen Geräten
Die Kamera und der Monitor könnten
zu weit voneinander entfernt sein
Bringen Sie den Monitor näher an die Kamera
Die Batterie könnte eine
unzureichende Ladung enthalten
Verwenden Sie den AC-DC-Adapter
Die Kamera und der Monitor könnten
sich zu nahe an zu vielen metallischen
Objekten benden
Entfernen Sie diese Objekte

59
DEUTSCH
Problem Mögliche Ursache Behebung
Die Batterie der Eltern-
Einheit lässt sich nicht
auaden
Der AC-DC-Adapter ist nicht
eingesteckt
Stecken Sie den Adapter ein
Die vorhandene Batterie ist nicht
auadbar
Es dürfen nur auadbare Batterien benutzt
werden
(Li-ion 3.7 V, 1200 mAh). Kontrollieren Sie
den Batterietyp und ersetzen Sie diese ggf.
durch die mit dem Gerät gelieferten Batterie
Die Baby-Einheit hat
die Verbindung mit dem
Eltern-Teil verloren
Die Kamera und der Monitor
könnten zu weit voneinander
entfernt sein
Stellen Sie den Monitor näher an die Kamera
auf
Die Verbindung zwischen beiden
Einheiten wurde vorübergehend
unterbrochen
Machen Sie an beiden Einheiten ein Reset,
indem Sie diese während mindestens 15
Sekunden von der elektrischen Speisung
trennen.
Warten Sie ca. 1 Minute, bis die beiden
Einheiten die Verbindung automatisch wieder
herstellen.
Die Verbindung zwischen
beiden Einheiten wurde denitiv
unterbrochen
Synchronisieren Sie erneut beide Einheiten
miteinander. Siehe dazu Abschnitt 5.2.7.1.3.
8. TECHNISCHE DATEN
Frequenz 2.4GHz FHSS
Reichweite 240m (direkte Verbindung und offener Bereich)
Anzahl der kongurierbaren Kanäle 4
Stromversorgung (Eltern- Einheit)
Input: 100-240VAC 50/60Hz
Output: 5V 800mA
Wiederauadbare Batterie für Monitor 3.7V 1200 mAh
Stromversorgung (Baby Einheit)
Input: 100-240 VCA 50/60Hz
Output: 5V 800mA
Betriebsdauer mit voll geladener Batterie (Eltern
Einheit)
Etwa 5 Stunden
LCD-Größe 3.5''
Format des RCA-Adapterkabels für
den Jack-Stecker
Abbildung D
Format kompatibel USB-MiniUSB
Kabel
USB-Datenkabel
9. INFORMATION ZUR ENTSORGUNG VON BATTERIEN UND DES PRODUKTS
• Denken Sie daran, das Produkt auf eine umweltverträgliche Art und Weise zu entsorgen, entfernen
Sie den Akku zuerst.
• Produkte mit dem Symbol einer durchkreuzten Mülltonne dürfen nicht über den normalen Hausmüll
entsorgt werden.
• Zur korrekten Entsorgung bringen Sie diese Produkte zu einer Sammelstelle, die Ihnen von Ihrer
örtlichen Verwaltung angegeben wurde. Sie können auch das Geschäft kontaktieren, in dem Sie
das Produkt gekauft haben.
Hiermit erklärt Miniland S.A., dass sich das Gerät „89174 digimonitor 3.5” plus“ in Übereinstimmung
mit den grundlegenden Anforderungen und den übrigen einschlägigen Bestimmungen der Richtlinie
2014/53/UE bendet.

60
ITALIANO
INDICE
1. Introduzione
2. Contenuto
3. Istruzioni di sicurezza
4. Caratteristiche e funzioni del prodotto
5. Istruzioni per l’uso
6. Manutenzione
7. Identicazione e risoluzione dei problemi
8. Speciche tecniche
9. Informazioni sullo smaltimento delle batterie e del
prodotto
1. INTRODUZIONE
Congratulazioni per aver acquistato questo baby
monitor con monitor senza li a colori, che include
la tecnologia più avanzata. Siamo certi della totale
soddisfazione del prodotto per quanto riguarda
la qualità e le sue caratteristiche, ciononostante
raccomandiamo di leggere attentamente le istruzioni
per ottenere i migliori risultati dal suo acquisto.
Questo baby monitor consente di trasmettere
segnali audio/video in modalità wireless sul display
a colori, che lo rende ideale per un grande numero
di situazioni come, ad esempio, la sorveglianza di
neonati, bambini o anziani.
NOTA: Le caratteristiche descritte da questo
manuale sono soggette a modiche senza previo
avviso.
2. CONTENUTO
1 Videocamera (unità del bambino)
1 Monitor (unità dei genitori)
2 Adattatori AC/DC
1 Batteria a litio (Li-ion) ricaricabile per il monitor
1 Cinturino per il collo
1 Borsa per il trasporto e la custodia
1 Cavalletto
Manuale di istruzioni e garanzia
• Nel caso di mancanza di uno degli elementi
sopra indicati, contattare il proprio fornitore.
3. ISTRUZIONI DI SICUREZZA
Leggere attentamente questo manuale di istruzioni
prima di utilizzare il baby monitor per la prima volta
e conservarlo come punto di riferimento per qualsiasi
necessità futura.
3.1. ISTRUZIONI DI SICUREZZA GENERALI:
Quando si utilizzano dispositivi elettrici è necessario
attenersi ad alcune precauzioni di sicurezza di base
in qualsiasi momento:
1. È necessario aumentare le precauzioni di sicurezza
nel caso in cui bambini o anziani utilizzino qualsiasi
prodotto o quando sia utilizzata in loro presenza.
Tenere il dispositivo fuori dalla portate dei bambini
mentre non si sta utilizzando.
2. Questo prodotto non deve essere utilizzato come
unico mezzo di sorveglianza e non sostituisce in nessun
caso la supervisione responsabile di bambini, adulti o
proprietà per conto di adulti.
3. Utilizzare il baby monitor solo con gli adattatori AC
inclusi con l’unità (5.0V, 800 mA)
4. Utilizzare solo batterie del tipo raccomandato (Li-
ion 3,7 V – 1200mAh). Non tentare di inserire alcun
altro tipo di batteria nel baby monitor.
5. Questo prodotto contiene parti di piccole
dimensioni. È necessario procedere con cautela
durante l’apertura della confezione e il montaggio de
prodotto.
6. NON permettere ai bambini di giocare con i materiali
dell’imballaggio, come ad esempio i sacchetti di
plastica. È necessario procedere con cautela durante
l’apertura della confezione e il montaggio del prodotto.
7. NON utilizzare il dispositivo se il cavo o la presa
elettrica risultano danneggiati. Se il display del baby
monitor non funziona correttamente o presenta
qualsiasi tipo di danno, contattare il centro di servizio
autorizzato da Miniland per richiedere il controllo e
riparazione dello stesso al ne di evitare qualsiasi
rischio.
8. NON tentare di riparare o modicare in alcun modo
nessuna delle funzioni elettrice dell’unità, in caso
contrario la garanzia non ha validità.
9. Vericare il voltaggio della propria abitazione per
assicurarsi che corrisponda alla portata del dispositivo
indicata nelle speciche tecniche dello stesso.
10. Se il baby monitor non viene utilizzato per un
periodo di tempo prolungato, scollegare sempre
l’adattatore dalla presa di corrente. Per scollegare il
dispositivo dalla rete elettrica, reggere il trasformatore
e staccare la spina dalla presa di corrente. Non tirare
mai direttamente dal cavo.
11. Questo prodotto è disegnato esclusivamente per
l’utilizzo in ambienti interni. L’unità non deve essere
esposta a pioggia, umidità o schizzi di qualsiasi
liquido. Non posizionare mai nessun oggetto pieno di
liquido, come ad esempio un bicchiere o una caraffa,
sopra o accanto al baby monitor. Il baby monitor non
deve essere utilizzato in prossimità dell’acqua.
ATTENZIONE
• Questo baby monitor è disegnato per tranquillizzare
i genitori quando non si trovano nella stessa stanza
del bambino. Questo prodotto non deve sostituire
la supervisione responsabile di un adulto. È
necessario che uno dei genitori resti nelle vicinanze
del monitor durante il suo utilizzo. Il baby monitor
non è un dispositivo medico e non deve essere ad
esso afdato il benessere del bambino. È importante
recarsi periodicamente nella stanza del bambino per
assicurarsi che tutto vada bene.
• Non utilizzare mai questo baby monitor in quei
casi in cui la vita o la salute del bambino o di altre
persone o l’integrità di un immobile dipendano dal
suo funzionamento. Il produttore non si farà carico
di alcuna responsabilità in caso di morte, lesioni
personali o danni materiali causati dal cattivo
funzionamento o da un uso improprio del prodotto.
• L’ uso improprio di questo baby monitor potrebbe
dare luogo ad azioni illegali.
• Utilizzare questo prodotto in modo responsabile.
IMPORTANTE: Tenere presente che qualsiasi
cambio o modica al dispositivo non effettuato
dal servizio tecnico di Miniland non sarà coperto
dalla garanzia del prodotto.
3.2. CONSIGLI PER LE INTERFERENZE RADIO
Questo dispositivo è stato sottoposto a test ed è
conforme alla Direttiva RED 2014/53/UE. Questi
requisiti sono disegnati per offrire una protezione
ragionevole contro le interferenze dannose in
una installazione residenziale. Se l’unità non

61
ITALIANO
viene installata e utilizzata secondo le istruzioni,
potrebbe causare interferenze dannose nelle
radiocomunicazioni.
Ciononostante, tenere presente che non è possibile
garantire la totale assenza di interferenze in una
specica installazione. In caso di interferenze nella
ricezione del baby monitor con la radio o la televisione,
che potrebbero vericarsi durante l’accensione o lo
spegnimento, si raccomanda all’utente di correggere
l’interferenza nel modo indicato di seguito:
• Orientare di nuovo o cambiare il ricevitore di
posizione.
• Aumentare la distanza tra il dispositivo in questione
e il baby monitor.
• Collegare il dispositivo ad una presa di corrente
diversa da quella utilizzata per il ricevitore.
• Consultare il dipartimento di Assistenza al Cliente
di Miniland.
Per soddisfare la Direttiva RED 2014/53/UE, questo
dispositivo è dotato di speciali cavi elettrici corazzati.
L’utilizzo di un dispositivo non approvato o non fornito
di cavi corazzati può provocare interferenze nella
ricezione radio o televisiva.
3.3. SCELTA DI UN LUOGO ADEGUATO
• Collegare il dispositivo elettronico in un luogo fuori
dalla portata dei bambini per evitare possibili incidenti.
• I bambini potrebbero impigliarsi nei cavi. L’unità del
bambino deve essere posizionata ad una distanza
di circa 1 – 1.5 metri dalla culla del bambino. Non
posizionare mai l’unità del bambino all’interno della
culla, lettino o box. Assicurarsi che l’unità, i cavi e
l’adattatore siano fuori dalla portata dei bambini.
• Posizionare il baby monitor in un luogo in cui
l’aria possa circolare liberamente. Non posizionarlo
sopra trapunte o coperte, né negli angoli di armadi,
mensole, ecc.
• Posizionare il baby monitor in un luogo lontano da
fonti di calore come radiatori, camini, cucine e dalla
luce diretta del sole.
• Posizionare l’unità del bambino lontano da apparecchi
televisivi, ripetitori e radio. I segnali radio intensi
generati da tali dispositivi potrebbero causare rumori
o anche la comparsa di suoni e immagini sul monitor.
Se ciò dovesse vericarsi, spostare la videocamera
in un altro luogo.
. Questo monitor può essere posizionato su un tavolo
utilizzando l’apposito supporto retrattile situato nella
parte posteriore del monitor. Quando non viene
utilizzato, basta piegarlo verso l’interno della parte
posteriore del monitor no ad ascoltare un “clic” che
indica che è completamente piegato.
CARATTERISTICHE E FUNZIONI DEL PRODOTTO
4.1. FUNZIONI E CONTROLLI DEL MONITOR
(FIGURA 1)
MONITOR (FIGURA 1.1)
1. Indicatore LED di accensione/connessione
2. Microfono
3. LED indicatore di carica
4. Display LCD
5. Tasto di accensione/spegnimento
6. Altoparlante
7. Gancio per il cinturino del collo
8. Tasto di impostazione ▲
9. Tasto zoom/menu
10. Tasto di impostazione ▼
11. Tasto conferma/modalità Scan
12. Tasto per parlare con il bambino
13. Collegamento uscita AV
14. Collegamento mini USB alimentazione/PC
15. Supporto abbattibile
16. Coperchio dello scompartimento della batteria
17. Antenna telescopica
DISPLAY
Icone del display (FIGURA 1.2)
a. Copertura
b. Volume selezionato sul monitor
c. Visione notturna
d. Ninnananna
e. Modalità VOX
f. Videocamera selezionata
g. Luce di compagnia
h. Livello di trasmissione
i. Livello di batteria
j. Icona parlare con il bambino
k. Icona sveglia attiva
Icone del Menu (FIGURA 1.3)
A. Menu seleziona/aggiungere/eliminare videocamera
B. Menu di impostazioni della videocamera
C. VOX/Standby
D. Livello di trasmissione
E. Sveglia
F. Funzione vibrazione
G. Luminosità del display
4.2. FUNZIONI E CONTROLLI DELLA
VIDEOCAMERA (FIGURA 2)
I. Antenna telescopica
II. Sensore di luce
III. Tasto di accensione
IV. Accessorio per appenderla
V. Altoparlante
VI. Tasto per l’abbinamento
VII. Connettore dell’alimentazione Mini USB
VIII. Microfono
IX. LED di accensione / abbinamento
X. Obiettivo della videocamera
XI. Infrarossi
XII. Accessorio di supporto
ISTRUZIONI PER L’USO
5.1. PRIMA DELL’USO
5.1.1. ALIMENTAZIONE DELL’UNITÀ DEI GENITORI
E USO DELLA BATTERIA
Il monitor, o unità dei genitori, di questo baby monitor
è disegnato per essere utilizzato con la batteria o con
l’adattatore AC/DC fornito. La batteria ricaricabile
deve essere caricata per almeno otto ore prima di
utilizzare l’unità per la prima volta o se non è stato
utilizzato per un lungo periodo.
Il baby monitor è fornito di una batteria Li-ion
ricaricabile da 3.7V 1200mAh per l’unità dei
genitori. Si raccomanda di utilizzare la batteria nel
monitor al ne di poter ricevere il segnale audio/
video proveniente dalla videocamera in qualsiasi
luogo. Collegare il monitor all’adattatore attaccato
alla rete elettrica sempre che sia possibile, al ne di
mantenere la batteria carica.

62
INSTALLAZIONE DELLA BATTERIA (FIGURA 3)
1. Svitare e rimuovere il coperchio della batteria (16)
situato nella parte posteriore dell’unità.
2. Inserire la batteria Li-ion (fornita).
3. Posizionare nuovamente il coperchio della batteria
al suo posto e ssarlo con la vite.
Precauzione: Utilizzare solo batterie della
tipologia raccomandata in quanto, in caso
contrario, esiste il rischio di esplosione. Smaltire
le batterie scariche in modo responsabile.
Nota: Quando le due unità non vengono utilizzate,
si raccomanda di spegnerle per risparmiare il
consumo della batteria.
CARICA DELLA BATTERIA
Inserire la batteria attenendosi alle istruzioni indicate
nel paragrafo anteriore.
Collegare il connettore dell’adattatore di corrente alla
presa mini USB situata nella parte laterale dell’unità
(14). Utilizzare solamente l’adattatore fornito. Collegare
l’adattatore alla rete elettrica.
Mentre il monitor è collegato alla rete elettrica e in
carica, il LED indicatore di carica (3) rimane acceso
di colore rosso.
Se il caricatore resta collegato alla rete ma il processo
di carica è completo, il LED indicatore di carica (3) si
illuminerà in verde.
Quando il livello di carica della batteria è molto basso,
l’icona del livello della batteria (i) lampeggia in rosso e
comincia ad emettere un bip ogni 30 secondi.
Nota: rimuovere la batteria quando il dispositivo
non viene utilizzato per un lungo periodo.
5.1.2. ALIMENTAZIONE DELL’UNITÀ DEL BAMBINO
La videocamera, o unità del bambino, di questo baby
monitor è disegnata per poter essere utilizzata con
l’adattatore AC/DC fornito.
1. Localizzare la presa del connettore (VII) nella parte
posteriore dell’unità del bambino.
2. Collegare il cavo dell’adattatore alla presa mini
USB della videocamera.
Utilizzare l’adattatore fornito.
3. Collegare l’adattatore alla presa elettrica.
Avvertenza: Pericolo di strangolo – Tenere il
cavo lontano dalla portata del bambino. NON
posizionare MAI una videocamera con il cavo a
meno di 1 metro dalla culla. Non utilizzare mai
prolunghe con gli adattatori AC. Utilizzare solo gli
adattatori AC forniti.
5.2. FUNZIONAMENTO
5.2.1. ACCENSIONE/SPEGNIMENTO DELLE UNITÀ
5.2.1.1. MONITOR:
Mantenere premuto il tasto di accensione (5), situato
nella parte superiore del monitor, per accenderlo o
spegnerlo. L’indicatore LED di acceso/collegato (1)
si illuminerà o spegnerà a seconda della funzione
selezionata.
5.2.1.2. VIDEOCAMERA:
Per accendere o spegnere la videocamera,
mantenere premuto il tasto di accensione (III) per due
ITALIANO
secondi. Il LED dell’alimentazione (IX) si illuminerà o
spegnerà a seconda della funzione selezionata.
Una volta installata o accesa la videocamera, sarà
possibile vedere le immagini e ascoltare i suoni rilevati
nella cameretta del bambino attraverso il monitor.
5.2.2. VOLUME DEL MONITOR
Premere il tasto di impostazione (8) se si
desidera aumentare il volume del monitor o il tasto
di impostazione (10) se si desidera diminuirlo,
scegliendo tra i 5 livelli disponibili.
5.2.3. PARLARE AL BAMBINO
È possibile parlare al bambino attraverso l’unità dei
genitori (ad esempio per tranquillizzarlo mentre ci si
reca da lui) o all’altro genitore (se lui o lei si trova nella
cameretta del bambino).
Premere e mantenere premuto il tasto per parlare con il
bambino (12) e parlare di fronte al monitor.
Lasciare il tasto una volta terminato di parlare per
tornare ad ascoltare l’audio della cameretta del
bambino.
Ricordare che non è possibile ascoltare il bambino
mentre si sta parlando con lui; per ascoltarlo si dovrà
lasciare il tasto.
5.2.4. ZOOM
È possibile aumentare la dimensione dell’immagine
visualizzata effettuando uno zoom di quattro posizioni.
Per accedere a questa funzione seguire i seguenti
passaggi:
1. Premere il tasto zoom . Il quadrante sinistro
superiore dell’immagine comparirà incorniciato di
bianco.
2. Premere i tasti IN ALTO e IN BASSO per
cambiare il quadrante selezionato.
3. Premere il tasto per aumentare l’immagine del
quadrante selezionato.
4. Premere il tasto zoom per tornare all’opzione di
selezione del quadrante ed effettuare lo zoom su un
altro dei quadranti.
5. Premere nuovamente il tasto zoom per uscire
dalla funzione zoom.
5.2.5. VISIONE NOTTURNA A INFRAROSSI
(AUTOMATICA)
La funzione di visione notturna a infrarossi della
videocamera per captare le immagini del bambino o
dell’area sorvegliata in condizioni di oscurità o scarsa
illuminazione.
In questo modo sarà possibile vedere sul monitor
le immagini in bianco e nero e solamente gli oggetti
situati a meno di 2 metri di distanza.
La videocamera sorveglia costantemente il livello di
luce e cambia automaticamente la modalità infrarossi
quando la luce è insufciente per la visuale normale.
5.2.6. AVVISO DI USCITA DAL RAGGIO DI COPERTURA
Se il monitor viene situato ad una distanza superiore
a quella consentita dalla videocamera (vedere
le caratteristiche tecniche), l’indicatore LED di
accensione/collegamento della videocamera (IX) e
del monitor (1) lampeggeranno in rosso, comparirà
il simbolo della copertura (a) di colore rosso e sul
display sarà mostrato il logo di MINILAND.
Avvicinare il monitor alla videocamera per tornare
a vedere correttamente l’immagine.

63
5.2.7. MENU PRINCIPALE
Mantenere premuto il tasto Menu/Indietro
per
poter effettuare modiche alle principali funzioni e
caratteristiche del baby monitor.
5.2.7.1. MENU DELLA VIDEOCAMERA
5.2.7.1.1. SELEZIONE DELLA VIDEOCAMERA
Il dispositivo è disegnato per consentire
l’osservazione di zone diverse con un massimo di
quattro videocamere. Per selezionare la videocamera
desiderata, seguire i passaggi illustrati di seguito:
1. Premere il tasto Menu/Indietro per tre secondi
per visualizzare il menu.
2. Premere i tasti IN ALTO e IN BASSO no
a quando l’icona della videocamera risulta
evidenziata e in seguito premere il tasto per
accedere al sotto-menu.
3. Premere i tasti IN ALTO e IN BASSO no
a quando l’icona VISUALIZZA videocamera risulta
evidenziata e in seguito premere il tasto .
4. Premere i tasti IN ALTO e IN BASSO
per selezionare la videocamere che si desidera
visualizzare e premere successivamente il tasto
per confermare la selezione.
Nota 1: È possibile visualizzare solo le videocamere
che sono state previamente abbinate al monitor.
Nota 2: Esiste un modo più rapido per cambiare la
videocamera da visualizzare. Premere direttamente il
tasto per poter vedere a rotazione le videocamere
abbinate: CAM1/CAM2/CAM3/CAM4/MODALITÀ SCAN.
5.2.7.1.2. MODALITÀ SCAN
Questa funzione consente di vedere in modo
consecutivo e a rotazione i canali delle videocamere
abbinate, mostrando le immagini di ogni videocamera
per 12 secondi. Questa funzione può essere utilizzata
solo se c’è più di una videocamera abbinata. Per
accedere a questa modalità:
1. Premere il tasto Menu/Indietro per tre secondi per
poter visualizzare il menu.
2. Premere i tasti IN ALTO e IN BASSO no
a quando l’icona della videocamera risulta
evidenziata e in seguito premere il tasto per
accedere al sotto-menu.
3. Premere i tasti IN ALTO e IN BASSO no
a quando il tasto VISUALIZZARE videocamera
risulta evidenziata e in seguito premere il tasto .
4. Premere i tasti IN ALTO e IN BASSO e
selezionare l’icona SCAN .
5. Premere il tasto per confermare.
Nota 1: Se una delle videocamere si trova fuori dal
raggio di copertura o se non è accesa, il
monitor emetterà un avviso e la Modalità Scan sarà
interrotta.
Nota 2: La Modalità Scan può essere attivata
o disattivata premendo il tasto mentre si sta
visualizzando il display principale se si ha più di una
videocamera collegata al monitor.
5.2.7.1.3. AGGIUNGERE VIDEOCAMERA
Questo prodotto è disegnato per consentire
l’osservazione di zone diverse con un massimo di 4
videocamere (canale 1, 2, 3 o 4 assegnato a diverse
ITALIANO
videocamere). Il monitor e la videocamera originale
escono di fabbrica con il canale 1 programmato. Se
si ha bisogno di aggiungere un’altra videocamera è
necessario seguire i seguenti passaggi:
1. Premere il tasto Menu/Indietro per tre secondi
per poter visualizzare il menu.
2. Premere i tasti IN ALTO e IN BASSO no
a quando l’icona della videocamera risulta
evidenziata e premere in seguito il tasto per
accedere al sotto-menu.
3. Premere i tasti IN ALTO e IN BASSO no a
quando l’icona “aggiungi videocamera” risulta
evidenziata e premere in seguito il tasto .
4. Premere i tasti IN ALTO e IN BASSO per
selezionare il canale al quale aggiungere la nuova
videocamera e confermare premendo il tasto .
5. Mentre l'indicatore LED di accensione/connessione
(1) lampeggia, premere il tasto per l’abbinamento
della videocamera (VI).
6. Una volta completato l’abbinamento, l’indicatore
LED smetterà di lampeggiare e le immagini della
videocamera saranno immediatamente visibili sul
display dell’unità monitor.
7. Nel caso in cui l’abbinamento non sia stato
effettuato correttamente, ripetere i passaggi sopra
indicati.
Nota 1: È possibile selezionare solo i canali ai quali
non è stata ancora abbinata nessuna videocamera.
Nota 2: Non è possibile accedere a questo sotto-
menu se sono presenti già 4 videocamere abbinate.
Per diversi motivi, potrebbe vericarsi la perdita
della connessione tra il monitor e una videocamera
collegata. In questo caso, ripetere il processo
precedentemente illustrato per collegare di nuovo la
videocamera con il monitor.
5.2.7.1.4. ELIMINARE VIDEOCAMERA
Per eliminare una delle videocamere collegate,
seguire i passaggi che sono indicati di seguito:
1. Premere il tasto Menu/Indietro per tre secondi
per poter visualizzare il menu.
2. Premere i tasti IN ALTO e IN BASSO no
a quando l’icona della videocamera risulta
evidenziata e premere in seguito il tasto per
accedere al sotto-menu.
3. Premere i tasti IN ALTO e IN BASSO hno
a quando l’icona “eliminare videocamera” risulta
evidenziato e premere in seguito il tasto .
4. Premere i tasti IN ALTO e IN BASSO per
selezionare la videocamera che si desidera eliminare
e confermare la scelta premendo il tasto .
Nota 1: Se c’è solo una videocamera abbinata con il
monitor, non sarà possibile eliminarla né accedere a
questo menu.
Nota 2: È necessario eliminare un canale prima di
abbinarlo ad una nuova unità videocamera.
5.2.7.2. MENU DI IMPOSTAZIONI DELLA VIDEOCAMERA
5.2.7.2.1. NINNANANNA
L’unità del bambino può riprodurre una dolce
ninnananna per aiutare il bambino ad addormentarsi.

64
Per attivare questa funzione:
1. Premere il tasto Menu/Indietro
per tre secondi
per poter visualizzare il menu.
2. Premere i tasti IN ALTO e IN BASSO no
a quando l’icona del menu di impostazioni della
videocamera risulta evidenziata e premere in seguito
il tasto per accedere al sotto-menu.
3. Premere i tasti IN ALTO e IN BASSO no a
quando l’icona della ninnananna risulta evidenziata
e premere in seguito il tasto .
4. Premere i tasti IN ALTO e IN BASSO per
selezionare una delle cinque ninnananne disponibili,
silenzio o riproduzione a ripetizione (l’impostazione
predenita è OFF).
5. Dopo aver selezionato la melodia, premere il tasto
e comparirà il controllo del volume. Premere il
tasto IN ALTO e IN BASSO per selezionare il
livello del volume da 1 no a 3 e premere il tasto .
6. Premere il tasto Menu/Indietro per tre volte per
tornare alla schermata principale.
7. Nella parte superiore del display LCD comparirà
l’icona della Ninnananna (d).
Tenere in considerazione che la congurazione delle
ninnananne sarà possibile solo sulla videocamera
che si sta visualizzando al momento.
Nota: La funzione di riproduzione a ripetizione delle
ninnananne trasmette tutte le melodie in sequenza.
5.2.7.2.2. VOLUME DELLA VIDEOCAMERA
Questo menu consente di congurare il livello del
volume con il quale viene riprodotta la voce dei
genitori attraverso la videocamera, quando si utilizza
la funzione bidirezionale.
Per congurare il volume delle videocamere seguire i
seguenti passaggi:
1. Premere il tasto Menu/Indietro per tre secondi
per poter visualizzare il menu.
2. Premere i tasti IN ALTO e IN BASSO no
a quando l’icona del menu di impostazioni della
videocamera risulta evidenziata e premere in
seguito il tasto per accedere al sotto-menu.
3. Premere i tasti IN ALTO e IN BASSO no a
quando l’icona del volume della videocamera
risulta evidenziata e premere in seguito il tasto .
4. Premere i tasti IN ALTO e IN BASSO per
selezionare una dei tre livelli di volume disponibili
(LOW/MID/HIGH)in base alle proprie necessità.
5. Confermare la scelta effettuata premendo il tasto
.
Tenere in considerazione che la congurazione
del volume avrà valore esclusivamente per la
videocamera che si sta visualizzando sul monitor al
momento.
5.2.7.2.3. LUCE DI COMPAGNIA
L’unità del bambino dispone di una soffusa luce
di compagnia che donerà comfort al bambino e
permetterà di vedere all’interno di una stanza buia.
Per attivare la luce di compagnia, seguire i seguenti
passaggi:
1. Premere il tasto Menu/Indietro
per tre secondi
per poter visualizzare il menu.
2. Premere i tasti IN ALTO e IN BASSO no
a quando l’icona del menu delle impostazioni della
videocamera risulta evidenziata e premere in seguito il
tasto per accedere al sotto-menu.
3. Premere i tasti IN ALTO e IN BASSO no
a quando l’icona della luce di compagnia risulta
evidenziata e premere in seguito il tasto .
4. Premere i tasti IN ALTO e IN BASSO e
selezionare ON o OFF a seconda se si vuole attivare
o disattivare questa funzione.
5. Confermare la scelta effettuata premendo il tasto
.
Tenere in considerazione che la congurazione della
luce di compagnia avrà valore esclusivamente per la
videocamera che si sta visualizzando sul monitor in
quel momento.
5.2.7.3. VOX/STANDBY MENU
5.2.7.3.1. MODALITÀ DI RISPARMIO ENERGIA O
SOLO AUDIO (STANDBY)
Con la modalità di risparmio energia o solo audio
(Standby), è possibile scegliere il tempo massimo
durante il quale l’immagine sul monitor resta attiva
(1, 3 o 5 minuti); trascorso questo tempo, l’immagine
scompare al ne di risparmiare energia, anche
se si continua ad ascoltare il suono. Per riattivare
l’immagine, è sufciente premere un tasto qualsiasi.
Per attivare questa modalità attenersi alle seguenti
istruzioni:
1. Premere il tasto Menu/Indietro per tre secondi
per poter visualizzare il menu.
2. Premere i tasti IN ALTO e IN BASSO no a
quando l’icona del menu VOX/Standby risulta
evidenziata e premere in seguito il tasto per
accedere al sotto-menu..
3. Premere i tasti IN ALTO e IN BASSO no
a quando l’icona della modalità Standby risulta
evidenziata e premere in seguito il tasto .
4. Premere i tasti IN ALTO e IN BASSO e
selezionare l’opzione desiderata scegliendo tra 1, 3 o
5 minuti oppure OFF per disattivare questa funzione.
5. Confermare la scelta effettuata premendo il tasto
.
6. Premere il tasto Menu/Indietro due volte per
tornare alla schermata principale.
5.2.7.3.2. IMPOSTAZIONE VOX
Questa modalità consente di controllare l’attivazione
attraverso il suono del baby monitor. Se si attiva la
modalità VOX sul monitor e non viene prodotto
alcun suono in prossimità della videocamera, essa
interromperà la trasmissione. Il display del monitor si
spegne quando la videocamera non sta trasmettendo.
Quando la videocamera rileva un qualsiasi suono
che abbia un’intensità superiore al livello di sensibilità
impostato, inizierà a trasmettere di nuovo il segnale
al monitor.
Per disattivare questa funzione e visualizzare l’area
costantemente sorvegliata, disattivare la modalità
VOX sul monitor.
ITALIANO

65
• Modalità VOX DISATTIVATA: La videocamera
trasmette continuamente, ciò consente di monitorare
costantemente il bambino o l’area che si desidera
proteggere.
• Modalità VOX ATTIVATA: La videocamera trasmette
solo quando rileva un suono che abbia una intensità
sufciente in prossimità della videocamera.
Per attivare questa funzione, accertarsi prima di tutto
di avere impostato la modalità standby a
1, 3 o 5 minuti (si veda punto 5.2.7.3.1). Scegliere
1/3 o 5 se si vuole che la videocamera smetta di
trasmettere l’immagine dopo 1/3 o 5 minuti se non vi
sono rumori ambientali.
Una volta impostato il tempo di standby, per attivare
la modalità VOX si prega di seguire queste istruzioni:
1. Premere il tasto Menu/Indietro
per tre secondi
per poter visualizzare il menu.
2. Premere i tasti IN ALTO e IN BASSO no
a quando l’icona del menu VOX/Standby risulta
evidenziata e premere in seguito il tasto .
3. Premere i tasti IN ALTO e IN BASSO no
a quando l’icona del VOX risulta evidenziata e
premere in seguito il tasto .
4. Premere i tasti IN ALTO e IN BASSO
e selezionare il livello di sensibilità desiderato:
OFF/1/2/3 (default OFF).
Impostare sensibilità a “1” per un bebè che dorme
tranquillo e che piange sommessamente, e “3” se il
bebè tende a fare rumore mentre dorme o produce
rumori ad alto volume prima di mettersi effettivamente
a piangere, o impostarlo a “2” se si ritiene che il
comportamento del bebè sia intermedio tra i due
precedenti.
5. Confermare la scelta effettuata premendo il tasto .
6. Premere il tasto Menu/Indietro due volte per
tornare alla schermata principale.
Se si desidera vedere il bambino in un
momento preciso, anche se non ci sono rumori
nell’ambiente circostante, è possibile attivare la
videocamera in modalità remota premendo un
tasto qualsiasi.
5.2.7.4. LIVELLO DI TRASMISSIONE
Attraverso questo menu è possibile modicare il livello
di potenza emesso dalla videocamera, scegliendo tra
le opzioni alta/bassa. Quando si sceglie l’opzione
alta (HI), la copertura raggiungerà una distanza di
250 metri in campo aperto con la potenza originale.
Quando si sceglie la posizione bassa (LOW), la
distanza massima di trasmissione si riduce 120 metri
in campo aperto, in quanto diminuisce la potenza
dell’emissione.
Per congurare il livello di trasmissione seguire i
seguenti passaggi:
1. Premere il tasto Menu/Indietro per tre secondi
per poter visualizzare il menu.
2. Premere i tasti IN ALTO e IN BASSO no a
quando l’icona del livello di trasmissione risulta
evidenziata e premere in seguito il tasto per
accedere al sotto-menu.
3. Premere i tasti IN ALTO
e IN BASSO e
selezionare il livello di trasmissione desiderato: HIGH
o LOW.
4. Confermare la scelta effettuata premendo il tasto .
5. Premere il tasto Menu/Indietro per tornare a
visualizzare la schermata principale.
5.2.7.5. IMPOSTAZIONE DELLA SVEGLIA
Per congurare la sveglia, seguire i seguenti passaggi:
1. Premere il tasto Menu/Indietro per tre secondi
per poter visualizzare il menu.
2. Premere i tasti IN ALTO e IN BASSO no a
quando l’icona della sveglia risulta evidenziata e
premere in seguito il tasto .
3. Premere i tasti IN ALTO e IN BASSO per
congurare il timer della sveglia (premere il tasto IN
ALTO per aumentare o il tasto IN BASSO per
diminuire).
4. Confermare la scelta effettuata premendo il tasto .
5. Premere il tasto Menu/Indietro per tornare alla
schermata principale.
Nota 1: Quando la sveglia è attiva, sul display LCD
comparirà l’icona di un orologio (k).
Nota 2: Se si desidera eliminare la sveglia seguire i
passaggi 1, 2 e 3 sopra descritti e impostare il tempo
00:00. L’icona dell’orologio scomparirà dal display.
Nota 3: Quando la sveglia sta suonando, premere un
qualsiasi tasto per spegnerla. Se non ottiene risposta,il
dispositivo continuerà a suonare per 7 minuti prima di
spegnersi.
5.2.7.6. FUNZIONE VIBRAZIONE
Questa funzione contente ai genitori di ottenere un
ambiente silenzioso nei momenti in cui necessitano
di tranquillità ed è di grande aiuto in contesti rumorosi
e per quelle persone che presentano problemi di
udito. Quando il suono nella cameretta del bambino
supera la soglia che corrisponde al livello di sensibilità
congurato, il monitor vibrerà per quattro volte al ne
di avvisare i genitori.
Per attivare la funzione vibrazione, seguire i seguenti
passaggi:
1. Premere il tasto Menu/Indietro per tre secondi
per poter visualizzare il menu.
2. Premere i tasti IN ALTO e IN BASSO no a
quando l’icona della funzione vibrazione risulta
evidenziata e in seguito premere il tasto .
3. Premere i tasti IN ALTO e IN BASSO per
attivare o disattivare questa funzione.
4. Confermare la scelta effettuata premendo il tasto .
5. Premere il tasto Menu/Indietro per tornare alla
schermata principale.
Tenere presente che la congurazione della
funzione vibrazione sarà applicata unicamente sulla
videocamera la cui immagine si sta visualizzando sul
monitor in quel momento.
NOTA: Per fare in modo che il monitor vibri
quando il volume nella cameretta del bambino
supera una certa soglia, è indispensabile che la
modalità VOX sia attiva.
ITALIANO

66
5.2.7.7. LUMINOSITÀ
Per modicare la luminosità del display del monitor,
seguire i seguenti passaggi:
1. Premere il tasto Menu/Indietro
per tre secondi
per poter visualizzare il menu.
2. Premere i tasti IN ALTO e IN BASSO no a
quando l’icona della luminosità risulta evidenziata
e premere in seguito il tasto .
3. Premere i tasti IN ALTO e IN BASSO e
scegliere il livello di luminosità desiderato scegliendo
tra i 5 disponibili.
4. Confermare la scelta effettuata premendo il tasto .
5. Premere il tasto Menu/Indietro per tornare alla
schermata principale.
5.2.8. eMyBaby
5.2.8.1. REGISTRAZIONE
1. In primo luogo si registri sul sito web di eMyBaby.
Per farlo, apra il suo browser, vada a www.emybaby.com
e clicchi su CREA ACCOUNT.
2. Compili i campi con i suoi dati personali e, dopo
avere accettato termini e condizioni di uso, clicchi su
ATTIVA ACCOUNT.
3. Riceverà al suo indirizzo di posta elettronica
(indicato durante la registrazione) un messaggio di
verica. Cliccando sul link contenuto nel messaggio
e-mail, verrà indirizzato alla pagina di eMyBaby e
potrà accedere introducendo identicativo utente e
password e cliccando su ACCESSO.
5.2.8.2. PER VEDERE LE IMMAGINI NEL PC CON
CUI SI È CONNESSI AL BABY MONITOR
1. Per poter vedere l’immagine trasmessa dalla
videocamera sul suo PC, dovrà connettere il monitor
(schermo) alla porta USB del suo computer mediante
un cavo miniUSB-USB (non incluso). Il monitor deve
essere acceso, e se la batteria è esaurita, occorre
caricarla.
2. Dopo l’accesso con il suo identicativo utente e la
sua password a eMyBaby, selezioni l’opzione BABY
MONITOR sul CRUSCOTTO.
3. Selezionare a questo punto il digimonitor 3.5” plus.
4. Si potrà scegliere tra due opzioni. Scelga “Solo sul
computer al quale ha conneso il baby monitor tramite
il cavo USB”.
5. Se tutto funziona correttamente, vedrà
automaticamente il bebè sullo schermo del computer.
Se l’immagine dà qualche problema, consulti le
opzioni di visualizzazione on-line premendo sull’icona
LEGGI QUI LES ISTRUZIONI.
5.2.8.3. PER VEDERE L’IMMAGINE A DISTANZA
ATTRAVERSO eMyBaby
Se si desidera vedere il bebè a distanza, sul proprio
pc, tablet o Smartphone, seguire i passi elencati:
NOTA: per vedere in remoto attraverso eMyBaby
le immagini che la videocamera sta catturando,
il monitor deve essere connesso al PC. Si deve
necesariamente emettere segnale attraverso
eMyBaby dal PC a cui è connesso lo schermo del
baby monitor.
Se non si effettua questo passaggio preliminare,
non si potrà ricevere il segnale in qualsiasi altro
dispositivo (PC, tablet o smartphone).
1. Connettere il baby monitor al PC secondo i passi
indicati precedentemente, connettendo il monitor alla
porta USB del computer mediante un cavo miniUSB-
USB (non incluso).
2. Acceda alla pagina web eMyBaby (www.emybaby.com) con
il suo identicativo utente e la sua password (registrarsi
come indicato in precedenza, qualora non lo si fosse
ancora fatto) e selezioni l’opzione BABY MONITOR.
3. Scelga digimonitor 3.5” plus fra i tre modelli diversi
di baby monitor.
4. Si potrà scegliere tra due opzioni. Scelga “Vedere
da qualsiasi luogo attraverso altro computer, tablet o
smartphone”.
5. La prima volta che si accede a questo servizio,
verrà chiesto di introdurre il numero di serie del
prodotto. Questo numero ha la forma MNLXX-XXXXX
e si trova all’interno dello scomparto batteria del
monitor.
6. Una volta introdotto il codice, accederà a una
schermata nella quale troverà due opzioni distinte:
Emetti e Ricevi Segnale. Per potere vedere in remoto
le immagini che la videocamera sta riprendendo, si
dovrà premere in primo luogo il pulsante Emetti.
7. Clicchi ora sull’icona che compare al centro
dell’immagine. Quando il computer inizia a emettere,
comparirà la seguente immagine sullo schermo:
Passi da realizzare se si desidera vedere
l’immagine da altro computer:
1. Connettere il baby monitor al PC secondo i passi
indicati precedentemente, connettendo il monitor alla
porta USB del computer mediante un cavo miniUSB-
USB (non incluso).
2. Nel PC in cui si vuole vedere l’immagine in remoto,
accedere al sito web eMyBaby (www.emybaby.com)
con nome utente e password e selezionare l’opzione
BABY MONITOR.
3. Scegliere digimonitor 3.5” plus tra i vari modelli di
baby monitor.
4. Si potrà scegliere tra due opzioni. Scegliere
“Vedere da qualsiasi luogo attraverso altro computer,
tablet o smartphone”.
5. Per vedere in remoto sul proprio dispositivo mobile le
immagini che la videocamera sta riprendendo, si dovrà
cliccare sul pulsante Ricevi Segnale. Se tutto funziona
correttamente, si dovrà vedere il bebè sullo schermo
del proprio computer. Se vi è qualche problema con
l’immagine, consultare le istruzioni di visualizzazione on-
line premendo sull’icona LEGGI QUI LES ISTRUZIONI.
Passi da realizzare se si desidera vedere l’immagine
da un dispositivo mobile (Tablet o telefono mobile):
Applicazione eMyBaby
Miniland ha sviluppato l’applicazione eMyBaby, che è
disponibile per iOS e Android, e si scarica facilmente
e gratuitamente.
Per scaricare l'applicazione eMyBaby, in primo luogo,
accedere al negozio di applicazioni corrispondenti o
scaricarla direttamente eseguendo una scansione del
codice QR corrispondente:
ITALIANO

67
Per installare l’applicazione, seguire le istruzioni indicate all’inizio di questo manuale.
1. Una volta installata l’applicazione, aprirla. Entrare in LOG IN e introdurre identicativo utente e password per
accedere, qualora si sia già registrati, altrimenti provvedere a registrarsi. Si riceverà un messaggio di verica
all’indirizzo di posta elettronica indicato durante la registrazione.
2. Nel menù principale, scegliere l’opzione BABY MONITOR.
3. Scegliere digimonitor 3.5” plus tra i diversi modelli di baby monitor.
4. Premere PLAY per vedere dal dispositivo mobile le immagini catturate dalla videocamera.
Browser del dispositivo
Potrà vedere le immagini della videocamera anche accedendo al sito web eMyBaby attraverso il browser del
suo dispositivo mobile. Qusta opzione le sarà particolarmente utile
se il suo dispositivo mobile non è iOS o Android.
1. Nel browser del suo dispositivo, acceda alla pagina eMyBaby (www.emybaby.com) con il suo identicativo
utente e la sua password. Selezioni l’opzione BABY MONITOR nel menù principale.
2. Scelga digimonitor 3.5” plus tra i diversi modelli di baby monitor.
3. Potrà scegliere tra due opzioni. Scelga “Da qualsiasi luogo con connessione a Internet, indipendentemente
dalla posizione geográca, su altro computer, tablet or Smartphone”.
4. Prema Ricevi Segnale. Se tutto funziona correttamente, si vedrà automaticamente il bebè sullo schermo del
dispositivo mobile.
6. MANUTENZIONE
• Pulire le superci della videocamera e del monitor con un panno morbido che non lasci pelucchi.
• Nel caso in cui le unità risultino sporche, utilizzare un panno leggermente umido per pulire le superci,
facendo attenzione ad evitare l’inltrazione dell’acqua in nessuna delle fessure.
• Non utilizzare mai prodotti per la pulizia o solventi.
7. IDENTIFICAZIONE E RISOLUZIONE DEI PROBLEMI
Problema Possibile Causa Soluzione
Non c’è recezione sul
monitor
La videocamera non si accende
Premere e mantenere premuto il tasto di
accensione (III) per 2 secondi
Il monitor non si accende
Premere e mantenere premuto il tasto di
accensione (5)
Videocamera:l’adattatore non è
stato collegato alla presa elettrica
Attaccare l’adattatore alla presa di corrente
Monitor: l’adattatore non è stato
collegato alla presa elettrica
Attaccare l’adattatore alla presa di corrente
Il monitor si trova al di fuori del suo
raggio di copertura
Avvicinare il monitor alla videocamera
Si è persa la connessione tra il
monitor e una videocamera già
abbinata
Abbinare di nuovo la videocamera al
monitor.
Consultare la sezione 5.2.7.1.3.
È stata selezionata una
videocamera non corretta
Cambiare il numero della videocamera che si
sta visualizzando.
Consultare la sezione 5.2.7.1.1.
Vengono visualizzate
solo immagini in bianco
e nero
Vericare se la videocamera
si trova nella modalità di
visualizzazione notturna/infrarossi
Per vedere le immagini a colori, aumentare
il livello di luminosità nel luogo in cui è
posizionata la videocamera e assicurarsi che
niente stia ostacolando il sensore della luce
della videocamera (II)
ITALIANO

68
Problema Possibile Causa Soluzione
Non è possibile
ascoltare la voce dei
genitori attraverso l’unità
del bambino
L’impostazione del volume
dell’unità dei genitori è troppo
basso
Impostare il volume sul livello più alto
La videocamera non
trasmette le immagini
La videocamera non è accesa
Premere e mantenere premuto il tasto
(III) per 2 secondi
Videocamera: l’adattatore non è
collegato alla presa di corrente
Collegare l’adattatore alla presa di corrente
È attiva la modalità VOX o la
modalità di risparmio energia
(Standby)
Per visualizzare l’area sorvegliata
costantemente, disconnettere la modalità VOX o
la modalità di risparmio energia sul monitor
Non è possibile sentire
il bambino attraverso
l’unità dei genitori
Il volume impostato sull’unità dei
genitori è troppo basso
Impostare il volume al livello più alto
Interferenze o ricezione
insoddisfacente
È possibile che altri dispositivi
elettronici stiano interferendo con
il segnale
Allontanarli dal dispositivo
La videocamera e il monitor
potrebbero essere troppo distanti uno
dall’altro
Avvicinare il monitor alla videocamera
Il livello di carica della batteria
potrebbe essere troppo basso
Collegare l’adattatore alla presa di corrente
La videocamera e il monitor
potrebbero essere troppo vicini a
molti oggetti metallici
Allontanarli dal dispositivo
Non è possibile caricare
la batteria dell’unità dei
genitori
L’adattatore AC/DC non è collegato
alla corrente
Collegare l’adattatore alla presa di corrente
Si sta utilizzando una batteria non
ricaricabile
È possibile utilizzare esclusivamente batterie
ricaricabili (batteria Li-ion da
3.7 V, 1200 mAh): controllare la batteria e
se necessario sostituirla con quella fornita
insieme al dispositivo
L’unità del bambino ha
perso il collegamento
con l’unità dei genitori
La videocamera e il monitor
potrebbero essere troppo distanti
l’uno dall’altro
Avvicinare il monitor alla videocamera
La connessione tra le due unità è
stata momentaneamente persa
Ripristinare le due unità scollegandole
dall’alimentazione elettrica.
Attendere circa 15 secondi prima di collegarle
nuovamente.
Attendere un minuto afnché l’unità del
bambino e quella dei genitori si sincronizzino
La connessione tra le due unità è
stata persa
Abbinare di nuovo la videocamera e il monitor.
Consultare la sezione 5.2.7.1.3.
8. SPECIFICHE TECNICHE
Frequenza 2.4GHz FHSS
Portata operativa 240m (in linea retta e in spazio aperto)
Numero di canali congurabili 4
Power (unità genitori)
Input: 100-240VAC 50/60Hz
Output: 5V 800mA
Batteria ricaricabile per monitor 3.7V 1200 mAh
Power (unità bebè)
Input: 100-240 VCA 50/60Hz
Output: 5V 800mA
Tempo di funzionamento con la batteria
completamente carica (unità genitori)
Circa 5 ore
ITALIANO

69
Dimensioni dello schermo LCD 3.5"
Formato da cavo adattatore da Jack a
RCA compatibile
Figura D
Formato da cavo miniUSB-USB
compatibile
Cavo dati USB
9. INFORMAZIONI SULLO SMALTIMENTO DELLE BATTERIE E DEL PRODOTTO
• Ricordare di smaltire il prodotto in modo responsabile dal punto di vista ambientale, rimuovendo
prima la batteria.
• Non mescolare prodotti che recano il simbolo di un bidone dei riuti barrato con i normali riuti
domestici.
• Per un’adeguata raccolta ed elaborazione di questi prodotti, conferirli ai punti di raccolta designati
dalle autorità locali. Si può anche contattare il negozio in cui il prodotto è stato acquistato.
Con la presente Miniland S.A. dichiara che questo “89174 digimonitor 3.5” plus”è conforme ai
requisiti essenziali ed alle altre disposizioni pertinenti stabilite dalla direttiva 2014/53/UE.
ITALIANO

70
POLSKI
SPIS TREŚCI
1. Wprowadzenie
2. Zawartość
3. Instrukcje bezpieczeństwa
4. Charakterystyka i funkcje produktu
5. Instrukcje użytkowania
6. Konserwacja
7. Identykacja i rozwiązywanie problemów
8. Specykacje techniczne
9. Informacja dotycząca utylizacji baterii i produktu
1. WPROWADZENIE
Gratulujemy zakupu elektronicznej niani z
bezprzewodowym kolorowym monitorem
wyposażonym w najnowsze technologie. Jesteśmy
pewni, że będą Państwo zadowoleni z jakości i
działania produktu, mimo to zalecamy uważną lekturę
niniejszej instrukcji, dzięki czemu korzystanie z
produktu będzie jeszcze wydajniejsze.
Elektroniczna niania umożliwia przesyłanie sygnałów
audio i wideo w trybie bezprzewodowym, które są
odbierane na kolorowym monitorze, co jest bardzo
przydatne w wielu sytuacjach, takich jak opieka
nad niemowlęciem, małymi dziećmi czy osobami
starszymi.
UWAGA: Charakterystyka podana w niniejszej
instrukcji użytkownika może ulec zmianie bez
wcześniejszego powiadomienia.
2. ZAWARTOŚĆ
1 kamera (nadajnik)
1 monitor (odbiornik)
2 adaptery AC/DC
1 akumulatorek litowy (Li-ion) do monitora
1 pasek do zawieszania na szyi
1 torba do przenoszenia i przechowywania
1 statyw
Instrukcja obsługi i karta gwarancyjna
• W razie braku któregoś z wymienionych powyżej
elementów prosimy o kontakt z dystrybutorem.
3. INSTRUKCJE BEZPIECZEŃSTWA
Przed użyciem elektronicznej niani po raz pierwszy
należy uważnie przeczytać niniejszą instrukcję i
zachować ją na przyszłość.
3.1. OGÓLNE INSTRUKCJE BEZPIECZEŃSTWA:
Podczas stosowania urządzeń elektrycznych należy
zachować podstawowe środki ostrożności:
1. W przypadku stosowania wyrobu przez dzieci
lub osoby starsze, bądź też w ich pobliżu, należy
zwiększyć ostrożność. Przechowywać nieużywane
urządzenie z dala od dzieci.
2. Produkt nie może być stosowany jako jedyny
środek nadzoru. W żadnym wypadku nie zastępuje
nadzoru osoby dorosłej odpowiedzialnej za dzieci,
dorosłych lub przedmioty.
3. Do elektronicznej niani stosować wyłącznie
załączone adaptery CA (5 V, 800 mA).
4. Stosować wyłącznie zalecane przez producenta
akumulatory litowo-jonowe (Li-ion 3,7 V – 1200mAh).
Nie ładować w urządzeniu baterii innych niż
dostarczone w zestawie.
5. Produkt zawiera małe elementy. Podczas
rozpakowywania i montażu zachować ostrożność.
6. NIE pozwalać, by dzieci bawiły się opakowaniem,
np. plastikowymi woreczkami. Podczas
rozpakowywania i montażu zachować ostrożność.
7. NIE stosować urządzenia w przypadku uszkodzenia
kabla lub wtyczki. Jeśli monitor urządzenia nie działa
prawidłowo lub w przypadku jego uszkodzenia,
należy skontaktować się z autoryzowanym centrum
serwisowym rmy Miniland w celu zamówienia
przeglądu i naprawy monitora.
8. NIE naprawiać ani nie ustawiać samodzielnie
żadnych funkcji elektrycznych lub mechanicznych
urządzenia, ponieważ może to spowodować utratę
gwarancji.
9. Sprawdzić napięcie w sieci celem upewnienia się,
że odpowiada ono zakresowi napięcia podanemu w
specykacjach produktu.
10. Jeśli urządzenie nie będzie użytkowane przez
dłuższy czas, należy zawsze odłączyć adapter od
prądu. Aby odłączyć urządzenie od sieci elektrycznej,
należy przytrzymać transformator i wyciągnąć
wtyczkę z gniazdka. Nie pociągać bezpośrednio za
kabel.
11. Produkt został zaprojektowany wyłącznie do
użytku w pomieszczeniach. Urządzenia nie można
wystawiać na deszcz, wilgoć lub rozpryskujące się
ciecze. Na ani przy urządzeniu nie należy ustawiać
żadnych pojemników z cieczą, jak na przykład
szklanki czy dzbanki. Monitora nie należy używać w
pobliży wody.
ŚRODKI OSTROŻNOŚCI
• Zadaniem elektronicznej niani jest zapewnienie
spokoju rodzicom, kiedy nie mogą przebywać w tym
samym pokoju, co dziecko. Produkt nie zastępuje
odpowiedzialnego nadzoru osoby dorosłej, Jeden
z rodziców musi zawsze znajdować się w pobliżu
monitora podczas użytkowania urządzenia.
Elektroniczna niania nie jest urządzeniem medycznym
i nie gwarantuje dobrego samopoczucia dziecka. Co
jakiś czas należy wchodzić do pokoju, w którym jest
dziecko, celem sprawdzenia, czy wszystko jest w
porządku.
• Nigdy nie stosować urządzenia w przypadku, gdy
życie lub zdrowie dziecka bądź innych osób, lub stan
mieszkania zależą od jego działania. Producent nie
bierze na siebie odpowiedzialności ani nie przyjmuje
reklamacji wynikających ze śmierci, obrażeń lub
szkód materialnych związanych z nieprawidłowym
działaniem, bądź niewłaściwym użytkowaniem
produktu.
• Niewłaściwe użytkowanie urządzenia może być
podstawą do podjęcia działań prawnych.
• Produkt należy użytkować w sposób odpowiedzialny.
WAŻNE! Należy pamiętać, że wszelkie zmiany
bądź przeróbki urządzenia niewykonane przez
serwis rmy Miniland, nie są objęte gwarancją.
3.2. ZALECENIA DOTYCZĄCE ZAKŁÓCEŃ
RADIOWYCH
Urządzenie zostało poddane testom i spełnia
wymogi dyrektywy RED 2014/53/UE. Wymogi te
zostały określone w celu zapewnienia ochrony przed
szkodliwymi zakłóceniami w instalacjach domowych.
Jeśli urządzenie nie jest instalowane i użytkowane
zgodnie z instrukcją, mogą powstać szkodliwe
zakłócenia w falach radiowych.

71
POLSKI
Jednak należy pamiętać, że nie jest możliwe
całkowite wyeliminowanie zakłóceń w niektórych
instalacjach. Jeśli urządzenie powoduje zakłócenia
w odbiorze radia lub telewizji, co można sprawdzić
poprzez wyłączenie i włączenie urządzenia, zalecamy
poniższe kroki w celu usunięcia zakłóceń:
• Przestawić lub zmienić ustawienie odbiornika.
• Zwiększyć odległość między urządzeniem a
elektroniczną nianią.
• Włożyć wtyczkę urządzenia do innego gniazdka niż
gniazdko używane do odbiornika.
• Skonsultować się z działem obsługi klienta rmy
Miniland.
Zgodnie z wymogami dyrektywy RED 2014/53/
UE urządzenie wyposażone jest w specjalne
przewody ekranowane. Działanie z urządzeniem
bez homologacji lub bez przewodów ekranowanych
najprawdopodobniej spowoduje zakłócenia w
odbiorze radia i telewizji.
3.3. WYBÓR ODPOWIEDNIEGO MIEJSCA
• Urządzenie elektroniczne należy umieścić z dala
od dzieci, zapobiegając w ten sposób możliwym
wypadkom.
• Dzieci mogą zaplątać się w kable. Nadajnik należy
umieścić w odległości ok. 1 - 1.5 m od łóżeczka
dziecka. Nigdy nie wstawiać nadajnika do łóżeczka,
ustawiać na łóżku lub w kojcu. Upewnić się, że
urządzenie, przewody i adapter znajdują się poza
zasięgiem niemowlęcia i innych małych dzieci.
• Umieścić elektroniczną nianię w miejscu, gdzie
zapewniona jest swobodna cyrkulacja powietrza. Nie
umieszczać jej na kołdrze, miękkich kocach, w rogach
szafek, półek itp.
• Umieścić urządzenie z dala od źródeł ciepła,
takich jak grzejniki, kominki, kuchenki i z dala od
bezpośredniego światła słonecznego.
• Umieścić nadajnik z dala od telewizorów,
regeneratorów sygnału i radia. Silne sygnały radiowe
generowane przez te elementy mogą powodować
powstawanie hałasów, a nawet dźwięków i obrazów
na monitorze. Jeśli wystąpią takie zakłócenia, należy
przenieść kamerę w inne miejsce.
• Monitor może być ustawiany na stole za pomocą
wysuwanej podstawy znajdującej się w tylnej części
monitora. Jeśli nie jest wykorzystywana, można po
prostu ją złożyć, wkładając w tylną część monitora
do momentu kliknięcia wskazującego na całkowite
złożenie podstawy.
4. CHARAKTERYSTYKA I FUNKCJE
PRODUKTU
4.1. FUNKCJE I STEROWANIE MONITOREM
(ZDJĘCIE 1)
MONITOR (ZDJĘCIE 1.1)
1. Dioda LED wskazująca na włączenie / połączenie
2. Mikrofon
3. Dioda LED wskazująca na ładowanie
4. Ekran LCD
5. Przycisk włączania / wyłączania
6. Głośnik
7. Zaczep na pasek na szyję
8. Przycisk regulacji ▲
9. Przycisk zoom / menu
10. Przycisk regulacji ▼
11. Przycisk Akceptuj / tryb Skanuj
12. Przycisk do rozmawiania z dzieckiem
13. Złącze wyjściowe AV
14. Złącze mini USB do zasilania / PC
15. Składana podstawa
16. Pokrywa komory baterii
17. Wyciągana antena
WYŚWIETLACZ
Ikony na ekranie (ZDJĘCIE 1.2)
a. Zasięg
b. Wybrana głośność kamery
c. Noktowizor
d. Kołysanki
e. Tryb VOX
f. Wybrana kamerag. Lampka
h. Poziom transmisji
i. Poziom naładowania akumulatorków
j. Ikonka rozmowy z dzieckiem
k. Ikonka aktywnego powiadamiania
IKONKI W MENU (ZDJĘCIE 1.3)
A. Menu wybierz / dodaj / usuń kamerę
B. Menu ustawień monitor
C. VOX / Standby
D. Poziom transmisji
E. Alarm
F. Funkcja wibracji
G. Jasność ekranu
4.2. FUNKCJE I STEROWANIE KAMERĄ (ZDJĘCIE 2)
I. Wyciągana antena
II. Czujnik światła
III. Przycisk włączania
IV. Element do zawieszania
V. Głośnik
VI. Przycisk parowania
VII. Złączka zasilająca mini USB
VIII. Mikrofon
IX. Dioda LED włączenia / parowania
X. Soczewka kamery
XI. Podczerwień
XII. Element do statywu
5. INSTRUKCJE UŻYTKOWANIA
5.1. PRZED UŻYCIEM
5.1.1. ZASILANIE ODBIORNIKA I KORZYSTANIE
Z BATERI
Do zasilania monitora lub odbiornika elektronicznej
niani należy stosować akumulatorek lub załączony
adapter AC/DC. Przed użyciem urządzenia po raz
pierwszy lub po dłuższym okresie nieużytkowania,
akumulatorek należy ładować przez co najmniej 8
godzin.
Elektroniczna niania wyposażona jest w
akumulatorek Li-ion 3.7V 1200 mAh do zasilania
monitora. Zalecamy stosowanie baterii w monitorze.
Dzięki temu sygnał audio / wideo z kamery może być
odbierany w każdym miejscu. Zawsze gdy to możliwe,
należy podłączyć monitor do adaptera podłączonego
do sieci elektrycznej w celu stałego naładowania
baterii.

72
MONTAŻ BATERII (ZDJĘCIE 3)
1. Odkręcić i zdjąć pokrywę komory baterii (16)
znajdującą się w tylnej części urządzenia.
2. Włożyć baterię Li-ion (załączona).
3. Ponownie założyć pokrywę i przykręcić ją za
pomocą śruby.
Uwaga! Stosować tylko baterie zalecanego
rodzaju, ponieważ w przeciwnym razie może dojść
do wybuchu. Zużyte baterie należy utylizować w
sposób odpowiedzialny.
Uwaga: Jeśli oba urządzenia nie są używane,
zaleca się wyłączanie ich celem oszczędzania
baterii.
ŁADOWANIE BATERII
Włożyć baterię zgodnie z instrukcjami podanymi w
poprzednim punkcie.
Podłączyć złącze adaptera do gniazda mini USB
znajdującego się na boku urządzenia (14). Stosować
wyłącznie załączony adapter. Podłączyć adapter do
sieci elektrycznej.
Kiedy monitor podłączony jest do sieci i ładuje się,
dioda LED wskazująca na ładowanie (3) świeci na
czerwono.
Kiedy ładowarka podłączona jest do sieci, ale proces
ładowania nie został jeszcze zakończony, dioda LED
wskazująca na ładowanie (3) świeci się na zielono.
Kiedy poziom naładowania baterii jest bardzo niski,
ikonka poziomu baterii (i) miga na czerwono i co 30
sekund emitowany jest sygnał dźwiękowy.
Uwaga: Wyjąć baterię, jeśli urządzenie nie będzie
wykorzystywane przez dłuższy czas.
5.1.2. ZASILANIE NADAJNIKA
Do zasilania kamery lub nadajnika elektronicznej
niani należy stosować załączony adapter AC/DC.
1. Zlokalizować gniazdo na złącze (VII) w tylnej części
nadajnika.
2. Podłączyć kabel adaptera do gniazda mini USB
kamery. Stosować wyłącznie załączony adapter.
3. Podłączyć adapter do sieci elektrycznej.
Ostrzeżenie: Niebezpieczeństwo uduszenia.
Przechowywać kable z dala od dziecka. NIGDY
NIE umieszczać kamery z kablami bliżej niż 1 m
od łóżeczka. Nigdy nie stosować przedłużaczy z
adapterami AC. Stosować wyłącznie załączone
adaptery AC.
5.2. OBSŁUGA
5.2.1. WŁĄCZANIE / WYŁĄCZANIE ODBIORNIKA
I NADAJNIKA
5.2.1.1. MONITOR:
Przytrzymać wciśnięty przycisk włączania (5)
znajdujący się w górnej części monitora w celu
włączenia lub wyłączenia urządzenia. Dioda LED
włączenia / połączenia (1) zaświeci się lub zgaśnie w
zależności od wykonywanej czynności.
5.2.1.2. KAMERA:
W celu włączenia lub wyłączenia kamery należy
przytrzymać przycisk włączania (III) przez 2 sekundy.
Dioda LED zasilania (IX) zaświeci się lub zgaśnie w
POLSKI
zależności od wykonywanej czynności.
Po zainstalowaniu i włączeniu kamery na monitorze
można oglądać obrazy i słuchać wyłapane dźwięki w
pokoju dziecka.
5.2.2. GŁOŚNOŚĆ MONITORA
Wcisnąć przycisk regulacji (8) w celu zwiększenia
głośności monitora lub przycisk regulacji (10) w celu
zmniejszenia głośności. Można wybrać spośród 5
poziomów głośności.
5.2.3. ROZMOWA Z DZIECKIEM
Używając odbiornika, można mówić do dziecka (np.
aby je uspokoić i powiedzieć, że zaraz będziemy przy
nim) lub do partnera / partnerki (kiedy znajduje się w
pokoju dziecka).
Wcisnąć i przytrzymać przycisk rozmowy z dzieckiem
(12) i mówić do monitora.
Zwolnić przycisk po zakończeniu rozmowy, aby
ponownie móc słuchać dźwięków z pokoju dziecka.
Należy pamiętać, że nie można słuchać dziecka,
kiedy się z nim rozmawia do czasu zwolnienia
przycisku.
5.2.4. ZOOM
Można zwiększyć wielkość wyświetlanego obrazu
poprzez ustawienie zoomu w czterech pozycjach.
Aby wejść do tej funkcji, należy wykonać poniższe
kroki:
1. Wcisnąć przycisk zoom . Lewa górna część
obrazu będzie podświetlona na biało.
2. Wcisnąć przyciski W GÓRĘ i W DÓŁ, aby
zmienić wybraną część.
3. Wcisnąć przycisk w celu zwiększenia obrazu
na wybranej części.
4. Wcisnąć przycisk zoom i urządzenie wróci do
procesu wyboru części, wówczas można wybrać inną
część ekranu.
5. Ponownie wcisnąć przycisk zoom aby wyjść z
tej funkcji.
5.2.5. NOKTOWIZOR NA PODCZERWIEŃ
(AUTOMATYCZNY)
Funkcja noktowizora na podczerwień umożliwia
wyłapywanie obrazów dziecka lub monitorowanego
miejsca przez kamerę w warunkach ograniczonego
oświetlenia lub w ciemności.
W trybie tym obrazy pokazywane są na monitorze
w bieli i czerni. Widoczne są wyłącznie obiekty
znajdujące się w odległości do 2 metrów.
Kamera stale monitoruje poziom światła i
automatycznie zmienia tryb na podczerwień, jeśli
światło jest niewystarczające.
5.2.6. OSTRZEŻENIE O PRZEKROCZENIU ZASIĘGU
Jeśli monitor zostanie umieszczony w odległości
większej niż dopuszczalna od kamery (patrz
charakterystyka techniczna), dioda LED włączenia /
połączenia kamery (IX) i monitora (1) będzie migać
na czerwono, symbol zasięgu (a) podświetli się na
czerwono, a na ekranie zostanie wyświetlone logo
rmy MINILAND.
Zbliżyć monitor do kamery, by móc ponownie
prawidłowo odbierać obraz.

73
POLSKI
5.2.7. MENU GŁÓWNE
Przytrzymać przycisk Menu / Cofnij w celu
wprowadzenia ustawień głównych funkcji i cech
elektronicznej niani.
5.2.7.1. MENU KAMERY
5.2.7.1.1. WYBÓR KAMERY
Urządzenie zostało zaprojektowane do obserwacji
różnych miejsc z wykorzystaniem czterech kamer. W
celu wyboru kamery, z której obraz chcemy oglądać,
należy postępować zgodnie z poniższymi instrukcjami:
1. Wcisnąć przycisk Menu / Cofnij przez 3
sekundy w celu wywołania menu.
2. Wcisnąć przycisk W GÓRĘ lub przycisk W
DÓŁ do czasu, aż ikonka kamery zostanie
podświetlona, wcisnąć następnie przycisk , aby
wejść do podmenu.
3. Wcisnąć przycisk W GÓRĘ lub przycisk W DÓŁ
do czasu, aż ikonka ZOBACZ kamerę zostanie
podświetlona, wcisnąć następnie przycisk .
4. Wcisnąć przycisk W GÓRĘ lub przycisk W DÓŁ
celem wybrania kamery, z której obraz ma być
wyświetlany, następnie wcisnąć przycisk w celu
potwierdzenia wyboru.
Uwaga 1: Wyświetlane mogą być wyłącznie kamery
sparowane z monitorem.
Uwaga 2: Można szybciej zmienić wyświetlaną
kamerę. Należy bezpośrednio wcisnąć przycisk ,
aby cyklicznie odbierać obraz ze sparowanych kamer:
CAM1/CAM2/CAM3/CAM4/MODO SCAN.
5.2.7.1.2. TRYB SKANOWANIA
Funkcja ta pozwala na kolejne i cykliczne odbieranie
kanałów ze sparowanych kamer, pokazując obrazy z
poszczególnych kamer co 12 sekund. Funkcja może
być stosowana wyłącznie wtedy, gdy sparowana jest
więcej niż jedna kamera. Aby wejść do tego trybu:
1. Wcisnąć przycisk Menu / Cofnij przez 3 sekundy
w celu wywołania menu.
2. Wcisnąć przycisk W GÓRĘ lub przycisk W
DÓŁ do czasu, aż ikonka kamery zostanie
podświetlona, wcisnąć następnie przycisk , aby
wejść do podmenu.
3. Wcisnąć przycisk W GÓRĘ lub przycisk W DÓŁ
do czasu, aż ikonka ZOBACZ kamerę zostanie
podświetlona, wcisnąć następnie przycisk .
4. Wcisnąć przycisk W GÓRĘ lub przycisk W DÓŁ
i wybrać ikonkę SKANUJ .
5. Wcisnąć przycisk celem potwierdzenia.
Uwaga 1: Jeśli jedna z kamer jest poza zasięgiem
lub nie jest włączona, monitor powiadomi o tym i tryb
Skanuj zostanie zatrzymany.
Uwaga 2: Tryb Skanuj można włączyć lub wyłączyć,
wciskając przycisk w trakcie wyświetlania
ekranu głównego, jeśli więcej niż jedna kamera jest
podłączona do monitora.
5.2.7.1.3. DODAWANIE KAMERY
Produkt został zaprojektowany do obserwacji
różnych miejsc z wykorzystaniem 4 kamer (kanał
1, 2, 3 lub 4 przypisany do poszczególnych kamer).
Oryginalny monitor oraz kamera fabrycznie mają
zaprogramowany kanał 1. Jeśli konieczne jest
dodanie kamery, należy postępować zgodnie z
poniższymi instrukcjami.
1. Wcisnąć przycisk Menu / Cofnij
przez 3 sekundy
w celu wywołania menu.
2. Wcisnąć przycisk W GÓRĘ lub przycisk W
DÓŁ do czasu, aż ikonka kamery zostanie
podświetlona, wcisnąć następnie przycisk , aby
wejść do podmenu.
3. Wcisnąć przycisk W GÓRĘ lub przycisk W DÓŁ
do czasu, aż ikonka Dodaj kamerę zostanie
podświetlona, wcisnąć następnie przycisk .
4. Wcisnąć przycisk W GÓRĘ lub przycisk W DÓŁ
w celu wybrania kanału, do którego chcemy dodać
nową kamerę, potwierdzić, wciskając przycisk .
5. W trakcie, gdy dioda LED wskazująca na włączenie
/ połączenie (1) miga należy wcisnąć przycisk
parowania kamery (VI).
6. Po sparowaniu dioda LED przestaje migać i obrazy
z kamery natychmiast są wyświetlane na ekranie
monitora.
7. Jeśli parowanie nie zostało przeprowadzone
prawidłowo, należy powtórzyć powyższe kroki.
Uwaga 1: Można wybrać tylko te kanały, do których
wcześniej nie została sparowana żadna kamera.
Uwaga 2: Nie można wejść do tego podmenu, jeśli
zostały sparowane 4 kamery.
Z różnych przyczyn może dojść do utraty połączenia
między monitorem a już połączoną kamerą. W takim
przypadku należy ponownie wykonać powyższą
procedurę w celu połączenia kamery z monitorem.
5.2.7.1.4. USUWANIE KAMERY
W celu usunięcia jednej z połączonych kamer należy
postępować zgodnie z poniższymi instrukcjami:
1. Wcisnąć przycisk Menu / Cofnij przez 3 sekundy
w celu wywołania menu.
2. Wcisnąć przycisk W GÓRĘ lub przycisk W
DÓŁ do czasu, aż ikonka kamery zostanie
podświetlona, wcisnąć następnie przycisk , aby
wejść do podmenu.
3. Wcisnąć przycisk W GÓRĘ lub przycisk W DÓŁ
do czasu, aż ikonka Usuń kamerę zostanie
podświetlona, wcisnąć następnie przycisk .
4. Wcisnąć przycisk W GÓRĘ lub przycisk W DÓŁ
w celu wybrania kamery, którą chcemy usunąć,
potwierdzić, wciskając przycisk .
Uwaga 1: Jeśli z monitorem sparowana jest tylko
jedna kamera, nie można wejść do tego menu.
Uwaga 2: Przed sparowaniem kanału z nową kamerą
należy go najpierw usunąć.
5.2.7.2. MENU USTAWIEŃ KAMERY
5.2.7.2.1. KOŁYSANKI
Nadajnik może odtwarzać kołysankę ułatwiającą dziecku
zasypianie. W celu uruchomienia tej funkcji:
1. Wcisnąć przycisk Menu / Cofnij przez 3 sekundy
w celu wywołania menu.
2. Wcisnąć przycisk W GÓRĘ lub przycisk W DÓŁ

74
do czasu, aż ikonka menu ustawień kamery
zostanie podświetlona, wcisnąć następnie przycisk
, aby wejść do podmenu.
3. Wcisnąć przycisk W GÓRĘ lub przycisk W
DÓŁ do czasu, aż ikonka Kołysanka zostanie
podświetlona, wcisnąć następnie przycisk .
4. Wcisnąć przycisk W GÓRĘ lub przycisk W DÓŁ
w celu wybrania jednej z pięciu kołysanek, ciszy
lub odtwarzania w pętli (ustawienie domyślne - OFF).
5. Po wybraniu melodii należy wcisnąć przycisk
i pojawi się wówczas ustawienie głośności. Wcisnąć
przycisk W GÓRĘ lub przycisk W DÓŁ w celu
wybrania poziomu głośności między 1 a 3, następnie
wcisnąć przycisk .
6. Wcisnąć trzykrotnie przycisk Menu / Cofnij , aby
powrócić do ekranu głównego.
7. Na górze ekranu LCD wyświetlana jest ikonka
Kołysanki (d).
Należy pamiętać, że ustawienie kołysanek można
wykonać jedynie w kamerze, z której aktualnie obraz
jest wyświetlany.
Uwaga: Funkcja odtwarzania kołysanek w pętli
cyklicznie odtwarza wszystkie kołysanki.
5.2.7.2.2. GŁOŚNOŚĆ KAMERY
Menu to umożliwia ustawienie poziomu głośności
odtwarzania głosu rodziców w kamerze przy
zastosowaniu funkcji dwukierunkowej.
Aby ustawić głośność kamery, należy wykonać
poniższe czynności:
1. Wcisnąć przycisk Menu / Cofnij przez 3 sekundy
w celu wywołania menu.
2. Wcisnąć przycisk W GÓRĘ lub przycisk W DÓŁ
do czasu, aż ikonka menu ustawień kamery
zostanie podświetlona, wcisnąć następnie przycisk
, aby wejść do podmenu.
3. Wcisnąć przycisk W GÓRĘ lub przycisk W DÓŁ
do czasu, aż ikonka głośności kamery zostanie
podświetlona, wcisnąć następnie przycisk .
4. Wcisnąć przycisk W GÓRĘ lub przycisk W
DÓŁ w celu wybrania jednego spośród trzech
dostępnych poziomów głośności (LOW/MID/HIGH) w
zależności od potrzeb.
5. Potwierdzić wybór za pomocą przycisku .
Należy pamiętać, że ustawienie głośności można
przeprowadzić wyłącznie dla kamery, z której obraz
jest aktualnie pokazywany na monitorze.
5.2.7.2.3. LAMPKA
Nadajnik wyposażony jest w lampkę o delikatnym
świetle dającym dziecku poczucie komfortu i
umożliwiającym obserwację w ciemnym pokoju.
Aby włączyć lampkę, należy wykonać poniższe
czynności:
1. Wcisnąć przycisk Menu / Cofnij przez 3 sekundy
w celu wywołania menu.
2. Wcisnąć przycisk W GÓRĘ lub przycisk W DÓŁ
do czasu, aż ikonka menu ustawień kamery
zostanie podświetlona, wcisnąć następnie przycisk
, aby wejść do podmenu.
3. Wcisnąć przycisk W GÓRĘ lub przycisk W
POLSKI
DÓŁ do czasu, aż ikonka lampki zostanie
podświetlona, wcisnąć następnie przycisk .
4. Wcisnąć przycisk W GÓRĘ lub przycisk W DÓŁ
i wybrać ON bądź OFF w zależności od tego, czy
chcemy uruchomić, czy wyłączyć tę funkcję.
5. Potwierdzić wybór za pomocą przycisku .
Należy pamiętać, że ustawienie lampki można
przeprowadzić wyłącznie dla kamery, z której obraz
jest aktualnie pokazywany na monitorze.
5.2.7.3. MENU VOX / STANDBY
5.2.7.3.1. TRYB OSZCZĘDZANIA ENERGII LUB
TYLKO AUDIO (STANDBY)
W trybie oszczędzania energii lub tylko audio
(Standby) można wybrać maksymalny czas
aktywności obrazu na monitorze (1, 3 lub 5 minut); po
tym czasie obraz znika w celu oszczędzania energii,
chociaż nadal odbiera sygnały dźwiękowe. W celu
przywrócenia obrazu wystarczy wcisnąć któryś z
przycisków.
Aby uruchomić ten tryb, należy:
1. Wcisnąć przycisk Menu / Cofnij przez 3 sekundy
w celu wywołania menu.
2. Wcisnąć przycisk W GÓRĘ lub przycisk W
DÓŁ do czasu, aż ikonka menu VOX / Standby
zostanie podświetlona, wcisnąć następnie przycisk
, aby wejść do podmenu.
3. Wcisnąć przycisk W GÓRĘ lub przycisk W
DÓŁ do czasu, aż ikonka Standby zostanie
podświetlona, wcisnąć następnie przycisk .
4. Wcisnąć przycisk W GÓRĘ lub przycisk W DÓŁ
i wybrać żądaną opcję spośród 1, 3 lub 5 minut
bądź OFF w celu wyłączenia funkcji.
5. Potwierdzić wybór za pomocą przycisku .
6. Wcisnąć dwukrotnie przycisk Menu / Cofnij , aby
powrócić do ekranu głównego.
5.2.7.3.2. USTAWIENIE VOX
Tryb ten umożliwia aktywowanie elektronicznej niani
dźwiękiem. Po uruchomieniu trybu VOX w monitorze,
jeśli wokół kamery nie słychać żadnych dźwięków,
przestaje ona nadawać. Kiedy kamera nie nadaje,
ekran monitora gaśnie.
Kiedy kamera wykryje jakiś dźwięk o natężeniu
wyższym niż ustawiony poziom czułości, ponownie
zaczyna przesyłać sygnał do monitora.
W celu wyłączenia tej funkcji i ciągłego obserwowania
miejsca należy wyłączyć tryb VOX na monitorze.
• Wyłączony tryb VOX: Kamera stale przekazuje
sygnał, dzięki czemu można stale nieprzerwanie
monitorować dziecko i miejsce.
• Włączony tryb VOX: Kamera nadaje wyłącznie
wtedy, gdy wykrywa w otoczeniu kamery dźwięk
o wystarczającym natężeniu, które zależy od
wybranego poziomu.
Przed włączeniem tej funkcji należy ustawić tryb
wstrzymania na 1, 3 lub 5 minut (patrz: punkt
5.2.7.3.1). Wybrać 1, 3 lub 5, jeżeli chce się, aby
kamera przestała przesyłać obraz odpowiednio
po 1, 3 lub 5 minutach, gdy w pobliżu nie słychać

75
POLSKI
żadnych dźwięków.
Aby po ustawieniu czasu wstrzymania włączyć tryb
VOX, prosimy wykonać następujące
czynności:
1. Wcisnąć przycisk Menu / Cofnij przez 3 sekundy
w celu wywołania menu.
2. Wcisnąć przycisk W GÓRĘ lub przycisk W DÓŁ
do czasu, aż ikonka menu VOX / Standby
zostanie podświetlona, wcisnąć następnie przycisk
, aby wejść do podmenu.
3. Wcisnąć przycisk W GÓRĘ lub przycisk W
DÓŁ do czasu, aż ikonka VOX zostanie
podświetlona, wcisnąć następnie przycisk .
4. Wcisnąć przycisk W GÓRĘ lub przycisk W
DÓŁ i wybrać żądany poziom czułości: wyłączony,
1, 3 lub 5 minut (domyślnie: wyłączony). Należy
ustawić czułość na „1” w przypadku dziecka, które
śpi w pokoju i płacze cicho, na „3”, jeżeli dziecko jest
głośne podczas snu lub wydaje dość głośne dźwięki
przed właściwym płaczem, lub na „2”, jeżeli uważają
Państwo, że zachowanie dziecka nie pasuje do
żadnego z powyższych wzorów.
5. Potwierdzić wybór za pomocą przycisku .
6. Wcisnąć dwukrotnie przycisk Menu / Cofnij , aby
powrócić do ekranu głównego.
Jeśli chcemy zobaczyć dziecko w określonym
momencie, mimo braku hałasu wokół, można
zdalnie uruchomić nadawanie kamery, wciskając
jakikolwiek przycisk.
5.2.7.4. POZIOM TRANSMISJI
W menu można zmienić poziom mocy emitowanej
przez kamerę, wybierając między opcjami niska
/ wysoka. W przypadku pozycji wysokiej (HI)
zasięg obejmuje 250 m na otwartym terenie przy
mocy ustawionej fabrycznie. W przypadku pozycji
niskiej (LOW) maksymalna odległość nadawania
zmniejsza się do ok. 120 m na otwartym terenie przy
zmniejszeniu mocy emisji.
Aby ustawić poziom transmisji, należy wykonać
poniższe czynności:
1. Wcisnąć przycisk Menu / Cofnij przez 3 sekundy
w celu wywołania menu.
2. Wcisnąć przycisk W GÓRĘ lub przycisk W DÓŁ
do czasu, aż ikonka poziomu transmisji zostanie
podświetlona, wcisnąć następnie przycisk , aby
wejść do podmenu.
3. Wcisnąć przycisk W GÓRĘ lub przycisk W DÓŁ
i wybrać żądany poziom transmisji: HIGH lub LOW.
4. Potwierdzić wybór za pomocą przycisku .
5. Wcisnąć przycisk Menu / Cofnij , aby powrócić
do ekranu głównego.
5.2.7.5. USTAWIENIE ALARMU
Aby ustawić alarm, należy wykonać poniższe kroki:
1. Wcisnąć przycisk Menu / Cofnij przez 3 sekundy
w celu wywołania menu.
2. Wcisnąć przycisk W GÓRĘ lub przycisk W
DÓŁ do czasu, aż ikonka Alarmu zostanie
podświetlona, wcisnąć następnie przycisk .
3. Wcisnąć przycisk W GÓRĘ lub przycisk W DÓŁ
w celu ustawienia timera alarmu (wcisnąć przycisk
W GÓRĘ , aby zwiększyć lub przycisk W DÓŁ
, aby zmniejszyć).
4. Potwierdzić wybór za pomocą przycisku .
5. Wcisnąć przycisk Menu / Cofnij , aby powrócić
do ekranu głównego.
Uwaga 1: Kiedy alarm jest uruchomiony, na ekranie
LCD pokazywana jest ikonka zegara (k).
Uwaga 2: Jeśli chcemy usunąć alarm, należy
wykonać powyższe czynności 1, 2 i 3 oraz ustawić
czas na 00:00. Ikonka zegara zniknie z ekranu.
Uwaga 3: Kiedy alarm dzwoni, należy wcisnąć
jakikolwiek przycisk w celu wyłączenia go. W
przypadku braku odpowiedzi urządzenie będzie emitowało
alarm przez 7 minut, a następnie go wyłączy.
5.2.7.6. FUNKCJA WIBRACJI
Funkcja ta pozwala na uzyskanie ciszy w chwili, gdy
rodzice potrzebują spokoju i jest bardzo pomocna w
miejscach, gdzie panuje duży hałas oraz dla osób
mających problemy ze słuchem.
Kiedy hałas w pokoju dziecka przekroczy próg
wskazany przez ustawiony poziom czułości, monitor
cztery ośmiokrotnie wibrować, ostrzegając w ten
sposób rodziców.
Aby uruchomić funkcję wibracji, należy wykonać
poniższe kroki:
1. Wcisnąć przycisk Menu / Cofnij przez 3 sekundy
w celu wywołania menu.
2. Wcisnąć przycisk W GÓRĘ lub przycisk W DÓŁ
do czasu, aż ikonka funkcji wibracji zostanie
podświetlona, wcisnąć następnie przycisk .
3. Wcisnąć przycisk W GÓRĘ lub przycisk W DÓŁ
, aby uruchomić lub wyłączyć funkcję.
4. Potwierdzić wybór za pomocą przycisku .
5. Wcisnąć przycisk Menu / Cofnij , aby powrócić
do ekranu głównego.
Należy pamiętać, że ustawienie funkcji wibracji
można przeprowadzić wyłącznie dla kamery, z której
obraz jest aktualnie pokazywany na monitorze.
UWAGA: Aby monitor wibrował w przypadku, gdy
głośność w pokoju dziecka przekroczy pewien
próg, należy uruchomić tryb VOX.
5.2.7.7.PODŚWIETLENIE
Aby zmienić podświetlenie ekranu monitora, należy
wykonać poniższe czynności:
1. Wcisnąć przycisk Menu / Cofnij przez 3 sekundy
w celu wywołania menu.
2. Wcisnąć przycisk W GÓRĘ lub przycisk W DÓŁ
do czasu, aż ikonka Podświetlenia zostanie
podświetlona, wcisnąć następnie przycisk .
3. Wcisnąć przycisk W GÓRĘ lub przycisk W DÓŁ
i wybrać żądany poziom podświetlenia z pięciu
dostępnych.
4. Potwierdzić wybór za pomocą przycisku .
5. Wcisnąć przycisk Menu / Cofnij , aby powrócić
do ekranu głównego.

76
5.2.8. eMyBaby
5.2.8.1. REJESTRACJA
1. Na początku prosimy zarejestrować się w serwisie
internetowym eMyBaby. W tym celu należy uruchomić
przeglądarkę, przejdź na stronę: www.emybaby.com,
a następnie nacisnąć przycisk UTWÓRZ KONTO.
2. Prosimy wypełnić pola danymi osobowymi,
a następnie po zaakceptowaniu warunków
użytkowania, nacisnąć przycisk AKTYWUJ KONTO.
3. Wówczas pocztą elektroniczną otrzymają
Państwo wiadomość werykacyjną zawierającą
dane przekazane podczas rejestracji. Po wybraniu
odnośnika zawartego w mailu powrócą Państwo na
stronę internetową eMyBaby, gdzie będą się Państwo
mogli zalogować, wprowadzając nazwę użytkownika i
hasło i naciskając przycisk ZALOGUJ SIĘ
5.2.8.2. ABY ZOBACZYĆ ZDJĘCIE W
KOMPUTERZE, DO KTÓREGO PODŁĄCZONA
ZOSTAŁA ELEKTRONICZNA NIANIA
1. Aby wyświetlić zdjęcie przekazane przez kamerę w
komputerze, należy podłączyć
monitor (ekran) do portu USB komputera za pomocą
kabla mcroUSB-USB (brak w zestawie). Ekran
musi być włączony; jeśli bateria jest słaba, należy ją
naładować.
2. Po wprowadzeniu nazwy użytkownika i hasła do
serwisu eMyBaby na WYŚWIETLACZ wybrać opcję
ELEKTRONICZA NIANIA.
3. Teraz wybrać model digimonitor 3.5” plus
4. Wówczas będzie można wybrać jedną z dwóch opcji.
Wybrać „Tylko na komputerze, do którego, za pomocą
anteny USB, jest podłączony monitor dziecka“.
5. Jeśli wszystko działa poprawnie, będą Państwo
mogli automatycznie widzieć swoje dziecko na
ekranie komputera. Jeżeli mają Państwo jakiekolwiek
problemy z uzyskaniem obrazu, prosimy zapoznać się
z instrukcją dotyczącą wyświetlania online, wybierając
ikonę PRZECZYTAJ INSTRUKCJĘ.
5.2.8.3. ABY MÓC ZDALNIE WIDZIEĆ OBRAZ z
urządzenia eMyBaby
Aby móc widzieć swoje dziecko zdalnie, w komputerze,
tablecie lub smartfonie, należy wykonać następujące
kroki:
UWAGA: Aby zdalnie widzieć obraz uchwycony
przez kamerę za pośrednictwem urządzenia
eMyBaby, należy podłączyć ekran urządzenia do
komputera. Konieczne jest nadawanie sygnału z
komputera, do którego został podłączony ekran
niani elektronicznej. za pośrednictwem urządzenia
eMyBaby. Jeżeli nie wykona się
tego kroku, to nie można odbierać sygnału z
urządzenia (komputer, tablet, telefon komórkowy).
1. Należy podłączyć nianię elektroniczną do komputera
według wyżej opisanej procedury, podłączając ekran
urządzenia do portu USB komputera za pomocą kabla
miniUSB-USB (brak w zestawie).
2. Zalogować się w serwisie eMyBaby (www.emybaby.
com), podając nazwę użytkownika i hasło (jeżeli nie
mają Państwo jeszcze konta w serwisie, to należy się
zarejestrować zgodnie ze wskazówkami podanymi
wyżej), a następnie wybrać opcję ELEKTRONICZA
NIANIA.
POLSKI
3. Spośród dostępnych modeli wybrać digimonitor 3.5”
plus.
4. Wówczas będzie można wybrać jedną z dwóch
opcji. Wybrać „Możesz oglądać z każdego miejsca na
świecie. Wystarczy komputer, tablet lub smartfon“.
5. Jeżeli po raz pierwszy korzystają Państwo z tej
usługi, to zostaną Państwo poproszeni o podanie
numeru zamówienia produktu. Numer ten ma postać
MNLXX-XXXXX, a znajdą go
Państwo w schowku na baterię ekranu urządzenia.
6. Po wprowadzeniu kodu pojawi się ekran z dwiema
opcjami: Transmisja sygnału i Odbieranie sygnału. Aby
móc zdalnie oglądać zdjęcia z kamery na urządzeniu
przenośnym, należy najpierw nacisnąć przycisk
Transmisja sygnału.
7. Teraz należy wybrać ikonę , która pojawi się
na środku zdjęcia. Gdy komputer zacznie nadawać
sygnał, na ekranie pojawi się obraz:
Kroki, jakie należy wykonać, aby oglądać obraz w
innym komputerze:
1. Należy podłączyć nianię elektroniczną do komputera
według wyżej opisanej procedury, podłączając ekran
urządzenia do portu USB komputera za pomocą kabla
miniUSB-USB (brak w zestawie).
2. W komputerze, w którym chce się oglądać zdalny
obraz, należy zalogować się na stronie internetowej
eMyBaby (www.emybaby.com), podając nazwę
użytkownika i hasło, a następnie wybrać opcję
ELEKTRONICZA NIANIA.
3. Spośród dostępnych modeli wybrać digimonitor 3.5”
plus.
4. Wówczas będzie można wybrać jedną z dwóch
opcji. Wybrać „Możesz oglądać z każdego miejsca na
świecie. Wystarczy komputer, tablet lub smartfon“.
5. Aby móc zdalnie oglądać zdjęcia z kamery na
urządzeniu przenośnym, teraz należy nacisnąć
przycisk Odbieranie sygnału. Jeśli wszystko działa
poprawnie, będą Państwo mogli automatycznie
widzieć swoje dziecko na ekranie komputera. Jeżeli
mają Państwo jakiekolwiek problemy z uzyskaniem
obrazu, prosimy zapoznać się z instrukcją dotyczącą
wyświetlania online, wybierając ikonę PRZECZYTAJ
INSTRUKCJĘ.
Kroki, jakie należy wykonać, aby oglądać obraz
w urządzeniu przenośnym (tablet lub telefon
komórkowy):

77
POLSKI
Aplikacja eMyBaby
Miniland stworzył darmową aplikację eMyBaby, dostępną na urządzenia pracujące w systemie iOS i Android,
którą można w łatwy sposób pobrać.
W celu pobrania aplikacji eMyBaby najpierw należy wejść do odpowiedniego sklepu z aplikacjami bądź pobrać
bezpośrednio, skanując odpowiedni kod QR: Aby zainstalować aplikację, postępuj zgodnie z instrukcjami
znajdującymi się na początku niniejszej instrukcji.
1. Po zainstalowaniu aplikacji należy ją uruchomić. Wybrać LOG IN, a następnie podać nazwę użytkownika
i hasło, aby mieć dostęp do serwisu, jeżeli już się Państwo zarejestrowali, lub zarejestrować się, jeżeli do tej
pory Państwo tego nie zrobili. Prosimy pamiętać, że otrzymają
Państwo wiadomość werykacyjną na adres e-mail podany podczas rejestracji.
2. W menu głównym wybrać opcję ELEKTRONICZA NIANIA.
3. Spośród dostępnych modeli wybrać digimonitor 3.5” plus.
4. Nacisnąć ikonę PLAY
, aby oglądać obraz z kamery w urządzeniu przenośnym.
Przeglądarka urządzenia
Można również oglądać obraz z kamery za pośrednictwem strony internetowej eMyBaby za pomocą
przeglądarki zainstalowanej na urządzeniu przenośnym. Opcja ta jest szczególnie przydatna, gdy urządzenie
przenośne nie pracuje w systemie iOS ani Android.
1. W przeglądarce urządzenia przenośnego należy zalogować się do serwisu eMyBaby (www.emybaby.com),
podając nazwę użytkownika i hasło. W menu głównym wybrać opcję ELEKTRONICZA NIANIA.
2. Spośród dostępnych modeli wybrać digimonitor 3.5” plus.
3. Wówczas będzie można wybrać jedną z dwóch opcji. Wybrać „Możesz oglądać z każdego miejsca na
świecie. Wystarczy komputer, tablet lub smartfon”.
4. Nacisnąć przycisk Odbieranie sygnału. Jeśli wszystko działa poprawnie, będą Państwo mogli automatycznie
widzieć swoje dziecko w urządzeniu przenośnym.
6. KONSERWACJA
• Powierzchnie kamery i monitora należy czyścić miękką szmatką niepozostawiającą włókien.
• W przypadku zabrudzenia urządzeń należy czyścić je lekko wilgotną szmatką, uważając, by woda nie dostała
się do żadnych otworów.
• Nigdy nie używać środków czyszczących ani rozpuszczalników.
7. IDENTYFIKACJA I ROZWIĄZYWANIE PROBLEMÓW
Problem Możliwa przyczyna Rozwiązanie
Monitor nie odbiera
Kamera nie włącza się Wcisnąć i przytrzymać przycisk
włączenia (III) przez 2 sekundy
Monitor nie włącza się Wcisnąć i przytrzymać przycisk
włączenia (5)
Kamera: adapter nie został
podłączony do prądu
Podłączyć adapter do prądu
Monitor: adapter nie został
podłączony do prądu
Podłączyć adapter do prądu
Monitor jest
poza zasięgiem
Zbliżyć monitor do kamery

78
Problem Możliwa przyczyna Rozwiązanie
Monitor nie odbiera Utracono połączenie
między monitorem a jedną
sparowaną już kamerą
Ponownie sparować kamerę
z monitorem.
Sprawdzić punkt 5.2.7.1.3.
Wybrano
nieprawidłową kamerę
Zmienić numer kamery,
z której obraz jest wyświetlany.
Sprawdzić punkt 5.2.7.1.1.
Wyświetlane są tylko
biało-czarne obrazy
Sprawdzić, czy kamera
znajduje się w trybie
noktowizora / podczerwieni
Aby zobaczyć obraz w kolorze,
zwiększyć światło w miejscu
umieszczenia kamery
i upewnić się, że nic nie zakrywa
czujnika światła kamery (II)
Nie można słuchać
głosu rodziców
w nadajniku.
Ustawienie głośności
odbiornika jest
zbyt niskie
Ustawić głośność na najwyższym poziomie
Kamera nie nadaje Kamera nie została włączona Wcisnąć i przytrzymać przycisk
(III) przez 2 sekundy
Kamera: adapter nie został
podłączony do prądu
Podłączyć adapter do prądu
Tryb VOX lub tryb
oszczędzania energii (Standby)
jest uruchomiony
W celu ciągłej obserwacji
nadzorowanego miejsca wyłączyć tryb
VOX lub tryb oszczędzania energii
na monitorze
Nie można słuchać
dziecka w
odbiorniku
Ustawienie głośności
odbiornika jest zbyt niskie
Ustawić głośność na najwyższym
poziomie
Zakłócenia lub
niewystarczający odbiór
Możliwe, że inne urządzenia
elektryczne zakłócają sygnał
Odsunąć je od urządzenia
Odległość między kamerą i
monitorem może być zbyt duża
Zbliżyć monitor do kamery
Poziom naładowania baterii może
być zbyt niski
Podłączyć adapter do prądu
Możliwe, że kamera lub
monitor znajdują się zbyt blisko
przedmiotów wykonanych z metalu
Odsunąć je od urządzenia
Nie jest możliwe
naładowanie
baterii w
odbiorniku
Adapter AC/DC nie został
Włączony
Podłączyć adapter do prądu
Zastosowano baterię
niebędącą akumulatorkiem
Mogą być stosowane wyłącznie
akumulatorki (Li-ion 3.7 V, 1200 mAh):
sprawdzić baterię i jeśli to konieczne,
wymienić ją na baterię załączoną
do urządzenia
Jeśli nadajnik
utracił połączenie z
odbiornikiem
Możliwe, że kamera i monitor
znajdują się zbyt
daleko od siebie
Zbliżyć monitor do kamery
Jeśli nadajnik
utracił połączenie z
odbiornikiem
Na chwilę
utracono
połączenie między
dwoma urządzeniami
Ponowie ustanowić połączenie urządzeń
odłączając je od zasilania elektrycznego.
Odczekać ok. 15 sekund przed ich
ponownym połączeniem.
Odczekać minutę, aby nadajnik i odbiornik
zsynchronizowały się
Utracono połączenie
między urządzeniami
Ponownie sparować kamerę z monitorem.
Sprawdzić punkt 5.2.7.1.3.
POLSKI

79
POLSKI
8. PARAMETRY TECHNICZNE
Częstotliwość 2.4GHz FHSS
Zakres roboczy 240m (linia prosta i otwarta przestrzeń)
Liczba kongurowalnych kanałów 4
Zasilanie (urządzenie dla rodziców)
Input: 100-240VAC 50/60Hz
Output: 5V 800mA
Bateria wielokrotnego ładowania do monitora 3.7V 1200 mAh
Moc (urządzenie dla dziecka)
Input: 100-240 VCA 50/60Hz
Output: 5V 800mA
Czas pracy baterii po pełnym
naładowaniu (urządzenie dla rodziców)
Około 5 godzin
Wielkość ekranu LCD 3.5"
Format przejściówki z Jack na RCA
kompatybilny
Zdjęcie D
Formatu kompatybilnego kabla miniUSBUSB Przewodu danych USB
9. INFORMACJE NA TEMAT UTYLIZACJI BATERII I PRODUKTU
• Należy pamiętać o wyrzucaniu produktu w sposób przyjazny dla środowiska po wyjęciu baterii.
• Nie mieszać produktów opatrzonych symbolem przekreślonego kosza z odpadami
z gospodarstw domowych.
• W celu prawidłowego odbioru i przetwarzania tych produktów należy przekazać je
do punktów zbiórki odpadów wyznaczonych przez władze lokalne. Można również skontaktować
się ze sklepem, w którym kupiono produkt.
Niniejszym Miniland S.A. oświadcza, że „89174 digimonitor 3.5” plus“ jest zgodny z
zasadniczymi wymogami oraz pozostałymi stosownymi postanowieniami Dyrektywy
2014/53/UE.

80
ОГЛАВЛЕНИЕ
1. Введение
2. Комплектация
3. Инструкции по безопасности
4. Характеристики устройства
5. Инструкции по использованию
6. Обслуживание
7. Обнаружение и устранение проблем
8. Технические характеристики
9. Указания по утилизации батарей и устройства
ВВЕДЕНИЕ
Поздравляем Вас с приобретением нашей
высокотехнологичной беспроводной радионяни
с цветным монитором. Мы уверены, что Вы
будете полностью удовлетворены качеством
и возможностями нашего устройства, тем не
менее, предлагаем внимательно ознакомиться с
настоящей инструкцией, чтобы использовать его с
максимальной эффективностью.
Наша радионяня позволяет осуществлять
беспроводную передачу аудио/видео сигнала на
цветной экран, что очень удобно в большинстве
случаев, когда Вам нужно проследить за Вашим
малышом, детьми младшего возраста или
пожилыми людьми.
ВНИМАНИЕ: Некоторые характеристики,
описанные в настоящем руководстве,
могут быть изменены изготовителем без
предварительного уведомления.
2. КОМПЛЕКТАЦИЯ
1 Камера (детский блок)
1 Монитор (родительский блок)
2 Адаптера постоянного/переменного тока
1 Подзаряжаемая батарея (Li-ion) для монитора
1 Ремешок на шею
1 Сумка для хранения и переноски
1 Треножный штатив
Инструкции по использованию и гарантия
• Если чего-либо из вышеприведенного списка
не хватает в комплекте поставки, обратитесь к
Вашему дистрибьютору или в пункт продажи.
3. ИНСТРУКЦИИ ПО БЕЗОПАСНОСТИ
Внимательно прочтите настоящую инструкцию
перед началом первого использования Вашей
радионяни и сохраните её для дальнейших
консультаций.
3.1. ОБЩИЕ ИНСТРУКЦИИ ПО БЕЗОПАСНОСТИ:
При пользовании электрическими приборами
всегда соблюдайте основные правила
безопасности:
1. Следует быть особенно внимательными при
использовании любого устройства детьми и
пожилыми людьми, а также в случаях, когда
они находятся рядом. Когда устройство не
используется, держите его вне зоны досягаемости
детей.
2. Настоящее устройство не следует использовать
как единственное средство ухода за детьми и, ни
в коем случае, оно не может служить заменой
ответственного ухода за детьми и лицами
преклонного возраста со стороны взрослых.
PУССКИЙ
3. При работе с радионяней пользуйтесь только
адаптерами переменного тока (5 V, 800 mA),
которые входят в комплект поставки.
4. Используйте только с батареями рекомендуемого
типа (литий-ионный аккумулятор
3,7 В – 1200 мА·ч). Не устанавливайте никакие
другие типы батарей в монитор.
5. Устройство содержит детали маленького
размера. Будьте внимательны и осторожны
при распаковке и сборке прибора.
6. Не позволяйте детям играть с упаковочными
материалами, например, с пластиковыми пакетами.
Будьте внимательны и осторожны при распаковке и
сборке прибора.
7. НЕ используйте устройство, если на кабеле
питания имеются повреждения. Если Вы
обнаружили какие-либо дефекты либо неполадки
в работе радионяни, свяжитесь с авторизованным
сервисным центром Miniland, где во избежание
возможных рисков, Вы можете проверить и
отремонтировать свое устройство.
8. НЕ пытайтесь самостоятельно отремонтировать
ни электрические, ни механические части
устройства. В этом случае Вы можете утратить
гарантию.
9. Проверьте уровень напряжения в электрической
сети Вашего дома на предмет соответствия
параметрам, указанным в технической
спецификации устройства.
10. Если Вы не собираетесь использовать
радионяню в течение долгого времени, пожалуйста,
отключите адаптер от электрической сети.
Для отключения устройства от электрической
сети вытяните вилку из розетки, придерживая
трансформатор. Никогда не тяните прямо за кабель.
11. Настоящее устройство предназначено для
использования исключительно в помещениях.
Устройство не предназначено для попадания под
дождь, во влажную среду, нежелательно попадание
на его части брызг или жидкости.Не оставляйте
емкости с жидкостью, например, стакан или кувшин,
сверху или рядом с Вашей радионяней. Экран для
наблюдения за малышом не следует использовать
рядом с водой.
ВНИМАНИЕ
• Настоящее устройство призвано обеспечить
спокойствие родителей, когда у них нет
возможности находиться в одном помещении с
малышом. Это устройство не должно заменить
ответственную заботу взрослого о ребенке. Один из
родителей должен обязательно находиться рядом с
монитором во время его использования. Устройство
по уходу за ребенком не является медицинским
прибором, не следует доверять ему здоровье и
благополучие малыша. Очень важно периодически
наведываться в детскую комнату, чтобы убедиться в
том, что все в порядке.
• Никогда не используйте устройство, если от его
работы зависит здоровье ребенка или других лиц
либо целостность помещения. Изготовитель не
несет никакой ответственности и не принимает
претензии по поводу смерти, травм либо
материального ущерба, полученных в результате
поломки или неправильного использования
прибора.

81
• Неправомерное использование этого
беспроводного устройства может привести к
правовым последствиям.
• Отнеситесь ответственно к использованию
устройства.
ВАЖНО: Помните, что последствия любого
изменения либо модификации устройства,
сделанное не специалистом технического
сервисного центра Miniland, не покрываются
страховкой на изделие.
3.2. СОВЕТЫ СВЯЗАННЫЕ С РАДИОПОМЕХАМИ
Настоящее устройство прошло испытания и
соответствует требованиям Директивы RED
2014/53/UE. Эти требования разработаны для
обеспечения разумной защиты против вредных
помех в жилых помещениях. В случае установки
и использования настоящего оборудования не
в соответствии с инструкциями могут возникать
помехи для радиосвязи.
Стоит отметить, что невозможно гарантировать,
что устройство не будет создавать помех для
конкретной аппаратуры. Если устройство для
ухода за ребенком создает помехи для приема
радио- или телевизионных сигналов, что может
быть определено путем его повторного включения
и выключения, пользователю рекомендуется
попытаться устранить помехи, как показано ниже:
• Смените местоположение приемника.
• Увеличьте расстояние между данным
устройством и радионяней.
• Подсоедините устройство к источнику питания,
отличному от источника питания приемника.
• Проконсультируйтесь со службой клиентской
поддержки Miniland.
В целях обеспечения соответствия с Директивой
RED 2014/53/UE, в настоящем устройстве
используются кабели со специальным покрытием.
При работе несертифицированного оборудования
или использовании кабелей без специального
покрытия могут возникать помехи приема радио
или телевидения.
3.3. ВЫБОР ПРАВИЛЬНОГО МЕСТОПОЛОЖЕНИЯ
• Во избежание возможных происшествий
разместите электронное устройство вне зоны
досягаемости детей.
• Дети могут запутаться в проводах. Детский
блок следует размещать на расстоянии около
1 – 1.5 метра от детской колыбели. Никогда
не кладите детский блок внутрь колыбельки,
детской кроватки или манежа. Убедитесь в том,
что устройство, провода и адаптер находятся вне
зоны досягаемости ребенка или других маленьких
детей.
• Размещайте радионяню в месте, где воздух
свободно циркулирует. Не ставьте ее на пуховые
и мягкие одеяла или на углах шкафов, полок и т.д.
• Размещайте устройство на удалении от
источников тепла: радиаторов, каминов, плит и
вне зоны прямого попадания солнечных лучей.
• Разместите блок ребенка на некотором удалении
от телевизоров и радиоприемников. Сильные
радиосигналы, излучаемые устройством,
могут создавать помехи и даже быть причиной
пропадания сигнала и звука на экране. В таких
случаях переместите камеру в другое место.
• Этот монитор может быть установлен на столе
с использованием складной опорной ножки на
задней панели. Если она не используется, просто
уберите ее внутрь задней части монитора до
характерного “щелчка”.
4. ХАРАКТЕРИСТИКИ УСТРОЙСТВА
4.1. ФУНКЦИИ И ОРГАНЫ УПРАВЛЕНИЯ
МОНИТОРОМ (Рисунок 1)
МОНИТОР (Рисунок 1.1)
1. Светодиодный (LED) индикатор
включения/соединения
2. Микрофон
3. Светодиодный (LED) индикатор загрузки
4. Жидкокристаллический экран
5. Кнопка включения/выключения
6. Динамик
7. Отверстие для нашейного ремешка
8. Кнопка настроек ▲
9. Кнопка зум/меню
10. Кнопка настроек ▼
11. Кнопка принять/режим СКАН
12. Кнопка разговора с малышом
13. Гнездо AV
14. Гнездо питания mini USB /ПК
15. Складная опорная ножка
16. Крышка отсека для батареи
17. Выдвижная антенна
ДИСПЛЕЙ
Значки на экране (Рисунок 1.2)
a. Зона покрытия сигнала
b. Выбор громкости монитор
c. Ночное видение
d. Колыбельные песни
e. Режим ГОЛОС
f. Выбор камеры
g. Ночник
h. Уровень передачи
i. Уровень батареи
j. Иконка разговора с малышом
k. Иконка оповещения включены
ЗНАЧКИ МЕНЮ (Рисунок 3)
A. Меню выбор/добавить/удалить камеру
B. Меню настроек камеры
C. ГОЛОС/спящий режим
D. Уровень передачи
E. Оповещение
F. Виброрежим
G. Яркость дисплея
VII. Гнездо питания мини USB
VIII. Микрофон
IX. LED индикатор включения/сопряжения
X. Объектив камеры
XI. Инфракрасный датчик
XII. Штатив-тренога
4.2. Функции и органы управления камерой
(Рисунок 2)
I. Выдвижная антенна
II. Датчик освещения
PУССКИЙ

82
PУССКИЙ
III. Кнопка включения
IV. Отверстие для крепления на стену
V. Динамик
VI. Кнопка сопряжения
5. ИНСТРУКЦИИ ПО ИСПОЛЬЗОВАНИЮ
5.1. ПЕРЕД НАЧАЛОМ РАБОТЫ
5.1.1. ПИТАНИЕ РОДИТЕЛЬСКОГО БЛОКА И
ИСПОЛЬЗОВАНИЕ БАТАРЕИ
Монитор или родительский блок радионяни
работает от батареи или от адаптера постоянного/
переменного тока, поставляемого в комплекте с
ней. Перед первым использованием устройства
или после длительного перерыва в работе
подзаряжаемую батарею следует поставить на
зарядку, как минимум, на восемь часов.
Ваша радионяня поставляется с Li-ion
подзаряжаемой батареей 3.7V 1200mAh для
монитора. Для того, чтобы получать исходящий
аудио/видео сигнал камеры в любом месте,
мы рекомендуем использовать в мониторе
батарею. По возможности всегда подключайте
монитор к адаптеру электрической сети, чтобы
поддерживать заряд батареи.
УСТАНОВКА БАТАРЕИ (Рисунок 3)
1. Открутите винт и снимите крышку отсека для
батареи (16) на задней части устройства.
2. Вставьте Li-ion батарею (поставляется в
комплекте).
3. Поставьте крышку на место и закрутите винт.
Предупреждение: Используйте батареи
только рекомендованного типа, в противном
случае возможен риск взрыва. Утилизируйте
использованные батареи надлежащим образом.
Примечание: Для продления срока службы
батареи выключайте оба блока, когда они не
используются.
ЗАРЯДКА БАТАРЕИ
Вставьте подзаряжаемую батарею согласно
инструкции, описанной в предыдущем разделе.
Подключите адаптер электрического тока к мини
USB входу на боковой панели устройства (14).
Используйте только адаптер, поставляемый в
комплекте. Подключите адаптер к электросети.
Во время подключения монитора к электросети
и при зарядке LED индикатор зарядки (3) будет
гореть красным.
Если зарядное устройство подключено к
электросети, а процесс зарядки завершен, зарядке
LED индикатор зарядки (3) загорится зеленым.
Когда уровень заряда батареи будет очень низким,
иконка уровня батареи (i) замигает красным и
каждые 30 секунд будет звучать короткий сигнал.
Примечание: если Вы не собираетесь
использовать устройство в течение
длительного времени, отсоедините батарею.
5.1.2. ПИТАНИЕ ДЕТСКОГО БЛОКА
Для обеспечения работы камеры детского
блока этой радионяни предназначен адаптер
постоянного/переменного тока, поставляемый в
комплекте.
1. Найдите гнездо разъема (VII) на задней части
детского блока.
2. Подсоедините адаптер к мини USB входу
камеры. Используйте только адаптер,
поставляемый в комплекте.
3. Подключите адаптер к электросети.
Предупреждение: Опасность удушения -
держите шнур подальше от детей! НИКОГДА НЕ
размещайте камеру с проводами на расстоянии
меньше 1 метра от детской кроватки. Никогда
не используйте удлинители с адаптерами
переменного тока. Пользуйтесь только
адаптерами переменного тока, поставляемыми
в комплекте в устройством.
5.2. РАБОТА
5.2.1. ВКЛЮЧЕНИЕ/ВЫКЛЮЧЕНИЕ УСТРОЙСТВ
5.2.1.1. МОНИТОР
Для включения или выключения монитора
удерживайте нажатой кнопку включения (5) на
его передней панели. LED индикатор включения/
сопряжения (1) загорится или потухнет в
зависимости от того, включаете Вы устройство или
выключаете его.
5.2.1.2. КАМЕРА:
Для включения или выключения камеры
удерживайте кнопку включения (III) нажатой в
течение 2 секунд. LED индикатор питания (IX)
загорится или погаснет в зависимости от того,
включаете Вы или выключаете устройство.
После установки и включения камеры Вы можете
видеть на мониторе изображения и слышать звуки
из комнаты Вашего малыша.
5.2.2. ГРОМКОСТЬ МОНИТОРА
Нажмите кнопку
(8) для увеличения и кнопку
(10) для уменьшения громкости Вашего монитора,
выбрав один из 5 уровней звука.
5.2.3. РАЗГОВОР С МАЛЫШОМ
Используя родительский блок Вы можете
поговорить с Вашим малышом (например, чтобы
успокоить его или создать ощущение, что Вы
рядом) или со своей супругой (если он или она
находится в детской спальне).
Нажмите и удерживайте кнопку разговора с
малышом (12) и говорите, находясь перед
монитором.
После окончания разговора отпустите кнопку,
чтобы продолжить прослушивание звуков из
детской спальни.
Учтите, что Вы не можете слышать ребенка, когда
говорите с ним; для прослушивания Вам следует
отпустить эту кнопку.
5.2.4. УВЕЛИЧЕНИЕ (ZOOM)
Вы можете увеличить размер воспроизводимого
изображения, используя четырех-позиционное
увеличение.
Для того, чтобы воспользоваться этой функцией
сделайте следующее:
1. Нажмите кнопку zoom . В левом верхнем углу
экрана появится участок, ограниченный белой
квадратной границей.

83
PУССКИЙ
2. Нажмите кнопки ВВЕРХ и ВНИЗ для смены
выбранной области.
3. Нажмите кнопку ,чтобы увеличить
изображение выбранной области.
4. Нажмите кнопку zoom и продолжите выбор
нужной области изображения, при желании можно
увеличить другие участки изображения.
5. Еще раз нажмите кнопку zoom , чтобы выйти из
режима увеличения.
5.2.5. ИНФРАКРАСНОЕ НОЧНОЕ ВИДЕНИЕ
(АВТОМАТИЧЕСКИ)
Функция инфракрасного ночного видения
позволяет камере транслировать изображение
ребенка или интересующего места в темноте или
при слабом освещении.
В этом режиме изображения транслируются
в черно-белом цвете и видны лишь объекты,
расположенные на расстоянии менее 2 метров.
Камера постоянно анализирует уровень света и
автоматически переходит в инфракрасный режим
при недостаточном освещении.
5.2.6. ПРЕДУПРЕЖДЕНИЕ ОБ ОТСУТСТВИИ
ЗОНЫ ДОСТУПА
Если монитор и камера находятся друг от друга на
расстоянии выше допустимого (см. технические
характеристики), LED индикатор включения/
сопряжения с камерой (IX) и монитор (1) замигают
красным, символ зоны покрытия (a) загорится
красным и на экране появится логотип MINILAND.
Для того, чтобы вернуться к трансляции
правильного изображения уменьшите
расстояние между монитором и камерой.
5.2.7. ГЛАВНОЕ МЕНЮ
Удерживайте нажатой кнопку Меню/Назад для
настройки основных функций и характеристик
Вашей радионяни.
5.2.7.1. МЕНЮ КАМЕРЫ
5.2.7.1.1. ВЫБОР КАМЕРЫ
Устройство предназначено для наблюдения за
различными участками. Оно может использовать
до четырех камер. Для выбора камеры,
трансляцию которой Вы хотите просматривать
необходимо сделать следующее:
1. Нажмите клавишу Меню/Назад в течение
трех секунд до появления меню.
2. Нажмите клавишу ВВЕРХ или ВНИЗ ,
перемещая иконку до камеры , затем нажмите
клавишу , чтобы войти в подменю.
3. Нажмите клавишу ВВЕРХ или ВНИЗ ,
перемещая иконку до СМОТРЕТЬ камеру затем
нажмите клавишу .
4. Нажмите клавишу ВВЕРХ или ВНИЗ
для выбора камеры, которую Вы хотите
просматривать, затем нажмите клавишу для
подтверждения выбора.
Примечание 1: Вы можете просматривать
изображение только с тех камер, которые
сопряжены с монитором.
Примечание 2:Есть способ более быстрой смены
камеры для просмотра. Нажмите сразу на клавишу
для циклического просмотра изображений с
сопряженных камер.
5.2.7.1.2. РЕЖИМ СКАНИРОВАНИЯ
Эта функция позволяет просматривать
последовательно и в круговом режиме изображения
со всех сопряженных камер, показывая картинку
с каждой камеры на протяжении 12 секунд. Эту
функцию можно использовать только когда с
монитором сопряжены более одной камеры. Для
перехода в этот режим:
1. Нажмите клавишу Меню/Назад в течение
трех секунд до появления меню.
2. Нажмите клавишу ВВЕРХ или ВНИЗ
перемещая иконку до камеры , затем нажмите
клавишу , чтобы войти в подменю.
3. Нажмите клавишу ВВЕРХ или ВНИЗ ,
перемещая иконку до СМОТРЕТЬ камеру , затем
нажмите клавишу .
4. Нажмите клавишу ВВЕРХ или ВНИЗ и
выберите иконку СКАН .
5. Нажмите клавишу для подтверждения.
Примечание 1: Если одна из камер находится вне
зоны доступа или выключена, монитор известит
Вас об этом и выйдет из режима СКАН.
Примечание 2: Режим СКАН можно активировать
или отключить нажатием клавиши , когда
работает основной экран и если с монитором
сопряжены более одной камеры.
5.2.7.1.3. ДОБАВИТЬ КАМЕРУ
Устройство предназначено для наблюдения
за различными участками с помощью камер
в количестве до 4 единиц (канал 1, 2, 3 или
4, назначенные для разных камер). Монитор
и оригинальная камера программируются на
заводе-изготовителе 1 каналом. Если Вам нужно
добавить дополнительную камеру, следует
сделать следующее:
1. Нажмите клавишу Меню/Назад в течение
трех секунд до появления меню.
2. Нажмите клавишу ВВЕРХ или ВНИЗ ,
перемещая иконку до камеры , затем нажмите
клавишу , чтобы войти в подменю.
3. Нажмите клавишу ВВЕРХ или ВНИЗ ,
перемещая иконку до добавления камеры ,
затем нажмите клавишу .
4. Нажмите клавишу ВВЕРХ или ВНИЗ для
выбора канала, на который Вы хотите добавить
новую камеру и подтвердите выбор нажатием
клавиши .
5. В то cветодиодный (LED) индикатор включения/
соединения (1) индикатор мигает, нажмите кнопку
сопряжения на камере (VI).
6. Сразу же после сопряжения LED индикатор
перестанет мигать и на экране монитора появятся
изображения с камеры.
7. Если сопряжение по какой-либо причине не
произошло, повторите вышеуказанные шаги.

84
Примечание 1: Вы можете выбрать только тот
канал, с которым еще не сопряжена ни одна
камера.
Примечание 2: Если у Вас сопряжены уже 4
камеры, Вы не сможете попасть в это подменю.
Иногда, по разным причинам, может быть потеряна
связь между монитором и уже подключенной к
нему камерой. В этом случае, просто повторите
все вышеуказанные шаги для повторного
сопряжения камеры и монитора.
5.2.7.1.4. УДАЛИТЬ КАМЕРУ
Для того, чтобы удалить одну из сопряженных
камер сделайте следующее:
1. Нажмите клавишу Меню/Назад
в течение
трех секунд до появления меню.
2. Нажмите клавишу ВВЕРХ или ВНИЗ ,
перемещая иконку до камеры , затем нажмите
клавишу , чтобы войти в подменю.
3. Нажмите клавишу ВВЕРХ или ВНИЗ ,
перемещая иконку до удаления камеры , затем
нажмите клавишу .
4. Нажмите клавишу ВВЕРХ или ВНИЗ для
выбора камеры, которую Вы хотите удалить, затем
нажмите клавишу для подтверждения выбора.
Примечание 1: Если у Вас с монитором сопряжена
только одна камера, Вы не сможете ни удалить ее,
ни войти в это меню.
Примечание 2: Перед сопряжением новой
камеры, необходимо удалить существующий
канал трансляции.
5.2.7.2. МЕНЮ НАСТРОЕК КАМЕРЫ
5.2.7.2.1. Колыбельные песни
Детский блок может проигрывать нежную
колыбельную для того, чтобы помочь заснуть
Вашему малышу. Для активации этой функции:
1. Нажмите клавишу Меню/Назад в течение
трех секунд до появления меню.
2. Нажмите клавишу ВВЕРХ или ВНИЗ ,
передвигая иконку до меню настроек камеры
, затем нажмите клавишу , чтобы войти в
подменю.
3. Нажмите клавишу ВВЕРХ или ВНИЗ ,
перемещая иконку до выбора колыбельной ,
затем нажмите клавишу .
4. Нажмите клавишу ВВЕРХ или ВНИЗ для
выбора одной из пяти предлагаемых колыбельных,
тишины или “циклического воспроизведения”
(настройка по умолчанию - ВЫКЛ).
5. После выбора мелодии нажмите клавишу
, появится контроль уровня громкости. Нажмите
клавишу ВВЕРХ или ВНИЗ выберите уровень
громкости от 1 до 3 и нажмите клавишу .
6. Трижды нажмите клавишу Меню/Назад ,
чтобы вернуться к основному экрану.
7. В верхней части ЖКэкрана появится иконка
Колыбельная (d).
Обратите внимание, что колыбельная будет
воспроизводиться только на камере, картинку с
которой Вы просматриваете в настоящее время.
PУССКИЙ
Примечание 1: Функция “циклического
воспроизведения” проигрывает все колыбельные
по кругу.
5.2.7.2.2. ГРОМКОСТЬ КАМЕРЫ
Это меню позволяет настроить уровень громкости,
на котором будет звучать голос родителей из
камеры при двусторонней связи.
Для настройки громкости камеры сделайте
следующее:
1. Нажмите клавишу Меню/Назад в течение
трех секунд до появления меню.
2. Нажмите клавишу ВВЕРХ или ВНИЗ ,
передвигая иконку до меню настроек камеры
, затем нажмите клавишу , чтобы войти в
подменю.
3. Нажмите клавишу ВВЕРХ или ВНИЗ
перемещая иконку до громкости камеры ,
затем нажмите клавишу .
4. Нажмите клавишу ВВЕРХ или ВНИЗ
для выбора одного из трех доступных уровней
громкости (LOW/MID/HIGH) на Ваше усмотрение.
5. Подтвердите Ваш выбор нажатием клавиши .
Имейте в виду, что настройки громкости
выполняются только на камере, картинка с
которой воспроизводится в настоящий момент.
5.2.7.2.3. НОЧНИК
Детский блок оснащен ночником, который создает
удобство для малыша и позволяет Вам видеть в
темной комнате.
Для активации ночника сделайте следующее:
1. Нажмите клавишу Меню/Назад в течение
трех секунд до появления меню.
2. Нажмите клавишу ВВЕРХ или ВНИЗ ,
передвигая иконку до меню настроек камеры
, затем нажмите клавишу ,чтобы войти в
подменю.
3. Нажмите клавишу ВВЕРХ или ВНИЗ ,
перемещая иконку до ночника затем нажмите
клавишу .
4. Нажмите клавишу ВВЕРХ или ВНИЗ
выберите ON (ВКЛ) или OFF (ВЫКЛ) в зависимости
от того хотите ли Вы активировать либо отключить
эту функцию.
5. Подтвердите Ваш выбор нажатием клавиши .
Имейте в виду, что настройки ночника
выполняются только на камере, картинка с
которой воспроизводится в настоящий момент.
5.2.7.3. МЕНЮ VOX/STANDBY (ГОЛОС/СПЯЩИЙ
РЕЖИМ)
5.2.7.3.1. Режим энергосбережения или только
аудио (STANDBY)
В режиме энергосбережения или только аудио
(STANDBY) Вы можете выбрать максимальный
промежуток времени активности монитора (1, 3
или 5 минут); по истечении этого времени картинка
исчезнет с экрана в целях энергосбережения, но
трансляция звукового сигнала будет продолжена.
Для возобновления показа картинки просто
нажмите на любую кнопку.

85
PУССКИЙ
Для активации этого режима сделайте следующее:
1. Нажмите клавишу Меню/Назад в течение
трех секунд до появления меню.
2. Нажмите клавишу ВВЕРХ или ВНИЗ
, перемещая иконку до появления меню VOX/
Standby , затем нажмите клавишу , чтобы
войти в подменю.
3. Нажмите клавишу ВВЕРХ или ВНИЗ ,
перемещая иконку до появления Standby ,
затем нажмите клавишу .
4. Нажмите клавишу ВВЕРХ или ВНИЗ
выберите желаемый параметр 1, 3 или 5 минут
или OFF (ВЫКЛ) для выключения этой функции.
5. Подтвердите Ваш выбор нажатием клавиши .
6. Дважды нажмите клавишу Меню/Назад чтобы
вернуться к основному экрану.
5.2.7.3.2. НАСТРОЙКА РЕЖИМА VOX (ГОЛОС)
Этот режим позволяет активировать Вашу
радионяню голосом. Если Вы активировали
режим VOX (ГОЛОС) и рядом с камерой не
слышны звуки, она отключит трансляцию. Когда
трансляция камеры не производится, экран
монитора погаснет.
Когда камера определит любой звук, громкость
которого выше запрограммированного уровня,
возобновится передача сигнала на монитор.
Для выключения этой функции и постоянного
просмотра области наблюдения отключите на
мониторе режим VOX.
• Режим VOX ОТКЛЮЧЕН: Камера ведет
постоянную трансляцию, что позволяет Вам
контролировать малыша и область наблюдения.
• Режим VOX ВКЛЮЧЕН: Камера ведет трансляцию
только когда рядом с ней обнаружен звук,
громкость которого выше запрограммированного
уровня.
Для активации этой функции, сначала необходимо
установить режим ожидания на 1, 3 или 5 минут
(см. пункт 5.2.7.3.1). Выберите переход на режим
ожидания через 1, 3 или 5 минут, если Вы хотите,
чтобы камера прекращала передачу изображения,
соответственно, через 1, 3 или 5 минут отсутствия
звука вокруг камеры.
После установки режима ожидания выполните
следующие действия для активации
голосового режима:
1. Нажмите клавишу Меню/Назад в течение
трех секунд до появления меню.
2. Нажмите клавишу ВВЕРХ или ВНИЗ
, перемещая иконку до появления меню VOX/
Standby , затем нажмите клавишу , чтобы
войти в подменю.
3. Нажмите клавишу ВВЕРХ или ВНИЗ ,
перемещая иконку до VOX (ГОЛОС) , затем
нажмите клавишу .
4. Нажмите клавишу ВВЕРХ или ВНИЗ ,
выберите нужный уровень чувствительности:
ВЫКЛ./1/2/3 (по умолчанию выбран вариант
ВЫКЛ.). Установите чувствительность на “1”, если
ребенок спит спокойно и плачет тихо, и на “3”,
если ребенок спит шумно или издает довольно
громкие звуки прежде, чем начать действительно
плакать; или установите чувствительность на
уровень “2”, если считаете, что поведение ребенка
не соответствует ни одному из описанных двух
вариантов.
5. Подтвердите Ваш выбор нажатием клавиши .
6. Дважды нажмите клавишу Меню/Назад чтобы
вернуться к основному экрану.
Если Вы в определенный момент хотите
взглянуть на Вашего малыша, хотя рядом с ним
тихо, Вы можете дистанционно активировать
трансляцию камеры, нажав любую кнопку.
5.2.7.4. УРОВЕНЬ ПЕРЕДАЧИ СИГНАЛА
В этом меню Вы можете установить нужную
Вам мощность передачи сигнала камерой,
выбрав между “высокая/низкая”. В положении
“высокая” (HI) зона покрытия достигает 250
метров в открытом пространстве с оригинальной
выходной мощностью. В положении “низкая”
(LOW) максимальная дальность передачи сигнала
снижается до 120 метров на открытой местности
из-за снижения мощности его трансляции.
Для настройки уровня трансляции сделайте
следующее:
1. Нажмите клавишу Меню/Назад в течение
трех секунд до появления меню.
2. Нажмите клавишу ВВЕРХ или ВНИЗ ,
перемещая иконку до появления уровня передачи
, затем нажмите клавишу , чтобы войти в
подменю.
3. Нажмите клавишу ВВЕРХ или ВНИЗ ,
выберите нужный уровень трансляции: ВЫСОКИЙ
или НИЗКИЙ.
4. Подтвердите Ваш выбор нажатием клавиши .
5. Нажмите клавишу Меню/Назад чтобы
вернуться к основному экрану.
5.2.7.5. НАСТРОЙКА ПРЕДУПРЕЖДЕНИЙ
Для настройки оповещений сделайте следующее:
1. Нажмите клавишу Меню/Назад в течение
трех секунд до появления меню.
2. Нажмите клавишу ВВЕРХ или ВНИЗ
, перемещая курсор до появления иконки
оповещения , затем нажмите клавишу .
3. Нажмите клавишу ВВЕРХ или ВНИЗ
, настройте таймер оповещения (нажатием
клавиши ВВЕРХ для увеличения или клавиши
ВНИЗ для уменьшения).
4. Подтвердите Ваш выбор нажатием клавиши .
5. Нажмите клавишу Меню/Назад , чтобы
вернуться к основному экрану.
Примечание 1: Если оповещения
запрограммированы, на ЖК экране видна иконка
часов (k).
Примечание 2: Если Вы хотите удалить
оповещения выполните вышеописанные шаги
1, 2 и 3 и установите время на 00:00. Значок
будильника исчезнет с Вашего экрана.
Примечание 3: Для выключения звучащего
сигнала нажмите на любую кнопку. При отсутствии

86
PУССКИЙ
ответа устройство будет издавать сигнал в течение
7 минут, а затем замолкнет.
5.2.7.6. Виброрежим
Эта функция помогает родителям сохранить
тишину в моменты, когда это необходимо, очень
полезна в шумной обстановке, а также пригодится
людям со слабым слухом.
Когда уровень шума в спальне ребенка превысит
установленный порог чувствительности, монитор
оповестит родителей вибрацией в четыре случаях.
Для активации виброрежима сделайте
следующее:
1. Нажмите клавишу Меню/Назад в течение
трех секунд до появления меню.
2. Нажмите клавишу ВВЕРХ или ВНИЗ
, перемещая курсор до появления иконки
виброрежима , затем нажмите клавишу .
3. Нажмите клавишу ВВЕРХ или ВНИЗ , для
включения или выключения этого режима.
4. Подтвердите Ваш выбор нажатием клавиши .
5. Нажмите клавишу Меню/Назад чтобы
вернуться к основному экрану.
Имейте в виду, что настройки виброрежима
выполняются только для камеры, картинка с
которой воспроизводится в настоящий момент.
ПРИМЕЧАНИЕ: Для вибрации монитора в
момент, когда уровень шума в детской спальне
превысит определенный уровень, крайне
необходимо, чтобы был включен режим VOX
(ГОЛОС).
5.2.7.7. ЯРКОСТЬ
Для изменения уровня яркости экрана Вашего
монитора выполните следующее:
1. Нажмите клавишу Меню/Назад в течение
трех секунд до появления меню.
2. Нажмите клавишу ВВЕРХ или ВНИЗ ,
перемещая курсор до появления иконки яркости
, затем нажмите клавишу .
3. Нажмите клавишу ВВЕРХ или ВНИЗ
, выберите нужный уровень яркости из 5
предлагаемых.
4. Подтвердите Ваш выбор нажатием клавиши .
5. Нажмите клавишу Меню/Назад чтобы
вернуться к основному экрану.
5.2.8. eMyBaby
5.2.8.1. РЕГИСТРАЦИЯ
1. В первую очередь необходимо
зарегистрироваться на Интернет-странице
eMyBaby. Для этого откройте Ваш браузер,
зайдите на страницу www.emybaby.com и
щелкните мышкой по кнопке СОЗДАТЬ УЧЕТНУЮ
ЗАПИСЬ.
2. Укажите в полях Ваши личные данные,
примите условия пользования и нажмите кнопку
АКТИВИРОВАТЬ УЧЕТНУЮ ЗАПИСЬ.
3. На электронную почту, которую Вы указали
в момент регистрации, к Вам придет письмо
подтверждение. После того, как Вы перейдете
по ссылке, содержащейся в письме, Вы снова
окажетесь на странице eMyBaby, с которой теперь
Вы сможете войти, используя имя своей учетной
записи и пароль, нажав кнопку ВОЙТИ.
5.2.8.2. ЧТОБЫ УВИДЕТЬ ИЗОБРАЖЕНИЕ НА
ПК, В КОТОРОМ АКТИВИРОВАНА ВИДЕОНЯНЯ
1. Для того, чтобы Вы смогли видеть изображение,
которое камера передает на Ваш ПК, Вам
необходимо подключить монитор (экран) к выходу
USB Вашего компьютера посредством кабеля
миниUSB-USB (не входит в комплектацию).
Монитор должен быть включен, если аккумулятор
разряжен, его необходимо зарядить.
2. После того, как Вы зайдете под своей учетной
записью и паролем в eMyBaby, выберите вариант
ВИДЕОНЯНЯ на РАБОЧИЙ СТОЛ.
3. Теперь выберите цифровой монитор 3.5” plus.
4. Вы можете выбрать из двух вариантов.
Выберите «Видеть его только на КОМПЬЮТЕРЕ,
к которому подключена видеоняня через USB-
кабель».
5. Если все работает корректно, на экране
Вашего компьютера Вы автоматически увидите
изображение Вашего ребенка. В случае каких-либо
проблем с изображением, проконсультируйтесь
с инструкциями по визуализации онлайн, нажав
иконку ПРОЧИТАЙТЕ ИНСТРУКЦИИ ЗДЕСЬ .
5.2.8.3. ЧТОБЫ ВИДЕТЬ ИЗОБРАЖЕНИЕ
УДАЛЕННО С ПОМОЩЬЮ eMyBaby
Если Вы желаете видеть своего ребенка
дистанционно, на компьютере, планшете или
смартфоне, следуйте инструкциям ниже:
ПРИМЕЧАНИЕ: для того, чтобы видеть
изображение, которое дистанционно
захватывает Ваша камера через eMyBaby,
монитор должен быть подключен к Вашему
ПК. Обязательным условием является подача
сигнала через eMyBaby
с ПК, к которому подключен монитор
Вашей программы vigilabebés. Без этой
предварительной настройки Вы не сможете
получать сигнал на каком-либо другом
устройстве (ПК, планшет или мобильный
телефон).
1. Подключите vigilabebés к своему ПК, следуя
изложенным ранее инструкциям, подключив
монитор к выходу USB Вашего компьютера
посредством кабеля
миниUSB-USB (не входит в поставку).
2. Зайдите на Интернет-страницу eMyBaby (www.
emybaby.com) под своей учетной записью и
паролем (если у Вас их нет, зарегистрируйтесь
согласно инструкциям выше) и выберите опцию
ВИДЕОНЯНЯ.
3. Среди различных моделей видеоняня выберите
цифровой монитор «3.5” plus».
Вы можете выбрать из двух вариантов. Выберите
«Доступ из любой точки с другогокомпьютера,
планшета или смартфона».
5. При первом использовании этой услуги,
система запросит Вас ввести номер заказа
Вашего продукта. Этот номер имеет формат
MNLXX-XXXXX, Вы найдете его внутри отсека
аккумулятора монитора.
6. После того, как Вы введете код, зажжется
экран, на котором Вы увидите различные опции:

87
PУССКИЙ
Отправить и Принять сигнал. Для того, чтобы
видеть изображение, которое камера захватывает
дистанционно, на Вашем мобильном устройстве,
сначала Вы должны нажать кнопку Отправить.
7. Теперь щелкните на иконке
, которая
появилась в центре изображения. Когда Ваш
компьютер начнет передавать сигнал, на Вашем
экране появится следующее изображение:
Если Вы желаете видеть изображение с
другого компьютера, следуйте инструкциям
ниже:
1.Подключите vigilabebés к своему ПК согласно
изложенной ранее инструкции, подключив
монитор к выходу USB своего компьютера с
помощью кабеля миниUSB-USB (не входит в
поставку).
2. На ПК, на котором Вы хотите дистанционно
видеть изображение, зайдите на Интернет-
страницу eMyBaby (www.emybaby.com) под своей
учетной записью и паролем и выберите вариант
ВИДЕОНЯНЯ.
3. Выберите цифровой монитор «3.5’’ plus» среди
различных моделей ВИДЕОНЯНЯ.
4. Вам будут представлены два варианта на
выбор. Выберите «Доступ из любой точки с другого
компьютера, планшета или смартфона».
5. Чтобы видеть изображение, которое камера
захватывает дистанционно, на Вашем мобильном
устройстве, сейчас Вам нужно нажать кнопку
Принять сигнал. Если все работает корректно,
на экране Вашего компьютера Вы автоматически
увидите изображение Вашего ребенка. В случае
проблем с изображением, вернитесь к инструкциям
по визуализации онлайн, нажав на иконке
ПРОЧИТАЙТЕ ИНСТРУКЦИИ ЗДЕСЬ .
Чтобы видеть изображение с мобильного
устройства (планшета или мобильного
телефона), следуйте следующим инструкциям:
Приложение eMyBaby
Miniland разработала приложение eMyBaby, которое доступно для iOS и Android, и которое Вы сможете
легко и бесплатно загрузить.
Для того, чтобы загрузить приложение eMyBaby, в первую очередь нужно перейти в соответствующую
библиотеку приложений или скачать его непосредственно путем сканирования соответствующего
QRCode:
Для установки приложения выполните действия, описанные в начале руководства.
1. Откройте приложение, как только оно будет установлено. Войдите в «LOG IN» и введите данные
Вашей учетной записи и пароль для входа, если Вы уже зарегистрированы, или зарегистрируйтесь, если
Вы не сделали этого ранее. Не забывайте о том, что на Вашу электронную почту, указанную во время
регистрации, Вам придет сообщение с подтверждением.
2. В главном меню выберите вариант «BABY MONITOR» (ВИДЕОНЯНЯ)
3. Выберите цифровой монитор «3.5’’ plus» среди нескольких моделей vigilabebés.
4. Нажмите на иконке «PLAY» , чтобы видеть дистанционно изображение, захватываемое камерой, с
Вашего мобильного устройства.
Браузер устройства
Также у Вас есть возможность видеть изображение камеры, если Вы зайдете на Интернет-страницу через
браузер со своего мобильного телефона. Эта возможность будет особенно Вам полезна, если Ваше
мобильное устройство не iOS или Android.
1. В браузере своего устройства зайдите на Интернет-страницу eMyBaby
(www.emybaby. com) под своей учетной записью пользователя и паролем. Выберите вариант
ВИДЕОНЯНЯ в главном меню.
2. Выберите цифровой монитор «3.5’’ plus» среди нескольких моделей vigilabebés.
3. Вам будут представлены два варианта на выбор. Выберите «Доступ из любой точки с другого
компьютера, планшета или смартфона».

88
Нажмите кнопку Принять сигнал. Если все работает корректно, на экране Вашего мобильного устройства
Вы автоматически увидите изображение Вашего ребенка.
6. ОБСЛУЖИВАНИЕ
• Протирайте поверхности камеры и монитора мягкой тканью без ворса.
• При загрязнении устройств протрите их слегка влажной тряпкой, при очистке поверхностей будьте
внимательны и не допускайте попадания воды в отверстия и пазы изделия.
• Никогда не используйте растворители и чистящие средства.
7. ОБНАРУЖЕНИЕ И УСТРАНЕНИЕ ПРОБЛЕМ
PУССКИЙ
Проблема Возможная причина Решение
Нет приема
на мониторе
Камера не включается Нажмите и удерживайте кнопку
включения (III) в течение 2 секунд
Монитор не включается Нажмите и удерживайте кнопку
включения (5)
Камера: нет соединения с
адаптером электрического тока
Включите адаптер электрического тока
Монитор: нет соединения с
адаптером электрического тока
Включите адаптер электрического тока
Монитор находится вне
зооны доступа
Сократите расстояние между монитором
и камерой
Утеряно соединениемонитора с
уже сопряженной камерой
Вновь произведите сопряжение камеры
с монитором.
Прочтите раздел 5.2.7.1.3.
Выбрана
неверная камера
Смените номер камеры, котрая ведет
трансляцию.
Прочтите раздел 5.2.7.1.1.
Картинка
отображается в черно-
белом цвете
Проверьте находится ли камера
в режиме ночного/инфракрасного
видения
Чтобы видеть цветную картинку добавьте
света там, где находится камера и
убедитесь, что датчик освещения камеры
(II) ничем не накрыт
Не слышен голос
родителей в детском
блоке
Регулировка громкости
родительского блока находится на
слишком низком уровне
Увеличьте уровень громкости
Камера не транслирует Камера не включена Нажмите и удерживайте кнопку(III)
в течение 2 секунд
Камера: нет соединения
с адаптером электрического тока
Включите адаптер электрического тока
Режим VOX или режим
энергосбережения (Standby)
активирован
Для того, чтобы видеть наблюдаемую
область в постоянном режиме, отключите
режим VOX (ГОЛОС) или режим
энергосбережения на мониторе
Не слышно ребенка на
родительском блоке
Уровень громкости на
родительском блоке находится на
слишком низком уровне
Увеличьте уровень громкости
Помехи или
неудовлетворительный
прием сигнала
Возможно мешают сигналы других
электронных устройств
Увеличьте расстояние между
устройствами
Камера и монитор находятся на
чрезмерном расстоянии
Сократите расстояние между монитором
и камерой
Слишком низкий уровень заряда
батареи
Включите адаптер электрического тока
Камера или монитор могут
находиться слишком близко с
металлическими предметами.
Увеличьте расстояние между
устройствами

89
PУССКИЙ
Проблема Возможная причина Решение
Невозможно
зарядить батарею в
родительском блоке
Не подключен адаптер
постоянного/переменного тока
Включите адаптер электрического тока
Используется батарея
без подзарядки
Следует использовать только
подзаряжаемые батареи (Li-ion 3.7
V, 1200 mAh): проверьте батарею и в
случае необходимости замените на
поставляемую в комплекте с устройством
Если детский блок
потерял связь
сродительским блоком
Камера или монитормогут
находиться на чрезмерном
расстоянии
Сократите расстояние между монитором
и камерой
Временно утеряна связь между
двумя устройствами
Перезагрузите устройства,
отключив их от источника
электропитания.
Подождите около 15 секунд перед тем,
как повторно их соединить.
Подождите около одной минуты
пока родительский и детский блок
синхронизируются
Утеряно сопряжение между двумя
устройствами
Произведите повторное
сопряжение камеры с монитором.
Прочтите раздел 5.2.7.1.3.
8. ТЕХНИЧЕСКИЕ ХАРАКТЕРИСТИКИ
Частота 2.4 ГГц, FHSS
Радиус действия 240 м (по прямой линии без препятствий)
Количество настраиваемых каналов 4
Питание (монитор)
Вход: 100-240 В переменного тока, 50/60 Гц
Выход: 5 В, 800 мА
Аккумуляторная батарея для монитора
3.7 В, 1200 мА-час
Вход: 100- 240 В переменного тока, 50/60 Гц
Питание (камера) Выход: 5 В, 800 мА
Продолжительность работы с
полностью заряженной батареей
(монитор)
Приблизительно 5 часов
Размер ЖК-экрана 3.5"
Сопоставимый формат кабеля-
переходника от Jack к RCA
Рисунок D
Формат-совместимый кабель miniUSBUSB USB-кабель для передачи данных
9. ИНФОРМАЦИЯ ПО УТИЛИЗАЦИИ БАТАРЕЙ И ИЗДЕЛИЯ
• Утилизация изделия должна осуществляться в соответствии с правилами охраны окружающей
среды с предварительно извлеченной батареей.
• Изделия с нанесенным на них символом перечеркнутого мусорного контейнера нельзя
выбрасывать с обычными бытовыми отходами.
• Для надлежащего сбора и переработки этих изделий их следует сдавать в специальные
пункты сбора, установленные органами властями. Вы также можете обратиться за
информацией в магазин, в котором Вы покупали изделие.

DECLARATION OF CONFORMITY
Miniland S.A. P.Ind. La Marjal I C/ La Patronal 10. 03430 ONIL (Alicante) SPAIN
Technical support: +34 966 557 775 · www.minilandgroup.com · [email protected]
We declare under our own responsibility that the product:
to which this declaration refers conforms with the
relevant standards or other standardising documents:
• Directive 2014/53/EU of the European Parliament and of the Council
of 16 April 2014 on the harmonisation of the laws of the Member States relating to the
making available on the market of radio equipment.
- EN 300 328 V2.1.1 (2016-11) Electromagnetic compatibility and Radio spectrum Matters
(ERM); Wideband transmission systems; Data transmission equipment operating in the 2,4
GHz ISM band and using wide band modulation techniques; Harmonized EN covering the
essential requirements of article 3.2 of the R&TTE Directive
- EN 301 489-1 V2.1.1 (2017-02) Electromagnetic compatibility and Radio spectrum Matters
(ERM); Electro-Magnetic Compatibility (EMC) standard for radio equipment and services; Part 1:
Common technical requirements.
- EN 301 489-17 V3.1.1 (2016-11) Electromagnetic compatibility and Radio spectrum Matters
(ERM); Electro-Magnetic Compatibility (EMC) standard for radio equipment; Part 17: Speci c
conditions for Broadband Data Transmission Systems.
- EN 50566:2013 Product standard to demonstrate compliance of radio frequency elds from
handheld and body-mounted Wireless communication devices used by the general public (30 MHz
— 6 GHz).
• Low Voltage Directive (LVD) 2014/35/EU
- EN 62368-1:2014 Information and communication technology equipment - Part 1: Safety
requirements
- EN 62311:2008 Assessment of electronic and electrical equipment related to human exposure
restrictions for electromagnetic elds (0 Hz — 300 GHz)
• Directive 2006/66/EU on Batteries and Accumulators and Waste Batteries and
Accumulators
• Directive 2009/125/EC Ecodesign requirements for energy-related products
- Commission Regulation (EC) NO 1275/2008, implementing Directive 2005/32/EC with regard
to ecodesign requirements for standby and off mode electric power consumption of electrical
and electronic household and of ce equipment.
• RoHS. Directive 2011/65/EU on the Restriction of the use of certain hazardous
substances in electrical and electronic equipment
• REACH (Registration, Evaluation, Authorization and Restriction of Chemical substances)
Regulation (EC) No 1907/2006
• Waste Electrical and Electronic Equipment (WEEE) Directive 2012/19/EU
digimonitor 3.5’’ plus · Miniland Baby · 89174 · Miniland, S.A.
Miniland, S.A.
Chief Executive Of cer
José Verdú Francés
Onil, Alicante, Spain.
29th October 2019


291019
2050089174
Miniland S.A. P. Ind. La Marjal I C/ La Patronal 10
03430 ONIL (Alicante) SPAIN
Technical support: +34 966 557 775
Fax +34 965 565 454
www.minilandgroup.com · tecnico@miniland.es
Miniland, S.A. 2016
digimonitor 3.5" plus 89174
Fabricado en China. Conservar los datos.
Made in China. Keep this information.
Fabricado em China. Conservar dados.
Fabbricato in China. Conservare i dati.
Fabriqué en China. Conserver ces informations.
Hergestellt in China. Bewahren Sie diese Angaben auf
Wyprodukowano w Chinach. Zachowaj instrukcję.
Сделано в Китае. Сохраните эту информацию.
Transcripción de documentos
digimonitor 3.5" plus Español 11 Português 30 Deutsch 50 Polski 70 English 21 Français 40 Italiano 60 Русский 80 Para descargar la aplicación eMyBaby, en primer lugar, acceda a la tienda de aplicaciones correspondiente. To download the eMyBaby app, go to the corresponding app store. Para descarregar a aplicação eMyBaby, em primeiro lugar aceda à respectiva loja de aplicações. Pour télécharger l’application eMyBaby, accédez d’abord à la boutique d’applications correspondante. Um die Anwendung eMyBaby runterzuladen, gehen Sie bitte zuerst im entsprechenden AppStore. Per scaricare l’applicazione eMyBaby è necessario, come prima cosa, accedere al market delle applicazioni. W celu pobrania aplikacji eMyBaby najpierw należy wejść do odpowiedniego sklepu z aplikacjami. Для того, чтобы загрузить приложение eMyBaby, в первую очередь нужно перейти в соответствующую библиотеку приложений. 1 Haga click sobre el icono de Play Store, según se indica en la imagen: Click on the icon in the Play Store, as shown in the picture: Clique no ícone da Play Store, conforme se indica na imagem: Cliquez sur l’icône Play Store, comme indiqué sur l’image: Klicken Sie auf das Play Store Symbol, wie im Bild gezeigt: Fare click sull’icona di Play Store così come indicato dall’immagine: Należy kliknąć na ikonkę Play Store, jak pokazano na obrazku: Кликните на иконке Play Store, как показано на изображении: 2 Una vez dentro de Play Store, debe buscar la aplicación. Para ello, en la barra de búsqueda debe teclear emybaby tal y como se indica en la imagen: Then search for the app in the store. Go to the search bar and write emybaby, as shown in the picture: Uma vez dentro da Play Store, deve procurar a aplicação. Para tal, na barra de procura deve digitar emybaby, tal como indicado na imagem: Une fois dans Play Store, vous devez chercher l’application. À cette fin, vous devez taper emybaby dans la barre de recherche, comme indiqué sur l’image: Wenn Sie sich im AppStore befinden, suchen Sie dort bitte die Anwendung. Um dies zu tun, geben Sie in der Suchleiste das Wort „emybaby“ ein, so wie in der Abbildung dargestellt: Dopo aver effettuato l’accesso nell’AppStore, bisognerà cercare l’applicazione digitando “emybaby” nella barra di ricerca, così come indicato dall’immagine: Po wejściu do Play Store należy odszukać aplikację. W tym celu w pasku wyszukiwania należy wpisać emybaby, jak pokazano na obrazku: Теперь Вы должны найти приложение в библиотеке Play Store. Для этого в строке поиска Вы должны набрать emybaby, как это показано на изображении: 3 Ahora deberá instalar la aplicación: Now install the app: Agora deverá instalar a aplicação: l’application: Vous devrez alors installer l’application: Jetzt können Sie die Anwendung installieren: Procedere all’installazione dell’applicazione: Teraz należy zainstalować aplikację: Теперь Вам необходимо установить приложение: 4 Una vez instalada, aparecerá el icono de la aplicación de eMyBaby en su pantalla principal. Pulse para entrar. Once it is installed, the eMyBaby app icon will appear on your home screen. Click to open the app. Uma vez instalada, aparecerá o ícone da aplicação da eMyBaby no seu ecrã principal. Pressione para entrar. Une fois installée, l’icône de l’application eMyBaby apparaîtra sur votre écran principal. Appuyez dessus pour entrer. Nach der Installierung erscheint auf Ihrem Hauptbildschirm das App-Symbol von eMyBaby. Klicken Sie dieses Symbol, um zur Anwendung zu gelangen. Una volta installata, l’icona dell’applicazione eMyBaby comparirà sulla schermata principale. Fare click su di essa per entrare. Po zainstalowaniu aplikacji na ekranie głównym pojawi się ikonka aplikacji eMyBaby. Należy ją wcisnąć aby wejść. После того, как приложение eMyBaby будет установлено, на Вашей главной странице появится соответствующая иконка. Нажмите ее для входа. 5 Al abrirse la aplicación, aparecerá la imagen que se muestra a continuación. The app will open and the following picture will appear. Quando a aplicação se abre, aparece a imagem que se mostra em seguida. En ouvrant l’application, l’image qui est montrée ci-dessous apparaîtra. Beim Öffnen der Anwendung, erscheint das weiter unter wiedergegebene Bild. Una volta aperta l’applicazione, si vedrà l’immagine seguente. Po otwarciu aplikacji pojawi się obrazek pokazany poniżej. Należy wprowadzić nazwę użytkownika i hasło. Когда Вы откроете приложение, Вы увидите изображение, представленное ниже. 1 En el caso de tener un móvil o tablet de Apple, debe descargar la aplicación desde la AppStore, cuyo icono se muestra en la imagen: If you have an iPhone or iPad, you should go to the AppStore, to the following icon: Caso tenha um telemóvel ou tablet da Apple, deve descarregar a aplicação a partir da AppStore, cujo ícone se apresenta na imagem: Si vous avez un téléphone portable ou une tablette d’Apple, vous devez télécharger l’application à partir de l’AppStore, dont l’icône est montrée sur l’image: Falls Sie über ein Handy oder Tablet von Apple verfügen, dann müssen Sie die Anwendung beim AppStore, dessen Symbol im folgenden Bild erscheint, runterladen: Se si possiede uno smartphone o un tablet Apple, sarà necessario scaricare l’applicazione dall’AppStore; l’icona corrispondente è quella mostrata nell’immagine: W przypadku telefonów komórkowych lub tabletów Apple należy pobrać aplikację z AppStore, którego ikonkę pokazano na obrazku: В случае если у Вас мобильный телефон или планшет марки Apple, Вам необходимо загрузить приложение, иконку которого Вы видите на изображении, из AppStore: 2 Una vez dentro de AppStore, debe buscar la aplicación. Para ello, en la barra de búsqeda debe teclear emybaby tal y como se indica en la imagen: Then search for the app in the store. Go to the search bar and write emybaby, as shown in the picture: Uma vez dentro da AppStore, deve procurar a aplicação. Para tal, na barra de procura deve digitar emybaby, tal como indicado na imagem: Une fois dans AppStore, vous devez chercher l’application. À cette fi n, vous devez taper emybaby dans la barre de recherche, comme indiqué sur l’image: Wenn Sie sich im AppStore befi nden, suchen Sie dort bitte die Anwendung. Um dies zu tun, geben Sie in der Suchleiste das Wort „emybaby“ ein, so wie in der Abbildung dargestellt: Dopo aver effettuato l’accesso nell’AppStore, bisognerà cercare l’applicazione digitando “emybaby” nella barra di ricerca, così come indicato dall’immagine: Po wejściu do AppStore należy odszukać aplikację. W tym celu w pasku wyszukiwania należy wpisać emybaby, jak pokazano na obrazku: Теперь Вы должны найти приложение в библиотеке AppStore. Для этого в строке поиска Вы должны набрать emybaby, как это показано на изображении: 3 Tras buscar la aplicación, pulse el botón marcado en rojo para descargarla. Once you have found the app, click on the button highlighted in red in order to download it. Depois de ter encontrado a aplicação, pressione o botão marcado a vermelho para a descarregar. Après avoir trouvé l’application, appuyez sur le bouton marqué en rouge pour la télécharger. Suchen Sie bitte die Anwendung, und drücken Sie anschließend den rot markierten Button, um die Anwendung runterzuladen. Una volta trovata l’applicazione, cliccare sul pulsante rosso per scaricarla. Po wyszukaniu aplikacji należy wcisnąć przycisk oznaczony na czerwono w celu pobrania aplikacji. После того, как приложение будет Вами найдено, нажмите кнопку, выделенную красным цветом, чтобы его загрузить. 4 Tras la instalación, en su pantalla principal aparecerá el icono de eMyBaby. Púlselo. When it is installed, the eMyBaby icon will appear on the home screen. Click on it. Após a instalação, no seu ecrã principal aparecerá o ícone da eMyBaby. Pressione-o. Une fois installée, l’icône eMyBaby apparaîtra sur votre écran principal. Appuyez dessus. Nach der Installierung erscheint auf Ihrem Hauptbildschirm das App-Symbol von eMyBaby. Drücken Sie bitte dieses Symbol. Quando l’installazione sarà completata, l’icona di eMyBaby comparirà sullo schermo. Fare click su di essa. Po zainstalowaniu na ekranie głównym pojawi się ikonka eMyBaby. Należy ją wcisnąć. После того, как Вы установите приложение, на Вашей главной странице появится иконка приложения eMyBaby. Нажмите ее. 5 Al abrirse la aplicación, aparecerá la imagen que se muestra a continuación. The app will open and the following picture will appear. Quando a aplicação se abre, aparece a imagem que se mostra em seguida. En ouvrant l’application, l’image qui est montrée ci-dessous apparaîtra. Beim Öffnen der Anwendung, erscheint das weiter unter wiedergegebene Bild. Una volta aperta l’applicazione, si vedrà l’immagine seguente. Po otwarciu aplikacji pojawi się obrazek pokazany poniżej. Когда Вы откроете приложение, Вы увидите изображение, представленное ниже. 1 5 3 1 2 4 6 7 17 8 9 10 16 13 11 12 15 14 j k A B C D E F G 2 IV III II I XI X V IX VIII XII VI VII 3 2 1 3 4 ÍNDICE 1. Introducción 2. Contenido 3. Instrucciones de seguridad 4. Características del producto 5. Instrucciones de uso 6. Mantenimiento 7. Identificación y resolución de problemas 8. Especificaciones técnicas 9. Información sobre la eliminación de las baterías y el producto 1. INTRODUCCIÓN Le felicitamos por haber adquirido este vigilabebés con monitor inalámbrico a color, que incorpora la tecnología más avanzada. Estamos seguros de que quedará totalmente satisfecho con la calidad y las características de este producto, aunque le recomendamos no obstante que lea cuidadosamente estas instrucciones con el fin de obtener los mejores resultados de su compra. Este vigilabebés le permite transmitir señales de audio/vídeo en modo inalámbrico para su recepción en el monitor a color, lo cual es perfecto para un gran número de situaciones como, por ejemplo, la vigilancia de bebés, de niños de corta edad o de ancianos. NOTA: Las características descritas en este manual de usuario están sujetas a modificaciones sin previo aviso. 2. CONTENIDO 1 Cámara (unidad del bebé) 1 Monitor (unidad de los padres) 2 Adaptadores de CA/CC 1 Batería de litio (Li-ion) recargable para el monitor 1 Cinta para el cuello 1 Bolsa para transporte y almacenaje 1 Trípode Manual de Instrucciones y garantía • Si faltara cualquiera de los elementos arriba indicados, póngase en contacto con su distribuidor. 3. INSTRUCCIONES DE SEGURIDAD Lea cuidadosamente este manual de instrucciones antes de utilizar su vigilabebés por primera vez y consérvelo para poder utilizarlo como referencia en el futuro. 3.1. INSTRUCCIONES DE SEGURIDAD GENERALES: Cuando se utilicen aparatos eléctricos es necesario cumplir algunas precauciones de seguridad básicas en todo momento: 1. Es necesario extremar las precauciones cuando niños o ancianos utilicen cualquier producto, o cuando se utilice cerca de ellos. Mantenga el aparato lejos del alcance de los niños mientras no se esté utilizando. 2. Este producto no debe utilizarse como el único medio de vigilancia, no siendo en ningún caso un sustituto de la supervisión responsable de los niños, adultos o propiedades por parte de los adultos. 3. Utilice el vigilabebés sólo con los adaptadores de CA incluidos con la unidad (5.0 V, 800 mA) 4. Utilice sólo baterías del tipo recomendado (Li-ion 3,7 V – 1200mAh). No intente cargar ningún otro tipo 11 ESPAÑOL de baterías en su monitor. 5. Este producto contiene piezas de pequeño tamaño. Es necesario proceder con cuidado a la hora de desempaquetar y montar el producto. 6. NO permita que los niños jueguen con los materiales del embalaje, como por ejemplo bolsas de plástico. Es necesario proceder con cuidado a la hora de desempaquetar y montar el producto. 7. NO utilice el aparato si el cable o el enchufe estuvieran dañados. Si el funcionamiento de su monitor de vigilancia de bebés no fuera correcto o si tuviera cualquier tipo de daños, póngase en contacto con el centro de servicio autorizado de Miniland para solicitar la inspección y la reparación del mismo con el fin de evitar cualquier posible riesgo. 8. NO intente reparar o ajustar ninguna de las funciones eléctricas o mecánicas de la unidad, ya que en ese caso la garantía quedaría anulada. 9. Compruebe el voltaje de su vivienda con el fin de asegurarse de que corresponda al régimen del aparato indicado en las especificaciones del mismo. 10. Si no va a utilizar el vigilabebés durante un período de tiempo prolongado, desenchufe siempre el adaptador de corriente. Para desconectar el aparato de la red eléctrica, sujete el transformador y retire el enchufe de la toma. No tire nunca directamente del cable. 11. Este producto está diseñado exclusivamente para el uso en interiores. La unidad no debe exponerse a la lluvia, humedad o goteos o salpicaduras de líquidos. No coloque nunca ningún objeto lleno de líquido, como por ejemplo un vaso o un jarrón, encima o al lado de su vigilabebés. El monitor de vigilancia de bebés no debe utilizarse cerca del agua. PRECAUCIÓN • Este vigilabebés está diseñado para proporcionar tranquilidad a los padres cuando no les es posible estar en la misma habitación que el bebé. Este producto no debe reemplazar la supervisión responsable de un adulto. Es necesario que uno de los padres permanezca cerca del monitor mientras se esté utilizando. El vigilabebés no es un dispositivo médico y no debe confiarse a él el bienestar del bebé. Es importante que visite periódicamente la habitación del bebé con el fin de asegurarse de que todo esté bien. • No utilice nunca este vigilabebés en aquellos casos en los que la vida o la salud del bebé u otras personas, o la integridad de un inmueble, dependan de su funcionamiento. El fabricante no aceptará ninguna responsabilidad o reclamación alguna por fallecimiento, lesiones personales o daños materiales resultantes del malfuncionamiento o del uso indebido del producto. • El uso indebido de este vigilabebés inalámbrico podría dar lugar a acciones legales. • Utilice este producto de manera responsable. IMPORTANTE: Tenga en cuenta que cualquier cambio o modificación en el equipo no efectuada por el servicio técnico de Miniland no estará cubierta por la garantía del producto. 3.2. CONSEJOS PARA LAS RADIO INTERFERENCIAS Este equipo ha sido sometido a pruebas y cumple con los requisitos de la Directiva RED 2014/53/ ESPAÑOL UE. Estos requisitos están diseñados para ofrecer una protección razonable contra las interferencias dañinas en una instalación residencial. Si la unidad no se instala y utiliza de acuerdo con las instrucciones, podría causar interferencias dañinas en las radiocomunicaciones. Tenga en cuenta, sin embargo, que no es posible garantizar que no vayan a producirse interferencias en una instalación específica. Si el vigilabebés provocara interferencias en la recepción de la radio o la televisión, lo cual puede determinarse apagándolo y encendiéndolo, se recomienda al usuario que intente subsanar la interferencia tal como se indica a continuación: • Reoriente o cambie el receptor de posición. • Aumente la distancia entre el equipo en cuestión y el vigilabebés. • Enchufe el equipo en un enchufe diferente del utilizado para el receptor. • Consulte con el departamento de Atención del Cliente de Miniland. Con el fin de asegurar el cumplimiento de la Directiva RED 2014/53/UE, este equipo tiene cables blindados especiales. La operación con un equipo no aprobado o con cables no blindados probablemente provocará interferencias en la recepción radiofónica o televisiva. 3.3. ELECCIÓN DE UN LUGAR ADECUADO • Coloque el dispositivo electrónico en un lugar alejado de los niños con el fin de evitar posibles accidentes. • Los niños podrían enredarse en los cables. La unidad del bebé debe situarse a una distancia de aproximadamente 1 – 1.5 metros de la cuna del bebé. No coloque nunca la unidad del bebé en el interior de la cuna, la cama o el corralito. Asegúrese de que la unidad, los cables y el adaptador estén lejos del alcance del bebé y de otros niños de corta edad. • Coloque el vigilabebés en un lugar en el que el aire pueda circular libremente. No lo coloque sobre edredones o mantas blandas ni en las esquinas de armarios, estanterías, etc. • Coloque el vigilabebés en un lugar alejado de las fuentes de calor como radiadores, chimeneas, cocinas y la luz solar directa. • Coloque la unidad del bebé alejada de aparatos de televisión, repetidores y radios. Las señales de radio intensas generadas por estos elementos podrían causar ruidos o incluso la aparición de sonidos e imágenes en el monitor. Si esto ocurriera, traslade la cámara a otro lugar. • Este monitor puede colocarse encima de una mesa utilizando el soporte para mesa retráctil situado en la parte posterior del monitor. Cuando no lo utilice, simplemente pliéguelo hacia el interior de la parte posterior del monitor hasta escuchar un “clic” que le indicará que ya está totalmente plegado. 4. CARACTERÍSTICAS Y FUNCIONES DEL PRODUCTO 4.1. FUNCIONES Y CONTROLES DEL MONITOR (FIGURA 1) MONITOR (FIGURA 1.1) 1. Indicador LED de encendido/enlace 2. Micrófono 3. LED indicador de carga 4. Pantalla LCD 5. Botón de encendido/apagado 6. Altavoz 7. Enganche para cinta del cuello 8. Botón de ajuste ▲ 9. Botón zoom/menú 10. Botón de ajuste ▼ 11. Botón aceptar/modo Scan 12. Botón para hablar con el bebé 13. Conector salida AV 14. Conector mini USB alimentación/PC 15. Soporte abatible 16. Tapa del compartimento de la batería 17. Antena retráctil DISPLAY Iconos de la pantalla (FIGURA 1.2) a. Cobertura b. Volumen seleccionado en el monitor c. Visión nocturna d. Nanas e. Modo VOX f. Cámara seleccionada g. Luz de compañía h. Nivel de transmisión i. Nivel de batería j. Icono hablar con el bebé k. Icono alerta activada Iconos del Menú (FIGURA 1.3) A. Menú selección/añadir/eliminar cámara B. Menú de ajustes de cámara C. VOX/Standby D. Nivel de transmisión E. Alarma F. Función Vibración G. Brillo de pantalla 4.2. FUNCIONES Y CONTROLES DE LA CÁMARA (FIGURA 2) I. Antena retráctil II. Sensor de luz III. Botón de encendido IV. Accesorio para colgar V. Altavoz VI. Botón de emparejamiento VII. Conector de alimentación Mini USB VIII. Micrófono IX. LED de encendido / Emparejamiento X. Lente de la cámara XI. Infrarrojo XII. Accesorio de trípode 5. INSTRUCCIONES DE USO 5.1. ANTES DEL USO 5.1.1. ALIMENTACIÓN DE LA UNIDAD DE LOS PADRES Y USO DE LA BATERÍA El monitor, o unidad de los padres, de este vigilabebés está diseñado para utilizarse con la batería o con el adaptador CA/CC suministrado. La batería recargable debe cargarse durante al menos ocho horas antes de utilizar la unidad por primera vez o si no se ha utilizado durante un período de tiempo prolongado. Su vigilabebés se suministra con una batería Liion recargable de 3.7V 1200mAh para el monitor. Recomendamos utilizar la batería en el monitor con el fin de poder recibir la señal de audio/vídeo 12 procedente de la cámara en cualquier lugar. Conecte el monitor al adaptador enchufado a la red eléctrica siempre que sea posible, con el fin de mantener la batería cargada. INSTALACIÓN DE LA BATERÍA (FIGURA 3) 1. Desatornille y retire la tapa del compartimento de la batería (16) situada en la parte posterior de la unidad. 2. Inserte la batería Li-ion (suministrada). 3. Coloque de nuevo la tapa de la batería en su lugar y fíjela con el tornillo. Precaución: Utilice sólo baterías del tipo recomendado ya que, en caso contrario, existe el riesgo de explosión. Deshágase de las baterías gastadas de manera responsable. Nota: Cuando no utilice las dos unidades, se recomienda apagarlas con el fin de ahorrar batería. CARGA DE LA BATERÍA Inserte la batería recargable de acuerdo a las instrucciones indicadas en el apartado anterior. Conecte el conector del adaptador de corriente a la toma mini USB situada en el lateral de la unidad (14). Utilice sólo el adaptador suministrado. Enchufe el adaptador a la red eléctrica. Mientras el monitor permanezca conectado a la red eléctrica y en carga, el LED indicador de carga (3) permanecerá encendido en rojo. Si el cargador permanece conectado a la red pero se ha completado el proceso de carga, el LED indicador de carga (3) se iluminará en verde. Cuando el nivel de carga de la batería sea muy bajo, el icono de nivel de batería (i) parpadeará en rojo y comenzará a emitir un bip cada 30 segundos. Nota: retire la batería cuando no vaya a utilizar el aparato durante un período de tiempo prolongado. 5.1.2. ALIMENTACIÓN DE LA UNIDAD DEL BEBÉ La cámara o unidad del bebé, de este vigilabebés está diseñada para utilizarse con el adaptador de CA/ CC suministrado. 1. Localice la toma del conector (VII) en la parte posterior de la unidad del bebé. 2. Conecte el cable del adaptador a la toma mini USB de la cámara. Utilice sólo el adaptador suministrado. 3. Enchufe el adaptador a la red eléctrica. Advertencia: Peligro de Estrangulación – Mantenga el cable lejos del alcance del bebé. NO coloque NUNCA una cámara con cables a menos de 1 metro de la cuna. No utilice nunca cables alargadores con adaptadores de CA. Utilice sólo los adaptadores de CA suministrados. 5.2. OPERACIÓN 5.2.1. ENCENDIDO/APAGADO DE LAS UNIDADES 5.2.1.1. MONITOR: Mantenga pulsado el botón de encendido (5), situado en la parte superior del monitor, para encenderlo o apagarlo. El indicador LED de encendido/enlace (1) se iluminará o apagará dependiendo de si usted enciende o apaga la unidad. 13 ESPAÑOL 5.2.1.2. CÁMARA. Para encender o apagar la cámara, mantenga pulsado el botón de encendido (III) durante dos segundos. El LED de alimentación (IX) se iluminará o apagará dependiendo de si usted enciende o apaga la unidad. Cuando haya instalado y encendido la cámara, podrá ver las imágenes y escuchar los sonidos captados en la habitación de su bebé a través del monitor. 5.2.2. VOLUMEN DEL MONITOR Pulse el botón de ajuste (8) si desea incrementar el volumen de su monitor o el botón de ajuste (10) si desea reducirlo, eligiendo entre los 5 niveles disponibles. 5.2.3. HABLAR AL BEBÉ Usted puede hablarle a su bebé desde la unidad de los padres (por ejemplo para tranquilizarlo y que perciba que ya va a acudir a su lado) o a su pareja (si él o ella está en la habitación del bebé). Pulse y mantenga pulsado el botón para hablar con el bebé (12) y hable frente al monitor. Suelte el botón cuando acabe de hablar para volver a escuchar el sonido de la habitación del bebé. Tenga en cuenta que no podrá escuchar a su bebé mientras esté hablándole; para escucharle tendrá que dejar de pulsar este botón. 5.2.4. ZOOM Puede aumentar el tamaño de la imagen visualizada realizando un zoom de cuatro posiciones. Para acceder a esta función siga los siguientes pasos: 1. Presione el botón zoom . El cuadrante izquierdo superior de la imagen aparecerá recuadrado en blanco. 2. Presione los botones de ARRIBA y ABAJO para cambiar el cuadrante seleccionado. 3. Pulse el botón para aumentar la imagen del cuadrante seleccionado. 4. Pulse el botón zoom y regresará al proceso de selección de cuadrante, por si desea hacer zoom sobre otro de los cuadrantes. 5. Presione de nuevo el botón zoom para salir de la función zoom. 5.2.5. VISIÓN NOCTURNA INFRARROJA (AUTOMÁTICA) La función de visión nocturna infrarroja permite a la cámara captar imágenes de su bebé o del área monitorizada en condiciones de oscuridad o de poca luz. En este modo sólo se mostrarán imágenes en blanco y negro en el monitor y sólo podrán verse los objetos situados a menos de 2 metros de distancia. La cámara monitoriza constantemente el nivel de luz y cambia automáticamente al modo infrarrojo cuando la luz es insuficiente para la visión normal. 5.2.6. ADVERTENCIA DE FUERA DE ALCANCE Si el monitor se sitúa a una distancia de la cámara superior a la admisible (vea las características técnicas), el indicador LED de encendido/enlace de la cámara (IX) y el monitor (1) parpadearán en rojo, el símbolo de cobertura (a) aparecerá en rojo y la pantalla mostrará el logo de MINILAND. ESPAÑOL Acerque el monitor a la cámara para volver a ver la imagen correctamente. canal 1 programado. Si necesita añadir una cámara extra, deberá seguir el siguiente proceso: 5.2.7. MENÚ PRINCIPAL Mantenga pulsado el botón Menú/Atrás para poder realizar los ajustes de las principales funciones y características de su vigilabebés. 1. Pulse la tecla Menú/Atrás durante tres segundos para hacer aparecer el menú. 2. Pulse la tecla ARRIBA o la tecla ABAJO hasta que el icono de cámara se resalte y pulse a continuación la tecla para entrar en el sub-menú. 3. Pulse la tecla ARRIBA o la tecla ABAJO hasta que el icono de añadir cámara se resalte y pulse a continuación la tecla . 4. Pulse la tecla ARRIBA o la tecla ABAJO para seleccionar el canal donde desea añadir la nueva cámara y confirme la selección pulsando la tecla . 5. Mientras el indicador LED de encendido/enlace (1) esté parpadeando, pulse el botón de emparejamiento en la cámara (VI). 6. Una vez emparejada, el indicador LED dejará de parpadear y las imágenes de la cámara se mostrarán inmediatamente en la pantalla de la unidad de monitor. 7. Si el emparejamiento no se hubiera efectuado correctamente, repita los pasos arriba indicados. 5.2.7.1. MENU DE CÁMARA 5.2.7.1.1. SELECCIÓN DE LA CÁMARA El dispositivo está diseñado para permitir la observación de diferentes zonas con hasta cuatro cámaras. Para seleccionar la cámara que desee ver, siga los pasos que se indican a continuación: 1. Pulse la tecla Menú/Atrás durante tres segundos para hacer aparecer el menú. 2. Pulse la tecla ARRIBA o la tecla ABAJO hasta que el icono de cámara se resalte y pulse a continuación la tecla para entrar en el sub-menú. 3. Pulse la tecla ARRIBA o la tecla ABAJO hasta que el icono de VER cámara se resalte y pulse a continuación la tecla . 4. Pulse la tecla ARRIBA o la tecla ABAJO para seleccionar la cámara que desee visualizar y pulse a continuación la tecla para confirmar la selección. Nota 1: Solo se podrán visualizar las cámaras que hayan sido emparejadas al monitor. Nota 2: Hay una manera más rápida de cambiar la cámara a visualizar. Pulse directamente la tecla para ir viendo cíclicamente las cámaras que estén emparejadas: CAM1/CAM2/CAM3/CAM4/MODO SCAN. 5.2.7.1.2. MODO SCAN Esta función le permite ver de manera consecutiva y cíclica los canales de cámara emparejados, mostrando las imágenes de cada cámara durante 12 segundos. Esta función solo puede utilizarse cuando hay más de una unidad de cámara emparejada. Para entrar en este modo: 1. Pulse la tecla Menú/Atrás durante tres segundos para hacer aparecer el menú. 2. Pulse la tecla ARRIBA o la tecla ABAJO hasta que el icono de cámara se resalte y pulse a continuación la tecla para entrar en el sub-menú. 3. Pulse la tecla ARRIBA o la tecla ABAJO hasta que el icono de VER cámara se resalte y pulse a continuación la tecla . 4. Pulse la tecla ARRIBA o la tecla ABAJO y seleccione el icono de SCAN . 5. Pulse la tecla para confirmar. Nota 1: Si una de las cámaras está fuera de alcance o si no está encendida, el monitor le avisará de ello y el modo Scan se detendrá. Nota 2: El modo Scan puede activarse o desactivarse pulsando la tecla mientras se visualiza la pantalla principal si tiene más de una cámara conectada a su monitor. 5.2.7.1.3. AÑADIR CÁMARA Este producto está diseñado para permitir la observación de distintas zonas con hasta 4 cámaras (canal 1, 2, 3 ó 4 asignado a distintas cámaras). El monitor y la cámara original salen de fábrica con el Nota 1: Sólo se podrá seleccionar los canales en los que no se haya emparejado aún ninguna cámara. Nota 2: No es posible acceder a este submenú si 4 cámaras han sido ya emparejadas. Puede que, por diversos motivos, se pierda la conexión entre el monitor y una cámara ya enlazada. En ese caso, repita el proceso explicado anteriormente para enlazar de nuevo la cámara con el monitor. 5.2.7.1.4. ELIMINAR CÁMARA Para eliminar una de las cámaras conectadas, siga los pasos que se indican a continuación: 1. Pulse la tecla Menú/Atrás durante tres segundos para hacer aparecer el menú. 2. Pulse la tecla ARRIBA o la tecla ABAJO hasta que el icono de cámara se resalte y pulse a continuación la tecla para entrar en el sub-menú. 3. Pulse la tecla ARRIBA o la tecla ABAJO hasta que el icono de eliminar cámara se resalte y pulse a continuación la tecla . 4. Pulse la tecla ARRIBA o la tecla ABAJO para seleccionar la cámara que desea eliminar y confirme la selección pulsando la tecla . Nota 1: Si solo tiene una cámara emparejada con el monitor, no podrá eliminarla ni acceder a este menú. Nota 2: Es necesario eliminar un canal antes de emparejarlo a una nueva unidad de cámara. 5.2.7.2. MENU DE AJUSTES DE CÁMARA 5.2.7.2.1. NANAS La unidad del bebé puede reproducir una suave nana para ayudar a su bebé a conciliar el sueño. Para activar esta función: durante tres segundos 1. Pulse la tecla Menú/Atrás para hacer aparecer el menú. 2. Pulse la tecla ARRIBA o la tecla ABAJO hasta que el icono de menú de ajustes de cámara se resalte y pulse a continuación la tecla para entrar en el sub-menú. 14 ESPAÑOL 3. Pulse la tecla ARRIBA o la tecla ABAJO hasta que el icono de Nana se resalte y pulse a continuación la tecla . 4. Pulse la tecla ARRIBA o la tecla ABAJO para seleccionar una de las cinco nanas disponibles, silencio o reproducción en bucle (el ajuste predeterminado es OFF). 5. Cuando se haya seleccionado la melodía, pulse la tecla y aparecerá el control de volumen. Pulse la tecla ARRIBA o la tecla ABAJO para seleccionar el nivel de volumen desde el 1 hasta el 3 y pulse la tecla . 6. Presione la tecla Menú/Atrás tres veces para volver a la pantalla principal. 7. En la parte superior de la pantalla LCD se mostrará el icono de Nana (d). Tenga en cuenta que la configuración de las nanas solo se producirá en la cámara que se esté visualizando en ese momento. Nota: La función de reproducción en bucle de las nanas reproduce cíclicamente todas las nanas. 5.2.7.2.2. VOLUMEN DE LA CÁMARA Este menú le permitirá configurar el nivel de volumen con el que se reproducirá en la cámara la voz de los padres, al emplear la función bidireccional. Para configurar el volumen de la cámara siga los siguientes pasos: 1. Pulse la tecla Menú/Atrás durante tres segundos para hacer aparecer el menú; 2. Pulse la tecla ARRIBA o la tecla ABAJO hasta que el icono de menú de ajustes de cámara se resalte y pulse a continuación la tecla para entrar en el sub-menú. 3. Pulse la tecla ARRIBA o la tecla ABAJO hasta que el icono de volumen de cámara se resalte y pulse a continuación la tecla . 4. Pulse la tecla ARRIBA o la tecla ABAJO para seleccionar uno de los tres niveles de volumen disponibles (LOW/MID/HIGH) en función de sus necesidades. 5. Confirme la selección pulsando la tecla . Tenga en cuenta que la configuración del volumen se llevará a cabo únicamente para la cámara cuya imagen se esté visualizando en el monitor en ese momento. 5.2.7.2.3. LUZ DE COMPAÑÍA La unidad del bebé tiene una suave luz de compañía que proporcionará confort al bebé y le permitirá ver en una habitación oscura. Para activar la luz de compañía, siga los siguientes pasos: durante tres segundos 1. Pulse la tecla Menú/Atrás para hacer aparecer el menú; 2. Pulse la tecla ARRIBA o la tecla ABAJO hasta que el icono de menú de ajustes de cámara se resalte y pulse a continuación la tecla para entrar en el sub-menú. 3. Pulse la tecla ARRIBA o la tecla ABAJO hasta que el icono de luz de compañía se resalte y pulse 15 . a continuación la tecla 4. Pulse la tecla ARRIBA o la tecla ABAJO y seleccione ON u OFF dependiendo de si desea activar o desactivar esta función. 5. Confirme la selección pulsando la tecla . Tenga en cuenta que la configuración de la luz de compañía se llevará a cabo únicamente para la cámara cuya imagen se esté visualizando en el monitor en ese momento. 5.2.7.3. VOX/STANDBY MENU 5.2.7.3.1. MODO DE AHORRO DE ENERGÍA O SÓLO AUDIO (STANDBY) Con el modo de ahorro de energía o sólo audio (Standby), usted puede elegir el tiempo máximo que la imagen del monitor permanece activa (1, 3 ó 5 minutos); después de este tiempo la imagen desaparece con el fin de ahorrar energía, aunque se sigue escuchando el sonido. Para reactivar la imagen, simplemente pulse cualquier botón. Para activar este modo debe hacer lo siguiente: 1. Pulse la tecla Menú/Atrás durante tres segundos para hacer aparecer el menú; 2. Pulse la tecla ARRIBA o la tecla ABAJO hasta que el icono de menú VOX/Standby se resalte y pulse a continuación la tecla para entrar en el sub-menú. 3. Pulse la tecla ARRIBA o la tecla ABAJO hasta que el icono de Standby se resalte y pulse a continuación la tecla . 4. Pulse la tecla ARRIBA o la tecla ABAJO y seleccione la opción deseada entre 1, 3 ó 5 minutos u OFF para desactivar esta función. 5. Confirme la selección pulsando la tecla . 6. Presione la tecla Menú/Atrás dos veces para volver a la pantalla principal. 5.2.7.3.2. AJUSTE VOX Este modo le permite controlar la activación por sonido de su vigilabebés. Si usted activa el modo VOX en el monitor y no se produce ningún sonido alrededor de la cámara, ésta dejará de transmitir. La pantalla del monitor se apaga cuando la cámara no está transmitiendo. Cuando la cámara detecte cualquier sonido con una intensidad superior al nivel de sensibilidad ajustado, comenzará a transmitir de nuevo la señal al monitor. Para desactivar esta función y ver el área vigilada continuamente, desconecte el modo VOX en el monitor. • Modo VOX DESACTIVADO: La cámara transmite continuamente, lo que le permite monitorizar continuamente a su bebé o el área que desee proteger. • Modo VOX ACTIVADO: La cámara sólo transmite cuando detecta un sonido de intensidad suficiente, lo que dependerá del nivel seleccionado, alrededor de la cámara. Para activar esta función, en primer lugar asegúrese de haber ajustado el modo de ahorro ESPAÑOL de energía en 1/3 ó 5 minutos (consulte el punto 5.2.7.3.1). Seleccione 1/3 ó 5 si desea que la cámara deje de transmitir una vez transcurridos 1/3 ó 5 minutos si no se produce ningún sonido alrededor de ella. Una vez ajustado el tiempo de espera, para activar el modo VOX siga los pasos que se indican a continuación: 1. Pulse la tecla Menú/Atrás durante tres segundos para hacer aparecer el menú. 2. Pulse la tecla ARRIBA o la tecla ABAJO hasta que el icono de menú VOX/Standby se resalte y pulse a continuación la tecla para entrar en el sub-menú. 3. Pulse la tecla ARRIBA o la tecla ABAJO hasta que el icono de VOX se resalte y pulse a continuación la tecla . 4. Pulse la tecla ARRIBA o la tecla ABAJO y seleccione el nivel de sensibilidad deseado: OFF/1/2/3 (el ajuste predeterminado es OFF). Ajuste la sensibilidad en el nivel “1” si su bebé suele dormir tranquilamente y cuando llora no lo hace con fuerza, en el nivel “3” si su bebé tiende a emitir ruidos mientras duerme o emite ruidos bastante fuertes antes de ponerse a llorar o en el nivel “2” si considera que el comportamiento de su bebé no corresponde a ninguno de los dos patrones anteriores. 5. Confirme la selección pulsando la tecla . 6. Presione la tecla Menú/Atrás dos veces para volver a la pantalla principal. Si desea ver a su bebé en un momento determinado, aunque no haya ruidos alrededor, puede activar la emisión de la cámara de forma remota pulsando cualquier botón. 1. Pulse la tecla Menú/Atrás durante tres segundos para hacer aparecer el menú. 2. Pulse la tecla ARRIBA o la tecla ABAJO hasta que el icono de la alarma se resalte y pulse a continuación la tecla . 3. Pulse la tecla ARRIBA o la tecla ABAJO para configurar el temporizador de la alerta (pulse la tecla ARRIBA para incrementar o la tecla ABAJO para reducir). 4. Confirme la selección pulsando la tecla . 5. Presione la tecla Menú/Atrás para volver a la pantalla principal. Nota 1: Cuando la alerta esté en marcha, en la pantalla LCD se mostrará el icono de un reloj (k). Nota 2: Si desea eliminar la alarma siga los pasos 1, 2 y 3 arriba mencionados y ajuste el tiempo a 00:00. El icono del reloj desaparecerá de su pantalla. Nota 3: Cuando la alerta esté sonando, presione cualquier tecla para cancelarla. Si no hay respuesta, el aparato le avisará durante 7 minutos y posteriormente dejará de sonar. 5.2.7.6. FUNCIÓN VIBRACIÓN Esta función permite a los papás conseguir un ambiente silencioso en los momentos en que necesiten tranquilidad y es de gran ayuda en entornos ruidosos y para aquellas personas que tengan problemas de audición. Cuando el sonido en la habitación del bebé supere el umbral que marca el nivel de sensibilidad configurado, el monitor vibrará en cuatro ocasiones para avisar a los padres. Para activar la función vibración, siga los siguientes pasos: 5.2.7.4. NIVEL DE TRANSMISIÓN Puede modificar desde este menú el nivel de potencia emitido por la cámara, eligiendo entre las opciones alta/baja. Cuando se sitúa en la posición alta (HI), la cobertura cubrirá una distancia de 250 metros en campo abierto con la potencia original. Cuando se sitúa en la posición baja (LOW), la distancia máxima de transmisión se reduce a aproximadamente 120 metros en campo abierto, al disminuir la potencia de emisión. 1. Pulse la tecla Menú/Atrás durante tres segundos para hacer aparecer el menú. 2. Pulse la tecla ARRIBA o la tecla ABAJO hasta que el icono de la función vibración se resalte y pulse a continuación la tecla . 3. Pulse la tecla ARRIBA o la tecla ABAJO para activar o desactivar esta función. 4. Confirme la selección pulsando la tecla . 5. Presione la tecla Menú/Atrás para volver a la pantalla principal. Para configurar el nivel de transmisión siga los siguientes pasos: Tenga en cuenta que la configuración de la función vibración se llevará a cabo únicamente para la cámara cuya imagen se esté visualizando en el monitor en ese momento. NOTA: Para que el monitor vibre cuando el volumen en la habitación del bebé supere un cierto umbral, es imprescindible que el modo VOX esté activo. 1. Pulse la tecla Menú/Atrás durante tres segundos para hacer aparecer el menú. 2. Pulse la tecla ARRIBA o la tecla ABAJO hasta que el icono de nivel de transmisión se resalte y pulse a continuación la tecla . 3. Pulse la tecla ARRIBA o la tecla ABAJO y seleccione el nivel de transmisión deseado: HIGH o LOW. 4. Confirme la selección pulsando la tecla . 5. Presione la tecla Menú/Atrás para volver a la pantalla principal. 5.2.7.5. AJUSTE DE LA ALARMA Para configurar la alerta, siga los siguientes pasos: 5.2.7.7. LUMINOSIDAD Para modificar la luminosidad de la pantalla de su monitor, siga los siguientes pasos: 1. Pulse la tecla Menú/Atrás durante tres segundos para hacer aparecer el menú. 2. Pulse la tecla ARRIBA o la tecla ABAJO hasta que el icono de luminosidad se resalte y pulse a continuación la tecla . 3. Pulse la tecla ARRIBA o la tecla ABAJO 16 ESPAÑOL y elija el nivel de luminosidad deseado entre los 5 disponibles. 4. Confirme la selección pulsando la tecla . 5. Presione la tecla Menú/Atrás para volver a la pantalla principal. 5.2.8. eMyBaby 5.2.8.1. REGISTRO 1. En primer lugar regístrese en la página web de eMyBaby. Para ello, abra su navegador y vaya a www.emybaby.com y haga click en el botón CREAR CUENTA. 2. Rellene los campos con sus datos personales y, habiendo aceptado los términos y condiciones de uso, pulse el botón ACTIVAR CUENTA. 3. Recibirá en la dirección de correo electrónico que haya indicado durante el registro un mensaje de verificación. Cuando haga click en el enlace que contiene el mensaje de correo, volverá usted a la página de eMyBaby y podrá acceder introduciendo su usuario y contraseña tras pulsar el botón ACCEDER. 5.2.8.2. PARA VER LA IMAGEN EN EL PC EN EL QUE ESTÁ CONECTADO EL VIGILABEBÉS 1. Para poder ver la imagen que transmite la cámara en su PC, deberá conectar el monitor (pantalla) al puerto USB de su ordenador mediante un cable miniUSB-USB (no incluido). El monitor debe estar encendido, si la batería está agotada, cárguela. 2. Tras acceder con su usuario y contraseña a eMyBaby, seleccione la opción VIGILABEBÉS en el ESCRITORIO. 3. Seleccione ahora el digimonitor 3.5” plus. 4. Podrá elegir entre dos opciones. Elija “Solamente en el ordenador donde tiene conectado el vigilabebés mediante el cable USB”. 5. Si todo funciona correctamente deberá ver automáticamente a su bebé en la pantalla de su ordenador. Si tiene algún problema con la imagen consulte las instrucciones de visualización online pulsando sobre LEER INSTRUCCIONES. 5.2.8.3. PARA VER LA IMAGEN A DISTANCIA A TRAVÉS DE eMyBaby Si desea ver a su bebé a distancia, ya sea en su pc, tablet o Smartphone, siga los siguientes pasos: NOTA: para ver la imagen que está captando la cámara de forma remota a través de eMyBaby, el monitor debe estar conectado a su PC. Es imprescindible emitir señal a través de eMyBaby desde el PC al que está conectado el monitor de su vigilabebés. Si no se realiza este paso previo, no podrá recibir la señal en cualquier otro dispositivo (PC, tablet o móvil). 1. Conecte el vigilabebés a su PC según los pasos indicados anteriormente, conectando el monitor al puerto USB de su ordenador mediante un cable miniUSB-USB (no incluido). 2. Acceda a la página web eMyBaby (www.emybaby. com) con su nombre de usuario y contraseña (regístrese como se ha indicado anteriormente en 17 caso de que no los tuviera) y seleccione la opción VIGILABEBÉS. 3. Escoja digimonitor 3.5’’ plus de entre los distintos modelos de vigilabebés. 4. Podrá elegir entre dos opciones. Elija “Ver desde cualquier lugar a través de otro ordenador, tablet o smartphone”. 5. La primera vez que acceda a este servicio, se le pedirá que introduzca el número de pedido de su producto. Este número tiene la forma MNLXX-XXXXX y lo encontrará en el interior del compartimento de la batería del monitor. 6. Una vez introducido el código, accederá a una pantalla en la que encontrará dos opciones distintas: Emitir y Recibir señal. Para poder ver la imagen que está captando la cámara remotamente en su dispositivo móvil, deberá pulsar en primer lugar el botón Emitir. 7. Haga click ahora sobre el icono que aparece en el centro de la imagen. Cuando su ordenador comience a emitir aparecerá la siguiente imagen en su pantalla: Pasos a realizar si desea ver la imagen desde otro ordenador: 1. Conecte el vigilabebés a su PC según los pasos indicados anteriormente, conectando el monitor al puerto USB de su ordenador mediante un cable miniUSB-USB (no incluido). 2. En el PC en el que desee ver la imagen de forma remota, acceda a la página web eMyBaby (www.emybaby.com) con su nombre de usuario y contraseña y seleccione la opción VIGILABEBÉS. 3. Escoja digimonitor 3.5” plus de entre los distintos modelos de vigilabebés. 4. Podrá elegir entre dos opciones. Elija “Ver desde cualquier lugar a través de otro ordenador, tablet o smartphone”. 5. Para ver la imagen que está captando la cámara remotamente en su dispositivo móvil, deberá pulsar ahora el botón Recibir señal. Si todo funciona correctamente deberá ver automáticamente a su bebé en la pantalla de su ordenador. Si tiene algún problema con la imagen consulte las instrucciones de visualización online pulsando sobre el icono LEER INSTRUCCIONES. Pasos a realizar si desea ver la imagen desde un dispositivo móvil (tablet o teléfono móvil): Aplicación eMyBaby Miniland ha desarrollado la aplicación eMyBaby, que está disponible para iOS y Android, y se descarga de manera sencilla y gratuita. Para descargar la aplicación eMyBaby, en primer lugar acceda a la tienda de aplicaciones correspondiente o descárguela directamente escaneando el código QR correspondiente de los que se muestran a continuación: ESPAÑOL Para instalar la aplicación, siga las instrucciones al principio de este manual. 1. Una vez instalada la aplicación, ábrala. Entre en LOG IN e introduzca su usuario y contraseña para acceder, en caso de que ya esté registrado, o regístrese si no lo había hecho antes. Recuerde que recibirá un mensaje de verificación en la dirección de correo electrónico indicada durante el registro. 2. En el menú principal, seleccione la opción VIGILABEBÉS. 3. Escoja digimonitor 3.5” plus de entre los distintos modelos de vigilabebés. 4. Pulse sobre el icono de PLAY para ver la imagen captada por la cámara desde su dispositivo móvil. Navegador del dispositivo También podrá ver la imagen de la cámara accediendo a la web eMyBaby a través del navegador de su dispositivo móvil. Esta opción le será especialmente útil si su dispositivo móvil no es iOS o Android. 1. En el navegador de su dispositivo acceda a la página eMyBaby (www.emybaby.com) con su nombre de usuario y contraseña. Seleccione la opción VIGILABEBÉS en el menú principal. 2. Escoja digimonitor 3.5” plus de entre los distintos modelos de vigilabebés. 3. Podrá elegir entre dos opciones. Elija “Ver desde cualquier lugar a través de otro ordenador, tablet o smartphone”. 4. Pulse el botón Recibir señal. Si todo funciona correctamente deberá ver automáticamente a su bebé en la pantalla de su dispositivo móvil. 6. MANTENIMIENTO • Limpie las superficies de la cámara y del monitor con un trapo suave que no deje pelusas. • Si las unidades se ensuciaran, utilice un trapo ligeramente húmedo para limpiar las superficies, teniendo cuidado de evitar la entrada de agua por ninguna de las aperturas. • No utilice nunca productos de limpieza o disolventes. 7. IDENTIFICACIÓN Y RESOLUCIÓN DE PROBLEMAS Problema No hay recepción en el monitor Causa posible La cámara no está encendida El monitor no está encendido Cámara: no se ha enchufado el adaptador de corriente Monitor: No se ha enchufado el adaptador de corriente El monitor está fuera de su campo de alcance Se ha perdido la conexión entre el monitor y una cámara ya emparejada Se ha seleccionado una cámara que no es la correcta Sólo se muestran imágenes en blanco y negro Compruebe si la cámara está en el modo de visión nocturna/infrarroja No es posible escuchar la voz de los padres en la unidad del bebé El ajuste del volumen de la unidad parental es demasiado bajo 18 Solución Pulse y mantenga pulsado el Botón de encendido (III) durante 2 segundos Pulse y mantenga pulsado el botón de encendido (5) Enchufe el adaptador de corriente Enchufe el adaptador de corriente Acerque el monitor a la cámara Empareje de nuevo la cámara con el monitor. Consulte la sección 5.2.7.1.3. Cambie el número de cámara que está visualizando. Consulte la sección 5.2.7.1.1. Para ver las imágenes en color, aumente el nivel de luz en el lugar en el que se encuentre la cámara y asegúrese de que nada está tapando el sensor de luz de la cámara (II) Ajuste el volumen en el nivel más alto ESPAÑOL Problema La cámara no transmite Causa posible No se ha encendido la cámara Cámara: no se ha enchufado el adaptador de corriente El modo VOX o el modo de ahorro de energía (Standby) está activado No es posible escuchar El ajuste del volumen de la al bebé en la unidad de unidad de los padres es los padres demasiado bajo Interferencias o Es posible que otros dispositivos recepción insatisfactoria electrónicos estén interfiriendo con la señal La cámara y el monitor podrían estar a una distancia excesiva No es posible cargar la batería en la unidad de los padres Si la unidad del bebé ha perdido la conexión con la unidad parental Solución Pulse y mantenga pulsado el botón (III) durante 2 segundos Enchufe el adaptador de corriente Para ver el área vigilada continuamente, desconecte el modo VOX o el modo de ahorro de energía en el monitor Ajuste el volumen en el nivel más alto Aléjelos del dispositivo. Despliegue la antena retráctil de la parte posterior de la cámara (I) Acerque el monitor a la cámara. Despliegue la antena de la parte posterior de la cámara (I) El monitor no está lo suficientemente Enchufe el adaptador de corriente cargado La cámara o el monitor podrían estar Aléjelos del dispositivo demasiado cerca de muchos objetos de metal No se ha enchufado el Enchufe el adaptador de corriente adaptador de CA/CC Se ha utilizado una batería no Sólo pueden utilizarse baterías recargable recargables (batería Li-ion de 3.7 V, 1200 mAh): compruebe la batería y si fuera necesario cámbiela por la suministrada con el aparato La cámara y el monitor podrían Acerque el monitor a la cámara. estar a una distancia excesiva Se ha perdido momentáneamente Restablezca las unidades la conexión entre las dos unidades desconectándolas de la alimentación eléctrica. Espere unos 15 segundos antes de conectarlas de nuevo. Deje pasar un minuto para que la unidad del bebé y la unidad parental se sincronicen Se ha perdido la conexión Empareje de nuevo la cámara y el monitor. entre las dos unidades Consulte la sección 5.2.7.1.3. 8. ESPECIFICACIONES TÉCNICAS Frequencia Cobertura Nº de canales configurables 2.4GHz FHSS 240m (línea recta y espacio abierto) 4 Input: 100-240VAC 50/60Hz Output: 5V 800mA 3.7V 1200 mAh Input: 100-240 VCA 50/60Hz Output: 5V 800mA Aproximadamente 5 horas Alimentación (unidad de los padres) Batería recargable del monitor Alimentación (unidad del bebé) Tiempo de funcionamiento con la batería totalmente cargada (unidad parental) Tamaño de la pantalla LCD Formato de cable adaptador de Jack a RCA compatible Formato de cable miniUSB-USB compatible 3.5'' Figura 4 Cable USB para transferencia de datos 19 ESPAÑOL 9. INFORMACIÓN SOBRE LA ELIMINACIÓN DE LAS BATERÍAS Y EL PRODUCTO • Recuerde que es necesario eliminar el producto de manera responsable con el medio ambiente, retirando antes la pila. • No mezcle los productos que lleven el símbolo de un contenedor de basura tachado con la basura doméstica normal. • Para la recogida y el tratamiento adecuados de estos productos, llévelos a los puntos de recogida designados por sus autoridades locales. También puede ponerse en contacto con el establecimiento en el que adquirió el producto. Por medio de la presente Miniland S.A. declara que el “89174 digimonitor 3.5’’ plus” cumple con los requisitos esenciales y cualesquiera otras disposiciones aplicables o exigibles de la Directiva 2014/53/UE. 20 ENGLISH INDEX 1. Introduction 2. Contents 3. Safety instructions 4. Product features 5. Instructions for use 6. Maintenance 7. Troubleshooting 8. Technical specifications 9. Information on disposal of batteries and product 1. INTRODUCTION Congratulations for purchasing this wireless color baby monitor, which incorporates the latest technology. We are sure you will be completely satisfied with the quality and features of this product. Nevertheless, we recommend you to read these instructions carefully to get the best results from your purchase. This baby monitor allows you to transmit audio/video signals wirelessly to be received on the color monitor, which is ideal for many situations such as, monitoring of babies, young children or the elderly. NOTE: the features described in this user manual may be subject to change without notice. 2. CONTENTS 1 Camera (baby unit) 1 Monitor (parents’ unit) 2 AC/DC Adapters 1 rechargeable Lithium battery (Li-ion) for the monitor 1 Neck strap 1 Transport and storage pouch 1 Tripod Guarantee Card and Instruction Manual • If any of the aforementioned elements is missing, get in touch with your distributor. 3. SAFETY INSTRUCTIONS Read this instruction manual carefully before using your baby monitor for the first time and keep it for reference use in the future. 3.1. GENERAL SAFETY INSTRUCTIONS: When using electrical equipment it is necessary to take certain basic safety precautions at all times: 1. It is necessary to exercise caution when any product is used by or in the vicinity of children or elderly persons. Keep the appliance out of reach of children. 2. This product should not be used as the sole means of surveillance, not being under any circumstances a substitute for responsible supervision of children, elderly persons or property by adults. 3. This unit should only be used with the AC power adapters included in this package (rated 5.0V, 800mA). 4. Only use batteries of the recommended type (Li-ion 3.7 V– 1200mAh). Do not try to charge any other type of batteries on your monitor. 5. This product contains small parts. Exercise care when unpacking and assembling the product. 6. DO NOT allow children to play with the packaging materials such as plastic bags. Exercise care when unpacking and assembling the product. 7. DO NOT use the appliance if the cord or plug is damaged. If your baby monitor is not operating 21 properly or has suffered any damage, contact the authorized Miniland service center to request inspection and repair of the appliance in order to avoid any possible risk. 8. DO NOT attempt to repair or adjust any of the electrical or mechanical functions of the unit since, if you do, the guarantee will be made void. 9. Check the voltage of your home in order to ensure that it matches the voltage indicated in the specifications of the appliance. 10. If you are not going to use the baby monitor for a long period of time, always unplug the power adapter. To disconnect the appliance from the mains, hold the transformer and remove the plug from the socket. Never pull on the cord itself. 11. This product is designed for indoor use only. The unit should not be exposed to rain, moisture, dripping or splashing. No objects filled with liquid should be placed on top of, or beside the product, such as a glass or vase. This item should not be used near water. CAUTION • This baby monitor is designed to give parents peace of mind when they are unable to be in the same room as their baby. This product is not a substitute for supervision by adults. It is necessary for one parent to stay near the monitor when in use. The baby monitor is not a medical device and you should not entrust the welfare of your baby to it. It is important that you regularly visit the baby’s room in person to ensure that everything is in order. • Never use this baby monitor in cases in which the life or health of the baby or other people, or the integrity of a building, depend on its operation. The manufacturer accepts no liability or claim for death, personal injury or property damage resulting from the malfunction or misuse of the product. • Misuse of this Wireless Baby Monitor could result in legal action. • Use this product responsibly. IMPORTANT: Please note that any change or modification to the equipment not performed by the Miniland technical service will not be covered by the product guarantee. 3.2. RADIO INTERFERENCE TIPS This equipment has been subjected to tests and complies with the requirements of the RED Directive 2014/53/EU. These requirements are designed to provide reasonable protection from harmful interference at residential premises. If the unit is not installed and used in line with the instructions, this could cause harmful interference to the radio communications. However, bear in mind that it is not possible to ensure that interferences are not going to occur at a specific installation. If the baby monitor causes interferences to radio or TV reception, which may be determined by turning it off and on, the user is recommended to try and rectify the interference in the manner indicated below • Reorient or change the position receiver. • Increase the distance between the equipment in question and the baby monitor. • Connect the equipment to a different socket from that used for the receiver. ENGLISH • Consult the Customer Care department. To ensure compliance with the RED Directive 2014/53/ EU, this equipment has special shielded cables. Operating with unapproved equipment or using unshielded cables will probably cause interference to radio or TV reception. 3.3. CHOOSING THE RIGHT PLACE • Place the electronic device somewhere out of the reach of children so as to avoid accidents. • The baby unit must be situated at least 1 and 1.5 meters away from the baby’s cot. Never place the baby unit inside the cot, bed or playpen, nor secure the tripod to them. Make sure that the unit, the cables and the adapter are well out of the reach of the baby and other young children. • Put the baby monitor in a place where the air can circulate freely. Do not place it on duvets or soft blankets nor in the corners of cupboards, shelves etc. • Place the baby monitor well away from heat sources like radiators, chimneys, kitchens and direct sunlight. • Keep the Camera away from TV appliances, repeaters and radios. The intense radio signals generated by these elements could cause noise or even sounds or images to be broadcast on the monitor. Should this occur, move the camera somewhere else. 4. PRODUCT CHARACTERISTICS 4.1. MONITOR CONTROLS AND FUNCTIONS (FIGURE 1) MONITOR (FIGURE 1.1) 1. ON/pairing LED indicator 2. Microphone 3. Charge indicator 4. LCD Screen 5. ON/OFF button 6. Loudspeaker 7. Neck strap hook 8. Set button▲ 9. Zoom/Menu/Back button 10. Set button ▼ 11. OK/Scan 12. Baby talk button 13. AV output connector 14. Mini USB power/PC connector 15. Folding support 16. Battery compartment cover 17. Retractable antenna DISPLAY Screen Icons (FIGURE 1.2) a. Signal level b. Volume selected on the monitor c. Night vision d. Lullabies e. VOX Mode f. Selected camera g. Night light h. Transmission level i. Battery level j. Talk to the baby k. Alert ON Menu Icons (FIGURE 1.3) A. Select/Add/Remove camera menu B. Camera Settings Menu C. VOX/Standby D. Transmission level E. Alert F. Vibration G. Screen configuration: luminosity 4.2. CAMERA CONTROLS AND (FIGURE 2) I. Retractable antenna II. Photo sensor III. Power button IV. Hanging attachment V. Speaker VI. Link button VII. Mini USB power connector VIII. Microphone IX. ON/link LED X. Camera lens XI. Infrared XII. Tripod attachment FUNCTIONS 5. USAGE INSTRUCTIONS 5.1. BEFORE USE 5.1.1. PARENTS’ UNIT POWER SUPPLY AND BATTERY USAGE The monitor, the parents’ unit, of this baby monitor is designed for use with the battery or with the AC/ DC adapter supplied. The rechargeable battery must be charged for at least eight hours before using the unit for the first time or if it has not been used for a prolonged time period. Your baby monitor comes with a rechargeable, 3.7V 1200mAh Li-ion battery for the monitor. We would recommend using the battery in the monitor so as to be able to receive the audio/video signal from the camera anywhere. Connect the monitor to the adaptor plugged into the mains whenever possible so as to keep the battery charged. BATTERY INSTALLATION (FIGURE 3) 1. Unscrew and remove the battery compartment cover (16) situated at the rear of the unit. 2. Insert the Li-ion battery (supplied). 3. Put the battery cover back in its place and secure it with the screw. Precaution: Only use batteries of the recommended type as otherwise there is a risk of explosion. Dispose of worn out batteries responsibly. Note: When you don’t use the two units, it is recommended to turn them off in order to save the battery. CHARGING THE BATTERY Insert the rechargeable battery in accordance with the instructions stated in the previous section. Connect the AC adapter connector to the mini-USB socket situated on the side of the unit (14). Only use the adapter supplied. Plug in the adapter to the mains. Whilst the monitor is connected to the mains and charging, the charging indicator LED (3) will be lighted in red. 22 If the charger remains connected to the mains but the charging process is complete, the charging LED indicator (3) will light in green. When the level of battery is low, the battery level icon (i) will begin to blink in red and the monitor will start to beep every 30 seconds. Note: remove the battery when the appliance is not going to be used for a prolonged time period. 5.1.2. BABY UNIT POWER SUPPLY The camera or baby unit of this baby monitor is designed for use with the AC/DC adapter supplied. 1. Place the connector socket (VII) at the rear of the baby unit. 2. Connect the adapter cable to the mini-USB socket of the camera. Only use the adapter supplied. 3. Plug in the adapter to the mains. Warning: Danger of Strangulation – Keep the cable out of reach of the baby. NEVER place a camera with cables less than 1 metre away from the cot. Never use extension cables with AC adapters. Only use the AC adapters supplied. 5.2. OPERATION 5.2.1. TURNING THE UNITS ON/OFF 5.2.1.1. MONITOR: Keep the ON button pressed (5) situated on the upper part of the monitor to turn it on and off. The ON/pairing LED indicator (1) will go on and off depending on whether you turn the unit on or off. 5.2.1.2. CAMERA: To turn the camera on or off, keep the on button (III) pressed in for two seconds. The power LED (IX) will go on and off depending on whether you turn the unit on or off. When you have installed the camera and turned it on, you can see the images and listen to the sounds captured in your baby’s room via the monitor. 5.2.2. MONITOR VOLUME (8) if you wish to increase the Press the set button volume of your monitor or the set button (10) if you wish to turn it down, choosing between the 5 levels available. 5.2.3. TALK TO THE BABY You may talk to your baby from the parents’ unit (for example, to calm it down and so it understands you’ll be with it in a moment) or to your partner (if he or she is in the baby’s room). Press the button and keep it pressed in to talk to the baby (12) and talk in front of the monitor. Release the button when you have finished talking to listen to the sound from the baby’s room again. Bear in mind that you can’t listen to your baby whilst you’re talking to it; to listen to it, you will have to stop pressing this button. 5.2.4. ZOOM You may increase the size of the image viewed, carrying out a four-position zoom. To use this function, follow the next steps: 1. Press the zoom button . to access the zoom function. The upper left quarter of the image will appear in the white section. 23 ENGLISH 2. Press the set UP (8) or DOWN (10) keys to change the selected quarter. 3. Press the button to increase the image of the selected quarter. 4. Press the zoom button and you will return to the quarter selection process in case you wish to zoom onto another of the quarters. 5. Press the zoom button again to exit the zoom function. 5.2.5. INFRARED NIGHT VISION (AUTOMATIC) The infrared night vision function enables the camera to capture images of your baby or of the monitored area when it is dark or there is little light. In this mode images will only be shown on the monitor in black and white and you will only be able to see images situated less than 2 meters away. The camera constantly monitors the light level and automatically switches to infrared mode when there is not enough light for normal vision. 5.2.6. OUT OF RANGE WARNING If the monitor is located at a distance away from the camera which is greater than that allowed (see the technical characteristics), the on/link LED indicator of the camera (IX) and the monitor (1) will flash in red, the coverage symbol (a) will appear red and the screen will display the “MINILAND” logo screen. Bring the monitor closer to the camera to see the image correctly again. 5.2.7. MAIN MENU Keep the Menu/Back button pressed in order to make adjustments to the main functions and characteristics of your baby monitor. 5.2.7.1. CAMERA MENU 5.2.7.1.1. CHOOSING THE CAMERA This product is designed to allow the observation of different areas with up to 4 cameras. To choose the camera you want to see, follow the next steps: 1. Press for 3 seconds the Menu/Back button and the menu will pop up; 2. Press the UP key or DOWN key until the camera icon is highlighted then press the key enter into the sub-menu. 3. Press the UP key or DOWN key until the SEE camera icon is highlighted and then press the key. key or DOWN key to select the 4. Press the UP camera that you want to see and confirm the selection with the key. Note 1: You will only be able to select the cameras that have already been paired with the monitor. Note 2: There is a faster way to change the camera you are viewing. Directly press key to cycle through paired cameras: CAM1 / CAM2 / CAM3 / CAM4 / SCAN MODE. 5.2.7.1.2. SCAN MODE This function automatically cycles through your paired camera channels to display each camera for 12 seconds. This function can be used only when you have more than 1 camera unit paired. To enter in this mode: ENGLISH 1. Press for 3 seconds the Menu/Back key and the menu will pop up. 2. Press the UP key or DOWN key until the camera icon is highlighted then press the key enter into the sub-menu. 3. Press the UP key or DOWN key until the SEE camera icon is highlighted and then press the key. 4. Press the UP key or DOWN key and select the SCAN icon . 5. Press the key to confirm. Note 1: When one of the cameras is out of range or is not switch on, the monitor will warn you and the Scan Mode will stop. Note 2: The Scan mode can be turned on or off by pressing the button while viewing the main screen. 5.2.7.1.3. PAIRING CAMERA This product is designed to allow the observation of different areas with up to 4 cameras (channels 1, 2, 3 or 4 assigned to different cameras). The monitor and the original camera leave the factory with channel 1 programmed. If you need to add an extra camera, follow the process set out below. 1. Press for 3 seconds the Menu/Back key and the menu will pop up. key or DOWN key until the 2. Press the UP camera icon is highlighted then press the key enter into the sub-menu. 3. Press the UP key or DOWN key until the add camera icon is highlighted and then press the key. 4. Press the UP key or DOWN key to select the channel where you want to add the new camera and confirm the selection with the key. 5. While the ON/pairing LED indicator (1) is flashing in green, press the link button on the camera (VI). 6. Once paired, the LED indicator will stop flashing and the image of the camera will show immediately on the monitor unit screen. 7. If unsuccessful, please repeat above steps. Note 1: You will only be able to select the channels where no camera has been paired yet. Note 2: It is not possible to enter this submenu if 4 cameras have already been paired. For various reasons you may lose the connection between the monitor and a camera which is already connected. Should this be the case, repeat the process explained above to connect the camera with the monitor again. 5.2.7.1.4. DELETE CAMERA To delete one of the cameras connected, follow the next steps: 1. Press for 3 seconds the Menu/Back key and the menu will pop up. 2. Press the UP key or DOWN key until the camera icon is highlighted then press the key enter into the sub-menu. 3. Press the UP key or DOWN key until the remove camera icon is highlighted and then press the key. 4. Press the UP key or DOWN key to select the camera you want to delete and confirm the selection with the key. Note 1: If you only have one camera paired to the monitor, you won’t be able to remove it and you won’t be allowed to enter this submenu. Note 2: A channel needs to be deleted before pairing to a new camera unit. 5.2.7.2. CAMERA SETTINGS MENU 5.2.7.2.1. LULLABIES You can soothe the baby to sleep by playing a gentle lullaby from the baby unit. To activate this function: 1. Press for 3 seconds the Menu/Back key and the menu will pop up. 2. Press the UP key or DOWN key until the camera settings menu icon is highlighted then press the key enter into the sub-menu. 3. Press the UP key or DOWN key until the lullaby icon is highlighted then press the key enter into the sub-menu. 4. Press the UP key or DOWN key to select one of the 5 available lullabies, silence or loop reproduction (default OFF). 5. When you have selected the tune, press the key and the volume control will appear. Press the UP / DOWN key to select the level of volume from 1 to 3 and press the key. 6. Press the Menu/Back key three times to return to the main screen. 7. Lullaby icon (d) will be displayed at the top of the LCD screen. Keep in mind that the configuration of the lullabies will take place only on the camera that is being watched in that moment. Note: Lullaby loop function plays in cycle all the lullabies. 5.2.7.2.2. CAMERA VOLUME This menu will allow you to configure the volume level at which the parents’ voices will be reproduced on the camera by using the two-way function. In order to configure the camera volume, follow the next steps: 1. Press for 3 seconds the Menu/Back key and the menu will pop up. 2. Press the UP key or DOWN key until the camera settings menu icon is highlighted. Then press the key enter into the sub-menu. 3. Press the UP key or DOWN key until the camera volume icon is highlighted. Then, press the key; 4. Press the UP key or DOWN key, choose whichever of the three camera volume levels available (HIGH/MID/LOW) you prefer. 5. Confirm the selection pressing the key. Bear in mind that the volume will only be configured for the camera whose image you are viewing on the monitor at that time. 5.2.7.2.3. NIGHT LIGHT The baby unit has a nightlight which emits a soft light, 24 providing your baby with comfort and allowing it to see in a dark room. To activate the night light, please, follow the next steps: 1. Press for 3 seconds the Menu/Back key and the menu will pop up. 2. Press the UP key or DOWN key until the camera settings menu icon is highlighted. Then press the key enter into the sub-menu. 3. Press the UP key or DOWN key until the nightlight icon is highlighted. Then, press the key; 4. Press the UP key or DOWN key, select ON/ OFF to activate or deactivate this function. 5. Confirm the selection pressing the key. Bear in mind that the volume will only be configured for the camera whose image you are viewing on the monitor at that time. 5.2.7.3. VOX/STANDBY MENU 5.2.7.3.1. STANDBY SETTING With the Standby mode you can choose the maximum time the monitor image remains active (1, 3 or 5 minutes); after this time the image disappears but the sound continues to be heard in order to save energy. To reactivate the image, just press any key. To activate this mode you should: 1. Press for 3 seconds the Menu/Back key and the menu will pop up. 2. Press the UP key or DOWN key until the VOX/ Standby menu icon is highlighted. Then press the key to enter into the sub-menu. 3. Press the UP key or DOWN key until the Standby icon is highlighted. Then, press the key. 4. Using the UP key or DOWN key, select the option desired between 1min/3min/5min or OFF to deactivate this feature. 5. Confirm the selection pressing the key. 6. Press the Menu/Back key twice to return to the main screen. 5.2.7.3.2. VOX SETTING This mode lets you control the sound activation of your baby monitor. If you enable the VOX mode on the monitor and there is no sound around the camera, the latter will stop transmitting. However, it will keep picking up the sounds using a minimum amount of power. The monitor screen will go off if the camera is not transmitting. When the camera detects any sound higher than the sensitivity setting, it will start transmitting the signal to the monitor again. To disable this function and see the monitored area continuously, you must disable the VOX mode on the monitor. • VOX mode disabled: The camera transmits continuously, allowing it to constantly monitor your baby or the area you wish to monitor • VOX mode enabled: The camera only transmits when a sound is detected with sufficient intensity depending on the level selected - around the camera. 25 ENGLISH To activate this function, first of all make sure you have set the standby mode to 1/3 or 5 minutes (see point 5.2.7.3.1). Choose 1/3 or 5 if you want your camera to stop transmitting the image after 1/3 or 5 minutes if there is no sound around. Once the standby time is set, to activate VOX mode, please, follow the next instructions: 1. Press for 3 seconds the Menu/Back key and the menu will pop up. 2. Press the UP key or DOWN key until the VOX/ Standby menu icon is highlighted. Then press the key to enter into the sub-menu. 3. Press the UP key or DOWN key until the VOX icon is highlighted. Then, press the key. 4. Press the UP key or DOWN key, select the sensitivity level desired: OFF/1/2/3 (default OFF). Set sensitivity to “1” for a baby that sleeps peacefully and cries quietly and “3” if the baby tends to make noise while sleeping or makes fairly loud noises before actually crying, or set it to “2” level if you consider that your baby’s behavior does not fit either of the two previous patterns. 5. Confirm the selection pressing the key. 6. Press the Menu/Back key twice to return to the main screen. If you wish to see your baby at a certain time, even if there is no noise about, you can enable the camera transmission remotely by pressing any button. 5.2.7.4. TRANSMISSION LEVEL On this menu you can change the power level transmitted by the camera, choosing from amongst the high/low options. When at the high position (HI), coverage will extend 250 meters in open country with the original power. When at the low position (LOW), the maximum transmission distance is reduced to around 120 meters in open country as the transmitting power is reduced. To configure the transmission level, follow the next steps: 1. Press for 3 seconds the Menu/Back key and the menu will pop up. 2. Press the UP key or DOWN key until the transmission level menu icon is highlighted. Then press the key. 3. Using the UP key or DOWN key, select the transmission level desired: HIGH or LOW. 4. Confirm the selection pressing the key. 5. Press the Menu/Back key to return to the main screen. 5.2.7.5. ALERT SETTING To set the alert, follow the next instructions: 1. Press for 3 seconds the Menu/Back key and the menu will pop up. 2. Press the UP key or DOWN key until the alert icon is highlighted. Then press the key. 3. Press the UP key or DOWN key to set the alarm time (press UP key to increment and DOWN to count down). 4. Confirm the selection pressing the key. ENGLISH 5. Press the Menu/Back screen. key to return to the main Note 1: Once the alert is running, an alarm clock icon (k) will be displayed on the LCD screen. Note 2: If you want to remove the alarm follow the steps 1 to 3 mentioned above and set the time to 00:00. The clock icon will disappear. Note: When the alert is ringing, press any key to cancel it. If there is no answer, the ringing will last 7 minutes and then stop. 5.2.7.6. VIBRATION FUNCTION This function allows parents to achieve a silent environment when they need peace and quiet and it is a great help in noisy environments and for people who have hearing problems. When the sound in the baby’s room exceeds the threshold marked by the sensitivity level configured, the monitor will vibrate on four occasions to warn the parents. To activate the vibration function, follow the next steps: 1. Press for 3 seconds the Menu/Back key and the menu will pop up; 2. Press the UP key or DOWN key until the is highlighted. Then vibration setting menu icon press the key. 3. Using the UP key or DOWN key, select ON/ OFF if you want to activate or deactivate this feature. 4. Confirm the selection pressing the key. 5. Press the Menu/Back key to return to the main screen. Bear in mind that the vibration function will only be configured for the camera whose image you are viewing on the monitor at that time. NOTE: In order for the monitor to vibrate when the volume in the baby’s room exceeds a certain threshold, it is vital for the VOX mode to be active. 5.2.7.7. LUMINOSITY To modify the luminosity of your monitor, follow the next steps: 1. Press for 3 seconds the Menu/Back key and the menu will pop up. 2. Press the UP key or DOWN key until the luminosity setting menu icon is highlighted. Then press the key. 3. Using the UP key or DOWN key, choose the luminosity level you prefer from amongst the five available. 4. Confirm the selection pressing the key. 5. Press the Menu/Back key to return to the main screen. 5.2.8. eMyBaby 5.2.8.1. REGISTRATION 1. First of all register on the eMyBaby website. To do so, open your browser, go to www.emybaby.com and click on the CREATE ACCOUNT tab. 2. Complete the fields with your personal data and after having accepted the terms and conditions of use, click on the ACTIVATE ACCOUNT tab. 3. You will receive a message of confirmation at the e-mail address you provided in the registration process. Clicking on the link containing the e-mail message will take you back to the eMyBaby page, where you need to enter your username and password after clicking on the SIGN IN tab. 5.2.8.2. IN ORDER TO VIEW THE IMAGE ON THE PC TO WHICH THE BABY MONITOR IS CONNECTED 1. In order to view the image from the camera on your computer you first need to make a few adjustments to the monitor. a. Go to the main menu and click on the adjustments icon. b. Click on monitor adjustments. Click on “USB Output” from the options displayed on the list. c. Once you are in, select the icon from the three options available. In this manner, when you connect the monitor to the computer, you will no longer see the monitor image and you will be able to see your baby on the computer. 2. In order to see the image transmitted by the camera on your PC, you should connect the monitor (screen) to the USB port on your computer using a mini USBUSB cable (not included). The monitor should be switched on; if the battery is flat, recharge it. 3. After accessing eMyBaby using your username and password, select the BABY MONITOR option in DASHBOARD. 4. Now select the digimonitor 3.5” plus model. 5. There are two options to choose from. Choose “USB Camera computer connected”. 6. If everything is working correctly you should automatically see your baby on the computer screen. If there is a problem with the image, consult the online viewing instructions by clicking on the READ INSTRUCTIONS icon. 5.2.8.3. IN ORDER TO VIEW THE IMAGE AT A DISTANCE BY MEANS OF eMyBaby Follow the instructions below if you wish to view your baby at a distance on your PC, tablet or Smartphone. Note: the monitor should be connected to your PC in order to see the image captured by the camera at a distance on eMyBaby. eMyBaby must transmit a signal via the PC to which your baby monitor screen is connected. If you do not follow this step you will not be able to receive a signal on any other appliance (PC, tablet or mobile device). 1. Connect the baby monitor to your PC in accordance with the aforementioned steps, connecting the monitor to the USB port on your computer using a mini USBUSB cable (not included). 2. Access the eMyBaby (www.emybaby.com) website using your username and password (register as instructed above if you do not possess a username and password) and select the BABY MONITOR option. 3. Select digimonitor 3.5” plus from the different models of baby monitor. 4. There are two options to choose from. Choose “View from anywhere through another computer, tablet or smartphone”. 26 5. The first time you access this service you will be asked to provide the product order number. This number is displayed in the MNLXX-XXXXX format and is found inside the monitor battery compartment. 6. Entering this code will lead you to a screen displaying two options: Emit and Receive signal. In order to see the remote image captured on the camera on your mobile device, click on the Emit button. icon in the center of the image. 7. Then click on the The following image will appear on your screen when your computer begins to transmit: Steps to follow if you wish to view the image from another computer: 1. Connect the baby monitor to your PC in accordance with the aforementioned steps, connecting the monitor to the USB port on your computer using a mini USBUSB cable (not included). ENGLISH 2. Access the eMyBaby website (www.emybaby.com) using your username and password and select the BABY MONITOR option on the PC on which you wish to see the remote image. 3. Select digimonitor 3.5” plus from the different models of baby monitor. 4. There are two options to choose from. Choose “View from anywhere through another computer, tablet or smartphone”. 5. In order to view the remote image captured on the camera on your mobile device, click on the Receive signal button. If everything is working correctly you should automatically see your baby on the computer screen. If there is a problem with the image, consult the online viewing instructions by clicking on the READ INSTRUCTIONS icon. Steps to follow if you wish to see the image on a mobile device (tablet or mobile phone): eMyBaby application Miniland has developed the eMyBaby application, available for iOS and Android and simple and free-of-charge to download. The eMyBaby app can be downloaded from the app store or download it directly by scanning the QR code: 1. Once you have installed the application, open it. Click on LOG IN and enter your username and password if you are already registered, or register if you are not. Remember you will receive a message of confirmation at the e-mail address you provided when registering. 2. Select the BABY MONITOR option on the main menu. 3. Select digimonitor 3.5” plus from the different models of baby monitor. 4. Click on the PLAY icon to see the image captured by the camera on your mobile device. Mobile browser You can also view the camera image by accessing the eMyBaby website via the browser on your mobile device. This option will be particularly useful if your mobile device is not iOS or Android. 1. Access the eMyBaby (www.emybaby.com) website on your browser using your username and password. Select the BABY MONITOR option on the main menu. 2. Select the digimonitor 3.5” plus from the different models of baby monitor. 3. There are two options to choose from. Choose “View from anywhere through another computer, tablet or smartphone, tablet or smartphone”. 4. Click on the Receive signal button. If everything is working correctly you should automatically see your baby on your mobile screen. 6. MAINTENANCE • Clean the surfaces of the camera and monitor with a soft, lint-free cloth. • If the units become dirty, use a lightly dampened cloth to wipe surfaces, taking care to not allow water into any openings. • Never use cleaning agents or solvents. 27 ENGLISH 7. TROUBLESHOOTING Problem No reception on the monitor Only black and white images are displayed You cannot hear the parents’ voice in the baby unit The camera does not transmit Possible Cause Camera not turned on Monitor not turned on Camera: not plugged in to the power adapter Monitor: The power adapter is not plugged Monitor out or range Connection lost between the monitor and a camera already linked Plug in the power adapter Plug in the power adapter Move the monitor closer to the camera Link the camera with the monitor again. See section 5.2.7.1.3. the camera number you are A wrong camera has been selected Change watching. See section 5.2.7.1.1. In order to view the images in colour, increase the level of light in the room Check whether the camera is in the camera is in or check there is night vision/infrared mode nothing covering the camera´s light sensor (II) The volume setting of the baby unit Set the volume to the highest level is too low The camera is not turned on Camera: the power adapter is not plugged in Press and hold down button (III) for 2 seconds VOX mode or Standby mode are active To see the monitored area continuously, disconnect the VOX or Standby mode on the Monitor You cannot hear the baby on the parent unit Interference or poor reception The volume setting of the parent unit is too low Other electronic devices may be interfering with the signal The camera and monitor may be too far apart The battery power may be too low The camera or monitor may be placed too close to many metal objects You cannot charge the The AC/DC adapter is not plugged battery in the parent unit in If the Baby Unit has lost its link with the Parent Unit Solution Press and hold down button (III) for 2 seconds Press and hold down the power button (5) Plug in the power adapter Set the volumen to the highest level Move them away from the device Move the monitor closer to the camera Plug in the power adapter Move them away from the device Plug in the adapter A non-rechargeable battery has been used Only rechargeable batteries can be used (3,7 V – 1200mAh Li-ion battery). test the battery and, where necessary, change it for the one supplied with the appliance The camera and monitor may be too far apart Move the monitor closer to the camera The link between both units has been lost momentarily The link between both units has been lost 28 Reset the units by disconnecting them from the electrical power. Wait about 15 seconds before reconnecting. Allow up to one minute for the Baby Unit and the Parent Unit to synchronize. Pair the camera and monitor again. See 5.2.7.1.3. ENGLISH 8. TECHNICAL SPECIFICATIONS Frequency Operating Range Nº of configurable channels 2.4GHz FHSS 240m (straight line and open space) 4 Input: 100-240VAC 50/60Hz Output: 5V 800mA 3.7V 1200 mAh Input: 100-240 VCA 50/60Hz Output: 5V 800mA Power (parent unit) Rechargeable battery for monitor Power (baby unit) Operating time with battery fully charged (parent unit) LCD Screen size Jack to RCA compatible adaptor cable format MiniUSB-USB compatible cable Approximately 5 hours 3.5'' Figure D USB cable for data transfer 9. INFORMATION ON DISPOSAL OF BATTERIES AND PRODUCT • Remember to dispose of the product in an environmentally responsible way, removing the battery first. • Do not mix products bearing the symbol of a crossed out bin with normal household waste. • For proper collection and processing of these products, take them to the collection points designated by local authorities. You can also contact the store where you purchased the product. Hereby, Miniland S.A. declares that this “89174 digimonitor 3.5’’ plus” is in compliance with the essential requirements and other relevant provisions of Directive 2014/53/EU. 29 PORTUGUÊS ÍNDICE 1. Introdução 2. Conteúdo 3. Instruções de segurança 4. Características e funções do produto 5. Instruções de utilização 6. Manutenção 7. Identificação e resolução de problemas 8. Especificações técnicas 9. Informação sobre a eliminação das baterias e do produto 1. INTRODUÇÃO Felicitamo-lo pelo facto de ter adquirido este vigiabebés com monitor sem fios a cores, que incorpora a tecnologia mais avançada. Temos a certeza de que ficará totalmente satisfeito com a qualidade e as características deste produto, embora lhe recomendemos que leia cuidadosamente estas instruções para obter os melhores resultados da sua compra. Este vigia-bebés permite a transmissão de sinais de áudio/vídeo no modo sem fios que são recebidos no monitor a cores, o que é ideal para um grande número de situações como, por exemplo, a vigilância de bebés, de crianças de tenra idade ou de idosos. NOTA: As características descritas neste manual do utilizador estão sujeitas a modificações sem aviso prévio. 2. CONTEÚDO 1 Câmara (unidade do bebé) 1 Monitor (unidade dos pais) 2 Adaptadores de CA/CC 1 Bateria de lítio (Li-ião) recarregável para o monitor 1 Fita para o pescoço 1 Saco para transporte e armazenamento 1 Tripé Manual de Instruções e garantia • Se faltar algum dos elementos acima indicados, entre em contacto com o seu distribuidor. 3. INSTRUÇÕES DE SEGURANÇA Leia atentamente este manual de instruções antes de utilizar o seu vigia-bebés pela primeira vez e guarde-o para o poder utilizar para consultas no futuro. 3.1. INSTRUÇÕES DE SEGURANÇA GERAIS: Quando forem utilizados aparelhos elétricos, devemse ter algumas precauções de segurança básicas a todo o momento: 1. É necessário intensificar as precauções quando crianças ou idosos utilizarem qualquer produto, ou quando qualquer produto for utilizado perto deles. Mantenha o aparelho afastado do alcance das crianças enquanto o mesmo não estiver a ser utilizado. 2. Este produto não deve ser utilizado como único meio de vigilância, não sendo, em caso nenhum, um substituto da supervisão responsável das crianças, adultos ou propriedades por parte dos adultos. 3. Utilize o vigia-bebés apenas com os adaptadores de CA incluídos com a unidade (5.0V, 800 mA). 4. Utilize apenas baterias do tipo recomendado (Li-ião 3,7 V – 1200mAh). Não tente carregar nenhum outro tipo de bateria no seu monitor. 5. Este produto contém peças de tamanho reduzido. É necessário proceder cuidadosamente quando se tratar de desembalar e montar o produto. 6. NÃO permita que as crianças brinquem com os materiais de embalagem como, por exemplo, sacos de plástico. Deve-se proceder cuidadosamente quando se tratar de desembalar e montar o produto. 7. NÃO utilize o aparelho se o cabo ou a ficha estiverem danificados. Se o funcionamento do seu monitor de vigilância de bebés não for o correto ou se o monitor tiver qualquer tipo de danos, entre em contacto com o centro de assistência autorizado da Miniland para solicitar a inspeção e a reparação do mesmo, tendo em vista evitar qualquer eventual risco. 8. NÃO tente reparar ou ajustar nenhuma das funções elétricas ou mecânicas da unidade, dado que nesse caso a garantia ficaria anulada. 9. Verifique a voltagem da sua habitação tendo em vista certificar-se de que a mesma corresponde ao regime do aparelho indicado nas especificações do mesmo. 10. Se não tiver intenção de utilizar o vigia-bebés durante um longo período de tempo, desconecte sempre o adaptador de corrente. Para desconectar o aparelho da rede elétrica, pegue no transformador e retire a ficha da tomada. Nunca puxe diretamente pelo cabo. 11. Este produto foi concebido exclusivamente para ser usado no interior. A unidade não deve ser exposta à chuva, humidade, gotejamentos ou salpicos de líquidos. Nunca coloque nenhum objeto cheio de líquido como, por exemplo, um copo ou um jarro, em cima ou ao lado do seu vigia-bebés. O monitor de vigilância de bebés não deve ser utilizado perto da água. CUIDADO • Este vigia-bebés foi concebido para proporcionar tranquilidade aos pais quando não lhes é possível estar no mesmo quarto que o bebé. Este produto não deve substituir a supervisão responsável de um adulto. É necessário que um dos pais se mantenha perto do monitor enquanto o mesmo estiver a ser utilizado. O vigia-bebés não é um dispositivo médico e não se deve confiar ao mesmo o bem-estar do bebé. É importante que visite periodicamente o quarto do bebé para se certificar de que tudo está bem. • Nunca utilize este vigia-bebés nos casos em que a vida ou a saúde do bebé ou de outras pessoas, ou a integridade de um imóvel dependam do seu funcionamento. O fabricante não aceitará qualquer responsabilidade ou reclamação por falecimento, lesões pessoais ou danos materiais resultantes do mau funcionamento ou do uso indevido do produto. • O uso indevido deste vigia-bebés sem fios poderá dar lugar a ações legais. • Utilize este produto de forma responsável. IMPORTANTE: Tenha em conta que qualquer alteração ou modificação no equipamento não efetuada pelo serviço técnico da Miniland não estará coberta pela garantia do produto. 3.2. CONSELHOS PARA AS INTERFERÊNCIAS RADIOELÉTRICAS Este equipamento foi submetido a testes e satisfaz os requisitos da Diretiva RED 2014/53 UE. 30 Estes requisitos foram concebidos para oferecerem uma proteção razoável contra as interferências daninhas numa instalação residencial. Se a unidade não for instalada e utilizada de acordo com as instruções, poderá provocar interferências daninhas nas radiocomunicações. No entanto, tenha em conta que não é possível garantir que não ocorrerão interferências numa instalação específica. Se o vigia-bebés provocar interferências na receção de rádio ou de televisão, o que pode ser determinado desligando-o e ligando-o, recomenda-se ao utilizador que tente corrigir a interferência da forma indicada em seguida: • Reoriente o recetor ou mude a posição do mesmo. • Aumente a distância entre o equipamento em questão e o vigia-bebés. • Conecte a ficha do equipamento a uma tomada diferente da utilizada para o recetor. • Consulte o departamento de Atendimento do Cliente da Miniland. Tendo em vista garantir o cumprimento da Diretiva RED 2014/53/UE, este equipamento tem cabos blindados especiais. A operação com um equipamento não aprovado ou com cabos não blindados provavelmente provocará interferências na receção radiofónica ou televisiva. 3.3. ESCOLHA DE UM LUGAR ADEQUADO • Coloque o dispositivo eletrónico num lugar afastado das crianças para evitar eventuais acidentes. • As crianças poder-se-ão enredar nos cabos. A unidade do bebé deve ser colocada a uma distância de aproximadamente 1 – 1.5 metros do berço do bebé. Nunca coloque a unidade do bebé no interior do berço, da cama ou do parque. Certifique-se de que a unidade, os cabos e o adaptador ficam afastados do alcance do bebé e de outras crianças de tenra idade. • Coloque o vigia-bebés num lugar em que o ar possa circular livremente. Não o coloque sobre edredões ou mantas moles nem nas esquinas de armários, estantes, etc. • Coloque o vigia-bebés num lugar afastado das fontes de calor como radiadores, lareiras, fogões e a luz solar direta. • Coloque a unidade do bebé afastada de aparelhos de televisão, repetidores e rádios. Os sinais de rádio intensos gerados por estes elementos poderão provocar ruídos ou até mesmo o aparecimento de sons e imagens no monitor. Se tal acontecer, transfira a câmara para outro lugar. • Este monitor pode ser colocado em cima de uma mesa utilizando o suporte para mesa retrátil situado na parte traseira do monitor. Quando não o utilizar, basta que o dobre para o interior da parte traseira do monitor até ouvir um “clique” que lhe indicará que o mesmo já está totalmente dobrado. 4. CARACTERÍSTICAS E FUNÇÕES DO PRODUTO 4.1. FUNÇÕES E CONTROLOS DO MONITOR (FIGURA 1) MONITOR (FIGURA 1.1) 1. Indicador LED de ativação/ligação 2. Microfone 3. LED indicador de carga 4. Ecrã LCD 31 PORTUGUÊS 5. Botão de ligar/desligar 6. Altifalante 7. Engate para fita do pescoço 8. Botão de ajuste ▲ 9. Botão zoom/menu 10. Botão de ajuste ▼ 11. Botão aceitar/modo Scan 12. Botão para falar com o bebé 13. Conector saída AV 14. Conector mini-USB alimentação/PC 15. Suporte rebatível 16. Tampa do compartimento da bateria 17. Antena retrátil VISOR Ícones na tela (FIGURA 1.2) a. Cobertura b. Volume selecionado no monitor. c. Visão noturna d. Canções de Embalar e. Modo VOX f. Câmara selecionada g. Luz de companhia h. Nível de transmissão i. Nível de bateria j. Ícone falar com o bebé k. Ícone alerta ativado Ícones do Menu (FIGURA 1.3) A. Menu seleção/adicionar/eliminar câmara B. Menu de ajustes de câmara C. VOX/Standby D. Nível de transmissão E. Alarme F. Função Vibração G. Brilho do ecrã 4.2. FUNÇÕES E CONTROLOS DA CÂMARA (FIGURA 2) I. Antena retrátil II. Sensor de luz III. Botão de ligação IV. Acessório para suspensão V. Altifalante VI. Botão de emparelhamento VII. Conector de alimentação Mini-USB VIII. Microfone IX. LED de ligação/Emparelhamento X. Lente da câmara XI. Infravermelho XII. Acessório de tripé 5. INSTRUÇÕES DE UTILIZAÇÃO 5.1. ANTES DA UTILIZAÇÃO 5.1.1. ALIMENTAÇÃO DA UNIDADE DOS PAIS E USO DA BATERIA O monitor, ou unidade dos pais deste vigia-bebés foi concebido(a) para ser utilizado(a) com a bateria ou com o adaptador CA/CC fornecido. A bateria recarregável deve ser carregada durante pelo menos oito horas antes da utilização da unidade pela primeira vez ou se a mesma não tiver sido utilizada durante um longo período de tempo. O seu vigia-bebés é fornecido com uma bateria Liião recarregável de 3.7V 1200mAh para o monitor. Recomendamos que a bateria seja utilizada no PORTUGUÊS monitor para que o sinal de áudio/vídeo proveniente da câmara possa ser recebido em qualquer lugar. Conecte o monitor ao adaptador conectado à rede elétrica sempre que seja possível, tendo em vista manter a bateria carregada. INSTALAÇÃO DA BATERIA (FIGURA 3) 1. Desaparafuse e retire a tampa do compartimento da bateria (16) situada na parte traseira da unidade. 2. Insira a bateria Li-ião (fornecida). 3. Coloque novamente a tampa da bateria no seu lugar e fixe-a com o parafuso. Cuidado: Utilize apenas baterias do tipo recomendado; caso contrário, existe o risco de explosão. Descarte as baterias gastas de forma responsável. Nota: Quando não utilizar as duas unidades, recomenda-se que as desligue para poupar bateria. CARGA DA BATERIA Insira a bateria recarregável de acordo com as instruções indicadas na secção anterior. Conecte o conector do adaptador de corrente à tomada mini-USB situada na parte lateral da unidade (14). Utilize apenas o adaptador fornecido. Conecte a ficha do adaptador à rede elétrica. Enquanto o monitor se mantiver conectado à rede elétrica e em carga, o LED indicador de carga (3) manter-se-á aceso em cor vermelha. Se o carregador continuar conectado à rede mas o processo de carga tiver sido concluído, o LED indicador de carga (3) ficará acesa em cor verde. Quando o nível de carga da bateria estiver muito baixo, o ícone de nível de bateria (i) piscará em cor vermelha e começará a emitir um bip de 30 em 30 segundos. Nota: retire a bateria quando não tiver intenção de utilizar o aparelho durante um longo período de tempo. 5.1.2. ALIMENTAÇÃO DA UNIDADE DO BEBÉ A câmara ou unidade do bebé deste vigia-bebés foi concebida para ser utilizada com o adaptador de CA/ CC fornecido. 1. Localize a tomada do conector (VII) na parte traseira da unidade do bebé. 2. Conecte o cabo do adaptador à tomada mini-USB da câmara. Utilize apenas o adaptador fornecido. 3. Conecte a ficha do adaptador à rede elétrica. Advertência: Perigo de Estrangulamento – Mantenha o cabo afastado do alcance do bebé. NUNCA coloque uma câmara com cabos a menos de 1 metro do berço. Nunca utilize cabos de extensão com adaptadores de CA. Utilize apenas os adaptadores de CA fornecidos. 5.2. OPERAÇÃO 5.2.1. LIGAR/DESLIGAR AS UNIDADES 5.2.1.1. MONITOR: Mantenha pressionado o botão de ligação (5), situado na parte superior do monitor, para o ligar ou desligar. O indicador LED de ativação/ligação (1) acender-se-á ou apagar-se-á, conforme você ligue ou desligue a unidade. 5.2.1.2. CÂMARA Para ligar ou desligar a câmara, mantenha o botão de ligação (III) pressionado durante dois segundos. O LED de alimentação (IX) acender-se-á ou apagarse-á, conforme você ligue ou desligue a unidade. Quando tiver instalado a câmara e ligado a mesma, poderá ver as imagens e ouvir os sons captados no quarto do seu bebé através do monitor. 5.2.2. VOLUME DO MONITOR Pressione o botão de ajuste (8) se quiser aumentar o volume do seu monitor ou o botão de ajuste (10) se quiser diminuí-lo, escolhendo um dos 5 níveis disponíveis. 5.2.3. FALAR AO BEBÉ Pode falar ao seu bebé a partir da unidade dos pais (por exemplo para o tranquilizar e para que perceba que já vai estar ao seu lado) ou ao seu par (se o mesmo estiver no quarto do bebé). Pressione e mantenha pressionado o botão para falar com o bebé (12) e fale frente ao monitor. Liberte o botão quando acabar de falar para voltar a ouvir o som do quarto do bebé. Tenha em conta que não poderá ouvir o seu bebé enquanto estiver a falar-lhe; para o ouvir, terá que deixar de pressionar este botão. 5.2.4. ZOOM Pode aumentar o tamanho da imagem visualizada efetuando um zoom de quatro posições. Para aceder a esta função, dê os passos abaixo: 1. Pressione o botão zoom . O quadrante esquerdo superior da imagem aparecerá enquadrado em branco. 2. Pressione os botões PARA CIMA e PARA BAIXO para alterar o quadrante selecionado. 3. Pressione o botão para aumentar a imagem do quadrante selecionado. 4. Pressione o botão zoom e regressará ao processo de seleção de quadrante, para o caso de querer fazer zoom sobre outro quadrante. 5. Pressione novamente o botão zoom para sair da função zoom. 5.2.5. VISÃO NOTURNA INFRAVERMELHA (AUTOMÁTICA) A função de visão noturna infravermelha permite que a câmara capte imagens do seu bebé ou da área monitorizada em condições de escuridão ou de pouca luz. Neste modo as imagens aparecerão a preto e branco no monitor e só se poderão ver os objetos situados a menos de 2 metros de distância. A câmara monitoriza constantemente o nível de luz e muda automaticamente para o modo infravermelho quando a luz é insuficiente para a visão normal. 5.2.6. ADVERTÊNCIA DE FORA DE ALCANCE Se o monitor for colocado a uma distância da câmara superior à admissível (veja as características técnicas), o indicador LED de ativação/ligação da câmara (IX) e o monitor (1) piscarão em cor vermelha, 32 o símbolo de cobertura (a) aparecerá em cor vermelha e o ecrã mostrará o logótipo da MINILAND. Aproxime o monitor à câmara para voltar a ver corretamente a imagem. 5.2.7. MENU PRINCIPAL pressionado para Mantenha o botão Menu/Voltar poder efetuar os ajustes das principais funções e características do seu vigia-bebés. 5.2.7.1. MENU DE CÂMARA 5.2.7.1.1. SELEÇÃO DA CÂMARA O dispositivo foi concebido para permitir a observação de diferentes zonas com um máximo de quatro câmaras. Para selecionar a câmara que deseja ver, dê os passos indicados em seguida: 1. Pressione a tecla Menu/Voltar durante três segundos para fazer aparecer o menu. 2. Pressione a tecla PARA CIMA ou a tecla PARA BAIXO até que o ícone câmara fique realçado e em seguida pressione a tecla para entrar no submenu. 3. Pressione a tecla PARA CIMA ou a tecla PARA BAIXO até que o ícone VER câmara fique realçado e em seguida pressione a tecla . 4. Pressione a tecla PARA CIMA ou a tecla PARA BAIXO para selecionar a câmara que deseja visualizar e em seguida pressione a tecla para confirmar a seleção. Nota 1: Só poderão ser visualizadas as câmaras que tenham sido emparelhadas com o monitor. Nota 2: Há uma forma mais rápida de alteração da câmara a visualizar. Pressione diretamente a tecla para ir vendo ciclicamente as câmaras que estejam emparelhadas: CAM1/CAM2/CAM3/CAM4/ MODO SCAN. 5.2.7.1.2. MODO SCAN Esta função permite-lhe ver de forma consecutiva e cíclica os canais de câmara emparelhados, mostrando as imagens de cada câmara durante 12 segundos. Esta função só pode ser utilizada quando há mais do que uma unidade de câmara emparelhada. Para entrar neste modo: PORTUGUÊS principal se tiver mais do que uma câmara conectada ao seu monitor. 5.2.7.1.3. ADICIONAR CÂMARA Este produto foi concebido para permitir a observação de diferentes zonas com um máximo de 4 câmaras (canal 1, 2, 3 ou 4 atribuído a diferentes câmaras). O monitor e a câmara original saem de fábrica com o canal 1 programado. Se necessitar de adicionar uma câmara extra, deverá seguir este procedimento. durante três 1. Pressione a tecla Menu/Voltar segundos para fazer aparecer o menu. 2. Pressione a tecla PARA CIMA ou a tecla PARA BAIXO até que o ícone câmara fique realçado e em seguida pressione a tecla para entrar no submenu. 3. Pressione a tecla PARA CIMA ou a tecla PARA BAIXO até que o ícone adicionar câmara fique realçado e em seguida pressione a tecla . 4. Pressione a tecla PARA CIMA ou a tecla PARA BAIXO para selecionar o canal onde deseja adicionar a nova câmara e confirme a seleção pressionando a tecla . 5. Enquanto o indicador LED de ativação/ ligação (1) estiver a piscar, pressione o botão de emparelhamento na câmara (VI). 6. Uma vez emparelhada, o indicador LED deixará de piscar e as imagens da câmara aparecerão imediatamente no ecrã da unidade do monitor. 7. Se o emparelhamento não tiver sido efetuado de forma correta, repita os passos indicados acima. Nota 1: Só poderá selecionar os canais com os quais ainda não tenha sido emparelhada nenhuma câmara. Nota 2: Não é possível aceder a este submenu se já tiverem sido emparelhadas 4 câmaras. Pode acontecer que, por diversos motivos, se perca a conexão entre o monitor e uma câmara já ligada. Nesse caso, repita o processo anteriormente explicado para ligar novamente a câmara ao monitor. 5.2.7.1.4. ELIMINAR CÂMARA Para eliminar uma das câmaras conectadas, dê os passos indicados em seguida: 1. Pressione a tecla Menu/Voltar durante três segundos para fazer aparecer o menu. 2. Pressione a tecla PARA CIMA ou a tecla PARA BAIXO até que o ícone câmara fique realçado e em seguida pressione a tecla para entrar no submenu. 3. Pressione a tecla PARA CIMA ou a tecla PARA BAIXO até que o ícone VER câmara fique realçado e em seguida pressione a tecla . 4. Pressione a tecla PARA CIMA ou a tecla PARA BAIXO e selecione o ícone SCAN ; 5. Pressione a tecla para confirmar. 1. Pressione a tecla Menu/Voltar durante três segundos para fazer aparecer o menu. 2. Pressione a tecla PARA CIMA ou a tecla PARA BAIXO até que o ícone câmara fique realçado e em seguida pressione a tecla para entrar no submenu. 3. Pressione a tecla PARA CIMA ou a tecla PARA BAIXO até que o ícone eliminar câmara fique realçado e em seguida pressione a tecla . 4. Pressione a tecla PARA CIMA ou a tecla PARA BAIXO para selecionar a câmara que deseja eliminar e confirme a seleção pressionando a tecla . Nota 1: Se uma das câmaras estiver fora de alcance ou se não estiver ligada, o monitor avisá-lo-á e o Modo Scan parará. Nota 2: O modo Scan pode ser ativado ou desativado pressionando a tecla enquanto se visualiza o ecrã Nota 1: Se só tiver uma câmara emparelhada com o monitor, não poderá eliminá-la nem aceder a este menu. Nota 2: É necessário eliminar um canal antes de o emparelhar com uma nova unidade de câmara. 33 PORTUGUÊS 5.2.7.2. MENU DE AJUSTES DE CÂMARA 5.2.7.2.1. CANÇÕES DE EMBALAR A unidade do bebé pode reproduzir uma suave canção de embalar para ajudar o seu bebé a conciliar o sonho. Para ativar esta função: 1. Pressione a tecla Menu/Voltar durante três segundos para fazer aparecer o menu. 2. Pressione a tecla PARA CIMA ou a tecla PARA BAIXO até que o ícone menu de ajustes de câmara fique realçado e em seguida pressione a tecla para entrar no submenu. 3. Pressione a tecla PARA CIMA ou a tecla PARA BAIXO até que o ícone Canção de Embalar fique realçado e em seguida pressione a tecla . 4. Pressione a tecla PARA CIMA ou a tecla PARA BAIXO para selecionar uma das cinco canções de embalar disponíveis, silêncio ou reprodução em circuito (o ajuste predeterminado é OFF). 5. Depois de ter selecionado a melodia, pressione a tecla e aparecerá o controlo de volume. Pressione a tecla PARA CIMA ou a tecla PARA BAIXO para selecionar o nível de volume desde 1 até 3 e pressione a tecla . 6. Pressione a tecla Menu/Voltar três vezes para voltar ao ecrã principal. 7. Na parte superior do ecrã LCD aparecerá o ícone Canção de Embalar (d). Tenha em conta que a configuração das canções de embalar só ficará ativada na câmara que esteja a ser visualizada nesse momento. Nota: A função de reprodução em circuito das canções de embalar reproduz ciclicamente todas as canções de embalar. 5.2.7.2.2. VOLUME DA CÂMARA Este menu permite-lhe a configuração do nível de volume com que a voz dos pais será reproduzida na câmara, ao utilizar a função bidirecional. Para configurar o volume da câmara, dê os passos abaixo: 1. Pressione a tecla Menu/Voltar durante três segundos para fazer aparecer o menu. 2. Pressione a tecla PARA CIMA ou a tecla PARA BAIXO até que o ícone menu de ajustes de câmara fique realçado e em seguida pressione a tecla para entrar no submenu. 3. Pressione a tecla PARA CIMA ou a tecla PARA BAIXO até que o ícone volume de câmara fique realçado e em seguida pressione a tecla . 4. Pressione a tecla PARA CIMA ou a tecla PARA BAIXO para selecionar um dos três níveis de volume disponíveis (LOW/MID/HIGH) em função das suas necessidades. 5. Confirme a seleção pressionando a tecla . Tenha em conta que a configuração do volume só ficará ativada para a câmara cuja imagem esteja a ser visualizada no monitor nesse momento. 5.2.7.2.3. LUZ DE COMPANHIA A unidade do bebé tem uma luz suave de companhia que proporcionará conforto ao bebé e lhe permitirá ver num quarto escuro. Para ativar a luz de companhia, dê os passos abaixo: 1. Pressione a tecla Menu/Voltar durante três segundos para fazer aparecer o menu. 2. Pressione a tecla PARA CIMA ou a tecla PARA BAIXO até que o ícone menu de ajustes de câmara fique realçado e em seguida pressione a tecla para entrar no submenu. 3. Pressione a tecla PARA CIMA ou a tecla PARA BAIXO até que o ícone luz de companhia fique realçado e em seguida pressione a tecla . 4. Pressione a tecla PARA CIMA ou a tecla PARA BAIXO e selecione ON ou OFF, conforme deseje ativar ou desativar esta função. 5. Confirme a seleção pressionando a tecla . Tenha em conta que a configuração da luz de companhia só ficará ativada para a câmara cuja imagem esteja a ser visualizada no monitor nesse momento. 5.2.7.3. VOX/STANDBY MENU 5.2.7.3.1. MODO DE POUPANÇA DE ENERGIA OU SÓ ÁUDIO (STANDBY) Com o modo de poupança de energia ou só áudio (Standby), pode escolher o tempo máximo durante o qual a imagem do monitor se mantém ativa (1, 3 ou 5 minutos); decorrido este tempo, a imagem desaparece para poupar energia, mesmo que continue a ouvir o som. Para reativar a imagem, basta que pressione qualquer botão. Para ativar este modo, deve fazer o seguinte: 1. Pressione a tecla Menu/Voltar durante três segundos para fazer aparecer o menu. 2. Pressione a tecla PARA CIMA ou a tecla PARA BAIXO até que o ícone menu VOX/Standby fique realçado e em seguida pressione a tecla para entrar no submenu. 3. Pressione a tecla PARA CIMA ou a tecla PARA BAIXO até que o ícone Standby fique realçado e em seguida pressione a tecla . 4. Pressione a tecla PARA CIMA ou a tecla PARA BAIXO e selecione a opção desejada de entre 1, 3 ou 5 minutos ou OFF para desativar esta função. 5. Confirme a seleção pressionando a tecla . 6. Pressione a tecla Menu/Voltar duas vezes para voltar ao ecrã principal. 5.2.7.3.2. AJUSTE VOX Este modo permite-lhe o controlo da ativação por som do seu vigia-bebés. Se ativar o modo VOX no monitor e não for emitido nenhum som nas proximidades da câmara, esta deixará de transmitir. O ecrã do monitor apaga-se quando a câmara não está a transmitir. Quando a câmara detetar algum som com uma intensidade superior ao nível de sensibilidade ajustado, começará a transmitir novamente o sinal para o monitor. Para desativar esta função e ver a área continuamente vigiada, desative o modo VOX no monitor. • Modo VOX DESATIVADO: A câmara transmite continuamente, o que lhe permite monitorizar continuamente o seu bebé ou a área que deseja proteger. 34 PORTUGUÊS • Modo VOX ATIVADO: A câmara só transmite quando deteta um som de intensidade suficiente, o que dependerá do nível selecionado, nas proximidades da câmara. Pra activar esta função, antes de mais, assegure-se de que definiu o modo de espera para 1/3 ou 5 minutos (ver ponto 5.2.7.3.1). Escolher 1/3 ou 5 se desejar que a sua câmara deixe de transmitir imagem após 1/3 ou 5 minutos se não houver som em redor. Uma vez definido o tempo de espera, para activar o modo VOX, executar as seguintes instruções: 1. Pressione a tecla Menu/Voltar durante três segundos para fazer aparecer o menu. 2. Pressione a tecla PARA CIMA ou a tecla PARA BAIXO até que o ícone menu VOX/Standby fique realçado e em seguida pressione a tecla para entrar no submenu. 3. Pressione a tecla PARA CIMA ou a tecla PARA BAIXO até que o ícone VOX fique realçado e em seguida pressione a tecla . 4. Pressione a tecla PARA CIMA ou a tecla PARA BAIXO e selecione o nível de sensibilidade desejado: OFF/1/2/3 (predefinido: OFF). Definir a sensibilidade em “1” para um bebé que durma tranquilamente e chore baixinho e “3” se o bebé tem tendência a fazer ruído enquanto dorme faz ruídos bastantes altos antes de começar a chorar mesmo, ou defini-la como nível “2” se considera que o comportamento do seu bebé não cabe nos dois padrões anteriormente descritos. 5. Confirme a seleção pressionando a tecla . 6. Pressione a tecla Menu/Voltar duas vezes para voltar ao ecrã principal. Se quiser ver o seu bebé num determinado momento, mesmo que não haja ruídos nas proximidades, pode ativar a emissão da câmara de forma remota pressionando qualquer botão. 5.2.7.4. NÍVEL DE TRANSMISSÃO Pode modificar o nível de potência emitido pela câmara a partir deste menu, escolhendo uma das opções: alta/baixa. Quando o situar na posição alta (HI), a cobertura cobrirá uma distância de 250 metros em campo aberto com a potência original. Quando o situar na posição baixa (LOW), a distância máxima de transmissão é reduzida para aproximadamente 120 metros em campo aberto, quando a potência de emissão diminuir. Para configurar o nível de transmissão, dê os passos abaixo: durante três 1. Pressione a tecla Menu/Voltar segundos para fazer aparecer o menu. 2. Pressione a tecla PARA CIMA ou a tecla PARA BAIXO até que o ícone nível de transmissão fique realçado e em seguida pressione a tecla . 3. Pressione a tecla PARA CIMA ou a tecla PARA BAIXO e selecione do nível de transmissão desejado: HIGH ou LOW. 4. Confirme a seleção pressionando a tecla . 35 5. Pressione a tecla Menu/Voltar ecrã principal. para voltar ao 5.2.7.5. AJUSTE DO ALARME Para configurar o alerta, dê os passos abaixo: 1. Pressione a tecla Menu/Voltar durante três segundos para fazer aparecer o menu. 2. Pressione a tecla PARA CIMA ou a tecla PARA BAIXO até que o ícone do alarme fique realçado e em seguida pressione a tecla . 3. Pressione a tecla PARA CIMA ou a tecla PARA BAIXO para configurar o temporizador do alerta (pressione a tecla PARA CIMA ou a tecla PARA BAIXO para diminuir). 4. Confirme a seleção pressionando a tecla . 5. Pressione a tecla Menu/Voltar para voltar ao ecrã principal. Nota 1: Quando o alerta estiver em funcionamento, no ecrã LCD aparecerá o ícone de um relógio (k). Nota 2: Se quiser eliminar o alarme, dê os passos 1, 2 e 3 acima mencionados e ajuste o tempo para 00:00. O ícone do relógio desaparecerá do seu ecrã. Nota 3: Quando o alerta estiver a soar, pressione qualquer tecla para o cancelar. Se não houver resposta, o aparelho avisá-lo-á durante 7 minutos e depois deixará de soar. 5.2.7.6. FUNÇÃO VIBRAÇÃO Esta função permite que os pais consigam um ambiente silencioso nos momentos em que necessitem de tranquilidade e é de grande ajuda no caso de ambientes ruidosos e de pessoas que tenham problemas auditivos. Quando o som no quarto do bebé ultrapassar o limiar traçado pelo nível de sensibilidade configurado, o monitor vibrará quatro vezes para avisar os pais. Para ativar a função vibração, dê os passos abaixo: 1. Pressione a tecla Menu/Voltar durante três segundos para fazer aparecer o menu. 2. Pressione a tecla PARA CIMA ou a tecla PARA BAIXO até que o ícone da função vibração fique realçado e em seguida pressione a tecla . 3. Pressione a tecla PARA CIMA ou a tecla PARA BAIXO para ativar ou desativar esta função. 4. Confirme a seleção pressionando a tecla . para voltar ao 5. Pressione a tecla Menu/Voltar ecrã principal. Tenha em conta que a configuração da função vibração só ficará ativada para a câmara cuja imagem esteja a ser visualizada no monitor nesse momento. NOTA: Para que o monitor vibre quando o volume no quarto do bebé ultrapassar um certo limiar, é imprescindível que o modo VOX esteja ativo. 5.2.7.7. LUMINOSIDADE Para modificar a luminosidade do ecrã do seu monitor, dê os passos abaixo: 1. Pressione a tecla Menu/Voltar durante três segundos para fazer aparecer o menu. 2. Pressione a tecla PARA CIMA ou a tecla PARA PORTUGUÊS BAIXO até que o ícone luminosidade fique realçado e em seguida pressione a tecla . 3. Pressione a tecla PARA CIMA ou a tecla PARA BAIXO e escolha o nível de luminosidade desejado, de entre os 5 disponíveis. 4. Confirme a seleção pressionando a tecla . 5. Pressione a tecla Menu/Voltar para voltar ao ecrã principal. 5.2.8. eMyBaby 5.2.8.1. REGISTRO 1. Em primeiro lugar registe-se na página da Internet da eMyBaby. Para tal, abra o seu navegador, vá a www.emybaby.com e pressione o botão CRIAR CONTA. 2. Preencha os campos com os seus dados pessoais e, depois de aceitar os termos e condições de utilização, pressione o botão ACTIVAR CONTA. 3. Receberá uma mensagem de verificação no endereço de e-mail que tiver indicado durante o registo. Quando pressionar a ligação que contém a mensagem de e-mail, voltará à página da eMyBaby e poderá aceder introduzindo o seu nome de utilizador e palavrapasse e pressionando em seguida o botão ACEDER. 5.2.8.2. PARA VER A IMAGEM NO PC A QUE O VIGIA-BEBÉS ESTÁ LIGADO 1. Para poder ver a imagem que a câmara transmite no seu PC, deverá conectar o monitor (ecrã) à porta USB do seu computador mediante um cabo miniUSB-USB (não incluído). O monitor deve estar ligado. Se a bateria estiver gasta, carregue-a. 2. Depois de ter acedido com o seu nome de utilizador e palavra-passe à eMyBaby, seleccione a opção INTERCOMUNICADOR no AMBIENTE DE TRABALHO. 3. Seleccione agora o digimonitor 3.5” plus. 4. Poderá escolher uma de duas opções. Escolha “Somente no computador ao qual tem o vigia-bebés conectado mediante o cabo USB”. 5. Se tudo funcionar correctamente, deverá ver automaticamente o seu bebé no ecrã do seu computador. Se tiver algum problema com a imagem, consulte as instruções de visualização online, pressionando o ícone LEIA AQUI AS INSTRUÇÕES. 5.2.8.3. PARA VER A IMAGEM À DISTÂNCIA ATRAVÉS DA eMyBaby Se desejar ver o seu bebé à distância, no seu pc, tablet ou Smartphone, dê os passos seguintes: NOTA: para ver a imagem que a câmara está a captar de forma remota através da eMyBaby, o monitor deve estar conectado ao seu PC. É imprescindível que se emita sinal através da eMyBaby a partir do PC ao qual o monitor do seu vigia-bebés está conectado. Se não for dado este passo prévio, não poderá receber o sinal em qualquer outro dispositivo (PC, tablet ou móvel). 1. Conecte o vigia-bebés ao seu PC seguindo os passos anteriormente indicados, conectando o monitor à porta USB do seu computador mediante um cabo miniUSB-USB (não incluído). 2. Aceda à página da Internet eMyBaby (www.emybaby.com) com o seu nome de utilizador e palavra-passe (registe-se tal como anteriormente indicado caso não os tenha) e seleccione a opção INTERCOMUNICADOR. 3. Escolha digimonitor 3.5” plus de entre os diferentes modelos de vigia-bebés. 4. Poderá escolher uma de duas opções. Escolha “Ver a partir de qualquer lugar através de outro computador, Tablet ou smartphone”. 5. Da primeira vez que aceder a este serviço, serlhe-á pedido que introduza o número de pedido do seu produto. Este número tem a forma MNLXXXXXXX e encontrá-lo-á no interior do compartimento da bateria do monitor. 6. Uma vez introduzido o código, acederá a um ecrã em que encontrará duas opções diferentes: Emitir e Receber sinal. Para poder ver a imagem que a câmara está a captar remotamente no seu dispositivo móvel, deverá pressionar em primeiro lugar o botão Emitir. 7. Pressione agora o ícone que aparece no centro da imagem. Quando o seu computador começar a emitir, aparecerá a imagem seguinte no seu ecrã: Passos a dar se desejar ver a imagem a partir de outro computador: 1. Conecte o vigia-bebés ao seu PC seguindo os passos anteriormente indicados, conectando o monitor à porta USB do seu computador mediante um cabo miniUSB-USB (não incluído). 2. No PC em que deseje ver a imagem de forma remota, aceda à página da Internet eMyBaby (www.emybaby.com) com o seu nome de utilizador e palavra-passe e seleccione a opção INTERCOMUNICADOR. 3. Escolha digimonitor 3.5” plus de entre os diferentes modelos de vigia-bebés. 4. Poderá escolher uma de duas opções. Escolha “Ver a partir de qualquer lugar através de outro computador, Tablet ou smartphone”. 5. Para ver a imagem que a câmara está a captar remotamente no seu dispositivo móvel, deverá pressionar agora o botão Receber sinal. Se tudo funcionar correctamente, deverá ver automaticamente o seu bebé no ecrã do seu computador. Se tiver algum problema com a imagem, consulte as instruções de visualização online pressionando o ícone LEIA AQUI AS INSTRUÇÕES. Passos a dar se desejar ver a imagem a partir de um dispositivo móvel (tablet ou telemóvel): Aplicación eMyBaby A Miniland desenvolveu a aplicação eMyBaby, que está disponível para iOS e Android e é descarregada de forma simples e gratuita. Para descarregar a aplicação eMyBaby, em primeiro lugar aceda à respectiva loja de aplicações ou descarregá-la directamente digitalizando o respectivo código QR: 36 PORTUGUÊS Para instalar a aplicação, siga as instruções indicadas no início deste manual. 1. Uma vez instalada a aplicação, abra-a. Entre em LOG IN e introduza o seu nome de utilizador e palavrapasse para aceder, caso já esteja registado, ou registe-se se não o tiver feito anteriormente. Lembre-se de que receberá uma mensagem de verificação no endereço de e-mail indicado durante o registo. 2. No menu principal, seleccione a opção INTERCOMUNICADOR. 3. Escolha digimonitor 3.5” plus de entre os diferentes modelos de vigia-bebés. para ver a imagem captada pela câmara a partir do seu dispositivo móvel. 4. Pressione o ícone PLAY Navegador do dispositivo Também poderá ver a imagem da câmara acedendo ao sítio da Internet eMyBaby através do navegador do seu dispositivo móvel. Esta opção ser-lhe-á especialmente útil se o seu dispositivo móvel não for iOS ou Android. 1. No navegador do seu dispositivo aceda à página eMyBaby (www.emybaby.com) com o seu nome de utilizador e palavra-passe. Seleccione a opção INTERCOMUNICADOR no menu principal. 2. Escolha digimonitor 3.5” plus de entre os diferentes modelos de vigia-bebés. 3. Poderá escolher uma de duas opções. Escolha “Ver a partir de qualquer lugar através de outro computador, Tablet ou smartphone”. 4. Pressione o botão Receber sinal. Se tudo funcionar correctamente, deverá ver automaticamente o seu bebé no ecrã do seu dispositivo móvel. 6. MANUTENÇÃO • Limpe as superfícies da câmara e do monitor com um pano macio que não deixe penugens. • Se as unidades se sujarem, utilize um pano ligeiramente húmido para limpar as superfícies, tendo o cuidado de evitar a entrada de água por alguma das aberturas. • Nunca utilize produtos de limpeza ou solventes. 7. IDENTIFICAÇÃO E RESOLUÇÃO DE PROBLEMAS Problema Causa possível Não há receção no monitor A câmara não se liga Solução Pressione e mantenha pressionado o Botão de ligação (III) durante 2 segundos Pressione e mantenha pressionado o botão de ligação (5) O monitor não se acende Câmara: não foi conectado o adaptador de corrente Monitor: não foi conectado o adaptador de corrente O monitor está fora do seu campo de alcance Perdeu-se a conexão entre o monitor e uma câmara já emparelhada Foi selecionada uma câmara que não é a correta se a câmara Só aparecem imagens a Verifique está no modo de visão preto e branco noturna/infravermelha Não é possível ouvir a voz dos pais na unidade do bebé A regulação do volume da unidade parental está demasiado baixo Conecte a ficha do adaptador de corrente Conecte a ficha do adaptador de corrente Aproxime o monitor à câmara Emparelhe novamente a câmara com o monitor. Consulte a secção 5.2.7.1.3. Altere o número de câmara que está a visualizar. Consulte a secção 5.2.7.1.1. Para ver as imagens a cores, aumente o nível de luz no lugar em que a câmara se encontre e certifique-se de que não há nada a tapar o sensor de luz da câmara (II) Ajuste o volume para o nível mais alto 37 PORTUGUÊS Problema A câmara não transmite Causa possível Solução Pressione e mantenha pressionado o botão (III) durante 2 segundos A câmara não se ligou Câmara: o adaptador de corrente não se conectou O modo VOX ou o modo de poupança de energia (Standby) está ativado Não é possível ouvir o A regulação do volume da bebé na unidade dos unidade dos pais está pais demasiado baixa Interferências ou É possível que outros dispositivos receção insatisfatórias eletrónicos estejam a interferir com o sinal A câmara e o monitor poderão estar a uma distância excessiva O nível de carga da bateria poderá estar demasiadamente baixo A câmara ou o monitor poderão estar demasiadamente perto de muitos objetos metálicos Não é possível carregar O adaptador de CA/CC não foi a bateria na unidade conectado dos pais Foi utilizada uma bateria não recarregável Se a unidade do bebé tiver perdido a ligação à unidade parental A câmara e o monitor poderão estar a uma distância excessiva Perdeu-se momentaneamente a ligação entre as duas unidades Perdeu-se a ligação entre as duas unidades Conecte a ficha do adaptador de corrente Para ver a área vigiada continuamente, desconecte o modo VOX ou o modo de poupança de energia no monitor Ajuste o volume para o nível mais alto Afaste-os do dispositivo Aproxime o monitor à câmara Conecte a ficha do adaptador de corrente Afaste-os do dispositivo Conecte a ficha do adaptador de corrente Só se podem utilizar baterias recarregáveis (bateria Li-ião de 3.7 V, 1200 mAh): verifique a bateria e, se for necessário, substitua-a pela fornecida com o aparelho Aproxime o monitor à câmara Restabeleça as unidades desconectando-as da alimentação elétrica. Aguarde cerca de 15 segundos antes de as conectar novamente. Deixe passar um minuto para que a unidade do bebé e a unidade parental se sincronizem Emparelhe novamente a câmara e o monitor. Consulte a secção 5.2.7.1.3. 8. ESPECIFICAÇÕES TÉCNICAS Frequência Alcance operacional N.º de canais configuráveis Alimentação (unidade dos pais) Bateria recarregável para o monitor Alimentação (unidade do bebé) Tempo de funcionamento com a bateria totalmente carregada (unidade dos pais) Tamanho da tela LCD 2.4GHz FHSS 240m (linha recta e espaço aberto) 4 Input: 100-240VAC 50/60Hz Output: 5V 800mA 3.7V 1200 mAh Input: 100-240 VCA 50/60Hz Output: 5V 800mA Aproximadamente 5 horas 3.5'' 38 PORTUGUÊS Formato de cabo adaptador de Jack a RCA compatível Formato de miniUSB-USB compatível Figura D Cabo de dados USB 9. INFORMAÇÕES SOBRE A ELIMINAÇÃO DAS PILHAS E DO PRODUTO • Lembre-se de eliminar o produto de uma maneira ambientalmente responsável, remover primeiro a bateria. • Não misturar produtos com um símbolo de contentor de lixo barrado com o lixo doméstico normal. • Para uma recolha e tratamento apropriados destes produtos, levá-los para os pontos de recolha designados pelas autoridades locais. Também contactar a loja onde comprou o produto. Miniland S.A. declara que este “89174 digimonitor 3.5” plus” está conforme com os requisitos essenciais e outras disposições da Directiva 2014/53/UE. 39 FRANÇAIS SOMMAIRE 1. Introduction 2. Contenu 3. Consignes de sécurité 4. Caractéristiques et fonctions du produit 5. Guide de l’utilisateur 6. Nettoyage 7. Identification et résolution de problèmes 8. Spécifications techniques 9. Information sur le retrait de la batterie et le produit 1. INTRODUCTION Nous vous remercions d’avoir choisi cet écoutebébé avec moniteur à écran couleur sans fils, doté des technologies améliorées. Nous sommes ainsi convaincus que vous serez totalement satisfait avec la qualité et les caractéristiques que vous offre ce produit. Néanmoins, nous vous conseillons vivement de lire attentivement ces instructions afin de tirer le meilleur parti de cet achat. Cet écoute-bébé permet de transmettre des signaux audio/vidéo en mode sans fils, qui apparaissent sur le moniteur à écran couleur, ce qui est parfait dans un grand nombre de situations, comme, par exemple, pour surveiller des bébés, des enfants en bas âge ou des personnes âgées. NOTA: Les caractéristiques décrites dans ce guide de l’utilisateur pourraient être modifiées sans préavis. 2. CONTENU 1 Caméra (unité bébé) 1 Moniteur (unité parents) 2 Adaptateurs CA/CC 1 Batterie au lithium (lithium-ion) rechargeable pour le moniteur 1 Lanière de cou 1 Sac de transport et stockage 1 Trépied Mode d’emploi et garantie • Si un élément susmentionné venait à manquer, prenez contact avec votre distributeur. 3. CONSIGNES DE SÉCURITÉ Lisez attentivement ce guide de l’utilisateur avant d’utiliser votre écoute-bébé pour la première fois et gardez-le pour le consulter ultérieurement. 3.1. CONSIGNES GÉNÉRALES DE SÉCURITÉ: Lors de l’utilisation d’appareils électriques, il convient de prendre à tout moment les mesures de sécurité de base: 1. Il est nécessaire de renforcer les précautions lorsqu’un produit est utilisé par un enfant ou une personne âgée ou près d’eux. Conservez l’appareil hors de la portée des enfants lorsqu’il n’est pas utilisé. 2. Ce produit ne doit pas être utilisé comme seul moyen de surveillance, ne remplaçant, en aucun cas, la surveillance d’un adulte responsable sur des enfants, adultes ou propriétés. 3. N’utilisez l’écoute-bébé qu’avec les adaptateurs CA qui accompagnent l’unité (5.0V, 800 MA) 4. N'utilisez que des batteries du type recommandé (Li-ion 3,7 V – 1200 mAh). N'essayez de charger aucun autre type de batteries dans votre écran. 5. Ce produit contient de petites pièces. Il convient donc de prendre les précautions nécessaires lors du déballage et du montage du produit. 6. NE laissez PAS les enfants jouer avec les matériaux d’emballage, tels que les sacs en plastique. Il convient donc de prendre les précautions nécessaires lors du déballage et du montage du produit. 7. N’utilisez PAS l’appareil si le câble ou la fiche sont endommagés. Si votre moniteur de surveillance du bébé ne fonctionne pas correctement ou est endommagé, prenez contact avec le centre de service agréé de Miniland, afin de solliciter l’inspection et la réparation de celle-ci, en vue d’éviter d’éventuels risques. 8. N’essayer PAS de réparer ou de régler toute fonction électrique ou mécanique de l’unité, car la garantie serait annulée dans ce cas-là. 9. Vérifiez la tension électrique de votre habitation, afin de vous assurer qu’elle correspond au régime de l’appareil indiqué dans ses spécifications. 10. Si vous n’allez pas utiliser l’écoute-bébé pendant une longue période de temps, débranchez toujours l’adaptateur d’alimentation. Pour débrancher l’appareil de la prise, fixez le transformateur et retirez la fiche de la prise. Ne le retirez jamais directement du câble. 11. Ce produit est spécialement conçu pour l’usage interne. L’unité ne doit pas être exposée à la pluie, à l’humidité ou aux égouttements ou éclaboussures de liquides. Ne placez jamais d’objets remplis de liquide, tels qu’un verre ou un vase, au-dessus ou à côté de votre écoute-bébé. Le moniteur de surveillance du bébé ne doit pas être utilisé près de l’eau. PRÉCAUTIONS • Cet écoute-bébé est spécialement conçu pour tranquilliser les parents lorsqu’ils ne peuvent pas être présents dans la même pièce que le bébé. Ce produit ne remplace, en aucun cas, la surveillance d’un adulte responsable. Il convient que l’un des parents reste à côté du moniteur lorsqu’il est utilisé. L’écoute-bébé n’est pas un dispositif médical, ne devant par conséquent, en aucun cas, lui confier la responsabilité du bien-être du bébé. Il est important de visiter régulièrement la pièce où se trouve le bébé afin de s’assurer que tout va bien. • N’utilisez jamais cet écoute-bébé dans les cas dont la vie ou la santé du bébé ou d’autres personnes ou l’intégrité d’un bien immobilier dépendent de son fonctionnement. Le fabricant décline toute responsabilité ou n’accepte aucune réclamation découlant du décès, de tout préjudice corporel ou matériel, suite au mauvais fonctionnement ou à l’utilisation incorrecte du produit. • L’utilisation incorrecte de cet écoute-bébé sans fils pourrait donner lieu à des actions en justice. • Utilisez ce produit de manière responsable. IMPORTANT : Toute adaptation ou modification apportée à l’équipement, n’ayant pas été effectuée par le service technique de Miniland, ne sera pas couverte par la garantie du produit. 3.2. CONSEILS POUR ÉVITER LES INTERFÉRENCES RADIOÉLECTRIQUES Cet équipement a été soumis à des tests et répond aux exigences de la directive européenne 2014/53/ UE dite "RED". 40 Ces exigences ont été établies afin d’offrir une protection raisonnable contre l’interférence préjudiciable dans une installation domestique. Si l’unité n’est pas installée et utilisée conformément aux instructions fournies, elle pourrait causer toute interférence préjudiciable aux radiocommunications. Il est cependant impossible de garantir l’absence totale d’interférence dans une installation spécifique. Si l’écoute-bébé provoque une interférence lors de la réception de la radio ou de la télévision, en l’éteignant et en le rallumant, il est recommandé à l’utilisateur d’essayer de remédier à l’interférence, comme indiqué ci-après: • Réorientez ou changez le récepteur de place. • Augmentez la distance entre l’équipement en question et l’écoute-bébé. • Branchez l’appareil à une prise différente de celle utilisée pour le récepteur. • Contactez le département de Service Clients de Miniland. Cet équipement possède des câbles blindés spéciaux, afin d’assurer le respect de la directive européenne 2014/53/UE dite "RED". L’opération à l’aide d’un équipement non-agréé ou de câbles non blindés est susceptible de causer toute interférence lors de la réception radiophonique ou télévisuelle. 3.3. CHOIX D’UN EMPLACEMENT ADÉQUAT • Placez le dispositif électronique dans un endroit éloigné des enfants afin d’éviter d’éventuels accidents. • Les enfants pourraient s’emmêler dans les câbles. L’unité bébé doit être placée à une distance d’approximativement 1 – 1.5 mètres du berceau du bébé. Ne placez jamais l’unité bébé à l’intérieur du berceau, du lit ou du parc. Assurez-vous que l’unité, les câbles et l’adaptateur restent hors de la portée du bébé et d’autres enfants en bas âge. • Placez l’écoute-bébé dans un endroit où l’air peut circuler librement. Ne le posez ni sur des couettes ou des couvertures tendres, ni dans les coins des armoires, étagères, etc. • Placez l’écoute-bébé dans un endroit éloigné des sources de chaleur, telles que les radiateurs, les cheminées, les cuisines et la lumière solaire directe. • Placez l’unité bébé loin des appareils de télévision, des répéteurs et des radios. Les signaux radio intenses, émis par ces éléments, pourraient provoquer des bruits, voire l’émission de sons et l’apparition d’images sur le moniteur. Si cela se produisait, posez la caméra ailleurs. • Ce moniteur peut être placé au-dessus d’une table, en utilisant le support pour table pliante, situé à l’arrière du moniteur. Si vous ne l’utilisez pas, repliezle vers l’intérieur de la partie arrière du moniteur, jusqu’à ce que vous entendiez un «clic », qui vous indiquera qu’il est totalement plié. 4. CARACTÉRISTIQUES ET FONCTIONS DU PRODUIT 4.1. FONCTIONS ET COMMANDES DU MONITEUR (FIGURE 1) MONITEUR (FIGURE 1.1) 1. Voyant d’alimentation/de liaison 2. Microphone 41 FRANÇAIS 3. Voyant de charge 4. Écran LCD 5. Bouton ON/OFF 6. Haut-parleur 7. Attache crochet pour lanière de cou 8. Bouton de réglage ▲ 9. Bouton zoom/menu 10. Bouton de réglage ▼ 11. Bouton accepter/mode Scan 12. Bouton pour parler avec bébé 13. Connexion à la sortie AV 14. Connecteur mini USB alimentation/PC 15. Support rabattable 16. Couvercle du compartiment de la batterie 17. Antenne rabattable AFFICHEUR Icônes sur l'écran (FIGURE 1.2) a. Couverture du signal b. Volume sélectionné sur le moniteur. c. Vision nocturne d. Berceuses e. Mode VOX f. Caméra sélectionnée g. Veilleuse h. Puissance de transmission i. Niveau de la batterie j. Icône parler avec bébé k. Icône alerte activée Icônes du Menu (FIGURE 1.3) A. Menu sélection/ajouter/supprimer une caméra B. Menu de réglage de la caméra C. VOX (déclenchement à la voix)/Stand-by D. Puissance de transmission E. Alarme F. Fonction vibration G. Luminosité de l’écran 4.2. FONCTIONS ET COMMANDES DE LA CAMÉRA (FIGURE 2) I. Antenne rabattable II. Capteur de lumière III. Bouton Marche IV. Accessoire pour accrocher V. Haut-parleur VI. Bouton d’appairage VII. Connecteur d’alimentation mini USB VIII. Microphone IX. Voyant d’alimentation / d’appairage X. Lentille de la caméra XI. Infrarouge XII. Accessoire pour trépied 5. GUIDE DE L’UTILISATEUR 5.1. AVANT UTILISATION 5.1.1. ALIMENTATION DE L’UNITÉ PARENTS ET UTILISATION DE LA BATTERIE Le moniteur ou l’unité parents de cet écoute-bébé est spécialement conçu pour être utilisé avec la batterie ou l’adaptateur CA/CC fourni avec le produit. La batterie rechargeable doit être chargée pendant au moins huit heures avant d’utiliser l’unité pour la première fois, ou si elle n’a pas été utilisée pendant une longue période de temps. Votre écoute-bébé est fourni avec une batterie en FRANÇAIS lithium-ion rechargeable de 3.7V 1200mAh pour le moniteur. Nous vous conseillons vivement d’utiliser la batterie avec le moniteur, afin d’obtenir le signal audio/vidéo provenant de la caméra à n’importe quel endroit. Connectez le moniteur à l’adaptateur branché à la prise dans la mesure du possible, en vue de maintenir la batterie chargée. 5.2. OPÉRATION 5.2.1. MARCHE/ARRÊT DES UNITÉS 5.2.1.1. MONITEUR: Maintenez le bouton ON/OFF (5) enfoncé, situé audessus du moniteur, afin de l’allumer ou de l’éteindre. Le voyant marche/arrêt (1) s’allumera ou s’éteindra, si vous allumez ou éteignez l’unité. INSTALLATION DE LA BATTERIE (FIGURE 3) 1. Dévissez et retirez le couvercle du compartiment de la batterie (16), situé à l’arrière de l’unité. 2. Introduisez la batterie en lithium-ion (fournie avec le produit). 3. Remettez le couvercle de la batterie à sa place et vissez-le. 5.2.1.2. CAMÉRA: Maintenez le bouton marche (III) enfoncé pendant deux secondes, afin d’allumer ou d’éteindre la caméra. Le connecteur d’alimentation (IX) s’allumera ou s’éteindra, si vous allumez ou éteignez l’unité. Une fois la caméra installée et allumée, vous pourrez voir les images et écouter les sons provenant de la chambre de votre bébé à travers le moniteur. Précautions à prendre : N’utilisez que les batteries recommandées par le fabricant. Dans le cas contraire, il existe des risques d’explosion. Jetez les batteries usagées de manière responsable. Note : Si vous n’utilisez pas les deux unités, il est recommandé de les éteindre, afin de réaliser des économies d’énergie de la batterie. RECHARGEMENT DE LA BATTERIE Introduisez la batterie rechargeable, en suivant les instructions indiquées au paragraphe précédent. Branchez le connecteur de l’adaptateur d’alimentation à la prise mini USB, située dans la partie latérale de l’unité (14). N’utilisez que l’adaptateur qui vous a été fourni avec le produit. Branchez l’adaptateur à la prise. Le voyant de charge (3) reste allumé en rouge lorsque le moniteur est branché à la prise afin d’être chargé. Si le chargeur reste branché à la prise, une fois le processus de chargement terminé, le voyant de charge (3) s’allumera en vert. Quand le niveau de chargement de la batterie est très bas, l’icône du niveau de la batterie (i) clignotera en rouge et commencera à émettre un bip toutes les 30 secondes. Note : retirez la batterie si vous n’utilisez plus l’appareil pendant une longue période de temps. 5.1.2. ALIMENTATION DE L’UNITÉ BÉBÉ La caméra ou l’unité bébé de cet écoute-bébé est spécialement conçue pour être utilisée avec l’adaptateur CA/CC fourni avec le produit. 1. Recherchez l’entrée du connecteur (VII) à l’arrière de l’unité bébé. 2. Branchez le câble de l’adaptateur à la prise mini USB de la caméra. N’utilisez que l’adaptateur qui vous a été fourni avec le produit. 3. Branchez l’adaptateur à la prise. Attention : Risques d’étranglement – Veuillez conserver le câble hors de la portée du bébé. NE placez JAMAIS une caméra avec des câbles à moins d’1 mètre du berceau. N’utilisez jamais de rallonges électriques avec des adaptateurs CA. N’utilisez que les adaptateurs CA fournis avec le produit. 5.2.2. VOLUME DU MONITEUR Appuyez sur le bouton de réglage (8), si vous souhaitez augmenter le volume de votre moniteur ou sur le bouton de réglage (10), si vous souhaitez le réduire, en choisissant parmi 5 niveaux disponibles. 5.2.3. PARLER AVEC BÉBÉ Vous pouvez parler avec votre bébé à partir de l’unité parents (par exemple, pour le tranquilliser et pour qu’il comprenne que vous allez bientôt aller le voir) ou avec votre conjoint (e) (si il ou elle se trouve dans la chambre du bébé). Appuyez ou maintenez le bouton enfoncé pour parler avec bébé (12) et parlez face au moniteur. Relâchez le bouton lorsque vous finissez de parler, afin de pouvoir entendre à nouveau le son provenant de la chambre du bébé. Notez que vous ne pourrez pas entendre votre bébé pendant que vous parlez. Vous devrez ainsi relâcher ce bouton pour l’écouter. 5.2.4. ZOOM Vous pouvez augmenter la taille de l’image affichée, en effectuant un zoom de quatre positions. Veuillez suivre les instructions suivantes, afin d’accéder à cette fonction : 1. Appuyez sur le bouton zoom . Le quart supérieur gauche de l’image apparaîtra encadré en blanc. 2. Appuyez sur les boutons HAUT y et BAS pour changer le quart de l’image sélectionné. 3. Appuyez sur le bouton pour augmenter le quart de l’image sélectionné. 4. Appuyez sur le bouton zoom et vous retournerez au mode de sélection du quart de l’image, dans le cas où vous souhaitez effectuer un zoom sur un autre quart. 5. Appuyez de nouveau sur le bouton zoom pour sortir de la fonction zoom. 5.2.5. VISION NOCTURNE INFRAROUGE (AUTOMATIQUE) Le mode vision nocturne infrarouge permet à la caméra d’obtenir des images de votre bébé ou de la zone de surveillance dans l’obscurité ou dans des conditions de faible luminosité. Dans ce mode, seules les images en noir et blanc seront affichées à l’écran et vous ne pourrez voir que les objets situés à moins de 2 mètres de distance. La caméra surveille constamment le niveau de 42 lumière et passe automatiquement en mode infrarouge lorsque la lumière est insuffisante pour la vision normale. 5.2.6. AVERTISSEMENT SUR LA HORS DE PORTÉE Si le moniteur se situe à une distance de la caméra supérieure à celle admissible (voir les caractéristiques techniques), le voyant d’alimentation/de liaison de la caméra (IX) et le moniteur (1) clignoteront en rouge, le symbole de la couverture du signal (a) apparaîtra en rouge et l’écran affichera le logo de MINILAND. Rapprochez le moniteur de la caméra afin de revoir l’image de manière correcte. 5.2.7. MENU PRINCIPAL Maintenez le bouton Menu/Retour enfoncé pour procéder aux réglages des principales fonctions de votre écoute-bébé. 5.2.7.1. MENU DE LA CAMÉRA 5.2.7.1.1. SÉLECTION DE LA CAMÉRA Le dispositif est spécialement conçu pour permettre l’observation de différentes zones, pouvant être connecté à quatre caméras maximum. Veuillez suivre les instructions indiquées ci-après pour sélectionner la caméra que vous souhaitez visualiser : 1. Appuyez sur la touche Menu/Retour pendant trois secondes pour que le menu s’affiche. 2. Appuyez sur la touche HAUT ou la touche BAS jusqu’à ce que l’icône de la caméra s’affiche et appuyez ensuite sur la touche pour avoir accès au sous-menu. 3. Appuyez sur la touche HAUT ou la touche BAS jusqu’à ce que l’icône VOIR caméra s’affiche et appuyez ensuite sur la touche . 4. Appuyez sur la touche HAUT ou la touche BAS pour sélectionner la caméra que vous souhaitez visualiser et appuyez ensuite sur la touche afin de confirmer la sélection. Note 1 : Vous ne pourrez visualiser que les caméras qui ont été reliées au moniteur. Note 2 : Il existe une manière plus rapide de changer la caméra que vous souhaitez visualiser. Appuyez directement sur la touche pour voir cycliquement les caméras reliées: CAM1/CAM2/CAM3/CAM4/ MODO SCAN. 5.2.7.1.2. MODE SCAN Cette fonction vous permet de voir, de manière successive et cyclique, les canaux de la caméra associés, tout en affichant les images de chaque caméra pendant 12 secondes. Cette fonction ne peut être utilisée que lorsqu’il existe plus d’une unité de caméra reliée. Pour accéder à ce mode, veuillez suivre les instructions ci-après : 1. Appuyez sur la touche Menu/Retour pendant trois secondes pour que le menu s’affiche. 2. Appuyez sur la touche HAUT ou la touche BAS jusqu’à ce que l’icône de la caméra s’affiche et appuyez ensuite sur la touche pour avoir accès au sous-menu. 3. Appuyez sur la touche HAUT ou la touche BAS jusqu’à ce que l’icône VOIR caméra s’afficheet 43 FRANÇAIS appuyez ensuite sur la touche . 4. Appuyez sur la touche HAUT ou la touche BAS et sélectionner l’icône SCAN . 5. Appuyez sur la touche pour confirmer. Note 1 : Si l’une des caméras est hors de portée ou n’est pas allumée, le moniteur vous l’indiquera et le Mode Scan s’arrêtera. Note 2 : Le mode Scan peut être activé ou désactivé en appuyant sur la touche pendant que vous visualisez l’écran principal, s’il existe plus d’une caméra branchée à votre moniteur. 5.2.7.1.3. AJOUTER UNE CAMÉRA Ce produit est spécialement conçu pour permettre l’observation de différentes zones, pouvant être connecté à quatre caméras maximum (canal 1, 2, 3 ou 4 attribué à différentes caméras). Le moniteur et la caméra d’origine sortent de l’usine avec le canal 1 programmé. Si vous souhaitez ajouter une caméra supplémentaire, veuillez suivre les instructions suivantes: 1. Appuyez sur la touche Menu/Retour pendant trois secondes pour que le menu s’affiche. 2. Appuyez sur la touche HAUT ou la touche BAS jusqu’à ce que l’icône de la caméra s’affiche et appuyez ensuite sur la touche pour avoir accès au sous-menu. 3. Appuyez sur la touche HAUT ou la touche BAS jusqu’à ce que l’icône ajouter caméra s’affiche et appuyez ensuite sur la touche . 4. Appuyez sur la touche HAUT ou la touche BAS pour sélectionner le canal où vous souhaitez ajouter la nouvelle caméra et confirmez la sélection en appuyant sur la touche . 5. Appuyez sur le bouton d’appairage de la caméra (VI) pendant que le voyant d’alimentation/de liaison (1) clignote. 6. Une fois ajoutée, le voyant ne clignotera plus et les images de la caméra seront immédiatement affichées sur l’écran de l’unité du moniteur. 7. Si la connexion n’a pas été correctement effectuée, répétez les étapes indiquées ci-dessus. Note 1 : Vous ne pourrez sélectionner que les canaux qui n’ont pas encore été associés à une caméra. Note 2 : Il n’est pas possible d’avoir accès à ce sousmenu si 4 caméras ont déjà été reliées. Vous risquez de perdre la connexion entre le moniteur et une caméra déjà reliée pour diverses raisons. Dans ce cas-là, répétez les étapes décrites ci-dessus afin de connecter la caméra au moniteur. 5.2.7.1.4. SUPPRIMER UNE CAMÉRA Si vous souhaitez supprimer l’une des caméras branchées, veuillez suivre les instructions indiquées ci-après : 1. Appuyez sur la touche Menu/Retour pendant trois secondes pour que le menu s’affiche. 2. Appuyez sur la touche HAUT ou la touche BAS jusqu’à ce que l’icône de la caméra s’affiche et appuyez ensuite sur la touche pour avoir accès au sous-menu. FRANÇAIS ou la touche BAS 3. Appuyez sur la touche HAUT jusqu’à ce que l’icône supprimer caméra s’affiche et appuyez ensuite sur la touche . 4. Appuyez sur la touche HAUT ou la touche BAS pour sélectionner la caméra que vous souhaitez supprimer et confirmez la sélection en appuyant sur la touche . . s’affiche et appuyez ensuite sur la touche 4. Appuyez sur la touche HAUT ou la touche BAS pour sélectionner l’un des trois niveaux de volume disponibles (LOW/MID/HIGH) en fonction de vos besoins. 5. Confirmez la sélection en appuyant sur la touche . Note 1 : Si vous n’avez qu’une caméra reliée au moniteur, vous ne pourrez ni la supprimer, ni avoir accès à ce menu. Note 2 : Il est nécessaire de supprimer un canal avant de l’associer à une nouvelle unité de caméra. Le volume ne pourra être sélectionné que pour la caméra dont l’image apparaît sur le moniteur à ce moment-là. 5.2.7.2. MENU RÉGLAGE DE LA CAMÉRA 5.2.7.2.1. BERCEUSES L’unité bébé peut reproduire une berceuse douce afin d’aider votre bébé à trouver le sommeil. Veuillez suivre les instructions suivantes pour activer cette fonction : 1. Appuyez sur la touche Menu/Retour pendant trois secondes pour que le menu s’affiche. 2. Appuyez sur la touche HAUT ou la touche BAS jusqu’á ce que l’icône du menu réglage de la caméra s’affiche et appuyez ensuite sur la touche pour avoir accès au sous-menu. 3. Appuyez sur la touche HAUT ou la touche BAS jusqu’à ce que l’icône Berceuse s’affiche et appuyez ensuite sur la touche . 4. Appuyez sur la touche HAUT ou la touche BAS pour sélectionner l’une des cinq berceuses disponibles, le mode silence ou la lecture en boucle (le réglage par défaut est OFF). 4. Une fois la mélodie sélectionnée, appuyez sur la touche et la fonction de réglage du volume s’affichera. Appuyez sur la touche HAUT ou la touche BAS pour sélectionner le niveau de volume souhaité allant de 1 à 3 et appuyez sur la touche . 6. Appuyez sur la touche Menu/Retour trois fois pour retourner à l’écran principal. 7. L’icône Berceuse (d) s’affichera dans la partie supérieure de l’écran LCD. Les berceuses ne pourront être sélectionnées que pour la caméra dont l’image apparaît sur le moniteur à ce moment-là. Note: Le mode de lecture en boucle des berceuses reproduit cycliquement toutes les berceuses. 5.2.7.2.2. VOLUME DE LA CAMÉRA Ce menu vous permettra de sélectionner le niveau de volume pour reproduire la voix des parents, à l’aide de la fonction bidirectionnelle. Veuillez suivre les instructions suivantes sélectionner le volume de la caméra: pour 1. Appuyez sur la touche Menu/Retour pendant trois secondes pour que le menu s’affiche. 2. Appuyez sur la touche HAUT ou la touche BAS jusqu’à ce que l’icône du menu réglage de la caméra s’affiche et appuyez ensuite sur la touche pour avoir accès au sous-menu. 3. Appuyez sur la touche HAUT ou la touche BAS jusqu’à ce que l’icône du volume de la caméra 5.2.7.2.3. VEILLEUSE L’unité bébé possède une veilleuse qui offre du confort au bébé et lui permet de voir l’environnement qui l’entoure dans une chambre sombre. Veuillez suivre les instructions suivantes pour activer la veilleuse : 1. Appuyez sur la touche Menu/Retour pendant trois secondes pour que le menu s’affiche. 2. Appuyez sur la touche HAUT ou la touche BAS jusqu’à ce que l’icône du menu réglage de la caméra s’affiche et appuyez ensuite sur la touche pour avoir accès au sous-menu. 3. Appuyez sur la touche HAUT ou la touche BAS jusqu’à ce que l’icône de la veilleuse s’affiche et . appuyez ensuite sur la touche 4. Appuyez sur la touche HAUT ou la touche BAS et sélectionnez ON ou OFF si vous souhaitez activer ou désactiver cette option. 5. Confirmez la sélection en appuyant sur la touche . La veilleuse ne pourra être sélectionnée que pour la caméra dont l’image apparaît sur le moniteur à ce moment-là. 5.2.7.3. MENU VOX/STAND-BY (déclenchement à la voix) 5.2.7.3.1. MODE D’ÉCONOMIE D’ÉNERGIE OU MODE AUDIO UNIQUEMENT (STAND-BY) Vous pouvez choisir le temps maximal pour que l’image reste active (1, 3 ou 5 minutes), à l’aide du mode d’économie d’énergie ou du mode audio uniquement (Stand-by). Une fois ce temps écoulé, l’image disparaît en vue d’économiser de l’énergie, tout en vous permettant d’entendre encore le son. Appuyez sur quelconque bouton pour afficher de nouveau l’image. Veuillez suivre les instructions suivantes pour activer ce mode : 1. Appuyez sur la touche Menu/Retour pendant trois secondes pour que le menu s’affiche. 2. Appuyez sur la touche HAUT ou la touche BAS jusqu’à ce que l’icône du menu VOX/Stand-by s’affiche et appuyez ensuite sur la touche pour avoir accès au sous-menu. 3. Appuyez sur la touche HAUT ou la touche BAS jusqu’à ce que l’icône Stand-by s’affiche et appuyez ensuite sur la touche . 4. Appuyez sur la touche HAUT ou la touche BAS et sélectionnez l’option souhaitée (1, 3 ou 5 44 FRANÇAIS minutes ou OFF) pour désactiver cette fonction. 5. Confirmez la sélection en appuyant sur la touche . 6. Appuyez sur la touche Menu/Retour deux fois pour retourner à l’écran principal. 5.2.7.3.2. RÉGLAGE VOX Ce mode permet de contrôler le déclenchement à la voix de votre écoute-bébé. Si vous activez le mode VOX sur le moniteur et aucun son n’est émis à proximité de la caméra, celle-ci cessera sa transmission. L’écran du moniteur s’éteindra lorsque la caméra cessera de transmettre. Si la caméra détecte un son avec une intensité supérieure au niveau de sensibilité défini, elle commencera à retransmettre le signal vers le moniteur. Déconnectez le mode VOX sur le moniteur afin de désactiver cette fonction et de voir continuellement la zone surveillée. • Mode VOX DÉSACTIVÉ : La caméra transmet continuellement, ce qui permet de contrôler constamment votre bébé ou la zone que vous souhaitez protéger. • Mode VOX ACTIVÉ : La caméra ne transmet que lorsqu’elle détecte un son d’une intensité suffisante, ce qui dépendra du niveau sélectionné, à proximité de la caméra. Pour activer cette fonction, avant toute chose, assurezvous que vous avez réglé le mode veille sur 1 / 3 ou 5 minutes (voir paragraphe 5.2.7.3.1). Choisissez 1 / 3 ou 5 si vous voulez que votre caméra cesse de transmettre l’image après 1 / 3 ou 5 minutes s’il n’y a plus de son autour. Dès lors que le mode veille a été réglé, pour activer le Mode VOX, suivez les instructions indiquées ci-après : 1. Appuyez sur la touche Menu/Retour pendant trois secondes pour que le menu s’affiche. 2. Appuyez sur la touche HAUT ou la touche BAS jusqu’à ce que l’icône du menu VOX/Stand-by s’affiche et appuyez ensuite sur la touche pour avoir accès au sous-menu. 3. Appuyez sur la touche HAUT ou la touche BAS jusqu’à ce que l’icône VOX s’affiche et . appuyez ensuite sur la touche 4. Appuyez sur la touche HAUT ou la touche BAS et sélectionnez le niveau de sensibilité sonore souhaité : OFF / 1 / 2 / 3 (réglé sur OFF par défaut). Réglez la sensibilité sur « 1 » pour un bébé qui dort paisiblement et qui ne pleure pas très fort, et sur « 3 » si le bébé a tendance à faire du bruit pendant son sommeil ou qu’il fait des bruits relativement forts avant de se mettre véritablement à pleurer, ou bien réglez sur le niveau « 2 » si vous considérez que le comportement de votre bébé ne correspond ni à l’un, ni à l’autre des deux précédents schémas. 5. Confirmez la sélection en appuyant sur la touche . 6. Appuyez sur la touche Menu/Retour deux fois pour retourner à l’écran principal. 45 Si vous souhaitez voir votre bébé à un moment donné, même s’il n’y a pas de bruits à proximité, vous pouvez activer la caméra à distance en appuyant sur quelconque bouton. 5.2.7.4. PUISSANCE DE TRANSMISSION Vous pouvez modifier à partir de ce menu le niveau de puissance émis par la caméra, en choisissant parmi les options haute/basse. Lorsqu’elle se situe sur la position haute (HI), le niveau du signal couvrira une distance de 250 mètres à l’air libre avec la puissance d’origine. Lorsqu’elle se situe sur la position basse (LOW), la distance maximale de transmission se limite à approximativement 120 mètres à l’air libre, en réduisant la puissance d’émission. Veuillez suivre les instructions suivantes afin de sélectionner la puissance de transmission : 1. Appuyez sur la touche Menu/Retour pendant trois secondes pour que le menu s’affiche. 2. Appuyez sur la touche HAUT ou la touche BAS jusqu’à ce que l’icône de la puissance de transmission s’affiche et appuyez ensuite sur la touche . 3. Appuyez sur la touche HAUT ou la touche BAS y seleccione del nivel de transmisión deseado : HIGH o LOW. et sélectionnez la puissance de transmission souhaitée : HIGH ou LOW. 4. Confirmez la sélection en appuyant sur la touche . 5. Appuyez sur la touche Menu/Retour pour retourner à l’écran principal. 5.2.7.5. RÉGLAGE DE L’ALARME Veuillez suivre les instructions suivantes pour régler l’alarme: 1. Appuyez sur la touche Menu/Retour pendant trois secondes pour que le menu s’affiche. 2. Appuyez sur la touche HAUT ou la touche BAS jusqu’à ce que l’icône de l’alarme s’affiche et appuyez ensuite sur la touche . 3. Appuyez sur la touche HAUT ou la touche BAS pour sélectionner le minuteur (appuyez sur la touche HAUT pour augmenter ou sur la touche BAS pour diminuer). 4. Confirmez la sélection en appuyant sur la touche . 5. Appuyez sur la touche Menu/Retour pour retourner à l’écran principal. Note 1 : Lorsque l’alarme se déclenche, l’icône de l’horloge (k) apparaît sur l’écran LCD. Note 2 : Si vous souhaitez éliminer l’horloge, suivez les étapes 1, 2 et 3 indiquées ci-dessus et réglez le temps au niveau 00:00. L’icône de l’horloge disparaîtra alors de votre écran. Note 3 : Lorsque l’alarme sonne, appuyez sur la touche pour l’arrêter. Si vous n’obtenez pas de réponse, l’appareil vous avisera pendant 7 minutes et s’arrêtera de sonner ensuite. 5.2.7.6. FONCTION VIBRATION Cette fonction permet aux parents d’obtenir un environnement paisible lorsqu’ils ont besoin de tranquillité, étant extrêmement utile dans des FRANÇAIS environnements bruyants et pour les personnes malentendantes. Lorsque le son franchit le seuil qui définit le niveau de sensibilité sonore sélectionné dans la chambre du bébé, le moniteur vibrera quatre fois afin de prévenir les parents. Veuillez suivre les instructions suivantes pour sélectionner la fonction vibration. 1. Appuyez sur la touche Menu/Retour pendant trois secondes pour que le menu s’affiche. 2. Appuyez sur la touche HAUT ou la touche BAS jusqu’à ce que l’icône de la fonction vibration s’affiche et appuyez ensuite sur la touche . 3. Appuyez sur la touche HAUT ou la touche BAS pour activer ou désactiver cette fonction. 4. Confirmez la sélection en appuyant sur la touche . 5. Appuyez sur la touche Menu/Retour pour retourner à l’écran principal. La fonction vibration ne pourra être sélectionnée que pour la caméra dont l’image apparaît sur le moniteur à ce moment-là. NOTE : Il est important que le mode VOX soit actif afin que le moniteur vibre lorsque le volume franchit un seuil qui a été défini dans la chambre du bébé. 5.2.7.7. LUMINOSITÉ Veuillez suivre les instructions suivantes pour modifier la luminosité de l’écran de votre moniteur : 1. Appuyez sur la touche Menu/Retour pendant trois secondes pour que le menu s’affiche. 2. Appuyez sur la touche HAUT ou la touche BAS jusqu’à ce que l’icône luminosité s’affiche et appuyez ensuite sur la touche . 3. Appuyez sur la touche HAUT ou la touche BAS et sélectionnez le niveau de luminosité souhaité parmi les 5 options disponibles. 4. Confirmez la sélection en appuyant sur la touche . 5. Appuyez sur la touche Menu/Retour pour retourner à l’écran principal. 5.2.8. eMyBaby 5.2.8.1. ENREGISTREMENT 1. En premier lieu, s’enregistrer sur le site web d’eMyBaby. Pour ce faire, ouvrez votre navigateur, allez à www.emybaby.com et cliquez sur le bouton CRÉER COMPTE. 2. Remplissez les champs avec vos données personnelles et, après avoir accepté les termes et conditions d’utilisation, appuyez sur le bouton ACTIVER COMPTE. 3. Vous recevrez un message de vérification à l’adresse e-mail que vous avez indiquée pendant l’enregistrement. Lorsque vous cliquerez sur le lien qui contient le message, vous reviendrez au site d’eMyBaby et vous pourrez accéder en introduisant votre identifiant et votre mot de passe après avoir appuyé sur le bouton ACCÉDER 5.2.8.2. POUR VOIR L’IMAGE SUR LE PC QUI EST CONNECTÉ À L’ÉCOUTE-BÉBÉ 1. Pour pouvoir voir l’image que transmet la caméra sur votre PC, vous devrez connecter l’écran au port USB de votre ordinateur au moyen d’un câble miniUSB-USB (non inclus). L’écran doit être allumé. Si la batterie est vide, rechargez-la. 2. Après avoir accéder à eMyBaby avec votre identifiant et votre mot de passe, sélectionnez l’option ÉCOUTE-BÉBÉ dans le BUREAU. 3. Sélectionnez alors le digimonitor 3.5” plus. 4. Vous pourrez choisir entre deux options. Choisissez « Uniquement sur l’ordinateur auquel est relié le système de surveillance de bébés au moyen du câble USB ». 5. Si tout fonctionne correctement, vous devriez voir automatiquement votre bébé sur l’écran de votre ordinateur. S’il y a un quelconque problème avec l’image, consultez les instructions de visualisation on line en appuyant sur l’icône LISEZ ICI LES INSTRUCTIONS 5.2.8.3. POUR VOIR L’IMAGE À DISTANCE GRÂCE eMyBaby Si vous souhaitez voir votre bébé à distance, que ce soit sur votre PC, votre tablette ou votre smartphone, suivez les étapes suivantes: NOTE: pour voir à distance l’image que capte la caméra grâce à eMyBaby, l’écran doit être connecté à votre PC. Il est indispensable d’émettre un signal grâce à eMyBaby à partir du PC auquel est connecté l’écran de votre écoute-bébé. Si vous n’effectuez pas cette étape préalable, vous ne pourrez pas recevoir le signal sur un autre dispositif (PC, tablette ou téléphone portable). 1. Connectez l’écoute-bébé à votre PC en suivant les étapes indiquées précédemment, en reliant l’écran au port USB de votre ordinateur au moyen d’un câble miniUSB-USB (non inclus). 2. Accédez au site Web d’eMyBaby (www.emybaby. com) avec votre identifiant et votre mot de passe (enregistrez-vous comme indiqué précédemment si vous n’en disposez pas) et sélectionnez l’option ÉCOUTE-BÉBÉ. 3. Choisissez digimonitor 3.5” plus parmi les différents modèles d’écoute-bébé. 4. Vous pourrez choisir entre deux options. Choisissez « Voir ailleurs, à partir d’un autre ordinateur, tablette ou smartphone ». 5. La première fois que vous accédez à ce service, il vous sera demandé d’introduire le numéro de commande de votre produit. Ce numéro se présente sous la forme MNLXX-XXXXX et vous le trouverez à l'intérieur du compartiment de la batterie de l'écran. 6. Une fois le code introduit, vous accéderez à un écran dans lequel vous trouverez deux options distinctes : Envoyer et Recevoir signal. Pour pouvoir voir à distance l’image que capte la caméra sur votre dispositif portable, vous devrez appuyer d’abord sur le bouton Envoyer. 7. Cliquez alors sur l’icône qui apparaît au centre de l’image. Lorsque votre ordinateur 46 commencera à émettre, l’image suivante apparaîtra sur votre écran: Étapes à effectuer si vous souhaitez voir l’image sur un autre ordinateur : 1. Connectez l’écoute-bébé à votre PC en suivant les étapes indiquées précédemment, en reliant le moniteur au port USB de votre ordinateur au moyen d’un câble miniUSB-USB (non inclus). 2. Sur PC sur lequel vous souhaitez voir l’image à distance, accédez au site Web d’eMyBaby (www.emybaby.com) avec votre identifiant et votre mot de passe et sélectionnez l’option ÉCOUTEBÉBÉ. 3. Choisissez digimonitor 3.5” plus parmi les différents modèles d’écoute-bébé. FRANÇAIS 4. Vous pourrez choisir entre deux options. Choisissez « Voir ailleurs, à partir d’un autre ordinateur, tablette ou smartphone » . 5. Pour pouvoir voir à distance l’image que capte la caméra, sur votre dispositif portable, vous devrez alors appuyer sur le bouton Recevoir signal. Si tout fonctionne correctement, vous devriez voir automatiquement votre bébé sur l’écran de votre ordinateur. S’il y a un quelconque problème avec l’image, consultez les instructions de visualisation on line en appuyant sur l’icône LISEZ ICI LES INSTRUCTIONS. Étapes à suivre si vous souhaitez voir l’image sur un dispositif portable (tablette ou téléphone portable) : Application eMyBaby Miniland a développé l’application eMyBaby, qui est disponible pour iOS et Android, et qui se télécharge de forme simple et gratuite. Pour télécharger l’application eMyBaby, accédez d’abord à la boutique d’applications correspondante ou la décharger directement en scannant le code QR correspondant: Pour installer l’application, suivez les instructions indiquées au début de ce manuel. 1. Une fois l’application installée, ouvrez-la. Entrez à LOG IN (ACCÉDER) et introduisez votre identifiant et votre mot de passe pour accéder si vous êtes déjà enregistré, ou enregistrezvous si vous ne l’avez pas fait auparavant. Rappelez-vous que vous recevrez un message de vérification à l’adresse e-mail que vous avez indiquée durant l’enregistrement. 2. Dans le menu principal, sélectionnez l’option BABY MONITOR (ÉCOUTE-BÉBÉ). 3. Choisissez digimonitor 3.5” plus parmi les différents modèles d’écoute-bébé. • Appuyez sur l’icône PLAY pour voir l’image captée par la caméra sur votre dispositif portable. Navigateur du dispositif Vous pourrez également voir l’image de la caméra en accédant au site Web d’eMyBaby par le biais du navigateur de votre dispositif portable. Cette option vous sera particulièrement utile si votre dispositif portable n’est pas iOS ou Android. 1. Dans le navigateur de votre dispositif, accédez au site d’eMyBaby (www.emybaby.com) avec votre identifiant et votre mot de passe. Dans le menu principal, sélectionnez l’option ÉCOUTE-BÉBÉ. 2. Choisissez digimonitor 3.5” plus parmi les différents modèles d’écoute-bébé. 3. Vous pourrez choisir entre deux options. Choisissez « Voir ailleurs, à partir d’un autre ordinateur, tablette ou smartphone » . 4. Appuyez sur le bouton Recevoir signal. Si tout fonctionne correctement, vous devriez voir automatiquement votre bébé sur l’écran de votre dispositif portable. 6. NETTOYAGE • Nettoyez les parties de la caméra et du moniteur avec un chiffon doux non pelucheux. • Si les unités sont sales, utilisez un chiffon légèrement humide pour nettoyer les parties, en évitant toute entrée d’eau à travers les ouvertures de l’appareil. • N’utilisez jamais de détergents ou de solvants. 47 FRANÇAIS 7. IDENTIFICATION ET RÉSOLUTION DE PROBLÈMES Problème Possible Cause Aucune connexion établie sur le moniteur La caméra ne s’allume pas Solution Appuyez et maintenez le bouton marche (III) enfoncé pendant 2 secondes Appuyez et maintenez le bouton marche (5) enfoncé Le moniteur ne s’allume pas Caméra : l’adaptateur d’alimentation n’a pas été branché Moniteur : l’adaptateur d’alimentation n’a pas été branché Le moniteur est hors de portée La connexion a été perdue entre le moniteur et l’une des caméras déjà reliée Branchez l’adaptateur d’alimentation La caméra souhaitée n’a pas été sélectionnée Modifiez le numéro de la caméra que vous êtes en train de visualiser. Consultez la section 5.2.7.1.1. Pour voir les images en couleur, augmentez le niveau de lumière à l’endroit où se trouve la caméra et vérifiez si rien ne couvre le capteur de lumière de la caméra (II) Branchez l’adaptateur d’alimentation Rapprochez le moniteur de la caméra Reliez la caméra au moniteur. Consultez la section 5.2.7.1.3. Seules des images en noir et blanc apparaissent Vérifiez si la caméra est en mode vision nocturne/infrarouge Il n’est pas possible d’entendre la voix des parents sur l’unité bébé La caméra ne transmet rien Le réglage du volume de l’unité parents est trop bas Réglez le volume au plus haut niveau La caméra n’a pas été allumée Appuyez et maintenez le bouton (III) enfoncé pendant 2 secondes Caméra: l’adaptateur d’alimentation n’a pas été branché Le mode VOX ou le mode d’économie d’énergie (Stand-by) est actif Branchez l’adaptateur d’alimentation Le réglage du volume de l’unité parents est trop bas Réglez le volume au plus haut niveau Il n’est pas possible d’entendre le bébé sur l’unité parents Interférences ou réception insatisfaisante Il n’est pas possible de charger la batterie de l’unité parents Il est possible que d’autres dispositifs électroniques interfèrent avec le signal La caméra et le moniteur se trouvent à une distance trop grande Le niveau de charge de la batterie est trop bas La caméra ou le moniteur se trouvent trop près de plusieurs objets métalliques L’adaptateur CA/CC n’a pas été branché Une batterie non rechargeable a été utilisée 48 Pour voir continuellement la zone surveillée, déconnectez le mode VOX ou le mode d’économie d’énergie sur le moniteur Éloignez-les du dispositif Rapprochez le moniteur de la caméra Branchez l’adaptateur d’alimentation Éloignez-les du dispositif Branchez l’adaptateur d’alimentation Seules des batteries rechargeables peuvent être utilisées (batterie en lithium-ion de 3.7 V, 1200 mAh): vérifiez la batterie et s’il est nécessaire de la remplacer par celle qui a été fournie avec l’appareil FRANÇAIS La connexion a été perdue entre l’unité bébé et l’unité parents La caméra et le moniteur se trouvent à une distance trop grande Rapprochez le moniteur de la caméra La connexion a été momentanément perdue entre les deux unités La connexion a été perdue entre les deux unités Rétablissez la connexion entre les unités en les déconnectant de la prise. Attendez environ 15 secondes avant de les reconnecter. Patientez une minute afin que l’unité bébé et l’unité parents se synchronisent. Relier la caméra et le moniteur. Consultez la section 5.2.7.1.3. 8. SPÉCIFICATIONS TECHNIQUES Fréquence Portée de fonctionnement Nombre de canaux configurables 2.4GHz FHSS 240m (en ligne droite et sur un espace ouvert) 4 Input: 100-240VAC 50/60Hz Output: 5V 800mA 3.7V 1200 mAh Input: 100-240 VCA 50/60Hz Output: 5V 800mA Puissance (Unité Parentale) Batterie rechargeable pour le moniteur Puissance (Unité Bébé) Durée de fonctionnement avec la batterie totalement chargée (Unité Parentale) Taille de l’écran LCD Format de câble adaptateur de Jack à RCA compatible Format de câble miniUSB-USB compatible Environ 5 heures 3.5'' Figure D Câble de données USB 9. INFORMATIONS RELATIVES À LA MISE AU REBUT DES BATTERIES ET DU PRODUIT • N’oubliez pas que vous devez éliminer le produit de manière responsable, dans le respect de l’environnement, en retirant d’abord la batterie. • Ne mélangez pas des produits portant le symbole d’une poubelle barrée par une croix avec les ordures ménagères courantes. • Pour une collecte et un traitement appropriés de ces produits, apportez-les dans un des points de collecte indiqués par les autorités locales. Vous pouvez également contacter le magasin dans lequel vous avez acheté le produit. Par la présente Miniland S.A. déclare que l’appareil “89174 digimonitor 3.5” plus” est conforme aux exigences essentielles et aux autres dispositions pertinentes de la 2014/53/UE. 49 DEUTSCH INHALT 1. Einführung 2. Lieferumfang 3. Sicherheitsnormen 4. Eigenschaften und Funktionen des Produktes 5. Bedienungsanleitung 6. Wartung 7. Störungen und deren mögliche Behebung 8. Technische Daten 9. Informationen über die Entsorgung der Batterien und des Gerätes 1. EINFÜHRUNG Herzlichen Glückwunsch zum Kauf dieses BabyÜberwachungssystems mit drahtlosem Farbmonitor. Dieses System beinhaltet die neueste Technologie. Wir sind überzeugt, dass Sie mit der Qualität und den Eigenschaften dieses Produkts voll und ganz zufrieden sein werden. Lesen Sie bitte diese Anleitung sorgfältig durch, um die besten Ergebnisse aus Ihrem Kauf zu erhalten. Dieses Baby-Überwachungssystem ermöglicht es Ihnen, Audio- und Videosignale drahtlos auf den Farbmonitor zu übertragen. Dies ist ideal für eine Vielzahl von Situationen, wie beispielsweise die Überwachung von Babys, Kleinkindern oder älteren Menschen. HINWEIS: Die in dieser Anleitung angegebenen Eigenschaften können jederzeit und ohne vorherige Ankündigung geändert werden. 2. LIEFERUMFANG 1 Kamera (Baby-Einheit) 1 Monitor (Eltern-Einheit) 2 AC-DC-Adapter 1 Aufladbare Lithium-Batterie (Li-ion) für den Monitor 1 Tragriemen 1 Tasche für den Transport und die Aufbewahrung 1 Stativ Bedienungsanleitung und Garantie • Sollte eines der oben beschriebenen Teile fehlen, setzen Sie sich bitte mit Ihrem Lieferanten in Verbindung. 3. SICHERHEITSNORMEN Lesen Sie bitte diese Anleitung sorgfältig durch, bevor Sie Ihr Baby-Überwachungssystem zum ersten Mal benutzen und bewahren sie die Anleitung für zukünftige Konsultationen auf. 3.1. ALLGEMEINE SICHERHEITSNORMEN: Bei der Verwendung von Elektrogeräten müssen gewisse grundlegende Sicherheitsnormen beachtet werden: 1. Es ist notwendig, spezielle Vorsicht walten zu lassen, wenn Kinder oder ältere Menschen ein elektrisches Produkt verwenden oder dieses in der Nähe von solchen Personen zum Einsatz kommt. Halten Sie das Produkt von Kindern fern, wenn Sie sich nicht anwesend sind. 2. Dieses Produkt darf ausschließlich zur Überwachung verwendet werden. Es ist auf keinen Fall ein Ersatz für eine verantwortungsvolle Überwachung von Kindern oder älteren Menschen. 3. Betreiben Sie das Baby-Überwachungssystem ausschließlich mit den mitgelieferten AC-DC-Adaptern (5.0 V, 800 mA). 4. Verwenden Sie nur die empfohlene Batterie (Li-ion 3,7 V - 1200mAh). Versuchen Sie nicht, andere Batterien mit Ihrem Gerät aufzuladen. 5. Dieses Produkt enthält eine Reihe von kleinen Teilen. Achten Sie darauf, dass beim Auspacken und Montieren des Gerätes keine Teile verloren gehen. 6. Lassen Sie Kinder NICHT mit Verpackungsmaterialien wie Kunststoffbeutel usw. spielen. Achten Sie beim Auspacken und Montieren des Produktes darauf. 7. Benutzen Sie das Gerät NICHT, wenn das Kabel oder der Stecker defekt sind. Falls das Gerät nicht einwandfrei funktioniert oder irgendeinen Schaden aufweist, setzen Sie sich bitte mit dem Kundendienst von Miniland in Verbindung, um es zu reparieren und unnötige Risiken zu vermeiden. 8. Versuchen Sie NICHT, das Gerät eigenhändig zu reparieren oder deren elektrischen oder mechanischen Eigenschaften zu verändern, andernfalls wird die Garantie annulliert. 9. Kontrollieren Sie, ob die Spannung in Ihrem Haus mit derjenigen des Gerätes übereinstimmt, die unter den technischen Daten desselben angegeben ist. 10. Sollten Sie das Baby-Überwachungssystem während einer längeren Zeitspanne nicht verwenden, stecken Sie den AC-DC-Adapter aus. Um diesen auszustecken, ziehen sie am Transformator und niemals am Kabel. 11. Dieses Gerät darf ausschließlich in Innenbereichen betrieben werden. Es darf nicht dem Regen, der Feuchtigkeit oder Spritzwasser oder anderen Flüssigkeiten ausgesetzt werden. Stellen Sie niemals ein mit Flüssigkeit gefüllter Behälter (Glas oder Vase) auf das oder in unmittelbarer Nähe des BabyÜberwachungsgerätes. Der Monitor des Gerätes darf nicht in der Nähe von Wasser benutzt werden. VORSICHTSMASSNAHMEN • Dieses Gerät wurde speziell entwickelt, um Eltern zu ermöglichen, ihr Baby auf Distanz zu überwachen. Es ist auf keinen Fall ein Ersatz für eine verantwortungsvolle Überwachung des Kindes. Eines del Elternteile sollte sich stets in der Nähe des Monitors befinden. Das Baby-Überwachungssystem ist kein medizinisches Gerät, das das Wohlbefinden des Babys gewährleisten könnte! Es ist wichtig, regelmäßig im Kinderzimmer nachzuschauen, ob dort alles in Ordnung ist. •Verwenden Sie niemals das Baby-Überwachungsgerät in Fällen, wo das Leben oder die Gesundheit des Babys oder anderen Personen, oder die Integrität des Gebäudes vom Gerät abhängig sein könnten. Der Hersteller übernimmt keine Haftung für Tod, körperlichen oder materiellen Schäden, die durch eine Fehlfunktion oder einen Missbrauch des Gerätes verursacht wurden. •Die unsachgemäße Verwendung dieses BabyÜberwachungssystems könnte rechtliche Folgen haben. • Benutzen Sie dieses Gerät auf eine verantwortungsvolle Weise. WICHTIGER HINWEIS: Beachten Sie bitte, dass Änderungen oder Modifikationen am Gerät, die nicht durch den technischen Dienst von Miniland durchgeführt wurden, nicht von der Produktgarantie gedeckt sind. 50 3.2. BEMERKUNGEN ZU ETWAIGEN FUNKSTÖRUNGEN Dieses Gerät wurde im Werk geprüft und erfüllt die Anforderungen der Richtlinie RED 2014/53/EU. Diese Anforderungen sollen einen angemessenen Schutz gegen störende Interferenzen (Funkstörungen) in einer Wohnumgebung gewährleisten. Wenn das Gerät nicht ordnungsgemäß installiert und gemäß den Anweisungen verwendet wird, können Störungen des Funkverkehrs auftreten. Beachten Sie jedoch, dass trotzdem Störungen in einer bestimmten Installation auftreten können. Sollte das Baby-Überwachungssystem Störungen des Radiooder Fernsehempfangs verursachen (dies kann man durch Aus- und Einschalten des Gerätes nachweisen), versuchen Sie die Störung wie nachstehend beschrieben zu beseitigen: • Ändern Sie die Ausrichtung oder den Standort des Empfängers. • Vergrößern Sie den Abstand zwischen dem betroffenen Gerät und dem Baby-Überwachungssystem. • Schließen Sie das Gerät und den Empfänger an verschiedenen Steckdosen an. • Stellen Si sich mit dem Kundendienst von Miniland in Verbindung. Um die Einhaltung der Richtlinie RED 2014/53/EU zu gewährleisten, verwendet dieses Gerät speziell abgeschirmte Kabel. Der Betrieb des Gerätes mit nicht zugelassenen oder nicht abgeschirmten Kabeln wird wahrscheinlich zu Störungen des Radio- oder Fernsehempfangs führen. 3.3. WAHL EINES GEEIGNETEN AUFSTELLORTES FÜR DAS GERÄT • Stellen Sie das elektronische Gerät nicht in der Nähe von Kindern auf, um mögliche Unfälle zu vermeiden. • Kinder können sich in den Kabeln verwickeln. Die Baby-Einheit sollte in einem Abstand von 1 bis 1.5 Metern von der Babykrippe aufgestellt werden. Stellen Sie die Baby-Einheit niemals im Inneren der Babykrippe, des Kinderbettes oder Laufstalls auf. Achten Sie darauf, dass die Einheit, die Kabel und der Adapter sich außerhalb der Reichweite des Babys und anderen Kleinkindern befinden. • Stellen Sie das Baby-Überwachungssystem in einem Ort auf, an dem die Luft frei zirkulieren kann. Das Gerät darf nicht auf weichen Kissen, Decken, Steppdecken usw. oder Ecken von Schränken, Regalen, usw. aufgestellt werden. • Stellen Sie das Baby-Überwachungssystem fern von Wärmequellen wie Heizungen, Kamine, Kochherde und direkter Sonneneinstrahlung auf. • Stellen Sie die Babyeinheit fern von Fernsehgeräten, Radios und Umsetzern (Repeater) auf. Die intensiven Funksignale, die diese Geräte erzeugen, können Rauschen oder Bildverzerrungen auf dem Monitor verursachen. Sollte dies der Fall sein, stellen Sie die Kamera an einem anderen Ort auf. • Der Monitor kann auf einem Tisch aufgestellt werden. Verwenden Sie hierzu das ausklappbare Stützelement, das sich auf der Rückseite Teil des Monitors befindet. Wenn Sie dieses Stützelement nicht mehr benötigen, klappen Sie es gegen die Rückseite des Monitors, bis Sie ein „Klick“ hören, welches anzeigt, dass die Vorrichtung korrekt zurückgeklappt wurde. 51 DEUTSCH 4. EIGENSCHAFTEN UND FUNKTIONEN DES PRODUKTES 4.1. FUNKTIONEN UND KONTROLLELEMENTE DES MONITORS (ABBILDUNG 1) MONITOR (ABBILDUNG 1.1) 1. EIN-AUS LED-Anzeige 2. Mikrofon 3. LED-Ladeanzeige 4. LCD-Bildschirm 5. EIN/AUS-Taste 6. Lautsprecher 7. Befestigung für das Tragband 8. Einstelltaste ▲ 9. Zoom/Menü-Taste 10. Einstelltaste ▼ 11. OK/Scan-Modus-Taste 12. Sprechtaste (um mit dem Baby zu sprechen) 13. AV-Ausgang 14. Mini-USB/PC-Anschluss 15. Klappbare Halterungsvorrichtung 16. Deckel des Batteriefachs 17. Ausziehbare Antenne DISPLAY Display-Symbole (ABBILDUNG 1.2) a. Signalstärke b. An der Monitor eingestellte Lautstärke c. Nachtsicht-Funktion d. Nachtliedchen e. VOX-Modus f. Angewählte Kamera g. Nachtlichtlein h. Übertragungsniveau i. Batteriezustand j. Symbol „mit dem Baby sprechen“ k. Symbol „ Alarm aktiviert“ Menü-Symbole (ABBILDUNG 1.3) A. Menü „Kamera Wählen/Hinzufügen/Löschen“ B. Menü „Einstellungen der Kamera“ C. VOX/Standby D. Übertragungsniveau E. Alarm F. Vibrationsfunktion G. Helligkeit des Bildschirms 4.2. FUNKTIONEN UND KONTROLLELEMENTE DER KAMERA (ABBILDUNG 2) I. Einziehbare Antenne II. Lichtsensor III. EIN-Taste IV. Tragvorrichtung V. Lautsprecher VI. Synchronisationstaste (Pairing) VII. Mini-USB- Anschluss VIII. Mikrophon IX. EIN/PAIRING LED-Anzeige X. Linse der Kamera XI. Infrarot XII. Anschluss für das Stativ DEUTSCH 5. BEDIENUNGSANLEITUNG 5.1. VOR DEM GEBRAUCH 5.1.1. SPEISUNG DER ELTERN-EINHEIT UND BENUTZUNG DER BATTERIE Der Monitor (Eltern-Einheit) dieses BabyÜberwachungsgerätes kann sowohl mit der Batterie als auch mit dem mitgelieferten AC/DC-Adapter betrieben werden. Die Batterie muss für mindestens während acht Stunden aufgeladen werden, bevor das Gerät zum ersten Mal verwendet wird oder für eine lange Zeit nicht benutzt worden ist. Das Baby-Überwachungssystem wird mit einer LithiumIonen-Batterie von 3.7 V, 1200mAh für den Monitor geliefert. Es wird empfohlen, den Monitor mit der Batterie zu betreiben, um das Audio/Video-Signal der Kamera überall empfangen zu können. Wenn immer möglich, verbinden Sie den Monitor mit dem AC-DC-Adapter, damit die Batterie stets aufgeladen ist. EINSETZEN DER BATTERIE (ABBILDUNG 3) 1. Lösen Sie die Schraube und entfernen Sie die Abdeckung des Batteriefaches (16), das sich auf der Rückseite des Gerätes befindet. 2. Legen Sie die Lithium-Ionen-Batterie (mitgeliefert) ein. 3. Setzen Sie den Deckel auf und ziehen Sie die Schraube an. VORSICHT: Verwenden Sie ausschließlich Batterien des empfohlenen Typs, andernfalls besteht die Gefahr einer Explosion der Batterie. Entsorgen Sie die verbrauchten Batterien auf eine verantwortungsvolle Weise. HINWEIS: Wenn Sie nicht beide Einheiten gleichzeitig benutzen, ist es ratsam, diese auszuschalten, um die Batterien zu schonen. AUFLADEN DER BATTERIE Legen Sie die aufladbare Batterie wie oben beschrieben in das Batteriefach ein. Stecken Sie das Kabel des AC-DC-Adapters in den Mini-USB-Anschluss der Einheit ein (14). Benutzen Sie ausschließlich den empfohlenen Adapter. Verbinden Sie den Adapter mit einer Steckdose. Während der Monitor ans Netz angeschlossen ist und die Batterie aufgeladen wird, leuchtet die rote Lade-LED (3). Wenn das Ladegerät ans Netz angeschlossen ist und der Ladeprozess der Batterie beendet wurde, leuchtet die rote Lade-LED (3) in grüner Farbe. Wenn die Batterie stark entladen ist, wird das BatterieSymbol (i) rot blinken und das Gerät alle 30 Sekunden einen Piepton erzeugen. HINWEIS: Entfernen Sie die Batterie, wenn Sie das Gerät während einer längeren Zeit nicht benutzen 5.1.2. SPEISUNG DER BABY-EINHEIT Die Kamera (Baby-Einheit) dieses BabyÜberwachungssystems darf nur mit dem mitgelieferten AC-DC-Adapter verwendet werden. 1. Lokalisieren Sie den entsprechenden Anschluss (IX) auf der Rückseite der Baby-Einheit. 2. Verbinden Sie das Kabel des Adapters mit dem Mini-USB-Anschluss der Kamera. Benutzen Sie ausschließlich den mitgelieferten Adapter. 3. Verbinden Sie den Adapter mit einer Steckdose. VORSICHT: Ertickungsgefahr! – Halten Sie das Kabel fern von der Reichweite des Babys! Stellen Sie die Kamera NIEMALS näher als 1 Meter von der Krippe auf! Verwenden Sie NIEMALS Verlängerungskabel mit integriertem Netzadapter, sondern ausschließlich den mitgelieferten AC-DC-Adapter! 5.2. BETRIEB 5.2.1. EIN- UND AUSSCHALTEN DER EINHEITEN 5.2.1.1. MONITOR: Halten Sie die EIN- oder AUS-Taste (5) gedrückt, die sich an der oberen Seite des Monitors befindet, wenn Sie diesen Ein- bzw. Ausschalten möchten. Die EIN/AUSLED-Anzeige (1) leuchtet oder erlischt, je nachdem das Gerät ein- oder ausgeschaltet ist. 5.2.1.2. KAMERA: Um die Kamera ein- oder auszuschalten, halten Sie die EIN/AUS-Taste (III) während ca. 2 Sekunden gedrückt. Die entsprechende LED (IX) leuchtet oder erlischt, je nachdem das Gerät ein- oder ausgeschaltet ist. Nach der Installation und dem Einschalten der Kamera, können Sie die im Kinderzimmer aufgenommen Bilder und Klänge auf dem Monitor sehen. 5.2.2. LAUTSTÄRKE DES MONITORS Drücken Sie die Einstelltaste (8), um die Lautstärke zu erhöhen und die Einstelltaste (10) wenn sie diese reduzieren möchten. Es gibt 5 verschiedene Lautstärkestufen. 5.2.3. MIT DEM BABY SPRECHEN Sie können mit Ihrem Baby über die Eltern-Einheit sprechen (zum Beispiel, um es zu beruhigen und ihm zu signalisieren, dass Sie gleich zu ihm gehen werden). Sie können auch mit Ihrem Partner sprechen, falls er sich im Kinderzimmer befindet. Halten Sie die Taste „mit dem Baby sprechen“ (12) gedrückt und sprechen Sie in den Monitor. Lassen Sie diese Taste los, wenn Sie mit dem Sprechen aufgehört haben und die Geräusche im Kinderzimmer wieder hören wollen. Beachten Sie bitte, dass Sie Ihr Baby nicht hören können, solange Sie zu ihm sprechen. Um es zu hören, müssen Sie die entsprechende Taste wieder loslassen. 5.2.4. ZOOM Sie können das auf dem Monitor angezeigte Bild vergrößern oder verkleinern. Benutzen Sie dazu die Zoom-Funktion, die über vier verschiedene Stufen verfügt. Um die Zoom-Funktion zu aktivieren, gehen Sie bitte folgendermaßen vor: 1. Drücken Sie die Zoom-Taste . Im oberen linken Quadranten des Bildes erscheint ein weißes Feld. 2. Drücken Sie die Tasten HINAUF und HINUNTER um den gewählten Quadranten zu ändern. 3. Drücken Sie die Taste um das Bild des gewählten Quadranten zu Vergrößern. 4. Drücken Sie die Zoom-Taste um wieder zum Einstellungsmodus der Quadranten zu gelangen (falls Sie das Bild eines anderen Quadranten zoomen möchten). 5. Drücken Sie erneut die Zoom-Taste um die ZoomFunktion wieder zu verlassen. 52 DEUTSCH 5.2.5. INFRAROT-NACHTSICHT (AUTOMATISCHE FUNKTION) Die Infrarot-Nachtsicht-Funktion ermöglicht es der Kamera, Bilder von Ihrem Baby oder des überwachten Bereiches in dunklen oder schwach beleuchteten Umgebungen zu erfassen. In diesem Modus werden auf dem Bildschirm nur Schwarz-Weiß-Bilder und Objekte, die weniger als 2 Meter von der Kamera entfern sind. angezeigt. Die Kamera überwacht ständig die Lichtverhältnisse und schaltet automatisch auf den Infrarot-NachtsichtModus um, wenn das Licht für normale Aufnahmen nicht ausreicht. 5.2.6. MELDUNG BEIM ÜBERSCHREITEN DER ZULÄSSIGEN REICHWEITE Falls der Monitor die maximal zulässige Distanz zur Kamera überschreitet (siehe technische Daten), wird die LED „EIN-AUS/Synchronisation“ (Pairing) der Kamera (IX) und des Monitors (1) rot blinken, und das Symbol „Reichweite“ (a) auf dem Bildschirm auf rot wechseln, während auf dem Bildschirm das Logo von MINILAND erscheint. Bringen Sie den Monitor näher an die Kamera, bis auf dem Bildschirm wieder ein sauberes Bild angezeigt wird. 5.2.7. HAUPTMENÜ Halten Sie die Taste Menü/Zurück gedrückt, um die Hauptfunktionen und –Eigenschaften Ihres BabyÜberwachungssystems einstellen zu können. 5.2.7.1. MENÜ DER KAMERA 5.2.7.1.1. WAHL EINER KAMERA An das Baby-Überwachungssystem können bis vier verschiedene Kameras angeschlossen werden, mit denen Sie verschiedene Bereiche überwachen können. Um eine bestimmte Kamera anzuwählen, gehen Sie bitte folgendermaßen vor: 1. Drücken Sie die Taste Menü/Zurück während ca. 3 Sekunden, um das Menü zu öffnen. 2. Drücken Sie die Taste HINAUF oder die Taste HINUNTER bis das Symbol der Kamera aufleuchtet und drücken Sie danach die Taste um zum entsprechenden Untermenü zu gelangen. 3. oder die Taste HINUNTER bis das Symbol „Kamera SEHEN“ aufleuchtet und drücken Sie . danach die Taste 4. Drücken Sie die Taste HINAUF oder die Taste HINUNTER um die gewünschte Kamera anzuwählen und drücken Sie danach die Taste um die Wahl zu bestätigen. Hinweis 1: Sie können nur die Bilder der Kameras sehen, die vorher mit dem Monitor synchronisiert wurden. Hinweis 2: Es gibt eine raschere Methode, um eine Kamera anzuwählen: durch Drücken der Taste können Sie zyklisch die Kameras sehen, die mit dem Monitor synchronisiert sind: CAM1/CAM2/CAM3/CAM4/SCAN-MODUS. 5.2.7.1.2. SCAN-MODUS Mit dieser Funktion können Sie nacheinander und 53 auf zyklische Weise die Kanäle der mit dem Monitor synchronisierten Kameras sehen. Das Bild jeder Kamera erscheint auf dem Bildschirm während ca. 12 Sekunden. Diese Funktion kann nur verwendet werden, wenn mehr als eine mit dem Monitor gekoppelt ist. Um zu dieser Funktion zu gelangen, gehen Sie bitte folgendermaßen vor: 1. Drücken Sie die Taste Menü/Zurück während ca. 3 Sekunden, um das Menü zu öffnen. 2. Drücken Sie die Taste HINAUF oder die Taste HINUNTER bis das Symbol der Kamera aufleuchtet und drücken Sie danach die Taste um zum Untermenü zu gelangen. 3. Drücken Sie die Taste HINAUF oder die Taste HINUNTER bis das Symbol „Kamera SEHEN“ aufleuchtet und drücken Sie danach die Taste . 4. Drücken Sie die Taste HINAUF oder die Taste HINUNTER und wählen Sie das Symbol „SCAN“ . 5. Drücken Sie die Taste um die Einstellung zu bestätigen. Hinweis 1: Wenn eine der Kameras ich außerhalb der Reichweite befindet oder nicht eingeschaltet ist, wir der Monitor dies melden, und den Scan-Modus automatisch unterbrechen. Hinweis 2: Der Scan-Modus kann aktiviert oder deaktiviert werden, indem Sie während der Betrachtung des Hauptbildschirmes die Taste drücken (falls mehr als eine Kamera mit dem Monitor synchronisiert ist). 5.2.7.1.3. EINE KAMERA HINZUFÜGEN Dieses Produkt ist in der Lage, verschiedene Bereiche mit bis zu 4 verschiedenen Kameras zu überwachen (über die Kanäle 1, 2, 3 und 4). Der Monitor und die Kamera verlassen das Werk mit programmiertem Kanal 1. Wenn Sie eine zusätzliche Kamera anschließen möchten, gehen Sie bitte folgendermaßen vor: 1. Drücken Sie die Taste Menü/Zurück während ca. 3 Sekunden, um das Menü zu öffnen. 2. Drücken Sie die Taste HINAUF oder die Taste HINUNTER bis das Symbol der Kamera aufleuchtet und drücken Sie danach die Taste um zum Untermenü zu gelangen. 3. Drücken Sie die Taste HINAUF oder die Taste HINUNTER bis das Symbol „Kamera HINZUFÜGEN“ aufleuchtet und drücken Sie danach die Taste . 4. Drücken Sie die Taste HINAUF oder die Taste um den Kanal anzuwählen, auf dem Sie HINUNTER die neue Kamera hinzufügen möchten und bestätigen Sie die Einstellung mit der Taste . 5. Während die EIN-AUS LED-Anzeige blinkt, drücken Sie die Synchronisierungstaste der Kamera (VI). 6. Sobald die Kamera mit dem Monitor synchronisiert ist, hört de LED-Anzeige auf zu blinken, und das Bild der neu angekoppelten Kamera erscheint auf dem Bildschirm des Monitors. 7. Falls der Synchronisierungsvorgang nicht korrekt ausgeführt wurde, wiederholen Sie bitte die oben beschriebenen Schritte. Hinweis 1: Es können nur diejenigen Kanäle angewählt werden, mit denen noch keine Kamera synchronisiert wurde. Hinweis 2: Dieses Untermenü kann nicht aufgerufen DEUTSCH werden, wenn bereit 4 Kameras mit dem Monitor synchronisiert wurden. Aus verschiedenen Gründen kann es vorkommen, dass die Verbindung zwischen dem Monitor und einer bereits mit ihm synchronisierten Kamera verloren geht. In diesem Fall, wiederholen Sie bitte den oben beschriebenen Vorgang, um die entsprechende Kamera erneut mit dem Monitor anzukoppeln. 5.2.7.1.4. EINE KAMERA ENTFERNEN Um eine der angeschlossenen Kamera zu entfernen, gehen Sie bitte folgendermaßen vor: während ca. 3 1. Drücken Sie die Taste Menü/Zurück Sekunden, um das Menü zu öffnen. 2. Drücken Sie die Taste HINAUF oder die Taste HINUNTER bis das Symbol der Kamera aufleuchtet und drücken Sie danach die Taste um zum Untermenü zu gelangen. 3. Drücken Sie die Taste HINAUF oder die Taste HINUNTER bis das Symbol „Kamera ENTFERNEN“ aufleuchtet und drücken Sie danach die Taste . 4. Pulse la tecla ARRIBA o la tecla ABAJO um die Kamera, die Sie entfernen möchten, anzuwählen und bestätigen Sie die Einstellung mit der Taste . Hinweis 1: Wenn nur eine Kamera mit dem Monitor synchronisiert ist, dann können weder diese Kamera entfernt noch dieses Untermenü aufgerufen werden. Hinweis 2: Es muss ein Kanal gelöscht werden, bevor eine zusätzliche Kamera mit dem Monitor synchronisiert werden kann. 5.2.7.2. EINSTELLUNGSMENÜ DER KAMERA 5.2.7.2.1. NACHTLIEDCHEN Die Baby-Einheit kann ein Nachtliedchen wiedergeben, um Ihr Baby in den Schlaf zu wiegen. Um diese Funktion zu aktivieren, gehen Sie bitte folgendermaßen vor: während ca. 3 1. Drücken Sie die Taste Menü/Zurück Sekunden, um das Menü zu öffnen. 2. Drücken Sie die Taste HINAUF oder die Taste HINUNTER bis das Symbol des Menüs für die Einstellungen der Kamera aufleuchtet und drücken Sie danach die Taste um zum Untermenü zu gelangen. 3. Drücken Sie die Taste HINAUF oder die Taste HINUNTER bis das Symbol „NACHTLIEDCHEN“ aufleuchtet und drücken Sie danach die Taste . 4. Drücken Sie die Taste HINAUF oder die Taste HINUNTER um eines der 5 zur Verfügung stehenden Nachtliedchen, Ruhe (OFF) oder zyklische Wiedergabe anzuwählen (die Standard-Einstellung ist OFF). 5. Nachdem Sie eine Melodie gewählt haben, drücken Sie die Taste um sur Einstellungsfunktion der Lautstärke zu gelangen. Drücken Sie die Taste HINAUF oder die Taste HINUNTER um die Lautstärke zwischen den Niveaus 1 und 3 einzustellen, und drücken Sie danach die Taste . 6. Drücken Sie die Taste Menü/Zurück drei Mal, um zum Hauptbildschirm zurückzukehren. 7. Auf der oberen Seite des LCD-Bildschirms erscheint ras Symbol „Nachtliedchen“ (d). Beachten Sie bitte, dass das angewählte Nachtliedchen nur von der Kamera, die im Moment aktiv ist, wiedergegeben wird. Hinweis: Die Funktion „endlose Wiedergabe“ wiedergibt alle vorhandenen Nachtliedchen auf eine zyklische Weise. 5.2.7.2.2. LAUTSTÄRKE DER KAMERA In diesem Menü kann die Lautstärke, mit der die Kamera die Stimme der Eltern wiedergeben wird, eingestellt werden. Das System verwendet eine bidirektionale Funktion für die Kontrolle der Lautstärke. Um die Lautstärke der Kamera einzustellen, gehen Sie bitte folgendermaßen vor: 1. Drücken Sie die Taste Menü/Zurück während ca. 3 Sekunden, um das Menü zu öffnen. 2. Drücken Sie die Taste HINAUF oder die Taste HINUNTER bis das Symbol „Menü für die Einstellungen der Kamera“ aufleuchtet und drücken Sie danach die Taste um zum Untermenü zu gelangen. 3. Drücken Sie die Taste HINAUF oder die Taste HINUNTER bis das Symbol „Lautstärke der Kamera“ aufleuchtet und drücken Sie danach die Taste . 4. Drücken Sie die Taste HINAUF oder die Taste HINUNTER um eines der 3 zur Verfügung stehenden Lautstärkeniveaus einzustellen: TIEF/MITTEL/HOCH (LOW/MID/HIGH). . 5. Bestätigen Sie die Einstellung mit der Taste Beachten Sie bitte, dass die eingestellte Lautstärke nur von der Kamera, die im Moment mit dem Monitor verbunden ist, wahrgenommen wird. 5.2.7.2.3. NACHTLICHTLEIN Das System verfügt über ein Nachtlichtlein, das Ihr Baby beruhigen wird, da es das Kinderzimmer sanft beleuchtet. Um das Nachtlichtlein zu aktivieren, gehen Sie bitte folgendermaßen vor: 1. Drücken Sie die Taste Menü/Zurück während ca. 3 Sekunden, um das Menü zu öffnen. 2. Drücken Sie die Taste HINAUF oder die Taste HINUNTER bis das Symbol „Menü für die Einstellungen der Kamera“ aufleuchtet und drücken Sie danach die Taste um zum Untermenü zu gelangen. 3. Drücken Sie die Taste HINAUF oder die Taste HINUNTER bis das Symbol „NACHTLICHTLEIN“ aufleuchtet und drücken Sie danach die Taste . 4. Drücken Sie die Taste HINAUF oder die Taste HINUNTER und stellen Sie „ON” oder „OFF“ ein, wenn Sie diese Funktion aktivieren bzw. deaktivieren möchten. 5. Bestätigen Sie die Einstellung mit der Taste . Beachten Sie bitte, dass das aktivierte Nachtlichtlein nur bei der Kamera, die im Moment mit dem Monitor verbunden ist, leuchten wird. 5.2.7.3. MENÜ VOX/STANDBY 5.2.7.3.1. ENERGIESPARMODUS ODER NUR AUDIO (STANDBY) Mit dem Energiespar- oder nur Audio-Modus (Standby), können Sie die maximale Zeit, während der das 54 DEUTSCH Monitorbild aktiv ist (1, 3 oder 5 Minuten) einstellen; nach dieser Zeit wird das Bild auf dem Bildschirm verschwinden, um Energie zu sparen, wobei das Audiosignal weiterhin zu hören ist. Um das Bild wieder zu aktivieren, drücken Sie eine beliebige Taste des Monitors. Um diesen Modus zu aktivieren, gehen Sie bitte folgendermaßen vor: 1. Drücken Sie die Taste Menü/Zurück während ca. 3 Sekunden, um das Menü zu öffnen. 2. Drücken Sie die Taste HINAUF oder die Taste HINUNTER bis das Symbol „Menü VOX/Standby“ aufleuchtet und drücken Sie danach die Taste um zum Untermenü zu gelangen. 3. Drücken Sie die Taste HINAUF oder die Taste HINUNTER bis das Symbol „Standby“ aufleuchtet und drücken Sie danach die Taste . 4. Drücken Sie die Taste HINAUF oder die Taste HINUNTER und wählen Sie die gewünschte Option 1, 3 oder 5 Minuten. Wählen Sie „OFF“, um diese Funktion zu deaktivieren. 5. Bestätigen Sie die Einstellung mit der Taste . 6. Drücken Sie die Taste Menü/Zurück zwei Mal, um zum Hauptbildschirm zurückzukehren. 5.2.7.3.2. VOX-EINSTELLUNG Dieser Modus ermöglicht es Ihnen, das BabyÜberwachungssystem mit der Stimme zu steuern. Wenn Sie auf dem Monitor den VOX-Modus aktivieren, dann wird die Kamera kein Bild übertragen, solange es im überwachten Bereich still ist. Der Bildschirm schaltet sich automatisch aus, wenn die Kamera kein Signal sendet. Sobald die Kamera ein beliebiges Geräusch wahrnimmt, das einen Pegel hat, der über der eingestellten Empfindlichkeitsgrenze der Kamera liegt, wird diese sofort wieder das Bild auf den Monitor übertragen. Um diese Funktion zu deaktivieren, um den überwachten Bereich permanent auf dem Bildschirm zu sehen, deaktivieren Sie am Monitor den VOX-Modus. • VOX-Modus DEAKTIVIERT: Die Kamera überträgt ständig, sodass sie Ihr Baby oder den überwachten Bereich kontinuierlich auf dem Bildschirm sehen können. • VOX-Modus AKTIVIERT: Die Kamera überträgt nur dann, wenn sie ein Geräuschpegel wahrnimmt, der über der eingestellten Empfindlichkeitsgrenze der Kamera liegt. Um diese Funktion zu aktivieren, müssen Sie sich zunächst vergewissern, dass Sie den Standby Modus auf 1, 3 oder 5 Minuten eingestellt haben (siehe Punkt 5.2.9.2.2). Wählen Sie 1, 3 oder 5 aus, wenn Sie wünschen, dass Ihre Kamera nach 1, 3 oder 5 Minuten, wenn kein Geräusch erkannt wurde, die Übertragung unterbricht. Wenn die Standby Zeit eingestellt ist, um den VOX Modus zu aktivieren, befolgen Sie bitte die folgenden Anweisungen: 1. Drücken Sie die Taste Menü/Zurück Sekunden, um das Menü zu öffnen. 2. Drücken Sie die Taste HINAUF während ca. 3 oder die Taste 55 HINUNTER bis das Symbol „Menü VOX/Standby“ aufleuchtet und drücken Sie danach die Taste um zum Untermenü zu gelangen. 3. Drücken Sie die Taste HINAUF oder die Taste HINUNTER bis das Symbol „VOX“ aufleuchtet und drücken Sie danach die Taste . 4. Drücken Sie die Taste HINAUF oder die Taste HINUNTER und stellen Sie das gewünschte Empfindlichkeitsniveau ein: OFF / 1 / 2 / 3 (voreingestellt ist OFF). Stellen Sie die Empfindlichkeit auf “1” bei einem Baby, das friedlich schläft und leise weint und auf “3”, wenn das Baby dazu neigt, während des Schlafes Lärm zu machen oder ziemlich laute Geräusche von sich gibt, bevor es tatsächlich zu weinen beginnt, oder setzen Sie den Pegel auf “2”, wenn das Verhalten Ihres Babys weder zum einen noch anderen Pegel passt. 5. Bestätigen Sie die Einstellung mit der Taste . 6. Drücken Sie die Taste Menü/Zurück zwei Mal, um zum Hauptbildschirm zurückzukehren. Hinweis: Wenn Sie Ihr Baby zu einem bestimmten Zeitpunkt sehen möchten, obwohl es in seiner Umgebung keinen Lärm gibt, können Sie die Kamera jederzeit durch Drücken einer beliebigen Taste auf dem Monitor wieder aktivieren. 5.2.7.4. ÜBERTRAGUNGSNIVEAU Sie können mit diesem Menü die Übertragungsleistung der Kamera einstellen. Es stehen zwei Niveaus zur Verfügung: HOCH / TIEF (HIGH / LOW). Im Modus HIGH, beträgt die Reichweite der Kamera auf offenem Feld ca. 250 Meter und im Modus LOW ca. 120 Meter, da die Kamera mit einer tieferen Sendeleistung arbeitet. Um das Übertragungsniveau einzustellen, gehen Sie bitte folgendermaßen vor: während ca. 3 1. Drücken Sie die Taste Menü/Zurück Sekunden, um das Menü zu öffnen. 2. Drücken Sie die Taste HINAUF oder die Taste HINUNTER bis das Symbol „Übertragungsniveau“ aufleuchtet und drücken Sie danach die Taste um zum Untermenü zu gelangen. 3. Drücken Sie die Taste HINAUF oder die Taste HINUNTER und wählen Sie das gewünschte Übertragungsniveau: HIGH oder LOW. 4. Bestätigen Sie die Einstellung mit der Taste . 5. Drücken Sie die Taste Menü/Zurück um zum Hauptbildschirm zurückzukehren. 5.2.7.5. EINSTELLUNG DER ALARMFUNKTION Um die Alarmfunktion einzustellen, gehen Sie bitte folgendermaßen vor: 1. Drücken Sie die Taste Menü/Zurück während ca. 3 Sekunden, um das Menü zu öffnen. 2. Drücken Sie die Taste HINAUF oder die Taste HINUNTER bis das Symbol „Alarm“ aufleuchtet und drücken Sie danach die Taste . 3. Drücken Sie die Taste HINAUF oder die Taste HINUNTER um den Timer der Alarm einzustellen (drücken Sie die Taste HINAUF um die Zeit zu erhöhen und die Taste HINUNTER um die Zeit zu reduzieren). 4. Bestätigen Sie die Einstellung mit der Taste . 5. Drücken Sie die Taste Menü/Zurück um zum Hauptbildschirm zurückzukehren. DEUTSCH Hinweis 1: Wenn die Alarmfunktion aktiv ist, erscheint auf dem LCD-Bildschirm das Symbol einer Uhr (k). Hinweis 2: Wenn Sie die Alarmfunktion deaktivieren möchten, wiederholen Sie die oben beschriebenen Schritte 1, 2 und 3 und stellen Sie für die Zeit den Wert „00:00“ ein. Das Symbol der Uhr wird vom Bildschirm verschwinden. Hinweis 3: Wenn das Alarmsignal ertönt, drücken Sie eine beliebige Taste, um es auszuschalten. Wenn Sie dies nicht tun, wird das Gerät während 7 Minuten ein Alarmsignal erzeugen und dieses danach automatisch ausschalten. 5.2.7.6. VIBRATIONSFUNKTION Mit dieser Funktion können Eltern bei Bedarf eine ruhige Atmosphäre schaffen. Sie ist besonders hilfreich in lärmigen Umgebungen und für Personen, die Hörprobleme haben. Wenn der Lärmpegel im Kinderzimmer die eingestellte Grenze überschreitet, wird der Monitor vier vibrieren, um die Eltern zu warnen. Um die Vibrationsfunktion zu aktivieren, gehen Sie bitte folgendermaßen vor: 1. Drücken Sie die Taste Menü/Zurück während ca. 3 Sekunden, um das Menü zu öffnen. 2. Drücken Sie die Taste HINAUF oder die Taste HINUNTER bis das Symbol „Vibrationsfunktion“ aufleuchtet und drücken Sie danach die Taste . 3. Drücken Sie die Taste HINAUF oder die Taste HINUNTER um diese Funktion zu aktiviere oder zu deaktivieren. 4. Bestätigen Sie die Einstellung mit der Taste . 5. Drücken Sie die Taste Menü/Zurück um zum Hauptbildschirm zurückzukehren. Beachten Sie bitte, dass die Vibrationsfunktion nur von der Kamera, die im Moment mit dem Monitor verbunden ist, ausgelöst wird. HINWEIS: Damit der Monitor vibrieret, wenn der Lärm im Kinderzimmer einen bestimmten Pegel überschreitet, ist es unerlässlich, dass der VOXModus aktiv ist. 5.2.7.7. HELLIGKEIT Um die Helligkeit des Bildschirms des Monitors einzustellen, gehen Sie bitte folgendermaßen vor: 1. Drücken Sie die Taste Menü/Zurück während ca. 3 Sekunden, um das Menü zu öffnen. 2. Drücken Sie die Taste HINAUF oder die Taste HINUNTER bis das Symbol „HELLIGKEIT“ aufleuchtet und drücken Sie danach die Taste . 3. Drücken Sie die Taste HINAUF oder die Taste HINUNTER aufleuchtet und drücken Sie danach die Taste. 4. Bestätigen Sie die Einstellung mit der Taste . 5. Drücken Sie die Taste Menü/Zurück um zum Hauptbildschirm zurückzukehren. 5.2.8. eMyBaby 5.2.8.1. ANMELDUNG 1. Melden Sie sich zuerst auf der Webseite eMyBaby an. Öffnen Sie zu diesem Zweck Ihren Webbrowser und üben Sie Zugriff auf www.emybaby.com aus. Klicken Sie auf den Button KONTO ERÖFFNEN. 2. Füllen Sie die Textfelder mit Ihren persönlichen Daten aus, akzeptieren Sie die Geschäfts- und Benutzungsbedingungen und drücken Sie dann auf den Button KONTO AKTIVIEREN. 3. Sie werden zur Bestätigung eine E-Mail an die Adresse empfangen, die Sie beim Anmeldungsvorgang angegeben haben. Durch Anklicken des mitgesendeten Links kehren Sie auf die Webseite von eMyBaby zurück und können nun Zugriff auf Ihr Konto ausüben, indem Sie Ihren Benutzernamen und das Kennwort eingeben und auf den Button ZUGANG drücken. 5.2.8.2. FÜR DEN BILDEMPFANG IM PC, AN DEN DAS BABYÜBERWACHUNGSGERÄT ANGESCHLOSSEN IST 1. Um das von der Kamera zu Ihrem Computer übertragene Bild empfangen zu können, müssen Sie den Monitor (Bildschirm) an den USB-Anschluss des Computers anschließen. Benutzen Sie dazu ein miniUSB-USB Kabel (nicht mitgeliefert). Der Monitor muss eingeschaltet sein. Sollte die Batterie leer sein, so muss sie wieder aufgeladen werden. 2. Nachdem Sie Ihren Benutzernamen und das Kennwort auf eMyBaby eingegeben haben, wählen Sie die Option BABYMONITOR auf dem DESKTOP. 3. Wählen Sie nun das Gerätemodell Digimonitor 3.5”plus. 4. Sie haben die Wahl zwischen zwei Optionen. Wählen „Sie Nur im Computer, an welchen das Babyüberwachungsgerät mittels USB kabel angeschlossen ist“. 5. Bei fehlerfreiem Betrieb können Sie Ihr Baby nun automatisch auf dem Bildschirm des Computers sehen. Sollten Sie Probleme mit dem Bildempfang haben, so rufen Sie die Online-Anleitungen auf, indem Sie auf das Symbol LESEN SIE HIER DIE ANLEITUNGEN drücken. 5.2.8.3. FÜR DIE FERNÜBERTRAGUNG DER BILDER ÜBER eMyBaby Für die Fernübertragung der Bilder zu Ihrem PC, Tablet oder Smartphone, befolgen Sie diese Schritte: ANMERKUNG: Um das von der Kamera aufgezeichnete Bild im Modus der Fernübertragung über eMyBaby sehen zu können, muss der Monitor an Ihren PC angeschlossen sein. Das Signal muss unbedingt vom PC aus, an den der Monitor Ihres Babyüberwachungsgeräts angeschlossen ist, über eMyBaby gesendet werden. Wird dieser erste Schritt unterlassen, so kann das Signal in keinem anderen Gerät (PC, Tablet oder Mobiltelefon) empfangen werden. 1. Schließen Sie das Babyüberwachungsgerät gemäß den zuvor beschriebenen Anweisungen an Ihren PC an. Der Monitor ist mittels eines miniUSB-USB Kabels (nicht mitgeliefert) an einen USB-Anschluss des Computers anzuschließen. 2. Üben Sie Zugriff auf die Webseite eMyBaby (www. emybaby.com) aus, indem Sie Ihren Benutzernamen und das Kennwort eingeben (melden Sie sich wie im vorher beschriebenen Fall an, wenn Sie noch nicht angemeldet sein sollten) und wählen Sie die Option BABYMONITOR. 56 3. Wählen Sie unter den verschiedenen angezeigten Modellen von Babyüberwachungsgeräten Digimonitor 3.5” plus aus. 4. Sie haben die Wahl zwischen zwei Optionen. Wählen Sie „Sie können Ihr Baby überall sehen, sei es auf einem anderen Computer, einem Tablet oder einem Smartphone“. 5. Wenn Sie zum ersten Mal Zugriff auf diesen Service ausüben, werden Sie um die Eingabe Ihrer Produktbestellnummer gebeten. Diese Nummer hat das Format MNLXX-XXXXX. Sie können sie im Inneren des Batteriefaches des Monitors finden. 6. Nach Eingabe des Codes gelangen Sie zu einer Bildfläche, auf der Sie zwei verschiedene Optionen vorfinden werden: Senden und Signal empfangen. Um das von der Kamera aufgezeichnete Bild im Modus der Fernübertragung in Ihrem Ferngerät sehen zu können, müssen Sie zuerst auf den Button Senden drücken. das in der Bildmitte 7. Drücken Sie auf das Symbol erscheint. Wenn Ihr Computer mit der Übertragung beginnt, erscheint das folgende Symbol auf Ihrem Bildschirm: Befolgen Sie diese Schritte, um das Bild von einem anderen Computer aus empfangen zu können: DEUTSCH den zuvor beschriebenen Anweisungen an Ihren PC an. Schließen Sie zu diesem Zweck den Monitor mittels eines miniUSB-USB Kabels (nicht mitgeliefert) an den USB-Anschluss Ihres Computers an. 2. Üben Sie im PC, in dem Sie das Bild im Modus der Fernübertragung empfangen möchten, Zugriff auf die Webseite eMyBaby (www.emybaby.com) aus. Geben Sie zu diesem Zweck Ihren Benutzernamen und das Kennwort ein und wählen Sie die Option BABYMONITOR. 3. Wählen Sie zwischen den verschiedenen Modellen von Babyüberwachungsgeräten Digimonitor 3.5” plus aus. 4. Sie haben die Wahl zwischen zwei Optionen. Wählen Sie „Sie können Ihr Baby überall sehen, sei es auf einem anderen Computer, einem Tablet oder einem Smartphone“. 5. Um das von der Kamera übertragene Bild im Modus der Fernübertragung in hrem Ferngerät sehen zu können, müssen Sie jetzt auf den Button Signal empfangen drücken. Bei fehlerfreiem Betrieb müssten Sie jetzt Ihr Baby automatisch auf dem Bildschirm Ihres Computers sehen können. Sollten Sie Probleme mit dem Bildempfang haben, so rufen Sie die Online-Anleitungen auf, indem Sie auf das Symbol LESEN SIE HIER DIE ANLEITUNGEN drücken. Befolgen Sie diese Schritte, um das Bild von einem Ferngerät aus empfangen (Tablet oder Mobiltelefon) 1. Schließen Sie das Babyüberwachungsgerät gemäß zu können: App eMyBaby Miniland hat die App eMyBaby entwickelt, die für iOS- und Android-Geräte zur Verfügung steht und kostenlos heruntergeladen werden kann. Um die Anwendung eMyBaby runterzuladen, gehen Sie bitte zuerst im entsprechenden AppStore oder laden Sie sie direkt herunter, indem Sie den entsprechenden QR Code scannen: Um diese App zu installieren, folgen Sie bitte den Anweisungen, die sich am Anfang dieses Handbuches befinden. 1. Öffnen Sie die App nach ihrer Installation. Gehen Sie zu ZUGANG und geben Sie Ihren Benutzernamen und Ihr Kennwort ein, wenn Sie bereits angemeldet sind, oder melden Sie sich an, wenn Sie noch nicht angemeldet sind. Vergessen Sie nicht, dass Ihnen eine Email zur Bestätigung an die von Ihnen bei der Anmeldung angegebene Adresse zugeschickt wird. 2. Im Hauptmenü wählen Sie die Option BABYMONITOR. Wählen Sie zwischen den verschiedenen Modellen von Babyüberwachungsgeräten Digimonitor 3.5” plus aus. um das von der Kamera aufgezeichnete Bild sehen zu können. 3. Drücken Sie auf das Symbol PLAY Webbrowser des Geräts Sie können das von der Kamera aufgezeichnete Bild auch sehen, indem Sie über den Webbrowser Ihres Mobilgeräts Zugriff auf die Webseite eMyBaby ausüben. Diese Option wird besonders nützlich für Sie sein, wenn Sie über kein iOS- oder Android-Gerät verfügen. 1. In Ihrem Webbrowser üben Sie Zugriff auf die Webseite eMyBaby(www.emybaby.com) aus und geben Sie Ihren Benutzernamen und Ihr Kennwort ein. Wählen Sie die Option BABYMONITOR im Hauptmenü. 2. Wählen Sie zwischen den verschiedenen Modellen von Babyüberwachungsgeräten digimonitor 3.5” plus aus. 3. Sie haben die Wahl zwischen zwei Optionen. Wählen Sie „Von jedem beliebigen Ort aus, an welchem ein 57 DEUTSCH Internetanschluss vorhanden ist, unabhängig davon, wo Sie sich gerade befinden, in einem anderen Computer, Tablet oder im Smartphone“. 4. Drücken Sie auf den Button Signal empfangen. Bei fehlerfreiem Betrieb müssten Sie Ihr Baby jetzt automatisch auf dem Bildschirm Ihres Mobilgeräts sehen können. 6. WARTUNG • Reinigen Sie die Oberflächen der Kamera und des Monitors mit einem feuchten, fusselfreien Tuch. • Achten Sie bei dieser Reinigung darauf, dass kein Wasser in die Öffnungen der Geräte gelangt. • Verwenden Sie NIEMALS Reinigungs- oder Lösemittel. 7. STÖRUNGEN UND DEREN MÖGLICHE BEHEBUNG Problem Mögliche Ursache Der Monitor empfängt kein Signal Die Kamera ist nicht eingeschaltet Der Monitor ist nicht eingeschaltet Der AC-DC-Adapter der Kamera ist nicht eingesteckt Der AC-DC-Adapter des Monitors ist nicht eingesteckt Der Monitor befindet sich außerhalb der zulässigen Reichweite Die Verbindung zwischen dem Monitor und der mit ihm synchronisierten Kamera wurde unterbrochen Es wurde eine nicht gültige Kamera angewählt Der Bildschirm zeigt nur Schwarz-WeiseBilder an Kontrollieren Sie, ob die Kamera nicht im Nachtsicht/Infrarot-Modus arbeitet Die Stimme der Eltern Lautstärke der Eltern-Einheit wird nicht von der Baby- Die ist zu niedrig eingestellt Einheit empfangen Die Kamera überträgt Die Kamera ist nicht eingeschaltet kein Signal Der AC-DC-Adapter der Kamera ist nicht eingesteckt Der VOX- oder der EnergiesparModus (Standby) ist aktiviert Die Stimme des Babys wird nicht von der Eltern-Einheit empfangen Auftreten von Interferenzen oder schlechter Empfang Behebung Halten Sie die EIN-Taste (III) während ca. 2 Sekunden gedrückt Halten Sie die EIN-Taste (5) während ca. 2 Sekunden gedrückt Stecken Sie den entsprechenden Adapter ein Stecken Sie den entsprechenden Adapter ein Bringen Sie den Monitor näher an die Kamera Synchronisieren Sie erneut die Kamera mit dem Monitor. Siehe Abschnitt 5.2.7.1.3. Wählen Sie die gültige Kamera an. Siehe Abschnitt 5.2.7.1.1. Um das Bild in Farbe zu sehen, erhöhen Sie die Beleuchtung des Ortes, in dem sich die Kamera befindet und kontrollieren Sie, ob sein Lichtsensor (II) nicht durch einen Gegenstand abgedeckt wird Erhöhen Sie die Lautstärke der Eltern-Einheit Halten Sie die Taste (III) während ca. 2 Sekunden gedrückt Stecken Sie den Adapter ein Um den überwachten Bereich auf dem Bildschirm zu sehen, muss der VOX- oder der Energiespar-Modus am Monitor deaktiviert sein Die Lautstärke der Eltern-Einheit ist Erhöhen Sie die Lautstärke der Eltern-Einheit zu niedrig eingestellt Möglicherweise sind andere elektronische Geräte in Betrieb, die das Signal stören Die Kamera und der Monitor könnten zu weit voneinander entfernt sein Die Batterie könnte eine unzureichende Ladung enthalten Die Kamera und der Monitor könnten sich zu nahe an zu vielen metallischen Objekten befinden 58 Erhöhen Sie die Distanz zu diesen Geräten Bringen Sie den Monitor näher an die Kamera Verwenden Sie den AC-DC-Adapter Entfernen Sie diese Objekte DEUTSCH Problem Die Batterie der ElternEinheit lässt sich nicht aufladen Die Baby-Einheit hat die Verbindung mit dem Eltern-Teil verloren Mögliche Ursache Der AC-DC-Adapter ist nicht eingesteckt Behebung Stecken Sie den Adapter ein Die vorhandene Batterie ist nicht aufladbar Es dürfen nur aufladbare Batterien benutzt werden (Li-ion 3.7 V, 1200 mAh). Kontrollieren Sie den Batterietyp und ersetzen Sie diese ggf. durch die mit dem Gerät gelieferten Batterie Die Kamera und der Monitor könnten zu weit voneinander entfernt sein Stellen Sie den Monitor näher an die Kamera auf Die Verbindung zwischen beiden Einheiten wurde vorübergehend unterbrochen Machen Sie an beiden Einheiten ein Reset, indem Sie diese während mindestens 15 Sekunden von der elektrischen Speisung trennen. Warten Sie ca. 1 Minute, bis die beiden Einheiten die Verbindung automatisch wieder herstellen. Die Verbindung zwischen beiden Einheiten wurde definitiv unterbrochen Synchronisieren Sie erneut beide Einheiten miteinander. Siehe dazu Abschnitt 5.2.7.1.3. 8. TECHNISCHE DATEN Frequenz Reichweite Anzahl der konfigurierbaren Kanäle 2.4GHz FHSS 240m (direkte Verbindung und offener Bereich) 4 Input: 100-240VAC 50/60Hz Output: 5V 800mA 3.7V 1200 mAh Input: 100-240 VCA 50/60Hz Output: 5V 800mA Stromversorgung (Eltern- Einheit) Wiederaufladbare Batterie für Monitor Stromversorgung (Baby Einheit) Betriebsdauer mit voll geladener Batterie (Eltern Einheit) LCD-Größe Format des RCA-Adapterkabels für den Jack-Stecker Format kompatibel USB-MiniUSB Kabel Etwa 5 Stunden 3.5'' Abbildung D USB-Datenkabel 9. INFORMATION ZUR ENTSORGUNG VON BATTERIEN UND DES PRODUKTS • Denken Sie daran, das Produkt auf eine umweltverträgliche Art und Weise zu entsorgen, entfernen Sie den Akku zuerst. • Produkte mit dem Symbol einer durchkreuzten Mülltonne dürfen nicht über den normalen Hausmüll entsorgt werden. • Zur korrekten Entsorgung bringen Sie diese Produkte zu einer Sammelstelle, die Ihnen von Ihrer örtlichen Verwaltung angegeben wurde. Sie können auch das Geschäft kontaktieren, in dem Sie das Produkt gekauft haben. Hiermit erklärt Miniland S.A., dass sich das Gerät „89174 digimonitor 3.5” plus“ in Übereinstimmung mit den grundlegenden Anforderungen und den übrigen einschlägigen Bestimmungen der Richtlinie 2014/53/UE befindet. 59 ITALIANO INDICE 1. Introduzione 2. Contenuto 3. Istruzioni di sicurezza 4. Caratteristiche e funzioni del prodotto 5. Istruzioni per l’uso 6. Manutenzione 7. Identificazione e risoluzione dei problemi 8. Specifiche tecniche 9. Informazioni sullo smaltimento delle batterie e del prodotto 1. INTRODUZIONE Congratulazioni per aver acquistato questo baby monitor con monitor senza fili a colori, che include la tecnologia più avanzata. Siamo certi della totale soddisfazione del prodotto per quanto riguarda la qualità e le sue caratteristiche, ciononostante raccomandiamo di leggere attentamente le istruzioni per ottenere i migliori risultati dal suo acquisto. Questo baby monitor consente di trasmettere segnali audio/video in modalità wireless sul display a colori, che lo rende ideale per un grande numero di situazioni come, ad esempio, la sorveglianza di neonati, bambini o anziani. NOTA: Le caratteristiche descritte da questo manuale sono soggette a modifiche senza previo avviso. 2. CONTENUTO 1 Videocamera (unità del bambino) 1 Monitor (unità dei genitori) 2 Adattatori AC/DC 1 Batteria a litio (Li-ion) ricaricabile per il monitor 1 Cinturino per il collo 1 Borsa per il trasporto e la custodia 1 Cavalletto Manuale di istruzioni e garanzia • Nel caso di mancanza di uno degli elementi sopra indicati, contattare il proprio fornitore. 3. ISTRUZIONI DI SICUREZZA Leggere attentamente questo manuale di istruzioni prima di utilizzare il baby monitor per la prima volta e conservarlo come punto di riferimento per qualsiasi necessità futura. 3.1. ISTRUZIONI DI SICUREZZA GENERALI: Quando si utilizzano dispositivi elettrici è necessario attenersi ad alcune precauzioni di sicurezza di base in qualsiasi momento: 1. È necessario aumentare le precauzioni di sicurezza nel caso in cui bambini o anziani utilizzino qualsiasi prodotto o quando sia utilizzata in loro presenza. Tenere il dispositivo fuori dalla portate dei bambini mentre non si sta utilizzando. 2. Questo prodotto non deve essere utilizzato come unico mezzo di sorveglianza e non sostituisce in nessun caso la supervisione responsabile di bambini, adulti o proprietà per conto di adulti. 3. Utilizzare il baby monitor solo con gli adattatori AC inclusi con l’unità (5.0V, 800 mA) 4. Utilizzare solo batterie del tipo raccomandato (Liion 3,7 V – 1200mAh). Non tentare di inserire alcun altro tipo di batteria nel baby monitor. 5. Questo prodotto contiene parti di piccole dimensioni. È necessario procedere con cautela durante l’apertura della confezione e il montaggio de prodotto. 6. NON permettere ai bambini di giocare con i materiali dell’imballaggio, come ad esempio i sacchetti di plastica. È necessario procedere con cautela durante l’apertura della confezione e il montaggio del prodotto. 7. NON utilizzare il dispositivo se il cavo o la presa elettrica risultano danneggiati. Se il display del baby monitor non funziona correttamente o presenta qualsiasi tipo di danno, contattare il centro di servizio autorizzato da Miniland per richiedere il controllo e riparazione dello stesso al fine di evitare qualsiasi rischio. 8. NON tentare di riparare o modificare in alcun modo nessuna delle funzioni elettrice dell’unità, in caso contrario la garanzia non ha validità. 9. Verificare il voltaggio della propria abitazione per assicurarsi che corrisponda alla portata del dispositivo indicata nelle specifiche tecniche dello stesso. 10. Se il baby monitor non viene utilizzato per un periodo di tempo prolungato, scollegare sempre l’adattatore dalla presa di corrente. Per scollegare il dispositivo dalla rete elettrica, reggere il trasformatore e staccare la spina dalla presa di corrente. Non tirare mai direttamente dal cavo. 11. Questo prodotto è disegnato esclusivamente per l’utilizzo in ambienti interni. L’unità non deve essere esposta a pioggia, umidità o schizzi di qualsiasi liquido. Non posizionare mai nessun oggetto pieno di liquido, come ad esempio un bicchiere o una caraffa, sopra o accanto al baby monitor. Il baby monitor non deve essere utilizzato in prossimità dell’acqua. ATTENZIONE • Questo baby monitor è disegnato per tranquillizzare i genitori quando non si trovano nella stessa stanza del bambino. Questo prodotto non deve sostituire la supervisione responsabile di un adulto. È necessario che uno dei genitori resti nelle vicinanze del monitor durante il suo utilizzo. Il baby monitor non è un dispositivo medico e non deve essere ad esso affidato il benessere del bambino. È importante recarsi periodicamente nella stanza del bambino per assicurarsi che tutto vada bene. • Non utilizzare mai questo baby monitor in quei casi in cui la vita o la salute del bambino o di altre persone o l’integrità di un immobile dipendano dal suo funzionamento. Il produttore non si farà carico di alcuna responsabilità in caso di morte, lesioni personali o danni materiali causati dal cattivo funzionamento o da un uso improprio del prodotto. • L’ uso improprio di questo baby monitor potrebbe dare luogo ad azioni illegali. • Utilizzare questo prodotto in modo responsabile. IMPORTANTE: Tenere presente che qualsiasi cambio o modifica al dispositivo non effettuato dal servizio tecnico di Miniland non sarà coperto dalla garanzia del prodotto. 3.2. CONSIGLI PER LE INTERFERENZE RADIO Questo dispositivo è stato sottoposto a test ed è conforme alla Direttiva RED 2014/53/UE. Questi requisiti sono disegnati per offrire una protezione ragionevole contro le interferenze dannose in una installazione residenziale. Se l’unità non 60 ITALIANO viene installata e utilizzata secondo le istruzioni, potrebbe causare interferenze dannose nelle radiocomunicazioni. Ciononostante, tenere presente che non è possibile garantire la totale assenza di interferenze in una specifica installazione. In caso di interferenze nella ricezione del baby monitor con la radio o la televisione, che potrebbero verificarsi durante l’accensione o lo spegnimento, si raccomanda all’utente di correggere l’interferenza nel modo indicato di seguito: • Orientare di nuovo o cambiare il ricevitore di posizione. • Aumentare la distanza tra il dispositivo in questione e il baby monitor. • Collegare il dispositivo ad una presa di corrente diversa da quella utilizzata per il ricevitore. • Consultare il dipartimento di Assistenza al Cliente di Miniland. Per soddisfare la Direttiva RED 2014/53/UE, questo dispositivo è dotato di speciali cavi elettrici corazzati. L’utilizzo di un dispositivo non approvato o non fornito di cavi corazzati può provocare interferenze nella ricezione radio o televisiva. 9. Tasto zoom/menu 10. Tasto di impostazione ▼ 11. Tasto conferma/modalità Scan 12. Tasto per parlare con il bambino 13. Collegamento uscita AV 14. Collegamento mini USB alimentazione/PC 15. Supporto abbattibile 16. Coperchio dello scompartimento della batteria 17. Antenna telescopica 3.3. SCELTA DI UN LUOGO ADEGUATO • Collegare il dispositivo elettronico in un luogo fuori dalla portata dei bambini per evitare possibili incidenti. • I bambini potrebbero impigliarsi nei cavi. L’unità del bambino deve essere posizionata ad una distanza di circa 1 – 1.5 metri dalla culla del bambino. Non posizionare mai l’unità del bambino all’interno della culla, lettino o box. Assicurarsi che l’unità, i cavi e l’adattatore siano fuori dalla portata dei bambini. • Posizionare il baby monitor in un luogo in cui l’aria possa circolare liberamente. Non posizionarlo sopra trapunte o coperte, né negli angoli di armadi, mensole, ecc. • Posizionare il baby monitor in un luogo lontano da fonti di calore come radiatori, camini, cucine e dalla luce diretta del sole. • Posizionare l’unità del bambino lontano da apparecchi televisivi, ripetitori e radio. I segnali radio intensi generati da tali dispositivi potrebbero causare rumori o anche la comparsa di suoni e immagini sul monitor. Se ciò dovesse verificarsi, spostare la videocamera in un altro luogo. . Questo monitor può essere posizionato su un tavolo utilizzando l’apposito supporto retrattile situato nella parte posteriore del monitor. Quando non viene utilizzato, basta piegarlo verso l’interno della parte posteriore del monitor fino ad ascoltare un “clic” che indica che è completamente piegato. Icone del Menu (FIGURA 1.3) A. Menu seleziona/aggiungere/eliminare videocamera B. Menu di impostazioni della videocamera C. VOX/Standby D. Livello di trasmissione E. Sveglia F. Funzione vibrazione G. Luminosità del display CARATTERISTICHE E FUNZIONI DEL PRODOTTO 4.1. FUNZIONI E CONTROLLI DEL MONITOR (FIGURA 1) MONITOR (FIGURA 1.1) 1. Indicatore LED di accensione/connessione 2. Microfono 3. LED indicatore di carica 4. Display LCD 5. Tasto di accensione/spegnimento 6. Altoparlante 7. Gancio per il cinturino del collo 8. Tasto di impostazione ▲ 61 DISPLAY Icone del display (FIGURA 1.2) a. Copertura b. Volume selezionato sul monitor c. Visione notturna d. Ninnananna e. Modalità VOX f. Videocamera selezionata g. Luce di compagnia h. Livello di trasmissione i. Livello di batteria j. Icona parlare con il bambino k. Icona sveglia attiva 4.2. FUNZIONI E CONTROLLI DELLA VIDEOCAMERA (FIGURA 2) I. Antenna telescopica II. Sensore di luce III. Tasto di accensione IV. Accessorio per appenderla V. Altoparlante VI. Tasto per l’abbinamento VII. Connettore dell’alimentazione Mini USB VIII. Microfono IX. LED di accensione / abbinamento X. Obiettivo della videocamera XI. Infrarossi XII. Accessorio di supporto ISTRUZIONI PER L’USO 5.1. PRIMA DELL’USO 5.1.1. ALIMENTAZIONE DELL’UNITÀ DEI GENITORI E USO DELLA BATTERIA Il monitor, o unità dei genitori, di questo baby monitor è disegnato per essere utilizzato con la batteria o con l’adattatore AC/DC fornito. La batteria ricaricabile deve essere caricata per almeno otto ore prima di utilizzare l’unità per la prima volta o se non è stato utilizzato per un lungo periodo. Il baby monitor è fornito di una batteria Li-ion ricaricabile da 3.7V 1200mAh per l’unità dei genitori. Si raccomanda di utilizzare la batteria nel monitor al fine di poter ricevere il segnale audio/ video proveniente dalla videocamera in qualsiasi luogo. Collegare il monitor all’adattatore attaccato alla rete elettrica sempre che sia possibile, al fine di mantenere la batteria carica. ITALIANO INSTALLAZIONE DELLA BATTERIA (FIGURA 3) 1. Svitare e rimuovere il coperchio della batteria (16) situato nella parte posteriore dell’unità. 2. Inserire la batteria Li-ion (fornita). 3. Posizionare nuovamente il coperchio della batteria al suo posto e fissarlo con la vite. Precauzione: Utilizzare solo batterie della tipologia raccomandata in quanto, in caso contrario, esiste il rischio di esplosione. Smaltire le batterie scariche in modo responsabile. Nota: Quando le due unità non vengono utilizzate, si raccomanda di spegnerle per risparmiare il consumo della batteria. CARICA DELLA BATTERIA Inserire la batteria attenendosi alle istruzioni indicate nel paragrafo anteriore. Collegare il connettore dell’adattatore di corrente alla presa mini USB situata nella parte laterale dell’unità (14). Utilizzare solamente l’adattatore fornito. Collegare l’adattatore alla rete elettrica. Mentre il monitor è collegato alla rete elettrica e in carica, il LED indicatore di carica (3) rimane acceso di colore rosso. Se il caricatore resta collegato alla rete ma il processo di carica è completo, il LED indicatore di carica (3) si illuminerà in verde. Quando il livello di carica della batteria è molto basso, l’icona del livello della batteria (i) lampeggia in rosso e comincia ad emettere un bip ogni 30 secondi. Nota: rimuovere la batteria quando il dispositivo non viene utilizzato per un lungo periodo. 5.1.2. ALIMENTAZIONE DELL’UNITÀ DEL BAMBINO La videocamera, o unità del bambino, di questo baby monitor è disegnata per poter essere utilizzata con l’adattatore AC/DC fornito. 1. Localizzare la presa del connettore (VII) nella parte posteriore dell’unità del bambino. 2. Collegare il cavo dell’adattatore alla presa mini USB della videocamera. Utilizzare l’adattatore fornito. 3. Collegare l’adattatore alla presa elettrica. Avvertenza: Pericolo di strangolo – Tenere il cavo lontano dalla portata del bambino. NON posizionare MAI una videocamera con il cavo a meno di 1 metro dalla culla. Non utilizzare mai prolunghe con gli adattatori AC. Utilizzare solo gli adattatori AC forniti. 5.2. FUNZIONAMENTO 5.2.1. ACCENSIONE/SPEGNIMENTO DELLE UNITÀ 5.2.1.1. MONITOR: Mantenere premuto il tasto di accensione (5), situato nella parte superiore del monitor, per accenderlo o spegnerlo. L’indicatore LED di acceso/collegato (1) si illuminerà o spegnerà a seconda della funzione selezionata. 5.2.1.2. VIDEOCAMERA: Per accendere o spegnere la videocamera, mantenere premuto il tasto di accensione (III) per due secondi. Il LED dell’alimentazione (IX) si illuminerà o spegnerà a seconda della funzione selezionata. Una volta installata o accesa la videocamera, sarà possibile vedere le immagini e ascoltare i suoni rilevati nella cameretta del bambino attraverso il monitor. 5.2.2. VOLUME DEL MONITOR Premere il tasto di impostazione (8) se si desidera aumentare il volume del monitor o il tasto di impostazione (10) se si desidera diminuirlo, scegliendo tra i 5 livelli disponibili. 5.2.3. PARLARE AL BAMBINO È possibile parlare al bambino attraverso l’unità dei genitori (ad esempio per tranquillizzarlo mentre ci si reca da lui) o all’altro genitore (se lui o lei si trova nella cameretta del bambino). Premere e mantenere premuto il tasto per parlare con il bambino (12) e parlare di fronte al monitor. Lasciare il tasto una volta terminato di parlare per tornare ad ascoltare l’audio della cameretta del bambino. Ricordare che non è possibile ascoltare il bambino mentre si sta parlando con lui; per ascoltarlo si dovrà lasciare il tasto. 5.2.4. ZOOM È possibile aumentare la dimensione dell’immagine visualizzata effettuando uno zoom di quattro posizioni. Per accedere a questa funzione seguire i seguenti passaggi: 1. Premere il tasto zoom . Il quadrante sinistro superiore dell’immagine comparirà incorniciato di bianco. 2. Premere i tasti IN ALTO e IN BASSO per cambiare il quadrante selezionato. 3. Premere il tasto per aumentare l’immagine del quadrante selezionato. 4. Premere il tasto zoom per tornare all’opzione di selezione del quadrante ed effettuare lo zoom su un altro dei quadranti. 5. Premere nuovamente il tasto zoom per uscire dalla funzione zoom. 5.2.5. VISIONE NOTTURNA A INFRAROSSI (AUTOMATICA) La funzione di visione notturna a infrarossi della videocamera per captare le immagini del bambino o dell’area sorvegliata in condizioni di oscurità o scarsa illuminazione. In questo modo sarà possibile vedere sul monitor le immagini in bianco e nero e solamente gli oggetti situati a meno di 2 metri di distanza. La videocamera sorveglia costantemente il livello di luce e cambia automaticamente la modalità infrarossi quando la luce è insufficiente per la visuale normale. 5.2.6. AVVISO DI USCITA DAL RAGGIO DI COPERTURA Se il monitor viene situato ad una distanza superiore a quella consentita dalla videocamera (vedere le caratteristiche tecniche), l’indicatore LED di accensione/collegamento della videocamera (IX) e del monitor (1) lampeggeranno in rosso, comparirà il simbolo della copertura (a) di colore rosso e sul display sarà mostrato il logo di MINILAND. Avvicinare il monitor alla videocamera per tornare a vedere correttamente l’immagine. 62 ITALIANO 5.2.7. MENU PRINCIPALE per Mantenere premuto il tasto Menu/Indietro poter effettuare modifiche alle principali funzioni e caratteristiche del baby monitor. videocamere). Il monitor e la videocamera originale escono di fabbrica con il canale 1 programmato. Se si ha bisogno di aggiungere un’altra videocamera è necessario seguire i seguenti passaggi: 5.2.7.1. MENU DELLA VIDEOCAMERA 5.2.7.1.1. SELEZIONE DELLA VIDEOCAMERA Il dispositivo è disegnato per consentire l’osservazione di zone diverse con un massimo di quattro videocamere. Per selezionare la videocamera desiderata, seguire i passaggi illustrati di seguito: 1. Premere il tasto Menu/Indietro per tre secondi per poter visualizzare il menu. 2. Premere i tasti IN ALTO e IN BASSO fino a quando l’icona della videocamera risulta evidenziata e premere in seguito il tasto per accedere al sotto-menu. 3. Premere i tasti IN ALTO e IN BASSO fino a quando l’icona “aggiungi videocamera” risulta evidenziata e premere in seguito il tasto . 4. Premere i tasti IN ALTO e IN BASSO per selezionare il canale al quale aggiungere la nuova videocamera e confermare premendo il tasto . 5. Mentre l'indicatore LED di accensione/connessione (1) lampeggia, premere il tasto per l’abbinamento della videocamera (VI). 6. Una volta completato l’abbinamento, l’indicatore LED smetterà di lampeggiare e le immagini della videocamera saranno immediatamente visibili sul display dell’unità monitor. 7. Nel caso in cui l’abbinamento non sia stato effettuato correttamente, ripetere i passaggi sopra indicati. 1. Premere il tasto Menu/Indietro per tre secondi per visualizzare il menu. 2. Premere i tasti IN ALTO e IN BASSO fino a quando l’icona della videocamera risulta evidenziata e in seguito premere il tasto per accedere al sotto-menu. 3. Premere i tasti IN ALTO e IN BASSO fino a quando l’icona VISUALIZZA videocamera risulta evidenziata e in seguito premere il tasto . 4. Premere i tasti IN ALTO e IN BASSO per selezionare la videocamere che si desidera visualizzare e premere successivamente il tasto per confermare la selezione. Nota 1: È possibile visualizzare solo le videocamere che sono state previamente abbinate al monitor. Nota 2: Esiste un modo più rapido per cambiare la videocamera da visualizzare. Premere direttamente il per poter vedere a rotazione le videocamere tasto abbinate: CAM1/CAM2/CAM3/CAM4/MODALITÀ SCAN. 5.2.7.1.2. MODALITÀ SCAN Questa funzione consente di vedere in modo consecutivo e a rotazione i canali delle videocamere abbinate, mostrando le immagini di ogni videocamera per 12 secondi. Questa funzione può essere utilizzata solo se c’è più di una videocamera abbinata. Per accedere a questa modalità: 1. Premere il tasto Menu/Indietro per tre secondi per poter visualizzare il menu. 2. Premere i tasti IN ALTO e IN BASSO fino a quando l’icona della videocamera risulta evidenziata e in seguito premere il tasto per accedere al sotto-menu. 3. Premere i tasti IN ALTO e IN BASSO fino a quando il tasto VISUALIZZARE videocamera risulta evidenziata e in seguito premere il tasto . 4. Premere i tasti IN ALTO e IN BASSO e selezionare l’icona SCAN . 5. Premere il tasto per confermare. Nota 1: Se una delle videocamere si trova fuori dal raggio di copertura o se non è accesa, il monitor emetterà un avviso e la Modalità Scan sarà interrotta. Nota 2: La Modalità Scan può essere attivata o disattivata premendo il tasto mentre si sta visualizzando il display principale se si ha più di una videocamera collegata al monitor. 5.2.7.1.3. AGGIUNGERE VIDEOCAMERA Questo prodotto è disegnato per consentire l’osservazione di zone diverse con un massimo di 4 videocamere (canale 1, 2, 3 o 4 assegnato a diverse 63 Nota 1: È possibile selezionare solo i canali ai quali non è stata ancora abbinata nessuna videocamera. Nota 2: Non è possibile accedere a questo sottomenu se sono presenti già 4 videocamere abbinate. Per diversi motivi, potrebbe verificarsi la perdita della connessione tra il monitor e una videocamera collegata. In questo caso, ripetere il processo precedentemente illustrato per collegare di nuovo la videocamera con il monitor. 5.2.7.1.4. ELIMINARE VIDEOCAMERA Per eliminare una delle videocamere collegate, seguire i passaggi che sono indicati di seguito: per tre secondi 1. Premere il tasto Menu/Indietro per poter visualizzare il menu. 2. Premere i tasti IN ALTO e IN BASSO fino a quando l’icona della videocamera risulta evidenziata e premere in seguito il tasto per accedere al sotto-menu. 3. Premere i tasti IN ALTO e IN BASSO hfino a quando l’icona “eliminare videocamera” risulta evidenziato e premere in seguito il tasto . 4. Premere i tasti IN ALTO e IN BASSO per selezionare la videocamera che si desidera eliminare e confermare la scelta premendo il tasto . Nota 1: Se c’è solo una videocamera abbinata con il monitor, non sarà possibile eliminarla né accedere a questo menu. Nota 2: È necessario eliminare un canale prima di abbinarlo ad una nuova unità videocamera. 5.2.7.2. MENU DI IMPOSTAZIONI DELLA VIDEOCAMERA 5.2.7.2.1. NINNANANNA L’unità del bambino può riprodurre una dolce ninnananna per aiutare il bambino ad addormentarsi. ITALIANO Per attivare questa funzione: 1. Premere il tasto Menu/Indietro per tre secondi per poter visualizzare il menu. 2. Premere i tasti IN ALTO e IN BASSO fino a quando l’icona del menu di impostazioni della videocamera risulta evidenziata e premere in seguito il tasto per accedere al sotto-menu. 3. Premere i tasti IN ALTO e IN BASSO fino a quando l’icona della ninnananna risulta evidenziata e premere in seguito il tasto . 4. Premere i tasti IN ALTO e IN BASSO per selezionare una delle cinque ninnananne disponibili, silenzio o riproduzione a ripetizione (l’impostazione predefinita è OFF). 5. Dopo aver selezionato la melodia, premere il tasto e comparirà il controllo del volume. Premere il tasto IN ALTO e IN BASSO per selezionare il livello del volume da 1 fino a 3 e premere il tasto . 6. Premere il tasto Menu/Indietro per tre volte per tornare alla schermata principale. 7. Nella parte superiore del display LCD comparirà l’icona della Ninnananna (d). Tenere in considerazione che la configurazione delle ninnananne sarà possibile solo sulla videocamera che si sta visualizzando al momento. Nota: La funzione di riproduzione a ripetizione delle ninnananne trasmette tutte le melodie in sequenza. 5.2.7.2.2. VOLUME DELLA VIDEOCAMERA Questo menu consente di configurare il livello del volume con il quale viene riprodotta la voce dei genitori attraverso la videocamera, quando si utilizza la funzione bidirezionale. Per configurare il volume delle videocamere seguire i seguenti passaggi: per tre secondi 1. Premere il tasto Menu/Indietro per poter visualizzare il menu. 2. Premere i tasti IN ALTO e IN BASSO fino a quando l’icona del menu di impostazioni della videocamera risulta evidenziata e premere in seguito il tasto per accedere al sotto-menu. 3. Premere i tasti IN ALTO e IN BASSO fino a quando l’icona del volume della videocamera risulta evidenziata e premere in seguito il tasto . 4. Premere i tasti IN ALTO e IN BASSO per selezionare una dei tre livelli di volume disponibili (LOW/MID/HIGH)in base alle proprie necessità. 5. Confermare la scelta effettuata premendo il tasto . Tenere in considerazione che la configurazione del volume avrà valore esclusivamente per la videocamera che si sta visualizzando sul monitor al momento. 5.2.7.2.3. LUCE DI COMPAGNIA L’unità del bambino dispone di una soffusa luce di compagnia che donerà comfort al bambino e permetterà di vedere all’interno di una stanza buia. Per attivare la luce di compagnia, seguire i seguenti passaggi: per tre secondi 1. Premere il tasto Menu/Indietro per poter visualizzare il menu. 2. Premere i tasti IN ALTO e IN BASSO fino a quando l’icona del menu delle impostazioni della videocamera risulta evidenziata e premere in seguito il tasto per accedere al sotto-menu. 3. Premere i tasti IN ALTO e IN BASSO fino a quando l’icona della luce di compagnia risulta evidenziata e premere in seguito il tasto . 4. Premere i tasti IN ALTO e IN BASSO e selezionare ON o OFF a seconda se si vuole attivare o disattivare questa funzione. 5. Confermare la scelta effettuata premendo il tasto . Tenere in considerazione che la configurazione della luce di compagnia avrà valore esclusivamente per la videocamera che si sta visualizzando sul monitor in quel momento. 5.2.7.3. VOX/STANDBY MENU 5.2.7.3.1. MODALITÀ DI RISPARMIO ENERGIA O SOLO AUDIO (STANDBY) Con la modalità di risparmio energia o solo audio (Standby), è possibile scegliere il tempo massimo durante il quale l’immagine sul monitor resta attiva (1, 3 o 5 minuti); trascorso questo tempo, l’immagine scompare al fine di risparmiare energia, anche se si continua ad ascoltare il suono. Per riattivare l’immagine, è sufficiente premere un tasto qualsiasi. Per attivare questa modalità attenersi alle seguenti istruzioni: 1. Premere il tasto Menu/Indietro per tre secondi per poter visualizzare il menu. 2. Premere i tasti IN ALTO e IN BASSO fino a quando l’icona del menu VOX/Standby risulta evidenziata e premere in seguito il tasto per accedere al sotto-menu.. 3. Premere i tasti IN ALTO e IN BASSO fino a quando l’icona della modalità Standby risulta evidenziata e premere in seguito il tasto . 4. Premere i tasti IN ALTO e IN BASSO e selezionare l’opzione desiderata scegliendo tra 1, 3 o 5 minuti oppure OFF per disattivare questa funzione. 5. Confermare la scelta effettuata premendo il tasto . 6. Premere il tasto Menu/Indietro due volte per tornare alla schermata principale. 5.2.7.3.2. IMPOSTAZIONE VOX Questa modalità consente di controllare l’attivazione attraverso il suono del baby monitor. Se si attiva la modalità VOX sul monitor e non viene prodotto alcun suono in prossimità della videocamera, essa interromperà la trasmissione. Il display del monitor si spegne quando la videocamera non sta trasmettendo. Quando la videocamera rileva un qualsiasi suono che abbia un’intensità superiore al livello di sensibilità impostato, inizierà a trasmettere di nuovo il segnale al monitor. Per disattivare questa funzione e visualizzare l’area costantemente sorvegliata, disattivare la modalità VOX sul monitor. 64 ITALIANO • Modalità VOX DISATTIVATA: La videocamera trasmette continuamente, ciò consente di monitorare costantemente il bambino o l’area che si desidera proteggere. • Modalità VOX ATTIVATA: La videocamera trasmette solo quando rileva un suono che abbia una intensità sufficiente in prossimità della videocamera. Per attivare questa funzione, accertarsi prima di tutto di avere impostato la modalità standby a 1, 3 o 5 minuti (si veda punto 5.2.7.3.1). Scegliere 1/3 o 5 se si vuole che la videocamera smetta di trasmettere l’immagine dopo 1/3 o 5 minuti se non vi sono rumori ambientali. Una volta impostato il tempo di standby, per attivare la modalità VOX si prega di seguire queste istruzioni: per tre secondi 1. Premere il tasto Menu/Indietro per poter visualizzare il menu. 2. Premere i tasti IN ALTO e IN BASSO fino a quando l’icona del menu VOX/Standby risulta evidenziata e premere in seguito il tasto . 3. Premere i tasti IN ALTO e IN BASSO fino a quando l’icona del VOX risulta evidenziata e premere in seguito il tasto . 4. Premere i tasti IN ALTO e IN BASSO e selezionare il livello di sensibilità desiderato: OFF/1/2/3 (default OFF). Impostare sensibilità a “1” per un bebè che dorme tranquillo e che piange sommessamente, e “3” se il bebè tende a fare rumore mentre dorme o produce rumori ad alto volume prima di mettersi effettivamente a piangere, o impostarlo a “2” se si ritiene che il comportamento del bebè sia intermedio tra i due precedenti. 5. Confermare la scelta effettuata premendo il tasto . 6. Premere il tasto Menu/Indietro due volte per tornare alla schermata principale. Se si desidera vedere il bambino in un momento preciso, anche se non ci sono rumori nell’ambiente circostante, è possibile attivare la videocamera in modalità remota premendo un tasto qualsiasi. 3. Premere i tasti IN ALTO e IN BASSO e selezionare il livello di trasmissione desiderato: HIGH o LOW. 4. Confermare la scelta effettuata premendo il tasto . 5. Premere il tasto Menu/Indietro per tornare a visualizzare la schermata principale. 5.2.7.5. IMPOSTAZIONE DELLA SVEGLIA Per configurare la sveglia, seguire i seguenti passaggi: 1. Premere il tasto Menu/Indietro per tre secondi per poter visualizzare il menu. 2. Premere i tasti IN ALTO e IN BASSO fino a quando l’icona della sveglia risulta evidenziata e premere in seguito il tasto . 3. Premere i tasti IN ALTO e IN BASSO per configurare il timer della sveglia (premere il tasto IN ALTO per aumentare o il tasto IN BASSO per diminuire). 4. Confermare la scelta effettuata premendo il tasto . 5. Premere il tasto Menu/Indietro per tornare alla schermata principale. Nota 1: Quando la sveglia è attiva, sul display LCD comparirà l’icona di un orologio (k). Nota 2: Se si desidera eliminare la sveglia seguire i passaggi 1, 2 e 3 sopra descritti e impostare il tempo 00:00. L’icona dell’orologio scomparirà dal display. Nota 3: Quando la sveglia sta suonando, premere un qualsiasi tasto per spegnerla. Se non ottiene risposta,il dispositivo continuerà a suonare per 7 minuti prima di spegnersi. 5.2.7.6. FUNZIONE VIBRAZIONE Questa funzione contente ai genitori di ottenere un ambiente silenzioso nei momenti in cui necessitano di tranquillità ed è di grande aiuto in contesti rumorosi e per quelle persone che presentano problemi di udito. Quando il suono nella cameretta del bambino supera la soglia che corrisponde al livello di sensibilità configurato, il monitor vibrerà per quattro volte al fine di avvisare i genitori. Per attivare la funzione vibrazione, seguire i seguenti passaggi: 5.2.7.4. LIVELLO DI TRASMISSIONE Attraverso questo menu è possibile modificare il livello di potenza emesso dalla videocamera, scegliendo tra le opzioni alta/bassa. Quando si sceglie l’opzione alta (HI), la copertura raggiungerà una distanza di 250 metri in campo aperto con la potenza originale. Quando si sceglie la posizione bassa (LOW), la distanza massima di trasmissione si riduce 120 metri in campo aperto, in quanto diminuisce la potenza dell’emissione. per tre secondi 1. Premere il tasto Menu/Indietro per poter visualizzare il menu. 2. Premere i tasti IN ALTO e IN BASSO fino a quando l’icona della funzione vibrazione risulta evidenziata e in seguito premere il tasto . 3. Premere i tasti IN ALTO e IN BASSO per attivare o disattivare questa funzione. 4. Confermare la scelta effettuata premendo il tasto . 5. Premere il tasto Menu/Indietro per tornare alla schermata principale. Per configurare il livello di trasmissione seguire i seguenti passaggi: Tenere presente che la configurazione della funzione vibrazione sarà applicata unicamente sulla videocamera la cui immagine si sta visualizzando sul monitor in quel momento. NOTA: Per fare in modo che il monitor vibri quando il volume nella cameretta del bambino supera una certa soglia, è indispensabile che la modalità VOX sia attiva. 1. Premere il tasto Menu/Indietro per tre secondi per poter visualizzare il menu. 2. Premere i tasti IN ALTO e IN BASSO fino a quando l’icona del livello di trasmissione risulta evidenziata e premere in seguito il tasto per accedere al sotto-menu. 65 ITALIANO 5.2.7.7. LUMINOSITÀ Per modificare la luminosità del display del monitor, seguire i seguenti passaggi: per tre secondi 1. Premere il tasto Menu/Indietro per poter visualizzare il menu. 2. Premere i tasti IN ALTO e IN BASSO fino a quando l’icona della luminosità risulta evidenziata e premere in seguito il tasto . 3. Premere i tasti IN ALTO e IN BASSO e scegliere il livello di luminosità desiderato scegliendo tra i 5 disponibili. 4. Confermare la scelta effettuata premendo il tasto . 5. Premere il tasto Menu/Indietro per tornare alla schermata principale. 5.2.8. eMyBaby 5.2.8.1. REGISTRAZIONE 1. In primo luogo si registri sul sito web di eMyBaby. Per farlo, apra il suo browser, vada a www.emybaby.com e clicchi su CREA ACCOUNT. 2. Compili i campi con i suoi dati personali e, dopo avere accettato termini e condizioni di uso, clicchi su ATTIVA ACCOUNT. 3. Riceverà al suo indirizzo di posta elettronica (indicato durante la registrazione) un messaggio di verifica. Cliccando sul link contenuto nel messaggio e-mail, verrà indirizzato alla pagina di eMyBaby e potrà accedere introducendo identificativo utente e password e cliccando su ACCESSO. 5.2.8.2. PER VEDERE LE IMMAGINI NEL PC CON CUI SI È CONNESSI AL BABY MONITOR 1. Per poter vedere l’immagine trasmessa dalla videocamera sul suo PC, dovrà connettere il monitor (schermo) alla porta USB del suo computer mediante un cavo miniUSB-USB (non incluso). Il monitor deve essere acceso, e se la batteria è esaurita, occorre caricarla. 2. Dopo l’accesso con il suo identificativo utente e la sua password a eMyBaby, selezioni l’opzione BABY MONITOR sul CRUSCOTTO. 3. Selezionare a questo punto il digimonitor 3.5” plus. 4. Si potrà scegliere tra due opzioni. Scelga “Solo sul computer al quale ha conneso il baby monitor tramite il cavo USB”. 5. Se tutto funziona correttamente, vedrà automaticamente il bebè sullo schermo del computer. Se l’immagine dà qualche problema, consulti le opzioni di visualizzazione on-line premendo sull’icona LEGGI QUI LES ISTRUZIONI. 5.2.8.3. PER VEDERE L’IMMAGINE A DISTANZA ATTRAVERSO eMyBaby Se si desidera vedere il bebè a distanza, sul proprio pc, tablet o Smartphone, seguire i passi elencati: NOTA: per vedere in remoto attraverso eMyBaby le immagini che la videocamera sta catturando, il monitor deve essere connesso al PC. Si deve necesariamente emettere segnale attraverso eMyBaby dal PC a cui è connesso lo schermo del baby monitor. Se non si effettua questo passaggio preliminare, non si potrà ricevere il segnale in qualsiasi altro dispositivo (PC, tablet o smartphone). 1. Connettere il baby monitor al PC secondo i passi indicati precedentemente, connettendo il monitor alla porta USB del computer mediante un cavo miniUSBUSB (non incluso). 2. Acceda alla pagina web eMyBaby (www.emybaby.com) con il suo identificativo utente e la sua password (registrarsi come indicato in precedenza, qualora non lo si fosse ancora fatto) e selezioni l’opzione BABY MONITOR. 3. Scelga digimonitor 3.5” plus fra i tre modelli diversi di baby monitor. 4. Si potrà scegliere tra due opzioni. Scelga “Vedere da qualsiasi luogo attraverso altro computer, tablet o smartphone”. 5. La prima volta che si accede a questo servizio, verrà chiesto di introdurre il numero di serie del prodotto. Questo numero ha la forma MNLXX-XXXXX e si trova all’interno dello scomparto batteria del monitor. 6. Una volta introdotto il codice, accederà a una schermata nella quale troverà due opzioni distinte: Emetti e Ricevi Segnale. Per potere vedere in remoto le immagini che la videocamera sta riprendendo, si dovrà premere in primo luogo il pulsante Emetti. 7. Clicchi ora sull’icona che compare al centro dell’immagine. Quando il computer inizia a emettere, comparirà la seguente immagine sullo schermo: Passi da realizzare se si desidera vedere l’immagine da altro computer: 1. Connettere il baby monitor al PC secondo i passi indicati precedentemente, connettendo il monitor alla porta USB del computer mediante un cavo miniUSBUSB (non incluso). 2. Nel PC in cui si vuole vedere l’immagine in remoto, accedere al sito web eMyBaby (www.emybaby.com) con nome utente e password e selezionare l’opzione BABY MONITOR. 3. Scegliere digimonitor 3.5” plus tra i vari modelli di baby monitor. 4. Si potrà scegliere tra due opzioni. Scegliere “Vedere da qualsiasi luogo attraverso altro computer, tablet o smartphone”. 5. Per vedere in remoto sul proprio dispositivo mobile le immagini che la videocamera sta riprendendo, si dovrà cliccare sul pulsante Ricevi Segnale. Se tutto funziona correttamente, si dovrà vedere il bebè sullo schermo del proprio computer. Se vi è qualche problema con l’immagine, consultare le istruzioni di visualizzazione online premendo sull’icona LEGGI QUI LES ISTRUZIONI. Passi da realizzare se si desidera vedere l’immagine da un dispositivo mobile (Tablet o telefono mobile): Applicazione eMyBaby Miniland ha sviluppato l’applicazione eMyBaby, che è disponibile per iOS e Android, e si scarica facilmente e gratuitamente. Per scaricare l'applicazione eMyBaby, in primo luogo, accedere al negozio di applicazioni corrispondenti o scaricarla direttamente eseguendo una scansione del codice QR corrispondente: 66 ITALIANO Per installare l’applicazione, seguire le istruzioni indicate all’inizio di questo manuale. 1. Una volta installata l’applicazione, aprirla. Entrare in LOG IN e introdurre identificativo utente e password per accedere, qualora si sia già registrati, altrimenti provvedere a registrarsi. Si riceverà un messaggio di verifica all’indirizzo di posta elettronica indicato durante la registrazione. 2. Nel menù principale, scegliere l’opzione BABY MONITOR. 3. Scegliere digimonitor 3.5” plus tra i diversi modelli di baby monitor. 4. Premere PLAY per vedere dal dispositivo mobile le immagini catturate dalla videocamera. Browser del dispositivo Potrà vedere le immagini della videocamera anche accedendo al sito web eMyBaby attraverso il browser del suo dispositivo mobile. Qusta opzione le sarà particolarmente utile se il suo dispositivo mobile non è iOS o Android. 1. Nel browser del suo dispositivo, acceda alla pagina eMyBaby (www.emybaby.com) con il suo identificativo utente e la sua password. Selezioni l’opzione BABY MONITOR nel menù principale. 2. Scelga digimonitor 3.5” plus tra i diversi modelli di baby monitor. 3. Potrà scegliere tra due opzioni. Scelga “Da qualsiasi luogo con connessione a Internet, indipendentemente dalla posizione geográfica, su altro computer, tablet or Smartphone”. 4. Prema Ricevi Segnale. Se tutto funziona correttamente, si vedrà automaticamente il bebè sullo schermo del dispositivo mobile. 6. MANUTENZIONE • Pulire le superfici della videocamera e del monitor con un panno morbido che non lasci pelucchi. • Nel caso in cui le unità risultino sporche, utilizzare un panno leggermente umido per pulire le superfici, facendo attenzione ad evitare l’infiltrazione dell’acqua in nessuna delle fessure. • Non utilizzare mai prodotti per la pulizia o solventi. 7. IDENTIFICAZIONE E RISOLUZIONE DEI PROBLEMI Problema Possibile Causa Non c’è recezione sul monitor La videocamera non si accende Soluzione Premere e mantenere premuto il tasto di accensione (III) per 2 secondi Il monitor non si accende Premere e mantenere premuto il tasto di accensione (5) Videocamera:l’adattatore non è stato collegato alla presa elettrica Monitor: l’adattatore non è stato collegato alla presa elettrica Il monitor si trova al di fuori del suo raggio di copertura Si è persa la connessione tra il monitor e una videocamera già abbinata Attaccare l’adattatore alla presa di corrente È stata selezionata una videocamera non corretta Vengono visualizzate solo immagini in bianco e nero Verificare se la videocamera si trova nella modalità di visualizzazione notturna/infrarossi 67 Attaccare l’adattatore alla presa di corrente Avvicinare il monitor alla videocamera Abbinare di nuovo la videocamera al monitor. Consultare la sezione 5.2.7.1.3. Cambiare il numero della videocamera che si sta visualizzando. Consultare la sezione 5.2.7.1.1. Per vedere le immagini a colori, aumentare il livello di luminosità nel luogo in cui è posizionata la videocamera e assicurarsi che niente stia ostacolando il sensore della luce della videocamera (II) ITALIANO Problema Non è possibile ascoltare la voce dei genitori attraverso l’unità del bambino La videocamera non trasmette le immagini Non è possibile sentire il bambino attraverso l’unità dei genitori Interferenze o ricezione insoddisfacente Possibile Causa Soluzione L’impostazione del volume dell’unità dei genitori è troppo basso Impostare il volume sul livello più alto La videocamera non è accesa Premere e mantenere premuto il tasto (III) per 2 secondi Videocamera: l’adattatore non è collegato alla presa di corrente È attiva la modalità VOX o la modalità di risparmio energia (Standby) Collegare l’adattatore alla presa di corrente Il volume impostato sull’unità dei genitori è troppo basso Impostare il volume al livello più alto È possibile che altri dispositivi elettronici stiano interferendo con il segnale La videocamera e il monitor potrebbero essere troppo distanti uno dall’altro Il livello di carica della batteria potrebbe essere troppo basso La videocamera e il monitor potrebbero essere troppo vicini a molti oggetti metallici Non è possibile caricare L’adattatore AC/DC non è collegato la batteria dell’unità dei alla corrente genitori L’unità del bambino ha perso il collegamento con l’unità dei genitori Per visualizzare l’area sorvegliata costantemente, disconnettere la modalità VOX o la modalità di risparmio energia sul monitor Allontanarli dal dispositivo Avvicinare il monitor alla videocamera Collegare l’adattatore alla presa di corrente Allontanarli dal dispositivo Collegare l’adattatore alla presa di corrente Si sta utilizzando una batteria non ricaricabile È possibile utilizzare esclusivamente batterie ricaricabili (batteria Li-ion da 3.7 V, 1200 mAh): controllare la batteria e se necessario sostituirla con quella fornita insieme al dispositivo La videocamera e il monitor potrebbero essere troppo distanti l’uno dall’altro Avvicinare il monitor alla videocamera La connessione tra le due unità è stata momentaneamente persa La connessione tra le due unità è stata persa Ripristinare le due unità scollegandole dall’alimentazione elettrica. Attendere circa 15 secondi prima di collegarle nuovamente. Attendere un minuto affinché l’unità del bambino e quella dei genitori si sincronizzino Abbinare di nuovo la videocamera e il monitor. Consultare la sezione 5.2.7.1.3. 8. SPECIFICHE TECNICHE Frequenza Portata operativa Numero di canali configurabili Power (unità genitori) Batteria ricaricabile per monitor Power (unità bebè) Tempo di funzionamento con la batteria completamente carica (unità genitori) 2.4GHz FHSS 240m (in linea retta e in spazio aperto) 4 Input: 100-240VAC 50/60Hz Output: 5V 800mA 3.7V 1200 mAh Input: 100-240 VCA 50/60Hz Output: 5V 800mA Circa 5 ore 68 ITALIANO Dimensioni dello schermo LCD Formato da cavo adattatore da Jack a RCA compatibile Formato da cavo miniUSB-USB compatibile 3.5" Figura D Cavo dati USB 9. INFORMAZIONI SULLO SMALTIMENTO DELLE BATTERIE E DEL PRODOTTO • Ricordare di smaltire il prodotto in modo responsabile dal punto di vista ambientale, rimuovendo prima la batteria. • Non mescolare prodotti che recano il simbolo di un bidone dei rifiuti barrato con i normali rifiuti domestici. • Per un’adeguata raccolta ed elaborazione di questi prodotti, conferirli ai punti di raccolta designati dalle autorità locali. Si può anche contattare il negozio in cui il prodotto è stato acquistato. Con la presente Miniland S.A. dichiara che questo “89174 digimonitor 3.5” plus”è conforme ai requisiti essenziali ed alle altre disposizioni pertinenti stabilite dalla direttiva 2014/53/UE. 69 POLSKI SPIS TREŚCI 1. Wprowadzenie 2. Zawartość 3. Instrukcje bezpieczeństwa 4. Charakterystyka i funkcje produktu 5. Instrukcje użytkowania 6. Konserwacja 7. Identyfikacja i rozwiązywanie problemów 8. Specyfikacje techniczne 9. Informacja dotycząca utylizacji baterii i produktu 1. WPROWADZENIE Gratulujemy zakupu elektronicznej niani z bezprzewodowym kolorowym monitorem wyposażonym w najnowsze technologie. Jesteśmy pewni, że będą Państwo zadowoleni z jakości i działania produktu, mimo to zalecamy uważną lekturę niniejszej instrukcji, dzięki czemu korzystanie z produktu będzie jeszcze wydajniejsze. Elektroniczna niania umożliwia przesyłanie sygnałów audio i wideo w trybie bezprzewodowym, które są odbierane na kolorowym monitorze, co jest bardzo przydatne w wielu sytuacjach, takich jak opieka nad niemowlęciem, małymi dziećmi czy osobami starszymi. UWAGA: Charakterystyka podana w niniejszej instrukcji użytkownika może ulec zmianie bez wcześniejszego powiadomienia. 2. ZAWARTOŚĆ 1 kamera (nadajnik) 1 monitor (odbiornik) 2 adaptery AC/DC 1 akumulatorek litowy (Li-ion) do monitora 1 pasek do zawieszania na szyi 1 torba do przenoszenia i przechowywania 1 statyw Instrukcja obsługi i karta gwarancyjna • W razie braku któregoś z wymienionych powyżej elementów prosimy o kontakt z dystrybutorem. 3. INSTRUKCJE BEZPIECZEŃSTWA Przed użyciem elektronicznej niani po raz pierwszy należy uważnie przeczytać niniejszą instrukcję i zachować ją na przyszłość. 3.1. OGÓLNE INSTRUKCJE BEZPIECZEŃSTWA: Podczas stosowania urządzeń elektrycznych należy zachować podstawowe środki ostrożności: 1. W przypadku stosowania wyrobu przez dzieci lub osoby starsze, bądź też w ich pobliżu, należy zwiększyć ostrożność. Przechowywać nieużywane urządzenie z dala od dzieci. 2. Produkt nie może być stosowany jako jedyny środek nadzoru. W żadnym wypadku nie zastępuje nadzoru osoby dorosłej odpowiedzialnej za dzieci, dorosłych lub przedmioty. 3. Do elektronicznej niani stosować wyłącznie załączone adaptery CA (5 V, 800 mA). 4. Stosować wyłącznie zalecane przez producenta akumulatory litowo-jonowe (Li-ion 3,7 V – 1200mAh). Nie ładować w urządzeniu baterii innych niż dostarczone w zestawie. 5. Produkt zawiera małe elementy. Podczas rozpakowywania i montażu zachować ostrożność. 6. NIE pozwalać, by dzieci bawiły się opakowaniem, np. plastikowymi woreczkami. Podczas rozpakowywania i montażu zachować ostrożność. 7. NIE stosować urządzenia w przypadku uszkodzenia kabla lub wtyczki. Jeśli monitor urządzenia nie działa prawidłowo lub w przypadku jego uszkodzenia, należy skontaktować się z autoryzowanym centrum serwisowym firmy Miniland w celu zamówienia przeglądu i naprawy monitora. 8. NIE naprawiać ani nie ustawiać samodzielnie żadnych funkcji elektrycznych lub mechanicznych urządzenia, ponieważ może to spowodować utratę gwarancji. 9. Sprawdzić napięcie w sieci celem upewnienia się, że odpowiada ono zakresowi napięcia podanemu w specyfikacjach produktu. 10. Jeśli urządzenie nie będzie użytkowane przez dłuższy czas, należy zawsze odłączyć adapter od prądu. Aby odłączyć urządzenie od sieci elektrycznej, należy przytrzymać transformator i wyciągnąć wtyczkę z gniazdka. Nie pociągać bezpośrednio za kabel. 11. Produkt został zaprojektowany wyłącznie do użytku w pomieszczeniach. Urządzenia nie można wystawiać na deszcz, wilgoć lub rozpryskujące się ciecze. Na ani przy urządzeniu nie należy ustawiać żadnych pojemników z cieczą, jak na przykład szklanki czy dzbanki. Monitora nie należy używać w pobliży wody. ŚRODKI OSTROŻNOŚCI • Zadaniem elektronicznej niani jest zapewnienie spokoju rodzicom, kiedy nie mogą przebywać w tym samym pokoju, co dziecko. Produkt nie zastępuje odpowiedzialnego nadzoru osoby dorosłej, Jeden z rodziców musi zawsze znajdować się w pobliżu monitora podczas użytkowania urządzenia. Elektroniczna niania nie jest urządzeniem medycznym i nie gwarantuje dobrego samopoczucia dziecka. Co jakiś czas należy wchodzić do pokoju, w którym jest dziecko, celem sprawdzenia, czy wszystko jest w porządku. • Nigdy nie stosować urządzenia w przypadku, gdy życie lub zdrowie dziecka bądź innych osób, lub stan mieszkania zależą od jego działania. Producent nie bierze na siebie odpowiedzialności ani nie przyjmuje reklamacji wynikających ze śmierci, obrażeń lub szkód materialnych związanych z nieprawidłowym działaniem, bądź niewłaściwym użytkowaniem produktu. • Niewłaściwe użytkowanie urządzenia może być podstawą do podjęcia działań prawnych. • Produkt należy użytkować w sposób odpowiedzialny. WAŻNE! Należy pamiętać, że wszelkie zmiany bądź przeróbki urządzenia niewykonane przez serwis firmy Miniland, nie są objęte gwarancją. 3.2. ZALECENIA DOTYCZĄCE ZAKŁÓCEŃ RADIOWYCH Urządzenie zostało poddane testom i spełnia wymogi dyrektywy RED 2014/53/UE. Wymogi te zostały określone w celu zapewnienia ochrony przed szkodliwymi zakłóceniami w instalacjach domowych. Jeśli urządzenie nie jest instalowane i użytkowane zgodnie z instrukcją, mogą powstać szkodliwe zakłócenia w falach radiowych. 70 POLSKI Jednak należy pamiętać, że nie jest możliwe całkowite wyeliminowanie zakłóceń w niektórych instalacjach. Jeśli urządzenie powoduje zakłócenia w odbiorze radia lub telewizji, co można sprawdzić poprzez wyłączenie i włączenie urządzenia, zalecamy poniższe kroki w celu usunięcia zakłóceń: • Przestawić lub zmienić ustawienie odbiornika. • Zwiększyć odległość między urządzeniem a elektroniczną nianią. • Włożyć wtyczkę urządzenia do innego gniazdka niż gniazdko używane do odbiornika. • Skonsultować się z działem obsługi klienta firmy Miniland. Zgodnie z wymogami dyrektywy RED 2014/53/ UE urządzenie wyposażone jest w specjalne przewody ekranowane. Działanie z urządzeniem bez homologacji lub bez przewodów ekranowanych najprawdopodobniej spowoduje zakłócenia w odbiorze radia i telewizji. 3.3. WYBÓR ODPOWIEDNIEGO MIEJSCA • Urządzenie elektroniczne należy umieścić z dala od dzieci, zapobiegając w ten sposób możliwym wypadkom. • Dzieci mogą zaplątać się w kable. Nadajnik należy umieścić w odległości ok. 1 - 1.5 m od łóżeczka dziecka. Nigdy nie wstawiać nadajnika do łóżeczka, ustawiać na łóżku lub w kojcu. Upewnić się, że urządzenie, przewody i adapter znajdują się poza zasięgiem niemowlęcia i innych małych dzieci. • Umieścić elektroniczną nianię w miejscu, gdzie zapewniona jest swobodna cyrkulacja powietrza. Nie umieszczać jej na kołdrze, miękkich kocach, w rogach szafek, półek itp. • Umieścić urządzenie z dala od źródeł ciepła, takich jak grzejniki, kominki, kuchenki i z dala od bezpośredniego światła słonecznego. • Umieścić nadajnik z dala od telewizorów, regeneratorów sygnału i radia. Silne sygnały radiowe generowane przez te elementy mogą powodować powstawanie hałasów, a nawet dźwięków i obrazów na monitorze. Jeśli wystąpią takie zakłócenia, należy przenieść kamerę w inne miejsce. • Monitor może być ustawiany na stole za pomocą wysuwanej podstawy znajdującej się w tylnej części monitora. Jeśli nie jest wykorzystywana, można po prostu ją złożyć, wkładając w tylną część monitora do momentu kliknięcia wskazującego na całkowite złożenie podstawy. 4. CHARAKTERYSTYKA I FUNKCJE PRODUKTU 4.1. FUNKCJE I STEROWANIE MONITOREM (ZDJĘCIE 1) MONITOR (ZDJĘCIE 1.1) 1. Dioda LED wskazująca na włączenie / połączenie 2. Mikrofon 3. Dioda LED wskazująca na ładowanie 4. Ekran LCD 5. Przycisk włączania / wyłączania 6. Głośnik 7. Zaczep na pasek na szyję 8. Przycisk regulacji ▲ 71 9. Przycisk zoom / menu 10. Przycisk regulacji ▼ 11. Przycisk Akceptuj / tryb Skanuj 12. Przycisk do rozmawiania z dzieckiem 13. Złącze wyjściowe AV 14. Złącze mini USB do zasilania / PC 15. Składana podstawa 16. Pokrywa komory baterii 17. Wyciągana antena WYŚWIETLACZ Ikony na ekranie (ZDJĘCIE 1.2) a. Zasięg b. Wybrana głośność kamery c. Noktowizor d. Kołysanki e. Tryb VOX f. Wybrana kamerag. Lampka h. Poziom transmisji i. Poziom naładowania akumulatorków j. Ikonka rozmowy z dzieckiem k. Ikonka aktywnego powiadamiania IKONKI W MENU (ZDJĘCIE 1.3) A. Menu wybierz / dodaj / usuń kamerę B. Menu ustawień monitor C. VOX / Standby D. Poziom transmisji E. Alarm F. Funkcja wibracji G. Jasność ekranu 4.2. FUNKCJE I STEROWANIE KAMERĄ (ZDJĘCIE 2) I. Wyciągana antena II. Czujnik światła III. Przycisk włączania IV. Element do zawieszania V. Głośnik VI. Przycisk parowania VII. Złączka zasilająca mini USB VIII. Mikrofon IX. Dioda LED włączenia / parowania X. Soczewka kamery XI. Podczerwień XII. Element do statywu 5. INSTRUKCJE UŻYTKOWANIA 5.1. PRZED UŻYCIEM 5.1.1. ZASILANIE ODBIORNIKA I KORZYSTANIE Z BATERI Do zasilania monitora lub odbiornika elektronicznej niani należy stosować akumulatorek lub załączony adapter AC/DC. Przed użyciem urządzenia po raz pierwszy lub po dłuższym okresie nieużytkowania, akumulatorek należy ładować przez co najmniej 8 godzin. Elektroniczna niania wyposażona jest w akumulatorek Li-ion 3.7V 1200 mAh do zasilania monitora. Zalecamy stosowanie baterii w monitorze. Dzięki temu sygnał audio / wideo z kamery może być odbierany w każdym miejscu. Zawsze gdy to możliwe, należy podłączyć monitor do adaptera podłączonego do sieci elektrycznej w celu stałego naładowania baterii. POLSKI MONTAŻ BATERII (ZDJĘCIE 3) 1. Odkręcić i zdjąć pokrywę komory baterii (16) znajdującą się w tylnej części urządzenia. 2. Włożyć baterię Li-ion (załączona). 3. Ponownie założyć pokrywę i przykręcić ją za pomocą śruby. Uwaga! Stosować tylko baterie zalecanego rodzaju, ponieważ w przeciwnym razie może dojść do wybuchu. Zużyte baterie należy utylizować w sposób odpowiedzialny. Uwaga: Jeśli oba urządzenia nie są używane, zaleca się wyłączanie ich celem oszczędzania baterii. ŁADOWANIE BATERII Włożyć baterię zgodnie z instrukcjami podanymi w poprzednim punkcie. Podłączyć złącze adaptera do gniazda mini USB znajdującego się na boku urządzenia (14). Stosować wyłącznie załączony adapter. Podłączyć adapter do sieci elektrycznej. Kiedy monitor podłączony jest do sieci i ładuje się, dioda LED wskazująca na ładowanie (3) świeci na czerwono. Kiedy ładowarka podłączona jest do sieci, ale proces ładowania nie został jeszcze zakończony, dioda LED wskazująca na ładowanie (3) świeci się na zielono. Kiedy poziom naładowania baterii jest bardzo niski, ikonka poziomu baterii (i) miga na czerwono i co 30 sekund emitowany jest sygnał dźwiękowy. Uwaga: Wyjąć baterię, jeśli urządzenie nie będzie wykorzystywane przez dłuższy czas. 5.1.2. ZASILANIE NADAJNIKA Do zasilania kamery lub nadajnika elektronicznej niani należy stosować załączony adapter AC/DC. 1. Zlokalizować gniazdo na złącze (VII) w tylnej części nadajnika. 2. Podłączyć kabel adaptera do gniazda mini USB kamery. Stosować wyłącznie załączony adapter. 3. Podłączyć adapter do sieci elektrycznej. Ostrzeżenie: Niebezpieczeństwo uduszenia. Przechowywać kable z dala od dziecka. NIGDY NIE umieszczać kamery z kablami bliżej niż 1 m od łóżeczka. Nigdy nie stosować przedłużaczy z adapterami AC. Stosować wyłącznie załączone adaptery AC. 5.2. OBSŁUGA 5.2.1. WŁĄCZANIE / WYŁĄCZANIE ODBIORNIKA I NADAJNIKA 5.2.1.1. MONITOR: Przytrzymać wciśnięty przycisk włączania (5) znajdujący się w górnej części monitora w celu włączenia lub wyłączenia urządzenia. Dioda LED włączenia / połączenia (1) zaświeci się lub zgaśnie w zależności od wykonywanej czynności. 5.2.1.2. KAMERA: W celu włączenia lub wyłączenia kamery należy przytrzymać przycisk włączania (III) przez 2 sekundy. Dioda LED zasilania (IX) zaświeci się lub zgaśnie w zależności od wykonywanej czynności. Po zainstalowaniu i włączeniu kamery na monitorze można oglądać obrazy i słuchać wyłapane dźwięki w pokoju dziecka. 5.2.2. GŁOŚNOŚĆ MONITORA Wcisnąć przycisk regulacji (8) w celu zwiększenia głośności monitora lub przycisk regulacji (10) w celu zmniejszenia głośności. Można wybrać spośród 5 poziomów głośności. 5.2.3. ROZMOWA Z DZIECKIEM Używając odbiornika, można mówić do dziecka (np. aby je uspokoić i powiedzieć, że zaraz będziemy przy nim) lub do partnera / partnerki (kiedy znajduje się w pokoju dziecka). Wcisnąć i przytrzymać przycisk rozmowy z dzieckiem (12) i mówić do monitora. Zwolnić przycisk po zakończeniu rozmowy, aby ponownie móc słuchać dźwięków z pokoju dziecka. Należy pamiętać, że nie można słuchać dziecka, kiedy się z nim rozmawia do czasu zwolnienia przycisku. 5.2.4. ZOOM Można zwiększyć wielkość wyświetlanego obrazu poprzez ustawienie zoomu w czterech pozycjach. Aby wejść do tej funkcji, należy wykonać poniższe kroki: 1. Wcisnąć przycisk zoom . Lewa górna część obrazu będzie podświetlona na biało. 2. Wcisnąć przyciski W GÓRĘ i W DÓŁ, aby zmienić wybraną część. 3. Wcisnąć przycisk w celu zwiększenia obrazu na wybranej części. 4. Wcisnąć przycisk zoom i urządzenie wróci do procesu wyboru części, wówczas można wybrać inną część ekranu. 5. Ponownie wcisnąć przycisk zoom aby wyjść z tej funkcji. 5.2.5. NOKTOWIZOR NA PODCZERWIEŃ (AUTOMATYCZNY) Funkcja noktowizora na podczerwień umożliwia wyłapywanie obrazów dziecka lub monitorowanego miejsca przez kamerę w warunkach ograniczonego oświetlenia lub w ciemności. W trybie tym obrazy pokazywane są na monitorze w bieli i czerni. Widoczne są wyłącznie obiekty znajdujące się w odległości do 2 metrów. Kamera stale monitoruje poziom światła i automatycznie zmienia tryb na podczerwień, jeśli światło jest niewystarczające. 5.2.6. OSTRZEŻENIE O PRZEKROCZENIU ZASIĘGU Jeśli monitor zostanie umieszczony w odległości większej niż dopuszczalna od kamery (patrz charakterystyka techniczna), dioda LED włączenia / połączenia kamery (IX) i monitora (1) będzie migać na czerwono, symbol zasięgu (a) podświetli się na czerwono, a na ekranie zostanie wyświetlone logo firmy MINILAND. Zbliżyć monitor do kamery, by móc ponownie prawidłowo odbierać obraz. 72 POLSKI 5.2.7. MENU GŁÓWNE Przytrzymać przycisk Menu / Cofnij w celu wprowadzenia ustawień głównych funkcji i cech elektronicznej niani. 5.2.7.1. MENU KAMERY 5.2.7.1.1. WYBÓR KAMERY Urządzenie zostało zaprojektowane do obserwacji różnych miejsc z wykorzystaniem czterech kamer. W celu wyboru kamery, z której obraz chcemy oglądać, należy postępować zgodnie z poniższymi instrukcjami: 1. Wcisnąć przycisk Menu / Cofnij przez 3 sekundy w celu wywołania menu. 2. Wcisnąć przycisk W GÓRĘ lub przycisk W DÓŁ do czasu, aż ikonka kamery zostanie podświetlona, wcisnąć następnie przycisk , aby wejść do podmenu. 3. Wcisnąć przycisk W GÓRĘ lub przycisk W DÓŁ do czasu, aż ikonka ZOBACZ kamerę zostanie podświetlona, wcisnąć następnie przycisk . 4. Wcisnąć przycisk W GÓRĘ lub przycisk W DÓŁ celem wybrania kamery, z której obraz ma być wyświetlany, następnie wcisnąć przycisk w celu potwierdzenia wyboru. Uwaga 1: Wyświetlane mogą być wyłącznie kamery sparowane z monitorem. Uwaga 2: Można szybciej zmienić wyświetlaną , kamerę. Należy bezpośrednio wcisnąć przycisk aby cyklicznie odbierać obraz ze sparowanych kamer: CAM1/CAM2/CAM3/CAM4/MODO SCAN. 5.2.7.1.2. TRYB SKANOWANIA Funkcja ta pozwala na kolejne i cykliczne odbieranie kanałów ze sparowanych kamer, pokazując obrazy z poszczególnych kamer co 12 sekund. Funkcja może być stosowana wyłącznie wtedy, gdy sparowana jest więcej niż jedna kamera. Aby wejść do tego trybu: zaprogramowany kanał 1. Jeśli konieczne jest dodanie kamery, należy postępować zgodnie z poniższymi instrukcjami. 1. Wcisnąć przycisk Menu / Cofnij przez 3 sekundy w celu wywołania menu. 2. Wcisnąć przycisk W GÓRĘ lub przycisk W DÓŁ do czasu, aż ikonka kamery zostanie podświetlona, wcisnąć następnie przycisk , aby wejść do podmenu. 3. Wcisnąć przycisk W GÓRĘ lub przycisk W DÓŁ do czasu, aż ikonka Dodaj kamerę zostanie podświetlona, wcisnąć następnie przycisk . 4. Wcisnąć przycisk W GÓRĘ lub przycisk W DÓŁ w celu wybrania kanału, do którego chcemy dodać nową kamerę, potwierdzić, wciskając przycisk . 5. W trakcie, gdy dioda LED wskazująca na włączenie / połączenie (1) miga należy wcisnąć przycisk parowania kamery (VI). 6. Po sparowaniu dioda LED przestaje migać i obrazy z kamery natychmiast są wyświetlane na ekranie monitora. 7. Jeśli parowanie nie zostało przeprowadzone prawidłowo, należy powtórzyć powyższe kroki. Uwaga 1: Można wybrać tylko te kanały, do których wcześniej nie została sparowana żadna kamera. Uwaga 2: Nie można wejść do tego podmenu, jeśli zostały sparowane 4 kamery. Z różnych przyczyn może dojść do utraty połączenia między monitorem a już połączoną kamerą. W takim przypadku należy ponownie wykonać powyższą procedurę w celu połączenia kamery z monitorem. 5.2.7.1.4. USUWANIE KAMERY W celu usunięcia jednej z połączonych kamer należy postępować zgodnie z poniższymi instrukcjami: 1. Wcisnąć przycisk Menu / Cofnij przez 3 sekundy w celu wywołania menu. 2. Wcisnąć przycisk W GÓRĘ lub przycisk W DÓŁ do czasu, aż ikonka kamery zostanie podświetlona, wcisnąć następnie przycisk , aby wejść do podmenu. 3. Wcisnąć przycisk W GÓRĘ lub przycisk W DÓŁ do czasu, aż ikonka ZOBACZ kamerę zostanie podświetlona, wcisnąć następnie przycisk . 4. Wcisnąć przycisk W GÓRĘ lub przycisk W DÓŁ i wybrać ikonkę SKANUJ . 5. Wcisnąć przycisk celem potwierdzenia. 1. Wcisnąć przycisk Menu / Cofnij przez 3 sekundy w celu wywołania menu. 2. Wcisnąć przycisk W GÓRĘ lub przycisk W DÓŁ do czasu, aż ikonka kamery zostanie podświetlona, wcisnąć następnie przycisk , aby wejść do podmenu. 3. Wcisnąć przycisk W GÓRĘ lub przycisk W DÓŁ do czasu, aż ikonka Usuń kamerę zostanie podświetlona, wcisnąć następnie przycisk . 4. Wcisnąć przycisk W GÓRĘ lub przycisk W DÓŁ w celu wybrania kamery, którą chcemy usunąć, potwierdzić, wciskając przycisk . Uwaga 1: Jeśli jedna z kamer jest poza zasięgiem lub nie jest włączona, monitor powiadomi o tym i tryb Skanuj zostanie zatrzymany. Uwaga 1: Jeśli z monitorem sparowana jest tylko jedna kamera, nie można wejść do tego menu. Uwaga 2: Tryb Skanuj można włączyć lub wyłączyć, wciskając przycisk w trakcie wyświetlania ekranu głównego, jeśli więcej niż jedna kamera jest podłączona do monitora. 5.2.7.1.3. DODAWANIE KAMERY Produkt został zaprojektowany do obserwacji różnych miejsc z wykorzystaniem 4 kamer (kanał 1, 2, 3 lub 4 przypisany do poszczególnych kamer). Oryginalny monitor oraz kamera fabrycznie mają 73 Uwaga 2: Przed sparowaniem kanału z nową kamerą należy go najpierw usunąć. 5.2.7.2. MENU USTAWIEŃ KAMERY 5.2.7.2.1. KOŁYSANKI Nadajnik może odtwarzać kołysankę ułatwiającą dziecku zasypianie. W celu uruchomienia tej funkcji: 1. Wcisnąć przycisk Menu / Cofnij przez 3 sekundy w celu wywołania menu. 2. Wcisnąć przycisk W GÓRĘ lub przycisk W DÓŁ POLSKI do czasu, aż ikonka menu ustawień kamery zostanie podświetlona, wcisnąć następnie przycisk , aby wejść do podmenu. 3. Wcisnąć przycisk W GÓRĘ lub przycisk W DÓŁ do czasu, aż ikonka Kołysanka zostanie podświetlona, wcisnąć następnie przycisk . 4. Wcisnąć przycisk W GÓRĘ lub przycisk W DÓŁ w celu wybrania jednej z pięciu kołysanek, ciszy lub odtwarzania w pętli (ustawienie domyślne - OFF). 5. Po wybraniu melodii należy wcisnąć przycisk i pojawi się wówczas ustawienie głośności. Wcisnąć przycisk W GÓRĘ lub przycisk W DÓŁ w celu wybrania poziomu głośności między 1 a 3, następnie wcisnąć przycisk . 6. Wcisnąć trzykrotnie przycisk Menu / Cofnij , aby powrócić do ekranu głównego. 7. Na górze ekranu LCD wyświetlana jest ikonka Kołysanki (d). Należy pamiętać, że ustawienie kołysanek można wykonać jedynie w kamerze, z której aktualnie obraz jest wyświetlany. Uwaga: Funkcja odtwarzania kołysanek w pętli cyklicznie odtwarza wszystkie kołysanki. 5.2.7.2.2. GŁOŚNOŚĆ KAMERY Menu to umożliwia ustawienie poziomu głośności odtwarzania głosu rodziców w kamerze przy zastosowaniu funkcji dwukierunkowej. Aby ustawić głośność kamery, należy wykonać poniższe czynności: 1. Wcisnąć przycisk Menu / Cofnij przez 3 sekundy w celu wywołania menu. 2. Wcisnąć przycisk W GÓRĘ lub przycisk W DÓŁ do czasu, aż ikonka menu ustawień kamery zostanie podświetlona, wcisnąć następnie przycisk , aby wejść do podmenu. 3. Wcisnąć przycisk W GÓRĘ lub przycisk W DÓŁ do czasu, aż ikonka głośności kamery zostanie podświetlona, wcisnąć następnie przycisk . 4. Wcisnąć przycisk W GÓRĘ lub przycisk W DÓŁ w celu wybrania jednego spośród trzech dostępnych poziomów głośności (LOW/MID/HIGH) w zależności od potrzeb. 5. Potwierdzić wybór za pomocą przycisku . Należy pamiętać, że ustawienie głośności można przeprowadzić wyłącznie dla kamery, z której obraz jest aktualnie pokazywany na monitorze. 5.2.7.2.3. LAMPKA Nadajnik wyposażony jest w lampkę o delikatnym świetle dającym dziecku poczucie komfortu i umożliwiającym obserwację w ciemnym pokoju. Aby włączyć lampkę, należy wykonać poniższe czynności: 1. Wcisnąć przycisk Menu / Cofnij przez 3 sekundy w celu wywołania menu. 2. Wcisnąć przycisk W GÓRĘ lub przycisk W DÓŁ do czasu, aż ikonka menu ustawień kamery zostanie podświetlona, wcisnąć następnie przycisk , aby wejść do podmenu. 3. Wcisnąć przycisk W GÓRĘ lub przycisk W DÓŁ do czasu, aż ikonka lampki zostanie podświetlona, wcisnąć następnie przycisk . 4. Wcisnąć przycisk W GÓRĘ lub przycisk W DÓŁ i wybrać ON bądź OFF w zależności od tego, czy chcemy uruchomić, czy wyłączyć tę funkcję. 5. Potwierdzić wybór za pomocą przycisku . Należy pamiętać, że ustawienie lampki można przeprowadzić wyłącznie dla kamery, z której obraz jest aktualnie pokazywany na monitorze. 5.2.7.3. MENU VOX / STANDBY 5.2.7.3.1. TRYB OSZCZĘDZANIA ENERGII LUB TYLKO AUDIO (STANDBY) W trybie oszczędzania energii lub tylko audio (Standby) można wybrać maksymalny czas aktywności obrazu na monitorze (1, 3 lub 5 minut); po tym czasie obraz znika w celu oszczędzania energii, chociaż nadal odbiera sygnały dźwiękowe. W celu przywrócenia obrazu wystarczy wcisnąć któryś z przycisków. Aby uruchomić ten tryb, należy: 1. Wcisnąć przycisk Menu / Cofnij przez 3 sekundy w celu wywołania menu. 2. Wcisnąć przycisk W GÓRĘ lub przycisk W DÓŁ do czasu, aż ikonka menu VOX / Standby zostanie podświetlona, wcisnąć następnie przycisk , aby wejść do podmenu. 3. Wcisnąć przycisk W GÓRĘ lub przycisk W DÓŁ do czasu, aż ikonka Standby zostanie podświetlona, wcisnąć następnie przycisk . 4. Wcisnąć przycisk W GÓRĘ lub przycisk W DÓŁ i wybrać żądaną opcję spośród 1, 3 lub 5 minut bądź OFF w celu wyłączenia funkcji. 5. Potwierdzić wybór za pomocą przycisku . 6. Wcisnąć dwukrotnie przycisk Menu / Cofnij , aby powrócić do ekranu głównego. 5.2.7.3.2. USTAWIENIE VOX Tryb ten umożliwia aktywowanie elektronicznej niani dźwiękiem. Po uruchomieniu trybu VOX w monitorze, jeśli wokół kamery nie słychać żadnych dźwięków, przestaje ona nadawać. Kiedy kamera nie nadaje, ekran monitora gaśnie. Kiedy kamera wykryje jakiś dźwięk o natężeniu wyższym niż ustawiony poziom czułości, ponownie zaczyna przesyłać sygnał do monitora. W celu wyłączenia tej funkcji i ciągłego obserwowania miejsca należy wyłączyć tryb VOX na monitorze. • Wyłączony tryb VOX: Kamera stale przekazuje sygnał, dzięki czemu można stale nieprzerwanie monitorować dziecko i miejsce. • Włączony tryb VOX: Kamera nadaje wyłącznie wtedy, gdy wykrywa w otoczeniu kamery dźwięk o wystarczającym natężeniu, które zależy od wybranego poziomu. Przed włączeniem tej funkcji należy ustawić tryb wstrzymania na 1, 3 lub 5 minut (patrz: punkt 5.2.7.3.1). Wybrać 1, 3 lub 5, jeżeli chce się, aby kamera przestała przesyłać obraz odpowiednio po 1, 3 lub 5 minutach, gdy w pobliżu nie słychać 74 POLSKI żadnych dźwięków. Aby po ustawieniu czasu wstrzymania włączyć tryb VOX, prosimy wykonać następujące czynności: 1. Wcisnąć przycisk Menu / Cofnij przez 3 sekundy w celu wywołania menu. 2. Wcisnąć przycisk W GÓRĘ lub przycisk W DÓŁ do czasu, aż ikonka menu VOX / Standby zostanie podświetlona, wcisnąć następnie przycisk , aby wejść do podmenu. 3. Wcisnąć przycisk W GÓRĘ lub przycisk W DÓŁ do czasu, aż ikonka VOX zostanie podświetlona, wcisnąć następnie przycisk . 4. Wcisnąć przycisk W GÓRĘ lub przycisk W DÓŁ i wybrać żądany poziom czułości: wyłączony, 1, 3 lub 5 minut (domyślnie: wyłączony). Należy ustawić czułość na „1” w przypadku dziecka, które śpi w pokoju i płacze cicho, na „3”, jeżeli dziecko jest głośne podczas snu lub wydaje dość głośne dźwięki przed właściwym płaczem, lub na „2”, jeżeli uważają Państwo, że zachowanie dziecka nie pasuje do żadnego z powyższych wzorów. 5. Potwierdzić wybór za pomocą przycisku . 6. Wcisnąć dwukrotnie przycisk Menu / Cofnij , aby powrócić do ekranu głównego. Jeśli chcemy zobaczyć dziecko w określonym momencie, mimo braku hałasu wokół, można zdalnie uruchomić nadawanie kamery, wciskając jakikolwiek przycisk. 5.2.7.4. POZIOM TRANSMISJI W menu można zmienić poziom mocy emitowanej przez kamerę, wybierając między opcjami niska / wysoka. W przypadku pozycji wysokiej (HI) zasięg obejmuje 250 m na otwartym terenie przy mocy ustawionej fabrycznie. W przypadku pozycji niskiej (LOW) maksymalna odległość nadawania zmniejsza się do ok. 120 m na otwartym terenie przy zmniejszeniu mocy emisji. Aby ustawić poziom transmisji, należy wykonać poniższe czynności: 1. Wcisnąć przycisk Menu / Cofnij przez 3 sekundy w celu wywołania menu. 2. Wcisnąć przycisk W GÓRĘ lub przycisk W DÓŁ do czasu, aż ikonka poziomu transmisji zostanie podświetlona, wcisnąć następnie przycisk , aby wejść do podmenu. 3. Wcisnąć przycisk W GÓRĘ lub przycisk W DÓŁ i wybrać żądany poziom transmisji: HIGH lub LOW. 4. Potwierdzić wybór za pomocą przycisku . 5. Wcisnąć przycisk Menu / Cofnij , aby powrócić do ekranu głównego. 5.2.7.5. USTAWIENIE ALARMU Aby ustawić alarm, należy wykonać poniższe kroki: 1. Wcisnąć przycisk Menu / Cofnij przez 3 sekundy w celu wywołania menu. 2. Wcisnąć przycisk W GÓRĘ lub przycisk W DÓŁ do czasu, aż ikonka Alarmu zostanie podświetlona, wcisnąć następnie przycisk . 3. Wcisnąć przycisk W GÓRĘ lub przycisk W DÓŁ 75 w celu ustawienia timera alarmu (wcisnąć przycisk W GÓRĘ , aby zwiększyć lub przycisk W DÓŁ , aby zmniejszyć). 4. Potwierdzić wybór za pomocą przycisku . 5. Wcisnąć przycisk Menu / Cofnij , aby powrócić do ekranu głównego. Uwaga 1: Kiedy alarm jest uruchomiony, na ekranie LCD pokazywana jest ikonka zegara (k). Uwaga 2: Jeśli chcemy usunąć alarm, należy wykonać powyższe czynności 1, 2 i 3 oraz ustawić czas na 00:00. Ikonka zegara zniknie z ekranu. Uwaga 3: Kiedy alarm dzwoni, należy wcisnąć jakikolwiek przycisk w celu wyłączenia go. W przypadku braku odpowiedzi urządzenie będzie emitowało alarm przez 7 minut, a następnie go wyłączy. 5.2.7.6. FUNKCJA WIBRACJI Funkcja ta pozwala na uzyskanie ciszy w chwili, gdy rodzice potrzebują spokoju i jest bardzo pomocna w miejscach, gdzie panuje duży hałas oraz dla osób mających problemy ze słuchem. Kiedy hałas w pokoju dziecka przekroczy próg wskazany przez ustawiony poziom czułości, monitor cztery ośmiokrotnie wibrować, ostrzegając w ten sposób rodziców. Aby uruchomić funkcję wibracji, należy wykonać poniższe kroki: 1. Wcisnąć przycisk Menu / Cofnij przez 3 sekundy w celu wywołania menu. 2. Wcisnąć przycisk W GÓRĘ lub przycisk W DÓŁ do czasu, aż ikonka funkcji wibracji zostanie podświetlona, wcisnąć następnie przycisk . 3. Wcisnąć przycisk W GÓRĘ lub przycisk W DÓŁ , aby uruchomić lub wyłączyć funkcję. 4. Potwierdzić wybór za pomocą przycisku . 5. Wcisnąć przycisk Menu / Cofnij , aby powrócić do ekranu głównego. Należy pamiętać, że ustawienie funkcji wibracji można przeprowadzić wyłącznie dla kamery, z której obraz jest aktualnie pokazywany na monitorze. UWAGA: Aby monitor wibrował w przypadku, gdy głośność w pokoju dziecka przekroczy pewien próg, należy uruchomić tryb VOX. 5.2.7.7.PODŚWIETLENIE Aby zmienić podświetlenie ekranu monitora, należy wykonać poniższe czynności: 1. Wcisnąć przycisk Menu / Cofnij przez 3 sekundy w celu wywołania menu. 2. Wcisnąć przycisk W GÓRĘ lub przycisk W DÓŁ do czasu, aż ikonka Podświetlenia zostanie podświetlona, wcisnąć następnie przycisk . 3. Wcisnąć przycisk W GÓRĘ lub przycisk W DÓŁ i wybrać żądany poziom podświetlenia z pięciu dostępnych. 4. Potwierdzić wybór za pomocą przycisku . 5. Wcisnąć przycisk Menu / Cofnij , aby powrócić do ekranu głównego. POLSKI 5.2.8. eMyBaby 5.2.8.1. REJESTRACJA 1. Na początku prosimy zarejestrować się w serwisie internetowym eMyBaby. W tym celu należy uruchomić przeglądarkę, przejdź na stronę: www.emybaby.com, a następnie nacisnąć przycisk UTWÓRZ KONTO. 2. Prosimy wypełnić pola danymi osobowymi, a następnie po zaakceptowaniu warunków użytkowania, nacisnąć przycisk AKTYWUJ KONTO. 3. Wówczas pocztą elektroniczną otrzymają Państwo wiadomość weryfikacyjną zawierającą dane przekazane podczas rejestracji. Po wybraniu odnośnika zawartego w mailu powrócą Państwo na stronę internetową eMyBaby, gdzie będą się Państwo mogli zalogować, wprowadzając nazwę użytkownika i hasło i naciskając przycisk ZALOGUJ SIĘ 5.2.8.2. ABY ZOBACZYĆ ZDJĘCIE W KOMPUTERZE, DO KTÓREGO PODŁĄCZONA ZOSTAŁA ELEKTRONICZNA NIANIA 1. Aby wyświetlić zdjęcie przekazane przez kamerę w komputerze, należy podłączyć monitor (ekran) do portu USB komputera za pomocą kabla mcroUSB-USB (brak w zestawie). Ekran musi być włączony; jeśli bateria jest słaba, należy ją naładować. 2. Po wprowadzeniu nazwy użytkownika i hasła do serwisu eMyBaby na WYŚWIETLACZ wybrać opcję ELEKTRONICZA NIANIA. 3. Teraz wybrać model digimonitor 3.5” plus 4. Wówczas będzie można wybrać jedną z dwóch opcji. Wybrać „Tylko na komputerze, do którego, za pomocą anteny USB, jest podłączony monitor dziecka“. 5. Jeśli wszystko działa poprawnie, będą Państwo mogli automatycznie widzieć swoje dziecko na ekranie komputera. Jeżeli mają Państwo jakiekolwiek problemy z uzyskaniem obrazu, prosimy zapoznać się z instrukcją dotyczącą wyświetlania online, wybierając ikonę PRZECZYTAJ INSTRUKCJĘ. 5.2.8.3. ABY MÓC ZDALNIE WIDZIEĆ OBRAZ z urządzenia eMyBaby Aby móc widzieć swoje dziecko zdalnie, w komputerze, tablecie lub smartfonie, należy wykonać następujące kroki: UWAGA: Aby zdalnie widzieć obraz uchwycony przez kamerę za pośrednictwem urządzenia eMyBaby, należy podłączyć ekran urządzenia do komputera. Konieczne jest nadawanie sygnału z komputera, do którego został podłączony ekran niani elektronicznej. za pośrednictwem urządzenia eMyBaby. Jeżeli nie wykona się tego kroku, to nie można odbierać sygnału z urządzenia (komputer, tablet, telefon komórkowy). 3. Spośród dostępnych modeli wybrać digimonitor 3.5” plus. 4. Wówczas będzie można wybrać jedną z dwóch opcji. Wybrać „Możesz oglądać z każdego miejsca na świecie. Wystarczy komputer, tablet lub smartfon“. 5. Jeżeli po raz pierwszy korzystają Państwo z tej usługi, to zostaną Państwo poproszeni o podanie numeru zamówienia produktu. Numer ten ma postać MNLXX-XXXXX, a znajdą go Państwo w schowku na baterię ekranu urządzenia. 6. Po wprowadzeniu kodu pojawi się ekran z dwiema opcjami: Transmisja sygnału i Odbieranie sygnału. Aby móc zdalnie oglądać zdjęcia z kamery na urządzeniu przenośnym, należy najpierw nacisnąć przycisk Transmisja sygnału. 7. Teraz należy wybrać ikonę , która pojawi się na środku zdjęcia. Gdy komputer zacznie nadawać sygnał, na ekranie pojawi się obraz: Kroki, jakie należy wykonać, aby oglądać obraz w innym komputerze: 1. Należy podłączyć nianię elektroniczną do komputera według wyżej opisanej procedury, podłączając ekran urządzenia do portu USB komputera za pomocą kabla miniUSB-USB (brak w zestawie). 2. W komputerze, w którym chce się oglądać zdalny obraz, należy zalogować się na stronie internetowej eMyBaby (www.emybaby.com), podając nazwę użytkownika i hasło, a następnie wybrać opcję ELEKTRONICZA NIANIA. 3. Spośród dostępnych modeli wybrać digimonitor 3.5” plus. 4. Wówczas będzie można wybrać jedną z dwóch opcji. Wybrać „Możesz oglądać z każdego miejsca na świecie. Wystarczy komputer, tablet lub smartfon“. 5. Aby móc zdalnie oglądać zdjęcia z kamery na urządzeniu przenośnym, teraz należy nacisnąć przycisk Odbieranie sygnału. Jeśli wszystko działa poprawnie, będą Państwo mogli automatycznie widzieć swoje dziecko na ekranie komputera. Jeżeli mają Państwo jakiekolwiek problemy z uzyskaniem obrazu, prosimy zapoznać się z instrukcją dotyczącą wyświetlania online, wybierając ikonę PRZECZYTAJ INSTRUKCJĘ. Kroki, jakie należy wykonać, aby oglądać obraz w urządzeniu przenośnym (tablet lub telefon komórkowy): 1. Należy podłączyć nianię elektroniczną do komputera według wyżej opisanej procedury, podłączając ekran urządzenia do portu USB komputera za pomocą kabla miniUSB-USB (brak w zestawie). 2. Zalogować się w serwisie eMyBaby (www.emybaby. com), podając nazwę użytkownika i hasło (jeżeli nie mają Państwo jeszcze konta w serwisie, to należy się zarejestrować zgodnie ze wskazówkami podanymi wyżej), a następnie wybrać opcję ELEKTRONICZA NIANIA. 76 POLSKI Aplikacja eMyBaby Miniland stworzył darmową aplikację eMyBaby, dostępną na urządzenia pracujące w systemie iOS i Android, którą można w łatwy sposób pobrać. W celu pobrania aplikacji eMyBaby najpierw należy wejść do odpowiedniego sklepu z aplikacjami bądź pobrać bezpośrednio, skanując odpowiedni kod QR: Aby zainstalować aplikację, postępuj zgodnie z instrukcjami znajdującymi się na początku niniejszej instrukcji. 1. Po zainstalowaniu aplikacji należy ją uruchomić. Wybrać LOG IN, a następnie podać nazwę użytkownika i hasło, aby mieć dostęp do serwisu, jeżeli już się Państwo zarejestrowali, lub zarejestrować się, jeżeli do tej pory Państwo tego nie zrobili. Prosimy pamiętać, że otrzymają Państwo wiadomość weryfikacyjną na adres e-mail podany podczas rejestracji. 2. W menu głównym wybrać opcję ELEKTRONICZA NIANIA. 3. Spośród dostępnych modeli wybrać digimonitor 3.5” plus. , aby oglądać obraz z kamery w urządzeniu przenośnym. 4. Nacisnąć ikonę PLAY Przeglądarka urządzenia Można również oglądać obraz z kamery za pośrednictwem strony internetowej eMyBaby za pomocą przeglądarki zainstalowanej na urządzeniu przenośnym. Opcja ta jest szczególnie przydatna, gdy urządzenie przenośne nie pracuje w systemie iOS ani Android. 1. W przeglądarce urządzenia przenośnego należy zalogować się do serwisu eMyBaby (www.emybaby.com), podając nazwę użytkownika i hasło. W menu głównym wybrać opcję ELEKTRONICZA NIANIA. 2. Spośród dostępnych modeli wybrać digimonitor 3.5” plus. 3. Wówczas będzie można wybrać jedną z dwóch opcji. Wybrać „Możesz oglądać z każdego miejsca na świecie. Wystarczy komputer, tablet lub smartfon”. 4. Nacisnąć przycisk Odbieranie sygnału. Jeśli wszystko działa poprawnie, będą Państwo mogli automatycznie widzieć swoje dziecko w urządzeniu przenośnym. 6. KONSERWACJA • Powierzchnie kamery i monitora należy czyścić miękką szmatką niepozostawiającą włókien. • W przypadku zabrudzenia urządzeń należy czyścić je lekko wilgotną szmatką, uważając, by woda nie dostała się do żadnych otworów. • Nigdy nie używać środków czyszczących ani rozpuszczalników. 7. IDENTYFIKACJA I ROZWIĄZYWANIE PROBLEMÓW Problem Monitor nie odbiera Możliwa przyczyna Kamera nie włącza się Monitor nie włącza się Kamera: adapter nie został podłączony do prądu Monitor: adapter nie został podłączony do prądu Monitor jest poza zasięgiem 77 Rozwiązanie Wcisnąć i przytrzymać przycisk włączenia (III) przez 2 sekundy Wcisnąć i przytrzymać przycisk włączenia (5) Podłączyć adapter do prądu Podłączyć adapter do prądu Zbliżyć monitor do kamery POLSKI Problem Monitor nie odbiera Możliwa przyczyna Utracono połączenie między monitorem a jedną sparowaną już kamerą Wybrano nieprawidłową kamerę Wyświetlane są tylko biało-czarne obrazy Sprawdzić, czy kamera znajduje się w trybie noktowizora / podczerwieni Nie można słuchać głosu rodziców w nadajniku. Kamera nie nadaje Ustawienie głośności odbiornika jest zbyt niskie Kamera nie została włączona Kamera: adapter nie został podłączony do prądu Tryb VOX lub tryb oszczędzania energii (Standby) jest uruchomiony Nie można słuchać dziecka w odbiorniku Zakłócenia lub niewystarczający odbiór Nie jest możliwe naładowanie baterii w odbiorniku Jeśli nadajnik utracił połączenie z odbiornikiem Jeśli nadajnik utracił połączenie z odbiornikiem Ustawienie głośności odbiornika jest zbyt niskie Możliwe, że inne urządzenia elektryczne zakłócają sygnał Odległość między kamerą i monitorem może być zbyt duża Poziom naładowania baterii może być zbyt niski Możliwe, że kamera lub monitor znajdują się zbyt blisko przedmiotów wykonanych z metalu Adapter AC/DC nie został Włączony Zastosowano baterię niebędącą akumulatorkiem Możliwe, że kamera i monitor znajdują się zbyt daleko od siebie Na chwilę utracono połączenie między dwoma urządzeniami Utracono połączenie między urządzeniami 78 Rozwiązanie Ponownie sparować kamerę z monitorem. Sprawdzić punkt 5.2.7.1.3. Zmienić numer kamery, z której obraz jest wyświetlany. Sprawdzić punkt 5.2.7.1.1. Aby zobaczyć obraz w kolorze, zwiększyć światło w miejscu umieszczenia kamery i upewnić się, że nic nie zakrywa czujnika światła kamery (II) Ustawić głośność na najwyższym poziomie Wcisnąć i przytrzymać przycisk (III) przez 2 sekundy Podłączyć adapter do prądu W celu ciągłej obserwacji nadzorowanego miejsca wyłączyć tryb VOX lub tryb oszczędzania energii na monitorze Ustawić głośność na najwyższym poziomie Odsunąć je od urządzenia Zbliżyć monitor do kamery Podłączyć adapter do prądu Odsunąć je od urządzenia Podłączyć adapter do prądu Mogą być stosowane wyłącznie akumulatorki (Li-ion 3.7 V, 1200 mAh): sprawdzić baterię i jeśli to konieczne, wymienić ją na baterię załączoną do urządzenia Zbliżyć monitor do kamery Ponowie ustanowić połączenie urządzeń odłączając je od zasilania elektrycznego. Odczekać ok. 15 sekund przed ich ponownym połączeniem. Odczekać minutę, aby nadajnik i odbiornik zsynchronizowały się Ponownie sparować kamerę z monitorem. Sprawdzić punkt 5.2.7.1.3. POLSKI 8. PARAMETRY TECHNICZNE Częstotliwość Zakres roboczy Liczba konfigurowalnych kanałów 2.4GHz FHSS 240m (linia prosta i otwarta przestrzeń) 4 Input: 100-240VAC 50/60Hz Output: 5V 800mA 3.7V 1200 mAh Input: 100-240 VCA 50/60Hz Output: 5V 800mA Zasilanie (urządzenie dla rodziców) Bateria wielokrotnego ładowania do monitora Moc (urządzenie dla dziecka) Czas pracy baterii po pełnym naładowaniu (urządzenie dla rodziców) Wielkość ekranu LCD Format przejściówki z Jack na RCA kompatybilny Formatu kompatybilnego kabla miniUSBUSB Około 5 godzin 3.5" Zdjęcie D Przewodu danych USB 9. INFORMACJE NA TEMAT UTYLIZACJI BATERII I PRODUKTU • Należy pamiętać o wyrzucaniu produktu w sposób przyjazny dla środowiska po wyjęciu baterii. • Nie mieszać produktów opatrzonych symbolem przekreślonego kosza z odpadami z gospodarstw domowych. • W celu prawidłowego odbioru i przetwarzania tych produktów należy przekazać je do punktów zbiórki odpadów wyznaczonych przez władze lokalne. Można również skontaktować się ze sklepem, w którym kupiono produkt. Niniejszym Miniland S.A. oświadcza, że „89174 digimonitor 3.5” plus“ jest zgodny z zasadniczymi wymogami oraz pozostałymi stosownymi postanowieniami Dyrektywy 2014/53/UE. 79 PУССКИЙ ОГЛАВЛЕНИЕ 1. Введение 2. Комплектация 3. Инструкции по безопасности 4. Характеристики устройства 5. Инструкции по использованию 6. Обслуживание 7. Обнаружение и устранение проблем 8. Технические характеристики 9. Указания по утилизации батарей и устройства ВВЕДЕНИЕ Поздравляем Вас с приобретением нашей высокотехнологичной беспроводной радионяни с цветным монитором. Мы уверены, что Вы будете полностью удовлетворены качеством и возможностями нашего устройства, тем не менее, предлагаем внимательно ознакомиться с настоящей инструкцией, чтобы использовать его с максимальной эффективностью. Наша радионяня позволяет осуществлять беспроводную передачу аудио/видео сигнала на цветной экран, что очень удобно в большинстве случаев, когда Вам нужно проследить за Вашим малышом, детьми младшего возраста или пожилыми людьми. ВНИМАНИЕ: Некоторые характеристики, описанные в настоящем руководстве, могут быть изменены изготовителем без предварительного уведомления. 2. КОМПЛЕКТАЦИЯ 1 Камера (детский блок) 1 Монитор (родительский блок) 2 Адаптера постоянного/переменного тока 1 Подзаряжаемая батарея (Li-ion) для монитора 1 Ремешок на шею 1 Сумка для хранения и переноски 1 Треножный штатив Инструкции по использованию и гарантия • Если чего-либо из вышеприведенного списка не хватает в комплекте поставки, обратитесь к Вашему дистрибьютору или в пункт продажи. 3. ИНСТРУКЦИИ ПО БЕЗОПАСНОСТИ Внимательно прочтите настоящую инструкцию перед началом первого использования Вашей радионяни и сохраните её для дальнейших консультаций. 3.1. ОБЩИЕ ИНСТРУКЦИИ ПО БЕЗОПАСНОСТИ: При пользовании электрическими приборами всегда соблюдайте основные правила безопасности: 1. Следует быть особенно внимательными при использовании любого устройства детьми и пожилыми людьми, а также в случаях, когда они находятся рядом. Когда устройство не используется, держите его вне зоны досягаемости детей. 2. Настоящее устройство не следует использовать как единственное средство ухода за детьми и, ни в коем случае, оно не может служить заменой ответственного ухода за детьми и лицами преклонного возраста со стороны взрослых. 3. При работе с радионяней пользуйтесь только адаптерами переменного тока (5 V, 800 mA), которые входят в комплект поставки. 4. Используйте только с батареями рекомендуемого типа (литий-ионный аккумулятор 3,7 В – 1200 мА·ч). Не устанавливайте никакие другие типы батарей в монитор. 5. Устройство содержит детали маленького размера. Будьте внимательны и осторожны при распаковке и сборке прибора. 6. Не позволяйте детям играть с упаковочными материалами, например, с пластиковыми пакетами. Будьте внимательны и осторожны при распаковке и сборке прибора. 7. НЕ используйте устройство, если на кабеле питания имеются повреждения. Если Вы обнаружили какие-либо дефекты либо неполадки в работе радионяни, свяжитесь с авторизованным сервисным центром Miniland, где во избежание возможных рисков, Вы можете проверить и отремонтировать свое устройство. 8. НЕ пытайтесь самостоятельно отремонтировать ни электрические, ни механические части устройства. В этом случае Вы можете утратить гарантию. 9. Проверьте уровень напряжения в электрической сети Вашего дома на предмет соответствия параметрам, указанным в технической спецификации устройства. 10. Если Вы не собираетесь использовать радионяню в течение долгого времени, пожалуйста, отключите адаптер от электрической сети. Для отключения устройства от электрической сети вытяните вилку из розетки, придерживая трансформатор. Никогда не тяните прямо за кабель. 11. Настоящее устройство предназначено для использования исключительно в помещениях. Устройство не предназначено для попадания под дождь, во влажную среду, нежелательно попадание на его части брызг или жидкости.Не оставляйте емкости с жидкостью, например, стакан или кувшин, сверху или рядом с Вашей радионяней. Экран для наблюдения за малышом не следует использовать рядом с водой. ВНИМАНИЕ • Настоящее устройство призвано обеспечить спокойствие родителей, когда у них нет возможности находиться в одном помещении с малышом. Это устройство не должно заменить ответственную заботу взрослого о ребенке. Один из родителей должен обязательно находиться рядом с монитором во время его использования. Устройство по уходу за ребенком не является медицинским прибором, не следует доверять ему здоровье и благополучие малыша. Очень важно периодически наведываться в детскую комнату, чтобы убедиться в том, что все в порядке. • Никогда не используйте устройство, если от его работы зависит здоровье ребенка или других лиц либо целостность помещения. Изготовитель не несет никакой ответственности и не принимает претензии по поводу смерти, травм либо материального ущерба, полученных в результате поломки или неправильного использования прибора. 80 PУССКИЙ • Неправомерное использование этого беспроводного устройства может привести к правовым последствиям. • Отнеситесь ответственно к использованию устройства. ВАЖНО: Помните, что последствия любого изменения либо модификации устройства, сделанное не специалистом технического сервисного центра Miniland, не покрываются страховкой на изделие. 3.2. СОВЕТЫ СВЯЗАННЫЕ С РАДИОПОМЕХАМИ Настоящее устройство прошло испытания и соответствует требованиям Директивы RED 2014/53/UE. Эти требования разработаны для обеспечения разумной защиты против вредных помех в жилых помещениях. В случае установки и использования настоящего оборудования не в соответствии с инструкциями могут возникать помехи для радиосвязи. Стоит отметить, что невозможно гарантировать, что устройство не будет создавать помех для конкретной аппаратуры. Если устройство для ухода за ребенком создает помехи для приема радио- или телевизионных сигналов, что может быть определено путем его повторного включения и выключения, пользователю рекомендуется попытаться устранить помехи, как показано ниже: • Смените местоположение приемника. • Увеличьте расстояние между данным устройством и радионяней. • Подсоедините устройство к источнику питания, отличному от источника питания приемника. • Проконсультируйтесь со службой клиентской поддержки Miniland. В целях обеспечения соответствия с Директивой RED 2014/53/UE, в настоящем устройстве используются кабели со специальным покрытием. При работе несертифицированного оборудования или использовании кабелей без специального покрытия могут возникать помехи приема радио или телевидения. 3.3. ВЫБОР ПРАВИЛЬНОГО МЕСТОПОЛОЖЕНИЯ • Во избежание возможных происшествий разместите электронное устройство вне зоны досягаемости детей. • Дети могут запутаться в проводах. Детский блок следует размещать на расстоянии около 1 – 1.5 метра от детской колыбели. Никогда не кладите детский блок внутрь колыбельки, детской кроватки или манежа. Убедитесь в том, что устройство, провода и адаптер находятся вне зоны досягаемости ребенка или других маленьких детей. • Размещайте радионяню в месте, где воздух свободно циркулирует. Не ставьте ее на пуховые и мягкие одеяла или на углах шкафов, полок и т.д. • Размещайте устройство на удалении от источников тепла: радиаторов, каминов, плит и вне зоны прямого попадания солнечных лучей. • Разместите блок ребенка на некотором удалении от телевизоров и радиоприемников. Сильные радиосигналы, излучаемые устройством, 81 могут создавать помехи и даже быть причиной пропадания сигнала и звука на экране. В таких случаях переместите камеру в другое место. • Этот монитор может быть установлен на столе с использованием складной опорной ножки на задней панели. Если она не используется, просто уберите ее внутрь задней части монитора до характерного “щелчка”. 4. ХАРАКТЕРИСТИКИ УСТРОЙСТВА 4.1. ФУНКЦИИ И ОРГАНЫ УПРАВЛЕНИЯ МОНИТОРОМ (Рисунок 1) МОНИТОР (Рисунок 1.1) 1. Светодиодный (LED) индикатор включения/соединения 2. Микрофон 3. Светодиодный (LED) индикатор загрузки 4. Жидкокристаллический экран 5. Кнопка включения/выключения 6. Динамик 7. Отверстие для нашейного ремешка 8. Кнопка настроек ▲ 9. Кнопка зум/меню 10. Кнопка настроек ▼ 11. Кнопка принять/режим СКАН 12. Кнопка разговора с малышом 13. Гнездо AV 14. Гнездо питания mini USB /ПК 15. Складная опорная ножка 16. Крышка отсека для батареи 17. Выдвижная антенна ДИСПЛЕЙ Значки на экране (Рисунок 1.2) a. Зона покрытия сигнала b. Выбор громкости монитор c. Ночное видение d. Колыбельные песни e. Режим ГОЛОС f. Выбор камеры g. Ночник h. Уровень передачи i. Уровень батареи j. Иконка разговора с малышом k. Иконка оповещения включены ЗНАЧКИ МЕНЮ (Рисунок 3) A. Меню выбор/добавить/удалить камеру B. Меню настроек камеры C. ГОЛОС/спящий режим D. Уровень передачи E. Оповещение F. Виброрежим G. Яркость дисплея VII. Гнездо питания мини USB VIII. Микрофон IX. LED индикатор включения/сопряжения X. Объектив камеры XI. Инфракрасный датчик XII. Штатив-тренога 4.2. Функции и органы управления камерой (Рисунок 2) I. Выдвижная антенна II. Датчик освещения PУССКИЙ III. Кнопка включения IV. Отверстие для крепления на стену V. Динамик VI. Кнопка сопряжения 5. ИНСТРУКЦИИ ПО ИСПОЛЬЗОВАНИЮ 5.1. ПЕРЕД НАЧАЛОМ РАБОТЫ 5.1.1. ПИТАНИЕ РОДИТЕЛЬСКОГО БЛОКА И ИСПОЛЬЗОВАНИЕ БАТАРЕИ Монитор или родительский блок радионяни работает от батареи или от адаптера постоянного/ переменного тока, поставляемого в комплекте с ней. Перед первым использованием устройства или после длительного перерыва в работе подзаряжаемую батарею следует поставить на зарядку, как минимум, на восемь часов. Ваша радионяня поставляется с Li-ion подзаряжаемой батареей 3.7V 1200mAh для монитора. Для того, чтобы получать исходящий аудио/видео сигнал камеры в любом месте, мы рекомендуем использовать в мониторе батарею. По возможности всегда подключайте монитор к адаптеру электрической сети, чтобы поддерживать заряд батареи. УСТАНОВКА БАТАРЕИ (Рисунок 3) 1. Открутите винт и снимите крышку отсека для батареи (16) на задней части устройства. 2. Вставьте Li-ion батарею (поставляется в комплекте). 3. Поставьте крышку на место и закрутите винт. Предупреждение: Используйте батареи только рекомендованного типа, в противном случае возможен риск взрыва. Утилизируйте использованные батареи надлежащим образом. Примечание: Для продления срока службы батареи выключайте оба блока, когда они не используются. ЗАРЯДКА БАТАРЕИ Вставьте подзаряжаемую батарею согласно инструкции, описанной в предыдущем разделе. Подключите адаптер электрического тока к мини USB входу на боковой панели устройства (14). Используйте только адаптер, поставляемый в комплекте. Подключите адаптер к электросети. Во время подключения монитора к электросети и при зарядке LED индикатор зарядки (3) будет гореть красным. Если зарядное устройство подключено к электросети, а процесс зарядки завершен, зарядке LED индикатор зарядки (3) загорится зеленым. Когда уровень заряда батареи будет очень низким, иконка уровня батареи (i) замигает красным и каждые 30 секунд будет звучать короткий сигнал. Примечание: если Вы не собираетесь использовать устройство в течение длительного времени, отсоедините батарею. 5.1.2. ПИТАНИЕ ДЕТСКОГО БЛОКА Для обеспечения работы камеры детского блока этой радионяни предназначен адаптер постоянного/переменного тока, поставляемый в комплекте. 1. Найдите гнездо разъема (VII) на задней части детского блока. 2. Подсоедините адаптер к мини USB входу камеры. Используйте только адаптер, поставляемый в комплекте. 3. Подключите адаптер к электросети. Предупреждение: Опасность удушения держите шнур подальше от детей! НИКОГДА НЕ размещайте камеру с проводами на расстоянии меньше 1 метра от детской кроватки. Никогда не используйте удлинители с адаптерами переменного тока. Пользуйтесь только адаптерами переменного тока, поставляемыми в комплекте в устройством. 5.2. РАБОТА 5.2.1. ВКЛЮЧЕНИЕ/ВЫКЛЮЧЕНИЕ УСТРОЙСТВ 5.2.1.1. МОНИТОР Для включения или выключения монитора удерживайте нажатой кнопку включения (5) на его передней панели. LED индикатор включения/ сопряжения (1) загорится или потухнет в зависимости от того, включаете Вы устройство или выключаете его. 5.2.1.2. КАМЕРА: Для включения или выключения камеры удерживайте кнопку включения (III) нажатой в течение 2 секунд. LED индикатор питания (IX) загорится или погаснет в зависимости от того, включаете Вы или выключаете устройство. После установки и включения камеры Вы можете видеть на мониторе изображения и слышать звуки из комнаты Вашего малыша. 5.2.2. ГРОМКОСТЬ МОНИТОРА Нажмите кнопку (8) для увеличения и кнопку (10) для уменьшения громкости Вашего монитора, выбрав один из 5 уровней звука. 5.2.3. РАЗГОВОР С МАЛЫШОМ Используя родительский блок Вы можете поговорить с Вашим малышом (например, чтобы успокоить его или создать ощущение, что Вы рядом) или со своей супругой (если он или она находится в детской спальне). Нажмите и удерживайте кнопку разговора с малышом (12) и говорите, находясь перед монитором. После окончания разговора отпустите кнопку, чтобы продолжить прослушивание звуков из детской спальни. Учтите, что Вы не можете слышать ребенка, когда говорите с ним; для прослушивания Вам следует отпустить эту кнопку. 5.2.4. УВЕЛИЧЕНИЕ (ZOOM) Вы можете увеличить размер воспроизводимого изображения, используя четырех-позиционное увеличение. Для того, чтобы воспользоваться этой функцией сделайте следующее: 1. Нажмите кнопку zoom . В левом верхнем углу экрана появится участок, ограниченный белой квадратной границей. 82 PУССКИЙ 2. Нажмите кнопки ВВЕРХ выбранной области. и ВНИЗ для смены 3. Нажмите кнопку ,чтобы увеличить изображение выбранной области. 4. Нажмите кнопку zoom и продолжите выбор нужной области изображения, при желании можно увеличить другие участки изображения. 5. Еще раз нажмите кнопку zoom , чтобы выйти из режима увеличения. 5.2.5. ИНФРАКРАСНОЕ НОЧНОЕ ВИДЕНИЕ (АВТОМАТИЧЕСКИ) Функция инфракрасного ночного видения позволяет камере транслировать изображение ребенка или интересующего места в темноте или при слабом освещении. В этом режиме изображения транслируются в черно-белом цвете и видны лишь объекты, расположенные на расстоянии менее 2 метров. Камера постоянно анализирует уровень света и автоматически переходит в инфракрасный режим при недостаточном освещении. 5.2.6. ПРЕДУПРЕЖДЕНИЕ ОБ ОТСУТСТВИИ ЗОНЫ ДОСТУПА Если монитор и камера находятся друг от друга на расстоянии выше допустимого (см. технические характеристики), LED индикатор включения/ сопряжения с камерой (IX) и монитор (1) замигают красным, символ зоны покрытия (a) загорится красным и на экране появится логотип MINILAND. Для того, чтобы вернуться к трансляции правильного изображения уменьшите расстояние между монитором и камерой. 5.2.7. ГЛАВНОЕ МЕНЮ для Удерживайте нажатой кнопку Меню/Назад настройки основных функций и характеристик Вашей радионяни. 5.2.7.1. МЕНЮ КАМЕРЫ 5.2.7.1.1. ВЫБОР КАМЕРЫ Устройство предназначено для наблюдения за различными участками. Оно может использовать до четырех камер. Для выбора камеры, трансляцию которой Вы хотите просматривать необходимо сделать следующее: 1. Нажмите клавишу Меню/Назад в течение трех секунд до появления меню. 2. Нажмите клавишу ВВЕРХ или ВНИЗ , перемещая иконку до камеры , затем нажмите клавишу , чтобы войти в подменю. 3. Нажмите клавишу ВВЕРХ или ВНИЗ , перемещая иконку до СМОТРЕТЬ камеру затем нажмите клавишу . 4. Нажмите клавишу ВВЕРХ или ВНИЗ для выбора камеры, которую Вы хотите просматривать, затем нажмите клавишу для подтверждения выбора. Примечание 1: Вы можете просматривать изображение только с тех камер, которые сопряжены с монитором. 83 Примечание 2:Есть способ более быстрой смены камеры для просмотра. Нажмите сразу на клавишу для циклического просмотра изображений с сопряженных камер. 5.2.7.1.2. РЕЖИМ СКАНИРОВАНИЯ Эта функция позволяет просматривать последовательно и в круговом режиме изображения со всех сопряженных камер, показывая картинку с каждой камеры на протяжении 12 секунд. Эту функцию можно использовать только когда с монитором сопряжены более одной камеры. Для перехода в этот режим: 1. Нажмите клавишу Меню/Назад в течение трех секунд до появления меню. 2. Нажмите клавишу ВВЕРХ или ВНИЗ перемещая иконку до камеры , затем нажмите клавишу , чтобы войти в подменю. 3. Нажмите клавишу ВВЕРХ или ВНИЗ , перемещая иконку до СМОТРЕТЬ камеру , затем нажмите клавишу . 4. Нажмите клавишу ВВЕРХ или ВНИЗ и выберите иконку СКАН . 5. Нажмите клавишу для подтверждения. Примечание 1: Если одна из камер находится вне зоны доступа или выключена, монитор известит Вас об этом и выйдет из режима СКАН. Примечание 2: Режим СКАН можно активировать или отключить нажатием клавиши , когда работает основной экран и если с монитором сопряжены более одной камеры. 5.2.7.1.3. ДОБАВИТЬ КАМЕРУ Устройство предназначено для наблюдения за различными участками с помощью камер в количестве до 4 единиц (канал 1, 2, 3 или 4, назначенные для разных камер). Монитор и оригинальная камера программируются на заводе-изготовителе 1 каналом. Если Вам нужно добавить дополнительную камеру, следует сделать следующее: 1. Нажмите клавишу Меню/Назад в течение трех секунд до появления меню. 2. Нажмите клавишу ВВЕРХ или ВНИЗ , перемещая иконку до камеры , затем нажмите клавишу , чтобы войти в подменю. 3. Нажмите клавишу ВВЕРХ или ВНИЗ , перемещая иконку до добавления камеры , затем нажмите клавишу . 4. Нажмите клавишу ВВЕРХ или ВНИЗ для выбора канала, на который Вы хотите добавить новую камеру и подтвердите выбор нажатием клавиши . 5. В то cветодиодный (LED) индикатор включения/ соединения (1) индикатор мигает, нажмите кнопку сопряжения на камере (VI). 6. Сразу же после сопряжения LED индикатор перестанет мигать и на экране монитора появятся изображения с камеры. 7. Если сопряжение по какой-либо причине не произошло, повторите вышеуказанные шаги. PУССКИЙ Примечание 1: Вы можете выбрать только тот канал, с которым еще не сопряжена ни одна камера. Примечание 2: Если у Вас сопряжены уже 4 камеры, Вы не сможете попасть в это подменю. Иногда, по разным причинам, может быть потеряна связь между монитором и уже подключенной к нему камерой. В этом случае, просто повторите все вышеуказанные шаги для повторного сопряжения камеры и монитора. 5.2.7.1.4. УДАЛИТЬ КАМЕРУ Для того, чтобы удалить одну из сопряженных камер сделайте следующее: в течение 1. Нажмите клавишу Меню/Назад трех секунд до появления меню. 2. Нажмите клавишу ВВЕРХ или ВНИЗ , перемещая иконку до камеры , затем нажмите клавишу , чтобы войти в подменю. 3. Нажмите клавишу ВВЕРХ или ВНИЗ , перемещая иконку до удаления камеры , затем нажмите клавишу . 4. Нажмите клавишу ВВЕРХ или ВНИЗ для выбора камеры, которую Вы хотите удалить, затем нажмите клавишу для подтверждения выбора. Примечание 1: Если у Вас с монитором сопряжена только одна камера, Вы не сможете ни удалить ее, ни войти в это меню. Примечание 2: Перед сопряжением новой камеры, необходимо удалить существующий канал трансляции. 5.2.7.2. МЕНЮ НАСТРОЕК КАМЕРЫ 5.2.7.2.1. Колыбельные песни Детский блок может проигрывать нежную колыбельную для того, чтобы помочь заснуть Вашему малышу. Для активации этой функции: в течение 1. Нажмите клавишу Меню/Назад трех секунд до появления меню. 2. Нажмите клавишу ВВЕРХ или ВНИЗ , передвигая иконку до меню настроек камеры , затем нажмите клавишу , чтобы войти в подменю. 3. Нажмите клавишу ВВЕРХ или ВНИЗ , перемещая иконку до выбора колыбельной , затем нажмите клавишу . 4. Нажмите клавишу ВВЕРХ или ВНИЗ для выбора одной из пяти предлагаемых колыбельных, тишины или “циклического воспроизведения” (настройка по умолчанию - ВЫКЛ). 5. После выбора мелодии нажмите клавишу , появится контроль уровня громкости. Нажмите клавишу ВВЕРХ или ВНИЗ выберите уровень громкости от 1 до 3 и нажмите клавишу . 6. Трижды нажмите клавишу Меню/Назад , чтобы вернуться к основному экрану. 7. В верхней части ЖКэкрана появится иконка Колыбельная (d). Обратите внимание, что колыбельная будет воспроизводиться только на камере, картинку с которой Вы просматриваете в настоящее время. Примечание 1: Функция “циклического воспроизведения” проигрывает все колыбельные по кругу. 5.2.7.2.2. ГРОМКОСТЬ КАМЕРЫ Это меню позволяет настроить уровень громкости, на котором будет звучать голос родителей из камеры при двусторонней связи. Для настройки громкости камеры сделайте следующее: 1. Нажмите клавишу Меню/Назад в течение трех секунд до появления меню. 2. Нажмите клавишу ВВЕРХ или ВНИЗ , передвигая иконку до меню настроек камеры , затем нажмите клавишу , чтобы войти в подменю. 3. Нажмите клавишу ВВЕРХ или ВНИЗ перемещая иконку до громкости камеры , затем нажмите клавишу . 4. Нажмите клавишу ВВЕРХ или ВНИЗ для выбора одного из трех доступных уровней громкости (LOW/MID/HIGH) на Ваше усмотрение. 5. Подтвердите Ваш выбор нажатием клавиши . Имейте в виду, что настройки громкости выполняются только на камере, картинка с которой воспроизводится в настоящий момент. 5.2.7.2.3. НОЧНИК Детский блок оснащен ночником, который создает удобство для малыша и позволяет Вам видеть в темной комнате. Для активации ночника сделайте следующее: 1. Нажмите клавишу Меню/Назад в течение трех секунд до появления меню. 2. Нажмите клавишу ВВЕРХ или ВНИЗ , передвигая иконку до меню настроек камеры , затем нажмите клавишу ,чтобы войти в подменю. 3. Нажмите клавишу ВВЕРХ или ВНИЗ , перемещая иконку до ночника затем нажмите клавишу . 4. Нажмите клавишу ВВЕРХ или ВНИЗ выберите ON (ВКЛ) или OFF (ВЫКЛ) в зависимости от того хотите ли Вы активировать либо отключить эту функцию. 5. Подтвердите Ваш выбор нажатием клавиши . Имейте в виду, что настройки ночника выполняются только на камере, картинка с которой воспроизводится в настоящий момент. 5.2.7.3. МЕНЮ VOX/STANDBY (ГОЛОС/СПЯЩИЙ РЕЖИМ) 5.2.7.3.1. Режим энергосбережения или только аудио (STANDBY) В режиме энергосбережения или только аудио (STANDBY) Вы можете выбрать максимальный промежуток времени активности монитора (1, 3 или 5 минут); по истечении этого времени картинка исчезнет с экрана в целях энергосбережения, но трансляция звукового сигнала будет продолжена. Для возобновления показа картинки просто нажмите на любую кнопку. 84 PУССКИЙ Для активации этого режима сделайте следующее: 1. Нажмите клавишу Меню/Назад в течение трех секунд до появления меню. 2. Нажмите клавишу ВВЕРХ или ВНИЗ , перемещая иконку до появления меню VOX/ Standby , затем нажмите клавишу , чтобы войти в подменю. 3. Нажмите клавишу ВВЕРХ или ВНИЗ , перемещая иконку до появления Standby , затем нажмите клавишу . 4. Нажмите клавишу ВВЕРХ или ВНИЗ выберите желаемый параметр 1, 3 или 5 минут или OFF (ВЫКЛ) для выключения этой функции. 5. Подтвердите Ваш выбор нажатием клавиши . 6. Дважды нажмите клавишу Меню/Назад чтобы вернуться к основному экрану. 5.2.7.3.2. НАСТРОЙКА РЕЖИМА VOX (ГОЛОС) Этот режим позволяет активировать Вашу радионяню голосом. Если Вы активировали режим VOX (ГОЛОС) и рядом с камерой не слышны звуки, она отключит трансляцию. Когда трансляция камеры не производится, экран монитора погаснет. Когда камера определит любой звук, громкость которого выше запрограммированного уровня, возобновится передача сигнала на монитор. Для выключения этой функции и постоянного просмотра области наблюдения отключите на мониторе режим VOX. • Режим VOX ОТКЛЮЧЕН: Камера ведет постоянную трансляцию, что позволяет Вам контролировать малыша и область наблюдения. • Режим VOX ВКЛЮЧЕН: Камера ведет трансляцию только когда рядом с ней обнаружен звук, громкость которого выше запрограммированного уровня. Для активации этой функции, сначала необходимо установить режим ожидания на 1, 3 или 5 минут (см. пункт 5.2.7.3.1). Выберите переход на режим ожидания через 1, 3 или 5 минут, если Вы хотите, чтобы камера прекращала передачу изображения, соответственно, через 1, 3 или 5 минут отсутствия звука вокруг камеры. После установки режима ожидания выполните следующие действия для активации голосового режима: в течение 1. Нажмите клавишу Меню/Назад трех секунд до появления меню. 2. Нажмите клавишу ВВЕРХ или ВНИЗ , перемещая иконку до появления меню VOX/ Standby , затем нажмите клавишу , чтобы войти в подменю. 3. Нажмите клавишу ВВЕРХ или ВНИЗ , перемещая иконку до VOX (ГОЛОС) , затем нажмите клавишу . 4. Нажмите клавишу ВВЕРХ или ВНИЗ , выберите нужный уровень чувствительности: ВЫКЛ./1/2/3 (по умолчанию выбран вариант ВЫКЛ.). Установите чувствительность на “1”, если ребенок спит спокойно и плачет тихо, и на “3”, если ребенок спит шумно или издает довольно 85 громкие звуки прежде, чем начать действительно плакать; или установите чувствительность на уровень “2”, если считаете, что поведение ребенка не соответствует ни одному из описанных двух вариантов. 5. Подтвердите Ваш выбор нажатием клавиши . 6. Дважды нажмите клавишу Меню/Назад чтобы вернуться к основному экрану. Если Вы в определенный момент хотите взглянуть на Вашего малыша, хотя рядом с ним тихо, Вы можете дистанционно активировать трансляцию камеры, нажав любую кнопку. 5.2.7.4. УРОВЕНЬ ПЕРЕДАЧИ СИГНАЛА В этом меню Вы можете установить нужную Вам мощность передачи сигнала камерой, выбрав между “высокая/низкая”. В положении “высокая” (HI) зона покрытия достигает 250 метров в открытом пространстве с оригинальной выходной мощностью. В положении “низкая” (LOW) максимальная дальность передачи сигнала снижается до 120 метров на открытой местности из-за снижения мощности его трансляции. Для настройки следующее: уровня трансляции сделайте в течение 1. Нажмите клавишу Меню/Назад трех секунд до появления меню. 2. Нажмите клавишу ВВЕРХ или ВНИЗ , перемещая иконку до появления уровня передачи , затем нажмите клавишу , чтобы войти в подменю. 3. Нажмите клавишу ВВЕРХ или ВНИЗ , выберите нужный уровень трансляции: ВЫСОКИЙ или НИЗКИЙ. 4. Подтвердите Ваш выбор нажатием клавиши . 5. Нажмите клавишу Меню/Назад чтобы вернуться к основному экрану. 5.2.7.5. НАСТРОЙКА ПРЕДУПРЕЖДЕНИЙ Для настройки оповещений сделайте следующее: 1. Нажмите клавишу Меню/Назад в течение трех секунд до появления меню. 2. Нажмите клавишу ВВЕРХ или ВНИЗ , перемещая курсор до появления иконки оповещения , затем нажмите клавишу . 3. Нажмите клавишу ВВЕРХ или ВНИЗ , настройте таймер оповещения (нажатием клавиши ВВЕРХ для увеличения или клавиши ВНИЗ для уменьшения). 4. Подтвердите Ваш выбор нажатием клавиши . 5. Нажмите клавишу Меню/Назад , чтобы вернуться к основному экрану. Примечание 1: Если оповещения запрограммированы, на ЖК экране видна иконка часов (k). Примечание 2: Если Вы хотите удалить оповещения выполните вышеописанные шаги 1, 2 и 3 и установите время на 00:00. Значок будильника исчезнет с Вашего экрана. Примечание 3: Для выключения звучащего сигнала нажмите на любую кнопку. При отсутствии PУССКИЙ ответа устройство будет издавать сигнал в течение 7 минут, а затем замолкнет. 5.2.7.6. Виброрежим Эта функция помогает родителям сохранить тишину в моменты, когда это необходимо, очень полезна в шумной обстановке, а также пригодится людям со слабым слухом. Когда уровень шума в спальне ребенка превысит установленный порог чувствительности, монитор оповестит родителей вибрацией в четыре случаях. Для активации следующее: виброрежима сделайте 1. Нажмите клавишу Меню/Назад в течение трех секунд до появления меню. 2. Нажмите клавишу ВВЕРХ или ВНИЗ , перемещая курсор до появления иконки виброрежима , затем нажмите клавишу . 3. Нажмите клавишу ВВЕРХ или ВНИЗ , для включения или выключения этого режима. 4. Подтвердите Ваш выбор нажатием клавиши . 5. Нажмите клавишу Меню/Назад чтобы вернуться к основному экрану. Имейте в виду, что настройки виброрежима выполняются только для камеры, картинка с которой воспроизводится в настоящий момент. ПРИМЕЧАНИЕ: Для вибрации монитора в момент, когда уровень шума в детской спальне превысит определенный уровень, крайне необходимо, чтобы был включен режим VOX (ГОЛОС). 5.2.7.7. ЯРКОСТЬ Для изменения уровня яркости экрана Вашего монитора выполните следующее: 1. Нажмите клавишу Меню/Назад в течение трех секунд до появления меню. 2. Нажмите клавишу ВВЕРХ или ВНИЗ , перемещая курсор до появления иконки яркости , затем нажмите клавишу . 3. Нажмите клавишу ВВЕРХ или ВНИЗ , выберите нужный уровень яркости из 5 предлагаемых. 4. Подтвердите Ваш выбор нажатием клавиши . 5. Нажмите клавишу Меню/Назад чтобы вернуться к основному экрану. 5.2.8. eMyBaby 5.2.8.1. РЕГИСТРАЦИЯ 1. В первую очередь необходимо зарегистрироваться на Интернет-странице eMyBaby. Для этого откройте Ваш браузер, зайдите на страницу www.emybaby.com и щелкните мышкой по кнопке СОЗДАТЬ УЧЕТНУЮ ЗАПИСЬ. 2. Укажите в полях Ваши личные данные, примите условия пользования и нажмите кнопку АКТИВИРОВАТЬ УЧЕТНУЮ ЗАПИСЬ. 3. На электронную почту, которую Вы указали в момент регистрации, к Вам придет письмо подтверждение. После того, как Вы перейдете по ссылке, содержащейся в письме, Вы снова окажетесь на странице eMyBaby, с которой теперь Вы сможете войти, используя имя своей учетной записи и пароль, нажав кнопку ВОЙТИ. 5.2.8.2. ЧТОБЫ УВИДЕТЬ ИЗОБРАЖЕНИЕ НА ПК, В КОТОРОМ АКТИВИРОВАНА ВИДЕОНЯНЯ 1. Для того, чтобы Вы смогли видеть изображение, которое камера передает на Ваш ПК, Вам необходимо подключить монитор (экран) к выходу USB Вашего компьютера посредством кабеля миниUSB-USB (не входит в комплектацию). Монитор должен быть включен, если аккумулятор разряжен, его необходимо зарядить. 2. После того, как Вы зайдете под своей учетной записью и паролем в eMyBaby, выберите вариант ВИДЕОНЯНЯ на РАБОЧИЙ СТОЛ. 3. Теперь выберите цифровой монитор 3.5” plus. 4. Вы можете выбрать из двух вариантов. Выберите «Видеть его только на КОМПЬЮТЕРЕ, к которому подключена видеоняня через USBкабель». 5. Если все работает корректно, на экране Вашего компьютера Вы автоматически увидите изображение Вашего ребенка. В случае каких-либо проблем с изображением, проконсультируйтесь с инструкциями по визуализации онлайн, нажав иконку ПРОЧИТАЙТЕ ИНСТРУКЦИИ ЗДЕСЬ . 5.2.8.3. ЧТОБЫ ВИДЕТЬ ИЗОБРАЖЕНИЕ УДАЛЕННО С ПОМОЩЬЮ eMyBaby Если Вы желаете видеть своего ребенка дистанционно, на компьютере, планшете или смартфоне, следуйте инструкциям ниже: ПРИМЕЧАНИЕ: для того, чтобы видеть изображение, которое дистанционно захватывает Ваша камера через eMyBaby, монитор должен быть подключен к Вашему ПК. Обязательным условием является подача сигнала через eMyBaby с ПК, к которому подключен монитор Вашей программы vigilabebés. Без этой предварительной настройки Вы не сможете получать сигнал на каком-либо другом устройстве (ПК, планшет или мобильный телефон). 1. Подключите vigilabebés к своему ПК, следуя изложенным ранее инструкциям, подключив монитор к выходу USB Вашего компьютера посредством кабеля миниUSB-USB (не входит в поставку). 2. Зайдите на Интернет-страницу eMyBaby (www. emybaby.com) под своей учетной записью и паролем (если у Вас их нет, зарегистрируйтесь согласно инструкциям выше) и выберите опцию ВИДЕОНЯНЯ. 3. Среди различных моделей видеоняня выберите цифровой монитор «3.5” plus». Вы можете выбрать из двух вариантов. Выберите «Доступ из любой точки с другогокомпьютера, планшета или смартфона». 5. При первом использовании этой услуги, система запросит Вас ввести номер заказа Вашего продукта. Этот номер имеет формат MNLXX-XXXXX, Вы найдете его внутри отсека аккумулятора монитора. 6. После того, как Вы введете код, зажжется экран, на котором Вы увидите различные опции: 86 PУССКИЙ Отправить и Принять сигнал. Для того, чтобы видеть изображение, которое камера захватывает дистанционно, на Вашем мобильном устройстве, сначала Вы должны нажать кнопку Отправить. , которая 7. Теперь щелкните на иконке появилась в центре изображения. Когда Ваш компьютер начнет передавать сигнал, на Вашем экране появится следующее изображение: Если Вы желаете видеть изображение с другого компьютера, следуйте инструкциям ниже: 1.Подключите vigilabebés к своему ПК согласно изложенной ранее инструкции, подключив монитор к выходу USB своего компьютера с помощью кабеля миниUSB-USB (не входит в поставку). 2. На ПК, на котором Вы хотите дистанционно видеть изображение, зайдите на Интернетстраницу eMyBaby (www.emybaby.com) под своей учетной записью и паролем и выберите вариант ВИДЕОНЯНЯ. 3. Выберите цифровой монитор «3.5’’ plus» среди различных моделей ВИДЕОНЯНЯ. 4. Вам будут представлены два варианта на выбор. Выберите «Доступ из любой точки с другого компьютера, планшета или смартфона». 5. Чтобы видеть изображение, которое камера захватывает дистанционно, на Вашем мобильном устройстве, сейчас Вам нужно нажать кнопку Принять сигнал. Если все работает корректно, на экране Вашего компьютера Вы автоматически увидите изображение Вашего ребенка. В случае проблем с изображением, вернитесь к инструкциям по визуализации онлайн, нажав на иконке ПРОЧИТАЙТЕ ИНСТРУКЦИИ ЗДЕСЬ . Чтобы видеть изображение с мобильного устройства (планшета или мобильного телефона), следуйте следующим инструкциям: Приложение eMyBaby Miniland разработала приложение eMyBaby, которое доступно для iOS и Android, и которое Вы сможете легко и бесплатно загрузить. Для того, чтобы загрузить приложение eMyBaby, в первую очередь нужно перейти в соответствующую библиотеку приложений или скачать его непосредственно путем сканирования соответствующего QRCode: Для установки приложения выполните действия, описанные в начале руководства. 1. Откройте приложение, как только оно будет установлено. Войдите в «LOG IN» и введите данные Вашей учетной записи и пароль для входа, если Вы уже зарегистрированы, или зарегистрируйтесь, если Вы не сделали этого ранее. Не забывайте о том, что на Вашу электронную почту, указанную во время регистрации, Вам придет сообщение с подтверждением. 2. В главном меню выберите вариант «BABY MONITOR» (ВИДЕОНЯНЯ) 3. Выберите цифровой монитор «3.5’’ plus» среди нескольких моделей vigilabebés. 4. Нажмите на иконке «PLAY» , чтобы видеть дистанционно изображение, захватываемое камерой, с Вашего мобильного устройства. Браузер устройства Также у Вас есть возможность видеть изображение камеры, если Вы зайдете на Интернет-страницу через браузер со своего мобильного телефона. Эта возможность будет особенно Вам полезна, если Ваше мобильное устройство не iOS или Android. 1. В браузере своего устройства зайдите на Интернет-страницу eMyBaby (www.emybaby. com) под своей учетной записью пользователя и паролем. Выберите вариант ВИДЕОНЯНЯ в главном меню. 2. Выберите цифровой монитор «3.5’’ plus» среди нескольких моделей vigilabebés. 3. Вам будут представлены два варианта на выбор. Выберите «Доступ из любой точки с другого компьютера, планшета или смартфона». 87 PУССКИЙ Нажмите кнопку Принять сигнал. Если все работает корректно, на экране Вашего мобильного устройства Вы автоматически увидите изображение Вашего ребенка. 6. ОБСЛУЖИВАНИЕ • Протирайте поверхности камеры и монитора мягкой тканью без ворса. • При загрязнении устройств протрите их слегка влажной тряпкой, при очистке поверхностей будьте внимательны и не допускайте попадания воды в отверстия и пазы изделия. • Никогда не используйте растворители и чистящие средства. 7. ОБНАРУЖЕНИЕ И УСТРАНЕНИЕ ПРОБЛЕМ Проблема Нет приема на мониторе Возможная причина Камера не включается Монитор не включается Камера: нет соединения с адаптером электрического тока Монитор: нет соединения с адаптером электрического тока Монитор находится вне зооны доступа Утеряно соединениемонитора с уже сопряженной камерой Выбрана неверная камера Картинка Проверьте находится ли камера отображается в черно- в режиме ночного/инфракрасного белом цвете видения Не слышен голос родителей в детском блоке Камера не транслирует Регулировка громкости родительского блока находится на слишком низком уровне Камера не включена Камера: нет соединения с адаптером электрического тока Режим VOX или режим энергосбережения (Standby) активирован Не слышно ребенка на Уровень громкости на родительском блоке родительском блоке находится на слишком низком уровне Помехи или Возможно мешают сигналы других неудовлетворительный электронных устройств прием сигнала Камера и монитор находятся на чрезмерном расстоянии Слишком низкий уровень заряда батареи Камера или монитор могут находиться слишком близко с металлическими предметами. 88 Решение Нажмите и удерживайте кнопку включения (III) в течение 2 секунд Нажмите и удерживайте кнопку включения (5) Включите адаптер электрического тока Включите адаптер электрического тока Сократите расстояние между монитором и камерой Вновь произведите сопряжение камеры с монитором. Прочтите раздел 5.2.7.1.3. Смените номер камеры, котрая ведет трансляцию. Прочтите раздел 5.2.7.1.1. Чтобы видеть цветную картинку добавьте света там, где находится камера и убедитесь, что датчик освещения камеры (II) ничем не накрыт Увеличьте уровень громкости Нажмите и удерживайте кнопку(III) в течение 2 секунд Включите адаптер электрического тока Для того, чтобы видеть наблюдаемую область в постоянном режиме, отключите режим VOX (ГОЛОС) или режим энергосбережения на мониторе Увеличьте уровень громкости Увеличьте расстояние между устройствами Сократите расстояние между монитором и камерой Включите адаптер электрического тока Увеличьте расстояние между устройствами PУССКИЙ Проблема Невозможно зарядить батарею в родительском блоке Возможная причина Не подключен адаптер постоянного/переменного тока Используется батарея без подзарядки Если детский блок Камера или монитормогут потерял связь находиться на чрезмерном сродительским блоком расстоянии Временно утеряна связь между двумя устройствами Утеряно сопряжение между двумя устройствами Решение Включите адаптер электрического тока Следует использовать только подзаряжаемые батареи (Li-ion 3.7 V, 1200 mAh): проверьте батарею и в случае необходимости замените на поставляемую в комплекте с устройством Сократите расстояние между монитором и камерой Перезагрузите устройства, отключив их от источника электропитания. Подождите около 15 секунд перед тем, как повторно их соединить. Подождите около одной минуты пока родительский и детский блок синхронизируются Произведите повторное сопряжение камеры с монитором. Прочтите раздел 5.2.7.1.3. 8. ТЕХНИЧЕСКИЕ ХАРАКТЕРИСТИКИ Частота Радиус действия Количество настраиваемых каналов 2.4 ГГц, FHSS 240 м (по прямой линии без препятствий) 4 Вход: 100-240 В переменного тока, 50/60 Гц Выход: 5 В, 800 мА 3.7 В, 1200 мА-час Вход: 100- 240 В переменного тока, 50/60 Гц Выход: 5 В, 800 мА Питание (монитор) Аккумуляторная батарея для монитора Питание (камера) Продолжительность работы с полностью заряженной батареей (монитор) Размер ЖК-экрана Сопоставимый формат кабеляпереходника от Jack к RCA Формат-совместимый кабель miniUSBUSB Приблизительно 5 часов 3.5" Рисунок D USB-кабель для передачи данных 9. ИНФОРМАЦИЯ ПО УТИЛИЗАЦИИ БАТАРЕЙ И ИЗДЕЛИЯ • Утилизация изделия должна осуществляться в соответствии с правилами охраны окружающей среды с предварительно извлеченной батареей. • Изделия с нанесенным на них символом перечеркнутого мусорного контейнера нельзя выбрасывать с обычными бытовыми отходами. • Для надлежащего сбора и переработки этих изделий их следует сдавать в специальные пункты сбора, установленные органами властями. Вы также можете обратиться за информацией в магазин, в котором Вы покупали изделие. 89 DECLARATION OF CONFORMITY Miniland S.A. P.Ind. La Marjal I C/ La Patronal 10. 03430 ONIL (Alicante) SPAIN Technical support: +34 966 557 775 · www.minilandgroup.com · [email protected] We declare under our own responsibility that the product: digimonitor 3.5’’ plus · Miniland Baby · 89174 · Miniland, S.A. to which this declaration refers conforms with the relevant standards or other standardising documents: • Directive 2014/53/EU of the European Parliament and of the Council of 16 April 2014 on the harmonisation of the laws of the Member States relating to the making available on the market of radio equipment. - EN 300 328 V2.1.1 (2016-11) Electromagnetic compatibility and Radio spectrum Matters (ERM); Wideband transmission systems; Data transmission equipment operating in the 2,4 GHz ISM band and using wide band modulation techniques; Harmonized EN covering the essential requirements of article 3.2 of the R&TTE Directive - EN 301 489-1 V2.1.1 (2017-02) Electromagnetic compatibility and Radio spectrum Matters (ERM); Electro-Magnetic Compatibility (EMC) standard for radio equipment and services; Part 1: Common technical requirements. - EN 301 489-17 V3.1.1 (2016-11) Electromagnetic compatibility and Radio spectrum Matters (ERM); Electro-Magnetic Compatibility (EMC) standard for radio equipment; Part 17: Specifi c conditions for Broadband Data Transmission Systems. - EN 50566:2013 Product standard to demonstrate compliance of radio frequency fields from handheld and body-mounted Wireless communication devices used by the general public (30 MHz — 6 GHz). • Low Voltage Directive (LVD) 2014/35/EU - EN 62368-1:2014 Information and communication technology equipment - Part 1: Safety requirements - EN 62311:2008 Assessment of electronic and electrical equipment related to human exposure restrictions for electromagnetic fields (0 Hz — 300 GHz) • Directive 2006/66/EU on Batteries and Accumulators and Waste Batteries and Accumulators • Directive 2009/125/EC Ecodesign requirements for energy-related products - Commission Regulation (EC) NO 1275/2008, implementing Directive 2005/32/EC with regard to ecodesign requirements for standby and off mode electric power consumption of electrical and electronic household and office equipment. • RoHS. Directive 2011/65/EU on the Restriction of the use of certain hazardous substances in electrical and electronic equipment • REACH (Registration, Evaluation, Authorization and Restriction of Chemical substances) Regulation (EC) No 1907/2006 • Waste Electrical and Electronic Equipment (WEEE) Directive 2012/19/EU Miniland, S.A. Chief Executive Officer José Verdú Francés Onil, Alicante, Spain. 29th October 2019 Miniland S.A. P. Ind. La Marjal I C/ La Patronal 10 03430 ONIL (Alicante) SPAIN Technical support: +34 966 557 775 Fax +34 965 565 454 www.minilandgroup.com · [email protected] Miniland, S.A. 2016 Fabricado en China. Conservar los datos. Made in China. Keep this information. Fabricado em China. Conservar dados. Fabbricato in China. Conservare i dati. Fabriqué en China. Conserver ces informations. Hergestellt in China. Bewahren Sie diese Angaben auf Wyprodukowano w Chinach. Zachowaj instrukcję. Сделано в Китае. Сохраните эту информацию. digimonitor 3.5" plus 89174 291019 2050089174-
 1
1
-
 2
2
-
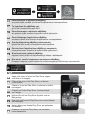 3
3
-
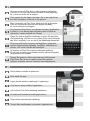 4
4
-
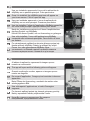 5
5
-
 6
6
-
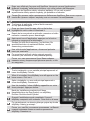 7
7
-
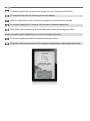 8
8
-
 9
9
-
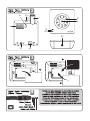 10
10
-
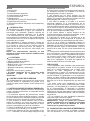 11
11
-
 12
12
-
 13
13
-
 14
14
-
 15
15
-
 16
16
-
 17
17
-
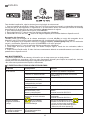 18
18
-
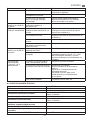 19
19
-
 20
20
-
 21
21
-
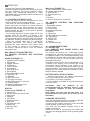 22
22
-
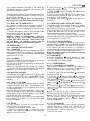 23
23
-
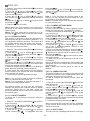 24
24
-
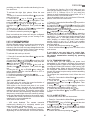 25
25
-
 26
26
-
 27
27
-
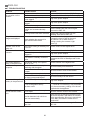 28
28
-
 29
29
-
 30
30
-
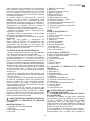 31
31
-
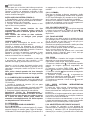 32
32
-
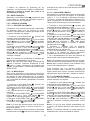 33
33
-
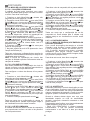 34
34
-
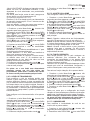 35
35
-
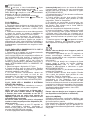 36
36
-
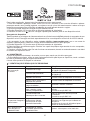 37
37
-
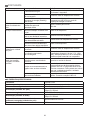 38
38
-
 39
39
-
 40
40
-
 41
41
-
 42
42
-
 43
43
-
 44
44
-
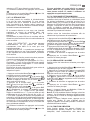 45
45
-
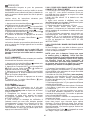 46
46
-
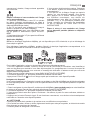 47
47
-
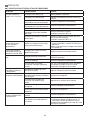 48
48
-
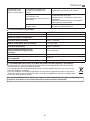 49
49
-
 50
50
-
 51
51
-
 52
52
-
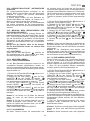 53
53
-
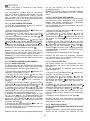 54
54
-
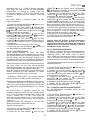 55
55
-
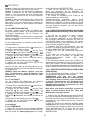 56
56
-
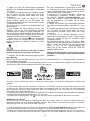 57
57
-
 58
58
-
 59
59
-
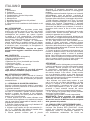 60
60
-
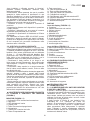 61
61
-
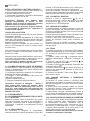 62
62
-
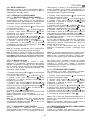 63
63
-
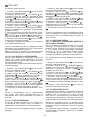 64
64
-
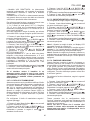 65
65
-
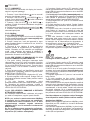 66
66
-
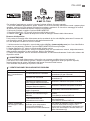 67
67
-
 68
68
-
 69
69
-
 70
70
-
 71
71
-
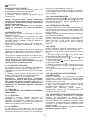 72
72
-
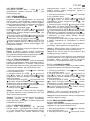 73
73
-
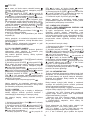 74
74
-
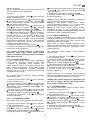 75
75
-
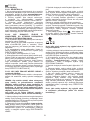 76
76
-
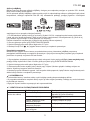 77
77
-
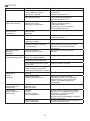 78
78
-
 79
79
-
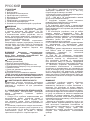 80
80
-
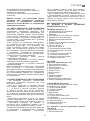 81
81
-
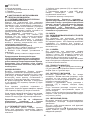 82
82
-
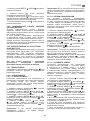 83
83
-
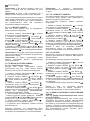 84
84
-
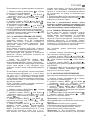 85
85
-
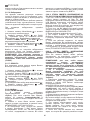 86
86
-
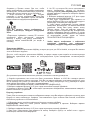 87
87
-
 88
88
-
 89
89
-
 90
90
-
 91
91
-
 92
92


Miniland digimonitor 3.5" plus Manual de usuario
- Categoría
- Monitores de video para bebés
- Tipo
- Manual de usuario
En otros idiomas
- français: Miniland digimonitor 3.5" plus Manuel utilisateur
- italiano: Miniland digimonitor 3.5" plus Manuale utente
- English: Miniland digimonitor 3.5" plus User manual
- Deutsch: Miniland digimonitor 3.5" plus Benutzerhandbuch
- русский: Miniland digimonitor 3.5" plus Руководство пользователя
- português: Miniland digimonitor 3.5" plus Manual do usuário
- polski: Miniland digimonitor 3.5" plus Instrukcja obsługi
Documentos relacionados
-
 Miniland Baby digimonitor 3.5" Manual de usuario
-
 Miniland digimonitor 2.4" gold Manual de usuario
-
 Miniland digimonitor 3.5" touch Manual de usuario
-
 Miniland digital camera 1.8" Manual de usuario
-
 Miniland Baby 89178 Manual de usuario
-
 Miniland digimonitor 5 Manual de usuario
-
 Miniland digital camera 3.5" touch Manual de usuario
-
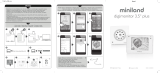 Miniland digimonitor 3.5" plus Guía de inicio rápido
-
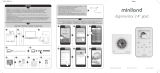 Miniland digimonitor 2.4" gold Guía de inicio rápido
-
 Miniland sweetBeat Manual de usuario


Otros documentos
-
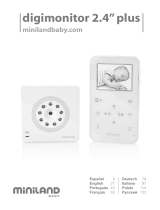 Miniland Baby digimonitor 2.4" plus Manual de usuario
-
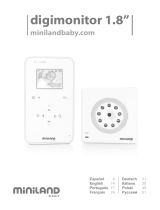 Miniland Baby 89178 Manual de usuario
-
 Miniland Baby 89093 Manual de usuario
-
 Miniland Baby DIGIMONITOR Manual de usuario
-
Beaba Ecoute bébé avec vidéo Zen+ 930294 El manual del propietario
-
Miniland Baby 89079 Manual de usuario
-
Motorola MBP854CONNECT-4 Manual de usuario
-
 Miniland Baby 89067 Especificación
-
 Miniland Baby digital video 1.4" Manual de usuario
-
Lorex SWEET PEEP Manual de usuario


