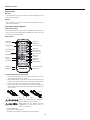
Lightning Audio LA-7000 El manual del propietario
- Categoría
- Receptores de medios de coche
- Tipo
- El manual del propietario

Owners
Manual
MULTIMEDIA RECEIVER
RECEPTOR DE MULTIMEDIA
LA-7000

2
If, after reading your manual, you still have questions regarding this
product, we recommend that you see your Lightning Audio dealer. If you
need further assistance, you can call us direct at 1-888-881-8186. Be sure
to have your serial number, model number and date of purchase available
when you call.
Safety
This symbol with “WARNING” is intended
to alert the user to the presence of important
instructions. Failure to heed the instructions will
result in severe injury or death.
This symbol with “CAUTION” is intended to
alert the user to the presence of important
instructions. Failure to heed the instructions can
result in injury or unit damage.
sTo prevent injury and damage to the unit, please read and follow the
instructions in this manual. We want you to enjoy this system, not get
a headache.
sIf you feel unsure about installing this system yourself, have it installed
by a qualified Lightning Audio technician.
sBefore installation, disconnect the battery negative (-) terminal to
prevent damage to the unit, fire and/or possible injury.
FCC Compliance Statement
This equipment has been tested and found to comply with the limits for a
Class B digital device, pursuant to part 15 of the FCC Rules. These limits are
designed to provide more reasonable protection against harmful interference
in a residential installation.
Operation is subjected to the following two conditions: (1) This device
may not cause harmful interference, and (2) the device must accept any
interference received, including interference that may cause undesired
operation.
This equipment generates, uses, and can radiate radio frequency energy
and, if not installed and used in accordance with the instructions, may
cause harmful interference to radio communications. However, there is
no guarantee that interference will not occur in a particular installation.
If this equipment does cause harmful interference to radio or television
reception, which can be determined by turning the equipment off and on,
you are encouraged to try to correct the interference by one of the following
measures:
s Reorient or relocate the receiving antenna.
s Increase the separation between the equipment and receiver.
s Connect the equipment into an outlet on a circuit different from that to
which the receiver is connected.
s Consult the dealer or an experience radio/TV technician for help.
Introduction
PRACTICE SAFE SOUND
Continuous exposure to sound pressure levels over 100dB
may cause permanent hearing loss. High powered auto
sound systems may produce sound pressure levels well over
130dB. Use common sense and practice safe sound.
2 Introduction
3 Specifications
4 Design Features
5-7 Installation
Contents
Installation Considerations
Mounting Locations
Wiring
8-14 Operation
Settings
Basic Operation
Radio Tuner Operation
CD/WMA/MP3/JPG Operation
DVD
iPod Operation
Bluetooth
TM
Operation
Rear Camera Operation
Remote Control
15 Troubleshooting
16-23 Translations
24 Limited Warranty Information
Dear Customer,
Congratulations on your purchase. At Lightning Audio we are
pleased that you chose our product.
For maximum performance we recommend you have your new
Lightning Audio product installed by an Authorized Lightning
Audio Dealer. Please read your warranty and retain your receipt
and original carton for possible future use.
Visit our web site for the latest information on all Lightning
Audio products; www.lightningaudio.com or, in the U.S. call
1-888-881-8186 or FAX 1-800-398-3985
Table of Contents.

3
6SHFLÆFDWLRQV
LA-7000
General Compatibility
Speaker Output Impedance: 4 ohms
Line out voltage: 2 volts
Line Output Impedance: 200 ohms
Power Output: 200 watts (50x4) Peak
Number of Channels: 4-Stereo, 1-Mono
Unit Dimensions: 7”(W) x 2”(D) x 4”(H)
FM Section
Frequency Range:
87.5MHz-107.9MHz US
87.5MHz-108 EU
Internet Radio available via Bluetooth wireless technology
Usable Sensitivity: 10dBf DISC
50dB Quieting Sensitivity: 20dBf Formats:
CD-DA, CD-ROM, CD-R, CD-RW, DVD Video,
DVD+R/RW, DVD-R/RW
Stereo Separation @ 1 kHz: 38dB
Frequency Response: 30Hz-13kHz
AM Section Regions:
Frequency Range:
530KHz-1710KHz US
522KHz-1620KHz EU
Usable Sensitivity: 24uV
Frequency Response: 30Hz-2.3kHz
USB Made for
Compatibility: High Speed USB 2.0 iPhone
®
model names:
iPhone 4S
iPhone 4
iPhone 3GS
iPhone 3G
Output: 5VDC, 500mA
USB Class:
Mass Storage Class
(Fat 8/16/32)
SD iPod
®
model names:
iPod Touch (4th generation)
iPod Touch (3rd generation)
iPod Nano (6th generation)
iPod Nano (5th generation)
iPod Nano (4th generation)
iPod Classic
Compatibility:
SD & SDHC memory card
(up to 32 GB)
Monitor
Panel Size: 7” Diagonal
View Angle
(Up/Down/Left/Right): 70/70/75/75
Resolution: 800 (W) x 480 (H)
Brightness (cd/m
2
) 400
Contrast Ratio: 600:1
Pixels: 1,152,000
ALL
©2013 Rockford Corporation. All Rights Reserved. LIGHTNING AUDIO and associated logos where applicable, are registered trademarks of Rockford Corporation in the United States and/or other countries. iPhone and iPod
are trademarks of Apple Inc., registered in the U.S. and other countries. The Bluetooth
®
word mark and logos are registered trademarks owned by Bluetooth SIG, Inc. and any use of such marks by Rockford Corporation is
under license. All other trademarks are the property of their respective owners. Specifications subject to change without notice.
“Made for iPod” and “Made for iPhone mean that an electronic accessory has been designed to connect specifically to iPod, iPhone, or iPad, respectively, and has been certified by the developer to meet Apple performance
standards. Apple is not responsible for the operation of this device or its compliance with safety and regulatory standards. Please note that the use of this accessory with iPod or iPhone may affect wireless performance.

4
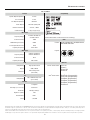
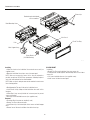
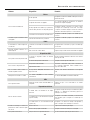
'HVLJQ)HDWXUHV)URQW
VOLUME/POWER
/MUTE button
3.5mm AUX input
USB 2.0 slot
SDHC Card slot
Internal MIC
EJECT button
IR remote sensor
7" Digital TFT
LCD Motorized
Touchscreen
Display
DISC slot
MENU button
MODE button
LA-7000
IR remote sensor
RESET button
ANGLE/OPEN/
CLOSE button
CD mode
AM/FM tuner
SDHC mode
FRONT A/V input
(3.5mm)
REAR A/V input
Bluetooth
mode
SETUP menu
FRONT USB
iPod/iPhone direct connect
illus.-1.1
illus.-1.2

5
,QVWDOODWLRQ
10. When grounding to the chassis of the vehicle, scrape all paint from
the metal to ensure a good, clean ground connection. Grounding
connections should be as short as possible and always be connected
to metal that is welded to the main body, or chassis, of the vehicle.
Seatbelt bolts should never be used for connecting to ground.
Mounting Locations
The mounting position of your source unit will have a great effect on the
performance of your in-dash Media Player. The source unit can be installed
in a wide range of operating locations. However, care should be taken to
ensure optimum performance.
Instrument Panel
Mounting the source unit in the instrument panel provides optimum
access. The source unit should be securely mounted using the “Standard
Mount” or “ISO-DIN Mount” method to ensure optimum Media Player
performance.
Center Console
Mounting the source unit in the center console also provides optimum
access. Be sure the installation does not interfere with the operation of the
gear shift or parking brake.
Glove Box
Mounting the source unit in the glove box is adequate, but does not provide
easy access. Glove box mounting should only be done if “Instrument
Panel” or ”Center Console,” mounting is not acceptable (i.e., maintaining
integrity of older vehicles with metal dashboards.)
Under Dash
Mounting the source unit under the dash is adequate, but does not provide
easy access. Under dash mounting should only be done if “Instrument
Panel,” ”Center Console” or ”Glove Box” mounting is not acceptable.
Mount the source unit off to the side of the driver’s area to reduce
interference with the parking brake, gear shift, or operating pedals.
NOTE: The source unit should have a mounting angle within ±20° from
horizontal.
Contents
Installation Considerations
The following is a list of tools needed for installation:
This section focuses on some of the vehicle considerations for installing
your new source unit. Pre-planning your system layout and best wiring
routes will save installation time. When deciding on the layout of your new
system, be sure that each component will be easily accessible for making
adjustments.
If you feel unsure about installing this system yourself, have it installed by
a qualified technician.
Before installation, disconnect the battery negative (-) terminal to prevent
damage to the unit, fire and/or possible injury.
Before beginning any installation, follow these simple rules:
1. Be sure to carefully read and understand the instructions before
attempting to install the unit.
2. For safety, disconnect the negative lead from the battery prior to
beginning the installation.
3. For easier assembly, we suggest you run all wires prior to mounting
your unit in place.
4. Route all of the RCA cables close together and away from any high
current wires.
5. Use high quality connectors for a reliable installation and to minimize
signal or power loss.
6. Think before you drill! Be careful not to cut or drill into gas tanks, fuel
lines, brake or hydraulic lines, vacuum lines or electrical wiring when
working on any vehicle.
7. Never run wires underneath the vehicle. Running the wires inside the
vehicle provides the best protection.
8. Avoid running wires over or through sharp edges. Use rubber or plastic
grommets to protect any wires routed through metal, especially the
firewall.
9. ALWAYS protect the battery and electrical system from damage with
proper fusing. Install the appropriate fuse holder and fuse on the +12V
power wire within 18” (45.7 cm) of the battery terminal.
sMultimedia Reciever
sRemote Control
sRelease Keys
sAssembly bracket and screw
sTrim Ring
sMounting Sleeve
sAV Out Harness
sUSB Extension Cable
sExternal Parking Wire
sPower Harness
sAV Wire for AUX-in
siPod Cable w/ RCA
sVolt/Ohm Meter
sWire strippers
sWire crimpers
sWire cutters
s#2 Phillips screwdriver
sBattery post wrench
sHand held drill w/ assorted bits
sAssorted connectors
s1/8” Dia. Heatshrink Tubing
sSoldering Iron
sSolder
sHeatgun

6
,QVWDOODWLRQ
Installing
s-OUNTTHE,OCKSFORTHE)NSTALLATION3LEEVEONTOTHESOURCEUNITUSE
supplied screws).
s-OUNTTHE)NSTALLATION3LEEVEINTOASECUREINSTRUMENTPANEL
NOTE: Make sure to mount the Source Unit as close to horizontal as
possible for optimum CD/DVD Player performance. Mounting Angles of
up to ±20° from horizontal can be accommodated.
NOTE: Make sure there is adequate room for the motorized screen to move
into a viewing position.
s"END!PPROPRIATE4ABSONALLSIDESOFTHEINSTALLATIONSLEEVE
s)NSTALL3OURCE5NITBYSLIDINGUNITINTOINSTALLATIONSLEEVEUNTILITCLICKS
into place.
s -OUNT "ACK 3TRAP SECURELY BEHIND THE INSTRUMENT PANEL TO PREVENT
source unit vibration.
s"ACKSTRAP3CREWSHOULDBEMMMAXUSESUPPLIEDSCREW
Removal;
s$ISCONNECT"ACK3TRAPFROMREAROFRADIOIFUSED
s2EMOVE4RIM0IECEFROMFRONTOFRADIO
s)NSERT2ELEASE+EYSINTOLEFTANDRIGHTSIDESOFSOURCEUNITTODISENGAGE
locks.
s2EMOVE3OURCE5NITFROMINSTALLATIONSLEEVEWITHRELEASEKEYS
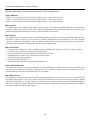
Metal Support Strap
Factory Bracket
(ISO DIN Mounting)
Release Keys
Plastic Trim Ring
Dash
Unit Chassis
Metal Mounting Sleeve
Bend tabs against dashboard
with a screwdriver.
ISO-DIN MOUNT
Installing
s2EMOVE4RIM0IECEAND)NSTALLATION3LEEVEFROMSOURCEUNIT
s&ACTORY"RACKETSHOULDALIGNWITHTWOMOUNTINGHOLESONEACHSIDEOF
source unit.
s)3/3CREWSSHOULDBEMMMAXUSESUPPLIEDSCREWS
s)NSTALL3OURCE5NITINTOINSTRUMENTPANEL
illus.-2.1

7
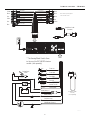
,QVWDOODWLRQ:LULQJ
White
White
White
iPod/iPhone Cable
(Included)
iPod/iPhone Cable
Audio Only
(Sold separately)
Red
Red
Red
Yellow
CVBS Output
Video Camera Input
Line Out Rear R
Line Out Rear L
Line Out Front R
SW Control Input
Line Out Front L
Line Output Sub
AUX Input L
AUX Input R
AUX Input Video
Yellow
Black
Black
Blue
Reverse Light
Ground
Ground
** The Steering Wheel Control allows
for the use of the PAC SWI-RC interface
module. (sold separately)
Note: Subwoofer preamp output is
active in all audio modes.
Ground
Parking Brake
Switch
Front Left
White
White/Black
Gray
Gray/Black
Violet
Violet/Black
Green
Green/Black
Rear Left
Remote Turn On
Parking Brake
Yellow/Blue
Yellow (Battery +)
White/Brown (Reverse)
Red (Accessory)
Black (Ground)
Blue/White
Front Right
Rear Right
illus.-3.1

8
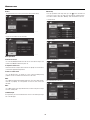
2SHUDWLRQ
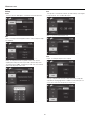
Settings
Screen
To increase or decrease the Brightness, Contrast and Color for the touchscreen.
DVD
Mode - Select the preferred DVD playback mode to be used (Full, Original, Height
Fit or Width Fit).
Rating - This rating control allows for playback restrictions to be enforced
depending on the rating level selected. A password is required to adjust levels.
The default password is “0000”. To change this password select Set Password to
update. Follow the prompts on the screen.
Time
Time adjustment - Select the hour or minutes you want to change. Use the keypad
to input desired time. Press on AM or PM to adjust.
Mode - 12 or 24 hour clock format to be used.
Tuner
Region - US or European frequencies to be acquired.
Tune Type - Setting the unit to Seek will seek the next or previous strong radio
signal when pressing >>| or |<<. When set to Manual, you will have to press >>
or << to increase or decrease the frequency one step at a time.
illus.-4.1
illus.-4.2
illus.-4.3
illus.-4.7
illus.-4.6
illus.-4.5
illus.-4.4

9
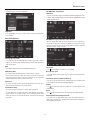
2SHUDWLRQ
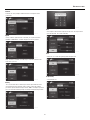
Calibrate
Follow the on screen prompts to calibrate touchscreen for optimum touch
performance.
System
Camera - When an optional camera is connected, you may choose between
NORMAL or MIRRORED to set how the display of the camera is viewed.
Beep - Activates or deactivates an audible beep to sound when a button or the
touchscreen is pressed.
Security
This is an anti theft feature. If activated, a password is required when the unit is
disconnected and reconnected to the vehicle’s power. To adjust the settings a
password is required and the default password is “0000”. To change the password
press Set Password. Follow the prompts for entering existing and new passwords.
Gain
Accessing this feature allows the adjustment of gain levels for all input sources
(Disc/SD/USB, iPod, Tuner, AV, BT & BT Mic).
iPod
Activates the use of iPod video/photo playback through the unit.
BT (Bluetooth)
Setup and device list.
illus.-4.8
illus.-4.9
illus.-4.10
illus.-4.11
illus.-4.15
illus.-4.14
illus.-4.13
illus.-4.12

10
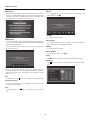
2SHUDWLRQ
Restore
This option allows you to restore your unit to the factory default settings.
Info
Displays current software version information.
Basic Operation:
To turn the unit on/off
Press the VOL/PWR/MUTE button to turn the unit on. To turn the unit off press and
hold the VOL/PWR/MUTE button unit powers off.
To adjust the volume level
Rotate VOL knob left or right to desired volume level (0-40). The current volume
level will be displayed during adjustment.
To mute or resume sound
Press the MUTE knob in to eliminate or resume sound immediately during
playback. You can also rotate the VOL knob to resume the sound.
Mode
Press MODE to step through all available input modes: Tuner, Disc (which includes
DVD and CD playback), SD, USB, operation of iPod, AV1, AV2, Camera and
Bluetooth.
Menu
Press MENU to view/select any operational mode, to enter the Setup menu or to put
the unit in Standby mode.
3.5mm A/V Input
This input allows you to connect external devices to this 3.5mm auxiliary A/V input
such as an MP3 player.
Audio Setup
From any operational mode except video, press the
icon in the bottom left
corner of the screen to access the Audio menu and adjust the following features:
EQ, Loudness, Balance, Fader, Bass, Midrange, Treble and Subwoofer Crossover.
Level Adjustment
Loudness On/Off
Balance/Fade Adjustment
Bass/Midrange/Treble Adustment
2SHUDWLRQ
illus.-4.16
illus.-4.17
illus.-5.1
illus.-5.2
illus.-5.3
illus.-5.4

11
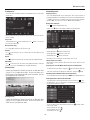
Selectable Low-Pass Crossover for Subwoofer
Setup Menu
From the Main Menu screen, press Setup to enter the Setup menu and adjust the
various options.
Radio Tuner Operation
Seek Tune Up / Tune Down
Press >>| to tune radio to a higher frequency. Press |<< to tune radio to a higher
frequency. This function can also be performed by pressing the corresponding key
on the remote control.
Band
Press BAND to toggle between the FM and AM radio frequencies.
Automatically Store
Press AS to automatically find and store the strongest stations as presets.
Note: To manually save preset stations, tune to the desired station, then press and
hold the desired preset number in the preset station display. The newly-stored
station will appear next to the preset number when saved.
Preset Scan
Press PS to scan all preset stations and listen to the first 10 seconds of each. Press
again to stop scanning and listen to the current station.
Local/Distance Tuning
Press to choose between Local (LOC) or Distance (DX) tuning options.
The local option tunes to nearby radio stations with sufficiently strong signals
for good reception. In areas where reception is poor, switching to distance tuning
enables the unit to tune in to more distant stations. Distance tuning is the default
tuning mode.
CD / WMA / MP3 / JPG Operation
CD Playback
Insert your CD with label facing up. CD playback will begin automatically once disc
is loaded. Playback display will appear automatically when playback begins giving
available playback options.
MP3/WMA/JPG Playback from Disc, USB or SD Card
This unit supports MP3, WMA and JPG files to play from a disc, USB device or
SD card. By inserting a disc, connecting a USB device or inserting a SD card, you
will be able to choose the desired source to begin playback. Playback is automatic
whenever a new disc or device is inserted.
Play / Pause
Press to pause playback. Press again to resume playback.
Next / Previous Track
Press >>| to advance to the next track or file. Press |<< to go back to the previous
track or file.
Fast Forward / Reverse (Remote Control only)
Press >> or << on the remote control to fast forward or fast reverse playback. Each
touch changes the speed (2x/4x/8x/16x/regular playback).
Random
Press
to play all tracks or files in a random order. Pressing it again will stop
RANDOM play.
Repeat
Press
to repeat current track or file. Pressing it again will stop REPEAT play.
Track Information & Track/Folder Selection
In CD mode, press to toggle between play list and current track information. In
WMA / MP3 / JPG mode, press to toggle between track and folder navigation for
the up and down arrow buttons.
2SHUDWLRQ
illus.-5.5
illus.-6.1
illus.-7.1
illus.-7.2

12
DVD Operation
NOTE: When properly installed, DVD video cannot be displayed on the main TFT
screen unless the parking brake is applied. It is illegal to view video while driving
or operating a motor vehicle. Set parking brake to view video. If you attempt to play
a DVD while the vehicle is moving, the TFT screen displays:
DVD Playback
Insert your DVD with label facing up. DVD playback will begin automatically once
disc is loaded. Playback display will appear automatically when playback begins
giving available playback options.
NOTE: The main DVD touch screen controls are accessed by touching the bottom
center of the touch screen.
NOTE: The DVD player is designed to play back DVD software that has been
encoded for specific region areas. It will not play back software for encoded for
other regions for which it has been designed. This unit will play discs labeled
“Region 1” or “All”.
Stop
To stop playback, press the
button. To resume play press the stop button again.
Fast Forward / Reverse
Press >> or << to fast forward or reverse playback. Each touch changes the speed
(2x/4x/8x/16x/regular playback).
Pause
To pause playback, press the
button. To resume play press the pause button
again.
Sub Menu
Press the
button to access the sub menu features. To return back to DVD
playback menu, press the
.
Title Menu
Press TITLE to bring up the menu.
Audio Language
Press AUDIO to bring up the audio menu options. To scroll through the audio
options, continue to press the AUDIO button repeatedly.
Subtitles
Press SUB.T to turn on/off subtitles.
Audio Setup Mode
To access the audio setup, press the
button.
Repeat
Press
to activate repeat functions: repeat chapter, repeat title and repeat off.
DVD Search
Press to access the search mode. This will allow you to search by title, chapter
or time.
2SHUDWLRQ
illus.-8.3
illus.-8.4
illus.-8.1
illus.-8.2

13
iPod Operation
Use the cable that is included to connect your iPod giving you access to your audio
and video files.
NOTE: You will not be able to view videos or photos on the touch screen while the
vehicle is moving.
Play / Pause
To begin playback press
To pause playback, press the button. To resume play
press the pause button again.
Next / Previous Song
Press >>| or |<< to skip to the next or previous song.
Random
Press
to play all tracks or files in a random order. Pressing it again will stop
RANDOM play.
Repeat
Press
to repeat current track or file. Pressing it again will stop REPEAT play.
Menu Mode
Press to enter menu mode. This allows you to toggle between Music, Video and
Photo files. Use the UP and DOWN arrows to navigate through files.
Viewing Photos
Connect your iPod to the USB slot on the unit with an iPod cable. Make
sure that TV Out is enabled on the device. To access the photos, press
PHOTOS to access the photo viewer mode; or from your device, select the
desired photo and start a slide show.
Viewing Videos
Connect your iPod to the USB slot on the unit with an iPod cable. Make
sure that TV Out is enabled on the device. To access the videos, press
VIDEOS to access the video viewer mode.
Bluetooth Operation
Pairing your device
Turn on the Bluetooth mode of your mobile phone, then select the function for
Finding Bluetooth Device. After finding, it will show the name of Bluetooth Device
“LA-7000”; once found, select it and then it will asks you to input a password/PIN.
Input the “0000” , then the screen on the LA-7000 will display CONNECT.
Dialing when connected
Press
to bring up the keypad on the unit.
Redial - Press
button on the display to redial the last number dialed.
Accept/ Reject/ End Call
During ringing, press
button to accept the call.
During ringing, press button to reject the call.
During talking, press button to end the call.
Note: When a call is incoming, the number displays on the screen.
Talking volume level setting
While talking, use volume control to adjust volume level, but this volume level can
not be saved.
To transfer the call to the Mobile Phone from the Car Audio Player
To switch your call to your phone, simply press
. This will make your phone the
active device to talk and listen through. To switch back, simply press
again.
Streaming audio from Mobile Phone to Car Audio Player
To start streaming audio from your phone press A2DP from the Bluetooth
screen.
Loading your phone’s Phone book information
To load your phone’s phone book information, you will need to press
to start
the upload process. This is a manual process and during synchronization, upload
time will be five contacts per second.
To sync your phone’s phone book with the head unit, press . Contacts load at
a rate of 5 per second.
To view Incoming calls, press
.
To view Outgoing calls, press .
To view Missed calls, press .
2SHUDWLRQ
illus.-9.1
illus.-9.2
illus.-10.1
illus.-10.2

14
Auxiliary Inputs
AV1 Front
3.5mm input on the front of the unit. Select AV1 from the Main Menu to listen to
audio from connected device.
AV2 Rear
3.5mm input on the rear of the unit. Select AV2 from the Main Menu to listen to
audio from connected device.
Rear Camera Operation (Optional)
Using the Rear Camera
When using the optional camera, the camera is activated automatically when your
vehicle is put into reversed. By touching the CAMERA icon from the main menu,
this turns the camera on/off manually.
Remote Control
Load/unloading battery of remote control
1. Please remove insulating sheet out of remote control before use. Pull out
insulating sheet in the direction as per Fig. 1.
2. When changing battery for remote control, first pull the movable block hold in
the direction as indicated in Fig. 2, Arrow A. Then pull the battery holder out
from the remote control in the direction as indicated in Fig.2, Arrow B.
3. Replace the old battery by a new battery with (+) polarity side upward. Then
return the battery holder to the remote control by pressing the battery holder.
Please see Fig.3.
Improper use of battery may cause overheating or
explosion. Which may result injury or fire.
Battery leakage may cause damage to the remote
control(Battery Life: 6 months with normal use in
normal room temperature).
s Do not short the battery.
s Do not throw the battery into the fire.
s To avoid the risk of accident, keep the battery out of reach of children.
2SHUDWLRQ
illus.-11.1
illus.-11.2
+ Side Up
Fig. 1 Fig. 2 Fig. 3
B
A
MUTE button
SRC (Search) button
NUMBER buttons
SRCH (Search) button
ESC button
ZOOM button
AUDIO button
OK button
EJECT button
POWER button
VOL (Volume) buttons
SEL (Select) button
INFO button
MENU button
A--B button
REPEAT button
ROOT button
PIC (Picture) button
FFWD/REV buttons
SUB-T (Subtitle) button
ANGLE button
SKIP (Fwd/Rev) buttons
TITLE button
NAVIGATION buttons
BAND/STOP button

15
7URXEOHVKRRWLQJ
Symptom Diagnosis Remedy
Basic
Source unit does not turn on.
Blown fuse Check fuse of the unit, replace with correct rating.
Vehicle’s ignition is off
If connect following the instructions, the unit will not
operate with ignition off.
Voltage applied to Red and Yellow wires is not
between 10.8 & 16 volts or there is not voltage
present
Check battery, connection and fuses and repair or
replace as necessary. If voltage is above +16 volts,
have the electrical system inspected by and authorized
car service center
Unit is not properly grounded Check wiring and repair as necessary
Unit resets itself when engine is off Incorrect connection between ACC and battery Check wiring and repair as necessary
Radio
Tuner fails to tune any stations
No antenna or disconnected or open connection
in cable
Check all connections and repair as necessary
Unable to tune stations in seek mode You are in a weak signal area Make sure the tuner LOC mode is off
USB Devices
USB device cannot be inserted
The USB device has been inserted with wrong
direction
Reversing the connection direction of the USB device,
try it again
The USB device connector is broken Replace with a new USB device
USB device is not recognized
The USB device is damaged
Disconnect USB device an reconnect. If the device is
still not recognized, try replacing with a different USB
device
Connectors are loose
No sound heard with the display “No
File” shown
No MP3/WMA files are not stored on the USB
device
Store these files properly on the USB device
Sound skips or is noisy MP3/WMA files are not connected properly Use MP3/WMA files encoded properly
MP3
MP3 is not playing back
Writing error occurred. The MP3 format is not
compatible.
Make sure MP3 has been written in a supported format
Disc Player
Disc skips excessively
Source unit mounted at an incorrect angle
Check mounting angle of source unit (Mount within
+ or - 20 degrees from horizontal) and repair as
necessary
Source unit not secured properly (Standard
Mount)
Check tightness of installation sleeve and back strap;
repair or replace as necessary
Source unit not secured properly (ISO Mount)
Check tightness of mounting screws and repair or
replace as necessary
Sound skips or is noisy; unable to
fast forward or backward disc
Disc is dirty Clean disc with soft cloth
Disc is heavily scratched or warped Replace with new disc without scratches
Disc Insertion not possible A disc is already in the disc player Press the eject button to remove disc

16
Estimado cliente,
Felicitaciones por su compra. En Lightning Audio estamos muy
complacidos porque escogió nuestro producto.
Para obtener el mejor rendimiento le recomendamos que haga
instalar su nuevo producto Lightning Audio por un distribuidor
autorizado de Lightning Audio. Por favor lea su garantía y guarde
su recibo y la caja original para usarlos en el futuro.
Visite nuestro sitio web para conseguir la última información
sobre todos los productos Lightning Audio; www.lightningau-
dio.com o, en los EE.UU. llame al 1-888-881-8186 o por FAX
1-800-398-3985
Si después de leer su manual, todavía tiene preguntas con
respecto a este producto, le recomendamos que consulte con
su distribuidor de Lightning Audio. Si necesita ayuda adicional,
puede llamar al número directo 1-888-881-8186. Asegúrese de
tener su número de serie, número de modelo y fecha de compra
disponibles cuando llame.
Seguridad
Este símbolo con la palabra “ADVERTENCIA”
está destinado a alertar al usuario sobre la
presencia de instrucciones importantes. No
tener en cuenta estas instrucciones resultará en
lesiones graves o muerte.
Este símbolo con la palabra “PRECAUCIÓN” está
destinado a alertar al usuario sobre la presencia
de instrucciones importantes. No tener en cuenta
estas instrucciones puede resultar en lesiones o
daños a la unidad.
sPara evitar lesiones y daños a la unidad, lea y siga las instrucciones de
este manual. Queremos que disfrute este sistema, no que le cause un
dolor de cabeza.
sSi no está seguro si debe hacer la instalación de este sistema usted
mismo, haga que lo instale un técnico calificado.
sAntes de efectuar la instalación, desconecte el terminal negativo (-)
de la batería para evitar daños a la unidad, incendio y/o posiblemente
lesiones.
Declaración de cumplimiento con la FCC
Se ha probado este equipo y se determinó que cumple con los límites de
un dispositivo digital clase B, de acuerdo a la parte 15 de las reglas de la
FCC. Estos límites están diseñados para proporcionar una protección más
razonable contra la interferencia nociva en una instalación residencial.
La operación está sujeta a las dos condiciones siguientes: (1) Este
dispositivo no causa interferencia nociva y (2) el dispositivo tiene que
aceptar cualquier interferencia recibida, incluida la interferencia que puede
causar el funcionamiento no deseado.
Este equipo genera, usa y puede irradiar energía de radiofrecuencia y, si no
se instala y usa correctamente de acuerdo a las instrucciones, puede causar
interferencia nociva a las comunicaciones radiales. Sin embargo, no se
garantiza que no ocurrirá interferencia en una instalación en particular. Si
este equipo causa interferencia nociva a la recepción radial o de televisión,
que se puede determinar encendiendo y apagando el aparato, se le alienta
a que trate de corregir al interferencia usando una de estas medidas:
sCambie la orientación o la ubicación de la antena receptora.
sAumente la separación entre el equipo y el receptor.
sConecte el equipo a una toma de corriente en un circuito distinto del que
se usó para conectar el euqipo.
sConsulte con el distribuidor o con un técnico de radio o televisión para
conseguir ayuda.
Características de Diseño - Adelante
(illus.-1.1)
Botón EJECT, Botón MENU, Micrófono interno, Botón MODE, Botón
VOLUMEN/ENCENDIDO/SILENCIAMIENTO, Ranura para tarjeta SDHC,
Entrada AUX de 3.5 mm, Sensor IR remoto, Controle los botones, Ranura
USB 2.0, Botón de reinicio, Botón Ángulo/Abierto/Cierre, Ranura para
DISCO, 7 pulgadas TFT LCD digital motorizaron la pantalla táctil
(illus.-1.2)
Modo CD, Sintonizador AM/ FM, Entrada A/V DELANTERA (3.5mm),
Entrada A/V TRASERA, Conexión directa iPod/iPhone, USB DELANTERO,
Modo SDHC, Menú SETUP (CONFIGURACIÓN), Modo Bluetooth
USE EL SONIDO DE MANERA SEGURA
La exposición continua a niveles de presión de sonido mayores de 100 dB
puede causar la pérdida permanente de oído. Los sistemas de sonido de
alta potencia de automóviles pueden producir niveles de presión de sonido
superiores a los 130dB. Use el sentido común y use el sonido de manera
segura.
,QWURGXFFLyQ

17
Contenido
Consideraciones para la instalación
La siguiente es una lista de herramientas necesarias para la instalación:
Esta sección se enfoca en algunas de las consideraciones de vehículos para
instalar el amplificador nuevo. Preplanear la distribución de su sistema y
las rutas de cableado le ahorrará tiempo de instalación. Cuando decida
la distribución de su nuevo sistema asegúrese de que pueda acceder
fácilmente a cada componente para hacer los ajustes.
Si no está seguro si debe hacer la instalación de este sistema usted mismo,
haga que lo instale un técnico calificado.
Antes de efectuar la instalación, desconecte el
terminal negativo (-) de la batería para evitar
daños a la unidad, incendio y/o posiblemente
lesiones.
Antes de comenzar cualquier instalación, siga
estas simples normas:
1. Asegúrese de leer cuidadosamente y de entender las instrucciones
antes de tratar de instalar la unidad.
2. Por seguridad, desconecte el conductor negativo de la batería antes de
comenzar la instalación.
3. Para facilitar el montaje, sugerimos que tienda todos los cables antes
de montar su unidad en el sitio.
4. Tienda todos los cables RCA cerca unos de otros y alejados de los
cables de alta corriente.
5. Utilice conectores de alta calidad para tener una instalación confiable y
para reducir al mínimo las pérdidas de señal o de potencia.
6. ¡Piense siempre antes de perforar! Tenga cuidado de no cortar ni
perforar tanques de combustible, tuberías de combustible, de frenos
o hidráulicas, tuberías de vacío o cableado eléctrico al trabajar en
cualquier vehículo.
7. Nunca tienda cables abajo del vehículo. Tender los cables adentro del
vehículo proporciona la mejor protección.
8. Evite tender cables arriba o a través de bordes filosos. Use arandelas
aislantes de caucho para proteger los cables tendidos a través de
metal, especialmente en la mampara cortafuegos.
9. Proteja SIEMPRE la batería y el sistema eléctrico contra daños usando
los fusibles correspondientes. Instale el portafusibles y los fusible
correspondientes en el cable de +12 V a una distancia menor de 45 cm
del terminal de la batería.
10. Al conectar la tierra del chasis del vehículo raspe la pintura del metal
para asegurar una conexión buena y limpia a tierra. Las conexiones a
tierra se deben hacer lo más cortas posibles y siempre conectadas a
metal que esté soldado a la carrocería o al chasis del vehículo. Nunca
se debe usar los pernos para los cinturones de seguridad para hacer
conexiones a tierra.
LUGARES DE MONTAJE
La posición para fijación de la unidad fuente afectará de manera significati-
va el rendimiento del Reproductor de DC para el panel de instrumentos.
La unidad fuente se puede instalar en una amplia variedad de lugares. No
obstante, se debe tener cuidado para garantizar su funcionamiento óptimo.
Panel de instrumentos
El montaje de la unidad fuente en el panel de instrumentos ofrece acceso
óptimo. La unidad se debe asegurar fijamente al “Soporte estándar” o
“Soporte ISO-DIN”, para garantizar la reproducción óptima del DC.
Panel central
El montaje de la unidad fuente en el panel central ofrece acceso óptimo.
Compruebe que la instalación no interfiera con el funcionamiento de la
palanca de cambios o el freno de mano.
Guantera
El montaje de la unidad fuente dentro de la guantera es adecuado, mas
no facilita el acceso. La instalación dentro de la guantera solamente se
debe hacer si el montaje en el panel de instrumentos o el panel central no
es adecuado (ejemplo, la conservación de la integridad de vehículos más
viejos cuyos paneles son metálicos.)
Debajo del tablero de instrumentos
El montaje de la unidad fuente debajo del tablero de instrumentos es
adecuado, mas no facilita el acceso. La instalación debajo del tablero
de instrumentos solamente se debe hacer si el montaje en el “panel de
instrumentos”, el “panel central” o la “guantera” no es adecuado. Monte la
unidad fuente a un lado del conductor para reducir la interferencia con el
freno de mano, el cambio de engranaje o los pedales.
Nota: La unidad fuente se debe montar dentro de un ángulo de ±20° al
plano horizontal.
sReceptor de multimedia
sControl remoto inalámbrico
sClaves que abren
sCorchete y tornillo de la
asamblea
sAnillo del ajuste
sFunda del montaje
sEl vídeo audio hacia fuera
aprovecha
sCable de extensión de USB
sAlambre externo del
estacionamiento
sHarness de potencia
sAlambre video audio para la
entrada de información AUX.
delantera
sCable de iPod con el conector
RCA
sPortafusibles y fusible
(Consulte la capacidad
de los fusibles en las
especificaciones)
sVoltio-óhmetro
sPelacables
sAlicates de engarzar
sPinza de corte
sDestornillador Phillips No. 2
sLlave para bornes de batería
sTaladro de mano con brocas
varias
sConectores varios
sLargo adecuado – Cable rojo
de alimentación
sLargo adecuado – Cable de
encendido remoto
sLargo adecuado – Cable negro
de puesta a tierra
,QVWDODFLyQ

18
(illus.-2.1)
Doble las lengüetas contra el tablero usando un destornillador, Anillo de
plástico para acabado, Chasis de la unidad, Abridores para liberar, Soporte
de fábrica (Montaje ISO DIN), Correa metálica de soporte, Tablero, Funda
de metal para el montaje
Instalación
sInstale los cierres para la instalación de la funda sobre la unidad fuente
(use los tornillos proporcionados).
sInstale la funda de instalación en un panel de instrumentos seguro.
NOTA: Asegúrese de montar la unidad fuente lo más horizontal que sea
posible para tener un funcionamiento óptimo del reproductor de CD / DVD.
Se pueden acomodar ángulos de montaje de hasta ±20° con respecto a la
horizontal.
NOTA: Asegúrese de que haya sitio adecuado para que la pantalla
motorizada se traslade a una posición de la visión.
sDoble las lengüetas correspondientes en todos los lados de la funda de
instalación.
sInstale la unidad Fuentes deslizándola adentro de la funda de instalación
hasta que calce en su sitio emitiendo un chasquido.
sMonte de manera segura la correa trasera atrás del panel del instrumento
para evitar la vibración de la unidad fuente.
sEl tornillo de la correa trasera debe ser de 6 mm máx. (use los tornillos
proporcionados).
Desmontaje;
sDesconecte la correa de la parte posterior de la radio (si se usa una).
sExtraiga la pieza de acabado de la parte delantera de la radio.
sInserte los abridores de liberación en los lados derecho e izquierdo de
la unidad fuente hasta que se liberen los cierres.
sExtraiga la unidad fuente de la funda de instalación usando los abridores
de liberación.
MONTAJE ISO DIN
Instalación
sExtraiga la pieza de acabado y el manguito de instalación de la unidad
fuente.
sSe debe alinear el soporte de fábrica usando dos agujeros de montaje en
cada lado de la unidad fuente.
sLos tornillos ISO debe ser de 6mm máx. (use los tornillos proporciona-
dos).
sInstale la unidad fuente en el panel de instrumentos.
Operación
Ajustes
Pantalla
Para aumentar o reducir el brillo, contraste y color de la pantalla táctil.
(illus.-4.1)
DVD
Modo - Seleccione el modo de reproducción de DVD preferido a ser usado
(Full, Original, Height Fit o Width Fit). (illus.-4.2)
Calificación - Este control de calificación permite que se hagan cumplir las
restricciones para la reproducción en el nivel de calificación seleccionado.
Se requiere una contraseña para ajustar niveles. La contraseña predetermi-
nada es “0000”. Para cambiar esta contraseña seleccione Set Password
para actualizar. Siga las instrucciones de la pantalla. (illus.-4.3)
Hora
Ajuste de la hora - Seleccione las horas o minutos que quiere cambiar. Use
el teclado para entrar la hora cambiada deseada. Presione AM o PM para
ajustar. (illus.-4.4)
Modo - Se usará el formato de 12 o 24 horas. (illus.-4.5)
Sintonizador
Región - Frecuencias de los EE.UU. o europeas a ser adquiridas. (illus.-4.6)
Tipo de sintonía - Si se configura la unidad en Seek (búsqueda) buscará la
señal de radio fuerte siguiente o anterior al presionar >>| o |<<. Cuando
está configurado en Manual, tendrá que presionar >> o << para aumentar
o reducir la frecuencia un paso por vez. (illus.-4.7)
Calibración
Siga las instrucciones de la pantalla para calibrar la pantalla táctil para
tener un rendimiento táctil óptimo. (illus.-4.8)
Sistema
Cámara - Cuando se conecta una cámara opcional, puede seleccionar
entre NORMAL o MIRRORED para configurar cómo se ve la visualización
de la cámara. (illus.-4.9)
Beep - Activa o desactiva una señal audible que se emite cuando se
presiona un botón de la pantalla táctil. (illus.-4.10)
Seguridad
Esta es una característica antirrobo. Si se activa, se exige una contraseña
cuando se desconecta y reconecta la unidad a la alimentación del vehículo.
Para ajustar la configuración, se requiere una contraseña y la contraseña
predeterminada es “0000”. Para cambiar la contraseña presione Set
Password. Siga las instrucciones para entrar contraseñas existentes y
nuevas. (illus.-4.11 & 4.12)
Ganancia
El acceso a esta característica permite el ajuste de niveles de ganancia para
todas las fuentes de entrada (Disc/SD/USB, iPod, Tuner, AV, BT & BT Mic).
(illus.-4.13)
iPod
Activa el uso de la reproducción de vídeo/fotos de iPod en toda la unidad.
(illus.-4.14)
2SHUDFLyQ

19
BT (Bluetooth)
Configuración y lista de dispositivos. (illus.-4.15)
Reponer
Esta opción le permite reponer su unidad a los valores predeterminados de
la fábrica. (illus.-4.16)
Información
Muestra información de la versión de software actual. (illus.-4.17)
Funcionamiento básico:
Para encender y apagar la unidad (on/off)
Presione el botón VOL/PWR/MUTE para encender la unidad. Para apagar
la unidad presione y sostenga presionado el botón VOL/PWR/MUTE hasta
que se apague la unidad.
Para ajustar el nivel del volumen
Haga girar a la izquierda o a la derecha el botón VOL al nivel de volumen
deseado (0-40). Se visualizará el nivel de volumen actual durante el ajuste.
Para silenciar o reanudar el sonido.
Presione el botón MUTE hacia adentro para eliminar o continuar
inmediatamente el sonido durante la reproducción. Usted también puede
hacer girar la perilla VOL para continuar con el sonido.
Modo
Presione MODE para pasar por todos los modos de entrada disponibles:
Tuner, Disc (que incluye la reproducción de DVD y CD), SD, USB,
operación de iPod, AV1, AV2, cámara y Bluetooth.
Menú˙
Presione MENU para ver/seleccionar cualquier modo de operación, para
entrar en un menú Setup o para poner la unidad en el modo Standby.
Entrada A/V 3.5mm
Esta entrada le permite conectar dispositivos externos a esta entrada
auxiliar A/V de 3.5 mm como un reproductor de MP3.
Configuración de audio
Desde cualquier modo de operación excepto vídeo, presione el icono
en la esquina inferior izquierda de la pantalla para acceder al menú audio
y ajuste las características siguientes: EQ, Loudness, Balance, Fader, Bass,
Midrange, Treble y Subwoofer Crossover.
Ajuste de Level (nivel) (illus.-5.1)
On/Off (Encendido/Apagado) de Loudness (sonoridad) (illus.-5.2)
Ajuste de Balance/Fade (balance/fundido) (illus.-5.3)
Ajuste de Bass/Midrange/Treble (bajos/medios/agudos) (illus.-5.4)
Cruce Low Pass (pasabajos) selecciónable para el subwoofer (illus.-5.5)
Menú de Configuración (Setup Menu)
En la pantalla Main Menu, presione Setup para entrar en el menú Setup y
ajustar las diversas opciones.
Operación del Sintonizador de radio (illus.-6.1)
Búsqueda Subir / Bajar la frecuencia
Presione >>| para sintonizar la radio a una frecuencia mayor. Presione |<<
para sintonizar la radio a una frecuencia menor. También se puede efectuar
esta función presionando la tecla correspondiente en el control remoto.
Banda
Presione BAND para cambiar las radiofrecuencias de FM y AM.
Presione AS para encontrar y almacenar automáticamente las estaciones
predeterminadas más potentes.
Aviso: Para guardar manualmente estaciones predeterminadas, sintonice
la estación deseada, luego presione y mantenga presionado el número
predeterminado en la pantalla de estación predeterminada. La estación
recientemente almacenada aparecerá al lado del número predeterminado
cuando se guarda.
Exploración predeterminada
Presione PS para explorar todas las estaciones predeterminadas y escuchar
a los primeros 10 segundos de cada una. Presione nuevamente para dejar
de explorar y escuchar a la estación actual.
Sintonía Local/Distante
Presione para seleccionar entre las opciones de sintonía Local (LOC) o
Distante (DX).
La opción local sintoniza a estaciones más cercanas con señales suficiente-
mente fuertes para tener buena recepción. En áreas donde la recepción
es deficiente, cambiar a sintonización distante habilita a la unidad a que
sintonice estaciones más distantes. La sintonía distante es el modo de
sintonía predeterminado.
2SHUDFLyQ

20
Operación CD / WMA / MP3 / JPG
Reproducción de CD
Inserte su CD con el rótulo enfrentado hacia arriba. La reproducción
de CD comenzará automáticamente cuando esté cargado el disco. La
pantalla de reproducción aparecerá automáticamente cuando comience la
reproducción dando las opciones de reproducción disponibles. (illus.-7.1)
Reproducción de MP3/WMA/JPG desde Disco, USB o tarjeta SD
Esta unidad permite el uso de archivos MP3, WMA y JPG para que se
reproduzcan desde disco, dispositivo USB o tarjeta SD. Al insertar un
disco, conectar a un dispositivo USB o insertar una tarjeta SD, usted podrá
seleccionar la fuente deseada para comenzar a reproducir. La reproducción
es automática cada vez que se inserte un disco o un dispositivo. (illus.-7.2)
Reproducir/Pausa
Presione
para pausar la reproducción. Presione nuevamente para
continuar reproduciendo.
Pista siguiente / anterior
Presione >>| para avanzar a la pista o archivo siguiente. Presione |<< para
retroceder a la pista o archivo anterior.
Avance / retroceso rápido (Sólo control remoto)
Presione >> o << en el control remoto para el avance o retroceso rápido
de la reproducción. Cada toque cambia la velocidad (2x/4x/8x/16x/
reproducción regular).
Al azar
Presione
para reproducir todas las pistas al azar. Presionarlo
nuevamente detendrá la reproducción AL AZAR.
Repetición
Presione el
para repetir la pista o el archivo actual. Presionarlo
nuevamente detendrá la reproducción con REPETICIÓN.
Información sobre la pista y selección de pista/carpeta
En el modo CD, presione para conmutar entre una lista de reproducción
y la información de pista actual. En el modo WMA / MP3 / JPG, presione
para conmutar entre navegación de pista y carpeta para los botones de
flecha hacia arriba y flecha hacia abajo.
Funcionamiento del DVD
NOTA: Cuando está correctamente instalado, no se puede visualizar el
vídeo del DVD en la pantalla TFT principal a menos que esté aplicado el
freno de estacionamiento. Es ilegal mirar un video mientras se maneja u
opera un vehículo motorizado. Accione el freno de estacionamiento para
ver un vídeo. Si trata de reproducir un DVD mientras que el vehículo está
en movimiento, la pantalla TFT visualizará: (illus.-8.1)
Reproducción del DVD
Inserte su DVD con el rótulo enfrentado hacia arriba. La reproducción
del DVD comenzará automáticamente cuando esté cargado el disco. La
pantalla de reproducción aparecerá automáticamente cuando comience la
reproducción dando las opciones de reproducción disponibles.
NOTA: Se puede acceder a los controles de la pantalla táctil principal del
DVD tocando el botón del centro de la pantalla táctil. (illus.-8.2)
NOTA: El reproductor de DVD está diseñado para reproducir software
de DVD que se ha codificado para regiones específicas. No reproducirá
software codificado para otras regiones para las que se lo ha diseñado.
Esta unidad reproducirá discos rotulados “Region 1” o “All” (todas).
Detener
Para detener la reproducción presione el botón
. Para continuar la
reproducción presione nuevamente el botón stop (detener).
Avance/Retroceso Rápido
Presione >> o << para la reproducción rápida en avance o retroceso. Cada
toque cambia la velocidad (2x/4x/8x/16x/reproducción regular).
Pausa
Para detener la reproducción presione el botón
. Para continuar la
reproducción presione nuevamente el botón pause (pausa).
Sub Menú
Presione el botón
para acceder a las características del sub menú. Para
volver al menú de reproducción del DVD, presione . (illus.-8.3)
Menú de título
Presione TITLE (título) para mostrar el menú.
Idioma de audio
Presione AUDIO para visualizar el menú de opciones de audio. Para
desplazarse por las opciones de audio, siga presionando repetidamente
el botón AUDIO.
Subtítulos
Presione SUB.T para encender/apagar los subtítulos.
Modo de configuración de audio
Para acceder a la configuración de audio, presione el botón
.
Repetición
Presione
para activar repetir funciones: Repetir el capítulo, repetir el
título y repetir el apagado.
Búsqueda en un DVD
Presione
para accede al modo de búsqueda. Esto le permite buscar por
título, capítulo u hora. (illus.-8.4)
2SHUDFLyQ

21
Operación de iPod
Use el cable que se ha incluido para conectar si iPod dándole acceso a sus
vídeos de audio y vídeo. (illus.-9.1)
NOTA: Usted no podrá ver vídeos ni fotos en la pantalla táctil mientras el
vehículo esté en movimiento.
Reproducir/Pausa
Para comenzar a reproducir presione
. Para pausar la reproducción
presione el botón . Para continuar la reproducción presione nuevamente
el botón pause (pausa).
Canción siguiente / anterior
Presione >>| o |<< para pasar a la canción siguiente o anterior.
Al azar
Presione
para reproducir todas las pistas al azar. Presionarlo
nuevamente detendrá la reproducción AL AZAR.
Repetición
Presione
para repetir la pista o el archivo actual. Presionarlo
nuevamente detendrá la reproducción con REPETICIÓN.
Modo Menú
Presione
para entrar en el modo menú. Esto le permite conmutar entre
archivos de Musica, Vídeo y Fotos. Use las flechas hacia ARRIBA y ABAJO
para navegar a través de los archivos.
Para ver fotos
Conecte su iPod a la ranura de USB en la unidad usando un cable de iPod.
Asegúrese de que en el dispositivo esté habilitada la salida a TV. Para
accede a las fotos, presione PHOTOS (FOTOS) para acceder al modo para
ver fotos; o desde su dispositivo, seleccione la foto deseada y comience
una presentación de diapositivas. (illus.-9.2)
Pava ver fotos
Conecte su iPod a la ranura de USB en la unidad usando un cable de
iPod. Asegúrese de que en el dispositivo esté habilitada la salida a TV.
Para accede a los videos, presione VIDEOS para accede al modo para ver
vídeos.
Operación de Bluetooth
Sincronizando su dispositivo
Encienda el modo Bluetooth de su teléfono móvil, luego seleccione la
función para encontrar el dispositivo Bluetooth. Después de encontrarlo,
mostrará el nombre del dispositivo Bluetooth “LA-7000”; una vez hallado,
selecciónelo y le pedirá que ingrese una contraseña/PIN. Ingrese “0000”,
luego la pantalla en el LA-7000 indicará CONNECT.
Para marcar mientras está conectado
Presione
para visualizar el teclado en la unidad.
Volver a marcar – Presione el botón
en la pantalla para volver a marcar
el último número que ha marcado. (illus.-10.1)
Aceptar/ Rechazar/ Terminar llamadas
Presione el botón
mientras llama para aceptar la llamada.
Presione el botón mientras llama para rechazar la llamada.
Presione el botón mientras habla para terminar la llamada.
Aviso: Cuando hay una llamada entrante, se puede ver el número en la
pantalla.
Ajuste del nivel del volume de habla
Al hablar, use el control de volumen para ajustar el nivel del volumen, pero
no se puede guardar este nivel de volumen.
Para transferir la llamada al teléfono móvil desde el reproductor
de audio del automóvil.
Para conmutar su llamada al teléfono, simplemente presione
. Esto hará
que su teléfono sea el dispositivo a través del que puede hablar y escuchar.
Para volver a cambiar, simplemente presione nuevamente .
Streaming de audio desde su teléfono móvil al reproductor de
audio del automóvil
Para comenzar el streaming desde su teléfono, presione A2DP desde la
pantalla Bluetooth.
Carga de la información del directorio de su teléfono
Para cargar la información de su directorio tendrá que presionar
para iniciar el proceso de carga. Este es un proceso manual durante la
sincronización, el tiempo de carga será de cinco contactos por segundo.
(illus.-10.2)
Para sincronizar el directorio de su teléfono con la unidad para la cabeza,
presione
. Los contactos se cargan a una velocidad de 5 por segundo.
Para ver las llamadas entrantes presione
.
Para ver las llamadas salientes presione .
Para ver las llamadas perdidas presione .
2SHUDFLyQ

22
Entradas auxiliares
AV1 Delantera
Entrada de 3.5 mm en la parte delantera de la unidad. Seleccione AV1
desde el Menú Main para escuchar audio desde un dispositivo conectado.
AV2 Trasera
Entrada de 3.5 mm en la parte trasera de la unidad. Seleccione AV2 desde
el Menú Main para escuchar audio desde un dispositivo conectado.
Funcionamiento de la cámara trasera (Opcional)
Uso de la cámara trasera
Al usar la cámara opcional. se acciona automáticamente la cámara cuando
se pone su vehículo en marcha atrás. Al tocar el icono CAMERA en el menú
principal, se apaga y enciende manualmente la cámara.
Control Remoto (illus.-11.1)
Botón MUTE (silenciamiento), Botón SRC (búsqueda), Botón NUMBER
(número), Botón SRCH (búsqueda), Botón ESC (salir), Botones
NAVIGATION (navegación), Botón OK , Botón TITLE (título), Botones SKIP
(Fwd/Rev) (adelante/atrás), Botón ZOOM, Botón AUDIO, Botón EJECT,
Botón POWER (encendido), Botones VOL (volumen), Botón INFO , Botón
BAND/STOP, Botón SEL (seleccionar), Botón PIC (foto), Botón MENU,
Botón A--B, Botón REPEAT, Botón ROOT, Botones AVANCE/RETROCESO
RÁPIDO, Botón SUB-T (subtítulo), Botón ANGLE (ángulo)
Carga/Descarga del la batería del control remoto (illus.-11.2)
Por favor extraiga la hoja aislante del control remoto antes de usarlo. Tire
de la hoja aislante en la dirección mostrada en la Fig. 1.
Al cambiar la batería para el control remoto, tire primero del bloque móvil
de retención en la dirección indicada en la Fig.1, Flecha A. Luego tire
del soporte de la batería para sacarlo del control remoto en la dirección
indicada en la Fig.2 Flecha B.
Reemplace la batería vieja por una nueva con el lado de la polaridad
(+) hacia arriba. Luego vuelva a colocar el soporte de la batería en el
control remoto presionando el soporte de la batería. Consulte la Fig. 3.
El uso indebido de la batería puede causar
sobrecalentamiento o explosión. Que puede
resultar en lesiones o fuego.
La pérdida de la batería puede causar daños al
control remoto (Vida útil de la batería: 6 meses
con uso normal a temperatura ambiente normal).
sNo cortocircuite la batería.
sNo arroje la batería al fuego.
sPare evitar riesgo de accidentes, mantenga la batería lejos del alcance
de los niños.
2SHUDFLyQ

23
6ROXFLyQGHSUREOHPDV
Síntoma Diagnóstico Remedio
Básico
No se enciende la unidad fuente.
Fusible quemado
Compruebe el fusible de la unidad, cambie por uno con la
calificación correcta.
La ignición del vehículo está apagada
Si se conecta siguiendo las instrucciones, la unidad no
funcionará con la ignición apagada.
El voltaje aplicado a los alambres rojo y amarillo no
está entre 10.8 y 16 voltios o no hay voltaje presente
Compruebe la batería, la conexión y los fusibles y repare
o reemplace en la medida que sea necesario. Si el voltaje
es mayor de +16 voltios, haga que un centro de servicio de
automóviles autorizado inspeccione el sistema eléctrico
La unidad no está correctamente conectada a tierra
Compruebe el cableado y repare en la medida que sea
necesario
La unidad se repone sola cuando el motor
está apagado
Conexión incorrecta entre ACC y la batería
Compruebe el cableado y repare en la medida que sea
necesario
Radio
El sintonizador no sintoniza ninguna de
las estaciones
Sin antena o desconectada o conexión abierta en el
cable
Compruebe todas las conexiones y repare en la medida que
sea necesario
No puede sintonizar estaciones en el
modo búsqueda
Está en un área de señales débiles Asegúrese de que el modo LOC del sintonizador esté apagado
Dispositivos USB
No se puede insertar el dispositivo USB
Se insertó el dispositivo USB en la dirección
equivocada
Pruebe nuevamente invirtiendo la dirección de la conexión
del dispositivo USB
El conector del dispositivo USB está roto Reemplace con un dispositivo USB unevo
No se reconoce el dispositivo USB
El dispositivo USB está dañado
Desconecte el dispositivo USB y vuelva a conectarlo. Si
no se reconoce el dispositivo, trate de cambiarlo con un
dispositivo USB distinto
Hay conectores sueltos
No se escuchó sonido mientras se
mostraba la pantalla “No File”
No hay archivos MP3/WMA almacenados en el
dispositivo USB
Almacene estos archivos correctamente en el dispositivo
USB
Interrupciones del sonido o es ruidoso
Los archivos MP3/WMA no están conectados
correctamente
Use archivos MP3/WMA correctamente codificados
MP3
No se reproduce el MP3
Ocurrió un error de escritura. El formato MP3 no es
compatible.
Asegúrese de que se ha escrito MP3 en un formato
reconocido
Reproductor de discos
El disco salta excesivamente
La unidad fuente está montada con un ángulo
incorrecto
Compruebe el ángulo de montaje de la unidad fuente (Monte
dentro de + o - 20 grados de la horizontal) y repare en la
medida que sea necesario
La unidad fuente no está correctamente asegurada
(Soporte estándar)
Compruebe si la funda de instalación y la correa trasera
están ajustadas; repare o reemplace en la medida que sea
necesario
Un unidad fuente no está correctamente fijada
(soporte ISO)
Compruebe si los tornillos de montaje están apretados y
repare o reemplace en la medida que sea necesario
El sonido se interrumpe o es ruidoso; no
puede hacer un avance o retroceso rápido
con el disco
El disco está sucio Limpie el disco usando un paño limpio
El disco está muy rayado o deformado Reemplace con un disco nuevo que no esté rayado
No se puede insertar el disco Ya hay un disco en el reproductor de discos Presione el botón de expulsión para extraer el disco

24
Lightning Audio offers a limited warranty on products on the following terms:
Length of Warranty
Headunits - One year replacement warranty from date of original purchase - requires proof of purchase.
Speakers - One year replacement warranty from date of original purchase - requires proof of purchase.
Amplifier s - One year replacement warranty from date of original purchase - requires proof of purchase.
What is Covered
This warranty applies only to Lightning Audio products sold to consumers by an authorized Lightning Audio Dealer in the United States
of America. Products purchased by consumers from an authorized Lightning Audio Dealer located outside of the USA are covered by the
authorized Lightning Audio Distributor for the country in which the products were purchased.
Who is Covered
This warranty covers only the original purchaser of Lightning Audio product purchased from an authorized Lightning Audio Dealer in the
United States. In order to receive service, the purchaser must provide Lightning Audio with a dated copy of the sales receipt stating the
customer name, dealer name and product(s) purchased. Products found to be defective during the warranty period will be replaced (with a
product deemed to be equivalent at Lightning Audio’s sole discretion) by Lightning Audio.
What is Not Covered
1. Damage caused by accident, misuse, abuse, improper installation or operation, water or moisture, excessive heat, theft, or shipping
2. Any cost or expense related to the removal or reinstallation of product
3. Items previously repaired, serviced or modified by an unauthorized service center
4. Any product which has had the serial number defaced, altered, or removed
5. Subsequent damage to other components
6. Any product purchased outside the U.S.
7. Any product not purchased from an authorized Lightning Audio Dealer
Limit on Implied Warranties
Any implied warranties of fitness for use and merchantability are limited in duration to the period of the express warranty set forth above. Some
states do not allow limitations on the length of an implied warranty, so this limitation may not apply. No person is authorized to assume for
Lightning Audio any other liability in connection with the sale of the product.
How to Obtain Service
Defective products should be returned to your local authorized Lightning Audio Dealer for warranty service or, you may call 1-888-881-8186
for Lightning Audio customer service. You must obtain an RA# (Return Authorization number) prior to returning any product to Lightning
Audio. Return Authorizations are valid for 30 days. You are responsible for the shipment of defective product to Lightning Audio and you
MUST include valid proof of purchase. Mark your RA# clearly on outside of your shipping carton. Products received without a valid RA# will
be refused and returned to sender at sender’s expense.
/LPLWHG:DUUDQW\6WDWHPHQW

1)LHVWD%OYG6XLWH*LOEHUW$UL]RQD86$
ZZZOLJKWQLQJDXGLRFRP
031413 1230-58192-01 Printed in China
-
 1
1
-
 2
2
-
 3
3
-
 4
4
-
 5
5
-
 6
6
-
 7
7
-
 8
8
-
 9
9
-
 10
10
-
 11
11
-
 12
12
-
 13
13
-
 14
14
-
 15
15
-
 16
16
-
 17
17
-
 18
18
-
 19
19
-
 20
20
-
 21
21
-
 22
22
-
 23
23
-
 24
24
-
 25
25


Lightning Audio LA-7000 El manual del propietario
- Categoría
- Receptores de medios de coche
- Tipo
- El manual del propietario
en otros idiomas
Artículos relacionados


Otros documentos
-
PEAK PKC0BU7 Owner's Manual And Warranty
-
Audiovox VME 9325 BTA Manual de usuario
-
Jensen Car Video System VM9224 Manual de usuario
-
-
Clarion VZ400 El manual del propietario
-
JENSEN VOYAGER VOYAGER VM9022 El manual del propietario
-
Clarion NZ500 El manual del propietario
-
Clarion NX409 El manual del propietario
-
Philips CED370/00 Guía de inicio rápido
-
Graco 2M21VIB/2M22VIB Manual de usuario