Home Decorators Collection SP5787 Instrucciones de operación
- Categoría
- Chimeneas
- Tipo
- Instrucciones de operación
Este manual también es adecuado para

QUESTIONS, PROBLEMS, MISSING PARTS? BEFORE RETURNING TO THE STORE,
CALL HOME DECORATORS COLLECTION CUSTOMER SERVICE
8 A.M. - 7 P.M., EST, MONDAY - FRIDAY, 9 A.M. - 6 P.M., EST, SATURDAY
1-800-986-3460
HOMEDEPOT.COM/HOMEDECORATORS
THANK YOU
We appreciate the trust and confidence you have placed in Home Decorators through the purchase of this electric fireplace. We strive to
continually create quality products designed to enhance your home. Visit us online to see our full line of products available for your home
improvement needs. Thank you for choosing Home Decorators Collection!
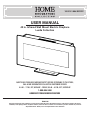
USER MANUAL
42 in. Infrared Wall Mount Electric Fireplace
Luella Collection
1003 151 894/SP5787

Table of Contents
Table of Contents ...................................2
Important Safety Instructions .......................3-4
Warranty ..........................................4
Pre-Installation ................................... 5-6
Planning Installation ...............................5
Tools Required ....................................5
Hardware Included .................................5
Package Contents .................................6
Installation ..................................... 7-13
Wall Mount ....................................7-11
Freestanding .................................12-13
Fuel Bed Setup .................................14-15
Operation. . . . . . . . . . . . . . . . . . . . . . . . . . . . . . . . . . . . . . 16-18
FCC/IC Information .................................19
Care and Maintenance ...........................19-20
Troubleshooting ...................................21
2

Important Safety Instructions
Please read and understand this entire manual before attempting
to assemble, operate or install the product. If you have any question
regarding the product, please call customer service at
1-800-986-3460, 8 a.m.-7 p.m., EST,
Monday-Friday, 9 a.m. - 6 p.m., EST, Saturday.
When using electrical appliances, basic precautions should always
be followed to reduce the risk of re, electrical shock, and injury to
persons including the following:
1. Read all instructions before installing or using the heater.
2. This appliance is hot when in use. To avoid burns, DO NOT let
bare skin touch hot surfaces. Keep combustible material, such
as furniture, pillows, bedding, papers, clothes and curtains, at
least 3 ft. (1 m) from the front of the heater and keep them away
from the side and rear.
3. Extreme caution is necessary when any heater is used by or
near children or individuals with disabilities and whenever the
replace is left operating and unattended.
4. ALWAYS unplug this appliance when not in use.
5. DO NOT operate any heater with a damaged cord or plug or
after the heater malfunctions. DO NOT operate any heater if
it has been dropped or damaged in any manner. Disconnect
power at service panel and have heater inspected by a
reputable electrician before reusing. Discard heater, or return to
authorized service facility for examination and/or repair.
6. DO NOT use outdoors.
7. This heater is not intended for use in bathrooms, laundry areas
and similar indoor locations. NEVER place heater where it may
fall into a bathtub or other water container.
8. DO NOT run cord under carpeting. DO NOT cover cord with throw
rugs, runners, or similar covering. Do not route cord under
furniture or appliances. Arrange cord away from trafc areas
and where it will not be tripped over.
9. To disconnect this appliance, turn controls to the off position,
then remove the plug from the outlet.
10. ONLY connect to properly grounded outlets.
11. Do NOT insert or allow foreign objects to enter any ventilation or
exhaust opening as this may cause an electric shock or re, or
damage the appliance.
12. To prevent a possible re, DO NOT block air intakes or exhaust
in any manner. DO NOT use on soft surfaces, like a bed, where
opening may become blocked.
13. Use this appliance only as described in the manual. Any other
use is NOT recommended by the manufacturer and may cause
re, electric shock or injury to persons.
14. This appliance has hot and arcing or sparking parts inside.
DO NOT use it in areas where gasoline, paint or ammable
vapors or liquids are used or stored. This replace should not
be used as a drying rack for clothing. Christmas stockings or
decorations should not be hung in the area of it.
15. ALWAYS plug heaters directly into a wall outlet/receptacle.
NEVER use with an extension cord or re-locatable power tap
(outlet/power strip).
16. This appliance, when installed, must be electrically grounded
in accordance with local codes, with the current CSA C22.1
Canadian Electrical Code or follow the National Electrical
Code, ANSI/NFPA N0.70.
CAUTION: DO NOT place any objects on top of insert and
top air intake vents as this will cause unit to overheat and
can cause a re.
CAUTION: The heaters MUST NOT be located immediately
below a socket-outlet.
CAUTION: There is a thermostat protective device
provided inside of the unit. If the inner temperature
overheats or abnormal heating occurs, the thermostat
protective device will cut off power supply to prevent
damage or risk of re.
CAUTION: Any repairs to this replace should be carried
out by a qualied service person.
CAUTION: If the information in this manual is not
followed exactly, an electric shock or re may result causing
property damage, personal injury or loss of life.
CAUTION: Under no circumstances should this replace
be modied. Parts having to be removed for servicing must
be replaced prior to operating this replace again.
NOTE:
SAVE THESE
INSTRUCTIONS
3 HOMEDEPOT.COM/HOMEDECORATORS
Please contact 1-800-986-3460 for further assistance.

4
Warranty
Important Safety Instructions (continued)
ELECTRICAL CONNECTION
□ A 15-amp, 120-volt, 60 Hz circuit with a properly grounded outlet is required. Preferably,
the replace will be on a dedicated circuit as other appliances on the same circuit may
cause the circuit breaker to trip or the fuse to blow when the heater is in operation. The
unit comes standard with 6-ft. three-wire cord, exiting from the rear of the replace.
DO NOT exceed the current rating of the current tap. ALWAYS plug this unit directly into
a wall outlet/receptacle. NEVER use with an extension cord or relocatable power tap
(outlet/power strip).
□ This rebox is for use on 120 volts. The cord has a plug as shown at A. See illustration
for grounding instruction. An adapter as shown at C is available for connecting three-
blade grounding-type plugs to two-slot receptacles. The green grounding plug extending
from the adapter must be connected to a permanent ground such as a properly grounded
outlet box. The adapter should not be used if a three-slot grounded receptacle is
available.
1 Year Limited Warranty: The manufacturer warrants this product to be free from manufacturing and material defects for a period of one
year from date of purchase, subject to the following conditions and limitations:
1. Install and operate this Electric Fireplace in accordance with the installation and operating instructions furnished with the product at
all times. Any unauthorized repair, alteration, willful abuse, accident, or misuse of the product shall nullify this warranty.
2. This warranty is non-transferable and is made to the original owner, provided that the purchase was made through an authorized
supplier of the product.
3. The warranty is limited to the repair or replacement of part(s) found to be defective in material or workmanship, provided that such
part(s) have been subjected to normal conditions of use and service, after said defect is conrmed by the manufacturer’s inspection.
4. The manufacturer may, at its discretion, fully discharge all obligations with respect to this warranty by refunding the wholesale price of
the defective part(s).
5. Any installation, labor, construction, transportation, or other related costs/expenses arising from defective part(s), repair, replacement,
or otherwise of same, will not be covered by this warranty, nor shall the manufacturer assume responsibility for same.
6. The owner/user assumes all other risks, if any, including the risk of any direct, indirect or consequential loss or damage arising out of
the use, or inability to use the product, except as provided by law.
7. All other warranties – expressed or implied – with respect to the product, its components and accessories, or any obligations/
liabilities on the part of the manufacturer are hereby expressly excluded.
8. The manufacturer neither assumes, nor authorizes any third party to assume on its behalf, any other liabilities with respect to the sale
of the product.
9. The warranties as outlined within this document do not apply to non-accessories used in conjunction with the installation of this
product.
10. This warranty gives you specic legal rights, and you may also have other rights which vary from state to state.
This warranty is void if:
a. The replace is subjected to prolonged periods of dampness or condensation.
b. There has been unauthorized alteration, willful abuse, accident, or misuse of the product.
c. You do not have the original receipt of purchase.
C
A
D
B

5 HOMEDEPOT.COM/HOMEDECORATORS
Please contact 1-800-986-3460 for further assistance.
Pre-Installation
PLANNING ASSEMBLY
□ Before you begin, locate the instructions and hardware. Be sure you have all of the parts and can identify them.
□ To avoid scratching the nish, assemble the product on a soft, non-abrasive surface such as carpet or cardboard.
□ Assembly of this product may require more than one person.
TOOLS REQUIRED
PRODUCT SPECIFICATIONS
Voltage 120 VAC, 60 Hz
Amps 12.5 Amps
Watts 1500 Watts
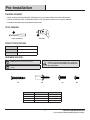
HARDWARE INCLUDED
NOTE: Hardware not shown to actual size.
NOTE: Number of the hardware in ( ) is separated for
backup.
WARNING: The included plastic wall anchors (BB) are
intended for use with solid wall applications only (tile and
concrete). DO NOT USE WITH DRYWALL OR OTHER HOLLOW
WALL APPLICATIONS.
Philips Screwdriver
AA BB CC DD
Hand Drill
Part Description Quantity
AA Screw 6 + (1)
BB Wall Anchor 6
CC Screw M6 *15 7 +(1)
DD Screw M4*8 2 + (1)

6
Pre-Installation (continued)
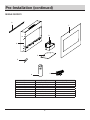
PACKAGE CONTENTS
Part Description Quantity
A Top Mounting Bracket 1
B Bottom Mounting Bracke 1
C Fireplace 1
D Base Bracket 1
E Base 1
F Front Glass 1
G Remote Control 1
H Acrylic Shards Varies
A
F
D
B
G
H
E
C

The Fireplace can be installed with 2 options:
1. Mount the unit on the wall.....Page 8
2. Freestanding.....Page 12
7 HOMEDEPOT.COM/HOMEDECORATORS
Please contact 1-800-986-3460 for further assistance.
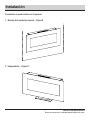
Installation

8
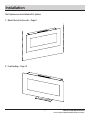
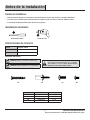
Installation - Wall Mount
1
Determine the desired location
□ Before installing your replace, determine the desired location.
2
Install the bottom bracket
□ Secure the bottom bracket (B) to the replace (C) using two screws (DD) as shown.
C
DD
B
6 in.
150mm
6 in.
150mm
6 in.
150mm
WARNING: For the best effect install the replace out of
direct sunlight and away from overhead lighting.

9 HOMEDEPOT.COM/HOMEDECORATORS
Please contact 1-800-986-3460 for further assistance.
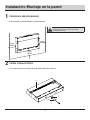
Installation - Wall Mount (continued)
3
Mark the drill holes
□ Use a level to align the bracket and mark the holes with a pencil.
9.84 in.
250mm
9.84 in.
250mm
1.5 in.
38mm
15.1 in.
383.7mm
Minimun height:
9 in.
9.84 in.
250mm
A

10
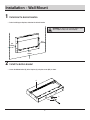
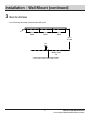
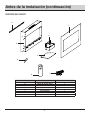
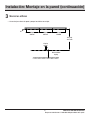
Installation - Wall Mount (continued)
4
Secure the top bracket to the wall
□ Select hardware best suited for your wall type and secure the top mounting bracket (A) to the wall.
STUD WALL:
Secure the top mounting bracket (A)
to the wall using the screws (AA) at
the marked stud locations.
DRYWALL:
Screw wall anchors (not included)
ush into the desired wall location.
Secure the top mounting bracket (A)
onto the wall using the screws (not
included) into the wall anchors.
CONCRETE WALL:
Drill holes at marked locations,
then insert wall anchors (BB) into
the holes. Secure the top mounting
bracket (A) to the wall using the
screws (AA).
A
AA
AA
AA
AA
WARNING: Enclosed wall anchors (BB) only can be used
on the concrete wall.

11 HOMEDEPOT.COM/HOMEDECORATORS
Please contact 1-800-986-3460 for further assistance.
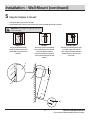
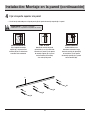
Installation - Wall Mount (continued)
5
Hang the replace to the wall
□ Hang the replace (C) to the wall as shown.
□ Select hardware best suited for your wall type and secure the bottom bracket (B) to the wall.
A
STUD WALL:
Secure the bottom mounting
bracket (B) to the wall using the
screws (AA) at the marked stud
locations.
DRYWALL:
Screw wall anchors (not included)
ush into the desired wall location.
Secure the bottom mounting
bracket (B) onto the wall using the
screws (not included) into the wall
anchors.
CONCRETE WALL:
Drill holes at marked locations, then
insert wall anchors (BB) into the
holes. Secure the bottom mounting
bracket (B) to the wall using the
screws (AA).
C
C
AA
A
WARNING: Enclosed wall anchors (BB) only can be used
on the concrete wall.

12
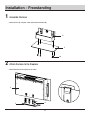
Installation - Freestanding
1
Assemble the base
□ Attach the base (E) using four screws (CC) to the base bracket (D).
2
Attach the base to the replace
□ Attached the base to the replace (C) as shown.
D
D
E
E
C
CC

13 HOMEDEPOT.COM/HOMEDECORATORS
Please contact 1-800-986-3460 for further assistance.
Installation - Freestanding
3
Fastening the base to the replace
□ Use three screws (CC) to fasten the base (D) to the back of the replace (C).
D
C
CC

14
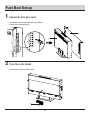
Fuel Bed Setup
1
Remove the front glass cover
□ Unscrew two screws located at both sides of the replace.
□ Carefully take out the front glass (F).
2
Place the acrylic shards
□ Place the acrylic shards (H) on the fuel bed.
F
C
H

15 HOMEDEPOT.COM/HOMEDECORATORS
Please contact 1-800-986-3460 for further assistance.
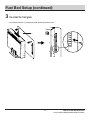
Fuel Bed Setup (continued)
3
Re-install the front glass
□ Re-install the front glass (F) using the two screws previously removed in step 1.
F

16
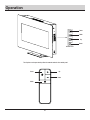
Operation
The replace can be operated by either the remote control or the control panel.
Control Panel
Power
Power
Mode
Mode
Up
Down
Up
Down

17 HOMEDEPOT.COM/HOMEDECORATORS
Please contact 1-800-986-3460 for further assistance.
Operation (continued)
1
Powering the Fireplace
□ Push the Power button to supply power to all functions of
the replace and put the insert in a standby mode.
□ Push the Power button again to turn off all functions.
□ When the unit is in ON mode, the power icon indicator light
is green.
□ When the unit is in OFF mode, the power icon indicator light
is red. When the power is OFF, the unit stops working. If the
heater was operating before the power was turned OFF, the
fan will continue to run for 30 seconds to ensure there is no
heat trapped inside the unit.
NOTE: The unit has a memory function with last
settings for heating level and ame brightness effect,
unless the main power to the unit has been interrupted.
NOTE: When you plug in the unit each time, an internal
check program runs for 5 seconds before the fan and
heater turn on.
2
Mode Button
□ Press the Mode button to cycle through the different
functions. Each time the Mode button is pressed, the mode
will enter the next function - Temperature, Timer, Flame
Brightness, Ember Bed Brightness or Ember Bed Color.
3
Adjusting the Temperature
□ The temperature mode controls the heater’s thermostat
setting.
□ Press the Up or Down buttons to select the desired
temperature.
□ The thermostat setting range is 59°F (15°C) to 86°F (30°C),
ON & OF (OFF).
□ When the ambient temperature is higher than the set
temperature, heater will turn off automatically.
NOTE: Hold the Mode button for 3 seconds. This allows
the temperature unit to change from °C to °F or °F to °C.
The unit default is °F. This function is only available if
using the control panel.
4
Setting the Timer
□ The timer setting should be used to set the countdown for
the unit’s main power.
□ Push the Mode button to enter timer mode.
□ Press the Up or Down buttons to adjust the timer setting
from 0 hour (OFF) to 9 hours with 0.5 hour interval.
Temperature Timer Flame Brightness
Ember bed Brightness
Ember bed Color

18
Operation (continued)
5
Adjusting the Flame Brightness
□ The ame brightness mode should be used to set the ame
brightness.
□ Use Up or Down buttons to scroll through the ame
brightness settings: F0 (Flame OFF), F1, F2, F3, F4, F5
(brightest).
6
Adjusting the Ember Bed Brightness
□ The ember bed brightness mode should be used to set the
ember bed brightness.
□ Use Up or Down buttons to scroll through the ember bed
brightness settings: L0 (lowest), L1, L2, L3, L4, L5 (brightest).
7
Adjusting the Ember Bed Color
□ The ember bed color mode should be used to set the ember
bed color.
□ Use Up or Down button to scroll through the ember bed color
settings: C1, C2, C3, C4, C5, C6, C7, C8
Setting Color
C1 Green
C2 Blue
C3 Red
C4 Blue + Green
C5 Red + Green
C6 Red + Blue
C7 Red + Blue + Green
C8
Auto Change
(Logset brightness
Fade In / Fade Out)
8
Using the Child Lock feature
□ When the unit is ON, hold the Power button for 10 seconds
to activate the Child Lock function. E3 will be displayed
and ash 3 times. When E3 is ON, heater is locked, E3 will
display when adjust temperature setting.
□ To deactivate the Child Lock function, hold the Power button
for 10 seconds.
NOTE: Child lock function is only available if using the
control panel.

19 HOMEDEPOT.COM/HOMEDECORATORS
Please contact 1-800-986-3460 for further assistance.
Care And Maintenance
FCC/IC Information
Please read and understand this entire manual before attempting to assemble, operate or install the product.
This equipment has been tested and found to comply with the limits for Class B digital devices, pursuant to part 15 of the FCC rules. These
limits are designed to provide reasonable protection against harmful interference in a residential installation. The equipment generates,
uses and can radiate radio frequency energy and, if not installed and used in accordance with the instructions, may cause harmful
interference to radio or television reception, which can be determined by turning the equipment off and on. The user is encouraged to try
and correct the interference by one or more of the following measures:
□ Reorient or relocate the receiving antenna
□ Increase the separation between the equipment and the receiver
□ Connect the equipment into an outlet on a circuit different from that to which the receiver is connected.
□ Consult the dealer or an experienced radio/TV technician for help.
This device complies with Part 15 of the FCC rules. Operation is subject to the following two conditions:
1. This device may not cause harmful interference, and
2. This device must accept any interference received, including interference that may cause undesired operation.
Modications not approved by the party responsible for compliance could void user’s authority to operate the equipment.
This Class B digital apparatus complies with Canadian ICES-003.
□ Make sure the unit is turned OFF, unplugged and the heating elements of heater are cool whenever you are cleaning the heater.
□ Clean the metal trim using a water-dampened soft, clean cloth. DO NOT use brass polish or household cleaners as these products will
damage the metal trim.
□ The motors used on the fan and the ame generator assembly are pre-lubricated for extended bearing life and require no further
lubrication. However, periodic cleaning/vacuuming of the fan/heater and air intake/output vents is recommended.
□ Any other servicing should be performed by an authorized service representative.
WARNING: Make sure the power is turned off before
proceeding. Any electrical repairs or rewiring of this
unit should be carried out by a licensed electrician in
accordance with national and local codes.
WARNING: If repairing or replacing an electrical
component or wiring, the original wire routing, color coding
and securing locations must be followed.
WARNING: Electrical outlet wiring must comply with local
building codes and other applicable regulations to reduce
the risk of re, electrical shock and injury to persons.
WARNING: Do not use this replace if any part of it has
been under water. Immediately call a qualied service
technician to inspect the replace and replace any part of
the electrical system.
WARNING: Disconnect power before attempting any
maintenance or cleaning to reduce the risk of re, electrical
shock or personal injury.
WARNING: During any service of this appliance, the
power to the unit must be turned off. First turn the main
power switch to the “OFF” position. Then remove the
electrical plug from the wall outlet.

20
Care And Maintenance (Continued)
NOTE: When the heater is not in use, the heater should
be stored in a dry location, away from possible damage.
The power cord should be stored properly to avoid
contact with hot or sharp objects.
Replacing the Remote Control Battery
When the remote control stops operating or its range seems reduced, it is time to replace the batteries.
1. The battery compartment is located on the back end of the remote control.
2. Press the small tab inward as you slide the battery door open and remove the old battery.
3. Insert a new CR2025 lithium battery (not included), ensuring the polarities of the battery match the inside of the battery compartment.
4. Re-insert the battery door.
NOTE: The batteries should be removed if the product
is to be left unused for a long time.
CAUTION: Non-rechargeable battery is not to be
recharged. Exhausted battery is to be removed from the
Product.
Disposal of Used Battery
A battery may contain hazardous substances that could be endangering to environment and human health.
□ This symbol marked on the battery and/or packaging indicates that used battery shall not be treated as municipal waste. Instead it
shall be left at the appropriate collection point for recycling.
□ By ensuring the used battery is disposed of correctly, you will help prevent potential negative consequences for the environment and
human health. The recycling of materials will help to conserve natural resources.
For more information about collection and recycling of used batteries, please contact your local municipality, your waste disposal service or
the point of sale where you purchased this item.

21 HOMEDEPOT.COM/HOMEDECORATORS
Please contact 1-800-986-3460 for further assistance.
Troubleshooting
Problem Possible Cause Corrective Action
There is no power and the logs do not glow. The unit does not have power.
Check that the unit is plugged into a standard
120 volt outlet. Then make sure power is set
to the “ON” position.
E1 displayed on control panel.
The overheat protection device has been
engaged.
Unplug the unit and wait 5-10 minutes to
allow the sensor to reset itself. Plug the unit
back in and turn on the heater. If the problem
persists, call customer service.
E2 displayed on control panel.
The ambient temperature sensor is broken or
not working correctly.
Unplug the unit and wait 5-10 minutes to
allow the sensor to reset itself. Plug the unit
back in and turn on the heater. If the problem
persists, call customer service.
E3 displayed on control panel. Child lock function is activated.
To deactivate the Child Lock function, hold
the Power button for 10 seconds.
Fan motor continues to blow after unit is
powered off.
Normal operation.
This is a standard feature; the blower runs
for an additional 20 seconds to ensure heat
will not be trapped inside the unit.
Power cord gets warm to the touch. Normal operation.
This is normal for a heater appliance as it
requires more current to operate. Check the
connections of the appliance cord and the
outlet. Make sure the plug ts tightly into the
outlet. During use, check the plug and outlet
frequently to determine if it is HOT; if so,
discontinue use of the appliance and consult
with a qualied electrician to check or change
the overheating outlet(s).

Questions, problems, missing parts? Before returning to the store,
call Glacier Bay Customer Service
8 a.m. - 7 p.m., EST, Monday - Friday, 9 a.m. - 6 p.m., EST, Saturday
1-800-986-3460
HOMEDEPOT.COM/HOMEDECORATORS
Retain this manual for future use.

¿TIENE PREGUNTAS, PROBLEMAS O LE FALTAN PIEZAS? ANTES DE DEVOLVER A LA TIENDA,
LLAME A ATENCIÓN AL CLIENTE DE HOME DECORATORS COLLECTION
LUNES A VIERNES DE 8:00 A.M. A 7:00 P.M., EST Y LOS SÁBADOS DE 9:00 A.M. A 6:00 P.M., EST
1-800-986-3460
HOMEDEPOT.COM/HOMEDECORATORS
GRACIAS
Apreciamos la confianza depositada en Home Decorators por medio de la compra de este calefactor eléctrico. Nos esforzamos continuamente
paracrear productos de calidad diseñados para mejorar su hogar. Visítenos en línea para ver nuestra línea completa de productos disponibles
parasusnecesidades de mejoramiento del hogar. ¡Gracias por elegir Home Decorators Collection!
MANUAL DEL USUARIO
Calefactor eléctrico infrarrojo de 42 pulgadas de montaje en la pared
Colección luella
1003 151 894/SP5787

Índice
Índice ............................................2
Instrucciones de seguridad importantes ...............3-4
Garantía. . . . . . . . . . . . . . . . . . . . . . . . . . . . . . . . . . . . . . . . . . . 4
Antes de la instalación ............................. 5-6
Planicación de la instalación ........................5
Herramientas requeridas ............................5
Herraje incluido ...................................5
Contenido del paquete ..............................6
Instalación .....................................7-13
Montaje en la pared ............................. 7-11
Independiente ................................12-13
Preparación del lecho de combustible ..............14-15
Funcionamiento ................................16-18
Información de la FCC/IC ............................19
Cuidado y mantenimiento ........................19-20
Resolución de problemas ............................21
2

Instrucciones de seguridad importantes
Lea y entienda este manual por completo antes de intentar
ensamblar, operar o instalar el producto. Si tiene preguntas sobre
elproducto, llame a atención al cliente al
1-800-986-3460, lunesaviernes de 8 a.m. a 7 p.m., EST
ylossábados de 9:00 a.m. a6:00 p.m., EST.
Cuando utilice electrodomésticos, siga siempre las medidas básicas
de seguridad para reducir el riesgo de incendios, descarga eléctrica
y lesiones personales, entre ellas:
1. Antes de instalar o usar el calefactor, lea todas las
instrucciones.
2. Este aparato se calienta cuando se utiliza. Para evitar
quemaduras, NO toque las supercies calientes con la piel
sin protección. Mantenga el material combustible, tal como
muebles, almohadas, sábanas, papeles, telas y cortinas,
almenos a 3 pies (1 m) del frente del calefactor y manténgalos
alejados de los costados y la parte posterior.
3. Se debe tener mucho cuidado cuando los niños o personas con
discapacidades utilizan el calefactor, cuando se lo utiliza cerca
de estos y siempre que se deje encendido sin supervisión.
4. SIEMPRE desconecte el aparato cuando no lo utilice.
5. NO utilice un calefactor con el cable o el enchufe dañado
odespués de que se haya averiado. NO utilice un calefactor
si se cayó o dañó de cualquier manera. Desconecte la
alimentación del panel de servicio y lleve el calefactor para que
lo inspeccione un electricista calicado. Deseche el calefactor
o devuélvalo a la instalación de servicio autorizada para su
examen o reparación.
6. NO usar en exteriores.
7. Este calefactor no está diseñado para usarse en baños, áreas
de lavandería y lugares similares en interiores. NUNCA coloque
el calefactor donde pueda caer a una tina u otro contenedor
deagua.
8. NO pase el cable por debajo de las alfombras. NO cubra elcable
con tapetes, alfombrillas o cubiertas similares. No pase elcable
por debajo de los muebles o electrodomésticos. Pase el cable
lejos de las áreas de tránsito y donde no haya riesgos de
tropiezo.
9. Para desconectar el aparato, gire el control a la posición
deapagado y luego extraiga el enchufe del tomacorriente.
10. SOLO conectar a tomacorrientes con conexión a tierra.
11. NO inserte objetos extraños, ni permita que entren, en las
aberturas de ventilación o escape ya que podría provocar
unadescarga eléctrica o incendio, o daños al aparato.
12. Para evitar un posible incendio, NO bloquee las entradas
oescapes de aire de ninguna manera. NO usar sobre supercies
blandas, como una cama, donde se podría bloquear la abertura.
13. Use este aparato solo como se describe en el manual.
Elfabricante NO recomienda ningún otro uso ya que podría
causar incendios, descargas eléctricas o lesiones a las
personas.
14. Este aparato tiene piezas calientes y que generan
chispas o arcos eléctricos adentro. NO lo utilice en áreas
donde se usen o almacenen gasolina, pintura o líquidos
o vapores inamables. Este calefactor no se debe usar
como tendedero para secar la ropa. No se deben colgar
ensuáreadecoraciones o medias navideñas.
15. SIEMPRE conecte los calefactores directamente a un
tomacorriente de pared. NUNCA lo utilice con un cable de
extensión o un toma móvil (tira/barra de tomacorrientes).
16. Cuando se instale este aparato, debe estar conectado
atierra en conformidad con las normas locales, con el
Código Eléctrico Canadiense CSA C22.1 o el Código Eléctrico
Nacional, ANSI/NFPA N0.70.
PRECAUCIÓN: NO coloque objetos encima del inserto y
de las aberturas de entrada de aire superiores ya que podría
hacer que la unidad se sobrecaliente y causar un incendio.
PRECAUCIÓN: Los calefactores NO SE DEBEN colocar
justo debajo de un tomacorriente.
PRECAUCIÓN: Hay un termostato protector incluido con
la unidad. Si la temperatura interna sube demasiado o hay
un calentamiento anormal, el termostato protector cortará
el suministro de energía para evitar daños o riesgos de
incendio.
PRECAUCIÓN: Un técnico calicado debe realizar
cualquier reparación a este calefactor.
PRECAUCIÓN: Si no se cumple con la información
de este manual, puede provocar una descarga eléctrica
o incendio que cause daños a la propiedad, lesiones
olamuerte.
PRECAUCIÓN: No modique bajo ninguna circunstancia
este calefactor. Se deben volver a colocar todas las piezas
que se extraigan para darle servicio antes de volver
autilizar el calefactor.
NOTA:
GUARDE ESTAS
INSTRUCCIONES
3 HOMEDEPOT.COM/HOMEDECORATORS
Póngase en contacto con el 1-800-986-3460 para obtener más ayuda.

4
Garantía
Instrucciones de seguridad importantes
(continuación)
CONEXIÓN ELÉCTRICA
□ Se requiere un circuito de 15 A, 120 V, 60 Hz con un tomacorriente conectado a tierra.
Es preferible que el calefactor esté en un circuito dedicado ya que podría hacer que se
active el disyuntor eléctrico o que se queme el fusible mientras funciona el calefactor
sihay otros dispositivos en el mismo circuito. La unidad incluye un cable de tres
hilos y6pies que sale de la parte trasera del calefactor. NO exceda la clasicación
de corriente del tomacorriente. SIEMPRE conecte esta unidad directamente a un
tomacorriente de pared. NUNCA lo utilice con un cable de extensión o un toma móvil
(tira/barra de tomacorrientes).
□ Este calefactor funciona con 120 V. El cable tiene el enchufe que se muestra en A.
Consulte la ilustración para conocer las instrucciones de conexión a tierra. Hay un
adaptador como el que se muestra en C disponible para conectar enchufes de tres
clavijas con conexión a tierra a receptáculos de dos clavijas. El enchufe de conexión
atierra verde que se extiende desde el adaptador se debe conectar a una conexión
atierra permanente como un tomacorriente conectado a tierra. El adaptador no se debe
utilizar si hay un tomacorriente de tres clavijas con conexión a tierra disponible.
Garantía limitada por 1 año: El fabricante garantiza que este producto está libre de defectos de fabricación y de materiales por un período
deunaño desde la fecha de compra, sujeto a las siguientes condiciones y limitaciones:
1. Instalar y utilizar este calefactor eléctrico en todo momento en conformidad con las instrucciones de instalación y funcionamiento
suministradas con el producto. Cualquier reparación, alteración, abuso voluntario, accidente o uso incorrecto del producto no
autorizados anularán la garantía.
2. Esta garantía no es transferible y aplica al propietario original, siempre que la compra se haya realizado a través de un proveedor
autorizado del producto.
3. La garantía se limita a la reparación o reposición de pieza(s) que se halle que tienen defectos debido al material o la mano de obra,
una vez que la inspección del fabricante haya conrmado el defecto y con el requisito de que dichas piezas se hayan utilizado bajo
condiciones normales de uso y servicio.
4. El fabricante puede, a su discreción, liberarse de todas las obligaciones relacionadas a esta garantía si reembolsa el precio mayorista
de la(s) pieza(s) defectuosa(s).
5. Cualquier costo o gasto de instalación, mano de obra, construcción, transporte u otros relacionados que surjan de las piezas
defectuosas, la reparación, la reposición u otros, no estarán cubiertos por esta garantía, y el fabricante no asumirá responsabilidad
alguna por ellos.
6. El propietario/usuario asume todos los demás riesgos, si los hay, incluidos los riesgos de daño o pérdida directos, indirectos
oconsecuentes que surjan del uso o incapacidad de uso del producto, excepto como lo estipule la ley.
7. Todas las demás garantías, expresas o implícitas, en relación al producto, sus componentes y accesorios, o cualquier obligación/
responsabilidad por parte del fabricante quedan excluidas de manera expresa por la presente.
8. El fabricante no asume ni autoriza a terceros a asumir otras responsabilidades en su nombre en relación a la venta del producto.
9. Las garantías delimitadas en este documento no aplican a elementos que no son accesorios y se utilizan durante la instalación de
este producto.
10. Esta garantía le brinda derechos legales especícos y quizás usted tenga otros derechos que varían según el estado.
Esta garantía se anula si:
a. El calefactor queda sujeto a períodos prolongados de humedad o condensación.
b. Ha habido una alteración no autorizada, un abuso voluntario, un accidente o una mala utilización del producto.
c. Usted no tiene el recibo original de compra.
C
A
D
B

5 HOMEDEPOT.COM/HOMEDECORATORS
Póngase en contacto con el 1-800-986-3460 para obtener más ayuda.
Antes de la instalación
PLANEAR EL ENSAMBLAJE
□ Antes de comenzar, busque las instrucciones y el herraje. Asegúrese de tener todas las piezas y de poder identicarlas.
□ Para evitar rayar el acabado, arme el producto sobre una supercie suave y no abrasiva, como una alfombra o cartón.
□ El ensamblaje del producto podría requerir de más de una persona.
HERRAMIENTAS REQUERIDAS
ESPECIFICACIONES DEL PRODUCTO
Voltaje 120 VCA, 60 Hz
Amperaje 12.5 A
Vataje 1500 W
HERRAJE INCLUIDO
NOTA: El herraje no se muestra en su tamaño real.
NOTA: El herraje con el número en ( ) es de repuesto.
ADVERTENCIA: Los anclajes de pared de plástico (BB)
que se incluyen están diseñados para su uso con paredes
sólidas (ladrillos y concreto) solamente. NO LOS USE CON
PANELES DE YESO U OTRAS PAREDES HUECAS.
Destornillador Phillips
AA BB CC DD
Taladro de mano
Pieza Descripción Cantidad
AA Tornillo 6 + (1)
BB Anclaje de pared 6
CC Tornillo M6 *15 7 +(1)
DD Tornillo M4*8 2 + (1)

6
Antes de la instalación (continuación)
CONTENIDO DEL PAQUETE
Pieza Descripción Cantidad
A Soporte de montaje superior 1
B Soporte de montaje inferior 1
C Calefactor 1
D Soporte de la base 1
E Base 1
F Cristal delantero 1
G Control remoto 1
H Fragmentos de acrílico Varía
A
F
D
B
G
H
E
C

El calefactor se puede instalar con 2 opciones:
1. Montaje de la unidad en la pared.....Página 8
2. Independiente.....Página 12
7 HOMEDEPOT.COM/HOMEDECORATORS
Póngase en contacto con el 1-800-986-3460 para obtener más ayuda.
Instalación

8
Instalación: Montaje en la pared
1
Determine la ubicación deseada
□ Antes de instalar el calefactor, determine la ubicación deseada.
2
Instalar el soporte inferior
□ Fije el soporte inferior (B) al calefactor (C) con dos tornillos (DD) como se muestra.
C
DD
B
6 pulg.
150mm
6 pulg.
150mm
6 pulg.
150mm
ADVERTENCIA: Para un mejor efecto instale el
calefactor fuera del alcance de la luz solar directa
ylaslámparas del techo.

9 HOMEDEPOT.COM/HOMEDECORATORS
Póngase en contacto con el 1-800-986-3460 para obtener más ayuda.
Instalación: Montaje en la pared (continuación)
3
Marcar los oricios
□ Use un nivel para alinear el soporte y marque los oricios con un lápiz.
9.84 pulg.
250mm
9.84 pulg.
250mm
1.5 pulg.
38mm
15.1 pulg.
383.7mm
Altura mínima:
9pulg.
9.84 pulg.
250mm
A

10
Instalación: Montaje en la pared (continuación)
4
Fijar el soporte superior a la pared
□ Use el herraje adecuado para su tipo de pared y je el soporte de montaje superior (A) a la pared.
PARED CON MONTANTES:
Fije el soporte de montaje
superior(A) a la pared con los
tornillos(AA) en las ubicaciones
marcadas delosmontantes
PANEL DE YESO:
Atornille los anclajes de pared
(noincluidos) a ras en la ubicación
deseada en la pared. Fije el soporte
de montaje superior (A) a la pared
con los tornillos (no incluidos)
alosanclajes de pared.
PARED DE CONCRETO:
Perfore oricios en las
ubicaciones marcadas, luego
inserte los anclajes de pared (BB)
enlosoricios. Fije el soporte
demontaje superior (A) a la pared
con los tornillos (AA).
A
AA
AA
AA
AA
ADVERTENCIA: Los anclajes de pared (BB)
suministrados solo se pueden usar en paredes de concreto.

11 HOMEDEPOT.COM/HOMEDECORATORS
Póngase en contacto con el 1-800-986-3460 para obtener más ayuda.
Instalación: Montaje en la pared (continuación)
5
Colgar el calefactor a la pared
□ Cuelgue el calefactor (C) a la pared como se muestra.
□ Seleccione el herraje más adecuado para su tipo de pared y je el soporte inferior (B) a la pared.
A
PARED CON MONTANTES:
Fije el soporte de montaje
inferior(B) a la pared con los
tornillos(AA) en las ubicaciones
marcadas delosmontantes.
PANEL DE YESO:
Atornille los anclajes de pared
(noincluidos) a ras en la ubicación
deseada en la pared. Fije el soporte
de montaje inferior (B) a la pared
con los tornillos (no incluidos)
alosanclajes de pared.
PARED DE CONCRETO:
Perfore oricios en las
ubicaciones marcadas, luego
inserte los anclajes de pared (BB)
enlosoricios. Fije el soporte
demontaje inferior (B) a la pared
con los tornillos (AA).
C
C
AA
A
ADVERTENCIA: Los anclajes de pared (BB)
suministrados solo se pueden usar en paredes de concreto.

12
Instalación: Independiente
1
Montaje de la base
□ Fijar la base (E) con cuatro tornillos (CC) al soporte de la base (D).
2
Fijar la base al calefactor
□ Fije la base al calefactor (C) como se muestra.
D
D
E
E
C
CC

13 HOMEDEPOT.COM/HOMEDECORATORS
Póngase en contacto con el 1-800-986-3460 para obtener más ayuda.
Instalación: Independiente
3
Sujetar la base al calefactor
□ Use tres tornillos (CC) para sujetar la base (D) a la parte posterior del calefactor (C).
D
C
CC

14
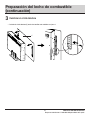
Preparación del lecho de combustible
1
Quitar la cubierta de cristal delantera
□ Desatornille los dos tornillos que están a ambos lados del calefactor.
□ Quite con cuidado el cristal delantero (F).
2
Colocar los fragmentos de acrílico
□ Coloque los fragmentos de acrílico (H) en el lecho de combustible.
F
C
H

15 HOMEDEPOT.COM/HOMEDECORATORS
Póngase en contacto con el 1-800-986-3460 para obtener más ayuda.
Preparación del lecho de combustible
(continuación)
3
Reinstalar el cristal delantero
□ Reinstale el cristal delantero (F) con los dos tornillos antes extraídos en el paso 1.
F

16
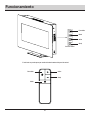
Funcionamiento
El calefactor se puede operar por medio del control remoto o del panel de control.
Panel de control
Encendido
Encendido
Modo
Modo
Arriba
Abajo
Arriba
Abajo

17 HOMEDEPOT.COM/HOMEDECORATORS
Póngase en contacto con el 1-800-986-3460 para obtener más ayuda.
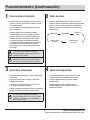
Funcionamiento (continuación)
Temperatura
1
Para encender el calefactor
□ Empuje el botón de encendido para suministrar energía
atodas las funciones del calefactor y coloque el inserto
enel modo de espera.
□ Presione el botón de encendido de nuevo para apagar
todaslas funciones.
□ Cuando la unidad está en el modo de encendido,
laluzindicadora del icono de encendido está verde.
□ Cuando la unidad está en el modo de apagado, la luz
indicadora del icono de encendido está roja. Cuando
la unidad está apagada, la unidad deja de funcionar.
Sielcalentador estaba funcionando antes de apagarlo,
el ventilador seguirá funcionando por 30 segundos
paragarantizar que el calor no quede atrapado dentro
delaunidad.
NOTA: La unidad tiene una función de memoria
con losúltimos ajustes de nivel de calor y efecto
debrillo delas llamas, a menos que se haya cortado
laalimentación de la unidad.
NOTA: Cada vez que enchufe la unidad, se ejecuta un
programa de vericación interna durante 5 segundos
antes de que se encienda el ventilador y el calefactor.
2
Botón de modo
□ Presione el botón de modo para pasar por las diferentes
funciones. Cada vez que presione el botón de modo, el modo
pasará a la función siguiente: temperatura, temporizador,
brillo de las llamas, brillo del lecho de ascuas o color del
lecho de ascuas.
3
Ajuste de la temperatura
□ El modo de temperatura controla el ajuste del termostato
delcalefactor.
□ Presione los botones arriba o abajo para seleccionar
latemperatura deseada.
□ El rango de ajuste del termostato es de 59°F (15°C)
a86°F(30°C), encendido y apagado.
□ Cuando la temperatura ambiente es mayor a la temperatura
ajustada, el calefactor se apagará automáticamente.
NOTA: Mantenga presionado el botón de modo
por 3segundos. Esto permitirá que la unidad de
temperatura cambie de °C a °F o de °F a °C. La unidad
por defecto es °F. Esta función solo está disponible
desde el panel de control.
4
Ajuste del temporizador
□ El ajuste del temporizador se debe utilizar para ajustar
lacuenta regresiva de la alimentación de la unidad.
□ Presione el botón de modo para ingresar al modo
detemporizador.
□ Presione los botones arriba y abajo para ajustar
eltemporizador de 0 horas (apagado) a 9 horas con
intervalos de 0.5 horas.
Temporizador
Brillo de las
llamas
Brillo del lecho
deascuas
Color del lecho
deascuas

18
Funcionamiento (continuación)
5
Ajuste del brillo de las llamas
□ El modo de brillo de las llamas se utiliza para ajustar
elbrillode la llama.
□ Use los botones arriba y abajo para desplazarse por
los ajustes de brillo de las llamas: F0 (llama apagada),
F1,F2,F3, F4, F5 (más brillante).
6
Ajuste del brillo del lecho de ascuas
□ El modo de brillo del lecho de ascuas se utiliza para ajustar
el brillo del lecho de ascuas.
□ Use los botones arriba y abajo para desplazarse por
los ajustes de brillo del lecho de ascuas: L0 (más bajo),
L1,L2,L3, L4, L5 (más brillante).
7
Ajuste del color del lecho de ascuas
□ El modo color del lecho de ascuas se utiliza para ajustar
elcolor del lecho de ascuas.
□ Use los botones arriba y abajo para desplazarse por los
ajustes de color del lecho de ascuas: C1, C2, C3, C4, C5, C6,
C7, C8
Ajuste Color
C1 Verde
C2 Azul
C3 Rojo
C4 Azul + Verde
C5 Rojo + Verde
C6 Rojo + Azul
C7 Rojo + Azul + Verde
C8
Cambiar automáticamente
(Brillo de los leños
subir / bajar intensidad)
8
Uso de la función de bloqueo
paraniños
□ Con la unidad encendida, mantenga pulsado el botón de
encendido durante 10 segundos para activar la función
de bloqueo para niños. Aparecerá la leyenda E3, la cual
parpadeará 3 veces. Mientras el calefactor esté bloqueado,
si se intenta ajustar la temperatura, se mostrará la leyenda
E3.
□ Para desactivar la función de bloqueo para niños, mantenga
presionado el botón de encendido por 10 segundos.
NOTA: La función de bloqueo para niños está activada.

19 HOMEDEPOT.COM/HOMEDECORATORS
Póngase en contacto con el 1-800-986-3460 para obtener más ayuda.
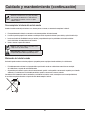
Cuidado y mantenimiento
Información de la FCC/IC
Lea y entienda este manual por completo antes de intentar ensamblar, operar o instalar el producto.
Este equipo ha sido probado y encontrado en cumplimiento con los límites correspondientes a dispositivos digitales de la Clase B,
conforme a la Parte 15 de las Reglas de la FCC. Estos límites están diseñados para brindar una protección razonable contra la interferencia
dañina en una instalación residencial. El equipo genera, utiliza y puede emitir energía de radiofrecuencia y, si no se instala y utiliza de
acuerdo con las instrucciones, puede causar interferencias perjudiciales en la recepción de radio o televisión, lo cual se puede determinar
encendiendo y apagando el equipo. Se recomienda al usuario que trate de corregir la interferencia realizando uno o varios de los
siguientes pasos:
□ Cambiar de dirección o de lugar la antena receptora
□ Aumentar la separación entre el equipo y el receptor
□ Conectar el equipo en un tomacorriente en un circuito diferente de donde esté conectado el receptor.
□ Consultar al concesionario o a un técnico de radio/TV con experiencia para que le ayude.
Este equipo cumple con la parte 15 de las reglas de la FCC. El funcionamiento está sujeto a las siguientes dos condiciones:
1. Este dispositivo no puede causar interferencia dañina, y
2. Este dispositivo debe aceptar toda interferencia recibida, incluso la que puede causar un funcionamiento indeseado.
Las modicaciones que no sean aprobadas en forma expresa por la parte responsable del cumplimiento pueden invalidar el permiso
delusuario para operar el equipo.
Este dispositivo digital de la Clase B cumple con la norma canadiense ICES-003.
□ Asegúrese de que la unidad está apagada, desconectada y que los elementos de calefacción del calefactor estén fríos siempre
quelovaya a limpiar.
□ Limpie el adorno metálico con un paño limpio, suave y humedecido. NO use limpiadores domésticos o pulidores de latón ya que
dañarán el adorno metálico.
□ Los motores utilizados en el ventilador y el conjunto generador de las llamas están pre-lubricados para extender la vida de los
cojinetes y no requieren más lubricación. Sin embargo, se recomienda la limpieza o aspirado periódicos del ventilador y calentador
yde las aberturas de entrada y escape.
□ Cualquier otro tipo de servicio debe realizarlo un representante de servicio autorizado.
ADVERTENCIA: Asegúrese de que esté apagado antes
de proceder. Solo un electricista licenciado puede realizar
cualquier reparación eléctrica o cambio de cableado de
esta unidad en conformidad con los códigos nacionales
ylocales.
ADVERTENCIA: Si repara o reemplaza un componente
eléctrico o cable, se debe seguir la disposición del cable
original, los códigos de color y las ubicaciones de jación.
ADVERTENCIA: El cableado del tomacorriente debe
cumplir con los códigos locales para edicios y otros
reglamentos aplicables para reducir el riesgo de incendio,
descarga eléctrica y lesiones a personas.
ADVERTENCIA: No utilice este calefactor si alguna
pieza estuvo sumergida en agua. Llame de inmediato a un
técnico de servicio calicado para inspeccionar el calefactor
yreemplace cualquier pieza del sistema eléctrico.
ADVERTENCIA: Desconecte la alimentación antes
deintentar dar mantenimiento o limpiar para disminuir
elriesgo de incendio, descarga eléctrica o lesiones.
ADVERTENCIA: Durante el mantenimiento de
este aparato, debe apagar la unidad. Primero coloque
el interruptor principal en la posición de apagado.
Luegoextraiga el enchufe del tomacorriente.

20
Cuidado y mantenimiento (continuación)
NOTA: Cuando no use el calefactor, este se debe
almacenar en una ubicación seca y lejos de posibles
daños. El cable de alimentación se debe almacenar
correctamente para evitar el contacto con objetos
calientes o losos.
Para reemplazar la batería del control remoto
Cuando el control remoto deja de funcionar o su alcance parece ser menor, es momento de reemplazar la batería.
1. El compartimento de la batería se encuentra en el extremo posterior del control remoto.
2. Presione la pestaña pequeña hacia adentro a medida que desliza la puerta de la batería para abrirla y quitar la batería vieja.
3. Inserte una batería de litio CR2025 nueva (no incluida), asegurándose de que las polaridades de la batería coincidan
conlasdelinterior del compartimento de la batería.
4. Vuelva a insertar la puerta de la batería.
NOTA: Se debe quitar la batería si el producto se va
adejar sin usar por mucho tiempo.
PRECAUCIÓN: La batería no recargable no se debe
recargar. Debe quitar la batería agotada del producto.
Eliminación de la batería usada
Una batería puede contener sustancias peligrosas que podrían poner en peligro el medio ambiente y la salud humana.
□ El símbolo marcado en la batería o el paquete indica que la batería usada no se debe tratar como la basura municipal.
Seladebellevar a un punto de reciclado adecuado.
□ Al garantizar que la batería usada se deseche correctamente, ayudará a evitar posibles consecuencias negativas para el medio
ambiente y la salud humana. El reciclado de materiales ayudará a conservar los recursos naturales.
Para obtener más información sobre la recolección y reciclado de las baterías usadas, comuníquese con la municipalidad local,
elserviciode recogida de desechos o el punto de venta donde compró el artículo.

21 HOMEDEPOT.COM/HOMEDECORATORS
Póngase en contacto con el 1-800-986-3460 para obtener más ayuda.
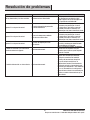
Resolución de problemas
Problema Causa posible Acción correctiva
No hay alimentación y los leños no brillan. La unidad no tiene alimentación.
Verique que la unidad está conectada
auntomacorriente estándar de 120 V.
Luegoasegúrese de que el interruptor esté
en laposición de encendido “ON”.
Aparece E1 en el panel de control.
Se activó el dispositivo de protección
desobrecalentamiento.
Desconecte la unidad y espere entre 5 y
10 minutos para permitir que el sensor
se reinicie por sí solo. Vuelva a conectar
la unidad y encienda el calefactor. Si el
problema persiste, llame a atención al cliente.
Aparece E2 en el panel de control.
El sensor de temperatura ambiente
estárotoo no funciona bien.
Desconecte la unidad y espere entre 5 y
10 minutos para permitir que el sensor
se reinicie por sí solo. Vuelva a conectar
la unidad y encienda el calefactor. Si el
problema persiste, llame a atención al cliente.
Aparece E3 en el panel de control.
La función de bloqueo para niños
estáactivada.
Para desactivar la función de bloqueo
paraniños, mantenga presionado el botón
deencendido por 10 segundos.
El motor del ventilador sigue funcionando
cuando la unidad está apagada.
Funcionamiento normal.
Esta es una función estándar; el ventilador
funciona unos 20 segundos más para
garantizar que el calor no quede atrapado
dentro de la unidad.
El cable de alimentación se siente caliente. Funcionamiento normal.
Esto es normal en un calefactor ya que
requiere más corriente para funcionar.
Verique las conexiones del cable del
aparato y del tomacorriente. Asegúrese
de que el enchufe encaje bien en el
tomacorriente. Durante el funcionamiento,
verique el enchufe y el tomacorriente con
frecuencia para determinar si está CALIENTE;
deser así, descontinúe el uso del aparato
yconsulte con un electricista calicado para
vericar o cambiar el tomacorriente que se
sobrecalienta.

¿Tiene preguntas o problemas, o le faltan piezas? Antes de devolver a la tienda,
llame a Atención al Cliente deHome Decorators Collection
Lunes a viernes de 8:00 a.m. - 7:00 p.m., EST, y los sábados de 9:00 a.m. a 6:00 p.m., EST
1-800-986-3460
HOMEDEPOT.COM/HOMEDECORATORS
Guarde este manual para su uso futuro.
-
 1
1
-
 2
2
-
 3
3
-
 4
4
-
 5
5
-
 6
6
-
 7
7
-
 8
8
-
 9
9
-
 10
10
-
 11
11
-
 12
12
-
 13
13
-
 14
14
-
 15
15
-
 16
16
-
 17
17
-
 18
18
-
 19
19
-
 20
20
-
 21
21
-
 22
22
-
 23
23
-
 24
24
-
 25
25
-
 26
26
-
 27
27
-
 28
28
-
 29
29
-
 30
30
-
 31
31
-
 32
32
-
 33
33
-
 34
34
-
 35
35
-
 36
36
-
 37
37
-
 38
38
-
 39
39
-
 40
40
-
 41
41
-
 42
42
-
 43
43
-
 44
44


Home Decorators Collection SP5787 Instrucciones de operación
- Categoría
- Chimeneas
- Tipo
- Instrucciones de operación
- Este manual también es adecuado para
en otros idiomas
Artículos relacionados
-
Home Decorators Collection 258-102-48-Y Guía de instalación
-
-
-
Home Decorators Collection 1003063516 Manual de usuario
-
-
-
-
-
-
Otros documentos
-
Muskoka 310-48C-10 Manual de usuario
-
-
-
 Dorel Home Furnishings 5033196COM El manual del propietario
-
Stovax eStudio 85R Instrucciones de operación
-
Ember CM19 Guía del usuario
-
GAZCO Arosa & Cerreto 140 LED Electric Stove Manual de usuario
-
TURBRO BR58 Manual de usuario
-
Ember CM19 Heated coffee mug Manual de usuario
