Hama 00055748 El manual del propietario
- Categoría
- Marcos de fotos digitales
- Tipo
- El manual del propietario

0 0055748/10.07
All listed brands are trademarks of the corresponding companies. Errors and omissions excepted,
and subject to technical changes. Our general terms of delivery and payment are applied.
Hama GmbH & Co KG
D-86651 Monheim/Germany
www.hama.com
Informationstechnische Einrichtung Class A d
Warnung! Dies ist eine Einrichtung der Klasse A. Diese Einrichtung
kann im Wohnbereich Funkstörungen verursachen. In diesem Fall
kann vom Betreiber verlangt werden, angemessene Maßnahmen
durchzuführen.
Class A information technology equipment g
Warning! This device is categorized as class A
equipment. This equipment can cause radio interference in living
spaces. If this is the case, you can request the operator to undertake
appropriate measures to prevent such interference.
Dispositif d’informations techniques classe A f
Avertissement ! Ce dispositif appartient à la classe A. Ce dispositif
est susceptible de provoquer des perturbations radioélectriques dans
une zone habitable. Il peut être exigé de l’utilisateur de prendre des
mesures appropriées.
Equipo de tecnología de información clase A e
Aviso: Éste es un aparato de la clase A. Este aparato puede provocar
interferencias en el ámbito doméstico. En este caso, el usuario puede
estar obligado a tomar medidas adecuadas.
Informatietechnische inrichting Class A o
Waarschuwing! Dit is een klasse-A-inrichting. Deze inrichting kan
in woonomgevingen storingen veroorzaken. In dat geval dient de
gebruiker passende maatregelen te nemen.
Dispositivo per tecnologie dell‘informazione classe A i
Attenzione! Questo è un dispositivo della classe A che può causare
disturbi radio nella zona abitativa. In questo caso l’esercente può
richiedere di prendere particolari
provvedimenti.
Τεχνική διάταξη ενημέρωσης κατηγορίας A
k
Προειδοποίηση! Αυτή είναι μία διάταξη κατηγορίας A. Αυτή η διάταξη
μπορεί να προκαλέσει ηλεκτρομαγνητικές παρεμβολές σε χώρους
διαμονής. Σε αυτή την περίπτωση μπορεί να ζητηθεί από τον ιδιοκτήτη να
λάβει τα κατάλληλα μέτρα.
Informationsteknisk enhet klass A s
Varning! Detta är en enhet enligt klass A. Dessa enheter kan förorsaka
radiostörningar i bostäder. I detta fall kan
driftsansvarig åläggas att vidtaga passande åtgärder.
Luokan A tietotekniikkalaite m
Varoitus: Tämä on A-luokan laite. Tämä laite voi aiheuttaa
radiohäiriöitä asunnossa käytettäessä. Siinä tapauksessa
käyttäjältä voidaan edellyttää kohtuullisia korjaustoimia.
Specyfi kacja informacyjno techniczna – urządzenie klasy A
q
UWAGA! Urządzenie klasy A. Urządzenie może powodować
zakłócenia w obrębie mieszkania. W takim wypadku użytkownik musi
przedsięwziąć odpowiednie kroki zapobiegawcze.
Információtechnikai berendezés, A-osztály
h
Figyelem! Ez az eszköz A-osztályú berendezés.
Ez az eszköz lakásban üzemeltetve rádiófrekvenciás zavart kelthet.
Ha hosszabb időn át üzemeltetve, a közelben lévő készülékeket
zavarja, célszerű áthelyezni más környezetbe.
Technicko informační zařízení třídy A
c
Varování! Tohle je zařízení třídy A. Může způsobit rádiové rušení v
obytné zóně.
V takovém případě může být požadováno od provozovatele, aby
provedl příslušná opatření.
Technicko-informačné zariadenie triedy A
v
POZOR! Toto je zariadenie triedy A. Môže spôsobiť rádiové rušenie
v obytnej zóne.
V takomto prípade môže byť požadované od prevádzkovateľa, aby
urobil príslušné opatrenia.
Aparelho de tecnologia da informação Class A
p
Aviso! Este é um aparelho de Classe A. Este aparelho pode
provocar interferências em áreas residenciais. Neste caso, pode-se
exigir ao utilizador que tome as medidas adequadas.
Информационное техническое устройство класса А
u
Предупреждение! Устройство относится к приборам класса А.
Устройство может создавать радиопомехи в жилых помещениях.
В этом случае эксплуатационник, возможно, будет обязан принять
соответствующие меры по их устранению.
A sınıfı bilgi tekniği tertibatı
t
Uyarı! Bu A sınıfı bir donanımdır. Bu tertibat oturma alanlarında parazitlere
sebep olabilir. Bu durumda işleticisinin uygun önlemleri alması gerekebilir.

DIGITAL
00055748
TV-Cardreader
»Photo Player«

d
Bedienungsanleitung
2
Bitte lesen Sie folgende Anweisungen vor der Installation genau durch, um sich
mit den besonderen Merkmalen und der Handhabung des Geräts vertraut zu
machen.
I. Lieferumfang:
- 55748 Digital Photo Player
- Wechselstromadapter (5V/2A)
- Fernbedienung
- A/V-Kabel (Anschlüsse gelb, weiß, rot)
- USB-Kabel
- Benutzerhandbuch
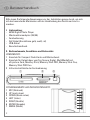
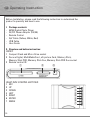
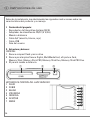
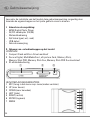
II. Bedienelemente, Anschlüsse und Kartenslots:
VORDERSEITE:
1 Einschub für Compact Flash-Karte und Minilaufwerk
2 Einschub für Datenträger vom Typ Secure Digital, MultiMediaCard ,
xD-picture Card, Memory Stick, Memory Stick PRO, Memory Stick Duo,
Memory Stick PRO Duo
3 Infrarotschnittstelle der Fernbedienung
STEUERELEMENTE AUF DER RECHTEN SEITE:
1 ESC (Abbruch)
2 UP (nach oben)
3 DOWN (Nach unten)
4 LEFT (Links)
5 RIGHT (Rechts)
6 ENTER (Eingabe)
7 MENU (Menü)
d
Benutzerhandbuch
' % #
'
#
!
&
$
"
%

3
g
Operating Instruction
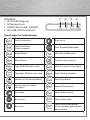
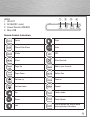
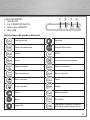
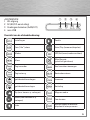
RÜCKSEITE:
1 AV OUT (AV-Ausgang)
2 5V-Netzanschluss
3 ON/OFF (Netzschalter, EIN/AUS)
4 Mini USB (USB-Schnittstelle)
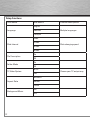
Anweisungen zur Fernbedienung:
Setup (Installation) Nach rechts
Photo Slide Show
(Diaschaumodus)
Enter (Eingabe/Wiedergabe)
Mode (Modus) ESC (Abbruch/Beenden)
Menu (Menü) Stummschaltung ein/aus
Page Up (Bildlauf nach oben) Mark (Zu Favoriten hinzufügen)
Page Down (Bildlauf nach unten) Delete (Dateien löschen)
Volume up (Lautstärke erhöhen) Zoom (Vergrößern)
Volume down (Lautstärke
verringern)
Repeat (Wiederholen)
Nach oben Folder (Ordnermodus)
Nach unten Rotate (Bild drehen)
Nach links
Combo (Musik während der
Diaschauwiedergabe abspielen
oder anhalten)
' % # !

4
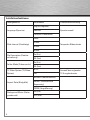
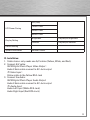
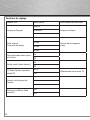
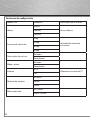
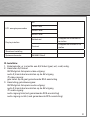
Installationsfunktionen
Anzeigemenüs Untermenüs Funktionsbeschreibung
Language (Sprache)
English (Englisch)
SprachauswahlDeutsch
Français (Französisch)
Slide Interval (Diaabfolge)
5 Sek.
Tempo des Bildwechsels
10 Sek.
30 Sek.
60 Sek.
File Description (Dateibe-
schreibung)
On (Ein)
Off (Aus)
Folder Mode (Ordnermodus)
On (Ein)
Off (Aus)
TV Video System (TV/Video-
System)
NTSC
Auswahl des regionalen
TV-Ausgabeformats
PAL
Aspect Ratio (Bildgröße)
NORMAL (Normalansicht)
SMART (Automatische
Anpassung)
ZOOM (Vergrößerung)
Background Music (Hinter-
grundmusik)
ON (Ein)
OFF (Aus)

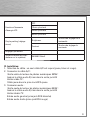
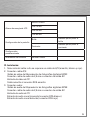
5
LCD Power Saving
(Energiesparmodus für LCD-
Anzeige)
OFF (Aus)
15 Min. Later (nach 15 Min.)
30 Min. Later (nach 30 Min.)
60 Min. Later (nach 60 Min.)
Setting Display (Anzeigeein-
stellungen)
Brightness (Helligkeit)
Anpassen der Helligkeit
mithilfe der Pfeiltasten
Contrast (Kontrast)
Anpassen der Helligkeit
mithilfe der Pfeiltasten
Default Setting (Zurück-
setzen auf werkseitige
Einstellungen)
System Information
(Systemangaben)
X6100001 Beta2
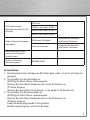
III. Installation:
1. Anschlusskabel: Das beiliegende AV-Kabel (gelb, weiß, rot) ist für alle Zwecke
geeignet.
2. So schließen Sie das AV-Kabel an:
55748 Digital Photo Player, Videoausgabe:
Stecken Sie den 2,5mm-Klinkenstecker an die AV-Buchse an.
TV/Video-Eingang:
Stecken Sie den gelben Cinch-Stecker in die gelbe Cinch-Buchse ein.
3. So schließen Sie das Audiokabel an:
55748 Digital Photo Player, Audioausgabe:
Stecken Sie den 2,5mm-Klinkenstecker an die AV-Buchse an.
TV/Audio-Eingang:
Linker Audioeingang (weiße Cinch-Buchse)
Rechter Audioeingang (rote Cinch-Buchse)

6
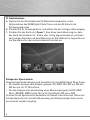
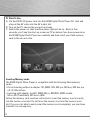
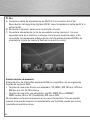
IV. Inbetriebnahme
A. Stecken Sie das Stromkabel des 5V-Wechselstromadapters in den
Netzanschluss des 55748 Digital Photo Player und das AV-Kabel in die
AV-Ausgangsbuchse.
B. Schalten Sie Ihr Fernsehgerät ein, und wählen Sie den richtigen Videoeingang.
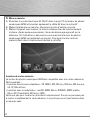
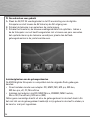
C. Schalten Sie das Gerät ein („Power“). Eine blaue Leuchtdiode zeigt an, dass
das Gerät betriebsbereit ist. Sofern alles richtig angeschlossen ist, erscheint
nach einigen Sekunden auf dem Bildschirm der Startbildschirm. Legen Sie nun
die Speicherkarte in den entsprechenden Einschub ein.
Einlegen der Speicherkarte
Folgende Speicherkartentypen sind kompatibel mit dem 55748 Digital Photo Player:
• Für direktes einlegen ohne Adapter geeignet: SD, MMC, MS, MS pro, MS duo,
MS duo pro, xD, CF, MicroDrive
• Für das einlegen unter Verwendung eines Adapters geeignet: miniSD, MMC
Micro, RSMMC, MMC mobile, Micro SD (TransFlash), MS micro (M2)
Drücken Sie die Speicherkarte keinesfalls mit Gewalt in den Einschub. Wenn sich
die Speicherkarte nicht ohne Kraftanwendung vollständig einlegen lässt, wurde
sie eventuell verkehrt eingelegt.

7
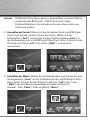
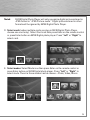
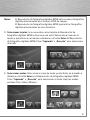
Hinweis: 55748 Digital Photo Player kann nur digitale Bilder im Format JPEG im
entsprechenden Bildmodus („JPEG Picture mode“) lesen.
Digitales Bildmaterial, das ein anderes Format aufweist, wird vom
Gerät nicht erkannt.
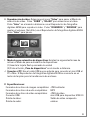
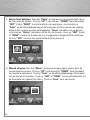
D. Auswählen der Karte(n): (Wenn sich bereits mehrere Karten im 55748 Digital
Photo Player befi nden, wählen Sie nur eine Karte.) Wählen Sie das
Kartensymbol („Card“), und drücken Sie dann die Eingabetaste („Enter“) an
der Fernbedienung oder am 55748 Digital Photo Player selbst. Drücken Sie die
Pfeiltasten nach links („Left“) oder rechts („Right“), um eine Karte
auszuwählen.
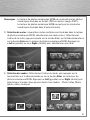
E. Auswählen des Modus: Wählen Sie das Modussymbol, und drücken Sie dann
die Eingabetaste („Enter“) an der Fernbedienung oder am 55748 Digital Photo
Player selbst. Drücken Sie die Pfeiltasten nach links („Left“) oder rechts
(„Right“), um einen Modus auszuwählen. Es stehen drei Modi zur
Auswahl – Foto („Photo“), Video und Musik („Music“).

8
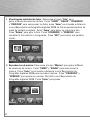
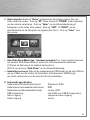
F. Einzelbildansicht: Wählen Sie das Fotosymbol („Photo“), und folgen Sie dann
dem Fotoauswahlmodus. Drücken Sie die Pfeiltasten auf der Fernbedienung
oder am Digital Photo Player, um nach oben („UP“), unten („DOWN“), links
(„LEFT“) oder rechts („RIGHT“) zu gehen. Fotos können als Vollbild
angezeigt werden. Drücken Sie auf „Zoom“, um einen Bildausschnitt zu
vergrößern. Drücken Sie auf „Rotate“ („Rotieren“), um das Bild zu drehen.
Drücken Sie auf den Links- („LEFT“) oder Rechtspfeil („RIGHT“), um zum
vorigen bzw. nächsten Bild zu gehen. Drücken Sie auf die Abbruchtaste
(„ESC“), um zum Startbildschirm zurückzukehren.
G. Musikwiedergabe: Wählen Sie das Musiksymbol („Music“), und folgen Sie
dann dem Auswahlmodus für Musik. Drücken Sie auf den „Nach oben“-
(„UP“) oder den „Nach unten“-Pfeil („DOWN“), um den gewünschte Musiktitel
auszuwählen. Drücken Sie auf der Fernbedienung oder am Digital Photo Player
auf die Eingabetaste („Enter“), um mit der Musikwiedergabe zu beginnen.
Mithilfe der Links- oder Rechtstaste („LEFT“ bzw. „RIGHT“) können Sie die
Lautstärke (Vol-/Vol+) des Digital Photo Players regeln. Drücken Sie die
Eingabetaste („Enter“), um eine Pause bei der Musikwiedergabe einzulegen.

9
H. Wiedergabe von Videomaterial: Wählen Sie das Videosymbol („Video“), und
folgen Sie dann dem Videoauswahlmodus. Drücken Sie auf den „Nach oben“-
(„UP“) oder den „Nach unten“-Pfeil („DOWN“), um den gewünschten Videoclip
auszuwählen. Drücken Sie auf der Fernbedienung oder am Digital Photo Player
auf die Eingabetaste („Enter“), um mit der Wiedergabe zu beginnen. Mithilfe
der Links- oder Rechtstaste („LEFT“ bzw. „RIGHT“) können Sie die Lautstärke
(Vol-/Vol+) des Digital Photo Players regeln. Drücken Sie die Eingabetaste
(„Enter“), um eine Pause bei der Videowiedergabe einzulegen.
I. Automatischer Diaschaumodus: Verfahren Sie folgendermaßen, um den
Diaschaumodus zu starten:
(1) Legen Sie die Speicherkarte in das Gerät ein, und schalten Sie dieses an.
(2) Drücken Sie auf der Fernbedienung die Diaschautaste („Slide Show“).
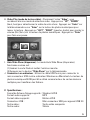
J. Anschluss an einen Computer: Mithilfe des im Lieferumfang enthaltenen
USB-Kabels können Sie das Gerät (Mini-USB) auch an Ihren Computer
anschließen. Damit wird der 55748 Photo Player zu einem Kartenlesegerät, der
auch zur Datenübertragung geeignet ist.
V. Technische Daten:
Unterstütztes Bilddateiformat: Standard-JPEG
Unterstütztes Audioformat: MP3
Unterstütztes Videoformat: Motion JPEG
USB-Anschluss: Mini-USB für USB 2.0-Anschluss
Videoausgang: Kombinierte Videoausgabe
Audioausgang: Stereo

d
Bedienungsanleitung
10
Before Installation, please read the following instruction to understand the
product’s specialty and how to use.
I. Package contents:
- 55748 Digital Photo Player
- AC/DC Power Adaptor (5V/2A)
- Remote Control
- A/V Cable (Yellow, White, Red)
- USB Cable
- User Guide
II. Structure and button instruction:
FRONT:
1 Compact Flash and Micro Drive socket
2 Secure Digital, MultiMediaCard , xD-picture Card, Memory Stick,
Memory Stick PRO, Memory Stick Duo, Memory Stick PRO Duo socket
3 Remote control IR
RIGHT SIDE CONTROL BUTTONS:
1 ESC
2 UP
3 DOWN
4 LEFT
5 RIGHT
6 ENTER
7 MENU
' % #
'
#
!
&
$
"
%
g
Operating Instruction

11
g
Operating Instruction
11
g
Operating Instruction
REAR:
1 AV OUT
2 5V (AV/(DC Jack)
3 Power Switch (ON/OFF)
4 Mini USB
Remote Control Instruction:
Setup Right
Photo Slide Show Enter
Mode ESC
Menu Mute/Unmute
Page Up Add to your favorite
Page Down Delete fi les
Volume up Zoom in
Volume down Repeat
Up Folder mode
Down Photo Rotate
Left
Play or pause the music while
playing photo slide show
' % # !

12
Setup Functions
OSD Menus Sub-Menus Function Descriptions
Language
English
Multiple languagesDeutsch
Français
Slide Interval
5 sec.
Slide changing speed
10 sec.
30 sec.
60 sec.
File Description
On
Off
Folder Mode
On
Off
TV Video System
NTSC
Choose your TV output way
PAL
Aspect Ratio
NORMAL
SMART
ZOOM
Background Music
ON
OFF

13
LCD Power Saving
OFF (Aus)
15 Min. Later
30 Min. Later
60 Min. Later
Display Setting
Brightness Keys adjust brightness
Contrast Keys adjust contrast
Default Setting
System Information X6100001 Beta2
III. Installation:
1. Cable choice: only needs one A/V cables (Yellow, White, and Red).
2. Connect A/V cable:
55748 Digital Photo Player Video Output :
Audio 2.5mm cable connect to AV Jack output
TV Video Input :
Yellow cable to the Yellow RCA Jack
3. Connect the Audio:
55748 Digital Photo Player Audio Output:
Audio 2.5mm cable connect to AV Jack output
TV Audio Input:
Audio Left Input (White RCA Jack)
Audio Right Input (Red RCA Jack)

14
IV. Start To Use
A. Put the AC/DC 5V power cord into the 55748 Digital Photo Player DC Jack and
also put the AV cable into the AV output slot
B. Turn on the TV, choose the correct Input way.
C. Switch the power on, then the Blue power light will be on. About a few
seconds, you’ll see the start-up screen on TV as below if you have powered on
the 55748 Digital Photo Player successfully and then insert your fl ash memory
card to the correct slots.
Inserting Memory cards
The 55748 Digital Photo Player is compatible with the following fl ash memory
cards:
• Direct inserting without a adapter: SD, MMC, MS, MS pro, MS duo, MS duo pro,
xD, CF, MicroDrive
• Inserting with adapter: miniSD, MMC Micro, RSMMC, MMC mobile,
Micro SD (TransFlash), MS micro (M2)
Follow the memory card insertion instruction to insert the memory card correctly
into the memory card slot. Do not force the memory card into the memory card
slot. If you are not able to easily insert the memory card completely, you may have
inserted it in a wrong way.

15
Noted: 55748 Digital Photo Player will only recognize digital pictures stored in
JPEG format in “JPEG Picture mode.” Digital pictures stored in other
formats will be ignored by 55748 Digital Photo Player.
D. Select cards: (when multiple cards are plug in 55748 Digital Photo Player,
choose one card only.) Select Card icon then press Enter on the remote control
or press Enter button on 55748 Digital photo player. Press “Left” or “Right” to
select card.
E. Select modes: Select Mode icon then press Enter on the remote control or
press Enter button on 55748 Digital photo player. Press “Left” or “Right” to
select mode. There’re three modes can be chosen—Photo, Video, Music.

16
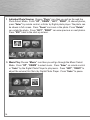
F. Individual Photo Viewing: Choose “Photo” icon then you will go through the
Photo Select Mode. Press “UP”, “DOWN”, “LEFT”, “RIGHT”, to choose photos,
press “Enter” by remote control, or Enter by Digital photo player. The photo can
be shown in full screen. Press “Zoom” can zoom in the photo. Press “Rotate”
can rotate the photo. Press “LEFT”, “RIGHT” can view previous or next photos.
Press “ESC” back to the start-up screen.
G. Music Play: Choose “Music” icon then you will go through the Music Select
Mode. Press “UP”, “DOWN” to select music. Press “Enter” on remote control
or “Enter” by the Digital Photo Player to play music. Press “LEFT”, “RIGHT” to
adjust the volume (Vol-/Vol+) by Digital Photo Player. Press “Enter” to pause.

17
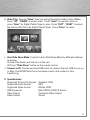
H. Video Play: Choose “Video” then you will go through the Video Select Mode.
Press “UP”, “DOWN” to select video. Press “Enter” by remote control or
press “Enter” by Digital Photo Player to play. Press “LEFT”, “RIGHT” to adjust
the volume (Vol-/Vol+) by Digital Photo Player. Press “Enter” to pause.
I.
Auto Slide Show Mode: It works to Auto Slide Show Mode by different methods
as bellow:
(1) Insert the Flash card and turn on the unit
(2) Press “Slide Show” button on the remote control.
J. Connect to PC: Use the enclosed USB cable to connect the mini USB to your pc
or Mac. The 55748 Photo Player becomes a multi card reader for fi les
transferring.
V. Specifi cations:
Supported Picture File Format: Standard JPEG
Supported Audio Format: MP3
Supported Video Format: Motion JPEG
USB Connector: Mini-USB for USB 2.0 Device
Video Output: Composite Video Output
Audio Output: Stereo

d
Bedienungsanleitung
18
Avant l‘installation, veuillez lire les instructions suivantes pour vous familiariser
aux fonctions du produit et à la façon de l‘utiliser.
I. Contenu de l‘emballage :
- Lecteur de photos numériques 55748
- Adaptateur électrique CA/CC (5V/2A)
- Télécommande
- Câble A/V (jaune, blanc, rouge)
- Câble USB
- Manuel d’utilisation
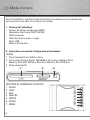
II. Instructions concernant la disposition et les boutons :
AVANT:
1 Prise Compact Flash et Micro Drive
2 Prise cartes Secure Digital, MultiMedia, xD-picture, Memory Stick,
Memory Stick PRO, Memory Stick Duo, Memory Stick PRO Duo
3 Télécommande IR
BOUTONS DE COMMANDE DE DROITE :
1 ECHAP.
2 HAUT
3 BAS
4 GAUCHE
5 DROITE
6 ENTER
7 MENU
f
Mode d´emploi
' % #
'
#
!
&
$
"
%

19
g
Operating Instruction
g
Operating Instruction
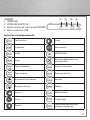
ARRIÈRE :
1 SORTIE AV
2 PRISE JACK AV/CC 5V
3
Bouton de mise en marche/arrêt (ON/OFF)
4 Mini-connecteur USB
Instructions de télécommande :
Confi guration Droite
Diaporama Enter/lecture
Mode ECHAP./Quitter
Menu
Activation/désactivation du
mode sourdine
Page précédente Ajouter à vos favoris
Page suivante Supprimer fi chiers
Augmentation du volume Agrandir
Baisse du volume Répéter
En haut Mode Dossiers
En bas Pivoter photo
Gauche
Lecture musicale ou pause
pendant le diaporama
' % # !

20
Fonctions de réglage
Menus OSD Sous-menus Descriptions des fonctions
Language (langue)
Anglais
Langues multiplesAllemand
Slide Interval
(intervalle de diapo)
Vitesse de changement
diapo
10 sec.
30 sec.
60 sec.
File description (description
du fi chier)
On
Off
Folder mode (mode dossier)
On
Off
TV Video System (système
vidéo TV)
NTSC
Sélectionnez votre sortie TV
PAL
Aspect ratio (rapport de
format)
Background Music (fond
musical)
ON
OFF

21
Fonction d’économie
d’énergie LCD
OFF
15 min. plus tard
30 min. plus tard
60 min. plus tard
Display setting (réglage
écran)
Brightness
Touches de réglage de la
luminosité
Contrast
Touches de réglage du
contraste
Réglages par défaut
System information (infor-
mations sur le système)
X6100001 Beta2
III. Installation:
1. Sélection du câble : un seul câble A/V est requis (jaune, blanc et rouge).
2. Connectez le câble A/V :
Sortie vidéo du lecteur de photos numériques 55748 :
Insérez le câble audio 2,5 mm dans la sortie jack AV
Entrée vidéo TV :
Câble jaune dans la prise Jack RCA jaune
3. Connexion audio :
Sortie audio du lecteur de photos numériques 55748 :
Insérez le câble audio 2,5 mm dans la sortie jack AV
Entrée Audio TV :
Entrée audio gauche (prise jack RCA blanche)
Entrée audio droite (prise jack RCA rouge)

22
IV. Mise en marche
A. Branchez le cordon électrique 5V CA/CC dans la prise CC du lecteur de photos
numériques 55748 et branchez également le câble AV dans la sortie AV .
B. Mettez la télévision en marche, choisissez la prise d‘entrée correcte.
C. Mettez l‘appareil sous tension ; le témoin lumineux bleu de fonctionnement
s‘allume. Après quelques secondes, l‘écran de démarrage apparaît sur le
téléviseur (cf. illustration ci-dessous) si vous avez mis le lecteur de photos
numériques 55748 correctement en marche. Puis insérez votre carte de
mémoire fl ash dans l‘emplacement destiné à cet effet.
Insertion de cartes mémoire
Le lecteur de photos numériques 55748 est compatible avec les cartes mémoires
fl ash suivantes :
• Insertion directe sans adaptateur : SD, MMC, MS, MS pro, MS duo, MS duo pro,
xD, CF, MicroDrive
• Insertion avec un adaptateur : miniSD, MMC Micro, RSMMC, MMC mobile,
Micro SD (TransFlash), MS micro (M2)
Ne forcez pas pour insérer la carte dans l’emplacement. Si vous ne parvenez pas
à insérer complètement la carte mémoire, il se peut que vous l‘ayez insérée dans
le mauvais sens.

23
Remarques : Le lecteur de photos numériques 55748 ne reconnaît que les photos
numériques stockées au format JPEG en mode « image JPEG ».
Le lecteur de photos numérique 55748 ne peut pas lire les photos
numériques stockées dans d’autres formats.
D. Sélection de cartes : (quand des cartes multiples sont insérées dans le lecteur
de photos numériques 55748, sélectionnez une seule carte.). Sélectionnez
l‘icône de la carte, appuyez ensuite sur la touche Enter sur la télécommande ou
sur le bouton Enter sur le lecteur de photos numériques 55748. Appuyez sur
« Left » (gauche) ou sur « Right » (droite) pour sélectionner une carte.
E. Sélection des modes : Sélectionnez l‘icône du mode, puis appuyez sur la
touche Enter sur la télécommande ou sur le bouton Enter sur le lecteur de
photos numériques 55748. Appuyez sur Left (gauche) ou sur Right (droite) pour
sélectionner le mode. Vous pouvez choisir trois modes – Photo, Video, Music
(photo, vidéo, musique).

24
F. Individual Photo Viewing (Visualisation individuelle de photos) : Choisissez
l‘icône “Photo“, vous accéderez alors au mode de sélection des photos.
Appuyez sur “UP”, “DOWN”, “LEFT”, “RIGHT” (haut, bas, gauche, droite) pour
choisir des photos, puis appuyez sur “Enter” sur la télécommande ou sur Enter
sur le lecteur de photos numériques. La photo peut être affi chée en plein
écran. Appuyez sur “Zoom” pour zoomer sur la photo. Appuyez sur “Rotate”
pour faire pivoter la photo. Appuyez sur “LEFT”, “RIGHT” (gauche, droite) pour
visualiser les photos précédentes ou les photos suivantes. Appuyez sur “ESC”
(échap.) pour retourner à l‘écran de départ.
G. Music Play (lecture musicale) : Choisissez l‘icône “Music”, vous accéderez
alors au mode de sélection musicale. Appuyez sur “UP”, “DOWN” (haut, bas)
pour sélectionner la musique de votre choix. Appuyez sur “Enter” sur la
télécommande ou sur “Enter” sur le lecteur de photos numériques pour lire le
morceau de musique sélectionné. Appuyez sur “LEFT”, “RIGHT” (gauche,
droite) pour ajuster le volume (Vol-/Vol+) sur le lecteur de photos numériques.
Appuyez sur “Enter” pour faire une pause.

25
H. Video Play (mode de lecture vidéo) : Choisissez l‘icône “Video”, vous
accéderez alors au mode de sélection vidéo. Appuyez sur “UP”, “DOWN”
(haut, bas) pour sélectionner la vidéo de votre choix. Appuyez sur “Enter” sur
la télécommande ou sur “Enter” sur le lecteur de photos numériques pour
lancer la lecture. Appuyez sur “LEFT”, “RIGHT” (gauche, droite) pour ajuster le
volume (Vol-/Vol+) sur le lecteur de photos numériques. Appuyez sur “Enter”
pour faire une pause.
I. Auto Slide Show (diaporama) : Le mode Auto Slide Show (diaporama)
fonctionne comme suit :
(1) Insérez la carte Flash et mettez l‘unité en marche
(2) Appuyez sur le bouton “Slide Show” sur la télécommande.
J. Connexion à un ordinateur : Utilisez le câble USB fourni pour connecter le
mini-connecteur USB à votre ordinateur Windows ou Macintosh. Le lecteur de
photos numériques 55748 peut être utilisé comme lecteur de cartes mémoire
multiples pour transférer des fi chiers.
V. Spécifi cations :
Format de fi chiers d‘image supporté :
Standard JPEG
Format audio supporté : MP3
Format vidéo supporté : Motion JPEG
Connecteur USB :
Mini-connecteur USB pour appareil USB 2.0
Sortie vidéo : Sortie vidéo composite
Sortie audio : Stéréo

d
Bedienungsanleitung
26
Antes de la instalación, lea atentamente las siguientes instrucciones sobre las
características del producto y su manejo.
I. Contenido del paquete:
- Reproductor de fotografías digitales 55748
- Adaptador de alimentación CA/CC (5 V/2 A)
- Mando a distancia
- Cable A/V (amarillo, blanco, rojo)
- Cable USB
- Guía del usuario
II. Estructura y botones:
FRONTAL:
1 Ranura compact fl ash y micro drive
2 Ranura para tarjetas Secure Digital, MultiMediaCard, xD-picture Card,
Memory Stick, Memory Stick PRO, Memory Stick Duo, Memory Stick PRO Duo
3 IR para el mando a distancia
BOTONES DE CONTROL DEL LADO DERECHO:
1 SALIR
2 SUBIR
3 BAJAR
4 IZQUIERDA
5 DERECHA
6 ACEPTAR
7 MENÚ
e
Instrucciones de uso
' % #
'
#
!
&
$
"
%

27
g
Operating Instruction
g
Operating Instruction
LADO POSTERIOR:
1 SALIDA AV
2 5 V (CONECTOR AV/CC)
3 Interruptor (ON/OFF)
4 Mini USB
Instrucciones del mando a distancia:
Confi guración Derecha
Pase de diapositivas Aceptar/Reproducir
Modo SALIR
Menú Activar/Desactivar silencio
Página anterior Añadir a favoritos
Página posterior Borrar archivos
Subir volumen Zoom
Bajar volumen Repetir
Subir Modo carpetas
Bajar Girar foto
Izquierda
Reproducir o pausar la música
durante el pase de diapositivas
' % # !

28
Funciones de confi guración
Menús OSD submenús Descripción de la función
Idioma
English
Varios idiomasDeutsch
Français
Intervalo de transición
5 seg.
Velocidad de transición
entre fotos
10 seg.
30 seg.
60 seg.
Descripción de archivo
Activada
Desactivada
Modo carpeta
Activado
Desactivado
Sistema
NTSC
Seleccione la salida de TV
PAL
Relación de aspecto
NORMAL
SMART
ZOOM
Música de fondo
ACTIVADA
DESACTIVADA

29
Ahorro de energía de LCD
DESACTIVADO
Tras 15 mín.
Tras 30 mín.
Tras 60 mín.
Confi guración de la pantalla
Brillo
Botones para ajustar el
brillo
Contraste
Botones para ajustar el
contraste
Confi guración
predeterminada
Información del sistema
X6100001 Beta2
III. Instalación:
1. Selección del cable: sólo se requiere un cable de A/V (amarillo, blanco y rojo).
2. Conectar cable A/V:
Salida de vídeo del Reproductor de fotografías digitales 55748:
Conectar cable de audio de 2,5 mm a conector de salida AV
Entrada de vídeo de TV:
Cable amarillo al conector RCA amarillo
3. Conectar audio:
Salida de audio del Reproductor de fotografías digitales 55748:
Conectar cable de audio de 2,5 mm a conector de salida AV
Entrada de audio de TV:
Entrada de audio canal izquierdo (conector RCA blanco)
Entrada de audio canal derecho (conector RCA rojo)

30
IV. Uso
A. Conecte el cable de alimentación de CA/CC 5 V al conector de 5 V del
Reproductor de fotografías digitales 55748, conecte también el cable de AV a la
salida de AV.
B. Encienda el televisor, seleccione la entrada correcta.
C. Conecte la alimentación, la luz de encendido azul se iluminará. En unos
segundos verá en el televisor la imagen inicial que se muestra abajo, si ha
conectado correctamente el Reproductor de fotografías digitales 55748 y ha
insertado la tarjeta de memoria fl ash en la ranura correcta.
Insertar tarjetas de memoria
El Reproductor de fotografías digitales 55748 es compatible con las siguientes
tarjetas de memoria fl ash:
• Tarjetas de inserción directa sin adaptador: SD, MMC, MS, MS pro, MS duo,
MS duo pro, xD, CF, MicroDrive
• Tarjetas de inserción con adaptador: miniSD, MMC Micro, RSMMC,
MMC mobile, Micro SD (TransFlash), MS micro (M2)
No introduzca la tarjeta de memoria en la ranura forzándola. Si no es posible
insertar la tarjeta de memoria completamente con facilidad, puede que la hay
insertado en sentido erróneo.

31
Notas: El Reproductor de fotografías digitales 55748 sólo reconoce fotografías
digitales almacenadas en el formato JPEG de imagen.
El Reproductor de fotografías digitales 55748 ignorará las fotografías
digitales almacenadas en otros formatos.
D. Seleccionar tarjetas: (si se conectan varias tarjetas al Reproductor de
fotografías digitales 55748, seleccione una sola). Seleccione el icono de la
tarjeta y pulse Enter en el mando a distancia o el botón Enter del Reproductor
de fotografías digitales 55748. Pulse “Izquierda” o „Derecha” para seleccionar
la tarjeta.
E. Seleccionar modos: Seleccione el icono de modo y pulse Enter en el mando a
distancia o el botón Enter en el Reproductor de fotografías digitales 55748.
Pulse “Izquierda” o „Derecha” para seleccionar el modo. Hay tres modos
posibles: Foto, Vídeo y Música.

32
F. Visualización individual de fotos: Seleccione el icono “Foto” para
pasar al Modo de selección de foto. Pulse “SUBIR”, “BAJAR”, “IZQUIERDA”
y “DERECHA” para seleccionar las fotos, pulse “Enter” en el mando a distancia
o en el Reproductor de fotografías digitales 55748. La foto se puede visualizar en
modo de pantalla completa. Pulse “Zoom” para hacer un zoom de la foto.
Pulse “Rotate” para girar la foto. Pulse “IZQUIERDA” o “DERECHA” para
visualizar la foto anterior o la siguiente. Pulse “ESC” para volver a la pantalla
inicial.
G. Reproducción de música: Seleccione el icono “Música” para pasar al Modo
de selección de música. Pulse “SUBIR” y “BAJAR” para seleccionar la
música. Pulse “Enter” en el mando a distancia o en el Reproductor de
fotografías digitales 55748 para reproducir música. Pulse “IZQUIERDA” y
“DERECHA” para ajustar el volumen, (Vol-/Vol+) en el Reproductor de
fotografías digitales 55748. Pulse “Enter” para pausa.

33
H. Reproducción de vídeo: Seleccione el icono “Vídeo” para pasar al Modo de
selección de vídeo. Pulse “SUBIR” y “BAJAR” para seleccionar el vídeo.
Pulse “Enter” en el mando a distancia o en el Reproductor de fotografías
digitales 55748 para reproducir vídeo. Pulse “IZQUIERDA” y “DERECHA” para
ajustar el volumen, (Vol-/Vol+) en el Reproductor de fotografías digitales 55748.
Pulse “Enter” para pausa.
I. Modo de pase automático de diapositivas: Existen las siguientes formas de
activar el Modo de pase automático de diapositivas:
(1) Inserte la tarjeta fl ash y encienda la unidad
(2) Pulse el botón „Pase de diapositivas” en el mando a distancia.
J. Conectar al PC: Use el cable USB que se adjunta para conectar el mini USB al
PC o Mac. El Reproductor de fotografías digitales 55748 se convierte en un
lector de tarjetas para la transferencia de archivos.
V. Especifi caciones:
Formatos de archivo de imagen compatibles: JPEG estándar
Formatos de archivo de audio compatibles: MP3
Formatos de archivo de vídeo compatibles: JPEG de vídeo
Conector USB: mini USB para dispositivo USB 2.0
Salida de vídeo: Salida de vídeo compuesto
Salida de audio: estéreo

d
Bedienungsanleitung
34
Lees vóór de installatie van het toestel deze gebruiksaanwijzing zorgvuldig door
teneinde de eigenschappen en het juiste gebruik ervan te ervaren.
I. Inhoud van de verpakking:
- 55748 Digital Photo Player
- AC/DC netadapter (5V/2A)
- Afstandsbediening
- A/V-kabel (geel, wit, rood)
- USB-kabel
- Gebruiksaanwijzing
II. Opbouw van- en bedienknoppen op het toestel:
VOORZIJDE:
1 Compact Flash en Micro Drive kaartsleuf
2 Secure Digital, MultiMediaCard , xD-picture Card, Memory Stick,
Memory Stick PRO, Memory Stick Duo, Memory Stick PRO Duo kaartsleuf
3 IR-afstandsbediening
RECHTERZIJDE BEDIENKNOPPEN:
1 ESC (terug in het menu resp. menu/modus verlaten)
2 UP (naar boven)
3 DOWN (naar beneden)
4 LEFT (links)
5 RIGHT (rechts)
6 ENTER (ingeven)
7 MENU
o
Gebruiksaanwijzing
' % #
'
#
!
&
$
"
%

35
g
Operating Instruction
g
Operating Instruction
ACHTERZIJDE:
1 AV-uitgang
2 5V (AC/DC-aansluiting)
3 Voedingsschakelaar (AAN/UIT)
4 mini-USB
Overzicht van de afstandsbediening:
Instellingen Rechts
Foto (“dia”) show Enter/Play (invoeren/afspelen)
Modus ESC/Exit (menu/modus verlaten)
Menu
Mute/Unmute
(geluid uit/geluid aan)
Pagina verder Aan favorieten toevoegen
Pagina terug Bestanden wissen
geluidssterkte verhogen Inzoomen
geluidssterkte verlagen Herhaling
Up (naar boven c.q. verhogen) Mappen-modus
Down (naar beneden c.q.
verlagen)
Foto draaien
Links
Muziek tijdens de diashow
afspelen of laten pauzeren
' % # !

36
Functies instellingen
OSD-menu’sSubmenu’sFunctiebeschrijving
Taal
Engels
Meerdere talenDuits
Frans
Intervaltijd diashow
5 sec.
Wijziging snelheid diashow
10 sec.
30 sec.
60 sec.
Beschrijving van het
bestand
Aan
Uit
Mappen-modus
Aan
Uit
TV videosysteem
NTSC
Selecteer het type tv-
uitgang
PAL
Aspectverhouding
NORMAAL
SMART (intelligent)
ZOOM
Achtergrondmuziek
Aan
Uit

37
LCD- energiespaarmodus
Uit
15 min. later
30 Min. later
60 Min. later
Display instellen
Helderheid
Knoppen om helderheid in
te stellen
Contrast
Knoppen om contrast in te
stellen
Standaard instelling
Systeeminformatie
X6100001 Beta2
III. Installatie:
1. Kabelselectie: er is slechts een A/V-kabel (geel, wit, rood) nodig.
2. Aansluiten A/V-kabel:
55748 digitale fotospeler video-uitgang:
audio 2,5 mm kabel aansluiten op de AV-uitgang
TV video-ingang:
gele kabel op de geel gemarkeerde RCA-aansluiting
3. Aansluiting geluidsweergave:
55748 digitale fotospeler audio-uitgang:
audio 2,5 mm kabel aansluiten op de AV-uitgang
TV audio-ingang:
audio-ingang links (wit gemarkeerde RCA-aansluiting)
audio-ingang rechts (rood gemarkeerde RCA-aansluiting)

38
IV. Gereed maken voor gebruik
A. Steek de AC/DC 5V voedingskabel in de DC-aansluiting van de digitale
fotospeler en sluit tevens de AV-kabel op de AV-uitgang aan.
B. Schakel de televisie in en selecteer de juiste ingang.
C. Schakel het toestel in; de blauwe voedingsindicator zal oplichten. Indien u
de de fotospeler correct heeft aangesloten ziet u binnen een paar seconden
het opstartscherm op de televisie verschijnen; plaats dan de fl ash-
geheugenkaarten in de juiste kaartsleuven.
Insteken/plaatsen van de geheugenkaarten
De 55748 digitale fotospeler is compatibel met de volgende fl ash-geheugen-
kaarten:
• Direct insteken zonder een adapter: SD, MMC, MS, MS pro, MS duo,
MS duo pro, xD, CF, MicroDrive
• Insteken met adapter: miniSD, MMC Micro, RSMMC, MMC mobile,
Micro SD (TransFlash), MS micro (M2)
Oefen geen overmatige kracht uit als u de geheugenkaart in de sleuf steekt. Als
het niet lukt om de geheugenkaart makkelijk in zijn geheel in de sleuf te steken, is
de kaart er niet juist ingestoken.

39
Opmerkingen: de digitale fotospeler herkent alleen digitale foto’s die
opgeslagen zijn in JPEG-formaat in de modus „JPEG Picture“.
Digitale foto’s die in een ander formaat opgeslagen zijn, worden
door de digitale fotospeler genegeerd.
D. Kaarten selecteren: (indien er meerdere kaarten in de digitale fotospeler zijn
geplaatst, selecteer dan uitsluitend 1 kaart). Kies het betreffende kaart-picto-
gram en druk dan op Enter op de afstandsbediening of fotospeler. Druk op
“Left” (links) of “Right” (rechts) om de juiste kaart te selecteren.
E. Modi selecteren: Kies het modus-pictogram en druk dan op Enter op de
afstandsbediening of fotospeler. Druk op “Left” (links) of “Right” (rechts) om
de juiste modus te selecteren. Er kan uit drie modi worden gekozen – foto,
video, muziek.

40
F. Enkele foto’s bekijken: Kies het “Photo”-pictogram en vervolgens gaat u door
de foto-selectie-modus. Druk op “UP” (naar boven), “DOWN” (naar beneden),
“LEFT” (links), “RIGHT” (rechts) om foto’s te selecteren, en druk dan op
“Enter” op de afstandsbediening of de fotospeler. De foto kan op een volledig
scherm (full screen) worden weergegeven. “Zoom” indrukken om op de foto
in te zoomen. “Rotate” indrukken om de foto te draaien. Door op “LEFT” (links)
of “RIGHT” (rechts) te drukken kunt u voorgaande of volgende foto’s bekijken.
Druk op “ESC” om naar het opstartscherm terug te keren.
G. Muziek afspelen: Kies het “Music”-pictogram en vervolgens gaat u door de
muziek-selectie-modus. Druk op “UP” (naar boven) of “DOWN” (naar beneden)
om muziek te selecteren. Druk op “Enter” op de afstandsbediening of fotospeler
om de muziek af te spelen. Druk op “LEFT” of “RIGHT” om de geluidssterkte via
de fotospeler te regelen (Vol-/Vol+). Druk op “Enter” voor een pauze.

41
H. Video afspelen: Kies het “Video”-pictogram en vervolgens gaat u door de
video-selectie-modus. Druk op “UP” (naar boven) of “DOWN” (naar beneden)
om de video te selecteren. Druk op “Enter” op de afstandsbediening of
fotospeler om de video af te spelen. Druk op “LEFT” of “RIGHT” om de
geluidssterkte via de fotospeler te regelen (Vol-/Vol+). Druk op “Enter” voor
een pauze.
I. Auto Slide Show Mode (zgn. “diashow-weergave”): er is een aantal manieren
om de Auto Slide Show Mode te activeren; zie onderstaande methoden:
(1) Plaats de fl ash-kaart en schakel het toestel in.
(2) Druk op de knop „Slide Show“ op de afstandsbediening.
J. Aansluiten op een pc: Gebruik de meegeleverde USB-kabel om de mini-USB op
uw pc of Mac aan te sluiten. De fotospeler (artikelnummer 55748) krijgt
een multi-cardreader voor de overdracht van bestanden.
V. Technische specifi caties:
Ondersteund fotobestandsformaat: Standaard JPEG
Ondersteund muziekbestandsformaat: MP3
Ondersteund videobestandsformaat: motion JPEG
USB-aansluiting: mini-USB voor USB 2.0-apparatuur
Video-uitgang: composiet video-uitgang
Audio-uitgang: stereo
-
 1
1
-
 2
2
-
 3
3
-
 4
4
-
 5
5
-
 6
6
-
 7
7
-
 8
8
-
 9
9
-
 10
10
-
 11
11
-
 12
12
-
 13
13
-
 14
14
-
 15
15
-
 16
16
-
 17
17
-
 18
18
-
 19
19
-
 20
20
-
 21
21
-
 22
22
-
 23
23
-
 24
24
-
 25
25
-
 26
26
-
 27
27
-
 28
28
-
 29
29
-
 30
30
-
 31
31
-
 32
32
-
 33
33
-
 34
34
-
 35
35
-
 36
36
-
 37
37
-
 38
38
-
 39
39
-
 40
40
-
 41
41
-
 42
42


Hama 00055748 El manual del propietario
- Categoría
- Marcos de fotos digitales
- Tipo
- El manual del propietario
en otros idiomas
- français: Hama 00055748 Le manuel du propriétaire
- italiano: Hama 00055748 Manuale del proprietario
- Deutsch: Hama 00055748 Bedienungsanleitung
- Nederlands: Hama 00055748 de handleiding
- português: Hama 00055748 Manual do proprietário
Artículos relacionados
Otros documentos
-
Lenco DF-1520 El manual del propietario
-
-
Thomson DP9200 El manual del propietario
-
AIPTEK Monet Manual de usuario
-
Belkin F5U229ea Manual de usuario
-
Sony MCMD-R1 Manual de usuario
-
Braun Photo Technik DF1960 El manual del propietario
-
-
Conceptronic 2.5" Multi Media Player Pocket Guía del usuario
-