Pioneer BCS-303 El manual del propietario
- Categoría
- Reproductores de DVD
- Tipo
- El manual del propietario

ENGLISH
FRANÇAIS
DEUTSCH ITALIANO ESPAÑOL
NEDERLANDS
P/NO: MFL65220804
BCS-707
XV-BD707
S-BD707T
S-BD707SW
BCS-303
XV-BD707
S-BD303
HB985-DB.BDEUPPK_ENG.indd 1HB985-DB.BDEUPPK_ENG.indd 1 2010-05-14 1:41:212010-05-14 1:41:21

2 Safety Information
Safety Information
1
CAUTION
RISK OF ELECTRIC SHOCK
DO NOT OPEN
CAUTION: TO REDUCE THE RISK OF ELECTRIC
SHOCK DO NOT REMOVE COVER (OR BACK) NO
USER-SERVICEABLE PARTS INSIDE REFER SERVICING
TO QUALIFIED SERVICE PERSONNEL.
This lightning ash with arrowhead
symbol within an equilateral
triangle is intended to alert the
user to the presence of uninsulated
dangerous voltage within the
product’s enclosure that may be of
su cient magnitude to constitute
a risk of electric shock to persons.
The exclamation point within an
equilateral triangle is intended
to alert the user to the presence
of important operating and
maintenance (servicing)
instructions in the literature
accompanying the product.
Cautions and Warnings
WARNING: TO PREVENT FIRE OR ELECTRIC SHOCK
HAZARD, DO NOT EXPOSE THIS PRODUCT TO RAIN
OR MOISTURE.
WARNING: Do not install this equipment in a
con ned space such as a book case or similar unit.
CAUTION: Do not block any ventilation openings.
Install in accordance with the manufacturer’s
instructions.
Slots and openings in the cabinet are provided for
ventilation and to ensure reliable operation of the
product and to protect it from over heating. The
openings shall be never be blocked by placing
the product on a bed, sofa, rug or other similar
surface. This product shall not be placed in a built-
in installation such as a bookcase or rack unless
proper ventilation is provided or the manufacturer’s
instruction has been adhered to.
CAUTION: This product is a class 1 laser product
classi ed under the Safety of laser products,
IEC60825-1:2007. To ensure proper use of this
product, please read this owner’s manual carefully
and retain it for future reference. Shall the unit
require maintenance, contact an authorized service
centre.
Use of controls, adjustments or the performance of
procedures other than those speci ed herein may
result in hazardous radiation exposure.
To prevent direct exposure to laser beam, do not try
to open the enclosure. Visible laser radiation when
open. DO NOT STARE INTO BEAM.
1
Safety Information
HB985-DB.BDEUPPK_ENG.indd 2HB985-DB.BDEUPPK_ENG.indd 2 2010-05-14 1:41:402010-05-14 1:41:40

Safety Information
3Safety Information
1
CAUTION concerning the Power Cord
Most appliances recommend they be placed upon a
dedicated circuit;
That is, a single outlet circuit which powers only
that appliance and has no additional outlets or
branch circuits. Check the speci cation page of this
owner’s manual to be certain. Do not overload wall
outlets. Overloaded wall outlets, loose or damaged
wall outlets, extension cords, frayed power cords, or
damaged or cracked wire insulation are dangerous.
Any of these conditions could result in electric
shock or re. Periodically examine the cord of your
appliance, and if its appearance indicates damage
or deterioration, unplug it, discontinue use of the
appliance, and have the cord replaced with an exact
replacement part by an authorized service centre.
Protect the power cord from physical or mechanical
abuse, such as being twisted, kinked, pinched, closed
in a door, or walked upon. Pay particular attention
to plugs, wall outlets, and the point where the cord
exits the appliance. To disconnect power from the
mains, pull out the mains cord plug. When installing
the product, ensure that the plug is easily accessible.
PIONEER hereby declares that this/
these product(s) is/are in compliance
with the essential requirements and
other relevant provisions of Directive
2004/108/EC, 2006/95/EC, and
2009/125/EC.
WARNING: To prevent a re hazard, do not place any
naked ame sources (such as a lighted candle) on
the equipment.
This device is equipped with a portable battery or
accumulator.
Safety way to remove the battery or the battery
from the equipment: Remove the old battery
or battery pack, follow the steps in reverse order
than the assembly. To prevent contamination of
the environment and bring on possible threat
to human and animal health, the old battery or
the battery put it in the appropriate container at
designated collection points. Do not dispose of
batteries or battery together with other waste.
It is recommended that you use local, free
reimbursement systems batteries and accumulators.
The battery shall not be exposed to excessive heat
such as sunshine, re or the like.
CAUTION: The apparatus shall not be exposed to
water (dripping or splashing) and no objects lled
with liquids, such as vases, shall be placed on the
apparatus.
HB985-DB.BDEUPPK_ENG.indd 3HB985-DB.BDEUPPK_ENG.indd 3 2010-05-14 1:41:412010-05-14 1:41:41

4 Safety Information
Safety Information
1
Information for users on collection and disposal
of old equipment and used batteries
These symbols on the products, packaging, and/or
accompanying documents mean that used electrical
and electronic products and batteries should not be
mixed with general household waste.
For proper treatment, recovery and recycling of old
products and used batteries, please take them to
applicable collection points in accordance with your
national legislation.
By disposing of these products and batteries
correctly, you will help to save valuable resources
and prevent any potential negative e ects on human
health and the environment which could otherwise
arise from inappropriate waste handling.
For more information about collection and recycling
of old products and batteries, please contact your
local municipality, your waste disposal service or the
point of sale where you purchased the items.
These symbols are only valid in the European
Union.
For countries outside the European Union:
If you wish to discard these items, please contact
your local authorities or dealer and ask for the correct
method of disposal.
Notes on Copyrights
• Because AACS (Advanced Access Content System)
is approved as content protection system for BD
format, similar to use of CSS (Content Scramble
System) for DVD format, certain restrictions are
imposed on playback, analogue signal output,
etc., of AACS protected contents. The operation of
this product and restrictions on this product may
vary depending on your time of purchase as those
restrictions may be adopted and/or changed by
AACS after the production of this product.
• Furthermore, BD-ROM Mark and BD+ are
additionally used as content protection systems
for BD format, which imposes certain restrictions
including playback restrictions for BD-ROM
Mark and/or BD+ protected contents. To obtain
additional information on AACS, BD-ROM Mark,
BD+, or this product, please contact an authorized
Customer Service Centre.
• Many BD-ROM/DVD discs are encoded with
copy protection. Because of this, you should only
connect your player directly to your TV, not to a
VCR. Connecting to a VCR results in a distorted
picture from copy-protected discs.
• This product incorporates copyright protection
technology that is protected by U.S. patents
and other intellectual property rights. Use of
this copyright protection technology must be
authorized by Rovi Corporation, and is intended
for home and other limited viewing uses only
unless otherwise authorized by Rovi Corporation.
Reverse engineering or disassembly is prohibited.
• Under the U.S. Copyright laws and Copyright
laws of other countries, unauthorized recording,
use, display, distribution, or revision of television
programmes, videotapes, BD-ROM discs, DVDs,
CDs and other materials may subject you to civil
and/or criminal liability.
Symbol examples
for batteries
Pb
HB985-DB.BDEUPPK_ENG.indd 4HB985-DB.BDEUPPK_ENG.indd 4 2010-05-14 1:41:412010-05-14 1:41:41

Safety Information
5Safety Information
1
Important Notice for TV colour system
The colour system of this player di ers according to
currently playing discs.
For example, when the player plays the disc recorded
in the NTSC colour system, the image is output as an
NTSC signal.
Only the multi system colour TV can receive all
signals output from the player.
• If you have a PAL colour system TV, you will see
just distorted images when using discs or video
contents recorded in NTSC.
• The multi system colour TV changes the colour
system automatically according to input signals.
In case that the colour system is not changed
automatically, turn it o and then on to see
normal images on screen.
• Even if the disc recorded in NTSC colour system
are well displayed on your TV, these may not be
recorded correctly on your recorder.
HB985-DB.BDEUPPK_ENG.indd 5HB985-DB.BDEUPPK_ENG.indd 5 2010-05-14 1:41:412010-05-14 1:41:41

6
Contents
1
Safety Information
2 Cautions and Warnings
2
Preparation
8 Introduction
8 About the “ ” Symbol
Display
8 Symbols Used in this Manual
9 Supplied Accessories
10 Playable Discs
11 File compatibility
12 Regional Code
12 AVCHD (Advanced Video
Codec High De nition)
12 Certain System Requirements
12 Compatibility Notes
13 Remote control
14 Front panel
15 Rear panel
3
Installation
16 Assemble the speakers
16 Speaker Setup for BCS-707
18 Speaker Setup for BCS-303
19 Wall mounting the centre speaker
19 Additional notes on speaker
20 Positioning the system
21 Connecting to Your TV
21 HDMI Connection
22 Component Video
Connection
23 Video Connection
23 Resolution Setting
24 Antenna connection
24 Connections with external device
24 AUX Connection
25 PORTABLE IN connection
25 OPTICAL IN 1/2 connection
26 Bluetooth® connection
28 Connecting to your Home Network
29 Network Setup
31 USB device connection
32 Settings
32 Adjust the Setup Settings
33 [DISPLAY] Menu
34 [LANGUAGE] Menu
35 [AUDIO] Menu
36 [LOCK] Menu
37 [NETWORK] Menu
37 [OTHERS] Menu
39 Sound E ect
HB985-DB.BDEUPPK_ENG.indd 6HB985-DB.BDEUPPK_ENG.indd 6 2010-05-14 1:41:412010-05-14 1:41:41

7
1
2
3
4
5
6
7
8
4
Operation
40 General Playback
42 Advanced Playback
44 On-Screen display
48 Enjoying BD-LIVE
49 Playing movie le and VR discs
51 Viewing a photo
53 Listening to music
56 Playing the iPod
58 Radio Operations
59 Playing content via your home
network
5
Maintenance
63 Notes on Discs
63 Handling the Unit
6
Troubleshooting
64 General
65 Picture
65 Sound
66 Network
7
Appendix
67 Controlling a TV with the Supplied
Remote Control
68 Area Code List
69 Language code List
70 Video output resolution
71 Trademarks and Licences
73 Speci cations
75 Open source software notice
HB985-DB.BDEUPPK_ENG.indd 7HB985-DB.BDEUPPK_ENG.indd 7 2010-05-14 1:41:412010-05-14 1:41:41

8 Preparation
Preparation
2
2
Preparation
Introduction
About the “ ” Symbol Display
“ ” may appear on your TV display during
operation and indicates that the function
explained in this owner’s manual is not
available on that speci c media.
Symbols Used in this Manual
NOTE
Indicates special notes and operating features.
CAUTION
Indicate cautions for preventing possible
damages from abuse.
A section whose title has one of the following
symbols are applicable only to the disc
represented by the symbol.
BD
BD-ROM disc
DVD
DVD-Video, DVD±R/RW in
Video mode or VR mode
and nalized
AVCHD
DVD±R/RW in AVCHD
format
ACD
Audio CDs
MOVIE
Movie les
MUSIC
Music les
PHOTO
Photo les
HB985-DB.BDEUPPK_ENG.indd 8HB985-DB.BDEUPPK_ENG.indd 8 2010-05-14 1:41:412010-05-14 1:41:41

9Preparation
2
Preparation
Supplied Accessories
Video cable (1) Remote control (1)
Battery (1) FM antenna (1)
iPod cradle (1)
Accessaries of speaker box
(S-BD707T)
Colour-coded
Speaker cables (5)
Screws (12)
Speaker stand bases
(4)
Small non-skid pads
(1)
Middle non-skid
pads (1)
Accessaries of speaker box
(S-BD707SW)
Speaker cable (1) Large non-skid pads
(1)
Accessaries of speaker box
(S-BD303)
Colour-coded
Speaker cables (6)
Small non-skid pads
(1)
Large non-skid pads
(1)
HB985-DB.BDEUPPK_ENG.indd 9HB985-DB.BDEUPPK_ENG.indd 9 2010-05-14 1:41:412010-05-14 1:41:41

10 Preparation
Preparation
2
Playable Discs
Blu-ray Disc
- Discs such as movies that can
be p
urchased or rented.
- BD-R/RE discs that contain
Movie, Music or Photo les.
DVD-VIDEO
8 / 12 cm disc
Discs such as movies that can be
purchased or rented.
DVD±R
8 / 12 cm disc
- Video mode and nalized only
- Supports the dual layer disc
also
- Finalized AVCHD format
- DVD±R discs that contain
Movie, Music or Photo les
DVD-RW
8 / 12 cm disc
- VR mode, Video mode and
nalized only
- Finalized AVCHD format
- DVD-RW discs that contain
Movie, Music or Photo les.
DVD+RW
8 / 12 cm disc
- Video mode and nalized only
- AVCHD format
- Finalized AVCHD format
- DVD+RW discs that contain
Movie, Music or Photo les.
Audio CD
8 / 12 cm disc
CD-R/RW
8 / 12 cm disc
- CD-R/RW discs that contain
audio titles, Movie, Music or
Photo les.
NOTE
• Depending on the conditions of the recording
equipment or the CD-R/RW (or DVD±R/RW)
disc itself, some CD-R/RW (or DVD±R/RW) discs
cannot be played on the unit.
• Depending on the recording software & the
nalization, some recorded discs (CD-R/RW,
DVD±R/RW, BD-R/RE) may not be playable.
• BD-R/RE, DVD±R/RW and CD-R/RW discs
recorded using a personal computer or a DVD or
CD Recorder may not play if the disc is damaged
or dirty, or if there is dirt or condensation on the
player’s lens.
• If you record a disc using a personal computer,
even if it is recorded in a compatible format,
there are cases in which it may not play because
of the settings of the application software used
to create the disc. (Check with the software
publisher for more detailed information.)
• This player requires discs and recordings to meet
certain technical standards in order to achieve
optimal playback quality.
• Pre-recorded DVDs are automatically set to
these standards. There are many di erent
types of recordable disc formats (including
CD-R containing MP3 or WMA les) and these
require certain pre-existing conditions to ensure
compatible playback.
• Customers should note that permission is
required in order to download MP3 / WMA les
and music from the Internet. Our company has
no right to grant such permission. Permission
should always be sought from the copyright
owner.
HB985-DB.BDEUPPK_ENG.indd 10HB985-DB.BDEUPPK_ENG.indd 10 2010-05-14 1:41:422010-05-14 1:41:42

11Preparation
2
Preparation
File compatibility
Overall
Available File extensions:
“.jpg”, “.jpeg”, “.png”, “.avi”, “.divx”, “.mpg”, “.mpeg”,
“.mkv”, “.mp4”, “.mp3”, “.wma”, “.wav”
• Available le extensions di er depending
on the DLNA servers.
• Some “.wav” les are not supported on this
player.
• The le name is limited to 180 characters.
• Depending on the size and number of the
les, it may take several minutes to read the
contents on the media.
Maximum Files/Folder: Less than 2 000 (total
number of les and folders)
CD-R/RW, DVD±R/RW, BD-R/RE Format:
ISO 9660+JOLIET, UDF and UDF Bridge format
MOVIE
Available resolution size:
1 920 x 1 080 (W x H) pixels
Playable subtitle: SubRip (.srt / .txt), SAMI
(.smi), SubStation Alpha (.ssa/.txt), MicroDVD
(.sub/.txt), VobSub (.sub), SubViewer 1.0 (.sub),
SubViewer 2.0 (.sub/.txt), TMPlayer (.txt), DVD
Subtitle System (.txt)
• VobSub (.sub) is not available in the
[Home Link] feature.
Playable Codec format: “DIVX3.xx”, “DIVX4.
xx”, “DIVX5.xx”, “XVID”, “DIVX6.xx” (Standard
playback only), H.264/MPEG-4 AVC, MPEG1 SS,
MPEG2 PS, MPEG2 TS
Playable Audio format: “Dolby Digital”, “DTS”,
“MP3”, “WMA”, “AAC”, “AC3”
• Not all the WMA and AAC Audio formats are
compatible with this unit.
Sampling frequency:
between 32 kHz to 48 kHz (WMA),
between 16 kHz to 48 kHz (MP3)
Bit rate:
between 20 kbps to 320 kbps (WMA),
between 32 kbps to 320 kbps (MP3)
NOTE
• HD movie les contained on the CD or USB
1.0/1.1 may not played properly. BD, DVD or USB
2.0 are recommended to play back HD movie
les.
• This player supports H.264/MPEG-4 AVC pro le
Main, High at Level 4.1. For a le with higher
level, the warning message will appear on the
screen.
• This player does not support the les that are
recorded with GMC
*
1
or Qpel
*
2
. Those are video
encoding techniques in MPEG4 standard, like
DivX or XVID have.
*1 GMC – Global Motion Compensation
*2 Qpel – Quarter pixel
MUSIC
Sampling frequency:
between 8 kHz to 48 KHz (WMA),
between 11 kHz to 48 kHz (MP3)
Bit rate:
between 8 kbps to 320 kbps (WMA, MP3),
NOTE
• This unit cannot support the ID3 Tag embedded
MP3 le.
• The total playback time indicated on the screen
may not be correct for VBR les.
PHOTO
Recommended size:
Less than 4,000 x 3,000 x 24 bit/pixel
Less than 3,000 x 3,000 x 32 bit/pixel
Less than 4 MByte/ le
• Progressive and lossless compression photo
image les are not supported.
HB985-DB.BDEUPPK_ENG.indd 11HB985-DB.BDEUPPK_ENG.indd 11 2010-05-14 1:41:422010-05-14 1:41:42

12 Preparation
Preparation
2
Regional Code
This unit has a regional code printed on the
rear of the unit. This unit can play only BD-ROM
or DVD discs labeled same as the rear of the
unit or “ALL”.
AVCHD (Advanced Video Codec
High De nition)
• This player can playback AVCHD format
discs. These discs are normally recorded and
used in camcorders.
• The AVCHD format is a high de nition
digital video camera format.
• The MPEG-4 AVC/H.264 format is capable
of compressing images at higher e ciency
than that of the conventional image
compressing format.
• Some AVCHD discs use the “x.v.Colour”
format.
• This player can playback AVCHD discs using
“x.v.Colour” format.
• Some AVCHD format discs may not play,
depending on the recording condition.
• AVCHD format discs need to be nalized.
• “x.v.Colour” o ers a wider colour range than
normal DVD camcorder discs.
Certain System Requirements
For high de nition video playback:
• High de nition display that has
COMPONENT or HDMI input jacks.
• BD-ROM disc with high de nition content.
• HDMI or HDCP capable DVI input on your
display device is required for some content
(as speci ed by disc authors).
• For up-conversion of standard de nition
DVD, a HDMI or HDCP capable DVI input
on your display device is required for copy
protected content.
Compatibility Notes
• Because BD-ROM is a new format,
certain disc, digital connection and other
compatibility issues are possible. If you
experience compatibility problems, please
contact an authorized Customer Service
Centre.
• Viewing high-de nition content and up-
converting standard DVD content may
require a HDMI-capable input or HDCP-
capable DVI input on your display device.
• Some BD-ROM and DVD discs may restrict
the use of some operation commands or
features.
• You can use a USB device that is used
to store some disc related information,
including downloaded on-line content. The
disc you are using will control how long this
information is retained.
HB985-DB.BDEUPPK_ENG.indd 12HB985-DB.BDEUPPK_ENG.indd 12 2010-05-14 1:41:422010-05-14 1:41:42

13Preparation
2
Preparation
Remote control
1
2
3
• • • • • • • • •
a
• • • • • • • • •
1
(STANDBY/ON): Switches the
player ON or OFF.
Z
OPEN/CLOSE: Opens and closes
the disc tray.
INPUT/TUNER: Changes input
mode.
BT AUDIO: Changes input mode to
BT AUDIO directly.
OPTICAL: Changes input mode to
optical directly.
DISPLAY: Displays or exits On-
Screen Display.
HOME MENU: Displays or exits
the [Home Menu].
MENU: Accesses the menu on a
disc.
Direction buttons: Selects an
option in the menu.
ENTER: Acknowledges menu
selection.
TUNE (+/-): Tunes in the desired
radio station.
PRESET: Selects programme of
Radio.
• • • • • • • • •
b
• • • • • • • • •
O
RETURN: Exits the menu or
resumes playback.
POPUP/ TOP MENU: Displays the
DVD title menu or BD-ROM’s pop-
up menu, if available.
x
STOP: Stops playback.
B
PLAY: Starts playback.
X
PAUSE/STEP: Pauses playback
.
/
>
SKIP: Goes to the next
or previous chapter / track / le.
m
/
M
SCAN: Searches
backward or forward.
SPK LEVEL: Sets the sound level of
desired speaker.
z
USB REC: Records an audio CD.
MUTE: Mute the unit.
SOUND: Selects a sound e ect
mode.
VOL +/- : Adjusts speaker volume.
• • • • • • • • •
c
• • • • • • • • •
0-9 numerical buttons: Selects
numbered options in a menu.
MARKER: Marks any point during
playback.
SEARCH: Displays or exits the
search menu.
REPEAT: Repeats a desired
section or sequence.
CLEAR: Removes a mark on the
search menu or a number when
setting the password.
DIMMER: Dims the light on the
unit.
ZOOM: Accesses the zoom menu.
Coloured (A, B, C, D) buttons: Use
to navigate on menus.
- A button (RDS): Radio Data
System.
- B button (PTY): Views the
programme type of the RDS.
- C button (PTY SEARCH):
Searches programme type.
- D button: Selects MONO or
STEREO in FM mode.
TV Control Buttons: See page 67.
SLEEP: Sets a certain period of time
after which the unit will switch to
o .
Battery Installation
Remove the battery cover
on the rear of the Remote
Control, and insert a R03 (size
AAA) battery with and
matched correctly.
HB985-DB.BDEUPPK_ENG.indd 13HB985-DB.BDEUPPK_ENG.indd 13 2010-05-14 1:41:422010-05-14 1:41:42

14 Preparation
Preparation
2
Front panel
a
Disc Tray
b
Operation buttons
1
STANDBY/ON Button
Z
(OPEN/CLOSE)
FUNCTION
Changes the input source or function
B
/
X
(PLAY / PAUSE)
x
(STOP)
.
/
>
(SKIP)
- TUNE + (Radio tuning)
c
Remote sensor
d
Display window
e
PORTABLE IN
f
USB Port
g
Volume control
1
2
3 4 5 6 7
HB985-DB.BDEUPPK_ENG.indd 14HB985-DB.BDEUPPK_ENG.indd 14 2010-05-14 1:41:432010-05-14 1:41:43

15Preparation
2
Preparation
a
AC Power cord
Plug into the power source.
b
Speakers connectors
c
Cooling Fan
d
Antenna Connector
e
VIDEO OUT
f
AUX (L/R) INPUT
g
COMPONENT VIDEO (Y P
B
P
R
)
OUTPUT (PROGRESSIVE SCAN)
h
OPTICAL IN 1(TV) / 2
i
iPod (24 pin)
Connect to the furnished iPod cradle.
j
HDMI OUT (type A, Version 1.3)
Connect to TV with HDMI inputs.
k
LAN port
Rear panel
1 2 3 4 5
6 7 8 9 10 11
HB985-DB.BDEUPPK_ENG.indd 15HB985-DB.BDEUPPK_ENG.indd 15 2010-05-14 1:41:432010-05-14 1:41:43

16 Installation
Installation
3
Assemble the
speakers
Speaker Setup for BCS-707
Preparing the speakers
1. Attach the non-skid pads to the base of
each speaker stand bases, the subwoofer
and the centre speaker.
For speaker stand bases:
Use the supplied adhesive to attach four
middle pads to the base (bottom) of each
speaker stand base.
middle non-skid pads
For subwoofer:
Use the supplied adhesive to attach four
large pads to the base of subwoofer.
large non-skid pads
For centre speaker:
Use the supplied adhesive to attach four
small pads to the base of centre speaker.
small non-skid pads
2. Attach the speaker stand bases to the stems
using the screws provided.
Once you have aligned the stem and base,
secure with the small screws at the points
shown below. Note that the speaker should
face in the direction of the base of the
isosceles triangle.
Rear
Front
3
Installation
HB985-DB.BDEUPPK_ENG.indd 16HB985-DB.BDEUPPK_ENG.indd 16 2010-05-14 1:41:432010-05-14 1:41:43

17Installation
3
Installation
3. Connect the wires to the player.
Connect the white wire with gray line into
(+) side and the other wire into (–) side. To
connect the cable to the player, press each
plastic nger pad to open the connection
terminal. Insert the wire and release the
nger pad.
CAUTION
• Do not connect any speakers other than those
supplied to this system.
• Do not connect the supplied speakers to any
ampli er other than the one supplied with this
system. Connection to any other ampli er may
result in malfunction or re.
Securing your front and surround
speakers
Secure each of the front and surround speakers
using the plastic catch provided. Screw two
supporting hooks into the wall behind the
speaker. Pass a thick cord around the hooks
and through the plastic catch so that the
speaker is stabilized (make sure to test that
it supports the weight of the speaker). After
installing, make sure the speaker is securely
xed.
thick cord
Plastic catch
CAUTION
• The plastic catch is not a mounting xture, and
the speaker should not be hung directly from
the wall using this catch. Always use a cord
when stabilizing the speaker.
• Pioneer disclaims all responsibility for any
losses or damage resulting from improper
assembly, installation, insu cient strength of the
installation materials, misuse, or natural disasters.
• When placing this unit, ensure that it is rmly
secured and avoid areas where it may be likely
to fall and cause injury in the event of a natural
disaster (such as an earthquake).
Coloured (+)
HB985-DB.BDEUPPK_ENG.indd 17HB985-DB.BDEUPPK_ENG.indd 17 2010-05-14 1:41:442010-05-14 1:41:44

18 Installation
Installation
3
Speaker Setup for BCS-303
Preparing the speakers
1. Attach the non-skid pads to the base of
each speaker.
For speaker stand bases:
Use the supplied adhesive to attach four
middle pads to the base (bottom) of each
speaker stand base.
small non-skid pads
For subwoofer:
Use the supplied adhesive to attach four
large pads to the base of subwoofer.
large non-skid pads
For centre speaker:
Use the supplied adhesive to attach four
small pads to the base of centre speaker.
small non-skid pads
2. Connect the wires to the player.
Connect the white wire with gray line into
(+) side and the other wire into (–) side. To
connect the cable to the player, press each
plastic nger pad to open the connection
terminal. Insert the wire and release the
nger pad.
Coloured (+)
HB985-DB.BDEUPPK_ENG.indd 18HB985-DB.BDEUPPK_ENG.indd 18 2010-05-14 1:41:442010-05-14 1:41:44

19Installation
3
Installation
Wall mounting the
centre speaker
The centre speaker have a mounting hole
which can be used to mount the speaker on
the wall.
Before mounting
Remember that the speaker system is heavy
and that its weight could cause the screws
to work loose, or the wall material to fail to
support it, resulting in the speaker falling. Make
sure that the wall you intend to mount the
speakers on is strong enough to support them.
Do not mount on plywood or soft surface
walls.
Mounting screws are not supplied. Use screws
suitable for the wall material and support the
weight of the speaker.
CAUTION
• If you are unsure of the qualities and strength of
the wall, consult a professional for advice.
• Pioneer is not responsible for any accidents or
damage that result from improper installation.
5 mm
10 mm
5 mm to 7 mm
Mounting screw
(not supplied)
Additional notes on
speaker
Install the main front left and right speakers at
an equal distance from the TV.
Precautions:
Make sure that all the bare speaker wire is
twisted together and inserted fully into the
speaker terminal. If any of the bare speaker
wire touches the back panel it may cause the
power to cut o as a safety measure.
The front, centre and surround speakers
supplied with this system are magnetically
shielded. However, depending on the
installation location, colour distortion may
occur if the speaker is installed extremely
close to the screen of a television set. If this
case happens, turn the power switch of the
television set OFF, and turn it ON after 15 min.
to 30 min. If the problem persists, place the
speaker system away from the television set.
The subwoofer is not magnetically shielded
and so should not be placed near a TV or
monitor. Magnetic storage media (such as
oppy discs and tape or video cassettes)
should also not be kept close to the subwoofer.
Do not attach the front/surround speakers and
subwoofer to a wall or ceiling. They may fall o
and cause injury.
HB985-DB.BDEUPPK_ENG.indd 19HB985-DB.BDEUPPK_ENG.indd 19 2010-05-14 1:41:442010-05-14 1:41:44

20 Installation
Installation
3
Positioning the system
The following illustration shows an example
of positioning the system. Note that the
illustrations in these instructions di er from the
actual unit for explanation purposes.
For the best possible surround sound, all the
speakers other than the subwoofer should be
placed at the same distance from the listening
position (
A
).
A
B
D
E
F
A
A
A
A
A
G
C
A
Front left speaker (L)/
B
Front right speaker (R):
Place the front speakers to the sides of the
monitor or screen and as ush with the screen
surface as possible.
C
Centre speaker:
Place the centre speaker above or below the
monitor or screen.
D
Surround left speaker (L)/
E
Surround right speaker (R):
Place these speakers behind your listening
position, facing slightly inwards.
F
Subwoofer:
The position of the subwoofer is not so
critical, because low bass sounds are not
highly directional. But it is better to place
the subwoofer near the front speakers. Turn
it slightly toward the centre of the room to
reduce the wall re ections.
G
Unit
CAUTION
• Be careful to make sure children do not put their
hands or any objects into the *subwoofer duct.
*subwoofer duct: A hole for plentiful bass sound
on subwoofer cabinet (enclosure).
• Place the centre speaker at a safe distance from
the child’s reach.
Otherwise it may result in the speaker falling
down and causing personal injury and/or
property damage.
• The speakers contain magnet parts, so colour
irregularity may occur on the TV screen or PC
monitor screen. Please use the speakers away
from the TV screen or PC monitor screen.
HB985-DB.BDEUPPK_ENG.indd 20HB985-DB.BDEUPPK_ENG.indd 20 2010-05-14 1:41:452010-05-14 1:41:45

21Installation
3
Installation
Connecting to Your TV
Make one of the following connections,
depending on the capabilities of your existing
equipment.
• HDMI connection (pages 21-22)
• Component Video connection (page 22)
• Video connection (page 23)
NOTE
• Depending on your TV and other equipment
you wish to connect, there are various ways you
could connect the player. Use only one of the
connections described in this manual.
• Please refer to the manuals of your TV, stereo
system or other devices as necessary to make
the best connections.
• Make sure the player is connected directly to
the TV. Tune the TV to the correct video input
channel.
• Do not connect your player via your VCR. The
image could be distorted by the copy protection
system.
HDMI Connection
If you have a HDMI TV or monitor, you
can connect it to this player using a HDMI
cable(Type A, Version 1.3). Connect the HDMI
OUT jack on the player to the HDMI IN jack on
a HDMI compatible TV or monitor.
HDMI Connection
Player
TV
TV
Player
Set the TV’s source to HDMI (refer to TV’s
Owner’s manual).
HB985-DB.BDEUPPK_ENG.indd 21HB985-DB.BDEUPPK_ENG.indd 21 2010-05-14 1:41:452010-05-14 1:41:45

22 Installation
Installation
3
NOTE
• Changing the resolution when the connection
has already been established may result in
malfunctions. To solve the problem, turn o the
player and then turn it on again.
• When the HDMI connection with HDCP is not
veri ed, TV screen is changed to black screen.
In this case, check the HDMI connection, or
disconnect the HDMI cable.
• If there is noise or lines on the screen, please
check the HDMI cable (length is generally
limited to 4.5 m and use a high speed HDMI
cable (version 1.3).
• If a connected HDMI device does not accept the
audio output of the
player, the HDMI
device’s audio sound may be distorted or may
not output.
• When you use HDMI connection, you can
change the resolution for the HDMI output.
(Refer to “Resolution Setting” on page 23.)
• Select the type of video output from the HDMI
OUT jack using [HDMI Color Setting] option on
the [Setup] menu (see page 34).
• When you connect a HDMI or DVI compatible
device make sure of the following:
- Try switching o the HDMI/DVI device and this
player. Next, switch on the HDMI/DVI device
and leave it for around 30 seconds, then switch
on this player.
- The connected device’s video input is set
correctly for this unit.
- The connected device is compatible with
720x576p (480p), 1280x720p, 1920x1080i or
1920x1080p video input.
• Not all HDCP-compatible HDMI or DVI devices
will work with this player.
- The picture will not be displayed properly with
non-HDCP device.
- This player does not playback and TV screen is
changed to black screen.
Component Video Connection
Connect the COMPONENT VIDEO OUT jacks on
the player to the corresponding input jacks on
the TV using Y Pb Pr cables. You can hear the
sound the through the system’s speaker.
Component Connection
Player
TV
Green
Blue
Red
PR
PB
Y
COMPONENT
VIDEO
INPUT
OUTPUT
L
AUX
R
VIDEO
Player
Green
Blue
Red
TV
NOTE
When you use COMPONENT VIDEO OUT
connection, you can change the resolution for the
output. (Refer to “Resolution setting” on page 23.)
HB985-DB.BDEUPPK_ENG.indd 22HB985-DB.BDEUPPK_ENG.indd 22 2010-05-14 1:41:462010-05-14 1:41:46

23Installation
3
Installation
Video Connection
Connect the VIDEO OUT jack on the player to
the video in jack on the TV using a video cable.
You can hear the sound through the system’s
speakers.
Video Connection
TV
Yellow
PR
PB
Y
COMPONENT
VIDEO
INPUT
OUTPUT
L
AUX
R
VIDEO
Player
TV
Yellow
Resolution Setting
The player provides several output resolutions
for HDMI OUT and COMPONENT VIDEO OUT
jacks. You can change the resolution using
[Setup] menu.
1. Press HOME MENU (
).
2. Use
I
/
i/U
/
u
to select the [Setup] and
press ENTER (
). The [Setup] menu appears.
3. Use
U
/
u
to select [DISPLAY] option then
press
i
to move to the second level.
4. Use
U
/
u
to select the [Resolution] option
then press ENTER (
) or
i
to move to the
third level.
5. Use
U
/
u
to select the desired resolution
then press ENTER (
) to con rm your
selection.
NOTE
• If your TV does not accept the resolution you
have set on the player, you can set resolution to
576p (480p) as follows:
1. Press
Z
to open the disc tray.
2. Press
x
for more than 5 seconds.
• Since several factors a ect the resolution of
video output, see “Video Output Resolution” on
page 70.
HB985-DB.BDEUPPK_ENG.indd 23HB985-DB.BDEUPPK_ENG.indd 23 2010-05-14 1:41:462010-05-14 1:41:46

24 Installation
Installation
3
Antenna connection
Connect the supplied antenna for listening to
the radio.
Antenna Connection
Player
Player
NOTE
After connecting the FM wire antenna, keep it as
horizontal as possible. Be sure to fully extend the
FM wire antenna.
Connections with
external device
AUX Connection
You can enjoy the sound from an external
component through the speakers of this
system.
Connect the analogue audio output jacks of
your component into the AUX L/R (INPUT) on
this unit. And then select the [AUX] option by
pressing INPUT/TUNER,
I
/
i
and ENTER (
).
AUX Connection
Player
To the audio output jacks
of your component
(TV, VCR, etc.)
Red
White
PR
PB
Y
COMPONENT
VIDEO
INPUT
L
AUX
R
VIDEO
Red
White
Player
To the audio output jacks
of your component
(TV, VCR, etc.)
HB985-DB.BDEUPPK_ENG.indd 24HB985-DB.BDEUPPK_ENG.indd 24 2010-05-14 1:41:472010-05-14 1:41:47

25Installation
3
Installation
PORTABLE IN connection
You can enjoy the sound from your portable
audio player through the speakers of this
system.
Connect the headphones (or line out )
jack of the portable audio player into the
PORTABLE IN socket of this unit. And then
select the [PORTABLE] option by pressing
INPUT/TUNER,
I
/
i
and ENTER (
).
PORT.IN Connection
twZGSGUUU
OPTICAL IN 1/2 connection
You can enjoy the sound from your component
with a digital optical connection through the
speakers of this system.
Connect the optical output jack of your
component into the OPTICAL IN 1/2 jacks on
the unit. And then select the [OPTICAL 1/2]
option by pressing INPUT/TUNER,
I
/
i
and
ENTER (
). Or press OPTICAL to select directly.
Optical Connection
To the digital
optical output jack
of your component
To the digital
optical output jack
of your component
HB985-DB.BDEUPPK_ENG.indd 25HB985-DB.BDEUPPK_ENG.indd 25 2010-05-14 1:41:472010-05-14 1:41:47

26 Installation
Installation
3
Bluetooth® connection
About Bluetooth
Bluetooth® is wireless communication
technology for short range connection.
The available range is within 10 meters.
(The sound may be interrupted when the
connection interfered by the other electronic
wave or you connect the bluetooth in the other
rooms.)
Connecting individual devices under
Bluetooth wireless technology does not incur
any charges. A mobile phone with Bluetooth
wireless technology can be operated via
the Cascade if the connection was made via
Bluetooth wireless technology.
Available Devices : Mobile phone, MP3, Laptop,
PDA (This units be supported the Stereo
Headset.)
Bluetooth Pro les
In order to use Bluetooth wireless technology,
devices must be able to interpret certain
pro les.
This unit is compatible with following pro le.
A2DP (Advanced Audio Distribution Pro le)
Listening to music of a Bluetooth
device
Pairing your unit and Bluetooth device
Before you start the pairing procedure, make
sure the Bluetooth feature is turned on in to
your Bluetooth device. Refer to your Bluetooth
device’s user guide. Once a pairing operation is
performed, it does not need to be performed
again.
1. Select the Bluetooth function by using the
INPUT/TUNER or BT AUDIO.
Appears “BT AUDIO” and then “BT READY” in
display window.
2. Operate the Bluetooth device and perform
the pairing operation. When searching for
this unit with the Bluetooth device, a list
of the devices found may appear in the
Bluetooth device display depending on the
type of Bluetooth device. Your unit appears
as “PIONEER AUDIO”.
3. Enter the PIN code.
PIN cord : 0000
4. When this unit successfully paired with your
Bluetooth device, Bluetooth LED of this unit
lights up and appears “BT SINK”.
NOTE
Depending on the Bluetooth device type, some
device have a di erent pairing way.
5. Listening to music.
To play a music stored on your Bluetooth
device, refer to your Bluetooth device’s user
guide.
NOTE
• If you change the function of the unit, the
Bluetooth function is disconnected, operate
pairing again.
• AVRCP cannot be available in this mode.
HB985-DB.BDEUPPK_ENG.indd 26HB985-DB.BDEUPPK_ENG.indd 26 2010-05-14 1:41:482010-05-14 1:41:48

27Installation
3
Installation
Checking the information of connected
Bluetooth device
This function is operated after pairing. You can
check the Bluetooth information.
Press DISPLAY repeatedly.
Bluetooth information is changed as follows.
Local Bluetooth Device Address
t
Device
Name
t
None
t
...
NOTE
• This units dose not be supported the Mono
Headset Pro le (Hands Free Pro le).
• The sound may be interrupted when the
connection interfered by the other electronic
wave.
• You cannot control the Bluetooth device with
this unit.
• Pairing is limited one Bluetooth device per one
unit and multi-pairing is not supported.
• Although the distance between your Bluetooth
and the set is less than 10 m, there are obstacles
between both, your Bluetooth device cannot be
connected.
• Depending on the type of the device, you may
not be able to use the Bluetooth function.
• When not connected the Bluetooth, “BT READY”
appears on the display window.
• The Electrical malfunction due to devices using
same frequency such as Medical equipment,
Microwaves or wireless LAN devices, the
connection will be disconnected.
• When someone stands and interrupts
communication between Bluetooth device and
the player, the connection will be disconnected.
• If the gotten away of the distance between
Bluetooth and the unit, the sound quality is lower
and lower the connection will disconnect when
the space between the Bluetooth and the unit
gets out of the operating range of Bluetooth.
• The device with Bluetooth wireless technology
is disconnected, if you turn o the main unit or
put the device away from the main unit more
than 10 m.
HB985-DB.BDEUPPK_ENG.indd 27HB985-DB.BDEUPPK_ENG.indd 27 2010-05-14 1:41:482010-05-14 1:41:48

28 Installation
Installation
3
Connecting to your
Home Network
This player can be connected to a local area
network (LAN) via the LAN port on the rear
panel.
Please refer to the documentation for your
network device for further instructions.
Connect the player’s LAN port to the
corresponding port on your Modem or Router
using a commercially available LAN or Ethernet
cable (CAT5 or better with RJ45 connector).
In the example con guration for wired
connection below, this player would be able to
access content from either of the PCs.
Network Connection
Broadband
Service
Router
WAN
LAN 1
LAN 2
LAN 3
Player
PC
PC
Router
Broadband
Service
Player
NOTE
• When plugging or unplugging the LAN cable,
hold the plug portion of the cable. When
unplugging, do not pull on the LAN cable but
unplug while pressing down on the lock.
• Do not connect a modular phone cable to the
LAN port.
• Since there are various connection
con gurations, please follow the speci cations
of your telecommunication carrier or internet
service provider.
• If you want to access content from PCs or DLNA
servers, this player must be connected to the
same local area network with them via a router.
HB985-DB.BDEUPPK_ENG.indd 28HB985-DB.BDEUPPK_ENG.indd 28 2010-05-14 1:41:482010-05-14 1:41:48

29Installation
3
Installation
Network Setup
Before setting the wired network, you need to
connect the broadband internet to your home
network.
If there is a DHCP server on the local area
network (LAN) via wired connection, this player
will automatically be allocated an IP address.
After making the physical connection, a small
number of home networks may require the
player’s network setting to be adjusted. Adjust
the [NETWORK] setting as follows.
1. Select [Connection Setting] option in the
[Setup] menu then press ENTER (
).
2. Use
U
/
u
/
I
/
i
to select the IP mode
between [Dynamic] and [Static].
Normally, select [Dynamic] to allocate an IP
address automatically.
NOTE
If there is no DHCP server on the network and you
want to set the IP address manually, select [Static]
then set the [IP Address], [Subnet Mask], [Gateway]
and [DNS Server] using
U
/
u
/
I
/
i
and numerical
buttons. If you make a mistake while entering a
number, press CLEAR to clear the highlighted part.
3. Select [OK] and press ENTER ( ) to apply
network settings.
4. The player will ask you to test the network
connection. Select [OK] and press ENTER
(
) to complete the network connection.
5. If you select [Test] and press ENTER ( )
at step 4 above, the network connection
status is displayed on the screen.
You can also test it on the [Connection
Status] in the [Setup] menu.
HB985-DB.BDEUPPK_ENG.indd 29HB985-DB.BDEUPPK_ENG.indd 29 2010-05-14 1:41:482010-05-14 1:41:48

30 Installation
Installation
3
Notes on Network Connection:
• Many network connection problems during
set up can often be xed by re-setting the
router or modem. After connecting the
player to the home network, quickly power
o and/or disconnect the power cable of
the home network router or cable modem.
Then power on and/or connect the power
cable again.
• Depending on the internet service provider
(ISP), the number of devices that can
receive internet service may be limited by
the applicable terms of service. For details,
contact your ISP.
• Our company is not responsible for
any malfunction of the player and/or
the internet connection feature due to
communication errors/malfunctions
associated with your broadband internet
connection, or other connected equipment.
• The features of BD-ROM discs made
available through the Internet Connection
feature are not created or provided
by our company, and our company is
not responsible for their functionality
or continued availability. Some disc
related material available by the Internet
Connection may not be compatible with
this player. If you have questions about such
content, please contact the producer of the
disc.
• Some internet contents may require a
higher bandwidth connection.
• Even if the player is properly connected and
con gured, some internet contents may
not operate properly because of internet
congestion, the quality or bandwidth of
your internet service, or problems at the
provider of the content.
• Some internet connection operations may
not be possible due to certain restrictions
set by the Internet service provider (ISP)
supplying your broadband Internet
connection.
• Any fees charged by an ISP including,
without limitation, connection charges are
your responsibility.
• A 10 Base-T or 100 Base-TX LAN port is
required for wired connection to this player.
If your internet service does not allow for
such a connection, you will not be able to
connect the player.
• You must use a Router to use xDSL service.
• A DSL modem is required to use DSL service
and a cable modem is required to use cable
modem service. Depending on the access
method of and subscriber agreement with
your ISP, you may not be able to use the
internet connection feature contained in
this player or you may be limited to the
number of devices you can connect at the
same time. (If your ISP limits subscription
to one device, this player may not be
allowed to connect when a PC is already
connected.)
• The use of a “Router” may not be allowed
or its usage may be limited depending on
the policies and restrictions of your ISP. For
details, contact your ISP directly.
• Turn o all unused network equipment in
your local home network. Some devices
may generate network tra c.
HB985-DB.BDEUPPK_ENG.indd 30HB985-DB.BDEUPPK_ENG.indd 30 2010-05-14 1:41:482010-05-14 1:41:48

31Installation
3
Installation
USB device
connection
This player can play movie, music and photo
les contained in the USB device.
1. Insert a USB device to the USB port until it
ts into place.
USB Connection
2. Press HOME MENU.
Select [Movie], [Photo] or [Music] using
U
/
u
/
I
/
i
, and press ENTER ( ).
3. Select a le using
U
/
u
/
I
/
i
, and press PLAY
or ENTER (
) to play the le.
You can check the space of the USB device
on the screen.
4. Select the other mode. And withdraw the
USB device carefully.
NOTE
• This player supports USB ash memory/external
HDD formatted in FAT16, FAT32 and NTFS when
accessing les (music, photo, movie). However,
for BD-LIVE and Audio CD recording, only FAT16
and FAT32 formats are supported. Use the USB
ash memory/external HDD formatted in either
FAT16 or FAT32 when using BD-LIVE and Audio
CD recording.
• The USB device can be used for local storage for
enjoying BD-Live discs from the Internet.
• This unit can support up to 4 partitions of the
USB device.
• Do not extract the USB device during operation
(play, etc.).
• An USB device which requires additional
programme installation when you have
connected it to a computer, is not supported.
• USB device: USB device that support USB 1.1
and USB 2.0.
• Movie, music and photo les can be played.
For details of operations on each le, refer to
relevant pages.
• Regular back up is recommended to prevent
data loss.
• If you use a USB extension cable, USB HUB or
USB Multi-reader, the USB device may not be
recognised.
• Some USB device may not work with this unit.
• Digital camera and mobile phone are not
supported.
• The USB Port on this unit cannot be connected
to a PC.
HB985-DB.BDEUPPK_ENG.indd 31HB985-DB.BDEUPPK_ENG.indd 31 2010-05-14 1:41:482010-05-14 1:41:48

32 Installation
Installation
3
Settings
Adjust the Setup Settings
You can change the settings of the player in
the [Setup] menu.
1. Press HOME MENU (
).
2. Use
I
/
i/U
/
u
to select [Setup] and press
ENTER ( ). The [Setup] menu appears.
3. Use
U
/
u
to select a rst setup option, and
press
i
to move to the second level.
4. Use
U
/
u
to select a second setup option,
and press ENTER (
) to move to the third
level.
5. Use
U
/
u
to select a desired setting, and
press
i
or ENTER ( ) to con rm your
selection.
HB985-DB.BDEUPPK_ENG.indd 32HB985-DB.BDEUPPK_ENG.indd 32 2010-05-14 1:41:482010-05-14 1:41:48

33Installation
3
Installation
[DISPLAY] Menu
TV Aspect Ratio
Select a TV aspect ratio option according to
your TV type.
[4:3 Letter Box]
Select when a standard 4:3 TV is connected.
Displays theatrical images with masking
bars above and below the picture.
[4:3 Pan Scan]
Select when a standard 4:3 TV is connected.
Displays pictures cropped to ll your TV
screen. Both sides of the picture are cut o .
[16:9 Original]
Select when a 16:9 wide TV is connected.
The 4:3 picture is displayed with an original
4:3 aspect ratio, with black bars appearing
at the left and right sides.
[16:9 Full]
Select when a 16:9 wide TV is connected.
The 4:3 picture is adjusted horizontally (in a
linear proportion) to ll the entire screen.
NOTE
You cannot select [4:3 Letter Box] and [4:3 Pan
Scan] option when the resolution is set to higher
than 720p.
Resolution
Sets the output resolution of the Component
and HDMI video signal. Refer to page 23 and
70 or details about the resolution setting.
[Auto]
If the HDMI OUT jack is connected to
TVs providing display information (EDID),
this automatically selects the resolution
best suited to the connected TV. If the
COMPONENT VIDEO OUT only is connected,
this changes the resolution to 1080i as
default resolution.
[1080p]
Outputs 1080 lines of progressive video.
[1080i]
Outputs 1080 lines of interlaced video.
[720p]
Outputs 720 lines of progressive video.
[576p (480p)]
Outputs 576 (480) lines of progressive video.
[576i (480i)]
Outputs 576 (480) lines of interlaced video.
HB985-DB.BDEUPPK_ENG.indd 33HB985-DB.BDEUPPK_ENG.indd 33 2010-05-14 1:41:492010-05-14 1:41:49

34 Installation
Installation
3
1080p Display Mode
When the resolution is set to 1080p, select
[24 Hz] for smooth presentation of lm material
(1080p/ 24 Hz) with a HDMI-equipped display
compatible with 1080p/ 24 Hz input.
NOTE
• When you select [24 Hz], you may experience
some picture disturbance when the video
switches video and lm material. In this case,
select [50 Hz].
• Even when [1080p Display Mode] is set to
[24 Hz], if your TV is not compatible with
1080p/ 24 Hz
, the actual frame frequency of
the video output will be 50 Hz to match the
video source format.
HDMI Color Setting
Select the type of output from the HDMI
OUT jack. For this setting, please refer to the
manuals of your display device.
[YCbCr]
Select when connecting to a HDMI display
device.
[RGB]
Select when connecting to a DVI (RGB)
display device.
[LANGUAGE] Menu
Display Menu
Select a language for the [Setup] menu and
on-screen display.
Disc Menu/ Disc Audio/
Disc Subtitle
Select the language you prefer for the audio
track (disc audio), subtitles, and the disc menu.
[Original]
Refers to the original language in which the
disc was recorded.
[Other]
Press ENTER (
) to select another language.
Use number buttons then ENTER ( ) to
enter the corresponding 4-digit number
according to the language code list on
page 69.
[O ] (for Disc Subtitle only)
Turn o Subtitle.
NOTE
Depending on the disc, your language setting may
not work.
HB985-DB.BDEUPPK_ENG.indd 34HB985-DB.BDEUPPK_ENG.indd 34 2010-05-14 1:41:492010-05-14 1:41:49

35Installation
3
Installation
[AUDIO] Menu
Speaker Setup
To obtain the best possible sound, use the
speaker setup display to specify the volume
of the speakers you have connected and their
distance from your listening position. Use the
test to adjust the volume of the speakers to the
same level.
[Speaker]
Select a speaker that you want to adjust.
[Volume]
Adjust the output level of each speaker.
[Distance]
Adjust the distance between each speaker
and the listening position.
[Test/ Stop test tone]
The speakers will emit a test tone.
[OK]
Con rms the setting.
[Cancel]
Cancels the setting.
HD AV Sync
Sometimes Digital TV encounters a delay
between picture and sound. If this happens
you can compensate by setting a delay on the
sound so that it e ectively ‘waits’ for the picture
to arrive: this is called HD AV Sync. Use
U u
to
scroll up and down through the delay amount,
which you can set at anything between 0 and
300 ms.
The delay will vary depending on which digital
TV channel you are on. If you change channel
you may need to readjust the HD AV Sync.
DRC (Dynamic Range Control)
When a title encoded in Dolby Digital or Dolby
Digital Plus is playing back, you may wish to
compress the dynamic range of the audio
output (the di erence between the loudest
sounds and the quietest ones). This allows you
to listen to a movie at a lower volume without
losing clarity of sound. Set [DRC] to [On] for
this e ect.
NOTE
The DRC setting can be changed only when a
disc is not inserted or the unit is in complete stop
mode.
HB985-DB.BDEUPPK_ENG.indd 35HB985-DB.BDEUPPK_ENG.indd 35 2010-05-14 1:41:492010-05-14 1:41:49

36 Installation
Installation
3
[LOCK] Menu
To access any features in the [LOCK] settings,
you must enter the 4-digit security code you
have created.
If you have not entered a password yet, you are
prompted to do so. Enter a 4-digit password
twice, and press ENTER (
) to create a new
password.
Password
You can create or change the password.
[None]
Enter a 4-digit password twice, and press
ENTER (
) to create a new password.
[Change]
Enter the current password and press ENTER
(
). Enter a 4-digit password twice, and
press ENTER ( ) to create a new password.
NOTE
If you make a mistake before pressing ENTER
( )
,
press CLEAR. Then input the correct password.
If you forget your password,
If you forget your password, you can clear it using
the following steps:
1. Remove any disc that might be in the player.
2. Select [Lock] option in the [Setup] menu.
3. Use number buttons to enter “210499” on the
[Lock] Menu. The password is cleared.
DVD Rating
Blocks playback of rated DVD based on their
content. (Not all discs are rated.)
[Rating 1-8]
Rating one (1) has the most restrictions and
rating eight (8) is the least restrictive.
[Unlock]
If you select this, parental control is not
active and the disc plays in full.
BD Rating
Sets an age limit for BD-ROM playback.
Use number buttons to input an age limit for
BD-ROM viewing.
[255]
All BD-ROM can be played.
[0-254]
Prohibits play of BD-ROM with
corresponding ratings recorded on them.
NOTE
The [BD Rating] will be applied only for the BD disc
that containing the Advanced Rating Control.
Area Code
Enter the code of the area whose standards
were used to rate the DVD video disc, based
on the list on page 68.
HB985-DB.BDEUPPK_ENG.indd 36HB985-DB.BDEUPPK_ENG.indd 36 2010-05-14 1:41:492010-05-14 1:41:49

37Installation
3
Installation
[NETWORK] Menu
Connection Setting
If your home network environment is ready to
connect to the player, the player needs to be
set up for network communication.
(See “Connecting to your Home Network” on
page 28.)
Connection Status
If you want to check the network status on
this player, select the [Connection Status]
option and press ENTER ( ) to check whether
a connection to the network and the internet
has been established.
BD-LIVE connection
You can restrict Internet access when BD-LIVE
functions are used.
[Permitted]
Internet access is permitted for all BD-LIVE
contents.
[Partially permitted]
Internet access is permitted only for BD-
LIVE contents which have content owner
certi cates. Internet access and AACS
Online functions are prohibited for all BD-
LIVE contents without a certi cate.
[Prohibited]
Internet access is prohibited for all BD-LIVE
contents.
[OTHERS] Menu
DivX VOD
ABOUT DIVX VIDEO: DivX® is a digital video
format created by DivX, Inc. This is an o cial
DivX Certi ed device that plays DivX video.
Visit www.divx.com for more information and
software tools to convert your les into DivX
video.
ABOUT DIVX VIDEO-ON-DEMAND: This DivX
Certi ed® device must be registered in order to
play DivX Video-on-Demand (VOD) content.
To generate the registration code, locate the
DivX VOD section in the device setup menu.
Go to vod.divx.com with this code to complete
the registration process and learn more about
DivX VOD.
[Register]
Displays the registration code of your player.
[Deregister]
Deactivate your player and display the
deactivation code.
NOTE
All the downloaded videos from DivX VOD with
this player’s registration code can only be played
back on this unit.
HB985-DB.BDEUPPK_ENG.indd 37HB985-DB.BDEUPPK_ENG.indd 37 2010-05-14 1:41:492010-05-14 1:41:49

38 Installation
Installation
3
Auto Power O
The screen saver appears when you leave
the player in Stop mode for about ve
minutes. If you set this option to [On], the unit
automatically turns itself o after the Screen
Saver is displayed for 25 minutes.
Set this option to [O ] to leave the screen
saver until the unit is operated by the user.
Initialize
Factory Set
You can reset the player to its original
factory settings.
BD Storage Clear
Removes the BD contents from the
connected USB storage.
NOTE
If you reset the player to its original factory settings
using [Factory Set] option, you have to set all the
activation for the on-line services and network
settings again.
Software Information
Displays the current software version.
HB985-DB.BDEUPPK_ENG.indd 38HB985-DB.BDEUPPK_ENG.indd 38 2010-05-14 1:41:492010-05-14 1:41:49

39Installation
3
Installation
Sound E ect
You can select a suitable sound mode. Press
SOUND repeatedly until the desired mode
appears on the front panel display or the TV
screen. The displayed items for the equalizer
maybe di erent depending on sound sources
and e ects.
[Pioneer 1]: Gives you suitable sound setting
with connecting small type of speakers
(S-BD303).
[Pioneer 2]: Gives you suitable sound
setting with connecting tall type of speakers
(S-BD707T).
[Bypass]: Software with multichannel surround
audio signals is played according to the way it
was recorded.
[Bass Blast]: Reinforce the bass sound
e ect from front left and right speaker and
subwoofer.
[PL ll Movie]: Performs Pro Logic ll movie
mode decoding to the input signal and
produces ve full-bandwidth output channels
from 2 channel sources. This setting is ideal for
watching videos of overdubbed or old movies.
This mode is available only to 2 channel
sources.
[PL ll Music]: Performs Pro Logic ll music mode
decoding to the input signal and produces
ve full-bandwidth output channels from
2 channel sources. This setting is ideal for
normal stereo sources such as CD. This mode is
available only to 2 channel sources.
[Clear Voice]: This mode makes voice sound
clear, improving the quality of voice sound.
[Game]: You can enjoy more virtual sound
while playing video games.
[Night]: This may be useful when you want to
watch movies at low volumes late at night.
[Mus. ReTouch]: When listening to MP3 les or
other compressed music, you can enhance the
sound. This mode is available only to 2 channel
sources.
[Loudness]: Improves bass and treble sound.
HB985-DB.BDEUPPK_ENG.indd 39HB985-DB.BDEUPPK_ENG.indd 39 2010-05-14 1:41:492010-05-14 1:41:49

40 Operation
Operation
4
General Playback
Playing Discs
1. Press
Z
OPEN/CLOSE, and place a disc on
the disc tray.
2. Press
Z
OPEN/CLOSE to close the disc tray.
For most Audio CD, BD-ROM and
DVD-ROM discs, playback starts
automatically.
3. Press
HOME MENU.
4. Select [Movie], [Photo] or [Music] using
U
/
u
/
I
/
i
, and press ENTER ( ).
5. Select the Disc option using
I
/
i
, and press
ENTER (
).
When you connect up to two devices, it
appears as above.
6. Select a le using
U
/
u
/
I
/
i
, and press
B
PLAY or ENTER (
) to play the le.
NOTE
• Playback functions described in this manual are
not always available in every les and medium.
Some functions can be restricted depending on
many factors.
• Depending on the BD-ROM titles, a USB device
connection may be needed for proper playback.
4
Operation
HB985-DB.BDEUPPK_ENG.indd 40HB985-DB.BDEUPPK_ENG.indd 40 2010-05-14 1:41:492010-05-14 1:41:49

41Operation
4
Operation
To stop playback
Press
x
STOP during playback.
To pause playback
Press
X
PAUSE/STEP during playback.
Press
B
PLAY to resume playback.
To play frame-by-frame
Press
X
PAUSE/STEP while movie playback.
Press
X
PAUSE/STEP repeatedly to playback
Frame-by-Frame.
To scan forward or backward
Press
m
or
M
to play fast forward or fast
reverse during playback.
You can change the various playback speeds
by pressing
m
or
M
repeatedly.
To slow down the playing speed
While the playback is paused, press
M
SCAN
repeatedly to play various speeds of slow
motion.
To skip to the next/previous
chapter/track/ le
During playback, press
.
or
>
to go to
the next chapter/track/ le or to return to the
beginning of the current chapter/track/ le.
Press
.
twice brie y to step back to the
previous chapter/track/ le.
Using the disc menu
BD
DVD
AVCHD
To display the disc menu
The menu screen may be displayed rst after
loading a disc which contains a menu. If you
want to display the disc menu during playback,
press MENU.
Use
U
/
u
/
I
/
i
buttons to navigate through
menu items.
To display the Pop-up menu
Some BD-ROM discs contain a Pop-up menu
that appears during playback.
Press POPUP/ TOP MENU during playback, and
use
U
/
u
/
I
/
i
buttons to navigate through
menu items.
Resume playback
BD
DVD
AVCHD
MOVIE
ACD
MUSIC
This unit remembers the
x
STOP depending
on the disc.
If “
Xx
(Resume Stop)” appears on the screen
brie y, press
B
(PLAY)
to resume playback
(from the scene point).
If you press
x
(STOP) twice or unload the disc,
“
x
”(Complete Stop) appears on the screen.
The unit will clear the stopped point.
NOTE
• The resume point may be cleared when a
button is pressed (for example;
1
(POWER),
Z
(OPEN/CLOSE), etc).
• On BD-Video discs with BD-J, the resume
playback function does not work.
• If you press
x
(STOP) once during BD-ROM
interactive title playback, the unit will be in
Complete Stop mode .
HB985-DB.BDEUPPK_ENG.indd 41HB985-DB.BDEUPPK_ENG.indd 41 2010-05-14 1:41:492010-05-14 1:41:49

42 Operation
Operation
4
Advanced Playback
Repeat Playback
BD
DVD
AVCHD
ACD
MUSIC
During playback, press REPEAT (
) repeatedly
to select a desired repeat mode.
BDs/DVDs
A-
– Selected portion will be repeated
continually.
Chapter
– The current chapter will be
played back repeatedly.
Title
– The current title will be played
back repeatedly.
To return to normal playback, press REPEAT
(
) repeatedly to select [O ].
Audio CDs/Music les
– The current track or le will be
played back repeatedly.
– All the tracks or les will be played
back repeatedly.
– The tracks or les will be played back
in random order.
– All the tracks or les will be
played back repeatedly in random order.
– Selected portion will be repeated
continually. (Audio CD only)
To return to normal playback, press CLEAR.
NOTE
• If you press
>
once during Repeat Chapter/
Track playback, the repeat playback cancels.
• This function may not work on some disc or title.
Repeating a speci c portion
BD
DVD
AVCHD
ACD
This player can repeat a portion you have
selected.
1. During playback, press REPEAT (
) to
select [A-] at the beginning of the portion
you wish to repeat. And then press ENTER
( ).
2. Press ENTER (
) at the end of the portion.
Your selected portion will be repeated
continually.
3. To return to normal playback, press REPEAT
(
) repeatedly to select [OFF] or press
CLEAR.
NOTE
You cannot select a portion less than 3 seconds.
Marker Search
BD
DVD
AVCHD
MOVIE
You can start playback from up to nine
memorized points.
To enter a marker
1. During playback, press MARKER at the
desired point. The Marker icon appears on
the TV screen brie y.
2. Repeat step 1 to add up to nine markers.
To recall a marked scene
1. Press SEARCH and the search menu appears
on the screen.
2. Press a number button to select a marker
number that you want to recall. Playback
starts from the marked scene.
HB985-DB.BDEUPPK_ENG.indd 42HB985-DB.BDEUPPK_ENG.indd 42 2010-05-14 1:41:492010-05-14 1:41:49

43Operation
4
Operation
To delete a Marker
1. Press SEARCH and the search menu appears
on the screen.
2. Press
u
to highlight a marker number. Use
I
/
i
to select a marked scene that you
want to delete.
3. Press CLEAR and the marked scene is erased
from the search menu.
NOTE
• This function may not work depending on discs,
titles, server ability.
• All marked points are cleared if the title is in
complete stop (
x
) mode, the title is changed or
if you unload the disc.
• If the total length of the title is less than
10 seconds, this function is not available.
Using the search menu
BD
DVD
AVCHD
MOVIE
Using search menu, you can easy to nd the
point where you want to start playback.
To search a point
1. During playback, press SEARCH to display
the search menu.
2. Press
I
/
i
to skip the playback 15 seconds
forward or backward. You can select a
point that you want to skip by pressing and
holding
I
/
i
button.
To start playback from a marked
scene
1. Press SEARCH and the search menu appears
on the screen.
2. Press
u
to highlight a marker number. Use
I
/
i
to select a marked scene that you
want to playback from.
3. Press ENTER (
) to start playback from the
marked scene.
NOTE
• This function may not work depending on discs,
titles, server ability.
• This function may not work on some [Home
Link] contents depending on the le type and
ability of the DLNA server.
HB985-DB.BDEUPPK_ENG.indd 43HB985-DB.BDEUPPK_ENG.indd 43 2010-05-14 1:41:502010-05-14 1:41:50

44
Operation
Operation
4
Last Scene Memory
BD
DVD
This unit memorizes the last scene from the
last disc that is viewed. The last scene remains
in memory even if you remove the disc from
the unit or switch o the unit. If you load a disc
that has the scene memorized, the scene is
automatically recalled.
NOTE
• Last Scene Memory function for a previous disc
is erased once a di erent disc is played.
• This function may not work depending on the
disc.
• This unit does not memorize settings of a disc if
you switch o the unit before commencing to
play it.
On-Screen display
You can display and adjust various information
and settings concerning the content.
Displaying content information
on-screen
BD
DVD
AVCHD
MOVIE
1. During playback, press DISPLAY (
) to show
various playback information.
a
h
g
f
e
d
c
b
a
Title – Current title number/total number
of titles
b
Chapter – Current chapter number/total
number of chapters
c
Time – Elapsed playing time/Total
playback time
d
Audio – Selected audio language or
channel
e
Subtitle – Selected subtitle
f
Angle – Selected angle/total number of
angles
g
TV Aspect Ratio – Selected a TV aspect
Ratio
h
Picture Mode – Selected picture mode
HB985-DB.BDEUPPK_ENG.indd 44HB985-DB.BDEUPPK_ENG.indd 44 2010-05-14 1:41:502010-05-14 1:41:50

45
Operation
4
Operation
2. Select an option using
U
/
u
.
3. Use
I
/
i
to adjust the selected option
value.
4. Press RETURN (
O
) to exit the On-Screen
display.
NOTE
• If no button is pressed for a few seconds, the on-
screen display disappears.
• A title number cannot be selected on some
discs.
• Available items may di er depending on discs
or titles.
• If BD interactive title is playing back, some
setting information is displayed on the screen
but prohibited to be changed.
Playing from selected time
BD
DVD
AVCHD
MOVIE
1. Press DISPLAY ( ) during playback. The
time search box shows the elapsed playing
time.
2. Select the [Time] option and then input
the required start time in hours, minutes,
and seconds from left to right.
For example, to nd a scene at 2 hours, 10
minutes, and 20 seconds, enter “21020”.
Press
I
/
i
to skip the pl
ayback 60 seconds
forward or backward.
3. Press ENTER (
) to start playback from
selected time.
NOTE
• This function may not work on some disc or
titles.
• This function may not work on some [Home
Link] contents depending on the le type and
ability of the DLNA server.
HB985-DB.BDEUPPK_ENG.indd 45HB985-DB.BDEUPPK_ENG.indd 45 2010-05-14 1:41:502010-05-14 1:41:50

46
Operation
Operation
4
Hearing di erent audio
BD
DVD
AVCHD
MOVIE
1. During playback, press DISPLAY ( ) to
display the on-screen display.
2. Use
U
/
u
to select the [Audio] option.
3. Use
I
/
i
to select desired audio language,
audio track or audio channel.
NOTE
• Some discs allow you to change audio selections
only via the disc menu. If this is the case, press
POPUP/ TOP MENU or MENU button and choose
the appropriate audio from the selections on
the disc menu.
• Immediately after you have switched sound,
there may be a temporary discrepancy between
the display and actual sound.
Selecting a subtitle language
BD
DVD
AVCHD
MOVIE
1. During playback, press DISPLAY ( ) to
display the on-screen display.
2. Use
U
/
u
to select the [Subtitle] option.
3. Use
I
/
i
to select the desired subtitle
language.
4. Press RETURN (
O
) to exit the On-Screen
display.
NOTE
Some discs allow you to change subtitle selections
only via the disc menu. If this is the case, press
POPUP/ TOP MENU or MENU button and choose
the appropriate subtitle from the selections on the
disc menu.
HB985-DB.BDEUPPK_ENG.indd 46HB985-DB.BDEUPPK_ENG.indd 46 2010-05-14 1:41:502010-05-14 1:41:50

47
Operation
4
Operation
Watching from a di erent angle
BD
DVD
If the disc contains scenes recorded at di erent
camera angles, you can change to a di erent
camera angle during playback.
1. During playback, press DISPLAY (
) to
display the on-screen display.
2. Use
U
/
u
to select the [Angle] option.
3. Use
I
/
i
to select desired angle.
4. Press RETURN (
O
) to exit the On-Screen
display.
Changing the TV Aspect Ratio
BD
DVD
AVCHD
MOVIE
You can change the TV aspect ratio setting
during playback.
1. During playback, press DISPLAY (
) to
display the on-screen display.
2. Use
U
/
u
to select the [TV Aspect Ratio]
option.
3. Use
I
/
i
to select desired option.
4. Press RETURN (
O
) to exit the On-Screen
display.
NOTE
Even if you change the value of the [TV Aspect
Ratio] option in On-Screen display, the [TV Aspect
Ratio] option in the [Setup] menu is not changed.
Changing the Picture Mode
BD
DVD
AVCHD
MOVIE
You can change the [Picture mode] option
during playback.
1. During playback, press DISPLAY (
) to
display the on-screen display.
2. Use
U
/
u
to select the [Picture Mode]
option.
3. Use
I
/
i
to select desired option.
4. Press RETURN (
O
) to exit the On-Screen
display.
Setting the [User setting] option
1. During playback, press DISPLAY ( ) to
display the on-screen display.
2. Use
U
/
u
to select the [Picture Mode]
option.
3. Use
I
/
i
to select the [User setting] option,
and press ENTER (
).
4. Use
U
/
u
/
I
/
i
to adjust the [Picture Mode]
options.
Select [Default] option then press ENTER
( ) to reset the all adjustments.
5. Use
U
/
u
/
I
/
i
to select the [Close] options,
and press ENTER (
) to nish setting.
HB985-DB.BDEUPPK_ENG.indd 47HB985-DB.BDEUPPK_ENG.indd 47 2010-05-14 1:41:502010-05-14 1:41:50

48
Operation
Operation
4
Enjoying BD-LIVE
This unit allows you to enjoy functions such as
picture-in-picture, secondary audio and Virtual
packages, etc., with BD-Video supporting
BONUSVIEW (BD-ROM version 2 Pro le 1
version 1.1/ Final Standard Pro le).
Secondary video and audio can be played from
a disc compatible with the picture-in-picture
function. For the playback method, refer to the
instructions in the disc.
In addition to the BONUSVIEW function, BD-
Video supporting BD-LIVE (BD-ROM version
2 Pro le 2) that has a network extension
function allows you to enjoy more functions
such as downloading new movie trailers by
connecting this unit to the internet.
1. Check the network connection and settings
(pages 28-30).
2. Insert a USB storage device to the USB port
on the front panel.
A USB storage device is needed to
download bonus content.
USB Connection
3 . Press HOME MENU, and set the [BD-LIVE
connection] option on the [Setup] menu
(page 37).
Depending on the disc, the BD-LIVE
function may not operate if
[BD-LIVE connection] option is set to
[Partially Permitted].
4 . Insert a BD-ROM with BD-LIVE.
The operations may di er depending on
the disc. Refer to the manual supplied with
the disc.
NOTE
• Do not extract the connected USB device while
content is being downloaded or a Blu-ray disc is
still in the disc tray. Doing so may damage the
connected USB device and BD-LIVE features may
not operate properly with the damaged USB
device anymore. If the connected USB device
seems damaged from such an action, you can
format the connected USB device from the PC
and reuse it with this player.
• Some BD-LIVE contents may be restrictively
accessed in some territories by contents
provider’s own decision.
• It may take up to several minutes to load and
start enjoying BD-LIVE contents.
HB985-DB.BDEUPPK_ENG.indd 48HB985-DB.BDEUPPK_ENG.indd 48 2010-05-14 1:41:502010-05-14 1:41:50

49
Operation
4
Operation
Playing movie le and
VR discs
You can play DVD-RW discs that are recorded
in Video Recording (VR) format and movie les
contained in a disc or USB device.
1. Press
HOME MENU.
2. Select [Movie] using
U
/
u
/
I
/
i
, and press
ENTER ( ).
3. Select the device using
I
/
i
, and press
ENTER ( ).
When you connect up to two devices, it
appears as above.
4. Select a le using
U
/
u
/
I
/
i
, and press
B
PLAY or ENTER ( ) to play the le.
NOTE
• The le requirements are described on page 11.
• You can use various playback functions. Refer to
pages 40-47.
• Un nalized DVD VR format discs may not be
played in this player.
• Some DVD-VR disc are made with CPRM data
by DVD recorder. This unit cannot support these
kinds of discs.
What is CPRM?
CPRM is a copy protection system (with
scramble system) only allowing the recording of
‘copy once’ broadcast programmes. CPRM stands
for Content Protection for Recordable Media.
HB985-DB.BDEUPPK_ENG.indd 49HB985-DB.BDEUPPK_ENG.indd 49 2010-05-14 1:41:512010-05-14 1:41:51

50
Operation
Operation
4
Selecting a subtitle le
MOVIE
If a movie le name and the subtitle le
name are the same, subtitle le is played
automatically when playing the movie le.
If the subtitle le name is di erent with the
movie le name, you need to select the subtitle
le on the [Movie] menu before playing the
movie.
1. Use
U
/
u
/
I
/
i
to select the subtitle le you
wish to play in the [Movie] menu.
2. Press ENTER (
).
Press ENTER ( ) again to deselect the
subtitle le. Selected subtitle le will be
displayed when you play the movie le.
NOTE
• If you press
x
STOP during playback, the
subtitle selection is cancelled.
• This function may not work in the [Home Link]
feature.
Changing subtitle code page
MOVIE
If the subtitle is not displayed properly, You
can change the subtitle code page to view the
subtitle le properly.
1. During playback, press DISPLAY (
) to
display the on-screen display.
2. Use
U
/
u
to select the [Code Page] option.
3. Use
I
/
i
to select desired code option.
4. Press RETURN (
O
) to exit the On-Screen
display.
HB985-DB.BDEUPPK_ENG.indd 50HB985-DB.BDEUPPK_ENG.indd 50 2010-05-14 1:41:512010-05-14 1:41:51

51
Operation
4
Operation
Viewing a photo
You can view photo les using this player.
1. Press
HOME MENU
2. Select [Photo] using
I
/
i
, and press ENTER
( ).
3. Select the device using
I
/
i
, and press
ENTER ( ).
When you connect up to two devices, it
appears as above.
4. Select a le using
U
/
u
/
I
/
i
, and press
ENTER ( ) to view the photo.
To play a slide show
Press
B
PLAY to start slide show.
To stop a slide show
Press
x
STOP during slide show.
To pause a slide show
Press
X
PAUSE/STEP during slide show.
Press
B
PLAY to re-start the slide show.
To skip to the next/previous photo
While viewing a photo in full screen, press
I
or
i
to go to the previous or next photo.
NOTE
• The le requirements are described on page 11.
• You can use various playback functions. Refer to
pages 40-47.
HB985-DB.BDEUPPK_ENG.indd 51HB985-DB.BDEUPPK_ENG.indd 51 2010-05-14 1:41:512010-05-14 1:41:51

52
Operation
Operation
4
Options while viewing a photo
You can use various options while viewing a
photo in full screen.
1. While viewing a photo in full screen, press
DISPLAY (
) to display the option menu.
2. Select an option using
U
/
u
.
a
g
f
e
d
c
b
h
a
Current photo/Total number of photos
– Use
I
/
i
to view previous/next photo.
b
Slide Show – Press ENTER (
) to start or
pause slide show.
c
Music Select – Select the background
music for the slide show.
d
Music –Press ENTER (
) to start or pause
background music.
e
Rotate – Press ENTER (
) to rotate the
photo clockwise.
f
Zoom – Press ENTER (
) to display the
[Zoom] menu.
g
E ect – Use
I
/
i
to select a transition
e ect between photos in a slide show.
h
Speed – Use
I
/
i
to select a delaying
speed between photos in a slide show.
3. Press RETURN (
O
) to exit the option menu.
Listening to music during a
slide show
You can display photo les while listening to
music les.
1. Press
HOME MENU
2. Select [Photo] or [Home Link] using
U
/
u
/
I
/
i
, and press ENTER ( ).
3. Select the [Disc] or [USB] option using
I
/
i
,
and press ENTER ( ).
Selecting a server or a share folder is
needed for [Home Link] menu.
4. Select a le using
U
/
u
/
I
/
i
, and press
ENTER ( ) to view the photo.
5. Press
DISPLAY ( ) to display the option
menu.
6. Use
U
/
u
to select [Music Select] option,
and press ENTER (
) to display the [Music
Select] menu.
HB985-DB.BDEUPPK_ENG.indd 52HB985-DB.BDEUPPK_ENG.indd 52 2010-05-14 1:41:512010-05-14 1:41:51

53
Operation
4
Operation
7. Use
U
/
u
to select a device, and press ENTER
( ).
Devices that you can select may di er
depending on the location of the photo le
you are displaying in full screen.
Photo location Available Device
Disc Disc, USB
USB Disc, USB
Share Folder on
your PC (CIFS)
CIFS
DLNA server DLNA server
8. Use
U
/
u
to select a le or a folder you wish
to play.
Select a folder and press ENTER ( ) to
display the lower directory.
Select
and press ENTER ( ) to display
the upper directory.
NOTE
When selecting music from [Home Link], folder
selection is not available. Only le selection is
available on the [Home link].
9. Use
i
to select [OK], and press ENTER ( )
to complete music selection.
Listening to music
The player can play Audio CDs and music les
1. Press
HOME MENU
2. Select [Music] using
U
/
u
/
I
/
i
, and press
ENTER ( ).
3. Select the device using
I
/
i
, and press
ENTER ( ).
When you connect up to two devices, it
appears as above.
4. Select a music le or audio track using
U
/
u
/
I
/
i
, and press ENTER (
) to play the
music.
NOTE
• The le requirements are described on page 11.
• You can use various playback functions. Refer to
pages 40-47.
HB985-DB.BDEUPPK_ENG.indd 53HB985-DB.BDEUPPK_ENG.indd 53 2010-05-14 1:41:522010-05-14 1:41:52

54
Operation
Operation
4
Audio CD Recording
You can record one desired track or all of the
tracks in Audio CD to a USB storage device.
1. Insert a USB storage device to the USB port
on the front panel.
2. Press
Z
(OPEN/CLOSE), and place an Audio
CD on the disc tray.
Press
Z
(OPEN/CLOSE) to close the disc
tray. The playback starts automatically.
3. Press DISPLAY ( ) to display the option
menu.
Or
Press
z
USB REC button on the remote
control. You can record all musics in the
audio CD.
4. Use
U
/
u
to select [CD Recording] option,
and press ENTER (
) to display the [CD
Recording] menu.
Repeat this step to select tracks as many as
you want.
5. Use
U
/
u
to select a track you wish to copy
on the menu, and press ENTER (
).
Repeat this step to select tracks as many as
you can.
Select all the tracks on an Audio
CD.
Selects an encoding option from
the pop-up menu (128 kbps,
192 kbps, 320 kbps or Lossless).
Cancels the recording and
returns to the previous screen.
6. Use
U
/
u
/
I
/
i
to select [Start], and press
ENTER (
).
7. Use
U
/
u
/
I
/
i
to select the destination
folder to be copied.
If you want to create a new folder, use
U
/
u
/
I
/
i
to select [New Folder] and press ENTER
( ).
Enter a folder name using the virtual
keyboard, and press ENTER ( ) while [OK] is
selected.
8. Use
U
/
u
/
I
/
i
to select [OK], and press
ENTER (
) to start Audio CD recording.
If you want to stop the Audio CD recording,
press ENTER ( ) while [Cancel] is
highlighted.
9. A message appears when Audio CD
recording is completed. Press ENTER (
)
to check the music le created in the
destination folder.
HB985-DB.BDEUPPK_ENG.indd 54HB985-DB.BDEUPPK_ENG.indd 54 2010-05-14 1:41:522010-05-14 1:41:52

55
Operation
4
Operation
NOTE
• The table below shows the average recording
time from an audio track with 4 minutes of
playback time to a music le with 192 kbps as an
example.
stop mode during playback
1.4 min. 2 min.
• All times in the above table are approximate.
• Actual recording time for USB storage device
varies depending on the USB storage device’s
ability.
• Make sure that there is minimum of 50 MB free
space when recording into the USB storage
device.
• The length of the music should be longer than
20 seconds for the proper recording.
• Do not turn o this player or extract the
connected USB storage device during Audio CD
recording.
The making of unauthorized copies of
copy-protected material, including computer
programmes, les, broadcasts and sound
recordings, may be an infringement of copyrights
and constitute a criminal o ense.
This equipment should not be used
for such purposes.
Be responsible
Respect copyrights
HB985-DB.BDEUPPK_ENG.indd 55HB985-DB.BDEUPPK_ENG.indd 55 2010-05-14 1:41:532010-05-14 1:41:53

56
Operation
Operation
4
Playing the iPod
You can enjoy the sound with your iPod. For
details about iPod, refer to the iPod’s User
Guide.
Preparation
• To view iPod’s Videos and Photos on the TV
screen.
- Be sure to use the video connection
through the VIDEO OUT jack on the rear
panel of this unit. Select the appropriate
video input mode on the TV.
- Depending on the iPod, make sure that
select Videos > Video settings, and then
set TV Out to Ask or On from your iPod.
For details about Video Settings, refer to
the iPod User Guide.
- The viewing photos is available only if this
unit is in iPod IN mode and you can view
photos only as a slide show. You have to
start a slide show on your iPod to view a
photo on a TV. For details about a slide
show, refer to the iPod User Guide.
• Before connecting the iPod, turn this unit
o and reduce the volume of this unit to its
minimum.
1. Connect the iPod rmly.
Connect the iPod
Connect the cradle and
put your iPod on it.
2. Select a le using
U
/
u
/
I
/
i
, and press
ENTER (
) to play the le.
Enjoying iPod on the screen
1. Connect the iPod rmly.
2. Press HOME MENU ( ).
3. Select [Music] or [Movie] using
I
/
i
, and
press ENTER ( ).
If you connected the other device
(CD or USB), select the iPod on the menu.
4. Select a content using
U
/
u
/
I
/
i
, and press
ENTER (
) to play.
HB985-DB.BDEUPPK_ENG.indd 56HB985-DB.BDEUPPK_ENG.indd 56 2010-05-14 1:41:532010-05-14 1:41:53

57
Operation
4
Operation
Enjoying the iPod IN mode
You can operate your iPod by using the
supplied remote control and controls on your
iPod.
1. Connect the iPod rmly.
If you turn this unit on, your iPod is
automatically turned on and recharging
starts.
2. Press INPUT/TUNER to select iPod IN mode.
U
/
u
/
I
/
i
Selects an option in the menu.
B
/ENTER
Starts playback the music or
video.
X
To pause while it is playing. To
resume playing, press
B
(PLAY)
again.
m
/
M
Fast-forward or rewind a song
or video
.
/
>
Skip the playback forward or
backward .
REPEAT To select a desired repeat
mode: Track
( )
, All
( )
, O
(No display).
NOTE
This system is compatible with the audio and video
of the iPod(4th generation), iPod nano, iPod classic,
iPod mini, iPod touch and iPhone (iPod shu e is
not supported.).
NOTE
• An error message “CHECK IPOD” or “Connected
iPod model is not supported.” appears when:
- your iPod is not available for the function to be
operated.
• An error message “CHECK IPOD” or “Please
update iPod’s software.” appears when:
- your iPod has an old software version.
t
Update your iPod software to latest version.
• If this unit displays an error message, follow the
message. An error message “CHECK IPOD” or
“Please check your iPod.” appears when:
- the communication between this unit and
your iPod is failed.
t
Undock & re-dock your iPod in this unit.
- your iPod is not connected rmly.
- this unit recognises your iPod as unknown
device.
- your iPod is exceptionally low on power.
t
The battery needs to be charged.
t
If you charge the battery while iPod is
extremely low in power, it may take longer
to charge.
• You may use the dock adapter which should
be supplied with your iPod to the dock for the
stable use of the iPod. If you need an adapter,
consult your iPod dealer.
• Compatibility with your iPod may vary
depending on the type of your iPod.
• iPod touch and iPhone have any di erence in
operation other than iPod. You may need any
additional control to use them with this unit.
(e.g. “slide to unlock”)
• If you use an application, make a call, or send
and receive SMS text message, etc. on iPod
touch or iPhone, disconnect it from iPod dock of
this unit and then use it.
• Depending on your iPod’s software version, it
may not be possible to control your iPod from
this unit. We recommend installing the latest
software version.
• The video quality depends on the video sources
on your iPod.
• If you have a problem with your iPod, please visit
www.apple.com/support/ipod.
HB985-DB.BDEUPPK_ENG.indd 57HB985-DB.BDEUPPK_ENG.indd 57 2010-05-14 1:41:532010-05-14 1:41:53

58
Operation
Operation
4
Radio Operations
Be sure that the antenna is connected.
(Refer to the page 24)
Listening to the radio
1. Press INPUT/TUNER until TUNER (FM)
appears in the display window. The last
received station is tuned in.
2. Press and hold TUNE (-/+) for about two
seconds until the frequency indication
starts to change. Scanning stops when the
unit tunes in a station. Or Press TUNE (-/+)
repeatedly.
3. Adjust the volume by rotating VOLUME on
the front panel or by pressing VOL (+/- ) on
the remote control.
Presetting the Radio Stations
You can preset 50 stations for FM.
Before tuning, make sure that you have turned
down the volume.
1. Press INPUT/TUNER until the TUNER (FM)
appears in the display window.
2. Select the desired frequency by using TUNE
(-/+).
3. Press ENTER (
) a preset number will ash
in the display window.
4. Press PRESET to select the preset number
you want.
5. Press ENTER (
). The station is stored.
6. Repeat the steps 2 to 5 to store other
stations.
Deleting all the saved stations
Press and hold CLEAR for two seconds.
“ERASE ALL” will ash up. Press CLEAR again.
Then all the saved stations are deleted.
Improving poor FM reception
Press D (blue) (ST/ MONO) coloured button on
the remote control. This will change the tuner
from stereo to mono and usually improve the
reception.
See information about a radio
station
The FM tuner is supplied with the RDS (Radio
Data System) facility. This shows information
about the radio station being listened to. Press
RDS repeatedly to cycle through the various
data types:
PS (Programme Service Name)
The name of the channel will
appear in the display
PTY (Programme Type Recognition)
The programme type (e.g. Jazz or
News) will appear in the display.
RT (Radio Text)
A text message contains special
information from the broadcast
station. This text may scroll across
the display.
CT (Time controlled by the channel)
This shows the time and date as
broadcast by the station.
HB985-DB.BDEUPPK_ENG.indd 58HB985-DB.BDEUPPK_ENG.indd 58 2010-05-14 1:41:532010-05-14 1:41:53

59
Operation
4
Operation
Playing content via
your home network
This player can browse and play content from
your PC and DLNA certi ed media servers
connected on your home network.
About DLNA
This Player is a DLNA Certi ed digital media
player that can display and play movie,
photo and music content from your DLNA-
compatible digital media server (PC and
Consumer Electronics).
The Digital Living Network Alliance (DLNA)
is a cross-industry organization of consumer
electronics, computing industry and mobile
device companies. Digital Living provides
consumers with easy sharing of digital media
through a network in the home.
The DLNA certi cation logo makes it easy
to nd products that comply with the DLNA
Interoperability Guidelines. This unit complies
with DLNA Interoperability Guidelines v1.5.
When a PC running DLNA server software or
other DLNA compatible device is connected to
this player, some setting changes of software
or other devices may be required. Please refer
to the operating instructions for the software
or device for more information.
Accessing a DLNA media server
1. Check the network connection and settings
(pages 28-30).
2. Press
HOME MENU.
3. Select [Home Link] using
U
/
u
/
I
/
i
, and
press ENTER (
).
4. Select a DLNA media server from the list
using
U
/
u
, and press ENTER ( ).
If you want to rescan for available media
servers, press the green (B) coloured button.
NOTE
Depending on the media server, this player may
need to get permission from the server.
5. Select a le using
U
/
u
/
I
/
i
, and press
ENTER (
) to play the le.
HB985-DB.BDEUPPK_ENG.indd 59HB985-DB.BDEUPPK_ENG.indd 59 2010-05-14 1:41:532010-05-14 1:41:53

60
Operation
Operation
4
NOTE
• The le requirements are described on page 11.
• You can use various playback functions. Refer to
pages 40-47.
•
The le requirements on page 11 are not always
compatible. There may be some restrictions due
to the le’s features and media server’s ability.
• The thumbnail of the unplayable les can be
displayed in the [Home Link] menu, but those
cannot be played on this player.
• If there is an unplayable music le in the [Home
Link] menu, the player skips the le and plays
the next le.
• The subtitle le name and movie le name have
to be the same and located in the same folder.
• The playback and operating quality of the
[Home Link] function may be a ected by your
home network condition.
• The les from removable media such as USB
drive, DVD-drive etc. on your media server may
not be shared properly.
Accessing a share folder from
your PC
1. Start your PC that is connected on your
local area network.
2. On your PC, share folders which contain
movie, photo or music les.
3. On the player, check the network
connection and settings (pages 28-30).
4. Press
HOME MENU.
5. Select [Home Link] using
U
/
u
/
I
/
i
, and
press ENTER (
).
6. Select a share folder from the list using
U
/
u
,
and press ENTER (
).
If you want to rescan available media
servers, press the green (B) coloured button.
NOTE
Depending on the share folder, this player may
need to input network user ID and password for
accessing the folder.
7. Select a le using
U
/
u
/
I
/
i
, and press
ENTER ( ) to play the le.
HB985-DB.BDEUPPK_ENG.indd 60HB985-DB.BDEUPPK_ENG.indd 60 2010-05-14 1:41:532010-05-14 1:41:53

61
Operation
4
Operation
NOTE
• The le requirements are described on page 11.
• You can use various playback functions. Refer to
pages 40-47.
• The thumbnail of the unplayable les can be
displayed in the [Home Link] menu, but those
cannot be played on this player.
• If there is an unplayable music le in the [Home
Link] menu, the player skips the le and play
next le.
• The subtitle le name and movie le name have
to be the same and located at the same folder.
• The playback and operating quality of the
[Home Link] function may be a ected by your
home network condition.
• The les on a removable media such as USB
drive, DVD-drive etc. on your PC may not be
shared properly.
• You may experience connection problems
depending on your PC’s environment.
PC requirements
• Windows® XP (Service Pack 2 or higher),
Windows Vista® (no Service Pack required)
Windows 7®
• 1.2 GHz Intel® Pentium® III or AMD
Sempron™ 2200+ processors
• Network environment: 100 Mb Ethernet,
WLAN (IEEE 802.11b/g/n)
NOTE
If you use Windows® XP or Windows Vista®, visit link
below for more information on le share settings.
HB985-DB.BDEUPPK_ENG.indd 61HB985-DB.BDEUPPK_ENG.indd 61 2010-05-14 1:41:532010-05-14 1:41:53

62
Operation
Operation
4
Entering a network user ID and the
password
Depending on your PC’s environment, you
may need to enter a network user ID and the
password for accessing a shared folder.
1. The keyboard menu appears automatically
if the network user ID and the password are
required.
2. Use
U
/
u
/
I
/
i
to select a character then
press ENTER ( ) to con rm your selection
on the keyboard menu.
To enter a letter with an accent mark, select
the letter from the extended character set.
Example: Select “D” and then press DISPLAY
( ) to display the extended character set.
Use
I
/
i
to select “D” or “Ď” and then press
ENTER ( ).
[Clear] – Clear all entered characters.
[Space] – Inserts a space at the cursor
position.
[<–] – Deletes the previous character at the
cursor position.
[ABC / abc / #+-=&] – Change the keyboard
menu settings to capital letters, small letters
or symbols.
3. When you nish entering the network user
ID and password, select [OK] using
U
/
u
/
I
/
i
and press ENTER (
) to access the folder.
The network user ID and password will be
remembered after accessing the folder
for your convenience. If you do not want
the network user ID and password to be
remembered, press red (A) coloured button
to un-tick the [Remember] check box
before accessing the folder.
HB985-DB.BDEUPPK_ENG.indd 62HB985-DB.BDEUPPK_ENG.indd 62 2010-05-14 1:41:542010-05-14 1:41:54

63
Maintenance
5
Maintenance
Notes on Discs
Handling Discs
Never stick paper or tape on the disc.
Storing Discs
After playing, store the disc in its case. Do not
expose the disc to direct sunlight or sources of
heat and never leave it in a parked car exposed
to direct sunlight.
Cleaning Discs
Do not use strong solvents such as alcohol,
benzine, thinner, commercially available
cleaners, or anti-static spray intended for older
vinyl records.
Handling the Unit
When shipping the unit
Please save the original shipping carton and
packing materials. If you need to ship the unit,
for maximum protection, re-pack the unit as it
was originally packed at the factory.
Keeping the exterior surfaces clean
• Do not use volatile liquids such as
insecticide spray near the unit.
• Wiping with strong pressure may damage
the surface.
• Do not leave rubber or plastic products in
contact with the unit for a long period of
time.
Cleaning the unit
To clean the player, use a soft, dry cloth. If
the surfaces are extremely dirty, use a soft
cloth lightly moistened with a mild detergent
solution. Do not use strong solvents such as
alcohol, benzine, or thinner, as these might
damage the surface of the unit.
Maintaining the Unit
The unit is a high-tech, precision device. If
the optical pick-up lens and disc drive parts
are dirty or worn, the picture quality could be
diminished. For details, please contact your
nearest authorized service centre.
5
Maintenance
HB985-DB.BDEUPPK_ENG.indd 63HB985-DB.BDEUPPK_ENG.indd 63 2010-05-14 1:41:542010-05-14 1:41:54

64
Troubleshooting
Troubleshooting
6
6
Troubleshooting
General
The Power does not turn
on.
• Plug the power cord into the wall outlet securely.
The unit does not start
playback.
• Insert a playable disc. (Check the disc type, colour system,
and regional code.)
• Place the disc with the playback side down.
• Place the disc on the disc tray correctly inside the guide.
• Clean the disc.
• Cancel the rating function or change the rating level.
The angle cannot be
changed.
• Multi-angles are not recorded on the DVD Video being
played.
The subtitle language
cannot be changed or
turned o .
• Subtitles are not recorded on the DVD Video being played.
Cannot play MP3/WMA/
JPEG/DivX les.
• The les are not recorded in a format that the unit can play.
• The unit does not support the codec of the movie le.
The remote control does
not work properly.
• The remote control is not pointed at the remote sensor of
the unit.
• The remote control is too far from the unit.
• There is an obstacle in the path between the remote control
and the unit.
• The battery in the remote control is exhausted.
HB985-DB.BDEUPPK_ENG.indd 64HB985-DB.BDEUPPK_ENG.indd 64 2010-05-14 1:41:542010-05-14 1:41:54

65
Troubleshooting
6
Troubleshooting
Picture
There is no picture. • Select the appropriate video input mode on the TV so the
picture from the unit appears on the TV screen.
• Connect the video connection securely.
• Check the [HDMI Colour Setting] in the [Setup] menu is
set to the appropriate item that conforms to your video
connection.
• Your TV may not support the resolution you have set on the
player. Change the resolution to one that your TV accepts.
• The player’s HDMI OUT jack is connected to a DVI device that
does not support copyright protection.
Picture noise appears • You are playing a disc recorded in a colour system that is
di erent from your TV.
• Set the resolution to one that your TV accepts.
Sound
There is no sound or the
sound is distorted.
• The unit is in scan, slow motion, or pause mode.
• The sound volume is low.
• Check the speaker cable connection. (page 16)
HB985-DB.BDEUPPK_ENG.indd 65HB985-DB.BDEUPPK_ENG.indd 65 2010-05-14 1:41:542010-05-14 1:41:54

66
Troubleshooting
Troubleshooting
6
Network
BD-LIVE feature does not
work.
• The connected USB storage may not have enough space.
Connect the USB storage with at least 1GB free space.
• Ensure that the unit is correctly connected to the local area
network and can access the internet (see page 28).
• Your broadband speed may not be fast enough to use the
BD-LIVE features. Contact your Internet Service Provider (ISP)
and increase the broadband speed to suit the unit’s.
• The [BD-LIVE connection] option in the [Setup] menu is set
to [Prohibited]. Set the option to [Permitted].
Design and speci cations are subject to change without notice.
Updates
Note that information on this product is available on the Pioneer website. Please check the
website for information on updating or servicing your Blu-ray Disc PLAYER.
HB985-DB.BDEUPPK_ENG.indd 66HB985-DB.BDEUPPK_ENG.indd 66 2010-05-14 1:41:542010-05-14 1:41:54

67
Appendix
7
Appendix
Controlling a TV with
the Supplied Remote
Control
You can control your PIONEER TV using the
buttons below.
TV Control
Buttons
Button Operation
1
(TV Power)
Turn the TV on or o .
INPUT Switch the TV’s input source
between the TV and other
input sources.
CH +/- Scan up or down through
memorized channels.
VOL +/- Adjust the volume of the
TV.
NOTE
Depending on the unit being connected, you may
not be able to control your TV using some of the
buttons.
Setting up the remote to
control your TV
You can operate your TV with the supplied
remote control.
If your TV is listed in the table below, set the
appropriate manufacturer code.
1. While holding down
1
(TV POWER) button,
and press the manufacturer code for your
TV with the numerical buttons (see the
table below).
Manufacturer Code Number
Pioneer 1(Default)
Sony 2, 3
Panasonic 4, 5
Samsung 6, 7
LG 8, 9
2. Release the
1
(TV POWER) button to
complete setting.
Depending on your TV, some or all buttons
may not function on the TV, even after
entering the correct manufacturer code. When
you replace the batteries of the remote, the
code number you have set may be reset to
the default setting. Set the appropriate code
number again.
7
Appendix
HB985-DB.BDEUPPK_ENG.indd 67HB985-DB.BDEUPPK_ENG.indd 67 2010-05-14 1:41:542010-05-14 1:41:54

68
Appendix
Appendix
7
Area Code List
Choose an area code from this list.
Area Code Area Code Area Code Area Code
Afghanistan AF
Argentina AR
Australia AU
Austria AT
Belgium BE
Bhutan BT
Bolivia BO
Brazil BR
Cambodia KH
Canada CA
Chile CL
China CN
Colombia CO
Congo CG
Costa Rica CR
Croatia HR
Czech Republic CZ
Denmark DK
Ecuador EC
Egypt EG
El Salvador SV
Ethiopia ET
Fiji FJ
Finland FI
France FR
Germany DE
Great Britain GB
Greece GR
Greenland GL
Hong Kong HK
Hungary HU
India IN
Indonesia ID
Israel IL
Italy IT
Jamaica JM
Japan JP
Kenya KE
Kuwait KW
Libya LY
Luxembourg LU
Malaysia MY
Maldives MV
Mexico MX
Monaco MC
Mongolia MN
Morocco MA
Nepal NP
Netherlands NL
Netherlands
Antilles AN
New Zealand NZ
Nigeria NG
Norway NO
Oman OM
Pakistan PK
Panama PA
Paraguay PY
Philippines PH
Poland PL
Portugal PT
Romania RO
Russian
Federation RU
Saudi Arabia SA
Senegal SN
Singapore SG
Slovak Republic SK
Slovenia SI
South Africa ZA
South Korea KR
Spain ES
Sri Lanka LK
Sweden SE
Switzerland CH
Taiwan TW
Thailand TH
Turkey TR
Uganda UG
Ukraine UA
United States US
Uruguay UY
Uzbekistan UZ
Vietnam VN
Zimbabwe ZW
HB985-DB.BDEUPPK_ENG.indd 68HB985-DB.BDEUPPK_ENG.indd 68 2010-05-14 1:41:542010-05-14 1:41:54

69
Appendix
7
Appendix
Language code List
Use this list to input your desired language for the following initial settings: [Disc Audio],
[Disc Subtitle] and [Disc Menu].
Language Code Language Code Language Code Language Code
Afar 6565
Afrikaans 6570
Albanian 8381
Ameharic 6577
Arabic 6582
Armenian 7289
Assamese 6583
Aymara 6588
Azerbaijani 6590
Bashkir 6665
Basque 6985
Bengali; Bangla 6678
Bhutani 6890
Bihari 6672
Breton 6682
Bulgarian 6671
Burmese 7789
Byelorussian 6669
Chinese 9072
Croatian 7282
Czech 6783
Danish 6865
Dutch 7876
English 6978
Esperanto 6979
Estonian 6984
Faroese 7079
Fiji 7074
Finnish 7073
French 7082
Frisian 7089
Galician 7176
Georgian 7565
German 6869
Greek 6976
Greenlandic 7576
Guarani 7178
Gujarati 7185
Hausa 7265
Hebrew 7387
Hindi 7273
Hungarian 7285
Icelandic 7383
Indonesian 7378
Interlingua 7365
Irish 7165
Italian 7384
Japanese 7465
Kannada 7578
Kashmiri 7583
Kazakh 7575
Kirghiz 7589
Korean 7579
Kurdish 7585
Laothian 7679
Latin 7665
Latvian, Lettish 7686
Lingala 7678
Lithuanian 7684
Macedonian 7775
Malagasy 7771
Malay 7783
Malayalam 7776
Maori 7773
Marathi 7782
Moldavian 7779
Mongolian 7778
Nauru 7865
Nepali 7869
Norwegian 7879
Oriya 7982
Panjabi 8065
Pashto, Pushto 8083
Persian 7065
Polish 8076
Portuguese 8084
Quechua 8185
Rhaeto-Romance
8277
Rumanian 8279
Russian 8285
Samoan 8377
Sanskrit 8365
Scots Gaelic 7168
Serbian 8382
Serbo-Croatian 8372
Shona 8378
Sindhi 8368
Singhalese 8373
Slovak 8375
Slovenian 8376
Spanish 6983
Sudanese 8385
Swahili 8387
Swedish 8386
Tagalog 8476
Tajik 8471
Tamil 8465
Telugu 8469
Thai 8472
Tonga 8479
Turkish 8482
Turkmen 8475
Twi 8487
Ukrainian 8575
Urdu 8582
Uzbek 8590
Vietnamese 8673
Volapük 8679
Welsh 6789
Wolof 8779
Xhosa 8872
Yiddish 7473
Yoruba 8979
Zulu 9085
HB985-DB.BDEUPPK_ENG.indd 69HB985-DB.BDEUPPK_ENG.indd 69 2010-05-14 1:41:542010-05-14 1:41:54

70
Appendix
Appendix
7
Video output resolution
When the non-copy protected media is playing back
Video Out
Resolution
HDMI OUT
COMPONENT VIDEO OUT
HDMI connected HDMI disconnected
576i (480i) 576p (480i) 576i (480i)
576p (480p) 576p (480p) 576p (480p)
720p 720p 720p
1080i 1080i 1080i
1080p / 24 Hz 1080p / 24 Hz 576i (480i) 1080i
1080p / 50 (60) Hz 1080p / 50 (60) Hz 576i (480i) 1080i
When the copy protected media is playing back
Video Out
Resolution
HDMI OUT
COMPONENT VIDEO OUT
HDMI connected HDMI disconnected
576i (480i) 576p (480p) 576i (480i)
576p (480p) 576p (480p) 576p (480p)
720p 720p 576i (480i) 576p (480p)
1080i 1080i 576i (480i) 576p (480p)
1080p / 24 Hz 1080p / 24 Hz 576i (480i) 576p (480p)
1080p / 50 (60) Hz 1080p / 50 (60) Hz 576i (480i) 576p (480p)
HDMI OUT connection
• For the 576i (480i) resolution setting, real
output resolution of HDMI OUT will change
to 576p (480p).
• If you select a resolution manually and then
connect the HDMI jack to TV and your TV
does not accept it, the resolution setting is
set to [Auto].
• If you select a resolution that your TV
does not accept, the warning message
will appear. After resolution change,
if you cannot see the screen, please
wait 20 seconds and the resolution will
automatically revert back to the previous
resolution.
• The 1080p video output frame rate may
be automatically set to either 24 Hz or
50 Hz depending both on the capability
and preference of the connected TV and
based on the native video frame rate of the
content on the BD-ROM disc.
COMPONENT VIDEO OUT connection
BD or DVD could prevent up-scaling on
analogue output.
VIDEO OUT connection
The resolution of the VIDEO OUT jack is always
outputted at 576i (480i) resolution.
HB985-DB.BDEUPPK_ENG.indd 70HB985-DB.BDEUPPK_ENG.indd 70 2010-05-14 1:41:542010-05-14 1:41:54

71
Appendix
7
Appendix
“Blu-ray Disc” and are trademarks.
“BD-LIVE” logo is a trademark of Blu-ray Disc
Association.
“BONUSVIEW” is trademark of Blu-ray Disc
Association.
Java and all Java-based trademarks and logos
are trademarks or registered trademarks of Sun
Microsystems, Inc. in the United States and other
countries.
Manufactured under licence from Dolby
Laboratories. Dolby, and the double-D symbol are
trademarks of Dolby Laboratories.
Manufactured under licence under U.S. Patent
#’s: 5,451,942; 5,956,674; 5,974,380; 5,978,762;
6,226,616; 6,487,535; 7,392,195; 7,272,567;
7,333,929; 7,212,872 & other U.S. and worldwide
patents issued & pending. DTS and the Symbol are
registered trademarks, & DTS-HD, DTS-HD Master
Audio l Essential and the DTS logos are trademarks
of DTS, Inc. Product includes software. © DTS, Inc.
All Rights Reserved.
HDMI, the HDMI Logo and High-De nition
Multimedia Interface are trademarks or registered
trademarks of HDMI Licensing, LLC in the United
States and other countries.
is a trademark of DVD Format/Logo Licensing
Corporation.
TM
DLNA and DLNA CERTIFIED are trademarks and /
or service marks of Digital Living Network Alliance.
DivX is a registered trademark of DivX, Inc., and is
used under licence.
“x.v.Colour” or “x.v.Colour” is a trademark of Sony
Corporation.
Trademarks and Licences
HB985-DB.BDEUPPK_ENG.indd 71HB985-DB.BDEUPPK_ENG.indd 71 2010-05-14 1:41:542010-05-14 1:41:54

72
Appendix
Appendix
7
“AVCHD” and the “AVCHD” logo are trademarks of
Panasonic Corporation and Sony Corporation.
This product is licenced under the AVC patent
portfolio licence and VC-1 patent portfolio licence
for the personal and non-commercial use of a
consumer to (i) encode video in compliance
with the AVC Standard and VC-1 Standard (“AVC/
VC-1 Video”) and/or (ii) decode AVC/VC-1 Video
that was encoded by a consumer engaged in
a personal and non-commercial activity and/or
was obtained from a video provider licenced to
provide AVC/VC-1 Video. No licence is granted
or shall be implied for any other use. Additional
information may be obtained from MPEG LA, LLC.
See http://www.mpegla.com.
iPod is a trademark of Apple Inc., registered in the
U.S. and other countries.
iPhone is a trademark of Apple Inc.
“Made for iPod” means that an electronic accessory
has been designed to connect speci cally to iPod
and has been certi ed by the developer to meet
Apple performance standards.
“Works with iPhone” means that an electronic
accessory has been designed to connect
speci cally to iPhone and has been certi ed
by the developer to meet Apple performance
standards.
Apple is not responsible for the operation of
this device or its compliance with safety and
regulatory standards.
Windows Media is either a registered trademark or
trademark of Microsoft Corporation in the United
States and / or other countries.
This product includes technology owned by Microsoft
Corporation and cannot be used or distributed
without a license from Microsoft Licensing, Inc.
®
Bluetooth® wireless technology is a system which
allows radio contact between electronic devices
within a max. range of 10 meters.
Connecting individual devices under Bluetooth
wireless technology does not incur any charges.
A mobile phone with Bluetooth wireless technology
can be operated via the Cascade if the connection
was made via Bluetooth wireless technology.
The Bluetooth word mark and logos are owned by
the Bluetooth SIG, Inc. and any use of such marks
by Pioneer Corporation is under license. Other
trademarks and trade names are those of their
respective owners.
HB985-DB.BDEUPPK_ENG.indd 72HB985-DB.BDEUPPK_ENG.indd 72 2010-05-14 1:41:552010-05-14 1:41:55

73
Appendix
7
Appendix
Speci cations
General
• Power requirements:
AC 220-240 V, 50/ 60 Hz
• Power consumption:
150 W
In Standby mode: Less than 0.5W
• Dimensions (W x H x D):
Approx. 430 × 64 × 304 mm
• Net Weight (Approx.):
3.6 kg
• Operating temperature:
41 °F to 95 °F (5 °C to 35 °C)
• Operating humidity:
5 % to 90 %
• Bus Power supply (USB):
DC 5V
500 mA
Inputs/ Outputs
• VIDEO OUT:
1.0 V (p-p), 75 Ω, sync negative, RCA jack x 1
• COMPONENT VIDEO OUT:
(Y) 1.0 V (p-p), 75 Ω, sync negative, RCA jack x 1,
(Pb)/(Pr) 0.7 V (p-p), 75 Ω, RCA jack x 2
• HDMI OUT (video/audio):
19 pin (HDMI standard, Type A, Version 1.3)
• Analogue AUDIO IN:
2.0 Vrms (1 kHz, 0 dB), 600 Ω, RCA jack (L, R) x 1
• DIGITAL IN (OPTICAL 1/2):
3 V (p-p), Optical jack x 2
• PORTABLE IN:
0.5 Vrms (3.5 mm stereo jack)
Tuner
• FM Tuning Range:
87.5 to 108.0 MHz or 87.50 to 108.00 MHz
Ampli er
• Power output, (PEAK), (4Ω/3Ω)
Total 1100 W
Front 180 W x 2
Centre 180 W
Rear 180 W x 2
Sub-Woofer 200 W (Passive)
• Power output, (RMS), THD 10% (4Ω/3Ω)
Total 930 W
Front 150 W x 2
Centre 150 W
Rear 150 W x 2
Sub-Woofer 180 W (Passive)
System
• Laser:
Semiconductor laser
Wavelength: 405 nm / 650 nm
• Signal system:
Standard NTSC/PAL colour TV system
• Frequency response:
20 Hz to 20 kHz (48 kHz, 96 kHz, 192 kHz sampling)
• LAN port:
Ethernet jack x 1, 10BASE-T/100BASE-TX
HB985-DB.BDEUPPK_ENG.indd 73HB985-DB.BDEUPPK_ENG.indd 73 2010-05-14 1:41:552010-05-14 1:41:55

74
Appendix
Appendix
7
Speakers for BCS-707
S-BD707
• Front/Surround speaker (Left/ Right)
Type: 2 Way
Impedance Rated: 4 Ω
Net Dimensions 260 x 1097 x 260 mm
(W x H x D):
Net Weight: 3.8 kg
• Centre speaker
Type: 1 Way
Impedance Rated: 4 Ω
Net Dimensions 300 x 87x 65 mm
(W x H x D):
Net Weight: 0.6 kg
S-BD707SW
• Subwoofer
Type: 1 Way 1 speaker
Impedance Rated: 3 Ω
Net Dimensions 130.5 x 420 x 375 mm
(W x H x D):
Net Weight: 4.4 kg
Speakers for BCS-303
S-BD303
• Front/Surround speaker (Left/ Right)
Type: 1 Way
Impedance Rated: 4 Ω
Net Dimensions 96 x 96 x 85 mm
(W x H x D):
Net Weight: 0.4 kg
• Centre speaker
Type: 1 Way
Impedance Rated: 4 Ω
Net Dimensions 300 x 87x 65 mm
(W x H x D):
Net Weight: 0.6 kg
• Subwoofer
Type: 1 Way 1 speaker
Impedance Rated: 3 Ω
Net Dimensions 130.5 x 420 x 375 mm
(W x H x D):
Net Weight: 4.4 kg
HB985-DB.BDEUPPK_ENG.indd 74HB985-DB.BDEUPPK_ENG.indd 74 2010-05-14 1:41:552010-05-14 1:41:55

75
Appendix
7
Appendix
Open source software
notice
The following GPL executables and LGPL libraries
used in this product are subject to the GPL2.0/
LGPL2.1 License Agreements:
GPL EXECUTABLES: Linux kernel 2.6, bash, busybox,
cramfs, dhcpcd, e2fsprogs, fdisk, mkdosfs, mtd-utils,
net-tools, procps, samba-3.0.25b, sysutils, tcpdump,
tftpd, tinylogin, unzip, utelnetd
LGPL LIBRARIES: uClibc, DirectFB, blow sh, cairo,
mpeg, iconv, libusb, mpg123
gSOAP Public License 1.3 LIBRARY: gsoap
A copy of the corresponding source code can be
obtained by being charged the fee for distribution.
To obtain a copy, contact your local Pioneer
Customer Support .
You can obtain a copy of the GPL, LGPL licenses
from http://www.gnu.org/licenses/old-licenses/
gpl-2.0.html and http://www.gnu.org/licenses/old-
licenses/lgpl-2.1.html .
Also you can obtain a copy of gSOAP public license
from http://www.cs.fsu.edu/~engelen/license.html.
This software is based in part on the work of the
Independent JPEG Group copyright © 1991 - 1998,
Thomas G. Lane.
This product includes
• boost C++: copyright © Beman Dawes 1999-2003
• c-ares : copyright © 1998 by the Massachusetts
Institute of Technology
• curl: copyright © 1996 - 2008, Daniel Stenberg
• expat: copyright © 2006 expat maintainers
• freetype: copyright © 2003 The FreeType Project
(www.freetype.org).
• jpeg: This software is based in part on the work of
the Independent JPEG Group copyright © 1991 –
1998, Thomas G. Lane.
• mng: copyright © 2000-2007 Gerard Juyn, Glenn
Randers-Pehrson
• ntp : copyright © David L. Mills 1992-2006
• OpenSSL:
– cryptographic software written by Eric Young
(eay@cryptsoft.com).
– software written by Tim Hudson
(tjh@cryptsoft.com).
– software developed by the OpenSSL Project
for use in the OpenSSL Toolkit.
(http://www.openssl.org)
• png: copyright © 2004 Glenn Randers-Pehrson
• portmap : copyright © 1990 The Regents of the
University of California
• ptmalloc : copyright © 2001-2006 Wolfram Gloger
• UnitTest++ : copyright © 2006 Noel Llopis and
Charles Nicholson
• UPnP SDK : copyright © 2000-2003 Intel
Corporation
• strace :
copyright © 1991, 1992 Paul Kranenburg
copyright © 1993 Branko Lankester
copyright © 1993 Ulrich Pegelow
copyright © 1995, 1996 Michael Elizabeth Chastain
copyright © 1993, 1994, 1995, 1996 Rick Sladkey
copyright © 1999,2000 Wichert Akkerman
• xml2 : copyright © 1998-2003 Daniel Veillard
• XML-RPC For C/C++:
copyright © 2001 by First Peer, Inc. All rights
reserved.
copyright © 2001 by Eric Kidd. All rights reserved.
• zlib: copyright © 1995-2002 Jean-loup Gailly and
Mark Adler.
All rights reserved.
Permission is hereby granted, free of charge, to
any person obtaining a copy of this software and
associated documentation les (the “Software”), to
deal in the Software without restriction, including
without limitation the rights to use, copy, modify,
merge, publish, distribute, sublicense, and/or sell
copies of the Software, and to permit persons to
whom the Software is furnished to do so, subject to
the following conditions:
THE SOFTWARE IS PROVIDED “AS IS”, WITHOUT
WARRANTY OF ANY KIND, EXPRESS OR IMPLIED,
INCLUDING BUT NOT LIMITED TO THE WARRANTIES
OF MERCHANTABILITY, FITNESS FOR A PARTICULAR
PURPOSE AND NONINFRINGEMENT. IN NO EVENT
SHALL THE AUTHORS OR COPYRIGHT HOLDERS
BE LIABLE FOR ANY CLAIM, DAMAGES OR OTHER
LIABILITY, WHETHER IN AN ACTION OF CONTRACT,
TORT OR OTHERWISE, ARISING FROM, OUT OF OR IN
CONNECTION WITH THE SOFTWARE OR THE USE OR
OTHER DEALINGS IN THE SOFTWARE.
HB985-DB.BDEUPPK_ENG.indd 75HB985-DB.BDEUPPK_ENG.indd 75 2010-05-14 1:41:552010-05-14 1:41:55

2 Consignes de sécurité
Consignes de sécurité
1
ATTENTION
RISQUE D’ÉLECTROCUTION NE
PAS OUVRIR
ATTENTION: AFIN DE MINIMISER LES RISQUES
D’ÉLECTROCUTION, NE RETIREZ PAS LE
COUVERCLE (OU L’ARRIÈRE) AUCUNE PIÈCE DE CET
APPAREIL N’EST SUSCEPTIBLE D’ÊTRE RÉPARÉE PAR
L’UTILISATEUR CONFIEZ L’ENTRETIEN DE L’APPAREIL
À DES PERSONNES QUALIFIÉES.
Le symbole d’un éclair à l’intérieur
d’un triangle sert à avertir
l’utilisateur de la présence d’une
tension dangereuse non isolée
dans le corps de l’appareil, qui peut
être su samment élevée pour
provoquer un risque
d’électrocution.
Le symbole d’un point
d’exclamation à l’intérieur d’un
triangle sert à avertir l’utilisateur
de la présence d’instructions
d’utilisation et de maintenance
(entretien) importantes dans la
documentation qui accompagne
l’appareil.
Précautions et mises en garde
AVERTISSEMENT: POUR PRÉVENIR TOUT RISQUE
D’INCENDIE OU D’ÉLECTROCUTION, N’EXPOSEZ PAS
CET APPAREIL À LA PLUIE OU À L’HUMIDITÉ.
AVERTISSEMENT: n’installez pas cet appareil dans
un espace con né tel qu’une bibliothèque ou tout
autre meuble similaire.
ATTENTION: n’obstruez pas les ouvertures
d’aération. Installez l’appareil conformément aux
instructions du fabricant.
Les fentes et les ouvertures du boîtier servent à
assurer la ventilation et le bon fonctionnement de
l’appareil, ainsi qu’à le protéger contre la surchau e.
Les ouvertures ne doivent jamais être bloquées en
installant l’appareil sur un lit, un canapé, un tapis ou
toute autre surface similaire. Cet appareil ne doit pas
être placé dans un emplacement fermé tel
qu’une bibliothèque ou une étagère, à moins
d’assurer une ventilation adéquate ou que les
instructions du fabricant l’autorisent.
ATTENTION: Ce produit est catégorisé comme un
produit laser de classe 1 selon le règlement IEC
60825-1:2007 sur la sécurité des produits laser.
A n de garantir l’utilisation correcte de cet appareil,
veuillez lire attentivement ce manuel d’utilisation et
conservez-le pour vous y référer ultérieurement.
Si l’appareil nécessite une intervention de
maintenance, contactez un point de service après-
vente agréé.
L’utilisation de commandes, de réglages ou de
procédures autres que ceux décrits dans ce
document peut entraîner une exposition à des
radiations dangereuses.
Pour éviter l’exposition directe au faisceau laser,
n’essayez pas d’ouvrir le boîtier. Le rayonnement laser
est visible lorsque l’appareil est ouvert. NE REGARDEZ
PAS DIRECTEMENT LE FAISCEAU.
1
Consignes de sécurité
HB985-DB.BDEUPPK_FRE.indd 2HB985-DB.BDEUPPK_FRE.indd 2 2010-05-14 1:54:142010-05-14 1:54:14

Consignes de sécurité
3Consignes de sécurité
1
PRÉCAUTION concernant le cordon
d’alimentation
Il est recommandé de brancher la plupart des
appareils sur un circuit dédié.
Autrement dit, un circuit comportant une prise de
courant qui alimente uniquement cet appareil et
qui n’a ni autres prises ni circuit dérivé. Reportez-
vous à la page des spéci cations de ce manuel
d’utilisation pour plus de détails. Ne surchargez pas
les prises murales. Les prises murales surchargées,
desserrées ou endommagées, les câbles de rallonge,
les cordons d’alimentation e lochés, ou les gaines
isolantes craquelées ou endommagées constituent
un danger. Chacune de ces conditions peut
entraîner un risque de choc électrique ou d’incendie.
Examinez régulièrement le cordon de votre appareil
et, si son aspect indique qu’il est endommagé ou
détérioré, débranchez-le, cessez d’utiliser l’appareil,
et faites remplacer le cordon par une pièce de
rechange appropriée auprès d’un point de service
après-vente agréé. Protégez le cordon d’alimentation
de sorte qu’il ne puisse pas être tordu, entortillé,
pincé, coincé dans une porte ou piétiné. Faites
particulièrement attention aux ches, aux prises
murales et au point d’où sort le cordon de l’appareil.
Pour déconnecter l’appareil du réseau électrique,
retirez le cordon d’alimentation de la prise électrique.
Lors de l’installation de l’appareil, assurez-vous que la
prise soit facilement accessible.
PIONEER déclare par la présente que
ce ou ces produits sont conformes
aux exigences essentielles et aux
dispositions applicables des directives
2004/108/CE, 2006/95/CE et 2009/125/
CE.
AVERTISSEMENT : pour éviter tout risque d’incendie,
ne posez pas sur l’appareil des sources de amme
nue (telle qu’une bougie allumée).
Cet appareil est équipé d’une batterie transportable
ou de piles rechargeables.
Retrait sans danger de la batterie ou des piles
de l’appareil: Pour retirer la batterie ou les piles
usagées, procédez dans l’ordre inverse de leur
insertion. Pour empêcher toute contamination de
l’environnement et tout danger pour la santé des
êtres humains et des animaux, la batterie ou les
piles usagées doivent être mises au rebut dans le
conteneur approprié à un point de collecte prévu
pour leur recyclage. Ne jetez pas la batterie ou les
piles usagées avec les autres déchets. Recyclez
toujours les batteries et piles rechargeables usagées.
Les piles ne doivent pas être exposées à une chaleur
excessive comme le soleil, ou le feu.
ATTENTION: l’appareil ne doit pas être exposé à des
projections d’eau ou à des éclaboussures, et aucun
objet rempli de liquide tel qu’un vase ne doit être
posé sur l’appareil.
HB985-DB.BDEUPPK_FRE.indd 3HB985-DB.BDEUPPK_FRE.indd 3 2010-05-14 1:54:172010-05-14 1:54:17

4 Consignes de sécurité
Consignes de sécurité
1
Informations destinées aux utilisateurs sur
la collecte et la mise au rebut des anciens
équipements et piles usagées
Symbol examples
for batteries
Pb
Les symboles qui gurent sur les produits, emballage
et/ou accompagnant des documents signi ent
que les produits électriques et électroniques et les
piles ne doivent pas être mélangés avec les ordures
ménagères.
Pour un traitement, une récupération et un recyclage
appropriés des produits anciens et piles usagées,
portez-les vers les points de collecte prévus à cet
e et conformément aux législations locales.
En mettant au rebut ces produits et piles
correctement, vous aiderez à sauvegarder des
ressources précieuses et à prévenir tout e et
potentiellement négatif sur la santé humaine et sur
l’environnement qui sinon devraient s’aggraver suite
à une gestion inappropriée des déchets.
Pour plus d’informations sur la collecte et le
recyclage des produits anciens et piles usagées,
contactez votre administration locale, votre service
de gestion des déchets ou les points de vente dans
lesquels vous avez acheté ces articles.
Ces symboles ne sont valables qu’au sein de
l’Union Européenne.
Pour les pays en dehors de l’Union Européenne :
Pour vous débarrasser de ces articles, contactez
les autorités locales ou votre revendeur pour leur
demander quelle méthode de mise au rebut semble
la plus appropriée.
Remarques sur les droits d’auteur
• De même que le système CSS (Content Scramble
System) protège le contenu des DVD, le système
AACS (Advanced Access Content System) protège
le contenu des disques Blu-ray ; les contenus
ainsi protégés sont donc soumis à certaines
restrictions en termes de lecture, de sortie de
signal analogique, etc. Le fonctionnement de
cet appareil et les restrictions concernant son
utilisation peuvent varier selon la date de votre
achat, car ces restrictions peuvent être adoptées
et/ou modi ées par la technologie AACS après la
production de cet appareil.
• De plus, les technologies BD-ROM Mark et BD+
sont également utilisées en tant que systèmes
de protection du contenu pour le format Blu-
ray, ce qui implique certaines restrictions pour
les contenus protégés par BD-ROM Mark et/
ou BD+, notamment en termes de lecture. Pour
obtenir des informations complémentaires sur
les technologies AACS, BD-ROM Mark et BD+ ou
sur ce produit, contactez un service après-vente
agréé.
• De nombreux DVD et BD-ROM sont encodés avec
une protection contre la copie. En conséquence,
vous devez raccorder votre lecteur directement
à votre téléviseur, et non à un magné-toscope.
Le raccordement à un magnétoscope génère
en e et une image déformée pour les disques
protégés contre la copie.
• Ce produit est doté d’une technologie de
protection des droits d’auteur protégée par
des brevets américains et d’autres droits sur
la propriété intellectuelle. L’utilisation de cette
technologie de protection des droits d’auteur
doit faire l’objet d’une autorisation par Rovi et est
exclusivement réservée à un usage domestique
et à d’autres types de visionnage limités, sauf
autorisation expresse de Rovi. Les opérations
d’ingénierie inverse et de démontage sont
interdites.
• Conformément aux lois sur les droits d’auteur en
vigueur aux États-Unis et dans d’autres pays,
l’enregistrement, l’utilisation, la di usion, la distrib-
ution ou la révision sans autorisation d’émissions
télévisées, de cassettes vidéo, de BD-ROM, de
DVD, de CD et d’autres contenus peut engager
votre responsabilité civile et/ou criminelle.
Exemples de
marquage
pour les batteries
HB985-DB.BDEUPPK_FRE.indd 4HB985-DB.BDEUPPK_FRE.indd 4 2010-05-14 1:54:172010-05-14 1:54:17

Consignes de sécurité
5Consignes de sécurité
1
Avis important concernant le système couleur du
téléviseur
Le système couleur de ce lecteur di ère en fonction
des disques lus.
Par exemple, lorsque le lecteur lit le disque enregistré
dans le système couleur NTSC, l’image est di usée
sous forme de signal NTSC.
Seuls les téléviseurs multisystème peuvent recevoir
l’ensemble des signaux retransmis à partir du lecteur.
• Si vous avez un téléviseur PAL et que vous utilisez
des disques ou des contenus vidéo enregistrés en
NTSC, vous verrez des images déformées.
• Le téléviseur multisystème change le système
couleur automatiquement en fonction des
signaux d’entrée. Si le système couleur n’est pas
modi é automatiquement, éteignez le téléviseur
et rallumez-le pour voir des images normales à
l’écran.
• Même si les disques enregistrés dans le système
couleur NTSC s’a chent correctement sur votre
téléviseur, il est possible que leur enregistrement
pose problème dans votre enregistreur.
HB985-DB.BDEUPPK_FRE.indd 5HB985-DB.BDEUPPK_FRE.indd 5 2010-05-14 1:54:172010-05-14 1:54:17

6
Table des matières
1
Consignes de sécurité
2 Précautions et mises en garde
2
Préparation
8 Introduction
8 À propos du symbole “ ”
8 Symboles utilisés dans ce
manuel
9 Accessoires fournis
10 Disques pouvant être lus
11 Compatibilité des chiers
12 Code de région
12 AVCHD (codec vidéo avancé
en haute dé nition)
12 Con gurations systme
spéci ques
12 Remarques sur la
compatibilité
13 Télécommande
14 Panneau avant
15 Panneau arrire
3
Installation
16 Assemblez les enceintes
16 Connexion au haut-parleur
BCS-707
18 Connexion au haut-parleur
BCS-303
19 Montage mural du haut-parleur
central
19 Remarque supplémentaire à propos
du placement des haut-parleurs
20 Positionnement du système
21 Connexion à votre TV
21 Connexion HDMI
22 Connexion vidéo
composantes
23 Connexion vidéo
23 Réglage de la résolution
24 Connexion de l’antenne
24 Connexions avec un équipement
externe
24 Connexion AUX
25 Connexion PORT. IN
(Entrée Port)
25 Connexion OPTICAL IN 1/2
(Entrée optique)
26 Connexion Bluetooth®
28 Raccordement à votre réseau
domestique
29 Paramétrage réseau
31 Raccordement d’un périphérique
USB
32 Réglages
32 Réglage des paramètres
33 Menu [AFFICHAGE]
34 Menu [LANGUE]
35 Menu [AUDIO]
36 Menu [VERROU]
HB985-DB.BDEUPPK_FRE.indd 6HB985-DB.BDEUPPK_FRE.indd 6 2010-05-14 1:54:172010-05-14 1:54:17

7
1
2
3
4
5
6
7
8
37 Menu [RÉSEAU]
37 Menu [AUTRES]
39 E ets sonores
4
Utilisation
40 Lecture générale
42 Lecture avancée
44 A chage à l’écran
48 Utilisation des fonctions BD-LIVE
49 Lecture d’un chier vidéo et d’un
disque VR
51 Lecture d’un chier photo
53 Écoute de musique
56 Lecture de l’iPod
58 Utilisation de la fonction Radio
59 Lecture de contenu via votre réseau
domestique
5
Entretien
63 Remarque sur les disques
63 Manipuler le lecteur
6
Dépannage
64 Général
65 Image
65 Son
66 Réseau
7
Annexe
67 Commande d’un téléviseur à l’aide
de la télécommande fournie
68 Liste des codes de région
69 Liste des codes de langue
70 Résolution de la sortie vidéo
71 Marques de commerce et licences
73 Caractéristiques
75 Avis concernant les logiciels open
source
HB985-DB.BDEUPPK_FRE.indd 7HB985-DB.BDEUPPK_FRE.indd 7 2010-05-14 1:54:172010-05-14 1:54:17

8 Préparation
Préparation
2
2
Préparation
Introduction
À propos du symbole “ ”
Le symbole “ ” peut apparaître sur votre écran
de téléviseur durant le fonctionnement. Il
signi e que la fonction décrite dans ce manuel
n’est pas disponible avec ce support spéci que.
Symboles utilisés dans ce
manuel
REMARQUE
Indique des remarques et fonctionnalités
spéciales.
ATTENTION
Indique des précautions à prendre pour éviter
les dommages éventuels dus à une utilisation
inappropriée.
Une section dont le titre comporte l’un des
symboles suivants ne s’applique qu’aux disques
représentés par ce symbole.
BD
Disque BD-ROM
DVD
DVD-Vidéo, DVD±R/RW
en mode vidéo ou VR et
nalisé
AVCHD
DVD±R/RW au format
AVCHD
ACD
CD audio
MOVIE
Fichiers vidéo
MUSIC
Fichiers musique
PHOTO
Fichiers image
HB985-DB.BDEUPPK_FRE.indd 8HB985-DB.BDEUPPK_FRE.indd 8 2010-05-14 1:54:172010-05-14 1:54:17

9Préparation
2
Préparation
Accessoires fournis
Câble vidéo (1) Télécommande (1)
Piles (1) Antenne FM (1)
Sabot iPod (1)
Accessoires du boîtier du haut-
parleur (S-BD707T)
Câble de haut-
parleur (5)
Vis (12)
bases du socle
d’enceinte (4)
Tampons anti-
dérapant – petits (1)
Tampons anti-
dérapant - moyens
(1)
Accessoires du boîtier du haut-
parleur (S-BD707SW)
Câble de haut-
parleur (1)
Tampons anti-
dérapant - grands (1)
Accessoires du boîtier du haut-
parleur (S-BD303)
Câble de haut-
parleur (6)
Tampons anti-
dérapant – petits (1)
Tampons anti-
dérapant - grands (1)
HB985-DB.BDEUPPK_FRE.indd 9HB985-DB.BDEUPPK_FRE.indd 9 2010-05-14 1:54:182010-05-14 1:54:18

10 Préparation
Préparation
2
Disques pouvant être lus
Disques Blu-ray
- Disques tels que des lms
disponibles à l’achat ou à la
location.
- Disques BD-R/RE contenant
des chiers vidéo, musicaux ou
photo.
DVD-VIDEO
8 / 12 cm
Disques tels que des lms
disponibles à l’achat ou à la location.
DVD±R
8 / 12 cm
- Mode vidéo et nalisé
uniquement.
- Les disques double couche
sont également accept
és.
- Format AVCHD nalisé.
- Disques DVD±R contenant des
chiers vidéo, musicaux ou photo.
DVD-RW
8 / 12 cm
- Mode VR, mode vidéo et
nalisé uniquement.
- Format AVCHD nalisé.
- Disques D
VD-RW contenant
des chiers vidéo, musicaux ou
photo.
DVD+RW
8 / 12 cm
- Mode vidéo et nalisé
uniquement.
- Format AVCHD.
- F
ormat AVCHD nalisé.
- Disques DVD+RW contenant
des chiers vidéo, musicaux ou
photo.
Audio CD
8 / 12 cm
CD-R/RW
8 / 12 cm
- Disques CD-R/RW contenant
des chiers audio, vidéo,
musicaux ou photo.
REMARQUE
• Selon les caractéristiques du matériel
d’enregistrement ou du CD-R/RW
(ou DVD±R/RW) à proprement parler, certains
CD-R/RW (ou DVD±R/RW) peuvent ne pas être
lus par l’appareil.
• En fonction du logiciel d’enregistrement et de la
nalisation, il est possible que certains disques
enregistrés (CD-R/RW, DVD±R/RW, BD-R/RE) ne
puissent pas être lus.
• Il est possible que les BD-R/RE, DVD±R/RW et
CD-R/RW enregistrés à l’aide d’un ordinateur ou
d’un enregistreur de CD/DVD puissent ne pas
être lus si le disque est endommagé ou sale, ou
si la lentille du lecteur présente de la poussière
ou de la condensation.
• Si vous enregistrez un disque à l’aide d’un
ordinateur, même s’il est enregistré dans un
format compatible, il existe une possibilité qu’il
ne puisse pas être lu à cause des paramètres du
logiciel d’application utilisé pour créer le disque.
(Adressez-vous à l’éditeur du logiciel pour des
informations plus détaillées.)
• Pour obtenir une qualité de lecture optimale,
ce lecteur nécessite que les disques et les
enregistrements répondent à certaines normes
techniques.
• Les DVD préenregistrés sont automatiquement
conformes à ces normes. Il existe de nombreux
types de formats de disques enregistrables (dont
des disques CD-R contenant des chiers MP3
ou WMA), et ces formats requièrent certaines
conditions préexistantes pour que la lecture soit
possible.
• Veuillez noter qu’il est nécessaire d’avoir une
autorisation pour télécharger des chiers MP3
ou WMA et de la musique depuis internet. Notre
société n’ayant pas le droit d’accorder une telle
autorisation, cette dernière doit toujours être
recherchée auprès du détenteur des droits
d’auteur.
HB985-DB.BDEUPPK_FRE.indd 10HB985-DB.BDEUPPK_FRE.indd 10 2010-05-14 1:54:182010-05-14 1:54:18

11Préparation
2
Préparation
Compatibilité des chiers
Généralités
Extension de chiers disponibles :
“.jpg”, “.jpeg”, “.png”, “.avi”, “.divx”, “.mpg”, “.mpeg”,
“.mkv”, “.mp4”, “.mp3”, “.wma”, “.wav”
• Les extensions de chiers disponibles
varient suivant les ser
veurs DLNA.
• Certains chiers “.wav” ne sont pas pris en
charge par cet appar
eil.
• Les noms des chiers sont limités à 180
caractères.
• Suivant la taille et le nombre de chiers,
plusieurs minutes peuvent être nécessaires
pour lire les contenus du support.
Nombre maximal de chiers par dossier:
2 000 (nombre total de chiers et de dossiers)
Format des CD-R/RW, DVD±R/RW et BD-R/
RE: ISO 9 660+JOLIET, UDF et UDF Bridge
FILM
Taille de résolution disponible:
1 920 x 1 080 pixels (L x H)
Sous-titres compatibles: SubRip (.srt /
.txt), SAMI (.smi), SubStation Alpha (.ssa/.txt),
MicroDVD (.sub/.txt), VobSub (.sub), SubViewer
1.0 (.sub), SubViewer 2.0 (.sub/.txt), TMPlayer
(.txt), DVD Subtitle System (.txt)
• Le ltre VobSub (.sub) n’est pas disponible
avec la fonction [Home Link].
Formats codec compatibles: “DIVX3.xx”,
“DIVX4.xx”, “DIVX5.xx”, “XVID”, “DIVX6.xx” (lecture
standard uniquement), H.264/MPEG-4 AVC,
MPEG1 SS, MPEG2 PS, MPEG2 TS
Formats audio compatibles: “Dolby Digital”,
“DTS”, “MP3”, “WMA”, “AAC”, “AC3”
• Ce lecteur n’est pas entièrement compatible
avec le format audio WMA et AAC.
Fréquence d’échantillonnage:
dans la plage 32 kHz à 48 kHz (WMA),
dans la plage 16 kHz à 48 kHz (MP3),
Débit binaire:
dans la plage 20 kbps à 320 kbps (WMA),
dans la plage 32 kbps à 320 kbps (MP3)
REMARQUE
• Les chiers vidéo haute dé nition contenus
sur un CD ou un périphérique USB 1,0/1,1
risquent de ne pas être lus correctement. Pour
lire des chiers vidéo haute dé nition, il est
recommandé d’utiliser les formats BD, DVD ou
USB 2,0.
• Ce lecteur prend en charge le format H.264/
MPEG-4 AVC pro l Main ou High au niveau 4,1.
Dans le cas d’un chier de niveau supérieur, un
message d’avertissement s’a chera à l’écran.n.
• Ce lecteur ne prend pas en charge les chiers
enregistrés avec fonction GMC*1 ou Qpel*2.
Il s’agit de techniques d’encodage vidéo du
standard MPEG4, comme celles dont disposent
DivX ou XVID.
*1 GMC – Global Motion Compensation
(compensation globale de mouvements)
*2 Qpel – Quarter pixel (quart de pixel)
MUSIQUE
Fréquence d’échantillonnage:
dans la plage 8 kHz à 48 KHz (WMA),
dans la plage 11 kHz à 48 kHz (MP3)
Débit binaire:
dans la plage 8 kbps à 320 kbps (WMA, MP3),
REMARQUE
• Ce lecteur ne prend pas en charge les balises
ID3 intégrées dans les chiers MP3.
• La durée totale de lecture indiquée à l’écran
peut ne pas être correcte pour les chiers VBR.
PHOTO
Taille recommandée:
Inférieure à 4 000 x 3 000 x 24 bits/pixel
Inférieure à 3 000 x 3 000 x 32 bits/pixel
Inférieure à 4 MByte/ le
• Les chiers d’image photo progressifs et à
compression sans perte ne sont pas pris en
charge.
HB985-DB.BDEUPPK_FRE.indd 11HB985-DB.BDEUPPK_FRE.indd 11 2010-05-14 1:54:192010-05-14 1:54:19

12 Préparation
Préparation
2
Code de région
Un code de région est indiqué à l’arrière de
l’appareil. Ce dernier ne peut lire que les
disques DVD ou BD-ROM de la même zone ou
portant la mention “ALL” (Toutes zones).
AVCHD (codec vidéo avancé en
haute dé nition)
• Ce lecteur peut lire les disques au format
AVCHD. Ces disques sont normalement
enregistrés et utilisés dans les caméscopes.
• Le format AVCHD est un format
d’enregistrement numérique de vidéo
haute dé nition.
• Le format MPEG-4 AVC/H.264 peut
compresser les images avec une plus
grande e cacité que le format de
compression d’image conventionnel.
• Certains disques AVCHD utilisent le format
“x.v.Colour”.
• Ce lecteur peut lire les disques AVCHD au
format “x.v.Colour”.
• Selon leurs conditions d’enregistrement, il
est possible que certains disques au format
AVCHD ne puissent pas être lus.
• Les disques au format AVCHD doivent être
nalisés.
• Le format “x.v.Colour” o re une palette de
couleurs plus vaste que les disques pour
caméscope DVD normaux.
Con gurations systme
spéci ques
Pour la lecture vidéo haute dé nition:
• Téléviseur haute dé nition doté de prises
d’entrée COMPOSANTES ou HDMI.
• BD-ROM avec du contenu haute dé nition.
• Une entrée HDMI ou DVI compatible HDCP
est nécessaire sur votre téléviseur pour
certains contenus (indiqués par les auteurs
du disque).
• Pour l’extrapolation des DVD de dé nition
standard, une entrée HDMI ou DVI
compatible HDCP est nécessaire sur votre
téléviseur a n d’accéder aux contenus
protégés contre la copie.
Remarques sur la compatibilité
• Comme les disques BD-ROM sont un
nouveau format, certains problèmes avec
les disques, la connexion numérique ou
d’autres problèmes de compatibilité sont
possibles. Si vous rencontrez des problèmes
de compatibilité, contactez un point de
service après-vente agréé.
• Pour visionner un contenu haute dé nition
et extrapoler un contenu DVD de dé nition
standard, il peut être nécessaire d’avoir une
entrée HDMI ou une entrée DVI compatible
HDCP sur votre téléviseur.
• Certains DVD et BD-ROM peuvent limiter
l’utilisation de certaines fonctionnalités ou
commandes.
• Vous pouvez utiliser un périphérique USB
qui sert à stocker des informations liées au
disque, notamment les contenus en ligne
téléchargés. Le disque que vous utilisez
déterminera la durée de conservation de
ces informations.
HB985-DB.BDEUPPK_FRE.indd 12HB985-DB.BDEUPPK_FRE.indd 12 2010-05-14 1:54:192010-05-14 1:54:19

13Préparation
2
Préparation
Télécommande
1
2
3
• • • • • • • • •
a
• • • • • • • • •
1
(STANDBY/ON): permet
d’allumer ou d’éteindre le lecteur.
Z
OPEN/CLOSE: permet
d’ouvrir ou de fermer le plateau du
disque.
INPUT/TUNER: permet de
modi er la source d’entrée.
BT AUDIO: Change le mode
d’entrée pour BT AUDIO
directement.
OPTICAL: Passe automatiquement
en mode d’entrée optique.
DISPLAY: permet
d’activer ou de désactiver
l’a chage à l’écran.
HOME MENU: permet
d’a cher ou de quitter le [Menu
d’accueil].
MENU: permet d’accéder au menu
du disque.
Touches échées: per
mett
ent de
sélectionner une option dans le
menu.
ENTER: permet de con rmer la
sélection du menu.
TUNE (+/-): Réglage de la station
de radio de votre choix.
PRESET: Sélections programmées
des radios.
• • • • • • • • •
b
• • • • • • • • •
O
RETURN: permet de quitter le
menu ou de reprendre la lecture.
POPUP/ TOP MENU: permet
d’a cher le menu de titres du DVD
ou le menu contextuel du BD-
ROM, s’il est disponible.
x
STOP: permet d’arrêter la
lecture.
B
PLAY: permet de démarrer la
lecture.
X
PAUSE/STEP: permet de mettre
la lecture en pause.
.
/
>
SKIP: Permet de passer
à la piste, au chier ou au chapitre
précédent/suivant.
m
/
M
SCAN: permet
d’e ectuer une recherche vers
l’arrière ou l’avant.
SPK LEVEL: Règle le volume
sonore du haut-parleur souhaité.
z
USB REC: enregistre un CD
audio.
MUTE: Passer en mode muet.
SOUND: Sélectionne un mode
d’e et sonore.
VOL +/- : Ajustez le volume des
haut-parleurs.
• • • • • • • • •
c
• • • • • • • • •
Touches numériques 0-9:
permettent de sélectionner les
options numérotées dans un
menu.
MARKER: Marque n’importe quel
passage lors de la lecture.
SEARCH: A che ou ferme le menu
de recherche.
REPEAT: permet de répéter une
section de votre choix.
CLEAR: permet d’e acer un index
dans le menu de recherche ou un
numéro lors de la dé nition du
mot de passe.
DIMMER: Pour réduire la luminosité
de l’a chage de l’appareil.
ZOOM: Accède au menu du zoom.
Touches de couleurs
(A, B, C, D): Utilisées pour naviguer
sur les menus.
- Bouton A (RDS): permet
d’activer la fonction RDS (Radio
Data System).
- Bouton B (PTY): visualise le type
de programme du RDS.
- Bouton C (PTY SEARCH):
Recherche un type de programme.
- Bouton D: Sélectionne mono/
stéréo en mode FM.
Touches de contrôle TV: Voir page
67.
SLEEP: Fixe un certain laps de
temps après lequel l’appareil
s’éteint.
Insertion des piles
Retirez le couvercle des piles
au dos de la télécommande,
et insérez une pile R03 (taille
AAA), en respectant les
polarités et .
HB985-DB.BDEUPPK_FRE.indd 13HB985-DB.BDEUPPK_FRE.indd 13 2010-05-14 1:54:192010-05-14 1:54:19

14 Préparation
Préparation
2
Panneau avant
a
Plateau de disque
b
Touches de fonctionnement
1
STANDBY/ON Touche
Z
(OPEN/CLOSE)
FONCTION
Change la source d’entrée ou la fonction.
B
/
X
(PLAY / PAUSE)
x
(STOP)
.
/
>
(SKIP)
- TUNE + (Réglage de station de radio)
c
Capteur de la télécommande
d
Fenêtre d’a chage
e
PORTABLE IN
f
Port USB
g
Réglage du volume
1
2
3 4 5 6 7
HB985-DB.BDEUPPK_FRE.indd 14HB985-DB.BDEUPPK_FRE.indd 14 2010-05-14 1:54:192010-05-14 1:54:19

15Préparation
2
Préparation
a
Cordon d’alimentation
Branchez sur le secteur.
b
Connecteurs haut-parleurs
c
Ventilateur
d
Connecteur Antenne
e
VIDEO OUT
f
AUX (L/R) INPUT
g
COMPONENT VIDEO (Y PB PR)
OUTPUT (PROGRESSIVE SCAN)
h
OPTICAL IN 1(TV) / 2
i
iPod (24 broches)
Raccordement au sabot iPod fourni.
j
HDMI OUT (type A, version 1.3)
Entrées HDMI pour connexion TV.
k
Port LAN
Panneau arrire
1 2 3 4 5
6 7 8 9 10 11
HB985-DB.BDEUPPK_FRE.indd 15HB985-DB.BDEUPPK_FRE.indd 15 2010-05-14 1:54:192010-05-14 1:54:19

16 Installation
Installation
3
Assemblez les
enceintes
Connexion au haut-parleur
BCS-707
Préparation des haut-parleurs
1. Fixez les tampons anti-dérapage à la base
des socles de chaque haut-parleur, du
caisson de basse et du haut-parleur central.
Utilisez l’adhésif fourni pour xer les quatre
tampons moyens à la base (en bas) de
chacun des socles de haut-parleur.
middle non-skid pads
Tampons anti-dérapant - moyens
Pour le caisson de basse :
Utilisez l’adhésif fourni pour xer quatre
grands tampons à la base du caisson de
basse.
large non-skid pads
Tampons anti-dérapant - grands
Pour le haut-parleur central :
Utilisez l’adhésif fourni pour xer quatre
petits tampons à la base du haut-parleur
central.
small non-skid pads
Tampons anti-
dérapant - petits
2. Fixez les socles des haut-parleurs aux tiges
en utilisant les vis fournies.
Dès que vous avez aligné la tige et la base
du socle, xez avec les petites vis aux points
indiquées ci-dessous. Notez que le haut-
parleur doit être face en direction de la base
d’un triangle isocèle.
Rear
Front
Arrière
Avant
3
Installation
HB985-DB.BDEUPPK_FRE.indd 16HB985-DB.BDEUPPK_FRE.indd 16 2010-05-14 1:54:202010-05-14 1:54:20

17Installation
3
Installation
3. Branchez les ls sur le lecteur.
Branchez le l blanc avec la ligne grise sur
le côté (+) et l’autre sur le côté (–). Pour
raccorder le l d’enceinte sur le lecteur,
appuyez sur chaque onglet en plastique
pour ouvrir la borne de connexion. Insérez
chaque l dans la borne appropriée, puis
relâcher l’onglet.
couleur (+)
Noir (–)
ATTENTION
• Ne branchez pas d’autres haut-parleurs que
ceux fournis avec de système.
• Ne branchez pas les haut-parleurs fournis sur
aucun autre ampli cateur que celui fourni
avec ce système. Toute connexion sur un
autre ampli cateur peut se traduire par un
dysfonctionnement ou un incendie.
Fixez vos haut-parleurs avant et
enceintes satellites
Fixez chaque haut-parleur avant et enceinte
satellite avec les taquets en plastique fournis.
Vissez sur crochets de support dans le mur
situé derrière le haut-parleur. Passez un cordon
épais autour des crochets et par le taquet
en plastique a n de stabiliser le haut-parleur
(véri ez bien que tout le dispositif est en
mesure de supporter le poids du haut-parleur).
Après l’installation, véri ez que le haut-parleur
est bien xé.
thick cord
Plastic catch
Cordon
su samment épais
Taquet en plastique
ATTENTION
• Le taquet en plastique n’est pas une xation
de montage et le haut-parleur ne doit pas être
directement accroché au mur avec ce taquet.
Utilisez toujours un cordon pour la stabilisation
du haut-parleur.
• Pioneer décline toute responsabilité en cas de
perte ou de dommages dus à un assemblage
et une installation incorrecte, à l’utilisation
de matériaux d’installation insu samment
robustes, à une mauvaise utilisation ou à des
catastrophes naturelles.
• Lors du placement de cet appareil, veillez à ce
qu’il soit installé de telle sorte qu’il ne risque
pas de tomber ni de causer des blessures
dans l’éventualité d’une catastrophe naturelle
(comme un tremblement de terre).
HB985-DB.BDEUPPK_FRE.indd 17HB985-DB.BDEUPPK_FRE.indd 17 2010-05-14 1:54:202010-05-14 1:54:20

18 Installation
Installation
3
Connexion au haut-parleur
BCS-303
Préparation des haut-parleurs
1. Fixez les tampons anti-dérapage à la base
de chaque haut-parleur.
Pour les haut-parleurs avant et enceintes
satellites :
Utilisez l’adhésif fourni pour xer les quatre
petits tampons à la base (en bas) de chacun
des socles de haut-parleurs.
samll non-skid pads
Tampons anti-dérapant –
petits
Pour le caisson de basse :
Utilisez l’adhésif fourni pour xer quatre
grands tampons à la base du caisson de
basse.
large non-skid pads
Tampons anti-dérapant –
grands
Pour le haut-parleur central :
Utilisez l’adhésif fourni pour xer quatre
petits tampons à la base du haut-parleur
central.
samll non-skid pads
Tampons anti-dérapant
– petits
2. Branchez les ls sur le lecteur.
Branchez le l blanc avec la ligne grise sur
le côté (+) et l’autre sur le côté (–). Pour
raccorder le l d’enceinte sur le lecteur,
appuyez sur chaque onglet en plastique
pour ouvrir la borne de connexion. Insérez
chaque l dans la borne appropriée, puis
relâcher l’onglet.
couleur (+)
Noir (–)
HB985-DB.BDEUPPK_FRE.indd 18HB985-DB.BDEUPPK_FRE.indd 18 2010-05-14 1:54:202010-05-14 1:54:20

19Installation
3
Installation
Montage mural du
haut-parleur central
Le haut-parleur central dispose d’un trou de
montage qui permet de xer le haut-parleur au
mur.
Avant le montage
Rappelez-vous que le système de haut-parleurs
est lourd et que son poids pourrait fragiliser la
xation des vis au mur, ou que le matériau du
mur pourrait ne pas résister au poids du haut-
parleur qui risquerait de tomber. Véri ez que
le mur sur lequel vous prévoyez de monter les
haut-parleurs est su samment robuste pour
supporter le poids du haut parleur. N’e ectuez
pas de montage sur du contre-plaqué ou des
cloisons à surface fragile.
Les vis de montage ne sont pas fournies.
Utilisez des vis appropriées au matériau du
mur et capable de supporter le poids des haut-
parleurs.
ATTENTION
• Si vous n’êtes pas sûr de la qualité et de la
robustesse de la cloison, demandez conseil à un
professionnel.
• Pioneer ne peut pas être tenu pour responsable
d’accidents ou de dommage dus à une
installation incorrecte.
5 mm
10 mm
Mounting screw
(not supplied)
Vis de montage
(non fournies)
Remarque
supplémentaire à
propos du placement
des haut-parleurs
Installez les haut-parleurs principaux avant
gauche et droit à égale distance de votre
téléviseur.
Précautions :
Veillez à bien torsader ensemble tous les
ls nus des haut-parleurs et de les insérer
complètement dans la borne du haut-parleur
Si un des ls nus de haut-parleur touche le
panneau arrière, cela peut provoquer une
coupure de l’alimentation à titre de mesure de
sécurité..
Les haut-parleurs avant, central et enceintes
satellites fournis avec ce système sont
blindés magnétiquement. Toutefois, selon
l’emplacement de l’installation, une distorsion
des couleurs peut apparaître sur l’écran de
votre téléviseur si vous avez installé le haut-
parleur vraiment trop près de celui-ci. Si c’est
le cas, éteignez votre téléviseur, puis allumez-
le après avoir patienté entre 15 et 30 minutes.
Si le problème persiste, éloignez le système de
haut-parleurs de votre téléviseur.
Le caisson de basse n’est pas blindé
magnétiquement et ne doit donc pas
être placé à proximité d’un téléviseur ou
d’un moniteur. Les supports de stockage
magnétiques (comme des disquettes, les
bandes et cassettes vidéo) ne doivent pas être
rangés à proximité du caisson de basse.
Ne xez pas les haut-parleurs avant/enceintes
satellites et le caisson de basse à un mur ou
au plafond. Ils peuvent tomber et causer des
blessures.
De 5 mm à 7 mm
HB985-DB.BDEUPPK_FRE.indd 19HB985-DB.BDEUPPK_FRE.indd 19 2010-05-14 1:54:212010-05-14 1:54:21

20 Installation
Installation
3
Positionnement du système
L’illustration suivante montre comment
positionner le système (exemple). Notez que
les illustrations de ces instructions sont à titre
explicatives et peuvent parfois di érer de votre
Home Cinema.
Pour un meilleur son surround possible, tous
les haut-parleurs autres que le subwoofer
doivent être placés à égale distance de la
position d’écoute (
A
).
A
B
D
E
F
A
A
A
A
A
G
C
A
Haut-parleur avant gauche (L)/
B
Haut-parleur avant droit (R):
Placez les haut-parleurs avant sur les côtés de
l’écran ou du moniteur et si possible à la même
hauteur.
C
Haut-parleur central:
Placez le haut-parleur central au dessus ou en
dessous de l’écran ou du moniteur.
D
Haut-parleur surround gauche (L)/
E
Haut-parleur surround droit (R):
Placez ces haut-parleurs derrière votre position
d’écoute, légèrement tournés vers l’intérieur.
F
Subwoofer:
La position du subwoofer n’est pas cruciale car
les extrêmes graves sont non-directionnels.
Mais il est préférable de placer le subwoofer
près des haut-parleurs avant. Tournez-le
légèrement vers le centre de la pièce pour
réduire les ré exions sur les murs.
G
Ampli
ATTENTION
• Veillez à ce que les enfants ne mettent pas les
mains ou tout autre objet dans le canal du haut-
parleur.
*Canal du haut parleur pour l’excitation aéro-
acoustique : basses abondantes sur un haut-
parleur acoustique.
• Placez l’enceinte centrale hors d’atteinte des
enfants.
Sinon, l’enceinte pourrait être endommagée et/
ou provoquer des dommages matériels et/ou
des blessures.
• Les enceintes contenant des pièces
magnétiques, il est possible que des irrégularités
de couleurs apparaissent sur l’écran du téléviseur
ou du moniteur d’ordinateur.
Utilisez les enceintes à une distance éloignée de
votre téléviseur ou écran d’ordinateur.
HB985-DB.BDEUPPK_FRE.indd 20HB985-DB.BDEUPPK_FRE.indd 20 2010-05-14 1:54:212010-05-14 1:54:21

21Installation
3
Installation
Connexion à votre TV
E ectuez la ou les connexions suivantes en
fonction des capacités de vos appareils à
connecter à l’ampli.
• Connexion HDMI (voir pages 21-22)
• Connexion vidéo composantes (page 22)
• Connexion vidéo (page 23)
REMARQUE
• Il existe plusieurs façons de connecter le lecteur
en fonction de votre TV et des autres appareils
que vous souhaitez connecter. Choisissez l’une
des connexions présentées dans le manuel.
• Veuillez vous référez aux manuels de votre TV,
chaîne hi- ou autres dispositifs nécessaires pour
e ectuer les connexions correctement.
• Assurez-vous que le lecteur est branché
directement à votre TV. Réglez la TV sur le canal
d’entrée vidéo.
• Ne branchez pas votre lecteur via votre
magnétoscope. L’image pourrait être déformée
par le système de protection contre la copie.
Connexion HDMI
Si vous possédez un moniteur ou un téléviseur
HDMI, vous pouvez le raccorder à ce lecteur à
l’aide d’un câble HDMI (type A, version 1.3).
Raccordez la prise de sortie HDMI OUT de
l’appareil à la prise d’entrée HDMI IN d’un
téléviseur ou d’un moniteur compatible HDMI.
Connexion HDMI
Player
TV
TV
Lecteur
Réglez la source du téléviseur sur HDMI
(reportez-vous au manuel d’utilisation de votre
téléviseur).
HB985-DB.BDEUPPK_FRE.indd 21HB985-DB.BDEUPPK_FRE.indd 21 2010-05-14 1:54:212010-05-14 1:54:21

22 Installation
Installation
3
REMARQUE
• Une modi cation de la résolution alors que la
connexion est déjà établie peut entraîner des
dysfonctionnements. Pour résoudre le problème,
éteignez le lecteur puis rallumez-le.
• Lorsque la connexion HDMI avec HDCP n’est
pas véri ée, le téléviseur a che un écran noir.
Dans ce cas, véri ez la connexion HDMI ou
débranchez le câble HDMI.
• Si des interférences apparaissent à l’écran,
véri ez le câble HDMI (la longueur du câble ne
doit généralement pas dépasser 4,5 m et vous
devez utiliser un câble HDMI haut-débit
(version 1.3).
• Si un périphérique HDMI raccordé n’accepte pas
la sortie audio du lecteur, le son du périphérique
HDMI peut être déformé ou muet.
• Lorsque vous utilisez la connexion HDMI, vous
pouvez modi er la résolution pour la sortie
HDMI. (Reportez-vous à la section “Réglage de la
résolution”, page 23.)
• Sélectionnez le type de sortie vidéo pour la prise
de sortie HDMI OUT à l’aide de l’option [Rég.
couleur HDMI] dans le menu [Con g.]
(voir page 34).
• Lorsque vous raccordez un appareil compatible
HDMI ou DVI, e ectuez les véri cations
suivantes:
- Essayez d’éteindre l’appareil HDMI/DVI ainsi
que ce lecteur. Ensuite, allumez
l’appareil HDMI/DVI, attendez environ 30
secondes, puis allumez ce lecteur.
- L’entrée vidéo de l’appareil raccordé est
correctement réglée pour cet appareil.
- L’appareil raccordé est compatible avec les
résolutions d’entrée vidéo 720 x 576p (480p),
1280 x 720p, 1920 x 1080i et 1920 x 1080p.
• Certains appareils DVI ou HDMI compatibles
HDCP ne fonctionneront pas avec ce lecteur.
- L’image ne s’a chera pas correctement avec
un appareil non HDCP.
- Ce lecteur ne peut pas e ectuer la lecture et le
téléviseur a che un écran noir.
Connexion vidéo composantes
Raccordez les prises COMPONENT VIDEO OUT
de l’appareil avec les prises correspondantes
du téléviseur, à l’aide de câbles Y Pb Pr.
Vous pouvez entendre le son sortir des
enceintes du système.
Connexion en composantes
Player
TV
Green
Blue
Red
PR
PB
Y
COMPONENT
VIDEO
INPUT
OUTPUT
L
AUX
R
VIDEO
Lecteur
Vert
Bleu
Rouge
TV
REMARQUE
Lorsque vous utilisez la sortie vidéo composantes
COMPONENT VIDEO OUT, vous pouvez modi er
la résolution pour la sortie. (Reportez-vous à la
section “Réglage de la résolution”, voir page 23.)
HB985-DB.BDEUPPK_FRE.indd 22HB985-DB.BDEUPPK_FRE.indd 22 2010-05-14 1:54:222010-05-14 1:54:22

23Installation
3
Installation
Connexion vidéo
Raccordez la prise de sortie vidéo VIDEO
OUT du lecteur à la prise d’entrée vidéo du
téléviseur à l’aide d’un câble vidéo.
Vous pouvez entendre le son sortir des
enceintes du système.
Connexion vidéo
TV
Yellow
PR
PB
Y
COMPONENT
VIDEO
INPUT
OUTPUT
L
AUX
R
VIDEO
Lecteur
TV
Jaune
Réglage de la résolution
Le lecteur o re plusieurs résolutions de
sortie pour les prises de sortie HDMI OUT
et COMPONENT VIDEO OUT. Vous pouvez
modi er la résolution à l’aide du menu
[Con g.].
1. Appuyez sur la touche HOME MENU (
).
2. Utilisez les touches
I
/
i/U
/
u
pour
sélectionner [Con g.], puis appuyez sur
ENTER (
). Le menu [Con g.] apparaît.
3. Utilisez les touches
U
/
u
pour sélectionner
l’option [AFFICHAGE], puis appuyez sur
i
pour accéder au deuxième niveau.
4. Utilisez les touches
U
/
u
pour sélectionner
l’option [Résolution] puis appuyez sur
ENTER (
) ou
i
pour accéder au troisième
niveau de menu.
5. Utilisez les touches
U
/
u
pour sélectionner
la résolution souhaitée, puis appuyez sur
la touche ENTER ( ) pour con rmer votre
choix.
REMARQUE
• Si votre téléviseur n’accepte pas la résolution
que vous avez dé nie sur le lecteur, vous pouvez
régler la résolution sur 576p (480p) comme suit:
1. Appuyez sur
Z
pour ouvrir le tiroir à disque.
2. Appuyez sur la touche
x
pendant au moins
5 secondes.
• Comme plusieurs facteurs a ectent la résolution
de sortie vidéo, reportez-vous à la section
“Résolution de la sortie vidéo”, page 70.
HB985-DB.BDEUPPK_FRE.indd 23HB985-DB.BDEUPPK_FRE.indd 23 2010-05-14 1:54:222010-05-14 1:54:22

24 Installation
Installation
3
Connexion de
l’antenne
Branchez l’antenne fournie pour écouter la
radio.
Connexion de l’antenne
Player
Lecteur
REMARQUE
Après avoir connecté l’antenne laire FM,
positionnez-la à l’horizontal autant que possible.
Veillez à étendre complètement l’antenne laire
FM.
Connexions avec un
équipement externe
Connexion AUX
Vous pouvez écouter la musique de votre
appareil avec les prises de sortie analogique
audio des haut-parleurs du système.
Branchez le câble de sortie analogique audio
de votre appareil aux entrées L/R (INPUT)
de l’ampli. Puis sélectionnez l’option AUX en
appuyant sur les touches INPUT/TUNER,
I
/
i
et ENTER (
).
Connexion AUX
Player
To the audio output jacks
of your component
(TV, VCR, etc.)
Red
White
PR
PB
Y
COMPONENT
VIDEO
INPUT
L
AUX
R
VIDEO
Rouge
Blanc
Lecteur
Vers la sortie audio de
votre appareil
(TV, VCR, etc.)
HB985-DB.BDEUPPK_FRE.indd 24HB985-DB.BDEUPPK_FRE.indd 24 2010-05-14 1:54:232010-05-14 1:54:23

25Installation
3
Installation
Connexion PORT. IN
(Entrée Port)
Vous pouvez écouter la musique de votre
lecteur audio portable sur les haut-parleurs du
système.
Branchez le casque (ou la sortie de ligne) de
votre lecteur audio portable au PORTABLE
IN de l’ampli. Puis sélectionnez l’option
[PORTABLE] en appuyant sur les touches
INPUT/TUNER,
I
/
i
et ENTER (
).
Connexion PORT.IN
twZGSGUUU
Lecteur MP3, etc.
Connexion OPTICAL IN 1/2
(Entrée optique)
Vous pouvez écouter la musique de votre
appareil avec la connexion numérique optique
depuis les haut-parleurs du système.
Connectez la prise de sortie optique de votre
appareil dans la prise OPTICAL IN 1/2 de
l’ampli. Puis sélectionnez l’option [OPTICAL 1/2]
en appuyant sur les touches INPUT/TUNER,
I
/
i
et ENTER (
). Ou appuyez directement
sur OPTICAL.
Connexion optique
To the digital
optical output jack
of your component
Vers la prise de sortie
numérique optique
de votre appareil
HB985-DB.BDEUPPK_FRE.indd 25HB985-DB.BDEUPPK_FRE.indd 25 2010-05-14 1:54:232010-05-14 1:54:23

26 Installation
Installation
3
Connexion Bluetooth®
À propos de Bluetooth
Bluetooth® est une technologie de
communication sans l dédiée à des
connexions à courte distance.
La portée accessible est inférieure à 10 mètres.
(Le son peut être interrompu si la connexion
interfère avec d’autres ondes électroniques
ou si vous connectez votre dispositif bluetooth
dans d’autres pièces.)
La connexion de périphériques individuels en
employant la technologie sans l Bluetooth
n’entraîne aucune charge supplémentaire.
Vous pouvez faire fonctionner un téléphone
mobile équipé de la technologie sans l
Bluetooth via la Cascade si la connexion a été
réalisée au moyen de la technologie sans l
Bluetooth.
Équipements pris en charge : téléphone
mobile, MP3, ordinateur portable, assistant
numérique personnel (PDA) (ces appareils
acceptent les écouteurs stéréo).
Pro ls Bluetooth
Pour utiliser la technologie sans l, les appareils
doivent être capables d’interpréter certain
pro ls.
Cet appareil est compatible avec le pro l
suivant.
A2DP (Advanced Audio Distribution Pro le -
pro l de distribution audio avancée)
Écoute de morceaux de musique d’un
équipement Bluetooth
Appariement de votre appareil avec
l’équipement Bluetooth
Avant de démarrer la procédure d’appariement,
véri ez que la fonction Bluetooth est activée
sur votre équipement Bluetooth. Pour plus
d’informations, reportez-vous au mode
d’emploi de votre équipement Bluetooth.
Une fois l’appariement réalisé, il ne sera plus
nécessaire de l’e ectuer à l’avenir.
1. Sélectionnez la fonction Bluetooth à l’aide
de la touche INPUT/TUNER ou BT AUDIO.
“BT AUDIO”, puis “BT READY” apparaissent
sur la fenêtre d’a chage.
2. Faites fonctionner l’équipement Bluetooth
et exécutez la procédure d’appariement.
En e ectuant la recherche de cet appareil
avec l’équipement Bluetooth, selon le
type d’équipement Bluetooth, la liste des
équipements trouvés peut apparaître sur
l’a chage de l’équipement Bluetooth .
Votre appareil apparaît sous l’appellation
“PIONEER AUDIO”.
3. Entrez le code PIN.
Code PIN : 0000
4. Lorsque cet appareil est correctement
apparié avec votre équipement Bluetooth, la
LED Bluetooth de cet appareil s’allume et “BT
SINK” apparaît.
REMARQUE
Selon le type de votre équipement Bluetooth,
certains appareils peuvent avoir des méthodes
d’appariement di érentes.
5. Écoute de morceaux de musique.
Pour écouter de la musique enregistrée sur
votre équipement Bluetooth, reportez-vous
au mode d’emploi de votre équipement
Bluetooth.
REMARQUE
• Si vous changez le fonctionnement de l’appareil,
la fonction Bluetooth est déconnectée, vous
devez alors refaire l’appariement.
• AVRCP n’est pas accessible dans ce mode.
HB985-DB.BDEUPPK_FRE.indd 26HB985-DB.BDEUPPK_FRE.indd 26 2010-05-14 1:54:242010-05-14 1:54:24

27Installation
3
Installation
Véri cation des informations de
l’équipement Bluetooth connecté
Cette fonction est disponible après
l’appariement. Vous pouvez contrôler les
informations Bluetooth.
Appuyez sur DISPLAY en maintenant la touche
enfoncée plusieurs fois.
Les informations Bluetooth sont modi ées
comme suit.
Adresse de l’équipement Bluetooth local
t
Nom de l’équipement
t
Aucun
t
...
REMARQUE
• Cet appareil ne reconnaît pas le pro l écouteur
mono (pro l mains libres).
• Le son peut être interrompu si la connexion
interfère avec d’autres ondes électroniques.
• Vous ne pouvez pas commander l’équipement
Bluetooth avec cet appareil.
• L’appariement est limité à un équipement
Bluetooth pour un appareil et le multi
appariement n’est pas possible.
• Bien que la distance entre votre équipement
Bluetooth et l’appareil soit inférieure à 10
m, s’il y a des obstacles entre ces éléments,
votre équipement Bluetooth peut ne pas être
connecté.
• Selon le type d’équipement, vous pourriez
ne pas être en mesure d’utiliser la fonction
Bluetooth.
• Sans connexion à Bluetooth active, “BT READY”
apparaît sur la fenêtre d’a chage.
• En cas de dysfonctionnement électrique dû
à des appareils utilisant la même fréquence
comme des équipements médicaux, des micro-
ondes ou des périphériques LAN sans l, la
connexion est perdue.
• Si quelqu’un se place entre l’équipement
Bluetooth et le lecteur, et ainsi interrompt la
communication, la connexion est perdue.
• L’écartement de la distance séparant
l’équipement Bluetooth de l’appareil peut
conduire à une diminution du son ; une
connexion trop faible peut entraîner une
déconnexion si l’espace entre l’équipement
Bluetooth et l’appareil est hors plage de
fonctionnement de l’équipement Bluetooth.
• Vous déconnectez l’équipement doté de
la technologie sans l Bluetooth lorsque
vous éteignez l’appareil principal ou placez
l’équipement à une distance supérieure à 10
mètres de l’appareil principal.
HB985-DB.BDEUPPK_FRE.indd 27HB985-DB.BDEUPPK_FRE.indd 27 2010-05-14 1:54:242010-05-14 1:54:24

28 Installation
Installation
3
Raccordement à votre
réseau domestique
Cet appareil peut être connecté à un réseau
local (LAN) via la prise LAN située à l’arrière de
l’appareil.
Reportez-vous à la documentation relative
à votre périphérique réseau pour plus
d’informations. Raccordez le port LAN du
lecteur au port correspondant de votre
modem ou routeur à l’aide d’un câble LAN ou
Ethernet en vente dans le commerce (CAT5 ou,
de préférence, connecteur RJ45).
Dans l’exemple de con guration d’une
connexion câblée ci-dessous, ce lecteur peut
accéder au contenu de chaque ordinateur.
Connexion à un réseau laire
Broadband
Service
Router
WAN
LAN 1
LAN 2
LAN 3
Player
PC
PC
Routeur
Service haut
débit
Lecteur
REMARQUE
• Maintenez fermement la che lorsque vous
branchez ou débranchez le câble LAN. Au
moment de débrancher, ne tirez pas sur le câble
LAN mais débranchez-le tout en appuyant sur la
languette.
• Ne raccordez pas un câble de téléphone
modulaire au port LAN.
• Comme il existe di érentes con gurations de
raccordement, suivez les spéci cations de votre
opérateur de télécommunications ou de votre
prestataire de services internet.
• Le lecteur envoie un signal audio depuis les
entrées HDMI à la fois vers la sortie HDMI et les
enceintes de l’appareil.
HB985-DB.BDEUPPK_FRE.indd 28HB985-DB.BDEUPPK_FRE.indd 28 2010-05-14 1:54:242010-05-14 1:54:24

29Installation
3
Installation
Paramétrage réseau
Avant de paramétrer le réseau câblé, vous
devez relier votre réseau domestique à internet
en haut débit.
S’il existe un serveur DHCP sur le réseau local
via une connexion câblée, ce lecteur se verra
attribuer automatiquement une adresse IP.
Une fois le raccordement physique e ectué,
certains réseaux domestiques nécessitent
de régler les paramètres réseau du lecteur.
Paramétrez l’option [RÉSEAU] comme suit.
1. Sélectionnez l’option [Con g. connexion]
dans le menu [Con g.] , puis appuyez sur la
touche ENTER (
).
2. Utilisez les touches
U
/
u
/
I
/
i
pour
sélectionner le mode IP [Dynamique] ou
[Statique].
Généralement, sélectionnez [Dynamique]
pour attribuer automatiquement une
adresse IP.
REMARQUE
S’il n’existe pas de serveur DHCP sur le réseau et
que vous voulez dé nir l’adresse IP manuellement,
sélectionnez [Statique], puis réglez les options
[Adresse IP], [Masque sous-réseau], [Passerelle] et
[Serveur DNS] à l’aide des touches
U
/
u
/
I
/
i
et
des touches numériques. Si vous vous trompez en
saisissant les chi res, appuyez sur la touche CLEAR
pour e acer la partie en surbrillance.
3. Sélectionnez [OK] et appuyez sur ENTER
( ) pour appliquer les paramètres réseau.
4. Le lecteur vous demandera de tester la
connexion réseau. Sélectionnez [OK] et
appuyez sur la touche ENTER ( ) pour
terminer la connexion réseau.
5. Si vous sélectionnez [Test] et appuyez sur
la touche ENTER ( ) à l’étape 4 ci-dessus,
le statut de la connexion réseau apparaît à
l’écran.
Vous pouvez aussi le tester via l’option
[Statut connexion] du menu [Con g.].
HB985-DB.BDEUPPK_FRE.indd 29HB985-DB.BDEUPPK_FRE.indd 29 2010-05-14 1:54:242010-05-14 1:54:24

30 Installation
Installation
3
Remarques sur la connexion réseau:
• Pour ce faire, après avoir raccordé le
lecteur au réseau domestique, éteignez
et/ou débranchez rapidement le câble
d’alimentation du routeur ou du modem
câblé du réseau domestique. Ensuite,
rallumez l’appareil et/ou rebranchez le
cordon d’alimentation.
• Selon le prestataire de services internet
(ISP), le nombre d’appareils pouvant
recevoir le service internet peut être limité
par les modalités de service applicables.
Pour plus de détails, contactez votre ISP.
• Notre entreprise décline toute
responsabilité en cas de dysfonctionnement
du lecteur et/ou de la fonctionnalité de
connexion à internet suite à des erreurs ou
problèmes de communication associés à
votre connexion internet haut débit ou à
tout autre équipement raccordé.
• Les caractéristiques des disques BD-
ROM accessibles via la fonctionnalité de
connexion à internet ne sont ni créées
ni fournies par notre entreprise, aussi
ne sommes-nous pas responsables de
leur bon fonctionnement ou de leur
disponibilité continue. Certains contenus
de disque disponibles via la connexion à
internet peuvent ne pas être compatibles
avec ce lecteur. Si vous avez des questions
concernant ces contenus, contactez le
producteur du disque.
• Certains contenus internet peuvent
nécessiter une connexion très haut débit.
• Même si le lecteur est correctement
raccordé et con guré, il se peut que certains
contenus internet ne puissent pas être lus à
cause d’un encombrement du réseau, de la
qualité ou de la largeur de bande de votre
service internet, ou de problèmes avec le
fournisseur du contenu.
• Certaines opérations liées à la connexion
à internet peuvent ne pas être possibles
en raison de certaines restrictions xées
par le prestataire de services internet (ISP)
fournissant votre connexion internet haut
débit.
• Tous les frais facturés par un ISP,
notamment, mais sans s’y limiter, les frais de
connexion, sont à votre charge.
• Un port LAN 10 Base-T ou 100 Base-TX est
nécessaire pour un raccordement câblé à ce
lecteur. Si votre service internet ne permet
pas un tel raccordement, vous ne pourrez
pas brancher le lecteur.
• Vous devez vous servir d’un routeur pour
pouvoir utiliser le service xDSL.
• Un modem DSL est nécessaire pour
utiliser le service DSL et un modem par
câble est nécessaire pour pouvoir utiliser
le service de modem par câble. Suivant la
méthode d’accès de votre ISP et le contrat
d’abonnement souscrit, il est possible que
vous ne puissiez pas utiliser la fonctionnalité
de connexion à internet o erte par ce
lecteur ou que vous soyez limité quant
au nombre d’appareils que vous pouvez
raccorder simultanément. (Si votre ISP
limite l’abonnement à un seul appareil, il est
possible que ce lecteur ne puisse pas être
raccordé lorsqu’un PC est déjà connecté.)
• L’utilisation d’un “routeur” peut ne pas être
autorisée ou être limitée en fonction des
règles et restrictions mises en place par
votre ISP. Pour plus de détails, contactez
directement votre ISP.
• Éteignez tous les appareils réseau non
utilisés dans votre réseau domestique local.
Certains appareils peuvent générer du tra c
sur le réseau.
HB985-DB.BDEUPPK_FRE.indd 30HB985-DB.BDEUPPK_FRE.indd 30 2010-05-14 1:54:242010-05-14 1:54:24

31Installation
3
Installation
Raccordement d’un
périphérique USB
Le lecteur peut lire des chiers vidéo, musique
et des chiers images contenus dans le
périphérique USB.
1. Insérez un périphérique USB au port USB
jusqu’à ce qu’il soit bien en place.
Connexion USB
2. Appuyez sur la touche HOME MENU.
Sélectionnez l’option [Film], [Photo] ou
[Musique] à l’aide des touches
U
/
u
/
I
/
i
,
puis appuyez sur ENTER ( ).
3. Sélectionnez un chier à l’aide des touches
U
/
u
/
I
/
i
, et appuyez sur la touche PLAY ou
ENTER (
) pour lire le chier.
Vous pouvez véri er à l’écran l’espace
disponible sur le périphérique USB.
4. Sélectionnez un autre mode. Retirez le
périphérique avec soin.
REMARQUE
• Ce lecteur prend en charge les clés mémoire
USB et disques durs externes aux formats
FAT16, FAT32 et NTFS lors de l’accès aux chiers
(musique, photos et lms). Toutefois, les
fonctionnalités BD-LIVE et d’enregistrement
de CD audio ne prennent en charge que les
formats FAT16 et FAT32. Lorsque vous utilisez les
fonctionnalités BD-LIVE et d’enregistrement d’un
CD audio, utilisez une clé USB à mémoire Flash
ou un disque dur externe au format FAT16 ou
FAT32.
• Le périphérique USB peut être utilisé pour le
stockage local a n de visionner des disques BD-
LIVE avec internet.
• Cet appareil peut prendre en charge jusqu’à
quatre partitions du périphérique USB.
• Ne retirez pas le périphérique USB pendant
l’utilisation (lecture, etc.).
• Les périphériques USB nécessitant l’installation
d’un programme supplémentaire après la
connexion à un ordinateur ne sont pas pris en
charge.
• Périphérique USB : périphérique USB prenant en
charge les technologies USB 1,1 et USB 2,0.
• Seuls les chiers vidéo, musicaux et
photo peuvent être lus.
Pour connaître les
carac
t
éristiques d’utilisation de chaque chier,
reportez-vous aux pages correspondantes.
• Il est recommandé d’e ectuer des sauvegardes
régulières pour éviter la perte de données.
• Si vous utilisez un câble d’extension USB, un
concentrateur USB ou un lecteur multiple USB,
il se peut que le périphérique USB ne soit pas
reconnu.
• Il est possible que certains périphériques USB ne
fonctionnent pas avec cet appareil.
• Les appareils photo numériques et les
téléphones mobiles ne sont pas compatibles.
• Vous ne pouvez pas connecter le port USB de
cet appareil à un PC.
HB985-DB.BDEUPPK_FRE.indd 31HB985-DB.BDEUPPK_FRE.indd 31 2010-05-14 1:54:242010-05-14 1:54:24

32 Installation
Installation
3
Réglages
Réglage des paramètres
Vous pouvez modi er les réglages de votre
lecteur dans le menu [Con g.].
1. Appuyez sur la touche HOME MENU (
).
2. Utilisez les touches
I
/
i/U
/
u
pour
sélectionner [Con g.], puis appuyez sur
ENTER ( ). Le menu [Con g.] apparaît.
3. Utilisez les touches
U
/
u
pour sélectionner
l’option de premier niveau souhaitée, puis
appuyez sur
i
pour accéder au deuxième
niveau.
4. Utilisez les touches
U
/
u
pour sélectionner
l’option de deuxième niveau souhaitée, puis
appuyez sur ENTER (
) pour accéder au
troisième niveau.
5. Utilisez les touches
U
/
u
pour sélectionner
le réglage souhaité, puis appuyez sur
i
ou
ENTER ( ) pour con rmer votre choix.
HB985-DB.BDEUPPK_FRE.indd 32HB985-DB.BDEUPPK_FRE.indd 32 2010-05-14 1:54:242010-05-14 1:54:24

33Installation
3
Installation
Menu [AFFICHAGE]
Format d’image
Sélectionnez une option de format d’image en
fonction du type de votre téléviseur.
[4:3 Format respecté]
sélectionnez cette option lorsque l’appareil
est connecté à un téléviseur 4/3 standard.
Les images 16/9 s’a chent avec une bande
noire en haut et en bas de l’écran.
[4:3 Recadrage auto]
sélectionnez cette option lorsque l’appareil
est connecté à un téléviseur 4/3 standard.
Les images sont recadrées pour tenir dans
votre écran de téléviseur. L’image est réduite
sur les côtés.
[16:9 Original]
sélectionnez cette option lorsque l’appareil
est connecté à un téléviseur 16:9. L’image
de format 4:3 s’a che avec son rapport
largeur/hauteur d’origine, avec des bandes
noires sur les côtés gauche et droit.
[16:9 Total]
sélectionnez cette option lorsque l’appareil
est connecté à un téléviseur 16:9. L’image
de format 4:3 est ajustée horizontalement
(dans des proportions linéaires) de sorte à
remplir tout l’écran.
REMARQUE
Vous ne pouvez pas sélectionner les options
[4:3 Format respecté] et [4:3 Recadrage auto]
lorsque la résolution choisie est supérieure à 720p.
Résolution
Cette option permet de dé nir la résolution
de sortie du signal vidéo HDMI et en
composantes. Reportez-vous aux pages 23
et 70 pour plus de détails sur le réglage de la
résolution.
[Auto]
si la prise de sortie HDMI OUT est raccordée
à un téléviseur fournissant des informations
sur l’a chage (EDID), cette option
sélectionne automatiquement la résolution
la mieux adaptée au téléviseur raccordé.
Si seule la sortie COMPONENT VIDEO OUT
est raccordée, la résolution passe à 1080i
(valeur par défaut).
[1080p]
sortie vidéo progressive en 1080 lignes.
[1080i]
sortie vidéo entrelacée en 1080 lignes.
[720p]
sortie vidéo progressive en 720 lignes.
[576p (480p)]
sortie vidéo progressive en 576 (480) lignes.
[576i (480i)]
sortie vidéo entrelacée en 576 (480) lignes.
HB985-DB.BDEUPPK_FRE.indd 33HB985-DB.BDEUPPK_FRE.indd 33 2010-05-14 1:54:252010-05-14 1:54:25

34 Installation
Installation
3
Mode 1080p
Lorsque la résolution est réglée sur 1080p,
sélectionnez [24Hz] pour une présentation
adaptée des lms (1080p/24 Hz) avec un
téléviseur HDMI compatible avec une entrée
1080p/24 Hz.
REMARQUE
• Lorsque vous sélectionnez [24 Hz], vous pouvez
constater une perturbation de l’image lors du
passage du mode vidéo au mode lm. Dans ce
cas, sélectionnez [50 Hz].
• Même lorsque l’option [Mode 1080p] est
réglée sur [24 Hz], si votre téléviseur n’est pas
compatible avec le réglage 1080p/24 Hz, la
fréquence de la sortie vidéo sera de 50 Hz.
Rég. couleur HDMI
Sélectionnez le type de sortie de la prise HDMI
OUT. Pour ce réglage, reportez-vous au manuel
de votre téléviseur.
[YCbCr]
sélectionnez cette option lorsque vous
raccordez le lecteur à un téléviseur HDMI.
[RGB]
sélectionnez cette option lorsque vous
raccordez le lecteur à un téléviseur DVI
(RGB).
Menu [LANGUE]
A chage Menu
Sélectionnez une langue pour le menu de
[Con g.] et l’a chage à l’écran.
Menu disque/Audio/Sous-titres
Sélectionnez la langue de votre choix pour
la piste audio, les sous-titres et le menu du
disque.
[Original]
désigne la langue d’origine dans laquelle le
disque a été enregistré.
[Autre]
appuyez sur ENTER (
) pour sélectionner
une autre langue. Utilisez les touches
numériques, puis appuyez sur
ENTER ( ) pour saisir le numéro à 4 chi res
correspondant indiqué dans la liste des
codes de langue, page 69.
[Arrêt] (pour le sous-titrage des disques
uniquement)
désactive les sous-titres.
REMARQUE
Votre réglage de la langue peut ne pas fonctionner
sur certains disques.
HB985-DB.BDEUPPK_FRE.indd 34HB985-DB.BDEUPPK_FRE.indd 34 2010-05-14 1:54:252010-05-14 1:54:25

35Installation
3
Installation
Menu [AUDIO]
Réglages enceintes
Pour obtenir le meilleur son possible, utilisez
l’écran de con guration des haut-parleurs pour
dé nir le volume des haut-parleurs que vous
avez connecté et leur distance à partir de votre
position d’écoute. Utilisez le test pour ajuster le
volume des haut-parleurs au même niveau.
[Enceintes]
Sélectionnez le haut-parleur que vous
souhaitez ajuster.
[Volume]
Dé nissez le volume de chaque haut-
parleur.
[Distance]
Ajustez la distance entre chaque haut-
parleur et votre position d’écoute.
[Test/ Arrêt test son]
Les haut-parleurs émettent un signal d’essai.
[OK]
Con rmez les réglages.
[Annuler]
Annuler les réglages.
HD AV Sync
Il arrive que la TV numérique rencontre un
décalage entre l’image et le son. Si cela se
produit vous pouvez régler le délai de l’arrivée
du son pour qu’il « attende » l’arrivée de l’image
: c’est ce qu’on appelle la synchronisation HD
AV. Utilisez les touches
U u
pour faire dé ler
la durée d’attente souhaitée que vous pouvez
dé nir entre 0 et 300 ms.
Le délai peut varier en fonction du canal de TV
numérique que vous regardez. Si vous changez
de chaîne, vous devrez probablement redé nir
la synchronisation HD AV.
DRC (Contrôle de la gamme
dynamique)
Lorsqu’un chier encodé en Dolby Digital ou en
Dolby Digital Plus est en lecture, vous avez la
possibilité de compresser la plage dynamique
de la sortie audio (la di érence entre le son
maximum et le son minimum).Cela vous
permet de regarder une vidéo à un volume
inférieur sans perdre la clarté du son. Réglez le
[DRC] sur [Marche] pour obtenir cet e et.
REMARQUE
Le réglage du DRC peut uniquement être e ectué
lorsqu’il n’y a pas de disque dans le lecteur ou
lorsque l’ampli est en mode Stop.
HB985-DB.BDEUPPK_FRE.indd 35HB985-DB.BDEUPPK_FRE.indd 35 2010-05-14 1:54:252010-05-14 1:54:25

36 Installation
Installation
3
Menu [VERROU]
Pour pouvoir accéder aux réglages [VERROU],
vous devez saisir le code de sécurité à quatre
chi res que vous avez créé.
Si vous n’avez pas encore saisi de mot de passe,
vous serez invité à le faire. Saisissez deux fois un
mot de passe à quatre chi res, puis appuyez
sur ENTER (
) pour valider le nouveau mot de
passe.
Mot de passe
Vous pouvez créer ou modi er le mot de passe.
[Sans]
Saisissez deux fois un mot de passe à quatre
chi res, puis appuyez sur ENTER (
) pour
valider le nouveau mot de passe.
[Modi er]
saisissez le mot de passe actuel et appuyez
sur la touche ENTER (
). Saisissez deux
fois un mot de passe à quatre chi res, puis
appuyez sur ENTER ( ) pour valider le
nouveau mot de passe.
REMARQUE
Si vous vous trompez, appuyez sur la touche CLEAR
avant d’appuyer sur ENTER
( )
. Saisissez ensuite le
mot de passe correct.
Si vous oubliez votre mot de passe,
Si vous oubliez votre mot de passe, vous pouvez
l’e acer en procédant comme suit:
1. Retirez tout disque contenu dans le lecteur.
2. Sélectionnez l’option [Verrou] dans le menu
de [Con g.].
3. Entrez “210499” sur le menu [Verrou], à l’aide
du clavier. Le mot de passe est e acé
.
Contrôle parental DVD
Bloque la lecture de DVD associés à un
certain niveau de contrôle en fonction de leur
contenu. (Tous les disques ne sont pas associés
à un niveau de contrôle.)
[Contrôle parental 1-8]
le niveau 1 est le plus restrictif, et le niveau
8 est le moins restrictif.
[Déverrouillage]
Lorsque cette option est sélectionnée,
le contrôle parental n’est pas activé et le
disque peut être lu sans restriction.
Contrôle parental BD
Déterminez une limite d’âge pour la lecture
d’un BD-ROM. Utilisez les touches numériques
pour indiquer une limite de visionnage pour
les BD-ROM.
[255]
tous les BD-ROM peuvent être lus.
[0-254]
empêche la lecture des BD-ROM avec
des niveaux de contrôle correspondants
enregistrés dessus.
REMARQUE
Le [Contrôle parental BD] ne s’applique qu’aux disques
Blu-ray disposant du système de contrôle avancé.
Indicatif régional
Indiquez le code de la région dont les normes
ont servi à déterminer le niveau de contrôle du
DVD, en vous reportant à la liste page 68.
HB985-DB.BDEUPPK_FRE.indd 36HB985-DB.BDEUPPK_FRE.indd 36 2010-05-14 1:54:252010-05-14 1:54:25

37Installation
3
Installation
Menu [RÉSEAU]
Con g. connexion
Si votre environnement de réseau domestique
est prêt pour la connexion de l’appareil, celui-
ci doit être con guré pour la connexion réseau
a n de pouvoir communiquer sur le réseau.
(Reportez-vous à la section “Raccordement à
votre réseau domestique”, page 28.)
Statut connexion
Si vous voulez connaître l’état du réseau
sur le lecteur, sélectionnez l’option [Statut
connexion] et appuyez sur la touche ENTER
( ) pour véri er si une connexion réseau ou
internet a été établie.
Connexion BD-LIVE
Vous pouvez limiter l’accès à internet lorsque
les fonctions BD-LIVE sont utilisées.
[Autorisée]
l’accès à internet est autorisé pour tous les
contenus BD-LIVE.
[Autorisée en partie]
l’accès à internet est autorisé uniquement
pour les contenus BD-LIVE dotés de
certi cats des fournisseurs de contenus.
L’accès à internet et les fonctions en ligne
AACS sont interdites pour l’ensemble des
contenus BD-LIVE dépourvus de certi cat.
[Interdite]
l’accès à internet est interdit pour
l’ensemble des contenus BD-LIVE.
Menu [AUTRES]
DivX VOD
À propos des vidéos DivX: DivX® est un
format vidéo numérique créé par DivX, Inc.
Cet appareil est o ciellement certi é DivX
et peut donc lire les vidéos DivX. Pour plus
d’informations et pour obtenir des outils
logiciels permettant de convertir vos chiers
en vidéos DivX, consultez le site
www.divx.com.
À propos des vidéos à la demande DivX : vous
devez enregistrer cet appareil certi é DivX®
pour pouvoir lire le contenu de vidéos à la
demande (VOD) DivX.
Pour générer le code d’enregistrement,
accédez à la section DivX VOD du menu de
con guration. Accédez ensuite au site vod.
divx.com et renseignez ce code pour terminer
le processus d’enregistrement et obtenir plus
d’informations sur les vidéos à la demande
DivX.
[Enregistrer]
Permet d’a cher le code d’enregistrement
de votre lecteur.
[Annuler enregistr.]
Permet de désactiver votre lecteur et
d’a cher le code de désactivation.
REMARQUE
Toutes les vidéos téléchargées via le service DivX
VOD avec le code d’enregistrement de ce lecteur
ne peuvent être lues que sur cet appareil.
HB985-DB.BDEUPPK_FRE.indd 37HB985-DB.BDEUPPK_FRE.indd 37 2010-05-14 1:54:252010-05-14 1:54:25

38 Installation
Installation
3
Extinction auto
L’économiseur d’écran s’a che lorsque vous
laissez le lecteur en mode Stop pendant
environ 5 minutes. Si vous réglez cette option
sur [Marche], l’ampli s’éteint automatiquement
une fois que l’économiseur d’écran s’est a ché
pendant 25 minutes.
Réglez cette option sur [Arrêt] pour quitter
l’économiseur d’écran pendant que l’utilisateur
manipule le lecteur.
Initialiser
Réglages d’usine
Vous pouvez rétablir les réglages d’usine
par défaut du lecteur.
E acer stockage BD
Initialise les contenus BD à partir du
périphérique de stockage USB connecté.
REMARQUE
Si vous utilisez l’option [Réglages d’usine] pour
réinitialisez le lecteur aux réglages d’origine fait en
usine, vous devez redé nir toutes les activations
des services en ligne et tous les paramètres réseau.
Information logiciel
A che la version actuelle du logiciel.
HB985-DB.BDEUPPK_FRE.indd 38HB985-DB.BDEUPPK_FRE.indd 38 2010-05-14 1:54:252010-05-14 1:54:25

39Installation
3
Installation
E ets sonores
Vous pouvez choisir un e et sonore approprié.
Appuyez sur SOUND jusqu’à ce que le mode
souhaité apparaisse sur l’écran d’a chage du
lecteur ou sur la TV. Les éléments a chés pour
l’égaliseur peuvent être di érents en fonction
des sources sonores et des e ets.
[Pioneer 1]: Vous permet d’obtenir un réglage
du son adapté aux enceintes de petite taille
(S-BD303).
[Pioneer 2]: Vous permet d’obtenir un réglage
du son adapté aux enceintes de grande taille
(S-BD707T).
[Bypass]: Les logiciels comportant des signaux
audio surround multicanaux sont lus à la
manière dont ils ont été enregistré.
[Bass Blast]: Renforce l’e et de son de basse
du haut-parleur avant gauche au haut-parleur
avant droit et du subwoofer.
[PL ll Movie]: Exécute le mode vidéo Pro Logic
II qui décode le signal d’entrée et créé cinq
canaux de sortie à toute la largeur de bande
à partir de sources à 2 canaux. Ce réglage est
idéal pour regarder des vidéos enregistrées en
overdub (surimpression) ou des vieux lms.
Ce mode est uniquement disponible pour les
sources à 2 canaux.
[PL ll Music]: Exécute le mode musique Pro
Logic II qui décode le signal d’entrée et créé
cinq canaux de sortie à toute la largeur de
bande à partir de sources à 2 canaux. Ce
réglage est idéal pour les sources stéréo
classiques telles que les CD. Ce mode est
uniquement disponible pour les sources à 2
canaux.
[Clear Voice]: Ce mode permet de rendre le
son des voix clair en améliorant la qualité de
son vocal.
[Game]: Vous pouvez béné cier d’un son plus
virtuel pendant vos parties de jeux vidéo.
[Night]: Cet e et sonore peut être utile lorsque
vous souhaitez regarder une vidéo à un faible
volume le soir.
[Mus. ReTouch]: Lorsque vous écoutez des
chiers MP3 ou autre format de musique
compressée, vous pouvez augmenter le son.
Ce mode est uniquement disponible pour les
sources à 2 canaux.
[Loudness]: Permet d’améliorer le rendu des
sons graves et aigus.
HB985-DB.BDEUPPK_FRE.indd 39HB985-DB.BDEUPPK_FRE.indd 39 2010-05-14 1:54:252010-05-14 1:54:25

40 Utilisation
Utilisation
4
Lecture générale
Lecture de disques
1. Appuyez sur
Z
OPEN/CLOSE, et placez un
disque sur le plateau.
2. Appuyez sur
Z
OPEN/CLOSE pour fermer le
plateau du disque.
Pour la plupart des CD audio, BD-
ROM et DVD-ROM, la lecture démarre
automatiquement.
3. Appuyez sur la touche
HOME MENU.
4. Sélectionnez l’option [Film], [Photo] ou
[Musique] à l’aide des touches
U
/
u
/
I
/
i
,
puis appuyez sur ENTER ( ).
5. Sélectionnez l’option Disque à l’aide des
touches
I
/
i
, puis appuyez sur ENTER (
).
Lorsque vous connectez jusqu’à deux
périphériques, une illustration semblable à
celle ci-dessus apparaît à l’écran.
6. Sélectionnez un chier à l’aide des touches
U
/
u
/
I
/
i
, puis appuyez sur
B
PLAY ou
ENTER (
) pour lire le chier.
REMARQUE
• Les fonctions de lecture décrites dans ce guide
ne sont pas toujours disponibles pour tous les
chiers et supports. Certaines fonctions peuvent
être limitées pour de multiples raisons.
• En fonction des titres du BD-ROM, une
connexion à un périphérique USB peut être
nécessaire pour une lecture appropriée.
4
Utilisation
HB985-DB.BDEUPPK_FRE.indd 40HB985-DB.BDEUPPK_FRE.indd 40 2010-05-14 1:54:252010-05-14 1:54:25

41Utilisation
4
Utilisation
Arrêt de la lecture
Appuyez sur la touche
x
STOP pendant la
lecture.
Suspension de la lecture
Appuyez sur la touche
X
PAUSE/STEP pendant
la lecture.
Appuyez sur la touche
B
PLAY pour reprendre
la lecture.
Lecture image par image
Appuyez sur la touche
X
PAUSE/STEP pendant
la lecture d’un lm.
Appuyez plusieurs fois sur la touche
X
PAUSE/
STEP pour une lecture image par image.
Avance ou retour rapide
Appuyez sur la touche
m
ou
M
pour
utiliser l’avance ou le retour rapide pendant la
lecture.
Vous pouvez modi er la vitesse de lecture en
appuyant plusieurs fois sur la touche
m
ou
M
.
Lecture au ralenti
Lorsque la lecture est en pause, appuyez
plusieurs fois sur la touche
M
pour changer
la vitesse de lecture au ralenti.
Accès à la piste, au chier ou au
chapitre suivant/précédent
Pendant la lecture, appuyez sur la touche
.
ou
>
pour sélectionner la piste, le
chapitre ou le chier suivant ou pour revenir
au début de la piste, du chapitre ou du chier
en cours.
Utilisation du menu du disque
BD
DVD
AVCHD
A chage du menu du disque
L’écran du menu peut s’a cher
immédiatement après l’insertion d’un disque
contenant un menu. Si vous voulez a cher le
menu du disque pendant la lecture, appuyez
sur la touche MENU.
Utilisez les touches
U
/
u
/
I
/
i
pour naviguer
dans les options de menu.
A chage du menu contextuel
Certains disques BD-ROM contiennent un menu
contextuel qui apparaît pendant la lecture.
Appuyez sur la touche POPUP/ TOP MENU
pendant la lecture et utilisez les touches
U
/
u
/
I
/
i
pour naviguer dans les options de menu.
Reprise de la lecture
BD
DVD
AVCHD
MOVIE
ACD
MUSIC
Si le disque le permet, le lecteur garde en
mémoire l’endroit où vous avez arrêté la lecture
en appuyant sur
x
(STOP). Si “
Xx
(reprise
de la lecture possible) s’a che brièvement à
l’écran, appuyez sur la touche
B
(PLAY)
pour
reprendre la lecture là où vous l’aviez laissée.
Si vous appuyez deux fois sur la touch
x
(STOP) ou sortez le disque, “
x
”(arrêt complet
de la lecture) s’a che à l’écran. Le lecteur
e ace le repère de reprise de la lecture.
REMARQUE
• Le repère de reprise de la lecture peut être
e acé si vous appuyez sur une touche (par
exemple,
1
(POWER),
Z
(OPEN/CLOSE), etc).
• Sur les disques BD-Vidéo incluant la capacité
BD-J, la fonction de reprise de la lecture n’est pas
disponible.
• Sur un titre interactif BD-ROM, l’appareil sera en
mode arrêt complet si vous appuyez une fois sur
la touche
x
(STOP) pendant la lecture.
HB985-DB.BDEUPPK_FRE.indd 41HB985-DB.BDEUPPK_FRE.indd 41 2010-05-14 1:54:262010-05-14 1:54:26

42 Utilisation
Utilisation
4
Lecture avancée
Lecture répétée
BD
DVD
AVCHD
ACD
MUSIC
Pendant la lecture, appuyez sur la touche
REPEAT (
) plusieurs fois de suite pour
sélectionner le mode de répétition souhaité.
Blu ray Disc/DVD
A-
– La partie sélectionnée sera répétée
continuellement.
Chapitre
– Le chapitre en cours est
répété.
Titre
– Le titre en cours est répété.
Pour revenir à la lecture normale, appuyez
plusieurs fois sur la touche REPEAT ( )
pour sélectionner [Arrêt].
CD audio/Fichiers musicaux
– La piste en cours est répétée.
– Toutes les pistes ou chiers sont
répétés.
– Les pistes ou chiers sont répétés dans
un ordre aléatoire.
– Toutes les pistes ou chiers sont
répétés dans un ordre aléatoire.
– La partie sélectionnée est répétée
continuellement (CD audio uniquement).
Pour revenir à la lecture normale, appuyez
sur la touche CLEAR.
REMARQUE
• Si vous appuyez sur
>
une fois lors de la
répétition d’un chapitre ou de la lecture d’une
piste, la lecture répétée s’annule.
• Cette fonction peut ne pas s’appliquer pour
certains disques ou titres.
Répétition d’une partie
spéci que
BD
DVD
AVCHD
ACD
Ce lecteur peut répéter une partie que vous
avez sélectionné.
1. Lors de la lecture, appuyez sur la touche
REPEAT (
) pour sélectionner [A-] au début
de la partie que vous souhaitez faire répéter.
Puis appuyez sur la touche ENTER ( ).
2. Appuyez sur la touche ENTER (
) à la n de
la partie à répéter. La partie que vous avez
sélectionné sera répétée continuellement.
3. Pour revenir à la lecture normale, appuyez
sur REPEAT (
) à plusieurs reprises pour
sélectionner [Arrêt] ou appuyez sur CLEAR.
REMARQUE
Vous ne pouvez pas sélectionner une partie de
moins de 3 secondes.
Recherche d’index
BD
DVD
AVCHD
MOVIE
Vous pouvez démarrer la lecture à partir de
points mémorisés (neuf au maximum).
Saisie d’un index
1. Appuyez sur la touche MARKER à l’endroit
souhaité pendant la lecture. L’icône de
repère apparaît un court instant sur l’écran
du téléviseur.
2. Répétez l’étape 1 pour placer jusqu’à neuf
repères.
HB985-DB.BDEUPPK_FRE.indd 42HB985-DB.BDEUPPK_FRE.indd 42 2010-05-14 1:54:262010-05-14 1:54:26

43Utilisation
4
Utilisation
Lecture d’une scène indexée
1. Appuyez sur la touche SEARCH pour faire
apparaître le menu de recherche à l’écran.
2. Appuyez sur une touche numérique pour
sélectionner le numéro d’index auquel vous
voulez retourner. La lecture commence à
partir de la scène indexée.
Suppression d’un repère
1. Appuyez sur la touche SEARCH pour faire
apparaître le menu de recherche à l’écran.
2. Appuyez sur la touche
u
pour mettre en
évidence un numéro de repère. Utilisez les
touches
I
/
i
pour sélectionner une scène
indexée que vous voulez supprimer.
3. Appuyez sur la touche CLEAR pour e acer
la scène indexée du menu de recherche.
REMARQUE
• Selon les disques, les titres et la capacité du
serveur, il se peut que cette fonction ne soit pas
disponible.
• Tous les points marqués sont e acés si le titre
est complètement à l’arrêt (
x
) , si le titre est
modi é ou si vous sortez le disque.
• Si la durée totale du titre est inférieure à 10
secondes, cette fonction n’est pas disponible.
Utilisation du menu de
recherche
BD
DVD
AVCHD
MOVIE
À l’aide du menu de recherche, vous pouvez
facilement trouver le point à partir duquel vous
voulez démarrer la lecture.
Recherche d’un point
1. Pendant la lecture, appuyez sur la touche
SEARCH pour a cher le menu de recherche.
2. Utilisez les touches
I
/
i
pour faire dé ler la
lecture de 15 secondes vers l’arrière ou vers
l’avant. Vous pouvez sélectionner un point
que vous voulez passer en maintenant
enfoncées les touches
I
/
i
.
Démarrage de la lecture à partir
d’une scène indexée
1. Appuyez sur la touche SEARCH pour faire
apparaître le menu de recherche à l’écran.
2. Appuyez sur la touche
u
pour mettre en
évidence un numéro de repère. Utilisez les
touches
I
/
i
pour sélectionner une scène
indexée à partir de laquelle vous voulez
démarrer la lecture.
3. Appuyez sur la touche ENTER (
) pour
démarrer la lecture à partir de la scène
indexée.
REMARQUE
• Selon les disques, les titres et la capacité du
serveur, il se peut que cette fonction ne soit pas
disponible.
• Il se peut que cette fonction ne soit pas
disponible pour certains contenus du menu
[Home Link], suivant le type de chier et la
capacité du serveur DLNA.
HB985-DB.BDEUPPK_FRE.indd 43HB985-DB.BDEUPPK_FRE.indd 43 2010-05-14 1:54:262010-05-14 1:54:26

44 Utilisation
Utilisation
4
Mémoire de la dernière scène
BD
DVD
Cet appareil mémorise la dernière scène du
dernier disque qui a été visionné. La dernière
scène reste en mémoire même si vous sortez
le disque du lecteur ou éteignez l’appareil.
Si vous insérez un disque dont la scène est
mémorisée, celle-ci est automatiquement lue.
REMARQUE
• La fonction Mémoire de la dernière scène d’un
disque précédent est e acée dès qu’un disque
di érent est lu.
• Selon le disque, il se peut que cette fonction ne
soit pas disponible.
• Cet appareil ne mémorise pas les paramètres
d’un disque si vous l’éteignez avant de
commencer à lire ce disque.
A chage à l’écran
Vous pouvez a cher et modi er di érents
réglages et informations à propos du contenu.
A chage à l’écran des
informations sur le contenu
BD
DVD
AVCHD
MOVIE
1. Pendant la lecture, appuyez sur la touche
DISPLAY (
) pour a cher di érentes
informations sur la lecture.
a
h
g
f
e
d
c
b
a
Titre – Numéro du titre en cours/nombre
total de titres.
b
Chapitre – numéro du chapitre en cours/
nombre total de chapitres
c
Heure – Temps de lecture écoulé/durée
de lecture totale.
d
Audio – langue ou canal audio
sélectionné
e
Sous-titrage – titrage: sous-titre
sélectionné
f
Angle – angle sélectionné/nombre total
d’angles
g
Format d’image – Format d’image
sélectionné pour le téléviseur.
h
Mode image – Mode d’image
sélectionné.
HB985-DB.BDEUPPK_FRE.indd 44HB985-DB.BDEUPPK_FRE.indd 44 2010-05-14 1:54:262010-05-14 1:54:26

45Utilisation
4
Utilisation
2. Sélectionnez une option à l’aide des
touches
U
/
u
.
3. Utilisez les touches
I
/
i
pour régler la
valeur de l’option sélectionnée.
4. Appuyez sur la touche RETURN (
O
) pour
quitter l’a chage à l’écran.
REMARQUE
• Si aucune touche n’est actionnée pendant
quelques secondes, l’a chage à l’écran disparaît.
• Il est possible qu’un numéro de titre ne puisse
pas être sélectionné sur certains disques.
• Les éléments disponibles peuvent varier suivant
les disques ou les titres.
• Si un titre interactif BD est en cours de lecture,
certaines informations sur les réglages s’a chent
à l’écran mais ne peuvent pas être modi ées.
Lecture à partir d’un code de
temps
BD
DVD
AVCHD
MOVIE
1. Appuyez sur la touche DISPLAY (
)
pendant la lecture. La zone d’a chage du
temps montre le temps de lecture écoulé.
2. Sélectionnez l’option [Heure] et saisissez
l’heure de début requise en heures, minutes
et secondes, de gauche à droite.
Par exemple, pour trouver une scène située
à 2 heures, 10 minutes et 20 secondes du
début, saisissez “21020”.
Utilisez les touches
I
/
i
pour faire dé ler la
lecture de 60 secondes vers l’arrière ou vers
l’avant.
3. Appuyez sur la touche ENTER (
) pour
démarrer la lecture à partir de l’heure
sélectionnée.
REMARQUE
• Il se peut que cette fonction ne soit pas
disponible avec certains disques ou titres.
• Il se peut que cette fonction ne soit pas
disponible pour certains contenus du menu
[Home Link], suivant le type de chier et la
capacité du serveur DLNA.
HB985-DB.BDEUPPK_FRE.indd 45HB985-DB.BDEUPPK_FRE.indd 45 2010-05-14 1:54:262010-05-14 1:54:26

46
Utilisation
Utilisation
4
Modi cation de la source audio
BD
DVD
AVCHD
MOVIE
1. Pendant la lecture, appuyez sur la touche
DISPLAY (
) pour activer l’a chage à
l’écran.
2. Utilisez les touches
U
/
u
pour sélectionner
l’option [Audio].
3. Utilisez les touches
I
/
i
pour sélectionner
la langue audio, la piste audio ou le canal
audio de votre choix.
REMARQUE
• Certains disques ne vous permettent de modi er
vos choix audio qu’en passant par le menu du
disque. Si tel est le cas, appuyez sur la touche
POPUP/ TOP MENU ou MENU et sélectionnez le
réglage audio de votre choix parmi les options
du menu de disque.
• Immédiatement après avoir modi é le réglage
audio, vous pouvez constater un décalage
temporaire entre l’image et le son.
Sélection de la langue des sous-
titres
BD
DVD
AVCHD
MOVIE
1. Pendant la lecture, appuyez sur la touche
DISPLAY (
) pour activer l’a chage à
l’écran.
2. Utilisez les touches
U
/
u
pour sélectionner
l’option [Sous-titrage].
3. Utilisez les touches
I
/
i
pour sélectionner
la langue de votre choix pour les sous-titres.
4. Appuyez sur la touche RETURN (
O
) pour
quitter l’a chage à l’écran.
REMARQUE
Certains disques ne vous permettent de modi er
vos choix de sous-titres qu’en passant par le menu
du disque. Si tel est le cas, appuyez sur la touche
POPUP/ TOP MENU ou MENU et sélectionnez le
sous-titre de votre choix parmi les options du
menu de disque.
HB985-DB.BDEUPPK_FRE.indd 46HB985-DB.BDEUPPK_FRE.indd 46 2010-05-14 1:54:262010-05-14 1:54:26

47
Utilisation
4
Utilisation
Visionnage sous un angle
di érent
BD
DVD
Si le disque contient des scènes enregistrées
sous di érents angles de prise de vue, vous
pouvez modi er l’angle pendant la lecture.
1. Pendant la lecture, appuyez sur la touche
DISPLAY ( ) pour activer l’a chage à
l’écran.
2. Utilisez les touches
U
/
u
pour sélectionner
l’option [Angle].
3. Utilisez les touches
I
/
i
pour sélectionner
l’angle de votre choix.
4. Appuyez sur la touche RETURN (
O
) pour
quitter l’a chage à l’écran.
Modi cation du format d’image
BD
DVD
AVCHD
MOVIE
Vous pouvez modi er le réglage de format
d’image pendant la lecture.
1. Pendant la lecture, appuyez sur la touche
DISPLAY (
) pour activer l’a chage à
l’écran.
2. Utilisez les touches
U
/
u
pour sélectionner
l’option [Format d’image].
3. Utilisez les touches
I
/
i
pour sélectionner
l’option de votre choix.
4. Appuyez sur la touche RETURN (
O
) pour
quitter l’a chage à l’écran.
REMARQUE
Même si vous modi ez la valeur de l’option
[Format d’image] dans l’a chage à l’écran,
l’option [Format d’image] du menu [Con g.] reste
inchangée.
Modi cation du mode d’image
BD
DVD
AVCHD
MOVIE
Vous pouvez modi er l’option [Mode image]
pendant la lecture.
1. Pendant la lecture, appuyez sur la touche
DISPLAY (
) pour activer l’a chage à
l’écran.
2. Utilisez les touches
U
/
u
pour sélectionner
l’option [Mode image].
3. Utilisez les touches
I
/
i
pour sélectionner
l’angle de votre choix.
4. Appuyez sur la touche RETURN (
O
) pour
quitter l’a chage à l’écran.
Réglage de l’option [Utilisateur]
1. Pendant la lecture, appuyez sur la touche
DISPLAY (
) pour activer l’a chage à
l’écran.
2. Utilisez les touches
U
/
u
pour sélectionner
l’option [Mode image].
3. Utilisez les touches
I
/
i
to pour
sélectionner l’option [Paramet. User], puis
appuyez sur la touche ENTER (
).
4. Utilisez les touches
U
/
u
/
I
/
i
pour régler
les options [Mode image].
Sélectionnez l’option [Défaut], puis appuyez
sur la touche ENTER ( ) pour rétablir tous
les réglages vidéo.
5. Utilisez les touches
U
/
u
/
I
/
i
pour
sélectionner l’option [Fermer], puis appuyez
sur la touche ENTER (
) pour terminer le
réglage.
HB985-DB.BDEUPPK_FRE.indd 47HB985-DB.BDEUPPK_FRE.indd 47 2010-05-14 1:54:262010-05-14 1:54:26

48
Utilisation
Utilisation
4
Utilisation des
fonctions BD-LIVE
Cet appareil vous permet d’utiliser des
fonctions telles que l’incrustation PIP, les
programmes audio secondaires, les bonus
virtuels, etc., avec les disques BD-Vidéo
prenant en charge la technologie BONUSVIEW
(BD-ROM version 2 Pro l 1, version 1.1/Final
Standard Pro le).
L’image et le programme audio secondaires
peuvent être lus à partir d’un disque
compatible avec la fonction d’incrustation
PIP. Pour connaître la méthode de lecture,
reportez-vous aux instructions relatives au
disque.
En plus de la fonction BONUSVIEW, les disques
BD-Vidéo prenant en charge la technologie
BD-LIVE (BD-ROM version 2 Pro l 2), qui
comporte une fonction d’extension réseau,
vous permettent de béné cier d’autres
fonctionnalités, telles que le téléchargement
des bandes-annonces de nouveaux lms, en
connectant cet appareil à internet.
1. Véri er la connexion et les paramètres
réseau (voir pages 28-30).
2. Insérez un périphérique de stockage USB
dans le port USB à l’avant du lecteur.
Un périphérique de stockage USB est
nécessaire pour pouvoir télécharger les
contenus en bonus.
Connexion USB
3 . Appuyez sur la touche HOME MENU, et
réglez l’option [Connexion BD-LIVE] dans le
menu [Con g.] (voir page 37).
Selon le disque, il se peut que la fonction
BD-LIVE soit inopérante si l’option
[Connexion BD-LIVE] est réglée sur
[Autorisée en partie].
4 . Insérez un BD-ROM comportant des
fonctionnalités BD-LIVE.
Les opérations disponibles di èrent selon
le disque. Reportez-vous au manuel fourni
avec le disque.
REMARQUE
• Ne retirez pas le périphérique USB connecté
pendant le téléchargement du contenu ou
lorsqu’un disque Blu-ray se trouve encore à
l’intérieur du lecteur. Cela pourrait endommager
le périphérique USB connecté et les
fonctionnalités BD-LIVE risqueraient de ne plus
fonctionner correctement avec ce périphérique.
Si le périphérique USB connecté semble
endommagé suite à une telle action, vous
pouvez le formater sur votre PC et le réutiliser
ensuite avec ce lecteur.
• Le fournisseur de contenus est libre de
restreindre l’accès aux contenus de BD-LIVE dans
certains territoires.
• Plusieurs minutes peuvent être nécessaires pour
charger les contenus BD-LIVE et les visionner.
HB985-DB.BDEUPPK_FRE.indd 48HB985-DB.BDEUPPK_FRE.indd 48 2010-05-14 1:54:272010-05-14 1:54:27

49
Utilisation
4
Utilisation
Lecture d’un chier
vidéo et d’un disque
VR
Cet appareil permet de lire des disques DVD-
RW enregistrés au format VR (Video Recording)
et des chiers vidéo stockés sur un disque ou
sur un périphérique USB.
1. Appuyez sur la touche
HOME MENU.
2. Sélectionnez l’option [Film] à l’aide des
touches
U
/
u
/
I
/
i
, puis appuyez sur ENTER
( ).
3. Sélectionnez le périphérique à l’aide des
touches
I
/
i
et appuyez sur la touche
ENTER ( ).
Lorsque vous connectez jusqu’à deux
périphériques, une illustration semblable à
celle ci-dessus apparaît à l’écran.
4. Sélectionnez un chier à l’aide des touches
U
/
u
/
I
/
i
, puis appuyez sur
B
PLAY ou
ENTER (
) pour lire le chier.
REMARQUE
• Les impératifs concernant les chiers sont
décrits page 11.
• Vous pouvez utiliser di érentes fonctions de
lecture. Reportez-vous aux pages 40-47.
• Les disques au format DVD-VR non nalisés ne
peuvent pas être lus par cet appareil.
• Certains DVD-VR sont créés avec des données
CPRM par un enregistreur de DVD. Cet appareil
ne pr
end pas en charge ces types de disques.
Présentation de la technologie CPRM
La technologie CPRM est un système de
protection contre la copie (avec cryptage des
contenus) autorisant uniquement
l’enregistrement des programmes enregistrables
une fois. CPRM signi e Content Protection for
Recordable Media (protection du contenu des
supports enregistrables).
HB985-DB.BDEUPPK_FRE.indd 49HB985-DB.BDEUPPK_FRE.indd 49 2010-05-14 1:54:272010-05-14 1:54:27

50
Utilisation
Utilisation
4
Sélection d’un chier de sous-
titres
MOVIE
Si le chier vidéo et le chier de sous-titres
portent le même nom, le chier de sous-titres
est lu automatiquement pendant la lecture du
chier vidéo.
Si le nom du chier de sous-titres est
di érent de celui du chier vidéo, vous devez
sélectionner le chier de sous-titres dans le
menu [Film] avant de lancer la lecture du lm.
1. Utilisez les touches
U
/
u
/
I
/
i
pour
sélectionner le chier de sous-titres que
vous voulez lire dans le menu [Film].
2. Appuyez sur la touche ENTER (
).
Appuyez de nouveau sur la touche ENTER
( ) pour désélectionner le chier de sous-
Le chier de sous-titres sélectionné s’a che
pendant la lecture du chier vidéo.
REMARQUE
• Si vous appuyez sur la touche
x
STOP pendant
la lecture, la sélection des sous-titres est annulée.
• Cette option peut ne pas être utilisable avec la
fonction [Home Link].
Modi cation de la page de code
des sous-titres
MOVIE
Si les sous-titres ne s’a chent pas
correctement, vous pouvez modi er la page
de code des sous-titres pour en améliorer
l’a chage.
1. Pendant la lecture, appuyez sur la touche
DISPLAY (
) pour activer l’a chage à
l’écran.
2. Utilisez les touches
U
/
u
pour sélectionner
l’option [Page de codes].
3. Utilisez les touches
I
/
i
pour sélectionner
l’option de code de votre choix.
4. Appuyez sur la touche RETURN (
O
) pour
quitter l’a chage à l’écran.
HB985-DB.BDEUPPK_FRE.indd 50HB985-DB.BDEUPPK_FRE.indd 50 2010-05-14 1:54:272010-05-14 1:54:27

51
Utilisation
4
Utilisation
Lecture d’un chier
photo
Ce lecteur vous permet de visionner des
chiers photo.
1. Appuyez sur la touche
HOME MENU
2. Sélectionnez l’option [Photo] à l’aide des
touches
I
/
i
, puis appuyez sur ENTER ( ).
3. Sélectionnez le périphérique à l’aide des
touches
I
/
i
et appuyez sur la touche
ENTER ( ).
Lorsque vous connectez jusqu’à deux
périphériques, une illustration semblable à
celle ci-dessus apparaît à l’écran.
4. Sélectionnez un chier à l’aide des touches
U
/
u
/
I
/
i
, puis appuyez sur ENTER (
) pour
a cher la photo correspondante.
Lecture d’un diaporama
Appuyez sur la touche
B
PLAY pour lancer le
diaporama.
Arrêt d’un diaporama
Appuyez sur la touche
x
STOP pendant la
lecture du diaporama.
Suspension d’un diaporama
Appuyez sur la touche
X
PAUSE/STEP pendant
la lecture du diaporama.
Appuyez sur la touche
B
PLAY pour relancer le
diaporama.
Accès à la photo suivante/précédente
Lorsqu’une photo est a chée en plein écran,
appuyez sur la touche
I
ou
i
pour accéder à
la photo précédente ou suivante.
REMARQUE
• Les impératifs concernant les chiers sont
décrits page 11.
• Vous pouvez utiliser di érentes fonctions de
lecture. Reportez-vous aux pages 40-47.
HB985-DB.BDEUPPK_FRE.indd 51HB985-DB.BDEUPPK_FRE.indd 51 2010-05-14 1:54:272010-05-14 1:54:27

52
Utilisation
Utilisation
4
Options disponibles pendant
l’a chage d’une photo
Vous pouvez utiliser di érentes options
pendant l’a chage d’une photo en plein
écran.
1. Lorsqu’une photo est a chée en plein
écran, appuyez sur la touche DISPLAY (
)
pour a cher le menu des options.
2. Sélectionnez une option à l’aide des
touches
U
/
u
.
a
g
f
e
d
c
b
h
a
Photo en cours/nombre total de
photos – Utilisez la touche
I
/
i
pour
a cher la photo précédente ou suivante.
b
Diaporama – Appuyez sur la touche
ENTER (
) pour lancer ou suspendre le
diaporama.
c
Sélect. musique – Sélectionnez la
musique de fond du diaporama.
d
Musique –Appuyez sur la touche ENTER
(
) pour lire ou suspendre la musique de
fond.
e
Rotation – Appuyez sur la touche ENTER
(
) pour faire pivoter la photo dans le
sens des aiguilles d’une montre.
f
Zoom – Appuyez sur la touche ENTER
(
)pour a cher le menu [Zoom].
g
E et – Utilisez les touches
I
/
i
pour
sélectionner un e et de transition entre
les photos dans un diaporama.
h
Vitesse – Utilisez les touches
I
/
i
pour
sélectionner la vit
esse de dé lement des
photos dans un diaporama.
3. Appuyez sur la touche RETURN (
O
) pour
quitter l’a chage à l’écran.
Écoute de musique pendant un
diaporama
Vous pouvez a cher des chiers photo
pendant l’écoute de chiers musicaux.
1. Appuyez sur la touche
HOME MENU
2. Sélectionnez l’option [Photo] ou
[Home Link] à l’aide des touches
U
/
u
/
I
/
i
,
puis appuyez sur ENTER (
).
3. Sélectionnez l’option [Disque] ou [USB] à
l’
aide des touches
I
/
i
, puis appuyez sur
ENTER (
).
Pour le menu [Home Link], vous devez
sélectionner un serveur ou un dossier
partagé.
4. Sélectionnez un chier à l’aide des touches
U
/
u
/
I
/
i
, puis appuyez sur ENTER (
) pour
a cher la photo.
5. Appuyez sur la touche DISPLAY (
) pour
a cher le menu des options.
HB985-DB.BDEUPPK_FRE.indd 52HB985-DB.BDEUPPK_FRE.indd 52 2010-05-14 1:54:282010-05-14 1:54:28

53
Utilisation
4
Utilisation
6. Utilisez les touches
U
/
u
pour sélectionner
l’option [Sélect. musique], et appuyez sur
ENTER ( ) pour a cher le menu
[Sélect. musique].
7. Utilisez les touches
U
/
u
pour sélectionner
un pér
iphérique, puis appuyez sur
ENTER ( ).
Les périphériques que vous pouvez
sélectionner varient selon l’emplacement du
chier photo que vous a chez en plein écran.
Emplacement
des photos
Périphériques
disponibles
Disque Disque, USB
USB Disque, USB
Dossier partagé
sur votre
ordinateur (CIFS)
CIFS
Serveur DLNA Serveur DLNA
8.
Utilisez les touches
U
/
u
pour sélectionner
un chier ou un dossier que vous voulez lire.
Sélectionnez un dossier et appuyez sur
ENTER ( ) pour a cher le répertoire de
niveau inférieur.
Sélectionnez
et appuyez sur ENTER
(
) pour a cher le répertoire de niveau
supérieur.
REMARQUE
Lorsque vous sélectionnez “music” dans [Home Link],
la sélection d’un dossier n’est pas possible. Seule la
sélection d’un chier est possible dans [Home link].
9. Utilisez la touche
i
pour sélectionner [OK],
puis appuyez sur ENTER ( ) pour terminer
la sélection de la musique.
Écoute de musique
Ce lecteur peut lire les CD audio et les chiers
musicaux.
1. Appuyez sur la touche
HOME MENU
2. Sélectionnez l’option [Musique] à l’aide des
touches
U
/
u
/
I
/
i
, puis appuyez sur ENTER
( ).
3. Sélectionnez le périphérique à l’aide des
touches
I
/
i
et appuyez sur la touche
ENTER ( ).
Lorsque vous connectez jusqu’à deux
périphériques, une illustration semblable à
celle ci-dessus apparaît à l’écran.
4. Sélectionnez un chier musical ou une piste
audio à l’aide des touches
U
/
u
/
I
/
i
, et
appuyez sur ENTER (
) pour lire la musique.
REMARQUE
• Les impératifs concernant les chiers sont
décrits page 11.
• Vous pouvez utiliser di érentes fonctions de
lecture. Reportez-vous aux pages 40-47.
HB985-DB.BDEUPPK_FRE.indd 53HB985-DB.BDEUPPK_FRE.indd 53 2010-05-14 1:54:282010-05-14 1:54:28

54
Utilisation
Utilisation
4
Enregistrement de CD audio
Vous pouvez enregistrer une piste en
particulier ou toutes les pistes d’un CD audio
vers un périphérique de stockage USB.
1. Insérez un périphérique de stockage USB
dans le port USB à l’avant du lecteur.
2. Appuyez sur
Z
(OPEN/CLOSE) (ouverture/
fermeture) et placez un CD audio sur le
plateau.
Appuyez sur
Z
(OPEN/CLOSE) (ouverture/
fermeture) pour fermer le plateau. La lecture
démarre automatiquement.
3. Appuyez sur la touche DISPLAY (
) pour
a cher le menu des options.
Ou
Appuyez sur la touche
z
USB REC de la
télécommande.
Vous pouvez enregistrer plusieurs chiers
de musique sur le CD audio.
4. Utilisez les touches
U
/
u
pour sélectionner
l’option [Enreg. CD] et appuyez sur ENTER
(
) pour a cher le menu [Enreg. CD].
Répétez l’opération pour sélectionner
autant de pistes que vous le souhaitez.
5. Utilisez les touches
U
/
u
pour sélectionner
une piste que vous voulez copier dans le
menu, puis appuyez sur ENTER (
).
Répétez l’opération pour sélectionner
autant de pistes que vous le souhaitez.
Sélectionne toutes les pistes
d’un CD audio.
Sélectionne une option
d’encodage dans le menu
contextuel (128 Kbit/s, 192 Kbit/
s, 320 Kbit/s ou Sans perte).
Annule l’enregistrement et
revient à l’écran précédent.
6. Utilisez les touches
U
/
u
/
I
/
i
pour
sélectionner [Démarrer] et appuyez sur la
touche ENTER (
).
7. Utilisez les touches
U
/
u
/
I
/
i
pour
sélectionner le dossier cible à copier.
Si vous voulez créer un nouveau dossier,
utilisez les touches
U
/
u
/
I
/
i
pour
sélectionner [Nouveau dossier] et appuyez
sur ENTER ( ).
Saisissez un nom de dossier à l’aide du
clavier virtuel, sélectionnez [OK] et appuyez
sur la touche ENTER ( ).
8. Utilisez les touches
U
/
u
/
I
/
i
pour
sélectionner [OK] et appuyez sur ENTER
(
) pour commencer l’enregistrement du
CD audio.
Pour interrompre l’enregistrement du CD
audio, sélectionnez [Annuler] et appuyez
sur la touche ENTER ( ).
9. Un message apparaît lorsque l’extraction
du CD audio est terminée. Appuyez sur la
touche ENTER (
) pour véri er le chier
musical créé dans le dossier cible.
HB985-DB.BDEUPPK_FRE.indd 54HB985-DB.BDEUPPK_FRE.indd 54 2010-05-14 1:54:292010-05-14 1:54:29

55
Utilisation
4
Utilisation
REMARQUE
• Le tableau ci-dessous donne en exemple la
durée moyenne d’enregistrement d’une piste
audio de 4 minutes vers un chier musical à
192 Kbit/s.
À l’arrêt Pendant la lecture
1,4 min. 2 min.
• Les durées indiquées dans le tableau ci-dessus
sont des estimations.
• La durée d’extraction réelle pour un
périphérique USB varie selon les caractéristiques
de ce dernier.
• Avant d’enregistrer sur le périphérique de
stockage USB, assurez-vous que l’espace
disponible est d’au moins 50 Mo.
• L’enregistrement ne fonctionnera que si les
chiers musicaux ont une durée supérieure à 20
secondes.
• N’éteignez pas ce lecteur ou ne retirez pas
le périphérique de stockage USB connecté
pendant l’enregistrement d’un CD audio.
La réalisation de copies non autorisées d’un
contenu protégé contre la copie, notamment
un programme informatique, un chier, une
émission ou un enregistrement sonore, peut être
une violation des droits d’auteur et constitue une
infraction criminelle.
Cet appareil ne doit pas être utilisé à de telles ns.
Assumez vos responsabilités.
Respectez les droits d’auteur.
HB985-DB.BDEUPPK_FRE.indd 55HB985-DB.BDEUPPK_FRE.indd 55 2010-05-14 1:54:292010-05-14 1:54:29

56
Utilisation
Utilisation
4
Lecture de l’iPod
Vous pouvez écouter la musique de votre iPod
sur votre Home Cinema. Pour plus de détails
sur l’iPod, consultez le guide utilisateur iPod.
Préparation
• Pour visionner les vidéos et photos
présentes sur l’iPod sur l’écran de votre TV.
- Assurez-vous d’utilisez la connexion vidéo
avec la prise VIDEO OUT sur le panneau
arrière de l’ampli. Sélectionnez le mode
d’entrée vidéo sur la TV.
- Selon votre modèle d’iPod, assurez-vous
de sélectionnez Vidéos > Réglages vidéo
puis de régler la sortie TV sur Ask ou sur On
sur votre iPod.
Pour plus de détails sur les réglages vidéo,
consultez le guide utilisateur iPod.
- La visualisation de photos est disponible
uniquement si l’ampli est en mode iPod
IN et vous pourrez seulement voir les
photos en diaporama. Vous devez ouvrir
un diaporama sur votre iPod pour voir une
photo sur la TV. Pour plus de détails au
sujet des diaporamas, consultez le guide
utilisateur iPod.
• Avant de brancher l’iPod, éteignez le et
réduisez le volume au minimum.
1. Raccordez fermement votre iPod.
Raccordez votre iPod
Raccordez le sabot
et placez votre iPod
dessus.
2. Sélectionnez un chier à l’aide de
U
/
u
/
I
/
i
puis appuyez sur ENTER (
) pour écouter le
chier.
A chage de l’iPod à l’écran
1. Raccordez fermement votre iPod.
2. Appuyez sur la touche HOME MENU (
).
3. Sélectionnez [Musique] ou [Film] à l’aide de
I
/
i
, puis appuyez sur ENTER ( ).
SI un autre équipement (lecteur CD
ou périphérique USB) est connecté,
sélectionnez l’iPod dans le menu.
4. Sélectionnez un contenu à l’aide des
touches
U
/
u
/
I
/
i
, puis appuyez sur ENTER
(
).
HB985-DB.BDEUPPK_FRE.indd 56HB985-DB.BDEUPPK_FRE.indd 56 2010-05-14 1:54:292010-05-14 1:54:29

57
Utilisation
4
Utilisation
Pro tez de votre iPod en mode
in iPod IN
Vous pouvez commander les fonctions de
votre iPod à l’aide de la télécommande fournie.
1. Raccordez fermement votre iPod.
En mettant cet appareil sous tension, votre
iPod se met automatiquement en marche
et le rechargement débute.
2. Appuyez sur INPUT/TUNER pour
sélectionnez le mode iPod IN.
U
/
u
/
I
/
i
sélectionne une option dans le
menu.
B
/ENTER
démarre la lecture de musique
ou vidéo.
X
marque une pause lors de
la lecture. Pour reprendre la
lecture, appuyez à nouveau sur
B
(PLAY).
m
/
M
avance rapide ou retour rapide
d’une chanson ou d’une vidéo.
.
/
>
passe la lecture d’une piste
d’avant en arrière.
REPEAT Appuyez sur la touche REPEAT
pour sélectionner le mode de
répétition souhaité: Piste
( )
,
Tous
( )
, O (Pas d’a chage).
REMARQUE
Cet appareil est compatible avec le son et la vidéo
de l’iPod (4e génération), l’iPod nano, l’iPod classic,
l’iPod mini, l’iPod touch et l’iPhone.
(L’iPod shu e n’est pas pris en charge.)
REMARQUE
• Un message d’erreur “CHECK IPOD” ou
“Connected iPod model is not supported”
(« ce modèle d’iPod n’est pas pris en charge »)
apparaît lorsque :
- Votre iPod n’est pas approprié pour la fonction
à e ectuer.
• Un message d’erreur “CHECK IPOD” ou “Please
update iPod’s software” (« Veuillez mettre le
logiciel de l’iPod à jour » apparaît lorsque :
- Votre iPod a une ancienne version du logiciel.
t
Mettez à jour le logiciel de votre iPod en
téléchargeant la dernière version.
• Si le lecteur a che un message d’erreur, suivez
les instructions de ce message. Un message
d’erreur “CHECK IPOD” ou “Please check your
iPod.” (« Veuillez véri er votre iPod ») apparaît
lorsque :
- La communication entre le lecteur et votre
iPod a échoué.
t
Retirez puis reposez votre iPod sur le
support du lecteur.
- Votre iPod n’est pas correctement connecté.
- Le lecteur ne reconnaît pas votre iPod.
- La batterie de votre iPod est très faible.
t
La batterie doit être rechargée.
t
Si vous chargez la batterie alors que la
batterie est au plus bas, le rechargement
peut prendre plus de temps.
• Vous devez utilisez l’adaptateur dock fournit
avec votre iPod pour une utilisation régulière.
Si vous avez besoin d’un adaptateur, consultez
votre revendeur iPod.
• La compatibilité avec votre iPod peut varier
selon le type d’iPod.
• L’iPod touch et l’iPhone ont un mode de
fonctionnement di érent de celui de l’iPod.
Vous pouvez avoir besoin d’une commande
supplémentaire pour les utiliser sur le lecteur.
(ex : « image à débloquer »)
• Si vous utilisez une application, e ectuez un
appel, ou envoyez ou recevez un SMS, etc. sur
un iPod touch ou un iPhone, détachez-le du
support iPod dock du lecteur pour l’utiliser.
• Selon la version de votre logiciel iPod, il peut y
avoir une impossibilité de contrôler votre iPod
depuis le lecteur. Nous vous recommandons
d’installer la dernière version du logiciel.
• La qualité vidéo dépend des sources vidéo sur
votre iPod.
• Si vous rencontrez un problème avec votre iPod,
veuillez visiter le site
http://www.apple.com/support/ipod
HB985-DB.BDEUPPK_FRE.indd 57HB985-DB.BDEUPPK_FRE.indd 57 2010-05-14 1:54:292010-05-14 1:54:29

58
Utilisation
Utilisation
4
Utilisation de la
fonction Radio
Véri ez que l’antenne est raccordée.
(Voir page 24)
Pour écouter la radio
1.
Appuyez sur INPUT/TUNER jusqu’à ce
que l’indication Tuner (FM) apparaisse sur
l’a chage du panneau frontal. Le syntoniseur
se règle sur la dernière station radio écoutée.
2. Appuyez sur la touche TUNE (-/+) et
maintenez-la enfoncée pendant environ
deux secondes, jusqu’à ce que l’indication
de fréquence commence à changer. La
recherche des stations s’arrête lorsque
le syntoniseur de l’appareil a trouvé une
station radio. Ou Appuyez de façon répétée
sur la touche TUNE (-/+).
3. Pour régler le volume, tournez le bouton
VOLUME situé sur le panneau frontal de
l’appareil, ou utilisez la touche VOL (+/- ) de
la télécommande.
Mémorisation des stations radio
Vous pouvez présélectionner 50 stations en
FM. Avant de commencer, veillez à baisser le
volume.
1. Appuyez sur INPUT/TUNER jusqu’à ce que
l’indication TUNER (FM) apparaisse sur
l’a chage du panneau frontal.
2. Sélectionnez la fréquence souhaitée à l’aide
de la touche TUNE (-/+).
3. Appuyez sur la touche ENTER (
) ; un
numéro apparaît sur l’a chage du panneau
frontal.
4. Appuyez sur la touche PRESET pour
sélectionner le numéro souhaité.
5. Appuyez sur la touche ENTER (
). La station
est mémorisée.
6. Répétez les étapes 2 à 5 pour mémoriser
d’autres stations.
Suppression de toutes les
stations préréglées
Appuyez sans relâcher sur la touche CLEAR
pendant deux secondes. L’indication “E acer
tout” clignote. Appuyez sur CLEAR. Toutes les
stations préréglées sont alors supprimées.
Amélioration de la réception FM
Appuyez sur la touche de couleur bleue D (ST/
MONO) de la télécommande. Le syntoniseur
passe du mode stéréo au mode mono, ce qui
permet d’améliorer la qualité de réception en
cas de mauvaise réception.
A cher les informations de la
station de radio
Le syntoniseur FM béné cie de la technologie
RDS (Radio Data System). Elle fournit des
informations sur la station de radio que vous
écoutez. Appuyez de manière répétée sur la
touche RDS pour a cher tour à tour les types
de données suivantes :
PS (nom de la station radio)
A che le nom de la station radio
PTY (reconnaissance du type de
programme)
A che le type de programme
(par ex : Jazz ou Actualités).
RT (texte radio)
A che des informations spéciales
publiées par la station radio. Ce
texte peut dé ler à l’a chage.
CT (horloge radio)
A che l’heure et la date telles
qu’envoyées par la station radio.
HB985-DB.BDEUPPK_FRE.indd 58HB985-DB.BDEUPPK_FRE.indd 58 2010-05-14 1:54:292010-05-14 1:54:29

59
Utilisation
4
Utilisation
Lecture de contenu
via votre réseau
domestique
Ce lecteur peut parcourir et lire les contenus
stockés sur votre ordinateur et vos serveurs
multimédia certi és DLNA connectés à votre
réseau domestique.
À propos des fonctions DLNA
Ce lecteur est un lecteur multimédia
numérique certi é DLNA pouvant a cher et
lire des contenus vidéo, photo et musicaux à
partir de votre serveur multimédia numérique
compatible DLNA (ordinateurs et produits
électroniques grand public).
La Digital Living Network Alliance (DLNA)
est un organisme intersectoriel regroupant
des fabricants d’appareils électroniques
grand public, d’ordinateurs personnels et de
périphériques mobiles. Digital Living permet
aux consommateurs de partager facilement
des contenus multimédia numériques via un
réseau à domicile.
Le logo de certi cation DLNA permet
d’identi er facilement les produits conformes
aux directives d’interopérabilité DLNA.
Cet appareil est conforme aux directives
d’interopérabilité DLNA v1.5.
Si un ordinateur exécutant le logiciel serveur
DLNA ou tout autre périphérique compatible
DLNA est connecté à ce lecteur, certaines
modi cations des paramètres du logiciel
ou d’autres périphériques seront peut-être
nécessaires. Pour plus d’informations, reportez-
vous au manuel d’utilisation du logiciel ou du
périphérique.
Accès à un serveur multimédia
DLNA
1. Véri er la connexion et les paramètres
réseau (voir pages 28-30).
2. Appuyez sur la touche
HOME MENU.
3. Sélectionnez l’option [Home Link] à l’aide
des touches
U
/
u
/
I
/
i
, puis appuyez sur
ENTER (
).
4. Sélectionnez un serveur multimédia DLNA
dans la liste à l’aide des touches
U
/
u
, puis
appuyez sur ENTER (
).
Si vous voulez réanalyser le serveur
multimédia disponible, appuyez sur la
touche de couleur verte (B).
REMARQUE
En fonction du serveur multimédia, le lecteur aura
peut-être besoin d’une autorisation du serveur.
5. Sélectionnez un chier à l’aide des touches
U
/
u
/
I
/
i
, puis appuyez sur ENTER ( ) pour
lire le chier.
HB985-DB.BDEUPPK_FRE.indd 59HB985-DB.BDEUPPK_FRE.indd 59 2010-05-14 1:54:292010-05-14 1:54:29

60
Utilisation
Utilisation
4
REMARQUE
• Les impératifs concernant les chiers sont
décrits page 11.
• Vous pouvez utiliser di érentes fonctions de
lecture. Reportez-vous aux pages 40-47.
• Les impératifs concernant les chiers indiqués
page 11 ne sont pas toujours compatibles.
Il se peut qu’il y ait des restrictions selon les
fonctionnalités des chiers et la capacité du
serveur multimédia.
• La vignette des chiers incompatibles peut
apparaître dans le menu [Home Link], mais ces
chiers ne peuvent pas être lus sur ce lecteur.
• Si le menu [Home Link] comporte un chier
musical incompatible, le lecteur l’ignore et lit le
chier suivant.
• Le nom du chier de sous-titres et celui du
chier vidéo doivent être identiques et les
chiers doivent se trouver dans le même dossier.
• La qualité de lecture et de fonctionnement du
menu [Home Link] peut être a ectée par les
conditions de votre réseau domestique.
• Il se peut que les chiers des supports
amovibles (clés USB, lecteur de DVD, etc.) sur
votre serveur multimédia ne soient pas partagés
correctement.
Accès à un dossier partagé de
votre ordinateur
1. Démarrez votre ordinateur connecté à votre
réseau local.
2. Sur votre ordinateur, partagez les dossiers
qui contiennent des chiers musicaux,
photo ou vidéo.
3. Sur le lecteur, véri ez les réglages et la
connexion réseau (voir pages 28-30).
4. Appuyez sur la touche
HOME MENU.
5. Sélectionnez l’option [Home Link] à l’aide
des touches
U
/
u
/
I
/
i
, puis appuyez sur
ENTER (
).
6. Sélectionnez un dossier partagé dans la
liste à l’aide des touches
U
/
u
, puis appuyez
sur ENTER (
).
Si vous souhaitez rechercher à nouveau les
serveurs multimédia disponibles, appuyez
sur la touche de couleur verte (B).
REMARQUE
En fonction du dossier partagé, il est possible que
vous deviez saisir un identi ant utilisateur réseau et
un mot de passe pour pouvoir accéder à ce dossier.
7. Sélectionnez un chier à l’aide des touches
U
/
u
/
I
/
i
, puis appuyez sur ENTER ( ) pour
lire le chier.
HB985-DB.BDEUPPK_FRE.indd 60HB985-DB.BDEUPPK_FRE.indd 60 2010-05-14 1:54:302010-05-14 1:54:30

61
Utilisation
4
Utilisation
REMARQUE
• Les impératifs concernant les chiers sont
décrits page 11.
• V
ous pouvez utiliser di érentes fonctions de
lecture. Reportez-vous aux pages 40-47.
• La vignette des chiers incompatibles peut
apparaître dans le menu [Home Link], mais ces
chiers ne peuvent pas être lus sur ce lecteur.
• Si le menu [Home Link] comporte un chier
musical incompatible, le lecteur l’ignore et lit le
chier suivant.
• Le nom du chier de sous-titres et celui du
chier vidéo doivent être identiques et les
chiers doivent se trouver dans le même dossier.
• La qualité de lecture et de fonctionnement du
menu [Home Link] peut être a ectée par les
conditions de votre réseau domestique.
• Il se peut que les chiers des supports amovibles
(clés USB, lecteur de DVD, etc.) sur votre
ordinateur ne soient pas partagés correctement.
• En fonction de l’environnement de votre
ordinateur, il est possible que vous rencontriez
des problèmes de connexion.
Con guration minimale requise de
l’ordinateur
• Windows® XP (Service Pack 2 ou ultérieur),
Windows Vista® (aucun Service Pack requis)
Windows 7®
• Processeur Intel® Pentium® III à 1,2 GHz ou
AMD Sempron™ 2200+
• Environnement réseau : Ethernet 100 Mbit/
s, réseau local sans l (IEEE 802.11b/g/n)
REMARQUE
Si vous utilisez Windows® XP ou Windows Vista®,
cliquez sur le lien correspondant ci-dessous pour
obtenir plus d’informations sur les paramètres de
partage de chiers.
HB985-DB.BDEUPPK_FRE.indd 61HB985-DB.BDEUPPK_FRE.indd 61 2010-05-14 1:54:302010-05-14 1:54:30

62
Utilisation
Utilisation
4
Saisie de l’identi ant utilisateur
réseau et du mot de passe
En fonction de l’environnement de votre
ordinateur, il est possible que vous deviez
saisir un identi ant utilisateur réseau et un mot
de passe pour pouvoir accéder à un dossier
partagé.
1. Le menu clavier apparaît automatiquement
si l’ID utilisateur et le mot de passe du
réseau sont requis.
2. Utilisez
U
/
u
/
I
/
i
pour sélectionner un
caractère, puis appuyez sur ENTER (
)
pour con rmer votre sélection sur le menu
clavier.
Pour saisir une lettre accentuée,
sélectionnez d’abord la lettre, puis accédez
au jeu de caractères étendu.
Exemple: sélectionnez “D”, puis appuyez sur
la touche DISPLAY ( ) pour a cher le jeu
de caractères étendu. Utilisez les touches
I
/
i
pour sélectionner “D” ou “Ď” et appuyez
sur ENTER ( ).
[E acer] – e ace tous les caractères saisis.
[Espace] – insère un espace à l’emplacement
du curseur.
[<–] – supprime le caractère situé à gauche
du curseur.
[ABC / abc / #+-=&] – modi e le réglage
du clavier pour activer les majuscules, les
minuscules ou les symboles.
3. Lorsque vous avez terminé de saisir
l’identi ant utilisateur réseau et le mot de
passe, sélectionnez [OK] à l’aide des touches
U
/
u
/
I
/
i
et appuyez sur ENTER (
) pour
accéder au dossier.
Une fois que vous aurez accédé au dossier,
l’identi ant utilisateur réseau et le mot
de passe seront mémorisés pour plus de
commodité. Si vous ne voulez pas que
l’identi ant utilisateur réseau et le mot de
passe soient mémorisés, appuyez sur la
touche de couleur rouge (A) pour décocher
la case [Mémoriser] avant d’accéder au
dossier.
HB985-DB.BDEUPPK_FRE.indd 62HB985-DB.BDEUPPK_FRE.indd 62 2010-05-14 1:54:302010-05-14 1:54:30

63
Entretien
5
Entretien
Remarque sur les
disques
Manipulation des disques
Ne jamais coller de papier ou de ruban adhésif
sur le disque.
Stockage des disques
Après la lecture, rangez le disque dans son
boîtier. N’exposez pas les disques aux rayons
directs du soleil ou de sources de chaleur et
ne les laissez jamais dans une voiture garée en
plein soleil.
Nettoyage des disques
N’utilisez pas de solvants puissants comme
l’alcool, le benzène, les diluants, les nettoyants
utilisés dans le commerce, ou des sprays
antistatiques destinés aux vieux disques
vinyles.
Manipuler le lecteur
Lors de l’expédition du lecteur
Veuillez garder le carton d’expédition d’origine
et les matériaux d’emballage. Si vous avez
besoin d’expédier l’appareil, pour une
protection maximale, ré-emballez le lecteur
comme il était à la sortie de l’usine.
Maintenez la surface du lecteur propre.
• N’utilisez pas de liquides volatils tels que du
spray insecticide près du lecteur.
• Essuyer en appuyant fortement peut
endommager la surface de l’appareil.
• Ne laissez pas de produits en caoutchouc
ou en plastique en contact avec le lecteur
pour une longue période.
Nettoyer le lecteur
Pour nettoyer le lecteur, utilisez un chi on
doux et sec. Si les surfaces sont très sales,
utilisez un chi on doux légèrement humidi é
avec une solution détergente neutre. N’utilisez
pas de solvants puissants tels que l’alcool,
du benzène ou du diluant qui pourraient
endommager la surface du lecteur.
Entretien du lecteur
Le lecteur est un appareil de précision haute
technologie. Si le bloc optique incorporé
ou les pièces du lecteur de disques sont
sales ou usées, la qualité de l’image pourrait
être diminuée. Pour plus de détails, veuillez
contacter le service autorisé le plus proche.
5
Entretien
HB985-DB.BDEUPPK_FRE.indd 63HB985-DB.BDEUPPK_FRE.indd 63 2010-05-14 1:54:302010-05-14 1:54:30

64
Dépannage
Dépannage
6
6
Dépannage
Général
L’appareil n’est pas sous
tension.
• Branchez le cordon d’alimentation sur la prise murale.
La lecture ne démarre pas. • Insérez un disque approprié. (Véri ez le type de disque, le
système de couleur et le code régional).
• Placez le disque face de lecture vers le bas.
• Placez le disque correctement sur le plateau de disque.
• Nettoyez le disque.
• Annuler la fonction d’évaluation ou changez le niveau
d’évaluation.
L’angle ne peut pas être
changé.
• Plusieurs angles de vue ne sont pas enregistrés sur le DVD
vidéo en cours de lecture.
La langue des sous-titres
ne peut être changée ou
désactivée.
• Les sous-titres ne sont pas enregistrés sur le DVD vidéo en
cours de lecture.
Les chiers MP3/WMA/
JPEG/DivX ne peuvent être
lus.
• Les chiers ne sont pas enregistrés dans un format pouvant
être lu par le lecteur.
• Le lecteur ne prend pas en charge le codec du chier vidéo.
La télécommande
ne fonctionne pas
correctement.
• La télécommande n’est pas dirigée vers le capteur de
l’appareil.
• La télécommande est trop loin de l’unité.
• Il y a un obstacle sur le chemin de la télécommande du
lecteur.
• Les piles de la télécommande sont épuisées.
HB985-DB.BDEUPPK_FRE.indd 64HB985-DB.BDEUPPK_FRE.indd 64 2010-05-14 1:54:302010-05-14 1:54:30

65
Dépannage
6
Dépannage
Image
Il n’y a pas d’image. • Sélectionnez le mode d’entrée vidéo approprié sur le
téléviseur de sorte que l’image de l’appareil apparaisse à
l’écran du téléviseur.
• Enfoncez correctement les branchements vidéo.
• Véri ez que l’option sélectionnée dans [Rég. couleur HDMI]
dans le menu [Con g.] correspond à votre connexion vidéo.
• Il est possible que votre téléviseur n’accepte pas la résolution
que vous avez dé nie sur le lecteur. Sélectionnez une
résolution acceptée par votre téléviseur.
• La prise de sortie HDMI OUT du lecteur est raccordée à un
appareil DVI qui ne prend pas en charge la protection des
droits d’auteur.
Présence de bruits
parasites sur l’image.
• Vous essayez de lire un disque enregistré dans un système
couleur di érent de celui de votre téléviseur.
• Sélectionnez une résolution acceptée par votre téléviseur.
Son
Il n’y a aucun son ou le son
est déformé.
• L’appareil est en balayage, mouvement lent ou en mode
pause.
• Le volume du son est bas.
• Véri ez la connexion du câble de haut-parleur. (page 16)
HB985-DB.BDEUPPK_FRE.indd 65HB985-DB.BDEUPPK_FRE.indd 65 2010-05-14 1:54:302010-05-14 1:54:30

66
Dépannage
Dépannage
6
Réseau
La fonctionnalité BD-LIVE
ne fonctionne pas.
• Le périphérique de stockage USB connecté ne contient pas
su samment d’espace. Raccordez un périphérique USB
ayant au moins 1 Go d’espace libre.
• Veillez à ce que l’appareil soit correctement connecté au
réseau local et puisse accéder à internet (voir page 28).
• Votre débit n’est peut-être pas su samment élevé pour
utiliser les fonctionnalités BD-LIVE. Contactez votre
fournisseur d’accès à Internet pour augmenter votre débit.
• L’option [Connexion BD-LIVE] du menu [Con g.] est dé nie
sur [Interdite]. Réglez cette option sur [Autorisée].
La conception et les spéci cations sont sujettes à modi cation sans préavis.
Mises à jour
Notez que les informations sur ce produit sont disponibles sur le site Web de Pioneer.
Recherchez sur le site Web des informations sur les mises à jour et l’entretien de votre lecteur
Blu-ray Disc.
HB985-DB.BDEUPPK_FRE.indd 66HB985-DB.BDEUPPK_FRE.indd 66 2010-05-14 1:54:302010-05-14 1:54:30

67
Annexe
7
Annexe
Commande d’un
téléviseur à l’aide de la
télécommande fournie
Vous pouvez commander votre PIONEER
téléviseur à l’aide des touches ci-dessous.
Touches de
commande
du téléviseur
Touche Utilisation
1
(TV Power)
Allumer ou éteindre le
téléviseur.
INPUT Choisir la source d’entrée
entre le téléviseur et
d’autres sources.
CH +/-
Passer d’une chaîne à l’autre.
VOL +/- Régler le volume du
téléviseur.
REMARQUE
Selon l’appareil raccordé, il se peut que vous ne
puissiez pas commander votre téléviseur à l’aide de
certaines de ces touches.
Réglage de la télécommande
pour commander votre
téléviseur
Vous pouvez piloter votre téléviseur à l’aide de
la télécommande fournie.
Si votre téléviseur est répertorié dans le tableau
ci-dessous, indiquez le code approprié qui
correspond au fabricant.
1. Tout en maintenant la touche
1
(TV
POWER) enfoncée, entrez le code fabricant
de votre téléviseur avec les touches
numériques (voir le tableau ci-dessous).
Fabricant
Numéro de
code
Pioneer 1(par défaut)
Sony 2, 3
Panasonic 4, 5
Samsung 6, 7
LG 8, 9
2. Relâchez la touche
1
(TV POWER) pour
terminer le réglage.
Selon les téléviseurs, la totalité ou certaines
des touches de la télécommande peuvent
ne pas fonctionner avec le téléviseur, même
après avoir entré le code correct du fabricant.
Lorsque vous remplacez les piles de la
télécommande, il est possible que le numéro
de code que vous aviez dé ni soit rétabli aux
valeurs par défaut. Entrez le numéro de code
approprié de nouveau.
7
Annexe
HB985-DB.BDEUPPK_FRE.indd 67HB985-DB.BDEUPPK_FRE.indd 67 2010-05-14 1:54:302010-05-14 1:54:30

68
Annexe
Annexe
7
Liste des codes de région
Choisissez un code de région dans cette liste.
Région Code Région Code Région Code Région Code
Afghanistan AF
Argentine AR
Australie AU
Autriche AT
Belgique BE
Bhoutan BT
Bolivie BO
Brésil BR
Cambodge KH
Canada CA
Chili CL
Chine CN
Colombie CO
Congo CG
Costa Rica CR
Croatie HR
République
tchèque CZ
Danemark DK
Équateur EC
Égypte EG
Salvador SV
Éthiopie ET
Fidji FJ
Finlande FI
France FR
Allemagne DE
Grande-Bretagne GB
Grèce GR
Groenland GL
Hong Kong HK
Hongrie HU
Inde IN
Indonésie ID
Israël IL
Italie IT
Jamaïque JM
Japon JP
Kenya KE
Koweït KW
Libye LY
Luxembourg LU
Malaisie MY
Maldives MV
Mexique MX
Monaco MC
Mongolie MN
Maroc MA
Népal NP
Pays-Bas NL
Antilles
néerlandaises AN
Nouvelle-Zélande NZ
Nigeria NG
Norvège NO
Oman OM
Pakistan PK
Panama PA
Paraguay PY
Philippines PH
Pologne PL
Portugal PT
Roumanie RO
Russian
Russie RU
Arabie Saoudite SA
Sénégal SN
Singapour SG
Slovaquie SK
Slovénie SI
Afrique du Sud ZA
Corée du Sud KR
Espagne ES
Sri Lanka LK
Suède SE
Suisse CH
Taiwan TW
Thaïlande TH
Turquie TR
Ouganda UG
Ukraine UA
États-Unis US
Uruguay UY
Ouzbékistan UZ
Vietnam VN
Zimbabwe ZW
HB985-DB.BDEUPPK_FRE.indd 68HB985-DB.BDEUPPK_FRE.indd 68 2010-05-14 1:54:312010-05-14 1:54:31

69
Annexe
7
Annexe
Liste des codes de langue
Utilisez cette liste a n de sélectionner la langue de votre choix pour les réglages initiaux suivants :
[Audio], [Sous-titres] et [Menu disque].
Langue Code Langue Code Langue Code Langue Code
Afar 6565
Afrikaans 6570
Albanais 8381
Amharique 6577
Arabe 6582
Arménien 7289
Assamais 6583
Aymara 6588
Azéri 6590
Bachkir 6665
Basque 6985
Bengali 6678
Bhoutanais 6890
Bihari 6672
Breton 6682
Bulgare 6671
Birman 7789
Biélorusse 6669
Chinois 9072
Croate 7282
Tchèque 6783
Danois 6865
Néerlandais 7876
Anglais 6978
Espéranto 6979
Estonien 6984
Féroïen 7079
Fidjien 7074
Finnois 7073
Français 7082
Frison 7089
Galicien 7176
Géorgien 7565
Allemand 6869
Grec 6976
Groenlandais 7576
Guarani 7178
Goudjrati 7185
Haoussa 7265
Hébreu 7387
Hindi 7273
Hongrois 7285
Islandais 7383
Indonésien 7378
Interlingue 7365
Irlandais 7165
Italien 7384
Japonais 7465
Kannada 7578
Kashmiri 7583
Kazakh 7575
Kirghiz 7589
Coréen 7579
Kurde 7585
Laotien 7679
Latin 7665
Lette, letton 7686
Lingala 7678
Lituanien 7684
Macédonien 7775
Malgache 7771
Malais 7783
Malayalam 7776
Maori 7773
Marathe 7782
Moldave 7779
Mongol 7778
Nauruan 7865
Népalais 7869
Norvégien 7879
Oriya 7982
Pendjabi 8065
Pachtou 8083
Perse 7065
Polonais 8076
Portugais 8084
Quechua 8185
Rhéto-roman 8277
Roumain 8279
Russe 8285
Samoan 8377
Sanskrit 8365
Gaélique écossais
7168
Serbe 8382
Serbo-croate 8372
Shona 8378
Sindhi 8368
Singhalais 8373
Slovaque 8375
Slovène 8376
Espagnol 6983
Soudanais 8385
Swahili 8387
Suédois 8386
Tagalog 8476
Tadjik 8471
Tamoul 8465
Télougou 8469
Thaï 8472
Tonga 8479
Turc 8482
Turkmène 8475
Twi 8487
Ukrainien 8575
Ourdou 8582
Ouzbek 8590
Vietnamien 8673
Volapük 8679
Galois 6789
Wolof 8779
Xhosa 8872
Yiddish 7473
Yoruba 8979
Zoulou 9085
HB985-DB.BDEUPPK_FRE.indd 69HB985-DB.BDEUPPK_FRE.indd 69 2010-05-14 1:54:312010-05-14 1:54:31

70
Annexe
Annexe
7
Résolution de la sortie vidéo
Lorsque le support lu n’est pas protégé contre la copie
Sortie vidéo
Résolution
HDMI OUT
COMPONENT VIDEO OUT
HDMI connecté HDMI déconnecté
576i (480i) 576p (480i) 576i (480i)
576p (480p) 576p (480p) 576p (480p)
720p 720p 720p
1080i 1080i 1080i
1080p / 24 Hz 1080p / 24 Hz 576i (480i) 1080i
1080p / 50 Hz 1080p / 50 Hz 576i (480i) 1080i
Lorsque le support lu est protégé contre la copie
Sortie vidéo
Résolution
HDMI OUT
COMPONENT VIDEO OUT
HDMI connecté HDMI déconnecté
576i (480i) 576p (480p) 576i (480i)
576p (480p) 576p (480p) 576p (480p)
720p 720p 576i (480i) 576p (480p)
1080i 1080i 576i (480i) 576p (480p)
1080p / 24 Hz 1080p / 24 Hz 576i (480i) 576p (480p)
1080p / 50 Hz 1080p / 50 Hz 576i (480i) 576p (480p)
Connexion HDMI OUT
• Pour le réglage de résolution 576i (480i),
la résolution de sortie réelle HDMI OUT
passera à 576p (480p).
• Si vous sélectionnez une résolution
manuellement, puis raccordez la prise HDMI
au téléviseur, mais que votre téléviseur
ne la prend pas en charge, le réglage de
résolution est dé ni sur [Auto].
• Si vous sélectionnez une résolution non
prise en charge par votre téléviseur, un
message d’avertissement apparaîtra.
Après modi cation de la résolution, si
rien n’apparaît à l’écran, attendez 20
secondes pour que la résolution revienne
automatiquement au réglage précédent.
• La fréquence d’image de sortie vidéo 1080p
peut être dé nie automatiquement sur
24 Hz ou 50 Hz en fonction de la capacité
et de la préférence du téléviseur raccordé,
ainsi que de la fréquence d’image vidéo
native du contenu du BD-ROM.
Connexion COMPONENT VIDEO OUT
Le format BD ou DVD peut empêcher
l’extrapolation en sortie analogique.
Connexion VIDEO OUT
La résolution de la prise de sortie VIDEO OUT
est toujours réglée sur 576i (480i).
HB985-DB.BDEUPPK_FRE.indd 70HB985-DB.BDEUPPK_FRE.indd 70 2010-05-14 1:54:312010-05-14 1:54:31

71
Annexe
7
Annexe
“Blu-ray Disc” et sont des marques de
commerce.
Le logo “BD-LIVE” est une marque commerciale de
l’association “Blu-ray Disc”.
“BONUSVIEW” est une marque commerciale de
l’association Blu-ray Disc.
Java et toutes les marques commerciales et les
logos Java sont des marques commerciales ou des
marques déposées de Sun Microsystems, Inc. aux
États-Unis et/ou dans d’autres pays.
Fabriqué sous licence de Dolby Laboratories.
Dolby et le sigle double D sont des marques
commerciales de Dolby Laboratories.
Fabriqué sous licence des brevets américains
suivants : 5,451,942; 5,956,674; 5,974,380; 5,978,762;
6,226,616; 6,487,535; 7,392,195; 7,272,567;
7,333,929; 7,212,872 et autres licences américaines
et d’autres pays publiées ou en attente.
DTS et le Symbole sont des marques déposées.
Les logos DTS-HD, DTS-HD Master Audio l Essential
et DTS sont des marques de DTS, Inc. Le produit
inclut des logiciels. © DTS, Inc. Tous droits réservés.
HDMI, le logo HDMI et High-De nition Multimedia
Interface sont des marques commerciales ou des
marques déposées de HDMI Licensing, LLC aux
États-Unis et dans d’autres pays.
Le logo est une marque commerciale de
DVD Format/Logo Licensing Corporation.
TM
DLNA et DLNA CERTIFIED sont des marques
commerciales et / ou des marques de service
Digital Living Network Alliance
DivX est une marque déposée de DivX, Inc., et son
utilisation est couverte par une licence.
“x.v.Color” ou “x.v.Colour” est une marque de
commerce de Sony Corporation.
Marques de commerce et licences
HB985-DB.BDEUPPK_FRE.indd 71HB985-DB.BDEUPPK_FRE.indd 71 2010-05-14 1:54:312010-05-14 1:54:31

72
Annexe
Annexe
7
“AVCHD” et le logo “AVCHD” sont des marques
commerciales de Panasonic Corporation et Sony
Corporation.
Ce produit est sous licence des portefeuilles
de brevets AVC et VC-1 pour une utilisation
domestique personnelle et non commerciale
pour (i) encoder un contenu vidéo en conformité
avec les standards AVC et VC-1 (“AVC/VC-1 Video”)
et/ou (ii) décoder un contenu vidéo AVC/VC-1
encodé par un utilisateur à titre personnel et
non commercial et/ou obtenu d’un fournisseur
de contenu vidéo béné ciant d’une licence
l’autorisant à distribuer un contenu vidéo AVC/VC-
1. Aucune licence n’est accordée explicitement
ou implicitement pour aucun autre usage. Des
informations supplémentaires peuvent être
obtenues au sujet de MPEG LA, LLC. Voir le site
Web : http://www.mpegla.com.
iPod est une marque commerciale d’Apple Inc.,
enregistrée aux États-Unis et dans d’autres pays.
iPhone est une marque commerciale d’Apple Inc.
Les accessoires électroniques portant la mention
« Made for iPod » ont été conçus pour fonctionner
avec un iPod et sont certi és conformes aux
exigences d’Apple par le fabricant.
Les accessoires électroniques portant la mention
« Works with iPhone » ont été conçus pour
fonctionner avec un iPhone et sont certi és
conformes aux exigences d’Apple par le fabricant.
Apple n’est pas responsable pour le
fonctionnement de cet appareil ou de sa
compatibilité avec les normes réglementaires et
de sécurité.
Windows Media est une marque déposée ou une
marque commerciale de Microsoft Corporation aux
États-Unis et / ou dans d’autres pays.
Ce produit inclut une technologie appartenant à
Microsoft Corporation et ne peut pas être utilisé ni
distribué sans licence de Microsoft Licensing, Inc.
®
La technologie sans l Bluetooth® est un système
qui permet un contact radio entre équipements
électroniques dans un rayon de 10 mètres maximum.
La connexion de périphériques individuels en
employant la technologie sans l Bluetooth n’entraîne
aucune charge supplémentaire. Vous pouvez faire
fonctionner un téléphone mobile équipé de la
technologie sans l Bluetooth via la Cascade si la
connexion a été réalisée au moyen de la technologie
sans l Bluetooth.
Le mot servant de marque et les logos Bluetooth sont
la propriété de Bluetooth SIG, Inc. et toute utilisation
de telles marques par Pioneer Corporation s’e ectue
sous licence. Les autres marques commerciales
et noms de commerces appartiennent à leurs
propriétaires respectifs.
HB985-DB.BDEUPPK_FRE.indd 72HB985-DB.BDEUPPK_FRE.indd 72 2010-05-14 1:54:312010-05-14 1:54:31

73
Annexe
7
Annexe
Caractéristiques
Général
• Puissance électrique requise:
AC 220-240 V, 50/ 60 Hz
• Consommation électrique:
150 W
En mode veille : inférieur à 0.5 W
• Dimensions (L x H x P):
Env. 430 × 64 × 304 mm
• Poids net (Env.):
3.6 kg
• Température de fonctionnement:
41 °F à 95 °F (5 °C à 35 °C)
• Humidité relative:
5 % à 90 %
• Alimentation USB:
DC 5 V
500 mA
Entrées/ Sorties
• VIDEO OUT:
1,0 V (p-p), 75 Ω, synchro négative, RCA jack x 1
• COMPONENT VIDEO OUT:
(Y) 1,0 V (pp), 75 Ω, synchro négative, RCA jack x 1,
(Pb)/(Pr) 0.7 V (pp), 75 Ω, RCA jack x 2
• HDMI OUT (vidéo/audio):
19 pin (norme HDMI, Type A, Version 1.3)
• Analogiques audio IN:
2,0 Vrms (1 kHz, 0 dB), 600 Ω, RCA jack (L, R) x 1
• DIGITAL IN (OPTICAL 1/2):
3 V (p-p), Optical jack x 2
• PORTABLE IN:
0,5 Vrms (sortie stéréo 3,5 mm)
Radio
• Plage FM:
87.5 à 108.0 MHz ou 87.50 à 108.00 MHz
Ampli cateur
• Puissance de sortie (PEAK), (4Ω/3Ω)
Total 1100 W
Avant 180 W x 2
Centre 180 W
Arrière 180 W x 2
Subwoofer 200 W (Passive)
• Puissance de sortie (RMS), THD 10% (4Ω/3Ω)
Total 930 W
Avant 150 W x 2
Centre 150 W
Arrière 150 W x 2
Sub-Woofer 180 W (Passive)
Système
• Laser:
Laser semiconducteur,
Longueur d’onde: 405 nm / 650 nm
• Système de signal:
TV couleur NTSC/PAL standard
• Réponse en fréquence:
20 Hz à 20 kHz (48 kHz, 96 kHz, 192 kHz
échantillonnage)
• Port LAN:
prise ethernet x 1, 10BASE-T/100BASE-TX
HB985-DB.BDEUPPK_FRE.indd 73HB985-DB.BDEUPPK_FRE.indd 73 2010-05-14 1:54:322010-05-14 1:54:32

74
Annexe
Annexe
7
Enceintes
BCS-707
S-BD707
• Haut-parleur avant/enceintes satellites
(gauche/droite)
Type: 2 voie
Impédance nominale: 4 Ω
Dimensions nettes 260 x 1097 x 260 mm
(L x H x P):
Poids net: 3.8 kg
• Enceinte centrale
Type: 1 voie
Impédance nominale: 4 Ω
Dimensions nettes 300 x 87 x 65 mm
(L x H x P):
Poids net: 0.6 kg
S-BD707SW
• Caisson de graves
Type: 1 voie 1 haut-parleur
Impédance nominale: 3 Ω
Dimensions nettes 130.5 x 420 x 375 mm
(L x H x P):
Poids net: 4.4 kg
Enceintes
BCS-303
S-BD303
• Haut-parleur avant/enceintes satellites
(gauche/droite)
Type: 1 voie
Impédance nominale: 4 Ω
Dimensions nettes 96 x 96 x 85 mm
(L x H x P):
Poids net: 0.4 kg
• Enceinte centrale
Type: 1 voie
Impédance nominale: 4 Ω
Dimensions nettes 300 x 87 x 65 mm
(L x H x P):
Poids net: 0.6 kg
• Caisson de graves
Type: 1 voie 1 haut-parleur
Impédance nominale: 3 Ω
Dimensions nettes 130.5 x 420 x 375 mm
(L x H x P):
Poids net: 4.4 kg
HB985-DB.BDEUPPK_FRE.indd 74HB985-DB.BDEUPPK_FRE.indd 74 2010-05-14 1:54:322010-05-14 1:54:32

75
Annexe
7
Annexe
Avis concernant les
logiciels open source
Les chiers exécutables GPL et les bibliothèques
LGPL suivants utilisés dans ce produit sont sujets aux
accords de licence GPL2.0/LGPL2.1.
EXÉCUTABLES GPL: Linux kernel 2.6, bash, busybox,
cramfs, dhcpcd, e2fsprogs, fdisk, mkdosfs, mtd-utils,
net-tools, procps, samba-3.0.25b, sysutils, tcpdump,
tftpd, tinylogin, unzip, utelnetd
BIBLIOTHÈQUES LGPL: uClibc, DirectFB, blow sh,
cairo, mpeg, iconv, libusb, mpg123
BIBLIOTHÈQUE de licence publique gSOAP 1.3:
gsoap
Vous pouvez obtenir une copie du code source
correspondant en prenant les frais de distribution à
votre charge. Pour obtenir une copie, contactez votre
service client Pioneer local.
Vous pouvez obtenir une copie des licences
GPL et LGPL sur les sites http://www.gnu.org/
licenses/old-licenses/gpl-2.0.html et http://
www.gnu.org/licenses/old-licenses/lgpl-
2.1.html .
Vous pouvez aussi obtenir une copie de la licence
publique gSOAP sur
http://www.cs.fsu.edu/~engelen/license.html.
ce logiciel est basé en partie sur le travail du groupe
Independent JPEG Group Copyright © 1991-1998,
Thomas G. Lane.
Ce produit inclut :
• boost C++ : Copyright © Beman Dawes 1999-2003
• c-ares : Copyright © 1998 Massachusetts Institute
of Technology
• curl : Copyright © 1996-2008 Daniel Stenberg
• expat : Copyright © 2006 Expat maintainers
• freetype : Copyright © 2003 The FreeType Project
(www.freetype.org).
• jpeg : ce logiciel est basé en partie sur le travail du
groupe Independent JPEG Group Copyright
© 1991-1998, Thomas G. Lane.
• mng : Copyright © 2000-2007 Gerard Juyn, Glenn
Randers-Pehrson
• ntp : Copyright © David L. Mills 1992-2006
• OpenSSL
– Le logiciel cryptographique écrit par Eric
Young (eay@cryptsoft.com).
– Le logiciel écrit par Tim Hudson
(tjh@cryptsoft.com).
– Le logiciel développé par OpenSSL Project
pour être utilisé dans la boîte à outils OpenSSL
(http://www.openssl.org).
• png : Copyright © 2004 Glenn Randers-Pehrson.
• portmap : Copyright © 1990 The Regents of the
University of California.
• ptmalloc : Copyright © 2001-2006 Wolfram Gloger
• UnitTest++ : Copyright © 2006 Noel Llopis et
Charles Nicholson
• Le kit de développement logiciel UPnP :
Copyright © 2000-2003 Intel Corporation
• strace
Copyright © 1991, 1992 Paul Kranenburg
copyright © 1993 Branko Lankester
copyright © 1993 Ulrich Pegelow
copyright © 1995, 1996 Michael Elizabeth Chastain
copyright © 1993, 1994, 1995, 1996 Rick Sladkey
copyright © 1999,2000 Wichert Akkerman
• xml2 : Copyright © 1998-2003 Daniel Veillard.
• XML-RPC pour C/C++
• Copyright © 2001 First Peer, Inc. Tous droits
réservés.
• Copyright © 2001 Eric Kidd. Tous droits réservés.
• zlib : Copyright © 1995-2002 Jean-Loup Gailly et
Mark Adler.
Tous droits réservés.
de ce logiciel et des chiers de documentation
associés (le “Logiciel”) est autorisée à utiliser ce
Logiciel gratuitement et sans restriction, notamment,
mais sans s’y limiter, les droits d’utilisation, copie,
modi cation, fusion, publication, distribution, sous-
licence et/ou vente de copies du Logiciel, et à
attribuer les mêmes autorisations aux personnes
à qui ce Logiciel est fourni, conformément aux
conditions suivantes :
LE LOGICIEL EST FOURNI “EN L’ÉTAT”, SANS AUCUNE
GARANTIE (EXPRESSE OU IMPLICITE) QUE CE SOIT,
NOTAMMENT MAIS SANS S’Y LIMITER, LES GARANTIES
DE QUALITÉ MARCHANDE, D’ADÉQUATION À UNE
FIN PARTICULIÈRE ET DE NON-TRANSGRESSION.
EN AUCUN CAS LES AUTEURS OU DÉTENTEURS
DES DROITS D’AUTEUR NE SAURONT ÊTRE TENUS
RESPONSABLES EN CAS DE RÉCLAMATION,
DOMMAGE OU AUTRE RESPONSABILITÉ DÉCOULANT
D’UN CONTRAT, D’UN DÉLIT OU AUTRE, EN RELATION
AVEC LE LOGICIEL, SON UTILISATION OU TOUTE
AUTRE MANIPULATION DE CE DERNIER.
HB985-DB.BDEUPPK_FRE.indd 75HB985-DB.BDEUPPK_FRE.indd 75 2010-05-14 1:54:322010-05-14 1:54:32

2 Sicherheitshinweise
Sicherheitshinweise
1
ACHTUNG
STROMSCHLAGGEFAHR
NICHT ÖFFNEN
ACHTUNG: UM DIE GEFAHR VON
STROMSCHLÄGEN ZU VERMEIDEN, DAS GEHÄUSE
(BZW. DIE RÜCKSEITE) NICHT ABNEHMEN UND/
ODER DAS GERÄT SELBST REPARIEREN. ES
BEFINDEN SICH KEINE BAUTEILE IM GERÄT, DIE
VOM BENUTZER REPARIERT WERDEN KÖNNEN.
REPARATUREN STETS VOM FACHMANN
AUSFÜHREN LASSEN.
Der Blitz mit der Pfeilspitze im
gleichseitigen Dreieck dient dazu,
den Benutzer vor unisolierten und
gefährlichen spannungsführenden
Stellen innerhalb des
Gerätegehäuses zu warnen, an
denen die Spannung groß genug
ist, um für den Menschen die
Gefahr eines Stromschlages zu
bergen.
Das Ausrufezeichen im
gleichseitigen Dreieck dient
dazu, den Benutzer auf
wichtige vorhandene Betriebs-
und Wartungsanleitungen
in der produktbegleitenden
Dokumentation hinzuweisen.
Vorsichts- und Warnhinweise
ACHTUNG: UM BRANDGEFAHR UND DIE GEFAHR
EINES STROMSCHLAGES ZU VERMEIDEN, SETZEN
SIE DAS GERÄT WEDER REGEN NOCH SONSTIGER
FEUCHTIGKEIT AUS.
ACHTUNG: Installieren Sie das Gerät nicht in einem
geschlossenen Raum, z. B. in einem Bücherregal oder
an einem ähnlichen Ort.
VORSICHT: Die Belüftungsö nungen niemals
verdecken. Das Gerät immer laut Herstellerangaben
anschließen.
Schlitze und Ö nungen im Gehäuse dienen der
Belüftung, gewährleisten einen störungsfreien
Betrieb des Gerätes und schützen es vor
Überhitzung. Ö nungen sollten niemals durch
Aufstellen des Gerätes auf einem Bett, Sofa, Teppich
oder ähnlichen Untergründen verdeckt werden.
Das Gerät sollte nicht z. B. in einem Bücherregal
oder Schrank aufgestellt werden, wenn keine
ausreichende Belüftung gewährleistet werden kann
oder die Anleitungen missachtet wurden.
VORSICHT: Dieses Produkt ist ein Laser-Produkt der
Klasse 1, das in der Sicherheits-Richtlinie für Laser-
Produkte, IEC 60825-1: 2007, klassi ziert ist.
Um das Gerät richtig zu verwenden, lesen Sie dieses
Benutzerhandbuch sorgfältig durch und bewahren
Sie es auf. Setzen Sie sich zur Wartung mit einem
quali zierten Servicebetrieb in Verbindung.
Durch Bedienungen, Einstellungen oder Verfahren,
die in diesem Handbuch nicht erwähnt werden,
können gefährliche Strahlungen verursacht werden.
Um direkten Kontakt mit dem Laserstrahl zu
vermeiden, darf das Gehäuse nicht geö net werden.
Ansonsten tritt sichtbare Laserstrahlung auf. NIEMALS
DIREKT IN DEN LASERSTRAHL BLICKEN.
1
Sicherheitshinweise
HB985-DB.BDEUPPK_GER.indd 2HB985-DB.BDEUPPK_GER.indd 2 2010-05-14 2:06:402010-05-14 2:06:40

Sicherheitshinweise
3Sicherheitshinweise
1
VORSICHTSHINWEISE zum Netzkabel
Die meisten Geräte sollten an einen eigenen
Stromkreis angeschlossen werden.
D. h. eine separate Steckdose ohne weitere
Anschlüsse oder Zweigleitungen, über die
ausschließlich dieses Gerät mit Strom versorgt wird.
Beachten Sie hierzu die technischen Daten des
Gerätes in diesem Benutzerhandbuch. Steckdosen
niemals überlasten. Bei überlasteten, lockeren oder
beschädigten Steckdosen, Verlängerungskabeln, bei
abgenutzten Kabeln oder beschädigter Isolierung
besteht die Gefahr von Stromschlägen oder Bränden.
Die Gerätekabel sollten regelmäßig überprüft
werden. Bei Beschädigungen oder Abnutzungen
der Kabel sofort den Netzstecker ziehen und das
Kabel von einem quali zierten Techniker durch ein
gleiches Modell austauschen lassen. Das Netzkabel
vor mechanischen Beschädigungen, schützen, wie
z. B. Verdrehen, Knicken, Eindrücken, Einklemmen in
einer Tür oder Darauftreten. Achten Sie besonders
auf die Stecker, Steckdosen und den Bereich, an dem
das Kabel aus dem Gerät austritt. Ziehen Sie zum
Unterbrechen der Stromversorgung den Netzstecker.
Achten Sie beim Aufstellen des Gerätes darauf, dass
der Netzstecker leicht erreichbar bleibt.
Hiermit erklärt PIONEER, dass diese(s)
Produkt(e) die grundlegenden
Anforderungen und die sonstigen
Bestimmungen der Richtlinien
2004/108/EC, 2006/95/EC und
2009/125/EC erfüllt/erfüllen.
ACHTUNG: Zur Vermeidung von Bränden keine
o enen Flammen auf das Gerät stellen (z. B. Kerzen).
Dieses Gerät besitzt eine tragbare Batterie oder
Akku-Batterie.
Sicherheitshinweise zum Herausnehmen
der Batterie aus dem Gerät: Führen Sie zum
Herausnehmen der alten Batterie bzw. das
Batteriepakets die Einzelschritte zum Einlegen der
Batterie in umgekehrter Reihenfolge durch. Um
eine Gefährdung der Umwelt sowie mögliche
Gesundheitsgefährdungen von Menschen und
Tieren zu vermeiden, sollten Altbatterien in einen
geeigneten Behälter einer Sammelstelle gegeben
werden. Altbatterien niemals zusammen mit dem
Hausmüll entsorgen. Bitte geben Sie Altbatterien an
einer kostenlosen Sammelstelle für Batterien und
Akku-Batterien ab. Die Batterie keiner extremen Hitze
aussetzen, wie z. B. direkte Sonneneinstrahlung,
Feuer o. ä.
VORSICHT: Das Gerät darf nicht mit Wasser (Tropf-
oder Spritzwasser) in Berührung kommen und es
sollten keine mit Flüssigkeit gefüllten Behälter auf
das Gerät gestellt werden, wie z. B. Vasen.
HB985-DB.BDEUPPK_GER.indd 3HB985-DB.BDEUPPK_GER.indd 3 2010-05-14 2:06:442010-05-14 2:06:44

4 Sicherheitshinweise
Sicherheitshinweise
1
Hinweise zur Sammlung und Entsorgung von
Altgeräten und verbrauchten Batterien
Diese Symbole auf den Geräten, Verpackungen und/
oder in der beigefügten Literatur weisen darauf hin,
dass diese elektrischen und elektronischen Geräte
sowie Batterien nicht mit dem normalen Hausmüll
entsorgt werden dürfen.
Zur ordnungsgemäßen Weiterverarbeitung,
Wiederaufbereitung und zum Recycling sollten
Altgeräte und verbrauchte Batterien gemäß den
geltenden Richtlinien bei einer vorgesehenen
Sammelstelle abgegeben werden.
Durch eine ordnungsgemäße Entsorgung solcher
Geräte und Batterien können wertvolle Ressourcen
geschont und negative Auswirkungen auf die
Gesundheit und die Umwelt vermieden werden.
Weitere Informationen zur Sammlung und
Wiederverwertung von Altgeräten und Batterien
erhalten Sie bei Ihrer Stadtverwaltung, bei Ihrem
Entsorgungsunternehmen oder beim Händler, bei
dem Sie das Gerät gekauft haben.
Diese Symbole sind nur in der Europäischen
Gemeinschaft gültig.
Länder außerhalb der Europäischen
Gemeinschaft:
Bitte wenden Sie sich zur ordnungsgemäßen
Entsorgung von Altgeräten und verbrauchten
Batterien an die jeweilige Stadtverwaltung oder an
Ihren Händler.
Hinweise zum Copyright
• AACS (Advanced Access Content System) ist ein
gültiges System zum Schutz von Inhalten für
das BD-Format, ähnlich CSS (Content Scramble
System) für das DVD-Format. Für z. B. die
Wiedergabe oder den analogen Signalausgang
bei AACS-geschützten Inhalten können
bestimmte Einschränkungen festgelegt werden.
Die Bedienung und die Einschränkungen dieses
Gerätes können je nach Kaufdatum verschieden
sein, da solche AACS-Einschränkungen auch nach
der Herstellung des Gerätes übernommen und/
oder geändert werden können.
• Des Weiteren wird das BD-ROM-Zeichen und BD+
mit bestimmten Einschränkungen als zusätzlicher
Schutz der Inhalte für das BD-Format verwendet,
einschließlich Wiedergabeeinschränkungen für
BD-ROM-Zeichen und/oder BD+ geschützte
Inhalte. Weitere Informationen zu AACS, zum BD-
ROM-Zeichen, BD+ oder zu diesem Gerät erhalten
Sie bei einem zugelassenen Kundendienst-Center.
• Viele BD-ROM-/DVD-Discs sind mit einem
Kopierschutz versehen. Der Player sollte aus
diesem Grund stets direkt am Fernseher
angeschlossen werden, und nicht über einen
Videorekorder. Beim Anschluss über einen
Videorekorder kann das Bild kopiergeschützter
Discs verzerrt dargestellt werden.
• Dieses Produkt verwendet eine durch US-Patente
und andere geistige Eigentumsrechte geschützte
Kopierschutz-Technologie. Für den Einsatz dieser
Kopierschutz-Technologie ist die Genehmigung
durch Rovi erforderlich. Der Einsatz ist ohne
zusätzliche Genehmigung von Rovi ausschließlich
für den Heimgebrauch und andere begrenzte
Vorführungen vorgesehen. Reverse Engineering
oder Zerlegung verboten.
• Laut Urheberrecht in den USA und anderen
Ländern wird die unerlaubte Aufnahme,
Verwendung, Vorführung, der Vertrieb oder
die Überarbeitung von Fernsehprogrammen,
Videobändern, BD-ROM-Discs, DVDs, CDs
und anderen Datenträgern zivil- und/oder
strafrechtlich verfolgt.
Pb
(
Beispielsymbole
für Batterien
)
HB985-DB.BDEUPPK_GER.indd 4HB985-DB.BDEUPPK_GER.indd 4 2010-05-14 2:06:442010-05-14 2:06:44

Sicherheitshinweise
5Sicherheitshinweise
1
Wichtige Hinweise zur TV-Farbnorm
Die Farbnorm dieses Players richtet sich nach der
gerade wiedergegebenen Disc.
Wird auf diesem Player z. B. eine in der NTSC-
Farbnorm aufgenommene Disc wiedergegeben,
wird das Bild als NTSC-Signal ausgegeben.
Nur Multinorm-Farbfernseher können sämtliche
Bildsignale dieses Players anzeigen.
• Falls Sie einen Fernseher mit PAL-Farbnorm
besitzen, wird das Bild bei der Wiedergabe von
Discs oder Video lmen im NTSC-Format verzerrt
angezeigt.
• Dieser Multinorm-Farbfernseher ändert die
Farbnorm je nach Eingangssignal automatisch.
Falls die Farbnorm nicht automatisch eingestellt
wird, schalten Sie das Gerät aus und wieder ein,
um das normale Fernsehbild anzuzeigen.
• Auch wenn eine in der NTSC-Farbnorm
aufgenommene Disc störungsfrei auf dem
Fernsehgerät angezeigt wird, wird diese Disc
möglicherweise nicht korrekt mit dem Rekorder
beschrieben.
HB985-DB.BDEUPPK_GER.indd 5HB985-DB.BDEUPPK_GER.indd 5 2010-05-14 2:06:442010-05-14 2:06:44

6
Inhalt
1
Sicherheitshinweise
2 Vorsichts- und Warnhinweise
2
Vorbereitung
8 Einführung
8 Info über das Symbol “ ” auf
dem Bildschirm
8 Hinweis zu den verwendeten
Symbolen
9 Mitgeliefertes Zubehör
10 Spielbare Discs
11 Dateikompatibilität
12 Ländercode
12 AVCHD (Advanced Video
Codec High De nition)
12 Besondere
Systemanforderungen
12 Hinweise zur Kompatibilität
13 Fernbedienung
14 Vorderes Bedienfeld
15 Rückseite
3
Montage
16 Montage der Lautsprecher
16 Lautsprechereinstellungen
BCS-707
18 Lautsprechereinstellungen
BCS-303
19 Wandmontage des Mittel-
Lautsprechers
19 Zusätzliche Hinweise zum Standort
der Lautsprecher
20 Aufstellen des Systems
21 Anschluss an einen Fernseher
21 HDMI-Anschluss
22 Component-Video-Anschluss
23 Video-Anschluss
23 Einstellung der Au ösung
24 Antennenanschluss
24 Anschluss von Zusatzgeräten
24 AUX-Anschluss
25 PORTABLE IN-Anschluss
25 OPTICAL IN 1/2-Anschluss
26 Bluetooth®-Verbindung
28 Verbindung mit dem Heimnetzwerk
29 Netzwerkeinstellungen
31 Anschluss eines USB-Gerätes
32 Einstellungen
32 Setup-Einstellungen
vornehmen
33 Das Menü [ANZEIGE]
34 Das Menü [SPRACHE]
35 Das Menü [AUDIO]
36 Das Menü [SPERRE]
37 Das Menü [NETZWERK]
37 Das Menü [WEITERE]
39 Klange ekte
HB985-DB.BDEUPPK_GER.indd 6HB985-DB.BDEUPPK_GER.indd 6 2010-05-14 2:06:452010-05-14 2:06:45

7
1
2
3
4
5
6
7
8
4
Betrieb
40 Normale Wiedergabe
42 Erweiterte Wiedergabe
45 Bildschirmmenü
48 BD-LIVE-Discs anschauen
49 Wiedergabe von Filmdateien und VR-
Discs
51 Bilddateien anzeigen
53 Musik hören
56 Wiedergabe von einem iPod
58 Radiobetrieb
59 Wiedergabe über das Heimnetzwerk
5
Wartung
63 Hinweise zu Discs
63 Handhabung des Gerätes
6
Störungsbehebung
64 Allgemein
65 Bild
65 Ton
66 Netzwerk
7
Anhang
67 Bedienung eines Fernsehgerätes
über die mitgelieferte
Fernbedienung
68 Liste der Ländercodes
69 Liste der Sprachcodes
70 Video-Ausgabeau ösung
71 Marken und Lizenzen
73 Technische Daten
75 Hinweise zu Open Source-Software
HB985-DB.BDEUPPK_GER.indd 7HB985-DB.BDEUPPK_GER.indd 7 2010-05-14 2:06:452010-05-14 2:06:45

8 Vorbereitung
Vorbereitung
2
2
Vorbereitung
Einführung
Info über das Symbol “ ” auf
dem Bildschirm
Während des Betriebs erscheint auf dem
Fernsehbildschirm u. U. das Symbol “ ” und
zeigt an, dass die im Benutzerhandbuch
erläuterte Funktion für diese Disc nicht
verfügbar ist.
Hinweis zu den verwendeten
Symbolen
HINWEIS
Weist auf besondere Hinweise und
Betriebsmerkmale hin.
VORSICHT
Vorsichtshinweise zur Vermeidung möglicher
Beschädigungen.
Abschnitte, in deren Titel eines der folgenden
Symbole angegeben ist, sind nur für den
dargestellten Disc-Typ gültig.
BD
BD-ROM-Disc
DVD
DVD-Video, DVD±R/RW
im Video-Modus oder VR-
Modus und nalisiert
AVCHD
DVD±R/RW im AVCHD-
Format
ACD
Audio-CDs
MOVIE
Filmdateien
MUSIC
Musikdateien
PHOTO
Fotodateien
HB985-DB.BDEUPPK_GER.indd 8HB985-DB.BDEUPPK_GER.indd 8 2010-05-14 2:06:452010-05-14 2:06:45

9Vorbereitung
2
Vorbereitung
Mitgeliefertes Zubehör
Videokabel (1) Fernbedienung (1)
Batterien (1) UKW-Antenne (1)
iPod-Dock (1)
Lautsprecherzubehör (S-BD707T)
Lautsprecherkabel (5)
Schrauben (12)
Lautsprecherständer-
Basis (4)
kleine rutschfeste
Unterlagen (1)
mittelgroße
rutschfeste
Unterlagen (1)
Lautsprecherzubehör (S-BD707SW)
Lautsprecherkabel
(1)
große rutschfeste
Unterlagen (1)
Lautsprecherzubehör (S-BD303)
Lautsprecherkabel
(6)
kleine rutschfeste
Unterlagen (1)
große rutschfeste
Unterlagen (1)
HB985-DB.BDEUPPK_GER.indd 9HB985-DB.BDEUPPK_GER.indd 9 2010-05-14 2:06:452010-05-14 2:06:45

10 Vorbereitung
Vorbereitung
2
Spielbare Discs
Blu-Ray-Discs
- Gekaufte oder ausgeliehene
Spiel lm-DVDs.
- BD-R/RE-Discs mit Film-, Musik-
oder Fotodateien.
DVD-VIDEO
8 / 12 cm
Gekaufte oder ausgeliehene
Spiel lm-DVDs.
DVD±R
8 / 12 cm
- Nur nalisierte Discs im Video-
Modus
- Unterstützt auch Dual-Layer-
Discs
- AVCHD-Format, nalisiert
- Finalized AVCHD format
- DVD±R-Discs mit Film-, Musik-
oder Fotodateien.
DVD-RW
8 / 12 cm
- Nur Discs im VR-Modus, Video-
Modus und nalisierte Discs
- AVCHD-Format, nalisiert
- DVD-RW-Discs mit Film-,
Musik- oder Fotodateien.
DVD+RW
8 / 12 cm
- Nur nalisierte Discs im Video-
Modus
- AVCHD-Format
- AVCHD-Format, nalisiert
- DVD+RW-Discs mit Film-,
Musik- oder Fotodateien.
Audio-CD
8 / 12 cm
CD-R/RW
8 / 12 cm
- CD-R/RW-Discs mit Audio-,
Film-, Musik- oder Fotodateien.
HINWEIS
• Einige CD-R-/RW- (bzw. DVD±R-/RW-)
Discs können, abhängig vom verwendeten
Aufnahmegerät oder der CD-R-/RW-Disc (bzw.
DVD±R-/RW-Disc) selbst, mit diesem Gerät u. U.
nicht abgespielt werden.
• Abhängig von der Aufnahmesoftware und
der Finalisierung können einige beschriebene
Discs (CD-R/RW, DVD±R/RW, BD-R/RE) nicht
wiedergegeben werden.
• Mit einem PC oder einem DVD- oder
CD-Rekorder beschriebene BD-R/RE,
DVD±R/RW- oder CD-R/RW-Discs können
u. U. nicht abgespielt werden, falls die Disc
beschädigt oder verschmutzt ist oder die Linse
des Players verschmutzt oder kondensiert ist.
• Falls eine Disc mit einem PC beschrieben wird,
auch in einem kompatiblen Aufnahmeformat,
können einige Discs auf Grund der Einstellungen
in der Brennsoftware nicht wiedergegeben
werden. (Genauere Informationen hierzu
erhalten Sie beim Hersteller der Brennsoftware.)
• Für eine optimale Wiedergabequalität müssen
Discs und Aufnahmen bestimmte technische
Voraussetzungen erfüllen.
• Bereits bespielte DVDs erfüllen diese
Voraussetzungen automatisch. Beschriebene
Discs können in einer Vielzahl verschiedener
Formate vorliegen (einschließlich CD-R-Discs
mit MP3- oder WMA-Dateien). Diese Formate
müssen zur Wiedergabe-Kompatibilität
bestimmte Voraussetzungen erfüllen.
• Der Kunde sollte beachten, dass für das
Herunterladen von MP3-/WMA-Dateien
sowie Musikdateien aus dem Internet
eine Genehmigung erforderlich ist. Unser
Unternehmen erteilt solche Genehmigungen
nicht. Diese sollten immer vom Urheber selbst
eingeholt werden.
HB985-DB.BDEUPPK_GER.indd 10HB985-DB.BDEUPPK_GER.indd 10 2010-05-14 2:06:462010-05-14 2:06:46

11Vorbereitung
2
Vorbereitung
Dateikompatibilität
Allgemein
Mögliche Dateierweiterungen:
“.jpg”, “.jpeg”, “.png”, “.avi”, “.divx”, “.mpg”, “.mpeg”,
“.mkv”, “.mp4”, “.mp3”, “.wma”, “.wav”
• Je nach DLNA-Server sind verschiedene
Dateierweiterungen verfügbar.
• Bestimmte “.wav”-Dateien werden von
diesem Gerät u. U. nicht unterstützt.
• Der Dateiname darf maximal 180 Zeichen
lang sein.
• Je nach Größe und Anzahl der Dateien kann
das L
esen der Disc einige Minuten dauern.
Maximale Anzahl Dateien/Ordner:
2 000 (Gesamtanzahl der Dat
eien und Ordner)
CD-R/RW, DVD±R/RW, BD-R/RE-Format:
ISO 9660+JOLIET, UDF und UDF Bridge-Format
FILM
Mögliche Au ösung:
1 920 x 1 080 (B x H) Bildpunkte
Abspielbare Untertitel: SubRip (.srt/.txt), SAMI
(.smi), SubStation Alpha (.ssa/.txt), MicroDVD
(.sub/.txt), VobSub (.sub), SubViewer 1.0 (.sub),
SubViewer 2.0 (.sub/.txt), TMPlayer (.txt), DVD
Subtitle System (.txt)
• Das Format VobSub (.sub) wird für die
F
unktion [Home Link] nicht unterstützt.
Abspielbare Codecs: “DIVX3.xx
”, “DIVX4.xx”,
“DIVX5.xx”, “XVID”, “DIVX6.xx” (nur normale
Wiedergabe), H.264/MPEG-4 AVC, MPEG1 SS,
MPEG2 PS, MPEG2 TS
Abspielbare Audioformate: “D
olby Digital”,
“DTS”, “MP3”, “WMA”, “AAC”, “AC3”
• Nicht alle WMA- und AAC-Audioformate
können auf diesem Gerät wiedergegeben
werden.
Abtastfrequenz:
32 kHz bis 48 kHz (WMA),
16 kHz bis 48 kHz (MP3)
Bitrate:
20 kbps bis 320 kbps (WMA),
32 kbps bis 320 kbps (MP3)
HINWEIS
• HD-Filmdateien auf einer CD oder einem USB
1.0/1.1-Gerät werden u. U. nicht störungsfrei
wiedergegeben. Zur Wiedergabe von HD-
Filmdateien werden BD-, DVD- oder USB
2.0-Datenträger empfohlen.
• Dieser Player unterstützt die Pro le H.264/MPEG-
4 AVC Main, High bei Stufe 4,1. Bei Dateien mit
höherer Stufe wird eine Warnmeldung auf dem
Bildschirm eingeblendet.
• Mit diesem Player können keine mit GMC*1 oder
Qpel*2 aufgenommenen. Dies sind Verfahren
zur Video-Kodierung im MPEG4-Standard wie
DivX oder XVID.
*1 GMC – Global Motion Compensation
*2 Qpel – Quarter Pixel
MUSIK
Abtastfrequenz:
8 kHz bis 48 KHz (WMA),
11 kHz bis 48 kHz (MP3)
Bitrate:
8 kbps bis 320 kbps (WMA, MP3),
HINWEIS
• Mit diesem Gerät können keine ID3-Tags einer
MP3-Datei angezeigt werden.
• Die Gesamt-Wiedergabedauer wird für VBR-
Dateien u. U. nicht exakt auf dem Bildschirm
angezeigt.
FOTO
Empfohlene Dateigröße:
Unter 4000 x 3000 x 24 Bit/Pixel
Unter 3000 x 3000 x 32 Bit/Pixel
Unter 4 MByte/ le
• Progressive sowie verlustfrei komprimierte
Fotodateien werden nicht unterstützt.
HB985-DB.BDEUPPK_GER.indd 11HB985-DB.BDEUPPK_GER.indd 11 2010-05-14 2:06:462010-05-14 2:06:46

12 Vorbereitung
Vorbereitung
2
Ländercode
Der Ländercode dieses Players ist auf der
Geräterückseite aufgedruckt. Es können
nur BD-ROM- oder DVD-Discs mit diesem
Ländercode oder mit dem Ländercode “ALLE”
wiedergegeben werden.
AVCHD (Advanced Video Codec
High De nition)
• Mit diesem Player können Discs im AVCHD-
Format wiedergegeben werden. Diese Discs
werden normalerweise zur Aufzeichnung
mit Camcordern eingesetzt.
• Beim AVCHD-Format handelt es sich
um ein hochau ösendes digitales
Videokameraformat.
• Das Format MPEG-4 AVC/H.264 ermöglicht
eine e zientere Komprimierung von
Bildern als mit einem konventionellen
Format zur Bildkomprimierung.
• Bestimmte AVCHD-Discs verwenden das
Format “x.v.Colour”.
• Mit diesem Player können AVCHD-Discs im
Format “x.v.Colour” wiedergegeben werden.
• Je nach Zustand der Aufnahme können
bestimmte Discs im AVCHD-Format u. U.
nicht wiedergegeben werden.
• Discs im AVCHD-Format müssen nalisiert
werden.
• “x.v.Colour” ermöglicht eine größere
Farbvielfalt als normale DVD-Camcorder-
Discs.
Besondere
Systemanforderungen
Für hochau ösende Video-Wiedergabe:
• High De nition-Anzeigegerät
mit COMPONENT- oder HDMI-
Eingangsbuchsen.
• BD-ROM-Disc mit hochau ösendem Inhalt.
• Für bestimmte Inhalte ist ein HDMI- oder
HDCP-fähiger DVI-Eingang am Anzeigegerät
erforderlich (wie von den Disc-Autoren
festgelegt).
• Zum Hochkonvertieren normalau ösender,
kopiergeschützter DVDs ist ein HDMI- oder
HDCP-fähiger DVI-Eingang am Anzeigegerät
erforderlich.
Hinweise zur Kompatibilität
• Da es sich bei BD-ROM-Discs um ein neues
Format handelt, können Probleme mit
bestimmten Discs, digitalen Anschlüssen
und andere Kompatibilitätsprobleme
auftreten. Bei Problemen mit der
Kompatibilität wenden Sie sich bitte an ein
zugelassenenes Kundendienst-Center.
• Zur Darstellung von hochau ösenden
Inhalten und hochkonvertierten Standard-
DVDs ist möglicherweise ein HDMI-fähiger
Eingang oder ein HDCP-fähiger DVI-Eingang
am Anzeigegerät erforderlich..
• Bei einigen BD-ROM- und DVD-Discs
sind bestimmte Funktionsbefehle oder
Merkmale u. U. nicht verfügbar.
• Mit Hilfe eines USB-Gerätes können
bestimmte Disc-Information gespeichert
werden, einschließlich heruntergeladener
Online-Inhalte. Durch die verwendete
Disc wird festgelegt, wie lange diese
Informationen gespeichert werden.
HB985-DB.BDEUPPK_GER.indd 12HB985-DB.BDEUPPK_GER.indd 12 2010-05-14 2:06:462010-05-14 2:06:46

13Vorbereitung
2
Vorbereitung
Fernbedienung
1
2
3
• • • • • • • • •
a
• • • • • • • • •
1
(STANDBY/ON): Player ein-und
ausschalten.
Z
OPEN/CLOSE: Disc-Fach ö nen
und schließen.
INPUT/TUNER: Eingangsmodus
ändern.
BT AUDIO: Eingangsmodus sofort
auf BT AUDIO einstellen.
OPTICAL: Eingangsmodus auf
optisch direkt einstellen.
DISPLAY: Bildschirmmenü ein-/
ausblenden.
HOME MENU: [Hauptmenü]
ein-/ausblenden.
MENU: Disc-Menü aufrufen.
Pfeiltasten: Auswahl einer Option
im Menü.
ENTER: Annehmen einer
Menüauswahl.
TUNE (+/-): Einen gewünschten
Radiosender einstellen.
PRESET: Gespeicherten
Radiosender aufrufen.
• • • • • • • • •
b
• • • • • • • • •
O
RETURN: Gewünschten
Abschnitt wiederholen.
POPUP/TOP MENU: DVD-
Titelmenü bzw. BD-ROM-
Kontextmenü aufrufen, falls
vorhanden.
x
STOP: Wiedergabe anhalten.
B
PLAY: Wiedergabe starten.
X
PAUSE/STEP: Wiedergabe
unterbrechen.
.
/
>
SKIP: Zur/zum nächsten
bzw. vorherigen Datei/Track/
Kapitel springen.
m
/
M
SCAN: Suchlauf zurück
oder vor.
SPK LEVEL: Lautstärke des
gewünschten Lautsprechers
einstellen.
z
USB REC: Aufnahme einer
Audio-CD.
MUTE: Gerät stummschalten.
SOUND: Klangmodus auswählen.
VOL +/- : Lautstärke der
Lautsprecher einstellen.
• • • • • • • • •
c
• • • • • • • • •
Nummerntasten 0-9: Auswahl
von Aufzählungsoptionen in einem
Menü.
MARKER: Markiert einen Punkt
während der Wiedergabe.
SEARCH: Suchmenü ein-/
ausblenden.
REPEAT: Menü verlassen bzw.
Wiedergabe fortsetzen.
CLEAR: Eine Marke im Suchmenü
löschen bzw. eine Zi er bei der
Kennworteingabe löschen.
DIMMER: Beleuchtung des Gerätes
dimmen.
ZOOM: Menü Zoom aufrufen.
Farbtasten (A, B, C, D): Navigation
in den Menüs.
- Taste A (RDS): Radio-Daten-
System.
- Taste B (PTY): Programmart-
kennung einer RDS-Sendung
anzeigen.
- Taste C (PTY SEARCH):
Programmart suchen.
- Taste D: Auswahl Mono/Stereo
im UKW-Modus.
TV-Bedienungstasten: Siehe Seite
67.
SLEEP: Einstellen einer Zeitdauer
nach der das Gerät ausgeschaltet
wird.
Einlegen der Batterien
Nehmen Sie die
Batterieklappe auf der
Rückseite der Fernbedienung
ab und legen Sie eine R03-
Batterie mit der richtigen
Polung und ein.
HB985-DB.BDEUPPK_GER.indd 13HB985-DB.BDEUPPK_GER.indd 13 2010-05-14 2:06:462010-05-14 2:06:46

14 Vorbereitung
Vorbereitung
2
Vorderes Bedienfeld
a
Disc-Fach
b
Bedienungstasten
1
STANDBY/ON Netzschalter
Z
(OPEN/CLOSE)
FUNCTION
Auswahl einer Eingangsquelle oder
Funktion.
B
/
X
(PLAY / PAUSE)
x
(STOP)
.
/
>
(SKIP)
- TUNE + (Radiosender einstellen)
c
Fernbedienungs-Sensor
d
Anzeigefenster
e
PORTABLE IN
f
USB-Anschluss
g
Lautstärkeregelung
1
2
3 4 5 6 7
HB985-DB.BDEUPPK_GER.indd 14HB985-DB.BDEUPPK_GER.indd 14 2010-05-14 2:06:462010-05-14 2:06:46

15Vorbereitung
2
Vorbereitung
a
Netzkabel
Anschluss an eine Steckdose.
b
Lautsprecheranschlüsse
c
Kühlungslüfter
d
Antennenanschluss
e
VIDEO OUT
f
AUX (L/R) INPUT
g
COMPONENT VIDEO (Y P
B
P
R
)
AUSGANG (PROGRESSIVE SCAN)
h
OPTICAL 1(TV) / 2
i
iPod (24-polig)
Anschluss eines iPod-Dock.
j
HDMI OUT (Typ A, Version 1.3)
Anschluss an einen Fernseher mit HDMI-
Eingängen.
k
LAN-Anschluss
Rückseite
1 2 3 4 5
6 7 8 9 10 11
HB985-DB.BDEUPPK_GER.indd 15HB985-DB.BDEUPPK_GER.indd 15 2010-05-14 2:06:462010-05-14 2:06:46

16 Montage
Montage
3
Montage der
Lautsprecher
Lautsprechereinstellungen
BCS-707
Vorbereitung der Lautsprecher
1. Befestigen Sie die rutschfesten Unterlagen
an den Standfüßen der Lautsprecher, des
Subwoofers und des Mittel-Lautsprechers.
Für Lautsprecherstandfüße:
Befestigen Sie mit den enthaltenen
Klebestreifen vier mittelgroße Unterlagen an
jedem Lautsprecherstandfuß (Unterseite).
middle non-skid pads
mittelgroße rutschfeste Unterlagen
Für Subwoofer:
Befestigen Sie mit den enthaltenen
Klebestreifen vier große Unterlagen am
Standfuß des Subwoofers.
large non-skid pads
große rutschfeste Unterlagen
Für Mittel-Lautsprecher:
Befestigen Sie mit den enthaltenen
Klebestreifen vier kleine Unterlagen am
Standfuß des Mittel-Lautsprechers.
small non-skid pads
kleine rutschfeste
Unterlagen
2. Montieren Sie die Lautsprecherstandfüße
mit den enthaltenen Schrauben an den
Ständern.
Setzen Sie den Ständer auf den Standfuß
und befestigen Sie die kleinen Schrauben
an den Positionen, wie in der folgenden
Abbildung gezeigt. Die Lautsprecher
sollten in Richtung des Standfußes des
gleichschenkligen Dreiecks zeigen.
Rear
Front
Hinten
Vorn
3
Montage
HB985-DB.BDEUPPK_GER.indd 16HB985-DB.BDEUPPK_GER.indd 16 2010-05-14 2:06:472010-05-14 2:06:47

17Montage
3
Montage
3. Schließen Sie die Kabel am Player an.
Schließen Sie den weißen Stecker des
grauen Kabels an den Anschluss (+) und
den anderen Stecker an den Anschluss (–)
an. Um die Kabel am Player anzuschließen,
drücken Sie jeweils auf eine der
Anschlussklemmen auf der Rückseite, so
dass sich die Anschlüsse ö nen. Führen Sie
das jeweilige Kabel ein und lassen Sie die
Anschlussklemme wieder los.
VORSICHT
• Es sollten ausschließlich die im Lieferumfang
dieses Systems enthaltenen Lautsprecher
angeschlossen werden.
• Die enthaltenen Lautsprecher sollten nur an
den Verstärker dieses Systems angeschlossen
werden. Beim Anschluss an einen anderen
Verstärker besteht die Gefahr von Fehlfunktionen
oder Bränden.
Montage der vorderen und der
Surround-Lautsprecher
Befestigen Sie die vorderen und die
Surround-Lautsprecher mit der enthaltenen
Kunststo klemme. Befestigen Sie zwei
Schraubhaken in der Wand hinter dem
Lautsprecher. Führen Sie zur Stabilisierung des
Lautsprechers ein dickeres Seil um die Haken
und durch die Kunststo klemmen hindurch
(überprüfen Sie, ob das gesamte Gewicht des
Lautsprechers getragen werden kann). Prüfen
Sie nach der Montage, ob der Lautsprecher
fest sitzt.
thick cord
Plastic catch
Ausreichend dickes
Seil
Kunststo klemme
VORSICHT
• Bei der Kunststo klemme handelt es sich um
kein Befestigungselement, d. h. der Lautsprecher
sollte nicht allein an der Klemme befestigt
von der Wand hängen. Zur Stabilisierung des
Lautsprechers muss ein Seil verwendet werden.
• Pioneer übernimmt keine Haftung für
Verluste oder Schäden jeglicher Art, die auf
einen unsachgemäßen Zusammenbau,
eine unsachgemäße Montage, eine
unzureichende Tragfähigkeit der Montageorte,
eine missbräuchliche Verwendung oder
Naturkatastrophen zurückzuführen sind.
• Achten Sie beim Aufstellen darauf, dass das
Gerät fest steht und vermeiden Sie möglichst
Standorte, an denen das Gerät im Falle einer
Naturkatastrophe (z. B. bei einem Erdbeben)
herunterfallen und Verletzungen verursachen
könnte.
Farbe (+)
Schwarz (-)
HB985-DB.BDEUPPK_GER.indd 17HB985-DB.BDEUPPK_GER.indd 17 2010-05-14 2:06:472010-05-14 2:06:47

18 Montage
Montage
3
Lautsprechereinstellungen
BCS-303
Vorbereitung der Lautsprecher
1. Befestigen Sie die rutschfesten Unterlagen
an den Lautsprecherstandfüßen.
Für die vorderen und Surround-
Lautsprecher:
Befestigen Sie mit den enthaltenen
Klebestreifen vier kleinen Unterlagen an
jedem Lautsprecherstandfuß (Unterseite).
samll non-skid pads
kleine rutschfeste Unterlagen
Für Subwoofer:
Befestigen Sie mit den enthaltenen
Klebestreifen vier große Unterlagen am
Standfuß des Subwoofers.
large non-skid pads
große rutschfeste Unterlagen
Für Mittel-Lautsprecher:
Befestigen Sie mit den enthaltenen
Klebestreifen vier kleine Unterlagen am
Standfuß des Mittel-Lautsprechers.
samll non-skid pads
kleine rutschfeste
Unterlagen
2. Schließen Sie die Kabel am Player an.
Schließen Sie den weißen Stecker des
grauen Kabels an den Anschluss (+) und
den anderen Stecker an den Anschluss (–)
an. Um die Kabel am Player anzuschließen,
drücken Sie jeweils auf eine der
Anschlussklemmen auf der Rückseite, so
dass sich die Anschlüsse ö nen. Führen Sie
das jeweilige Kabel ein und lassen Sie die
Anschlussklemme wieder los.
Farbe (+)
Schwarz (-)
HB985-DB.BDEUPPK_GER.indd 18HB985-DB.BDEUPPK_GER.indd 18 2010-05-14 2:06:472010-05-14 2:06:47

19Montage
3
Montage
Wandmontage des
Mittel-Lautsprechers
Der Mittel-Lautsprecher besitzt eine
Montageö nung, mit der der Lautsprecher an
der Wand montiert werden kann.
Vor der Montage
Das Lautsprechersystem ist sehr schwer.
Das Gewicht kann zu einer Lockerung der
Schrauben führen, und die Wand muss das
Gewicht der Lautsprecher tragen können.
Ansonsten könnten die Lautsprecher
herunterfallen. Die Wand muss über eine
ausreichende Stärke verfügen, so dass das
Gesamtgewicht der Lautsprecher getragen
werden kann. Nicht an Wänden aus Sperrholz
oder weichem Material befestigen.
Die Montageschrauben sind nicht im
Lieferumfang enthalten. Verwenden Sie
Schrauben, die für die Bescha enheit und
Tragfähigkeit der Wand geeignet sind.
VORSICHT
• Falls Sie die Bescha enheit und Tragfähigkeit
Ihrer Wand nicht einschätzen können, ziehen Sie
einen Fachmann zu Rate.
• Pioneer übernimmt keine Haftung für Unfälle
oder Schäden, die auf eine unsachgemäße
Montage zurückzuführen sind.
5 mm
10 mm
Mounting screw
(not supplied)
Montageschrauben
(nicht im
Lieferumfang
enthalten)
Zusätzliche Hinweise
zum Standort der
Lautsprecher
Stellen Sie die vorderen Haupt-Lautsprecher
links und rechts in gleichem Abstand zum
Fernsehgerät auf.
Vorsichtshinweise:
Blanke Lautsprecherkabel müssen
zusammengedreht und vollständig in die
Lautsprecheranschlüsse eingeführt werden.
Sollten die blanken Lautsprecherkabel
die Systemrückseite berühren, wird
möglicherweise die Sicherheitsvorrichtung
des Systems ausgelöst und das System
abgeschaltet.
Die vorderen, der mittlere und die Surround-
Lautsprecher dieses Systems sind magnetisch
abgeschirmt. Falls die Lautsprecher sehr
nahe am Fernsehgerät aufgestellt werden,
können Farbverfälschungen jedoch nicht
ausgeschlossen werden. Schalten Sie in einem
solchen Fall das Fernsehgerät aus und nach
etwa 15 bis 30 Minuten wieder ein. Sollten
die Farbverfälschungen weiterhin auftreten,
stellen Sie das Lautsprechersystem in größerer
Entfernung zum Fernsehgerät auf.
Der Subwoofer besitzt keine magnetische
Abschirmung und sollte daher nicht in der
Nähe eines Fernsehgerätes oder Monitors
aufgestellt werden. Magnetische Datenträger
(z. B. Disketten, Musik- oder Videokassetten)
sollten ebenfalls nicht in der Nähe des
Subwoofers aufbewahrt werden.
Die vorderen, die Surround-Lautsprecher
und der Subwoofer nicht an einer Wand oder
Decke befestigen. Die Lautsprecher könnten
herunterfallen und zu Verletzungen führen.
5 mm - 7 mm
HB985-DB.BDEUPPK_GER.indd 19HB985-DB.BDEUPPK_GER.indd 19 2010-05-14 2:06:482010-05-14 2:06:48

20 Montage
Montage
3
Aufstellen des Systems
Die folgende Abbildung zeigt die Aufstellung
des Systems am Beispiel. Die Abbildungen in
dieser Anleitung können vom tatsächlichen
Gerät abweichen und dienen lediglich zur
Beschreibung.
Ein optimaler Surround-Sound wird erreicht,
wenn alle Lautsprecher mit Ausnahme des
Subwoofers im gleichen Abstand von der
Zuhörerposition (
A
) aufgestellt werden.
A
B
D
E
F
A
A
A
A
A
G
C
A
Vorderer Lautsprecher links (L)/
B
Vorderer Lautsprecher rechts (R):
Stellen Sie die vorderen Lautsprecher neben
den Monitor oder Bildschirm und bündig mit
der Bildschirm äche auf.
C
Mittel-Lautsprecher:
Stellen Sie den Mittel-Lautsprecher ober- oder
unterhalb des Monitors oder Bildschirms auf.
D
Surround-Lautsprecher links (L)/
E
Surround-Lautsprecher rechts (R):
Stellen Sie diese Lautsprecher hinter der
Zuhörerposition und leicht nach innen
ausgerichtet auf.
F
Subwoofer:
Die Position des Subwoofers kann beliebig
gewählt werden, da niederfrequente Bässe nur
leicht direktional sind. Der Subwoofer sollte
jedoch bevorzugt in der Nähe der vorderen
Lautsprecher aufgestellt werden. Richten Sie
den Subwoofer leicht zur Raummitte aus, um
Wandre exionen zu vermeiden.
G
Gerät
VORSICHT
• Achten Sie darauf, dass Kinder nicht ihre
Hände oder andere Gegenstände in die
*Lautsprecherö nung einführen.
*Lautsprecherö nung: Eine Aushöhlung im
Lautsprechergehäuse zum Erzeugen satter
Bässe.
• Platzieren Sie den Mittel-Lautsprecher für Kinder
unzugänglich.
Ansonsten könnte der Lautsprecher
herunterfallen und Verletzungen und/oder
Sachschäden verursachen.
• Die Lautsprecher enthalten magnetische
Bauteile. Aus diesem Grund können
Farbverfälschungen auf dem Bildschirm oder
PC-Monitor auftreten. Die Lautsprecher sollten
daher in ausreichendem Abstand zum Fernseher
oder PC-Monitor aufgestellt werden.
HB985-DB.BDEUPPK_GER.indd 20HB985-DB.BDEUPPK_GER.indd 20 2010-05-14 2:06:482010-05-14 2:06:48

21Montage
3
Montage
Anschluss an einen
Fernseher
Nehmen Sie, abhängig von den Möglichkeiten
Ihrer Geräte, einen der folgenden Anschlüsse
vor.
• HDMI-Anschluss (Seite 21-22)
• Component-Video-Anschluss (Seite 22)
• Video-Anschluss (Seite 23)
HINWEIS
• Abhängig vom Fernseher und anderen Geräten
gibt es verschiedene Anschlussmöglichkeiten
an den Player. Verwenden Sie nur einen der in
dieser Anleitung angegebenen Anschlüsse.
• Lesen Sie zum Anschluss die Bedienungsanlei-
tung des Fernsehers, der Stereo-Anlage bzw. des
jeweiligen Gerätes.
• Der Player muss direkt am Fernseher
angeschlossen werden. Stellen Sie den
Fernseher auf den richtigen Videokanal ein.
• Den Player nicht über einen Videorekorder
anschließen. Das DVD-Bild könnte durch das
Kopierschutzsystem verzerrt werden.
HDMI-Anschluss
Ein HDMI-Fernseher oder Monitor kann über
ein HDMI-Kabel an diesen Player angeschlossen
werden (type A, Version 1.3). Verbinden Sie die
HDMI OUT
-Buchse des Players mit der HDMI
IN-Buchse eines HDMI-kompatiblen Fernsehers
oder Monitors.
HDMI-Anschluss
Player
TV
TV
Player
Stellen Sie den Eingang des Fernsehers
auf HDMI (siehe Bedienungsanleitung des
F
ernsehers).
HB985-DB.BDEUPPK_GER.indd 21HB985-DB.BDEUPPK_GER.indd 21 2010-05-14 2:06:482010-05-14 2:06:48

22 Montage
Montage
3
HINWEIS
• Beim Ändern der Au ösung bei bereits
angeschlossenem Gerät können Fehlfunktionen
auftreten. Um diese Störung zu beheben,
schalten Sie den Player aus und wieder ein.
• Wenn der HDMI-Anschluss noch nicht mir
dem HDCP abgeglichen wurde, erscheint ein
schwarzer Bildschirm. Überprüfen Sie in diesem
Fall den HDMI-Anschluss oder ziehen Sie das
HDMI-Kabel ab.
• Überprüfen Sie bei Rauschen oder Streifen auf
dem Bildschirm das HDMI-Kabel (die Länge
sollte 4,5 m nicht überschreiten, zudem sollte
ein HDMI-Hochgeschwindigkeitskabel (Version
1.3) verwendet werden.
• Falls ein angeschlossenes HDMI-Gerät den
Audioausgang des Players nicht unterstützt, ist
der Ton des HDMI-Gerätes u. U. nur verzerrt oder
nicht zu hören.
• Bei einem HDMI-Anschluss kann die Au ösung
für den HDMI-Ausgang geändert werden. (Siehe
Kapitel “Einstellung der Au ösung” auf Seite 23.)
• Legen Sie über die Option [HDMI-Farbeinst.] im
Menü [Setup] die Art der Videoausgabe über die
HDMI OUT-Buchse fest (siehe Seite 34).
• Beachten Sie beim Anschluss eines HDMI- oder
DVI-kompatiblen Gerätes folgende Punkte:
- Schalten Sie das HDMI-/DVI-Gerät sowie diesen
Player aus. Schalten Sie dann das HDMI-/DVI-
Gerät ein, warten Sie ca. 30 Sekunden, und
schalten Sie dann den Player ein.
- Der Videoeingang des angeschlossenen
Gerätes muss auf dieses Gerät eingestellt sein.
- Das angeschlossene Gerät muss eine der
Video-Eingangsau ösungen 720x576p (480p),
1280x720p, 1920x1080i oder 1920x1080p
unterstützen.
• Nicht alle HDCP-kompatiblen HDMI- oder DVI-
Geräte arbeiten mit diesem Player zusammen.
- Bei nicht-HDCP-Geräten wird das Bild nicht
richtig angezeigt.
- Es erfolgt keine Wiedergabe mit diesem Player
und es wird ein schwarzer Bildschirm angezeigt.
Component-Video-Anschluss
Verbinden Sie die COMPONENT VIDEO OUT-
Buchsen des Players über ein Y Pb Pr-Kabel
mit den entsprechenden Eingangsbuchsen
des Fernsehers. Der Ton wird über die
Systemlautsprecher ausgegeben.
Component-Anschluss
Player
TV
Green
Blue
Red
PR
PB
Y
COMPONENT
VIDEO
INPUT
OUTPUT
L
AUX
R
VIDEO
Player
Grün
Blau
Rot
TV
HINWEIS
Bei einem COMPONENT VIDEO OUT-Anschluss
kann die Au ösung für den Ausgang geändert
werden. (Siehe Kapitel “Einstellung der Au ösung”
auf Seite 23.)
HB985-DB.BDEUPPK_GER.indd 22HB985-DB.BDEUPPK_GER.indd 22 2010-05-14 2:06:492010-05-14 2:06:49

23Montage
3
Montage
Video-Anschluss
Verbinden Sie die VIDEO OUT-Buchse des
Players über das Videokabel mit der Video-
Eingangsbuchse des Fernsehers. Der Ton wird
über die Systemlautsprecher ausgegeben.
Video-Anschluss
TV
Yellow
PR
PB
Y
COMPONENT
VIDEO
INPUT
OUTPUT
L
AUX
R
VIDEO
Player
TV
Gelb
Einstellung der Au ösung
Der Player bietet verschiedene
Ausgabeau ösungen für die HDMI OUT-
und COMPONENT VIDEO OUT-Buchsen. Die
Au ösung wird im Menü [Setup] eingestellt.
1. Drücken Sie die Taste HOME MENU (
).
2. Wählen Sie mit den Tasten
I
/
i/U
/
u
den
Eintrag [Setup] und drücken Sie ENTER
(
). Daraufhin wird das Menü [Setup]
aufgerufen.
3. Wählen Sie mit den Tasten
U
/
u
die Option
[ANZEIGE] und drücken Sie die Taste
i
, um
in das Unterverzeichnis zu gelangen.
4. Wählen Sie mit den Tasten
U
/
u
den Eintrag
[Au ösung] und drücken Sie für die dritte
Ebene auf ENTER (
) oder auf
i
.
5. Wählen Sie mit den Tasten
U
/
u
die
gewünschte Au ösung aus und drücken
Sie zur Bestätigung der Auswahl auf
ENTER ( ).
HINWEIS
• Falls Ihr Fernsehgerät die am Player eingestellte
Au ösung nicht unterstützt, stellen Sie die
Au ösung wie folgt auf 576p (480p) ein:
1. Drücken Sie zum Ö nen des Disc-Fachs auf
Z
.
2. Halten Sie die Taste
x
mindestens fünf
Sekunden lang gedrückt.
• Die Videoausgabe ist von zahlreichen Faktoren
abhängig. Hinweise hierzu nden Sie unter
“Video-Ausgabeau ösung” auf Seite 70.
HB985-DB.BDEUPPK_GER.indd 23HB985-DB.BDEUPPK_GER.indd 23 2010-05-14 2:06:492010-05-14 2:06:49

24 Montage
Montage
3
Antennenanschluss
Schließen Sie zum Radioempfang die
mitgelieferte Antenne an.
Antennenanschluss
Player
Player
HINWEIS
Die UKW-Drahtantenne sollte nach dem Anschluss
so waagerecht wie möglich ausgerichtet werden.
Die UKW-Drahtantenne muss vollständig entfaltet
werden.
Anschluss von
Zusatzgeräten
AUX-Anschluss
Der Ton eines Gerätes kann mit Hilfe der
analogen Audio-Ausgangsbuchsen über
die Lautsprecher des Systems ausgegeben
werden.
Schließen Sie die analogen Audio-
Ausgangsbuchsen des Gerätes an den
Anschluss AUX L/R (INPUT) dieses Gerätes an.
Wählen Sie dann mit den Tasten INPUT/TUNER,
I
/
i
sowie ENTER (
) die Option [AUX].
AUX-Anschluss
Player
To the audio output jacks
of your component
(TV, VCR, etc.)
Red
White
PR
PB
Y
COMPONENT
VIDEO
INPUT
L
AUX
R
VIDEO
Rot
Weiß
Player
Zu den Audio-
Ausgangsbuchsen des
Gerätes (TV,
Videorekorder usw.)
HB985-DB.BDEUPPK_GER.indd 24HB985-DB.BDEUPPK_GER.indd 24 2010-05-14 2:06:502010-05-14 2:06:50

25Montage
3
Montage
PORTABLE IN-Anschluss
Der Ton eines tragbaren Players kann über
die Lautsprecher des Systems ausgegeben
werden.
Verbinden Sie die Kopfhörerbuchse (oder Line
Out-Buchse) des tragbaren Players mit der
PORT. IN-Buchse dieses Gerätes. Wählen Sie
dann mit den Tasten INPUT/TUNER,
I
/
i
sowie
ENTER (
) die Option [PORTABLE].
PORTABLE IN-Anschluss
twZGSGUUU
Z. B. MP3-Player.
OPTICAL IN 1/2-Anschluss
Der Ton eines Gerätes kann mit Hilfe der
digitalen, optischen Buchse über die
Lautsprecher des Systems ausgegeben
werden.
Verbinden Sie die optische Ausgangsbuchse
des Gerätes mit der OPTICAL IN 1/2-Buchse
dieses Gerätes. Wählen Sie dann mit den Tasten
INPUT/TUNER,
I
/
i
sowie ENTER (
) die
Option [OPTICAL 1/2]. Oder wählen Sie diese
Funktion direkt über die Taste OPTICAL aus.
Optischer Anschluss
To the digital
optical output jack
of your component
Zur digitalen,
optischen
Ausgangsbuchse des
Gerätes
HB985-DB.BDEUPPK_GER.indd 25HB985-DB.BDEUPPK_GER.indd 25 2010-05-14 2:06:502010-05-14 2:06:50

26 Montage
Montage
3
Bluetooth®-Verbindung
Über Bluetooth
Bluetooth® ist eine kabellose
Übertragungstechnologie zur Verbindung über
kurze Distanzen.
Die Übertragungsreichweite beträgt etwa
zehn Meter. (Bei Störungen durch andere
elektronische Geräte in der Nähe kann der
Ton bei der Bluetooth-Übertragung über
verschiedene Räume zeitweise unterbrochen
werden.)
Bei der Verbindung mehrere Geräte über
die Bluetooth Wireless-Technologie fallen
keinerlei Gebühren an. Verbindungen mit
Hilfe der Bluetooth Wireless-Technologie über
ein Mobiltelefon können in Reihenschaltung
betrieben werden.
Unterstützte Geräte: Mobiltelefone, MP3-Player,
Notebooks, PDA-Geräte (An diese Geräte muss
ein Stereo-Headset angeschlossen werden
können.)
Bluetooth-Pro le
Um die Bluetooth Wireless-Technologie zu
nutzen, müssen die Geräte mit bestimmten
Pro larten kompatibel sein.
Dieses Gerät unterstützt die folgenden Pro le.
A2DP (Advanced Audio Distribution Pro le
[Übertragung von Audiodaten])
Musik vom Bluetooth-Gerät hören
Verbindung zwischen Gerät und Bluetooth-
Gerät herstellen
Vor der Verbindung muss die Bluetooth-
Funktion Ihres Bluetooth-Gerätes aktiviert
werden. Hinweise nden Sie in der
Bedienungsanleitung des Bluetooth-Gerätes.
Eine einmal hergestellte Verbindung muss
nicht nochmals hergestellt werden.
1. Wählen Sie mit der Taste INPUT/TUNER oder
BT AUDIO die Bluetooth-Funktion.
Daraufhin erscheint die Meldung “BT AUDIO”
gefolgt von “BT READY” im Anzeigefenster.
2.
Bedienen Sie das Bluetooth-Gerät
und stellen Sie eine Verbindung her.
Während der Suche nach diesem Gerät
mit dem Bluetooth-Gerät wird eine
Liste der gefundenen Geräte in der
Anzeige des Bluetooth-Gerätes, je nach
Funktionsumfang, angezeigt. Dieses Gerät
besitzt die Bezeichnung “PIONEER AUDIO”.
3. Geben Sie die PIN-Nummer ein.
PIN-Nummer: 0000
4. Nach erfolgter Verbindung dieses Gerätes
mit dem Bluetooth-Gerät leuchtet die
Bluetooth-LED dieses Gerätes auf und die
Meldung “BT SINK” wird angezeigt.
HINWEIS
Je nach Art des Bluetooth-Gerätes erfolgt die
Herstellung der Verbindung auf verschiedene
Weise.
5. Musik hören.
Hinweise zur Wiedergabe von Musikdateien
auf dem Bluetooth-Gerät nden Sie in
der Bedienungsanleitung des Bluetooth-
Gerätes.
HINWEIS
• Falls die Bluetooth-Verbindung bei einem
Wechsel der Gerätefunktion getrennt wird, muss
diese neu hergestellt werden.
• Das AVRCP-Pro l kann in dieser Betriebsart nicht
genutzt werden.
HB985-DB.BDEUPPK_GER.indd 26HB985-DB.BDEUPPK_GER.indd 26 2010-05-14 2:06:512010-05-14 2:06:51

27Montage
3
Montage
Informationen zum verbundenen
Bluetooth-Gerät anzeigen
Diese Funktion ist nach erfolgter Verbindung
möglich. Hier können verschiedene Bluetooth-
Informationen angezeigt werden.
Drücken Sie die Taste DISPLAY gedrückt.
Folgende Bluetooth-Informationen werden
nacheinander angezeigt. Lokale Adresse des
Lokale Adresse des Bluetooth-Gerätes
t
Gerätename
t
Keine
t
...
HINWEIS
• Dieses Gerät unterstützt nicht das Pro l Mono-
Sprachausgabe per Headset (Schnurlose
Telefonie).
• Bei Störungen der Übertragung durch andere
elektronische Geräte in der Nähe kann der Ton
zeitweise unterbrochen werden.
• Bluetooth-Geräte können nicht über dieses Gerät
bedient werden.
• Es kann jeweils nur eine Verbindung zu einem
Bluetooth-Gerät hergestellt werden. Mehrfach-
Verbindungen sind nicht möglich.
• Auch wenn das Bluetooth-Gerät und dieses Gerät
weniger als zehn Meter voneinander entfernt
sind, kann die Verbindung durch Hindernisse
zwischen den Geräten gestört werden.
• Je nach Art des Gerätes kann die Bluetooth-
Funktion u. U. nicht genutzt werden.
• Falls keine Verbindung zu einem Bluetooth-Gerät
besteht, erscheint die Meldung “BT READY” im
Anzeigefenster.
• Bei Geräten in der Nähe, die auf derselben
Frequenz betrieben werden, wie z. B.
medizinische Geräte, Mikrowellengeräte oder
WLAN-Geräte, ist auf Grund elektronischer
Störungen möglicherweise keine Verbindung
möglich.
• Bei zwischen den Geräten be ndlichen
Personen oder bei einer Unterbrechung der
Verbindung zwischen Bluetooth-Gerät und
Player wird die Verbindung getrennt.
• Mit zunehmendem Abstand zwischen Bluetooth-
Gerät und Player nimmt die Tonqualität ab. Bei
zu großem Abstand außerhalb der Reichweite
des Bluetooth-Gerätes wird die Verbindung
getrennt.
• Die Verbindung zu Geräten mit Bluetooth
Wireless-Technologie wird beim Ausschalten
des Hauptgerätes oder bei einem Abstand des
Gerätes zum Hauptgerät von über zehn Metern
getrennt.
HB985-DB.BDEUPPK_GER.indd 27HB985-DB.BDEUPPK_GER.indd 27 2010-05-14 2:06:512010-05-14 2:06:51

28 Montage
Montage
3
Verbindung mit dem
Heimnetzwerk
Dieser Player kann über den LAN-Anschluss
auf der Rückseite mit einem lokalen Netzwerk
(LAN) verbunden werden.
Weitere Hinweise nden Sie in der
Bedienungsanleitung des Netzwerkgerätes.
Verbinden Sie den LAN-Anschluss des Players
über ein handelsübliches LAN- oder Ethernet-
Kabel (CAT5 oder höher mit RJ45-Anschluss)
mit dem entsprechenden Anschluss am
Modem oder Router. In der folgenden
Beispielkon guration für eine Kabelverbindung
kann mit dem Player auf die Inhalte beider PCs
zugegri en werden.
Netzwerkverbindung
Broadband
Service
Router
WAN
LAN 1
LAN 2
LAN 3
Player
PC
PC
Router
Breitband-
Dienst
Player
HINWEIS
• Halten Sie das LAN-Kabel beim Anschließen
oder Abziehen immer am Stecker selbst fest.
Ziehen Sie nicht am LAN-Kabel und halten Sie
die Sperre am Stecker gedrückt.
• Am LAN-Anschluss darf kein modulares
Telefonkabel angeschlossen werden.
• Halten Sie sich auf Grund der zahlreichen
möglichen Anschlussarten an die Angaben Ihres
Telekommunikationsanbieters bzw. Internet-
Anbieters.
• Für den Zugri auf Inhalte auf einem PC oder
DLNA-Server muss dieser Player mit demselben
lokalen Netzwerk wie der Router verbunden
sein.
HB985-DB.BDEUPPK_GER.indd 28HB985-DB.BDEUPPK_GER.indd 28 2010-05-14 2:06:512010-05-14 2:06:51

29Montage
3
Montage
Netzwerkeinstellungen
Vor der Einrichtung des Kabel-Netzwerks
muss eine Breitband-Internetverbindung zum
Heimnetzwerk hergestellt werden.
Falls das kabelgebundene lokale Netzwerk
(LAN) einen DHCP-Server besitzt, wird
dem Player automatisch eine IP-Adresse
zugewiesen. Für bestimmte Heimnetzwerke
müssen nach dem Anschluss der Kabel
die Netzwerkeinstellungen des Players
vorgenommen werden. Nehmen Sie die
[NETZWERK]-Einstellungen wie folgt vor.
1. Wählen Sie im Menü [Verbindungseinst.]
die Option [Setup] und drücken Sie auf
oder ENTER (
).
2. Wählen Sie mit den Tasten
U
/
u
/
I
/
i
den IP-
Modus [Dynamisch] oder [Statisch].
Wählen Sie die Option [Dynamisch], um die
IP-Adresse automatisch zu beziehen.
HINWEIS
Falls kein DHCP-Server im Netzwerk vorhanden
ist und die IP-Adresse manuell eingerichtet
werden muss, wählen Sie die Option [Statisch]
und nehmen Sie die Einstellungen für [IP-Adresse],
[Subnetzmaske], [Gateway] und [DNS-Server] mit
den Tasten
U
/
u
/
I
/
i
sowie den Nummerntasten
vor. Drücken Sie bei falscher Eingabe einer Zi er
auf CLEAR, um den markierten Teil zu löschen.
3. Markieren Sie die Option [OK] und
drücken Sie ENTER ( ), um die
Netzwerkeinstellungen zu übernehmen.
4. Der Player fordert Sie zur Prüfung der
Netzwerkverbindung auf. Markieren Sie die
Option [OK] und drücken Sie ENTER (
),
um die Netzwerkverbindung herzustellen.
5. Wählen Sie den Eintrag [Test] und drücken
Sie bei Schritt 4 auf ENTER ( ), um den
Status der Netzwerkverbindung auf dem
Bildschirm anzuzeigen.
Der Test kann auch über die Option
[Verbindungsstatus] im Menü [Setup]
durchgeführt werden.
HB985-DB.BDEUPPK_GER.indd 29HB985-DB.BDEUPPK_GER.indd 29 2010-05-14 2:06:512010-05-14 2:06:51

30 Montage
Montage
3
Hinweise zur Netzwerkverbindung:
• Viele Probleme bei der Netzwerkverbindung
während der Einrichtung können häu g
durch ein Zurücksetzen des Routers bzw.
Modems behoben werden. Schalten Sie
nach der Verbindung des Players mit
dem Heimnetzwerk den Router bzw. das
Kabelmodem des Heimnetzwerks schnell
aus und/oder trennen Sie das Netzkabel.
Schalten Sie das Gerät dann wieder ein
und/oder schließen Sie das Netzkabel
wieder an.
• Je nach Vertragsbedingungen Ihres
Internet-Anbieters (ISP) kann die Anzahl der
Geräte, für die eine Internet-Verbindung
eingerichtet werden kann, begrenzt sein.
Hinweise erhalten Sie von Ihrem Internet-
Anbieter.
• Unser Unternehmen übernimmt keine
Haftung für Fehlfunktionen des Players und/
oder der Internetverbindung auf Grund von
Verbindungsfehlern/Fehlfunktionen, die
durch Ihre Breitband-Internetverbindung
oder andere angeschlossene Geräte
verursacht werden.
• Die über die Internetverbindung
angebotenen Funktionserweiterungen für
BD-ROM-Discs werden nicht von unserem
Unternehmen erzeugt oder zur Verfügung
gestellt, und unser Unternehmen
gewährleistet nicht die Funktionalität
oder künftige Verfügbarkeit dieser Inhalte.
Bestimmte über eine Internetverbindung
verfügbare Disc-Inhalte sind mit diesem
Player u. U. nicht kompatibel. Wenden Sie
sich bei Fragen zu solchen Inhalten bitte an
den Hersteller der Disc.
• Für bestimmte Internet-Inhalte ist u. U. eine
höhere Bandbreite erforderlich.
• Auch wenn der Player korrekt verbunden
und kon guriert ist können bestimmte
Internet-Inhalte auf Grund von Engpässen,
minderer Qualität oder geringer Bandbreite
der Internetverbindung oder Störungen
beim Anbieter nicht richtig wiedergegeben
werden.
• Auf Grund bestimmter Einschränkungen
durch den Internet-Anbieter (ISP), der
die Breitband-Internetverbindung
bereitstellt, sind bestimmte Funktionen der
Internetverbindung u. U. nicht möglich.
• Jegliche Entgelte des ISP, auch
Verbindungsentgelte, müssen vom
Benutzer selbst getragen werden.
• Zur Kabelverbindung dieses Players ist ein
10 Base-T- oder 100 Base-TX-LAN-Anschluss
erforderlich. Falls Ihr Internet-Anbieter einen
solchen Anschluss nicht unterstützt, kann
mit dem Player keine Internetverbindung
hergestellt werden.
• Für den xDSL-Dienst ist ein Router
erforderlich.
• Zur Nutzung des DSL-Dienstes ist ein DSL-
Modem erforderlich. Für den Kabelmodem-
Dienst ist in ein Kabelmodem erforderlich.
Je nach Zugri sart auf den und den
Vertragsbedingungen des ISP können
Sie die Internetverbindungsfunktion
dieses Players nicht nutzen oder die
Anzahl der Geräte, die gleichzeitig eine
Internetverbindung herstellen können, ist
begrenzt. (Falls Ihr ISP nur die Verbindung
von einem Gerät zulässt, kann mit diesem
Player u. U. keine Verbindung hergestellt
werden, wenn bereits ein PC verbunden
ist.)
• Der Einsatz eines “Routers” ist
möglicherweise nicht oder nur
eingeschränkt zulässig, abhängig von den
Bedingungen und Einschränkungen des
ISP. Hinweise erhalten Sie direkt von Ihrem
Internet-Anbieter.
• Schalten Sie sämtliche nicht genutzte
Netzwerkgeräte im lokalen Heimnetzwerk
aus. Einige Geräte erzeugen u. U.
Netzwerkverkehr.
HB985-DB.BDEUPPK_GER.indd 30HB985-DB.BDEUPPK_GER.indd 30 2010-05-14 2:06:512010-05-14 2:06:51

31Montage
3
Montage
Anschluss eines USB-
Gerätes
Mit diesem Player können auf einem USB-Gerät
gespeicherte Film-, Musik- und Fotodateien
wiedergegeben werden.
1. Schließen Sie das USB-Gerät fest am USB-
Anschluss an.
USB-Anschluss
2. Drücken Sie die Taste HOME MENU.
Wählen Sie mit den Tasten
U
/
u
/
I
/
i
, die
Option [Spiel lm], [Foto] oder [Musik] und
drücken Sie ENTER ( ).
3. Wählen Sie mit den Tasten
U
/
u
/
I
/
i
eine
Datei aus und drücken Sie zur Wiedergabe
auf PLAY bzw. auf ENTER (
).
Anzeige der freien Speicherkapazität des
USB-Gerätes auf dem Bildschirm.
4. Wählen Sie eine andere Betriebsart. Ziehen
Sie das USB-Gerät vorsichtig ab.
HINWEIS
• Dieser Player unterstützt USB-Flash-Speicher/
externe USB-Festplatten mit dem Dateiformat
FAT16, FAT32 und NTFS (Musik, Foto und Video).
Für BD-LIVE sowie zum Kopieren von Audio-
CDs wird jedoch ausschließlich das Dateiformat
FAT16 oder FAT32 unterstützt. Bitte nutzen Sie
für BD-LIVE und zum Kopieren von Audio-CDs
den USB-Flash-Speicher/eine externe Festplatte
mit dem Dateiformat FAT16 oder FAT32.
• Das USB-Gerät kann als lokaler Speicher
eingesetzt werden, um BD-LIVE-Discs über das
Internet wiederzugeben.
• Dieses Gerät unterstützt bis zu vier Partitionen
auf einem USB-Gerät.
• Ein USB-Gerät niemals während des Betriebs
trennen (z. B. während der Wiedergabe oder
eines Kopiervorgangs).
• USB-Geräte, für die zum Anschluss an einen
Computer eine zusätzliche Softwareinstallation
erforderlich ist werden nicht unterstützt.
• USB-Gerät: USB-Gerät mit Unterstützung für
USB 1.1 und USB 2.0.
• Es können Film-, Musik- und Fotodateien
wiedergegeben werden. Weitere Hinweise zu
den Bedienungsfunktionen für die einzelnen
Dateitypen nden Sie auf den entsprechenden
Seiten.
• Zur Vermeidung von Datenverlust sollten
regelmäßig Sicherungskopien erstellt werden.
• Bei Verwendung eines Verlängerungskabels,
eines USB-Hubs oder eines USB Multi-
Kartenlesegerätes wird das USB-Gerät u. U. nicht
erkannt.
• Bestimmte USB-Geräte funktionieren nicht
zusammen mit diesem Gerät.
• Digitalkameras und Mobiltelefone werden nicht
unterstützt.
• Der USB-Anschluss dieses Gerätes kann nicht für
den Anschluss an einen PC genutzt werden.
HB985-DB.BDEUPPK_GER.indd 31HB985-DB.BDEUPPK_GER.indd 31 2010-05-14 2:06:512010-05-14 2:06:51

32 Montage
Montage
3
Einstellungen
Setup-Einstellungen
vornehmen
Im Menü [Setup] können die Einstellungen für
den Player vorgenommen werden.
1. Drücken Sie die Taste HOME MENU (
).
2. Wählen Sie mit den Tasten
I
/
i/U
/
u
den
Eintrag [Setup] und drücken Sie ENTER
( ). Daraufhin wird das Menü [Setup]
aufgerufen.
3. Wählen Sie mit den Tasten
U
/
u
den ersten
Eintrag aus und drücken Sie die Taste
i
, um
in das Unterverzeichnis zu gelangen.
4. Wählen Sie mit den Tasten
U
/
u
den zweiten
Eintrag aus und drücken Sie auf ENTER
(
), um in das nächste Unterverzeichnis zu
gelangen.
5. Wählen Sie mit den Tasten
U
/
u
die
gewünschte Einstellung und drücken Sie
zur Bestätigung der Auswahl die Taste
i
oder ENTER ( ).
HB985-DB.BDEUPPK_GER.indd 32HB985-DB.BDEUPPK_GER.indd 32 2010-05-14 2:06:512010-05-14 2:06:51

33Montage
3
Montage
Das Menü [ANZEIGE]
Bildformat
Wählen Sie die für das Bildformat des
Fernsehers die geeignete Einstellung.
[4:3 Letterbox]
Beim Anschluss an einen Standard
4:3-Fernseher. Zeigt Kino lme mit
schwarzen Balken oberhalb und unterhalb
des Bildes.
[4:3 Panscan]
Beim Anschluss an einen Standard
4:3-Fernseher. Das Bild wird verkleinert, um
den Bildschirm zu füllen. Beide Seiten des
Bildes werden abgeschnitten.
[16:9 Original]
Beim Anschluss an einen
16:9-Breitbildfernseher. Das 4:3-Bild wird
im Original-Bildformat 4:3 mit schwarzen
Streifen am linken und rechten Bildrand
angezeigt.
[16:9 Vollbild]
Beim Anschluss an einen
16:9-Breitbildfernseher.
HINWEIS
Die Optionen [4:3 Letterbox] und [4:3 PanScan]
können bei einer höheren Au ösung als 720p nicht
eingestellt werden.
Au ösung
Einstellen der Ausgabeau ösung für das
Component- und HDMI-Videosignal.
Einzelheiten zur Einstellung der Au ösung
nden Sie auf den Seiten 23 und 70.
[Auto]
Falls an der HDMI OUT-Buchse ein
Fernsehgerät angeschlossen ist, das
Anzeigeinformation (EDID) bereitstellt, wird
die Au ösung für den angeschlossenen
Fernseher automatisch optimal angepasst.
Falls der Anschluss ausschließlich über
die COMPONENT VIDEO OUT-Buchse
erfolgt, wird die Standardau ösung 1080i
eingestellt.
[1080p]
Ausgabe von 1080 Zeilen Progressive-Video.
[1080i]
Ausgabe von 1080 Zeilen Interlaced-Video.
[720p]
Ausgabe von 720 Zeilen Progressive-Video.
[576p (480p)]
Ausgabe von 576 (480) Zeilen Progressive-
Video.
[576i (480i)]
Ausgabe von 576 (480) Zeilen Interlaced-
Video.
HB985-DB.BDEUPPK_GER.indd 33HB985-DB.BDEUPPK_GER.indd 33 2010-05-14 2:06:522010-05-14 2:06:52

34 Montage
Montage
3
1080p-Anzeige
Wählen Sie bei einer Au ösung von 1080p die
Einstellung [24 Hz], um Filme auf HDMI-fähigen
Anzeigegeräten mit 1080p/24 Hz-Eingang
ruckelfrei darzustellen (1080p/24 Hz).
HINWEIS
• In der Einstellung [24 Hz] können beim Wechsel
zwischen Video- und Filmmaterial Bildstörungen
auftreten. Wählen Sie in diesem Fall die
Einstellung [50 Hz].
• Auch wenn die Option [1080p-Anzeige] auf
[24 Hz] eingestellt ist, wird die tatsächliche
Bildfrequenz der Videoausgabe je nach Format
der Video-Quelle auf 50 Hz festgelegt, falls Ihr
Fernsehgerät die Au ösung 1080p/24 Hz nicht
unterstützt.
HDMI-Farbeinst.
Auswahl der Ausgabeart über die HDMI
OUT-Buchse. Hinweise zu dieser Einstellung
nden Sie in der Bedienungsanleitung des
Anzeigegerätes.
[YCbCr]
Wählen Sie diese Einstellung beim
Anschluss an HDMI-Anzeigegerät.
[RGB]
Wählen Sie diese Einstellung beim
Anschluss an DVI-Anzeigegerät.
Das Menü [SPRACHE]
Anzeigemenü
Sprache für das [Setup]-Menü und für die
Bildschirmmenüs festlegen.
Disc-Menü/Disc-Audio/Disc-Untertitel
Wählen Sie die gewünschte Sprache für
Audiotracks (Disc-Audio), für Untertitel und für
die Disc-Menüs aus.
[Original]
Die auf der Disc aufgezeichnete
Originalsprache wird verwendet.
[Andere]
Drücken Sie zur Auswahl einer anderen
Sprache auf ENTER (
). Geben Sie über
die Nummerntasten die entsprechende
vierstellige Nummer ein, die Sie der Liste
der Sprachcodes entnehmen können
(siehe Seite 69), und drücken Sie ENTER ( ).
[Aus] (nur für Disc-Untertitel)
Untertitel ausblenden.
HINWEIS
Die Spracheinstellungen werden je nach Disc
möglicherweise nicht übernommen.
HB985-DB.BDEUPPK_GER.indd 34HB985-DB.BDEUPPK_GER.indd 34 2010-05-14 2:06:522010-05-14 2:06:52

35Montage
3
Montage
Das Menü [AUDIO]
Lautsprecher-Setup
Nutzen Sie für einen optimalen Ton die
Lautsprechereinstellungen, um die Lautstärke
der angeschlossenen Lautsprecher sowie die
Abstände von der Zuhörerposition festzulegen.
Führen Sie den Test durch, um die Lautstärke
der Lautsprecher auf den gleichen Wert
einzustellen.
[Lautsprecher]
Wählen Sie einen einzustellenden
Lautsprecher aus.
[Lautstärke]
Lautstärkepegel für jeden Lautsprecher
festlegen.
[Abstand]
Abstände der einzelnen Lautsprecher zur
Zuhörerposition festlegen.
[Test/Testton beenden]
Ausgabe eines Testtons über die Lautsprecher.
[OK]
Einstellung übernehmen.
[Abbrechen]
Änderungen verwerfen.
HD AV Sync
Beim Digitalfernsehen kann es zu
Verzögerungen zwischen Bild und Ton
kommen. In diesem Fall kann eine Verzögerung
für den Ton festgelegt werden, so dass der Ton
auf das Bild ‘wartet’: Diese Funktion wird als HD
AV Sync bezeichnet. Wählen Sie mit den Tasten
U u
einen Wert zwischen 0 und 300 mSek. für
die Verzögerung aus.
Die Verzögerung kann je nach eingestelltem
digitalen Fernsehsender variieren. Beim
Umschalten des Kanals muss der Wert für HD
AV Sync u. U. geändert werden.
DRC (Steuerung des
Dynamikbereichs)
Während der Wiedergabe von Dolby Digital-
oder Dolby Digital Plus-Inhalten möchten
Sie vielleicht den Dynamikbereich der
Audioausgabe verringern (den Unterschied
zwischen den lautesten und den leisesten
Tönen). Auf diese Weise können Sie z. B. einen
Film bei geringer Lautstärke anschauen, ohne
dass die Klangqualität abnimmt. Stellen Sie
die Option [DRC] auf [Ein], um die Funktion zu
aktivieren.
HINWEIS
Die DRC-Einstellungen können nur vorgenommen
werden, wenn keine Disc eingelegt ist oder die
Wiedergabe vollständig angehalten wurde.
HB985-DB.BDEUPPK_GER.indd 35HB985-DB.BDEUPPK_GER.indd 35 2010-05-14 2:06:522010-05-14 2:06:52

36 Montage
Montage
3
Das Menü [SPERRE]
Um eine Funktion mit der Einstellung [SPERRE]
aufzurufen, müssen Sie den zuvor erstellten
vierstelligen Sicherheitscode eingeben.
Falls Sie noch kein Kennwort vergeben haben,
werden Sie nun dazu aufgefordert. Geben Sie
zweimal ein vierstelliges Kennwort ein und
drücken Sie ENTER (
) um das neue Kennwort
zu erstellen.
Kennwort
Sie können ein Kennwort vergeben oder ändern.
[Keine]
Geben Sie zweimal ein vierstelliges
Kennwort ein und drücken Sie ENTER ( ),
um das neue Kennwort zu erstellen.
[Ändern]
Geben Sie das aktuelle Kennwort ein und
drücken Sie ENTER (
). Geben Sie zweimal
ein vierstelliges Kennwort ein und drücken
Sie ENTER ( ), um das neue Kennwort zu
erstellen.
HINWEIS
Um eine falsche Eingabe vor dem Drücken auf
ENTER (
) zu korrigieren, drücken Sie auf CLEAR.
Geben Sie nun das korrekte Kennwort ein.
Wenn Sie das Kennwort vergessen
haben,
Falls Sie das Kennwort vergessen haben, kann es
mit folgenden Schritten gelöscht werden:
1. Nehmen Sie eine evtl. eingelegte Disc aus
dem Player.
2.
Wählen Sie im [SPERRE]-Menü die Option [Setup].
3. Geben Sie im Menü [Sperre] über die
Nummerntasten das Kennwort “210499” ein.
Das Kennwort wird gelöscht.
DVD-Einstufung
Verhindert die Wiedergabe von nicht
jugendfreien DVDs. (Es sind jedoch nicht alle
DVDs eingestuft.)
[Einstufung 1-8]
Stufe 1 bedeutet niedrigste
Wiedergabeeinschränkungen.
Stufe 8 bedeutet höchste
Wiedergabeeinschränkungen.
[Aufheben]
In dieser Einstellung wird die
Kindersicherung deaktiviert und die Disc
wird ohne Einschränkungen wiedergegeben.
BD-Einstufung
Festlegen einer Altersfreigabe für BD-ROM-
Discs. Geben Sie über die Nummerntasten eine
Altersfreigabe zur Wiedergabe von BD-ROM-
Discs ein.
[255]
Alle BD-ROM-Discs wiedergeben.
[0-254]
BD-ROM-Discs mit der entsprechenden
Einstufung wiedergeben.
HINWEIS
Eine [BD-Einstufung] kann nur für BD-Discs mit
Avance Rating Controller vorgenommen werden.
Ländercode
Geben Sie gemäß der Liste auf Seite 68 den
Code für das Land ein, dessen Standards
bei der Einstufung der DVD-Video-Disc
angewendet wurden.
HB985-DB.BDEUPPK_GER.indd 36HB985-DB.BDEUPPK_GER.indd 36 2010-05-14 2:06:522010-05-14 2:06:52

37Montage
3
Montage
Das Menü [NETZWERK]
Verbindungseinst.
Nachdem Sie Ihr Heimnetzwerk zur Verbindung
mit den Player vorbereitet haben, muss
für der Player für die Netzwerkverbindung
eingerichtet werden. (Siehe “Verbindung mit
dem Heimnetzwerk” auf den Seite 28.)
Verbindungsstatus
Um den Netzwerkstatus dieses Players
zu überprüfen, wählen Sie die Option
[Verbindungsstatus] und drücken Sie auf
ENTER ( ), um die Verbindung zum Netzwerk
und zum Internet zu testen.
BD-LIVE-Verbindung
Der Internetzugri für die BD-LIVE-Funktionen
kann eingeschränkt werden.
[Zulässig]
Der Internetzugri wird für sämtliche BD-
LIVE-Inhalte freigegeben.
[Teilweise zulässig]
Der Internetzugri wird nur für BD-
LIVE-Inhalte mit entsprechendem
Benutzerzerti kat freigegeben. Für
sämtliche BD-LIVE-Inhalte ohne Zerti kat
werden der Internetzugri sowie AACS-
Onlinefunktionen gesperrt.
[Nicht zulässig]
Der Internetzugri wird für sämtliche BD-
LIVE-Inhalte gesperrt.
Das Menü [WEITERE]
DivX VOD
ÜBER DIVX-VIDEO: DivX® ist ein von DivX, Inc.
entwickeltes digitales Videoformat. Dies ist
ein o zielles DivX Certi ed- oder DivX Ultra
Certi ed-Gerät zur Wiedergabe von DivX-
Video. Weitere Information und Software-Tools
zur Konvertierung von Dateien in DivX-Videos
nden Sie unter www.divx.com.
ÜBER DIVX VIDEO-ON-DEMAND: Dieses DivX®
Certi ed-Gerät muss zur Wiedergabe von DivX
Video-on-Demand (VOD) registriert werden.
Eine Registrierungskennung kann im Abschnitt
DivX VOD im Einstellungsmenü des Gerätes
erstellt werden. Geben Sie diese Kennung
unter vod.divx.com an, um die Registrierung
abzuschließen und weitere Informationen zu
DivX VOD zu erhalten.
[Registrieren]
Anzeige des Registrierungscodes des Players.
[Registrierung deaktivieren]
Player deaktivieren und Deaktivierungscode
anzeigen.
HINWEIS
Sämtliche über DivX VOD heruntergeladenen Filme
mit dem Registrierungscode dieses Players können
nur mit diesem Gerät wiedergegeben werden.
HB985-DB.BDEUPPK_GER.indd 37HB985-DB.BDEUPPK_GER.indd 37 2010-05-14 2:06:522010-05-14 2:06:52

38 Montage
Montage
3
Autom. Ausschalten
Der Bildschirmschoner wird eingeblendet,
wenn der Player ca. fünf Minuten im Stopp-
Modus betrieben wird. In der Einstellung [Ein]
wird das Gerät automatisch abgeschaltet,
nachdem der Bildschirmschoner 25 Minuten
lang angezeigt wurde.
Stellen Sie diese Einstellung auf [Aus] ein, um
den Bildschirmschoner anzuzeigen, bis das
Gerät wieder bedient wird.
Initialisieren
Werkseinstellungen
Der Player kann auf die ursprünglichen
Werkseinstellungen zurückgesetzt werden.
BD-Speicher löschen
BD-Inhalte auf dem angeschlossenen USB-
Gerät löschen.
HINWEIS
Nach dem Zurücksetzen des Players auf
die Werkseinstellungen über die Option
[Werkseinstellungen] müssen sämtliche
Aktivierungen für Online-Dienste sowie die
Netzwerkeinstellungen erneut vorgenommen
werden.
Software-Information
Aktuelle Software-Version anzeigen.
HB985-DB.BDEUPPK_GER.indd 38HB985-DB.BDEUPPK_GER.indd 38 2010-05-14 2:06:522010-05-14 2:06:52

39Montage
3
Montage
Klange ekte
Drücken Sie mehrmals die Taste SOUND am
Gerät, bis die gewünschte Klangart in der
Anzeige oder auf dem Fernsehbildschirm
erscheint. Die angezeigten Einträge für den
Equalizer können je nach Klangquellen und
E ekten variieren.
[Pioneer 1]: Für einen satten Klang durch den
Anschluss kleiner Lautsprecher (S-BD303).
[Pioneer 2]: Für einen satten Klang durch den
Anschluss großer Lautsprecher (S-BD707T).
[Bypass]: Softwaretitel mit Mehrkanal-
Surround-Audiosignalen werden so
wiedergegeben, wie sie aufgenommen
wurden.
[Bass Blast]: Bässe der linken und rechten
Lautsprecher und des Subwoofers verstärken.
[PL ll Movie]: Pro Logic ll Spiel lm-Modus zur
Dekodierung des Eingangssignals zur Ausgabe
von fünf Ausgangskanälen voller Bandbreite
über ein Zweikanal-System. Diese Einstellung
eignet sich ideal zum Anschauen von
synchronisierten Videos oder alten Spiel lmen.
Diese Funktion ist nur im 2-Kanal-Modus
verfügbar.
[PL ll Music]: Pro Logic ll Musik-Modus zur
Dekodierung des Eingangssignals zur Ausgabe
von fünf Ausgangskanälen voller Bandbreite
über ein Zweikanal-System. Diese Einstellung
eignet sich ideal zum Anhören normaler
Stereo-Quellen wie CDs. Diese Funktion ist nur
im 2-Kanal-Modus verfügbar.
[Clear Voice]: In diesem Modus wird
Sprache klarer und mit verbesserter Qualität
wiedergegeben.
[Game]: Virtueller Klang für Videospiele.
[Night]: Diese Funktion ist nützlich, um
Spiel lme bei Nacht mit geringer Lautstärke
anzuschauen.
[Mus. ReTouch]: Klangverbesserung beim
Anhören von MP3-Dateien oder anderen
komprimierten Musikdateien. Diese Funktion
ist nur im 2-Kanal-Modus verfügbar.
[Loudness]: Verbesserung der Bässe und
Höhen.
HB985-DB.BDEUPPK_GER.indd 39HB985-DB.BDEUPPK_GER.indd 39 2010-05-14 2:06:522010-05-14 2:06:52

40 Betrieb
Betrieb
4
Normale Wiedergabe
Discs wiedergeben
1. Drücken Sie die Taste
Z
OPEN/CLOSE und
legen Sie eine Disc in das Disc-Fach.
2. Drücken Sie auf
Z
OPEN/CLOSE, um das
Disc-Fach zu schließen.
Die Wiedergabe wird bei den meisten
Audio-CDs, BD-ROM- und DVD-ROM-Discs
automatisch gestartet.
3. Drücken Sie die Taste
HOME MENU.
4. Wählen Sie mit den Tasten
U
/
u
/
I
/
i
, die
Option [Spiel lm], [Foto] oder [Musik] und
drücken Sie ENTER ( ).
5. Wählen Sie mit den Tasten
I
/
i
den Eintrag
Disc und drücken Sie ENTER (
).
Beim Anschluss von bis zu zwei Geräten
erscheint diese Anzeige.
6. Wählen Sie mit den Tasten
U
/
u
/
I
/
i
eine
Datei aus und drücken Sie zur Wiedergabe
auf
B
PLAY bzw. auf ENTER (
).
HINWEIS
• Die in dieser Anleitung beschriebenen
Wiedergabefunktionen sind nicht für alle
Dateien und Medien verfügbar. Bestimmte
Funktionen sind aus verschiedenen Gründen
nicht immer möglich.
• Je nach BD-ROM-Titeln muss zur störungsfreien
Wiedergabe ein USB-Gerät angeschlossen
werden.
4
Betrieb
HB985-DB.BDEUPPK_GER.indd 40HB985-DB.BDEUPPK_GER.indd 40 2010-05-14 2:06:522010-05-14 2:06:52

41Betrieb
4
Betrieb
Wiedergabe anhalten
Drücken Sie während der Wiedergabe auf
x
STOP.
Wiedergabe unterbrechen
Drücken Sie während der Wiedergabe auf
X
PAUSE/STEP.
Drücken Sie zum Fortsetzen der Wiedergabe
auf
B
PLAY.
Einzelbildwiedergabe
Drücken Sie während der Wiedergabe auf
X
.
Drücken Sie zur Einzelbildwiedergabe
mehrmals auf
X
.
Suchlauf vor oder zurück.
Drücken Sie für den schnellen Vorlauf bzw. den
schnellen Rücklauf während der Wiedergabe
die Taste
m
bzw.
M
.
Um die Wiedergabegeschwindigkeit zu
ändern, drücken Sie mehrmals die Taste
m
bzw.
M
.
Wiedergabegeschwindigkeit
verringern
Drücken Sie zur Wiedergabe in Zeitlupe
mit verschiedenen Geschwindigkeiten bei
unterbrochener Wiedergabe die Taste
M
SCAN.
Zum/Zur nächsten/vorherigen
Kapitel/Titel/Datei springen
Drücken Sie während der Wiedergabe die Taste
.
bzw.
>
, um zum nächsten Kapitel/
Track/Dateien bzw. zum Anfang das aktuelle
Kapitel/Track/Dateien zu springen.
Drücken Sie zweimal kurz die Taste
.
, um
zum vorherigen Kapitel/Track/Dateien zu
springen.
Bedienungen im Disc-Menü
BD
DVD
AVCHD
Disc-Menü aufrufen
Der Menübildschirm wird u. U. erst nach dem
Laden einer Disc mit Menü angezeigt.
Drücken Sie zur Anzeige des Disc-Menüs
während der Wiedergabe auf MENU.
Wählen Sie mit den Tasten
U
/
u
/
I
/
i
den
gewünschten Menüeintrag aus.
Popup-Menü einblenden
Bestimmte BD-ROM-Discs besitzen ein
Kontextmenü, das während der Wiedergabe
eingeblendet wird.
Drücken Sie während der Wiedergabe die
Taste POPUP/ TOP MENU und rufen Sie mit
den Tasten
U
/
u
/
I
/
i
die gewünschten
Menüpunkte auf.
HB985-DB.BDEUPPK_GER.indd 41HB985-DB.BDEUPPK_GER.indd 41 2010-05-14 2:06:532010-05-14 2:06:53

42 Betrieb
Betrieb
4
Wiedergabe fortsetzen
BD
DVD
AVCHD
MOVIE
ACD
MUSIC
Bei bestimmten Discs merkt sich das Gerät
den Punkt, an dem die Taste
x
STOP gedrückt
wurde. Sobald das Symbol “
Xx
(Pause Stop)”
kurz auf dem Bildschirm erscheint, drücken
Sie auf
B
PLAY, um die Wiedergabe (ab der
aktuellen Szene) fortzusetzen.
Bei zweimaligem Drücken auf
x
STOP bzw.
beim Auswerfen der Disc erscheint das Symbol
“
x
” Stop auf dem Bildschirm. Das Gerät löscht
daraufhin sämtliche Anhaltepunkte.
HINWEIS
• Der Fortsetzungspunkt wird beim Betätigen
einer Taste u. U. gelöscht (z. B.
1
(POWER),
Z
(OPEN/CLOSE), etc).
• Bei BD-Video-Discs einschließlich BD-J ist die
Funktion Wiedergabe fortsetzen nicht möglich.
• Beim Drücken auf
x
(STOP) während der
Wiedergabe eines interaktiven Titels einer BD-
ROM wird die Wiedergabe angehalten.
Erweiterte
Wiedergabe
Wiederholte Wiedergabe
BD
DVD
AVCHD
ACD
MUSIC
Drücken Sie während der Wiedergabe
mehrmals die Taste REPEAT (
), um den
gewünschten Wiederholungsmodus
einzustellen.
BDs/DVDs
A-
– Den ausgewählten Abschnitt
wiederholt wiedergeben.
Kapitels
– Das aktuelle Kapitel mehrmals
wiedergeben.
Title
Titel
– Den aktuellen Titel mehrmals
wiedergeben.
Drücken Sie zur normalen Wiedergabe
mehrmals die Taste REPEAT (
) und
wählen Sie die Option [AUS].
Audio-CDs/Musikdateien
– Den aktuellen Track oder die
Datei mehrmals wiedergeben.
– Alle Tracks oder Dateien mehrmals
wiedergeben.
– Tracks bzw. Dateien in zufälliger
Reihenfolge wiedergeben.
– Alle Tracks oder Dateien
mehrmals in zufälliger Reihenfolge
wiedergeben.
– Den ausgewählten Abschnitt
wiederholt wiedergeben. (nur Audio-CD)
Drücken Sie zur normalen Wiedergabe die
Taste CLEAR.
HINWEIS
• Beim Drücken der Taste
>
während der
wiederholten Wiedergabe eines Kapitels/Titels
wird die Wiedergabewiederholung beendet.
• Diese Funktion ist bei einigen Discs oder Titeln
nicht v
erfügbar.
HB985-DB.BDEUPPK_GER.indd 42HB985-DB.BDEUPPK_GER.indd 42 2010-05-14 2:06:532010-05-14 2:06:53

43Betrieb
4
Betrieb
Abschnittswiederholung
BD
DVD
AVCHD
ACD
Es ist möglich, einen markierten Abschnitt
wiederholt wiederzugeben.
1. Drücken Sie während der Wiedergabe die
Taste REPEAT (
), um den Startpunkt [A-]
des zu wiederholenden Abschnitts
festzulegen. Drücken Sie abschließend auf
ENTER (
).
2. Drücken Sie am Ende des Abschnitts auf
ENTER (
). Der gewählte Abschnitt wird
daraufhin fortlaufend wiederholt.
3. Drücken Sie zur normalen Wiedergabe
mehrmals die Taste REPEAT (
) und
wählen Sie die Option [Aus].
HINWEIS
Ein Abschnitt muss mindestens drei Sekunden lang
sein.
Markensuche
BD
DVD
AVCHD
MOVIE
Die Wiedergabe kann von bis zu neun
gespeicherten Punkten erfolgen.
Eine Marke hinzufügen
1. Drücken Sie während der Wiedergabe an
der gewünschten Stelle die Taste MARKER.
Daraufhin wird kurz das Markierungssymbol
auf dem Bildschirm eingeblendet.
2. Wiederholen Sie Schritt 1, um bis zu neun
Markierungen festzulegen.
Aufrufen einer markierten Szene
1. Drücken Sie die Taste SEARCH, um das
Suchmenü auf dem Bildschirm aufzurufen.
2. Wählen Sie über die Nummerntasten die
gewünschte Markierungsnummer aus. Die
Wiedergabe beginnt ab der markierten
Szene.
Eine Marke löschen
1. Drücken Sie die Taste SEARCH, um das
Suchmenü auf dem Bildschirm aufzurufen.
2. Drücken Sie die Taste
u
, um die gewünschte
Markierungsnummer zu markieren.
Wählen Sie mit den Tasten
I
/
i
die
gewünschte markierte Szene zum Löschen
aus.
3. Drücken Sie die Taste CLEAR, um die
markierte Szene im Suchmenü zu löschen.
HINWEIS
• Diese Funktion ist bei bestimmten Discs, Titeln
und je nach Verfügbarkeit des Servers nicht
möglich.
• Beim Anhalten des Titels (
x
), beim Ändern des
Titels oder beim Auswerfen der Disc werden alle
Markierungspunkte gelöscht.
• Falls die Gesamtlänge des Titels weniger als
10 Sekunden beträgt, ist diese Funktion nicht
möglich.
HB985-DB.BDEUPPK_GER.indd 43HB985-DB.BDEUPPK_GER.indd 43 2010-05-14 2:06:532010-05-14 2:06:53

44 Betrieb
Betrieb
4
Funktionen im Suchmenü
BD
DVD
AVCHD
MOVIE
Über das Suchmenü kann eine gewünschte
Stelle zum Beginn der Wiedergabe aufgerufen
werden.
Einen Wiedergabepunkt suchen
1. Drücken Sie während der Wiedergabe
die Taste SEARCH, um das Suchmenü
aufzurufen.
2. Drücken Sie die Taste
I
/
i
, um während der
Wiedergabe 15 Sekunden vor oder zurück
zu springen. Um eine bestimmte Stelle
zu überspringen, halten Sie die Taste
I
/
i
gedrückt.
Wiedergabe ab der markierten Szene
starten
1. Drücken Sie die Taste SEARCH, um das
Suchmenü auf dem Bildschirm aufzurufen.
2. Drücken Sie die Taste
u
, um die gewünschte
Markierungsnummer zu markieren.
Wählen Sie mit den Tasten
I
/
i
die
gewünschte markierte Szene zum Löschen
aus.
3. Drücken Sie zur Wiedergabe ab der
markierten Szene auf ENTER (
).
HINWEIS
• Diese Funktion ist bei bestimmten Discs, Titeln
und je nach Verfügbarkeit des Servers nicht
möglich.
• Diese Funktion ist je nach Dateityp und
Eigenschaften des DLNA-Servers für bestimmte
Inhalte unter[Home Link] nicht möglich.
Merken der letzten Szene
BD
DVD
Dieses Gerät merkt sich die zuletzt gespielte
Szene der letzten Disc. Die letzte Szene wird im
Speicher aufbewahrt, auch wenn die Disc aus
dem Player herausgenommen oder das Gerät
ausgeschaltet wird. Beim erneuten Einlegen
dieser Disc wird die gespeicherte Szene
automatisch wiedergegeben.
HINWEIS
• Die Funktion Letzte Szene merken wird beim
Einlegen einer neuen Disc zurückgesetzt.
• Diese Funktion ist bei bestimmten Discs nicht
möglich.
• Die Einstellungen einer Disc werden nicht
gespeichert, wenn das Gerät vor der Wiedergabe
der Disc ausgeschaltet wird.
HB985-DB.BDEUPPK_GER.indd 44HB985-DB.BDEUPPK_GER.indd 44 2010-05-14 2:06:532010-05-14 2:06:53

45Betrieb
4
Betrieb
Bildschirmmenü
Es können verschiedene Informationen und
Einstellungen zum Inhalt angezeigt und
bearbeitet werden.
Anzeige der Informationen zum
Inhalt auf dem Bildschirm
BD
DVD
AVCHD
MOVIE
1. Drücken Sie während der Wiedergabe
die Taste DISPLAY (
), um verschiedene
Wiedergabeinformationen anzuzeigen.
a
h
g
f
e
d
c
b
a
Titel – aktuelle Titelnummer/
Gesamtanzahl der Titel
b
Kapitel – Aktuelle Kapitelnummer/
Gesamtan-zahl der Kapitel
c
Zeit – verstrichene Spielzeit/Gesamte
Spielzeit
d
Audio – Ausgewählte Audiosprache oder
gewählter Tonkanal
e
Untertitel – Ausgewählte Untertitel
f
Winkel – Ausgewählter Kamerawinkel/
Gesamt-anzahl der Kamerawinkel
g
Bildformat – gewähltes TV-Bildformat
h
Bildmodus – gewählter Anzeigemodus
2. W
ählen Sie mit den Tasten
U
/
u
eine
Einstellung aus.
3. Stellen Sie mit den Tasten
I
/
i
den
gewünschten Einstellungswert ein.
4. Drücken Sie auf RETURN (
O
), um das
Bildschirmmenü zu verlassen.
HINWEIS
• Wird einige Sekunden lang keine Taste gedrückt,
wird die Bildschirmanzeige ausgeblendet.
• Bei bestimmten Discs können Titelnummern
nicht ausgewählt werden.
• Die verfügbaren Einträge können je nach Disc
oder Titel variieren.
• Während der Wiedergabe eines interaktiven
BD-Titels werden auf dem Bildschirm
möglicherweise verschiedene Einstellungen
angezeigt, die jedoch nicht geändert werden
können.
HB985-DB.BDEUPPK_GER.indd 45HB985-DB.BDEUPPK_GER.indd 45 2010-05-14 2:06:532010-05-14 2:06:53

46
Betrieb
Betrieb
4
Wiedergabe ab einer gewählten
Zeitposition
BD
DVD
AVCHD
MOVIE
1. Drücken Sie während der Wiedergabe auf
DISPLAY (
). Im Zeit-Suchlauf-Feld wird die
verstrichene Spielzeit angezeigt.
2. Wechseln Sie in das [Zeit]-Feld und geben
Sie die gewünschte Startzeit von links nach
rechts in Stunden, Minuten und Sekunden
ein.
Um beispielsweise eine Szene an der
Wiedergabezeit 2 Stunden, 10 Minuten und
20 Sekunden zu suchen, geben Sie den
Wert “21020” ein.
Drücken Sie die Taste
I
/
i
, um während der
Wiedergabe 60 Sekunden vor oder zurück
zu springen.
3. Drücken Sie zur Wiedergabe ab dem
gewählten Zeitpunkt auf ENTER (
).
HINWEIS
• Diese Funktion ist bei einigen Discs oder Titeln
nicht verfügbar.
• Diese Funktion ist je nach Dateityp und
Eigenschaften des DLNA-Servers für bestimmte
Inhalte unter [Home Link] nicht möglich.
Auswahl der Untertitelsprache
BD
DVD
AVCHD
MOVIE
1. Drücken Sie während der Wiedergabe die
Taste DISPLAY (
), um das Bildschirmmenü
einzublenden.
2. Wählen Sie mit den Tasten
U
/
u
die Option
[Audio].
3. Wählen Sie mit den Tasten
I
/
i
die
gewünschte Sprache, die Audiospur oder
den Tonkanal aus.
HINWEIS
• Bei bestimmten Discs kann die Sprache nur über
das Disc-Menü eingestellt werden. Drücken
Sie in diesem Fall die Taste POPUP/TOP MENU
bzw. MENU und wählen Sie im Disc-Menü die
gewünschte Sprache.
• Unmittelbar nach dem Umstellen des Tons kann
es zu einer vorübergehenden Verzögerung
zwischen Bild und Ton kommen.
Auswahl der Untertitelsprache
BD
DVD
AVCHD
MOVIE
1. Drücken Sie während der Wiedergabe die
Taste DISPLAY (
), um das Bildschirmmenü
einzublenden.
2. Wählen Sie mit den Tasten
U
/
u
die Option
[Untertitel].
3. Wählen Sie mit den Tasten
I
/
i
die
gewünschte Untertitelsprache.
4. Drücken Sie auf RETURN (
O
), um das
Bildschirmmenü zu verlassen.
HINWEIS
Bei bestimmten Discs können die Untertitel nur
über das Disc-Menü eingestellt werden. Drücken
Sie in diesem Fall die Taste POPUP/ TOP MENU
bzw. MENU und wählen Sie im Disc-Menü die
gewünschten Untertitel.
HB985-DB.BDEUPPK_GER.indd 46HB985-DB.BDEUPPK_GER.indd 46 2010-05-14 2:06:532010-05-14 2:06:53

47
Betrieb
4
Betrieb
Anzeige verschiedener
Kamerawinkel
BD
DVD
Falls Szenen auf der Disc in verschiedenen
Kamerawinkeln aufgezeichnet wurden, kann
der Kamerawinkel während der Wiedergabe
gewechselt werden.
1. Drücken Sie während der Wiedergabe die
Taste DISPLAY ( ), um das Bildschirmmenü
einzublenden.
2. Wählen Sie mit den Tasten
U
/
u
die Option
[Winkel].
3. Legen Sie mit den Tasten
I
/
i
den
gewünschten Blickwinkel fest.
4. Drücken Sie auf RETURN (
O
), um das
Bildschirmmenü zu verlassen.
Ändern des TV-Bildformats
BD
DVD
AVCHD
MOVIE
Das TV-Bildformat kann während der
Wiedergabe geändert werden.
1. Drücken Sie während der Wiedergabe die
Taste DISPLAY (
), um das Bildschirmmenü
einzublenden.
2. Wählen Sie mit den Tasten
U
/
u
die Option
[Bildformat].
3. Legen Sie mit den Tasten
I
/
i
das
gewünschte Bildformat fest.
4. Drücken Sie auf RETURN (
O
), um das
Bildschirmmenü zu verlassen.
HINWEIS
Beim Ändern der Einstellung [Bildformat] im
Bildschirmmenü wird die Einstellung [Bildformat]
im Menü [Setup] ebenfalls geändert.
Anzeigemodus einstellen
BD
DVD
AVCHD
MOVIE
Der [Bildmodus] kann während der
Wiedergabe geändert werden.
1. Drücken Sie während der Wiedergabe die
Taste DISPLAY (
), um das Bildschirmmenü
einzublenden.
2. Wählen Sie mit den Tasten
U
/
u
die Option
[Bildmodus].
3. Legen Sie mit den Tasten
I
/
i
das
gewünschte Bildformat fest.
4. Drücken Sie auf RETURN (
O
), um das
Bildschirmmenü zu verlassen.
Einstellen der Option [Benutzereinst.]
1. Drücken Sie während der Wiedergabe die
Taste DISPLAY (
), um das Bildschirmmenü
einzublenden.
2. Wählen Sie mit den Tasten
U
/
u
die Option
[Bildmodus].
3. Wählen Sie mit den Tasten
I
/
i
die Option
[Benutzereinst.] und drücken Sie ENTER (
).
4. Nehmen Sie mit den Tasten
U
/
u
/
I
/
i
die
Einstellungen für den [Bildmodus] vor.
Wählen Sie die Option [Standard]
und drücken Sie ENTER ( ), um die
Bildeinstellungen zurückzusetzen.
5. Wählen Sie mit den Tasten
U
/
u
/
I
/
i
den Eintrag [Schl.] und drücken Sie zum
Beenden der Einstellungen auf ENTER (
).
HB985-DB.BDEUPPK_GER.indd 47HB985-DB.BDEUPPK_GER.indd 47 2010-05-14 2:06:532010-05-14 2:06:53

48
Betrieb
Betrieb
4
BD-LIVE-Discs
anschauen
Mit diesem Gerät werden Funktionen wie
Bild-im-Bild, zweiter Tonkanal oder virtuelle
Pakete für BD-Videoinhalte ermöglicht, die
BONUSVIEW (BD-ROM Version 2 Pro l 1 Version
1.1/Final Standard Pro le) unterstützen.
Für Discs, die die Bild-im-Bild-Funktion
unterstützen, kann ein zweites Videobild
angezeigt und eine zweite Tonspur
wiedergegeben werden. Hinweise zu dieser
Wiedergabeart nden Sie in der Anleitung zur
jeweiligen Disc.
Neben der BONUSVIEW-Funktion unterstützen
BD-Videoinhalte zudem BD-LIVE-Inhalte (BD-
ROM Version 2 Pro l 2), mit deren Hilfe über
eine Netzwerkfunktion weitere Funktionen
genutzt werden können, wie z. B. das
Herunterladen neuer Filmvorschauen, indem
eine Internetverbindung hergestellt wird.
1. Überprüfen Sie die Netzwerkverbindung
und -einstellungen (Seiten 28-30).
2. Schließen Sie das USB-Speichergerät an den
USB-Anschluss auf dem Bedienungsfeld an.
Zum Herunterladen von Bonus-Material ist
ein USB-Speichergerät erforderlich.
USB-Anschluss
3 . Drücken Sie die Taste HOME MENU,
und nehmen Sie die Einstellungen für die
Option [BD-LIVE-Verbindung] im Menü
[Setup] vor (Seite 37).
Je nach eingelegter Disc ist die BD-LIVE-
Funktion u. U. nicht möglich, falls die
Option [BD-LIVE-Verbindung] auf [Teilweise
zulässig] eingestellt ist.
4 . Legen Sie eine BD-ROM-Disc mit BD-LIVE
ein.
Die Bedienung kann je nach Disc
variieren. Hinweise nden Sie in der
Bedienungsanleitung der Disc.
HINWEIS
• Das angeschlossene USB-Gerät darf nicht
während der Datenübertragung oder bei
eingelegter Blue-Ray-Disc getrennt werden.
Ansonsten könnte das angeschlossene USB-
Gerät beschädigt werden und die BD-LIVE-
Funktionen werden bei einem beschädigten
USB-Gerät u. U. nicht korrekt ausgeführt. Falls das
angeschlossene USB-Gerät aus diesem Grund
beschädigt zu sein scheint, kann das USB-Gerät
über einen PC neu formatiert und mit diesem
Player weiter genutzt werden.
• Der Zugri auf bestimmte BD-LIVE-Inhalte ist in
einigen Ländern u. U. eingeschränkt, je nach den
Richtlinien des Anbieters dieser Inhalte.
• Es dauert möglicherweise einige Minuten, bis
die BD-LIVE-Inhalte geladen und angezeigt
werden.
HB985-DB.BDEUPPK_GER.indd 48HB985-DB.BDEUPPK_GER.indd 48 2010-05-14 2:06:542010-05-14 2:06:54

49
Betrieb
4
Betrieb
Wiedergabe von
Filmdateien und VR-
Discs
Mit diesem Player können DVD-RW-Discs
im Video-Aufnahmeformat (VR) sowie
Filmdateien auf einer Disc/einem USB-Gerät
wiedergegeben werden.
1. Drücken Sie die Taste
HOME MENU.
2. Wählen Sie mit den Tasten
U
/
u
/
I
/
i
den
Eintrag [Spiel lm] und drücken Sie ENTER
( ).
3. Wählen Sie mit den Tasten
I
/
i
das Gerät
aus und drücken Sie ENTER ( ).
Beim Anschluss von bis zu zwei Geräten
erscheint diese Anzeige.
4. Wählen Sie mit den Tasten
U
/
u
/
I
/
i
eine
Datei aus und drücken Sie zur Wiedergabe
auf
B
PLAY bzw. auf ENTER (
).
HINWEIS
• Die Dateianforderungen nden Sie auf Seite 11.
• Es sind verschiedene Wiedergabefunktionen
möglich. Siehe Seiten 40-47.
• Nicht nalisierte DVD-VR-Discs werden auf
diesem Player u. U. nicht wiedergegeben.
• Bestimmte DVD-VR-Discs enthalten CPRM-Daten
des DVD-REKORDERS. Solche Discs können auf
diesem Gerät nicht abgespielt werden.
Was bedeutet CPRM?
CPRM ist ein Kopierschutzsystem (mit
Verschlüsselung), bei dem nur ‘einmalig
kopierbare’ Sendungen aufgenommen werden
können. CPRM steht für Content Protection for
Recordable Media.
HB985-DB.BDEUPPK_GER.indd 49HB985-DB.BDEUPPK_GER.indd 49 2010-05-14 2:06:542010-05-14 2:06:54

50
Betrieb
Betrieb
4
Auswahl der Untertiteldatei
MOVIE
Wenn Filmdatei und Untertiteldatei
den gleichen Namen besitzen, wird die
Untertiteldatei bei der Wiedergabe der
Filmdatei automatisch angezeigt.
Falls Filmdatei und Untertiteldatei
unterschiedliche Dateinamen besitzen, muss
die Untertiteldatei vor der Wiedergabe des
Films im Menü [Spiel lm] ausgewählt werden.
1. Wechseln Sie mit den Tasten
U
/
u
/
I
/
i
im
Menü [Film] eine Untertiteldatei zur Anzeige
aus.
2. Drücken Sie auf ENTER (
).
Drücken Sie zur Auswahl einer
Untertiteldatei nochmals auf ENTER ( ).
Die gewählte Untertiteldatei wird während
der Wiedergabe der Filmdatei angezeigt.
HINWEIS
• Drücken Sie während der Wiedergabe auf
x
STOP, um die Auswahl der Untertiteldatei
aufzuheben.
• Diese Funktion ist für [Home Link] nicht
verfügbar.
Zeichensatz für Untertitel
ändern
MOVIE
Falls die Untertitel nicht korrekt angezeigt
werden, kann der Zeichensatz der Untertitel
geändert werden.
1. Drücken Sie während der Wiedergabe die
Taste DISPLAY (
), um das Bildschirmmenü
einzublenden.
2. Wählen Sie mit den Tasten
U
/
u
die Option
[Codeliste].
3. Legen Sie mit den Tasten
I
/
i
den
gewünschten Zeichensatz fest.
4. Drücken Sie auf RETURN (
O
), um das
Bildschirmmenü zu verlassen.
HB985-DB.BDEUPPK_GER.indd 50HB985-DB.BDEUPPK_GER.indd 50 2010-05-14 2:06:542010-05-14 2:06:54

51
Betrieb
4
Betrieb
Bilddateien anzeigen
Mit diesem Player können Fotodateien
angezeigt werden.
1. Drücken Sie die Taste
HOME MENU
2. Wählen Sie mit den Tasten
I
/
i
den Eintrag
[Foto] und drücken Sie ENTER ( ).
3. Wählen Sie mit den Tasten
I
/
i
das Gerät
aus und drücken Sie ENTER ( ).
Beim Anschluss von bis zu zwei Geräten
erscheint diese Anzeige.
4. Wählen Sie mit den Tasten
U
/
u
/
I
/
i
eine
Datei aus und drücken Sie zur Fotoanzeige
auf ENTER (
).
Diashow anzeigen
Drücken Sie zum Starten der Diashow auf
B
PLAY.
Diashow beenden
Drücken Sie während der Diashow auf
x
STOP.
Diashow unterbrechen
Drücken Sie während der Diashow auf
X
PAUSE/STEP.
Drücken Sie zum Fortsetzen der Diashow auf
B
PLAY.
Zum vorherigen/nächsten Foto
springen
Drücken Sie während der Vollbildanzeige eines
Fotos auf
I
bzw.
i
, um zum vorherigen bzw.
nächsten Foto zu gelangen.
HINWEIS
• Die Dateianforderungen nden Sie auf Seite 11.
• Es sind verschiedene Wiedergabefunktionen
möglich. Siehe Seiten 40-47.
HB985-DB.BDEUPPK_GER.indd 51HB985-DB.BDEUPPK_GER.indd 51 2010-05-14 2:06:542010-05-14 2:06:54

52
Betrieb
Betrieb
4
Funktionen während der
Fotoanzeige
Während der Fotoanzeige im Vollbild stehen
Ihnen verschiedene Funktionen zur Verfügung.
1. Drücken Sie während der Vollbildanzeige
eines Fotos auf DISPLAY (
), um das
Einstellungsmenü aufzurufen.
2. Wählen Sie mit den Tasten
U
/
u
eine
Einstellung aus.
a
g
f
e
d
c
b
h
a
Aktuelles Foto/Gesamtanzahl der Fotos
– Wechseln Sie mit den Tasten
I
/
i
zum
vorherigen/nächsten Foto.
b
Diashow – Drücken Sie zum Starten oder
Anhalten der Diashow die Taste ENTER
(
).
c
Musikauswahl – Wählen Sie eine
Hintergrundmusik für die Diashow aus.
d
Musik –Drücken Sie zum Starten oder
Beenden der Hintergrundmusik auf ENTER
(
).
e
Drehen – Drücken Sie zum Drehen eines
Fotos im Uhrzeigersinn auf ENTER (
).
f
Zoom – Drücken Sie zum Aufrufen des
Menüs [Zoom] auf ENTER( ).
g
E ekt – Wählen Sie mit den Tasten
I
/
i
einen Überblendungse ekt zwischen den
einzelnen Fotos während einer Diashow.
h
Geschwindigkeit – Wählen Sie mit den
Tasten
I
/
i
die Verzögerung zwischen den
einzelnen Fotos während einer Diashow.
3. Drücken Sie auf RETURN (
O
) um das
Einstellungsmenü zu verlassen.
Während der Diaschau Musik
hören
Während der Fotoanzeige können Musiktitel
wiedergegeben werden.
1. Drücken Sie die Taste
HOME MENU
2. Wählen Sie mit den Tasten
U
/
u
/
I
/
i
,
die Option [Foto] oder [Home Link] und
drücken Sie ENTER ( ).
3. Wählen Sie mit den Tasten
I
/
i
den Eintrag
[Disc] oder [USB] und drücken Sie ENTER ( ).
Zur Anzeige des Menüs [Home Link] muss
ein Server oder ein freigegebener Ordner
ausgewählt werden.
4. Wählen Sie mit den Tasten
U
/
u
/
I
/
i
, eine
Dat
ei aus und drücken Sie zur Fotoanzeige
auf ENTER ( ).
5. Drücken Sie die Taste DISPLAY (
) um das
Einstellungsmenü aufzurufen.
6. Wählen Sie mit den Tasten
U
/
u
den Eintrag
[Musik
auswahl] und drücken Sie ENTER ( )
um das Menü [Musikauswahl] aufzurufen.
HB985-DB.BDEUPPK_GER.indd 52HB985-DB.BDEUPPK_GER.indd 52 2010-05-14 2:06:552010-05-14 2:06:55

53
Betrieb
4
Betrieb
7. Wählen Sie mit den Tasten
U
/
u
ein Gerät
aus und drücken Sie ENTER ( ).
Das auswählbare Gerät ist vom Speicherort
der Fotodatei zur Vollbildanzeige abhängig.
Speicherort des
Fotos
Verfügbares Gerät
Disc Disc, USB
USB Disc, USB
Freigegebene
Ordner auf dem
PC (CIFS)
CIFS
DLNA-Server DLNA-Server
8. Wählen Sie mit den Tasten
U
/
u
eine Dat
ei
oder einen Ordner zur Wiedergabe aus.
Wählen Sie einen Ordner und drücken
Sie ENTER ( ), um zum untergeordneten
Verzeichnis zu gelangen.
Markieren Sie das Symbol
und drücken
Sie ENTER (
), um zum übergeordneten
Verzeichnis zu gelangen.
HINWEIS
Bei der Musikauswahl unter [Home Link] werden
keine Ordner angezeigt. Unter [Home Link] können
ausschließlich Dateien ausgewählt werden.
9. Wählen Sie zur Auswahl der Musiktitel mit
den Tasten
i
den Eintrag [OK] und drücken
Sie ENTER ( ).
Musik hören
Mit dem Player können Audio-CDs und
Musikdateien wiedergegeben werden.
1. Drücken Sie die Taste
HOME MENU
2. Wählen Sie mit den Tasten
U
/
u
/
I
/
i
den
Eintrag [Musik] und drücken Sie ENTER ( ).
3. Wählen Sie mit den Tasten
I
/
i
das Gerät
aus und drücken Sie ENTER ( ).
Beim Anschluss von bis zu zwei Geräten
erscheint diese Anzeige.
4. Wählen Sie mit den Tasten
U
/
u
/
I
/
i
eine
Musikdatei oder einen Audiotrack aus und
drücken Sie zur Wiedergabe auf ENTER (
).
HINWEIS
• Die Dateianforderungen nden Sie auf Seite 11.
• Es sind verschiedene Wiedergabefunktionen
möglich. Siehe Seiten 40-47.
HB985-DB.BDEUPPK_GER.indd 53HB985-DB.BDEUPPK_GER.indd 53 2010-05-14 2:06:552010-05-14 2:06:55

54
Betrieb
Betrieb
4
Audio-CD kopieren
Auf einem USB-Speichergerät können einer
oder alle Titel einer Audio-CD aufgenommen
werden.
1. Schließen Sie das USB-Speichergerät an den
USB-Anschluss auf dem Bedienungsfeld an.
2. Drücken Sie die Taste
Z
(OPEN/CLOSE) und
legen Sie eine Audio-CD in das Disc-Fach.
Drücken Sie auf
Z
(OPEN/CLOSE), um das
Disc-Fach zu schließen. Die Wiedergabe
wird automatisch gestartet.
3. Drücken Sie die Taste DISPLAY (
), um das
Einstellungsmenü aufzurufen.
Oder
Drücken Sie die Taste
z
USB REC auf der
Fernbedienung. Es können alle Musiktitel
einer Audio-CD aufgenommen werden.
4. Wählen Sie mit den Tasten
U
/
u
die Funktion
[CD-Aufn.] und drücken Sie ENTER (
), um
das Menü [CD-Aufn.] aufzurufen.
Wiederholen Sie diesen Schritt zur Auswahl
weiterer Titel.
5. Wählen Sie mit den Tasten
U
/
u
im Menü
einen Track zum Kopieren aus und drücken
Sie ENTER (
).
Wiederholen Sie diesen Schritt zur Auswahl
weiterer Titel.
Alle Titel auf einer Audio-CD
auswählen.
Wählen Sie im Popup-Menü eine
Encoding-Option (128 Kbps, 192
Kbps, 320 Kbps oder Verlustfrei).
Aufnahme abbrechen und
zum vorherigen Bildschirm
zurückkehren.
6. Wählen Sie mit den Tasten
U
/
u
/
I
/
i
die
Option [Start] und drücken Sie ENTER (
).
7. Wählen Sie mit den Tasten
U
/
u
/
I
/
i
einen
Zielordner zum Kopieren aus.
Um einen neuen Ordner zu erstellen,
wählen Sie mit den Tasten
U
/
u
/
I
/
i
den
Eintrag [Neuer Ordner] und drücken Sie
ENTER ( ).
Geben Sie über die virtuelle Tastatur einen
Ordnernamen ein, markieren Sie die Option
[OK] und drücken Sie ENTER ( ).
8. Markieren Sie mit den Tasten
U
/
u
/
I
/
i
die
Option [OK] und drücken Sie ENTER (
),
um die Audio-CD zu kopieren.
Um den Kopiervorgang einer Audio-CD
abzubrechen, markieren Sie die Option
[Abbrechen] und drücken Sie ENTER ( ).
9. Bei Abschluss des Kopiervorgangs
der Audio-CD wird eine Mitteilung
eingeblendet. Drücken Sie auf ENTER
(
), um die im Zielordner erstellte
Musikdatei anzuzeigen.
HB985-DB.BDEUPPK_GER.indd 54HB985-DB.BDEUPPK_GER.indd 54 2010-05-14 2:06:562010-05-14 2:06:56

55
Betrieb
4
Betrieb
HINWEIS
• In der folgenden Tabelle nden Sie die
durchschnittlichen Aufnahmedauer am
Beispiel einer Musikdatei mit vier Minuten
Wiedergabedauer bei 192 kbps.
Stop-Modus Während der
Wiedergabe
1,4 Min. 2 min.
• Bei den angegebenen Zeiten handelt es sich um
Näherungswerte.
• Die tatsächliche Kopierdauer für ein USB-
Speichergerät kann je nach den Merkmalen des
USB-Speichergerätes variieren.
• Zur Aufnahme auf einem USB-Speichergerät
sind mindestens 50 MB freier Speicher
erforderlich.
• Für eine korrekte Aufnahme sollte ein Musiktitel
mindestens 20 Sekunden lang sein.
• Während des Kopiervorgangs einer Audio-
CD darf der Player nicht ausgeschaltet und
das angeschlossene USB-Speichergerät nicht
getrennt werden.
Die unerlaubte Vervielfältigung kopiergeschützter
Inhalte, einschließlich Computerprogramme,
Dateien, Sendungen und Tonaufnahmen, stellt
eine Verletzung des Urheberrechts dar und wird
strafrechtlich verfolgt.
Dieses Gerät sollte nicht für solche Zwecke
eingesetzt werden.
Zeigen Sie Verantwortung
Beachten Sie das Urheberrecht
HB985-DB.BDEUPPK_GER.indd 55HB985-DB.BDEUPPK_GER.indd 55 2010-05-14 2:06:562010-05-14 2:06:56

56
Betrieb
Betrieb
4
Wiedergabe von
einem iPod
Sie können die Musik auf Ihrem iPod
wiedergeben. Weitere Hinweise nden Sie in
der Bedienungsanleitung des iPod.
Vorbereitung
• Videos und Fotos eines iPod auf dem
Bildschirm anzeigen.
- Der Videoanschluss sollte über die VIDEO
OUT-Buchse auf der Rückseite dieses
Gerätes erfolgen. Einen geeigneten
Videoeingangsmodus für den Fernseher
wählen.
- Wählen Sie je nach iPod-Modell das Menü
Videos > Video-Einstellungen und stellen
Sie die Option TV-Ausgang am iPod auf
Fragen oder Ein ein.
Weitere Hinweise zu Video-Einstellungen
nden Sie in der Bedienungsanleitung des
iPod.
-
Fotos können nur im iPod-Eingangsmodus
und nur als Diashow angezeigt werden. Zur
Anzeige der Fotos auf dem Fernseher muss
die Diashow auf dem iPod gestartet werden.
Weitere Hinweise zu Diashows nden Sie in
der Bedienungsanleitung des iPod.
• Schalten Sie dieses Gerät vor dem Anschluss
des iPod und stellen Sie die Lautstärke auf
ein Minimum ein.
1. Schließen Sie den iPod fest an.
Schließen Sie den iPod an
Schließen Sie das Dock
an und stellen Sie den
iPod darauf.
2. Wählen Sie mit den Tasten
U
/
u
/
I
/
i
, eine
Datei aus und drücken Sie zur Wiedergabe
auf ENTER (
).
iPod-Inhalte auf dem
Bildschirm anzeigen
1. Schließen Sie den iPod fest an.
2. Drücken Sie die Taste HOME MENU (
).
3. Wählen Sie mit den Tasten
I
/
i
die Option
[Musik] oder [Spiel
lm] und drücken Sie
ENTER (
).
Wählen Sie bei Anschluss eines anderen
Gerätes (CD oder USB) im Menü den Eintrag
iPod.
4. Wählen Sie mit den Tasten
U
/
u
/
I
/
i
einen
Inhalt und drücken Sie ENTER (
).
HB985-DB.BDEUPPK_GER.indd 56HB985-DB.BDEUPPK_GER.indd 56 2010-05-14 2:06:562010-05-14 2:06:56

57
Betrieb
4
Betrieb
Bedienung des iPod im iPod-
Modus
Ihr iPod lässt sich über die mitgelieferte
Fernbedienung sowie über die Tasten am iPod
bedienen.
1. Schließen Sie den iPod fest an.
Beim Einschalten dieses Gerätes wird der
iPod automatisch mit eingeschaltet und
aufgeladen.
2. Wählen Sie mit der Taste INPUT/TUNER den
iPod-Eingangsmodus.
U
/
u
/
I
/
i
Auswahl einer Option in einem
Menü.
B
/
ENTER
Musik- oder Videowiedergabe
starten.
X
Wiedergabe unterbrechen.
Drücken Sie zum Fortsetzen
der Wiedergabe nochmals auf
B
(PLAY).
m
/
M
Schneller Vor- oder Rücklauf
eines Titels oder Videos.
.
/
>
Titel vor oder zurück
überspringen.
REPEAT Auswahl eines gewünschten
Wiederholungsmodus: Track
(
), Alle ( ), Aus (Keine
Anzeige).
HINWEIS
Dieses System ist mit dem Ton und dem Bild eines
iPod (4. Generation), iPod nano, iPod classic, iPod
mini, iPod touch und iPhone kompatibel.
(iPod shu e wird nicht unterstützt).
HINWEIS
• Die Fehlermeldung “IPOD PRÜFEN” oder
“Angeschlossenes iPod-Modell wird nicht
unterstützt.” wird angezeigt, wenn:
-
Ihr iPod eine bestimmte Funktion nicht unterstützt.
• Die Fehlermeldung “IPOD PRÜFEN” oder “Bitte
Software des iPod aktualisieren.” wird angezeigt,
wenn:
- Ihr iPod eine ältere Software-Version besitzt.
t
Aktualisieren Sie die Software des iPod auf
die neueste Version.
• Falls dieses Gerät eine Fehlermeldung
anzeigt, befolgen Sie die Anweisungen. Die
Fehlermeldung “IPOD PRÜFEN” oder “Bitte iPod
prüfen.” wird angezeigt, wenn:
- Keine Verbindung zwischen diesem Gerät und
dem iPod hergestellt werden konnte.
t
Nehmen Sie den iPod vom Dock dieses
Gerätes und setzen Sie es wieder ein.
- Ihr iPod nicht fest angeschlossen ist.
- Ihr iPod von diesem Gerät als unbekanntes
Gerät erkannt wurde.
- Ihr iPod kaum aufgeladen ist.
t
Die Batterie muss aufgeladen werden.
t
Das Au aden einer sehr erschöpften
Batterie des iPod dauert u. U. etwas länger.
• Für eine höhere Stabilität des iPod können Sie den
üblicherweise mit dem iPod gelieferten Dock-
Adapter verwenden. Falls Sie keinen Adapter
besitzen, wenden Sie sich an Ihren iPod-Händler.
• Die Kompatibilität mit Ihrem iPod richtet sich
nach dem jeweiligen Modell.
• Die Bedienung von iPod touch und iPhone
unterscheidet sich von der Bedienung
eines iPod. Zur Bedienung mit diesem Gerät
benötigen Sie u. U. eine zusätzliche Steuerung.
(z. B. “Slide to Unlock”)
• Bei Verwendung eines Anwendungsprogramms,
bei einem Anruf oder beim Senden und
Empfangen von SMS-Nachrichten usw. bei
einem iPod touch oder iPhone, trennen Sie
zuvor den iPod vom iPod Dock dieses Gerätes.
• Je nach Software-Version des iPod kann der iPod
nicht über dieses Gerät bedient werden. Wir
empfehlen die Aktualisierung auf die aktuelle
Software-Version.
• Die Bildqualität ist abhängig von den
Videoquellen des iPod.
• Falls Sie ein Problem mit Ihrem iPod haben,
besuchen Sie die Webseite
www.apple.com/de/support/ipod/.
HB985-DB.BDEUPPK_GER.indd 57HB985-DB.BDEUPPK_GER.indd 57 2010-05-14 2:06:562010-05-14 2:06:56

58
Betrieb
Betrieb
4
Radiobetrieb
Die Antenne muss angeschlossen sein.
(Siehe Seite 24.)
Radio hören
1. Drücken Sie die Taste INPUT/TUNER, bis
die Anzeige Tuner (FM) im Anzeigefenster
erscheint. Der zuletzt empfangene Sender
wird eingestellt.
2. Halten Sie die Taste TUNE (-/+) ca.
zwei Sekunden lang gedrückt, bis die
Frequenzanzeige beginnt zu laufen,
und lassen Sie die Taste dann los.
Die Sendersuche stoppt, sobald ein
Radiosender empfangen wird. Oder
Drücken Sie mehrmals auf TUNE (-/+).
3. Stellen Sie über den Lautstärkeregler
VOLUME auf dem Bedienungsfeld oder über
die Tasten VOL (+/-) auf der Fernbedienung
die Lautstärke ein.
Speichern von Radiosendern
Es können 50 UKW-Sender gespeichert werden.
Vor der Sendersuche sollte die Lautstärke
verringert werden.
1. Drücken Sie die Taste INPUT/TUNER, bis
die Anzeige TUNER (FM) im Anzeigefenster
erscheint.
2. Stellen Sie mit den Tasten TUNE (-/+) die
gewünschte Frequenz ein.
3. Drücken Sie die Taste ENTER (
), bis eine
Speicherplatznummer im Anzeigefenster
blinkt.
4. Wählen Sie mit den Tasten PRESET die
gewünschte Speicherplatznummer.
5. Drücken Sie ENTER (
). Der Radiosender
wird gespeichert.
6. Wiederholen Sie die Schritte 2 bis 5, um
weitere Sender zu speichern.
Alle gespeicherten Sender
löschen
Halten Sie die Taste CLEAR zwei Sekunden lang
gedrückt. Daraufhin erscheint die Meldung
“ALLE LÖSCHEN”. Daraufhin werden alle
gespeicherten Sender gelöscht.
Schlechten UKW-Empfang
verbessern
Drücken Sie blaue Taste D (MONO/STEREO) auf
der Fernbedienung. Ändern der Einstellung
von Stereo nach Mono zur Verbesserung des
Empfangs.
Siehe die Hinweise über
Radiosender
Der UKW-Tuner ist mit der RDS-Funktion (Radio
Data System) ausgestattet. Hierbei werden
Information über den gerade eingestellten
Radiosender angezeigt. Drücken Sie mehrmals
die Taste RDS, um die verschiedenen
Datentypen zu durchlaufen:
PS (Name des Programmdienstes)
Der Name des Kanals erscheint in
der Anzeige.
PTY (Programmarterkennung)
Die Programmart (z. B. Jazz oder
Nachrichten) erscheint in der
Anzeige.
RT (Radiotext)
Textmeldungen mit
Sonderinformationen des Senders.
Der Text läuft u. U. über die
Anzeige.
CT
(Vom Sender ausgestrahlte Uhrzeit)
Anzeige des vom Sender
ausgestrahlten Datums und der
Uhrzeit.
HB985-DB.BDEUPPK_GER.indd 58HB985-DB.BDEUPPK_GER.indd 58 2010-05-14 2:06:562010-05-14 2:06:56

59
Betrieb
4
Betrieb
Wiedergabe über das
Heimnetzwerk
Mit diesem Player können bei bestehender
Heimnetzwerkverbindung auf einem
PC oder auf DLNA-zerti zierten Medien-
Servern gespeicherte Inhalte angezeigt und
wiedergegeben werden.
Über DLNA
Dieser Player ist ein DLNA-zerti zierter digitaler
Medien-Player, mit dem Film-, Foto- und
Musikinhalte über einen DLNA-kompatiblen
digitalen Medien-Server (PC und
Unterhaltungselektronik) angezeigt und
wiedergegeben werden können.
Bei der Digital Living Network Alliance
(DLNA) handelt es sich um eine
branchenübergreifende Organisation
für Unterhaltungselektronik, die
Computerbranche und Unternehmen für
tragbare Geräte. Digital Living ermöglicht
dem Verbraucher die einfache gemeinsame
Nutzung digitaler Medien über ein Netzwerk
zu Hause.
Das Logo der DLNA-Zerti zierung
kennzeichnet alle Produkte, die dem DLNA
Interoperability Guidelines entsprechen.
Dieses Gerät erfüllt die DLNA Interoperability
Guidelines v1.5.
Bei der Verbindung eines PCs mit DLNA-
Server-Software oder einen anderen DLNA-
kompatiblen Gerätes mit diesem Player
müssen u. U. einige Einstellungen der Software
oder anderer Geräte vorgenommen werden.
Weitere Information nden Sie in der
Bedienungsanleitung der jeweiligen Software
bzw. des Gerätes.
Zugri auf den DLNA-Medien-
Server
1. Überprüfen Sie die Netzwerkverbindung
und -einstellungen (Seiten 28-30).
2. Drücken Sie die Taste
HOME MENU.
3. Wählen Sie mit den Tasten
U
/
u
/
I
/
i
, den
Eintrag [Home Link] und drücken Sie ENTER
(
).
4. Wählen Sie mit den Tasten
U
/
u
einen
DLNA-Medien-Server aus der Liste und
drücken Sie ENTER ( ).
Um die Suche nach verfügbaren Medien-
Servern zu wiederholen, drücken Sie die
grüne Taste (B).
HINWEIS
Abhängig vom jeweiligen Medien-Server benötigt
dieser Player u. U. eine Genehmigung des Servers.
5. Wählen Sie mit den Tasten
U
/
u
/
I
/
i
eine
Datei aus und drücken Sie zur Wiedergabe
auf ENTER ( ).
HB985-DB.BDEUPPK_GER.indd 59HB985-DB.BDEUPPK_GER.indd 59 2010-05-14 2:06:562010-05-14 2:06:56

60
Betrieb
Betrieb
4
HINWEIS
• Die Dateianforderungen nden Sie auf Seite 11.
• Es sind verschiedene Wiedergabefunktionen
möglich. Siehe Seiten 40-47.
• Die auf Seite 11 angegebenen
Dat
eianforderungen sind u. U. nicht immer
kompatibel. Je nach den Dateimerkmalen
und Fähigkeiten des Medien-Servers gelten
möglicherweise verschiedene Einschränkungen.
• Die Miniaturansicht nicht abspielbarer Dateien
wird zwar im Menü [Home Link] angezeigt, diese
Dateien können jedoch nicht auf diesem Player
wiedergegeben werden.
• Der Player überspringt nicht abspielbare
Musik
dateien im Menü [Home Link] und spielt
die nächste Datei.
• Untertiteldatei und Filmdatei müssen den
gleichen Namen besitzen und müssen sich im
selben Ordner be nden.
• Die Qualität der Wiedergabe und Bedienung
der [Home Link]-Funktion kann durch
die Bedingungen des Heimnetzwerkes
beeinträchtigt werden.
• Dateien auf einem Wechseldatenträger wie
einem USB- oder DVD-Laufwerk am Medien-
Server werden u. U. nicht korrekt freigegeben.
Zugri auf einen freigegebenen
Ordner auf dem PC
1. Starten Sie den mit dem lokalen Netzwerk
verbundenen PC.
2. Geben Sie auf dem PC die Ordner mit
Filmen, Fotos oder Musikdateien frei.
3. Überprüfen Sie die Netzwerkverbindung
und -einstellungen (Seiten 28-30).
4. Drücken Sie die Taste
HOME MENU.
5. Wählen Sie mit den Tasten
U
/
u
/
I
/
i
den
Eintrag [Home Link] und drücken Sie ENTER
(
).
6. Wählen Sie mit den Tasten
U
/
u
einen
freigegebenen Ordner und drücken Sie
ENTER (
).
Um die Suche nach verfügbaren Medien-
Servern zu wiederholen, drücken Sie die
grüne Taste (B).
HINWEIS
Je nach Kon guration müssen für den Zugri
auf einen freigegebenen Ordner u. U. die
Benutzerkennung und das Kennwort für den
Netzwerkzugri angegeben werden.
7. Wählen Sie mit den Tasten
U
/
u
/
I
/
i
eine
Datei aus und drücken Sie zur Wiedergabe
auf ENTER ( ).
HB985-DB.BDEUPPK_GER.indd 60HB985-DB.BDEUPPK_GER.indd 60 2010-05-14 2:06:562010-05-14 2:06:56

61
Betrieb
4
Betrieb
HINWEIS
• Die Dateianforderungen nden Sie auf Seite 11.
• Es sind verschiedene Wiedergabefunktionen
möglich. Siehe Seiten 40-47.
• Die Miniaturansicht nicht abspielbarer Dateien
wird zwar im Menü [Home Link] angezeigt, diese
Dateien können jedoch nicht auf diesem Player
wiedergegeben werden.
• Der Player überspringt nicht abspielbare
Musikdateien im Menü [Home Link] und spielt
die nächste Datei.
• Untertiteldatei und Filmdatei müssen den
gleichen Namen besitzen und müssen sich im
selben Ordner be nden.
• Die Qualität der Wiedergabe und Bedienung
der [Home Link]-Funktion kann durch
die Bedingungen des Heimnetzwerkes
beeinträchtigt werden.
• Dateien auf einem Wechseldatenträger wie
einem am PC angeschlossenen USB- oder DVD-
Laufwerk werden u. U. nicht korrekt freigegeben.
• Je nach Kon guration des PCs können
Verbindungsprobleme auftreten.
Systemvoraussetzungen
• Windows® XP (Service-Pack 2 oder
höher), Windows Vista® (kein Service-Pack
erforderlich)
Windows 7®
• 1,2 GHz Intel® Pentium® III- oder AMD
Sempron™ 2200+-Prozessor
• Netzwerkumgebung: 100 MB Ethernet,
WLAN (IEEE 802.11b/g/n)
HINWEIS
Falls Sie das Betriebssystem Windows® XP oder
Windows Vista® verwenden, rufen Sie den
folgenden Link auf, um weitere Information zur
Dateifreigabe zu erhalten.
HB985-DB.BDEUPPK_GER.indd 61HB985-DB.BDEUPPK_GER.indd 61 2010-05-14 2:06:572010-05-14 2:06:57

62
Betrieb
Betrieb
4
Geben Sie die Benutzerkennung und
das Kennwort für das Netzwerk ein.
Je nach Kon guration des PCs müssen für den
Zugri auf einen freigegebenen Ordner u. U.
die Benutzerkennung und das Kennwort für
den Netzwerkzugri angegeben werden.
1. Falls eine Benutzerkennung und das
Kennwort für den Netzwerkzugri
eingegeben werden müssen, wird das
Tastaturmenü automatisch eingeblendet.
2. Wählen Sie mit den Tasten
U
/
u
/
I
/
i
das
erste Zeichen auf der Tastatur aus und
drücken Sie auf ENTER. (
).
Um einen Buchstaben mit Akzent
einzugeben, wählen Sie den gewünschten
Buchstaben aus den Sonderzeichen aus.
Beispiel: Wählen Sie den Buchstaben “D”
und drücken Sie die Taste DISPLAY ( ), um
die Sonderzeichen anzuzeigen. Wählen Sie
nun mit den Tasten
I
/
i
den Buchstaben “D”
oder “Ď” und drücken Sie ENTER (
).
[Löschen] – Alles eingegebenen Zeichen
löschen.
[Leer] – Fügt ein Leerzeichen ein.
[<–] – Löscht das vorangehende Zeichen.
[ABC / abc / #+-=&] – Tastatureinstellung
nach Groß- oder Kleinbuchstaben oder
Symbolen ändern.
3. Markieren Sie nach der Eingabe der
Netzwerk-Benutzerkennung und des
Kennworts mit den Tasten
U
/
u
/
I
/
i
die
Option [OK] und drücken Sie ENTER (
),
um den Ordner zu ö nen.
Die Netzwerk-Benutzerkennung und das
Kennwort werden nach dem ersten Zugri
auf den Ordner gespeichert. Falls Netzwerk-
Benutzerkennung und Kennwort nicht
gespeichert werden sollen, drücken Sie die
rote Taste (A) und heben Sie die Markierung
im Kontrollkästchen [Merken] vor dem
Zugri auf den Ordner auf.
HB985-DB.BDEUPPK_GER.indd 62HB985-DB.BDEUPPK_GER.indd 62 2010-05-14 2:06:572010-05-14 2:06:57

63
Wartung
5
Wartung
Hinweise zu Discs
Handhabung von Discs
Bringen Sie auf keiner der beiden Seiten der
Disc Papier oder Aufkleber an.
Aufbewahrung von Discs
Legen Sie die Disc nach der Wiedergabe
wieder in die zugehörige Hülle. Setzen Sie
die Disc keiner direkten Sonneneinstrahlung
oder Wärmequellen aus und lassen Sie sie nie
in einem Auto liegen, das direkt in der Sonne
geparkt wird.
Reinigung von Discs
Verwenden Sie keine starken Lösungsmittel
wie Alkohol, Benzin, Verdünner, handelsübliche
Reiniger oder für Schallplatten vorgesehene
Antistatik-Sprays.
Handhabung des
Gerätes
Transport und Versand des Gerätes
Bewahren Sie den Original-Versandkarton und
das Verpackungsmaterial auf. Wenn Sie das
Gerät einsenden müssen, verpacken Sie es
wieder so, wie es ab Werk geliefert wurde, um
es optimal zu schützen.
Außenseiten sauber halten
• Verwenden Sie keine üchtigen
Flüssigkeiten wie Insektensprays in der
Nähe des Gerätes.
• Durch zu starken Druck beim Abwischen
können die Ober ächen beschädigt werden.
• Gummi- oder Plastikteile sollten nicht über
einen längeren Zeitraum mit dem Gerät in
Kontakt sein.
Reinigung des Gerätes
Reinigen Sie den Player mit einem weichen,
trockenen Tuch. Wenn die Ober äche stark
verschmutzt ist, verwenden Sie ein mit einer
milden Putzmittellösung angefeuchtetes
weiches Tuch. Verwenden Sie keine starken
Lösungsmittel wie Alkohol, Benzin oder
Verdünner, da sie die Ober äche des Gerätes
angreifen können.
P ege des Gerätes
Bei diesem Gerät handelt es sich um ein
High-Tech-Präzisionsgerät. Die Bildqualität
verschlechtert sich, wenn die Linse und
Teile des Disc-Laufwerks verschmutzt bzw.
abgenutzt sind. Detaillierte Hinweise erhalten
Sie bei Ihrem Kundendienst-Center.
5
Wartung
HB985-DB.BDEUPPK_GER.indd 63HB985-DB.BDEUPPK_GER.indd 63 2010-05-14 2:06:572010-05-14 2:06:57

64
Störungsbehebung
Störungsbehebung
6
6
Störungsbehebung
Allgemein
Das Gerät lässt sich nicht
einschalten.
• Schließen Sie das Netzkabel an eine Steckdose an.
Das Gerät startet die
Wiedergabe nicht.
• Eine spielbare Disc einlegen. (Disc-Typ, Farbnorm und
Ländercode überprüfen.)
• Disc mit der Wiedergabeseite nach unten einlegen.
• Disc richtig in die Mulde im Disc-Fach einlegen.
• Die Disc reinigen.
• Einstufung aufheben oder Freigabestufe ändern.
Der Kamerawinkel kann
nicht geändert werden.
• Die wiedergegebene DVD Video-Disc enthält keine weiteren
Kamerawinkel.
Die Untertitelsprache lässt
sich nicht ändern oder wird
nicht angezeigt.
• Die wiedergegebene Video-DVD enthält keine Untertitel.
MP3-/WMA-/JPEG-/DivX-
Dateien lassen sich nicht
wiedergeben.
• Die Dateien wurden in einem vom Gerät nicht unterstützten
Format erstellt.
• Der Codec der Filmdatei wird nicht unterstützt.
Die BD-LIVE-Funktion ist
nicht möglich.
• Die Fernbedienung ist nicht auf den Fernbedienungs-Sensor
des Gerätes gerichtet.
• Die Fernbedienung ist zu weit vom Gerät entfernt.
• Zwischen Fernbedienung und Gerät be ndet sich ein
Hindernis.
• Die Batterien der Fernbedienung sind schwach.
HB985-DB.BDEUPPK_GER.indd 64HB985-DB.BDEUPPK_GER.indd 64 2010-05-14 2:06:572010-05-14 2:06:57

65
Störungsbehebung
6
Störungsbehebung
Bild
Kein Bild. • Wählen Sie den richtigen Video-Eingangsmodus des
Fernsehers, so dass das Bild des Gerätes angezeigt wird.
• Videokabel fest anschließen.
• Überprüfen Sie, ob für die Option [HDMI-Farbeinst.] im Menü
[Setup] eine geeignete Einstellung vorgenommen wurde, die
dem Videoanschluss entspricht.
• Falls Ihr Fernsehgerät die am Player eingestellte Au ösung
nicht unterstützt, wählen Sie eine vom Fernsehgerät
unterstützte Au ösung.
• An der HDMI OUT-Buchse des Players ist ein DVI-Gerät
angeschlossen, dass den Kopierschutz nicht unterstützt.
Verzerrtes Bild. • Die wiedergegebene Disc wurde in einer Farbnorm
aufgenommen, die das Fernsehgerät nicht unterstützt.
• Wählen Sie eine vom Fernseher unterstützte Au ösung.
Ton
Kein oder verzerrter Ton. • Das Gerät führt gerade einen Suchlauf oder eine Wiedergabe
in Zeitlupe durch oder be ndet sich im Pause-Modus.
• Die Lautstärke ist zu gering.
• Überprüfen Sie die Lautsprecheranschlüsse. (Seite 16)
HB985-DB.BDEUPPK_GER.indd 65HB985-DB.BDEUPPK_GER.indd 65 2010-05-14 2:06:572010-05-14 2:06:57

66
Störungsbehebung
Störungsbehebung
6
Netzwerk
Die BD-LIVE-Funktion ist
nicht möglich.
• Auf dem angeschlossenen USB-Speichergerät ist nicht
genügend Speicher verfügbar. Schließen Sie ein USB-
Speichergerät mit mindestens 1 GB freiem Speicher an.
• Stellen Sie sicher, dass das Gerät richtig mit dem lokalen
Netzwerk verbunden und auf das Internet zugreifen kann
(siehe Seite 28).
• Die Breitbandgeschwindigkeit ist zur Nutzung von BD-
LIVE-Funktionen nicht schnell genug. Wenden Sie sich
an Ihren Internet-Dienstanbieter (ISP) und lassen Sie die
Breitbandgeschwindigkeit erhöhen.
• Die Option [BD-LIVE-Verbindung] wurde im [Setup]-Menü
auf [Nicht zulässig] eingestellt. Stellen Sie die Option auf
[Zulässig] ein.
Änderungen der Ausführung und der technischen Daten ohne vorherige Ankündigung
vorbehalten.
Updates
Informationen zu diesem Produkt erhalten Sie auf der Pioneer-Webseite. Hier nden Sie
Hinweise zur Aktualisierung und Wartung des Blu-ray-Disc-PLAYERS.
HB985-DB.BDEUPPK_GER.indd 66HB985-DB.BDEUPPK_GER.indd 66 2010-05-14 2:06:572010-05-14 2:06:57

67
Anhang
7
Anhang
Bedienung eines
Fernsehgerätes über
die mitgelieferte
Fernbedienung
Dieser PIONEER Fernseher wird mit folgenden
Tasten bedient.
TV-
Steuerungs-
tasten
Taste Funktion
1
(TV Power)
Fernseher ein-/ausschalten.
INPUT
Eingangsquelle des
Fernsehers zwischen TV und
anderen Quellen umschalten.
CH +/- Umschalten der
gespeicherten Sender nach
oben/nach unten.
VOL +/- Lautstärke des Fernsehers
einstellen.
HINWEIS
Je nach angeschlossenem Gerät sind bestimmte
Tasten für Ihren Fernseher ohne Funktion.
Fernbedienung zur Bedienung
Ihres Fernsehgerätes einstellen
Sie können Ihren vorhandenen Fernseher über
die mitgelieferte Fernbedienung bedienen.
Falls Ihr Fernseher in der folgenden Tabelle
aufgeführt wird, stellen Sie die jeweilige
Herstellerkennung ein.
1. Halten Sie die Taste
1
(TV POWER) gedrückt
und geben Sie den Herstellercode Ihres
Fernsehers über die Nummerntasten ein
(siehe folgende Tabelle).
Hersteller Codenummer
Pioneer
1(Standardeinstel-
lung)
Sony 2, 3
Panasonic 4, 5
Samsung 6, 7
LG 8, 9
2. Lassen Sie die Taste
1
(TV POWER) wieder
los, um die Einstellung zu übernehmen.
Je nach Modell Ihres Fernsehers funktionieren
u. U. einige oder keine der Tasten mit dem
Gerät, selbst wenn der richtige Herstellercode
eingegeben wurde. Beim Austauschen der
Batterien der Fernbedienung wird diese
eingegebene Codenummer möglicherweise
auf die Standardeinstellung zurückgesetzt.
In diesem Fall muss die jeweilige Codenummer
erneut eingegeben werden.
7
Anhang
HB985-DB.BDEUPPK_GER.indd 67HB985-DB.BDEUPPK_GER.indd 67 2010-05-14 2:06:572010-05-14 2:06:57

68
Anhang
Anhang
7
Liste der Ländercodes
Wählen Sie einen Ländercode aus der Liste.
Land Code Land Code Land Code Land Code
Afghanistan AF
Argentinien AR
Australien AU
Österreich AT
Belgien BE
Bhutan BT
Bolivien BO
Brasilien BR
Kambodscha KH
Kanada CA
Chile CL
China CN
Kolumbien CO
Republik Kongo CG
Costa Rica CR
Kroatien HR
Tschechische
Republik CZ
Dänemark DK
Ecuador EC
Ägypten EG
El Salvador SV
Äthiopien ET
Fiji FJ
Finnland FI
Frankreich FR
Deutschland DE
Großbritannien GB
Griechenland GR
Grönland GL
Hongkong HK
Ungarn HU
Indien IN
Indonesien ID
Israel IL
Italien IT
Jamaika JM
Japan JP
Kenia KE
Kuwait KW
Libyen LY
Luxemburg LU
Malaysia MY
Malediven MV
Mexiko MX
Monaco MC
Mongolei MN
Marokko MA
Nepal NP
Niederlande NL
Niederländische
Antillen AN
Neu Seeland NZ
Nigeria NG
Norwegen NO
Oman OM
Pakistan PK
Panama PA
Paraguay PY
Philippinen PH
Polen PL
Portugal PT
Rumänien RO
Russische
Föderation RU
Saudi Arabien SA
Senegal SN
Singapur SG
Slowakische
Republik SK
Slowenien SI
Südafrika ZA
Südkorea KR
Spanien ES
Sri Lanka LK
Schweden SE
Schweiz CH
Taiwan TW
Thailand TH
Türkei TR
Uganda UG
Ukraine UA
USA US
Uruguay UY
Usbekistan UZ
Vietnam VN
Simbabwe ZW
HB985-DB.BDEUPPK_GER.indd 68HB985-DB.BDEUPPK_GER.indd 68 2010-05-14 2:06:572010-05-14 2:06:57

69
Anhang
7
Anhang
Liste der Sprachcodes
Verwenden Sie diese Liste zur Einstellung der gewünschten Sprache für die folgenden
Voreinstellungen: [Disc-Audio], [Disc-Untertitel] und [Disc-Menü].
Sprache Code Sprache Code Sprache Code Sprache Code
Afar 6565
Afrikaans 6570
Albanisch 8381
Amharisch 6577
Arabisch 6582
Armenisch 7289
Assamesisch 6583
Aymara 6588
Aserbeidschanisch
6590
Baschkirisch 6665
Baskisch 6985
Bengali, Bangla 6678
Bhutanisch 6890
Bihari 6672
Bretonisch 6682
Bulgarisch 6671
Myanmarisch 7789
Weißrussisch 6669
Chinesisch 9072
Kroatisch 7282
Tschechisch 6783
Dänisch 6865
Niederländisch 7876
Englisch 6978
Esperanto 6979
Estnisch 6984
Faroerisch 7079
Fiji 7074
Finnisch 7073
Französisch 7082
Friesisch 7089
Galizisch 7176
Georgisch 7565
Deutsch 6869
Griechisch 6976
Grönländisch 7576
Guarani 7178
Gujarati 7185
Haussa 7265
Hebräisch 7387
Hindi 7273
Ungarisch 7285
Isländisch 7383
Indonesisch 7378
Interlingua 7365
Irisch 7165
Italienisch 7384
Japanisch 7465
Kanadisch 7578
Kaschmir 7583
Kasachisch 7575
Kirgisisch 7589
Koreanisch 7579
Kurdisch 7585
Laotisch 7679
Lateinisch 7665
Lettisch 7686
Lingala 7678
Litauisch 7684
Mazedonisch 7775
Madagassisch 7771
Malaiisch 7783
Malajalam 7776
Maori 7773
Marathi 7782
Moldawisch 7779
Mongolisch 7778
Nauru 7865
Nepalesisch 7869
Norwegisch 7879
Oriya 7982
Pandschabi 8065
Paschtu 8083
Persisch 7065
Polnisch 8076
Portugiesisch 8084
Quechua 8185
Retoromanisch 8277
Rumänisch 8279
Russisch 8285
Samoanisch 8377
Sanskrit 8365
Schottisch (Gälisch)
7168
Serbisch 8382
Serbo-Kroatisch 8372
Shona 8378
Sindhi 8368
Singalesisch 8373
Slowakisch 8375
Slowenisch 8376
Spanisch 6983
Sudanesisch 8385
Swahili 8387
Schwedisch 8386
Tagalog 8476
Tadschikisch 8471
Tamilisch 8465
Telugu 8469
Thai 8472
Tongalesisch 8479
Türkisch 8482
Turkmenisch 8475
Twi 8487
Ukrainisch 8575
Urdu 8582
Usbekisch 8590
Vietnamesisch 8673
Volapük 8679
Walisisch 6789
Wolof 8779
Xhosa 8872
Jiddish 7473
Yoruba 8979
Zulu 9085
HB985-DB.BDEUPPK_GER.indd 69HB985-DB.BDEUPPK_GER.indd 69 2010-05-14 2:06:572010-05-14 2:06:57

70
Anhang
Anhang
7
Video-Ausgabeau ösung
Bei der Wiedergabe von Datenträgern ohne Kopierschutz
Videoausgang
Auflösung
HDMI OUT
COMPONENT VIDEO OUT
mit HDMI Anschluss ohne HDMI Anschluss
576i (480i) 576p (480i) 576i (480i)
576p (480p) 576p (480p) 576p (480p)
720p 720p 720p
1080i 1080i 1080i
1080p / 24 Hz 1080p / 24 Hz 576i (480i) 1080i
1080p / 50 Hz 1080p / 50 Hz 576i (480i) 1080i
Bei der Wiedergabe kopiergeschützter Datenträger
Videoausgang
Auflösung
HDMI OUT
COMPONENT VIDEO OUT
mit HDMI Anschluss ohne HDMI Anschluss
576i (480i) 576p (480p) 576i (480i)
576p (480p) 576p (480p) 576p (480p)
720p 720p 576i (480i) 576p (480p)
1080i 1080i 576i (480i) 576p (480p)
1080p / 24 Hz 1080p / 24 Hz 576i (480i) 576p (480p)
1080p / 50 Hz 1080p / 50 Hz 576i (480i) 576p (480p)
HDMI OUT-Anschluss
• In der Einstellung 576i (480i) wird für
die HDMI OUT-Buchse eine tatsächliche
Au ösung von 576p (576p) eingestellt.
• Falls Ihr Fernsehgerät die manuelle Auswahl
der Au ösung für ein an die HDMI-Buchse
angeschlossenes Fernsehgerät nicht zulässt,
wird die Au ösung auf [Auto] eingestellt.
• Bei einer eingestellten Au ösung, die
Ihr Fernsehgerät nicht unterstützt, wird
eine Warnmeldung eingeblendet. Falls
nach dem Ändern der Au ösung kein
Bild angezeigt wird, warten Sie bitte 20
Sekunden, bis die vorherige Au ösung
automatisch wiederhergestellt wird.
• Die Bildwiederholrate 1080p für den
Videoausgang wird dabei automatisch
auf 24 Hz oder 50 Hz eingestellt, je nach
Möglichkeiten und Voreinstellungen des
angeschlossenen Fernsehgerätes und
basierend auf der ursprünglichen Video-
Bildrate der BD-ROM-Disc.
COMPONENT VIDEO OUT-Anschluss
BD und DVD können eine Hochskalierung oder
analoge Ausgabe verhindern.
VIDEO OUT-Anschluss
Die Au ösung der VIDEO OUT-Buchse ist auf
576i (480i) festgelegt.
HB985-DB.BDEUPPK_GER.indd 70HB985-DB.BDEUPPK_GER.indd 70 2010-05-14 2:06:572010-05-14 2:06:57

71
Anhang
7
Anhang
“Blu-ray Disc” und sind Markenzeichen.
Das “BD-LIVE” Logo ist ein Markenzeichen von Blu-
ray Disc Association.
“BONUSVIEW” ist ein Markenzeichen von Blu-ray
Disc Association.
Java und alle Java-basierten Markenzeichen und
Logos sind Markenzeichen oder eingetragene
Markenzeichen von Sun Microsystems, Inc. in den
Vereinigten Staaten und in anderen Ländern.
Hergestellt unter der Lizenz von Dolby
Laboratories. Dolby und das Doppel-D-Symbol
sind Markenzeichen von Dolby Laboratories.
Hergestellt unter folgenden U.S.-Patenten:
5,451,942; 5,956,674; 5,974,380; 5,978,762;
6,226,616; 6,487,535; 7,392,195; 7,272,567;
7,333,929; 7,212,872 und weitere U.S.- und
weltweite Patente ausgestellt und angemeldet.
DTS und das Symbol sind eingetragene
Markenzeichen, DTS-HD, DTS-HD Master Audio l
Essential und die DTS-Logos sind Markenzeichen
von DTS, Inc. Dieses Produkt beinhaltet Software.
© DTS, Inc.
HDMI, das HDMI Logo und High-De nition
Multimedia Interface sind Markenzeichen oder
eingetragene Markenzeichen von HDMI Licensing,
LLC in den Vereinigten Staaten und anderen
Ländern.
ist ein Markenzeichen von DVD Format/Logo
Licensing Corporation.
TM
DLNA und DLNA CERTIFIED sind Marken- und/
oder Dienstleistungszeichen von Digital Living
Network Alliance.
DivX® ist eine eingetragene Marke von DivX, Inc.
und ist lizenziert.
“x.v.Color” oder “x.v.Colour” ist ein Markenzeichen
von Sony Corporation.
Marken und Lizenzen
HB985-DB.BDEUPPK_GER.indd 71HB985-DB.BDEUPPK_GER.indd 71 2010-05-14 2:06:582010-05-14 2:06:58

72
Anhang
Anhang
7
“AVCHD” und das „AVCHD” Logo sind
Markenzeichen von Panasonic Corporation und
Sony Corporation.
Dieses Produkt wurde lizenziert unter AVC Patent-
Lizenz und VC-1 Patent-Lizenz für den privaten
und nicht gewerblichen Einsatz des Kunden zur
(i) Codierung von Video in Übereinstimmung
mit den Normen AVC und VC-1 (“AVC/VC-1
Video”) und/oder (ii) Decodierung von AVC/
VC-1 Video, das vom Kunden für private und
nicht gewerbliche Zwecke codiert und/oder von
einem zugelassenen Video-Anbieter für AVC/
VC-1 Video bezogen wurde. Es darf und wird
keine Genehmigung für eine andere Verwendung
erteilt. Weitere Information erhalten Sie von MPEG
LA, LLC. Siehe http://www.mpegla.com.
iPod ist ein Markenzeichen von Apple Inc.,
eingetragen in den Vereinigten Staaten und
anderen Ländern.
iPhone ist ein Markenzeichen von Apple Inc.
Der Hinweis “Made for iPod” weist darauf hin,
dass ein elektronisches Gerät für den Anschluss
eines iPod entwickelt wurde und von Hersteller
als ein Gerät zerti ziert wurde, das den Apple-
Leistungsstandards entspricht.
Der Hinweis “Works with iPhone” weist darauf hin,
dass ein elektronisches Gerät für den Anschluss
eines iPhone entwickelt wurde und von Hersteller
als ein Gerät zerti ziert wurde, das den Apple-
Leistungsstandards entspricht.
Apple übernimmt keine Haftung für den Betrieb
dieses Gerät oder dessen Kompatibilität mit
Sicherheitsstandards und Richtlinien.
Windows Media ist entweder ein eingetragenes
Markenzeichen oder ein Markenzeichen von
Microsoft Corporation in den Vereinigten Staaten
und/oder in anderen Ländern.
Dieses Produkt verfügt über eine Technologie
der Microsoft Corporation und darf nicht ohne
Genehmigung von Microsoft Licensing, Inc. genutzt
oder vertrieben werden.
®
Die Bluetooth® Wireless-Technologie ermöglicht die
Funkübertragung zwischen elektronischen Geräten
innerhalb einer Reichweite von bis zu zehn Metern.
Bei der Verbindung mehrere Geräte über die
Bluetooth Wireless-Technologie fallen keinerlei
Gebühren an. Verbindungen mit Hilfe der Bluetooth
Wireless-Technologie über ein Mobiltelefon
können in Reihenschaltung betrieben werden.
Die Bluetooth Markennamen und Logos sind
Eigentum der Bluetooth SIG, Inc. Pioneer Corporation
besitzt eine Genehmigung für die Verwendung
dieser Marken. Alle anderen Markennamen und
Handelsbezeichnungen sind Eigentum der jeweiligen
Besitzer.
HB985-DB.BDEUPPK_GER.indd 72HB985-DB.BDEUPPK_GER.indd 72 2010-05-14 2:06:582010-05-14 2:06:58

73
Anhang
7
Anhang
Technische Daten
Allgemein
• Stromversorgung:
AC 220-240 V, 50/ 60 Hz
• Leistungsaufnahme:
150 W
Im Bereitschaftsmodus: Unter 0,5 W
• Abmessungen (B x H x T):
Ca. 430 × 64 × 304 mm
• Gesamtgewicht (ca.):
3.6 kg
• Betriebstemperatur:
5 °C bis 35 °C
• Luftfeuchtigkeit bei Betrieb:
5 % bis 90 %
• Stromversorgung über Bus (USB):
DC 5 V
500 mA
Eingänge/Ausgänge
• VIDEO OUT:
1,0 V (p-p), 75 Ω, negative Sync., Cinch-Buchse x 1
• COMPONENT VIDEO OUT:
(Y) 1,0 V (p-p), 75 Ω, negative Sync., Cinch-Buchse
x 1, (Pb)/(Pr) 0,7 V (p-p), 75 Ω, Cinch-Buchse x 2
• HDMI IN/OUT (Video/Audio):
19-polig (HDMI-Norm, Typ A, Version 1.3)
• Analog AUDIO IN:
2,0 Vrms (1 kHz, 0 dB), 600 Ω,
Cinch-Buchse (L, R) x 1
• DIGITAL IN (OPTICAL 1/2):
3 V (p-p), Optische Buchse x 2
• PORTABLE IN:
0,5 Vrms (3,5 mm Stereo-Buchse)
Tuner
• UKW-Empfangsbereich:
87,5 bis 108,0 MHz oder 87.50 bis 108.00 MHz
Verstärker
• Ausgangsleistung, (Spitze), (4 Ω/3 Ω)
Gesamt 1100 W
Vorn 180 W x 2
Mitte 180 W
Hinten 180 W x 2
Subwoofer 200 W (Passive)
• Ausgangsleistung, (RMS),
Geamtklirrfaktor 10 % (4 Ω/3 Ω)
Gesamt 930 W
Vorn 150 W x 2
Mitte 150 W
Hinten 150 W x 2
Subwoofer 180 W (Passiv)
System
• Laser:
Halbleiter-Laser
Wellenlänge: 405 nm / 650 nm
• Fernsehnorm:
Standard NTSC/PAL Farb-Fernsehnorm
• Frequenzbereich:
20 Hz bis 20 kHz (48 kHz-, 96 kHz-, 192 kHz-
Sampling)
• LAN-Anschluss:
Ethernet-Buchse x 1, 10BASE-T/100BASE-TX
HB985-DB.BDEUPPK_GER.indd 73HB985-DB.BDEUPPK_GER.indd 73 2010-05-14 2:06:582010-05-14 2:06:58

74
Anhang
Anhang
7
Lautsprecher BCS-707
S-BD707
• Vordere/Surround-Lautsprecher (Links/Rechts)
Typ: 2 Wege
Nennimpedanz: 4 Ω
Gesamtabmessungen 260 x 1097 x 260 mm
(B x H x T):
Gesamtgewicht: 3,8 kg
• Mittel-Lautsprecher
Typ: 1 Weg
Nennimpedanz: 4 Ω
Gesamtabmessungen 300 x 87x 65 mm
(B x H x T):
Gesamtgewicht: 0,6 kg
S-BD707SW
• Subwoofer
Typ: 1-Weg-1-Lautsprecher
Nennimpedanz: 3 Ω
Gesamtabmessungen 130,5 x 420 x 375 mm
(B x H x T):
Gesamtgewicht: 4,4 kg
Lautsprecher BCS-303
S-BD303
• Vordere/Surround-Lautsprecher (Links/Rechts)
Typ: 1 Weg
Nennimpedanz: 4 Ω
Gesamtabmessungen 96 x 96 x 85 mm
(B x H x T):
Gesamtgewicht: 0.4 kg
• Mittel-Lautsprecher
Typ: 1 Weg
Nennimpedanz: 4 Ω
Gesamtabmessungen 300 x 87 x 65 mm
(B x H x T):
Gesamtgewicht: 0,6 kg
• Subwoofer
Typ: 1-Weg-1-Lautsprecher
Nennimpedanz: 3 Ω
Gesamtabmessungen 130,5 x 420 x 375 mm
(B x H x T):
Gesamtgewicht: 4,4 kg
HB985-DB.BDEUPPK_GER.indd 74HB985-DB.BDEUPPK_GER.indd 74 2010-05-14 2:06:582010-05-14 2:06:58

75
Anhang
7
Anhang
Hinweise zu Open
Source-Software
Die folgenden in diesem Produkt eingesetzten
GPL-Anwendungen und LGPL-Bibliotheken
unterliegen den folgenden GPL2.0-/LGPL2.1-
Lizenzvereinbarungen:
GPL-ANWENDUNGEN: Linux kernel 2.6, bash,
busybox, cramfs, dhcpcd, e2fsprogs, fdisk, mkdosfs,
mtd-utils, net-tools, procps, samba-3.0.25b, sysutils,
tcpdump, tftpd, tinylogin, unzip, utelnetd
LGPL-BIBLIOTHEKEN: uClibc, DirectFB, blow sh,
cairo, mpeg, iconv, libusb, mpg123
gSOAP Public License 1.3-BIBLIOTHEK: gsoap
Eine Kopie des entsprechenden Quellcodes
kann versandkostenp ichtig angefordert werden
Bitte richten Sie Ihre Anfrage an den Pioneer
Kundendienst.
Eine Kopie der GPL- und LGPL-Lizenzen nden Sie
unter http://www.gnu.org/licenses/old-licenses/
gpl-2.0.html und http://www.gnu.org/licenses/old-
licenses/lgpl-2.1.html .
Eine Kopie der gSOAP Public License nden Sie unter
http://www.cs.fsu.edu/~engelen/license.html.
Diese Software basiert teilweise auf der Arbeit der
Independent JPEG Group Copyright © 1991-1998,
Thomas G. Lane.
Dieses Produkt beinhaltet
• boost C++: Copyright © Beman Dawes 1999-2003
• c-ares: Copyright © 1998 Massachusetts Institute
of Technology
• curl: Copyright © 1996 - 2008, Daniel Stenberg
• expat: Copyright © 2006 expat maintainers
• freetype: Copyright © 2003 The FreeType Project
(www.freetype.org).
• jpeg: Diese Software basiert teilweise auf der
Arbeit der Independent JPEG Group Copyright ©
1991-1998, Thomas G. Lane.
• mng: Copyright © 2000-2007 Gerard Juyn, Glenn
Randers-Pehrson
• ntp: Copyright © David L. Mills 1992-2006
• OpenSSL:
– Kryptographische Software programmiert von
Eric Young (eay@cryptsoft.com).
– Software programmiert von Tim Hudson
(tjh@cryptsoft.com).
– Software entwickelt von OpenSSL Project für
den Einsatz im OpenSSL Toolkit.
(http://www.openssl.org)
• png: Copyright © 2004 Glenn Randers-Pehrson
• portmap: Copyright © 1990 The Regents of the
University of California
• ptmalloc: Copyright © 2001-2006 Wolfram Gloger
• UnitTest++: Copyright © 2006 Noel Llopis und
Charles Nicholson
• UPnP SDK: Copyright © 2000-2003 Intel
Corporation
• strace :
Copyright © 1991, 1992 Paul Kranenburg
copyright © 1993 Branko Lankester
copyright © 1993 Ulrich Pegelow
copyright © 1995, 1996 Michael Elizabeth Chastain
copyright © 1993, 1994, 1995, 1996 Rick Sladkey
copyright © 1999,2000 Wichert Akkerman
• xml2 : copyright © 1998-2003 Daniel Veillard
• XML-RPC für C/C++:
• Copyright © 2001 First Peer, Inc. Alle Rechte
vorbehalten.
• Copyright © 2001 Eric Kidd. Alle Rechte
vorbehalten.
• zlib: Copyright © 1995-2002 Jean-loup Gailly und
Mark Adler.
Alle Rechte vorbehalten
Hiermit wird kostenfrei allen Nutzern, die eine
Kopie dieser Software und die zugehörigen
Dokumentationsdateien (die “Software”) erhalten, die
Erlaubnis erteilt, die Software ohne Einschränkungen
zu verwenden. Dies umfasst die uneingeschränkte
Genehmigung zum Verwenden, Kopieren, Ändern,
Zusammenführen, Verö entlichen, Verteilen,
Unterlizenzieren und/oder Verkaufen von Kopien
der Software. Diese Rechte dürfen außerdem auf die
Personen übertragen werden, an die die Software
weitergegeben wird, wenn folgende Bedingungen
eingehalten werden:
DIE SOFTWARE WIRD OHNE MÄNGELGEWÄHR
GELIEFERT, OHNE GARANTIEN JEDWEDER
ART, WEDER AUSDRÜCKLICH NOCH IMPLIZIT,
EINSCHLIESSLICH DER, ABER NICHT BESCHRÄNKT
AUF DIE GARANTIEN DER MARKTGÄNGIGKEIT, DER
EIGNUNG FÜR EINEN BESTIMMTEN ZWECK UND
DER NICHTÜBERTRETUNG. IN KEINEM FALL SIND
DIE AUTOREN ODER DIE URHEBERRECHTSINHABER
HAFTBAR FÜR SCHÄDEN ODER SONSTIGE
ANSPRÜCHE, DIE AUS DEM VERTRAG, AUS DESSEN
VERLETZUNG ODER SONST WIE ENTSTEHEN, SEI ES
UNABHÄNGIG VON ODER IN VERBINDUNG MIT DER
SOFTWARE ODER DURCH DIE VERWENDUNG DER
SOFTWARE ODER ANDEREN HANDLUNGEN MIT DER
SOFTWARE.
HB985-DB.BDEUPPK_GER.indd 75HB985-DB.BDEUPPK_GER.indd 75 2010-05-14 2:06:582010-05-14 2:06:58

2 Informazioni sulla sicurezza
Informazioni sulla sicurezza
1
AVVERTENZA
RISCHIO DI SCOSSE ELETTRICHE
NON APRIRE
AVVERTENZA: PER RIDURRE IL RISCHIO DI SCOSSE
ELETTRICHE, NON RIMUOVERE IL COPERCHIO (O
LA PARTE POSTERIORE). L’UNITÀ NON CONTIENE
PARTI RIPARABILI DALL’UTENTE. SE OCCORRE UN
INTERVENTO IN ASSISTENZA, RIVOLGERSI A UN
TECNICO QUALIFICATO.
Questo simbolo di un fulmine
all’interno di un triangolo avverte
l’utente della presenza di tensione
pericolosa non isolata all’interno
dell’unità che può provocare
scosse elettriche.
Il punto esclamativo all’interno di
un triangolo avverte l’utente della
presenza di istruzioni operative e
di manutenzione particolarmente
importanti contenute
nella documentazione di
accompagnamento del prodotto.
Precauzioni ed avvertimenti
Avvertenze: PER EVITARE IL RISCHIO DI INCENDI
O SCOSSE ELETTRICHE, TENERE IL PRODOTTO
LONTANO DALLA PIOGGIA E DALL’UMIDITÀ.
Avvertenze: non installare questo apparecchio in
spazi ristretti quali sca ali o unità simili.
AVVERTENZA: Non ostruire le aperture di
ventilazione. Installare secondo le istruzioni del
fabbricante.
Le feritoie e le aperture sono previste per la
ventilazione e per garantire il corretto funzionamento
del prodotto, proteggendolo dal surriscaldamento.
Non ostruire le aperture collocando il prodotto
su divani, letto, tappeti o altre super ci simili. Non
collocare il prodotto incassato in mobili come
librerie o sca ali, a meno che non sia prevista una
ventilazione su ciente e siano state seguite le
istruzioni del fabbricante.
AVVERTENZA: Questo è un prodotto laser di
classe 1 in base alla classi cazione Sicurezza dei
prodotti laser IEC 60825-1:2007. Per essere sicuri di
utilizzare il prodotto in modo appropriato, leggere
con particolare attenzione questo manuale d’uso e
conservarlo come riferimento per ogni eventuale
futuro intervento di manutenzione; per questi
interventi, rivolgersi a centri di assistenza autorizzati.
L’utilizzo di controlli, regolazioni o procedure diverse
da quelle speci cate di seguito può dare luogo a una
pericolosa esposizione a radiazioni.
Per evitare l’esposizione diretta al fascio laser, non
aprire il contenitore. Quando il contenitore è aperto,
la radiazione laser è visibile. NON FISSARE CON LO
SGUARDO IL FASCIO LASER.
1
Informazioni sulla sicurezza
HB985-DB.BDEUPPK_ITA.indd 2HB985-DB.BDEUPPK_ITA.indd 2 2010-05-14 2:29:532010-05-14 2:29:53

Informazioni sulla sicurezza
3Informazioni sulla sicurezza
1
AVVERTENZA relativa al cavo di alimentazione
Per molti elettrodomestici è consigliabile utilizzare
un circuito dedicato.
Ciò signi ca, un circuito di alimentazione speci co
per un solo apparecchio che non abbia altre prese
in derivazione. A tal ne, veri care le speci che di
questo Manuale dell’utente. Non sovraccaricare
le prese a muro. Prese sovraccariche, allentate o
danneggiate, prolunghe, cavi s lacciati o isolamenti
spaccati o deteriorati sono pericolosi. In ognuno
dei suddetti casi possono veri carsi incendi o
scosse elettriche. Esaminare periodicamente il cavo
dell’apparecchio e se si notano danneggiamenti
scollegarlo, interrompere l’uso dell’apparecchio
e far sostituire il cavo con uno identico da un
tecnico dell’assistenza quali cato. Evitare che il
cavo sia attorcigliato, piegato o calpestato. Prestare
particolare attenzione alle spine, alle prese a parete
e ai punti in cui il cavo esce dall’unità. Per scollegare
l’alimentazione di rete, staccare il cavo. Durante
l’installazione del prodotto, assicurarsi che la spina sia
facilmente accessibile.
PIONEER dichiara che questo/
i prodotto/i è/sono conforme/i ai
requisiti essenziali e altre indicazioni
della Direttiva 2004/108/CE, 2006/95/
CE e 2009/125/CE.
Avvertenze: Per evitare il pericolo di incendi, non
avvicinare alcuna sorgente di amma aperta (come
una candela accesa) all’apparecchiatura.
Questo dispositivo è dotato di batteria portatile o
accumulatore.
Modo sicuro per rimuovere la batteria o la
batteria dall’apparecchiatura: Rimuovere la
batteria vecchia o accomulatore seguendo i passi
inversi a quelli seguiti per l’assemblaggio.
Per impedire la contaminazione dell’ambiente
e creare possibili pericoli alla salute dell’uomo o
animali, la vecchia batteria deve essere smaltita
inserendola nel contenitore adeguato nei punti
di raccolta predisposti. Non smaltire le batterie o
accumulatori insieme ai ri uti domestici.
Si raccomanda di utilizzare i sistemi locali di raccolta
di batterie e accumulatori. Non esporre la batteria a
temperature eccessive, ad esempio non esporla al
sole, non gettarla sul fuoco, ecc.
AVVERTENZA: non esporre l’apparecchio all’acqua
(sgocciola-mento o spruzzi) e non collocare su di
esso oggetti riempiti di liquidi, quali ad esempio vasi.
HB985-DB.BDEUPPK_ITA.indd 3HB985-DB.BDEUPPK_ITA.indd 3 2010-05-14 2:29:562010-05-14 2:29:56

4 Informazioni sulla sicurezza
Informazioni sulla sicurezza
1
Informazioni per gli utilizzatori nali sulla
raccolta e lo smaltimento di vecchi dispositivi e
batterie esauste
Questi simboli sui prodotti, le confezioni e/o i
documenti allegati indicano che i prodotti elettrici
ed elettronici e le batterie non devono essere gettati
insieme alla spazzatura normale.
Per il trattamento appropriato, il recupero ed il riciclo
di vecchi prodotti e di batterie usate, recarsi ai punti
di raccolta in base a quanto disposto dalle norme
locali.
E ettuando lo smaltimento degli apparecchi e
delle batterie in modo corretto, si contribuisce alla
salvaguardia di risorse preziose e s’impediscono gli
e etti potenziali negativi sulla salute dell’uomo e
dell’ambiente che potrebbero altrimenti veri carsi
da una gestione inadeguata della spazzatura.
Per maggiori informazioni dettagliate sullo
smaltimento e sul riciclaggio del vecchio dispositivo
e delle batterie, contattare l’ente locale, il servizio
di nettezza urbana o il punto vendita dove è stato
acquistato il prodotto.
Questi simboli sono validi soltanto nell’Unione
Europea.
Per i paesi extra-UE:
Per gettare questi prodotti, contattare l’ente locale
o il rivenditore e chiedere informazioni sul metodo
corretto di smaltimento.
Questo prodotto è conforme al DM 28/8/1995,
Nº548, ottemperando alle prescrizioni di cui al DM
25/6/1985 (par.3, all. A) e DM 27/8/1987 (All. I).
Note sul Copyright
• Poiché l’AACS (Advanced Access Content System)
è approvato come sistema di protezione del
contenuto per il formato BD, analogamente
all’uso del CSS (Content Scramble System) per
il formato DVD, sono presenti alcune limitazioni
su riproduzione, uscita segnale analogico, ecc.,
dei contenuti protetti AACS. Il funzionamento di
questo prodotto e le restrizioni su questo prodotto
possono variare dipendendo dal momento del
vostro acquisto poiché tali restrizioni possono
essere adottate e/o modi cate da AACS dopo la
produzione di questo prodotto.
• Inoltre, BD-ROM Mark e BD+ sono utilizzati
ulteriormente come sistema di protezione dei
contenuti per il formato BD, il quale impone
alcune restrizioni incluse restrizioni di riproduzione
di contenuti protetti BD-ROM Mark e/o BD+. Per
informazioni aggiuntive su AACS, contrassegno
BD-ROM, BD+ o su questo prodotto, rivolgersi a
un centro assistenza clienti autorizzato.
• Molti dischi BD-ROM/DVD sono codi cati
con protezione dalla copia. A causa di queste
restrizioni, è necessario connettere il lettore
direttamente alla TV anziché il VCR. La connessione
tramite VCR ha come risultato un’immagine
distorta quando questa proviene da dischi protetti
da copia.
• Questo prodotto contiene tecnologia di
protezione del copyright protetto da brevetti
USA e da altri diritti di proprietà intellettuale. L’uso
di tale tecnologia di protezione del copyright
deve essere autorizzato da Rovi ed è previsto
solo per uso domestico e altri impieghi limitati di
visualizzazione se non diversamente autorizzato
da Rovi. La decodi ca e il disassemblaggio sono
vietati.
• In base alle leggi sul copyright degli U.S.A. e di
altri paesi, registrazione, uso, visualizzazione,
distribuzione o revisione non autorizzati di
programmi televisivi, nastri, dischi BD-ROM, DVD,
CD e altri materiali possono essere soggetti a
responsabilità civile e/o penale.
Symbol examples
for batteries
Pb
Esempio di simboli
per le batterie
HB985-DB.BDEUPPK_ITA.indd 4HB985-DB.BDEUPPK_ITA.indd 4 2010-05-14 2:29:562010-05-14 2:29:56

Informazioni sulla sicurezza
5Informazioni sulla sicurezza
1
Avviso importante per il sistema colore TV
Il sistema colore di questo lettore cambia sulla base
del sistema del disco correntemente in riproduzione.
Per esempio, quando il lettore riproduce un disco
registrato con il sistema colore NTSC, l’uscita
dell’immagine sarà con segnale NTSC.
Solo un apparecchio TV multi sistema colore è in
grado di ricevere tutti i segnali in uscita dal lettore.
• Se si dispone di una TV con sistema colore PAL,
quando si usano dischi registrati in NTSC si
vedranno solo delle immagini distorte.
• Un apparecchio TV a sistema multiplo colore
cambia automaticamente il sistema colore
sulla base dei segnali in ingresso. Nel caso
in cui il sistema colore non venga cambiato
automaticamente, spegnere l’apparecchio e
riaccendere per vedere le immagini normalmente
sullo schermo.
• Anche se i dischi vengono visualizzai
correttamente sull’apparecchio TV, è possibile
che non vengano registrati correttamente sul
registratore.
HB985-DB.BDEUPPK_ITA.indd 5HB985-DB.BDEUPPK_ITA.indd 5 2010-05-14 2:29:562010-05-14 2:29:56

6
Sornmario
1
Informazioni sulla sicurezza
2 Precauzioni ed avvertimenti
2
Preparazione
8 Introduzione
8 Informazioni sul simbolo “ ”
8 Simboli utilizzati nel manuale
9 Accessori forniti
10 Dischi riproducibili
11 Compatibilità dei le
12 Codice regionale
12 AVCHD (Advanced Video
Codec High De nition)
12 Requisiti del sistema
12 Note di compatibilità
13 Telecomando
14 Pannello frontale
15 Pannello posteriore
3
Installazione
16 Assemblare gli altoparlanti
16 Montaggio degli altoparlanti
BCS-707
18 Montaggio degli altoparlanti
BCS-303
19 Installazione a parete
dell’altoparlante centrale
19 Note aggiuntive sugli altoparlanti
20 Posizionamento del sistema
21 Connessioni al TV
21 Connessione HDMI
22 Connessione Component
Video
23 Connessione video
23 Impostazione della
risoluzione
24 Collegamento antenna
24 Connessione con il dispositivo
esterno
24 Connessione AUX
25 PORTA Connessione IN
25 Connessione OPTICAL IN 1/2
26 Collegamento Bluetooth®
28 Connessione alla rete domestica
29 Impostazione rete
31 Collegamento dispositivo USB
32 Settaggi
32 Regolare le impostazioni di
con gurazione
33 Menu [DISPLAY]
34 Menu [LINGUA]
35 Menu [AUDIO]
36 Menu [BLOCCATO]
37 Menu [RETE]
37 Menu [ALTRO]
39 E etto audio
HB985-DB.BDEUPPK_ITA.indd 6HB985-DB.BDEUPPK_ITA.indd 6 2010-05-14 2:29:572010-05-14 2:29:57

7
1
2
3
4
5
6
7
8
4
Uso
40 Riproduzione generale
42 Riproduzione avanzata
44 Visualizzazione su schermo
48 Gustare BD-LIVE
49 Riproduzione di un le video e disco
VR
51 Visualizzazione di fotogra e
53 Ascolto dei brani musicali
56 Riproduzione del iPod
58 Funzionamento della radio
59 Riproduzione di contenuto sulla rete
domestica
5
Manutenzione
63 Note sui dischi
63 Maneggiamento dell’unità
6
Risoluzione dei problemi
64 Generale
65 Immagine
65 Suono
66 Network
7
Appendice
67 Controllo del televisore mediante il
telecomando
68 Indicativo località
69 Elenco codici lingua
70 Risoluzione video di uscita
71 Marchi commerciali e licenze
73 Speci che tecniche
75 Avviso per il software Open source
HB985-DB.BDEUPPK_ITA.indd 7HB985-DB.BDEUPPK_ITA.indd 7 2010-05-14 2:29:572010-05-14 2:29:57

8 Preparazione
Preparazione
2
2
Preparazione
Introduzione
Informazioni sul simbolo “ ”
Durante la riproduzione, sullo schermo della
vostra televisione può apparire “ ”, questo
segno indica che la funzione descritta nel
manuale dell’utente non è disponibile su quel
supporto speci co.
Simboli utilizzati nel manuale
NOTA
Indica note speciali e funzionalità operative.
ATTENZIONE
Indica avvertenze di pericolo per la
prevenzione da possibili danni provocati da
uso improprio.
Una sezione, il cui titolo ha uno dei
seguenti simboli, è applicabile solo sul disco
rappresentato dal simbolo.
BD
Disco BD-ROM
DVD
DVD-Video, DVD±R/
RW in modalità Video o
modalità VR e nalizzata
AVCHD
DVD±R/RW in formato
AVCHD
ACD
CD audio
MOVIE
File video
MUSIC
File musicali
PHOTO
File foto
HB985-DB.BDEUPPK_ITA.indd 8HB985-DB.BDEUPPK_ITA.indd 8 2010-05-14 2:29:572010-05-14 2:29:57

9Preparazione
2
Preparazione
Accessori forniti
Cavo video (1) Telecomando (1)
Batterie (1) Antenna FM (1)
Supporto per iPod
(1)
Accessori della cassa
dell’altoparlante (S-BD707T)
Cavi altoparlante (5)
Viti (12)
Basi per sostegno
altoparlante (4)
Attenuatori
antislittamento
generali (1)
Attenuatori
antislittamento
mediani (1)
Accessori della cassa
dell’altoparlante (S-BD707SW)
Cavi altoparlante (1) Attenuatori
antislittamento
grandi (1)
Accessori della cassa
dell’altoparlante (S-BD303)
Cavi altoparlante (6)
Attenuatori
antislittamento
generali (1)
Attenuatori
antislittamento
grandi (1)
HB985-DB.BDEUPPK_ITA.indd 9HB985-DB.BDEUPPK_ITA.indd 9 2010-05-14 2:29:572010-05-14 2:29:57

10 Preparazione
Preparazione
2
Dischi riproducibili
Blu-ray Disc
- Dischi, contenenti ad esempio
lm, acquistabili o noleggiabili
- Dischi BD-R/RE che
contengono le di lm, musica
o foto.
DVD-VIDEO
dischi da 8 / 12 cm
Dischi, contenenti ad esempio
lm, acquistabili o noleggiabili
DVD±R
dischi da 8 / 12 cm
- Solo modalità video e
nalizzata
- Supporta anche dischi dual
layer
- Formato AVCHD nalizzato
- Dischi DVD±R che contengono
le di lm, musica o foto.
DVD-RW
dischi da 8 / 12 cm
- Modalità VR, modalità Video e
solo nalizzata
- Formato AVCHD nalizzato
- Dischi DVD-RW che
contengono le di lm, musica
o foto.
DVD+RW
8 / 12 cm disc
- Solo modalità video e
nalizzata
- Formato AVCHD
- Formato AVCHD nalizzato
- Dischi DVD+RW che
contengono le di lm, musica
o foto.
Audio CD
dischi da 8 / 12 cm
CD-R/RW
dischi da 8 / 12 cm
- Dischi CD-R/RW contenenti
titoli audio, le video, musica o
foto.
NOTA
• In base alle condizioni dell’apparecchiatura
di registrazione o dello stesso disco CD-R/
RW (o DVD±R/RW), non è possibile riprodurre
nell’unità alcuni dischi CD-R/RW (o DVD±R/RW).
• In base al software di registrazione e
nalizzazione, potrebbe non essere possibile
riprodurre alcuni dischi registrati (CD-R/RW,
DVD±R/RW, BD-R/RE).
• I dischi BD-R/RE, DVD±R/RW e CD-R/RW
registrati mediante PC o masterizzatore DVD o
CD potrebbero non venire riprodotti se il disco
è danneggiato o sporco, oppure se è presente
sporcizia o condensa sulla lente del lettore.
• Se il disco è stato registrato tramite PC, anche
mediante un formato compatibile, in alcuni casi
la riproduzione potrebbe risultare impossibile a
causa delle impostazioni del software utilizzato
per creare il disco. Per maggiori informazioni,
consultare il produttore del software.
• Per garantire un’ottima qualità della
riproduzione, questo lettore richiede la
conformità di dischi e registrazioni con
determinati standard tecnici.
• I DVD preregistrtrati sono conformi con questi
standard. Esistono diversi tipi di formati di dischi
registrabili (compresi CD-R contenenti le MP3 o
WMA) che richiedono la presenza di determinate
condizioni per assicurare una riproduzione
compatibile.
• I clienti devono tenere presente che per scaricare
le MP3/WMA e musicali da Internet è richiesta
autorizzazione. La nostra azienda non ha alcun
diritto per concedere tale autorizzazione.
L’autorizzazione deve essere sempre ottenuta
dal proprietario del copyright.
HB985-DB.BDEUPPK_ITA.indd 10HB985-DB.BDEUPPK_ITA.indd 10 2010-05-14 2:29:582010-05-14 2:29:58

11Preparazione
2
Preparazione
Compatibilità dei le
Complessivo
Estensioni le disponibili:
“.jpg”, “.jpeg”, “.png”, “.avi”, “.divx”, “.mpg”, “.mpeg”,
“.mkv”, “.mp4”, “.mp3”, “.wma”, “.wav”
• Le estensioni di le disponibili variano in
funzione dei server DLNA.
• Alcuni le “.wav” non sono supportati da
questo lettore.
• Il nome del le è limitato a 180 caratteri.
• Dipendendo dalle dimensioni e numero di
le, possono essere necessari diversi minuti
per la lettura del contenuto dei supporti.
Massimo numero di le/cartelle:
Meno di 2 000 (numero totale di le e cartelle)
Formato CD-R/RW, DVD±R/RW, BD-R/RE:
ISO 9 660+JOLIET, UDF e UDF Bridge
MOVIE
Risoluzione disponibile:
1 920 x 1 080 (OxV) pixel
Sottotitolo riproducibile: SubRip (.srt /
.txt), SAMI (.smi), SubStation Alpha (.ssa/.txt),
MicroDVD (.sub/.txt), VobSub (.sub), SubViewer
1.0 (.sub), SubViewer 2.0 (.sub/.txt), TMPlayer
(.txt), DVD Subtitle System (.txt)
• VobSub (.sub) non è disponibile nella
funzione [Coll. Home].
Formati codec riproducibili: “DIVX3.xx”,
“DIVX4.xx”, “DIVX5.xx”, “XVID”, “DIVX6.xx” (solo
riproduzione standard), H.264/MPEG-4 AVC,
MPEG1 SS, MPEG2 PS, MPEG2 TS
Formati audio riproducibili: “Dolby Digital”,
“DTS”, “MP3”, “WMA”, “AAC”, “AC3”
• Non tutti i formati audio WMA e AAC sono
compatibili con questa unità.
Frequenza di campionamento:
entro 32 kHz no a 48 kHz (WMA),
entro 16 kHz no a 48 kHz (MP3)
Velocità trasmissione:
entro 20 kbps no a 320 kbps (WMA),
entro 32 kbps no a 320 kbps (MP3)
NOTA
• I le dei lm HD contenuti su CD o USB 1,0/1,1
potrebbero non venire correttamente riprodotti.
Si consiglia BD, DVD o USB 2.0 per riprodurre le
di lmati HD.
• Questo lettore supporta H.264/MPEG-4 AVC
pro lo Main, High al Level 4,1. Nel caso di le
con livello superiore, sullo schermo apparirà un
messaggio di avvertenza.
• Questo lettore non supporta i le registrati
con GMC
*
1
o Qpel
*
2
. Queste sono tecniche di
registrazione video in standard MPEG4, come
quelle di DivX o XVID.
*1 GMC – Compensazione movimento globale
*2 Qpel – Quarter pixel
MUSICA
Frequenza di campionamento:
entro 8 kHz no a 48 KHz (WMA),
entro 11 kHz no a 48 kHz (MP3)
Velocità trasmissione:
entro 8 kbps no a 320 kbps (WMA, MP3),
NOTA
• Questa unità non supporta i le MP3 con ID3
Tag embedded.
• Il tempo di riproduzione totale indicato sullo
schermo può non essere corretto per le VBR.
PHOTO
Dimensioni consigliate:
Meno di 4,000 x 3,000 x 24 bit/pixel
Meno di 3,000 x 3,000 x 32 bit/pixel
Meno di 4 MByte/ le
• Le immagini foto a compressione
progressiva e losless non sono supportate.
HB985-DB.BDEUPPK_ITA.indd 11HB985-DB.BDEUPPK_ITA.indd 11 2010-05-14 2:29:582010-05-14 2:29:58

12 Preparazione
Preparazione
2
Codice regionale
Questa unità dispone di un codice regionale
stampato sul retro. Questa unità è in grado di
riprodurre solo dischi BD-ROM o DVD con la
stessa indicazione presente sul retro o con
l’etichetta “ALL”.
AVCHD (Advanced Video Codec
High De nition)
• Questo lettore può riprodurre dischi
in formato AVCHD. Tali dischi vengono
normalmente registrati e utilizzati nelle
videocamere.
• Il formato AVCHD è un formato digitale ad
alta de nizione per videocamere.
• Il formato MPEG-4 AVC/H.264 è in grado
di comprimere le immagini con e cienza
maggiore rispetto al formato convenzionale
di compressione immagini.
• Alcuni dischi AVCHD usano il formato
“x.v.Colour”.
• Questo lettore è in grado di riprodurre
dischi AVCHD tramite il formato “x.v.Colour”.
• Alcuni dischi in formato AVCHD potrebbero
non venire riprodotti, in base alla condizione
di registrazione.
• I dischi in formato AVCHD devono essere
nalizzati.
• “x.v.Colour” o re una gamma di colori più
ampia rispetto ai normali dischi DVD delle
videocamere.
Requisiti del sistema
Per la riproduzione video ad alta de nizione:
• Un display ad alta de nizione dotato di jack
di ingresso COMPONENT o HDMI.
• Disco BD-ROM con contenuto ad alta
de nizione.
• Per alcuni contenuti (come de nito
dagli autori) è richiesto un ingresso DVI
compatibile HDMI o HDCP sulla propria
periferica di visualizzazione.
• Per la conversione di DVD di de nizione
standard, è necessario avere sul proprio
display un ingresso DVI compatibile HDMI o
HDCP per la copia di contenuto protetto.
Note di compatibilità
• Poiché BD-ROM è un nuovo formato,
sono possibili alcuni problemi ai dischi, di
connessione digitale e di compatibilità. Se si
rilevano problemi di compatibilità, rivolgersi
a un centro assistenza autorizzato.
• La visione di contenuto ad alta de nizione
e la conversione di contenuti DVD standard
può richiedere un ingresso compatibile
HDMI o un ingresso DVI-HDMI sul
dispositivo usato per la visualizzazione.
• Alcuni dischi BD-ROM e DVD possono
limitare l’uso di alcuni comandi o funzioni.
• Si può utilizzare un dispositivo USB utilizzato
per memorizzare alcune informazioni
relative al disco, incluso contenuto
scaricato on-line. Il disco usato controllerà
la durata per la quale l’informazione viene
mantenuta.
HB985-DB.BDEUPPK_ITA.indd 12HB985-DB.BDEUPPK_ITA.indd 12 2010-05-14 2:29:582010-05-14 2:29:58

13Preparazione
2
Preparazione
Telecomando
1
2
3
• • • • • • • • •
a
• • • • • • • • •
1
(STANDBY/ON): Accende e
spegne il lettore.
Z
OPEN/CLOSE: Apre/chiude il
vassoio del disco.
INPUT/TUNER: Modi ca la
modalità di ingresso.
BT AUDIO: Si modi ca
direttamente il modo ingresso in
modo BT AUDIO.
OPTICAL: Modi ca direttamente la
modalità di immissione su ottico.
DISPLAY: Visualizza o chiude il
display su schermo (OSD).
HOME MENU: Visualizza il
[Menu prin.] o esce da esso.
MENU: Accede al menu su un
disco.
Pulsanti di direzione: Consentono
di selezionare un’opzione nel
menu.
ENTER: Conferma la selezione
di menu.
TUNE (+/-): sintonizza la stazione
radiofonica desiderata.
PRESET: seleziona i programmi
radiofonici prede niti.
• • • • • • • • •
b
• • • • • • • • •
O
RETURN: Esce dal menu o
riprende la riproduzione.
POPUP/ TOP MENU: Visualizza
il menu del titolo DVD o il menu
a comparsa del BD-ROM, se
disponibile.
x
STOP: Interrompe la
riproduzione.
B
PLAY:
Avvia la riproduzione.
X
PAUSE/STEP: Mette la
riproduzione in pausa.
.
/
>
SKIP: Passa al le/
brano/capitolo successivo o
precedente.
m
/
M
SCAN: Ricerca avanti o
indietro.
SPK LEVEL: Imposta il livello audio
dell’altoparlante desiderato.
z
USB REC: Registra un CD Audio.
MUTE: Silenzia l’unità.
SOUND: Seleziona una modalità di
e etto audio.
VOL +/- : Regola il volume
dell’altoparlante.
• • • • • • • • •
c
• • • • • • • • •
Tasti numerici 0-9: Seleziona le
opzioni numerate in un menu.
MARKER: Segna qualsiasi punto
durante la riproduzione.
SEARCH: Visualizza o esce dal
menu di ricerca.
REPEAT: Ripete una sezione
desiderata.
CLEAR: Rimuove il contrassegno
nel menu di ricerca o un numero
durante l’impostazione della
password.
DIMMER: attenua la luce dell’unità.
ZOOM: Si accede al menu di zoom.
Pulsanti colorati (A, B, C, D):
Usare per navigare i menu.
- Pulsante A (RDS): Radio Data
System.
- Pulsante
B (PTY): Visualizza la
tipologia di programma dell’RDS.
- Pulsante
C (PTY SEARCH): Cerca
la tipologia di programma.
- Pulsante
D: Seleziona mono/
stereo nella modalità FM.
Pulsanti di controllo TV: Vedere
pagina 67.
SLEEP: Imposta un dato periodo di
tempo trascorso il quale l’unità si
spegne.
Installazione della
batteria
Togliere il coperchio
sulla parte posteriore del
telecomando, quindi inserire
una batteria R03 (tipo
AAA) con la polarità e
corretta.
HB985-DB.BDEUPPK_ITA.indd 13HB985-DB.BDEUPPK_ITA.indd 13 2010-05-14 2:29:582010-05-14 2:29:58

14 Preparazione
Preparazione
2
Pannello frontale
a
Vassoio del disco
b
Pulsanti di funzionamento
Pulsante
1
STANDBY/ON
Z
(OPEN/CLOSE)
FUNZIONE
Modi ca la sorgente di ingresso o funzione.
B
/
X
(PLAY / PAUSE)
x
(STOP)
.
/
>
(SKIP)
- TUNE + (Sintonizzazione della radio)
c
Sensore del telecomando
d
Finestra Display
e
PORTABLE IN
f
Porta USB
g
Controllo volume
1
2
3 4 5 6 7
HB985-DB.BDEUPPK_ITA.indd 14HB985-DB.BDEUPPK_ITA.indd 14 2010-05-14 2:29:582010-05-14 2:29:58

15Preparazione
2
Preparazione
a
Cavo di alimentazione CA
Inserire nella presa di corrente.
b
Connettori altoparlanti
c
Ventola di raffreddamento
d
Connettore dell’antenna
e
VIDEO OUT
f
AUX (L/R) INPUT
g
COMPONENT VIDEO (Y P
B
P
R
)
OUTPUT (SCANSIONE PROGRESSIVA)
h
OPTICAL 1(TV) / 2
i
iPod (24 pin)
Connettere al supporto per l’iPod fornito.
j
HDMI OUT (tipo A, Versione 1.3)
Connettere a una TV con ingressi HDMI.
k
Porta LAN
Pannello posteriore
1 2 3 4 5
6 7 8 9 10 11
HB985-DB.BDEUPPK_ITA.indd 15HB985-DB.BDEUPPK_ITA.indd 15 2010-05-14 2:29:592010-05-14 2:29:59

16 Installazione
Installazione
3
Assemblare gli
altoparlanti
Montaggio degli altoparlanti
BCS-707
Preparazione degli altoparlanti
1. Applicare i piedini antiscivolo alla base
di ciascun altoparlante, del subwoofer e
dell’altoparlante centrale.
Per basi dell’altoparlante:
Utilizzare l’adesivo in dotazione per
applicare i quattro piedini medi alla
base (parte inferiore) di ciascuna base
dell’altoparlante.
middle non-skid pads
piedini antiscivolo medi
Per subwoofer:
Utilizzare l’adesivo in dotazione per
applicare i quattro piedini medi alla base.
large non-skid pads
piedini antiscivolo grandi
Per l’altoparlante centrale:
Utilizzare l’adesivo in dotazione per
applicare i quattro piedini piccoli alla base
dell’altoparlante centrale.
small non-skid pads
piedini antiscivolo
piccoli
2. Installare le basi dell’altoparlante sulle aste
utilizzando le viti in dotazione.
Dopo aver allineato l’asta e la base, stringere
le viti piccolo nei punti illustrati di seguito.
Si noti che l’altoparlante deve essere rivolto
nella direzione della base del triangolo
isoscele.
Rear
Front
Parte posteriore
Parte anteriore
3
Installazione
HB985-DB.BDEUPPK_ITA.indd 16HB985-DB.BDEUPPK_ITA.indd 16 2010-05-14 2:29:592010-05-14 2:29:59

17Installazione
3
Installazione
3. Collegare i cavi al lettore.
Collegare il cavo bianco con linea grigia
nel lato (+) e l’altro cavo nel lato (–). Per
collegare il cavo al lettore premere ciascuna
linguetta di plastic per aprire il connettore
di collegamento. Inserire il cavo e rilasciare
la linguetta.
Colore (+)
Nero (-)
ATTENZIONE
• Non collegare casse di tipo diverso da quello
fornito con il sistema.
• Non collegare gli altoparlanti in dotazione
ad ampli catori diversi da quelli forniti con
il sistema. Il collegamento ad ampli catori
di altro tipo può provocare un problema di
funzionamento o un incendio.
Fissaggio degli altoparlanti anteriore
e surround
Fissare gli altoparlanti anteriore e surround
utilizzando il morsetto in plastica in dotazione.
Avvitare i due ganci di supporto nella parete
dietro all’altoparlante. Passare un cavo spesso
attorno i ganci e attraverso il morsetto in
plastic in modo da stabilizzare l’altoparlante
(veri care che sia in grado di supportare il peso
dell’altoparlante). Dopo l’installazione veri care
che l’altoparlante sia ssato correttamente.
thick cord
Plastic catch
Cavo
adeguatamente
spesso
Morsetto in plastica
ATTENZIONE
• Il morsetto in plastica non è un accessorio
d’installazione e non si deve appendere
l’altoparlante alla parete utilizzando
esclusivamente il morsetto. Per stabilizzare gli
altoparlanti utilizzare sempre un cavo.
• Pioneer non è responsabile di danni o perdite
provocate dal montaggio, dall’installazione
inadeguata, dalla forza insu ciente dei materiali
d’installazione, dall’uso improprio o dai disastri
naturali.
• Per posizionare l’unità, veri care che sia ben
ssata ed evitare punti in cui è facile che possa
cadere e provocare ferimenti in caso di disastri
naturali (terremoto).
HB985-DB.BDEUPPK_ITA.indd 17HB985-DB.BDEUPPK_ITA.indd 17 2010-05-14 2:29:592010-05-14 2:29:59

18 Installazione
Installazione
3
Montaggio degli altoparlanti
BCS-303
Preparazione degli altoparlanti
1. Applicare i piedini antiscivolo alla base di
ogni altoparlante.
Per altoparlanti anteriore e surround:
Utilizzare l’adesivo in dotazione per
applicare i quattro piedini piccoli alla
base (parte inferiore) di ciascuna base
dell’altoparlante.
samll non-skid pads
piedini antiscivolo piccoli
Per subwoofer:
Utilizzare l’adesivo in dotazione per
applicare i quattro piedini medi alla base.
large non-skid pads
piedini antiscivolo grandi
Per l’altoparlante centrale:
Utilizzare l’adesivo in dotazione per
applicare i quattro piedini piccoli alla base
dell’altoparlante centrale.
samll non-skid pads
piedini antiscivolo
piccoli
2. Collegare i cavi al lettore.
Collegare il cavo bianco con linea grigia
nel lato (+) e l’altro cavo nel lato (–). Per
collegare il cavo al lettore premere ciascuna
linguetta di plastica per aprire il connettore
di collegamento. Inserire il cavo e rilasciare
la linguetta.
Colore (+)
Nero (-)
HB985-DB.BDEUPPK_ITA.indd 18HB985-DB.BDEUPPK_ITA.indd 18 2010-05-14 2:30:002010-05-14 2:30:00

19Installazione
3
Installazione
Installazione a parete
dell’altoparlante
centrale
L’altoparlante centrale è dotato di un foro
d’installazione che può essere utilizzato per
montare l’altoparlante alla parete.
Prima dell’installazione
Ricordarsi che il sistema di altoparlanti è
pesante e il peso potrebbe allentare le viti o
il materiale della parete potrebbe non essere
adeguato a sorreggere, provocando la caduta
dell’altoparlante. Veri care che la parete
che s’intende utilizzare sia adeguatamente
resistente per supportare gli altoparlanti.
Non installare su pareti di compensato o
cartongesso.
Le viti d’installazione non sono fornite.
Utilizzare viti indicate per il materiale della
parete e a supportare il perso dell’altoparlante.
ATTENZIONE
• Se non si è sicuri della qualità e della forza
della parte, consultare un tecnico per eventuali
consigli.
• Pioneer non è responsabile di incidenti o danni
dovuti all’installazione impropria.
5 mm
10 mm
Mounting screw
(not supplied)
Vite per
l’installazione
(non in dotazione)
Note aggiuntive sugli
altoparlanti
Installare gli altoparlanti principali anteriore
destro e sinistro alla stessa distanza dal TV.
Precauzioni:
Veri care che tutto il cavo scoperto
dell’altoparlante sia attorcigliato insieme
e inserito completamente nel connettore
dell’altoparlante. Se i cavi scoperti del di usore
toccano il panello posteriore si potrebbe
veri care un’interruzione di alimentazione
come misura di sicurezza.
Gli altoparlanti anteriore, centrale e surround
in dotazione con il sistema sono schermati
magneticamente. Tuttavia, a seconda del luogo
d’installazione si può veri care una distorsione
del colore se l’altoparlante è installato molto
vicino allo schermo del televisore. In tal caso,
spegnere l’interruttore del televisore (OFF)
e riaccenderlo (ON) dopo 15 - 30 min. Se il
problema persiste posizionare il sistema di
altoparlanti lontano dal televisore.
Il subwoofer non è schermato magneticamente
e non dovrebbe essere posto vicino a un TV
o a un monitor. I supporti di memorizzazione
magnetica ( oppy-disk, nastri o videocassette)
devono essere conservati lontani dal
subwoofer.
Non installare l’altoparlante centrale/surround
e il subwoofer alla parete o al so tto.
Potrebbero cadere provocando ferimenti.
da 5 mm a 7 mm
HB985-DB.BDEUPPK_ITA.indd 19HB985-DB.BDEUPPK_ITA.indd 19 2010-05-14 2:30:002010-05-14 2:30:00

20 Installazione
Installazione
3
Posizionamento del sistema
L’illustrazione seguente mostra un esempio
di posizionamento del sistema. Notare che
le illustrazioni in queste istruzioni possono
essere diverse dall’unità e ettiva per scopo
esplicativo. Per ottenere il miglior audio
surround possibile, tutti gli altoparlanti diversi
dal subwoofer devono essere posizionati alla
stessa distanza dal punto di ascolto (
A
).
A
B
D
E
F
A
A
A
A
A
G
C
A
Altoparlante anteriore sinistro (S)/
B
Altoparlante anteriore destro (D):
Posizionare gli altoparlanti anteriori sui lati del
monitor o schermo allineandoli il più possibile
all’altezza di quest’ultimo.
C
Cassa centrale:
Posizionare l’altoparlante centrale sopra o sotto
al monitor o schermo.
D
Altoparlante surround sinistro (S)/
E
Altoparlante surround destro (D):
Posizionare questi altoparlanti dietro alla posizione
di ascolto rivolti leggermente verso l’interno.
F
Subwoofer:
La posizione del subwoofer non è così
importante poiché i suoni bassi non sono
altamente direzionali. Ma il meglio posizionare
il subwoofer vicino agli altoparlanti anteriori.
Ruotarlo leggermente verso il centro della
stanza per ridurre i ri essi sulle pareti.
G
Unità
ATTENZIONE
• Attenzione che i bambini non mettano le
mani o qualsiasi tipo di oggetto nel *condotto
dell’altoparlante.
*Condotto dell’altoparlante: Un ambiente per un
suono basso pieno nella cassa dell’altoparlante
(alloggiamento).
• Posizionare l’altoparlante centrale ad una
distanza di sicurezza dai bambini.
In caso contrario, l’altoparlante potrebbe cadere
e provocare lesioni personali e/o danni alla
proprietà.
• Gli altoparlanti contengono parti magnetiche
che possono provocare irregolarità di colore
sullo schermo della TV o del PC. Posizionare gli
altoparlanti lontano dal TV o dal PC.
HB985-DB.BDEUPPK_ITA.indd 20HB985-DB.BDEUPPK_ITA.indd 20 2010-05-14 2:30:002010-05-14 2:30:00

21Installazione
3
Installazione
Connessioni al TV
E ettuare uno dei collegamenti che seguono
a seconda delle capacità delle apparecchiature
esistenti.
• Connessione HDMI (pagina 21-22)
• Connessione Component Video (pagina 22)
• Connessione video (pagina 23)
NOTA
• Dipendendo dalle apparecchiature che si
desidera connettere, esistono varie modalità di
connessione del lettore. Usare solo una delle
connessioni descritte in questo manuale.
• Consultare i manuali della propria TV,
videoregistratore, impianto stereo o altre
apparecchiature al ne di e ettuare il miglior
collegamento.
• Assicurarsi che il lettore sia collegato
direttamente alla TV. Sintonizzare la TV sul canale
di ingresso video corretto.
• Non connettere il lettore passando dal VCR.
L’immagine potrebbe venire distorta dal sistema
di protezione della copia.
Connessione HDMI
Se si possiede un televisore o un monitor HDMI
è possibile collegarli a questo lettore mediante
cavo HDMI (tipo A, Versione 1.3). Connettere il
jack HDMI OUT del lettore al jack HDMI IN della
TV o monitor HDMI compatibile.
Connessione HDMI
Player
TV
TV
Lettore
Impostare la sorgente TV su HDMI (consultare
il manuale del
TV).
HB985-DB.BDEUPPK_ITA.indd 21HB985-DB.BDEUPPK_ITA.indd 21 2010-05-14 2:30:002010-05-14 2:30:00

22 Installazione
Installazione
3
NOTA
• La modi ca della risoluzione quando la
connessione è già stata stabilita può avere
un cattivo funzionamento come risultato. Per
risolvere il problema, spegnere i lettore e quindi
riaccenderlo.
• Se la connessione HDMI con HDCP non è
veri cata, lo schermo TV diviene nero. In questo
caso, controllare la connessione HDMI, oppure
scollegare il cavo HDMI.
• Se ci sono disturbi o linee sullo schermo,
controllare il cavo HDMI (la lunghezza è
generalmente limitata a 4,5 m e usare un cavo
HDMI ad alta velocità (versione 1.3).
• Se un dispositivo HDMI connesso non accetta
un’uscita audio del lettore, l’audio del dispositivo
HDMI può essere distorto o può non uscire.
• Quando si usa la connessione HDMI, è possibile
modi care la risoluzione dell’uscita HDMI.
(Vedere “Impostazione della risoluzione”
a pagina 23.)
• Selezionare il tipo di uscita video dal jack HDMI
OUT usando l’opzione [Imp. colore HDMI] sul
menu [Impostaz.] (vedere pagina 34).
• Quando si connette un dispositivo HDMI o DVI
compatibile, accertarsi di quanto segue:
- Provare a spegnere il dispositivo HDMI/DVI
e questo lettore. Dopodiché, accendere il
dispositivo HDMI/DVI e lasciarlo per circa 30
secondi, quindi accendere questo lettore.
- L’ingresso video del dispositivo connesso sia
impostato correttamente per questa unità.
- Il dispositivo connesso sia compatibile con
ingresso video 720x576p (480p), 1280x720p,
1920x1080i o 1920x1080p.
• Non tutti i dispositivi HDMI o DVI HDCP-
compatibili funzionano con questo lettore.
- Su un dispositivo non HDCP è possibile che
l’immagine non venga visualizzata in modo
corretto.
- Questo lettore non avvia la riproduzione e lo
schermo del televisore diviene nero.
Connessione Component Video
Connettere i jack COMPONENT VIDEO OUT sul
lettore ai jack di ingresso corrispondenti sulla
TV tramite i cavi Y Pb Pr. Potete ascoltare l’audio
sull’altoparlante del sistema.
Connessione componente
Player
TV
Green
Blue
Red
PR
PB
Y
COMPONENT
VIDEO
INPUT
OUTPUT
L
AUX
R
VIDEO
Lettore
Verde
Blu
Rosso
TV
NOTA
Quando si usa la connessione COMPONENT VIDEO
OUT, è possibile modi care la risoluzione dell’uscita
VIDEO. (Vedere “Impostazione della risoluzione” a
pagina 23.)
HB985-DB.BDEUPPK_ITA.indd 22HB985-DB.BDEUPPK_ITA.indd 22 2010-05-14 2:30:012010-05-14 2:30:01

23Installazione
3
Installazione
Connessione video
Collegare il connettore VIDEO OUT del lettore
al connettore video sul TV tramite il cavo video.
Potete ascoltare l’audio sull’altoparlante del
sistema.
Connessione video
TV
Yellow
PR
PB
Y
COMPONENT
VIDEO
INPUT
OUTPUT
L
AUX
R
VIDEO
Lettore
Giallo
Impostazione della risoluzione
Il lettore consente di impostare diverse
risoluzioni dell’uscita per i jack HDMI OUT e
COMPONENT VIDEO OUT. Si può modi care la
risoluzione usando il menu di con gurazione
[Impostaz.].
1. Premere HOME MENU (
).
2. Usare
I
/
i/U
/
u
per selezionare [Impostaz.]
e premere ENTER (
). Appare il menu di
con gurazione [Impostaz.].
3. Utilizzare
U
/
u
per selezionare l’opzione
[DISPLAY], quindi premere
i
per passare al
secondo livello.
4. Usare
U
/
u
per selezionare l’opzione
[Resolution] e quindi premere ENTER (
)
o
i
per passare al terzo livello.
5. Utilizzare
U
/
u
per selezionare la risoluzione
desiderata, quindi premere ENTER ( ) per
confermare la selezione.
NOTA
• Se la TV non accetta la risoluzione impostata sul
lettore è possibile impostare la risoluzione su
576p (480p) come segue:
1. Premere
Z
per aprire il vassoio del disco.
2. Premere
x
per oltre 5 secondi.
• Poiché diversi fattori in uenzano la risoluzione
dell’uscita video, vedere “Risoluzione video di
uscita” a pagina 70.
HB985-DB.BDEUPPK_ITA.indd 23HB985-DB.BDEUPPK_ITA.indd 23 2010-05-14 2:30:022010-05-14 2:30:02

24 Installazione
Installazione
3
Collegamento
antenna
Per ascoltare la radio connettere l’antenna
fornita in dotazione.
Collegamento antenna
Player
Lettore
NOTA
Una volta connessa l’antenna a lo FM tenerla nella
posizione più orizzontale possibile. Veri care che
l’antenna a lo FM sia completamente distesa.
Connessione con il
dispositivo esterno
Connessione AUX
Si può godere l’audio dell’unità tramite i
jack analogici di uscita degli altoparlanti del
sistema.
Connettere i jack di uscita audio analogici del
componente alla porta AUX S/D (INPUT) di
questa unità. E quindi selezionare l’opzione
[AUX] premendo INPUT/TUNER,
I
/
i
e quindi
ENTER (
).
Connessione AUX
Player
To the audio output jacks
of your component
(TV, VCR, etc.)
Red
White
PR
PB
Y
COMPONENT
VIDEO
INPUT
L
AUX
R
VIDEO
Rosso
Bianco
Lettore
Verso i jack di uscita audio
del componente
(TV, VCR, ecc.)
HB985-DB.BDEUPPK_ITA.indd 24HB985-DB.BDEUPPK_ITA.indd 24 2010-05-14 2:30:022010-05-14 2:30:02

25Installazione
3
Installazione
PORTA Connessione IN
Si può godere l’audio del lettore audio portatile
tramite gli altoparlanti del sistema.
Connettere il jack delle cu e (o line out) del
lettore audio portatile alla porta PORT IN di
questa unità.E quindi selezionare l’opzione
[PORTABLE] premendo INPUT/TUNER,
I
/
i
e
quindi ENTER (
).
Connessione PORT IN
twZGSGUUU
Lettore MP3 ecc..
Connessione OPTICAL IN 1/2
Si può godere l’audio del proprio componente
tramite la connessione ottica digitale che
connette gli altoparlanti del sistema.
Connettere il jack ottico di uscita del
componente ai jack OPTICAL IN 1/2 dell’unità.
E quindi selezionare l’opzione [OPTICAL 1/2]
premendo INPUT/TUNER,
I
/
i
e quindi ENTER
(
). Oppure premere OPTICAL per la selezione
diretta.
Connessione ottica
To the digital
optical output jack
of your component
Verso l’uscita jack
ottico digitale del
componente
HB985-DB.BDEUPPK_ITA.indd 25HB985-DB.BDEUPPK_ITA.indd 25 2010-05-14 2:30:032010-05-14 2:30:03

26 Installazione
Installazione
3
Collegamento Bluetooth®
Informazioni sul Bluetooth
Bluetooth® è una tecnologia di comunicazione
wireless per collegamenti a breve raggio.
L’intervallo supportato è entro i 10 metri (se il
collegamento subisce interferenze da parte
di altre onde elettromagnetiche o si collega
il Bluetooth in altre stanze, l’audio potrebbe
interrompersi).
Il collegamento di singoli dispositivi tramite
la tecnologia Bluetooth non comporta alcun
costo.
Un telefono cellulare dotato di tecnologia
wireless Bluetooth può essere adoperato
tramite il Cascade se la connessione è
e ettuata con Bluetooth.
Dispositivi supportati: telefoni cellulari, MP3,
laptop, PDA (queste unità devono supportare
cu e stereofoniche).
Pro li Bluetooth
Per usare la tecnologia wireless Bluetooth,
i dispositivi devono essere in grado di
interpretare alcuni pro li.
Questa unità è compatibile con i seguenti
pro li.
A2DP (Advanced Audio Distribution Pro le)
Ascolto di musica da un dispositivo
Bluetooth
Accoppiare l’unità e il dispositivo Bluetooth
Prima di cominciare la procedura di
abbinamento, accertarsi che sul dispositivo sia
stato abilitato il Bluetooth.
Fare riferimento alla guida utente del
dispositivo. Non è necessario ripetere
l’operazione di accoppiamento una volta
eseguita la prima volta.
1. Selezionare la funzione Bluetooth usando
INPUT/TUNER o BT AUDIO.
Sul display è visualizzato “BT AUDIO” e
quindi “BT READY”.
2. Attivare il dispositivo Bluetooth ed eseguire
l’operazione di accoppiamento.
Quando l’unità cerca un dispositivo
Bluetooth, sul display di quest’ultimo
può essere visualizzato un elenco delle
periferiche disponibili a seconda del tipo
di dispositivo. L’unità è visualizzata come
“PIONEER AUDIO”.
3. Immettere il codice PIN.
Codice PIN: 0000
4. Se l’unità è accoppiata correttamente con
il dispositivo Bluetooth, il LED Bluetooth
dell’unità si illumina ed è visualizzato “BT
SINK”.
NOTA
La procedura di accoppiamento può cambiare in
base al tipo di dispositivo Bluetooth.
5. Ascolto di brani musicali.
Per riprodurre i le musicali memorizzati
sul proprio dispositivo Bluetooth, fare
riferimento alla relativa guida utente.
NOTA
• Se si cambia il funzionamento dell’unità, la
funzione Bluetooth è disconnessa; in questo caso
è necessario ripetere l’accoppiamento.
• AVRCP potrebbe non essere disponibile in
questa modalità.
HB985-DB.BDEUPPK_ITA.indd 26HB985-DB.BDEUPPK_ITA.indd 26 2010-05-14 2:30:032010-05-14 2:30:03

27Installazione
3
Installazione
Controllo delle informazioni del dispositivo
Bluetooth collegato
Questa funzione è attivata dopo
l’accoppiamento. Per controllare le informazioni
sul Bluetooth.
Tenere premuto ripetutamente DISPLAY.
Le informazioni sul Bluetooth cambiano come
di seguito.
Indirizzo del dispositivo Bluetooth locale
t
Nome del dispositivo
t
Nessuno
t
...
NOTA
• Questa unità non supporta il pro lo Cu e
monofoniche (pro lo vivavoce).
• Quando il collegamento subisce interferenze da
parte di altre onde elettromagnetiche, l’audio
potrebbe essere interrotto.
• Con questa unità non è possibile controllare il
dispositivo Bluetooth.
• L’accoppiamento è limitato a un dispositivo
Bluetooth per unità; non è supportato
l’accoppiamento multiplo.
• Sebbene la distanza tra il Bluetooth e l’unità
sia inferiore a 10 m, in presenza di ostacoli ci
potrebbero essere problemi di collegamento.
• A seconda del tipo di dispositivo, potrebbe non
essere possibile utilizzare la funzione Bluetooth.
• Quando il Bluetooth è collegato, sul display è
visualizzato “BT READY”.
• In caso di malfunzionamenti elettrici
provocati da dispositivi che utilizzano le stesse
frequenze, come apparecchiature medicali,
forni a microonde e periferiche LAN wireless, il
collegamento può interrompersi.
• La presenza di una persona tra il dispositivo
Bluetooth e il lettore può interrompere
la comunicazione; in tal caso, si avrà una
disconnessione.
• Aumentando la distanza tra il Bluetooth e
l’unità, la qualità audio si reduce; si ha una
disconnessione quando lo spazio tra il Bluetooth
e l’unità supera l’intervallo operativo del
Bluetooth.
• La periferica con tecnologia wireless Bluetooth
si disconnette se si spegne l’unità principale
oppure il dispositivo è allontanato dall’unità
principale per oltre 10 m.
HB985-DB.BDEUPPK_ITA.indd 27HB985-DB.BDEUPPK_ITA.indd 27 2010-05-14 2:30:032010-05-14 2:30:03

28 Installazione
Installazione
3
Connessione alla rete
domestica
Questo lettore può essere connesso a una rete
locale (LAN) tramite la porta LAN sul pannello
posteriore.
Per ulteriori informazioni consultare la
documentazione relativa alla propria periferica
di rete. Connettere la porta LAN alla porta
corrispondente del proprio modem o router
usando un cavo LAN o Ethernet disponibile
commercialmente (CAT5 o superiore con
connettore RJ45). Nella con gurazione di
esempio fornita sotto, questo lettore potrà
accedere a contenuti di entrambi PC.
Collegamento rete
Broadband
Service
Router
WAN
LAN 1
LAN 2
LAN 3
Player
PC
PC
Router
Servizio a
banda larga
Lettore
NOTA
• Quando si collega o scollega il cavo LAN,
a errare la spina e non il cavo. Quando si
scollega il cavo LAN, non tirarlo ma estrarlo dalla
presa premendo in basso la linguetta.
• Non collegare un cavo telefonico modulare alla
porta LAN.
• Poiché esistono diverse con gurazioni della
connessione, seguire le speci che della società
telefonica o del fornitore di accesso.
• Se si desidera accedere a contenuti dei PC o
dei server DLNA, questo lettore deve essere
connesso a loro tramite un router sulla stessa
rete locale.
HB985-DB.BDEUPPK_ITA.indd 28HB985-DB.BDEUPPK_ITA.indd 28 2010-05-14 2:30:032010-05-14 2:30:03

29Installazione
3
Installazione
Impostazione rete
Prima di impostare la rete cablata è necessario
collegare la rete a banda larga alla rete
domestica.
Se sulla rete locale (LAN) è presente un server
DHCP tramite connessione cablata, questo
lettore riceverà allocato automaticamente
un indirizzo IP. Dopo avere eseguito la
connessione sica, un certo numero di reti
locali può richiedere una regolazione delle
impostazioni di rete del lettore. Regolare le
impostazioni di rete [RETE] come segue.
1. Selezionare l’opzione [Impost. connessione]
nel menu di [Impostaz.] quindi premere
ENTER (
).
2. Usare i tasti
U
/
u
/
I
/
i
per selezionare la
modalità IP scegliendo tra [Dinamico] e
[Statico].
Solitamente selezionare [Dinamico] per
allocare un indirizzo IP automaticamente.
NOTA
Se sulla rete non ci sono server DHCP e si
desidera impostare il numero di IP manualmente,
selezionare [Statico] quindi impostare [Indirizzo IP],
[Subnet Mask], [Ingresso] e [Server DNS] tramite i
tasti numerici
U
/
u
/
I
/
i
. Se commettete un errore
inserendo il numero, premere CLEAR per cancellare
la sezione evidenziata.
3. Selezionare [OK] e premere ENTER ( ) per
applicare le impostazioni di rete.
4. Il lettore chiederà di veri care la
connessione di rete. Selezionare [OK] e
premere ENTER (
) per completare la
connessione di rete.
5. Se si seleziona [Test] e preme ENTER
( ) al punto 4 di cui sopra, lo stato della
connessione di rete viene visualizzato sullo
schermo.
La connessione di rete può anche essere
testata su [Stato connessione] nel menu di
[Impostaz.].
HB985-DB.BDEUPPK_ITA.indd 29HB985-DB.BDEUPPK_ITA.indd 29 2010-05-14 2:30:032010-05-14 2:30:03

30 Installazione
Installazione
3
Note relative alla connessione di rete:
• Molti problemi di connessione di rete
durate la con gurazione possono essere
risolti eseguendo un reset del router o
modem. Dopo avere connesso il lettore
alla rete domestica, accendere e spegnere
il cavo di alimentazione del router delle
rete domestica oppure modem via cavo.
Quindi accendere e/o riconnettere il cavo di
alimentazione.
• Dipendendo dal fornitore di servizi Internet
(ISP) il numero di dispositivi che possono
ricevere il servizio Internet può essere
limitato dai termini di servizio applicabili.
Per maggiori dettagli rivolgersi al proprio
gestore del servizio.
• La nostra azienda non è responsabile per
eventuali cattivi funzionamenti del lettore
e/o la funzione di connessione a Internet
a causa di errori/cattivi funzionamenti
associati alla connessione a Internet
di banda larga o altre apparecchiature
connesse.
• Le funzioni dei dischi BD-ROM resi
disponibili tramite la funzione di
connessione internet non sono create
o fornite dalla nostra azienda e la nostra
azienda non è responsabile per la loro
funzionalità o disponibilità continuata.
Alcuni materiali relativi al disco resi
disponibili tramite la connessione Internet
possono non essere compatibili con questo
lettore. Se avete domande relative a questi
contenuti, rivolgetevi al produttore del
disco.
• Alcuni contenuti Internet richiedono una
connessione di rete a banda larga.
• Anche se il lettore è connesso e con gurato
correttamente, alcuni contenuti Internet
possono non funzionare correttamente
a causa di congestione di rete, la qualità
della banda del proprio servizio Internet o
problemi con il fornitore dei contenuto.
• Alcune operazioni sulle connessioni Internet
possono non essere possibili a causa di date
restrizioni imposte dal fornitore di servizi
internet (ISP) che vi fornisce la connessione
a Internet a banda larga.
• Eventuali addebiti imposti dal fornitore
ISP incluso, senza limitazione, i costi di
connessione sono vostra responsabilità.
• Per la connessione cablata di questo lettore
è necessaria una porta A 10 Base-T o 100
Base-TX LAN. Se il vostro servizio Internet
non permette questo tipo di connessione,
non sarà possibile collegare il lettore.
• Per usare un servizio xDSL è necessario
utilizzare un router.
• Per usare un servizio DSL è necessario
un modem DSL e per usare il servizio di
modem cablato è necessario un modem
cablato. ipendendoDipendendo dal
metodo di accesso dell’accordo di licenza
con il vostro ISP, è possibile che la funzione
di connessione Internet del vostro lettore
o è possibile che abbiate un limite ai
dispositivi che possono essere collegati
contemporaneamente. (Se il vostro ISP
limita l’abbonamento ad un dispositivo, è
possibile che a questo questo lettore non
sia permesso connettersi a Internet quando
alla rete è già connesso un PC.)
• È possibile che l’uso di un “Router” non sia
permesso o sia limitato dipendendo dalle
politiche e restrizioni poste dal ISP.
Per maggiori dettagli rivolgersi direttamente
al proprio ISP.
• Spegnere tutte le apparecchiature non
utilizzate presenti sulla rete domestica
locale. Alcuni dispositivi possono generare
tra co di rete.
HB985-DB.BDEUPPK_ITA.indd 30HB985-DB.BDEUPPK_ITA.indd 30 2010-05-14 2:30:032010-05-14 2:30:03

31Installazione
3
Installazione
Collegamento
dispositivo USB
Questo lettore può riprodurre le video,
musicali e foto contenuti su un dispositivo USB.
1. Inserire un dispositivo USB nella porta USB
no a completo inserimento.
Connessione USB
2. Premere HOME MENU.
Selezionare [Video], [Foto] o [Musica]
usando
U
/
u
/
I
/
i
e premere ENTER ( ).
3. Selezionare un le tramite
U
/
u
/
I
/
i
e
premere PLAY o ENTER (
) per riprodurre il
le.
Sullo schermo si può controllare la spazio
presente sul dispositivo USB.
4. Selezionare l’altra modalità. Ed estrarre con
attenzione il dispositivo USB.
NOTA
• Questo lettore supporta memorie Flash/Disco
rigido sterno formattati FAT16, FAT32 e NTFS
quando accede a le (musica, foto, video).
Tuttavia, per la registrazione BD-LIVE e Audio
CD, sono supportati solo i formati FAT16 e FAT32.
Usare una memoria USB ash/disco sso esterno
formattati con FAT16 o FAT32 quando si usa la
registrazione BD-LIVE e Audio CD.
• Il dispositivo USB può essere utilizzato per la
memorizzazione locale per poter vedere dischi
BD Live tramite internet.
• Questa unità può supportare no a 4 partizioni
del dispositivi USB.
• Non estrarre il dispositivo USB durante il
funzionamento (riproduzione, ecc.)
• Un dispositivo USB che richiede l’installazione
aggiuntiva di un programma quando è
connesso un computer non è supportato.
• Dispositivo USB: Dispositivo USB che supporta
USB 1,1 e USB 2,0.
• File video, musica e immagine che possono
essere riprodotti. Per informazioni sulle
operazioni su ciascun le, consultare le pagine
relative.
• Si consiglia di eseguire backup regolari per
prevenire la perdita dei dati.
• Quando si usa una prolunga USB o lettore USB
multiplo, è possibile che il dispositivo non venga
riconosciuto.
• Alcuni dispositivi USB possono non funzionare
con questa unità.
• Fotocamere digitali e telefoni cellulari non sono
supportati.
• La porta USB su questa unità non può essere
collegata ad un PC.
HB985-DB.BDEUPPK_ITA.indd 31HB985-DB.BDEUPPK_ITA.indd 31 2010-05-14 2:30:032010-05-14 2:30:03

32 Installazione
Installazione
3
Settaggi
Regolare le impostazioni di
con gurazione
Potete cambiare le impostazioni del lettore sul
menu [Impostaz.].
1. Premere HOME MENU (
).
2. Usare
I
/
i/U
/
u
per selezionare [Impostaz.]
e premere ENTER ( ). Appare il menu di
con gurazione [Impostaz.].
3. Usare
U
/
u
per selezionare la prima di
impostazione e premere
i
per passare al
secondo livello.
4. Usare
U
/
u
per selezionare la seconda
opzione di impostazione e poi premere
ENTER (
) per passare al terzo livello.
5. Usare
U
/
u
per selezionare la risoluzione
desiderata quindi premere ENTER ( )
i
per
confermare la selezione.
HB985-DB.BDEUPPK_ITA.indd 32HB985-DB.BDEUPPK_ITA.indd 32 2010-05-14 2:30:042010-05-14 2:30:04

33Installazione
3
Installazione
Menu [DISPLAY]
Aspetto TV
Selezionare un rapporto d’aspetto TV in base al
tipo della propria TV.
[4:3 Letterbox]
Selezionare se è collegato un televisore
standard 4:3. Visualizza le immagini con
barre nere sopra e sotto.
[4:3 Panscan]
Selezionare se è collegato un televisore
standard 4:3. Visualizza immagini tagliate
per riempire lo schermo. Entrambi i lati
dell’immagine sono tagliati.
[16:9 Originale]
Selezionare se è collegato un televisore
16:9. L’immagine a 4:3 è visualizzata con un
rapporto di aspetto 4:3 originale, con barre
nere sul lato destro e sinistro.
[16:9 Full]
Selezionare se è collegato un televisore 16:9.
L’immagine a 4:3 è regolata orizzontalmente
(in proporzione lineare) per riempire tutto
lo schermo.
NOTA
Potete selezionare l’opzione [4:3 Letterbox] e
[4:3 Panscan] quando la risoluzione è impostata ad
una risoluzione superiore a 720p.
Risoluzione
Imposta la risoluzione di uscita del segnale
video Component e HDMI. Vedere la
pagina 23 e 70 per maggiori dettagli relativi
all’impostazione della risoluzione.
[Auto]
Se è collegato il jack HDMI OUT per fornire
i dati di identi cazione dello schermo TV
(EDID), viene selezionata automaticamente
la risoluzione più adatta al televisore
collegato. Se è collegato solo COMPONENT
VIDEO OUT, la risoluzione passa a 1080i
come risolu zione prede nita.
[1080p]
produce 1080 linee di video progressivo.
[1080i]
produce 1080 linee di video interlacciato.
[720p]
produce 720 linee di video progressivo.
[576p (480p)]
produce 576 (480) linee di video
progressivo.
[576i (480i)]
produce 576 (480) linee di video
interlacciato.
HB985-DB.BDEUPPK_ITA.indd 33HB985-DB.BDEUPPK_ITA.indd 33 2010-05-14 2:30:042010-05-14 2:30:04

34 Installazione
Installazione
3
Mod. v. 1080p
Se la risoluzione è impostata su 1080p,
selezionare [24 Hz] per una presentazione
senza disturbi dei lm (1080p/24 Hz) con
schermo HDMI compatibile con ingresso a
1080p/24 Hz.
NOTA
• Se si seleziona [24 Hz], possono veri carsi
disturbi delle immagini quando si passa da
materiali video ai lm. In questo caso, selezionare
[50 Hz].
• Anche se [Mod. v. 1080p] è impostato su
[24 Hz], se il TV non è compatibile con
1080p/24 Hz, la frequenza fotogrammi e ettiva
dell’uscita video sarà di 50 Hz in base al formato
della sorgente video.
Imp. colore HDMI
Selezionare il tipo di uscita dal jack HDMI OUT.
Per questa impostazione, fare riferimento ai
manuali dello schermo.
[YCbCr]
Selezionare quando si collega a uno
schermo HDMI.
[RGB]
Selezionare quando si collega a uno
schermo DVI (RGB).
Menu [LINGUA]
Menu display
Selezionare una lingua per il menu [Impostaz.]
e per le visualizzazioni a schermo.
Menu Disco/ Audio Disco/ Sottotitolo
Disco
Selezionare la lingua preferita per la traccia
audio (disc audio), sottotitoli e menu disco.
[Originale]
Indica la lingua originale in cui è stato
registrato il disco.
[Altro]
Premere ENTER (
) per selezionare un’altra
lingua. Usare i pulsanti numerici quindi
ENTER ( ) per immettere il numero
corrispondente a 4 cifre in base all’elenco
codici lingua a pagina 69.
[O ] (solo per i sottotitoli del disco)
Disattiva i sottotitoli.
NOTA
Dipendendo dal disco è possibile che la funzione
lingua non funzioni.
HB985-DB.BDEUPPK_ITA.indd 34HB985-DB.BDEUPPK_ITA.indd 34 2010-05-14 2:30:042010-05-14 2:30:04

35Installazione
3
Installazione
Menu [AUDIO]
Settaggio Di usori
Per ottenere il miglior audio possibile, usare
il display di con gurazione altoparlanti per
speci care il volume degli altoparlanti connessi
e la loro distanza dal punto di ascolto. Usare
questo test per regolare il volume degli
altoparlanti allo stesso livello.
[Di usore]
Selezionare l’altoparlante che si desidera
regolare.
[Volume]
Regola il livello di uscita di ogni altoparlante.
[Distanza]
Regola la distanza tra ciascuno altoparlante
e la posizione di ascolto.
[Test/ Stop tono test]
Gli altoparlanti emetteranno un tono di test.
[OK]
Conferma le impostazioni.
[Annulla]
Cancella l’impostazione.
HD AV Sync
A volte con la TV digitale ci sono ritardi tra
immagine e audio. Quando si veri ca questa
eventualità potete compensare impostando
un ritardo sull’audio in modo che questo
‘attenda’ l’arrivo dell’immagine: questo viene
denominato HD AV Sync. Usare
U u
per
scor
rere verso l’alto e verso il basso il ritardo
che può essere impostato su qualsiasi valore
tra 0 e 300m sec.
Il ritardo varierà in funzione del canale della
TV Digitale su ci si trova. Se si modi ca canale è
possibile che sia necessario risincronizzare HD
AV Sync.
DRC (Controllo range dinamico)
Quando un contenuto codi cato in Dolby
Digital o Dolby Digital Plus viene riprodotto,
potete comprimere l’intervallo dinamico
dell’uscita audio (la di erenza tra i suoni più
forti e quelli più deboli). Questo ti permette
di ascoltare un lm ad un volume più
basso, senza perdere la chiarezza del suono.
Impostare il [DRC] su [ON] per questo e etto.
NOTA
L’impostazione DRC può essere modi cata solo
quando un disco non viene inserito o l’unità è nella
modalità di arresto completo.
HB985-DB.BDEUPPK_ITA.indd 35HB985-DB.BDEUPPK_ITA.indd 35 2010-05-14 2:30:042010-05-14 2:30:04

36 Installazione
Installazione
3
Menu [BLOCCATO]
Per accedere alle funzioni di [BLOCCATO],
occorre immettere il codice di sicurezza a 4
cifre creato. Se non è ancora stata inserita una
password, verrà chiesto di farlo. Inserire due
volte una password a 4 cifre e premere ENTER
(
) per creare una password nuova.
Password
Potete creare o modi care la password.
[Nessuno]
Inserire due volte una password a 4 cifre
e premere ENTER (
) per creare una
password nuova.
[Modi ca]
Inserire la password attuale e premere
ENTER (
). Inserire due volte una password
a 4 cifre e premere ENTER (
) per creare
una password nuova.
NOTA
Se si commette un errore prima di premere ENTER
( )
, premere CLEAR(ANNULLA). Dopodiché
inserire la password corretta.
Se si dimentica la password,
In caso non si ricordi la password, è possibile
annullarla come segue:
1. Rimuovere eventuali dischi dal lettore.
2. Selezionare l’opzione [Bloccato] nel menu
[Impostaz.].
3. Utilizzare i tasti numerici per inserire “210499”
nel menu [Bloccato]. La password viene
annullata.
Classi cazione DVD
Blocca la riproduzione di DVD classi cati sulla
base dei loro contenuti. (Non tutti i dischi sono
classi cati.)
[Restrizione 1-8]
Il valore 1 presenta le maggiori restrizioni,
mentre il valore 8 presenta restrizioni
minime.
[Sblocca]
Se si seleziona questa opzione, il controllo
parentale non è attivo il disco viene
riprodotto completamente.
Classi cazione BD
Selezionare un limite di età per la riproduzione
di BD-ROM. Usare i tasti numerici per inserire il
limite di età per la visualizzazione di BD-ROM.
[255]
È possibile riprodurre tutti i BD-ROM.
[0-254]
Impedisce la riproduzione di un BD-ROM
con le valutazioni corrispondenti de nite.
NOTA
La [Classi cazione BD] viene applicata solo per
i dischi CD dotati di Advanced Rating Control
(controllo avanzato della classi cazione).
Codice Locale
Immettere il codice dell’area i cui standard
sono stati utilizzati per valutare il DVD, in base
all’elenco a pagina 68.
HB985-DB.BDEUPPK_ITA.indd 36HB985-DB.BDEUPPK_ITA.indd 36 2010-05-14 2:30:042010-05-14 2:30:04

37Installazione
3
Installazione
Menu [RETE]
Impost. connessione
Se la vostra rete domestica è pronta per la
connessione del lettore, il lettore necessita
essere con gurato per la connessione di rete
per poter comunicare sulla rete.
(Vedere “Connessione alla rete domestica” alle
pagina 28.)
Stato connessione
Se si desidera controllare lo stato della
connessione di rete su questo lettore,
selezionare le opzioni [Stato connessione] e
premere ENTER ( ) per veri care se sono state
stabilite connessioni alla rete e a Internet.
Collegamento BD-LIVE
È possibile limitare l’accesso a Internet quando
si utilizzano le funzionalità BD-LIVE.
[Consentito]
L’accesso a Internet è consentito per tutti i
contenuti BD-LIVE.
[Parz. Consentito]
L’accesso a Internet è consentito solo per
i contenuti BD-LIVE che dispongono di
certi cati del proprietario. L’accesso a Internet
e le funzionalità AACS Online sono vietati per
tutti i contenuti BD-LIVE senza certi cato.
[Proibito]
L’accesso a Internet è vietato per tutti i
contenuti BD-LIVE.
Menu [ALTRO]
DivX VOD
INFORMAZIONI SU DIVX VIDEO: DivX® è un
formato digitale video creato da DivX, Inc.
Questo dispositivo è un dispositivo originale
certi cato DivX Certi ed® che riproduce DivX
video. Visitate www.divx.com per ulteriori
informazioni e strumenti software per
convertire i vostri le in DivX video.
INFORMAZIONI SU DIVX VIDEO-ON-DEMAND:
Per riprodurre contenuti Video-on-Demand
(VOD) questo dispositivo originale certi cato
DivX Certi ed® deve essere registrato.
Per generare il codice di registrazione,
individuare la sezione DivX VOD nel menu di
impostazione del dispositivo. Andare a vod.
divx.com con questo codice per completare
il processo di registrazione ed avere ulteriori
informazioni relativamente a DivX VOD.
[Registra]
Visualizza il codice di registrazione del
vostro lettore.
[Disattiva]
Disattivate il lettore e visualizzate il codice
di disattivazione.
NOTA
Tutti i video scaricati da DivX® VOD con il codice
di registrazione di questo lettore possono essere
riprodotti solo su questa unità.
HB985-DB.BDEUPPK_ITA.indd 37HB985-DB.BDEUPPK_ITA.indd 37 2010-05-14 2:30:042010-05-14 2:30:04

38 Installazione
Installazione
3
Spegnimento automatico
Il salvaschermo appare quando si lascia il
lettore in modalità arresto per circa cinque
minuti. Se si imposta l’opzione su [ON],
l’unità si spegne automaticamente quando
il salvaschermo rimane visualizzato per 25
minuti. Impostare questa opzione su [O ]
lasciare il salvaschermo acceso no a quando
l’unità non viene azionata dall’utente.
Inizializza
Imp.fabbrica
L’unità può essere resettata alle impostazioni
originali di fabbrica.
Canc. mem. BD
Inizializza il contenuto BD dall’unità di
memorizzazione USB connessa.
NOTA
Se si ripristina il lettore alle impostazioni prede nite
utilizzando l’opzione [Imp.fabbrica], bisognerà
impostare di nuovo l’attivazione a tutti i servizi
on-line e di rete.
Info software
Visualizza la versione software corrente.
HB985-DB.BDEUPPK_ITA.indd 38HB985-DB.BDEUPPK_ITA.indd 38 2010-05-14 2:30:042010-05-14 2:30:04

39Installazione
3
Installazione
E etto audio
Potete selezionare una modalità audio adatta.
Premere SOUND ripetutamente no a quando
non appare la modalità desiderata sul pannello
anteriore o schermo. Gli elementi visualizzati
per l’equalizzatore possono essere diversi
dipendendo dalle fonti audio ed e etti.
[Pioneer 1]: Fornisce una regolazione del
suono adatta con il tipo di collegamento
piccolo degli altoparlanti (S-BD303).
[Pioneer 2]: Fornisce una regolazione del
suono adatta con il tipo di collegamento
grande degli altoparlanti (S-BD707T).
[Bypass]: Software con segnale audio surround
multicanale viene riprodotto in base al modo
con cui è stato registrato.
[Bass Blast]: Rinforza l’e etto audio basso
dagli altoparlanti anteriore destro e sinistro e
subwoofer.
[PL ll Movie]: Esegue la decodi ca modalità
lm Pro Logic ll del segnale di ingresso e
produce cinque canali di uscita a banda
completa da 2 sorgenti canale. Questa
impostazione è ideale per la visione di video di
vecchi lm o lm doppiati. Questa modalità è
disponibile solo per 2 sorgenti canale.
[PL ll Music]: Esegue la decodi ca modalità
musica Pro Logic ll del segnale di ingresso
e produce cinque canali di uscita a banda
completa da 2 sorgenti canale. Questa
impostazione è l’ideale sia per gli stereo
normali che per i CD. Questa modalità è
disponibile solo per 2 sorgenti canale.
[Clear Voice]: Questa modalità rende il suono
della voce chiaro migliorando la qualità
dell’audio vocale.
[Game]: Potete godere di un audio più virtuale
durante il gioco dei giochi video.
[Night]: Questo può essere utile quando si
guardano lm a basso volume a notte tarda.
[Mus. ReTouch]: Quando si ascoltano le MP3
o altra musica compressa è possibile migliorare
l’audio. Questa modalità è disponibile solo per
2 sorgenti canale.
[Loudness]: Migliora l’audio dei bassi e degli
acuti.
HB985-DB.BDEUPPK_ITA.indd 39HB985-DB.BDEUPPK_ITA.indd 39 2010-05-14 2:30:042010-05-14 2:30:04

40 Uso
Uso
4
Riproduzione
generale
Riproduzione dei dischi
1. Premere
Z
OPEN/CLOSE e posizionare il
disco sul vassoio portadisco.
2. Premere
Z
OPEN/CLOSE per chiudere il
vassoio portadischi e.
Con la maggioranza di dischi Audio CD,
BD-ROM e DVD-ROM la riproduzione viene
avviata automaticamente.
3. Premere
HOME MENU.
4. Selezionare [Video], [Foto] o [Musica]
usando
U
/
u
/
I
/
i
e premere ENTER ( ).
5. Selezionare l’opzione Disc tramite
I
/
i
e
premere ENTER (
).
Quando si connettono fino a due dispositivi
compare come sopra.
6. Selezionare un le tramite
U
/
u
/
I
/
i
,
e premere
B
(PLAY) o ENTER (
) per
riprodurre il le.
NOTA
• Le funzioni di riproduzione descritte i questo
manuale non sono sempre disponibili con ogni
le e supporto. Alcune funzioni possono essere
limitate dipendendo da molti fattori.
• Dipendendo dai titoli BD-ROM, per la
riproduzione corretta è possibile che sia
necessaria una connessione con dispositivo USB.
4
Uso
HB985-DB.BDEUPPK_ITA.indd 40HB985-DB.BDEUPPK_ITA.indd 40 2010-05-14 2:30:042010-05-14 2:30:04

41Uso
4
Uso
Per interrompere l
Premere
x
STOP durante la riproduzione.
Per sospendere l
Premere
X
PAUSE/STEP durante la
riproduzione.
Premere
B
PLAY per riprendere la riproduzione.
Riproduzione fotogramma per
fotogramma
Premere
X
PAUSE/STEP durante la
riproduzione di lm.
Premere ripetutamente
X
PAUSE/STEP per
riprodurre fotogramma per fotogramma.
Scansione avanti o indietro
Durante la riproduzione premere
m
o
M
per l’avanzamento veloce o il riavvolgimento
veloce.
È possibile cambiare varie velocità di
riproduzione premendo ripetutamente
m
o
M
.
Rallentare la velocità di riproduzione
Con la riproduzione in pausa, premere
M
SCAN ripetutamente per avviare
la riproduzione con diverse velocità di
rallentatore.
Saltare il capitolo/traccia o le
precedente/successivo
Durante la riproduzione, premere
.
o
>
per passare al capitolo/brano/ le successivo
o tornare all’inizio del capitolo/brano/ le
corrente.
Premere brevemente
.
due volte per
tornare al capitolo/brano/ le precedente.
Uso del menu disco
BD
DVD
AVCHD
Visualizzazione del menu disco
La schermata di menu può essere visualizzata
in primo luogo dopo il caricamento del disco
che contiene un menu. Se si vuole visualizzare
il menu disco durante la riproduzione, premere
MENU.
Usare i pulsanti
U
/
u
/
I
/
i
per navigare le voci
del menu.
Visualizzazione del menu popup
Alcuni dischi BD-ROM contengono menu
Pop-up che vengono visualizzati durante la
riproduzione.
Premere POPUP/ TOP MENU durante la
riproduzione, e usare i pulsanti
U
/
u
/
I
/
i
per
navigare le voci del menu.
Riprendere riproduzione
BD
DVD
AVCHD
MOVIE
ACD
MUSIC
L’unità registra il punto in cui avete premuto il
x
(STOP) dipendendo dal disco.
Se “
Xx
(Resume Stop)” (Riprendi Stop) appare
sullo schermo brevemente, premere
B
(PLAY)
riprendere la riproduzione (dal punto scena).
Se si preme
x
(STOP) due volte o si scarica
il disco, “
x
”(Complete Stop) appare sullo
schermo. L’unità annulla il punto di arresto.
NOTA
• Il punto di ripresa può essere cancellato quando
si preme un pulsante (ad esempio;
1
(POWER),
Z
(OPEN/CLOSE), ecc).
• Sui dischi BD-Video con BD-J, la funzione di
ripresa riproduzione non funziona.
• Se si preme
x
(STOP) una volta durante la
riproduzione di un titolo BD-ROM interattivo,
l’unità si troverà nella modalità di arresto completo.
HB985-DB.BDEUPPK_ITA.indd 41HB985-DB.BDEUPPK_ITA.indd 41 2010-05-14 2:30:052010-05-14 2:30:05

42 Uso
Uso
4
Riproduzione
avanzata
Ripetere la riproduzione
BD
DVD
AVCHD
ACD
MUSIC
Durante la riproduzione, premere REPEAT (
)
ripetutamente per selezionare una modalità di
ripetizione.
BD/DVD
A-
– La vostra sezione selezionata verrà
ripetuta continuamente.
Capitolo
– Il le corrente viene riprodotto
ripetutamente.
Title
Titolo
– Il le corrente viene riprodotto
ripetutamente.
Per tornare alla riproduzione normale,
premere ripetutamente REPEAT (
) per
selezionare [O ].
Audio CD/File musicali
– Il le corrente o traccia viene
riprodotto ripetutamente.
– Tutte le tracce o le vengono
riprodotti ripetutamente.
– Le tracce o le vengono riprodotti in
ordine casuale.
– Tutte le tracce o le vengono
riprodotti in ordine casuale.
– La vostra sezione selezionata verrà
ripetuta continuamente. (Solo AUDIO CD).
Per riprendere la riproduzione normale,
premere CLEAR.
NOTA
• Se si preme
>
una volta durante la
riproduzione Ripeti Capitolo/ Traccia, la
riproduzione ripetuta viene annullata.
• È possibile che questa funzione non sia funzioni
con alcuni dischi o titolo.
Ripetizione di una sezione
speci ca
BD
DVD
AVCHD
ACD
Questo lettore non è in grado di ripetere una
porzione speci cata.
1. Durante la riproduzione, premere REPEAT
(
) per selezionare [A-] all’inizio della
porzione che si desidera ripetere. E quindi
premere ENTER ( ).
2. Premere ENTER (
) alla ne di ogni
porzione. La vostra sezione selezionata verrà
ripetuta continuamente.
3. Per tornare alla riproduzione normale,
pr
emere ripetutamente REPEAT ( ) per
selezionare [o ] oppure premere CLEAR.
NOTA
Non potete selezionare una sezione inferiore a 3
secondi.
Ricerca con contrassegno
BD
DVD
AVCHD
MOVIE
È possibile avviare la riproduzione da un
massimo di nove punti registrati.
Per immettere un contrassegno
1. Durante la riproduzione, premere MARKER
(Contrassegno) nel punto desiderato.
L’icona Marker appare brevemente sullo
schermo.
2. Ripetere il punto 1 per aggiungere no a
nove segnalibri.
HB985-DB.BDEUPPK_ITA.indd 42HB985-DB.BDEUPPK_ITA.indd 42 2010-05-14 2:30:052010-05-14 2:30:05

43Uso
4
Uso
Per richiamare una scena
contrassegnata
1. Premere SEARCH; viene visualizzato il menu
di ricerca sullo schermo.
2. Premere un pulsante numerico per
selezionare il contrassegno da richiamare.
La riproduzione viene avviata dalla scena
contrassegnata.
Eliminare un segnalibro
1. Premere SEARCH; viene visualizzato il menu
di ricerca sullo schermo.
2. Premere
u
per evidenziare un numero di
contrassegno. Usare
I
/
i
per selezionare
una scena evidenziata che si desidera
eliminare.
3. Premere CLEAR; la scena contrassegnata
viene cancellata dal menu di ricerca.
NOTA
• Questa funzione può non funzionare
dipendendo dai dischi, titoli o capacità del
server.
• Tutti i punti contrassegnati vengono cancellati
se il titolo è nella modalità di fermo completo
(
x
), il titolo viene cambiato o se il disco viene
scaricato.
• Se la lunghezza totale del titolo è inferiore a 10
secondi, questa funzione non è disponibile.
Utilizzo del menu di ricerca
BD
DVD
AVCHD
MOVIE
Usando il menu di ricerca si può trovare
agevolmente il punto dal quale si desidera
avviare la riproduzione.
Cercare un punto
1. Durante la riproduzione, premere SEARCH
per visualizzare il menu di ricerca.
2. Premere
I
/
i
per andare avanti o indietro di
15 secondi. È possibile selezionare il punto
che si desidera saltare tenendo premuto il
tasto
I
/
i
.
Avviare la riproduzione da un punto
contrassegnato
1. Premere SEARCH; viene visualizzato il menu
di ricerca sullo schermo.
2. Premere
u
per evidenziare un numero di
contrassegno. Usare
I
/
i
per selezionare la
scena evidenziata di cui si desidera avviare
la riproduzione.
3. Premere ENTER (
) per avviare la
riproduzione dalla scena evidenziata.
NOTA
• Questa funzione può non funzionare
dipendendo dai dischi, titoli o capacità del
server.
• Questa funzione può non funzionare su alcuni
contenuti [Coll. Home] dipendendo dal tipo di
le e capacità del server DLNA.
HB985-DB.BDEUPPK_ITA.indd 43HB985-DB.BDEUPPK_ITA.indd 43 2010-05-14 2:30:052010-05-14 2:30:05

44 Uso
Uso
4
Memorizzazione dell’ultima
scena
BD
DVD
Questa unità è in grado di memorizzare
l’ultima scena dell’ultimo disco visualizzato.
L’ultima scena rimane in memoria anche se
si rimuove il disco o si spegne l’unità. Se si
carica un disco la cui ultima scena è stata
memorizzata, quest’ultima viene richiamata
automaticamente.
NOTA
• L’ultima scena memorizzata di un disco
precedente viene cancellata non appena viene
riprodotto un altro disco.
• Con alcuni dischi, questa funzione potrebbe non
funzionare.
• Questo lettore non memorizza le impostazioni
di un disco se l’unità viene spento prima di
iniziare la riproduzione.
Visualizzazione su
schermo
Si possono visualizzare e regolare varie
informazioni e impostazioni del contenuto.
Visualizzazione di contenuto
sullo schermo
BD
DVD
AVCHD
MOVIE
1. Durante la riproduzione premere DISPLAY
(
) per visualizzare le varie informazioni di
riproduzione.
a
h
g
f
e
d
c
b
a
Titolo – numero del titolo corrente/
numero complessivo di titoli.
b
Capitolo – tempo trascorso di
riproduzione /tempo complessivo di
riproduzione
c
Tempo – tempo trascorso di riproduzione
/tempo complessivo di riproduzione
d
Audio – Scelta della lingua o del canale
audio
e
Sottotitolo – Sottotitolo selezionato
f
Angolo – Angolazione selezionata/
numero totale di angolazioni
HB985-DB.BDEUPPK_ITA.indd 44HB985-DB.BDEUPPK_ITA.indd 44 2010-05-14 2:30:052010-05-14 2:30:05

45Uso
4
Uso
g
Aspetto TV – Rapporto d’aspetto della
TV selezionato
h
Mod. immagine – modo immagine
selezionato.
2. Selezionare un’opzione usando
U
/
u
.
3. Usare
I
/
i
per selezionare il parametro
desiderato per l’opzione.
4. Premere RETURN (
O
) per uscire dal menu
su schermo.
NOTA
• Se non vengono premuti pulsanti per un paio di
secondi, il display su schermo scompare.
• Un numero di titolo non può essere selezionato
su alcuni dischi.
• Le voci disponibili possono essere diversi
dipendendo dai dischi e dai titoli.
• Durante la riproduzione di un titolo interattivo
BD, alcune informazioni sulle impostazioni
vengono visualizzate sullo schermo ma non è
possibile modi carle.
Riproduzione a partire da un
punto desiderato
BD
DVD
AVCHD
MOVIE
1. Premere DISPLAY (
) durante la
riproduzione. La casella di ricerca tempo
visualizza il tempo trascorso.
2. Selezionare l’opzione [Tempo] quindi
inserire il tempo di inizio desiderato
indicando le ore, i minuti e i secondi da
sinistra a destra.
Per esempio, per trovare una scena a 2 ore,
10 minuti e 20 secondi, inserire “21020”.
Premere
I
/
i
per andare avanti o indietro di
60 secondi.
3. Premere ENTER (
) per avviare la
riproduzione dall’ora speci cata.
NOTA
• Questa funzione può non funzionare su alcuni
dischi o titoli.
• Questa funzione può non funzionare su alcuni
contenuti [Coll. Home] dipendendo dal tipo di
le e capacità del server DLNA.
HB985-DB.BDEUPPK_ITA.indd 45HB985-DB.BDEUPPK_ITA.indd 45 2010-05-14 2:30:052010-05-14 2:30:05

46
Uso
Uso
4
Ascolto di un diverso audio
BD
DVD
AVCHD
MOVIE
1. Durante la riproduzione, premere DISPLAY
(
) per visualizzare il menu su schermo.
2. Usare
U
/
u
per selezionare l’opzione [Audio].
3. Usare
I
/
i
per selezionare la lingua audio
desiderata, traccia audio o canale audio.
NOTA
• Alcuni dischi consentono di cambiare le
selezioni audio solo attraverso il menu del disco.
In questo caso, premere il pulsante POPUP/ TOP
MENU o MENU e scegliere l’audio appropriato
dalle opzioni del menu.
• Subito dopo aver cambiato l’impostazione
dell’audio, può veri carsi una discrepanza
temporanea tra immagine e audio.
Scelta della lingua dei
sottotitoli
BD
DVD
AVCHD
MOVIE
1. Durante la riproduzione, premere DISPLAY
(
) per visualizzare il menu su schermo.
2. Usare
U
/
u
per selezionare l’opzione
[Sottotitolo].
3. Usare
I
/
i
per selezionare la lingua
desiderata per i sottotitoli.
4. Premere RETURN (
O
) per uscire dal menu
su schermo.
NOTA
Alcuni dischi consentono di cambiare le selezioni
dei sottotitoli solo attraverso il menu del disco.
In questo caso, premere il pulsante POPUP/ TOP
MENU o MENU e scegliere il sottotitolo appropriato
dalle opzioni del menu.
HB985-DB.BDEUPPK_ITA.indd 46HB985-DB.BDEUPPK_ITA.indd 46 2010-05-14 2:30:052010-05-14 2:30:05

47
Uso
4
Uso
Visione da un’angolazione
diversa
BD
DVD
Se il disco contiene scene registrate a
di erenti angolazioni della telecamera, è
possibile cambiare l’angolazione durante la
riproduzione.
1. Durante la riproduzione, premere DISPLAY
( ) per visualizzare il menu su schermo.
2. Usare
U
/
u
per selezionare l’opzione
[Angolo].
3. Usare
I
/
i
per selezionare l’angolo
desiderato.
4. Premere RETURN (
O
) per uscire dal menu
su schermo.
Modi ca del rapporto di
aspetto della TV
BD
DVD
AVCHD
MOVIE
Si può modi care il rapporto di aspetto della
TV durante la riproduzione.
1. Durante la riproduzione, premere DISPLAY
(
) per visualizzare il menu su schermo.
2. Usare
U
/
u
per selezionare l’opzione
[Aspetto TV].
3. Usare
I
/
i
per selezionare l’opzione
desiderata.
4. Premere RETURN (
O
) per uscire dal menu
su schermo.
NOTA
Anche se si modi ca il valore dell’opzione
[Aspetto TV] l’opzione [Aspetto TV] nel menu di
con gurazione [Impostaz.] non viene modi cata.
Modi ca della modalità
immagine
BD
DVD
AVCHD
MOVIE
Si può modi care la [Mod. immagine] durante
la riproduzione.
1. Durante la riproduzione, premere DISPLAY
(
) per visualizzare il menu su schermo.
2. Usare
U
/
u
per selezionare l’opzione [Mod.
immagine].
3. Usare
I
/
i
per selezionare l’opzione
desiderata.
4. Premere RETURN (
O
) per uscire dal menu
su schermo.
Impostazione dell’opzione [Imp ut]
1. Durante la riproduzione, premere DISPLAY
( ) per visualizzare il menu su schermo.
2. Usare
U
/
u
per selezionare l’opzione [Mod.
immagine].
3. Usare
I
/
i
per selezionare l’opzione
[Imp ut] e premere ENTER (
).
4. Usare
U
/
u
/
I
/
i
per regolare l’opzione [Mod.
immagine].
Selezionare l’opzione [Default] quindi
premere ENTER ( ) per ripristinare tutte le
regolazioni video.
5. Usare
U
/
u
/
I
/
i
per selezionare l’opzione
[Chiudi] e premere ENTER (
) per terminare
l’impostazione.
HB985-DB.BDEUPPK_ITA.indd 47HB985-DB.BDEUPPK_ITA.indd 47 2010-05-14 2:30:062010-05-14 2:30:06

48
Uso
Uso
4
Gustare BD-LIVE
Questa unità consente di utilizzare funzionalità
come picture- in-picture, audio secondario
e pacchetti Virtuali, ecc., con BD-Video che
supporta BONUSVIEW (BD-ROM versione 2
Pro le 1 versione 1.1/ Final Standard Pro le).
Audio e video secondari possono essere
riprodotti da un disco compatibile con
la funzione picture-in-picture (immagine
nell’immagine). Per il metodo di riproduzione
vedere le istruzioni fornite con il disco.
Oltre alla funzione di BONUSVIEW, il BD-Video
con supporto BD-LIVE (BD-ROM versione 2
Pro lo 2) con funzione di estensione di rete
permette di usare più funzioni quali scaricare
i trailer dei nuovi lm in uscita tramite la
connessione di questa unità a Internet.
1. Controllare la connessione di rete e le
impostazioni (Pagine 28-30).
2. Inserire un dispositivo di memorizzazione
nella porta USB sul pannello anteriore.
Per scaricare i contenuti bonus è
necessario disporre di un dispositivo di
memorizzazione USB.
Connessione USB
3 . Premere HOME MENU, e impostare
l’opzione [Collegamento BD-LIVE] nel menu
di [Impostaz.] (pagina 37).
In base al disco, la funzionalità BD-
LIVE può non essere attiva se l’opzione
[Collegamento BD-LIVE] è impostata su
[Parz. Consentito].
4 . Inserire un BD-ROM con BD-LIVE.
Le operazioni variano in funzione del disco.
Vedere il manuale fornito con il disco.
NOTA
• Non estrarre il dispositivo USB collegato durante
il download del contenuto o se un disco Blu-
ray è nel vassoio. In questo caso è possibile
danneggiare il dispositivo USB collegato e le
funzionalità BD-LIVE potrebbero non funzionare
più correttamente con il dispositivo USB
danneggiato. Se il dispositivo USB collegato
appare sembra danneggiato da tale azione, è
possibile formattare il dispositivo USB dal PC e
riutilizzarlo con questo lettore.
• In alcuni paesi, l’accesso ad alcuni contenuti
BD-LIVE potrebbe essere limitato, a seguito di
decisioni del fornitore del contenuto stesso.
• Per caricare e avviare la riproduzione dei
contenuti BD-LIVE sono necessari alcuni minuti.
HB985-DB.BDEUPPK_ITA.indd 48HB985-DB.BDEUPPK_ITA.indd 48 2010-05-14 2:30:062010-05-14 2:30:06

49
Uso
4
Uso
Riproduzione di un
le video e disco VR
Potete riprodurre i dischi DVD-RW che sono
stati registrati con il formato Video Recording
(VR) e le video contenuti su un disco o
dispositivo USB.
1. Premere
HOME MENU.
2. Selezionare l’opzione [Video] usando
U
/
u
/
I
/
i
e premere ENTER ( ).
3. Selezionare il dispositivo usando
I
/
i
e
premere ENTER ( ).
Quando si connettono fino a due dispositivi
compare come sopra.
4. Selezionare un le tramite
U
/
u
/
I
/
i
, e
premere
B
PLAY o ENTER ( ) per riprodurre
il le.
NOTA
• I requisiti per i le sono descritti a pagina 11.
• È possibile utilizzare diverse funzioni di
riproduzione. Vedere le pagine 40-47.
• I dischi in formato DVD-VR non nalizzati non
possono essere riprodotti in questo lettore.
• Alcuni dischi DVD-VR sono realizzati con dati
CPRM con DVD RECORDER. Questa unità non
supporta tali tipi di dischi.
Che cos’è CPRM?
CPRM è un sistema di protezione dalla copia
(con sistema di codi ca) che consente solo
la registrazione a ‘copia unica’ dei programmi
trasmessi. CPRM è l’acronimo di Content
Protection for Recordable Media.
HB985-DB.BDEUPPK_ITA.indd 49HB985-DB.BDEUPPK_ITA.indd 49 2010-05-14 2:30:062010-05-14 2:30:06

50
Uso
Uso
4
Selezione della le dei
sottotitoli.
MOVIE
Se un nome di le video e nome di le di
sottotitoli sono uguali, il le di sottotitoli
viene riprodotto automaticamente con la
riproduzione del le video.
Se il nome del le di sottotitoli è diverso da
quello del le video, è necessario selezionare
il nome del le sottotitoli nel menu [Video]
prima di riprodurre il le.
1. Usare
U
/
u
/
I
/
i
per selezionare il le di
sottotitoli che si desidera riprodurre nel
menu [Video].
2. Premere ENTER (
).
Premere ENTER ( ) nuovamente per
deselezionare il le di sottotitoli. Il le di
sottotitoli selezionato viene visualizzato
durate la riproduzione del le video.
NOTA
• S si preme
x
STOP durante la riproduzione la
selezione sottotitolo viene annullata.
• Questa funzione può non funzionare con la
funzione [Coll. Home].
Modi ca della pagina di codice
sottotitoli
MOVIE
Se i sottotitoli non vengono visualizzati in
modo corretto, è possibile modi care la
pagina di codice sottotitoli per visualizzare
correttamente il le.
1. Durante la riproduzione, premere DISPLAY
(
) per visualizzare il menu su schermo.
2. Usare
U
/
u
per selezionare l’opzione
[Pagina codice].
3. Usare
I
/
i
per selezionare l’opzione codice
desiderata.
4. Premere RETURN (
O
) per uscire dal menu
su schermo.
HB985-DB.BDEUPPK_ITA.indd 50HB985-DB.BDEUPPK_ITA.indd 50 2010-05-14 2:30:062010-05-14 2:30:06

51
Uso
4
Uso
Visualizzazione di
fotogra e
Con questo lettore è possibile visualizzare le
di immagini.
1. Premere
HOME MENU
2. Selezionare l’opzione [Foto] usando
I
/
i
e
premere ENTER ( ).
3. Selezionare il dispositivo tramite
I
/
i
, e
premere ENTER ( ).
Quando si connettono fino a due dispositivi
compare come sopra.
4. Selezionare un le tramite
U
/
u
/
I
/
i
, e
premere ENTER (
) per visualizzare la foto.
Esecuzione della presentazione
Premere
B
PLAY per avviare la presentazione.
Fermare una presentazione.
Premere
x
STOP durante la presentazione.
Fermare temporaneamente una
presentazione.
Premere
X
PAUSE/STEP durante la
presentazione.
Premere
B
PLAY per riprendere la proiezione.
Passare alla foto precedente /
successiva
Durante la visualizzazione di una foto a tutto
schermo premere
I
o
i
per passare alla foto
precedente o successiva.
NOTA
• I requisiti per i le sono descritti a pagina 11.
• È possibile utilizzare diverse funzioni di
riproduzione. Vedere le pagine 40-47.
HB985-DB.BDEUPPK_ITA.indd 51HB985-DB.BDEUPPK_ITA.indd 51 2010-05-14 2:30:062010-05-14 2:30:06

52
Uso
Uso
4
Opzioni durante la
visualizzazione di una foto
Potete usare varie funzioni durante la visione di
una foto a tutto schermo.
1. Durante la visione di una foto a tutto
schermo, premere DISPLAY (
) per
visualizzare il menu delle opzioni.
2. Selezionare un’opzione usando
U
/
u
.
a
g
f
e
d
c
b
h
a
Foto corrente/Numero totale di foto
– Usare
I
/
i
per visualizzare la foto
precedente/successiva.
b
Present. – Premere ENTER (
) per avviare
o mettere in pausa la presentazione.
c
Sel. musica – Selezione della musica di
sottofondo per la presentazione.
d
Musica –Premere ENTER (
) per avviare o
mettere in pausa la musica di sottofondo.
e
Ruota – Premere ENTER (
) per ruotare la
foto in senso orario.
f
Zoom – Premere ENTER (
) per
visualizzare il menu [Zoom].
g
e etto – Usare
I
/
i
per selezionare
un e etto di transizione tra foto in una
presentazione.
h
Intervallo – Usare
I
/
i
per selezionare
un e etto di ritardo tra foto in una
presentazione.
3. Premere RETURN (
O
) per chiudere il menu
delle opzioni.
Ascolto musica della musica
durante la presentazione
diapositive
Potete visualizzare i le di foto durante l’ascolto
dei le musicali.
1. Premere
HOME MENU
2. Selezionare [Foto] o [Coll. Home] usando
U
/
u
/
I
/
i
, e premere ENTER ( ).
3. Selezionare l’opzione [Disco] o [USB] tramite
I
/
i
e premere ENTER ( ).
Per il menu [Coll. Home] è necessaria la
selezione di un server o cartella condivisa.
4. Selezionare un le tramite
U
/
u
/
I
/
i
, e
pr
emere ENTER ( ) per visualizzare le foto.
5. Premere DISPLAY (
) per visualizzare il
menu delle opzioni.
6. Usare
U
/
u
per selezionar
e l’opzione
[Sel. musica] e premere ENTER ( ) per
visualizzare il menu [Sel. musica].
HB985-DB.BDEUPPK_ITA.indd 52HB985-DB.BDEUPPK_ITA.indd 52 2010-05-14 2:30:072010-05-14 2:30:07

53
Uso
4
Uso
7. Utilizzare
U
/
u
per selezionare un dispositivo
e quindi premere ENTER ( ).
I dispositivi che potete selezionare possono
essere diverse dipendendo sulla posizione
dei le di foto che si stanno visualizzando a
tutto schermo.
Posizione foto Dispositivo
disponibile
Disco Disco, USB
USB Disco, USB
Condividere
cartella sul
proprio PC (CIFS)
CIFS
Server DLNA Server DLNA
8. Usare
U
/
u
per selezionar
e il le o cartella
che si desidera riprodurre.
Selezionare una cartella e premere ENTER
(
) per visualizzare la cartella inferiore.
Selezionare
e premere ENTER ( ) per
visualizzare la cartella superiore.
NOTA
Quando si seleziona musica da [Coll. Home], la
scelta della cartella non è disponibile.
Su [Coll. Home] è disponibile solo la selezione del
le.
9. Usare
i
per selezionare [OK] e premere
ENTER ( ) per completare la selezione
musicale.
Ascolto dei brani
musicali
Questa unità è in grado di riprodurre CD Audio
e le musicali.
1. Premere
HOME MENU
2. Selezionare l’opzione [Musica] usando
U
/
u
/
I
/
i
e premere ENTER ( ).
3. Selezionare il dispositivo tramite
I
/
i
, e
premere ENTER ( ).
Quando si connettono fino a due dispositivi
compare come sopra.
4. Selezionare un le musicale o traccia audio
tramite
U
/
u
/
I
/
i
, e premere ENTER ( ) per
riprodurre la musica.
NOTA
• I requisiti per i le sono descritti a pagina 11.
• È possibile utilizzare diverse funzioni di
riproduzione. Vedere le pagine 40-47.
HB985-DB.BDEUPPK_ITA.indd 53HB985-DB.BDEUPPK_ITA.indd 53 2010-05-14 2:30:072010-05-14 2:30:07

54
Uso
Uso
4
Registrazione Audio CD
Si può registrare una traccia o tutte le tracce
desiderate da un CD audio su un dispositivo di
memorizzazione.
1. Inserire un dispositivo di memorizzazione
nella porta USB sul pannello anteriore.
2. Premere
Z
(OPEN/CLOSE) e posizionare un
CD audio sul vassoio portadisco.
Premere
Z
(OPEN/CLOSE) per chiudere il
vassoio portadischi e. La riproduzione inizia
automaticamente.
3. Premere DISPLAY (
) per visualizzare il
menu delle opzioni.
Oppure
Premere il tasto
z
USB REC sul
telecomando.
Potete registrare tutta la musica sul CD
audio.
4. Usare
U
/
u
per selezionare l’opzione
[Registrazione CD] e premere ENTER (
)
per visualizzare il menu [Registrazione CD].
Ripetere questo passo per selezionare tutte
le tracce desiderate.
5. Usare
U
/
u
per selezionare la traccia che si
desidera copiare sul menu e premere ENTER
(
).
Ripetere questo passo per selezionare tutte
le tracce desiderate.
Selezionare tutte le tracce su un
CD audio.
Seleziona un’opzione di codi ca
dal menu di pop-up menu
(128 kbps, 192 kbps, 320 kbps o
Lossless).
Chiude la registrazione e riporta
alla schermata principale.
6. Usare
U
/
u
/
I
/
i
per selezionate [Start] e
premete ENTER (
).
7. Usare
U
/
u
/
I
/
i
selezionare la cartella di
destinazione da copiare.
Se si desidera creare una cartella nuova
usare
U
/
u
/
I
/
i
per selezionare [Nuova
cartella] e premere ENTER ( ).
Inserire un nome di cartella tramite la
tastiera virtuale e premere ENTER ( ) con
[OK] è selezionato.
8. Usare
U
/
u
/
I
/
i
per selezionare [OK]
e premere ENTER (
) per avviare la
registrazione CD audio.
Se si desidera interrompere la registrazione
audio CD in corso, premere ENTER ( ) con
[Annulla] evidenziato.
9. Quando è completata la registrazione audio
CD appare un messaggio. Premere ENTER
(
)per veri care il le musicale creato nella
cartella di destinazione.
HB985-DB.BDEUPPK_ITA.indd 54HB985-DB.BDEUPPK_ITA.indd 54 2010-05-14 2:30:082010-05-14 2:30:08

55
Uso
4
Uso
NOTA
• La tabella sotto mostra il tempo medio di
registrazione da una traccia audio con 4 minuti
di tempo di riproduzione su un le musicale con
192 kbps come esempio.
Modalità Stop Durante la
riproduzione
1,4 min. 2 min.
• Tutti i tempi riportati nella tabella di cui sopra
sono approssimativi.
• Il tempo di ripping per il dispositivo di
memorizzazione USB varia in funzione delle
capacità di archiviazione del dispositivo USB.
• Accertarsi che vi siano almeno minimo 50MB di
spazio libero quando si registra sul dispositivo di
memorizzazione USB.
• La lunghezza della musica deve essere superiore
a 20 secondi per una registrazione corretta.
• Non spegnere il lettore o rimuovere il dispositivo
di archiviazione USB durante la registrazione
Audio CD.
La copia non autorizzata di materiale protetto,
compresi programmi per computer, le,
trasmissioni e registrazioni audio, potrebbe
infrangere i diritti d’autore e costituire reato.
Questo apparecchio non dovrebbe essere usato
per tali propositi.
Siate responsabili
Rispettate i diritti d’autore
HB985-DB.BDEUPPK_ITA.indd 55HB985-DB.BDEUPPK_ITA.indd 55 2010-05-14 2:30:082010-05-14 2:30:08

56
Uso
Uso
4
Riproduzione del iPod
Potete godere dell’audio del vostro iPod.
Per maggiori dettagli riguardo iPod vedere la
guida dell’utente iPod.
Preparazione
• Per visualizzare i video e foto iPod sullo
schermo TV.
- Accertarsi di utilizzare la connessione
video tramite il jack VIDEO OUT sul
pannello posteriore di questa unità.
Selezionare la modalità di ingresso video
appropriata sulla TV.
- Dipendendo dall’iPod, accertarsi che le
impostazioni video di video > e quindi
impostare TV Out su Ask o On dall’iPod.
Per maggiori dettagli riguardo le
impostazioni video vedere la guida
dell’utente iPod.
- la visione delle foto è disponibile solo
se questa unità è nella modalità iPod
IN e si possono vedere foto solo come
presentazione. Dovete avviare una
presentazione sull’iPod per vedere una foto
su una TV. Per maggiori dettagli riguardo
una presentazione vedere la guida
dell’utente iPod.
• Prima di connettere l’iPod spegnere questa
unità e ridurre il volume dell’unità al
minimo.
1. Connettere saldamente l’unità iPod.
Collegare l’iPod
Collegare la base e
posizionarvi l’iPod.
2. Selezionare un le usando
U
/
u
/
I
/
i
, quindi
premere ENTER per avviare la riproduzione.
Visualizzazione iPod sullo
schermo
1. Connettere saldamente l’unità iPod.
2. Premere HOME MENU (
).
3. Selezionare [Musica] oppure [Video] usando
I
/
i
, quindi premere ENTER ( ).
Se si è connesso l’altro dispositivo (CD o
USB), selezionare iPod sul menu.
4. Selezionare un contenuto usando
U
/
u
/
I
/
i
, e premere ENTER (
).
HB985-DB.BDEUPPK_ITA.indd 56HB985-DB.BDEUPPK_ITA.indd 56 2010-05-14 2:30:082010-05-14 2:30:08

57
Uso
4
Uso
Utilizzare l’iPod in modalità
iPod IN
È possibile utilizzare l’iPod tramite il
telecomando fornito e i controlli dell’iPod.
1. Connettere saldamente l’unità iPod.
Se si accende questa unità il vostro iPod
viene automaticamente acceso e viene
riavviata la ricarica.
2. Premere INPUT/TUNER per selezionare la
funzione iPod.
U
/
u
/
I
/
i
Seleziona un’opzione di menu.
B
/ENTER
Avvia la riproduzione di musica
o video.
X
Per mettere i pausa durante la
riproduzione. Per riprendere
la riproduzione, premere
nuovamente
B
(PLAY).
m
/
M
Avanti veloce o riavvolgi un
brano o video
.
/
>
Salta la riproduzione avanti o
indietro.
REPEAT Premere ripetutamente per
selezionare una modalità di
ripetizione: Traccia (
), Tutto
(
), O (No display).
NOTA
Questo sistema è compatibile con il sistema audio
e video di iPod (4 generazione), iPod nano, iPod
classic, iPod mini, iPod touch e iPhone.
(L’iPod shu e non è supportato).
NOTA
• Un messaggio di errore “CHECK IPOD” (controllare
IPOD) o “Connected iPod model is not supported” (il
modello iPod collegato non è supportato) appare
quando:
- il vostro iPod non è disponibile per la funzione da
usare.
t
Aggiornare il software iPod all’ultima versione
disponibile.
• Se questa unità visualizza un messaggio di errore,
seguire il messaggio. Un messaggio di errore
“CONTROLLA IPOD” o “Controllare il vostro iPod.”
- La comunicazione tra questa unità e l’iPod non è
riuscita
t
Eseguire la procedura di undock & re-dock
dell’iPod su questa unità.
- Il vostro iPod non è connesso saldamente.
- Questa unità riconosce l’iPod come dispositivo
sconosciuto.
- La carica del vostro iPod è eccezionalmente
insu ciente.
t
La batteria necessita di carica.
t
Se si carica la batteria quando al carica dell’iPod
è molto bassa, la procedura di ricarica può
richiedere un tempo di ricarica più lungo.
• Potete utilizzare l’adattatore che è stato fornito
con il vostro iPod per eseguire la connessione
per uso stabile dell’iPod.
• La compatibilità con il vostro iPod può variare
dipendendo dal tipo di iPod.
• iPod touch e iPhone hanno una di erenza di
funzionamento rispetto all’iPod. È possibile
che sia necessario un controllo aggiuntivo
per utilizzarli su questa unità. (es. “scorrere per
sbloccare”)
• Se si usa un’applicazione, e ettua una telefonata,
o invia e riceve un messaggio di testo SMS, ecc.
su iPod touch o iPhone, staccarlo dall’iPod dock
di questa unità e quindi usarlo.
• Dipendendo dalla versione di software del vostro
iPod, è possibile che non sia possibile controllare
il vostro iPod dall’unità. Si raccomanda di
installare la versione software più recente.
• La qualità video dipende dalle sorgenti video del
vostro iPod.
• Se si hanno problemi con il proprio iPod, visitare
www.apple.com/support/ipod.
HB985-DB.BDEUPPK_ITA.indd 57HB985-DB.BDEUPPK_ITA.indd 57 2010-05-14 2:30:082010-05-14 2:30:08

58
Uso
Uso
4
Funzionamento della
radio
Veri care che l’antenna sia collegata.
(Vedere a pagina 24.)
Ascoltare la RADIO
1. Premere INPUT/TUNER no (FM) alla
visualizzazione della radio nella nestra del
display. Viene sintonizzata l’ultima stazione
radio ricevuta.
2. Premere e tenere premuto TUNE (-/+)
per circa due secondi no a quando
l’indicazione della frequenza non inizia
a modi care. La scansione si interrompe
quando l’unità si sintonizza su una stazione.
Oppure Premere TUNE (-/+) ripetutamente.
3. Regolare il volume girando la manopola
VOLUME posta sul pannello anteriore
oppure premendo VOL (+/-) del
telecomando.
Preimpostazione delle stazioni
radio
È possibile preimpostare 50 stazioni per la FM.
Prima di sintonizzare, assicurarsi di abbassare il
volume.
1. Premere INPUT/TUNER no alla
visualizzazione di TUNER (FM) nella nestra
del display.
2. Selezionare la frequenza desiderata tramite
TUNE (-/+).
3.
Premere ENTER ( ) nella nestrella del
display lampeggia un numero preimpostato.
4. Premere PRESET per selezionare il numero
di preimpostazione desiderato.
5.
Premere ENTER ( ). La stazione viene salvata.
6. Ripetere i passaggi 2 e 5 per memorizzare
ulteriori stazioni.
Elimina tutte le stazioni salvate
Premere e tenere premuto CLEAR per due
secondi. “ERASE ALL” inizia lampeggiare. Quindi
tutte le emittenti salvate vengono eliminate.
Migliorare una ricezione FM
scadente
Premere il pulsante colorato D (blu)
(ST/ MONO) del telecomando. Questo passa
il sintonizzatore dalla modalità stereo a quella
mono e di solito migliora la ricezione.
Vedere informazioni relative a
un’emittente radio
Il sintonizzatore FM è dotato di un servizio
Radio Data System (RDS). Questo visualizza
informazioni relative alla stazione radio che si
sta ascoltando. Premere RDS ripetutamente
per scorrere i vari tipi di dati:
PS (Nome del programma di servizio)
Il nome del canale viene
visualizzato sul display.
PTY (Riconoscimento del tipo di
programma)
Il tipo di programma (es. Jazz o
News) viene visualizzato sul display.
RT (Radio Text)
Un messaggio di testo che
contiene informazioni speciali
relative alla stazione emittente.
Questo testo può scorrere sullo
schermo.
CT (Ora controllata dal canale)
Questo visualizza data e ora come
trasmessa dalla stazione radio.
HB985-DB.BDEUPPK_ITA.indd 58HB985-DB.BDEUPPK_ITA.indd 58 2010-05-14 2:30:082010-05-14 2:30:08

59
Uso
4
Uso
Riproduzione di
contenuto sulla rete
domestica
Il lettore può sfogliare e riprodurre contenuti
presenti sul vostro PC e server DLNA certi cati
presenti sulla vostra rete domestica.
Informazioni su DLNA
Questo lettore è un lettore di supporti
multimediali digitali certi cato DLNA in grado
di visualizzare e riprodurre video e musica
dai vostri server di supporti multimediali
digitali compatibili DLNA (PC e elettronica di
consumo).
La Digital Living Network Alliance (DLNA) è
un’organizzazione tra industrie di elettronica di
consumo, industria dei computer e aziende di
telefonia cellulare. Digital Living consente una
facile condivisione di supporti digitali su una
rete domestica.
Il logotipo di certi cazione DLNA rende
agevole individuare prodotti conformi alle linee
guida di interoperativià DLNA. Questa unità è
conforme alle linee guida di interoperatività
DLNA v1.5.
Quando un PC con software server DLNA
o altro dispositivo compatibile DLNA viene
connesso è possibile che sia necessario
impostare modi che al software server
software o altri dispositivi. Vedere le istruzioni
del software o dispositivo per ulteriori
informazioni.
Accesso ad un server DLNA
media
1. Controllare la connessione di rete e le
impostazioni (pagine 28-30).
2. Premere
HOME MENU.
3. Selezionare l’opzione [Coll. Home] usando
U
/
u
/
I
/
i
e premere ENTER (
).
4. Selezionare un server DLNA media all’elenco
usando
U
/
u
, e premere ENTER ( ).
Se si desidera eseguire una nuova scansione
dei server di media disponibili, premere il
pulsante verde (B).
NOTA
Dipendendo dal server multimediale questo
lettore può avere la necessità di ottenere prima un
permesso dal server.
5. Selezionare un le tramite
U
/
u
/
I
/
i
, e
premere ENTER ( ) per riprodurre il le.
HB985-DB.BDEUPPK_ITA.indd 59HB985-DB.BDEUPPK_ITA.indd 59 2010-05-14 2:30:082010-05-14 2:30:08

60
Uso
Uso
4
NOTA
• I requisiti per i le sono descritti a pagina 11.
• È possibile utilizzare diverse funzioni di
riproduzione. Vedere le pagine 40-47.
• I requisiti dei le a pagina 11 non sono sempre
compatibili. Vi possono essere delle limitazioni
delle funzioni dei le e della capacità del media
server.
• Le miniature dei le non riproducibili possono
essere visualizzate nel menu [Coll. Home] menu,
ma non possono essere riprodotti su questo
lettore.
• Se nel menu [Coll. Home] si trova un le
musicale che non può esser
e riprodotto il lettore
ignora il le e passa a quello successivo.
• Il nome del le per sottotitoli e nome del le
video devono essere uguali e trovarsi nella
stessa cartella.
• La qualità di riproduzione e funzionamento della
funzione [Coll. Home] può essere in uenzata
dalle condizioni della r
ete domestica.
• I le su supporti rimovibili quali unità USB, unità
DVD ecc. sul media server possono non essere
condivisi in modo corretto.
Accesso alla cartella condivisa
dal PC
1. Avviare il PC che ha connesso la rete locale.
2. Sul PC, le cartelle condivise che contengono
le video, musicali o immagini.
3. Sul lettore controllare la connessione di rete
e le impostazioni (pagine 28-30).
4. Premere
HOME MENU.
5. Selezionare l’opzione [Coll. Home] usando
U
/
u
/
I
/
i
, e premere ENTER (
).
6. Selezionare una cartella condivisa
dall’elenco selezionando
U
/
u
, e premere
ENTER (
).
Se si desidera e ettuare una scansione dei
server multimediali disponibili, premere il
pulsante color verde (B).
NOTA
Dipendendo dalla cartella condivisa, questo lettore
può richiedere l’immissione di un ID utente di rete
e password per accedere alla cartella.
7. Selezionare un le tramite
U
/
u
/
I
/
i
, e
premere ENTER ( ) per riprodurre il le.
HB985-DB.BDEUPPK_ITA.indd 60HB985-DB.BDEUPPK_ITA.indd 60 2010-05-14 2:30:092010-05-14 2:30:09

61
Uso
4
Uso
NOTA
• I requisiti per i le sono descritti a pagina 11.
• È possibile utilizzare diverse funzioni di
riproduzione. Vedere le pagine 40-47.
• Se nel menu [Coll. Home] si trova un le
musicale che non può essere riprodotto il lettore
ignora il le e passa a quello successivo.
• Se nel menu [Coll. Home] si trova un le
musicale che non può essere riprodotto il lettore
ignora il le e passa a quello successivo.
• Il nome del le per sottotitoli e nome del le
video devono essere uguali e trovarsi nella
stessa cartella.
• La qualità di riproduzione e funzionamento della
funzione [Coll. Home] può essere in uenzata
dalle condizioni della rete domestica.
• I le su supporti rimovibili quali unità USB, unità
DVD ecc. sul PC possono non essere condivisi in
modo corretto.
• Dipendendo dall’ambiente del PC si possono
veri care problemi di connessione.
Requisiti PC
• Windows® XP (Service Pack 2 o superiore),
Windows Vista® (nessun Service Pack
richiesto)
Windows 7®
• Processori 1.2 GHz Intel® Pentium® III o AMD
Sempron™ 2200+
• Ambiente di rete: 100 Mb Ethernet, WLAN
(IEEE 802.11b/g/n)
NOTA
Se si usa Windows® XP o Windows Vista®, visitare
il collegamento fornito sotto per ulteriori
informazioni relativamente alle impostazioni di
condivisione le.
HB985-DB.BDEUPPK_ITA.indd 61HB985-DB.BDEUPPK_ITA.indd 61 2010-05-14 2:30:092010-05-14 2:30:09

62
Uso
Uso
4
Inserimento di un ID utente di rete e
password
Dipendendo dall’ambiente del PC è possibile
che sia necessario inserire un ID utente e
password per accedere alla cartella condivisa.
1. Il menu della tastiera viene visualizzato
automaticamente se è richiesto
l’inserimento dell’ID utente e della password
di rete.
2. Utilizzare
U
/
u
/
I
/
i
per selezionare un
carattere, quindi premere ENTER (
) per
confermare la selezione sul menu della
tastiera.
Per inserire una lettera accentata,
selezionare la lettera dal set di caratteri
esteso.
Esempio: selezionare “D” quindi premere
DISPLAY ( ) per visualizzare il set di caratteri
esteso. Utilizzare
I
/
i
per selezionare “D” o
“Ď”, quindi premere ENTER (
).
[Annulla] – Annulla tutti i caratteri inseriti.
[Spazio] – Inserisce uno spazio nella posizione
del cursore.
[<–] – Elimina il carattere precedente nella
posizione del cursore.
[ABC / abc / #+-=&] – Cambia le impostazioni
del menu della tastiera passando alle lettere
maiuscole, minuscole o simboli.
3. Quando si è nito0 di inserire ID utente e
password di rete, selezionare [OK] tramite
U
/
u
/
I
/
i
e premere ENTER (
) per
accedere alla cartella.
L’ID utente e la password verranno ricordati
dopo l’accesso alla cartella. Se non si
desidera che ID utente e password vengano
ricordati, premere il pulsante colore rosso
(A) per deselezionare la casella [Ricorda]
prima di accedere alla cartella.
HB985-DB.BDEUPPK_ITA.indd 62HB985-DB.BDEUPPK_ITA.indd 62 2010-05-14 2:30:092010-05-14 2:30:09

63
Manutenzione
5
Manutenzione
Note sui dischi
Maneggiamento dei dischi
Non attaccare mai carta o nastro adesivo al
disco.
Conservazione dei dischi
Dopo la riproduzione riporre sempre il disco
nella sua custodia. Non esporre il disco alla luce
diretta del sole o fonti di calore e non lasciare
mai in un’auto posteggiata alla diretta luce del
sole.
Pulizia dei dischi
Non usare solventi quali alcol, benzina,
diluente, detergenti disponibili in commercio o
spray antistatico prodotti per i vecchi dischi di
vinile.
Maneggiamento
dell’unità
Durante la spedizione
Conservare la scatola e materiale di
imballaggio originali. Se si necessita inviare
l’unità, per ottenere la massima protezione,
imballare l’unità come imballata originalmente
di fabbrica.
Per mantenere le super ci esterne pulite vicino
all’unità.
• Non usare liquidi volatili quali spray
insetticidi vicino all’unità.
• Stro nare con forza può danneggiare la
super cie.
• Non lasciare la gomma dei prodotti di
plastica in contatto con l’unità per un
periodo prolungato di tempo.
Pulizia dell’unità
Per pulire l’apparecchio usare un panno
morbido ed asciutto. Se le super ci sono molto
sporche usare un panno morbido leggermente
inumidito con una soluzione detergente dolce.
Non usare solventi aggressivi come alcol,
benzene o diluente poiché questi possono
rovinare la super cie dell’unità.
Manutenzione dell’unità
L’unità è un apparecchio di precisione ad
altissima tecnologia Quando le lenti ottiche del
pick-up e gli elementi del gruppo conduttore
del disco sono sporchi o usurati, la qualità
dell’immagine può essere ridotta. per dettagli,
rivolgersi al centro di assistenza autorizzato più
vicino.
5
Manutenzione
HB985-DB.BDEUPPK_ITA.indd 63HB985-DB.BDEUPPK_ITA.indd 63 2010-05-14 2:30:092010-05-14 2:30:09

64
Risoluzione dei problemi
Risoluzione dei problemi
6
6
Risoluzione dei problemi
Generale
L’;alimentazione non è
inserita.
• Inserire il cavo di alimentazione nella presa di rete.
L’unità non avvia la
riproduzione.
• Inserire un disco riproducibile. (Controllare il tipo di disco,
sistema colore e codice regionale.)
• Disporre il disco con il lato riproduzione volto verso il basso.
• Collocare in modo corretto nella guida il disco nel vassoio
portadisco.
• Pulire il disco.
• Eliminare la funzione di classi cazione o modi care il livello
di classi cazione.
L’angolo non può essere
modi cato.
• Le angolature multiple non sono registrate sul video DVD in
riproduzione.
La lingua dei sottotitoli non
può essere modi cata o
disattivata.
• I sottotitoli non sono registrati sul video DVD in riproduzione.
Impossibile riprodurre i le
MP3/WMA/ JPEG/DivX.
• I le non sono stati registrati con un formato supportato
dall’unità.
• L’unità non è compatibile con il codec del le video.
Il telecomando non
funziona in modo corretto
• Il telecomando non è puntato al sensore dell’unità.
• Il telecomando è troppo lontano dall’unità.
• C’è un ostacolo nel percorso tra telecomando e unità.
• Le batterie del telecomando sono scariche
HB985-DB.BDEUPPK_ITA.indd 64HB985-DB.BDEUPPK_ITA.indd 64 2010-05-14 2:30:092010-05-14 2:30:09

65
Risoluzione dei problemi
6
Risoluzione dei problemi
Immagine
Nessuna immagine • Selezionare sulla TV il modo corretto di ingresso segnale
video in modo da poter visualizzare sullo schermo
l’immagine.
• Collegare saldamente il cavo audio.
• Controllare l’impostazione colore [Imp. colore HDMI]
nel menu di con gurazione [Impostaz.] è impostata per
l’elemento corretto conforme alla propria connessione video.
• È possibile che la vostra TV non supporti la risoluzione di
impostazione del lettore. Modi care la risoluzione su una
supportata dalla TV.
• Il jack di uscita HDMI OUT è connesso ad un dispositivo DVI
che non supporta la funzione di protezione del copyright.
L’immagine è molto
disturbata
• Si sta riproducendo un disco registrato con un sistema colore
diverso da quello della TV.
• Impostare su una risoluzione supportata dalla propria TV.
Suono
L’audio è assente o l’audio
è distorto
• L’unità si trova nella modalità di scansione, rallentatore o
pausa.
• Il volume audio è basso.
• Controllare la connessione dei cavi dell’altoparlante.
(pagina 16)
HB985-DB.BDEUPPK_ITA.indd 65HB985-DB.BDEUPPK_ITA.indd 65 2010-05-14 2:30:092010-05-14 2:30:09

66
Risoluzione dei problemi
Risoluzione dei problemi
6
Network
La funzionalità BD-LIVE
non funziona.
• L’unità di archiviazione USB connessa può non avere spazio
su ciente. Connettere un’unità di memorizzazione USB con
almeno 1GB di spazio libero.
• Veri care che l’unità sia collegata correttamente alla rete LAN
e che sia possibile accedere a Internet (vedere a pag. 28).
• La velocità della connessione a banda larga non è su ciente
per l’uso delle funzioni BD-LIVE. Rivolgersi al proprio provider
di servizi internet (ISP) e si consiglia aumentare la velocità
della banda larga.
• L’opzione [Collegamento BD-LIVE] nel menu di
con gurazione [Impostaz.] è impostata [Proibito]. Impostare
l’opzione su [Consentito].
Il design e le speci che tecniche sono soggette a cambiamento senza preavviso.
Aggiornamenti
Le informazioni relative a questo prodotto sono disponibili sul sito Web di Pioneer.
Accedere al sito per le informazioni sull’aggiornamento o sull’assistenza del lettore di dischi Blu-
ray.
HB985-DB.BDEUPPK_ITA.indd 66HB985-DB.BDEUPPK_ITA.indd 66 2010-05-14 2:30:092010-05-14 2:30:09

67
Appendice
7
Appendice
Controllo del
televisore mediante il
telecomando
Potete controllare la PIONEER TV tramite i
pulsanti sotto.
Pulsanti di
omando TV
Pulsante Uso
1
(TV Power)
Spegne/accende la TV
INPUT Alterna la sorgente di
ingresso TV tra il TV e altre
sorgenti di ingresso.
CH +/- Consente di cercare in
su e in giù tra i canali
memorizzati.
VOL +/- Regola il volume del TV.
NOTA
In base all’unità connessa, è probabile non sia
possibile controllare il TV usando alcuni dei
pulsanti.
Con gurare il telecomando per
controllare l’apparecchio TV
È possibile impartire comandi all’apparecchio
TV utilizzando il telecomando in dotazione.
Se il televisore posseduto è tra quelli elencati di
seguito, impostare il relativo codice di fabbrica.
1. Tenendo premuto il tasto
1
(TV POWER),
premere i tasti numerici per inserire il
codice del produttore dell’apparecchio TV
(vedere la tabella sotto riportata).
Produttore
Numero di
codice
Pioneer 1 (Prede nito)
Sony 2, 3
Panasonic 4, 5
Samsung 6, 7
LG 8, 9
2. Rilasciare il tasto
1
(TV POWER) per
completare la con gurazione.
A seconda del modello di apparecchio TV,
alcuni tasti, o anche tutti, potrebbero non
funzionare, anche dopo aver inserito il corretto
codice del produttore.
Dopo aver sostituito le batterie del
telecomando, il numero del codice impostato
potrebbe ricon gurarsi alle impostazioni
prede nite.
Reimpostare il numero codice appropriato.
7
Appendice
HB985-DB.BDEUPPK_ITA.indd 67HB985-DB.BDEUPPK_ITA.indd 67 2010-05-14 2:30:092010-05-14 2:30:09

68
Appendice
Appendice
7
Indicativo località
Selezionare un codice area dall’elenco.
Area Codice Area Codice Area Codice Area Codice
Afghanistan AF
Argentina AR
Australia AU
Austria AT
Belgio BE
Bhutan BT
Bolivia BO
Brasile BR
Cambogia KH
Canada CA
Cile CL
Cina CN
Colombia CO
Congo CG
Costa Rica CR
Croazia HR
Repubblica Ceca CZ
Danimarca DK
Ecuador EC
Egitto EG
El Salvador SV
Etiopia ET
Fiji FJ
Finlandia FI
Francia FR
Germania DE
Gran Bretagna GB
Grecia GR
Groenlandia GL
Hong Kong HK
Ungheria HU
India IN
Indonesia ID
Israele IL
Italia IT
Giamaica JM
Giappone JP
Kenya KE
Kuwait KW
Libia LY
Lussemburgo LU
Malaysia MY
Maldive MV
Messico MX
Monaco MC
Mongolia MN
Morocco MA
Nepal NP
Paesi Bassi NL
Antille Olandesi AN
Nuova Zelanda NZ
Nigeria NG
Norvegia NO
Oman OM
Pakistan PK
Panama PA
Paraguay PY
Filippine PH
Polonia PL
Portogallo PT
Romania RO
Federazione Russa RU
Arabia Saudita SA
Senegal SN
Singapore SG
Repubblica
Slovacca SK
Slovenia SI
Sud Africa ZA
Corea del Sud KR
Spagna ES
Sri Lanka LK
Svezia SE
Svizzera CH
Taiwan TW
Tailandia TH
Turchia TR
Uganda UG
Ucraina UA
Stati Uniti US
Uruguay UY
Uzbekistan UZ
Vietnam VN
Zimbabwe ZW
HB985-DB.BDEUPPK_ITA.indd 68HB985-DB.BDEUPPK_ITA.indd 68 2010-05-14 2:30:092010-05-14 2:30:09

69
Appendice
7
Appendice
Elenco codici lingua
Usare questo elenco per inserire la lingua desiderata per le seguenti impostazioni iniziali:
[Audio Disco], [Sottotitolo Disco], e [Menu Disco].
Lingua Codice Lingua Codice Lingua Codice Lingua Codice
Afar 6565
Afrikaans 6570
Albanese 8381
Ameharic 6577
Arabo 6582
Armeno 7289
Assamese 6583
Aymara 6588
Azerbaigiano 6590
Bashkir 6665
Basco 6985
Bengali, Bangla 6678
Bhutani 6890
Bihari 6672
Bretone 6682
Bulgaro 6671
Birmano 7789
Bielorusso 6669
Cinese 9072
Croato 7282
Ceco 6783
Danese 6865
Olandese 7876
Inglese 6978
Esperanto 6979
Estone 6984
Faroese 7079
Fiji 7074
Finlandese 7073
Francese 7082
Frisone 7089
Galiziano 7176
Georgiano 7565
Tedesco 6869
Greco 6976
Groenlandese 7576
Guarani 7178
Gujarati 7185
Hausa 7265
Ebraico 7387
Hindi 7273
Ungherese 7285
Islandese 7383
Indonesiano 7378
Interlingua 7365
Irlandese 7165
Italiano 7384
Giapponese 7465
Kannada 7578
Kashmiri 7583
Kazako 7575
Kirghiso 7589
Coreano 7579
Curdo 7585
Laothian 7679
Latino 7665
Lettone, Lettish 7686
Lingala 7678
Lituano 7684
Macedone 7775
Malgascio 7771
Malese 7783
Malayalam 7776
Maori 7773
Maratto 7782
Moldavo 7779
Mongolo 7778
Nauru 7865
Nepali 7869
Norvegese 7879
Oriya 7982
Panjabi 8065
Pashto, Pushto 8083
Persiano 7065
Polacco 8076
Portoghese 8084
Quechua 8185
Retoromanzo 8277
Romeno 8279
Russo 8285
Samoano 8377
Sanscrito 8365
Scozzese Gaelico
7168
Serbo 8382
Serbo-Croato 8372
Shona 8378
Sindhi 8368
Cingalese 8373
Slovacco 8375
Sloveno 8376
Spagnolo 6983
Sudanese 8385
Swahili 8387
Svedese 8386
Tagalog 8476
Tajik 8471
Tamilico 8465
Telugu 8469
Tailandese 8472
Tonga 8479
Turco 8482
Turcomanno 8475
Twi 8487
Ucraino 8575
Urdu 8582
Uzbeco 8590
Vietnamese 8673
Volapük 8679
Gallese 6789
Wolof 8779
Xhosa 8872
Yiddish 7473
Yoruba 8979
Zulu 9085
HB985-DB.BDEUPPK_ITA.indd 69HB985-DB.BDEUPPK_ITA.indd 69 2010-05-14 2:30:092010-05-14 2:30:09

70
Appendice
Appendice
7
Risoluzione video di uscita
Quando si riproducono supporti non protetti da copia
Video Out
Risoluzione
HDMI OUT
COMPONENT VIDEO OUT
HDMI connesso HDMI disconnesso
576i (480i) 576p (480i) 576i (480i)
576p (480p) 576p (480p) 576p (480p)
720p 720p 720p
1080i 1080i 1080i
1080p / 24 Hz 1080p / 24 Hz 576i (480i) 1080i
1080p / 50 Hz 1080p / 50 Hz 576i (480i) 1080i
Se si riproducono supporti con protezione dalla copia
Video Out
Risoluzione
HDMI OUT
COMPONENT VIDEO OUT
HDMI connesso HDMI disconnesso
576i (480i) 576p (480p) 576i (480i)
576p (480p) 576p (480p) 576p (480p)
720p 720p 576i (480i) 576p (480p)
1080i 1080i 576i (480i) 576p (480p)
1080p / 24 Hz 1080p / 24 Hz 576i (480i) 576p (480p)
1080p / 50 Hz 1080p / 50 Hz 576i (480i) 576p (480p)
Connessione HDMI OUT
• Per l’impostazione di risoluzione 576i (480i),
la risoluzione reale di HDMI OUT passa a
576p (480p).
• Se si seleziona una risoluzione
manualmente, quindi si collega il jack HDMI
al TV e il TV non l’accetta, la risoluzione
viene impostata su [Auto].
• Se si seleziona una risoluzione che non
viene accettata dall’apparecchio TV viene
visualizzato un messaggio di avvertenza.
Dopo avere modi cato la risoluzione
se non è possibile vedere lo schermo,
attendere 20 secondi e la risoluzione
tornerà automaticamente alla risoluzione
precedente.
• La frequenza delle immagini dell’uscita
video 1080p può essere impostata
automaticamente a 24 Hz o 50 Hz in
base alla capacità e alla preferenza del TV
collegato e alla frequenza delle immagini
nativa del contenuto sul disco BD-ROM.
Connessione COMPONENT VIDEO
OUT
BD o DVD possono impedire il passaggio a
valori superiori su uscita analogica.
Connessione VIDEO OUT
La risoluzione della presa VIDEO OUT è sempre
a 576i (480i).
HB985-DB.BDEUPPK_ITA.indd 70HB985-DB.BDEUPPK_ITA.indd 70 2010-05-14 2:30:102010-05-14 2:30:10

71
Appendice
7
Appendice
“Blu-ray Disc” e sono marchi commerciali.
Il lodo “BD-LIVE” è un marchio dell’associazione
Blu-ray Disc.
“BONUSVIEW” è un marchio di Blu-ray Disc Association.
Java e tutti i marchi e loghi basati su Java sono
marchi o marchi registrati di Sun Microsystems,
Inc. negli Stati Uniti e in altri paesi.
Fabbricato sotto licenza della Dolby Laboratories.
“Dolby” ed il simbolo della doppia D sono marchi
commerciali della Dolby Laboratories.
Prodotto su licenza con brevetto U.S. n: 5.451.942;
5.956.674; 5.974.380; 5.978.762; 6.226.616;
6.487.535; 7.392.195; 7.272.567; 7.333.929;
7.212.872 e altri brevetti U.S. e internazionali
concessi o in attesa di concessione.
DTS e il simbolo sono marchi registrati e DTS-HD,
DTS-HD Master Audio | Essential e i logo DTS sono
marchi di fabbrica di DTS, Inc.
Il prodotto include il software. © DTS, Inc.
Tutti i diritti riservati.
HDMI, il logo HDMI e la High-De nition
Multimedia Interface sono marchi commerciali o
marchi registrati di HDMI Licensing LLC negli USA
e in altri paesi.
Il è un marchio di DVD Format/Logo
Licensing Corporation.
TM
DLNA e DLNA CERTIFIED sono marchi di fabbrica
e/o marchi di servizio di Digital Living Network
Alliance
DivX è un marchio registrato della DivX, Inc., ed è
utilizzato sotto licenza.
“x.v.Color” o “x.v.Colour” è un marchio di Sony
Corporation.
Marchi commerciali e licenze
HB985-DB.BDEUPPK_ITA.indd 71HB985-DB.BDEUPPK_ITA.indd 71 2010-05-14 2:30:102010-05-14 2:30:10

72
Appendice
Appendice
7
“AVCHD” e il logo “AVCHD” sono marchi di
Panasonic Corporation e Sony Corporation.
Questo prodotto è fornito sotto licenza portfolio
del brevetto AVC e VC-1 per uso personale e non
commerciale di un utente per (i) codi care video
in conformità con la norma AVC e VC-1 (“AVC/
VC-1 Video”) e/o (ii) decodi care video AVC/VC-1
codi cato da un utente per uso personale e non
commerciale e/o ottenuto da un fornitore video
con licenza per fornire video AVC/VC-1. Non è
concessa né è implicita alcuna licenza per altri usi.
Ulteriori informazioni possono essere ottenute da
MPEG LA, LLC. Vedere http://www.mpegla.com.
iPod è un marchio commerciale di Apple
Computer, Inc, registrato negli USA ed in altre
nazioni.
iPhone è un marchio di fabbrica di Apple
Computer, Inc.
“Made for iPod” signi ca che un accessorio
elettronico è stato progettato per connettersi
speci camente con un iPod ed è stato certi cato
dallo sviluppatore corrispondente agli standard di
rendimento previsti da Apple.
“Works with iPhone” signi ca che un accessorio
elettronico è stato progettato per connettersi
speci camente con un iPhone ed è stato
certi cato dallo sviluppatore corrispondente agli
standard di rendimento previsti da Apple.
Apple non è responsabile per il
funzionamento di questo dispositivo o per
la sua conformità agli standard normativi e
regolamentari di sicurezza.
Windows Media è un marchio registrato o un
marchio di fabbrica di Microsoft Corporation negli
Stati Uniti e/o negli altri paesi.
Il prodotto include sistemi di proprietà di Microsoft
Corporation e non può essere utilizzato o distribuito
senza una licenza di Microsoft Licensing, Inc.
®
Le tecnologia wireless Bluetooth® permette di
collegare tra loro dispositivi elettronici in un intervallo
massimo di 10 metri.
Il collegamento di singoli dispositivi tramite la
tecnologia Bluetooth non comporta alcun costo.
Un telefono cellulare dotato di tecnologia wireless
Bluetooth può essere adoperato tramite il Cascade se
la connessione è e ettuata con Bluetooth.
Il nome e i logo Bluetooth sono di proprietà di
Bluetooth SIG, Inc; qualsiasi utilizzo di tali marchi da
parte di Pioneer Corporation è soggetto a licenza. Altri
marchi registrati e nomi commerciali appartengono
ai rispettivi proprietari.
HB985-DB.BDEUPPK_ITA.indd 72HB985-DB.BDEUPPK_ITA.indd 72 2010-05-14 2:30:102010-05-14 2:30:10

73
Appendice
7
Appendice
Speci che tecniche
Generale
• Requisiti di alimentazione:
AC 220-240 V, 50/ 60 Hz
• Consumo elettrico:
150 W
Nella modalità Standby: meno di 0,5 W
• Dimensioni (L x A x P):
Circa 430 × 64 × 304 mm
• Peso netto (approssimativo):
3,6 kg
• Temperatura di esercizio da:
41 °F a 95 °F (5 °C a 35 °C)
• Umidità di esercizio:
5 % a 90 %
• Alimentazione tensione bus (USB):
DC 5 V
500 mA
Ingressi/ Uscite
• VIDEO OUT:
1,0 V (p-p), 75 , sinc negativo, jack RCA x 1
• COMPONENT VIDEO OUT:
(Y) 1,0 V (p-p), 75 Ω, sinc. negativo, RCA jack x 1
(Pb)/(Pr) 0,7 V (p-p), 75 Ω, RCA jack x 2
• HDMI OUT (video/audio):
19 pin (HDMI standard, Tipo A, Versione 1.3)
• Analogue AUDIO IN:
2,0 Vrms (1 kHz, 0 dB), 600 Ω, RCA jack (L, R) x 1
• DIGITAL IN (OPTICAL 1/2):
3 V (p-p), jack ottico x 2
• PORTABLE IN:
0,5 Vrms (3,5 mm stereo jack)
Sintonizzatore
• Campo di sintonizzazione FM:
87.5 a 108.0 MHz o 87.50 a 108.00 MHz
Ampli catore
• Uscita di potenza, (PEAK), (4/3)
Totale 1100 W
Anteriore 180 W x 2
Centro 180 W
Vista posteriore 180 W x 2
Subwoofer 200 W (Passive)
• Uscita di potenza, (RMS), THD 10% (4/3)
Totale 930 W
Anteriore 150 W x 2
Centro 150 W
Vista posteriore 150 W x 2
Subwoofer 180 W (Passive)
Sistema
• Laser:
laser semiconduttore,
Lunghezza d’onda: 405 nm / 650 nm
• Sistema segnale:
Sistema colore TV NTSC/PAL standard
• Risposta in frequenza:
da 20 Hz a 20 kHz (campionamento 48 kHz,
96 kHz, 192 kHz)
• Porta LAN:
Jack Ethernet x 1, 10BASE-T/100BASE-TX
HB985-DB.BDEUPPK_ITA.indd 73HB985-DB.BDEUPPK_ITA.indd 73 2010-05-14 2:30:102010-05-14 2:30:10

74
Appendice
Appendice
7
Altoparlanti
BCS-707
S-BD707
• Cassa anteriore/surround (sinistra/destra)
Tipo: 2 vie
Impedenza nominale: 4
Dimensioni nette 260 x 1097 x 260 mm
(L x H x P):
Peso netto: 3,8 kg
• Di usore centrale
Tipo: 1 vie
Impedenza nominale: 4
Dimensioni nette 300 x 87x 65 mm
(L x H x P):
Peso netto: 0,6 kg
S-BD707SW
• Subwoofer
Tipo: 1 vie 1 altoparlante
Impedenza nominale: 3
Dimensioni nette 130.5 x 420 x 375 mm
(L x H x P):
Peso netto: 4,4 kg
Altoparlanti
BCS-303
S-BD303
• Cassa anteriore/surround (sinistra/destra)
Tipo: 1 vie
Impedenza nominale: 4
Dimensioni nette 96 x 96 x 85 mm
(L x H x P):
Peso netto: 0,4 kg
• Di usore centrale
Tipo: 1 vie
Impedenza nominale: 4
Dimensioni nette 300 x 87 x 65 mm
(L x H x P):
Peso netto: 0,6 kg
• Subwoofer
Tipo: 1 vie 1 altoparlante
Impedenza nominale: 3
Dimensioni nette 130.5 x 420 x 375 mm
(L x H x P):
Peso netto: 4,4 kg
HB985-DB.BDEUPPK_ITA.indd 74HB985-DB.BDEUPPK_ITA.indd 74 2010-05-14 2:30:102010-05-14 2:30:10

75
Appendice
7
Appendice
Avviso per il software
Open source
I seguenti eseguibili GPL e librerie LGPL usati in
questo prodotto sono soggetti agli accordi di licenza
GPL2.0/LGPL2.1:
ESEGUIBILI GPL: Linux kernel 2.6, bash, busybox,
cramfs, dhcpcd, e2fsprogs, fdisk, mkdosfs, mtd-utils,
net-tools, procps, samba-3.0.25b, sysutils, tcpdump,
tftpd, tinylogin, unzip, utelnetd
LIBRERIE LGPL: uClibc, DirectFB, blow sh, cairo,
mpeg, iconv, libusb, mpg123
gSOAP Licenza pubblica 1.3 LIBRERIA: gsoap
Una copia del corrispondente codice sorgente può
essere ottenuta pagando le spese di distribuzione.
Per ottenere una copia, contattare l’Assistenza clienti
locale Pioneer.
Potete ottenere una copia delle licenze di GPL,
LGPL da http://www.gnu.org/licenses/old-licenses/
gpl-2.0.html e http://www.gnu.org/licenses/old-
licenses/lgpl-2.1.html.
Inoltre potete ottenere una copia della
licenza pubblica gSOAP da http://www.cs.fsu.
edu/~engelen/license.html.
Questo software è basato in parte sul lavoro del
Independent JPEG Group diritti di riproduzione ©
1991 – 1998, Thomas G. Lane.
Questo prodotto include:
• boost C++: diritti di riproduzione © Beman Dawes
1999-2003
• c-ares : diritti di riproduzione © 1998 del
Massachusetts Institute of Technology
• curl: diritti di riproduzione © 1996 - 2008, Daniel
Stenberg
• expat: diritti di riproduzione © 2006 manutentori
expat
• freetype: diritti di riproduzione © 2003 The
FreeType Project (www.freetype.org).
• jpeg: Questo software è basato in parte sul
lavoro del Independent JPEG Group diritti di
riproduzione © 1991 – 1998, Thomas G. Lane.
• mng: diritti di riproduzione © 2000-2007 Gerard
Juyn, Glenn Randers-Pehrson
• ntp: diritti di riproduzione © David L. Mills 1992-
2006
• OpenSSL:
– software di crittogra a scritto da Eric Young
(eay@cryptsoft.com).
– software scritto da Tim Hudson
(tjh@cryptsoft.com).
– software sviluppato dal OpenSSL Project per
l’uso con il tool kit OpenSSL.
(http://www.openssl.org)
• png: diritti di riproduzione © 2004 Glenn Randers-
Pehrson
• portmap: diritti di riproduzione © 1990 The Regents
of the University of California
• ptmalloc: diritti di riproduzione © 2001-2006 Wolfram
Gloger
• nitTest++ : diritti di riproduzione © 2006 Noel Llopis
and Charles Nicholson
• UPnP SDK : Diritti di riproduzione (c) 2000-2003 Intel
Corporation
• strace :
diritti di riproduzione © 1991, 1992 Paul Kranenburg
diritti di riproduzione © 1993 Branko Lankester
diritti di riproduzione © 1993 Ulrich Pegelow
diritti di riproduzione © 1995, 1996 Michael Elizabeth
Chastain
diritti di riproduzione © 1993, 1994, 1995, 1996 Rick
Sladkey
diritti di riproduzione © 1999, 2000 Wichert Akkerman
• xml2: diritti di riproduzione (C) 1998-2003 Daniel
Veillard.
• XML-RPC For C/C++:
diritti di riproduzione © 2001 di First Peer, Inc. Tutti i
diritti sono riservati.
diritti di riproduzione © 2001 di Eric Kidd. Tutti i diritti
sono riservati.
• zlib : diritti di riproduzione (c) 1995-2002 Jean-loup
Gailly e Mark Adler.
Tutti diritti sono riservati.
Viene di seguito concessa autorizzazione,
gratuitamente, a chiunque ottenga una copia del
presente software e dei le della documentazione
associata (il “Software”), a operare con il Software
senza limitazione,compresi senza limitazione i diritti
di utilizzare, copiare, modi care, unire, pubblicare,
distribuire, concedere in sublicenza e/o vendere
copie del Software, e di concedere alle persone a cui
il Software è fornito tale autorizzazione, soggetta alle
condizioni seguenti:
IL SOFTWARE VIENE FORNITO COME È, SENZA
GARANZIA DI ALCUN TIPO, ESPRESSA O IMPLICITA,
INCLUSE MA NON LIMITATE ALLE GARANZIE DI
COMMERCIABILITÀ, IDONEITÀ PER UNO SCOPO
PARTICOLARE E NON VIOLAZIONE. IN NESSUN CASO
GLI AUTORI O I DETENTORI DEL COPYRIGHT SONO
RESPONSABILI PER RIVENDICAZIONI, DANNI O ALTRA
RESPONSABILITÀ, IN AZIONE CONTRATTUALE, TORTO
O ALTRO, DERIVANTE DA O CONGIUNTAMENTE AL
SOFTWARE O ALL’UTILIZZO O ALTRI RAPPORTI CON
IL SOFTWARE.
HB985-DB.BDEUPPK_ITA.indd 75HB985-DB.BDEUPPK_ITA.indd 75 2010-05-14 2:30:112010-05-14 2:30:11

2 Información de seguridad
Información de seguridad
1
ADVERTENCIA
RIESGO DE DESCARGA
ELÉCTRICA NO ABRIR
ADVERTENCIA: PARA REDUCIR EL RIESGO DE
DESCARGA ELÉCTRICA NO EXTRAIGA LA CUBIERTA
(O PARTE POSTERIOR). NO HAY EN EL INTERIOR
NINGUNA PARTE QUE PUEDA REEMPLAZAR
EL USUARIO. PARA CUALQUIER REPARACIÓN
CONTACTE CON PERSONAL DE MANTENIMIENTO
CUALIFICADO.
Este símbolo de un relámpago
con cabeza de echa dentro
de un triángulo equilátero está
destinado para alertar al usuario
de la presencia de una potencia
no aislada peligrosa dentro del
producto que puede ser de la
magnitud su ciente como para
constituir un riesgo de descarga
eléctrica a las personas.
El signo de exclamación dentro
de un triángulo equilátero está
destinado para alertar al usuario
de la presencia de instrucciones de
mantenimiento y funcionamiento
en la documentación que
acompaña al producto.
Precauciones y advertencias
ADVERTENCIA: PARA REDUCIR EL RIESGO DE
INCENDIO O DESCARGA ELÉCTRICA, NO EXPONGA
ESTE PRODUCTO A LA LLUVIA NI A LA HUMEDAD.
ADVERTENCIA: No instale el equipo en un espacio
cerrado, como en una estantería o mueble similar.
PRECAUCIÓN: No obstruya ninguno de los ori cios
de ventilación. Instalar conforme a las instrucciones
del fabricante.
Las ranuras y ori cios de la carcasa cumplen un
propósito de ventilación y aseguran el correcto
funcionamiento del producto, y lo protegen de un
posible sobrecalentamiento. Los ori cios no deben
obstruirse en ningún caso colocando el producto
sobre una cama, sofá, alfombra o super cie similar.
Este producto no debe colocarse en una instalación
empotrada, como una librería o estante, a menos
que se proporcione una correcta ventilación del
mismo y se respeten todas las instrucciones del
fabricante.
PRECAUCIÓN: Éste es un producto láser clase
I, clasi cado conforme a la norma CEI 60825-
1:2007 sobre seguridad de los productos láser.
Para asegurar un uso apropiado de este producto,
lea cuidadosamente este manual del propietario
y consérvelo para futuras consultas. Si la unidad
necesitara de mantenimiento, póngase en contacto
con un centro de servicio autorizado.
El uso de controles, ajustes o procedimientos
diferentes a los especi cados aquí puede provocar
una exposición peligrosa a la radiación.
Para prevenir la exposición directa al rayo láser, no
intente abrir el cerramiento. Radiación visible del
láser al abrirlo. NO FIJE LA VISTA EN EL LÁSER O HAZ
DE LUZ.
1
Información de seguridad
HB985-DB.BDEUPPK_SPA.indd 2HB985-DB.BDEUPPK_SPA.indd 2 2010-05-14 2:48:222010-05-14 2:48:22

Información de seguridad
3Información de seguridad
1
PRECAUCIÓN referente al cable de alimentación
Para la mayor parte los aparatos eléctricos, se
recomienda su conexión en un circuito dedicado.
es decir, un circuito de un sólo enchufe que acciona
solamente este aparato y no tiene enchufes o
circuitos derivados adicionales. Revise la página
de especi caciones de este manual de usuario
para asegurarse. No sobrecargue los enchufes
de pared. Los enchufes de pared sobrecargados,
ojos o dañados, cables de extensión, cables de
alimentación pelados, o el aislamiento dañado
o agrietado del cable son elementos peligrosos.
Cualquiera de estas condiciones podría dar
lugar a descargas eléctricas o fuego. Examine
periódicamente el cable de su electrodoméstico, y si
su aspecto indica daños o deterioro, desenchúfelo,
cese el uso del electrodoméstico, y haga cambiar
el cable por una pieza de recambio exacta por un
distribuidor de servicio autorizado. Proteja el cable
de alimentación de daños físicos o mecánicos y evite
doblarlo, aplastarlo, pellizcarlo o pisarlo con una
puerta o caminar sobre él. Preste especial atención
a los enchufes, tomas de pared, y al punto donde el
cable sale del electrodoméstico. Para desconectar
la alimentación principal, retire el cable principal de
alimentación. Durante la instalación del producto,
asegúrese de que el enchufe sea fácilmente
accesible.
PIONEER declara por este documento
que este/estos producto(s) cumplen con
los requisitos esenciales y las demás
provisiones de la Directiva 2004/108/
EC, 2006/95/EC y 2009/125/EC.
ADVERTENCIA: para evitar el peligro de incendio,
no coloque ninguna llama abierta (por ejemplo, una
vela encendida) sobre el aparato.
Este dispositivo está provisto de una batería o
acumulador portátil.
Forma segura de extraer la pila o el acumulador
del equipo: Retire la pila o juego de pilas usadas y
siga los pasos en orden inverso a su colocación. Para
impedir la contaminación del medioambiente o los
posibles efectos adversos en la salud de humanos
y animales, coloque la pila usada o el acumulador
en el contenedor apropiado de los puntos de
recogida designados para tal n. No elimine las pilas
o el acumulador junto con la basura doméstica. Se
recomienda utilizar pilas y acumuladores con sistema
de reembolso gratuito en su localidad. No exponga
las pilas al calor intenso intenso, como la luz del sol,
un incendio o similar.
PRECAUCIÓN: El aparato no debe exponerse al
agua (goteo o salpicaduras) y no debe colocar sobre
el aparato objetos llenos de líquidos, como oreros.
HB985-DB.BDEUPPK_SPA.indd 3HB985-DB.BDEUPPK_SPA.indd 3 2010-05-14 2:48:252010-05-14 2:48:25

4 Información de seguridad
Información de seguridad
1
Información para los usuarios sobre la recogida y
eliminación de equipos usados y pilas agotadas.
Estos símbolos en los productos, embalajes o
documentación que los acompaña signi can que los
productos eléctricos y electrónicos usados y las pilas
agotadas no deberán mezclarse con los residuos
domésticos.
Para un correcto tratamiento, recuperación y reciclaje
de los productos y pilas usados, llévelos a los puntos
de recogida correspondientes, en cumplimiento con
la legislación nacional vigente.
Si elimina estos productos y sus pilas de forma
correcta, estará ayudando a conservar importantes
recursos y evitar cualquier efecto negativo sobre
la salud humana y el medio ambiente que, de otro
modo, podría producirse como resultado de una
gestión incorrecta de los residuos.
Para más información acerca de la recogida y
reciclaje de producto y pilas usados, póngase
en contacto con su ayuntamiento, el servicio de
recogida de residuos o el punto de venta donde
haya adquirido los productos.
Estos símbolos sólo tienen validez en la Unión
Europea.
Para países fuera de la Unión Europea:
Si desea eliminar estos productos, póngase en
contacto con las autoridades locales o su distribuidor
y solicite información acerca del método de
eliminación correcto.
Notas sobre el copyright
• Dado que el sistema AACS (Sistema de contenido
de acceso avanzado) está aprobado como sistema
de protección contenido para formato BD, similar
al uso del sistema CSS (Sistema de cifrado de
contenido) para formato DVD, se aplican ciertas
restricciones a la reproducción, la salida de
señales analógicas, etc.. de contenido protegido
por AACS. El manejo de este producto y las
restricciones impuestas sobre él pueden variar
dependiendo del momento de la compra, ya que
esas restricciones pueden haberse adoptado y/
o modi cado por AACS después de la fabricación
de este producto.
• Además, la marca BD-ROM y BD+ también se
utilizan como sistema de protección de contenido
en el formato BD, que impone ciertas restricciones
incluidas las de reproducción en los contenidos
protegidos de la marca BD-ROM y/o BD+. Para
obtener información adicional sobre AACS, la
marca BD-ROM, BD+, o su producto, póngase en
contacto con un Centro de Atención al cliente
autorizado.
• Muchos discos BD-ROM/DVD están codi cados
con protección anticopia. Por ello, debe conectar
el reproductor directamente al televisor, no a un
vídeo. Si conecta el reproductor a un vídeo, los
discos con protección anticopia emitirán una
imagen distorsionada.
• Este producto incorpora tecnología de protección
de derechos de autor amparada mediante
patentes de EE.UU. y otras leyes de propiedad
intelectual. La utilización de esta tecnología
de protección de derechos de autor debe
estar autorizada por Rovi, estando dirigida
exclusivamente al uso doméstico y otros medios
de visualización limitados, salvo autorización
contraria de Rovi. Está prohibida la alteración o
desmontaje de dicha tecnología.
• Bajo las leyes de Propiedad Intelectual de EE.UU.
y otros países, la grabación, uso, visualización,
distribución o revisión no autorizada de
programas de televisión, cintas de video, discos
BD-ROM, DVD, CD y otros materiales puede estar
sujeta a responsabilidad civil o criminal.
Pb
(
Símbolo para
pilas y baterías
)
HB985-DB.BDEUPPK_SPA.indd 4HB985-DB.BDEUPPK_SPA.indd 4 2010-05-14 2:48:252010-05-14 2:48:25

Información de seguridad
5Información de seguridad
1
Aviso importante para los sistemas de color del
televisor
El sistema de color de este reproductor varía en
función de los discos que se están reproduciendo en
ese momento.
Por ejemplo, cuando la unidad reproduce un disco
grabado en el sistema de color NTSC, la imagen se
emite como una señal NTSC.
El sistema multicolor del televisor es el único que
puede recibir todas las señales emitidas por el
reproductor.
• Si tiene un televisor con un sistema de color
PAL, sólo se mostrarán imágenes distorsionadas
cuando utilice discos o contenido de vídeo
grabado en NTSC.
• El televisor con sistema multicolor cambia el
sistema de color de forma automática según las
señales de entrada.
En caso de que el sistema de color no se cambie
automáticamente, desactívelo y actívelo de nuevo
para ver imágenes normales en pantalla.
• Incluso si los discos grabados en el sistema de
color NTSC se muestran bien en su televisor
puede que no se graben correctamente en su
grabadora.
HB985-DB.BDEUPPK_SPA.indd 5HB985-DB.BDEUPPK_SPA.indd 5 2010-05-14 2:48:262010-05-14 2:48:26

6
Índice
1
Información de seguridad
2 Precauciones y advertencias
2
Preparación
8 Introducción
8 El símbolo “ ” en pantalla
8 Símbolos utilizados en este
manual
9 Accesorios suministrados
10 Discos reproducibles
11 Compatibilidad de archivos
12 Código de región
12 AVCHD (Códec de video
avanzado de alta de nición)
12 Algunos requisitos del
sistema
12 Notas sobre la compatibilidad
13 Mando a distancia
14 Panel delantero
15 Parte posterior
3
Instalación
16 Monte los altavoces
16 Con guración de los
altavoces BCS-707
18 Con guración de los
altavoces BCS-303
19 Montaje mural del altavoz central
19 Notas adicionales sobre la colocación
20 Ubicación del sistema
21 Conexiones a su TV
21 Conexión HDMI
22 Conexión de vídeo
componente
23 Conexión del vídeo
23 Ajuste de la resolución
24 Conexión de la antena
24 Conexiones con un dispositivo
externo
24 Conexión auxiliar
25 Conexión a entrada de
puerto
25 Conexión a entrada óptica
1/2
26 Conexión Bluetooth®
28 Conexión a la red doméstica
29 Con guración de la red
31 Conexión de dispositivos USB
32 Ajustes
32 Ajuste de los valores de
con guración
33 Menú [PANTALLA]
34 Menú [IDIOMA]
35 Menú [AUDIO]
36 Menú [BLOQUEO]
37 Menú [RED]
37 Menú [OTROS]
39 Efecto de sonido
HB985-DB.BDEUPPK_SPA.indd 6HB985-DB.BDEUPPK_SPA.indd 6 2010-05-14 2:48:262010-05-14 2:48:26

7
1
2
3
4
5
6
7
8
4
Funcionamiento
40 Reproducción general
42 Reproducción avanzada
44 Visualización en pantalla
48 Disfrutar de BD-LIVE
49 Reproducción de archivos de vídeo y
discos VR
51 Ver una fotografía
53 Escuchar música
56 Reproducción de iPod
58 Funcionamiento de la radio
59 Reproducción de contenidos a través
de la red doméstica
5
Mantenimiento
63 Notas en los discos
63 Manejo de la unidad
6
Resolución de problemas
64 General
65 Imagen
65 Sonido
66 Red
7
Apéndice
67 Control de un televisor con el mando
a distancia suministrado
68 Lista del código del país
69 Lista de código de idioma
70 Resolución de la salida de vídeo
71 Marcas comerciales y licencias
73 Datos técnicos
75 Aviso sobre el software de código
abierto
HB985-DB.BDEUPPK_SPA.indd 7HB985-DB.BDEUPPK_SPA.indd 7 2010-05-14 2:48:262010-05-14 2:48:26

8 Preparación
Preparación
2
2
Preparación
Introducción
El símbolo “ ” en pantalla
El símbolo “ ” puede aparecer en la pantalla de
su televisor durante su manejo e indica que la
función explicada en este manual del usuario
no está disponible en ese el aparato.
Símbolos utilizados en este
manual
NOTA
Indica la existencia de notas y características
de funcionamiento particulares.
PRECAUCIÓN
Indica precauciones que se deben tomar para
evitar posibles daños debido a un mal uso.
Un apartado cuyo título contenga uno de los
siguientes símbolos es aplicable sólo al disco
representado por el símbolo.
BD
Disco BD-ROM
DVD
Los discos DVD-Vídeo,
DVD±R/RW en modo
Vídeo o modo VR están
nalizados
AVCHD
Discos DVD±R/RW en
formato AVCHD
ACD
CD de audio
MOVIE
Archivos de vídeo
MUSIC
Archivos de música
PHOTO
Archivos de fotos
HB985-DB.BDEUPPK_SPA.indd 8HB985-DB.BDEUPPK_SPA.indd 8 2010-05-14 2:48:262010-05-14 2:48:26

9Preparación
2
Preparación
Accesorios suministrados
Cable de vídeo (1) Mando a distancia (1)
Pilas (1) Antena FM (1)
Cradle para iPod (1)
Accesorios y cajas de altavoces
(S-BD707T)
Cables para los
altavoces (5)
Tornillos (12)
Bases de soporte
para los altavoces (4)
Apoyos pequeños
antideslizantes (1)
Apoyos intermedios
antideslizantes (1)
Accesorios y cajas de altavoces
(S-BD707SW)
Cables para los
altavoces (1)
Apoyos grandes
antideslizantes (4)
Accesorios y cajas de altavoces
(S-BD303)
Cables para los
altavoces (6)
Apoyos pequeños
antideslizantes (1)
Apoyos grandes
antideslizantes (1)
HB985-DB.BDEUPPK_SPA.indd 9HB985-DB.BDEUPPK_SPA.indd 9 2010-05-14 2:48:262010-05-14 2:48:26

10 Preparación
Preparación
2
Discos reproducibles
Disco Blu-ray
- Discos de películas que
puedan comprarse o alquilarse.
- Discos BD-R/RE que contienen
archivos con películas, música
o fotografías.
DVD-VIDEO
disco 8 / 12 cm
Discos de películas que puedan
comprarse o alquilarse.
DVD±R
disco
8 / 12 cm
- Sólo modo vídeo y nalizado
- También admite discos de
doble capa
- Formato AVCHD nalizado
- Discos DVD±R que contienen
archivos con películas, música
o fotografías.
DVD-RW
disco
8 / 12 cm
- Modo VR, Modo Vídeo y
nalizado solamente
- Formato AVCHD nalizado
- Discos DVD-RW que contienen
archivos con películas, música
o fotografías.
DVD+RW
disco
8 / 12 cm
- Sólo modo vídeo y nalizado
- Formato AVCHD
- Formato AVCHD nalizado
- Discos DVD+RW que
contienen archivos con
películas, música o fotografías.
Audio CD
disco
8 / 12 cm
CD-R/RW
disco 8 / 12 cm
- Discos CD-R/RW que
contienen títulos de audio,
archivos de vídeo, música o
fotos.
NOTA
• Algunos discos CD-R/RW (o DVD±R/RW) no
podrán reproducirse en la unidad debido a las
condiciones del equipo de grabación o a los
propios discos CD-R/RW (o DVD±R/RW).
• Dependiendo de la nalización y del software de
grabación, algunos discos grabados (CD-R/RW,
DVD±R/RW o BD-R/RE) podrían no reproducirse.
• Puede que no se reproduzcan los discos
CD-R/RW y BD-R/RE, DVD±R/RW grabados con
un ordenador personal o una grabadora de DVD
o CD si el disco está dañado o sucio, o si hay
suciedad o restos de condensación en la lente
de la unidad.
• Si graba un disco con un ordenador, incluso si
lo hace en un formato compatible, hay casos
en los que no se puede reproducir debido a
los ajustes del programa usado para crear el
disco. (Consulte al editor del programa para más
información).
• El reproductor requiere discos y grabaciones que
cumplan ciertas normas técnicas para obtener
una calidad de reproducción óptima.
• Los DVD previamente grabados se ajustan
automáticamente a estas normas. Existen
muchos tipos diferentes de formatos de
disco gravables (incluido CD-R con archivos
MP3 o WMA) que exigen ciertas condiciones
preexistentes para garantizar una reproducción
compatible.
• Los clientes deben tener en cuenta que
es necesario tener un permiso para poder
descargarse archivos MP3/WMA y música de
Internet. Nuestra empresa no está autorizada
para conceder ese permiso. El permiso deberá
solicitarse siempre al propietario de los derechos
de autor.
HB985-DB.BDEUPPK_SPA.indd 10HB985-DB.BDEUPPK_SPA.indd 10 2010-05-14 2:48:272010-05-14 2:48:27

11Preparación
2
Preparación
Compatibilidad de archivos
General
Extensiones de archivo disponibles:
“.jpg”, “.jpeg”, “.png”, “.avi”, “.divx”, “.mpg”, “.mpeg”,
“.mkv”, “.mp4”, “.mp3”, “.wma”, “.wav”
• Las extensiones de archivo que hay disponibles
variarán según los servidores DLNA.
• Algunos archivos ”.wav” no so con este
reproductor.
• El número máximo de caracteres para el
nombre de archivo es 180.
• Puede que tarde varios minutos en leer el
contenido del soporte dependiendo del
tamaño y el número de archivos.
Número máximo de archivos/carpetas:
Menos de 2 000 (número total de archivos y
carpetas)
Formato CD-R/RW, DVD±R/RW, BD-R/RE:
ISO 9 660+JOLIET, UDF y formato UDF Bridge
PELÍCULA
Resolución disponible:
Píxeles de 1 920 x 1 080 (An. x Alt.)
Subtítulos que se pueden reproducir:
SubRip (.srt / .txt), SAMI (.smi), SubStation Alpha
(.ssa/.txt), MicroDVD (.sub/.txt), VobSub (.sub),
SubViewer 1,0 (.sub), SubViewer 2,0 (.sub/.txt),
TMPlayer (.txt), DVD Subtitle System (.txt)
• VobSub (.sub) no está disponible en la
función [Enlace principal].
Formato de codec reproducible: “DIVX3.xx”,
“DIVX4.xx”, “DIVX5.xx”, “XVID”, “DIVX6.xx”
(sólo para reproducción estándar), H.264/
MPEG-4 AVC, MPEG1 SS, MPEG2 PS, MPEG2 TS
Formato de audio reproducible: “Dolby
Digital”, “DTS”, “MP3”, “WMA”, “AAC”, “AC3”
• No todos los formatos de audio WMA y AAC
son compatibles con esta unidad.
Frecuencia de muestreo:
entre 32 kHz y 48 kHz (WMA),
entre 16 kHz y 48 kHz (MP3)
Velocidad de bits:
entre 20 kbps y 320 kbps (WMA)
entre 32 kbps y 320 kbps (MP3)
NOTA
• Los archivos de película HD contenidos en
el CD o USB 1,0/1,1 podrían no reproducirse
correctamente. Se recomienda usar los sistemas
BD, DVD o USB 2,0 para reproducir archivos de
película en HD.
• Este reproductor admite H.264/MPEG-4 AVC de
per l principal y alto en Level 4,1. Para archivos
con un nivel superior, aparecerá en pantalla un
mensaje de advertencia.
• Este reproductor no admite archivos que se
graban con GMC*1 o Qpel*2. Éstas son las
denominadas técnicas de codi cación de vídeo
en el estándar MPEG4, como DivX o XviD.
*1 GMC – Compensación global del movimiento
*2 Qpel – Cuarto de píxel
MÚSICA
Frecuencia de muestreo:
entre 8 y 48 KHz (WMA),
entre 11 y 48 KHz (MP3)
Velocidad de lectura:
entre 8 y 320 kbps (WMA, MP3),
NOTA
• Esta unidad no admite archivos MP3 con
etiquetas ID3.
• El tiempo de reproducción total indicado en la
pantalla puede no ser correcto para archivos
VBR.
FOTOGRAFÍAS
Tamaño recomendado:
Inferior a 4 000 x 3 000 x 24 bit/píxeles
Inferior a 3 000 x 3 000 x 32 bit/píxeles
Inferior a 4 MByte/ le
• No es compatible con archivos de imagen
progresivos y sin pérdida de compresión.
HB985-DB.BDEUPPK_SPA.indd 11HB985-DB.BDEUPPK_SPA.indd 11 2010-05-14 2:48:272010-05-14 2:48:27

12 Preparación
Preparación
2
Código de región
El código de región se encuentra impreso en la
parte posterior de esta unidad. Esta unidad sólo
puede leer discos BD-ROM o DVD cali cados
como la parte posterior de la unidad o “Todos”.
AVCHD (Códec de video
avanzado de alta de nición)
• Este reproductor puede reproducir discos
en formato AVCHD. Estos discos se graban y
usan normalmente en videocámaras.
• El formato AVCHD es un formato de cámara
de vídeo digital de alta de nición.
• El formato MPEG-4 AVC/H.264 es capaz
de comprimir imágenes con una e cacia
mayor que el formato de compresión de
imagen convencional.
• Algunos discos AVCHD usan el formato
“x.v.Colour”.
• Este reproductor puede reproducir discos
AVCHD usando el formato “x.v.Colour”.
• Algunos discos en formato AVCHD podrían
no reproducirse dependiendo de las
condiciones de la grabación.
• Los discos en formato AVCHD deben estar
nalizados.
• “x.v.Colour” ofrece una mayor gama de
colores que los discos DVD normales de
videocámara.
Algunos requisitos del sistema
Para reproducción de vídeo de alta de nición:
• Visualización de alta de nición con tomas
de entrada COMPONENT o HDMI.
• Disco BD-ROM con contenido en alta
de nición.
• Es necesario que el dispositivo de pantalla
disponga de una entrada DVI apta para
HDMI o HDCP para mostrar algunos
contenidos (como indican los autores del
disco).
• Para realizar una conversión de un DVD
con de nición estándar, es necesario que
el dispositivo de pantalla disponga de una
entrada DVI apta para HDMI o HDCP para
contenido con protección anticopia.
Notas sobre la compatibilidad
• Dado que BD-ROM es un nuevo formato,
pueden aparecer algunos problemas de
discos, conexión digital y otros problemas
de compatibilidad. Si tiene problemas de
compatibilidad, póngase en contacto con
un Centro de servicio técnico autorizado.
• Para visualizar contenidos de alta de nición
y convertir contenido estándar de DVD
a una resolución mayor, es posible que
el dispositivo de pantalla deba tener una
entrada apta para HDMI o una entrada DVI
apta para HDCP.
• Algunos discos BD-ROM y DVD pueden
restringir el uso de algunos comandos
operación o algunas funciones.
• Puede utilizar un dispositivo USB para
almacenar información relacionada con el
disco, incluso contenido descargado en
línea. El disco que está utilizando controlará
el tiempo que se retiene esta información.
HB985-DB.BDEUPPK_SPA.indd 12HB985-DB.BDEUPPK_SPA.indd 12 2010-05-14 2:48:282010-05-14 2:48:28

13Preparación
2
Preparación
Mando a distancia
1
2
3
• • • • • • • • •
a
• • • • • • • • •
1
(STANDBY/ON): Apaga y
enciende el reproductor.
Z
OPEN/CLOSE: Abre o cierra la
bandeja del disco.
INPUT/TUNER: Cambia el modo
de entrada.
BT AUDIO: Cambia el modo de
entrada a BT AUDIO directamente.
OPTICAL: Cambia el modo de
entrada directamente a óptico.
DISPLAY: Muestra o sale de la
pantalla del menú OSD.
HOME MENU: Muestra o sale
del [MENÚ INICIO].
MENU: Accede al menú de un
disco.
Botones de dirección:
Seleccionan una opción en el
menú.
ENTER: Con rma la selección
del menú.
TUNE (+/-): Sintoniza la emisora de
radio deseada.
PRESET: Selecciona programas de
radio.
• • • • • • • • •
b
• • • • • • • • •
O
RETURN: Sale del menú o
reanuda la reproducción.
POPUP/ TOP MENU: Muestra el
menú del disco DVD o el menú
emergente del BD-ROM, cuando
haya uno disponible.
x
STOP: Detiene la reproducción.
B
PLAY: Comienza la reproducción.
X
PAUSE/STEP: La reproducción
cambia a modo de pausa.
.
/
>
SKIP: Pasa al archive/
pista/capítulo siguiente o anterior.
m
/
M
SCAN: Busca hacia atrás
o delante.
SPK LEVEL: Establece el nivel de
sonido del altavoz deseado.
z
USB REC: Graba un CD de
audio.
MUTE: Silencia la unidad.
SOUND: Selecciona un modo de
efecto de sonido.
VOL +/- : Ajusta el volumen del
altavoz.
• • • • • • • • •
c
• • • • • • • • •
Botones numéricos 0-9:
Selecciona las opciones numéricas
en un menú.
MARKER: Marca un punto
especí co durante la reproducción.
SEARCH: Muestra o sale del menú
de búsqueda.
REPEAT: Repite la sección
deseada.
CLEAR: Elimina la marca del menú
de búsqueda o un número al
de nir la contraseña.
DIMMER: Atenúa la luz del aparato.
ZOOM: Accede al menú de zoom.
Botones coloreados
(A, B, C, D):
Permiten navegar por los menús.
- A Botón (RDS): Sistema de datos
de radio.
- B Botón (PTY): Vistas del tipo de
programa del RDS.
- C Botón (PTY SEARCH): Busca el
tipo de programa.
- D Botón : Selecciona el modo FM
en mono o estéreo.
Botones de control de TV:
Consultar la página 67.
SLEEP: Establece un período de
tiempo concreto después del cual,
se apaga la unidad.
Colocación de las pilas
Retire la tapa de las pilas de
la parte trasera del mando
a distancia e introduzca una
pila R03 (tamaño AAA) con la
polaridad , correcta.
HB985-DB.BDEUPPK_SPA.indd 13HB985-DB.BDEUPPK_SPA.indd 13 2010-05-14 2:48:282010-05-14 2:48:28

14 Preparación
Preparación
2
Panel delantero
a
Bandeja del disco
b
Botones de funcionamiento
1
STANDBY/ON Botón
Z
(OPEN/CLOSE)
FUNCTION
Cambia la fuente de entrada o la función.
B
/
X
(PLAY / PAUSE)
x
(STOP)
.
/
>
(SKIP)
- TUNE + (Sintonización de la rada)
c
Sensor remoto
d
Ventana de visualización
e
PORTABLE IN
f
Puerto USB
g
Control de volumen
1
2
3 4 5 6 7
HB985-DB.BDEUPPK_SPA.indd 14HB985-DB.BDEUPPK_SPA.indd 14 2010-05-14 2:48:282010-05-14 2:48:28

15Preparación
2
Preparación
a
Cable de corriente alterna (CA)
Conectar a la fuente de alimentación.
b
Conexiones de los altavoces
c
Ventilador de refrigeración
d
Conexión de la antena
e
VIDEO OUT
f
AUX (L/R) INPUT
g
COMPONENT VIDEO (Y P
B
P
R
)
OUTPUT (PROGRESSIVE SCAN)
h
OPTICAL 1(TV) / 2
i
iPod (24 pin)
Conectar al cradle de iPod incluido.
j
HDMI OUT (tipo A, Versión 1.3)
Conecta a un TV con entradas HDMI.
k
Puerto LAN
Parte posterior
1 2 3 4 5
6 7 8 9 10 11
HB985-DB.BDEUPPK_SPA.indd 15HB985-DB.BDEUPPK_SPA.indd 15 2010-05-14 2:48:282010-05-14 2:48:28

16 Instalación
Instalación
3
Monte los altavoces
Con guración de los altavoces
BCS-707
Preparación de los altavoces
1. Coloque los apoyos antideslizantes en la
base de cada pie de altavoz, el subwoofer y
el altavoz central.
Para las bases de altavoz:
Utilice el adhesivo incluido para colocar los
cuatro apoyos centrales en la base (inferior)
de cada pie de altavoz.
middle non-skid pads
apoyos centrales antideslizantes
Para subwoofer:
Utilice el adhesivo incluido para colocar
los cuatro apoyos grandes en la base del
subwoofer.
large non-skid pads
apoyos grandes antideslizantes
Para altavoz central:
Utilice el adhesivo incluido para colocar
los cuatro apoyos pequeños en la base del
altavoz central.
small non-skid pads
apoyos pequeños
antideslizantes
2. Coloque los pies del altavoz en los vástagos
con los tornillos incluidos.
Cuando haya alineado el vástago y la base,
fíjelos con los tornillos pequeños en los
puntos que se muestran más adelante.
Tenga en cuenta que el altavoz debe
orientarse en la dirección de la base del
triángulo isósceles.
Rear
Front
Parte trasera
Frente
3
Instalación
HB985-DB.BDEUPPK_SPA.indd 16HB985-DB.BDEUPPK_SPA.indd 16 2010-05-14 2:48:282010-05-14 2:48:28

17Instalación
3
Instalación
3. Conecte los cables al reproductor.
Conecte el cable blanco con el lado de línea
gris (+) y el otro cable en el lado (-). Para
conectar el cable al reproductor, presione
cada pestaña plástica para abrir el terminal
de conexión. Introduzca el cable y suelte la
pestaña.
Color (+)
Negro (-)
PRECAUCIÓN
• No conecte ningún altavoz diferente a los
suministrados con este sistema.
• No conecte los altavoces suministrados a ningún
ampli cador diferente al que se incluye con
este sistema. La conexión a otro ampli cador
puede dar lugar a fallos de funcionamiento o un
incendio.
Fijación de los altavoces delanteros y
surround.
Coloque los altavoces delanteros y surround
con el pasador plástico incluido. Atornille
los dos ganchos en la pared detrás del
altavoz. Pase un cordón grueso alrededor de
los ganchos y a través del pasador plástico
para estabilizar el altavoz (asegúrese de que
soporte el peso del altavoz). Tras la instalación,
asegúrese de que se haya jado correctamente
el altavoz.
thick cord
Plastic catch
Cordón con el
grosor su ciente
Pasador plástico
PRECAUCIÓN
• El pasador plástico no es un componente
de montaje, y el altavoz no debe colgar
directamente de la pared con este pasador.
Utilice siempre un cordón para estabilizar el
altavoz.
• Pioneer no acepta ninguna responsabilidad
por posibles pérdidas o daños resultantes
de un montaje o instalación incorrectos, una
resistencia insu ciente de los materiales de
instalación, uso incorrecto o desastres naturales.
• Al colocar esta unidad, asegúrese de jarla de
forma segura y evite áreas en las que exista la
posibilidad de que caiga y causarle lesiones si
se produce un desastre natural (por ejemplo, un
terremoto).
HB985-DB.BDEUPPK_SPA.indd 17HB985-DB.BDEUPPK_SPA.indd 17 2010-05-14 2:48:292010-05-14 2:48:29

18 Instalación
Instalación
3
Con guración de los altavoces
BCS-303
Preparación de los altavoces
1. Coloque los apoyos antideslizantes en la
base de cada altavoz.
Para las bases de altavoz:
Utilice el adhesivo incluido para colocar los
cuatro apoyos centrales pequeños en la
base (inferior) de cada pie de altavoz.
samll non-skid pads
apoyos antideslizantes
pequeños
Para subwoofer:
Utilice el adhesivo incluido para colocar
los cuatro apoyos grandes en la base del
subwoofer.
large non-skid pads
apoyos grandes
antideslizantes
Para altavoz central:
Utilice el adhesivo incluido para colocar
los cuatro apoyos pequeños en la base del
altavoz central.
samll non-skid pads
apoyos antideslizantes
pequeños
2. Conecte los cables al reproductor.
Conecte el cable blanco con el lado de línea
gris (+) y el otro cable en el lado (-). Para
conectar el cable al reproductor, presione
cada pestaña plástica para abrir el terminal
de conexión. Introduzca el cable y suelte la
pestaña.
Color (+)
Negro (-)
HB985-DB.BDEUPPK_SPA.indd 18HB985-DB.BDEUPPK_SPA.indd 18 2010-05-14 2:48:292010-05-14 2:48:29

19Instalación
3
Instalación
Montaje mural del
altavoz central
El altavoz central tiene un ori cio de montaje
que se puede usar para montar el altavoz en la
pared.
Antes del montaje
Recuerde que el sistema de altavoces es
pesado y que su peso podría hacer que se
a ojen los tornillos, o que falle el material de
la pared que los sujeta, con una posible caída
de los altavoces. Asegúrese de que la pared
en la que desea montar los altavoces tenga
la resistencia su ciente para soportarlos. No
realice el montaje sobre contrachapado o
paredes blandas.
No se incluyen los tornillos de montaje. Utilice
tornillos adecuados para el material de la pared
y apoye el peso del altavoz.
PRECAUCIÓN
• Si no está seguro de la calidad y la resistencia de
una pared, consulte a un profesional.
• Pioneer no se hace responsable de ningún
accidente o daños resultantes de una instalación
inadecuada.
5 mm
10 mm
Mounting screw
(not supplied)
Tornillo de montaje
(incluido)
Notas adicionales
sobre la colocación
Instale los altavoces principales delanteros
izquierdo y derecho a la misma distancia del
televisor.
Precauciones:
Asegúrese de enroscar el cable pelado del
altavoz e insértelo completamente en el
terminal del altavoz. Si alguno de los cables de
altavoz pelados toca el panel trasero, puede
hacer que se corte la alimentación eléctrica
como medida de seguridad.
Los altavoces delanteros, central y surround
suministrados con este sistema están
protegidos magnéticamente. Sin embargo,
dependiendo de la ubicación de instalación,
puede producirse distorsión del color si los
altavoces se instalan muy cerca de la pantalla
de un televisor. Si esto ocurre, apague el
televisor, y enciéndalo después de 15 – 30
minutos. Si el problema continúa, separe el
sistema de altavoces del televisor.
El subwoofer no está protegido
magnéticamente y, por esta razón, no puede
colocarse cerca de un televisor o monitor. No
coloque medios de almacenaje magnéticos
(como discos exibles y cintas o cassettes de
vídeo) cerca del subwoofer.
No je los altavoces delanteros/surround y el
subwoofer a una pared o techo. Podrían caerse
o causar lesiones.
De 5 mm a 7 mm
HB985-DB.BDEUPPK_SPA.indd 19HB985-DB.BDEUPPK_SPA.indd 19 2010-05-14 2:48:292010-05-14 2:48:29

20 Instalación
Instalación
3
Ubicación del sistema
La siguiente imagen muestra un ejemplo de
posicionamiento del sistema. Recuerde que la
ilustración en estas instrucciones di ere de la
unidad real, en cuanto a nes explicativos
Para un sonido envolvente óptimo, todos
los altavoces aparte del subwoofer deberían
colocarse a la misma distancia de la posición
desde donde se van a escuchar (
A
).
A
B
D
E
F
A
A
A
A
A
G
C
A
Altavoz frontal izquierdo /
B
Altavoz frontal derecho:
Coloque los altavoces frontales a ambos
lados del monitor o pantalla y debidamente
alineados respecto a la pantalla.
C
Altavoz central:
Coloque el altavoz central encima o debajo del
monitor o pantalla.
D
Altavoz izquierdo envolvente /
E
Altavoz derecho envolvente:
Coloque estos altavoces detrás de la posición
desde donde se van a escuchar, orientados
ligeramente hacia dentro.
F
Subwoofer:
La posición del subwoofer no es tan
importante, ya que los sonidos de graves no
dependen en gran medida de su orientación.
No obstante, es mejor colocar el subwoofer
cerca de los altavoces frontales. Gírelo
ligeramente hacia el centro de la habitación
para reducir el re ejo contra la pared.
G
Unidad
PRECAUCIÓN
• Tenga cuidado y asegúrese de que los niños no
se apoyen o dejen objetos en el *conducto del
altavoz. *Conducto del altavoz: Habitáculo para
sonidos bajos en la estructura (alojamiento) del
altavoz.
• Coloque el altavoz central a una distancia segura
fuera del alcance de los niños.
De lo contrario, puede caerse y causar lesiones
personales y/o daños materiales.
• Los altavoces contienen piezas magnéticas,
por lo que pueden aparecer irregularidades
cromáticas en la pantalla del televisor o en el
monitor del ordenador. Utilice los altavoces lejos
de la televisión y del monitor del ordenador.
HB985-DB.BDEUPPK_SPA.indd 20HB985-DB.BDEUPPK_SPA.indd 20 2010-05-14 2:48:292010-05-14 2:48:29

21Instalación
3
Instalación
Conexiones a su TV
Realice una de las conexiones siguientes,
dependiendo de las opciones del propio
equipo.
• Conexión HDMI (página 21-22)
• Conexión de vídeo componente
(página 22)
• Conexión del vídeo (página 23)
NOTA
• Dependiendo de su TV y otros equipos que
quiera conectar, hay varias formas de conectar el
reproductor. Utilice sólo una de las conexiones
descritas en este manual.
• Por favor, consulte los manuales de su TV,
sistema estéreo y otros dispositivos según
necesite para establecer la mejor conexión
posible.
• Asegúrese de que el reproductor está conectado
directamente al TV. Sintonice el TV al canal de
entrada de vídeo correcto.
• No conecte el reproductor a través de su VCR.
La imagen podría distorsionarse debido al
sistema de protección anti-copia.
Conexión HDMI
Si dispone de un televisor o monitor HDMI,
puede conectarlo a este reproductor usando
un cable HDMI (tipo A, Versión 1.3).
Conecte la toma HDMI OUT del reproductor
a la toma HDMI IN de un televisor o monitor
compatible con HDMI.
Conexión HDMI
Player
TV
Televisor
Reproductor
Seleccione la fuente del televisor a HDMI
(consulte el manual de instrucciones del
televisor).
HB985-DB.BDEUPPK_SPA.indd 21HB985-DB.BDEUPPK_SPA.indd 21 2010-05-14 2:48:302010-05-14 2:48:30

22 Instalación
Instalación
3
NOTA
• No modi que la resolución si la conexión ya se
ha establecido, podrían producirse fallos en el
funcionamiento. Para resolver este problema,
apague el reproductor y vuelva a encenderlo.
• Cuando la conexión HDMI con el HDCP no
esté veri cada, la pantalla de TV cambiará a
una pantalla negra. En este caso, compruebe la
conexión HDMI o desconecte el cable HDMI.
• Si aparecen ruidos o líneas en la pantalla,
compruebe el cable HDMI (la longitud se limita
generalmente a 4,5 m y se utiliza un cable HDMI
de alta velocidad (versión 1.3).
• Si un dispositivo HDMI conectado no acepta
la salida de audio del reproductor, el audio del
dispositivo HDMI podrá distorsionarse o no
emitirse.
• Si utiliza una conexión HDMI, se puede cambiar
la resolución para la salida HDMI.
(Consulte “Ajuste de la resolución” en la página 23).
• Seleccione el tipo de salida de vídeo de la toma
HDMI OUT mediante la opción [Conf. color
HDMI] en el menú [Con g.] (ver página 34).
• Cuando conecte un dispositivo compatible
con HDMI o DVI, realice las siguientes
comprobaciones:
- Intente apagar el dispositivo HDMI/DVI y
este reproductor. A continuación, encienda el
dispositivo HDMI/DVI y transcurridos unos 30
segundos, encienda el reproductor.
- La entrada de vídeo del dispositivo conectado
está seleccionada correctamente para esta
unidad.
- El dispositivo conectado es compatible con
las entradas de vídeo de resolución 720x576p
(480p), 1280x720p, 1920x1080i o 1920x1080p.
• o todos los dispositivos HDMI o DVI compatibles
con HDCP funcionarán con este reproductor.
- La imagen no se verá correctamente con un
dispositivo que no sea compatible con HDCP.
- El reproductor no funciona y la pantalla de TV
se vuelve negra.
Conexión de vídeo componente
Conecte las tomas COMPONENT VIDEO
OUT del reproductor a las tomas de entrada
correspondientes del televisor usando cables
Y Pb Pr. Puede oír el sonido a través del altavoz
del sistema.
Conexión de componentes
Player
TV
Green
Blue
Red
PR
PB
Y
COMPONENT
VIDEO
INPUT
OUTPUT
L
AUX
R
VIDEO
Reproductor
Verde
Azul
Rojo
Televisor
NOTA
Si utiliza la conexión COMPONENT VIDEO OUT,
puede modi car la resolución de salida (consulte el
apartado “Ajuste de la resolución” en la página 23.)
HB985-DB.BDEUPPK_SPA.indd 22HB985-DB.BDEUPPK_SPA.indd 22 2010-05-14 2:48:302010-05-14 2:48:30

23Instalación
3
Instalación
Conexión del vídeo
Conecte la toma VIDEO OUT del reproductor
a la toma de entrada de vídeo situada en el
televisor mediante un cable de vídeo. Puede
oír el sonido a través del altavoz del sistema.
Conexión del vídeo
TV
Yellow
PR
PB
Y
COMPONENT
VIDEO
INPUT
OUTPUT
L
AUX
R
VIDEO
Reproductor
Televisor
Amarillo
Ajuste de la resolución
El reproductor proporciona varias resoluciones
de salida para las conexiones HDMI OUT y
COMPONENT VIDEO OUT. Es posible cambiar la
resolución mediante el menú [Con g.].
1. Pulse HOME MENU (
).
2. Utilice
I
/
i/U
/
u
para seleccionar el menú
[
Con g.
]
y pulse ENTER ( ). Aparecerá el
menú [Con g.].
3. Utilice
U
/
u
para seleccionar la opción
[PANTALLA] y, a continuación, pulse
i
para
pasar al segundo nivel.
4. Utilice
U
/
u
para seleccionar la opción
[Resolución] y, a continuación, pulse ENTER
(
) o
i
para pasar al tercer nivel.
5. Use
U
/
u
para seleccionar una opción y,
a continuación, pulse ENTER ( ) para
con rmar su selección.
NOTA
• Si su televisor no acepta la resolución que ha
con gurado en el reproductor, es posible ajustar
la resolución a 576p (480p) de la siguiente
manera:
1. Pulse
Z
para abrir la bandeja de discos.
2 Pulse
x
por más de 5 segundos.
• Como son varios los factores que in uyen
en la resolución de salida de vídeo, consulte
“Resolución de la salida de vídeo” en la página
70.
HB985-DB.BDEUPPK_SPA.indd 23HB985-DB.BDEUPPK_SPA.indd 23 2010-05-14 2:48:312010-05-14 2:48:31

24 Instalación
Instalación
3
Conexión de la antena
Conecte la antena facilitada para escuchar la
radio.
Conexión de la antena
Player
Reproductor
NOTA
Después de conectar la antena por hilo FM,
manténgala lo más horizontal posible. Asegúrese
de sacar la antena por hilo FM completamente.
Conexiones con un
dispositivo externo
Conexión auxiliar
Puede disfrutar del sonido de su componente
con las tomas de salida de audio analógicas de
los altavoces del sistema.
Conecte las tomas de salida de audio
analógicas a su componente en la conexión
auxiliar izquierda o derecha de esta unidad. Y
después, seleccione la opción [AUX] pulsando
INPUT/TUNER,
I
/
i
y ENTER
(
).
Conexión auxiliar
Player
To the audio output jacks
of your component
(TV, VCR, etc.)
Red
White
PR
PB
Y
COMPONENT
VIDEO
INPUT
L
AUX
R
VIDEO
Rojo
Blanco
Reproductor
A la toma de salida de
audio de su componente
(TV, VCR, etc.)
HB985-DB.BDEUPPK_SPA.indd 24HB985-DB.BDEUPPK_SPA.indd 24 2010-05-14 2:48:322010-05-14 2:48:32

25Instalación
3
Instalación
Conexión a entrada de puerto
Puede disfrutar del sonido de su reproductor
de audio portátil desde los altavoces del
sistema.
Conecte la toma de los auriculares (o la salida
de línea) del reproductor de audio portátil a la
entrada del puerto en esta unidad. Y después,
seleccione la opción [PORTABLE] pulsando
INPUT/TUNER,
I
/
i
y ENTER
(
).
Conexión a entrada de puerto
twZGSGUUU
Reproductor de
MP3, etc.
Conexión a entrada óptica 1/2
Puede disfrutar del sonido de su componente
con la conexión óptica digital de los altavoces
del sistema.
Conecte la toma de salida óptica de su
componente a las tomas de entrada óptica 1/2
de la unidad. Y después, seleccione la opción
[OPTICAL 1/2] pulsando INPUT/TUNER,
I
/
i
y
ENTER
(
). O pulse OPTICAL para seleccionar
directamente.
Conexión óptica
To the digital
optical output jack
of your component
A la toma de salida
óptica digital de su
componente
HB985-DB.BDEUPPK_SPA.indd 25HB985-DB.BDEUPPK_SPA.indd 25 2010-05-14 2:48:322010-05-14 2:48:32

26 Instalación
Instalación
3
Conexión Bluetooth®
Acerca de Bluetooth
Bluetooth® es una tecnología de comunicación
inalámbrica para conexiones de corta distancia.
El alcance disponible es de 10 metros. (Puede
interrumpirse el sonido si hay interferencias
causadas por otra onda electrónica o si se
conecta el bluetooth en otras habitaciones.)
La conexión de aparatos individuales bajo
Tecnología inalámbrica Bluetooth no incurre
en ningún cargo. Se puede utilizar un teléfono
móvil con tecnología inalámbrica Bluetooth
a través de Cascade, si la conexión se ha
realizado con tecnología inalámbrica Bluetooth.
Aparatos disponibles: Teléfono móvil, MP3,
ordenador portátil, PDA (estas unidades deben
ser compatibles con auriculares estéreo.)
Per les de Bluetooth
Para utilizar la tecnología inalámbrica Bluetooth,
los aparatos deben cumplir con ciertos per les.
Este equipo es compatible con el per l
siguiente.
A2DP (Advanced Audio Distribution Pro le)
Escuchar música de un aparato
Bluetooth
Acoplar su equipo y un aparato Bluetooth
Antes de comenzar el procedimiento de
acoplamiento, asegúrese de que se haya
activado la función Bluetooth del aparato
Bluetooth. Consulte la guía de usuario del
aparato Bluetooth. Una vez realizado con éxito
el acoplamiento, no es necesario volver a
realizarlo.
1. Selección la función Bluetooth con INPUT/
TUNER o BT AUDIO.
Aparece “BT AUDIO” y, posteriormente, “BT
READY” en la ventana de la pantalla.
2. Encienda el aparato Bluetooth y realice la
operación de acoplamiento. Durante la
búsqueda del aparato Bluetooth, quizás
se muestre una lista de los dispositivos
encontrados en la pantalla del aparato
Bluetooth, dependiendo del tipo de aparato
de que se trate. Su equipo aparece como
“PIONEER AUDIO”.
3. Introduzca el código PIN.
Código PIN: 0000
4. Cuando se haya realizado el acoplamiento
con éxito, se iluminará el LED del Bluetooth
y se mostrará “BT SINK”.
NOTA
Dependiendo del tipo de aparato de que se trate,
el modo de acoplamiento puede ser diferente.
5. Escuchar música.
Para reproducir música guardada en el
aparato Bluetooth, consulte la guía de
usuario de ese aparato.
NOTA
• Si cambia la función del equipo, se desconectará
la función Bluetooth y deberá realizar de nuevo
el acoplamiento.
• AVRCP no está disponible en este modo.
HB985-DB.BDEUPPK_SPA.indd 26HB985-DB.BDEUPPK_SPA.indd 26 2010-05-14 2:48:322010-05-14 2:48:32

27Instalación
3
Instalación
Comprobación de la información del
aparato Bluetooth conectado
Esta función se realiza tras el acoplamiento.
Puede comprobar la información Bluetooth.
Mantenga pulsado DISPLAY repetidamente.
La información de Bluetooth cambia del modo
siguiente. Dirección local de aparato Bluetooth
t
Nombre de aparato
t
Ninguno
t
...
NOTA
• Este equipo no es compatible con el per l de
auriculares mono (per l de manos libres).
• El sonido podría interrumpirse cuando otra onda
electrónica inter era en la conexión.
• No se puede controlar el aparato Bluetooth con
este equipo.
• El acoplamiento se limita a un aparato Bluetooth
por equipo y no es posible el acoplamiento
múltiple.
• Aunque la distancia entre su Bluetooth y el
aparato sea inferior a 10 m, si hay obstáculos
entre ambos, no se podrá conectar el aparato
Bluetooth.
• Dependiendo del tipo de aparato, quizás no
pueda usar la función Bluetooth.
• Cuando no se ha conectado el Bluetooth,
aparece “BT READY” en la ventana de la pantalla.
• Si se produce un fallo eléctrico debido a
aparatos que utilizan la misma frecuencia, como
equipos médicos, microondas o dispositivos
LAN inalámbricos, se interrumpirá la conexión.
• Cuando se sitúe una persona en el recorrido de
la comunicación entre el aparato Bluetooth y el
reproductor, se interrumpirá la conexión.
• Si aumenta la distancia entre el Bluetooth y el
equipo, se reducirá la calidad del sonido y la
conexión se interrumpirá si el espacio entre el
Bluetooth y el equipo es superior al alcance del
Bluetooth.
• Se desconecta el aparato con tecnología
inalámbrica Bluetooth, si se apaga el equipo
principal o la distancia entre el aparato y la
unidad principal es superior a 10 m.
HB985-DB.BDEUPPK_SPA.indd 27HB985-DB.BDEUPPK_SPA.indd 27 2010-05-14 2:48:322010-05-14 2:48:32

28 Instalación
Instalación
3
Conexión a la red
doméstica
Este reproductor se puede conectar a una red
de área local (LAN) a través de un puerto LAN
en el panel trasero.
Para más información consulte la
documentación del dispositivo de red.
Conecte el puerto LAN del reproductor al
correspondiente puerto del módem o router
a través de un cable de red LAN o cable
Ethernet (CAT5 o superior con conector RJ45)
disponibles en comercios.
En el ejemplo de con guración de una
conexión por cable que se muestra a
continuación, el reproductor puede acceder
al contenido desde cualquiera de los
ordenadores.
Conexión a red
Broadband
Service
Router
WAN
LAN 1
LAN 2
LAN 3
Player
PC
PC
Router
Servicio
de banda
ancha
Reproductor
NOTA
• Cuando enchufe o desenchufe el cable LAN,
hágalo sujetando el cable por el enchufe.
Al desenchufarlo, no estire del cable LAN,
desenchúfelo presionando hacia abajo el
enchufe.
• No conecte un cable de teléfono modular al
puerto LAN.
• Existen varias con guraciones para la conexión,
siga las especi caciones de su compañía de
telecomunicaciones o de su proveedor de
Internet.
• Si desea acceder a contenido desde ordenadores
o servidores DLNA, el reproductor deberá estar
conectado a la misma red de área local que
dichos ordenadores o servidores a través de un
router.
HB985-DB.BDEUPPK_SPA.indd 28HB985-DB.BDEUPPK_SPA.indd 28 2010-05-14 2:48:322010-05-14 2:48:32

29Instalación
3
Instalación
Con guración de la red
Antes de ajustar la red por cable, es necesario
conectar Internet de banda ancha a su red
doméstica.
Si hay un servidor DHCP en la red de área
local (LAN) a través de una conexión por
cable, a este reproductor se le asignará
automáticamente una dirección IP.
Después de realizar la conexión física,
es posible que se tenga que ajustar la
con guración de red del reproductor
en algunas redes domésticas. Ajuste la
con guración de [RED] de la siguiente manera.
1. Seleccione la opción [Con g de conexión]
en el menú [Con g.] y, a continuación,
pulse ENTER (
).
2. Utilice
U
/
u
/
I
/
i
para seleccionar el modo
IP entre [Dinámico] y [Estático].
Normalmente, seleccione [Dinámico] para
asignar de forma automática una dirección
IP.
NOTA
Si no hay disponible un servidor DHCP en la red
y desea con gurar manualmente la dirección IP,
seleccione [Estático] y, a continuación, [dirección
IP], [máscara de red], [gateway] y [servidor DNS]
mediante los botones
U
/
u
/
I
/
i
y los botones
numéricos.
Si se equivoca mientras introduce un número,
pulse CLEAR para borrar la parte resaltada.
3. Seleccione [OK] y pulse ENTER ( ) para
aplicar los ajustes de red.
4. El reproductor le pedirá que compruebe la
conexión de red. Seleccione [OK] y pulse
ENTER ( ) para completar la conexión de
red.
5. Si selecciona [Test] y pulsa ENTER ( ) en el
paso 4 anterior, el estado de conexión de la
red se mostrará en la pantalla.
Además, es posible hacer la comprobación
en [Estado conexión] en el menú [Con g.].
HB985-DB.BDEUPPK_SPA.indd 29HB985-DB.BDEUPPK_SPA.indd 29 2010-05-14 2:48:332010-05-14 2:48:33

30 Instalación
Instalación
3
Notas sobre la conexión de red:
• Muchos de los problemas de conexión
a la red que se producen durante la
con guración pueden resolverse a menudo
reseteando el router o cable módem.
Después de conectar el reproductor a la
red doméstica, apague inmediatamente y/
o desconecte el cable de alimentación del
router o cable módem de la red doméstica.
Después, encienda y/o conecte de nuevo el
cable de alimentación.
• El número de dispositivos que pueden recibir
el servicio de Internet quedará limitado
por las condiciones de servicio aplicables
dependiendo del proveedor de servicios de
Internet (ISP). Para obtener más información,
póngase en contacto con su ISP.
• Nuestra empresa no se responsabiliza de un
mal funcionamiento del reproductor y/o la
función de conexión a Internet por errores/
fallos de comunicación con su conexión
a Internet de banda ancha u otro equipo
conectado.
• Nuestra empresa no es la creadora o
suministradora de las características de
los discos BD-ROM disponibles en la
función de conexión a Internet, y tampoco
se responsabiliza de su funcionalidad o
disponibilidad continuada. Puede que haya
material relacionado con el disco disponible
a través de la conexión a Internet que sea
incompatible con este reproductor. Si tiene
alguna duda acerca de dicho contenido,
póngase en contacto con el fabricante del
disco.
• Algunos contenidos de Internet pueden
requerir una conexión con un ancho de
banda superior.
• Incluso si el reproductor está correctamente
conectado y con gurado, puede que parte
de los contenidos de Internet no funcionen
correctamente debido a congestión de
Internet, la calidad o ancho de banda de
su servicio de Internet, o problemas con el
proveedor de contenido.
• Es posible que algunas operaciones
de conexión a Internet no se puedan
realizar debido a ciertas restricciones del
proveedor de servicios de Internet (ISP) que
le proporciona la conexión a Internet de
banda ancha.
• Los costes del proveedor de Internet
incluidos (sin limitación) los cargos de
conexión corren por su cuenta y riesgo.
• Se necesita un puerto 10 LAN Base-T o 100
Base-TX para la conexión por cable a este
reproductor. Si su servicio de Internet no
permite ese tipo de conexiones no podrá
conectar el reproductor.
• Para utilizar el servicio xDSL necesitará un
router.
• Es necesario un módem DSL para utilizar el
servicio DSL y un cable módem para usar
el servicio de cable módem. Dependiendo
del método de acceso y el acuerdo de
suscripción que tenga con su ISP, puede que
no pueda utilizar la función de conexión a
Internet de este reproductor, o puede que
se limite al número de dispositivos que se
pueden conectar a la vez. (Si su ISP limita
la suscripción a un dispositivo, puede que
este reproductor no pueda conectarse si ya
hay conectado un ordenador).
• Puede que el uso de un “Router” no esté
permitido o su uso esté limitado según las
políticas y restricciones de su ISP. Para más
información, póngase directamente en
contacto con su ISP.
• Apague todos los equipos de red que no
utilice en su red doméstica local. Algunos
dispositivos pueden generar trá co de red.
HB985-DB.BDEUPPK_SPA.indd 30HB985-DB.BDEUPPK_SPA.indd 30 2010-05-14 2:48:332010-05-14 2:48:33

31Instalación
3
Instalación
Conexión de
dispositivos USB
Este reproductor puede reproducir archivos
de vídeo, música y fotos guardados en el
dispositivo USB.
1. Inserte un dispositivo USB en el puerto USB
hasta que se ajuste en su posición.
Conexión USB
2. Pulse HOME MENU.
Seleccione [Película], [Foto] o [Música] con
los botones
U
/
u
/
I
/
i
, y pulse ENTER ( ).
3. Seleccione un archivo con los botones
U
/
u
/
I
/
i
, y pulse PLAY o ENTER (
) para
reproducir el archivo.
Puede comprobar el espacio del dispositivo
USB en la pantalla.
4. Seleccione el otro modo.
Y retire el dispositivo USB con cuidado.
NOTA
• Este reproductor es compatible con memoria
ash USB/HDD externo formateado en FAT16,
FAT32 y NTFS cuando se accede a archivos
(música, fotos, vídeos). Sin embargo, para la
grabación de CD de audio y BD-LIVE sólo son
compatibles los formatos FAT16 y FAT32. Utilice
la memoria ash USB/HDD externo formateado
en FAT16 o FAT32 cuando use la grabación de
CD de audio y BD-LIVE.
• El dispositivo USB puede utilizarse para el
almacenamiento local y así disfrutar de discos
BD-LIVE con Internet.
• Esta unidad admite hasta 4 particiones del
dispositivo USB.
• No extraiga el dispositivo USB mientras esté en
funcionamiento (reproducción, etc.).
• No es compatible con un dispositivo USB que
necesite un programa de instalación adicional al
estar conectado al ordenador.
• Dispositivo USB: Dispositivo USB que admite
USB 1,1 y USB 2,0.
• Se pueden reproducir archivos de vídeo, música
y fotos. Para obtener una información detallada
de funcionamiento con cada archivo, consulte
las páginas correspondientes.
• Es recomendable realizar copias de seguridad
regularmente para evitar pérdida de datos.
• Si utiliza un cable de extensión USB, un HUB USB
o un multilector USB, el dispositivo USB puede
no reconocerse.
• Es posible que algunos dispositivos USB no
funcionen con esta unidad.
• No admite cámaras digitales ni teléfonos
móviles.
• El puerto USB de este aparato no puede
conectarse a un ordenador.
HB985-DB.BDEUPPK_SPA.indd 31HB985-DB.BDEUPPK_SPA.indd 31 2010-05-14 2:48:332010-05-14 2:48:33

32 Instalación
Instalación
3
Ajustes
Ajuste de los valores de
con guración
Es posible modi car los ajustes del reproductor
en el menú [Con g.].
1. Pulse HOME MENU (
).
2. Utilice
I
/
i/U
/
u
para seleccionar el menú
[Con g.] y pulse ENTER ( ). Aparecerá el
menú [Con g.].
3. Utilice
U
/
u
para seleccionar la primera
opción de con guración y pulse
i
para
pasar al segundo nivel.
4. Utilice
U
/
u
para seleccionar una segunda
opción de con guración y pulse ENTER (
)
para desplazarse hasta el tercer nivel.
5. Utilice
U
/
u
para seleccionar la opción
deseada y pulse
i
o ENTER ( ) para
con rmar su selección.
HB985-DB.BDEUPPK_SPA.indd 32HB985-DB.BDEUPPK_SPA.indd 32 2010-05-14 2:48:332010-05-14 2:48:33

33Instalación
3
Instalación
Menú [PANTALLA]
Aspecto TV
Seleccione una relación de aspecto del TV
según el tipo de televisor.
[Formato Carta 4:3]
Selecciónelo cuando haya una pantalla
de televisión tradicional (4:3) conectada.
Muestra la imagen con barras que la
ocultan por la parte superior e inferior.
[Form. panorám. 4:3]
Selecciónelo cuando haya una pantalla
de televisión tradicional (4:3) conectada.
Muestra la imagen recortada para ajustarse
a la pantalla de su TV. Ambos lados de la
imagen están recortados.
[16:9 Original]
Seleccione esta opción cuando se haya
conectado a una TV panorámica 16:9. La
imagen de formato 4:3 se mostrará con
una proporción de 4:3 con bandas negras a
derecha e izquierda.
[16:9 Completa]
Seleccione esta opción cuando se haya
conectado a una TV panorámica 16:9.
La imagen de formato 4:3 se ajustará
horizontalmente (en proporción lineal) para
llenar toda la pantalla.
NOTA
No se puede seleccionar [Formato Carta 4:3] y
[Form. panorám. 4:3] si la resolución está ajustada
en un valor superior a 720p.
Resolución
Ajusta la resolución de salida de la señal de
vídeo HDMI y de componente. Re érase a la
página 23 y 70 para obtener detalles sobre la
con guración de la resolución.
[Auto]
Si la conexión [HDMI OUT] se conecta a una
TV que proporcione información de pantalla
(EDID), se seleccionará automáticamente
la resolución que mejor se adapte a la TV
conectada. Si solamente está conectada
la conexión COMPONENT VIDEO OUT], la
resolución se cambiará a 1080i de forma
predeterminada.
[1080p]
Representa 1080 líneas de vídeo progresivo.
[1080i]
Representa 1080 líneas de vídeo
entrelazado.
[720p]
Representa 720 líneas de vídeo progresivo.
[576p (480p)]
Representa 576 (480) líneas de vídeo
progresivo.
[576i (480i)]
Representa 576 (480) líneas de vídeo
entrelazado.
HB985-DB.BDEUPPK_SPA.indd 33HB985-DB.BDEUPPK_SPA.indd 33 2010-05-14 2:48:332010-05-14 2:48:33

34 Instalación
Instalación
3
Pantalla 1080p
Cuando la resolución se con gure como
1080p, seleccione la opción [24Hz] para
obtener una presentación limpia del material
lmado (1080p/24 Hz) con una pantalla
equipada con HDMI compatible con la entrada
1080p/24 Hz.
NOTA
• Si selecciona [24 Hz], podrían producirse
distorsiones en la imagen cuando el vídeo
cambia material lmográ co y de vídeo. En ese
caso, seleccione [50 Hz].
• Incluso cuando la opción [Pantalla 1080p] se
con gura a [24 Hz], si la TV no es compatible
con 1080p/24 Hz, la frecuencia de fotogramas
real de la salida de video será 50 Hz según el
formato de la fuente de vídeo.
Conf. color HDMI
Seleccione el tipo de salida de la conexión
HDMI OUT. Para esta con guración, consulte
los manuales del dispositivo de pantalla.
[YCbCr]
Seleccione esta opción al conectar a un
dispositivo de pantalla HDMI.
[RGB]
Seleccione esta opción al conectar a un
dispositivo de pantalla DVI (RGB).
Menú [IDIOMA]
Menú de visualización
Seleccione un idioma para el menú [Con g.] y
para la información en pantalla.
Menú del disco/Audio del disco/
Subtítulo del disco
Seleccione el idioma que pre era para la pista
de audio (audio del disco), los subtítulos, y el
menú del disco.
[Original]
Hace referencia al idioma original en que se
grabó el disco.
[Otros]
Pulse ENTER (
) para seleccionar otro
idioma. Use los botones numéricos y a
continuación ENTER ( ) para introducir
el número de 4 dígitos según la lista de
códigos de idioma de la página 69.
[Apagado] (sólo para subtítulos del
disco)
Desactiva los subtítulos.
NOTA
Puede que el ajuste del idioma no funcione
dependiendo del disco.
HB985-DB.BDEUPPK_SPA.indd 34HB985-DB.BDEUPPK_SPA.indd 34 2010-05-14 2:48:332010-05-14 2:48:33

35Instalación
3
Instalación
Menú [AUDIO]
Ajuste Altavoces
Para obtener el mejor sonido posible, utilice
la pantalla de con guración del altavoz para
especi car el volumen de los altavoces que
ha conectado y la distancia desde donde se
van a escuchar. Utilice la prueba para ajustar el
volumen de los altavoces al mismo nivel.
[Altavoces]
Seleccione un altavoz que quiera ajustar.
[Volumen]
Ajusta el nivel de salida de cada altavoz.
[Distancia]
Ajusta la distancia entre cada altavoz y la
posición desde donde se van a escuchar.
[Prueba/ Parar tono de prueba]
Los altavoces emitirán un tono de prueba.
[OK]
Con rma la con guración.
[Cancelar]
Cancela la con guración.
Sincronismo HD AV
A veces, la televisión digital se encuentra con
cierto desfase entre la imagen y el sonido Si
esto ocurre, se puede compensar ajustando
cierto retraso en el sonido de manera que éste
“espere” a que llegue la imagen; es lo que se
denomina “Sincronismo HD AV”.
Utilice
U u
para aumentar o disminuir el
tiempo de retraso, eligiendo entre 0 y 300 ms.
El retraso variará según el canal de televisión
digital que esté viendo. Si cambia de canal
deberá volver a ajustar el valor Sincronismo HD
AV.
DRC (Control de rango dinámico)
Cuando se reproduce contenido codi cado en
Dolby Digital o Dolby Digital Plus, puede que
quiera comprimir el rango dinámico de la salida
de audio (la diferencia entre los sonidos más
altos y los más bajos). Esta opción le permite
escuchar una película con el volumen bajo sin
perder la precisión del sonido. Con gurar en
[Activo] para obtener este efecto.
NOTA
El ajuste DRC se puede modi car sólo cuando no
hay discos en la unidad o ésta se encuentra parada
completamente.
HB985-DB.BDEUPPK_SPA.indd 35HB985-DB.BDEUPPK_SPA.indd 35 2010-05-14 2:48:342010-05-14 2:48:34

36 Instalación
Instalación
3
Menú [BLOQUEO]
Para acceder a las distintas funciones de
[BLOQUEO] es preciso introducir el código
de seguridad de 4 dígitos establecido
anteriormente.
Si todavía no ha introducido una contraseña,
se le pedirá que lo haga. Introduzca dos veces
una contraseña de 4 dígitos y pulse ENTER (
)
para crear una nueva contraseña.
Contraseña
Puede crear o cambiar la contraseña.
[Ninguno]
Introduzca dos veces una contraseña de 4
dígitos y pulse ENTER (
) para crear una
nueva contraseña.
[Cambiar]
Introduzca la contraseña actual y pulse
ENTER (
). Introduzca dos veces una
contraseña de 4 dígitos y pulse ENTER (
)
para crear una nueva contraseña.
NOTA
Si se equivoca antes de pulsar ENTER
( )
, pulse CLEAR.
A continuación, introduzca la contraseña correcta.
Si olvida su contraseña,
Si olvida su contraseña, puede borrarla siguiendo
estos pasos:
1. Extraiga los discos que puedan estar en el
reproductor.
2. Seleccione la opción [Bloqueo] en el menú
[Con g.].
3. Utilice los botones numéricos para introducir
“210499” en el menú [Bloqueo]. Se borra la
contraseña.
Índice DVD
Bloquea la reproducción de un DVD clasi cado
según su contenido. (No todos los discos están
clasi cados).
[Indice 1-8]
La clasi cación uno (1) es la que tiene más
restricciones y la ocho (8) la que menos.
[Desbloqueo]
Si se selecciona esta opción, el control
paterno no está activo y el disco se
reproduce en su totalidad.
Índice BD
Establece un límite de edad para la
reproducción de BD-ROM. Utilice los botones
numéricos para introducir un límite de edad
para la visualización de BD-ROM.
[255]
Todos los BD-ROM se pueden reproducir.
[0-254]
Prohíbe la reproducción de BD-ROM con
la correspondiente selección de valoración
incorporada.
NOTA
El [Índice BD] se aplicará sólo para el disco BD que
contiene el control de clasi cación avanzada.
Código del país
Introduzca el código del área cuyos estándares
se han utilizado para valorar el DVD, según la
lista que aparece en la página 68.
HB985-DB.BDEUPPK_SPA.indd 36HB985-DB.BDEUPPK_SPA.indd 36 2010-05-14 2:48:342010-05-14 2:48:34

37Instalación
3
Instalación
Menú [RED]
Con g de conexión
Si su entorno de red doméstica está preparado
para la conexión del reproductor, se deberá
con gurar la conexión de red por cable del
reproductor para una comunicación por red.
(Consulte la “Conexión a la red doméstica” en
las página 28.)
Estado conexión
Si desea comprobar el estado de red en este
reproductor, seleccione las opciones
[Enlace principal] y pulse ENTER ( ) para
comprobar si se ha establecido una conexión a
la red e Internet.
Conexión BD-LIVE
Al usar las funciones de BD-LIVE puede
restringir el acceso a Internet.
[Permitido]
El acceso a Internet se permite a todos los
contenidos de BDLive.
[Permiso parcial]
El acceso a Internet se permite solamente
al contenido de BD-LIVE que disponga
de certi cados de propietario. El acceso
a Internet y las funciones AACS queda
prohibido para todo el contenido BD-LIVE
sin certi cado.
[Prohibido]
El acceso a Internet queda prohibido a
todos los contenidos de BD-LIVE.
Menú [OTROS]
DivX VOD
ACERCA DE DIVX VIDEO: DivX ® es un formato
de vídeo digital creado por DivX, Inc. Se trata
de un dispositivo o cial con certi cación DivX
que reproduce vídeo DivX. Visite
www.divx.com y podrá obtener más
información y herramientas de software para
convertir sus archivos de vídeo en DivX.
ACERCA DE VÍDEO A DEMANDA DIVX: Este
dispositivo DivX Certi ed ® debe registrarse
para poder reproducir contenido de vídeo a
demanda DivX (VOD).
Para generar el código de registro, busque
la sección de DivX VOD en el menú de
con guración del dispositivo. Visite la página
vod.divx.com con este código, complete el
proceso de registro y obtenga más información
acerca de DivX VOD.
[Registrar]
Muestra el código de registro de su
reproductor.
[Anular registro]
Desactiva el reproductor y visualiza el
código de desactivación.
NOTA
Todos los vídeos descargados de DivX® VOD con
el código de registro de este reproductor sólo
pueden reproducirse en esta unidad.
HB985-DB.BDEUPPK_SPA.indd 37HB985-DB.BDEUPPK_SPA.indd 37 2010-05-14 2:48:342010-05-14 2:48:34

38 Instalación
Instalación
3
Desconexión automat
El protector de pantalla aparece cuando el
reproductor se deja en el modo de parada
durante más de cinco minutos. Si con gura
esta opción en [Activo], la unidad se
desconecta automáticamente después de que
el protector de pantalla se muestre durante 25
minutos. Con gure esta opción en [Apagado]
para dejar el protector de pantalla hasta que la
unidad sea accionada por el usuario.
Inicializar
Ajuste de fábrica
Se pueden restablecer la con guración del
reproductor a los ajustes predeterminados
de fábrica.
Espac. libre en BD
Inicializa el contenido de BD desde el
almacenamiento USB conectado.
NOTA
Si restaura la con guración de fábrica del
reproductor utilizando la opción [Ajuste de fábrica]
deberá realizar la activación de los servicios en
línea y con guración de red de nuevo.
Información de software
Muestra la versión actual del software.
HB985-DB.BDEUPPK_SPA.indd 38HB985-DB.BDEUPPK_SPA.indd 38 2010-05-14 2:48:342010-05-14 2:48:34

39Instalación
3
Instalación
Efecto de sonido
Puede seleccionar un modo de sonido
adecuado. Pulse SOUND varias veces hasta
que aparezca el modo deseado en la pantalla
del panel frontal o en la pantalla del TV. Los
elementos mostrados en el ecualizador
pueden variar según las fuentes de sonido y
los efectos.
[Pioneer 1]: Le proporciona el ajuste de sonido
adecuado cuando se conectan altavoces de
tipo pequeño (S-BD303).
[Pioneer 2]: Le proporciona el ajuste de sonido
adecuado cuando se conectan altavoces de
tipo alto (S-BD707T).
[Bypass]: Las señales de audio envolvente y
de múltiples canales se reproducen según la
manera en la que se grabaron.
[Bass Blast]: Refuerza el efecto del sonido
grave desde el altavoz frontal izquierdo y
derecho y el subwoofer.
[PL ll Movie]: Realiza la decodi cación del
modo de película Pro Logic II en la señal de
entrada y produce cinco canales de salida de
banda ancha desde las fuentes de 2 canales.
Este ajuste es ideal para ver vídeos de películas
ya grabadas o antiguas. Este modo está
disponible sólo en las fuentes de 2 canales.
[PL ll Music]: Realiza la decodi cación del
modo de música Pro Logic II en la señal de
entrada y produce cinco canales de salida
de banda ancha desde las fuentes de 2
canales. Este ajuste es ideal para las fuentes de
estéreo normal como un CD. Este modo está
disponible sólo en las fuentes de 2 canales.
[Clear Voice]: Este modo ofrece un sonido de
voz claro, mejorando la calidad de la voz que
se escucha.
[Game]: Puede disfrutar de un sonido
más virtual mientras se entretiene con sus
videojuegos.
[Night]: Esta opción puede ser útil si quiere ver
películas con el volumen bajo porque ya es
tarde.
[Mus. ReTouch]: Cuando escuche archivos
MP3 u otro tipo de música comprimida, podrá
mejorar el sonido. Este modo está disponible
sólo en las fuentes de 2 canales.
[Loudness]: Mejora el sonido de graves y
agudos.
HB985-DB.BDEUPPK_SPA.indd 39HB985-DB.BDEUPPK_SPA.indd 39 2010-05-14 2:48:342010-05-14 2:48:34

40 Funcionamiento
Funcionamiento
4
Reproducción general
Reproducción de discos
1. Pulse
Z
OPEN/CLOSE, y coloque un disco
en la bandeja de discos.
2. Pulse
Z
OPEN/CLOSE para cerrar la bandeja
de discos.
La mayoría de CDs de audio, BD-ROM y
DVD-ROM se reproducen automáticamente.
3. Pulse
HOME MENU.
4. Seleccione [Película], [Foto] o [Música] con
los botones
U
/
u
/
I
/
i
, y pulse ENTER ( ).
5. Seleccione la opción Disco con
I
/
i
, y pulse
ENTER (
).
Cuando conecte un máximo de dos
dispositivos, se mostrará como previamente.
6. Seleccione un archivo con
U
/
u
/
I
/
i
, y
pulse
B
PLAY o ENTER (
) para reproducir
el archivo.
NOTA
• Las funciones de reproducción descritas en este
manual no siempre están disponibles en todos
los archivos y dispositivos. Algunas funciones
pueden estar restringidas por muchos factores.
• Dependiendo de los títulos de BD-ROM es
posible que sea necesaria una conexión de
dispositivo USB para una correcta reproducción.
4
Funcionamiento
HB985-DB.BDEUPPK_SPA.indd 40HB985-DB.BDEUPPK_SPA.indd 40 2010-05-14 2:48:342010-05-14 2:48:34

41Funcionamiento
4
Funcionamiento
Para detener la reproducción
Pulse
x
STOP durante la reproducción.
Para hacer una pausa
Pulse
X
PAUSE/STEP durante la reproducción.
Pulse
B
PLAY para reanudar la reproducción.
Para reproducir fotograma a
fotograma
Pulse
X
PAUSE/STEP durante la reproducción
de películas.
Pulse
X
PAUSE/STEP repetidamente para
reproducir fotograma a fotograma.
Para buscar hacia delante o hacia
atrás
Pulse
m
o
M
durante la reproducción
para avanzar rápidamente o retroceder
rápidamente.
Puse
m
o
M
varias veces para cambiar
entre las distintas velocidades de reproducción.
Para reducir la velocidad de
reproducción
Mientras que la reproducción está en pausa,
pulse varias veces
M
para reproducir a varias
velocidades de cámara lenta.
Para saltar al capítulo/pista/archivo
siguiente/anterior
Durante la reproducción, pulse
.
o
>
para ir al siguiente capítulo/pista/archivo o
para volver al principio del capítulo/pista/
archivo actual.
Pulse
.
dos veces brevemente para volver
al capítulo/pista/archivo anterior.
Utilización del menú del disco
BD
DVD
AVCHD
Para visualizar el menú del disco
La pantalla de menús puede aparecer la
primera vez después de cargar un disco que
contenga un menú. Si desea visualizar el menú
del disco durante la reproducción, pulse MENU.
Utilice
U
/
u
/
I
/
i
para navegar a través de las
opciones del menú.
Para mostrar el menú desplegable
Algunos discos BD-ROM contienen un menú
desplegable que se muestra durante la
reproducción.
Pulse POPUP/ TOP MENU durante la
reproducción y utilice los botones
U
/
u
/
I
/
i
para navegar por las opciones del menú.
Reanudar la reproducción
BD
DVD
AVCHD
MOVIE
ACD
MUSIC
La unidad graba a partir del punto en el que
pulsó
x
STOP dependiendo del disco.
Si aparece en la pantalla durante unos
instantes “
Xx
(Resume Stop)” pulse
B
PLAY
para reanudar la reproducción (desde el punto
de la escena).
Si pulsa dos veces
x
STOP o extrae el disco,
aparece en pantalla, “
x
”(parada completa). La
unidad eliminará el punto donde se detuvo.
NOTA
• El punto de reanudación podría eliminarse si se
pulsa un botón (por ejemplo:;
1
(POWER),
Z
(OPEN/CLOSE), etc).
• La función de reanudación no está operativa
para discos BD-Video con BD-J.
• Si pulsa una vez
x
(STOP) durante la reproducción
de títulos interactivos de BD-ROM, la unidad
entrará en el modo de parada completa.
HB985-DB.BDEUPPK_SPA.indd 41HB985-DB.BDEUPPK_SPA.indd 41 2010-05-14 2:48:342010-05-14 2:48:34

42 Funcionamiento
Funcionamiento
4
Reproducción
avanzada
Reproducción repetida
BD
DVD
AVCHD
ACD
MUSIC
Durante la reproducción, pulse varias veces
REPEAT (
) para seleccionar el modo de
repetición deseado.
BD/DVD
A-
– El segmento seleccionado se repetirá
de forma continua.
Capítulo
– El capítulo actual se
reproducirá de forma repetitiva.
Título
– El título actual se reproducirá de
forma repetitiva.
Para volver a la reproducción normal, pulse
REPEAT (
) repetidamente para
seleccionar [Apagado].
Archivos de música/CDs de audio
– La pista actual o el archivo se
reproducirá de forma repetitiva.
– Todas las pistas o archivos se
reproducirán de forma repetitiva.
– Las pistas o archivos se reproducirán
en orden aleatorio.
– Todas las pistas o archivos se
reproducirán de forma repetitiva y en orden
aleatorio.
– El segmento seleccionado se
repetirá de forma continua. (Sólo CD de
audio)
Para volver a la reproducción normal, pulse
CLEAR.
NOTA
• Si pulsa una vez
>
durante la reproducción
repetida de capítulo/pista se cancelará la
reproducción repetida.
• Esta función puede que no funcione en algunos
discos o títulos.
Repetir una parte concreta
BD
DVD
AVCHD
ACD
Este reproductor permite repetir la parte que
haya seleccionado.
1.
Mientras se reproduce, pulse REPEAT ( )
para seleccionar [A-] al comienzo de la
parte que quiera repetir. Y después, pulse
ENTER ( ).
2. Pulse ENTER ( ) el na de la parte. El
segmento seleccionado se repetirá de
forma continua.
3. Para volver a la reproducción normal, pulse
REPEAT
( ) varias veces para seleccionar
[OFF] o pulse CLEAR.
NOTA
No puede seleccionar un segmento inferior a 3
segundos.
HB985-DB.BDEUPPK_SPA.indd 42HB985-DB.BDEUPPK_SPA.indd 42 2010-05-14 2:48:342010-05-14 2:48:34

43Funcionamiento
4
Funcionamiento
Búsqueda por marcador
BD
DVD
AVCHD
MOVIE
Puede comenzar la reproducción desde un
máximo de nueve puntos memorizados.
Para introducir un marcador
1. Durante la reproducción, pulse MARKER en
el punto que desee. El icono Marker aparece
brevemente en la pantalla del televisor.
2. Repita el paso 1 para agregar hasta nueve
marcadores.
Para recuperar una escena marcada
1. Pulse SEARCH y aparecerá el menú de
búsqueda en la pantalla.
2. Pulse un botón numérico para seleccionar
el número de marcador que desee
recuperar. La reproducción comenzará
desde la escena marcada.
Para eliminar un marcador
1. Pulse SEARCH y aparecerá el menú de
búsqueda en la pantalla.
2. Pulse
u
para resaltar un número de
marcador. Utilice
I
/
i
para seleccionar una
escena marcada que desea eliminar.
3. Pulse CLEAR y la escena marcada se borrará
del menú de búsqueda.
NOTA
• Puede que esta función no esté operativa para
algunos discos, títulos, capacidad del servidor.
• Todos los puntos marcados se borran si el
título está en modo de parada completa (
x
) se
cambia el título o si se expulsa el disco.
• Esta función no está disponible si la duración
total del título es inferior a 10 segundos.
Usar el menú de búsqueda
BD
DVD
AVCHD
MOVIE
Con el menú de búsqueda, es posible
encontrar fácilmente el punto a partir del cual
se desea iniciar la reproducción.
Para buscar un punto
1. Durante la reproducción, pulse SEARCH
para mostrar el menú de búsqueda.
2. Pulse
I
/
i
para avanzar o retroceder
la reproducción 15 segundos. Puede
seleccionar un punto hasta el que avanzar o
retroceder manteniendo pulsado el botón
I
/
i
.
HB985-DB.BDEUPPK_SPA.indd 43HB985-DB.BDEUPPK_SPA.indd 43 2010-05-14 2:48:352010-05-14 2:48:35

44 Funcionamiento
Funcionamiento
4
Para iniciar la reproducción de una
escena marcada
1. Pulse SEARCH y aparecerá el menú de
búsqueda en la pantalla.
2. Pulse
u
para resaltar un número de
marcador. Utilice
I
/
i
para seleccionar
una escena marcada que desea empezar a
reproducir.
3. Pulse ENTER ( ) para iniciar la reproducción
a partir de la escena marcada.
NOTA
• Puede que esta función no esté operativa para
algunos discos, títulos, servidor.
• Puede que esta función no esté operativa para
cierto contenido [Enlace principal] según el tipo
de archivo y la capacidad del servidor DLNA.
Memoria de la última escena
BD
DVD
Esta unidad memoriza la última escena
del último disco que se haya visionado. La
última escena visualizada permanece en
memoria incluso si retira el disco de la unidad
o apaga la unidad. Si carga un disco con
la escena memorizada, ésta se recuperará
automáticamente.
NOTA
• La función de memoria de un disco anterior se
borrará al reproducir un disco diferente.
• Esta función puede no funcionar dependiendo
del disco.
• Esta unidad no memoriza los ajustes de un
disco si apaga la unidad antes de comenzar la
reproducción.
Visualización en
pantalla
Es posible visualizar y ajustar diversa
información y ajustes sobre el contenido.
Visualización en pantalla de la
información del contenido
BD
DVD
AVCHD
MOVIE
1. Durante la reproducción pulse DISPLAY
(
) para mostrar diversa información sobre
la reproducción.
a
h
g
f
e
d
c
b
a
Título – número del título actual/número
total de títulos
b
Capítulo – Número del capítulo actual/
número total de capítulos.
c
Tiempo – tiempo de reproducción
transcurrido/tiempo total de
reproducción
d
Audio – Idioma o canal de audio
seleccionado.
e
Subtítulo – Subtítulos seleccionados.
f
Angulo – Ángulo seleccionado/número
total de ángulos.
HB985-DB.BDEUPPK_SPA.indd 44HB985-DB.BDEUPPK_SPA.indd 44 2010-05-14 2:48:352010-05-14 2:48:35

45Funcionamiento
4
Funcionamiento
g
Aspecto TV – relación de aspecto de TV
seleccionado
h
Modo de imagen – modo de imagen
seleccionada
2. Seleccione una opción con
U
/
u
.
3. Utilice
I
/
i
para ajustar el valor de la opción
seleccionada.
4. Pulse RETURN (
O
) para salir de la
visualización en pantalla.
NOTA
• Si durante unos segundos no pulsa ningún
botón, la visualización de la pantalla
desaparecerá.
• En algunos discos no puede seleccionarse un
número de título.
• Las opciones disponibles podrán variar en
función del disco o título.
• Si se está reproduciendo un título interactivo BD,
se mostrará información de con guración en la
pantalla, pero no permitirá cambiarla.
Reproducir a partir del tiempo
seleccionado
BD
DVD
AVCHD
MOVIE
1. Presione DISPLAY (
) durante la
reproducción. El cuadro de búsqueda de
tiempo muestra el tiempo de reproducción
transcurrido.
2. Seleccione la opción [Tiempo] e introduzca
el tiempo de inicio deseado en horas,
minutos y segundos, de izquierda a
derecha.
Por ejemplo, para buscar una escena a
las 2 horas, 10 minutos y 20 segundos,
introduzca “21020”.
Pulse
I
/
i
para avanzar o retroceder la
reproducción 60 segundos.
3. Pulse ENTER (
) para iniciar la reproducción
a partir del tiempo seleccionado.
NOTA
• Esta función puede no funcionar en algunos
discos o títulos.
• Puede que esta función no esté operativa para
cierto contenido [Enlace principal] dependiendo
del tipo de archivo y la capacidad del servidor
DLNA.
HB985-DB.BDEUPPK_SPA.indd 45HB985-DB.BDEUPPK_SPA.indd 45 2010-05-14 2:48:352010-05-14 2:48:35

46
Funcionamiento
Funcionamiento
4
Escuchar un audio diferente
BD
DVD
AVCHD
MOVIE
1. Durante la reproducción, pulse
DISPLAY (
) para mostrar la visualización en
pantalla.
2. Utilice
U
/
u
para seleccionar la opción
[Audio].
3. Utilice
I
/
i
para seleccionar el idioma de
audio, pista de audio o canal de audio que
desee.
NOTA
• Algunos discos le permiten cambiar las opciones
de audio sólo con el menú del disco. De ser así,
pulse el botón POPUP/ TOP MENU o MENU y
elija el audio adecuado desde las selecciones en
el menú del disco.
• Nada más cambiar el sonido, se producirá una
discrepancia temporal entre el sonido actual y el
visualizado.
Seleccionar el idioma de los
subtítulos
BD
DVD
AVCHD
MOVIE
1. Durante la reproducción, pulse
DISPLAY (
) para mostrar la visualización en
pantalla.
2. Utilice
U
/
u
para seleccionar la opción
[Subtítulo].
3. Utilice
I
/
i
para seleccionar el idioma de
subtítulos deseado.
4. Pulse RETURN (
O
) para salir de la
visualización en pantalla.
NOTA
Algunos discos le permiten cambiar la selección
de subtítulos mediante el menú del disco. Si este
es el caso, pulse el botón POPUP/ TOP MENU o
MENU y seleccione el subtítulo adecuado entre las
opciones del menú del disco.
HB985-DB.BDEUPPK_SPA.indd 46HB985-DB.BDEUPPK_SPA.indd 46 2010-05-14 2:48:352010-05-14 2:48:35

47
Funcionamiento
4
Funcionamiento
Visualizar desde un ángulo
diferente
BD
DVD
Durante la reproducción, si el disco contiene
escenas grabadas desde diferentes ángulos de
cámara, puede cambiar a un ángulo de cámara
diferente.
1. Durante la reproducción, pulse DISPLAY ( )
para mostrar la visualización en pantalla.
2. Utilice
U
/
u
para seleccionar la opción
[Angulo].
3. Utilice
I
/
i
para seleccionar el ángulo
deseado.
4. Pulse RETURN (
O
) para salir de la
visualización en pantalla.
Para cambiar la relación de
aspecto de TV
BD
DVD
AVCHD
MOVIE
Es posible cambiar el ajuste de la relación de
aspecto de TV durante la reproducción.
1. Durante la reproducción, pulse DISPLAY (
)
para mostrar la visualización en pantalla.
2. Utilice
U
/
u
para seleccionar la opción
[Aspecto TV].
3. Utilice
I
/
i
para seleccionar la opción
deseada.
4. Pulse RETURN (
O
) para salir de la
visualización en pantalla.
NOTA
Si cambia el valor de la opción [Aspecto TV] en
la visualización en pantalla, no se modi cará la
opción [Aspecto TV]] del menú [Con g.].
Para cambiar el modo de
imagen
BD
DVD
AVCHD
MOVIE
Es posible cambiar la opción
[Modo de imagen] durante la reproducción.
1. Durante la reproducción, pulse DISPLAY (
)
para mostrar la visualización en pantalla.
2. Utilice
U
/
u
para seleccionar la opción
[Modo de imagen].
3. Utilice
I
/
i
para seleccionar la opción
deseada.
4. Pulse RETURN (
O
) para salir de la
visualización en pantalla.
Ajuste de la opción [Conf. usuario]
1. Durante la reproducción, pulse DISPLAY ( )
para mostrar la visualización en pantalla.
2. Utilice
U
/
u
para seleccionar la opción
[Modo de imagen].
3. Utilice
I
/
i
para seleccionar la opción
[Conf. usuario] y pulse ENTER (
).
4. Utilice
U
/
u
/
I
/
i
para ajustar las opciones
[Modo de imagen].
Seleccione la opción [Predeterm.] y, a
continuación, pulse ENTER ( ) para retear
todos los ajustes de vídeo.
5. Utilice
U
/
u
/
I
/
i
para seleccionar las
opciones [Cerrar] y pulse ENTER (
) para
nalizar la con guración.
HB985-DB.BDEUPPK_SPA.indd 47HB985-DB.BDEUPPK_SPA.indd 47 2010-05-14 2:48:352010-05-14 2:48:35

48
Funcionamiento
Funcionamiento
4
Disfrutar de BD-LIVE
Esta unidad le permite disfrutar de funciones
tales como imagen secundaria (PIP), audio
secundario y paquetes virtuales, etc… con
BD-Video que admite BONUSVIEW (BD-ROM
versión 2 Per l 1 versión 1.1/ Per l de estándar
nal).
Es posible reproducir audio y vídeo secundario
desde un disco compatible con la función
Picture-in-Picture. Para más información sobre
el método de reproducción, consulte las
instrucciones del disco.
Además de la función BONUSVIEW, el BD-
Video, con compatibilidad con BD-LIVE (BD-
ROM versión 2 per l 2) y función de ampliación
de red, le permite disfrutar de más funciones
como la descarga de trailers de películas
nuevas mediante la conexión de esta unidad a
Internet.
1. Compruebe la conexión de red y los ajustes
(páginas 28-30).
2. Inserte en el panel frontal un dispositivo de
almacenamiento USB en el puerto USB.
Para descargar contenido extra se necesita
un dispositivo de almacenamiento USB.
Conexión USB
3 . Pulse HOME MENU, y ajuste la opción
[Conexión BD-LIVE] en el menú [Con g.]
(página 37).
Dependiendo del disco, la función BD-LIVE
puede no utilizarse si la opción [Conexión
BD-LIVE] está con gurada como [Permiso
parcial].
4 . Inserte un BD-ROM con BD-LIVE.
Las operaciones podrán variar en función
del disco. Consulte el manual suministrado
con el disco.
NOTA
• No extraiga el dispositivo USB conectado
mientras se está descargando contenido o si hay
un disco Blu-ray en la bandeja de discos. Hacerlo
podría dañar el dispositivo USB conectado y las
características de BD-LIVE podrían no funcionar
correctamente nunca más con el dispositivo
USB dañado. Si el dispositivo USB conectado
parece dañado, puede formatearlo desde el PC y
reusarlo con el reproductor.
• Algunos contenidos BD-LIVE podrían tener
acceso restringido en algunas áreas por decisión
propia del proveedor de contenidos.
• Puede que se tarde unos minutos en cargar y
comenzar a disfrutar del contenido de BD-LIVE.
HB985-DB.BDEUPPK_SPA.indd 48HB985-DB.BDEUPPK_SPA.indd 48 2010-05-14 2:48:352010-05-14 2:48:35

49
Funcionamiento
4
Funcionamiento
Reproducción de
archivos de vídeo y
discos VR
Es posible reproducir discos DVD-RW grabados
en formato de grabación de vídeo (VR) y
archivos de vídeo almacenados en un disco o
dispositivo USB.
1. Pulse
HOME MENU.
2. Seleccione [Película] con
U
/
u
/
I
/
i
, y pulse
ENTER ( ).
3. Seleccione el dispositivo utilizando
I
/
i
, y
pulse ENTER ( ).
Cuando conecte un máximo de dos
dispositivos, se mostrará como previamente.
4. Seleccione un archivo con los botones
U
/
u
/
I
/
i
, y pulse
B
PLAY o ENTER ( ) para
reproducir el archivo.
NOTA
• Los requisitos del archivo se describen en la
página 11.
• Puede usar varias funciones de reproducción.
Véanse las páginas 40-47.
• Los discos de formato DVD-VR sin nalizar no
podrán reproducirse en esta unidad.
• Algunos discos DVD-VR se hacen con datos
CPRM mediante una DVD RECORDER. Esta
unidad no admite estos tipos de disco.
¿Qué es el CPRM?
CPRM es un sistema de protección anticopia
(con sistema codi cado) que permite solamente
la grabación de programas de emisión “una sola
copia”. CPRM signi ca Protección de contenido
para medios grabables.
HB985-DB.BDEUPPK_SPA.indd 49HB985-DB.BDEUPPK_SPA.indd 49 2010-05-14 2:48:352010-05-14 2:48:35

50
Funcionamiento
Funcionamiento
4
Seleccionar un archivo de
subtítulos
MOVIE
En el caso de que coincida el nombre de un
archivo de vídeo y el nombre del archivo de
subtítulos, se reproducirá automáticamente el
archivo de subtítulos al reproducir el archivo
de vídeo.
Si el nombre del archivo de subtítulos es
diferente del nombre del archivo de película,
tendrá que seleccionar el archivo de subtítulos
en el menú [Película] antes de reproducir la
película.
1. Utilice
U
/
u
/
I
/
i
para seleccionar el archivo
de subtítulos que desea reproducir en el
menú [Película].
2. Pulse ENTER (
).
Pulse ENTER ( ) de nuevo para
deseleccionar el archivo de subtítulos.
El archivo de subtítulos seleccionado se
mostrará al reproducir el archivo de vídeo.
NOTA
• Si pulsa la tecla
x
(STOP) durante la
reproducción, se cancelará la selección de
subtítulos.
• Esta función puede no funcionar en la función
[Enlace principal].
Para cambiar la página del
código de subtítulos
MOVIE
Si los subtítulos no se visualizan correctamente,
se puede cambiar la página del código de
subtítulos para ver el archivo de subtítulos
correctamente.
1. Durante la reproducción, pulse DISPLAY (
)
para mostrar la visualización en pantalla.
2. Utilice
U
/
u
para seleccionar la opción
[Página de código].
3. Utilice
I
/
i
para seleccionar la opción del
código deseada.
4. Pulse RETURN (
O
) para salir de la
visualización en pantalla.
HB985-DB.BDEUPPK_SPA.indd 50HB985-DB.BDEUPPK_SPA.indd 50 2010-05-14 2:48:362010-05-14 2:48:36

51
Funcionamiento
4
Funcionamiento
Ver una fotografía
Es posible visualizar archivos de fotos con este
reproductor.
1. Pulse
HOME MENU
2. Seleccione [Foto] con
I
/
i
, y pulse
ENTER ( ).
3. Seleccione el dispositivo utilizando
I
/
i
, y
pulse ENTER ( ).
Cuando conecte un máximo de dos
dispositivos, se mostrará como previamente.
4. Seleccione un archivo usando
U
/
u
/
I
/
i
y
pulse ENTER (
) para ver la fotografía.
Para reproducir una presentación de
diapositivas
Pulse
B
(PLAY) para iniciar la presentación de
diapositivas.
Para detener una presentación de
diapositivas
Pulse
x
(STOP) durante la presentación de
diapositivas.
Para hacer una pausa en una
presentación de diapositivas
Pulse
X
PAUSE/STEP durante la presentación
de diapositivas.
Pulse
B
PLAY para volver a iniciar la
presentación.
Para saltar a la foto anterior/siguiente
Mientras ve una foto en pantalla completa,
pulse
I
o
i
para ir a la foto anterior o siguiente.
NOTA
• Los requisitos del archivo se describen en la
página 11.
• Puede usar varias funciones de reproducción.
Véanse las páginas 40-47.
HB985-DB.BDEUPPK_SPA.indd 51HB985-DB.BDEUPPK_SPA.indd 51 2010-05-14 2:48:362010-05-14 2:48:36

52
Funcionamiento
Funcionamiento
4
Opciones durante la
visualización de una foto
Puede utilizar varias opciones mientras
visualiza una foto en pantalla completa.
1. Mientras ve una foto en pantalla completa,
pulse DISPLAY (
) para mostrar el menú de
opciones.
2. Seleccione una opción con
U
/
u
.
a
g
f
e
d
c
b
h
a
Foto actual/número total de fotos –
Utilice
I
/
i
para visualizar la foto anterior/
siguiente.
b
Diapositivas – Pulse ENTER (
) para
iniciar o pausar la presentación en
diapositivas.
c
Selec música – Seleccione la música de
fondo para la presentación de diapositivas.
d
Música –Pulse ENTER (
) para iniciar o
hacer una pausa en la música de fondo.
e
Rotar – Pulse ENTER (
) para girar la foto
en sentido horario.
f
Zoom – Pulse ENTER (
) para visualizar el
menú [Zoom].
g
Efecto – Utilice
I
/
i
para seleccionar un
efecto de transición entre fotos en una
presentación de diapositivas.
h
Velocidad – Utilice
I
/
i
para seleccionar
un efecto de transición entre fotos en una
presentación de diapositivas.
3. Pulse RETURN (
O
) para salir del menú de
opciones.
Escuchar música mientras se
muestran diapositivas
Puede mostrar archivos de fotografías mientras
escucha archivos de música.
1.
Pulse HOME MENU
2. Seleccione [Foto] o [Enlace principal]
utilizando
U
/
u
/
I
/
i
, y pulse ENTER ( ).
3. Seleccione la opción [Disco] o [USB] con
I
/
i
, y pulse ENTER ( ).
La selección de un servidor o una carpeta
de recursos compartidos es necesaria para
el menú [Enlace principal].
4. Seleccione un archivo usando
U
/
u
/
I
/
i
, y
pulse ENTER ( ) para ver la fotografía.
5. Pulse DISPLAY ( ) para visualizar el menú
de opciones.
6. Utilice
U
/
u
para seleccionar la opción [Selec
música] y pulse ENTER ( ) para mostrar el
menú [Selec música].
HB985-DB.BDEUPPK_SPA.indd 52HB985-DB.BDEUPPK_SPA.indd 52 2010-05-14 2:48:362010-05-14 2:48:36

53
Funcionamiento
4
Funcionamiento
7. Utilice
U
/
u
para seleccionar un dispositivo
y pulse ENTER. ( ).
Los dispositivos que pueden seleccionarse
di eren dependiendo de la ubicación del
archivo de fotografías que se muestra en
pantalla completa.
Ubicación de la
fotografía
Dispositivo
disponible
Disco Disco, USB
USB Disco, USB
Carpeta
compartida en su
PC (CIFS)
CIFS
Servidor DLNA Servidor DLNA
8. Utilice
U
/
u
para seleccionar un archivo o
una carpeta que desee reproducir.
Seleccione una carpeta y pulse ENTER ( )
para mostrar el directorio inferior.
Seleccione y pulse ENTER ( ) para
mostrar el directorio superior.
NOTA
Al seleccionar música de [Enlace principal], la
selección de carpeta no estará disponible.
En [Enlace principal] sólo está disponible la
selección de archivos.
9. Utilice
i
para seleccionar [OK] y pulse
ENTER ( ) para completar la selección de la
música.
Escuchar música
El reproductor puede reproducir CD de audio y
archivos de música.
1. Pulse
HOME MENU
2. Seleccione [Música] con
U
/
u
/
I
/
i
, y pulse
ENTER ( ).
3. Seleccione el dispositivo utilizando
I
/
i
, y
pulse ENTER ( ).
Cuando conecte un máximo de dos
dispositivos, se mostrará como previamente.
4. Seleccione un archivo de música o pista
de audio con
U
/
u
/
I
/
i
, y pulse ENTER ( )
para escuchar la música.
NOTA
• Los requisitos del archivo se describen en la
página 11.
• Puede usar varias funciones de reproducción.
Véanse las páginas 40-47.
HB985-DB.BDEUPPK_SPA.indd 53HB985-DB.BDEUPPK_SPA.indd 53 2010-05-14 2:48:372010-05-14 2:48:37

54
Funcionamiento
Funcionamiento
4
Grabación de CD de audio
Es posible grabar una pista o todas las pistas
que desee de un CD de audio hasta un
dispositivo de almacenamiento USB.
1. Inserte en el panel frontal un dispositivo de
almacenamiento USB en el puerto USB.
2. Pulse
Z
(OPEN/CLOSE) y coloque un CD de
audio en la bandeja de discos.
Pulse
Z
(OPEN/CLOSE) para cerrar la
bandeja de discos. La reproducción se inicia
automáticamente.
3. Pulse DISPLAY ( ) para visualizar el menú
de opciones.
O
Pulse el botón
z
USB REC en el mando a
distancia.
Puede grabar toda la música en el CD de
audio.
4. Utilice
U
/
u
para seleccionar la opción
[Grabación de CD] y pulse ENTER (
) para
mostrar el menú [Grabación de CD].
Repita este paso para seleccionar tantas
pistas como pueda.
5.
Utilice
U
/
u
para seleccionar la pista que
desea copiar en el menú, y pulse ENTER ( ).
Repita este paso para seleccionar tantas
pistas como pueda.
Selecciona todas las pistas de un
CD de audio.
Selecciona una opción
de codi cación del menú
desplegable (128 kbps, 192 kbps,
320 kbps o sin pérdidas).
Cancela la grabación y vuelve a
la pantalla anterior.
6. Utilice
U
/
u
/
I
/
i
para seleccionar [Inicio] y
pulse ENTER (
).
7. Utilice
U
/
u
/
I
/
i
para seleccionar la carpeta
de destino a la que desea copiar.
Si desea crear una carpeta nueva, utilice
U
/
u
/
I
/
i
para seleccionar [Nueva carpeta]
y pulse ENTER ( ).
Introduzca un nombre de carpeta con el
teclado virtual, y pulse ENTER ( ) mientras
[OK] está seleccionado.
8. Utilice
U
/
u
/
I
/
i
para seleccionar [OK] y
pulse ENTER (
) para iniciar la grabación
del CD de audio.
Si desea detener la grabación de un CD de
audio, pulse ENTER ( ) mientras [Cancelar]
se ilumina.
9. Aparecerá un mensaje cuando se haya
completado la grabación del CD de audio.
Pulse ENTER (
) para comprobar el archivo
de música creado en la carpeta de destino.
HB985-DB.BDEUPPK_SPA.indd 54HB985-DB.BDEUPPK_SPA.indd 54 2010-05-14 2:48:372010-05-14 2:48:37

55
Funcionamiento
4
Funcionamiento
NOTA
• La siguiente tabla muestra el promedio de
tiempo de grabación de una pista de audio
con 4 minutos de tiempo de reproducción a
un archivo de música con 192 kbps a modo de
ejemplo.
Modo de parada Durante la
reproducción
1,4 min. 2 min.
• Todos los tiempos de la tabla anterior son
aproximados.
• El tiempo de extracción real para el dispositivo
de almacenamiento USB varía dependiendo de
la capacidad del dispositivo de almacenamiento
USB.
• Asegúrese de que hay un mínimo de 50 MB de
espacio libre cuando se graba en el dispositivo
de almacenamiento USB.
• La duración de la música debe superar los 20
segundos para obtener un registro adecuado.
• No apague el reproductor ni extraiga el
dispositivo de almacenamiento USB conectado
durante la grabación del CD de audio.
La realización de copias no autorizadas de material
protegido contra copias, incluyendo los programas
informáticos, archivos, emisiones o grabaciones
de audio, puede infringir los derechos de autor y
como tal constituir una ofensa criminal.
Este equipo no deberá utilizarse con dichos nes.
Sea responsable
Respete los derechos de autor
HB985-DB.BDEUPPK_SPA.indd 55HB985-DB.BDEUPPK_SPA.indd 55 2010-05-14 2:48:372010-05-14 2:48:37

56
Funcionamiento
Funcionamiento
4
Reproducción de iPod
Puede disfrutar del sonido desde su iPod. Para
más información sobre el iPod, consulte la Guía
de usuario del iPod.
Preparación
• Para ver los vídeos y las fotos del iPod en la
pantalla del TV.
- Asegúrese de utilizar la conexión de vídeo
a través de la toma de salida de vídeo en
el panel trasero de la unidad. Seleccione el
modo de entrada de vídeo apropiado en el
TV.
- Dependiendo del iPod, asegúrese de
seleccionar Vídeos > Ajustes de vídeo y
después, con gure la Salida del TV en Ask
(Preguntar) o en On (Activado), desde
el iPod. Para más información sobre los
Ajustes del vídeo, consulte la Guía de
usuario del iPod.
- La visualización de fotos está disponible
sólo si esta unidad está en el modo de
entrada de iPod y le permite ver fotos sólo
a modo de presentación. Debe empezar
una presentación en su iPod para ver una
foto en un TV. Para más información sobre
la con guración de diapositivas, consulte
la Guía de usuario del iPod.
• Antes de conectar el iPod, desactive esta
unidad y baje el volumen al mínimo.
1. Conecte el iPod rmemente.
Conecte el iPod
Conecte el cradle y
coloque el iPod sobre él.
2. Seleccione un archivo usando
U
/
u
/
I
/
i
, y
pulse ENTER (
) para reproducir el archivo.
Disfrutar del iPod en la pantalla
1. Conecte el iPod rmemente.
2. Pulse HOME MENU ( ).
3. Seleccione [Música] o [Película] utilizando
I
/
i
, y pulse ENTER ( ).
Si había conectado otro dispositivo (CD o
USB), seleccione el iPod en el menú.
4. Seleccione un archivo usando
U
/
u
/
I
/
i
, y
pulse ENTER (
) para reproducir el archivo.
HB985-DB.BDEUPPK_SPA.indd 56HB985-DB.BDEUPPK_SPA.indd 56 2010-05-14 2:48:372010-05-14 2:48:37

57
Funcionamiento
4
Funcionamiento
Disfrutar del iPod en el modo
iPod IN (ENTRADA iPod)
Puede utilizar el iPod usando el control remoto
y los controles del iPod.
1. Conecte el iPod rmemente.
Al encender la unidad, el iPod se encenderá
automáticamente y comenzará a cargarse.
2. Pulse INPUT/TUNER para seleccionar el
modo iPod IN.
U
/
u
/
I
/
i
Selecciona una opción en el
menú.
B
/ENTER
Inicia la reproducción de
música o vídeos.
X
Se detiene en pausa durante la
reproducción. Para reanudar la
reproducción, pulse
B
(PLAY)
de nuevo.
m
/
M
Avanza o retrocede rápido una
canción o vídeo.
.
/
>
Omite la reproducción
pasando hacia delante o hacia
atrás.
REPEAT Permite seleccionar el modo
de repetición deseado: Pista
( )
, Todos
( )
, Desactivado
(Sin pantalla).
NOTA
Este sistema es compatible con audio y video de
iPod (4 generación), iPod nano, iPod classic, iPod
mini, iPouch touch y iPhone.
(No es compatible con iPod shu e)
NOTA
• Aparece un mensaje de error “REVISAR IPOD”
o “Modelo iPod conectado no compatible”,
cuando:
- su iPod no está disponible para la función a
accionar.
• Aparece un mensaje de error “REVISAR IPOD” o
“Actualizar software de iPod”, cuando:
- su iPod tiene una versión de software obsoleta.
t
Actualice el software de su iPod a la versión
más reciente.
• Si esta unidad muestra un mensaje de error, siga
dicho mensaje. Aparece un mensaje de error
“REVISAR IPOD” o “Revisar su iPod”, cuando:
- la comunicación entre esta unidad y su iPod no
se establece correctamente.
t
Acople y desacople su iPod a esta unidad.
- su iPod no está conectado correctamente.
- esta unidad clasi ca a su iPod como un
dispositivo desconocido.
- su iPod tiene muy poca carga de energía.
t
Debe cargar la batería.
t
Si carga la batería cuando el iPod ya
tiene muy poca cantidad, tardará más en
completar la carga.
• Debe utilizar el adaptador de acople que se
facilita con su iPod para el uso estable de este
dispositivo. Si necesita un adaptador, consulte al
proveedor de su iPod.
• La compatibilidad con su iPod puede variar
dependiendo de tipo de iPod.
• Los iPod touch y iPhone funcionan de modo
diferente a cualquier otro iPod.
Pueden necesitarse controles adicionales para
su utilización con esta unidad (por ejemplo,
“deslizar para desbloquear”).
• Si utiliza una aplicación, realiza una llamada o
envía o recibe un mensaje de texto SMS, etc. en
su iPod táctil o iPhone, desconéctelo del acople
del iPod de esta unidad y después utilícelo.
• Dependiendo de la versión de software de su
iPod, puede que no consiga controlar el iPod
desde esta unidad. Recomendamos que instale
la última versión del software.
• La calidad del vídeo depende de las fuentes de
vídeo de su iPod.
• Si tiene algún problema con su iPod,
consulte:www.apple.com/support/ipod.
HB985-DB.BDEUPPK_SPA.indd 57HB985-DB.BDEUPPK_SPA.indd 57 2010-05-14 2:48:382010-05-14 2:48:38

58
Funcionamiento
Funcionamiento
4
Funcionamiento de la
radio
Asegúrese de que la antena está conectada.
(Consulte la página 24)
Cómo escuchar la radio
1. Pulse INPUT/TUNER hasta que aparezca
TUNER (FM) en la pantalla de visualización.
Se sintoniza la última emisora recibida.
2. Mantenga pulsado TUNE (-/+) durante unos
dos segundos hasta que la indicación de
frecuencia empiece a cambiar. La búsqueda
se detiene cuando la unidad sintoniza una
emisora. O Pulse TUNE (-/+) varias veces.
3. Ajuste el volumen girando VOLUME en el
panel frontal o pulsando VOL (+/-) en el
mando a distancia.
Presintonización de las
emisoras de radio
Puede memorizar 50 emisoras de FM. Antes
de sintonizar, asegúrese de que ha bajado el
volumen.
1. Pulse INPUT/TUNER hasta que aparezca
TUNER (FM) en la pantalla de visualización.
2. Seleccione la frecuencia deseada mediante
TUNE (-/+).
3. Un número de presintonía parpadeará en la
pantalla.
4. Pulse PRESET para seleccionar el número de
presintonía que desea.
5. Pulse ENTER (
). Se memorizará la emisora.
6. Repita los pasos 2 a 5 para memorizar otras
emisoras.
Eliminación de todas las
emisoras guardadas
Mantenga pulsado CLEAR durante dos
segundos. “Borrar todo” parpadeará.
A continuación, se eliminarán todas las
emisoras guardadas.
Cómo mejorar una mala
recepción de emisiones en FM
Pulse el botón coloreado D (azul) (MONO/
STEREO) en el mando a distancia. Esto
cambiará el sintonizador de estéreo a mono y
normalmente mejorará la recepción.
Cómo obtener más información
acerca de una emisora de radio
El sintonizador de FM incorpora la función RDS
(Radio Data System). De esta forma obtendrá
información acerca de la emisora de radio que
está escuchando. Pulse RDS varias veces para
recorrer los distintos tipos de datos:
PS (nombre de la red de emisoras)
El nombre del canal aparecerá en
la pantalla.
PTY (tipo de programa)
El tipo de programa (por ejemplo,
Jazz o Noticias) aparecerá en la
pantalla.
RT (radio texto)
Un mensaje de texto que
contiene información especial
de la emisora. Este texto puede
desplazarse por la pantalla.
CT (fecha y hora)
Se muestran la fecha y la hora
según la transmisión de la
emisora.
HB985-DB.BDEUPPK_SPA.indd 58HB985-DB.BDEUPPK_SPA.indd 58 2010-05-14 2:48:382010-05-14 2:48:38

59
Funcionamiento
4
Funcionamiento
Reproducción de
contenidos a través de
la red doméstica
El reproductor puede examinar y reproducir
contenido en su ordenador y servidores de
medios con certi cación DLNA conectados a la
red doméstica.
Acerca de DLNA
Esta unidad es un reproductor de medios
digitales con certi cación DLNA que puede
mostrar y reproducir vídeo, fotos y música
desde el servidor de medios digitales
compatible con DLNA (ordenador y electrónica
de consumo).
La DLNA (Digital Living Network Alliance) es
una organización que abarca varios sectores
industriales como la electrónica de consumo,
la computación y las empresas de dispositivos
móviles. Digital Living proporciona a los
consumidores un medio para compartir
fácilmente medios digitales a través de una red
doméstica.
El logotipo de certi cación DLNA facilita la
búsqueda de productos que cumplen con
las directrices de interoperabilidad DLNA.
Esta unidad cumple con las directrices de
interoperabilidad DLNA v1.5.
Cuando se conecta a este reproductor un
ordenador que ejecuta software del servidor
DLNA u otros dispositivos compatibles con
DLNA, es posible que sea necesario efectuar
algunos cambios de con guración en el
software o dispositivos. Consulte el manual de
instrucciones del software o dispositivo para
obtener más información.
Acceso a un servidor de medios
DLNA
1. Revisar la conexión de red y los ajustes
(páginas 28-30).
2. Pulse
HOME MENU.
3. Seleccione [Enlace principal] con
U
/
u
/
I
/
i
,
y pulse ENTER (
).
4. Seleccione un servidor de medios DLNA de
la lista con
U
/
u
, y pulse ENTER ( ).
Si desea volver a explorar el servidor
de medios disponibles, pulse el botón
coloreado en verde (B).
NOTA
Puede que este reproductor necesite un permiso
del servidor, dependiendo del tipo de servidor de
medios.
5. Seleccione un archivo con
U
/
u
/
I
/
i
, y
pulse ENTER ( ) para reproducir el archivo.
HB985-DB.BDEUPPK_SPA.indd 59HB985-DB.BDEUPPK_SPA.indd 59 2010-05-14 2:48:382010-05-14 2:48:38

60
Funcionamiento
Funcionamiento
4
NOTA
• Los requisitos del archivo se describen en la
página 11.
• Puede usar varias funciones de reproducción.
Véanse las páginas 40-47.
•
Los requisitos de archivo de la página 11 no
siempre son compatibles. Puede que haya
algunas restricciones por las características del
archivo y la capacidad de servidor de medios.
• La vista en miniatura de los archivos
reproducibles se puede mostrar en el menú
[Enlace principal], pero dichos archivos no se
pueden reproducir en el reproductor.
• Si hay un archivo de música reprod
ucible en el
menú [Enlace principal], el reproductor se salta
el archivo y reproduce el archivo siguiente.
• El nombre del archivo de subtítulos y el nombre
del archivo de la película han de coincidir y estar
en la misma carpeta.
• La calidad de la reproducción y el
funcionamiento de [Enlace principal] puede
verse afectada por el estado de su red
doméstica.
• Puede que no se puedan compartir
correctamente los archivos almacenados en
un dispositivo extraíble como una unidad USB,
unidad DVD, etc.
Acceso a una carpeta para
compartir desde el ordenador
1. Arranque el PC conectado a la red de área
local.
2. Comparta las carpetas con archivos de
vídeos, fotos o música que hay en el
ordenador.
3. Compruebe en el reproductor la conexión
de red y los ajustes (páginas 28-30).
4. Pulse
HOME MENU.
5. Seleccione [Enlace principal] con
U
/
u
/
I
/
i
,
y pulse ENTER (
).
6. Seleccione una carpeta para compartir de
la lista con
U
/
u
, y pulse ENTER (
).
Si desea volver a explorar los servidores
de medios disponibles, pulse el botón
coloreado en verde (B).
NOTA
Dependiendo de la carpeta que se vaya a
compartir, este reproductor puede necesitar el ID
de usuario de la red de entrada y la contraseña
para acceder a la carpeta.
7. Seleccione un archivo con
U
/
u
/
I
/
i
, y
pulse ENTER ( ) para reproducir el archivo.
HB985-DB.BDEUPPK_SPA.indd 60HB985-DB.BDEUPPK_SPA.indd 60 2010-05-14 2:48:382010-05-14 2:48:38

61
Funcionamiento
4
Funcionamiento
NOTA
• Los requisitos del archivo se describen en la
página 11.
• Puede usar varias funciones de reproducción.
Véanse las páginas 40-47.
• La vista en miniatura de los archivos
reproducibles se puede mostrar en el menú
[Enlace principal], pero dichos archivos no se
pueden reproducir en el reproductor.
• Si hay un archivo de música reproducible en el
menú [Enlace principal], el reproductor se salta
el archivo y reproduce el siguiente.
• El nombre del archivo de subtítulos y el nombre
del archivo de la película han de coincidir y estar
en la misma carpeta.
• La calidad de la reproducción y el
funcionamiento de [Enlace principal] puede
verse afectado por el estado de su red
doméstica.
• Puede que no se puedan compartir
correctamente los archivos almacenados en
un dispositivo extraíble como una unidad USB,
unidad DVD, etc del ordenador.
• Es posible que tenga algún problema de
conexión según el entorno de su PC.
Requisitos del PC
• Windows ® XP (Service Pack 2 o superior),
Windows Vista ® (no es necesario Service
Pack)
Windows 7®
• 1,2 GHz Intel ® Pentium ® III o AMD Sempron
™ 2200 + procesadores
• Entorno de red: Ethernet de 100 MB, WLAN
(IEEE 802.11b/g/n)
NOTA
Si utiliza Windows ® XP o Windows Vista ®, haga
clic en el siguiente enlace para obtener más
información sobre los ajustes para compartir
archivos.
HB985-DB.BDEUPPK_SPA.indd 61HB985-DB.BDEUPPK_SPA.indd 61 2010-05-14 2:48:382010-05-14 2:48:38

62
Funcionamiento
Funcionamiento
4
Introducción de un ID usuario y
contraseña de red
Dependiendo del entorno de su PC, puede
que tenga que introducir un ID de usuario y
contraseña de red para poder acceder a una
carpeta compartida.
1. El menú de teclado aparece
automáticamente si se solicitan el ID de
usuario de red y la contraseña.
2. Utilice
U
/
u
/
I
/
i
para seleccionar un
carácter y pulse ENTER ( ) en el menú de
teclado para con rmar su selección.
Para introducir una letra con acento,
seleccione la letra del conjunto de
caracteres ampliados.
Ejemplo: Seleccione “D” y, a continuación,
pulse DISPLAY( ) para mostrar el grupo
de caracteres expandido. Utilice
I
/
i
para
seleccionar “D” o “Ď” y, a continuación, pulse
ENTER (
).
[Nítido] – Borrar todos los caracteres
introducidos.
[Espacio] – Insertar un espacio en la posición
del cursor.
[<–] – Eliminar el carácter anterior a la
posición del cursor.
[ABC / abc / #+-=&] – Cambiar la
con guración del menú del teclado a letras
mayúsculas, minúsculas o símbolos.
3. Cuando termine de introducir el ID de
usuario y contraseña de red, seleccione
[OK] con
U
/
u
/
I
/
i
y pulse ENTER (
) para
acceder a la carpeta.
El sistema recordará el ID de usuario y
contraseña de red después de acceder a la
carpeta. Si no desea que el sistema recuerde
el ID de usuario y contraseña de red,
pulse el botón coloreado en rojo (A) para
eliminar la marca de la casilla de veri cación
[Recordar] antes de acceder a la carpeta.
HB985-DB.BDEUPPK_SPA.indd 62HB985-DB.BDEUPPK_SPA.indd 62 2010-05-14 2:48:382010-05-14 2:48:38

63
Mantenimiento
5
Mantenimiento
Notas en los discos
Manipulación de discos
Nunca pegue papel ni cinta adhesiva en el
disco.
Guardar los discos
Tras la reproducción, guarde el disco en su
caja. No deje el disco expuesto a la luz directa
del sol o cerca de una fuente de calor; nunca
lo deje en un coche donde esté expuesto
directamente al sol.
Limpieza de discos
No utilice productos abrasivos como alcohol,
benceno, disolventes u otros productos
disponibles en el mercado. Evite igualmente
los pulverizadores antiestáticos pensados para
grabaciones de vinilo más antiguas.
Manejo de la unidad
Envío de la unidad
Guarde el embalaje original y los materiales
de empaquetado. Si necesita enviar la unidad,
para máxima protección, intente que el
embalaje sea similar al de salida de fábrica.
Mantener las super cies exteriores limpias.
• Cuando esté cerca de la unidad, no utilice
productos volátiles como insecticidas.
• No ejerza una presión excesiva cuando
limpie la unidad, a n de evitar daños en la
super cie.
• No deje que la unidad entre en contacto
con productos de plástico o goma durante
períodos prolongados.
Limpieza de la unidad
Para limpiar el reproductor, utilice un paño
suave y seco. Si las super cies están muy sucias,
utilice un paño ligeramente humedecido
con un detergente no agresivo. No utilice
productos fuertes como alcohol, benceno o
diluyentes ya que pueden dañar la super cie
de la unidad.
Mantenimiento de la unidad
La unidad es un dispositivo de precisión y alta
tecnología. Si las lentes ópticas o la unidad
del disco acumulan suciedad o presentan
desgaste, afectará a la calidad de la imagen.
Para información más detallada, consulte en el
centro de servicio autorizado más cercano.
5
Mantenimiento
HB985-DB.BDEUPPK_SPA.indd 63HB985-DB.BDEUPPK_SPA.indd 63 2010-05-14 2:48:392010-05-14 2:48:39

64
Resolución de problemas
Resolución de problemas
6
6
Resolución de problemas
General
La corriente no responde. • Conecte el cable de alimentación a la fuente de corriente de
la pared.
La unidad no inicia la
reproducción.
• Inserte un disco reproducible. (Revise el tiempo de disco, el
sistema de color y el código regional).
• Coloque el disco en la posición correcta.
• Coloque el disco correctamente en la bandeja para discos,
dentro de la guía.
• Limpie el disco.
• Cancele la función de clasi cación o cambia el nivel de
clasi cación.
El ángulo no se puede
cambiar.
• En un vídeo DVD a reproducir no se graban múltiples
ángulos.
El idioma de los subtítulos
no se puede cambiar ni
desactivar.
• En un vídeo DVD a reproducir no se graban los subtítulos.
No puede reproducir
archivos MP3/WMA/ JPEG/
DivX.
• Los archivos no están codi cados en un formato que la
unidad puede reproducir.
• La unidad no admite el códec del archivo de película.
El mando a distancia no
funciona correctamente.
• El mando a distancia no está orientado hacia el sensor
remoto de la unidad.
• El mando a distancia está demasiado lejos de la unidad.
• Hay un obstáculo delante del mando a distancia y la unidad.
• Las pilas del mando a distancia se han agotado.
HB985-DB.BDEUPPK_SPA.indd 64HB985-DB.BDEUPPK_SPA.indd 64 2010-05-14 2:48:392010-05-14 2:48:39

65
Resolución de problemas
6
Resolución de problemas
Imagen
No hay imagen. • Seleccione el modo de entrada de vídeo apropiado en el
televisor de modo que la imagen de la unidad aparezca en la
pantalla del televisor.
• Conecte rmemente la conexión de vídeo.
• Compruebe si [Conf. color HDMI] en el menú [Con g.] está
ajustado en el elemento adecuado según su conexión de
vídeo.
• El televisor no es compatible con la resolución que ha
con gurado en el reproductor. Cambie la resolución a una
compatible con el televisor.
• La toma HDMI OUT del reproductor está conectada a un
dispositivo DVI que no es compatible con la protección de
los derechos de autor.
Aparece ruido en la
imagen.
• Está reproduciendo un disco grabado en un sistema de color
diferente al del televisor.
• Ajuste la resolución que su televisor admita.
Sonido
No hay sonido o está
distorsionado.
• La unidad está buscando, en movimiento lento o en el modo
de pausa.
• El volumen del sonido es bajo.
• Revise la conexión del cable del altavoz. (página 16)
HB985-DB.BDEUPPK_SPA.indd 65HB985-DB.BDEUPPK_SPA.indd 65 2010-05-14 2:48:392010-05-14 2:48:39

66
Resolución de problemas
Resolución de problemas
6
Red
La función BD-LIVE no
funciona.
• Es posible que el almacenamiento USB que hay conectado
no tenga espacio su ciente. Conecte el almacenamiento USB
con al menos 1 GB de espacio libre.
• Asegúrese de que la unidad está correctamente conectada
a la red de área local y pueda acceder a Internet (véase la
página 28).
• Su velocidad de banda ancha puede que no sea lo
su cientemente rápida para usar las funciones BD-LIVE. Le
recomendamos que se ponga en contacto con su proveedor
de servicios Internet (ISP) y aumente la velocidad de banda
ancha.
• La opción [Conexión BD-LIVE] del menú [Con g.] está
ajustada en [Prohibido]. Ajuste la opción en [Permitido].
El diseño y las especi caciones están sujetas a cambio sin previo aviso.
Actualizaciones
Esta información está disponible en la página web de Pioneer. Consulte la página web para más
información sobre la actualización o servicio de su reproductor de discos Blu-ray.
HB985-DB.BDEUPPK_SPA.indd 66HB985-DB.BDEUPPK_SPA.indd 66 2010-05-14 2:48:392010-05-14 2:48:39

67
Apéndice
7
Apéndice
Control de un televisor
con el mando a
distancia suministrado
Puede controlar su televisor PIONEER con los
botones siguientes.
Botones de
control del
televisor
Botón Funcionamiento
1
(TV Power)
Encender y apagar el
televisor.
INPUT
Cambiar la fuente de entrada
del televisor entre éste y
otras fuentes de entrada.
CH +/- Avanzar o retroceder por
los canales memorizados.
VOL +/- Ajustar el volumen del
televisor.
NOTA
Dependiendo de la unidad que se conecte, es
posible que no pueda controlar su televisor con
alguno de los botones.
Con guración del mando a
distancia para el televisor
Puede utilizar el televisor con el mando a
distancia incluido.
Si el televisor se encuentra en la lista siguiente,
seleccione el código de fabricante apropiado.
1. Con el botón
1
(ENCENDIDO DEL
TELEVISOR) pulsado, pulse el código de
fabricante para su televisor con los botones
numéricos (véase tabla siguiente).
Fabricante
Número de
código
Pioneer 1 (por defecto)
Sony 2, 3
Panasonic 4, 5
Samsung 6, 7
LG 8, 9
2. Suelte el botón
1
(ENCENDIDO DEL
TELEVISOR) para completar el ajuste.
Dependiendo del televisor, algunos o todos los
botones pueden no funcionar en el televisor,
incluso después de introducir el código de
fabricante correcto. Cuando cambie las pilas
del mando a distancia, el número de código
que haya introducido podría volver al ajuste
por defecto. Introduzca de nuevo el número
de código adecuado.
7
Apéndice
HB985-DB.BDEUPPK_SPA.indd 67HB985-DB.BDEUPPK_SPA.indd 67 2010-05-14 2:48:392010-05-14 2:48:39

68
Apéndice
Apéndice
7
Lista del código del país
Seleccione un código de área de esta lista.
País Código País Código País Código País Código
Afganistán AF
Argentina AR
Australia AU
Austria AT
Bélgica BE
Bután BT
Bolivia SB
Brasil BR
Camboya KH
Canadá CA
Chile CL
China CN
Colombia CO
Congo CG
Costa Rica CR
Croacia HR
República Checa CZ
Dinamarca DK
Ecuador EC
Egipto EG
El Salvador SV
Etiopía ET
Fiji FJ
Finland FI
France FR
Germany DE
Great Britain GB
Greece GR
Greenland GL
Hong Kong HK
Hungary HU
India IN
Indonesia ID
Israel IL
Italy IT
Jamaica JM
Japan JP
Kenya KE
Kuwait KW
Libya LY
Luxembourg LU
Malaysia MY
Maldives MV
Mexico MX
Mónaco MC
Mongolia MN
Marruecos MA
Nepal NP
Holanda NL
Antillas Holandesas AN
Nueva Zelanda NZ
Nigeria NG
Noruega NO
Omán OM
Pakistán PK
Panamá PA
Paraguay PY
Filipinas PH
Polonia PL
Portugal PT
Rumanía RO
Federación de
Rusia RU
Arabia Saudita SA
Senegal SN
Singapur SG
República de
Eslovaquia SK
Eslovenia SI
Sudáfrica ZA
Corea del Sur KR
España ES
Sri Lanka LK
Suecia SE
Suiza CH
Taiwán TW
Tailandia TH
Turquía TR
Uganda UG
Ucrania UA
Estados Unidos US
Uruguay UY
Uzbekistán UZ
Vietnam VN
Zimbabwe ZW
HB985-DB.BDEUPPK_SPA.indd 68HB985-DB.BDEUPPK_SPA.indd 68 2010-05-14 2:48:392010-05-14 2:48:39

69
Apéndice
7
Apéndice
Lista de código de idioma
Utilice esta lista para introducir el idioma deseado para los siguientes ajustes iniciales: [Audio del
disco], [Subtítulo del disco] y [Menú del disco].
Idioma Código Idioma Código Idioma Código Idioma Código
Afar 6565
Afrikaans 6570
Albanés 8381
Amharic 6577
Árabe 6582
Armenio 7289
Assamais 6583
Aymara 6588
Azerbayano 6590
Bashkir 6665
Vasco 6985
Bengalí, Bangla 6678
Butaní 6890
Bihari 6672
Bretón 6682
Búlgaro 6671
Birmano 7789
Bielorruso 6669
Chino 9072
Croata 7282
Checo 6783
Danés 6865
Holandés 7876
Inglés 6978
Esperanto 6979
Estonio 6984
Feroés 7079
Fidji 7074
Finlandés 7073
Francés 7082
Frisón 7089
Gallego 7176
Georgiano 7565
Alemán 6869
Griego 6976
Groenlandés 7576
Guaraní 7178
Goujrati 7185
Haoussa 7265
Hebreo 7387
Hindi 7273
Húngaro 7285
Islandés 7383
Indonesio 7378
Interlingua 7365
Gaélico irlandés 7165
Italiano 7384
Japonés 7465
Kannada 7578
Kashmir 7583
Kazako 7575
Kirghiz 7589
Coreano 7579
Kurdo 7585
Laosiano 7679
Latín 7665
Letón 7686
Lingala 7678
Lituano 7684
Macedonio 7775
Malgache 7771
Malayo 7783
Malayalam 7776
Maorí 7773
Marath 7782
Moldavo 7779
Mongol 7778
Nauru 7865
Nepalés 7869
Noruego 7879
Oriya 7982
Punjabí 8065
Pastún 8083
Persa 7065
Polaco 8076
Portugués 8084
Quechua 8185
Reto-romano 8277
Rumano 8279
Ruso 8285
Samoano 8377
Sánscrito 8365
Gaélico escocés 7168
Serbio 8382
Serbo-croata 8372
Shona 8378
Sindhi 8368
Cingalés 8373
Eslovaco 8375
Esloveno 8376
Español 6983
Sudanés 8385
Swahili 8387
Sueco 8386
Tagalo 8476
Tajiko 8471
Tamil 8465
Telougou 8469
Tailandés 8472
Tonga 8479
Turco 8482
Turkmeno 8475
Twi 8487
Ucraniano 8575
Urdu 8582
Uzbeco 8590
Vietnamita 8673
Volapuk 8679
Galés 6789
Wolof 8779
Xhosa 8872
Yiddish 7473
Yoruba 8979
Zulú 9085
HB985-DB.BDEUPPK_SPA.indd 69HB985-DB.BDEUPPK_SPA.indd 69 2010-05-14 2:48:392010-05-14 2:48:39

70
Apéndice
Apéndice
7
Resolución de la salida de vídeo
Cuando se reproducen medios sin protección anticopia
Salida de vídeo
Resolución
HDMI OUT
COMPONENT VIDEO OUT
HDMI conectado HDMI desconectado
576i (480i) 576p (480i) 576i (480i)
576p (480p) 576p (480p) 576p (480p)
720p 720p 720p
1080i 1080i 1080i
1080p / 24 Hz 1080p / 24 Hz 576i (480i) 1080i
1080p / 50 Hz 1080p / 50 Hz 576i (480i) 1080i
Al reproducir un disco con protección anticopia
Salida de vídeo
Resolución
HDMI OUT
COMPONENT VIDEO OUT
HDMI conectado HDMI desconectado
576i (480i) 576p (480p) 576i (480i)
576p (480p) 576p (480p) 576p (480p)
720p 720p 576i (480i) 576p (480p)
1080i 1080i 576i (480i) 576p (480p)
1080p / 24 Hz 1080p / 24 Hz 576i (480i) 576p (480p)
1080p / 50 Hz 1080p / 50 Hz 576i (480i) 576p (480p)
Conexión HDMI OUT
• Para una con guración de resolución de
576i (480i), la resolución real de salida de
HDMI OUT cambiará a 576p(480p).
• Si selecciona manualmente una resolución
y, a continuación conecta un terminal HDMI
a la TV y ésta no la acepta, la con guración
de resolución cambiará a [Auto].
• Si selecciona una resolución que el
televisor no admite, aparecerá un mensaje
de advertencia. Después de cambiar la
resolución, si no puede ver la pantalla,
espere 20 segundos y la resolución
regresará automáticamente a la resolución
anterior.
• La velocidad de fotogramas de la salida
de video 1080p puede con gurarse
automáticamente a 24 Hz o 50 Hz
dependiendo de la capacidad y las
preferencias de la TV conectada y se basa
en la velocidad de fotogramas del vídeo
nativo del contenido del disco BD-ROM.
Conexión COMPONENT VIDEO
OUTconnection
Los sistemas BD o DVD podrían evitar la
escalada en la salida analógica.
Conexión VIDEO OUT
La resolución de la clavija VIDEO OUT siempre
es 576i (480i).
HB985-DB.BDEUPPK_SPA.indd 70HB985-DB.BDEUPPK_SPA.indd 70 2010-05-14 2:48:392010-05-14 2:48:39

71
Apéndice
7
Apéndice
“Disco Blu-ray” y son marcas comerciales.
El logotipo “BD-LIVE” es una marca registrada de la
asociación Blu-ray Disc.
“BONUSVIEW” es una marca registrada de Blu-ray
Disc Association.
Java y todas las marcas comerciales y logotipos
basados en Java son marcas registradas o
comerciales de Sun Microsystems, Inc. en los
Estados Unidos y otros países.
Fabricado bajo la licencia de Dolby Laboratories.
Dolby y el símbolo de la doble-D son marcas
comerciales propiedad de Dolby Laboratories.
Fabricado bajo licencia bajo los siguientes
números de patente U.S.: 5,451,942; 5,956,674;
5,974,380; 5,978,762; 6,226,616; 6,487,535;
7,392,195; 7,272,567; 7,333,929; 7,212,872 y
otras patentes U.S. y de otros países emitidas y
solicitadas. DTS y el símbolo son marcas registradas
y DTS-HD, DTS-HD Master Audio l Essential and los
logotipos DTS son marcas comerciales de DTS, Inc.
El producto incluye software. © DTS, Inc. Todos los
derechos reservados.
HDMI, el logotipo HDMI y High-De nition
Multimedia Interface son marcas registrada de
HDMI Licensing, LLC en Estados Unidos y otros
países.
El logotipo es una marca registrada de DVD
Format/Logo Licensing Corporation.
TM
DLNA y DLNA CERTIFIED son marcas comerciales
y / o marcas de servicio de Digital Living Network
Alliance
DivX es una marca comercial registrada de DivX,
Inc. y se utiliza bajo licencia.
“x.v.Color” o “x.v.Colour” es una marca comercial de
Sony Corporation.
Marcas comerciales y licencias
HB985-DB.BDEUPPK_SPA.indd 71HB985-DB.BDEUPPK_SPA.indd 71 2010-05-14 2:48:392010-05-14 2:48:39

72
Apéndice
Apéndice
7
“AVCHD” y el logotipo “AVCHD” son marcas
registradas de Panasonic Corporation y Sony
Corporation.
Este producto tiene licencia bajo las previsiones
del archivo de patente AVC y VC-1 para uso
personal y no comercial de un consumidor para
(i) codi car vídeo según los estándares AVC y
VC-1 (“video AVC/VC-1”) o (ii) decodi car vídeo
AVC/VC-1 que ha sido codi cado por un usuario
involucrado en una actividad personal y no
comercial o se obtuvo de un proveedor de vídeo
autorizado para suministrar vídeo AVC/VC-1. No
se concede ni implica ninguna otra licencia para
ningún otro uso. Puede obtener información
adicional de MPEG LA, LLC. Visite
http://www.mpegla.com.
iPod es una marca comercial de Apple Inc.,
registrada en los Estados Unidos y en otros países.
iPhone es una marca comercial de Apple, Inc.
“Made for iPod” signi ca que el accesorio
electrónico ha sido diseñado para conectarse
de forma especí ca al iPod y como tal, ha sido
certi cado por el fabricante conforme a los
estándares de rendimiento de Apple.
“Works with iPhone” signi ca que el accesorio
electrónico ha sido diseñado para conectarse
de forma especí ca al iPhone y como tal, ha
sido certi cado por el fabricante conforme a los
estándares de rendimiento de Apple.
Apple no se responsabiliza del funcionamiento
de este dispositivo y su cumplimiento con los
estándares de regulación y seguridad.
Windows Media es una marca registrada o marca
comercial de Microsoft Corporation en Estados
Unidos y/u otros países.
Este producto incluye tecnología propiedad de
Microsoft Corporation y no puede ser utilizado o
distribuido sin una licencia de Microsoft Licensing,
Inc.
®
La tecnología inalámbrica Bluetooth® es un sistema
que permite contacto por radio entre aparatos
electrónicos con un alcance máximo de 10 metros.
La conexión de aparatos individuales bajo tecnología
inalámbrica Bluetooth no incurre en ningún cargo.
Se puede utilizar un teléfono móvil con tecnología
inalámbrica Bluetooth a través de Cascade, si la
conexión se ha realizado con tecnología inalámbrica
Bluetooth. El término, la marca y los logotipos
Bluetooth son propiedad de Bluetooth SIG, Inc. y
cualquier uso que Pioneer Corporation haga de
ellos estará bajo licencia. Otras marcas comerciales
y nombre comerciales son propiedad de sus
respectivos propietarios.
HB985-DB.BDEUPPK_SPA.indd 72HB985-DB.BDEUPPK_SPA.indd 72 2010-05-14 2:48:402010-05-14 2:48:40

73
Apéndice
7
Apéndice
Datos técnicos
General
• Requisitos eléctricos:
AC 220-240 V, 50/ 60 Hz
• Consumo de energía:
150 W
En modo standby: Menos de 0,5 W
• Dimensiones (An. x Al. x Prof.):
Aprox. 430 × 64 × 304 mm
• Peso neto (aprox.):
3.6 kg
• Temperatura en funcionamiento:
41 °F a 95 °F (5 °C a 35 °C)
• Humedad operativa:
5 % a 90 %
• Suministro de corriente a Bus (USB):
DC 5 V
500 mA
Entradas/Salidas
• VIDEO OUT:
1,0 V (p-p), 75 , sincr. negativa, toma RCA x 1
• COMPONENT VIDEO OUT:
(Y) 1,0 V (p-p), 75 , sincr. negativa,
toma RCA x 1, (Pb)/(Pr) 0,7 V (p-p), 75 Ω,
toma RCA x 2
• HDMI IN/OUT (vídeo/audio):
19 pines (HDMI estándar, tipo A, Versión 1.3)
• Entrada de audio analógica:
2,0 Vrms (1 kHz, 0 dB), 600 ,
toma RCA (Izq., Dcha.) x 1
• DIGITAL IN (OPTICAL 1/2):
3 V (p-p), 2 x toma óptica
• Entrada de puerto :
0,5 Vrms (toma estéreo 3,5 mm)
Sintonizador
• Rango de sintonización FM:
87.5 a 108.0 MHz o 87.50 a 108.00 MHz
Ampli cador
• Salida de potencia, (PEAK), (4/3)
Total 1100 W
Parte anterior 180 W x 2
Centro 180 W
Parte trasera 180 W x 2
Subwoofer 200 W (Passive)
• Salida de potencia, (RMS), THD 10% (4/3)
Total 930 W
Parte anterior 150 W x 2
Centro 150 W
Parte trasera 150 W x 2
Subwoofer 180 W (Passive)
Sistema
• Láser:
Láser semiconductor,
Longitud de onda: 405 nm / 650 nm
• Sistema de señal:
Sistema de TV en color NTSC/PAL estándar
• Respuesta de frecuencia:
20 Hz a 20 kHz (muestras, 48 kHz, 96 kHz, 192 kHz)
• Puerto LAN:
Toma Ethernet x 1, 10 BASE-T/100 BASE-TX
HB985-DB.BDEUPPK_SPA.indd 73HB985-DB.BDEUPPK_SPA.indd 73 2010-05-14 2:48:402010-05-14 2:48:40

74
Apéndice
Apéndice
7
Altavoces BCS-707
S-BD707
• Altavoz delantero/Surround (Izquierdo/Delantero)
Modelo: 2 altavoces
Relación de impedancia: 4
Dimensiones netas 260 x 1097 x 260 mm
(An. x Al. x Prof.):
Peso neto: 3.8 kg
• Altavoz central
Modelo: 1 altavoces
Relación de impedancia: 4
Dimensiones netas 300 x 87x 65 mm
(An. x Al. x Prof.):
Peso neto: 0.6 kg
S-BD707SW
• Subwoofer
Modelo: 1 altavoces, 1 vías
Relación de impedancia: 3
Dimensiones netas 130.5 x 420 x 375 mm
(An. x Al. x Prof.):
Peso neto: 4.4 kg
Altavoces BCS-303
S-BD303
• Altavoz delantero/Surround (Izquierdo/Delantero)
Modelo: 1 altavoces
Relación de impedancia: 4
Dimensiones netas 96 x 96 x 85 mm
(An. x Al. x Prof.):
Peso neto: 0.4 kg
• Altavoz central
Modelo: 1 altavoces
Relación de impedancia: 4
Dimensiones netas 300 x 87 x 65 mm
(An. x Al. x Prof.):
Peso neto: 0.6 kg
• Subwoofer
Modelo: 1 altavoces, 1 vías
Relación de impedancia: 3
Dimensiones netas 130.5 x 420 x 375 mm
(An. x Al. x Prof.):
Peso neto: 4.4 kg
HB985-DB.BDEUPPK_SPA.indd 74HB985-DB.BDEUPPK_SPA.indd 74 2010-05-14 2:48:402010-05-14 2:48:40

75
Apéndice
7
Apéndice
Aviso sobre el
software de código
abierto
Los siguientes ejecutables GPL y bibliotecas LGPL
utilizados en este producto están sujetos a los
Acuerdos de licencia de GPL2.0/LGPL2.1:
EJECUTABLES GPL: Linux kernel 2.6, bash, busybox,
cramfs, dhcpcd, e2fsprogs, fdisk, mkdosfs, mtd-utils,
net-tools, procps, samba-3.0.25b, sysutils, tcpdump,
tftpd, tinylogin, unzip, utelnetd
BIBLIOTECAS LGPL: uClibc, DirectFB, blow sh,
cairo, mpeg, iconv, libusb, mpg123
BIBLIOTECA 1.3, licencia pública gSOAL: gsoap
Se puede obtener el código fuente correspondiente
realizando el pago de distribución. Para obtener una
copia, póngase en contacto con el servicio local de
atención al cliente de Pioneer.
Puede obtener una copia de las licencias GPL, LGPL en
http://www.gnu.org/licenses/old-licenses/gpl-2.0.html y
http://www.gnu.org/licenses/old-licenses/lgpl-2.1.html.
También puede obtener una copia de la licencia
pública gSOAP en http://www.cs.fsu.edu/~engelen/
license.html.
Este software se basa en parte del trabajo del
Independent JPEG Group – 1998, Thomas G. Lane.
Este producto incluye:
• boost C++: copyright Beman Dawes 1999-2003
• c-ares: copyright © 1998 por el MIT (Massachusetts
Institute of Technology)
• curl: copyright © 1996 - 2008, Daniel Stenberg
• expat: copyright © 2006 expat maintainers
• freetype: copyright © 2003 The FreeType Project
(www.freetype.org)
• jpeg: Este software se basa en parte del trabajo del
Independent JPEG Group – 1998, Thomas G. Lane
• mng: copyright © 2000-2007 Gerard Juyn, Glenn
Randers-Pehrson
• ntp : copyright © David L. Mills 1992-2006
• OpenSSL:
– software criptográ co escrito por Eric Young
(eay@cryptsoft.com)
– software escrito por Tim Hudson
(tjh@cryptsoft.com)
– software desarrollado por OpenSSL Project
para su utilización en OpenSSL Toolkit.
(http://www.openssl.org)
• png: copyright © 2004 Glenn Randers-Pehrson
• portmap: copyright © 1990 The Regents of the
University of California
• ptmalloc: copyright © 2001-2006 Wolfram Gloger
• UnitTest++: copyright © 2006 Noel Llopis y
Charles Nicholson
• UPnP SDK: copyright © 2000-2003 Intel
Corporation
• strace :
copyright © 1991, 1992 Paul Kranenburg
copyright © 1993 Branko Lankester
copyright © 1993 Ulrich Pegelow
copyright © 1995, 1996 Michael Elizabeth Chastain
copyright © 1993, 1994, 1995, 1996 Rick Sladkey
copyright © 1999,2000 Wichert Akkerman
• xml2 : copyright © 1998-2003 Daniel Veillard
• XML-RPC para C/C++:
• copyright © 2001 por First Peer, Inc. Reservados
todos los derechos.
• copyright © 2001 por Eric Kidd. Reservados todos
los derechos.
• zlib: copyright © 1995-2002 Jean-loup Gailly y
Mark Adler.
Reservados todos los derechos
Por la presente, se concede permiso, de forma
gratuita, a toda persona que obtenga una copia
de este software o de archivos de documentación
relacionados con el mismo (en adelante,
“el Software”) para tratar dicho Software sin
restricciones, incluyendo a modo enunciativo, el
derecho a utilizar, copiar, modi car, integrar con otro
Software, publicar, sublicenciar y/o vender copias
del Software, y además permitir a las personas a las
que se les entregue el Software hacer lo mismo,
conforme a las siguientes condiciones:
EL SOFTWARE SE FACILITA “TAL CUAL”, SIN
GARANTÍA DE NINGÚN TIPO, EXPLÍCITA O IMPLÍCITA,
INCLUYENDO A MODO ENUNCIATIVO, TODA
GARANTÍA DE COMERCIABILIDAD E IDONEIDAD
PARA UN FIN CONCRETO Y SIN VIOLACIÓN DE LOS
DERECHOS. BAJO NINGUNA CIRCUNSTANCIA, LOS
AUTORES O PORTADORES DE LOS DERECHOS DE
COPYRIGHT ASUMIRÁN RESPONSABILIDAD ALGUNA
ANTE RECLAMACIONES, DAÑOS O CUALQUIER OTRA
RESPONSABILIDAD, YA SEA MEDIANTE ACCIÓN
CONTRACTUAL, AGRAVIO U OTROS, RESULTANTE DE
O EN RELACIÓN CON EL SOFTWARE O EL USO QUE
SE HAGA DE ÉSTE U OTROS TEMAS RELACIONADOS
CON EL MISMO.
HB985-DB.BDEUPPK_SPA.indd 75HB985-DB.BDEUPPK_SPA.indd 75 2010-05-14 2:48:402010-05-14 2:48:40

2 Veiligheidsinformatie
Veiligheidsinformatie
1
OPGELET
SCHOKGEVAAR
NIET OPENEN
LET OP: om het risico van een elektrische schok
te voorkomen, het deksel (of de achterzijde)
niet verwijderen. Binnenin bevinden zich geen
onderdelen die door de gebruiker kunnen
worden onderhouden. Bel hiervoor een erkende
servicetechnicus.
Een bliksem met pijl in een
gelijkbenige driehoek is bedoeld
om de gebruiker attent te maken
op de aanwezigheid van een
gevaarlijke, niet-geïsoleerde
spanning in de behuizing van het
product die zo groot kan zijn dat zij
gevaar voor een elektrische schok
oplevert.
Het uitroepteken in een
gelijkbenige driehoek is bedoeld
om de gebruiker attent te
maken op belangrijke gebruiks-
en onderhoudsinstructies in
de bij het apparaat geleverde
gebruiksaanwijzing.
Veiligheidsmaatregelen en
waarschuwingen
WAARSCHUWING: STEL DIT PRODUCT NIET BLOOT
AAN REGEN OF VOCHT OM HET RISICO VAN BRAND
OF EEN ELEKTRISCHE SCHOK TE VOORKOMEN.
WAARSCHUWING: Plaats het toestel niet in een
kleine ruimte, zoals een boekenkast of een dergelijke
afgesloten ruimte.
WAARSCHUWING: Blokkeer de ventilatieopeningen
niet. Installeer volgens de instructies van de fabrikant.
Sleuven en openingen in de kast zijn geplaatst ter
ventilatie en te zorgen voor betrouwbaar gebruik van
het product, en om oververhitting te voorkomen.
De openingen mogen nooit geblokkeerd worden
door het product op een bed, bank, tapijt of
soortgelijke ondergrond te plaatsen. Het product
mag niet geplaatst worden in een inbouwmeubel,
zoals een boekenkast of rek tenzij er gezorgd wordt
in voldoende ventilatie en de instructies van de
fabrikant opgevolgd worden.
WAARSCHUWING: Dit is een klasse 1 laserproduct
en valt onder de norm Veiligheid van laserproducten,
IEC 60825-1:2007. U dient, voor een correct
gebruik van dit product, de gebruikershandleiding
aandachtig door te lezen en deze te bewaren voor
toekomstig gebruik. Indien het apparaat onderhoud
nodig heeft, neem dan contact op met een erkend
servicecentrum.
Het gebruik van een of meer bedieningsknoppen,
instellingen of procedures op een andere wijze dan
in deze handleiding is aangegeven kan blootstelling
aan gevaarlijke straling tot gevolg hebben.
Voorkom directe blootstelling aan de laserstraal
en open het apparaat niet. Zichtbare laser straling
indien geopend. KIJK NIET IN DE STRAAL.
1
Veiligheidsinformatie
HB985-DB.BDEUPPK_DUT.indd 2HB985-DB.BDEUPPK_DUT.indd 2 2010-05-14 2:57:552010-05-14 2:57:55

Veiligheidsinformatie
3Veiligheidsinformatie
1
WAARSCHUWING betre ende de
netvoedingskabel
Wij adviseren de meeste apparaten aan te sluiten
op een eigen circuit, namelijk een enkelvoudig
stopcontact dat alleen dat apparaat van
stroom voorziet en geen verdere aansluitingen
betreft. Controleer de speci caties in deze
gebruikershandleiding om zeker te zijn. Sluit niet
teveel apparaten aan op hetzelfde stopcontact.
Overbelaste stopcontacten, loszittende of
beschadigde stopcontacten, verlengsnoeren,
beschadigde netvoedingskabels of beschadigde of
gebarsten kabelisolatie zijn gevaarlijk. Elk van deze
omstandigheden kunnen leiden tot kortsluiting
of brand. Periodieke controle van de kabel van uw
apparaat is noodzakelijk, en indien het apparaat
tekenen van beschadiging of slijtage toont, trek dan
de stekker uit het stopcontact, gebruik het apparaat
niet, en laat de kabel door een erkend servicecentrum
vervangen door een goedgekeurd gelijkwaardig
exemplaar. Bescherm de netvoedingskabel tegen
fysiek of mechanisch misbruik, zoals buigen,
vastklemmen, klemmen tussen een gesloten
deur, of erover lopen. Let speciaal op stekkers,
wandcontactdozen en het punt waar de kabel het
apparaat verlaat. Verwijder de netvoedingskabel
door aan de stekker te trekken, niet aan de kabel. Let
erop dat de stekker makkelijk toegankelijk is nadat u
het product hebt geïnstalleerd.
Hierdoor verklaart PIONEER dat dit/
deze product(en) voldoet/voldoen
aan de belangrijkste eisen en andere
relevante voorzieningen van de
Europese Richtlijnen 2004/108/EC,
2006/95/EC en 2009/125/EC.
WAARSCHUWING: Voorkom brandgevaar en plaats
geen bronnen met open vuur (zoals brandende
kaarsen) op de apparatuur.
Dit apparaat is voorzien van een draagbare batterij of
accu.
U kunt de batterij of de accu als volgt veilig uit
het apparaat verwijderen: Verwijder de oude
batterij of het batterijpack. Ga in omgekeerde
volgorde als bij het plaatsen te werk. Voorkom
milieuvervuiling en gezondheidsgevaren voor mens
en dier en werp de oude batterij, het batterijpack
of de accu in de daarvoor bestemde bak bij een
o cieel aangewezen inzameladres. Doe oude
batterijen en accu’s nooit samen met het gewone
huisvuil weg. Wij adviseren u gratis batterijen en
accu’s te gebruiken die u tegen vergoeding weer
kunt inleveren(Indien deze service in uw land wordt
geboden.). Stel de batterij (accu) niet bloot aan de
hoge temperatuur van rechtstreekse zonnestraling,
een open haard e.d.
WAARSCHUWING: Dit apparaat mag niet worden
blootgesteld aan druip- of spatwater en plaats geen
objecten gevuld met vloeistof, zoals vazen, op het
apparaat.
HB985-DB.BDEUPPK_DUT.indd 3HB985-DB.BDEUPPK_DUT.indd 3 2010-05-14 2:57:582010-05-14 2:57:58

4 Veiligheidsinformatie
Veiligheidsinformatie
1
Informatie voor gebruikers betre ende het
inzamelen en opruimen van oude apparaten en
gebruikte batterijen
Deze symbolen op de producten, verpakking en/
of meegeleverde documenten betekenen dat
gebruikte elektrische en elektronische producten en
batterijen niet tegelijk met algemeen huishoudelijk
afval mogen worden opgeruimd.
Breng oude producten en gebruikte batterijen
zoals wettelijk voorgeschreven naar de daarvoor
aangewezen inzamelingsadressen die voor een juiste
behandeling, reparatie of hergebruik kunnen zorgen.
Door deze producten en batterijen op de juiste
wijze op te ruimen helpt u waardevolle grondsto en
te behouden en voorkomt u mogelijke negatieve
e ecten voor de gezondheid van mens en dier die
het gevolg zijn van het achteloos wegdoen van afval.
Voor meer informatie over het inzamelen en
hergebruiken van oude producten en batterijen
kunt u contact opnemen met het gemeentehuis van
uw woonplaats, een o cieel inzameladres of het
verkooppunt waar u de goederen hebt gekocht.
Deze symbolen gelden alleen in de Europese
Unie.
Voor landen buiten de Europese Unie:
Als u deze zaken wilt afdanken, neem dan contact
op met het gemeentehuis van uw woonplaats of de
leverancier ervan en vraag naar de juiste manier van
wegdoen.
Wat u moet weten over copyright
• Er zijn bepaalde beperkingen voor afspelen,
analoge signaaluitvoer, etc van door AACS
beschermde inhoud, omdat AACS (Advanced
Access Content System) goedgekeurd is als
inhoudbeschermingsysteem voor BD-formaat,
gelijk aan het gebruik van CSS (Content
Scramble System). Het gebruik van dit product
en beperkingen op dit product kunnen variëren
afhankelijk van uw tijd van aankoop aangezien die
beperkingen zijn toegepast en/of gewijzigd door
AACS na de productie van dit product.
• Verder worden BD-ROM Mark en BD+ nog
gebruikt als inhoudbeveiligingssyteem voor het
BD-formaat, dat bepaalde beperkingen oplegt
inclusief afspeelbeperkingen aan met BD-ROM
Mark en/of BD+ beveiligde inhoud. Voor extra
informatie over AACS, BD-ROM teken, BD+, of dit
product, neemt u contact op met een erkend
Klantenservicecentrum.
• Veel BD-ROM/DVD disks zijn gecodeerd met
kopieerbeveiliging. Hierdoor dient u uw speler
rechtstreeks op uw tv aan te sluiten, niet op
een videorecorder. Het aansluiten op een
videorecorder heeft een gestoord beeld van
tegen kopiëren beveiligde disks tot gevolg.
• Dit product maakt gebruik van technologie
voor bescherming van auteursrechten die
beschermd wordt door U.S. patenten en andere
intellectuele eigendomsrechten. Gebruik van deze
technologie ter bescherming van auteursrechten
moet geautoriseerd worden door Rovi, en is
bedoeld voor thuisgebruik en beperkt aantal
kijkbeurten, tenzij anderszins aangegeven door
Rovi. Omgekeerde engineering of demontage is
verboden.
• Volgens de Amerikaanse wetgeving op het
auteursrecht en de daarmee vergelijkbare
wetgeving van andere landen, is niet bevoegde
opname, gebruik, tonen, distributie of revisie
van televisieprogramma’s, videobanden, BD-
ROM disks, DVD’s, CD’s en andere materialen
onderworpen aan civielrechtelijke en/of
strafrechtelijke wetgeving.
Pb
(
Voorbeelden van
symbolen voor
batterijen
)
HB985-DB.BDEUPPK_DUT.indd 4HB985-DB.BDEUPPK_DUT.indd 4 2010-05-14 2:57:582010-05-14 2:57:58

Veiligheidsinformatie
5Veiligheidsinformatie
1
Belangrijke informatie over het tv-
kleurensysteem
Het door deze speler gebruikte tv-kleurensysteem
richt zich naar de afgespeelde disks.
Wanneer de speler bijvoorbeeld een volgens het
NTSC-kleurensysteem opgenomen disk afspeelt,
wordt het beeld als NTSC-signaal uitgevoerd.
Alleen kleurentelevisies die voor meerdere
kleurensystemen geschikt zijn, kunnen alle door de
speler uitgevoerde signalen verwerken.
• Als uw tv uitsluitend geschikt is voor PAL
kleurensignalen toont het beeldscherm
vervormde beelden wanneer u disks of video-
inhoud gebruikt die in NTSC zijn opgenomen.
• Een kleuren-tv die voor meerdere systemen
geschikt is, past het kleurensysteem automatisch
aan bij het ingevoerde signaal. Wanneer
het kleurensysteem niet automatisch wordt
overgeschakeld, schakelt u de tv uit en weer aan
waardoor een normaal beeld op het beeldscherm
moet verschijnen.
• Ook wanneer volgens het NTSC-kleurensysteem
opgenomen disks door uw tv correct worden
weergegeven is het mogelijk dat dit signaaltype
niet correct door uw recorder wordt opgenomen.
HB985-DB.BDEUPPK_DUT.indd 5HB985-DB.BDEUPPK_DUT.indd 5 2010-05-14 2:57:582010-05-14 2:57:58

6
Inhoud
1
Veiligheidsinformatie
2 Veiligheidsmaatregelen en
waarschuwingen
2
Voorbereiding
8 Inleiding
8 Weergave van het symbool “
”
8 Symbolen die in deze
handleiding worden gebruikt
9 Meegeleverde toebehoren
10 Afspeelbare disks
11 Bestandscompatibiliteit
12 Regiocode
12 AVCHD (Advanced Video
Codec High De nition)
12 Bepaalde systeemvereisten
12 Opmerkingen betre ende
compatibiliteit
13 Afstandsbediening
14 Voorpaneel
15 Achterpaneel
3
Installeren
16 Luidsprekers monteren
16 Luidsprekers installeren
BCS-707
18 Luidsprekers installeren
BCS-303
19 De middenluidspreker aan de wand
bevestigen
19 Extra informatie over het ophangen
van luidsprekers
20 Het systeem opstellen
21 Aansluitingen op uw tv
21 HDMI-aansluiting
22 Component Video-
aansluiting
23 Videoverbinding
23 Resolutie instellen
24 Antenneaansluiting
24 Op een extern apparaat aansluiten
24 AUX-aansluiting
25 PORTABLE IN-aansluiting
25 OPTICAL IN 1/2-aansluiting
26 Bluetooth® aansluiting
28 Aansluiten op uw thuisnetwerk
29 Een netwerk installeren
31 Usb-apparaat aansluiten
32 Instellingen
32 De setup-instellimgen
aanpassen
33 [SCHERM]-menu
34 [TAAL]-menu
35 [AUDIO]-menu
36 [SLOT]-menu
37 [NETWERK]-menu
37 [ANDERS]-menu
39 Geluidse ecten
HB985-DB.BDEUPPK_DUT.indd 6HB985-DB.BDEUPPK_DUT.indd 6 2010-05-14 2:57:592010-05-14 2:57:59

7
1
2
3
4
5
6
7
8
4
Bediening
40 Afspelen in het algemeen
42 Geavanceerd afspelen
45 Beeldscherminformatie (OSD)
48 De ongekende mogelijkheden van
BD-Live
49 Film- en VR-disks afspelen
51 Foto’s bekijken
53 Naar muziek luisteren
56 iPod afspelen
58 Radio
59 Inhoud via uw thuisnetwerk afspelen
5
Onderhoud
63 Wat u over disks moet weten
63 Behandeling van het apparaat
6
Problemen oplossen
64 Algemeen
65 Beeld
65 Geluid
66 Netwerk
7
Bijlage
67 Uw tv bedienen met de
meegeleverde afstandsbediening
68 Regiocodelijst
69 Taalcodelijst
70 Resolutie video-uitvoersignaal
71 Handelsmerken en licenties
73 Technische gegevens
75 Kennisgeving over open-source
software
HB985-DB.BDEUPPK_DUT.indd 7HB985-DB.BDEUPPK_DUT.indd 7 2010-05-14 2:57:592010-05-14 2:57:59

8 Voorbereiding
Voorbereiding
2
2
Voorbereiding
Inleiding
Weergave van het symbool “ ”
“ ” kan op uw tv-scherm verschijnen tijdens
gebruik en geeft aan dat de functie die wordt
uitgelegd in deze gebruikershandleiding niet
beschikbaar is bij die speci eke media.
Symbolen die in deze
handleiding worden gebruikt
LET OP
Geeft aan dat er bijzondere opmerkingen en
bedieningskenmerken zijn.
VOORZICHTIG
Vestigt uw aandacht op voorzorgsmaatregelen
die mogelijke schade door verkeerd gebruik
kunnen voorkomen.
Een hoofdstuk waarvan de titel een van
de volgende symbolen bevat, is alleen van
toepassing op de disk waarnaar het symbool
verwijst.
BD
BD-ROM disk
DVD
DVD-Video, DVD±R/RW
in Video modus of VR
modus en ge naliseerd
AVCHD
DVD±R/RW in AVCHD
formaat
ACD
Audio cd
MOVIE
Filmbestanden
MUSIC
Muziekbestanden
PHOTO
Fotobestanden
HB985-DB.BDEUPPK_DUT.indd 8HB985-DB.BDEUPPK_DUT.indd 8 2010-05-14 2:57:592010-05-14 2:57:59

9Voorbereiding
2
Voorbereiding
Meegeleverde toebehoren
Videokabel (1)
Afstandsbediening (1)
Batterijen (1) Fm-antenne (1)
iPod houder (1)
Toebehoren voor luidsprekerboxen
(S-BD707T)
Luidsprekerkabel (5)
Schroeven (12)
Luidsprekervoet
-stukken (4)
kleine
antislipkussentjes (1)
Middelgrote
antislipkussentjes (1)
Toebehoren voor luidsprekerboxen
(S-BD707SW)
Luidsprekerkabel (1) Grote
antislipkussentjes (1)
Toebehoren voor luidsprekerboxen
(S-BD303)
Luidsprekerkabel (6)
kleine
antislipkussentjes (1)
Grote
antislipkussentjes (1)
HB985-DB.BDEUPPK_DUT.indd 9HB985-DB.BDEUPPK_DUT.indd 9 2010-05-14 2:57:592010-05-14 2:57:59

10 Voorbereiding
Voorbereiding
2
Afspeelbare disks
Blu-ray Disc
- Disks met lms die u kunt
kopen of huren.
- BD-R/RE disks die lm-, muziek-
of fotobestanden bevatten.
DVD-VIDEO
8 / 12 cm
Disks met lms die u kunt kopen
of huren.
DVD±R
8 / 12 cm
- Alleen video-opnamen, mits
ge naliseerd
- Ook tweelaags disks worden
ondersteund
- Ge naliseerd AVCHD-formaat
- DVD±R disks die lm-, muziek-
of fotobestanden bevatten.
DVD-RW
8 / 12 cm
- Alleen VR modus, Videomodus
en ge naliseerd
- Ge naliseerd AVCHD-formaat
- DVD-RW disks die lm-
, muziek- of fotobestanden
bevatten.
DVD+RW
8 / 12 cm
- Alleen video-opnamen, mits
ge naliseerd
- AVCHD-formaat
- Ge naliseerd AVCHD-formaat
- DVD+RW disks die lm-,
muziek- of fotobestanden
bevatten.
Audio CD
8 / 12 cm
CD-R/RW
8 / 12 cm
- CD-R/RW disks die audiotitels
evenals lm-, muziek- en
fotobestanden kunnen
bevatten.
LET OP
• Afhankelijk van de conditie van de
opnameapparatuur of van de CD-R/RW
(of DVD±R/RW)-disk zelf, kunt u sommige CD-R/
RW (of DVD±R/RW)-disks niet met deze speler
weergeven.
• Afhankelijk van de opnamesoftware en de
nalisering is het mogelijk dat u sommige
opgenomen disks (CD-R/RW, DVD±R/RW, BD-R/
RE) niet met deze speler kunt weergeven.
• Het is mogelijk dat u CD-R/RW- en BD-R/RE,
DVD±R/RW-disks die met behulp van een pc
of dvd- of cd-recorder zijn opgenomen niet
met deze speler kunt weergeven als de disk is
beschadigd of als er vuil of condens op de lens
van de speler aanwezig is.
• Als u een disk met behulp van een pc opneemt,
is het mogelijk dat u de disk - zelfs als u deze in
een compatibel formaat opneemt - niet kunt
weergeven als gevolg van de instellingen van
de applicatiesoftware die u hebt gebruikt om de
disk te beschrijven. (Neem voor meer informatie
contact op met de leverancier van de software.)
• Deze speler vereist dat de gebruikte disks en
opnamen aan bepaalde technische normen
voldoen om een optimaal opname- en
weergaveresultaat te bereiken.
• Vooraf opgenomen dvd-disks worden
automatisch op deze normen ingesteld. Er is een
groot aantal verschillende typen opneembare
diskformaten (waaronder begrepen cd-r-
disks die mp3- of wma-bestanden bevatten)
en deze vereisen bepaalde vooraf aanwezige
voorwaarden om het compatibel afspelen
mogelijk te maken.
• Wij nemen aan dat u weet dat u toestemming
moet hebben voor het downloaden van mp3-
en wma-bestanden van het internet. Ons bedrijf
heeft niet het recht deze toestemming te
verlenen. U moet toestemming hebben van de
eigenaar van het auteursrecht (“copyright”).
HB985-DB.BDEUPPK_DUT.indd 10HB985-DB.BDEUPPK_DUT.indd 10 2010-05-14 2:58:002010-05-14 2:58:00

11Voorbereiding
2
Voorbereiding
Bestandscompatibiliteit
Volledig
Beschikbare bestandsextensies:
“.jpg”, “.jpeg”, “.png”, “.avi”, “.divx”, “.mpg”, “.mpeg”,
“.mkv”, “.mp4”, “.mp3”, “.wma”, “.wav”
• De beschikbare bestandsextensies zijn
verschillend, afhankelijk van de DNLA-
servers.
• Sommige “.wav”-bestanden worden op
deze speler niet ondersteund.
• De bestandsnaam is tot 180 tekens beperkt.
• Afhankelijk van de grootte en het aantal
bestanden kan het enige minuten duren
om de inhoud op het medium in te lezen.
Maximum bestanden/mappen: Minder dan
2 000 (totaal aantal bestanden en mappen)
CD-R/RW, DVD±R/RW, BD-R/RE formaat:
ISO 9 660+JOLIET, UDF en UDF Bridge formaat
MOVIE (Film)
Beschikbare resolutiegrootte:
1 920 x 1 080 (B x H) pixels
Afspeelbare ondertitel: SubRip (.srt / .txt),
SAMI (.smi), SubStation Alpha (.ssa/.txt),
MicroDVD (.sub/.txt), VobSub (.sub), SubViewer
1.0 (.sub), SubViewer 2.0 (.sub/.txt), TMPlayer
(.txt), DVD Subtitle System (.txt)
• VobSub (.sub) is niet beschikbaar in de
[HomeLink]-func
tie.
Afspeelbare DivX ondertiteling: “DIVX3.xx”,
“DIVX4.xx”, “DIVX5.xx”, “XVID”, “DIVX6.xx” (alleen
standaard afspelen), H.264/MPEG-4 AVC,
MPEG1 SS, MPEG2 PS, MPEG2 TS
Afspeelbaar Audioformaat: “Dolby Digital”,
“DTS”, “MP3”, “WMA”, “AAC”, “AC3”
• Niet alle wma- en aac-audioformaten zijn
voor dit apparaat geschikt.
Bemonsteringsfrequentie:
Vanaf 32 kHz t/m 48 kHz (WMA),
Vanaf 16 kHz t/m 48 kHz (MP3)
Bitsnelheid:
Vanaf 20 kbps t/m 320 kbps (WMA),
Vanaf 32 kbps t/m 320 kbps (MP3)
LET OP
• Het kan voorkomen dat HD lmbestanden op
een CD of USB 1,0/1,1 niet goed afgespeeld
worden. BD, DVD of USB 2,0 worden aanbevolen
om HD lmbestanden af te spelen.
• Deze speler ondersteunt H.264/MPEG-4 AVC
pro le Main, High op niveau 4,1. Bij titels met
een hoger niveau verschijnt een waarschuwing
op het beeldscherm.
• Deze speler ondersteunt geen bestanden die
met GMC*
1
of Qpel*
2
zijn opgenomen. Dat zijn
videocoderingstechnieken volgens de MPEG4-
norm zoals DivX en XviD.
*1 GMC – Global Motion Compensation
*2 Qpel – Quarter pixel
MUSIC (Muziek)
Bemonsteringsfrequentie:
Vanaf 8 t/m 48 KHz (wma),
Vanaf 11 t/m 48 KHz (mp3),
Bitsnelheid:
Vanaf 8 t/m 320 Kbps (wma, mp3),
LET OP
• Dit apparaat ondersteunt geen ID3 tag-
embedded mp3-bestanden.
• De totale afspeeltijd aangeduid op het scherm
kan niet voor VBR-bestanden gecorrigeerd
worden.
PHOTO (Foto)
Geadviseerde grootte:
Minder dan 4.000 x 3.000 x 24 bits/pixels
Minder dan 3.000 x 3.000 x 32 bits/pixels
Minder dan 4 MByte/ le
• Progressieve en lossless-compression
f
otobeeldbestanden worden niet
ondersteund.
HB985-DB.BDEUPPK_DUT.indd 11HB985-DB.BDEUPPK_DUT.indd 11 2010-05-14 2:58:002010-05-14 2:58:00

12 Voorbereiding
Voorbereiding
2
Regiocode
Achterop deze speler is een regiocode
aangegeven. Deze speler is uitsluitend geschikt
voor het afspelen van BD-ROM- en DVD-disks
waarop dezelfde regiocode of de tekst “Alles” is
aangegeven.
AVCHD (Advanced Video Codec
High De nition)
• Deze speler kan AVCHD geformatteerde
disks afspelen. Deze disk worden normaliter
opgenomen en gebruikt in camcorders.
• Het AVCHD formaat is een hoogde nitie
digitaal videocamera formaat.
• Het MPEG-4 AVC/H.264 formaat is
in staat tot het comprimeren van
beelden in een hogere e ciëntie
dan die van het conventionele beeld
comprimeringsformaat.
• Sommige AVCHD disks gebruiken het
“x.v.Colour” formaat.
• Deze speler kan AVCHD disks afspelen met
het “x.v.Colour” formaat.
• Sommige disks in AVCHD formaat worden
niet afgespeeld, afhankelijk van de opname
omstandigheden.
• AVCHD disks moeten ge naliseerd worden.
• “x.v.Colour” biedt een groter kleurbereik dan
normale DVD camcorderdisks.
Bepaalde systeemvereisten
Voor het afspelen van hogede nitie-video:
• Hogede nitie-beeldscherm met
COMPONTENT of HDMI ingangen.
• BD-Rom disk met hogede nitie inhoud.
• Voor de weergave van bepaald materiaal
is een monitor nodig met een voor
HDMI of HDCP geschikte DVI-ingang (als
aangegeven door de makers van de disk).
• Voor de up-conversie van DVD’s die
materiaal van standaard-de nitie bevatten
is voor de weergave van tegen kopiëren
beveiligd materiaal een monitor nodig met
een DVI-ingang die voor HDMI of HDMI
geschikt is.
Opmerkingen betre ende
compatibiliteit
• Omdat BD-ROM een nieuw formaat
is, kunnen bij bepaalde disks, digitale
aansluitingen en andere verbindingen
compatibiliteitsproblemen optreden.
Neem contact op met het LG
Klantenservicecentrum indien u
compatibiliteitsproblemen aantreft.
• De weergave van hogede nitiemateriaal en
het omzetten van standaard DVD inhoud
kan een monitor vereisen met ingangen die
geschikt zijn voor HDMI of een voor HDMI
geschikte DVI.
• Sommige BD-ROM en DVD disks
kunnen het gebruik van bepaalde
bedieningscommando’s of functies
beperken.
• U kunt een usb-apparaat gebruiken dat
wordt gebruikt om bepaalde aan disks
gerelateerde informatie op te slaan
waaronder gedownload on-line materiaal.
De disk die u gebruikt bepaalt hoe lang
deze informatie wordt vastgehouden.
HB985-DB.BDEUPPK_DUT.indd 12HB985-DB.BDEUPPK_DUT.indd 12 2010-05-14 2:58:002010-05-14 2:58:00

13Voorbereiding
2
Voorbereiding
Afstandsbediening
1
2
3
• • • • • • • • •
a
• • • • • • • • •
1
(STANDBY/ON): Schakel het
toestel AAN/UIT.
Z
OPEN/CLOSE: Opent of sluit de
disklade.
INPUT/TUNER: Hiermee kunt u
de invoermodus wijzigen.
BT AUDIO: Changes input mode to
BT AUDIO directly.
OPTICAL: Hiermee wijzigt u de
invoermodus rechtstreeks in
optisch.
DISPLAY: Opent of sluit de On-
Screen Display.
HOME MENU: Geeft het
[Beginmenu] weer of stopt
hiermee.
MENU: Opent een menu op een
disk.
Richtingknoppen: Hiermee
selecteert u een optie in het menu.
ENTER: Bevestigt de
menukeuze.
TUNE (+/-): Stemt af op de
gewenste radiostations.
PRESET: Selecteert
radioprogramma’s.
• • • • • • • • •
b
• • • • • • • • •
O
RETURN: Sluit het menu af en
hervat het afspelen.
POPUP/ TOP MENU: Toont
het DVD titelmenu of BD-ROM
popupmenu indien beschikbaar.
x
STOP: Stopt de weergave.
B
PLAY: De weergave starten.
X
PAUSE/STEP: Pauzeert het
afspelen.
.
/
>
SKIP: Ga naar volgende
of vorige bestand/track/hoofdstuk.
m
/
M
SCAN: Zoekt
achterwaarts of voorwaarts.
SPK LEVEL: Hiermee stelt u het
geluidsniveau van de gewenste
luidspreker in.
z
USB REC: Hiermee neemt u een
audio-cd op.
MUTE: Hiermee kunt u het systeem
stilschakelen.
SOUND: Hiermee selecteert u de
modus voor geluidse ecten.
VOL +/- : Hiermee past u het
luidsprekervolume aan.
• • • • • • • • •
c
• • • • • • • • •
0-9 numerieke toetsen: Selecteert
genummerde opties in een menu.
MARKER: Hiermee kunt u tijdens
het afspelen een herkenningspunt
vastleggen.
SEARCH: Hiermee kunt u het
zoekmenu oproepen of sluiten.
REPEAT: Hiermee herhaalt u
een bepaald hoofdstuk.
CLEAR: Verwijdert een markering
in het zoeken menu of een getal
tijdens het instellen van het
wachtwoord.
DIMMER: Dimt de verlichting van
de speler.
ZOOM: Accesses ths zoom menu.
Gekleurde (A, B, C, D) knoppen:
Hiermee navigeert u door menu’s.
- A Knop voor (RDS): Radio Data
System.
- B Knop voor (PTY): Toont het het
programmatype van het RDS.
- C Knop voor (PTY SEARCH):
Zoekt het programmatype op.
- D Knop voor: Hiermee selecteert
u mono of stereo in de fm-modus.
Tv-bedieningsknoppen: Zie
pagina 67.
SLEEP: Hiermee stelt u een
bepaalde tijdsduur in waarna het
systeem zichzelf automatisch
uitschakelt.
Batterijen installeren
Maak het deksel van
het batterijenvak aan
de achterkant van de
afstandsbediening open
en plaats daarin een R03
(formaat AAA) batterij en wel
zó dat de tekens en op
de batterij aansluiten op deze
tekens in het batterijenvak.
HB985-DB.BDEUPPK_DUT.indd 13HB985-DB.BDEUPPK_DUT.indd 13 2010-05-14 2:58:002010-05-14 2:58:00

14 Voorbereiding
Voorbereiding
2
Voorpaneel
a
Disklade
b
Bedieningsknoppen
1
STANDBY/ON Knop voor
Z
(OPEN/CLOSE)
FUNCTIE
Hiermee wijzigt u de invoerbron of –
functie.
B
/
X
(PLAY / PAUSE)
x
(STOP)
.
/
>
(SKIP)
- TUNE + (Op radiostations afstemmen)
c
Sensor van de afstandsbediening
d
Informatievenster
e
PORTABLE IN
f
Usb-poort
g
Volumeregeling
1
2
3 4 5 6 7
HB985-DB.BDEUPPK_DUT.indd 14HB985-DB.BDEUPPK_DUT.indd 14 2010-05-14 2:58:012010-05-14 2:58:01

15Voorbereiding
2
Voorbereiding
a
Netvoedingskabel
Bevestig deze kabel in een stopcontact.
b
Luidsprekeraansluitingen
c
Koelventilator
d
Antenneaansluiting
e
VIDEO OUT
f
AUX (L/R) INPUT
g
COMPONENT VIDEO (Y P
B
P
R
)
uitgang (PROGRESSIVE SCAN)
h
Optische aansluiting 1(TV) / 2
i
iPod (24 pin)
Aansluiten op de meegeleverde iPod
houder.
j
HDMI OUT (type A, versie 1.3)
Bestemd voor aansluiting op een tv met
HDMI-ingangen.
k
LAN-poort
Achterpaneel
1 2 3 4 5
6 7 8 9 10 11
HB985-DB.BDEUPPK_DUT.indd 15HB985-DB.BDEUPPK_DUT.indd 15 2010-05-14 2:58:012010-05-14 2:58:01

16 Installeren
Installeren
3
Luidsprekers
monteren
Luidsprekers installeren
BCS-707
De luidsprekers voorbereiden
1. Bevestig antislipkussentjes op de onderkant
van de luidsprekerconsoles, de subwoofer
en de middenluidspreker.
Voor luidsprekerconsoles:
Zet vier middelgrote antislipkussentjes
met het meegeleverde hechtmiddel
op de onderkant (de bodem) van de
luidsprekerconsoles vast.
middle non-skid pads
middelgrote antislipkussentjes
Voor de subwoofer:
Zet vier grote antislipkussentjes met
het meegeleverde hechtmiddel op de
onderkant van de subwoofer vast.
large non-skid pads
grote antislipkussentjes
Voor de middenluidspreker:
Zet vier kleine antislipkussentjes op de
onderkant van de middenluidspreker vast.
small non-skid pads
kleine
antislipkussentjes
2. Bevestig de luidsprekerconsoles met
de meegeleverde schroeven op de
draagstangen.
Plaats elke draagstang en console recht op
elkaar en ze zet vervolgens op de hieronder
aangegeven punten met de meegeleverde
schroe es vast. Let erop dat de luidsprekers
in de richting van de gebruikelijke
luisterpositie moeten wijzen.
Rear
Front
Achterzijde
Voorzijde
3
Installeren
HB985-DB.BDEUPPK_DUT.indd 16HB985-DB.BDEUPPK_DUT.indd 16 2010-05-14 2:58:012010-05-14 2:58:01

17Installeren
3
Installeren
3. Sluit de luidsprekerkabels op de speler aan.
Sluit de witte kabel met de grijze lijn op de
(+) zijde aan en de andere kabel op de (-)
zijde. Druk vervolgens op het kunststof lipje
van elk aansluitpunt om dit te openen en
de kabel met de speler te verbinden. Steek
het kabeluiteinde erin en laat het lipje los.
Kleur (+)
Zwart (-)
VOORZICHTIG
• Sluit op de speler geen andere luidsprekers
aan dan de luidsprekers die bij dit systeem zijn
geleverd.
• Sluit de meegeleverde luidsprekers niet op een
andere versterker aan dan de versterker die
bij dit systeem is meegeleverd. Wanneer u de
luidsprekers op een andere versterker aansluit
riskeert u beschadiging van de luidsprekers en
de versterker evenals brand.
De frontluidsprekers en de surround-
luidspreker vastzetten
Zet de frontluidsprekers en de surround-
luidspreker met de meegeleverde kunststof
houder vast. Schroef twee steunhaken in de
wand achter elke luidspreker. Voer een dik
koord rond de haken en door de kunststof
houder om de luidsprekers te stabiliseren
(controleer of deze constructie het gewicht van
de luidsprekers kan dragen). Controleer nadat
u alles hebt gemonteerd of elke luidspreker
goed vast zit.
thick cord
Plastic catch
Voldoende dik koord
Kunststof houder
VOORZICHTIG
• De kunststof houder is geen montage tting en
de luidsprekers mogen niet met deze houder
rechtstreeks aan de wand worden opgehangen.
Gebruik bij het stabiliseren van de luidsprekers
altijd een koord.
• Pioneer is niet aansprakelijk voor verliezen of
schade als gevolg van onvakkundige montage,
installatie, onvoldoende sterkte van het
montagemateriaal, verkeerd gebruik of van
buiten komend onheil zoals natuurgeweld.
• Bij het plaatsen van dit apparaat moet u ervoor
zorgen dat het stevig vast zit. Bevestig de
apparatuur niet op wandgedeelten waar het
gevaar bestaat dat deze bij een natuurramp
zoals een aardbeving van de wand kan vallen en
personen verwonden.
HB985-DB.BDEUPPK_DUT.indd 17HB985-DB.BDEUPPK_DUT.indd 17 2010-05-14 2:58:022010-05-14 2:58:02

18 Installeren
Installeren
3
Luidsprekers installeren
BCS-303
De luidsprekers voorbereiden
1. Bevestig antislipkussentjes op de onderkant
van elke luidspreker.
Voor front en surround-luidsprekers:
Bevestig vier kleine antislipkussentjes
met het meegeleverde hechtmiddel
op de onderkant (de bodem) van de
luidsprekerconsoles.
samll non-skid pads
kleine antislipkussentjes
Voor de subwoofer:
Zet vier grote antislipkussentjes met
het meegeleverde hechtmiddel op de
onderkant van de subwoofer vast.
large non-skid pads
grote antislipkussentjes
Voor de middenluidspreker:
Zet vier kleine antislipkussentjes op de
onderkant van de middenluidspreker vast.
samll non-skid pads
kleine antislipkussentjes
2. Sluit de luidsprekerkabels op de speler aan.
Sluit de witte kabel met de grijze lijn op de
(+) zijde aan en de andere kabel op de (-)
zijde. Druk vervolgens op het kunststof lipje
van elk aansluitpunt om dit te openen en
de kabel met de speler te verbinden. Steek
het kabeluiteinde erin en laat het lipje los.
Kleur (+)
Zwart (-)
HB985-DB.BDEUPPK_DUT.indd 18HB985-DB.BDEUPPK_DUT.indd 18 2010-05-14 2:58:022010-05-14 2:58:02

19Installeren
3
Installeren
De middenluidspreker
aan de wand bevestigen
De middenluidspreker is voorzien van een
montageopening die u kunt gebruiken om de
luidspreker aan de wand te bevestigen.
Vóór de montage
Denk eraan dat het luidsprekersysteem zwaar is
en dat de schroeven of het bouwmateriaal van
de wand door dit gewicht los kunnen komen
waardoor de luidspreker valt. Controleer altijd
eerst of de wand waarop u de luidsprekers wilt
bevestigen voldoende sterk is om het gewicht
van de luidsprekers te dragen. Monteer de
luidsprekers niet op wanden van triplex,
multiplex of een ander zacht materiaal.
U moet zelf voor de bevestigingsschroeven
zorgen. Gebruik alleen schroeven die voor de
door u gekozen type wand geschikt zijn en
die sterk genoeg zijn om het gewicht van de
luidsprekers te dragen.
VOORZICHTIG
• Als u niet zeker weet met welk wandmateriaal u
te maken hebt en of dit sterk genoeg is, neem
dan contact op met een vakman voor advies.
• Pioneer is niet aansprakelijk voor ongevallen of
schade als gevolg van een verkeerde installatie.
5 mm
10 mm
Mounting screw
(not supplied)
Montageschroef
(niet meegeleverd)
Extra informatie over
het ophangen van
luidsprekers
Plaats de linker en rechter hoofdluidsprekers
op gelijke afstanden van de televisie.
Voorzorgsmaatregelen:
Zorg ervoor dat het blote einde van de
luidsprekerkabel in elkaar gedraaid en
helemaal in het aansluitpunt is gestoken.
Als namelijk een van de blote einden van
de luidsprekerkabel contact maken met de
achterkant van de luidspreker bestaat de kans
dat de stroom als veiligheidsmaatregel wordt
uitgeschakeld.
De front-, midden- en surround-luidsprekers
die u bij dit systeem hebt ontvangen, zijn
magnetisch afgeschermd. Afhankelijk van de
montagesituatie is het echter mogelijk dat er
kleurvervorming op het beeldscherm optreedt
als een of meer luidsprekers te dicht bij de
televisie worden gemonteerd.
Schakel als u dit constateert de stroom van
de televisie uit en na 15 tot 30 minuten
weer in. Als u het probleem hierdoor niet
kunt oplossen, moet de u de luidsprekers op
grotere afstand van de televisie hangen. De
subwoofer is niet magnetisch afgeschermd en
mag dus niet dicht bij een televisie of monitor
worden geplaatst. Media die voor magnetisme
gevoelig zijn (zoals oppy disks en band- of
videocassettes) mogen niet in de buurt van
een subwoofer worden bewaard.
Bevestig de front/surround-luidsprekers en de
subwoofer niet aan de wand of het plafond.
Door hun gewicht kunnen ze vallen en
verwondingen veroorzaken.
5 mm tot 7 mm
HB985-DB.BDEUPPK_DUT.indd 19HB985-DB.BDEUPPK_DUT.indd 19 2010-05-14 2:58:022010-05-14 2:58:02

20 Installeren
Installeren
3
Het systeem opstellen
De volgende afbeelding toont een voorbeeld
van de opstelling van een systeem. U moet er
rekening mee houden dat de afbeeldingen in
deze handleiding omwille van de duidelijkheid
kunnen afwijken van de werkelijke uitvoering
van de apparaten. U bereikt de best mogelijke
surround-sound door alle luidsprekers – met
uitzondering van de subwoofer – op dezelfde
afstand van uw luisterpositie (
A
) te plaatsen.
A
B
D
E
F
A
A
A
A
A
G
C
A
Frontluidspreker linkerzijde (L)
B
Frontluidspreker rechterzijde (R):
Plaats de frontluidsprekers links en rechts van
de tv of de monitor en op dezelfde lijn als het
beeldscherm.
C
Middenluidspreker:
Plaats de middenluidspreker boven of onder
het beeldscherm van de tv of de monitor.
D
Surround-luidsprekers linkerzijde
E
Surround-luidsprekers rechterzijde:
Plaats deze luidsprekers enigszins naar binnen
gericht achter uw luisterpositie.
F
Subwoofer:
De plaats van de subwoofer luistert niet
zo nauw omdat lage tonen nauwelijks
richtinggevoelig zijn. Het is echter beter om de
subwoofer in de buurt van de frontluidsprekers
te plaatsen. Plaats de subwoofer min of
meer naar het midden van de kamer gericht
om geluidsre ecties tegen de wanden te
voorkomen.
G
Speler
VOORZICHTIG
• Zorg ervoor dat kinderen niet hun vingers
of voorwerpen in het luidsprekerkanaal
steken. *Luidsprekerkanaal: Resonantieruimte
in de luidsprekerkast die voor een rijke
lagetonenweergave zorgt.
• Plaats de middenluidspreker buiten bereik van
kinderen.
Wanneer een luidspreker valt, kan hij worden
beschadigd en lichamelijk letsel en/of materiële
schade veroorzaken.
• De luidsprekerboxen bevatten magnetische
onderdelen waardoor de kleurenweergave van
uw tv-scherm of pc-monitorscherm kan worden
vervormd. Plaats de luidsprekerboxen op grotere
afstand van de tv of de pc-monitor.
HB985-DB.BDEUPPK_DUT.indd 20HB985-DB.BDEUPPK_DUT.indd 20 2010-05-14 2:58:032010-05-14 2:58:03

21Installeren
3
Installeren
Aansluitingen op uw
tv
Maak een van de volgende aansluitingen,
afhankelijk van de mogelijkheden van uw
bestaande apparatuur.
• HDMI-aansluiting (pagina 21-22)
• Component Video-aansluiting (pagina 22)
• Videoverbinding (pagina 23)
LET OP
• Afhankelijk van de mogelijkheden van de
tv en andere apparaten kunt u de speler op
verschillende manieren aansluiten. Kies één
van de aansluitmogelijkheden die in deze
handleiding beschreven zijn.
• Zie de handleiding van uw tv, stereo-installatie
of andere apparaten voor de beste manier van
aansluiten.
• Sluit de speler rechtstreeks op de tv aan.
Stem de tv af op het juiste video-ingangskanaal.
• Sluit de speler niet aan via een videorecorder.
Het kopieerbeveiligingssysteem kan het beeld
vervormen.
HDMI-aansluiting
Indien u een HDMI TV of monitor heeft, kunt u
deze aansluiten op de speler met behulp van
een HDMI kabel (Type A, versie 1.3). Sluit het
HDMI OUT-aansluitpunt van de speler aan op
het HDMI IN-aansluitpunt van een voor HDMI
geschikte tv of monitor.
HDMI-aansluiting
Player
TV
TV
Speler
Stel de TV bron in op HDMI (zie de handleiding
van de TV).
HB985-DB.BDEUPPK_DUT.indd 21HB985-DB.BDEUPPK_DUT.indd 21 2010-05-14 2:58:032010-05-14 2:58:03

22 Installeren
Installeren
3
LET OP
• Er kunnen foutmeldingen ontstaan als u de
resolutie wijzigt terwijl de aansluiting reeds
gemaakt is. Om het probleem op te lossen,
schakelt u de speler uit en weer in.
• Indien de HDMI aansluiting met HDCP niet
geveri eerd is, wordt het TV scherm gewijzigd in
een zwart scherm. In dat geval controleert u de
HDMI-aansluiting, of koppelt u de HDMI-kabel
los.
• Als ruis (“sneeuw”) of strepen op het
beeldscherm verschijnen, controleer dan de
lengte van de HDMI-kabel (de lengte is meestal
beper
kt tot 4,5 m en u moet een high-speed
HDMI-kabel (versie 1.3) gebruiken).
• Als een aangesloten HDMI-apparaat het audio-
uitgangssignaal van de speler niet accepteert,
is het mogelijk dat het geluid van het HDMI-
apparaat is vervormd of niet wordt uitgevoerd.
• Als u een HDMI-verbinding gebruikt, kunt u
de resolutie van het HDMI-uitgangssignaal
aanpassen. (Zie “Resolutie instellen” op pagina
23.)
• Selecteer het type video-uitvoer van de HDMI-
uitgang met gebruikmaking van de optie
[HDMI Kleur instelling.] in het [Instellen]-menu
(zie pagina 34).
• Indien u een HDMI- of DVI-compatibel apparaat
aansluit, controleert u het volgende:
- Schakel het HDMI/DVI toestel en deze speler
uit. Schakel vervolgens het HDMI/DVI toestel
in en wacht ongeveer 30 seconden, schakel
vervolgens deze speler in.
- De video ingang van het aangesloten toestel is
correct ingesteld voor deze speler.
- Het aangesloten apparaat is compatibel met
720x576p (480p), 1280x720p, 1920x1080i of
1920x1080p video-invoer.
• Niet alle HDCP compatibele HDMI of DVI
apparaten werken met deze speler.
- Het beeld zal niet correct getoond worden bij
een niet-HDCP-apparaat.
- Deze speler speelt niet af en het TV scherm
wordt gewijzigd een zwart scherm.
Component Video-aansluiting
Verbind de COMPONENT VIDEO OUT
stekkerbussen van de speler met Y Pb Pr-kabels
met de overeenkomstige stekkerbussen op de
tv. U kunt het geluid via de luidspreker van het
systeem weergeven.
Componentaansluiting
Player
TV
Green
Blue
Red
PR
PB
Y
COMPONENT
VIDEO
INPUT
OUTPUT
L
AUX
R
VIDEO
Speler
Groen
Blauw
Rood
TV
LET OP
Indien u gebruik maakt van een COMPONENT
VIDEO UIT-aansluiting, kunt u de resolutie voor
de uitvoer wijzigen. (Zie “Resolutie instellen” op
bladzijde 23.)
HB985-DB.BDEUPPK_DUT.indd 22HB985-DB.BDEUPPK_DUT.indd 22 2010-05-14 2:58:042010-05-14 2:58:04

23Installeren
3
Installeren
Videoverbinding
Sluit de VIDEO UIT stekkerbus van de speler
aan op de video in ingang van de tv. Gebruik
hiervoor een videokabel. U kunt het geluid via
de luidspreker van het systeem weergeven.
Videoverbinding
TV
Yellow
PR
PB
Y
COMPONENT
VIDEO
INPUT
OUTPUT
L
AUX
R
VIDEO
Speler
TV
Geel
Resolutie instellen
De speler voorziet in verschillende
uitvoerresoluties voor HDMI en COMPONENT
VIDEO uitgangen. U kunt de resolutie
aanpassen in het [Instellen]-menu.
1. Druk op HOME MENU (
).
2. Gebruik
I
/
i/U
/
u
om [Instellen] te
selecteren en druk op ENTER (
). Het
installatiemenu verschijnt.
3. Selecteer met
U
/
u
de optie [SCHERM] en
druk vervolgens op
i
om naar het tweede
niveau te gaan.
4. Selecteer met
U
/
u
de optie [Resolutie] en
druk vervolgens op ENTER (
) of
i
om
naar het derde niveau te gaan.
5. Selecteer met
U
/
u
de gewenste instelling
en druk vervolgens op ENTER ( ) om uw
keuze te bevestigen.
LET OP
• Als de tv de door u op de speler ingestelde
resolutie niet accepteert, kunt u de resolutie als
volgt op 576p (480p) instellen:
1. Druk op
Z
om de disklade te openen.
2 Druk minstens vijf seconden op
x
.
• De resolutie van de video-uitvoer is van
verschillende factoren afhankelijk. Zie “Resolutie
video-uitvoersignaal” op pagina 70.
HB985-DB.BDEUPPK_DUT.indd 23HB985-DB.BDEUPPK_DUT.indd 23 2010-05-14 2:58:042010-05-14 2:58:04

24 Installeren
Installeren
3
Antenneaansluiting
Sluit voor de ontvangst van radio-uitzendingen
de meegeleverde antenne aan.
Antenneaansluiting
Player
Speler
LET OP
Nadat u de fm-draadantenne hebt aangesloten
kunt u deze het best zoveel mogelijk horizontaal
bevestigen.Trek de fm-antenne over de volle
lengte uit.
Op een extern
apparaat aansluiten
AUX-aansluiting
U kunt het geluid van een component
weergeven met gebruikmaking van de
analoge audio-uitgangen van de luidsprekers
van het systeem.
Sluit de analoge audio-uitgangen van de
component aan op de AUX L/R (INGANG) van
het hoofdapparaat. Selecteer vervolgens de
optie [AUX] op INPUT/TUNER,
I
/
i
en druk
vervolgens op ENTER (
).
AUX-aansluiting
Player
To the audio output jacks
of your component
(TV, VCR, etc.)
Red
White
PR
PB
Y
COMPONENT
VIDEO
INPUT
L
AUX
R
VIDEO
Rood
Wit
Speler
Naar de audio-uitgangen
van de component
(tv, videorecorder enz.)
HB985-DB.BDEUPPK_DUT.indd 24HB985-DB.BDEUPPK_DUT.indd 24 2010-05-14 2:58:052010-05-14 2:58:05

25Installeren
3
Installeren
PORTABLE IN-aansluiting
U kunt ook het geluid van uw draagbare audio-
apparaten via de luidsprekers van het systeem
weergeven.
Sluit de hoofdtelefoon- of lijnuitgang van de
draagbare audiospeler aan op de PORT IN-
aansluiting van het hoofdapparaat. Selecteer
vervolgens de optie [PORTABLE] door op
INPUT/TUNER,
I
/
i
en vervolgens op ENTER
(
) te drukken.
PORTABLE IN-aansluiting
twZGSGUUU
MP3-SPELER E.D.
OPTICAL IN 1/2-aansluiting
U kunt het geluid van componenten ook
via de digitale optische aansluiting van de
luidsprekers van het systeem weergeven.
Sluit de optische digitale uitgang van de
betre ende component aan op de OPTICAL
IN 1/2-aansluitpunten van het hoofdapparaat.
Selecteer vervolgens de optie [OPTICAL 1/2]
door op INPUT/TUNER,
I
/
i
en vervolgens op
ENTER (
) te drukken. U kunt ook op OPTICAL
drukken om deze aansluiting rechtstreeks te
selecteren.
Optische verbinding
To the digital
optical output jack
of your component
Naar de digitale
optische uitgang van
de component
HB985-DB.BDEUPPK_DUT.indd 25HB985-DB.BDEUPPK_DUT.indd 25 2010-05-14 2:58:052010-05-14 2:58:05

26 Installeren
Installeren
3
Bluetooth® aansluiting
Informatie over Bluetooth
Bluetooth® is een draadloze
communicatietechnologie voor
korteafstandsverbindingen.
Het bereik gaat tot 10 m. (het geluid kan
worden onderbroken wanneer de verbinding
wordt gestoord door andere elektronische
velden of wanneer u een Bluetooth apparaat in
een andere kamer gebruikt.)
Voor het aansluiten van afzonderlijke apparaten
door middel van draadloze Bluetooth
technologie zijn geen kosten verschuldigd.
Een mobiele telefoon met draadloze Bluetooth
technologie kan via de Cascade worden
gebruikt als de verbinding via draadloze
Bluetooth technologie wordt opgebouwd.
Beschikbare apparaten: Mobiele telefoons,
mp3-spelers, laptops, pda’s (deze apparaten
ondersteunen stereo headsets.)
Bluetooth pro elen
Om Bluetooth draadloze technologie te
gebruiken moeten apparaten bepaalde
pro elen kunnen interpreteren.
Deze speler is compatibel met het volgende
pro el.
A2DP (Advanced Audio Distribution Pro le)
Naar muziek van een Bluetooth
apparaat luisteren
Uw apparaat en een Bluetooth apparaat
koppelen
Zorg ervoor dat voordat u de
koppelingsprocedure begint de Bluetooth
functie op uw Bluetooth apparaat is
ingeschakeld. Zie de handleiding van uw
Bluetooth apparaat. Nadat u de koppeling hebt
opgebouwd, hoeft u deze niet opnieuw uit te
voeren.
1. Selecteer de Bluetooth functie met INPUT/
TUNER of BT AUDIO.
In het a eesvenster verschijnt “BT AUDIO”
en vervolgens “BT READY”.
2. Gebruik het Bluetooth apparaat om de
koppeling uit te voeren. Wanneer u met het
Bluetooth apparaat naar deze speler zoekt,
kan – afhankelijk van het Bluetooth apparaat
- een lijst van gevonden apparaten in het
a eesvenster van het Bluetooth apparaat
verschijnen. Uw speler wordt als
“PIONEER AUDIO” aangeduid.
3. Voer uw pincode in.
Pincode : 0000
4. Wanneer deze speler met uw Bluetooth
apparaat is gekoppeld, licht het Bluetooth
statuslampje van de speler op en verschijnt
in het a eesvenster de tekst “BT SINK”.
LET OP
Sommige apparaten gebruiken een afwijkende
manier van koppelen, afhankelijk van het type
Bluetooth apparaat.
5. Naar muziek luisteren.
Zie de handleiding van uw Bluetooth
apparaat voor het afspelen van op uw
Bluetooth apparaat opgeslagen muziek.
LET OP
• Als u de functie van de speler wijzigt, wordt
de Bluetooth functie onderbroken en moet u
opnieuw een koppeling opbouwen.
• AVRCP is in deze modus niet beschikbaar.
HB985-DB.BDEUPPK_DUT.indd 26HB985-DB.BDEUPPK_DUT.indd 26 2010-05-14 2:58:062010-05-14 2:58:06

27Installeren
3
Installeren
Informatie van een aangesloten Bluetooth
apparaat controleren
Deze functie wordt na de koppeling gebruikt.
U kunt de Bluetooth informatie controleren.
Druk een paar keer op DISPLAY en houd deze
knop even ingedrukt.
De Bluetooth informatie wordt als volgt
gewijzigd.
Local Bluetooth Device Address
t
Device
Name
t
None
t
...
LET OP
• Deze speler ondersteunt geen mono
headsetpro el (handsfree pro el).
• Het geluid kan worden onderbroken als de
verbinding door andere elektronische apparaten
wordt gestoord.
• U kunt met deze speler geen Bluetooth
apparaten bedienen.
• Het koppelen is beperkt tot één Bluetooth
apparaat en het koppelen van meerdere
Bluetooth apparaten wordt niet ondersteund.
• Hoewel de afstand tussen uw Bluetooth apparaat
en deze speler maximaal 10 meter is, kan de
verbinding door obstakels tussen de speler en
het Bluetooth apparaat worden gestoord.
• Afhankelijk van het type apparaat is het mogelijk
dat u de Bluetooth functie niet kunt gebruiken.
• Als de verbinding met het Bluetooth apparaat
wordt onderbroken, verschijnt in het
a eesvenster de tekst “BT READY”.
• De verbinding kan ook worden gestoord
doordat andere apparaten in de omgeving -
zoals medische apparatuur, een magnetron
oven of een draadloos LAN netwerk – dezelfde
frequentie als het Bluetooth apparaat gebruiken.
• De verbinding kan ook worden onderbroken
doordat iemand tussen de speler en het
Bluetooth apparaat gaat staan.
• De geluidskwaliteit wordt minder naarmate
de afstand tussen de speler en het Bluetooth
apparaat groter is en de verbinding kan ten
slotte wegvallen doordat de afstand tussen de
speler en het Bluetooth apparaat te groot wordt.
• De verbinding met het Bluetooth apparaat valt
weg als u de speler uitschakelt of als de afstand
tussen de speler en het Bluetooth apparaat
groter is dan 10 meter.
HB985-DB.BDEUPPK_DUT.indd 27HB985-DB.BDEUPPK_DUT.indd 27 2010-05-14 2:58:062010-05-14 2:58:06

28 Installeren
Installeren
3
Aansluiten op uw
thuisnetwerk
U kunt deze speler via de LAN-poort achterop
de speler op een lokaal netwerk (LAN)
aansluiten.
Zie voor nadere aanwijzingen de documentatie
van uw netwerkapparaat.
Sluit de LAN-poort van de speler met een in
de handel verkrijgbare LAN- of Ethernetkabel
(CAT5 of beter met RJ45-connector) aan op
de daarmee overeenkomende poort van
uw modem of router. In de onderstaande
voorbeeldcon guratie voor bedrade
aansluitingen heeft de speler toegang tot
bestanden op alle aangesloten pc’s.
Netwerkverbinding
Broadband
Service
Router
WAN
LAN 1
LAN 2
LAN 3
Player
PC
PC
Router
Breedbanddienst
Speler
LET OP
• Houd een LAN-kabel bij het aansluiten en
ontkoppelen altijd bij de stekker vast. Trek bij
het ontkoppelen niet aan de LAN-kabel maar
ontkoppel de kabel terwijl u het blokkeernokje
indrukt.
• Sluit geen modulaire telefoonkabel op een LAN-
poort aan.
• Omdat er verschillende aansluitingscon guraties
mogelijk zijn, moet u de speci caties van uw
telefoonverbinding of internetleverancier
opvolgen.
• Als u toegang wilt krijgen tot bestanden op
pc’s of DLNA-servers moet de speler daarmee
verbinding kunnen maken via een router binnen
hetzelfde LAN (Local Area Network).
HB985-DB.BDEUPPK_DUT.indd 28HB985-DB.BDEUPPK_DUT.indd 28 2010-05-14 2:58:062010-05-14 2:58:06

29Installeren
3
Installeren
Een netwerk installeren
Voordat u het bedrade netwerk installeert,
moet u uw thuisnetwerk op een breedband-
internetverbinding aansluiten.
Als er een DHCP-server via een kabelverbinding
op het LAN-netwerk is aangesloten, krijgt deze
speler automatisch een IP-adres toegewezen.
Bij sommige thuisnetwerken is het nodig de
netwerkinstelling van de speler aan te passen
nadat de fysieke verbinding is opgebouwd. Pas
de [NETWERK]-instelling als volgt aan.
1. Selecteer de optie [Verbindingsinstelling] in
het [Instellen]-menu en druk vervolgens op
ENTER (
).
2. Gebruik
U
/
u
/
I
/
i
om de IP-modus tussen
[Dynamisch] en [Statisch] te selecteren.
Meestal kunt u het best [Dynamisch]
selecteren om automatisch een IP-adres toe
te wijzen.
LET OP
Als er een DHCP-server in het netwerk aanwezig
is en u wilt het IP-adres met de hand instellen,
selecteer dan [Statisch] en stel vervolgens de
opties [IP Adres], [Subnet Mask], [Gateway] en
[DNS Server] met behulp van
U
/
u
/
I
/
i
en de
cijfertoetsen in.Als u bij het invoeren van een
getal een fout maakt, druk dan op CLEAR om het
gemarkeerde gedeelte te wissen.
3. Selecteer [OK] en druk op ENTER ( ) om de
netwerkinstellingen toe te passen.
4. Vervolgens vraagt de speler u de
netwerkverbinding te testen. Selecteer
[OK] en druk op ENTER ( ) om de
netwerkverbinding te voltooien.
5. Als u bij de bovenstaande stap 4 de optie
[Test] selecteert en op ENTER ( ) drukt,
wordt de verbindingsstatus van het netwerk
op het scherm weergegeven.
U kunt het netwerk ook testen met behulp
van de optie [Verbindingsstatus] in het
[Instellen]-menu.
HB985-DB.BDEUPPK_DUT.indd 29HB985-DB.BDEUPPK_DUT.indd 29 2010-05-14 2:58:062010-05-14 2:58:06

30 Installeren
Installeren
3
Belangrijke informatie over
netwerkverbindingen:
• Problemen bij het opbouwen van een
netwerkverbinding kunt u vaak oplossen
door de router of de modem te resetten.
Nadat u de speler op het thuisnetwerk hebt
aangesloten, schakelt u de stroom even uit
of maakt u de stroomkabel van de router
van het thuisnetwerk of de kabelmodem
los. Vervolgens schakelt u de stroom weer
in en/of sluit u de stroomkabel weer aan.
• Uw internetleverancier (ISP) kan
contractueel bepalen hoeveel voor
internet geschikte apparaten u op één
internetaansluiting mag aansluiten. Neem
voor meer informatie contact op met uw
internetleverancier.
• LG Electronics is niet verantwoordelijk
voor storingen in de speler en/of
de internetverbinding ten gevolge
van communicatiefouten/storingen
die verband houden met uw
breedbandinternetaansluiting of andere
aangesloten apparatuur.
• De functies van BD-ROM-disks die via een
internetverbinding beschikbaar zijn, worden
niet door ons ontwikkeld of geleverd en
wij zijn dan ook niet verantwoordelijk voor
de functionaliteit of leverbaarheid ervan.
Bepaalde aan disks gerelateerde inhoud
die via een internetaansluiting beschikbaar
kan komen, is mogelijk niet voor met deze
speler geschikt. Als u vragen hebt over
dergelijk materiaal, neem dan contact op
met de producent van de disk.
• Bepaald internetmateriaal kan een
internetverbinding met een grotere
bandbreedte vereisen.
• Zelfs als de speler op de juiste wijze is
aangesloten en gecon gureerd, is het
mogelijk dat bepaald internetmateriaal
niet op de juiste wijze werkt door
internetopstoppingen, de kwaliteit of de
bandbreedte van uw internetverbinding
of problemen bij de leverancier van het
materiaal.
• Het is mogelijk dat een aantal functies van
de internetverbinding niet beschikbaar
is wegens bepaalde beperkingen die
door de leverancier van uw breedband-
internetverbinding (ISP) zijn ingesteld.
• Alle kosten, inclusief de kosten van
telefoonverbindingen die door uw
internetleverancier aan u in rekening
worden gebracht, komen voor uw rekening.
• Voor een kabelaansluiting op deze speler
is een 10 Base-T of 100 Base-TX LAN-poort
nodig. Als uw internetleverancier een
dergelijke aansluiting niet toestaat, kunt u
de speler niet aansluiten.
• Voor het gebruik van een xDSL-service
moet u een router aansluiten.
• Voor het gebruik van DSL-diensten is
een DSL-modem vereist en voor het
gebruik van kabelmodemdiensten is
een kabelmodem vereist. Afhankelijk
van de toegangsmethode van, en de
abonnementsovereenkomst met, uw
internetleverancier is het mogelijk dat u
de internetverbindingsfunctie van deze
speler niet kunt gebruiken of dat uw
internetleverancier beperkingen heeft
gesteld aan het aantal apparaten dat
u gelijktijdig kunt aansluiten. (Als uw
internetleverancier de met u gesloten
abonnementsovereenkomst tot één
apparaat heeft beperkt, is het mogelijk
dat u deze speler niet op het internet kunt
aansluiten als u al een pc op het internet
hebt aangesloten.)
• Mogelijk is het gebruik van een router niet
of slechts onder beperkende voorwaarden
toegestaan, afhankelijk van het beleid van
uw internetleverancier en de door deze
bedongen beperkingen. Neem voor meer
informatie rechtstreeks contact op met uw
internetleverancier.
• Schakel alle niet gebruikte
netwerkapparaten in uw thuisnetwerk
(LAN) uit. Sommige apparaten kunnen
netwerkverkeer veroorzaken.
HB985-DB.BDEUPPK_DUT.indd 30HB985-DB.BDEUPPK_DUT.indd 30 2010-05-14 2:58:062010-05-14 2:58:06

31Installeren
3
Installeren
Usb-apparaat
aansluiten
De speler kan op een usb-geheugenstick
opgeslagen lms, muziek en fotobestanden
afspelen.
1. Plaats de usb-geheugenstick in de usb-
poort en zet hem goed vast.
Usb-aansluiting
2. Druk op HOME MENU.
Selecteer met
U
/
u
/
I
/
i
, de optie [Film],
[Foto] of [Muziek] en druk op ENTER ( ).
3. Selecteer een bestand met
U
/
u
/
I
/
i
, en
druk op PLAY of ENTER (
) om het bestand
af te spelen.
De vrij beschikbare ruimte op de
usb-geheugenstick kunt u op het
beeldscherm controleren.
4. Selecteer een andere modus. Maak de usb-
geheugenstick vervolgens voorzichtig los.
LET OP
• Voor het openen van bestanden ( lm, foto
en muziek) ondersteunt deze speler usb-
ashgeheugens en volgens FAT 16, FAT 32 en
NTFS geformatteerde harde disks (HDD). Voor
het opnemen van BD-LIVE en audio-cd’s worden
alleen volgens FAT 16 en FAT 32 geformatteerde
media ondersteund. Gebruik het usb-
ashgeheugen of een externe HDD die volgens
FAT16 of FAT32 zijn geformatteerd wanneer u
BD-LIVE of audio-cd’s wilt opnemen.
• U kunt een usb-apparaat gebruiken voor
plaatselijke opslag van BD-Live disks via het
internet.
• Dit apparaat ondersteunt totaal vier partities van
een usb-apparaat.
• Ontkoppel nooit een usb-apparaat als de speler
ingeschakeld is (afspelen, kopiëren e.d.).
• Usb-apparaten die na aansluiting op een
computer de installatie van extra programma’s
vereisen, worden niet ondersteund.
• Usb-apparaat: Usb-apparaat dat USB 1,1 en USB
2,0 ondersteunt.
• Film-, muziek- en fotobestanden kunnen worden
afgespeeld. Voor informatie over gebruik van elk
bestand kijkt u op de relevante bladzijdes.
• We raden het regelmatig maken van back-ups
aan om gegevensverlies te voorkomen.
• Als u een usb-verlengkabel, een usb-hub of een
usb-multireader gebruikt, is het mogelijk dat de
usb-geheugenstick niet wordt herkend.
• Sommige usb-apparaten zijn niet geschikt voor
dit apparaat.
• Digitale camera’s en mobiele telefoons worden
niet ondersteund.
• De usb-poort van deze speler kan niet op een
pc worden aangesloten.
HB985-DB.BDEUPPK_DUT.indd 31HB985-DB.BDEUPPK_DUT.indd 31 2010-05-14 2:58:062010-05-14 2:58:06

32 Installeren
Installeren
3
Instellingen
De setup-instellimgen
aanpassen
U kunt de instellingen van de speler in het
[Instellen]-menu aanpassen.
1. Druk op HOME MENU (
).
2. Gebruik
I
/
i/U
/
u
om [Instellen] te
selecteren en druk op ENTER ( ). Het
installatiemenu verschijnt.
3. Selecteer de eerste setup-optie met
U
/
u
en druk op
i
om naar het tweede niveau te
gaan.
4. Gebruik
U
/
u
om een tweede setup-optie te
selecteren en druk op ENTER (
) om naar
het derde niveau te gaan.
5. Selecteer de gewenste instelling met
U
/
u
en druk op
i
of ENTER ( ) om uw keuze te
bevestigen.
HB985-DB.BDEUPPK_DUT.indd 32HB985-DB.BDEUPPK_DUT.indd 32 2010-05-14 2:58:062010-05-14 2:58:06

33Installeren
3
Installeren
[SCHERM]-menu
Beeldverhouding
Selecteer de hoogte-breedteverhouding
(aspect ratio) die met uw tv overeenstemt.
[4:3 Letter Box]
Selecteer deze optie wanneer een
standaard 4:3-tv is aangesloten. Shows,
theatervoorstellingen e.d. worden met
zwarte balken aan de boven- en onderkant
van het beeld weergegeven.
[4:3 Pan Scan]
Selecteer deze optie wanneer een
standaard 4:3-tv is aangesloten. Het tv-
beeld wordt beeldvullend weergegeven. Bij
deze optie wordt het tv-beeld echter links
en rechts aangesneden.
[16:9 Origineel]
Selecteer deze optie wanneer een
standaard 4:3-tv is aangesloten. Het tv-
beeld wordt beeldvullend weergegeven. Bij
deze optie wordt het tv-beeld echter links
en rechts aangesneden.
[16:9 Volledig]
Selecteer wanneer een 16:9 breedbeeld-
tvaangesloten is. Het 4:3 beeld wordt
weergegeven met een oorspronkelijke 4:3
hoogte/breedte-verhouding, met zwarte
balken aan de linker en rechter kant.
LET OP
De opties [4:3 Letter Box] en [4:3 Pan Scan] zijn niet
beschikbaar wanneer u een hogere resolutie dan
720p kiest.
Resolutie
Hiermee stelt u de uitgangsresolutie van het
HDMI- en Component-Video-signaal in.
Zie pagina 23 en 70 voor meer informatie over
de inst
elling van de resolutie.
[Auto]
Indien uw HDMI ingang is aangesloten
op de TV voor het verstrekken van
scherminformatie (EDID), wordt
automatisch de resolutie die het best bij
de aangesloten TV past, geselecteerd.
Indien de COMPONENT VIDEO UIT alleen
aangesloten is, wijzigt dit de standaard
resolutie naar 1080i als standaard.
[1080p]
Stuurt progressieve video van 1080 lijnen
uit.
[1080i]
Stuurt geïnterlinieerde video van 1080
lijnen uit.
[720p]
Stuurt progressieve video van 720 lijnen uit.
[576p (480p)]
Stuurt progressieve video van 576 (480)
lijnen uit.
[576i (480i)]
Stuurt geïnterlinieerde video van 576 (480)
lijnen uit.
HB985-DB.BDEUPPK_DUT.indd 33HB985-DB.BDEUPPK_DUT.indd 33 2010-05-14 2:58:072010-05-14 2:58:07

34 Installeren
Installeren
3
1080p fullHD beeld
Indien de resolutie ingesteld is op 1080p,
selecteert u [24 Hz] voor een vloeiende
weergave van lmmateriaal (1080p/24 Hz) op
een HDMI uitgerust scherm dat compatibel is
met 1080p/24 Hz invoer.
LET OP
• Wanneer u [24 Hz] selecteert, moet u rekening
houden met de mogelijkheid van enige
beeldstoring wanneer de video overschakelt
tussen video- en lmmateriaal. Als dat het geval
is, selecteert u [50 Hz].
• Zelfs indien het [1080p fullHD beeld] is ingesteld
op [24 Hz] zal de werkelijke beeldfrequentie van
de video uitvoer 50 Hz bedragen volgens het
videobronformaat, indien uw TV niet compatibel
is met 1080p/24 Hz.
HDMI Kleur instelling.
Selecteer het type uitvoer van de HDMI UIT
stekker. Voor deze instelling kijkt u in de
handleidingen van uw weergavetoestel.
[YCbCr]
Selecteer deze optie bij het aansluiten op
een HDMI tv of monitor.
[RGB]
Selecteer deze optie bij het aansluiten op
een DVI (RGB) tv of monitor..
[TAAL]-menu
Schermmenu
Selecteer een taal voor het menu [Instellen] en
de weergave op het scherm.
Disk Menu/Audio disk/
Disk ondertiteling
Selecteer de taal die u voor het audionummer
(geluid op de disk), de ondertiteling en het disk
menu wilt gebruiken.
[Origineel]
Verwijst naar de oorspronkelijke taal die op
de disk is opgenomen.
[Anders]
Druk op ENTER (
) om een andere taal te
selecteren. Gebruik de nummertoetsen
en vervolgens ENTER ( ) om de
overeenkomende 4-cijferige code in te
voeren volgens de taalcodelijst op bladzijde
69.
[Uit] (alleen voor diskondertitels)
Schakelt de ondertiteling uit.
LET OP
Afhankelijk van het type disk is het mogelijk dat de
door u gekozen taalinstelling niet werkt.
HB985-DB.BDEUPPK_DUT.indd 34HB985-DB.BDEUPPK_DUT.indd 34 2010-05-14 2:58:072010-05-14 2:58:07

35Installeren
3
Installeren
[AUDIO]-menu
Luidspreker Set-up
U bereikt de best mogelijke geluidsweergave
met behulp van het scherm voor
luidsprekeropstelling om vervolgens
het geluidsvolume van de aangesloten
luidsprekers en de afstand van de luidsprekers
tot de luisterpositie in te stellen. Maak gebruik
van de test om het geluidsvolume van de
luidsprekers op een gelijk niveau af te stellen.
[Luidspreker]
Hiermee selecteert u een luidspreker die u
wilt afstellen.
[Volume]
Hiermee past u het geluidsvolume van elke
luidspreker afzonderlijk aan.
[Afstand]
Hiermee kunt u de ideale afstand tussen de
luidsprekers afzonderlijk en de luisterpositie
bepalen.
[Teste/ Stop testoon]
De luidsprekers zenden een testtoon uit.
[OK]
Hiermee bevestigt u de instelling.
[Annuleren]
Hiermee maakt u de instelling ongedaan.
HD AV Sync
Soms komt bij digitale tv een vertraging tussen
beeld en geluid voor. Als u dit constateert, kunt
u dit verschijnsel compenseren door voor het
geluid een vertraging in te stellen waardoor het
geluid daadwerkelijk “wacht” op het bijbehorende
beeld. Dit wordt HD AV-synchronisatie genoemd.
Met behulp van
U u
kunt u de mate van
vertraging vergroten en verkleinen die u traploos
kunt instellen tussen 0 en 300 m/sec.
De vertraging is afhankelijk van het digitale
tv-kanaal waarop uw tv is afgestemd.
Het is mogelijk dat u een andere HD AV-
synchronisatie moet instellen wanneer u een
ander kanaal kiest.
DRC (Dynamic Range Control)
Tijdens het afspelen van een disk die in Dolby
Digital of Dolby Digital Plus is gecodeerd, kunt
u het dynamische bereik van het audiosignaal
comprimeren (d.w.z. het verschil tussen de
sterkste en zwakste geluiden verkleinen).
Hierdoor kunt u bijvoorbeeld het geluid
van een lm met een lager geluidsvolume
beluisteren zonder dat het geluid minder
helder wordt. Om dit e ect te bereiken stelt u
DRC in op [aan].
LET OP
U kunt de DRC-instelling alleen wijzigen wanneer
er geen disk in het apparaat aanwezig is of
wanneer het apparaat volledig is gestopt.
HB985-DB.BDEUPPK_DUT.indd 35HB985-DB.BDEUPPK_DUT.indd 35 2010-05-14 2:58:072010-05-14 2:58:07

36 Installeren
Installeren
3
[SLOT]-menu
Om toegang te krijgen tot functies in [SLOT]-
instellingen moet u de beveiligingscode van
vier cijfers invoeren die u hebt gemaakt.
Als u nog geen wachtwoord hebt ingevoerd,
wordt u dit nu gevraagd. Voer een wachtwoord
van vier cijf
ers tweemaal in en druk up ENTER
(
) om een nieuw wachtwoord aan te maken.
Wachtwoord
U kunt een wachtwoord aanmaken of een
bestaand wachtwoord wijzigen.
[Geen]
Voer een wachtwoord van vier cijfers
tweemaal in en druk up ENTER (
) om een
nieuw wachtwoord aan te maken.
[Wijzig]
Voer het huidige wachtwoord in en druk op
ENTER (
). Voer een wachtwoord van vier
cijfers tweemaal in en druk up ENTER (
)
om een nieuw wachtwoord aan te maken.
LET OP
Als u een fout maakt voordat u op ENTER
( )
hebt
gedrukt, druk dan op CLEAR. Voer vervolgens het
juiste wachtwoord in.
Indien u uw wachtwoord bent
vergeten,
U kunt het wachtwoord wissen, indien u dit hebt
vergeten, door de volgende stappen uit te voeren:
1. Verwijder de disk die eventueel in de speler
aanwezig is.
2.
Selecteer de optie [Slot] in het menu [Instellen].
3. Gebruik de cijfertoetsen om “210499” in het
[Slot] menu in te voeren. Het wachtwoord
wordt gewist.
DVD Beoordeling
Blokkeert het afspelen van geclassi ceerde
dvd’s op grond van hun inhoud. (Niet alle disks
zijn geclassi ceerd.)
[Waardering 1-8]
Censuurcijfer één (1) heeft de hoogste
beperkingen en censuurcijfer acht (8) de
laagste.
[Ontgrendelen]
Als u dit selecteert, is het ouderlijk toezicht
(“parental control”) niet actief en wordt de
disk volledig afgespeeld.
BD Beoordeling
Stelt leeftijdsgrens voor het afspelen van een
BD-ROM in. Gebruik de cijferknoppen om een
leeftijdsgrens in te voeren voor het bekijken
van BD-ROM’s.
[255]
De hele BD-ROM kan worden afgespeeld.
[0-254]
Maakt het onmogelijk de BD-ROM waarop
de betre ende leeftijdsgrens is vastgelegd
af te spelen.
LET OP
De [BD Beoordeling] is alleen van toepassing op
BD-disks met Advanced Rating Control.
Regiocode
Voer de code in van de regio waarvan de
normen zijn gebruikt om aan de DVD Video-
disk een waarde toe te kennen die gebaseerd
is op de lijst op pagina 68.
HB985-DB.BDEUPPK_DUT.indd 36HB985-DB.BDEUPPK_DUT.indd 36 2010-05-14 2:58:072010-05-14 2:58:07

37Installeren
3
Installeren
[NETWERK]-menu
Verbindingsinstelling
Als uw thuisnetwerkomgeving klaar is voor
het aansluiten van de speler, moet de speler
worden ingesteld op netwerkcommunicatie.
(Zie “Aansluiten op uw thuisnetwerk” op pagina
28.)
Verbindingsstatus
Als u op deze speler de netwerkstatus
wilt controleren, selecteert u de optie
[Verbindingsstatus] en drukt u op ENTER ( )
om te controleren of een verbinding met het
netwerk en het internet is opgebouwd.
BD-LIVE aansluiting
U kunt de internettoegang beperken indien de
BD-LIVE functies gebruikt worden.
[Toegestaan]
Internettoegang is toegestaan voor alle
BD-LIVE inhoud.
[Deels toegestaan]
Internettoegang is alleen toegestaan voor
BD-LIVE inhoud waarvan de eigenaar
bekend is. Internettoegang en AACS Online
functies zijn verboden voor alle BD-LIVE
inhoud zonder certi caat.
[Verboden]
Internettoegang is verboden voor alle BD-
LIVE inhoud.
[ANDERS]-menu
DivX VOD
INFORMATIE OVER DIVX VIDEO DivX® is een
digitaal videoformaat dat door DivX, Inc. is
ontwikkeld. De speler die in deze handleiding
wordt uitgelegd is een o cieel door DivX
gecerti ceerd apparaat dat geschikt is voor de
weergave van DivX video. Ga naar
www.divx.com voor meer informatie en
softwaretools voor het omzetten van uw
beeldbestanden in DivX.
INFORMATIE OVER VIDEO-ON-DEMAND: Voor
het afspelen van DivX Video-on-Demand
(VOD) materiaal moet dit DivX Certi ed®-
apparaat worden geregistreerd.
Ga voor het genereren van de registratiecode
naar het hoofdstuk over DivX VOD in het
installatiemenu van het apparaat. Ga met deze
code naar de website vod.divx.com om de
registratieprocedure te voltooien en voor meer
informatie over DivX VOD.
[Registreren]
Toont de registratiecode van uw speler.
[Deregistreren]
Deactiveert de speler en toont de
deactivatiecode.
LET OP
Alle met de registratiecode van deze speler van
DivX VOD (Video on Demand) gedownloade
videobestanden kunnen alleen op deze speler
worden afgespeeld.
HB985-DB.BDEUPPK_DUT.indd 37HB985-DB.BDEUPPK_DUT.indd 37 2010-05-14 2:58:072010-05-14 2:58:07

38 Installeren
Installeren
3
Auto Power uitschakelen
De screensaver verschijnt wanneer u het
systeem ongeveer vijf minuten in de stopstand
laat staan. Als u deze optie op [aan] instelt,
schakelt de speler zichzelf uit nadat de
screensaver 25 minuten op het beeldscherm is
weergegeven.
Als u deze optie op [uit] instelt, blijft de
screensaver actief tot u het apparaat bedient.
Initialiseren
Fabrieksinstelling
Hierdoor wordt de speler naar zijn
oorspronkelijke fabrieksinstellingen
teruggezet.
BD opslag wissen
Verwijdert de BD-inhoud van de
aangesloten usb-geheugenstick.
LET OP
Als u de speler met de optie [Fabrieksinstelling]
naar zijn oorspronkelijke fabrieksinstellingen
terugzet, moet u de activering van alle on-line
diensten en de netwerkinstellingen opnieuw
instellen.
Software info
Toont de huidige softwareversie.
HB985-DB.BDEUPPK_DUT.indd 38HB985-DB.BDEUPPK_DUT.indd 38 2010-05-14 2:58:072010-05-14 2:58:07

39Installeren
3
Installeren
Geluidse ecten
U kunt naar eigen wens een bepaalde
geluidsmodus instellen. Druk een paar keer
op SOUND tot de gewenste geluidsmodus
op n het display aan de voorkant van het
apparaat of op het tv-scherm zichtbaar is. De
weergegeven onderwerpen voor de equalizer
kunnen verschillen, afhankelijk van de gekozen
geluidsbronnen en e ecten.
[Pioneer 1]: Geeft u passende geluidsinstelling
met het verbinden van het kleine type
speakers (S-BD303).
[Pioneer 2]: Geeft u passende geluidsinstelling
met het verbinden van het hoge type speakers
(S-BD707T).
[Bypass]: Software met meerkanaals surround-
sound wordt volgens de oorspronkelijke
opname weergegeven.
[Bass Blast]: In deze stand worden de lage
tonen van de linker en rechter frontluidsprekers
en van de subwoofer extra versterkt.
[PL ll Movie]: Geluidskleur die speciaal is
afgestemd op decodering van het signaal van
de Pro Logic III lmmodus. Deze maakt het
mogelijk vijf uitvoerkanalen met een volledige
bandbreedte te creëren met gebruikmaking
van slechts twee kanaalbronnen. Deze stand
is ideaal voor het bekijken van video’s van
overgedubde of oudere lms. Deze stand
is alleen geschikt voor het afspelen van
tweekanaals bronmateriaal.
[PL ll Music]: Geluidskleur die speciaal is
afgestemd op decodering van het signaal
van de Pro Logic II muziekmodus. Creëert
vijf uitvoerkanalen met een volledige
bandbreedte met gebruikmaking van slechts
twee kanaalbronnen. Deze stand is ideaal
voor normale stereobronnen zoals cd’s. Deze
modus is alleen geschikt voor het afspelen van
tweekanaals bronmateriaal.
[Clear Voice]: Met behulp van deze modus
wordt het geluid van de menselijke stem
bijzonder helder weergegeven.
[Game]: Deze stand is speciaal ontwikkeld
voor een dynamische geluidsweergave van
videogames.
[Night]: Als u in de late uren lms wilt kijken
zonder anderen te storen, is dit de ideale stand.
[Mus. ReTouch]: Stand waarmee u de kwaliteit
van het geluid kunt verbeteren bij het
luisteren naar mp3-muziekbestanden en ander
gecomprimeerd geluid. Deze modus is alleen
geschikt voor het afspelen van tweekanaals
bronmateriaal.
[Loudness]: Hierdoor kunt u de weergave van
de hoge en lage tonen verbeteren.
HB985-DB.BDEUPPK_DUT.indd 39HB985-DB.BDEUPPK_DUT.indd 39 2010-05-14 2:58:072010-05-14 2:58:07

40 Bediening
Bediening
4
Afspelen in het
algemeen
Disks afspelen
1. Druk op
Z
OPEN/CLOSE en leg een disk in
de disklade.
2. Druk op
Z
OPEN/CLOSE om de disklade te
sluiten.
Bij de meeste audio-cd’s, bd-rom- en cd-
romdisks start het afspelen automatisch.
3. Druk op
HOME MENU.
4. Selecteer [Film], [Foto] of [Muziek] met
U
/
u
/
I
/
i
, en druk op ENTER ( ).
5. Selecteer met
I
/
i
de optie Disk en druk op
ENTER (
).
Wanneer u een of twee apparaten aansluit,
ontstaat de bovenstaande situatie.
6. Selecteer een bestand met
U
/
u
/
I
/
i
en
druk op
B
PLAY of ENTER (
) om het
bestand af te spelen.
LET OP
• De in deze handleiding beschreven
afspeelfuncties zijn niet voor alle bestanden
en media beschikbaar. Afhankelijk van allerlei
factoren kunnen bepaalde functies beperkt
beschikbaar zijn.
• Afhankelijk van de BD-ROM titels is het mogelijk
dat u een usb-aansluiting nodig hebt om het
bestand af te kunnen spelen.
4
Bediening
HB985-DB.BDEUPPK_DUT.indd 40HB985-DB.BDEUPPK_DUT.indd 40 2010-05-14 2:58:072010-05-14 2:58:07

41Bediening
4
Bediening
Afspelen stoppen
Druk tijdens het afspelen op
x
STOP.
Afspelen pauzeren
Druk tijdens het afspelen op
X
PAUSE/STEP.
Druk op
B
PLAY om het afspelen te hervatten.
Beeld-voor-beeld afspelen
Druk tijdens het afspelen van een lm op
X
PAUSE/STEP.
Druk herhaaldelijk op
X
PAUSE/STEP om frame
voor frame af te spelen.
Vooruit of achteruit scannen
Druk op
m
of
M
om tijdens afspelen snel
naar voren of achteren te spoelen.
U kunt de verschillende afspeelsnelheden
veranderen door herhaaldelijk op
m
of
M
te drukken.
Speelsnelheid vertragen
U kunt verschillende slowmotion-snelheden
kiezen door terwijl het afspelen is gepauzeerd
een paar keer op
M
te drukken.
Naar het volgende of vorige
hoofdstuk, nummer of bestand
overspringen
Druk tijdens het afspelen op
.
of
>
om naar het volgende hoofdstuk/nummer/
bestand of nummer te gaan of om terug
te gaan naar het begin van het lopende
hoofdstuk/nummer/bestand.
Druk tweemaal kort op
.
om terug te gaan
naar het vorige hoofdstuk/nummer/bestand of
nummer.
Diskmenu gebruiken
BD
DVD
AVCHD
Diskmenu weergeven
Nadat u een disk die een menu bevat hebt
geladen, verschijnt meestal eerst het diskmenu.
ls u het diskmenu tijdens het afspelen wilt
weergeven, drukt u op MENU.
Met de
U
/
u
/
I
/
i
knoppen kunt u door de
menuonderwerpen navigeren.
Pop-upmenu weergeven
Sommige BD-ROM-disks bevatten pop-
upmenu’s die tijdens het afspelen verschijnen.
Druk tijdens het afspelen op POPUP/ TOP
MENU en gebruik de
U
/
u
/
I
/
i
knoppen om
door de menuonderwerpen te navigeren.
HB985-DB.BDEUPPK_DUT.indd 41HB985-DB.BDEUPPK_DUT.indd 41 2010-05-14 2:58:082010-05-14 2:58:08

42 Bediening
Bediening
4
Afspelen hervatten
BD
DVD
AVCHD
MOVIE
ACD
MUSIC
Afhankelijk van de disk slaat het apparaat het
punt op waar u op
x
(STOP) hebt gedrukt.
Druk op
B
(PLAY) om het afspelen (vanaf
het opgeslagen punt) te hervatten wanneer
“
Xx
(Afspelen hervatten)” kortstondig op het
scherm verschijnt.
Als u tweemaal op
x
(STOP) drukt of de disk uit
de disklade verwijdert, verschijnt “
x
” (Volledige
stop) op het scherm. Hierbij wordt het
opgeslagen stoppunt door het apparaat gewist.
LET OP
• Het hervattingspunt kan worden gewist
wanneer u een knop indrukt (bijvoorbeeld:
1
(POWER),
Z
(OPEN/CLOSE), etc).
• De functie voor afspelen hervatten werkt niet bij
BD-Video-disks met BD-J.
• Als u tijdens het afspelen van een interactieve bd-
rom-tiitel één keer op
x
(STOP) drukt, wordt het
apparaat volledig uitgeschakeld (Complete Stop).
Geavanceerd afspelen
Afspelen herhalen
BD
DVD
AVCHD
ACD
MUSIC
Druk tijdens het afspelen een paar keer op
REPEAT (
) om de gewenste
herhalingsmodus te selecteren.
BD’s / DVD’s
A-
– Het geselecteerde gedeelte wordt
continu herhaald.
Hoofdstuk
– Het momenteel
geselecteerde hoofdstuk wordt continu
herhaald.
Title
Titel
– De momenteel geselecteerde
titel wordt continu herhaald.
Druk een paar keer op REPEAT (
) om [uit]
te selecteren en naar normaal afspelen
terug te gaan.
Audio-cd’s / muziekbestanden
– Het geselecteerde nummer of
bestand wordt continu herhaald.
– Alle nummers of bestanden
worden continu herhaald.
– De nummers of bestanden worden in
willekeurige volgorde afgespeeld.
– Alle nummers of bestanden
worden herhaald in willekeurige volgorde
afgespeeld.
– Het geselecteerde gedeelte wordt
continu herhaald. (Alleen audio-cd’s)
Druk op CLEAR om naar de normale
afspeelsnelheid terug te gaan.
LET OP
• Als u tijdens [Repeat Chapter/Track] (Hoofdstuk/
nummer herhalen) eenmaal op
>
drukt, wordt de functie “Afspelen herhalen”
geannuleerd.
• Bij bepaalde disks en titels werkt deze functie niet.
HB985-DB.BDEUPPK_DUT.indd 42HB985-DB.BDEUPPK_DUT.indd 42 2010-05-14 2:58:082010-05-14 2:58:08

43Bediening
4
Bediening
Een bepaald gedeelte herhalen
BD
DVD
AVCHD
ACD
Deze speler kan een door u geselecteerd
gedeelte van een bestand herhalen.
1. Druk tijdens het afspelen op REPEAT (
)
om [A-] te selecteren aan het begin van het
gedeelt
e dat u wilt herhalen. Druk
vervolgens op ENTER ( ).
2. Druk aan het einde van het gedeelte
op ENTER (
). Het gedeelte dat u hebt
geselecteerd wordt nu continu herhaald.
3. Om naar normaal afspelen terug te gaan
drukt u een paar k
eer op REPEAT ( ) om
[uit] te selecteren of drukt u op CLEAR.
LET OP
U kunt geen gedeelte selecteren dat korter is dan 3
seconden.
Markeringen zoeken
BD
DVD
AVCHD
MOVIE
U kunt beginnen met afspelen vanaf een totaal
van negen punten die u in het geheugen.
Een markering invoeren
1. Druk tijdens het afspelen op het gewenste
punt op MARKER. Het markeerpictogram
verschijnt even op het tv-scherm.
2. Door stap 1 te herhalen kunt u totaal negen
markeringen toevoegen.
Gemarkeerde scènes terugzoeken
1. Druk op SEARCH en het Markering Zoeken
menu wordt geopend.
2. Druk op een nummertoets om een
markeringnummer dat u wilt oproepen,
te selecteren. Het afspelen start vanaf de
gemarkeerde scène.
Markeringen wissen
1. Druk op SEARCH en het Markering Zoeken
menu wordt geopend.
2. Druk op
u
om een markeringsnummer
te markeren. Selecteer met
I
/
i
de
gemarkeerde scène die u wilt wissen.
3. Druk op CLEAR om de gemarkeerde
scène van het Marker Zoeken menu te
verwijderen.
LET OP
• Soms werkt deze functie niet, afhankelijk van de
disks, titels en mogelijkheden van de server.
• Als de betre ende titel zich de Complete Stop-
modus (
x
) bevindt, is gewijzigd of als u de disk
uit de speler haalt, worden alle gemarkeerde
punten gewist.
• Als de totale lengte van de titel minder dan 10
seconden is, is deze functie niet beschikbaar.
HB985-DB.BDEUPPK_DUT.indd 43HB985-DB.BDEUPPK_DUT.indd 43 2010-05-14 2:58:082010-05-14 2:58:08

44 Bediening
Bediening
4
Zoekmenu gebruiken
BD
DVD
AVCHD
MOVIE
Met behulp van het zoekmenu kunt u het punt
waar u het afspelen wilt starten gemakkelijk
terugvinden.
Een punt opzoeken
1. Tijdens afspelen drukt u op SEARCH om het
menu Search weer te geven.
2. Druk op
I
/
i
om afspelen 15 seconden
naar voren of achteren te halen. U kunt een
punt selecteren dat u wilt overslaan door de
knop
I
/
i
in te drukken en vast te houden.
Het afspelen vanaf een gemarkeerde
scène starten
1. Druk op SEARCH en het Markering Zoeken
menu wordt geopend.
2. Druk op
u
om een markeringsnummer
te markeren. Selecteer met
I
/
i
de
gemarkeerde scène die u wilt afspelen.
3. Druk op ENTER (
) om het afspelen vanaf
de gemarkeerde scène te starten.
LET OP
• Soms werkt deze functie niet, afhankelijk van de
disks, titels en mogelijkheden van de server.
• Afhankelijk van het bestandstype en de
mogelijkheden van de DLNA-server is het
mogelijk dat deze functie bij bepaalde
[Homelink] inhoud niet werkt.
Laatste scène-geheugen
BD
DVD
Deze speler legt de laatst afgespeelde scène
van de laatst afgespeelde disk in zijn geheugen
vast. De laatste scène blijft in het geheugen
aanwezig, ook als u de disk uit de speler
neemt of de speler uitschakelt. Als u een disk
laadt waarvan een scène is het geheugen is
opgeslagen, wordt deze scène automatisch
opgeroepen.
LET OP
• De functie Laatste Scène Geheugen voor een
vorige disk wordt gewist zodra er een andere
disk afgespeeld wordt.
• Deze functie werkt, afhankelijk van de disk,
misschien niet.
• De speler onthoudt geen instellingen van een
disk als u de speler uitschakelt voordat het
afspelen van de disk is gestart.
HB985-DB.BDEUPPK_DUT.indd 44HB985-DB.BDEUPPK_DUT.indd 44 2010-05-14 2:58:082010-05-14 2:58:08

45Bediening
4
Bediening
Beeldscherminformatie
(OSD)
U kunt verschillende soorten informatie óver
en instellingen van de inhoud weergeven en
aanpassen.
Inhoudsinformatie op het
beeldscherm weergeven
BD
DVD
AVCHD
MOVIE
1. Druk tijdens het afspelen op DISPLAY
(
) om verschillende soorten informatie
over het afspelen weer te geven.
a
h
g
f
e
d
c
b
a
Titel – nummer van huidige titel / totaal
aantal bestanden.
b
Hoofdstuk – Huidige
hoofdstuknummer/totaal aantal
hoofdstukken.
c
Tijd – verstreken speeltijd / totale
afspeeltijd.
d
Audio – Geselecteerde audiotaal of
-kanaal.
e
Ondertiteling – Geselecteerde
ondertiteling.
f
Hoek – Geselecteerde
camerastandpunten/ totaal aantal
standpunten.
g
Beeldverhouding – geselecteerde
hoogte-breedteverhouding van het tv-
beeld.
h
Beeldmodus – geselecteerde
beeldmodus.
2. Selecteer een optie met
U
/
u
.
3. Gebruik
I
/
i
om de geselecteerde
optiewaarde aan te passen.
4. Druk op RETURN (
O
) om het OSD-
beeldschermmenu te sluiten.
LET OP
• Als u een paar seconden lang geen knop
indrukt, verdwijnt het on-screen scherm.
• Een titelnummer kan bij sommige disks niet
geselecteerd worden.
• Afhankelijk van de disks en de titels kunnen de
beschikbare onderwerpen variëren.
• Tijdens het afspelen van een interactieve BD-
titel wordt bepaalde installatie-informatie
weergegeven doch deze kan niet worden
gewijzigd.
HB985-DB.BDEUPPK_DUT.indd 45HB985-DB.BDEUPPK_DUT.indd 45 2010-05-14 2:58:082010-05-14 2:58:08

46
Bediening
Bediening
4
Geprogrammeerde perioden
afspelen
BD
DVD
AVCHD
MOVIE
1. Druk tijdens afspelen op DISPLAY (
).
Het tijdzoekvak toont de verstreken
afspeeltijd.
2. Selecteer de optie [Tijd] en voer dan
de vereiste starttijd in uren, minuten en
seconden in van links naar rechts.
Om bijvoorbeeld een scène op 2 uur, 10
minuten en 20 seconden te vinden, voert u
“21020” in.
Druk op
I
/
i
om afspelen 60 seconden
naar voren of achteren te halen.
3. Druk op ENTER (
) om het afspelen vanaf
het geselecteerde tijdstip te starten.
LET OP
• Deze functie is niet bij alle disks of titels
beschikbaar.
• Afhankelijk van het bestandstype en de
mogelijkheden van de DLNA-server is het
mogelijk dat deze functie bij bepaalde
[Homelink] inhoud niet werkt.
Een ander audiosignaal
beluisteren
BD
DVD
AVCHD
MOVIE
1. Druk tijdens het afspelen op DISPLAY
(
) om het OSD (On-Screen Display)
beeldscherm weer te geven.
2. Selecteer met
U
/
u
de optie [Audio].
3. Selecteer met
I
/
i
de gewenste audiotaal
en het audionummer of audiokanaal.
LET OP
• Bij sommige disks kunt u de verschillende
mogelijkheden voor geluidsweergave alleen
via het diskmenu kiezen. Druk in dat geval
op de knoppen POPUP/ TOP MENU of MENU
en kies de gewenste geluidsweergave uit de
keuzemogelijkheden in het diskmenu.
• Het is mogelijk dat het beeld en geluid korte
tijd niet gelijk lopen nadat u het geluid hebt
overgeschakeld.
De taal voor ondertitels
selecteren
BD
DVD
AVCHD
MOVIE
1. Druk tijdens het afspelen op DISPLAY
(
) om het OSD (On-Screen Display)
beeldscherm weer te geven.
2. Selecteer met
U
/
u
de optie [Ondertiteling].
3. Selecteer met
I
/
i
de gewenste
ondertiteltaal.
4. Druk op RETURN (
O
) om het OSD-
beeldschermmenu te sluiten.
LET OP
Sommige disks stellen u in staat om ondertiteling
selecties alleen via het diskmenu te wijzigen. Indien
dit het geval is drukt u op POPUP/ TOP MENU of
MENU knop en kiest u de juiste taal uit de keuzes
van het diskmenu.
HB985-DB.BDEUPPK_DUT.indd 46HB985-DB.BDEUPPK_DUT.indd 46 2010-05-14 2:58:082010-05-14 2:58:08

47
Bediening
4
Bediening
Kijken vanuit een andere hoek
BD
DVD
Als de disk beelden bevat die onder
verschillende camerahoeken opgenomen
zijn, kunt u overschakelen naar een andere
camerahoek tijdens afspelen.
1. Druk tijdens het afspelen op DISPLAY
(
) om het OSD (On-Screen Display)
beeldscherm weer te geven.
2. Selecteer met
U
/
u
de optie [Hoek].
3. Selecteer met
I
/
i
de gewenste
camerahoek.
4. Druk op RETURN (
O
) om het OSD-
beeldschermmenu te sluiten.
De hoogte-breedteverhouding
van het tv-beeld aanpassen
BD
DVD
AVCHD
MOVIE
Tijdens het afspelen kunt u de ingestelde
hoogte-breedteverhouding van het tv-beeld
aanpassen.
1. Druk tijdens het afspelen op DISPLAY
(
) om het OSD (On-Screen Display)
beeldscherm weer te geven.
2. Selecteer met
U
/
u
de optie
[Beeldverhouding].
3. Selecteer met
I
/
i
de gewenste optie.
4. Druk op RETURN (
O
) om het OSD-
beeldschermmenu te sluiten.
LET OP
Ook als u in het OSD-beeldschermmenu de waarde
van de optie [Beeldverhouding] wijzigt, wordt de
optie [Beeldverhouding] in het [Instellen]-menu
niet gewijzigd.
Beeldmodus wijzigen
BD
DVD
AVCHD
MOVIE
Tijdens het afspelen kunt u de optie
[Beeldmodus] wijzigen.
1. Druk tijdens het afspelen op DISPLAY
(
) om het OSD (On-Screen Display)
beeldscherm weer te geven.
2. Selecteer met
U
/
u
de optie [Beeldmodus].
3. Selecteer met
I
/
i
de gewenste optie.
4. Druk op RETURN (
O
) om het OSD-
beeldschermmenu te sluiten.
[Gebr. Inst.] optie instellen
1. Druk tijdens het afspelen op DISPLAY
(
) om het OSD (On-Screen Display)
beeldscherm weer te geven.
2. Selec
teer met
U
/
u
de optie [Beeldmodus].
3. Selecteer met
I
/
i
de optie [Gebr. Inst.] en
druk op ENTER (
).
4. Gebruik
U
/
u
/
I
/
i
om de opties van
[Beeldmodus] aan te passen.
Selecteer de optie [Standaard] en druk
vervolgens op ENTER ( ) om alle video-
instellingen naar de fabrieksinstelling terug
te zetten.
5. Selecteer met
U
/
u
/
I
/
i
de optie [Sluit]
en druk op ENTER (
) om de instelling te
voltooien.
HB985-DB.BDEUPPK_DUT.indd 47HB985-DB.BDEUPPK_DUT.indd 47 2010-05-14 2:58:092010-05-14 2:58:09

48
Bediening
Bediening
4
De ongekende
mogelijkheden van
BD-Live
Met deze speler kunt u genieten van functies
zoals beeld-in-beeld, secundaire audio en
virtuele pakketten, etc. met BD-Video met
BONUSVIEW (BD-ROM versie 2 Pro el 1 versie
1.1 / De nitieve standaard pro el).
U kunt secundaire video en audio afspelen van
disks die geschikt zijn voor de beeld-in-beeld
functie. Zie voor de weergavemethode de
aanwijzingen op de disk.
Naast de BONUSVIEW functie, heeft BD-
Video, dat BD-Live (BD-ROM version 2 Pro le
2) ondersteunt, een netwerkextensiefunctie
waarmee u door dit apparaat aan te sluiten
op het internet gebruik kunt maken van meer
functies zoals het downloaden van nieuwe
lmtrailers.
1. De aansluitingen en de instellingen van het
netwerk controleren (pagina 28-30).
2. Bevestig een usb-geheugen aan de usb-
poor
t op het frontpaneel.
Een usb-geheugen is nodig voor het
downloaden van extra bonuscontent.
Usb-aansluiting
3 . Druk op HOME MENU, en stel de optie
[BD-LIVE aansluiting] in het [Instellen]-menu
in (pagina 37).
Afhankelijk van de disk is de BD-LIVE functie
niet altijd beschikbaar indien de [BD-
LIVE aansluiting] optie ingesteld is [Deels
toegestaan].
4 . Plaats een BD-ROM-disk met BD-Live
functionaliteit in de disklade.
De mogelijkheden zijn afhankelijk van het
type disk. Zie de handleiding die met de
disk is meegeleverd.
LET OP
• Ontkoppel het aangesloten USB-apparaat
niet tijdens het downloaden van beeld- en/
of audiomateriaal of wanneer er nog een Blu-
ray-disk in de disklade zit. Als u dit advies niet
opvolgt, kan het aangesloten USB-apparaat
beschadigd worden en werken de BD-LIVE-
functies niet meer met het beschadigde USB-
apparaat samen. Als het aangesloten USB-
apparaat door een dergelijke actie beschadigd
lijkt, kunt u het aangesloten USB-apparaat
vanaf de PC formatteren en dit met deze speler
opnieuw gebruiken.
• Sommige BD-LIVE inhoud kan, zoals bepaald
door de provider van de inhoud, in sommige
gebieden maar beperkt toegankelijk zijn.
• Het laden en starten van BD-LIVE inhoud kan
enkele minuten duren.
HB985-DB.BDEUPPK_DUT.indd 48HB985-DB.BDEUPPK_DUT.indd 48 2010-05-14 2:58:092010-05-14 2:58:09

49
Bediening
4
Bediening
Film- en VR-disks
afspelen
U kunt dvd-rw-disks afspelen die in Video
Recording (VR)-formaat zijn opgenomen en
lmbestanden die op een disk of usb-apparaat
zijn opgeslagen.
1. Druk op
HOME MENU.
2. Selecteer met
U
/
u
/
I
/
i
de optie [Film] en
druk op ENTER ( ).
3. Selecteer het apparaat met behulp van
I
/
i
en druk op ENTER ( ).
Wanneer u een of twee apparaten aansluit,
ontstaat de bovenstaande situatie.
4. Selecteer een bestand met
U
/
u
/
I
/
i
en
druk op
B
PLAY of ENTER ( ) om het
bestand af te spelen.
LET OP
• De vereisten waaraan de bestanden moeten
voldoen vindt u op pagina 11.
• U kunt verscheidene afspeelfuncties gebruiken.
Zie pagina 40-47.
• Niet ge naliseerde DVD-VR disks worden.
• Sommige dvd-vr-disks zijn opgenomen met
CPRM (Copy Protection for Recordable Media)
kopieerbeveiliging. Dit toestel ondersteunt dit
soort disks niet.
Wat is CPRM?
CPRM is een beveiligingsysteem tegen
kopiëren (met coderingsysteem) dat alleen het
opnemen van “één maal kopiëren” programma’s
toestaat. CPRM betekent Content Protection for
Recordable Media (Inhoudsbescherming voor
opneembare media).
HB985-DB.BDEUPPK_DUT.indd 49HB985-DB.BDEUPPK_DUT.indd 49 2010-05-14 2:58:092010-05-14 2:58:09

50
Bediening
Bediening
4
Een bestand met ondertitels
selecteren
MOVIE
Als de naam van een lmbestand en het
betre ende ondertitelbestand gelijk zijn, wordt
het ondertitelbestand automatisch tegelijk
met het lmbestand afgespeeld.
Als de naam van het ondertitelbestand niet
gelijk is aan die van het lmbestand, moet
u het ondertitelbestand voordat u de lm
afspeelt selecteren in het [Film]-menu.
1. Selecteer met
U
/
u
/
I
/
i
in het [Film]-menu
het ondertitelbestand dat u wilt afspelen.
2. Druk op ENTER (
).
Druk nogmaals op ENTER ( ) om de
selectie van het ondertitelbestand
ongedaan te maken. Wanneer u het
lmbestand afspeelt wordt ook het
ondertitelbestand weergegeven.
LET OP
• ls u tijdens het afspelen op
x
(STOP) drukt,
wordt de selectie van de ondertitel geannuleerd.
• Het is mogelijk dat deze functie in de
[Homelink]-functie niet werkt.
De ondertitel-codepagina
wijzigen
MOVIE
Als de ondertiteling van een lm niet goed
loopt, kunt u de ondertitelcodepagina wijzigen
om het ondertitelbestand correct weer te
geven.
1. Druk tijdens het afspelen op DISPLAY
(
) om het OSD (On-Screen Display)
beeldscherm weer te geven.
2. Selecteer met
U
/
u
de optie
[Codepaginamenu].
3. Selecteer met
I
/
i
de gewenste codeoptie.
4. Druk op RETURN (
O
) om het OSD-
beeldschermmenu te sluiten.
HB985-DB.BDEUPPK_DUT.indd 50HB985-DB.BDEUPPK_DUT.indd 50 2010-05-14 2:58:092010-05-14 2:58:09

51
Bediening
4
Bediening
Foto’s bekijken
U kunt met deze speler ook fotobestanden
weergeven.
1. Druk op
HOME MENU.
2. Selecteer met
I
/
i
de optie [Foto] en druk
op ENTER ( ).
3. Selecteer het apparaat met behulp van
I
/
i
en druk op ENTER ( ).
Wanneer u een of twee apparaten aansluit,
ontstaat de bovenstaande situatie.
4. Selecteer met
U
/
u
/
I
/
i
een bestand en
druk op ENTER (
) om de foto weer te
geven.
Een diavoorstelling (slideshow)
afspelen
Druk op
B
PLAY om de diapresentatie te
starten.
Een diapresentatie stoppen
Druk op
x
STOP terwijl de diapresentatie
loopt.
Een diapresentatie pauzeren
Druk op
X
PAUSE/STEP terwijl de
diapresentatie loopt.
Druk op
B
PLAY om de diapresentatie opnieuw
te starten.
Naar de vorige of volgende foto
overspringen
Wanneer u foto’s schermvullend weergeeft,
kunt u door op
I
of
i
te drukken naar de
vorige of volgende foto springen.
LET OP
• De vereisten waaraan de bestanden moeten
voldoen vindt u op pagina 11.
• U kunt verscheidene afspeelfuncties gebruiken.
Zie pagina 40-47.
HB985-DB.BDEUPPK_DUT.indd 51HB985-DB.BDEUPPK_DUT.indd 51 2010-05-14 2:58:102010-05-14 2:58:10

52
Bediening
Bediening
4
Opties tijdens het weergeven
van foto’s
Tijdens het schermvullend weergeven
van foto’s hebt u verschillende
keuzemogelijkheden.
1. Druk tijdens het schermvullend weergeven
van foto’s op DISPLAY (
) om het
optiemenu op te roepen.
2. Selecteer een optie met
U
/
u
.
a
g
f
e
d
c
b
h
a
Huidige foto / totaal aantal foto’s –
Gebruik
I
/
i
om de vorige of de volgende
foto weer te geven.
b
Diavoor. – Druk op ENTER (
) om de
diapresentatie te starten of te pauzeren.
c
Kies Muziek – De achtergrondmuziek
voor uw diapresentatie selecteren
d
Muziek – Druk op ENTER ( ) om
achtergrondmuziek te starten of te pauzeren.
e
Roteren – Druk op ENTER (
) om de foto
rechtsom te draaien.
f
Zoomen – Druk op ENTER (
) om het
[Zoomen]-menu op te roepen.
g
E ect – Selecteer met
I
/
i
een
overgangse ect tussen de foto’s in een
diapresentatie.
h
Snelheid – Selecteer met
I
/
i
de
tijdvertraging tussen foto’s in een
diapresentatie.
3. Druk op RETURN (
O
) om het optiemenu
te verlaten.
Muziek luisteren tijdens een
diapresentatie
Tijdens het luisteren naar uw muziekbestanden
kunt u ook fotobestanden weergeven.
1. Druk op
HOME MENU.
2. Select met
U
/
u
/
I
/
i
, de optie [Foto] of
[Homelink] en druk op ENTER ( ).
3. Selecteer met
I
/
i
, de optie [Disk] of [USB]
en druk op ENTER ( ).
Om gebruik te kunnen maken van het
[Homelink]-menu moet u een server
selecteren of een map delen.
4. Selecteer met
U
/
u
/
I
/
i
, een bestand en
druk op ENTER (
) om een foto weer te
geven.
5. Druk op DISPLAY (
) om het optiemenu
weer te geven.
6. Selecteer met
U
/
u
de optie [K
ies Muziek]
en druk op ENTER ( ) om het [Kies Muziek]
-menu weer te geven.
HB985-DB.BDEUPPK_DUT.indd 52HB985-DB.BDEUPPK_DUT.indd 52 2010-05-14 2:58:102010-05-14 2:58:10

53
Bediening
4
Bediening
7. Selecteer met
U
/
u
een apparaat en druk op
ENTER ( ).
De apparaten die u kunt selecteren zijn
verschillend afhankelijk van de locatie van
het fotobestand dat u beeldschermvullend
weergeeft.
Fotolocatie Beschikbaar
apparaat
Disk Disk, USB
USB Disk, USB
Mappen op uw
pc (CIFS) delen
CIFS
DLNA-server DLNA-server
8. Selecteer met
U
/
u
een bestand of een map
om af t
e spelen.
Selecteer een map en druk op ENTER ( )
om de onderste directory weer te geven.
Selecteer
en druk o ENTER ( ) om de
bovenste directory weer te geven.
LET OP
U kunt geen muziek in de map [Homelink]
selecteren. In [Homelink] kunt u alleen bestanden
selecteren.
9. Selecteer met
i
de optie [OK] en druk
op ENTER ( ) om de muziekselectie te
voltooien.
Naar muziek luisteren
De speler is geschikt voor het afspelen van
audio-cd’s en muziekbestanden.
1. Druk op
HOME MENU.
2. Selecteer met
U
/
u
/
I
/
i
de optie [Muziek]
en druk op ENTER ( ).
3. Selecteer het apparaat met behulp van
I
/
i
en druk op ENTER ( ).
Wanneer u een of twee apparaten aansluit,
ontstaat de bovenstaande situatie.
4. Selecteer met
U
/
u
/
I
/
i
een muziekbestand
of –nummer en druk op ENTER (
) om de
muziek af te spelen.
LET OP
• De vereisten waaraan de bestanden moeten
voldoen vindt u op pagina 11.
• U kunt verscheidene afspeelfuncties gebruiken.
Zie pagina 40-47.
HB985-DB.BDEUPPK_DUT.indd 53HB985-DB.BDEUPPK_DUT.indd 53 2010-05-14 2:58:102010-05-14 2:58:10

54
Bediening
Bediening
4
Audio-cd’s opnemen
U kunt een bepaald nummer of alle nummers
van een audio-cd naar een usb-opslagapparaat
(geheugenstick) overzetten.
1. Bevestig een usb-geheugenstick in de usb-
poor
t op het frontpaneel.
2. Druk op
Z
(OPEN/CL
OSE) en leg een audio-
cd in de disklade.
Druk op
Z
(OPEN/CLOSE) om de disklade
te sluiten. Het afspelen start automatisch.
3. Druk op DISPLAY (
) om het optiemenu
weer te geven.
Of
Druk op de afstandsbediening op de USB
REC-knop
z
. U kunt alle muzieknummers
op de audio-cd opnemen.
4. Selecteer met
U
/
u
de optie [Cd opnem]
en druk op ENTER (
) om het [Cd opnem]-
menu weer te geven.
Herhaal deze stap om zoveel mogelijk
nummers te selecteren.
5. Selecteer met
U
/
u
een nummer dat u wilt
kopiëren en druk op ENTER (
).
Herhaal deze stap om zoveel mogelijk
nummers te selecteren.
Selecteer alle nummers op een
audio-cd.
Selecteer in het pop-upmenu
een coderingsoptie (128, 192 of
320 kbps of Lossless)
Annuleert de opname en gaat
terug naar het vorige scherm.
6. Selecteer met
U
/
u
/
I
/
i
de optie [Start] en
druk op ENTER (
).
7. Selecteer met
U
/
u
/
I
/
i
de
bestemmingsmap die moet worden
gekopieerd.
Als u een nieuwe map wilt maken, gebruik
dan
U
/
u
/
I
/
i
om [Nieuwe map] te
selecteren en druk op ENTER ( ).
Voer met het virtuele toetsenbord een
mapnaam in en druk op ENTER ( ) terwijl
[OK] is geselecteerd.
8. Selecteer met
U
/
u
/
I
/
i
de optie [OK] en
druk op ENTER (
) om met het opnemen
van audio-cd’s te beginnen.
Als u tijdens het opnemen van een audio-
cd wilt stoppen, drukt u op ENTER (
)
nadat u eerst [Annuleren] hebt gemarkeerd.
9. Er verschijnt een bericht wanneer het
opnemen van de audio
-cd is voltooid. Druk
op ENTER ( ) om het muziekbestand te
controleren dat u in de bestemmingsmap
hebt gemaakt.
HB985-DB.BDEUPPK_DUT.indd 54HB985-DB.BDEUPPK_DUT.indd 54 2010-05-14 2:58:112010-05-14 2:58:11

55
Bediening
4
Bediening
LET OP
• De onderstaande tabel bevat een overzicht van
de gemiddelde opnametijden met bijvoorbeeld
een snelheid van 192 Kbps vanaf een nummer
met een afspeeltijd van 4 minuten naar een
muziekbestand.
Stopmodus Tijdens afspelen
1,4 min. 2 min.
• Alle tijden in de bovenstaande tabel zijn
gemiddelden.
• De werkelijke riptijd voor een usb-geheugenstick
is afhankelijk van de mogelijkheden van de usb-
geheugenstick.
• Zorg ervoor dat u minimaal 50 MB vrije
geheugenruimte nodig hebt wanneer u op een
usb-geheugenstick opneemt.
• Voor de feitelijke opname moet de muziek
minimaal 20 seconden lang zijn.
• Schakel de speler niet uit en trek de usb-
geheugenstick niet uit de speler tijdens het
opnemen van een audio-cd.
Het zonder toestemming van de eigenaars
van het auteursrecht maken van kopieën van
auteursrechtelijk beschermd materiaal, waaronder
begrepen computerprogramma’s, bestanden,
tv- en radio-uitzendingen en geluidsopnamen,
kan worden aangemerkt als een inbreuk op het
auteursrecht en strafrechtelijk worden vervolgd.
Het is verboden deze apparatuur voor de
bovengenoemde doeleinden te gebruiken.
Neem uw verantwoordelijkheid
Respecteer auteursrechten
HB985-DB.BDEUPPK_DUT.indd 55HB985-DB.BDEUPPK_DUT.indd 55 2010-05-14 2:58:112010-05-14 2:58:11

56
Bediening
Bediening
4
iPod afspelen
U kunt een iPod op dit systeem afspelen. Zie
voor meer informatie de handleiding van de
iPod.
Voorbereiding
• Houd rekening met het volgende als u
op een iPod opgeslagen video’s en foto’s
op het beeldscherm van een tv wilt
weergeven.
- Gebruik een videoaansluiting via het
VIDEO OUT-aansluitpunt aan de achterzijde
van dit apparaat. Selecteer de geschikte
video-ingangsmodus op de tv.
- Zorg er afhankelijk van de iPod voor dat u
Video’s > Video-instellingen is geselecteerd
en stel vervolgens de tv-uitgang in op “Ask”
of “On” van uw iPod.
Zie de iPod handleiding voor meer
informatie over video-instellingen.
- De weergave van foto’s is alleen
beschikbaar als u dit apparaat overschakelt
naar de “IN”-modus van de iPod en u kunt
foto’s alleen als diapresentatie weergeven.
Om foto’s op een tv weer te geven, moet
u een diapresentatie op uw iPod starten.
Zie de handleiding van de iPod voor meer
informatie over diapresentaties.
• Schakel dit apparaat uit en zet het geluid
zo zacht mogelijk voordat u een iPod op dit
apparaat aansluit.
1. Sluit de iPod stevig aan.
Een iPod aansluiten
Sluit de houder aan en
plaats uw iPod erin.
2. Selecteer een bestand met
U
/
u
/
I
/
i
en
druk op ENTER om het bestand af te spelen.
iPod op het scherm weergeven
1. Sluit de iPod stevig aan.
2. Druk op HOME MENU (
).
3. Select met
I
/
i
de optie [Muziek] of [Film]
en druk op ENTER ( ).
Nadat u het andere apparaat hebt
aangesloten, selecteert u de iPod in het
menu.
4. Selecteer met
U
/
u
/
I
/
i
, het opgenomen
materiaal en druk op ENTER (
).
HB985-DB.BDEUPPK_DUT.indd 56HB985-DB.BDEUPPK_DUT.indd 56 2010-05-14 2:58:112010-05-14 2:58:11

57
Bediening
4
Bediening
Naar een iPod luisteren in de
iPod IN-modus
U kunt uw iPod bedienen met behulp van
de meegeleverde afstandsbediening en de
bedieningsknoppen op uw iPod.
1. Sluit de iPod stevig aan.
Als u dit apparaat inschakelt, wordt uw
iPod automatisch ingeschakeld en start het
opladen.
2. Druk op INPUT/TUNER om de iPod IN-
modus te selecteren.
U
/
u
/
I
/
i
Een optie in het menu
selecteren.
B
/ENTER
Start het afspelen van de
muziek of video.
X
Hiermee kunt u het afspelen
pauzeren. Druk nog een keer
op
B
(PLAY) om het afspelen
te hervatten.
m
/
M
Een muzieknummer of video
snel vooruit “spoelen”.
.
/
>
Het afspelen vooruit of
achteruit overslaan.
REPEAT Een geselecteerde
herhaalmodus selecteren:
Nummer
( )
, Alles
( )
, Uit
(Geen weergave).
LET OP
Dit systeem is compatibel met de audio en video
van de iPod (4
e
generatie), iPod nano, iPod classic,
iPod mini, iPod touch en iPhone.
(iPod shu e wordt niet ondersteund).
LET OP
• Het foutbericht “CHECK IPOD” (iPod controleren)
of “Connected iPod model is not supported”
(Aangesloten model iPod wordt niet
ondersteund) verschijnt wanneer:
- Uw iPod niet geschikt is voor de functie die u
wilt bedienen.
• Het foutbericht “CHECK IPOD” (iPod controleren)
of “Please update iPod’s software” (Software van
iPod bijwerken) verschijnt als:
- Uw iPod met een verouderde softwareversie
werkt.
t
Update uw iPod naar de nieuwste versie.
• Als dit apparaat een foutbericht toont, volg het
bericht dan op. Het foutbericht “CHECK IPOD”
(iPod controleren) of “Please check your iPod”
(Controleer uw iPod) verschijnt als:
- De verbinding tussen dit apparaat en uw iPod
is verbroken.
t
Ontkoppel uw iPod van dit apparaat en
plaats hem vervolgens in het dock terug.
- Uw iPod is niet goed aangesloten.
- Dit apparaat ziet uw iPod als onbekend
apparaat.
- De accu van uw iPod is vrijwel uitgeput.
t
De accu moet opnieuw worden geladen.
t
Als de accu van uw iPod bijna leeg is, kan het
wat meer tijd kosten om uw iPod weer te laden.
• Het best kunt u de meegeleverde dock-adapter
in het dock gebruiken om uw iPod goed aan te
sluiten. Vraag advies van uw iPod leverancier als
u een adapter nodig hebt.
• De compatibiliteit met uw iPod is afhankelijk van
het type iPod dat u gebruikt.
• De bediening van een iPod touch en iPhone
verschilt van de bediening van een “normale”
iPod. Het is mogelijk dat u een aanvullende
bedieningsmogelijkheid nodig hebt om ze met
dit apparaat te gebruiken. (bijv. “slide to unlock”
ofwel “openschuiven om te ontgrendelen”)
• Als u een toepassing gebruikt, bel dan op of
stuur en ontvang een SMS’-tekstbericht e.d.
over uw iPod touch of iPhone, neem hem uit
de iPod dock van dit apparaat en gebruik hem
vervolgens opnieuw.
• Afhankelijk van de softwareversie van uw iPod is
het mogelijk dat u de iPod niet met dit apparaat
kunt gebruiken. Wij adviseren de nieuwste
softwareversie te installeren.
• De videokwaliteit is afhankelijk van het
videobronmateriaal op uw iPod
• Als u problemen met uw iPod hebt, ga dan naar
www.apple.com/support/ipod.
HB985-DB.BDEUPPK_DUT.indd 57HB985-DB.BDEUPPK_DUT.indd 57 2010-05-14 2:58:122010-05-14 2:58:12

58
Bediening
Bediening
4
Radio
Zorg ervoor dat de antenne is aangesloten.
(Zie pagina 24)
Naar de radio luisteren
1. Druk op INPUT/TUNER tot TUNER (FM)
op het weergavescherm verschijnt. De
radiotuner stemt nu af op het radiostation
waarop u het laatst hebt afgestemd.
2. Druk ongeveer twee seconden op TUNE
(-/+) tot de frequentie-indicatie verandert.
Het scannen stopt wanneer het apparaat
op een station afstemt. Of Druk een paar
keer op TUNE (-/+).
3. U regelt het geluidsvolume door aan
de VOLUME-knop op het frontpaneel te
draaien of door op de afstandsbediening
op VOL (+/-) te drukken.
Voorkeurstations vastleggen
U kunt de afstemming op 50 fm-radiostations
vooraf programmeren. Zet voordat u met
afstemmen begint het volume zo laag mogelijk.
1. Druk op INPUT/TUNER tot TUNER (FM) op
het weergavescherm verschijnt.
2. Selecteer met TUNE (-/+) de frequentie van
een radiostation dat u als voorkeurstation
wilt vastleggen.
3. Druk vervolgens op ENTER (
) en de
afgestemde frequentie gaat op het
weergavescherm knipperen.
4. Druk op PRESET om de gewenste
voorkeurfrequenties te selecteren.
5. Druk op ENTER (
). De door u gekozen
frequentie wordt nu als voorkeurstation
opgeslagen.
6. Herhaal stap 2 t/m 5 om meer stations op
te slaan.
Alle opgeslagen stations wissen
Druk twee seconden op CLEAR (Wissen).
De tekst “ERASE ALL” (Verwijder alles) gaat
knipperen. Vervolgens worden alle opgeslagen
stations gewist.
Slechte fm-ontvangst
verbeteren
Druk op de afstandsbediening op de blauwe
(MONO/STEREO) knop D. Hierdoor schakelt de
tuner over van stereo naar mono waardoor de
ontvangst doorgaans beter wordt.
Informatie over radiostations
De fm-tuner is geschikt voor de ontvangst van
Radio Data System (RDS)-informatie. Hierdoor
krijgt u informatie te zien over het radiostation
dat u beluistert. Door herhaald op RDS te
drukken, kunt u de verschillende soorten
informatie bekijken.
PS (Programme Service Name)
Met deze functie kunt u de naam
van de afgestemde radiostations
ofwel programma’s op het
weergavescherm bekijken.
PTY (Programme Type Recognition)
Het programmatype (bijv. Jazz of
Nieuws) verschijnt op het display.
RT (Radio Text)
Er verschijnt een bericht met
speciale informatie over het
uitgezonden station. Deze tekst
kan over het display lopen.
CT (Time controlled by the channel)
Dit toont de tijd en de datum
die door het station worden
uitgezonden.
HB985-DB.BDEUPPK_DUT.indd 58HB985-DB.BDEUPPK_DUT.indd 58 2010-05-14 2:58:122010-05-14 2:58:12

59
Bediening
4
Bediening
Inhoud via uw
thuisnetwerk afspelen
De speler kan materiaal opzoeken en
afspelen dat in uw pc en op uw thuisnetwerk
aangesloten DLNA-gecerti ceerde
mediaservers is opgeslagen.
Wat betekent DLNA?
Deze speler is een voor DNLA gecerti ceerde
digitale mediaspeler die lm-, foto- en
muziekmateriaal afkomstig van een met DNLA
compatibele digitale mediaserver (pc en
consumentenelektronica) kan weergeven en
afspelen.
De Digital Living Network Alliance (DLNA)
is een breedgeoriënteerde organisatie van
bedrijven die actief zijn op het gebied van
consumentenelektronica, computers en
mobiele digitale apparaten. Door middel van
de functie Digital Living kunt u eenvoudig
digitale media via een thuisnetwerk delen.
Producten die aan de richtlijnen voor
onderlinge samenwerking van de
DLNA voldoen, zijn gemakkelijk aan
het certi ceringslogo van de DLNA te
herkennen. Dit apparaat voldoet aan de DLNA
Interoperability Guidelines (Richtlijnen voor
onderlinge samenwerking) versienummer 1.5.
Wanneer een pc die DLNA software uitvoert,
of die op een ander met DLNA compatibel
apparaat is aangesloten, met deze speler
wordt verbonden, kan het nodig zijn bepaalde
instellingen voor software of andere apparaten
aan te passen. Zie voor meer informatie
de handleiding van de software of van het
betre ende apparaat.
Een DLNA-mediaserver openen
1. De aansluitingen en de instellingen van het
netwerk controleren (pagina 28-30).
2. Druk op
HOME MENU.
3. Selecteer met
U
/
u
/
I
/
i
, de optie
[Homelink] en druk op ENTER (
).
4. Selecteer met
U
/
u
een van de DLNA-
mediaservers in het overzicht en druk op
ENTER ( ).
Druk op de groene knop (B) als u de
beschikbare mediaserver opnieuw wilt
scannen.
LET OP
Afhankelijk van de mediaserver is het mogelijk
dat deze speler toestemming van de server moet
krijgen.
5. Selecteer een bestand met
U
/
u
/
I
/
i
en
druk op ENTER ( ) om het bestand af te
spelen.
HB985-DB.BDEUPPK_DUT.indd 59HB985-DB.BDEUPPK_DUT.indd 59 2010-05-14 2:58:122010-05-14 2:58:12

60
Bediening
Bediening
4
LET OP
• De vereisten waaraan de bestanden moeten
voldoen vindt u op pagina 11.
• U kunt verscheidene afspeelfuncties gebruiken.
Zie pagina 40-47.
• De bestandsvereisten op pagina 11 zijn niet altijd
compatibel
. Er kunnen bepaalde beperkingen
gelden voor bestandseigenschappen en de
mogelijkheden van de mediaserver.
• In het [Homelink]-menu kunt u de miniaturen
van onspeelbar
e bestanden weergeven maar
u kunt deze bestanden niet op deze speler
afspelen.
• Als het [Homelink]-menu een onspeelbaar
muziek
bestand bevat, slaat de speler dit bestand
over en speelt daarna het eerstvolgende
afspeelbare bestand.
• De namen van het ondertitelbestand en het
lmbestand moeten dezelfde zijn en deze
bestanden moeten zich in dezelfde map
bevinden.
• De afspeelkwaliteit en de
bedieningsmogelijkheden van de [Homelink]-
functie zijn afhankelijk van de conditie van uw
thuisnetwerk.
• Soms kunnen bestanden van mobiele media
zoals usb- en dvd-stations en dergelijke op uw
mediaserver niet worden gedeeld.
Gedeelde mappen vanaf uw pc
openen
1. Start de pc die op uw LAN (plaatselijke
netwerk) is aangesloten.
2. Op uw pc kunt u mappen met lms, foto’s
en muziek delen.
3. C
ontroleer op de speler de
netwerkverbinding en netwerkinstellingen
(pagina 28-30).
4. Druk op HOME MENU.
5. Selecteer met
U
/
u
/
I
/
i
, de optie
[Homelink] en druk op ENTER (
).
6. Selecteer met
U
/
u
in de lijst een map om te
delen en druk op ENTER (
).
Druk op de groene knop (B) als u de
beschikbare mediaservers opnieuw wilt
scannen.
LET OP
Afhankelijk van de te delen map is het mogelijk
dat u met deze speler de gebruikersnaam van de
netwerkgebruiker en het wachtwoord voor het
openen van de map moet invoeren.
7. Selecteer een bestand met
U
/
u
/
I
/
i
en
druk op ENTER ( ) om het bestand af te
spelen.
HB985-DB.BDEUPPK_DUT.indd 60HB985-DB.BDEUPPK_DUT.indd 60 2010-05-14 2:58:122010-05-14 2:58:12

61
Bediening
4
Bediening
LET OP
• De vereisten waaraan de bestanden moeten
voldoen vindt u op pagina 11.
• U kunt verscheidene afspeelfuncties gebruiken.
Zie pagina 40-47.
• In het [Homelink]-menu kunt u de miniaturen
van onspeelbare bestanden weergeven maar
u kunt deze bestanden niet op deze speler
afspelen.
• Als het [Homelink]-menu een onspeelbaar
muziekbestand bevat, slaat de speler dit bestand
over en speelt daarna het eerstvolgende
afspeelbare bestand.
• De namen van het ondertitelbestand en het
lmbestand moeten dezelfde zijn en deze
bestanden moeten zich in dezelfde map
bevinden.
• De afspeelkwaliteit en de
bedieningsmogelijkheden van de [Homelink]-
functie zijn afhankelijk van de conditie van uw
thuisnetwerk.
• Het is mogelijk dat u bestanden op verwisselbare
media zoals usb-stations, dvd-stations e.d. op
uw pc niet probleemloos kunt delen.
• Afhankelijk van uw pc-omgeving is het mogelijk
dat u problemen met verbindingen tegenkomt.
PC eisen
• Windows® XP (Service Pack 2 of hoger),
Windows Vista® (geen Service Pack nodig)
Windows 7®
• 1.2 GHz Intel® Pentium® III of AMD
Sempron™ 2200+ processors
• Netwerkomgeving: 100 MB Ethernet, WLAN
(IEEE 802.11b/g/n)
LET OP
Als u Windows® XP of Windows Vista® gebruikt, ga
dan naar de hieronder vermelde link voor meer
informatie over instellingen voor het delen van
bestanden.
HB985-DB.BDEUPPK_DUT.indd 61HB985-DB.BDEUPPK_DUT.indd 61 2010-05-14 2:58:122010-05-14 2:58:12

62
Bediening
Bediening
4
Uw netwerkgebruikersnaam en
wachtwoord invoeren
Afhankelijk van uw pc-omgeving kan het nodig
zijn dat u de naam van de netwerkgebruiker
en een wachtwoord moet invoeren om een
gedeelde map te openen.
1. Het toetsenbordmenu
verschijnt automatisch als een
netwerkgebruikersnaam en een
wachtwoord vereist zijn.
2. Gebruik
U
/
u
/
I
/
i
om een teken te
selecteren en druk vervolgens op ENTER
(
) om uw keuze in het toetsenbordmenu
te bevestigen.
Letters met een accentteken (á, à, é, è, â,
ê, ã enzovoort) kunt u in de uitgebreide
tekenset (extended character set) vinden en
van daaruit invoeren.
Voorbeeld: Selecteer “D” en druk op DISPLAY
(
) om de uitgebreide tekenset te tonen.
Selecteer “D” or “Ď” met behulp van
I
/
i
en
druk op ENTER(
).
[Wis] – Alle ingevoerde tekens wissen.
[Spatie] – Voert een spatie op de cursorpositie
in.
[<–] – Verwijder het vorige teken bij de
cursorpositie.
[ABC / abc / #+-=&] – Verandert de instelling
van het toetsenbordmenu in hoofdletter,
kleine letter of symbolen.
3. Wanneer u klaar bent met het invoeren
van uw netwerkgebruikersnaam en
wachtwoord selecteert u met
U
/
u
/
I
/
i
de
optie [OK] en drukt u op ENTER (
) om de
map te openen.
Om het u gemakkelijk te maken,
worden uw netwerkgebruikersnaam en
wachtwoord in een geheugen opgeslagen
nadat u de map hebt geopend. Als u niet
wilt dat de netwerkgebruikersnaam en het
wachtwoord worden opgeslagen, drukt
u voordat u de map opent op de rode (A)
knop om het kruisje uit het selectievakje
[Onthoud] te verwijderen.
HB985-DB.BDEUPPK_DUT.indd 62HB985-DB.BDEUPPK_DUT.indd 62 2010-05-14 2:58:122010-05-14 2:58:12

63
Onderhoud
5
Onderhoud
Wat u over disks moet
weten
Disks hanteren
Plak nooit papier of plakband op een disk.
Disks bewaren
Doe de disk na het afspelen terug in de
bijbehorende cassette. Stel disks niet bloot
aan direct zonlicht of warmtebronnen (bijv. de
verwarming) en laat disks nooit in uw auto in
de zon liggen.
Disks reinigen
Gebruik geen krachtige oplosmiddelen
zoals alcohol, benzeen, thinner, in de
handel verkrijgbare reinigingsmiddelen
of antistatische sprays die voor oudere
vinylgrammofoonplaten bedoeld zijn.
Behandeling van het
apparaat
Het apparaat vervoeren
Bewaar de originele doos en het
verpakkingsmateriaal waarin u het apparaat
hebt gekocht. Als u het apparaat veilig wilt
versturen, verpak het dan op dezelfde manier
waarop het in de fabriek is verpakt.
De buitenkant van het apparaat schoon
houden;
• Gebruik in de buurt van het apparaat geen
vluchtige vloeisto en door bijvoorbeeld
insecticide te verstuiven.
• Door het apparaat met kracht af te wrijven
kunt u het beschadigen.
• Laat geen rubber of kunststof voorwerpen
langdurig in contact met het apparaat.
Apparaat reinigen
Gebruik een zachte droge doek om het
apparaat te reinigen. Als de buitenkant van
het apparaat erg vuil is, gebruik dan een zachte
doek die u met een sopje licht bevochtigt.
Gebruik geen krachtige oplosmiddelen zoals
alcohol, benzeen of thinner omdat deze het
oppervlak van het apparaat kunnen aantasten.
Apparaat onderhouden
Dit apparaat is een high-tech precisieapparaat.
Als de optische pick-uplens en de onderdelen
die de disks aandrijven vuil of versleten
zijn, kan de beeldkwaliteit achteruitgaan.
Neem voor meer informatie contact op met
uw LG leverancier of het dichtstbijzijnde
servicecentrum.
5
Onderhoud
HB985-DB.BDEUPPK_DUT.indd 63HB985-DB.BDEUPPK_DUT.indd 63 2010-05-14 2:58:132010-05-14 2:58:13

64
Problemen oplossen
Problemen oplossen
6
6
Problemen oplossen
Algemeen
De stroom wordt niet
ingeschakeld.
• Steek de stroomkabel goed in het stopcontact.
Het apparaat start niet met
afspelen.
• Leg een afspeelbare disk in de speler (en controleer of u
het juiste type disk met het juiste kleurensysteem en dito
regiocode gebruikt.)
• Leg de disk met de afspeelkant naar beneden.
• Leg de disk goed in de geleider in de disklade..
• Maak de disk schoon.
• Annuleer de beoordelingsfunctie of verander het
beoordelingsniveau.
De hoek kan niet worden
veranderd.
• Op de dvd-video die u afspeelt zijn geen verschillende
camerastandpunten (multi-angles) opgenomen.
U kunt de taal van de
ondertitels niet veranderen
of uitschakelen.
• Op de dvd-video die u afspeelt zijn geen ondertitels
opgenomen.
Kan geen mp3-, wma-,
jpeg- of DivX-bestanden
afspelen.
• De bestanden zijn niet opgenomen in een formaat dat de
speler kan afspelen.
• De speler ondersteunt de codec van het lmbestand niet.
De afstandsbediening
werkt niet goed.
• De afstandsbediening is niet op de afstandssensor van het
apparaat gericht.
• U gebruikt de afstandsbediening te ver van het apparaat.
• Er is een obstakel aanwezig tussen de afstandsbediening en
het apparaat.
• De batterijen in de afstandsbediening zijn uitgeput.
HB985-DB.BDEUPPK_DUT.indd 64HB985-DB.BDEUPPK_DUT.indd 64 2010-05-14 2:58:132010-05-14 2:58:13

65
Problemen oplossen
6
Problemen oplossen
Beeld
Er is geen beeld. • Selecteer het geschikte video-ingangssignaal op de tv
waardoor het beeld van het speler op het beeldscherm van
de tv verschijnt.
• Zorg dat de videoverbinding stevig is aangesloten.
• Controleer of de [HDMI Kleur instelling.] in het [Instellen]-
menu is ingesteld op de component die met uw
videoverbinding overeenstemt.
• Het is mogelijk dat uw tv de door u op de speler ingestelde
resolutie niet ondersteunt. Verander deze in een resolutie die
uw tv kan verwerken.
• De HDMI-uitgang van de speler is aangesloten op een dvi-
apparaat dat de kopieerbeveiligingsfunctie niet ondersteunt.
Er verschijnt beeldruis • U speelt een disk af die opgenomen is met een
kleurensysteem dat verschilt van het kleurensysteem van uw
tv.
• Stel een resolutie in die uw tv accepteert.
Geluid
Er is geen geluid of het
geluid is vervormd.
• Het apparaat is op scannen, slow motion of pauzeren
ingesteld.
• Het geluidsvolume is te zwak.
• Controleer of de luidsprekerkabel goed is aangesloten.
(pagina 16)
HB985-DB.BDEUPPK_DUT.indd 65HB985-DB.BDEUPPK_DUT.indd 65 2010-05-14 2:58:132010-05-14 2:58:13

66
Problemen oplossen
Problemen oplossen
6
Netwerk
BD-LIVE functie werkt niet. • De aangesloten usb-geheugenstick heeft niet genoeg
opslagruimte. Sluit een usb-geheugenstick aan met minstens
1 GB vrij beschikbare geheugenruimte.
• Zorg dat het toestel correct aangesloten is op het LAN
netwerk en toegang heeft tot het internet (zie bladzijde 28).
• Uw zendsnelheid is te traag voor het gebruik van BD-Live
functies. Wij adviseren u contact op te nemen met uw
leverancier van internetdiensten en deze om een hogere
breedbandsnelheid te vragen.
• De optie [BD-LIVE aansluiting] in het [Instellen]-menu is
ingesteld op [Verboden]. Stel de optie in op [Toegestaan].
Ontwerp en speci caties kunnen zonder voorafgaande mededeling worden gewijzigd.
Updates
Informatie over dit product is beschikbaar op de website van Pioneer. Ga naar deze website
voor informatie over het bijwerken of servicen van uw Blu-ray diskspeler.
HB985-DB.BDEUPPK_DUT.indd 66HB985-DB.BDEUPPK_DUT.indd 66 2010-05-14 2:58:132010-05-14 2:58:13

67
Bijlage
7
Bijlage
Uw tv bedienen met
de meegeleverde
afstandsbediening
Met de hieronder afgebeelde toetsen kunt u
uw PIONEER televisie bedienen
TV
bedienings-
knoppen
Knop Bediening
1
(TV Power)
De tv in- en uitschakelen.
INPUT Schakelen tussen de
ingangsbronnen van de tv
en andere bronnen.
CH +/- Omhoog en omlaag
scannen door
geprogrammeerde kanalen.
VOL +/- Het geluidsvolume van de
tv aanpassen.
LET OP
Afhankelijk van het aangesloten toestel, is het
mogelijk dat u uw tv met bepaalde knoppen niet
kunt bedienen.
De afstandsbediening voor uw
tv geschikt maken
U kunt uw tv met de meegeleverde
afstandsbediening bedienen.
Als uw tv in de onderstaande lijst voorkomt,
kunt u de bijbehorende fabriekscode ingeven.
1. Terwijl u de
1
(TV POWER)-knop ingedrukt
houdt, voert u met de cijfertoetsen de
fabriekscode van uw tv in (zie onderstaande
tabel).
Merk Code
Pioneer 1(Standaard)
Sony 2, 3
Panasonic 4, 5
Samsung 6, 7
LG 8, 9
2. Laat de
1
(TV POWER) knop los om de
instelling te voltooien.
Afhankelijk van uw tv is het mogelijk dat
sommige of alle toetsen niet met uw tv
samenwerken, ook niet nadat u de juiste
fabriekscode hebt ingevoerd. Wanneer u
de batterijen van de afstandsbediening
vervangt, wordt de door u ingegeven code
naar de standaardinstelling teruggezet. Stel de
betre ende code opnieuw in.
7
Bijlage
HB985-DB.BDEUPPK_DUT.indd 67HB985-DB.BDEUPPK_DUT.indd 67 2010-05-14 2:58:132010-05-14 2:58:13

68
Bijlage
Bijlage
7
Regiocodelijst
Kies een regiocode uit de lijst.
Gebied Code Gebied Code Gebied Code Gebied Code
Afghanistan AF
Argentinië AR
Australië AU
Oostenrijk AT
België BE
Bhoetan BT
Bolivia BO
Brazilië BR
Cambodja KH
Canada CA
Chili CL
China CN
Colombia CO
Congo CG
Costa Rica CR
Kroatië HR
Tsjechië CZ
Denemarken DK
Ecuador EC
Egypte EG
El Salvador SV
Ethiopië ET
Fijis FJ
Finland FI
Frankrijk FR
Duitsland DE
Groot-Brittanië GB
Griekenland GR
Groenland GL
Hong-Kong HK
Hongarije HU
India IN
Indonesië ID
Israël IL
Italië IT
Jamaica JM
Japan JP
Kenia KE
Koeweit KW
Libië LY
Luxemburg LU
Maleisië MY
Maldiven MV
Mexico MX
Monaco MC
Mongolië MN
Marokko MA
Nepal NP
Nederland NL
Nederlandse
Antillen AN
Nieuw-Zeeland NZ
Nigeria NG
Noorwegen NO
Oman OM
Pakistan PK
Panama PA
Paraguay PY
Filipijnen PH
Polen PL
Portugal PT
Roemenië RO
Russische
Federatie RU
Saudi Arabië SA
Senegal SN
Singapore SG
Slowakije SK
Slovenië SI
Zuid-Afrika ZA
Zuid-Korea KR
Spanje ES
Sri Lanka LK
Zweden SE
Zwitserland CH
Taiwan TW
Thailand TH
Turkije TR
Oeganda UG
Oekraïne UA
Verenigde Staten US
Uruguay UY
Oezbekistan UZ
Vietnam VN
Zimbabwe ZW
HB985-DB.BDEUPPK_DUT.indd 68HB985-DB.BDEUPPK_DUT.indd 68 2010-05-14 2:58:132010-05-14 2:58:13

69
Bijlage
7
Bijlage
Taalcodelijst
Aan de hand van deze lijst kunt u de gewenste taal voor de volgende startinstellingen invoeren:
[Audio disk], [Disk ondertiteling] en [Disk Menu].
Taal Code Taal Code Taal Code Taal Code
Afaars 6565
Afrikaans 6570
Albanees 8381
Amharisch 6577
Arabisch 6582
Armeens 7289
Assamees 6583
Aymara 6588
Azerbeidzjaans 6590
Bashkir 6665
Basks 6985
Bengali; Bangladesh
6678
Bhutani 6890
Bihari 6672
Bretons 6682
Bulgaars 6671
Burmees 7789
Wit-russisch 6669
Chinees 9072
Kroatisch 7282
Tsjechisch 6783
Deens 6865
Nederlands 7876
English 6978
Esperanto 6979
Ests 6984
Faroëse 7079
Fijis 7074
Fins 7073
Frans 7082
Fries 7089
Keltisch 7176
Georgies 7565
Duits 6869
Grieks 6976
Groenlands 7576
Guarani 7178
Gujarati 7185
Hausa 7265
Hebreeuws 7387
Hindi 7273
Hongaars 7285
Ijslands 7383
Indonesisch 7378
Interlingua 7365
Iers 7165
Italiaans 7384
Japans 7465
Canada 7578
Kashmiri 7583
Kazakh 7575
Kirghiz 7589
Koreaans 7579
Koerdisch 7585
Laothiaans 7679
Latijns 7665
Lets 7686
Lingalaas 7678
Litouws 7684
Macedonies 7775
Malagasy 7771
Maleis 7783
Malayalam 7776
Maori 7773
Marathi 7782
Moldavisch 7779
Mongools 7778
Nauru 7865
Nepalees 7869
Noors 7879
Oriya 7982
Panjabi 8065
Pashto, Pushto 8083
Perzisch 7065
Pools 8076
Portugees 8084
Quechua 8185
Reto-romaans 8277
Roemeens 8279
Russisch 8285
Samoaans 8377
Sanskriet 8365
Schots Keltisch 7168
Servisch 8382
Servo-Kroatisch 8372
Shona 8378
Sindhi 8368
Singalees 8373
Slovaaks 8375
Sloveens 8376
Spaans 6983
Soedanees 8385
Swahili 8387
Zweeds 8386
Tagalog 8476
Tajik 8471
Tamil 8465
Telugu 8469
Thai 8472
Tonga 8479
Turks 8482
Turkmeens 8475
Twi 8487
Oekraïens 8575
Urdu 8582
Oezbeeks 8590
Vietnamees 8673
Volapük 8679
Welsh 6789
Wolof 8779
Xhosa 8872
Yiddish 7473
Yoruba 8979
Zulu 9085
HB985-DB.BDEUPPK_DUT.indd 69HB985-DB.BDEUPPK_DUT.indd 69 2010-05-14 2:58:132010-05-14 2:58:13

70
Bijlage
Bijlage
7
Resolutie video-uitvoersignaal
Wanneer de niet tegen kopiëren beschermde media worden afgespeeld
Video-uitgang
Resolutie
HDMI OUT
COMPONENT VIDEO UIT
HDMI aangesloten HDMI ontkoppeld
576i (480i) 576p (480i) 576i (480i)
576p (480p) 576p (480p) 576p (480p)
720p 720p 720p
1080i 1080i 1080i
1080p / 24 Hz 1080p / 24 Hz 576i (480i) 1080i
1080p / 50 Hz 1080p / 50 Hz 576i (480i) 1080i
Bij afspelen van beveiligde media
Video-uitgang
Resolutie
HDMI OUT
COMPONENT VIDEO UIT
HDMI aangesloten HDMI ontkoppeld
576i (480i) 576p (480p) 576i (480i)
576p (480p) 576p (480p) 576p (480p)
720p 720p 576i (480i) 576p (480p)
1080i 1080i 576i (480i) 576p (480p)
1080p / 24 Hz 1080p / 24 Hz 576i (480i) 576p (480p)
1080p / 50 Hz 1080p / 50 Hz 576i (480i) 576p (480p)
HDMI-uitgang
• Bij de 576i (480i) resolutie instelling, wordt
de werkelijk uitgevoerde resolutie van
HDMI OUT gewijzigd in 576p (480p).
• Indien u een resolutie met de hand
selecteert en vervolgens de HDMI
contrastekker aansluit op uw TV en uw
TV accepteert dit niet, dan is de resolutie
instelling ingesteld op [Auto].
• Als u een resolutie kiest die uw tv niet
accepteert, verschijnt een waarschuwing.
Wacht ca. 20 seconden als u na aanpassing
van de resolutie geen beeld ziet waarna de
resolutie automatisch teruggaat naar de
vorige resolutie.
• De 1080p framesnelheid van de video-
uitgang wordt automatisch ingesteld op 24
Hz of 50 Hz afhankelijk van de mogelijkheid
en voorkeur van de aangesloten TV en
gebaseerd op de video-framesnelheid van
de BD-ROM disk.
COMPONENT VIDEO-uitgang
BD of DVD kan het upscalen van analoge
uitgangssignalen voorkomen.
VIDEO-uitgang
De resolutie van de video-uitgang wordt altijd
uitgevoerd op resolutie 576i (480i).
HB985-DB.BDEUPPK_DUT.indd 70HB985-DB.BDEUPPK_DUT.indd 70 2010-05-14 2:58:132010-05-14 2:58:13

71
Bijlage
7
Bijlage
“Blu-ray Disc” en zijn handelsmerken.
“BD-LIVE” logo is een handelsmerk van Blu-Ray
organisatie.
“BONUSVIEW” is een handelsmerk van Blu-Ray Disc
Association.
Java en alle op Java gebaseerde handelsmerken
en logo’s zijn handelsmerken of gedeponeerde
handelsmerken van Sun Microsystems, Inc. in de
Verenigde Staten en andere landen.
Gefabriceerd onder licentie van Dolby
Laboratories. Dolby en het dubbele-D-symbool
zijn handelsmerken van Dolby Laboratories.
Gefabriceerd onder licentie van een of meer van
de volgende Amerikaanse patenten: 5,451,942;
5,956,674; 5,974,380; 5,978,762; 6,226,616;
6,487,535; 7,392,195; 7,272,567; 7,333,929;
7,212,872 en andere verleende en aangevraagde
Amerikaanse en wereldwijde patenten. DTS en het
DTS-symbool zijn gedeponeerde handelsmerken.
DTS-HD, DTS-HD Master Audio l Essential en de
DTS logo’s zijn handelsmerken van DTS, Inc. Het
product bevat software van derden. © DTS, Inc.
Alle rechten voorbehouden.
HDMI, het HDMI Logo en High-De nition
Multimedia Interface zijn handelsmerken of
gedeponeerde handelsmerken van HDMI
Licensing, LLC in de Verenigde Staten en in andere
landen.
is een handelsmerk van DVD Format/Logo
Licentiebedrijf.
TM
DLNA en DLNA CERTIFIED zijn handelsmerken
en/of sevicemerken van Digital Living Network
Alliance.
DivX is een gedeponeerd handelsmerk van DivX,
Inc. en wordt in licentie gebruikt.
“x.v.Color” of “x.v.Colour” is een handelsmerk van
Sony Corporation.
Handelsmerken en licenties
HB985-DB.BDEUPPK_DUT.indd 71HB985-DB.BDEUPPK_DUT.indd 71 2010-05-14 2:58:132010-05-14 2:58:13

72
Bijlage
Bijlage
7
“AVCHD” en het “AVCHD” logo zijn handelsmerken
van Panasonic Corporation en Sony Corporation.
Dit product is gelicenseerd volgens de AVC
patent portfolio licentie en VC-1 patent portfolio
licentie voor het persoonlijke en niet-commercieel
gebruik van een consument voor het (i) coderen
van video volgens de AVC Standaard en VC-1
Standaard (“AVC/VC-1 Video) en/of (ii) coderen
van AVC/VC-1 video die gecodeerd werd door
een consument die betrokken is bij persoonlijke
en niet-commercieel activiteiten en/of werd
verkregen van een video provider die een licentie
heeft om AVC/VC-1 Video te verstrekken. Er
wordt geen licentie toegekend voor enig ander
gebruik, impliciet of expliciet. Extra informatie kan
verkregen worden van MPEG LA, LLC. Zie
http://www.mpegla.com.
De naam iPod is een handelsmerk van Apple
Computer, Inc. dat gedeponeerd is in de Verenigde
Staten en andere landen.
iPhone is een handelsmerk van Apple Inc.
“Made for iPod” betekent dat een elektronisch
accessoire speciaal voor aansluiting op een iPod is
ontwikkeld en door de ontwerper goedgekeurd
volgens de kwaliteitsnormen van Apple.
“Works with iPod” betekent dat een elektronisch
accessoire speciaal voor aansluiting op een iPod is
ontwikkeld en door de ontwerper goedgekeurd
volgens de kwaliteitsnormen van Apple.
Apple is niet verantwoordelijk voor de werking
van dit apparaat of het voldoen ervan aan de
veiligheidsnormen en de wettelijke normen.
Windows Media is een gedeponeerd handelsmerk
of een handelsmerk van Microsoft Corporation in de
Verenigde Staten en/of in andere landen.
Dit product bevat technologie die eigendom is van
Microsoft Corporation en deze kan niet worden
gebruikt of gedistribueerd zonder een licentie van
Microsoft Licensing, Inc.
®
Bluetooth® draadloze technologie is een systeem dat
radiocontact tussen elektronische apparaten binnen
een maximum afstand van 10 meter mogelijk maakt.
Voor het aansluiten van afzonderlijke apparaten door
middel van draadloze Bluetooth technologie zijn
geen kosten verschuldigd. Een mobiele telefoon met
draadloze Bluetooth technologie kan via de Cascade
worden gebruikt als de verbinding via draadloze
Bluetooth technologie wordt opgebouwd. Het
woordmerk en de logo’s van Bluetooth zijn eigendom
van Bluetooth SIG, Inc. en voor het gebruik daarvan
is aan Pioneer Corporation licentie verleend. Andere
handelsmerken en handelsnamen zijn eigendom van
de betre ende eigenaren.
HB985-DB.BDEUPPK_DUT.indd 72HB985-DB.BDEUPPK_DUT.indd 72 2010-05-14 2:58:142010-05-14 2:58:14

73
Bijlage
7
Bijlage
Technische gegevens
Algemeen
• Voeding:
AC 220-240 V, 50/ 60 Hz
• Opgenomen vermogen:
150 W
In standby-modus: minder dan 0,5 W.
• Afmetingen (bxhxd):
plm. 430 × 64 × 304 mm
• Netto gewicht (plm.):
3,6 kg
• Bedrijfstemperatuur:
41 °F t/m 95 °F (5 °C t/m 35 °C)
• Relatieve vochtigheid omgeving:
5 % t/m 90 %
• Usb-busvoeding:
DC 5 V gelijkstroom over
500 mA
Ingangen / uitgangen
• VIDEO OUT:
1,0 V (p-p), 75 Ω, negatieve synchronisatie,
1x RCA-aansluiting
• COMPONENT VIDEO OUT:
(Y) 1,0 V (p-p), 75 Ω, negatieve synchronisatie,
1x RCA-aansluiting, (Pb)/(Pr) 0,7 V (p-p), 75 ohm,
2 RCA-aansluitingen
• HDMI OUT (video/audio):
19-polig (HDMI-norm, type A, Versie 1.3)
• Analogue AUDIO IN:
2,0 Vrms (1 kHz, 0 dB), 600 Ω,
1 RCA aansluiting (L, R)
• DIGITAL IN (OPTICAL 1/2):
3 V (p-p), 2 optische aansluitpunten
• PORTABLE IN:
0,5 Vrms (3,5 mm stereoaansluiting)
Tuner
• Afstembereik fm-band:
87,5 t/m 108,0 MHz of 87,50 t/m 108,00 MHz
Versterker
• Uitgangsvermogen, (piekvermogen), (4 Ω/3 Ω)
Totaal 1100 W
Voorzijde 180 W x 2
Centre 180 W
Achter 180 W x 2
Sub-Woofer 200 W (Passive)
• Uitgangsvermogen, (RMS), THD 10 % (4 Ω/3 Ω)
Totaal 930 W
Voorzijde 150 W x 2
Centre 150 W
Achter 150 W x 2
Sub-Woofer 180 W (Passive)
Systeem
• Laser:
Halfgeleiderlaser,
Gol engte: 405 nm / 650 nm
• Signaalsysteem:
Standaard NTSC/PAL kleurentelevisiesysteem
• Frequentiegebied:
20 Hz – 20 kHz
(bemonstering bij 48, 96 en 192 kHz)
• LAN-poort:
Ethernet-aansluiting 1x, 10BASE-T/100BASE-TX
HB985-DB.BDEUPPK_DUT.indd 73HB985-DB.BDEUPPK_DUT.indd 73 2010-05-14 2:58:142010-05-14 2:58:14

74
Bijlage
Bijlage
7
Luidsprekers BCS-707
S-BD707
• Front/surround-luidsprekerbox (links/rechts)
Type: tweeweg
Gewogen impedantie: 4 Ω
Afmetingen 260 x 1097 x 260 mm
(bxhxd):
Netto gewicht: 3,8 kg
• Middenluidspreker
Type: eenweg
Gewogen impedantie: 4 Ω
Afmetingen 300 x 87x 65 mm
(bxhxd):
Netto gewicht: 0,6 kg
S-BD707SW
• Subwoofer
Type: eenweg, 1 luidspreker
Gewogen impedantie: 3 Ω
Afmetingen 130,5 x 420 x 375 mm
(bxhxd):
Netto gewicht: 4,4 kg
Luidsprekers BCS-303
S-BD303
• Front/surround-luidsprekerbox (links/rechts)
Type: eenweg
Gewogen impedantie: 4 Ω
Afmetingen 96 x 96 x 85 mm
(bxhxd):
Netto gewicht: 0,4 kg
• Middenluidspreker
Type: eenweg
Gewogen impedantie: 4 Ω
Afmetingen 300 x 87 x 65 mm
(bxhxd):
Netto gewicht: 0,6 kg
• Subwoofer
Type: eenweg, 1 luidspreker
Gewogen impedantie: 3 Ω
Afmetingen 130,5 x 420 x 375 mm
(bxhxd):
Netto gewicht: 4,4 kg
HB985-DB.BDEUPPK_DUT.indd 74HB985-DB.BDEUPPK_DUT.indd 74 2010-05-14 2:58:142010-05-14 2:58:14

75
Bijlage
7
Bijlage
Kennisgeving over
open-source software
De volgende in dit product gebruikte uitvoerbare
GPL-bestanden en LGPL-programmabibliotheken
zijn onderworpen aan licentieovereenkomsten voor
GPL2.0/LGPL2.1:
UITVOERBARE GPL-BESTANDEN: Linux kernel
2.6, bash, busybox, cramfs, dhcpcd, e2fsprogs, fdisk,
mkdosfs, mtd-utils, net-tools, procps, samba-3.0.25b,
sysutils, tcpdump, tftpd, tinylogin, unzip, utelnetd
LGPL-PROGRAMMABIBLIOTHEKEN: uClibc,
DirectFB, blow sh, cairo, mpeg, iconv, libusb,
mpg123
gSOAP Public License 1.3 BIBLIOTHEEK: gsoap
Een exemplaar van de corresponderende broncode
is verkrijgbaar door betaling van een vergoeding
voor de afgifte. Neem contact op met de
dichtstbijzijnde Pioneer klantenondersteuning om
een exemplaar van de broncode te verkrijgen.
Een exemplaar van de GPL en LGPL-licenties is
verkrijgbaar via http://www.gnu.org/licenses/old-
licenses/gpl-2.0.html en http://www.gnu.org/
licenses/old-licenses/lgpl-2.1.html.
U kunt ook een exemplaar van de openbare gSOAP-
licentie downloaden van
http://www.cs.fsu.edu/~engelen/license.html.
Deze software is gedeeltelijk gebaseerd op de
inbreng van de onafhankelijke JPEG Group copyright
© 1991 - 1998, Thomas G. Lane.
Dit product bevat:
• boost C++: copyright © Beman Dawes 1999-2003
• c-ares: copyright © 1998 by the Massachusetts
Institute of Technology
• curl: copyright © 1996 - 2008, Daniel Stenberg
• expat: copyright © 2006 expat maintainers
• freetype: copyright © 2003 The FreeType Project
(www.freetype.org).
• jpeg: Deze software is gedeeltelijk gebaseerd op
de inbreng van de onafhankelijke JPEG Group
copyright © 1991 - 1998, Thomas G. Lane.
• mng: copyright © 2000-2007 Gerard Juyn, Glenn
Randers-Pehrson
• ntp: copyright © David L. Mills 1992-2006
• OpenSSL:
– cryptogra sche software geschreven door Eric
Young (eay@cryptsoft.com).
– software geschreven door Tim Hudson
(tjh@cryptsoft.com).
– Software ontwikkeld door het OpenSSL Project
voor gebruik in de OpenSSL Toolkit.
(http://www.openssl.org)
• png: copyright © 2004 Glenn Randers-Pehrson
• portmap: copyright © 1990 The Regents of the
University of California.
• ptmalloc : copyright © 2001-2006 Wolfram Gloger
• UnitTest++: copyright © 2006 Noel Llopis and
Charles Nicholson
• UPnP SDK : copyright © 2000-2003 Intel
Corporation
• strace :
copyright © 1991, 1992 Paul Kranenburg
copyright © 1993 Branko Lankester
copyright © 1993 Ulrich Pegelow
copyright © 1995, 1996 Michael Elizabeth Chastain
copyright © 1993, 1994, 1995, 1996 Rick Sladkey
copyright © 1999,2000 Wichert Akkerman
• xml2 : copyright © 1998-2003 Daniel Veillard
• XML-RPC For C/C++:
• copyright © 2001 by First Peer, Inc. Alle rechten
voorbehouden.
• copyright © 2001 by Eric Kidd. Alle rechten
voorbehouden.
• zlib: copyright © 1995-2002 Jean-Loup Gailly en
Mark Adler.
Alle rechten voorbehouden.
Hierbij wordt aan elke persoon die een
exemplaar van deze software en de bijbehorende
documentatiebestanden (de “Software”) verkrijgt
zonder kosten toestemming verleend om deze
software onbeperkt te verhandelen, inclusief het
onbeperkte recht tot het gebruiken, kopiëren,
wijzigen, integreren, publiceren, distribueren, in
onderlicentie geven en/of verkopen van kopieën
van de software en personen aan wie de software is
verstrekt toe te staan aldus te handelen, mits aan de
volgende voorwaarden wordt voldaan:
DE SOFTWARE WORDT ALS ZODANIG VERSTREKT
ZONDER ENIGE NADRUKKELIJKE OF IMPLICIETE
GARANTIE DAN OOK, INCLUSIEF MAAR NIET BEPERKT
TOT DE GARANTIES VAN VERKOOPBAARHEID,
GESCHIKTHEID VOOR EEN BEPAALD DOEL EN
NIET-INBREUKMAKING. DE SCHRIJVERS OF DE
RECHTHEBBENDEN OP DE AUTEURSRECHTEN
ZULLEN IN GEEN GEVAL AANSPRAKELIJK ZIJN
VOOR ENIGE CLAIM, SCHADE OF ANDERE
AANSPRAKELIJKHEID ALS GEVOLG VAN EEN
CONTRACTUELE VERPLICHTING, ONRECHTMATIGE
DAAD OF ANDERSZINS, VOORTKOMEND UIT OF IN
VERBAND MET DE SOFTWARE OF HET GEBRUIK VAN
OF ANDERE TRANSACTIES IN DE SOFTWARE.
HB985-DB.BDEUPPK_DUT.indd 75HB985-DB.BDEUPPK_DUT.indd 75 2010-05-14 2:58:142010-05-14 2:58:14

76
Bijlage
Bijlage
7
Declaration of Conformity with regard to the R&TTE Directive 1999/5/EC
Manufacturer:
Pioneer Corporation
1-1, SHIN-OGURA, SAIWAI-KU,
KAWASAKI-SHI,
KANAGAWA-KEN 212-0031, JAPAN
EU Representative’s:
Pioneer Europe NV
Haven 1087, Keetberglaan 1,
9120 Melsele, Belgium
http://www.pioneer.eu
English:
Hereby, Pioneer, declares that this BCS-707
(BCS-303) is in compliance with the essential
requirements and other relevant provisions
of Directive 1999/5/EC.
Suomi:
Pioneer vakuuttaa täten että BCS-707 (BCS-
303) tyyppinen laite on direktiivin 1999/5/
EY oleellisten vaatimusten ja sitä koskevien
direktiivin muiden ehtojen mukainen.
Nederlands:
Hierbij verklaart Pioneer dat het toestel BCS-
707 (BCS-303) in overeenstemming is met
de essentiële eisen en de andere relevante
bepalingen van richtlijn 1999/5/EG.
Français:
Par la présente Pioneer déclare que
l’appareil BCS-707 (BCS-303) est conforme
aux exigences essentielles et aux autres
dispositions pertinentes de la directive
1999/5/CE.
Svenska:
Härmed intygar Pioneer att denna BCS-707
(BCS-303) står I överensstämmelse med de
väsentliga egenskapskrav ch övriga relevanta
bestämmelser som framgår av direktiv
1999/5/EG.
Dansk:
Undertegnede Pioneer erklærer herved,
at følgende udstyr BCS-707 (BCS-303)
overholder de væsentlige krav og øvrige
relevante krav i direktiv 1999/5/EF.
Deutsch:
Hiermit erklärt Pioneer, dass sich dieses BCS-
707 (BCS-303) in Übereinstimmung mit den
grundlegenden Anforderungen und den
anderen relevanten Vorschriften der Richtlinie
1999/5/EG.
Ελληνικά:
ΜΕ ΤΗΝ ΠΑΡΟΥΣΑ Pioneer ΔΗΛΩΝΕΙ ΟΤΙ
BCS-707 (BCS-303) ΣΥΜΜΟΡΦΩΝΕΤΑΙ ΠΡΟΣ
ΤΙΣ ΟΥΣΙΩΔΕΙΣ ΑΠΑΙΤΗΣΕΙΣ ΚΑΙ ΤΙΣ ΛΟΙΠΕΣ
ΣΧΕΤΙΚΕΣ ΔΙΑΤΑΞΕΙΣ ΤΗΣ ΟΔΗΓΙΑΣ 1999/5/
ΕΚ.
Italiano:
Con la presente Pioneer dichiara che questo
BCS-707 (BCS-303) è conforme ai requisiti
essenziali ed alle altre disposizioni pertinenti
stabilite dalla direttiva 1999/5/CE.
Español:
Por medio de la presente Pioneer declara
que el BCS-707 (BCS-303) cumple con los
requisitos esenciales y cualesquiera otras
disposiciones aplicables o exigibles de la
Directiva 1999/5/CE.
HB985-DB.BDEUPPK_DUT.indd 76HB985-DB.BDEUPPK_DUT.indd 76 2010-05-14 2:58:142010-05-14 2:58:14

77
Bijlage
7
Bijlage
Português:
Pioneer declara que este BCS-707 (BCS-303)
está conforme com os requisitos essenciais e
outras disposições da Directiva 1999/5/CE.
Čeština:
Pioneer tímto prohlašuje, že tento BCS-
707 (BCS-303) je ve shodě se základními
požadavky a dalšími příslušnými
ustanoveními směrnice 1999/5/ES.
Eesti:
Käesolevaga kinnitab Pioneer seadme BCS-
707 (BCS-303) vastavust direktiivi 1999/5/
EÜ põhinõuetele ja nimetatud direktiivist
tulenevatele teistele asjakohastele sätetele.
Magyar:
Alulírott, Pioneer nyilatkozom, hogy a BCS-
707 (BCS-303) megfelel a vonatkozó alapvetõ
követelményeknek és az 1999/5/EC irányelv
egyéb elõírásainak.
Latviešu valoda:
Ar šo Pioneer deklarē, ka BCS-707 (BCS-
303) atbilst Direktīvas 1999/5/EK būtiskajām
prasībām un citiem ar to saistītajiem
noteikumiem.
Lietuvių kalba:
Šiuo Pioneer deklaruoja, kad šis BCS-707 (BCS-
303) (BCS-303) atitinka esminius reikalavimus
ir kitas 1999/5/EB Direktyvos nuostatas.
Malti:
Hawnhekk, Pioneer jiddikjara li dan BCS-707
(BCS-303) jikkonforma mal-ħtiġijiet essenzjali
u ma provvedimenti oħrajn relevanti li hemm
d-Dirrettiva 1999/5/EC.
Slovenčina:
Pioneer týmto vyhlasuje, že BCS-707 (BCS-
303) spĺňa základné požiadavky a všetky
príslušné ustanovenia Smernice 1999/5/ES.
Slovenščina:
Pioneer izjavlja, da je ta BCS-707 (BCS-303) v
skladu z bistvenimi zahtevami in ostalimi
relevantnimi določili direktive 1999/5/ES.
Română:
Prin prezenta, Pioneer declara ca acest
BCS-707 (BCS-303) este in conformitate
cu cerintele esentiale si alte prevederi ale
Directivei 1999/5/EU.
български:
С настоящето, Pioneer декларира, че
този BCS-707 (BCS-303) отговаря на
основните изисквания и други съответни
постановления на Директива 1999/5/EC.
Polski:
Niniejszym Pioneer oświadcza, że BCS-
707 (BCS-303) jest zgodny z zasadniczymi
wymogami oraz pozostałymi stosownymi
postanowieniami Dyrektywy 1999/5/EC.
Norsk:
Pioneer erklærer herved at utstyret BCS-
707 (BCS-303) er i samsvar med de
grunnleggende krav og øvrige relevante krav
i direktiv 1999/5/EF.
Íslenska:
Hér með lýsir Pioneer y r því að BCS-707
(BCS-303) er í samræmi við grunnkröfur
og aðrar kröfur, sem gerðar eru í tilskipun
1999/5/EC.
HB985-DB.BDEUPPK_DUT.indd 77HB985-DB.BDEUPPK_DUT.indd 77 2010-05-14 2:58:142010-05-14 2:58:14

http://www.pioneer.co.uk
http://www.pioneer.fr
http://www.pioneer.de
http://www.pioneer.it
http://www.pioneer.nl
http://www.pioneer.be
http://www.pioneer.es
http://www.pioneer.eu
Published by Pioneer Corporation.
Copyright © 2010 Pioneer Corporation.
All rights reserved.
Publication de Pioneer Corporation.
© 2010 Pioneer Corporation.
Tous droits de reproduction et de traduction réservés.
Printed in Indonesia / Imprimé en Indonesia
PIONEER CORPORATION
1-1, Shin-ogura, Saiwai-ku, Kawasaki-shi, Kanagawa 212-0031, Japan
PIONEER ELECTRONICS (USA) INC.
P.O. BOX 1540, Long Beach, California 90801-1540, U.S.A. TEL: (800) 421-1404
PIONEER ELECTRONICS OF CANADA, INC.
300 Allstate Parkway, Markham, Ontario L3R 0P2, Canada TEL: 1-877-283-5901, 905-479-4411
PIONEER EUROPE NV
Haven 1087, Keetberglaan 1, B-9120 Melsele, Belgium TEL: 03/570.05.11
PIONEER ELECTRONICS ASIACENTRE PTE. LTD.
253 Alexandra Road, #04-01, Singapore 159936 TEL: 65-6472-7555
PIONEER ELECTRONICS AUSTRALIA PTY. LTD.
178-184 Boundary Road, Braeside, Victoria 3195, Australia, TEL: (03) 9586-6300
PIONEER ELECTRONICS DE MEXICO S.A. DE C.V.
Blvd.Manuel Avila Camacho 138 10 piso Col.Lomas de Chapultepec, Mexico, D.F. 11000
TEL: 55-9178-4270
HB985-DB.BDEUPPK_DUT.indd 78HB985-DB.BDEUPPK_DUT.indd 78 2010-05-14 2:58:142010-05-14 2:58:14
Transcripción de documentos
ENGLISH FRANÇAIS BCS-707 XV-BD707 DEUTSCH S-BD707T ITALIANO S-BD707SW BCS-303 ESPAÑOL XV-BD707 NEDERLANDS S-BD303 P/NO: MFL65220804 HB985-DB.BDEUPPK_ENG.indd 1 2010-05-14 1:41:21 2 1 Safety Information Safety Information 1 Safety Information CAUTION RISK OF ELECTRIC SHOCK DO NOT OPEN CAUTION: TO REDUCE THE RISK OF ELECTRIC SHOCK DO NOT REMOVE COVER (OR BACK) NO USER-SERVICEABLE PARTS INSIDE REFER SERVICING TO QUALIFIED SERVICE PERSONNEL. This lightning flash with arrowhead symbol within an equilateral triangle is intended to alert the user to the presence of uninsulated dangerous voltage within the product’s enclosure that may be of sufficient magnitude to constitute a risk of electric shock to persons. The exclamation point within an equilateral triangle is intended to alert the user to the presence of important operating and maintenance (servicing) instructions in the literature accompanying the product. Cautions and Warnings WARNING: TO PREVENT FIRE OR ELECTRIC SHOCK HAZARD, DO NOT EXPOSE THIS PRODUCT TO RAIN OR MOISTURE. WARNING: Do not install this equipment in a confined space such as a book case or similar unit. CAUTION: Do not block any ventilation openings. Install in accordance with the manufacturer’s instructions. Slots and openings in the cabinet are provided for ventilation and to ensure reliable operation of the product and to protect it from over heating. The openings shall be never be blocked by placing the product on a bed, sofa, rug or other similar surface. This product shall not be placed in a builtin installation such as a bookcase or rack unless proper ventilation is provided or the manufacturer’s instruction has been adhered to. CAUTION: This product is a class 1 laser product classified under the Safety of laser products, IEC60825-1:2007. To ensure proper use of this product, please read this owner’s manual carefully and retain it for future reference. Shall the unit require maintenance, contact an authorized service centre. Use of controls, adjustments or the performance of procedures other than those specified herein may result in hazardous radiation exposure. To prevent direct exposure to laser beam, do not try to open the enclosure. Visible laser radiation when open. DO NOT STARE INTO BEAM. HB985-DB.BDEUPPK_ENG.indd 2 2010-05-14 1:41:40 Safety Information CAUTION concerning the Power Cord Most appliances recommend they be placed upon a dedicated circuit; This device is equipped with a portable battery or accumulator. Safety way to remove the battery or the battery from the equipment: Remove the old battery or battery pack, follow the steps in reverse order than the assembly. To prevent contamination of the environment and bring on possible threat to human and animal health, the old battery or the battery put it in the appropriate container at designated collection points. Do not dispose of batteries or battery together with other waste. It is recommended that you use local, free reimbursement systems batteries and accumulators. The battery shall not be exposed to excessive heat such as sunshine, fire or the like. 1 Safety Information That is, a single outlet circuit which powers only that appliance and has no additional outlets or branch circuits. Check the specification page of this owner’s manual to be certain. Do not overload wall outlets. Overloaded wall outlets, loose or damaged wall outlets, extension cords, frayed power cords, or damaged or cracked wire insulation are dangerous. Any of these conditions could result in electric shock or fire. Periodically examine the cord of your appliance, and if its appearance indicates damage or deterioration, unplug it, discontinue use of the appliance, and have the cord replaced with an exact replacement part by an authorized service centre. Protect the power cord from physical or mechanical abuse, such as being twisted, kinked, pinched, closed in a door, or walked upon. Pay particular attention to plugs, wall outlets, and the point where the cord exits the appliance. To disconnect power from the mains, pull out the mains cord plug. When installing the product, ensure that the plug is easily accessible. 3 CAUTION: The apparatus shall not be exposed to water (dripping or splashing) and no objects filled with liquids, such as vases, shall be placed on the apparatus. PIONEER hereby declares that this/ these product(s) is/are in compliance with the essential requirements and other relevant provisions of Directive 2004/108/EC, 2006/95/EC, and 2009/125/EC. WARNING: To prevent a fire hazard, do not place any naked flame sources (such as a lighted candle) on the equipment. HB985-DB.BDEUPPK_ENG.indd 3 2010-05-14 1:41:41 4 Safety Information Information for users on collection and disposal of old equipment and used batteries 1 Safety Information Pb Symbol examples for batteries These symbols on the products, packaging, and/or accompanying documents mean that used electrical and electronic products and batteries should not be mixed with general household waste. For proper treatment, recovery and recycling of old products and used batteries, please take them to applicable collection points in accordance with your national legislation. By disposing of these products and batteries correctly, you will help to save valuable resources and prevent any potential negative effects on human health and the environment which could otherwise arise from inappropriate waste handling. For more information about collection and recycling of old products and batteries, please contact your local municipality, your waste disposal service or the point of sale where you purchased the items. These symbols are only valid in the European Union. For countries outside the European Union: If you wish to discard these items, please contact your local authorities or dealer and ask for the correct method of disposal. HB985-DB.BDEUPPK_ENG.indd 4 Notes on Copyrights • Because AACS (Advanced Access Content System) is approved as content protection system for BD format, similar to use of CSS (Content Scramble System) for DVD format, certain restrictions are imposed on playback, analogue signal output, etc., of AACS protected contents. The operation of this product and restrictions on this product may vary depending on your time of purchase as those restrictions may be adopted and/or changed by AACS after the production of this product. • Furthermore, BD-ROM Mark and BD+ are additionally used as content protection systems for BD format, which imposes certain restrictions including playback restrictions for BD-ROM Mark and/or BD+ protected contents. To obtain additional information on AACS, BD-ROM Mark, BD+, or this product, please contact an authorized Customer Service Centre. • Many BD-ROM/DVD discs are encoded with copy protection. Because of this, you should only connect your player directly to your TV, not to a VCR. Connecting to a VCR results in a distorted picture from copy-protected discs. • This product incorporates copyright protection technology that is protected by U.S. patents and other intellectual property rights. Use of this copyright protection technology must be authorized by Rovi Corporation, and is intended for home and other limited viewing uses only unless otherwise authorized by Rovi Corporation. Reverse engineering or disassembly is prohibited. • Under the U.S. Copyright laws and Copyright laws of other countries, unauthorized recording, use, display, distribution, or revision of television programmes, videotapes, BD-ROM discs, DVDs, CDs and other materials may subject you to civil and/or criminal liability. 2010-05-14 1:41:41 Safety Information 5 Important Notice for TV colour system The colour system of this player differs according to currently playing discs. For example, when the player plays the disc recorded in the NTSC colour system, the image is output as an NTSC signal. 1 Safety Information Only the multi system colour TV can receive all signals output from the player. • If you have a PAL colour system TV, you will see just distorted images when using discs or video contents recorded in NTSC. • The multi system colour TV changes the colour system automatically according to input signals. In case that the colour system is not changed automatically, turn it off and then on to see normal images on screen. • Even if the disc recorded in NTSC colour system are well displayed on your TV, these may not be recorded correctly on your recorder. HB985-DB.BDEUPPK_ENG.indd 5 2010-05-14 1:41:41 6 Contents 3 Installation 16 16 1 Safety Information 2 Cautions and Warnings Speaker Setup for BCS-303 19 Wall mounting the centre speaker 19 Additional notes on speaker 20 Introduction 8 About the “ ” Symbol Display 8 Positioning the system Connecting to Your TV 21 HDMI Connection 22 Component Video Connection 23 Video Connection Preparation 8 Speaker Setup for BCS-707 18 21 2 Assemble the speakers 23 Resolution Setting 24 Antenna connection Symbols Used in this Manual 24 Connections with external device Supplied Accessories 24 AUX Connection 10 Playable Discs 25 PORTABLE IN connection 11 File compatibility 25 OPTICAL IN 1/2 connection 12 Regional Code 26 Bluetooth® connection 12 AVCHD (Advanced Video Codec High Definition) 28 29 Network Setup 12 Certain System Requirements 31 USB device connection 12 Compatibility Notes 32 Settings 9 Connecting to your Home Network 13 Remote control 32 14 Front panel 33 [DISPLAY] Menu 15 Rear panel 34 [LANGUAGE] Menu 35 [AUDIO] Menu 36 [LOCK] Menu 37 [NETWORK] Menu 37 39 HB985-DB.BDEUPPK_ENG.indd 6 Adjust the Setup Settings [OTHERS] Menu Sound Effect 2010-05-14 1:41:41 7 4 7 Operation Appendix 40 General Playback 67 42 Advanced Playback Controlling a TV with the Supplied Remote Control 44 On-Screen display 68 Area Code List 48 Enjoying BD-LIVE 69 Language code List Playing movie file and VR discs 70 Video output resolution 51 Viewing a photo 71 Trademarks and Licences 53 Listening to music 73 Specifications 56 Playing the iPod 75 Open source software notice 58 Radio Operations 59 Playing content via your home network 49 1 2 3 5 4 Maintenance 63 Notes on Discs 63 Handling the Unit 5 6 Troubleshooting 64 General 65 Picture 65 Sound 66 Network 6 7 8 HB985-DB.BDEUPPK_ENG.indd 7 2010-05-14 1:41:41 8 Preparation 2 Preparation 2 Introduction Preparation About the “ ” Symbol Display “ ” may appear on your TV display during operation and indicates that the function explained in this owner’s manual is not available on that specific media. Symbols Used in this Manual NOTE Indicates special notes and operating features. A section whose title has one of the following symbols are applicable only to the disc represented by the symbol. BD BD-ROM disc DVD DVD-Video, DVD±R/RW in Video mode or VR mode and finalized AVCHD DVD±R/RW in AVCHD format ACD Audio CDs MOVIE Movie files MUSIC Music files PHOTO Photo files CAUTION Indicate cautions for preventing possible damages from abuse. HB985-DB.BDEUPPK_ENG.indd 8 2010-05-14 1:41:41 Preparation Supplied Accessories Video cable (1) FM antenna (1) Accessaries of speaker box (S-BD707SW) Speaker cable (1) Accessaries of speaker box (S-BD303) Colour-coded Speaker cables (6) iPod cradle (1) Large non-skid pads (1) 2 Preparation Battery (1) Remote control (1) 9 Small non-skid pads (1) Accessaries of speaker box (S-BD707T) Large non-skid pads (1) Colour-coded Speaker cables (5) Screws (12) Speaker stand bases (4) Small non-skid pads (1) Middle non-skid pads (1) HB985-DB.BDEUPPK_ENG.indd 9 2010-05-14 1:41:41 10 Preparation Playable Discs Blu-ray Disc - Discs such as movies that can be purchased or rented. - BD-R/RE discs that contain Movie, Music or Photo files. 2 Preparation DVD-VIDEO 8 / 12 cm disc Discs such as movies that can be purchased or rented. DVD±R 8 / 12 cm disc - Video mode and finalized only - Supports the dual layer disc also - Finalized AVCHD format - DVD±R discs that contain Movie, Music or Photo files DVD-RW 8 / 12 cm disc - VR mode, Video mode and finalized only - Finalized AVCHD format - DVD-RW discs that contain Movie, Music or Photo files. DVD+RW 8 / 12 cm disc - Video mode and finalized only - AVCHD format - Finalized AVCHD format - DVD+RW discs that contain Movie, Music or Photo files. NOTE • Depending on the conditions of the recording equipment or the CD-R/RW (or DVD±R/RW) disc itself, some CD-R/RW (or DVD±R/RW) discs cannot be played on the unit. • Depending on the recording software & the finalization, some recorded discs (CD-R/RW, DVD±R/RW, BD-R/RE) may not be playable. • BD-R/RE, DVD±R/RW and CD-R/RW discs recorded using a personal computer or a DVD or CD Recorder may not play if the disc is damaged or dirty, or if there is dirt or condensation on the player’s lens. • If you record a disc using a personal computer, even if it is recorded in a compatible format, there are cases in which it may not play because of the settings of the application software used to create the disc. (Check with the software publisher for more detailed information.) • This player requires discs and recordings to meet certain technical standards in order to achieve optimal playback quality. • Pre-recorded DVDs are automatically set to these standards. There are many different types of recordable disc formats (including CD-R containing MP3 or WMA files) and these require certain pre-existing conditions to ensure compatible playback. • Customers should note that permission is required in order to download MP3 / WMA files and music from the Internet. Our company has no right to grant such permission. Permission should always be sought from the copyright owner. Audio CD 8 / 12 cm disc CD-R/RW 8 / 12 cm disc - CD-R/RW discs that contain audio titles, Movie, Music or Photo files. HB985-DB.BDEUPPK_ENG.indd 10 2010-05-14 1:41:42 Preparation File compatibility NOTE Overall • HD movie files contained on the CD or USB 1.0/1.1 may not played properly. BD, DVD or USB 2.0 are recommended to play back HD movie files. Available File extensions: “.jpg”, “.jpeg”, “.png”, “.avi”, “.divx”, “.mpg”, “.mpeg”, “.mkv”, “.mp4”, “.mp3”, “.wma”, “.wav” Available file extensions differ depending on the DLNA servers. • Some “.wav” files are not supported on this player. • The file name is limited to 180 characters. • Depending on the size and number of the files, it may take several minutes to read the contents on the media. Maximum Files/Folder: Less than 2 000 (total number of files and folders) CD-R/RW, DVD±R/RW, BD-R/RE Format: ISO 9660+JOLIET, UDF and UDF Bridge format MOVIE Available resolution size: 1 920 x 1 080 (W x H) pixels Playable subtitle: SubRip (.srt / .txt), SAMI (.smi), SubStation Alpha (.ssa/.txt), MicroDVD (.sub/.txt), VobSub (.sub), SubViewer 1.0 (.sub), SubViewer 2.0 (.sub/.txt), TMPlayer (.txt), DVD Subtitle System (.txt) VobSub (.sub) is not available in the [Home Link] feature. Playable Codec format: “DIVX3.xx”, “DIVX4. xx”, “DIVX5.xx”, “XVID”, “DIVX6.xx” (Standard playback only), H.264/MPEG-4 AVC, MPEG1 SS, MPEG2 PS, MPEG2 TS Playable Audio format: “Dolby Digital”, “DTS”, “MP3”, “WMA”, “AAC”, “AC3” • This player supports H.264/MPEG-4 AVC profile Main, High at Level 4.1. For a file with higher level, the warning message will appear on the screen. • This player does not support the files that are recorded with GMC*1 or Qpel*2. Those are video encoding techniques in MPEG4 standard, like DivX or XVID have. *1 GMC – Global Motion Compensation *2 Qpel – Quarter pixel MUSIC Sampling frequency: between 8 kHz to 48 KHz (WMA), between 11 kHz to 48 kHz (MP3) Bit rate: between 8 kbps to 320 kbps (WMA, MP3), NOTE • This unit cannot support the ID3 Tag embedded MP3 file. • The total playback time indicated on the screen may not be correct for VBR files. • • Not all the WMA and AAC Audio formats are compatible with this unit. Sampling frequency: between 32 kHz to 48 kHz (WMA), between 16 kHz to 48 kHz (MP3) Bit rate: between 20 kbps to 320 kbps (WMA), between 32 kbps to 320 kbps (MP3) HB985-DB.BDEUPPK_ENG.indd 11 2 Preparation • 11 PHOTO Recommended size: Less than 4,000 x 3,000 x 24 bit/pixel Less than 3,000 x 3,000 x 32 bit/pixel Less than 4 MByte/file • Progressive and lossless compression photo image files are not supported. 2010-05-14 1:41:42 12 2 Preparation Regional Code Certain System Requirements This unit has a regional code printed on the rear of the unit. This unit can play only BD-ROM or DVD discs labeled same as the rear of the unit or “ALL”. For high definition video playback: AVCHD (Advanced Video Codec High Definition) Preparation • This player can playback AVCHD format discs. These discs are normally recorded and used in camcorders. • The AVCHD format is a high definition digital video camera format. • The MPEG-4 AVC/H.264 format is capable of compressing images at higher efficiency than that of the conventional image compressing format. • Some AVCHD discs use the “x.v.Colour” format. • This player can playback AVCHD discs using “x.v.Colour” format. • Some AVCHD format discs may not play, depending on the recording condition. • AVCHD format discs need to be finalized. • “x.v.Colour” offers a wider colour range than normal DVD camcorder discs. HB985-DB.BDEUPPK_ENG.indd 12 • High definition display that has COMPONENT or HDMI input jacks. • BD-ROM disc with high definition content. • HDMI or HDCP capable DVI input on your display device is required for some content (as specified by disc authors). • For up-conversion of standard definition DVD, a HDMI or HDCP capable DVI input on your display device is required for copy protected content. Compatibility Notes • Because BD-ROM is a new format, certain disc, digital connection and other compatibility issues are possible. If you experience compatibility problems, please contact an authorized Customer Service Centre. • Viewing high-definition content and upconverting standard DVD content may require a HDMI-capable input or HDCPcapable DVI input on your display device. • Some BD-ROM and DVD discs may restrict the use of some operation commands or features. • You can use a USB device that is used to store some disc related information, including downloaded on-line content. The disc you are using will control how long this information is retained. 2010-05-14 1:41:42 Preparation 13 Remote control 1 MUTE: Mute the unit. 1 (STANDBY/ON): Switches the player ON or OFF. SOUND: Selects a sound effect mode. Z OPEN/CLOSE: Opens and closes the disc tray. VOL +/- : Adjusts speaker volume. INPUT/TUNER: Changes input mode. 0-9 numerical buttons: Selects numbered options in a menu. BT AUDIO: Changes input mode to BT AUDIO directly. MARKER: Marks any point during playback. OPTICAL: Changes input mode to optical directly. SEARCH: Displays or exits the search menu. DISPLAY: Displays or exits OnScreen Display. REPEAT: Repeats a desired section or sequence. HOME MENU: Displays or exits the [Home Menu]. CLEAR: Removes a mark on the search menu or a number when setting the password. MENU: Accesses the menu on a disc. Direction buttons: Selects an option in the menu. 3 Remove the battery cover on the rear of the Remote Control, and insert a R03 (size AAA) battery with and matched correctly. ZOOM: Accesses the zoom menu. Coloured (A, B, C, D) buttons: Use to navigate on menus. TUNE (+/-): Tunes in the desired radio station. - A button (RDS): Radio Data System. PRESET: Selects programme of Radio. - B button (PTY): Views the programme type of the RDS. • • • • • • • • • b • • • • • • • • • - C button (PTY SEARCH): Searches programme type. POPUP/ TOP MENU: Displays the DVD title menu or BD-ROM’s popup menu, if available. x STOP: Stops playback. B PLAY: Starts playback. 2 DIMMER: Dims the light on the unit. ENTER: Acknowledges menu selection. O RETURN: Exits the menu or resumes playback. Battery Installation • • • • • • • • • c • • • • • • • • • Preparation 2 • • • • • • • • • a • • • • • • • • • - D button: Selects MONO or STEREO in FM mode. TV Control Buttons: See page 67. SLEEP: Sets a certain period of time after which the unit will switch to off. X PAUSE/STEP: Pauses playback ./> SKIP: Goes to the next or previous chapter / track / file. m/M SCAN: Searches backward or forward. SPK LEVEL: Sets the sound level of desired speaker. z USB REC: Records an audio CD. HB985-DB.BDEUPPK_ENG.indd 13 2010-05-14 1:41:42 14 Preparation Front panel 1 2 2 Preparation 3 4 a Disc Tray c Remote sensor b Operation buttons 1 STANDBY/ON Button Z (OPEN/CLOSE) FUNCTION Changes the input source or function B/X (PLAY / PAUSE) x (STOP) ./> (SKIP) - TUNE + (Radio tuning) d Display window HB985-DB.BDEUPPK_ENG.indd 14 5 6 7 e PORTABLE IN f USB Port g Volume control 2010-05-14 1:41:43 Preparation 15 Rear panel 1 2 3 4 5 2 7 8 9 10 Preparation 6 11 a AC Power cord Plug into the power source. g COMPONENT VIDEO (Y PB PR) OUTPUT (PROGRESSIVE SCAN) b Speakers connectors h OPTICAL IN 1(TV) / 2 c Cooling Fan i iPod (24 pin) Connect to the furnished iPod cradle. d Antenna Connector e VIDEO OUT f AUX (L/R) INPUT HB985-DB.BDEUPPK_ENG.indd 15 j HDMI OUT (type A, Version 1.3) Connect to TV with HDMI inputs. k LAN port 2010-05-14 1:41:43 16 Installation 3 Installation Assemble the speakers 3 For centre speaker: Use the supplied adhesive to attach four small pads to the base of centre speaker. Installation Speaker Setup for BCS-707 small non-skid pads Preparing the speakers 1. Attach the non-skid pads to the base of each speaker stand bases, the subwoofer and the centre speaker. For speaker stand bases: Use the supplied adhesive to attach four middle pads to the base (bottom) of each speaker stand base. middle non-skid pads 2. Attach the speaker stand bases to the stems using the screws provided. Once you have aligned the stem and base, secure with the small screws at the points shown below. Note that the speaker should face in the direction of the base of the isosceles triangle. For subwoofer: Use the supplied adhesive to attach four large pads to the base of subwoofer. Rear large non-skid pads Front HB985-DB.BDEUPPK_ENG.indd 16 2010-05-14 1:41:43 Installation 3. Connect the wires to the player. Connect the white wire with gray line into (+) side and the other wire into (–) side. To connect the cable to the player, press each plastic finger pad to open the connection terminal. Insert the wire and release the finger pad. Coloured (+) 17 Securing your front and surround speakers Secure each of the front and surround speakers using the plastic catch provided. Screw two supporting hooks into the wall behind the speaker. Pass a thick cord around the hooks and through the plastic catch so that the speaker is stabilized (make sure to test that it supports the weight of the speaker). After installing, make sure the speaker is securely fixed. 3 Installation thick cord CAUTION Plastic catch • Do not connect any speakers other than those supplied to this system. • Do not connect the supplied speakers to any amplifier other than the one supplied with this system. Connection to any other amplifier may result in malfunction or fire. CAUTION • The plastic catch is not a mounting fixture, and the speaker should not be hung directly from the wall using this catch. Always use a cord when stabilizing the speaker. • Pioneer disclaims all responsibility for any losses or damage resulting from improper assembly, installation, insufficient strength of the installation materials, misuse, or natural disasters. • When placing this unit, ensure that it is firmly secured and avoid areas where it may be likely to fall and cause injury in the event of a natural disaster (such as an earthquake). HB985-DB.BDEUPPK_ENG.indd 17 2010-05-14 1:41:44 18 Installation Speaker Setup for BCS-303 Preparing the speakers 1. Attach the non-skid pads to the base of each speaker. For centre speaker: Use the supplied adhesive to attach four small pads to the base of centre speaker. small non-skid pads For speaker stand bases: Use the supplied adhesive to attach four middle pads to the base (bottom) of each speaker stand base. small non-skid pads 3 2. Connect the wires to the player. Installation Connect the white wire with gray line into (+) side and the other wire into (–) side. To connect the cable to the player, press each plastic finger pad to open the connection terminal. Insert the wire and release the finger pad. For subwoofer: Use the supplied adhesive to attach four large pads to the base of subwoofer. Coloured (+) large non-skid pads HB985-DB.BDEUPPK_ENG.indd 18 2010-05-14 1:41:44 Installation Wall mounting the centre speaker Additional notes on speaker The centre speaker have a mounting hole which can be used to mount the speaker on the wall. Install the main front left and right speakers at an equal distance from the TV. 19 Precautions: Before mounting Mounting screws are not supplied. Use screws suitable for the wall material and support the weight of the speaker. CAUTION • If you are unsure of the qualities and strength of the wall, consult a professional for advice. • Pioneer is not responsible for any accidents or damage that result from improper installation. Make sure that all the bare speaker wire is twisted together and inserted fully into the speaker terminal. If any of the bare speaker wire touches the back panel it may cause the power to cut off as a safety measure. The front, centre and surround speakers supplied with this system are magnetically shielded. However, depending on the installation location, colour distortion may occur if the speaker is installed extremely close to the screen of a television set. If this case happens, turn the power switch of the television set OFF, and turn it ON after 15 min. to 30 min. If the problem persists, place the speaker system away from the television set. 3 Installation Remember that the speaker system is heavy and that its weight could cause the screws to work loose, or the wall material to fail to support it, resulting in the speaker falling. Make sure that the wall you intend to mount the speakers on is strong enough to support them. Do not mount on plywood or soft surface walls. The subwoofer is not magnetically shielded and so should not be placed near a TV or monitor. Magnetic storage media (such as floppy discs and tape or video cassettes) should also not be kept close to the subwoofer. Do not attach the front/surround speakers and subwoofer to a wall or ceiling. They may fall off and cause injury. Mounting screw (not supplied) 5 mm 10 mm 5 mm to 7 mm HB985-DB.BDEUPPK_ENG.indd 19 2010-05-14 1:41:44 20 Installation Positioning the system The following illustration shows an example of positioning the system. Note that the illustrations in these instructions differ from the actual unit for explanation purposes. For the best possible surround sound, all the speakers other than the subwoofer should be placed at the same distance from the listening position (A). C A G Installation F A A • Place the centre speaker at a safe distance from the child’s reach. Otherwise it may result in the speaker falling down and causing personal injury and/or property damage. A A D • Be careful to make sure children do not put their hands or any objects into the *subwoofer duct. *subwoofer duct: A hole for plentiful bass sound on subwoofer cabinet (enclosure). • The speakers contain magnet parts, so colour irregularity may occur on the TV screen or PC monitor screen. Please use the speakers away from the TV screen or PC monitor screen. B 3 CAUTION E A A Front left speaker (L)/ B Front right speaker (R): Place the front speakers to the sides of the monitor or screen and as flush with the screen surface as possible. C Centre speaker: Place the centre speaker above or below the monitor or screen. D Surround left speaker (L)/ E Surround right speaker (R): Place these speakers behind your listening position, facing slightly inwards. F Subwoofer: The position of the subwoofer is not so critical, because low bass sounds are not highly directional. But it is better to place the subwoofer near the front speakers. Turn it slightly toward the centre of the room to reduce the wall reflections. G Unit HB985-DB.BDEUPPK_ENG.indd 20 2010-05-14 1:41:45 Installation Connecting to Your TV Make one of the following connections, depending on the capabilities of your existing equipment. • HDMI connection (pages 21-22) • Component Video connection (page 22) • Video connection (page 23) NOTE 21 HDMI Connection If you have a HDMI TV or monitor, you can connect it to this player using a HDMI cable(Type A, Version 1.3). Connect the HDMI OUT jack on the player to the HDMI IN jack on a HDMI compatible TV or monitor. HDMI Connection Player Player 3 • Please refer to the manuals of your TV, stereo system or other devices as necessary to make the best connections. • Make sure the player is connected directly to the TV. Tune the TV to the correct video input channel. Installation • Depending on your TV and other equipment you wish to connect, there are various ways you could connect the player. Use only one of the connections described in this manual. TV TV • Do not connect your player via your VCR. The image could be distorted by the copy protection system. Set the TV’s source to HDMI (refer to TV’s Owner’s manual). HB985-DB.BDEUPPK_ENG.indd 21 2010-05-14 1:41:45 22 Installation Component Video Connection NOTE • Changing the resolution when the connection has already been established may result in malfunctions. To solve the problem, turn off the player and then turn it on again. • When the HDMI connection with HDCP is not verified, TV screen is changed to black screen. In this case, check the HDMI connection, or disconnect the HDMI cable. 3 • If there is noise or lines on the screen, please check the HDMI cable (length is generally limited to 4.5 m and use a high speed HDMI cable (version 1.3). Connect the COMPONENT VIDEO OUT jacks on the player to the corresponding input jacks on the TV using Y Pb Pr cables. You can hear the sound the through the system’s speaker. Component Connection Player Player PR VIDEO L Installation • If a connected HDMI device does not accept the audio output of the player, the HDMI device’s audio sound may be distorted or may not output. R • When you connect a HDMI or DVI compatible device make sure of the following: - Try switching off the HDMI/DVI device and this player. Next, switch on the HDMI/DVI device and leave it for around 30 seconds, then switch on this player. - The connected device’s video input is set correctly for this unit. - The connected device is compatible with 720x576p (480p), 1280x720p, 1920x1080i or 1920x1080p video input. • Not all HDCP-compatible HDMI or DVI devices will work with this player. - The picture will not be displayed properly with non-HDCP device. - This player does not playback and TV screen is changed to black screen. HB985-DB.BDEUPPK_ENG.indd 22 Y COMPONENT VIDEO INPUT • When you use HDMI connection, you can change the resolution for the HDMI output. (Refer to “Resolution Setting” on page 23.) • Select the type of video output from the HDMI OUT jack using [HDMI Color Setting] option on the [Setup] menu (see page 34). PB AUX OUTPUT Green Blue Red TV TV NOTE When you use COMPONENT VIDEO OUT connection, you can change the resolution for the output. (Refer to “Resolution setting” on page 23.) 2010-05-14 1:41:46 Installation Video Connection Resolution Setting Connect the VIDEO OUT jack on the player to the video in jack on the TV using a video cable. You can hear the sound through the system’s speakers. The player provides several output resolutions for HDMI OUT and COMPONENT VIDEO OUT jacks. You can change the resolution using [Setup] menu. 1. Press HOME MENU ( Video Connection 23 ). 2. Use I/i/U/u to select the [Setup] and press ENTER ( ). The [Setup] menu appears. 3. Use U/u to select [DISPLAY] option then press i to move to the second level. Player PR VIDEO PB AUX R Y COMPONENT VIDEO INPUT OUTPUT Yellow Yellow 3 Installation L 4. Use U/u to select the [Resolution] option then press ENTER ( ) or i to move to the third level. TV TV 5. Use U/u to select the desired resolution then press ENTER ( ) to confirm your selection. NOTE • If your TV does not accept the resolution you have set on the player, you can set resolution to 576p (480p) as follows: 1. Press Z to open the disc tray. 2. Press x for more than 5 seconds. • Since several factors affect the resolution of video output, see “Video Output Resolution” on page 70. HB985-DB.BDEUPPK_ENG.indd 23 2010-05-14 1:41:46 24 Installation Antenna connection Connect the supplied antenna for listening to the radio. Antenna Connection Connections with external device AUX Connection You can enjoy the sound from an external component through the speakers of this system. Connect the analogue audio output jacks of your component into the AUX L/R (INPUT) on this unit. And then select the [AUX] option by pressing INPUT/TUNER, I/i and ENTER ( ). 3 Installation AUX Connection Player Player Player VIDEO L PR PB AUX R Y COMPONENT VIDEO INPUT NOTE After connecting the FM wire antenna, keep it as horizontal as possible. Be sure to fully extend the FM wire antenna. HB985-DB.BDEUPPK_ENG.indd 24 Red Red White White To the audio output jacks To the audiocomponent output jacks of your of your component (TV, VCR, etc.) (TV, VCR, etc.) 2010-05-14 1:41:47 Installation PORTABLE IN connection OPTICAL IN 1/2 connection You can enjoy the sound from your portable audio player through the speakers of this system. You can enjoy the sound from your component with a digital optical connection through the speakers of this system. Connect the headphones (or line out ) jack of the portable audio player into the PORTABLE IN socket of this unit. And then select the [PORTABLE] option by pressing INPUT/TUNER, I/i and ENTER ( ). Connect the optical output jack of your component into the OPTICAL IN 1/2 jacks on the unit. And then select the [OPTICAL 1/2] option by pressing INPUT/TUNER, I/i and ENTER ( ). Or press OPTICAL to select directly. PORT.IN Connection 25 Optical Connection 3 Installation To Tothe thedigital digital optical opticaloutput outputjack jack of ofyour yourcomponent component twZG SGUUU HB985-DB.BDEUPPK_ENG.indd 25 2010-05-14 1:41:47 26 Installation Bluetooth® connection About Bluetooth Bluetooth® is wireless communication technology for short range connection. 3 Installation The available range is within 10 meters. (The sound may be interrupted when the connection interfered by the other electronic wave or you connect the bluetooth in the other rooms.) Connecting individual devices under Bluetooth wireless technology does not incur any charges. A mobile phone with Bluetooth wireless technology can be operated via the Cascade if the connection was made via Bluetooth wireless technology. Available Devices : Mobile phone, MP3, Laptop, PDA (This units be supported the Stereo Headset.) Bluetooth Profiles In order to use Bluetooth wireless technology, devices must be able to interpret certain profiles. This unit is compatible with following profile. 1. Select the Bluetooth function by using the INPUT/TUNER or BT AUDIO. Appears “BT AUDIO” and then “BT READY” in display window. 2. Operate the Bluetooth device and perform the pairing operation. When searching for this unit with the Bluetooth device, a list of the devices found may appear in the Bluetooth device display depending on the type of Bluetooth device. Your unit appears as “PIONEER AUDIO”. 3. Enter the PIN code. PIN cord : 0000 4. When this unit successfully paired with your Bluetooth device, Bluetooth LED of this unit lights up and appears “BT SINK”. NOTE Depending on the Bluetooth device type, some device have a different pairing way. 5. Listening to music. To play a music stored on your Bluetooth device, refer to your Bluetooth device’s user guide. A2DP (Advanced Audio Distribution Profile) NOTE Listening to music of a Bluetooth device Pairing your unit and Bluetooth device Before you start the pairing procedure, make sure the Bluetooth feature is turned on in to your Bluetooth device. Refer to your Bluetooth device’s user guide. Once a pairing operation is performed, it does not need to be performed again. HB985-DB.BDEUPPK_ENG.indd 26 • If you change the function of the unit, the Bluetooth function is disconnected, operate pairing again. • AVRCP cannot be available in this mode. 2010-05-14 1:41:48 Installation Checking the information of connected Bluetooth device This function is operated after pairing. You can check the Bluetooth information. Press DISPLAY repeatedly. Bluetooth information is changed as follows. Local Bluetooth Device Address t Device Name t None t ... 27 NOTE • This units dose not be supported the Mono Headset Profile (Hands Free Profile). • The sound may be interrupted when the connection interfered by the other electronic wave. • You cannot control the Bluetooth device with this unit. • Pairing is limited one Bluetooth device per one unit and multi-pairing is not supported. • Depending on the type of the device, you may not be able to use the Bluetooth function. • When not connected the Bluetooth, “BT READY” appears on the display window. 3 Installation • Although the distance between your Bluetooth and the set is less than 10 m, there are obstacles between both, your Bluetooth device cannot be connected. • The Electrical malfunction due to devices using same frequency such as Medical equipment, Microwaves or wireless LAN devices, the connection will be disconnected. • When someone stands and interrupts communication between Bluetooth device and the player, the connection will be disconnected. • If the gotten away of the distance between Bluetooth and the unit, the sound quality is lower and lower the connection will disconnect when the space between the Bluetooth and the unit gets out of the operating range of Bluetooth. • The device with Bluetooth wireless technology is disconnected, if you turn off the main unit or put the device away from the main unit more than 10 m. HB985-DB.BDEUPPK_ENG.indd 27 2010-05-14 1:41:48 28 Installation Connecting to your Home Network This player can be connected to a local area network (LAN) via the LAN port on the rear panel. 3 Installation Please refer to the documentation for your network device for further instructions. Connect the player’s LAN port to the corresponding port on your Modem or Router using a commercially available LAN or Ethernet cable (CAT5 or better with RJ45 connector). In the example configuration for wired connection below, this player would be able to access content from either of the PCs. Network Connection Router Router Broadband Broadband Service Service WAN LAN 1 LAN 2 PC PC LAN 3 Player Player NOTE • When plugging or unplugging the LAN cable, hold the plug portion of the cable. When unplugging, do not pull on the LAN cable but unplug while pressing down on the lock. • Do not connect a modular phone cable to the LAN port. • Since there are various connection configurations, please follow the specifications of your telecommunication carrier or internet service provider. • If you want to access content from PCs or DLNA servers, this player must be connected to the same local area network with them via a router. HB985-DB.BDEUPPK_ENG.indd 28 2010-05-14 1:41:48 Installation Network Setup Before setting the wired network, you need to connect the broadband internet to your home network. If there is a DHCP server on the local area network (LAN) via wired connection, this player will automatically be allocated an IP address. After making the physical connection, a small number of home networks may require the player’s network setting to be adjusted. Adjust the [NETWORK] setting as follows. 1. Select [Connection Setting] option in the [Setup] menu then press ENTER ( ). HB985-DB.BDEUPPK_ENG.indd 29 NOTE If there is no DHCP server on the network and you want to set the IP address manually, select [Static] then set the [IP Address], [Subnet Mask], [Gateway] and [DNS Server] using U/u/I/i and numerical buttons. If you make a mistake while entering a number, press CLEAR to clear the highlighted part. 3. Select [OK] and press ENTER ( ) to apply network settings. 4. The player will ask you to test the network connection. Select [OK] and press ENTER ( ) to complete the network connection. 3 Installation 2. Use U/u/I/i to select the IP mode between [Dynamic] and [Static]. Normally, select [Dynamic] to allocate an IP address automatically. 29 5. If you select [Test] and press ENTER ( ) at step 4 above, the network connection status is displayed on the screen. You can also test it on the [Connection Status] in the [Setup] menu. 2010-05-14 1:41:48 30 Installation Notes on Network Connection: • 3 Many network connection problems during set up can often be fixed by re-setting the router or modem. After connecting the player to the home network, quickly power off and/or disconnect the power cable of the home network router or cable modem. Then power on and/or connect the power cable again. Depending on the internet service provider (ISP), the number of devices that can receive internet service may be limited by the applicable terms of service. For details, contact your ISP. • Our company is not responsible for any malfunction of the player and/or the internet connection feature due to communication errors/malfunctions associated with your broadband internet connection, or other connected equipment. • The features of BD-ROM discs made available through the Internet Connection feature are not created or provided by our company, and our company is not responsible for their functionality or continued availability. Some disc related material available by the Internet Connection may not be compatible with this player. If you have questions about such content, please contact the producer of the disc. Installation • • Some internet contents may require a higher bandwidth connection. • Even if the player is properly connected and configured, some internet contents may not operate properly because of internet congestion, the quality or bandwidth of your internet service, or problems at the provider of the content. HB985-DB.BDEUPPK_ENG.indd 30 • Some internet connection operations may not be possible due to certain restrictions set by the Internet service provider (ISP) supplying your broadband Internet connection. • Any fees charged by an ISP including, without limitation, connection charges are your responsibility. • A 10 Base-T or 100 Base-TX LAN port is required for wired connection to this player. If your internet service does not allow for such a connection, you will not be able to connect the player. • You must use a Router to use xDSL service. • A DSL modem is required to use DSL service and a cable modem is required to use cable modem service. Depending on the access method of and subscriber agreement with your ISP, you may not be able to use the internet connection feature contained in this player or you may be limited to the number of devices you can connect at the same time. (If your ISP limits subscription to one device, this player may not be allowed to connect when a PC is already connected.) • The use of a “Router” may not be allowed or its usage may be limited depending on the policies and restrictions of your ISP. For details, contact your ISP directly. • Turn off all unused network equipment in your local home network. Some devices may generate network traffic. 2010-05-14 1:41:48 Installation USB device connection This player can play movie, music and photo files contained in the USB device. 1. Insert a USB device to the USB port until it fits into place. USB Connection 31 NOTE • This player supports USB flash memory/external HDD formatted in FAT16, FAT32 and NTFS when accessing files (music, photo, movie). However, for BD-LIVE and Audio CD recording, only FAT16 and FAT32 formats are supported. Use the USB flash memory/external HDD formatted in either FAT16 or FAT32 when using BD-LIVE and Audio CD recording. • The USB device can be used for local storage for enjoying BD-Live discs from the Internet. • This unit can support up to 4 partitions of the USB device. • An USB device which requires additional programme installation when you have connected it to a computer, is not supported. • USB device: USB device that support USB 1.1 and USB 2.0. 3 Installation • Do not extract the USB device during operation (play, etc.). • Movie, music and photo files can be played. For details of operations on each file, refer to relevant pages. 2. Press HOME MENU. Select [Movie], [Photo] or [Music] using U/u/I/i, and press ENTER ( ). 3. Select a file using U/u/I/i, and press PLAY or ENTER ( ) to play the file. You can check the space of the USB device on the screen. 4. Select the other mode. And withdraw the USB device carefully. HB985-DB.BDEUPPK_ENG.indd 31 • Regular back up is recommended to prevent data loss. • If you use a USB extension cable, USB HUB or USB Multi-reader, the USB device may not be recognised. • Some USB device may not work with this unit. • Digital camera and mobile phone are not supported. • The USB Port on this unit cannot be connected to a PC. 2010-05-14 1:41:48 32 Installation 4. Use U/u to select a second setup option, and press ENTER ( ) to move to the third level. Settings Adjust the Setup Settings You can change the settings of the player in the [Setup] menu. 1. Press HOME MENU ( ). 5. Use U/u to select a desired setting, and press i or ENTER ( ) to confirm your selection. 3 Installation 2. Use I/i/U/u to select [Setup] and press ENTER ( ). The [Setup] menu appears. 3. Use U/u to select a first setup option, and press i to move to the second level. HB985-DB.BDEUPPK_ENG.indd 32 2010-05-14 1:41:48 Installation [DISPLAY] Menu TV Aspect Ratio Select a TV aspect ratio option according to your TV type. [4:3 Letter Box] Select when a standard 4:3 TV is connected. Displays theatrical images with masking bars above and below the picture. [4:3 Pan Scan] Select when a standard 4:3 TV is connected. Displays pictures cropped to fill your TV screen. Both sides of the picture are cut off. 33 Resolution Sets the output resolution of the Component and HDMI video signal. Refer to page 23 and 70 or details about the resolution setting. [Auto] If the HDMI OUT jack is connected to TVs providing display information (EDID), this automatically selects the resolution best suited to the connected TV. If the COMPONENT VIDEO OUT only is connected, this changes the resolution to 1080i as default resolution. [16:9 Original] Select when a 16:9 wide TV is connected. The 4:3 picture is displayed with an original 4:3 aspect ratio, with black bars appearing at the left and right sides. [1080i] Outputs 1080 lines of interlaced video. [16:9 Full] Select when a 16:9 wide TV is connected. The 4:3 picture is adjusted horizontally (in a linear proportion) to fill the entire screen. [576p (480p)] Outputs 576 (480) lines of progressive video. [720p] Outputs 720 lines of progressive video. 3 Installation [1080p] Outputs 1080 lines of progressive video. [576i (480i)] Outputs 576 (480) lines of interlaced video. NOTE You cannot select [4:3 Letter Box] and [4:3 Pan Scan] option when the resolution is set to higher than 720p. HB985-DB.BDEUPPK_ENG.indd 33 2010-05-14 1:41:49 34 Installation 1080p Display Mode [LANGUAGE] Menu When the resolution is set to 1080p, select [24 Hz] for smooth presentation of film material (1080p/ 24 Hz) with a HDMI-equipped display compatible with 1080p/ 24 Hz input. Display Menu Select a language for the [Setup] menu and on-screen display. NOTE • When you select [24 Hz], you may experience some picture disturbance when the video switches video and film material. In this case, select [50 Hz]. 3 Installation • Even when [1080p Display Mode] is set to [24 Hz], if your TV is not compatible with 1080p/ 24 Hz, the actual frame frequency of the video output will be 50 Hz to match the video source format. HDMI Color Setting Select the type of output from the HDMI OUT jack. For this setting, please refer to the manuals of your display device. [YCbCr] Select when connecting to a HDMI display device. [RGB] Select when connecting to a DVI (RGB) display device. HB985-DB.BDEUPPK_ENG.indd 34 Disc Menu/ Disc Audio/ Disc Subtitle Select the language you prefer for the audio track (disc audio), subtitles, and the disc menu. [Original] Refers to the original language in which the disc was recorded. [Other] Press ENTER ( ) to select another language. Use number buttons then ENTER ( ) to enter the corresponding 4-digit number according to the language code list on page 69. [Off ] (for Disc Subtitle only) Turn off Subtitle. NOTE Depending on the disc, your language setting may not work. 2010-05-14 1:41:49 Installation [AUDIO] Menu Speaker Setup To obtain the best possible sound, use the speaker setup display to specify the volume of the speakers you have connected and their distance from your listening position. Use the test to adjust the volume of the speakers to the same level. HD AV Sync Sometimes Digital TV encounters a delay between picture and sound. If this happens you can compensate by setting a delay on the sound so that it effectively ‘waits’ for the picture to arrive: this is called HD AV Sync. Use U u to scroll up and down through the delay amount, which you can set at anything between 0 and 300 ms. [Speaker] Select a speaker that you want to adjust. The delay will vary depending on which digital TV channel you are on. If you change channel you may need to readjust the HD AV Sync. [Volume] Adjust the output level of each speaker. DRC (Dynamic Range Control) [Test/ Stop test tone] The speakers will emit a test tone. [OK] Confirms the setting. [Cancel] Cancels the setting. HB985-DB.BDEUPPK_ENG.indd 35 3 When a title encoded in Dolby Digital or Dolby Digital Plus is playing back, you may wish to compress the dynamic range of the audio output (the difference between the loudest sounds and the quietest ones). This allows you to listen to a movie at a lower volume without losing clarity of sound. Set [DRC] to [On] for this effect. Installation [Distance] Adjust the distance between each speaker and the listening position. 35 NOTE The DRC setting can be changed only when a disc is not inserted or the unit is in complete stop mode. 2010-05-14 1:41:49 36 Installation [LOCK] Menu To access any features in the [LOCK] settings, you must enter the 4-digit security code you have created. If you have not entered a password yet, you are prompted to do so. Enter a 4-digit password twice, and press ENTER ( ) to create a new password. Password DVD Rating Blocks playback of rated DVD based on their content. (Not all discs are rated.) [Rating 1-8] Rating one (1) has the most restrictions and rating eight (8) is the least restrictive. [Unlock] If you select this, parental control is not active and the disc plays in full. You can create or change the password. 3 Installation [None] Enter a 4-digit password twice, and press ENTER ( ) to create a new password. [Change] Enter the current password and press ENTER ( ). Enter a 4-digit password twice, and press ENTER ( ) to create a new password. BD Rating Sets an age limit for BD-ROM playback. Use number buttons to input an age limit for BD-ROM viewing. [255] All BD-ROM can be played. [0-254] Prohibits play of BD-ROM with corresponding ratings recorded on them. NOTE If you make a mistake before pressing ENTER ( ), press CLEAR. Then input the correct password. NOTE The [BD Rating] will be applied only for the BD disc that containing the Advanced Rating Control. If you forget your password, If you forget your password, you can clear it using the following steps: 1. Remove any disc that might be in the player. 2. Select [Lock] option in the [Setup] menu. 3. Use number buttons to enter “210499” on the [Lock] Menu. The password is cleared. HB985-DB.BDEUPPK_ENG.indd 36 Area Code Enter the code of the area whose standards were used to rate the DVD video disc, based on the list on page 68. 2010-05-14 1:41:49 Installation [OTHERS] Menu Connection Setting DivX VOD If your home network environment is ready to connect to the player, the player needs to be set up for network communication. (See “Connecting to your Home Network” on page 28.) ABOUT DIVX VIDEO: DivX® is a digital video format created by DivX, Inc. This is an official DivX Certified device that plays DivX video. Visit www.divx.com for more information and software tools to convert your files into DivX video. Connection Status ABOUT DIVX VIDEO-ON-DEMAND: This DivX Certified® device must be registered in order to play DivX Video-on-Demand (VOD) content. To generate the registration code, locate the DivX VOD section in the device setup menu. Go to vod.divx.com with this code to complete the registration process and learn more about DivX VOD. If you want to check the network status on this player, select the [Connection Status] option and press ENTER ( ) to check whether a connection to the network and the internet has been established. BD-LIVE connection You can restrict Internet access when BD-LIVE functions are used. [Permitted] Internet access is permitted for all BD-LIVE contents. [Partially permitted] Internet access is permitted only for BDLIVE contents which have content owner certificates. Internet access and AACS Online functions are prohibited for all BDLIVE contents without a certificate. [Register] Displays the registration code of your player. 3 Installation [NETWORK] Menu 37 [Deregister] Deactivate your player and display the deactivation code. NOTE All the downloaded videos from DivX VOD with this player’s registration code can only be played back on this unit. [Prohibited] Internet access is prohibited for all BD-LIVE contents. HB985-DB.BDEUPPK_ENG.indd 37 2010-05-14 1:41:49 38 Installation Auto Power Off The screen saver appears when you leave the player in Stop mode for about five minutes. If you set this option to [On], the unit automatically turns itself off after the Screen Saver is displayed for 25 minutes. Set this option to [Off ] to leave the screen saver until the unit is operated by the user. Initialize Factory Set You can reset the player to its original factory settings. 3 Installation BD Storage Clear Removes the BD contents from the connected USB storage. NOTE If you reset the player to its original factory settings using [Factory Set] option, you have to set all the activation for the on-line services and network settings again. Software Information Displays the current software version. HB985-DB.BDEUPPK_ENG.indd 38 2010-05-14 1:41:49 Installation Sound Effect 39 [Clear Voice]: This mode makes voice sound clear, improving the quality of voice sound. [Game]: You can enjoy more virtual sound while playing video games. You can select a suitable sound mode. Press SOUND repeatedly until the desired mode appears on the front panel display or the TV screen. The displayed items for the equalizer maybe different depending on sound sources and effects. [Pioneer 1]: Gives you suitable sound setting with connecting small type of speakers (S-BD303). [Night]: This may be useful when you want to watch movies at low volumes late at night. [Mus. ReTouch]: When listening to MP3 files or other compressed music, you can enhance the sound. This mode is available only to 2 channel sources. [Loudness]: Improves bass and treble sound. 3 Installation [Pioneer 2]: Gives you suitable sound setting with connecting tall type of speakers (S-BD707T). [Bypass]: Software with multichannel surround audio signals is played according to the way it was recorded. [Bass Blast]: Reinforce the bass sound effect from front left and right speaker and subwoofer. [PL ll Movie]: Performs Pro Logic ll movie mode decoding to the input signal and produces five full-bandwidth output channels from 2 channel sources. This setting is ideal for watching videos of overdubbed or old movies. This mode is available only to 2 channel sources. [PL ll Music]: Performs Pro Logic ll music mode decoding to the input signal and produces five full-bandwidth output channels from 2 channel sources. This setting is ideal for normal stereo sources such as CD. This mode is available only to 2 channel sources. HB985-DB.BDEUPPK_ENG.indd 39 2010-05-14 1:41:49 40 Operation 4 Operation General Playback 4. Select [Movie], [Photo] or [Music] using U/u/I/i, and press ENTER ( ). 5. Select the Disc option using I/i, and press ENTER ( ). Playing Discs 1. Press Z OPEN/CLOSE, and place a disc on the disc tray. 4 Operation When you connect up to two devices, it appears as above. 2. Press Z OPEN/CLOSE to close the disc tray. For most Audio CD, BD-ROM and DVD-ROM discs, playback starts automatically. 3. Press HOME MENU. 6. Select a file using U/u/I/i, and press B PLAY or ENTER ( ) to play the file. NOTE • Playback functions described in this manual are not always available in every files and medium. Some functions can be restricted depending on many factors. • Depending on the BD-ROM titles, a USB device connection may be needed for proper playback. HB985-DB.BDEUPPK_ENG.indd 40 2010-05-14 1:41:49 Operation To stop playback Press x STOP during playback. Using the disc menu BD DVD AVCHD To pause playback To display the disc menu Press X PAUSE/STEP during playback. Press B PLAY to resume playback. The menu screen may be displayed first after loading a disc which contains a menu. If you want to display the disc menu during playback, press MENU. To play frame-by-frame Press X PAUSE/STEP while movie playback. Press X PAUSE/STEP repeatedly to playback Frame-by-Frame. 41 Use U/u/I/i buttons to navigate through menu items. To display the Pop-up menu To scan forward or backward Press m or M to play fast forward or fast reverse during playback. You can change the various playback speeds by pressing m or M repeatedly. Some BD-ROM discs contain a Pop-up menu that appears during playback. Press POPUP/ TOP MENU during playback, and use U/u/I/i buttons to navigate through menu items. While the playback is paused, press M SCAN repeatedly to play various speeds of slow motion. To skip to the next/previous chapter/track/file During playback, press . or > to go to the next chapter/track/file or to return to the beginning of the current chapter/track/file. Press . twice briefly to step back to the previous chapter/track/file. Resume playback BD MUSIC DVD AVCHD MOVIE ACD 4 Operation To slow down the playing speed This unit remembers the x STOP depending on the disc. If “Xx (Resume Stop)” appears on the screen briefly, press B (PLAY) to resume playback (from the scene point). If you press x (STOP) twice or unload the disc, “x”(Complete Stop) appears on the screen. The unit will clear the stopped point. NOTE • The resume point may be cleared when a button is pressed (for example; 1 (POWER), Z (OPEN/CLOSE), etc). • On BD-Video discs with BD-J, the resume playback function does not work. • If you press x (STOP) once during BD-ROM interactive title playback, the unit will be in Complete Stop mode . HB985-DB.BDEUPPK_ENG.indd 41 2010-05-14 1:41:49 42 Operation Advanced Playback DVD AVCHD ACD MUSIC During playback, press REPEAT ( ) repeatedly to select a desired repeat mode. BDs/DVDs A- – Selected portion will be repeated continually. Chapter – The current chapter will be played back repeatedly. Title – The current title will be played back repeatedly. 4 BD DVD AVCHD ACD This player can repeat a portion you have selected. Repeat Playback BD Repeating a specific portion 1. During playback, press REPEAT ( ) to select [A-] at the beginning of the portion you wish to repeat. And then press ENTER ( ). 2. Press ENTER ( ) at the end of the portion. Your selected portion will be repeated continually. 3. To return to normal playback, press REPEAT ( ) repeatedly to select [OFF] or press CLEAR. To return to normal playback, press REPEAT ( ) repeatedly to select [Off ]. NOTE Operation You cannot select a portion less than 3 seconds. Audio CDs/Music files – The current track or file will be played back repeatedly. – All the tracks or files will be played back repeatedly. – The tracks or files will be played back in random order. – All the tracks or files will be played back repeatedly in random order. – Selected portion will be repeated continually. (Audio CD only) To return to normal playback, press CLEAR. Marker Search BD DVD AVCHD MOVIE You can start playback from up to nine memorized points. To enter a marker 1. During playback, press MARKER at the desired point. The Marker icon appears on the TV screen briefly. 2. Repeat step 1 to add up to nine markers. NOTE • If you press > once during Repeat Chapter/ Track playback, the repeat playback cancels. • This function may not work on some disc or title. To recall a marked scene 1. Press SEARCH and the search menu appears on the screen. 2. Press a number button to select a marker number that you want to recall. Playback starts from the marked scene. HB985-DB.BDEUPPK_ENG.indd 42 2010-05-14 1:41:49 Operation To delete a Marker 1. Press SEARCH and the search menu appears on the screen. 43 Using the search menu BD DVD AVCHD MOVIE Using search menu, you can easy to find the point where you want to start playback. To search a point 2. Press u to highlight a marker number. Use I/i to select a marked scene that you want to delete. 1. During playback, press SEARCH to display the search menu. 3. Press CLEAR and the marked scene is erased from the search menu. NOTE • This function may not work depending on discs, titles, server ability. 2. Press I/i to skip the playback 15 seconds forward or backward. You can select a point that you want to skip by pressing and holding I/i button. To start playback from a marked scene • If the total length of the title is less than 10 seconds, this function is not available. 1. Press SEARCH and the search menu appears on the screen. 2. Press u to highlight a marker number. Use I/i to select a marked scene that you want to playback from. 4 Operation • All marked points are cleared if the title is in complete stop (x) mode, the title is changed or if you unload the disc. 3. Press ENTER ( ) to start playback from the marked scene. NOTE • This function may not work depending on discs, titles, server ability. • This function may not work on some [Home Link] contents depending on the file type and ability of the DLNA server. HB985-DB.BDEUPPK_ENG.indd 43 2010-05-14 1:41:50 44 Operation Last Scene Memory BD DVD This unit memorizes the last scene from the last disc that is viewed. The last scene remains in memory even if you remove the disc from the unit or switch off the unit. If you load a disc that has the scene memorized, the scene is automatically recalled. NOTE • Last Scene Memory function for a previous disc is erased once a different disc is played. On-Screen display You can display and adjust various information and settings concerning the content. Displaying content information on-screen BD DVD AVCHD MOVIE 1. During playback, press DISPLAY ( ) to show various playback information. • This function may not work depending on the disc. • This unit does not memorize settings of a disc if you switch off the unit before commencing to play it. 4 a b c Operation d e f g h a Title – Current title number/total number of titles b Chapter – Current chapter number/total number of chapters c Time – Elapsed playing time/Total playback time d Audio – Selected audio language or channel e Subtitle – Selected subtitle f Angle – Selected angle/total number of angles g TV Aspect Ratio – Selected a TV aspect Ratio h Picture Mode – Selected picture mode HB985-DB.BDEUPPK_ENG.indd 44 2010-05-14 1:41:50 Operation 2. Select an option using U/u. 3. Use I/i to adjust the selected option value. 4. Press RETURN (O) to exit the On-Screen display. NOTE • If no button is pressed for a few seconds, the onscreen display disappears. • A title number cannot be selected on some discs. • Available items may differ depending on discs or titles. • If BD interactive title is playing back, some setting information is displayed on the screen but prohibited to be changed. 45 Playing from selected time BD DVD AVCHD MOVIE 1. Press DISPLAY ( ) during playback. The time search box shows the elapsed playing time. 2. Select the [Time] option and then input the required start time in hours, minutes, and seconds from left to right. For example, to find a scene at 2 hours, 10 minutes, and 20 seconds, enter “21020”. Press I/i to skip the playback 60 seconds forward or backward. 3. Press ENTER ( ) to start playback from selected time. NOTE 4 • This function may not work on some [Home Link] contents depending on the file type and ability of the DLNA server. HB985-DB.BDEUPPK_ENG.indd 45 2010-05-14 Operation • This function may not work on some disc or titles. 1:41:50 46 Operation Hearing different audio BD DVD AVCHD MOVIE BD DVD AVCHD MOVIE 1. During playback, press DISPLAY ( ) to display the on-screen display. 1. During playback, press DISPLAY ( ) to display the on-screen display. 2. Use U/u to select the [Audio] option. 2. Use U/u to select the [Subtitle] option. 3. Use I/i to select desired audio language, audio track or audio channel. 3. Use I/i to select the desired subtitle language. NOTE • Some discs allow you to change audio selections only via the disc menu. If this is the case, press POPUP/ TOP MENU or MENU button and choose the appropriate audio from the selections on the disc menu. 4 Selecting a subtitle language • Immediately after you have switched sound, there may be a temporary discrepancy between the display and actual sound. 4. Press RETURN (O) to exit the On-Screen display. NOTE Some discs allow you to change subtitle selections only via the disc menu. If this is the case, press POPUP/ TOP MENU or MENU button and choose the appropriate subtitle from the selections on the disc menu. Operation HB985-DB.BDEUPPK_ENG.indd 46 2010-05-14 1:41:50 Operation Watching from a different angle BD DVD Changing the Picture Mode BD If the disc contains scenes recorded at different camera angles, you can change to a different camera angle during playback. 1. During playback, press DISPLAY ( ) to display the on-screen display. DVD AVCHD MOVIE You can change the [Picture mode] option during playback. 1. During playback, press DISPLAY ( ) to display the on-screen display. 2. Use U/u to select the [Angle] option. 2. Use U/u to select the [Picture Mode] option. 3. Use I/i to select desired angle. 3. Use I/i to select desired option. 4. Press RETURN (O) to exit the On-Screen display. 4. Press RETURN (O) to exit the On-Screen display. Changing the TV Aspect Ratio BD DVD AVCHD MOVIE 47 Setting the [User setting] option 1. During playback, press DISPLAY ( ) to display the on-screen display. 2. Use U/u to select the [Picture Mode] option. 1. During playback, press DISPLAY ( ) to display the on-screen display. 3. Use I/i to select the [User setting] option, and press ENTER ( ). 2. Use U/u to select the [TV Aspect Ratio] option. 4 Operation You can change the TV aspect ratio setting during playback. 3. Use I/i to select desired option. 4. Press RETURN (O) to exit the On-Screen display. NOTE Even if you change the value of the [TV Aspect Ratio] option in On-Screen display, the [TV Aspect Ratio] option in the [Setup] menu is not changed. 4. Use U/u/I/i to adjust the [Picture Mode] options. Select [Default] option then press ENTER ( ) to reset the all adjustments. 5. Use U/u/I/i to select the [Close] options, and press ENTER ( ) to finish setting. HB985-DB.BDEUPPK_ENG.indd 47 2010-05-14 1:41:50 48 Operation Enjoying BD-LIVE This unit allows you to enjoy functions such as picture-in-picture, secondary audio and Virtual packages, etc., with BD-Video supporting BONUSVIEW (BD-ROM version 2 Profile 1 version 1.1/ Final Standard Profile). Secondary video and audio can be played from a disc compatible with the picture-in-picture function. For the playback method, refer to the instructions in the disc. 4 In addition to the BONUSVIEW function, BDVideo supporting BD-LIVE (BD-ROM version 2 Profile 2) that has a network extension function allows you to enjoy more functions such as downloading new movie trailers by connecting this unit to the internet. Operation 1. Check the network connection and settings (pages 28-30). 2. Insert a USB storage device to the USB port on the front panel. A USB storage device is needed to download bonus content. 3 . Press HOME MENU, and set the [BD-LIVE connection] option on the [Setup] menu (page 37). Depending on the disc, the BD-LIVE function may not operate if [BD-LIVE connection] option is set to [Partially Permitted]. 4 . Insert a BD-ROM with BD-LIVE. The operations may differ depending on the disc. Refer to the manual supplied with the disc. NOTE • Do not extract the connected USB device while content is being downloaded or a Blu-ray disc is still in the disc tray. Doing so may damage the connected USB device and BD-LIVE features may not operate properly with the damaged USB device anymore. If the connected USB device seems damaged from such an action, you can format the connected USB device from the PC and reuse it with this player. • Some BD-LIVE contents may be restrictively accessed in some territories by contents provider’s own decision. • It may take up to several minutes to load and start enjoying BD-LIVE contents. USB Connection HB985-DB.BDEUPPK_ENG.indd 48 2010-05-14 1:41:50 Operation Playing movie file and VR discs 49 NOTE • The file requirements are described on page 11. • You can use various playback functions. Refer to pages 40-47. You can play DVD-RW discs that are recorded in Video Recording (VR) format and movie files contained in a disc or USB device. 1. Press HOME MENU. • Unfinalized DVD VR format discs may not be played in this player. • Some DVD-VR disc are made with CPRM data by DVD recorder. This unit cannot support these kinds of discs. What is CPRM? CPRM is a copy protection system (with scramble system) only allowing the recording of ‘copy once’ broadcast programmes. CPRM stands for Content Protection for Recordable Media. 2. Select [Movie] using U/u/I/i, and press ENTER ( ). 4 Operation 3. Select the device using I/i, and press ENTER ( ). When you connect up to two devices, it appears as above. 4. Select a file using U/u/I/i, and press B PLAY or ENTER ( ) to play the file. HB985-DB.BDEUPPK_ENG.indd 49 2010-05-14 1:41:51 50 Operation Selecting a subtitle file Changing subtitle code page MOVIE MOVIE If a movie file name and the subtitle file name are the same, subtitle file is played automatically when playing the movie file. If the subtitle is not displayed properly, You can change the subtitle code page to view the subtitle file properly. If the subtitle file name is different with the movie file name, you need to select the subtitle file on the [Movie] menu before playing the movie. 1. During playback, press DISPLAY ( ) to display the on-screen display. 1. Use U/u/I/i to select the subtitle file you wish to play in the [Movie] menu. 2. Use U/u to select the [Code Page] option. 3. Use I/i to select desired code option. 2. Press ENTER ( ). Press ENTER ( ) again to deselect the subtitle file. Selected subtitle file will be displayed when you play the movie file. 4 NOTE Operation • If you press x STOP during playback, the subtitle selection is cancelled. 4. Press RETURN (O) to exit the On-Screen display. • This function may not work in the [Home Link] feature. HB985-DB.BDEUPPK_ENG.indd 50 2010-05-14 1:41:51 Operation Viewing a photo You can view photo files using this player. 1. Press 51 To play a slide show Press B PLAY to start slide show. To stop a slide show Press x STOP during slide show. HOME MENU To pause a slide show Press X PAUSE/STEP during slide show. Press B PLAY to re-start the slide show. To skip to the next/previous photo 2. Select [Photo] using I/i, and press ENTER ( ). 3. Select the device using I/i, and press ENTER ( ). While viewing a photo in full screen, press I or i to go to the previous or next photo. NOTE • The file requirements are described on page 11. 4 Operation • You can use various playback functions. Refer to pages 40-47. When you connect up to two devices, it appears as above. 4. Select a file using U/u/I/i, and press ENTER ( ) to view the photo. HB985-DB.BDEUPPK_ENG.indd 51 2010-05-14 1:41:51 52 Operation Options while viewing a photo You can use various options while viewing a photo in full screen. 1. While viewing a photo in full screen, press DISPLAY ( ) to display the option menu. Listening to music during a slide show You can display photo files while listening to music files. 1. Press HOME MENU 2. Select an option using U/u. a b c d e f g h 4 2. Select [Photo] or [Home Link] using U/u/I/i, and press ENTER ( ). 3. Select the [Disc] or [USB] option using I/i, and press ENTER ( ). Operation a Current photo/Total number of photos – Use I/i to view previous/next photo. b Slide Show – Press ENTER ( ) to start or pause slide show. c Music Select – Select the background music for the slide show. d Music –Press ENTER ( ) to start or pause background music. e Rotate – Press ENTER ( ) to rotate the photo clockwise. f Zoom – Press ENTER ( ) to display the [Zoom] menu. g Effect – Use I/i to select a transition effect between photos in a slide show. h Speed – Use I/i to select a delaying speed between photos in a slide show. Selecting a server or a share folder is needed for [Home Link] menu. 4. Select a file using U/u/I/i, and press ENTER ( ) to view the photo. 5. Press DISPLAY ( ) to display the option menu. 6. Use U/u to select [Music Select] option, and press ENTER ( ) to display the [Music Select] menu. 3. Press RETURN (O) to exit the option menu. HB985-DB.BDEUPPK_ENG.indd 52 2010-05-14 1:41:51 Operation 7. Use U/u to select a device, and press ENTER ( ). Devices that you can select may differ depending on the location of the photo file you are displaying in full screen. Photo location Available Device Disc Disc, USB USB Disc, USB Share Folder on your PC (CIFS) CIFS DLNA server DLNA server 8. Use U/u to select a file or a folder you wish to play. 53 Listening to music The player can play Audio CDs and music files 1. Press HOME MENU 2. Select [Music] using U/u/I/i, and press ENTER ( ). 3. Select the device using I/i, and press ENTER ( ). 4 Operation Select a folder and press ENTER ( ) to display the lower directory. Select and press ENTER ( ) to display the upper directory. NOTE When selecting music from [Home Link], folder selection is not available. Only file selection is available on the [Home link]. 9. Use i to select [OK], and press ENTER ( ) to complete music selection. When you connect up to two devices, it appears as above. 4. Select a music file or audio track using U/u/I/i, and press ENTER ( ) to play the music. NOTE • The file requirements are described on page 11. • You can use various playback functions. Refer to pages 40-47. HB985-DB.BDEUPPK_ENG.indd 53 2010-05-14 1:41:52 54 Operation Audio CD Recording You can record one desired track or all of the tracks in Audio CD to a USB storage device. 6. Use U/u/I/i to select [Start], and press ENTER ( ). 7. Use U/u/I/i to select the destination folder to be copied. 1. Insert a USB storage device to the USB port on the front panel. 2. Press Z (OPEN/CLOSE), and place an Audio CD on the disc tray. Press Z (OPEN/CLOSE) to close the disc tray. The playback starts automatically. 3. Press DISPLAY ( ) to display the option menu. Or Press z USB REC button on the remote control. You can record all musics in the audio CD. 4 Operation 4. Use U/u to select [CD Recording] option, and press ENTER ( ) to display the [CD Recording] menu. Repeat this step to select tracks as many as you want. 5. Use U/u to select a track you wish to copy on the menu, and press ENTER ( ). Repeat this step to select tracks as many as you can. If you want to create a new folder, use U/u/ I/i to select [New Folder] and press ENTER ( ). Enter a folder name using the virtual keyboard, and press ENTER ( ) while [OK] is selected. 8. Use U/u/I/i to select [OK], and press ENTER ( ) to start Audio CD recording. If you want to stop the Audio CD recording, press ENTER ( ) while [Cancel] is highlighted. 9. A message appears when Audio CD recording is completed. Press ENTER ( ) to check the music file created in the destination folder. Select all the tracks on an Audio CD. Selects an encoding option from the pop-up menu (128 kbps, 192 kbps, 320 kbps or Lossless). Cancels the recording and returns to the previous screen. HB985-DB.BDEUPPK_ENG.indd 54 2010-05-14 1:41:52 Operation 55 NOTE • The table below shows the average recording time from an audio track with 4 minutes of playback time to a music file with 192 kbps as an example. stop mode during playback 1.4 min. 2 min. • All times in the above table are approximate. • Actual recording time for USB storage device varies depending on the USB storage device’s ability. • Make sure that there is minimum of 50 MB free space when recording into the USB storage device. • The length of the music should be longer than 20 seconds for the proper recording. • Do not turn off this player or extract the connected USB storage device during Audio CD recording. 4 Operation The making of unauthorized copies of copy-protected material, including computer programmes, files, broadcasts and sound recordings, may be an infringement of copyrights and constitute a criminal offense. This equipment should not be used for such purposes. Be responsible Respect copyrights HB985-DB.BDEUPPK_ENG.indd 55 2010-05-14 1:41:53 56 Operation Playing the iPod 1. Connect the iPod firmly. Connect the iPod You can enjoy the sound with your iPod. For details about iPod, refer to the iPod’s User Guide. Connect the cradle and put your iPod on it. Preparation • To view iPod’s Videos and Photos on the TV screen. - Be sure to use the video connection through the VIDEO OUT jack on the rear panel of this unit. Select the appropriate video input mode on the TV. - Depending on the iPod, make sure that select Videos > Video settings, and then set TV Out to Ask or On from your iPod. For details about Video Settings, refer to the iPod User Guide. 4 Operation - The viewing photos is available only if this unit is in iPod IN mode and you can view photos only as a slide show. You have to start a slide show on your iPod to view a photo on a TV. For details about a slide show, refer to the iPod User Guide. • Before connecting the iPod, turn this unit off and reduce the volume of this unit to its minimum. HB985-DB.BDEUPPK_ENG.indd 56 2. Select a file using U/u/I/i, and press ENTER ( ) to play the file. Enjoying iPod on the screen 1. Connect the iPod firmly. 2. Press HOME MENU ( ). 3. Select [Music] or [Movie] using I/i, and press ENTER ( ). If you connected the other device (CD or USB), select the iPod on the menu. 4. Select a content using U/u/I/i, and press ENTER ( ) to play. 2010-05-14 1:41:53 Operation 57 Enjoying the iPod IN mode You can operate your iPod by using the supplied remote control and controls on your iPod. 1. Connect the iPod firmly. If you turn this unit on, your iPod is automatically turned on and recharging starts. 2. Press INPUT/TUNER to select iPod IN mode. Selects an option in the menu. B /ENTER Starts playback the music or video. X To pause while it is playing. To resume playing, press B (PLAY) again. m/M Fast-forward or rewind a song or video ./> Skip the playback forward or backward . REPEAT To select a desired repeat mode: Track ( ), All ( ), Off (No display). NOTE This system is compatible with the audio and video of the iPod(4th generation), iPod nano, iPod classic, iPod mini, iPod touch and iPhone (iPod shuffle is not supported.). • An error message “CHECK IPOD” or “Connected iPod model is not supported.” appears when: - your iPod is not available for the function to be operated. • An error message “CHECK IPOD” or “Please update iPod’s software.” appears when: - your iPod has an old software version. t Update your iPod software to latest version. • If this unit displays an error message, follow the message. An error message “CHECK IPOD” or “Please check your iPod.” appears when: - the communication between this unit and your iPod is failed. t Undock & re-dock your iPod in this unit. - your iPod is not connected firmly. - this unit recognises your iPod as unknown device. - your iPod is exceptionally low on power. t The battery needs to be charged. t If you charge the battery while iPod is extremely low in power, it may take longer to charge. • You may use the dock adapter which should be supplied with your iPod to the dock for the stable use of the iPod. If you need an adapter, consult your iPod dealer. 4 Operation U/u/I/i NOTE • Compatibility with your iPod may vary depending on the type of your iPod. • iPod touch and iPhone have any difference in operation other than iPod. You may need any additional control to use them with this unit. (e.g. “slide to unlock”) • If you use an application, make a call, or send and receive SMS text message, etc. on iPod touch or iPhone, disconnect it from iPod dock of this unit and then use it. • Depending on your iPod’s software version, it may not be possible to control your iPod from this unit. We recommend installing the latest software version. • The video quality depends on the video sources on your iPod. • If you have a problem with your iPod, please visit www.apple.com/support/ipod. HB985-DB.BDEUPPK_ENG.indd 57 2010-05-14 1:41:53 58 Operation Radio Operations Deleting all the saved stations Press and hold CLEAR for two seconds. “ERASE ALL” will flash up. Press CLEAR again. Then all the saved stations are deleted. Be sure that the antenna is connected. (Refer to the page 24) Listening to the radio 1. Press INPUT/TUNER until TUNER (FM) appears in the display window. The last received station is tuned in. 2. Press and hold TUNE (-/+) for about two seconds until the frequency indication starts to change. Scanning stops when the unit tunes in a station. Or Press TUNE (-/+) repeatedly. 4 Operation 3. Adjust the volume by rotating VOLUME on the front panel or by pressing VOL (+/- ) on the remote control. Improving poor FM reception Press D (blue) (ST/ MONO) coloured button on the remote control. This will change the tuner from stereo to mono and usually improve the reception. See information about a radio station The FM tuner is supplied with the RDS (Radio Data System) facility. This shows information about the radio station being listened to. Press RDS repeatedly to cycle through the various data types: PS (Programme Service Name) The name of the channel will appear in the display You can preset 50 stations for FM. Before tuning, make sure that you have turned down the volume. PTY (Programme Type Recognition) The programme type (e.g. Jazz or News) will appear in the display. 1. Press INPUT/TUNER until the TUNER (FM) appears in the display window. RT (Radio Text) A text message contains special information from the broadcast station. This text may scroll across the display. CT (Time controlled by the channel) This shows the time and date as broadcast by the station. Presetting the Radio Stations 2. Select the desired frequency by using TUNE (-/+). 3. Press ENTER ( ) a preset number will flash in the display window. 4. Press PRESET to select the preset number you want. 5. Press ENTER ( ). The station is stored. 6. Repeat the steps 2 to 5 to store other stations. HB985-DB.BDEUPPK_ENG.indd 58 2010-05-14 1:41:53 Operation Playing content via your home network Accessing a DLNA media server 1. Check the network connection and settings (pages 28-30). 2. Press This player can browse and play content from your PC and DLNA certified media servers connected on your home network. 59 HOME MENU. 3. Select [Home Link] using U/u/I/i, and press ENTER ( ). 4. Select a DLNA media server from the list using U/u, and press ENTER ( ). About DLNA This Player is a DLNA Certified digital media player that can display and play movie, photo and music content from your DLNAcompatible digital media server (PC and Consumer Electronics). The DLNA certification logo makes it easy to find products that comply with the DLNA Interoperability Guidelines. This unit complies with DLNA Interoperability Guidelines v1.5. When a PC running DLNA server software or other DLNA compatible device is connected to this player, some setting changes of software or other devices may be required. Please refer to the operating instructions for the software or device for more information. HB985-DB.BDEUPPK_ENG.indd 59 If you want to rescan for available media servers, press the green (B) coloured button. NOTE 4 Operation The Digital Living Network Alliance (DLNA) is a cross-industry organization of consumer electronics, computing industry and mobile device companies. Digital Living provides consumers with easy sharing of digital media through a network in the home. Depending on the media server, this player may need to get permission from the server. 5. Select a file using U/u/I/i, and press ENTER ( ) to play the file. 2010-05-14 1:41:53 60 Operation NOTE • The file requirements are described on page 11. • You can use various playback functions. Refer to pages 40-47. • The file requirements on page 11 are not always compatible. There may be some restrictions due to the file’s features and media server’s ability. • The thumbnail of the unplayable files can be displayed in the [Home Link] menu, but those cannot be played on this player. Accessing a share folder from your PC 1. Start your PC that is connected on your local area network. 2. On your PC, share folders which contain movie, photo or music files. 3. On the player, check the network connection and settings (pages 28-30). 4. Press HOME MENU. • If there is an unplayable music file in the [Home Link] menu, the player skips the file and plays the next file. 5. Select [Home Link] using U/u/I/i, and press ENTER ( ). • The subtitle file name and movie file name have to be the same and located in the same folder. 6. Select a share folder from the list using U/u, and press ENTER ( ). • The playback and operating quality of the [Home Link] function may be affected by your home network condition. 4 Operation • The files from removable media such as USB drive, DVD-drive etc. on your media server may not be shared properly. If you want to rescan available media servers, press the green (B) coloured button. NOTE Depending on the share folder, this player may need to input network user ID and password for accessing the folder. 7. Select a file using U/u/I/i, and press ENTER ( ) to play the file. HB985-DB.BDEUPPK_ENG.indd 60 2010-05-14 1:41:53 Operation 61 PC requirements NOTE • Windows® XP (Service Pack 2 or higher), Windows Vista® (no Service Pack required) Windows 7® • 1.2 GHz Intel® Pentium® III or AMD Sempron™ 2200+ processors • Network environment: 100 Mb Ethernet, WLAN (IEEE 802.11b/g/n) • The file requirements are described on page 11. • You can use various playback functions. Refer to pages 40-47. • The thumbnail of the unplayable files can be displayed in the [Home Link] menu, but those cannot be played on this player. • If there is an unplayable music file in the [Home Link] menu, the player skips the file and play next file. • The subtitle file name and movie file name have to be the same and located at the same folder. • The playback and operating quality of the [Home Link] function may be affected by your home network condition. NOTE If you use Windows® XP or Windows Vista®, visit link below for more information on file share settings. • The files on a removable media such as USB drive, DVD-drive etc. on your PC may not be shared properly. 4 HB985-DB.BDEUPPK_ENG.indd 61 Operation • You may experience connection problems depending on your PC’s environment. 2010-05-14 1:41:53 62 Operation Entering a network user ID and the password Depending on your PC’s environment, you may need to enter a network user ID and the password for accessing a shared folder. 1. The keyboard menu appears automatically if the network user ID and the password are required. 2. Use U/u/I/i to select a character then press ENTER ( ) to confirm your selection on the keyboard menu. 3. When you finish entering the network user ID and password, select [OK] using U/u/I/ i and press ENTER ( ) to access the folder. The network user ID and password will be remembered after accessing the folder for your convenience. If you do not want the network user ID and password to be remembered, press red (A) coloured button to un-tick the [Remember] check box before accessing the folder. To enter a letter with an accent mark, select the letter from the extended character set. Example: Select “D” and then press DISPLAY ( ) to display the extended character set. Use I/i to select “D” or “Ď” and then press ENTER ( ). 4 Operation [Clear] – Clear all entered characters. [Space] – Inserts a space at the cursor position. [<–] – Deletes the previous character at the cursor position. [ABC / abc / #+-=&] – Change the keyboard menu settings to capital letters, small letters or symbols. HB985-DB.BDEUPPK_ENG.indd 62 2010-05-14 1:41:54 Maintenance 63 5 Maintenance Notes on Discs Handling the Unit Handling Discs When shipping the unit Please save the original shipping carton and packing materials. If you need to ship the unit, for maximum protection, re-pack the unit as it was originally packed at the factory. Never stick paper or tape on the disc. Storing Discs After playing, store the disc in its case. Do not expose the disc to direct sunlight or sources of heat and never leave it in a parked car exposed to direct sunlight. • Do not use volatile liquids such as insecticide spray near the unit. • Wiping with strong pressure may damage the surface. • Do not leave rubber or plastic products in contact with the unit for a long period of time. Cleaning the unit To clean the player, use a soft, dry cloth. If the surfaces are extremely dirty, use a soft cloth lightly moistened with a mild detergent solution. Do not use strong solvents such as alcohol, benzine, or thinner, as these might damage the surface of the unit. Do not use strong solvents such as alcohol, benzine, thinner, commercially available cleaners, or anti-static spray intended for older vinyl records. HB985-DB.BDEUPPK_ENG.indd 63 5 Maintenance Cleaning Discs Keeping the exterior surfaces clean Maintaining the Unit The unit is a high-tech, precision device. If the optical pick-up lens and disc drive parts are dirty or worn, the picture quality could be diminished. For details, please contact your nearest authorized service centre. 2010-05-14 1:41:54 64 Troubleshooting 6 Troubleshooting General 6 Troubleshooting The Power does not turn on. • Plug the power cord into the wall outlet securely. The unit does not start playback. • Insert a playable disc. (Check the disc type, colour system, and regional code.) • Place the disc with the playback side down. • Place the disc on the disc tray correctly inside the guide. • Clean the disc. • Cancel the rating function or change the rating level. The angle cannot be changed. • Multi-angles are not recorded on the DVD Video being played. The subtitle language cannot be changed or turned off. • Subtitles are not recorded on the DVD Video being played. Cannot play MP3/WMA/ JPEG/DivX files. • The files are not recorded in a format that the unit can play. • The unit does not support the codec of the movie file. The remote control does not work properly. • The remote control is not pointed at the remote sensor of the unit. • The remote control is too far from the unit. • There is an obstacle in the path between the remote control and the unit. • The battery in the remote control is exhausted. HB985-DB.BDEUPPK_ENG.indd 64 2010-05-14 1:41:54 Troubleshooting 65 Picture There is no picture. Picture noise appears • Select the appropriate video input mode on the TV so the picture from the unit appears on the TV screen. • Connect the video connection securely. • Check the [HDMI Colour Setting] in the [Setup] menu is set to the appropriate item that conforms to your video connection. • Your TV may not support the resolution you have set on the player. Change the resolution to one that your TV accepts. • The player’s HDMI OUT jack is connected to a DVI device that does not support copyright protection. • You are playing a disc recorded in a colour system that is different from your TV. • Set the resolution to one that your TV accepts. • The unit is in scan, slow motion, or pause mode. • The sound volume is low. • Check the speaker cable connection. (page 16) Sound There is no sound or the sound is distorted. 6 Troubleshooting HB985-DB.BDEUPPK_ENG.indd 65 2010-05-14 1:41:54 66 Troubleshooting Network BD-LIVE feature does not work. • The connected USB storage may not have enough space. Connect the USB storage with at least 1GB free space. • Ensure that the unit is correctly connected to the local area network and can access the internet (see page 28). • Your broadband speed may not be fast enough to use the BD-LIVE features. Contact your Internet Service Provider (ISP) and increase the broadband speed to suit the unit’s. • The [BD-LIVE connection] option in the [Setup] menu is set to [Prohibited]. Set the option to [Permitted]. Design and specifications are subject to change without notice. Updates Note that information on this product is available on the Pioneer website. Please check the website for information on updating or servicing your Blu-ray Disc PLAYER. 6 Troubleshooting HB985-DB.BDEUPPK_ENG.indd 66 2010-05-14 1:41:54 Appendix 67 7 Appendix Controlling a TV with the Supplied Remote Control You can control your PIONEER TV using the buttons below. TV Control Buttons Operation 1 (TV Power) Turn the TV on or off. INPUT Switch the TV’s input source between the TV and other input sources. CH +/- Scan up or down through memorized channels. VOL +/- Adjust the volume of the TV. You can operate your TV with the supplied remote control. If your TV is listed in the table below, set the appropriate manufacturer code. 1. While holding down 1 (TV POWER) button, and press the manufacturer code for your TV with the numerical buttons (see the table below). Manufacturer Code Number Pioneer 1(Default) Sony 2, 3 Panasonic 4, 5 Samsung 6, 7 LG 8, 9 2. Release the 1 (TV POWER) button to complete setting. Depending on your TV, some or all buttons may not function on the TV, even after entering the correct manufacturer code. When you replace the batteries of the remote, the code number you have set may be reset to the default setting. Set the appropriate code number again. Appendix Button Setting up the remote to control your TV 7 NOTE Depending on the unit being connected, you may not be able to control your TV using some of the buttons. HB985-DB.BDEUPPK_ENG.indd 67 2010-05-14 1:41:54 68 Appendix Area Code List Choose an area code from this list. Area Code Area Afghanistan Appendix 7 AF Fiji Code Area Code Area Code FJ Monaco MC Singapore SG SK Argentina AR Finland FI Mongolia MN Slovak Republic Australia AU France FR Morocco MA Slovenia Austria AT Germany DE Nepal NP South Africa ZA Belgium BE Great Britain GB Netherlands NL South Korea KR Bhutan BT Greece GR Netherlands GL Antilles Bolivia BO Greenland Brazil BR Hong Kong Cambodia KH Hungary Canada CA India Chile CL Indonesia China CN Israel Colombia CO Italy Congo CG Jamaica Costa Rica CR Japan Croatia HR Kenya Czech Republic CZ Kuwait Denmark DK Libya Ecuador EC Luxembourg Egypt EG Malaysia El Salvador SV Maldives Ethiopia ET Mexico HB985-DB.BDEUPPK_ENG.indd 68 HK New Zealand HU Nigeria IN Norway ID Oman IL Pakistan IT Panama JM Paraguay JP Philippines KE Poland KW Portugal LY Romania LU Russian Federation MY Saudi Arabia MV Senegal MX SI Spain ES AN Sri Lanka NZ Sweden LK NG Switzerland NO Taiwan CH SE TW OM Thailand PK Turkey TH PA Uganda PY Ukraine UG TR UA PH United States PL Uruguay US UY PT Uzbekistan RO Vietnam UZ Zimbabwe ZW RU VN SA SN 2010-05-14 1:41:54 Appendix 69 Language code List Use this list to input your desired language for the following initial settings: [Disc Audio], [Disc Subtitle] and [Disc Menu]. Language Code Language Code Language Code Language Code 6565 French 7082 Lithuanian 7684 Sindhi 8368 Afrikaans 6570 Frisian 7089 Macedonian 7775 Singhalese 8373 Albanian 8381 Galician 7176 Malagasy 7771 Slovak 8375 Ameharic 6577 Georgian 7565 Malay 7783 Slovenian 8376 Arabic 6582 German 6869 Malayalam 7776 Spanish 6983 Armenian 7289 Greek 6976 Maori 7773 Sudanese 8385 Assamese 6583 Greenlandic 7576 Marathi 7782 Swahili 8387 Aymara 6588 Guarani 7178 Moldavian 7779 Swedish 8386 Azerbaijani 6590 Gujarati 7185 Mongolian 7778 Tagalog 8476 Bashkir 6665 Hausa 7265 Nauru 7865 Tajik 8471 Basque 6985 Hebrew 7387 Nepali 7869 Tamil 8465 Bengali; Bangla 6678 Hindi 7273 Norwegian 7879 Telugu 8469 Bhutani 6890 Hungarian 7285 Oriya 7982 Thai 8472 Bihari 6672 Icelandic 7383 Panjabi 8065 Tonga 8479 Breton 6682 Indonesian 7378 Pashto, Pushto 8083 Turkish 8482 Bulgarian 6671 Interlingua 7365 Persian 7065 Turkmen 8475 Burmese 7789 Irish 7165 Polish 8076 Twi 8487 Byelorussian 6669 Italian 7384 Portuguese 8084 Ukrainian 8575 Chinese 9072 Japanese 7465 Quechua 8185 Urdu 8582 Croatian 7282 Kannada 7578 8590 6783 Kashmiri 7583 Rhaeto-Romance 8277 Uzbek Czech Vietnamese 8673 Danish 6865 Kazakh 7575 Rumanian 8279 Volapük 8679 Dutch 7876 Kirghiz 7589 Russian 8285 Welsh 6789 English 6978 Korean 7579 Samoan 8377 Wolof 8779 Esperanto 6979 Kurdish 7585 Sanskrit 8365 Xhosa 8872 7168 Yiddish 7473 8382 Yoruba 8979 Zulu 9085 Estonian 6984 Laothian 7679 Scots Gaelic Faroese 7079 Latin 7665 Serbian Fiji 7074 Latvian, Lettish 7686 Serbo-Croatian 8372 Finnish 7073 Lingala Shona HB985-DB.BDEUPPK_ENG.indd 69 7678 Appendix Afar 7 8378 2010-05-14 1:41:54 70 Appendix Video output resolution When the non-copy protected media is playing back Video Out HDMI OUT Resolution 576i (480i) COMPONENT VIDEO OUT HDMI connected HDMI disconnected 576p (480i) 576i (480i) 576p (480p) 576p (480p) 576p (480p) 720p 720p 720p 1080i 1080i 1080i 1080p / 24 Hz 1080p / 24 Hz 576i (480i) 1080i 1080p / 50 (60) Hz 1080p / 50 (60) Hz 576i (480i) 1080i When the copy protected media is playing back Video Out HDMI OUT Resolution 576i (480i) 576p (480p) 576p (480p) 720p 720p 576i (480i) 576p (480p) 1080i 1080i 576i (480i) 576p (480p) 576p (480p) 1080p / 24 Hz 1080p / 24 Hz 576i (480i) 576p (480p) 1080p / 50 (60) Hz 1080p / 50 (60) Hz 576i (480i) 576p (480p) Appendix • For the 576i (480i) resolution setting, real output resolution of HDMI OUT will change to 576p (480p). • If you select a resolution manually and then connect the HDMI jack to TV and your TV does not accept it, the resolution setting is set to [Auto]. • HDMI disconnected 576i (480i) 576p (480p) HDMI OUT connection 7 COMPONENT VIDEO OUT HDMI connected If you select a resolution that your TV does not accept, the warning message will appear. After resolution change, if you cannot see the screen, please wait 20 seconds and the resolution will automatically revert back to the previous resolution. HB985-DB.BDEUPPK_ENG.indd 70 • The 1080p video output frame rate may be automatically set to either 24 Hz or 50 Hz depending both on the capability and preference of the connected TV and based on the native video frame rate of the content on the BD-ROM disc. COMPONENT VIDEO OUT connection BD or DVD could prevent up-scaling on analogue output. VIDEO OUT connection The resolution of the VIDEO OUT jack is always outputted at 576i (480i) resolution. 2010-05-14 1:41:54 Appendix 71 Trademarks and Licences “Blu-ray Disc” and are trademarks. HDMI, the HDMI Logo and High-Definition Multimedia Interface are trademarks or registered trademarks of HDMI Licensing, LLC in the United States and other countries. “BD-LIVE” logo is a trademark of Blu-ray Disc Association. “BONUSVIEW” is trademark of Blu-ray Disc Association. is a trademark of DVD Format/Logo Licensing Corporation. TM Java and all Java-based trademarks and logos are trademarks or registered trademarks of Sun Microsystems, Inc. in the United States and other countries. DLNA and DLNA CERTIFIED are trademarks and / or service marks of Digital Living Network Alliance. DivX is a registered trademark of DivX, Inc., and is used under licence. Appendix “x.v.Colour” or “x.v.Colour” is a trademark of Sony Corporation. 7 Manufactured under licence from Dolby Laboratories. Dolby, and the double-D symbol are trademarks of Dolby Laboratories. Manufactured under licence under U.S. Patent #’s: 5,451,942; 5,956,674; 5,974,380; 5,978,762; 6,226,616; 6,487,535; 7,392,195; 7,272,567; 7,333,929; 7,212,872 & other U.S. and worldwide patents issued & pending. DTS and the Symbol are registered trademarks, & DTS-HD, DTS-HD Master Audio l Essential and the DTS logos are trademarks of DTS, Inc. Product includes software. © DTS, Inc. All Rights Reserved. HB985-DB.BDEUPPK_ENG.indd 71 2010-05-14 1:41:54 72 Appendix Windows Media is either a registered trademark or trademark of Microsoft Corporation in the United States and / or other countries. “AVCHD” and the “AVCHD” logo are trademarks of Panasonic Corporation and Sony Corporation. This product is licenced under the AVC patent portfolio licence and VC-1 patent portfolio licence for the personal and non-commercial use of a consumer to (i) encode video in compliance with the AVC Standard and VC-1 Standard (“AVC/ VC-1 Video”) and/or (ii) decode AVC/VC-1 Video that was encoded by a consumer engaged in a personal and non-commercial activity and/or was obtained from a video provider licenced to provide AVC/VC-1 Video. No licence is granted or shall be implied for any other use. Additional information may be obtained from MPEG LA, LLC. See http://www.mpegla.com. iPod is a trademark of Apple Inc., registered in the U.S. and other countries. This product includes technology owned by Microsoft Corporation and cannot be used or distributed without a license from Microsoft Licensing, Inc. ® Bluetooth® wireless technology is a system which allows radio contact between electronic devices within a max. range of 10 meters. Connecting individual devices under Bluetooth wireless technology does not incur any charges. A mobile phone with Bluetooth wireless technology can be operated via the Cascade if the connection was made via Bluetooth wireless technology. The Bluetooth word mark and logos are owned by the Bluetooth SIG, Inc. and any use of such marks by Pioneer Corporation is under license. Other trademarks and trade names are those of their respective owners. iPhone is a trademark of Apple Inc. Appendix 7 “Made for iPod” means that an electronic accessory has been designed to connect specifically to iPod and has been certified by the developer to meet Apple performance standards. “Works with iPhone” means that an electronic accessory has been designed to connect specifically to iPhone and has been certified by the developer to meet Apple performance standards. Apple is not responsible for the operation of this device or its compliance with safety and regulatory standards. HB985-DB.BDEUPPK_ENG.indd 72 2010-05-14 1:41:55 Appendix Specifications 73 Tuner • FM Tuning Range: 87.5 to 108.0 MHz or 87.50 to 108.00 MHz General • Power requirements: AC 220-240 V, 50/ 60 Hz • Power consumption: 150 W In Standby mode: Less than 0.5W • Dimensions (W x H x D): Approx. 430 × 64 × 304 mm • Net Weight (Approx.): 3.6 kg • Operating temperature: 41 °F to 95 °F (5 °C to 35 °C) • Operating humidity: 5 % to 90 % • Bus Power supply (USB): DC 5V 500 mA Inputs/ Outputs • VIDEO OUT: 1.0 V (p-p), 75 Ω, sync negative, RCA jack x 1 • HDMI OUT (video/audio): 19 pin (HDMI standard, Type A, Version 1.3) • Power output, (PEAK), (4Ω/3Ω) Total 1100 W Front 180 W x 2 Centre 180 W Rear 180 W x 2 Sub-Woofer 200 W (Passive) • Power output, (RMS), THD 10% (4Ω/3Ω) Total 930 W Front 150 W x 2 Centre 150 W Rear 150 W x 2 Sub-Woofer 180 W (Passive) System • Laser: Semiconductor laser Wavelength: 405 nm / 650 nm • Signal system: Standard NTSC/PAL colour TV system • Frequency response: 20 Hz to 20 kHz (48 kHz, 96 kHz, 192 kHz sampling) • LAN port: Ethernet jack x 1, 10BASE-T/100BASE-TX Appendix • COMPONENT VIDEO OUT: (Y) 1.0 V (p-p), 75 Ω, sync negative, RCA jack x 1, (Pb)/(Pr) 0.7 V (p-p), 75 Ω, RCA jack x 2 Amplifier • Analogue AUDIO IN: 2.0 Vrms (1 kHz, 0 dB), 600 Ω, RCA jack (L, R) x 1 • DIGITAL IN (OPTICAL 1/2): 3 V (p-p), Optical jack x 2 7 • PORTABLE IN: 0.5 Vrms (3.5 mm stereo jack) HB985-DB.BDEUPPK_ENG.indd 73 2010-05-14 1:41:55 74 Appendix Speakers for BCS-707 Speakers for BCS-303 S-BD707 S-BD303 • Front/Surround speaker (Left/ Right) Type: 2 Way Impedance Rated: 4Ω Net Dimensions 260 x 1097 x 260 mm (W x H x D): Net Weight: 3.8 kg • Front/Surround speaker (Left/ Right) Type: 1 Way Impedance Rated: 4Ω Net Dimensions 96 x 96 x 85 mm (W x H x D): Net Weight: 0.4 kg • Centre speaker Type: Impedance Rated: Net Dimensions (W x H x D): Net Weight: • Centre speaker Type: Impedance Rated: Net Dimensions (W x H x D): Net Weight: 1 Way 4Ω 300 x 87x 65 mm 0.6 kg S-BD707SW • Subwoofer Type: Impedance Rated: Net Dimensions (W x H x D): Net Weight: 1 Way 1 speaker 3Ω 130.5 x 420 x 375 mm • Subwoofer Type: Impedance Rated: Net Dimensions (W x H x D): Net Weight: 1 Way 4Ω 300 x 87x 65 mm 0.6 kg 1 Way 1 speaker 3Ω 130.5 x 420 x 375 mm 4.4 kg 4.4 kg Appendix 7 HB985-DB.BDEUPPK_ENG.indd 74 2010-05-14 1:41:55 Appendix Open source software notice The following GPL executables and LGPL libraries used in this product are subject to the GPL2.0/ LGPL2.1 License Agreements: GPL EXECUTABLES: Linux kernel 2.6, bash, busybox, cramfs, dhcpcd, e2fsprogs, fdisk, mkdosfs, mtd-utils, net-tools, procps, samba-3.0.25b, sysutils, tcpdump, tftpd, tinylogin, unzip, utelnetd LGPL LIBRARIES: uClibc, DirectFB, blowfish, cairo, ffmpeg, iconv, libusb, mpg123 gSOAP Public License 1.3 LIBRARY: gsoap A copy of the corresponding source code can be obtained by being charged the fee for distribution. To obtain a copy, contact your local Pioneer Customer Support . You can obtain a copy of the GPL, LGPL licenses from http://www.gnu.org/licenses/old-licenses/ gpl-2.0.html and http://www.gnu.org/licenses/oldlicenses/lgpl-2.1.html . Also you can obtain a copy of gSOAP public license from http://www.cs.fsu.edu/~engelen/license.html. This product includes • boost C++: copyright © Beman Dawes 1999-2003 • c-ares : copyright © 1998 by the Massachusetts Institute of Technology • curl: copyright © 1996 - 2008, Daniel Stenberg • expat: copyright © 2006 expat maintainers • freetype: copyright © 2003 The FreeType Project (www.freetype.org). • jpeg: This software is based in part on the work of the Independent JPEG Group copyright © 1991 – 1998, Thomas G. Lane. • mng: copyright © 2000-2007 Gerard Juyn, Glenn Randers-Pehrson • ntp : copyright © David L. Mills 1992-2006 HB985-DB.BDEUPPK_ENG.indd 75 • OpenSSL: – cryptographic software written by Eric Young ([email protected]). – software written by Tim Hudson ([email protected]). – software developed by the OpenSSL Project for use in the OpenSSL Toolkit. (http://www.openssl.org) • png: copyright © 2004 Glenn Randers-Pehrson • portmap : copyright © 1990 The Regents of the University of California • ptmalloc : copyright © 2001-2006 Wolfram Gloger • UnitTest++ : copyright © 2006 Noel Llopis and Charles Nicholson • UPnP SDK : copyright © 2000-2003 Intel Corporation • strace : copyright © 1991, 1992 Paul Kranenburg copyright © 1993 Branko Lankester copyright © 1993 Ulrich Pegelow copyright © 1995, 1996 Michael Elizabeth Chastain copyright © 1993, 1994, 1995, 1996 Rick Sladkey copyright © 1999,2000 Wichert Akkerman • xml2 : copyright © 1998-2003 Daniel Veillard • XML-RPC For C/C++: copyright © 2001 by First Peer, Inc. All rights reserved. copyright © 2001 by Eric Kidd. All rights reserved. • zlib: copyright © 1995-2002 Jean-loup Gailly and Mark Adler. All rights reserved. Permission is hereby granted, free of charge, to any person obtaining a copy of this software and associated documentation files (the “Software”), to deal in the Software without restriction, including without limitation the rights to use, copy, modify, merge, publish, distribute, sublicense, and/or sell copies of the Software, and to permit persons to whom the Software is furnished to do so, subject to the following conditions: Appendix This software is based in part on the work of the Independent JPEG Group copyright © 1991 - 1998, Thomas G. Lane. 75 7 THE SOFTWARE IS PROVIDED “AS IS”, WITHOUT WARRANTY OF ANY KIND, EXPRESS OR IMPLIED, INCLUDING BUT NOT LIMITED TO THE WARRANTIES OF MERCHANTABILITY, FITNESS FOR A PARTICULAR PURPOSE AND NONINFRINGEMENT. IN NO EVENT SHALL THE AUTHORS OR COPYRIGHT HOLDERS BE LIABLE FOR ANY CLAIM, DAMAGES OR OTHER LIABILITY, WHETHER IN AN ACTION OF CONTRACT, TORT OR OTHERWISE, ARISING FROM, OUT OF OR IN CONNECTION WITH THE SOFTWARE OR THE USE OR OTHER DEALINGS IN THE SOFTWARE. 2010-05-14 1:41:55 2 1 Consignes de sécurité Consignes de sécurité 1 Consignes de sécurité ATTENTION RISQUE D’ÉLECTROCUTION NE PAS OUVRIR ATTENTION: AFIN DE MINIMISER LES RISQUES D’ÉLECTROCUTION, NE RETIREZ PAS LE COUVERCLE (OU L’ARRIÈRE) AUCUNE PIÈCE DE CET APPAREIL N’EST SUSCEPTIBLE D’ÊTRE RÉPARÉE PAR L’UTILISATEUR CONFIEZ L’ENTRETIEN DE L’APPAREIL À DES PERSONNES QUALIFIÉES. Le symbole d’un éclair à l’intérieur d’un triangle sert à avertir l’utilisateur de la présence d’une tension dangereuse non isolée dans le corps de l’appareil, qui peut être suffisamment élevée pour provoquer un risque d’électrocution. Le symbole d’un point d’exclamation à l’intérieur d’un triangle sert à avertir l’utilisateur de la présence d’instructions d’utilisation et de maintenance (entretien) importantes dans la documentation qui accompagne l’appareil. Précautions et mises en garde AVERTISSEMENT: POUR PRÉVENIR TOUT RISQUE D’INCENDIE OU D’ÉLECTROCUTION, N’EXPOSEZ PAS CET APPAREIL À LA PLUIE OU À L’HUMIDITÉ. AVERTISSEMENT: n’installez pas cet appareil dans un espace confiné tel qu’une bibliothèque ou tout autre meuble similaire. ATTENTION: n’obstruez pas les ouvertures d’aération. Installez l’appareil conformément aux instructions du fabricant. Les fentes et les ouvertures du boîtier servent à assurer la ventilation et le bon fonctionnement de l’appareil, ainsi qu’à le protéger contre la surchauffe. Les ouvertures ne doivent jamais être bloquées en installant l’appareil sur un lit, un canapé, un tapis ou toute autre surface similaire. Cet appareil ne doit pas être placé dans un emplacement fermé tel qu’une bibliothèque ou une étagère, à moins d’assurer une ventilation adéquate ou que les instructions du fabricant l’autorisent. ATTENTION: Ce produit est catégorisé comme un produit laser de classe 1 selon le règlement IEC 60825-1:2007 sur la sécurité des produits laser. Afin de garantir l’utilisation correcte de cet appareil, veuillez lire attentivement ce manuel d’utilisation et conservez-le pour vous y référer ultérieurement. Si l’appareil nécessite une intervention de maintenance, contactez un point de service aprèsvente agréé. L’utilisation de commandes, de réglages ou de procédures autres que ceux décrits dans ce document peut entraîner une exposition à des radiations dangereuses. Pour éviter l’exposition directe au faisceau laser, n’essayez pas d’ouvrir le boîtier. Le rayonnement laser est visible lorsque l’appareil est ouvert. NE REGARDEZ PAS DIRECTEMENT LE FAISCEAU. HB985-DB.BDEUPPK_FRE.indd 2 2010-05-14 1:54:14 Consignes de sécurité Cet appareil est équipé d’une batterie transportable ou de piles rechargeables. Il est recommandé de brancher la plupart des appareils sur un circuit dédié. Retrait sans danger de la batterie ou des piles de l’appareil: Pour retirer la batterie ou les piles usagées, procédez dans l’ordre inverse de leur insertion. Pour empêcher toute contamination de l’environnement et tout danger pour la santé des êtres humains et des animaux, la batterie ou les piles usagées doivent être mises au rebut dans le conteneur approprié à un point de collecte prévu pour leur recyclage. Ne jetez pas la batterie ou les piles usagées avec les autres déchets. Recyclez toujours les batteries et piles rechargeables usagées. Les piles ne doivent pas être exposées à une chaleur excessive comme le soleil, ou le feu. Autrement dit, un circuit comportant une prise de courant qui alimente uniquement cet appareil et qui n’a ni autres prises ni circuit dérivé. Reportezvous à la page des spécifications de ce manuel d’utilisation pour plus de détails. Ne surchargez pas les prises murales. Les prises murales surchargées, desserrées ou endommagées, les câbles de rallonge, les cordons d’alimentation effilochés, ou les gaines isolantes craquelées ou endommagées constituent un danger. Chacune de ces conditions peut entraîner un risque de choc électrique ou d’incendie. Examinez régulièrement le cordon de votre appareil et, si son aspect indique qu’il est endommagé ou détérioré, débranchez-le, cessez d’utiliser l’appareil, et faites remplacer le cordon par une pièce de rechange appropriée auprès d’un point de service après-vente agréé. Protégez le cordon d’alimentation de sorte qu’il ne puisse pas être tordu, entortillé, pincé, coincé dans une porte ou piétiné. Faites particulièrement attention aux fiches, aux prises murales et au point d’où sort le cordon de l’appareil. Pour déconnecter l’appareil du réseau électrique, retirez le cordon d’alimentation de la prise électrique. Lors de l’installation de l’appareil, assurez-vous que la prise soit facilement accessible. 1 Consignes de sécurité PRÉCAUTION concernant le cordon d’alimentation 3 ATTENTION: l’appareil ne doit pas être exposé à des projections d’eau ou à des éclaboussures, et aucun objet rempli de liquide tel qu’un vase ne doit être posé sur l’appareil. PIONEER déclare par la présente que ce ou ces produits sont conformes aux exigences essentielles et aux dispositions applicables des directives 2004/108/CE, 2006/95/CE et 2009/125/ CE. AVERTISSEMENT : pour éviter tout risque d’incendie, ne posez pas sur l’appareil des sources de flamme nue (telle qu’une bougie allumée). HB985-DB.BDEUPPK_FRE.indd 3 2010-05-14 1:54:17 4 Consignes de sécurité Informations destinées aux utilisateurs sur la collecte et la mise au rebut des anciens équipements et piles usagées 1 Consignes de sécurité Pb Exemples de Symbol examples marquage for batteries pour les batteries Les symboles qui figurent sur les produits, emballage et/ou accompagnant des documents signifient que les produits électriques et électroniques et les piles ne doivent pas être mélangés avec les ordures ménagères. Pour un traitement, une récupération et un recyclage appropriés des produits anciens et piles usagées, portez-les vers les points de collecte prévus à cet effet conformément aux législations locales. En mettant au rebut ces produits et piles correctement, vous aiderez à sauvegarder des ressources précieuses et à prévenir tout effet potentiellement négatif sur la santé humaine et sur l’environnement qui sinon devraient s’aggraver suite à une gestion inappropriée des déchets. Pour plus d’informations sur la collecte et le recyclage des produits anciens et piles usagées, contactez votre administration locale, votre service de gestion des déchets ou les points de vente dans lesquels vous avez acheté ces articles. Ces symboles ne sont valables qu’au sein de l’Union Européenne. Pour les pays en dehors de l’Union Européenne : Pour vous débarrasser de ces articles, contactez les autorités locales ou votre revendeur pour leur demander quelle méthode de mise au rebut semble la plus appropriée. Remarques sur les droits d’auteur • De même que le système CSS (Content Scramble System) protège le contenu des DVD, le système AACS (Advanced Access Content System) protège le contenu des disques Blu-ray ; les contenus ainsi protégés sont donc soumis à certaines restrictions en termes de lecture, de sortie de signal analogique, etc. Le fonctionnement de cet appareil et les restrictions concernant son utilisation peuvent varier selon la date de votre achat, car ces restrictions peuvent être adoptées et/ou modifiées par la technologie AACS après la production de cet appareil. • De plus, les technologies BD-ROM Mark et BD+ sont également utilisées en tant que systèmes de protection du contenu pour le format Bluray, ce qui implique certaines restrictions pour les contenus protégés par BD-ROM Mark et/ ou BD+, notamment en termes de lecture. Pour obtenir des informations complémentaires sur les technologies AACS, BD-ROM Mark et BD+ ou sur ce produit, contactez un service après-vente agréé. • De nombreux DVD et BD-ROM sont encodés avec une protection contre la copie. En conséquence, vous devez raccorder votre lecteur directement à votre téléviseur, et non à un magné-toscope. Le raccordement à un magnétoscope génère en effet une image déformée pour les disques protégés contre la copie. • Ce produit est doté d’une technologie de protection des droits d’auteur protégée par des brevets américains et d’autres droits sur la propriété intellectuelle. L’utilisation de cette technologie de protection des droits d’auteur doit faire l’objet d’une autorisation par Rovi et est exclusivement réservée à un usage domestique et à d’autres types de visionnage limités, sauf autorisation expresse de Rovi. Les opérations d’ingénierie inverse et de démontage sont interdites. • Conformément aux lois sur les droits d’auteur en vigueur aux États-Unis et dans d’autres pays, l’enregistrement, l’utilisation, la diffusion, la distribution ou la révision sans autorisation d’émissions télévisées, de cassettes vidéo, de BD-ROM, de DVD, de CD et d’autres contenus peut engager votre responsabilité civile et/ou criminelle. HB985-DB.BDEUPPK_FRE.indd 4 2010-05-14 1:54:17 Consignes de sécurité 5 Avis important concernant le système couleur du téléviseur Le système couleur de ce lecteur diffère en fonction des disques lus. 1 Consignes de sécurité Par exemple, lorsque le lecteur lit le disque enregistré dans le système couleur NTSC, l’image est diffusée sous forme de signal NTSC. Seuls les téléviseurs multisystème peuvent recevoir l’ensemble des signaux retransmis à partir du lecteur. • Si vous avez un téléviseur PAL et que vous utilisez des disques ou des contenus vidéo enregistrés en NTSC, vous verrez des images déformées. • Le téléviseur multisystème change le système couleur automatiquement en fonction des signaux d’entrée. Si le système couleur n’est pas modifié automatiquement, éteignez le téléviseur et rallumez-le pour voir des images normales à l’écran. • Même si les disques enregistrés dans le système couleur NTSC s’affichent correctement sur votre téléviseur, il est possible que leur enregistrement pose problème dans votre enregistreur. HB985-DB.BDEUPPK_FRE.indd 5 2010-05-14 1:54:17 6 Table des matières 3 Installation 16 1 Connexion au haut-parleur BCS-707 18 Connexion au haut-parleur BCS-303 Consignes de sécurité 2 Précautions et mises en garde 2 Préparation Assemblez les enceintes 16 19 Montage mural du haut-parleur central 19 Remarque supplémentaire à propos du placement des haut-parleurs 20 21 Positionnement du système Connexion à votre TV 21 Connexion HDMI 8 À propos du symbole “ ” 22 8 Symboles utilisés dans ce manuel Connexion vidéo composantes 23 Connexion vidéo 9 Accessoires fournis 23 10 Disques pouvant être lus 24 Connexion de l’antenne 11 Compatibilité des fichiers 24 12 Code de région Connexions avec un équipement externe 12 AVCHD (codec vidéo avancé en haute définition) 8 12 12 Introduction Réglage de la résolution 24 Connexion AUX 25 Configurations systme spécifiques Connexion PORT. IN (Entrée Port) 25 Remarques sur la compatibilité Connexion OPTICAL IN 1/2 (Entrée optique) 26 Connexion Bluetooth® 28 Raccordement à votre réseau domestique 13 Télécommande 14 Panneau avant 15 Panneau arrire HB985-DB.BDEUPPK_FRE.indd 6 29 Paramétrage réseau 31 Raccordement d’un périphérique USB 32 Réglages 32 Réglage des paramètres 33 Menu [AFFICHAGE] 34 Menu [LANGUE] 35 Menu [AUDIO] 36 Menu [VERROU] 2010-05-14 1:54:17 7 37 Menu [RÉSEAU] 37 Menu [AUTRES] 39 Effets sonores 4 Utilisation 6 Dépannage 64 Général 65 Image 65 Son 66 Réseau 1 2 40 Lecture générale 42 Lecture avancée 44 Affichage à l’écran 48 Utilisation des fonctions BD-LIVE 49 Lecture d’un fichier vidéo et d’un disque VR 67 Commande d’un téléviseur à l’aide de la télécommande fournie 51 Lecture d’un fichier photo 68 Liste des codes de région 53 Écoute de musique 69 Liste des codes de langue 56 Lecture de l’iPod 70 Résolution de la sortie vidéo 58 Utilisation de la fonction Radio 71 Marques de commerce et licences 59 Lecture de contenu via votre réseau domestique 73 Caractéristiques 75 Avis concernant les logiciels open source 7 Annexe 3 4 5 5 Entretien 63 Remarque sur les disques 63 Manipuler le lecteur 6 7 8 HB985-DB.BDEUPPK_FRE.indd 7 2010-05-14 1:54:17 8 Préparation 2 Préparation 2 Introduction Préparation À propos du symbole “ ” Le symbole “ ” peut apparaître sur votre écran de téléviseur durant le fonctionnement. Il signifie que la fonction décrite dans ce manuel n’est pas disponible avec ce support spécifique. Symboles utilisés dans ce manuel REMARQUE Une section dont le titre comporte l’un des symboles suivants ne s’applique qu’aux disques représentés par ce symbole. BD Disque BD-ROM DVD DVD-Vidéo, DVD±R/RW en mode vidéo ou VR et finalisé AVCHD DVD±R/RW au format AVCHD ACD CD audio MOVIE Fichiers vidéo MUSIC Fichiers musique PHOTO Fichiers image Indique des remarques et fonctionnalités spéciales. ATTENTION Indique des précautions à prendre pour éviter les dommages éventuels dus à une utilisation inappropriée. HB985-DB.BDEUPPK_FRE.indd 8 2010-05-14 1:54:17 Préparation Accessoires fournis Câble vidéo (1) Antenne FM (1) Accessoires du boîtier du hautparleur (S-BD707SW) Câble de hautparleur (1) Accessoires du boîtier du hautparleur (S-BD303) Câble de hautparleur (6) Sabot iPod (1) Tampons antidérapant - grands (1) 2 Préparation Piles (1) Télécommande (1) 9 Tampons antidérapant – petits (1) Accessoires du boîtier du hautparleur (S-BD707T) Tampons antidérapant - grands (1) Câble de hautparleur (5) Vis (12) bases du socle d’enceinte (4) Tampons antidérapant – petits (1) Tampons antidérapant - moyens (1) HB985-DB.BDEUPPK_FRE.indd 9 2010-05-14 1:54:18 10 Préparation Disques pouvant être lus Disques Blu-ray - Disques tels que des films disponibles à l’achat ou à la location. - Disques BD-R/RE contenant des fichiers vidéo, musicaux ou photo. 2 Préparation DVD-VIDEO 8 / 12 cm Disques tels que des films disponibles à l’achat ou à la location. DVD±R 8 / 12 cm - Mode vidéo et finalisé uniquement. - Les disques double couche sont également acceptés. - Format AVCHD finalisé. - Disques DVD±R contenant des fichiers vidéo, musicaux ou photo. DVD-RW 8 / 12 cm - Mode VR, mode vidéo et finalisé uniquement. - Format AVCHD finalisé. - Disques DVD-RW contenant des fichiers vidéo, musicaux ou photo. DVD+RW 8 / 12 cm - Mode vidéo et finalisé uniquement. - Format AVCHD. - Format AVCHD finalisé. - Disques DVD+RW contenant des fichiers vidéo, musicaux ou photo. Audio CD 8 / 12 cm REMARQUE • Selon les caractéristiques du matériel d’enregistrement ou du CD-R/RW (ou DVD±R/RW) à proprement parler, certains CD-R/RW (ou DVD±R/RW) peuvent ne pas être lus par l’appareil. • En fonction du logiciel d’enregistrement et de la finalisation, il est possible que certains disques enregistrés (CD-R/RW, DVD±R/RW, BD-R/RE) ne puissent pas être lus. • Il est possible que les BD-R/RE, DVD±R/RW et CD-R/RW enregistrés à l’aide d’un ordinateur ou d’un enregistreur de CD/DVD puissent ne pas être lus si le disque est endommagé ou sale, ou si la lentille du lecteur présente de la poussière ou de la condensation. • Si vous enregistrez un disque à l’aide d’un ordinateur, même s’il est enregistré dans un format compatible, il existe une possibilité qu’il ne puisse pas être lu à cause des paramètres du logiciel d’application utilisé pour créer le disque. (Adressez-vous à l’éditeur du logiciel pour des informations plus détaillées.) • Pour obtenir une qualité de lecture optimale, ce lecteur nécessite que les disques et les enregistrements répondent à certaines normes techniques. • Les DVD préenregistrés sont automatiquement conformes à ces normes. Il existe de nombreux types de formats de disques enregistrables (dont des disques CD-R contenant des fichiers MP3 ou WMA), et ces formats requièrent certaines conditions préexistantes pour que la lecture soit possible. • Veuillez noter qu’il est nécessaire d’avoir une autorisation pour télécharger des fichiers MP3 ou WMA et de la musique depuis internet. Notre société n’ayant pas le droit d’accorder une telle autorisation, cette dernière doit toujours être recherchée auprès du détenteur des droits d’auteur. CD-R/RW 8 / 12 cm - Disques CD-R/RW contenant des fichiers audio, vidéo, musicaux ou photo. HB985-DB.BDEUPPK_FRE.indd 10 2010-05-14 1:54:18 Préparation Compatibilité des fichiers REMARQUE Généralités • Les fichiers vidéo haute définition contenus sur un CD ou un périphérique USB 1,0/1,1 risquent de ne pas être lus correctement. Pour lire des fichiers vidéo haute définition, il est recommandé d’utiliser les formats BD, DVD ou USB 2,0. • Ce lecteur prend en charge le format H.264/ MPEG-4 AVC profil Main ou High au niveau 4,1. Dans le cas d’un fichier de niveau supérieur, un message d’avertissement s’affichera à l’écran.n. • Ce lecteur ne prend pas en charge les fichiers enregistrés avec fonction GMC*1 ou Qpel*2. Il s’agit de techniques d’encodage vidéo du standard MPEG4, comme celles dont disposent DivX ou XVID. Nombre maximal de fichiers par dossier: 2 000 (nombre total de fichiers et de dossiers) Format des CD-R/RW, DVD±R/RW et BD-R/ RE: ISO 9 660+JOLIET, UDF et UDF Bridge Taille de résolution disponible: 1 920 x 1 080 pixels (L x H) Sous-titres compatibles: SubRip (.srt / .txt), SAMI (.smi), SubStation Alpha (.ssa/.txt), MicroDVD (.sub/.txt), VobSub (.sub), SubViewer 1.0 (.sub), SubViewer 2.0 (.sub/.txt), TMPlayer (.txt), DVD Subtitle System (.txt) Le filtre VobSub (.sub) n’est pas disponible avec la fonction [Home Link]. Formats codec compatibles: “DIVX3.xx”, “DIVX4.xx”, “DIVX5.xx”, “XVID”, “DIVX6.xx” (lecture standard uniquement), H.264/MPEG-4 AVC, MPEG1 SS, MPEG2 PS, MPEG2 TS Formats audio compatibles: “Dolby Digital”, “DTS”, “MP3”, “WMA”, “AAC”, “AC3” *1 GMC – Global Motion Compensation (compensation globale de mouvements) *2 Qpel – Quarter pixel (quart de pixel) MUSIQUE Fréquence d’échantillonnage: dans la plage 8 kHz à 48 KHz (WMA), dans la plage 11 kHz à 48 kHz (MP3) Débit binaire: dans la plage 8 kbps à 320 kbps (WMA, MP3), REMARQUE • • Ce lecteur n’est pas entièrement compatible avec le format audio WMA et AAC. Fréquence d’échantillonnage: dans la plage 32 kHz à 48 kHz (WMA), dans la plage 16 kHz à 48 kHz (MP3), Débit binaire: dans la plage 20 kbps à 320 kbps (WMA), dans la plage 32 kbps à 320 kbps (MP3) HB985-DB.BDEUPPK_FRE.indd 11 2 Préparation Extension de fichiers disponibles : “.jpg”, “.jpeg”, “.png”, “.avi”, “.divx”, “.mpg”, “.mpeg”, “.mkv”, “.mp4”, “.mp3”, “.wma”, “.wav” • Les extensions de fichiers disponibles varient suivant les serveurs DLNA. • Certains fichiers “.wav” ne sont pas pris en charge par cet appareil. • Les noms des fichiers sont limités à 180 caractères. • Suivant la taille et le nombre de fichiers, plusieurs minutes peuvent être nécessaires pour lire les contenus du support. FILM 11 • Ce lecteur ne prend pas en charge les balises ID3 intégrées dans les fichiers MP3. • La durée totale de lecture indiquée à l’écran peut ne pas être correcte pour les fichiers VBR. PHOTO Taille recommandée: Inférieure à 4 000 x 3 000 x 24 bits/pixel Inférieure à 3 000 x 3 000 x 32 bits/pixel Inférieure à 4 MByte/file • Les fichiers d’image photo progressifs et à compression sans perte ne sont pas pris en charge. 2010-05-14 1:54:19 12 Préparation Code de région Un code de région est indiqué à l’arrière de l’appareil. Ce dernier ne peut lire que les disques DVD ou BD-ROM de la même zone ou portant la mention “ALL” (Toutes zones). 2 AVCHD (codec vidéo avancé en haute définition) Préparation • Ce lecteur peut lire les disques au format AVCHD. Ces disques sont normalement enregistrés et utilisés dans les caméscopes. • Le format AVCHD est un format d’enregistrement numérique de vidéo haute définition. • Le format MPEG-4 AVC/H.264 peut compresser les images avec une plus grande efficacité que le format de compression d’image conventionnel. • Certains disques AVCHD utilisent le format “x.v.Colour”. • Ce lecteur peut lire les disques AVCHD au format “x.v.Colour”. • Selon leurs conditions d’enregistrement, il est possible que certains disques au format AVCHD ne puissent pas être lus. • Les disques au format AVCHD doivent être finalisés. • Le format “x.v.Colour” offre une palette de couleurs plus vaste que les disques pour caméscope DVD normaux. HB985-DB.BDEUPPK_FRE.indd 12 Configurations systme spécifiques Pour la lecture vidéo haute définition: • Téléviseur haute définition doté de prises d’entrée COMPOSANTES ou HDMI. • BD-ROM avec du contenu haute définition. • Une entrée HDMI ou DVI compatible HDCP est nécessaire sur votre téléviseur pour certains contenus (indiqués par les auteurs du disque). • Pour l’extrapolation des DVD de définition standard, une entrée HDMI ou DVI compatible HDCP est nécessaire sur votre téléviseur afin d’accéder aux contenus protégés contre la copie. Remarques sur la compatibilité • Comme les disques BD-ROM sont un nouveau format, certains problèmes avec les disques, la connexion numérique ou d’autres problèmes de compatibilité sont possibles. Si vous rencontrez des problèmes de compatibilité, contactez un point de service après-vente agréé. • Pour visionner un contenu haute définition et extrapoler un contenu DVD de définition standard, il peut être nécessaire d’avoir une entrée HDMI ou une entrée DVI compatible HDCP sur votre téléviseur. • Certains DVD et BD-ROM peuvent limiter l’utilisation de certaines fonctionnalités ou commandes. • Vous pouvez utiliser un périphérique USB qui sert à stocker des informations liées au disque, notamment les contenus en ligne téléchargés. Le disque que vous utilisez déterminera la durée de conservation de ces informations. 2010-05-14 1:54:19 Préparation 13 m/M SCAN: permet d’effectuer une recherche vers l’arrière ou l’avant. SPK LEVEL: Règle le volume sonore du haut-parleur souhaité. z USB REC: enregistre un CD audio. MUTE: Passer en mode muet. SOUND: Sélectionne un mode d’effet sonore. VOL +/- : Ajustez le volume des haut-parleurs. • • • • • • • • • c • • • • • • • • • 2 Télécommande • • • • • • • • • a • • • • • • • • • 1 3 Insertion des piles Retirez le couvercle des piles au dos de la télécommande, et insérez une pile R03 (taille AAA), en respectant les polarités et . HB985-DB.BDEUPPK_FRE.indd 13 O RETURN: permet de quitter le menu ou de reprendre la lecture. POPUP/ TOP MENU: permet d’afficher le menu de titres du DVD ou le menu contextuel du BDROM, s’il est disponible. x STOP: permet d’arrêter la lecture. B PLAY: permet de démarrer la lecture. X PAUSE/STEP: permet de mettre la lecture en pause. ./> SKIP: Permet de passer à la piste, au fichier ou au chapitre précédent/suivant. Préparation 2 1 (STANDBY/ON): permet d’allumer ou d’éteindre le lecteur. Z OPEN/CLOSE: permet d’ouvrir ou de fermer le plateau du disque. INPUT/TUNER: permet de modifier la source d’entrée. BT AUDIO: Change le mode d’entrée pour BT AUDIO directement. OPTICAL: Passe automatiquement en mode d’entrée optique. DISPLAY: permet d’activer ou de désactiver l’affichage à l’écran. HOME MENU: permet d’afficher ou de quitter le [Menu d’accueil]. MENU: permet d’accéder au menu du disque. Touches fléchées: permettent de sélectionner une option dans le menu. ENTER: permet de confirmer la sélection du menu. TUNE (+/-): Réglage de la station de radio de votre choix. PRESET: Sélections programmées des radios. • • • • • • • • • b • • • • • • • • • Touches numériques 0-9: permettent de sélectionner les options numérotées dans un menu. MARKER: Marque n’importe quel passage lors de la lecture. SEARCH: Affiche ou ferme le menu de recherche. REPEAT: permet de répéter une section de votre choix. CLEAR: permet d’effacer un index dans le menu de recherche ou un numéro lors de la définition du mot de passe. DIMMER: Pour réduire la luminosité de l’affichage de l’appareil. ZOOM: Accède au menu du zoom. Touches de couleurs (A, B, C, D): Utilisées pour naviguer sur les menus. - Bouton A (RDS): permet d’activer la fonction RDS (Radio Data System). - Bouton B (PTY): visualise le type de programme du RDS. - Bouton C (PTY SEARCH): Recherche un type de programme. - Bouton D: Sélectionne mono/ stéréo en mode FM. Touches de contrôle TV: Voir page 67. SLEEP: Fixe un certain laps de temps après lequel l’appareil s’éteint. 2010-05-14 1:54:19 14 Préparation Panneau avant 1 2 2 Préparation 3 4 5 6 7 a Plateau de disque c Capteur de la télécommande b Touches de fonctionnement 1 STANDBY/ON Touche Z (OPEN/CLOSE) FONCTION Change la source d’entrée ou la fonction. B/X (PLAY / PAUSE) x (STOP) ./> (SKIP) - TUNE + (Réglage de station de radio) d Fenêtre d’affichage HB985-DB.BDEUPPK_FRE.indd 14 e PORTABLE IN f Port USB g Réglage du volume 2010-05-14 1:54:19 Préparation 15 Panneau arrire 1 2 3 4 5 2 7 8 9 10 Préparation 6 11 a Cordon d’alimentation Branchez sur le secteur. g COMPONENT VIDEO (Y PB PR) OUTPUT (PROGRESSIVE SCAN) b Connecteurs haut-parleurs h OPTICAL IN 1(TV) / 2 c Ventilateur i iPod (24 broches) Raccordement au sabot iPod fourni. d Connecteur Antenne e VIDEO OUT f AUX (L/R) INPUT HB985-DB.BDEUPPK_FRE.indd 15 j HDMI OUT (type A, version 1.3) Entrées HDMI pour connexion TV. k Port LAN 2010-05-14 1:54:19 16 Installation 3 Installation Assemblez les enceintes 3 Pour le haut-parleur central : Utilisez l’adhésif fourni pour fixer quatre petits tampons à la base du haut-parleur central. Installation Connexion au haut-parleur BCS-707 Tampons antidérapant - petits small non-skid pads Préparation des haut-parleurs 1. Fixez les tampons anti-dérapage à la base des socles de chaque haut-parleur, du caisson de basse et du haut-parleur central. Utilisez l’adhésif fourni pour fixer les quatre tampons moyens à la base (en bas) de chacun des socles de haut-parleur. middle non-skid pads Tampons anti-dérapant - moyens Pour le caisson de basse : Utilisez l’adhésif fourni pour fixer quatre grands tampons à la base du caisson de basse. 2. Fixez les socles des haut-parleurs aux tiges en utilisant les vis fournies. Dès que vous avez aligné la tige et la base du socle, fixez avec les petites vis aux points indiquées ci-dessous. Notez que le hautparleur doit être face en direction de la base d’un triangle isocèle. Arrière Rear large non-skid pads Tampons anti-dérapant - grands Avant Front HB985-DB.BDEUPPK_FRE.indd 16 2010-05-14 1:54:20 Installation 3. Branchez les fils sur le lecteur. Branchez le fil blanc avec la ligne grise sur le côté (+) et l’autre sur le côté (–). Pour raccorder le fil d’enceinte sur le lecteur, appuyez sur chaque onglet en plastique pour ouvrir la borne de connexion. Insérez chaque fil dans la borne appropriée, puis relâcher l’onglet. couleur (+) 17 Fixez vos haut-parleurs avant et enceintes satellites Fixez chaque haut-parleur avant et enceinte satellite avec les taquets en plastique fournis. Vissez sur crochets de support dans le mur situé derrière le haut-parleur. Passez un cordon épais autour des crochets et par le taquet en plastique afin de stabiliser le haut-parleur (vérifiez bien que tout le dispositif est en mesure de supporter le poids du haut-parleur). Après l’installation, vérifiez que le haut-parleur est bien fixé. 3 ATTENTION Cordon suffithick samment cord épais Installation Noir (–) Taquet encatch plastique Plastic • Ne branchez pas d’autres haut-parleurs que ceux fournis avec de système. • Ne branchez pas les haut-parleurs fournis sur aucun autre amplificateur que celui fourni avec ce système. Toute connexion sur un autre amplificateur peut se traduire par un dysfonctionnement ou un incendie. ATTENTION • Le taquet en plastique n’est pas une fixation de montage et le haut-parleur ne doit pas être directement accroché au mur avec ce taquet. Utilisez toujours un cordon pour la stabilisation du haut-parleur. • Pioneer décline toute responsabilité en cas de perte ou de dommages dus à un assemblage et une installation incorrecte, à l’utilisation de matériaux d’installation insuffisamment robustes, à une mauvaise utilisation ou à des catastrophes naturelles. • Lors du placement de cet appareil, veillez à ce qu’il soit installé de telle sorte qu’il ne risque pas de tomber ni de causer des blessures dans l’éventualité d’une catastrophe naturelle (comme un tremblement de terre). HB985-DB.BDEUPPK_FRE.indd 17 2010-05-14 1:54:20 18 Installation Connexion au haut-parleur BCS-303 Pour le haut-parleur central : Utilisez l’adhésif fourni pour fixer quatre petits tampons à la base du haut-parleur central. Préparation des haut-parleurs 1. Fixez les tampons anti-dérapage à la base de chaque haut-parleur. Tampons anti-dérapant –samll petitsnon-skid pads Pour les haut-parleurs avant et enceintes satellites : Utilisez l’adhésif fourni pour fixer les quatre petits tampons à la base (en bas) de chacun des socles de haut-parleurs. 2. Branchez les fils sur le lecteur. 3 Installation Tampons anti-dérapant – samll non-skid pads petits Pour le caisson de basse : Utilisez l’adhésif fourni pour fixer quatre grands tampons à la base du caisson de basse. Branchez le fil blanc avec la ligne grise sur le côté (+) et l’autre sur le côté (–). Pour raccorder le fil d’enceinte sur le lecteur, appuyez sur chaque onglet en plastique pour ouvrir la borne de connexion. Insérez chaque fil dans la borne appropriée, puis relâcher l’onglet. couleur (+) Tampons anti-dérapant – grands large non-skid pads Noir (–) HB985-DB.BDEUPPK_FRE.indd 18 2010-05-14 1:54:20 Installation Montage mural du haut-parleur central Le haut-parleur central dispose d’un trou de montage qui permet de fixer le haut-parleur au mur. Avant le montage Les vis de montage ne sont pas fournies. Utilisez des vis appropriées au matériau du mur et capable de supporter le poids des hautparleurs. ATTENTION • Si vous n’êtes pas sûr de la qualité et de la robustesse de la cloison, demandez conseil à un professionnel. • Pioneer ne peut pas être tenu pour responsable d’accidents ou de dommage dus à une installation incorrecte. Vis Mounting de montage screw (non(not fournies) supplied) 5 mm 10 mm De 5 mm à 7 mm HB985-DB.BDEUPPK_FRE.indd 19 Remarque supplémentaire à propos du placement des haut-parleurs Installez les haut-parleurs principaux avant gauche et droit à égale distance de votre téléviseur. 3 Précautions : Veillez à bien torsader ensemble tous les fils nus des haut-parleurs et de les insérer complètement dans la borne du haut-parleur Si un des fils nus de haut-parleur touche le panneau arrière, cela peut provoquer une coupure de l’alimentation à titre de mesure de sécurité.. Installation Rappelez-vous que le système de haut-parleurs est lourd et que son poids pourrait fragiliser la fixation des vis au mur, ou que le matériau du mur pourrait ne pas résister au poids du hautparleur qui risquerait de tomber. Vérifiez que le mur sur lequel vous prévoyez de monter les haut-parleurs est suffisamment robuste pour supporter le poids du haut parleur. N’effectuez pas de montage sur du contre-plaqué ou des cloisons à surface fragile. 19 Les haut-parleurs avant, central et enceintes satellites fournis avec ce système sont blindés magnétiquement. Toutefois, selon l’emplacement de l’installation, une distorsion des couleurs peut apparaître sur l’écran de votre téléviseur si vous avez installé le hautparleur vraiment trop près de celui-ci. Si c’est le cas, éteignez votre téléviseur, puis allumezle après avoir patienté entre 15 et 30 minutes. Si le problème persiste, éloignez le système de haut-parleurs de votre téléviseur. Le caisson de basse n’est pas blindé magnétiquement et ne doit donc pas être placé à proximité d’un téléviseur ou d’un moniteur. Les supports de stockage magnétiques (comme des disquettes, les bandes et cassettes vidéo) ne doivent pas être rangés à proximité du caisson de basse. Ne fixez pas les haut-parleurs avant/enceintes satellites et le caisson de basse à un mur ou au plafond. Ils peuvent tomber et causer des blessures. 2010-05-14 1:54:21 20 Installation Positionnement du système L’illustration suivante montre comment positionner le système (exemple). Notez que les illustrations de ces instructions sont à titre explicatives et peuvent parfois différer de votre Home Cinema. Pour un meilleur son surround possible, tous les haut-parleurs autres que le subwoofer doivent être placés à égale distance de la position d’écoute (A). B 3 Installation G F A A A A D • Veillez à ce que les enfants ne mettent pas les mains ou tout autre objet dans le canal du hautparleur. *Canal du haut parleur pour l’excitation aéroacoustique : basses abondantes sur un hautparleur acoustique. • Placez l’enceinte centrale hors d’atteinte des enfants. Sinon, l’enceinte pourrait être endommagée et/ ou provoquer des dommages matériels et/ou des blessures. • Les enceintes contenant des pièces magnétiques, il est possible que des irrégularités de couleurs apparaissent sur l’écran du téléviseur ou du moniteur d’ordinateur. Utilisez les enceintes à une distance éloignée de votre téléviseur ou écran d’ordinateur. C A ATTENTION E A A Haut-parleur avant gauche (L)/ B Haut-parleur avant droit (R): Placez les haut-parleurs avant sur les côtés de l’écran ou du moniteur et si possible à la même hauteur. C Haut-parleur central: Placez le haut-parleur central au dessus ou en dessous de l’écran ou du moniteur. D Haut-parleur surround gauche (L)/ E Haut-parleur surround droit (R): Placez ces haut-parleurs derrière votre position d’écoute, légèrement tournés vers l’intérieur. F Subwoofer: La position du subwoofer n’est pas cruciale car les extrêmes graves sont non-directionnels. Mais il est préférable de placer le subwoofer près des haut-parleurs avant. Tournez-le légèrement vers le centre de la pièce pour réduire les réflexions sur les murs. G Ampli HB985-DB.BDEUPPK_FRE.indd 20 2010-05-14 1:54:21 Installation Connexion à votre TV Effectuez la ou les connexions suivantes en fonction des capacités de vos appareils à connecter à l’ampli. • Connexion HDMI (voir pages 21-22) • Connexion vidéo composantes (page 22) • Connexion vidéo (page 23) 21 Connexion HDMI Si vous possédez un moniteur ou un téléviseur HDMI, vous pouvez le raccorder à ce lecteur à l’aide d’un câble HDMI (type A, version 1.3). Raccordez la prise de sortie HDMI OUT de l’appareil à la prise d’entrée HDMI IN d’un téléviseur ou d’un moniteur compatible HDMI. Connexion HDMI REMARQUE Lecteur Player 3 Installation • Il existe plusieurs façons de connecter le lecteur en fonction de votre TV et des autres appareils que vous souhaitez connecter. Choisissez l’une des connexions présentées dans le manuel. • Veuillez vous référez aux manuels de votre TV, chaîne hi-fi ou autres dispositifs nécessaires pour effectuer les connexions correctement. • Assurez-vous que le lecteur est branché directement à votre TV. Réglez la TV sur le canal d’entrée vidéo. TV TV • Ne branchez pas votre lecteur via votre magnétoscope. L’image pourrait être déformée par le système de protection contre la copie. Réglez la source du téléviseur sur HDMI (reportez-vous au manuel d’utilisation de votre téléviseur). HB985-DB.BDEUPPK_FRE.indd 21 2010-05-14 1:54:21 22 Installation Connexion vidéo composantes REMARQUE • Une modification de la résolution alors que la connexion est déjà établie peut entraîner des dysfonctionnements. Pour résoudre le problème, éteignez le lecteur puis rallumez-le. • Lorsque la connexion HDMI avec HDCP n’est pas vérifiée, le téléviseur affiche un écran noir. Dans ce cas, vérifiez la connexion HDMI ou débranchez le câble HDMI. 3 • Si des interférences apparaissent à l’écran, vérifiez le câble HDMI (la longueur du câble ne doit généralement pas dépasser 4,5 m et vous devez utiliser un câble HDMI haut-débit (version 1.3). Raccordez les prises COMPONENT VIDEO OUT de l’appareil avec les prises correspondantes du téléviseur, à l’aide de câbles Y Pb Pr. Vous pouvez entendre le son sortir des enceintes du système. Connexion en composantes Player Lecteur PR VIDEO Installation L • Si un périphérique HDMI raccordé n’accepte pas la sortie audio du lecteur, le son du périphérique HDMI peut être déformé ou muet. R • Lorsque vous raccordez un appareil compatible HDMI ou DVI, effectuez les vérifications suivantes: - Essayez d’éteindre l’appareil HDMI/DVI ainsi que ce lecteur. Ensuite, allumez l’appareil HDMI/DVI, attendez environ 30 secondes, puis allumez ce lecteur. - L’entrée vidéo de l’appareil raccordé est correctement réglée pour cet appareil. - L’appareil raccordé est compatible avec les résolutions d’entrée vidéo 720 x 576p (480p), 1280 x 720p, 1920 x 1080i et 1920 x 1080p. • Certains appareils DVI ou HDMI compatibles HDCP ne fonctionneront pas avec ce lecteur. - L’image ne s’affichera pas correctement avec un appareil non HDCP. - Ce lecteur ne peut pas effectuer la lecture et le téléviseur affiche un écran noir. HB985-DB.BDEUPPK_FRE.indd 22 Y COMPONENT VIDEO INPUT • Lorsque vous utilisez la connexion HDMI, vous pouvez modifier la résolution pour la sortie HDMI. (Reportez-vous à la section “Réglage de la résolution”, page 23.) • Sélectionnez le type de sortie vidéo pour la prise de sortie HDMI OUT à l’aide de l’option [Rég. couleur HDMI] dans le menu [Config.] (voir page 34). PB AUX OUTPUT Vert Green Blue Bleu Red Rouge TV TV REMARQUE Lorsque vous utilisez la sortie vidéo composantes COMPONENT VIDEO OUT, vous pouvez modifier la résolution pour la sortie. (Reportez-vous à la section “Réglage de la résolution”, voir page 23.) 2010-05-14 1:54:22 Installation Connexion vidéo Réglage de la résolution Raccordez la prise de sortie vidéo VIDEO OUT du lecteur à la prise d’entrée vidéo du téléviseur à l’aide d’un câble vidéo. Vous pouvez entendre le son sortir des enceintes du système. Le lecteur offre plusieurs résolutions de sortie pour les prises de sortie HDMI OUT et COMPONENT VIDEO OUT. Vous pouvez modifier la résolution à l’aide du menu [Config.]. 1. Appuyez sur la touche HOME MENU ( Connexion vidéo 23 ). 2. Utilisez les touches I/i/U/u pour sélectionner [Config.], puis appuyez sur ENTER ( ). Le menu [Config.] apparaît. Lecteur 3. Utilisez les touches U/u pour sélectionner l’option [AFFICHAGE], puis appuyez sur i pour accéder au deuxième niveau. 3 PR L PB AUX R Y COMPONENT VIDEO INPUT OUTPUT 4. Utilisez les touches U/u pour sélectionner l’option [Résolution] puis appuyez sur ENTER ( ) ou i pour accéder au troisième niveau de menu. Installation VIDEO Yellow Jaune TV TV 5. Utilisez les touches U/u pour sélectionner la résolution souhaitée, puis appuyez sur la touche ENTER ( ) pour confirmer votre choix. REMARQUE • Si votre téléviseur n’accepte pas la résolution que vous avez définie sur le lecteur, vous pouvez régler la résolution sur 576p (480p) comme suit: 1. Appuyez sur Z pour ouvrir le tiroir à disque. 2. Appuyez sur la touche x pendant au moins 5 secondes. • Comme plusieurs facteurs affectent la résolution de sortie vidéo, reportez-vous à la section “Résolution de la sortie vidéo”, page 70. HB985-DB.BDEUPPK_FRE.indd 23 2010-05-14 1:54:22 24 Installation Connexion de l’antenne Branchez l’antenne fournie pour écouter la radio. Connexion de l’antenne Connexions avec un équipement externe Connexion AUX Vous pouvez écouter la musique de votre appareil avec les prises de sortie analogique audio des haut-parleurs du système. Branchez le câble de sortie analogique audio de votre appareil aux entrées L/R (INPUT) de l’ampli. Puis sélectionnez l’option AUX en appuyant sur les touches INPUT/TUNER, I/i et ENTER ( ). 3 Installation Connexion AUX Lecteur Player Lecteur Player VIDEO L PR PB AUX R Y COMPONENT VIDEO INPUT REMARQUE Après avoir connecté l’antenne filaire FM, positionnez-la à l’horizontal autant que possible. Veillez à étendre complètement l’antenne filaire FM. HB985-DB.BDEUPPK_FRE.indd 24 Rouge Red Blanc White To the audio output jacks Versof la your sortiecomponent audio de votre appareil (TV, VCR, etc.) (TV, VCR, etc.) 2010-05-14 1:54:23 Installation Connexion PORT. IN (Entrée Port) Connexion OPTICAL IN 1/2 (Entrée optique) Vous pouvez écouter la musique de votre lecteur audio portable sur les haut-parleurs du système. Vous pouvez écouter la musique de votre appareil avec la connexion numérique optique depuis les haut-parleurs du système. Branchez le casque (ou la sortie de ligne) de votre lecteur audio portable au PORTABLE IN de l’ampli. Puis sélectionnez l’option [PORTABLE] en appuyant sur les touches INPUT/TUNER, I/i et ENTER ( ). Connectez la prise de sortie optique de votre appareil dans la prise OPTICAL IN 1/2 de l’ampli. Puis sélectionnez l’option [OPTICAL 1/2] en appuyant sur les touches INPUT/TUNER, I/i et ENTER ( ). Ou appuyez directement sur OPTICAL. 25 Connexion PORT.IN Connexion optique 3 Installation Vers la prise de sortie To the digital numérique optique output jack de optical votre appareil of your component LecteurSGUUU MP3, etc. twZG HB985-DB.BDEUPPK_FRE.indd 25 2010-05-14 1:54:23 26 Installation Connexion Bluetooth® À propos de Bluetooth Bluetooth® est une technologie de communication sans fil dédiée à des connexions à courte distance. 3 Installation La portée accessible est inférieure à 10 mètres. (Le son peut être interrompu si la connexion interfère avec d’autres ondes électroniques ou si vous connectez votre dispositif bluetooth dans d’autres pièces.) La connexion de périphériques individuels en employant la technologie sans fil Bluetooth n’entraîne aucune charge supplémentaire. Vous pouvez faire fonctionner un téléphone mobile équipé de la technologie sans fil Bluetooth via la Cascade si la connexion a été réalisée au moyen de la technologie sans fil Bluetooth. Équipements pris en charge : téléphone mobile, MP3, ordinateur portable, assistant numérique personnel (PDA) (ces appareils acceptent les écouteurs stéréo). Profils Bluetooth Pour utiliser la technologie sans fil, les appareils doivent être capables d’interpréter certain profils. Cet appareil est compatible avec le profil suivant. A2DP (Advanced Audio Distribution Profile profil de distribution audio avancée) Écoute de morceaux de musique d’un équipement Bluetooth Appariement de votre appareil avec l’équipement Bluetooth Avant de démarrer la procédure d’appariement, vérifiez que la fonction Bluetooth est activée sur votre équipement Bluetooth. Pour plus d’informations, reportez-vous au mode d’emploi de votre équipement Bluetooth. Une fois l’appariement réalisé, il ne sera plus nécessaire de l’effectuer à l’avenir. HB985-DB.BDEUPPK_FRE.indd 26 1. Sélectionnez la fonction Bluetooth à l’aide de la touche INPUT/TUNER ou BT AUDIO. “BT AUDIO”, puis “BT READY” apparaissent sur la fenêtre d’affichage. 2. Faites fonctionner l’équipement Bluetooth et exécutez la procédure d’appariement. En effectuant la recherche de cet appareil avec l’équipement Bluetooth, selon le type d’équipement Bluetooth, la liste des équipements trouvés peut apparaître sur l’affichage de l’équipement Bluetooth . Votre appareil apparaît sous l’appellation “PIONEER AUDIO”. 3. Entrez le code PIN. Code PIN : 0000 4. Lorsque cet appareil est correctement apparié avec votre équipement Bluetooth, la LED Bluetooth de cet appareil s’allume et “BT SINK” apparaît. REMARQUE Selon le type de votre équipement Bluetooth, certains appareils peuvent avoir des méthodes d’appariement différentes. 5. Écoute de morceaux de musique. Pour écouter de la musique enregistrée sur votre équipement Bluetooth, reportez-vous au mode d’emploi de votre équipement Bluetooth. REMARQUE • Si vous changez le fonctionnement de l’appareil, la fonction Bluetooth est déconnectée, vous devez alors refaire l’appariement. • AVRCP n’est pas accessible dans ce mode. 2010-05-14 1:54:24 Installation Vérification des informations de l’équipement Bluetooth connecté Cette fonction est disponible après l’appariement. Vous pouvez contrôler les informations Bluetooth. Appuyez sur DISPLAY en maintenant la touche enfoncée plusieurs fois. Les informations Bluetooth sont modifiées comme suit. Adresse de l’équipement Bluetooth local t Nom de l’équipement t Aucun t ... 27 REMARQUE • Cet appareil ne reconnaît pas le profil écouteur mono (profil mains libres). • Le son peut être interrompu si la connexion interfère avec d’autres ondes électroniques. • Vous ne pouvez pas commander l’équipement Bluetooth avec cet appareil. • L’appariement est limité à un équipement Bluetooth pour un appareil et le multi appariement n’est pas possible. • Selon le type d’équipement, vous pourriez ne pas être en mesure d’utiliser la fonction Bluetooth. 3 Installation • Bien que la distance entre votre équipement Bluetooth et l’appareil soit inférieure à 10 m, s’il y a des obstacles entre ces éléments, votre équipement Bluetooth peut ne pas être connecté. • Sans connexion à Bluetooth active, “BT READY” apparaît sur la fenêtre d’affichage. • En cas de dysfonctionnement électrique dû à des appareils utilisant la même fréquence comme des équipements médicaux, des microondes ou des périphériques LAN sans fil, la connexion est perdue. • Si quelqu’un se place entre l’équipement Bluetooth et le lecteur, et ainsi interrompt la communication, la connexion est perdue. • L’écartement de la distance séparant l’équipement Bluetooth de l’appareil peut conduire à une diminution du son ; une connexion trop faible peut entraîner une déconnexion si l’espace entre l’équipement Bluetooth et l’appareil est hors plage de fonctionnement de l’équipement Bluetooth. • Vous déconnectez l’équipement doté de la technologie sans fil Bluetooth lorsque vous éteignez l’appareil principal ou placez l’équipement à une distance supérieure à 10 mètres de l’appareil principal. HB985-DB.BDEUPPK_FRE.indd 27 2010-05-14 1:54:24 28 Installation Raccordement à votre réseau domestique Cet appareil peut être connecté à un réseau local (LAN) via la prise LAN située à l’arrière de l’appareil. 3 Installation Reportez-vous à la documentation relative à votre périphérique réseau pour plus d’informations. Raccordez le port LAN du lecteur au port correspondant de votre modem ou routeur à l’aide d’un câble LAN ou Ethernet en vente dans le commerce (CAT5 ou, de préférence, connecteur RJ45). Dans l’exemple de configuration d’une connexion câblée ci-dessous, ce lecteur peut accéder au contenu de chaque ordinateur. Connexion à un réseau fi laire Routeur Router Broadband Service haut Service débit WAN LAN 1 LAN 2 PC PC LAN 3 Lecteur Player REMARQUE • Maintenez fermement la fiche lorsque vous branchez ou débranchez le câble LAN. Au moment de débrancher, ne tirez pas sur le câble LAN mais débranchez-le tout en appuyant sur la languette. • Ne raccordez pas un câble de téléphone modulaire au port LAN. • Comme il existe différentes configurations de raccordement, suivez les spécifications de votre opérateur de télécommunications ou de votre prestataire de services internet. • Le lecteur envoie un signal audio depuis les entrées HDMI à la fois vers la sortie HDMI et les enceintes de l’appareil. HB985-DB.BDEUPPK_FRE.indd 28 2010-05-14 1:54:24 Installation Paramétrage réseau Avant de paramétrer le réseau câblé, vous devez relier votre réseau domestique à internet en haut débit. S’il existe un serveur DHCP sur le réseau local via une connexion câblée, ce lecteur se verra attribuer automatiquement une adresse IP. Une fois le raccordement physique effectué, certains réseaux domestiques nécessitent de régler les paramètres réseau du lecteur. Paramétrez l’option [RÉSEAU] comme suit. 2. Utilisez les touches U/u/I/i pour sélectionner le mode IP [Dynamique] ou [Statique]. Généralement, sélectionnez [Dynamique] pour attribuer automatiquement une adresse IP. HB985-DB.BDEUPPK_FRE.indd 29 REMARQUE S’il n’existe pas de serveur DHCP sur le réseau et que vous voulez définir l’adresse IP manuellement, sélectionnez [Statique], puis réglez les options [Adresse IP], [Masque sous-réseau], [Passerelle] et [Serveur DNS] à l’aide des touches U/u/I/i et des touches numériques. Si vous vous trompez en saisissant les chiffres, appuyez sur la touche CLEAR pour effacer la partie en surbrillance. 3. Sélectionnez [OK] et appuyez sur ENTER ( ) pour appliquer les paramètres réseau. 4. Le lecteur vous demandera de tester la connexion réseau. Sélectionnez [OK] et appuyez sur la touche ENTER ( ) pour terminer la connexion réseau. 3 Installation 1. Sélectionnez l’option [Config. connexion] dans le menu [Config.] , puis appuyez sur la touche ENTER ( ). 29 5. Si vous sélectionnez [Test] et appuyez sur la touche ENTER ( ) à l’étape 4 ci-dessus, le statut de la connexion réseau apparaît à l’écran. Vous pouvez aussi le tester via l’option [Statut connexion] du menu [Config.]. 2010-05-14 1:54:24 30 Installation Remarques sur la connexion réseau: • • 3 • Installation • Pour ce faire, après avoir raccordé le lecteur au réseau domestique, éteignez et/ou débranchez rapidement le câble d’alimentation du routeur ou du modem câblé du réseau domestique. Ensuite, rallumez l’appareil et/ou rebranchez le cordon d’alimentation. Selon le prestataire de services internet (ISP), le nombre d’appareils pouvant recevoir le service internet peut être limité par les modalités de service applicables. Pour plus de détails, contactez votre ISP. Notre entreprise décline toute responsabilité en cas de dysfonctionnement du lecteur et/ou de la fonctionnalité de connexion à internet suite à des erreurs ou problèmes de communication associés à votre connexion internet haut débit ou à tout autre équipement raccordé. Les caractéristiques des disques BDROM accessibles via la fonctionnalité de connexion à internet ne sont ni créées ni fournies par notre entreprise, aussi ne sommes-nous pas responsables de leur bon fonctionnement ou de leur disponibilité continue. Certains contenus de disque disponibles via la connexion à internet peuvent ne pas être compatibles avec ce lecteur. Si vous avez des questions concernant ces contenus, contactez le producteur du disque. • Certains contenus internet peuvent nécessiter une connexion très haut débit. • Même si le lecteur est correctement raccordé et configuré, il se peut que certains contenus internet ne puissent pas être lus à cause d’un encombrement du réseau, de la qualité ou de la largeur de bande de votre service internet, ou de problèmes avec le fournisseur du contenu. HB985-DB.BDEUPPK_FRE.indd 30 • Certaines opérations liées à la connexion à internet peuvent ne pas être possibles en raison de certaines restrictions fixées par le prestataire de services internet (ISP) fournissant votre connexion internet haut débit. • Tous les frais facturés par un ISP, notamment, mais sans s’y limiter, les frais de connexion, sont à votre charge. • Un port LAN 10 Base-T ou 100 Base-TX est nécessaire pour un raccordement câblé à ce lecteur. Si votre service internet ne permet pas un tel raccordement, vous ne pourrez pas brancher le lecteur. • Vous devez vous servir d’un routeur pour pouvoir utiliser le service xDSL. • Un modem DSL est nécessaire pour utiliser le service DSL et un modem par câble est nécessaire pour pouvoir utiliser le service de modem par câble. Suivant la méthode d’accès de votre ISP et le contrat d’abonnement souscrit, il est possible que vous ne puissiez pas utiliser la fonctionnalité de connexion à internet offerte par ce lecteur ou que vous soyez limité quant au nombre d’appareils que vous pouvez raccorder simultanément. (Si votre ISP limite l’abonnement à un seul appareil, il est possible que ce lecteur ne puisse pas être raccordé lorsqu’un PC est déjà connecté.) • L’utilisation d’un “routeur” peut ne pas être autorisée ou être limitée en fonction des règles et restrictions mises en place par votre ISP. Pour plus de détails, contactez directement votre ISP. • Éteignez tous les appareils réseau non utilisés dans votre réseau domestique local. Certains appareils peuvent générer du trafic sur le réseau. 2010-05-14 1:54:24 Installation Raccordement d’un périphérique USB Le lecteur peut lire des fichiers vidéo, musique et des fichiers images contenus dans le périphérique USB. 1. Insérez un périphérique USB au port USB jusqu’à ce qu’il soit bien en place. Connexion USB 31 REMARQUE • Ce lecteur prend en charge les clés mémoire USB et disques durs externes aux formats FAT16, FAT32 et NTFS lors de l’accès aux fichiers (musique, photos et films). Toutefois, les fonctionnalités BD-LIVE et d’enregistrement de CD audio ne prennent en charge que les formats FAT16 et FAT32. Lorsque vous utilisez les fonctionnalités BD-LIVE et d’enregistrement d’un CD audio, utilisez une clé USB à mémoire Flash ou un disque dur externe au format FAT16 ou FAT32. • Le périphérique USB peut être utilisé pour le stockage local afin de visionner des disques BDLIVE avec internet. • Ne retirez pas le périphérique USB pendant l’utilisation (lecture, etc.). Installation • Cet appareil peut prendre en charge jusqu’à quatre partitions du périphérique USB. 3 • Les périphériques USB nécessitant l’installation d’un programme supplémentaire après la connexion à un ordinateur ne sont pas pris en charge. • Périphérique USB : périphérique USB prenant en charge les technologies USB 1,1 et USB 2,0. 2. Appuyez sur la touche HOME MENU. Sélectionnez l’option [Film], [Photo] ou [Musique] à l’aide des touches U/u/I/i, puis appuyez sur ENTER ( ). 3. Sélectionnez un fichier à l’aide des touches U/u/I/i, et appuyez sur la touche PLAY ou ENTER ( ) pour lire le fichier. Vous pouvez vérifier à l’écran l’espace disponible sur le périphérique USB. 4. Sélectionnez un autre mode. Retirez le périphérique avec soin. • Seuls les fichiers vidéo, musicaux et photo peuvent être lus. Pour connaître les caractéristiques d’utilisation de chaque fichier, reportez-vous aux pages correspondantes. • Il est recommandé d’effectuer des sauvegardes régulières pour éviter la perte de données. • Si vous utilisez un câble d’extension USB, un concentrateur USB ou un lecteur multiple USB, il se peut que le périphérique USB ne soit pas reconnu. • Il est possible que certains périphériques USB ne fonctionnent pas avec cet appareil. • Les appareils photo numériques et les téléphones mobiles ne sont pas compatibles. • Vous ne pouvez pas connecter le port USB de cet appareil à un PC. HB985-DB.BDEUPPK_FRE.indd 31 2010-05-14 1:54:24 32 Installation 4. Utilisez les touches U/u pour sélectionner l’option de deuxième niveau souhaitée, puis appuyez sur ENTER ( ) pour accéder au troisième niveau. Réglages Réglage des paramètres Vous pouvez modifier les réglages de votre lecteur dans le menu [Config.]. 1. Appuyez sur la touche HOME MENU ( ). 5. Utilisez les touches U/u pour sélectionner le réglage souhaité, puis appuyez sur i ou ENTER ( ) pour confirmer votre choix. 3 Installation 2. Utilisez les touches I/i/U/u pour sélectionner [Config.], puis appuyez sur ENTER ( ). Le menu [Config.] apparaît. 3. Utilisez les touches U/u pour sélectionner l’option de premier niveau souhaitée, puis appuyez sur i pour accéder au deuxième niveau. HB985-DB.BDEUPPK_FRE.indd 32 2010-05-14 1:54:24 Installation Menu [AFFICHAGE] Format d’image Sélectionnez une option de format d’image en fonction du type de votre téléviseur. [4:3 Format respecté] sélectionnez cette option lorsque l’appareil est connecté à un téléviseur 4/3 standard. Les images 16/9 s’affichent avec une bande noire en haut et en bas de l’écran. [16:9 Original] sélectionnez cette option lorsque l’appareil est connecté à un téléviseur 16:9. L’image de format 4:3 s’affiche avec son rapport largeur/hauteur d’origine, avec des bandes noires sur les côtés gauche et droit. [16:9 Total] sélectionnez cette option lorsque l’appareil est connecté à un téléviseur 16:9. L’image de format 4:3 est ajustée horizontalement (dans des proportions linéaires) de sorte à remplir tout l’écran. Résolution Cette option permet de définir la résolution de sortie du signal vidéo HDMI et en composantes. Reportez-vous aux pages 23 et 70 pour plus de détails sur le réglage de la résolution. [Auto] si la prise de sortie HDMI OUT est raccordée à un téléviseur fournissant des informations sur l’affichage (EDID), cette option sélectionne automatiquement la résolution la mieux adaptée au téléviseur raccordé. Si seule la sortie COMPONENT VIDEO OUT est raccordée, la résolution passe à 1080i (valeur par défaut). [1080p] sortie vidéo progressive en 1080 lignes. 3 Installation [4:3 Recadrage auto] sélectionnez cette option lorsque l’appareil est connecté à un téléviseur 4/3 standard. Les images sont recadrées pour tenir dans votre écran de téléviseur. L’image est réduite sur les côtés. 33 [1080i] sortie vidéo entrelacée en 1080 lignes. [720p] sortie vidéo progressive en 720 lignes. [576p (480p)] sortie vidéo progressive en 576 (480) lignes. [576i (480i)] sortie vidéo entrelacée en 576 (480) lignes. REMARQUE Vous ne pouvez pas sélectionner les options [4:3 Format respecté] et [4:3 Recadrage auto] lorsque la résolution choisie est supérieure à 720p. HB985-DB.BDEUPPK_FRE.indd 33 2010-05-14 1:54:25 34 Installation Mode 1080p Lorsque la résolution est réglée sur 1080p, sélectionnez [24Hz] pour une présentation adaptée des films (1080p/24 Hz) avec un téléviseur HDMI compatible avec une entrée 1080p/24 Hz. REMARQUE • Lorsque vous sélectionnez [24 Hz], vous pouvez constater une perturbation de l’image lors du passage du mode vidéo au mode film. Dans ce cas, sélectionnez [50 Hz]. 3 Installation • Même lorsque l’option [Mode 1080p] est réglée sur [24 Hz], si votre téléviseur n’est pas compatible avec le réglage 1080p/24 Hz, la fréquence de la sortie vidéo sera de 50 Hz. Rég. couleur HDMI Sélectionnez le type de sortie de la prise HDMI OUT. Pour ce réglage, reportez-vous au manuel de votre téléviseur. [YCbCr] sélectionnez cette option lorsque vous raccordez le lecteur à un téléviseur HDMI. [RGB] sélectionnez cette option lorsque vous raccordez le lecteur à un téléviseur DVI (RGB). HB985-DB.BDEUPPK_FRE.indd 34 Menu [LANGUE] Affichage Menu Sélectionnez une langue pour le menu de [Config.] et l’affichage à l’écran. Menu disque/Audio/Sous-titres Sélectionnez la langue de votre choix pour la piste audio, les sous-titres et le menu du disque. [Original] désigne la langue d’origine dans laquelle le disque a été enregistré. [Autre] appuyez sur ENTER ( ) pour sélectionner une autre langue. Utilisez les touches numériques, puis appuyez sur ENTER ( ) pour saisir le numéro à 4 chiffres correspondant indiqué dans la liste des codes de langue, page 69. [Arrêt] (pour le sous-titrage des disques uniquement) désactive les sous-titres. REMARQUE Votre réglage de la langue peut ne pas fonctionner sur certains disques. 2010-05-14 1:54:25 Installation Menu [AUDIO] Réglages enceintes Pour obtenir le meilleur son possible, utilisez l’écran de configuration des haut-parleurs pour définir le volume des haut-parleurs que vous avez connecté et leur distance à partir de votre position d’écoute. Utilisez le test pour ajuster le volume des haut-parleurs au même niveau. HD AV Sync Il arrive que la TV numérique rencontre un décalage entre l’image et le son. Si cela se produit vous pouvez régler le délai de l’arrivée du son pour qu’il « attende » l’arrivée de l’image : c’est ce qu’on appelle la synchronisation HD AV. Utilisez les touches U u pour faire défiler la durée d’attente souhaitée que vous pouvez définir entre 0 et 300 ms. [Enceintes] Sélectionnez le haut-parleur que vous souhaitez ajuster. Le délai peut varier en fonction du canal de TV numérique que vous regardez. Si vous changez de chaîne, vous devrez probablement redéfinir la synchronisation HD AV. [Volume] Définissez le volume de chaque hautparleur. DRC (Contrôle de la gamme dynamique) [Test/ Arrêt test son] Les haut-parleurs émettent un signal d’essai. [OK] Confirmez les réglages. [Annuler] Annuler les réglages. HB985-DB.BDEUPPK_FRE.indd 35 3 Lorsqu’un fichier encodé en Dolby Digital ou en Dolby Digital Plus est en lecture, vous avez la possibilité de compresser la plage dynamique de la sortie audio (la différence entre le son maximum et le son minimum).Cela vous permet de regarder une vidéo à un volume inférieur sans perdre la clarté du son. Réglez le [DRC] sur [Marche] pour obtenir cet effet. Installation [Distance] Ajustez la distance entre chaque hautparleur et votre position d’écoute. 35 REMARQUE Le réglage du DRC peut uniquement être effectué lorsqu’il n’y a pas de disque dans le lecteur ou lorsque l’ampli est en mode Stop. 2010-05-14 1:54:25 36 Installation Menu [VERROU] Pour pouvoir accéder aux réglages [VERROU], vous devez saisir le code de sécurité à quatre chiffres que vous avez créé. Si vous n’avez pas encore saisi de mot de passe, vous serez invité à le faire. Saisissez deux fois un mot de passe à quatre chiffres, puis appuyez sur ENTER ( ) pour valider le nouveau mot de passe. Mot de passe Vous pouvez créer ou modifier le mot de passe. 3 Installation [Sans] Saisissez deux fois un mot de passe à quatre chiffres, puis appuyez sur ENTER ( ) pour valider le nouveau mot de passe. [Modifier] saisissez le mot de passe actuel et appuyez sur la touche ENTER ( ). Saisissez deux fois un mot de passe à quatre chiffres, puis appuyez sur ENTER ( ) pour valider le nouveau mot de passe. REMARQUE Si vous vous trompez, appuyez sur la touche CLEAR avant d’appuyer sur ENTER ( ). Saisissez ensuite le mot de passe correct. Contrôle parental DVD Bloque la lecture de DVD associés à un certain niveau de contrôle en fonction de leur contenu. (Tous les disques ne sont pas associés à un niveau de contrôle.) [Contrôle parental 1-8] le niveau 1 est le plus restrictif, et le niveau 8 est le moins restrictif. [Déverrouillage] Lorsque cette option est sélectionnée, le contrôle parental n’est pas activé et le disque peut être lu sans restriction. Contrôle parental BD Déterminez une limite d’âge pour la lecture d’un BD-ROM. Utilisez les touches numériques pour indiquer une limite de visionnage pour les BD-ROM. [255] tous les BD-ROM peuvent être lus. [0-254] empêche la lecture des BD-ROM avec des niveaux de contrôle correspondants enregistrés dessus. REMARQUE Le [Contrôle parental BD] ne s’applique qu’aux disques Blu-ray disposant du système de contrôle avancé. Si vous oubliez votre mot de passe, Si vous oubliez votre mot de passe, vous pouvez l’effacer en procédant comme suit: 1. Retirez tout disque contenu dans le lecteur. 2. Sélectionnez l’option [Verrou] dans le menu de [Config.]. 3. Entrez “210499” sur le menu [Verrou], à l’aide du clavier. Le mot de passe est effacé. HB985-DB.BDEUPPK_FRE.indd 36 Indicatif régional Indiquez le code de la région dont les normes ont servi à déterminer le niveau de contrôle du DVD, en vous reportant à la liste page 68. 2010-05-14 1:54:25 Installation Menu [RÉSEAU] Menu [AUTRES] Config. connexion DivX VOD Si votre environnement de réseau domestique est prêt pour la connexion de l’appareil, celuici doit être configuré pour la connexion réseau afin de pouvoir communiquer sur le réseau. (Reportez-vous à la section “Raccordement à votre réseau domestique”, page 28.) À propos des vidéos DivX: DivX® est un format vidéo numérique créé par DivX, Inc. Cet appareil est officiellement certifié DivX et peut donc lire les vidéos DivX. Pour plus d’informations et pour obtenir des outils logiciels permettant de convertir vos fichiers en vidéos DivX, consultez le site www.divx.com. Statut connexion Connexion BD-LIVE Vous pouvez limiter l’accès à internet lorsque les fonctions BD-LIVE sont utilisées. [Autorisée] l’accès à internet est autorisé pour tous les contenus BD-LIVE. [Autorisée en partie] l’accès à internet est autorisé uniquement pour les contenus BD-LIVE dotés de certificats des fournisseurs de contenus. L’accès à internet et les fonctions en ligne AACS sont interdites pour l’ensemble des contenus BD-LIVE dépourvus de certificat. [Interdite] l’accès à internet est interdit pour l’ensemble des contenus BD-LIVE. HB985-DB.BDEUPPK_FRE.indd 37 À propos des vidéos à la demande DivX : vous devez enregistrer cet appareil certifié DivX® pour pouvoir lire le contenu de vidéos à la demande (VOD) DivX. Pour générer le code d’enregistrement, accédez à la section DivX VOD du menu de configuration. Accédez ensuite au site vod. divx.com et renseignez ce code pour terminer le processus d’enregistrement et obtenir plus d’informations sur les vidéos à la demande DivX. 3 Installation Si vous voulez connaître l’état du réseau sur le lecteur, sélectionnez l’option [Statut connexion] et appuyez sur la touche ENTER ( ) pour vérifier si une connexion réseau ou internet a été établie. 37 [Enregistrer] Permet d’afficher le code d’enregistrement de votre lecteur. [Annuler enregistr.] Permet de désactiver votre lecteur et d’afficher le code de désactivation. REMARQUE Toutes les vidéos téléchargées via le service DivX VOD avec le code d’enregistrement de ce lecteur ne peuvent être lues que sur cet appareil. 2010-05-14 1:54:25 38 Installation Extinction auto L’économiseur d’écran s’affiche lorsque vous laissez le lecteur en mode Stop pendant environ 5 minutes. Si vous réglez cette option sur [Marche], l’ampli s’éteint automatiquement une fois que l’économiseur d’écran s’est affiché pendant 25 minutes. Réglez cette option sur [Arrêt] pour quitter l’économiseur d’écran pendant que l’utilisateur manipule le lecteur. Initialiser 3 Installation Réglages d’usine Vous pouvez rétablir les réglages d’usine par défaut du lecteur. Effacer stockage BD Initialise les contenus BD à partir du périphérique de stockage USB connecté. REMARQUE Si vous utilisez l’option [Réglages d’usine] pour réinitialisez le lecteur aux réglages d’origine fait en usine, vous devez redéfinir toutes les activations des services en ligne et tous les paramètres réseau. Information logiciel Affiche la version actuelle du logiciel. HB985-DB.BDEUPPK_FRE.indd 38 2010-05-14 1:54:25 Installation Effets sonores Vous pouvez choisir un effet sonore approprié. Appuyez sur SOUND jusqu’à ce que le mode souhaité apparaisse sur l’écran d’affichage du lecteur ou sur la TV. Les éléments affichés pour l’égaliseur peuvent être différents en fonction des sources sonores et des effets. [Pioneer 1]: Vous permet d’obtenir un réglage du son adapté aux enceintes de petite taille (S-BD303). 39 [Game]: Vous pouvez bénéficier d’un son plus virtuel pendant vos parties de jeux vidéo. [Night]: Cet effet sonore peut être utile lorsque vous souhaitez regarder une vidéo à un faible volume le soir. [Mus. ReTouch]: Lorsque vous écoutez des fichiers MP3 ou autre format de musique compressée, vous pouvez augmenter le son. Ce mode est uniquement disponible pour les sources à 2 canaux. [Loudness]: Permet d’améliorer le rendu des sons graves et aigus. 3 Installation [Pioneer 2]: Vous permet d’obtenir un réglage du son adapté aux enceintes de grande taille (S-BD707T). [Bypass]: Les logiciels comportant des signaux audio surround multicanaux sont lus à la manière dont ils ont été enregistré. [Bass Blast]: Renforce l’effet de son de basse du haut-parleur avant gauche au haut-parleur avant droit et du subwoofer. [PL ll Movie]: Exécute le mode vidéo Pro Logic II qui décode le signal d’entrée et créé cinq canaux de sortie à toute la largeur de bande à partir de sources à 2 canaux. Ce réglage est idéal pour regarder des vidéos enregistrées en overdub (surimpression) ou des vieux films. Ce mode est uniquement disponible pour les sources à 2 canaux. [PL ll Music]: Exécute le mode musique Pro Logic II qui décode le signal d’entrée et créé cinq canaux de sortie à toute la largeur de bande à partir de sources à 2 canaux. Ce réglage est idéal pour les sources stéréo classiques telles que les CD. Ce mode est uniquement disponible pour les sources à 2 canaux. [Clear Voice]: Ce mode permet de rendre le son des voix clair en améliorant la qualité de son vocal. HB985-DB.BDEUPPK_FRE.indd 39 2010-05-14 1:54:25 40 Utilisation 4 Utilisation Lecture générale 4. Sélectionnez l’option [Film], [Photo] ou [Musique] à l’aide des touches U/u/I/i, puis appuyez sur ENTER ( ). 5. Sélectionnez l’option Disque à l’aide des touches I/i, puis appuyez sur ENTER ( ). Lecture de disques 1. Appuyez sur Z OPEN/CLOSE, et placez un disque sur le plateau. 4 Utilisation Lorsque vous connectez jusqu’à deux périphériques, une illustration semblable à celle ci-dessus apparaît à l’écran. 2. Appuyez sur Z OPEN/CLOSE pour fermer le plateau du disque. Pour la plupart des CD audio, BDROM et DVD-ROM, la lecture démarre automatiquement. 3. Appuyez sur la touche HOME MENU. 6. Sélectionnez un fichier à l’aide des touches U/u/I/i, puis appuyez sur B PLAY ou ENTER ( ) pour lire le fichier. REMARQUE • Les fonctions de lecture décrites dans ce guide ne sont pas toujours disponibles pour tous les fichiers et supports. Certaines fonctions peuvent être limitées pour de multiples raisons. • En fonction des titres du BD-ROM, une connexion à un périphérique USB peut être nécessaire pour une lecture appropriée. HB985-DB.BDEUPPK_FRE.indd 40 2010-05-14 1:54:25 Utilisation Arrêt de la lecture Appuyez sur la touche x STOP pendant la lecture. Suspension de la lecture Utilisation du menu du disque BD DVD AVCHD Affichage du menu du disque Appuyez sur la touche X PAUSE/STEP pendant la lecture. Appuyez sur la touche B PLAY pour reprendre la lecture. L’écran du menu peut s’afficher immédiatement après l’insertion d’un disque contenant un menu. Si vous voulez afficher le menu du disque pendant la lecture, appuyez sur la touche MENU. Lecture image par image Utilisez les touches U/u/I/i pour naviguer dans les options de menu. Appuyez sur la touche X PAUSE/STEP pendant la lecture d’un film. Appuyez plusieurs fois sur la touche X PAUSE/ STEP pour une lecture image par image. Affichage du menu contextuel Avance ou retour rapide Appuyez sur la touche POPUP/ TOP MENU pendant la lecture et utilisez les touches U/u/ I/i pour naviguer dans les options de menu. Lecture au ralenti Lorsque la lecture est en pause, appuyez plusieurs fois sur la touche M pour changer la vitesse de lecture au ralenti. Accès à la piste, au fichier ou au chapitre suivant/précédent Pendant la lecture, appuyez sur la touche . ou > pour sélectionner la piste, le chapitre ou le fichier suivant ou pour revenir au début de la piste, du chapitre ou du fichier en cours. Certains disques BD-ROM contiennent un menu contextuel qui apparaît pendant la lecture. Reprise de la lecture BD MUSIC DVD AVCHD MOVIE ACD 4 Utilisation Appuyez sur la touche m ou M pour utiliser l’avance ou le retour rapide pendant la lecture. Vous pouvez modifier la vitesse de lecture en appuyant plusieurs fois sur la touche m ou M. 41 Si le disque le permet, le lecteur garde en mémoire l’endroit où vous avez arrêté la lecture en appuyant sur x (STOP). Si “Xx (reprise de la lecture possible) s’affiche brièvement à l’écran, appuyez sur la touche B (PLAY) pour reprendre la lecture là où vous l’aviez laissée. Si vous appuyez deux fois sur la touch x (STOP) ou sortez le disque, “x”(arrêt complet de la lecture) s’affiche à l’écran. Le lecteur efface le repère de reprise de la lecture. REMARQUE • Le repère de reprise de la lecture peut être effacé si vous appuyez sur une touche (par exemple, 1 (POWER), Z (OPEN/CLOSE), etc). • Sur les disques BD-Vidéo incluant la capacité BD-J, la fonction de reprise de la lecture n’est pas disponible. • Sur un titre interactif BD-ROM, l’appareil sera en mode arrêt complet si vous appuyez une fois sur la touche x (STOP) pendant la lecture. HB985-DB.BDEUPPK_FRE.indd 41 2010-05-14 1:54:26 42 Utilisation Lecture avancée Répétition d’une partie spécifique BD Lecture répétée BD DVD AVCHD ACD MUSIC Pendant la lecture, appuyez sur la touche REPEAT ( ) plusieurs fois de suite pour sélectionner le mode de répétition souhaité. Blu ray Disc/DVD A- – La partie sélectionnée sera répétée continuellement. Chapitre – Le chapitre en cours est répété. Titre – Le titre en cours est répété. 4 Utilisation Pour revenir à la lecture normale, appuyez sur la touche CLEAR. REMARQUE • Si vous appuyez sur > une fois lors de la répétition d’un chapitre ou de la lecture d’une piste, la lecture répétée s’annule. AVCHD ACD Ce lecteur peut répéter une partie que vous avez sélectionné. 1. Lors de la lecture, appuyez sur la touche REPEAT ( ) pour sélectionner [A-] au début de la partie que vous souhaitez faire répéter. Puis appuyez sur la touche ENTER ( ). 2. Appuyez sur la touche ENTER ( ) à la fin de la partie à répéter. La partie que vous avez sélectionné sera répétée continuellement. 3. Pour revenir à la lecture normale, appuyez sur REPEAT ( ) à plusieurs reprises pour sélectionner [Arrêt] ou appuyez sur CLEAR. Pour revenir à la lecture normale, appuyez plusieurs fois sur la touche REPEAT ( ) pour sélectionner [Arrêt]. CD audio/Fichiers musicaux – La piste en cours est répétée. – Toutes les pistes ou fichiers sont répétés. – Les pistes ou fichiers sont répétés dans un ordre aléatoire. – Toutes les pistes ou fichiers sont répétés dans un ordre aléatoire. – La partie sélectionnée est répétée continuellement (CD audio uniquement). DVD REMARQUE Vous ne pouvez pas sélectionner une partie de moins de 3 secondes. Recherche d’index BD DVD AVCHD MOVIE Vous pouvez démarrer la lecture à partir de points mémorisés (neuf au maximum). Saisie d’un index 1. Appuyez sur la touche MARKER à l’endroit souhaité pendant la lecture. L’icône de repère apparaît un court instant sur l’écran du téléviseur. 2. Répétez l’étape 1 pour placer jusqu’à neuf repères. • Cette fonction peut ne pas s’appliquer pour certains disques ou titres. HB985-DB.BDEUPPK_FRE.indd 42 2010-05-14 1:54:26 Utilisation Lecture d’une scène indexée 1. Appuyez sur la touche SEARCH pour faire apparaître le menu de recherche à l’écran. 2. Appuyez sur une touche numérique pour sélectionner le numéro d’index auquel vous voulez retourner. La lecture commence à partir de la scène indexée. Suppression d’un repère 1. Appuyez sur la touche SEARCH pour faire apparaître le menu de recherche à l’écran. 2. Appuyez sur la touche u pour mettre en évidence un numéro de repère. Utilisez les touches I/i pour sélectionner une scène indexée que vous voulez supprimer. REMARQUE • Selon les disques, les titres et la capacité du serveur, il se peut que cette fonction ne soit pas disponible. • Tous les points marqués sont effacés si le titre est complètement à l’arrêt (x) , si le titre est modifié ou si vous sortez le disque. • Si la durée totale du titre est inférieure à 10 secondes, cette fonction n’est pas disponible. Utilisation du menu de recherche BD DVD AVCHD MOVIE À l’aide du menu de recherche, vous pouvez facilement trouver le point à partir duquel vous voulez démarrer la lecture. Recherche d’un point 1. Pendant la lecture, appuyez sur la touche SEARCH pour afficher le menu de recherche. 2. Utilisez les touches I/i pour faire défiler la lecture de 15 secondes vers l’arrière ou vers l’avant. Vous pouvez sélectionner un point que vous voulez passer en maintenant enfoncées les touches I/i. Démarrage de la lecture à partir d’une scène indexée 4 Utilisation 3. Appuyez sur la touche CLEAR pour effacer la scène indexée du menu de recherche. 43 1. Appuyez sur la touche SEARCH pour faire apparaître le menu de recherche à l’écran. 2. Appuyez sur la toucheu pour mettre en évidence un numéro de repère. Utilisez les touches I/i pour sélectionner une scène indexée à partir de laquelle vous voulez démarrer la lecture. 3. Appuyez sur la touche ENTER ( ) pour démarrer la lecture à partir de la scène indexée. REMARQUE • Selon les disques, les titres et la capacité du serveur, il se peut que cette fonction ne soit pas disponible. • Il se peut que cette fonction ne soit pas disponible pour certains contenus du menu [Home Link], suivant le type de fichier et la capacité du serveur DLNA. HB985-DB.BDEUPPK_FRE.indd 43 2010-05-14 1:54:26 44 Utilisation Mémoire de la dernière scène BD DVD Cet appareil mémorise la dernière scène du dernier disque qui a été visionné. La dernière scène reste en mémoire même si vous sortez le disque du lecteur ou éteignez l’appareil. Si vous insérez un disque dont la scène est mémorisée, celle-ci est automatiquement lue. REMARQUE • La fonction Mémoire de la dernière scène d’un disque précédent est effacée dès qu’un disque différent est lu. Affichage à l’écran Vous pouvez afficher et modifier différents réglages et informations à propos du contenu. Affichage à l’écran des informations sur le contenu BD DVD AVCHD MOVIE 1. Pendant la lecture, appuyez sur la touche DISPLAY ( ) pour afficher différentes informations sur la lecture. • Selon le disque, il se peut que cette fonction ne soit pas disponible. 4 • Cet appareil ne mémorise pas les paramètres d’un disque si vous l’éteignez avant de commencer à lire ce disque. a b c Utilisation d e f g h a Titre – Numéro du titre en cours/nombre total de titres. b Chapitre – numéro du chapitre en cours/ nombre total de chapitres c Heure – Temps de lecture écoulé/durée de lecture totale. d Audio – langue ou canal audio sélectionné e Sous-titrage – titrage: sous-titre sélectionné f Angle – angle sélectionné/nombre total d’angles g Format d’image – Format d’image sélectionné pour le téléviseur. h Mode image – Mode d’image sélectionné. HB985-DB.BDEUPPK_FRE.indd 44 2010-05-14 1:54:26 Utilisation 2. Sélectionnez une option à l’aide des touches U/u. 3. Utilisez les touches I/i pour régler la valeur de l’option sélectionnée. 4. Appuyez sur la touche RETURN (O) pour quitter l’affichage à l’écran. REMARQUE • Si aucune touche n’est actionnée pendant quelques secondes, l’affichage à l’écran disparaît. • Il est possible qu’un numéro de titre ne puisse pas être sélectionné sur certains disques. • Les éléments disponibles peuvent varier suivant les disques ou les titres. • Si un titre interactif BD est en cours de lecture, certaines informations sur les réglages s’affichent à l’écran mais ne peuvent pas être modifiées. 45 Lecture à partir d’un code de temps BD DVD AVCHD MOVIE 1. Appuyez sur la touche DISPLAY ( ) pendant la lecture. La zone d’affichage du temps montre le temps de lecture écoulé. 2. Sélectionnez l’option [Heure] et saisissez l’heure de début requise en heures, minutes et secondes, de gauche à droite. Par exemple, pour trouver une scène située à 2 heures, 10 minutes et 20 secondes du début, saisissez “21020”. Utilisez les touches I/i pour faire défiler la lecture de 60 secondes vers l’arrière ou vers l’avant. 3. Appuyez sur la touche ENTER ( ) pour démarrer la lecture à partir de l’heure sélectionnée. 4 Utilisation REMARQUE • Il se peut que cette fonction ne soit pas disponible avec certains disques ou titres. • Il se peut que cette fonction ne soit pas disponible pour certains contenus du menu [Home Link], suivant le type de fichier et la capacité du serveur DLNA. HB985-DB.BDEUPPK_FRE.indd 45 2010-05-14 1:54:26 46 Utilisation Modification de la source audio BD DVD AVCHD MOVIE 1. Pendant la lecture, appuyez sur la touche DISPLAY ( ) pour activer l’affichage à l’écran. 2. Utilisez les touches U/u pour sélectionner l’option [Audio]. 3. Utilisez les touches I/i pour sélectionner la langue audio, la piste audio ou le canal audio de votre choix. REMARQUE 4 • Certains disques ne vous permettent de modifier vos choix audio qu’en passant par le menu du disque. Si tel est le cas, appuyez sur la touche POPUP/ TOP MENU ou MENU et sélectionnez le réglage audio de votre choix parmi les options du menu de disque. Utilisation • Immédiatement après avoir modifié le réglage audio, vous pouvez constater un décalage temporaire entre l’image et le son. HB985-DB.BDEUPPK_FRE.indd 46 Sélection de la langue des soustitres BD DVD AVCHD MOVIE 1. Pendant la lecture, appuyez sur la touche DISPLAY ( ) pour activer l’affichage à l’écran. 2. Utilisez les touches U/u pour sélectionner l’option [Sous-titrage]. 3. Utilisez les touches I/i pour sélectionner la langue de votre choix pour les sous-titres. 4. Appuyez sur la touche RETURN (O) pour quitter l’affichage à l’écran. REMARQUE Certains disques ne vous permettent de modifier vos choix de sous-titres qu’en passant par le menu du disque. Si tel est le cas, appuyez sur la touche POPUP/ TOP MENU ou MENU et sélectionnez le sous-titre de votre choix parmi les options du menu de disque. 2010-05-14 1:54:26 Utilisation Visionnage sous un angle différent BD DVD Si le disque contient des scènes enregistrées sous différents angles de prise de vue, vous pouvez modifier l’angle pendant la lecture. 1. Pendant la lecture, appuyez sur la touche DISPLAY ( ) pour activer l’affichage à l’écran. Modification du mode d’image BD DVD AVCHD MOVIE Vous pouvez modifier l’option [Mode image] pendant la lecture. 1. Pendant la lecture, appuyez sur la touche DISPLAY ( ) pour activer l’affichage à l’écran. 2. Utilisez les touches U/u pour sélectionner l’option [Mode image]. 3. Utilisez les touches I/i pour sélectionner l’angle de votre choix. 3. Utilisez les touches I/i pour sélectionner l’angle de votre choix. 4. Appuyez sur la touche RETURN (O) pour quitter l’affichage à l’écran. 4. Appuyez sur la touche RETURN (O) pour quitter l’affichage à l’écran. Réglage de l’option [Utilisateur] Modification du format d’image 1. Pendant la lecture, appuyez sur la touche DISPLAY ( ) pour activer l’affichage à l’écran. DVD AVCHD MOVIE Vous pouvez modifier le réglage de format d’image pendant la lecture. 1. Pendant la lecture, appuyez sur la touche DISPLAY ( ) pour activer l’affichage à l’écran. 2. Utilisez les touches U/u pour sélectionner l’option [Mode image]. 4 Utilisation 2. Utilisez les touches U/u pour sélectionner l’option [Angle]. BD 47 3. Utilisez les touches I/i to pour sélectionner l’option [Paramet. User], puis appuyez sur la touche ENTER ( ). 2. Utilisez les touches U/u pour sélectionner l’option [Format d’image]. 3. Utilisez les touches I/i pour sélectionner l’option de votre choix. 4. Appuyez sur la touche RETURN (O) pour quitter l’affichage à l’écran. REMARQUE Même si vous modifiez la valeur de l’option [Format d’image] dans l’affichage à l’écran, l’option [Format d’image] du menu [Config.] reste inchangée. HB985-DB.BDEUPPK_FRE.indd 47 4. Utilisez les touches U/u/I/i pour régler les options [Mode image]. Sélectionnez l’option [Défaut], puis appuyez sur la touche ENTER ( ) pour rétablir tous les réglages vidéo. 5. Utilisez les touches U/u/I/i pour sélectionner l’option [Fermer], puis appuyez sur la touche ENTER ( ) pour terminer le réglage. 2010-05-14 1:54:26 48 Utilisation Utilisation des fonctions BD-LIVE Cet appareil vous permet d’utiliser des fonctions telles que l’incrustation PIP, les programmes audio secondaires, les bonus virtuels, etc., avec les disques BD-Vidéo prenant en charge la technologie BONUSVIEW (BD-ROM version 2 Profil 1, version 1.1/Final Standard Profile). 4 L’image et le programme audio secondaires peuvent être lus à partir d’un disque compatible avec la fonction d’incrustation PIP. Pour connaître la méthode de lecture, reportez-vous aux instructions relatives au disque. Utilisation En plus de la fonction BONUSVIEW, les disques BD-Vidéo prenant en charge la technologie BD-LIVE (BD-ROM version 2 Profil 2), qui comporte une fonction d’extension réseau, vous permettent de bénéficier d’autres fonctionnalités, telles que le téléchargement des bandes-annonces de nouveaux films, en connectant cet appareil à internet. 1. Vérifier la connexion et les paramètres réseau (voir pages 28-30). 3 . Appuyez sur la touche HOME MENU, et réglez l’option [Connexion BD-LIVE] dans le menu [Config.] (voir page 37). Selon le disque, il se peut que la fonction BD-LIVE soit inopérante si l’option [Connexion BD-LIVE] est réglée sur [Autorisée en partie]. 4 . Insérez un BD-ROM comportant des fonctionnalités BD-LIVE. Les opérations disponibles diffèrent selon le disque. Reportez-vous au manuel fourni avec le disque. REMARQUE • Ne retirez pas le périphérique USB connecté pendant le téléchargement du contenu ou lorsqu’un disque Blu-ray se trouve encore à l’intérieur du lecteur. Cela pourrait endommager le périphérique USB connecté et les fonctionnalités BD-LIVE risqueraient de ne plus fonctionner correctement avec ce périphérique. Si le périphérique USB connecté semble endommagé suite à une telle action, vous pouvez le formater sur votre PC et le réutiliser ensuite avec ce lecteur. • Le fournisseur de contenus est libre de restreindre l’accès aux contenus de BD-LIVE dans certains territoires. • Plusieurs minutes peuvent être nécessaires pour charger les contenus BD-LIVE et les visionner. 2. Insérez un périphérique de stockage USB dans le port USB à l’avant du lecteur. Un périphérique de stockage USB est nécessaire pour pouvoir télécharger les contenus en bonus. Connexion USB HB985-DB.BDEUPPK_FRE.indd 48 2010-05-14 1:54:27 Utilisation Lecture d’un fichier vidéo et d’un disque VR 49 4. Sélectionnez un fichier à l’aide des touches U/u/I/i, puis appuyez sur B PLAY ou ENTER ( ) pour lire le fichier. REMARQUE • Les impératifs concernant les fichiers sont décrits page 11. Cet appareil permet de lire des disques DVDRW enregistrés au format VR (Video Recording) et des fichiers vidéo stockés sur un disque ou sur un périphérique USB. 1. Appuyez sur la touche HOME MENU. • Les disques au format DVD-VR non finalisés ne peuvent pas être lus par cet appareil. • Certains DVD-VR sont créés avec des données CPRM par un enregistreur de DVD. Cet appareil ne prend pas en charge ces types de disques. Présentation de la technologie CPRM La technologie CPRM est un système de protection contre la copie (avec cryptage des contenus) autorisant uniquement l’enregistrement des programmes enregistrables une fois. CPRM signifie Content Protection for Recordable Media (protection du contenu des supports enregistrables). 4 Utilisation 2. Sélectionnez l’option [Film] à l’aide des touches U/u/I/i, puis appuyez sur ENTER ( ). • Vous pouvez utiliser différentes fonctions de lecture. Reportez-vous aux pages 40-47. 3. Sélectionnez le périphérique à l’aide des touches I/i et appuyez sur la touche ENTER ( ). Lorsque vous connectez jusqu’à deux périphériques, une illustration semblable à celle ci-dessus apparaît à l’écran. HB985-DB.BDEUPPK_FRE.indd 49 2010-05-14 1:54:27 50 Utilisation Sélection d’un fichier de soustitres Modification de la page de code des sous-titres MOVIE MOVIE Si le fichier vidéo et le fichier de sous-titres portent le même nom, le fichier de sous-titres est lu automatiquement pendant la lecture du fichier vidéo. Si les sous-titres ne s’affichent pas correctement, vous pouvez modifier la page de code des sous-titres pour en améliorer l’affichage. Si le nom du fichier de sous-titres est différent de celui du fichier vidéo, vous devez sélectionner le fichier de sous-titres dans le menu [Film] avant de lancer la lecture du film. 1. Pendant la lecture, appuyez sur la touche DISPLAY ( ) pour activer l’affichage à l’écran. 1. Utilisez les touches U/u/I/i pour sélectionner le fichier de sous-titres que vous voulez lire dans le menu [Film]. 2. Utilisez les touches U/u pour sélectionner l’option [Page de codes]. 3. Utilisez les touches I/i pour sélectionner l’option de code de votre choix. 2. Appuyez sur la touche ENTER ( ). 4 Utilisation Appuyez de nouveau sur la touche ENTER ( ) pour désélectionner le fichier de sousLe fichier de sous-titres sélectionné s’affiche pendant la lecture du fichier vidéo. REMARQUE • Si vous appuyez sur la touche x STOP pendant la lecture, la sélection des sous-titres est annulée. 4. Appuyez sur la touche RETURN (O) pour quitter l’affichage à l’écran. • Cette option peut ne pas être utilisable avec la fonction [Home Link]. HB985-DB.BDEUPPK_FRE.indd 50 2010-05-14 1:54:27 Utilisation Lecture d’un fichier photo 51 Lecture d’un diaporama Appuyez sur la touche B PLAY pour lancer le diaporama. Arrêt d’un diaporama Ce lecteur vous permet de visionner des fichiers photo. 1. Appuyez sur la touche HOME MENU Appuyez sur la touche x STOP pendant la lecture du diaporama. Suspension d’un diaporama Appuyez sur la touche X PAUSE/STEP pendant la lecture du diaporama. Appuyez sur la touche B PLAY pour relancer le diaporama. Accès à la photo suivante/précédente 2. Sélectionnez l’option [Photo] à l’aide des touches I/i, puis appuyez sur ENTER ( ). REMARQUE • Les impératifs concernant les fichiers sont décrits page 11. 4 Utilisation 3. Sélectionnez le périphérique à l’aide des touches I/i et appuyez sur la touche ENTER ( ). Lorsqu’une photo est affichée en plein écran, appuyez sur la touche I ou i pour accéder à la photo précédente ou suivante. • Vous pouvez utiliser différentes fonctions de lecture. Reportez-vous aux pages 40-47. Lorsque vous connectez jusqu’à deux périphériques, une illustration semblable à celle ci-dessus apparaît à l’écran. 4. Sélectionnez un fichier à l’aide des touches U/u/I/i, puis appuyez sur ENTER ( ) pour afficher la photo correspondante. HB985-DB.BDEUPPK_FRE.indd 51 2010-05-14 1:54:27 52 Utilisation Options disponibles pendant l’affichage d’une photo h Vitesse – Utilisez les touches I/i pour sélectionner la vitesse de défilement des photos dans un diaporama. Vous pouvez utiliser différentes options pendant l’affichage d’une photo en plein écran. 3. Appuyez sur la touche RETURN (O) pour quitter l’affichage à l’écran. 1. Lorsqu’une photo est affichée en plein écran, appuyez sur la touche DISPLAY ( ) pour afficher le menu des options. 2. Sélectionnez une option à l’aide des touches U/u. a Écoute de musique pendant un diaporama Vous pouvez afficher des fichiers photo pendant l’écoute de fichiers musicaux. 1. Appuyez sur la touche HOME MENU b c d e f g h 4 Utilisation a Photo en cours/nombre total de photos – Utilisez la touche I/i pour afficher la photo précédente ou suivante. b Diaporama – Appuyez sur la touche ENTER ( ) pour lancer ou suspendre le diaporama. 2. Sélectionnez l’option [Photo] ou [Home Link] à l’aide des touches U/u/I/i, puis appuyez sur ENTER ( ). 3. Sélectionnez l’option [Disque] ou [USB] à l’aide des touches I/i, puis appuyez sur ENTER ( ). c Sélect. musique – Sélectionnez la musique de fond du diaporama. d Musique –Appuyez sur la touche ENTER ( ) pour lire ou suspendre la musique de fond. e Rotation – Appuyez sur la touche ENTER ( ) pour faire pivoter la photo dans le sens des aiguilles d’une montre. f Zoom – Appuyez sur la touche ENTER ( )pour afficher le menu [Zoom]. g Effet – Utilisez les touches I/i pour sélectionner un effet de transition entre les photos dans un diaporama. Pour le menu [Home Link], vous devez sélectionner un serveur ou un dossier partagé. 4. Sélectionnez un fichier à l’aide des touches U/u/I/i, puis appuyez sur ENTER ( ) pour afficher la photo. 5. Appuyez sur la touche DISPLAY ( ) pour afficher le menu des options. HB985-DB.BDEUPPK_FRE.indd 52 2010-05-14 1:54:28 Utilisation 6. Utilisez les touches U/u pour sélectionner l’option [Sélect. musique], et appuyez sur ENTER ( ) pour afficher le menu [Sélect. musique]. Écoute de musique 7. Utilisez les touches U/u pour sélectionner un périphérique, puis appuyez sur ENTER ( ). Ce lecteur peut lire les CD audio et les fichiers musicaux. 1. Appuyez sur la touche 53 HOME MENU Les périphériques que vous pouvez sélectionner varient selon l’emplacement du fichier photo que vous affichez en plein écran. Emplacement des photos Périphériques disponibles Disque Disque, USB USB Disque, USB Dossier partagé sur votre ordinateur (CIFS) CIFS Serveur DLNA Sélectionnez un dossier et appuyez sur ENTER ( ) pour afficher le répertoire de niveau inférieur. Sélectionnez et appuyez sur ENTER ( ) pour afficher le répertoire de niveau supérieur. REMARQUE Lorsque vous sélectionnez “music” dans [Home Link], la sélection d’un dossier n’est pas possible. Seule la sélection d’un fichier est possible dans [Home link]. 9. Utilisez la touche i pour sélectionner [OK], puis appuyez sur ENTER ( ) pour terminer la sélection de la musique. HB985-DB.BDEUPPK_FRE.indd 53 3. Sélectionnez le périphérique à l’aide des touches I/i et appuyez sur la touche ENTER ( ). 4 Utilisation Serveur DLNA U/u pour sélectionner 8. Utilisez les touches un fichier ou un dossier que vous voulez lire. 2. Sélectionnez l’option [Musique] à l’aide des touches U/u/I/i, puis appuyez sur ENTER ( ). Lorsque vous connectez jusqu’à deux périphériques, une illustration semblable à celle ci-dessus apparaît à l’écran. 4. Sélectionnez un fichier musical ou une piste audio à l’aide des touches U/u/I/i, et appuyez sur ENTER ( ) pour lire la musique. REMARQUE • Les impératifs concernant les fichiers sont décrits page 11. • Vous pouvez utiliser différentes fonctions de lecture. Reportez-vous aux pages 40-47. 2010-05-14 1:54:28 54 Utilisation Enregistrement de CD audio Vous pouvez enregistrer une piste en particulier ou toutes les pistes d’un CD audio vers un périphérique de stockage USB. 6. Utilisez les touches U/u/I/i pour sélectionner [Démarrer] et appuyez sur la touche ENTER ( ). 7. Utilisez les touches U/u/I/i pour sélectionner le dossier cible à copier. 1. Insérez un périphérique de stockage USB dans le port USB à l’avant du lecteur. 2. Appuyez sur Z (OPEN/CLOSE) (ouverture/ fermeture) et placez un CD audio sur le plateau. Appuyez sur Z (OPEN/CLOSE) (ouverture/ fermeture) pour fermer le plateau. La lecture démarre automatiquement. 3. Appuyez sur la touche DISPLAY ( ) pour afficher le menu des options. Ou 4 Utilisation Appuyez sur la touche z USB REC de la télécommande. Vous pouvez enregistrer plusieurs fichiers de musique sur le CD audio. 4. Utilisez les touches U/u pour sélectionner l’option [Enreg. CD] et appuyez sur ENTER ( ) pour afficher le menu [Enreg. CD]. Répétez l’opération pour sélectionner autant de pistes que vous le souhaitez. 5. Utilisez les touches U/u pour sélectionner une piste que vous voulez copier dans le menu, puis appuyez sur ENTER ( ). Si vous voulez créer un nouveau dossier, utilisez les touches U/u/I/i pour sélectionner [Nouveau dossier] et appuyez sur ENTER ( ). Saisissez un nom de dossier à l’aide du clavier virtuel, sélectionnez [OK] et appuyez sur la touche ENTER ( ). 8. Utilisez les touches U/u/I/i pour sélectionner [OK] et appuyez sur ENTER ( ) pour commencer l’enregistrement du CD audio. Pour interrompre l’enregistrement du CD audio, sélectionnez [Annuler] et appuyez sur la touche ENTER ( ). 9. Un message apparaît lorsque l’extraction du CD audio est terminée. Appuyez sur la touche ENTER ( ) pour vérifier le fichier musical créé dans le dossier cible. Répétez l’opération pour sélectionner autant de pistes que vous le souhaitez. Sélectionne toutes les pistes d’un CD audio. Sélectionne une option d’encodage dans le menu contextuel (128 Kbit/s, 192 Kbit/ s, 320 Kbit/s ou Sans perte). Annule l’enregistrement et revient à l’écran précédent. HB985-DB.BDEUPPK_FRE.indd 54 2010-05-14 1:54:29 Utilisation 55 REMARQUE • Le tableau ci-dessous donne en exemple la durée moyenne d’enregistrement d’une piste audio de 4 minutes vers un fichier musical à 192 Kbit/s. À l’arrêt Pendant la lecture 1,4 min. 2 min. • Les durées indiquées dans le tableau ci-dessus sont des estimations. • La durée d’extraction réelle pour un périphérique USB varie selon les caractéristiques de ce dernier. • Avant d’enregistrer sur le périphérique de stockage USB, assurez-vous que l’espace disponible est d’au moins 50 Mo. • L’enregistrement ne fonctionnera que si les fichiers musicaux ont une durée supérieure à 20 secondes. 4 Utilisation • N’éteignez pas ce lecteur ou ne retirez pas le périphérique de stockage USB connecté pendant l’enregistrement d’un CD audio. La réalisation de copies non autorisées d’un contenu protégé contre la copie, notamment un programme informatique, un fichier, une émission ou un enregistrement sonore, peut être une violation des droits d’auteur et constitue une infraction criminelle. Cet appareil ne doit pas être utilisé à de telles fins. Assumez vos responsabilités. Respectez les droits d’auteur. HB985-DB.BDEUPPK_FRE.indd 55 2010-05-14 1:54:29 56 Utilisation Lecture de l’iPod 1. Raccordez fermement votre iPod. Raccordez votre iPod Vous pouvez écouter la musique de votre iPod sur votre Home Cinema. Pour plus de détails sur l’iPod, consultez le guide utilisateur iPod. Raccordez le sabot et placez votre iPod dessus. Préparation • Pour visionner les vidéos et photos présentes sur l’iPod sur l’écran de votre TV. - Assurez-vous d’utilisez la connexion vidéo avec la prise VIDEO OUT sur le panneau arrière de l’ampli. Sélectionnez le mode d’entrée vidéo sur la TV. - Selon votre modèle d’iPod, assurez-vous de sélectionnez Vidéos > Réglages vidéo puis de régler la sortie TV sur Ask ou sur On sur votre iPod. Pour plus de détails sur les réglages vidéo, consultez le guide utilisateur iPod. 4 Utilisation - La visualisation de photos est disponible uniquement si l’ampli est en mode iPod IN et vous pourrez seulement voir les photos en diaporama. Vous devez ouvrir un diaporama sur votre iPod pour voir une photo sur la TV. Pour plus de détails au sujet des diaporamas, consultez le guide utilisateur iPod. • Avant de brancher l’iPod, éteignez le et réduisez le volume au minimum. HB985-DB.BDEUPPK_FRE.indd 56 2. Sélectionnez un fichier à l’aide de U/u/I/i puis appuyez sur ENTER ( ) pour écouter le fichier. Affichage de l’iPod à l’écran 1. Raccordez fermement votre iPod. 2. Appuyez sur la touche HOME MENU ( ). 3. Sélectionnez [Musique] ou [Film] à l’aide de I/i, puis appuyez sur ENTER ( ). SI un autre équipement (lecteur CD ou périphérique USB) est connecté, sélectionnez l’iPod dans le menu. 4. Sélectionnez un contenu à l’aide des touches U/u/I/i, puis appuyez sur ENTER ( ). 2010-05-14 1:54:29 Utilisation Profitez de votre iPod en mode in iPod IN Vous pouvez commander les fonctions de votre iPod à l’aide de la télécommande fournie. 1. Raccordez fermement votre iPod. En mettant cet appareil sous tension, votre iPod se met automatiquement en marche et le rechargement débute. 2. Appuyez sur INPUT/TUNER pour sélectionnez le mode iPod IN. sélectionne une option dans le menu. B /ENTER démarre la lecture de musique ou vidéo. X marque une pause lors de la lecture. Pour reprendre la lecture, appuyez à nouveau sur B (PLAY). m/M avance rapide ou retour rapide d’une chanson ou d’une vidéo. ./> passe la lecture d’une piste d’avant en arrière. REPEAT Appuyez sur la touche REPEAT pour sélectionner le mode de répétition souhaité: Piste ( ), Tous ( ), Off (Pas d’affichage). REMARQUE Cet appareil est compatible avec le son et la vidéo de l’iPod (4e génération), l’iPod nano, l’iPod classic, l’iPod mini, l’iPod touch et l’iPhone. (L’iPod shuffle n’est pas pris en charge.) HB985-DB.BDEUPPK_FRE.indd 57 REMARQUE • Un message d’erreur “CHECK IPOD” ou “Connected iPod model is not supported” (« ce modèle d’iPod n’est pas pris en charge ») apparaît lorsque : - Votre iPod n’est pas approprié pour la fonction à effectuer. • Un message d’erreur “CHECK IPOD” ou “Please update iPod’s software” (« Veuillez mettre le logiciel de l’iPod à jour » apparaît lorsque : - Votre iPod a une ancienne version du logiciel. t Mettez à jour le logiciel de votre iPod en téléchargeant la dernière version. • Si le lecteur affiche un message d’erreur, suivez les instructions de ce message. Un message d’erreur “CHECK IPOD” ou “Please check your iPod.” (« Veuillez vérifier votre iPod ») apparaît lorsque : - La communication entre le lecteur et votre iPod a échoué. t Retirez puis reposez votre iPod sur le support du lecteur. - Votre iPod n’est pas correctement connecté. - Le lecteur ne reconnaît pas votre iPod. - La batterie de votre iPod est très faible. t La batterie doit être rechargée. t Si vous chargez la batterie alors que la batterie est au plus bas, le rechargement peut prendre plus de temps. • Vous devez utilisez l’adaptateur dock fournit avec votre iPod pour une utilisation régulière. Si vous avez besoin d’un adaptateur, consultez votre revendeur iPod. • La compatibilité avec votre iPod peut varier selon le type d’iPod. • L’iPod touch et l’iPhone ont un mode de fonctionnement différent de celui de l’iPod. Vous pouvez avoir besoin d’une commande supplémentaire pour les utiliser sur le lecteur. (ex : « image à débloquer ») • Si vous utilisez une application, effectuez un appel, ou envoyez ou recevez un SMS, etc. sur un iPod touch ou un iPhone, détachez-le du support iPod dock du lecteur pour l’utiliser. • Selon la version de votre logiciel iPod, il peut y avoir une impossibilité de contrôler votre iPod depuis le lecteur. Nous vous recommandons d’installer la dernière version du logiciel. • La qualité vidéo dépend des sources vidéo sur votre iPod. • Si vous rencontrez un problème avec votre iPod, veuillez visiter le site http://www.apple.com/support/ipod 2010-05-14 4 Utilisation U/u/I/i 57 1:54:29 58 Utilisation Utilisation de la fonction Radio 6. Répétez les étapes 2 à 5 pour mémoriser d’autres stations. Vérifiez que l’antenne est raccordée. (Voir page 24) Suppression de toutes les stations préréglées Pour écouter la radio Appuyez sans relâcher sur la touche CLEAR pendant deux secondes. L’indication “Effacer tout” clignote. Appuyez sur CLEAR. Toutes les stations préréglées sont alors supprimées. 1. Appuyez sur INPUT/TUNER jusqu’à ce que l’indication Tuner (FM) apparaisse sur l’affichage du panneau frontal. Le syntoniseur se règle sur la dernière station radio écoutée. 4 5. Appuyez sur la touche ENTER ( ). La station est mémorisée. Utilisation 2. Appuyez sur la touche TUNE (-/+) et maintenez-la enfoncée pendant environ deux secondes, jusqu’à ce que l’indication de fréquence commence à changer. La recherche des stations s’arrête lorsque le syntoniseur de l’appareil a trouvé une station radio. Ou Appuyez de façon répétée sur la touche TUNE (-/+). 3. Pour régler le volume, tournez le bouton VOLUME situé sur le panneau frontal de l’appareil, ou utilisez la touche VOL (+/- ) de la télécommande. Mémorisation des stations radio Vous pouvez présélectionner 50 stations en FM. Avant de commencer, veillez à baisser le volume. 1. Appuyez sur INPUT/TUNER jusqu’à ce que l’indication TUNER (FM) apparaisse sur l’affichage du panneau frontal. 2. Sélectionnez la fréquence souhaitée à l’aide de la touche TUNE (-/+). Amélioration de la réception FM Appuyez sur la touche de couleur bleue D (ST/ MONO) de la télécommande. Le syntoniseur passe du mode stéréo au mode mono, ce qui permet d’améliorer la qualité de réception en cas de mauvaise réception. Afficher les informations de la station de radio Le syntoniseur FM bénéficie de la technologie RDS (Radio Data System). Elle fournit des informations sur la station de radio que vous écoutez. Appuyez de manière répétée sur la touche RDS pour afficher tour à tour les types de données suivantes : PS (nom de la station radio) Affiche le nom de la station radio PTY (reconnaissance du type de programme) Affiche le type de programme (par ex : Jazz ou Actualités). RT (texte radio) Affiche des informations spéciales publiées par la station radio. Ce texte peut défiler à l’affichage. CT (horloge radio) Affiche l’heure et la date telles qu’envoyées par la station radio. 3. Appuyez sur la touche ENTER ( ) ; un numéro apparaît sur l’affichage du panneau frontal. 4. Appuyez sur la touche PRESET pour sélectionner le numéro souhaité. HB985-DB.BDEUPPK_FRE.indd 58 2010-05-14 1:54:29 Utilisation Lecture de contenu via votre réseau domestique Accès à un serveur multimédia DLNA 1. Vérifier la connexion et les paramètres réseau (voir pages 28-30). 2. Appuyez sur la touche Ce lecteur peut parcourir et lire les contenus stockés sur votre ordinateur et vos serveurs multimédia certifiés DLNA connectés à votre réseau domestique. 59 HOME MENU. 3. Sélectionnez l’option [Home Link] à l’aide des touches U/u/I/i, puis appuyez sur ENTER ( ). 4. Sélectionnez un serveur multimédia DLNA dans la liste à l’aide des touches U/u, puis appuyez sur ENTER ( ). À propos des fonctions DLNA La Digital Living Network Alliance (DLNA) est un organisme intersectoriel regroupant des fabricants d’appareils électroniques grand public, d’ordinateurs personnels et de périphériques mobiles. Digital Living permet aux consommateurs de partager facilement des contenus multimédia numériques via un réseau à domicile. Le logo de certification DLNA permet d’identifier facilement les produits conformes aux directives d’interopérabilité DLNA. Cet appareil est conforme aux directives d’interopérabilité DLNA v1.5. 4 Si vous voulez réanalyser le serveur multimédia disponible, appuyez sur la touche de couleur verte (B). Utilisation Ce lecteur est un lecteur multimédia numérique certifié DLNA pouvant afficher et lire des contenus vidéo, photo et musicaux à partir de votre serveur multimédia numérique compatible DLNA (ordinateurs et produits électroniques grand public). REMARQUE En fonction du serveur multimédia, le lecteur aura peut-être besoin d’une autorisation du serveur. 5. Sélectionnez un fichier à l’aide des touches U/u/I/i, puis appuyez sur ENTER ( ) pour lire le fichier. Si un ordinateur exécutant le logiciel serveur DLNA ou tout autre périphérique compatible DLNA est connecté à ce lecteur, certaines modifications des paramètres du logiciel ou d’autres périphériques seront peut-être nécessaires. Pour plus d’informations, reportezvous au manuel d’utilisation du logiciel ou du périphérique. HB985-DB.BDEUPPK_FRE.indd 59 2010-05-14 1:54:29 60 Utilisation REMARQUE • Les impératifs concernant les fichiers sont décrits page 11. • Vous pouvez utiliser différentes fonctions de lecture. Reportez-vous aux pages 40-47. • Les impératifs concernant les fichiers indiqués page 11 ne sont pas toujours compatibles. Il se peut qu’il y ait des restrictions selon les fonctionnalités des fichiers et la capacité du serveur multimédia. • La vignette des fichiers incompatibles peut apparaître dans le menu [Home Link], mais ces fichiers ne peuvent pas être lus sur ce lecteur. • Si le menu [Home Link] comporte un fichier musical incompatible, le lecteur l’ignore et lit le fichier suivant. 4 • Le nom du fichier de sous-titres et celui du fichier vidéo doivent être identiques et les fichiers doivent se trouver dans le même dossier. Accès à un dossier partagé de votre ordinateur 1. Démarrez votre ordinateur connecté à votre réseau local. 2. Sur votre ordinateur, partagez les dossiers qui contiennent des fichiers musicaux, photo ou vidéo. 3. Sur le lecteur, vérifiez les réglages et la connexion réseau (voir pages 28-30). 4. Appuyez sur la touche HOME MENU. 5. Sélectionnez l’option [Home Link] à l’aide des touches U/u/I/i, puis appuyez sur ENTER ( ). 6. Sélectionnez un dossier partagé dans la liste à l’aide des touches U/u, puis appuyez sur ENTER ( ). Utilisation • La qualité de lecture et de fonctionnement du menu [Home Link] peut être affectée par les conditions de votre réseau domestique. • Il se peut que les fichiers des supports amovibles (clés USB, lecteur de DVD, etc.) sur votre serveur multimédia ne soient pas partagés correctement. Si vous souhaitez rechercher à nouveau les serveurs multimédia disponibles, appuyez sur la touche de couleur verte (B). REMARQUE En fonction du dossier partagé, il est possible que vous deviez saisir un identifiant utilisateur réseau et un mot de passe pour pouvoir accéder à ce dossier. 7. Sélectionnez un fichier à l’aide des touches U/u/I/i, puis appuyez sur ENTER ( ) pour lire le fichier. HB985-DB.BDEUPPK_FRE.indd 60 2010-05-14 1:54:30 Utilisation REMARQUE • Les impératifs concernant les fichiers sont décrits page 11. • Vous pouvez utiliser différentes fonctions de lecture. Reportez-vous aux pages 40-47. • La vignette des fichiers incompatibles peut apparaître dans le menu [Home Link], mais ces fichiers ne peuvent pas être lus sur ce lecteur. • Si le menu [Home Link] comporte un fichier musical incompatible, le lecteur l’ignore et lit le fichier suivant. • Le nom du fichier de sous-titres et celui du fichier vidéo doivent être identiques et les fichiers doivent se trouver dans le même dossier. • La qualité de lecture et de fonctionnement du menu [Home Link] peut être affectée par les conditions de votre réseau domestique. Configuration minimale requise de l’ordinateur • Windows® XP (Service Pack 2 ou ultérieur), Windows Vista® (aucun Service Pack requis) Windows 7® • Processeur Intel® Pentium® III à 1,2 GHz ou AMD Sempron™ 2200+ • Environnement réseau : Ethernet 100 Mbit/ s, réseau local sans fil (IEEE 802.11b/g/n) REMARQUE Si vous utilisez Windows® XP ou Windows Vista®, cliquez sur le lien correspondant ci-dessous pour obtenir plus d’informations sur les paramètres de partage de fichiers. • Il se peut que les fichiers des supports amovibles (clés USB, lecteur de DVD, etc.) sur votre ordinateur ne soient pas partagés correctement. 4 Utilisation • En fonction de l’environnement de votre ordinateur, il est possible que vous rencontriez des problèmes de connexion. HB985-DB.BDEUPPK_FRE.indd 61 61 2010-05-14 1:54:30 62 Utilisation Saisie de l’identifiant utilisateur réseau et du mot de passe En fonction de l’environnement de votre ordinateur, il est possible que vous deviez saisir un identifiant utilisateur réseau et un mot de passe pour pouvoir accéder à un dossier partagé. 1. Le menu clavier apparaît automatiquement si l’ID utilisateur et le mot de passe du réseau sont requis. 2. Utilisez U/u/I/i pour sélectionner un caractère, puis appuyez sur ENTER ( ) pour confirmer votre sélection sur le menu clavier. 3. Lorsque vous avez terminé de saisir l’identifiant utilisateur réseau et le mot de passe, sélectionnez [OK] à l’aide des touches U/u/I/i et appuyez sur ENTER ( ) pour accéder au dossier. Une fois que vous aurez accédé au dossier, l’identifiant utilisateur réseau et le mot de passe seront mémorisés pour plus de commodité. Si vous ne voulez pas que l’identifiant utilisateur réseau et le mot de passe soient mémorisés, appuyez sur la touche de couleur rouge (A) pour décocher la case [Mémoriser] avant d’accéder au dossier. Pour saisir une lettre accentuée, sélectionnez d’abord la lettre, puis accédez au jeu de caractères étendu. 4 Utilisation Exemple: sélectionnez “D”, puis appuyez sur la touche DISPLAY ( ) pour afficher le jeu de caractères étendu. Utilisez les touches I/i pour sélectionner “D” ou “Ď” et appuyez sur ENTER ( ). [Effacer] – efface tous les caractères saisis. [Espace] – insère un espace à l’emplacement du curseur. [<–] – supprime le caractère situé à gauche du curseur. [ABC / abc / #+-=&] – modifie le réglage du clavier pour activer les majuscules, les minuscules ou les symboles. HB985-DB.BDEUPPK_FRE.indd 62 2010-05-14 1:54:30 Entretien 63 5 Entretien Remarque sur les disques Manipuler le lecteur Lors de l’expédition du lecteur Manipulation des disques Veuillez garder le carton d’expédition d’origine et les matériaux d’emballage. Si vous avez besoin d’expédier l’appareil, pour une protection maximale, ré-emballez le lecteur comme il était à la sortie de l’usine. Maintenez la surface du lecteur propre. • N’utilisez pas de liquides volatils tels que du spray insecticide près du lecteur. Stockage des disques • Essuyer en appuyant fortement peut endommager la surface de l’appareil. Après la lecture, rangez le disque dans son boîtier. N’exposez pas les disques aux rayons directs du soleil ou de sources de chaleur et ne les laissez jamais dans une voiture garée en plein soleil. • Ne laissez pas de produits en caoutchouc ou en plastique en contact avec le lecteur pour une longue période. Nettoyage des disques Pour nettoyer le lecteur, utilisez un chiffon doux et sec. Si les surfaces sont très sales, utilisez un chiffon doux légèrement humidifié avec une solution détergente neutre. N’utilisez pas de solvants puissants tels que l’alcool, du benzène ou du diluant qui pourraient endommager la surface du lecteur. Nettoyer le lecteur 5 Entretien Ne jamais coller de papier ou de ruban adhésif sur le disque. Entretien du lecteur N’utilisez pas de solvants puissants comme l’alcool, le benzène, les diluants, les nettoyants utilisés dans le commerce, ou des sprays antistatiques destinés aux vieux disques vinyles. HB985-DB.BDEUPPK_FRE.indd 63 Le lecteur est un appareil de précision haute technologie. Si le bloc optique incorporé ou les pièces du lecteur de disques sont sales ou usées, la qualité de l’image pourrait être diminuée. Pour plus de détails, veuillez contacter le service autorisé le plus proche. 2010-05-14 1:54:30 64 Dépannage 6 Dépannage Général 6 L’appareil n’est pas sous tension. • Branchez le cordon d’alimentation sur la prise murale. La lecture ne démarre pas. • Insérez un disque approprié. (Vérifiez le type de disque, le système de couleur et le code régional). • Placez le disque face de lecture vers le bas. Dépannage • Placez le disque correctement sur le plateau de disque. • Nettoyez le disque. • Annuler la fonction d’évaluation ou changez le niveau d’évaluation. L’angle ne peut pas être changé. • Plusieurs angles de vue ne sont pas enregistrés sur le DVD vidéo en cours de lecture. La langue des sous-titres ne peut être changée ou désactivée. • Les sous-titres ne sont pas enregistrés sur le DVD vidéo en cours de lecture. Les fichiers MP3/WMA/ JPEG/DivX ne peuvent être lus. • Les fichiers ne sont pas enregistrés dans un format pouvant être lu par le lecteur. • Le lecteur ne prend pas en charge le codec du fichier vidéo. La télécommande ne fonctionne pas correctement. • La télécommande n’est pas dirigée vers le capteur de l’appareil. • La télécommande est trop loin de l’unité. • Il y a un obstacle sur le chemin de la télécommande du lecteur. • Les piles de la télécommande sont épuisées. HB985-DB.BDEUPPK_FRE.indd 64 2010-05-14 1:54:30 Dépannage 65 Image Il n’y a pas d’image. Présence de bruits parasites sur l’image. • Sélectionnez le mode d’entrée vidéo approprié sur le téléviseur de sorte que l’image de l’appareil apparaisse à l’écran du téléviseur. • Enfoncez correctement les branchements vidéo. • Vérifiez que l’option sélectionnée dans [Rég. couleur HDMI] dans le menu [Config.] correspond à votre connexion vidéo. • Il est possible que votre téléviseur n’accepte pas la résolution que vous avez définie sur le lecteur. Sélectionnez une résolution acceptée par votre téléviseur. • La prise de sortie HDMI OUT du lecteur est raccordée à un appareil DVI qui ne prend pas en charge la protection des droits d’auteur. • Vous essayez de lire un disque enregistré dans un système couleur différent de celui de votre téléviseur. • Sélectionnez une résolution acceptée par votre téléviseur. Son Il n’y a aucun son ou le son • est déformé. L’appareil est en balayage, mouvement lent ou en mode pause. • Le volume du son est bas. • Vérifiez la connexion du câble de haut-parleur. (page 16) 6 Dépannage HB985-DB.BDEUPPK_FRE.indd 65 2010-05-14 1:54:30 66 Dépannage Réseau La fonctionnalité BD-LIVE ne fonctionne pas. • Le périphérique de stockage USB connecté ne contient pas suffisamment d’espace. Raccordez un périphérique USB ayant au moins 1 Go d’espace libre. • Veillez à ce que l’appareil soit correctement connecté au réseau local et puisse accéder à internet (voir page 28). • Votre débit n’est peut-être pas suffisamment élevé pour utiliser les fonctionnalités BD-LIVE. Contactez votre fournisseur d’accès à Internet pour augmenter votre débit. • L’option [Connexion BD-LIVE] du menu [Config.] est définie sur [Interdite]. Réglez cette option sur [Autorisée]. La conception et les spécifications sont sujettes à modification sans préavis. Mises à jour Notez que les informations sur ce produit sont disponibles sur le site Web de Pioneer. Recherchez sur le site Web des informations sur les mises à jour et l’entretien de votre lecteur Blu-ray Disc. 6 Dépannage HB985-DB.BDEUPPK_FRE.indd 66 2010-05-14 1:54:30 Annexe 67 7 Annexe Commande d’un téléviseur à l’aide de la télécommande fournie Vous pouvez commander votre PIONEER téléviseur à l’aide des touches ci-dessous. Touches de commande du téléviseur Utilisation 1 (TV Power) Allumer ou éteindre le téléviseur. INPUT Choisir la source d’entrée entre le téléviseur et d’autres sources. CH +/- Passer d’une chaîne à l’autre. VOL +/- Régler le volume du téléviseur. REMARQUE Selon l’appareil raccordé, il se peut que vous ne puissiez pas commander votre téléviseur à l’aide de certaines de ces touches. HB985-DB.BDEUPPK_FRE.indd 67 Vous pouvez piloter votre téléviseur à l’aide de la télécommande fournie. Si votre téléviseur est répertorié dans le tableau ci-dessous, indiquez le code approprié qui correspond au fabricant. 1. Tout en maintenant la touche 1 (TV POWER) enfoncée, entrez le code fabricant de votre téléviseur avec les touches numériques (voir le tableau ci-dessous). Fabricant Numéro de code Pioneer 1(par défaut) Sony 2, 3 Panasonic 4, 5 Samsung 6, 7 LG 8, 9 Annexe Touche Réglage de la télécommande pour commander votre téléviseur 2. Relâchez la touche 1 (TV POWER) pour terminer le réglage. Selon les téléviseurs, la totalité ou certaines des touches de la télécommande peuvent ne pas fonctionner avec le téléviseur, même après avoir entré le code correct du fabricant. Lorsque vous remplacez les piles de la télécommande, il est possible que le numéro de code que vous aviez défini soit rétabli aux valeurs par défaut. Entrez le numéro de code approprié de nouveau. 2010-05-14 7 1:54:30 68 Annexe Liste des codes de région Choisissez un code de région dans cette liste. Région Code Région Afghanistan Code Région Code FJ Monaco MC Singapour SG SK Argentine AR Finlande FI Mongolie MN Slovaquie Australie AU France FR Maroc MA Slovénie Autriche AT Allemagne DE Népal NP Afrique du Sud ZA Belgique BE Grande-Bretagne GB Pays-Bas NL Corée du Sud KR Bhoutan BT Grèce GR Antilles GL néerlandaises Espagne ES AN Sri Lanka Nouvelle-Zélande NZ Suède HK NG Suisse HU Nigeria LK Bolivie BO Groenland Brésil BR Hong Kong Cambodge KH Hongrie Canada CA Inde Chili CL Indonésie Chine CN Israël Colombie CO Italie Congo CG Jamaïque Annexe Costa Rica CR Japon Croatie HR Kenya République tchèque Koweït CZ Libye DK Luxembourg Danemark Équateur Égypte 7 Code Région AF Fidji Salvador Éthiopie HB985-DB.BDEUPPK_FRE.indd 68 EC Malaisie EG Maldives SV Mexique ET IN Norvège ID Oman NO Taiwan OM Thaïlande IL Pakistan IT Panama PK Turquie PA Ouganda JM Paraguay JP Philippines KE Pologne KW Portugal LY Roumanie LU Russian Russie MY Arabie Saoudite MV Sénégal MX SI SE CH TW TH TR UG PY Ukraine PH États-Unis PL Uruguay UA PT Ouzbékistan RO Vietnam UZ RU Zimbabwe US UY VN ZW SA SN 2010-05-14 1:54:31 Annexe 69 Liste des codes de langue Utilisez cette liste afin de sélectionner la langue de votre choix pour les réglages initiaux suivants : [Audio], [Sous-titres] et [Menu disque]. Langue Code Langue Code Langue Code Langue Code 6565 Français 7082 Lituanien 7684 Sindhi 8368 Afrikaans 6570 Frison 7089 Macédonien 7775 Singhalais 8373 Albanais 8381 Galicien 7176 Malgache 7771 Slovaque 8375 Amharique 6577 Géorgien 7565 Malais 7783 Slovène 8376 Arabe 6582 Allemand 6869 Malayalam 7776 Espagnol 6983 Arménien 7289 Grec 6976 Maori 7773 Soudanais 8385 Assamais 6583 Groenlandais 7576 Marathe 7782 Swahili 8387 Aymara 6588 Guarani 7178 Moldave 7779 Suédois 8386 Azéri 6590 Goudjrati 7185 Mongol 7778 Tagalog 8476 Bachkir 6665 Haoussa 7265 Nauruan 7865 Tadjik 8471 Basque 6985 Hébreu 7387 Népalais 7869 Tamoul 8465 Bengali 6678 Hindi 7273 Norvégien 7879 Télougou 8469 Bhoutanais 6890 Hongrois 7285 Oriya 7982 Thaï 8472 Bihari 6672 Islandais 7383 Pendjabi 8065 Tonga 8479 Breton 6682 Indonésien 7378 Pachtou 8083 Turc 8482 Bulgare 6671 Interlingue 7365 Perse 7065 Turkmène 8475 Birman 7789 Irlandais 7165 Polonais 8076 Twi 8487 Biélorusse 6669 Italien 7384 Portugais 8084 Ukrainien 8575 Chinois 9072 Japonais 7465 Quechua 8185 Ourdou 8582 Croate 7282 Kannada 7578 Rhéto-roman 8277 Ouzbek 8590 Tchèque 6783 Kashmiri 7583 Roumain 8279 Vietnamien 8673 Danois 6865 Kazakh 7575 Russe 8285 Volapük 8679 Néerlandais 7876 Kirghiz 7589 Samoan 8377 Galois 6789 Anglais 6978 Coréen 7579 Sanskrit 8365 Wolof 8779 Espéranto 6979 Kurde 7585 8872 6984 Laotien 7679 Gaélique écossais 7168 Xhosa Estonien Yiddish 7473 Féroïen 7079 Latin 7665 Serbe 8382 Yoruba 8979 8372 Zoulou 9085 8378 Fidjien 7074 Lette, letton 7686 Serbo-croate Finnois 7073 Lingala 7678 Shona HB985-DB.BDEUPPK_FRE.indd 69 2010-05-14 Annexe Afar 7 1:54:31 70 Annexe Résolution de la sortie vidéo Lorsque le support lu n’est pas protégé contre la copie Sortie vidéo HDMI OUT COMPONENT VIDEO OUT HDMI connecté HDMI déconnecté Résolution 576i (480i) 576p (480i) 576i (480i) 576p (480p) 576p (480p) 576p (480p) 720p 720p 720p 1080i 1080i 1080i 1080p / 24 Hz 1080p / 24 Hz 576i (480i) 1080i 1080p / 50 Hz 1080p / 50 Hz 576i (480i) 1080i Lorsque le support lu est protégé contre la copie Sortie vidéo HDMI OUT Résolution 576i (480i) 576p (480p) 576p (480p) 720p 720p 576i (480i) 576p (480p) 1080i 1080i 576i (480i) 576p (480p) 1080p / 24 Hz 1080p / 24 Hz 576i (480i) 576p (480p) 1080p / 50 Hz 1080p / 50 Hz 576i (480i) 576p (480p) Annexe • Pour le réglage de résolution 576i (480i), la résolution de sortie réelle HDMI OUT passera à 576p (480p). • Si vous sélectionnez une résolution manuellement, puis raccordez la prise HDMI au téléviseur, mais que votre téléviseur ne la prend pas en charge, le réglage de résolution est défini sur [Auto]. • HDMI déconnecté 576i (480i) 576p (480p) Connexion HDMI OUT 7 COMPONENT VIDEO OUT HDMI connecté Si vous sélectionnez une résolution non prise en charge par votre téléviseur, un message d’avertissement apparaîtra. Après modification de la résolution, si rien n’apparaît à l’écran, attendez 20 secondes pour que la résolution revienne automatiquement au réglage précédent. HB985-DB.BDEUPPK_FRE.indd 70 576p (480p) • La fréquence d’image de sortie vidéo 1080p peut être définie automatiquement sur 24 Hz ou 50 Hz en fonction de la capacité et de la préférence du téléviseur raccordé, ainsi que de la fréquence d’image vidéo native du contenu du BD-ROM. Connexion COMPONENT VIDEO OUT Le format BD ou DVD peut empêcher l’extrapolation en sortie analogique. Connexion VIDEO OUT La résolution de la prise de sortie VIDEO OUT est toujours réglée sur 576i (480i). 2010-05-14 1:54:31 Annexe 71 Marques de commerce et licences “Blu-ray Disc” et commerce. sont des marques de Le logo “BD-LIVE” est une marque commerciale de l’association “Blu-ray Disc”. “BONUSVIEW” est une marque commerciale de l’association Blu-ray Disc. HDMI, le logo HDMI et High-Definition Multimedia Interface sont des marques commerciales ou des marques déposées de HDMI Licensing, LLC aux États-Unis et dans d’autres pays. Le logo est une marque commerciale de DVD Format/Logo Licensing Corporation. TM Java et toutes les marques commerciales et les logos Java sont des marques commerciales ou des marques déposées de Sun Microsystems, Inc. aux États-Unis et/ou dans d’autres pays. DLNA et DLNA CERTIFIED sont des marques commerciales et / ou des marques de service Digital Living Network Alliance Annexe DivX est une marque déposée de DivX, Inc., et son utilisation est couverte par une licence. Fabriqué sous licence de Dolby Laboratories. Dolby et le sigle double D sont des marques commerciales de Dolby Laboratories. “x.v.Color” ou “x.v.Colour” est une marque de commerce de Sony Corporation. 7 Fabriqué sous licence des brevets américains suivants : 5,451,942; 5,956,674; 5,974,380; 5,978,762; 6,226,616; 6,487,535; 7,392,195; 7,272,567; 7,333,929; 7,212,872 et autres licences américaines et d’autres pays publiées ou en attente. DTS et le Symbole sont des marques déposées. Les logos DTS-HD, DTS-HD Master Audio l Essential et DTS sont des marques de DTS, Inc. Le produit inclut des logiciels. © DTS, Inc. Tous droits réservés. HB985-DB.BDEUPPK_FRE.indd 71 2010-05-14 1:54:31 72 Annexe Windows Media est une marque déposée ou une marque commerciale de Microsoft Corporation aux États-Unis et / ou dans d’autres pays. “AVCHD” et le logo “AVCHD” sont des marques commerciales de Panasonic Corporation et Sony Corporation. Ce produit est sous licence des portefeuilles de brevets AVC et VC-1 pour une utilisation domestique personnelle et non commerciale pour (i) encoder un contenu vidéo en conformité avec les standards AVC et VC-1 (“AVC/VC-1 Video”) et/ou (ii) décoder un contenu vidéo AVC/VC-1 encodé par un utilisateur à titre personnel et non commercial et/ou obtenu d’un fournisseur de contenu vidéo bénéficiant d’une licence l’autorisant à distribuer un contenu vidéo AVC/VC1. Aucune licence n’est accordée explicitement ou implicitement pour aucun autre usage. Des informations supplémentaires peuvent être obtenues au sujet de MPEG LA, LLC. Voir le site Web : http://www.mpegla.com. iPod est une marque commerciale d’Apple Inc., enregistrée aux États-Unis et dans d’autres pays. Ce produit inclut une technologie appartenant à Microsoft Corporation et ne peut pas être utilisé ni distribué sans licence de Microsoft Licensing, Inc. ® La technologie sans fil Bluetooth® est un système qui permet un contact radio entre équipements électroniques dans un rayon de 10 mètres maximum. La connexion de périphériques individuels en employant la technologie sans fil Bluetooth n’entraîne aucune charge supplémentaire. Vous pouvez faire fonctionner un téléphone mobile équipé de la technologie sans fil Bluetooth via la Cascade si la connexion a été réalisée au moyen de la technologie sans fil Bluetooth. Le mot servant de marque et les logos Bluetooth sont la propriété de Bluetooth SIG, Inc. et toute utilisation de telles marques par Pioneer Corporation s’effectue sous licence. Les autres marques commerciales et noms de commerces appartiennent à leurs propriétaires respectifs. iPhone est une marque commerciale d’Apple Inc. Annexe Les accessoires électroniques portant la mention « Made for iPod » ont été conçus pour fonctionner avec un iPod et sont certifiés conformes aux exigences d’Apple par le fabricant. Les accessoires électroniques portant la mention « Works with iPhone » ont été conçus pour fonctionner avec un iPhone et sont certifiés conformes aux exigences d’Apple par le fabricant. 7 Apple n’est pas responsable pour le fonctionnement de cet appareil ou de sa compatibilité avec les normes réglementaires et de sécurité. HB985-DB.BDEUPPK_FRE.indd 72 2010-05-14 1:54:31 Annexe Caractéristiques 73 Radio • Plage FM: 87.5 à 108.0 MHz ou 87.50 à 108.00 MHz Général • Puissance électrique requise: AC 220-240 V, 50/ 60 Hz • Consommation électrique: 150 W En mode veille : inférieur à 0.5 W • Dimensions (L x H x P): Env. 430 × 64 × 304 mm • Poids net (Env.): 3.6 kg • Température de fonctionnement: 41 °F à 95 °F (5 °C à 35 °C) • Humidité relative: 5 % à 90 % • Alimentation USB: DC 5 V 500 mA Entrées/ Sorties • VIDEO OUT: 1,0 V (p-p), 75 Ω, synchro négative, RCA jack x 1 • HDMI OUT (vidéo/audio): 19 pin (norme HDMI, Type A, Version 1.3) • Analogiques audio IN: 2,0 Vrms (1 kHz, 0 dB), 600 Ω, RCA jack (L, R) x 1 • Puissance de sortie (PEAK), (4Ω/3Ω) Total 1100 W Avant 180 W x 2 Centre 180 W Arrière 180 W x 2 Subwoofer 200 W (Passive) • Puissance de sortie (RMS), THD 10% (4Ω/3Ω) Total 930 W Avant 150 W x 2 Centre 150 W Arrière 150 W x 2 Sub-Woofer 180 W (Passive) Système • Laser: Laser semiconducteur, Longueur d’onde: 405 nm / 650 nm • Système de signal: TV couleur NTSC/PAL standard • Réponse en fréquence: 20 Hz à 20 kHz (48 kHz, 96 kHz, 192 kHz échantillonnage) • Port LAN: prise ethernet x 1, 10BASE-T/100BASE-TX Annexe • COMPONENT VIDEO OUT: (Y) 1,0 V (pp), 75 Ω, synchro négative, RCA jack x 1, (Pb)/(Pr) 0.7 V (pp), 75 Ω, RCA jack x 2 Amplificateur • DIGITAL IN (OPTICAL 1/2): 3 V (p-p), Optical jack x 2 7 • PORTABLE IN: 0,5 Vrms (sortie stéréo 3,5 mm) HB985-DB.BDEUPPK_FRE.indd 73 2010-05-14 1:54:32 74 Annexe Enceintes BCS-707 Enceintes BCS-303 S-BD707 S-BD303 • Haut-parleur avant/enceintes satellites (gauche/droite) Type: 2 voie Impédance nominale: 4Ω Dimensions nettes 260 x 1097 x 260 mm (L x H x P): Poids net: 3.8 kg • Haut-parleur avant/enceintes satellites (gauche/droite) Type: 1 voie Impédance nominale: 4Ω Dimensions nettes 96 x 96 x 85 mm (L x H x P): Poids net: 0.4 kg • Enceinte centrale Type: Impédance nominale: Dimensions nettes (L x H x P): Poids net: • Enceinte centrale Type: Impédance nominale: Dimensions nettes (L x H x P): Poids net: 1 voie 4Ω 300 x 87 x 65 mm 0.6 kg S-BD707SW • Caisson de graves Type: Impédance nominale: Dimensions nettes (L x H x P): Poids net: 1 voie 1 haut-parleur 3Ω 130.5 x 420 x 375 mm • Caisson de graves Type: Impédance nominale: Dimensions nettes (L x H x P): Poids net: 1 voie 4Ω 300 x 87 x 65 mm 0.6 kg 1 voie 1 haut-parleur 3Ω 130.5 x 420 x 375 mm 4.4 kg 4.4 kg Annexe 7 HB985-DB.BDEUPPK_FRE.indd 74 2010-05-14 1:54:32 Annexe Avis concernant les logiciels open source Les fichiers exécutables GPL et les bibliothèques LGPL suivants utilisés dans ce produit sont sujets aux accords de licence GPL2.0/LGPL2.1. EXÉCUTABLES GPL: Linux kernel 2.6, bash, busybox, cramfs, dhcpcd, e2fsprogs, fdisk, mkdosfs, mtd-utils, net-tools, procps, samba-3.0.25b, sysutils, tcpdump, tftpd, tinylogin, unzip, utelnetd BIBLIOTHÈQUES LGPL: uClibc, DirectFB, blowfish, cairo, ffmpeg, iconv, libusb, mpg123 BIBLIOTHÈQUE de licence publique gSOAP 1.3: gsoap Vous pouvez obtenir une copie du code source correspondant en prenant les frais de distribution à votre charge. Pour obtenir une copie, contactez votre service client Pioneer local. Vous pouvez obtenir une copie des licences GPL et LGPL sur les sites http://www.gnu.org/ licenses/old-licenses/gpl-2.0.html et http:// www.gnu.org/licenses/old-licenses/lgpl2.1.html . Vous pouvez aussi obtenir une copie de la licence publique gSOAP sur http://www.cs.fsu.edu/~engelen/license.html. Ce produit inclut : • boost C++ : Copyright © Beman Dawes 1999-2003 • c-ares : Copyright © 1998 Massachusetts Institute of Technology • curl : Copyright © 1996-2008 Daniel Stenberg • expat : Copyright © 2006 Expat maintainers • freetype : Copyright © 2003 The FreeType Project (www.freetype.org). • jpeg : ce logiciel est basé en partie sur le travail du groupe Independent JPEG Group Copyright © 1991-1998, Thomas G. Lane. • mng : Copyright © 2000-2007 Gerard Juyn, Glenn Randers-Pehrson HB985-DB.BDEUPPK_FRE.indd 75 • ntp : Copyright © David L. Mills 1992-2006 • OpenSSL – Le logiciel cryptographique écrit par Eric Young ([email protected]). – Le logiciel écrit par Tim Hudson ([email protected]). – Le logiciel développé par OpenSSL Project pour être utilisé dans la boîte à outils OpenSSL (http://www.openssl.org). • png : Copyright © 2004 Glenn Randers-Pehrson. • portmap : Copyright © 1990 The Regents of the University of California. • ptmalloc : Copyright © 2001-2006 Wolfram Gloger • UnitTest++ : Copyright © 2006 Noel Llopis et Charles Nicholson • Le kit de développement logiciel UPnP : Copyright © 2000-2003 Intel Corporation • strace Copyright © 1991, 1992 Paul Kranenburg copyright © 1993 Branko Lankester copyright © 1993 Ulrich Pegelow copyright © 1995, 1996 Michael Elizabeth Chastain copyright © 1993, 1994, 1995, 1996 Rick Sladkey copyright © 1999,2000 Wichert Akkerman • xml2 : Copyright © 1998-2003 Daniel Veillard. • XML-RPC pour C/C++ • Copyright © 2001 First Peer, Inc. Tous droits réservés. • Copyright © 2001 Eric Kidd. Tous droits réservés. • zlib : Copyright © 1995-2002 Jean-Loup Gailly et Mark Adler. Tous droits réservés. de ce logiciel et des fichiers de documentation associés (le “Logiciel”) est autorisée à utiliser ce Logiciel gratuitement et sans restriction, notamment, mais sans s’y limiter, les droits d’utilisation, copie, modification, fusion, publication, distribution, souslicence et/ou vente de copies du Logiciel, et à attribuer les mêmes autorisations aux personnes à qui ce Logiciel est fourni, conformément aux conditions suivantes : Annexe ce logiciel est basé en partie sur le travail du groupe Independent JPEG Group Copyright © 1991-1998, Thomas G. Lane. 75 7 LE LOGICIEL EST FOURNI “EN L’ÉTAT”, SANS AUCUNE GARANTIE (EXPRESSE OU IMPLICITE) QUE CE SOIT, NOTAMMENT MAIS SANS S’Y LIMITER, LES GARANTIES DE QUALITÉ MARCHANDE, D’ADÉQUATION À UNE FIN PARTICULIÈRE ET DE NON-TRANSGRESSION. EN AUCUN CAS LES AUTEURS OU DÉTENTEURS DES DROITS D’AUTEUR NE SAURONT ÊTRE TENUS RESPONSABLES EN CAS DE RÉCLAMATION, DOMMAGE OU AUTRE RESPONSABILITÉ DÉCOULANT D’UN CONTRAT, D’UN DÉLIT OU AUTRE, EN RELATION AVEC LE LOGICIEL, SON UTILISATION OU TOUTE AUTRE MANIPULATION DE CE DERNIER. 2010-05-14 1:54:32 2 1 Sicherheitshinweise Sicherheitshinweise 1 Sicherheitshinweise ACHTUNG Vorsichts- und Warnhinweise STROMSCHLAGGEFAHR NICHT ÖFFNEN ACHTUNG: UM BRANDGEFAHR UND DIE GEFAHR EINES STROMSCHLAGES ZU VERMEIDEN, SETZEN SIE DAS GERÄT WEDER REGEN NOCH SONSTIGER FEUCHTIGKEIT AUS. ACHTUNG: UM DIE GEFAHR VON STROMSCHLÄGEN ZU VERMEIDEN, DAS GEHÄUSE (BZW. DIE RÜCKSEITE) NICHT ABNEHMEN UND/ ODER DAS GERÄT SELBST REPARIEREN. ES BEFINDEN SICH KEINE BAUTEILE IM GERÄT, DIE VOM BENUTZER REPARIERT WERDEN KÖNNEN. REPARATUREN STETS VOM FACHMANN AUSFÜHREN LASSEN. Der Blitz mit der Pfeilspitze im gleichseitigen Dreieck dient dazu, den Benutzer vor unisolierten und gefährlichen spannungsführenden Stellen innerhalb des Gerätegehäuses zu warnen, an denen die Spannung groß genug ist, um für den Menschen die Gefahr eines Stromschlages zu bergen. Das Ausrufezeichen im gleichseitigen Dreieck dient dazu, den Benutzer auf wichtige vorhandene Betriebsund Wartungsanleitungen in der produktbegleitenden Dokumentation hinzuweisen. ACHTUNG: Installieren Sie das Gerät nicht in einem geschlossenen Raum, z. B. in einem Bücherregal oder an einem ähnlichen Ort. VORSICHT: Die Belüftungsöffnungen niemals verdecken. Das Gerät immer laut Herstellerangaben anschließen. Schlitze und Öffnungen im Gehäuse dienen der Belüftung, gewährleisten einen störungsfreien Betrieb des Gerätes und schützen es vor Überhitzung. Öffnungen sollten niemals durch Aufstellen des Gerätes auf einem Bett, Sofa, Teppich oder ähnlichen Untergründen verdeckt werden. Das Gerät sollte nicht z. B. in einem Bücherregal oder Schrank aufgestellt werden, wenn keine ausreichende Belüftung gewährleistet werden kann oder die Anleitungen missachtet wurden. VORSICHT: Dieses Produkt ist ein Laser-Produkt der Klasse 1, das in der Sicherheits-Richtlinie für LaserProdukte, IEC 60825-1: 2007, klassifiziert ist. Um das Gerät richtig zu verwenden, lesen Sie dieses Benutzerhandbuch sorgfältig durch und bewahren Sie es auf. Setzen Sie sich zur Wartung mit einem qualifizierten Servicebetrieb in Verbindung. Durch Bedienungen, Einstellungen oder Verfahren, die in diesem Handbuch nicht erwähnt werden, können gefährliche Strahlungen verursacht werden. Um direkten Kontakt mit dem Laserstrahl zu vermeiden, darf das Gehäuse nicht geöffnet werden. Ansonsten tritt sichtbare Laserstrahlung auf. NIEMALS DIREKT IN DEN LASERSTRAHL BLICKEN. HB985-DB.BDEUPPK_GER.indd 2 2010-05-14 2:06:40 Sicherheitshinweise VORSICHTSHINWEISE zum Netzkabel Die meisten Geräte sollten an einen eigenen Stromkreis angeschlossen werden. Dieses Gerät besitzt eine tragbare Batterie oder Akku-Batterie. Sicherheitshinweise zum Herausnehmen der Batterie aus dem Gerät: Führen Sie zum Herausnehmen der alten Batterie bzw. das Batteriepakets die Einzelschritte zum Einlegen der Batterie in umgekehrter Reihenfolge durch. Um eine Gefährdung der Umwelt sowie mögliche Gesundheitsgefährdungen von Menschen und Tieren zu vermeiden, sollten Altbatterien in einen geeigneten Behälter einer Sammelstelle gegeben werden. Altbatterien niemals zusammen mit dem Hausmüll entsorgen. Bitte geben Sie Altbatterien an einer kostenlosen Sammelstelle für Batterien und Akku-Batterien ab. Die Batterie keiner extremen Hitze aussetzen, wie z. B. direkte Sonneneinstrahlung, Feuer o. ä. 1 Sicherheitshinweise D. h. eine separate Steckdose ohne weitere Anschlüsse oder Zweigleitungen, über die ausschließlich dieses Gerät mit Strom versorgt wird. Beachten Sie hierzu die technischen Daten des Gerätes in diesem Benutzerhandbuch. Steckdosen niemals überlasten. Bei überlasteten, lockeren oder beschädigten Steckdosen, Verlängerungskabeln, bei abgenutzten Kabeln oder beschädigter Isolierung besteht die Gefahr von Stromschlägen oder Bränden. Die Gerätekabel sollten regelmäßig überprüft werden. Bei Beschädigungen oder Abnutzungen der Kabel sofort den Netzstecker ziehen und das Kabel von einem qualifizierten Techniker durch ein gleiches Modell austauschen lassen. Das Netzkabel vor mechanischen Beschädigungen, schützen, wie z. B. Verdrehen, Knicken, Eindrücken, Einklemmen in einer Tür oder Darauftreten. Achten Sie besonders auf die Stecker, Steckdosen und den Bereich, an dem das Kabel aus dem Gerät austritt. Ziehen Sie zum Unterbrechen der Stromversorgung den Netzstecker. Achten Sie beim Aufstellen des Gerätes darauf, dass der Netzstecker leicht erreichbar bleibt. 3 VORSICHT: Das Gerät darf nicht mit Wasser (Tropfoder Spritzwasser) in Berührung kommen und es sollten keine mit Flüssigkeit gefüllten Behälter auf das Gerät gestellt werden, wie z. B. Vasen. Hiermit erklärt PIONEER, dass diese(s) Produkt(e) die grundlegenden Anforderungen und die sonstigen Bestimmungen der Richtlinien 2004/108/EC, 2006/95/EC und 2009/125/EC erfüllt/erfüllen. ACHTUNG: Zur Vermeidung von Bränden keine offenen Flammen auf das Gerät stellen (z. B. Kerzen). HB985-DB.BDEUPPK_GER.indd 3 2010-05-14 2:06:44 4 Sicherheitshinweise Hinweise zur Sammlung und Entsorgung von Altgeräten und verbrauchten Batterien 1 Sicherheitshinweise Pb ( Beispielsymbole für Batterien ) Diese Symbole auf den Geräten, Verpackungen und/ oder in der beigefügten Literatur weisen darauf hin, dass diese elektrischen und elektronischen Geräte sowie Batterien nicht mit dem normalen Hausmüll entsorgt werden dürfen. Zur ordnungsgemäßen Weiterverarbeitung, Wiederaufbereitung und zum Recycling sollten Altgeräte und verbrauchte Batterien gemäß den geltenden Richtlinien bei einer vorgesehenen Sammelstelle abgegeben werden. Durch eine ordnungsgemäße Entsorgung solcher Geräte und Batterien können wertvolle Ressourcen geschont und negative Auswirkungen auf die Gesundheit und die Umwelt vermieden werden. Weitere Informationen zur Sammlung und Wiederverwertung von Altgeräten und Batterien erhalten Sie bei Ihrer Stadtverwaltung, bei Ihrem Entsorgungsunternehmen oder beim Händler, bei dem Sie das Gerät gekauft haben. Diese Symbole sind nur in der Europäischen Gemeinschaft gültig. Länder außerhalb der Europäischen Gemeinschaft: Bitte wenden Sie sich zur ordnungsgemäßen Entsorgung von Altgeräten und verbrauchten Batterien an die jeweilige Stadtverwaltung oder an Ihren Händler. HB985-DB.BDEUPPK_GER.indd 4 Hinweise zum Copyright • AACS (Advanced Access Content System) ist ein gültiges System zum Schutz von Inhalten für das BD-Format, ähnlich CSS (Content Scramble System) für das DVD-Format. Für z. B. die Wiedergabe oder den analogen Signalausgang bei AACS-geschützten Inhalten können bestimmte Einschränkungen festgelegt werden. Die Bedienung und die Einschränkungen dieses Gerätes können je nach Kaufdatum verschieden sein, da solche AACS-Einschränkungen auch nach der Herstellung des Gerätes übernommen und/ oder geändert werden können. • Des Weiteren wird das BD-ROM-Zeichen und BD+ mit bestimmten Einschränkungen als zusätzlicher Schutz der Inhalte für das BD-Format verwendet, einschließlich Wiedergabeeinschränkungen für BD-ROM-Zeichen und/oder BD+ geschützte Inhalte. Weitere Informationen zu AACS, zum BDROM-Zeichen, BD+ oder zu diesem Gerät erhalten Sie bei einem zugelassenen Kundendienst-Center. • Viele BD-ROM-/DVD-Discs sind mit einem Kopierschutz versehen. Der Player sollte aus diesem Grund stets direkt am Fernseher angeschlossen werden, und nicht über einen Videorekorder. Beim Anschluss über einen Videorekorder kann das Bild kopiergeschützter Discs verzerrt dargestellt werden. • Dieses Produkt verwendet eine durch US-Patente und andere geistige Eigentumsrechte geschützte Kopierschutz-Technologie. Für den Einsatz dieser Kopierschutz-Technologie ist die Genehmigung durch Rovi erforderlich. Der Einsatz ist ohne zusätzliche Genehmigung von Rovi ausschließlich für den Heimgebrauch und andere begrenzte Vorführungen vorgesehen. Reverse Engineering oder Zerlegung verboten. • Laut Urheberrecht in den USA und anderen Ländern wird die unerlaubte Aufnahme, Verwendung, Vorführung, der Vertrieb oder die Überarbeitung von Fernsehprogrammen, Videobändern, BD-ROM-Discs, DVDs, CDs und anderen Datenträgern zivil- und/oder strafrechtlich verfolgt. 2010-05-14 2:06:44 Sicherheitshinweise 5 Wichtige Hinweise zur TV-Farbnorm Die Farbnorm dieses Players richtet sich nach der gerade wiedergegebenen Disc. Wird auf diesem Player z. B. eine in der NTSCFarbnorm aufgenommene Disc wiedergegeben, wird das Bild als NTSC-Signal ausgegeben. 1 Sicherheitshinweise Nur Multinorm-Farbfernseher können sämtliche Bildsignale dieses Players anzeigen. • Falls Sie einen Fernseher mit PAL-Farbnorm besitzen, wird das Bild bei der Wiedergabe von Discs oder Videofilmen im NTSC-Format verzerrt angezeigt. • Dieser Multinorm-Farbfernseher ändert die Farbnorm je nach Eingangssignal automatisch. Falls die Farbnorm nicht automatisch eingestellt wird, schalten Sie das Gerät aus und wieder ein, um das normale Fernsehbild anzuzeigen. • Auch wenn eine in der NTSC-Farbnorm aufgenommene Disc störungsfrei auf dem Fernsehgerät angezeigt wird, wird diese Disc möglicherweise nicht korrekt mit dem Rekorder beschrieben. HB985-DB.BDEUPPK_GER.indd 5 2010-05-14 2:06:44 6 Inhalt 3 Montage 16 1 Lautsprechereinstellungen BCS-707 18 Lautsprechereinstellungen BCS-303 Sicherheitshinweise 2 Vorsichts- und Warnhinweise 2 Vorbereitung Montage der Lautsprecher 16 19 Wandmontage des MittelLautsprechers 19 Zusätzliche Hinweise zum Standort der Lautsprecher 20 21 Aufstellen des Systems Anschluss an einen Fernseher 21 HDMI-Anschluss Info über das Symbol “ ” auf dem Bildschirm 22 Component-Video-Anschluss 23 Video-Anschluss Hinweis zu den verwendeten Symbolen 23 24 Antennenanschluss 9 Mitgeliefertes Zubehör 24 Anschluss von Zusatzgeräten 10 Spielbare Discs 24 AUX-Anschluss 11 Dateikompatibilität 25 PORTABLE IN-Anschluss 12 Ländercode 25 OPTICAL IN 1/2-Anschluss 12 AVCHD (Advanced Video Codec High Definition) 26 Bluetooth®-Verbindung 12 Besondere Systemanforderungen 29 12 Hinweise zur Kompatibilität 8 8 8 Einführung 28 Einstellung der Auflösung Verbindung mit dem Heimnetzwerk Netzwerkeinstellungen 31 Anschluss eines USB-Gerätes Fernbedienung 32 Einstellungen 14 Vorderes Bedienfeld 32 15 Rückseite Setup-Einstellungen vornehmen 33 Das Menü [ANZEIGE] 34 Das Menü [SPRACHE] 35 Das Menü [AUDIO] 36 Das Menü [SPERRE] 37 Das Menü [NETZWERK] 13 37 39 HB985-DB.BDEUPPK_GER.indd 6 Das Menü [WEITERE] Klangeffekte 2010-05-14 2:06:45 7 4 7 Betrieb Anhang 40 Normale Wiedergabe 67 42 Erweiterte Wiedergabe Bedienung eines Fernsehgerätes über die mitgelieferte Fernbedienung 45 Bildschirmmenü 48 BD-LIVE-Discs anschauen 49 Wiedergabe von Filmdateien und VRDiscs 51 Bilddateien anzeigen 71 Marken und Lizenzen 53 Musik hören 73 Technische Daten 56 Wiedergabe von einem iPod 75 Hinweise zu Open Source-Software 58 Radiobetrieb 59 Wiedergabe über das Heimnetzwerk 68 Liste der Ländercodes 69 Liste der Sprachcodes 70 Video-Ausgabeauflösung 1 2 3 5 4 Wartung 63 Hinweise zu Discs 63 Handhabung des Gerätes 5 6 Störungsbehebung 64 Allgemein 65 Bild 65 Ton 66 Netzwerk 6 7 8 HB985-DB.BDEUPPK_GER.indd 7 2010-05-14 2:06:45 8 Vorbereitung 2 Vorbereitung 2 Einführung Vorbereitung Info über das Symbol “ ” auf dem Bildschirm Während des Betriebs erscheint auf dem Fernsehbildschirm u. U. das Symbol “ ” und zeigt an, dass die im Benutzerhandbuch erläuterte Funktion für diese Disc nicht verfügbar ist. Hinweis zu den verwendeten Symbolen Abschnitte, in deren Titel eines der folgenden Symbole angegeben ist, sind nur für den dargestellten Disc-Typ gültig. BD BD-ROM-Disc DVD DVD-Video, DVD±R/RW im Video-Modus oder VRModus und finalisiert AVCHD DVD±R/RW im AVCHDFormat ACD Audio-CDs MOVIE Filmdateien MUSIC Musikdateien PHOTO Fotodateien HINWEIS Weist auf besondere Hinweise und Betriebsmerkmale hin. VORSICHT Vorsichtshinweise zur Vermeidung möglicher Beschädigungen. HB985-DB.BDEUPPK_GER.indd 8 2010-05-14 2:06:45 Vorbereitung Mitgeliefertes Zubehör Videokabel (1) Fernbedienung (1) 9 Lautsprecherzubehör (S-BD707SW) Lautsprecherkabel (1) große rutschfeste Unterlagen (1) 2 UKW-Antenne (1) Lautsprecherkabel (6) Vorbereitung Lautsprecherzubehör (S-BD303) Batterien (1) kleine rutschfeste Unterlagen (1) iPod-Dock (1) Lautsprecherzubehör (S-BD707T) große rutschfeste Unterlagen (1) Lautsprecherkabel (5) Schrauben (12) Lautsprecherständer- kleine rutschfeste Basis (4) Unterlagen (1) mittelgroße rutschfeste Unterlagen (1) HB985-DB.BDEUPPK_GER.indd 9 2010-05-14 2:06:45 10 Vorbereitung Spielbare Discs Blu-Ray-Discs - Gekaufte oder ausgeliehene Spielfilm-DVDs. - BD-R/RE-Discs mit Film-, Musikoder Fotodateien. 2 Vorbereitung DVD-VIDEO 8 / 12 cm Gekaufte oder ausgeliehene Spielfilm-DVDs. DVD±R 8 / 12 cm - Nur finalisierte Discs im VideoModus - Unterstützt auch Dual-LayerDiscs - AVCHD-Format, finalisiert - Finalized AVCHD format - DVD±R-Discs mit Film-, Musikoder Fotodateien. DVD-RW 8 / 12 cm - Nur Discs im VR-Modus, VideoModus und finalisierte Discs - AVCHD-Format, finalisiert - DVD-RW-Discs mit Film-, Musik- oder Fotodateien. DVD+RW 8 / 12 cm - Nur finalisierte Discs im VideoModus - AVCHD-Format - AVCHD-Format, finalisiert - DVD+RW-Discs mit Film-, Musik- oder Fotodateien. HINWEIS • Einige CD-R-/RW- (bzw. DVD±R-/RW-) Discs können, abhängig vom verwendeten Aufnahmegerät oder der CD-R-/RW-Disc (bzw. DVD±R-/RW-Disc) selbst, mit diesem Gerät u. U. nicht abgespielt werden. • Abhängig von der Aufnahmesoftware und der Finalisierung können einige beschriebene Discs (CD-R/RW, DVD±R/RW, BD-R/RE) nicht wiedergegeben werden. • Mit einem PC oder einem DVD- oder CD-Rekorder beschriebene BD-R/RE, DVD±R/RW- oder CD-R/RW-Discs können u. U. nicht abgespielt werden, falls die Disc beschädigt oder verschmutzt ist oder die Linse des Players verschmutzt oder kondensiert ist. • Falls eine Disc mit einem PC beschrieben wird, auch in einem kompatiblen Aufnahmeformat, können einige Discs auf Grund der Einstellungen in der Brennsoftware nicht wiedergegeben werden. (Genauere Informationen hierzu erhalten Sie beim Hersteller der Brennsoftware.) • Für eine optimale Wiedergabequalität müssen Discs und Aufnahmen bestimmte technische Voraussetzungen erfüllen. • Bereits bespielte DVDs erfüllen diese Voraussetzungen automatisch. Beschriebene Discs können in einer Vielzahl verschiedener Formate vorliegen (einschließlich CD-R-Discs mit MP3- oder WMA-Dateien). Diese Formate müssen zur Wiedergabe-Kompatibilität bestimmte Voraussetzungen erfüllen. • Der Kunde sollte beachten, dass für das Herunterladen von MP3-/WMA-Dateien sowie Musikdateien aus dem Internet eine Genehmigung erforderlich ist. Unser Unternehmen erteilt solche Genehmigungen nicht. Diese sollten immer vom Urheber selbst eingeholt werden. Audio-CD 8 / 12 cm CD-R/RW 8 / 12 cm - CD-R/RW-Discs mit Audio-, Film-, Musik- oder Fotodateien. HB985-DB.BDEUPPK_GER.indd 10 2010-05-14 2:06:46 Vorbereitung Dateikompatibilität HINWEIS Allgemein • HD-Filmdateien auf einer CD oder einem USB 1.0/1.1-Gerät werden u. U. nicht störungsfrei wiedergegeben. Zur Wiedergabe von HDFilmdateien werden BD-, DVD- oder USB 2.0-Datenträger empfohlen. Mögliche Dateierweiterungen: “.jpg”, “.jpeg”, “.png”, “.avi”, “.divx”, “.mpg”, “.mpeg”, “.mkv”, “.mp4”, “.mp3”, “.wma”, “.wav” Je nach DLNA-Server sind verschiedene Dateierweiterungen verfügbar. • Bestimmte “.wav”-Dateien werden von diesem Gerät u. U. nicht unterstützt. • Der Dateiname darf maximal 180 Zeichen lang sein. • Je nach Größe und Anzahl der Dateien kann das Lesen der Disc einige Minuten dauern. Maximale Anzahl Dateien/Ordner: 2 000 (Gesamtanzahl der Dateien und Ordner) CD-R/RW, DVD±R/RW, BD-R/RE-Format: ISO 9660+JOLIET, UDF und UDF Bridge-Format FILM Mögliche Auflösung: 1 920 x 1 080 (B x H) Bildpunkte Abspielbare Untertitel: SubRip (.srt/.txt), SAMI (.smi), SubStation Alpha (.ssa/.txt), MicroDVD (.sub/.txt), VobSub (.sub), SubViewer 1.0 (.sub), SubViewer 2.0 (.sub/.txt), TMPlayer (.txt), DVD Subtitle System (.txt) • Das Format VobSub (.sub) wird für die Funktion [Home Link] nicht unterstützt. Abspielbare Codecs: “DIVX3.xx”, “DIVX4.xx”, “DIVX5.xx”, “XVID”, “DIVX6.xx” (nur normale Wiedergabe), H.264/MPEG-4 AVC, MPEG1 SS, MPEG2 PS, MPEG2 TS Abspielbare Audioformate: “Dolby Digital”, “DTS”, “MP3”, “WMA”, “AAC”, “AC3” • Nicht alle WMA- und AAC-Audioformate können auf diesem Gerät wiedergegeben werden. Abtastfrequenz: 32 kHz bis 48 kHz (WMA), 16 kHz bis 48 kHz (MP3) Bitrate: 20 kbps bis 320 kbps (WMA), 32 kbps bis 320 kbps (MP3) HB985-DB.BDEUPPK_GER.indd 11 • Dieser Player unterstützt die Profile H.264/MPEG4 AVC Main, High bei Stufe 4,1. Bei Dateien mit höherer Stufe wird eine Warnmeldung auf dem Bildschirm eingeblendet. • Mit diesem Player können keine mit GMC*1 oder Qpel*2 aufgenommenen. Dies sind Verfahren zur Video-Kodierung im MPEG4-Standard wie DivX oder XVID. 2 Vorbereitung • 11 *1 GMC – Global Motion Compensation *2 Qpel – Quarter Pixel MUSIK Abtastfrequenz: 8 kHz bis 48 KHz (WMA), 11 kHz bis 48 kHz (MP3) Bitrate: 8 kbps bis 320 kbps (WMA, MP3), HINWEIS • Mit diesem Gerät können keine ID3-Tags einer MP3-Datei angezeigt werden. • Die Gesamt-Wiedergabedauer wird für VBRDateien u. U. nicht exakt auf dem Bildschirm angezeigt. FOTO Empfohlene Dateigröße: Unter 4000 x 3000 x 24 Bit/Pixel Unter 3000 x 3000 x 32 Bit/Pixel Unter 4 MByte/file • Progressive sowie verlustfrei komprimierte Fotodateien werden nicht unterstützt. 2010-05-14 2:06:46 12 Vorbereitung Ländercode Der Ländercode dieses Players ist auf der Geräterückseite aufgedruckt. Es können nur BD-ROM- oder DVD-Discs mit diesem Ländercode oder mit dem Ländercode “ALLE” wiedergegeben werden. 2 Vorbereitung AVCHD (Advanced Video Codec High Definition) • Mit diesem Player können Discs im AVCHDFormat wiedergegeben werden. Diese Discs werden normalerweise zur Aufzeichnung mit Camcordern eingesetzt. • Beim AVCHD-Format handelt es sich um ein hochauflösendes digitales Videokameraformat. • Das Format MPEG-4 AVC/H.264 ermöglicht eine effizientere Komprimierung von Bildern als mit einem konventionellen Format zur Bildkomprimierung. • Bestimmte AVCHD-Discs verwenden das Format “x.v.Colour”. • Mit diesem Player können AVCHD-Discs im Format “x.v.Colour” wiedergegeben werden. • Je nach Zustand der Aufnahme können bestimmte Discs im AVCHD-Format u. U. nicht wiedergegeben werden. • Discs im AVCHD-Format müssen finalisiert werden. • “x.v.Colour” ermöglicht eine größere Farbvielfalt als normale DVD-CamcorderDiscs. HB985-DB.BDEUPPK_GER.indd 12 Besondere Systemanforderungen Für hochauflösende Video-Wiedergabe: • High Definition-Anzeigegerät mit COMPONENT- oder HDMIEingangsbuchsen. • BD-ROM-Disc mit hochauflösendem Inhalt. • Für bestimmte Inhalte ist ein HDMI- oder HDCP-fähiger DVI-Eingang am Anzeigegerät erforderlich (wie von den Disc-Autoren festgelegt). • Zum Hochkonvertieren normalauflösender, kopiergeschützter DVDs ist ein HDMI- oder HDCP-fähiger DVI-Eingang am Anzeigegerät erforderlich. Hinweise zur Kompatibilität • Da es sich bei BD-ROM-Discs um ein neues Format handelt, können Probleme mit bestimmten Discs, digitalen Anschlüssen und andere Kompatibilitätsprobleme auftreten. Bei Problemen mit der Kompatibilität wenden Sie sich bitte an ein zugelassenenes Kundendienst-Center. • Zur Darstellung von hochauflösenden Inhalten und hochkonvertierten StandardDVDs ist möglicherweise ein HDMI-fähiger Eingang oder ein HDCP-fähiger DVI-Eingang am Anzeigegerät erforderlich.. • Bei einigen BD-ROM- und DVD-Discs sind bestimmte Funktionsbefehle oder Merkmale u. U. nicht verfügbar. • Mit Hilfe eines USB-Gerätes können bestimmte Disc-Information gespeichert werden, einschließlich heruntergeladener Online-Inhalte. Durch die verwendete Disc wird festgelegt, wie lange diese Informationen gespeichert werden. 2010-05-14 2:06:46 Vorbereitung 13 Fernbedienung • • • • • • • • • a • • • • • • • • • 1 (STANDBY/ON): Player ein-und ausschalten. Z OPEN/CLOSE: Disc-Fach öffnen und schließen. 1 INPUT/TUNER: Eingangsmodus BT AUDIO: Eingangsmodus sofort auf BT AUDIO einstellen. OPTICAL: Eingangsmodus auf optisch direkt einstellen. DISPLAY: Bildschirmmenü ein-/ ausblenden. 2 HOME MENU: [Hauptmenü] ein-/ausblenden. MENU: Disc-Menü aufrufen. Pfeiltasten: Auswahl einer Option im Menü. ENTER: Annehmen einer Menüauswahl. TUNE (+/-): Einen gewünschten Radiosender einstellen. 3 PRESET: Gespeicherten Radiosender aufrufen. • • • • • • • • • b • • • • • • • • • O RETURN: Gewünschten Abschnitt wiederholen. Einlegen der Batterien Nehmen Sie die Batterieklappe auf der Rückseite der Fernbedienung ab und legen Sie eine R03Batterie mit der richtigen Polung und ein. POPUP/TOP MENU: DVDTitelmenü bzw. BD-ROMKontextmenü aufrufen, falls vorhanden. x STOP: Wiedergabe anhalten. MUTE: Gerät stummschalten. SOUND: Klangmodus auswählen. VOL +/- : Lautstärke der Lautsprecher einstellen. • • • • • • • • • c • • • • • • • • • Nummerntasten 0-9: Auswahl von Aufzählungsoptionen in einem Menü. 2 MARKER: Markiert einen Punkt während der Wiedergabe. SEARCH: Suchmenü ein-/ ausblenden. REPEAT: Menü verlassen bzw. Wiedergabe fortsetzen. CLEAR: Eine Marke im Suchmenü löschen bzw. eine Ziffer bei der Kennworteingabe löschen. DIMMER: Beleuchtung des Gerätes dimmen. ZOOM: Menü Zoom aufrufen. Farbtasten (A, B, C, D): Navigation in den Menüs. - Taste A (RDS): Radio-DatenSystem. - Taste B (PTY): Programmartkennung einer RDS-Sendung anzeigen. B PLAY: Wiedergabe starten. - Taste C (PTY SEARCH): Programmart suchen. X PAUSE/STEP: Wiedergabe unterbrechen. - Taste D: Auswahl Mono/Stereo im UKW-Modus. ./> SKIP: Zur/zum nächsten bzw. vorherigen Datei/Track/ Kapitel springen. TV-Bedienungstasten: Siehe Seite 67. m/M SCAN: Suchlauf zurück oder vor. HB985-DB.BDEUPPK_GER.indd 13 z USB REC: Aufnahme einer Audio-CD. Vorbereitung ändern. SPK LEVEL: Lautstärke des gewünschten Lautsprechers einstellen. SLEEP: Einstellen einer Zeitdauer nach der das Gerät ausgeschaltet wird. 2010-05-14 2:06:46 14 Vorbereitung Vorderes Bedienfeld 1 2 2 Vorbereitung 3 4 5 6 a Disc-Fach c Fernbedienungs-Sensor b Bedienungstasten 1 STANDBY/ON Netzschalter Z (OPEN/CLOSE) FUNCTION Auswahl einer Eingangsquelle oder Funktion. B/X (PLAY / PAUSE) x (STOP) ./> (SKIP) - TUNE + (Radiosender einstellen) d Anzeigefenster HB985-DB.BDEUPPK_GER.indd 14 7 e PORTABLE IN f USB-Anschluss g Lautstärkeregelung 2010-05-14 2:06:46 Vorbereitung 15 Rückseite 1 2 3 4 5 2 7 8 9 10 11 a Netzkabel Anschluss an eine Steckdose. g COMPONENT VIDEO (Y PB PR) AUSGANG (PROGRESSIVE SCAN) b Lautsprecheranschlüsse h OPTICAL 1(TV) / 2 c Kühlungslüfter i iPod (24-polig) Anschluss eines iPod-Dock. d Antennenanschluss e VIDEO OUT f AUX (L/R) INPUT Vorbereitung 6 j HDMI OUT (Typ A, Version 1.3) Anschluss an einen Fernseher mit HDMIEingängen. k LAN-Anschluss HB985-DB.BDEUPPK_GER.indd 15 2010-05-14 2:06:46 16 Montage 3 Montage Montage der Lautsprecher 3 Für Mittel-Lautsprecher: Befestigen Sie mit den enthaltenen Klebestreifen vier kleine Unterlagen am Standfuß des Mittel-Lautsprechers. Montage Lautsprechereinstellungen BCS-707 kleine rutschfeste Unterlagen small non-skid pads Vorbereitung der Lautsprecher 1. Befestigen Sie die rutschfesten Unterlagen an den Standfüßen der Lautsprecher, des Subwoofers und des Mittel-Lautsprechers. Für Lautsprecherstandfüße: Befestigen Sie mit den enthaltenen Klebestreifen vier mittelgroße Unterlagen an jedem Lautsprecherstandfuß (Unterseite). middle non-skid pads mittelgroße rutschfeste Unterlagen 2. Montieren Sie die Lautsprecherstandfüße mit den enthaltenen Schrauben an den Ständern. Setzen Sie den Ständer auf den Standfuß und befestigen Sie die kleinen Schrauben an den Positionen, wie in der folgenden Abbildung gezeigt. Die Lautsprecher sollten in Richtung des Standfußes des gleichschenkligen Dreiecks zeigen. Für Subwoofer: Befestigen Sie mit den enthaltenen Klebestreifen vier große Unterlagen am Standfuß des Subwoofers. Hinten Rear large non-skid pads große rutschfeste Unterlagen Vorn Front HB985-DB.BDEUPPK_GER.indd 16 2010-05-14 2:06:47 Montage 3. Schließen Sie die Kabel am Player an. Schließen Sie den weißen Stecker des grauen Kabels an den Anschluss (+) und den anderen Stecker an den Anschluss (–) an. Um die Kabel am Player anzuschließen, drücken Sie jeweils auf eine der Anschlussklemmen auf der Rückseite, so dass sich die Anschlüsse öffnen. Führen Sie das jeweilige Kabel ein und lassen Sie die Anschlussklemme wieder los. Farbe (+) 17 Montage der vorderen und der Surround-Lautsprecher Befestigen Sie die vorderen und die Surround-Lautsprecher mit der enthaltenen Kunststoffklemme. Befestigen Sie zwei Schraubhaken in der Wand hinter dem Lautsprecher. Führen Sie zur Stabilisierung des Lautsprechers ein dickeres Seil um die Haken und durch die Kunststoffklemmen hindurch (überprüfen Sie, ob das gesamte Gewicht des Lautsprechers getragen werden kann). Prüfen Sie nach der Montage, ob der Lautsprecher fest sitzt. 3 Montage Ausreichend dickes Seilthick cord Schwarz (-) VORSICHT • Es sollten ausschließlich die im Lieferumfang dieses Systems enthaltenen Lautsprecher angeschlossen werden. • Die enthaltenen Lautsprecher sollten nur an den Verstärker dieses Systems angeschlossen werden. Beim Anschluss an einen anderen Verstärker besteht die Gefahr von Fehlfunktionen oder Bränden. Kunststoff klemme Plastic catch VORSICHT • Bei der Kunststoffklemme handelt es sich um kein Befestigungselement, d. h. der Lautsprecher sollte nicht allein an der Klemme befestigt von der Wand hängen. Zur Stabilisierung des Lautsprechers muss ein Seil verwendet werden. • Pioneer übernimmt keine Haftung für Verluste oder Schäden jeglicher Art, die auf einen unsachgemäßen Zusammenbau, eine unsachgemäße Montage, eine unzureichende Tragfähigkeit der Montageorte, eine missbräuchliche Verwendung oder Naturkatastrophen zurückzuführen sind. • Achten Sie beim Aufstellen darauf, dass das Gerät fest steht und vermeiden Sie möglichst Standorte, an denen das Gerät im Falle einer Naturkatastrophe (z. B. bei einem Erdbeben) herunterfallen und Verletzungen verursachen könnte. HB985-DB.BDEUPPK_GER.indd 17 2010-05-14 2:06:47 18 Montage Lautsprechereinstellungen BCS-303 Für Mittel-Lautsprecher: Befestigen Sie mit den enthaltenen Klebestreifen vier kleine Unterlagen am Standfuß des Mittel-Lautsprechers. Vorbereitung der Lautsprecher 1. Befestigen Sie die rutschfesten Unterlagen an den Lautsprecherstandfüßen. kleine rutschfeste Unterlagen samll non-skid pads Für die vorderen und SurroundLautsprecher: Befestigen Sie mit den enthaltenen Klebestreifen vier kleinen Unterlagen an jedem Lautsprecherstandfuß (Unterseite). 2. Schließen Sie die Kabel am Player an. 3 Montage samll non-skid pads kleine rutschfeste Unterlagen Für Subwoofer: Befestigen Sie mit den enthaltenen Klebestreifen vier große Unterlagen am Standfuß des Subwoofers. Schließen Sie den weißen Stecker des grauen Kabels an den Anschluss (+) und den anderen Stecker an den Anschluss (–) an. Um die Kabel am Player anzuschließen, drücken Sie jeweils auf eine der Anschlussklemmen auf der Rückseite, so dass sich die Anschlüsse öffnen. Führen Sie das jeweilige Kabel ein und lassen Sie die Anschlussklemme wieder los. Farbe (+) große rutschfeste large non-skid padsUnterlagen Schwarz (-) HB985-DB.BDEUPPK_GER.indd 18 2010-05-14 2:06:47 Montage Wandmontage des Mittel-Lautsprechers Der Mittel-Lautsprecher besitzt eine Montageöffnung, mit der der Lautsprecher an der Wand montiert werden kann. Vor der Montage Die Montageschrauben sind nicht im Lieferumfang enthalten. Verwenden Sie Schrauben, die für die Beschaffenheit und Tragfähigkeit der Wand geeignet sind. VORSICHT • Falls Sie die Beschaffenheit und Tragfähigkeit Ihrer Wand nicht einschätzen können, ziehen Sie einen Fachmann zu Rate. • Pioneer übernimmt keine Haftung für Unfälle oder Schäden, die auf eine unsachgemäße Montage zurückzuführen sind. Montageschrauben (nicht im Mounting screw Lieferumfang (not supplied) enthalten) Zusätzliche Hinweise zum Standort der Lautsprecher Stellen Sie die vorderen Haupt-Lautsprecher links und rechts in gleichem Abstand zum Fernsehgerät auf. Vorsichtshinweise: Blanke Lautsprecherkabel müssen zusammengedreht und vollständig in die Lautsprecheranschlüsse eingeführt werden. Sollten die blanken Lautsprecherkabel die Systemrückseite berühren, wird möglicherweise die Sicherheitsvorrichtung des Systems ausgelöst und das System abgeschaltet. 3 Montage Das Lautsprechersystem ist sehr schwer. Das Gewicht kann zu einer Lockerung der Schrauben führen, und die Wand muss das Gewicht der Lautsprecher tragen können. Ansonsten könnten die Lautsprecher herunterfallen. Die Wand muss über eine ausreichende Stärke verfügen, so dass das Gesamtgewicht der Lautsprecher getragen werden kann. Nicht an Wänden aus Sperrholz oder weichem Material befestigen. 19 Die vorderen, der mittlere und die SurroundLautsprecher dieses Systems sind magnetisch abgeschirmt. Falls die Lautsprecher sehr nahe am Fernsehgerät aufgestellt werden, können Farbverfälschungen jedoch nicht ausgeschlossen werden. Schalten Sie in einem solchen Fall das Fernsehgerät aus und nach etwa 15 bis 30 Minuten wieder ein. Sollten die Farbverfälschungen weiterhin auftreten, stellen Sie das Lautsprechersystem in größerer Entfernung zum Fernsehgerät auf. Der Subwoofer besitzt keine magnetische Abschirmung und sollte daher nicht in der Nähe eines Fernsehgerätes oder Monitors aufgestellt werden. Magnetische Datenträger (z. B. Disketten, Musik- oder Videokassetten) sollten ebenfalls nicht in der Nähe des Subwoofers aufbewahrt werden. 5 mm 10 mm Die vorderen, die Surround-Lautsprecher und der Subwoofer nicht an einer Wand oder Decke befestigen. Die Lautsprecher könnten herunterfallen und zu Verletzungen führen. 5 mm - 7 mm HB985-DB.BDEUPPK_GER.indd 19 2010-05-14 2:06:48 20 Montage Aufstellen des Systems Die folgende Abbildung zeigt die Aufstellung des Systems am Beispiel. Die Abbildungen in dieser Anleitung können vom tatsächlichen Gerät abweichen und dienen lediglich zur Beschreibung. Ein optimaler Surround-Sound wird erreicht, wenn alle Lautsprecher mit Ausnahme des Subwoofers im gleichen Abstand von der Zuhörerposition (A) aufgestellt werden. F Subwoofer: Die Position des Subwoofers kann beliebig gewählt werden, da niederfrequente Bässe nur leicht direktional sind. Der Subwoofer sollte jedoch bevorzugt in der Nähe der vorderen Lautsprecher aufgestellt werden. Richten Sie den Subwoofer leicht zur Raummitte aus, um Wandreflexionen zu vermeiden. G Gerät VORSICHT • Achten Sie darauf, dass Kinder nicht ihre Hände oder andere Gegenstände in die *Lautsprecheröffnung einführen. *Lautsprecheröffnung: Eine Aushöhlung im Lautsprechergehäuse zum Erzeugen satter Bässe. B 3 C Montage A G F A A A A D E A A Vorderer Lautsprecher links (L)/ B Vorderer Lautsprecher rechts (R): Stellen Sie die vorderen Lautsprecher neben den Monitor oder Bildschirm und bündig mit der Bildschirmfläche auf. • Platzieren Sie den Mittel-Lautsprecher für Kinder unzugänglich. Ansonsten könnte der Lautsprecher herunterfallen und Verletzungen und/oder Sachschäden verursachen. • Die Lautsprecher enthalten magnetische Bauteile. Aus diesem Grund können Farbverfälschungen auf dem Bildschirm oder PC-Monitor auftreten. Die Lautsprecher sollten daher in ausreichendem Abstand zum Fernseher oder PC-Monitor aufgestellt werden. C Mittel-Lautsprecher: Stellen Sie den Mittel-Lautsprecher ober- oder unterhalb des Monitors oder Bildschirms auf. D Surround-Lautsprecher links (L)/ E Surround-Lautsprecher rechts (R): Stellen Sie diese Lautsprecher hinter der Zuhörerposition und leicht nach innen ausgerichtet auf. HB985-DB.BDEUPPK_GER.indd 20 2010-05-14 2:06:48 Montage Anschluss an einen Fernseher Nehmen Sie, abhängig von den Möglichkeiten Ihrer Geräte, einen der folgenden Anschlüsse vor. • HDMI-Anschluss (Seite 21-22) • Component-Video-Anschluss (Seite 22) • Video-Anschluss (Seite 23) HDMI-Anschluss Ein HDMI-Fernseher oder Monitor kann über ein HDMI-Kabel an diesen Player angeschlossen werden (type A, Version 1.3). Verbinden Sie die HDMI OUT-Buchse des Players mit der HDMI IN-Buchse eines HDMI-kompatiblen Fernsehers oder Monitors. HDMI-Anschluss Player Player 3 Montage HINWEIS • Abhängig vom Fernseher und anderen Geräten gibt es verschiedene Anschlussmöglichkeiten an den Player. Verwenden Sie nur einen der in dieser Anleitung angegebenen Anschlüsse. • Lesen Sie zum Anschluss die Bedienungsanleitung des Fernsehers, der Stereo-Anlage bzw. des jeweiligen Gerätes. 21 TV TV • Der Player muss direkt am Fernseher angeschlossen werden. Stellen Sie den Fernseher auf den richtigen Videokanal ein. • Den Player nicht über einen Videorekorder anschließen. Das DVD-Bild könnte durch das Kopierschutzsystem verzerrt werden. Stellen Sie den Eingang des Fernsehers auf HDMI (siehe Bedienungsanleitung des Fernsehers). HB985-DB.BDEUPPK_GER.indd 21 2010-05-14 2:06:48 22 Montage Component-Video-Anschluss HINWEIS • Beim Ändern der Auflösung bei bereits angeschlossenem Gerät können Fehlfunktionen auftreten. Um diese Störung zu beheben, schalten Sie den Player aus und wieder ein. • Wenn der HDMI-Anschluss noch nicht mir dem HDCP abgeglichen wurde, erscheint ein schwarzer Bildschirm. Überprüfen Sie in diesem Fall den HDMI-Anschluss oder ziehen Sie das HDMI-Kabel ab. 3 Montage • Überprüfen Sie bei Rauschen oder Streifen auf dem Bildschirm das HDMI-Kabel (die Länge sollte 4,5 m nicht überschreiten, zudem sollte ein HDMI-Hochgeschwindigkeitskabel (Version 1.3) verwendet werden. Verbinden Sie die COMPONENT VIDEO OUTBuchsen des Players über ein Y Pb Pr-Kabel mit den entsprechenden Eingangsbuchsen des Fernsehers. Der Ton wird über die Systemlautsprecher ausgegeben. Component-Anschluss Player Player PR VIDEO L R • Beachten Sie beim Anschluss eines HDMI- oder DVI-kompatiblen Gerätes folgende Punkte: - Schalten Sie das HDMI-/DVI-Gerät sowie diesen Player aus. Schalten Sie dann das HDMI-/DVIGerät ein, warten Sie ca. 30 Sekunden, und schalten Sie dann den Player ein. - Der Videoeingang des angeschlossenen Gerätes muss auf dieses Gerät eingestellt sein. - Das angeschlossene Gerät muss eine der Video-Eingangsauflösungen 720x576p (480p), 1280x720p, 1920x1080i oder 1920x1080p unterstützen. • Nicht alle HDCP-kompatiblen HDMI- oder DVIGeräte arbeiten mit diesem Player zusammen. - Bei nicht-HDCP-Geräten wird das Bild nicht richtig angezeigt. - Es erfolgt keine Wiedergabe mit diesem Player und es wird ein schwarzer Bildschirm angezeigt. HB985-DB.BDEUPPK_GER.indd 22 Y COMPONENT VIDEO INPUT OUTPUT Grün Green Blue Blau Red Rot • Bei einem HDMI-Anschluss kann die Auflösung für den HDMI-Ausgang geändert werden. (Siehe Kapitel “Einstellung der Auflösung” auf Seite 23.) • Legen Sie über die Option [HDMI-Farbeinst.] im Menü [Setup] die Art der Videoausgabe über die HDMI OUT-Buchse fest (siehe Seite 34). PB AUX • Falls ein angeschlossenes HDMI-Gerät den Audioausgang des Players nicht unterstützt, ist der Ton des HDMI-Gerätes u. U. nur verzerrt oder nicht zu hören. TV TV HINWEIS Bei einem COMPONENT VIDEO OUT-Anschluss kann die Auflösung für den Ausgang geändert werden. (Siehe Kapitel “Einstellung der Auflösung” auf Seite 23.) 2010-05-14 2:06:49 Montage Video-Anschluss Einstellung der Auflösung Verbinden Sie die VIDEO OUT-Buchse des Players über das Videokabel mit der VideoEingangsbuchse des Fernsehers. Der Ton wird über die Systemlautsprecher ausgegeben. Der Player bietet verschiedene Ausgabeauflösungen für die HDMI OUTund COMPONENT VIDEO OUT-Buchsen. Die Auflösung wird im Menü [Setup] eingestellt. 1. Drücken Sie die Taste HOME MENU ( Video-Anschluss 23 ). 2. Wählen Sie mit den Tasten I/i/U/u den Eintrag [Setup] und drücken Sie ENTER ( ). Daraufhin wird das Menü [Setup] aufgerufen. Player PR VIDEO PB AUX R Y COMPONENT VIDEO INPUT OUTPUT 4. Wählen Sie mit den Tasten U/u den Eintrag [Auflösung] und drücken Sie für die dritte Ebene auf ENTER ( ) oder auf i. 3 Montage L 3. Wählen Sie mit den Tasten U/u die Option [ANZEIGE] und drücken Sie die Taste i, um in das Unterverzeichnis zu gelangen. Yellow Gelb TV TV 5. Wählen Sie mit den Tasten U/u die gewünschte Auflösung aus und drücken Sie zur Bestätigung der Auswahl auf ENTER ( ). HINWEIS • Falls Ihr Fernsehgerät die am Player eingestellte Auflösung nicht unterstützt, stellen Sie die Auflösung wie folgt auf 576p (480p) ein: 1. Drücken Sie zum Öffnen des Disc-Fachs auf Z. 2. Halten Sie die Taste x mindestens fünf Sekunden lang gedrückt. • Die Videoausgabe ist von zahlreichen Faktoren abhängig. Hinweise hierzu finden Sie unter “Video-Ausgabeauflösung” auf Seite 70. HB985-DB.BDEUPPK_GER.indd 23 2010-05-14 2:06:49 24 Montage Antennenanschluss Schließen Sie zum Radioempfang die mitgelieferte Antenne an. Antennenanschluss Anschluss von Zusatzgeräten AUX-Anschluss Der Ton eines Gerätes kann mit Hilfe der analogen Audio-Ausgangsbuchsen über die Lautsprecher des Systems ausgegeben werden. Schließen Sie die analogen AudioAusgangsbuchsen des Gerätes an den Anschluss AUX L/R (INPUT) dieses Gerätes an. Wählen Sie dann mit den Tasten INPUT/TUNER, I/i sowie ENTER ( ) die Option [AUX]. 3 Montage AUX-Anschluss Player Player Player VIDEO L PR PB AUX R Y COMPONENT VIDEO INPUT HINWEIS Die UKW-Drahtantenne sollte nach dem Anschluss so waagerecht wie möglich ausgerichtet werden. Die UKW-Drahtantenne muss vollständig entfaltet werden. HB985-DB.BDEUPPK_GER.indd 24 Rot Red Weiß White To the audio output jacks Zu den Audioof your component Ausgangsbuchsen des (TV, (TV, VCR, etc.) Gerätes Videorekorder usw.) 2010-05-14 2:06:50 Montage PORTABLE IN-Anschluss OPTICAL IN 1/2-Anschluss Der Ton eines tragbaren Players kann über die Lautsprecher des Systems ausgegeben werden. Der Ton eines Gerätes kann mit Hilfe der digitalen, optischen Buchse über die Lautsprecher des Systems ausgegeben werden. Verbinden Sie die Kopfhörerbuchse (oder Line Out-Buchse) des tragbaren Players mit der PORT. IN-Buchse dieses Gerätes. Wählen Sie dann mit den Tasten INPUT/TUNER, I/i sowie ENTER ( ) die Option [PORTABLE]. PORTABLE IN-Anschluss 25 Verbinden Sie die optische Ausgangsbuchse des Gerätes mit der OPTICAL IN 1/2-Buchse dieses Gerätes. Wählen Sie dann mit den Tasten INPUT/TUNER, I/i sowie ENTER ( ) die Option [OPTICAL 1/2]. Oder wählen Sie diese Funktion direkt über die Taste OPTICAL aus. Optischer Anschluss 3 Montage Z. B. MP3-Player. twZG SGUUU HB985-DB.BDEUPPK_GER.indd 25 Zur digitalen, To the digital optischen optical output jack Ausgangsbuchse des of your component Gerätes 2010-05-14 2:06:50 26 Montage Bluetooth®-Verbindung Über Bluetooth Bluetooth® ist eine kabellose Übertragungstechnologie zur Verbindung über kurze Distanzen. 3 Montage Die Übertragungsreichweite beträgt etwa zehn Meter. (Bei Störungen durch andere elektronische Geräte in der Nähe kann der Ton bei der Bluetooth-Übertragung über verschiedene Räume zeitweise unterbrochen werden.) Bei der Verbindung mehrere Geräte über die Bluetooth Wireless-Technologie fallen keinerlei Gebühren an. Verbindungen mit Hilfe der Bluetooth Wireless-Technologie über ein Mobiltelefon können in Reihenschaltung betrieben werden. Unterstützte Geräte: Mobiltelefone, MP3-Player, Notebooks, PDA-Geräte (An diese Geräte muss ein Stereo-Headset angeschlossen werden können.) Bluetooth-Profile Um die Bluetooth Wireless-Technologie zu nutzen, müssen die Geräte mit bestimmten Profilarten kompatibel sein. Dieses Gerät unterstützt die folgenden Profile. A2DP (Advanced Audio Distribution Profile [Übertragung von Audiodaten]) 1. Wählen Sie mit der Taste INPUT/TUNER oder BT AUDIO die Bluetooth-Funktion. Daraufhin erscheint die Meldung “BT AUDIO” gefolgt von “BT READY” im Anzeigefenster. 2. Bedienen Sie das Bluetooth-Gerät und stellen Sie eine Verbindung her. Während der Suche nach diesem Gerät mit dem Bluetooth-Gerät wird eine Liste der gefundenen Geräte in der Anzeige des Bluetooth-Gerätes, je nach Funktionsumfang, angezeigt. Dieses Gerät besitzt die Bezeichnung “PIONEER AUDIO”. 3. Geben Sie die PIN-Nummer ein. PIN-Nummer: 0000 4. Nach erfolgter Verbindung dieses Gerätes mit dem Bluetooth-Gerät leuchtet die Bluetooth-LED dieses Gerätes auf und die Meldung “BT SINK” wird angezeigt. HINWEIS Je nach Art des Bluetooth-Gerätes erfolgt die Herstellung der Verbindung auf verschiedene Weise. 5. Musik hören. Hinweise zur Wiedergabe von Musikdateien auf dem Bluetooth-Gerät finden Sie in der Bedienungsanleitung des BluetoothGerätes. HINWEIS Musik vom Bluetooth-Gerät hören Verbindung zwischen Gerät und BluetoothGerät herstellen • Falls die Bluetooth-Verbindung bei einem Wechsel der Gerätefunktion getrennt wird, muss diese neu hergestellt werden. Vor der Verbindung muss die BluetoothFunktion Ihres Bluetooth-Gerätes aktiviert werden. Hinweise finden Sie in der Bedienungsanleitung des Bluetooth-Gerätes. Eine einmal hergestellte Verbindung muss nicht nochmals hergestellt werden. • Das AVRCP-Profil kann in dieser Betriebsart nicht genutzt werden. HB985-DB.BDEUPPK_GER.indd 26 2010-05-14 2:06:51 Montage Informationen zum verbundenen Bluetooth-Gerät anzeigen Diese Funktion ist nach erfolgter Verbindung möglich. Hier können verschiedene BluetoothInformationen angezeigt werden. Drücken Sie die Taste DISPLAY gedrückt. Folgende Bluetooth-Informationen werden nacheinander angezeigt. Lokale Adresse des Lokale Adresse des Bluetooth-Gerätes t Gerätename t Keine t ... 27 HINWEIS • Dieses Gerät unterstützt nicht das Profil MonoSprachausgabe per Headset (Schnurlose Telefonie). • Bei Störungen der Übertragung durch andere elektronische Geräte in der Nähe kann der Ton zeitweise unterbrochen werden. • Bluetooth-Geräte können nicht über dieses Gerät bedient werden. • Es kann jeweils nur eine Verbindung zu einem Bluetooth-Gerät hergestellt werden. MehrfachVerbindungen sind nicht möglich. • Je nach Art des Gerätes kann die BluetoothFunktion u. U. nicht genutzt werden. 3 Montage • Auch wenn das Bluetooth-Gerät und dieses Gerät weniger als zehn Meter voneinander entfernt sind, kann die Verbindung durch Hindernisse zwischen den Geräten gestört werden. • Falls keine Verbindung zu einem Bluetooth-Gerät besteht, erscheint die Meldung “BT READY” im Anzeigefenster. • Bei Geräten in der Nähe, die auf derselben Frequenz betrieben werden, wie z. B. medizinische Geräte, Mikrowellengeräte oder WLAN-Geräte, ist auf Grund elektronischer Störungen möglicherweise keine Verbindung möglich. • Bei zwischen den Geräten befindlichen Personen oder bei einer Unterbrechung der Verbindung zwischen Bluetooth-Gerät und Player wird die Verbindung getrennt. • Mit zunehmendem Abstand zwischen BluetoothGerät und Player nimmt die Tonqualität ab. Bei zu großem Abstand außerhalb der Reichweite des Bluetooth-Gerätes wird die Verbindung getrennt. • Die Verbindung zu Geräten mit Bluetooth Wireless-Technologie wird beim Ausschalten des Hauptgerätes oder bei einem Abstand des Gerätes zum Hauptgerät von über zehn Metern getrennt. HB985-DB.BDEUPPK_GER.indd 27 2010-05-14 2:06:51 28 Montage Verbindung mit dem Heimnetzwerk Dieser Player kann über den LAN-Anschluss auf der Rückseite mit einem lokalen Netzwerk (LAN) verbunden werden. 3 Montage Weitere Hinweise finden Sie in der Bedienungsanleitung des Netzwerkgerätes. Verbinden Sie den LAN-Anschluss des Players über ein handelsübliches LAN- oder EthernetKabel (CAT5 oder höher mit RJ45-Anschluss) mit dem entsprechenden Anschluss am Modem oder Router. In der folgenden Beispielkonfiguration für eine Kabelverbindung kann mit dem Player auf die Inhalte beider PCs zugegriffen werden. Netzwerkverbindung Router Router Broadband BreitbandService Dienst WAN LAN 1 LAN 2 PC PC LAN 3 Player Player HINWEIS • Halten Sie das LAN-Kabel beim Anschließen oder Abziehen immer am Stecker selbst fest. Ziehen Sie nicht am LAN-Kabel und halten Sie die Sperre am Stecker gedrückt. • Am LAN-Anschluss darf kein modulares Telefonkabel angeschlossen werden. • Halten Sie sich auf Grund der zahlreichen möglichen Anschlussarten an die Angaben Ihres Telekommunikationsanbieters bzw. InternetAnbieters. • Für den Zugriff auf Inhalte auf einem PC oder DLNA-Server muss dieser Player mit demselben lokalen Netzwerk wie der Router verbunden sein. HB985-DB.BDEUPPK_GER.indd 28 2010-05-14 2:06:51 Montage Netzwerkeinstellungen Vor der Einrichtung des Kabel-Netzwerks muss eine Breitband-Internetverbindung zum Heimnetzwerk hergestellt werden. Falls das kabelgebundene lokale Netzwerk (LAN) einen DHCP-Server besitzt, wird dem Player automatisch eine IP-Adresse zugewiesen. Für bestimmte Heimnetzwerke müssen nach dem Anschluss der Kabel die Netzwerkeinstellungen des Players vorgenommen werden. Nehmen Sie die [NETZWERK]-Einstellungen wie folgt vor. 2. Wählen Sie mit den Tasten U/u/I/i den IPModus [Dynamisch] oder [Statisch]. Wählen Sie die Option [Dynamisch], um die IP-Adresse automatisch zu beziehen. HB985-DB.BDEUPPK_GER.indd 29 HINWEIS Falls kein DHCP-Server im Netzwerk vorhanden ist und die IP-Adresse manuell eingerichtet werden muss, wählen Sie die Option [Statisch] und nehmen Sie die Einstellungen für [IP-Adresse], [Subnetzmaske], [Gateway] und [DNS-Server] mit den Tasten U/u/I/i sowie den Nummerntasten vor. Drücken Sie bei falscher Eingabe einer Ziffer auf CLEAR, um den markierten Teil zu löschen. 3. Markieren Sie die Option [OK] und drücken Sie ENTER ( ), um die Netzwerkeinstellungen zu übernehmen. 4. Der Player fordert Sie zur Prüfung der Netzwerkverbindung auf. Markieren Sie die Option [OK] und drücken Sie ENTER ( ), um die Netzwerkverbindung herzustellen. 3 Montage 1. Wählen Sie im Menü [Verbindungseinst.] die Option [Setup] und drücken Sie auf oder ENTER ( ). 29 5. Wählen Sie den Eintrag [Test] und drücken Sie bei Schritt 4 auf ENTER ( ), um den Status der Netzwerkverbindung auf dem Bildschirm anzuzeigen. Der Test kann auch über die Option [Verbindungsstatus] im Menü [Setup] durchgeführt werden. 2010-05-14 2:06:51 30 Montage Hinweise zur Netzwerkverbindung: • • 3 Montage • • • • Viele Probleme bei der Netzwerkverbindung während der Einrichtung können häufig durch ein Zurücksetzen des Routers bzw. Modems behoben werden. Schalten Sie nach der Verbindung des Players mit dem Heimnetzwerk den Router bzw. das Kabelmodem des Heimnetzwerks schnell aus und/oder trennen Sie das Netzkabel. Schalten Sie das Gerät dann wieder ein und/oder schließen Sie das Netzkabel wieder an. Je nach Vertragsbedingungen Ihres Internet-Anbieters (ISP) kann die Anzahl der Geräte, für die eine Internet-Verbindung eingerichtet werden kann, begrenzt sein. Hinweise erhalten Sie von Ihrem InternetAnbieter. Unser Unternehmen übernimmt keine Haftung für Fehlfunktionen des Players und/ oder der Internetverbindung auf Grund von Verbindungsfehlern/Fehlfunktionen, die durch Ihre Breitband-Internetverbindung oder andere angeschlossene Geräte verursacht werden. Die über die Internetverbindung angebotenen Funktionserweiterungen für BD-ROM-Discs werden nicht von unserem Unternehmen erzeugt oder zur Verfügung gestellt, und unser Unternehmen gewährleistet nicht die Funktionalität oder künftige Verfügbarkeit dieser Inhalte. Bestimmte über eine Internetverbindung verfügbare Disc-Inhalte sind mit diesem Player u. U. nicht kompatibel. Wenden Sie sich bei Fragen zu solchen Inhalten bitte an den Hersteller der Disc. Für bestimmte Internet-Inhalte ist u. U. eine höhere Bandbreite erforderlich. Auch wenn der Player korrekt verbunden und konfiguriert ist können bestimmte Internet-Inhalte auf Grund von Engpässen, minderer Qualität oder geringer Bandbreite der Internetverbindung oder Störungen beim Anbieter nicht richtig wiedergegeben werden. HB985-DB.BDEUPPK_GER.indd 30 • Auf Grund bestimmter Einschränkungen durch den Internet-Anbieter (ISP), der die Breitband-Internetverbindung bereitstellt, sind bestimmte Funktionen der Internetverbindung u. U. nicht möglich. • Jegliche Entgelte des ISP, auch Verbindungsentgelte, müssen vom Benutzer selbst getragen werden. • Zur Kabelverbindung dieses Players ist ein 10 Base-T- oder 100 Base-TX-LAN-Anschluss erforderlich. Falls Ihr Internet-Anbieter einen solchen Anschluss nicht unterstützt, kann mit dem Player keine Internetverbindung hergestellt werden. • Für den xDSL-Dienst ist ein Router erforderlich. • Zur Nutzung des DSL-Dienstes ist ein DSLModem erforderlich. Für den KabelmodemDienst ist in ein Kabelmodem erforderlich. Je nach Zugriffsart auf den und den Vertragsbedingungen des ISP können Sie die Internetverbindungsfunktion dieses Players nicht nutzen oder die Anzahl der Geräte, die gleichzeitig eine Internetverbindung herstellen können, ist begrenzt. (Falls Ihr ISP nur die Verbindung von einem Gerät zulässt, kann mit diesem Player u. U. keine Verbindung hergestellt werden, wenn bereits ein PC verbunden ist.) • Der Einsatz eines “Routers” ist möglicherweise nicht oder nur eingeschränkt zulässig, abhängig von den Bedingungen und Einschränkungen des ISP. Hinweise erhalten Sie direkt von Ihrem Internet-Anbieter. • Schalten Sie sämtliche nicht genutzte Netzwerkgeräte im lokalen Heimnetzwerk aus. Einige Geräte erzeugen u. U. Netzwerkverkehr. 2010-05-14 2:06:51 Montage Anschluss eines USBGerätes Mit diesem Player können auf einem USB-Gerät gespeicherte Film-, Musik- und Fotodateien wiedergegeben werden. 1. Schließen Sie das USB-Gerät fest am USBAnschluss an. USB-Anschluss 31 HINWEIS • Dieser Player unterstützt USB-Flash-Speicher/ externe USB-Festplatten mit dem Dateiformat FAT16, FAT32 und NTFS (Musik, Foto und Video). Für BD-LIVE sowie zum Kopieren von AudioCDs wird jedoch ausschließlich das Dateiformat FAT16 oder FAT32 unterstützt. Bitte nutzen Sie für BD-LIVE und zum Kopieren von Audio-CDs den USB-Flash-Speicher/eine externe Festplatte mit dem Dateiformat FAT16 oder FAT32. • Das USB-Gerät kann als lokaler Speicher eingesetzt werden, um BD-LIVE-Discs über das Internet wiederzugeben. • Dieses Gerät unterstützt bis zu vier Partitionen auf einem USB-Gerät. Montage • Ein USB-Gerät niemals während des Betriebs trennen (z. B. während der Wiedergabe oder eines Kopiervorgangs). 3 • USB-Geräte, für die zum Anschluss an einen Computer eine zusätzliche Softwareinstallation erforderlich ist werden nicht unterstützt. • USB-Gerät: USB-Gerät mit Unterstützung für USB 1.1 und USB 2.0. 2. Drücken Sie die Taste HOME MENU. Wählen Sie mit den Tasten U/u/I/i, die Option [Spielfilm], [Foto] oder [Musik] und drücken Sie ENTER ( ). 3. Wählen Sie mit den Tasten U/u/I/i eine Datei aus und drücken Sie zur Wiedergabe auf PLAY bzw. auf ENTER ( ). Anzeige der freien Speicherkapazität des USB-Gerätes auf dem Bildschirm. 4. Wählen Sie eine andere Betriebsart. Ziehen Sie das USB-Gerät vorsichtig ab. • Es können Film-, Musik- und Fotodateien wiedergegeben werden. Weitere Hinweise zu den Bedienungsfunktionen für die einzelnen Dateitypen finden Sie auf den entsprechenden Seiten. • Zur Vermeidung von Datenverlust sollten regelmäßig Sicherungskopien erstellt werden. • Bei Verwendung eines Verlängerungskabels, eines USB-Hubs oder eines USB MultiKartenlesegerätes wird das USB-Gerät u. U. nicht erkannt. • Bestimmte USB-Geräte funktionieren nicht zusammen mit diesem Gerät. • Digitalkameras und Mobiltelefone werden nicht unterstützt. • Der USB-Anschluss dieses Gerätes kann nicht für den Anschluss an einen PC genutzt werden. HB985-DB.BDEUPPK_GER.indd 31 2010-05-14 2:06:51 32 Montage 4. Wählen Sie mit den Tasten U/u den zweiten Eintrag aus und drücken Sie auf ENTER ( ), um in das nächste Unterverzeichnis zu gelangen. Einstellungen Setup-Einstellungen vornehmen Im Menü [Setup] können die Einstellungen für den Player vorgenommen werden. 1. Drücken Sie die Taste HOME MENU ( ). 5. Wählen Sie mit den Tasten U/u die gewünschte Einstellung und drücken Sie zur Bestätigung der Auswahl die Taste i oder ENTER ( ). 3 Montage 2. Wählen Sie mit den Tasten I/i/U/u den Eintrag [Setup] und drücken Sie ENTER ( ). Daraufhin wird das Menü [Setup] aufgerufen. 3. Wählen Sie mit den Tasten U/u den ersten Eintrag aus und drücken Sie die Taste i, um in das Unterverzeichnis zu gelangen. HB985-DB.BDEUPPK_GER.indd 32 2010-05-14 2:06:51 Montage Das Menü [ANZEIGE] Auflösung Bildformat Einstellen der Ausgabeauflösung für das Component- und HDMI-Videosignal. Einzelheiten zur Einstellung der Auflösung finden Sie auf den Seiten 23 und 70. Wählen Sie die für das Bildformat des Fernsehers die geeignete Einstellung. [4:3 Letterbox] Beim Anschluss an einen Standard 4:3-Fernseher. Zeigt Kinofilme mit schwarzen Balken oberhalb und unterhalb des Bildes. [16:9 Original] Beim Anschluss an einen 16:9-Breitbildfernseher. Das 4:3-Bild wird im Original-Bildformat 4:3 mit schwarzen Streifen am linken und rechten Bildrand angezeigt. [16:9 Vollbild] Beim Anschluss an einen 16:9-Breitbildfernseher. HINWEIS [1080p] Ausgabe von 1080 Zeilen Progressive-Video. 3 Montage [4:3 Panscan] Beim Anschluss an einen Standard 4:3-Fernseher. Das Bild wird verkleinert, um den Bildschirm zu füllen. Beide Seiten des Bildes werden abgeschnitten. [Auto] Falls an der HDMI OUT-Buchse ein Fernsehgerät angeschlossen ist, das Anzeigeinformation (EDID) bereitstellt, wird die Auflösung für den angeschlossenen Fernseher automatisch optimal angepasst. Falls der Anschluss ausschließlich über die COMPONENT VIDEO OUT-Buchse erfolgt, wird die Standardauflösung 1080i eingestellt. 33 [1080i] Ausgabe von 1080 Zeilen Interlaced-Video. [720p] Ausgabe von 720 Zeilen Progressive-Video. [576p (480p)] Ausgabe von 576 (480) Zeilen ProgressiveVideo. [576i (480i)] Ausgabe von 576 (480) Zeilen InterlacedVideo. Die Optionen [4:3 Letterbox] und [4:3 PanScan] können bei einer höheren Auflösung als 720p nicht eingestellt werden. HB985-DB.BDEUPPK_GER.indd 33 2010-05-14 2:06:52 34 Montage 1080p-Anzeige Das Menü [SPRACHE] Wählen Sie bei einer Auflösung von 1080p die Einstellung [24 Hz], um Filme auf HDMI-fähigen Anzeigegeräten mit 1080p/24 Hz-Eingang ruckelfrei darzustellen (1080p/24 Hz). Anzeigemenü Sprache für das [Setup]-Menü und für die Bildschirmmenüs festlegen. HINWEIS • In der Einstellung [24 Hz] können beim Wechsel zwischen Video- und Filmmaterial Bildstörungen auftreten. Wählen Sie in diesem Fall die Einstellung [50 Hz]. 3 Montage • Auch wenn die Option [1080p-Anzeige] auf [24 Hz] eingestellt ist, wird die tatsächliche Bildfrequenz der Videoausgabe je nach Format der Video-Quelle auf 50 Hz festgelegt, falls Ihr Fernsehgerät die Auflösung 1080p/24 Hz nicht unterstützt. HDMI-Farbeinst. Auswahl der Ausgabeart über die HDMI OUT-Buchse. Hinweise zu dieser Einstellung finden Sie in der Bedienungsanleitung des Anzeigegerätes. [YCbCr] Wählen Sie diese Einstellung beim Anschluss an HDMI-Anzeigegerät. [RGB] Wählen Sie diese Einstellung beim Anschluss an DVI-Anzeigegerät. HB985-DB.BDEUPPK_GER.indd 34 Disc-Menü/Disc-Audio/Disc-Untertitel Wählen Sie die gewünschte Sprache für Audiotracks (Disc-Audio), für Untertitel und für die Disc-Menüs aus. [Original] Die auf der Disc aufgezeichnete Originalsprache wird verwendet. [Andere] Drücken Sie zur Auswahl einer anderen Sprache auf ENTER ( ). Geben Sie über die Nummerntasten die entsprechende vierstellige Nummer ein, die Sie der Liste der Sprachcodes entnehmen können (siehe Seite 69), und drücken Sie ENTER ( ). [Aus] (nur für Disc-Untertitel) Untertitel ausblenden. HINWEIS Die Spracheinstellungen werden je nach Disc möglicherweise nicht übernommen. 2010-05-14 2:06:52 Montage Das Menü [AUDIO] Lautsprecher-Setup Nutzen Sie für einen optimalen Ton die Lautsprechereinstellungen, um die Lautstärke der angeschlossenen Lautsprecher sowie die Abstände von der Zuhörerposition festzulegen. Führen Sie den Test durch, um die Lautstärke der Lautsprecher auf den gleichen Wert einzustellen. [Lautsprecher] Wählen Sie einen einzustellenden Lautsprecher aus. [Abstand] Abstände der einzelnen Lautsprecher zur Zuhörerposition festlegen. [Test/Testton beenden] Ausgabe eines Testtons über die Lautsprecher. [OK] Einstellung übernehmen. [Abbrechen] Änderungen verwerfen. HB985-DB.BDEUPPK_GER.indd 35 HD AV Sync Beim Digitalfernsehen kann es zu Verzögerungen zwischen Bild und Ton kommen. In diesem Fall kann eine Verzögerung für den Ton festgelegt werden, so dass der Ton auf das Bild ‘wartet’: Diese Funktion wird als HD AV Sync bezeichnet. Wählen Sie mit den Tasten U u einen Wert zwischen 0 und 300 mSek. für die Verzögerung aus. Die Verzögerung kann je nach eingestelltem digitalen Fernsehsender variieren. Beim Umschalten des Kanals muss der Wert für HD AV Sync u. U. geändert werden. 3 DRC (Steuerung des Dynamikbereichs) Während der Wiedergabe von Dolby Digitaloder Dolby Digital Plus-Inhalten möchten Sie vielleicht den Dynamikbereich der Audioausgabe verringern (den Unterschied zwischen den lautesten und den leisesten Tönen). Auf diese Weise können Sie z. B. einen Film bei geringer Lautstärke anschauen, ohne dass die Klangqualität abnimmt. Stellen Sie die Option [DRC] auf [Ein], um die Funktion zu aktivieren. Montage [Lautstärke] Lautstärkepegel für jeden Lautsprecher festlegen. 35 HINWEIS Die DRC-Einstellungen können nur vorgenommen werden, wenn keine Disc eingelegt ist oder die Wiedergabe vollständig angehalten wurde. 2010-05-14 2:06:52 36 Montage Das Menü [SPERRE] Um eine Funktion mit der Einstellung [SPERRE] aufzurufen, müssen Sie den zuvor erstellten vierstelligen Sicherheitscode eingeben. Falls Sie noch kein Kennwort vergeben haben, werden Sie nun dazu aufgefordert. Geben Sie zweimal ein vierstelliges Kennwort ein und drücken Sie ENTER ( ) um das neue Kennwort zu erstellen. Kennwort Sie können ein Kennwort vergeben oder ändern. 3 Montage [Keine] Geben Sie zweimal ein vierstelliges Kennwort ein und drücken Sie ENTER ( ), um das neue Kennwort zu erstellen. [Ändern] Geben Sie das aktuelle Kennwort ein und drücken Sie ENTER ( ). Geben Sie zweimal ein vierstelliges Kennwort ein und drücken Sie ENTER ( ), um das neue Kennwort zu erstellen. DVD-Einstufung Verhindert die Wiedergabe von nicht jugendfreien DVDs. (Es sind jedoch nicht alle DVDs eingestuft.) [Einstufung 1-8] Stufe 1 bedeutet niedrigste Wiedergabeeinschränkungen. Stufe 8 bedeutet höchste Wiedergabeeinschränkungen. [Aufheben] In dieser Einstellung wird die Kindersicherung deaktiviert und die Disc wird ohne Einschränkungen wiedergegeben. BD-Einstufung Festlegen einer Altersfreigabe für BD-ROMDiscs. Geben Sie über die Nummerntasten eine Altersfreigabe zur Wiedergabe von BD-ROMDiscs ein. [255] Alle BD-ROM-Discs wiedergeben. [0-254] BD-ROM-Discs mit der entsprechenden Einstufung wiedergeben. HINWEIS Um eine falsche Eingabe vor dem Drücken auf ENTER ( ) zu korrigieren, drücken Sie auf CLEAR. Geben Sie nun das korrekte Kennwort ein. HINWEIS Eine [BD-Einstufung] kann nur für BD-Discs mit Avance Rating Controller vorgenommen werden. Wenn Sie das Kennwort vergessen haben, Falls Sie das Kennwort vergessen haben, kann es mit folgenden Schritten gelöscht werden: 1. Nehmen Sie eine evtl. eingelegte Disc aus dem Player. 2. Wählen Sie im [SPERRE]-Menü die Option [Setup]. Ländercode Geben Sie gemäß der Liste auf Seite 68 den Code für das Land ein, dessen Standards bei der Einstufung der DVD-Video-Disc angewendet wurden. 3. Geben Sie im Menü [Sperre] über die Nummerntasten das Kennwort “210499” ein. Das Kennwort wird gelöscht. HB985-DB.BDEUPPK_GER.indd 36 2010-05-14 2:06:52 Montage Das Menü [NETZWERK] Das Menü [WEITERE] Verbindungseinst. DivX VOD Nachdem Sie Ihr Heimnetzwerk zur Verbindung mit den Player vorbereitet haben, muss für der Player für die Netzwerkverbindung eingerichtet werden. (Siehe “Verbindung mit dem Heimnetzwerk” auf den Seite 28.) ÜBER DIVX-VIDEO: DivX® ist ein von DivX, Inc. entwickeltes digitales Videoformat. Dies ist ein offizielles DivX Certified- oder DivX Ultra Certified-Gerät zur Wiedergabe von DivXVideo. Weitere Information und Software-Tools zur Konvertierung von Dateien in DivX-Videos finden Sie unter www.divx.com. Verbindungsstatus BD-LIVE-Verbindung Der Internetzugriff für die BD-LIVE-Funktionen kann eingeschränkt werden. [Zulässig] Der Internetzugriff wird für sämtliche BDLIVE-Inhalte freigegeben. [Teilweise zulässig] Der Internetzugriff wird nur für BDLIVE-Inhalte mit entsprechendem Benutzerzertifikat freigegeben. Für sämtliche BD-LIVE-Inhalte ohne Zertifikat werden der Internetzugriff sowie AACSOnlinefunktionen gesperrt. ÜBER DIVX VIDEO-ON-DEMAND: Dieses DivX® Certified-Gerät muss zur Wiedergabe von DivX Video-on-Demand (VOD) registriert werden. Eine Registrierungskennung kann im Abschnitt DivX VOD im Einstellungsmenü des Gerätes erstellt werden. Geben Sie diese Kennung unter vod.divx.com an, um die Registrierung abzuschließen und weitere Informationen zu DivX VOD zu erhalten. 3 Montage Um den Netzwerkstatus dieses Players zu überprüfen, wählen Sie die Option [Verbindungsstatus] und drücken Sie auf ENTER ( ), um die Verbindung zum Netzwerk und zum Internet zu testen. 37 [Registrieren] Anzeige des Registrierungscodes des Players. [Registrierung deaktivieren] Player deaktivieren und Deaktivierungscode anzeigen. HINWEIS Sämtliche über DivX VOD heruntergeladenen Filme mit dem Registrierungscode dieses Players können nur mit diesem Gerät wiedergegeben werden. [Nicht zulässig] Der Internetzugriff wird für sämtliche BDLIVE-Inhalte gesperrt. HB985-DB.BDEUPPK_GER.indd 37 2010-05-14 2:06:52 38 Montage Autom. Ausschalten Der Bildschirmschoner wird eingeblendet, wenn der Player ca. fünf Minuten im StoppModus betrieben wird. In der Einstellung [Ein] wird das Gerät automatisch abgeschaltet, nachdem der Bildschirmschoner 25 Minuten lang angezeigt wurde. Stellen Sie diese Einstellung auf [Aus] ein, um den Bildschirmschoner anzuzeigen, bis das Gerät wieder bedient wird. Initialisieren 3 Montage Werkseinstellungen Der Player kann auf die ursprünglichen Werkseinstellungen zurückgesetzt werden. BD-Speicher löschen BD-Inhalte auf dem angeschlossenen USBGerät löschen. HINWEIS Nach dem Zurücksetzen des Players auf die Werkseinstellungen über die Option [Werkseinstellungen] müssen sämtliche Aktivierungen für Online-Dienste sowie die Netzwerkeinstellungen erneut vorgenommen werden. Software-Information Aktuelle Software-Version anzeigen. HB985-DB.BDEUPPK_GER.indd 38 2010-05-14 2:06:52 Montage Klangeffekte 39 [Game]: Virtueller Klang für Videospiele. [Night]: Diese Funktion ist nützlich, um Spielfilme bei Nacht mit geringer Lautstärke anzuschauen. Drücken Sie mehrmals die Taste SOUND am Gerät, bis die gewünschte Klangart in der Anzeige oder auf dem Fernsehbildschirm erscheint. Die angezeigten Einträge für den Equalizer können je nach Klangquellen und Effekten variieren. [Mus. ReTouch]: Klangverbesserung beim Anhören von MP3-Dateien oder anderen komprimierten Musikdateien. Diese Funktion ist nur im 2-Kanal-Modus verfügbar. [Loudness]: Verbesserung der Bässe und Höhen. [Pioneer 1]: Für einen satten Klang durch den Anschluss kleiner Lautsprecher (S-BD303). [Pioneer 2]: Für einen satten Klang durch den Anschluss großer Lautsprecher (S-BD707T). 3 Montage [Bypass]: Softwaretitel mit MehrkanalSurround-Audiosignalen werden so wiedergegeben, wie sie aufgenommen wurden. [Bass Blast]: Bässe der linken und rechten Lautsprecher und des Subwoofers verstärken. [PL ll Movie]: Pro Logic ll Spielfilm-Modus zur Dekodierung des Eingangssignals zur Ausgabe von fünf Ausgangskanälen voller Bandbreite über ein Zweikanal-System. Diese Einstellung eignet sich ideal zum Anschauen von synchronisierten Videos oder alten Spielfilmen. Diese Funktion ist nur im 2-Kanal-Modus verfügbar. [PL ll Music]: Pro Logic ll Musik-Modus zur Dekodierung des Eingangssignals zur Ausgabe von fünf Ausgangskanälen voller Bandbreite über ein Zweikanal-System. Diese Einstellung eignet sich ideal zum Anhören normaler Stereo-Quellen wie CDs. Diese Funktion ist nur im 2-Kanal-Modus verfügbar. [Clear Voice]: In diesem Modus wird Sprache klarer und mit verbesserter Qualität wiedergegeben. HB985-DB.BDEUPPK_GER.indd 39 2010-05-14 2:06:52 40 Betrieb 4 Betrieb Normale Wiedergabe 4. Wählen Sie mit den Tasten U/u/I/i, die Option [Spielfilm], [Foto] oder [Musik] und drücken Sie ENTER ( ). 5. Wählen Sie mit den Tasten I/i den Eintrag Disc und drücken Sie ENTER ( ). Discs wiedergeben 1. Drücken Sie die Taste Z OPEN/CLOSE und legen Sie eine Disc in das Disc-Fach. 4 Betrieb Beim Anschluss von bis zu zwei Geräten erscheint diese Anzeige. 2. Drücken Sie auf Z OPEN/CLOSE, um das Disc-Fach zu schließen. Die Wiedergabe wird bei den meisten Audio-CDs, BD-ROM- und DVD-ROM-Discs automatisch gestartet. 3. Drücken Sie die Taste HOME MENU. 6. Wählen Sie mit den Tasten U/u/I/i eine Datei aus und drücken Sie zur Wiedergabe auf B PLAY bzw. auf ENTER ( ). HINWEIS • Die in dieser Anleitung beschriebenen Wiedergabefunktionen sind nicht für alle Dateien und Medien verfügbar. Bestimmte Funktionen sind aus verschiedenen Gründen nicht immer möglich. • Je nach BD-ROM-Titeln muss zur störungsfreien Wiedergabe ein USB-Gerät angeschlossen werden. HB985-DB.BDEUPPK_GER.indd 40 2010-05-14 2:06:52 Betrieb Wiedergabe anhalten Drücken Sie während der Wiedergabe auf x STOP. Wiedergabe unterbrechen Drücken Sie während der Wiedergabe auf X PAUSE/STEP. Drücken Sie zum Fortsetzen der Wiedergabe auf B PLAY. 41 Bedienungen im Disc-Menü BD DVD AVCHD Disc-Menü aufrufen Der Menübildschirm wird u. U. erst nach dem Laden einer Disc mit Menü angezeigt. Drücken Sie zur Anzeige des Disc-Menüs während der Wiedergabe auf MENU. Wählen Sie mit den Tasten U/u/I/i den gewünschten Menüeintrag aus. Einzelbildwiedergabe Drücken Sie während der Wiedergabe auf X. Drücken Sie zur Einzelbildwiedergabe mehrmals auf X. Popup-Menü einblenden Suchlauf vor oder zurück. Drücken Sie während der Wiedergabe die Taste POPUP/ TOP MENU und rufen Sie mit den Tasten U/u/I/i die gewünschten Menüpunkte auf. 4 Betrieb Drücken Sie für den schnellen Vorlauf bzw. den schnellen Rücklauf während der Wiedergabe die Taste m bzw. M. Um die Wiedergabegeschwindigkeit zu ändern, drücken Sie mehrmals die Taste m bzw. M. Bestimmte BD-ROM-Discs besitzen ein Kontextmenü, das während der Wiedergabe eingeblendet wird. Wiedergabegeschwindigkeit verringern Drücken Sie zur Wiedergabe in Zeitlupe mit verschiedenen Geschwindigkeiten bei unterbrochener Wiedergabe die Taste M SCAN. Zum/Zur nächsten/vorherigen Kapitel/Titel/Datei springen Drücken Sie während der Wiedergabe die Taste . bzw. >, um zum nächsten Kapitel/ Track/Dateien bzw. zum Anfang das aktuelle Kapitel/Track/Dateien zu springen. Drücken Sie zweimal kurz die Taste ., um zum vorherigen Kapitel/Track/Dateien zu springen. HB985-DB.BDEUPPK_GER.indd 41 2010-05-14 2:06:53 42 Betrieb Wiedergabe fortsetzen BD MUSIC DVD AVCHD MOVIE ACD Bei bestimmten Discs merkt sich das Gerät den Punkt, an dem die Taste x STOP gedrückt wurde. Sobald das Symbol “Xx (Pause Stop)” kurz auf dem Bildschirm erscheint, drücken Sie auf B PLAY, um die Wiedergabe (ab der aktuellen Szene) fortzusetzen. Bei zweimaligem Drücken auf x STOP bzw. beim Auswerfen der Disc erscheint das Symbol “x” Stop auf dem Bildschirm. Das Gerät löscht daraufhin sämtliche Anhaltepunkte. HINWEIS 4 Betrieb • Der Fortsetzungspunkt wird beim Betätigen einer Taste u. U. gelöscht (z. B. 1 (POWER), Z (OPEN/CLOSE), etc). • Bei BD-Video-Discs einschließlich BD-J ist die Funktion Wiedergabe fortsetzen nicht möglich. • Beim Drücken auf x (STOP) während der Wiedergabe eines interaktiven Titels einer BDROM wird die Wiedergabe angehalten. Erweiterte Wiedergabe Wiederholte Wiedergabe BD DVD AVCHD ACD MUSIC Drücken Sie während der Wiedergabe mehrmals die Taste REPEAT ( ), um den gewünschten Wiederholungsmodus einzustellen. BDs/DVDs A- – Den ausgewählten Abschnitt wiederholt wiedergeben. Kapitels – Das aktuelle Kapitel mehrmals wiedergeben. Titel Title – Den aktuellen Titel mehrmals wiedergeben. Drücken Sie zur normalen Wiedergabe mehrmals die Taste REPEAT ( ) und wählen Sie die Option [AUS]. Audio-CDs/Musikdateien – Den aktuellen Track oder die Datei mehrmals wiedergeben. – Alle Tracks oder Dateien mehrmals wiedergeben. – Tracks bzw. Dateien in zufälliger Reihenfolge wiedergeben. – Alle Tracks oder Dateien mehrmals in zufälliger Reihenfolge wiedergeben. – Den ausgewählten Abschnitt wiederholt wiedergeben. (nur Audio-CD) Drücken Sie zur normalen Wiedergabe die Taste CLEAR. HINWEIS • Beim Drücken der Taste > während der wiederholten Wiedergabe eines Kapitels/Titels wird die Wiedergabewiederholung beendet. • Diese Funktion ist bei einigen Discs oder Titeln nicht verfügbar. HB985-DB.BDEUPPK_GER.indd 42 2010-05-14 2:06:53 Betrieb Abschnittswiederholung BD DVD AVCHD ACD Es ist möglich, einen markierten Abschnitt wiederholt wiederzugeben. 1. Drücken Sie während der Wiedergabe die Taste REPEAT ( ), um den Startpunkt [A-] des zu wiederholenden Abschnitts festzulegen. Drücken Sie abschließend auf ENTER ( ). 2. Drücken Sie am Ende des Abschnitts auf ENTER ( ). Der gewählte Abschnitt wird daraufhin fortlaufend wiederholt. 3. Drücken Sie zur normalen Wiedergabe mehrmals die Taste REPEAT ( ) und wählen Sie die Option [Aus]. HINWEIS Markensuche BD DVD AVCHD MOVIE Aufrufen einer markierten Szene 1. Drücken Sie die Taste SEARCH, um das Suchmenü auf dem Bildschirm aufzurufen. 2. Wählen Sie über die Nummerntasten die gewünschte Markierungsnummer aus. Die Wiedergabe beginnt ab der markierten Szene. Eine Marke löschen 1. Drücken Sie die Taste SEARCH, um das Suchmenü auf dem Bildschirm aufzurufen. 2. Drücken Sie die Taste u, um die gewünschte Markierungsnummer zu markieren. Wählen Sie mit den Tasten I/i die gewünschte markierte Szene zum Löschen aus. 3. Drücken Sie die Taste CLEAR, um die markierte Szene im Suchmenü zu löschen. HINWEIS Die Wiedergabe kann von bis zu neun gespeicherten Punkten erfolgen. • Diese Funktion ist bei bestimmten Discs, Titeln und je nach Verfügbarkeit des Servers nicht möglich. Eine Marke hinzufügen • Beim Anhalten des Titels (x), beim Ändern des Titels oder beim Auswerfen der Disc werden alle Markierungspunkte gelöscht. 1. Drücken Sie während der Wiedergabe an der gewünschten Stelle die Taste MARKER. Daraufhin wird kurz das Markierungssymbol auf dem Bildschirm eingeblendet. 4 Betrieb Ein Abschnitt muss mindestens drei Sekunden lang sein. 43 • Falls die Gesamtlänge des Titels weniger als 10 Sekunden beträgt, ist diese Funktion nicht möglich. 2. Wiederholen Sie Schritt 1, um bis zu neun Markierungen festzulegen. HB985-DB.BDEUPPK_GER.indd 43 2010-05-14 2:06:53 44 Betrieb Funktionen im Suchmenü BD DVD AVCHD MOVIE Über das Suchmenü kann eine gewünschte Stelle zum Beginn der Wiedergabe aufgerufen werden. Einen Wiedergabepunkt suchen 1. Drücken Sie während der Wiedergabe die Taste SEARCH, um das Suchmenü aufzurufen. Merken der letzten Szene BD DVD Dieses Gerät merkt sich die zuletzt gespielte Szene der letzten Disc. Die letzte Szene wird im Speicher aufbewahrt, auch wenn die Disc aus dem Player herausgenommen oder das Gerät ausgeschaltet wird. Beim erneuten Einlegen dieser Disc wird die gespeicherte Szene automatisch wiedergegeben. HINWEIS • Die Funktion Letzte Szene merken wird beim Einlegen einer neuen Disc zurückgesetzt. 4 2. Drücken Sie die Taste I/i, um während der Wiedergabe 15 Sekunden vor oder zurück zu springen. Um eine bestimmte Stelle zu überspringen, halten Sie die Taste I/i gedrückt. • Diese Funktion ist bei bestimmten Discs nicht möglich. • Die Einstellungen einer Disc werden nicht gespeichert, wenn das Gerät vor der Wiedergabe der Disc ausgeschaltet wird. Betrieb Wiedergabe ab der markierten Szene starten 1. Drücken Sie die Taste SEARCH, um das Suchmenü auf dem Bildschirm aufzurufen. 2. Drücken Sie die Taste u, um die gewünschte Markierungsnummer zu markieren. Wählen Sie mit den Tasten I/i die gewünschte markierte Szene zum Löschen aus. 3. Drücken Sie zur Wiedergabe ab der markierten Szene auf ENTER ( ). HINWEIS • Diese Funktion ist bei bestimmten Discs, Titeln und je nach Verfügbarkeit des Servers nicht möglich. • Diese Funktion ist je nach Dateityp und Eigenschaften des DLNA-Servers für bestimmte Inhalte unter[Home Link] nicht möglich. HB985-DB.BDEUPPK_GER.indd 44 2010-05-14 2:06:53 Betrieb Bildschirmmenü 45 2. Wählen Sie mit den Tasten U/u eine Einstellung aus. 3. Stellen Sie mit den Tasten I/i den gewünschten Einstellungswert ein. Es können verschiedene Informationen und Einstellungen zum Inhalt angezeigt und bearbeitet werden. 4. Drücken Sie auf RETURN (O), um das Bildschirmmenü zu verlassen. HINWEIS Anzeige der Informationen zum Inhalt auf dem Bildschirm BD DVD • Wird einige Sekunden lang keine Taste gedrückt, wird die Bildschirmanzeige ausgeblendet. • Bei bestimmten Discs können Titelnummern nicht ausgewählt werden. AVCHD MOVIE 1. Drücken Sie während der Wiedergabe die Taste DISPLAY ( ), um verschiedene Wiedergabeinformationen anzuzeigen. • Während der Wiedergabe eines interaktiven BD-Titels werden auf dem Bildschirm möglicherweise verschiedene Einstellungen angezeigt, die jedoch nicht geändert werden können. 4 Betrieb a b c • Die verfügbaren Einträge können je nach Disc oder Titel variieren. d e f g h a Titel – aktuelle Titelnummer/ Gesamtanzahl der Titel b Kapitel – Aktuelle Kapitelnummer/ Gesamtan-zahl der Kapitel c Zeit – verstrichene Spielzeit/Gesamte Spielzeit d Audio – Ausgewählte Audiosprache oder gewählter Tonkanal e Untertitel – Ausgewählte Untertitel f Winkel – Ausgewählter Kamerawinkel/ Gesamt-anzahl der Kamerawinkel g Bildformat – gewähltes TV-Bildformat h Bildmodus – gewählter Anzeigemodus HB985-DB.BDEUPPK_GER.indd 45 2010-05-14 2:06:53 46 Betrieb Wiedergabe ab einer gewählten Zeitposition BD DVD AVCHD MOVIE 1. Drücken Sie während der Wiedergabe auf DISPLAY ( ). Im Zeit-Suchlauf-Feld wird die verstrichene Spielzeit angezeigt. 2. Wechseln Sie in das [Zeit]-Feld und geben Sie die gewünschte Startzeit von links nach rechts in Stunden, Minuten und Sekunden ein. Um beispielsweise eine Szene an der Wiedergabezeit 2 Stunden, 10 Minuten und 20 Sekunden zu suchen, geben Sie den Wert “21020” ein. Drücken Sie die Taste I/i, um während der Wiedergabe 60 Sekunden vor oder zurück zu springen. 4 Betrieb 3. Drücken Sie zur Wiedergabe ab dem gewählten Zeitpunkt auf ENTER ( ). HINWEIS • Diese Funktion ist bei einigen Discs oder Titeln nicht verfügbar. • Diese Funktion ist je nach Dateityp und Eigenschaften des DLNA-Servers für bestimmte Inhalte unter [Home Link] nicht möglich. Auswahl der Untertitelsprache BD DVD HINWEIS • Bei bestimmten Discs kann die Sprache nur über das Disc-Menü eingestellt werden. Drücken Sie in diesem Fall die Taste POPUP/TOP MENU bzw. MENU und wählen Sie im Disc-Menü die gewünschte Sprache. • Unmittelbar nach dem Umstellen des Tons kann es zu einer vorübergehenden Verzögerung zwischen Bild und Ton kommen. Auswahl der Untertitelsprache BD DVD AVCHD MOVIE 1. Drücken Sie während der Wiedergabe die Taste DISPLAY ( ), um das Bildschirmmenü einzublenden. 2. Wählen Sie mit den Tasten U/u die Option [Untertitel]. 3. Wählen Sie mit den Tasten I/i die gewünschte Untertitelsprache. 4. Drücken Sie auf RETURN (O), um das Bildschirmmenü zu verlassen. HINWEIS Bei bestimmten Discs können die Untertitel nur über das Disc-Menü eingestellt werden. Drücken Sie in diesem Fall die Taste POPUP/ TOP MENU bzw. MENU und wählen Sie im Disc-Menü die gewünschten Untertitel. AVCHD MOVIE 1. Drücken Sie während der Wiedergabe die Taste DISPLAY ( ), um das Bildschirmmenü einzublenden. 2. Wählen Sie mit den Tasten U/u die Option [Audio]. 3. Wählen Sie mit den Tasten I/i die gewünschte Sprache, die Audiospur oder den Tonkanal aus. HB985-DB.BDEUPPK_GER.indd 46 2010-05-14 2:06:53 Betrieb Anzeige verschiedener Kamerawinkel BD DVD Falls Szenen auf der Disc in verschiedenen Kamerawinkeln aufgezeichnet wurden, kann der Kamerawinkel während der Wiedergabe gewechselt werden. 1. Drücken Sie während der Wiedergabe die Taste DISPLAY ( ), um das Bildschirmmenü einzublenden. 2. Wählen Sie mit den Tasten U/u die Option [Winkel]. 3. Legen Sie mit den Tasten I/i den gewünschten Blickwinkel fest. 4. Drücken Sie auf RETURN (O), um das Bildschirmmenü zu verlassen. BD DVD AVCHD MOVIE Das TV-Bildformat kann während der Wiedergabe geändert werden. Anzeigemodus einstellen BD DVD AVCHD MOVIE Der [Bildmodus] kann während der Wiedergabe geändert werden. 1. Drücken Sie während der Wiedergabe die Taste DISPLAY ( ), um das Bildschirmmenü einzublenden. 2. Wählen Sie mit den Tasten U/u die Option [Bildmodus]. 3. Legen Sie mit den Tasten I/i das gewünschte Bildformat fest. 4. Drücken Sie auf RETURN (O), um das Bildschirmmenü zu verlassen. Einstellen der Option [Benutzereinst.] 1. Drücken Sie während der Wiedergabe die Taste DISPLAY ( ), um das Bildschirmmenü einzublenden. 2. Wählen Sie mit den Tasten U/u die Option [Bildmodus]. 4 Betrieb Ändern des TV-Bildformats 47 3. Wählen Sie mit den Tasten I/i die Option [Benutzereinst.] und drücken Sie ENTER ( ). 1. Drücken Sie während der Wiedergabe die Taste DISPLAY ( ), um das Bildschirmmenü einzublenden. 2. Wählen Sie mit den Tasten U/u die Option [Bildformat]. 3. Legen Sie mit den Tasten I/i das gewünschte Bildformat fest. 4. Drücken Sie auf RETURN (O), um das Bildschirmmenü zu verlassen. HINWEIS Beim Ändern der Einstellung [Bildformat] im Bildschirmmenü wird die Einstellung [Bildformat] im Menü [Setup] ebenfalls geändert. HB985-DB.BDEUPPK_GER.indd 47 4. Nehmen Sie mit den TastenU/u/I/i die Einstellungen für den [Bildmodus] vor. Wählen Sie die Option [Standard] und drücken Sie ENTER ( ), um die Bildeinstellungen zurückzusetzen. 5. Wählen Sie mit den Tasten U/u/I/i den Eintrag [Schl.] und drücken Sie zum Beenden der Einstellungen auf ENTER ( ). 2010-05-14 2:06:53 48 Betrieb BD-LIVE-Discs anschauen Mit diesem Gerät werden Funktionen wie Bild-im-Bild, zweiter Tonkanal oder virtuelle Pakete für BD-Videoinhalte ermöglicht, die BONUSVIEW (BD-ROM Version 2 Profil 1 Version 1.1/Final Standard Profile) unterstützen. Für Discs, die die Bild-im-Bild-Funktion unterstützen, kann ein zweites Videobild angezeigt und eine zweite Tonspur wiedergegeben werden. Hinweise zu dieser Wiedergabeart finden Sie in der Anleitung zur jeweiligen Disc. 4 Betrieb Neben der BONUSVIEW-Funktion unterstützen BD-Videoinhalte zudem BD-LIVE-Inhalte (BDROM Version 2 Profil 2), mit deren Hilfe über eine Netzwerkfunktion weitere Funktionen genutzt werden können, wie z. B. das Herunterladen neuer Filmvorschauen, indem eine Internetverbindung hergestellt wird. 1. Überprüfen Sie die Netzwerkverbindung und -einstellungen (Seiten 28-30). 2. Schließen Sie das USB-Speichergerät an den USB-Anschluss auf dem Bedienungsfeld an. Zum Herunterladen von Bonus-Material ist ein USB-Speichergerät erforderlich. 3 . Drücken Sie die Taste HOME MENU, und nehmen Sie die Einstellungen für die Option [BD-LIVE-Verbindung] im Menü [Setup] vor (Seite 37). Je nach eingelegter Disc ist die BD-LIVEFunktion u. U. nicht möglich, falls die Option [BD-LIVE-Verbindung] auf [Teilweise zulässig] eingestellt ist. 4 . Legen Sie eine BD-ROM-Disc mit BD-LIVE ein. Die Bedienung kann je nach Disc variieren. Hinweise finden Sie in der Bedienungsanleitung der Disc. HINWEIS • Das angeschlossene USB-Gerät darf nicht während der Datenübertragung oder bei eingelegter Blue-Ray-Disc getrennt werden. Ansonsten könnte das angeschlossene USBGerät beschädigt werden und die BD-LIVEFunktionen werden bei einem beschädigten USB-Gerät u. U. nicht korrekt ausgeführt. Falls das angeschlossene USB-Gerät aus diesem Grund beschädigt zu sein scheint, kann das USB-Gerät über einen PC neu formatiert und mit diesem Player weiter genutzt werden. • Der Zugriff auf bestimmte BD-LIVE-Inhalte ist in einigen Ländern u. U. eingeschränkt, je nach den Richtlinien des Anbieters dieser Inhalte. • Es dauert möglicherweise einige Minuten, bis die BD-LIVE-Inhalte geladen und angezeigt werden. USB-Anschluss HB985-DB.BDEUPPK_GER.indd 48 2010-05-14 2:06:54 Betrieb Wiedergabe von Filmdateien und VRDiscs 49 HINWEIS • Die Dateianforderungen finden Sie auf Seite 11. • Es sind verschiedene Wiedergabefunktionen möglich. Siehe Seiten 40-47. • Nicht finalisierte DVD-VR-Discs werden auf diesem Player u. U. nicht wiedergegeben. Mit diesem Player können DVD-RW-Discs im Video-Aufnahmeformat (VR) sowie Filmdateien auf einer Disc/einem USB-Gerät wiedergegeben werden. 1. Drücken Sie die Taste HOME MENU. • Bestimmte DVD-VR-Discs enthalten CPRM-Daten des DVD-REKORDERS. Solche Discs können auf diesem Gerät nicht abgespielt werden. Was bedeutet CPRM? CPRM ist ein Kopierschutzsystem (mit Verschlüsselung), bei dem nur ‘einmalig kopierbare’ Sendungen aufgenommen werden können. CPRM steht für Content Protection for Recordable Media. 4 Betrieb 2. Wählen Sie mit den Tasten U/u/I/i den Eintrag [Spielfilm] und drücken Sie ENTER ( ). 3. Wählen Sie mit den Tasten I/i das Gerät aus und drücken Sie ENTER ( ). Beim Anschluss von bis zu zwei Geräten erscheint diese Anzeige. 4. Wählen Sie mit den Tasten U/u/I/i eine Datei aus und drücken Sie zur Wiedergabe auf B PLAY bzw. auf ENTER ( ). HB985-DB.BDEUPPK_GER.indd 49 2010-05-14 2:06:54 50 Betrieb Auswahl der Untertiteldatei MOVIE Wenn Filmdatei und Untertiteldatei den gleichen Namen besitzen, wird die Untertiteldatei bei der Wiedergabe der Filmdatei automatisch angezeigt. Falls Filmdatei und Untertiteldatei unterschiedliche Dateinamen besitzen, muss die Untertiteldatei vor der Wiedergabe des Films im Menü [Spielfilm] ausgewählt werden. 1. Wechseln Sie mit den Tasten U/u/I/i im Menü [Film] eine Untertiteldatei zur Anzeige aus. 2. Drücken Sie auf ENTER ( ). 4 Zeichensatz für Untertitel ändern MOVIE Falls die Untertitel nicht korrekt angezeigt werden, kann der Zeichensatz der Untertitel geändert werden. 1. Drücken Sie während der Wiedergabe die Taste DISPLAY ( ), um das Bildschirmmenü einzublenden. 2. Wählen Sie mit den Tasten U/u die Option [Codeliste]. 3. Legen Sie mit den Tasten I/i den gewünschten Zeichensatz fest. Drücken Sie zur Auswahl einer Untertiteldatei nochmals auf ENTER ( ). Die gewählte Untertiteldatei wird während der Wiedergabe der Filmdatei angezeigt. Betrieb HINWEIS • Drücken Sie während der Wiedergabe auf x STOP, um die Auswahl der Untertiteldatei aufzuheben. 4. Drücken Sie auf RETURN (O), um das Bildschirmmenü zu verlassen. • Diese Funktion ist für [Home Link] nicht verfügbar. HB985-DB.BDEUPPK_GER.indd 50 2010-05-14 2:06:54 Betrieb Bilddateien anzeigen Diashow anzeigen Mit diesem Player können Fotodateien angezeigt werden. Diashow beenden 1. Drücken Sie die Taste HOME MENU 51 Drücken Sie zum Starten der Diashow auf B PLAY. Drücken Sie während der Diashow auf x STOP. Diashow unterbrechen Drücken Sie während der Diashow auf X PAUSE/STEP. Drücken Sie zum Fortsetzen der Diashow auf B PLAY. Zum vorherigen/nächsten Foto springen 3. Wählen Sie mit den Tasten I/i das Gerät aus und drücken Sie ENTER ( ). Drücken Sie während der Vollbildanzeige eines Fotos auf I bzw. i, um zum vorherigen bzw. nächsten Foto zu gelangen. HINWEIS 4 Betrieb 2. Wählen Sie mit den Tasten I/i den Eintrag [Foto] und drücken Sie ENTER ( ). • Die Dateianforderungen finden Sie auf Seite 11. • Es sind verschiedene Wiedergabefunktionen möglich. Siehe Seiten 40-47. Beim Anschluss von bis zu zwei Geräten erscheint diese Anzeige. 4. Wählen Sie mit den Tasten U/u/I/i eine Datei aus und drücken Sie zur Fotoanzeige auf ENTER ( ). HB985-DB.BDEUPPK_GER.indd 51 2010-05-14 2:06:54 52 Betrieb Funktionen während der Fotoanzeige Während der Diaschau Musik hören Während der Fotoanzeige im Vollbild stehen Ihnen verschiedene Funktionen zur Verfügung. Während der Fotoanzeige können Musiktitel wiedergegeben werden. 1. Drücken Sie während der Vollbildanzeige eines Fotos auf DISPLAY ( ), um das Einstellungsmenü aufzurufen. 1. Drücken Sie die Taste HOME MENU 2. Wählen Sie mit den Tasten U/u eine Einstellung aus. a b c d e f g h 4 2. Wählen Sie mit den Tasten U/u/I/i, die Option [Foto] oder [Home Link] und drücken Sie ENTER ( ). 3. Wählen Sie mit den Tasten I/i den Eintrag [Disc] oder [USB] und drücken Sie ENTER ( ). Betrieb a Aktuelles Foto/Gesamtanzahl der Fotos – Wechseln Sie mit den Tasten I/i zum vorherigen/nächsten Foto. b Diashow – Drücken Sie zum Starten oder Anhalten der Diashow die Taste ENTER ( ). c Musikauswahl – Wählen Sie eine Hintergrundmusik für die Diashow aus. d Musik –Drücken Sie zum Starten oder Beenden der Hintergrundmusik auf ENTER ( ). e Drehen – Drücken Sie zum Drehen eines Fotos im Uhrzeigersinn auf ENTER ( ). f Zoom – Drücken Sie zum Aufrufen des Menüs [Zoom] auf ENTER( ). g Effekt – Wählen Sie mit den TastenI/i einen Überblendungseffekt zwischen den einzelnen Fotos während einer Diashow. Zur Anzeige des Menüs [Home Link] muss ein Server oder ein freigegebener Ordner ausgewählt werden. 4. Wählen Sie mit den Tasten U/u/I/i, eine Datei aus und drücken Sie zur Fotoanzeige auf ENTER ( ). 5. Drücken Sie die Taste DISPLAY ( ) um das Einstellungsmenü aufzurufen. 6. Wählen Sie mit den Tasten U/u den Eintrag [Musikauswahl] und drücken Sie ENTER ( ) um das Menü [Musikauswahl] aufzurufen. h Geschwindigkeit – Wählen Sie mit den Tasten I/i die Verzögerung zwischen den einzelnen Fotos während einer Diashow. 3. Drücken Sie auf RETURN (O) um das Einstellungsmenü zu verlassen. HB985-DB.BDEUPPK_GER.indd 52 2010-05-14 2:06:55 Betrieb 7. Wählen Sie mit den Tasten U/u ein Gerät aus und drücken Sie ENTER ( ). 53 Musik hören Das auswählbare Gerät ist vom Speicherort der Fotodatei zur Vollbildanzeige abhängig. Speicherort des Verfügbares Gerät Fotos Disc Disc, USB USB Disc, USB Freigegebene Ordner auf dem PC (CIFS) CIFS DLNA-Server 8. Wählen Sie mit den Tasten U/u eine Datei oder einen Ordner zur Wiedergabe aus. Mit dem Player können Audio-CDs und Musikdateien wiedergegeben werden. 1. Drücken Sie die Taste HOME MENU DLNA-Server 2. Wählen Sie mit den Tasten U/u/I/i den Eintrag [Musik] und drücken Sie ENTER ( ). 3. Wählen Sie mit den Tasten I/i das Gerät aus und drücken Sie ENTER ( ). 4 Betrieb Wählen Sie einen Ordner und drücken Sie ENTER ( ), um zum untergeordneten Verzeichnis zu gelangen. Markieren Sie das Symbol und drücken Sie ENTER ( ), um zum übergeordneten Verzeichnis zu gelangen. HINWEIS Bei der Musikauswahl unter [Home Link] werden keine Ordner angezeigt. Unter [Home Link] können ausschließlich Dateien ausgewählt werden. 9. Wählen Sie zur Auswahl der Musiktitel mit den Tasten i den Eintrag [OK] und drücken Sie ENTER ( ). HB985-DB.BDEUPPK_GER.indd 53 Beim Anschluss von bis zu zwei Geräten erscheint diese Anzeige. 4. Wählen Sie mit den Tasten U/u/I/i eine Musikdatei oder einen Audiotrack aus und drücken Sie zur Wiedergabe auf ENTER ( ). HINWEIS • Die Dateianforderungen finden Sie auf Seite 11. • Es sind verschiedene Wiedergabefunktionen möglich. Siehe Seiten 40-47. 2010-05-14 2:06:55 54 Betrieb Audio-CD kopieren 6. Wählen Sie mit den Tasten U/u/I/i die Option [Start] und drücken Sie ENTER ( ). Auf einem USB-Speichergerät können einer oder alle Titel einer Audio-CD aufgenommen werden. 7. Wählen Sie mit den Tasten U/u/I/i einen Zielordner zum Kopieren aus. 1. Schließen Sie das USB-Speichergerät an den USB-Anschluss auf dem Bedienungsfeld an. 2. Drücken Sie die Taste Z (OPEN/CLOSE) und legen Sie eine Audio-CD in das Disc-Fach. Drücken Sie auf Z (OPEN/CLOSE), um das Disc-Fach zu schließen. Die Wiedergabe wird automatisch gestartet. 3. Drücken Sie die Taste DISPLAY ( ), um das Einstellungsmenü aufzurufen. Oder 4 Drücken Sie die Taste z USB REC auf der Fernbedienung. Es können alle Musiktitel einer Audio-CD aufgenommen werden. Betrieb 4. Wählen Sie mit den Tasten U/u die Funktion [CD-Aufn.] und drücken Sie ENTER ( ), um das Menü [CD-Aufn.] aufzurufen. Wiederholen Sie diesen Schritt zur Auswahl weiterer Titel. 5. Wählen Sie mit den Tasten U/u im Menü einen Track zum Kopieren aus und drücken Sie ENTER ( ). Wiederholen Sie diesen Schritt zur Auswahl weiterer Titel. Um einen neuen Ordner zu erstellen, wählen Sie mit den Tasten U/u/I/i den Eintrag [Neuer Ordner] und drücken Sie ENTER ( ). Geben Sie über die virtuelle Tastatur einen Ordnernamen ein, markieren Sie die Option [OK] und drücken Sie ENTER ( ). 8. Markieren Sie mit den Tasten U/u/I/i die Option [OK] und drücken Sie ENTER ( ), um die Audio-CD zu kopieren. Um den Kopiervorgang einer Audio-CD abzubrechen, markieren Sie die Option [Abbrechen] und drücken Sie ENTER ( ). 9. Bei Abschluss des Kopiervorgangs der Audio-CD wird eine Mitteilung eingeblendet. Drücken Sie auf ENTER ( ), um die im Zielordner erstellte Musikdatei anzuzeigen. Alle Titel auf einer Audio-CD auswählen. Wählen Sie im Popup-Menü eine Encoding-Option (128 Kbps, 192 Kbps, 320 Kbps oder Verlustfrei). Aufnahme abbrechen und zum vorherigen Bildschirm zurückkehren. HB985-DB.BDEUPPK_GER.indd 54 2010-05-14 2:06:56 Betrieb HINWEIS • In der folgenden Tabelle finden Sie die durchschnittlichen Aufnahmedauer am Beispiel einer Musikdatei mit vier Minuten Wiedergabedauer bei 192 kbps. Stop-Modus Während der Wiedergabe 1,4 Min. 2 min. 55 Die unerlaubte Vervielfältigung kopiergeschützter Inhalte, einschließlich Computerprogramme, Dateien, Sendungen und Tonaufnahmen, stellt eine Verletzung des Urheberrechts dar und wird strafrechtlich verfolgt. Dieses Gerät sollte nicht für solche Zwecke eingesetzt werden. Zeigen Sie Verantwortung Beachten Sie das Urheberrecht • Bei den angegebenen Zeiten handelt es sich um Näherungswerte. • Die tatsächliche Kopierdauer für ein USBSpeichergerät kann je nach den Merkmalen des USB-Speichergerätes variieren. • Zur Aufnahme auf einem USB-Speichergerät sind mindestens 50 MB freier Speicher erforderlich. • Für eine korrekte Aufnahme sollte ein Musiktitel mindestens 20 Sekunden lang sein. 4 HB985-DB.BDEUPPK_GER.indd 55 Betrieb • Während des Kopiervorgangs einer AudioCD darf der Player nicht ausgeschaltet und das angeschlossene USB-Speichergerät nicht getrennt werden. 2010-05-14 2:06:56 56 Betrieb Wiedergabe von einem iPod Sie können die Musik auf Ihrem iPod wiedergeben. Weitere Hinweise finden Sie in der Bedienungsanleitung des iPod. 1. Schließen Sie den iPod fest an. Schließen Sie den iPod an Schließen Sie das Dock an und stellen Sie den iPod darauf. Vorbereitung • Videos und Fotos eines iPod auf dem Bildschirm anzeigen. - Der Videoanschluss sollte über die VIDEO OUT-Buchse auf der Rückseite dieses Gerätes erfolgen. Einen geeigneten Videoeingangsmodus für den Fernseher wählen. - Wählen Sie je nach iPod-Modell das Menü Videos > Video-Einstellungen und stellen Sie die Option TV-Ausgang am iPod auf Fragen oder Ein ein. Weitere Hinweise zu Video-Einstellungen finden Sie in der Bedienungsanleitung des iPod. 4 Betrieb - Fotos können nur im iPod-Eingangsmodus und nur als Diashow angezeigt werden. Zur Anzeige der Fotos auf dem Fernseher muss die Diashow auf dem iPod gestartet werden. Weitere Hinweise zu Diashows finden Sie in der Bedienungsanleitung des iPod. • Schalten Sie dieses Gerät vor dem Anschluss des iPod und stellen Sie die Lautstärke auf ein Minimum ein. HB985-DB.BDEUPPK_GER.indd 56 2. Wählen Sie mit den Tasten U/u/I/i, eine Datei aus und drücken Sie zur Wiedergabe auf ENTER ( ). iPod-Inhalte auf dem Bildschirm anzeigen 1. Schließen Sie den iPod fest an. 2. Drücken Sie die Taste HOME MENU ( ). 3. Wählen Sie mit den Tasten I/i die Option [Musik] oder [Spielfilm] und drücken Sie ENTER ( ). Wählen Sie bei Anschluss eines anderen Gerätes (CD oder USB) im Menü den Eintrag iPod. 4. Wählen Sie mit den Tasten U/u/I/i einen Inhalt und drücken Sie ENTER ( ). 2010-05-14 2:06:56 Betrieb Bedienung des iPod im iPodModus Ihr iPod lässt sich über die mitgelieferte Fernbedienung sowie über die Tasten am iPod bedienen. 1. Schließen Sie den iPod fest an. Beim Einschalten dieses Gerätes wird der iPod automatisch mit eingeschaltet und aufgeladen. 2. Wählen Sie mit der Taste INPUT/TUNER den iPod-Eingangsmodus. Auswahl einer Option in einem Menü. B/ ENTER Musik- oder Videowiedergabe starten. X Wiedergabe unterbrechen. Drücken Sie zum Fortsetzen der Wiedergabe nochmals auf B (PLAY). m/M Schneller Vor- oder Rücklauf eines Titels oder Videos. ./> Titel vor oder zurück überspringen. REPEAT Auswahl eines gewünschten Wiederholungsmodus: Track ( ), Alle ( ), Aus (Keine Anzeige). HINWEIS Dieses System ist mit dem Ton und dem Bild eines iPod (4. Generation), iPod nano, iPod classic, iPod mini, iPod touch und iPhone kompatibel. (iPod shuffle wird nicht unterstützt). HB985-DB.BDEUPPK_GER.indd 57 HINWEIS • Die Fehlermeldung “IPOD PRÜFEN” oder “Angeschlossenes iPod-Modell wird nicht unterstützt.” wird angezeigt, wenn: - Ihr iPod eine bestimmte Funktion nicht unterstützt. • Die Fehlermeldung “IPOD PRÜFEN” oder “Bitte Software des iPod aktualisieren.” wird angezeigt, wenn: - Ihr iPod eine ältere Software-Version besitzt. t Aktualisieren Sie die Software des iPod auf die neueste Version. • Falls dieses Gerät eine Fehlermeldung anzeigt, befolgen Sie die Anweisungen. Die Fehlermeldung “IPOD PRÜFEN” oder “Bitte iPod prüfen.” wird angezeigt, wenn: - Keine Verbindung zwischen diesem Gerät und dem iPod hergestellt werden konnte. t Nehmen Sie den iPod vom Dock dieses Gerätes und setzen Sie es wieder ein. - Ihr iPod nicht fest angeschlossen ist. - Ihr iPod von diesem Gerät als unbekanntes Gerät erkannt wurde. - Ihr iPod kaum aufgeladen ist. t Die Batterie muss aufgeladen werden. t Das Aufladen einer sehr erschöpften Batterie des iPod dauert u. U. etwas länger. • Für eine höhere Stabilität des iPod können Sie den üblicherweise mit dem iPod gelieferten DockAdapter verwenden. Falls Sie keinen Adapter besitzen, wenden Sie sich an Ihren iPod-Händler. • Die Kompatibilität mit Ihrem iPod richtet sich nach dem jeweiligen Modell. • Die Bedienung von iPod touch und iPhone unterscheidet sich von der Bedienung eines iPod. Zur Bedienung mit diesem Gerät benötigen Sie u. U. eine zusätzliche Steuerung. (z. B. “Slide to Unlock”) • Bei Verwendung eines Anwendungsprogramms, bei einem Anruf oder beim Senden und Empfangen von SMS-Nachrichten usw. bei einem iPod touch oder iPhone, trennen Sie zuvor den iPod vom iPod Dock dieses Gerätes. • Je nach Software-Version des iPod kann der iPod nicht über dieses Gerät bedient werden. Wir empfehlen die Aktualisierung auf die aktuelle Software-Version. • Die Bildqualität ist abhängig von den Videoquellen des iPod. • Falls Sie ein Problem mit Ihrem iPod haben, besuchen Sie die Webseite www.apple.com/de/support/ipod/. 2010-05-14 4 Betrieb U/u/I/i 57 2:06:56 58 Betrieb Radiobetrieb Die Antenne muss angeschlossen sein. (Siehe Seite 24.) Radio hören 1. Drücken Sie die Taste INPUT/TUNER, bis die Anzeige Tuner (FM) im Anzeigefenster erscheint. Der zuletzt empfangene Sender wird eingestellt. 4 2. Halten Sie die Taste TUNE (-/+) ca. zwei Sekunden lang gedrückt, bis die Frequenzanzeige beginnt zu laufen, und lassen Sie die Taste dann los. Die Sendersuche stoppt, sobald ein Radiosender empfangen wird. Oder Drücken Sie mehrmals auf TUNE (-/+). Betrieb 3. Stellen Sie über den Lautstärkeregler VOLUME auf dem Bedienungsfeld oder über die Tasten VOL (+/-) auf der Fernbedienung die Lautstärke ein. Speichern von Radiosendern Es können 50 UKW-Sender gespeichert werden. Vor der Sendersuche sollte die Lautstärke verringert werden. 1. Drücken Sie die Taste INPUT/TUNER, bis die Anzeige TUNER (FM) im Anzeigefenster erscheint. 2. Stellen Sie mit den Tasten TUNE (-/+) die gewünschte Frequenz ein. Alle gespeicherten Sender löschen Halten Sie die Taste CLEAR zwei Sekunden lang gedrückt. Daraufhin erscheint die Meldung “ALLE LÖSCHEN”. Daraufhin werden alle gespeicherten Sender gelöscht. Schlechten UKW-Empfang verbessern Drücken Sie blaue Taste D (MONO/STEREO) auf der Fernbedienung. Ändern der Einstellung von Stereo nach Mono zur Verbesserung des Empfangs. Siehe die Hinweise über Radiosender Der UKW-Tuner ist mit der RDS-Funktion (Radio Data System) ausgestattet. Hierbei werden Information über den gerade eingestellten Radiosender angezeigt. Drücken Sie mehrmals die Taste RDS, um die verschiedenen Datentypen zu durchlaufen: PS (Name des Programmdienstes) Der Name des Kanals erscheint in der Anzeige. PTY (Programmarterkennung) Die Programmart (z. B. Jazz oder Nachrichten) erscheint in der Anzeige. RT (Radiotext) Textmeldungen mit Sonderinformationen des Senders. Der Text läuft u. U. über die Anzeige. CT (Vom Sender ausgestrahlte Uhrzeit) Anzeige des vom Sender ausgestrahlten Datums und der Uhrzeit. 3. Drücken Sie die Taste ENTER ( ), bis eine Speicherplatznummer im Anzeigefenster blinkt. 4. Wählen Sie mit den Tasten PRESET die gewünschte Speicherplatznummer. 5. Drücken Sie ENTER ( ). Der Radiosender wird gespeichert. 6. Wiederholen Sie die Schritte 2 bis 5, um weitere Sender zu speichern. HB985-DB.BDEUPPK_GER.indd 58 2010-05-14 2:06:56 Betrieb Wiedergabe über das Heimnetzwerk Mit diesem Player können bei bestehender Heimnetzwerkverbindung auf einem PC oder auf DLNA-zertifizierten MedienServern gespeicherte Inhalte angezeigt und wiedergegeben werden. Über DLNA Zugriff auf den DLNA-MedienServer 1. Überprüfen Sie die Netzwerkverbindung und -einstellungen (Seiten 28-30). 2. Drücken Sie die Taste HOME MENU. 3. Wählen Sie mit den Tasten U/u/I/i, den Eintrag [Home Link] und drücken Sie ENTER ( ). 4. Wählen Sie mit den Tasten U/u einen DLNA-Medien-Server aus der Liste und drücken Sie ENTER ( ). Dieser Player ist ein DLNA-zertifizierter digitaler Medien-Player, mit dem Film-, Foto- und Musikinhalte über einen DLNA-kompatiblen digitalen Medien-Server (PC und Unterhaltungselektronik) angezeigt und wiedergegeben werden können. Das Logo der DLNA-Zertifizierung kennzeichnet alle Produkte, die dem DLNA Interoperability Guidelines entsprechen. Dieses Gerät erfüllt die DLNA Interoperability Guidelines v1.5. 4 Um die Suche nach verfügbaren MedienServern zu wiederholen, drücken Sie die grüne Taste (B). Betrieb Bei der Digital Living Network Alliance (DLNA) handelt es sich um eine branchenübergreifende Organisation für Unterhaltungselektronik, die Computerbranche und Unternehmen für tragbare Geräte. Digital Living ermöglicht dem Verbraucher die einfache gemeinsame Nutzung digitaler Medien über ein Netzwerk zu Hause. 59 HINWEIS Abhängig vom jeweiligen Medien-Server benötigt dieser Player u. U. eine Genehmigung des Servers. 5. Wählen Sie mit den Tasten U/u/I/i eine Datei aus und drücken Sie zur Wiedergabe auf ENTER ( ). Bei der Verbindung eines PCs mit DLNAServer-Software oder einen anderen DLNAkompatiblen Gerätes mit diesem Player müssen u. U. einige Einstellungen der Software oder anderer Geräte vorgenommen werden. Weitere Information finden Sie in der Bedienungsanleitung der jeweiligen Software bzw. des Gerätes. HB985-DB.BDEUPPK_GER.indd 59 2010-05-14 2:06:56 60 Betrieb HINWEIS • Die Dateianforderungen finden Sie auf Seite 11. • Es sind verschiedene Wiedergabefunktionen möglich. Siehe Seiten 40-47. Zugriff auf einen freigegebenen Ordner auf dem PC 1. Starten Sie den mit dem lokalen Netzwerk verbundenen PC. • Die auf Seite 11 angegebenen Dateianforderungen sind u. U. nicht immer kompatibel. Je nach den Dateimerkmalen und Fähigkeiten des Medien-Servers gelten möglicherweise verschiedene Einschränkungen. 2. Geben Sie auf dem PC die Ordner mit Filmen, Fotos oder Musikdateien frei. • Die Miniaturansicht nicht abspielbarer Dateien wird zwar im Menü [Home Link] angezeigt, diese Dateien können jedoch nicht auf diesem Player wiedergegeben werden. 4. Drücken Sie die Taste • Der Player überspringt nicht abspielbare Musikdateien im Menü [Home Link] und spielt die nächste Datei. 4 • Untertiteldatei und Filmdatei müssen den gleichen Namen besitzen und müssen sich im selben Ordner befinden. Betrieb • Die Qualität der Wiedergabe und Bedienung der [Home Link]-Funktion kann durch die Bedingungen des Heimnetzwerkes beeinträchtigt werden. • Dateien auf einem Wechseldatenträger wie einem USB- oder DVD-Laufwerk am MedienServer werden u. U. nicht korrekt freigegeben. 3. Überprüfen Sie die Netzwerkverbindung und -einstellungen (Seiten 28-30). HOME MENU. 5. Wählen Sie mit den Tasten U/u/I/i den Eintrag [Home Link] und drücken Sie ENTER ( ). 6. Wählen Sie mit den Tasten U/u einen freigegebenen Ordner und drücken Sie ENTER ( ). Um die Suche nach verfügbaren MedienServern zu wiederholen, drücken Sie die grüne Taste (B). HINWEIS Je nach Konfiguration müssen für den Zugriff auf einen freigegebenen Ordner u. U. die Benutzerkennung und das Kennwort für den Netzwerkzugriff angegeben werden. 7. Wählen Sie mit den Tasten U/u/I/i eine Datei aus und drücken Sie zur Wiedergabe auf ENTER ( ). HB985-DB.BDEUPPK_GER.indd 60 2010-05-14 2:06:56 Betrieb 61 Systemvoraussetzungen HINWEIS • Windows® XP (Service-Pack 2 oder höher), Windows Vista® (kein Service-Pack erforderlich) Windows 7® • 1,2 GHz Intel® Pentium® III- oder AMD Sempron™ 2200+-Prozessor • Netzwerkumgebung: 100 MB Ethernet, WLAN (IEEE 802.11b/g/n) • Die Dateianforderungen finden Sie auf Seite 11. • Es sind verschiedene Wiedergabefunktionen möglich. Siehe Seiten 40-47. • Die Miniaturansicht nicht abspielbarer Dateien wird zwar im Menü [Home Link] angezeigt, diese Dateien können jedoch nicht auf diesem Player wiedergegeben werden. • Der Player überspringt nicht abspielbare Musikdateien im Menü [Home Link] und spielt die nächste Datei. • Untertiteldatei und Filmdatei müssen den gleichen Namen besitzen und müssen sich im selben Ordner befinden. • Die Qualität der Wiedergabe und Bedienung der [Home Link]-Funktion kann durch die Bedingungen des Heimnetzwerkes beeinträchtigt werden. HINWEIS Falls Sie das Betriebssystem Windows® XP oder Windows Vista® verwenden, rufen Sie den folgenden Link auf, um weitere Information zur Dateifreigabe zu erhalten. 4 Betrieb • Dateien auf einem Wechseldatenträger wie einem am PC angeschlossenen USB- oder DVDLaufwerk werden u. U. nicht korrekt freigegeben. • Je nach Konfiguration des PCs können Verbindungsprobleme auftreten. HB985-DB.BDEUPPK_GER.indd 61 2010-05-14 2:06:57 62 Betrieb Geben Sie die Benutzerkennung und das Kennwort für das Netzwerk ein. Je nach Konfiguration des PCs müssen für den Zugriff auf einen freigegebenen Ordner u. U. die Benutzerkennung und das Kennwort für den Netzwerkzugriff angegeben werden. 1. Falls eine Benutzerkennung und das Kennwort für den Netzwerkzugriff eingegeben werden müssen, wird das Tastaturmenü automatisch eingeblendet. 2. Wählen Sie mit den Tasten U/u/I/i das erste Zeichen auf der Tastatur aus und drücken Sie auf ENTER. ( ). 3. Markieren Sie nach der Eingabe der Netzwerk-Benutzerkennung und des Kennworts mit den Tasten U/u/I/i die Option [OK] und drücken Sie ENTER ( ), um den Ordner zu öffnen. Die Netzwerk-Benutzerkennung und das Kennwort werden nach dem ersten Zugriff auf den Ordner gespeichert. Falls NetzwerkBenutzerkennung und Kennwort nicht gespeichert werden sollen, drücken Sie die rote Taste (A) und heben Sie die Markierung im Kontrollkästchen [Merken] vor dem Zugriff auf den Ordner auf. Um einen Buchstaben mit Akzent einzugeben, wählen Sie den gewünschten Buchstaben aus den Sonderzeichen aus. 4 Betrieb Beispiel: Wählen Sie den Buchstaben “D” und drücken Sie die Taste DISPLAY ( ), um die Sonderzeichen anzuzeigen. Wählen Sie nun mit den Tasten I/i den Buchstaben “D” oder “Ď” und drücken Sie ENTER ( ). [Löschen] – Alles eingegebenen Zeichen löschen. [Leer] – Fügt ein Leerzeichen ein. [<–] – Löscht das vorangehende Zeichen. [ABC / abc / #+-=&] – Tastatureinstellung nach Groß- oder Kleinbuchstaben oder Symbolen ändern. HB985-DB.BDEUPPK_GER.indd 62 2010-05-14 2:06:57 Wartung 63 5 Wartung Hinweise zu Discs Handhabung des Gerätes Handhabung von Discs Transport und Versand des Gerätes Bringen Sie auf keiner der beiden Seiten der Disc Papier oder Aufkleber an. Aufbewahrung von Discs Reinigung von Discs Außenseiten sauber halten • Verwenden Sie keine flüchtigen Flüssigkeiten wie Insektensprays in der Nähe des Gerätes. • Durch zu starken Druck beim Abwischen können die Oberflächen beschädigt werden. • Gummi- oder Plastikteile sollten nicht über einen längeren Zeitraum mit dem Gerät in Kontakt sein. 5 Wartung Legen Sie die Disc nach der Wiedergabe wieder in die zugehörige Hülle. Setzen Sie die Disc keiner direkten Sonneneinstrahlung oder Wärmequellen aus und lassen Sie sie nie in einem Auto liegen, das direkt in der Sonne geparkt wird. Bewahren Sie den Original-Versandkarton und das Verpackungsmaterial auf. Wenn Sie das Gerät einsenden müssen, verpacken Sie es wieder so, wie es ab Werk geliefert wurde, um es optimal zu schützen. Reinigung des Gerätes Verwenden Sie keine starken Lösungsmittel wie Alkohol, Benzin, Verdünner, handelsübliche Reiniger oder für Schallplatten vorgesehene Antistatik-Sprays. HB985-DB.BDEUPPK_GER.indd 63 Reinigen Sie den Player mit einem weichen, trockenen Tuch. Wenn die Oberfläche stark verschmutzt ist, verwenden Sie ein mit einer milden Putzmittellösung angefeuchtetes weiches Tuch. Verwenden Sie keine starken Lösungsmittel wie Alkohol, Benzin oder Verdünner, da sie die Oberfläche des Gerätes angreifen können. Pflege des Gerätes Bei diesem Gerät handelt es sich um ein High-Tech-Präzisionsgerät. Die Bildqualität verschlechtert sich, wenn die Linse und Teile des Disc-Laufwerks verschmutzt bzw. abgenutzt sind. Detaillierte Hinweise erhalten Sie bei Ihrem Kundendienst-Center. 2010-05-14 2:06:57 64 Störungsbehebung 6 Störungsbehebung Allgemein Das Gerät lässt sich nicht einschalten. • Schließen Sie das Netzkabel an eine Steckdose an. Das Gerät startet die Wiedergabe nicht. • Eine spielbare Disc einlegen. (Disc-Typ, Farbnorm und Ländercode überprüfen.) • Disc mit der Wiedergabeseite nach unten einlegen. • Disc richtig in die Mulde im Disc-Fach einlegen. • Die Disc reinigen. • Einstufung aufheben oder Freigabestufe ändern. Der Kamerawinkel kann nicht geändert werden. • Die wiedergegebene DVD Video-Disc enthält keine weiteren Kamerawinkel. Die Untertitelsprache lässt sich nicht ändern oder wird nicht angezeigt. • Die wiedergegebene Video-DVD enthält keine Untertitel. MP3-/WMA-/JPEG-/DivXDateien lassen sich nicht wiedergeben. • Die Dateien wurden in einem vom Gerät nicht unterstützten Format erstellt. • Der Codec der Filmdatei wird nicht unterstützt. Die BD-LIVE-Funktion ist nicht möglich. • Die Fernbedienung ist nicht auf den Fernbedienungs-Sensor des Gerätes gerichtet. • Die Fernbedienung ist zu weit vom Gerät entfernt. • Zwischen Fernbedienung und Gerät befindet sich ein Hindernis. • Die Batterien der Fernbedienung sind schwach. 6 Störungsbehebung HB985-DB.BDEUPPK_GER.indd 64 2010-05-14 2:06:57 Störungsbehebung 65 Bild Kein Bild. Verzerrtes Bild. • Wählen Sie den richtigen Video-Eingangsmodus des Fernsehers, so dass das Bild des Gerätes angezeigt wird. • Videokabel fest anschließen. • Überprüfen Sie, ob für die Option [HDMI-Farbeinst.] im Menü [Setup] eine geeignete Einstellung vorgenommen wurde, die dem Videoanschluss entspricht. • Falls Ihr Fernsehgerät die am Player eingestellte Auflösung nicht unterstützt, wählen Sie eine vom Fernsehgerät unterstützte Auflösung. • An der HDMI OUT-Buchse des Players ist ein DVI-Gerät angeschlossen, dass den Kopierschutz nicht unterstützt. • Die wiedergegebene Disc wurde in einer Farbnorm aufgenommen, die das Fernsehgerät nicht unterstützt. • Wählen Sie eine vom Fernseher unterstützte Auflösung. • Das Gerät führt gerade einen Suchlauf oder eine Wiedergabe in Zeitlupe durch oder befindet sich im Pause-Modus. • Die Lautstärke ist zu gering. • Überprüfen Sie die Lautsprecheranschlüsse. (Seite 16) Ton Kein oder verzerrter Ton. 6 Störungsbehebung HB985-DB.BDEUPPK_GER.indd 65 2010-05-14 2:06:57 66 Störungsbehebung Netzwerk Die BD-LIVE-Funktion ist nicht möglich. • Auf dem angeschlossenen USB-Speichergerät ist nicht genügend Speicher verfügbar. Schließen Sie ein USBSpeichergerät mit mindestens 1 GB freiem Speicher an. • Stellen Sie sicher, dass das Gerät richtig mit dem lokalen Netzwerk verbunden und auf das Internet zugreifen kann (siehe Seite 28). • Die Breitbandgeschwindigkeit ist zur Nutzung von BDLIVE-Funktionen nicht schnell genug. Wenden Sie sich an Ihren Internet-Dienstanbieter (ISP) und lassen Sie die Breitbandgeschwindigkeit erhöhen. • Die Option [BD-LIVE-Verbindung] wurde im [Setup]-Menü auf [Nicht zulässig] eingestellt. Stellen Sie die Option auf [Zulässig] ein. Änderungen der Ausführung und der technischen Daten ohne vorherige Ankündigung vorbehalten. Updates Informationen zu diesem Produkt erhalten Sie auf der Pioneer-Webseite. Hier finden Sie Hinweise zur Aktualisierung und Wartung des Blu-ray-Disc-PLAYERS. 6 Störungsbehebung HB985-DB.BDEUPPK_GER.indd 66 2010-05-14 2:06:57 Anhang 67 7 Anhang Bedienung eines Fernsehgerätes über die mitgelieferte Fernbedienung Dieser PIONEER Fernseher wird mit folgenden Tasten bedient. TVSteuerungstasten Funktion 1 (TV Power) Fernseher ein-/ausschalten. INPUT Eingangsquelle des Fernsehers zwischen TV und anderen Quellen umschalten. CH +/- Umschalten der gespeicherten Sender nach oben/nach unten. VOL +/- Lautstärke des Fernsehers einstellen. HINWEIS Sie können Ihren vorhandenen Fernseher über die mitgelieferte Fernbedienung bedienen. Falls Ihr Fernseher in der folgenden Tabelle aufgeführt wird, stellen Sie die jeweilige Herstellerkennung ein. 1. Halten Sie die Taste 1 (TV POWER) gedrückt und geben Sie den Herstellercode Ihres Fernsehers über die Nummerntasten ein (siehe folgende Tabelle). Hersteller Codenummer Pioneer 1(Standardeinstellung) Sony 2, 3 Panasonic 4, 5 Samsung 6, 7 LG 8, 9 Anhang Taste Fernbedienung zur Bedienung Ihres Fernsehgerätes einstellen 2. Lassen Sie die Taste 1 (TV POWER) wieder los, um die Einstellung zu übernehmen. Je nach Modell Ihres Fernsehers funktionieren u. U. einige oder keine der Tasten mit dem Gerät, selbst wenn der richtige Herstellercode eingegeben wurde. Beim Austauschen der Batterien der Fernbedienung wird diese eingegebene Codenummer möglicherweise auf die Standardeinstellung zurückgesetzt. In diesem Fall muss die jeweilige Codenummer erneut eingegeben werden. 7 Je nach angeschlossenem Gerät sind bestimmte Tasten für Ihren Fernseher ohne Funktion. HB985-DB.BDEUPPK_GER.indd 67 2010-05-14 2:06:57 68 Anhang Liste der Ländercodes Wählen Sie einen Ländercode aus der Liste. Land Code Land Afghanistan Code Land SG MN Slowakische MA Republik SK NP Slowenien NL Südafrika ZA AR Finnland FI Mongolei AU Frankreich FR Marokko Österreich AT Deutschland DE Nepal Belgien BE Großbritannien GB Niederlande Bhutan BT Griechenland Bolivien BO Grönland GR Niederländische GL Antillen BR Hongkong Kambodscha KH Ungarn Kanada CA Indien Chile CL Indonesien CN Israel Kolumbien CO Italien Republik Kongo CG Jamaika Costa Rica CR Japan Kroatien HR Kenia Anhang Tschechische Republik Dänemark Ecuador Ägypten El Salvador Äthiopien HB985-DB.BDEUPPK_GER.indd 68 Kuwait CZ Libyen DK Luxemburg EC Malaysia EG Malediven SV Mexiko ET Code MC Singapur Australien Brasilien Code Land FJ Monaco Argentinien China 7 AF Fiji HK Neu Seeland HU Nigeria IN Norwegen ID Oman IL Pakistan IT Panama Südkorea SI KR AN Spanien ES NZ Sri Lanka LK NG Schweden SE NO Schweiz CH OM Taiwan TW PK Thailand TH PA Türkei TR JM Paraguay JP Philippinen PY Uganda UG PH Ukraine UA KE Polen KW Portugal PL USA US PT Uruguay UY RO Usbekistan UZ Vietnam RU Simbabwe SA ZW LY Rumänien LU Russische Föderation MY Saudi Arabien MV Senegal MX VN SN 2010-05-14 2:06:57 Anhang 69 Liste der Sprachcodes Verwenden Sie diese Liste zur Einstellung der gewünschten Sprache für die folgenden Voreinstellungen: [Disc-Audio], [Disc-Untertitel] und [Disc-Menü]. Sprache Code Sprache Code Sprache Code Sprache Code Afar 6565 Französisch 7082 Litauisch 7684 Sindhi 8368 Afrikaans 6570 Friesisch 7089 Mazedonisch 7775 Singalesisch 8373 Albanisch 8381 Galizisch 7176 Madagassisch 7771 Slowakisch 8375 Amharisch 6577 Georgisch 7565 Malaiisch 7783 Slowenisch 8376 Arabisch 6582 Deutsch 6869 Malajalam 7776 Spanisch 6983 Armenisch 7289 Griechisch 6976 Maori 7773 Sudanesisch 8385 Assamesisch 6583 Grönländisch 7576 Marathi 7782 Swahili 8387 Aymara 6588 Guarani 7178 Moldawisch 7779 Schwedisch 8386 Aserbeidschanisch 6590 Gujarati 7185 Mongolisch 7778 Tagalog 8476 Haussa 7265 Nauru 7865 Tadschikisch 8471 Baschkirisch 6665 Hebräisch 7387 Nepalesisch 7869 Tamilisch 8465 Baskisch 6985 Hindi 7273 Norwegisch 7879 Telugu 8469 Ungarisch 7285 Oriya 7982 Thai 8472 Bhutanisch 6890 Isländisch 7383 Pandschabi 8065 Tongalesisch 8479 Bihari 6672 Indonesisch 7378 Paschtu 8083 Türkisch 8482 Bretonisch 6682 Interlingua 7365 Persisch 7065 Turkmenisch 8475 Bulgarisch 6671 Irisch 7165 Polnisch 8076 Twi 8487 Myanmarisch 7789 Italienisch 7384 Portugiesisch 8084 Ukrainisch 8575 Weißrussisch 6669 Japanisch 7465 Quechua 8185 Urdu 8582 Chinesisch 9072 Kanadisch 7578 Retoromanisch 8277 Usbekisch 8590 Kroatisch 7282 Kaschmir 7583 Rumänisch 8279 Vietnamesisch 8673 Tschechisch 6783 Kasachisch 7575 Russisch 8285 Volapük 8679 Dänisch 6865 Kirgisisch 7589 Samoanisch 8377 Walisisch 6789 Niederländisch 7876 Koreanisch 7579 Sanskrit 8365 Wolof 8779 Englisch 6978 Kurdisch 7585 8872 6979 Laotisch 7679 Schottisch (Gälisch) 7168 Xhosa Esperanto Jiddish 7473 Estnisch 6984 Lateinisch 7665 Serbisch Yoruba 8979 Faroerisch 7079 Lettisch 7686 Serbo-Kroatisch 8372 Zulu 9085 Fiji 7074 Lingala 7678 Shona Finnisch 7073 HB985-DB.BDEUPPK_GER.indd 69 8382 Anhang Bengali, Bangla 6678 7 8378 2010-05-14 2:06:57 70 Anhang Video-Ausgabeauflösung Bei der Wiedergabe von Datenträgern ohne Kopierschutz Videoausgang HDMI OUT COMPONENT VIDEO OUT mit HDMI Anschluss ohne HDMI Anschluss Auflösung 576i (480i) 576p (480i) 576i (480i) 576p (480p) 576p (480p) 576p (480p) 720p 720p 720p 1080i 1080i 1080i 1080p / 24 Hz 1080p / 24 Hz 576i (480i) 1080i 1080p / 50 Hz 1080p / 50 Hz 576i (480i) 1080i Bei der Wiedergabe kopiergeschützter Datenträger Videoausgang Auflösung 576i (480i) HDMI OUT COMPONENT VIDEO OUT mit HDMI Anschluss 576p (480p) 576p (480p) 576p (480p) 720p 720p 576i (480i) 576p (480p) 1080i 1080i 576i (480i) 576p (480p) 1080p / 24 Hz 1080p / 24 Hz 576i (480i) 576p (480p) 1080p / 50 Hz 1080p / 50 Hz 576i (480i) 576p (480p) HDMI OUT-Anschluss Anhang 7 ohne HDMI Anschluss 576i (480i) • In der Einstellung 576i (480i) wird für die HDMI OUT-Buchse eine tatsächliche Auflösung von 576p (576p) eingestellt. • Falls Ihr Fernsehgerät die manuelle Auswahl der Auflösung für ein an die HDMI-Buchse angeschlossenes Fernsehgerät nicht zulässt, wird die Auflösung auf [Auto] eingestellt. • Bei einer eingestellten Auflösung, die Ihr Fernsehgerät nicht unterstützt, wird eine Warnmeldung eingeblendet. Falls nach dem Ändern der Auflösung kein Bild angezeigt wird, warten Sie bitte 20 Sekunden, bis die vorherige Auflösung automatisch wiederhergestellt wird. HB985-DB.BDEUPPK_GER.indd 70 576p (480p) • Die Bildwiederholrate 1080p für den Videoausgang wird dabei automatisch auf 24 Hz oder 50 Hz eingestellt, je nach Möglichkeiten und Voreinstellungen des angeschlossenen Fernsehgerätes und basierend auf der ursprünglichen VideoBildrate der BD-ROM-Disc. COMPONENT VIDEO OUT-Anschluss BD und DVD können eine Hochskalierung oder analoge Ausgabe verhindern. VIDEO OUT-Anschluss Die Auflösung der VIDEO OUT-Buchse ist auf 576i (480i) festgelegt. 2010-05-14 2:06:57 Anhang 71 Marken und Lizenzen “Blu-ray Disc” und sind Markenzeichen. HDMI, das HDMI Logo und High-Definition Multimedia Interface sind Markenzeichen oder eingetragene Markenzeichen von HDMI Licensing, LLC in den Vereinigten Staaten und anderen Ländern. Das “BD-LIVE” Logo ist ein Markenzeichen von Bluray Disc Association. “BONUSVIEW” ist ein Markenzeichen von Blu-ray Disc Association. ist ein Markenzeichen von DVD Format/Logo Licensing Corporation. TM Java und alle Java-basierten Markenzeichen und Logos sind Markenzeichen oder eingetragene Markenzeichen von Sun Microsystems, Inc. in den Vereinigten Staaten und in anderen Ländern. DivX® ist eine eingetragene Marke von DivX, Inc. und ist lizenziert. Anhang Hergestellt unter der Lizenz von Dolby Laboratories. Dolby und das Doppel-D-Symbol sind Markenzeichen von Dolby Laboratories. DLNA und DLNA CERTIFIED sind Marken- und/ oder Dienstleistungszeichen von Digital Living Network Alliance. 7 Hergestellt unter folgenden U.S.-Patenten: 5,451,942; 5,956,674; 5,974,380; 5,978,762; 6,226,616; 6,487,535; 7,392,195; 7,272,567; 7,333,929; 7,212,872 und weitere U.S.- und weltweite Patente ausgestellt und angemeldet. DTS und das Symbol sind eingetragene Markenzeichen, DTS-HD, DTS-HD Master Audio l Essential und die DTS-Logos sind Markenzeichen von DTS, Inc. Dieses Produkt beinhaltet Software. © DTS, Inc. HB985-DB.BDEUPPK_GER.indd 71 “x.v.Color” oder “x.v.Colour” ist ein Markenzeichen von Sony Corporation. 2010-05-14 2:06:58 72 Anhang Windows Media ist entweder ein eingetragenes Markenzeichen oder ein Markenzeichen von Microsoft Corporation in den Vereinigten Staaten und/oder in anderen Ländern. “AVCHD” und das „AVCHD” Logo sind Markenzeichen von Panasonic Corporation und Sony Corporation. Dieses Produkt wurde lizenziert unter AVC PatentLizenz und VC-1 Patent-Lizenz für den privaten und nicht gewerblichen Einsatz des Kunden zur (i) Codierung von Video in Übereinstimmung mit den Normen AVC und VC-1 (“AVC/VC-1 Video”) und/oder (ii) Decodierung von AVC/ VC-1 Video, das vom Kunden für private und nicht gewerbliche Zwecke codiert und/oder von einem zugelassenen Video-Anbieter für AVC/ VC-1 Video bezogen wurde. Es darf und wird keine Genehmigung für eine andere Verwendung erteilt. Weitere Information erhalten Sie von MPEG LA, LLC. Siehe http://www.mpegla.com. iPod ist ein Markenzeichen von Apple Inc., eingetragen in den Vereinigten Staaten und anderen Ländern. iPhone ist ein Markenzeichen von Apple Inc. Anhang 7 Dieses Produkt verfügt über eine Technologie der Microsoft Corporation und darf nicht ohne Genehmigung von Microsoft Licensing, Inc. genutzt oder vertrieben werden. ® Die Bluetooth® Wireless-Technologie ermöglicht die Funkübertragung zwischen elektronischen Geräten innerhalb einer Reichweite von bis zu zehn Metern. Bei der Verbindung mehrere Geräte über die Bluetooth Wireless-Technologie fallen keinerlei Gebühren an. Verbindungen mit Hilfe der Bluetooth Wireless-Technologie über ein Mobiltelefon können in Reihenschaltung betrieben werden. Die Bluetooth Markennamen und Logos sind Eigentum der Bluetooth SIG, Inc. Pioneer Corporation besitzt eine Genehmigung für die Verwendung dieser Marken. Alle anderen Markennamen und Handelsbezeichnungen sind Eigentum der jeweiligen Besitzer. Der Hinweis “Made for iPod” weist darauf hin, dass ein elektronisches Gerät für den Anschluss eines iPod entwickelt wurde und von Hersteller als ein Gerät zertifiziert wurde, das den AppleLeistungsstandards entspricht. Der Hinweis “Works with iPhone” weist darauf hin, dass ein elektronisches Gerät für den Anschluss eines iPhone entwickelt wurde und von Hersteller als ein Gerät zertifiziert wurde, das den AppleLeistungsstandards entspricht. Apple übernimmt keine Haftung für den Betrieb dieses Gerät oder dessen Kompatibilität mit Sicherheitsstandards und Richtlinien. HB985-DB.BDEUPPK_GER.indd 72 2010-05-14 2:06:58 Anhang Technische Daten 73 Tuner • UKW-Empfangsbereich: 87,5 bis 108,0 MHz oder 87.50 bis 108.00 MHz Allgemein • Stromversorgung: AC 220-240 V, 50/ 60 Hz • Leistungsaufnahme: 150 W Im Bereitschaftsmodus: Unter 0,5 W • Abmessungen (B x H x T): Ca. 430 × 64 × 304 mm • Gesamtgewicht (ca.): 3.6 kg • Betriebstemperatur: 5 °C bis 35 °C • Luftfeuchtigkeit bei Betrieb: 5 % bis 90 % Verstärker • Ausgangsleistung, (Spitze), (4 Ω/3 Ω) Gesamt 1100 W Vorn 180 W x 2 Mitte 180 W Hinten 180 W x 2 Subwoofer 200 W (Passive) • Ausgangsleistung, (RMS), Geamtklirrfaktor 10 % (4 Ω/3 Ω) Gesamt 930 W Vorn 150 W x 2 Mitte 150 W Hinten 150 W x 2 Subwoofer 180 W (Passiv) • Stromversorgung über Bus (USB): DC 5 V 500 mA System Eingänge/Ausgänge • VIDEO OUT: 1,0 V (p-p), 75 Ω, negative Sync., Cinch-Buchse x 1 • HDMI IN/OUT (Video/Audio): 19-polig (HDMI-Norm, Typ A, Version 1.3) • Analog AUDIO IN: 2,0 Vrms (1 kHz, 0 dB), 600 Ω, Cinch-Buchse (L, R) x 1 • Fernsehnorm: Standard NTSC/PAL Farb-Fernsehnorm • Frequenzbereich: 20 Hz bis 20 kHz (48 kHz-, 96 kHz-, 192 kHzSampling) • LAN-Anschluss: Ethernet-Buchse x 1, 10BASE-T/100BASE-TX • DIGITAL IN (OPTICAL 1/2): 3 V (p-p), Optische Buchse x 2 Anhang • COMPONENT VIDEO OUT: (Y) 1,0 V (p-p), 75 Ω, negative Sync., Cinch-Buchse x 1, (Pb)/(Pr) 0,7 V (p-p), 75 Ω, Cinch-Buchse x 2 • Laser: Halbleiter-Laser Wellenlänge: 405 nm / 650 nm 7 • PORTABLE IN: 0,5 Vrms (3,5 mm Stereo-Buchse) HB985-DB.BDEUPPK_GER.indd 73 2010-05-14 2:06:58 74 Anhang Lautsprecher BCS-707 Lautsprecher BCS-303 S-BD707 S-BD303 • Vordere/Surround-Lautsprecher (Links/Rechts) Typ: 2 Wege Nennimpedanz: 4Ω Gesamtabmessungen 260 x 1097 x 260 mm (B x H x T): Gesamtgewicht: 3,8 kg • Vordere/Surround-Lautsprecher (Links/Rechts) Typ: 1 Weg Nennimpedanz: 4Ω Gesamtabmessungen 96 x 96 x 85 mm (B x H x T): Gesamtgewicht: 0.4 kg • Mittel-Lautsprecher Typ: Nennimpedanz: Gesamtabmessungen (B x H x T): Gesamtgewicht: • Mittel-Lautsprecher Typ: Nennimpedanz: Gesamtabmessungen (B x H x T): Gesamtgewicht: 1 Weg 4Ω 300 x 87x 65 mm 0,6 kg S-BD707SW • Subwoofer Typ: Nennimpedanz: Gesamtabmessungen (B x H x T): Gesamtgewicht: 1-Weg-1-Lautsprecher 3Ω 130,5 x 420 x 375 mm • Subwoofer Typ: Nennimpedanz: Gesamtabmessungen (B x H x T): Gesamtgewicht: 1 Weg 4Ω 300 x 87 x 65 mm 0,6 kg 1-Weg-1-Lautsprecher 3Ω 130,5 x 420 x 375 mm 4,4 kg 4,4 kg Anhang 7 HB985-DB.BDEUPPK_GER.indd 74 2010-05-14 2:06:58 Anhang Hinweise zu Open Source-Software Die folgenden in diesem Produkt eingesetzten GPL-Anwendungen und LGPL-Bibliotheken unterliegen den folgenden GPL2.0-/LGPL2.1Lizenzvereinbarungen: GPL-ANWENDUNGEN: Linux kernel 2.6, bash, busybox, cramfs, dhcpcd, e2fsprogs, fdisk, mkdosfs, mtd-utils, net-tools, procps, samba-3.0.25b, sysutils, tcpdump, tftpd, tinylogin, unzip, utelnetd LGPL-BIBLIOTHEKEN: uClibc, DirectFB, blowfish, cairo, ffmpeg, iconv, libusb, mpg123 gSOAP Public License 1.3-BIBLIOTHEK: gsoap Eine Kopie des entsprechenden Quellcodes kann versandkostenpflichtig angefordert werden Bitte richten Sie Ihre Anfrage an den Pioneer Kundendienst. HB985-DB.BDEUPPK_GER.indd 75 2010-05-14 Anhang Eine Kopie der GPL- und LGPL-Lizenzen finden Sie unter http://www.gnu.org/licenses/old-licenses/ gpl-2.0.html und http://www.gnu.org/licenses/oldlicenses/lgpl-2.1.html . Eine Kopie der gSOAP Public License finden Sie unter http://www.cs.fsu.edu/~engelen/license.html. Diese Software basiert teilweise auf der Arbeit der Independent JPEG Group Copyright © 1991-1998, Thomas G. Lane. Dieses Produkt beinhaltet • boost C++: Copyright © Beman Dawes 1999-2003 • c-ares: Copyright © 1998 Massachusetts Institute of Technology • curl: Copyright © 1996 - 2008, Daniel Stenberg • expat: Copyright © 2006 expat maintainers • freetype: Copyright © 2003 The FreeType Project (www.freetype.org). • jpeg: Diese Software basiert teilweise auf der Arbeit der Independent JPEG Group Copyright © 1991-1998, Thomas G. Lane. • mng: Copyright © 2000-2007 Gerard Juyn, Glenn Randers-Pehrson • ntp: Copyright © David L. Mills 1992-2006 • OpenSSL: – Kryptographische Software programmiert von Eric Young ([email protected]). – Software programmiert von Tim Hudson ([email protected]). – Software entwickelt von OpenSSL Project für den Einsatz im OpenSSL Toolkit. (http://www.openssl.org) • png: Copyright © 2004 Glenn Randers-Pehrson • portmap: Copyright © 1990 The Regents of the University of California • ptmalloc: Copyright © 2001-2006 Wolfram Gloger • UnitTest++: Copyright © 2006 Noel Llopis und Charles Nicholson • UPnP SDK: Copyright © 2000-2003 Intel Corporation • strace : Copyright © 1991, 1992 Paul Kranenburg copyright © 1993 Branko Lankester copyright © 1993 Ulrich Pegelow copyright © 1995, 1996 Michael Elizabeth Chastain copyright © 1993, 1994, 1995, 1996 Rick Sladkey copyright © 1999,2000 Wichert Akkerman • xml2 : copyright © 1998-2003 Daniel Veillard • XML-RPC für C/C++: • Copyright © 2001 First Peer, Inc. Alle Rechte vorbehalten. • Copyright © 2001 Eric Kidd. Alle Rechte vorbehalten. • zlib: Copyright © 1995-2002 Jean-loup Gailly und Mark Adler. Alle Rechte vorbehalten Hiermit wird kostenfrei allen Nutzern, die eine Kopie dieser Software und die zugehörigen Dokumentationsdateien (die “Software”) erhalten, die Erlaubnis erteilt, die Software ohne Einschränkungen zu verwenden. Dies umfasst die uneingeschränkte Genehmigung zum Verwenden, Kopieren, Ändern, Zusammenführen, Veröffentlichen, Verteilen, Unterlizenzieren und/oder Verkaufen von Kopien der Software. Diese Rechte dürfen außerdem auf die Personen übertragen werden, an die die Software weitergegeben wird, wenn folgende Bedingungen eingehalten werden: DIE SOFTWARE WIRD OHNE MÄNGELGEWÄHR GELIEFERT, OHNE GARANTIEN JEDWEDER ART, WEDER AUSDRÜCKLICH NOCH IMPLIZIT, EINSCHLIESSLICH DER, ABER NICHT BESCHRÄNKT AUF DIE GARANTIEN DER MARKTGÄNGIGKEIT, DER EIGNUNG FÜR EINEN BESTIMMTEN ZWECK UND DER NICHTÜBERTRETUNG. IN KEINEM FALL SIND DIE AUTOREN ODER DIE URHEBERRECHTSINHABER HAFTBAR FÜR SCHÄDEN ODER SONSTIGE ANSPRÜCHE, DIE AUS DEM VERTRAG, AUS DESSEN VERLETZUNG ODER SONST WIE ENTSTEHEN, SEI ES UNABHÄNGIG VON ODER IN VERBINDUNG MIT DER SOFTWARE ODER DURCH DIE VERWENDUNG DER SOFTWARE ODER ANDEREN HANDLUNGEN MIT DER SOFTWARE. 75 7 2:06:58 2 1 Informazioni sulla sicurezza Informazioni sulla sicurezza 1 Informazioni sulla sicurezza AVVERTENZA Precauzioni ed avvertimenti RISCHIO DI SCOSSE ELETTRICHE NON APRIRE Avvertenze: PER EVITARE IL RISCHIO DI INCENDI O SCOSSE ELETTRICHE, TENERE IL PRODOTTO LONTANO DALLA PIOGGIA E DALL’UMIDITÀ. AVVERTENZA: PER RIDURRE IL RISCHIO DI SCOSSE ELETTRICHE, NON RIMUOVERE IL COPERCHIO (O LA PARTE POSTERIORE). L’UNITÀ NON CONTIENE PARTI RIPARABILI DALL’UTENTE. SE OCCORRE UN INTERVENTO IN ASSISTENZA, RIVOLGERSI A UN TECNICO QUALIFICATO. Questo simbolo di un fulmine all’interno di un triangolo avverte l’utente della presenza di tensione pericolosa non isolata all’interno dell’unità che può provocare scosse elettriche. Il punto esclamativo all’interno di un triangolo avverte l’utente della presenza di istruzioni operative e di manutenzione particolarmente importanti contenute nella documentazione di accompagnamento del prodotto. Avvertenze: non installare questo apparecchio in spazi ristretti quali scaffali o unità simili. AVVERTENZA: Non ostruire le aperture di ventilazione. Installare secondo le istruzioni del fabbricante. Le feritoie e le aperture sono previste per la ventilazione e per garantire il corretto funzionamento del prodotto, proteggendolo dal surriscaldamento. Non ostruire le aperture collocando il prodotto su divani, letto, tappeti o altre superfici simili. Non collocare il prodotto incassato in mobili come librerie o scaffali, a meno che non sia prevista una ventilazione sufficiente e siano state seguite le istruzioni del fabbricante. AVVERTENZA: Questo è un prodotto laser di classe 1 in base alla classificazione Sicurezza dei prodotti laser IEC 60825-1:2007. Per essere sicuri di utilizzare il prodotto in modo appropriato, leggere con particolare attenzione questo manuale d’uso e conservarlo come riferimento per ogni eventuale futuro intervento di manutenzione; per questi interventi, rivolgersi a centri di assistenza autorizzati. L’utilizzo di controlli, regolazioni o procedure diverse da quelle specificate di seguito può dare luogo a una pericolosa esposizione a radiazioni. Per evitare l’esposizione diretta al fascio laser, non aprire il contenitore. Quando il contenitore è aperto, la radiazione laser è visibile. NON FISSARE CON LO SGUARDO IL FASCIO LASER. HB985-DB.BDEUPPK_ITA.indd 2 2010-05-14 2:29:53 Informazioni sulla sicurezza AVVERTENZA relativa al cavo di alimentazione Per molti elettrodomestici è consigliabile utilizzare un circuito dedicato. Questo dispositivo è dotato di batteria portatile o accumulatore. Modo sicuro per rimuovere la batteria o la batteria dall’apparecchiatura: Rimuovere la batteria vecchia o accomulatore seguendo i passi inversi a quelli seguiti per l’assemblaggio. Per impedire la contaminazione dell’ambiente e creare possibili pericoli alla salute dell’uomo o animali, la vecchia batteria deve essere smaltita inserendola nel contenitore adeguato nei punti di raccolta predisposti. Non smaltire le batterie o accumulatori insieme ai rifiuti domestici. Si raccomanda di utilizzare i sistemi locali di raccolta di batterie e accumulatori. Non esporre la batteria a temperature eccessive, ad esempio non esporla al sole, non gettarla sul fuoco, ecc. 1 Informazioni sulla sicurezza Ciò significa, un circuito di alimentazione specifico per un solo apparecchio che non abbia altre prese in derivazione. A tal fine, verificare le specifiche di questo Manuale dell’utente. Non sovraccaricare le prese a muro. Prese sovraccariche, allentate o danneggiate, prolunghe, cavi sfilacciati o isolamenti spaccati o deteriorati sono pericolosi. In ognuno dei suddetti casi possono verificarsi incendi o scosse elettriche. Esaminare periodicamente il cavo dell’apparecchio e se si notano danneggiamenti scollegarlo, interrompere l’uso dell’apparecchio e far sostituire il cavo con uno identico da un tecnico dell’assistenza qualificato. Evitare che il cavo sia attorcigliato, piegato o calpestato. Prestare particolare attenzione alle spine, alle prese a parete e ai punti in cui il cavo esce dall’unità. Per scollegare l’alimentazione di rete, staccare il cavo. Durante l’installazione del prodotto, assicurarsi che la spina sia facilmente accessibile. 3 AVVERTENZA: non esporre l’apparecchio all’acqua (sgocciola-mento o spruzzi) e non collocare su di esso oggetti riempiti di liquidi, quali ad esempio vasi. PIONEER dichiara che questo/ i prodotto/i è/sono conforme/i ai requisiti essenziali e altre indicazioni della Direttiva 2004/108/CE, 2006/95/ CE e 2009/125/CE. Avvertenze: Per evitare il pericolo di incendi, non avvicinare alcuna sorgente di fiamma aperta (come una candela accesa) all’apparecchiatura. HB985-DB.BDEUPPK_ITA.indd 3 2010-05-14 2:29:56 4 Informazioni sulla sicurezza Informazioni per gli utilizzatori finali sulla raccolta e lo smaltimento di vecchi dispositivi e batterie esauste 1 Informazioni sulla sicurezza Pb Esempio di simboli Symbol examples forlebatteries per batterie Questi simboli sui prodotti, le confezioni e/o i documenti allegati indicano che i prodotti elettrici ed elettronici e le batterie non devono essere gettati insieme alla spazzatura normale. Per il trattamento appropriato, il recupero ed il riciclo di vecchi prodotti e di batterie usate, recarsi ai punti di raccolta in base a quanto disposto dalle norme locali. Effettuando lo smaltimento degli apparecchi e delle batterie in modo corretto, si contribuisce alla salvaguardia di risorse preziose e s’impediscono gli effetti potenziali negativi sulla salute dell’uomo e dell’ambiente che potrebbero altrimenti verificarsi da una gestione inadeguata della spazzatura. Per maggiori informazioni dettagliate sullo smaltimento e sul riciclaggio del vecchio dispositivo e delle batterie, contattare l’ente locale, il servizio di nettezza urbana o il punto vendita dove è stato acquistato il prodotto. Questi simboli sono validi soltanto nell’Unione Europea. Per i paesi extra-UE: Per gettare questi prodotti, contattare l’ente locale o il rivenditore e chiedere informazioni sul metodo corretto di smaltimento. Questo prodotto è conforme al DM 28/8/1995, Nº548, ottemperando alle prescrizioni di cui al DM 25/6/1985 (par.3, all. A) e DM 27/8/1987 (All. I). HB985-DB.BDEUPPK_ITA.indd 4 Note sul Copyright • Poiché l’AACS (Advanced Access Content System) è approvato come sistema di protezione del contenuto per il formato BD, analogamente all’uso del CSS (Content Scramble System) per il formato DVD, sono presenti alcune limitazioni su riproduzione, uscita segnale analogico, ecc., dei contenuti protetti AACS. Il funzionamento di questo prodotto e le restrizioni su questo prodotto possono variare dipendendo dal momento del vostro acquisto poiché tali restrizioni possono essere adottate e/o modificate da AACS dopo la produzione di questo prodotto. • Inoltre, BD-ROM Mark e BD+ sono utilizzati ulteriormente come sistema di protezione dei contenuti per il formato BD, il quale impone alcune restrizioni incluse restrizioni di riproduzione di contenuti protetti BD-ROM Mark e/o BD+. Per informazioni aggiuntive su AACS, contrassegno BD-ROM, BD+ o su questo prodotto, rivolgersi a un centro assistenza clienti autorizzato. • Molti dischi BD-ROM/DVD sono codificati con protezione dalla copia. A causa di queste restrizioni, è necessario connettere il lettore direttamente alla TV anziché il VCR. La connessione tramite VCR ha come risultato un’immagine distorta quando questa proviene da dischi protetti da copia. • Questo prodotto contiene tecnologia di protezione del copyright protetto da brevetti USA e da altri diritti di proprietà intellettuale. L’uso di tale tecnologia di protezione del copyright deve essere autorizzato da Rovi ed è previsto solo per uso domestico e altri impieghi limitati di visualizzazione se non diversamente autorizzato da Rovi. La decodifica e il disassemblaggio sono vietati. • In base alle leggi sul copyright degli U.S.A. e di altri paesi, registrazione, uso, visualizzazione, distribuzione o revisione non autorizzati di programmi televisivi, nastri, dischi BD-ROM, DVD, CD e altri materiali possono essere soggetti a responsabilità civile e/o penale. 2010-05-14 2:29:56 Informazioni sulla sicurezza 5 Avviso importante per il sistema colore TV Il sistema colore di questo lettore cambia sulla base del sistema del disco correntemente in riproduzione. Per esempio, quando il lettore riproduce un disco registrato con il sistema colore NTSC, l’uscita dell’immagine sarà con segnale NTSC. 1 Informazioni sulla sicurezza Solo un apparecchio TV multi sistema colore è in grado di ricevere tutti i segnali in uscita dal lettore. • Se si dispone di una TV con sistema colore PAL, quando si usano dischi registrati in NTSC si vedranno solo delle immagini distorte. • Un apparecchio TV a sistema multiplo colore cambia automaticamente il sistema colore sulla base dei segnali in ingresso. Nel caso in cui il sistema colore non venga cambiato automaticamente, spegnere l’apparecchio e riaccendere per vedere le immagini normalmente sullo schermo. • Anche se i dischi vengono visualizzai correttamente sull’apparecchio TV, è possibile che non vengano registrati correttamente sul registratore. HB985-DB.BDEUPPK_ITA.indd 5 2010-05-14 2:29:56 6 Sornmario 3 Installazione 16 1 Montaggio degli altoparlanti BCS-707 18 Montaggio degli altoparlanti BCS-303 Informazioni sulla sicurezza 2 Precauzioni ed avvertimenti Preparazione 8 19 Installazione a parete dell’altoparlante centrale 19 Note aggiuntive sugli altoparlanti 20 2 Introduzione Assemblare gli altoparlanti 16 21 Posizionamento del sistema Connessioni al TV 21 Connessione HDMI 22 Connessione Component Video 8 Informazioni sul simbolo “ ” 8 Simboli utilizzati nel manuale 23 Connessione video 9 Accessori forniti 23 Impostazione della risoluzione 10 Dischi riproducibili 11 Compatibilità dei file 24 Collegamento antenna 12 Codice regionale 24 12 AVCHD (Advanced Video Codec High Definition) Connessione con il dispositivo esterno 24 Connessione AUX 12 Requisiti del sistema 25 PORTA Connessione IN 12 Note di compatibilità 25 Connessione OPTICAL IN 1/2 Telecomando 26 14 Pannello frontale 28 15 Pannello posteriore 29 13 Impostazione rete 31 Collegamento dispositivo USB 32 Settaggi 32 Regolare le impostazioni di configurazione 33 Menu [DISPLAY] 34 Menu [LINGUA] 35 Menu [AUDIO] 36 Menu [BLOCCATO] 37 Menu [RETE] 37 39 HB985-DB.BDEUPPK_ITA.indd 6 Collegamento Bluetooth® Connessione alla rete domestica Menu [ALTRO] Effetto audio 2010-05-14 2:29:57 7 4 6 Uso Risoluzione dei problemi 40 Riproduzione generale 64 Generale 42 Riproduzione avanzata 65 Immagine 44 Visualizzazione su schermo 65 Suono 48 Gustare BD-LIVE 66 Network 49 Riproduzione di un file video e disco VR 2 51 Visualizzazione di fotografie 7 53 Ascolto dei brani musicali Appendice 56 Riproduzione del iPod 58 Funzionamento della radio 59 Riproduzione di contenuto sulla rete domestica 5 Manutenzione 63 Note sui dischi 63 Maneggiamento dell’unità 1 67 Controllo del televisore mediante il telecomando 68 Indicativo località 69 Elenco codici lingua 70 Risoluzione video di uscita 71 Marchi commerciali e licenze 73 Specifiche tecniche 75 Avviso per il software Open source 3 4 5 6 7 8 HB985-DB.BDEUPPK_ITA.indd 7 2010-05-14 2:29:57 8 Preparazione 2 Preparazione 2 Introduzione Preparazione Informazioni sul simbolo “ ” Durante la riproduzione, sullo schermo della vostra televisione può apparire “ ”, questo segno indica che la funzione descritta nel manuale dell’utente non è disponibile su quel supporto specifico. Simboli utilizzati nel manuale NOTA Una sezione, il cui titolo ha uno dei seguenti simboli, è applicabile solo sul disco rappresentato dal simbolo. BD Disco BD-ROM DVD DVD-Video, DVD±R/ RW in modalità Video o modalità VR e finalizzata AVCHD DVD±R/RW in formato AVCHD ACD CD audio MOVIE File video MUSIC File musicali PHOTO File foto Indica note speciali e funzionalità operative. ATTENZIONE Indica avvertenze di pericolo per la prevenzione da possibili danni provocati da uso improprio. HB985-DB.BDEUPPK_ITA.indd 8 2010-05-14 2:29:57 Preparazione Accessori forniti Cavo video (1) Accessori della cassa dell’altoparlante (S-BD707SW) Telecomando (1) Antenna FM (1) Supporto per iPod (1) Cavi altoparlante (1) Accessori della cassa dell’altoparlante (S-BD303) Cavi altoparlante (6) Accessori della cassa dell’altoparlante (S-BD707T) Cavi altoparlante (5) Viti (12) Basi per sostegno altoparlante (4) Attenuatori antislittamento generali (1) Attenuatori antislittamento grandi (1) 2 Preparazione Batterie (1) 9 Attenuatori antislittamento generali (1) Attenuatori antislittamento grandi (1) Attenuatori antislittamento mediani (1) HB985-DB.BDEUPPK_ITA.indd 9 2010-05-14 2:29:57 10 Preparazione Dischi riproducibili Blu-ray Disc - Dischi, contenenti ad esempio film, acquistabili o noleggiabili - Dischi BD-R/RE che contengono file di film, musica o foto. 2 Preparazione DVD-VIDEO dischi da 8 / 12 cm Dischi, contenenti ad esempio film, acquistabili o noleggiabili DVD±R dischi da 8 / 12 cm - Solo modalità video e finalizzata - Supporta anche dischi dual layer - Formato AVCHD finalizzato - Dischi DVD±R che contengono file di film, musica o foto. DVD-RW dischi da 8 / 12 cm - Modalità VR, modalità Video e solo finalizzata - Formato AVCHD finalizzato - Dischi DVD-RW che contengono file di film, musica o foto. DVD+RW 8 / 12 cm disc - Solo modalità video e finalizzata - Formato AVCHD - Formato AVCHD finalizzato - Dischi DVD+RW che contengono file di film, musica o foto. NOTA • In base alle condizioni dell’apparecchiatura di registrazione o dello stesso disco CD-R/ RW (o DVD±R/RW), non è possibile riprodurre nell’unità alcuni dischi CD-R/RW (o DVD±R/RW). • In base al software di registrazione e finalizzazione, potrebbe non essere possibile riprodurre alcuni dischi registrati (CD-R/RW, DVD±R/RW, BD-R/RE). • I dischi BD-R/RE, DVD±R/RW e CD-R/RW registrati mediante PC o masterizzatore DVD o CD potrebbero non venire riprodotti se il disco è danneggiato o sporco, oppure se è presente sporcizia o condensa sulla lente del lettore. • Se il disco è stato registrato tramite PC, anche mediante un formato compatibile, in alcuni casi la riproduzione potrebbe risultare impossibile a causa delle impostazioni del software utilizzato per creare il disco. Per maggiori informazioni, consultare il produttore del software. • Per garantire un’ottima qualità della riproduzione, questo lettore richiede la conformità di dischi e registrazioni con determinati standard tecnici. • I DVD preregistrtrati sono conformi con questi standard. Esistono diversi tipi di formati di dischi registrabili (compresi CD-R contenenti file MP3 o WMA) che richiedono la presenza di determinate condizioni per assicurare una riproduzione compatibile. • I clienti devono tenere presente che per scaricare file MP3/WMA e musicali da Internet è richiesta autorizzazione. La nostra azienda non ha alcun diritto per concedere tale autorizzazione. L’autorizzazione deve essere sempre ottenuta dal proprietario del copyright. Audio CD dischi da 8 / 12 cm CD-R/RW dischi da 8 / 12 cm - Dischi CD-R/RW contenenti titoli audio, file video, musica o foto. HB985-DB.BDEUPPK_ITA.indd 10 2010-05-14 2:29:58 Preparazione Compatibilità dei file NOTA Complessivo • I file dei film HD contenuti su CD o USB 1,0/1,1 potrebbero non venire correttamente riprodotti. Si consiglia BD, DVD o USB 2.0 per riprodurre file di filmati HD. Estensioni file disponibili: “.jpg”, “.jpeg”, “.png”, “.avi”, “.divx”, “.mpg”, “.mpeg”, “.mkv”, “.mp4”, “.mp3”, “.wma”, “.wav” Le estensioni di file disponibili variano in funzione dei server DLNA. • Alcuni file “.wav” non sono supportati da questo lettore. • Il nome del file è limitato a 180 caratteri. • Dipendendo dalle dimensioni e numero di file, possono essere necessari diversi minuti per la lettura del contenuto dei supporti. Massimo numero di file/cartelle: Meno di 2 000 (numero totale di file e cartelle) Formato CD-R/RW, DVD±R/RW, BD-R/RE: ISO 9 660+JOLIET, UDF e UDF Bridge MOVIE Risoluzione disponibile: 1 920 x 1 080 (OxV) pixel Sottotitolo riproducibile: SubRip (.srt / .txt), SAMI (.smi), SubStation Alpha (.ssa/.txt), MicroDVD (.sub/.txt), VobSub (.sub), SubViewer 1.0 (.sub), SubViewer 2.0 (.sub/.txt), TMPlayer (.txt), DVD Subtitle System (.txt) VobSub (.sub) non è disponibile nella funzione [Coll. Home]. Formati codec riproducibili: “DIVX3.xx”, “DIVX4.xx”, “DIVX5.xx”, “XVID”, “DIVX6.xx” (solo riproduzione standard), H.264/MPEG-4 AVC, MPEG1 SS, MPEG2 PS, MPEG2 TS Formati audio riproducibili: “Dolby Digital”, “DTS”, “MP3”, “WMA”, “AAC”, “AC3” • Questo lettore supporta H.264/MPEG-4 AVC profilo Main, High al Level 4,1. Nel caso di file con livello superiore, sullo schermo apparirà un messaggio di avvertenza. • Questo lettore non supporta i file registrati con GMC*1 o Qpel*2. Queste sono tecniche di registrazione video in standard MPEG4, come quelle di DivX o XVID. *1 GMC – Compensazione movimento globale *2 Qpel – Quarter pixel MUSICA Frequenza di campionamento: entro 8 kHz fino a 48 KHz (WMA), entro 11 kHz fino a 48 kHz (MP3) Velocità trasmissione: entro 8 kbps fino a 320 kbps (WMA, MP3), NOTA • Questa unità non supporta i file MP3 con ID3 Tag embedded. • Il tempo di riproduzione totale indicato sullo schermo può non essere corretto per file VBR. • • Non tutti i formati audio WMA e AAC sono compatibili con questa unità. Frequenza di campionamento: entro 32 kHz fino a 48 kHz (WMA), entro 16 kHz fino a 48 kHz (MP3) Velocità trasmissione: entro 20 kbps fino a 320 kbps (WMA), entro 32 kbps fino a 320 kbps (MP3) HB985-DB.BDEUPPK_ITA.indd 11 2 Preparazione • 11 PHOTO Dimensioni consigliate: Meno di 4,000 x 3,000 x 24 bit/pixel Meno di 3,000 x 3,000 x 32 bit/pixel Meno di 4 MByte/file • Le immagini foto a compressione progressiva e losless non sono supportate. 2010-05-14 2:29:58 12 2 Preparazione Codice regionale Requisiti del sistema Questa unità dispone di un codice regionale stampato sul retro. Questa unità è in grado di riprodurre solo dischi BD-ROM o DVD con la stessa indicazione presente sul retro o con l’etichetta “ALL”. Per la riproduzione video ad alta definizione: Preparazione • Un display ad alta definizione dotato di jack di ingresso COMPONENT o HDMI. • Disco BD-ROM con contenuto ad alta definizione. • Per alcuni contenuti (come definito dagli autori) è richiesto un ingresso DVI compatibile HDMI o HDCP sulla propria periferica di visualizzazione. • Per la conversione di DVD di definizione standard, è necessario avere sul proprio display un ingresso DVI compatibile HDMI o HDCP per la copia di contenuto protetto. AVCHD (Advanced Video Codec High Definition) • Questo lettore può riprodurre dischi in formato AVCHD. Tali dischi vengono normalmente registrati e utilizzati nelle videocamere. • Il formato AVCHD è un formato digitale ad alta definizione per videocamere. • Il formato MPEG-4 AVC/H.264 è in grado di comprimere le immagini con efficienza maggiore rispetto al formato convenzionale di compressione immagini. Note di compatibilità • Poiché BD-ROM è un nuovo formato, sono possibili alcuni problemi ai dischi, di connessione digitale e di compatibilità. Se si rilevano problemi di compatibilità, rivolgersi a un centro assistenza autorizzato. • La visione di contenuto ad alta definizione e la conversione di contenuti DVD standard può richiedere un ingresso compatibile HDMI o un ingresso DVI-HDMI sul dispositivo usato per la visualizzazione. • Alcuni dischi AVCHD usano il formato “x.v.Colour”. • Questo lettore è in grado di riprodurre dischi AVCHD tramite il formato “x.v.Colour”. • Alcuni dischi in formato AVCHD potrebbero non venire riprodotti, in base alla condizione di registrazione. • I dischi in formato AVCHD devono essere finalizzati. • Alcuni dischi BD-ROM e DVD possono limitare l’uso di alcuni comandi o funzioni. • “x.v.Colour” offre una gamma di colori più ampia rispetto ai normali dischi DVD delle videocamere. • Si può utilizzare un dispositivo USB utilizzato per memorizzare alcune informazioni relative al disco, incluso contenuto scaricato on-line. Il disco usato controllerà la durata per la quale l’informazione viene mantenuta. HB985-DB.BDEUPPK_ITA.indd 12 2010-05-14 2:29:58 Preparazione 13 Telecomando • • • • • • • • • a • • • • • • • • • 1 (STANDBY/ON): Accende e spegne il lettore. Z OPEN/CLOSE: Apre/chiude il vassoio del disco. 1 BT AUDIO: Si modifica direttamente il modo ingresso in modo BT AUDIO. OPTICAL: Modifica direttamente la modalità di immissione su ottico. 2 DISPLAY: Visualizza o chiude il display su schermo (OSD). HOME MENU: Visualizza il [Menu prin.] o esce da esso. MENU: Accede al menu su un disco. Pulsanti di direzione: Consentono di selezionare un’opzione nel menu. 3 ENTER: Conferma la selezione di menu. TUNE (+/-): sintonizza la stazione radiofonica desiderata. PRESET: seleziona i programmi radiofonici predefiniti. • • • • • • • • • b • • • • • • • • • Installazione della batteria Togliere il coperchio sulla parte posteriore del telecomando, quindi inserire una batteria R03 (tipo AAA) con la polarità e corretta. O RETURN: Esce dal menu o riprende la riproduzione. POPUP/ TOP MENU: Visualizza il menu del titolo DVD o il menu a comparsa del BD-ROM, se disponibile. z USB REC: Registra un CD Audio. MUTE: Silenzia l’unità. 2 SOUND: Seleziona una modalità di effetto audio. VOL +/- : Regola il volume dell’altoparlante. • • • • • • • • • c • • • • • • • • • Tasti numerici 0-9: Seleziona le opzioni numerate in un menu. MARKER: Segna qualsiasi punto durante la riproduzione. SEARCH: Visualizza o esce dal menu di ricerca. REPEAT: Ripete una sezione desiderata. CLEAR: Rimuove il contrassegno nel menu di ricerca o un numero durante l’impostazione della password. DIMMER: attenua la luce dell’unità. ZOOM: Si accede al menu di zoom. Pulsanti colorati (A, B, C, D): Usare per navigare i menu. - Pulsante A (RDS): Radio Data System. - Pulsante B (PTY): Visualizza la tipologia di programma dell’RDS. - Pulsante C (PTY SEARCH): Cerca la tipologia di programma. x STOP: Interrompe la riproduzione. - Pulsante D: Seleziona mono/ stereo nella modalità FM. B PLAY: Avvia la riproduzione. Pulsanti di controllo TV: Vedere pagina 67. X PAUSE/STEP: Mette la riproduzione in pausa. ./> SKIP: Passa al file/ brano/capitolo successivo o precedente. HB985-DB.BDEUPPK_ITA.indd 13 SPK LEVEL: Imposta il livello audio dell’altoparlante desiderato. Preparazione INPUT/TUNER: Modifica la modalità di ingresso. m/M SCAN: Ricerca avanti o indietro. SLEEP: Imposta un dato periodo di tempo trascorso il quale l’unità si spegne. 2010-05-14 2:29:58 14 Preparazione Pannello frontale 1 2 2 Preparazione 3 4 5 6 a Vassoio del disco c Sensore del telecomando b Pulsanti di funzionamento Pulsante 1 STANDBY/ON Z (OPEN/CLOSE) FUNZIONE Modifica la sorgente di ingresso o funzione. B/X (PLAY / PAUSE) x (STOP) ./> (SKIP) - TUNE + (Sintonizzazione della radio) d Finestra Display HB985-DB.BDEUPPK_ITA.indd 14 7 e PORTABLE IN f Porta USB g Controllo volume 2010-05-14 2:29:58 Preparazione 15 Pannello posteriore 1 2 3 4 5 2 7 8 9 10 Preparazione 6 11 a Cavo di alimentazione CA Inserire nella presa di corrente. g COMPONENT VIDEO (Y PB PR) OUTPUT (SCANSIONE PROGRESSIVA) b Connettori altoparlanti h OPTICAL 1(TV) / 2 c Ventola di raffreddamento i iPod (24 pin) Connettere al supporto per l’iPod fornito. d Connettore dell’antenna e VIDEO OUT f AUX (L/R) INPUT HB985-DB.BDEUPPK_ITA.indd 15 j HDMI OUT (tipo A, Versione 1.3) Connettere a una TV con ingressi HDMI. k Porta LAN 2010-05-14 2:29:59 16 Installazione 3 Installazione Assemblare gli altoparlanti 3 Per l’altoparlante centrale: Utilizzare l’adesivo in dotazione per applicare i quattro piedini piccoli alla base dell’altoparlante centrale. Installazione Montaggio degli altoparlanti BCS-707 piedini antiscivolo piccoli small non-skid pads Preparazione degli altoparlanti 1. Applicare i piedini antiscivolo alla base di ciascun altoparlante, del subwoofer e dell’altoparlante centrale. Per basi dell’altoparlante: Utilizzare l’adesivo in dotazione per applicare i quattro piedini medi alla base (parte inferiore) di ciascuna base dell’altoparlante. middle non-skid pads piedini antiscivolo medi Per subwoofer: Utilizzare l’adesivo in dotazione per applicare i quattro piedini medi alla base. 2. Installare le basi dell’altoparlante sulle aste utilizzando le viti in dotazione. Dopo aver allineato l’asta e la base, stringere le viti piccolo nei punti illustrati di seguito. Si noti che l’altoparlante deve essere rivolto nella direzione della base del triangolo isoscele. ParteRear posteriore large non-skid pads piedini antiscivolo grandi ParteFront anteriore HB985-DB.BDEUPPK_ITA.indd 16 2010-05-14 2:29:59 Installazione 3. Collegare i cavi al lettore. Collegare il cavo bianco con linea grigia nel lato (+) e l’altro cavo nel lato (–). Per collegare il cavo al lettore premere ciascuna linguetta di plastic per aprire il connettore di collegamento. Inserire il cavo e rilasciare la linguetta. Colore (+) 17 Fissaggio degli altoparlanti anteriore e surround Fissare gli altoparlanti anteriore e surround utilizzando il morsetto in plastica in dotazione. Avvitare i due ganci di supporto nella parete dietro all’altoparlante. Passare un cavo spesso attorno i ganci e attraverso il morsetto in plastic in modo da stabilizzare l’altoparlante (verificare che sia in grado di supportare il peso dell’altoparlante). Dopo l’installazione verificare che l’altoparlante sia fissato correttamente. 3 ATTENZIONE Installazione Nero (-) Cavo adeguatamente thick cord spesso Morsetto in plastica Plastic catch • Non collegare casse di tipo diverso da quello fornito con il sistema. • Non collegare gli altoparlanti in dotazione ad amplificatori diversi da quelli forniti con il sistema. Il collegamento ad amplificatori di altro tipo può provocare un problema di funzionamento o un incendio. ATTENZIONE • Il morsetto in plastica non è un accessorio d’installazione e non si deve appendere l’altoparlante alla parete utilizzando esclusivamente il morsetto. Per stabilizzare gli altoparlanti utilizzare sempre un cavo. • Pioneer non è responsabile di danni o perdite provocate dal montaggio, dall’installazione inadeguata, dalla forza insufficiente dei materiali d’installazione, dall’uso improprio o dai disastri naturali. • Per posizionare l’unità, verificare che sia ben fissata ed evitare punti in cui è facile che possa cadere e provocare ferimenti in caso di disastri naturali (terremoto). HB985-DB.BDEUPPK_ITA.indd 17 2010-05-14 2:29:59 18 Installazione Montaggio degli altoparlanti BCS-303 Per l’altoparlante centrale: Utilizzare l’adesivo in dotazione per applicare i quattro piedini piccoli alla base dell’altoparlante centrale. Preparazione degli altoparlanti 1. Applicare i piedini antiscivolo alla base di ogni altoparlante. piedini antiscivolo piccoli samll non-skid pads Per altoparlanti anteriore e surround: Utilizzare l’adesivo in dotazione per applicare i quattro piedini piccoli alla base (parte inferiore) di ciascuna base dell’altoparlante. 2. Collegare i cavi al lettore. 3 Installazione samll non-skidpiccoli pads piedini antiscivolo Collegare il cavo bianco con linea grigia nel lato (+) e l’altro cavo nel lato (–). Per collegare il cavo al lettore premere ciascuna linguetta di plastica per aprire il connettore di collegamento. Inserire il cavo e rilasciare la linguetta. Colore (+) Per subwoofer: Utilizzare l’adesivo in dotazione per applicare i quattro piedini medi alla base. piedini antiscivolo large non-skid pads grandi Nero (-) HB985-DB.BDEUPPK_ITA.indd 18 2010-05-14 2:30:00 Installazione Installazione a parete dell’altoparlante centrale 19 Note aggiuntive sugli altoparlanti Installare gli altoparlanti principali anteriore destro e sinistro alla stessa distanza dal TV. L’altoparlante centrale è dotato di un foro d’installazione che può essere utilizzato per montare l’altoparlante alla parete. Prima dell’installazione Le viti d’installazione non sono fornite. Utilizzare viti indicate per il materiale della parete e a supportare il perso dell’altoparlante. ATTENZIONE • Se non si è sicuri della qualità e della forza della parte, consultare un tecnico per eventuali consigli. • Pioneer non è responsabile di incidenti o danni dovuti all’installazione impropria. Verificare che tutto il cavo scoperto dell’altoparlante sia attorcigliato insieme e inserito completamente nel connettore dell’altoparlante. Se i cavi scoperti del diffusore toccano il panello posteriore si potrebbe verificare un’interruzione di alimentazione come misura di sicurezza. Gli altoparlanti anteriore, centrale e surround in dotazione con il sistema sono schermati magneticamente. Tuttavia, a seconda del luogo d’installazione si può verificare una distorsione del colore se l’altoparlante è installato molto vicino allo schermo del televisore. In tal caso, spegnere l’interruttore del televisore (OFF) e riaccenderlo (ON) dopo 15 - 30 min. Se il problema persiste posizionare il sistema di altoparlanti lontano dal televisore. 3 Installazione Ricordarsi che il sistema di altoparlanti è pesante e il peso potrebbe allentare le viti o il materiale della parete potrebbe non essere adeguato a sorreggere, provocando la caduta dell’altoparlante. Verificare che la parete che s’intende utilizzare sia adeguatamente resistente per supportare gli altoparlanti. Non installare su pareti di compensato o cartongesso. Precauzioni: Il subwoofer non è schermato magneticamente e non dovrebbe essere posto vicino a un TV o a un monitor. I supporti di memorizzazione magnetica (floppy-disk, nastri o videocassette) devono essere conservati lontani dal subwoofer. Non installare l’altoparlante centrale/surround e il subwoofer alla parete o al soffitto. Potrebbero cadere provocando ferimenti. Vite per Mounting screw l’installazione (non(not in dotazione) supplied) 5 mm 10 mm da 5 mm a 7 mm HB985-DB.BDEUPPK_ITA.indd 19 2010-05-14 2:30:00 20 Installazione Posizionamento del sistema L’illustrazione seguente mostra un esempio di posizionamento del sistema. Notare che le illustrazioni in queste istruzioni possono essere diverse dall’unità effettiva per scopo esplicativo. Per ottenere il miglior audio surround possibile, tutti gli altoparlanti diversi dal subwoofer devono essere posizionati alla stessa distanza dal punto di ascolto (A). B 3 G Installazione F A A A A D • Attenzione che i bambini non mettano le mani o qualsiasi tipo di oggetto nel *condotto dell’altoparlante. *Condotto dell’altoparlante: Un ambiente per un suono basso pieno nella cassa dell’altoparlante (alloggiamento). • Posizionare l’altoparlante centrale ad una distanza di sicurezza dai bambini. In caso contrario, l’altoparlante potrebbe cadere e provocare lesioni personali e/o danni alla proprietà. • Gli altoparlanti contengono parti magnetiche che possono provocare irregolarità di colore sullo schermo della TV o del PC. Posizionare gli altoparlanti lontano dal TV o dal PC. C A ATTENZIONE E A A Altoparlante anteriore sinistro (S)/ B Altoparlante anteriore destro (D): Posizionare gli altoparlanti anteriori sui lati del monitor o schermo allineandoli il più possibile all’altezza di quest’ultimo. C Cassa centrale: Posizionare l’altoparlante centrale sopra o sotto al monitor o schermo. D Altoparlante surround sinistro (S)/ E Altoparlante surround destro (D): Posizionare questi altoparlanti dietro alla posizione di ascolto rivolti leggermente verso l’interno. F Subwoofer: La posizione del subwoofer non è così importante poiché i suoni bassi non sono altamente direzionali. Ma il meglio posizionare il subwoofer vicino agli altoparlanti anteriori. Ruotarlo leggermente verso il centro della stanza per ridurre i riflessi sulle pareti. G Unità HB985-DB.BDEUPPK_ITA.indd 20 2010-05-14 2:30:00 Installazione Connessioni al TV Effettuare uno dei collegamenti che seguono a seconda delle capacità delle apparecchiature esistenti. • Connessione HDMI (pagina 21-22) • Connessione Component Video (pagina 22) • Connessione video (pagina 23) NOTA 21 Connessione HDMI Se si possiede un televisore o un monitor HDMI è possibile collegarli a questo lettore mediante cavo HDMI (tipo A, Versione 1.3). Connettere il jack HDMI OUT del lettore al jack HDMI IN della TV o monitor HDMI compatibile. Connessione HDMI Lettore Player 3 • Consultare i manuali della propria TV, videoregistratore, impianto stereo o altre apparecchiature al fine di effettuare il miglior collegamento. Installazione • Dipendendo dalle apparecchiature che si desidera connettere, esistono varie modalità di connessione del lettore. Usare solo una delle connessioni descritte in questo manuale. TV TV • Assicurarsi che il lettore sia collegato direttamente alla TV. Sintonizzare la TV sul canale di ingresso video corretto. • Non connettere il lettore passando dal VCR. L’immagine potrebbe venire distorta dal sistema di protezione della copia. Impostare la sorgente TV su HDMI (consultare il manuale del TV). HB985-DB.BDEUPPK_ITA.indd 21 2010-05-14 2:30:00 22 Installazione Connessione Component Video NOTA • La modifica della risoluzione quando la connessione è già stata stabilita può avere un cattivo funzionamento come risultato. Per risolvere il problema, spegnere i lettore e quindi riaccenderlo. • Se la connessione HDMI con HDCP non è verificata, lo schermo TV diviene nero. In questo caso, controllare la connessione HDMI, oppure scollegare il cavo HDMI. 3 • Se ci sono disturbi o linee sullo schermo, controllare il cavo HDMI (la lunghezza è generalmente limitata a 4,5 m e usare un cavo HDMI ad alta velocità (versione 1.3). Connettere i jack COMPONENT VIDEO OUT sul lettore ai jack di ingresso corrispondenti sulla TV tramite i cavi Y Pb Pr. Potete ascoltare l’audio sull’altoparlante del sistema. Connessione componente Player Lettore PR VIDEO L Installazione R • Se un dispositivo HDMI connesso non accetta un’uscita audio del lettore, l’audio del dispositivo HDMI può essere distorto o può non uscire. • Quando si connette un dispositivo HDMI o DVI compatibile, accertarsi di quanto segue: - Provare a spegnere il dispositivo HDMI/DVI e questo lettore. Dopodiché, accendere il dispositivo HDMI/DVI e lasciarlo per circa 30 secondi, quindi accendere questo lettore. - L’ingresso video del dispositivo connesso sia impostato correttamente per questa unità. - Il dispositivo connesso sia compatibile con ingresso video 720x576p (480p), 1280x720p, 1920x1080i o 1920x1080p. • Non tutti i dispositivi HDMI o DVI HDCPcompatibili funzionano con questo lettore. - Su un dispositivo non HDCP è possibile che l’immagine non venga visualizzata in modo corretto. - Questo lettore non avvia la riproduzione e lo schermo del televisore diviene nero. HB985-DB.BDEUPPK_ITA.indd 22 Y COMPONENT VIDEO INPUT • Quando si usa la connessione HDMI, è possibile modificare la risoluzione dell’uscita HDMI. (Vedere “Impostazione della risoluzione” a pagina 23.) • Selezionare il tipo di uscita video dal jack HDMI OUT usando l’opzione [Imp. colore HDMI] sul menu [Impostaz.] (vedere pagina 34). PB AUX OUTPUT Verde Green Blue Blu Red Rosso TV TV NOTA Quando si usa la connessione COMPONENT VIDEO OUT, è possibile modificare la risoluzione dell’uscita VIDEO. (Vedere “Impostazione della risoluzione” a pagina 23.) 2010-05-14 2:30:01 Installazione Connessione video Impostazione della risoluzione Collegare il connettore VIDEO OUT del lettore al connettore video sul TV tramite il cavo video. Potete ascoltare l’audio sull’altoparlante del sistema. Il lettore consente di impostare diverse risoluzioni dell’uscita per i jack HDMI OUT e COMPONENT VIDEO OUT. Si può modificare la risoluzione usando il menu di configurazione [Impostaz.]. Connessione video 1. Premere HOME MENU ( 23 ). 2. Usare I/i/U/u per selezionare [Impostaz.] e premere ENTER ( ). Appare il menu di configurazione [Impostaz.]. Lettore PR VIDEO PB AUX R Y COMPONENT VIDEO INPUT OUTPUT 4. Usare U/u per selezionare l’opzione [Resolution] e quindi premere ENTER ( ) o i per passare al terzo livello. Yellow Giallo 3 Installazione L 3. Utilizzare U/u per selezionare l’opzione [DISPLAY], quindi premere i per passare al secondo livello. TV 5. Utilizzare U/u per selezionare la risoluzione desiderata, quindi premere ENTER ( ) per confermare la selezione. NOTA • Se la TV non accetta la risoluzione impostata sul lettore è possibile impostare la risoluzione su 576p (480p) come segue: 1. Premere Z per aprire il vassoio del disco. 2. Premere x per oltre 5 secondi. • Poiché diversi fattori influenzano la risoluzione dell’uscita video, vedere “Risoluzione video di uscita” a pagina 70. HB985-DB.BDEUPPK_ITA.indd 23 2010-05-14 2:30:02 24 Installazione Collegamento antenna Per ascoltare la radio connettere l’antenna fornita in dotazione. Collegamento antenna Connessione con il dispositivo esterno Connessione AUX Si può godere l’audio dell’unità tramite i jack analogici di uscita degli altoparlanti del sistema. Connettere i jack di uscita audio analogici del componente alla porta AUX S/D (INPUT) di questa unità. E quindi selezionare l’opzione [AUX] premendo INPUT/TUNER, I/i e quindi ENTER ( ). 3 Installazione Connessione AUX Lettore Player Lettore Player VIDEO L PR PB AUX R Y COMPONENT VIDEO INPUT NOTA Una volta connessa l’antenna a filo FM tenerla nella posizione più orizzontale possibile. Verificare che l’antenna a filo FM sia completamente distesa. HB985-DB.BDEUPPK_ITA.indd 24 Rosso Red Bianco White To the audio output jacks Verso jack di uscita audio ofiyour component del componente (TV, VCR, etc.) (TV, VCR, ecc.) 2010-05-14 2:30:02 Installazione PORTA Connessione IN Connessione OPTICAL IN 1/2 Si può godere l’audio del lettore audio portatile tramite gli altoparlanti del sistema. Si può godere l’audio del proprio componente tramite la connessione ottica digitale che connette gli altoparlanti del sistema. Connettere il jack delle cuffie (o line out) del lettore audio portatile alla porta PORT IN di questa unità.E quindi selezionare l’opzione [PORTABLE] premendo INPUT/TUNER, I/i e quindi ENTER ( ). Connessione PORT IN 25 Connettere il jack ottico di uscita del componente ai jack OPTICAL IN 1/2 dell’unità. E quindi selezionare l’opzione [OPTICAL 1/2] premendo INPUT/TUNER, I/i e quindi ENTER ( ). Oppure premere OPTICAL per la selezione diretta. Connessione ottica 3 Installazione Lettore MP3 ecc.. twZG SGUUU HB985-DB.BDEUPPK_ITA.indd 25 Verso To thel’uscita digitaljack ottico digitale optical outputdel jack componente of your component 2010-05-14 2:30:03 26 Installazione Collegamento Bluetooth® Informazioni sul Bluetooth Bluetooth® è una tecnologia di comunicazione wireless per collegamenti a breve raggio. L’intervallo supportato è entro i 10 metri (se il collegamento subisce interferenze da parte di altre onde elettromagnetiche o si collega il Bluetooth in altre stanze, l’audio potrebbe interrompersi). 3 Il collegamento di singoli dispositivi tramite la tecnologia Bluetooth non comporta alcun costo. Installazione Un telefono cellulare dotato di tecnologia wireless Bluetooth può essere adoperato tramite il Cascade se la connessione è effettuata con Bluetooth. Dispositivi supportati: telefoni cellulari, MP3, laptop, PDA (queste unità devono supportare cuffie stereofoniche). Profili Bluetooth Per usare la tecnologia wireless Bluetooth, i dispositivi devono essere in grado di interpretare alcuni profili. Questa unità è compatibile con i seguenti profili. A2DP (Advanced Audio Distribution Profile) Ascolto di musica da un dispositivo Bluetooth Accoppiare l’unità e il dispositivo Bluetooth Prima di cominciare la procedura di abbinamento, accertarsi che sul dispositivo sia stato abilitato il Bluetooth. Fare riferimento alla guida utente del dispositivo. Non è necessario ripetere l’operazione di accoppiamento una volta eseguita la prima volta. HB985-DB.BDEUPPK_ITA.indd 26 1. Selezionare la funzione Bluetooth usando INPUT/TUNER o BT AUDIO. Sul display è visualizzato “BT AUDIO” e quindi “BT READY”. 2. Attivare il dispositivo Bluetooth ed eseguire l’operazione di accoppiamento. Quando l’unità cerca un dispositivo Bluetooth, sul display di quest’ultimo può essere visualizzato un elenco delle periferiche disponibili a seconda del tipo di dispositivo. L’unità è visualizzata come “PIONEER AUDIO”. 3. Immettere il codice PIN. Codice PIN: 0000 4. Se l’unità è accoppiata correttamente con il dispositivo Bluetooth, il LED Bluetooth dell’unità si illumina ed è visualizzato “BT SINK”. NOTA La procedura di accoppiamento può cambiare in base al tipo di dispositivo Bluetooth. 5. Ascolto di brani musicali. Per riprodurre i file musicali memorizzati sul proprio dispositivo Bluetooth, fare riferimento alla relativa guida utente. NOTA • Se si cambia il funzionamento dell’unità, la funzione Bluetooth è disconnessa; in questo caso è necessario ripetere l’accoppiamento. • AVRCP potrebbe non essere disponibile in questa modalità. 2010-05-14 2:30:03 Installazione Controllo delle informazioni del dispositivo Bluetooth collegato Questa funzione è attivata dopo l’accoppiamento. Per controllare le informazioni sul Bluetooth. Tenere premuto ripetutamente DISPLAY. Le informazioni sul Bluetooth cambiano come di seguito. Indirizzo del dispositivo Bluetooth locale t Nome del dispositivo t Nessuno t ... 27 NOTA • Questa unità non supporta il profilo Cuffie monofoniche (profilo vivavoce). • Quando il collegamento subisce interferenze da parte di altre onde elettromagnetiche, l’audio potrebbe essere interrotto. • Con questa unità non è possibile controllare il dispositivo Bluetooth. • L’accoppiamento è limitato a un dispositivo Bluetooth per unità; non è supportato l’accoppiamento multiplo. • A seconda del tipo di dispositivo, potrebbe non essere possibile utilizzare la funzione Bluetooth. • Quando il Bluetooth è collegato, sul display è visualizzato “BT READY”. 3 Installazione • Sebbene la distanza tra il Bluetooth e l’unità sia inferiore a 10 m, in presenza di ostacoli ci potrebbero essere problemi di collegamento. • In caso di malfunzionamenti elettrici provocati da dispositivi che utilizzano le stesse frequenze, come apparecchiature medicali, forni a microonde e periferiche LAN wireless, il collegamento può interrompersi. • La presenza di una persona tra il dispositivo Bluetooth e il lettore può interrompere la comunicazione; in tal caso, si avrà una disconnessione. • Aumentando la distanza tra il Bluetooth e l’unità, la qualità audio si reduce; si ha una disconnessione quando lo spazio tra il Bluetooth e l’unità supera l’intervallo operativo del Bluetooth. • La periferica con tecnologia wireless Bluetooth si disconnette se si spegne l’unità principale oppure il dispositivo è allontanato dall’unità principale per oltre 10 m. HB985-DB.BDEUPPK_ITA.indd 27 2010-05-14 2:30:03 28 Installazione Connessione alla rete domestica Questo lettore può essere connesso a una rete locale (LAN) tramite la porta LAN sul pannello posteriore. 3 Installazione Per ulteriori informazioni consultare la documentazione relativa alla propria periferica di rete. Connettere la porta LAN alla porta corrispondente del proprio modem o router usando un cavo LAN o Ethernet disponibile commercialmente (CAT5 o superiore con connettore RJ45). Nella configurazione di esempio fornita sotto, questo lettore potrà accedere a contenuti di entrambi PC. Collegamento rete Router Router Broadband Servizio a Service banda larga WAN LAN 1 LAN 2 PC PC LAN 3 Lettore Player NOTA • Quando si collega o scollega il cavo LAN, afferrare la spina e non il cavo. Quando si scollega il cavo LAN, non tirarlo ma estrarlo dalla presa premendo in basso la linguetta. • Non collegare un cavo telefonico modulare alla porta LAN. • Poiché esistono diverse configurazioni della connessione, seguire le specifiche della società telefonica o del fornitore di accesso. • Se si desidera accedere a contenuti dei PC o dei server DLNA, questo lettore deve essere connesso a loro tramite un router sulla stessa rete locale. HB985-DB.BDEUPPK_ITA.indd 28 2010-05-14 2:30:03 Installazione Impostazione rete Prima di impostare la rete cablata è necessario collegare la rete a banda larga alla rete domestica. Se sulla rete locale (LAN) è presente un server DHCP tramite connessione cablata, questo lettore riceverà allocato automaticamente un indirizzo IP. Dopo avere eseguito la connessione fisica, un certo numero di reti locali può richiedere una regolazione delle impostazioni di rete del lettore. Regolare le impostazioni di rete [RETE] come segue. 2. Usare i tasti U/u/I/i per selezionare la modalità IP scegliendo tra [Dinamico] e [Statico]. Solitamente selezionare [Dinamico] per allocare un indirizzo IP automaticamente. HB985-DB.BDEUPPK_ITA.indd 29 NOTA Se sulla rete non ci sono server DHCP e si desidera impostare il numero di IP manualmente, selezionare [Statico] quindi impostare [Indirizzo IP], [Subnet Mask], [Ingresso] e [Server DNS] tramite i tasti numerici U/u/I/i. Se commettete un errore inserendo il numero, premere CLEAR per cancellare la sezione evidenziata. 3. Selezionare [OK] e premere ENTER ( ) per applicare le impostazioni di rete. 4. Il lettore chiederà di verificare la connessione di rete. Selezionare [OK] e premere ENTER ( ) per completare la connessione di rete. 3 Installazione 1. Selezionare l’opzione [Impost. connessione] nel menu di [Impostaz.] quindi premere ENTER ( ). 29 5. Se si seleziona [Test] e preme ENTER ( ) al punto 4 di cui sopra, lo stato della connessione di rete viene visualizzato sullo schermo. La connessione di rete può anche essere testata su [Stato connessione] nel menu di [Impostaz.]. 2010-05-14 2:30:03 30 Installazione Note relative alla connessione di rete: • • 3 Molti problemi di connessione di rete durate la configurazione possono essere risolti eseguendo un reset del router o modem. Dopo avere connesso il lettore alla rete domestica, accendere e spegnere il cavo di alimentazione del router delle rete domestica oppure modem via cavo. Quindi accendere e/o riconnettere il cavo di alimentazione. Installazione Dipendendo dal fornitore di servizi Internet (ISP) il numero di dispositivi che possono ricevere il servizio Internet può essere limitato dai termini di servizio applicabili. Per maggiori dettagli rivolgersi al proprio gestore del servizio. • La nostra azienda non è responsabile per eventuali cattivi funzionamenti del lettore e/o la funzione di connessione a Internet a causa di errori/cattivi funzionamenti associati alla connessione a Internet di banda larga o altre apparecchiature connesse. • Le funzioni dei dischi BD-ROM resi disponibili tramite la funzione di connessione internet non sono create o fornite dalla nostra azienda e la nostra azienda non è responsabile per la loro funzionalità o disponibilità continuata. Alcuni materiali relativi al disco resi disponibili tramite la connessione Internet possono non essere compatibili con questo lettore. Se avete domande relative a questi contenuti, rivolgetevi al produttore del disco. • Alcuni contenuti Internet richiedono una connessione di rete a banda larga. • Anche se il lettore è connesso e configurato correttamente, alcuni contenuti Internet possono non funzionare correttamente a causa di congestione di rete, la qualità della banda del proprio servizio Internet o problemi con il fornitore dei contenuto. HB985-DB.BDEUPPK_ITA.indd 30 • Alcune operazioni sulle connessioni Internet possono non essere possibili a causa di date restrizioni imposte dal fornitore di servizi internet (ISP) che vi fornisce la connessione a Internet a banda larga. • Eventuali addebiti imposti dal fornitore ISP incluso, senza limitazione, i costi di connessione sono vostra responsabilità. • Per la connessione cablata di questo lettore è necessaria una porta A 10 Base-T o 100 Base-TX LAN. Se il vostro servizio Internet non permette questo tipo di connessione, non sarà possibile collegare il lettore. • Per usare un servizio xDSL è necessario utilizzare un router. • Per usare un servizio DSL è necessario un modem DSL e per usare il servizio di modem cablato è necessario un modem cablato. ipendendoDipendendo dal metodo di accesso dell’accordo di licenza con il vostro ISP, è possibile che la funzione di connessione Internet del vostro lettore o è possibile che abbiate un limite ai dispositivi che possono essere collegati contemporaneamente. (Se il vostro ISP limita l’abbonamento ad un dispositivo, è possibile che a questo questo lettore non sia permesso connettersi a Internet quando alla rete è già connesso un PC.) • È possibile che l’uso di un “Router” non sia permesso o sia limitato dipendendo dalle politiche e restrizioni poste dal ISP. Per maggiori dettagli rivolgersi direttamente al proprio ISP. • Spegnere tutte le apparecchiature non utilizzate presenti sulla rete domestica locale. Alcuni dispositivi possono generare traffico di rete. 2010-05-14 2:30:03 Installazione Collegamento dispositivo USB Questo lettore può riprodurre file video, musicali e foto contenuti su un dispositivo USB. 1. Inserire un dispositivo USB nella porta USB fino a completo inserimento. Connessione USB 31 NOTA • Questo lettore supporta memorie Flash/Disco rigido sterno formattati FAT16, FAT32 e NTFS quando accede a file (musica, foto, video). Tuttavia, per la registrazione BD-LIVE e Audio CD, sono supportati solo i formati FAT16 e FAT32. Usare una memoria USB flash/disco fisso esterno formattati con FAT16 o FAT32 quando si usa la registrazione BD-LIVE e Audio CD. • Il dispositivo USB può essere utilizzato per la memorizzazione locale per poter vedere dischi BD Live tramite internet. • Questa unità può supportare fino a 4 partizioni del dispositivi USB. • Un dispositivo USB che richiede l’installazione aggiuntiva di un programma quando è connesso un computer non è supportato. 3 Installazione • Non estrarre il dispositivo USB durante il funzionamento (riproduzione, ecc.) • Dispositivo USB: Dispositivo USB che supporta USB 1,1 e USB 2,0. 2. Premere HOME MENU. Selezionare [Video], [Foto] o [Musica] usando U/u/I/i e premere ENTER ( ). 3. Selezionare un file tramite U/u/I/i e premere PLAY o ENTER ( ) per riprodurre il file. Sullo schermo si può controllare la spazio presente sul dispositivo USB. 4. Selezionare l’altra modalità. Ed estrarre con attenzione il dispositivo USB. HB985-DB.BDEUPPK_ITA.indd 31 • File video, musica e immagine che possono essere riprodotti. Per informazioni sulle operazioni su ciascun file, consultare le pagine relative. • Si consiglia di eseguire backup regolari per prevenire la perdita dei dati. • Quando si usa una prolunga USB o lettore USB multiplo, è possibile che il dispositivo non venga riconosciuto. • Alcuni dispositivi USB possono non funzionare con questa unità. • Fotocamere digitali e telefoni cellulari non sono supportati. • La porta USB su questa unità non può essere collegata ad un PC. 2010-05-14 2:30:03 32 Installazione 4. Usare U/u per selezionare la seconda opzione di impostazione e poi premere ENTER ( ) per passare al terzo livello. Settaggi Regolare le impostazioni di configurazione Potete cambiare le impostazioni del lettore sul menu [Impostaz.]. 1. Premere HOME MENU ( ). 5. Usare U/u per selezionare la risoluzione desiderata quindi premere ENTER ( ) i per confermare la selezione. 3 Installazione 2. Usare I/i/U/u per selezionare [Impostaz.] e premere ENTER ( ). Appare il menu di configurazione [Impostaz.]. 3. Usare U/u per selezionare la prima di impostazione e premere i per passare al secondo livello. HB985-DB.BDEUPPK_ITA.indd 32 2010-05-14 2:30:04 Installazione Menu [DISPLAY] Risoluzione Aspetto TV Imposta la risoluzione di uscita del segnale video Component e HDMI. Vedere la pagina 23 e 70 per maggiori dettagli relativi all’impostazione della risoluzione. Selezionare un rapporto d’aspetto TV in base al tipo della propria TV. [4:3 Letterbox] Selezionare se è collegato un televisore standard 4:3. Visualizza le immagini con barre nere sopra e sotto. [Auto] Se è collegato il jack HDMI OUT per fornire i dati di identificazione dello schermo TV (EDID), viene selezionata automaticamente la risoluzione più adatta al televisore collegato. Se è collegato solo COMPONENT VIDEO OUT, la risoluzione passa a 1080i come risolu zione predefinita. [1080p] produce 1080 linee di video progressivo. [16:9 Originale] Selezionare se è collegato un televisore 16:9. L’immagine a 4:3 è visualizzata con un rapporto di aspetto 4:3 originale, con barre nere sul lato destro e sinistro. [1080i] produce 1080 linee di video interlacciato. [16:9 Full] Selezionare se è collegato un televisore 16:9. L’immagine a 4:3 è regolata orizzontalmente (in proporzione lineare) per riempire tutto lo schermo. [576p (480p)] produce 576 (480) linee di video progressivo. 3 Installazione [4:3 Panscan] Selezionare se è collegato un televisore standard 4:3. Visualizza immagini tagliate per riempire lo schermo. Entrambi i lati dell’immagine sono tagliati. 33 [720p] produce 720 linee di video progressivo. [576i (480i)] produce 576 (480) linee di video interlacciato. NOTA Potete selezionare l’opzione [4:3 Letterbox] e [4:3 Panscan] quando la risoluzione è impostata ad una risoluzione superiore a 720p. HB985-DB.BDEUPPK_ITA.indd 33 2010-05-14 2:30:04 34 Installazione Mod. v. 1080p Se la risoluzione è impostata su 1080p, selezionare [24 Hz] per una presentazione senza disturbi dei film (1080p/24 Hz) con schermo HDMI compatibile con ingresso a 1080p/24 Hz. NOTA • Se si seleziona [24 Hz], possono verificarsi disturbi delle immagini quando si passa da materiali video ai film. In questo caso, selezionare [50 Hz]. 3 Installazione • Anche se [Mod. v. 1080p] è impostato su [24 Hz], se il TV non è compatibile con 1080p/24 Hz, la frequenza fotogrammi effettiva dell’uscita video sarà di 50 Hz in base al formato della sorgente video. Imp. colore HDMI Selezionare il tipo di uscita dal jack HDMI OUT. Per questa impostazione, fare riferimento ai manuali dello schermo. [YCbCr] Selezionare quando si collega a uno schermo HDMI. [RGB] Selezionare quando si collega a uno schermo DVI (RGB). HB985-DB.BDEUPPK_ITA.indd 34 Menu [LINGUA] Menu display Selezionare una lingua per il menu [Impostaz.] e per le visualizzazioni a schermo. Menu Disco/ Audio Disco/ Sottotitolo Disco Selezionare la lingua preferita per la traccia audio (disc audio), sottotitoli e menu disco. [Originale] Indica la lingua originale in cui è stato registrato il disco. [Altro] Premere ENTER ( ) per selezionare un’altra lingua. Usare i pulsanti numerici quindi ENTER ( ) per immettere il numero corrispondente a 4 cifre in base all’elenco codici lingua a pagina 69. [Off ] (solo per i sottotitoli del disco) Disattiva i sottotitoli. NOTA Dipendendo dal disco è possibile che la funzione lingua non funzioni. 2010-05-14 2:30:04 Installazione Menu [AUDIO] Settaggio Diffusori Per ottenere il miglior audio possibile, usare il display di configurazione altoparlanti per specificare il volume degli altoparlanti connessi e la loro distanza dal punto di ascolto. Usare questo test per regolare il volume degli altoparlanti allo stesso livello. [Diffusore] Selezionare l’altoparlante che si desidera regolare. [Distanza] Regola la distanza tra ciascuno altoparlante e la posizione di ascolto. [Test/ Stop tono test] Gli altoparlanti emetteranno un tono di test. [OK] Conferma le impostazioni. [Annulla] Cancella l’impostazione. HB985-DB.BDEUPPK_ITA.indd 35 HD AV Sync A volte con la TV digitale ci sono ritardi tra immagine e audio. Quando si verifica questa eventualità potete compensare impostando un ritardo sull’audio in modo che questo ‘attenda’ l’arrivo dell’immagine: questo viene denominato HD AV Sync. Usare U u per scorrere verso l’alto e verso il basso il ritardo che può essere impostato su qualsiasi valore tra 0 e 300m sec. Il ritardo varierà in funzione del canale della TV Digitale su ci si trova. Se si modifica canale è possibile che sia necessario risincronizzare HD AV Sync. DRC (Controllo range dinamico) Quando un contenuto codificato in Dolby Digital o Dolby Digital Plus viene riprodotto, potete comprimere l’intervallo dinamico dell’uscita audio (la differenza tra i suoni più forti e quelli più deboli). Questo ti permette di ascoltare un film ad un volume più basso, senza perdere la chiarezza del suono. Impostare il [DRC] su [ON] per questo effetto. 3 Installazione [Volume] Regola il livello di uscita di ogni altoparlante. 35 NOTA L’impostazione DRC può essere modificata solo quando un disco non viene inserito o l’unità è nella modalità di arresto completo. 2010-05-14 2:30:04 36 Installazione Menu [BLOCCATO] Per accedere alle funzioni di [BLOCCATO], occorre immettere il codice di sicurezza a 4 cifre creato. Se non è ancora stata inserita una password, verrà chiesto di farlo. Inserire due volte una password a 4 cifre e premere ENTER ( ) per creare una password nuova. Password Potete creare o modificare la password. 3 Installazione [Nessuno] Inserire due volte una password a 4 cifre e premere ENTER ( ) per creare una password nuova. [Modifica] Inserire la password attuale e premere ENTER ( ). Inserire due volte una password a 4 cifre e premere ENTER ( ) per creare una password nuova. NOTA Se si commette un errore prima di premere ENTER ( ), premere CLEAR(ANNULLA). Dopodiché inserire la password corretta. Classificazione DVD Blocca la riproduzione di DVD classificati sulla base dei loro contenuti. (Non tutti i dischi sono classificati.) [Restrizione 1-8] Il valore 1 presenta le maggiori restrizioni, mentre il valore 8 presenta restrizioni minime. [Sblocca] Se si seleziona questa opzione, il controllo parentale non è attivo il disco viene riprodotto completamente. Classificazione BD Selezionare un limite di età per la riproduzione di BD-ROM. Usare i tasti numerici per inserire il limite di età per la visualizzazione di BD-ROM. [255] È possibile riprodurre tutti i BD-ROM. [0-254] Impedisce la riproduzione di un BD-ROM con le valutazioni corrispondenti definite. NOTA Se si dimentica la password, In caso non si ricordi la password, è possibile annullarla come segue: La [Classificazione BD] viene applicata solo per i dischi CD dotati di Advanced Rating Control (controllo avanzato della classificazione). 1. Rimuovere eventuali dischi dal lettore. 2. Selezionare l’opzione [Bloccato] nel menu [Impostaz.]. Codice Locale 3. Utilizzare i tasti numerici per inserire “210499” nel menu [Bloccato]. La password viene annullata. Immettere il codice dell’area i cui standard sono stati utilizzati per valutare il DVD, in base all’elenco a pagina 68. HB985-DB.BDEUPPK_ITA.indd 36 2010-05-14 2:30:04 Installazione Menu [ALTRO] Impost. connessione DivX VOD Se la vostra rete domestica è pronta per la connessione del lettore, il lettore necessita essere configurato per la connessione di rete per poter comunicare sulla rete. (Vedere “Connessione alla rete domestica” alle pagina 28.) INFORMAZIONI SU DIVX VIDEO: DivX® è un formato digitale video creato da DivX, Inc. Questo dispositivo è un dispositivo originale certificato DivX Certified® che riproduce DivX video. Visitate www.divx.com per ulteriori informazioni e strumenti software per convertire i vostri file in DivX video. Stato connessione INFORMAZIONI SU DIVX VIDEO-ON-DEMAND: Per riprodurre contenuti Video-on-Demand (VOD) questo dispositivo originale certificato DivX Certified® deve essere registrato. Per generare il codice di registrazione, individuare la sezione DivX VOD nel menu di impostazione del dispositivo. Andare a vod. divx.com con questo codice per completare il processo di registrazione ed avere ulteriori informazioni relativamente a DivX VOD. Se si desidera controllare lo stato della connessione di rete su questo lettore, selezionare le opzioni [Stato connessione] e premere ENTER ( ) per verificare se sono state stabilite connessioni alla rete e a Internet. Collegamento BD-LIVE È possibile limitare l’accesso a Internet quando si utilizzano le funzionalità BD-LIVE. [Consentito] L’accesso a Internet è consentito per tutti i contenuti BD-LIVE. [Parz. Consentito] L’accesso a Internet è consentito solo per i contenuti BD-LIVE che dispongono di certificati del proprietario. L’accesso a Internet e le funzionalità AACS Online sono vietati per tutti i contenuti BD-LIVE senza certificato. [Proibito] L’accesso a Internet è vietato per tutti i contenuti BD-LIVE. HB985-DB.BDEUPPK_ITA.indd 37 3 Installazione Menu [RETE] 37 [Registra] Visualizza il codice di registrazione del vostro lettore. [Disattiva] Disattivate il lettore e visualizzate il codice di disattivazione. NOTA Tutti i video scaricati da DivX® VOD con il codice di registrazione di questo lettore possono essere riprodotti solo su questa unità. 2010-05-14 2:30:04 38 Installazione Spegnimento automatico Il salvaschermo appare quando si lascia il lettore in modalità arresto per circa cinque minuti. Se si imposta l’opzione su [ON], l’unità si spegne automaticamente quando il salvaschermo rimane visualizzato per 25 minuti. Impostare questa opzione su [Off ] lasciare il salvaschermo acceso fino a quando l’unità non viene azionata dall’utente. Inizializza 3 Imp.fabbrica L’unità può essere resettata alle impostazioni originali di fabbrica. Installazione Canc. mem. BD Inizializza il contenuto BD dall’unità di memorizzazione USB connessa. NOTA Se si ripristina il lettore alle impostazioni predefinite utilizzando l’opzione [Imp.fabbrica], bisognerà impostare di nuovo l’attivazione a tutti i servizi on-line e di rete. Info software Visualizza la versione software corrente. HB985-DB.BDEUPPK_ITA.indd 38 2010-05-14 2:30:04 Installazione Effetto audio 39 [Game]: Potete godere di un audio più virtuale durante il gioco dei giochi video. [Night]: Questo può essere utile quando si guardano film a basso volume a notte tarda. Potete selezionare una modalità audio adatta. Premere SOUND ripetutamente fino a quando non appare la modalità desiderata sul pannello anteriore o schermo. Gli elementi visualizzati per l’equalizzatore possono essere diversi dipendendo dalle fonti audio ed effetti. [Mus. ReTouch]: Quando si ascoltano file MP3 o altra musica compressa è possibile migliorare l’audio. Questa modalità è disponibile solo per 2 sorgenti canale. [Loudness]: Migliora l’audio dei bassi e degli acuti. [Pioneer 1]: Fornisce una regolazione del suono adatta con il tipo di collegamento piccolo degli altoparlanti (S-BD303). 3 Installazione [Pioneer 2]: Fornisce una regolazione del suono adatta con il tipo di collegamento grande degli altoparlanti (S-BD707T). [Bypass]: Software con segnale audio surround multicanale viene riprodotto in base al modo con cui è stato registrato. [Bass Blast]: Rinforza l’effetto audio basso dagli altoparlanti anteriore destro e sinistro e subwoofer. [PL ll Movie]: Esegue la decodifica modalità film Pro Logic ll del segnale di ingresso e produce cinque canali di uscita a banda completa da 2 sorgenti canale. Questa impostazione è ideale per la visione di video di vecchi film o film doppiati. Questa modalità è disponibile solo per 2 sorgenti canale. [PL ll Music]: Esegue la decodifica modalità musica Pro Logic ll del segnale di ingresso e produce cinque canali di uscita a banda completa da 2 sorgenti canale. Questa impostazione è l’ideale sia per gli stereo normali che per i CD. Questa modalità è disponibile solo per 2 sorgenti canale. [Clear Voice]: Questa modalità rende il suono della voce chiaro migliorando la qualità dell’audio vocale. HB985-DB.BDEUPPK_ITA.indd 39 2010-05-14 2:30:04 40 Uso 4 Uso Riproduzione generale 4. Selezionare [Video], [Foto] o [Musica] usando U/u/I/i e premere ENTER ( ). 5. Selezionare l’opzione Disc tramite I/i e premere ENTER ( ). Riproduzione dei dischi 1. Premere Z OPEN/CLOSE e posizionare il disco sul vassoio portadisco. 4 Uso Quando si connettono fino a due dispositivi compare come sopra. 6. Selezionare un file tramite U/u/I/i, e premere B (PLAY) o ENTER ( ) per riprodurre il file. 2. Premere Z OPEN/CLOSE per chiudere il vassoio portadischi e. Con la maggioranza di dischi Audio CD, BD-ROM e DVD-ROM la riproduzione viene avviata automaticamente. 3. Premere HOME MENU. NOTA • Le funzioni di riproduzione descritte i questo manuale non sono sempre disponibili con ogni file e supporto. Alcune funzioni possono essere limitate dipendendo da molti fattori. • Dipendendo dai titoli BD-ROM, per la riproduzione corretta è possibile che sia necessaria una connessione con dispositivo USB. HB985-DB.BDEUPPK_ITA.indd 40 2010-05-14 2:30:04 Uso Per interrompere l Premere x STOP durante la riproduzione. Uso del menu disco BD DVD AVCHD Per sospendere l Visualizzazione del menu disco Premere X PAUSE/STEP durante la riproduzione. Premere B PLAY per riprendere la riproduzione. La schermata di menu può essere visualizzata in primo luogo dopo il caricamento del disco che contiene un menu. Se si vuole visualizzare il menu disco durante la riproduzione, premere MENU. Riproduzione fotogramma per fotogramma Premere X PAUSE/STEP durante la riproduzione di film. Premere ripetutamente X PAUSE/STEP per riprodurre fotogramma per fotogramma. Scansione avanti o indietro Rallentare la velocità di riproduzione Usare i pulsanti U/u/I/i per navigare le voci del menu. Visualizzazione del menu popup Alcuni dischi BD-ROM contengono menu Pop-up che vengono visualizzati durante la riproduzione. Premere POPUP/ TOP MENU durante la riproduzione, e usare i pulsanti U/u/I/i per navigare le voci del menu. Riprendere riproduzione BD MUSIC DVD AVCHD MOVIE ACD Con la riproduzione in pausa, premere M SCAN ripetutamente per avviare la riproduzione con diverse velocità di rallentatore. L’unità registra il punto in cui avete premuto il x (STOP) dipendendo dal disco. Se “Xx (Resume Stop)” (Riprendi Stop) appare sullo schermo brevemente, premere B (PLAY) riprendere la riproduzione (dal punto scena). Saltare il capitolo/traccia o file precedente/successivo Se si preme x (STOP) due volte o si scarica il disco, “x”(Complete Stop) appare sullo schermo. L’unità annulla il punto di arresto. Durante la riproduzione, premere . o > per passare al capitolo/brano/file successivo o tornare all’inizio del capitolo/brano/file corrente. Premere brevemente . due volte per tornare al capitolo/brano/file precedente. HB985-DB.BDEUPPK_ITA.indd 41 4 Uso Durante la riproduzione premere m o M per l’avanzamento veloce o il riavvolgimento veloce. È possibile cambiare varie velocità di riproduzione premendo ripetutamente m o M. 41 NOTA • Il punto di ripresa può essere cancellato quando si preme un pulsante (ad esempio; 1 (POWER), Z (OPEN/CLOSE), ecc). • Sui dischi BD-Video con BD-J, la funzione di ripresa riproduzione non funziona. • Se si preme x (STOP) una volta durante la riproduzione di un titolo BD-ROM interattivo, l’unità si troverà nella modalità di arresto completo. 2010-05-14 2:30:05 42 Uso Ripetizione di una sezione specifica Riproduzione avanzata BD DVD AVCHD ACD Questo lettore non è in grado di ripetere una porzione specificata. Ripetere la riproduzione BD DVD AVCHD ACD MUSIC Durante la riproduzione, premere REPEAT ( ) ripetutamente per selezionare una modalità di ripetizione. 4 BD/DVD A- – La vostra sezione selezionata verrà ripetuta continuamente. Capitolo – Il file corrente viene riprodotto ripetutamente. Titolo Title – Il file corrente viene riprodotto ripetutamente. Uso Per tornare alla riproduzione normale, premere ripetutamente REPEAT ( ) per selezionare [Off ]. Audio CD/File musicali – Il file corrente o traccia viene riprodotto ripetutamente. – Tutte le tracce o file vengono riprodotti ripetutamente. – Le tracce o file vengono riprodotti in ordine casuale. – Tutte le tracce o file vengono riprodotti in ordine casuale. – La vostra sezione selezionata verrà ripetuta continuamente. (Solo AUDIO CD). Per riprendere la riproduzione normale, premere CLEAR. NOTA 1. Durante la riproduzione, premere REPEAT ( ) per selezionare [A-] all’inizio della porzione che si desidera ripetere. E quindi premere ENTER ( ). 2. Premere ENTER ( ) alla fine di ogni porzione. La vostra sezione selezionata verrà ripetuta continuamente. 3. Per tornare alla riproduzione normale, premere ripetutamente REPEAT ( ) per selezionare [off ] oppure premere CLEAR. NOTA Non potete selezionare una sezione inferiore a 3 secondi. Ricerca con contrassegno BD DVD AVCHD MOVIE È possibile avviare la riproduzione da un massimo di nove punti registrati. Per immettere un contrassegno 1. Durante la riproduzione, premere MARKER (Contrassegno) nel punto desiderato. L’icona Marker appare brevemente sullo schermo. 2. Ripetere il punto 1 per aggiungere fino a nove segnalibri. • Se si preme > una volta durante la riproduzione Ripeti Capitolo/ Traccia, la riproduzione ripetuta viene annullata. • È possibile che questa funzione non sia funzioni con alcuni dischi o titolo. HB985-DB.BDEUPPK_ITA.indd 42 2010-05-14 2:30:05 Uso Per richiamare una scena contrassegnata 1. Premere SEARCH; viene visualizzato il menu di ricerca sullo schermo. 2. Premere un pulsante numerico per selezionare il contrassegno da richiamare. La riproduzione viene avviata dalla scena contrassegnata. Eliminare un segnalibro 43 Utilizzo del menu di ricerca BD DVD AVCHD MOVIE Usando il menu di ricerca si può trovare agevolmente il punto dal quale si desidera avviare la riproduzione. Cercare un punto 1. Durante la riproduzione, premere SEARCH per visualizzare il menu di ricerca. 1. Premere SEARCH; viene visualizzato il menu di ricerca sullo schermo. 3. Premere CLEAR; la scena contrassegnata viene cancellata dal menu di ricerca. NOTA • Questa funzione può non funzionare dipendendo dai dischi, titoli o capacità del server. • Tutti i punti contrassegnati vengono cancellati se il titolo è nella modalità di fermo completo (x), il titolo viene cambiato o se il disco viene scaricato. • Se la lunghezza totale del titolo è inferiore a 10 secondi, questa funzione non è disponibile. 4 Avviare la riproduzione da un punto contrassegnato Uso 2. Premere u per evidenziare un numero di contrassegno. Usare I/i per selezionare una scena evidenziata che si desidera eliminare. 2. Premere I/i per andare avanti o indietro di 15 secondi. È possibile selezionare il punto che si desidera saltare tenendo premuto il tasto I/i. 1. Premere SEARCH; viene visualizzato il menu di ricerca sullo schermo. 2. Premere u per evidenziare un numero di contrassegno. Usare I/i per selezionare la scena evidenziata di cui si desidera avviare la riproduzione. 3. Premere ENTER ( ) per avviare la riproduzione dalla scena evidenziata. NOTA • Questa funzione può non funzionare dipendendo dai dischi, titoli o capacità del server. • Questa funzione può non funzionare su alcuni contenuti [Coll. Home] dipendendo dal tipo di file e capacità del server DLNA. HB985-DB.BDEUPPK_ITA.indd 43 2010-05-14 2:30:05 44 Uso Memorizzazione dell’ultima scena BD DVD Questa unità è in grado di memorizzare l’ultima scena dell’ultimo disco visualizzato. L’ultima scena rimane in memoria anche se si rimuove il disco o si spegne l’unità. Se si carica un disco la cui ultima scena è stata memorizzata, quest’ultima viene richiamata automaticamente. NOTA • L’ultima scena memorizzata di un disco precedente viene cancellata non appena viene riprodotto un altro disco. 4 • Con alcuni dischi, questa funzione potrebbe non funzionare. Uso • Questo lettore non memorizza le impostazioni di un disco se l’unità viene spento prima di iniziare la riproduzione. Visualizzazione su schermo Si possono visualizzare e regolare varie informazioni e impostazioni del contenuto. Visualizzazione di contenuto sullo schermo BD DVD AVCHD MOVIE 1. Durante la riproduzione premere DISPLAY ( ) per visualizzare le varie informazioni di riproduzione. a b c d e f g h a Titolo – numero del titolo corrente/ numero complessivo di titoli. b Capitolo – tempo trascorso di riproduzione /tempo complessivo di riproduzione c Tempo – tempo trascorso di riproduzione /tempo complessivo di riproduzione d Audio – Scelta della lingua o del canale audio e Sottotitolo – Sottotitolo selezionato f Angolo – Angolazione selezionata/ numero totale di angolazioni HB985-DB.BDEUPPK_ITA.indd 44 2010-05-14 2:30:05 Uso g Aspetto TV – Rapporto d’aspetto della TV selezionato h Mod. immagine – modo immagine selezionato. 2. Selezionare un’opzione usando U/u. 3. Usare I/i per selezionare il parametro desiderato per l’opzione. 4. Premere RETURN (O) per uscire dal menu su schermo. NOTA • Se non vengono premuti pulsanti per un paio di secondi, il display su schermo scompare. • Un numero di titolo non può essere selezionato su alcuni dischi. • Le voci disponibili possono essere diversi dipendendo dai dischi e dai titoli. Riproduzione a partire da un punto desiderato BD DVD AVCHD MOVIE 1. Premere DISPLAY ( ) durante la riproduzione. La casella di ricerca tempo visualizza il tempo trascorso. 2. Selezionare l’opzione [Tempo] quindi inserire il tempo di inizio desiderato indicando le ore, i minuti e i secondi da sinistra a destra. Per esempio, per trovare una scena a 2 ore, 10 minuti e 20 secondi, inserire “21020”. Premere I/i per andare avanti o indietro di 60 secondi. 3. Premere ENTER ( ) per avviare la riproduzione dall’ora specificata. 4 NOTA Uso • Durante la riproduzione di un titolo interattivo BD, alcune informazioni sulle impostazioni vengono visualizzate sullo schermo ma non è possibile modificarle. 45 • Questa funzione può non funzionare su alcuni dischi o titoli. • Questa funzione può non funzionare su alcuni contenuti [Coll. Home] dipendendo dal tipo di file e capacità del server DLNA. HB985-DB.BDEUPPK_ITA.indd 45 2010-05-14 2:30:05 46 Uso Ascolto di un diverso audio BD DVD AVCHD MOVIE 1. Durante la riproduzione, premere DISPLAY ( ) per visualizzare il menu su schermo. BD DVD AVCHD MOVIE 2. Usare U/u per selezionare l’opzione [Audio]. 1. Durante la riproduzione, premere DISPLAY ( ) per visualizzare il menu su schermo. 3. Usare I/i per selezionare la lingua audio desiderata, traccia audio o canale audio. 2. Usare U/u per selezionare l’opzione [Sottotitolo]. NOTA • Alcuni dischi consentono di cambiare le selezioni audio solo attraverso il menu del disco. In questo caso, premere il pulsante POPUP/ TOP MENU o MENU e scegliere l’audio appropriato dalle opzioni del menu. 4 Scelta della lingua dei sottotitoli • Subito dopo aver cambiato l’impostazione dell’audio, può verificarsi una discrepanza temporanea tra immagine e audio. Uso HB985-DB.BDEUPPK_ITA.indd 46 3. Usare I/i per selezionare la lingua desiderata per i sottotitoli. 4. Premere RETURN (O) per uscire dal menu su schermo. NOTA Alcuni dischi consentono di cambiare le selezioni dei sottotitoli solo attraverso il menu del disco. In questo caso, premere il pulsante POPUP/ TOP MENU o MENU e scegliere il sottotitolo appropriato dalle opzioni del menu. 2010-05-14 2:30:05 Uso Visione da un’angolazione diversa BD DVD Modifica della modalità immagine BD DVD AVCHD MOVIE Se il disco contiene scene registrate a differenti angolazioni della telecamera, è possibile cambiare l’angolazione durante la riproduzione. Si può modificare la [Mod. immagine] durante la riproduzione. 1. Durante la riproduzione, premere DISPLAY ( ) per visualizzare il menu su schermo. 2. Usare U/u per selezionare l’opzione [Mod. immagine]. 2. Usare U/u per selezionare l’opzione [Angolo]. 3. Usare I/i per selezionare l’angolo desiderato. 4. Premere RETURN (O) per uscire dal menu su schermo. BD DVD AVCHD MOVIE Si può modificare il rapporto di aspetto della TV durante la riproduzione. 1. Durante la riproduzione, premere DISPLAY ( ) per visualizzare il menu su schermo. 3. Usare I/i per selezionare l’opzione desiderata. 4. Premere RETURN (O) per uscire dal menu su schermo. Impostazione dell’opzione [Imp ut] 1. Durante la riproduzione, premere DISPLAY ( ) per visualizzare il menu su schermo. 2. Usare U/u per selezionare l’opzione [Mod. immagine]. 4 Uso Modifica del rapporto di aspetto della TV 47 3. Usare I/i per selezionare l’opzione [Imp ut] e premere ENTER ( ). 1. Durante la riproduzione, premere DISPLAY ( ) per visualizzare il menu su schermo. 2. Usare U/u per selezionare l’opzione [Aspetto TV]. 3. Usare I/i per selezionare l’opzione desiderata. 4. Premere RETURN (O) per uscire dal menu su schermo. NOTA Anche se si modifica il valore dell’opzione [Aspetto TV] l’opzione [Aspetto TV] nel menu di configurazione [Impostaz.] non viene modificata. HB985-DB.BDEUPPK_ITA.indd 47 4. Usare U/u/I/i per regolare l’opzione [Mod. immagine]. Selezionare l’opzione [Default] quindi premere ENTER ( ) per ripristinare tutte le regolazioni video. 5. Usare U/u/I/i per selezionare l’opzione [Chiudi] e premere ENTER ( ) per terminare l’impostazione. 2010-05-14 2:30:06 48 Uso Gustare BD-LIVE Questa unità consente di utilizzare funzionalità come picture- in-picture, audio secondario e pacchetti Virtuali, ecc., con BD-Video che supporta BONUSVIEW (BD-ROM versione 2 Profile 1 versione 1.1/ Final Standard Profile). Audio e video secondari possono essere riprodotti da un disco compatibile con la funzione picture-in-picture (immagine nell’immagine). Per il metodo di riproduzione vedere le istruzioni fornite con il disco. 4 Uso Oltre alla funzione di BONUSVIEW, il BD-Video con supporto BD-LIVE (BD-ROM versione 2 Profilo 2) con funzione di estensione di rete permette di usare più funzioni quali scaricare i trailer dei nuovi film in uscita tramite la connessione di questa unità a Internet. 1. Controllare la connessione di rete e le impostazioni (Pagine 28-30). 2. Inserire un dispositivo di memorizzazione nella porta USB sul pannello anteriore. Per scaricare i contenuti bonus è necessario disporre di un dispositivo di memorizzazione USB. 3 . Premere HOME MENU, e impostare l’opzione [Collegamento BD-LIVE] nel menu di [Impostaz.] (pagina 37). In base al disco, la funzionalità BDLIVE può non essere attiva se l’opzione [Collegamento BD-LIVE] è impostata su [Parz. Consentito]. 4 . Inserire un BD-ROM con BD-LIVE. Le operazioni variano in funzione del disco. Vedere il manuale fornito con il disco. NOTA • Non estrarre il dispositivo USB collegato durante il download del contenuto o se un disco Bluray è nel vassoio. In questo caso è possibile danneggiare il dispositivo USB collegato e le funzionalità BD-LIVE potrebbero non funzionare più correttamente con il dispositivo USB danneggiato. Se il dispositivo USB collegato appare sembra danneggiato da tale azione, è possibile formattare il dispositivo USB dal PC e riutilizzarlo con questo lettore. • In alcuni paesi, l’accesso ad alcuni contenuti BD-LIVE potrebbe essere limitato, a seguito di decisioni del fornitore del contenuto stesso. • Per caricare e avviare la riproduzione dei contenuti BD-LIVE sono necessari alcuni minuti. Connessione USB HB985-DB.BDEUPPK_ITA.indd 48 2010-05-14 2:30:06 Uso Riproduzione di un file video e disco VR 49 NOTA • I requisiti per i file sono descritti a pagina 11. • È possibile utilizzare diverse funzioni di riproduzione. Vedere le pagine 40-47. Potete riprodurre i dischi DVD-RW che sono stati registrati con il formato Video Recording (VR) e file video contenuti su un disco o dispositivo USB. 1. Premere HOME MENU. • I dischi in formato DVD-VR non finalizzati non possono essere riprodotti in questo lettore. • Alcuni dischi DVD-VR sono realizzati con dati CPRM con DVD RECORDER. Questa unità non supporta tali tipi di dischi. Che cos’è CPRM? CPRM è un sistema di protezione dalla copia (con sistema di codifica) che consente solo la registrazione a ‘copia unica’ dei programmi trasmessi. CPRM è l’acronimo di Content Protection for Recordable Media. 4 Uso 2. Selezionare l’opzione [Video] usando U/u/ I/i e premere ENTER ( ). 3. Selezionare il dispositivo usando I/i e premere ENTER ( ). Quando si connettono fino a due dispositivi compare come sopra. 4. Selezionare un file tramite U/u/I/i, e premere B PLAY o ENTER ( ) per riprodurre il file. HB985-DB.BDEUPPK_ITA.indd 49 2010-05-14 2:30:06 50 Uso Selezione della file dei sottotitoli. Modifica della pagina di codice sottotitoli MOVIE MOVIE Se un nome di file video e nome di file di sottotitoli sono uguali, il file di sottotitoli viene riprodotto automaticamente con la riproduzione del file video. Se i sottotitoli non vengono visualizzati in modo corretto, è possibile modificare la pagina di codice sottotitoli per visualizzare correttamente il file. Se il nome del file di sottotitoli è diverso da quello del file video, è necessario selezionare il nome del file sottotitoli nel menu [Video] prima di riprodurre il file. 1. Durante la riproduzione, premere DISPLAY ( ) per visualizzare il menu su schermo. 1. Usare U/u/I/i per selezionare il file di sottotitoli che si desidera riprodurre nel menu [Video]. 2. Usare U/u per selezionare l’opzione [Pagina codice]. 3. Usare I/i per selezionare l’opzione codice desiderata. 2. Premere ENTER ( ). 4 Uso Premere ENTER ( ) nuovamente per deselezionare il file di sottotitoli. Il file di sottotitoli selezionato viene visualizzato durate la riproduzione del file video. NOTA • S si preme x STOP durante la riproduzione la selezione sottotitolo viene annullata. 4. Premere RETURN (O) per uscire dal menu su schermo. • Questa funzione può non funzionare con la funzione [Coll. Home]. HB985-DB.BDEUPPK_ITA.indd 50 2010-05-14 2:30:06 Uso Visualizzazione di fotografie 51 Esecuzione della presentazione Premere B PLAY per avviare la presentazione. Fermare una presentazione. Premere x STOP durante la presentazione. Con questo lettore è possibile visualizzare file di immagini. 1. Premere HOME MENU Fermare temporaneamente una presentazione. Premere X PAUSE/STEP durante la presentazione. Premere B PLAY per riprendere la proiezione. Passare alla foto precedente / successiva 2. Selezionare l’opzione [Foto] usando I/i e premere ENTER ( ). 4 Uso 3. Selezionare il dispositivo tramite I/i, e premere ENTER ( ). Durante la visualizzazione di una foto a tutto schermo premere I o i per passare alla foto precedente o successiva. NOTA • I requisiti per i file sono descritti a pagina 11. • È possibile utilizzare diverse funzioni di riproduzione. Vedere le pagine 40-47. Quando si connettono fino a due dispositivi compare come sopra. 4. Selezionare un file tramite U/u/I/i, e premere ENTER ( ) per visualizzare la foto. HB985-DB.BDEUPPK_ITA.indd 51 2010-05-14 2:30:06 52 Uso Opzioni durante la visualizzazione di una foto Potete usare varie funzioni durante la visione di una foto a tutto schermo. 1. Durante la visione di una foto a tutto schermo, premere DISPLAY ( ) per visualizzare il menu delle opzioni. Ascolto musica della musica durante la presentazione diapositive Potete visualizzare i file di foto durante l’ascolto dei file musicali. 1. Premere HOME MENU 2. Selezionare un’opzione usando U/u. a b c d e f g h 4 2. Selezionare [Foto] o [Coll. Home] usando U/ u/I/i, e premere ENTER ( ). 3. Selezionare l’opzione [Disco] o [USB] tramite I/i e premere ENTER ( ). Uso a Foto corrente/Numero totale di foto – Usare I/i per visualizzare la foto precedente/successiva. b Present. – Premere ENTER ( ) per avviare o mettere in pausa la presentazione. c Sel. musica – Selezione della musica di sottofondo per la presentazione. d Musica –Premere ENTER ( ) per avviare o mettere in pausa la musica di sottofondo. e Ruota – Premere ENTER ( ) per ruotare la foto in senso orario. f Zoom – Premere ENTER ( ) per visualizzare il menu [Zoom]. g effetto – Usare I/i per selezionare un effetto di transizione tra foto in una presentazione. Per il menu [Coll. Home] è necessaria la selezione di un server o cartella condivisa. 4. Selezionare un file tramite U/u/I/i, e premere ENTER ( ) per visualizzare le foto. 5. Premere DISPLAY ( ) per visualizzare il menu delle opzioni. 6. Usare U/u per selezionare l’opzione [Sel. musica] e premere ENTER ( ) per visualizzare il menu [Sel. musica]. h Intervallo – Usare I/i per selezionare un effetto di ritardo tra foto in una presentazione. 3. Premere RETURN (O) per chiudere il menu delle opzioni. HB985-DB.BDEUPPK_ITA.indd 52 2010-05-14 2:30:07 Uso 7. Utilizzare U/u per selezionare un dispositivo e quindi premere ENTER ( ). I dispositivi che potete selezionare possono essere diverse dipendendo sulla posizione dei file di foto che si stanno visualizzando a tutto schermo. Posizione foto Dispositivo disponibile Disco Disco, USB USB Disco, USB 53 Ascolto dei brani musicali Questa unità è in grado di riprodurre CD Audio e file musicali. 1. Premere HOME MENU Condividere CIFS cartella sul proprio PC (CIFS) Server DLNA Server DLNA 8. Usare U/u per selezionare il file o cartella che si desidera riprodurre. 2. Selezionare l’opzione [Musica] usando U/u/ I/i e premere ENTER ( ). 4 Uso 3. Selezionare il dispositivo tramite I/i, e premere ENTER ( ). Selezionare una cartella e premere ENTER ( ) per visualizzare la cartella inferiore. Selezionare e premere ENTER ( ) per visualizzare la cartella superiore. NOTA Quando si seleziona musica da [Coll. Home], la scelta della cartella non è disponibile. Su [Coll. Home] è disponibile solo la selezione del file. 9. Usare i per selezionare [OK] e premere ENTER ( ) per completare la selezione musicale. HB985-DB.BDEUPPK_ITA.indd 53 Quando si connettono fino a due dispositivi compare come sopra. 4. Selezionare un file musicale o traccia audio tramite U/u/I/i, e premere ENTER ( ) per riprodurre la musica. NOTA • I requisiti per i file sono descritti a pagina 11. • È possibile utilizzare diverse funzioni di riproduzione. Vedere le pagine 40-47. 2010-05-14 2:30:07 54 Uso Registrazione Audio CD 6. Usare U/u/I/i per selezionate [Start] e premete ENTER ( ). Si può registrare una traccia o tutte le tracce desiderate da un CD audio su un dispositivo di memorizzazione. 7. Usare U/u/I/i selezionare la cartella di destinazione da copiare. 1. Inserire un dispositivo di memorizzazione nella porta USB sul pannello anteriore. 2. Premere Z (OPEN/CLOSE) e posizionare un CD audio sul vassoio portadisco. Premere Z (OPEN/CLOSE) per chiudere il vassoio portadischi e. La riproduzione inizia automaticamente. 3. Premere DISPLAY ( ) per visualizzare il menu delle opzioni. Oppure 4 Uso Premere il tasto z USB REC sul telecomando. Potete registrare tutta la musica sul CD audio. 4. Usare U/u per selezionare l’opzione [Registrazione CD] e premere ENTER ( ) per visualizzare il menu [Registrazione CD]. Ripetere questo passo per selezionare tutte le tracce desiderate. 5. Usare U/u per selezionare la traccia che si desidera copiare sul menu e premere ENTER ( ). Se si desidera creare una cartella nuova usare U/u/I/i per selezionare [Nuova cartella] e premere ENTER ( ). Inserire un nome di cartella tramite la tastiera virtuale e premere ENTER ( ) con [OK] è selezionato. 8. Usare U/u/I/i per selezionare [OK] e premere ENTER ( ) per avviare la registrazione CD audio. Se si desidera interrompere la registrazione audio CD in corso, premere ENTER ( ) con [Annulla] evidenziato. 9. Quando è completata la registrazione audio CD appare un messaggio. Premere ENTER ( )per verificare il file musicale creato nella cartella di destinazione. Ripetere questo passo per selezionare tutte le tracce desiderate. Selezionare tutte le tracce su un CD audio. Seleziona un’opzione di codifica dal menu di pop-up menu (128 kbps, 192 kbps, 320 kbps o Lossless). Chiude la registrazione e riporta alla schermata principale. HB985-DB.BDEUPPK_ITA.indd 54 2010-05-14 2:30:08 Uso NOTA • La tabella sotto mostra il tempo medio di registrazione da una traccia audio con 4 minuti di tempo di riproduzione su un file musicale con 192 kbps come esempio. Modalità Stop Durante la riproduzione 1,4 min. 2 min. 55 La copia non autorizzata di materiale protetto, compresi programmi per computer, file, trasmissioni e registrazioni audio, potrebbe infrangere i diritti d’autore e costituire reato. Questo apparecchio non dovrebbe essere usato per tali propositi. Siate responsabili Rispettate i diritti d’autore • Tutti i tempi riportati nella tabella di cui sopra sono approssimativi. • Il tempo di ripping per il dispositivo di memorizzazione USB varia in funzione delle capacità di archiviazione del dispositivo USB. • Accertarsi che vi siano almeno minimo 50MB di spazio libero quando si registra sul dispositivo di memorizzazione USB. • La lunghezza della musica deve essere superiore a 20 secondi per una registrazione corretta. 4 HB985-DB.BDEUPPK_ITA.indd 55 Uso • Non spegnere il lettore o rimuovere il dispositivo di archiviazione USB durante la registrazione Audio CD. 2010-05-14 2:30:08 56 Uso Riproduzione del iPod 1. Connettere saldamente l’unità iPod. Collegare l’iPod Potete godere dell’audio del vostro iPod. Per maggiori dettagli riguardo iPod vedere la guida dell’utente iPod. Collegare la base e posizionarvi l’iPod. Preparazione • Per visualizzare i video e foto iPod sullo schermo TV. - Accertarsi di utilizzare la connessione video tramite il jack VIDEO OUT sul pannello posteriore di questa unità. Selezionare la modalità di ingresso video appropriata sulla TV. - Dipendendo dall’iPod, accertarsi che le impostazioni video di video > e quindi impostare TV Out su Ask o On dall’iPod. Per maggiori dettagli riguardo le impostazioni video vedere la guida dell’utente iPod. 4 Uso - la visione delle foto è disponibile solo se questa unità è nella modalità iPod IN e si possono vedere foto solo come presentazione. Dovete avviare una presentazione sull’iPod per vedere una foto su una TV. Per maggiori dettagli riguardo una presentazione vedere la guida dell’utente iPod. • Prima di connettere l’iPod spegnere questa unità e ridurre il volume dell’unità al minimo. HB985-DB.BDEUPPK_ITA.indd 56 2. Selezionare un file usando U/u/I/i, quindi premere ENTER per avviare la riproduzione. Visualizzazione iPod sullo schermo 1. Connettere saldamente l’unità iPod. 2. Premere HOME MENU ( ). 3. Selezionare [Musica] oppure [Video] usando I/i, quindi premere ENTER ( ). Se si è connesso l’altro dispositivo (CD o USB), selezionare iPod sul menu. 4. Selezionare un contenuto usando U/u/I/i, e premere ENTER ( ). 2010-05-14 2:30:08 Uso Utilizzare l’iPod in modalità iPod IN È possibile utilizzare l’iPod tramite il telecomando fornito e i controlli dell’iPod. 1. Connettere saldamente l’unità iPod. Se si accende questa unità il vostro iPod viene automaticamente acceso e viene riavviata la ricarica. 2. Premere INPUT/TUNER per selezionare la funzione iPod. Seleziona un’opzione di menu. B /ENTER Avvia la riproduzione di musica o video. X Per mettere i pausa durante la riproduzione. Per riprendere la riproduzione, premere nuovamente B (PLAY). m/M Avanti veloce o riavvolgi un brano o video ./> Salta la riproduzione avanti o indietro. REPEAT Premere ripetutamente per selezionare una modalità di ripetizione: Traccia ( ), Tutto ( ), Off (No display). NOTA Questo sistema è compatibile con il sistema audio e video di iPod (4 generazione), iPod nano, iPod classic, iPod mini, iPod touch e iPhone. (L’iPod shuffle non è supportato). NOTA • Un messaggio di errore “CHECK IPOD” (controllare IPOD) o “Connected iPod model is not supported” (il modello iPod collegato non è supportato) appare quando: - il vostro iPod non è disponibile per la funzione da usare. t Aggiornare il software iPod all’ultima versione disponibile. • Se questa unità visualizza un messaggio di errore, seguire il messaggio. Un messaggio di errore “CONTROLLA IPOD” o “Controllare il vostro iPod.” - La comunicazione tra questa unità e l’iPod non è riuscita t Eseguire la procedura di undock & re-dock dell’iPod su questa unità. - Il vostro iPod non è connesso saldamente. - Questa unità riconosce l’iPod come dispositivo sconosciuto. - La carica del vostro iPod è eccezionalmente insufficiente. t La batteria necessita di carica. t Se si carica la batteria quando al carica dell’iPod è molto bassa, la procedura di ricarica può richiedere un tempo di ricarica più lungo. 4 Uso U/u/I/i 57 • Potete utilizzare l’adattatore che è stato fornito con il vostro iPod per eseguire la connessione per uso stabile dell’iPod. • La compatibilità con il vostro iPod può variare dipendendo dal tipo di iPod. • iPod touch e iPhone hanno una differenza di funzionamento rispetto all’iPod. È possibile che sia necessario un controllo aggiuntivo per utilizzarli su questa unità. (es. “scorrere per sbloccare”) • Se si usa un’applicazione, effettua una telefonata, o invia e riceve un messaggio di testo SMS, ecc. su iPod touch o iPhone, staccarlo dall’iPod dock di questa unità e quindi usarlo. • Dipendendo dalla versione di software del vostro iPod, è possibile che non sia possibile controllare il vostro iPod dall’unità. Si raccomanda di installare la versione software più recente. • La qualità video dipende dalle sorgenti video del vostro iPod. • Se si hanno problemi con il proprio iPod, visitare www.apple.com/support/ipod. HB985-DB.BDEUPPK_ITA.indd 57 2010-05-14 2:30:08 58 Uso Funzionamento della radio 5. Premere ENTER ( ). La stazione viene salvata. 6. Ripetere i passaggi 2 e 5 per memorizzare ulteriori stazioni. Elimina tutte le stazioni salvate Verificare che l’antenna sia collegata. (Vedere a pagina 24.) Premere e tenere premuto CLEAR per due secondi. “ERASE ALL” inizia lampeggiare. Quindi tutte le emittenti salvate vengono eliminate. Ascoltare la RADIO 1. Premere INPUT/TUNER fino (FM) alla visualizzazione della radio nella finestra del display. Viene sintonizzata l’ultima stazione radio ricevuta. 4 Uso 2. Premere e tenere premuto TUNE (-/+) per circa due secondi fino a quando l’indicazione della frequenza non inizia a modificare. La scansione si interrompe quando l’unità si sintonizza su una stazione. Oppure Premere TUNE (-/+) ripetutamente. 3. Regolare il volume girando la manopola VOLUME posta sul pannello anteriore oppure premendo VOL (+/-) del telecomando. Migliorare una ricezione FM scadente Premere il pulsante colorato D (blu) (ST/ MONO) del telecomando. Questo passa il sintonizzatore dalla modalità stereo a quella mono e di solito migliora la ricezione. Vedere informazioni relative a un’emittente radio Il sintonizzatore FM è dotato di un servizio Radio Data System (RDS). Questo visualizza informazioni relative alla stazione radio che si sta ascoltando. Premere RDS ripetutamente per scorrere i vari tipi di dati: Preimpostazione delle stazioni radio PS È possibile preimpostare 50 stazioni per la FM. Prima di sintonizzare, assicurarsi di abbassare il volume. (Nome del programma di servizio) Il nome del canale viene visualizzato sul display. PTY (Riconoscimento del tipo di programma) Il tipo di programma (es. Jazz o News) viene visualizzato sul display. RT (Radio Text) Un messaggio di testo che contiene informazioni speciali relative alla stazione emittente. Questo testo può scorrere sullo schermo. CT (Ora controllata dal canale) Questo visualizza data e ora come trasmessa dalla stazione radio. 1. Premere INPUT/TUNER fino alla visualizzazione di TUNER (FM) nella finestra del display. 2. Selezionare la frequenza desiderata tramite TUNE (-/+). 3. Premere ENTER ( ) nella finestrella del display lampeggia un numero preimpostato. 4. Premere PRESET per selezionare il numero di preimpostazione desiderato. HB985-DB.BDEUPPK_ITA.indd 58 2010-05-14 2:30:08 Uso Riproduzione di contenuto sulla rete domestica Accesso ad un server DLNA media 1. Controllare la connessione di rete e le impostazioni (pagine 28-30). 2. Premere Il lettore può sfogliare e riprodurre contenuti presenti sul vostro PC e server DLNA certificati presenti sulla vostra rete domestica. 59 HOME MENU. 3. Selezionare l’opzione [Coll. Home] usando U/u/I/i e premere ENTER ( ). 4. Selezionare un server DLNA media all’elenco usando U/u, e premere ENTER ( ). Informazioni su DLNA Questo lettore è un lettore di supporti multimediali digitali certificato DLNA in grado di visualizzare e riprodurre video e musica dai vostri server di supporti multimediali digitali compatibili DLNA (PC e elettronica di consumo). Il logotipo di certificazione DLNA rende agevole individuare prodotti conformi alle linee guida di interoperativià DLNA. Questa unità è conforme alle linee guida di interoperatività DLNA v1.5. 4 Uso La Digital Living Network Alliance (DLNA) è un’organizzazione tra industrie di elettronica di consumo, industria dei computer e aziende di telefonia cellulare. Digital Living consente una facile condivisione di supporti digitali su una rete domestica. Se si desidera eseguire una nuova scansione dei server di media disponibili, premere il pulsante verde (B). NOTA Dipendendo dal server multimediale questo lettore può avere la necessità di ottenere prima un permesso dal server. 5. Selezionare un file tramite U/u/I/i, e premere ENTER ( ) per riprodurre il file. Quando un PC con software server DLNA o altro dispositivo compatibile DLNA viene connesso è possibile che sia necessario impostare modifiche al software server software o altri dispositivi. Vedere le istruzioni del software o dispositivo per ulteriori informazioni. HB985-DB.BDEUPPK_ITA.indd 59 2010-05-14 2:30:08 60 Uso NOTA • I requisiti per i file sono descritti a pagina 11. • È possibile utilizzare diverse funzioni di riproduzione. Vedere le pagine 40-47. • I requisiti dei file a pagina 11 non sono sempre compatibili. Vi possono essere delle limitazioni delle funzioni dei file e della capacità del media server. Accesso alla cartella condivisa dal PC 1. Avviare il PC che ha connesso la rete locale. 2. Sul PC, le cartelle condivise che contengono file video, musicali o immagini. 3. Sul lettore controllare la connessione di rete e le impostazioni (pagine 28-30). HOME MENU. • Le miniature dei file non riproducibili possono essere visualizzate nel menu [Coll. Home] menu, ma non possono essere riprodotti su questo lettore. 4. Premere • Se nel menu [Coll. Home] si trova un file musicale che non può essere riprodotto il lettore ignora il file e passa a quello successivo. 6. Selezionare una cartella condivisa dall’elenco selezionando U/u, e premere ENTER ( ). 5. Selezionare l’opzione [Coll. Home] usando U/u/I/i, e premere ENTER ( ). • Il nome del file per sottotitoli e nome del file video devono essere uguali e trovarsi nella stessa cartella. 4 Uso • La qualità di riproduzione e funzionamento della funzione [Coll. Home] può essere influenzata dalle condizioni della rete domestica. • I file su supporti rimovibili quali unità USB, unità DVD ecc. sul media server possono non essere condivisi in modo corretto. Se si desidera effettuare una scansione dei server multimediali disponibili, premere il pulsante color verde (B). NOTA Dipendendo dalla cartella condivisa, questo lettore può richiedere l’immissione di un ID utente di rete e password per accedere alla cartella. 7. Selezionare un file tramite U/u/I/i, e premere ENTER ( ) per riprodurre il file. HB985-DB.BDEUPPK_ITA.indd 60 2010-05-14 2:30:09 Uso 61 Requisiti PC NOTA • Windows® XP (Service Pack 2 o superiore), Windows Vista® (nessun Service Pack richiesto) Windows 7® • Processori 1.2 GHz Intel® Pentium® III o AMD Sempron™ 2200+ • Ambiente di rete: 100 Mb Ethernet, WLAN (IEEE 802.11b/g/n) • I requisiti per i file sono descritti a pagina 11. • È possibile utilizzare diverse funzioni di riproduzione. Vedere le pagine 40-47. • Se nel menu [Coll. Home] si trova un file musicale che non può essere riprodotto il lettore ignora il file e passa a quello successivo. • Se nel menu [Coll. Home] si trova un file musicale che non può essere riprodotto il lettore ignora il file e passa a quello successivo. • Il nome del file per sottotitoli e nome del file video devono essere uguali e trovarsi nella stessa cartella. • La qualità di riproduzione e funzionamento della funzione [Coll. Home] può essere influenzata dalle condizioni della rete domestica. NOTA Se si usa Windows® XP o Windows Vista®, visitare il collegamento fornito sotto per ulteriori informazioni relativamente alle impostazioni di condivisione file. • I file su supporti rimovibili quali unità USB, unità DVD ecc. sul PC possono non essere condivisi in modo corretto. 4 HB985-DB.BDEUPPK_ITA.indd 61 Uso • Dipendendo dall’ambiente del PC si possono verificare problemi di connessione. 2010-05-14 2:30:09 62 Uso Inserimento di un ID utente di rete e password Dipendendo dall’ambiente del PC è possibile che sia necessario inserire un ID utente e password per accedere alla cartella condivisa. 1. Il menu della tastiera viene visualizzato automaticamente se è richiesto l’inserimento dell’ID utente e della password di rete. 3. Quando si è finito0 di inserire ID utente e password di rete, selezionare [OK] tramite U/u/I/i e premere ENTER ( ) per accedere alla cartella. L’ID utente e la password verranno ricordati dopo l’accesso alla cartella. Se non si desidera che ID utente e password vengano ricordati, premere il pulsante colore rosso (A) per deselezionare la casella [Ricorda] prima di accedere alla cartella. 2. Utilizzare U/u/I/i per selezionare un carattere, quindi premere ENTER ( ) per confermare la selezione sul menu della tastiera. Per inserire una lettera accentata, selezionare la lettera dal set di caratteri esteso. 4 Uso Esempio: selezionare “D” quindi premere DISPLAY ( ) per visualizzare il set di caratteri esteso. Utilizzare I/i per selezionare “D” o “Ď”, quindi premere ENTER ( ). [Annulla] – Annulla tutti i caratteri inseriti. [Spazio] – Inserisce uno spazio nella posizione del cursore. [<–] – Elimina il carattere precedente nella posizione del cursore. [ABC / abc / #+-=&] – Cambia le impostazioni del menu della tastiera passando alle lettere maiuscole, minuscole o simboli. HB985-DB.BDEUPPK_ITA.indd 62 2010-05-14 2:30:09 Manutenzione 63 5 Manutenzione Note sui dischi Maneggiamento dell’unità Maneggiamento dei dischi Durante la spedizione Non attaccare mai carta o nastro adesivo al disco. Conservazione dei dischi Pulizia dei dischi Per mantenere le superfici esterne pulite vicino all’unità. • Non usare liquidi volatili quali spray insetticidi vicino all’unità. • Strofinare con forza può danneggiare la superficie. • Non lasciare la gomma dei prodotti di plastica in contatto con l’unità per un periodo prolungato di tempo. Pulizia dell’unità Non usare solventi quali alcol, benzina, diluente, detergenti disponibili in commercio o spray antistatico prodotti per i vecchi dischi di vinile. HB985-DB.BDEUPPK_ITA.indd 63 5 Manutenzione Dopo la riproduzione riporre sempre il disco nella sua custodia. Non esporre il disco alla luce diretta del sole o fonti di calore e non lasciare mai in un’auto posteggiata alla diretta luce del sole. Conservare la scatola e materiale di imballaggio originali. Se si necessita inviare l’unità, per ottenere la massima protezione, imballare l’unità come imballata originalmente di fabbrica. Per pulire l’apparecchio usare un panno morbido ed asciutto. Se le superfici sono molto sporche usare un panno morbido leggermente inumidito con una soluzione detergente dolce. Non usare solventi aggressivi come alcol, benzene o diluente poiché questi possono rovinare la superficie dell’unità. Manutenzione dell’unità L’unità è un apparecchio di precisione ad altissima tecnologia Quando le lenti ottiche del pick-up e gli elementi del gruppo conduttore del disco sono sporchi o usurati, la qualità dell’immagine può essere ridotta. per dettagli, rivolgersi al centro di assistenza autorizzato più vicino. 2010-05-14 2:30:09 64 Risoluzione dei problemi 6 Risoluzione dei problemi Generale 6 Risoluzione dei problemi L’;alimentazione non è inserita. • Inserire il cavo di alimentazione nella presa di rete. L’unità non avvia la riproduzione. • Inserire un disco riproducibile. (Controllare il tipo di disco, sistema colore e codice regionale.) • Disporre il disco con il lato riproduzione volto verso il basso. • Collocare in modo corretto nella guida il disco nel vassoio portadisco. • Pulire il disco. • Eliminare la funzione di classificazione o modificare il livello di classificazione. L’angolo non può essere modificato. • Le angolature multiple non sono registrate sul video DVD in riproduzione. La lingua dei sottotitoli non può essere modificata o disattivata. • I sottotitoli non sono registrati sul video DVD in riproduzione. Impossibile riprodurre i file MP3/WMA/ JPEG/DivX. • I file non sono stati registrati con un formato supportato dall’unità. • L’unità non è compatibile con il codec del file video. • Il telecomando non è puntato al sensore dell’unità. • Il telecomando è troppo lontano dall’unità. • C’è un ostacolo nel percorso tra telecomando e unità. • Le batterie del telecomando sono scariche Il telecomando non funziona in modo corretto HB985-DB.BDEUPPK_ITA.indd 64 2010-05-14 2:30:09 Risoluzione dei problemi 65 Immagine Nessuna immagine L’immagine è molto disturbata • Selezionare sulla TV il modo corretto di ingresso segnale video in modo da poter visualizzare sullo schermo l’immagine. • Collegare saldamente il cavo audio. • Controllare l’impostazione colore [Imp. colore HDMI] nel menu di configurazione [Impostaz.] è impostata per l’elemento corretto conforme alla propria connessione video. • È possibile che la vostra TV non supporti la risoluzione di impostazione del lettore. Modificare la risoluzione su una supportata dalla TV. • Il jack di uscita HDMI OUT è connesso ad un dispositivo DVI che non supporta la funzione di protezione del copyright. • Si sta riproducendo un disco registrato con un sistema colore diverso da quello della TV. • Impostare su una risoluzione supportata dalla propria TV. • L’unità si trova nella modalità di scansione, rallentatore o pausa. • Il volume audio è basso. • Controllare la connessione dei cavi dell’altoparlante. (pagina 16) Suono L’audio è assente o l’audio è distorto 6 Risoluzione dei problemi HB985-DB.BDEUPPK_ITA.indd 65 2010-05-14 2:30:09 66 Risoluzione dei problemi Network La funzionalità BD-LIVE non funziona. • L’unità di archiviazione USB connessa può non avere spazio sufficiente. Connettere un’unità di memorizzazione USB con almeno 1GB di spazio libero. • Verificare che l’unità sia collegata correttamente alla rete LAN e che sia possibile accedere a Internet (vedere a pag. 28). • La velocità della connessione a banda larga non è sufficiente per l’uso delle funzioni BD-LIVE. Rivolgersi al proprio provider di servizi internet (ISP) e si consiglia aumentare la velocità della banda larga. • L’opzione [Collegamento BD-LIVE] nel menu di configurazione [Impostaz.] è impostata [Proibito]. Impostare l’opzione su [Consentito]. Il design e le specifiche tecniche sono soggette a cambiamento senza preavviso. Aggiornamenti Le informazioni relative a questo prodotto sono disponibili sul sito Web di Pioneer. Accedere al sito per le informazioni sull’aggiornamento o sull’assistenza del lettore di dischi Bluray. 6 Risoluzione dei problemi HB985-DB.BDEUPPK_ITA.indd 66 2010-05-14 2:30:09 Appendice 67 7 Appendice Controllo del televisore mediante il telecomando Potete controllare la PIONEER TV tramite i pulsanti sotto. Pulsanti di omando TV Uso 1 (TV Power) Spegne/accende la TV INPUT Alterna la sorgente di ingresso TV tra il TV e altre sorgenti di ingresso. CH +/- Consente di cercare in su e in giù tra i canali memorizzati. VOL +/- Regola il volume del TV. NOTA È possibile impartire comandi all’apparecchio TV utilizzando il telecomando in dotazione. Se il televisore posseduto è tra quelli elencati di seguito, impostare il relativo codice di fabbrica. 1. Tenendo premuto il tasto 1 (TV POWER), premere i tasti numerici per inserire il codice del produttore dell’apparecchio TV (vedere la tabella sotto riportata). Produttore Numero di codice Pioneer 1 (Predefinito) Sony 2, 3 Panasonic 4, 5 Samsung 6, 7 LG 8, 9 Appendice Pulsante Configurare il telecomando per controllare l’apparecchio TV 2. Rilasciare il tasto 1 (TV POWER) per completare la configurazione. A seconda del modello di apparecchio TV, alcuni tasti, o anche tutti, potrebbero non funzionare, anche dopo aver inserito il corretto codice del produttore. Dopo aver sostituito le batterie del telecomando, il numero del codice impostato potrebbe riconfigurarsi alle impostazioni predefinite. Reimpostare il numero codice appropriato. 7 In base all’unità connessa, è probabile non sia possibile controllare il TV usando alcuni dei pulsanti. HB985-DB.BDEUPPK_ITA.indd 67 2010-05-14 2:30:09 68 Appendice Indicativo località Selezionare un codice area dall’elenco. Area Codice Area Afghanistan Appendice 7 AF Fiji Codice Area Codice Area MC Singapore SG MN Repubblica MA Slovacca SK NP Slovenia NL Sud Africa ZA Argentina AR Finlandia FI Mongolia Australia AU Francia FR Morocco Austria AT Germania DE Nepal Belgio BE Gran Bretagna GB Paesi Bassi Bhutan BT Grecia GR Antille Olandesi Bolivia BO Groenlandia GL Nuova Zelanda Brasile BR Hong Kong HK Nigeria Cambogia KH Ungheria HU Norvegia Canada CA India IN Oman Cile CL Indonesia ID Pakistan Cina CN Israele IL Panama Colombia CO Italia IT Paraguay Congo CG Giamaica JM Filippine Costa Rica CR Giappone JP Polonia Croazia HR Kenya KE Portogallo Repubblica Ceca CZ Kuwait Danimarca DK Libia Ecuador EC Lussemburgo KW Romania SI AN Corea del Sud NZ Spagna KR NG Sri Lanka NO Svezia LK OM Svizzera PK Taiwan CH ES SE TW PA Tailandia PY Turchia TH PH Uganda PL Ucraina UG PT Stati Uniti RO Uruguay TR UA US UY LY Federazione Russa RU Uzbekistan LU Arabia Saudita SA Vietnam UZ SN Zimbabwe ZW Egitto EG Malaysia MY Senegal El Salvador SV Maldive MV Etiopia ET Messico MX HB985-DB.BDEUPPK_ITA.indd 68 Codice FJ Monaco VN 2010-05-14 2:30:09 Appendice 69 Elenco codici lingua Usare questo elenco per inserire la lingua desiderata per le seguenti impostazioni iniziali: [Audio Disco], [Sottotitolo Disco], e [Menu Disco]. Lingua Codice Lingua Codice Lingua Codice Lingua Codice 6565 Francese 7082 Lituano 7684 Sindhi 8368 Afrikaans 6570 Frisone 7089 Macedone 7775 Cingalese 8373 Albanese 8381 Galiziano 7176 Malgascio 7771 Slovacco 8375 Ameharic 6577 Georgiano 7565 Malese 7783 Sloveno 8376 Arabo 6582 Tedesco 6869 Malayalam 7776 Spagnolo 6983 Armeno 7289 Greco 6976 Maori 7773 Sudanese 8385 Assamese 6583 Groenlandese 7576 Maratto 7782 Swahili 8387 Aymara 6588 Guarani 7178 Moldavo 7779 Svedese 8386 Azerbaigiano 6590 Gujarati 7185 Mongolo 7778 Tagalog 8476 Bashkir 6665 Hausa 7265 Nauru 7865 Tajik 8471 Basco 6985 Ebraico 7387 Nepali 7869 Tamilico 8465 Bengali, Bangla 6678 Hindi 7273 Norvegese 7879 Telugu 8469 Bhutani 6890 Ungherese 7285 Oriya 7982 Tailandese 8472 Bihari 6672 Islandese 7383 Panjabi 8065 Tonga 8479 Bretone 6682 Indonesiano 7378 Pashto, Pushto 8083 Turco 8482 Bulgaro 6671 Interlingua 7365 Persiano 7065 Turcomanno 8475 Birmano 7789 Irlandese 7165 Polacco 8076 Twi 8487 Bielorusso 6669 Italiano 7384 Portoghese 8084 Ucraino 8575 Cinese 9072 Giapponese 7465 Quechua 8185 Urdu 8582 Croato 7282 Kannada 7578 Retoromanzo 8277 Uzbeco 8590 Ceco 6783 Kashmiri 7583 Romeno 8279 Vietnamese 8673 Danese 6865 Kazako 7575 Russo 8285 Volapük 8679 Olandese 7876 Kirghiso 7589 Samoano 8377 Gallese 6789 Inglese 6978 Coreano 7579 Sanscrito 8365 Wolof 8779 Esperanto 6979 Curdo 7585 Scozzese Gaelico Estone 6984 Laothian 7679 Faroese 7079 Latino 7665 Xhosa 8872 7168 Yiddish 7473 Serbo 8382 Yoruba 8979 8372 Zulu 9085 8378 Fiji 7074 Lettone, Lettish 7686 Serbo-Croato Finlandese 7073 Lingala Shona HB985-DB.BDEUPPK_ITA.indd 69 7678 2010-05-14 Appendice Afar 7 2:30:09 70 Appendice Risoluzione video di uscita Quando si riproducono supporti non protetti da copia Video Out HDMI OUT COMPONENT VIDEO OUT HDMI connesso HDMI disconnesso Risoluzione 576i (480i) 576p (480i) 576i (480i) 576p (480p) 576p (480p) 576p (480p) 720p 720p 720p 1080i 1080i 1080i 1080p / 24 Hz 1080p / 24 Hz 576i (480i) 1080i 1080p / 50 Hz 1080p / 50 Hz 576i (480i) 1080i Se si riproducono supporti con protezione dalla copia Video Out Risoluzione 576i (480i) Appendice 7 HDMI OUT 576p (480p) HDMI disconnesso 576i (480i) 576p (480p) 576p (480p) 720p 720p 576i (480i) 576p (480p) 1080i 1080i 576i (480i) 576p (480p) 1080p / 24 Hz 1080p / 24 Hz 576i (480i) 576p (480p) 1080p / 50 Hz 1080p / 50 Hz 576i (480i) 576p (480p) Connessione HDMI OUT • Per l’impostazione di risoluzione 576i (480i), la risoluzione reale di HDMI OUT passa a 576p (480p). • Se si seleziona una risoluzione manualmente, quindi si collega il jack HDMI al TV e il TV non l’accetta, la risoluzione viene impostata su [Auto]. • COMPONENT VIDEO OUT HDMI connesso Se si seleziona una risoluzione che non viene accettata dall’apparecchio TV viene visualizzato un messaggio di avvertenza. Dopo avere modificato la risoluzione se non è possibile vedere lo schermo, attendere 20 secondi e la risoluzione tornerà automaticamente alla risoluzione precedente. HB985-DB.BDEUPPK_ITA.indd 70 576p (480p) • La frequenza delle immagini dell’uscita video 1080p può essere impostata automaticamente a 24 Hz o 50 Hz in base alla capacità e alla preferenza del TV collegato e alla frequenza delle immagini nativa del contenuto sul disco BD-ROM. Connessione COMPONENT VIDEO OUT BD o DVD possono impedire il passaggio a valori superiori su uscita analogica. Connessione VIDEO OUT La risoluzione della presa VIDEO OUT è sempre a 576i (480i). 2010-05-14 2:30:10 Appendice 71 Marchi commerciali e licenze “Blu-ray Disc” e sono marchi commerciali. HDMI, il logo HDMI e la High-Definition Multimedia Interface sono marchi commerciali o marchi registrati di HDMI Licensing LLC negli USA e in altri paesi. Il lodo “BD-LIVE” è un marchio dell’associazione Blu-ray Disc. “BONUSVIEW” è un marchio di Blu-ray Disc Association. Il è un marchio di DVD Format/Logo Licensing Corporation. TM Java e tutti i marchi e loghi basati su Java sono marchi o marchi registrati di Sun Microsystems, Inc. negli Stati Uniti e in altri paesi. Prodotto su licenza con brevetto U.S. n: 5.451.942; 5.956.674; 5.974.380; 5.978.762; 6.226.616; 6.487.535; 7.392.195; 7.272.567; 7.333.929; 7.212.872 e altri brevetti U.S. e internazionali concessi o in attesa di concessione. DTS e il simbolo sono marchi registrati e DTS-HD, DTS-HD Master Audio | Essential e i logo DTS sono marchi di fabbrica di DTS, Inc. Il prodotto include il software. © DTS, Inc. Tutti i diritti riservati. HB985-DB.BDEUPPK_ITA.indd 71 DivX è un marchio registrato della DivX, Inc., ed è utilizzato sotto licenza. “x.v.Color” o “x.v.Colour” è un marchio di Sony Corporation. 2010-05-14 Appendice Fabbricato sotto licenza della Dolby Laboratories. “Dolby” ed il simbolo della doppia D sono marchi commerciali della Dolby Laboratories. DLNA e DLNA CERTIFIED sono marchi di fabbrica e/o marchi di servizio di Digital Living Network Alliance 7 2:30:10 72 Appendice “AVCHD” e il logo “AVCHD” sono marchi di Panasonic Corporation e Sony Corporation. Questo prodotto è fornito sotto licenza portfolio del brevetto AVC e VC-1 per uso personale e non commerciale di un utente per (i) codificare video in conformità con la norma AVC e VC-1 (“AVC/ VC-1 Video”) e/o (ii) decodificare video AVC/VC-1 codificato da un utente per uso personale e non commerciale e/o ottenuto da un fornitore video con licenza per fornire video AVC/VC-1. Non è concessa né è implicita alcuna licenza per altri usi. Ulteriori informazioni possono essere ottenute da MPEG LA, LLC. Vedere http://www.mpegla.com. iPod è un marchio commerciale di Apple Computer, Inc, registrato negli USA ed in altre nazioni. iPhone è un marchio di fabbrica di Apple Computer, Inc. Appendice 7 Windows Media è un marchio registrato o un marchio di fabbrica di Microsoft Corporation negli Stati Uniti e/o negli altri paesi. Il prodotto include sistemi di proprietà di Microsoft Corporation e non può essere utilizzato o distribuito senza una licenza di Microsoft Licensing, Inc. ® Le tecnologia wireless Bluetooth® permette di collegare tra loro dispositivi elettronici in un intervallo massimo di 10 metri. Il collegamento di singoli dispositivi tramite la tecnologia Bluetooth non comporta alcun costo. Un telefono cellulare dotato di tecnologia wireless Bluetooth può essere adoperato tramite il Cascade se la connessione è effettuata con Bluetooth. Il nome e i logo Bluetooth sono di proprietà di Bluetooth SIG, Inc; qualsiasi utilizzo di tali marchi da parte di Pioneer Corporation è soggetto a licenza. Altri marchi registrati e nomi commerciali appartengono ai rispettivi proprietari. “Made for iPod” significa che un accessorio elettronico è stato progettato per connettersi specificamente con un iPod ed è stato certificato dallo sviluppatore corrispondente agli standard di rendimento previsti da Apple. “Works with iPhone” significa che un accessorio elettronico è stato progettato per connettersi specificamente con un iPhone ed è stato certificato dallo sviluppatore corrispondente agli standard di rendimento previsti da Apple. Apple non è responsabile per il funzionamento di questo dispositivo o per la sua conformità agli standard normativi e regolamentari di sicurezza. HB985-DB.BDEUPPK_ITA.indd 72 2010-05-14 2:30:10 Appendice Specifiche tecniche 73 Sintonizzatore • Campo di sintonizzazione FM: 87.5 a 108.0 MHz o 87.50 a 108.00 MHz Generale • Requisiti di alimentazione: AC 220-240 V, 50/ 60 Hz • Consumo elettrico: 150 W Nella modalità Standby: meno di 0,5 W • Dimensioni (L x A x P): Circa 430 × 64 × 304 mm • Peso netto (approssimativo): 3,6 kg • Temperatura di esercizio da: 41 °F a 95 °F (5 °C a 35 °C) • Umidità di esercizio: 5 % a 90 % • Alimentazione tensione bus (USB): DC 5 V 500 mA Ingressi/ Uscite • VIDEO OUT: 1,0 V (p-p), 75 Ω, sinc negativo, jack RCA x 1 • HDMI OUT (video/audio): 19 pin (HDMI standard, Tipo A, Versione 1.3) • Analogue AUDIO IN: 2,0 Vrms (1 kHz, 0 dB), 600 Ω, RCA jack (L, R) x 1 • Uscita di potenza, (PEAK), (4Ω/3Ω) Totale 1100 W Anteriore 180 W x 2 Centro 180 W Vista posteriore 180 W x 2 Subwoofer 200 W (Passive) • Uscita di potenza, (RMS), THD 10% (4Ω/3Ω) Totale 930 W Anteriore 150 W x 2 Centro 150 W Vista posteriore 150 W x 2 Subwoofer 180 W (Passive) Sistema • Laser: laser semiconduttore, Lunghezza d’onda: 405 nm / 650 nm • Sistema segnale: Sistema colore TV NTSC/PAL standard • Risposta in frequenza: da 20 Hz a 20 kHz (campionamento 48 kHz, 96 kHz, 192 kHz) • Porta LAN: Jack Ethernet x 1, 10BASE-T/100BASE-TX Appendice • COMPONENT VIDEO OUT: (Y) 1,0 V (p-p), 75 Ω, sinc. negativo, RCA jack x 1 (Pb)/(Pr) 0,7 V (p-p), 75 Ω, RCA jack x 2 Amplificatore • DIGITAL IN (OPTICAL 1/2): 3 V (p-p), jack ottico x 2 7 • PORTABLE IN: 0,5 Vrms (3,5 mm stereo jack) HB985-DB.BDEUPPK_ITA.indd 73 2010-05-14 2:30:10 74 Appendice Altoparlanti BCS-707 Altoparlanti BCS-303 S-BD707 S-BD303 • Cassa anteriore/surround (sinistra/destra) Tipo: 2 vie Impedenza nominale: 4Ω Dimensioni nette 260 x 1097 x 260 mm (L x H x P): Peso netto: 3,8 kg • Cassa anteriore/surround (sinistra/destra) Tipo: 1 vie Impedenza nominale: 4Ω Dimensioni nette 96 x 96 x 85 mm (L x H x P): Peso netto: 0,4 kg • Diffusore centrale Tipo: Impedenza nominale: Dimensioni nette (L x H x P): Peso netto: • Diffusore centrale Tipo: Impedenza nominale: Dimensioni nette (L x H x P): Peso netto: 1 vie 4Ω 300 x 87x 65 mm 0,6 kg S-BD707SW • Subwoofer Tipo: Impedenza nominale: Dimensioni nette (L x H x P): Peso netto: 1 vie 1 altoparlante 3Ω 130.5 x 420 x 375 mm • Subwoofer Tipo: Impedenza nominale: Dimensioni nette (L x H x P): Peso netto: 1 vie 4Ω 300 x 87 x 65 mm 0,6 kg 1 vie 1 altoparlante 3Ω 130.5 x 420 x 375 mm 4,4 kg 4,4 kg Appendice 7 HB985-DB.BDEUPPK_ITA.indd 74 2010-05-14 2:30:10 Appendice • OpenSSL: – software di crittografia scritto da Eric Young ([email protected]). – software scritto da Tim Hudson ([email protected]). – software sviluppato dal OpenSSL Project per l’uso con il tool kit OpenSSL. (http://www.openssl.org) I seguenti eseguibili GPL e librerie LGPL usati in questo prodotto sono soggetti agli accordi di licenza GPL2.0/LGPL2.1: ESEGUIBILI GPL: Linux kernel 2.6, bash, busybox, cramfs, dhcpcd, e2fsprogs, fdisk, mkdosfs, mtd-utils, net-tools, procps, samba-3.0.25b, sysutils, tcpdump, tftpd, tinylogin, unzip, utelnetd LIBRERIE LGPL: uClibc, DirectFB, blowfish, cairo, ffmpeg, iconv, libusb, mpg123 gSOAP Licenza pubblica 1.3 LIBRERIA: gsoap Una copia del corrispondente codice sorgente può essere ottenuta pagando le spese di distribuzione. Per ottenere una copia, contattare l’Assistenza clienti locale Pioneer. Potete ottenere una copia delle licenze di GPL, LGPL da http://www.gnu.org/licenses/old-licenses/ gpl-2.0.html e http://www.gnu.org/licenses/oldlicenses/lgpl-2.1.html. Inoltre potete ottenere una copia della licenza pubblica gSOAP da http://www.cs.fsu. edu/~engelen/license.html. Questo software è basato in parte sul lavoro del Independent JPEG Group diritti di riproduzione © 1991 – 1998, Thomas G. Lane. Questo prodotto include: • boost C++: diritti di riproduzione © Beman Dawes 1999-2003 • c-ares : diritti di riproduzione © 1998 del Massachusetts Institute of Technology • curl: diritti di riproduzione © 1996 - 2008, Daniel Stenberg • expat: diritti di riproduzione © 2006 manutentori expat • freetype: diritti di riproduzione © 2003 The FreeType Project (www.freetype.org). • jpeg: Questo software è basato in parte sul lavoro del Independent JPEG Group diritti di riproduzione © 1991 – 1998, Thomas G. Lane. • mng: diritti di riproduzione © 2000-2007 Gerard Juyn, Glenn Randers-Pehrson • ntp: diritti di riproduzione © David L. Mills 19922006 • png: diritti di riproduzione © 2004 Glenn RandersPehrson • portmap: diritti di riproduzione © 1990 The Regents of the University of California • ptmalloc: diritti di riproduzione © 2001-2006 Wolfram Gloger • nitTest++ : diritti di riproduzione © 2006 Noel Llopis and Charles Nicholson • UPnP SDK : Diritti di riproduzione (c) 2000-2003 Intel Corporation • strace : diritti di riproduzione © 1991, 1992 Paul Kranenburg diritti di riproduzione © 1993 Branko Lankester diritti di riproduzione © 1993 Ulrich Pegelow diritti di riproduzione © 1995, 1996 Michael Elizabeth Chastain diritti di riproduzione © 1993, 1994, 1995, 1996 Rick Sladkey diritti di riproduzione © 1999, 2000 Wichert Akkerman • xml2: diritti di riproduzione (C) 1998-2003 Daniel Veillard. • XML-RPC For C/C++: diritti di riproduzione © 2001 di First Peer, Inc. Tutti i diritti sono riservati. diritti di riproduzione © 2001 di Eric Kidd. Tutti i diritti sono riservati. • zlib : diritti di riproduzione (c) 1995-2002 Jean-loup Gailly e Mark Adler. HB985-DB.BDEUPPK_ITA.indd 75 Tutti diritti sono riservati. Viene di seguito concessa autorizzazione, gratuitamente, a chiunque ottenga una copia del presente software e dei file della documentazione associata (il “Software”), a operare con il Software senza limitazione,compresi senza limitazione i diritti di utilizzare, copiare, modificare, unire, pubblicare, distribuire, concedere in sublicenza e/o vendere copie del Software, e di concedere alle persone a cui il Software è fornito tale autorizzazione, soggetta alle condizioni seguenti: IL SOFTWARE VIENE FORNITO COME È, SENZA GARANZIA DI ALCUN TIPO, ESPRESSA O IMPLICITA, INCLUSE MA NON LIMITATE ALLE GARANZIE DI COMMERCIABILITÀ, IDONEITÀ PER UNO SCOPO PARTICOLARE E NON VIOLAZIONE. IN NESSUN CASO GLI AUTORI O I DETENTORI DEL COPYRIGHT SONO RESPONSABILI PER RIVENDICAZIONI, DANNI O ALTRA RESPONSABILITÀ, IN AZIONE CONTRATTUALE, TORTO O ALTRO, DERIVANTE DA O CONGIUNTAMENTE AL SOFTWARE O ALL’UTILIZZO O ALTRI RAPPORTI CON IL SOFTWARE. 2010-05-14 Appendice Avviso per il software Open source 75 7 2:30:11 2 1 Información de seguridad Información de seguridad 1 Información de seguridad ADVERTENCIA Precauciones y advertencias RIESGO DE DESCARGA ELÉCTRICA NO ABRIR ADVERTENCIA: PARA REDUCIR EL RIESGO DE INCENDIO O DESCARGA ELÉCTRICA, NO EXPONGA ESTE PRODUCTO A LA LLUVIA NI A LA HUMEDAD. ADVERTENCIA: PARA REDUCIR EL RIESGO DE DESCARGA ELÉCTRICA NO EXTRAIGA LA CUBIERTA (O PARTE POSTERIOR). NO HAY EN EL INTERIOR NINGUNA PARTE QUE PUEDA REEMPLAZAR EL USUARIO. PARA CUALQUIER REPARACIÓN CONTACTE CON PERSONAL DE MANTENIMIENTO CUALIFICADO. Este símbolo de un relámpago con cabeza de flecha dentro de un triángulo equilátero está destinado para alertar al usuario de la presencia de una potencia no aislada peligrosa dentro del producto que puede ser de la magnitud suficiente como para constituir un riesgo de descarga eléctrica a las personas. El signo de exclamación dentro de un triángulo equilátero está destinado para alertar al usuario de la presencia de instrucciones de mantenimiento y funcionamiento en la documentación que acompaña al producto. ADVERTENCIA: No instale el equipo en un espacio cerrado, como en una estantería o mueble similar. PRECAUCIÓN: No obstruya ninguno de los orificios de ventilación. Instalar conforme a las instrucciones del fabricante. Las ranuras y orificios de la carcasa cumplen un propósito de ventilación y aseguran el correcto funcionamiento del producto, y lo protegen de un posible sobrecalentamiento. Los orificios no deben obstruirse en ningún caso colocando el producto sobre una cama, sofá, alfombra o superficie similar. Este producto no debe colocarse en una instalación empotrada, como una librería o estante, a menos que se proporcione una correcta ventilación del mismo y se respeten todas las instrucciones del fabricante. PRECAUCIÓN: Éste es un producto láser clase I, clasificado conforme a la norma CEI 608251:2007 sobre seguridad de los productos láser. Para asegurar un uso apropiado de este producto, lea cuidadosamente este manual del propietario y consérvelo para futuras consultas. Si la unidad necesitara de mantenimiento, póngase en contacto con un centro de servicio autorizado. El uso de controles, ajustes o procedimientos diferentes a los especificados aquí puede provocar una exposición peligrosa a la radiación. Para prevenir la exposición directa al rayo láser, no intente abrir el cerramiento. Radiación visible del láser al abrirlo. NO FIJE LA VISTA EN EL LÁSER O HAZ DE LUZ. HB985-DB.BDEUPPK_SPA.indd 2 2010-05-14 2:48:22 Información de seguridad PRECAUCIÓN referente al cable de alimentación Para la mayor parte los aparatos eléctricos, se recomienda su conexión en un circuito dedicado. Este dispositivo está provisto de una batería o acumulador portátil. Forma segura de extraer la pila o el acumulador del equipo: Retire la pila o juego de pilas usadas y siga los pasos en orden inverso a su colocación. Para impedir la contaminación del medioambiente o los posibles efectos adversos en la salud de humanos y animales, coloque la pila usada o el acumulador en el contenedor apropiado de los puntos de recogida designados para tal fin. No elimine las pilas o el acumulador junto con la basura doméstica. Se recomienda utilizar pilas y acumuladores con sistema de reembolso gratuito en su localidad. No exponga las pilas al calor intenso intenso, como la luz del sol, un incendio o similar. PRECAUCIÓN: El aparato no debe exponerse al agua (goteo o salpicaduras) y no debe colocar sobre el aparato objetos llenos de líquidos, como floreros. 1 Información de seguridad es decir, un circuito de un sólo enchufe que acciona solamente este aparato y no tiene enchufes o circuitos derivados adicionales. Revise la página de especificaciones de este manual de usuario para asegurarse. No sobrecargue los enchufes de pared. Los enchufes de pared sobrecargados, flojos o dañados, cables de extensión, cables de alimentación pelados, o el aislamiento dañado o agrietado del cable son elementos peligrosos. Cualquiera de estas condiciones podría dar lugar a descargas eléctricas o fuego. Examine periódicamente el cable de su electrodoméstico, y si su aspecto indica daños o deterioro, desenchúfelo, cese el uso del electrodoméstico, y haga cambiar el cable por una pieza de recambio exacta por un distribuidor de servicio autorizado. Proteja el cable de alimentación de daños físicos o mecánicos y evite doblarlo, aplastarlo, pellizcarlo o pisarlo con una puerta o caminar sobre él. Preste especial atención a los enchufes, tomas de pared, y al punto donde el cable sale del electrodoméstico. Para desconectar la alimentación principal, retire el cable principal de alimentación. Durante la instalación del producto, asegúrese de que el enchufe sea fácilmente accesible. 3 PIONEER declara por este documento que este/estos producto(s) cumplen con los requisitos esenciales y las demás provisiones de la Directiva 2004/108/ EC, 2006/95/EC y 2009/125/EC. ADVERTENCIA: para evitar el peligro de incendio, no coloque ninguna llama abierta (por ejemplo, una vela encendida) sobre el aparato. HB985-DB.BDEUPPK_SPA.indd 3 2010-05-14 2:48:25 4 Información de seguridad Información para los usuarios sobre la recogida y eliminación de equipos usados y pilas agotadas. 1 Información de seguridad Pb ( Símbolo para pilas y baterías ) Estos símbolos en los productos, embalajes o documentación que los acompaña significan que los productos eléctricos y electrónicos usados y las pilas agotadas no deberán mezclarse con los residuos domésticos. Para un correcto tratamiento, recuperación y reciclaje de los productos y pilas usados, llévelos a los puntos de recogida correspondientes, en cumplimiento con la legislación nacional vigente. Si elimina estos productos y sus pilas de forma correcta, estará ayudando a conservar importantes recursos y evitar cualquier efecto negativo sobre la salud humana y el medio ambiente que, de otro modo, podría producirse como resultado de una gestión incorrecta de los residuos. Para más información acerca de la recogida y reciclaje de producto y pilas usados, póngase en contacto con su ayuntamiento, el servicio de recogida de residuos o el punto de venta donde haya adquirido los productos. Estos símbolos sólo tienen validez en la Unión Europea. Para países fuera de la Unión Europea: Si desea eliminar estos productos, póngase en contacto con las autoridades locales o su distribuidor y solicite información acerca del método de eliminación correcto. Notas sobre el copyright • Dado que el sistema AACS (Sistema de contenido de acceso avanzado) está aprobado como sistema de protección contenido para formato BD, similar al uso del sistema CSS (Sistema de cifrado de contenido) para formato DVD, se aplican ciertas restricciones a la reproducción, la salida de señales analógicas, etc.. de contenido protegido por AACS. El manejo de este producto y las restricciones impuestas sobre él pueden variar dependiendo del momento de la compra, ya que esas restricciones pueden haberse adoptado y/ o modificado por AACS después de la fabricación de este producto. • Además, la marca BD-ROM y BD+ también se utilizan como sistema de protección de contenido en el formato BD, que impone ciertas restricciones incluidas las de reproducción en los contenidos protegidos de la marca BD-ROM y/o BD+. Para obtener información adicional sobre AACS, la marca BD-ROM, BD+, o su producto, póngase en contacto con un Centro de Atención al cliente autorizado. • Muchos discos BD-ROM/DVD están codificados con protección anticopia. Por ello, debe conectar el reproductor directamente al televisor, no a un vídeo. Si conecta el reproductor a un vídeo, los discos con protección anticopia emitirán una imagen distorsionada. • Este producto incorpora tecnología de protección de derechos de autor amparada mediante patentes de EE.UU. y otras leyes de propiedad intelectual. La utilización de esta tecnología de protección de derechos de autor debe estar autorizada por Rovi, estando dirigida exclusivamente al uso doméstico y otros medios de visualización limitados, salvo autorización contraria de Rovi. Está prohibida la alteración o desmontaje de dicha tecnología. • Bajo las leyes de Propiedad Intelectual de EE.UU. y otros países, la grabación, uso, visualización, distribución o revisión no autorizada de programas de televisión, cintas de video, discos BD-ROM, DVD, CD y otros materiales puede estar sujeta a responsabilidad civil o criminal. HB985-DB.BDEUPPK_SPA.indd 4 2010-05-14 2:48:25 Información de seguridad 5 Aviso importante para los sistemas de color del televisor El sistema de color de este reproductor varía en función de los discos que se están reproduciendo en ese momento. 1 Información de seguridad Por ejemplo, cuando la unidad reproduce un disco grabado en el sistema de color NTSC, la imagen se emite como una señal NTSC. El sistema multicolor del televisor es el único que puede recibir todas las señales emitidas por el reproductor. • Si tiene un televisor con un sistema de color PAL, sólo se mostrarán imágenes distorsionadas cuando utilice discos o contenido de vídeo grabado en NTSC. • El televisor con sistema multicolor cambia el sistema de color de forma automática según las señales de entrada. En caso de que el sistema de color no se cambie automáticamente, desactívelo y actívelo de nuevo para ver imágenes normales en pantalla. • Incluso si los discos grabados en el sistema de color NTSC se muestran bien en su televisor puede que no se graben correctamente en su grabadora. HB985-DB.BDEUPPK_SPA.indd 5 2010-05-14 2:48:26 6 Índice 3 Instalación 16 1 Monte los altavoces 16 Confi guración de los altavoces BCS-707 18 Confi guración de los altavoces BCS-303 Información de seguridad 2 Precauciones y advertencias 19 Montaje mural del altavoz central 19 Notas adicionales sobre la colocación 20 Ubicación del sistema 2 21 Preparación 21 Conexión HDMI 22 Conexión de vídeo componente 8 Conexiones a su TV Introducción 8 El símbolo “ ” en pantalla 23 Conexión del vídeo 8 Símbolos utilizados en este manual 23 Ajuste de la resolución 24 Conexión de la antena 9 Accesorios suministrados 24 10 Discos reproducibles Conexiones con un dispositivo externo 11 Compatibilidad de archivos 24 Conexión auxiliar 12 Código de región 25 12 AVCHD (Códec de video avanzado de alta definición) Conexión a entrada de puerto 25 12 Algunos requisitos del sistema Conexión a entrada óptica 1/2 26 Conexión Bluetooth® 12 Notas sobre la compatibilidad 28 Conexión a la red doméstica 13 Mando a distancia 29 14 Panel delantero 31 Conexión de dispositivos USB 15 Parte posterior 32 Ajustes 32 Ajuste de los valores de configuración 33 Menú [PANTALLA] 34 Menú [IDIOMA] 35 Menú [AUDIO] 36 Menú [BLOQUEO] 37 Menú [RED] 37 39 HB985-DB.BDEUPPK_SPA.indd 6 Configuración de la red Menú [OTROS] Efecto de sonido 2010-05-14 2:48:26 7 4 6 Funcionamiento Resolución de problemas 40 Reproducción general 64 General 42 Reproducción avanzada 65 Imagen 44 Visualización en pantalla 65 Sonido 48 Disfrutar de BD-LIVE 66 Red 49 Reproducción de archivos de vídeo y discos VR 51 Ver una fotografía 7 53 Escuchar música Apéndice 56 Reproducción de iPod 58 Funcionamiento de la radio 59 Reproducción de contenidos a través de la red doméstica 5 Mantenimiento 63 Notas en los discos 63 Manejo de la unidad 1 2 67 Control de un televisor con el mando a distancia suministrado 68 Lista del código del país 69 Lista de código de idioma 70 Resolución de la salida de vídeo 71 Marcas comerciales y licencias 73 Datos técnicos 75 Aviso sobre el software de código abierto 3 4 5 6 7 8 HB985-DB.BDEUPPK_SPA.indd 7 2010-05-14 2:48:26 8 Preparación 2 Preparación 2 Introducción Preparación El símbolo “ ” en pantalla El símbolo “ ” puede aparecer en la pantalla de su televisor durante su manejo e indica que la función explicada en este manual del usuario no está disponible en ese el aparato. Símbolos utilizados en este manual NOTA Indica la existencia de notas y características de funcionamiento particulares. Un apartado cuyo título contenga uno de los siguientes símbolos es aplicable sólo al disco representado por el símbolo. BD Disco BD-ROM DVD Los discos DVD-Vídeo, DVD±R/RW en modo Vídeo o modo VR están finalizados AVCHD Discos DVD±R/RW en formato AVCHD ACD CD de audio MOVIE Archivos de vídeo MUSIC Archivos de música PHOTO Archivos de fotos PRECAUCIÓN Indica precauciones que se deben tomar para evitar posibles daños debido a un mal uso. HB985-DB.BDEUPPK_SPA.indd 8 2010-05-14 2:48:26 Preparación Accesorios suministrados Cable de vídeo (1) Antena FM (1) Cradle para iPod (1) Accesorios y cajas de altavoces (S-BD707SW) Cables para los altavoces (1) Apoyos grandes antideslizantes (4) Accesorios y cajas de altavoces (S-BD303) Cables para los altavoces (6) 2 Preparación Pilas (1) Mando a distancia (1) 9 Apoyos pequeños antideslizantes (1) Accesorios y cajas de altavoces (S-BD707T) Apoyos grandes antideslizantes (1) Cables para los altavoces (5) Tornillos (12) Bases de soporte para los altavoces (4) Apoyos pequeños antideslizantes (1) Apoyos intermedios antideslizantes (1) HB985-DB.BDEUPPK_SPA.indd 9 2010-05-14 2:48:26 10 Preparación Discos reproducibles Disco Blu-ray - Discos de películas que puedan comprarse o alquilarse. - Discos BD-R/RE que contienen archivos con películas, música o fotografías. 2 Preparación DVD-VIDEO disco 8 / 12 cm Discos de películas que puedan comprarse o alquilarse. DVD±R disco 8 / 12 cm - Sólo modo vídeo y finalizado - También admite discos de doble capa - Formato AVCHD finalizado - Discos DVD±R que contienen archivos con películas, música o fotografías. DVD-RW disco 8 / 12 cm - Modo VR, Modo Vídeo y finalizado solamente - Formato AVCHD finalizado - Discos DVD-RW que contienen archivos con películas, música o fotografías. DVD+RW disco 8 / 12 cm - Sólo modo vídeo y finalizado - Formato AVCHD - Formato AVCHD finalizado - Discos DVD+RW que contienen archivos con películas, música o fotografías. NOTA • Algunos discos CD-R/RW (o DVD±R/RW) no podrán reproducirse en la unidad debido a las condiciones del equipo de grabación o a los propios discos CD-R/RW (o DVD±R/RW). • Dependiendo de la finalización y del software de grabación, algunos discos grabados (CD-R/RW, DVD±R/RW o BD-R/RE) podrían no reproducirse. • Puede que no se reproduzcan los discos CD-R/RW y BD-R/RE, DVD±R/RW grabados con un ordenador personal o una grabadora de DVD o CD si el disco está dañado o sucio, o si hay suciedad o restos de condensación en la lente de la unidad. • Si graba un disco con un ordenador, incluso si lo hace en un formato compatible, hay casos en los que no se puede reproducir debido a los ajustes del programa usado para crear el disco. (Consulte al editor del programa para más información). • El reproductor requiere discos y grabaciones que cumplan ciertas normas técnicas para obtener una calidad de reproducción óptima. • Los DVD previamente grabados se ajustan automáticamente a estas normas. Existen muchos tipos diferentes de formatos de disco gravables (incluido CD-R con archivos MP3 o WMA) que exigen ciertas condiciones preexistentes para garantizar una reproducción compatible. • Los clientes deben tener en cuenta que es necesario tener un permiso para poder descargarse archivos MP3/WMA y música de Internet. Nuestra empresa no está autorizada para conceder ese permiso. El permiso deberá solicitarse siempre al propietario de los derechos de autor. Audio CD disco 8 / 12 cm CD-R/RW disco 8 / 12 cm - Discos CD-R/RW que contienen títulos de audio, archivos de vídeo, música o fotos. HB985-DB.BDEUPPK_SPA.indd 10 2010-05-14 2:48:27 Preparación Compatibilidad de archivos General Velocidad de bits: entre 20 kbps y 320 kbps (WMA) entre 32 kbps y 320 kbps (MP3) Extensiones de archivo disponibles: “.jpg”, “.jpeg”, “.png”, “.avi”, “.divx”, “.mpg”, “.mpeg”, “.mkv”, “.mp4”, “.mp3”, “.wma”, “.wav” Las extensiones de archivo que hay disponibles variarán según los servidores DLNA. • Algunos archivos ”.wav” no so con este reproductor. • El número máximo de caracteres para el nombre de archivo es 180. • Puede que tarde varios minutos en leer el contenido del soporte dependiendo del tamaño y el número de archivos. NOTA • Los archivos de película HD contenidos en el CD o USB 1,0/1,1 podrían no reproducirse correctamente. Se recomienda usar los sistemas BD, DVD o USB 2,0 para reproducir archivos de película en HD. • Este reproductor admite H.264/MPEG-4 AVC de perfil principal y alto en Level 4,1. Para archivos con un nivel superior, aparecerá en pantalla un mensaje de advertencia. • Este reproductor no admite archivos que se graban con GMC*1 o Qpel*2. Éstas son las denominadas técnicas de codificación de vídeo en el estándar MPEG4, como DivX o XviD. Número máximo de archivos/carpetas: Menos de 2 000 (número total de archivos y carpetas) Formato CD-R/RW, DVD±R/RW, BD-R/RE: ISO 9 660+JOLIET, UDF y formato UDF Bridge PELÍCULA Resolución disponible: Píxeles de 1 920 x 1 080 (An. x Alt.) Subtítulos que se pueden reproducir: SubRip (.srt / .txt), SAMI (.smi), SubStation Alpha (.ssa/.txt), MicroDVD (.sub/.txt), VobSub (.sub), SubViewer 1,0 (.sub), SubViewer 2,0 (.sub/.txt), TMPlayer (.txt), DVD Subtitle System (.txt) VobSub (.sub) no está disponible en la función [Enlace principal]. Formato de codec reproducible: “DIVX3.xx”, “DIVX4.xx”, “DIVX5.xx”, “XVID”, “DIVX6.xx” (sólo para reproducción estándar), H.264/ MPEG-4 AVC, MPEG1 SS, MPEG2 PS, MPEG2 TS Formato de audio reproducible: “Dolby Digital”, “DTS”, “MP3”, “WMA”, “AAC”, “AC3” *1 GMC – Compensación global del movimiento *2 Qpel – Cuarto de píxel MÚSICA Frecuencia de muestreo: entre 8 y 48 KHz (WMA), entre 11 y 48 KHz (MP3) Velocidad de lectura: entre 8 y 320 kbps (WMA, MP3), NOTA • Esta unidad no admite archivos MP3 con etiquetas ID3. • • No todos los formatos de audio WMA y AAC son compatibles con esta unidad. Frecuencia de muestreo: entre 32 kHz y 48 kHz (WMA), entre 16 kHz y 48 kHz (MP3) HB985-DB.BDEUPPK_SPA.indd 11 2 Preparación • 11 • El tiempo de reproducción total indicado en la pantalla puede no ser correcto para archivos VBR. FOTOGRAFÍAS Tamaño recomendado: Inferior a 4 000 x 3 000 x 24 bit/píxeles Inferior a 3 000 x 3 000 x 32 bit/píxeles Inferior a 4 MByte/file • No es compatible con archivos de imagen progresivos y sin pérdida de compresión. 2010-05-14 2:48:27 12 2 Preparación Código de región Algunos requisitos del sistema El código de región se encuentra impreso en la parte posterior de esta unidad. Esta unidad sólo puede leer discos BD-ROM o DVD calificados como la parte posterior de la unidad o “Todos”. Para reproducción de vídeo de alta definición: AVCHD (Códec de video avanzado de alta definición) Preparación • Este reproductor puede reproducir discos en formato AVCHD. Estos discos se graban y usan normalmente en videocámaras. • El formato AVCHD es un formato de cámara de vídeo digital de alta definición. • El formato MPEG-4 AVC/H.264 es capaz de comprimir imágenes con una eficacia mayor que el formato de compresión de imagen convencional. • Algunos discos AVCHD usan el formato “x.v.Colour”. • Este reproductor puede reproducir discos AVCHD usando el formato “x.v.Colour”. • Algunos discos en formato AVCHD podrían no reproducirse dependiendo de las condiciones de la grabación. • Los discos en formato AVCHD deben estar finalizados. • “x.v.Colour” ofrece una mayor gama de colores que los discos DVD normales de videocámara. HB985-DB.BDEUPPK_SPA.indd 12 • Visualización de alta definición con tomas de entrada COMPONENT o HDMI. • Disco BD-ROM con contenido en alta definición. • Es necesario que el dispositivo de pantalla disponga de una entrada DVI apta para HDMI o HDCP para mostrar algunos contenidos (como indican los autores del disco). • Para realizar una conversión de un DVD con definición estándar, es necesario que el dispositivo de pantalla disponga de una entrada DVI apta para HDMI o HDCP para contenido con protección anticopia. Notas sobre la compatibilidad • Dado que BD-ROM es un nuevo formato, pueden aparecer algunos problemas de discos, conexión digital y otros problemas de compatibilidad. Si tiene problemas de compatibilidad, póngase en contacto con un Centro de servicio técnico autorizado. • Para visualizar contenidos de alta definición y convertir contenido estándar de DVD a una resolución mayor, es posible que el dispositivo de pantalla deba tener una entrada apta para HDMI o una entrada DVI apta para HDCP. • Algunos discos BD-ROM y DVD pueden restringir el uso de algunos comandos operación o algunas funciones. • Puede utilizar un dispositivo USB para almacenar información relacionada con el disco, incluso contenido descargado en línea. El disco que está utilizando controlará el tiempo que se retiene esta información. 2010-05-14 2:48:28 Preparación 13 Mando a distancia • • • • • • • • • a • • • • • • • • • 1 (STANDBY/ON): Apaga y enciende el reproductor. Z OPEN/CLOSE: Abre o cierra la bandeja del disco. 1 BT AUDIO: Cambia el modo de entrada a BT AUDIO directamente. OPTICAL: Cambia el modo de entrada directamente a óptico. 2 Retire la tapa de las pilas de la parte trasera del mando a distancia e introduzca una pila R03 (tamaño AAA) con la polaridad , correcta. SOUND: Selecciona un modo de efecto de sonido. VOL +/- : Ajusta el volumen del altavoz. • • • • • • • • • c • • • • • • • • • Botones numéricos 0-9: Selecciona las opciones numéricas en un menú. HOME MENU: Muestra o sale del [MENÚ INICIO]. MARKER: Marca un punto específico durante la reproducción. MENU: Accede al menú de un disco. SEARCH: Muestra o sale del menú de búsqueda. Botones de dirección: Seleccionan una opción en el menú. REPEAT: Repite la sección deseada. DIMMER: Atenúa la luz del aparato. PRESET: Selecciona programas de radio. Botones coloreados (A, B, C, D): Permiten navegar por los menús. • • • • • • • • • b • • • • • • • • • - A Botón (RDS): Sistema de datos de radio. POPUP/ TOP MENU: Muestra el menú del disco DVD o el menú emergente del BD-ROM, cuando haya uno disponible. x STOP: Detiene la reproducción. B PLAY: Comienza la reproducción. X PAUSE/STEP: La reproducción cambia a modo de pausa. ./> SKIP: Pasa al archive/ pista/capítulo siguiente o anterior. 2 CLEAR: Elimina la marca del menú de búsqueda o un número al definir la contraseña. TUNE (+/-): Sintoniza la emisora de radio deseada. O RETURN: Sale del menú o reanuda la reproducción. Colocación de las pilas MUTE: Silencia la unidad. DISPLAY: Muestra o sale de la pantalla del menú OSD. ENTER: Confirma la selección del menú. 3 z USB REC: Graba un CD de audio. Preparación INPUT/TUNER: Cambia el modo de entrada. SPK LEVEL: Establece el nivel de sonido del altavoz deseado. ZOOM: Accede al menú de zoom. - B Botón (PTY): Vistas del tipo de programa del RDS. - C Botón (PTY SEARCH): Busca el tipo de programa. - D Botón : Selecciona el modo FM en mono o estéreo. Botones de control de TV: Consultar la página 67. SLEEP: Establece un período de tiempo concreto después del cual, se apaga la unidad. m/M SCAN: Busca hacia atrás o delante. HB985-DB.BDEUPPK_SPA.indd 13 2010-05-14 2:48:28 14 Preparación Panel delantero 1 2 2 Preparación 3 4 5 6 a Bandeja del disco c Sensor remoto b Botones de funcionamiento 1 STANDBY/ON Botón Z (OPEN/CLOSE) FUNCTION Cambia la fuente de entrada o la función. B/X (PLAY / PAUSE) x (STOP) ./> (SKIP) - TUNE + (Sintonización de la rada) d Ventana de visualización HB985-DB.BDEUPPK_SPA.indd 14 7 e PORTABLE IN f Puerto USB g Control de volumen 2010-05-14 2:48:28 Preparación 15 Parte posterior 1 2 3 4 5 2 7 8 9 10 Preparación 6 11 a Cable de corriente alterna (CA) Conectar a la fuente de alimentación. g COMPONENT VIDEO (Y PB PR) OUTPUT (PROGRESSIVE SCAN) b Conexiones de los altavoces h OPTICAL 1(TV) / 2 c Ventilador de refrigeración i iPod (24 pin) Conectar al cradle de iPod incluido. d Conexión de la antena e VIDEO OUT f AUX (L/R) INPUT HB985-DB.BDEUPPK_SPA.indd 15 j HDMI OUT (tipo A, Versión 1.3) Conecta a un TV con entradas HDMI. k Puerto LAN 2010-05-14 2:48:28 16 Instalación 3 Instalación Monte los altavoces 3 Para altavoz central: Utilice el adhesivo incluido para colocar los cuatro apoyos pequeños en la base del altavoz central. Confi guración de los altavoces BCS-707 Instalación apoyos pequeños antideslizantes small non-skid pads Preparación de los altavoces 1. Coloque los apoyos antideslizantes en la base de cada pie de altavoz, el subwoofer y el altavoz central. Para las bases de altavoz: Utilice el adhesivo incluido para colocar los cuatro apoyos centrales en la base (inferior) de cada pie de altavoz. middle non-skid pads apoyos centrales antideslizantes 2. Coloque los pies del altavoz en los vástagos con los tornillos incluidos. Cuando haya alineado el vástago y la base, fíjelos con los tornillos pequeños en los puntos que se muestran más adelante. Tenga en cuenta que el altavoz debe orientarse en la dirección de la base del triángulo isósceles. Para subwoofer: Utilice el adhesivo incluido para colocar los cuatro apoyos grandes en la base del subwoofer. large non-skid pads Parte trasera Rear apoyos grandes antideslizantes Frente Front HB985-DB.BDEUPPK_SPA.indd 16 2010-05-14 2:48:28 Instalación 3. Conecte los cables al reproductor. Conecte el cable blanco con el lado de línea gris (+) y el otro cable en el lado (-). Para conectar el cable al reproductor, presione cada pestaña plástica para abrir el terminal de conexión. Introduzca el cable y suelte la pestaña. Color (+) 17 Fijación de los altavoces delanteros y surround. Coloque los altavoces delanteros y surround con el pasador plástico incluido. Atornille los dos ganchos en la pared detrás del altavoz. Pase un cordón grueso alrededor de los ganchos y a través del pasador plástico para estabilizar el altavoz (asegúrese de que soporte el peso del altavoz). Tras la instalación, asegúrese de que se haya fijado correctamente el altavoz. 3 Instalación Negro (-) Cordón con el grosor ciente thicksufi cord PRECAUCIÓN Pasador Plasticplástico catch • No conecte ningún altavoz diferente a los suministrados con este sistema. • No conecte los altavoces suministrados a ningún amplificador diferente al que se incluye con este sistema. La conexión a otro amplificador puede dar lugar a fallos de funcionamiento o un incendio. PRECAUCIÓN • El pasador plástico no es un componente de montaje, y el altavoz no debe colgar directamente de la pared con este pasador. Utilice siempre un cordón para estabilizar el altavoz. • Pioneer no acepta ninguna responsabilidad por posibles pérdidas o daños resultantes de un montaje o instalación incorrectos, una resistencia insuficiente de los materiales de instalación, uso incorrecto o desastres naturales. • Al colocar esta unidad, asegúrese de fijarla de forma segura y evite áreas en las que exista la posibilidad de que caiga y causarle lesiones si se produce un desastre natural (por ejemplo, un terremoto). HB985-DB.BDEUPPK_SPA.indd 17 2010-05-14 2:48:29 18 Instalación Confi guración de los altavoces BCS-303 Para altavoz central: Utilice el adhesivo incluido para colocar los cuatro apoyos pequeños en la base del altavoz central. Preparación de los altavoces 1. Coloque los apoyos antideslizantes en la base de cada altavoz. apoyos antideslizantes pequeños samll non-skid pads Para las bases de altavoz: Utilice el adhesivo incluido para colocar los cuatro apoyos centrales pequeños en la base (inferior) de cada pie de altavoz. apoyos antideslizantes pequeños samll non-skid pads 3 Instalación Para subwoofer: Utilice el adhesivo incluido para colocar los cuatro apoyos grandes en la base del subwoofer. 2. Conecte los cables al reproductor. Conecte el cable blanco con el lado de línea gris (+) y el otro cable en el lado (-). Para conectar el cable al reproductor, presione cada pestaña plástica para abrir el terminal de conexión. Introduzca el cable y suelte la pestaña. Color (+) apoyos grandes antideslizantes large non-skid pads Negro (-) HB985-DB.BDEUPPK_SPA.indd 18 2010-05-14 2:48:29 Instalación Notas adicionales sobre la colocación El altavoz central tiene un orificio de montaje que se puede usar para montar el altavoz en la pared. Instale los altavoces principales delanteros izquierdo y derecho a la misma distancia del televisor. Antes del montaje Precauciones: Recuerde que el sistema de altavoces es pesado y que su peso podría hacer que se aflojen los tornillos, o que falle el material de la pared que los sujeta, con una posible caída de los altavoces. Asegúrese de que la pared en la que desea montar los altavoces tenga la resistencia suficiente para soportarlos. No realice el montaje sobre contrachapado o paredes blandas. Asegúrese de enroscar el cable pelado del altavoz e insértelo completamente en el terminal del altavoz. Si alguno de los cables de altavoz pelados toca el panel trasero, puede hacer que se corte la alimentación eléctrica como medida de seguridad. No se incluyen los tornillos de montaje. Utilice tornillos adecuados para el material de la pared y apoye el peso del altavoz. PRECAUCIÓN • Si no está seguro de la calidad y la resistencia de una pared, consulte a un profesional. • Pioneer no se hace responsable de ningún accidente o daños resultantes de una instalación inadecuada. Los altavoces delanteros, central y surround suministrados con este sistema están protegidos magnéticamente. Sin embargo, dependiendo de la ubicación de instalación, puede producirse distorsión del color si los altavoces se instalan muy cerca de la pantalla de un televisor. Si esto ocurre, apague el televisor, y enciéndalo después de 15 – 30 minutos. Si el problema continúa, separe el sistema de altavoces del televisor. 3 Instalación Montaje mural del altavoz central 19 El subwoofer no está protegido magnéticamente y, por esta razón, no puede colocarse cerca de un televisor o monitor. No coloque medios de almacenaje magnéticos (como discos flexibles y cintas o cassettes de vídeo) cerca del subwoofer. No fije los altavoces delanteros/surround y el subwoofer a una pared o techo. Podrían caerse o causar lesiones. Tornillo de montaje Mounting screw (incluido) (not supplied) 5 mm 10 mm De 5 mm a 7 mm HB985-DB.BDEUPPK_SPA.indd 19 2010-05-14 2:48:29 20 Instalación Ubicación del sistema La siguiente imagen muestra un ejemplo de posicionamiento del sistema. Recuerde que la ilustración en estas instrucciones difiere de la unidad real, en cuanto a fines explicativos Para un sonido envolvente óptimo, todos los altavoces aparte del subwoofer deberían colocarse a la misma distancia de la posición desde donde se van a escuchar (A). C A G Instalación F A A A A D • Tenga cuidado y asegúrese de que los niños no se apoyen o dejen objetos en el *conducto del altavoz. *Conducto del altavoz: Habitáculo para sonidos bajos en la estructura (alojamiento) del altavoz. • Coloque el altavoz central a una distancia segura fuera del alcance de los niños. De lo contrario, puede caerse y causar lesiones personales y/o daños materiales. • Los altavoces contienen piezas magnéticas, por lo que pueden aparecer irregularidades cromáticas en la pantalla del televisor o en el monitor del ordenador. Utilice los altavoces lejos de la televisión y del monitor del ordenador. B 3 PRECAUCIÓN E A A Altavoz frontal izquierdo / B Altavoz frontal derecho: Coloque los altavoces frontales a ambos lados del monitor o pantalla y debidamente alineados respecto a la pantalla. C Altavoz central: Coloque el altavoz central encima o debajo del monitor o pantalla. D Altavoz izquierdo envolvente / E Altavoz derecho envolvente: Coloque estos altavoces detrás de la posición desde donde se van a escuchar, orientados ligeramente hacia dentro. F Subwoofer: La posición del subwoofer no es tan importante, ya que los sonidos de graves no dependen en gran medida de su orientación. No obstante, es mejor colocar el subwoofer cerca de los altavoces frontales. Gírelo ligeramente hacia el centro de la habitación para reducir el reflejo contra la pared. G Unidad HB985-DB.BDEUPPK_SPA.indd 20 2010-05-14 2:48:29 Instalación Conexiones a su TV Realice una de las conexiones siguientes, dependiendo de las opciones del propio equipo. • Conexión HDMI (página 21-22) • Conexión de vídeo componente (página 22) • Conexión del vídeo (página 23) NOTA Conexión HDMI Si dispone de un televisor o monitor HDMI, puede conectarlo a este reproductor usando un cable HDMI (tipo A, Versión 1.3). Conecte la toma HDMI OUT del reproductor a la toma HDMI IN de un televisor o monitor compatible con HDMI. Conexión HDMI Reproductor Player 3 Instalación • Dependiendo de su TV y otros equipos que quiera conectar, hay varias formas de conectar el reproductor. Utilice sólo una de las conexiones descritas en este manual. • Por favor, consulte los manuales de su TV, sistema estéreo y otros dispositivos según necesite para establecer la mejor conexión posible. 21 Televisor TV • Asegúrese de que el reproductor está conectado directamente al TV. Sintonice el TV al canal de entrada de vídeo correcto. • No conecte el reproductor a través de su VCR. La imagen podría distorsionarse debido al sistema de protección anti-copia. Seleccione la fuente del televisor a HDMI (consulte el manual de instrucciones del televisor). HB985-DB.BDEUPPK_SPA.indd 21 2010-05-14 2:48:30 22 Instalación Conexión de vídeo componente NOTA • No modifique la resolución si la conexión ya se ha establecido, podrían producirse fallos en el funcionamiento. Para resolver este problema, apague el reproductor y vuelva a encenderlo. • Cuando la conexión HDMI con el HDCP no esté verificada, la pantalla de TV cambiará a una pantalla negra. En este caso, compruebe la conexión HDMI o desconecte el cable HDMI. 3 • Si aparecen ruidos o líneas en la pantalla, compruebe el cable HDMI (la longitud se limita generalmente a 4,5 m y se utiliza un cable HDMI de alta velocidad (versión 1.3). Conecte las tomas COMPONENT VIDEO OUT del reproductor a las tomas de entrada correspondientes del televisor usando cables Y Pb Pr. Puede oír el sonido a través del altavoz del sistema. Conexión de componentes Player Reproductor PR VIDEO Instalación • Si un dispositivo HDMI conectado no acepta la salida de audio del reproductor, el audio del dispositivo HDMI podrá distorsionarse o no emitirse. L R • Cuando conecte un dispositivo compatible con HDMI o DVI, realice las siguientes comprobaciones: - Intente apagar el dispositivo HDMI/DVI y este reproductor. A continuación, encienda el dispositivo HDMI/DVI y transcurridos unos 30 segundos, encienda el reproductor. - La entrada de vídeo del dispositivo conectado está seleccionada correctamente para esta unidad. - El dispositivo conectado es compatible con las entradas de vídeo de resolución 720x576p (480p), 1280x720p, 1920x1080i o 1920x1080p. • o todos los dispositivos HDMI o DVI compatibles con HDCP funcionarán con este reproductor. - La imagen no se verá correctamente con un dispositivo que no sea compatible con HDCP. - El reproductor no funciona y la pantalla de TV se vuelve negra. HB985-DB.BDEUPPK_SPA.indd 22 Y COMPONENT VIDEO INPUT • Si utiliza una conexión HDMI, se puede cambiar la resolución para la salida HDMI. (Consulte “Ajuste de la resolución” en la página 23). • Seleccione el tipo de salida de vídeo de la toma HDMI OUT mediante la opción [Conf. color HDMI] en el menú [Config.] (ver página 34). PB AUX OUTPUT Verde Green Blue Azul Red Rojo Televisor TV NOTA Si utiliza la conexión COMPONENT VIDEO OUT, puede modificar la resolución de salida (consulte el apartado “Ajuste de la resolución” en la página 23.) 2010-05-14 2:48:30 Instalación Conexión del vídeo Ajuste de la resolución Conecte la toma VIDEO OUT del reproductor a la toma de entrada de vídeo situada en el televisor mediante un cable de vídeo. Puede oír el sonido a través del altavoz del sistema. El reproductor proporciona varias resoluciones de salida para las conexiones HDMI OUT y COMPONENT VIDEO OUT. Es posible cambiar la resolución mediante el menú [Config.]. 1. Pulse HOME MENU ( Conexión del vídeo 23 ). 2. Utilice I/i/U/u para seleccionar el menú [Config.] y pulse ENTER ( ). Aparecerá el menú [Config.]. Reproductor 3. Utilice U/u para seleccionar la opción [PANTALLA] y, a continuación, pulse i para pasar al segundo nivel. PR VIDEO PB AUX R Y COMPONENT VIDEO INPUT OUTPUT 4. Utilice U/u para seleccionar la opción [Resolución] y, a continuación, pulse ENTER ( ) o i para pasar al tercer nivel. Yellow Amarillo 3 Instalación L Televisor TV 5. Use U/u para seleccionar una opción y, a continuación, pulse ENTER ( ) para confirmar su selección. NOTA • Si su televisor no acepta la resolución que ha configurado en el reproductor, es posible ajustar la resolución a 576p (480p) de la siguiente manera: 1. Pulse Z para abrir la bandeja de discos. 2 Pulse x por más de 5 segundos. • Como son varios los factores que influyen en la resolución de salida de vídeo, consulte “Resolución de la salida de vídeo” en la página 70. HB985-DB.BDEUPPK_SPA.indd 23 2010-05-14 2:48:31 24 Instalación Conexión de la antena Conecte la antena facilitada para escuchar la radio. Conexión de la antena Conexiones con un dispositivo externo Conexión auxiliar Puede disfrutar del sonido de su componente con las tomas de salida de audio analógicas de los altavoces del sistema. Conecte las tomas de salida de audio analógicas a su componente en la conexión auxiliar izquierda o derecha de esta unidad. Y después, seleccione la opción [AUX] pulsando INPUT/TUNER, I/i y ENTER ( ). 3 Instalación Conexión auxiliar Reproductor Player Reproductor Player VIDEO L PR PB AUX R Y COMPONENT VIDEO INPUT NOTA Después de conectar la antena por hilo FM, manténgala lo más horizontal posible. Asegúrese de sacar la antena por hilo FM completamente. HB985-DB.BDEUPPK_SPA.indd 24 Rojo Red Blanco White To the audio output jacks A la of toma decomponent salida de your audio deVCR, su componente (TV, etc.) (TV, VCR, etc.) 2010-05-14 2:48:32 Instalación Conexión a entrada de puerto Conexión a entrada óptica 1/2 Puede disfrutar del sonido de su reproductor de audio portátil desde los altavoces del sistema. Puede disfrutar del sonido de su componente con la conexión óptica digital de los altavoces del sistema. Conecte la toma de los auriculares (o la salida de línea) del reproductor de audio portátil a la entrada del puerto en esta unidad. Y después, seleccione la opción [PORTABLE] pulsando INPUT/TUNER, I/i y ENTER ( ). Conecte la toma de salida óptica de su componente a las tomas de entrada óptica 1/2 de la unidad. Y después, seleccione la opción [OPTICAL 1/2] pulsando INPUT/TUNER, I/i y ENTER ( ). O pulse OPTICAL para seleccionar directamente. 25 Conexión a entrada de puerto Conexión óptica 3 Instalación ATolathe toma de salida digital óptica dejack su opticaldigital output componente of your component Reproductor de twZG SGUUU MP3, etc. HB985-DB.BDEUPPK_SPA.indd 25 2010-05-14 2:48:32 26 Instalación Conexión Bluetooth® Acerca de Bluetooth Bluetooth® es una tecnología de comunicación inalámbrica para conexiones de corta distancia. El alcance disponible es de 10 metros. (Puede interrumpirse el sonido si hay interferencias causadas por otra onda electrónica o si se conecta el bluetooth en otras habitaciones.) 3 Instalación La conexión de aparatos individuales bajo Tecnología inalámbrica Bluetooth no incurre en ningún cargo. Se puede utilizar un teléfono móvil con tecnología inalámbrica Bluetooth a través de Cascade, si la conexión se ha realizado con tecnología inalámbrica Bluetooth. Aparatos disponibles: Teléfono móvil, MP3, ordenador portátil, PDA (estas unidades deben ser compatibles con auriculares estéreo.) Perfiles de Bluetooth Para utilizar la tecnología inalámbrica Bluetooth, los aparatos deben cumplir con ciertos perfiles. Este equipo es compatible con el perfil siguiente. A2DP (Advanced Audio Distribution Profile) Escuchar música de un aparato Bluetooth Acoplar su equipo y un aparato Bluetooth Antes de comenzar el procedimiento de acoplamiento, asegúrese de que se haya activado la función Bluetooth del aparato Bluetooth. Consulte la guía de usuario del aparato Bluetooth. Una vez realizado con éxito el acoplamiento, no es necesario volver a realizarlo. HB985-DB.BDEUPPK_SPA.indd 26 1. Selección la función Bluetooth con INPUT/ TUNER o BT AUDIO. Aparece “BT AUDIO” y, posteriormente, “BT READY” en la ventana de la pantalla. 2. Encienda el aparato Bluetooth y realice la operación de acoplamiento. Durante la búsqueda del aparato Bluetooth, quizás se muestre una lista de los dispositivos encontrados en la pantalla del aparato Bluetooth, dependiendo del tipo de aparato de que se trate. Su equipo aparece como “PIONEER AUDIO”. 3. Introduzca el código PIN. Código PIN: 0000 4. Cuando se haya realizado el acoplamiento con éxito, se iluminará el LED del Bluetooth y se mostrará “BT SINK”. NOTA Dependiendo del tipo de aparato de que se trate, el modo de acoplamiento puede ser diferente. 5. Escuchar música. Para reproducir música guardada en el aparato Bluetooth, consulte la guía de usuario de ese aparato. NOTA • Si cambia la función del equipo, se desconectará la función Bluetooth y deberá realizar de nuevo el acoplamiento. • AVRCP no está disponible en este modo. 2010-05-14 2:48:32 Instalación Comprobación de la información del aparato Bluetooth conectado Esta función se realiza tras el acoplamiento. Puede comprobar la información Bluetooth. Mantenga pulsado DISPLAY repetidamente. La información de Bluetooth cambia del modo siguiente. Dirección local de aparato Bluetooth t Nombre de aparato t Ninguno t ... 27 NOTA • Este equipo no es compatible con el perfil de auriculares mono (perfil de manos libres). • El sonido podría interrumpirse cuando otra onda electrónica interfiera en la conexión. • No se puede controlar el aparato Bluetooth con este equipo. • El acoplamiento se limita a un aparato Bluetooth por equipo y no es posible el acoplamiento múltiple. • Dependiendo del tipo de aparato, quizás no pueda usar la función Bluetooth. • Cuando no se ha conectado el Bluetooth, aparece “BT READY” en la ventana de la pantalla. 3 Instalación • Aunque la distancia entre su Bluetooth y el aparato sea inferior a 10 m, si hay obstáculos entre ambos, no se podrá conectar el aparato Bluetooth. • Si se produce un fallo eléctrico debido a aparatos que utilizan la misma frecuencia, como equipos médicos, microondas o dispositivos LAN inalámbricos, se interrumpirá la conexión. • Cuando se sitúe una persona en el recorrido de la comunicación entre el aparato Bluetooth y el reproductor, se interrumpirá la conexión. • Si aumenta la distancia entre el Bluetooth y el equipo, se reducirá la calidad del sonido y la conexión se interrumpirá si el espacio entre el Bluetooth y el equipo es superior al alcance del Bluetooth. • Se desconecta el aparato con tecnología inalámbrica Bluetooth, si se apaga el equipo principal o la distancia entre el aparato y la unidad principal es superior a 10 m. HB985-DB.BDEUPPK_SPA.indd 27 2010-05-14 2:48:32 28 Instalación Conexión a la red doméstica Este reproductor se puede conectar a una red de área local (LAN) a través de un puerto LAN en el panel trasero. 3 Instalación Para más información consulte la documentación del dispositivo de red. Conecte el puerto LAN del reproductor al correspondiente puerto del módem o router a través de un cable de red LAN o cable Ethernet (CAT5 o superior con conector RJ45) disponibles en comercios. En el ejemplo de configuración de una conexión por cable que se muestra a continuación, el reproductor puede acceder al contenido desde cualquiera de los ordenadores. Conexión a red Router Router Broadband Servicio Service de banda ancha WAN LAN 1 LAN 2 PC PC LAN 3 Reproductor Player NOTA • Cuando enchufe o desenchufe el cable LAN, hágalo sujetando el cable por el enchufe. Al desenchufarlo, no estire del cable LAN, desenchúfelo presionando hacia abajo el enchufe. • No conecte un cable de teléfono modular al puerto LAN. • Existen varias configuraciones para la conexión, siga las especificaciones de su compañía de telecomunicaciones o de su proveedor de Internet. • Si desea acceder a contenido desde ordenadores o servidores DLNA, el reproductor deberá estar conectado a la misma red de área local que dichos ordenadores o servidores a través de un router. HB985-DB.BDEUPPK_SPA.indd 28 2010-05-14 2:48:32 Instalación Configuración de la red Antes de ajustar la red por cable, es necesario conectar Internet de banda ancha a su red doméstica. Si hay un servidor DHCP en la red de área local (LAN) a través de una conexión por cable, a este reproductor se le asignará automáticamente una dirección IP. Después de realizar la conexión física, es posible que se tenga que ajustar la configuración de red del reproductor en algunas redes domésticas. Ajuste la configuración de [RED] de la siguiente manera. 2. Utilice U/u/I/i para seleccionar el modo IP entre [Dinámico] y [Estático]. Normalmente, seleccione [Dinámico] para asignar de forma automática una dirección IP. HB985-DB.BDEUPPK_SPA.indd 29 NOTA Si no hay disponible un servidor DHCP en la red y desea configurar manualmente la dirección IP, seleccione [Estático] y, a continuación, [dirección IP], [máscara de red], [gateway] y [servidor DNS] mediante los botones U/u/I/i y los botones numéricos. Si se equivoca mientras introduce un número, pulse CLEAR para borrar la parte resaltada. 3. Seleccione [OK] y pulse ENTER ( ) para aplicar los ajustes de red. 4. El reproductor le pedirá que compruebe la conexión de red. Seleccione [OK] y pulse ENTER ( ) para completar la conexión de red. 3 Instalación 1. Seleccione la opción [Config de conexión] en el menú [Config.] y, a continuación, pulse ENTER ( ). 29 5. Si selecciona [Test] y pulsa ENTER ( ) en el paso 4 anterior, el estado de conexión de la red se mostrará en la pantalla. Además, es posible hacer la comprobación en [Estado conexión] en el menú [Config.]. 2010-05-14 2:48:33 30 Instalación Notas sobre la conexión de red: • • 3 Muchos de los problemas de conexión a la red que se producen durante la configuración pueden resolverse a menudo reseteando el router o cable módem. Después de conectar el reproductor a la red doméstica, apague inmediatamente y/ o desconecte el cable de alimentación del router o cable módem de la red doméstica. Después, encienda y/o conecte de nuevo el cable de alimentación. Instalación El número de dispositivos que pueden recibir el servicio de Internet quedará limitado por las condiciones de servicio aplicables dependiendo del proveedor de servicios de Internet (ISP). Para obtener más información, póngase en contacto con su ISP. • Nuestra empresa no se responsabiliza de un mal funcionamiento del reproductor y/o la función de conexión a Internet por errores/ fallos de comunicación con su conexión a Internet de banda ancha u otro equipo conectado. • Nuestra empresa no es la creadora o suministradora de las características de los discos BD-ROM disponibles en la función de conexión a Internet, y tampoco se responsabiliza de su funcionalidad o disponibilidad continuada. Puede que haya material relacionado con el disco disponible a través de la conexión a Internet que sea incompatible con este reproductor. Si tiene alguna duda acerca de dicho contenido, póngase en contacto con el fabricante del disco. • Algunos contenidos de Internet pueden requerir una conexión con un ancho de banda superior. • Incluso si el reproductor está correctamente conectado y configurado, puede que parte de los contenidos de Internet no funcionen correctamente debido a congestión de Internet, la calidad o ancho de banda de su servicio de Internet, o problemas con el proveedor de contenido. HB985-DB.BDEUPPK_SPA.indd 30 • Es posible que algunas operaciones de conexión a Internet no se puedan realizar debido a ciertas restricciones del proveedor de servicios de Internet (ISP) que le proporciona la conexión a Internet de banda ancha. • Los costes del proveedor de Internet incluidos (sin limitación) los cargos de conexión corren por su cuenta y riesgo. • Se necesita un puerto 10 LAN Base-T o 100 Base-TX para la conexión por cable a este reproductor. Si su servicio de Internet no permite ese tipo de conexiones no podrá conectar el reproductor. • Para utilizar el servicio xDSL necesitará un router. • Es necesario un módem DSL para utilizar el servicio DSL y un cable módem para usar el servicio de cable módem. Dependiendo del método de acceso y el acuerdo de suscripción que tenga con su ISP, puede que no pueda utilizar la función de conexión a Internet de este reproductor, o puede que se limite al número de dispositivos que se pueden conectar a la vez. (Si su ISP limita la suscripción a un dispositivo, puede que este reproductor no pueda conectarse si ya hay conectado un ordenador). • Puede que el uso de un “Router” no esté permitido o su uso esté limitado según las políticas y restricciones de su ISP. Para más información, póngase directamente en contacto con su ISP. • Apague todos los equipos de red que no utilice en su red doméstica local. Algunos dispositivos pueden generar tráfico de red. 2010-05-14 2:48:33 Instalación Conexión de dispositivos USB Este reproductor puede reproducir archivos de vídeo, música y fotos guardados en el dispositivo USB. 1. Inserte un dispositivo USB en el puerto USB hasta que se ajuste en su posición. Conexión USB 31 NOTA • Este reproductor es compatible con memoria flash USB/HDD externo formateado en FAT16, FAT32 y NTFS cuando se accede a archivos (música, fotos, vídeos). Sin embargo, para la grabación de CD de audio y BD-LIVE sólo son compatibles los formatos FAT16 y FAT32. Utilice la memoria flash USB/HDD externo formateado en FAT16 o FAT32 cuando use la grabación de CD de audio y BD-LIVE. • El dispositivo USB puede utilizarse para el almacenamiento local y así disfrutar de discos BD-LIVE con Internet. • Esta unidad admite hasta 4 particiones del dispositivo USB. • No es compatible con un dispositivo USB que necesite un programa de instalación adicional al estar conectado al ordenador. Instalación • No extraiga el dispositivo USB mientras esté en funcionamiento (reproducción, etc.). 3 • Dispositivo USB: Dispositivo USB que admite USB 1,1 y USB 2,0. 2. Pulse HOME MENU. Seleccione [Película], [Foto] o [Música] con los botones U/u/I/i, y pulse ENTER ( ). 3. Seleccione un archivo con los botones U/u/I/i, y pulse PLAY o ENTER ( ) para reproducir el archivo. Puede comprobar el espacio del dispositivo USB en la pantalla. 4. Seleccione el otro modo. Y retire el dispositivo USB con cuidado. HB985-DB.BDEUPPK_SPA.indd 31 • Se pueden reproducir archivos de vídeo, música y fotos. Para obtener una información detallada de funcionamiento con cada archivo, consulte las páginas correspondientes. • Es recomendable realizar copias de seguridad regularmente para evitar pérdida de datos. • Si utiliza un cable de extensión USB, un HUB USB o un multilector USB, el dispositivo USB puede no reconocerse. • Es posible que algunos dispositivos USB no funcionen con esta unidad. • No admite cámaras digitales ni teléfonos móviles. • El puerto USB de este aparato no puede conectarse a un ordenador. 2010-05-14 2:48:33 32 Instalación 4. Utilice U/u para seleccionar una segunda opción de configuración y pulse ENTER ( ) para desplazarse hasta el tercer nivel. Ajustes Ajuste de los valores de configuración Es posible modificar los ajustes del reproductor en el menú [Config.]. 1. Pulse HOME MENU ( ). 5. Utilice U/u para seleccionar la opción deseada y pulse i o ENTER ( ) para confirmar su selección. 3 Instalación 2. Utilice I/i/U/u para seleccionar el menú [Config.] y pulse ENTER ( ). Aparecerá el menú [Config.]. 3. Utilice U/u para seleccionar la primera opción de configuración y pulse i para pasar al segundo nivel. HB985-DB.BDEUPPK_SPA.indd 32 2010-05-14 2:48:33 Instalación Menú [PANTALLA] Resolución Aspecto TV Ajusta la resolución de salida de la señal de vídeo HDMI y de componente. Refiérase a la página 23 y 70 para obtener detalles sobre la configuración de la resolución. Seleccione una relación de aspecto del TV según el tipo de televisor. [Formato Carta 4:3] Selecciónelo cuando haya una pantalla de televisión tradicional (4:3) conectada. Muestra la imagen con barras que la ocultan por la parte superior e inferior. [16:9 Original] Seleccione esta opción cuando se haya conectado a una TV panorámica 16:9. La imagen de formato 4:3 se mostrará con una proporción de 4:3 con bandas negras a derecha e izquierda. [16:9 Completa] Seleccione esta opción cuando se haya conectado a una TV panorámica 16:9. La imagen de formato 4:3 se ajustará horizontalmente (en proporción lineal) para llenar toda la pantalla. [1080p] Representa 1080 líneas de vídeo progresivo. [1080i] Representa 1080 líneas de vídeo entrelazado. 3 Instalación [Form. panorám. 4:3] Selecciónelo cuando haya una pantalla de televisión tradicional (4:3) conectada. Muestra la imagen recortada para ajustarse a la pantalla de su TV. Ambos lados de la imagen están recortados. [Auto] Si la conexión [HDMI OUT] se conecta a una TV que proporcione información de pantalla (EDID), se seleccionará automáticamente la resolución que mejor se adapte a la TV conectada. Si solamente está conectada la conexión COMPONENT VIDEO OUT], la resolución se cambiará a 1080i de forma predeterminada. 33 [720p] Representa 720 líneas de vídeo progresivo. [576p (480p)] Representa 576 (480) líneas de vídeo progresivo. [576i (480i)] Representa 576 (480) líneas de vídeo entrelazado. NOTA No se puede seleccionar [Formato Carta 4:3] y [Form. panorám. 4:3] si la resolución está ajustada en un valor superior a 720p. HB985-DB.BDEUPPK_SPA.indd 33 2010-05-14 2:48:33 34 Instalación Pantalla 1080p Cuando la resolución se configure como 1080p, seleccione la opción [24Hz] para obtener una presentación limpia del material filmado (1080p/24 Hz) con una pantalla equipada con HDMI compatible con la entrada 1080p/24 Hz. NOTA 3 Menú [IDIOMA] Menú de visualización Seleccione un idioma para el menú [Config.] y para la información en pantalla. Menú del disco/Audio del disco/ Subtítulo del disco Instalación • Si selecciona [24 Hz], podrían producirse distorsiones en la imagen cuando el vídeo cambia material filmográfico y de vídeo. En ese caso, seleccione [50 Hz]. Seleccione el idioma que prefiera para la pista de audio (audio del disco), los subtítulos, y el menú del disco. • Incluso cuando la opción [Pantalla 1080p] se configura a [24 Hz], si la TV no es compatible con 1080p/24 Hz, la frecuencia de fotogramas real de la salida de video será 50 Hz según el formato de la fuente de vídeo. [Original] Hace referencia al idioma original en que se grabó el disco. Conf. color HDMI Seleccione el tipo de salida de la conexión HDMI OUT. Para esta configuración, consulte los manuales del dispositivo de pantalla. [YCbCr] Seleccione esta opción al conectar a un dispositivo de pantalla HDMI. [RGB] Seleccione esta opción al conectar a un dispositivo de pantalla DVI (RGB). HB985-DB.BDEUPPK_SPA.indd 34 [Otros] Pulse ENTER ( ) para seleccionar otro idioma. Use los botones numéricos y a continuación ENTER ( ) para introducir el número de 4 dígitos según la lista de códigos de idioma de la página 69. [Apagado] (sólo para subtítulos del disco) Desactiva los subtítulos. NOTA Puede que el ajuste del idioma no funcione dependiendo del disco. 2010-05-14 2:48:33 Instalación Menú [AUDIO] Ajuste Altavoces Para obtener el mejor sonido posible, utilice la pantalla de configuración del altavoz para especificar el volumen de los altavoces que ha conectado y la distancia desde donde se van a escuchar. Utilice la prueba para ajustar el volumen de los altavoces al mismo nivel. [Altavoces] Seleccione un altavoz que quiera ajustar. [Volumen] Ajusta el nivel de salida de cada altavoz. [Prueba/ Parar tono de prueba] Los altavoces emitirán un tono de prueba. [OK] Confirma la configuración. [Cancelar] Cancela la configuración. HB985-DB.BDEUPPK_SPA.indd 35 Sincronismo HD AV A veces, la televisión digital se encuentra con cierto desfase entre la imagen y el sonido Si esto ocurre, se puede compensar ajustando cierto retraso en el sonido de manera que éste “espere” a que llegue la imagen; es lo que se denomina “Sincronismo HD AV”. Utilice U u para aumentar o disminuir el tiempo de retraso, eligiendo entre 0 y 300 ms. El retraso variará según el canal de televisión digital que esté viendo. Si cambia de canal deberá volver a ajustar el valor Sincronismo HD AV. 3 DRC (Control de rango dinámico) Cuando se reproduce contenido codificado en Dolby Digital o Dolby Digital Plus, puede que quiera comprimir el rango dinámico de la salida de audio (la diferencia entre los sonidos más altos y los más bajos). Esta opción le permite escuchar una película con el volumen bajo sin perder la precisión del sonido. Configurar en [Activo] para obtener este efecto. Instalación [Distancia] Ajusta la distancia entre cada altavoz y la posición desde donde se van a escuchar. 35 NOTA El ajuste DRC se puede modificar sólo cuando no hay discos en la unidad o ésta se encuentra parada completamente. 2010-05-14 2:48:34 36 Instalación Menú [BLOQUEO] Para acceder a las distintas funciones de [BLOQUEO] es preciso introducir el código de seguridad de 4 dígitos establecido anteriormente. Si todavía no ha introducido una contraseña, se le pedirá que lo haga. Introduzca dos veces una contraseña de 4 dígitos y pulse ENTER ( ) para crear una nueva contraseña. Contraseña Índice DVD Bloquea la reproducción de un DVD clasificado según su contenido. (No todos los discos están clasificados). [Indice 1-8] La clasificación uno (1) es la que tiene más restricciones y la ocho (8) la que menos. [Desbloqueo] Si se selecciona esta opción, el control paterno no está activo y el disco se reproduce en su totalidad. Puede crear o cambiar la contraseña. 3 Instalación [Ninguno] Introduzca dos veces una contraseña de 4 dígitos y pulse ENTER ( ) para crear una nueva contraseña. [Cambiar] Introduzca la contraseña actual y pulse ENTER ( ). Introduzca dos veces una contraseña de 4 dígitos y pulse ENTER ( ) para crear una nueva contraseña. NOTA Índice BD Establece un límite de edad para la reproducción de BD-ROM. Utilice los botones numéricos para introducir un límite de edad para la visualización de BD-ROM. [255] Todos los BD-ROM se pueden reproducir. [0-254] Prohíbe la reproducción de BD-ROM con la correspondiente selección de valoración incorporada. Si se equivoca antes de pulsar ENTER ( ), pulse CLEAR. A continuación, introduzca la contraseña correcta. NOTA Si olvida su contraseña, Si olvida su contraseña, puede borrarla siguiendo estos pasos: 1. Extraiga los discos que puedan estar en el reproductor. 2. Seleccione la opción [Bloqueo] en el menú [Config.]. El [Índice BD] se aplicará sólo para el disco BD que contiene el control de clasificación avanzada. Código del país Introduzca el código del área cuyos estándares se han utilizado para valorar el DVD, según la lista que aparece en la página 68. 3. Utilice los botones numéricos para introducir “210499” en el menú [Bloqueo]. Se borra la contraseña. HB985-DB.BDEUPPK_SPA.indd 36 2010-05-14 2:48:34 Instalación Menú [OTROS] Config de conexión DivX VOD Si su entorno de red doméstica está preparado para la conexión del reproductor, se deberá configurar la conexión de red por cable del reproductor para una comunicación por red. (Consulte la “Conexión a la red doméstica” en las página 28.) ACERCA DE DIVX VIDEO: DivX ® es un formato de vídeo digital creado por DivX, Inc. Se trata de un dispositivo oficial con certificación DivX que reproduce vídeo DivX. Visite www.divx.com y podrá obtener más información y herramientas de software para convertir sus archivos de vídeo en DivX. Estado conexión ACERCA DE VÍDEO A DEMANDA DIVX: Este dispositivo DivX Certified ® debe registrarse para poder reproducir contenido de vídeo a demanda DivX (VOD). Para generar el código de registro, busque la sección de DivX VOD en el menú de configuración del dispositivo. Visite la página vod.divx.com con este código, complete el proceso de registro y obtenga más información acerca de DivX VOD. Si desea comprobar el estado de red en este reproductor, seleccione las opciones [Enlace principal] y pulse ENTER ( ) para comprobar si se ha establecido una conexión a la red e Internet. Conexión BD-LIVE Al usar las funciones de BD-LIVE puede restringir el acceso a Internet. [Permitido] El acceso a Internet se permite a todos los contenidos de BDLive. [Permiso parcial] El acceso a Internet se permite solamente al contenido de BD-LIVE que disponga de certificados de propietario. El acceso a Internet y las funciones AACS queda prohibido para todo el contenido BD-LIVE sin certificado. [Prohibido] El acceso a Internet queda prohibido a todos los contenidos de BD-LIVE. HB985-DB.BDEUPPK_SPA.indd 37 3 Instalación Menú [RED] 37 [Registrar] Muestra el código de registro de su reproductor. [Anular registro] Desactiva el reproductor y visualiza el código de desactivación. NOTA Todos los vídeos descargados de DivX® VOD con el código de registro de este reproductor sólo pueden reproducirse en esta unidad. 2010-05-14 2:48:34 38 Instalación Desconexión automat El protector de pantalla aparece cuando el reproductor se deja en el modo de parada durante más de cinco minutos. Si configura esta opción en [Activo], la unidad se desconecta automáticamente después de que el protector de pantalla se muestre durante 25 minutos. Configure esta opción en [Apagado] para dejar el protector de pantalla hasta que la unidad sea accionada por el usuario. Inicializar 3 Instalación Ajuste de fábrica Se pueden restablecer la configuración del reproductor a los ajustes predeterminados de fábrica. Espac. libre en BD Inicializa el contenido de BD desde el almacenamiento USB conectado. NOTA Si restaura la configuración de fábrica del reproductor utilizando la opción [Ajuste de fábrica] deberá realizar la activación de los servicios en línea y configuración de red de nuevo. Información de software Muestra la versión actual del software. HB985-DB.BDEUPPK_SPA.indd 38 2010-05-14 2:48:34 Instalación Efecto de sonido Puede seleccionar un modo de sonido adecuado. Pulse SOUND varias veces hasta que aparezca el modo deseado en la pantalla del panel frontal o en la pantalla del TV. Los elementos mostrados en el ecualizador pueden variar según las fuentes de sonido y los efectos. [Pioneer 1]: Le proporciona el ajuste de sonido adecuado cuando se conectan altavoces de tipo pequeño (S-BD303). 39 [Game]: Puede disfrutar de un sonido más virtual mientras se entretiene con sus videojuegos. [Night]: Esta opción puede ser útil si quiere ver películas con el volumen bajo porque ya es tarde. [Mus. ReTouch]: Cuando escuche archivos MP3 u otro tipo de música comprimida, podrá mejorar el sonido. Este modo está disponible sólo en las fuentes de 2 canales. [Loudness]: Mejora el sonido de graves y agudos. 3 Instalación [Pioneer 2]: Le proporciona el ajuste de sonido adecuado cuando se conectan altavoces de tipo alto (S-BD707T). [Bypass]: Las señales de audio envolvente y de múltiples canales se reproducen según la manera en la que se grabaron. [Bass Blast]: Refuerza el efecto del sonido grave desde el altavoz frontal izquierdo y derecho y el subwoofer. [PL ll Movie]: Realiza la decodificación del modo de película Pro Logic II en la señal de entrada y produce cinco canales de salida de banda ancha desde las fuentes de 2 canales. Este ajuste es ideal para ver vídeos de películas ya grabadas o antiguas. Este modo está disponible sólo en las fuentes de 2 canales. [PL ll Music]: Realiza la decodificación del modo de música Pro Logic II en la señal de entrada y produce cinco canales de salida de banda ancha desde las fuentes de 2 canales. Este ajuste es ideal para las fuentes de estéreo normal como un CD. Este modo está disponible sólo en las fuentes de 2 canales. [Clear Voice]: Este modo ofrece un sonido de voz claro, mejorando la calidad de la voz que se escucha. HB985-DB.BDEUPPK_SPA.indd 39 2010-05-14 2:48:34 40 Funcionamiento 4 Funcionamiento Reproducción general 4. Seleccione [Película], [Foto] o [Música] con los botones U/u/I/i, y pulse ENTER ( ). 5. Seleccione la opción Disco con I/i, y pulse ENTER ( ). Reproducción de discos 1. Pulse Z OPEN/CLOSE, y coloque un disco en la bandeja de discos. 4 Funcionamiento Cuando conecte un máximo de dos dispositivos, se mostrará como previamente. 2. Pulse Z OPEN/CLOSE para cerrar la bandeja de discos. La mayoría de CDs de audio, BD-ROM y DVD-ROM se reproducen automáticamente. 3. Pulse HOME MENU. 6. Seleccione un archivo con U/u/I/i, y pulse B PLAY o ENTER ( ) para reproducir el archivo. NOTA • Las funciones de reproducción descritas en este manual no siempre están disponibles en todos los archivos y dispositivos. Algunas funciones pueden estar restringidas por muchos factores. • Dependiendo de los títulos de BD-ROM es posible que sea necesaria una conexión de dispositivo USB para una correcta reproducción. HB985-DB.BDEUPPK_SPA.indd 40 2010-05-14 2:48:34 Funcionamiento Para detener la reproducción Pulse x STOP durante la reproducción. Utilización del menú del disco BD DVD AVCHD Para hacer una pausa Para visualizar el menú del disco Pulse X PAUSE/STEP durante la reproducción. Pulse B PLAY para reanudar la reproducción. La pantalla de menús puede aparecer la primera vez después de cargar un disco que contenga un menú. Si desea visualizar el menú del disco durante la reproducción, pulse MENU. Para reproducir fotograma a fotograma Pulse X PAUSE/STEP durante la reproducción de películas. Pulse X PAUSE/STEP repetidamente para reproducir fotograma a fotograma. Para buscar hacia delante o hacia atrás Para reducir la velocidad de reproducción Mientras que la reproducción está en pausa, pulse varias veces M para reproducir a varias velocidades de cámara lenta. Para saltar al capítulo/pista/archivo siguiente/anterior Durante la reproducción, pulse . o > para ir al siguiente capítulo/pista/archivo o para volver al principio del capítulo/pista/ archivo actual. Pulse . dos veces brevemente para volver al capítulo/pista/archivo anterior. HB985-DB.BDEUPPK_SPA.indd 41 Utilice U/u/I/i para navegar a través de las opciones del menú. Para mostrar el menú desplegable Algunos discos BD-ROM contienen un menú desplegable que se muestra durante la reproducción. Pulse POPUP/ TOP MENU durante la reproducción y utilice los botones U/u/I/i para navegar por las opciones del menú. Reanudar la reproducción BD MUSIC DVD AVCHD MOVIE ACD La unidad graba a partir del punto en el que pulsó x STOP dependiendo del disco. Si aparece en la pantalla durante unos instantes “Xx (Resume Stop)” pulse B PLAY para reanudar la reproducción (desde el punto de la escena). 4 Funcionamiento Pulse m o M durante la reproducción para avanzar rápidamente o retroceder rápidamente. Puse m o M varias veces para cambiar entre las distintas velocidades de reproducción. 41 Si pulsa dos veces x STOP o extrae el disco, aparece en pantalla, “x”(parada completa). La unidad eliminará el punto donde se detuvo. NOTA • El punto de reanudación podría eliminarse si se pulsa un botón (por ejemplo:; 1 (POWER), Z (OPEN/CLOSE), etc). • La función de reanudación no está operativa para discos BD-Video con BD-J. • Si pulsa una vez x (STOP) durante la reproducción de títulos interactivos de BD-ROM, la unidad entrará en el modo de parada completa. 2010-05-14 2:48:34 42 Funcionamiento NOTA Reproducción avanzada • Si pulsa una vez > durante la reproducción repetida de capítulo/pista se cancelará la reproducción repetida. • Esta función puede que no funcione en algunos discos o títulos. Reproducción repetida BD DVD AVCHD ACD MUSIC Durante la reproducción, pulse varias veces REPEAT ( ) para seleccionar el modo de repetición deseado. 4 BD/DVD A- – El segmento seleccionado se repetirá de forma continua. Capítulo – El capítulo actual se reproducirá de forma repetitiva. Título – El título actual se reproducirá de forma repetitiva. Funcionamiento Para volver a la reproducción normal, pulse REPEAT ( ) repetidamente para seleccionar [Apagado]. Archivos de música/CDs de audio – La pista actual o el archivo se reproducirá de forma repetitiva. – Todas las pistas o archivos se reproducirán de forma repetitiva. – Las pistas o archivos se reproducirán en orden aleatorio. – Todas las pistas o archivos se reproducirán de forma repetitiva y en orden aleatorio. – El segmento seleccionado se repetirá de forma continua. (Sólo CD de audio) Repetir una parte concreta BD DVD AVCHD ACD Este reproductor permite repetir la parte que haya seleccionado. 1. Mientras se reproduce, pulse REPEAT ( ) para seleccionar [A-] al comienzo de la parte que quiera repetir. Y después, pulse ENTER ( ). 2. Pulse ENTER ( ) el fina de la parte. El segmento seleccionado se repetirá de forma continua. 3. Para volver a la reproducción normal, pulse REPEAT ( ) varias veces para seleccionar [OFF] o pulse CLEAR. NOTA No puede seleccionar un segmento inferior a 3 segundos. Para volver a la reproducción normal, pulse CLEAR. HB985-DB.BDEUPPK_SPA.indd 42 2010-05-14 2:48:34 Funcionamiento Búsqueda por marcador BD DVD NOTA AVCHD MOVIE Puede comenzar la reproducción desde un máximo de nueve puntos memorizados. Para introducir un marcador 1. Durante la reproducción, pulse MARKER en el punto que desee. El icono Marker aparece brevemente en la pantalla del televisor. 2. Repita el paso 1 para agregar hasta nueve marcadores. 43 • Puede que esta función no esté operativa para algunos discos, títulos, capacidad del servidor. • Todos los puntos marcados se borran si el título está en modo de parada completa (x) se cambia el título o si se expulsa el disco. • Esta función no está disponible si la duración total del título es inferior a 10 segundos. Usar el menú de búsqueda BD DVD AVCHD MOVIE Para recuperar una escena marcada 1. Pulse SEARCH y aparecerá el menú de búsqueda en la pantalla. Con el menú de búsqueda, es posible encontrar fácilmente el punto a partir del cual se desea iniciar la reproducción. 2. Pulse un botón numérico para seleccionar el número de marcador que desee recuperar. La reproducción comenzará desde la escena marcada. Para buscar un punto 4 Para eliminar un marcador 1. Pulse SEARCH y aparecerá el menú de búsqueda en la pantalla. 2. Pulse u para resaltar un número de marcador. Utilice I/i para seleccionar una escena marcada que desea eliminar. Funcionamiento 1. Durante la reproducción, pulse SEARCH para mostrar el menú de búsqueda. 2. Pulse I/i para avanzar o retroceder la reproducción 15 segundos. Puede seleccionar un punto hasta el que avanzar o retroceder manteniendo pulsado el botón I/i. 3. Pulse CLEAR y la escena marcada se borrará del menú de búsqueda. HB985-DB.BDEUPPK_SPA.indd 43 2010-05-14 2:48:35 44 Funcionamiento Para iniciar la reproducción de una escena marcada 1. Pulse SEARCH y aparecerá el menú de búsqueda en la pantalla. 2. Pulse u para resaltar un número de marcador. Utilice I/i para seleccionar una escena marcada que desea empezar a reproducir. 3. Pulse ENTER ( ) para iniciar la reproducción a partir de la escena marcada. NOTA • Puede que esta función no esté operativa para algunos discos, títulos, servidor. 4 • Puede que esta función no esté operativa para cierto contenido [Enlace principal] según el tipo de archivo y la capacidad del servidor DLNA. Funcionamiento Memoria de la última escena BD DVD Esta unidad memoriza la última escena del último disco que se haya visionado. La última escena visualizada permanece en memoria incluso si retira el disco de la unidad o apaga la unidad. Si carga un disco con la escena memorizada, ésta se recuperará automáticamente. NOTA • La función de memoria de un disco anterior se borrará al reproducir un disco diferente. • Esta función puede no funcionar dependiendo del disco. • Esta unidad no memoriza los ajustes de un disco si apaga la unidad antes de comenzar la reproducción. HB985-DB.BDEUPPK_SPA.indd 44 Visualización en pantalla Es posible visualizar y ajustar diversa información y ajustes sobre el contenido. Visualización en pantalla de la información del contenido BD DVD AVCHD MOVIE 1. Durante la reproducción pulse DISPLAY ( ) para mostrar diversa información sobre la reproducción. a b c d e f g h a Título – número del título actual/número total de títulos b Capítulo – Número del capítulo actual/ número total de capítulos. c Tiempo – tiempo de reproducción transcurrido/tiempo total de reproducción d Audio – Idioma o canal de audio seleccionado. e Subtítulo – Subtítulos seleccionados. f Angulo – Ángulo seleccionado/número total de ángulos. 2010-05-14 2:48:35 Funcionamiento g Aspecto TV – relación de aspecto de TV seleccionado h Modo de imagen – modo de imagen seleccionada 2. Seleccione una opción con U/u. 3. Utilice I/i para ajustar el valor de la opción seleccionada. 4. Pulse RETURN (O) para salir de la visualización en pantalla. NOTA • Si durante unos segundos no pulsa ningún botón, la visualización de la pantalla desaparecerá. • En algunos discos no puede seleccionarse un número de título. • Si se está reproduciendo un título interactivo BD, se mostrará información de configuración en la pantalla, pero no permitirá cambiarla. Reproducir a partir del tiempo seleccionado BD DVD AVCHD MOVIE 1. Presione DISPLAY ( ) durante la reproducción. El cuadro de búsqueda de tiempo muestra el tiempo de reproducción transcurrido. 2. Seleccione la opción [Tiempo] e introduzca el tiempo de inicio deseado en horas, minutos y segundos, de izquierda a derecha. Por ejemplo, para buscar una escena a las 2 horas, 10 minutos y 20 segundos, introduzca “21020”. Pulse I/i para avanzar o retroceder la reproducción 60 segundos. 3. Pulse ENTER ( ) para iniciar la reproducción a partir del tiempo seleccionado. NOTA • Esta función puede no funcionar en algunos discos o títulos. 4 Funcionamiento • Las opciones disponibles podrán variar en función del disco o título. 45 • Puede que esta función no esté operativa para cierto contenido [Enlace principal] dependiendo del tipo de archivo y la capacidad del servidor DLNA. HB985-DB.BDEUPPK_SPA.indd 45 2010-05-14 2:48:35 46 Funcionamiento Escuchar un audio diferente BD DVD AVCHD MOVIE 1. Durante la reproducción, pulse DISPLAY ( ) para mostrar la visualización en pantalla. 2. Utilice U/u para seleccionar la opción [Audio]. 3. Utilice I/i para seleccionar el idioma de audio, pista de audio o canal de audio que desee. NOTA 4 • Algunos discos le permiten cambiar las opciones de audio sólo con el menú del disco. De ser así, pulse el botón POPUP/ TOP MENU o MENU y elija el audio adecuado desde las selecciones en el menú del disco. Funcionamiento • Nada más cambiar el sonido, se producirá una discrepancia temporal entre el sonido actual y el visualizado. HB985-DB.BDEUPPK_SPA.indd 46 Seleccionar el idioma de los subtítulos BD DVD AVCHD MOVIE 1. Durante la reproducción, pulse DISPLAY ( ) para mostrar la visualización en pantalla. 2. Utilice U/u para seleccionar la opción [Subtítulo]. 3. Utilice I/i para seleccionar el idioma de subtítulos deseado. 4. Pulse RETURN (O) para salir de la visualización en pantalla. NOTA Algunos discos le permiten cambiar la selección de subtítulos mediante el menú del disco. Si este es el caso, pulse el botón POPUP/ TOP MENU o MENU y seleccione el subtítulo adecuado entre las opciones del menú del disco. 2010-05-14 2:48:35 Funcionamiento Visualizar desde un ángulo diferente BD DVD Para cambiar el modo de imagen BD DVD AVCHD MOVIE Durante la reproducción, si el disco contiene escenas grabadas desde diferentes ángulos de cámara, puede cambiar a un ángulo de cámara diferente. Es posible cambiar la opción [Modo de imagen] durante la reproducción. 1. Durante la reproducción, pulse DISPLAY ( ) para mostrar la visualización en pantalla. 2. Utilice U/u para seleccionar la opción [Modo de imagen]. 2. Utilice U/u para seleccionar la opción [Angulo]. 3. Utilice I/i para seleccionar el ángulo deseado. 4. Pulse RETURN (O) para salir de la visualización en pantalla. BD DVD AVCHD MOVIE Es posible cambiar el ajuste de la relación de aspecto de TV durante la reproducción. 1. Durante la reproducción, pulse DISPLAY ( ) para mostrar la visualización en pantalla. 3. Utilice I/i para seleccionar la opción deseada. 4. Pulse RETURN (O) para salir de la visualización en pantalla. Ajuste de la opción [Conf. usuario] 1. Durante la reproducción, pulse DISPLAY ( ) para mostrar la visualización en pantalla. 2. Utilice U/u para seleccionar la opción [Modo de imagen]. 3. Utilice I/i para seleccionar la opción [Conf. usuario] y pulse ENTER ( ). 4 Funcionamiento Para cambiar la relación de aspecto de TV 47 1. Durante la reproducción, pulse DISPLAY ( ) para mostrar la visualización en pantalla. 2. Utilice U/u para seleccionar la opción [Aspecto TV]. 3. Utilice I/i para seleccionar la opción deseada. 4. Pulse RETURN (O) para salir de la visualización en pantalla. NOTA Si cambia el valor de la opción [Aspecto TV] en la visualización en pantalla, no se modificará la opción [Aspecto TV]] del menú [Config.]. HB985-DB.BDEUPPK_SPA.indd 47 4. Utilice U/u/I/i para ajustar las opciones [Modo de imagen]. Seleccione la opción [Predeterm.] y, a continuación, pulse ENTER ( ) para retear todos los ajustes de vídeo. 5. Utilice U/u/I/i para seleccionar las opciones [Cerrar] y pulse ENTER ( ) para finalizar la configuración. 2010-05-14 2:48:35 48 Funcionamiento Disfrutar de BD-LIVE Esta unidad le permite disfrutar de funciones tales como imagen secundaria (PIP), audio secundario y paquetes virtuales, etc… con BD-Video que admite BONUSVIEW (BD-ROM versión 2 Perfil 1 versión 1.1/ Perfil de estándar final). Es posible reproducir audio y vídeo secundario desde un disco compatible con la función Picture-in-Picture. Para más información sobre el método de reproducción, consulte las instrucciones del disco. 4 3 . Pulse HOME MENU, y ajuste la opción [Conexión BD-LIVE] en el menú [Config.] (página 37). Dependiendo del disco, la función BD-LIVE puede no utilizarse si la opción [Conexión BD-LIVE] está configurada como [Permiso parcial]. 4 . Inserte un BD-ROM con BD-LIVE. Las operaciones podrán variar en función del disco. Consulte el manual suministrado con el disco. NOTA Funcionamiento Además de la función BONUSVIEW, el BDVideo, con compatibilidad con BD-LIVE (BDROM versión 2 perfil 2) y función de ampliación de red, le permite disfrutar de más funciones como la descarga de trailers de películas nuevas mediante la conexión de esta unidad a Internet. • No extraiga el dispositivo USB conectado mientras se está descargando contenido o si hay un disco Blu-ray en la bandeja de discos. Hacerlo podría dañar el dispositivo USB conectado y las características de BD-LIVE podrían no funcionar correctamente nunca más con el dispositivo USB dañado. Si el dispositivo USB conectado parece dañado, puede formatearlo desde el PC y reusarlo con el reproductor. 1. Compruebe la conexión de red y los ajustes (páginas 28-30). • Algunos contenidos BD-LIVE podrían tener acceso restringido en algunas áreas por decisión propia del proveedor de contenidos. 2. Inserte en el panel frontal un dispositivo de almacenamiento USB en el puerto USB. • Puede que se tarde unos minutos en cargar y comenzar a disfrutar del contenido de BD-LIVE. Para descargar contenido extra se necesita un dispositivo de almacenamiento USB. Conexión USB HB985-DB.BDEUPPK_SPA.indd 48 2010-05-14 2:48:35 Funcionamiento Reproducción de archivos de vídeo y discos VR Es posible reproducir discos DVD-RW grabados en formato de grabación de vídeo (VR) y archivos de vídeo almacenados en un disco o dispositivo USB. 1. Pulse HOME MENU. 49 NOTA • Los requisitos del archivo se describen en la página 11. • Puede usar varias funciones de reproducción. Véanse las páginas 40-47. • Los discos de formato DVD-VR sin finalizar no podrán reproducirse en esta unidad. • Algunos discos DVD-VR se hacen con datos CPRM mediante una DVD RECORDER. Esta unidad no admite estos tipos de disco. ¿Qué es el CPRM? CPRM es un sistema de protección anticopia (con sistema codificado) que permite solamente la grabación de programas de emisión “una sola copia”. CPRM significa Protección de contenido para medios grabables. 4 Funcionamiento 2. Seleccione [Película] con U/u/I/i, y pulse ENTER ( ). 3. Seleccione el dispositivo utilizando I/i, y pulse ENTER ( ). Cuando conecte un máximo de dos dispositivos, se mostrará como previamente. 4. Seleccione un archivo con los botones U/u/I/i, y pulse B PLAY o ENTER ( ) para reproducir el archivo. HB985-DB.BDEUPPK_SPA.indd 49 2010-05-14 2:48:35 50 Funcionamiento Seleccionar un archivo de subtítulos Para cambiar la página del código de subtítulos MOVIE MOVIE En el caso de que coincida el nombre de un archivo de vídeo y el nombre del archivo de subtítulos, se reproducirá automáticamente el archivo de subtítulos al reproducir el archivo de vídeo. Si los subtítulos no se visualizan correctamente, se puede cambiar la página del código de subtítulos para ver el archivo de subtítulos correctamente. Si el nombre del archivo de subtítulos es diferente del nombre del archivo de película, tendrá que seleccionar el archivo de subtítulos en el menú [Película] antes de reproducir la película. 1. Utilice U/u/I/i para seleccionar el archivo de subtítulos que desea reproducir en el menú [Película]. 4 1. Durante la reproducción, pulse DISPLAY ( ) para mostrar la visualización en pantalla. 2. Utilice U/u para seleccionar la opción [Página de código]. 3. Utilice I/i para seleccionar la opción del código deseada. 2. Pulse ENTER ( ). Funcionamiento Pulse ENTER ( ) de nuevo para deseleccionar el archivo de subtítulos. El archivo de subtítulos seleccionado se mostrará al reproducir el archivo de vídeo. NOTA 4. Pulse RETURN (O) para salir de la visualización en pantalla. • Si pulsa la tecla x (STOP) durante la reproducción, se cancelará la selección de subtítulos. • Esta función puede no funcionar en la función [Enlace principal]. HB985-DB.BDEUPPK_SPA.indd 50 2010-05-14 2:48:36 Funcionamiento Ver una fotografía 51 Para reproducir una presentación de diapositivas Pulse B (PLAY) para iniciar la presentación de diapositivas. Es posible visualizar archivos de fotos con este reproductor. 1. Pulse HOME MENU Para detener una presentación de diapositivas Pulse x (STOP) durante la presentación de diapositivas. Para hacer una pausa en una presentación de diapositivas 2. Seleccione [Foto] con I/i, y pulse ENTER ( ). Pulse X PAUSE/STEP durante la presentación de diapositivas. Pulse B PLAY para volver a iniciar la presentación. 3. Seleccione el dispositivo utilizando I/i, y pulse ENTER ( ). Para saltar a la foto anterior/siguiente NOTA • Los requisitos del archivo se describen en la página 11. Cuando conecte un máximo de dos dispositivos, se mostrará como previamente. 4 Funcionamiento Mientras ve una foto en pantalla completa, pulse I o i para ir a la foto anterior o siguiente. • Puede usar varias funciones de reproducción. Véanse las páginas 40-47. 4. Seleccione un archivo usando U/u/I/i y pulse ENTER ( ) para ver la fotografía. HB985-DB.BDEUPPK_SPA.indd 51 2010-05-14 2:48:36 52 Funcionamiento Opciones durante la visualización de una foto Escuchar música mientras se muestran diapositivas Puede utilizar varias opciones mientras visualiza una foto en pantalla completa. Puede mostrar archivos de fotografías mientras escucha archivos de música. 1. Mientras ve una foto en pantalla completa, pulse DISPLAY ( ) para mostrar el menú de opciones. 1. Pulse HOME MENU 2. Seleccione una opción con U/u. a b c d e f g h 4 2. Seleccione [Foto] o [Enlace principal] utilizando U/u/I/i, y pulse ENTER ( ). 3. Seleccione la opción [Disco] o [USB] con I/i, y pulse ENTER ( ). Funcionamiento a Foto actual/número total de fotos – Utilice I/i para visualizar la foto anterior/ siguiente. b Diapositivas – Pulse ENTER ( ) para iniciar o pausar la presentación en diapositivas. c Selec música – Seleccione la música de fondo para la presentación de diapositivas. La selección de un servidor o una carpeta de recursos compartidos es necesaria para el menú [Enlace principal]. d Música –Pulse ENTER ( ) para iniciar o hacer una pausa en la música de fondo. 4. Seleccione un archivo usando U/u/I/i, y pulse ENTER ( ) para ver la fotografía. e Rotar – Pulse ENTER ( ) para girar la foto en sentido horario. 5. Pulse DISPLAY ( ) para visualizar el menú de opciones. f Zoom – Pulse ENTER ( ) para visualizar el menú [Zoom]. 6. Utilice U/u para seleccionar la opción [Selec música] y pulse ENTER ( ) para mostrar el menú [Selec música]. g Efecto – Utilice I/i para seleccionar un efecto de transición entre fotos en una presentación de diapositivas. h Velocidad – Utilice I/i para seleccionar un efecto de transición entre fotos en una presentación de diapositivas. 3. Pulse RETURN (O) para salir del menú de opciones. HB985-DB.BDEUPPK_SPA.indd 52 2010-05-14 2:48:36 Funcionamiento 7. Utilice U/u para seleccionar un dispositivo y pulse ENTER. ( ). Los dispositivos que pueden seleccionarse difieren dependiendo de la ubicación del archivo de fotografías que se muestra en pantalla completa. Ubicación de la fotografía Dispositivo disponible Disco Disco, USB USB Disco, USB 53 Escuchar música El reproductor puede reproducir CD de audio y archivos de música. 1. Pulse HOME MENU Carpeta CIFS compartida en su PC (CIFS) Servidor DLNA Servidor DLNA 8. Utilice U/u para seleccionar un archivo o una carpeta que desee reproducir. 2. Seleccione [Música] con U/u/I/i, y pulse ENTER ( ). 3. Seleccione el dispositivo utilizando I/i, y pulse ENTER ( ). 4 Funcionamiento Seleccione una carpeta y pulse ENTER ( ) para mostrar el directorio inferior. Seleccione y pulse ENTER ( ) para mostrar el directorio superior. NOTA Al seleccionar música de [Enlace principal], la selección de carpeta no estará disponible. En [Enlace principal] sólo está disponible la selección de archivos. 9. Utilice i para seleccionar [OK] y pulse ENTER ( ) para completar la selección de la música. HB985-DB.BDEUPPK_SPA.indd 53 Cuando conecte un máximo de dos dispositivos, se mostrará como previamente. 4. Seleccione un archivo de música o pista de audio con U/u/I/i, y pulse ENTER ( ) para escuchar la música. NOTA • Los requisitos del archivo se describen en la página 11. • Puede usar varias funciones de reproducción. Véanse las páginas 40-47. 2010-05-14 2:48:37 54 Funcionamiento Grabación de CD de audio 6. Utilice U/u/I/i para seleccionar [Inicio] y pulse ENTER ( ). Es posible grabar una pista o todas las pistas que desee de un CD de audio hasta un dispositivo de almacenamiento USB. 7. Utilice U/u/I/i para seleccionar la carpeta de destino a la que desea copiar. 1. Inserte en el panel frontal un dispositivo de almacenamiento USB en el puerto USB. 2. Pulse Z (OPEN/CLOSE) y coloque un CD de audio en la bandeja de discos. Pulse Z (OPEN/CLOSE) para cerrar la bandeja de discos. La reproducción se inicia automáticamente. 3. Pulse DISPLAY ( ) para visualizar el menú de opciones. O 4 Funcionamiento Pulse el botón z USB REC en el mando a distancia. Puede grabar toda la música en el CD de audio. 4. Utilice U/u para seleccionar la opción [Grabación de CD] y pulse ENTER ( ) para mostrar el menú [Grabación de CD]. Repita este paso para seleccionar tantas pistas como pueda. 5. Utilice U/u para seleccionar la pista que desea copiar en el menú, y pulse ENTER ( ). Si desea crear una carpeta nueva, utilice U/u/I/i para seleccionar [Nueva carpeta] y pulse ENTER ( ). Introduzca un nombre de carpeta con el teclado virtual, y pulse ENTER ( ) mientras [OK] está seleccionado. 8. Utilice U/u/I/i para seleccionar [OK] y pulse ENTER ( ) para iniciar la grabación del CD de audio. Si desea detener la grabación de un CD de audio, pulse ENTER ( ) mientras [Cancelar] se ilumina. 9. Aparecerá un mensaje cuando se haya completado la grabación del CD de audio. Pulse ENTER ( ) para comprobar el archivo de música creado en la carpeta de destino. Repita este paso para seleccionar tantas pistas como pueda. Selecciona todas las pistas de un CD de audio. Selecciona una opción de codificación del menú desplegable (128 kbps, 192 kbps, 320 kbps o sin pérdidas). Cancela la grabación y vuelve a la pantalla anterior. HB985-DB.BDEUPPK_SPA.indd 54 2010-05-14 2:48:37 Funcionamiento 55 NOTA • La siguiente tabla muestra el promedio de tiempo de grabación de una pista de audio con 4 minutos de tiempo de reproducción a un archivo de música con 192 kbps a modo de ejemplo. Modo de parada Durante la reproducción 1,4 min. 2 min. • Todos los tiempos de la tabla anterior son aproximados. • El tiempo de extracción real para el dispositivo de almacenamiento USB varía dependiendo de la capacidad del dispositivo de almacenamiento USB. • Asegúrese de que hay un mínimo de 50 MB de espacio libre cuando se graba en el dispositivo de almacenamiento USB. 4 Funcionamiento • La duración de la música debe superar los 20 segundos para obtener un registro adecuado. • No apague el reproductor ni extraiga el dispositivo de almacenamiento USB conectado durante la grabación del CD de audio. La realización de copias no autorizadas de material protegido contra copias, incluyendo los programas informáticos, archivos, emisiones o grabaciones de audio, puede infringir los derechos de autor y como tal constituir una ofensa criminal. Este equipo no deberá utilizarse con dichos fines. Sea responsable Respete los derechos de autor HB985-DB.BDEUPPK_SPA.indd 55 2010-05-14 2:48:37 56 Funcionamiento Reproducción de iPod 1. Conecte el iPod firmemente. Conecte el iPod Puede disfrutar del sonido desde su iPod. Para más información sobre el iPod, consulte la Guía de usuario del iPod. Conecte el cradle y coloque el iPod sobre él. Preparación • Para ver los vídeos y las fotos del iPod en la pantalla del TV. - Asegúrese de utilizar la conexión de vídeo a través de la toma de salida de vídeo en el panel trasero de la unidad. Seleccione el modo de entrada de vídeo apropiado en el TV. 4 Funcionamiento • - Dependiendo del iPod, asegúrese de seleccionar Vídeos > Ajustes de vídeo y después, configure la Salida del TV en Ask (Preguntar) o en On (Activado), desde el iPod. Para más información sobre los Ajustes del vídeo, consulte la Guía de usuario del iPod. - La visualización de fotos está disponible sólo si esta unidad está en el modo de entrada de iPod y le permite ver fotos sólo a modo de presentación. Debe empezar una presentación en su iPod para ver una foto en un TV. Para más información sobre la configuración de diapositivas, consulte la Guía de usuario del iPod. Antes de conectar el iPod, desactive esta unidad y baje el volumen al mínimo. HB985-DB.BDEUPPK_SPA.indd 56 2. Seleccione un archivo usando U/u/I/i, y pulse ENTER ( ) para reproducir el archivo. Disfrutar del iPod en la pantalla 1. Conecte el iPod firmemente. 2. Pulse HOME MENU ( ). 3. Seleccione [Música] o [Película] utilizando I/i, y pulse ENTER ( ). Si había conectado otro dispositivo (CD o USB), seleccione el iPod en el menú. 4. Seleccione un archivo usando U/u/I/i, y pulse ENTER ( ) para reproducir el archivo. 2010-05-14 2:48:37 Funcionamiento Disfrutar del iPod en el modo iPod IN (ENTRADA iPod) Puede utilizar el iPod usando el control remoto y los controles del iPod. 1. Conecte el iPod firmemente. Al encender la unidad, el iPod se encenderá automáticamente y comenzará a cargarse. 2. Pulse INPUT/TUNER para seleccionar el modo iPod IN. Selecciona una opción en el menú. B /ENTER Inicia la reproducción de música o vídeos. X Se detiene en pausa durante la reproducción. Para reanudar la reproducción, pulse B (PLAY) de nuevo. m/M Avanza o retrocede rápido una canción o vídeo. ./> Omite la reproducción pasando hacia delante o hacia atrás. REPEAT Permite seleccionar el modo de repetición deseado: Pista ( ), Todos ( ), Desactivado (Sin pantalla). NOTA Este sistema es compatible con audio y video de iPod (4 generación), iPod nano, iPod classic, iPod mini, iPouch touch y iPhone. (No es compatible con iPod shuffle) NOTA • Aparece un mensaje de error “REVISAR IPOD” o “Modelo iPod conectado no compatible”, cuando: - su iPod no está disponible para la función a accionar. • Aparece un mensaje de error “REVISAR IPOD” o “Actualizar software de iPod”, cuando: - su iPod tiene una versión de software obsoleta. t Actualice el software de su iPod a la versión más reciente. • Si esta unidad muestra un mensaje de error, siga dicho mensaje. Aparece un mensaje de error “REVISAR IPOD” o “Revisar su iPod”, cuando: - la comunicación entre esta unidad y su iPod no se establece correctamente. t Acople y desacople su iPod a esta unidad. - su iPod no está conectado correctamente. - esta unidad clasifica a su iPod como un dispositivo desconocido. - su iPod tiene muy poca carga de energía. t Debe cargar la batería. t Si carga la batería cuando el iPod ya tiene muy poca cantidad, tardará más en completar la carga. • Debe utilizar el adaptador de acople que se facilita con su iPod para el uso estable de este dispositivo. Si necesita un adaptador, consulte al proveedor de su iPod. 4 Funcionamiento U/u/I/i 57 • La compatibilidad con su iPod puede variar dependiendo de tipo de iPod. • Los iPod touch y iPhone funcionan de modo diferente a cualquier otro iPod. Pueden necesitarse controles adicionales para su utilización con esta unidad (por ejemplo, “deslizar para desbloquear”). • Si utiliza una aplicación, realiza una llamada o envía o recibe un mensaje de texto SMS, etc. en su iPod táctil o iPhone, desconéctelo del acople del iPod de esta unidad y después utilícelo. • Dependiendo de la versión de software de su iPod, puede que no consiga controlar el iPod desde esta unidad. Recomendamos que instale la última versión del software. • La calidad del vídeo depende de las fuentes de vídeo de su iPod. • Si tiene algún problema con su iPod, consulte:www.apple.com/support/ipod. HB985-DB.BDEUPPK_SPA.indd 57 2010-05-14 2:48:38 58 Funcionamiento Funcionamiento de la radio Asegúrese de que la antena está conectada. (Consulte la página 24) Cómo escuchar la radio 1. Pulse INPUT/TUNER hasta que aparezca TUNER (FM) en la pantalla de visualización. Se sintoniza la última emisora recibida. 4 2. Mantenga pulsado TUNE (-/+) durante unos dos segundos hasta que la indicación de frecuencia empiece a cambiar. La búsqueda se detiene cuando la unidad sintoniza una emisora. O Pulse TUNE (-/+) varias veces. Funcionamiento 3. Ajuste el volumen girando VOLUME en el panel frontal o pulsando VOL (+/-) en el mando a distancia. Eliminación de todas las emisoras guardadas Mantenga pulsado CLEAR durante dos segundos. “Borrar todo” parpadeará. A continuación, se eliminarán todas las emisoras guardadas. Cómo mejorar una mala recepción de emisiones en FM Pulse el botón coloreado D (azul) (MONO/ STEREO) en el mando a distancia. Esto cambiará el sintonizador de estéreo a mono y normalmente mejorará la recepción. Cómo obtener más información acerca de una emisora de radio El sintonizador de FM incorpora la función RDS (Radio Data System). De esta forma obtendrá información acerca de la emisora de radio que está escuchando. Pulse RDS varias veces para recorrer los distintos tipos de datos: Presintonización de las emisoras de radio PS Puede memorizar 50 emisoras de FM. Antes de sintonizar, asegúrese de que ha bajado el volumen. (nombre de la red de emisoras) El nombre del canal aparecerá en la pantalla. PTY (tipo de programa) El tipo de programa (por ejemplo, Jazz o Noticias) aparecerá en la pantalla. RT (radio texto) Un mensaje de texto que contiene información especial de la emisora. Este texto puede desplazarse por la pantalla. CT (fecha y hora) Se muestran la fecha y la hora según la transmisión de la emisora. 1. Pulse INPUT/TUNER hasta que aparezca TUNER (FM) en la pantalla de visualización. 2. Seleccione la frecuencia deseada mediante TUNE (-/+). 3. Un número de presintonía parpadeará en la pantalla. 4. Pulse PRESET para seleccionar el número de presintonía que desea. 5. Pulse ENTER ( ). Se memorizará la emisora. 6. Repita los pasos 2 a 5 para memorizar otras emisoras. HB985-DB.BDEUPPK_SPA.indd 58 2010-05-14 2:48:38 Funcionamiento Reproducción de contenidos a través de la red doméstica Acceso a un servidor de medios DLNA 1. Revisar la conexión de red y los ajustes (páginas 28-30). 2. Pulse El reproductor puede examinar y reproducir contenido en su ordenador y servidores de medios con certificación DLNA conectados a la red doméstica. 59 HOME MENU. 3. Seleccione [Enlace principal] con U/u/I/i, y pulse ENTER ( ). 4. Seleccione un servidor de medios DLNA de la lista con U/u, y pulse ENTER ( ). Acerca de DLNA La DLNA (Digital Living Network Alliance) es una organización que abarca varios sectores industriales como la electrónica de consumo, la computación y las empresas de dispositivos móviles. Digital Living proporciona a los consumidores un medio para compartir fácilmente medios digitales a través de una red doméstica. El logotipo de certificación DLNA facilita la búsqueda de productos que cumplen con las directrices de interoperabilidad DLNA. Esta unidad cumple con las directrices de interoperabilidad DLNA v1.5. Si desea volver a explorar el servidor de medios disponibles, pulse el botón coloreado en verde (B). NOTA Puede que este reproductor necesite un permiso del servidor, dependiendo del tipo de servidor de medios. 4 Funcionamiento Esta unidad es un reproductor de medios digitales con certificación DLNA que puede mostrar y reproducir vídeo, fotos y música desde el servidor de medios digitales compatible con DLNA (ordenador y electrónica de consumo). 5. Seleccione un archivo con U/u/I/i, y pulse ENTER ( ) para reproducir el archivo. Cuando se conecta a este reproductor un ordenador que ejecuta software del servidor DLNA u otros dispositivos compatibles con DLNA, es posible que sea necesario efectuar algunos cambios de configuración en el software o dispositivos. Consulte el manual de instrucciones del software o dispositivo para obtener más información. HB985-DB.BDEUPPK_SPA.indd 59 2010-05-14 2:48:38 60 Funcionamiento NOTA • Los requisitos del archivo se describen en la página 11. • Puede usar varias funciones de reproducción. Véanse las páginas 40-47. • Los requisitos de archivo de la página 11 no siempre son compatibles. Puede que haya algunas restricciones por las características del archivo y la capacidad de servidor de medios. • La vista en miniatura de los archivos reproducibles se puede mostrar en el menú [Enlace principal], pero dichos archivos no se pueden reproducir en el reproductor. • Si hay un archivo de música reproducible en el menú [Enlace principal], el reproductor se salta el archivo y reproduce el archivo siguiente. 4 • El nombre del archivo de subtítulos y el nombre del archivo de la película han de coincidir y estar en la misma carpeta. Acceso a una carpeta para compartir desde el ordenador 1. Arranque el PC conectado a la red de área local. 2. Comparta las carpetas con archivos de vídeos, fotos o música que hay en el ordenador. 3. Compruebe en el reproductor la conexión de red y los ajustes (páginas 28-30). 4. Pulse HOME MENU. 5. Seleccione [Enlace principal] con U/u/I/i, y pulse ENTER ( ). 6. Seleccione una carpeta para compartir de la lista con U/u, y pulse ENTER ( ). Funcionamiento • La calidad de la reproducción y el funcionamiento de [Enlace principal] puede verse afectada por el estado de su red doméstica. • Puede que no se puedan compartir correctamente los archivos almacenados en un dispositivo extraíble como una unidad USB, unidad DVD, etc. Si desea volver a explorar los servidores de medios disponibles, pulse el botón coloreado en verde (B). NOTA Dependiendo de la carpeta que se vaya a compartir, este reproductor puede necesitar el ID de usuario de la red de entrada y la contraseña para acceder a la carpeta. 7. Seleccione un archivo con U/u/I/i, y pulse ENTER ( ) para reproducir el archivo. HB985-DB.BDEUPPK_SPA.indd 60 2010-05-14 2:48:38 Funcionamiento 61 Requisitos del PC NOTA • Windows ® XP (Service Pack 2 o superior), Windows Vista ® (no es necesario Service Pack) Windows 7® • 1,2 GHz Intel ® Pentium ® III o AMD Sempron ™ 2200 + procesadores • Entorno de red: Ethernet de 100 MB, WLAN (IEEE 802.11b/g/n) • Los requisitos del archivo se describen en la página 11. • Puede usar varias funciones de reproducción. Véanse las páginas 40-47. • La vista en miniatura de los archivos reproducibles se puede mostrar en el menú [Enlace principal], pero dichos archivos no se pueden reproducir en el reproductor. • Si hay un archivo de música reproducible en el menú [Enlace principal], el reproductor se salta el archivo y reproduce el siguiente. • El nombre del archivo de subtítulos y el nombre del archivo de la película han de coincidir y estar en la misma carpeta. • La calidad de la reproducción y el funcionamiento de [Enlace principal] puede verse afectado por el estado de su red doméstica. NOTA Si utiliza Windows ® XP o Windows Vista ®, haga clic en el siguiente enlace para obtener más información sobre los ajustes para compartir archivos. 4 Funcionamiento • Puede que no se puedan compartir correctamente los archivos almacenados en un dispositivo extraíble como una unidad USB, unidad DVD, etc del ordenador. • Es posible que tenga algún problema de conexión según el entorno de su PC. HB985-DB.BDEUPPK_SPA.indd 61 2010-05-14 2:48:38 62 Funcionamiento Introducción de un ID usuario y contraseña de red Dependiendo del entorno de su PC, puede que tenga que introducir un ID de usuario y contraseña de red para poder acceder a una carpeta compartida. 1. El menú de teclado aparece automáticamente si se solicitan el ID de usuario de red y la contraseña. 2. Utilice U/u/I/i para seleccionar un carácter y pulse ENTER ( ) en el menú de teclado para confirmar su selección. 3. Cuando termine de introducir el ID de usuario y contraseña de red, seleccione [OK] con U/u/I/i y pulse ENTER ( ) para acceder a la carpeta. El sistema recordará el ID de usuario y contraseña de red después de acceder a la carpeta. Si no desea que el sistema recuerde el ID de usuario y contraseña de red, pulse el botón coloreado en rojo (A) para eliminar la marca de la casilla de verificación [Recordar] antes de acceder a la carpeta. Para introducir una letra con acento, seleccione la letra del conjunto de caracteres ampliados. 4 Funcionamiento Ejemplo: Seleccione “D” y, a continuación, pulse DISPLAY( ) para mostrar el grupo de caracteres expandido. Utilice I/i para seleccionar “D” o “Ď” y, a continuación, pulse ENTER ( ). [Nítido] – Borrar todos los caracteres introducidos. [Espacio] – Insertar un espacio en la posición del cursor. [<–] – Eliminar el carácter anterior a la posición del cursor. [ABC / abc / #+-=&] – Cambiar la configuración del menú del teclado a letras mayúsculas, minúsculas o símbolos. HB985-DB.BDEUPPK_SPA.indd 62 2010-05-14 2:48:38 Mantenimiento 63 5 Mantenimiento Notas en los discos Manejo de la unidad Manipulación de discos Envío de la unidad Guarde el embalaje original y los materiales de empaquetado. Si necesita enviar la unidad, para máxima protección, intente que el embalaje sea similar al de salida de fábrica. Nunca pegue papel ni cinta adhesiva en el disco. Guardar los discos Mantener las superficies exteriores limpias. • Cuando esté cerca de la unidad, no utilice productos volátiles como insecticidas. No ejerza una presión excesiva cuando limpie la unidad, a fin de evitar daños en la superficie. • No deje que la unidad entre en contacto con productos de plástico o goma durante períodos prolongados. Limpieza de discos Limpieza de la unidad Para limpiar el reproductor, utilice un paño suave y seco. Si las superficies están muy sucias, utilice un paño ligeramente humedecido con un detergente no agresivo. No utilice productos fuertes como alcohol, benceno o diluyentes ya que pueden dañar la superficie de la unidad. No utilice productos abrasivos como alcohol, benceno, disolventes u otros productos disponibles en el mercado. Evite igualmente los pulverizadores antiestáticos pensados para grabaciones de vinilo más antiguas. HB985-DB.BDEUPPK_SPA.indd 63 5 Mantenimiento • Tras la reproducción, guarde el disco en su caja. No deje el disco expuesto a la luz directa del sol o cerca de una fuente de calor; nunca lo deje en un coche donde esté expuesto directamente al sol. Mantenimiento de la unidad La unidad es un dispositivo de precisión y alta tecnología. Si las lentes ópticas o la unidad del disco acumulan suciedad o presentan desgaste, afectará a la calidad de la imagen. Para información más detallada, consulte en el centro de servicio autorizado más cercano. 2010-05-14 2:48:39 64 Resolución de problemas 6 Resolución de problemas General 6 La corriente no responde. • Conecte el cable de alimentación a la fuente de corriente de la pared. La unidad no inicia la reproducción. • Inserte un disco reproducible. (Revise el tiempo de disco, el sistema de color y el código regional). • Coloque el disco en la posición correcta. • Coloque el disco correctamente en la bandeja para discos, dentro de la guía. Resolución de problemas • Limpie el disco. • Cancele la función de clasificación o cambia el nivel de clasificación. El ángulo no se puede cambiar. • En un vídeo DVD a reproducir no se graban múltiples ángulos. El idioma de los subtítulos no se puede cambiar ni desactivar. • En un vídeo DVD a reproducir no se graban los subtítulos. No puede reproducir archivos MP3/WMA/ JPEG/ DivX. • Los archivos no están codificados en un formato que la unidad puede reproducir. • La unidad no admite el códec del archivo de película. El mando a distancia no funciona correctamente. • El mando a distancia no está orientado hacia el sensor remoto de la unidad. • El mando a distancia está demasiado lejos de la unidad. • Hay un obstáculo delante del mando a distancia y la unidad. • Las pilas del mando a distancia se han agotado. HB985-DB.BDEUPPK_SPA.indd 64 2010-05-14 2:48:39 Resolución de problemas 65 Imagen No hay imagen. Aparece ruido en la imagen. • Seleccione el modo de entrada de vídeo apropiado en el televisor de modo que la imagen de la unidad aparezca en la pantalla del televisor. • Conecte firmemente la conexión de vídeo. • Compruebe si [Conf. color HDMI] en el menú [Config.] está ajustado en el elemento adecuado según su conexión de vídeo. • El televisor no es compatible con la resolución que ha configurado en el reproductor. Cambie la resolución a una compatible con el televisor. • La toma HDMI OUT del reproductor está conectada a un dispositivo DVI que no es compatible con la protección de los derechos de autor. • Está reproduciendo un disco grabado en un sistema de color diferente al del televisor. • Ajuste la resolución que su televisor admita. • La unidad está buscando, en movimiento lento o en el modo de pausa. • El volumen del sonido es bajo. • Revise la conexión del cable del altavoz. (página 16) Sonido No hay sonido o está distorsionado. Resolución de problemas HB985-DB.BDEUPPK_SPA.indd 65 6 2010-05-14 2:48:39 66 Resolución de problemas Red La función BD-LIVE no funciona. • Es posible que el almacenamiento USB que hay conectado no tenga espacio suficiente. Conecte el almacenamiento USB con al menos 1 GB de espacio libre. • Asegúrese de que la unidad está correctamente conectada a la red de área local y pueda acceder a Internet (véase la página 28). • Su velocidad de banda ancha puede que no sea lo suficientemente rápida para usar las funciones BD-LIVE. Le recomendamos que se ponga en contacto con su proveedor de servicios Internet (ISP) y aumente la velocidad de banda ancha. • La opción [Conexión BD-LIVE] del menú [Config.] está ajustada en [Prohibido]. Ajuste la opción en [Permitido]. El diseño y las especificaciones están sujetas a cambio sin previo aviso. Actualizaciones Esta información está disponible en la página web de Pioneer. Consulte la página web para más información sobre la actualización o servicio de su reproductor de discos Blu-ray. 6 Resolución de problemas HB985-DB.BDEUPPK_SPA.indd 66 2010-05-14 2:48:39 Apéndice 67 7 Apéndice Control de un televisor con el mando a distancia suministrado Puede controlar su televisor PIONEER con los botones siguientes. Botones de control del televisor Configuración del mando a distancia para el televisor Puede utilizar el televisor con el mando a distancia incluido. Si el televisor se encuentra en la lista siguiente, seleccione el código de fabricante apropiado. 1. Con el botón 1 (ENCENDIDO DEL TELEVISOR) pulsado, pulse el código de fabricante para su televisor con los botones numéricos (véase tabla siguiente). Fabricante Número de código Pioneer 1 (por defecto) Sony 2, 3 Panasonic 4, 5 Funcionamiento Samsung 6, 7 1 (TV Power) Encender y apagar el televisor. LG 8, 9 INPUT Cambiar la fuente de entrada del televisor entre éste y otras fuentes de entrada. CH +/- Avanzar o retroceder por los canales memorizados. VOL +/- Ajustar el volumen del televisor. NOTA Apéndice Botón 2. Suelte el botón 1 (ENCENDIDO DEL TELEVISOR) para completar el ajuste. Dependiendo del televisor, algunos o todos los botones pueden no funcionar en el televisor, incluso después de introducir el código de fabricante correcto. Cuando cambie las pilas del mando a distancia, el número de código que haya introducido podría volver al ajuste por defecto. Introduzca de nuevo el número de código adecuado. 7 Dependiendo de la unidad que se conecte, es posible que no pueda controlar su televisor con alguno de los botones. HB985-DB.BDEUPPK_SPA.indd 67 2010-05-14 2:48:39 68 Apéndice Lista del código del país Seleccione un código de área de esta lista. País Código País Afganistán Apéndice 7 AF Fiji Código País Código País Código FJ Mónaco MC Singapur SG MN República de MA Eslovaquia SK NP Eslovenia NL Sudáfrica ZA Argentina AR Finland FI Mongolia Australia AU France FR Marruecos Austria AT Germany DE Nepal SI Bélgica BE Great Britain GB Holanda Bután BT Greece Bolivia SB Greenland GR Antillas Holandesas AN Corea del Sur GL Nueva Zelanda NZ España Brasil BR Hong Kong HK Nigeria Camboya KH Hungary HU Noruega Canadá CA India IN Omán Chile CL Indonesia ID Pakistán China CN Israel IL Panamá Colombia CO Italy IT Paraguay Congo CG Jamaica JM Filipinas Costa Rica CR Japan JP Polonia Croacia HR Kenya KE Portugal República Checa CZ Kuwait Dinamarca DK Libya Ecuador EC Luxembourg KW Rumanía LY Federación de LU Rusia Egipto EG Malaysia El Salvador SV Maldives MY Arabia Saudita MV Senegal Etiopía ET Mexico MX HB985-DB.BDEUPPK_SPA.indd 68 KR ES NG Sri Lanka NO Suecia LK OM Suiza PK Taiwán CH SE TW PA Tailandia PY Turquía TH PH Uganda PL Ucrania UG TR UA PT Estados Unidos RO Uruguay UY US Uzbekistán UZ RU Vietnam VN SA Zimbabwe ZW SN 2010-05-14 2:48:39 Apéndice 69 Lista de código de idioma Utilice esta lista para introducir el idioma deseado para los siguientes ajustes iniciales: [Audio del disco], [Subtítulo del disco] y [Menú del disco]. Idioma Código Idioma Código Idioma Código Idioma Código 6565 Francés 7082 Lituano 7684 Sindhi 8368 Afrikaans 6570 Frisón 7089 Macedonio 7775 Cingalés 8373 Albanés 8381 Gallego 7176 Malgache 7771 Eslovaco 8375 Amharic 6577 Georgiano 7565 Malayo 7783 Esloveno 8376 Árabe 6582 Alemán 6869 Malayalam 7776 Español 6983 Armenio 7289 Griego 6976 Maorí 7773 Sudanés 8385 Assamais 6583 Groenlandés 7576 Marath 7782 Swahili 8387 Aymara 6588 Guaraní 7178 Moldavo 7779 Sueco 8386 Azerbayano 6590 Goujrati 7185 Mongol 7778 Tagalo 8476 Bashkir 6665 Haoussa 7265 Nauru 7865 Tajiko 8471 Vasco 6985 Hebreo 7387 Nepalés 7869 Tamil 8465 Bengalí, Bangla 6678 Hindi 7273 Noruego 7879 Telougou 8469 Butaní 6890 Húngaro 7285 Oriya 7982 Tailandés 8472 Bihari 6672 Islandés 7383 Punjabí 8065 Tonga 8479 Bretón 6682 Indonesio 7378 Pastún 8083 Turco 8482 Búlgaro 6671 Interlingua 7365 Persa 7065 Turkmeno 8475 Birmano 7789 Gaélico irlandés 7165 Polaco 8076 Twi 8487 Bielorruso 6669 Italiano 7384 Portugués 8084 Ucraniano 8575 Chino 9072 Japonés 7465 Quechua 8185 Urdu 8582 Croata 7282 Kannada 7578 Reto-romano 8277 Uzbeco 8590 Checo 6783 Kashmir 7583 Rumano 8279 Vietnamita 8673 Danés 6865 Kazako 7575 Ruso 8285 Volapuk 8679 Holandés 7876 Kirghiz 7589 Samoano 8377 Galés 6789 Inglés 6978 Coreano 7579 Sánscrito 8365 Wolof 8779 Esperanto 6979 Kurdo 7585 Gaélico escocés 7168 Xhosa 8872 Estonio 6984 Laosiano 7679 Serbio 8382 Yiddish 7473 Feroés 7079 Latín 7665 Serbo-croata 8372 Yoruba 8979 Fidji 7074 Letón 7686 Shona 8378 Zulú 9085 Finlandés 7073 Lingala 7678 HB985-DB.BDEUPPK_SPA.indd 69 2010-05-14 Apéndice Afar 7 2:48:39 70 Apéndice Resolución de la salida de vídeo Cuando se reproducen medios sin protección anticopia Salida de vídeo Resolución 576i (480i) HDMI OUT COMPONENT VIDEO OUT HDMI conectado HDMI desconectado 576p (480i) 576i (480i) 576p (480p) 576p (480p) 576p (480p) 720p 720p 720p 1080i 1080i 1080i 1080p / 24 Hz 1080p / 24 Hz 576i (480i) 1080i 1080p / 50 Hz 1080p / 50 Hz 576i (480i) 1080i Al reproducir un disco con protección anticopia Salida de vídeo Resolución 576i (480i) HDMI OUT 576p (480p) HDMI desconectado 576i (480i) 576p (480p) 576p (480p) 720p 720p 576i (480i) 576p (480p) 1080i 1080i 576i (480i) 576p (480p) 1080p / 24 Hz 1080p / 24 Hz 576i (480i) 576p (480p) 1080p / 50 Hz 1080p / 50 Hz 576i (480i) 576p (480p) Conexión HDMI OUT Apéndice 7 COMPONENT VIDEO OUT HDMI conectado • Para una configuración de resolución de 576i (480i), la resolución real de salida de HDMI OUT cambiará a 576p(480p). • Si selecciona manualmente una resolución y, a continuación conecta un terminal HDMI a la TV y ésta no la acepta, la configuración de resolución cambiará a [Auto]. • Si selecciona una resolución que el televisor no admite, aparecerá un mensaje de advertencia. Después de cambiar la resolución, si no puede ver la pantalla, espere 20 segundos y la resolución regresará automáticamente a la resolución anterior. HB985-DB.BDEUPPK_SPA.indd 70 576p (480p) • La velocidad de fotogramas de la salida de video 1080p puede configurarse automáticamente a 24 Hz o 50 Hz dependiendo de la capacidad y las preferencias de la TV conectada y se basa en la velocidad de fotogramas del vídeo nativo del contenido del disco BD-ROM. Conexión COMPONENT VIDEO OUTconnection Los sistemas BD o DVD podrían evitar la escalada en la salida analógica. Conexión VIDEO OUT La resolución de la clavija VIDEO OUT siempre es 576i (480i). 2010-05-14 2:48:39 Apéndice 71 Marcas comerciales y licencias “Disco Blu-ray” y son marcas comerciales. HDMI, el logotipo HDMI y High-Definition Multimedia Interface son marcas registrada de HDMI Licensing, LLC en Estados Unidos y otros países. El logotipo “BD-LIVE” es una marca registrada de la asociación Blu-ray Disc. “BONUSVIEW” es una marca registrada de Blu-ray Disc Association. El logotipo es una marca registrada de DVD Format/Logo Licensing Corporation. TM Java y todas las marcas comerciales y logotipos basados en Java son marcas registradas o comerciales de Sun Microsystems, Inc. en los Estados Unidos y otros países. Fabricado bajo licencia bajo los siguientes números de patente U.S.: 5,451,942; 5,956,674; 5,974,380; 5,978,762; 6,226,616; 6,487,535; 7,392,195; 7,272,567; 7,333,929; 7,212,872 y otras patentes U.S. y de otros países emitidas y solicitadas. DTS y el símbolo son marcas registradas y DTS-HD, DTS-HD Master Audio l Essential and los logotipos DTS son marcas comerciales de DTS, Inc. El producto incluye software. © DTS, Inc. Todos los derechos reservados. HB985-DB.BDEUPPK_SPA.indd 71 DivX es una marca comercial registrada de DivX, Inc. y se utiliza bajo licencia. “x.v.Color” o “x.v.Colour” es una marca comercial de Sony Corporation. 2010-05-14 Apéndice Fabricado bajo la licencia de Dolby Laboratories. Dolby y el símbolo de la doble-D son marcas comerciales propiedad de Dolby Laboratories. DLNA y DLNA CERTIFIED son marcas comerciales y / o marcas de servicio de Digital Living Network Alliance 7 2:48:39 72 Apéndice Windows Media es una marca registrada o marca comercial de Microsoft Corporation en Estados Unidos y/u otros países. “AVCHD” y el logotipo “AVCHD” son marcas registradas de Panasonic Corporation y Sony Corporation. Este producto tiene licencia bajo las previsiones del archivo de patente AVC y VC-1 para uso personal y no comercial de un consumidor para (i) codificar vídeo según los estándares AVC y VC-1 (“video AVC/VC-1”) o (ii) decodificar vídeo AVC/VC-1 que ha sido codificado por un usuario involucrado en una actividad personal y no comercial o se obtuvo de un proveedor de vídeo autorizado para suministrar vídeo AVC/VC-1. No se concede ni implica ninguna otra licencia para ningún otro uso. Puede obtener información adicional de MPEG LA, LLC. Visite http://www.mpegla.com. iPod es una marca comercial de Apple Inc., registrada en los Estados Unidos y en otros países. iPhone es una marca comercial de Apple, Inc. Apéndice 7 Este producto incluye tecnología propiedad de Microsoft Corporation y no puede ser utilizado o distribuido sin una licencia de Microsoft Licensing, Inc. ® La tecnología inalámbrica Bluetooth® es un sistema que permite contacto por radio entre aparatos electrónicos con un alcance máximo de 10 metros. La conexión de aparatos individuales bajo tecnología inalámbrica Bluetooth no incurre en ningún cargo. Se puede utilizar un teléfono móvil con tecnología inalámbrica Bluetooth a través de Cascade, si la conexión se ha realizado con tecnología inalámbrica Bluetooth. El término, la marca y los logotipos Bluetooth son propiedad de Bluetooth SIG, Inc. y cualquier uso que Pioneer Corporation haga de ellos estará bajo licencia. Otras marcas comerciales y nombre comerciales son propiedad de sus respectivos propietarios. “Made for iPod” significa que el accesorio electrónico ha sido diseñado para conectarse de forma específica al iPod y como tal, ha sido certificado por el fabricante conforme a los estándares de rendimiento de Apple. “Works with iPhone” significa que el accesorio electrónico ha sido diseñado para conectarse de forma específica al iPhone y como tal, ha sido certificado por el fabricante conforme a los estándares de rendimiento de Apple. Apple no se responsabiliza del funcionamiento de este dispositivo y su cumplimiento con los estándares de regulación y seguridad. HB985-DB.BDEUPPK_SPA.indd 72 2010-05-14 2:48:40 Apéndice Datos técnicos 73 Sintonizador • Rango de sintonización FM: 87.5 a 108.0 MHz o 87.50 a 108.00 MHz General • Requisitos eléctricos: AC 220-240 V, 50/ 60 Hz • Consumo de energía: 150 W En modo standby: Menos de 0,5 W • Dimensiones (An. x Al. x Prof.): Aprox. 430 × 64 × 304 mm • Peso neto (aprox.): 3.6 kg • Temperatura en funcionamiento: 41 °F a 95 °F (5 °C a 35 °C) • Humedad operativa: 5 % a 90 % • Suministro de corriente a Bus (USB): DC 5 V 500 mA Entradas/Salidas • VIDEO OUT: 1,0 V (p-p), 75 Ω, sincr. negativa, toma RCA x 1 • HDMI IN/OUT (vídeo/audio): 19 pines (HDMI estándar, tipo A, Versión 1.3) • Salida de potencia, (PEAK), (4Ω/3Ω) Total 1100 W Parte anterior 180 W x 2 Centro 180 W Parte trasera 180 W x 2 Subwoofer 200 W (Passive) • Salida de potencia, (RMS), THD 10% (4Ω/3Ω) Total 930 W Parte anterior 150 W x 2 Centro 150 W Parte trasera 150 W x 2 Subwoofer 180 W (Passive) Sistema • Láser: Láser semiconductor, Longitud de onda: 405 nm / 650 nm • Sistema de señal: Sistema de TV en color NTSC/PAL estándar • Respuesta de frecuencia: 20 Hz a 20 kHz (muestras, 48 kHz, 96 kHz, 192 kHz) • Puerto LAN: Toma Ethernet x 1, 10 BASE-T/100 BASE-TX Apéndice • COMPONENT VIDEO OUT: (Y) 1,0 V (p-p), 75 Ω, sincr. negativa, toma RCA x 1, (Pb)/(Pr) 0,7 V (p-p), 75 Ω, toma RCA x 2 Amplificador • Entrada de audio analógica: 2,0 Vrms (1 kHz, 0 dB), 600 Ω, toma RCA (Izq., Dcha.) x 1 7 • DIGITAL IN (OPTICAL 1/2): 3 V (p-p), 2 x toma óptica • Entrada de puerto : 0,5 Vrms (toma estéreo 3,5 mm) HB985-DB.BDEUPPK_SPA.indd 73 2010-05-14 2:48:40 74 Apéndice Altavoces BCS-707 Altavoces BCS-303 S-BD707 S-BD303 • Altavoz delantero/Surround (Izquierdo/Delantero) Modelo: 2 altavoces Relación de impedancia: 4 Ω Dimensiones netas 260 x 1097 x 260 mm (An. x Al. x Prof.): Peso neto: 3.8 kg • Altavoz delantero/Surround (Izquierdo/Delantero) Modelo: 1 altavoces Relación de impedancia: 4 Ω Dimensiones netas 96 x 96 x 85 mm (An. x Al. x Prof.): Peso neto: 0.4 kg • Altavoz central Modelo: Relación de impedancia: Dimensiones netas (An. x Al. x Prof.): Peso neto: • Altavoz central Modelo: Relación de impedancia: Dimensiones netas (An. x Al. x Prof.): Peso neto: 1 altavoces 4Ω 300 x 87x 65 mm 0.6 kg S-BD707SW • Subwoofer Modelo: Relación de impedancia: Dimensiones netas (An. x Al. x Prof.): Peso neto: 1 altavoces, 1 vías 3Ω 130.5 x 420 x 375 mm • Subwoofer Modelo: Relación de impedancia: Dimensiones netas (An. x Al. x Prof.): Peso neto: 1 altavoces 4Ω 300 x 87 x 65 mm 0.6 kg 1 altavoces, 1 vías 3Ω 130.5 x 420 x 375 mm 4.4 kg 4.4 kg Apéndice 7 HB985-DB.BDEUPPK_SPA.indd 74 2010-05-14 2:48:40 Apéndice Aviso sobre el software de código abierto Los siguientes ejecutables GPL y bibliotecas LGPL utilizados en este producto están sujetos a los Acuerdos de licencia de GPL2.0/LGPL2.1: EJECUTABLES GPL: Linux kernel 2.6, bash, busybox, cramfs, dhcpcd, e2fsprogs, fdisk, mkdosfs, mtd-utils, net-tools, procps, samba-3.0.25b, sysutils, tcpdump, tftpd, tinylogin, unzip, utelnetd BIBLIOTECAS LGPL: uClibc, DirectFB, blowfish, cairo, ffmpeg, iconv, libusb, mpg123 BIBLIOTECA 1.3, licencia pública gSOAL: gsoap Se puede obtener el código fuente correspondiente realizando el pago de distribución. Para obtener una copia, póngase en contacto con el servicio local de atención al cliente de Pioneer. Puede obtener una copia de las licencias GPL, LGPL en http://www.gnu.org/licenses/old-licenses/gpl-2.0.html y http://www.gnu.org/licenses/old-licenses/lgpl-2.1.html. • boost C++: copyright Beman Dawes 1999-2003 • c-ares: copyright © 1998 por el MIT (Massachusetts Institute of Technology) • curl: copyright © 1996 - 2008, Daniel Stenberg • expat: copyright © 2006 expat maintainers • freetype: copyright © 2003 The FreeType Project (www.freetype.org) • jpeg: Este software se basa en parte del trabajo del Independent JPEG Group – 1998, Thomas G. Lane • mng: copyright © 2000-2007 Gerard Juyn, Glenn Randers-Pehrson • ntp : copyright © David L. Mills 1992-2006 • OpenSSL: – software criptográfico escrito por Eric Young ([email protected]) HB985-DB.BDEUPPK_SPA.indd 75 2010-05-14 Apéndice También puede obtener una copia de la licencia pública gSOAP en http://www.cs.fsu.edu/~engelen/ license.html. Este software se basa en parte del trabajo del Independent JPEG Group – 1998, Thomas G. Lane. Este producto incluye: – software escrito por Tim Hudson ([email protected]) – software desarrollado por OpenSSL Project para su utilización en OpenSSL Toolkit. (http://www.openssl.org) • png: copyright © 2004 Glenn Randers-Pehrson • portmap: copyright © 1990 The Regents of the University of California • ptmalloc: copyright © 2001-2006 Wolfram Gloger • UnitTest++: copyright © 2006 Noel Llopis y Charles Nicholson • UPnP SDK: copyright © 2000-2003 Intel Corporation • strace : copyright © 1991, 1992 Paul Kranenburg copyright © 1993 Branko Lankester copyright © 1993 Ulrich Pegelow copyright © 1995, 1996 Michael Elizabeth Chastain copyright © 1993, 1994, 1995, 1996 Rick Sladkey copyright © 1999,2000 Wichert Akkerman • xml2 : copyright © 1998-2003 Daniel Veillard • XML-RPC para C/C++: • copyright © 2001 por First Peer, Inc. Reservados todos los derechos. • copyright © 2001 por Eric Kidd. Reservados todos los derechos. • zlib: copyright © 1995-2002 Jean-loup Gailly y Mark Adler. Reservados todos los derechos Por la presente, se concede permiso, de forma gratuita, a toda persona que obtenga una copia de este software o de archivos de documentación relacionados con el mismo (en adelante, “el Software”) para tratar dicho Software sin restricciones, incluyendo a modo enunciativo, el derecho a utilizar, copiar, modificar, integrar con otro Software, publicar, sublicenciar y/o vender copias del Software, y además permitir a las personas a las que se les entregue el Software hacer lo mismo, conforme a las siguientes condiciones: EL SOFTWARE SE FACILITA “TAL CUAL”, SIN GARANTÍA DE NINGÚN TIPO, EXPLÍCITA O IMPLÍCITA, INCLUYENDO A MODO ENUNCIATIVO, TODA GARANTÍA DE COMERCIABILIDAD E IDONEIDAD PARA UN FIN CONCRETO Y SIN VIOLACIÓN DE LOS DERECHOS. BAJO NINGUNA CIRCUNSTANCIA, LOS AUTORES O PORTADORES DE LOS DERECHOS DE COPYRIGHT ASUMIRÁN RESPONSABILIDAD ALGUNA ANTE RECLAMACIONES, DAÑOS O CUALQUIER OTRA RESPONSABILIDAD, YA SEA MEDIANTE ACCIÓN CONTRACTUAL, AGRAVIO U OTROS, RESULTANTE DE O EN RELACIÓN CON EL SOFTWARE O EL USO QUE SE HAGA DE ÉSTE U OTROS TEMAS RELACIONADOS CON EL MISMO. 75 7 2:48:40 2 1 Veiligheidsinformatie Veiligheidsinformatie 1 Veiligheidsinformatie OPGELET SCHOKGEVAAR NIET OPENEN LET OP: om het risico van een elektrische schok te voorkomen, het deksel (of de achterzijde) niet verwijderen. Binnenin bevinden zich geen onderdelen die door de gebruiker kunnen worden onderhouden. Bel hiervoor een erkende servicetechnicus. Een bliksem met pijl in een gelijkbenige driehoek is bedoeld om de gebruiker attent te maken op de aanwezigheid van een gevaarlijke, niet-geïsoleerde spanning in de behuizing van het product die zo groot kan zijn dat zij gevaar voor een elektrische schok oplevert. Het uitroepteken in een gelijkbenige driehoek is bedoeld om de gebruiker attent te maken op belangrijke gebruiksen onderhoudsinstructies in de bij het apparaat geleverde gebruiksaanwijzing. Veiligheidsmaatregelen en waarschuwingen WAARSCHUWING: STEL DIT PRODUCT NIET BLOOT AAN REGEN OF VOCHT OM HET RISICO VAN BRAND OF EEN ELEKTRISCHE SCHOK TE VOORKOMEN. WAARSCHUWING: Plaats het toestel niet in een kleine ruimte, zoals een boekenkast of een dergelijke afgesloten ruimte. WAARSCHUWING: Blokkeer de ventilatieopeningen niet. Installeer volgens de instructies van de fabrikant. Sleuven en openingen in de kast zijn geplaatst ter ventilatie en te zorgen voor betrouwbaar gebruik van het product, en om oververhitting te voorkomen. De openingen mogen nooit geblokkeerd worden door het product op een bed, bank, tapijt of soortgelijke ondergrond te plaatsen. Het product mag niet geplaatst worden in een inbouwmeubel, zoals een boekenkast of rek tenzij er gezorgd wordt in voldoende ventilatie en de instructies van de fabrikant opgevolgd worden. WAARSCHUWING: Dit is een klasse 1 laserproduct en valt onder de norm Veiligheid van laserproducten, IEC 60825-1:2007. U dient, voor een correct gebruik van dit product, de gebruikershandleiding aandachtig door te lezen en deze te bewaren voor toekomstig gebruik. Indien het apparaat onderhoud nodig heeft, neem dan contact op met een erkend servicecentrum. Het gebruik van een of meer bedieningsknoppen, instellingen of procedures op een andere wijze dan in deze handleiding is aangegeven kan blootstelling aan gevaarlijke straling tot gevolg hebben. Voorkom directe blootstelling aan de laserstraal en open het apparaat niet. Zichtbare laser straling indien geopend. KIJK NIET IN DE STRAAL. HB985-DB.BDEUPPK_DUT.indd 2 2010-05-14 2:57:55 Veiligheidsinformatie Dit apparaat is voorzien van een draagbare batterij of accu. Wij adviseren de meeste apparaten aan te sluiten op een eigen circuit, namelijk een enkelvoudig stopcontact dat alleen dat apparaat van stroom voorziet en geen verdere aansluitingen betreft. Controleer de specificaties in deze gebruikershandleiding om zeker te zijn. Sluit niet teveel apparaten aan op hetzelfde stopcontact. Overbelaste stopcontacten, loszittende of beschadigde stopcontacten, verlengsnoeren, beschadigde netvoedingskabels of beschadigde of gebarsten kabelisolatie zijn gevaarlijk. Elk van deze omstandigheden kunnen leiden tot kortsluiting of brand. Periodieke controle van de kabel van uw apparaat is noodzakelijk, en indien het apparaat tekenen van beschadiging of slijtage toont, trek dan de stekker uit het stopcontact, gebruik het apparaat niet, en laat de kabel door een erkend servicecentrum vervangen door een goedgekeurd gelijkwaardig exemplaar. Bescherm de netvoedingskabel tegen fysiek of mechanisch misbruik, zoals buigen, vastklemmen, klemmen tussen een gesloten deur, of erover lopen. Let speciaal op stekkers, wandcontactdozen en het punt waar de kabel het apparaat verlaat. Verwijder de netvoedingskabel door aan de stekker te trekken, niet aan de kabel. Let erop dat de stekker makkelijk toegankelijk is nadat u het product hebt geïnstalleerd. U kunt de batterij of de accu als volgt veilig uit het apparaat verwijderen: Verwijder de oude batterij of het batterijpack. Ga in omgekeerde volgorde als bij het plaatsen te werk. Voorkom milieuvervuiling en gezondheidsgevaren voor mens en dier en werp de oude batterij, het batterijpack of de accu in de daarvoor bestemde bak bij een officieel aangewezen inzameladres. Doe oude batterijen en accu’s nooit samen met het gewone huisvuil weg. Wij adviseren u gratis batterijen en accu’s te gebruiken die u tegen vergoeding weer kunt inleveren(Indien deze service in uw land wordt geboden.). Stel de batterij (accu) niet bloot aan de hoge temperatuur van rechtstreekse zonnestraling, een open haard e.d. 1 Veiligheidsinformatie WAARSCHUWING betreffende de netvoedingskabel 3 WAARSCHUWING: Dit apparaat mag niet worden blootgesteld aan druip- of spatwater en plaats geen objecten gevuld met vloeistof, zoals vazen, op het apparaat. Hierdoor verklaart PIONEER dat dit/ deze product(en) voldoet/voldoen aan de belangrijkste eisen en andere relevante voorzieningen van de Europese Richtlijnen 2004/108/EC, 2006/95/EC en 2009/125/EC. WAARSCHUWING: Voorkom brandgevaar en plaats geen bronnen met open vuur (zoals brandende kaarsen) op de apparatuur. HB985-DB.BDEUPPK_DUT.indd 3 2010-05-14 2:57:58 4 Veiligheidsinformatie Informatie voor gebruikers betreffende het inzamelen en opruimen van oude apparaten en gebruikte batterijen 1 Veiligheidsinformatie Pb ( Voorbeelden van symbolen voor batterijen ) Deze symbolen op de producten, verpakking en/ of meegeleverde documenten betekenen dat gebruikte elektrische en elektronische producten en batterijen niet tegelijk met algemeen huishoudelijk afval mogen worden opgeruimd. Breng oude producten en gebruikte batterijen zoals wettelijk voorgeschreven naar de daarvoor aangewezen inzamelingsadressen die voor een juiste behandeling, reparatie of hergebruik kunnen zorgen. Door deze producten en batterijen op de juiste wijze op te ruimen helpt u waardevolle grondstoffen te behouden en voorkomt u mogelijke negatieve effecten voor de gezondheid van mens en dier die het gevolg zijn van het achteloos wegdoen van afval. Voor meer informatie over het inzamelen en hergebruiken van oude producten en batterijen kunt u contact opnemen met het gemeentehuis van uw woonplaats, een officieel inzameladres of het verkooppunt waar u de goederen hebt gekocht. Deze symbolen gelden alleen in de Europese Unie. Voor landen buiten de Europese Unie: Als u deze zaken wilt afdanken, neem dan contact op met het gemeentehuis van uw woonplaats of de leverancier ervan en vraag naar de juiste manier van wegdoen. HB985-DB.BDEUPPK_DUT.indd 4 Wat u moet weten over copyright • Er zijn bepaalde beperkingen voor afspelen, analoge signaaluitvoer, etc van door AACS beschermde inhoud, omdat AACS (Advanced Access Content System) goedgekeurd is als inhoudbeschermingsysteem voor BD-formaat, gelijk aan het gebruik van CSS (Content Scramble System). Het gebruik van dit product en beperkingen op dit product kunnen variëren afhankelijk van uw tijd van aankoop aangezien die beperkingen zijn toegepast en/of gewijzigd door AACS na de productie van dit product. • Verder worden BD-ROM Mark en BD+ nog gebruikt als inhoudbeveiligingssyteem voor het BD-formaat, dat bepaalde beperkingen oplegt inclusief afspeelbeperkingen aan met BD-ROM Mark en/of BD+ beveiligde inhoud. Voor extra informatie over AACS, BD-ROM teken, BD+, of dit product, neemt u contact op met een erkend Klantenservicecentrum. • Veel BD-ROM/DVD disks zijn gecodeerd met kopieerbeveiliging. Hierdoor dient u uw speler rechtstreeks op uw tv aan te sluiten, niet op een videorecorder. Het aansluiten op een videorecorder heeft een gestoord beeld van tegen kopiëren beveiligde disks tot gevolg. • Dit product maakt gebruik van technologie voor bescherming van auteursrechten die beschermd wordt door U.S. patenten en andere intellectuele eigendomsrechten. Gebruik van deze technologie ter bescherming van auteursrechten moet geautoriseerd worden door Rovi, en is bedoeld voor thuisgebruik en beperkt aantal kijkbeurten, tenzij anderszins aangegeven door Rovi. Omgekeerde engineering of demontage is verboden. • Volgens de Amerikaanse wetgeving op het auteursrecht en de daarmee vergelijkbare wetgeving van andere landen, is niet bevoegde opname, gebruik, tonen, distributie of revisie van televisieprogramma’s, videobanden, BDROM disks, DVD’s, CD’s en andere materialen onderworpen aan civielrechtelijke en/of strafrechtelijke wetgeving. 2010-05-14 2:57:58 Veiligheidsinformatie 5 Belangrijke informatie over het tvkleurensysteem Het door deze speler gebruikte tv-kleurensysteem richt zich naar de afgespeelde disks. 1 Veiligheidsinformatie Wanneer de speler bijvoorbeeld een volgens het NTSC-kleurensysteem opgenomen disk afspeelt, wordt het beeld als NTSC-signaal uitgevoerd. Alleen kleurentelevisies die voor meerdere kleurensystemen geschikt zijn, kunnen alle door de speler uitgevoerde signalen verwerken. • Als uw tv uitsluitend geschikt is voor PAL kleurensignalen toont het beeldscherm vervormde beelden wanneer u disks of videoinhoud gebruikt die in NTSC zijn opgenomen. • Een kleuren-tv die voor meerdere systemen geschikt is, past het kleurensysteem automatisch aan bij het ingevoerde signaal. Wanneer het kleurensysteem niet automatisch wordt overgeschakeld, schakelt u de tv uit en weer aan waardoor een normaal beeld op het beeldscherm moet verschijnen. • Ook wanneer volgens het NTSC-kleurensysteem opgenomen disks door uw tv correct worden weergegeven is het mogelijk dat dit signaaltype niet correct door uw recorder wordt opgenomen. HB985-DB.BDEUPPK_DUT.indd 5 2010-05-14 2:57:58 6 Inhoud 3 Installeren 16 1 Luidsprekers installeren BCS-707 18 Luidsprekers installeren BCS-303 Veiligheidsinformatie 2 Veiligheidsmaatregelen en waarschuwingen Voorbereiding 8 19 De middenluidspreker aan de wand bevestigen 19 Extra informatie over het ophangen van luidsprekers 20 2 Inleiding Luidsprekers monteren 16 21 Het systeem opstellen Aansluitingen op uw tv 21 HDMI-aansluiting 22 Component Videoaansluiting 23 Videoverbinding 8 Weergave van het symbool “ ” 8 Symbolen die in deze handleiding worden gebruikt 23 24 Antenneaansluiting 9 Meegeleverde toebehoren 24 Op een extern apparaat aansluiten 10 Afspeelbare disks 24 AUX-aansluiting 11 Bestandscompatibiliteit 25 PORTABLE IN-aansluiting 12 Regiocode 25 OPTICAL IN 1/2-aansluiting 12 AVCHD (Advanced Video Codec High Definition) 26 Bluetooth® aansluiting 12 Bepaalde systeemvereisten 12 Opmerkingen betreffende compatibiliteit 28 29 Resolutie instellen Aansluiten op uw thuisnetwerk Een netwerk installeren 31 Usb-apparaat aansluiten Afstandsbediening 32 Instellingen 14 Voorpaneel 32 15 Achterpaneel De setup-instellimgen aanpassen 33 [SCHERM]-menu 34 [TAAL]-menu 35 [AUDIO]-menu 36 [SLOT]-menu 37 [NETWERK]-menu 37 [ANDERS]-menu 13 39 HB985-DB.BDEUPPK_DUT.indd 6 Geluidseffecten 2010-05-14 2:57:59 7 4 6 Bediening Problemen oplossen 40 Afspelen in het algemeen 64 Algemeen 42 Geavanceerd afspelen 65 Beeld 45 Beeldscherminformatie (OSD) 65 Geluid 48 De ongekende mogelijkheden van BD-Live 66 Netwerk 49 Film- en VR-disks afspelen 51 Foto’s bekijken 7 53 Naar muziek luisteren Bijlage 56 iPod afspelen 58 Radio 59 Inhoud via uw thuisnetwerk afspelen 5 Onderhoud 63 Wat u over disks moet weten 63 Behandeling van het apparaat 1 2 67 Uw tv bedienen met de meegeleverde afstandsbediening 68 Regiocodelijst 69 Taalcodelijst 70 Resolutie video-uitvoersignaal 71 Handelsmerken en licenties 73 Technische gegevens 75 Kennisgeving over open-source software 3 4 5 6 7 8 HB985-DB.BDEUPPK_DUT.indd 7 2010-05-14 2:57:59 8 Voorbereiding 2 Voorbereiding 2 Inleiding Voorbereiding Weergave van het symbool “ ” “ ” kan op uw tv-scherm verschijnen tijdens gebruik en geeft aan dat de functie die wordt uitgelegd in deze gebruikershandleiding niet beschikbaar is bij die specifieke media. Symbolen die in deze handleiding worden gebruikt LET OP Geeft aan dat er bijzondere opmerkingen en bedieningskenmerken zijn. Een hoofdstuk waarvan de titel een van de volgende symbolen bevat, is alleen van toepassing op de disk waarnaar het symbool verwijst. BD BD-ROM disk DVD DVD-Video, DVD±R/RW in Video modus of VR modus en gefinaliseerd AVCHD DVD±R/RW in AVCHD formaat ACD Audio cd MOVIE Filmbestanden MUSIC Muziekbestanden PHOTO Fotobestanden VOORZICHTIG Vestigt uw aandacht op voorzorgsmaatregelen die mogelijke schade door verkeerd gebruik kunnen voorkomen. HB985-DB.BDEUPPK_DUT.indd 8 2010-05-14 2:57:59 Voorbereiding Meegeleverde toebehoren Videokabel (1) Fm-antenne (1) Toebehoren voor luidsprekerboxen (S-BD707SW) Luidsprekerkabel (1) Toebehoren voor luidsprekerboxen (S-BD303) Luidsprekerkabel (6) iPod houder (1) Grote antislipkussentjes (1) 2 Voorbereiding Batterijen (1) Afstandsbediening (1) 9 kleine antislipkussentjes (1) Toebehoren voor luidsprekerboxen (S-BD707T) Grote antislipkussentjes (1) Luidsprekerkabel (5) Schroeven (12) Luidsprekervoet -stukken (4) kleine antislipkussentjes (1) Middelgrote antislipkussentjes (1) HB985-DB.BDEUPPK_DUT.indd 9 2010-05-14 2:57:59 10 Voorbereiding Afspeelbare disks 2 LET OP Voorbereiding Blu-ray Disc - Disks met films die u kunt kopen of huren. - BD-R/RE disks die film-, muziekof fotobestanden bevatten. • Afhankelijk van de conditie van de opnameapparatuur of van de CD-R/RW (of DVD±R/RW)-disk zelf, kunt u sommige CD-R/ RW (of DVD±R/RW)-disks niet met deze speler weergeven. DVD-VIDEO 8 / 12 cm Disks met films die u kunt kopen of huren. • Afhankelijk van de opnamesoftware en de finalisering is het mogelijk dat u sommige opgenomen disks (CD-R/RW, DVD±R/RW, BD-R/ RE) niet met deze speler kunt weergeven. DVD±R 8 / 12 cm - Alleen video-opnamen, mits gefinaliseerd - Ook tweelaags disks worden ondersteund - Gefinaliseerd AVCHD-formaat - DVD±R disks die film-, muziekof fotobestanden bevatten. DVD-RW 8 / 12 cm - Alleen VR modus, Videomodus en gefinaliseerd - Gefinaliseerd AVCHD-formaat - DVD-RW disks die film, muziek- of fotobestanden bevatten. DVD+RW 8 / 12 cm - Alleen video-opnamen, mits gefinaliseerd - AVCHD-formaat - Gefinaliseerd AVCHD-formaat - DVD+RW disks die film-, muziek- of fotobestanden bevatten. Audio CD 8 / 12 cm • Het is mogelijk dat u CD-R/RW- en BD-R/RE, DVD±R/RW-disks die met behulp van een pc of dvd- of cd-recorder zijn opgenomen niet met deze speler kunt weergeven als de disk is beschadigd of als er vuil of condens op de lens van de speler aanwezig is. • Als u een disk met behulp van een pc opneemt, is het mogelijk dat u de disk - zelfs als u deze in een compatibel formaat opneemt - niet kunt weergeven als gevolg van de instellingen van de applicatiesoftware die u hebt gebruikt om de disk te beschrijven. (Neem voor meer informatie contact op met de leverancier van de software.) • Deze speler vereist dat de gebruikte disks en opnamen aan bepaalde technische normen voldoen om een optimaal opname- en weergaveresultaat te bereiken. • Vooraf opgenomen dvd-disks worden automatisch op deze normen ingesteld. Er is een groot aantal verschillende typen opneembare diskformaten (waaronder begrepen cd-rdisks die mp3- of wma-bestanden bevatten) en deze vereisen bepaalde vooraf aanwezige voorwaarden om het compatibel afspelen mogelijk te maken. • Wij nemen aan dat u weet dat u toestemming moet hebben voor het downloaden van mp3en wma-bestanden van het internet. Ons bedrijf heeft niet het recht deze toestemming te verlenen. U moet toestemming hebben van de eigenaar van het auteursrecht (“copyright”). CD-R/RW 8 / 12 cm - CD-R/RW disks die audiotitels evenals film-, muziek- en fotobestanden kunnen bevatten. HB985-DB.BDEUPPK_DUT.indd 10 2010-05-14 2:58:00 Voorbereiding Bestandscompatibiliteit Volledig Beschikbare bestandsextensies: “.jpg”, “.jpeg”, “.png”, “.avi”, “.divx”, “.mpg”, “.mpeg”, “.mkv”, “.mp4”, “.mp3”, “.wma”, “.wav” • De beschikbare bestandsextensies zijn verschillend, afhankelijk van de DNLAservers. Sommige “.wav”-bestanden worden op deze speler niet ondersteund. • De bestandsnaam is tot 180 tekens beperkt. • Afhankelijk van de grootte en het aantal bestanden kan het enige minuten duren om de inhoud op het medium in te lezen. Maximum bestanden/mappen: Minder dan 2 000 (totaal aantal bestanden en mappen) CD-R/RW, DVD±R/RW, BD-R/RE formaat: ISO 9 660+JOLIET, UDF en UDF Bridge formaat Bitsnelheid: Vanaf 20 kbps t/m 320 kbps (WMA), Vanaf 32 kbps t/m 320 kbps (MP3) LET OP • Het kan voorkomen dat HD filmbestanden op een CD of USB 1,0/1,1 niet goed afgespeeld worden. BD, DVD of USB 2,0 worden aanbevolen om HD filmbestanden af te spelen. • Deze speler ondersteunt H.264/MPEG-4 AVC profile Main, High op niveau 4,1. Bij titels met een hoger niveau verschijnt een waarschuwing op het beeldscherm. • Deze speler ondersteunt geen bestanden die met GMC*1 of Qpel*2 zijn opgenomen. Dat zijn videocoderingstechnieken volgens de MPEG4norm zoals DivX en XviD. *1 GMC – Global Motion Compensation *2 Qpel – Quarter pixel MOVIE (Film) MUSIC (Muziek) Beschikbare resolutiegrootte: 1 920 x 1 080 (B x H) pixels Afspeelbare ondertitel: SubRip (.srt / .txt), SAMI (.smi), SubStation Alpha (.ssa/.txt), MicroDVD (.sub/.txt), VobSub (.sub), SubViewer 1.0 (.sub), SubViewer 2.0 (.sub/.txt), TMPlayer (.txt), DVD Subtitle System (.txt) Bemonsteringsfrequentie: Vanaf 8 t/m 48 KHz (wma), Vanaf 11 t/m 48 KHz (mp3), Bitsnelheid: Vanaf 8 t/m 320 Kbps (wma, mp3), • VobSub (.sub) is niet beschikbaar in de [HomeLink]-functie. Afspeelbare DivX ondertiteling: “DIVX3.xx”, “DIVX4.xx”, “DIVX5.xx”, “XVID”, “DIVX6.xx” (alleen standaard afspelen), H.264/MPEG-4 AVC, MPEG1 SS, MPEG2 PS, MPEG2 TS Afspeelbaar Audioformaat: “Dolby Digital”, “DTS”, “MP3”, “WMA”, “AAC”, “AC3” • Niet alle wma- en aac-audioformaten zijn voor dit apparaat geschikt. Bemonsteringsfrequentie: Vanaf 32 kHz t/m 48 kHz (WMA), Vanaf 16 kHz t/m 48 kHz (MP3) HB985-DB.BDEUPPK_DUT.indd 11 2 Voorbereiding • 11 LET OP • Dit apparaat ondersteunt geen ID3 tagembedded mp3-bestanden. • De totale afspeeltijd aangeduid op het scherm kan niet voor VBR-bestanden gecorrigeerd worden. PHOTO (Foto) Geadviseerde grootte: Minder dan 4.000 x 3.000 x 24 bits/pixels Minder dan 3.000 x 3.000 x 32 bits/pixels Minder dan 4 MByte/file • Progressieve en lossless-compression fotobeeldbestanden worden niet ondersteund. 2010-05-14 2:58:00 12 2 Voorbereiding Regiocode Bepaalde systeemvereisten Achterop deze speler is een regiocode aangegeven. Deze speler is uitsluitend geschikt voor het afspelen van BD-ROM- en DVD-disks waarop dezelfde regiocode of de tekst “Alles” is aangegeven. Voor het afspelen van hogedefinitie-video: Voorbereiding AVCHD (Advanced Video Codec High Definition) • Deze speler kan AVCHD geformatteerde disks afspelen. Deze disk worden normaliter opgenomen en gebruikt in camcorders. • Het AVCHD formaat is een hoogdefinitie digitaal videocamera formaat. • Het MPEG-4 AVC/H.264 formaat is in staat tot het comprimeren van beelden in een hogere efficiëntie dan die van het conventionele beeld comprimeringsformaat. • Sommige AVCHD disks gebruiken het “x.v.Colour” formaat. • Deze speler kan AVCHD disks afspelen met het “x.v.Colour” formaat. • Sommige disks in AVCHD formaat worden niet afgespeeld, afhankelijk van de opname omstandigheden. • AVCHD disks moeten gefinaliseerd worden. • “x.v.Colour” biedt een groter kleurbereik dan normale DVD camcorderdisks. HB985-DB.BDEUPPK_DUT.indd 12 • Hogedefinitie-beeldscherm met COMPONTENT of HDMI ingangen. • BD-Rom disk met hogedefinitie inhoud. • Voor de weergave van bepaald materiaal is een monitor nodig met een voor HDMI of HDCP geschikte DVI-ingang (als aangegeven door de makers van de disk). • Voor de up-conversie van DVD’s die materiaal van standaard-definitie bevatten is voor de weergave van tegen kopiëren beveiligd materiaal een monitor nodig met een DVI-ingang die voor HDMI of HDMI geschikt is. Opmerkingen betreffende compatibiliteit • Omdat BD-ROM een nieuw formaat is, kunnen bij bepaalde disks, digitale aansluitingen en andere verbindingen compatibiliteitsproblemen optreden. Neem contact op met het LG Klantenservicecentrum indien u compatibiliteitsproblemen aantreft. • De weergave van hogedefinitiemateriaal en het omzetten van standaard DVD inhoud kan een monitor vereisen met ingangen die geschikt zijn voor HDMI of een voor HDMI geschikte DVI. • Sommige BD-ROM en DVD disks kunnen het gebruik van bepaalde bedieningscommando’s of functies beperken. • U kunt een usb-apparaat gebruiken dat wordt gebruikt om bepaalde aan disks gerelateerde informatie op te slaan waaronder gedownload on-line materiaal. De disk die u gebruikt bepaalt hoe lang deze informatie wordt vastgehouden. 2010-05-14 2:58:00 Voorbereiding 13 Afstandsbediening • • • • • • • • • a • • • • • • • • • 1 (STANDBY/ON): Schakel het toestel AAN/UIT. Z OPEN/CLOSE: Opent of sluit de disklade. 1 INPUT/TUNER: Hiermee kunt u de invoermodus wijzigen. OPTICAL: Hiermee wijzigt u de invoermodus rechtstreeks in optisch. 2 3 Batterijen installeren Maak het deksel van het batterijenvak aan de achterkant van de afstandsbediening open en plaats daarin een R03 (formaat AAA) batterij en wel zó dat de tekens en op de batterij aansluiten op deze tekens in het batterijenvak. HB985-DB.BDEUPPK_DUT.indd 13 z USB REC: Hiermee neemt u een audio-cd op. MUTE: Hiermee kunt u het systeem stilschakelen. SOUND: Hiermee selecteert u de modus voor geluidseffecten. VOL +/- : Hiermee past u het luidsprekervolume aan. • • • • • • • • • c • • • • • • • • • DISPLAY: Opent of sluit de OnScreen Display. 0-9 numerieke toetsen: Selecteert genummerde opties in een menu. HOME MENU: Geeft het [Beginmenu] weer of stopt hiermee. MARKER: Hiermee kunt u tijdens het afspelen een herkenningspunt vastleggen. MENU: Opent een menu op een disk. SEARCH: Hiermee kunt u het zoekmenu oproepen of sluiten. Richtingknoppen: Hiermee selecteert u een optie in het menu. REPEAT: Hiermee herhaalt u een bepaald hoofdstuk. ENTER: Bevestigt de menukeuze. TUNE (+/-): Stemt af op de gewenste radiostations. CLEAR: Verwijdert een markering in het zoeken menu of een getal tijdens het instellen van het wachtwoord. PRESET: Selecteert radioprogramma’s. DIMMER: Dimt de verlichting van de speler. • • • • • • • • • b • • • • • • • • • ZOOM: Accesses ths zoom menu. O RETURN: Sluit het menu af en hervat het afspelen. Gekleurde (A, B, C, D) knoppen: Hiermee navigeert u door menu’s. POPUP/ TOP MENU: Toont het DVD titelmenu of BD-ROM popupmenu indien beschikbaar. x STOP: Stopt de weergave. B PLAY: De weergave starten. X PAUSE/STEP: Pauzeert het afspelen. ./> SKIP: Ga naar volgende of vorige bestand/track/hoofdstuk. m/M SCAN: Zoekt achterwaarts of voorwaarts. 2 Voorbereiding BT AUDIO: Changes input mode to BT AUDIO directly. SPK LEVEL: Hiermee stelt u het geluidsniveau van de gewenste luidspreker in. - A Knop voor (RDS): Radio Data System. - B Knop voor (PTY): Toont het het programmatype van het RDS. - C Knop voor (PTY SEARCH): Zoekt het programmatype op. - D Knop voor: Hiermee selecteert u mono of stereo in de fm-modus. Tv-bedieningsknoppen: Zie pagina 67. SLEEP: Hiermee stelt u een bepaalde tijdsduur in waarna het systeem zichzelf automatisch uitschakelt. 2010-05-14 2:58:00 14 Voorbereiding Voorpaneel 1 2 2 Voorbereiding 3 4 5 6 7 a Disklade c Sensor van de afstandsbediening b Bedieningsknoppen 1 STANDBY/ON Knop voor Z (OPEN/CLOSE) FUNCTIE Hiermee wijzigt u de invoerbron of – functie. B/X (PLAY / PAUSE) x (STOP) ./> (SKIP) - TUNE + (Op radiostations afstemmen) d Informatievenster HB985-DB.BDEUPPK_DUT.indd 14 e PORTABLE IN f Usb-poort g Volumeregeling 2010-05-14 2:58:01 Voorbereiding 15 Achterpaneel 1 2 3 4 5 2 7 8 9 10 Voorbereiding 6 11 a Netvoedingskabel Bevestig deze kabel in een stopcontact. g COMPONENT VIDEO (Y PB PR) uitgang (PROGRESSIVE SCAN) b Luidsprekeraansluitingen h Optische aansluiting 1(TV) / 2 c Koelventilator i iPod (24 pin) Aansluiten op de meegeleverde iPod houder. d Antenneaansluiting e VIDEO OUT f AUX (L/R) INPUT j HDMI OUT (type A, versie 1.3) Bestemd voor aansluiting op een tv met HDMI-ingangen. k LAN-poort HB985-DB.BDEUPPK_DUT.indd 15 2010-05-14 2:58:01 16 Installeren 3 Installeren Luidsprekers monteren 3 Voor de middenluidspreker: Zet vier kleine antislipkussentjes op de onderkant van de middenluidspreker vast. kleine antislipkussentjes small non-skid pads Installeren Luidsprekers installeren BCS-707 De luidsprekers voorbereiden 1. Bevestig antislipkussentjes op de onderkant van de luidsprekerconsoles, de subwoofer en de middenluidspreker. Voor luidsprekerconsoles: Zet vier middelgrote antislipkussentjes met het meegeleverde hechtmiddel op de onderkant (de bodem) van de luidsprekerconsoles vast. middle non-skid pads middelgrote antislipkussentjes Voor de subwoofer: Zet vier grote antislipkussentjes met het meegeleverde hechtmiddel op de onderkant van de subwoofer vast. 2. Bevestig de luidsprekerconsoles met de meegeleverde schroeven op de draagstangen. Plaats elke draagstang en console recht op elkaar en ze zet vervolgens op de hieronder aangegeven punten met de meegeleverde schroefjes vast. Let erop dat de luidsprekers in de richting van de gebruikelijke luisterpositie moeten wijzen. Achterzijde Rear large non-skid pads grote antislipkussentjes Voorzijde Front HB985-DB.BDEUPPK_DUT.indd 16 2010-05-14 2:58:01 Installeren 3. Sluit de luidsprekerkabels op de speler aan. Sluit de witte kabel met de grijze lijn op de (+) zijde aan en de andere kabel op de (-) zijde. Druk vervolgens op het kunststof lipje van elk aansluitpunt om dit te openen en de kabel met de speler te verbinden. Steek het kabeluiteinde erin en laat het lipje los. Kleur (+) 17 De frontluidsprekers en de surroundluidspreker vastzetten Zet de frontluidsprekers en de surroundluidspreker met de meegeleverde kunststof houder vast. Schroef twee steunhaken in de wand achter elke luidspreker. Voer een dik koord rond de haken en door de kunststof houder om de luidsprekers te stabiliseren (controleer of deze constructie het gewicht van de luidsprekers kan dragen). Controleer nadat u alles hebt gemonteerd of elke luidspreker goed vast zit. 3 Installeren Zwart (-) Voldoende dik koord VOORZICHTIG • Sluit op de speler geen andere luidsprekers aan dan de luidsprekers die bij dit systeem zijn geleverd. • Sluit de meegeleverde luidsprekers niet op een andere versterker aan dan de versterker die bij dit systeem is meegeleverd. Wanneer u de luidsprekers op een andere versterker aansluit riskeert u beschadiging van de luidsprekers en de versterker evenals brand. thick cord Kunststof houder Plastic catch VOORZICHTIG • De kunststof houder is geen montagefitting en de luidsprekers mogen niet met deze houder rechtstreeks aan de wand worden opgehangen. Gebruik bij het stabiliseren van de luidsprekers altijd een koord. • Pioneer is niet aansprakelijk voor verliezen of schade als gevolg van onvakkundige montage, installatie, onvoldoende sterkte van het montagemateriaal, verkeerd gebruik of van buiten komend onheil zoals natuurgeweld. • Bij het plaatsen van dit apparaat moet u ervoor zorgen dat het stevig vast zit. Bevestig de apparatuur niet op wandgedeelten waar het gevaar bestaat dat deze bij een natuurramp zoals een aardbeving van de wand kan vallen en personen verwonden. HB985-DB.BDEUPPK_DUT.indd 17 2010-05-14 2:58:02 18 Installeren Luidsprekers installeren BCS-303 De luidsprekers voorbereiden 1. Bevestig antislipkussentjes op de onderkant van elke luidspreker. Voor front en surround-luidsprekers: Bevestig vier kleine antislipkussentjes met het meegeleverde hechtmiddel op de onderkant (de bodem) van de luidsprekerconsoles. 3 Installeren samll non-skid pads kleine antislipkussentjes Voor de middenluidspreker: Zet vier kleine antislipkussentjes op de onderkant van de middenluidspreker vast. kleine antislipkussentjes samll non-skid pads 2. Sluit de luidsprekerkabels op de speler aan. Sluit de witte kabel met de grijze lijn op de (+) zijde aan en de andere kabel op de (-) zijde. Druk vervolgens op het kunststof lipje van elk aansluitpunt om dit te openen en de kabel met de speler te verbinden. Steek het kabeluiteinde erin en laat het lipje los. Kleur (+) Voor de subwoofer: Zet vier grote antislipkussentjes met het meegeleverde hechtmiddel op de onderkant van de subwoofer vast. grote largeantislipkussentjes non-skid pads Zwart (-) HB985-DB.BDEUPPK_DUT.indd 18 2010-05-14 2:58:02 Installeren 19 De middenluidspreker Extra informatie over aan de wand bevestigen het ophangen van luidsprekers De middenluidspreker is voorzien van een montageopening die u kunt gebruiken om de luidspreker aan de wand te bevestigen. Plaats de linker en rechter hoofdluidsprekers op gelijke afstanden van de televisie. Vóór de montage U moet zelf voor de bevestigingsschroeven zorgen. Gebruik alleen schroeven die voor de door u gekozen type wand geschikt zijn en die sterk genoeg zijn om het gewicht van de luidsprekers te dragen. VOORZICHTIG • Als u niet zeker weet met welk wandmateriaal u te maken hebt en of dit sterk genoeg is, neem dan contact op met een vakman voor advies. • Pioneer is niet aansprakelijk voor ongevallen of schade als gevolg van een verkeerde installatie. Montageschroef Mounting screw (niet(not meegeleverd) supplied) 5 mm 10 mm Voorzorgsmaatregelen: Zorg ervoor dat het blote einde van de luidsprekerkabel in elkaar gedraaid en helemaal in het aansluitpunt is gestoken. Als namelijk een van de blote einden van de luidsprekerkabel contact maken met de achterkant van de luidspreker bestaat de kans dat de stroom als veiligheidsmaatregel wordt uitgeschakeld. 3 Installeren Denk eraan dat het luidsprekersysteem zwaar is en dat de schroeven of het bouwmateriaal van de wand door dit gewicht los kunnen komen waardoor de luidspreker valt. Controleer altijd eerst of de wand waarop u de luidsprekers wilt bevestigen voldoende sterk is om het gewicht van de luidsprekers te dragen. Monteer de luidsprekers niet op wanden van triplex, multiplex of een ander zacht materiaal. De front-, midden- en surround-luidsprekers die u bij dit systeem hebt ontvangen, zijn magnetisch afgeschermd. Afhankelijk van de montagesituatie is het echter mogelijk dat er kleurvervorming op het beeldscherm optreedt als een of meer luidsprekers te dicht bij de televisie worden gemonteerd. Schakel als u dit constateert de stroom van de televisie uit en na 15 tot 30 minuten weer in. Als u het probleem hierdoor niet kunt oplossen, moet de u de luidsprekers op grotere afstand van de televisie hangen. De subwoofer is niet magnetisch afgeschermd en mag dus niet dicht bij een televisie of monitor worden geplaatst. Media die voor magnetisme gevoelig zijn (zoals floppy disks en band- of videocassettes) mogen niet in de buurt van een subwoofer worden bewaard. Bevestig de front/surround-luidsprekers en de subwoofer niet aan de wand of het plafond. Door hun gewicht kunnen ze vallen en verwondingen veroorzaken. 5 mm tot 7 mm HB985-DB.BDEUPPK_DUT.indd 19 2010-05-14 2:58:02 20 Installeren Het systeem opstellen De volgende afbeelding toont een voorbeeld van de opstelling van een systeem. U moet er rekening mee houden dat de afbeeldingen in deze handleiding omwille van de duidelijkheid kunnen afwijken van de werkelijke uitvoering van de apparaten. U bereikt de best mogelijke surround-sound door alle luidsprekers – met uitzondering van de subwoofer – op dezelfde afstand van uw luisterpositie (A) te plaatsen. C Installeren A G F A A A A D • Zorg ervoor dat kinderen niet hun vingers of voorwerpen in het luidsprekerkanaal steken. *Luidsprekerkanaal: Resonantieruimte in de luidsprekerkast die voor een rijke lagetonenweergave zorgt. • Plaats de middenluidspreker buiten bereik van kinderen. Wanneer een luidspreker valt, kan hij worden beschadigd en lichamelijk letsel en/of materiële schade veroorzaken. • De luidsprekerboxen bevatten magnetische onderdelen waardoor de kleurenweergave van uw tv-scherm of pc-monitorscherm kan worden vervormd. Plaats de luidsprekerboxen op grotere afstand van de tv of de pc-monitor. B 3 VOORZICHTIG E A A Frontluidspreker linkerzijde (L) B Frontluidspreker rechterzijde (R): Plaats de frontluidsprekers links en rechts van de tv of de monitor en op dezelfde lijn als het beeldscherm. C Middenluidspreker: Plaats de middenluidspreker boven of onder het beeldscherm van de tv of de monitor. D Surround-luidsprekers linkerzijde E Surround-luidsprekers rechterzijde: Plaats deze luidsprekers enigszins naar binnen gericht achter uw luisterpositie. F Subwoofer: De plaats van de subwoofer luistert niet zo nauw omdat lage tonen nauwelijks richtinggevoelig zijn. Het is echter beter om de subwoofer in de buurt van de frontluidsprekers te plaatsen. Plaats de subwoofer min of meer naar het midden van de kamer gericht om geluidsreflecties tegen de wanden te voorkomen. G Speler HB985-DB.BDEUPPK_DUT.indd 20 2010-05-14 2:58:03 Installeren Aansluitingen op uw tv Maak een van de volgende aansluitingen, afhankelijk van de mogelijkheden van uw bestaande apparatuur. • HDMI-aansluiting (pagina 21-22) • Component Video-aansluiting (pagina 22) • Videoverbinding (pagina 23) HDMI-aansluiting Indien u een HDMI TV of monitor heeft, kunt u deze aansluiten op de speler met behulp van een HDMI kabel (Type A, versie 1.3). Sluit het HDMI OUT-aansluitpunt van de speler aan op het HDMI IN-aansluitpunt van een voor HDMI geschikte tv of monitor. HDMI-aansluiting Speler Player 3 Installeren LET OP • Afhankelijk van de mogelijkheden van de tv en andere apparaten kunt u de speler op verschillende manieren aansluiten. Kies één van de aansluitmogelijkheden die in deze handleiding beschreven zijn. • Zie de handleiding van uw tv, stereo-installatie of andere apparaten voor de beste manier van aansluiten. 21 TV TV • Sluit de speler rechtstreeks op de tv aan. Stem de tv af op het juiste video-ingangskanaal. • Sluit de speler niet aan via een videorecorder. Het kopieerbeveiligingssysteem kan het beeld vervormen. Stel de TV bron in op HDMI (zie de handleiding van de TV). HB985-DB.BDEUPPK_DUT.indd 21 2010-05-14 2:58:03 22 Installeren Component Video-aansluiting LET OP • Er kunnen foutmeldingen ontstaan als u de resolutie wijzigt terwijl de aansluiting reeds gemaakt is. Om het probleem op te lossen, schakelt u de speler uit en weer in. • Indien de HDMI aansluiting met HDCP niet geverifieerd is, wordt het TV scherm gewijzigd in een zwart scherm. In dat geval controleert u de HDMI-aansluiting, of koppelt u de HDMI-kabel los. 3 Installeren • Als ruis (“sneeuw”) of strepen op het beeldscherm verschijnen, controleer dan de lengte van de HDMI-kabel (de lengte is meestal beperkt tot 4,5 m en u moet een high-speed HDMI-kabel (versie 1.3) gebruiken). Verbind de COMPONENT VIDEO OUT stekkerbussen van de speler met Y Pb Pr-kabels met de overeenkomstige stekkerbussen op de tv. U kunt het geluid via de luidspreker van het systeem weergeven. Componentaansluiting Player Speler PR VIDEO L • Als u een HDMI-verbinding gebruikt, kunt u de resolutie van het HDMI-uitgangssignaal aanpassen. (Zie “Resolutie instellen” op pagina 23.) PB AUX R • Als een aangesloten HDMI-apparaat het audiouitgangssignaal van de speler niet accepteert, is het mogelijk dat het geluid van het HDMIapparaat is vervormd of niet wordt uitgevoerd. Y COMPONENT VIDEO INPUT OUTPUT Groen Green Blue Blauw Red Rood TV TV • Selecteer het type video-uitvoer van de HDMIuitgang met gebruikmaking van de optie [HDMI Kleur instelling.] in het [Instellen]-menu (zie pagina 34). • Indien u een HDMI- of DVI-compatibel apparaat aansluit, controleert u het volgende: - Schakel het HDMI/DVI toestel en deze speler uit. Schakel vervolgens het HDMI/DVI toestel in en wacht ongeveer 30 seconden, schakel vervolgens deze speler in. - De video ingang van het aangesloten toestel is correct ingesteld voor deze speler. - Het aangesloten apparaat is compatibel met 720x576p (480p), 1280x720p, 1920x1080i of 1920x1080p video-invoer. LET OP Indien u gebruik maakt van een COMPONENT VIDEO UIT-aansluiting, kunt u de resolutie voor de uitvoer wijzigen. (Zie “Resolutie instellen” op bladzijde 23.) • Niet alle HDCP compatibele HDMI of DVI apparaten werken met deze speler. - Het beeld zal niet correct getoond worden bij een niet-HDCP-apparaat. - Deze speler speelt niet af en het TV scherm wordt gewijzigd een zwart scherm. HB985-DB.BDEUPPK_DUT.indd 22 2010-05-14 2:58:04 Installeren Videoverbinding Resolutie instellen Sluit de VIDEO UIT stekkerbus van de speler aan op de video in ingang van de tv. Gebruik hiervoor een videokabel. U kunt het geluid via de luidspreker van het systeem weergeven. De speler voorziet in verschillende uitvoerresoluties voor HDMI en COMPONENT VIDEO uitgangen. U kunt de resolutie aanpassen in het [Instellen]-menu. 1. Druk op HOME MENU ( Videoverbinding 23 ). 2. Gebruik I/i/U/u om [Instellen] te selecteren en druk op ENTER ( ). Het installatiemenu verschijnt. Speler 3. Selecteer met U/u de optie [SCHERM] en druk vervolgens op i om naar het tweede niveau te gaan. PR VIDEO PB AUX R Y COMPONENT VIDEO INPUT OUTPUT 4. Selecteer met U/u de optie [Resolutie] en druk vervolgens op ENTER ( ) of i om naar het derde niveau te gaan. 3 Installeren L Yellow Geel TV TV 5. Selecteer met U/u de gewenste instelling en druk vervolgens op ENTER ( ) om uw keuze te bevestigen. LET OP • Als de tv de door u op de speler ingestelde resolutie niet accepteert, kunt u de resolutie als volgt op 576p (480p) instellen: 1. Druk op Z om de disklade te openen. 2 Druk minstens vijf seconden op x. • De resolutie van de video-uitvoer is van verschillende factoren afhankelijk. Zie “Resolutie video-uitvoersignaal” op pagina 70. HB985-DB.BDEUPPK_DUT.indd 23 2010-05-14 2:58:04 24 Installeren Antenneaansluiting Sluit voor de ontvangst van radio-uitzendingen de meegeleverde antenne aan. Antenneaansluiting Op een extern apparaat aansluiten AUX-aansluiting U kunt het geluid van een component weergeven met gebruikmaking van de analoge audio-uitgangen van de luidsprekers van het systeem. Sluit de analoge audio-uitgangen van de component aan op de AUX L/R (INGANG) van het hoofdapparaat. Selecteer vervolgens de optie [AUX] op INPUT/TUNER, I/i en druk vervolgens op ENTER ( ). 3 Installeren AUX-aansluiting Speler Player Speler Player VIDEO L PR PB AUX R Y COMPONENT VIDEO INPUT LET OP Nadat u de fm-draadantenne hebt aangesloten kunt u deze het best zoveel mogelijk horizontaal bevestigen.Trek de fm-antenne over de volle lengte uit. HB985-DB.BDEUPPK_DUT.indd 24 Rood Red Wit White To the audio output jacks Naarofde audio-uitgangen your component van (TV, de component VCR, etc.) (tv, videorecorder enz.) 2010-05-14 2:58:05 Installeren PORTABLE IN-aansluiting OPTICAL IN 1/2-aansluiting U kunt ook het geluid van uw draagbare audioapparaten via de luidsprekers van het systeem weergeven. U kunt het geluid van componenten ook via de digitale optische aansluiting van de luidsprekers van het systeem weergeven. Sluit de hoofdtelefoon- of lijnuitgang van de draagbare audiospeler aan op de PORT INaansluiting van het hoofdapparaat. Selecteer vervolgens de optie [PORTABLE] door op INPUT/TUNER, I/i en vervolgens op ENTER ( ) te drukken. Sluit de optische digitale uitgang van de betreffende component aan op de OPTICAL IN 1/2-aansluitpunten van het hoofdapparaat. Selecteer vervolgens de optie [OPTICAL 1/2] door op INPUT/TUNER, I/i en vervolgens op ENTER ( ) te drukken. U kunt ook op OPTICAL drukken om deze aansluiting rechtstreeks te selecteren. PORTABLE IN-aansluiting 25 3 Optische verbinding Installeren MP3-SPELER E.D. twZG SGUUU HB985-DB.BDEUPPK_DUT.indd 25 To the Naar dedigital digitale optical output jack optische uitgang van of your component de component 2010-05-14 2:58:05 26 Installeren Bluetooth® aansluiting Informatie over Bluetooth Bluetooth® is een draadloze communicatietechnologie voor korteafstandsverbindingen. 3 Installeren Het bereik gaat tot 10 m. (het geluid kan worden onderbroken wanneer de verbinding wordt gestoord door andere elektronische velden of wanneer u een Bluetooth apparaat in een andere kamer gebruikt.) Voor het aansluiten van afzonderlijke apparaten door middel van draadloze Bluetooth technologie zijn geen kosten verschuldigd. Een mobiele telefoon met draadloze Bluetooth technologie kan via de Cascade worden gebruikt als de verbinding via draadloze Bluetooth technologie wordt opgebouwd. Beschikbare apparaten: Mobiele telefoons, mp3-spelers, laptops, pda’s (deze apparaten ondersteunen stereo headsets.) Bluetooth profielen Om Bluetooth draadloze technologie te gebruiken moeten apparaten bepaalde profielen kunnen interpreteren. Deze speler is compatibel met het volgende profiel. 1. Selecteer de Bluetooth functie met INPUT/ TUNER of BT AUDIO. In het afl eesvenster verschijnt “BT AUDIO” en vervolgens “BT READY”. 2. Gebruik het Bluetooth apparaat om de koppeling uit te voeren. Wanneer u met het Bluetooth apparaat naar deze speler zoekt, kan – afhankelijk van het Bluetooth apparaat - een lijst van gevonden apparaten in het afleesvenster van het Bluetooth apparaat verschijnen. Uw speler wordt als “PIONEER AUDIO” aangeduid. 3. Voer uw pincode in. Pincode : 0000 4. Wanneer deze speler met uw Bluetooth apparaat is gekoppeld, licht het Bluetooth statuslampje van de speler op en verschijnt in het afleesvenster de tekst “BT SINK”. LET OP Sommige apparaten gebruiken een afwijkende manier van koppelen, afhankelijk van het type Bluetooth apparaat. 5. Naar muziek luisteren. Zie de handleiding van uw Bluetooth apparaat voor het afspelen van op uw Bluetooth apparaat opgeslagen muziek. A2DP (Advanced Audio Distribution Profile) LET OP Naar muziek van een Bluetooth apparaat luisteren Uw apparaat en een Bluetooth apparaat koppelen • Als u de functie van de speler wijzigt, wordt de Bluetooth functie onderbroken en moet u opnieuw een koppeling opbouwen. • AVRCP is in deze modus niet beschikbaar. Zorg ervoor dat voordat u de koppelingsprocedure begint de Bluetooth functie op uw Bluetooth apparaat is ingeschakeld. Zie de handleiding van uw Bluetooth apparaat. Nadat u de koppeling hebt opgebouwd, hoeft u deze niet opnieuw uit te voeren. HB985-DB.BDEUPPK_DUT.indd 26 2010-05-14 2:58:06 Installeren Informatie van een aangesloten Bluetooth apparaat controleren Deze functie wordt na de koppeling gebruikt. U kunt de Bluetooth informatie controleren. Druk een paar keer op DISPLAY en houd deze knop even ingedrukt. De Bluetooth informatie wordt als volgt gewijzigd. Local Bluetooth Device Address t Device Name t None t ... 27 LET OP • Deze speler ondersteunt geen mono headsetprofiel (handsfree profiel). • Het geluid kan worden onderbroken als de verbinding door andere elektronische apparaten wordt gestoord. • U kunt met deze speler geen Bluetooth apparaten bedienen. • Het koppelen is beperkt tot één Bluetooth apparaat en het koppelen van meerdere Bluetooth apparaten wordt niet ondersteund. • Afhankelijk van het type apparaat is het mogelijk dat u de Bluetooth functie niet kunt gebruiken. • Als de verbinding met het Bluetooth apparaat wordt onderbroken, verschijnt in het afleesvenster de tekst “BT READY”. 3 Installeren • Hoewel de afstand tussen uw Bluetooth apparaat en deze speler maximaal 10 meter is, kan de verbinding door obstakels tussen de speler en het Bluetooth apparaat worden gestoord. • De verbinding kan ook worden gestoord doordat andere apparaten in de omgeving zoals medische apparatuur, een magnetron oven of een draadloos LAN netwerk – dezelfde frequentie als het Bluetooth apparaat gebruiken. • De verbinding kan ook worden onderbroken doordat iemand tussen de speler en het Bluetooth apparaat gaat staan. • De geluidskwaliteit wordt minder naarmate de afstand tussen de speler en het Bluetooth apparaat groter is en de verbinding kan ten slotte wegvallen doordat de afstand tussen de speler en het Bluetooth apparaat te groot wordt. • De verbinding met het Bluetooth apparaat valt weg als u de speler uitschakelt of als de afstand tussen de speler en het Bluetooth apparaat groter is dan 10 meter. HB985-DB.BDEUPPK_DUT.indd 27 2010-05-14 2:58:06 28 Installeren Aansluiten op uw thuisnetwerk U kunt deze speler via de LAN-poort achterop de speler op een lokaal netwerk (LAN) aansluiten. 3 Installeren Zie voor nadere aanwijzingen de documentatie van uw netwerkapparaat. Sluit de LAN-poort van de speler met een in de handel verkrijgbare LAN- of Ethernetkabel (CAT5 of beter met RJ45-connector) aan op de daarmee overeenkomende poort van uw modem of router. In de onderstaande voorbeeldconfiguratie voor bedrade aansluitingen heeft de speler toegang tot bestanden op alle aangesloten pc’s. Netwerkverbinding Router Router Broadband Breedbanddienst Service WAN LAN 1 LAN 2 PC PC LAN 3 Speler Player LET OP • Houd een LAN-kabel bij het aansluiten en ontkoppelen altijd bij de stekker vast. Trek bij het ontkoppelen niet aan de LAN-kabel maar ontkoppel de kabel terwijl u het blokkeernokje indrukt. • Sluit geen modulaire telefoonkabel op een LANpoort aan. • Omdat er verschillende aansluitingsconfiguraties mogelijk zijn, moet u de specificaties van uw telefoonverbinding of internetleverancier opvolgen. • Als u toegang wilt krijgen tot bestanden op pc’s of DLNA-servers moet de speler daarmee verbinding kunnen maken via een router binnen hetzelfde LAN (Local Area Network). HB985-DB.BDEUPPK_DUT.indd 28 2010-05-14 2:58:06 Installeren Een netwerk installeren Voordat u het bedrade netwerk installeert, moet u uw thuisnetwerk op een breedbandinternetverbinding aansluiten. Als er een DHCP-server via een kabelverbinding op het LAN-netwerk is aangesloten, krijgt deze speler automatisch een IP-adres toegewezen. Bij sommige thuisnetwerken is het nodig de netwerkinstelling van de speler aan te passen nadat de fysieke verbinding is opgebouwd. Pas de [NETWERK]-instelling als volgt aan. 2. Gebruik U/u/I/i om de IP-modus tussen [Dynamisch] en [Statisch] te selecteren. Meestal kunt u het best [Dynamisch] selecteren om automatisch een IP-adres toe te wijzen. HB985-DB.BDEUPPK_DUT.indd 29 LET OP Als er een DHCP-server in het netwerk aanwezig is en u wilt het IP-adres met de hand instellen, selecteer dan [Statisch] en stel vervolgens de opties [IP Adres], [Subnet Mask], [Gateway] en [DNS Server] met behulp van U/u/I/i en de cijfertoetsen in.Als u bij het invoeren van een getal een fout maakt, druk dan op CLEAR om het gemarkeerde gedeelte te wissen. 3. Selecteer [OK] en druk op ENTER ( ) om de netwerkinstellingen toe te passen. 4. Vervolgens vraagt de speler u de netwerkverbinding te testen. Selecteer [OK] en druk op ENTER ( ) om de netwerkverbinding te voltooien. 3 Installeren 1. Selecteer de optie [Verbindingsinstelling] in het [Instellen]-menu en druk vervolgens op ENTER ( ). 29 5. Als u bij de bovenstaande stap 4 de optie [Test] selecteert en op ENTER ( ) drukt, wordt de verbindingsstatus van het netwerk op het scherm weergegeven. U kunt het netwerk ook testen met behulp van de optie [Verbindingsstatus] in het [Instellen]-menu. 2010-05-14 2:58:06 30 Installeren Belangrijke informatie over netwerkverbindingen: • • 3 Installeren • • • • Problemen bij het opbouwen van een netwerkverbinding kunt u vaak oplossen door de router of de modem te resetten. Nadat u de speler op het thuisnetwerk hebt aangesloten, schakelt u de stroom even uit of maakt u de stroomkabel van de router van het thuisnetwerk of de kabelmodem los. Vervolgens schakelt u de stroom weer in en/of sluit u de stroomkabel weer aan. Uw internetleverancier (ISP) kan contractueel bepalen hoeveel voor internet geschikte apparaten u op één internetaansluiting mag aansluiten. Neem voor meer informatie contact op met uw internetleverancier. LG Electronics is niet verantwoordelijk voor storingen in de speler en/of de internetverbinding ten gevolge van communicatiefouten/storingen die verband houden met uw breedbandinternetaansluiting of andere aangesloten apparatuur. De functies van BD-ROM-disks die via een internetverbinding beschikbaar zijn, worden niet door ons ontwikkeld of geleverd en wij zijn dan ook niet verantwoordelijk voor de functionaliteit of leverbaarheid ervan. Bepaalde aan disks gerelateerde inhoud die via een internetaansluiting beschikbaar kan komen, is mogelijk niet voor met deze speler geschikt. Als u vragen hebt over dergelijk materiaal, neem dan contact op met de producent van de disk. Bepaald internetmateriaal kan een internetverbinding met een grotere bandbreedte vereisen. Zelfs als de speler op de juiste wijze is aangesloten en geconfigureerd, is het mogelijk dat bepaald internetmateriaal niet op de juiste wijze werkt door internetopstoppingen, de kwaliteit of de bandbreedte van uw internetverbinding of problemen bij de leverancier van het materiaal. HB985-DB.BDEUPPK_DUT.indd 30 • • • • • • • Het is mogelijk dat een aantal functies van de internetverbinding niet beschikbaar is wegens bepaalde beperkingen die door de leverancier van uw breedbandinternetverbinding (ISP) zijn ingesteld. Alle kosten, inclusief de kosten van telefoonverbindingen die door uw internetleverancier aan u in rekening worden gebracht, komen voor uw rekening. Voor een kabelaansluiting op deze speler is een 10 Base-T of 100 Base-TX LAN-poort nodig. Als uw internetleverancier een dergelijke aansluiting niet toestaat, kunt u de speler niet aansluiten. Voor het gebruik van een xDSL-service moet u een router aansluiten. Voor het gebruik van DSL-diensten is een DSL-modem vereist en voor het gebruik van kabelmodemdiensten is een kabelmodem vereist. Afhankelijk van de toegangsmethode van, en de abonnementsovereenkomst met, uw internetleverancier is het mogelijk dat u de internetverbindingsfunctie van deze speler niet kunt gebruiken of dat uw internetleverancier beperkingen heeft gesteld aan het aantal apparaten dat u gelijktijdig kunt aansluiten. (Als uw internetleverancier de met u gesloten abonnementsovereenkomst tot één apparaat heeft beperkt, is het mogelijk dat u deze speler niet op het internet kunt aansluiten als u al een pc op het internet hebt aangesloten.) Mogelijk is het gebruik van een router niet of slechts onder beperkende voorwaarden toegestaan, afhankelijk van het beleid van uw internetleverancier en de door deze bedongen beperkingen. Neem voor meer informatie rechtstreeks contact op met uw internetleverancier. Schakel alle niet gebruikte netwerkapparaten in uw thuisnetwerk (LAN) uit. Sommige apparaten kunnen netwerkverkeer veroorzaken. 2010-05-14 2:58:06 Installeren Usb-apparaat aansluiten De speler kan op een usb-geheugenstick opgeslagen films, muziek en fotobestanden afspelen. 1. Plaats de usb-geheugenstick in de usbpoort en zet hem goed vast. Usb-aansluiting 31 LET OP • Voor het openen van bestanden (film, foto en muziek) ondersteunt deze speler usbflashgeheugens en volgens FAT 16, FAT 32 en NTFS geformatteerde harde disks (HDD). Voor het opnemen van BD-LIVE en audio-cd’s worden alleen volgens FAT 16 en FAT 32 geformatteerde media ondersteund. Gebruik het usbflashgeheugen of een externe HDD die volgens FAT16 of FAT32 zijn geformatteerd wanneer u BD-LIVE of audio-cd’s wilt opnemen. • U kunt een usb-apparaat gebruiken voor plaatselijke opslag van BD-Live disks via het internet. • Ontkoppel nooit een usb-apparaat als de speler ingeschakeld is (afspelen, kopiëren e.d.). • Usb-apparaten die na aansluiting op een computer de installatie van extra programma’s vereisen, worden niet ondersteund. 3 Installeren • Dit apparaat ondersteunt totaal vier partities van een usb-apparaat. • Usb-apparaat: Usb-apparaat dat USB 1,1 en USB 2,0 ondersteunt. 2. Druk op HOME MENU. Selecteer met U/u/I/i, de optie [Film], [Foto] of [Muziek] en druk op ENTER ( ). • Film-, muziek- en fotobestanden kunnen worden afgespeeld. Voor informatie over gebruik van elk bestand kijkt u op de relevante bladzijdes. • We raden het regelmatig maken van back-ups aan om gegevensverlies te voorkomen. 3. Selecteer een bestand met U/u/I/i, en druk op PLAY of ENTER ( ) om het bestand af te spelen. De vrij beschikbare ruimte op de usb-geheugenstick kunt u op het beeldscherm controleren. • Als u een usb-verlengkabel, een usb-hub of een usb-multireader gebruikt, is het mogelijk dat de usb-geheugenstick niet wordt herkend. 4. Selecteer een andere modus. Maak de usbgeheugenstick vervolgens voorzichtig los. • De usb-poort van deze speler kan niet op een pc worden aangesloten. HB985-DB.BDEUPPK_DUT.indd 31 • Sommige usb-apparaten zijn niet geschikt voor dit apparaat. • Digitale camera’s en mobiele telefoons worden niet ondersteund. 2010-05-14 2:58:06 32 Installeren 4. Gebruik U/u om een tweede setup-optie te selecteren en druk op ENTER ( ) om naar het derde niveau te gaan. Instellingen De setup-instellimgen aanpassen U kunt de instellingen van de speler in het [Instellen]-menu aanpassen. 1. Druk op HOME MENU ( ). 5. Selecteer de gewenste instelling met U/u en druk op i of ENTER ( ) om uw keuze te bevestigen. 3 Installeren 2. Gebruik I/i/U/u om [Instellen] te selecteren en druk op ENTER ( ). Het installatiemenu verschijnt. 3. Selecteer de eerste setup-optie met U/u en druk op i om naar het tweede niveau te gaan. HB985-DB.BDEUPPK_DUT.indd 32 2010-05-14 2:58:06 Installeren [SCHERM]-menu Resolutie Beeldverhouding Hiermee stelt u de uitgangsresolutie van het HDMI- en Component-Video-signaal in. Zie pagina 23 en 70 voor meer informatie over de instelling van de resolutie. Selecteer de hoogte-breedteverhouding (aspect ratio) die met uw tv overeenstemt. [4:3 Letter Box] Selecteer deze optie wanneer een standaard 4:3-tv is aangesloten. Shows, theatervoorstellingen e.d. worden met zwarte balken aan de boven- en onderkant van het beeld weergegeven. [16:9 Origineel] Selecteer deze optie wanneer een standaard 4:3-tv is aangesloten. Het tvbeeld wordt beeldvullend weergegeven. Bij deze optie wordt het tv-beeld echter links en rechts aangesneden. [16:9 Volledig] Selecteer wanneer een 16:9 breedbeeldtvaangesloten is. Het 4:3 beeld wordt weergegeven met een oorspronkelijke 4:3 hoogte/breedte-verhouding, met zwarte balken aan de linker en rechter kant. [1080p] Stuurt progressieve video van 1080 lijnen uit. 3 Installeren [4:3 Pan Scan] Selecteer deze optie wanneer een standaard 4:3-tv is aangesloten. Het tvbeeld wordt beeldvullend weergegeven. Bij deze optie wordt het tv-beeld echter links en rechts aangesneden. [Auto] Indien uw HDMI ingang is aangesloten op de TV voor het verstrekken van scherminformatie (EDID), wordt automatisch de resolutie die het best bij de aangesloten TV past, geselecteerd. Indien de COMPONENT VIDEO UIT alleen aangesloten is, wijzigt dit de standaard resolutie naar 1080i als standaard. 33 [1080i] Stuurt geïnterlinieerde video van 1080 lijnen uit. [720p] Stuurt progressieve video van 720 lijnen uit. [576p (480p)] Stuurt progressieve video van 576 (480) lijnen uit. [576i (480i)] Stuurt geïnterlinieerde video van 576 (480) lijnen uit. LET OP De opties [4:3 Letter Box] en [4:3 Pan Scan] zijn niet beschikbaar wanneer u een hogere resolutie dan 720p kiest. HB985-DB.BDEUPPK_DUT.indd 33 2010-05-14 2:58:07 34 Installeren 1080p fullHD beeld Indien de resolutie ingesteld is op 1080p, selecteert u [24 Hz] voor een vloeiende weergave van filmmateriaal (1080p/24 Hz) op een HDMI uitgerust scherm dat compatibel is met 1080p/24 Hz invoer. LET OP • Wanneer u [24 Hz] selecteert, moet u rekening houden met de mogelijkheid van enige beeldstoring wanneer de video overschakelt tussen video- en filmmateriaal. Als dat het geval is, selecteert u [50 Hz]. 3 Installeren • Zelfs indien het [1080p fullHD beeld] is ingesteld op [24 Hz] zal de werkelijke beeldfrequentie van de video uitvoer 50 Hz bedragen volgens het videobronformaat, indien uw TV niet compatibel is met 1080p/24 Hz. HDMI Kleur instelling. Selecteer het type uitvoer van de HDMI UIT stekker. Voor deze instelling kijkt u in de handleidingen van uw weergavetoestel. [YCbCr] Selecteer deze optie bij het aansluiten op een HDMI tv of monitor. [RGB] Selecteer deze optie bij het aansluiten op een DVI (RGB) tv of monitor.. HB985-DB.BDEUPPK_DUT.indd 34 [TAAL]-menu Schermmenu Selecteer een taal voor het menu [Instellen] en de weergave op het scherm. Disk Menu/Audio disk/ Disk ondertiteling Selecteer de taal die u voor het audionummer (geluid op de disk), de ondertiteling en het disk menu wilt gebruiken. [Origineel] Verwijst naar de oorspronkelijke taal die op de disk is opgenomen. [Anders] Druk op ENTER ( ) om een andere taal te selecteren. Gebruik de nummertoetsen en vervolgens ENTER ( ) om de overeenkomende 4-cijferige code in te voeren volgens de taalcodelijst op bladzijde 69. [Uit] (alleen voor diskondertitels) Schakelt de ondertiteling uit. LET OP Afhankelijk van het type disk is het mogelijk dat de door u gekozen taalinstelling niet werkt. 2010-05-14 2:58:07 Installeren [AUDIO]-menu Luidspreker Set-up U bereikt de best mogelijke geluidsweergave met behulp van het scherm voor luidsprekeropstelling om vervolgens het geluidsvolume van de aangesloten luidsprekers en de afstand van de luidsprekers tot de luisterpositie in te stellen. Maak gebruik van de test om het geluidsvolume van de luidsprekers op een gelijk niveau af te stellen. [Luidspreker] Hiermee selecteert u een luidspreker die u wilt afstellen. [Afstand] Hiermee kunt u de ideale afstand tussen de luidsprekers afzonderlijk en de luisterpositie bepalen. [Teste/ Stop testoon] De luidsprekers zenden een testtoon uit. HD AV Sync Soms komt bij digitale tv een vertraging tussen beeld en geluid voor. Als u dit constateert, kunt u dit verschijnsel compenseren door voor het geluid een vertraging in te stellen waardoor het geluid daadwerkelijk “wacht” op het bijbehorende beeld. Dit wordt HD AV-synchronisatie genoemd. Met behulp van U u kunt u de mate van vertraging vergroten en verkleinen die u traploos kunt instellen tussen 0 en 300 m/sec. De vertraging is afhankelijk van het digitale tv-kanaal waarop uw tv is afgestemd. Het is mogelijk dat u een andere HD AVsynchronisatie moet instellen wanneer u een ander kanaal kiest. DRC (Dynamic Range Control) Tijdens het afspelen van een disk die in Dolby Digital of Dolby Digital Plus is gecodeerd, kunt u het dynamische bereik van het audiosignaal comprimeren (d.w.z. het verschil tussen de sterkste en zwakste geluiden verkleinen). Hierdoor kunt u bijvoorbeeld het geluid van een film met een lager geluidsvolume beluisteren zonder dat het geluid minder helder wordt. Om dit effect te bereiken stelt u DRC in op [aan]. 3 Installeren [Volume] Hiermee past u het geluidsvolume van elke luidspreker afzonderlijk aan. 35 [OK] Hiermee bevestigt u de instelling. [Annuleren] Hiermee maakt u de instelling ongedaan. HB985-DB.BDEUPPK_DUT.indd 35 LET OP U kunt de DRC-instelling alleen wijzigen wanneer er geen disk in het apparaat aanwezig is of wanneer het apparaat volledig is gestopt. 2010-05-14 2:58:07 36 Installeren [SLOT]-menu Om toegang te krijgen tot functies in [SLOT]instellingen moet u de beveiligingscode van vier cijfers invoeren die u hebt gemaakt. Als u nog geen wachtwoord hebt ingevoerd, wordt u dit nu gevraagd. Voer een wachtwoord van vier cijfers tweemaal in en druk up ENTER ( ) om een nieuw wachtwoord aan te maken. Wachtwoord U kunt een wachtwoord aanmaken of een bestaand wachtwoord wijzigen. 3 Installeren [Geen] Voer een wachtwoord van vier cijfers tweemaal in en druk up ENTER ( ) om een nieuw wachtwoord aan te maken. [Wijzig] Voer het huidige wachtwoord in en druk op ENTER ( ). Voer een wachtwoord van vier cijfers tweemaal in en druk up ENTER ( ) om een nieuw wachtwoord aan te maken. LET OP Als u een fout maakt voordat u op ENTER ( ) hebt gedrukt, druk dan op CLEAR. Voer vervolgens het juiste wachtwoord in. DVD Beoordeling Blokkeert het afspelen van geclassificeerde dvd’s op grond van hun inhoud. (Niet alle disks zijn geclassificeerd.) [Waardering 1-8] Censuurcijfer één (1) heeft de hoogste beperkingen en censuurcijfer acht (8) de laagste. [Ontgrendelen] Als u dit selecteert, is het ouderlijk toezicht (“parental control”) niet actief en wordt de disk volledig afgespeeld. BD Beoordeling Stelt leeftijdsgrens voor het afspelen van een BD-ROM in. Gebruik de cijferknoppen om een leeftijdsgrens in te voeren voor het bekijken van BD-ROM’s. [255] De hele BD-ROM kan worden afgespeeld. [0-254] Maakt het onmogelijk de BD-ROM waarop de betreffende leeftijdsgrens is vastgelegd af te spelen. LET OP Indien u uw wachtwoord bent vergeten, U kunt het wachtwoord wissen, indien u dit hebt vergeten, door de volgende stappen uit te voeren: 1. Verwijder de disk die eventueel in de speler aanwezig is. 2. Selecteer de optie [Slot] in het menu [Instellen]. 3. Gebruik de cijfertoetsen om “210499” in het [Slot] menu in te voeren. Het wachtwoord wordt gewist. HB985-DB.BDEUPPK_DUT.indd 36 De [BD Beoordeling] is alleen van toepassing op BD-disks met Advanced Rating Control. Regiocode Voer de code in van de regio waarvan de normen zijn gebruikt om aan de DVD Videodisk een waarde toe te kennen die gebaseerd is op de lijst op pagina 68. 2010-05-14 2:58:07 Installeren [NETWERK]-menu [ANDERS]-menu Verbindingsinstelling DivX VOD Als uw thuisnetwerkomgeving klaar is voor het aansluiten van de speler, moet de speler worden ingesteld op netwerkcommunicatie. (Zie “Aansluiten op uw thuisnetwerk” op pagina 28.) INFORMATIE OVER DIVX VIDEO DivX® is een digitaal videoformaat dat door DivX, Inc. is ontwikkeld. De speler die in deze handleiding wordt uitgelegd is een officieel door DivX gecertificeerd apparaat dat geschikt is voor de weergave van DivX video. Ga naar www.divx.com voor meer informatie en softwaretools voor het omzetten van uw beeldbestanden in DivX. Verbindingsstatus BD-LIVE aansluiting U kunt de internettoegang beperken indien de BD-LIVE functies gebruikt worden. [Toegestaan] Internettoegang is toegestaan voor alle BD-LIVE inhoud. [Deels toegestaan] Internettoegang is alleen toegestaan voor BD-LIVE inhoud waarvan de eigenaar bekend is. Internettoegang en AACS Online functies zijn verboden voor alle BD-LIVE inhoud zonder certificaat. [Verboden] Internettoegang is verboden voor alle BDLIVE inhoud. HB985-DB.BDEUPPK_DUT.indd 37 INFORMATIE OVER VIDEO-ON-DEMAND: Voor het afspelen van DivX Video-on-Demand (VOD) materiaal moet dit DivX Certified®apparaat worden geregistreerd. Ga voor het genereren van de registratiecode naar het hoofdstuk over DivX VOD in het installatiemenu van het apparaat. Ga met deze code naar de website vod.divx.com om de registratieprocedure te voltooien en voor meer informatie over DivX VOD. 3 Installeren Als u op deze speler de netwerkstatus wilt controleren, selecteert u de optie [Verbindingsstatus] en drukt u op ENTER ( ) om te controleren of een verbinding met het netwerk en het internet is opgebouwd. 37 [Registreren] Toont de registratiecode van uw speler. [Deregistreren] Deactiveert de speler en toont de deactivatiecode. LET OP Alle met de registratiecode van deze speler van DivX VOD (Video on Demand) gedownloade videobestanden kunnen alleen op deze speler worden afgespeeld. 2010-05-14 2:58:07 38 Installeren Auto Power uitschakelen De screensaver verschijnt wanneer u het systeem ongeveer vijf minuten in de stopstand laat staan. Als u deze optie op [aan] instelt, schakelt de speler zichzelf uit nadat de screensaver 25 minuten op het beeldscherm is weergegeven. Als u deze optie op [uit] instelt, blijft de screensaver actief tot u het apparaat bedient. Initialiseren 3 Installeren Fabrieksinstelling Hierdoor wordt de speler naar zijn oorspronkelijke fabrieksinstellingen teruggezet. BD opslag wissen Verwijdert de BD-inhoud van de aangesloten usb-geheugenstick. LET OP Als u de speler met de optie [Fabrieksinstelling] naar zijn oorspronkelijke fabrieksinstellingen terugzet, moet u de activering van alle on-line diensten en de netwerkinstellingen opnieuw instellen. Software info Toont de huidige softwareversie. HB985-DB.BDEUPPK_DUT.indd 38 2010-05-14 2:58:07 Installeren Geluidseffecten U kunt naar eigen wens een bepaalde geluidsmodus instellen. Druk een paar keer op SOUND tot de gewenste geluidsmodus op n het display aan de voorkant van het apparaat of op het tv-scherm zichtbaar is. De weergegeven onderwerpen voor de equalizer kunnen verschillen, afhankelijk van de gekozen geluidsbronnen en effecten. [Pioneer 2]: Geeft u passende geluidsinstelling met het verbinden van het hoge type speakers (S-BD707T). [Clear Voice]: Met behulp van deze modus wordt het geluid van de menselijke stem bijzonder helder weergegeven. [Game]: Deze stand is speciaal ontwikkeld voor een dynamische geluidsweergave van videogames. [Night]: Als u in de late uren films wilt kijken zonder anderen te storen, is dit de ideale stand. [Mus. ReTouch]: Stand waarmee u de kwaliteit van het geluid kunt verbeteren bij het luisteren naar mp3-muziekbestanden en ander gecomprimeerd geluid. Deze modus is alleen geschikt voor het afspelen van tweekanaals bronmateriaal. [Loudness]: Hierdoor kunt u de weergave van de hoge en lage tonen verbeteren. 3 Installeren [Pioneer 1]: Geeft u passende geluidsinstelling met het verbinden van het kleine type speakers (S-BD303). 39 [Bypass]: Software met meerkanaals surroundsound wordt volgens de oorspronkelijke opname weergegeven. [Bass Blast]: In deze stand worden de lage tonen van de linker en rechter frontluidsprekers en van de subwoofer extra versterkt. [PL ll Movie]: Geluidskleur die speciaal is afgestemd op decodering van het signaal van de Pro Logic III filmmodus. Deze maakt het mogelijk vijf uitvoerkanalen met een volledige bandbreedte te creëren met gebruikmaking van slechts twee kanaalbronnen. Deze stand is ideaal voor het bekijken van video’s van overgedubde of oudere films. Deze stand is alleen geschikt voor het afspelen van tweekanaals bronmateriaal. [PL ll Music]: Geluidskleur die speciaal is afgestemd op decodering van het signaal van de Pro Logic II muziekmodus. Creëert vijf uitvoerkanalen met een volledige bandbreedte met gebruikmaking van slechts twee kanaalbronnen. Deze stand is ideaal voor normale stereobronnen zoals cd’s. Deze modus is alleen geschikt voor het afspelen van tweekanaals bronmateriaal. HB985-DB.BDEUPPK_DUT.indd 39 2010-05-14 2:58:07 40 Bediening 4 Bediening Afspelen in het algemeen 4. Selecteer [Film], [Foto] of [Muziek] met U/ u/I/i, en druk op ENTER ( ). 5. Selecteer met I/i de optie Disk en druk op ENTER ( ). Disks afspelen 1. Druk op Z OPEN/CLOSE en leg een disk in de disklade. 4 Bediening Wanneer u een of twee apparaten aansluit, ontstaat de bovenstaande situatie. 6. Selecteer een bestand met U/u/I/i en druk op B PLAY of ENTER ( ) om het bestand af te spelen. 2. Druk op Z OPEN/CLOSE om de disklade te sluiten. Bij de meeste audio-cd’s, bd-rom- en cdromdisks start het afspelen automatisch. 3. Druk op HOME MENU. LET OP • De in deze handleiding beschreven afspeelfuncties zijn niet voor alle bestanden en media beschikbaar. Afhankelijk van allerlei factoren kunnen bepaalde functies beperkt beschikbaar zijn. • Afhankelijk van de BD-ROM titels is het mogelijk dat u een usb-aansluiting nodig hebt om het bestand af te kunnen spelen. HB985-DB.BDEUPPK_DUT.indd 40 2010-05-14 2:58:07 Bediening Afspelen stoppen Druk tijdens het afspelen op x STOP. Diskmenu gebruiken BD DVD AVCHD Afspelen pauzeren Diskmenu weergeven Druk tijdens het afspelen op X PAUSE/STEP. Druk op B PLAY om het afspelen te hervatten. Nadat u een disk die een menu bevat hebt geladen, verschijnt meestal eerst het diskmenu. ls u het diskmenu tijdens het afspelen wilt weergeven, drukt u op MENU. Beeld-voor-beeld afspelen Druk tijdens het afspelen van een film op X PAUSE/STEP. Druk herhaaldelijk op X PAUSE/STEP om frame voor frame af te spelen. Vooruit of achteruit scannen Met de U/u/I/i knoppen kunt u door de menuonderwerpen navigeren. Pop-upmenu weergeven Sommige BD-ROM-disks bevatten popupmenu’s die tijdens het afspelen verschijnen. Druk tijdens het afspelen op POPUP/ TOP MENU en gebruik de U/u/I/i knoppen om door de menuonderwerpen te navigeren. 4 Bediening Druk op m of M om tijdens afspelen snel naar voren of achteren te spoelen. U kunt de verschillende afspeelsnelheden veranderen door herhaaldelijk op m of M te drukken. 41 Speelsnelheid vertragen U kunt verschillende slowmotion-snelheden kiezen door terwijl het afspelen is gepauzeerd een paar keer op M te drukken. Naar het volgende of vorige hoofdstuk, nummer of bestand overspringen Druk tijdens het afspelen op . of > om naar het volgende hoofdstuk/nummer/ bestand of nummer te gaan of om terug te gaan naar het begin van het lopende hoofdstuk/nummer/bestand. Druk tweemaal kort op . om terug te gaan naar het vorige hoofdstuk/nummer/bestand of nummer. HB985-DB.BDEUPPK_DUT.indd 41 2010-05-14 2:58:08 42 Bediening Afspelen hervatten BD MUSIC DVD AVCHD MOVIE ACD Afhankelijk van de disk slaat het apparaat het punt op waar u op x (STOP) hebt gedrukt. Druk op B (PLAY) om het afspelen (vanaf het opgeslagen punt) te hervatten wanneer “Xx (Afspelen hervatten)” kortstondig op het scherm verschijnt. Als u tweemaal op x (STOP) drukt of de disk uit de disklade verwijdert, verschijnt “x” (Volledige stop) op het scherm. Hierbij wordt het opgeslagen stoppunt door het apparaat gewist. LET OP 4 Bediening • Het hervattingspunt kan worden gewist wanneer u een knop indrukt (bijvoorbeeld: 1 (POWER), Z (OPEN/CLOSE), etc). • De functie voor afspelen hervatten werkt niet bij BD-Video-disks met BD-J. • Als u tijdens het afspelen van een interactieve bdrom-tiitel één keer op x (STOP) drukt, wordt het apparaat volledig uitgeschakeld (Complete Stop). Geavanceerd afspelen Afspelen herhalen BD DVD AVCHD ACD MUSIC Druk tijdens het afspelen een paar keer op REPEAT ( ) om de gewenste herhalingsmodus te selecteren. BD’s / DVD’s A- – Het geselecteerde gedeelte wordt continu herhaald. Hoofdstuk – Het momenteel geselecteerde hoofdstuk wordt continu herhaald. Titel Title – De momenteel geselecteerde titel wordt continu herhaald. Druk een paar keer op REPEAT ( ) om [uit] te selecteren en naar normaal afspelen terug te gaan. Audio-cd’s / muziekbestanden – Het geselecteerde nummer of bestand wordt continu herhaald. – Alle nummers of bestanden worden continu herhaald. – De nummers of bestanden worden in willekeurige volgorde afgespeeld. – Alle nummers of bestanden worden herhaald in willekeurige volgorde afgespeeld. – Het geselecteerde gedeelte wordt continu herhaald. (Alleen audio-cd’s) Druk op CLEAR om naar de normale afspeelsnelheid terug te gaan. LET OP • Als u tijdens [Repeat Chapter/Track] (Hoofdstuk/ nummer herhalen) eenmaal op > drukt, wordt de functie “Afspelen herhalen” geannuleerd. • Bij bepaalde disks en titels werkt deze functie niet. HB985-DB.BDEUPPK_DUT.indd 42 2010-05-14 2:58:08 Bediening Een bepaald gedeelte herhalen BD DVD AVCHD ACD Deze speler kan een door u geselecteerd gedeelte van een bestand herhalen. 1. Druk tijdens het afspelen op REPEAT ( ) om [A-] te selecteren aan het begin van het gedeelte dat u wilt herhalen. Druk vervolgens op ENTER ( ). 2. Druk aan het einde van het gedeelte op ENTER ( ). Het gedeelte dat u hebt geselecteerd wordt nu continu herhaald. 43 Gemarkeerde scènes terugzoeken 1. Druk op SEARCH en het Markering Zoeken menu wordt geopend. 2. Druk op een nummertoets om een markeringnummer dat u wilt oproepen, te selecteren. Het afspelen start vanaf de gemarkeerde scène. Markeringen wissen 1. Druk op SEARCH en het Markering Zoeken menu wordt geopend. 3. Om naar normaal afspelen terug te gaan drukt u een paar keer op REPEAT ( ) om [uit] te selecteren of drukt u op CLEAR. 2. Druk op u om een markeringsnummer te markeren. Selecteer met I/i de gemarkeerde scène die u wilt wissen. LET OP Markeringen zoeken BD DVD AVCHD MOVIE U kunt beginnen met afspelen vanaf een totaal van negen punten die u in het geheugen. Een markering invoeren 1. Druk tijdens het afspelen op het gewenste punt op MARKER. Het markeerpictogram verschijnt even op het tv-scherm. 3. Druk op CLEAR om de gemarkeerde scène van het Marker Zoeken menu te verwijderen. 4 Bediening U kunt geen gedeelte selecteren dat korter is dan 3 seconden. LET OP • Soms werkt deze functie niet, afhankelijk van de disks, titels en mogelijkheden van de server. • Als de betreffende titel zich de Complete Stopmodus (x) bevindt, is gewijzigd of als u de disk uit de speler haalt, worden alle gemarkeerde punten gewist. • Als de totale lengte van de titel minder dan 10 seconden is, is deze functie niet beschikbaar. 2. Door stap 1 te herhalen kunt u totaal negen markeringen toevoegen. HB985-DB.BDEUPPK_DUT.indd 43 2010-05-14 2:58:08 44 Bediening Zoekmenu gebruiken BD DVD AVCHD MOVIE Met behulp van het zoekmenu kunt u het punt waar u het afspelen wilt starten gemakkelijk terugvinden. Een punt opzoeken 1. Tijdens afspelen drukt u op SEARCH om het menu Search weer te geven. Laatste scène-geheugen BD DVD Deze speler legt de laatst afgespeelde scène van de laatst afgespeelde disk in zijn geheugen vast. De laatste scène blijft in het geheugen aanwezig, ook als u de disk uit de speler neemt of de speler uitschakelt. Als u een disk laadt waarvan een scène is het geheugen is opgeslagen, wordt deze scène automatisch opgeroepen. LET OP 2. Druk op I/i om afspelen 15 seconden naar voren of achteren te halen. U kunt een punt selecteren dat u wilt overslaan door de knop I/i in te drukken en vast te houden. 4 Bediening Het afspelen vanaf een gemarkeerde scène starten • De functie Laatste Scène Geheugen voor een vorige disk wordt gewist zodra er een andere disk afgespeeld wordt. • Deze functie werkt, afhankelijk van de disk, misschien niet. • De speler onthoudt geen instellingen van een disk als u de speler uitschakelt voordat het afspelen van de disk is gestart. 1. Druk op SEARCH en het Markering Zoeken menu wordt geopend. 2. Druk op u om een markeringsnummer te markeren. Selecteer met I/i de gemarkeerde scène die u wilt afspelen. 3. Druk op ENTER ( ) om het afspelen vanaf de gemarkeerde scène te starten. LET OP • Soms werkt deze functie niet, afhankelijk van de disks, titels en mogelijkheden van de server. • Afhankelijk van het bestandstype en de mogelijkheden van de DLNA-server is het mogelijk dat deze functie bij bepaalde [Homelink] inhoud niet werkt. HB985-DB.BDEUPPK_DUT.indd 44 2010-05-14 2:58:08 Bediening Beeldscherminformatie (OSD) 45 f Hoek – Geselecteerde camerastandpunten/ totaal aantal standpunten. g Beeldverhouding – geselecteerde hoogte-breedteverhouding van het tvbeeld. U kunt verschillende soorten informatie óver en instellingen van de inhoud weergeven en aanpassen. h Beeldmodus – geselecteerde beeldmodus. 2. Selecteer een optie met U/u. Inhoudsinformatie op het beeldscherm weergeven BD DVD 3. Gebruik I/i om de geselecteerde optiewaarde aan te passen. 4. Druk op RETURN (O) om het OSDbeeldschermmenu te sluiten. AVCHD MOVIE 1. Druk tijdens het afspelen op DISPLAY ( ) om verschillende soorten informatie over het afspelen weer te geven. LET OP • Als u een paar seconden lang geen knop indrukt, verdwijnt het on-screen scherm. • Een titelnummer kan bij sommige disks niet geselecteerd worden. d • Tijdens het afspelen van een interactieve BDtitel wordt bepaalde installatie-informatie weergegeven doch deze kan niet worden gewijzigd. e f g h • Afhankelijk van de disks en de titels kunnen de beschikbare onderwerpen variëren. 4 Bediening a b c a Titel – nummer van huidige titel / totaal aantal bestanden. b Hoofdstuk – Huidige hoofdstuknummer/totaal aantal hoofdstukken. c Tijd – verstreken speeltijd / totale afspeeltijd. d Audio – Geselecteerde audiotaal of -kanaal. e Ondertiteling – Geselecteerde ondertiteling. HB985-DB.BDEUPPK_DUT.indd 45 2010-05-14 2:58:08 46 Bediening Geprogrammeerde perioden afspelen BD DVD AVCHD MOVIE 1. Druk tijdens afspelen op DISPLAY ( ). Het tijdzoekvak toont de verstreken afspeeltijd. 2. Selecteer de optie [Tijd] en voer dan de vereiste starttijd in uren, minuten en seconden in van links naar rechts. Om bijvoorbeeld een scène op 2 uur, 10 minuten en 20 seconden te vinden, voert u “21020” in. Druk op I/i om afspelen 60 seconden naar voren of achteren te halen. 3. Druk op ENTER ( ) om het afspelen vanaf het geselecteerde tijdstip te starten. 4 Bediening LET OP LET OP • Bij sommige disks kunt u de verschillende mogelijkheden voor geluidsweergave alleen via het diskmenu kiezen. Druk in dat geval op de knoppen POPUP/ TOP MENU of MENU en kies de gewenste geluidsweergave uit de keuzemogelijkheden in het diskmenu. • Het is mogelijk dat het beeld en geluid korte tijd niet gelijk lopen nadat u het geluid hebt overgeschakeld. De taal voor ondertitels selecteren BD DVD AVCHD MOVIE 1. Druk tijdens het afspelen op DISPLAY ( ) om het OSD (On-Screen Display) beeldscherm weer te geven. 2. Selecteer met U/u de optie [Ondertiteling]. • Deze functie is niet bij alle disks of titels beschikbaar. • Afhankelijk van het bestandstype en de mogelijkheden van de DLNA-server is het mogelijk dat deze functie bij bepaalde [Homelink] inhoud niet werkt. 3. Selecteer met I/i de gewenste ondertiteltaal. 4. Druk op RETURN (O) om het OSDbeeldschermmenu te sluiten. LET OP Een ander audiosignaal beluisteren BD DVD AVCHD MOVIE Sommige disks stellen u in staat om ondertiteling selecties alleen via het diskmenu te wijzigen. Indien dit het geval is drukt u op POPUP/ TOP MENU of MENU knop en kiest u de juiste taal uit de keuzes van het diskmenu. 1. Druk tijdens het afspelen op DISPLAY ( ) om het OSD (On-Screen Display) beeldscherm weer te geven. 2. Selecteer met U/u de optie [Audio]. 3. Selecteer met I/i de gewenste audiotaal en het audionummer of audiokanaal. HB985-DB.BDEUPPK_DUT.indd 46 2010-05-14 2:58:08 Bediening Kijken vanuit een andere hoek BD DVD Beeldmodus wijzigen BD Als de disk beelden bevat die onder verschillende camerahoeken opgenomen zijn, kunt u overschakelen naar een andere camerahoek tijdens afspelen. 1. Druk tijdens het afspelen op DISPLAY ( ) om het OSD (On-Screen Display) beeldscherm weer te geven. 2. Selecteer met U/u de optie [Hoek]. DVD AVCHD MOVIE Tijdens het afspelen kunt u de optie [Beeldmodus] wijzigen. 1. Druk tijdens het afspelen op DISPLAY ( ) om het OSD (On-Screen Display) beeldscherm weer te geven. 2. Selecteer met U/u de optie [Beeldmodus]. 3. Selecteer met I/i de gewenste optie. 3. Selecteer met I/i de gewenste camerahoek. 4. Druk op RETURN (O) om het OSDbeeldschermmenu te sluiten. 4. Druk op RETURN (O) om het OSDbeeldschermmenu te sluiten. [Gebr. Inst.] optie instellen BD DVD AVCHD MOVIE Tijdens het afspelen kunt u de ingestelde hoogte-breedteverhouding van het tv-beeld aanpassen. 1. Druk tijdens het afspelen op DISPLAY ( ) om het OSD (On-Screen Display) beeldscherm weer te geven. 2. Selecteer met U/u de optie [Beeldmodus]. 3. Selecteer met I/i de optie [Gebr. Inst.] en druk op ENTER ( ). 4 Bediening De hoogte-breedteverhouding van het tv-beeld aanpassen 47 1. Druk tijdens het afspelen op DISPLAY ( ) om het OSD (On-Screen Display) beeldscherm weer te geven. 2. Selecteer met U/u de optie [Beeldverhouding]. 3. Selecteer met I/i de gewenste optie. 4. Druk op RETURN (O) om het OSDbeeldschermmenu te sluiten. LET OP Ook als u in het OSD-beeldschermmenu de waarde van de optie [Beeldverhouding] wijzigt, wordt de optie [Beeldverhouding] in het [Instellen]-menu niet gewijzigd. HB985-DB.BDEUPPK_DUT.indd 47 4. Gebruik U/u/I/i om de opties van [Beeldmodus] aan te passen. Selecteer de optie [Standaard] en druk vervolgens op ENTER ( ) om alle videoinstellingen naar de fabrieksinstelling terug te zetten. 5. Selecteer met U/u/I/i de optie [Sluit] en druk op ENTER ( ) om de instelling te voltooien. 2010-05-14 2:58:09 48 Bediening De ongekende mogelijkheden van BD-Live Met deze speler kunt u genieten van functies zoals beeld-in-beeld, secundaire audio en virtuele pakketten, etc. met BD-Video met BONUSVIEW (BD-ROM versie 2 Profiel 1 versie 1.1 / Definitieve standaard profiel). U kunt secundaire video en audio afspelen van disks die geschikt zijn voor de beeld-in-beeld functie. Zie voor de weergavemethode de aanwijzingen op de disk. 4 Bediening Naast de BONUSVIEW functie, heeft BDVideo, dat BD-Live (BD-ROM version 2 Profile 2) ondersteunt, een netwerkextensiefunctie waarmee u door dit apparaat aan te sluiten op het internet gebruik kunt maken van meer functies zoals het downloaden van nieuwe filmtrailers. 1. De aansluitingen en de instellingen van het netwerk controleren (pagina 28-30). 3 . Druk op HOME MENU, en stel de optie [BD-LIVE aansluiting] in het [Instellen]-menu in (pagina 37). Afhankelijk van de disk is de BD-LIVE functie niet altijd beschikbaar indien de [BDLIVE aansluiting] optie ingesteld is [Deels toegestaan]. 4 . Plaats een BD-ROM-disk met BD-Live functionaliteit in de disklade. De mogelijkheden zijn afhankelijk van het type disk. Zie de handleiding die met de disk is meegeleverd. LET OP • Ontkoppel het aangesloten USB-apparaat niet tijdens het downloaden van beeld- en/ of audiomateriaal of wanneer er nog een Bluray-disk in de disklade zit. Als u dit advies niet opvolgt, kan het aangesloten USB-apparaat beschadigd worden en werken de BD-LIVEfuncties niet meer met het beschadigde USBapparaat samen. Als het aangesloten USBapparaat door een dergelijke actie beschadigd lijkt, kunt u het aangesloten USB-apparaat vanaf de PC formatteren en dit met deze speler opnieuw gebruiken. 2. Bevestig een usb-geheugen aan de usbpoort op het frontpaneel. • Sommige BD-LIVE inhoud kan, zoals bepaald door de provider van de inhoud, in sommige gebieden maar beperkt toegankelijk zijn. Een usb-geheugen is nodig voor het downloaden van extra bonuscontent. • Het laden en starten van BD-LIVE inhoud kan enkele minuten duren. Usb-aansluiting HB985-DB.BDEUPPK_DUT.indd 48 2010-05-14 2:58:09 Bediening Film- en VR-disks afspelen U kunt dvd-rw-disks afspelen die in Video Recording (VR)-formaat zijn opgenomen en filmbestanden die op een disk of usb-apparaat zijn opgeslagen. 1. Druk op HOME MENU. 49 LET OP • De vereisten waaraan de bestanden moeten voldoen vindt u op pagina 11. • U kunt verscheidene afspeelfuncties gebruiken. Zie pagina 40-47. • Niet gefinaliseerde DVD-VR disks worden. • Sommige dvd-vr-disks zijn opgenomen met CPRM (Copy Protection for Recordable Media) kopieerbeveiliging. Dit toestel ondersteunt dit soort disks niet. Wat is CPRM? CPRM is een beveiligingsysteem tegen kopiëren (met coderingsysteem) dat alleen het opnemen van “één maal kopiëren” programma’s toestaat. CPRM betekent Content Protection for Recordable Media (Inhoudsbescherming voor opneembare media). 4 Bediening 2. Selecteer met U/u/I/i de optie [Film] en druk op ENTER ( ). 3. Selecteer het apparaat met behulp van I/i en druk op ENTER ( ). Wanneer u een of twee apparaten aansluit, ontstaat de bovenstaande situatie. 4. Selecteer een bestand met U/u/I/i en druk op B PLAY of ENTER ( ) om het bestand af te spelen. HB985-DB.BDEUPPK_DUT.indd 49 2010-05-14 2:58:09 50 Bediening Een bestand met ondertitels selecteren De ondertitel-codepagina wijzigen MOVIE MOVIE Als de naam van een filmbestand en het betreffende ondertitelbestand gelijk zijn, wordt het ondertitelbestand automatisch tegelijk met het filmbestand afgespeeld. Als de ondertiteling van een film niet goed loopt, kunt u de ondertitelcodepagina wijzigen om het ondertitelbestand correct weer te geven. Als de naam van het ondertitelbestand niet gelijk is aan die van het filmbestand, moet u het ondertitelbestand voordat u de film afspeelt selecteren in het [Film]-menu. 1. Druk tijdens het afspelen op DISPLAY ( ) om het OSD (On-Screen Display) beeldscherm weer te geven. 1. Selecteer met U/u/I/i in het [Film]-menu het ondertitelbestand dat u wilt afspelen. 2. Selecteer met U/u de optie [Codepaginamenu]. 3. Selecteer met I/i de gewenste codeoptie. 2. Druk op ENTER ( ). 4 Bediening Druk nogmaals op ENTER ( ) om de selectie van het ondertitelbestand ongedaan te maken. Wanneer u het filmbestand afspeelt wordt ook het ondertitelbestand weergegeven. LET OP • ls u tijdens het afspelen op x (STOP) drukt, wordt de selectie van de ondertitel geannuleerd. 4. Druk op RETURN (O) om het OSDbeeldschermmenu te sluiten. • Het is mogelijk dat deze functie in de [Homelink]-functie niet werkt. HB985-DB.BDEUPPK_DUT.indd 50 2010-05-14 2:58:09 Bediening Foto’s bekijken 51 Een diavoorstelling (slideshow) afspelen Druk op B PLAY om de diapresentatie te starten. U kunt met deze speler ook fotobestanden weergeven. 1. Druk op HOME MENU. Een diapresentatie stoppen Druk op x STOP terwijl de diapresentatie loopt. Een diapresentatie pauzeren Druk op X PAUSE/STEP terwijl de diapresentatie loopt. Druk op B PLAY om de diapresentatie opnieuw te starten. 2. Selecteer met I/i de optie [Foto] en druk op ENTER ( ). 3. Selecteer het apparaat met behulp van I/i en druk op ENTER ( ). Naar de vorige of volgende foto overspringen LET OP 4 Bediening Wanneer u foto’s schermvullend weergeeft, kunt u door op I of i te drukken naar de vorige of volgende foto springen. • De vereisten waaraan de bestanden moeten voldoen vindt u op pagina 11. Wanneer u een of twee apparaten aansluit, ontstaat de bovenstaande situatie. • U kunt verscheidene afspeelfuncties gebruiken. Zie pagina 40-47. 4. Selecteer met U/u/I/i een bestand en druk op ENTER ( ) om de foto weer te geven. HB985-DB.BDEUPPK_DUT.indd 51 2010-05-14 2:58:10 52 Bediening Opties tijdens het weergeven van foto’s Muziek luisteren tijdens een diapresentatie Tijdens het schermvullend weergeven van foto’s hebt u verschillende keuzemogelijkheden. Tijdens het luisteren naar uw muziekbestanden kunt u ook fotobestanden weergeven. 1. Druk op HOME MENU. 1. Druk tijdens het schermvullend weergeven van foto’s op DISPLAY ( ) om het optiemenu op te roepen. 2. Selecteer een optie met U/u. a b c d e f g h 4 2. Select met U/u/I/i, de optie [Foto] of [Homelink] en druk op ENTER ( ). 3. Selecteer met I/i, de optie [Disk] of [USB] en druk op ENTER ( ). Bediening a Huidige foto / totaal aantal foto’s – Gebruik I/i om de vorige of de volgende foto weer te geven. b Diavoor. – Druk op ENTER ( ) om de diapresentatie te starten of te pauzeren. c Kies Muziek – De achtergrondmuziek voor uw diapresentatie selecteren d Muziek – Druk op ENTER ( ) om achtergrondmuziek te starten of te pauzeren. e Roteren – Druk op ENTER ( ) om de foto rechtsom te draaien. f Zoomen – Druk op ENTER ( ) om het [Zoomen]-menu op te roepen. g Effect – Selecteer met I/i een overgangseffect tussen de foto’s in een diapresentatie. Om gebruik te kunnen maken van het [Homelink]-menu moet u een server selecteren of een map delen. 4. Selecteer met U/u/I/i, een bestand en druk op ENTER ( ) om een foto weer te geven. 5. Druk op DISPLAY ( ) om het optiemenu weer te geven. 6. Selecteer metU/u de optie [Kies Muziek] en druk op ENTER ( ) om het [Kies Muziek] -menu weer te geven. h Snelheid – Selecteer met I/i de tijdvertraging tussen foto’s in een diapresentatie. 3. Druk op RETURN (O) om het optiemenu te verlaten. HB985-DB.BDEUPPK_DUT.indd 52 2010-05-14 2:58:10 Bediening 7. Selecteer met U/u een apparaat en druk op ENTER ( ). De apparaten die u kunt selecteren zijn verschillend afhankelijk van de locatie van het fotobestand dat u beeldschermvullend weergeeft. Fotolocatie Beschikbaar apparaat Disk Disk, USB USB Disk, USB Mappen op uw pc (CIFS) delen CIFS DLNA-server DLNA-server 8. Selecteer met U/u een bestand of een map om af te spelen. 53 Naar muziek luisteren De speler is geschikt voor het afspelen van audio-cd’s en muziekbestanden. 1. Druk op HOME MENU. 2. Selecteer met U/u/I/i de optie [Muziek] en druk op ENTER ( ). 3. Selecteer het apparaat met behulp van I/i en druk op ENTER ( ). 4 Bediening Selecteer een map en druk op ENTER ( ) om de onderste directory weer te geven. Selecteer en druk o ENTER ( ) om de bovenste directory weer te geven. Wanneer u een of twee apparaten aansluit, ontstaat de bovenstaande situatie. LET OP U kunt geen muziek in de map [Homelink] selecteren. In [Homelink] kunt u alleen bestanden selecteren. 9. Selecteer met i de optie [OK] en druk op ENTER ( ) om de muziekselectie te voltooien. 4. Selecteer met U/u/I/i een muziekbestand of –nummer en druk op ENTER ( ) om de muziek af te spelen. LET OP • De vereisten waaraan de bestanden moeten voldoen vindt u op pagina 11. • U kunt verscheidene afspeelfuncties gebruiken. Zie pagina 40-47. HB985-DB.BDEUPPK_DUT.indd 53 2010-05-14 2:58:10 54 Bediening Audio-cd’s opnemen U kunt een bepaald nummer of alle nummers van een audio-cd naar een usb-opslagapparaat (geheugenstick) overzetten. 6. Selecteer met U/u/I/i de optie [Start] en druk op ENTER ( ). 7. Selecteer met U/u/I/i de bestemmingsmap die moet worden gekopieerd. 1. Bevestig een usb-geheugenstick in de usbpoort op het frontpaneel. 2. Druk op Z (OPEN/CLOSE) en leg een audiocd in de disklade. Druk op Z (OPEN/CLOSE) om de disklade te sluiten. Het afspelen start automatisch. 3. Druk op DISPLAY ( ) om het optiemenu weer te geven. Of 4 Druk op de afstandsbediening op de USB REC-knop z. U kunt alle muzieknummers op de audio-cd opnemen. Bediening 4. Selecteer met U/u de optie [Cd opnem] en druk op ENTER ( ) om het [Cd opnem]menu weer te geven. Herhaal deze stap om zoveel mogelijk nummers te selecteren. 5. Selecteer met U/u een nummer dat u wilt kopiëren en druk op ENTER ( ). Herhaal deze stap om zoveel mogelijk nummers te selecteren. Als u een nieuwe map wilt maken, gebruik dan U/u/I/i om [Nieuwe map] te selecteren en druk op ENTER ( ). Voer met het virtuele toetsenbord een mapnaam in en druk op ENTER ( ) terwijl [OK] is geselecteerd. 8. Selecteer met U/u/I/i de optie [OK] en druk op ENTER ( ) om met het opnemen van audio-cd’s te beginnen. Als u tijdens het opnemen van een audiocd wilt stoppen, drukt u op ENTER ( ) nadat u eerst [Annuleren] hebt gemarkeerd. 9. Er verschijnt een bericht wanneer het opnemen van de audio-cd is voltooid. Druk op ENTER ( ) om het muziekbestand te controleren dat u in de bestemmingsmap hebt gemaakt. Selecteer alle nummers op een audio-cd. Selecteer in het pop-upmenu een coderingsoptie (128, 192 of 320 kbps of Lossless) Annuleert de opname en gaat terug naar het vorige scherm. HB985-DB.BDEUPPK_DUT.indd 54 2010-05-14 2:58:11 Bediening 55 LET OP • De onderstaande tabel bevat een overzicht van de gemiddelde opnametijden met bijvoorbeeld een snelheid van 192 Kbps vanaf een nummer met een afspeeltijd van 4 minuten naar een muziekbestand. Stopmodus Tijdens afspelen 1,4 min. 2 min. • Alle tijden in de bovenstaande tabel zijn gemiddelden. • De werkelijke riptijd voor een usb-geheugenstick is afhankelijk van de mogelijkheden van de usbgeheugenstick. • Zorg ervoor dat u minimaal 50 MB vrije geheugenruimte nodig hebt wanneer u op een usb-geheugenstick opneemt. • Voor de feitelijke opname moet de muziek minimaal 20 seconden lang zijn. 4 Bediening • Schakel de speler niet uit en trek de usbgeheugenstick niet uit de speler tijdens het opnemen van een audio-cd. Het zonder toestemming van de eigenaars van het auteursrecht maken van kopieën van auteursrechtelijk beschermd materiaal, waaronder begrepen computerprogramma’s, bestanden, tv- en radio-uitzendingen en geluidsopnamen, kan worden aangemerkt als een inbreuk op het auteursrecht en strafrechtelijk worden vervolgd. Het is verboden deze apparatuur voor de bovengenoemde doeleinden te gebruiken. Neem uw verantwoordelijkheid Respecteer auteursrechten HB985-DB.BDEUPPK_DUT.indd 55 2010-05-14 2:58:11 56 Bediening iPod afspelen 1. Sluit de iPod stevig aan. Een iPod aansluiten U kunt een iPod op dit systeem afspelen. Zie voor meer informatie de handleiding van de iPod. Sluit de houder aan en plaats uw iPod erin. Voorbereiding • 4 Bediening • Houd rekening met het volgende als u op een iPod opgeslagen video’s en foto’s op het beeldscherm van een tv wilt weergeven. - Gebruik een videoaansluiting via het VIDEO OUT-aansluitpunt aan de achterzijde van dit apparaat. Selecteer de geschikte video-ingangsmodus op de tv. - Zorg er afhankelijk van de iPod voor dat u Video’s > Video-instellingen is geselecteerd en stel vervolgens de tv-uitgang in op “Ask” of “On” van uw iPod. Zie de iPod handleiding voor meer informatie over video-instellingen. - De weergave van foto’s is alleen beschikbaar als u dit apparaat overschakelt naar de “IN”-modus van de iPod en u kunt foto’s alleen als diapresentatie weergeven. Om foto’s op een tv weer te geven, moet u een diapresentatie op uw iPod starten. Zie de handleiding van de iPod voor meer informatie over diapresentaties. Schakel dit apparaat uit en zet het geluid zo zacht mogelijk voordat u een iPod op dit apparaat aansluit. HB985-DB.BDEUPPK_DUT.indd 56 2. Selecteer een bestand met U/u/I/i en druk op ENTER om het bestand af te spelen. iPod op het scherm weergeven 1. Sluit de iPod stevig aan. 2. Druk op HOME MENU ( ). 3. Select met I/i de optie [Muziek] of [Film] en druk op ENTER ( ). Nadat u het andere apparaat hebt aangesloten, selecteert u de iPod in het menu. 4. Selecteer met U/u/I/i, het opgenomen materiaal en druk op ENTER ( ). 2010-05-14 2:58:11 Bediening Naar een iPod luisteren in de iPod IN-modus U kunt uw iPod bedienen met behulp van de meegeleverde afstandsbediening en de bedieningsknoppen op uw iPod. 1. Sluit de iPod stevig aan. Als u dit apparaat inschakelt, wordt uw iPod automatisch ingeschakeld en start het opladen. 2. Druk op INPUT/TUNER om de iPod INmodus te selecteren. Een optie in het menu selecteren. B /ENTER Start het afspelen van de muziek of video. X Hiermee kunt u het afspelen pauzeren. Druk nog een keer op B (PLAY) om het afspelen te hervatten. m/M Een muzieknummer of video snel vooruit “spoelen”. ./> Het afspelen vooruit of achteruit overslaan. REPEAT Een geselecteerde herhaalmodus selecteren: Nummer ( ), Alles ( ), Uit (Geen weergave). LET OP Dit systeem is compatibel met de audio en video van de iPod (4e generatie), iPod nano, iPod classic, iPod mini, iPod touch en iPhone. (iPod shuffle wordt niet ondersteund). HB985-DB.BDEUPPK_DUT.indd 57 LET OP • Het foutbericht “CHECK IPOD” (iPod controleren) of “Connected iPod model is not supported” (Aangesloten model iPod wordt niet ondersteund) verschijnt wanneer: - Uw iPod niet geschikt is voor de functie die u wilt bedienen. • Het foutbericht “CHECK IPOD” (iPod controleren) of “Please update iPod’s software” (Software van iPod bijwerken) verschijnt als: - Uw iPod met een verouderde softwareversie werkt. t Update uw iPod naar de nieuwste versie. • Als dit apparaat een foutbericht toont, volg het bericht dan op. Het foutbericht “CHECK IPOD” (iPod controleren) of “Please check your iPod” (Controleer uw iPod) verschijnt als: - De verbinding tussen dit apparaat en uw iPod is verbroken. t Ontkoppel uw iPod van dit apparaat en plaats hem vervolgens in het dock terug. - Uw iPod is niet goed aangesloten. - Dit apparaat ziet uw iPod als onbekend apparaat. - De accu van uw iPod is vrijwel uitgeput. t De accu moet opnieuw worden geladen. t Als de accu van uw iPod bijna leeg is, kan het wat meer tijd kosten om uw iPod weer te laden. • Het best kunt u de meegeleverde dock-adapter in het dock gebruiken om uw iPod goed aan te sluiten. Vraag advies van uw iPod leverancier als u een adapter nodig hebt. • De compatibiliteit met uw iPod is afhankelijk van het type iPod dat u gebruikt. • De bediening van een iPod touch en iPhone verschilt van de bediening van een “normale” iPod. Het is mogelijk dat u een aanvullende bedieningsmogelijkheid nodig hebt om ze met dit apparaat te gebruiken. (bijv. “slide to unlock” ofwel “openschuiven om te ontgrendelen”) • Als u een toepassing gebruikt, bel dan op of stuur en ontvang een SMS’-tekstbericht e.d. over uw iPod touch of iPhone, neem hem uit de iPod dock van dit apparaat en gebruik hem vervolgens opnieuw. • Afhankelijk van de softwareversie van uw iPod is het mogelijk dat u de iPod niet met dit apparaat kunt gebruiken. Wij adviseren de nieuwste softwareversie te installeren. • De videokwaliteit is afhankelijk van het videobronmateriaal op uw iPod • Als u problemen met uw iPod hebt, ga dan naar www.apple.com/support/ipod. 2010-05-14 4 Bediening U/u/I/i 57 2:58:12 58 Bediening Radio 6. Herhaal stap 2 t/m 5 om meer stations op te slaan. Alle opgeslagen stations wissen Zorg ervoor dat de antenne is aangesloten. (Zie pagina 24) Naar de radio luisteren 1. Druk op INPUT/TUNER tot TUNER (FM) op het weergavescherm verschijnt. De radiotuner stemt nu af op het radiostation waarop u het laatst hebt afgestemd. 4 2. Druk ongeveer twee seconden op TUNE (-/+) tot de frequentie-indicatie verandert. Het scannen stopt wanneer het apparaat op een station afstemt. Of Druk een paar keer op TUNE (-/+). Bediening 3. U regelt het geluidsvolume door aan de VOLUME-knop op het frontpaneel te draaien of door op de afstandsbediening op VOL (+/-) te drukken. Voorkeurstations vastleggen U kunt de afstemming op 50 fm-radiostations vooraf programmeren. Zet voordat u met afstemmen begint het volume zo laag mogelijk. Druk twee seconden op CLEAR (Wissen). De tekst “ERASE ALL” (Verwijder alles) gaat knipperen. Vervolgens worden alle opgeslagen stations gewist. Slechte fm-ontvangst verbeteren Druk op de afstandsbediening op de blauwe (MONO/STEREO) knop D. Hierdoor schakelt de tuner over van stereo naar mono waardoor de ontvangst doorgaans beter wordt. Informatie over radiostations De fm-tuner is geschikt voor de ontvangst van Radio Data System (RDS)-informatie. Hierdoor krijgt u informatie te zien over het radiostation dat u beluistert. Door herhaald op RDS te drukken, kunt u de verschillende soorten informatie bekijken. PS (Programme Service Name) Met deze functie kunt u de naam van de afgestemde radiostations ofwel programma’s op het weergavescherm bekijken. 2. Selecteer met TUNE (-/+) de frequentie van een radiostation dat u als voorkeurstation wilt vastleggen. PTY (Programme Type Recognition) Het programmatype (bijv. Jazz of Nieuws) verschijnt op het display. 3. Druk vervolgens op ENTER ( ) en de afgestemde frequentie gaat op het weergavescherm knipperen. RT (Radio Text) Er verschijnt een bericht met speciale informatie over het uitgezonden station. Deze tekst kan over het display lopen. CT (Time controlled by the channel) Dit toont de tijd en de datum die door het station worden uitgezonden. 1. Druk op INPUT/TUNER tot TUNER (FM) op het weergavescherm verschijnt. 4. Druk op PRESET om de gewenste voorkeurfrequenties te selecteren. 5. Druk op ENTER ( ). De door u gekozen frequentie wordt nu als voorkeurstation opgeslagen. HB985-DB.BDEUPPK_DUT.indd 58 2010-05-14 2:58:12 Bediening Inhoud via uw thuisnetwerk afspelen Een DLNA-mediaserver openen 1. De aansluitingen en de instellingen van het netwerk controleren (pagina 28-30). 2. Druk op De speler kan materiaal opzoeken en afspelen dat in uw pc en op uw thuisnetwerk aangesloten DLNA-gecertificeerde mediaservers is opgeslagen. 59 HOME MENU. 3. Selecteer met U/u/I/i, de optie [Homelink] en druk op ENTER ( ). 4. Selecteer met U/u een van de DLNAmediaservers in het overzicht en druk op ENTER ( ). Wat betekent DLNA? Deze speler is een voor DNLA gecertificeerde digitale mediaspeler die film-, foto- en muziekmateriaal afkomstig van een met DNLA compatibele digitale mediaserver (pc en consumentenelektronica) kan weergeven en afspelen. Producten die aan de richtlijnen voor onderlinge samenwerking van de DLNA voldoen, zijn gemakkelijk aan het certificeringslogo van de DLNA te herkennen. Dit apparaat voldoet aan de DLNA Interoperability Guidelines (Richtlijnen voor onderlinge samenwerking) versienummer 1.5. LET OP 4 Bediening De Digital Living Network Alliance (DLNA) is een breedgeoriënteerde organisatie van bedrijven die actief zijn op het gebied van consumentenelektronica, computers en mobiele digitale apparaten. Door middel van de functie Digital Living kunt u eenvoudig digitale media via een thuisnetwerk delen. Druk op de groene knop (B) als u de beschikbare mediaserver opnieuw wilt scannen. Afhankelijk van de mediaserver is het mogelijk dat deze speler toestemming van de server moet krijgen. 5. Selecteer een bestand met U/u/I/i en druk op ENTER ( ) om het bestand af te spelen. Wanneer een pc die DLNA software uitvoert, of die op een ander met DLNA compatibel apparaat is aangesloten, met deze speler wordt verbonden, kan het nodig zijn bepaalde instellingen voor software of andere apparaten aan te passen. Zie voor meer informatie de handleiding van de software of van het betreffende apparaat. HB985-DB.BDEUPPK_DUT.indd 59 2010-05-14 2:58:12 60 Bediening LET OP • De vereisten waaraan de bestanden moeten voldoen vindt u op pagina 11. • U kunt verscheidene afspeelfuncties gebruiken. Zie pagina 40-47. • De bestandsvereisten op pagina 11 zijn niet altijd compatibel. Er kunnen bepaalde beperkingen gelden voor bestandseigenschappen en de mogelijkheden van de mediaserver. • In het [Homelink]-menu kunt u de miniaturen van onspeelbare bestanden weergeven maar u kunt deze bestanden niet op deze speler afspelen. • Als het [Homelink]-menu een onspeelbaar muziekbestand bevat, slaat de speler dit bestand over en speelt daarna het eerstvolgende afspeelbare bestand. 4 Gedeelde mappen vanaf uw pc openen 1. Start de pc die op uw LAN (plaatselijke netwerk) is aangesloten. 2. Op uw pc kunt u mappen met films, foto’s en muziek delen. 3. Controleer op de speler de netwerkverbinding en netwerkinstellingen (pagina 28-30). 4. Druk op HOME MENU. 5. Selecteer met U/u/I/i, de optie [Homelink] en druk op ENTER ( ). 6. Selecteer met U/u in de lijst een map om te delen en druk op ENTER ( ). Bediening • De namen van het ondertitelbestand en het filmbestand moeten dezelfde zijn en deze bestanden moeten zich in dezelfde map bevinden. • De afspeelkwaliteit en de bedieningsmogelijkheden van de [Homelink]functie zijn afhankelijk van de conditie van uw thuisnetwerk. • Soms kunnen bestanden van mobiele media zoals usb- en dvd-stations en dergelijke op uw mediaserver niet worden gedeeld. Druk op de groene knop (B) als u de beschikbare mediaservers opnieuw wilt scannen. LET OP Afhankelijk van de te delen map is het mogelijk dat u met deze speler de gebruikersnaam van de netwerkgebruiker en het wachtwoord voor het openen van de map moet invoeren. 7. Selecteer een bestand met U/u/I/i en druk op ENTER ( ) om het bestand af te spelen. HB985-DB.BDEUPPK_DUT.indd 60 2010-05-14 2:58:12 Bediening 61 PC eisen LET OP • Windows® XP (Service Pack 2 of hoger), Windows Vista® (geen Service Pack nodig) Windows 7® • U kunt verscheidene afspeelfuncties gebruiken. Zie pagina 40-47. • 1.2 GHz Intel® Pentium® III of AMD Sempron™ 2200+ processors • In het [Homelink]-menu kunt u de miniaturen van onspeelbare bestanden weergeven maar u kunt deze bestanden niet op deze speler afspelen. • Netwerkomgeving: 100 MB Ethernet, WLAN (IEEE 802.11b/g/n) • De vereisten waaraan de bestanden moeten voldoen vindt u op pagina 11. • Als het [Homelink]-menu een onspeelbaar muziekbestand bevat, slaat de speler dit bestand over en speelt daarna het eerstvolgende afspeelbare bestand. • De namen van het ondertitelbestand en het filmbestand moeten dezelfde zijn en deze bestanden moeten zich in dezelfde map bevinden. LET OP Als u Windows® XP of Windows Vista® gebruikt, ga dan naar de hieronder vermelde link voor meer informatie over instellingen voor het delen van bestanden. • De afspeelkwaliteit en de bedieningsmogelijkheden van de [Homelink]functie zijn afhankelijk van de conditie van uw thuisnetwerk. 4 Bediening • Het is mogelijk dat u bestanden op verwisselbare media zoals usb-stations, dvd-stations e.d. op uw pc niet probleemloos kunt delen. • Afhankelijk van uw pc-omgeving is het mogelijk dat u problemen met verbindingen tegenkomt. HB985-DB.BDEUPPK_DUT.indd 61 2010-05-14 2:58:12 62 Bediening Uw netwerkgebruikersnaam en wachtwoord invoeren Afhankelijk van uw pc-omgeving kan het nodig zijn dat u de naam van de netwerkgebruiker en een wachtwoord moet invoeren om een gedeelde map te openen. 1. Het toetsenbordmenu verschijnt automatisch als een netwerkgebruikersnaam en een wachtwoord vereist zijn. 2. Gebruik U/u/I/i om een teken te selecteren en druk vervolgens op ENTER ( ) om uw keuze in het toetsenbordmenu te bevestigen. 4 3. Wanneer u klaar bent met het invoeren van uw netwerkgebruikersnaam en wachtwoord selecteert u met U/u/I/i de optie [OK] en drukt u op ENTER ( ) om de map te openen. Om het u gemakkelijk te maken, worden uw netwerkgebruikersnaam en wachtwoord in een geheugen opgeslagen nadat u de map hebt geopend. Als u niet wilt dat de netwerkgebruikersnaam en het wachtwoord worden opgeslagen, drukt u voordat u de map opent op de rode (A) knop om het kruisje uit het selectievakje [Onthoud] te verwijderen. Letters met een accentteken (á, à, é, è, â, ê, ã enzovoort) kunt u in de uitgebreide tekenset (extended character set) vinden en van daaruit invoeren. Bediening Voorbeeld: Selecteer “D” en druk op DISPLAY ( ) om de uitgebreide tekenset te tonen. Selecteer “D” or “Ď” met behulp van I/i en druk op ENTER( ). [Wis] – Alle ingevoerde tekens wissen. [Spatie] – Voert een spatie op de cursorpositie in. [<–] – Verwijder het vorige teken bij de cursorpositie. [ABC / abc / #+-=&] – Verandert de instelling van het toetsenbordmenu in hoofdletter, kleine letter of symbolen. HB985-DB.BDEUPPK_DUT.indd 62 2010-05-14 2:58:12 Onderhoud 63 5 Onderhoud Wat u over disks moet weten Behandeling van het apparaat Disks hanteren Het apparaat vervoeren Bewaar de originele doos en het verpakkingsmateriaal waarin u het apparaat hebt gekocht. Als u het apparaat veilig wilt versturen, verpak het dan op dezelfde manier waarop het in de fabriek is verpakt. Plak nooit papier of plakband op een disk. Disks bewaren Disks reinigen 5 Onderhoud Doe de disk na het afspelen terug in de bijbehorende cassette. Stel disks niet bloot aan direct zonlicht of warmtebronnen (bijv. de verwarming) en laat disks nooit in uw auto in de zon liggen. De buitenkant van het apparaat schoon houden; • Gebruik in de buurt van het apparaat geen vluchtige vloeistoffen door bijvoorbeeld insecticide te verstuiven. • Door het apparaat met kracht af te wrijven kunt u het beschadigen. • Laat geen rubber of kunststof voorwerpen langdurig in contact met het apparaat. Apparaat reinigen Gebruik een zachte droge doek om het apparaat te reinigen. Als de buitenkant van het apparaat erg vuil is, gebruik dan een zachte doek die u met een sopje licht bevochtigt. Gebruik geen krachtige oplosmiddelen zoals alcohol, benzeen of thinner omdat deze het oppervlak van het apparaat kunnen aantasten. Gebruik geen krachtige oplosmiddelen zoals alcohol, benzeen, thinner, in de handel verkrijgbare reinigingsmiddelen of antistatische sprays die voor oudere vinylgrammofoonplaten bedoeld zijn. HB985-DB.BDEUPPK_DUT.indd 63 Apparaat onderhouden Dit apparaat is een high-tech precisieapparaat. Als de optische pick-uplens en de onderdelen die de disks aandrijven vuil of versleten zijn, kan de beeldkwaliteit achteruitgaan. Neem voor meer informatie contact op met uw LG leverancier of het dichtstbijzijnde servicecentrum. 2010-05-14 2:58:13 64 Problemen oplossen 6 Problemen oplossen Algemeen 6 Problemen oplossen De stroom wordt niet ingeschakeld. • Steek de stroomkabel goed in het stopcontact. Het apparaat start niet met afspelen. • Leg een afspeelbare disk in de speler (en controleer of u het juiste type disk met het juiste kleurensysteem en dito regiocode gebruikt.) • Leg de disk met de afspeelkant naar beneden. • Leg de disk goed in de geleider in de disklade.. • Maak de disk schoon. • Annuleer de beoordelingsfunctie of verander het beoordelingsniveau. De hoek kan niet worden veranderd. • Op de dvd-video die u afspeelt zijn geen verschillende camerastandpunten (multi-angles) opgenomen. U kunt de taal van de ondertitels niet veranderen of uitschakelen. • Op de dvd-video die u afspeelt zijn geen ondertitels opgenomen. Kan geen mp3-, wma-, jpeg- of DivX-bestanden afspelen. • De bestanden zijn niet opgenomen in een formaat dat de speler kan afspelen. • De speler ondersteunt de codec van het filmbestand niet. De afstandsbediening werkt niet goed. • De afstandsbediening is niet op de afstandssensor van het apparaat gericht. • U gebruikt de afstandsbediening te ver van het apparaat. • Er is een obstakel aanwezig tussen de afstandsbediening en het apparaat. • De batterijen in de afstandsbediening zijn uitgeput. HB985-DB.BDEUPPK_DUT.indd 64 2010-05-14 2:58:13 Problemen oplossen 65 Beeld Er is geen beeld. Er verschijnt beeldruis • Selecteer het geschikte video-ingangssignaal op de tv waardoor het beeld van het speler op het beeldscherm van de tv verschijnt. • Zorg dat de videoverbinding stevig is aangesloten. • Controleer of de [HDMI Kleur instelling.] in het [Instellen]menu is ingesteld op de component die met uw videoverbinding overeenstemt. • Het is mogelijk dat uw tv de door u op de speler ingestelde resolutie niet ondersteunt. Verander deze in een resolutie die uw tv kan verwerken. • De HDMI-uitgang van de speler is aangesloten op een dviapparaat dat de kopieerbeveiligingsfunctie niet ondersteunt. • U speelt een disk af die opgenomen is met een kleurensysteem dat verschilt van het kleurensysteem van uw tv. • Stel een resolutie in die uw tv accepteert. • Het apparaat is op scannen, slow motion of pauzeren ingesteld. • Het geluidsvolume is te zwak. • Controleer of de luidsprekerkabel goed is aangesloten. (pagina 16) Geluid Er is geen geluid of het geluid is vervormd. 6 Problemen oplossen HB985-DB.BDEUPPK_DUT.indd 65 2010-05-14 2:58:13 66 Problemen oplossen Netwerk BD-LIVE functie werkt niet. • De aangesloten usb-geheugenstick heeft niet genoeg opslagruimte. Sluit een usb-geheugenstick aan met minstens 1 GB vrij beschikbare geheugenruimte. • Zorg dat het toestel correct aangesloten is op het LAN netwerk en toegang heeft tot het internet (zie bladzijde 28). • Uw zendsnelheid is te traag voor het gebruik van BD-Live functies. Wij adviseren u contact op te nemen met uw leverancier van internetdiensten en deze om een hogere breedbandsnelheid te vragen. • De optie [BD-LIVE aansluiting] in het [Instellen]-menu is ingesteld op [Verboden]. Stel de optie in op [Toegestaan]. Ontwerp en specificaties kunnen zonder voorafgaande mededeling worden gewijzigd. Updates Informatie over dit product is beschikbaar op de website van Pioneer. Ga naar deze website voor informatie over het bijwerken of servicen van uw Blu-ray diskspeler. 6 Problemen oplossen HB985-DB.BDEUPPK_DUT.indd 66 2010-05-14 2:58:13 Bijlage 67 7 Bijlage Uw tv bedienen met de meegeleverde afstandsbediening Met de hieronder afgebeelde toetsen kunt u uw PIONEER televisie bedienen TV bedieningsknoppen Bediening 1 (TV Power) De tv in- en uitschakelen. INPUT Schakelen tussen de ingangsbronnen van de tv en andere bronnen. CH +/- Omhoog en omlaag scannen door geprogrammeerde kanalen. VOL +/- Het geluidsvolume van de tv aanpassen. U kunt uw tv met de meegeleverde afstandsbediening bedienen. Als uw tv in de onderstaande lijst voorkomt, kunt u de bijbehorende fabriekscode ingeven. 1. Terwijl u de 1 (TV POWER)-knop ingedrukt houdt, voert u met de cijfertoetsen de fabriekscode van uw tv in (zie onderstaande tabel). Merk Code Pioneer 1(Standaard) Sony 2, 3 Panasonic 4, 5 Samsung 6, 7 LG 8, 9 2. Laat de 1 (TV POWER) knop los om de instelling te voltooien. Afhankelijk van uw tv is het mogelijk dat sommige of alle toetsen niet met uw tv samenwerken, ook niet nadat u de juiste fabriekscode hebt ingevoerd. Wanneer u de batterijen van de afstandsbediening vervangt, wordt de door u ingegeven code naar de standaardinstelling teruggezet. Stel de betreffende code opnieuw in. Bijlage Knop De afstandsbediening voor uw tv geschikt maken 7 LET OP Afhankelijk van het aangesloten toestel, is het mogelijk dat u uw tv met bepaalde knoppen niet kunt bedienen. HB985-DB.BDEUPPK_DUT.indd 67 2010-05-14 2:58:13 68 Bijlage Regiocodelijst Kies een regiocode uit de lijst. Gebied Code Gebied Afghanistan Bijlage 7 AF Fijis Code Gebied Code Gebied Code FJ Monaco MC Singapore SG SK Argentinië AR Finland FI Mongolië MN Slowakije Australië AU Frankrijk FR Marokko MA Slovenië Oostenrijk AT Duitsland DE Nepal NP Zuid-Afrika ZA België BE Groot-Brittanië GB Nederland NL Zuid-Korea KR Bhoetan BT Griekenland GR Nederlandse GL Antillen Spanje ES Bolivia BO Groenland Brazilië BR Hong-Kong Cambodja KH Hongarije Canada CA India Chili CL Indonesië China CN Israël Colombia CO Italië Congo CG Jamaica Costa Rica CR Japan Kroatië HR Kenia Tsjechië CZ Koeweit Denemarken DK Libië Ecuador EC Luxemburg Egypte EG Maleisië El Salvador SV Maldiven Ethiopië ET Mexico HB985-DB.BDEUPPK_DUT.indd 68 HK Nieuw-Zeeland HU Nigeria IN Noorwegen ID Oman IL Pakistan IT Panama JM Paraguay JP Filipijnen KE Polen KW Portugal LY Roemenië LU Russische Federatie MY Saudi Arabië MV Senegal MX SI AN Sri Lanka NZ Zweden LK NG Zwitserland NO Taiwan CH SE TW OM Thailand PK Turkije TH PA Oeganda PY Oekraïne UG TR UA PH Verenigde Staten PL Uruguay PT Oezbekistan RO Vietnam RU Zimbabwe US UY UZ VN ZW SA SN 2010-05-14 2:58:13 Bijlage 69 Taalcodelijst Aan de hand van deze lijst kunt u de gewenste taal voor de volgende startinstellingen invoeren: [Audio disk], [Disk ondertiteling] en [Disk Menu]. Taal Code Taal Code Taal Code Taal Code Afaars 6565 Frans 7082 Litouws 7684 Sindhi 8368 Afrikaans 6570 Fries 7089 Macedonies 7775 Singalees 8373 Albanees 8381 Keltisch 7176 Malagasy 7771 Slovaaks 8375 Amharisch 6577 Georgies 7565 Maleis 7783 Sloveens 8376 Arabisch 6582 Duits 6869 Malayalam 7776 Spaans 6983 Armeens 7289 Grieks 6976 Maori 7773 Soedanees 8385 Assamees 6583 Groenlands 7576 Marathi 7782 Swahili 8387 Aymara Guarani 7178 Moldavisch 7779 Zweeds 8386 Gujarati 7185 Mongools 7778 Tagalog 8476 Bashkir 6665 Hausa 7265 Nauru 7865 Tajik 8471 Basks 6985 Hebreeuws 7387 Nepalees 7869 Tamil 8465 Bengali; Bangladesh 6678 Hindi 7273 Noors 7879 Telugu 8469 Hongaars 7285 Oriya 7982 Thai 8472 Bhutani 6890 Ijslands 7383 Panjabi 8065 Tonga 8479 Bihari 6672 Indonesisch 7378 Pashto, Pushto 8083 Turks 8482 Bretons 6682 Interlingua 7365 Perzisch 7065 Turkmeens 8475 Bulgaars 6671 Iers 7165 Pools 8076 Twi 8487 Burmees 7789 Italiaans 7384 Portugees 8084 Oekraïens 8575 Wit-russisch 6669 Japans 7465 Quechua 8185 Urdu 8582 Chinees 9072 Canada 7578 Reto-romaans 8277 Oezbeeks 8590 Kroatisch 7282 Kashmiri 7583 Roemeens 8279 Vietnamees 8673 Tsjechisch 6783 Kazakh 7575 Russisch 8285 Volapük 8679 Deens 6865 Kirghiz 7589 Samoaans 8377 Welsh 6789 Nederlands 7876 Koreaans 7579 Sanskriet 8365 Wolof 8779 English 6978 Koerdisch 7585 Schots Keltisch 7168 Xhosa 8872 Esperanto 6979 Laothiaans 7679 Servisch 8382 Yiddish 7473 Ests 6984 Latijns 7665 Servo-Kroatisch 8372 Yoruba 8979 Faroëse 7079 Lets 7686 Shona Zulu 9085 Fijis 7074 Lingalaas 7678 Fins 7073 HB985-DB.BDEUPPK_DUT.indd 69 8378 2010-05-14 Bijlage 6588 Azerbeidzjaans 6590 7 2:58:13 70 Bijlage Resolutie video-uitvoersignaal Wanneer de niet tegen kopiëren beschermde media worden afgespeeld Video-uitgang HDMI OUT COMPONENT VIDEO UIT HDMI aangesloten HDMI ontkoppeld Resolutie 576i (480i) 576p (480i) 576i (480i) 576p (480p) 576p (480p) 576p (480p) 720p 720p 720p 1080i 1080i 1080i 1080p / 24 Hz 1080p / 24 Hz 576i (480i) 1080i 1080p / 50 Hz 1080p / 50 Hz 576i (480i) 1080i Bij afspelen van beveiligde media Video-uitgang Resolutie 576i (480i) HDMI OUT 576p (480p) 576p (480p) 720p 720p 576i (480i) 576p (480p) 1080i 1080i 576i (480i) 576p (480p) 1080p / 24 Hz 1080p / 24 Hz 576i (480i) 576p (480p) 1080p / 50 Hz 1080p / 50 Hz 576i (480i) 576p (480p) Bijlage • Bij de 576i (480i) resolutie instelling, wordt de werkelijk uitgevoerde resolutie van HDMI OUT gewijzigd in 576p (480p). • Indien u een resolutie met de hand selecteert en vervolgens de HDMI contrastekker aansluit op uw TV en uw TV accepteert dit niet, dan is de resolutie instelling ingesteld op [Auto]. • HDMI ontkoppeld 576i (480i) 576p (480p) HDMI-uitgang 7 COMPONENT VIDEO UIT HDMI aangesloten Als u een resolutie kiest die uw tv niet accepteert, verschijnt een waarschuwing. Wacht ca. 20 seconden als u na aanpassing van de resolutie geen beeld ziet waarna de resolutie automatisch teruggaat naar de vorige resolutie. HB985-DB.BDEUPPK_DUT.indd 70 576p (480p) • De 1080p framesnelheid van de videouitgang wordt automatisch ingesteld op 24 Hz of 50 Hz afhankelijk van de mogelijkheid en voorkeur van de aangesloten TV en gebaseerd op de video-framesnelheid van de BD-ROM disk. COMPONENT VIDEO-uitgang BD of DVD kan het upscalen van analoge uitgangssignalen voorkomen. VIDEO-uitgang De resolutie van de video-uitgang wordt altijd uitgevoerd op resolutie 576i (480i). 2010-05-14 2:58:13 Bijlage 71 Handelsmerken en licenties “Blu-ray Disc” en zijn handelsmerken. HDMI, het HDMI Logo en High-Definition Multimedia Interface zijn handelsmerken of gedeponeerde handelsmerken van HDMI Licensing, LLC in de Verenigde Staten en in andere landen. “BD-LIVE” logo is een handelsmerk van Blu-Ray organisatie. “BONUSVIEW” is een handelsmerk van Blu-Ray Disc Association. is een handelsmerk van DVD Format/Logo Licentiebedrijf. TM Java en alle op Java gebaseerde handelsmerken en logo’s zijn handelsmerken of gedeponeerde handelsmerken van Sun Microsystems, Inc. in de Verenigde Staten en andere landen. DivX is een gedeponeerd handelsmerk van DivX, Inc. en wordt in licentie gebruikt. Bijlage Gefabriceerd onder licentie van Dolby Laboratories. Dolby en het dubbele-D-symbool zijn handelsmerken van Dolby Laboratories. DLNA en DLNA CERTIFIED zijn handelsmerken en/of sevicemerken van Digital Living Network Alliance. 7 Gefabriceerd onder licentie van een of meer van de volgende Amerikaanse patenten: 5,451,942; 5,956,674; 5,974,380; 5,978,762; 6,226,616; 6,487,535; 7,392,195; 7,272,567; 7,333,929; 7,212,872 en andere verleende en aangevraagde Amerikaanse en wereldwijde patenten. DTS en het DTS-symbool zijn gedeponeerde handelsmerken. DTS-HD, DTS-HD Master Audio l Essential en de DTS logo’s zijn handelsmerken van DTS, Inc. Het product bevat software van derden. © DTS, Inc. Alle rechten voorbehouden. HB985-DB.BDEUPPK_DUT.indd 71 “x.v.Color” of “x.v.Colour” is een handelsmerk van Sony Corporation. 2010-05-14 2:58:13 72 Bijlage Windows Media is een gedeponeerd handelsmerk of een handelsmerk van Microsoft Corporation in de Verenigde Staten en/of in andere landen. “AVCHD” en het “AVCHD” logo zijn handelsmerken van Panasonic Corporation en Sony Corporation. Dit product is gelicenseerd volgens de AVC patent portfolio licentie en VC-1 patent portfolio licentie voor het persoonlijke en niet-commercieel gebruik van een consument voor het (i) coderen van video volgens de AVC Standaard en VC-1 Standaard (“AVC/VC-1 Video) en/of (ii) coderen van AVC/VC-1 video die gecodeerd werd door een consument die betrokken is bij persoonlijke en niet-commercieel activiteiten en/of werd verkregen van een video provider die een licentie heeft om AVC/VC-1 Video te verstrekken. Er wordt geen licentie toegekend voor enig ander gebruik, impliciet of expliciet. Extra informatie kan verkregen worden van MPEG LA, LLC. Zie http://www.mpegla.com. De naam iPod is een handelsmerk van Apple Computer, Inc. dat gedeponeerd is in de Verenigde Staten en andere landen. Dit product bevat technologie die eigendom is van Microsoft Corporation en deze kan niet worden gebruikt of gedistribueerd zonder een licentie van Microsoft Licensing, Inc. ® Bluetooth® draadloze technologie is een systeem dat radiocontact tussen elektronische apparaten binnen een maximum afstand van 10 meter mogelijk maakt. Voor het aansluiten van afzonderlijke apparaten door middel van draadloze Bluetooth technologie zijn geen kosten verschuldigd. Een mobiele telefoon met draadloze Bluetooth technologie kan via de Cascade worden gebruikt als de verbinding via draadloze Bluetooth technologie wordt opgebouwd. Het woordmerk en de logo’s van Bluetooth zijn eigendom van Bluetooth SIG, Inc. en voor het gebruik daarvan is aan Pioneer Corporation licentie verleend. Andere handelsmerken en handelsnamen zijn eigendom van de betreffende eigenaren. iPhone is een handelsmerk van Apple Inc. Bijlage “Made for iPod” betekent dat een elektronisch accessoire speciaal voor aansluiting op een iPod is ontwikkeld en door de ontwerper goedgekeurd volgens de kwaliteitsnormen van Apple. “Works with iPod” betekent dat een elektronisch accessoire speciaal voor aansluiting op een iPod is ontwikkeld en door de ontwerper goedgekeurd volgens de kwaliteitsnormen van Apple. 7 Apple is niet verantwoordelijk voor de werking van dit apparaat of het voldoen ervan aan de veiligheidsnormen en de wettelijke normen. HB985-DB.BDEUPPK_DUT.indd 72 2010-05-14 2:58:14 Bijlage Technische gegevens 73 Tuner • Afstembereik fm-band: 87,5 t/m 108,0 MHz of 87,50 t/m 108,00 MHz Algemeen Versterker • Voeding: AC 220-240 V, 50/ 60 Hz • Opgenomen vermogen: 150 W In standby-modus: minder dan 0,5 W. • Afmetingen (bxhxd): plm. 430 × 64 × 304 mm • Netto gewicht (plm.): 3,6 kg • Bedrijfstemperatuur: 41 °F t/m 95 °F (5 °C t/m 35 °C) • Relatieve vochtigheid omgeving: 5 % t/m 90 % • Usb-busvoeding: DC 5 V gelijkstroom over 500 mA Ingangen / uitgangen • VIDEO OUT: 1,0 V (p-p), 75 Ω, negatieve synchronisatie, 1x RCA-aansluiting • HDMI OUT (video/audio): 19-polig (HDMI-norm, type A, Versie 1.3) • Uitgangsvermogen, (RMS), THD 10 % (4 Ω/3 Ω) Totaal 930 W Voorzijde 150 W x 2 Centre 150 W Achter 150 W x 2 Sub-Woofer 180 W (Passive) Systeem • Laser: Halfgeleiderlaser, Golflengte: 405 nm / 650 nm • Signaalsysteem: Standaard NTSC/PAL kleurentelevisiesysteem • Frequentiegebied: 20 Hz – 20 kHz (bemonstering bij 48, 96 en 192 kHz) • LAN-poort: Ethernet-aansluiting 1x, 10BASE-T/100BASE-TX • Analogue AUDIO IN: 2,0 Vrms (1 kHz, 0 dB), 600 Ω, 1 RCA aansluiting (L, R) Bijlage • COMPONENT VIDEO OUT: (Y) 1,0 V (p-p), 75 Ω, negatieve synchronisatie, 1x RCA-aansluiting, (Pb)/(Pr) 0,7 V (p-p), 75 ohm, 2 RCA-aansluitingen • Uitgangsvermogen, (piekvermogen), (4 Ω/3 Ω) Totaal 1100 W Voorzijde 180 W x 2 Centre 180 W Achter 180 W x 2 Sub-Woofer 200 W (Passive) 7 • DIGITAL IN (OPTICAL 1/2): 3 V (p-p), 2 optische aansluitpunten • PORTABLE IN: 0,5 Vrms (3,5 mm stereoaansluiting) HB985-DB.BDEUPPK_DUT.indd 73 2010-05-14 2:58:14 74 Bijlage Luidsprekers BCS-707 Luidsprekers BCS-303 S-BD707 S-BD303 • Front/surround-luidsprekerbox (links/rechts) Type: tweeweg Gewogen impedantie: 4Ω Afmetingen 260 x 1097 x 260 mm (bxhxd): Netto gewicht: 3,8 kg • Front/surround-luidsprekerbox (links/rechts) Type: eenweg Gewogen impedantie: 4Ω Afmetingen 96 x 96 x 85 mm (bxhxd): Netto gewicht: 0,4 kg • Middenluidspreker Type: Gewogen impedantie: Afmetingen (bxhxd): Netto gewicht: • Middenluidspreker Type: Gewogen impedantie: Afmetingen (bxhxd): Netto gewicht: eenweg 4Ω 300 x 87x 65 mm 0,6 kg S-BD707SW • Subwoofer Type: Gewogen impedantie: Afmetingen (bxhxd): Netto gewicht: eenweg, 1 luidspreker 3Ω 130,5 x 420 x 375 mm • Subwoofer Type: Gewogen impedantie: Afmetingen (bxhxd): Netto gewicht: eenweg 4Ω 300 x 87 x 65 mm 0,6 kg eenweg, 1 luidspreker 3Ω 130,5 x 420 x 375 mm 4,4 kg 4,4 kg Bijlage 7 HB985-DB.BDEUPPK_DUT.indd 74 2010-05-14 2:58:14 Bijlage Kennisgeving over open-source software De volgende in dit product gebruikte uitvoerbare GPL-bestanden en LGPL-programmabibliotheken zijn onderworpen aan licentieovereenkomsten voor GPL2.0/LGPL2.1: UITVOERBARE GPL-BESTANDEN: Linux kernel 2.6, bash, busybox, cramfs, dhcpcd, e2fsprogs, fdisk, mkdosfs, mtd-utils, net-tools, procps, samba-3.0.25b, sysutils, tcpdump, tftpd, tinylogin, unzip, utelnetd LGPL-PROGRAMMABIBLIOTHEKEN: uClibc, DirectFB, blowfish, cairo, ffmpeg, iconv, libusb, mpg123 gSOAP Public License 1.3 BIBLIOTHEEK: gsoap Een exemplaar van de corresponderende broncode is verkrijgbaar door betaling van een vergoeding voor de afgifte. Neem contact op met de dichtstbijzijnde Pioneer klantenondersteuning om een exemplaar van de broncode te verkrijgen. HB985-DB.BDEUPPK_DUT.indd 75 2010-05-14 Bijlage Een exemplaar van de GPL en LGPL-licenties is verkrijgbaar via http://www.gnu.org/licenses/oldlicenses/gpl-2.0.html en http://www.gnu.org/ licenses/old-licenses/lgpl-2.1.html. U kunt ook een exemplaar van de openbare gSOAPlicentie downloaden van http://www.cs.fsu.edu/~engelen/license.html. Deze software is gedeeltelijk gebaseerd op de inbreng van de onafhankelijke JPEG Group copyright © 1991 - 1998, Thomas G. Lane. Dit product bevat: • boost C++: copyright © Beman Dawes 1999-2003 • c-ares: copyright © 1998 by the Massachusetts Institute of Technology • curl: copyright © 1996 - 2008, Daniel Stenberg • expat: copyright © 2006 expat maintainers • freetype: copyright © 2003 The FreeType Project (www.freetype.org). • jpeg: Deze software is gedeeltelijk gebaseerd op de inbreng van de onafhankelijke JPEG Group copyright © 1991 - 1998, Thomas G. Lane. • mng: copyright © 2000-2007 Gerard Juyn, Glenn Randers-Pehrson • ntp: copyright © David L. Mills 1992-2006 • OpenSSL: – cryptografische software geschreven door Eric Young ([email protected]). – software geschreven door Tim Hudson ([email protected]). – Software ontwikkeld door het OpenSSL Project voor gebruik in de OpenSSL Toolkit. (http://www.openssl.org) • png: copyright © 2004 Glenn Randers-Pehrson • portmap: copyright © 1990 The Regents of the University of California. • ptmalloc : copyright © 2001-2006 Wolfram Gloger • UnitTest++: copyright © 2006 Noel Llopis and Charles Nicholson • UPnP SDK : copyright © 2000-2003 Intel Corporation • strace : copyright © 1991, 1992 Paul Kranenburg copyright © 1993 Branko Lankester copyright © 1993 Ulrich Pegelow copyright © 1995, 1996 Michael Elizabeth Chastain copyright © 1993, 1994, 1995, 1996 Rick Sladkey copyright © 1999,2000 Wichert Akkerman • xml2 : copyright © 1998-2003 Daniel Veillard • XML-RPC For C/C++: • copyright © 2001 by First Peer, Inc. Alle rechten voorbehouden. • copyright © 2001 by Eric Kidd. Alle rechten voorbehouden. • zlib: copyright © 1995-2002 Jean-Loup Gailly en Mark Adler. Alle rechten voorbehouden. Hierbij wordt aan elke persoon die een exemplaar van deze software en de bijbehorende documentatiebestanden (de “Software”) verkrijgt zonder kosten toestemming verleend om deze software onbeperkt te verhandelen, inclusief het onbeperkte recht tot het gebruiken, kopiëren, wijzigen, integreren, publiceren, distribueren, in onderlicentie geven en/of verkopen van kopieën van de software en personen aan wie de software is verstrekt toe te staan aldus te handelen, mits aan de volgende voorwaarden wordt voldaan: DE SOFTWARE WORDT ALS ZODANIG VERSTREKT ZONDER ENIGE NADRUKKELIJKE OF IMPLICIETE GARANTIE DAN OOK, INCLUSIEF MAAR NIET BEPERKT TOT DE GARANTIES VAN VERKOOPBAARHEID, GESCHIKTHEID VOOR EEN BEPAALD DOEL EN NIET-INBREUKMAKING. DE SCHRIJVERS OF DE RECHTHEBBENDEN OP DE AUTEURSRECHTEN ZULLEN IN GEEN GEVAL AANSPRAKELIJK ZIJN VOOR ENIGE CLAIM, SCHADE OF ANDERE AANSPRAKELIJKHEID ALS GEVOLG VAN EEN CONTRACTUELE VERPLICHTING, ONRECHTMATIGE DAAD OF ANDERSZINS, VOORTKOMEND UIT OF IN VERBAND MET DE SOFTWARE OF HET GEBRUIK VAN OF ANDERE TRANSACTIES IN DE SOFTWARE. 75 7 2:58:14 76 Bijlage Declaration of Conformity with regard to the R&TTE Directive 1999/5/EC Manufacturer: EU Representative’s: Pioneer Corporation Pioneer Europe NV Haven 1087, Keetberglaan 1, 9120 Melsele, Belgium 1-1, SHIN-OGURA, SAIWAI-KU, KAWASAKI-SHI, KANAGAWA-KEN 212-0031, JAPAN Bijlage 7 http://www.pioneer.eu English: Hereby, Pioneer, declares that this BCS-707 (BCS-303) is in compliance with the essential requirements and other relevant provisions of Directive 1999/5/EC. Dansk: Undertegnede Pioneer erklærer herved, at følgende udstyr BCS-707 (BCS-303) overholder de væsentlige krav og øvrige relevante krav i direktiv 1999/5/EF. Suomi: Pioneer vakuuttaa täten että BCS-707 (BCS303) tyyppinen laite on direktiivin 1999/5/ EY oleellisten vaatimusten ja sitä koskevien direktiivin muiden ehtojen mukainen. Deutsch: Hiermit erklärt Pioneer, dass sich dieses BCS707 (BCS-303) in Übereinstimmung mit den grundlegenden Anforderungen und den anderen relevanten Vorschriften der Richtlinie 1999/5/EG. Nederlands: Hierbij verklaart Pioneer dat het toestel BCS707 (BCS-303) in overeenstemming is met de essentiële eisen en de andere relevante bepalingen van richtlijn 1999/5/EG. Français: Par la présente Pioneer déclare que l’appareil BCS-707 (BCS-303) est conforme aux exigences essentielles et aux autres dispositions pertinentes de la directive 1999/5/CE. Svenska: Härmed intygar Pioneer att denna BCS-707 (BCS-303) står I överensstämmelse med de väsentliga egenskapskrav ch övriga relevanta bestämmelser som framgår av direktiv 1999/5/EG. HB985-DB.BDEUPPK_DUT.indd 76 Ελληνικά: ΜΕ ΤΗΝ ΠΑΡΟΥΣΑ Pioneer ΔΗΛΩΝΕΙ ΟΤΙ BCS-707 (BCS-303) ΣΥΜΜΟΡΦΩΝΕΤΑΙ ΠΡΟΣ ΤΙΣ ΟΥΣΙΩΔΕΙΣ ΑΠΑΙΤΗΣΕΙΣ ΚΑΙ ΤΙΣ ΛΟΙΠΕΣ ΣΧΕΤΙΚΕΣ ΔΙΑΤΑΞΕΙΣ ΤΗΣ ΟΔΗΓΙΑΣ 1999/5/ ΕΚ. Italiano: Con la presente Pioneer dichiara che questo BCS-707 (BCS-303) è conforme ai requisiti essenziali ed alle altre disposizioni pertinenti stabilite dalla direttiva 1999/5/CE. Español: Por medio de la presente Pioneer declara que el BCS-707 (BCS-303) cumple con los requisitos esenciales y cualesquiera otras disposiciones aplicables o exigibles de la Directiva 1999/5/CE. 2010-05-14 2:58:14 Bijlage Português: Slovenčina: Pioneer declara que este BCS-707 (BCS-303) está conforme com os requisitos essenciais e outras disposições da Directiva 1999/5/CE. Pioneer týmto vyhlasuje, že BCS-707 (BCS303) spĺňa základné požiadavky a všetky príslušné ustanovenia Smernice 1999/5/ES. Čeština: Slovenščina: Pioneer tímto prohlašuje, že tento BCS707 (BCS-303) je ve shodě se základními požadavky a dalšími příslušnými ustanoveními směrnice 1999/5/ES. Pioneer izjavlja, da je ta BCS-707 (BCS-303) v skladu z bistvenimi zahtevami in ostalimi relevantnimi določili direktive 1999/5/ES. Eesti: Käesolevaga kinnitab Pioneer seadme BCS707 (BCS-303) vastavust direktiivi 1999/5/ EÜ põhinõuetele ja nimetatud direktiivist tulenevatele teistele asjakohastele sätetele. Magyar: Alulírott, Pioneer nyilatkozom, hogy a BCS707 (BCS-303) megfelel a vonatkozó alapvetõ követelményeknek és az 1999/5/EC irányelv egyéb elõírásainak. Latviešu valoda: Ar šo Pioneer deklarē, ka BCS-707 (BCS303) atbilst Direktīvas 1999/5/EK būtiskajām prasībām un citiem ar to saistītajiem noteikumiem. Šiuo Pioneer deklaruoja, kad šis BCS-707 (BCS303) (BCS-303) atitinka esminius reikalavimus ir kitas 1999/5/EB Direktyvos nuostatas. Malti: Hawnhekk, Pioneer jiddikjara li dan BCS-707 (BCS-303) jikkonforma mal-ħtiġijiet essenzjali u ma provvedimenti oħrajn relevanti li hemm fid-Dirrettiva 1999/5/EC. HB985-DB.BDEUPPK_DUT.indd 77 Română: Prin prezenta, Pioneer declara ca acest BCS-707 (BCS-303) este in conformitate cu cerintele esentiale si alte prevederi ale Directivei 1999/5/EU. български: С настоящето, Pioneer декларира, че този BCS-707 (BCS-303) отговаря на основните изисквания и други съответни постановления на Директива 1999/5/EC. Polski: Niniejszym Pioneer oświadcza, że BCS707 (BCS-303) jest zgodny z zasadniczymi wymogami oraz pozostałymi stosownymi postanowieniami Dyrektywy 1999/5/EC. Norsk: Pioneer erklærer herved at utstyret BCS707 (BCS-303) er i samsvar med de grunnleggende krav og øvrige relevante krav i direktiv 1999/5/EF. Bijlage Lietuvių kalba: 77 Íslenska: Hér með lýsir Pioneer yfir því að BCS-707 (BCS-303) er í samræmi við grunnkröfur og aðrar kröfur, sem gerðar eru í tilskipun 1999/5/EC. 2010-05-14 7 2:58:14 http://www.pioneer.co.uk http://www.pioneer.fr http://www.pioneer.de http://www.pioneer.it http://www.pioneer.nl http://www.pioneer.be http://www.pioneer.es http://www.pioneer.eu Published by Pioneer Corporation. Copyright © 2010 Pioneer Corporation. All rights reserved. Publication de Pioneer Corporation. © 2010 Pioneer Corporation. Tous droits de reproduction et de traduction réservés. PIONEER CORPORATION 1-1, Shin-ogura, Saiwai-ku, Kawasaki-shi, Kanagawa 212-0031, Japan PIONEER ELECTRONICS (USA) INC. P.O. BOX 1540, Long Beach, California 90801-1540, U.S.A. TEL: (800) 421-1404 PIONEER ELECTRONICS OF CANADA, INC. 300 Allstate Parkway, Markham, Ontario L3R 0P2, Canada TEL: 1-877-283-5901, 905-479-4411 PIONEER EUROPE NV Haven 1087, Keetberglaan 1, B-9120 Melsele, Belgium TEL: 03/570.05.11 PIONEER ELECTRONICS ASIACENTRE PTE. LTD. 253 Alexandra Road, #04-01, Singapore 159936 TEL: 65-6472-7555 PIONEER ELECTRONICS AUSTRALIA PTY. LTD. 178-184 Boundary Road, Braeside, Victoria 3195, Australia, TEL: (03) 9586-6300 PIONEER ELECTRONICS DE MEXICO S.A. DE C.V. Blvd.Manuel Avila Camacho 138 10 piso Col.Lomas de Chapultepec, Mexico, D.F. 11000 TEL: 55-9178-4270 Printed in Indonesia / Imprimé en Indonesia HB985-DB.BDEUPPK_DUT.indd 78 2010-05-14 2:58:14-
 1
1
-
 2
2
-
 3
3
-
 4
4
-
 5
5
-
 6
6
-
 7
7
-
 8
8
-
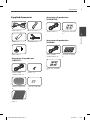 9
9
-
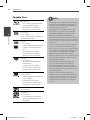 10
10
-
 11
11
-
 12
12
-
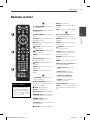 13
13
-
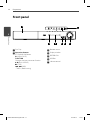 14
14
-
 15
15
-
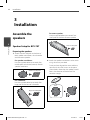 16
16
-
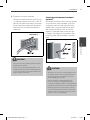 17
17
-
 18
18
-
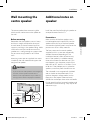 19
19
-
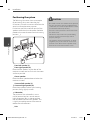 20
20
-
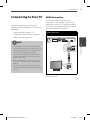 21
21
-
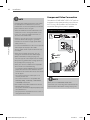 22
22
-
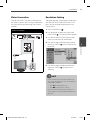 23
23
-
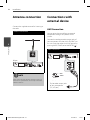 24
24
-
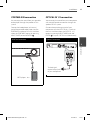 25
25
-
 26
26
-
 27
27
-
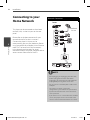 28
28
-
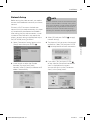 29
29
-
 30
30
-
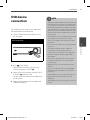 31
31
-
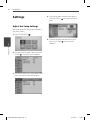 32
32
-
 33
33
-
 34
34
-
 35
35
-
 36
36
-
 37
37
-
 38
38
-
 39
39
-
 40
40
-
 41
41
-
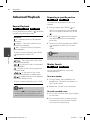 42
42
-
 43
43
-
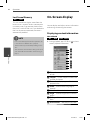 44
44
-
 45
45
-
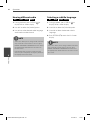 46
46
-
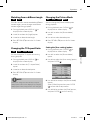 47
47
-
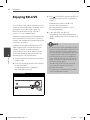 48
48
-
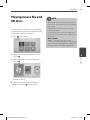 49
49
-
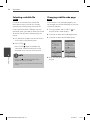 50
50
-
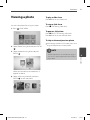 51
51
-
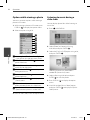 52
52
-
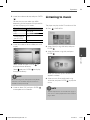 53
53
-
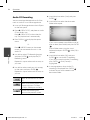 54
54
-
 55
55
-
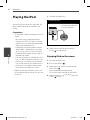 56
56
-
 57
57
-
 58
58
-
 59
59
-
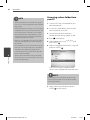 60
60
-
 61
61
-
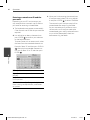 62
62
-
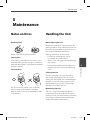 63
63
-
 64
64
-
 65
65
-
 66
66
-
 67
67
-
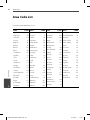 68
68
-
 69
69
-
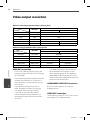 70
70
-
 71
71
-
 72
72
-
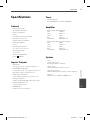 73
73
-
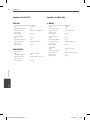 74
74
-
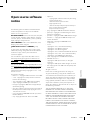 75
75
-
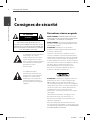 76
76
-
 77
77
-
 78
78
-
 79
79
-
 80
80
-
 81
81
-
 82
82
-
 83
83
-
 84
84
-
 85
85
-
 86
86
-
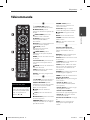 87
87
-
 88
88
-
 89
89
-
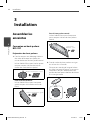 90
90
-
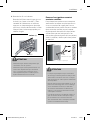 91
91
-
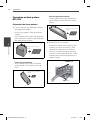 92
92
-
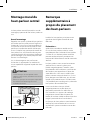 93
93
-
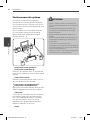 94
94
-
 95
95
-
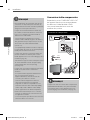 96
96
-
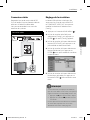 97
97
-
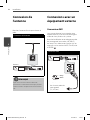 98
98
-
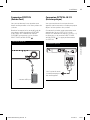 99
99
-
 100
100
-
 101
101
-
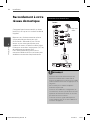 102
102
-
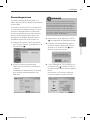 103
103
-
 104
104
-
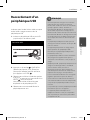 105
105
-
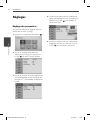 106
106
-
 107
107
-
 108
108
-
 109
109
-
 110
110
-
 111
111
-
 112
112
-
 113
113
-
 114
114
-
 115
115
-
 116
116
-
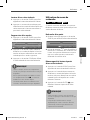 117
117
-
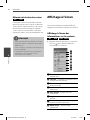 118
118
-
 119
119
-
 120
120
-
 121
121
-
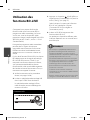 122
122
-
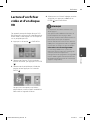 123
123
-
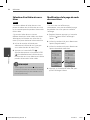 124
124
-
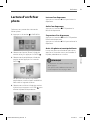 125
125
-
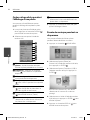 126
126
-
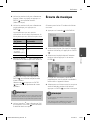 127
127
-
 128
128
-
 129
129
-
 130
130
-
 131
131
-
 132
132
-
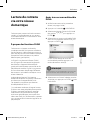 133
133
-
 134
134
-
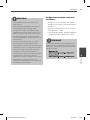 135
135
-
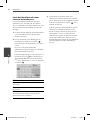 136
136
-
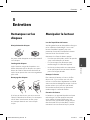 137
137
-
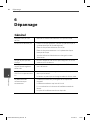 138
138
-
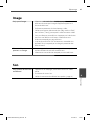 139
139
-
 140
140
-
 141
141
-
 142
142
-
 143
143
-
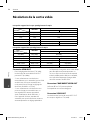 144
144
-
 145
145
-
 146
146
-
 147
147
-
 148
148
-
 149
149
-
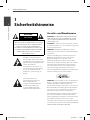 150
150
-
 151
151
-
 152
152
-
 153
153
-
 154
154
-
 155
155
-
 156
156
-
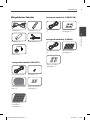 157
157
-
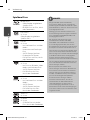 158
158
-
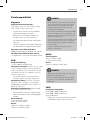 159
159
-
 160
160
-
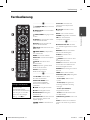 161
161
-
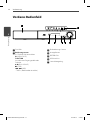 162
162
-
 163
163
-
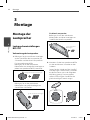 164
164
-
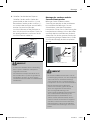 165
165
-
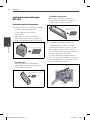 166
166
-
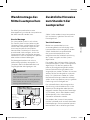 167
167
-
 168
168
-
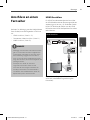 169
169
-
 170
170
-
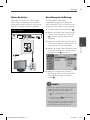 171
171
-
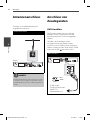 172
172
-
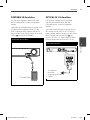 173
173
-
 174
174
-
 175
175
-
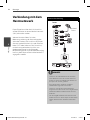 176
176
-
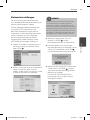 177
177
-
 178
178
-
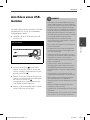 179
179
-
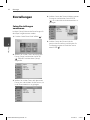 180
180
-
 181
181
-
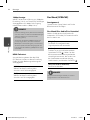 182
182
-
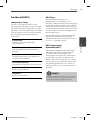 183
183
-
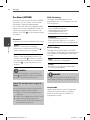 184
184
-
 185
185
-
 186
186
-
 187
187
-
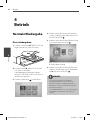 188
188
-
 189
189
-
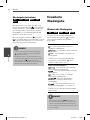 190
190
-
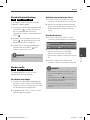 191
191
-
 192
192
-
 193
193
-
 194
194
-
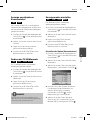 195
195
-
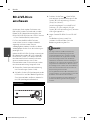 196
196
-
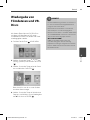 197
197
-
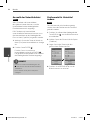 198
198
-
 199
199
-
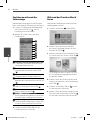 200
200
-
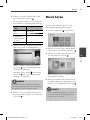 201
201
-
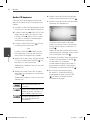 202
202
-
 203
203
-
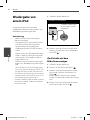 204
204
-
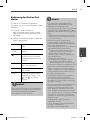 205
205
-
 206
206
-
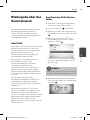 207
207
-
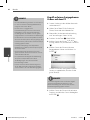 208
208
-
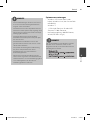 209
209
-
 210
210
-
 211
211
-
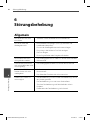 212
212
-
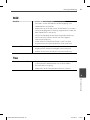 213
213
-
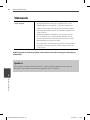 214
214
-
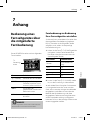 215
215
-
 216
216
-
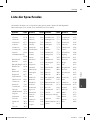 217
217
-
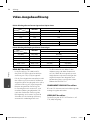 218
218
-
 219
219
-
 220
220
-
 221
221
-
 222
222
-
 223
223
-
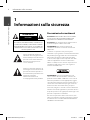 224
224
-
 225
225
-
 226
226
-
 227
227
-
 228
228
-
 229
229
-
 230
230
-
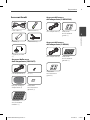 231
231
-
 232
232
-
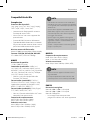 233
233
-
 234
234
-
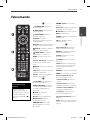 235
235
-
 236
236
-
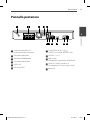 237
237
-
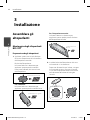 238
238
-
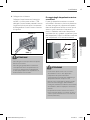 239
239
-
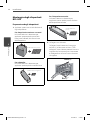 240
240
-
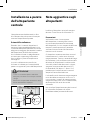 241
241
-
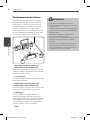 242
242
-
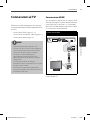 243
243
-
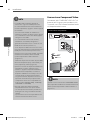 244
244
-
 245
245
-
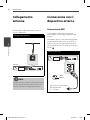 246
246
-
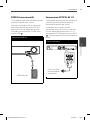 247
247
-
 248
248
-
 249
249
-
 250
250
-
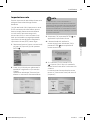 251
251
-
 252
252
-
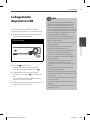 253
253
-
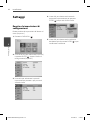 254
254
-
 255
255
-
 256
256
-
 257
257
-
 258
258
-
 259
259
-
 260
260
-
 261
261
-
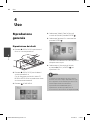 262
262
-
 263
263
-
 264
264
-
 265
265
-
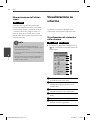 266
266
-
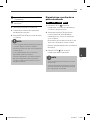 267
267
-
 268
268
-
 269
269
-
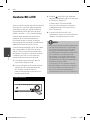 270
270
-
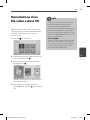 271
271
-
 272
272
-
 273
273
-
 274
274
-
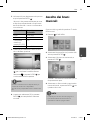 275
275
-
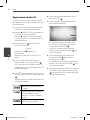 276
276
-
 277
277
-
 278
278
-
 279
279
-
 280
280
-
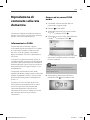 281
281
-
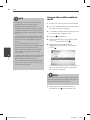 282
282
-
 283
283
-
 284
284
-
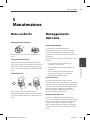 285
285
-
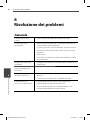 286
286
-
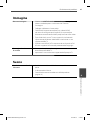 287
287
-
 288
288
-
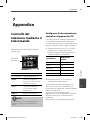 289
289
-
 290
290
-
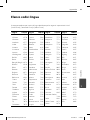 291
291
-
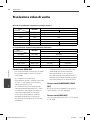 292
292
-
 293
293
-
 294
294
-
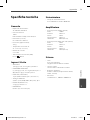 295
295
-
 296
296
-
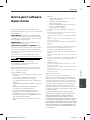 297
297
-
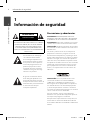 298
298
-
 299
299
-
 300
300
-
 301
301
-
 302
302
-
 303
303
-
 304
304
-
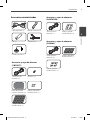 305
305
-
 306
306
-
 307
307
-
 308
308
-
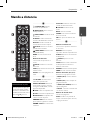 309
309
-
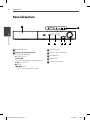 310
310
-
 311
311
-
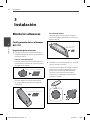 312
312
-
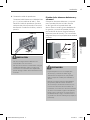 313
313
-
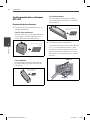 314
314
-
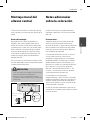 315
315
-
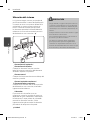 316
316
-
 317
317
-
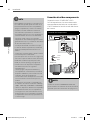 318
318
-
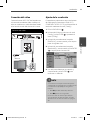 319
319
-
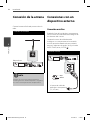 320
320
-
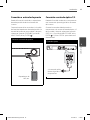 321
321
-
 322
322
-
 323
323
-
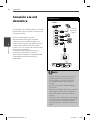 324
324
-
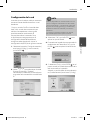 325
325
-
 326
326
-
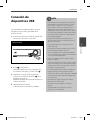 327
327
-
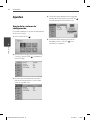 328
328
-
 329
329
-
 330
330
-
 331
331
-
 332
332
-
 333
333
-
 334
334
-
 335
335
-
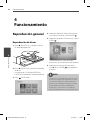 336
336
-
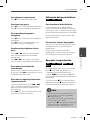 337
337
-
 338
338
-
 339
339
-
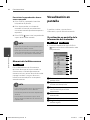 340
340
-
 341
341
-
 342
342
-
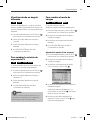 343
343
-
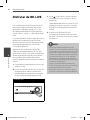 344
344
-
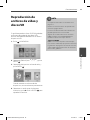 345
345
-
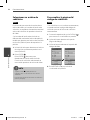 346
346
-
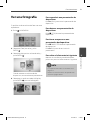 347
347
-
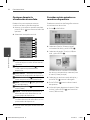 348
348
-
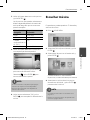 349
349
-
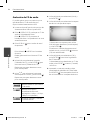 350
350
-
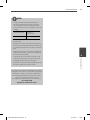 351
351
-
 352
352
-
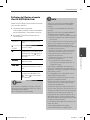 353
353
-
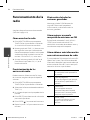 354
354
-
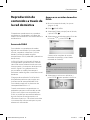 355
355
-
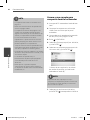 356
356
-
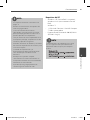 357
357
-
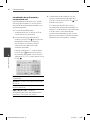 358
358
-
 359
359
-
 360
360
-
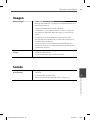 361
361
-
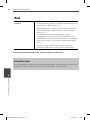 362
362
-
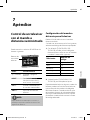 363
363
-
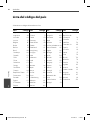 364
364
-
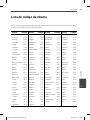 365
365
-
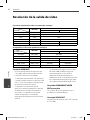 366
366
-
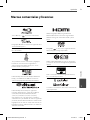 367
367
-
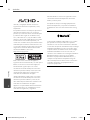 368
368
-
 369
369
-
 370
370
-
 371
371
-
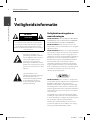 372
372
-
 373
373
-
 374
374
-
 375
375
-
 376
376
-
 377
377
-
 378
378
-
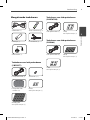 379
379
-
 380
380
-
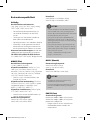 381
381
-
 382
382
-
 383
383
-
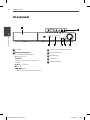 384
384
-
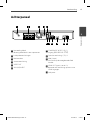 385
385
-
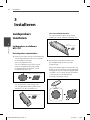 386
386
-
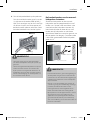 387
387
-
 388
388
-
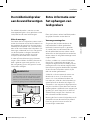 389
389
-
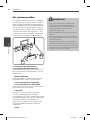 390
390
-
 391
391
-
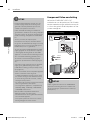 392
392
-
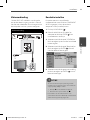 393
393
-
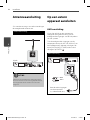 394
394
-
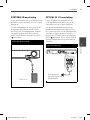 395
395
-
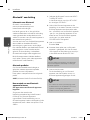 396
396
-
 397
397
-
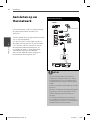 398
398
-
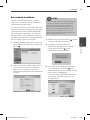 399
399
-
 400
400
-
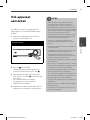 401
401
-
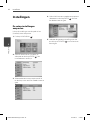 402
402
-
 403
403
-
 404
404
-
 405
405
-
 406
406
-
 407
407
-
 408
408
-
 409
409
-
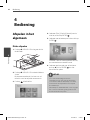 410
410
-
 411
411
-
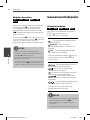 412
412
-
 413
413
-
 414
414
-
 415
415
-
 416
416
-
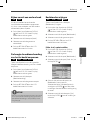 417
417
-
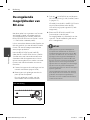 418
418
-
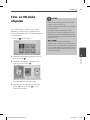 419
419
-
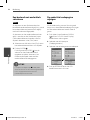 420
420
-
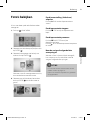 421
421
-
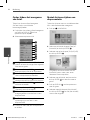 422
422
-
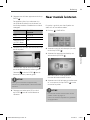 423
423
-
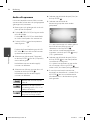 424
424
-
 425
425
-
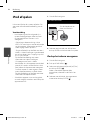 426
426
-
 427
427
-
 428
428
-
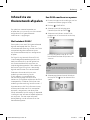 429
429
-
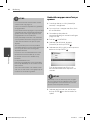 430
430
-
 431
431
-
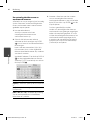 432
432
-
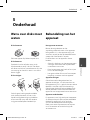 433
433
-
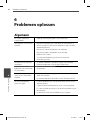 434
434
-
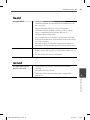 435
435
-
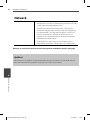 436
436
-
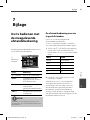 437
437
-
 438
438
-
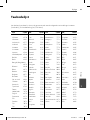 439
439
-
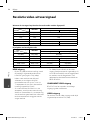 440
440
-
 441
441
-
 442
442
-
 443
443
-
 444
444
-
 445
445
-
 446
446
-
 447
447
-
 448
448


Pioneer BCS-303 El manual del propietario
- Categoría
- Reproductores de DVD
- Tipo
- El manual del propietario
en otros idiomas
- français: Pioneer BCS-303 Le manuel du propriétaire
- italiano: Pioneer BCS-303 Manuale del proprietario
- English: Pioneer BCS-303 Owner's manual
- Deutsch: Pioneer BCS-303 Bedienungsanleitung
- Nederlands: Pioneer BCS-303 de handleiding
Artículos relacionados
Otros documentos
-
Samsung HT-Z221 Instrucciones de operación
-
Samsung HT-J5100K Manual de usuario
-
Yamaha BD-S1067 El manual del propietario
-
Samsung BD-C6500 Manual de usuario
-
-
-
Samsung BD-C6900 Manual de usuario
-
LG LHD655 Manual de usuario
-
Denon DVD-A1XVA El manual del propietario
-