
OWNER’S MANUAL
Swash CL510 Advanced Bidet Toilet Seats
CL510-EW
CL510-RW

Attach Proof of Purchase to This Page
Adjunte prueba de compra a esta página

1
CONTENTS
This manual contains important safety information. Before operating the
bidet, please read this manual thoroughly, and retain it for future reference.
PRODUCT INSTALLATION
GENERAL INFO
PRODUCT OPERATION
02
SAFETY INFORMATION
06
06
07
08
PRODUCT INFORMATION
Product Features
Product Dimensions
Product Parts
09
09
10
10
13
PRODUCT INSTALLATION
Installation Parts
Before Installation
Swash Installation
External Bidet Filter Installation
14
14
16
18
OPERATING THE SWASH
CL510 Control Panel
Using the Swash CL510
Special Mode Operations
TECHNICAL INFO
TRANSLATIONS
19
PRODUCT SPECIFICATIONS
20
20
20
21
21
MAINTENANCE
Seat Cleaning & Removal
Nozzle Cleaning
Cleaning the Mesh Filter
Product Storage & Use
22
TROUBLESHOOTING
25
WARRANTY
26
CONTACT
27
SPANISH

2
Failure to observe the following warnings may result in electric shock, fire, personal injury, property
damage or product damage:
• Do not use a damaged power plug or plug into a loose electric outlet.
• Do not move the product by pulling the power cord.
• Do not handle the product or power plug with wet hands.
• Do not forcefully bend the power cord or place heavy objects on it to prevent it from being damaged
or deformed.
• Do not connect and pull out the power plug or cord repeatedly.
• Unplug the product before cleaning, repairing, inspecting, or replacing parts.
• Remove any dust or water from the power plug prior to plugging in.
• Do not plug the product into an electrical outlet or power strip that is being used by too many other
products. Use an electrical outlet adequate for the wattage of the product rated for a minimum of 15
amps.
• If the power cord is damaged, do not attempt to repair, modify, or replace the cord yourself. Contact
the Brondell Service Center toll free at 888-542-3355 or email us through our website.
• If the product produces a strange noise, a burning smell, or emits smoke, unplug it immediately
from the electrical outlet and contact Brondell. Failure to do so may result in electric shock or fire.
• Do not insert any wires or sharp objects into any product gaps. This may result in electric shock, fire,
or product damage.
Be careful to keep this safety information. Please read this information
to prevent property loss and ensure safety.
SAFETY INFORMATION
IMPORTANT SAFEGUARDS
DANGER:
If not observed, serious injury or even death may occur as a result.
DANGER
WARNING:
If not observed, serious physical injury or property damage may occur as a result.
CAUTION:
If not observed, minor physical injury or property damage may occur as a result.
READ ALL INSTRUCTIONS BEFORE USING
SAVE THESE INSTRUCTIONS

3
• Do not place an electronic or gas heater near the product or dispose of any burning materials
such as a lit cigarette in the toilet. This may result in fire or product deformation. Do not place any
containers filled with water or other liquids, food, metallic objects, or any flammable material on top
of the product. If foreign material enters the product, this may result in electric shock or fire.
• Do not use the product in locations exposed to excessive moisture and do not splash water onto the
product.
• While cleaning the bathroom, pull the power plug out of the electrical outlet and exercise caution to
ensure that water or cleaning supplies do not splash onto the bidet. Failure to do so may result in
electric shock or fire.
• If foreign material enters the product, pull the power plug out of the electrical outlet, turn o the
main water valve, and call the Brondell Service Center.
• Do not disassemble, repair, or modify the product yourself.
• Do not use the product while wet from bathing or showering.
• Do not place or store the product where it can fall or be pulled into a tub or sink.
• Do not place in or drop the product into water or any other liquid.
• Do not reach for the product if it has fallen into water. Unplug the product immediately and call the
Brondell Service Center.
• Do not use the product if it is not working properly. Please unplug the product immediately, close
the main water supply valve, and call the Brondell Service Center at 888-542-3355. Failure to do so
may result in electric shock, fire, or flooding.
SAFETY INFORMATION (cont.)
IMPORTANT SAFEGUARDS
DANGER
SAVE THESE INSTRUCTIONS
Failure to observe the following warnings may result in electric shock, fire, personal injury, property
damage or product damage.
• Do not plug in, operate, or store the unit in locations where flammable or combustible materials are
used or kept.
• Do not use industrial water, or gray water for the supply, as this may cause skin damage or disease.
• Turn o the main water supply valve when cleaning.
• For children and seniors who may have diculties with adjusting temperatures or those with sen-
sitive skin or impaired heat sensitivity, set the temperature of the wash spray and seat to “low” or
“o” to prevent burning.
• Close supervision is necessary when this product is used by children, seniors, or persons requiring
general assistance.
• Do not press the buttons using excessive force.
• Do not stand on top of or place any heavy objects onto the seat cover.
• Use this product for its intended use only, as described in this manual. Do not use any attachments
that are not recommended by Brondell.
WARNING

4
SAFETY INFORMATION (cont.)
IMPORTANT SAFEGUARDS
SAVE THESE INSTRUCTIONS
Failure to observe the following warnings may result in electric shock, fire, personal injury, property
damage, or product damage.
• Do not connect the main water supply to the hot water pipe or supply (only connect to the cold
water supply).
• After the installation, make sure to check all water supply connections for leaks. Rubber washers
should be in place for the water connection hoses & T-Valve.
• Do not open/close the seat or seat cover with excessive force.
• Exercise caution that urine does not come into contact with the product - failure to do so may result
in bad odors or malfunction.
• If the product will not be used for a long period of time, unplug the power cord, close the main
water supply valve, and drain any water in the water tank.
• Do not pull out the bidet hose using excessive force.
• Do not use thinner, benzene, acidic chemicals, chloride, or hydrochloric acid detergent on or near
the product. This may result in corrosion to the metal parts or discoloration or scratches to the bidet
body.
• This appliance is not intended for use by persons (including children and seniors) with reduced
physical, sensory, or mental capabilities, or lack of experience and knowledge, unless they have
been given supervision or instruction concerning the use of the appliance by a person responsible
for their safety.
• Children should be supervised to ensure that they do not play with the appliance.
CAUTION
WARNING
• Never operate this product if it has a damaged cord or plug, if it is not working properly, if it has
been dropped or damaged, or dropped into water. Contact the Brondell Service Center for examina-
tion and repair.
• Keep the cord away from heated surfaces and heating vents.
• Never block the air openings of the product or place it on a soft surface, such as a bed or couch,
where the air openings may be blocked. Keep the air openings free of lint, hair, etc.
• Never drop or insert any object into any opening or hose.
• Do not use the product outdoors or operate where aerosol (spray) products are being used or a
room where it could be exposed to oxygen.
• Connect this product to a properly grounded outlet only. Refer to the Grounding Instructions in the
next pages of the manual.

5
This product should only be used with a grounded GFCI
(Ground Fault Circuit Interrupter) outlet and a grounded
three-prong electrical cord as shown to the right. In the
event of an electrical short circuit, using a grounded GFCI
outlet reduces the risk of electric shock.
This product is equipped with a grounded cord and is for
use on a nominal 120V circuit only (minimum 15 amps) and
must be plugged into an outlet that is properly grounded
with a GFCI breaker as shown. Replace or repair a damaged
cord immediately.
Extension Cord Use
If it is necessary to use an extension cord, only use those rated for a minimum of 15 amps with a
three-wire extension cord with a three-blade grounding plug. Only plug into a three-slot grounded
GFCI receptacle that will accept the plug of the product. Replace or repair any damaged cords
immediately.
GROUNDING AND GFI OUTLET INSTRUCTIONS
Test
Reset
Ground GFCI Outlet
Grounding Pin
Improper use of the grounding plug can result in a risk of electric shock.
• If repair or replacement of the cord or plug is necessary, do not connect the
grounding wire to either flat blade terminal. The wire with green insulation
(either with or without a yellow stripe) is the grounding wire.
• Check with a qualified electrician if the grounding instructions are not completely
understood, or if there is doubt if the product is properly grounded.
SAFETY INFORMATION (cont.)
IMPORTANT SAFEGUARDS
SAVE THESE INSTRUCTIONS

6
PRODUCT INFORMATION
Stainless-Steel Nozzle System - Stainless steel resists soiling and bacterial contamination for
enhanced hygiene.
Posterior and Feminine Warm Water Wash – experience the ultimate in clean with adjustable
temperature, position, pressure, massage, and oscillation settings.
Positionable Nozzle – the nozzle has five dierent positions to ensure the most comfortable and
complete wash.
Adjustable Water Temperature and Pressure – each wash mode (Front and Rear) has four
available water temperature settings, and five water pressure settings.
Massage – when activated, the water pressure automatically increases and decreases to provide a
pulsating, cleaning spray.
Warm Air Dryer – includes adjustable temperature with five levels for a hands-free experience and
toilet paper reduction – even elimination.
Nozzle Oscillation – the Move function provides a massaging, oscillating cleanse during the wash
cycle ensuring a thorough and comfortable wash.
Auto Function – activates a preset for a rear wash cycle followed by a drying cycle.
Ergonomic Heated Seat – with four temperature settings (High/Med/Low/O).
Illuminating Nightlight – the cool blue hue of the nightlight means no more blinding lights during
midnight trips to the bathroom.
Gentle-Closing Seat and Lid – “slam free” gentle closing seat and lid are user friendly.
Eco Mode – when activated, this function automatically lowers the water and seat temperature.
PRODUCT FEATURES

7
PRODUCT DIMENSIONS
5.5 in
Required Distance Between
Mounting Holes
18.2 in
18.2 in
14.9 in
14.9 in
7.8 in
7.8 in
2.7 in
2.7 in
16.4 in
15.2 in
13.6 in
13.6 in
4.3 in
4.3 in
Elongated Top View
Round Top View

8
PRODUCT PARTS
PRODUCT INFORMATION (cont.)
1. Lid
2. Seat Sensor
3. Warm Seat
4. Warm Air Dryer
5. Nozzle Assembly
6. LED Nightlight
7. Control Panel
8. Power Plug
9. Water Inlet with Mesh Filter
10. Drain Plug
11. Mounting Plate
8
9
10
7
6
1
11
5
4
2
3

9
INSTALLATION PARTS
1. Mounting Bolt (2)
2. Rubber Cone Washer (2)
3. Flat Washer (2)
4. Nuts (2)
5. Mounting Plate
1
5
2
3
6
4
6. Top-Mount Brackets (2)
7. T-Valve Connector with
Rubber Washer
8. Bidet Hose
8
7
PRODUCT INSTALLATION

10
DO NOT PLUG THE PRODUCT IN WHILE THE UNIT IS UPSIDE DOWN
This may cause damage to the internal components.
WATCH OUR INSTALLATION VIDEO
Installation for all Swash products can be found online at brondell.com
CHECK BOLT SPREAD
This bidet can only be installed on toilets with a bolt hole spread of 5.5 inches (see Product
Dimensions on Page 7 for more information).
CHECK FOR TOP MOUNT INSTALLATION
If your fixture only has top-side access to the mounting bolts that hold the seat to the toilet,
include the Top-Mount Brackets included in the hardware pack (see Page 12).
CHECK FOR A CONCEALED TOILET FILL VALVE
Many modern toilets have sleek designs intended to cover and camouflage plumbing
connections, which makes a standard Swash installation dicult or impossible. For this, we
recommend using our Alternate Swash Bidet Seat T-Valve, found on brondell.com.
CHECK WATER SUPPLY LINE
Check the line that connects the toilet tank to the water shut o valve. If it is a rigid pipe, you may
need to purchase a flexible hose to replace it before installing the Swash. The length of the hose
and the size of the connectors will vary.
RESIDUAL MOISTURE IS NORMAL
Every product is tested with pure water during production to ensure the highest quality and
performance. It is normal to find a small amount of residual moisture on the product and in the
reservoir and filter.
TOOLS
A Phillips head or standard screwdriver may be needed to remove the existing toilet seat and a
standard wrench may be needed for tight water supply connections. Teflon tape can be helpful in
creating a water-tight seat between plumbing connections.
PRODUCT INSTALLATION (cont.)
BEFORE INSTALLATION
SWASH INSTALLATION
1. Existing Toilet Seat Removal
a. Lift hinge covers and use a screwdriver to remove the mounting bolts.
b. Remove the toilet seat. Keep for future use.
Please read these instructions carefully before installing the Swash. Failure to do so could result
in flooding, leaking or damage to the product.

11
NOTE: Steps may vary by type of seat and toilet
SWASH INSTALLATION (cont.)
3. Connect the top of the T-Valve to the incoming water
connection on the bottom of your toilet tank.
4. Connect the water supply line coming from the wall to the
bottom of the T-Valve
5. Install Mounting Plate for Standard Installation (see
Page 12, Step 6 for instructions on using the Top-Mount
Brackets)
a. Place adjustable mounting plate over mounting holes
on toilet, rubber side facing down, arrow pointing to the
toilet bowl.
b. Insert the mounting bolts through the mounting plate
and mounting holes of the toilet. Be sure that the
square mounting bolt head is even with the sides of the
mounting plate.
c. Slide rubber cone washer, flat washer, and then nut
onto mounting bolts under the toilet bowl and tighten to
keep mounting plate in place.
NOTES:
• The T-Valve connects to the fill valve directly under
your toilet tank - it does not connect at the wall.
• Only connect to the cold toilet water supply line.
• If your water supply line is rigid you may need to
replace it before continuing.
Steps 5b & 5c
Steps 3-4
toilet tank
t-valve
cold water
supply line
NOTES:
• You may wish to place a container under the tank to
catch any excess water.
• Do not continue without completing the above steps
• Failure to do so could result in flooding, leaking or
damage to the Swash.
2. Turn O Water Supply Valve and Flush Toilet
a. Turn water valve o to stop the flow of water.
b. Flush toilet and hold down handle to completely
empty tank.
c. Disconnect water supply hose from toilet tank. Do not
disconnect from the water supply valve.
Step 2c

12
PRODUCT INSTALLATION cont.
SWASH INSTALLATION (cont.)
9. Connect the open end of the Bidet Hose to the T-Valve.
8. Attach the Swash to the Mounting Plate
a. Set the Swash flat on the toilet bowl in front of the
mounting plate, and slide seat onto plate until it is
secure.
b. If the seat appears too short or too long for the toilet,
adjust the mounting plate accordingly. To adjust the
mounting plate, loosen the nuts underneath the toilet
and slide seat forward or backwards as needed. Once
the seat is lined up properly, tighten the nuts to hold in
place.
7. Connect the Bidet Hose to the Seat
a. Connect the elbow side of the bidet hose to the water
inlet. Hand-tighten to secure. Take care not to twist the
bidet hose, excessively bend it, or strip the plastic screw
threads when screwing the hose onto the bidet seat.
11. Plug the Power Cord into an Electrical Outlet
a. If the Power Indicator is not illuminated press any
button on the control panel.
10. Turn On Water Supply
a. Open the main water supply valve slowly and check
for leaks.
b. Wait 5 minutes, check again and if there are no leaks
continue.
Step 8b
Step 7a
Step 9
6. Install Mounting Plate for top-mounted toilet seats (see
Page 11, Step 5 for instructions on Standard Installation).
This method will use a combination of the included Top-
Mount Brackets and the original toilet seat mounting bolts.
a. Place adjustable mounting plate over mounting holes
on toilet, rubber side facing down, arrow pointing to the
toilet bowl.
b. Place the provided Top-Mount Brackets flat side down
into the slots of the Mounting Bracket, over the bolt
holes.
c. Insert the original toilet seat mounting bolts through the
Top-Mount Brackets and into the threaded bolt holes of
the toilet, using a screwdriver to tighten.
Steps 6b & 6c

13
SWASH INSTALLATION (cont.)
NOTES:
• Make sure to only use a grounded GFCI (ground fault circuit interrupter) electrical outlet. In
the case of a short circuit, a grounded GFCI outlet may help prevent electric shock or injury.
• If it is necessary to use an extension cord, only use those rated for a minimum of 15 amps
with a three-wire extension cord with a three-blade grounding plug.
12. Press the “REAR WASH” button on the control arm to fill the water tank. The bidet will beep
continuously while it fills and then issue one long beep when the water tank is full. Wait 3-5
minutes for the water to heat, and then the Swash will be ready to use.
13. Follow instructions on Page 16 for using the Swash.
EXTERNAL BIDET FILTER INSTALLATION
1. Turn O Water Supply Valve and Flush Toilet.
a. Turn water valve o to stop the flow of water.
b. Flush toilet and hold down handle to completely empty tank.
2. Disconnect the Bidet Hose from the T-Valve
3. Connect the female end of the Swash Filter to the open T-Valve connection.
4. Connect the Bidet Hose to the male end of the Swash Filter.
5. Turn the toilet water supply valve back on.
Step 2
FLOW
Step 3
FLOW
Step 4
NOTE:
• Customers with hard water, well water, and softened water can extend the life of their bidet
seat by purchasing and installing an external inline water filter to be used with the Swash.
The bidet filter should be changed every six months, and can be purchased online at
brondell.com.

14
OPERATING THE SWASH
CL510 CONTROL PANEL
Water Temperature
Button and Indicators
Nozzle Position Buttons
Water Pressure and
Dry Temperature
Buttons and Indicators
Seat Temperature
Button and Indicators
9
8
7
6
Eco Mode Button
and Indicator
Power Indicator
Auto Mode Button
Night Light Button
and Indicator
10
11
12
13
1
3
4
2
Massage Button
Stop Button
Front Wash /
Move Button
Rear Wash /
Move Button
Warm Air Dry Button
5

15
CL510 CONTROL PANEL cont.)
1. Stop Button
Stops all wash and dry functions currently operating. Press and hold this button for four
seconds to power o the bidet.
2. Rear Wash / Move Button
Press once to initiate a rear wash. Press again to initiate nozzle oscillation (repetitive forward
and backward nozzle movement).
3. Front Wash / Move Button
Press once to initiate a front wash. Press again to initiate nozzle oscillation (repetitive forward
and backward nozzle movement).
4. Dry Button
Press once to initiate a two minute Warm Air Dryer cycle.
5. Massage Button
Pressing this button while a wash is running enables the water to repeatedly increase and
decrease in pressure in a pulsating pattern. Press again to stop the massage.
6. Water Pressure and Dry Temperature Buttons and Indicators
Press the “+” and “–” buttons to increase and decrease the outgoing water pressure to one of
five settings. Pressing these buttons while the Warm Air Dryer is operating will adjust the Drying
temperature. Settings will be saved for the next use.
7. Nozzle Position Buttons
Press the arrow up and arrow down buttons to adjust the nozzle position forward and backward
during a wash cycle. Between uses the nozzles will revert back to the middle position.
8. Water Temperature Button and Indicators
Press and release the “Water Temp” button to adjust the outgoing water temperature to one of
four settings (LO: 93.2° F, MED: 98.6° F, HI: 104° F, and OFF). Settings will be saved for the
next use.
9. Seat Temperature Button and Indicators
Press and release the “Seat Temp” button to adjust the seat temperature to one of four settings
(LO: 95° F, MED: 100.4° F, HI: 104° F, and OFF). Settings will be saved for the next use.
10. Power Indicator
This indicator will light up when the bidet is powered on, and will be o when the bidet is
powered o. To turn o the bidet press and hold the “STOP” button for at least four seconds.
11. Eco Mode Button and Indicator
Press and release the “Eco Mode” button to select or turn o Eco Mode. The indicator will light
up when the Eco Mode has been selected. See Page 17 for more information.
12. Night Light Button and Indicator
Press the “Night Light” button to enable the Night Light (the indicator light will be illuminated).
Press again to disable the Night Light and indicator.
13. Auto Mode Button
Press this button once to initiate a one minute rear wash cycle followed by a one minute dry
cycle. See Page 17 for more information.

16
OPERATING THE SWASH cont.
USING THE SWASH CL510
Warm Water Wash
When ready to wash, press the “Rear Wash” or “Front Wash” button on the control panel one time
to initiate a wash. The nozzle will self-clean, extend into the toilet bowl, spray for two minutes,
turn o automatically, retract, and self-clean once again.
1. Pressing the “Rear” or “Front” button a second time while the wash is running will cause the
nozzle to oscillate forward and backward, providing a wider range of wash spray. Press again
to cancel the move function.
2. While washing, users can adjust the water temperature, pressure, and nozzle position settings,
as well as initiate the massage feature by following the notes on Page 15.
3. If you would like to stop the wash before the two minute cycle ends, press the “Stop” button to
discontinue water flow.
4. After extended use the water may decrease in temperature if a LO, MEDIUM, or HI water
temperature setting is selected. To regain warmer water, stop all wash functions for three
minutes to allow the bidet to reheat the water.
Prepare for Wash
Sit on the seat to ensure skin-to-seat contact on the Seat Sensor. Once contact is made the seat
will automatically perform many functions:
1. The seat will give an audible beep letting you know the Seat Sensor has been engaged.
2. The water pressure indicator lights will come on displaying the current setting.
3. If the bidet was set to Eco Mode, the seat and water temperature will rise to the set
temperature settings.
Warm Air Dryer Function
Press the “Dry” button to activate the warm air dryer. The dryer will run for two minutes and turn
o automatically.
1. While the air dryer is operating, users can adjust the dryer temperature to a comfortable level
using the Dry “
+”
and “–” buttons. The dry temperature will be reflected on the five indicator
LEDs.
2. If you would like to stop the dryer before the two minutes has elapsed, press Stop.
NOTES:
• The wash functions will not work unless the sensor in the seat detects someone sitting
down (with the built-in skin conductivity sensor). To override the Seat Sensor, please see
the instructions on Page 18.

17
USING THE SWASH CL510 cont.)
Auto Mode
Pressing the “Auto Mode” button will initiate a one-minute Rear Wash with the following
parameters preset:
• Seat Temperature set to Medium
• Nozzle Oscillation (Move) on
• Water Pressure set to Level 3
• Water Temperature set to Medium
After the wash cycle is over, Auto Mode will initiate a one-minute Warm Air Dry cycle on Level 2.
Note: All wash and dry settings are adjustable, while the Auto Mode wash cycle is running, to suit
your preferences
Eco Mode
In this mode the water in the tank and the seat temperature will be heated to 86°F when the
bidet is not in use. Once a person sits on the bidet the Swash will revert to the last seat and water
temperature settings used. To select this option press and release the “Eco Mode” button to
illuminate its indicator.

18
OPERATING THE SWASH cont.
SPECIAL MODE OPERATIONS
Seat Sensor Override
The Seat Sensor is activated at the factory by default. Completing the following steps will bypass
the body sensor located in the seat and allows the wash functions and dry functions to operate
without the sensor being engaged. Use caution in this mode.
1. Unplug the Swash bidet seat.
2. Press the two Water Pressure/Dry Temp buttons (+ and –) and plug the seat in while holding
the two buttons down.
3. Keep holding the two Water Pressure/Dry Temp buttons (+ and –) down for five seconds.
A beep will sound, indicating that the Seat Sensor has been overridden. To test that the
procedure worked, press the Dry button. If the Warm Air Dryer comes on without anyone
sitting on the seat, you have successfully overridden the Seat Sensor.
4. You can resume using the seat as normal.
5. To reactivate the Seat Sensor, repeat Steps 1-3.
NOTE:
• Do not sit on the seat when in Special Mode Operations. The process will not work while
the seat is occupied.
Activating/Deactivating Silent Mode
By default, the Swash will beep to confirm commands from the control panel. Follow the steps
below to silence the beeping sounds.
1. Press and hold down the Rear Wash/Move button and the “–” Water Pressure/Dry Temp button
at the same time for four seconds.
2. A beep will sound, indicating that the Silent Mode has been activated.
3. To deactivate Silent Mode, repeat Steps 1-2.

19
PRODUCT SPECIFICATIONS
NOTE:
The specifications listed above are subject to change without prior notice for reasons of
improving the product performance.
BRONDELL SWASH ADVANCED BIDET SEAT
Model
CL510-EW, CL510-RW
Power Voltage
120 V, 60 Hz
Power Consumption
660 W
Supply Water Pressure
14.2 psi – 106.6 psi
Dimensions
Elongated: 18.5 in x 20.87 in x 6.10 in
Round: 18.5 in x 19.5 in x 6.10 in
Weight
Elongated: 9.7 lbs / Round: 9.5 lbs
Seat / Lid Weight Limit
275 lbs. / 178 lbs.
Operating Temperature
37.4° F – 104° F
Mesh Filter
0.43 in x 0.6 in diameter
WARM WATER WASHING DEVICE
Rear Wash
Maximum .95 L/min., automatic nozzle self-cleaning
Front Wash
Maximum .95 L/min., automatic nozzle self-cleaning
Standard Time
Rear Wash: 2 minutes / Front Wash: 2 minutes
Water Pressure Control
5 Levels
Water Temperature
Control
4 Levels: O - incoming water temperature,
Low – 93.2° F, Medium – 98.6° F, High - 104° F
Heater Power
Consumption
600W
Safety Devices
Thermal Fuse, Thermostat, Water Level Sensor
HEATED SEAT
Seat Temperature
Control
4 Levels: O - room temperature
Low - 95° F, Medium – 100.4° F, High - 104° F
Heater Power
Consumption
55 W
Safety Devices
Thermostat

20
MAINTENANCE
Use a soft, damp cloth and mild cleanser (such as dish soap, Simple Green or Windex) to wipe
down the seat. DO NOT scrub or use harsh, abrasive products to clean the Swash. DO NOT use
thinner, benzene, acidic chemicals, chloride, or hydrochloric acid detergent. This may result in
corrosion to the metal parts or discoloration or scratches to the bidet body.
For a more thorough cleaning, you may remove the Swash. To remove the bidet, forcefully pull
the bidet away from the toilet tank o of the mounting plate.
Unplug the Swash from the power source before cleaning or removing the seat.
1. Press and release the “Rear Wash” and “Front Wash”
buttons simultaneously on the control panel. The nozzle
will extend into the toilet bowl.
2. Gently clean the nozzle manually with a soft cloth or
toothbrush.
3. To retract the nozzle press the “Stop” button.
Step 1
SEAT CLEANING & REMOVAL
NOZZLE CLEANING
NOTE:
• Be cautious of leaving home and beauty products in contact with the bidet seat, the result
of which can be irreversible discoloration. Most stains can be removed using a 1:1 mix of
rubbing alcohol and water and a soft cloth or towel. However, some permanent stains are
the result of substances left on the seat while the seat heater was activated. Be cautious
of home and beauty products (including but not limited to various hair and air freshener
sprays, lotions, body wash, skin tanners, body butters, and oils) that come in contact with
the seat. Wash o any substances that come in contact with the seat as soon as possible. If
necessary, replacement seat parts can be purchased through Brondell customer support.
NOTE:
• The Nozzle Cleaning function will not work if the
seat is occupied, or if the Seat Sensor has been
overridden.

21
CLEANING THE MESH FILTER
Cleaning intervals will dier depending on use and water
quality. It is recommended to check the filter at least once a
year.
1. Turn o the water supply and hold the toilet’s flush lever
down until all of the water has drained from the tank.
2. Unplug the Swash, remove the bidet from the toilet, and
disconnect the bidet hose. You may want to use a bucket
to catch any dripping water from the bidet hose.
3. Remove the Mesh Filter from the water inlet with a pair of
tweezers or needle-nosed pliers.
4. Clean the filter with a toothbrush while running under tap
water to eectively remove any foreign substances or
build-up.
5. Replace the Mesh Filter and carefully check that it is
installed correctly. If improperly installed, it could result in
the product leaking water.
6. Reconnect the bidet hose and place the seat back on the
toilet. Plug the cord back in, and turn the water supply
back on.
Step 3
PRODUCT STORAGE & USE
Short Term Non-Use
If the product will not be used for more than a few weeks, you can simply unplug it. You may also
consider shutting the water supply o at the wall for extra precaution.
Long Term Non-Use
If the product will not be used for an extended time (longer
than four months), you should unplug the unit, shut the
water supply o at the wall, remove the Swash from the
toilet by forcefully pulling the Swash away from the tank o
of the mounting plate. Remove the bidet hose drain the
Hot Water Heater. To drain the Hot Water Heater, remove
the drain plug and the back of the bidet seat by turning it
counterclockwise by 90 degrees towards “OPEN” and then
pulling it out so that any residual water drains out.

22
TROUBLESHOOTING
If the bidet appears to be operating abnormally, please review the troubleshooting tips before
calling the Brondell Service Center as most issues are easily resolved with a few simple steps.
If you are unable to resolve the issue after checking the following items, please call the Service
Center at 888-542-3355, Mon–Fri, 9am–5pm PST, or email us at [email protected].
Check before continuing:
• Make sure the Swash is connected to power and that the outlet is working properly.
• Make sure you check & test the reset button on the GFCI outlet (Standard 120V GFCI outlet).
• Make sure main water supply valve is open.
• Make sure the seat is not in Eco Mode.
• Confirm there are no leaks from hoses or water supply.
• Make sure Mesh Filter is clean and free of build up or debris (see maintenance section).
After checking items above, refer to the following troubleshooting chart for additional solutions
Problem Possible Cause(s) Solution(s)
The bidet seat
is not working
1. Bidet not plugged in
2. No power to Swash
3. The incoming water is too hot
4. Not activating Seat Sensor
1. Make sure the bidet is plugged in.
2. Check and reset GFCI outlet.
3. Ensure that the bidet seat is connected to
the cold water supply.
4a. Adjust sitting position to fully cover the
Seat Sensor.
4b. Override the Seat Sensor.
Product shuts o
during use
1. Washing time exceeded the cycle
time
2. Power failure
3. Water supply too hot
1. The wash cycles run for two minutes. Press
the wash button after the wash has finished to
continue the wash cycle.
2. Check and reset GFCI outlet.
3. Ensure that the Swash is connected to the
cold water supply only.
Low water flow or
spray pressure
1. Clogged filter
2. Water supply valve not opened fully
3. Nozzles dirty
4. External bidet filter
5. Pressure settings
1. Remove, clean, and reinstall mesh filter
(see maintenance section).
2. Check that the water supply valve at wall
is fully open.
3. Clean nozzles (see maintenance section).
4. If you have an external bidet filter, check
and replace if necessary.
5. Increase the water pressure settings.

23
Problem Possible Cause(s) Solution(s)
Nozzles do not
function properly
1.Nozzles are dirty
2. Clogged filter
3. Water pressure is too low
4. External bidet filter
1. Clean nozzles (see Page 20).
2. Remove, clean, and reinstall mesh filter
(see Page 21).
3. Check water supply valve at wall is fully
open.
4. If you have an external bidet filter, check
and replace if necessary.
Water Temperature
is low
1. Water comes out cold
2. Water comes out lukewarm
3. Water starts out hot but decreased
in temperature
1. The Water temperature level is turned o
or set to “LO”. Adjust temperature on control
panel.
2. Turn o Eco Mode.
3. Warm water can be used for about 40
seconds at the “MED” setting. Stop all wash
functions to allow the heater to warm the
water.
Seat is not heated 1. Seat temperature set to o
1. Make sure that the Seat temperature setting
is on.
Bidet wash feature
does not work or
fails to spray
1. Body sensor does not detect that you
are sitting on the Swash
1a. Adjust sitting position to fully cover the
Body Sensor (see Page 8).
1b. Override the body sensor – refer to
Special Mode Operation section on Page 18
to unlock the body Seat Sensor.
Water (wash spray)
not heated
1. Water temperature set to o
2. Resettable fuse blown
1. Make sure that the Water temperature
setting is on.
2. The bimetal resettable fuse may blow if
the temperature exceeds over the normal
level. The bidet will not work and show an
error message until the bidet cools down.
The fuse will automatically reset.
Water flows before or
after use
1. Water coming from nozzles
1a. The water that comes out between the
nozzles before or after a wash cycle is the
self-clean cycle and is not a malfunction.
1b. Residual water may drip into the
bowl for several seconds after a wash
cycle or self-clean cycle, and is not a
malfunction.

24
Problem Possible Cause(s) Solution(s)
Water leaks from
areas other than the
nozzles
1. Water leaking from the T-valve
2. Water leaking from the bidet hose
connection
3. Water leaking from under the seat
4. Water leaking from behind the seat
1. Make sure that the rubber gasket is
inserted correctly into the T-valve (flat side
down with lip pointing up towards the toilet
tank connection) and firmly tighten the
connector.
2. Make sure that the bidet hose is correctly
connected and tight. Check any rubber
washers and do not over tighten.
3. Check if there is anything between the
mesh filter and bidet. Remove, clean, and
reinstall mesh filter. Check if the filter is
damaged (see maintenance section).
4. Check the water tank plug in the back of
the seat (see maintenance section under
product storage and use).
TROUBLESHOOTING (cont.)

25
Brondell products are backed by some of the most comprehensive warranties in the industry. Brondell
warrants that all products (excluding consumable items) shall be free from defects in material and
workmanship under normal use and service.
CL510 Residential One-Year Limited Warranty
• 100% Coverage of all parts and labor for the entire product (excluding consumable filters) for the first
year from original date of purchase
CL510 Commercial Warranty
• Warranty period one year from original purchase date for all Brondell products. Warranties may not
apply to products that are used for heavy commercial, hospital, or other high use non-residential
applications.
Exclusions and Limitations
1. BRONDELL warrants its products to be free from manufacturing defects under normal use and service.
This warranty is extended only to the ORIGINAL PURCHASER.
2. BRONDELL’s obligations under this warranty are limited to repairs or replacement, at BRONDELL’s
option, of products or parts found to be defective, provided that such products were properly installed
and used in accordance with instructions. BRONDELL reserves the right to make such inspections as
may be necessary in order to determine the cause of the defect. BRONDELL will not charge for labor or
parts in connection with warranty repairs for the first three years from date of purchase on all products
except those that may be subject to commercial use limitations.
3. BRONDELL is not responsible for the cost of removal, return (shipping) and/or re-installation of
products. This warranty does NOT apply to:
• Damage or loss which occurs during shipment.
• Damage or loss sustained through any natural or man-made causes beyond the control of
BRONDELL, including but not limited to fire, earthquake, floods, etc.
• Damage or loss resulting from sediments or foreign matter contained in a water system.
• Damage or loss resulting from negligent or improper installation including installation of a unit in
a harsh or hazardous environment.
• Damage or loss resulting from removal, improper repair, modification of the product, or improper
maintenance including damage caused by chlorine or chlorine related products
• Damage or loss resulting from electrical surges, electrical outages, lightning strikes, or other acts
which are not the fault of Brondell or which the Product is not specified to tolerate.
4. This warranty gives you specific legal rights. You may have other rights which vary from state to state.
THIS WRITTEN WARRANTY IS THE ONLY WARRANTY MADE BY BRONDELL. REPAIR OR REPLACEMENT
AS PROVIDED UNDER THIS WARRANTY SHALL BE THE EXCLUSIVE REMEDY AVAILABLE TO THE
PURCHASER. BRONDELL SHALL NOT BE RESPONSIBLE FOR LOSS OF USE OF THE PRODUCT OR
FOR OTHER INCIDENTAL, SPECIAL, FOR CONSEQUENTIAL DAMAGES OR EXPENSES INCURRED
BY THE PURCHASER OR FOR LABOR OR OTHER COSTS DUE TO INSTALLATION OR REMOVAL OR
COSTS OF REPAIRS BY OTHERS, OR FOR ANY OTHER EXPENSE NOT SPECIFICALLY STATED ABOVE.
EXCEPT TO THE EXTENT PROHIBITED BY APPLICABLE LAW, ANY IMPLIED WARRANTIES, INCLUDING
THAT OF MERCHANTABILITY, ARE EXPRESSLY LIMITED TO THE DURATION OF THIS WARRANTY.
SOME STATES DO NOT ALLOW LIMITATIONS, SO THE ABOVE LIMITATION AND EXCLUSION MAY NOT
APPLY TO YOU.
How to Obtain Service
To obtain repair service under this warranty, you must contact an authorized BRONDELL Service Center
to obtain an RMA (Return Merchandise Authorization) number. Proof of purchase in the form of a copy
of the original receipt must accompany the returned unit for the warranty to be valid. Take or ship the
unit pre-paid to the closest Brondell authorized service center along with the RMA number and proof of
purchase.
To obtain the RMA number and locate the BRONDELL Service Center location nearest you, please call
1-888-542-3355, Mon–Fri, 9am–5pm PST.
WARRANTY

26
CONTACT:
Brondell, Inc.
PO Box 470085
San Francisco, CA 94147-0085
Phone: 1-888-542-3355
Email: [email protected]
Web: www.brondell.com
For questions, contact Brondell Customer Service:
1-888-542-3355, Monday – Friday, 9am – 5pm PST
MANUFACTURED BY:
Brondell, Inc.
PO Box 470085
San Francisco, CA 94147-0085
Please retain receipt records for any warranty claims.
Made in Korea

CONTENIDO
Este manual contiene importante información de seguridad. Antes de
utilizar su unidad, por favor lea este manual por completo y consérvelo
para consulta en el futuro.
INSTALACIÓN DEL PRODUCTO
INFORMACIÓN GENERAL
OPERACIÓN DEL PRODUCTO
28
INFORMACIÓN DE SEGURIDAD
32
32
33
34
INFORMACIÓN DEL PRODUCTO
Características del producto
Dimensiones del producto
Partes del producto
35
35
36
37
40
INSTALACIÓN DEL PRODUCTO
Partes de la instalación
Antes de la instalación
Instalación del asiento Swash
Instalación del filtro de bidé externo
41
41
43
45
USO DEL ASIENTO SWASH
Panel de Control del CL510
Uso del asiento Swash CL510
Operaciones en Modo Especial
INFORMACIÓN TÉCNICA
TRADUCCIONES
46
ESPECIFICACIONES DEL PRODUCTO
47
47
47
48
48
Mantenimiento
Limpieza y extracción del asiento
Limpieza de boquillas
Limpieza del filtro de malla
Almacenamiento y uso del producto
49
SOLUCIÓN DE PROBLEMAS
52
GARANTÍA
53
CONTACTAR
01
INGLÉS
MANUAL DEL USUARIO
Asientos para inodoro con bidé de lujo Swash CL510
CL510-EW
CL510-RW

28
No acatar las siguientes advertencias puede provocar descarga eléctrica, incendio, lesiones
personales, daños materiales o daños al producto:
• No utilice una clavija dañada ni la inserte en un tomacorriente flojo.
• No mueva el producto jalando del cable de corriente.
• No maneje el producto o la clavija con las manos mojadas.
• Para evitar que se dañe o deforme el producto, no coloque objetos pesados sobre él ni doble a la
fuerza el cable de corriente.
• No conecte y desconecte repetidamente el cable de corriente.
• Desconecte el producto antes de limpiar, reparar, inspeccionar o reemplazar cualquiera de sus
partes.
• Retire restos de polvo o agua de la clavija antes de conectarla.
• No conecte el producto a un tomacorriente o extensión que esté siendo utilizado por demasiados
productos. Use un tomacorriente adecuado para el consumo eléctrico del producto, clasificado
para un mínimo de 15 amperios.
• Si el cable de corriente está dañado, no intente repararlo, modificarlo o reemplazarlo usted mismo.
Comuníquese con el Centro de Servicio Brondell sin costo marcando el 888-542-3355 o envíenos
un correo electrónico a través de nuestro sitio web.
• Si el producto emite un ruido extraño, despide un olor a quemado o produce humo, desconéctelo
inmediatamente del tomacorriente y llame al Centro de Servicio Brondell. No hacerlo puede
provocar descarga eléctrica o fuego.
• No inserte cables ni objetos afilados en las aberturas del producto. Esto puede provocar descarga
eléctrica, incendio o daños al producto.
Asegúrese de guardar esta información de seguridad. Por favor, lea esta información para
evitar daños materiales y garantizar la seguridad.
PELIGRO:
Si no se siguen estas indicaciones, pueden ocurrir lesiones graves o incluso la muerte.
PELIGRO
ADVERTENCIA:
Si no se siguen estas indicaciones, pueden ocurrir lesiones físicas o daños materiales graves.
PRECAUCIÓN:
Si no se siguen estas indicaciones, pueden ocurrir lesiones físicas o daños materiales menores.
LEA TODAS LAS INSTRUCCIONES ANTES DE USAR
GUARDE ESTAS INSTRUCCIONES
INFORMACIÓN DE SEGURIDAD
SALVAGUARDIAS IMPORTANTES

29
• No coloque un calentador electrónico o de gas cerca del producto ni deseche en el inodoro
materiales encendidos, tales como cigarrillos. Esto puede provocar fuego o deformaciones en
el producto. No coloque sobre el producto ningún recipiente con agua u otros líquidos, comida,
objetos metálicos ni materiales inflamables. Si algún material extraño se introduce al producto, esto
puede provocar una descarga eléctrica o un incendio.
• No utilice el producto en lugares expuestos a humedad excesiva y no salpique agua sobre el
producto.
• Mientras limpia el cuarto de baño, retire la clavija del tomacorriente y tenga precaución para
asegurar que ni agua ni productos de limpieza salpiquen en el bidé. No hacerlo puede provocar
descarga eléctrica o fuego.
• Si algún material extraño entra en el producto, retire la clavija del tomacorriente, cierre la válvula
principal de agua y llame al Centro de Servicio Brondell.
• No desarme, repare ni modifique el producto usted mismo.
• No utilice el producto mientras usted esté mojado tras haber tomado un baño o una ducha.
• No coloque ni guarde el producto donde pueda caer o ser jalado al interior de una tina o lavabo.
• No coloque ni deje caer el producto en agua o algún otro líquido.
• No intente agarrar el producto si ha caído al agua. Desconecte el producto inmediatamente y llame
al Centro de Servicio Brondell.
• No utilice el producto si no está funcionando apropiadamente. Desconéctelo inmediatamente,
cierre la válvula principal de suministro de agua y llame al Centro de Servicio Brondell marcando
888-542-3355. No hacerlo puede provocar descarga eléctrica, fuego o inundación.
INFORMACIÓN DE SEGURIDAD
SALVAGUARDIAS IMPORTANTES
PELIGRO
GUARDE ESTAS INSTRUCCIONES
No acatar las siguientes advertencias puede provocar descarga eléctrica, incendio, lesiones
personales, daños materiales o daños al producto.
• No conecte, ni utilice, ni guarde la unidad en lugares donde se usen o se guarden materiales
inflamables o combustibles.
• No utilice aguas industriales ni residuales para el suministro, ya que esto puede causar daños en la
piel o enfermedades.
• Cierre la válvula principal de suministro de agua al realizar la limpieza.
• En el caso de niños y personas mayores que pudieran tener dificultades para ajustar temperaturas
o quienes tienen piel sensible o alteración en la sensibilidad térmica, ajuste la temperatura del
rociado de lavado y del asiento a un nivel “bajo” o “apagado” para evitar quemaduras.
• Es necesaria una estrecha supervisión cuando este producto sea usado por niños, personas
mayores o personas que requieran asistencia general.
• No oprima los botones con fuerza excesiva.
• No se pare ni coloque algún objeto pesado sobre la tapa del asiento.
• Use este producto solo para el fin que está diseñado, según se describe en este manual. No utilice
accesorios que no sean recomendados por Brondell.
ADVERTENCIA

30
INFORMACIÓN DE SEGURIDAD
SALVAGUARDIAS IMPORTANTES
No acatar las siguientes advertencias puede provocar descarga eléctrica, incendio, lesiones
personales, daños materiales o daños al producto.
• No conecte el suministro principal de agua al tubo o suministro de agua caliente (solo conéctelo al
suministro de agua fría).
• Después de la instalación, asegúrese de revisar todas las conexiones de suministro de agua para
ver si presentan fugas. Las arandelas de goma se deberán colocar donde corresponde para las
mangueras de conexión de agua y la válvula en T.
• No abra ni cierre el asiento o la tapa del asiento con fuerza excesiva.
• Tenga cuidado de que la orina no entre en contacto con el producto. No hacerlo así puede provocar
malos olores o mal funcionamiento.
• Si el producto no se usará por un período de tiempo prolongado, desconecte el cable de corriente,
cierre la válvula principal de suministro de agua y drene el agua restante del depósito de agua.
• No retire la manguera del bidé con fuerza excesiva.
• No use adelgazador, benceno, compuestos químicos ácidos, cloro o detergente con ácido
clorhídrico en el producto o cerca del mismo. Esto puede provocar corrosión a las partes metálicas
o decoloración/rayaduras en el cuerpo del bidé.
• Este aparato no está diseñado para ser usado por personas (incluidos niños y personas mayores)
con discapacidades físicas, sensoriales o mentales, o carentes de experiencia y conocimiento, a
menos que se les haya brindado supervisión o entrenamiento con respecto al uso del aparato por
parte de una persona responsable de su seguridad.
• Lo niños deberán ser supervisados para asegurar que no jueguen con el aparato.
PRECAUCIÓN
ADVERTENCIA
• Nunca utilice este producto si se ha dañado el cable o la clavija, si no está funcionando
apropiadamente, si se ha caído o dañado, o si ha caído al agua. Comuníquese al Centro de Servicio
Brondell para solicitar una revisión y reparación.
• Mantenga el cable alejado de superficies calientes y de rejillas de calefacción.
• Nunca bloquee las aberturas de ventilación del producto ni lo coloque sobre una superficie blanda,
tal como una cama o un sillón, donde las aberturas de ventilación pudieran quedar bloqueadas.
Mantenga las aberturas de ventilación libres de pelusa, cabello, etc.
• Nunca deje caer ni inserte objeto alguno en alguna abertura o manguera.
• No utilice el producto en exteriores ni donde se estén usando productos en aerosol (rociadores) o
donde pueda estar expuesto a oxígeno.
• Conecte este producto solo a un tomacorriente con conexión apropiada a tierra. Consulte las
instrucciones de conexión a tierra en las siguientes páginas del manual.
• Conecte este producto sólo a un tomacorriente con conexión apropiada a tierra. Consulte las
Instrucciones de Conexión a Tierra.
GUARDE ESTAS INSTRUCCIONES

31
Este producto solo se debe usar con un tomacorriente tipo
GFCI (interruptor de falla a tierra) con conexión a tierra y con
un cable eléctri-co con clavija de tres agujas como se muestra
a la derecha. En caso de un cortocircuito eléctrico, el uso de un
tomacorriente tipo GFCI con conexión a tierra reduce el riesgo de
descarga eléctrica.
Este producto está equipado con un cable con conexión a tierra;
se debe usar solamente en un circuito nominal de 120 V (mínimo
de 15 amperios) y se debe conectar a un tomacorriente que tenga
conexión apropiada a tierra con un cortacircuitos GFCI como se
muestra. Reemplace o repare inmediatamente un cable dañado.
Uso de un cable de extensión
Si es necesario el uso de un cable de extensión, use solo los que estén calificados para un mínimo
de 15 amperios y que tengan cable de tres alambres y clavija de tres agujas con conexión a tierra.
Conéctelo solo en un tomacorriente de tres ranuras tipo GFCI con conexión a tierra que acepte la
clavija del producto. Reemplace o repare inmediatamente todo cable dañado.
INSTRUCCIONES DE CONEXIÓN A TIERRA Y TOMACORRIENTE TIPO GFI
El uso inapropiado de la clavija con conexión a tierra puede provocar riesgo
de descarga eléctrica.
• Si se requiere la reparación o el reemplazo del cable o la clavija, no conecte el cable
de conexión a tierra a ninguna de las terminales de aguja plana. El cable con aislan-
te verde (ya sea con o sin franja amarilla) es el cable de conexión a tierra.
• Consulte a un electricista calificado si no comprende por completo las instrucciones
de conexión a tierra o si tiene duda de si el aparato está conectado a tierra apropia-
damente.
INFORMACIÓN DE SEGURIDAD
SALVAGUARDIAS IMPORTANTES
GUARDE ESTAS INSTRUCCIONES
Tomacorriente tipo GFCI
Probar
Reiniciar
Aguja de conexión
a tierra

32
INFORMACIÓN DEL PRODUCTO
Lavado de Agua Caliente Posterior y Femenino – experimente lo último en limpieza con
configuración ajustable de temperatura, posición, presión, masaje, y oscilación.
Boquillas posicionables – cada boquilla cuenta con cinco posiciones diferentes para asegurar la
mayor comodidad y un lavado completo.
Presión y Temperatura de Agua Ajustables – cada modo de lavado (Frontal y Posterior) cuenta
con cuatro niveles de temperatura de agua y cinco niveles de presión de agua disponibles.
Masaje – cuando se activa, la presión del agua aumenta y disminuye automáticamente para
proporcionar un aerosol de limpieza pulsante.
Secador con Aire Caliente – incluye temperatura ajustable con tres niveles para una experiencia
de limpieza sin usar las manos y una reducción en el uso e incluso eliminación de papel higiénico.
Oscilación de las Boquillas – la función de movimiento brinda una limpieza con masaje oscilatorio
durante el ciclo de lavado que asegura una limpieza completa y cómoda.
Función Auto – activa un ajuste preestablecido para un lavado posterior, seguido por un ciclo de
secado.
Asiento ergonómico con calor – con cuatro niveles de temperatura (Alta/Media/Baja/Apagado).
Luz nocturna – la incorporación de una luz nocturna iluminadora significa que ya no se sentirá
deslumbrado las veces que se levante y vaya al baño durante la noche.
Asiento y tapa de cerrado suave – el asiento y la tapa con cerrado suave “anti-golpes” permiten
un uso amable.
Modo Eco – Cuando se activa, esta función reduce automáticamente el agua y la temperatura del
asiento.
CARACTERÍSTICAS DEL PRODUCTO CL510

33
DIMENSIONES DEL PRODUCTO
14 cm
Distancia entre los orificios
de montaje
46.2 cm
46.2 cm
37.8 cm
37.8 cm
19.8 cm
19.8 cm
6.9 cm
6.9 cm
41.7 cm
41.7 cm
34.5 cm
34.5 cm
10.9 cm
10.9 cm
Vista superior alargada
Vista superior redonda

34
PARTES DEL PRODUCTO
1. Tapa
2. Sensor del Asiento
3. Asiento caliente
4. Secador con Aire Caliente
5. Ensamblaje de las Boquillas
6. Luz LED nocturna
7. Panel de Control
8. Cable de Corriente
9. Entrada de Agua y Filtro
de malla
10. Tapón de drenaje
11. Placa de montaje
8
9
10
7
6
1
11
5
4
2
3
INFORMACIÓN DEL PRODUCTO cont.

35
PARTES DE LA INSTALACIÓN
1. Pernos de Montaje (2)
2. Arandela Cónica de Goma (2)
3. Arandela Plana (2)
4. Tuercas (2)
5. Placa de Montaje
6. Soportes de montaje superior (2)
7. Conector de Válvula en T con
arandela de goma
8. Manguera del bidé
1
5
2
3
6
4
8
7
INSTALACIÓN DEL PRODUCTO

36
NO ENCHUFE EL PRODUCTO MIENTRAS ESTÉ AL REVÉS
Esto puede dañar los componentes internos.
VEA NUESTRO VIDEO DE INSTALACIÓN
Las instrucciones de instalación para todos los productos Swash se pueden encontrar en línea
en brondell.com.
REVISE LA DISTANCIA ENTRE LOS PERNOS
Este bidé solo puede instalarse en baños con una extensión del agujero del perno de 13,97 cm
(véase Dimensiones del Producto en la página 33 para más información).
REVISE SI LA INSTALACIÓN ES DE MONTAJE SUPERIOR
Si su instalación solo tiene acceso superior a los pernos de montaje que sujetan el asiento al
inodoro, utilice los soportes de montaje superior incluidos en el paquete de hardware (consulte la
página 38).
REVISE SI HAY UNA VÁLVULA DE LLENADO OCULTA EN EL INODORO
Muchos inodoros modernos tienen diseños estilizados cuyo fin es cubrir y disimular las
conexiones de mangueras, lo cual dificulta o impide la instalación estándar de la unidad Swash.
En tal caso, recomendamos usar nuestra válvula en T alternativa para asiento con bidé Swash,
que puede encontrar en Brondell.com.
REVISE EL TUBO DE SUMINISTRO DE AGUA
Revise el tubo que conecta el depósito del inodoro a la válvula de corte de agua. Si es tubo
rígido, podría necesitar comprar una manguera flexible para reemplazarlo antes de instalar el
asiento Swash. La extensión de la manguera y la medida de los conectores varían.
LOS RESTOS DE HUMEDAD SON NORMALES
Cada producto es probado con agua pura durante la producción para asegurar la mayor calidad
y el más alto desempeño. Es normal encontrar una pequeña cantidad de restos de humedad en
el producto, el depósito y el filtro.
HERRAMIENTAS
Se podría requerir un destornillador Phillips (cabeza de estrella) o estándar para retirar el asiento
del inodoro existente y se podría requerir una llave inglesa estándar para las conexiones de
suministro de agua que estén muy apretadas. La cinta de Teflón puede ser útil para crear un sello
hermético entre las conexiones de las mangueras.
ANTES DE LA INSTALACIÓN
INSTALACIÓN DEL PRODUCTO cont.

37
1. Extracción del asiento existente del inodoro
a. Levante las tapas de la bisagra y con un destornillador retire los pernos de montaje.
b. Retire el asiento del inodoro. Conserve para su uso posterior.
Lea estas instrucciones con cuidado antes de instalar el asiento Swash. No hacerlo podría provo-
car derrames, fugas o daños al producto.
NOTA: Los pasos pueden variar según el tipo de asiento e inodoro.
2. Cierre la válvula de suministro de agua y descargue el
inodoro.
a. Cierre la válvula del agua para detener el flujo.
b. Descargue el inodoro y sostenga la manija para vaciar el
depósito por completo.
c. Desconecte la manguera de suministro de agua del
depósito del inodoro. No la desconecte de la válvula de
suministro de agua.
3. Conecte la parte superior de la válvula t a la conexión de
agua entrante en la parte inferior del tanque del inodoro.
4. Conecte el tubo de suministro de agua que viene de la
pared a la parte inferior de la válvula en T.
NOTAS:
• La válvula en T se conecta a la válvula de llenado
directamente debajo del depósito del inodoro. No se
conecta en la pared.
• Solo conecte al tubo de suministro de agua fría del
inodoro.
• Si el tubo de suministro de agua es rígido, podría
necesitar reemplazarlo antes de continuar.
NOTAS:
• Quizás desee colocar un contenedor debajo del depósito
para captar el agua excedente.
• No continúe sin haber completado los pasos anteriores.
• No hacerlo podría provocar derrames, fugas o daños al
asiento Swash.
Pasos 3-4
tanque del
inodoro
válvula
en T
Manguera de
suministro de
agua fría
Paso 2c
INSTALACIÓN DEL ASIENTO SWASH

38
INSTALACIÓN DEL ASIENTO SWASH (cont.)
7. Conecte la manguera del bidé al asiento
a. Conecte el lado en codo de la manguera del bidé a la
entrada de agua. Apriete con la mano para asegurarla.
Tenga cuidado de no torcer la manguera del bidé, no
doblarla excesivamente, ni barrer la rosca de plástico al
conectar la manguera en el asiento del bidé.
Paso 7a
5. Instale la placa de montaje para instalación estándar
(consulte paso 6 para obtener instrucciones sobre el uso de
los soportes de montaje superior)
a. Coloque la placa de montaje ajustable sobre los agujeros
de montaje en el inodoro, con el lado de goma hacia aba-
jo y la flecha apuntando hacia la taza del inodoro.
b. Inserte los pernos de montaje a través de la placa
de montaje y los agujeros de montaje del inodoro.
Asegúrese de que la cabeza cuadrada del perno de mon-
taje esté a nivel con los lados de la placa de montaje.
c. Deslice la arandela cónica de goma, la arandela plana y
luego la tuerca en los pernos de montaje debajo de la
taza del inodoro y apriete la tuerca para mantener fija la
placa de montaje.
Pasos 5b & 5c
6.Instale la placa de montaje para los asientos de inodoro
montados en la parte superior (consulte paso 5 para
obtener instrucciones sobre la instalación estándar). Este
método utilizará una combinación de los soportes de
montaje superior incluidos y los pernos de montaje del
asiento del inodoro original.
a. Coloque la placa de montaje ajustable sobre los agujeros
de montaje en el inodoro, con el lado de goma hacia
abajo y la flecha apuntando hacia la taza del inodoro.
b. Coloque los soportes de montaje superior suministrados
con el lado plano hacia abajo en las ranuras del soporte
de montaje, sobre los orificios de los pernos.
c. Inserte los pernos de montaje del asiento del inodoro
original a través de los soportes de montaje superior y en
los orificios roscados del perno del inodoro, usando un
destornillador para apretar.
Pasos 6b & 6c
INSTALACIÓN DEL PRODUCTO cont.

39
INSTALACIÓN DEL ASIENTO SWASH (cont.)
NOTAS:
• Asegúrese de usar solamente un tomacorriente tipo GFCI (interruptor de falla a tierra) con
conexión a tierra. En caso de cortocircuito, un tomacorriente tipo GFCI con conexión a tierra
podría ayudar a evitar una descarga eléctrica o lesiones.
• Si es necesario el uso de un cable de extensión, use solamente los que estén calificados
para un mínimo de 15 amperios y que tengan cable de tres alambres y una clavija de tres
agujas con conexión a tierra.
12. Oprima el botón “REAR WASH” en el brazo de control para llenar el tanque de agua. El bidet
emitirá un pitido continuo mientras se llena y emitirá un pitido largo cuando el tanque de agua
esté lleno. Espere 3-5 minutos para que el agua caliente, y entonces el Swash estará listo para
usar.
13. Siga las instrucciones de uso del asiento Swash en la página 43.
9. Conecte el extremo abierto de la Manguera del Bidé a la
válvula en T.
Paso 9
10. Abra el suministro de agua
a. Abra la válvula principal de suministro de agua
lentamente y revise si hay fugas.
b. Espere 5 minutos, revise de nuevo y si no hay fugas,
continúe.
11. Inserte el cable de corriente en el tomacorriente.
a. Si el indicador de Encendido no está iluminado, oprima
cualquier botón en el panel de control.
8. Fije el asiento Swash a la placa de montaje
a. Coloque el asiento Swash sobre la taza del inodoro
enfrente de la placa de montaje y deslice el asiento en
la placa hasta que esté asegurado.
b. Si el asiento queda demasiado corto o demasiado
largo para el inodoro, ajuste la placa de montaje según
corresponda. Para ajustar la placa de montaje, afloje las
tuercas debajo del inodoro y deslice el asiento hacia
delante o hacia atrás según se requiera. Una vez que el
asiento esté alineado apropiadamente, apriete las
tuercas para fijarlo en su lugar.
Paso 8b

40
INSTALACIÓN DEL FILTRO DE BIDÉ EXTERNO
1. Cierre la válvula de suministro de agua y descargue el
inodoro.
a. Cierre la válvula del agua para detener el flujo.
b. Descargue el inodoro y sostenga la manija para vaciar
el depósito por completo.
2. Desconecte la manguera del bidé de la válvula en T.
3. Conecte el extremo hembra del filtro del asiento Swash a
la conexión abierta de la válvula en T.
4. Conecte la manguera del bidé al extremo macho del filtro
del asiento Swash.
5. Vuelva a abrir la válvula de suministro de agua del
inodoro.
FLOW
FLOW
Paso 2
Paso 3
Paso 4
NOTA:
• Los clientes cuyo suministro es de agua dura, agua de pozo y agua blanda pueden
extender la duración de su asiento con bidé con la compra e instalación de un filtro de
agua en línea externo que se utilice con el asiento Swash. El filtro del bidé se deberá
cambiar cada seis meses.
INSTALACIÓN DEL PRODUCTO cont.

41
USO DEL ASIENTO SWASH
PANEL DE CONTROL DEL CL510
Botón e Indicadores de
Temperatura del Agua
Botones de Posición
de Boquillas
Botónes y Indicadores
de Presión del Agua y
Temperatura de Secado
Botón e Indicadores de
Temperatura del asiento
9
8
7
6
Botón e Indicador del
Modo Eco
Indicador de Encendido
Botón del Modo Auto
Botón e Indicador de la
Luz Nocturna
10
11
12
13
1
3
4
2
Botón de Masaje
Botón de parar
Lavado Frontal /
Botón de Movimiento
Lavado Posterior /
Botón de Movimiento
Botón de Secado
5

42
PANEL DE CONTROL DEL CL510 cont.)
1. Botón de parar
Detiene todas las funciones de lavado y secado que actualmente se estén ejecutando. Oprima y
sostenga este botón durante cuatro segundos para apagar el bidé.
2. Lavado Posterior / Botón de Movimiento
Oprima una vez para iniciar el lavado posterior. Oprima una vez más para iniciar la oscilación de la
boquilla (movimiento repetitivo de boquilla hacia delante y hacia atrás).
3. Lavado Frontal / Botón de Movimiento
Oprima una vez para iniciar el lavado frontal. Oprima una vez más para iniciar la oscilación de la
boquilla (movimiento repetitivo de boquilla hacia delante y hacia atrás).
4. Botón de Secado
Oprima una vez para iniciar un ciclo de dos minutos de Secado con Aire Caliente.
5. Botón de Masaje
Presionando este botón mientras se está ejecutando el ciclo de lavado permite al agua aumentar y
disminuir repetidamente la presión en un patrón de pulsaciones. Oprima una vez más para detener el
masaje.
6. Botones e Indicadores de Presión del Agua y Temperatura de Secado
Oprima los botones “+” y “-” para aumentar y disminuir la presión del flujo de agua en uno de los cinco
ajustes. Presionando estos botones mientras está operando el Secado de Aire Caliente ajustará la
temperatura de Secado. Los ajustes se guardarán para el siguiente uso.
7. Botones de Posición de Boquillas
Oprima los botones de flecha arriba y flecha abajo para ajustar la posición de las boquillas hacia delante
y hacia atrás durante el ciclo de lavado. Entre cada uso, las boquillas volverán a la posición media.
8. Botón e Indicadores de Temperatura del Agua
Oprima y sostenga el botón “Water Temp” para configurar la temperatura del flujo de agua en uno de
los cuatro ajustes (Baja / LO – 34 ºC (93,2 F), Media / Med – 37 ºC (98,6 F), Alta / HI – 40 ºC (104 F) y
APAGADO). Los ajustes se guardarán para el siguiente uso.
9. Botón e Indicadores de Temperatura del Asiento
Oprima y sostenga el botón “Seat Temp” para ajustar la temperatura del asiento en uno de cuatro
ajustes (Baja / LO – 35 ºC (95 F), Media / Med – 38 ºC (100,4 F), Alta / HI – 40 ºC (104 F) y APAGADO).
Los ajustes se guardarán para el siguiente uso.
10. Indicador de Encendido
Este indicador se encenderá cuando el bidé esté encendido y se apagará cuando el bidé esté apagado.
Para apagar el bidé oprima y sostenga el botón “STOP” durante al menos cuatro segundos.
11. Botón e Indicador del Modo Eco
Oprima y suelte el botón “Eco Mode” para seleccionar o apagar el Modo Eco. El indicador se encenderá
cuando se haya seleccionado el Modo Eco. Consulte la página 44 para más información.
12. Botón e Indicador de Luz Nocturna
Oprima el botón “Luz nocturna” para activar la luz nocturna (el indicador luminoso se iluminará).
Oprima nuevamente para desactivar el indicador luminoso nocturno.
13. Botón Modo Auto
Oprima este botón una vez para iniciar un ciclo de lavado posterior de un minuto, seguido de un ciclo
de secado de un minuto. Consulte la página 44 para más información.
USO DEL ASIENTO SWASH cont.

43
USO DEL ASIENTO SWASH CL510
Preparación para el Lavado
Sentarse en el asiento para asegurar el contacto de la piel con el Sensor del Asiento. Una vez
que se hace contacto, el asiento realizará varias funciones de forma automática.
1. El asiento emitirá una señal auditiva para hacerle saber que el sensor del asiento se ha
activado.
2. Las luces del indicador de presión de agua se encenderán, mostrando la configuración actual.
3. Si el bidé se ajustó al modo Eco, la temperatura del asiento y del agua aumentará a los ajustes
de temperatura establecidos.
Lavado con agua caliente
Cuando esté listo para lavar, oprima una vez el botón de lavado posterior (“Rear”) o frontal
(“Front”) en el panel de control para iniciar el lavado. La boquilla se autolimpiará, se extenderá
dentro de la taza del inodoro, rociará durante dos minutos, se apagará automáticamente, se
retraerá y se autolimpiará una vez más.
1. Si se oprime el botón “Rear” o “Front” una segunda vez mientras está funcionando el ciclo de
lavado, la boquilla oscilará hacia delante y hacia atrás, proporcionando un rango más amplio de
lavado. Oprima una vez más para cancelar la función de movimiento.
2. Durante el lavado, los usuarios pueden ajustar la temperatura y presión del agua y la posición
de la boquilla, así como iniciar la función de masaje siguiendo las instrucciones en la página 42.
3. Si desea detener el lavado antes de que termine el ciclo de dos minutos, oprima el botón
“Stop” para interrumpir el flujo de agua.
4. Después de un uso prolongado la temperatura del agua puede disminuir si tenemos
seleccionada la configuración de temperatura BAJA, MEDIA, o ALTA. Para volver a tener agua
más caliente, detenga las funciones de lavado durante tres minutos para que el bidé pueda
recalentar el agua.
NOTA:
• Las funciones de lavado no funcionarán a menos que el sensor en el asiento detecte a
alguien sentado (Sensor de conductividad de la piel). Para anular el sensor del asiento,
consulte las instrucciones de la página 45.
Función de Secador con Aire Caliente
Oprima el botón “Dry” para activar el secador de aire caliente. El secador operará por dos
minutos y se apagará automáticamente.
1. Mientras el secador está en funcionamiento, los usuarios pueden ajustar la temperatura del
mismo a un nivel cómodo usando los botones de secado “+” y “-”. La temperatura de secado
se verá reflejada en los cinco indicadores LED.
2. Si desea detener el secador antes de que pasen los tres minutos, oprima Parar.

44
USO DEL ASIENTO SWASH CL510 cont.)
Modo Autolimpieza
Al presionar el botón “Modo automático” se iniciará un lavado trasero de un minuto con los
siguientes parámetros preestablecidos:
• Temperatura del asiento ajustada a media
• La oscilación de la boquilla está activada
• Presión de agua ajustada al nivel 3
• Temperatura del agua a medio
Una vez finalizado el ciclo de lavado, el modo automático iniciará un ciclo de secado con aire
caliente de un minuto en el nivel 2.
Nota: Todos los ajustes de lavado y secado son ajustables mientras se está ejecutando el ciclo
de lavado automático, según sus preferencias.
USO DEL ASIENTO SWASH cont.
Modo Eco
En este modo la temperatura del asiento y el agua en el depósito se calentará a 30ºC (86ºF)
cuando el bidé no esté en uso. Una vez que una persona se sienta en el bidé, el Swash
regresará a la última configuración de temperatura de asiento y agua. Para seleccionar esta
opción oprima y suelte el botón “Eco Mode” para iluminar el indicador.

45
OPERACIONES EN MODO ESPECIAL
Anulación del Sensor de Asiento
El sensor del asiento se activa de fábrica de forma predeterminada. Completar los siguientes
pasos evitará el sensor del cuerpo situado en el asiento y permitirá que las funciones de lavado y
las funciones secas funcionen sin que el sensor se active. Tenga cuidado en este modo.
1. Desenchufe el asiento de bidet Swash.
2. Oprima los dos botones de presión de agua / seco (+ y –) y enchufe el asiento mientras
sostiene los dos botones hacia abajo.
3. Mantenga presionados los dos botones de presión de agua / temperatura seca durante cinco
segundos. Se escuchará un pitido que indicará que se ha anulado el sensor del asiento. Para
probar que el procedimiento funcionó, presione el botón Seco. Si la secadora de aire caliente
se enciende, sin que nadie se sienta en el asiento, ha anulado exitosamente el sensor de
asiento.
4. Puede volver a usar el asiento como si fuera normal.
5. Para reactivar el sensor de asiento, repita los pasos 1-3.
NOTA:
• No se siente en el asiento cuando esté en Operaciones en Modo Especial. El proceso no
funcionará mientras el asiento está ocupado.
Activar/Desactivar el Modo Silencioso
De forma predeterminada, el Swash emitirá un pitido para confirmar los comandos del panel de
control. Siga los pasos a continuación para silenciar los sonidos de los pitidos.
1. Oprima y mantenga presionado el botón de lavado / movimiento trasero y el botón “–” de
presión de agua / seco al mismo tiempo durante cuatro segundos.
2. Se escuchará un pitido que indicará que se ha activado el modo silencioso.
3. Para desactivar el modo silencioso, repita los pasos 1-2.

46
ESPECIFICACIONES DEL PRODUCTO
ASIENTO SWASH BRONDELL CON BIDÉ AVANZADO
Modelo
CL510-EW, CL510-RW
Voltaje eléctrico
120 V, 60 Hz
Consumo eléctrico
660 W
Presión de suministro de agua
14.2 psi – 106.6 psi
Dimensiones
Alargado: 47 cm x 53 cm x 15.5 cm /
Redondo: 47 cm x 50 cm x 15.5 cm
Peso
Alargado: 4.4 kg / Redondo: 4.3 kg
Límite de peso asiento/tapa
125kg / 81kg
Temperatura de funcionamiento
3° C – 40° C
Filtro de malla
11mm x 15mm diámetro
DISPOSITIVO DE LAVADO CON AGUA CALIENTE
Lavado posterior
Máximo 0,95L por minuto, autolimpieza de boquillas automática
Lavado frontal
Máximo 0,95L por minuto, autolimpieza de boquillas automática
Tiempo estándar
Lavado posterior: 2 minutos / Lavado frontal: 2 minutos
Control de presión del agua
5 niveles
Control de temperatura del agua
4 niveles: Apagado - temperatura de agua entrante,
Baja - 34 °C, Media – 37 °C, Alta – 40 °C
Consumo eléctrico del calentador
600W
Dispositivos de seguridad
Fusible térmico, termostato, sensor de nivel de agua
ASIENTO CALIENTE
Control de temperatura del asiento
4 niveles: Apagado - temperatura ambiente
Baja - 35 °C, Media - 38 °C, Alta - 40 °C
Consumo eléctrico del calentador
55 W
Dispositivos de seguridad
Termostato
NOTA:
• Las especificaciones indicadas anteriormente están sujetas a cambio sin previo aviso con el
fin de mejorar el desempeño del producto.

47
MANTENIMIENTO
Use un trapo suave húmedo y un limpiador suave (tal como jabón para platos, Simple Green o
Windex) para limpiar el asiento. NO talle ni utilice productos ásperos abrasivos para limpiar el
asiento Swash. NO use adelgazador, benceno, compuestos químicos ácidos, cloro o detergente
con ácido clorhídrico. Esto puede provocar corrosión a las partes metálicas o decoloración/
rayaduras en el cuerpo del bidé.
Para una limpieza más completa, puede retirar el asiento Swash. Para quitar el bidé, tire con
fuerza el bidé, alejándolo del depósito del inodoro y sacándolo de la placa de montaje.
Desconecte el Swash de la fuente de corriente antes de la limpieza o extracción
del asiento.
1. Oprima y suelte simultáneamente los botones de lavado
posterior y frontal en el panel de control. La boquilla se
extenderá en la taza del inodoro.
2. Limpie con cuidado la boquilla con un trapo suave o un
cepillo de dientes.
3. Para retraer la boquilla oprima el botón “Parar”.
LIMPIEZA Y EXTRACCIÓN DEL ASIENTO
LIMPIEZA DE BOQUILLAS
NOTA:
• Tenga cuidado de no dejar productos del hogar y de belleza en contacto con el asiento
del bidé, lo cual podría provocar decoloración irreversible. La mayoría de las manchas
se pueden eliminar con una mezcla 1:1 de alcohol y agua en un trapo suave o toalla. Sin
embargo, algunas manchas permanentes resultan de dejar sustancias en el asiento
mientras el calentador está activado. Tenga precaución con productos del hogar y de
belleza (incluidos entre otros diversos productos para el cabello y aromatizantes en aerosol,
lociones, jabón líquido para el cuerpo, bronceadores, cremas corporales y aceites) que
entren en contacto con el asiento. Lave cualquier sustancia que entre en contacto con
el asiento tan pronto como sea posible. Si es necesario, se pueden comprar partes de
repuesto del asiento a través del Servicio al Cliente de Brondell.
Paso 1
NOTA:
• La función de limpieza de la boquilla no funcionará si el
asiento está ocupado o si el sensor del asiento ha sido
anulado.

48
Los intervalos de limpieza variarán dependiendo del uso y la
calidad del agua. Se recomienda revisar el filtro al menos una
vez al año.
1. Cierre el suministro de agua y sostenga la palanca de
descarga del inodoro hasta que se elimine todo el agua del
depósito.
2. Desconecte el Swash, retire el bidé del inodoro y
desconecte la manguera del bidé. Quizás desee usar una
tina para captar el agua que escurra de la manguera del
bidé.
3. Retire el filtro de malla de la entrada de agua con unas
pinzas o unos alicantes con punta de aguja.
4. Limpie el filtro con un cepillo de dientes bajo un chorro
de agua para retirar efectivamente cualquier sustancia o
acumulación extraña.
5. Vuelva a colocar el filtro de malla y verifique con cuidado
que esté instalado correctamente. Si no está instalado
apropiadamente, podría provocar que el producto presente
fugas de agua.
6. Reconecte la manguera del bidé y vuelva a colocar el
asiento en el inodoro. Conecte el cable de nuevo y restaure
el suministro de agua.
LIMPIEZA DEL FILTRO DE MALLA
Paso 3
MANTENIMIENTO cont.
ALMACENAMIENTO Y USO DEL PRODUCTO
Desuso por corto plazo
Si no se usará el producto por varias semanas, puede simplemente desconectarlo. También
puede considerar cortar el suministro de agua en la pared para mayor precaución.
Desuso por largo tiempo
Si no se usará el producto por un período de tiempo largo
(más de cuatro meses), deberá desconectar la unidad,
cortar el suministro de agua en la pared, retirar el Swash del
inodoro tirando con fuerza del Swash alojándolo del depósito
del inodoro y sacándolo de la placa de montaje. Retire la
manguera del bidé y drene el calentador de agua. Para drenar
el calentador de agua, retire el tapón de drenaje y la parte
posterior del asiento del bidé girándolo en sentido contrario a
las agujas del reloj en 90 grados hacia “ABIERTO” y luego tire
de él hacia fuera de modo que el agua residual se drene.

49
SOLUCIÓN DE PROBLEMAS
Si el bidé parece estar funcionando de forma anormal, por favor revise los consejos para
solución de problemas antes de llamar al Centro de Servicio Brondell ya que la mayoría de
los problemas se resuelven fácilmente con algunos pasos simples. Si no puede resolver el
problema después de revisar los siguientes puntos, llame al Centro de Servicio marcando
888-542-3355, de lunes a viernes, de 9:00 a 17:00 PST (Hora Normal del Pacífico) o envíenos
un correo electrónico a [email protected].
Verifique antes de continuar:
• Asegúrese de que el asiento Swash esté conectado a la corriente eléctrica y que el
tomacorriente funcione apropiadamente.
• Asegúrese de revisar y probar el botón de reinicio en el tomacorriente tipo GFCI
(tomacorriente GFCI estándar de 120 V).
• Asegúrese de que la válvula principal de agua esté abierta.
• Asegúrese de que el asiento no esté en el Modo Eco.
• Confirme que no hay fugas en las mangueras o el suministro de agua.
• Asegúrese de que el filtro de malla esté limpio y no tenga acumulaciones o suciedad (vea la
sección de mantenimiento).
Después de revisar los puntos anteriores, consulte la siguiente tabla de solución de problemas
para tratar de encontrar soluciones adicionales.
Problema Causa(s) posible(s) Solución(es)
El asiento con bidé
no funciona.
1. El bidé no está conectado.
2. No hay corriente eléctrica hacia el
asiento Swash.
3. El agua entrante está demasiado
caliente.
4. No se activa el sensor del asiento.
1. Asegúrese de que el bidé esté conectado.
2. Revise y reinicie el tomacorriente tipo GFCI.
3. Asegúrese de que el asiento del bidé esté
conectado al suministro de agua fría.
4a. Ajuste su posición en el asiento para que
cubra totalmente el sensor del asiento.
4b. Anular el sensor de asiento
La unidad se apaga
durante el uso.
1. El tiempo de lavado excedió el
tiempo del ciclo.
2. Corte de corriente
3. El suministro de agua está demasi-
ado caliente.
1. Los ciclos de lavado funcionan durante dos
minutos.
2. Revise y reinicie el tomacorriente GFCI.
3. Asegúrese de que el asiento Swash esté
conectado solamente al suministro de agua fría.

50
SOLUCIÓN DE PROBLEMAS cont.
Problema Causa(s) posible(s) Solución(es)
Flujo de agua bajo o
presión de rociado
baja.
1. El filtro está obstruido.
2. La válvula de suministro de agua no
está abierta por completo.
3. Las boquillas están sucias.
4. Filtro de bidé externo
5. Niveles de presión y amplitud de
rociado
1. Retire, limpie y vuelva a instalar el filtro de
malla (vea la sección de mantenimiento).
2. Verifique que la válvula de suministro de
agua en la pared esté completamente abierta.
3. Limpie las boquillas (vea la sección de
mantenimiento).
4. Si cuenta con un filtro de bidé externo,
revíselo y reemplácelo de ser necesario.
5. Ajuste los niveles de presión de agua en
el control remoto para aumentarla y ajuste
también los niveles de amplitud de rociado en
el control remoto.
Las boquillas no
funcionan
apropiadamente.
1. Las boquillas están sucias.
2. El filtro está obstruido.
3. La presión del agua es demasiado
baja.
4. Filtro de bidé externo
1. Limpie las boquillas (vea la sección de
mantenimiento).
2. Retire, limpie y vuelva a instalar el filtro de
malla (vea la sección de mantenimiento).
3. Revise que la válvula de suministro de agua
en la pared esté completamente abierta.
4. Si cuenta con un filtro de bidé externo,
revíselo y reemplácelo de ser necesario.
El asiento no está
caliente.
1. El control de temperatura del
asiento está apagado.
1. Asegúrese de que el control de temperatura
del asiento esté encendido.
La función de lavado
de bidé no funciona o
no rocía.
1. El sensor del cuerpo no detecta que
usted está sentado en la unidad Swash.
1a. Ajuste su posición en el asiento para que
cubra totalmente el sensor del cuerpo (vea la
página 34).
1b. Anule el sensor del cuerpo – consulte la
sección de operación en modo especial en
la página 45 para desbloquear el sensor del
cuerpo en el asiento.
El agua (de rociado)
no está caliente.
1. El control de temperatura del agua
está apagado.
2. Se quemó el fusible reiniciable.
1. Asegúrese de que el control de temperatura
del agua esté encendido (Baja- luz azul, Me-
dia- luz rosa, Alta - luz roja, Apagado - sin luz).
2. El fusible bimetálico reiniciable se puede
quemar si la temperatura excede el nivel
normal. El bidé no funcionará y mostrará un
mensaje de error hasta que el bidé se enfríe.
El fusible se reiniciará automáticamente.

51
Problema Causa(s) posible(s) Solución(es)
Fluye agua antes o
después del uso.
1. Sale agua de las boquillas.
1a. El agua que sale por entre las boquillas
antes o después del ciclo de lavado es
del ciclo de autolimpieza. No se debe a un
funcionamiento defectuoso.
1b. Es posible que restos de agua se
escurran en el inodoro por varios segundos
después de un ciclo de lavado o un ciclo
de autolimpieza. Esto no se debe a un
funcionamiento defectuoso.
Hay fugas de agua de
otras áreas además
de las boquillas.
1. Hay fugas de agua de la válvula
en T.
2. Hay fugas de agua de la conexión
de la manguera del bidé.
3. Hay fugas de agua de debajo del
asiento.
4. Hay fugas de agua de detrás del
asiento.
1. Asegúrese de que el empaque de goma
esté insertado correctamente en la válvula en
T (el lado plano hacia abajo con el reborde
hacia arriba hacia la conexión del depósito
del inodoro) y apriete firmemente el conector.
2. Asegúrese de que la manguera del bidé
esté conectada correctamente y apretada.
Revise las arandelas de goma y no las apriete
en exceso.
3. Revise si hay algo entre el filtro de malla
y el bidé. Retire, limpie y vuelva a instalar el
filtro de malla. Revise si el filtro está dañado
(vea la sección de mantenimiento).
4. Revise el tapón del deposito de agua en la
parte posterior del asiento (vea la sección de
mantenimiento bajo almacenamiento y uso
del producto).
La temperatura del
agua es baja
1. El agua sale fría
2. El agua sale tibia
3. El agua comienza a salir caliente
pero disminuye su temperatura
1. El nivel de temperatura del agua está
apagado o configurado en “LO”. Ajuste la
temperatura en el panel de control.
2. Apagar el Modo Eco.
3. Puede utilizar agua caliente durante unos
40 segundos en la configuración “MED”.
Detenga todas las funciones de lavado para
permitir que calentador pueda calentar el
agua.

52
Los productos Brondell están respaldados por algunas de las garantías más completas en la industria. Brondell
garantiza que todos los productos (con excepción de los consumibles) estarán libres de defectos en materiales
y mano de obra bajo uso y servicio normales.
CL510 Garantía residencial limitada por 1 año
• 100% de cobertura en todas las partes y mano de obra para todo el producto durante el primer año a partir
de la fecha original de compra.
CL510 Garantía comercial
• Período de garantía de 1 año desde la fecha de compra original para todos los productos de Brondell. Las
garantías pueden no ser aplicables a los productos que se utilizan para fines comerciales pesados, hospital u
otras aplicaciones no residenciales de alto uso.
Exclusiones y limitaciones
1. BRONDELL garantiza que sus productos están libres de cualquier tipo de defectos de fabricación, en
condiciones de uso y servicio normales. Esta garantía se extiende solo al COMPRADOR ORIGINAL.
2. Las obligaciones de BRONDELL, según esta garantía, se limitan a reparaciones o reemplazos, a criterio
de BRONDELL, de productos o partes que se encuentren defectuosas, en tanto tales productos hayan sido
instalados adecuadamente y utilizados de acuerdo con las instrucciones. BRONDELL se reserva el derecho de
realizar tales inspecciones según lo considere necesario, para determinar la causa del defecto. BRONDELL no
cobrará por la reparación o reemplazo de partes en relación con reparaciones de garantía durante el primer
año, a partir de la fecha de compra de todos los productos, a excepción de aquellos que puedan estar sujetos a
limitaciones de uso comercial.
3. BRONDELL no se responsabiliza por los costos de renovación, devolución (envío) o reinstalación de
productos. Esta garantía NO se aplica en los siguientes casos:
• Daño o extravío durante el envío.
• Daño o extravío producido por causas naturales o humanas, que exceden a los controles de BRONDELL,
incluidos incendios, sismos, inundaciones, etc.
• Daño o extravío como resultado de sedimentos o material extraño contenido en el sistema de agua.
• Daño o extravío como resultado de negligencia o instalación inadecuada, incluida la instalación de una
unidad en un medioambiente hostil o peligroso.
• Daño o extravío como resultado de la renovación, reparación inadecuada o modificación del producto, o el
mantenimiento inadecuado, incluido el daño causado por el cloro o productos derivados del cloro
• Daño o extravío como resultado de actos que no son responsabilidad de Brondell para los cuales el producto
no está específicamente preparado.
4. Esta garantía le otorga derechos legales específicos. Usted puede ejercer otros derechos, según el estado
donde se encuentre.
ESTA GARANTÍA ESCRITA ES LA ÚNICA EMITIDA POR BRONDELL. LA REPARACIÓN O EL REEMPLAZO, SEGÚN
LOS TÉRMINOS ESTABLECIDOS POR ESTA GARANTÍA, CONSTITUYEN LA ÚNICA SOLUCIÓN DISPONIBLE
PARA EL COMPRADOR. BRONDELL NO SE RESPONSABILIZA POR EL EXTRAVÍO DE USO DEL PRODUCTO
U OTROS DAÑOS INCIDENTALES, ESPECIALES, RESULTANTES O POR LOS GASTOS INCURRIDOS POR EL
COMPRADOR, GASTOS DE TRABAJO, OTROS COSTOS DERIVADOS DE LA INSTALACIÓN O EXTRACCIÓN DEL
PRODUCTO, COSTOS DE REPARACIÓN POR PARTE DE TERCEROS O CUALQUIER OTRO TIPO DE GASTOS
NO ESPECIFICADOS ANTERIORMENTE. A EXCEPCIÓN DEL ALCANCE APLICABLE DE LA LEY, CUALQUIER
TIPO DE GARANTÍA IMPLÍCITA, INCLUSO LA DE COMERCIABILIDAD, QUEDA EXPRESAMENTE LIMITADA A LA
DURACIÓN DE ESTA GARANTÍA. ALGUNOS ESTADOS NO PERMITEN LIMITACIONES, POR LO QUE ES POSIBLE
QUE LAS LIMITACIONES Y EXCLUSIONES ANTERIORES NO SE APLIQUEN A SU CASO.
Cómo Obtener Servicio
Para obtener servicio de reparación bajo esta garantía, debe comunicarse con un Centro de Servicios
BRONDELL autorizado para obtener un número de RMA (Autorización de devolución de mercadería). La unidad
devuelta debe estar acompañada de una copia del comprobante de compra original para que la garantía sea
válida. Lleve o envíe la unidad prepaga al Centro de Servicios BRONDELL autorizado más cercano, junto con su
número de RMA y el comprobante de compra.
Para obtener su número de RMA y para localizar el Centro de Servicios BRONDELL más cercano,
llame al 1-888-542-3355, Lunes – Viernes, 9am-5pm, PST.
GARANTÍA

53
CONTACTAR:
Brondell, Inc.
PO Box 470085
San Francisco, CA 94147-0085
Phone: 1-888-542-3355
Email: [email protected]
Web: www.brondell.com
Si tiene preguntas, póngase en contacto con Brondell
Servicio al Cliente: 1-888-542-3355 (Lunes – Viernes, 9am-5pm, PST)
FABRICADO POR:
Brondell, Inc.
PO Box 470085
San Francisco, CA 94147-0085
Por favor, guarde los registros de recibos de las reclamaciones
de garantía.
Hecho en Corea

-
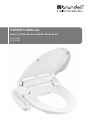 1
1
-
 2
2
-
 3
3
-
 4
4
-
 5
5
-
 6
6
-
 7
7
-
 8
8
-
 9
9
-
 10
10
-
 11
11
-
 12
12
-
 13
13
-
 14
14
-
 15
15
-
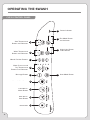 16
16
-
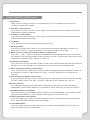 17
17
-
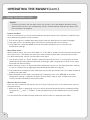 18
18
-
 19
19
-
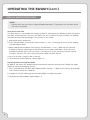 20
20
-
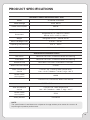 21
21
-
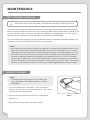 22
22
-
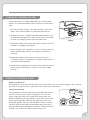 23
23
-
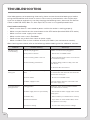 24
24
-
 25
25
-
 26
26
-
 27
27
-
 28
28
-
 29
29
-
 30
30
-
 31
31
-
 32
32
-
 33
33
-
 34
34
-
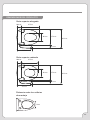 35
35
-
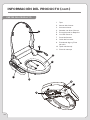 36
36
-
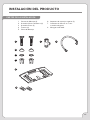 37
37
-
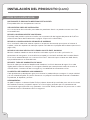 38
38
-
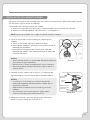 39
39
-
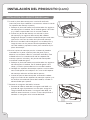 40
40
-
 41
41
-
 42
42
-
 43
43
-
 44
44
-
 45
45
-
 46
46
-
 47
47
-
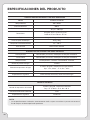 48
48
-
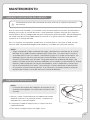 49
49
-
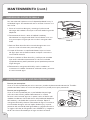 50
50
-
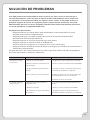 51
51
-
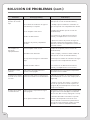 52
52
-
 53
53
-
 54
54
-
 55
55
-
 56
56


brondell CL510-RW Manual de usuario
- Tipo
- Manual de usuario
- Este manual también es adecuado para
en otros idiomas
- English: brondell CL510-RW User manual
Artículos relacionados
-
brondell Swash CL510 El manual del propietario
-
-
brondell CSG15 Manual de usuario
-
brondell LES512 El manual del propietario
-
brondell DS725-RW Manual de usuario
-
-
brondell SWASH LT99 El manual del propietario
-
brondell S1400-RB Manual de usuario
-
-
Otros documentos
-
 SmartBidet SB-410 Guía de instalación
-
 OVE Decors VANDA-STS Guía de instalación
-
Moen EB2000 El manual del propietario
-
OVE Decors 15WST-LENA00-000 Guía de instalación
-
 OVE Decors TUVA Guía de instalación
-
Clorox 4460030627 Instrucciones de operación
-
Dometic 8100, 8500, 8600, 8700, 8900 Instrucciones de operación
-
 Mediterraneo CS0076331321CV Guía de instalación
-
American Standard 297AA204-291 Manual de usuario


