
VER. 2, 2/28/2012
Assembly and Operating
Instructions for Model:
591320
!
PLEASE READ ALL RULES FOR SAFE
OPERATION AND FOOD SAFETY BEFORE USING.
Smoky Mountain Series
Bravo Premium Charcoal Grill
with Offset Smoker Firebox
®

. . . . . . . . . . . . . . . . . . . . . . . . . . . . . . . . . . . . . . . . . . . . . . . . .1
. . . . . . . . . . . . . . . . . . . . . . . . . . . . . . . . . . . . . . . . . . . . . . . . .1
. . . . . . . . . . . . . . . . . . . . . . . . . . . . . . . . . . . . . . . . . . . . . . . . .1
. . . . . . . . . . . . . . . . . . . . . . . . . . . . . . . . . . . . . . . . . . . . . . . . .1
. . . . . . . . . . . . . . . . . . . . . . . . . . . . . . . . . . . . . . . . . . . . . . . . .1
. . . . . . . . . . . . . . . . . . . . . . . . . . . . . . . . . . . . . . . . . . . . . . . . .2
. . . . . . . . . . . . . . . . . . . . . . . . . . . . . . . . . . . . . . . . . . . . . . . . .2
. . . . . . . . . . . . . . . . . . . . . . . . . . . . . . . . . . . . . . . . . . . . . . . . .1
. . . . . . . . . . . . . . . . . . . . . . . . . . . . . . . . . . . . . . . . . . . . . . . . .1
. . . . . . . . . . . . . . . . . . . . . . . . . . . . . . . . . . . . . . . . . . . . . . . . .8
. . . . . . . . . . . . . . . . . . . . . . . . . . . . . . . . . . . . . . . . . . . . . . . . .12
• THE GRILL IS FOR OUTDOOR USE ONLY!
• KEEP THE GRILL A MINIMUM OF 10 FT. AWAY FROM BUILDINGS,
STRUCTURES, ANY FLAMMABLE ITEMS AND VEHICLES.
• NEVER USE THE GRILL UNDER COVERED PORCHES, AWNINGS,
LOW HANGING TREE BRANCHES, TRELLIS, OR OVERHANGS OF
ANY KIND.
• NEVER USE INSIDE ENCLOSED AREAS SUCH PATIOS, GARAGES,
ENCLOSED ROOMS, BUILDINGS OR TENTS.
• ALWAYS USE THE GRILL ON A HARD, STABLE AND LEVEL
SURFACE.
• THE GRILL IS FOR ADULT USE ONLY.
• WARNING! NEVER USE GASOLINE, ALCOHOL OR VOLATILE
FLUIDS TO START OR RESTART FIRES. USE CHARCOAL LIGHTER
FLUID ONLY TO START CHARCOAL. READ AND FOLLOW
CHARCOAL LIGHTER FLUID MANUFACTURER INSTRUCTIONS
CLOSELY.
• DO NOT STORE LIGHTER FLUID OR OTHER FLAMMABLE LIQUIDS
OR MATERIALS IN THE STORAGE CABINET.
• KEEP CHILDREN AND PETS AWAY WHILE THE GRILL IS BEING
USED.
• MITTENS OR GLOVES WILL BE NEEDED TO OPEN THE LID AND
DOORS AS SURFACES WILL BE HOT.
• MOST SURFACES OF THIS GRILL BECOME HOT, USE CAUTION.
• DO NOT MOVE THE GRILL WHILE IT IS BEING USED.
• DO NOT LEAVE UNATTENDED AT ANY TIME WHILE IN USE.
• DO NOT USE IN WINDY CONDITIONS.
• USE CAUTION WHEN OPENING THE LID AS HOT STEAM OR A
FLARE UP COULD CAUSE BURNS.
• BEFORE EACH USE, MAKE SURE THE GRILL IS IN GOOD WORKING
CONDITION.
• FOR LONGER PRODUCT LIFE, KEEP THE CHARCOAL FIRES TO A
RESPECTABLE SIZE, DO NOT OVERLOAD.
• DO NOT ALLOW CHARCOAL TO COME IN CONTACT WITH THE
GRILL SIDES, KEEP CHARCOAL INSIDE CHARCOAL PANS.
• ALLOWING THE CHARCOAL TO CONTACT THE GRILL SIDES WILL
GREATLY REDUCE THE LIFE OF THE METAL AND THE FINISH.
• DO NOT ALTER THE GRILL IN ANY WAY.
• DO NOT USE THE GRILL UNTIL IT IS COMPLETELY ASSEMBLED
WITH ALL PARTS SECURELY TIGHTENED.
• THE SIDE SHELVES CAN HOLD 15 LBS. SAFELY, DO NOT PUT
MORE THAN 15 LBS. ON THE SIDE SHELVES.
• USE CAUTION WHEN HANDLING THE CAST IRON COOKING
GRATES, CAST IRON CAN CHIP, CRACK OR BREAK IF HIT OR
STRUCK WITH A SHARP OBJECT. DO NOT DROP THE CAST IRON
GRATES ON THE GROUND!
• DO NOT LEAN OR PUSH DOWN ON THE SIDE SHELVES OR SIDE
SHELF HANDLES.
• USE CAUTION AFTER THE FIRE HAS BEEN EXTINGUISHED-
SURFACES WILL REMAIN HOT FOR SOME TIME.
• BE SURE ALL COALS ARE COLD BEFORE DISPOSING.
• DISPOSE OF COALS PROPERLY.
• THE GRILL MUST BE COMPLETELY COOLED OFF AND ALL
EMBERS MUST BE EXTINGUISHED BEFORE ANY COVER CAN
BE USED.
PAGE 2
READ FIRST!
RULES FOR BRAVO PREMIUM
CHARCOAL GRILL SAFE OPERATION.
!
• RAW MEAT AND POULTRY HAS TO BE KEPT SEPARATE FROM
READY TO EAT FOOD.
• USE CLEAN PLATTERS AND UTENSILS FOR HANDLING COOKED
FOODS.
• COOK POULTRY AND MEATS THOROUGHLY TO KILL BACTERIA.
• USE INSTANT-READ THERMOMETER TO ENSURE PROPER
INTERNAL FOOD TEMPERATURES.
• KEEP PREPARED FOOD AND LEFTOVERS REFRIGERATED.
• WASH HANDS, UTENSILS AND SURFACES WITH SOAP AND HOT
WATER PRIOR TO AND AFTER HANDLING RAW MEAT AND
POULTRY.
FOOD SAFETY
!
. . . . . . . . . . . . . . . . . . . . . . . . . . . . . . . . . . . . . . . . . . . . . . . . .1
. . . . . . . . . . . . . . . . . . . . . . . . . . . . . . . . . . . . . . . . . . . . . . . . .1
. . . . . . . . . . . . . . . . . . . . . . . . . . . . . . . . . . . . . . . . . . . . . . . . .1
. . . . . . . . . . . . . . . . . . . . . . . . . . . . . . . . . . . . . . . . . . . . . . . . .1
. . . . . . . . . . . . . . . . . . . . . . . . . . . . . . . . . . . . . . . . . . . . . . . . .1
. . . . . . . . . . . . . . . . . . . . . . . . . . . . . . . . . . . . . . . . . . . . . . . . .2
. . . . . . . . . . . . . . . . . . . . . . . . . . . . . . . . . . . . . . . . . . . . . . . . .1
. . . . . . . . . . . . . . . . . . . . . . . . . . . . . . . . . . . . . . . . . . . . . . . . .1
. . . . . . . . . . . . . . . . . . . . . . . . . . . . . . . . . . . . . . . . . . . . . . . . .1
. . . . . . . . . . . . . . . . . . . . . . . . . . . . . . . . . . . . . . . . . . . . . . . . .1
. . . . . . . . . . . . . . . . . . . . . . . . . . . . . . . . . . . . . . . . . . . . . . . . .1
. . . . . . . . . . . . . . . . . . . . . . . . . . . . . . . . . . . . . . . . . . . . . . . . .1
. . . . . . . . . . . . . . . . . . . . . . . . . . . . . . . . . . . . . . . . . . . . . . . . .1
. . . . . . . . . . . . . . . . . . . . . . . . . . . . . . . . . . . . . . . . . . . . . . . . .1
. . . . . . . . . . . . . . . . . . . . . . . . . . . . . . . . . . . . . . . . . . . . . . . . .1
. . . . . . . . . . . . . . . . . . . . . . . . . . . . . . . . . . . . . . . . . . . . . . . . .1
. . . . . . . . . . . . . . . . . . . . . . . . . . . . . . . . . . . . . . . . . . . . . . . . .2
. . . . . . . . . . . . . . . . . . . . . . . . . . . . . . . . . . . . . . . . . . . . . . . . .1
. . . . . . . . . . . . . . . . . . . . . . . . . . . . . . . . . . . . . . . . . . . . . . . . .1
. . . . . . . . . . . . . . . . . . . . . . . . . . . . . . . . . . . . . . . . . . . . . . . . .4
. . . . . . . . . . . . . . . . . . . . . . . . . . . . . . . . . . . . . . . . . . . . . . . . .2
. . . . . . . . . . . . . . . . . . . . . . . . . . . . . . . . . . . . . . . . . . . . . . . . .2
. . . . . . . . . . . . . . . . . . . . . . . . . . . . . . . . . . . . . . . . . . . . . . . . . . .4
. . . . . . . . . . . . . . . . . . . . . . . . . . . . . . . . . . . . . . . . . . . . . . . . .2
. . . . . . . . . . . . . . . . . . . . . . . . . . . . . . . . . . . . . . . . . . . . . . . . .2
. . . . . . . . . . . . . . . . . . . . . . . . . . . . . . . . . . . . . . . . . . . . . . . . .2
. . . . . . . . . . . . . . . . . . . . . . . . . . . . . . . . . . . . . . . . . . . . . . . . .1
. . . . . . . . . . . . . . . . . . . . . . . . . . . . . . . . . . . . . . . . . . . . . . . . .1
. . . . . . . . . . . . . . . . . . . . . . . . . . . . . . . . . . . . . . . . . . . . . . . . .2
. . . . . . . . . . . . . . . . . . . . . . . . . . . . . . . . . . . . . . . . . . . . . . . . .8
. . . . . . . . . . . . . . . . . . . . . . . . . . . . . . . . . . . . . . . . . . . . . . . . .4
. . . . . . . . . . . . . . . . . . . . . . . . . . . . . . . . . . . . . . . . . . . . . . . . .36
. . . . . . . . . . . . . . . . . . . . . . . . . . . . . . . . . . . . . . . . . . . . . . . . .4
. . . . . . . . . . . . . . . . . . . . . . . . . . . . . . . . . . . . . . . . . . . . . . . . .12
. . . . . . . . . . . . . . . . . . . . . . . . . . . . . . . . . . . . . . . . . . . . . . . . .4
. . . . . . . . . . . . . . . . . . . . . . . . . . . . . . . . . . . . . . . . . . . . . . . . .14
. . . . . . . . . . . . . . . . . . . . . . . . . . . . . . . . . . . . . . . . . . . . . . . . .10
. . . . . . . . . . . . . . . . . . . . . . . . . . . . . . . . . . . . . . . . . . . . . . . . .8
. . . . . . . . . . . . . . . . . . . . . . . . . . . . . . . . . . . . . . . . . . . . . . . . .1
A.
B.
C.
D.
E.
F.
H.
JJ.
KK.
LL.
M.
N.
QQ.
R.
T.
U.
V.
W.
X.
Y.
AA.
AB.
AC.
AD.
AE.
AF.
AG.
AH.
AJ.
AK.
AP.
AQ.
AR.
AT.
AX.
AY.
AZ.
BA.
BB.
GRILL PARTS QTY
When unpacking the grill from the carton, make sure you find
and become familiar with all the parts listed below. Use
caution as some parts may have sharp edges.
PARTS LIST
LID AND COOKING CHAMBER PRE-ASSEMBLY
LEG, FRONT RIGHT
LEG, FRONT LEFT
LEG, BACK RIGHT
LEG, BACK LEFT
CABINET PANEL, SIDE
CABINET PANEL, BACK
RIGHT CABINET DOOR
LEFT CABINET DOOR
BOTTOM SHELF
ASH TRAY
SIDE SHELF WITH HANDLE
FRONT CONNECTOR WITH DOOR STOP
LEG CONNECTOR
CHARCOAL PAN ASSEMBLY, RIGHT
CHARCOAL PAN ASSEMBLY, LEFT
CAST IRON COOKING GRATE
WARMING GRATE
LID HANDLE
SMALL HANDLE
CASTER
LOCKING CASTER
VENT
CHARCOAL PAN ADJUSTMENT CRANK HANDLE ASSEMBLY
ACCESS DOOR HANDLE ASSEMBLY
THREADED SLEEVE BRACKET
TEMPERATURE GAUGE WITH BRASS HEXNUT
LOGO PLATE
LARGE FINISHING WASHER
SMALL FINISHING WASHER
M5 x 15MM BOLT
M6 x 10MM BOLT
M6 x 50MM BOLT
M6 KEP HEXNUT
M6 LOCKING HEXNUT
M4 x 10MM BOLT
M6 x 15MM BOLT
M6 x 10MM ROUND HEAD BOLT
DOOR STOP ASSEMBLY
BE.
BF.
BG.
BH.
BJ.
BK.
BL.
BM.
BN.
BP.
BQ.
OFFSET PARTS QTY
OFFSET SMOKER FIREBOX
OFFSET SMOKER FIREBOX LID
OFFSET SMOKER FIREBOX DOOR
OFFSET SMOKER FIREBOX CAST IRON COOKING GRATE
OFFSET SMOKER FIREBOX WOOD GRATE
OFFSET SMOKER FIREBOX LID HINGE
OFFSET SMOKER FIREBOX DOOR HINGE
OFFSET SMOKER FIREBOX DOOR HANDLE PRE-ASSEMBLY
OFFSET SMOKER FIREBOX DOOR HANDLE CATCH
M6 x 35MM BOLT
M4 KEP HEXNUT
CARBON MONOXIDE HAZARD!
BURNING WOOD OR CHARCOAL
PRODUCES CARBON MONOXIDE, WHICH
HAS NO ODOR AND CAN CAUSE DEATH IF
BURNED IN ENCLOSED AREAS. NEVER
BURN WOOD OR CHARCOAL INSIDE
HOMES, VEHICLES, TENTS OR ANY OTHER
ENCLOSED AREAS.
WARNING!
!

HARDWARE AND SMALL PART LISTING
AP
(4) M5 x 15MM
BOLT
AQ
(36) M6 x 10MM
BOLT
AR
(4) M6 x 50MM
BOLT
AY
(14) M4 x 10MM
BOLT
AZ
(10) M6 x 15MM
BOLT
BA
(8) M6 x 10MM
ROUND HEAD BOLT
AT
(12) M6 KEP
HEXNUT
AX
(4) M6 LOCKING
HEXNUT
AK
(8) SMALL
FINISHING WASHER
AJ
(2) LARGE
FINISHING WASHER
AF
(2) THREADED
SLEEVE BRACKET
x 4
x 36
x 4 x 14 x 10 x 8
x 12 x 4
x 2 x 8 x 2
PAGE 3
BP
(8) M6 x 35MM
BOLT
x 8
BQ
(12) M4 KEP
HEXNUT
x 12
NOTE: PART AF
IS PRE-ASSEMBLED TO
PART AD

A
(1) LID AND COOKING
CHAMBER ASSEMBLY
PART LISTING
PAGE 4
B
(1) LEG,
FRONT RIGHT
C
(1) LEG,
FRONT LEFT
D
(1) LEG,
BACK RIGHT
E
(1) LEG,
BACK LEFT
F
(2) CABINET
PANEL, SIDE
H
(1) CABINET
PANEL, BACK
JJ
(1) RIGHT CABINET DOOR
KK
(1) LEFT CABINET DOOR
(1) BOTTOM SHELF
LL

PART LISTING
PAGE 5
M
(1) ASH TRAY
N
(1) SIDE SHELF
WITH HANDLE
QQ
(1) FRONT CONNECTOR
WITH DOOR STOP
R
(2) LEG CONNECTOR
T
(1) CHARCOAL PAN
ASSEMBLY, RIGHT
U
(1) CHARCOAL PAN
ASSEMBLY, LEFT
V
(2) CAST IRON
COOKING GRATE
W
(1) WARMING GRATE

PART LISTING
PAGE 6
X
(1) LID HANDLE
Y
(4) SMALL HANDLE
AA
(2) CASTER
AB
(2) LOCKING
CASTER
AC
(4) VENT
AD
(2) CHARCOAL PAN
ADJUSTMENT CRANK
HANDLE ASSEMBLY
AE
(2) ACCESS DOOR
HANDLE ASSEMBLY
AG
(1) TEMPERATURE GAUGE
WITH BRASS HEXNUT
AH
(1) LOGO PLATE
BB
(1) DOOR STOP
ASSEMBLY

OFFSET PART LISTING
PAGE 7
BE
(1) OFFSET SMOKER
FIREBOX
BF
(1) OFFSET SMOKER
FIREBOX LID
BG
(1) OFFSET SMOKER
FIREBOX DOOR
BH
(1) OFFSET SMOKER
FIREBOX COOKING GRATE
BK
(2) OFFSET SMOKER
FIREBOX LID HINGE
BM
(1) OFFSET SMOKER
FIREBOX DOOR HANDLE
PRE-ASSEMBLY
BJ
(1) OFFSET SMOKER
FIREBOX WOOD GRATE
BL
(2) OFFSET SMOKER
FIREBOX DOOR HINGE
BN
(1) OFFSET SMOKER
FIREBOX DOOR HANDLE
CATCH

BRAVO CHARCOAL GRILL
ASSEMBLY INSTRUCTIONS
STEP 1: ASSEMBLE THE LEGS TO SIDE
CABINET PANELS
Assembly time: 90 minutes
A Phillips or plain screwdriver,
adjustable wrench and needle nose
pliers are needed for assembly.
Arrange the (4) legs [ B,C,D,E ] in the
correct orientation and assemble the
side cabinet panels [ F ] to the legs using
(4) 10MM bolts [ AQ ] on each side.
Tighten bolts securely.
STEP 2: ASSEMBLE THE BOTTOM
SHELF TO THE LEGS
Assemble the bottom shelf [ LL ] to the
legs using (4) 50MM bolts [ AR ].
Assemble the door stop assembly [ BB ]
to the bottom shelf [ LL ] using (2)
M4 x 10MM bolts [ AY ] and (2) M4
hexnuts [ BQ ]. It may be necessary to
unclip the magnets to assemble the
doorstop.
Tighten all bolts securely.
STEP 3: ASSEMBLE THE BACK PANEL
Assemble the back panel [ H ] to the legs
[ D,E ] using (4) 10MM bolts [ AQ ].
Tighten bolts securely.
For easier reading and visual
reference, part letters are
described in either black or gray
circles in each step.
K
AG
Black circle part letters are
parts added for the step.
Gray circle part letters are
reference parts for the step.
EXAMPLE
1
STEP
3
STEP
AQ
F
D
F
C
E
H
AQ
D
E
PAGE 8
B
DO NOT RETURN PRODUCT TO THE STORE.
IF YOU HAVE QUESTIONS OR HAVE
TROUBLE WITH ASSEMBLY, PLEASE CALL
1-877-347-4557 FOR ASSISTANCE.
2
STEP
C
E
D
B
AR
LL
AY
BB
BQ
MAGNET

BRAVO CHARCOAL GRILL
ASSEMBLY INSTRUCTIONS
STEP 4: ASSEMBLE THE FRONT AND
LEG CONNECTORS
First, assemble the front connector
[ QQ ] as shown to the legs using (4)
10MM bolts [ AQ ]. Tighten the bolts
securely.
Next, assemble the (2) leg connectors
[ R ] to the legs as shown using (4)
10MM bolts [ AQ ]. Tighten bolts
securely.
STEP 5: ASSEMBLE THE CASTERS
Carefully turn the leg and cabinet
assembly over. Assemble the (4) casters
[ AA,AB ] to the leg threaded inserts.
Assemble the locking casters on the
front side.
PAGE 9
DO NOT RETURN PRODUCT TO THE STORE.
IF YOU HAVE QUESTIONS OR HAVE
TROUBLE WITH ASSEMBLY, PLEASE CALL
1-877-347-4557 FOR ASSISTANCE.
4
STEP
AQ
R
R
QQ
AQ
5
STEP
CARDBOARD OR BLANKET
AA
AB
AB

BRAVO CHARCOAL GRILL
ASSEMBLY INSTRUCTIONS
STEP 7: ASSEMBLE LID AND
COOKING CHAMBER TO THE LEGS
First make sure the locking casters are in
the locked position so the leg and
cabinet will not move around.
Very carefully place the lid and cooking
chamber [ A ] onto the legs. Adjust so
the front of the cooking chamber is
flush with the front of the legs and
resting on top of the legs. See STEP 7A.
Carefully open the lid and keep the
cooking chamber steady. Use (8) 10MM
bolts [ BA ] to assemble the cooking
chamber to the legs. Tighten all bolts
securely. See STEP 7B.
Avoid pinched fingers
and hands! Keep fingers and hands
clear of the connection area.
CAUTION !!!
2 persons are needed
for this step.
ATTENTION !!
!
STEP 6: ASSEMBLE THE CABINET
DOORS
Carefully turn the leg and cabinet
assembly back over onto the casters.
Assemble the cabinet doors [ JJ,KK ] to
the bottom shelf. First identify the left
and right doors. Put the fixed pins into
the bottom shelf [ LL ] and press the top
pins to insert into the front connector
[ QQ ].
Assemble (1) handle [ Y ] to each door
[ JJ,KK ] using (1) small finishing washer
[ AK ] and (1) M6 x 15MM bolt [ AZ ] per
door. Tighten bolts securely.
A
A
BA
PAGE 10
BA
7A
STEP
7B
STEP
FIXED PINS
SPRING LOADED PINS
JJ
KK
6
STEP
KK
AK
JJ
Y
AZ
LL
QQ

BRAVO CHARCOAL GRILL
ASSEMBLY INSTRUCTIONS
STEP 8: ASSEMBLE LID HANDLE AND
TEMPERATURE GAUGE
Assemble the lid handle [ X ] to the lid
using (2) 15MM bolts [ AZ ] and (2) large
finishing washers [ AJ ]. Assemble as
shown.
Remove the brass hexnut from the
temperature gauge [ AG ] and align the
probe key with the lock on the logo
plate [ AH ].
Align the temperature gauge and logo
plate probe and pins with the holes in
the lid. Secure to lid with the brass
hexnut.
STEP 9: ASSEMBLE THE VENTS
Assemble (2) vents [ AC ] to the lid using
(1) M6 x 10MM bolt [ AQ ] and (1) M6
locking hexnut [ AX ] per vent. Tighten
enough to allow for some friction.
Assemble (1) vent to the cooking
chamber using (1) M6 x 10MM bolt
[ AQ ] and (1) M6 locking hexnut [ AX ].
Tighten enough to allow for some
friction.
PAGE 11
AG
8
STEP
9
STEP
AH
X
AJ
AZ
A
BRASS HEXNUT
DO NOT RETURN PRODUCT TO THE STORE.
IF YOU HAVE QUESTIONS OR HAVE
TROUBLE WITH ASSEMBLY, PLEASE CALL
1-877-347-4557 FOR ASSISTANCE.
AC
AC
AX
AQ
AC
A

BRAVO CHARCOAL GRILL
ASSEMBLY INSTRUCTIONS
STEP 10: ASSEMBLE THE CHARCOAL
PAN ASSEMBLIES
Assemble one assembly at a time to
avoid mixing up parts.
Identify the right charcoal pan assembly
[ T ]. See STEP 10A. Remove the push
plate rod from the right charcoal pan
assembly [ T ]. Using needle nose pliers
or pliers, pull the (2) locking pins from
the rod ends. Remove the push plate
rod from the (2) top support bars and
set aside. See STEP 10B.
Align the holes and assemble the
charcoal pan assembly to the cooking
chamber.
Start on the push plate side. Insert the
threaded sleeve bracket [ AF ] into the
hole and assemble the side with (2)
M5 x 15MM bolts [ AP ] as shown. See
STEP 10C.
Return the push plate rod to the
assembly inserting the ends of the rod
into the brackets and support bars.
Secure the rod with the locking pins.
See STEP 10D.
Finish by using (2) M6 x 10MM bolts
[ AQ ] to assemble the opposite side to
the cooking chamber. See STEP 10E.
Assemble the left charcoal pan [ U ]
assembly the same way.
LID NOT SHOWN IN DRAWINGS
FOR CLARITY
NOTE
PAGE 12
T
10A
STEP
AP
10B
STEP
AF
10E
STEP
T
LOCKING PIN
PUSH PLATE ROD
AQ
10C
STEP
AP
AF
PUSH PLATE ROD
LOCKING PIN
SUPPORT BAR
SUPPORT BAR
T
10D
STEP
LOCKING PIN
PUSH PLATE ROD

STEP 12: ASSEMBLE THE ACCESS
DOOR HANDLES
Cut the nylon ties and remove the ties,
polybag and packing material around
the access doors.
Remove the latch and M6 kep hexnut
from the access door handle [ AE ]. The
flat washer remains and assembles on
the outside. Insert the threaded end of
the handle into the access door hole.
Slide the latch onto the handle so it
aligns with the key. Note the position
of the latch. Secure with the M6 kep
hexnut. Tighten securely.
Assembly is the same for the other side.
BRAVO CHARCOAL GRILL
ASSEMBLY INSTRUCTIONS
STEP 11: ASSEMBLE THE CHARCOAL
PAN CRANK ADJUSTMENT HANDLES
Thread the charcoal pan crank
adjustment handles [ AD ] into the
threaded sleeve brackets [ AF ].
Crank the pans up and down a few
times to make sure they work properly.
Secure the handle with (1) M4 x 10MM
bolt [ AY ] per handle. See STEP 11A.
PAGE 13
11
STEP
KEP HEXNUT
AD
AD
12
STEP
AE
LATCH
ACCESS DOOR
AD
AY
11A
STEP
DO NOT RETURN PRODUCT TO THE STORE.
IF YOU HAVE QUESTIONS OR HAVE
TROUBLE WITH ASSEMBLY, PLEASE CALL
1-877-347-4557 FOR ASSISTANCE.
AF
AE

BRAVO CHARCOAL GRILL
ASSEMBLY INSTRUCTIONS
STEP 13: ASSEMBLE THE SIDE SHELF
Assemble the side shelf [ N ] to the legs
using (4) M6 x 10MM bolts [ AQ ].
Tighten bolts securely.
Note the weight limit on the side shelf
is 15 lbs.
PAGE 14
DO NOT RETURN PRODUCT TO THE STORE.
IF YOU HAVE QUESTIONS OR HAVE
TROUBLE WITH ASSEMBLY, PLEASE CALL
1-877-347-4557 FOR ASSISTANCE.
STEP 14: ASSEMBLE THE OFFSET
SMOKER FIREBOX
Assemble the offset smoker firebox
[ BE ] to the smoker chamber using (4)
M6 x 10MM bolts [ AQ ] and (4) M6 kep
hexnuts [ AT ]. Tighten bolts securely.
14
STEP
13
STEP
AQ
N
AQ
AT
BE

BRAVO CHARCOAL GRILL
ASSEMBLY INSTRUCTIONS
DO NOT RETURN PRODUCT TO THE STORE.
IF YOU HAVE QUESTIONS OR HAVE
TROUBLE WITH ASSEMBLY, PLEASE CALL
1-877-347-4557 FOR ASSISTANCE.
STEP 15: ASSEMBLE THE OFFSET
SMOKER FIREBOX LID
Assemble the offset smoker firebox lid
[ BF ] to the firebox [ BE ] using (2)
hinges [ BK ], (8) M6 x 35MM bolts [ BP ]
and (8) M6 kep hexnuts [ AT ]. Tighten
all bolts securely.
STEP 16: ASSEMBLE THE OFFSET
SMOKER FIREBOX DOOR AND HANDLE
Assemble the offset smoker firebox door
[ BG ] to the firebox using (2) hinges
[ BL ], (8) M4 x 10MM bolts [ AY ] and (8)
M4 kep hexnuts [ BQ ]. Tighten bolts
securely.
Assemble the vent [ AC ] to the firebox
door [ BG ] using (1) M6 x 10MM bolt
[ AQ ] and (1) M6 locking hexnut [ AX].
Tighten enough to allow for some
friction.
Take off the hexnut and one washer
from the pre-assembled handle [ BM ]
and insert into the door [ BG ]. Replace
the washer and hexnut to assemble.
Tighten enough to allow for some
friction.
Assemble the handle catch [ BN ] to the
firebox using (2) M4 x 10MM bolts [ AY ]
and (2) M4 kep hexnuts [ BQ ]. Tighten
bolts securely.
Assemble the small handle [ Y ] to
the lid [ BF ] using (2) small finishing
washers [ AK ] and (2) M6 x 15MM
bolts [ AZ ]. Tighten all bolts securely.
16
STEP
15
STEP
BG
Y
BQ
BL
AY
BE
AQ
BM
AC
AX
AY
BN
BQ
BF
AZ
AK
BF
BK
BK
BP
AT
BE
PAGE 15

BRAVO CHARCOAL GRILL
ASSEMBLY INSTRUCTIONS
STEP 18: INSERT THE WOOD AND
COOKING GRATES
Place the (2) cast iron cooking grates
[ V ] on the smoker chamber as shown.
Place the offset wood grate [ BJ ] inside
the offset firebox and place the cast iron
cooking grate [ BH ] on the firebox as
shown.
Handle the cooking grates with care as
the cast iron grates can chip, crack or
break if hit or struck with a sharp object.
Do not drop the cast iron grates on the
ground.
STEP 17: ASSEMBLE THE ASH TRAY
AND HANDLE
Assemble the small handle [ Y ] to the
ash tray [ M ] using (2) M6 x 15MM bolts
[ AZ ] and (2) small finishing washers
[ AK ]. Assemble as shown.
Insert the ash tray into the cooking
chamber.
17
STEP
AK
M
AZ
Y
PAGE 16
V
BJ
BH
18
STEP

BRAVO CHARCOAL GRILL
ASSEMBLY INSTRUCTIONS
DO NOT RETURN PRODUCT TO THE STORE.
IF YOU HAVE QUESTIONS OR HAVE
TROUBLE WITH ASSEMBLY, PLEASE CALL
1-877-347-4557 FOR ASSISTANCE.
W
STEP 19: ASSEMBLE THE WARMING
GRATE
Assemble the warming grate [ W ] to
the smoker chamber by aligning the
rods and legs with holes. Assemble as
shown.
19
STEP
PAGE 17

1. Pour the desired amount (3-6 lbs.) of charcoal onto the
charcoal pan(s).
2. Keep all charcoal inside the pans. Do not allow charcoal to
come in contact with the sides. Pick up any loose charcoal that
falls onto the ash pan.
3. Adjust all vents to full open and keep the lid open.
4. Light charcoal according to the charcoal manufacturer
instructions.
5. After the flames have disappeared from the charcoal, close
the lid, keep all vents full open.
6. After about 10-15 minutes, check the charcoal to see that it
has ashed over (turned gray) and the initial starter odors are
gone.
7. Adjust the charcoal or spread the charcoal evenly across the
charcoal pan(s) if necessary.
The adjustable charcoal pans can be moved to within a
few inches of the cooking grate allowing you to sear the
meat and lock in the juices. Searing takes only a few
minutes on each side. Don't allow the meat or food to
burn. After searing, crank the charcoal pans back down
from the top and cook the food to your personal
preference.
OPTIONAL: If preferred, small wood chunks can be added to
the charcoal at this time for flavor and smoke. Crank the
charcoal pans to the lowest position away from the cooking
grates. Carefully open the access door(s) and carefully add
small wood chunks on top of the charcoal. The smoke will be
heavy at first and after a short while will burn with less smoke.
The temperature will spike when the wood is first added. As a
general rule, you will need to add more wood or charcoal when
the temperature drops below 250 degrees. Do not use more
than 2 or 3 wood chunks at a time. DO NOT ALLOW THE
WOOD CHUNKS TO TOUCH OR COME IN CONTACT WITH ANY
SIDE PANEL. Keep wood chunks inside the charcoal pans.
8. The optimum cooking temperature is 300~350 degrees. The
vents may need to be adjusted more open or more closed for
the desired temperature. The type charcoal and the climate
conditions can affect the grill temperature.
9. Carefully wipe the cooking grate surfaces with vegetable oil
to keep the food from sticking.
10. Add meat and food as desired to the cooking grates. Cook
food to your personal preference.
11. Add charcoal or wood as needed through the access doors.
Tip
This grill becomes very hot and possibly the handles. Use caution working
around the grill. Use mittens or oven gloves when opening the lid, access doors,
ash tray or adjusting the vents during use.
WARNING !
BRAVO CHARCOAL GRILL OPERATING INSTRUCTIONS
!
PAGE 18
ADD 3-6 LBS.
OF CHARCOAL
ADD 3-6 LBS.
OF CHARCOAL

The fire is in the offset firebox and the food is cooked in the
smoker chamber (main grill). The smoke and indirect heat pass
through the opening between the offset firebox and the smoker
chamber. Follow these steps for cooking with smoke and indirect
heat. Note that most food needs several hours to cook with this
method. These are the basic instructions.
1. Pour the desired amount (3-6 lbs.) of charcoal onto the offset
firebox wood grate and light the charcoal according to the
charcoal manufacturer instructions. DO NOT ALLOW ANY
CHARCOAL TO TOUCH THE PANEL SIDES.
2. Adjust all vents to full open and keep the offset firebox lid
open.
3. Light charcoal according to the charcoal manufacturer
instructions.
4. After the flames have disappeared from the charcoal, close all
lids and doors, but keep all vents open.
5. After about 10-15 minutes, check the charcoal to see that it has
ashed over (turned gray) and the intial starter odors are gone.
6. Now carefully add about 1-2 lbs. of wood chunks to the fire.
Note! Keep all wood chunks away from the firebox side
panels. DO NOT ALLOW ANY WOOD TO TOUCH THE PANEL
SIDES. The best types of wood for flavor and smoke are pecan,
hickory and mesquite. The smoke will be heavy at first and
after a short while will burn with less smoke.
7. Carefully wipe the cooking grate surfaces with vegetable oil to
keep the food from sticking.
This grill becomes very hot and possibly the handles. Use caution working
around the grill. Use mittens or oven gloves when opening the lid, access doors,
ash tray or adjusting the vents during use.
WARNING !
BRAVO OFFSET FIREBOX SMOKER OPERATING INSTRUCTIONS
!
8. When the smoker chamber temperature reaches 220~250
degrees, add meat and food as desired to the cooking grates.
Cook food to your personal preference.
9. Adjust the vents as needed to control the temperature in the
smoker chamber.
10. As a general rule, you will need to add more wood when the
temperature drops below 200 degrees. 1-2 lbs of wood will
burn for about 1 hour. Each pound of meat will take 1 hour
to cook. These are general rules and will vary depending on
your actual conditions.
PAGE 19
ADD 3-6 LBS.
OF CHARCOAL
+
1-2 LBS. WOOD
OR CHARCOAL
EACH HOUR
OR AS NEEDED

. . . . . . . . . . . . . . . . . . . . .145°F
. . . . . . . . . . . . . . . . . . . . .160°F
. . . . . . . . . . . . . . . . . . . . .165°F
. . . . . . . . . . . . . . . . . . . . .160°F
. . . . . . . . . . . . . . . . . . . . .160°F
. . . . . . . . . . . . . . . . . . . . .170°F
. . . . . . . . . . . . . . . . . . . . .165°F
. . . . . . . . . . . . . . . . . . . . .165°F
. . . . . . . . . . . . . . . . . . . . .145°F
. . . . . . . . . . . . . . . . . . . . .160°F
. . . . . . . . . . . . . . . . . . . . .170°F
. . . . . . . . . . . . . . . . . . . . .145°F
. . . . . . . . . . . . . . . . . . . . .160°F
. . . . . . . . . . . . . . . . . . . . .170°F
. . . . . . . . . . . . . . . . . . . . .145°F
. . . . . . . . . . . . . . . . . . . . .160°F
. . . . . . . . . . . . . . . . . . . . .170°F
FOOD TEMPERATURES
If you are unsure about when food is done, use this chart as a guide for measuring properly cooked
meat temperatures.
Medium rare
Medium
Well done
Steaks & Roasts
Fish
Beef, Pork
Turkey
Ground Meats
Egg Dishes
Medium
Well done
Pork
Turkey
Chicken
Poultry
Medium rare
Medium
Well done
Bison
Medium rare
Medium
Well done
Lamb
Use a high quality meat thermometer with probe to measure the meat temperature. Push probe
into the thickest part of the meat to get an accurate measurement. The temperature gauge on
the grill measures the air temperature of the grill cooking chamber, not the food temperature.
If you still have questions, please see the USDA contact info below.
USDA Meat and Poultry Hotline
1-888-674-6854
TTY: 1-800-256-7072
www.IsItDoneYet.gov
PAGE 20

Landmann® Limited
Distributed by Landmann® USA
Cartersville, GA 30120
www.landmann-usa.com
Made in China
© 2012 Landmann® USA
Congratulations on your
purchase of the Bravo
Premium Charcoal Grill with
Offset Smoker Firebox! At
Landmann USA, we strive
to provide you with an easy
to use, easy to assemble
product. However, in the
unlikely event your package
should have a missing or
defective part, please
contact us at:
customerservice@landmann
-usa.com
-OR-
1-877-347-4557 M-F 8-5 ET.
Proof of purchase may be
required.
Thank you!
NEVER USE GASOLINE,
ALCOHOL OR VOLATILE
FLUIDS TO START OR
RESTART FIRES.
WARNING!
!
HOT!
!
WARNING!
!
HOT SURFACES DURING
USE! USE MITTENS OR
GLOVES ON THESE
PAR TS.
FOR THE BRAVO
AVAILABLE
ACCESSORIES
These custom made accessories
are made just for the Bravo.
COVER
This high quality cover keeps out
the elements.
MODEL 150122
Please visit our website at:
www.landmann-usa.com
-OR-
Call customer service toll free at:
1-800-321-3473
HOT SURFACES
DURING USE!
HANDLES BECOME
WARM TO HOT WITH
EXTENDED USE.
!
!
SIDE SHELF
15 LBS. MAX.
!
!
!
!
!
!
!
!
PAGE 21
!
DO NOT STORE LIGHTER FLUID OR
OTHER FLAMMABLE LIQUIDS OR
MATERIALS IN THE STORAGE CABINET.
!
!
!
!
!
!
!
!
!

LIMITED WARRANTY
Landmann USA (“Landmann”) warrants that this product shall be
free of defects in material and workmanship to the original
purchaser for 90 days. This limited warranty is made exclusively to
the original customer presenting proof of purchase. This warranty
is limited to non-commercial residential use only. Any returned
goods must be shipped prepaid. The ash tray is specifically excluded
from this warranty, as cleaning and maintaining is vital to its life,
lining with aluminum foil will help prolong the use of the ash tray
over time.
This warranty does not cover normal wear of parts or damage
resulting from any of the following: negligence, abuse, misuse,
alteration, improper installation, improper maintenance or failure
to perform normal maintenance, or any use contrary to operating
instructions. Furthermore, Landmann does not warrant in any way
the paint finish of the product or cover damage or deterioration
due to any normal or severe weather conditions or to any chemical
exposure. These warranties do not cover surface scratches or heat
damage, which is considered to be normal wear. These warranties
exclude liability for any indirect, incidental consequential damages
or loss of property of any nature.
Do not return product or any parts to the store or ship to the
manufacturer without written authorization.
Contact Customer Service at: 1-877-3GRILLS (1-877-347-4557) or
grills@landmann-usa.com. Any returned products or parts must be
returned postage prepaid.
These warranties are limited to non-commercial residential use only.
Product repair or replacement as provided under this warranty is
your exclusive remedy. Landmann shall not be liable for any
incidental or consequential damages or breach of any express or
implied warranty on this product or any part thereof, except to the
extent prohibited by applicable law. Some states do not allow the
exclusion or limitation of incidental or consequential damages, or
allow limitation on how long an implied warranty lasts, therefore,
the above limitation or exclusion may not apply to you. This
warranty gives you specific legal rights, and you may also have
other rights, which vary, from state to state.

VER. 2, 2/28/2012
Instrucciones de armado y
funcionamiento para el modelo:
591320
!
POR FAVOR LEA TODAS LAS NORMAS A FIN DE LOGRAR UN
FUNCIONAMIENTO SEGURO Y PARA LA SEGURIDAD
ALIMENTARIA ANTES DE SU USO.
Smoky Mountain Series
Parrilla de carbón Bravo Premium con la
caja de Desplazamiento fuego Fumador
®

. . . . . . . . . . . . . . . . . . . . . . . . . . . . . . . . . . . . . . . . . . . . . . . . .1
. . . . . . . . . . . . . . . . . . . . . . . . . . . . . . . . . . . . . . . . . . . . . . . . .1
. . . . . . . . . . . . . . . . . . . . . . . . . . . . . . . . . . . . . . . . . . . . . . . . .1
. . . . . . . . . . . . . . . . . . . . . . . . . . . . . . . . . . . . . . . . . . . . . . . . .1
. . . . . . . . . . . . . . . . . . . . . . . . . . . . . . . . . . . . . . . . . . . . . . . . .1
. . . . . . . . . . . . . . . . . . . . . . . . . . . . . . . . . . . . . . . . . . . . . . . . .2
. . . . . . . . . . . . . . . . . . . . . . . . . . . . . . . . . . . . . . . . . . . . . . . . .2
. . . . . . . . . . . . . . . . . . . . . . . . . . . . . . . . . . . . . . . . . . . . . . . . .1
. . . . . . . . . . . . . . . . . . . . . . . . . . . . . . . . . . . . . . . . . . . . . . . . .1
. . . . . . . . . . . . . . . . . . . . . . . . . . . . . . . . . . . . . . . . . . . . . . . . .8
. . . . . . . . . . . . . . . . . . . . . . . . . . . . . . . . . . . . . . . . . . . . . . . . .12
• LA PARRILLA ES PARA EL USO AL AIRE LIBRE EXCLUSIVAMENTE!
• MANTENGA LA PARRILLA A UNA DISTANCIA MÍNIMA DE 10 PIES DE
EDIFICIOS, CONSTRUCCIONES Y CUALQUIER ARTÍCULO INFLAMABLE Y
VEHÍCULO.
• NUNCA USE DEBAJO DE PORCHES CUBIERTOS, TOLDOS, RAMAS DE
ÁRBOLES BAJAS, ENREJADOS U OBJETOS SALIENTES DE CUALQUIER TIPO.
• NUNCA USE DENTRO DE ÁREAS CERRADAS COMO PATIOS, GARAJES,
CUARTOS CERRADOS, EDIFICIOS O CARPAS.
• SIEMPRE USE LA PARRILLA EN UNA SUPERFICIE FIRME, ESTABLE Y
NIVELADA.
• LA PARRILLA PUEDE SER UTILIZADA ÚNICAMENTE POR ADULTOS.
• ¡ADVERTENCIA! NUNCA USE GASOLINA, ALCOHOL NI LÍQUIDOS
VOLÁTILES PARA ENCENDER O REAVIVAR FUEGOS. USE SOLAMENTE
LÍQUIDO COMBUSTIBLE PARA CARBÓN PARA ENCENDER EL CARBÓN. LEA
Y SIGA ATENTAMENTE LAS NORMAS E INSTRUCCIONES DE USO DEL
FABRICANTE DEL LÍQUIDO COMBUSTIBLE.
• NO GUARDE EL LÍQUIDO COMBUSTIBLE U OTROS LÍQUIDOS O MATERIALES
INFLAMABLES DENTRO DEL GABINETE DE ALMACENAMIENTO.
• MANTENGA A LOS NIÑOS Y MASCOTAS ALEJADOS AL USAR LA PARRILLA.
• SE NECESITAN MITONES O GUANTES PARA ABRIR LA TAPA Y LAS PUERTAS
YA QUE LAS SUPERFICIES ESTARÁN CALIENTES.
• LA MAYORÍA DE LAS SUPERFICIES EN ESTA PARRILLA SE CALIENTAN:
TENGA CUIDADO.
• NO MUEVA LA PARILLA MIENTRAS ESTÉ EN USO.
• NO DEJE LA PARRILLA SIN ATENCIÓN EN NINGÚN MOMENTO DURANTE
SU USO.
• NO USE LA PARRILLA EN CONDICIONES DE MUCHO VIENTO.
• TENGA PRECAUCIÓN AL QUITAR LA TAPA, YA QUE EL VAPOR CALIENTE O
UNA LLAMARADA PUEDEN OCASIONAR QUEMADURAS.
• ANTES DE CADA USO, ASEGÚRESE DE QUE LA PARRILLA ESTÉ EN BUENAS
CONDICIONES DE FUNCIONAMIENTO.
• PARA LOGRAR UNA MAYOR VIDA ÚTIL DEL PRODUCTO, MANTENGA EL
FUEGO DE CARBÓN A UN NIVEL ACCEPTABLE; NO SOBRECARGUE LA
PARRILLA.
• NO PERMITA QUE EL CARBÓN TOQUE LOS COSTADOS DE LA PARRILLA;
DEJE EL CARBÓN DENTRO DE LOS RECIPIENTES CORRESPONDIENTES.
• PERMITIR QUE EL CARBÓN TOQUE LOS COSTADOS DE LA PARILLA
REDUCIRÁ LA VIDA ÚTIL DEL METAL Y DEL ACABADO
CONSIDERABLEMENTE.
• NO MODIFIQUE LA PARRILLA DE NINGUNA MANERA.
• NO USE LA PARRILLA HASTA QUE ESTÉ COMPLETAMENTE ARMADA CON
TODAS LAS PIEZAS AJUSTADAS DE FORMA SEGURA.
• LOS ESTANTES LATERALES PUEDEN SOSTENER HASTA 15 LIBRAS DE FORMA
SEGURA; NO PONGA MAS DE 15 LIBRAS EN LOS ESTANTES LATERALES.
• TENGA CUIDADO CUANDO MANEJE LAS REJILLAS DE HIERRO FUNDIDO DE
LA PARRILLA, YA QUE EL HIERRO FUNDIDO SE PUEDE RAJAR, QUEBRAR O
FISURAR SI SE LE PEGA O GOLPEA CON UN OBJETO AFILADO. ¡NO DEJE
CAER LAS REJILLAS DE HIERRO FUNDIDO AL SUELO!
• NO SE APOYE NI PRESIONE LOS ESTANTES LATERALES O SUS MANIJAS.
• TENGA CUIDADO DESPUÉS DE APAGAR EL FUEGO; LAS SUPERFICIES
SEGUIRÁN CALIENTES POR UN TIEMPO.
• ASEGÚRESE DE QUE TODOS LOS CARBONES SE HAYAN ENFRIADO ANTES
DE DESHACERSE DE ELLOS.
• DESHÁGASE DE LOS CARBONES ADECUADAMENTE.
• LA PARRILLA DEBE ESTAR COMPLETAMENTE ENFRIADA, Y TODAS LAS
BRASAS SE DEBEN HABER APAGADO ANTES DE PODER COLOCAR UNA
CUBIERTA.
PAGINA 2
¡LEA PRIMERO!
NORMAS PARA EL FUNCIONAMIENTO SEGURO
DE LA PARRILLA DE CARBÓÓN BRAVO PREMIUM.
!
• LA CARNE CRUDA Y LA CARNE AVÍCOLA DEBEN PERMANECER SEPARADAS
DE LA COMIDA COCIDA Y LISTA PARA CONSUMIR.
• USE RECIPIENTES Y UTENSILIOS LIMPIOS PARA MANIPULAR LA COMIDA
COCIDA Y LISTA PARA CONSUMIR.
• COCINE LA CARNE AVÍCOLA Y VACUNA EL TIEMPO NECESARIO PARA
MATAR LAS BACTERIAS.
• USE UN TERMÓMETRO INSTANTÁNEO PARA ASEGURARSE DE QUE LAS
TEMPERATURAS INTERNAS DE LAS COMIDAS SEAN CORRECTAS.
• REFRIGERE LAS COMIDAS PREPARADAS Y LAS SOBRAS.
• LAVE LAS MANOS, LOS UTENSILIOS Y LAS SUPERFICIES CON JABÓN Y
AGUA CALIENTE ANTES Y DESPUES DE MANIPULAR CARNE CRUDA Y
AVÍCOLA.
SEGURIDAD ALIMENTARIA
!
. . . . . . . . . . . . . . . . . . . . . . . . . . . . . . . . . . . . . . . . . . . . . . . . .1
. . . . . . . . . . . . . . . . . . . . . . . . . . . . . . . . . . . . . . . . . . . . . . . . .1
. . . . . . . . . . . . . . . . . . . . . . . . . . . . . . . . . . . . . . . . . . . . . . . . .1
. . . . . . . . . . . . . . . . . . . . . . . . . . . . . . . . . . . . . . . . . . . . . . . . .1
. . . . . . . . . . . . . . . . . . . . . . . . . . . . . . . . . . . . . . . . . . . . . . . . .1
. . . . . . . . . . . . . . . . . . . . . . . . . . . . . . . . . . . . . . . . . . . . . . . . .2
. . . . . . . . . . . . . . . . . . . . . . . . . . . . . . . . . . . . . . . . . . . . . . . . .1
. . . . . . . . . . . . . . . . . . . . . . . . . . . . . . . . . . . . . . . . . . . . . . . . .1
. . . . . . . . . . . . . . . . . . . . . . . . . . . . . . . . . . . . . . . . . . . . . . . . .1
. . . . . . . . . . . . . . . . . . . . . . . . . . . . . . . . . . . . . . . . . . . . . . . . .1
. . . . . . . . . . . . . . . . . . . . . . . . . . . . . . . . . . . . . . . . . . . . . . . . .1
. . . . . . . . . . . . . . . . . . . . . . . . . . . . . . . . . . . . . . . . . . . . . . . . .1
. . . . . . . . . . . . . . . . . . . . . . . . . . . . . . . . . . . . . . . . . . . . . . . . .1
. . . . . . . . . . . . . . . . . . . . . . . . . . . . . . . . . . . . . . . . . . . . . . . . .1
. . . . . . . . . . . . . . . . . . . . . . . . . . . . . . . . . . . . . . . . . . . . . . . . .1
. . . . . . . . . . . . . . . . . . . . . . . . . . . . . . . . . . . . . . . . . . . . . . . . .1
. . . . . . . . . . . . . . . . . . . . . . . . . . . . . . . . . . . . . . . . . . . . . . . . .2
. . . . . . . . . . . . . . . . . . . . . . . . . . . . . . . . . . . . . . . . . . . . . . . . .1
. . . . . . . . . . . . . . . . . . . . . . . . . . . . . . . . . . . . . . . . . . . . . . . . .1
. . . . . . . . . . . . . . . . . . . . . . . . . . . . . . . . . . . . . . . . . . . . . . . . .4
. . . . . . . . . . . . . . . . . . . . . . . . . . . . . . . . . . . . . . . . . . . . . . . . . . .2
. . . . . . . . . . . . . . . . . . . . . . . . . . . . . . . . . . . . . . . . . . . . . . . . .2
. . . . . . . . . . . . . . . . . . . . . . . . . . . . . . . . . . . . . . . . . . . . . . . . . . .4
. . . . . . . . . . . . . . . . . . . . . . . . . . . . . . . . . . . . . . . . . . . . . . . . .2
. . . . . . . . . . . . . . . . . . . . . . . . . . . . . . . . . . . . . . . . . . . . . . . . .2
. . . . . . . . . . . . . . . . . . . . . . . . . . . . . . . . . . . . . . . . . . . . . . . . .2
. . . . . . . . . . . . . . . . . . . . . . . . . . . . . . . . . . . . . . . . . . . . . . . . .1
. . . . . . . . . . . . . . . . . . . . . . . . . . . . . . . . . . . . . . . . . . . . . . . . .1
. . . . . . . . . . . . . . . . . . . . . . . . . . . . . . . . . . . . . . . . . . . . . . . . .2
. . . . . . . . . . . . . . . . . . . . . . . . . . . . . . . . . . . . . . . . . . . . . . . . .8
. . . . . . . . . . . . . . . . . . . . . . . . . . . . . . . . . . . . . . . . . . . . . . . . .4
. . . . . . . . . . . . . . . . . . . . . . . . . . . . . . . . . . . . . . . . . . . . . . . . .36
. . . . . . . . . . . . . . . . . . . . . . . . . . . . . . . . . . . . . . . . . . . . . . . . .4
. . . . . . . . . . . . . . . . . . . . . . . . . . . . . . . . . . . . . . . . . . . . . . . . .12
. . . . . . . . . . . . . . . . . . . . . . . . . . . . . . . . . . . . . . . . . . . . . . . . .4
. . . . . . . . . . . . . . . . . . . . . . . . . . . . . . . . . . . . . . . . . . . . . . . . .14
. . . . . . . . . . . . . . . . . . . . . . . . . . . . . . . . . . . . . . . . . . . . . . . . .10
. . . . . . . . . . . . . . . . . . . . . . . . . . . . . . . . . . . . . . . . . . . . . . . . .8
. . . . . . . . . . . . . . . . . . . . . . . . . . . . . . . . . . . . . . . . . . . . . . . . .1
A.
B.
C.
D.
E.
F.
H.
JJ.
KK.
LL.
M.
N.
QQ.
R.
T.
U.
V.
W.
X.
Y.
AA.
AB.
AC.
AD.
AE.
AF.
AG.
AH.
AJ.
AK.
AP.
AQ.
AR.
AT.
AX.
AY.
AZ.
BA.
BB.
PIEZAS DE LA PARRILLA CANT
Al desembalar la parrilla de la caja, asegúrese de encontrar todas las
piezas mencionadas a continuación y familiarizarse con ellas. Tenga
cuidado ya que algunas piezas pueden tener bordes afilados.
LISTA DE PIEZAS
PREARMADO DE TAPA Y CÁMARA DE COCCIÓN
PATA, DERECHA DELANTERA
PATA, IZQUIERDA DELANTERA
PATA, DERECHA TRASERA
PATA, IZQUIERDA TRASERA
PANEL DEL GABINETE, LATERAL
PANEL DEL GABINETE, TRASERO
PUERTA DEL ARMARIO DERECHO
PUERTA DEL ARMARIO IZQUIERDA
ESTANTE INFERIOR
BANDEJA PARA CENIZAS
ESTANTE LATERAL CON MANIJA
CONECTOR DELANTERO
CONECTOR DE PATAS
CONJUNTO DE RECIPIENTE PARA CARBÓN, DERECHO
CONJUNTO DE RECIPIENTE PARA CARBÓN, IZQUIERDO
REJILLA DE COCCIÓN DE HIERRO FUNDIDO
REJILLA DE CALENTAMIENTO
MANIJA DE LA TAPA
MANIJA PEQUEÑA
RUEDITA
BLOQUEADOR DE RUEDITA
REJILLA DE VENTILACIÓN
ARMADO DE LA MANIVELA DE AJUSTE DEL RECIPIENTE PARA CARBÓN
CONJUNTO DE LA MANIJA DE LA PUERTA DE ACCESO
SOPORTE DE MANGUITO ROSCADO
INDICADOR DE TEMPERATURA
PLACA DEL LOGO
ARANDELA DE ACABADO GRANDE
ARANDELA DE ACABADO CHICA
PERNO M5 x 15MM
PERNO M6 x 10MM
PERNO M6 x 50MM
TUERCA HEXAGONAL DE TOPE M5
TUERCA HEXAGONAL DE TOPE M6
TUERCA HEXAGONAL DE SUJECIÓN M6
PERNO M4 X 10MM
PERNO M6 X 15MM
PUERTA CONJUNTO DE TOPE
¡PELIGRO DE MONÓXIDO DE CARBONO!
LA COMBUSTIÓN DE LA MADERA O DEL CARBÓN
PRODUCE MONÓXIDO DE CARBONO, QUE NO TIENE
OLOR Y PUEDE CAUSAR LA MUERTE SI SE QUEMA EN
ÁREAS CERRADAS. NUNCA QUEME MADERA NI
CARBÓN EN EL INTERIOR DE VIVIENDAS, VEHÍCULOS,
CARPAS O CUALQUIER OTRA ÁREA CERRADA.
¡ADVERTENCIA!
!
BE.
BF.
BG.
BH.
BJ.
BK.
BL.
BM.
BN.
BP.
BQ.
DESPLAZAMIENTO DE PIEZAS CANT
FUMADOR DESPLAZAMIENTO CAJA DE FUEGO
FUEGO DESPLAZAMIENTO FUMADOR TAPA DE LA CAJA
DESPLAZAMIENTO DE INCENDIO FUMADOR PUERTA DE LA CAJA
FUEGO DESPLAZAMIENTO LA CAJA DEL AHUMADOR REPARTO
DE COCINA REJA DE HIERRO
FUEGO DESPLAZAMIENTO FUMADOR CAJA DE MADERA REJILLA
FUEGO DESPLAZAMIENTO LA CAJA DEL AHUMADOR
TAPA BISAGRA
FUEGO DESPLAZAMIENTO LA CAJA DEL AHUMADOR
PUERTA BISAGRA
CAJA DE DESPLAZAMIENTO DE INCENDIO FUMADOR MANGO
PREVIA A LA ASAMBLEA
DESPLAZAMIENTO DE INCENDIO CAJA DEL AHUMADOR PUERTA
DE CAPTURA MANGO
PERNO M6 X 35MM
TUERCA HEXAGONAL DE TOP M4

LISTA DE TORNILLERÍA Y CHICA DE PIEZA
AP
(4) PERNO
M5 x 15MM
AQ
(36) PERNO
M6 x 10MM
AR
(4) PERNO
M6 x 50MM
AY
(14) PERNO
M4 x 10MM
AZ
(10) PERNO
M6 x 15MM
BA
(8) PERNO CABEZA
REDONDA M6 x 10MM
AT
(12) TUERCA
HEXAGONAL
DE TOPE M6
AX
(4) TUERCA
HEXAGONAL DE
SUJECIÓN M6
AK
(8) ARANDELA DE
ACABADO CHICA
AJ
(2) ARANDELA DE
ACABADO GRANDE
AF
(2) SOPORTE DE
MANGUITO ROSCADO
x 4
x 36
x 4 x 14 x 10 x 8
x 12 x 4
x 2 x 8 x 2
PAGINA 3
BP
(8) PERNO
M6 x 35MM
x 8
BQ
(12) TUERCA
HEXAGONAL
DE TOPE M4
x 12

A
(1) PREARMADO DE
TAPA Y CÁMARA DE
COCCIÓN
LISTA DE PIEZA
PAGINA 4
B
(1) PATA,
DERECHA
DELANTERA
C
(1) PATA,
IZQUIERDA
DELANTERA
D
(1) PATA,
DERECHA
TRASERA
E
(1) PATA,
IZQUIERDA
TRASERA
F
(2) PANEL DEL
GABINETE,
LATERAL
H
(1) PANEL DEL
GABINETE,
TRASERO
JJ
(1) PUERTA DEL
ARMARIO DERECHO
KK
(1) PUERTA DEL
ARMARIO IZQUIERDA
(1) ESTANTE INFERIOR
LL

LISTA DE PIEZA
PAGINA 5
M
(1) BANDEJA PARA
CENIZAS
N
(1) ESTANTE LATERAL
CON MANIJA
(1) CONECTOR
DELANTERO
R
(2) CONECTOR DE PATAS
T
(1) CONJUNTO DE RECIPIENTE
PARA CARBÓN, DERECHO
U
(1) CONJUNTO DE RECIPIENTE
PARA CARBÓN, IZQUIERDO
V
(2) REJILLA DE COCCIÓN
DE HIERRO FUNDIDO
W
(1) REJILLA DE
CALENTAMIENTO
QQ

LISTA DE PIEZA
PAGINA 6
X
(1) MANIJA DE LA TAPA
Y
(4) MANIJA PEQUEÑA
AA
(2) RUEDITA
AB
(2) BLOQUEADOR DE
RUEDITA
AC
(4) REJILLA DE
VENTILACIÓN
AD
(2) ARMADO DE LA
MANIVELA DE AJUSTE
DEL RECIPIENTE PARA
CARBÓN
AE
(2) CONJUNTO DE LA
MANIJA DE LA PUERTA
DE ACCESO
AG
(1) INDICADOR DE
TEMPERATURA
AH
(1) PLACA DEL LOGO
BB
(1) PUERTA CONJUNTO
DE TOPE

DESPLAZAMIENTO LISTADO PARTE
PAGINA 7
BE
(1) FUMADOR
DESPLAZAMIENTO CAJA
DE FUEGO
BF
(1) FUEGO DESPLAZAMIENTO
FUMADOR TAPA DE LA CAJA
BG
(1) DESPLAZAMIENTO DE
INCENDIO FUMADOR PUERTA
DE LA CAJA
BH
(1) FUEGO DESPLAZAMIENTO LA CAJA
DEL AHUMADOR REPARTO DE
COCINA REJA DE HIERRO
BK
(2) CAJA DE
DESPLAZAMIENTO DE
INCENDIO FUMADOR
MANGO PREVIA A LA
ASAMBLEA
BM
(1) FUEGO
DESPLAZAMIENTO LA
CAJA DEL AHUMADOR
TAPA BISAGRA
BJ
(1) FUEGO DESPLAZAMIENTO
FUMADOR CAJA DE MADERA
REJILLA
BL
(2) FUEGO
DESPLAZAMIENTO LA
CAJA DEL AHUMADOR
PUERTA BISAGRA
BN
(1) DESPLAZAMIENTO DE
INCENDIO CAJA DEL
AHUMADOR PUERTA DE
CAPTURA MANGO

PARRILLA DE CARBÓN BRAVO
INSTRUCCIONES DE ARMADO
Tiempo de armado: 90 minutos
Para el armado se necesitan un
destornillador plano o de cruz (Phillips),
una llave inglesa ajustable y una pinza de
punta de aguja.
Coloque las cuatro (4) patas [ B,C,D,E ]
en la orientación adecuada y monte los
paneles laterales del gabinete [ F ] en las
patas con (4) pernos de 10MM [ AQ ] en
cada lado. Apriete los pernos con
firmeza.
PASO 2: MONTAJE DEL ESTANTE
INFERIOR EN LAS PATAS
Monte el estante inferior [ L ] en las
patas con (4) pernos de 50MM [ AR ].
Montar el tope de la puerta de la
asamblea [ BB ] para el estante de abajo
[ LL ] usando (2) pernos M4 X 10MM
[ AY ] y (2) tuercas hexagonales M4
[ BQ ]. Puede que sea necesario para
desenganchar los imanes para montar el
tope de puerta.
Apriete todos los pernos con firmeza.
PASO 3: ARMADO DEL PANEL TRASERO
Monte el panel trasero [ H ] en las patas
[ D,E ] con (4) pernos de 10MM [ AQ ].
Apriete los pernos con firmeza.
Para facilitar la lectura y como
referencia visual, las letras de cada
pieza se detallan en cíírculos
negros o grises en cada paso.
K
AG
Las letras en los círculos negros son
las piezas añadidas para el paso.
Las letras en los círculos grises son las
piezas de referencia para el paso.
EJEMPLO
1
PASO
3
PASO
AQ
F
D
F
C
E
H
AQ
D
E
PAGINA 8
B
PASO 1: MONTAJE DE LAS PATAS EN
LOS PANELES DEL GABINETE LATERAL
NO DEVUELVA EL PRODUCTO A LA TIENDA.
SI TIENE PREGUNTAS O PROBLEMAS
DURANTE EL ARMADO, LLAME AL
1-877-347-4557 PARA OBTENER AYUDA.
2
PASO
C
E
D
B
AR
LL
AY
BB
BQ
IMÁN

PARRILLA DE CARBÓN BRAVO
INSTRUCCIONES DE ARMADO
PASO 4: ARMADO DE LOS CONECTORES
DELANTEROS Y DE LAS PATAS
Primero, arme la conectora frontal
[ QQ ] como se indica con (4) pernos de
10MM [ AQ ]. Apriete los pernos con
firmeza.
Luego, monte los (2) conectores de las
patas [ R ] en las patas como se indica
con (4) pernos de 10MM [ AQ ]. Apriete
los pernos con firmeza.
PASO 5: ARMADO DE LAS RUEDITAS
Con mucho cuidado, gire el conjunto de
pata y gabinete. Inserte las (4) rueditas
[ AA,AB ] a los encajes roscados de las
patas.
Inserte las rueditas de bloqueo en la
parte delantera
PAGINA 9
NO DEVUELVA EL PRODUCTO A LA TIENDA.
SI TIENE PREGUNTAS O PROBLEMAS
DURANTE EL ARMADO, LLAME AL
1-877-347-4557 PARA OBTENER AYUDA.
TABLA DE TARJETA O MANTA
4
PASO
AQ
R
R
QQ
AQ
5
PASO
AA
AB
AB

PARRILLA DE CARBÓN BRAVO
INSTRUCCIONES DE ARMADO
PASO 7: MONTAJE DE LA TAPA Y LA
CÁMARA DE COCCIÓN EN LAS PATAS
Primero, asegúrese de que las rueditas
de bloqueo estén en la posición de
bloqueo para que las patas y el gabinete
no se muevan.
Con mucho cuidado, coloque la tapa y la
cámara de cocción [ A ] sobre las patas.
Ajuste la cámara de cocción de modo
que la parte delantera esté alineada con
la parte delantera de las patas y que se
apoye encima de las ellas. Vea el PASO
7A.
Abra la tapa con cuidado y mantenga la
cámara de cocción firme. Use (8) pernos
de 10 MM [ BA ] para montar la cámara
de cocción en las patas. Apriete todos
los pernos con firmeza. Vea el PASO 7B.
¡Evite apretarse los
dedos y las manos! Mantenga los
dedos y las manos alejados del área de
conexión.
¡CUIDADO!!
Se necesitan dos (2)
personas para este paso.
¡ATENCIÓN!!
PASO 6: ARMADO DE LAS PUERTAS
DEL GABINETE
Con mucho cuidado, vuelva a girar el
conjunto de gabinete sobre las rueditas.
Monte las puertas del gabinete [ JJ,KK ] en el
estante inferior. Primero, identifique las
puertas derecha e izquierda. Inserte las
clavijas fijas en el estante inferior [ LL ] y
presione las clavijas superiores para
insertarlas en la placa conectora delantera
[ QQ ].
Ensamble (1) mango [ Y ] para cada puerta
[ JJ, KK ] usando (1) arandela pequeña
acabado [ AK ] y (1) perno M6 x 15 mm [ AZ ]
por la puerta. Apriete bien los pernos.
A
A
BA
PAGINA 10
BA
7A
PASO
7B
PASO
JJ
KK
KK
AK
JJ
Y
AZ
LL
QQ
ALFILERES FIJOS
PRIMAVERA CARGO ALFILERES
6
PASO

PARRILLA DE CARBÓN BRAVO
INSTRUCCIONES DE ARMADO
PASO 8: ARMADO DE LA MANIJA DE
LA TAPA Y EL INDICADOR DE
TEMPERATURA
Monte la manija de la tapa [ X ] en la
tapa con (2) pernos de 15MM [ AZ ] y (2)
arandelas de acabado grandes [ AJ ].
Arme como se indica.
Quite la tuerca hexagonal de bronce del
indicador de temperatura [ AG ] y alinee
la chaveta de medición con la traba en
la placa del logo [ AH ].
Alinee el indicador de temperatura y la
chaveta de medición y las clavijas de la
placa del logo con los orificios de la
tapa. Sujete firmemente la tapa con la
tuerca hexagonal de bronce.
PASO 9: ARMADO LOS VENTILACIÓN
Monte (2) rejillas de ventilación [ AC ] en
la tapa con (1) perno M6 x 10MM [ AQ ]
y (1) tuerca hexagonal de sujeción M6
[ AX ] por cada lado. Ajuste lo suficiente
como para permitir algo de fricción.
Monte (1) rejilla de ventilación en la
cámara de cocción uso (1) perno M6 x
10MM [ AQ ] y (1) tuerca hexagonal de
sujeción M6 [ AX ] por cada lado. Ajuste
lo suficiente para permitir algo de
fricción.
PAGINA 11
AG
8
PASO
9
PASO
AH
X
AJ
AZ
A
TUERCA HEXAGONAL DE BRONCE
NO DEVUELVA EL PRODUCTO A LA TIENDA.
SI TIENE PREGUNTAS O PROBLEMAS
DURANTE EL ARMADO, LLAME AL
1-877-347-4557 PARA OBTENER AYUDA.
AC
AC
AX
AQ
AC
A

PARRILLA DE CARBÓN BRAVO
INSTRUCCIONES DE ARMADO
PASO 10: ARMADO DE LOS RECIPIENTE
PARA CARBÓN
Arme un recipiente a la vez para evitar
mezclar las piezas.
Primero, quite la varilla de la placa de
empuje del recipiente de carbón
derecho [ T ]. Vea el PATAS 10A. Con
pinzas de punta de aguja o alicates,
saque las (2) clavijas de bloqueo del
extremo de las varillas. Quite la placa
de empuje de las (2) varas de soporte y
apáártelas. Vea el PASO 10B.
Alinee los orificios y monte el recipiente
para carbón en la cámara de cocción.
Comience por el lado de la placa de
empuje. Inserte el soporte de manguito
roscado [ AF ] en el orificio y sujete el
lado con (2) pernos M5 x 15MM [ AP ].
Vea el PASO 10C.
Para regresar la varilla de la placa de
empuje al recipiente, inserte los
extremos de la varilla dentro de los
soportes y las varillas de soporte. Sujete
firmemente la varilla con las clavijas de
bloqueo. Vea el PASO 10D.
Para finalizar el armado, use (2) pernos
M6 x 10MM [ AQ ] para montar el lado
opuesto en la cámara de cocción. Vea el
PASO 10E.
Arme el conjunto izquierdo de
recipiente para carbón [ U ] del mismo
modo.
LA TAPA NO MOSTRADO EN
DIBUJOS PARA LA CLARIDAD
NOTA
PAGINA 12
T
10A
PASO
AP
10B
PASO
AF
10E
PASO
T
AQ
10C
PASO
AP
AF
EMPUJE PLATO BARRA
CERRAR ALFILER
APOYE BARRA
T
10D
PASO
APOYE BARRA
EMPUJE PLATO
BARRA
CERRAR ALFILER
EMPUJE PLATO
BARRA
CERRAR ALFILER

PASO 12: ARMADO DE LAS MANIJAS
DE LAS PUERTAS DE ACCESO
Corte los sujetadores de nailon y quite
los sujetadores, la bolsa de polietileno y
el material de empaque que rodea las
puertas de acceso.
Quite el pestillo y la tuerca hexagonal
de tope M6 [ AT ] de la manija de la
puerta de acceso [ AE ]. La arandela
plana permanece y se usa en la parte
exterior. Inserte la parte roscada de la
manija dentro del orificio de la puerta
de acceso.
Corra el pestillo hacia la manija para
alinearla con la chaveta. Tenga en
cuenta la posición del pestillo. Sujete
firmemente con la tuerca hexagonal de
tope M6. Apriete con firmeza.
Arme de la misma manera el otro lado.
PARRILLA DE CARBÓN BRAVO
INSTRUCCIONES DE ARMADO
PASO 11: ARMADO DE LAS MANIVELAS
DE AJUSTE DEL RECIPIENTE PARA
CARBÓN
Enrosque las manivelas de ajuste del
recipiente para carbón [ AD ] a los
soportes de manguito roscado [ AF ].
Suba y baje los recipientes para carbón
un par de veces para asegurarse de que
funcionan correctamente. Sujete
firmemente la manivela con (1) perno
M4 x 10MM [ AY ] por manivela. Vea el
PASO 11A.
PAGINA 13
11
PASO
TUERCA HEXAGONAL
DE TOPE
AD
AD
12
PASO
AE
PICAPORTE
PUERTA DE ACCESO
AD
AY
11A
STEP
AF
AE
NO DEVUELVA EL PRODUCTO A LA TIENDA.
SI TIENE PREGUNTAS O PROBLEMAS
DURANTE EL ARMADO, LLAME AL
1-877-347-4557 PARA OBTENER AYUDA.

PARRILLA DE CARBÓN BRAVO
INSTRUCCIONES DE ARMADO
PASO 13: ARMADO DE LOS ESTANTES
LATERALES
Monte los estantes lateral [ N ] en las
patas con (4) pernos M6 x 10MM [ AQ ].
Apriete los pernos con firmeza.
Tenga en cuenta que el límite de peso
en cada estante lateral es de 15 libras.
PAGINA 14
NO DEVUELVA EL PRODUCTO A LA TIENDA.
SI TIENE PREGUNTAS O PROBLEMAS
DURANTE EL ARMADO, LLAME AL
1-877-347-4557 PARA OBTENER AYUDA.
13
PASO
AQ
N
PASO 14: ARMAR LA CAJA FUMADOR
FUEGO DESPLAZAMIENTO
Montar la caja de fuego fumador
desplazamiento [ BE ] a la cámara de
fumador que utiliza (4) pernos M6 x
10MM [ AQ ] y (4) tuercas hexagonales
M6 kep [ EN ]. Apriete bien los pernos.
AQ
AT
BE
14
PASO

PASO 15: ARMAR EL FUEGO
DESPLAZAMIENTO FUMADOR TAPA
DE LA CAJA
Montar el fuego desplazamiento
fumador tapa de la caja [ GC ] para la
cámara de combustión [ BE ] usando (2)
bisagras [ BK ], (8) pernos M6 x 35MM
[ BP ] y (8) tuercas hexagonales M6 de
tope [ EN ]. Apriete todos los pernos.
PASO 16: ARMAR EL FUEGO
DESPLAZAMIENTO FUMADOR PUERTA
DE LA CAJA Y MANGO
Montar el fuego desplazamiento
fumador puerta de la caja [ BG ] para
utilizar la cámara de combustión (2)
bisagras [ BL ], (8) pernos M4 x 10MM
[ AY ] y (8) M4 tuercas hexagonales de
tope [ BQ ]. Apriete bien los pernos.
Montar la rejilla de ventilación [ AC ] de
la puerta del hogar [ BG ] con (1)
M6 x 10MM perno [ AQ ] y (1) M6 de
bloqueo tuerca hexagonal [ AX ].
Apretar suficiente para permitir cierta
fricción.
Retire la tuerca hexagonal y la arandela
de la empuñadura de un
pre-ensamblado [ BM ] y se insertan en
la puerta [ BG ]. Vuelva a colocar la
arandela y tuerca hexagonal de montar.
Apretar suficiente para permitir cierta
fricción.
Montar el mango de capturas [ BN ]
para utilizar la cámara de combustión
(2) pernos M4 x 10MM [ AY ] y (2) M4 de
tope tuercas hexagonales [ BQ ].
Apriete bien los pernos.
Montar el mango pequeño [ Y ]
para la tapa [ BF ] con (2) pequeñas
arandelas de acabado [ AK ] y (2)
M6 x 15MM pernos [ AZ ]. Apriete
todos los pernos.
16
PASO
15
PASO
BG
Y
BQ
BL
AY
BE
AQ
BM
AC
AX
AY
BN
BQ
BF
AZ
AK
BF
BK
BK
BP
AT
BE
PAGINA 15
PARRILLA DE CARBÓN BRAVO
INSTRUCCIONES DE ARMADO
NO DEVUELVA EL PRODUCTO A LA TIENDA.
SI TIENE PREGUNTAS O PROBLEMAS
DURANTE EL ARMADO, LLAME AL
1-877-347-4557 PARA OBTENER AYUDA.

PASO 18: INSERTAR LAS REJAS DE
MADERA Y COCINA
Coloque las parrillas (2) de hierro
fundido de cocina [ V ] en la cámara de
fumador como se muestra.
Coloque la rejilla de madera
compensada [ BJ ] dentro de la caja de
fuego de desplazamiento y colocar la
rejilla de hierro fundido de cocina [ BH ]
en la cámara de combustión, como se
muestra.
Manejar las parrillas de cocción con el
cuidado como las rejillas de hierro
fundido puede saltar, agrietarse o
romperse si se golpea o es golpeado con
un objeto punzante. No deje caer las
rejillas de hierro fundido en el suelo.
PASO 17: ARMADO DE LA BANDEJA
PARA CENIZAS LA MANIJA
Monte la manija de la bandeja para
cenizas [ Y ] en la bandeja para cenizas
[ M ] con (2) pernos M6 x 15MM [ AZ ] y
(2) arandelas de acabado chica [ AK ].
Arme como se indica.
Inserte la bandeja para cenizas dentro
de la cámara de cocción.
17
PASO
AK
M
AZ
Y
PAGINA 16
V
BJ
BH
18
PASO
PARRILLA DE CARBÓN BRAVO
INSTRUCCIONES DE ARMADO

W
PASO 19: ARMADO DE LA REJILLA DE
CALENTAMIENTO
Monte la rejilla de calentamiento [ W ]
en la cámara de cocción y alinee las
varillas y las patas con los orificios.
Arme como se indica.
19
PASO
PAGINA 17
NO DEVUELVA EL PRODUCTO A LA TIENDA.
SI TIENE PREGUNTAS O PROBLEMAS
DURANTE EL ARMADO, LLAME AL
1-877-347-4557 PARA OBTENER AYUDA.
PARRILLA DE CARBÓN BRAVO
INSTRUCCIONES DE ARMADO

1. Vierta la cantidad deseada (3-6 libras) de carbón en el o los
recipientes para carbón.
2. Mantenga todo el carbón dentro de los recipientes. No deje
que el carbón toque los costados de la parrilla. Levante
cualquier pedazo de carbón que caiga en recipiente de cenizas.
3. Ajuste todas las rejillas de ventilación al máximo de apertura
y deje la tapa abierta.
4. Encienda el carbón de acuerdo con las instrucciones de uso del
fabricante de carbón.
5. Después que las llamas del carbón se hayan extinguido, cierre la
tapa y mantenga todas las rejillas de ventilación abiertas.
6. Después de entre 10 y 15 minutos, controle el carbón para ver
si se ha tornado gris y asegúúrese de que los olores del iniciador
se hayan ido.
7. Coloque el carbón o desparrámelo de manera uniforme en el o
los recipientes para carbón si es necesario.
CONSEJO PRÁCTICO
Los recipientes para carbón ajustables se pueden mover a
unas pocas pulgadas de la superficie de cocción, lo cual le
permite dorar rápidamente la carne y sellar los jugos. Este
procedimiento lleva solamente un par de minutos en cada
lado. No deje que la carne o la comida se queme.
Después de dorar, baje los recipientes para carbón del
nivel más alto y cocine la comida de acuerdo a su
preferencia personal.
OPCIONAL: Si se prefiere, se pueden añadir pequeños trozos de
madera al carbóón en este momento para darle sabor y
ahumar. Coloque los recipientes para carbón en la posición
más baja y alejada de las rejillas de cocción. Con mucho
cuidado, abra la(s) puerta(s) de acceso y añada los pequeños
trozos de madera encima del carbón. El humo será denso al
principio pero después de poco tiempo quemará con menos
humo. La temperatura aumentará cuando la madera se
introduzca. En general, necesitará añadir mas madera que
carbón cuando la temperatura baja a menos de 250 grados. No
use más de 2 ó 3 trozos de madera a la vez. NO DEJE QUE LOS
TROZOS DE MADERA TOQUEN O TENGAN CONTACTO ALGUNO
CON NINGÚN PANEL INTERNO. Mantenga los trozos de madera
dentro de los recipientes para carbón.
8. La temperatura óptima de cocción es entre 300 y 350 grados.
Es posible que las rejillas de ventilación se tengan que ajustar
a más abierto o más cerrado para alcanzar la temperatura
deseada. El tipo de carbón y las condiciones climáticas
pueden afectar la temperatura de la parrilla.
9. Con mucho cuidado pase un trapo con aceite vegetal a las
superficies de cocción de hierro para prevenir que la comida se
pegue.
10. Añada carne y comida como se desee en las rejillas de cocción.
Cocine la comida según su preferencia personal.
11. Añada carbón o madera según sea necesario a través de
las puertas de acceso.
La parrilla se calienta mucho y posiblemente las manijas también. Tenga cuidado al
trabajar alrededor de la parrilla. Use manoplas o guantes al abrir la tapa, las puertas de
acceso, la bandeja para cenizas o al ajustar las rejillas de ventilación durante el uso.
¡ADVERTENCIA!
INSTRUCCIONES DE USO PARA LA PARRILLA DE CARBÓN BRAVO
!
PAGINA 18
ADD 3-6 LBS.
OF CHARCOAL
ADD 3-6 LBS.
OF CHARCOAL

El fuego está en la caja de fuego desplazamiento y la comida se
cocina en la cámara de fumador (parrilla principal). El humo y el
paso de calor indirecto a través de la abertura entre la cámara de
combustión de la cámara de de desplazamiento y fumador. Siga
estos pasos para la cocción de humo y de calor indirecto. Tenga
en cuenta que la mayoría de las necesidades alimentarias de varias
horas a cocinar con este método. Estas son las instrucciones
básicas.
BRAVO DESPLAZAMIENTO LA CAJA DEL FUEGO INSTRUCCIONES
DE USO AHUMADOR
6. Ahora agregue cuidadosamente alrededor de 1-2 libras. de
trozos de madera para el fuego. Tenga en cuenta! Mantenga
todos los trozos de madera hacia el lado del fogón paneles.
NO PERMITA QUE LA MADERA A TOCAR EL PANEL LADOS.
Los mejores tipos de madera para el sabor y el humo son de
nuez, nogal y mezquite. El humo será pesado al principio y
despuós de un rato se quema con menos humo.
7. Limpie cuidadosamente las superficies de la parrilla de cocción
con aceite vegetal para mantener los alimentos se peguen.
8. Cuando la temperatura de la cámara fumador alcanza
220 ~ 250 grados, añadir la carne y los alimentos como se
desee para las parrillas de cocción. Cocine los alimentos a sus
preferencias personales.
9. Ajuste las aberturas como sea necesario para controlar la
temperatura en el fumador de cámara.
10. Como regla general, usted tendrá que añadir más leña
cuando el la temperatura cae por debajo de 200 grados.
1-2 libras de madera quemar durante aproximadamente 1
hora. Cada libra de carne tendrá una hora para cocinar.
Estas son las normas generales y pueden variar dependiendo
sus condiciones reales.
PAGINA 19
AGREGUE (3-6 LIBRAS)
DE CARON
+
1-2 LIBRAS DE MADERA
O CARBÓN CADA HORA
O SEGÚN SEA NECESARIO
La parrilla se calienta mucho y posiblemente las manijas también. Tenga cuidado al
trabajar alrededor de la parrilla. Use manoplas o guantes al abrir la tapa, las puertas de
acceso, la bandeja para cenizas o al ajustar las rejillas de ventilación durante el uso.
¡ADVERTENCIA!
!
1. Verter la cantidad deseada (3-6 libras) de carbón en el
desplazamiento cámara de combustión de madera y rejilla de
encender el carbón de acuerdo con la las instrucciones del
fabricante de carbón. NO PERMITA QUE CUALQUIER CARBÓN
PARA TOCAR LOS LADOS DEL PANEL.
2. Ajustar todos los respiraderos de apertura completa y
mantener la tapa del fogón desplazamiento abrir.
3. Luz carbón de acuerdo con las instrucciones del fabricante de
carbón.
4. Después de que las llamas han desaparecido del carbón de
leña, cierre todas las tapas y puertas, pero debe tener todas las
rejillas de ventilación abierta.
5. Después de unos 10-15 minutos, comprobar el carbón para ver
que tiene incinera más (se volvió gris) y los olores de arranque
Iniciales se han ido.

TEMPERATURAS DE LA COMIDA
Si usted no está seguro de cuándo la comida está lista, use este gráfico como una guía para medir
correctamente las temperaturas de carne cocida.
Use un medidor de temperatura de carne de alta calidad para medir la temperatura de la carne. El
medidor de temperatura en la parrilla mide la temperatura del aire dentro de la cámara de cocción
de la parrilla, no la temperatura de la comida.
Si aún tiene preguntas, por favor vea la información de contacto del
USDA a continuación.
Línea directa de carne vacuna y carne avícola del USDA
1-888-674-6854
TTY: 1-800-256-7072
www.IsItDoneYet.gov
PAGINA 20
. . . . . . . . . . . . . . . . . . . . .145°F
. . . . . . . . . . . . . . . . . . . . .160°F
. . . . . . . . . . . . . . . . . . . . . . . . .165°F
. . . . . . . . . . . . . . . . . . . . .160°F
. . . . . . . . . . . . . . . . . . . . .160°F
. . . . . . . . . . . . . . . . . . . . .170°F
. . . . . . . . . . . . . . . . . . . . . . . . .165°F
. . . . . . . . . . . . . . . . . . . . . . . . .165°F
. . . . . . . . . . . . . . . . . . . . .145°F
. . . . . . . . . . . . . . . . . . . . .160°F
. . . . . . . . . . . . . . . . . . . . .170°F
. . . . . . . . . . . . . . . . . . . . .145°F
. . . . . . . . . . . . . . . . . . . . .160°F
. . . . . . . . . . . . . . . . . . . . .170°F
. . . . . . . . . . . . . . . . . . . . .145°F
. . . . . . . . . . . . . . . . . . . . .160°F
. . . . . . . . . . . . . . . . . . . . .170°F
Jugoso
Al punto
Bien cocido
Bistecs y Asados
Pescado
Carne de Vaca, Cerdo
Pavo
Carne Picada
Platos con Huevos
Al punto
Bien cocido
Cerdo
Pavo
Pollo
Carne Avícola
Jugoso
Al punto
Bien cocido
Bisonte
Jugoso
Al punto
Bien cocido
Cordero

¡Lo felicitamos por la compra de su
parrilla de carbón Bravo prima asador
de carbón con la caja de compensación
fuego Fumador! En Landmann USA, nos
esforzamos para ofrecerle un producto
fácil de usar y armar. No obstante, en
el caso poco probable de que su
paquete incluya una pieza defectuosa o
falte alguna de las piezas, comuníquese
con nosotros a:
customerservice@landmann-usa.com
O
al 1-877-347-4557, de lunes a viernes de
8:00a.m. a 5:00p.m., hora del Este.
Posiblemente se le solicite
comprobante de compra.
¡Gracias!
Landmann® Limited
Distribuido por Landmann® USA
Cartersville, GA 30120
www.landmann-usa.com
Hecho en China
© 2012 Landmann® USA
¡LAS SUPERFICIES ESTÁN
CALIENTES DURANTE SU USO!
LOS ASIDEROS LLEGAN A SER
TIBIOS A CALIENTE CON EL
USO PROLONGADO.
TOME PARTIDO
ESTANTE 15 LIBRAS
MAX.
NO ALMACENE LIQUIDO MAS LIGERO NI
OTROS LIQUIDOS DE FLAMABLE NI LOS
MATERIALES EN EL GABINETE DE ALMACENAMIENTO.
PARA EL BRAVO
ACCESORIOS
DISPONIBLES
Estos accesorios hechos a
medida se hacen sólo para el
Bravo.
CUBIERTA
Esta cubierta de alta calidad
mantiene los elementos.
MODELO 150122
Por favor, visite nuestro sitio web en:
www.landmann-usa.com
-O-
Llame a la lÌnea gratuita de servicio
al cliente en:
1-800-321-3473
!
!
!
!
!
!
!
!
!
!
PAGINA 21
!
!
!
!
!
!
!
!
!
!
NUNCA USE GASOLINA,
ALCOHOL NI LÍQUIDOS
VOLÁTILES PARA ENCENDER O
REAVIVAR FUEGOS.
¡ADVERTENCIA!
!
!
¡LAS SUPERFICIES ESTÁN
CALIENTES DURANTE SU USO!
USE MITONES O GUANTES
PARA MANIPULAR LAS PIEZAS.
¡ADVERTENCIA!
¡CALIENTE!
!

GARANTÍA LIMITADA
Landmann USA (“Landmann”) garantiza que este producto debería
estar libre de defectos en materiales y mano de obra por 90 días.
Esta garantía se extiende exclusivamente al comprador original y
contra presentación de comprobante de compra. Dicha garantía
está limitada solamente a un uso residencial y no comercial.
Cualesquiera mercaderías devueltas deben ser transportadas con su
porte prepagado. La bandeja de la ceniza es excluida
específicamente de esta garantía, como limpiando y manteniendo
es esencial a su vida, forrando con papel de aluminio ayudará a
prolongar el uso de la bandeja de ceniza con el tiempo.
Esta garantía no cubre el deterioro normal de las partes o daños
que resulten de cualesquiera de las siguientes razones: negligencia,
abuso, uso impropio, alteración, instalación incorrecta,
mantenimiento inadecuado o no brindar el mantenimiento normal,
o por cualquier uso contrario a las instrucciones de operación.
Además, Landmann no garantiza de ninguna forma el acabado de
la pintura o daño a la cubierta o deterioro causado por cualesquier
condiciones inclementes del tiempo o por cualquier exposición
a químicos. Estas garantíías no cubren rasguños a superficies o
daños causados por el calor, por considerarse los mismos daños
propios del uso. Dichas garantías excluyen también responsabilidad
por cualquier daño indirecto, incidental o consecuente o
pérdidas de propiedad de cualquier naturaleza.
No devuelva el producto o ninguna parte de este a su proveedor ni
lo envíe al fabricante sin una autorización escrita. Contacte
al Servicio al Cliente al 1-877-3GRILLS (1-877-347-4557) or
grills@landmann-usa.com. Cualesquier productos o partes
devueltos deben ser enviados con su porte pagado.
Estas garantías están limitadas solamente a uso residencial no
comercial.
La reparación o el reemplazo del producto según se proveen bajo
esta garantía representan su exclusivo remedio. Landmann no
será responsable por ningún daño incidental o consecuente o por
violación de ninguna garantía expresa o implícita sobre este
producto o cualesquiera de sus partes, excepto al grado prohibido
por la ley aplicable. Algunos estados no permiten la exclusión
o limitación de daños incidentals o consecuentes, o permiten una
limitación en cuanto a cuánto dura una garantía implícita, y por
lo tanto, la antes mencionada limitación o exclusión pudiera no
aplicarle a usted. Esta garantía le da derechos legales específicos,
y usted pudiera tener otros derechos, los cuales varíían, de estado a
estado.
-
 1
1
-
 2
2
-
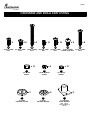 3
3
-
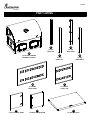 4
4
-
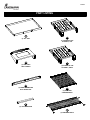 5
5
-
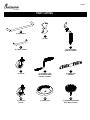 6
6
-
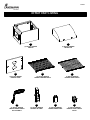 7
7
-
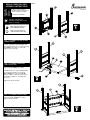 8
8
-
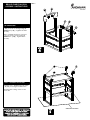 9
9
-
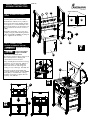 10
10
-
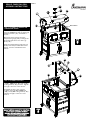 11
11
-
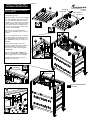 12
12
-
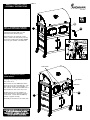 13
13
-
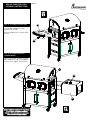 14
14
-
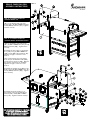 15
15
-
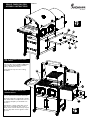 16
16
-
 17
17
-
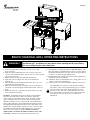 18
18
-
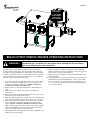 19
19
-
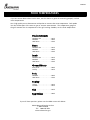 20
20
-
 21
21
-
 22
22
-
 23
23
-
 24
24
-
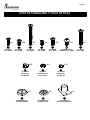 25
25
-
 26
26
-
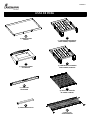 27
27
-
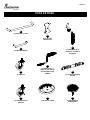 28
28
-
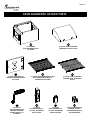 29
29
-
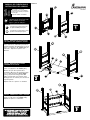 30
30
-
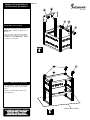 31
31
-
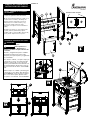 32
32
-
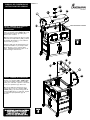 33
33
-
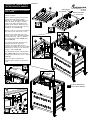 34
34
-
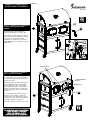 35
35
-
 36
36
-
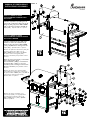 37
37
-
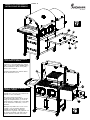 38
38
-
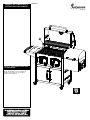 39
39
-
 40
40
-
 41
41
-
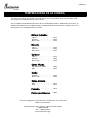 42
42
-
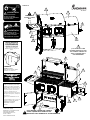 43
43
-
 44
44


en otros idiomas
- English: LANDMANN 591320 User manual
Artículos relacionados
Otros documentos
-
Thrustmaster 2960709 2971005 2962068 4160545 El manual del propietario
-
 BBQ-Pro 20040309 El manual del propietario
-
Brinkmann Smoke'n Pit Manual de usuario
-
-
-
-
-
-
none 82443 Guía de instalación
