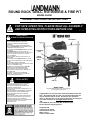
LANDMANN 590501 El manual del propietario
- Categoría
- Cuidado de mascotas
- Tipo
- El manual del propietario

MODEL 590501
Congratulations on your purchase of the Round Rock Fire Pit and
Grill! At Landmann USA, our goal is to provide products that are
easy to assemble and fun to use. Should you have questions,
issues, a defective part or if you have any questions concerning its
use, please contact us at: grills@landmann-usa.com
-OR-
1-877-3GRILLS (1-877-347-4557) M-F 8-5 Eastern Time
Proof of purchase may be required.
Landmann USA
Cartersville, GA 30120
www.landmann-usa.com
Made in China
© 2007 Landmann USA
ROUND ROCK GRILL, ROTISSERIE & FIRE PIT
ASSEMBLY AND OPERATING INSTRUCTIONS
Page 1
FOR SAFE OPERATION, PLEASE READ ALL ASSEMBLY
AND OPERATING INSTRUCTIONS BEFORE USE.
• RAW POULTRY AND MEAT SHOULD BE KEPT
SEPARATE FROM READY TO EAT FOOD.
• USE CLEAN PLATTERS AND UTENSILS FOR
HANDLING COOKED FOODS.
• COOK POULTRY AND MEATS THOROUGHLY TO
KILL BACTERIA.
• USE INSTANT-READ THERMOMETER TO ENSURE
PROPER INTERNAL FOOD TEMPERATURES.
• KEEP PREPARED FOOD AND LEFTOVERS
REFRIGERATED.
• WASH HANDS, UTENSILS AND SURFACES WITH
SOAP AND HOT WATER PRIOR TO AND AFTER
HANDLING RAW POULTRY AND MEATS.
• FOR MORE INFORMATION CALL USDA MEAT AND
POULTRY HOTLINE: 1-800-535-4555 IN
WASHINGTON, DC.
FOOD SAFETY
READ FIRST!
RULES FOR SAFE OPERATION
• THE ROUND ROCK IS FOR OUTDOOR USE ONLY!
• USE THE ROUND ROCK ONLY ON BRICK,
CONCRETE, STONE OR OTHER MASONRY
SURFACES!
• DO NOT USE ON LAWNS OR WOODEN DECKS!
• KEEP THE ROUND ROCK AWAY FROM BUILDINGS,
FLAMMABLE ITEMS AND VEHICLES.
• DO NOT USE THE ROUND ROCK UNDER A COVER
OR AWNING.
• THE ROUND ROCK IS FOR ADULT USE ONLY.
• VEGETABLE OIL MUST BE APPLIED TO THE GRILLS
PRIOR TO COOKING OR FOOD WILL NOT BE
EASY TO REMOVE.
• KEEP CHILDREN AND PETS AWAY WHILE IT IS
BEING USED.
• DO NOT MOVE THE ROUND ROCK WHILE IN USE.
• DO NOT LEAVE UNATTENDED AT ANY TIME WHILE
IN USE.
• DO NOT USE IN WINDY CONDITIONS.
• NEVER USE KEROSENE, GASOLINE OR ANY OTHER
FUELS AS A STARTING AGENT.
• BEFORE EACH USE, MAKE SURE THE ROUND
ROCK IS IN GOOD WORKING CONDITION.
• USE CAUTION AFTER THE FIRE HAS BEEN
EXTINGUISHED- SURFACES WILL REMAIN HOT
FOR SOME TIME.
• BE SURE ALL COALS ARE COLD BEFORE
EMPTYING. IF NECESSARY POUR WATER ON
COALS BEFORE MOVING GRILL.
VER. 2, 1/21/07
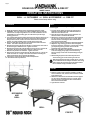
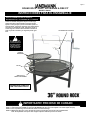
ROTISSERIE
ACCESSORY
GRILL
!
FIRE PIT
LARGE
COOKING
GRILL
MODEL 590501
completely assembled with rotisserie, large cooking grill,
accessory grill and pot hook in use
!
!
®
TM

Landmann USA (“Landmann”) warrants that this
product shall be free of defects in material and
workmanship to the original purchaser for 90 days.
This limited warranty is made exclusively to the original
customer presenting proof of purchase. This warranty
is limited to non-commercial residential use only. Any
returned goods must be shipped prepaid.
Landmann USA ("Landmann") warrants the bowl only
due to rust out or burn thru for a ONE (1) year period
from the time of purchase and made exclusively to the
original customer presenting proof of purchase.
This warranty does not cover normal wear of parts or
damage resulting from any of the following:
negligence, abuse, misuse, alteration, improper
installation, improper maintenance or failure to perform
normal maintenance, or any use contrary to operating
instructions. Furthermore, Landmann does not warrant
in any way the paint finish of the product or cover
damage or deterioration due to any normal or severe
weather conditions or to any chemical exposure. These
warranties do not cover surface scratches or heat
damage, which is considered to be normal wear. These
warranties exclude liability for any indirect, incidental
consequential damages or loss of property of any
nature.
Do not return product or any parts to the store or ship
to the manufacturer without written authorization.
Contact Customer Service at 1-877-3GRILLS
(1-877-347-4557) or grills@landmann-usa.com. Any
returned products or parts must be returned postage
prepaid.
These warranties are limited to non-commercial
residential use only.
Product repair or replacement as provided under this
warranty is your exclusive remedy. Landmann shall not
be liable for any incidental or consequential damages
or breach of any express or implied warranty on this
product or any part thereof, except to the extent
prohibited by applicable law. Some states do not allow
the exclusion or limitation of incidental or
consequential damages, or allow limitation on how long
an implied warranty lasts, therefore, the above
limitation or exclusion may not apply to you. This
warranty gives you specific legal rights, and you may
also have other rights, which vary, from state to state.
PARTS LIST
Page 2
. . . . . . . . . . . . . . . . . . . . . . . . . . . . . . . . . . . . . . . .1
. . . . . . . . . . . . . . . . . . . . . . . . . . . . . . . . . . . . . . . .4
. . . . . . . . . . . . . . . . . . . . . . . . . . . . . . . . . . . . . . . .1
. . . . . . . . . . . . . . . . . . . . . . . . . . . . . . . . . . . . . . . .1
. . . . . . . . . . . . . . . . . . . . . . . . . . . . . . . . . . . . . . . .4
. . . . . . . . . . . . . . . . . . . . . . . . . . . . . . . . . . . . . . . .1
. . . . . . . . . . . . . . . . . . . . . . . . . . . . . . . . . . . . . . . .1
. . . . . . . . . . . . . . . . . . . . . . . . . . . . . . . . . . . . . . . .1
. . . . . . . . . . . . . . . . . . . . . . . . . . . . . . . . . . . . . . . .1
. . . . . . . . . . . . . . . . . . . . . . . . . . . . . . . . . . . . . . . .1
. . . . . . . . . . . . . . . . . . . . . . . . . . . . . . . . . . . . . . . .1
. . . . . . . . . . . . . . . . . . . . . . . . . . . . . . . . . . . . . . . .1
. . . . . . . . . . . . . . . . . . . . . . . . . . . . . . . . . . . . . . . .8
. . . . . . . . . . . . . . . . . . . . . . . . . . . . . . . . . . . . . . . .8
. . . . . . . . . . . . . . . . . . . . . . . . . . . . . . . . . . . . . . . 16
. . . . . . . . . . . . . . . . . . . . . . . . . . . . . . . . . . . . . . . .16
FIRE PIT PARTS
A.
B.
C.
D.
E.
F.
G.
H.
I.
N.
O.
P.
Q.
R.
S.
T.
FIREBOWL
LEG SECTIONS
UPPER LEG CONNECTOR (WITH SPACER)
LOWER LEG CONNECTOR
RING / HANDLE SECTIONS
POT HOOK
ACCESSORY GRILL ROD WITH COLLAR
ACCESSORY GRILL
LARGE COOKING GRILL
T BOLT (FOR FIREBOWL TO LEG ASSEMBLY)
T BOLT WASHER
T BOLT LOCKNUT
LEG CONNECTOR BOLTS
LEG CONNECTOR FLANGED HEXNUTS
RING / HANDLE BOLTS
RING / HANDLE FLANGED HEXNUTS
QTY
IF YOU HAVE BROKEN OR
MISSING PARTS, PLEASE
CALL CUSTOMER SERVICE
AT 1-877-347-4557
LIMITED WARRANTY
. . . . . . . . . . . . . . . . . . . . . . . . . . . . . . . . . . . . . . . .2
. . . . . . . . . . . . . . . . . . . . . . . . . . . . . . . . . . . . . . . .2
. . . . . . . . . . . . . . . . . . . . . . . . . . . . . . . . . . . . . . . .1
. . . . . . . . . . . . . . . . . . . . . . . . . . . . . . . . . . . . . . . .2
. . . . . . . . . . . . . . . . . . . . . . . . . . . . . . . . . . . . . . . .2
. . . . . . . . . . . . . . . . . . . . . . . . . . . . . . . . . . . . . . . .1
. . . . . . . . . . . . . . . . . . . . . . . . . . . . . . . . . . . . . . . .1
. . . . . . . . . . . . . . . . . . . . . . . . . . . . . . . . . . . . . . . .1
. . . . . . . . . . . . . . . . . . . . . . . . . . . . . . . . . . . . . . . .1
. . . . . . . . . . . . . . . . . . . . . . . . . . . . . . . . . . . . . . . .2
ROTISSERIE PARTS
V.
W.
X.
AA.
HH.
JJ.
KK.
LL.
MM.
NN.
BLACK VERTICAL ROTISSERIE RODS
ADJ ALUMINUM BLOCKS W/ SET SCREWS
PRE-ASSEMBLED STAINLESS ROTISSERIE ROD
C BRACKETS
C BRACKET EYE BOLTS
HANDLE SPROCKET
WIRE HANDLE
HANDLE BOLT
HANDLE LOCKNUT
ALLEN WRENCH
QTY
When unpacking the Round Rock from the carton,
make sure you find and become familiar with all parts
before discarding the packing materials.
FOR OUTDOOR USE ONLY
!
ROUND ROCK GRILL, ROTISSERIE & FIRE PIT
MODEL 590501
®
TM

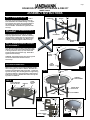
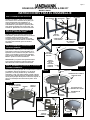
STEP 1: ASSEMBLE THE LEGS
Arrange the (4) leg sections as shown in STEP 1.
Use the (2) leg connectors and (8) leg connector
bolts and hexnuts to assemble the legs. The upper
leg connector with spacer has to be assembled on
top. Adjust legs so they are approximately 90°
from one another. See STEP 1A. Tighten all bolts
securely!
STEP 1
ASSEMBLY INSTRUCTIONS
Page 3
STEP 3: ASSEMBLE FIREBOWL ASSEMBLY
TO LEG ASSEMBLY
Carefully place the firebowl onto the center of the
legs. Move the firebowl as little as possible to align
the hole in the center of the firebowl with the spacer
in the leg connectors. Use (1) T bolt, washer and
locknut to fasten the firebowl to legs. See STEP 3.
Tighten the bolt securely!
CAUTION: The firebowl support pins on the legs will
scratch the underside of the bowl if moved
excessively!
STEP 2: INSTALL THE RING SECTIONS TO
THE FIREBOWL
Place (1) ring section to the underside of the
firebowl and use (4) bolts and nuts to assemble,
only finger tighten the bolts. Install the remaining
(3) ring sections, making sure the ring sections fit
together to form a continuous ring. When all ring
sections are installed, tighten all bolts securely.
STEP 4: ASSEMBLE C BRACKETS AND INSTALL
THE LARGE COOKING GRILL
First, assemble the (2) C brackets to the large cooking grill.
Match the C brackets to the threaded backplates on the
main cooking grate as shown in STEP 4. Assemble the C
brackets to the backplates with (2) eye bolts. Tighten the
eye bolts securely. Next, carefully place the large cooking
grill onto the firebowl. Using the handles, rotate the large
cooking grill until the C bracket holes match with any two
leg holes. See STEP 4A.
LEG SECTION
LOWER LEG
CONNECTOR
LEG CONNECTOR
HEXNUT
LEG CONNECTOR BOLT
UPPER LEG
CONNECTOR
SPACER
STEP 2
STEP 1A
RING /
HANDLE
SECTION
RING SECTION BOLT
RING
SECTION
HEXNUT
T BOLT
WASHER
LOCKNUT
POINTED BOWL
SUPPORT PIN
LEG ASSEMBLY
FIREBOWL /
RING ASSEMBLY
STEP 3
STEP 3A
T BOLT
C BRACKET
LARGE COOKING
GRILL
BACKPLATE
EYE BOLT
STEP 4A
STEP 4
LARGE
COOKING
GRILL
ALIGN C BRACKET
WITH LEG HOLES
FIREBOWL
HANDLES
ROUND ROCK GRILL, ROTISSERIE & FIRE PIT
MODEL 590501
®
TM

ASSEMBLY INSTRUCTIONS
Page 4
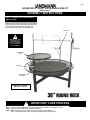
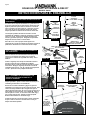
STEP 5: ASSEMBLE VERTICAL ROTISSERIE RODS
Place the black vertical rotisserie rods into the C bracket slots
and slide the rods thru the leg until the rod hits the bottom of
the leg. Adjust the leg so it drops into the seat on the leg
bottom. When the rod finds the seat, the rod will drop 1/2" and
the rod will no longer pivot. Rotate the rotisserie rods so the
the adjustable aluminum blocks face the same way.
The adjustable aluminum blocks hold the stainless rotisserie
rod and can be adjusted to any height preference on the rod.
Loosen the two set screws to move and tighten to secure.
Make sure both aluminum blocks are the same height.
Before use, spray or wipe vegetable oil onto the rod surfaces
so the large cooking grill can move easily up and down the rod.
STEP 6: ASSEMBLE ROTISSERIE ROD HANDLE
Insert the handle bolt into the wire handle. Align the
threaded end of the handle bolt with the hole in the handle
sprocket and fasten the bolt to the sprocket with the handle
lock nut. See STEP 6.
Install the assembled rotisserie handle sprocket to the end
of the stainless steel rotisserie rod. Make sure the collar
side of the sprocket is installed out. Push the sprocket onto
the rotisserie rod until there is about 1/4" - 3/8" of rod
coming thru the collar. Tighten the set screw securely.
STEP 7: ASSEMBLE THE ROTISSERIE AND LARGE
COOKING GRILL HEIGHT ADJUSTMENT CABLES
Place the stainless steel rotisserie rod into the adjustable
blocks. Adjust the end collar so the rotisserie turns easily.
See STEP 7A.
Unwind the stainless cables and attach the clip hooks to the
eye bolts on the large cooking grill. Turn the handle slowly
to make sure the cables are the same length. If they are not,
lock the handle in place with an Allen wrench. See STEP 7B.
Loosen the set screw on the collar that has the longer cable
and turn the collar until tight. Tighten the set screw. Both
cables should be the same length.
When the large cooking grill height is adjusted, make sure
the wire wraps on the rod between the collar and the
adjustable aluminum block.
ROD SEAT
AT BOTTOM
OF ALL LEGS
STEP 5
VERTICAL
ROTISSERIE
ROD
LEG
VERTICAL
ROTISSERIE
ROD
SET
SCREWS
ADJUSTABLE
ALUMINUM
BLOCK
ADJUSTABLE
ALUMINUM
BLOCK
STEP 5A
HANDLE BOLT
WIRE HANDLE
LOCK NUT
HANDLE
SPROCKET
STEP 6
STEP 7
ADJ ALUMINUM BLOCK
LARGE
COOKING
GRILL
HEIGHT
ADJUSTMENT
CABLE
(STAINLESS)
END COLLAR
END
COLLAR
STEP 7A
STEP 6A
STAINLESS STEEL
ROTISSERIE ROD
ROTISSERIE
HANDLE
SPROCKET
COLLAR
COLLAR
SET SCREW
THREADS
MEAT
SKEWER
EYE BOLT
CLIP HOOK
ALLEN
WRENCH
STEP 7B
ROUND ROCK GRILL, ROTISSERIE & FIRE PIT
MODEL 590501
®
TM

Page 5
IMPORTANT! CURE PROCESS
Prior to your first use, follow these 3 steps to cure the finish as well as rid the Round Rock of paint odor.
STEP 1: Lightly coat ALL INTERIOR surfaces of the firebowl with vegetable oil or vegetable oil spray.
STEP 2: Start your first fire with 6-8 lbs of charcoal in firebowl.
STEP 3: Maintain the fire for 1 hour. After 1 hour, allow the grill to cool completely.
Note: It is important not to scrape or rub any surface during the curing process.
ASSEMBLY INSTRUCTIONS
ASSEMBLY INSTRUCTIONS
STEP 8: ASSEMBLY OF ACCESSORY GRILL
AND POT HOOK
Place the accessory grill rod into an unused leg hole.
Make sure the rod drops into the seat on the leg bottom.
Adjust the collar for the preferred accessory grill height.
Place the pot hook into the unused leg hole. Make sure
the rod drops into the seat on the leg bottom. The
accessory grill and pot hook can be pivoted 360°.
ACCESSORY
GRILL
POT HOOK
ACCESSORY
GRILL ROD
COLLAR
!
ROUND ROCK GRILL, ROTISSERIE & FIRE PIT
MODEL 590501
®
COMPLETE ASSEMBLY
WITH ALL PARTS
TM
VEGETABLE OIL MUST
BE APPLIED TO THE
GRILL SURFACES
PRIOR TO COOKING OR
FOOD WILL NOT BE
EASY TO REMOVE
!

ROTISSERIE
The Round Rock can be used as a:
GRILL -OR- ROTISSERIE -OR- GRILL & ROTISSERIE -OR- FIRE PIT
Please read all steps before using.
1. Adjust the aluminum blocks to the desired height rotisserie height.
2. OPTIONAL: The large cooking grill cable assemblies may be removed
if desired for a freely turning rotisserie. If the cable assemblies are left
assembled to the large cooking grill, the rotisserie will pull the large
cooking grill with it.
3. It is recommended that the meat be pierced by the stainless rotisserie rod
for the best hold. Remove the rotisserie rod from the aluminum blocks.
Using an Allen wrench, loosen set screws and remove one stainless
skewer, one cable assembly collar and end collar from the rod.
4. Pierce the meat with the rotisserie rod and push the meat to the fixed
skewer. The skewer should pierce the meat.
5. Reinstall and position the stainless skewer so it pierces the other side of
the meat and gives additional hold. Tighten set screw.
6. Reinstall and position the cable assembly collar to the rod. Connect the
clip hook to the large cooking grill if desired. Tighten set screw.
7. Reinstall and position the end collar. Tighten set screw.
8. Add wood or charcoal to the firebowl for desired type of fire. Do not use
wood more than 18" in length. Don't allow the wood to overhang the
sides of the firebowl. Don't overload the firebowl.
9. Light wood or charcoal and wait for desired temperature.
10. Cook food to desired preference.
GRILL
1. For best results, make sure the large cooking grill is
attached to the adjustable cable assemblies that are
fastened to the rotisserie rod.
2. Raise the large cooking grill using the rotisserie rod
handle so there is access to the firebowl.
3. Add wood or charcoal to the firebowl for desired type of
fire. Do not use wood more than 18" in length. Don't
allow the wood to overhang the sides of the firebowl.
Don't overload the firebowl.
4. Light wood or charcoal and wait for desired temperature.
5. Adjust the large cooking grill to the desired height by
turning the rotisserie rod handle. Lock the large cooking
grill in place by placing an Allen wrench into the
aluminum block and handle sprocket.
6. Make sure vegetable oil is applied to the grills that are
to be used. Apply oil by spray or with an oiled rag.
Failure to apply oil will result in food sticking to the grill
surfaces.
7. Add food to grill(s) and cook to desired preference.
The food is cooked on the stainless steel rotisserie rod.
The food is cooked on the large cooking grill or the
accessory grill.
OPERATING INSTRUCTIONS
The accessory grill can be used to grill food at a
different height from the large cooking grill or it can be
use to hold food until its ready to be served. The swing
feature allows the accessory grill to be removed from
the fire without having to remove the food.
Tip
OPERATING INSTRUCTIONS
1. Remove all parts of the rotisserie assembly, including
vertical rotisserie rods, stainless steel rotisserie rod and
large cooking grill.
2. Add wood or charcoal to the firebowl for desired type of
fire. Do not use wood more than 18" in length. Don't
allow the wood to overhang the sides of the firebowl.
Don't overload the firebowl.
3. Light wood or charcoal.
The Round Rock is used as a fire pit.
Page 6
FIRE PIT
ROTISSERIE
AND
GRILL
GRILL
FIRE PIT
ROUND ROCK GRILL, ROTISSERIE & FIRE PIT
MODEL 590501
®
TM

MODELO 590501
ROUND ROCK GRILL, ROTISSERIE & FIRE PIT
Page 1
• CARNE CRUDA DE RES Y AVE DEBEN MANTENERSE
SEPARADA DE ALIMENTOS LISTOS PARA COMER.
• USE PLATOS Y UTENSILIOS LIMPIOS PARA
MANEJAR ALIMENTOS COCINADOS.
• COCINE BIEN LAS CARNES DE AVE Y RES PARA
MATAR LAS BACTERIAS.
• USE UN TERMÒMETRO DE LECTURA INSTANTÀNEA
PARA ASEGURARSE DE LAS TEMPERATURAS
INTERNAS APROPIADAS DE LOS ALIMENTOS.
• MANTENGA LOS ALIMENTOS PREPARADOS Y LAS
SOBRAS REFRIGERADOS.
• LÀVESE LAS MANOS, LOS UTENSILIOS Y
SUPERFICIES CON JABÒN Y AGUA CALIENTE ANTES
Y DESPUÈS DE MANIPULAR CARNES DE AVE O RES
CRUDAS.
¡LEA PRIMERO!
REGLAS PARA UNA OPERACIÒN SEGURA
• ¡El ROUND ROCK ES PARA USO EXCLUSIVO EN
EXTERIORES!
• ¡USE EL ROUND ROCK SOLO EN SUPERFICIES DE
LADRILLO, CONCRETO, PIEDRA O CUALQUIER
OTRA SUPERFICIE PREPARADA POR UN ALBAÑIL!
• ¡NO LO UTILICE SOBRE EL CÈSPED O CUBIERTAS
DE MADERA!
• MANTENGA EL ROUND ROCK LEJOS DE EDIFICIOS,
OBJETOS COMBUSTIBLES Y VEHÌCULOS.
• NO USE EL ROUND ROCK BAJO ÀREAS CUBIERTAS
O TOLDOS.
• EL ROUND ROCK DEBE SER UTILIZADO POR
ADULTOS SOLAMENTE.
• EL ACEITE VEGETAL SE DEBE APLICAR A LAS
PARRILLAS ANTES DE COCINAR O EL ALIMENTO
NO SERÁ FÁCIL DE QUITAR.
• MANTENGA A NIÑOS Y MASCOTAS ALEJADOS
MIENTRAS LO ESTÈ UTILIZANDO.
• NO MUEVA SU ROUND ROCK MIENTRAS ESTÀ EN
USO.
• NO DESCUIDE SU ROUND ROCK EN NINGÙN
MOMENTO MIENTRAS LO UTILIZA.
• NO LO USE EN CONDICIONES VENTOSAS
• NUNCA UTILICE KEROSENO, GASOLINA O NINGÙN
OTRO COMBUSTIBLE PARA EL ENCENDIDO.
• ANTES DE CADA USO, ASEGÙRESE DE QUE EL
ROUND ROCK ESTÈ EN BUENAS CONDICIONES
PARA OPERARLO.
• TENGA MUCHA PRECAUCIÒN DESPUÈS DE QUE EL
FUEGO HAYA SIDO APAGADO. LAS SUPERFICIES
PERMANECERÁN CALIENTES POR ALGÙN TIEMPO.
• ASEGÙRESE DE QUE TODAS LAS BRASAS ESTÈN
FRÍAS ANTES DE VACIARLAS. SI ES NECESARIO
VIERTA AGUA SOBRE LAS BRASAS ANTES DE
MOVER EL ASADOR.
VER. 2, 1/21/07
ROSTIZADOR
PARRILLA
ACCESORIA
O SECUNDARIA
!
HORNILLO
PARA FUEGO
PARRILLA
PRINCIPAL
DE COCINADO
MODELO 590501
COMPLETAMENTE ENSAMBLADA CON ROSTIZADOR, PARRILLA PRINCIPAL DE
COCINADO, PARRILLA ACCESORIA O SECUNDARIA Y COLGADERO PARA LA CAZUELA
(MIENTRAS SE UTILIZA)
!
!
®
TM
PROTECCIÒN DE LOS ALIMENTOS
Felicitaciones por la compra de su Round Rock Hornillo Para
Fuego y Parrilla! En Landmann USA, nuestra meta es
proveer parrillasque sean fáciles de ensamblar y divertidas
de usar. Si tiene preguntas, inquietudes, alguna parte
defectuosa o si tiene alguna pregunta con respecto a su uso,
por favor contáctenos a:
grills@landmann-usa.com
-OR-
1-877-3GRILLS (1-877-347-4557) L-V 8-5 Tiempo del Este
Comprobante de compra puede ser requerido.
Landmann USA
Cartersville, GA 30120
Hecho en China
© 2007 Landmann USA
PARA UNA OPERACIÓN SEGURA, POR FAVOR LEA TODAS LAS
INSTRUCCIONES DE ENSAMBLAJE Y OPERACIÓN ANTES DE USARLO.
INSTRUCCIONES PARA EL ENSAMBLAJE Y OPERACIÒN

LISTA DE PARTES
Página 2
. . . . . . . . . . . . . . . . . . . . . . . . . . . . . . . . . . . . . . . .1
. . . . . . . . . . . . . . . . . . . . . . . . . . . . . . . . . . . . . . . .4
. . . . . . . . . . . . . . . . . . . . . . . . . . . . . . . . . . . . . . . .1
. . . . . . . . . . . . . . . . . . . . . . . . . . . . . . . . . . . . . . . .1
. . . . . . . . . . . . . . . . . . . . . . . . . . . . . . . . . . . . . . . .4
. . . . . . . . . . . . . . . . . . . . . . . . . . . . . . . . . . . . . . . .1
. . . . . . . . . . . . . . . . . . . . . . . . . . . . . . . . . . . . . . . .1
. . . . . . . . . . . . . . . . . . . . . . . . . . . . . . . . . . . . . . . .1
. . . . . . . . . . . . . . . . . . . . . . . . . . . . . . . . . . . . . . . .1
. . . . . . . . . . . . . . . . . . . . . . . . . . . . . . . . . . . . . . . .1
. . . . . . . . . . . . . . . . . . . . . . . . . . . . . . . . . . . . . . . .1
. . . . . . . . . . . . . . . . . . . . . . . . . . . . . . . . . . . . . . . .1
. . . . . . . . . . . . . . . . . . . . . . . . . . . . . . . . . . . . . . . .8
. . . . . . . . . . . . . . . . . . . . . . . . . . . . . . . . . . . . . . . .8
. . . . . . . . . . . . . . . . . . . . . . . . . . . . . . . . . . . . . . . 16
. . . . . . . . . . . . . . . . . . . . . . . . . . . . . . . . . . . . . . . .16
PARTES DE LA CÀMARA DEL FUEGO
A.
B.
C.
D.
E.
F.
G.
H.
I.
N.
O.
P.
Q.
R.
S.
T.
CANTIDAD
. . . . . . . . . . . . . . . . . . . . . . . . . . . . . . . . . . . . . . . .2
. . . . . . . . . . . . . . . . . . . . . . . . . . . . . . . . . . . . . . . .2
. . . . . . . . . . . . . . . . . . . . . . . . . . . . . . . . . . . . . . . .1
. . . . . . . . . . . . . . . . . . . . . . . . . . . . . . . . . . . . . . . .2
. . . . . . . . . . . . . . . . . . . . . . . . . . . . . . . . . . . . . . . .2
. . . . . . . . . . . . . . . . . . . . . . . . . . . . . . . . . . . . . . . .1
. . . . . . . . . . . . . . . . . . . . . . . . . . . . . . . . . . . . . . . .1
. . . . . . . . . . . . . . . . . . . . . . . . . . . . . . . . . . . . . . . .1
. . . . . . . . . . . . . . . . . . . . . . . . . . . . . . . . . . . . . . . .1
. . . . . . . . . . . . . . . . . . . . . . . . . . . . . . . . . . . . . . . .2
PARTES DEL ROSTIZADOR
V.
W.
X.
AA.
HH.
JJ.
KK.
LL.
MM.
NN.
CANTIDAD
!
ROUND ROCK GRILL, ROTISSERIE & FIRE PIT
MODELO 590501
®
TM
VARILLAS VERTICALES NEGRAS DEL ROSTIZADOR
BLOQUES DE ALUMINIO AJUSTABLESS CON
TORNILLOS PRE-FIJADOS
VARRILLA INOXIDABLE PRE-ENSAMBLADA DEL
ROSTIZADOR
SOPORTES “C”
TORNILLOS DE OJO DE LOS SOPORTES “C”
ENGRANAJE DE LA MANIJA
MANIJA DE CABLE
PERNO O TORNILLO DE LA MANIJA
TUERCA DE SEGURIDAD DE LA MANIJA
LLAVE ALLEN
TAZÒN PARA EL FUEGO
SECCIONES DE LA PATA
CONECTOR SUPERIOR DE LA PATA
(CON ESPACIADOR)
CONECTOR INFERIOR DE LA PATA
SECCIONES DE LA MANIJA CIRCULAR
COLGADERO PARA LA CAZUELA
VARILLA CON COLLAR DE LA PARRILLA
SECUNDARIA
PARRILLA SECUNDARIA
PARRILLA PRINCIPAL DE COCINAR
TORNILLO T (PARA EL ENSAMBLAJE DEL
TAZÒN A LA PATA)
ARANDELA PARA EL TORNILLO T
TUERCA DE SEGURIDAD DEL TORNILLO T
TORNILLOS DEL CONECTOR DE LA PATA
TUERCAS HEXAG. DE SEGURIDAD DEL
CONECTOR DE LA PATA
TORNILLOS DE LA MANIJA CIRCULAR
TUERCAS HEXAG. DE SEGURIDAD PARA
MANIJA CIRCULAR
Cuando desempaque el Round Rock de su caja, asegúrese
de encontrar y familiarizarse con todas sus partes antes de
desechar los materiales de empaque.
PARA USO EN EXTERIORES SOLAMENTE
SI USTED ENCUENTRA PARTES
QUEBRADAS O QUE HAGAN
FALTA POR FAVOR LLAME A
SERVICIO AL CLIENTE AL
1-877-347-4557
Landmann USA (“Landmann”) garantiza que este
producto debería estar libre de defectos en materiales
y mano de obra por 90 días. Esta garantía se extiende
exclusivamente al comprador original y contra
presentación de comprobante de compra. Dicha
garantía está limitada solamente a un uso residencial
y no comercial. Cualesquiera mercaderías devueltas
deben ser transportadas en forma prepagada.
Landmann USA (“Landmann”) autoriza el tazón de
fuente solamente debido al moho hacia fuera o a la
quemadura a través por UN (un 1) período del año
desde compra y hecho exclusivamente al cliente
original que presenta la prueba de la compra.
Esta garantía no cubre el deterioro normal de las
partes o daños que resulten de cualesquiera de las
siguientes razones: negligencia, abuso, uso impropio,
alteración, instalación incorrecta, mantenimiento
inadecuado o no brindar el mantenimiento normal, o
por cualquier uso contrario a las instrucciones de
operación. Además, Landmann no garantiza de
ninguna forma el acabado de la pintura o daño a la
cubierta o deterioro causado por cualesquier
condiciones inclementes del tiempo o por cualquier
exposición a químicos. Estas garantías no cubren
rasguños a superficies o daños causados por el calor,
por considerarse los mismos daños propios del uso.
Dichas garantías excluyen también responsabilidad
por cualquier daño indirecto, incidental o consecuente
o pérdidas de propiedad de cualquier naturaleza.
No devuelva el producto o ninguna parte de este a su
proveedor ni lo envíe al fabricante sin una
autorización escrita. Contacte al Servicio al Cliente al
1-877-3GRILLS (1-877-347-4557) or
grills@landmann-usa.com. Cualesquier productos o
partes devueltos deben ser enviados con su porte
pagado.
Estas garantías están limitadas solamente a uso
residencial no comercial.
La reparación o el reemplazo del producto según se
proveen bajo esta garantía representan su exclusivo
remedio. Landmann no será responsable por ningún
daño incidental o consecuente o por violación de
ninguna garantía expresa o implícita sobre este
producto o cualesquiera de sus partes, excepto al
grado prohibido por la ley aplicable. Algunos estados
no permiten la exclusión o limitación de daños
incidentals o consecuentes, o permiten una limitación
en cuanto a cuánto dura una garantía implícita, y por
lo tanto, la antes mencionada limitación o exclusión
pudiera no aplicarle a usted. Esta garantía le da
derechos legales específicos, y usted pudiera tener
otros derechos, los cuales varían, de estado a estado.
GARANTÍA LIMITADA

PASO 1: ENSAMBLAJE DE LAS PATAS
Coloque las 4 secciones de la pata como se
muestra en el PASO 1. Utilice los 2 conectores y
los 2 tornillos de los conectores de las patas y las
tuercas hexagonales para ensamblarlas. El
conector superior con espaciador tiene que ser
ensamblado en la parte superior. Ajuste las patas
de tal modo que queden a 90” una de la otra. Vea
el PASO 1A. Ajuste todos los tornillos firmemente.
PASO 1
INSTRUCCIONES PARA EL ENSAMBLAJE
Página 3
PASO 3: ENSAMBLE EL TAZÒN ARMADO A
LAS PATAS ARMADAS
Coloque cuidadosamente el tazón en el centro de las
patas. Mueva el tazón tan poco como sea posible
para alinear el orificio en el centro del tazón con el
espaciador en los conectores de la pata. Utilice un
tornillo T, una arandela y una tuerca de seguridad
para atornillar el tazón del fuego a las patas. Vea el
PASO 3. Apriete los tornillos firmemente.
PRECAUCIÓN: ¡Los pernos de la ayuda del firebowl
en las piernas rasguñarán el superficie inferior del
tazón de fuente si están movidos excesivamente!
PASO 2: INSTALE LAS SECCIONES DEL
COLLAR AL TAZÒN DEL FUEGO
Coloque 1 sección del collar en la parte de abajo
del tazón y utilice los 4 tornillos y tuercas para
ensamblarlos, ajustando los tornillos con los dedos
solamente. Instale las restantes 3 partes,
asegurándose que todas las partes calcen unas
con otras y formen un aro continuo. Cuando todas
las partes estén instaladas, ajuste los tornillos
firmemente.
PASO 4: ENSAMBLE LOS SOPORTES “C” E INSTALE
LA PARRILLA PRINCIPAL
Primero atornille los dos (2) soportes en las placas posteriores
con rosca en la parrilla principal de cocinado como se muestra
en el PASO 4. Atornille los soportes “C” a las placas
posteriores con dos (2) tornillos de ojo. Atorníllelos
firmemente. Luego, con mucho cuidado, coloque la parrilla
principal dentro del tazón del fuego. Utilizando las manijas,
rote la parrilla principal hasta que los orificios del soporte “C”
calcen con cualesquier dos orificios de las patas. Vea el
PASO 4.
SECCIÓN
DE LA PATA
CONECTOR DE LA
PATA INFERIOR
TUERCA HEXAGONAL
DEL CONECTOR
DE LA PATA
TORNILLO DEL CONECTOR
DE LA PATA
CONECTOR DE LA
PATA SUPERIOR
ESPACIADOR
PASO 2
PASO 1A
SECCIÓN
DE LA MANIJA
CIRCULAR
TORNILLO DE LA SECCIÓN DE LA MANIJA
TUERCA
HEXAGONAL
DE LA
SECCIÓNDE
LA MANIJA
CIRCULAR
TORNILLO T
ARANDELA
TUERCA DE
SEGURIDAD
PIN O PERNO APOYO
MARCADO EN EL TAZÓN
ENSAMBLADO DE
LA PATA
ENSAMBLADO DE LA MANIJA /
TAZÓN DEL FUEGO
PASO 3
PASO 3A
TORNILLO T
SOPORTE "C"
PARRILLA
PRINCIPAL
PLACA TRASERA
TORNILLO DE OJO
PASO 4A
PASO 4
PARRILLA
PRINCIPAL
ALINEE LOS SPORTES
"C" CON LOS ORIFICIOS
DE LAS PATAS
TAZÓN DEL
FUEGO
MANIJAS
ROUND ROCK GRILL, ROTISSERIE & FIRE PIT
MODELO 590501
®
TM

INSTRUCCIONES PARA EL ENSAMBLAJE
Página 4
PASO 5: ENSAMBLE LAS VARILLAS VERTICALES DEL
ROSTIZADOR
Coloque las varillas verticales negras del rostizador dentro de
las ranuras de los soportes en forma de “C” y deslícelos a lo
largo de la pata hasta que la varilla toque el fondo de la pata.
Ajuste la pata hasta que la varilla se asiente en el fondo de
ésta. Al asentarse la varilla caerá 1/2” y entonces no girará
más. Rote las varillas del rostizador de tal modo que los
bloques ajustables de aluminio miren todos al mismo lado.
Los bloques ajustables de aluminio sostienen la varilla
inoxidable del rostizador y pueden ser ajustados a cualquier
altura en la varilla. Suelte los tornillados prefijados para
moverla y apriételos para fijarla. Asegúrese de que ambos
bloques de aluminio estén a la misma altura.
Antes de su uso, rocíe o aplique aceite vegetal a las
superficies de la varilla de tal modo que la parrilla principal se
pueda mover fácilmente en la varilla hacia arriba o abajo.
PASO 6: ENSAMBLE LA MANIJA DE LA VARILLA
DEL ROSTIZADOR
Introduzca el tornillo de la manija en la manija de cable.
Alinee el extremo con rosca del tornillo de la manija con el
orificio en el engranaje de la manija y fije el tornillo al
engranaje con la tuerca de seguridad de la manija. Vea el
PASO 6.
Instale el engranaje de la manija del rostizador armado al
final de la varilla de acero inoxidable del rostizador.
Asegúrese de que el lado del collar del engranaje se instale
hacia afuera. Empuje el engranaje dentro de la varilla del
rostizador hasta que 1/4" - 3/8” de la varilla haya traspasado
el collar. Apriete el tornillo prefijado firmemente.
PASO 7: ENSAMBLE EL ROSTIZADOR Y LOS
CABLES DE AJUSTE DE ALTURA DE LA
PARRILLA PRINCIPAL
Coloque la varilla de acero inoxidable del rostizador en los
bloques ajustables. Ajuste el collar final de tal modo que el
rostizador gire fácilmente. Vea el PASO 7A.
Desenrrolle los cables inoxidables y pegue los ganchos
sujetadores a los tornillos de ojo de la parrilla principal. Déle
vuelta a la manija lentamente para asegurarse de que los
cables sean del mismo largo. Si no lo son, fije la manija en su
lugar debido con una llave Allen. Vea el PASO 7B. Afloje el
tornillo fijado en el collar , el cual tiene el cable más largo y
gire el collar hasta su tope. Apriete el tornillo prefijado.
Ambos cables deberían ser del mismo largo.
Cuando la altura de la parrilla principal se ajuste, asegúrese
de que el cable se arrolle en la varilla entre el collar y el
bloque de aluminio ajustable.
ASIENTO DE LA
VARILLA AL FONDO
DE TODAS LAS PATAS
PASO 5
VARILLA
VERTICAL
DEL
ROSTIZADOR
PATA
VARILLA
VERTICAL
DEL
ROSTIZADOR
TORNILLOS
PREFIJADOS
BLOQUE
AJUSTABLE
DE ALUMINIO
BLOQUE
AJUSTABLE
DE ALUMINIO
PASO 5A
TORNILLO DE LA
MANIJA
MANIJA DE CABLE
TUERCA
SEGURIDAD
ENGRANAJE
DE LA MANIJA
PASO 6
PASO 7
BLOQUE AJUSTABLE
DE ALUMINIO
CABLE
DEL AJUSTE
DE LA ALTURA
DE LA PARRILLA
PRINCIPAL
(INOXIDABLE)
COLLAR FINAL
COLLAR
FINAL
PASO 7A
PASO 6A
VARILLA DE ACERO INOXIDABLE
DEL ROSTIZADOR
MANIJA DEL
ROSTIZADOR
ENGRANAJE
COLLAR
TORNILLO
PREFIJADO
DEL COLLAR
ENROSCADO
BROQUETA
DE LA CARNE
TORNILLO DE OJO
GANCHO SUJETADOR
LLAVE
ALLEN
PASO 7B
ROUND ROCK GRILL, ROTISSERIE & FIRE PIT
MODELO 590501
®
TM

Página 5
IMPORTANTE! PROCESO DE CURADO
Previo a su primero uso, siga estos 3 pasos para curar el acabado así como para librar al Round Rock del olor a pintura también.
PASO 1: Cubra ligeramente TODAS las superficies INTERIORES del tazón con aceite vegetal o con aceite vegetal en spray.
PASO 2: Inicie su primer fuego con 6-8 libras de carbón en el tazón del fuego.
PASO 3: Mantenga el fuego por 1 hora. Después de una hora, permita que la parrilla se enfríe completamente.
Nota: Es importante no raspar ni frotar ninguna superficie durante el proceso de curado.
ASSEMBLY INSTRUCTIONS
INSTRUCCIONES PARA EL ENSAMBLAJE
PASO 8: ENSAMBLAJE DE LA PARRILLA
SECUNDARIA Y EL COLGADERO DE LA CAZUELA
Coloque la varilla de la parrilla secundaria dentro de un
orificio no utilizado. Asegúrese de que la varilla caiga
dentro del asiento o descansadero al fondo de la pata.
Ajuste el collar para que la parrilla secundaria quede a la
altura preferida. Coloque el colgadero de la cazuela dentro
del orificio no utilizado de la pata. Asegúrese de que la
varilla caiga en el asiento o descansadero al fondo de la
pata. La parrilla secundaria y el colgadero pueden girar
360°.
PARRILLA
SECUNDARIA
COLGADERO DE LA CAZUELA
VARILLA DE LA
PARRILLA SECUNDARIA
COLLAR
!
ROUND ROCK GRILL, ROTISSERIE & FIRE PIT
MODELO 590501
®
ENSAMBLADO COMPLETO
CON TODAS SUS PARTES
TM
EL ACEITE VEGETAL
SE DEBE APLICAR A
LAS SUPERFICIES DE
LA PARRILLA ANTES
DE COCINAR O EL
ALIMENTO NO SERÁ
FÁCIL DE QUITAR
!

ROSTIZADOR
El Round Rock puede ser utilizado como un(a):
PARRILLA - O - ROSTIZADOR - O - PARRILLA Y ROSTIZADOR - O - HORNILLO PARA FUEGO
Por favor lea todos estos pasos antes de utilizarlo.
1. Ajuste los bloques de aluminio a la altura deseada del rostizador.
2. OPCIONAL: La partes ensamblables del cable de la parrilla principal
pueden ser removidos si se desea para girar libremente el rostizador.
Si dichas partes se dejan ensambladas a la parrilla principal el
rostizador moverá la parrilla principal con ellas.
3. Es recomendable que la carne sea atravesada por la varilla de acero
inoxidable del rostizador para sostenerse mejor. Remueva la varilla del
rostizador de los bloques de aluminio. Utilizando una llave Allen, afloje
los tornillos prefijados y remueva una broqueta (pincho) inoxidable, un
collar del ensamblado del cable y el collar final de la varilla.
4. Atraviese la carne con la varilla del rostizador y empuje la carne hacia la
braqueta fijada. La braqueta debe atravesar la carne.
5. Reinstale y posicione la broqueta inoxidable de tal modo que atraviese el
otro lado de la carne y le dé mayor sostén a la misma. Apriete el tornillo
prefijado.
6. Reinstale y posicione el collar del ensamblado del cable a la varilla.
Conecte el gancho sujetador a la parrilla principal si así lo desea.
Apriete el tornillo prefijado.
7. Reinstale y posicione el collar final. Apriete el tornillo prefijado.
8. Agregue leña o carbón al tazón del fuego para lograr el tipo de fuego
deseado. No utilice trozos de leña de más de 18” de largo. No permita
que la leña cuelgue por encima de los lados del tazón del fuego. No
sobrecargue el tazón.
9. Encienda la leña o el carbón y espere la temperatura deseada.
10. Cocine la comida según su preferencia.
PARRILLA
1. Para mejores resultados, asegúrese de que la parrilla
principal se encuentre conectada a las partes
ensamblables del cable ajustable que se hayan sujetas a
la varilla del rostizador.
2. Levante la parrilla principal utilizando la manija de la
varilla del rostizador de tal modo que haya acceso al
tazón del fuego.
3. Agregue leña o carbón al tazón según el tipo de fuego
deseado. No utilice leña de más de 18” de largo. No
permita que la leña cuelgue por encima de los lados del
tazón. No sobrecargue el tazón.
4. Encienda la leña o el carbón y espere la temperatura
deseada.
5. Ajuste la parrilla principal a la altura deseada por medio
de girar la manija de la varilla del rostizador. Fije la
parrilla principal en su debido lugar por medio de colocar
una llave Allen en el bloque de aluminio y el engranaje de
la manija.
6. Cerciorarte de que el aceite vegetal esté aplicado a las
parrillas que son ser utilizado. Aplicar el aceite por el
aerosol o con un trapo engrasado. La falta de aplicar el
aceite dará lugar al alimento que se pega a las superficies
de la parrilla.
7. Agregue comida a la(s) parrilla(s) y cocínela según su
preferencia.
La comida se cocina en la varilla de acero inoxidable del rostizador.
La comida se cocina en la parrilla principal o en la parrilla
secundaria.
OPERATING INSTRUCTIONS
La parrilla secundaria puede ser utilizada para asar
comida a una altura diferente con respecto a la parrilla
principal o puede ser utilizada para mantener la comida
hasta que esté lista para ser servida. La característica
de movimiento oscilatorio permite que la parrilla
secundaria sea removida del fuego sin tener que
remover la comida.
INSTRUCCIONES PARA LA OPERACIÒN
El Round Rock es utilizado como un hornillo.
Página 6
HORNILLO PARA EL FUEGO
ROSTIZADOR
Y
PARRILLA
PARRILLA
HORNILLO
PARA FUEGO
ROUND ROCK GRILL, ROTISSERIE & FIRE PIT
MODELO 590501
®
TM
CONSEJO
1. Remueva todas las partes del ensamblado del rostizador,
incluyendo las varillas verticales, la varilla de acero
inoxidable y la parrilla principal.
2. Agregue leña o carbón al tazón para obtener el tipo de
fuego deseado. No utilice trozos de leña de más de 18” de
largo. No permita que la leña cuelgue por los lados
de tazón. No sobregargue el tazón del fuego.
3. Encienda la leña o el carbón.
-
 1
1
-
 2
2
-
 3
3
-
 4
4
-
 5
5
-
 6
6
-
 7
7
-
 8
8
-
 9
9
-
 10
10
-
 11
11
-
 12
12


LANDMANN 590501 El manual del propietario
- Categoría
- Cuidado de mascotas
- Tipo
- El manual del propietario
en otros idiomas
- English: LANDMANN 590501 Owner's manual
Artículos relacionados
-
LANDMANN 610101 El manual del propietario
-
-
-
LANDMANN 42304NG El manual del propietario
-
-
LANDMANN 42301 El manual del propietario
-
-
-
LANDMANN 28336 El manual del propietario
-