
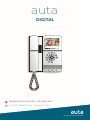
Bringing people together
auta
CCI SWITCHBOARD COAX _ COAXLESS / P&P
CENTRAL CCI DIGITAL COAX _ NO-COAX / P&P
EN
ES
DIGITAL
1
2
3
4
5
6
7
8
0
9
Exit
Accept OK
Select

Índice
Descripción ................................................................................................................................. 1
Conexiones ................................................................................................................................. 1
Coniguración. USUARIO ............................................................................................................ 2
Coniguración. INSTALACIÓN ..................................................................................................... 3
Funcionamiento .......................................................................................................................... 4
Guía de instalación ...................................................................................................................... 8
Index
Description .................................................................................................................................. 1
Connections ................................................................................................................................ 1
Coniguration. USER .................................................................................................................... 5
Coniguration. INSTALLATION ...................................................................................................... 6
Functioning ................................................................................................................................. 7
Installation guide ......................................................................................................................... 8
Bringing people together
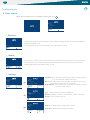
Instalación Installation
Supericie
Surface
Escritorio
(adaptador 730482, NO INCLUIDO)
Desk
(adapter 730482, NOT INCLUDED)

Bringing people together
1
AUX
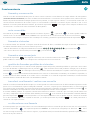
Descripción Description
Conexiones Connections
Pantalla Screen
Teclado de control Control keypad
ONOFF e Imagen ONOFF and Image
Altavoz Speaker
Micrófono Microphone
Conexión de Interface USB Auta para gestión de bases de datos (167097)
Auta USB interface connection for the management of data bases (167097)
Conexión de la central CCI
Connection of the CCI switchboard
Conmutador de cuelgue Hang switch
Pulsadores y LED de estado Push-buttons and status LED
AUX
Vi_b
Video - (entrada) (CCTV)
Video - (in) (CCTV)
Vi_a
Video + (entrada) (CCTV)
Video + (in) (CCTV)
-24 Vcc (durante la llamada)
-24 Vdc (during the call)
+24 Vcc (durante la llamada)
+24 Vdc (during the call)
Aux 2
-24 Vcc (modo PULSO, )
-24 Vdc (PULSE mode, )
Aux 1
-24 Vcc (modo ONOFF, )
-24 Vdc (ONOFF mode, )
_Z
Altavoz_Datos
Speaker_Data
Micrófono
Microphone
+
+24 Vcc
+24 Vdc
-
-24 Vcc
-24 Vdc
Vo_b
Video - (salida)
Video - (out)
Vo_a
Video + (salida)
Video + (out)
Vi_b
Video - (entrada)
Video - (in)
Vi_a
Video + (entrada)
Video + (in)
AUX AUX
+
Vi
Video + (entrada) (CCTV)
Video - (in) (CCTV)
-
Video - (entrada) (CCTV)
Video + (in) (CCTV)
-24 Vcc (durante la llamada)
-24 Vdc (during the call)
+24 Vcc (durante la llamada)
+24 Vdc (during the call)
Aux 2
-24 Vcc (modo PULSO, )
-24 Vdc (PULSE mode, )
Aux 1
-24 Vcc (modo ONOFF, )
-24 Vdc (ONOFF mode, )
_Z
Altavoz_Datos
Speaker_Data
Micrófono
Microphone
+
+24 Vcc
+24 Vdc
-
-24 Vcc
-24 Vdc
Vo
Video + (salida)
Video + (out)
-
Video - (salida)
Video - (out)
Vi
Video + (entrada)
Video + (in)
-
Video - (entrada)
Video - (in)
AUX
AUX
+
1
2
3
4
5
6
7
8
0
9
Apertura_Intercom entre centrales Opening_Intercom between switchboards
Conmutador ONOFF ONOFF switch
Ajuste de BRILLO BRIGHTNESS adjust
Ajuste de COLOR COLOUR adjust
Auto-encendido multi-placa (hasta 15) Multi-panel self-starting (up to 15)
Pulsador auxiliar (salida -24Vcc, modo ONOFF)
Auxiliary push-button (output -24Vdc, ONOFF mode)
Pulsador auxiliar (salida -24Vcc, modo PULSO)
Auxiliary push-button (output -24Vdc, PULSE mode)
+
Z
AUX
1
AUX
2
NO-COAX _ P&PCOAX
+
Z
AUX
1
AUX
2
NO-COAX _ P&P
COAX
230
195 55

Bringing people together
2
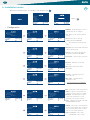
Conguración
ES
▶ menús de usuario
▷ Directorio
▷ Ajustes
▷ Cola
Directorio
Cola
Ajustes
Coniguración
Menu Principal
Salir
AceptarOK
Escoger
Modo de operación
Timbre
Audio
Ajustes
Salir
CambiarOK
Escoger
Estándar
Directo
No Molestar
Modo de operación: Estándar
Atrás
CambiarOK
Escoger
Tipo: 1 / 8
Número Timbrazos: 4
Volumen: - .
Atrás
Timbre
+
AceptarOK
Escoger
Audio In: - | |
Audio Out: - | |
Atrás
Audio
+
AceptarOK
Escoger
Directorio
Salir
LlamarOK
Navegar
Cola
Salir
Llamar
Borrar
OK
Navegar
En este menú aparecerá el listado de viviendas que pertenecen a la instalación. Podremos navegar
por los diferentes registros y realizar una llamada. Para ellos seguiremos los pasos descritos en la
sección "Funcionamiento".
En este menú aparecerá el listado de llamadas perdidas, realizadas desde viviendas, que no han
sido atendidas. Podremos devolver una llamada o borrarla directamente.
Sabremos que existen llamadas perdidas porque la central emitirá un destello azul cada segundo.
Estándar - La llamada desde calle suena en central, si esta no puede
atenderla, se re-dirige a vivienda automáticamente.
Directo - La llamada desde calle suena en vivienda directamente.
La central solo puede monitorizar. No intervenir.
No Molestar - La llamada desde calle suena en central, si esta no
puede atenderla, inalizará en la misma.
Tipo - Selección de melodía. Existen 8 diferentes.
Número Timbrazos - Selección del número de tonos. " 0 " silencio.
Volumen - Selección del volumen de los tonos.
Audio In - Ajuste del volumen de audio entrante.
Audio Out - Ajuste del volumen de audio saliente.
Estando las central en reposo se presionará

Bringing people together
3
▶ menú de instalación
▷ Conguración
Directorio
Cola
Ajustes
Coniguración
Menu Principal
Salir
AceptarOK
Escoger
Gestión Directorio
Parámetros
Cambio Clave
V40170109
Coniguración
Salir
AceptarOK
Escoger
Gestión Directorio
Parámetros
Cambio Clave
V40170109
Coniguración
Salir
AceptarOK
Escoger
Mostrar / Editar
Añadir
Borrar
Enviar
Gestión Directorio
Atrás
AceptarOK
Escoger
Mostrar / Editar
Añadir
Borrar
Enviar
Gestión Directorio
Atrás
AceptarOK
Escoger
Mostrar / Editar
Añadir
Borrar
Enviar
Gestión Directorio
Atrás
AceptarOK
Escoger
Mostrar / Editar
Añadir
Borrar
Enviar
Gestión Directorio
Atrás
AceptarOK
Escoger
Central
Instalación
Parámetros
Atrás
AceptarOK
Escoger
Central
Instalación
Parámetros
Atrás
AceptarOK
Escoger
Entrada Manual
Entrada Remota
Entrada Automática
Añadir
Atrás
AceptarOK
Escoger
Registro seleccionado
Directorio completo
Borrar
Atrás
AceptarOK
Escoger
Registro seleccionado
Directorio completo
Enviar
Atrás
AceptarOK
Escoger
ID: 1
Estatus: MASTER
Manager: DESHABILITADO
Pánico: DESHABILITADO
Central
Atrás
AceptarOK
Escoger
Pull-UP: OFF
Tipo: INTERIOR
Instalación
Atrás
AceptarOK
Escoger
000001 m/t: 1 sdl: 1
J________________________ J_______
Mostrar Registro
Atrás
EditarOK
Navegar
000001 - Código que deseamos
usar para llamar a la vivienda.
Hasta 9 dígitos.
m/t - Código binario del terminal
en vivienda.
sdl - Código binario del sdl.
SOLO CCI COMO EXTERIOR.
J___ - Campos libres de texto
informativo.
ID: 1 - Código ID de la central.
Desde 0 a 15.
Estatus - Si hay más de una
central, 1 master el resto SLAVE.
Manager - La central solo recibe
llamadas de otras centrales.
Puede realizar a todo el sistema.
Pánico - Modo solo operativo con
monitor AVANT PÁNICO.
Pull-UP - Carga de línea, se activa
solo si la central no tiene ninguna
placa u otra central “Pull-UP: ON”
en su mismo bus de datos.
Tipo - INTERIOR, llama a viviendas.
EXTERIOR, llama a SDL’s.
Manual - Se usarán los mismos
campos arriba indicados.
Remota - Recepción a través de PC.
Interface Auta USB (167097).
Automática - Estructura tipo “hotel”.
Registro - Elimina el registro que
se seleccione.
Directorio - Elimina toda la base
de datos.
Registro - Envía a PC el registro
que se seleccione.
Directorio - Envía a PC toda la
base de datos.
Interface USB AUTA (167097)
Clave:
Coniguración
Atrás
Aceptar
Borrar
OK
Estando las central en reposo se presionará
fábrica
9
ES

Bringing people together
4
Funcionamiento
llamada y conversación
Cuando se recibe una llamada desde placa de calle la central comienza a sonar durante un tiempo máximo de 30 segundos
(ver modos de funcionamiento). De forma estándar efectúa 4 timbrazos con intervalos de 4 segundos entre cada uno de ellos.
Durante el periodo de llamada la imagen aparecerá en la pantalla, si la placa posee cámara, o se mostrará un fondo azul. La
central mostrará información del usuario al que se está realizando la llamada y el número de placa desde la cual se está
llamando. El usuario podrá abrir directamente, presionando el pulsador , o descolgar el auricular para establecer una
conversación. La conversación tiene un máximo de 90 segundos.
auto-encendido
Presionando el pulsador , seleccionando el número de placa y pulsando , el usuario podrá establecer
comunicación con la PLACA DE CALLE / CÁMARA CCTV que desee en el caso de existir más de una en la instalación.
El sistema mostrará imagen, si la placa seleccionada posee cámara, y permitirá su apertura presionando el pulsador
transferir una llamada / realizar una consulta
Cuando se recibe una llamada desde una placa, el usuario puede ver toda la información de dicha llamada en pantalla. Desde
que acceso se está llamando, a quien va dirigida la llamada..., e incluso, si la placa posee cámara de video, se verá a la persona
en el exterior. Una vez atendida, el usuario podrá transferir directamente la llamada a vivienda presionando el pulsador . Al
transferir la llamada la central perderá el control de la misma pasando a modo "Linea ocupada".
El sistema también permite, en lugar de transferir directamente la llamada a vivienda, que el usuario pueda realizar una
consulta y comprobar si desean atender dicha llamada, presionando . Si en vivienda se desea atender la llamada, deberán
presionar el pulsador en su monitor/teléfono. La central pasará a modo "Linea ocupada". Si por el contrario en vivienda
no se desea atender la llamada, colgarán el auricular y el usuario presionará el pulsador en la central para volver a
comunicar con la placa exterior.
re-direccionar una llamada
El sistema permite que el usuario re-direccione una llamada de placa hacia la vivienda que desee. Para ello, una vez atendida,
presionará el pulsador . En la pantalla aparecerá "Cambiar". A continuación navegará por el directorio hasta
encontrar el registro deseado. Una vez en el registro, se podrá transferir/consultar dicha llamada, siguiendo el procedimiento
descrito en el punto anterior.
llamada a otra conserjería
Presionando el pulsador , descolgando el auricular, seleccionando el número de central y pulsando , el usuario
podrá establecer comunicación con cualquier otra central que desee en la instalación.
gestión de llamadas perdidas de viviendas
Si estando la central en reposo el LED de estado parpadea, signiicará que hay llamadas perdidas sin gestionar. Para acceder
a la cola de llamadas se deberá presionar el pulsador . Una vez dentro del listado podremos navegar por las distintas
llamadas presionando . En cada registro de la lista podremos devolver la llamada, descolgando el auricular y presionando
la tecla , o suprimir directamente dicha llamada si así se desea. Si devolvemos la llamada y en vivienda no responden, el
sistema conservará dicha llamada en el listado como no atendida. Si en vivienda responden la llamada, el sistema borrará
automáticamente la llamada del listado considerándola atendida.
llamada a viviendas
Si se desea realizar una llamada a cualquier vivienda de la base de datos, se deberá descolgar el auricular. La pantalla se
encenderá automáticamente, el usuario tendrá 2 opciones.
- Marcar directamente el código de llamada de la vivienda y posteriormente
- Buscar en el directorio de viviendas presionando y posteriormente
1
2
3
4
5
6
7
8
0
9
ES

Bringing people together
5
Conguration
▶ User menu
▷ Directory
▷ Seings
▷ Queue
Directory
Queue
Settings
Coniguration
Main menu
Exit
AcceptOK
Select
Operation mode
Melody
Audio
Settings
Exit
ChangeOK
Select
Standard
Direct
Do not disturb
Operation mode: Standard
Back
ChangeOK
Select
Type: 1 / 8
Number of tones: 4
Volume: - .
Back
Melody
+
AcceptOK
Select
Audio In: - | |
Audio Out: - | |
Back
Audio
+
AcceptOK
Select
Directory
Exit
CallOK
Navigate
Queue
Exit
Call
Erase
OK
Navigate
In this menu the list of lats belonging to the installation will appear. We can browse the dierent
registers and make a call.
For it we will follow the steps described in the "Functioning" section.
In this menu you will see the list of missed calls, made from lats, which have not been answered.
We can return a call or delete it directly. We will know that there are missed calls because the
switchboard will emit a blue lash every second.
Standard - The call from the street rings in CCI, if it cannot answer
it, it is automatically redirected to lats.
Direct - The call from the street rings directly at lats. The control
panel can only monitor. Do not intervene.
Do Not Disturb - The call from the street rings in central, if it cannot
answer it, it will end in it.
Type - Melody selection. There are 8 dierent.
Number of tones - Selection of the number of tones. "0" silence.
Volume - Tone volume selection.
Audio In - Adjusting the incoming audio volume.
Audio Out - Adjusting outgoing audio volume.
When the switchboard is at standby, it will be pressed
EN

Bringing people together
6
▶ Installation menu
▷ Conguration
Directory management
Parameters
Password change
V40170109
Coniguration
Exit
AcceptOK
Select
Directory management
Parameters
Password change
V40170109
Coniguration
Exit
AcceptOK
Select
Display / Change
Add
Erase
Send
Directory management
Back
AcceptOK
Select
Display / Change
Add
Erase
Send
Directory management
Back
AcceptOK
Select
Manual input
Remote input
Automatic input
Send
Add
Back
AcceptOK
Select
Selected register
Complete directory
Erase
Back
AcceptOK
Select
Selected register
Complete directory
Send
Back
AcceptOK
Select
Display / Change
Add
Erase
Send
Directory management
Back
AcceptOK
Select
Display / Change
Add
Erase
Send
Directory management
Back
AcceptOK
Select
Switchboard
Installation
Parameters
Back
AcceptOK
Select
ID: 1
Status: MASTER
Manager: DISABLE
Panic: DISABLE
Switchboard
Back
AcceptOK
Select
Pull-UP: OFF
Type: INTERNAL
Installation
Back
AcceptOK
Select
Switchboard
Installation
Parameters
Back
AcceptOK
Select
000001 m/t: 1 sdl: 1
J________________________ J_______
Display register
Back
EditOK
Navigate
000001 - Code we want to use to
call the lat. Up to 9 digits.
m/t - Binary code of the terminal
in lat.
sdl - Binary code of the sdl.
ONLY CCI AS EXTERNAL.
J___ - Free ields for informational
text.
ID: 1 - Central ID code. From 0 to 15.
Status - If there is more than one
central, 1 master the rest SLAVE.
Manager - The CCI only receives
calls from other CCI’s. It can
perform to the entire system.
Panic - Operational mode only with
AVANT PANIC monitor.
Pull-UP - Line load is activated only
if the control panel does not have
any “Pull-UP: ON” panel or other
panel on its same data bus.
Type - INTERNAL, call to lats.
EXTERNAL, call to SDL’s.
Manual - The same ields indicated
above will be used.
Remote - Reception through PC.
Interface Auta USB (167097).
Automatic - “Hotel” type structure.
Register - Delete the selected
record.
Directory - Delete the entire
database.
Registro - Send the selected
record to PC.
Directorio - Send the entire
database to PC.
AUTA USB interface (167097)
Pass:
Coniguration
Back
Accept
Erase
OK
Directory
Queue
Settings
Coniguration
Main menu
Exit
AcceptOK
Select
When the switchboard is at standby, it will be pressed
factory
9
EN

Bringing people together
7
Functioning
call and conversation
When a call is received from the entrance panel, the control unit starts to sound for a maximum of 30 seconds (see operating
modes). As standard, it performs 4 rings with intervals of 4 seconds between each of them.
During the call period the image will appear on the screen, if the board has a camera, or a blue background will be shown. The
control panel will show information about the user to whom the call is being made and the panel ID number from which it is
being called. The user can open directly, by pressing the button , or pick up the handset to establish a conversation. The
conversation has a maximum of 90 seconds.
self-staing
Pressing the button , selecting the panel number and pressing , the user will be able to establish communication
with the STREET PANEL / CCTV CAMERA that he wishes in case there is more than one in the installation.
The system will show the image, if the selected plate has a camera, and allow its opening by pressing the button
transfer a call / make a query
When a call is received from a board, the user can see all the information of this call on the screen. From which access is being
called, to whom the call is directed ..., and even if the panel has a video camera, the person will be seen at the screen. Once
attended, the user can directly transfer the call to housing by pressing the button . When the call is transferred, the guard
porter loses control of the call, changing to "Busy line" mode.
The system also allows, instead of directly transferring the call to housing, that the user can make a query and check if they
want to answer the call, by pressing . If you want to answer the call at home, you must press the button on your
monitor/phone. The control panel will switch to "Busy line" mode. If, on the other hand, the home does not want to answer the
call, they will hang up the handset and the user will press the button on the guard porter to communicate with the
external panel again.
redirect a call
The system allows the user to redirect a call from panel to the desired home. To do this, once attended, press the button .
"Change" will appear on the screen. Then navigate through the directory until you ind the desired record. Once in the
registry, you can transfer / consult the call, following the procedure described in the previous point.
call to another guard poer
Pressing the button , picking up the handset, selecting the guard porter ID number and pressing , the user
can establish communication with any other guard porter that he wishes in the installation.
management of missed calls of ats
If the central station is in standby, the status LED lashes, it means that there are missed calls unmanaged. To access the call
queue, press the button . Once inside the list we can navigate through the dierent calls by pressing . In each record
of the list we can return the call, by picking up the handset and pressing the key , or directly suppress the call if desired.
If we return the call and the lat does not respond, the system will keep that call in the list as unattended. If the call is answered
at lat, the system will automatically delete the call from the list considering it attended.
call to a at
If you want to make a call to any lat in the database, you must pick up the handset. The screen will turn on automatically, the
user will have 2 options.
- Directly dial the call code of the apartment and after
- Search at housing directory by pressing and after
1
2
3
4
5
6
7
8
0
9
EN

Bringing people together
auta.es
HI-743 _ V 1.0
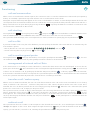
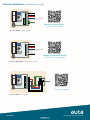
Guía de instalación Installation guide
Sistema P&P P&P system
730160
VIDEO
POWER
DATA
Va
Vb
Sistema COAX COAX system
Sistema NOCOAX COAXLESS system
SOLO VIDEO
ONLY VIDEO
Vi
Vo
+
Z
1
2
3
4
5
6
7
8
0
9
Va
Vb
Va
Vb
+
Z
1
2
3
4
5
6
7
8
0
9
Va
Vb
Va
Vb
+
Z
1
2
3
4
5
6
7
8
0
9
CCI
NOCOAX
COAXLESS
Solo sistemas en cascada
Solo sistemas en cascada
Only serial systems
Only serial systems
COAX system guide
Manual sistema COAX
COAXLESS system guide
Manual sistema NOCOAX
P&P system guide
Manual sistema P&P
-
 1
1
-
 2
2
-
 3
3
-
 4
4
-
 5
5
-
 6
6
-
 7
7
-
 8
8
-
 9
9
-
 10
10


en otros idiomas
- English: Auta 760595 User manual
Artículos relacionados
-
Auta 760597 Central Compact Integrada Manual de usuario
-
-
-
-
-
-
-
-
-