Sentinel Boat Monitor Guía de instalación
- Tipo
- Guía de instalación

Sentinel Boat Monitor
Installation Guide • Installationsanleitung • Guide d'installation
Guida all’installazione • Guía de instalación
MONTAGETEILE - INKLUSIV
•
Sentinel Boat Monitor device
•
Benutzerhandbuch
•
Externe Antennen (Modell für externe
Antennen)
OPTIONALE TEILE (SKU: 010-11417-21)
• Magnetischer Schalter
• Verbindungskabel
(NMEA 2000)
• T-Verbinder
(NMEA 2000)
INCLUSE LE PARTI DI INSTALLAZIONE
•
Sentinel Boat Monitor device
•
Manuale utente
• Antenne esterne (modello per antenne
esterne)
PARTI OPZIONALI (SKU: 010-11417-21)
• Interruttore magnetico
• Cavo di discesa
(NMEA 2000)
• Connettore a T
(NMEA 2000)
PIEZAS DE INSTALACIÓN - INCLUIDAS
•
Sentinel Boat Monitor device
•
Manual de usuario
•
Antenas externas (modelo de
antenas externas)
PIEZAS OPCIONALES (SKU: 010-11417-21)
• Interruptor magnético
• Cable de derivación
(NMEA 2000)
• Conector T
(NMEA 2000)
INSTALLATION PARTS - INCLUDED
•
Sentinel Boat Monitor device
•
User manual
•
External antennas (external
antennas model)
OPTIONAL PARTS (SKU: 010-11417-21)
•
Magnetic switch
•
Drop cable (NMEA 2000)
•
T-connector (NMEA 2000)
DE
EN
IT
E
PIÈCES D'INSTALLATION - INCLUSES
•
Sentinel Boat Monitor device
•
Guide d’utilisation
•
Antennes externes (modèle d'antennes
externes)
FR
PIÈCES OPTIONNELLES
(SKU: 010-11417-21)
• Interrupteur magnétique
• Câble de branchement
(NMEA 2000)
• Connecteur T
(NMEA 2000)

1. Installing Sentinel App • Installieren der Sentinel-App •
Installation de l’application Sentinel • Installare la App di Sentinel •
Instalando Sentinel App
1.1 Using the Sentinel app • Verwendung der Sentinel-App •
Usando la aplicación Sentinel • Modalità d’uso della app Sentinel •
Utilisation de l'application Sentinel
To start using your Boat Monitor device you should install the
“Sentinel Marine solutions” app for your platform and create a
Sentinel account.
Tap “Register” if you do not yet have a Sentinel user account. Otherwise,
tap “Login” and enter your email and password.
Tippen Sie auf "Registrieren", wenn Sie noch kein Sentinel-Benutzerkonto
haben. Andernfalls tippen Sie auf "Login" und geben Sie Ihre
E-Mail-Adresse und Ihr Passwort ein.
Pulse "Registrarse" si aún no tiene una cuenta de usuario de Sentinel. De
lo contrario pulse "Iniciar sesión" e ingrese su correo electrónico y
contraseña.
Clicca su “Registra” se non hai ancora l’account di Sentinel. In caso
contrario clicca su “login” e inserisci la tua mail e la tua password.
Appuyez sur « Créer un compte » si vous n'avez pas encore de compte
utilisateur Sentinel. Sinon, appuyez sur « Connexion » et entrez votre
e-mail et votre mot de passe.
Um mit der Nutzung Ihres Boat Monitor
zu beginnen, sollten Sie die App
"Sentinel Marine solutions" für Ihre
Plattform installieren und einen
Sentinel-Account anlegen.
Pour commencer à utiliser votre dispositif
Boat Monitor, vous devez installer
l'application « Sentinel Marine solutions »
sur votre plate-forme et créer un compte
Sentinel.
Per incominciare ad usare il vostro
apparecchio di Boat Monitor dovete
prima installare la “Sentinel Marine
solutions app” per la vostra piattaforma
e creare un account personale.
Para comenzar a usar su dispositivo debe
instalar la aplicación "Sentinel Marine
solutions" para su plataforma y crear una
cuenta Sentinel.
DE
EN
DE
EN
E
E
IT
IT
FR
FR
2

Select the boat name for your Boat Monitor device.
Wählen Sie den Bootsnamen für Ihren Boat Monitor aus.
Seleccione el nombre de la embarcación para su dispositivo Boat Monitor.
Seleziona il nome del natante per il tuo apparecchio di Boat Monitor.
Sélectionnez le nom du bateau pour votre dispositif Boat Monitor.
Tap the + sign at the top of the screen.
Tippen Sie auf das +-Zeichen am oberen Bildschirmrand.
Pulse el signo + en la parte superior de la pantalla.
Clicca sul “+” in cima allo schermo
Appuyez sur le signe + en haut de l'écran.
Enter your email address and choose a password if you are registering a
new account.
Geben Sie Ihre E-Mail-Adresse ein und wählen Sie ein Passwort, wenn Sie
ein neues Konto eröffnen.
Si está registrando una cuenta nueva ingrese su dirección de correo
electrónico y elija una contraseña.
Oppure inserisci la tua mail e la tua password, se stai registrando un
nuovo account.
Entrez votre adresse e-mail et choisissez un mot de passe si vous créez
un nouveau compte.
Scan the QR code on the device
(included on the first page of this manual).
Scannen Sie den QR-Code auf dem Gerät
(auf der ersten Seite dieses Handbuchs).
Escanee el código QR en el dispositivo
(incluido en la primera página de este manual).
Osserva il codice QR sull’apparecchio
(lo trovi sulla prima pagina di questo manuale).
Scannez le QR code sur l'appareil
(fourni dans la première page de ce manuel).
DE
E
IT
FR
EN
DE
E
IT
FR
EN
DE
E
IT
FR
EN
DE
E
IT
FR
EN
3

Follow the instructions to activate the device and start using the
subscription.
Folgen Sie den Anweisungen, um das Gerät zu aktivieren und mit der
Nutzung des Abonnements zu beginnen.
Siga las instrucciones para activar el dispositivo y comience a usar la
suscripción.
Segui le istruzioni per attivare l’apparecchio e incomincia ad usare
l’abbonamento.
Suivez les instructions pour activer l'appareil et commencer à l’utiliser.
Enter the 6-digit activation code, which you received with the device
(included on the first page of this manual).
Geben Sie den 6-stelligen Aktivierungscode ein, den Sie mit dem Gerät
erhalten haben (auf der ersten Seite dieses Handbuchs).
Ingrese el código de activación de 6 dígitos que recibió con el dispositivo
(incluido en la primera página de este manual).
Inserisci il codice di attivazione a sei caratteri che ti è stato consegnato
assieme all’apparecchio (lo trovi sulla prima pagina di questo manuale).
Entrez le code d'activation à 6 chiffres que vous avez reçu avec l'appareil
(fourni dans la première page de ce manuel).
NOTE!
•
HINWEIS!
•
¡NOTA!
•
NOTE!
•
REMARQUE !
Please note that it might up to 2 hours for your device to start sending data to your smartphone
once the Subscription is activated.
Bitte beachten Sie, dass es bis zu 2 Stunden dauern kann, bis Ihr Abonnement aktiviert ist und Ihr
Gerät Daten an Ihr mobiles Gerät sendet.
Tenga en cuenta que su dispositivo puede tardar hasta 2 horas en comenzar a enviar datos a su
dispositivo móvil una vez activada la suscripción
Tieni presente che ci potrebbero volere più di due ore, perché il tuo apparecchio incominci a
mandare dati al tuo dispositivo mobile dopo che l'abbonamento è stato attivato.
Veuillez noter que votre appareil peut commencer à envoyer des données sur votre appareil mobile
2 heures après l'activation de votre compte.
DE
E
IT
FR
EN
DE
EN
E
IT
FR
DE
EN
E
IT
FR
4

Sentinel Boat Monitor ist
spritzwassergeschützt, es wird jedoch
empfohlen, das Gerät in Innenräumen zu
installieren. Das Gerät hat seitlich 2
Befestigungslöcher, die mit
Kunststoffklappen abgedeckt sind. Sie
kann mit Schrauben angezogen oder mit
Klebeband oder Kunststoffbändern
befestigt werden.
Sentinel Boat Monitor es a prueba de
salpicaduras pero se recomienda
instalarlo en interiores.
El dispositivo tiene 2 orificios de montaje
laterales cubiertos con escotillas de
plástico. Puede ser apretado con
tornillos o unido con cinta adhesiva o
correas de plástico.
Sentinel Boat Monitor è resistente
all’acqua, si raccomanda comunque di
installarlo al coperto.
L’apparecchio a due fori ai lati per il
montaggio, ricoperti da guarnizioni di
plastica. Può essere fissato con viti o
attaccata con nastro adesivo o cinghiette
di plastica.
Le système de surveillance pour bateaux
Boat Monitor de Sentinel, est résistant
aux éclaboussures, mais il est
recommandé de l’installer à l'intérieur.
L'appareil a 2 perforations de montage
sur le côté, recouverts de caches en
plastique. L’appareil peut être serré avec
des vis ou fixé avec du ruban adhésif ou
des sangles en plastique.
2. Installation Guide • Installationsanleitung •
Guía de instalación • Guida all’installazione • Guide d’installation
Sentinel Boat Monitor is splash proof, but it is recommended to be installed indoors.
The device has 2 mounting holes on the side, covered with plastic hatches. It can be
tightened with screws or attached with adhesive tape or plastic straps.
Mounting hole
•
Befestigungsloch
•
Orificio de
montaje
•
Foro di montaggio
•
Perforation de
montage
Mounting hole
•
Befestigungsloch
•
Orificio de
montaje
•
Foro di montaggio
•
Perforation de
montage
METAL FREE DIRECTION
•
Metallfreie Richtung
•
Dirección libre de metal
•
Direzione senza ostacoli
metallici
•
Direction sans métal
2.1. Model with internal antennas • Ausführung mit internen Antennen •
Modelo con antenas internas • Modello con antenne interne •
Modèle avec antennes internes
DE
EN
E
IT FR
5

Sentinel Boat Monitor has internal GPS and GSM antennas. The device is designed for wall
mounting. Supply cable should always face the ground as shown in figure. Any other orientation
will cause poor satellite reception, which can significantly lower the positioning precision.
The sky view should not be obstructed with any metal objects.
Sentinel Boat Monitor verfügt über interne GPS- und GSM-Antennen. Das Gerät ist für die
Wandmontage konzipiert. Das Versorgungskabel sollte immer zur Erde zeigen, wie in der
Abbildung gezeigt. Jede andere Ausrichtung führt zu einem schlechten Satellitenempfang, der die
Positioniergenauigkeit erheblich herabsetzen kann.
Der Blick in den Himmel darf nicht durch metallische Gegenstände versperrt werden.
Sentinel Boat Monitor tiene antenas GPS y GSM internas. El dispositivo está diseñado para
montarlo en la pared. El cable de suministro eléctrico siempre debe estar hacia abajo como se
muestra en la figura. Cualquier otra orientación causará una mala recepción del satélite lo que
puede reducir significativamente el posicionamiento preciso.
La vista hacia el cielo no debe estar obstruida con ningún objeto metálico.
Sentinel Boat Monitor è dotato di antenne interne di tipo GPS e GSM. L’apparecchio è progettato
per essere montato a parete. Il cavo di alimentazione dovrebbe essere sempre rivolto verso il
pavimento. Qualsiasi altro orientamento potrà causare una ricezione satellitare insufficiente che
può rendere più incerto il posizionamento.
La direzione verso il cielo non dovrà essere ostruita da nessun oggetto metallico.
Le dispositif Boat Monitor de Sentinel a des antennes GPS et GSM internes. L'appareil est conçu
pour un montage mural. Le câble d'alimentation doit toujours faire face au sol comme indiqué
sur la figure. Toute autre orientation entraînera une mauvaise réception du satellite, ce qui peut
réduire considérablement la précision du positionnement.
La vue du ciel ne doit pas être obstruée par des objets métalliques.
2.2 Model with external antennas • Ausführung mit externen Antennen •
Modelo con antenas externas • Modello con antenne esterne •
Modèle avec antennes externes
GSMGPS
2.2B2.2A
Sentinel Boat Monitor model with external antennas includes an external combo GSM+GPS
antenna with 3m of cable. Mount the antenna horizontally onto a designated place with a clear
sky view to ensure optimal satellite reception. Possible mounting holes are shown in fig. 2.2A.
Connect the antenna wires to the Boat Monitor as shown in fig. 2.2B: the cable with GPS label
should be on the left, GSM cable on the right. Tighten the antenna connectors firmly.
DE
E
IT
FR
EN
EN
6

Das Modell des Sentinel Boat Monitor mit externen Antennen beinhaltet eine externe Kombi
GSM+GPS Antenne mit 3 m Kabel.
Montieren Sie die Antenne waagerecht an einem dafür vorgesehenen Ort mit freiem Himmel,
um einen optimalen Satellitenempfang zu gewährleisten. Mögliche Befestigungsbohrungen
sind in Abb. 2.2A dargestellt.
Schließen Sie die Antennenkabel an den Boat Monitor an, wie in Abb. 2.2B gezeigt: Das Kabel
mit GPS-Etikett sollte sich links, das GSM-Kabel rechts befinden. Ziehen Sie die
Antennenanschlüsse fest an.
El modelo Sentinel Boat Monitor con antenas externas incluye un combo externo de antenas
GSM + GPS con 3m de cable.
Monte la antena horizontalmente en un lugar designado con una vista clara del cielo para
asegurar una recepción óptima. Posibles orificios de montaje se muestran en la fig. 2.2A.
Conecte los cables de antena al Monitor como se muestra en la fig. 2.2B: el cable con la
etiqueta GPS debe estar a la izquierda y el cable GSM a la derecha. Apriete firmemente los
conectores.
Il modello con antenne esterne del Sentinel Boat Monitor include un’antenna combo esterna
GSM+GPS con cavo lungo 3 m.
Il montaggio dell’antenna deve avvenire nel punto designato in cui non ci siano ostacoli nella
direzione del cielo. Al fine di garantire una ricezione ottimale dell’onda satellitare. I fori di
montaggio sono visibili nella fig. 2.2A.
Connettere i cavi dell’antenna al Boat Monitor come mostrato in fig. 2.2B: il cavo con
l’etichetta GPS dovrà trovarsi alla sinistra mentre il cavo GSM alla destra. I connettori
dell’antenna vanno stretti efficacemente.
Le modèle Sentinel Boat Monitor avec antennes externes comprend un combo externe GSM
+ une antenne GPS avec 3m de câble.
Montez l'antenne horizontalement sur un endroit adapté avec une vue du ciel dégagée afin
d’assurer une réception satellite optimale. Les trous de montage sont indiqués sur la fig.
2.2A.
Branchez les fils d'antenne au système de surveillance du bateau comme indiqué sur la fig.
2.2B : le câble avec l'étiquette GPS doit être à gauche, le câble GSM à droite. Serrez
fermement les connecteurs d'antenne.
WARNING!
•
WARNUNG!
•
¡ADVERTENCIA!
•
ATTENZIONE!
•
ATTENTION !
The antenna mounting screw is directly connected to the Boat Monitor ground (black wire). If the
antenna is mounted onto a metal plane (hull) make sure that the metal plane is on the same
potential as the Boat Monitor ground (black wire)! Failing to do so, excessive current flowing through
the device may damage the device or other equipment.
Die Antennenbefestigungsschraube ist direkt mit der Boat Monitor-Masse (schwarzer Draht)
verbunden. Wenn die Antenne auf einer Metallplatte (Rumpf) montiert ist, stellen Sie sicher, dass
sich die Metallplatte auf dem gleichen Potential wie die Masse des Boat Monitor befindet (schwarzer
Draht)! Andernfalls kann ein zu hoher Strom, der durch das Gerät fließt, das Gerät oder andere
Geräte beschädigen.
El tornillo de montaje de la antena está conectado directamente a la conexión de tierra del monitor
(cable negro). Si la antena está montada en un plano de metal (casco) asegúrese de que el plano
tenga el mismo potencial al de conexión de tierra del Monitor (cable negro). De lo contrario la
corriente excesiva que fluye a través del dispositivo puede dañar el dispositivo o algún otro equipo.
DE
E
EN
DE
E
IT
FR
7

2.3 Electrical connection overview • Übersicht der elektrischen Anschlüsse •
Revisión general de la conexión eléctrica • Collegamento alla fonte elettrica:
riepilogo • Présentation de la connexion électrique
La vite per il montaggio dell’antenna è direttamente connessa alla terra (cavo nero) del Boat Monitor.
Se l’antenna è montata su un piano metallico (scafo), accertarsi che il piano metallico sia sullo stesso
potenziale della presa a terra del Monitor (cavo nero)! In caso di errore, un flusso eccessivo di
corrente, che attraverso l’apparecchio, può causare danni all’apparecchio e ad altri dispositivi.
La vis de montage de l'antenne est directement connectée à la base du Boat Monitor (fil noir). Si
l'antenne est montée sur un plan métallique (coque), assurez-vous que le plan métallique soit au
même niveau que la base du système de surveillance du bateau (fil noir) ! À défaut de le faire, un
courant excessif circulant dans l'appareil peut endommager l'appareil ou d'autres équipements.
IT
FR
Das Gerät sollte an eine
DAUERSTROMQUELLE angeschlossen
werden, um eine ständige Überwachung
zu ermöglichen. Der Geräteverbrauch
beträgt weniger als 1 Ah pro Tag bei
Bewegung und weniger als 50 mAh pro
Tag im Tiefschlaf-Modus.
El dispositivo debe estar conectado
a una FUENTE DE ALIMENTACIÓN
PERMANENTE para permitir el monitoreo
en todo momento. El consumo del
dispositivo al estar moviéndose es inferior
a 1 Ah por día y menos de 50 mAh por día
al estar en modo de suspensión.
L’apparecchio deve essere collegata
ad una FONTE DI ENERGIA ELETRICA
PERMANENTE per consentire il
funzionamento ininterrotto del
monitoraggio. Il consumo dell’apparecchio
è inferiore ad 1 Ah per giorno in
condizioni di movimento e 50mAh quindi
in modalità sleep.
L'appareil doit être connecté à une
SOURCE D'ALIMENTATION PERMANENTE
pour permettre une surveillance à tout
moment. La consommation de l'appareil
est inférieure à 1 Ah par jour en
déplacement et inférieure à 50 mAh par
jour en mode veille prolongée.
The device should be connected to a PERMANENT POWER SOURCE to allow monitoring at all
times. The device consumption is less than 1 Ah per day when moving and less than 50 mAh
per day when in deep sleep mode.
Power supply (+12 or +24 V DC)
Spannungsversorgung (+12 oder +24 V DC)
Fuente de alimentación (+12 or +24 V DC)
Alimentazione (+12 oppure +24 V DC)
Source de courant (+12 ou +24 V DC)
RED
•
ROT
•
ROJO
•
CAVO ROSSO
•
ROUGE
Ground
Masse
Tierra
Collegamento a terra
Sol
BLACK
•
SCHWARZ
•
NEGRO
•
CAVO NERO
•
NOIR
Wiring • Verkabelung • Cableado • Collegamenti • Câblage
DE
EN
E
IT
FR
WARNING!
•
WARNUNG!
•
¡ADVERTENCIA!
•
ATTENZIONE!
•
ATTENTION !
8

Shunt - fourth voltage input (+48 V DC)
Nebenwiderstand - vierter Spannungseingang
(+48 V DC)
Derivación – cuarta entrada de tensión (+48 V DC)
Shunt - quarta entrata in tensione (+48 V DC)
Shunt - quatrième entrée de tension (+48 V DC)
Door sensor input
Eingang Türsensor
Entrada del sensor de puerta
Ingresso del sensore di porta
Entrée du capteur de porte
Second battery voltage measurement (+24 V DC)
Zweite Batteriespannungsmessung (+24 V DC)
Medición de voltaje de la segunda batería (+24 V DC)
Seconda misurazione del livello di tensione della
batteria (+24 V DC)
Deuxième mesure de tension de batterie (+24 V DC)
Shore power detection input
Eingang Landstromerkennung
Detección de fuente de alimentación de la orilla
Ingresso per il rilevamento della corrente da banchina
Entrée de détection de l’alimentation à quai
Third battery voltage measurement (+24 V DC)
Dritte Batteriespannungsmessung (+24 V DC)
Medición de voltaje de la tercera batería (+24 V DC)
Terza misurazione del livello di tensione della batteria
(+24 V DC)
Troisième mesure de tension de batterie (+24 V DC)
GREEN
•
GRÜN
•
VERDE
•
VERDE
•
VERT
Bilge sensor input
Bilgensensoreingang
Entrada del sensor sentina
Ingresso del sensore di sentina
Entrée de capteur de cale
PURPLE
•
VIOLETT
•
MORADO
•
PORPORA
•
VIOLET
BLUE
•
BLAU
•
AZUL
•
BLU
•
BLEU
YELLOW
•
GELB
•
AMARILLO
•
GIALLO
•
JAUNE
PINK
•
ROSA
•
ROSADO
•
ROSA
•
ROSE
BROWN
•
BRAUN
•
MARRÓN
•
MARRONE
•
MARRON
WHITE
•
WEIß
•
BLANCO
•
BIANCO
•
BLANC
When connecting any line (power supply or voltage input) directly to the battery, always
protect the battery and electrical circuit from potential damages with a fuse. Install a fuse
holder with 1 A fuse on the positive (+) power cable as close as possible to the battery
terminal.
Connect the red wire through a fuse (fuse should not be inserted until installation is
complete) to permanent power source (battery).
Connect the BLACK wire to system ground.
Wenn Sie eine beliebige Leitung (Stromversorgung oder Spannungseingang) direkt an die
Batterie anschließen, schützen Sie die Batterie und den Stromkreis immer mit einer
Sicherung vor möglichen Schäden. Installieren Sie einen Sicherungshalter mit einer 1 Ampere
Sicherung am Pluskabel (+) so nah wie möglich an der Batterieklemme.
Schließen Sie das rote Kabel durch eine Sicherung (Sicherung sollte erst nach Abschluss der
Installation eingesetzt werden) an eine Dauerstromquelle (Batterie) an.
Schließen Sie den SCHWARZEN Draht an die Systemmasse an.
2.4 Power supply connection • Anschluss der Stromversorgung •
Conexión de suministro de energía • Collegamento di alimentazione •
Connexion d'alimentation
DE
EN
9

Al conectar cualquier línea (fuente de alimentación o entrada de tensión) directamente a la
batería es necesario colocar un fusible para proteger la batería y el circuito eléctrico contra
posibles daños. Instale un porta fusibles con 1A fusible en el cable de alimentación positivo (+) lo
más cerca del terminal de la batería posible.
Conecte el cable rojo a través del fusible (el fusible no debe insertarse hasta que se complete la
instalación) a la fuente de alimentación permanente (batería).
Conecte el cable NEGRO a la tierra del sistema.
Quando si collega all’elettricità (sia essa rete o da banchina o batteria) è necessario proteggere
sempre la batteria e il circuito da danni potenziali con un fusibile. Installa una scatola portafusibili
con 1A sul lato positivo (+) del cavo elettrico il più vicino possibile al terminale della batteria.
Collegare il cavo rosso attraverso il fusibile (non inserire il fusibile fino a compimento
dell’impianto) alla rete elettrica (o batteria).
Collegare il cavo NERO alla terra del sistema.
Lorsque vous connectez une ligne (alimentation ou entrée de tension) directement à la batterie,
protégez toujours la batterie et le circuit électrique des dommages éventuels avec un fusible.
Installez un porte-fusible avec un fusible de 1 A sur le câble d'alimentation positif (+) le plus près
possible de la borne de la batterie.
Connectez le fil rouge à travers un fusible (le fusible ne doit pas être inséré le temps de
l'installation) à la source d'alimentation permanente (batterie).
Connectez le fil NOIR à la base du système.
Power supply / Voltage 1 • Stromversorgung/Spannung 1 • Fuente de alimentación/Voltaje 1 •
Corrente elettrica/tensione • Alimentation / tension 1
red
•
rot
•
rojo
•
rosso
•
rouge
Fuse
•
Sicherung
•
Fusible
•
Fusibile
• Fusible
Boat
Monitor
+
12/24V
black
•
schwarz
•
negro
•
nero
•
noir
2.5 Voltage and current measurements • Spannungs- und Strommessungen •
Mediciones de voltaje y corriente • Tensione e misurazione della corrente •
Mesures de tension et de courant
Current can be measured on HIGH-SIDE shunt resistor (not included). For low-side shunt wiring
please contact support. Shunt should be sized based on maximum current consumption
(e.g. 1 mΩ for up to 80 A). Connect shunt as shown in fig 2.5A.
Yellow and Pink wires should be used for measuring voltages up to 30 V (Voltage 2 and 3), brown
wire up to 60 V (Voltage 4) (fig. 2.5B). If current measurement in not required, connect white and
brown together to avoid false current readings (fig. 2.5C)
2.4
E
IT
FR
EN
10

Die Strommessung erfolgt über einen HIGH-SIDE Nebenwiderstand (nicht im Lieferumfang
enthalten). Für Low-Side Nebenwiderstandsverdrahtung wenden Sie sich bitte an den
Support.
Der Nebenwiderstand sollte nach der maximalen Stromaufnahme bemessen werden (z. B. 1
mΩ für bis zu 80 A). Schließen Sie den Nebenwiderstand gemäß Abb. 2.5A an.
Gelbe und rosa Drähte sollten für die Messung von Spannungen bis 30 V (Spannung 2 und 3),
der braune Draht bis 60 V (Spannung 4) verwendet werden (Abb. 2.5B). Wenn die
Strommessung nicht erforderlich ist, verbinden Sie weiß und braun miteinander, um falsche
Strommessungen zu vermeiden (Abb. 2.5C).
La corriente puede ser medida en la resistencia de derivación HIGH-SIDE (no incluida). Para el
cableado de la resistencia de derivación LOW-SIDE comuníquese con el soporte.
Derivación debe dimensionarse según el consumo máximo de corriente (por ejemplo, 1 mΩ
hasta 80 A). Conéctela como se muestra en la figura 2.5A.
Los cables amarillo y rosado deben utilizarse para medir tensiones de hasta 30 V (voltaje 2 y
3), cable marrón hasta 60 V (voltaje 4) (figura 2.5B). Si la medición de corriente no es
necesaria conecte el cable blanco con el marrón para evitar lecturas de corriente falsas
(figura 2.5C).
La corrente può essere misurata con un resistore Shunt HIGH-SIDE (non incluso). Per i
collegamenti dello shunt low-side sentire per piacere l’assistenza.
Lo shunt deve esser dimensionato sulla base dei consumi massimi di corrente elettrica (ad
esempio 1 fino a 80 A). Collegare lo shunt come mostrato in fig 2.5A.
I cavi giallo e rosa dovranno essere usati per misurare la tensione fino a 30 V (tensione 2 e 3),
il cavo marrone fino a 60V (tensione 4) (fig. 2.5B). Qualora la misurazione della corrente non
è richiesta, connettere i cavi bianco e marrone per evitare false letture di corrente (fig. 2.5C).
Le courant peut être mesuré sur la résistance de shunt CÔTÉ HAUT (non fournie). Pour le
câblage de dérivation côté bas, veuillez contacter le service d'assistance.
Le shunt doit être dimensionné en fonction de la consommation de courant maximale (par
exemple 1 mΩ et jusqu'à 80 A). Connectez le shunt comme indiqué sur la figure 2.5A.
Les fils jaunes et roses doivent être utilisés pour mesurer des tensions jusqu'à 30 V (tension 2
et 3), le fil marron jusqu'à 60 V (tension 4) (figure 2.5B). Si la mesure du courant n'est pas
nécessaire, connectez le blanc et le brun ensemble pour éviter les erreurs de lecture de
courant (figure 2.5C).
2.5B
+
12/24V 12/24V
+
pink
• rosa • rosado •
rosa • rose
yellow
• gelb •
amarillo
•
giallo
•
jaune
Voltage 2
•
Spannung 2
•
Voltaje 2
•
Tensione 2
•
Tension 2
Voltage 3
•
Spannung 3
•
Voltaje 3
•
Tensione 3
•
Tension 3
Boat
Monitor
+
Shunt resistor
•
Nebenschlusswiderstand
•
Resistencia de derivación
•
Resistore shunt •
Résistance shunt
Load
•
Ladung
•
Cargar
•
Carica
•
Charge
12/24/48V
Boat
Monitor
Voltage 4
•
Spannung 4
•
Voltaje 4
•
Tensione 4
•
Tension 4
white
•
weiß
•
blanco
•
bianco
•
blanc
brown
•
braun
•
marrón
•
marrone
•
marron
2.5A
DE
E
IT
FR
11

Purple wire can be used for bilge pump activity detection as shown in fig 2.6A. Bilge input uses
ACTIVE HIGH logic. If active low logic is required please contact support.
Green wire can be used for door alerts. Connect magnetic switch as shown in fig. 2.6B.
Blue wire can be used for shore power presence detection. Connect a step-down transformer
(not included) as shown in fig. 2.6C.
Der violette Draht kann für die Erkennung der Bilgepumpenaktivität verwendet werden, wie in
Abb. 2.6A gezeigt. Der Bilge-Eingang verwendet die ACTIVE HIGH-Logik. Wenn eine aktive
Low-Logik benötigt wird, wenden Sie sich bitte an den Support.
Der grüne Draht kann für Türalarme verwendet werden. Schließen Sie den Magnetschalter wie in
Abb. 2.6B gezeigt an. Das blaue Kabel kann für die Anwesenheitserkennung von Landstrom
verwendet werden. Schließen Sie einen Abwärtstransformator (nicht im Lieferumfang enthalten)
an, wie in Abb. 2.6C gezeigt wird.
El cable morado se puede utilizar para detectar la actividad de la bomba de sentina tal como se
muestra en la figura 2.6A. La entrada de sentina utiliza la lógica de actividad alta. Si requiere de
lógica de actividad baja póngase en contacto con el soporte.
El cable verde se puede utilizar para alertas de puertas. Conecte el interruptor magnético como
se muestra en la fig. 2.6B. El cable azul se puede utilizar para la detección de presencia de energía
de la orilla. Conecte un transformador reductor (no incluido) como se muestra en la fig. 2.6C.
Il cavo purpureo può essere usato per connettere la pompa di sentina come si vede nella fig.
2.6A. L’ingresso di sentina usa l’ACTIVE HIGH Logic. Se è richiesta l’active low logic chiamare
l'assistenza.
Il cavo verde può esser utilizzato per gli allarmi delle porte Collegare l'interruttore magnetico
come in fig. 2.6B. Il cavo blu può esser utilizzato per rilevamento della corrente di banchina.
Collegare un trasformatore step-down (non incluso) coma in fig. 2.6C.
2.6 Bilge, door switch connection and shore power detection •
Bilge, Türschalteranschluss und Landstromerkennung • La sentina, conexión de
interruptor de puerta y detección de fuente de alimentación de la orilla •
Collegamenti ai sensori di sentina, di porta e rilevamento della corrente da
banchina • Cale de fond, raccordement du commutateur de porte et détection
de l’alimentation à quai.
+
12/24/48V
Boat
Monitor
white
•
weiß
•
blanco
•
bianco
•
blanc
Voltage 4
•
Spannung 4
•
Voltaje 4
•
Tensione 4
•
Tension 4
brown
•
braun
•
marrón
•
marrone
•
marron
2.5C
DE
E
IT
EN
12

2.7 NMEA 2000® connection • NMEA 2000®-Verbindung • Conexión NMEA
2000® • Collegamento NMEA 2000® • NMEA 2000® connection
Der Boot-Monitor kann über ein
Verbindungskabel und einen T-Verbinder
mit dem NMEA 2000® Backbone (Bus)
verbunden werden. Wichtig: Der
Boot-Monitor kann nicht über das NMEA
2000®-Backbone mit Strom versorgt
werden.
El monitor puede ser conectado al
troncal (bus) NMEA 2000® a través del
cable de derivación y el conector T.
Importante: Boat Monitor no puede ser
alimentado desde el troncal NMEA
2000®.
Il Boat monitor può essere collegato alla
dorsale NMEA 2000® (bus) per mezzo di
un cavo di discesa e un connettore a T.
Importante: Il Boat Monitor non può
essere alimentato dalla dorsale NMEA
2000®.
Le système de surveillance pour bateau
peut être connecté au câble de dorsale
NMEA 2000® (bus) via un câble de
dérivation et un connecteur en T.
Important : Boat Monitor ne peut être
alimenté par un câble de dorsale NMEA
2000®.
Boat monitor can be connected to NMEA 2000® backbone (bus) via a drop cable and
T-connector. Important: Boat Monitor cannot be powered from the NMEA 2000® backbone.
Bilge pump
• Bilgenpumpe • Bomba de
sentina • Pompa di sentina • Pompe de cale
2.6A
2.6C
2.6B
Bilge in
• Eingang
Bilge • Entrada
sentina • Sentina in •
Cale de fond dans
M
12/24V
purple
•
violett
•
morado
•
porpora
•
violet
Door in
• Eingang Tür • Entrada puerta •
Porta in • porte dans
12/24V
green
•
grün
•
verde
•
verde
•
vert
Step-down transformer
•
Abwärtstransformator
•
Transformador reductor
•
Trasformatore step-down
•
Transformateur abaisseur
Shore power •
Landstromerkennung •
Alimentacion de la orilla •
Corrente da banchina •
Alimentation à quai
220/12 V
blue
•
blau
•
azul
•
blu
•
bleu
DE
EN
E
IT FR
FR
Le fil violet peut être utilisé pour la détection de l'activité de la pompe de cale comme indiqué
sur la figure 2.6A. L'entrée de cale utilise le système de logique ACTIVE HIGH (état haut actif).
Si une logique basse active est requise, veuillez contacter le support technique.
Le fil vert peut être utilisé pour les alarmes de la porte. Branchez l'interrupteur magnétique
comme indiqué sur la fig. 2.6B. Le fil bleu peut être utilisé pour la détection de présence de
l’alimentation à quai. Connectez un transformateur abaisseur (non inclus) comme indiqué sur
la fig. 2.6C.
Boat
Monitor
13

To power up the device for the first time the following steps are required:
1. Insert the fuse on the supply wire (see fig. 2.4) to release the deep sleep lock.
2. Remove the fuse and reinsert it again.
The device should power up and LEDs should start blinking. When the subscription is active it takes
approximately 1 minute until LEDs start blinking once every 3 seconds. This pattern signals normal
operation.
Um das Gerät zum ersten Mal einzuschalten, sind die folgenden Schritte erforderlich:
1. Setzen Sie die Sicherung an der Zuleitung ein (siehe Abb. 2.4), um die Tiefschlafsperre zu lösen.
2. Entfernen Sie die Sicherung und setzen Sie sie wieder ein.
Das Gerät sollte sich einschalten und die LEDs sollten beginnen zu blinken. Wenn das Abonnement
aktiv ist, dauert es ca. 1 Minute, bis die LEDs alle 3 Sekunden einmal blinken. Dieses Muster
signalisiert den Normalbetrieb.
Para encender el dispositivo por primera vez se requieren los siguientes pasos:
1. Inserte el fusible en el cable de alimentación (vea la figura 2.4) para liberar el bloqueo de modo de
suspensión.
2. Retire el fusible y vuelva a insertarlo.
El dispositivo debería encenderse y los LED deberían comenzar a parpadear. Cuando la suscripción
está activa transcurre aproximadamente 1 minuto hasta que los LED comienzan a parpadear una vez
cada 3 segundos. Este patrón indica el funcionamiento normal.
Per accendere la prima volta l’apparecchio è necessario seguire i seguenti passaggi:
1. Inserire il fusibile nel cavo di alimentazione (vedi fig. 2.4) per sbloccare la chiusura del deep sleep.
2. Rimuovere il fusibile e reinserirlo nuovamente.
L’apparecchio dovrebbe accendersi e il LED lampeggiare. Quando l’abbonamento è attivo passerà 1
minuto prima che il LED incominci a lampeggiare una volta ogni tre secondi. Questo sequenza
significa che l’apparecchio è in funzione.
Pour mettre l'appareil sous tension pour la première fois, les étapes suivantes sont requises :
1. Insérez le fusible sur le fil d'alimentation (voir fig. 2.4) pour déverrouiller la serrure.
2. Retirez le fusible et réinsérez-le.
L'appareil doit s'allumer et les voyants doivent commencer à clignoter. Lorsque le compte est actif, il
faut environ 1 minute pour que les voyants commencent à clignoter toutes les 3 secondes. Ce mode
signale un fonctionnement normal.
WARNING!
•
WARNUNG!
•
¡ADVERTENCIA!
•
ATTENZIONE!
•
ATTENTION !
DE
E
IT
FR
EN
2.7
Boat
Monitor
Drop cable
•
Verbindungskabel
•
Cable de
derivación
•
Cavo di discesa
•
Câble de dérivation
T-connector
•
T-Verbinder
•
conector T
•
connettore a T
•
connecteur en T
NMEA 2000 bus
14

3. Technical specification • Technische Daten • Especificaciones
técnicas • Specifiche tecniche • Spécifications techniques
POWER SUPPLY:
12 to 24 V DC 2 W Max
ENERGY CONSUMPTION (12 V):
Nominal: average 50 mA r.m.s,
Deep Sleep: average less than 2 mA
OPERATION TEMPERATURE:
-10 °C to +55 °C
STORAGE TEMPERATURE:
-40 °C to +70 °C
STORAGE RELATIVE HUMIDITY:
5 to 95 % (no condensation)
Minimum Typical Maximum
11 V 12 V - 24 V
5 V
30 V
80 mV
500 kΩ
Input resistance
Input Voltage threshold
(bilge, door)
Shunt differential full scale
input
Supply Voltage
Input Voltage Range:
Voltage 1/2/3
Voltage 4
30 V
60 V
STROMVERSORGUNG:
12 bis 24 V DC 2 W Max.
ENERGIEVERBRAUCH (12 V):
Nennwert: durchschnittlich 50 mA QMW
Tiefschlaf: durchschnittlich weniger als 2 mA
BETRIEBSTEMPERATUR:
-10°C bis + 55°C
LAGERTEMPERATUR:
-40°C bis +70°C
RELATIVE LUFTFEUCHTIGKEIT BEI DER
LAGERUNG: 5 bis 95 % (nicht kondensierend)
Minimum Typisch Maximum
11 V 12 V - 24 V
5 V
30 V
80 mV
500 kΩ
Eingangswiderstand
Eingangsspannungsschwelle
(Bilge, Tür)
Nebenwiderstand-Differen-
zeingang für Vollskala
Versorgungsspannung
Eingangsspannungsbereich:
Spannung 1/2/3
Spannung 4
30 V
60 V
FUENTE DE ALIMENTACIÓN:
12 a 24 V DC 2 W Max
CONSUMO DE ENERGÍA (12 V):
Nominal: PROMEDIO 50 mA r.m.s,
Sueño profundo: promedio menos de 2 mA
TEMPERATURA OPERACIONAL:
-10 °C a +55 °C
TEMPERATURA DE ALMACENAMIENTO:
-40 °C to +70 °C
HUMEDAD RELATIVA DE ALMACENAMIENTO:
5 a 95 % (sin condensación)
Minimum Típico Maximum
11 V 12 V - 24 V
5 V
30 V
80 mV
500 kΩ
Resistencia de entrada
Entrada umbral de
voltaje (sentina, puerta)
Entrada de diferencial de
derivación a escala completa
Suministro de voltaje
Rango de voltaje de entrada:
Voltaje 1/2/3
Voltaje 4
30 V
60 V
ALIMENTAZIONE ELETTRICA:
Da 12 a 24 V DC 2 W Max
CONSUMO (12V):
Nominale: mediamente 50 mA r.m.s,
Deep Sleep: mediamente meno di 2 mA
TEMPERATURA DI FUNZIONAMENTO:
Da -10 °C a +55 °C
TEMPERATURA DELLO STORAGE:
Da -40 °C a +70 °C
UMIDITA’ RELATIVA DEL DEPOSITO:
Da 5 a 95 % (nessuna condensa)
Minimo Tipico Massimo
11 V 12 V - 24 V
5 V
30 V
80 mV
500 kΩ
Resistenza di ingresso
Soglia della tensione in
ingresso
Differenziale di shunt
sulla scala di entrata
Tensione di alimentazione
Livelli di tensione in ingresso:
Tensione 1/2/3
Tensione 4
30 V
60 V
DE
EN
E
IT
15

CONTACT
•
KONTAKT
•
CONTACTO
•
CONTATTI
•
CONTACT
www.sentinelmarine.net
SOURCE DE COURANT :
12 à 24 V DC 2 W Max
CONSOMMATION D'ÉNERGIE (12 V) :
Nominal : moyenne 50 mA r.m.s,
Veille prolongée : moyenne inférieure à 2 mA
TEMPÉRATURE DE FONCTIONNEMENT :
-10 °C à +55 °C
TEMPÉRATURE DE STOCKAGE :
-40 °C à +70 °C
STOCKAGE D’HUMIDITÉ RELATIVE :
5 à 95 % (pas de condensation)
Minimo Normal Maximum
11 V 12 V - 24 V
5 V
30 V
80 mV
500 kΩ
Résistance d'entrée
Entrée seuil de tension
(fond de cale, porte)
Entrée de shunt
différentiel pleine échelle
Tension d'alimentation
Plage de tension d'entrée :
Tension 1/2/3
Tension 4
30 V
60 V
FR
Boat monitor compliance
This product is marked with logo and uses radio frequency bands that are harmo-
nized throughout the European Community and others. Declaration of conformity is
located in the box together with warranty list.
Boat Monitor-Konformität
Dieses Produkt ist mit einem Logo gekennzeichnet und verwendet Funkfrequenz-
bänder, die in der gesamten Europäischen Gemeinschaft und anderen Ländern
harmonisiert sind. Die Konformitätserklärung befindet sich im Karton zusammen mit
dem Garantieschein.
Cumplimiento de Boat Monitor
Este producto está marcado con el logotipo y utiliza frecuencias radiales armoniza-
das en toda la Comunidad Europea y otros. Declaración de conformidad se encuentra en
la caja junto con la hoja de garantía.
Compatibilità del Boat Monitor
Questo dispositivo è segnato dal logo e usa bande di frequenza radio armonizzate a
livello della Comunità Europea e altre. La dichiarazione di conformità è situata nella
scatola assieme al certificato di garanzia.
Conformité du Boat Monitor
Ce produit est marqué d'un logo et utilise des bandes de fréquences radio qui sont
harmonisées dans toute la Communauté européenne et au-delà. La déclaration de
conformité se trouve dans la boîte avec le bon de garantie.
DE
EN
E
IT
FR
Transcripción de documentos
Sentinel Boat Monitor Installation Guide • Installationsanleitung • Guide d'installation Guida all’installazione • Guía de instalación INSTALLATION PARTS - INCLUDED • Sentinel Boat Monitor device • User manual • External antennas (external antennas model) EN OPTIONAL PARTS (SKU: 010-11417-21) • Magnetic switch • Drop cable (NMEA 2000) • T-connector (NMEA 2000) PIEZAS DE INSTALACIÓN - INCLUIDAS • Sentinel Boat Monitor device • Manual de usuario • Antenas externas (modelo de antenas externas) MONTAGETEILE - INKLUSIV • Sentinel Boat Monitor device • Benutzerhandbuch • Externe Antennen (Modell für externe Antennen) DE OPTIONALE TEILE (SKU: 010-11417-21) • Magnetischer Schalter • Verbindungskabel (NMEA 2000) • T-Verbinder (NMEA 2000) E INCLUSE LE PARTI DI INSTALLAZIONE IT • Sentinel Boat Monitor device • Manuale utente • Antenne esterne (modello per antenne esterne) PIEZAS OPCIONALES (SKU: 010-11417-21) • Interruptor magnético • Cable de derivación (NMEA 2000) • Conector T (NMEA 2000) PARTI OPZIONALI (SKU: 010-11417-21) • Interruttore magnetico • Cavo di discesa (NMEA 2000) • Connettore a T (NMEA 2000) PIÈCES D'INSTALLATION - INCLUSES • Sentinel Boat Monitor device • Guide d’utilisation • Antennes externes (modèle d'antennes externes) PIÈCES OPTIONNELLES (SKU: 010-11417-21) • Interrupteur magnétique • Câble de branchement (NMEA 2000) • Connecteur T (NMEA 2000) FR 1. Installing Sentinel App • Installieren der Sentinel-App • Installation de l’application Sentinel • Installare la App di Sentinel • Instalando Sentinel App EN To start using your Boat Monitor device you should install the “Sentinel Marine solutions” app for your platform and create a Sentinel account. DE Um mit der Nutzung Ihres Boat Monitor zu beginnen, sollten Sie die App "Sentinel Marine solutions" für Ihre Plattform installieren und einen Sentinel-Account anlegen. E Para comenzar a usar su dispositivo debe instalar la aplicación "Sentinel Marine solutions" para su plataforma y crear una cuenta Sentinel. IT Per incominciare ad usare il vostro apparecchio di Boat Monitor dovete prima installare la “Sentinel Marine solutions app” per la vostra piattaforma e creare un account personale. FR Pour commencer à utiliser votre dispositif Boat Monitor, vous devez installer l'application « Sentinel Marine solutions » sur votre plate-forme et créer un compte Sentinel. 1.1 Using the Sentinel app • Verwendung der Sentinel-App • Usando la aplicación Sentinel • Modalità d’uso della app Sentinel • Utilisation de l'application Sentinel EN DE E IT FR Tap “Register” if you do not yet have a Sentinel user account. Otherwise, tap “Login” and enter your email and password. Tippen Sie auf "Registrieren", wenn Sie noch kein Sentinel-Benutzerkonto haben. Andernfalls tippen Sie auf "Login" und geben Sie Ihre E-Mail-Adresse und Ihr Passwort ein. Pulse "Registrarse" si aún no tiene una cuenta de usuario de Sentinel. De lo contrario pulse "Iniciar sesión" e ingrese su correo electrónico y contraseña. Clicca su “Registra” se non hai ancora l’account di Sentinel. In caso contrario clicca su “login” e inserisci la tua mail e la tua password. Appuyez sur « Créer un compte » si vous n'avez pas encore de compte utilisateur Sentinel. Sinon, appuyez sur « Connexion » et entrez votre e-mail et votre mot de passe. 2 EN DE E IT FR Enter your email address and choose a password if you are registering a new account. Geben Sie Ihre E-Mail-Adresse ein und wählen Sie ein Passwort, wenn Sie ein neues Konto eröffnen. Si está registrando una cuenta nueva ingrese su dirección de correo electrónico y elija una contraseña. Oppure inserisci la tua mail e la tua password, se stai registrando un nuovo account. Entrez votre adresse e-mail et choisissez un mot de passe si vous créez un nouveau compte. EN Tap the + sign at the top of the screen. DE Tippen Sie auf das +-Zeichen am oberen Bildschirmrand. E Pulse el signo + en la parte superior de la pantalla. IT Clicca sul “+” in cima allo schermo FR Appuyez sur le signe + en haut de l'écran. EN Scan the QR code on the device (included on the first page of this manual). DE Scannen Sie den QR-Code auf dem Gerät (auf der ersten Seite dieses Handbuchs). E IT Escanee el código QR en el dispositivo (incluido en la primera página de este manual). Osserva il codice QR sull’apparecchio (lo trovi sulla prima pagina di questo manuale). FR Scannez le QR code sur l'appareil (fourni dans la première page de ce manuel). EN Select the boat name for your Boat Monitor device. DE Wählen Sie den Bootsnamen für Ihren Boat Monitor aus. E Seleccione el nombre de la embarcación para su dispositivo Boat Monitor. IT Seleziona il nome del natante per il tuo apparecchio di Boat Monitor. FR Sélectionnez le nom du bateau pour votre dispositif Boat Monitor. 3 EN DE E IT Follow the instructions to activate the device and start using the subscription. Folgen Sie den Anweisungen, um das Gerät zu aktivieren und mit der Nutzung des Abonnements zu beginnen. Siga las instrucciones para activar el dispositivo y comience a usar la suscripción. Segui le istruzioni per attivare l’apparecchio e incomincia ad usare l’abbonamento. FR Suivez les instructions pour activer l'appareil et commencer à l’utiliser. EN Enter the 6-digit activation code, which you received with the device (included on the first page of this manual). DE E IT FR Geben Sie den 6-stelligen Aktivierungscode ein, den Sie mit dem Gerät erhalten haben (auf der ersten Seite dieses Handbuchs). Ingrese el código de activación de 6 dígitos que recibió con el dispositivo (incluido en la primera página de este manual). Inserisci il codice di attivazione a sei caratteri che ti è stato consegnato assieme all’apparecchio (lo trovi sulla prima pagina di questo manuale). Entrez le code d'activation à 6 chiffres que vous avez reçu avec l'appareil (fourni dans la première page de ce manuel). NOTE! • HINWEIS! • ¡NOTA! • NOTE! • REMARQUE ! EN Please note that it might up to 2 hours for your device to start sending data to your smartphone once the Subscription is activated. DE Bitte beachten Sie, dass es bis zu 2 Stunden dauern kann, bis Ihr Abonnement aktiviert ist und Ihr Gerät Daten an Ihr mobiles Gerät sendet. E Tenga en cuenta que su dispositivo puede tardar hasta 2 horas en comenzar a enviar datos a su dispositivo móvil una vez activada la suscripción IT Tieni presente che ci potrebbero volere più di due ore, perché il tuo apparecchio incominci a mandare dati al tuo dispositivo mobile dopo che l'abbonamento è stato attivato. FR Veuillez noter que votre appareil peut commencer à envoyer des données sur votre appareil mobile 2 heures après l'activation de votre compte. 4 2. Installation Guide • Installationsanleitung • Guía de instalación • Guida all’installazione • Guide d’installation EN Sentinel Boat Monitor is splash proof, but it is recommended to be installed indoors. The device has 2 mounting holes on the side, covered with plastic hatches. It can be tightened with screws or attached with adhesive tape or plastic straps. DE Sentinel Boat Monitor ist spritzwassergeschützt, es wird jedoch empfohlen, das Gerät in Innenräumen zu installieren. Das Gerät hat seitlich 2 Befestigungslöcher, die mit Kunststoffklappen abgedeckt sind. Sie kann mit Schrauben angezogen oder mit Klebeband oder Kunststoffbändern befestigt werden. E Sentinel Boat Monitor es a prueba de salpicaduras pero se recomienda instalarlo en interiores. El dispositivo tiene 2 orificios de montaje laterales cubiertos con escotillas de plástico. Puede ser apretado con tornillos o unido con cinta adhesiva o correas de plástico. IT Sentinel Boat Monitor è resistente all’acqua, si raccomanda comunque di installarlo al coperto. L’apparecchio a due fori ai lati per il montaggio, ricoperti da guarnizioni di plastica. Può essere fissato con viti o attaccata con nastro adesivo o cinghiette di plastica. FR Le système de surveillance pour bateaux Boat Monitor de Sentinel, est résistant aux éclaboussures, mais il est recommandé de l’installer à l'intérieur. L'appareil a 2 perforations de montage sur le côté, recouverts de caches en plastique. L’appareil peut être serré avec des vis ou fixé avec du ruban adhésif ou des sangles en plastique. 2.1. Model with internal antennas • Ausführung mit internen Antennen • Modelo con antenas internas • Modello con antenne interne • Modèle avec antennes internes METAL FREE DIRECTION • Metallfreie Richtung • Dirección libre de metal • Direzione senza ostacoli metallici • Direction sans métal Mounting hole • Befestigungsloch • Orificio de montaje • Foro di montaggio • Perforation de montage Mounting hole • Befestigungsloch • Orificio de montaje • Foro di montaggio • Perforation de montage 5 EN DE E IT FR Sentinel Boat Monitor has internal GPS and GSM antennas. The device is designed for wall mounting. Supply cable should always face the ground as shown in figure. Any other orientation will cause poor satellite reception, which can significantly lower the positioning precision. The sky view should not be obstructed with any metal objects. Sentinel Boat Monitor verfügt über interne GPS- und GSM-Antennen. Das Gerät ist für die Wandmontage konzipiert. Das Versorgungskabel sollte immer zur Erde zeigen, wie in der Abbildung gezeigt. Jede andere Ausrichtung führt zu einem schlechten Satellitenempfang, der die Positioniergenauigkeit erheblich herabsetzen kann. Der Blick in den Himmel darf nicht durch metallische Gegenstände versperrt werden. Sentinel Boat Monitor tiene antenas GPS y GSM internas. El dispositivo está diseñado para montarlo en la pared. El cable de suministro eléctrico siempre debe estar hacia abajo como se muestra en la figura. Cualquier otra orientación causará una mala recepción del satélite lo que puede reducir significativamente el posicionamiento preciso. La vista hacia el cielo no debe estar obstruida con ningún objeto metálico. Sentinel Boat Monitor è dotato di antenne interne di tipo GPS e GSM. L’apparecchio è progettato per essere montato a parete. Il cavo di alimentazione dovrebbe essere sempre rivolto verso il pavimento. Qualsiasi altro orientamento potrà causare una ricezione satellitare insufficiente che può rendere più incerto il posizionamento. La direzione verso il cielo non dovrà essere ostruita da nessun oggetto metallico. Le dispositif Boat Monitor de Sentinel a des antennes GPS et GSM internes. L'appareil est conçu pour un montage mural. Le câble d'alimentation doit toujours faire face au sol comme indiqué sur la figure. Toute autre orientation entraînera une mauvaise réception du satellite, ce qui peut réduire considérablement la précision du positionnement. La vue du ciel ne doit pas être obstruée par des objets métalliques. 2.2 Model with external antennas • Ausführung mit externen Antennen • Modelo con antenas externas • Modello con antenne esterne • Modèle avec antennes externes GPS 2.2A EN GSM 2.2B Sentinel Boat Monitor model with external antennas includes an external combo GSM+GPS antenna with 3m of cable. Mount the antenna horizontally onto a designated place with a clear sky view to ensure optimal satellite reception. Possible mounting holes are shown in fig. 2.2A. Connect the antenna wires to the Boat Monitor as shown in fig. 2.2B: the cable with GPS label should be on the left, GSM cable on the right. Tighten the antenna connectors firmly. 6 DE E IT FR Das Modell des Sentinel Boat Monitor mit externen Antennen beinhaltet eine externe Kombi GSM+GPS Antenne mit 3 m Kabel. Montieren Sie die Antenne waagerecht an einem dafür vorgesehenen Ort mit freiem Himmel, um einen optimalen Satellitenempfang zu gewährleisten. Mögliche Befestigungsbohrungen sind in Abb. 2.2A dargestellt. Schließen Sie die Antennenkabel an den Boat Monitor an, wie in Abb. 2.2B gezeigt: Das Kabel mit GPS-Etikett sollte sich links, das GSM-Kabel rechts befinden. Ziehen Sie die Antennenanschlüsse fest an. El modelo Sentinel Boat Monitor con antenas externas incluye un combo externo de antenas GSM + GPS con 3m de cable. Monte la antena horizontalmente en un lugar designado con una vista clara del cielo para asegurar una recepción óptima. Posibles orificios de montaje se muestran en la fig. 2.2A. Conecte los cables de antena al Monitor como se muestra en la fig. 2.2B: el cable con la etiqueta GPS debe estar a la izquierda y el cable GSM a la derecha. Apriete firmemente los conectores. Il modello con antenne esterne del Sentinel Boat Monitor include un’antenna combo esterna GSM+GPS con cavo lungo 3 m. Il montaggio dell’antenna deve avvenire nel punto designato in cui non ci siano ostacoli nella direzione del cielo. Al fine di garantire una ricezione ottimale dell’onda satellitare. I fori di montaggio sono visibili nella fig. 2.2A. Connettere i cavi dell’antenna al Boat Monitor come mostrato in fig. 2.2B: il cavo con l’etichetta GPS dovrà trovarsi alla sinistra mentre il cavo GSM alla destra. I connettori dell’antenna vanno stretti efficacemente. Le modèle Sentinel Boat Monitor avec antennes externes comprend un combo externe GSM + une antenne GPS avec 3m de câble. Montez l'antenne horizontalement sur un endroit adapté avec une vue du ciel dégagée afin d’assurer une réception satellite optimale. Les trous de montage sont indiqués sur la fig. 2.2A. Branchez les fils d'antenne au système de surveillance du bateau comme indiqué sur la fig. 2.2B : le câble avec l'étiquette GPS doit être à gauche, le câble GSM à droite. Serrez fermement les connecteurs d'antenne. WARNING! • WARNUNG! • ¡ADVERTENCIA! • ATTENZIONE! • ATTENTION ! EN DE E The antenna mounting screw is directly connected to the Boat Monitor ground (black wire). If the antenna is mounted onto a metal plane (hull) make sure that the metal plane is on the same potential as the Boat Monitor ground (black wire)! Failing to do so, excessive current flowing through the device may damage the device or other equipment. Die Antennenbefestigungsschraube ist direkt mit der Boat Monitor-Masse (schwarzer Draht) verbunden. Wenn die Antenne auf einer Metallplatte (Rumpf) montiert ist, stellen Sie sicher, dass sich die Metallplatte auf dem gleichen Potential wie die Masse des Boat Monitor befindet (schwarzer Draht)! Andernfalls kann ein zu hoher Strom, der durch das Gerät fließt, das Gerät oder andere Geräte beschädigen. El tornillo de montaje de la antena está conectado directamente a la conexión de tierra del monitor (cable negro). Si la antena está montada en un plano de metal (casco) asegúrese de que el plano tenga el mismo potencial al de conexión de tierra del Monitor (cable negro). De lo contrario la corriente excesiva que fluye a través del dispositivo puede dañar el dispositivo o algún otro equipo. 7 WARNING! • WARNUNG! • ¡ADVERTENCIA! • ATTENZIONE! • ATTENTION ! La vite per il montaggio dell’antenna è direttamente connessa alla terra (cavo nero) del Boat Monitor. Se l’antenna è montata su un piano metallico (scafo), accertarsi che il piano metallico sia sullo stesso potenziale della presa a terra del Monitor (cavo nero)! In caso di errore, un flusso eccessivo di corrente, che attraverso l’apparecchio, può causare danni all’apparecchio e ad altri dispositivi. IT FR La vis de montage de l'antenne est directement connectée à la base du Boat Monitor (fil noir). Si l'antenne est montée sur un plan métallique (coque), assurez-vous que le plan métallique soit au même niveau que la base du système de surveillance du bateau (fil noir) ! À défaut de le faire, un courant excessif circulant dans l'appareil peut endommager l'appareil ou d'autres équipements. 2.3 Electrical connection overview • Übersicht der elektrischen Anschlüsse • Revisión general de la conexión eléctrica • Collegamento alla fonte elettrica: riepilogo • Présentation de la connexion électrique EN The device should be connected to a PERMANENT POWER SOURCE to allow monitoring at all times. The device consumption is less than 1 Ah per day when moving and less than 50 mAh per day when in deep sleep mode. DE Das Gerät sollte an eine DAUERSTROMQUELLE angeschlossen werden, um eine ständige Überwachung zu ermöglichen. Der Geräteverbrauch beträgt weniger als 1 Ah pro Tag bei Bewegung und weniger als 50 mAh pro Tag im Tiefschlaf-Modus. IT L’apparecchio deve essere collegata ad una FONTE DI ENERGIA ELETRICA PERMANENTE per consentire il funzionamento ininterrotto del monitoraggio. Il consumo dell’apparecchio è inferiore ad 1 Ah per giorno in condizioni di movimento e 50mAh quindi in modalità sleep. El dispositivo debe estar conectado a una FUENTE DE ALIMENTACIÓN PERMANENTE para permitir el monitoreo en todo momento. El consumo del dispositivo al estar moviéndose es inferior a 1 Ah por día y menos de 50 mAh por día al estar en modo de suspensión. E FR L'appareil doit être connecté à une SOURCE D'ALIMENTATION PERMANENTE pour permettre une surveillance à tout moment. La consommation de l'appareil est inférieure à 1 Ah par jour en déplacement et inférieure à 50 mAh par jour en mode veille prolongée. Wiring • Verkabelung • Cableado • Collegamenti • Câblage RED • ROT • ROJO • CAVO ROSSO • ROUGE BLACK • SCHWARZ • NEGRO • CAVO NERO • NOIR Power supply (+12 or +24 V DC) Spannungsversorgung (+12 oder +24 V DC) Fuente de alimentación (+12 or +24 V DC) Alimentazione (+12 oppure +24 V DC) Source de courant (+12 ou +24 V DC) Ground Masse Tierra Collegamento a terra Sol 8 PURPLE • VIOLETT • MORADO • PORPORA • VIOLET GREEN • GRÜN • VERDE • VERDE • VERT Bilge sensor input Bilgensensoreingang Entrada del sensor sentina Ingresso del sensore di sentina Entrée de capteur de cale Door sensor input Eingang Türsensor Entrada del sensor de puerta Ingresso del sensore di porta Entrée du capteur de porte BLUE • BLAU • AZUL • BLU • BLEU YELLOW • GELB • AMARILLO • GIALLO • JAUNE Shore power detection input Eingang Landstromerkennung Detección de fuente de alimentación de la orilla Ingresso per il rilevamento della corrente da banchina Entrée de détection de l’alimentation à quai Second battery voltage measurement (+24 V DC) Zweite Batteriespannungsmessung (+24 V DC) Medición de voltaje de la segunda batería (+24 V DC) Seconda misurazione del livello di tensione della batteria (+24 V DC) Deuxième mesure de tension de batterie (+24 V DC) PINK • ROSA • ROSADO • ROSA • ROSE BROWN • BRAUN • MARRÓN • MARRONE • MARRON Third battery voltage measurement (+24 V DC) Dritte Batteriespannungsmessung (+24 V DC) Medición de voltaje de la tercera batería (+24 V DC) Terza misurazione del livello di tensione della batteria (+24 V DC) Troisième mesure de tension de batterie (+24 V DC) WHITE • WEIß • BLANCO • BIANCO • BLANC Shunt - fourth voltage input (+48 V DC) Nebenwiderstand - vierter Spannungseingang (+48 V DC) Derivación – cuarta entrada de tensión (+48 V DC) Shunt - quarta entrata in tensione (+48 V DC) Shunt - quatrième entrée de tension (+48 V DC) 2.4 Power supply connection • Anschluss der Stromversorgung • Conexión de suministro de energía • Collegamento di alimentazione • Connexion d'alimentation EN When connecting any line (power supply or voltage input) directly to the battery, always protect the battery and electrical circuit from potential damages with a fuse. Install a fuse holder with 1 A fuse on the positive (+) power cable as close as possible to the battery terminal. Connect the red wire through a fuse (fuse should not be inserted until installation is complete) to permanent power source (battery). Connect the BLACK wire to system ground. DE Wenn Sie eine beliebige Leitung (Stromversorgung oder Spannungseingang) direkt an die Batterie anschließen, schützen Sie die Batterie und den Stromkreis immer mit einer Sicherung vor möglichen Schäden. Installieren Sie einen Sicherungshalter mit einer 1 Ampere Sicherung am Pluskabel (+) so nah wie möglich an der Batterieklemme. Schließen Sie das rote Kabel durch eine Sicherung (Sicherung sollte erst nach Abschluss der Installation eingesetzt werden) an eine Dauerstromquelle (Batterie) an. Schließen Sie den SCHWARZEN Draht an die Systemmasse an. 9 E Al conectar cualquier línea (fuente de alimentación o entrada de tensión) directamente a la batería es necesario colocar un fusible para proteger la batería y el circuito eléctrico contra posibles daños. Instale un porta fusibles con 1A fusible en el cable de alimentación positivo (+) lo más cerca del terminal de la batería posible. Conecte el cable rojo a través del fusible (el fusible no debe insertarse hasta que se complete la instalación) a la fuente de alimentación permanente (batería). Conecte el cable NEGRO a la tierra del sistema. IT Quando si collega all’elettricità (sia essa rete o da banchina o batteria) è necessario proteggere sempre la batteria e il circuito da danni potenziali con un fusibile. Installa una scatola portafusibili con 1A sul lato positivo (+) del cavo elettrico il più vicino possibile al terminale della batteria. Collegare il cavo rosso attraverso il fusibile (non inserire il fusibile fino a compimento dell’impianto) alla rete elettrica (o batteria). Collegare il cavo NERO alla terra del sistema. FR Lorsque vous connectez une ligne (alimentation ou entrée de tension) directement à la batterie, protégez toujours la batterie et le circuit électrique des dommages éventuels avec un fusible. Installez un porte-fusible avec un fusible de 1 A sur le câble d'alimentation positif (+) le plus près possible de la borne de la batterie. Connectez le fil rouge à travers un fusible (le fusible ne doit pas être inséré le temps de l'installation) à la source d'alimentation permanente (batterie). Connectez le fil NOIR à la base du système. 2.4 Boat Monitor red • rot • rojo • rosso • rouge black • schwarz • negro • nero • noir Fuse • Sicherung • Fusible • Fusibile • Fusible + 12/24V Power supply / Voltage 1 • Stromversorgung/Spannung 1 • Fuente de alimentación/Voltaje 1 • Corrente elettrica/tensione • Alimentation / tension 1 2.5 Voltage and current measurements • Spannungs- und Strommessungen • Mediciones de voltaje y corriente • Tensione e misurazione della corrente • Mesures de tension et de courant EN Current can be measured on HIGH-SIDE shunt resistor (not included). For low-side shunt wiring please contact support. Shunt should be sized based on maximum current consumption (e.g. 1 mΩ for up to 80 A). Connect shunt as shown in fig 2.5A. Yellow and Pink wires should be used for measuring voltages up to 30 V (Voltage 2 and 3), brown wire up to 60 V (Voltage 4) (fig. 2.5B). If current measurement in not required, connect white and brown together to avoid false current readings (fig. 2.5C) 10 DE Die Strommessung erfolgt über einen HIGH-SIDE Nebenwiderstand (nicht im Lieferumfang enthalten). Für Low-Side Nebenwiderstandsverdrahtung wenden Sie sich bitte an den Support. Der Nebenwiderstand sollte nach der maximalen Stromaufnahme bemessen werden (z. B. 1 mΩ für bis zu 80 A). Schließen Sie den Nebenwiderstand gemäß Abb. 2.5A an. Gelbe und rosa Drähte sollten für die Messung von Spannungen bis 30 V (Spannung 2 und 3), der braune Draht bis 60 V (Spannung 4) verwendet werden (Abb. 2.5B). Wenn die Strommessung nicht erforderlich ist, verbinden Sie weiß und braun miteinander, um falsche Strommessungen zu vermeiden (Abb. 2.5C). La corriente puede ser medida en la resistencia de derivación HIGH-SIDE (no incluida). Para el cableado de la resistencia de derivación LOW-SIDE comuníquese con el soporte. Derivación debe dimensionarse según el consumo máximo de corriente (por ejemplo, 1 mΩ hasta 80 A). Conéctela como se muestra en la figura 2.5A. Los cables amarillo y rosado deben utilizarse para medir tensiones de hasta 30 V (voltaje 2 y 3), cable marrón hasta 60 V (voltaje 4) (figura 2.5B). Si la medición de corriente no es necesaria conecte el cable blanco con el marrón para evitar lecturas de corriente falsas (figura 2.5C). E La corrente può essere misurata con un resistore Shunt HIGH-SIDE (non incluso). Per i collegamenti dello shunt low-side sentire per piacere l’assistenza. Lo shunt deve esser dimensionato sulla base dei consumi massimi di corrente elettrica (ad esempio 1 fino a 80 A). Collegare lo shunt come mostrato in fig 2.5A. I cavi giallo e rosa dovranno essere usati per misurare la tensione fino a 30 V (tensione 2 e 3), il cavo marrone fino a 60V (tensione 4) (fig. 2.5B). Qualora la misurazione della corrente non è richiesta, connettere i cavi bianco e marrone per evitare false letture di corrente (fig. 2.5C). IT FR Le courant peut être mesuré sur la résistance de shunt CÔTÉ HAUT (non fournie). Pour le câblage de dérivation côté bas, veuillez contacter le service d'assistance. Le shunt doit être dimensionné en fonction de la consommation de courant maximale (par exemple 1 mΩ et jusqu'à 80 A). Connectez le shunt comme indiqué sur la figure 2.5A. Les fils jaunes et roses doivent être utilisés pour mesurer des tensions jusqu'à 30 V (tension 2 et 3), le fil marron jusqu'à 60 V (tension 4) (figure 2.5B). Si la mesure du courant n'est pas nécessaire, connectez le blanc et le brun ensemble pour éviter les erreurs de lecture de courant (figure 2.5C). 2.5A 2.5B Boat Monitor brown • braun • marrón • marrone • marron white • weiß • blanco • bianco • blanc Shunt resistor • Nebenschlusswiderstand • 12/24/48V Resistencia de derivación • Resistore shunt • Voltage 4 • Spannung 4 • Résistance shunt + Boat Monitor yellow • gelb • amarillo • giallo • jaune Load • Ladung • Cargar • Carica • Charge Voltaje 4 • Tensione 4 • Tension 4 11 + 12/24V pink • rosa • rosado • rosa • rose + 12/24V Voltage 2 • Spannung 2 • Voltage 3 • Spannung 3 • Voltaje 2 • Tensione 2 • Voltaje 3 • Tensione 3 • Tension 2 Tension 3 2.5C Boat Monitor white • weiß • blanco • bianco • blanc brown • braun • marrón • marrone • marron + 12/24/48V Voltage 4 • Spannung 4 • Voltaje 4 • Tensione 4 • Tension 4 2.6 Bilge, door switch connection and shore power detection • Bilge, Türschalteranschluss und Landstromerkennung • La sentina, conexión de interruptor de puerta y detección de fuente de alimentación de la orilla • Collegamenti ai sensori di sentina, di porta e rilevamento della corrente da banchina • Cale de fond, raccordement du commutateur de porte et détection de l’alimentation à quai. EN DE E IT Purple wire can be used for bilge pump activity detection as shown in fig 2.6A. Bilge input uses ACTIVE HIGH logic. If active low logic is required please contact support. Green wire can be used for door alerts. Connect magnetic switch as shown in fig. 2.6B. Blue wire can be used for shore power presence detection. Connect a step-down transformer (not included) as shown in fig. 2.6C. Der violette Draht kann für die Erkennung der Bilgepumpenaktivität verwendet werden, wie in Abb. 2.6A gezeigt. Der Bilge-Eingang verwendet die ACTIVE HIGH-Logik. Wenn eine aktive Low-Logik benötigt wird, wenden Sie sich bitte an den Support. Der grüne Draht kann für Türalarme verwendet werden. Schließen Sie den Magnetschalter wie in Abb. 2.6B gezeigt an. Das blaue Kabel kann für die Anwesenheitserkennung von Landstrom verwendet werden. Schließen Sie einen Abwärtstransformator (nicht im Lieferumfang enthalten) an, wie in Abb. 2.6C gezeigt wird. El cable morado se puede utilizar para detectar la actividad de la bomba de sentina tal como se muestra en la figura 2.6A. La entrada de sentina utiliza la lógica de actividad alta. Si requiere de lógica de actividad baja póngase en contacto con el soporte. El cable verde se puede utilizar para alertas de puertas. Conecte el interruptor magnético como se muestra en la fig. 2.6B. El cable azul se puede utilizar para la detección de presencia de energía de la orilla. Conecte un transformador reductor (no incluido) como se muestra en la fig. 2.6C. Il cavo purpureo può essere usato per connettere la pompa di sentina come si vede nella fig. 2.6A. L’ingresso di sentina usa l’ACTIVE HIGH Logic. Se è richiesta l’active low logic chiamare l'assistenza. Il cavo verde può esser utilizzato per gli allarmi delle porte Collegare l'interruttore magnetico come in fig. 2.6B. Il cavo blu può esser utilizzato per rilevamento della corrente di banchina. Collegare un trasformatore step-down (non incluso) coma in fig. 2.6C. 12 FR Le fil violet peut être utilisé pour la détection de l'activité de la pompe de cale comme indiqué sur la figure 2.6A. L'entrée de cale utilise le système de logique ACTIVE HIGH (état haut actif). Si une logique basse active est requise, veuillez contacter le support technique. Le fil vert peut être utilisé pour les alarmes de la porte. Branchez l'interrupteur magnétique comme indiqué sur la fig. 2.6B. Le fil bleu peut être utilisé pour la détection de présence de l’alimentation à quai. Connectez un transformateur abaisseur (non inclus) comme indiqué sur la fig. 2.6C. Bilge pump • Bilgenpumpe • Bomba de sentina • Pompa di sentina • Pompe de cale 12/24V M Bilge in • Eingang Bilge • Entrada sentina • Sentina in • Cale de fond dans 2.6C Boat Monitor purple • violett • morado • blue • blau • azul • blu • bleu 220/12 V porpora • violet 2.6A Step-down transformer • Abwärtstransformator • Transformador reductor • Trasformatore step-down • Transformateur abaisseur green • grün • verde • verde • vert 2.6B 12/24V Shore power • Landstromerkennung • Alimentacion de la orilla • Corrente da banchina • Alimentation à quai Door in • Eingang Tür • Entrada puerta • Porta in • porte dans 2.7 NMEA 2000® connection • NMEA 2000®-Verbindung • Conexión NMEA 2000® • Collegamento NMEA 2000® • NMEA 2000® connection EN Boat monitor can be connected to NMEA 2000® backbone (bus) via a drop cable and T-connector. Important: Boat Monitor cannot be powered from the NMEA 2000® backbone. DE Der Boot-Monitor kann über ein Verbindungskabel und einen T-Verbinder mit dem NMEA 2000® Backbone (Bus) verbunden werden. Wichtig: Der Boot-Monitor kann nicht über das NMEA 2000®-Backbone mit Strom versorgt werden. E El monitor puede ser conectado al troncal (bus) NMEA 2000® a través del cable de derivación y el conector T. Importante: Boat Monitor no puede ser alimentado desde el troncal NMEA 2000®. IT Il Boat monitor può essere collegato alla dorsale NMEA 2000® (bus) per mezzo di un cavo di discesa e un connettore a T. Importante: Il Boat Monitor non può essere alimentato dalla dorsale NMEA 2000®. FR Le système de surveillance pour bateau peut être connecté au câble de dorsale NMEA 2000® (bus) via un câble de dérivation et un connecteur en T. Important : Boat Monitor ne peut être alimenté par un câble de dorsale NMEA 2000®. 13 2.7 Boat Monitor Drop cable • Verbindungskabel • Cable de derivación • Cavo di discesa • Câble de dérivation NMEA 2000 bus T-connector • T-Verbinder • conector T • connettore a T • connecteur en T WARNING! • WARNUNG! • ¡ADVERTENCIA! • ATTENZIONE! • ATTENTION ! EN To power up the device for the first time the following steps are required: 1. Insert the fuse on the supply wire (see fig. 2.4) to release the deep sleep lock. 2. Remove the fuse and reinsert it again. The device should power up and LEDs should start blinking. When the subscription is active it takes approximately 1 minute until LEDs start blinking once every 3 seconds. This pattern signals normal operation. DE Um das Gerät zum ersten Mal einzuschalten, sind die folgenden Schritte erforderlich: 1. Setzen Sie die Sicherung an der Zuleitung ein (siehe Abb. 2.4), um die Tiefschlafsperre zu lösen. 2. Entfernen Sie die Sicherung und setzen Sie sie wieder ein. Das Gerät sollte sich einschalten und die LEDs sollten beginnen zu blinken. Wenn das Abonnement aktiv ist, dauert es ca. 1 Minute, bis die LEDs alle 3 Sekunden einmal blinken. Dieses Muster signalisiert den Normalbetrieb. E IT FR Para encender el dispositivo por primera vez se requieren los siguientes pasos: 1. Inserte el fusible en el cable de alimentación (vea la figura 2.4) para liberar el bloqueo de modo de suspensión. 2. Retire el fusible y vuelva a insertarlo. El dispositivo debería encenderse y los LED deberían comenzar a parpadear. Cuando la suscripción está activa transcurre aproximadamente 1 minuto hasta que los LED comienzan a parpadear una vez cada 3 segundos. Este patrón indica el funcionamiento normal. Per accendere la prima volta l’apparecchio è necessario seguire i seguenti passaggi: 1. Inserire il fusibile nel cavo di alimentazione (vedi fig. 2.4) per sbloccare la chiusura del deep sleep. 2. Rimuovere il fusibile e reinserirlo nuovamente. L’apparecchio dovrebbe accendersi e il LED lampeggiare. Quando l’abbonamento è attivo passerà 1 minuto prima che il LED incominci a lampeggiare una volta ogni tre secondi. Questo sequenza significa che l’apparecchio è in funzione. Pour mettre l'appareil sous tension pour la première fois, les étapes suivantes sont requises : 1. Insérez le fusible sur le fil d'alimentation (voir fig. 2.4) pour déverrouiller la serrure. 2. Retirez le fusible et réinsérez-le. L'appareil doit s'allumer et les voyants doivent commencer à clignoter. Lorsque le compte est actif, il faut environ 1 minute pour que les voyants commencent à clignoter toutes les 3 secondes. Ce mode signale un fonctionnement normal. 14 3. Technical specification • Technische Daten • Especificaciones técnicas • Specifiche tecniche • Spécifications techniques POWER SUPPLY: 12 to 24 V DC 2 W Max ENERGY CONSUMPTION (12 V): Nominal: average 50 mA r.m.s, Deep Sleep: average less than 2 mA OPERATION TEMPERATURE: -10 °C to +55 °C STORAGE TEMPERATURE: -40 °C to +70 °C STORAGE RELATIVE HUMIDITY: 5 to 95 % (no condensation) STROMVERSORGUNG: 12 bis 24 V DC 2 W Max. ENERGIEVERBRAUCH (12 V): Nennwert: durchschnittlich 50 mA QMW Tiefschlaf: durchschnittlich weniger als 2 mA BETRIEBSTEMPERATUR: -10°C bis + 55°C LAGERTEMPERATUR: -40°C bis +70°C RELATIVE LUFTFEUCHTIGKEIT BEI DER LAGERUNG: 5 bis 95 % (nicht kondensierend) FUENTE DE ALIMENTACIÓN: 12 a 24 V DC 2 W Max CONSUMO DE ENERGÍA (12 V): Nominal: PROMEDIO 50 mA r.m.s, Sueño profundo: promedio menos de 2 mA TEMPERATURA OPERACIONAL: -10 °C a +55 °C TEMPERATURA DE ALMACENAMIENTO: -40 °C to +70 °C HUMEDAD RELATIVA DE ALMACENAMIENTO: 5 a 95 % (sin condensación) ALIMENTAZIONE ELETTRICA: Da 12 a 24 V DC 2 W Max CONSUMO (12V): Nominale: mediamente 50 mA r.m.s, Deep Sleep: mediamente meno di 2 mA TEMPERATURA DI FUNZIONAMENTO: Da -10 °C a +55 °C TEMPERATURA DELLO STORAGE: Da -40 °C a +70 °C UMIDITA’ RELATIVA DEL DEPOSITO: Da 5 a 95 % (nessuna condensa) Minimum Typical Maximum Supply Voltage 11 V 12 V - 24 V 30 V Input resistance 500 kΩ EN Input Voltage Range: Voltage 1/2/3 30 V Voltage 4 60 V 5V Input Voltage threshold (bilge, door) 80 mV Shunt differential full scale input Versorgungsspannung Eingangswiderstand Minimum Typisch Maximum 11 V 12 V - 24 V 30 V DE 500 kΩ Eingangsspannungsbereich: Spannung 1/2/3 30 V Spannung 4 60 V 5V Eingangsspannungsschwelle (Bilge, Tür) 80 mV Nebenwiderstand-Differenzeingang für Vollskala Suministro de voltaje Resistencia de entrada Minimum Típico Maximum 11 V 12 V - 24 V 30 V E 500 kΩ Rango de voltaje de entrada: Voltaje 1/2/3 30 V Voltaje 4 60 V 5V Entrada umbral de voltaje (sentina, puerta) 80 mV Entrada de diferencial de derivación a escala completa Tensione di alimentazione Resistenza di ingresso Minimo Tipico Massimo 11 V 12 V - 24 V 30 V 500 kΩ Livelli di tensione in ingresso: Tensione 1/2/3 30 V Tensione 4 Soglia della tensione in 60 V 5V ingresso Differenziale di shunt sulla scala di entrata 15 80 mV IT FR SOURCE DE COURANT : 12 à 24 V DC 2 W Max CONSOMMATION D'ÉNERGIE (12 V) : Nominal : moyenne 50 mA r.m.s, Veille prolongée : moyenne inférieure à 2 mA TEMPÉRATURE DE FONCTIONNEMENT : -10 °C à +55 °C TEMPÉRATURE DE STOCKAGE : -40 °C à +70 °C STOCKAGE D’HUMIDITÉ RELATIVE : 5 à 95 % (pas de condensation) EN DE E IT FR Tension d'alimentation Résistance d'entrée Minimo Normal Maximum 11 V 12 V - 24 V 30 V 500 kΩ Plage de tension d'entrée : Tension 1/2/3 30 V Tension 4 Entrée seuil de tension 60 V 5V (fond de cale, porte) Entrée de shunt 80 mV différentiel pleine échelle Boat monitor compliance This product is marked with logo and uses radio frequency bands that are harmonized throughout the European Community and others. Declaration of conformity is located in the box together with warranty list. Boat Monitor-Konformität Dieses Produkt ist mit einem Logo gekennzeichnet und verwendet Funkfrequenzbänder, die in der gesamten Europäischen Gemeinschaft und anderen Ländern harmonisiert sind. Die Konformitätserklärung befindet sich im Karton zusammen mit dem Garantieschein. Cumplimiento de Boat Monitor Este producto está marcado con el logotipo y utiliza frecuencias radiales armonizadas en toda la Comunidad Europea y otros. Declaración de conformidad se encuentra en la caja junto con la hoja de garantía. Compatibilità del Boat Monitor Questo dispositivo è segnato dal logo e usa bande di frequenza radio armonizzate a livello della Comunità Europea e altre. La dichiarazione di conformità è situata nella scatola assieme al certificato di garanzia. Conformité du Boat Monitor Ce produit est marqué d'un logo et utilise des bandes de fréquences radio qui sont harmonisées dans toute la Communauté européenne et au-delà. La déclaration de conformité se trouve dans la boîte avec le bon de garantie. CONTACT • KONTAKT • CONTACTO • CONTATTI • CONTACT [email protected] www.sentinelmarine.net-
 1
1
-
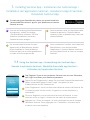 2
2
-
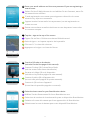 3
3
-
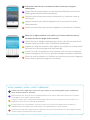 4
4
-
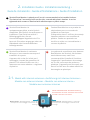 5
5
-
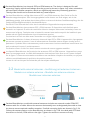 6
6
-
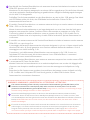 7
7
-
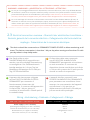 8
8
-
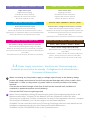 9
9
-
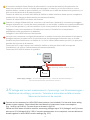 10
10
-
 11
11
-
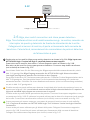 12
12
-
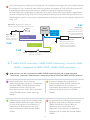 13
13
-
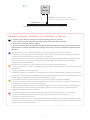 14
14
-
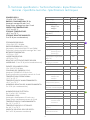 15
15
-
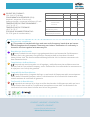 16
16


Sentinel Boat Monitor Guía de instalación
- Tipo
- Guía de instalación
en otros idiomas
Artículos relacionados
Otros documentos
-
 Outsunny 845-639V00ND Assembly Instructions
-
Quick EBSN 15 Manual For Use And Installation
-
Hubbell Wiring Device-Kellems PD1343 Guía de instalación
-
KlarkTeknik SENTINEL SM1 Guía de inicio rápido
-
Sonim XP 3340 Z1 Sentinel Guía del usuario
-
Sonim XP 3340 Sentinel Manual de usuario
-
Uniden SDS200 El manual del propietario
-
-
 JOHNSON PUMP - SPX FLOW 36152 Manual de usuario
-

