
Aero
14
Italiano
Español
Français
Deutsch
Indonesia

English
1
English
PB
Congratulations on your purchase of the GIGABYTE Notebook.
This manual will help you to get started with setting up your notebook. The final product
conguration depends on the model at the point of your purchase. GIGABYTE reserves the
right to amend without prior notice. For more detailed information, please visit our website at
www.gigabyte.com
1 Connect the power cord to the AC adapter.
2 Connect the AC adapter to the DC-in jack on the right side of the notebook.
3 Connect the power cord to the power outlet.
Switching on the Power
After you turn on the Notebook for the very rst time, do not turn it off until the operating system
has been congured. Please note that the volume for the audio will not function until Windows
®
Setup has completed.
Booting Up the Notebook for the First Time
Depending on your conguration, the Microsoft
®
Windows
®
Boot Screen will be the rst screen that
you will see as the notebook starts up. Follow the on-screen prompts and instructions and enter
your personal information to complete the setup of the Windows
®
Operating System.
Using GIGABYTE Notebook for the First Time
1
2
3
USB
Charging
Port
IMPORTANT
•
Ensure that your Notebook PC is connected to a grounded power adapter before turning it on for the rst time.
•
When using your Notebook PC on power adapter mode, the socket outlet must be near to the unit and easily accessible.
•
Locate the input/output rating label on your Notebook PC and ensure that it matches the input/output rating information on your
power adapter. Some Notebook PC models may have multiple rating output currents based on the available SKU.
•
Power adapter information: Input voltage: 100-240Vac ,- Input frequency: 50-60Hz ,- Rating output voltage: 19.5V,7.7A

English
3
English
2
Top View
1 Light sensor
2 Webcam
3 Webcam Status LED Indicator
4 Microphone x2
5 Power Button
6 TouchPad
7 Battery Indicator Button
8
LED Indicators
Press the right button of touchpad to
check the remaining battery power.
Right-click to show the remaining
power percentage. As shown below, the
battery life indicator is available when
the laptop is shut down, in stand-by or
hibernation.(Battery mode)
1
2
<10%
11-30%
31-50%
51-70%
71-90%
>90%
Bluetooth Status LED
Wireless Lan Status LED
HDD Status LED
Battery Status LED
Power Status LED
Your GIGABYTE Notebook Tour
2
1 3
6
87
5
4

English
3
English
2
Left View
1 Kensington Lock Slot
2 HDMI Port
3 USB 3.0
4 Combo Audio Jack
5 SD Card Reader
Right View
1 USB 3.1
2 Mini Displayport
3 USB 3.0(Support USB Charge)
4 USB 3.0
5
DC-in Jack
3 4
1
2 5
1 3
2
4 5
Warning:
DO NOT remove the built-in lithium battery. For any service needs, please contact your local GIGABYTE
Authorized Service Center.
•
Do not install the Notebook PC on a slant or a place prone to vibrations, or avoid using the Notebook PC in that
location for a long time.This increases the risk that a malfunction or damage to the product will occur.
•
Do not store and use Notebook PC in direct sunlight or the location where temperatures exceed 112°F (45°C) such
as inside a vehicle.There is a danger of Lithium-ion battery expansion and aging.
•
Do not use the Notebook PC in a badly ventilated location such as on bedding, on a pillow or cushion, etc, and do
not use it in a location such as room with oor heating as it may cause the computer to overheat.Take care that the
Notebook PC vents (on the side or the bottom) are not blocked especially in these environments. If the vents are
blocked, it may be dangerous and cause the Notebook PC to overheat.

English
5
English
4
The computer employs hotkeys or key combinations to access most of the computer’s controls like
screen brightness and volume output. To activate hotkeys, press and hold the <Fn> key before
pressing the other key in the hotkey combination.
Hotkey
Function Description
Fn+F1 Sleep Put the computer in Sleep mode.
Fn+F2
Wireless LAN Enables/disable the Wireless LAN function.
Fn+F3
Brightness Down Decrease the screen brightness.
Fn+F4
Brightness Up Increase the screen brightness.
Fn+F5
Display Toggle
Switche display output between the display
screen, external monitor (if connected) and
both.
Fn+F6
Screen Display Toggle Turn the screen display on and off.
Fn+F7
Speaker Toggle Turn the speaker on and off.
Fn+F8
Volume Down Decrease the sound volume.
Fn+F9
Volume Up Increase the sound volume.
Fn+F10
Touchpad Toggle Turn the internal touchpad on and off.
Fn+F11
Bluetooth Enable/disable the Bluetooth function.
Fn+F12
Webcam Turn the internal webcam on and off.
Fn+Space
Keyboard Backlight
Toggle
Turn the keyboard backlight on and off.
Macro key
Macro keys can be set via Macro Hub, setting combination keys for complicated and/or general
operation.
Macro key Macro key Description
G
Macro group switch, press around 3 secconds as hardware
switch on/off.
G1 User Programmable Macro key
G2 User Programmable Macro key
G3 User Programmable Macro key
G4 User Programmable Macro key
G5 User Programmable Macro key
Hotkeys

English
5
English
4
Welcome to use Macro Hub ! Macro Hub makes it much easier for you to control your Macro Key
. You can deal with complex key stroke combination by just one press on macro key, which brings
you benets both in work and game. Before using Macro Hub, please read following guide, thanks.
1
Launch Macro Hub
You can nd the shortcut of Macro Hub on desktop. Just double click it.
2
The overview of Macro Hub
4
5
1 3
2
1 Proles: View your current macro command settings.
2
Macros: Edit macro command funtions anf settings.
3 Settings: Update Macro Hub version or renew macro hub settings.
4 Macro Key Group Indicators: Indicate the activated Macro Key Group (the atcivated
group indicator will light up)
5 Macro Key Function: Show the programmed Macro functions under the Macro Key
Group, from G1 to G5.
Macro Hub Instruction

English
7
English
6
3
Using Macro Hub
1 Set Macro Key to basic function
a. Click the G button on the left-top of the keyboard to switch to the Macro Key group you
would like to use
b. Click the Macro Key function brick
c. Double-click the function you would like to use(ex. Media Player) in the Basic or Macros
function area.
d. Complete the setting

English
7
English
6
2 Edit macro command funtions anf settings.
a. Click "Macros" (you can set up to 100 sets of macro)
13
1
8
3
7
6
10
11
9
5
2
4
12
b. Overview of macro record panel (you can record your own macro here)
1. Start recording: Click when you’re about to record the macro
2. Pause key Switch: Enable/Disable Pause key to stop recording.
3. Macro Name: Set the name of this macro
4. Import icon: Set icon for this macro. You can use default icon or upload your own
icon
5. Record type: You can choose to record only mouse(or keyboard) movement, or
record both. You can also decide to or not to record mouse position.
6. Record interval: You can decide to or not to record the interval of each movement(or
You can set xed interval time between every movement)
7. Execution way: You can set the macro execution way (execution once, repeat
execution or repeat execution with deep press)
8. Export macro: Export your macro
9. Import macro: Import the macro
10. Delete all: Delete all movement in this macro

English
9
English
8
11. Delete selected: Delete selected movement
12. Movement list: it shows all movement you record
13. Exit: The system will inquire you if to save the recorded macro
c. Start to record macro: When you click start button, the macro engine will start to record
macro. All movement you made(mouse/keyboard) will be shown in the movement list.
You can decide to use “pause” key or mouse click on stop button to stop recording
based on your record range.Finishing recording: When you have done all movement,
click exit button. The Macro Engine will inquire you if you want to save the macro. Click
Yes then you can nish the record of your own macro.
d. Complete the setting.

English
9
English
8
3 Edit "Settings" of Macro Hub
1
2
3
1. Software update: Update latest version of GIGABYTE Macro Hub
2. Clean memory: Erase current Macro Hub settings
3. Firmware Upgrade: Upgrade Macro Key rmware

English
11
English
10
GIGABYTE Smart Manager
You can activate GIGABYTE Smart Manager by double clicking on the shortcut icon on the
desktop if the machine you purchased has the operation system built-in. GIGABYTE Smart
Manager is an icon-based control interface, enabling users to intuitionally access common
system setup as well as GIGABYTE exclusive utilities. Please be noted that the GIGABYTE
Smart Manager interface, icons, utilities and software versions may vary based on the
purchased models. Please operate GIGABYTE Smart Manager according to the actual version
built-in.
GIGABYTE Software Application

English
11
English
10
Smart USB Backup Guide
WARNING
●
You can backup original recovery image through this application in case of losing by device damage.
●
You can backup original recovery image to USB disk and restore the system if any storage system
replacement with the recovery USB disk.
●
Before you restore the system through the recovery USB disk, please make sure that you have already
made the backup of your data.
●
Please DO NOT shut down or un-plug the system when performing backup through recovery USB disk.
1
>20G
• Please plug in the USB disk which is
at least 20GB in capacity to make the
original image (backup the data in USB
rst. All data will be eliminated during
the creation of recovery USB disk)
2
• Insert the driver disk to your optical
drive and run the install of “Smart USB
Backup” (for none-ODD model, please
use USB ODD device or download
from http://www.gigabyte.com
3
• Run the “Smart USB Backup” after
nishing the install.
4
• Select your USB disk from the drop-
down list and start to create the
recovery USB disk.
5
• The window will pop out when the creation of recovery disk is done.
• Please press F12 on starting the system when you need to restore the system. Select
“boot from recovery USB disk” and the system will be restored.
• The time needed for restore will be around 30 mins(time needed may vary by USB disk
model) .

English
13
English
12
Windows 10 Recovery Guide
During the laptop turn on process, press and hold F9
key to launch the tool.
2
1
3
Turn off and restart the laptop.
There are two options for system recovery
˙
Reset this PC
You can choose to keep or remove your files and then reinstalls Windows
without losing your les.
˙
GIGABYTE Smart Recovery
Your PC settings will be restored to factory default settings.
Caution: All personal data and les will be lost.
Choose “Troubleshoot” to enter the recovery settings. (Also you can choose
“Continue” to exit recovery system and continue to Windows 10 for files or
data backup.)
System Recovery (Restore your laptop operating system)
When something is going wrong with the laptop operating system, the storage of the laptop has
a hidden partition containing a full back up image of the operating system that can be used to
restore the system to factory default settings.
All ready to go
Make sure your PC is plugged in. This will take a few minutes.
Recovery Guide
Note
˙
If the storage has been switched or the partition deleted, the recovery option will no longer be
available and a recovery service will be needed.
˙
The recovery function is only available on devices with O/S preinstalled. Devices with DOS do not
have the recovery function.
Launch System Recovery
The system recovery feature is preinstalled before the laptop is shipped from the factory. The
option menu allows you to launch the Windows recovery tool to reinstall the operating system to
factory default.
The brief introduction below will show you how to start the recovery tool and restore your system.

English
13
English
12
Here are what will happen
˙
All of your personal les and apps will be removed.
˙
Your PC settings will be restored to pure O/S (without GIGABYTE app) .
4
▓
Choose “Reset this PC”
Keep my les
Choose an account to continue.All apps will be removed, and settings
will back to pure O/S (without GIGABYTE app), but your personal les
will be kept.
Remove everything
All apps, setting and personal les will be removed.
Just remove my les
Only personal data and les will be removed, but computer settings will
be kept.
Fully clean the drive
The drive will be completely restored to factory default settings. It takes
more time. > [Click on “Reset” to execute recovery function.]
▓
GIGABYTE Smart Recovery
Caution
˙
Once the “Recovery” is selected, your personal data and les will be deleted
after the laptop starts restoring, and the operating system will be reset to
factory default settings.
˙
A progress indicator bar will show on the window when the recovery process is
running. Please make sure the AC-adapter is plugged in and do not turn off the
laptop.
The recovery will be activated and you will see the
option buttons on the window. Click on “Yes” to start it.
After the system recovery is completed, you will see
the option button on the window, please click on
“Shutdown”.

English
PB
English
14
▓
Advanced options
System Restore
Use a restore point recorded on your PC to restore Windows.
System Image Recovery
Recover Windows using a specic system image le.
Startup Repair
Fix problems that keep Windows from loading.
Command Prompt
Use the Command Prompt for advanced trobleshooting.
UEFI Firmware Settings
Change settings in your PC’s UEFI rmware.
Startup Settings
Change Windows Startup behavior.
Warranty & Service:
Warranty and service and related information please refer to the warranty card or GIGABYTE
service website as the below link:
http://www.gigabyte.com/support-downloads/technical-support.aspx
FAQ:
FAQ (Frequent Asked Questions) please refer to the below link:
http://www.gigabyte.com/support-downloads/faq.aspx
Appendix

PB 1
感謝您選擇技嘉筆記型電腦 !
為協助您順利使用技嘉筆記型電腦,我們特地設計此快速安裝說明。如果您需要更多關於電腦功能,
歡迎上技嘉官方網站 www.gigabyte.tw查詢。產品實際規格以出貨為準,如有異動恕不另行通知。
1 將電源線接上電源轉換器。
2 將電源轉換器連接到電腦的電源插孔。
3 將電源線插入電源插座。
開啟筆記型電腦
電源指示燈會顯示機器是否為通電的狀態。
第一次開機時,在還未完全進入作業系統前請勿強制關機。開啟電源後,直到該作業系統配置完成
前,音量無法設定。
開始第一次使用
根據您的筆記型電腦配置,當您第一次開機,第一個畫面會是微軟
Windows
®
啟動畫面,按照該螢幕上
的提示和指示,完成作業系統的配置。當軟體許可條款顯示時,請務必閱讀並同意後再繼續。
首次使用
GIGABYTE
技嘉筆記型電腦
1
2
3
USB
Charging
Port
重要
•第一次啟動筆記型電腦之前,請先確認已經將電源變壓器連接至電腦。
•找出筆記型電腦的輸入/輸出頻率標籤,並請確認符合電源變壓器上的輸入/輸出頻率資訊。
•當筆記型電腦在電源變壓器使用模式時,請將電源變壓器靠近插座以便於使用。
•電源變壓器資訊:輸入電壓:100-240Vac ,輸 入 頻 率:50-60Hz ,輸 出 電 壓 功 率:19.5V,7.7A

2 3
GIGABYTE
技嘉筆記型電腦導覽
上視圖
1
光源感應器
2
視訊攝影機
3
視訊指示燈
4
麥克風 x2
5
電源開關
6
觸控板
7
電池電量顯示鍵
8
LED 狀態指示燈
按下右鍵可檢視電池剩餘電量
。
在關機/
待命/休眠模式時按下右鍵可透過指示燈
號檢視電池剩餘電量(電量對照如下圖)
(電池模式下)
1
2
<10%
11-30%
31-50%
51-70%
71-90%
>90%
藍牙指示燈
無線網路指示燈
硬碟存取指示燈
電池充電指示燈
電源狀態指示燈
2
1 3
6
87
5
4
警語:使用過度恐傷害視力。
注意事項:
(1)使用30分鐘請休息10分鐘。
(2) 2 歲以下幼兒不看螢幕, 2 歲以上每天看螢幕不要超過1小時。

2 3
左視圖
3 4
1
2 5
1
Kensington防盜鎖孔
2
HDMI 埠
3
USB 3.0
4
耳機/麥克風複合插孔
5
SD記憶卡讀卡機
1
USB 3.1
2
Mini Display 埠
3
USB 3.0(支援USB Charge
)
4
USB 3.0
5
電源插孔
1 3
2
4 5
右視圖
USB Charge 支援在電腦關機、睡眠狀態或休眠狀態仍可進行充電您的可攜式USB裝置
(可於Gigabyte Smart Manager軟體內選擇開啟/關閉此項功能)
警告:
本機器設備配備的鋰電池為不可拆卸裝置,請交由技嘉授權專業維修服務中心移除裝置中的電池。
• 請不要於斜面上或容易震動的地方使用筆記型電腦,以降低發生故障和產品損壞的風險。
• 請勿置於車內、室內外陽光強烈或高於45度C之儲藏環境, 以免鋰電池發生老化或膨脹等危險。
• 請於通風良好的地方使用此產品。請勿在床上、枕頭等通風不良的地方使用此產品,並且不要在有樓板暖氣的地方使
用,避免導致筆記型電腦過熱。請避免底部和側邊的通風孔阻塞。如果通風孔阻塞,會有損害筆記型電腦或導致內部
過 熱 的 危 險。

4 5
許多電腦的設定例如螢幕亮度、喇叭音量等可利用電腦的快速鍵直接調整。如需使用快速鍵,請依
下表先按住 <Fn> 鍵,再按下<F1>~<F12>等按鍵。
快速鍵 功能 功能敘述
Fn+F1
睡眠模式 讓電腦進入睡眠模式。
Fn+F2
無線區域網路 開啟/關閉無線區域網路裝置。
Fn+F3
減弱亮度 降低螢幕亮度。
Fn+F4
增強亮度 提高螢幕亮度。
Fn+F5
螢幕顯示切換
在電腦螢幕以及外接式顯示器之間切換影像輸出,
或者同時顯示。
Fn+F6
螢幕開關 開啟/關閉螢幕。
Fn+F7
喇叭靜音 將喇叭切換為靜音模式。
Fn+F8
減弱音量 降低喇叭音量。
Fn+F9
增大音量 提高喇叭音量。
Fn+F10
觸控板開關 開啟/關閉觸控板。
Fn+F11
藍牙通訊 開啟/關閉藍牙通訊裝置。
Fn+F12
視訊攝影機 開啟/關閉內建視訊攝影機。
Fn+Space
鍵盤背光開關 調整鍵盤背光亮度。
巨集鍵
使用者可透過Marco Hub自行定義巨集設定,並透過各種設定完成複雜的遊戲連續操作或一般電腦
操作的需求。
巨集鍵 功能 功能敘述
巨集群組切換鍵 切換所設定的巨集群組,壓按約三秒可開關巨集鍵。
自定義巨集鍵 使用者自行定義的巨集鍵
自定義巨集鍵 使用者自行定義的巨集鍵
自定義巨集鍵 使用者自行定義的巨集鍵
自定義巨集鍵 使用者自行定義的巨集鍵
自定義巨集鍵 使用者自行定義的巨集鍵
快速鍵

4 5
Macro Hub
介紹
歡迎使用Macro Hub ! 使用Macro Hub 能讓您輕鬆控制/存取您的Macro Key,同時要操作多鍵的功
能讓您輕鬆一鍵就搞定,不論在工作/遊戲中都能應付自如。使用Macro Hub 之前,請參考以下之
使用說明,謝謝
1
開啟Macro Hub
在您的桌面上找到Macro Hub的圖示,並且加以點擊
2
Macro Hub 概觀
4
5
1 3
2
1
基本功能:檢視你目前的巨集設定
2
自訂巨集:設定編輯自訂巨集指令功能
3
其他設定:前往更新Macro Hub或是清除Macro Hub之設定
4
Macro Key 群組啟動指示燈:顯示您目前已經啟動之Macro Key Group (已啟動之Macro
Key群組燈號會亮起)
5
Macro Key 功能:顯示您目前正在使用之Macro Key群組底下的Macro 功能 (共五個),從
G1到G5

6 7
3
使用Macro Hub
1
設定Macro Key功能
a.
利用鍵盤左上方的
G
鍵切換至您想要使用的
Macro Key
群組
b.
點擊
Macro Key
功能區塊
c.
在"基本功能"或"自訂巨集"功能區塊內點選(需連擊兩次)
d.
完成設定

6 7
2
設定編輯自訂巨集功能
a.
選擇"自訂巨集"內的"編輯巨集" (您至多可以設定
100
組巨集來給
Macro Key
使用)
13
1
8
3
7
6
10
11
9
5
2
4
12
b.
巨集錄製介面概觀(您可以在此錄製您專屬的巨集)
1. 開始錄製:開始錄製巨集,點擊之後系統會開始錄製巨集
2. 停止鍵開關: 使用停止鍵來停止錄製與否。
3. 巨集名稱:自訂錄製巨集的名稱
4. 匯入圖檔:為該巨集設定圖像,您可以使用系統內建的圖示,也可以上傳其他圖示
5. 錄製範圍:您可以設定是否單錄製鍵盤動作/滑鼠動作,或是同時錄製鍵盤以及滑鼠
動作,您同樣可以設定是否要同時錄製滑鼠座標。
6. 間隔時間:您可以設定系統是否要錄製每個動作的間隔時間,或是固定每個動作的間
隔時間。
7. 執行方式:您可以設定當按下巨集鍵時錄製動作的執行方式,可以單執行一次、循環
多次或是按住巨集鍵時循環執行
8. 匯出巨集:將您錄製的巨集匯出保存以利下次使用
9. 匯入巨集:將您之前錄製或是別人錄製的巨集匯入使用。
10. 刪除全部:刪除巨集內全部的動作。

8 9
11. 刪除選取:刪除巨集內特定的動作(刪除您點選的動作)
12. 動作列表:顯示您所錄製的動作(按下鍵盤/滑鼠)
13. 離開此頁:離開前會詢問您是否要儲存錄製的巨集
c.
開始錄製巨集:點下開始錄製,系統將會開始錄製巨集,所有動作會顯示在動作列表
中,您可以視錄製範圍(鍵盤/滑鼠)來決定用「
pause
」鍵結束錄製,或是用滑鼠點擊停
止錄製按鈕來結束錄製。完成錄製:按下「
Save
」鍵儲存巨集功能,便可以完成巨集鍵
之錄製。
d.
完成編輯自訂巨集功能。

8 9
3
編輯Macro Hub 設定
1
2
3
1.
軟體更新: 更新
GIGABYTE Macro Hub
版本
2.
清除記憶體:清空儲存的所有巨集組合設定
3.
韌體更新:更新巨集鍵韌體

10 11
(以下各軟體使用介面、圖示及功能可隨您購買的機種、軟體版本而有所變更。)
GIGABYTE Smart Manager
若您購買的電腦出貨已搭載
Windows
®
作業系統,你可
在
桌面上雙擊Smart Manager捷徑圖示
啟動GIGABYTE Smart Manager軟體,透過Smart Manager簡易的圖示介面,可以輕鬆校調系
統的相關設定。請注意Smart Manager使用介面、圖示及功能將隨您購買的機種、軟體版本而
有所變更,使用方式請依實際所搭載的Smart Manager版本操作。
GIGABYTE
技嘉專屬軟體

10 11
Smart USB Backup
使用說明
警告
● 為避免儲存裝置毀損導致原廠的還原映像檔遺失,您可以透過此軟體來備份原廠的還原映像檔
● 如果您想更換新的儲存裝置,您可以透過此軟體將原廠還原映像檔備份至 USB 隨身碟,安裝好新的儲存裝
置後,再將出廠的預設系統倒回新儲存裝置。
● 使用本軟體所製作的還原 USB 隨身碟 將系統還原以前,請先做好資料備份,以免資料流失。
● 利用還原 USB 隨身碟進行系統還原時,請勿移除或關掉電源。
1
>20G
•
若要製作原廠映像檔的還原 USB 隨身
碟,請先插入容量至少有 20GB 的 USB
隨身碟 ( 請先將 USB 隨身碟裡原有的資
料備份,避免因下述操作造成 USB 隨身
碟裡的資料遺失 )
2
•
放入驅動程式光碟,執行安裝”Smart
USB Backup”。( 無內建光碟機的機種,
請外接 USB 光碟機;若光碟內沒有軟
體,請 上 http://www.gigabyte.com 下
載 )。
3
•
安裝完成後,執行桌面上的”Smart USB
B a c k u p ”。
4
•
從清單中選取剛剛插入的 USB 隨身碟,
然後選擇建立還原 USB。
5
•
跳出結束視窗後即完成。
•
若要還原您的系統,請在開機時按 F12,選擇用【USB 隨身碟開機】,【USB 隨身碟】會自動
完 成 還 原 您 的 系 統。
•
還原時間約需 30 分鐘 ( 所需時間會因 USB 隨身碟種類而有所不同 )。

12 13
Windows 10 系統還原說明
關機並重新啟動筆記型電腦。
2
1
3
啟動筆記型電腦後,按著 F9 按鍵幾秒鐘以啟動還原
工具。
系統還原有兩種方式可供選擇
˙ Reset this PC
如果電腦因軟體或設定值不佳而不穩定,您可以選擇移除或保留個人檔案,在
重設電腦設定值而不遺失個人檔案。
˙ GIGABYTE Smart Recovery
筆記型電腦的設定值會被還原成出廠預設值。
注意:將會遺失所有的個人資料與檔案。
選擇“Troubleshoot”進入系統還原及進階選項。
(您也可以選擇“Continue”直接進入 Windows 10 作業系統,先行備份個人資料
與檔案再作還原。或選擇“Turn off your PC”關機並重新啟動筆記型電腦。)
系統還原使用說明
系統還原(修復您的筆記型電腦作業系統)
當作業系統使用上出現不穩定的情況,筆記型電腦原廠出貨的儲存裝置裡有一個隱藏磁區,其內容為
作業系統的完整備份映像檔,可以用來救援系統將儲存裝置裡的作業系統還原到出廠預設值。
執行還原前請注意
確認筆記型電腦已接上外接電源,還原系統會花費幾分鐘的時間。
注意
˙ 如果儲存裝置有被更換過或刪除該隱藏磁區,還原功能將無法使用,需送維修中心還原。
˙ 出廠規格為預搭作業系統時才有此還原功能,若是 DOS 銷售則不提供此功能。
啟動系統還原
系統還原功能是筆記型電腦出廠時被預先安裝的。該選項可以啟動 Windows 故障還原工具,重新安
裝作業系統為出廠預設值。
以下為簡要介紹如何啟動還原工具,並開始還原系統。

12 13
注意事項
˙ 您所有的個人檔案與應用程式將會被移除。
˙ 所有的電腦設定值將會被還原成單純的 O/S ( 不含 GIGABYTE 應用程式 )。
▓ Reset this PC
- 重設電腦設定值
Keep my files -
保留個人檔案
選擇一個使用者帳戶後繼續。所有應用程式會被移除,設定值會還原成單純
的 O/S( 不含 GIGABYTE 應用程式 ),但個人檔案會被保留。
Remove everything -
移除所有項目
所有應用程式、設定值和個人檔案將會被移除。
Just remove my files -
只移除個人檔案
只 移 除 個 人檔 案,但 保 留 電 腦 設 定 值。
Fully clean the drive -
完整還原
完整還原儲存裝置至出廠設定值,會花費較長的還原時間。
> 【 按 下“ R e s e t ”執 行 】。
4
注意事項
˙ 一選擇還原後,所有原本的個人資料與檔案將被刪除,並還原系統及儲存裝置至
出廠預設值。
˙ 還原視窗開啟並進行系統還原,在這之時請確認接上變壓器確保電力無虞,並請
勿關閉電源。
▓
GIGABYTE Smart Recovery
進入重置系統模式,工具列會有還原選項,如您確定
要系統還原,點選“是”執行。
當系統還原完成後,工具列會有選項,請點選“關機”

14 PB
▓ Advanced options
其它或進階選項
更多 系 統 還 原 的 進 階 設 定。
System Restore
系統還原
選擇系統還原的記錄時間,將系統還原至該時間點。
System Image Recovery
系統備份還原
使用之前備份的系統備份資料還原 Windows 系統。
Startup Repair
啟動修復程序
修復及解決 Windows 系統問題。
Command Prompt
命令提示字元
使 用命 令 字元 集 執行 進 階 的 疑 難 排 解。
UEFI Firmware SettingsUEFI BIOS
設定
重 新 啟 動,變 更 U E F I B I O S 設 定 值。
Startup Settings
啟動設置
變更 Windows 啟動設定。
保固及客服資訊 :
相關保固條款及客服資訊請參考隨貨所附之保固保證書,或參考技嘉技術服務區網站。
http://www.gigabyte.tw/support-downloads/technical-support.aspx
FAQ :
相關常見問題請參考技嘉常見問題網站。
http://www.gigabyte.tw/support-downloads/faq.aspx
附錄

PB 1
感謝您選擇技嘉筆記本電腦
!
為協助您順利使用技嘉筆記本電腦,我們特地設計此快速安裝說明。如果您需要更多關於電腦功能,
歡迎上技嘉官方網站
www.gigabyte.cn
查詢。產品實際規格以出貨為准,如有異動恕不另行通知。
1
將電源線接上電源適配器。
2
將電源適配器連接到電腦的電源插孔。
3
將電源線插入電源插座。
開啟筆記本電腦
電源指示燈會顯示機器是否為通電的狀態。
第一次開機時,在還未完全進入作業系統前請勿強制關機。開啟電源後,直到該操作系統配置完成
前,音量無法設定。
開始第一次使用
根據您的筆記本電腦配置,當您第一次開機,第一個畫面會是微軟
Windows
®
啟動畫面,按照該屏
幕上的提示和指示,完成操作系統的配置。當軟體許可條款顯示時,請務必開讀並同意後在繼續。
首次使用
GIGABYTE
技嘉筆記本電腦
1
2
3
USB
Charging
Port

2 3
上視圖
1
光源感應器
2
攝像頭
3
攝像頭指示燈
4
內置麥克風
x2
5
電源開關
6
觸摸板
7
電池電量顯示鍵
8
LED
狀態指示燈
按下右鍵可檢視電池剩餘電量。在關機
/
待命
/
休眠模式時按下右鍵可透過指示燈
號檢視電池剩餘電量
(
電量對照如下圖
)
(
電池模式下
)
1
2
<10%
11-30%
31-50%
51-70%
71-90%
>90%
藍牙指示燈
無線網絡指示燈
硬盤存取指示燈
電池充電指示燈
電源狀態指示燈
GIGABYTE
技嘉筆記型電腦導覽
2
1 3
6
87
5
4

2 3
右視圖
左視圖
1
Kensington
防盜鎖孔
2
HDMI
端口
3
USB 3.0
4
耳机
/
麥克風复合接口
5
SD
內存卡讀卡器
1
USB 3.1
2
Mini Display
接口
3
USB 3.0(
支援
USB Charge)
4
USB 3.0
5
電源插孔
3 4
1
2 5
1 3
2
4 5
警告:
本機器設備配備的鋰電池為不可拆卸裝置,請交由技嘉授權專業維修服務中心移除裝置中的電池。
●
請不要於斜面上或容易震動的地方使用筆記型電腦,以降低發生故障和產品損壞的風險。
●
請勿置於車內、室內外陽光強烈或高於
45
度
C
之儲藏環境,
以免鋰電池發生老化或膨脹等危險。
●
請於通風良好的地方使用此產品。請勿在床上、枕頭等通風不良的地方使用此產品,並且不要在有樓板暖氣的地方使
用,避免導致筆記型電腦過熱。請避免底部和側邊的通風孔阻塞。如果通風孔阻塞,會有損害筆記型電腦或導致內部
過熱的危險。

4 5
許多計算機的設定例如屏幕亮度、喇叭音量等可利用計算機的快捷鍵直接調整。如需使用快捷鍵,請
依下表先按住
<Fn>
鍵,再按下
<F1>~<F12>
等按鍵。
快捷鍵 功能 功能敘述
Fn+F1
睡眠模式 讓計算機進入睡眠模式。
Fn+F2
無線局域網絡 開啟
/
關閉無線局域網絡裝置。
Fn+F3
減弱亮度 降低屏幕亮度。
Fn+F4
增強亮度 提高屏幕亮度。
Fn+F5
屏幕顯示切換
在計算機屏幕以及外接式顯示器之間切換影像輸
出,或者同時顯示。
Fn+F6
屏幕開關 開啟
/
關閉屏幕。
Fn+F7
喇叭靜音 將喇叭切換為靜音模式。
Fn+F8
減弱音量 降低喇叭音量。
Fn+F9
增大音量 提高喇叭音量。
Fn+F10
觸摸板開關 開啟
/
關閉觸摸板。
Fn+F11
藍牙通訊 開啟
/
關閉藍牙通訊裝置。
Fn+F12
視訊攝影機 開啟
/
關閉內建視訊攝影機。
Fn+Space
鍵盤背光開關 調整鍵盤背光亮度。
組合功能鍵
用戶可通過
Marco Hub
自行定義組合設定,並透過各種設定完成複雜的遊戲連續操作或一般電腦操
作的需求。
組合功能鍵 功能 功能敘述
組合功能鍵切換鍵
切換所設定的組合功能鍵群組,壓按約三秒可開關組合功
能鍵。
自定義組合功能鍵 使用者自行定義的組合功能鍵
自定義組合功能鍵 使用者自行定義的組合功能鍵
自定義組合功能鍵 使用者自行定義的組合功能鍵
自定義組合功能鍵 使用者自行定義的組合功能鍵
自定義組合功能鍵 使用者自行定義的組合功能鍵
快捷鍵

4 5
Macro Hub
介紹
歡迎使用
Macro Hub !
使用
Macro Hub
能讓您輕鬆控制/存取您的
Macro Key
,同時要操作多鍵的
功能讓您輕鬆一鍵就搞定,不論在工作/遊戲中都能應付自如。使用
Macro Hub
之前,請參考以下
之使用說明,謝謝
1
開啟
Macro Hub
在您的桌面上找到Macro Hub的圖示,並且加以點擊
2
Macro Hub
概觀
4
5
1 3
2
1
基本功能:檢視你目前的快捷鍵模式設定
2
自定義快捷鍵模式:設定編輯自定義快捷鍵組合指令功能
3
其他設定:前往更新
Macro Hub
或是清除
Macro Hub
之設定
4 Macro Key
群組啟動指示燈:顯示您目前已經啟動之
Macro Key Group (
已啟動之
Macro
Key
群組燈號會亮起
)
5 Macro Key
功能:顯示您目前正在使用之
Macro Key
群組底下的
Macro
功能
(
共五個
)
,從
G1
到
G5

6 7
3
使用
Macro Hub
1
設定
Macro Key
功能
a.
利用鍵盤左上方的
G
鍵切換至您想要使用的
Macro Key
群組
b.
點擊
Macro Key
功能區塊
c.
在
"
基本功能
"
或
"
自訂巨集
"
功能區塊內點選
(
需連擊兩次
)
d.
完成設定

6 7
2
設定編輯自訂巨集功能
a.
選擇
"
自定義快捷鍵模式
"
內的
"
編輯快捷鍵
" (
您至多可以設定
100
組快捷鍵來給
Macro
Key
使用
)
13
1
8
3
7
6
11
9
5
2
4
12
10
b.
快捷鍵模式錄製接口概觀
(
您可以在此錄製您專屬的快捷鍵
)
1.
開始設置:開始設置快捷鍵模式,點擊之後系統會開始設置
2.
停止鍵開關
:
使用停止鍵來停止設置與否。
3.
快捷鍵模式名稱:自定義錄製快捷鍵模式的名稱
4.
匯入圖檔:為該快捷鍵模式設定圖像,您可以使用系統內建的圖標,也可以上傳其他
圖示
5.
設置範圍:您可以設定是否單設置鍵盤動作
/
鼠標動作,或是同時設置鍵盤以及鼠標動
作,您同樣可以設定是否要同時設置鼠標坐標。
6.
間隔時間:您可以設定系統是否要錄製每個動作的間隔時間,或是固定每個動作的間
隔時間。
7.
執行方式:您可以設定當按下快捷鍵模式時錄製動作的執行方式,可以單執行一次、
循環多次或是按住快捷鍵模式時循環執行
8.
導出快捷鍵:將您錄製的快捷鍵模式導出保存以利下次使用
9.
匯入快捷鍵:將您之前錄製或是別人錄製的快捷鍵模式匯入使用。
10.
刪除全部:刪除快捷鍵模式內全部的動作

8 9
11.
刪除選取:刪除快捷鍵模式內特定的動作
(
刪除您點選的動作
)
12.
動作列表:顯示您所錄製的動作
(
按下鍵盤
/
鼠標
)
13.
離開此頁:離開前會詢問您是否要儲存錄製的快捷鍵
c.
開始錄製快捷鍵:點下開始錄製,系統將會開始錄製快捷鍵,所有動作會顯示在動作列
表中,您可以視錄製範圍
(
鍵盤
/
鼠標
)
來決定用「
pause
」鍵結束錄製,或是用鼠標點擊
停止錄製按鈕來結束錄製。完成錄製:按下「
Save
」鍵儲存快捷鍵功能,便可以完成
快捷鍵之錄製。
d.
完成編輯自定義快捷鍵模式功能。

8 9
3
編輯
Macro Hub
設定
1
2
3
1.
軟件更新
:
更新
GIGABYTE Macro Hub
版本
2.
清除內存
:
清空儲存的所有快捷鍵組合設定
3.
韌體更新
:
更新快捷鍵程序。

10 11
(
以下各軟件使用介面、圖示及功能可隨您購買的機種、軟件版本而有所變更。
)
GIGABYTE Smart Manager
您購買的電腦出貨已搭載
Windows
®
操作系統,你可在桌面上雙擊
Smart Manager
捷徑圖示啟
動
GIGABYTE Smart Manager
軟體,透過
Smart Manager
簡易的圖示介面,可以輕鬆校調系統
的相關設定。請注意
Smart Manager
使用介面、圖示及功能將隨您購買的機型,軟件版本而有所
變更,使用方式請依實際所搭載的
Smart anager
版本操作。
GIGABYTE
技嘉專屬軟件

10 11
Smart USB Backup
使用說明
注意
●
為避免儲存裝置毀損導致原廠的還原映像檔遺失,您可以透過此軟件來備份原廠的還原映像檔
●
如果您想更換新的儲存裝置,您可以透過此軟件將原廠還原映像檔備份至
USB
隨身碟,安裝好新的儲存
裝置後,再將出廠的默認系統倒回新儲存裝置。
●
使用本軟件所製作的還原
USB
隨身碟
將系統還原以前,請先做好數據備份,以免數據流失。
●
利用還原
USB
隨身碟進行系統還原時,請勿移除或關掉電源。
1
>20G
•
若要製作原廠映像檔的還原
USB
隨身
碟,請先插入容量至少有
20GB
的
USB
隨身碟
(
請先將
USB
隨身碟裡原有的數
據備份,避免因下述操作造成
USB
隨身
碟裡的數據遺失
)
2
•
放 入 驅 動 程 序光 盤,執行 安 裝 "
Smart
USB Backup
"。
(
無內建光驅的機種,請
外接
USB
光驅;若光盤內沒有軟件,請
上
http://www.gigabyte.com
下載
)
。
3
•
安裝完成後,執行桌面上的"
Smart USB
Backup
"。
4
• 從清單中選取剛剛插入的 USB 隨身碟,
然後選擇建立還原 USB。
5
•
跳出結束窗口後即完成。
•
若要還原您的系統,請在開機時按
F12
,選擇用【
USB
隨身碟開機】,【
USB
隨身碟】會自
動完成還原您的系統。
•
還原時間約需
30
分鐘
(
所需時間會因
USB
隨身碟種類而有所不同
)
。

12 13
關機並重新啟動筆記本電腦。
2
1
3
啟動筆記本電腦後,按
F9
按鍵幾秒鐘以啟動還原工具。
系統還原有兩種方式可供選擇
˙ Reset this PC-
重設計算機設定值
如果計算機因軟件或設定值不佳而不穩定,您可以選擇删除或保留個人文件,在
重設計算機設定值而不遺失個人文件。
˙ GIGABYTE Smart Recovery
筆記本電腦的設定值會被還原成出廠默認值。
注意:將會遺失所有的個人資料與文件。
選擇“
Troubleshoot
"進入系統還原及高級選項。(您也可以選擇“
Continue
"直
接進入
Windows 10
操作系統,備份個人資料與文件後再進行還原。)
Windows 10
系統還原說明
系統還原使用說明
系統還原(修復您的筆記本電腦操作系統)
當操作系統使用上出現不穩定的情況,筆記本電腦原廠出貨的儲存裝置裡有一個隱藏磁區,其內容為
操作系統的完整備份映射檔,可以用來救援系統將儲存裝置裡的操作系統還原到出廠預設值。
執行還原前請注意
確認筆記本電腦已接上外接電源,還原系統會花費幾分鐘的時間。
注意
˙
如果儲存裝置有被更換過或刪除該隱藏磁區,還原功能將無法使用,需送維修中心還原。
˙
出廠規格為預搭操作系統時才有此還原功能,若是
DOS
銷售則不提供此功能。
啟動系統還原
系統還原功能是筆記本電腦出廠時被預先安裝的。該選項可以啟動
Windows
故障還原工具,重新安
裝操作系統為出廠預設值。
以下為簡要介紹如何啟動還原工具,並開始還原系統。

12 13
注意事項
˙ 您所有的個人檔案與應用程序將會被移除。
˙ 所有的計算機設定值將會被還原成單純的 OS ( 不含 GIGABYTE 應用程序 )。
▓
▀
Reset this PC -
重設計算機設定值
Keep my files
保留個人檔案
選擇一個用戶帳戶後繼續。所有應用程序會被移除,設定值會還原成單純的
OS(
不含
GIGABYTE
應用程序
)
,但個人文件會被保留。
Remove everything
刪除所有項目
所有應用程序、設定值和個人文件將會被刪除。
Just remove my files -
只刪除個人文件
只刪除個人文件,但保留計算機設定值。
Fully clean the drive -
完整還原
完整還原儲存裝置至出廠設定值,會花費較長的還原時間。
>
【按下“
Reset
"執行】。
4
注意
˙
一旦選擇還原後,所有原本的個人資料與文件將被刪除,還原系統及儲存裝置
至出廠默認值。
˙
還原窗口開啟進行系統還原,此時請確認接上變壓器確保電力充足,請勿關閉
電源。
▓
▀
GIGABYTE Smart Recovery
進入重置系統模式,工具欄會有還原選項,如您確定要系
統還原,點選“是"執行。
當系統還原完成後,工具欄會有選項,請點選“關機"

14 PB
▓ Advanced options
其它或進階選項
更多系統還原的進階設定
System Restore
系統還原
選擇系統還原的記錄時間,將系統還原至該時間點。
System Image Recovery
系統備份還原
使用之前備份的系統備份數據還原
Windows
系統。
Startup Repair
啟動修復程序
修復及解決
Windows
系統問題。
Command Prompt
命令提示字符
使用命令字符集執行進階的疑難解答。
UEFI Firmware Settings UEFI BIOS
設定
重新啟動,變更
UEFI BIOS
設定值。
Startup Setting
啟動設定
變更
Windows
啟動設定。
保修及客服資訊:
相關保修條款及客服資訊請參考隨貨所附之保修卡,或參考技嘉技術服務區網站
:
http://www.gigabyte.cn/support-downloads/technical-support.aspx
FAQ :
相關常見問題請參考技嘉常見問題網址
:
http://www.gigabyte.cn/support-downloads/faq.aspx
附錄

PB 1
기가바이트 노트북을 구매 하신 것을 축하 드립니다.
이 설명서는 당신이 새로 구매한 노트북을 처음 세팅 하는데 도움을 줄 것입니다. 마지 막 제품
의 스펙은 당신의 구매 시점에 따라 다를 수 있습니다. 이는 기가바이트가 사 전 서면의 통보 없
이 변경할 수 있는 권리를 가지고 있습니다. 보다 더 자세한 정보가 필요 하시면 저의 웹사이트
www.gigabyte.com. 을 방문 하십시오.
1
파워코드를 AC 아답터에 연결 하십시오
2
AC 아답터를 노트북 오른쪽의 DC-In 잭에 연결 하십시오
3
파워코드를 파워 아울렛에 연결 하십시오
전원 켜기
처음노트북을 켤시, 운영체제가 모두 셋팅 될 때까지 전원을 끄지 마십시오. 윈도우 셋업이 모두
마치기 전에 오디오는 작동을 하지 않을 수 있습니다.
처음으로부팅 하기
당신의 환경 설정에 따라, 당신의 노트북의 시작 시 마이크로소프트 윈도우 부트 스크린은 당신
의 처음 스크린 일 것 입니다. 스크린상의 자시에 따라 개인정보를 입력하여 윈도우 운영체제 셋
업을 마치십시오.
기가바이트 노트북 처음 으로 사용 하기
1
2
3
USB
Charging
Port

2 3
정면도
1 등 센서
2 웹캠
3 웹캠 상태 LED표시등
4 마이크로 폰 x2
5 전원 버튼
6 터치패드
7 배터리 표시 버튼
8
LED 표시등
배터리 잔여량을 확인 하기 위하여 터
치패드로른쪽의 버튼을 누르십시오.터
치패드 오른쪽을 클릭하면 배터리 잔여
량이 표시 됩니다. 아래 보이는 바와
같이, 배터리 표시등은 노트북이 꺼져
있거나, 대기 혹은 수면 모드시 사용 가
능합니다. (배터리 모드)
1
2
<10%
11-30%
31-50%
51-70%
71-90%
>90%
블루투스 LED
무선 랜 상태 표시등
HDD 상태 표시등
배터리 상태 표시등
전원 상태 표시등
기가바이트 노트북 투어
2
1 3
6
87
5
4

2 3
좌측면도
1 킹스턴 락 슬럿
2 HDMI 포트
3 USB 3.0
4 콤보 오디오 잭
5 SD 카드 리더
우측면도
1 USB 3.1
2 미니 디스플레이
3 USB 3.0(USB 충전 지원)
4 USB 3.0
5
DC-in 잭
3 4
1
2 5
1 3
2
4 5
경고 :
어떤 서비스 목적이라도 리튬배터리를 제거하지 마십시오.
각 지역 지정된 공식 기가바이트 서비스 센터에 연락 하십시오.
• 노트북을경사가진곳이나진동이있는부분에서설치를하시거나장시간사용을삼가하십시오.이는제품의이상이나문제를
야기시킬수있습니다.
• 태양직사광선에서의사용이나노출혹은자동차와같이실내온도가112°F(45°C)이상의곳에서는사용을피하십시오.이는리
튬배터리의폭발이나수명단축을여기시킬수있습니다.
• 침대,쿠션,베게밑과같이통풍이좋지않거나밀폐된공간에서의사용을금하십시오.또한바닥이따듯한온돌등에서의사용
은노트북의과열을초래하야기능이상이나사용상의문제를야기시킬수22있습니다.

4 5
화면밝기 , 음량조절과 같은 대부분의 기능을 제어하기 위한 단축키를 제공합니다 .
단축키를 사용하려면 <Fn> 키를 누른채로 해당 기능의 키를 함께 누릅니다 .
단축키
기능 기술
Fn+F1
슬립모드 슬립모드로 전환합니다.
Fn+F2
무선랜 무선랜 기능을 켜거나 끕니다.
Fn+F3
밝기 감소 화면의 밝기를 감소시킵니다.
Fn+F4
밝기 증가 화면의 밝기를 증가시킵니다.
Fn+F5
디스플레이 선택
노트북 액정 / 외부모니터 어느쪽에 화면을 표
시할 지 선택합니다. 동시 출력도 가능합니다.
Fn+F6
액정 켜고 끄기 노트북의 액정을 켜거나 끕니다
Fn+F7
음소거 소리를 켜거나 끕니다.
Fn+F8
음량 감소 음량을 감소시킵니다.
Fn+F9
음량 증가 음량을 증가시킵니다.
Fn+F10
터치패드 잠금 터치패드 기능을 켜거나 끕니다.
Fn+F11
블루투스 블루투스 기능을 켜거나 끕니다.
Fn+F12
웹캠 웹캠을 켜거나 끕니다.
Fn+Space
키보드 백라이트 키보드 백라이트를 켜거나 끕니다.
마크로키
매크로키는 매키로 엔진의 키 조합을 세팅을 통해 보다 다양한 또는 일반적인 사용 설정이 가능 합
니다.
단축키 기능 기술
G
마크로 구 릅 스위치로서, 약 3초간을 누르면 하드웨어 기능이 꺼
지거나 켜집니다.
G1
사용자가 스스로 설정하는 마크로 키
G2
사용자가 스스로 설정하는 마크로 키
G3
사용자가 스스로 설정하는 마크로 키
G4
사용자가 스스로 설정하는 마크로 키
G5
사용자가 스스로 설정하는 마크로 키
단축키 안내

4 5
마크로 허브에 에 오신것을 환영합니다. 마크로 허브는 의 마크로 키를 보다 쉽게 조작할 수 있는 장
치 입니다. 마크로 허브를 통해 여러가지 키 조합을 한번의 클릭으로 보다 쉽게 컴퓨터를 사용하실
수 있습니다. 마크로 허브를 사용하시기 전에 아래와 같이 가이드를 숙지 하시기 바랍니다.
1
마크로 허브 시직하기
바탕화면에 있는 바크로 허브 아이콘을 확인후 더블 클릭 하십시오.
2
마크로 허브 개요
4
5
1 3
2
1
프로파일: 현재 마크로 허브 명령 세팅을 확인하기
2
마크로: 마크로 명령 기능및 시팅을 변경하기
3
세팅: 마크로 허브 버전 업그레이드나 마크로 허브 세팅을 제 설정 할 수 있습니다.
4
마크로 키 구릅 표시기: 활성화된 마크로 키 구릅을 표시 합니다. (활성화된 구릅 표시기
가 켜질 것입니다.)
5
마크로 키 기능: G1부터 G2 까지의 마크로 구릅안에 프로그램된 마크로 기능을 보여 줍
니다.
마크로 허브 설명서

6 7
3
마크로 허브 사용하기
1
마크로키 를 기본 기능으로 세팅하기
a.
키보드 왼쪽 상단의 G버튼을 을 클릭하여 사용하고 싶은 마크로 구릅으로 이동 하십시
오
b.
마크로 키 기능 브릭크 클릭하기
c.
기본 혹은 마크로 기능 위치에 있는 마크로의 사용하고 싶은 기능을 더블 클릭하십시오,
(예제. 미디어 플레이)
d.
세틍 마치기

6 7
2
마크로 명령 기능및 세팅 변경하기
a.
마크로
클
릭하기. ( 총합 100개 까지 설정 가능)
13
1
8
3
7
6
10
11
9
5
2
4
12

8 9
b. 마크로기록제어판개요(사용자에따라마크로기능을기록할수있
습니다.)
1.레코딩시작하기:마크로를레코딩이필요할시클릭을하십시오.
2.멈춤키스위치:멈춤키를통해레코딩을잠깐멈추거나정지를할수있습
니다.
3.마크로이름:마크로의이름을설정합니다.
4.아이콘가져오기:마크로의아이콘을설정을하고,기본아이콘을사용하거
나혹은본인고유의아이콘을업로드하여사용할수있습니다.
5.레코드타입:오직마우스동작을레코드할것인지결정을할수있으며(또
는키보드)또는두가지모두가능합니다.또한마우스위위치에따른기록
을할것인지도결정이가능합니다.
6.레코딩간격:각동장의레코딩간격을결정할수있으며,(또는고정단시
간간격을세팅레코딩할수있습니다)
7.실행방법:마크로실행방법을설정할수있습니다.(한번실행,반복실행,
또는꾹누름을통한반복실행)
8.마크로추출:마크로를추출합니다.
9.마크로가져오기:마크로를가져옵니다.
10.삭제:모든마크로동작을삭제하기
11. 선택 삭제: 선택된 동작만 삭제하기
12. 동작 리스트: 기록된 모든 동작을 나타냅니다.
13. 나가기: 나가기를 선택하면 시스템이 모든 기록된 마크로 기능을 저장 할 것인지 요청
합니다.

8 9
c.
마크로 레코딩 시작하기: 스타트 버튼을 클릭하면, 마크로 엔진이 마크로 레코딩을 시작
합니다. 당신이 만든 모든 동작은 (마우스/키보드)는 모든 동작 리슽트에 보여집니다. "
멈춤" 키나 마우스 클릭을 통해 현재 기록된 범위내에서 레코딩을 멈출것인지 결정 할수
있습니다. 레코딩 마침: 모든 동작이 끝납니다.
나가기 버튼 클릭: 나가기를 선택하면 시스템이 마크로 기능을 저장 할 것인지 요청합
니다. 네"를 클릭하여 마크로 레코딩을 마침니다.
d.
설정 끝내기
3
마크로의 "설정"변경
1
2
3
1.소프트웨어 업데이트: 기가바이트마크로 허브의 최신 버전을 업데이트 합니다.
2.메모리 지움: 현재 마크로 허브 지움 삭제 합니다
3.펌웨어 업그레이드: 마크로 키 펌웨어를 업그레이드 합니다.

10 11
기가바이트 스마트 매니저
만약 당신이 구매한 기가바이트 노트북이 내장된 운영체제가 포함된 것을 사셨다면, 당신은 바
탕화면의 빨리 가기 아이콘을 더블 클릭 함으로서 기가바이트 스마트 매니저를 활성화 할 수
있습니다. 기가바이트 스마트 매니저는 아이콘을 기본적으로 한 제어 인터페이스로서 기본적
으로 사용자의 기가바이트 시스템 셋업의 쉬운 접근을 제공하는 기가바이트 독자 유틸리티 입
니다. 기가바이트 스마트 매니저의 인터페이스, 아이콘, 유틸리티 그리고 소프트웨어 버전은
당신이 구매한 버전에 따라 다를 수 있습니다. 실제 구매한 버전에 따라 기가바이트 스마트 매
니저를 운용하십시오.
기가바이트 소프트웨어 어플리케이션

10 11
스마트 USB 백업 안내
주의
●
장치 손상으로 인해 복구 이미지가 손상된 경우, 이 프로그램을 통해 원래의 복구 이미지를 백업할 수
있습니다 .
●
저장장치의 변경없이 USB 디스크를 통해 , 원래의 복구이미지를 USB 디스크에 저장하고 복원할 수
있습니다 .
●
복원을 진행하기 전에 , 중요 데이터의 백업을 반드시 확인하십시오 .
●
데이터 복원중에는 절대로 전원을 끄거나 전원에서 분리하지 마십시오 .
1
>20G
• 오리지널 이미지를 저장하기 위해 , 20GB 이
상의 용량이 확보된 USB 디스크를 연결하십
시오 .
(USB 복구 디스크를 작성하는 도중에 USB
디스크 안의 모든 데이터가 삭제되므로 중요
한 데이터는 반드시 백업하십시오 .)
2
• 드 라 이 버 디 스 크 를 ODD 에 삽 입 하 고
"Smart USB Backup" 프로그램을 실행합니
다 . (ODD 가 없는 모델은 USB 방식의 ODD
를 이용하거나 , http://www.gigabyte.com
에서 다운로드 하십시오 .)
3
• "Smart USB Backup" 설치 과정을 완료합니
다.
4
• 드롭다운 목록에서 USB 디스크를 선택하고
USB 복구 디스크 작성을 시작합니다 .
5
• USB 복구 디스크 작성이 완료되면 팝업창이 표시됩니다 .
• 복구가 필요한 경우 , 전원을 켜고 F12 키를 누른 뒤 "boot from recovery USB disk" 항
목을 선택하면 시스템이 복원됩니다 .
• 복구 과정에는 약 30 분 정도가 소요됩니다 .
(USB 디스크 종류에 따라 소요시간은 달라질 수 있습니다 .)

12 13
윈도우 10 복원 가이드
전원끈
후
노트북
재
부팅
하기
2
1
3
노트북이
부팅을
시작
할
시
F9
키를
눌러
도구를
실행
하십시오
.
시스템 복원 리셋을 하기 위해서는 2 가지 선택사항이 있습니다 .
Reset this PC - PC 리렛 하기
하하
사용자는
파일을
제거
혹은
지우지
않은
상태에서
윈도우를
재
설치
가능
합니다
.
GIGABYTE Smart Recovery
이
선택사항은
당신의
PC
를
공장출시
규격으로
재
세팅
될것이며
,
모든
데이터와
파일은
잃게
될것입니다
.
“PC 리셋하기” 선택
“
Troubleshot
”
을
선택하여
복원
세팅으로
진입
하십시요
. (
“
Continue
”
를
선
택하여
복원
시스템에서
나기기를
할
수
있으며
,
윈도우
10
파일
데이터
백업
으로
진행
할
수
있습니다
.)
복원 가이드
시스템복원 ( 당신의 노트북의 운영체제를 복원 )
노트북운영체제에
무엇인가
이상이
생겼을시
,
노트북의
숭겨진
파티션에
저장되어
있는
운영체
제
복원기능을
통해
노트북을
공장출시상태의
세팅으로
복원을
시킬
수
있습니다
.
준비
PC
가
전원에
연결된것을
확인
부탁드리며
,
몇분이
소요
될
수
있습니다
.
참고
만일
저장장치가
켜지거나
교환되거나
파티션이
삭제가
되면
복원선택사항은
더
이상
이용
할
수
없읍니다
.
복원
기능은
운영체제가
기본
내장되어
있는
노트북에서만
가능하며
,
운영체제가
저장되어
있지
않은
노트북을
구매
하셨을
경우
복원
기능은
불가능
합니다
.
시스템 복원장치 실행하기
시스템
복원장치는
노트북이
공장에서
출하하기
전에
이미
설치되어
있으며
,
선택메뉴를
통해
윈도우
복원
도구
를
실행하여
운영체제를
공장세팅모드로
복원을
시킬
수
있습니다
.
아래의
간단한
설명을
통해
어떻게
운영체제
복원을
실행
할
수
있는지
보여줄
것입니다
.

12 13
앞으로 진행될
하하
모든 개인 데이터와 어플은 삭제 될 것입니다 . 당신의 노트북은 완전히 순수
운영체제 값으로 복원될 것입니다 .
Reset this PC - “PC 리셋하기” 선택
Keep my files 나의 파일 보존하기
계정을 선택하여 계속 하십시오 .
모든 어플은 제거 될 것이며, 운영체제는 초기 값으로 재 설정 됩니다 . ( 기
가비이트 어플 제외 ), 그러나 개인적인 파일은 보존 될 것입니다 .)
Remove everything 모든 것을
하하하하
모든 어플 , 세팅 , 파일은 제거 되지만 컴퓨터 세팅은 유지 될 것입니다 .
Just remove my files - 파일만 제거 하기
오직 데이터와 파일만 삭제 될 것입니다 . 그러나 컴퓨터 세팅은 유지 될
것입니다 .
Fully clean the drive - 드라이브 청소하기
드라이브는 완전히 재 복원 될 것이며 , 당신의 노트북은 순수 운영체제
값이 됩니다 . ( 기가바이트 어플 제외 )
4
경고
복원이 선택이 되면 , 복원 후에는 모든 개인 데이트와 파일은 제거 될 것입니다 .
또한 운영체제는 공장도 값으로 재 설정 됩니다 . 진행상태를 나타내는 표시 바가
표시 될 것입니다 .
GIGABYTE Smart Recovery
복원이
활성화
될
것이며
,
화면의
“
YES
”를
선택하여
시작
합니다
.
시스템
복원이
완료가
되면
,
윈도우
창의
“전원
끄기”
버튼이
나오면
선택을
하십시오
.

14 PB
Advanced options 고급 선택사항
System Restore 시스템복원
당신의 PC 에 저장된 기록 시점을 사용 합니다 .
System Image Recovery 시스템 이미지 복원
특정 시스테 이미지를 사용하여 윈도우를 복원 합니다 .
Startup Repair 시작 리페어
윈도우의 로딩 문제시 문제를 해결 합니다 .
Command Promp 명령 실행
명령 실행을 통해서 고급 트러블 슈팅 을 사용 합니다 .
Startup Setting 시작 세팅
윈도우의 시작 행동을 변경합니다 .
UEFI Firmware Settings UEFI BIOS UEFI 펌웨어 세팅
당신의 PC 에서 UEFI 펌웨어을 변경 합니다 .
보증 &서비스 :
보증 , 서비스 그리고 이와 관련된 정보는 워런티 카드를 참조 하시거나 아래의 링크의 기가바
이트 사이트를 참고 하십시오 :
http://www.gigabyte.com/support-downloads/technical-support.aspx
자주 묻는 질문 :
FAQ( 자주 묻는 질문 ) 은 다음의 링크를 참조 하십시오 :
http://www.gigabyte.com/support-downloads/faq.aspx
부록

Deutsch
1
Deutsch
PB
Herzlichen Glückwunsch zum Kauf Ihres GIGABYTE Notebooks.
Diese Anleitung erklärt die Inbetriebnahme Ihres Notebooks. Die Ausstattung des Notebooks
kann je nach gekauftem Modell variieren. GIGABYTE behält sich das Recht vor Änderungen
ohne Vorankündigung vorzunehmen. Für genauere Informationen besuchen Sie bitte unsere
Internetseite unter www.gigabyte.com
1 Verbinden Sie das Stromkabel mit dem Netzteil
2 Verbinden Sie das Netzteil mit dem Notebook
3 Stecken Sie den Stecker in die Steckdose
Einschalten des Notebooks
Wenn Sie das Notebook zum ersten Mal einschalten dürfen Sie das Notebook nicht ausschalten
bis die Konfiguration des Betriebssystems abgeschlossen wurde. Bitte beachten Sie, dass die
Lautstärkeregelung erst mit dem Abschluß der Windows
®
Einrichtung funktionsfähig ist.
Der erste Start Ihres Notebook
Abhängig von Ihrer Notebooks werden Sie als erstes den Microsoft Windows
®
Boot Screen
sehen. Folgen Sie den Anweisungen und Abfragen auf dem Bildschirm um die Konguration Ihres
Windows
®
Betriebssystems abzuschließen.
Erste Inbetriebnahme Ihres GIGABYTE Notebooks
1
2
3
USB
Charging
Port

Deutsch
3
Deutsch
2
Ansicht von oben
1 Lichtsensor
2 Webcam
3 Webcam Status Anzeige
4 Mikrofon x2
5 Einschaltknopf
6 Touchpad
7 Akku Ladezustand Anzeige
8
LED Anzeigen
Drücken Sie den rechten Mausbutton
des Touchpads um den Akku Lade-
zustand zu überprüfen. Rechts-Klick
um die verbliebene Akku-Kapazität zu
prüfen. Wie unten zu sehen ist die Bat-
terieanzeige im Stand-by, Schlafmodus
wie auch im ausgeschalteten Zustand
verfügbar.(Akku-modus)
1
2
<10%
11-30%
31-50%
51-70%
71-90%
>90%
Bluetooth Status Anzeige
wirelesse Lan Status Anzeige
HDD Status Anzeige
Akku Status Anzeige
Stromversorgungsstatus
Übersicht Ihres GIGABYTE Notebooks
2
1 3
6
87
5
4

Deutsch
3
Deutsch
2
Ansicht von links
1 Kensington Lock
2 HDMI Port
3 USB 3.0
4
Kombianschluss Audio/Mic
(3,5mm Klinke)
5 SD Card Reader
1 USB 3.1
2 Mini Display Port
3 USB 3.0(unterstützt USB Charge)
4 USB 3.0
5
Stromeingangsbuchse
Ansicht von rechts
3 4
1
2 5
1 3
2
4 5
Achtung:
Entfernen Sie NICHT den eingebauten Lithium-Akku. Für jegliche Wartung kontaktieren Sie Ihre von
GIGABYTE authorisierte Service-Stelle.
•
Nutzen Sie das Notenbook nicht auf schrägen Flächen oder Plätzen die anfällig für Vibrationen sind, oder
vermeiden sie dort zumindest die längere Nutzung, da sich sonst die Gefahr der Beschädigung oder von
Fehlfunktionen erhöht.
•
Setzen Sie ihr Notebook nicht dauerhaft Temperaturen von über 45°, wie z.B. im parkenden Auto, aus, sondt
besteht die Gefahr der frühzeitigen Alterung oder Vergrößerung des Lithium-Ionen-Akkus.
•
Nutzen Sie Ihr Notebook nicht an schlecht zu belüftenden Oberflächen wie Bettwäsche, Kissen oder Polster
und vermeiden Sie die Nutzung auf dem Boden eines Raumes mit Fußbodenheizung, um Überhitzungen
vorzubeugen. Achten Sie darauf das die Lüftungseinlässe am Boden und den Seiten ihres Gerätes niemals
verdeckt werden. Wenn die Lüftungsöffnungen blöockiert sind führt dies zur Überhitzung ihres Gerätes.

Deutsch
5
Deutsch
4
Das Notebook hat Hotkeys oder Tastatur Kombinationen für die meisten Funktionen wie
Bildschirmhelligkeit und Lautstärke. Um einen Hotkey zu aktivieren halten Sie die <Fn> Taste
gedrückt und drücken eine weitere Taste der Hotkey Kombination.
Hotkey
Funktion Beschreibung
Fn+F1 Ruhezustand Versetzt den Computer in den Ruhezustand
Fn+F2
W-LAN Schaltet W-LAN EIN/AUS
Fn+F3
Bildschirmhelligkeit
verringern
Verringert die Bildschirmhelligkeit
Fn+F4
Bildschirmhelligkeit
erhöhen
Erhöht die Bildschirmhelligkeit
Fn+F5
Ausgabebildschirm
ändern
Wechselt zwischem dem Notebookbildschirm,
Externen Monitorausgang oder der Möglichkeit
beide gleichzeitig zu betreiben.
Fn+F6
Bildschirmanzeige Schaltet den Bildschirm EIN/AUS
Fn+F7
Lautsprecher Schatet die Lautsprecher EIN/AUS
Fn+F8
Lautstärke verringern Verringert die Lautstärke
Fn+F9
Lautstärke erhöhen Erhöht die Lautstärke
Fn+F10
Touchpad Schaltet das integrierte Touchpad an oder aus.
Fn+F11
Bluetooth Schaltet Bluetooth EIN/AUS
Fn+F12
Webcam Schaltet die ingrierte Webcam an oder aus.
Fn+Space
Tastaturbeleuchtung Schaltet die Tastaturbeleuchtung AN/AUS
Macro key
Die Macrotasten können über den Macro Hub eingestellt werden um Tastenkombinationen
voreinzustellen.
Macro key Macro key Description
G
Wechselt zwischen Makroprolen. Aktiviert, bzw. Deaktiviert die
die Macrotasten, wenn die Taste 3 Sekunden gehalten wird.
G1 Selbst denierte Macrotaste
G2 Selbst denierte Macrotaste
G3 Selbst denierte Macrotaste
G4 Selbst denierte Macrotaste
G5 Selbst denierte Macrotaste
Hotkeys

Deutsch
5
Deutsch
4
Wilkommen beim Makro Hub! Der Makro Hub erleichtert Ihnen den Einsatz von Makros auf
Ihrem. Damit sind Sie in der Lage, komplexe Tastenkombinationen nur mit einer Makro- Taste
auszuführen, was Ihnen bei der Arbeit und in Spielen Vorteile bringen wird. Bevor Sie den Makro
Hub benutzen lesen Sie bitte die folgenden
1
Starten des Makro Hubs
Auf dem Desktop befindet sich eine Verknüpfung zum Makro Hub. Ein Doppelklick
darauf startet den Makro Hub.
2
Übersicht zum Makro Hub
4
5
1 3
2
1 Proles: Gibt Ihnen eine Übersicht zu den aktuellen Makro -befehlseinstellungen
2
Makros: Ändern Sie die Makrobefehlsfunktionen und - Einstellungen
3
Einstellungen: Aktualisieren Sie die Makro Hub Version oder erneuern Sie die Makro
Hub Einstellungen
4 Makro Key Group Indicators: Zeigt die aktuell ausgewählte Makrotasten Gruppe an (der
Indikator der aktivierten Gruppe leuchtet auf)
5 Makro Key Function: Zeigt die programmierten Makro Funktionen unter der Makrotasten
Gruppe von G1 bis G5 an
Makro Hub Bedienungsanleitung

Deutsch
7
Deutsch
6
3
Einsatz des Makro Hubs
1 Stellen Sie die Grundfunktionen der Makrotasten ein
a. Drücken Sie auf einen der Tasten "G" auf der linken Seite der Tastatur um die
gewünschte Makrotastengruppe auszuwählen
b. Clicken Sie auf den eine Button in der Makrotasten Gruppe
c. Wählen Sie die Funktion die sie wünschen im Basic (externe Media Player) oder im
Makrofunktionsbereich mit einem Doppel-Klick aus.
d. Vervollständigen Sie die Eingaben

Deutsch
7
Deutsch
6
2 Bearbeiten der Makro Befehlsfunktionen und Einstellungen
a. Übersicht zum Makro Aufnahme Panel (Sie können hier Ihre eigenen Makros
aufnehmen
13
1
8
3
7
6
10
11
9
5
2
4
12
b. Overview of macro record panel (you can record your own macro here)
1. Start recording: Clicken Sie hier wenn Sie eigene Makros aufnehmen möchten
2. Pause key Switch: Klicken Sie "Pause" oder drücken Sie die Pausetaste auf der
Tastatur um die Aufnahme zu beenden.
3. Macro Name: Legen Sie den Namen dieses Makros fest
4. Import icon: Legen Sie ein icon für dieses Makro fest. Sie können ein Standard Icon
auswählen oder individuelle Icons hochladen.
5. Record type: Sie können auswählen ob Sie nur die Mausbewegungen oder
Tastenfolgen oder beides aufnehmen möchten. Sie können auch entscheiden ob
Sie die Mouseposition mit aufnehmen möchten (oder nicht)
6. Record interval: Sie können entscheiden ob Sie jede Bewegung oder Folge einzeln
aufnehmen wollen oder Sie haben die Möglichkeit ein festes Zeitinterval zwischen
den einzelnen Bewegungen oder Eingaben festzulegen.
7. Execution way: Hier können Sie auswählen wie das Makro gestartet wird (Einmalige
Ausführung, mehrfache Ausführung oder mehrfache Ausführung bei lang
anhaltendem Tastendruck.

Deutsch
9
Deutsch
8
8. Export macro: Exportieren Sie Ihre Makros
9. Import macro: Importieren Sie Ihre Makros
10. Delete all: Löschen Sie alle Bewegungen/Eingaben des Makros
11. Delete selected: Löschen Sie ausgewählte Bewegungen/Eingaben des Makros.
12. Movement list: zeigt alle Eingaben in einer Liste
13. Exit: das System fragt ob Sie die Eingaben speichern möchten
c. Start to record macro: When Sie auf RECORD klicken startet die Makro Aufzeichnung.
Alle Bewegungen/Tasteneingaben die Sie gemacht haben werden aufgelistet.Sie
können die Pausetaste oder auf "Pause" klicken um die Aufnahme zu beenden.
Finishing recording: Klicken Sie anschliessend auf Exit und es wird gefragt ob Sie die
Aufnahme speichern wollen. Klicken Sie auf "Yes" um Ihr eigenes Makro zu speichern.
d. Vervollständigen Sie die Eingaben

Deutsch
9
Deutsch
8
3 Bearbeiten der Einstellungen des Macro Hubs
1
2
3
1.Software Update: Überprüft und aktualisiert gegebenenfalls die GIGABYTE Macro Hub
Software
2.Clean Memory: Löscht alle aktuellen Macro Hub Einstellungen!
3.Firmware Upgrade: Aktualisiert die Makrotasten Firmware

Deutsch
11
Deutsch
10
GIGABYTE Smart Manager
Wenn das Gerät bereits mit einem Betriebssystem ausgeliefert wurde können Sie den
GIGABYTE Smart Manager mit einem Doppelklick auf das Desktop Icon starten. Der
GIGABYTE Smart Manager hat eine Grafische Benutzeroberfläche die es ermöglicht
Einstellungen und exklusive GIGABYTE grasche aufzurufen. Bitte beachten Sie das dies je
nach gekauften Modell unterschiedlich sein kann.
GIGABYTE Software Anwendungen

Deutsch
11
Deutsch
10
Smart USB Backup Guide
ACHTUNG
●
Sie können mit dieser Anwendung ein Backup Ihres Systems erstellen, um einen Verlust Ihres Systems
im Falle von Schäden am Gerät zu vermeiden.
●
Sollten Sie die Datenträger ihres Gerätes austauschen, können Sie mit dieser Anwendung ein Backup
Ihres Systems erstellen und es nach dem Tausch der Datenträger wiederherstellen
●
Bevor Sie Ihr System mit dem USB Backup wiederherstellen möchten, stellen Sie sicher, dass Sie ein
Backup Ihrer Dateien erstellt haben
●
Bitte schließen Sie Ihr Gerät während des Backups an eine Stromquelle, schalten Sie Ihr System
während des Backups nicht aus und entfernen Sie nicht den USB-Datenträger
1
>20G
• Bitte schließen Sie Ihren USB-
Datenträger mit mindestens 20GB
freiem Speicher an Ihrem Gerät an, um
ein Image Ihres Systems zu erstellen
(Bitte speichern Sie Ihre Daten von
Ihrem USB-Datenträger, da diese
Daten während des Vorgangs vom
USB-Datenträger entfernt werden)
2
• Legen Sie die Driver Disk in ihr
optisches Laufwerk und starten Sie die
Installation des "Smart USB Backup"
(Sollte kein optisches Laufwerk
integriert sein, nutzen sie bitte ein
externes optisches Laufwerk oder laden
sie den Treiber von folgender Seite
runter: http://www.gigabyte.com
3
• Starten Sie nach der Installation das
"Smart USB Backup"
4
• Wählen Sie vom Drop-Down Menü
Ihren USB-Datenträger und starten Sie
die Erstellung der Recovery USB Disk
5
• Nach der Erstellung der Recovery Disc erscheint ein neues Fenster
• Drücken Sie während des Startens des Systems die F12 Taste, falls Sie Ihr System
wiederherstellen möchten. Wählen Sie "boot from recovery disk". Ihr System wird nun
wiederhergestellt
• Die Wiederherstellung dauert etwa 30 Minuten (Die Zeit kann je nach Modell Ihres
USB-Datenträgers variieren)

Deutsch
13
Deutsch
12
Halten Sie während der Einschaltung des Notebooks
zum Starten des Werkzeugs die F9-Taste gedrückt.
2
1
3
Notebook abschalten und neu starten.
Es gibt zwei Optionen zur Systemwiederherstellung
˙
Reset this PC
Sie können festlegen, ob Sie die Dateien aufbewahren oder entfernen
möchten; installieren Sie Windows dann neu, ohne Ihre Dateien zu verlieren.
˙
GIGABYTE Smart Recovery
Ihre PC-Einstellungen werden auf die werkseitigen Standardeinstellungen
rückgesetzt.
Achtung: Alle persönlichen Daten und Dateien gehen verloren.
“Wählen Sie zum Aufrufen der Wiederherstellungseinstellungen „Problemlösung“.
(Zudem können Sie zum Verlassen des Wiederherstellungssystems und zum
Fortfahren von Windows 10 zur Datei- oder Datensicherung „Fortfahren“ wählen.)”
Windows 10 Systemwiederherstellung
Systemwiederherstellung
Das Notebook hat eine versteckte Partition mit einer Kopie des Betriebssystems. Sollten Sie
Probleme mit dem Betriebssystem haben, können Sie jederzeit das Gerät auf Werkseinstellungen
zurücksetzen.
Achtung
Der PC ist jetzt betriebsbereit. Stellen Sie sicher das Ihr PC am Stromnetz ist. Der Vorgang wird
einige Minuten dauern.
Anleitung zur Systemwiederherstellung
Bitte beachten
˙
Falls die Festplatte gewechselt wurde oder die Partition gelöscht wurde, ist die
Wiederherstellungsoption nicht mehr verfügbar und das Gerät muß neu installiert werden.
˙
Die Wiederherstellungsfunktion ist nur verfügbar wenn bereits bei der Auslieferung ein
Betriebssystem installiert ist. Geräte ohne Betriebssystem haben keine Wiederherstellungsfunktion.
Systemwiederherstellung starten
Die Systemwiederherstellung ist bereits vorinstalliert wenn das Gerät ausgeliefert wird.
Im Auswahlmenü können Sie die Systemwiederherstellung starten und das Gerät auf
Werkseinstellungen zurücksetzen.
In der Kurzanleitung nden Sie alle nötigen Informationen um Ihr System wiederherzustellen.

Deutsch
13
Deutsch
12
Hier folgt, was geschieht
˙
All Ihre persönlichen Dateien und Apps werden entfernt.
˙
Ihre PC-Einstellungen werden auf das reine Betriebssystem (ohne GIGABYTE-
App) rückgesetzt.
4
▓
Diesen PC rücksetzen wählen
Meine Dateien aufbewahren
Wählen Sie ein Konto zum Fortfahren.
Alle Apps werden entfernt und Einstellungen werden auf das reine
Betriebssystem (ohne GIGABYTE-App) rückgesetzt; Ihre persönlichen
Dateien hingegen werden weiterhin aufbewahrt.
Alles entfernen
Alle Apps, Einstellungen und persönlichen Dateien werden entfernt.
Nur meine Dateien entfernen
Nur persönliche Daten und Dateien werden entfernt,
Computereinstellungen bleiben hingegen erhalten.
Laufwerk vollständig bereinigen
Das Laufwerk wird vollständig auf die werkseitigen
Standardeinstellungen rückgesetzt. Dies erfordert mehr Zeit. > [Klicken
Sie zum Ausführen der Wiederherstellungsfunktion auf „Rücksetzen“.]
▓
GIGABYTE Smart Recovery
Achtung
˙
“Sobald „Wiederherstellung“ ausgewählt ist, werden Ihre persönlichen Daten
und Dateien gelöscht, nachdem das Notebook die Wiederherstellung begonnen
hat; das Betriebssystem setzt die werkseitigen Standardeinstellungen zurück.
˙
Eine Fortschrittsleiste erscheint im Fenster, wenn die Wiederherstellung
im Gange ist. Bitte stellen Sie sicher, dass das Netzteil angeschlossen ist;
schalten Sie das Notebook nicht aus.”
Die Wiederherstellung wird aktiviert und Sie sehen
die Optionsschaltächen im Fenster. Klicken Sie zum
Starten auf „Ja“.
Nach Abschluss der Systemwiederherstellung sehen
Sie die Optionsschaltfläche im Fenster; bitte klicken
Sie auf „Herunterfahren“.

Deutsch
PB
Deutsch
14
▓
Erweiterte Optionen
Systemwiederherstellung
Verwenden Sie einen auf Ihrem PC aufgezeichneten
Wiederherstellungspunkt zur Windows-Wiederherstellung.
Systemabbildwiederherstellung
Stellen Sie Windows mit einer spezischen Systemabbilddatei wieder her.
Startvorgang-Reparatur
Beheben Sie Probleme, die Windows am Laden hindern.
Befehlseingabe
Nutzen Sie die Befehlseingabe für erweiterte Problemlösung.
UEFI-Firmware-Einstellungen
Ändern Sie Einstellungen in der UEFI-Firmware Ihres PCs.
Startvorgang-Einstellungen
Ändern Sie das Startverhalten von Windows.
Anhang
Garantie und Kundendienst:
Garantie- und Kundendiensthinweise sowie weitere Informationen finden Sie auf der
Garantiekarte oder den GIGABYTE-Kundendienstseiten:
http://www.gigabyte.com/support-downloads/technical-support.aspx
Häug gestellte Fragen:
Häug gestellte Fragen nden Sie hier:
http://www.gigabyte.com/support-downloads/faq.aspx

1
Español
PB
Español
Felicitaciones por la compra de la GIGABYTE Notebooks.
Este manual te ayudará a empezar a usar su notebook.Para obtener más información,
visite nuestro sitio web en www.gigabyte.com.Todas las especificaciones están sujetos a la
conguración del fabricante en el momento del envíoy pueden cambiar sin previo aviso.
1 Conecte el cable de alimentación al adaptador de ca.
2 Conecte el adaptador de ca al equipo.
3 Conecte el cable de alimentación a una fuente de poder.
Conexión de la alimentación
El indicador de encendido se ilumina cuando el equipo está prendido. Después de encender la,
por vez primera, no lo apague hasta que el sistema operativo haya sido congurado.Tenga en
cuenta que el volumen del audio no funcionará hasta que la instalación de Windows
®
se haya
completado.
Arrancar la por primera vez
Dependiendo de la confguración, la pantalla de inicio de Microsoft Windows
®
será la primera
pantalla que se pueden ver como inicia el equipo. Siga las instrucciones en pantalla e introduzca
su información personal para completar la conguración del sistema operativo Window
®
.
Usando GIGABYTE Notebook por primera vez
1
2
3
USB
Charging
Port

3
Español
2
Español
Vista Superior
1 Sensor de luz
2 Webcam
3
Indicador de estado LED para Webcam
4 Micrófono x2
5 botón de encendido
6 Panel Táctil
7 Indicador de batería en el botón
8
Indicadores LED
Pulse el botón derecho del touchpad para
controlar el poder de la batería restante.
Haga clic para mostrar el porcentaje
de carga restante. Como se muestra a
continuación, el indicador de duración de
la batería está disponible cuando el portátil
está apagado, en stand-by o hibernación.
(modo de batería)
1
2
<10%
11-30%
31-50%
51-70%
71-90%
>90%
El Bluetooth LED de estado
El indicador de estado de Wireless LAN
Indicador de estado del Disco duro
Indicador de estado de la batería
Indicador de Estado
Tu GIGABYTE Tour
2
1 3
6
87
5
4

3
Español
2
Español
Vista Izquierda
1 Ranura de bloqueo Kensington
2 Puerto HDMI
3 USB 3.0
4 Audio en Combo en Jack
5 Lector de tarjetas SD
1 USB 3.1
2 Mini DisplayPort
3
USB 3.0
(Soporta carga por Puerto USB)
4 USB 3.0
5 La toma de corriente
la visión Derecha
3 4
1
2 5
1 3
2
4 5
Advertencia:
NO retire la batería de litio incorporada. Para cualquier solicitud de asistencia, por favor comuníquese
con su centro de servicio autorizado.
•
No instale el equipo portátil en una inclinación o en un lugar propenso a las vibraciones, o evite el uso del PC
Portátil por mucho tiempo.Esto aumenta el riesgo de que se produzca un fallo de funcionamiento o daños en el
producto.
•
No almacenar ni utilizar PC portátil de luz directa del sol o del lugar donde la temperatura exceda los 112 ° F (45 ° C)
como el interior de un vehículo.Existe el peligro de la expansión de la batería de iones de litio y el envejecimiento.
•
No use el PC Portátil en un lugar mal ventilado como en la ropa de cama, sobre una almohada o cojín, etc, y no
lo utilice en un lugar como la habitación con calefacción por suelo radiante, ya que puede hacer que el equipo
se sobrecaliente.Tenga cuidado de que los oricios de ventilación del PC portátil (en el lado o la parte inferior)
no están bloqueados sobre todo en estos entornos. Si los oricios de ventilación están bloqueados, puede ser
peligroso y provocar que el PC portátil se sobrecaliente.

5
Español
4
Español
El ordenador utiliza teclas de acceso directo o combinaciones de teclas para acceder a los
controles más utilizados como el brillo de la pantalla y la salida de volumen. Para activar teclas
de acceso rápido, mantenga pulsada la tecla <Fn> antes de pulsar la tecla de la combinación de
teclas rápidas.
Hotkey
Función Descripción
Fn+F1 dormir Ponga el ordenador en modo de suspensión.
Fn+F2
LAN inalámbrico Activa / desactiva la función LAN inalámbrica.
Fn+F3
Brillo de Down Disminuya el brillo de la pantalla.
Fn+F4
Brillo Hasta Aumenta el brillo de la pantalla.
Fn+F5
Cambio de pantalla "Salida de la pantalla entre Switche
Fn+F6
Pantalla de
visualización en
pantalla
Gire visualizar la pantalla de encendido y
apagado.
Fn+F7
Alternar altavoces
Activa
Encienda el altavoz encendido y apagado.
Fn+F8
Bajar volumen Disminuya el volumen del sonido.
Fn+F9
Subir volumen Aumenta el volumen del sonido.
Fn+F10
Panel táctil Activa Gire el panel táctil interno y apagado.
Fn+F11
Bluetooth Activa / desactiva la función Bluetooth.
Fn+F12
webcam Encienda la cámara interior y fuera.
Fn+Space
Luz de fondo del
teclado TOGGLE
Encienda la luz de fondo del teclado y se
apaga.
Teclas Macro
Teclas de macro se pueden establecer a través del Hub Macro, el establecimiento de teclas de
combinación para un funcionamiento complicado y / o general.
Macro key Tecla Macro Descripción
G
Conmutador del grupo de Macros, presione durante 3 segundos
para activar/desactivar.
G1 Tecla programable
G2 Tecla programable
G3 Tecla programable
G4 Tecla programable
G5 Tecla programable
Teclas de acceso rápido

5
Español
4
Español
Bienvenidos al uso de Macro Hub! Macro Hub hace sencillo el uso de las teclas Macro en .
Puedes lidiar con combinaciones de teclas complicadas sólo con presionar la tecla Macro, las
cuales te ayudarán tanto en tareas de trabajo como de juego. Antes de usar Macro Hub, por favor
lee la siguiente guía, Gracias.
1
Ejecutar Macro Hub
Podrás encontrar un acceso directo de Macro Hub en el Escritorio. Simplemente
hazdoble-clic en él.
2
Visión general de Macro Hub
4
5
1 3
2
1 Perles: Revisa la conguración actual de tus comandos macro.
2
Macros: Edita la conguración de las funciones de comandos macro.
3
Conguración: Actualiza la versión de Macro Hub o refresca la conguración de Macro
Hub.
4 Indicadores de Macro Key: Indica el grupo de teclas Macro activadas ( el indicador se
iluminará )
5 Funciones de Teclas Macro: Muestra las funciones Macro programadas, desde G1 a G5
Instrucciones Macro Hub

7
Español
6
Español
3
Usando Macro Hub
1 Congura Macro Key a sus funciones básicas
a. Haz Clic en el botón G en la esquina superior izquierda del teclado para cambiar al
grupo de teclas macro que deseas usar.
b. Haz clic en la función Macro.
c. Doble-clic en la función que deseas usar (Ej,Media Player) en el área de funciones
Macro básicas.
d. Completa la conguración.

7
Español
6
Español
2 Editar conguración de comandos macro.
a. Clic 'Macros' ( puedes congurar hasta 100 sets de macros)
13
1
8
3
7
6
10
11
9
5
2
4
12

9
Español
8
Español
b. Visión del panel de grabación de Macros (puedes grabar tu propia macro aquí).
1. Empezar grabación: clic cuando esté listo para grabar la macro.
2.Botón Pausa: Habilita/deshabilita pausa para parar la grabación.
3. Nombre de Macro: Indica el nombre de esta macro.
4. Icono importación: Selecciona un icono para la macro. Puedes usar el icono por
defecto o subir el tuyo propio.
5. Tipo de grabación: Puedes seleccionar grabar solo el movimiento del ratón ( o
teclado), o ambos. Puedes seleccionar no grabar el movimiento del ratón.
6.Intervalo de grabación: Puedes decidir grabar o no grabar el intervalo de tiempo entre
movimientos ( puedes seleccionar un intervalo de tiempo jo entre cada uno de los
movimientos)
7. Ejecución: Puedes congurar el tipo de ejecución de la macro ( que se ejecute una
sola vez, o varias veces, presionando profundamente)
8. Exportar macro: Exporta tu macro
9.Importar macro: importa tu macro
10.Borrar todo: Borra todo el movimiento de la macro.
11.Borra lo seleccionado: Borra el movimiento seleccionado.
12. Lista de movimiento: Muestra los movimientos grabados.
13. Salir: El sistema te pedirá guardar las macros grabadas.

9
Español
8
Español
c. Empezar a grabar macro: Cuando haces clic en el botón start, el motor de macro
empezará a grabar la macro. Todos los movimientos que hagas ( teclado y ratón) se
mostrarán en la lista de movimientos. Puedes decidir si usar la tecla 'Pausa' o clicar
en el botón 'Stop' para parar la grabación. Finalizando la grabación: Cuando hayas
terminado todo el movimiento, haz clic en 'Exit'. El sistema Macro te preguntará si
quieres guardar la macro. Clic en 'Si' nalizará la grabación de tu propia macro.
d. Completa la conguración.
3 Editar conguración de comandos macro.
1
2
3
1.Actualización de Software: Actualiza a la última versión de GIGABYTE Macro Hub
2.Borrado de memoria: Borra la conguración actual de Macro Hub
3.Actualización de Firmware: Actualiza el rmware de las teclas Macro.

11
Español
10
Español
GIGABYTE Smart Manager
Puede activar el Administrador de GIGABYTE Smart doble clic en el icono de acceso directo en
el escritorio si la máquina que compró tiene el sistema operativo incorporado. GIGABYTE Smart
es una interfaz de control basado en iconos, lo que permite a los usuarios acceder intuitivamente
la configuracióndel sistema común, así GIGABYTE, como empresas de servicios públicos
exclusivos. por favor, tener en cuenta que la interfaz del Administrador de GIGABYTE Smart,
iconos, utilidades y versiones de software puede variar en función de los modelos adquiridos.por
favor, operar GIGABYTE Smart de acuerdo a su versión.
GIGABYTE Software de Aplicación

11
Español
10
Español
Guía Smart USB Backup
ADVERTENCIA
●
Puede guardar una imagen de recuperación a través de esta aplicación en el caso de pérdida de datos
si el dispositivo de almacenamiento está dañado.
●
Puede imagen original de recuperación de copia de seguridad en el disco USB y restaurar el sistema si
la sustitución del sistema de almacenamiento con el disco de recuperación USB.
●
Por favor, copia de seguridad de los datos antes de recuperar el sistema a través de un USB de
recuperación.
●
Por favor, no retire el dispositivo USB ni apague el ordenador durante el proceso de recuperación del
sistema.
1
>20G
• Por favor, conecte el disco USB que es
al menos 20 GB de capacidad de tomar
la imagen original (copia de seguridad
de los datos en USB primero. Todos
los datos serán eliminados durante la
creación del disco de recuperación
USB)
2
• Inserte el disco de controladores en la
unidad óptica y ejecutar la instalación
de "Backup USB inteligente" (para el
modelo-ninguno ODD, por favor, utilice
el dispositivo ODD USB o descargar
desde http://www.gigabyte.com)
3
• Ejecute el "Backup USB inteligente"
después de terminar la instalación.
4
• Seleccione su disco USB de la lista
desplegable y comenzar a crear el
disco de recuperación USB.
5
• La ventana se abrirá cuando se realiza la creación del disco de recuperación.
• Por favor, pulse F12 en el arranque del sistema cuando se necesita para restaurar el
sistema. Seleccione “arranque desde el disco USB de recuperación” y el sistema será
restaurado.
• El tiempo necesario para la restauración será de alrededor de 30 minutos (tiempo ne-
cesario puede variar según el modelo de disco USB).

13
Español
12
Español
Durante el proceso de encendido del equipo
portátil, presione sin soltar la tecla F9 para iniciar la
herramienta.
2
1
3
Apague y reinicie el equipo portátil.
Hay dos opciones para la recuperación del sistema:
˙
Restablecer este PC
Puede optar por mantener o quitar los archivos y, a continuación, reinstalar
Windows sin perder los archivos.
˙
Utilidad GIGABYTE
Se restaurará la conguración predeterminada de fábrica para la conguración
de su PC.
Precaución: Todos los datos personales y archivos se perderán.
Elija “Solucionar problemas” para entrar en la conguración de recuperación.
(También puede elegir “Continuar” para salir del sistema de recuperación y
continuar con Windows 10 para copia de seguridad de archivos o datos.)
Windows 10 Guía de recuperación
Recuperación del sistema (Restaurar el sistema operativo)
Cuando algo va mal con el sistema operativo de la computadora portátil, el almacenamiento de
la computadora portátil tiene una partición oculta que contiene una copia de seguridad completa
imagen del sistema operativo que se puede utilizar para restaurar el sistema a los valores
predeterminados de fábrica.
Todo listo para ir
Asegúrese de que su PC está conectado , Esto tomará unos minutos.
Guía de recuperación
Nota
˙
Si el almacenamiento se ha cambiado o eliminado la partición, la opción de recuperación ya no
estará disponible y un servicio de recuperación será necesario.
˙
La función de recuperación sólo está disponible en dispositivos con O/S preinstalado. Los
dispositivos con DOS no tienen la función de recuperación.
Lanzamiento de recuperación del sistema
La función de recuperación del sistema está preinstalado antes de que el ordenador portátil se
suministra de fábrica. El menú de opciones permite iniciar la herramienta de recuperación de
Windows para reinstalar el sistema operativo por defecto de fábrica .
La introducción breve a continuación le mostrará cómo iniciar la herramienta de recuperación y
restaurar el sistema.

13
Español
12
Español
Esto es lo que ocurrirá
˙
Todas las aplicaciones y archivos personales se quitarán.
˙
La configuración de su PC volverá a ser el sistema operativo puro (sin la
aplicación GIGABYTE).
4
▓
Elija “Restablecer este PC”
Conservar mis archivos
Elija una cuenta para continuar.Todas las aplicaciones se quitarán y la
conguración volverá a ser el sistema operativo puro (sin la aplicación
GIGABYTE), pero los archivos personales se conservarán.
Quitar todo
Todas las aplicaciones, configuraciones y archivos personales se
quitarán.
Eliminar únicamente mis archivos
Solamente se quitarán los datos y archivos personales; la
conguración del equipo se conservará.
Limpiar completamente la unidad
Se restaurará completamente la configuración predeterminada de
fábrica de la unidad. Esta acción lleva más tiempo. > [Haga clic en
“Restablecer” para ejecutar la función de recuperación.]
▓
Elegir Utilidad GIGABYTE
Precaución
˙
“Si selecciona “Recuperación”, los datos y archivos personales se eliminarán
después de que el equipo portátil inicie la restauración y se restablecerá la
conguración predeterminada de fábrica del sistema operativo.
˙
Una barra de indicación de progreso se mostrará en la ventana cuando el
proceso de recuperación se esté ejecutando. Asegúrese de que el adaptador
de CA está enchufado y no apague el equipo portátil.”
La recuperación se activará y verá los botones de
opción en la ventana. Haga clic en “Sí” para iniciarla.
Una vez completada la recuperación del sistema,
verá el botón de opción en la ventana. Haga clic en
“Apagar”.

PB
Español
14
Español
▓
Opciones avanzadas
Restauración del sistema
Utilice un punto de restauración grabado en su PC para restaurar Windows.
Recuperación a partir de una imagen del sistema
Recupere Windows mediante un archivo de imagen del sistema especíco.
Reparación de inicio
Solucione problemas que impiden que Windows se cargue.
Símbolo del sistema
Utilice el símbolo del sistema para solución avanzada de problemas.
Conguración del rmware UEFI
Cambie la conguración del rmware UEFI de su PC.
Configuración de inicio
Cambiar comportamiento de inicio de Windows.
Garantía y servicio :
Garantía y servicio técnico e información relacionada, consulte la tarjeta de garantía
GIGABYTE o sitio web del servicio como en el siguiente enlace:
http://www.gigabyte.com/support-downloads/technical-support.aspx
FAQ:
FAQ (Preguntas Frecuentes) por favor consulte el siguiente enlace:http://www.gigabyte.com/
support-downloads/faq.aspx
Apéndice

Français
1
Français
PB
Félicitations pour l'achat de votre Notebook GIGABYTE
Ce manuel vous aidera à démarrer avec l'installation de votre notebook. La conguration du
produit nal dépend du modèle acheté. GIGABYTE se réserve tout droit de modicationsans
préavis. Pour plus d'informations, merci de consulter notre site internet www.gigabyte.com
1 Branchez le cordon d'alimentation à l'adaptateur AC
2 Branchez l'adaptateur AC à la prise "DC-in jack" située sur le coté droit de votre notebook
3 Branchez le cordon d'alimentation à une prise secteur
Mise sous tension
Après avoir allumé le pour la première fois, n'éteignez pas l'ordinateur avant que le système n'ait
été conguré. Notez que le volume audio ne fonctionne pas avant que l'installation Windows
®
ne
soit complètement terminée.
Premier démarrage du
Selon votre configuration,l'écran de Microsoft
®
Windows
®
Boot sera le premier écran qui
s'afficheralors du démarrage du netebook. Suivez les instructions et entrez vos informations
personnelles pour terminer la conuration de Windows
®
.
Utiliser le Notebook GIGABYTE pour la première fois
1
2
3
USB
Charging
Port

Français
3
Français
2
Vue d'en haut
1 Capteur de lumière
2 Webcam
3
état de Webcam LED indicateur
4 Microphone x2
5 Haut-parleurs
6 TouchPad
7 Indicateur de batterie
8
Indicateurs LED
Bouton d'alimentation. Un clic sur le
bouton droit comm eindiqué ci-des-
sous, lorsque l'ordinateur est arrêté
ou en veille prolongée, vous indiquera
le niveau de batterie disponible par
tranche de 20%.(Le mode batterie)
1
2
<10%
11-30%
31-50%
51-70%
71-90%
>90%
Bluetooth
Wireless LAN
HDD
Batterie
Indicateur d'état de puissance
Visite guidée du Notebook GIGABYTE
2
1 3
6
87
5
4

Français
3
Français
2
Vue du côté gauche
1 Verrou Kensington
2 Port HDMI
3
USB 3.0
4 Prise audio combo
5 Lecteur de carte SD
1 USB 3.1
2 Port Mini-Display
3
USB 3.0
(Compatible Recharge via USB)
4
USB 3.0
5 Entrée d'alimentation
Vue du côté droit
3 4
1
2 5
1 3
2
4 5
Attention:
NE JAMAIS enlever la batterie au Lithium par vous-même. Au besoin , veuillez contacter le Centre de
Réparation GIGABYTE le plus proche
•
Ne disposez pas votre Portable sur une surface inclinée ou pouvant être soumise à vibrations. En cas de nécessité
de telles congurations, réduisez au maximum le temps d'exposition. Une telle mise en place pourrait accroitre les
risques d'endommagement matériel.
•
N'entreposez pas votre Portable dans un environnement où la température ambiante dépasse les 45°C (112°F).
N'exposez pas votre Portable à la lumière directe du soleil. Votre batterie Lithium-ion pourrait se dégrader et voir
sa durée de vie considérablement réduite.
•
Ne placez pas votre Portable en un lieu mal ventilé, comme par exemple sur un lit, coussin, oreiller etc. et ne
l'utilisez pas dans une pièce disposant d'un chauffage au sol; votre Portable pourrait surchauffer. Merci de vous
assurer avec le plus grand soin que les systèmes de ventilation de votre Portable ne sont pas bloqués ou obstrués
lors d'utilisation au coeur de tels environnements. Un système de ventilation obstrué ou ne fonctionnant pas à son
plein potentiel pourrait endommager votre Portable par surchauffe.

Français
5
Français
4
Votre ordinateur dispose de touches racourcies ou combinaisons de touches pour accéder
aux principaux contrôles comme l'intensité d'afchage à l'écran ou le contrôle du volume. Pour
activer ces fonctions, gardez la touche <Fn> appuyée, en combinaison avec l'autre touche
correspondante à la fonction demandée.
Touche
Fonction Description
Fn+F1 Veille Met le portable enmode veille prolongée.
Fn+F2
Wi Active ou désactive le Wi.
Fn+F3
Réduction de la luminosité Touche raccourci pour baisser la luminosité.
Fn+F4
Augmentation de la luminosité Touche raccourci pour augmenter la luminosité.
Fn+F5
Mode d'afchage
Change de mode d'afchage entre, un
périphérique d'afchage externe (si branché)
et/ou l'écran du portable ou les deux.
Fn+F6
Ecran Active ou désactive l'afchage à l'écran.
Fn+F7
Audio Active ou désactive les haut parleurs.
Fn+F8
Baisser le Volume Raccourci pour baisser le volume.
Fn+F9
Monter le Volume Raccourci pour augmenter le volume.
Fn+F10
Touchpad Active ou désactive le pavé tactile (Touchpad).
Fn+F11
Bluetooth Active ou désactive le Blutooth.
Fn+F12
Webcam Active ou désactive la webcam.
Fn+Space
Rétro-éclairage du clavier
Active ou désactive le rétro-éclairage du
clavier.
Touches Macro
Les touches Macro peuvent être paramétrées via le Macro Engine, pour combiner un groupe de
touches et/ou une action simple ou compliquée.
Touche Macro Touche Macro Description
G
Commutateur de groupe de macros, appuyez environ 3
secondes pour l'activer ou le désactiver.
G1 Touche marcro personnalisable
G2 Touche marcro personnalisable
G3 Touche marcro personnalisable
G4 Touche marcro personnalisable
G5 Touche marcro personnalisable
Utilisation des touches Fonction

Français
5
Français
4
Bienvenue dans Macro Hub ! Macro Hub, va vous faciliter le paramétrage et l'utilisation des
touches Macro sur votre. Vous pouvez lancer une combinaison de touches complexe par une
simple pression sur une touche macro. Vous serez plus efcace à la fois pour travailler et pour
jouer. An de bien utiliser Macro Hub, veuillez lire le guide ci-dessous, merci.
1
Lancer l'application Macro Hub
Vous trouverez un raccourci de Macro Hub sur le bureau. Double cliquez dessus.
2
Présentation de l'application Macro Hub
4
5
1 3
2
1 "Proles" : Voir les paramètres de commande de la macro en cours.
2
"Macros" : Editer une macro, ses paramètres, ses fonctions, et les commandes
associées.
3
"Settings" : Met à jour l'application Macro Hub, ou remet à zéro la conguration des
paramètres
4 Indicateur de groupe de Macros : indique quel groupe est actif (l'indicateur du groupe
actif est en surbrillance)
5 Fonction de touche Macro : montre la fonction liée à la touche Macro dans ce groupe de
Macros. Il y a au total 5 fonctions par groupe, de G1 à G5.
Utilisation du logiciel Macro Hub

Français
7
Français
6
3
Comment utiliser Macro Hub
1 Paramètrer les touches Macros avec des fonctions basiques
a. Cliquez sur le bouton G sur la gauche, en haut du clavier pour basculer sur le groupe
des touches de macros que vous souhaitez paramétrer.
b. Cliquez sur la case de la la touche Macro à paramérer
c. Double cliquez sur la fonction que vous souhaitez lancer (ex. ouvrir votre navigateur
internet) dans la zone des fonctions basiques ou des fonctions macros
d. Veuillez conrmer pour compléter le paramétrage.

Français
7
Français
6
2 Comment dénir les fonctions et les paramètres d'une macro
a. Cliquez sur "Macros" (vous pouvez dénir jusqu'à 100 ensembles de macro)
13
1
8
3
7
6
10
11
9
5
2
4
12
b. Vue d'ensemble du panneau d'enregistrement des macros (vous pouvez enregistrer
votre propre macro ici)
1. Démarrez l'enregistrement : Cliquez ici quand vous êtes sur le point d'enregistrer la
macro
2. Arrêter l'enregistrement : Cliquez ici sur pour arrêter l'enregistrement de la macro
3. Nom de la macro : Dénissez le nom de cette macro
4. Définissez l'icône de cette macro. Vous pouvez utiliser l'icône par défaut ou
télécharger votre propre icône
5. Record type - Type d'enregistrement : Vous pouvez choisir d'enregistrer seulement
les mouvements de la souris (ou du clavier), ou les deux à la fois. Vous pouvez
également décider ou non d'enregistrer la position de la souris.
6. Enregistrer l'intervalle de temps : Vous pouvez décider ou non d'enregistrer l'intervalle
de chaque mouvement (ou vous pouvez dénir l'intervalle de temps xe entre chaque
mouvement)
7. Vous pouvez dénir le mode d'exécution de la macro (exécuter une fois les actions,
répéter l'exécution des actions ou répétition de l'exécution des actions si appui
prolongé sur la touche Macro)

Français
9
Français
8
8. Exporter une macro : Exportez votre macro
9. Importer une macro : Importez une macro à partir d'un enregistrement
10. Supprimer tous les mouvements dans cette macro
11. Supprimer un mouvement sélectionné
12. Liste des mouvements : Cette fonction montre tous les mouvements que vous avez
enregistrés.
13. Exit - Sortie: Le système vous demandera si vous souhaitez sauvegarder la macro en cours.
c. Commencez à enregistrer la macro : Lorsque vous cliquez sur le bouton de démarrage,
l'application Macro Hub commence l'enregistrement de votre macro. Tous les mouvements que
vous faites (souris / clavier) seront afchés dans la liste des mouvements. Vous pouvez décider
d'utiliser la touche "pause" ou le cliquez avec votre souris sur le bouton d'arrêt pour arrêter
l'enregistrement en fonction de votre plage d'enregistrement.Finissez l'enregistrement de votre
macro : Lorsque vous avez ni vos mouvements, cliquez sur le bouton de sortie. L'application
Macro Hub vous demandera si vous souhaitez enregistrer la macro. Cliquez sur "Yes", Oui,
pour terminer l'enregistrement de votre macro.
d. Veuillez conrmer pour compléter le paramétrage.

Français
9
Français
8
3 Paramétrages principaux du logiciel Marco Hub
1
2
3
1.Software update: Met sà jour le logiciel vers la dernière version de GIGABYTE Macro Hub
2.Clean memory: Efface les paramètres actuels du logiciel Macro Hub
3.Firmware Upgrade: Met à jour le rmware des touches Macros

Français
11
Français
10
GIGABYTE Smart Manager
Pour activer le "Smart Manager" double cliquez sur l'icône de raccourci du bureau si la
machine que vous avez acheté possède un système d'exploitation intégré. Le "Smart Manager"
de GIGABYTE est est une interface de contrôle à base d'icônes, permettant aux utilisateurs de
accéder intuitivement à la conguration du système commun aussi bien qu'aux services publics
exclusifs GIGABYTE. Notez que l'interface "Smart Manager" de GIGABYTE, les icônes, les
services publics et les versions des logiciels peuvent varier en fonction des modèles achetés.
Utilisez le "Smart Manager" de GIGABYTE en fonction de la version intégrée.
Logiciel d'application GIGABYTE

Français
11
Français
10
Smart USB Backup : Guide d'utilisation
ATTENTION
●
Vous pouvez sauvegarder l'image de récupération d'origine grâce à cette application en cas de perte
par une lésion de l'appareil.
●
Vous pouvez sauvegarder l'image de récupération d'origine sur disque ou clé USB et restaurer le
système en cas de remplacement du système de stockage avec le disque USB de récupération.
●
Avant de restaurer le système à travers le disque USB de récupération, veuillez vous assurez que vous
avez fait la sauvegarde de toutes vos données.
●
Veuillez NE PAS éteindre ou débrancher le système lors de la sauvegarde sur disque ou clé USB.
1
>20G
• Veuillez brancher le disque USB qui
est d'au moins 20 Go de capacité
pour contenir l'image originale de
restauration (Veuillez sauvegarder
vos données en premier. Toutes les
données seront supprimées lors de
la création de la récupération disque
USB)
2
• Insérez le disque de pilotes dans votre
lecteur et lancez l'installation de "Smart
Backup USB" (pour les modèles sans
lecteur, veuillez utiliser un lecteur de
disques externe sur port USB ou les
télécharger via http://www.gigabyte.fr
3
• Exécutez le "Backup Smart USB"
après avoir terminé l'installation.
4
• Sélectionnez votre disque/clé
USB dans la liste déroulante et de
commencez à créer le disque USB de
récupération.
5
• Une fenêtre apparaîtra lorsque la création de disque de récupération sera terminée.
• Veuillez appuyer sur F12 au démarrage du système lorsque vous devez restaurer
le système. Sélectionnez "boot from recovery USB disk" et le système lancera la
restauration.
• Le temps nécessaire pour la restauration sera d'environ 30 minutes (Le temps
nécessaire peut varier selon le modèle du disque/clé USB).

Français
13
Français
12
Guide de restauration du système Windows 10
Pendant que l’ordinateur redémarre, appuyez et
maintenez la touche F9 appuyée pour lancer l’utilitaire.
2
1
3
Eteignez et redémarrez votre ordinateur.
Il y a deux options de restauration :
˙
Reset this PC
Vous pouves choisir de conserver ou d’effacer vos fichiers et ensuite de
réinstaller Windows sans perdre vos données.
˙
GIGABYTE Smart Recovery
Vos paramètres seront restaurés à l’origine, comme lorsque le PC est sorti
d’usine.
Choisissez “Troubleshoot” (Résoudre) pour entrer dans les paramètres de
restauration. (Vou spouvez également choisir “Continue” (continuer) pour
sortir du système de restauration et continuer de démarrez votre portable
sous Windows 10 pour sauvegarder vos données et chiers personnels.
Système de restauration (restaurer le système d'exploitation de
votre Portable)
Quand quelque chose ne va pas avec le système d’exploitation de votre portable, le système de
stockage de l’ordinateur a une partition cachée contenant une image de sauvegarde complète
du système d’exploitation qui peut être utilisée pour restaurer le système en revenant aux
paramètres d’usine par défaut.
Tout est prêt pour commencer
Assurez-vous que votre PC est branché au courant. Patientez ensuite quelques minutes.
Guide du système de restauration
Utilliser System Recovery
La fonction de restauration du système d’exploitation est installée en nos usines. Le menu d’options
au démarrage vous permet de lancer l’outil de restauration de Windows pour réinstaller le système
d’exploitation avec les réglages d’usine par défaut.
La brève introduction ci-dessous va vous montrer comment démarrer l’outil de restauration et
comment restaurer votre système.
Note
˙
Si le système de stockage a été changé ou la partition supprimée, l’option de récupération ne sera plus
disponible et un service de récupération complet sera nécessaire.
˙
La fonction de récupération est disponible uniquement sur les appareils avec un système d’exploitation
préinstallé. Les appareils livrés sous DOS ne disposent pas de la fonction de restauration.

Français
13
Français
12
Voici ce qui va se passer
˙
Tous vos chiers personnels et applications serton supprimés.
˙
Les paramètres de votre PC seront restaurés à l’origine du système
d’exlpoitation (sans les applications GIGABYTE)
4
▓
Choix “Reset this PC”
Keep my les : Conserver mes chiers
Choisissez un compte avant de continuer.Toutes les applications seront
effacées, et les paramètres reviendront à l’origine (sans les applications
GIGABYTE), mais vos chiers personnels seront conservés.
Remove everything : Tout effacer
Tous les paramètres, applications et chiers personnels seront effacés.
Just remove my les : Effacer seulement mes chiers
Seules les données personnelles seront effacées, mais les paramètres
de l’ordinateur seront conservés.
Fully clean the drive : Nettoyer complètement le disque
Le disque sera complètement restauré d’usine avec tous les
paramètres d’origine. Cela prend plus de temps. [Cliquez sur “Reset”
pour exécuter la restauration]
▓
GIGABYTE Smart Recovery
Attention
˙
Une fois la restauration lancée, vos données personnelles et chiers seront
effacés dès que l’ordinateur commence la restauration, et le système
d’exploitation sera restauré avec les paramètre d’usine.
˙
Une barre de progression indiquera la progression de processus de
restauration dans la fenêtre. Vériez que l’adaptateur secteur est bien branché
et n’éteignez pas l’ordinateur.
La restauration sera activée et vous verrez les
boutons des différentes options. Cliquez sur “Yes”
(oui) pour commencer.
Après la fin de la restauration cliquez sur le bouton
“Shutdown” (Eteindre) pour éteindre votre ordinateur.

Français
PB
Français
14
▓
Options avancées
System Restore : Restauration du système
Utilisez un point de restauration enregistré au préalable sur votre
ordinateur pour restaurer votre système.
System Image Recovery : Restauration à partir d’une image système.
Restaurer Windows en utilisant une image specique du système.
Startup Repair : Réparation du système de démarrage
Résoudre les problèmes qui empêchent le chargement de Windows.
Command Prompt : Invite de commandes
Utiliser l’invite de commande pour un dépannage avancé.
UEFI Firmware Settings : Paramétrage du BIOS UEFI
Changer les paramètres du BIOS UEFI
Startup Settings : Paramétres de démarrage
Changer le comportement de Windows au démarrage.
Garantie & service:
Concernant la garantie, les services et informations complémentaires, merci de consulter votre
carte de garantie ou au site internet GIGABYTE ci-dessous:
http://www.gigabyte.fr/support-downloads/support-downloads.aspx
Foire Aux Questions:
FAQ (Questions frequentes) - Référez-vous au lien suivant :
http://www.gigabyte.fr/support-downloads/faq.aspx
Annexes

Indonesia
1
Indonesia
PB
Selamat atas pembelian Notebook GIGABYTE anda.
Panduan ini akan membantu anda bagaimana memulai dan menyiapkan notebook Anda.
Konfigurasi produk tergantung pada model pembelian Anda. GIGABYTE berhak untuk
mengubah tanpa pemberitahuan sebelumnya. Untuk informasi lebih rinci, silakan kunjungi
website kami di www.gigabyte.com
1 Sambungkan Kabel Daya ke AC Adaptor.
2 Sambungkan AC adaptor DC-in jack pada sisi kanan Notebook.
3 Sambungkan kabel daya ke stopkontak.
Beralih pada Power
Setelah Anda menghidupkan untuk pertama kalinya, jangan mematikannya sampai sistem
operasi telah dikongurasi. Harap dicatat bahwa volume untuk audio tidak akan berfungsi sampai
Penataan Windows® telah selesai.
Melakukan Booting pada untuk Pertama Kalinya
Tergantung pada konfigurasi Anda, Microsoft® Windows® Boot Screen akan menjadi layar
pertama yang akan anda lihat setelah notebook dinyalakan. Ikuti petunjuk pada layar dan
masukan informasi pribadi Anda untuk menyelesaikan setup dari operasi sistem Windows® .
Penggunaan Notebook GIGABYTE Untuk Pertama Kalinya
1
2
3
USB
Charging
Port

Indonesia
3
Indonesia
2
Tampilan Atas
1 Status Webcam LED indikator
2 Kamera Web
3 Status Webcam LED indikator
4
Mikrofon x 1
5 Tombol Daya
6 Bantalan Sentuh
7 Tombol Indikator Baterai
8
Indikator LED
Tekan tombol kanan touchpad untuk
memeriksa baterai yang tersisa
Klik kanan untuk menunjukkan sisa
persentase daya. Seperti yang ditunjuk-
kan ilustrasi di bawah ini,
indikator baterai tersedia saat
laptop dimatikan, di stand-by atau
hibernasi. (mode Battery)
1
2
<10%
11-30%
31-50%
51-70%
71-90%
>90%
Status LED Bluetooth
Status Indikator LAN Nirkabel
Status Indikator HDD
Status Indikator Baterai
Status Indikator Daya
Keterangan GIGABYTE Notebook Anda
2
1 3
6
87
5
4

Indonesia
3
Indonesia
2
Tampilan Kiri
1 Kunci Kensington
2 Soket HDMI
3 USB 3.0
4 Colokan Audio Combo
5 Pembacaan Kartu SD
Tampilan Kanan
1 USB 3.1
2 Mini DisplayPort
3
USB 3.0(mendukung charging
baterai)
4 USB 3.0
5
Colokan DC-in
3 4
1
2 5
1 3
2
4 5
Perhatian:
JANGAN mengeluarkan baterai lithium yang terpasang di dalam, Untuk setiap pelayanan. Silahkan
hubungi pusat servis resmi GIGABYTE setempat.
•
Jangan menginstal PC Notebook pada tempat yang miring atau tempat yang rawan getaran, atau hindari
menggunakan PC Notebook di tempat yang demikian. Ini akan meningkatkan risiko kerusakan pada produk
tersebut
•
Jangan menyimpan dan menggunakan PC Notebook di sinar matahari langsung atau lokasi di mana suhu
melebihi 112 ° F (45 ° C) seperti di dalam kendaraan.ini akan berbahaya dan memperpendek umur baterai
Lithium-ion
•
Jangan menggunakan PC Notebook di tempat ventilasi yang buruk seperti di tempat tidur, di atas bantal
atau bantalan, dll, dan jangan menggunakannya dalam lokasi seperti kamar dengan pemanas lantai karena
dapat menyebabkan komputer kelewat panas.Rawat ventilasi PC Notebook (di samping atau bawah)
jangan pernah diblokir terutama ventilasi Notebook PC tersebut. Jika ventilasi diblokir, akan berbahaya dan
menyebabkan PC Notebook terlalu panas.

Indonesia
5
Indonesia
4
Komputer menggunakan Hotkeys atau kombinasi tombol untuk mengakses sebagian besar dari
komputer seperti kecerahan layar dan output volume. Untuk mengaktifkan tombol Hotkeys, tekan
terus tombol <fn> sebelum menekan tombol lain pada kombinasi Hotkey.
Hotkey
Fungsi Keterangan
Fn+F1 Mode Tidur Mengalihkan komputer pada mode tidur
Fn+F2
LAN Nirkabel / Wi-Fi
"Mengaktifkan / menonaktifkan fungsi LAN
Nirkabel."
Fn+F3
Mengurangi kecerahan Mengurangi Tngkat kecerahan layar.
Fn+F4
Meningkatakan
kecerahan
Meningkatkan Tingkat Kecerahan Layar.
Fn+F5
Peralihan Layar
"Beralih tampilan output di antara tampilan
layar, monitor eksternal (jika terhubung) dan
kedua."
Fn+F6
Menampilkan Layar Mengaktifkan layar tampilan dan mematikan.
Fn+F7
Peralihan Speaker Menyalakan / Mematikan Speaker
Fn+F8
Mengurangi Volume
Suara
Mengurangi Tingkat Volume Suara.
Fn+F9
Meningkatkan Volume
Suara
Meningkatkan Tingkat Volume Suara.
Fn+F10
Peralihan Bantalan
Sentuh
Mengaktifkan / Mematikan Bantalan sentuh
internal
Fn+F11
Bluetooth Mengaktifkan / Mematikan fungsi Bluetooth.
Fn+F12
Kamera web
Mengaktifkan / Mematikan kamera web
internal.
Fn+Space
"Peralihan papan
ketik backlight"
Mengaktifkan / Mematikan Lampu Latar Papan
Ketik.
Tombol Makro
Kunci makro dapat diatur melalui Hub makro, pengaturan kunci kombinasi untuk operasi yang
rumit dan / atau umum.
Tombol Makro Tombol Makro Rincian
G
Pengelompokan Tombol makro, tekan sekitar 3
detik sebagai peralihan hardware on / off.
G1 Pengguna dapat memprogram tombol makro
G2 Pengguna dapat memprogram tombol makro
G3 Pengguna dapat memprogram tombol makro
G4 Pengguna dapat memprogram tombol makro
G5 Pengguna dapat memprogram tombol makro
Hotkeys

Indonesia
5
Indonesia
4
Selamat menggunakan Hub Makro! makro Hub membuat anda lebih mudah untuk mengontrol
Key Makro pada P37. Anda dapat mengatur kombinasi stroke kunci kompleks dengan hanya satu
tekanan pada tombol makro, yang dimana dapat memudahkan anda baik dalam pekerjaan dan
permainan. Sebelum menggunakan Hub Makro, silakan baca panduan berikut ini, terima kasih.
1
Memulain Hub Makro
Anda dapat menemukan shortcut Hub Makro pada desktop. Hanya dengan dua klik.
2
Ikhtisar Hub Makro
4
5
1 3
2
1 Prol: Lihat pengaturan makro saat yang berlangsung
2
Macro: Edit FUNGSI perintah makro pengaturan anf.
3 Pengaturan: Perbaharui versi Hub Makro atau memperbarui pengaturan hub makro.
4 Kelompok Makro Indikator Kunci: Tunjukkan diaktifkan Makro Key Group (indikator
kelompok atcivated akan menyala)
5 Makro Function Key: Tampilkan fungsi Makro yang diprogram bawah Makro Key Group,
dari G1 ke G5.
Makro Hub Instruksi

Indonesia
7
Indonesia
6
3
Menggunakan Hub Makro
1 Mengatur fungsi dasar Key Makro
a. Klik tombol G di kiri-atas keyboard untuk beralih ke kelompok Key Makro ingin anda
gunakan
b. Klik fungsi Makro Key
c."Double-klik fungsi yang ingin Anda gunakan (ex. Media Player) dalam Basic atau
Macro
fungsi area. "
d. Menyelesaikan pengaturan

Indonesia
7
Indonesia
6
2 Mengedit FUNGSI perintah makro pengaturan anf.
a. Klik "Macro" (Anda dapat mengatur hingga 100 set makro)
13
1
8
3
7
6
10
11
9
5
2
4
12
b. Sekilas panel record makro (Anda dapat merekam makro Anda sendiri di sini)
1. Mulai rekaman: Klik bila Anda tentang untuk merekam makro
2. Jeda Beralih: Aktifkan / Nonaktifkan tombol Pause untuk berhenti merekam.
3. Nama Makro: Mengatur nama makro ini
Icon 4. Impor: Mengatur ikon untuk makro ini. Anda dapat menggunakan icon standar
atau meng-upload ikon Anda sendiri
5. Jenis Record: Anda dapat memilih untuk merekam hanya Mouse (atau keyboard)
gerakan, atau merekam. Anda juga dapat memutuskan untuk atau tidak untuk
merekam posisi mouse.
6. Rekam Interval: Anda dapat memutuskan untuk atau tidak untuk merekam interval
setiap gerakan (atau Anda dapat mengatur waktu yang tetap jeda antara setiap
gerakan)
7. Cara Eksekusi: Anda dapat mengatur cara eksekusi makro (eksekusi sekali, eksekusi
pengulangan atau eksekusi ulang dengan pers dalam)
8. Ekspor makro: Ekspor makro Anda
9. Impor makro: Impor makro
10. Hapus semua: Hapus semua gerakan dalam makro ini

Indonesia
9
Indonesia
8
11. Hapus yang dipilih: gerakan Hapus dipilih
12. Daftar Gerakan: itu menunjukkan semua gerakan Anda merekam
13. Keluar: Sistem akan menanyakan Anda jika menyimpan makro yang direkam "
c. memulai perekaman makro: Ketika Anda mengklik tombol start, mesin makro akan
mulai merekam makro Semua gerakan yang Anda buat (mouse / keyboard) akan
ditampilkan dalam daftar gerakan Anda dapat memutuskan untuk menggunakan.." Jeda
"tombol atau klik mouse tombol stop untuk menghentikan perekaman berdasarkan
catatan rekaman range.Finishing Anda: Bila Anda telah melakukan semua gerakan,
klik tombol keluar. Makro Engine akan menanyakan apakah Anda ingin menyimpan
makro. Klik Yes maka Anda dapat menyelesaikan catatan makro Anda sendiri. "
d. Menyelesaikan Pengaturan

Indonesia
9
Indonesia
8
3 Meng-edit "Pentaturan" Hub Makro
1
2
3
1. Mengupdate software: perbaharui GIGABYTE Makro Hub
2. Membershikan memori: Menghapus pengaturan Hub Makro yang ada
3. Pengupgradean Firmware: upgrade rmware Makro Key

Indonesia
11
Indonesia
10
GIGABYTE Smart Manager
Anda dapat mengaktifkan GIGABYTE Smart Manager dengan mengklik dua kali pada ikon
shortcut pada desktop jika mesin yang Anda beli memiliki sistem operasi built-in. GIGABYTE
Smart Manager merupakan kontrol antarmuka berbasis ikon, memungkinkan pengguna untuk
mengakses pengaturan sistem GIGABYTE secara umum serta khusus. Harap dicatat bahwa
GIGABYTE Smart Manajer interface, ikon, utilitas dan versi perangkat lunak dapat bervariasi
berdasarkan model yang dibeli. Silahkan mengoperasikan GIGABYTE Smart Manager built-in
menurut versi sebenarnya.
Perangkat lunak aplikasi GIGABYTE

Indonesia
11
Indonesia
10
Petunjuk Smart USB Backup
(Original: Pemulihan Image USB)
PERINGATAN
●
Anda dapat membuat cadangan image pemulihan ke yang aslinya melalui aplikasi ini dalam
kasus,apabila adanya kehilangan oleh kerusakan perangkat .
●
Anda dapat membuat cadangan image pemulihan ke disk USB dan mengembalikan sistemnya
jika sistem penyimpanan penggantiannya dengan USB disk pemulihan.
●
Sebelum Anda mengembalikan sistem melalui USB disk pemulihan, pastikan bahwa Anda
telah membuat backup data Anda .
●
Harap JANGAN menutup atau un -plug sistem ketika melakukan backup melalui USB disk pemulihan.
1
>20G
• Silakan pasang di USB disk yang
setidaknya 20GB kapasitas untuk
membuat image asli ( backup data
di USB pertama. Semua data akan
dihilangkan selama pembuatan
recovery disk USB )
2
• Masukkan driver disk untuk drive optik
Anda dan menjalankan instalasi dari
" Cerdas USB Backup " ( untuk tidak
ada - ODD Model , silakan gunakan
perangkat USB ODD atau download
dari http://www.gigabyte.com
3
• Jalankan "Smart USB Backup " setelah
menyelesaikan instalasi.
Pilih USB disk Anda dari daftar drop-
down dan mulai membuat disk USB
pemulihan.
4
• Pilih USB disk Anda dari daftar
drop-down dan mulai membuat disk
pemulihan USB.
5
• Jendela akan muncul ketika penciptaan pemulihan disk dilakukan.
• Silahkan tekan F12 pada memulai sistem ketika Anda perlu untuk mengembalikan
sistem. Pilih boot Dari pemulihan USB disk dan sistem akan dipulihkan.
• Waktu yang dibutuhkan untuk mengembalikan akan sekitar 30 menit (waktu yang dibu-
tuhkan dapat bervariasi tergantung model USB disk).

Indonesia
13
Indonesia
12
Sistem Pemulihan (Restore sistem operasi laptop Anda):
Bila terjadi kesalahan dengan sistem operasi laptop, penyimpanan laptop memiliki partisi
tersembunyi yang berisi penuh cadangan image dari sistem operasi yang dapat digunakan untuk
memulihkan sistem ke pengaturan pabrikannya.
Catatan:
˙
Jika penyimpanan telah beralih atau partisi yang dihapus, pilihan untuk pemulihan tidak akan lagi
tersedia dan layanan untuk pemulihan akan dibutuhkan.
˙
Fungsi pemulihan hanya tersedia pada perangkat dengan O / S terpasang. Perangkat dengan
DOS tidak memiliki fungsi recovery.
Persiapan
Pastikan PC anda terpasang. Ini akan di butuhkan beberapa menit.
Panduan Pemulihan
Memunculkan Sistem Pemulihan:
Fitur sistem pemulihan telah diinstal sebelum laptop dikirim dari pabrik. Menu pilihan memungkinkan
Anda untuk membuka alat pemulihan Windows untuk menginstal ulang sistem operasi ke standar
pabrikannya.
Pengenalan singkat di bawah ini akan menunjukkan kepada Anda bagaimana untuk memulai alat
pemulihan dan mengembalikan operasi sistem Anda.
Pemulihan Gratis Windows 10
Selama proses peralihan sistem di laptop anda,
silahkan tekan terus key F9
untuk maluncurkan sistemnya.
2
1
3
Matikan dan restart laptop.
˙
Dua cara yang dapat dilakukan untuk pemulihan sistem
˙
Meperbarui PC ini,
Pilih” Masalah “untuk memasukkan pengaturan pemulihan. (Anda juga dapat
memilih “Lanjutkan” untuk keluar sistem pemulihan dan melanjutkannya ke
Windows 10 untuk le atau data cadangan.
Anda dapat memperbarui sistem stabilitas laptop anda tanpa menghilangkan
data-data yang ada.
˙
GIGABYTE Smart Recovery (Pemulihan dengan menggunakan GIGABYTE
Smart Recover)
Pengaturan PC Anda akan dikembalikan ke pengaturan parbrikannya.
Caution: All personal data and les will be lost.

Indonesia
13
Indonesia
12
Berikut adalah apa yang akan terjadi
˙
Semua le pribadi Anda dan aplikasi akan dihapus.
˙
Pengaturan PC Anda akan dikembalikan ke pengaturan pabrikannya.
▓▓ ▓▓▓
Pilih “Refresh PC Anda”
Keep my les
Pilih akun untuk lanjut. Semua Apps akan dihapus, dan pengaturan
akan kembali ke OS sebelumnya (tanpa aplikasi GIGABYTE), tetapi le
pribadi Anda akan tersimpan.
menghapus semuanya
Semua aplikasi, pengaturan dan le pribadi akan dihapus.
Hanya menghapus le saya
Hanya data pribadi dan le akan dihapus, namun pengaturan komputer
akan disimpan.
Sepenuhnya menghapus drive
drive akan sepenuhnya dikembalikan ke pengaturan pabrikannta.
Dibutuhkan waktu yang panjang. > [Klik “Reset” untuk menjalankan
fungsi pemulihan.]
▓▓ ▓▓▓
GIGABYTE Smart Recovery
Perhatian
˙
Setelah “Recovery” dipilih, data pribadi Anda dan file akan dihapus setelah
laptop mulai memulihkan, dan sistem operasi akan diatur ulang ke pengaturan
pabrikannya.
˙
Sebuah bar indikator progress akan ditampilkan di jendela ketika proses
pemulihan berjalan. Pastikan adaptor AC terpasang dan tidak mematikan
laptop.
pemulihan akan diaktifkan dan Anda akan melihat
tombol pilihan pada jendela. Klik “Ya” untuk
memulainya.
Setelah pemulihan sistem selesai, Anda akan melihat
tombol pilihan pada jendela, silakan klik
“Matikan”.
4

Indonesia
PB
Indonesia
14
▓
Pilihan lanjutan
pemulihan sistem
Gunakan restore point yang tersimpan pada PC Anda untuk
memulihkan Windows
Pemulihan Sistem Image
Recover Windows menggunakan sistem le image.
Perbaikan secara otomatis
solusi untuk sistem Windows dari loading.
Gommand Prompt
Menggunakan Command Prompt untuk pemecahan masalah yang
lebih lanjut.
Pengaturan UEFI Firmware
Merubah pengaturan PC’s UEFI rmware.
Pengaturan startup
Mengubah pemualain Windows sesuai dengan yang dikehendakinya.
Garansi & Layanan:
Garansi, layanan dan informasi yang terkait silahkan lihat kartu garansi atau situs layanan
GIGABYTE, link di bawah ini:
http://www.gigabyte.com/support-downloads/technical-support.aspx
Pertanyaan Umum (FAQ):
FAQ (Pertanyaan yang Sering Ditanyakan) silakan lihat link di bawah ini:
http://www.gigabyte.com/support-downloads/faq.aspx
Lampiran

I taliano
1
I taliano
PB
1
2
3
USB
Charging
Port
Complimenti per l'acquisto del Notebook GIGABYTE.
Questo manuale vi aiuterà a iniziare la configurazione del notebook.La configurazione del
prodotto finale dipende dal modello al punto di acquisto.GIGABYTE si riserva il diritto di
modicare senza preavviso. Per informazioni più dettagliate, si prega di visitare il nostro sito
web all'indirizzo www.gigabyte.com.
Utilizzando GIGABYTE notebook per la prima volta
1 Collega il cavo di alimentazione nel AC adattatore.
2 Collega l'adattatore AC al jack DC-in sul lato destro del notebook.
3 Collega il cavo di alimentazione alla presa di corrente.
IMPORTANTE!
•
Assicurarsi che il notebook è collegato ad adattatore di alimentazione con messa a terra prima di accenderlo per la prima volta.
•
Quando si utilizza il PC Notebook in modalità di adattatore di alimentazione, la presa deve essere vicina all'unità e facilmente
accessibile.
•
Localizzare la letichetta di input / output sul Notebook e assicurarsi che corrisponda alla informazioni Valutazione input/putput del sul
alimentatore.Alcuni modelli di Notebook possono avere più correnti di uscita valutazione basata sul SKU disponibili.
•
Informazioni del Adattatore di alimentazione:
Tensione di Input: 100-240Vac ,- Frequenza di Input: 50-60Hz ,- Tensione Valutazione di outpu:: 19.5V and 19V
Accensione del Alimentazione
Dopo aver acceso il Notebook per la prima volta,non spegnerlo no quando il sistema operativo
è stato configurato. Si prega di notare che il volume del'audio non funzionerà fino quando
l'Installazione di Windows® è stata completata.
L'avviamento del Notebook per la prima volta
Secondo alla configurazione,la schermata di avvio di Microsoft® Windows® sarà la prima
schermata che si vedrà come il notebook si avvia. Segue le istruzioni e le istruzioni su schermo e
insere le informazioni personali per completare la congurazione del sistema operativo Windows®.

I taliano
3
I taliano
2
1 Sensore di luce
2 Webcam
3 Indicatore LED di stato di Webcam
4
Microfono x2
5 Pulsante di accensione
6 TouchPad
7 Indicatore di pulsante di batteria
8
Indicatori LED
Premere il tasto destro del touchpad
per controllare la carica residua della
batteria. Tasto destro del mouse per
visualizzare la percentuale di carica
residua.Come mostrato di seguito,
l’indicatore della durata della batteria è
disponibile quando il portatile è spento,
in stand-by o ibernazione. (Modalità
batteria)
1
2
<10%
11-30%
31-50%
51-70%
71-90%
>90%
LED Stato di bluetooth
LED Stato di internet
LED Stato di HDD
LED Stato di batteria
LED Stato di potenza
2
1 3
6
87
5
4
Vista dall'alto
Un giro nell tuo GIGABYTE Notebook

I taliano
3
I taliano
2
1 Porta di Kensington Lock
2 Porta di HDMI
3 Porta di USB (sopporta carica di USB)
4 Porta dell'audio combo
5 Lettore di carta SD
1 USB 3.1
2 Porta di mini display
3 Porta di USB 3.0 (carica USB)
4 USB 3.0
5
Porta di DC-in
3 4
1
2 5
1 3
2
4 5
Avvertimento:
NON rimuovere la batteria al litio incorporata. Per eventuali esigenze di servizio, si prega di contattare il
centro di assistenza autorizzato locale dal GIGABYTE.
•
Non installare il Notebook PC su un taglio o un luogo soggetto a vibrazioni,o evitare di utilizzare il Notebook in
quella posizione per un lungo periodo.Questo aumenta il rischio che si verichino problemi di funzionamento o
danni al prodotto.
•
Non conservare e utilizzare Notebook in luce diretta del sole o la posizione in cui la temperatura supera i 112 °
F (45 ° C), come ad esempio all'interno di un veicolo.C'è il pericolo di espansione della batteria agli ioni di litio e
l'invecchiamento.
•
Non utilizzare il Notebook in un luogo scarsamente ventilato come sulla biancheria, su un cuscino, ecc,e non
utilizzarlo in un luogo come la camera con riscaldamento a pavimento come potrebbe causare il surriscaldamento
del computer. Fare attenzione che le aperture di Notebook (sul lato o sul fondo) non siano bloccati sopprattutto
in questi ambienti. Se le prese d'aria sono bloccate, può essere pericoloso e causare surriscaldamento del
Notebook..
Vista Sinistra
Vista Destra

I taliano
5
I taliano
4
Il computer utilizza tasti di scelta rapida o combinazioni di tasti per accedere alla maggior parte
dei controlli, quali la luminosità dello schermo e uscita volume. Per attivare tasti di scelta rapida,
tenere premuto il tasto <Fn> e premere l'altro tasto della combinazione.
Hotkey
Funzione Descrizione
Fn+ESC Espulsa ODD Espulsa ODD
Fn+F1
Dormire Mette il computer in modalità sospensione
Fn+F2
Internet Abilita/disabilita la funzione di internet
Fn+F3
Riduci luminosità Diminui la luminosità dello schermo
Fn+F4
Aumenta luminosità Aumenta la luminosità dello schermo
Fn+F5
Display Toggle
Scambia is display output tra lo schermo,
monitor esterno( se collegato) ed entrambi
Fn+F6
Touchpad Toggle Svolta il touchpad interno ON/OFF
Fn+F7
Altoparlanti Toggle Svolta il altoparlanti ON/OFF
Fn+F8
Abbassa volume Diminui il volume
Fn+F9
Aumenta volume Aumenta il volume
Fn+F10
Screen Display Toggle Accende e spegne il schermo
Fn+F11
Bluetooth Abilita/disabilita la funzione di Bluetooth
Fn+F12
Webcam Accende e spegne il webcam interno
Fn+Space
Toggle
Retroilluminazione
della tastiera
Svolta la retroilluminazione della tastiera ON/
OFF
Tasto Macro
Tasti macro possono essere impostati tramite Hub Macro,impostando combinazione di tasti per il
funzionamento complicato e / o generale.
Tasto Macro Tasto Macro Descrizione
G
interruttore gruppo Macro , premere circa 3 secondi, come
interruttore hardware on / off.
G1 Utente tasto Macro programmabile
G2 Utente tasto Macro programmabile
G3 Utente tasto Macro programmabile
G4 Utente tasto Macro programmabile
G5 Utente tasto Macro programmabile
Tasti di scelta rapida

I taliano
5
I taliano
4
Benvenuto per usare Hub Macro! Macro Hub rende molto più facile per voi per controllare la
chiave Macro in Aero14. Si può trattare con combinazione di pressione di un tasto complessa da
una sola pressione sul tasto macro, che ti porta beneci sia nel lavoro e gioco. Prima di utilizzare
Hub Macro, si prega di leggere seguente guida, grazie.
1
Avviare Macro Hub
È possibile trovare la scorciatoia di Macro Hub sul desktop. Basta fare doppio clic su di esso
2
La panoramica di Macro Hub
4
5
1 3
2
1 Proli: Visualizza le impostazioni attuale dei comandi macro .
2
Macro: Modica funzioni di comando di macro e le impostazioni.
3 Impostazioni: Update versione Hub Macro o rinnovare le impostazioni hub macro.
4 Indicatori Gruppo Macro Key: Indicare l'attivazione Macro Group chiave (l'indicatore di
gruppo attivato si accende)
5 Funzione di tasto Macro: Mostra le funzioni macro programmata sotto il gruppo di macro
chiave, da G1 a G5.
Istruzione di Macro Hub

I taliano
7
I taliano
6
3
Utilizzando Macro Hub
1 Set macro key per funzione di base
a. Fare clic sul pulsante G a sinistra-
superiore della tastiera per passare al
gruppo tasto macro che vuoi utilizzare
b.Fare clic sulla macro di funzione di
mattoni
c.Fare doppio clic sulla funzione che si desidera utilizzare (es. Media Player) nell'area
Funzione di base o macro.
d. Completa l'impostazione

I taliano
7
I taliano
6
2 Modica funzioni di comando di macro e le impostazioni.
a. Fai clic su "Macro" (è possibile impostare no a 100 set di macro)
13
1
8
3
7
6
10
11
9
5
2
4
12
b. Panoramica del pannello di record di macro (è possibile registrare il proprio macro qui)
1. Avviare la registrazione: Fare clic quando si sta per registrare la macro
2. Chiave di interruttore : abilitazione inibizione chiave / Pausa per interrompere la
registrazione.
3. Nome di Macro : Impostare il nome di questa macro
4.Importa icona: Icon Set per questa macro. È possibile utilizzare l'icona predenita per
caricare la propria icona
5.Tipo di registrazione: È possibile scegliere di registrare solo il mouse (o la tastiera) il
movimento, o di registrare sia. Si può anche decidere di non registrare o posizione
del mouse.
6. Intervallo di registrazione: si può decidere di non registrare o l'intervallo di ogni
movimento (oppure è possibile impostare l'intervallo di tempo fisso fra ogni
movimento)
7. Modo di esecuzione: è possibile impostare il modo in esecuzione di macro (eseguito
una volta sola, l'esecuzione di ripetizione o l'esecuzione di ripetizione con la stampa
di profondità)

I taliano
9
I taliano
8
8. Export macro: Esportare il macro
9. Importa macro: Importare la macro
10. Elimina tutto: Elimina tutto momento in questa macro
11. Elimina selezionati: elimina il movimento selezionato
12. Lista Movimento: mostra tutti i movimenti che si registra
13. Uscita: Il sistema di informarsi se per salvare la macro registrata
c. Inizia a registrare macro: Quando si fa clic su pulsante di avvio, il motore macro inizierà
a registrare macro. Tutti i movimenti che hai fatto (mouse / tastiera) sarà mostrato nella
lista del movimento. Si può decidere di usare ""mettere in pausa"" tasto o click del
mouse sul pulsante stop per interrompere la registrazione basato sulla registrazione
vostro record range.Finishing: Quando avete fatto tutto il movimento, fare clic sul
pulsante di uscita. Il motore di macro di informarsi se si desidera salvare la macro. Fare
clic su Sì allora si può nire il record della propria macro.
d. Completa l'impostazione.

I taliano
9
I taliano
8
3 Modica "Impostazioni" di Hub Macro
1
2
3
1.Aggiornamento software: Aggiornare la versione più recente di GIGABYTE Hub Macro
2.Pulizia di memoria : cancella le impostazioni correnti Hub macro
3.Aggiornamento rmware: aggiornamento rmware tasto macro

I taliano
11
I taliano
10
Amministratore inteligente di GIGABYTE
È possibile attivare amministratore inteligente di GIGABYTE facendo doppio clic sull'icona del
collegamento sul desktop, se la macchina acquistata c'è l'operazione del sistema operativo
integrato.Amministratore inteligente di GIGABYTE è un'interfaccia di controllo basata su icone,
che consente agli utenti di accedere intenzionalmente configurazione del sistema comune,
così come GIGABYTE utilità esclusivi. Si prega di notare che l'interfaccia della amministratore
inteligente di GIGABYTE , le icone, i servizi e le versioni del software possono variare in base
ai modelli acquistati.Si prega di operare amministratore inteligente di GIGABYTE a seconda
della effettiva versione incorporato.
Applicazione software di GIGABYTE

I taliano
11
I taliano
10
Guida intelligente di USB Backup
(originale: Recupero immagine di USB)
Avvertimento
●
Puo fare il backup del recupero de la immagine attraverso questa applicazione, in caso di perdita da
danni del dispositivo.
●
Puo fare il backup del recupero de la immagine su disco USB e ripristinare il sistema di qualsiasi sistema
di storage.
●
Prima di ripristinare il sistema attraverso il disco di ripristino USB, assicurarsi di avere già fatto il backup
dei dati.
●
Si prega di NON spegnere o scollegare il sistema durante l'esecuzione di backup tramite disco di
ripristino USB.
1
>20G
• Si prega di inserire il disco USB che è
almeno 20 GB di capacità per rendere
l'immagine originale (backup dei dati
in USB.Tutti i dati saranno eliminate
durante la creazione di recupero
disco USB)
2
• Inseri il disco driver nell'unità ottica ed
esegui l'installazione di "Smart USB
Backup "(per nessuno - modello di
ODD, si prega di utilizzare dispositivi
ODD USB o scarisca da
http://www.gigabyte.com
3
• Esegui il "Backup USB Smart" dopo
aver terminato l'installazione.
4
• Seleziona il disco USB dall'elenco a
discesa e inizia a creare il disco di
ripristino USB.
5
• La nestra si aprirà quando la creazione di disco di ripristino è fatto.
• Si prega di premere F12 sulla avviare il sistema quando è necessario ripristinare il
sistema. Selezionare “Boot dal disco di ripristino USB” e il sistema verrà ripristinato.
• Il tempo necessario per il ripristino sarà di circa 30 minuti (tempo necessario può
variare a seconda del modello del disco USB).

I taliano
13
I taliano
12
Ripristino di sistema (ripristinare il sistema operativo portatile):
Quando qualcosa che non va con il sistema operativo del computer portatile, la conservazione
del portatile ha una partizione nascosta che contiene un backup di immagine completa del
sistema operativo che può essere utilizzato per ripristinare il sistema alle impostazioni di
fabbrica.
Tutto pronto ad andare
Assicurarsi che il PC sia collegato. Questo richiederà alcuni minuti.
Guida di Recupero
Nota:
˙
Se allo stoccaggio è stato attivato o eliminare la partizione, l’opzione di ripristino non sarà più
disponibile e verrà richiesta un servizio di recupero.
˙
La funzione di recupero è disponibile solo su dispositivi con sistema operativo pre installato. I
dispositivi con DOS non hanno la funzione di recupero.
Avviare Ripristino di sistema:
La funzione di ripristino del sistema è preinstallato prima che il portatile è spedito dalla fabbrica.
Il menu delle opzioni consente di avviare lo strumento di recupero di Windows per reinstallare il
sistema operativo di default di fabbrica.
La breve introduzione di seguito vi mostrerà come avviare lo strumento di recupero e ripristinare il
sistema.
Guida di Recupero per Windows 10
Durante il portatile accende sul processo, premere e
tenere premuto F9 chiave per avviare lo strumento.
2
1
3
Spegnere e riavviare il computer portatile.
Ci sono due opzioni per il ripristino del sistema
˙
Aggiorna il tuo PC
È possibile aggiornare il vostro computer portatile per migliorare la stabilità del
sistema senza perdere i le
˙
Recupero Inteligente di GIGABYTE
Le impostazioni del PC verrà ripristinato alle impostazioni di fabbrica.
Attenzione: Tutti i dati personali ei le verranno persi.
Scegliere “Risoluzione dei problemi” per immettere le impostazioni di
recupero. (Inoltre è possibile scegliere “Continua” per uscire sistema di
recupero e continuare a Windows 10 per i le o backup dei dati.)

I taliano
13
I taliano
12
Ecco cosa accadrà
˙
Tutti i le e applicazioni personali saranno rimossi.
˙
Le impostazioni del PC verranno ripristinate al puro O / S (senza GIGABYTE
app).
4
▓
Scegliere “Reset questo PC”
Mantenere i miei le
Scegliere un account per continuare.Tutte le applicazioni saranno
rimossi, e le impostazioni sosterrà a puro O / S (senza GIGABYTE app),
ma i le personali saranno conservati.
Rimuovere tutto
Tutte le applicazioni, impostazioni e le personali saranno rimossi.
Rimuovi i miei le
Solo i dati personali ed i le saranno rimossi, ma le impostazioni del
computer verranno conservati.
Pulisci completamente il disco
L’unità sarà completamente ripristinato le impostazioni predefinite.
Ci vuole più tempo. > [Clicca su “Reset” per eseguire la funzione di
recupero.]
▓ Recupero Inteligente di GIGABYTE
Attenzione:
˙
Una volta selezionato il “”Recupero””, i dati personali e le saranno cancellati
dopo che il portatile si avvia il ripristino, e il sistema operativo verrà riportato a
impostazioni di fabbrica.
˙
Un indicatore di avanzamento mostra sulla finestra quando il processo di
recupero è in funzione. Si prega di accertarsi che l’adattatore CA sia collegato
e non spegnere il portatile.
La ripresa sarà attivato e si vedrà la pulsanti di
opzione sulla nestra. Clicca su “Sì” per avviarlo .
Dopo il ripristino del sistema è completato, si vedrà
il pulsante di opzione sulla finestra, cliccate sul
“Fermare”.

I taliano
PB
I taliano
14
▓
Opzioni avanzate
Ripristino del sistema
Utilizza un punto di ripristino registrati sul PC per ripristinare Windows.
Recupero di immagine del sistema
Recupera Windows utilizzando un le di immagine del sistema specico
Recupero Automatico
Risolve i problemi che impediscono il caricamento di Windows.
Comando Immediato
Utilizza il comando immediato per la risoluzione avanzata dei problemi.
Impostazioni del rmware UEFI
Modica le impostazioni di rmware UEFI del PC.
Impostazione di avvio
Cambia il comportamento di avvio di Windows.
Garanzia e assistenza:
Garanzia e assistenza e le relative informazioni si rimanda al sito web del servizio di garanzia o
GIGABYTE come sul link qui sotto:
http://www.gigabyte.com/support-downloads/technical-support.aspx
FAQ :
FAQ(Domande frequenti)consultare il seguente link:
http://www.gigabyte.com/support-downloads/faq.aspx
Manuale d'uso completo:
Per più manuale d'uso e di istruzioni del software, fare riferimento al link sottostante:
http://www.gigabyte.com/support-downloads/download-center.aspx
Appendice
-
 1
1
-
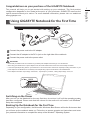 2
2
-
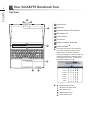 3
3
-
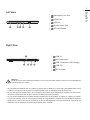 4
4
-
 5
5
-
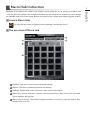 6
6
-
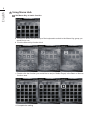 7
7
-
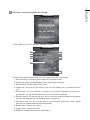 8
8
-
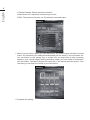 9
9
-
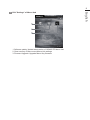 10
10
-
 11
11
-
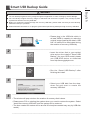 12
12
-
 13
13
-
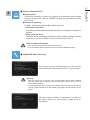 14
14
-
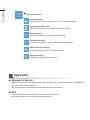 15
15
-
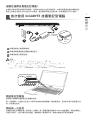 16
16
-
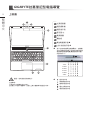 17
17
-
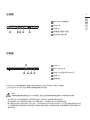 18
18
-
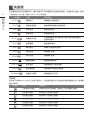 19
19
-
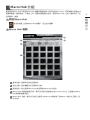 20
20
-
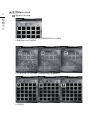 21
21
-
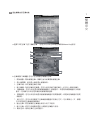 22
22
-
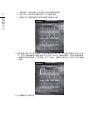 23
23
-
 24
24
-
 25
25
-
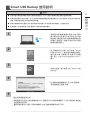 26
26
-
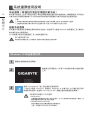 27
27
-
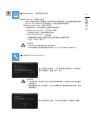 28
28
-
 29
29
-
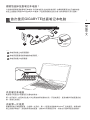 30
30
-
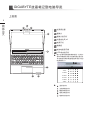 31
31
-
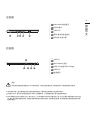 32
32
-
 33
33
-
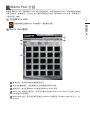 34
34
-
 35
35
-
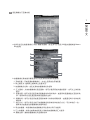 36
36
-
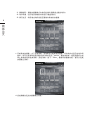 37
37
-
 38
38
-
 39
39
-
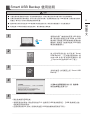 40
40
-
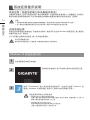 41
41
-
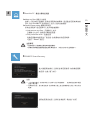 42
42
-
 43
43
-
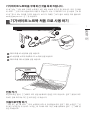 44
44
-
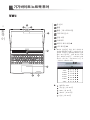 45
45
-
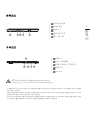 46
46
-
 47
47
-
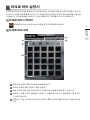 48
48
-
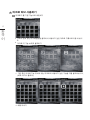 49
49
-
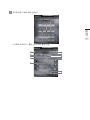 50
50
-
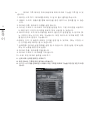 51
51
-
 52
52
-
 53
53
-
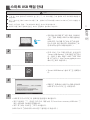 54
54
-
 55
55
-
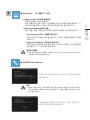 56
56
-
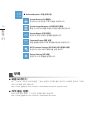 57
57
-
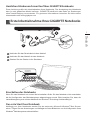 58
58
-
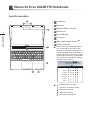 59
59
-
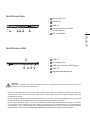 60
60
-
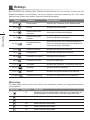 61
61
-
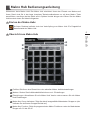 62
62
-
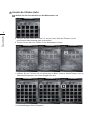 63
63
-
 64
64
-
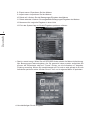 65
65
-
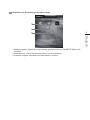 66
66
-
 67
67
-
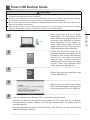 68
68
-
 69
69
-
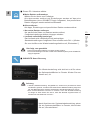 70
70
-
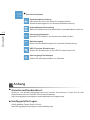 71
71
-
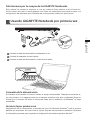 72
72
-
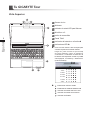 73
73
-
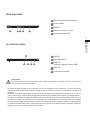 74
74
-
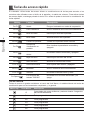 75
75
-
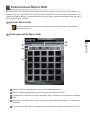 76
76
-
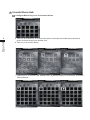 77
77
-
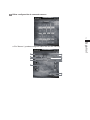 78
78
-
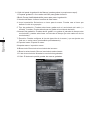 79
79
-
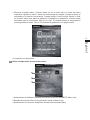 80
80
-
 81
81
-
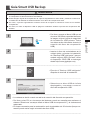 82
82
-
 83
83
-
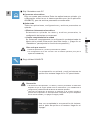 84
84
-
 85
85
-
 86
86
-
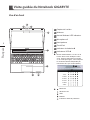 87
87
-
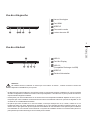 88
88
-
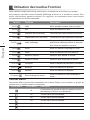 89
89
-
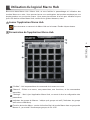 90
90
-
 91
91
-
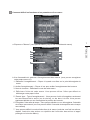 92
92
-
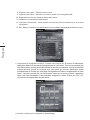 93
93
-
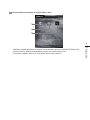 94
94
-
 95
95
-
 96
96
-
 97
97
-
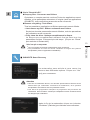 98
98
-
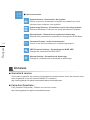 99
99
-
 100
100
-
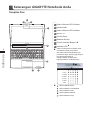 101
101
-
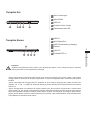 102
102
-
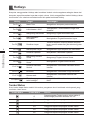 103
103
-
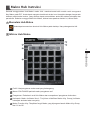 104
104
-
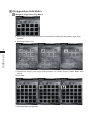 105
105
-
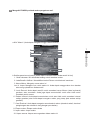 106
106
-
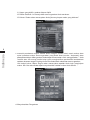 107
107
-
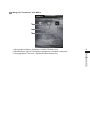 108
108
-
 109
109
-
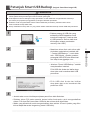 110
110
-
 111
111
-
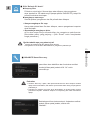 112
112
-
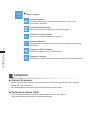 113
113
-
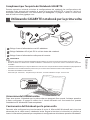 114
114
-
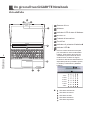 115
115
-
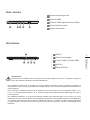 116
116
-
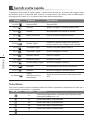 117
117
-
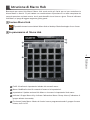 118
118
-
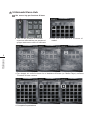 119
119
-
 120
120
-
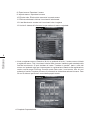 121
121
-
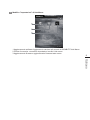 122
122
-
 123
123
-
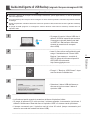 124
124
-
 125
125
-
 126
126
-
 127
127


Gigabyte AERO 14 Manual de usuario
- Tipo
- Manual de usuario
- Este manual también es adecuado para
En otros idiomas
- français: Gigabyte AERO 14 Manuel utilisateur
- italiano: Gigabyte AERO 14 Manuale utente
- 日本語: Gigabyte AERO 14 ユーザーマニュアル
Documentos relacionados
-
Gigabyte P34 Manual de usuario
-
-
-
Gigabyte P37W V5 El manual del propietario
-
-
-
-
-
Gigabyte U2442T El manual del propietario
-
Otros documentos
-
Adesso CyberTablet Z12 Manual de usuario
-
Tripp Lite B032-VU1 El manual del propietario
-
-
Coby Windows 7 Recovery v1.0 Recovery Manual
-
Coby NBPC1022 Recovery Manual
-
Perixx PERIBOARD-335 Manual de usuario
-
-
Perixx PERIBOARD-835 Manual de usuario