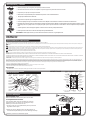
GPX KCCD6817DT Manual de usuario
- Categoría
- Reproductores de CD
- Tipo
- Manual de usuario
El GPX KCCD6817DT es un reproductor de CD y radio AM/FM de alta calidad diseñado para brindar un sonido nítido y potente en cualquier entorno. Con su diseño compacto y elegante, este dispositivo es ideal para usarse en el hogar, la oficina o incluso en el automóvil.
Algunas de sus características principales incluyen:
- Reproducción de CD de audio, CD-R y CD-RW.
- Radio AM/FM con sintonizador digital.
- Función de programación de estaciones de radio.
- Ecualizador de sonido con cinco ajustes predefinidos.
- Función de repetición y reproducción aleatoria.
- Control remoto para mayor comodidad.


Transcripción de documentos
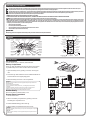
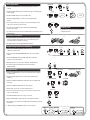
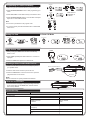
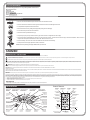
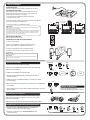
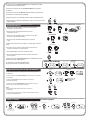
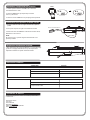
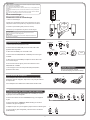
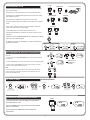
KCCD6817DT Instruction Manual Manual de Instruciones/Manuel d'Instruciones Under-Cabinet CD Player/Tocador de DVD debajo del Gabinete/Coiffeuse de DVD sous le Cabinet Before operating this product, please read the instructions completely Antes de utilizar este producto, favor lea las instruciones por completo/Avant d'utiliser ce produit, faveur lisez les instruciones complètement English page 2/Spanish page 6/French page 10 Warnings and Precautions TO PREVENT FIRE OR SHOCK HAZARDS, DO NOT EXPOSE THIS UNIT TO RAIN OR MOISTURE. This symbol, located on back or bottom of the unit, is intended to alert the user to the presence of uninsulated “dangerous voltage” within the product's enclosure that may be of sufficient magnitude to constitute a risk of electric shock to persons. This symbol is intended to alert the user to the presence of important operating and maintenance (servicing) instructions in the literature accompanying the appliance. This product utilizes a Class 1 laser to read Compact Discs. This laser Compact Disc Player is equipped with safety switches to avoid exposure when the CD door is open and the safety interlocks are defeated. Invisible laser radiation is present when the CD Player's lid is open and the system's interlock has failed or been defeated. It is very important that you avoid direct exposure to the laser beam at all times. Please do not attempt to defeat or bypass the safety switches. Any use of the controls or an adjustment to the procedures other than those specified herein may result in hazardous radiation. CAUTION: TO PREVENT ELECTRIC SHOCK, MATCH WIDE BLADE OF PLUG TO WIDE SLOT, FULLY INSERT. TO REDUCE THE RISK OF ELECTRIC SHOCK, DO NOT REMOVE COVER (OR BACK). THERE ARE NO USER-SERVICEABLE PARTS INSIDE. PLEASE REFER ANY SERVICING TO QUALIFIED SERVICE PERSONNEL. WARNING: Changes or modifications to this unit not expressly approved by the party responsible for compliance could void the user's authority to operate the equipment. NOTE: This equipment has been tested and found to comply with the limits for a Class B digital device, pursuant to Part 15 of the FCC Rules. Receiver complies with Part 15 of FCC rules when manufactured.These limits are designed to provide reasonable protection against harmful interference in a residential installation. This equipment generates, uses, and can radiate radio frequency energy and, if not installed and used in accordance with the instructions, may cause harmful interference to radio communications. however, there is no guarantee that interference will not occur in a particular installation. If this equipment does cause harmful interference to radio or television reception, which can be determined by turning the equipment off and on, the user is encouraged to try to correct the interference by one or more of the following measures: • Reorient or relocate the receiving antenna. • Increase the separation between the equipment and receiver. • Connect the equipment into an outlet on a circuit different from that to which the receiver is connected. • Consult the dealer or an experienced radio/TV technician for help. Special Note When placing your unit on a lacquered or natural finish, protect your furniture with a cloth or other protective material. Remote: Features Unit: TIMER BUTTON SKIP TUNE DN BUTTON SKIP TUNE UP BUTTON PLAY/PAUSEBUTTON MOUNTING BRACKET BOTÓN TIMER BOTÓN SKOP TUNE DN BOTÓN SKOP TUNE UP BOTÓN PLAY/PAUSE SOPORTE DE INSTALACIÓN BOUTON TIMER BOUTON SKIP TUNE DN BOUTON SKIP TUNE UP BOUTON PLAY/PAUSE SUPPORT D' INSTALLATION MUTE BUTTON BOTÓN BAND BOUTON BAND BOUTON FUNCTION TIMER BUTTON BOTÓN TIMER BOUTON TIMER POWER OPEN/CLOSE MUTE FUNCTION BAND TIMER SKIP FB/ TUNE DN PLAY/PAUSE SKIP FF/ TUNE UP SKIP FF/TUNE UP BUTTON PLAY/PAUSE BUTTON BOTÓN PLAY/PAUSE BOUTON STOP BOUTON PLAY/PAUSE FICHE 12V C.C. FUNCTION BUTTON SKIP FB/TUNE DN BUTTON BOTÓN FUNCTION BOTÓN SKIP FB/TUNE DN POWER BUTTON BOUTON FUNCTION BOUTON SKIP FB/TUNE DN OPEN/CLOSE BUTTON M+ BUTTON BOTÓN OPEN/CLOSE BOUTON M+ BOTÓN POWER BOUTON POWER COMPARTIMENTO DE PILAS STOP VOL PROG/MEM VOL VOLUME + BUTTON REPEAT BOTÓN TUNING CLK ADJ/ DISPLAY CLK ADJ/DISPLAY BUTTON BOTÓN CLK ADJ/DISPLAY REMOTE CONTROL M- BUTTON M+ BUTTON PROG/MEM BUTTON Control Remoto BOTÓN M- BOTÓN M+ BOTÓN PROG/MEM BOTÓN REPEAT Contrôle Éloigné BOUTON M- BOUTON M+ BOUTON PROG/MEM BOUTON REPEAT BOTÓN PROG BOUTON PROG EQ BUTTON REPEAT BUTTON BOTÓN EQ BOTÓN REPEAT VOLUME BUTTON BOTÓN VOLUME BOUTON REPEAT BOUTON EQ REPEAT BUTTON BOUTON VOLUME + PROG BUTTON EQ BOUTON TUNING BOUTON CLK ADJ/DISPLAY STOP BUTTON BOTÓN STOP BOTÓN VOLUME + TUNING BUTTON COMPATIMENT Á PILES BOTÓN SKIP FF/TUNE UP BOUTON SKIP FF/TUNE UP BOUTON STOP BOTÓN M+ BOUTON OPEN/CLOSE BATTERY COMPARTMENT BAND BUTTON BOTÓN MUTE BOUTON MUTE BOTÓN FUNCTION BOTÓN STOP 12 V DC JACK OPEN/CLOSE BUTTON BOTÓN OPEN/CLOSE BOUTON OPEN/CLOSE FUNCTION BUTTON STOP BUTTON DC JACK DE 12V POWER BUTTON BOTÓN POWER BOUTON POWER BOUTON VOLUME BAND BUTTON BOTÓN BAND CLK ADJ/DISPLAY BUTTON BOUTON BAND BOTÓN CLK ADJ/DISPLAY BOUTON CLK ADJ/DISPLAY BATTERY COMPARTMENT COMPARTIMENTO DE PILAS COMPATIMENT Á PILES EQ BUTTON BOTÓN EQ BOUTON EQ Power Source AC Connection Connect the AC plug to a 120v AC, 60Hz wall outlet. 120V AC/60 Hz Battery Compartment Three (3) “AAA” size batteries can also be used to power and/or to provide backup for the clock and alarm time for as follows: 1. Open the battery door by pushing on the tab, removing the door. 2. Insert three (3) “AAA” batteries as shown. Alkaline batteries are recommended for the longest playing time. DC 1.5V "AAA" x 3 (Not Included) 3. Place the battery door back on the compartment. WARNING: Danger of explosion if batteries are incorrectly replaced. Replace only with the same or equivalent type. • Do not mix old and new batteries. • Do not mix alkaline, standard (carbon-zinc), or rechargeable (nickel-cadmium) batteries. • Replace the batteries when the sound becomes unstable or cannot be heard. • When you are not going to use your unit for a long time, remove the batteries to prevent damage from battery leakage and corrosion. Remote Battery Remove the plastic protective battery cover. OPEN POWER OPEN/CLOSE MUTE FUNCTION BAND TIMER SKIP FB/ TUNE DN PLAY/PAUSE SKIP FF/ TUNE UP Remote Battery Installation 1. Turn the remote over. 2. Remove the battery compartment by pressing on the tab and sliding the compartment out. REPEAT STOP VOL PROG/MEM VOL CLK ADJ/ DISPLAY OPEN EQ REMOVE BEFORE USE PULL + + 3. Turn Install a remote CR2025over. battery (positive side up). 1. the LITHIUM BATTERY LITHIUM BATTERY CR2025 CR2025 3V 3V 4. Remove Replace the battery compartment back the remote. 2. battery compartment byinpressing in on the tab and then sliding the compartment out. WARNING: The button cell battery contains mercury, don't put in the trash. Recycle or dispose as hazardous waste. 3.CAUTION: Install a Cr2025 battery (positive side up). Danger of explosion if battery is incorrectly replaced, Replace only with the same or equivalent type. 4. Put the battery compartment back in the remote. + + LITHIUM BATTERY CR2025 3V LITHIUM BATTERY CR2025 3V Radio Operation FUNCTION POWER ON BAND 1. Press the POWER button on the front of the unit or on the remote. 2. Press the FUNCTION button to select radio, AM or FM will appear in the display. VOLUME TUNING DN SKIP/TUNE UP RADIO 107.7 3. Press the BAND button to choose FM or AM + UP ROCK MHZ DOWN DOWN OR L-12 - OR UP 4. Press the SKIP/TUNE up or down to find a desired radio station. DN 5. To turn the volume up or down you can use the features on the unit it self or the ones on the remote. 6. To scan through stations press and hold the SKIP/TUNE buttons up or down. SKIP/TUNE UP OR UP DOWN Display Time EQ In Radio mode, press CLOCK ADJ/DISPLAY to display the time. 7. To change sound of the music to Flat/Rock/Pop/Jazz/Classic press the EQ button. To Improve Reception FM: AM: 1. For AM reception rotate the unit or move it from side to side to improve reception. Remember once you mount the unit you can’t adjust the am reception anymore. 2. For FM reception unwind digital FM wire antenna. Programming Stations Into Memory DN SKIP/TUNE PROG/MEM UP PROG/MEM M 1. Press the TUNE/SKIP/SEARCH button up or down to locate station you want to save. DOWN M+ UP OR OR 2. Press and hold PROGRAM/MEMORY button to save desired station. Press and hold REPEAT TO STORE ADDITIONAL STATIONS 3. Press the MEMORY buttons (M-DN & M-UP) to select the location of the saved station. 4. Repeat steps 1 & 2 to store up to 20 FM & 10 AM stations. M M+ 5. To listen to stations saved press the memory buttons (M-DN & M-UP). . CD OR STANDBY Operations FUNCTION OPEN/INSERT CD/CLOSE 1. Press the POWER button on the unit or press the power button on the remote. 1. 2. 3. 4. 5. 2. Press the FUNCTION button to select CD represented by 2 dashes (--). Calypso Collection Emerald Mist Collection B:i-2 Collection Soft Metallics Outdoor Collection 6. 7. 8. 9. 10. Karaoke Media Center Roommates Home & Go Walkarounds POWER ON VOLUME PLAY/PAUSE 3. Press the OPEN/CLOSE button and place CD in tray label side facing up. UP OR DOWN 4. Press the OPEN/CLOSE button to close the tray. 5. Press PLAY on the unit or remote to start the CD. SKIP/TUNING 6. To turn the volume up or down you can use the controls on the unit or on the remote. OR 7. Use SKIP/TUNE to search for songs on the CD. UP DOWN 8. Press PLAY/PAUSE to pause the CD, press again to restart it EQ 9. To change sound of music to Flat/Rock/Pop/Jazz/Classic press the EQ button. 10. When pressing the REPEAT button to choose repeat. REPEAT (PLAY MODE) REPEAT REPEAT ONE TRACK 12:39 REP 1 01 REPEAT CANCEL MODE CANCELAR MODE REPEAT ALL TRACK 12:39 REP ALL 01 ANNULER MODE CD MODE 12:39 01 PROG/MEM Programming CD Tracks Into Memory 1. Make sure you are in STOP mode when programming tracks. 1 TUNING/SKIP 2 2. Press PROGRAM/MEMOERY button to start programming your tracks. 12:39 OR PGM DOWN PRESS PROG/MEM 3. Press SKIP/TUNE to locate desired track you would like to save. 12:39 3 4. Press PROGRAM/MEMORY button to save the track and repeat steps 2 & 3 to save additional tracks. M-DN 12:39 01 PGM 04 UP REPEAT STEPS TO PROGRAM UP TO 20 TRACKS PGM 02 M-UP OR Note: You can save up to 20 tracks in the program mode. STOP/BAND FUNCTION OR 5. To cancel program press the STOP button twice or FUNCTION button once. X2 . Setting The Time In Power Off Mode CLOCK ADJ/DISPLAY 2 1 TUNER/CLK TUNER/CLK CLOCK ADJ/DISPLAY 4 3 CLOCK ADJ/DISPLAY 2:00 5 OR PRESS AND HOLD PRESIONE Y MANTENGA APPUYER ET MAINTENIR L'APPUI 6 2:15 7 OR TO ADJUST MINUTE TO ADJUST HOUR PARA AJUSTAR MINUTO PARA AJUSTAR HORA POUR AJUSTER LA MINUTE POUR AJUSTER L'HEURE Using Kitchen Timer TIMER 1. When pressing the TIMER button the timer automatically starts at 1 min. 2. Press TIMER repeatedly until desired time from 1 to 90 min is displayed 1 90 3. Press the TIMER button again to turn the timer off. Listening to Other Portable Audio Devices 1. Insert an audio cable into the line out or headphone jack on your portable device. 2. Insert the other end into the line in jack on the unit. LINE OUT OR HEADPHONE JACK OPTIONAL (INCLUDED) 3. Press the POWER button on the front of the unit or press the play/pause button on the remote. LINE IN JACK NOTE: Remote control will not operate portable device features. Reset the unit functions 1. If the unit behaves strangely or stops responding, insert and press a blunt stylus into the RESET hole. This will reset the unit to factory defaults. TroubleShooting PROBLEM No sound is heard. No sound is heard. POSSIBLE CAUSE GENERAL SOLUTION Power is not on. Wrong function selected. Press POWER button . Select appropriate function. VOLUME Control is set to minimum. Adjust the VOLUME Control. RADIO Station has not been tuned properly. Tune station FM reception is weak. Extend the FM antenna. AM Reception is weak. Reorient the unit. Service Information If you have any questions on our product please contact us at: GPX Consumer Services 2122 Carr St. St Louis MO. 63106 Web site: www.gpx.com Call: (314)621-2881 Fax: (314)588-1805 E-mail: [email protected] Care and Maintenance • Use a soft, clean cloth moistened with plain, luke-warm water to clean the exterior of the unit. • Never use solvents such as benzene or other strong chemical cleaners since these could damage the unit's finish. EM CH L ICA • It is important that no liquid reaches the inside of the unit. • Remove the CD from the case by holding it at the edges while pressing the center hole lightly. • Do not touch the shiny surface of the CD or bend the CD. • Place the CD into the tray with the label facing up. • A dirty CD may not play correctly. If a CD becomes dirty, wipe it with a soft cloth in a straight line from center to edge. 1. 2. 3. 4. 5. Calypso Collection Emerald Mist Collection B:i-2 Collection Soft Metallics Outdoor Collection 6. 7. 8. 9. 10. Karaoke Media Center Roommates Home & Go Walkarounds • A dirty lens will cause sound skipping and, if the lens is very dirty, the CD may not work. Open the CD door and clean using a camera lens brush/blower. Blow on the lens a couple of times and wipe the lens with the brush to remove dust. Blow on the lens once more. • If the lens is still dirty, use a cotton swab. Start in the middle of the lens and work to the outside edge. • Avoid exposure to direct sun light, temperature extremes, and moisture. CAUTION: Do not use any solvent (eg: record sprays, thinner, benzene, etc.) to clean a CD. SPANISH: ADVERTENCIAS Y PRECAUCIONES PARA REDUCIR EL RIESGO DE INCENDIOS O DE SACUDIDAS ELÉCTRICAS, NO EXPONGA ESTE A PARATO A LA LLUVIA O A LA HUMEDAD Este símbolo, localizado detrás o en la par te de abajo de la unidad, indica la presencia de "tensiones peligrosas" sin aislar en el interior de la caja del producto que pueden ser de suficiente magnitud como para constituir un riesgo de sacudida eléctrica para las personas Este símbolo indica la presencia de instrucciones de operación y de mantenimiento (reparación) en el material impreso que acompaña el aparato Este producto utiliza un láser de Clase 1 para reproducir discos compactos. Este reproductor de discos compactos láser posee interruptores de seguridad que impiden la exposición a los rayos láser cuando la puer ta del disco compacto está abier ta y cuando los dispositivos de seguridad han sido anulados. Hay radiación láser invisible cuando la tapa del reproductor de discos compactos está abier ta y cuando el sistema de seguridad falla o es anulado. Evite la exposición directa a los rayos láser. Por favor no intente anular o eludir los interruptores de seguridad PRECAUCIÓN:Para reducir el riesgo de fuego, no coloque ningún aparato caliente o de cocinar debajo de la unidad. Usted puede recibir una radiación peligrosa si utiliza los botones o aplica los procedimientos de manera diferente a la que ha sido indicada en este documento. PRECAUCIÓN:PARA EVITAR UNA DESCARGA ELÉCTRICA, INTRODUZCA LA HOJA MÁS ANCHA DEL ENCHUFE EN LA RANURA CORRESPONDIENTE DE LA TOMA Y EMPUJE HASTA EL FONDO. PARA REDUCIR EL RIESGO DE SACUDIDAS ELÉCTRICAS, NO RETIRE LA TAPA (O LA PARTE POSTERIOR) DEL APARATO. DENTRO DEL APARATO NO HAY PARTES QUE PUEDAN SER REPARADAS POR EL USUARIO. LOS TRABAJOS DE REPARACIÓN DEBEN SER EFECTUADOS POR PERSONAL DE SERVICIO CALIFICADO. ADVERTENCIA: El usuario puede perder el derecho de utilizar este aparato si efectua cambios o modificaciones que no han sido expresamente aprobados por la autoridad responsable Este equipo ha sido probado y ha demostrado cumplir con los límites establecidos para los aparatos digitales de Clase B, de acuerdo con el Apar tado 15 de las Normas de la FCC. El receptor se forma de lapar te 15 en las reqlas FCC cuando fabricado. Estos límites han sido designados para proveer una protección razonable contra las inter ferencias perjudiciales en una instalación residencial. Este equipo genera, utiliza y puede irradiar energía radioeléctrica y, si no se instala y utiliza de acuerdo con las instrucciones, puede causar inter ferencias perjudiciales en las radiocomunicaciones. Sin embargo, no existe garantía de que no se produzcan inter ferencias en una instalación en par ticular. Si este aparato causa inter ferencias en la recepción de radio o de televisión, lo que puede determinarse desconectando y conectando el aparato, se recomienda tratar de corregir la inter ferencia de la siguiente manera: • Vuelva a orientar la antena o cambie su lugar de instalación. • Aumente la separación entre el equipo y el receptor. • Conecte el equipo a una toma de corriente cuyo circuito no sea el mismo que aquél al que ha conectado el receptor. • Consulte al concesionario o a un técnico de radio/televisión con experiencia. Nota Especial Cuando coloque la unidad sobre un mueble con acabado laqueado o natural, proteja su mueble con un paño u otro material protector. Características Control Remoto: POWER BUTTON TIMER BUTTON SKIP TUNE DN BUTTON SKIP TUNE UP BUTTON PLAY/PAUSEBUTTON MOUNTING BRACKET BOTÓN TIMER BOTÓN SKOP TUNE DN BOTÓN SKOP TUNE UP BOTÓN PLAY/PAUSE SOPORTE DE INSTALACIÓN BOUTON TIMER BOUTON SKIP TUNE DN BOUTON SKIP TUNE UP BOUTON PLAY/PAUSE SUPPORT D' INSTALLATION MUTE BUTTON BAND BUTTON BOTÓN POWER BOTÓN OPEN/CLOSE BOTÓN MUTE BOTÓN BAND BOUTON POWER BOUTON OPEN/CLOSE OPEN/CLOSE BUTTON BOUTON MUTE BOUTON BAND TIMER BUTTON FUNCTION BUTTON STOP BUTTON BOTÓN STOP 12 V DC JACK BOUTON STOP DC JACK DE 12V FICHE 12V C.C. FUNCTION BUTTON BOTÓN TIMER BOTÓN FUNCTION BOUTON FUNCTION BOUTON TIMER POWER OPEN/CLOSE MUTE FUNCTION BAND TIMER SKIP FB/ TUNE DN PLAY/PAUSE SKIP FF/ TUNE UP SKIP FF/TUNE UP BUTTON PLAY/PAUSE BUTTON BOTÓN PLAY/PAUSE BOUTON PLAY/PAUSE BOTÓN FUNCTION POWER BUTTON BOUTON FUNCTION BOTÓN POWER SKIP FB/TUNE DN BUTTON BOTÓN SKIP FB/TUNE DN BOUTON POWER OPEN/CLOSE BUTTON BOTÓN OPEN/CLOSE BOUTON OPEN/CLOSE BATTERY COMPARTMENT STOP VOL PROG/MEM VOL M+ BUTTON VOLUME + BUTTON BOTÓN M+ BOTÓN VOLUME + TUNING BUTTON COMPATIMENT Á PILES BOTÓN TUNING BOUTON TUNING REPEAT CLK ADJ/ DISPLAY PROG BUTTON EQ BOTÓN PROG EQ BUTTON BOTÓN CLK ADJ/DISPLAY BOUTON CLK ADJ/DISPLAY BOTÓN EQ REPEAT BUTTON BOUTON EQ BOTÓN REPEAT VOLUME M+ BUTTON PROG/MEM BUTTON REPEAT BUTTON Control Remoto BOTÓN M- BOTÓN M+ BOTÓN PROG/MEM BOTÓN REPEAT Contrôle Éloigné BOUTON M- BOUTON M+ BOUTON PROG/MEM BOUTON REPEAT BOUTON VOLUME BAND BUTTON BOTÓN BAND BOUTON BAND CLK ADJ/DISPLAY BUTTON BOTÓN CLK ADJ/DISPLAY BOUTON CLK ADJ/DISPLAY BUTTON BOTÓN VOLUME BOUTON REPEAT M- BUTTON BOUTON VOLUME + BOUTON PROG CLK ADJ/DISPLAY BUTTON REMOTE CONTROL STOP BUTTON BOTÓN STOP BOUTON STOP BOUTON SKIP FB/TUNE DN BOUTON M+ COMPARTIMENTO DE PILAS BOTÓN SKIP FF/TUNE UP BOUTON SKIP FF/TUNE UP BATTERY COMPARTMENT COMPARTIMENTO DE PILAS COMPATIMENT Á PILES EQ BUTTON BOTÓN EQ BOUTON EQ Fuentes de Energía Conexción de AC Conecte el cable de AC a una salida de la pared 120v AC, 60Hz. 120V AC/60 Hz Compartimento de Pilas Tres (3) pilas de tamaño “AAA” puede ser utilizado para proveer energía y/oproporcionar una reserva para el reloj y el tiempo de alarma para esta unidad tal y co mo sigue: 1. Abra la puerta del compartimento de pilas al empujar la lengüeta y retire la puerta. 2. Coloque tres pilas (3) “AAA”tal como está demonstrado. Pilas Alkaline son recomendadas para tocar más tiempo. DC 1.5V "AAA" x 3 (Not Included) 3. Coloque la puerta en el comartimento de pilas. ADVERTENCIA: Peligro de explosión si las baterías se substituyen incorrectamente. Substituya solamente con el mismo tipo o uno equivalente. •No mezcle las baterías viejas y nuevas •No mezcle las baterías Acalinas, estándares (carbon-zinc), o recargables (nickel-cadmium) •Substituya las baterías cuando el sonido llega a ser inestable o no puede ser escuchado •Cuando usted no va a utilizar su unidad durante mucho tiempo, quite las baterías para prevenir daño de salida y de corrosión de la batería. OPEN Pila del Control Remoto Retire el protector plástico de la pila. POWER OPEN/CLOSE MUTE FUNCTION BAND TIMER SKIP FB/ TUNE DN PLAY/PAUSE SKIP FF/ TUNE UP Instalación de la Pila del Control Remoto 1. Voltée el control remoto. REPEAT 2. Retire el compartimento de pila al empujarla dentro de la legüeta y luego halando el compartimento hacia afuera STOP VOL PROG/MEM VOL CLK ADJ/ DISPLAY OPEN EQ REMOVE BEFORE USE HALE + + 3. Turn Instale pila CR2025 1. theuna remote over. (parte positiva hacia arriba). LITHIUM BATTERY LITHIUM BATTERY CR2025 CR2025 3V 3V 4. Regrese el compartimento de pilas al control remoto. 2. Remove the battery compartment by pressing in on the tab and then sliding the compartment out. ADVERTENCIA: El botón “cell battery” contiene mercurio, no lo coloque en la basura. Recicle o tire como basura peligrosa 3.PRECAUCIÓN: Install a Cr2025 battery (positive side up). Peligro de exloción si la pila están puestas incorrectamente. Reemplace solamente con el mismo tipo o uno equivalente. + 4. Put the battery compartment back in the remote. Operación del Radio LITHIUM BATTERY CR2025 3V + LITHIUM BATTERY CR2025 3V FUNCTION POWER ON BAND 1. Presione el botón de energía en la unidad. 2. Presione el botón FUNCTION para seleccionar radio, FM ó AM aparecerá en la exhibición. VOLUME TUNING DN SKIP/TUNE UP RADIO 3. Utilize el botón BAND para elegir AM o FM. 4. Presione el botón SKIP/TUNE UP o DOWN para encontrar la estación deseada. 5. Utilize el botón de VOLUME para ajustar el volumen en la unidad o el control remoto. 107.7 OR MHZ UP SKIP/TUNE UP OR UP 6. Para buscar en las estaciones,presione y sostenga el botón SKIP/TUNE UP o DOWN. DOWN EQ 7. Para cambiar el sonido de la musica a Rock/Pop/Jazz/Classic, presione el botón de EQ. OR DOWN DOWN DN + UP ROCK - L-12 Tiempo de Exhibición En el modo de Radio, presione CLOCK ADJ/DISPLAY para exhibir el tiempo Para mejorar la recepción FM: AM: 1. Para Recepción AM: Rote la unidad ó muevala de lado a lado para mejorar la recepción. Recuerde, ya montado, no se puede mejorar la recepción AM 2. Para Recepción FM: Estreche el cable antena detrás de la unidad. Programando las canciones en una memoria 1. Presione el botón TUNE/SKIP/SEARCH UP o DOWN para localizar la estación que usted quiera grabar. DN SKIP/TUNE UP PROG/MEM PROG/MEM M DOWN OR M+ UP OR 2. Presione y sostenga el botón PROGRAM/MEMORY para grabar la estación. Press and hold REPEAT TO STORE ADDITIONAL STATIONS 1. Presione el botón TUNE/SKIP/SEARCH UP o DOWN para localizar la estación que usted quiera grabar. 2. Presione y sostenga el botón PROGRAM/MEMORY para grabar la estación. 3. Presione los botones de MEMORY (M-DN & M-UP) para seleccionar la localización de las estaciones grabadas. 4. Repita los pasos 1 & 2 para grabar hasta 10 FM & 10 AM estaciones. M M+ 5. Para escuchar las estaciones grabadas, presione el botón de memoria (M-DN & M-UP). . Operaciones OR STANDBY de CD FUNCTION OPEN/INSERT CD/CLOSE 1. Presione el botón de POWER en la unidad o presione el botón de energía en el control remoto. 1. 2. 3. 4. 5. 2. Presione el botón de FUNCTION para seleccionar CD representado por dos “--”. Calypso Collection Emerald Mist Collection B:i-2 Collection Soft Metallics Outdoor Collection 6. 7. 8. 9. 10. Karaoke Media Center Roommates Home & Go Walkarounds POWER ON VOLUME PLAY/PAUSE 3. Presione el botón de OPEN/CLOSE y coloque el CD en el cajón de carga, con la etiqueta hacia arriba. UP OR 4. Presione el botón de OPEN/CLOSE para cerrar el cajón de carga. DOWN 5. Presione el botón PLAY en la unidad o el control para comenzar el CD. SKIP/TUNING 6. Para subir o bajar el volumen, usted puede usar los botones de volumen en la unidad o en el control remoto. OR 7. Utilize SKIP/SEARCH para buscar canciones en el CD. UP DOWN 8. Presione PLAY/PAUSE para pausar el CD, presione otravez para volcer a empezar. EQ 9. Presione el botón TUNE/SKIP/SEARCH UP o DOWN para localizar la estación que usted quiera grabar. REPEAT (PLAY MODE) REPEAT 10. Presione los botones de CD MODE para elegir las selecciones de repetición y al azar. 12:39 Programando las pieza de CD una memoria CANCEL MODE CANCELAR MODE REPEAT REPEAT ONE TRACK 12:39 REP 1 01 PROG/MEM 1. Asegurese que esté en el modo de parar cuando está programando las canciones. 1 2 12:39 OR 01 12:39 DOWN 12:39 3 4. Presione el botón PROGRAM/MEMORY para guardar la canción y repita pasos 2 & 3 para guardar otras canciones. 01 PGM PROG/MEM 3. Presione SKIP/SEARCH para encontrar las canciones que usted desearía guardar. 12:39 REP ALL 01 TUNING/SKIP PRESS 2. Presione el botón de PROGRAM/MEMORY para comenzar a programar sus canciones. ANNULER MODE CD MODE REPEAT ALL TRACK M-DN PGM 04 UP REPEAT STEPS TO PROGRAM UP TO 20 TRACKS PGM 02 M-UP OR Nota: Usted puede guardar hasta 20 canciones en el modo de programación. STOP/BAND 5. Para cancelar la programación, presione el botón STOP dos veces o el botón de FUNCTION una vez. X2 Fijando el Tiempo En modo Apagado CLOCK ADJ/DISPLAY PRESIONE Y MANTENGA APPUYER ET MAINTENIR L'APPUI CLOCK ADJ/DISPLAY 4 3 OR PRESS AND HOLD TUNER/CLK TUNER/CLK 2 1 FUNCTION OR CLOCK ADJ/DISPLAY 5 2:00 6 7 OR TO ADJUST MINUTE TO ADJUST HOUR PARA AJUSTAR MINUTO PARA AJUSTAR HORA POUR AJUSTER LA MINUTE POUR AJUSTER L'HEURE 2:15 Utilizando el Temporizador de la Cocina TIMER 1. Cuando presione el botón de TIMER, este comenzará automáticamente en 1mins. 1 2. Presione TIMER hasta que elija el tiempo deseado entre 10 y 90 minutos. 90 3. Presione el botón TIMER otra vez para apagar el temporizador. Escuchando otros aparatos de Audio Portátil 1. IPonga un cable de audio en el gato de salida de su aparato portátil 2. Coloque la otra parte en el gato de entrada de la unidad. LINE OUT OR HEADPHONE JACK 3. Presione el botón de POWER en el frente de la unidad o PLAY/ PAUSE en el control remoto. OPTIONAL (INCLUDED) LINE IN JACK NOTA: El control remoto no operará ningunas características en los aparatos portátiles. Reajuste las funciones de la unidad 1.Si la unidad actua de una manera diferente y no responde,ponga y presione una aguja embotada en el hoyo de reajuste. Esto reajustará la unidad a los ajustes de factoría iniciales. Solución de Problemas PROBLEMA No se escucha el sonido. No se escucha el sonido. POSIBLE CAUSA GENERAL La unidad no está ensendida. La función incorrecta está selecionada Presione el botón de POWER. Seleccione la función apropiada. El control de volumen está en el nivel mínimo. Ajuste el control de volumen RADIO No sintonizado la estación correctamente. Sintonize la estación correctamente. La recepción de FM es débil. Extienda la antena FM. La recepción de AM es débil. Reoriente la unidad. Información de Servicio Si usted tiene preguntas en relación con nuestros porductos,favor contactarnos á: GPX Consumer Services 2116 Carr St. St Louis MO. 63106 Página Web: www.GPX.com Llamar: (314)621-2881 Fax: (314)588-1805 E-mail: [email protected] SOLUCIÓN Mantenimiento y Cuidado • Utilize un paño limpio y suave con agua tibia y clara para limpiar el exterior de la unidad. • Nunca utilize solventes tal como benceno u otros limpiadores con químicos porque estos pueden dañar el material de la unidad. CH ICA EM L • Es importante que no deje que se le entre liquido a la unidad. • Retire el CD de su caja sosteniendolo por las orillas mientras presiona el centro de hollo livianamente. • No toque la parte brillosa del CD o doble el CD. • Coloque el CD en el cajón de carga con la etiqueta hacia arriba. • Un CD sucio puede que no toque correctamente. Si un CD se ensucia, limpielo con una toalla suave en una linea recta del centro de CD hacia fuera. 1. 2. 3. 4. 5. Calypso Collection Emerald Mist Collection B:i-2 Collection Soft Metallics Outdoor Collection 6. 7. 8. 9. 10. Karaoke Media Center Roommates Home & Go Walkarounds • El CD puede que no funcione si está sucio o puede obstruir el sonido. Abra la puerta del CD y limpielo con cepillo/soplador de un lente de cámara fotográfica. Sople en el lente un par de veces y limpie el lente con el cepillo para quitar el polvo. Sople en el lente una vez más. Utilice un disco de la limpieza del CD para limpiar la lente. • Si el lente sigue sucio, utilice una esponja de algodón. Comience en el centro del lente y trabaje al borde exterior. • Evite la exposición a la luz solar, a los extremos de la temperatura y a la humedad directa. PRECAUCIÓN: No utilice ningún solvente (ej: los aerosoles de discos, deluente, el benceno, etc.) para limpiar un CD. FRENCH: ADVERTISSEMENTS ET PRÈCAUTIONS POUR RÉDUIRE LE RISQUE d'INCENDIES OU DE CHOCS ÉLECTRIQUES, N'EXPOSEZ PAS CETTE A PARATO À LA PLUIE OU à l'HUMIDITÉ Ce symbole, localisé derrière ou dans la par tie de sous l'unité, indique la présence de "tensions dangereuses" sans isoler dans la caisse du produit qui peuvent être d'ampleur suffisante comme pour constituer un risque de choc électrique pour les personnes Ce symbole indique la présence d'instructions d'opération et de maintien (réparation) dans le matériel imprimé qui accompagne l'appareil Ce produit utilise un laser de Classe 1 pour reproduire des disques compacts. Ce reproducteur de disques compacts laser possède des interrupteurs de sécurité qui empêchent l'exposition aux rayons laser quand la por te du disque compact sera ouver te et quand les dispositifs de sécurité ont été annulés. Il y a une radiation laser invisible quand la couver ture du reproducteur de disques compacts sera ouver te et quand le système de sécurité manquera ou est annulé. Évitez l'exposition directe aux rayons laser. S'il vous plaît n'essayez pas d'annuler ou d'éluder les interrupteurs de sécurité PRÈCAUTION:Pour réduire le risque de feu, ne placez aucun appareil chaud ou de cuisiner sous l'unité. Vous pouvez recevoir une radiation dangereuse s'il utilise les boutons ou applique les procédures de manière différente à à laquelle on a indiqué dans ce document. PRÈCAUTION :POUR ÉVITER UNIT DÉCHARGE ÉLECTRIQUE, INTRODUIS LA FEUILLE GRATIFICATION LARGE QUE LE BOUCHON DANS LA CANNELURE CORRESPONDANTE DE LA PRISE ET POUSSE JUSQÚAU FONDS. POUR RÉDUIRE LE RISQUE DE CHOCS ÉLECTRIQUES, NE RETIREZ PAS LA COUVERTURE (OU LA PARTIE POSTÉRIEURE) DE l'APPAREIL. DANS L'APPAREIL IL N'Y A PAS DE PARTIES QUI PEUVENT ÊTRE DES ÉCARTS PAR L'UTILISATEUR. LES TRAVAUX DE RÉPARATION DOIVENT ÊTRE EFFECTUÉS PAR PERSONNEL DE SERVICE QUALIFIÉ. AVERTISSEMENT : L'utilisateur peut perdre le droit d'utiliser cet appareil si efectua changements ou modifications qui expressément n'ont pas été approuvé par l'autorité responsable Cet équipement a été prouvé et a démontré remplir les limites établies pour les appareils numériques de Classe B, en accord avec le Paragraphe 15 des Normes de la FCC. Le récepteur se formera de lapar te 15 dans les FCC reqlas quand fabriqué. Ces limites ont été désignées pour fournir une protection raisonnable contre les inter férences nuisibles dans une installation résidentielle. Cet équipement produit, utilise et peut irradier de l'énergie radioélectrique et, s'il n'est pas installé et utilise en accord avec les instructions, peut causer des inter férences nuisibles dans les communications par radio. Toutefois, il n'existe pas de garantie que des inter férences dans une installation ne se produisent pas en par ticulier. Si on recommande cet appareil cause des inter férences dans la réception de radio ou de télévision, ce qui peut être déterminé en déconnectant et en reliant l'appareil, d'essayer de corriger l'inter férence de la manière suivante : • Oriente-t-tu à nouveau l'antenne ou changez-vous son lieu d'installation • Augmentez-vous la séparation entre l'équipement et le récepteur • Reliez-vous l'équipement à une prise de courant dont le circuit n'est pas le même que celui à auquel a-t-il relié le récepteur • Consultez au concessionnaire ou à un technicien de radio/télévision avec expérience. Note Spéciale Quand il placera l'unité sur un meuble avec finie laqueado ou naturelle, protégez son meuble avec un chiffon ou un autre protecteur matériel. CONTRÔLE ÉLOIGNÉ Caractéristiques TIMER BUTTON SKIP TUNE DN BUTTON SKIP TUNE UP BUTTON PLAY/PAUSEBUTTON BOTÓN SKOP TUNE DN BOTÓN SKOP TUNE UP BOTÓN PLAY/PAUSE SOPORTE DE INSTALACIÓN BOUTON SKIP TUNE DN BOUTON SKIP TUNE UP BOUTON PLAY/PAUSE SUPPORT D' INSTALLATION TIMER BUTTON BOTÓN TIMER BOUTON TIMER POWER OPEN/CLOSE MUTE FUNCTION BAND TIMER SKIP FB/ TUNE DN PLAY/PAUSE SKIP FF/ TUNE UP SKIP FF/TUNE UP BUTTON PLAY/PAUSE BUTTON BOTÓN PLAY/PAUSE BOUTON PLAY/PAUSE BOUTON STOP FICHE 12V C.C. SKIP FB/TUNE DN BUTTON FUNCTION BUTTON BOTÓN SKIP FB/TUNE DN BOTÓN FUNCTION BOUTON POWER PROG/MEM VOL TUNING BUTTON VOLUME + BUTTON REPEAT BOTÓN TUNING CLK ADJ/ DISPLAY CLK ADJ/DISPLAY BUTTON BOTÓN CLK ADJ/DISPLAY REMOTE CONTROL M- BUTTON M+ BUTTON PROG/MEM BUTTON REPEAT BUTTON Control Remoto BOTÓN M- BOTÓN M+ BOTÓN PROG/MEM BOTÓN REPEAT BOUTON M- BOUTON M+ BOUTON PROG/MEM BOUTON REPEAT BOTÓN PROG BOUTON PROG EQ BUTTON REPEAT BUTTON BOTÓN EQ BOTÓN REPEAT VOLUME BOUTON VOLUME BAND BUTTON BOTÓN BAND CLK ADJ/DISPLAY BUTTON BOUTON BAND BOTÓN CLK ADJ/DISPLAY BOUTON CLK ADJ/DISPLAY BATTERY COMPARTMENT COMPARTIMENTO DE PILAS COMPATIMENT Á PILES EQ BUTTON BOTÓN EQ BOUTON EQ Sources d'Énergie Raccordement à CA 120V AC/60 Hz Reliez le câble d'AC à une sortie de la paroi 120v AC, 60Hz. Je Compartimente de Piles Trois (3) piles de taille "AAA" peut être utilisé pour fournir de l'énergie et/ou fournir une réserve pour l'horloge et le temps d'alarme pour cette unité tel et CO mo suit : DC 1.5V "AAA" x 3 (Not Included) 1. Ouvrez la porte de le je compartimente de piles en poussant la languette et retirez la porte. 2. Placez trois piles (3) "AAA"tal comme il est demonstrado. On recommande des piles Alkaline pour toucher davantage de temps. 3. Placez la porte dans le comartimento de piles. OPEN BUTTON BOTÓN VOLUME BOUTON REPEAT BOUTON EQ Contrôle Éloigné BOUTON VOLUME + PROG BUTTON EQ BOUTON TUNING BOUTON CLK ADJ/DISPLAY STOP BUTTON BOTÓN STOP BOTÓN VOLUME + BOUTON M+ BOUTON OPEN/CLOSE COMPARTIMENTO DE PILAS VOL BOTÓN M+ BOTÓN OPEN/CLOSE COMPATIMENT Á PILES STOP M+ BUTTON OPEN/CLOSE BUTTON BATTERY COMPARTMENT BOTÓN SKIP FF/TUNE UP BOUTON SKIP FF/TUNE UP BOUTON STOP BOUTON SKIP FB/TUNE DN BOUTON FUNCTION BOTÓN POWER BAND BUTTON BOTÓN BAND BOUTON BAND BOUTON FUNCTION BOTÓN STOP POWER BUTTON MUTE BUTTON BOTÓN MUTE BOUTON MUTE BOTÓN FUNCTION STOP BUTTON 12 V DC JACK DC JACK DE 12V OPEN/CLOSE BUTTON BOTÓN OPEN/CLOSE BOUTON OPEN/CLOSE FUNCTION BUTTON MOUNTING BRACKET BOTÓN TIMER BOUTON TIMER POWER BUTTON BOTÓN POWER BOUTON POWER OPEN AVERTISSEMENT : Danger d'explosion si les batteries sont incorrectement remplacées. Remplacez seulement avec le même taux ou un équivalent. • No mélange les vieilles batteries et nouvelles • No mélangez les batteries Acalinas, standards (charbon- zinc), ou rechargeables (nickelcadmium) •Substituya les batteries quand le son arrivera à être instable ou vous ne pouvez pas être écouté •Cuando ne vais pas utiliser son unité pendant beaucoup de temps, enlevez les batteries pour prévoir des dommages de sortie et de corrosion de la batterie. POWER OPEN/CLOSE MUTE FUNCTION BAND TIMER SKIP FB/ TUNE DN PLAY/PAUSE SKIP FF/ TUNE UP Pile du Contrôle Éloigné Retirez le protecteur plastique de la pile. STOP VOL PROG/MEM VOL CLK ADJ/ DISPLAY REPEAT EQ Installation de la Pile du Contrôle Éloigné REMOVE BEFORE USE 1. Voltee le contrôle éloigné. TRACTION 2. Retirez le je compartimente de pile en la poussant dans ce qui est l’étiquette et ensuite en transportant le je compartimente vers dehors. + + 3. Turn Installez pile over. CR2025 (partie positive vers le haut). 1. the une remote LITHIUM BATTERY CR2025 LITHIUM BATTERY 3V 4. Retournez le je compartimente de piles au contrôle éloigné. CR2025 3V 2. Remove the battery compartment by pressing in on the tab and then sliding the compartment out. AVERTISSEMENT : Le bouton "battery cell" contient mercure, ne le placez pas dans les ordures. Recyclez ou jetez comme ordures dangereuses. 3.PRÉCAUTION Install a Cr2025 battery (positive side up). : Danger d'exloción si la pile sont mise incorrectement. Remplacez seulement avec le même taux ou un équivalent. + LITHIUM BATTERY CR2025 3V 4. Put the battery compartment back in the remote. + LITHIUM BATTERY CR2025 3V Opération du Rayon FUNCTION POWER ON BAND 1. Pressez le bouton d'énergie dans l'unité. 2. Pressez le bouton FUNCTION pour choisir radio, FM ou AM apparaîtra dans l'exposition. VOLUME TUNING DN SKIP/TUNE UP RADIO 3. Utilize le bouton BAND pour choisir AM ou FM. 107.7 4. Pressez le bouton SKIP/TUNE UP ou DOWN pour trouver la gare souhaitée. + UP ROCK OR MHZ DOWN DOWN 5. Utilize le bouton de VOLUME pour adapter le volume dans l'unité ou le contrôle éloigné DN OR UP SKIP/TUNE UP OR UP - L-12 6. Pour chercher dans les gares, pressez et soutenez le bouton SKIP/TUNE UP ou DOWN. DOWN EQ 7. Pour changer le son de la musique à Rock/Pop/Jazz/Classic, pressez le bouton d'EQ. Temps d'Exposition Dans le mode de Radio, pressez CLOCK ADJ/display pour exhiber le temps Pour améliorer la réception FM: AM: 1. Pour Réception AM : Rote l'unité ou muevala de côté à côté pour améliorer la réception. Rappelez, déjà monté, on ne peut pas améliorer la réception AM 2. Pour Réception FM : Rétrécissez le câble antenne derrière l'unité. En programmant les chansons dans une mémoire 1. Pressez le bouton TUNE/SKIP/SEARCH UP ou DOWN pour localiser la gare que vous voulez enregistrer. DN SKIP/TUNE PROG/MEM UP PROG/MEM M DOWN 2. Pressez et soutenez le bouton PROGRAM/memory pour enregistrer la gare. M+ UP OR OR Press and hold REPEAT TO STORE ADDITIONAL STATIONS 3. Pressez les boutons de MEMORY (M-DN et M-UP) pour choisir la localisation des gares enregistrées. 4. Répétez les pas 1 et 2 pour enregistrer jusqu'à 10 FM et 10 AM des gares. M M+ 5. Pour écouter les gares enregistrées, pressez le bouton de mémoire (M-DN et M-UP). OR . -2- STANDBY Fonctionnement du CD FUNCTION OPEN/INSERT CD/CLOSE 1.Pressez le bouton de POWER dans l'unité ou pressez le bouton d'énergie dans le contrôle éloigné. 1. 2. 3. 4. 5. Calypso Collection Emerald Mist Collection B:i-2 Collection Soft Metallics Outdoor Collection 6. 7. 8. 9. 10. Karaoke Media Center Roommates Home & Go Walkarounds 2. Pressez le bouton de FUNCTION pour choisir CD représenté par deux "- -". POWER ON 3. Pressez le bouton d'OPEN/CLOSE et placez le CD dans le tiroir de charge, avec l'étiquette vers le haut VOLUME PLAY/PAUSE UP 4. Pressez le bouton d'OPEN/close pour fermer le tiroir de charge. OR DOWN 5. Pressez le bouton PLAY dans l'unité ou le contrôle pour commencer le CD. 6. Pour monter ou baisser le volume, vous pouvez utiliser les boutons de SKIP/TUNING volume dans l'unité ou dans le contrôle éloigné. 7. Utilize SKIP/search pour chercher des chansons dans le CD. OR 8. Pressez PLAY/ralentissez pour ralentir le CD, pressez otravez pour volcer commencer. EQ 9. Pressez le bouton TUNE/SKIP/SEARCH UP ou DOWN pour localiser l a gare que vous voulez enregistrer. 10. Pressez les boutons de CD MODE pour choisir les sélections de répétition et au hasard. UP DOWN REPEAT (PLAY MODE) REPEAT REPEAT ONE TRACK 12:39 En programmant la pièce de CD une mémoire CANCEL MODE CANCELAR MODE REPEAT 12:39 REP 1 01 PROG/MEM 1. Asegurese qui est dans la manière d'arrêter quand il programmera les chansons. 1 01 12:39 OR PGM 01 12:39 DOWN PRESS PROG/MEM 3. Pressez SKIP/SEARCH pour trouver les chansons que vous souhaiteriez garder. 12:39 3 01 M-DN PGM 04 UP REPEAT STEPS TO PROGRAM UP TO 20 TRACKS PGM 02 4. Pressez le bouton PROGRAM/memory pour garder la chanson et répétez des pas 2 & 3 pour garder d'autres chansons. Note: Vous pouvez garder jusqu'à 20 chansons dans le mode de programmation. 12:39 REP ALL TUNING/SKIP 2 2. Pressez le bouton de PROGRAM/MEMORY pour commencer à programmer ses chansons. ANNULER MODE CD MODE REPEAT ALL TRACK M-UP OR 5. Pour annuler la programmation, pressez le bouton STOP deux fois ou le bouton de FUNCTION une fois. STOP/BAND FUNCTION OR . X2 En Fixant le Temps En manière Éteinte CLOCK ADJ/DISPLAY 2 1 TUNER/CLK TUNER/CLK CLOCK ADJ/DISPLAY 2:00 5 4 3 CLOCK ADJ/DISPLAY OR PRESS AND HOLD PRESIONE Y MANTENGA APPUYER ET MAINTENIR L'APPUI 6 2:15 7 OR TO ADJUST MINUTE TO ADJUST HOUR PARA AJUSTAR MINUTO PARA AJUSTAR HORA POUR AJUSTER LA MINUTE POUR AJUSTER L'HEURE En utilisant le Temporisateur de la Cuisine TIMER 1. quand il pressera le bouton de TIMER, ce il commencera automatiquement en 1mins. 1 2. Pressez TIMER jusqu'à ce qu'il choisisse le temps souhaité entre 10 et 90 minutes. 3. Pressez le bouton TIMER autre fois pour éteindre le temporisateur.. -2- 90 En écoutant d'autres appareils d'audio de Portatif 1. Mettez un câble de d'audio dans le chat de sortie de son appareil portatif LINE OUT OR HEADPHONE JACK 2. Placez l'autre partie dans le chat d'entrée de l'unité. OPTIONAL (INCLUDED) 3. Pressez le bouton de POWER dans l'avant de l'unité ou PLAY/RALENTISSEZ dans le contrôle éloigné. LINE IN JACK NOTE : Le contrôle éloigné n'opérera aucunes caractéristiques dans les appareils portatifs. Il rajuste les fonctions de l'unité 1.Si l'unité actua d'une manière différente et ne répond pas, mets et presse une aiguille obtuse dans le trou de rajustement. Ceci rajustera l'unité aux ajustements d'usine initiaux. Solution de Problèmes PROBLÈME On n'écoute pas le son POSSIBLE CAUSE GENERAL SOLUTION Il n'est pas allumé Pressez le bouton de Power. La fonction incorrecte est selecionada Choisissez la fonction appropriée. Le contrôle de Volume est mis au minimum. Il adapte le contrôle de VOLUME. RADIO On n'écoute pas le son La gare n'est pas accordée appropriéement. Sintonize la gare appropriéement La réception de FM est faible Étendez le câble de l'antenne de FM La réception de AM est faible Réorientez l'unité. Information de Service Si vous avez des questions pour rapport nos produit, faveur nous contacter à: GPX Consumer Services 2116 Carr St. St Louis MO. 63106 Page Web : www.GPX.com Appeler: (314)621-2881 Fax: (314)588-1805 E-mail: [email protected] Maintien et Soins • Utilize un chiffon propre et lisse avec eau tiède et claire pour nettoyer l'extérieur de l'unité. • Jamais utilize tu ne résous comme du benzène ou d'autres nettoyeuses avec chimiques parce que ceux-ci peuvent endommager le matériel de l'unité. CH L ICA EM • Il est important qu'il ne laisse pas qu'on lui entre liquide à l'unité. • Retirez le CD de sa caisse en le soutenant par les bords tandis qu'il presse le centre de hollo de légèrement. • Ne touche pas la partie brillosa du CD ou double le CD. _ • Placez le CD dans le tiroir de charge avec l'étiquette vers le haut. 1. 2. 3. 4. 5. Calypso Collection Emerald Mist Collection B:i-2 Collection Soft Metallics Outdoor Collection 6. 7. 8. 9. 10. Karaoke Media Center Roommates Home & Go Walkarounds • Un CD sale peut-être non contact correctement. Si un CD est sali, limpielo avec une serviette lisse dans une ligne droite du centre de CD vers dehors • Le CD ne fonctionnez pas peut-être s'il est sale ou peut obstruer le son. Ouvrez la porte de CD et nettoyez à l'aide d'un objectif d'appareil-photo brush/blower. Soufflez sur l'objectif un couple des périodes et essuyez l'objectif avec la brosse pour enlever la poussière. Soufflez sur l'objectif une fois de plus. • Si l'objectif est encore sale, employez un tampon de coton. Commencez au milieu de l'objectif et travaillez au bord extérieur. • Évitez l'exposition à la lumière du soleil, aux extrémités de la température, et à l'humidité directes. ATTENTION : N'employez aucun dissolvant (par exemple : enregistrez les pulvérisateurs, le diluant, le benzène, etc...) pour nettoyer un CD. -2--
 1
1
-
 2
2
-
 3
3
-
 4
4
-
 5
5
-
 6
6
-
 7
7
-
 8
8
-
 9
9
-
 10
10
-
 11
11
-
 12
12


GPX KCCD6817DT Manual de usuario
- Categoría
- Reproductores de CD
- Tipo
- Manual de usuario
El GPX KCCD6817DT es un reproductor de CD y radio AM/FM de alta calidad diseñado para brindar un sonido nítido y potente en cualquier entorno. Con su diseño compacto y elegante, este dispositivo es ideal para usarse en el hogar, la oficina o incluso en el automóvil.
Algunas de sus características principales incluyen:
- Reproducción de CD de audio, CD-R y CD-RW.
- Radio AM/FM con sintonizador digital.
- Función de programación de estaciones de radio.
- Ecualizador de sonido con cinco ajustes predefinidos.
- Función de repetición y reproducción aleatoria.
- Control remoto para mayor comodidad.
en otros idiomas
- français: GPX KCCD6817DT Manuel utilisateur
- English: GPX KCCD6817DT User manual
Artículos relacionados
Otros documentos
-
Brigmton BT-41 El manual del propietario
-
iLive iHMD8816DT-E1 Manual de usuario
-
-
Insignia NS-C2115 Manual de usuario
-
-
-
Roadstar HIF-6850USMP El manual del propietario
-
Elta 2382IP Manual de usuario
-
Denver MRP-161 Manual de usuario
-
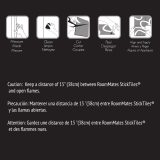 StickTiles TIL2767FLT Guía de instalación
