La página se está cargando...

Model:PEP033
OWNER’S MANUAL
Pedestal Pump
Model:PEP033
El manual del propietario
Bomba de Pedestal
Modelo:PEP033
WARNING: Read carefully and understand all ASSEMBLY AND OPERATION INSTRUCTIONS
before operating. Failure to follow the safety rules and other basic safety precautions may result
in serious personal injury
If you have any QUESTIONS, PROBLEMS, MISSING PARTS, please call our customer service
department at 833-290-1189 before returning to your retailer
FOR ENGLISH
................................................................
Pages 02-05
FOR SPANISH
................................................................
Pages 07-10
9815 3rd Street Road, Louisville, Kentucky 40272
Phone: 833-290-1189
Email: [email protected]
Web: www.acquaerpumps.com

Property
Specifications
Voltage
Horse Power
Amps
Max. Head (ft.)
Max. Flow (GPH)
Discharge Size (in.)
Power cord length (ft.)
Model: PEP033
TECHNICAL SPECIFICATIONS
PERFORMANCE
Model
PEP033
GPH of water @ Total Ft. Head
Max.
Head
115V/60Hz
1/3HP
4.3A
18 ft.
3270@5ft
1-1/4 in.
10 ft.
5 ft. 10 ft. 15 ft. 20 ft.
3270 2560 1740 - 18ft
SAFETY INFORMATION
WARNING
This pump motor is not submersible. Do not submerge the motor or allow motor to be exposed to
water. Personal injury and/or death from electrical shock could result.
Do not use this unit to pump chemicals, flammable liquids, sewage or corrosive liquids. You could injure
yourself and the pump will fail. Pumping these types of liquids voids the warranty.
Water and electricity can be dangerous if certain precautions are not adhered to. This pump is
designed to operate perfectly safe in a water environment; however, improper use and installation
can result in personal harm from electrical shock. Please pay attention to the following warnings.
Never touch any electrical device, including this pump, when it is touching water, in water, or even
in a moist environment. Always unplug (disconnect the electricity) when servicing or installing the
unit.
RISK OF ELECTRICAL SHOCK. This pump is supplied with a grounding conductor and grounding
-type attachment plug. To reduce the risk of electrical shock, be certain that it is connected only to
a properly grounded, grounding-type receptacle.
Do not use the power cord or discharge hose to carry or handle the pump. Doing so may caus
damage to the power cord or discharge hose.

SAFETY INFORMATION
CAUTION
Your pump has thermal over-load protection built in. The thermal overload protector will
automatically shut down the motor in an overheat situation. It will then reset itself once the motor
cools down. The pump will then work again. This overload protector is designed as a safety device
and it will fail after repeated use.
INSTALLATION INSTRUCTIONS
a. Insert the float rod through the hole in the switch.
b. Carefully slide the rubber grommet onto the float rod. NOTE: Use liquid soap to help slide the
grommet on the float rod.
c. Slide guide onto the float rod and attach it to the column.
d. Thread the float ball onto the float rod. You may need a set of pliers to prevent the rod from
turning.
e. Move the grommet up or down on the float rod to adjust the “turn on” position of the pump.
1.
2.
3.
Always use a grounded outlet to attach the plug. A three-prong mating type receptacle is needed
for safe use. This should be in accordance with the National Electric Code and any additional
codes or laws required by your local government.
This unit is designed only for use on 115 volts (single phase), 60 Hz, and is equipped with a
approved 3-conductor cord and 3-prong grounded plug. DO NOT REMOVE THE GROUND PI
UNDER ANY CIRCUMSTANCES. The 3-prong plug must be directly inserted into a properl
installed and grounded 3-prong, grounding-type receptacle. Do not use pump with a 2-prong wall
outlet. Replace the 2-prong outlet with a properly grounded 3-prong receptacle (a GFCI outlet
installed in accordance with the National Electrical Code and local codes and ordinances. Al
wiring should be performed by a qualified electrician.
Protect the electrical cord from sharp objects, hot surfaces, oil, and chemicals. Avoid kinking the
cord. Do not use damaged or worn cords.
For best performance, it is recommended to connect the power cord directly to the grounded GFCI
outlet. If the use of an extension cord is necessary, always use a grounded waterproof type cord
Never use longer than a 25-ft. cord that is lighter than 14/3 gauge.
Keep all electrical connections away from wet and moist environments. Wet connections ca
cause electrical shock resulting in personal injury.
ALWAYS DISCONNECT THE POWER SOURCE BEFORE ATTEMPTING TO INSTALL, SERVICE
OR PERFORM MAINTENANCE ON THE PUMP. FAILURE TO DO SO MAY RESULT IN FATAL
ELECTRICAL SHOCK.
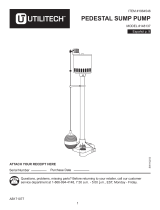
Set your new pump in the bottom of the sump basin. The pump should be placed on a solid
foundation. Do not place pump directly on sandy or rocky surfaces. Sand and small stones may
clog or cause damage to your pump.
Make sure the float ball will move up and down freel
without coming in contact with the side of the sump pit.
Contact with the side of the sump pit may cause th
switch to malfunction. See as below.
GFCI Outlet
Switch
Grommet
Guide
Float Rod
Float Ball
Column
Check Valve

INSTALLATION INSTRUCTIONS
It is highly recommended to install a full flow, swing type check valve (not included) as close to
the discharge outlet on the pump as possible. A new check valve will greatly increase the life of
your pump, and should be the same size as the pump discharge, 1 ¼” or 1 ½”.
4.
5.
6.
Connect the pump and check valve together using schedule 40 PVC pipe and fittings. You can
also use DWV or ABS pipe, as this is not a pressure installation. Corrugated drain hose is
intended for temporary use and should not be used in a permanent installation. Although there
are many types of pipe that work adequately for this installation, PVC is recommended.
Test your installation after you have completed setting up the pump and connected all piping.
Plug the cord into the grounded outlet. The pump should not run at this point. If the pump runs,
the switch is stuck in the upright position. Fill the sump basin with water using buckets or a hose.
When the float moves to the upright position, the pump will turn on. The switch will turn off the
pump when the float reaches the down position. You may adjust the “turn on” position to meet
your particular needs by moving the grommet up or down on the float rod. Remember the switch
must move up and down freely without touching the sides of the sump basin.
TROUBLESHOOTING
Problem Possible Cause Corrective Action
the pump
does not
start or run
The pump
starts and
stops too
often
1.
2.
3.
4.
5.
Pump is not plugged in, switch or
breaker is off
Check for blown fuses or tripped
circuit breakers or tripped GFCI
outlets
Switch is defective
Motor thermal protector tripped
Float ball is stuck or obstructed
1.
2.
3.
4.
5.
Plug pump in or turn on switch
/breaker
Replace fuse, reset breaker, reset
GFCI outlet
Replace fuse, reset breaker, reset
GFCI outlet
Allow pump to cool. Pump will reset
Remove obstruction or position
pump so it will not become stuck
1.
2.
Backflow of water from discharge
hose/pipe
Switch is defective
1.
2.
Install or replace check valve
Replace switch
If the pump
runs but
moves little
or no water
1.
2.
3.
4.
5.
6.
7.
Clogged intake screen
Clogged discharge hose/pipe
Frozen discharge hose/pipe
Low line voltage
Check valve is stuck in the closed
position
Check valve is installed backwards
Worn, damaged or clogged pump
parts
1.
2.
3.
4.
5.
6.
7.
Clean or replace screen
Remove clog
Allow hose/pipe to thaw
Check wire size and increase if
necessary
Inspect, repair or replace if
necessary
Inspect, repair or replace if
necessary
Inspect for wear, damage or clog
and clean or replace if necessary
Pump does
not shut off
1.
2.
Float ball is obstructed or stuck
Defective Switch
1.
2.
Remove obstruction
Replace switch

PARTS DIAGRAM
PARTS LIST
Part No.
Description
1
2
3
4
5
switch
pump body
impeller
pump base
Drive Shaft
floating ball
6
1
2
3
4
5
6

Modelo:PEP033
OWNER’S MANUAL
Pedestal
Model:PEP033
Pump
El manual del propietario
Bomba de Pedestal
Modelo:PEP033
FOR ENGLISH
................................................................
Pages 02-05
FOR SPANISH
................................................................
Pages 07-10
ADVERTENCIA: Lea cuidadosamente y comprenda todas las INSTRUCCIONES DE MONTAJE
Y OPERACIÓN antes de operar. Si no se siguen las reglas de seguridad y otras precauciones
básicas de seguridad puede resultar en lesiones personales graves
Si tiene cualquier PREGUNTAS, PROBLEMAS, PIEZAS FALTANTES, por favor llame a nuestro
departamento de servicio al cliente al 833-290-1189 antes de devolver a la tienda
9815 3rd Street Road, Louisville, Kentucky 40272
Phone: 833-290-1189
Email: [email protected]
Web: www.acquaerpumps.com

INFORMACIÓN DE SEGURIDAD
ADVERTENCIA
Este motor de la bomba no es sumergible. No sumerja el motor o deje que el motor esté expuesto
al agua. Lesiones y / o la muerte personales por electrocución pueden resultar.
No utilice esta unidad para bombear productos químicos, líquidos inflamables, aguas residuales
líquidos corrosivos. Se podría lesionarse y la bomba se producirá un error. El bombeo de este tipo d
líquidos anula la garantía.
El agua y la electricidad pueden ser peligrosos si ciertas precauciones no se cumplen. Esta bomba
está diseñada para funcionar perfectamente seguro en un entorno de agua; Sin embargo, el uso
la instalación inadecuada pueden causar daños personales por descarga eléctrica. Por favo
preste atención a las siguientes advertencias.
Nunca toque cualquier dispositivo eléctrico, incluyendo esta bomba, cuando se está en contacto
con el agua, en el agua, o incluso en un ambiente húmedo. Siempre desenchufe (desconectar l
electricidad) cuando realice el mantenimiento o la instalación de la unidad.
RIESGO DE DESCARGA ELECTRICA.Esta bomba se suministra con un conductor de puesta
tierra y un enchufe con toma de tierra. Para reducir el riesgo de choque eléctrico, asegúrese d
que está conectado sólo a una conexión a tierra adecuada, el receptáculo con conexión a tierra.
No utilice el cable de alimentación o descarga de la manguera para transportar o manipular l
bomba. Si lo hace, puede provocar daños en el cable o manguera de descarga.
Propiedad
Especificaciones
Voltaje
Caballo de fuerza
Amperios
Max. Cabeza(m)
Max. Flujo(LPM)
tamaño de la descarga
Longitud del cable eléctrico
Modelo: PEP033
ESPECIFICACIONES TÉCNICAS
115V/60Hz
1/3HP
4.3A
5.5m
210
1-1/4 in.
2.4m
RENDIMIENTO
Modelo
PEP033
LPM de agua a un total de metros de cabeza
Max.
Cabeza(m)
1.5 m
210 160 110 - 5.5m
3 m 4.6 m 6.1 m

INFORMACIÓN DE SEGURIDAD
PRECAUCIÓN
La bomba tiene una protección térmica de sobrecarga incorporada. El protector de sobrecarga
térmica se apagará automáticamente el motor en una situación de sobrecalentamiento. A
continuación, se restablecerá una vez que el motor se enfríe. La bomba trabajará entonces de
nuevo. Este protector de sobrecarga está diseñado como un dispositivo de seguridad y va a fallar
después de un uso repetido.
INSTRUCCIONES DE INSTALACIÓN
a. Inserte la varilla del flotador a través del agujero en el interruptor.
b. Con cuidado, deslice la arandela de goma en la varilla del flotador. NOTA: El uso de jabón
líquido para ayudar a deslizar la arandela en la varilla del flotador.
c. Mueva la guía en la varilla del flotador y adjúntelo a la columna.
d. Enrosque el flotador en la varilla del flotador. Es posible que tenga un conjunto de pinzas para
evitar que el vástago gire.
e. Mueva la arandela hacia arriba o hacia abajo en la varilla del flotador para ajustar el
"encender" la posición de la bomba.
1.
2.
3.
Utilice siempre una toma de tierra para conectar el enchufe. Se necesita un receptáculo tipo de
tres clavijas gemelo para un uso seguro. Esto debe realizarse de acuerdo con el Código Eléctrico
Nacional y todos los códigos o leyes adicionales requeridos por su gobierno local.
Esta unidad está diseñada sólo para uso en 115 voltios (monofásica), 60 Hz, y está equipada con
un cable de 3 conductores aprobado y toma de tierra de 3 clavijas.NO QUITAR EL CONECTOR
DE TIERRA BAJO NINGUNA CIRCUNSTANCIA.El enchufe de 3 clavijas debe ser insertado
directamente en un 3 clavijas, el receptáculo de toma corriente con conexión a tierra adecuada.
No utilice la bomba con una toma de corriente de 2 patas. Sustituir la toma de 2 clavijas con un
receptáculo 3 con conexión a tierra (un enchufe GFCI) instalado de acuerdo con el Código
Eléctrico Nacional y los códigos y ordenanzas locales. Todo el cableado debe ser realizado por un
electricista calificado.
Proteja el cable eléctrico de objetos afilados, superficies calientes, aceite y productos químicos.
Evite torcer el cable. No utilice cables dañados o desgastados.
Para un mejor rendimiento, se recomienda conectar el cable de alimentación directamente a la
toma de corriente GFCI con conexión a tierra. Si es necesario el uso de un cable de extensión,
utilice siempre un cable de tipo impermeable a tierra. Nunca use cable más de un 25 pies. que es
más ligero que el calibre 14/3.
Mantenga todas las conexiones eléctricas lejos de ambientes húmedos y mojados. Conexiones
mojadas pueden causar una descarga eléctrica que resulta en lesiones personales.
DESCONECTE SIEMPRE LA FUENTE DE ALIMENTACIÓN ANTES DE INTENTAR INSTALAR,
MANTENER O TAREAS DE MANTENIMIENTO EN LA BOMBA. DE LO CONTRARIO PUEDE
PRODUCIR UNA DESCARGA ELÉCTRICA FATAL.
Establezca su nueva bomba en el fondo del depósito de
recogida.La bomba debe colocarse sobre una base sólida.
No coloque la bomba directamente sobre superficies
arenosas o rocosas.Arena y piedras pequeñas pueden
obstruir o causar daños a la bomba.
Asegúrese de que el flotador de bola se moverá hacia arriba
y hacia abajo libremente sin entrar en contacto con el lado
del foso de recogida. El contacto con el lado de la fosa del
sumidero puede hacer que el interruptor funcione mal. Vea
la siguiente manera.
GFCI Outlet
Switch
Grommet
Guide
Float Rod
Float Ball
Column
Check Valve

INSTRUCCIONES DE INSTALACIÓN
Es muy recomendable instalar una válvula de retención de flujo completo y de tipo oscilante (n
incluido) tan cerca de la salida de descarga de la bomba como sea posible. Una nueva válvul
de retención aumentará en gran medida la vida de la bomba, y debe ser el mismo tamaño que l
descarga de la bomba, 1 ¼ "o 1 ½".
4
5.
6.
Conecte la bomba y válvula de retención entre sí usando programa tubería 40 de PVC
accesorios. También puede utilizar DWV o ABS tubería, ya que esto no es una instalación d
presión. Manguera de drenaje corrugada es para uso temporal y no se debe utilizar en un
instalación permanente. Aunque hay muchos tipos de tubos que funcionan de manera adecuada
para esta instalación, se recomienda PVC
Pruebe la instalación después de haber completado la configuración de la bomba y se conecta
todas las tuberías. Enchufe el cable a la toma de tierra. La bomba no debe funcionar en est
punto. Si la bomba funciona, el interruptor se ha quedado atascado en la posición vertical. Llene
el depósito de recogida de agua con el uso de cubos o una manguera. Cuando el flotador s
mueve a la posición vertical, la bomba se encenderá. El interruptor se apagará la bomba cuando
el flotador alcanza la posición hacia abajo. Es posible ajustar el "encender" la posición par
satisfacer sus necesidades particulares moviendo el ojal hacia arriba o hacia abajo en la varill
del flotador. Recuerde que el conmutador debe moverse hacia arriba y hacia abajo librement
sin tocar los lados de la esclusa del sumidero.
SOLUCIÓN DE PROBLEMAS
Problema Causa Posible Acción correctiva
La bomba
no arranca
o funciona
La bomba
arranca y se
detiene con
demasiada
frecuencia
1.
2.
3.
4.
5.
La bomba no está enchufado,
conmutador o interruptor está apagado
Compruebe si hay un fusible fundido
o interruptores de circuito disparado
o salida de GFCI disparada
El interruptor está defectuoso
El protector térmico de motor disparado
Bola de flotador se ha quedado
atascada u obstruida
1.
2.
3.
4.
5.
Enchufe la bomba o encienda el
interruptor / disyuntor
Cambie el fusible, restablezca el
interruptor automático, restablezca
salida GFCI
Cambie el fusible, restablezca el
interruptor automático, restablezca
salida GFCI
Deje que la bomba se enfríe. Bomba
restaurará
Retire la obstrucción o la posición de la
bomba para que no estar atascada.
1.
2.
El reflujo de agua de la manguera / tubería
de descarga
El interruptor está defectuoso
1.
2.
Instale o reemplace la válvula de
retención
Reemplace el interruptor
Si la bomba
funciona pero
mueve poca o
ninguna agua
1.
2.
3.
4.
5.
6.
7.
Pantalla ingesta obstruida
Manguera/tubo de descarga obstruido
Manguera/tubo de descarga congelado
Voltaje de línea bajo
La válvula de retención se ha quedado
atascada en la posición cerrada
La válvula de retención está instalada al
revés
Piezas de la bomba desgastadas,
dañadas u obstruidas
1.
2.
3.
4.
5.
6.
7.
Limpie o reemplace la pantalla
Retire la obstrucción
Deje que la manguera / tubería se
descongele
Compruebe el tamaño del cable y
aumente si es necesario
Inspeccione, repare o reemplace si es
necesario
Inspeccione, repare o reemplace si es
necesario
Inspeccione el desgaste, daño o tapa y
limpie o reemplace si es necesario
La bomba no
se apaga
1.
2.
Bola de flotador está obstruida o atascada
Interruptor defectuoso
1.
2.
Retire la obstrucción
Reemplace el interruptor

DIAGRAMA DE PIEZAS
LISTA DE PARTES
1
2
3
4
5
6
Número de pieza
Descripción
1
2
3
4
5
6
interruptor
cuerpo de la bomba
impulsor
base de la bomba
eje de conducir
bola flotante
/