
1
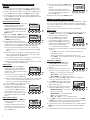
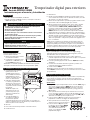
Day Of Week (DOW) Display — events can be programmed for
just one day of the week, all the days of the week, just weekdays
or just weekends
Event Display — the timer can be programmed for up to 28 total
ON/OFF events per week
Mode Display — the timer can display several modes during
setup and programming and three modes during operation:
MANual, AUTO and RANDom. MANual allows for manual operation
of the plugged-in devices, AUTO uses the timer’s exact settings
and RANDom uses the timer’s settings varied by random 5-minute
increments of ±30 minutes.
Output Status Indicator — this is the ON/OFF indicator. When the
green light is on it means that the lamp or appliance should be
on. If it is not on, the bulb may be burned out or the device may
be turned off at the lamp or appliance.
NOTE: You may set up and program the timer before you plug it
in. Be aware that while it is unplugged, the display will turn off to
conserve battery power if there is no pushbutton activity for a few
minutes. If this happens, simply push any button to turn the display
back on.
8.
9.
10.
11.
Digital Outdoor Timer
Input: 102-132 VAC 60 Hz, 2.5W max.
Output: 15 Amp/1800W Resistive, 12 Amp Inductive, 1000W Tungsten,
1/3 HP
•
•
Installation and User Instructions
MODEL HB800 Series
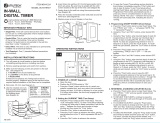
2 – Get Familiar with the Timer’s Features
Ratings
The timer comes with two LR44
batteries installed.
Remove the pull tab to connect
the installed batteries.
The display will initialize itself,
then flash “12:00 AM” in the
CLOCK mode (Fig. 1).
NOTE: If display doesn’t light, the batteries are dead. Replace the
batteries before using the digital timer.
1.
2.
ON
DAYSAV MAN AUTO RAND CLOCK
YEARDATE
MONTH
SKIP
EVENT
MO TU WE TH FR SA SU AM PM
OFF LOC DUSK DAWNON
DAYSAV MAN AUTO RAND CLOCK
YEARDATE
MONTH
SKIP
EVENT
MO TU WE TH FR SA SU AM PM
OFF LOC DUSK DAWN
1 – Activate the Batteries
Plug timer power cord into GFCI only.
Do not exceed capacity of 15 amps.
Fully insert plugs.
Not for use with power tools such as hedge trimmers, weed trimmers and
lawn mowers.
As power cord blends with grass and foliage, use care when operating lawn
equipment near cord.
Keep children away.
•
•
•
•
•
•
WARNING — Risk of fire or electric shock
Follow local electrical codes during use.
Store indoors when not in use.
Dispose of used batteries promptly per local regulations.
•
•
•
NOTICE
It’s unlikely that your new digital timer has any existing
programming, but to make sure, use this procedure before setting
the time.
Locate the Reset button. It is the small, round hole adjacent to the
keypad. You will need a pen or paper clip to press this button.
Press and hold the ON/OFF button.
Press the Reset button for 3 seconds and release. The display will
light up and then go blank.
Release the ON/OFF button.
NOTE: Pressing the Reset button without holding down the ON/
OFF button will clear the time, but will not clear the non-volatile
(programming) memory.
1.
2.
3.
4.
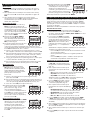
3 – Clear Any Existing Programming
NOTE: The following procedure must be completed entirely,
including adjustments, in order for the Astronomic and automatic
Daylight Saving Time features to function properly.
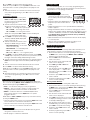
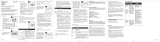
Setting Time
Ensure that the timer is in the CLOCK mode (Fig. 1). If it is not,
press the MODE button a few times (through MANual, AUTO and
RANDom) until CLOCK shows in the mode display area, then
press OK.
Turn the selector knob until the correct hour shows in the first
two digits of the Time Of Day (TOD) display, along with the
correct AM and PM display. Note that the AM and PM displays will
alternate as the time passes through 12.
Press the OK button to set the hour. The last two digits of the TOD
display (minute display) will begin to flash.
Turn the selector knob until the
correct time in minutes shows.
Press the OK button to set the
minutes. MONTH, DATE and YEAR
will show in the mode display area,
with the digits under YEAR flashing
(Fig. 3).
1.
2.
3.
4.
5.
Fig.
3
ON
DAYSAV MAN AUTO RAND CLOCK
YEARDATE
MONTH
SKIP
EVENT
MO TU WE TH FR SA SU AM PM
OFF LOC DUSK DAWN
OK MODE PROG ON/OFF
Fig.
3
ON
DAYSAV MAN AUTO RAND CLOCK
YEARDATE
MONTH
SKIP
EVENT
MO TU WE TH FR SA SU AM PM
OFF LOC DUSK DAWN
OK MODE PROG ON/OFF
4 – Set the Time, Date and Location
Fig.
1
Fig.
2
Battery Holder (back of unit)
— two LR44 batteries keep
time up to three months
without power
Low Battery Indicator —
programmed data is stored
in non-volatile memory,
so it won’t be lost when
batteries are removed
NOTE: Replace the batteries
as soon as possible after
the low battery indicator
appears.
Time Of Day (TOD)
Display — the timer will
automatically adjust for
Daylight Saving Time (DST)
and changing dawn and
dusk times for your location
(Astronomic feature)
1.
2.
3.
Pushbuttons
Two Timed, Grounded Outlets
Selector Knob
Reset Button
4.
5.
6.
7.
+
MO TU WE TH FR SA SU
EVENT
MONTH
ON OFF LOC DUSK DAWN
DATE YEAR
AM PM
MAN AUTO RAND CLOCK
SKIP
DAYSAV
OK MODE
PROG
ON/OFF
1 2
4
3
6
5
7
8
9
10
11

2
Setting Date
Turn the selector knob until the current year is displayed and
press the OK button. The digits under MONTH will begin to flash.
Turn the selector knob until the current month is displayed and
press the OK button. The digits under DATE will begin to flash.
Turn the selector knob until the current date is displayed and
press the OK button. The timer will automatically determine and
display the day of the week.
NOTE: “00” indicates 2000.
Adjusting Daylight Saving Time
DAYSAV and AUTO will show in the mode
display area (Fig. 4). The timer will
automatically adjust the clock for
Daylight Saving Time (DST) when set to
AUTO here. If you do not want the timer
to do this, turn the selector knob until
MANual shows.
After choosing AUTO or MANual, press the
OK button. The timer’s starting date for
DST will show in the display in the form
of MONTH and week (Fig. 5).
The start and end dates for DST can
change. The next four steps allow you to
change them for your location. If the timer’s settings for DST are
already correct, press the OK button right away, otherwise:
First, turn the selector knob to choose the correct month
(01 through 12) for your DST starting date and press the OK
button.
Turn the selector knob again to change the week (01 = first,
02 = second, 03 = third, 04 = fourth, 0L = Last) for your DST
starting date and press the OK button.
Then, turn the selector knob to choose the correct month for
your DST ending date and press the OK button.
Turn the selector knob again to change the week for your DST
ending date and press the OK button.
Setting Location
The timer will now display LOC, the
default state and country (Alabama,
United States) (Fig. 6). The location
must be set in order for the Astronomic
feature to function.
First, turn the selector knob to choose
your state and press the OK button.
Turn the selector knob again to change from the country to the
section, if necessary. Your state may have from one to nine
sections to choose from (NE, NW, CTR, etc.).
Press the OK button to accept the location.
The timer will now display LOC, “TZ”
and the selected time zone for your
location (Fig. 7). If the timer’s selection
is correct, press the OK button right
away, otherwise turn the selector
knob until the correct time zone shows
in the display and then press the OK
button.
Adjusting Dawn and Dusk
The timer will now display DAWN and
the calculated sunrise time for your
location (Fig. 8).
Accept the calculated sunrise time or
turn the selector knob until the correct
time shows in the display, and then
press the OK button.
6.
7.
8.
9.
10.
11.
a.
b.
c.
d.
12.
a.
b.
c.
13.
14.
ON
DAYSAV MAN AUTO RAND CLOCK
YEARDATE
MONTH
SKIP
EVENT
MO TU WE TH FR SA SU AM PM
OFF LOC DUSK DAWN
OK MODE PROG ON/OFF
Fig.
4
ON
DAYSAV MAN AUTO RAND CLOCK
YEARDATE
MONTH
SKIP
EVENT
MO TU WE TH FR SA SU AM PM
OFF LOC DUSK DAWN
OK MODE PROG ON/OFF
Fig.
4
ON
DAYSAV MAN AUTO RAND CLOCK
YEARDATE
MONTH
SKIP
EVENT
MO TU WE TH FR SA SU AM PM
OFF LOC DUSK DAWN
OK MODE PROG ON/OFF
Fig.
5
ON
DAYSAV MAN AUTO RAND CLOCK
YEARDATE
MONTH
SKIP
EVENT
MO TU WE TH FR SA SU AM PM
OFF LOC DUSK DAWN
OK MODE PROG ON/OFF
Fig.
5
ON
DAYSAV MAN AUTO RAND CLOCK
YEARDATE
MONTH
SKIP
EVENT
MO TU WE TH FR SA SU AM PM
OFF LOC DUSK DAWN
OK MODE PROG ON/OFF
Fig.
6
ON
DAYSAV MAN AUTO RAND CLOCK
YEARDATE
MONTH
SKIP
EVENT
MO TU WE TH FR SA SU AM PM
OFF LOC DUSK DAWN
OK MODE PROG ON/OFF
Fig.
6
ON
DAYSAV MAN AUTO RAND CLOCK
YEARDATE
MONTH
SKIP
EVENT
MO TU WE TH FR SA SU AM PM
OFF LOC DUSK DAWN
OK MODE PROG ON/OFF
Fig.
7
ON
DAYSAV MAN AUTO RAND CLOCK
YEARDATE
MONTH
SKIP
EVENT
MO TU WE TH FR SA SU AM PM
OFF LOC DUSK DAWN
OK MODE PROG ON/OFF
Fig.
7
ON
DAYSAV MAN AUTO RAND CLOCK
YEARDATE
MONTH
SKIP
EVENT
MO TU WE TH FR SA SU AM PM
OFF LOC DUSK DAWN
OK MODE PROG ON/OFF
Fig.
8
ON
DAYSAV MAN AUTO RAND CLOCK
YEARDATE
MONTH
SKIP
EVENT
MO TU WE TH FR SA SU AM PM
OFF LOC DUSK DAWN
OK MODE PROG ON/OFF
Fig.
8
4 – Set the Time, Date and Location (Continued)
The timer will now display DUSK and the
calculated sunset time for your location
(Fig. 9).
Accept the calculated sunset time or
turn the selector knob until the correct
time shows in the display, and then
press the OK button.
The timer will now jump to MANual mode.
15.
16.
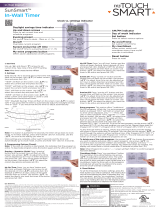
5 – Set Initial Pair of ON and OFF Events
You may program the digital timer for up to 28 events. A time setting
to turn on (at a specific time, DAWN or DUSK) is considered an ON
event. A time setting to turn off (at a specific time, DAWN or DUSK) is
considered an OFF event.
NOTE: You must view an event screen before programming.
Viewing an Event
Ensure that the timer is in a normal operating mode by pressing
the MODE button, if necessary, until MANual, AUTO or RANDom
appears in the mode display area.
Press the PROG button to view the
first event screen (Fig. 10). If all
programming has been cleared, the
timer will display SKIP above the event
display (“01”), indicating that the first
event is not programmed, and
“--:--” will replace the time display.
NOTE: From any event viewing screen (with no displays flashing),
you may:
Press OK to return to the normal operating mode without
making any change.
Turn the selector knob to view the next event screen.
Press PROG to set or change the event you are viewing. Event
number will flash.
Programming an ON Event
Press PROG again. The SKIP display
(or ON or OFF, if the timer has been
programmed) will begin flashing
(Fig. 11).
Turn the selector knob until the screen
displays the event setting you desire:
ON only — for turning on at a preset time
ON and DUSK — for turning on at sunset
ON and DAWN — for turning on at sunrise
NOTE: The settings with SKIP or OFF are used for disabling an
event or programming an OFF event.
Press PROG to accept the event setting.
The Days Of Week (DOW) display will
begin to flash (Fig. 12).
Turn the selector knob until the screen
displays the DOW setting you desire:
MO TU WE TH FR SA SU — for an event
that occurs every day
MO TU WE TH FR — for a weekday event
SA SU — for a weekend event
MO (or TU, or WE, etc.) — for a single day event
Press PROG to accept the DOW setting. If you have chosen DAWN
or DUSK, skip to step 10. If you have chosen a preset time, the first
two digits of the Time Of Day (TOD) will begin to flash.
Turn the selector knob until the desired hour is reached and press
PROG. The last two digits of the Time Of Day (TOD) will begin to
flash.
Turn the selector knob until the desired minutes are reached.
1.
2.
-
-
-
3.
4.
-
-
-
5.
6.
-
-
-
-
7.
8.
9.
ON
DAYSAV MAN AUTO RAND CLOCK
YEARDATE
MONTH
SKIP
EVENT
MO TU WE TH FR SA SU AM PM
OFF LOC DUSK DAWN
OK MODE PROG ON/OFF
Fig.
10
ON
DAYSAV MAN AUTO RAND CLOCK
YEARDATE
MONTH
SKIP
EVENT
MO TU WE TH FR SA SU AM PM
OFF LOC DUSK DAWN
OK MODE PROG ON/OFF
Fig.
10
ON
DAYSAV MAN AUTO RAND CLOCK
YEARDATE
MONTH
SKIP
EVENT
MO TU WE TH FR SA SU AM PM
OFF LOC DUSK DAWN
OK MODE PROG ON/OFF
Fig.
11
ON
DAYSAV MAN AUTO RAND CLOCK
YEARDATE
MONTH
SKIP
EVENT
MO TU WE TH FR SA SU AM PM
OFF LOC DUSK DAWN
OK MODE PROG ON/OFF
Fig.
11
OK MODE PROG ON/OFF
ON
DAYSAV MAN AUTO RAND CLOCK
YEARDATE
MONTH
SKIP
EVENT
MO TU WE TH FR SA SU AM PM
OFF LOC DUSK DAWN
Fig.
12
OK MODE PROG ON/OFF
ON
DAYSAV MAN AUTO RAND CLOCK
YEARDATE
MONTH
SKIP
EVENT
MO TU WE TH FR SA SU AM PM
OFF LOC DUSK DAWN
Fig.
12
ON
DAYSAV MAN AUTO RAND CLOCK
YEARDATE
MONTH
SKIP
EVENT
MO TU WE TH FR SA SU AM PM
OFF LOC DUSK DAWN
OK MODE PROG ON/OFF
Fig.
9

3
The battery voltage is continuously
monitored. If a low voltage is detected,
the low battery indicator will be displayed
(Fig. 15).
The timer requires two LR44 batteries to
keep time up to three months without
power.
Replace the batteries as soon as possible after the low battery
indicator appears.
Change the batteries within one minute of unplugging in order to
keep the time and date settings. Afterwards, if the display is wrong
or flashes “12:00 AM”, reset the time and date. All other settings
(your ON and OFF programming) remain in memory indefinitely
without battery or AC power.
While the batteries are removed, the timer will turn off the display
to conserve power.
Dispose of the used batteries promptly according to local
regulations. Keep batteries away from children.
•
•
•
•
•
•
About the Batteries
To conserve battery power, as soon as setup, programming and
mounting are complete, plug the desired devices into the timer and
plug the timer into a properly grounded outlet.
8 – Plug In Timer
Changing Program Times
Skipping an ON or OFF Event
Use these steps to disable an existing ON or OFF event that you no
longer want (for example, special settings from a vacation).
Ensure that the timer is in a normal operating mode by pressing
the MODE button, if necessary, until MANual, AUTO or RANDom
appears in the mode display area.
Press the PROG button to view the first
event screen (“01”).
Turn the selector knob until the desired
event screen is displayed.
Press PROG again. ON or OFF will be
flashing (Fig.16).
Turn the selector knob until SKIP shows
in the display and “-- --” replaces the
time (Fig. 17), then press PROG to accept
the new setting.
Continue to press PROG until the next
event is viewed.
Continue programming or press OK to
return to normal operating.
Revising an ON or OFF Event
Use these steps to revise an existing ON or OFF event.
Ensure that the timer is in a normal operating mode by pressing
the MODE button, if necessary, until MANual, AUTO or RANDom
appears in the mode display area.
Press the PROG button to view the first
event screen (“01”).
Turn the selector knob until the desired
event screen is displayed.
Press PROG as many times as necessary
to display the setting you want to revise,
for example, DOW (Fig. 18).
Turn the selector knob until you reach
the DOW setting you want (Fig. 19) and
press PROG to accept the new setting.
Continue to press PROG until the next
event is viewed.
Continue programming or press OK to
return to normal operating.
1.
2.
3.
4.
5.
6.
7.
1.
2.
3.
4.
5.
6.
7.
ON
DAYSAV MAN AUTO RAND CLOCK
YEARDATE
MONTH
SKIP
EVENT
MO TU WE TH FR SA SU AM PM
OFF LOC DUSK DAWN
OK MODE PROG ON/OFF
Fig.
16
ON
DAYSAV MAN AUTO RAND CLOCK
YEARDATE
MONTH
SKIP
EVENT
MO TU WE TH FR SA SU AM PM
OFF LOC DUSK DAWN
OK MODE PROG ON/OFF
Fig.
16
ON
DAYSAV MAN AUTO RAND CLOCK
DATE
MONTH
SKIP
EVENT
MO TU WE TH FR SA SU AM PM
OFF LOC DUSK DAWN
OK MODE PROG ON/OFF
Fig.
17
ON
DAYSAV MAN AUTO RAND CLOCK
DATE
MONTH
SKIP
EVENT
MO TU WE TH FR SA SU AM PM
OFF LOC DUSK DAWN
OK MODE PROG ON/OFF
Fig.
17
OK MODE PROG ON/OFF
ON
DAYSAV MAN AUTO RAND CLOCK
YEARDATE
MONTH
SKIP
EVENT
MO TU WE TH FR SA SU AM PM
OFF LOC DUSK DAWN
Fig.
18
OK MODE PROG ON/OFF
ON
DAYSAV MAN AUTO RAND CLOCK
YEARDATE
MONTH
SKIP
EVENT
MO TU WE TH FR SA SU AM PM
OFF LOC DUSK DAWN
Fig.
18
ON
DAYSAV MAN AUTO RAND CLOCK
YEARDATE
MONTH
SKIP
EVENT
MO TU WE TH FR SA SU AM PM
OFF LOC DUSK DAWN
OK MODE PROG ON/OFF
Fig.
19
ON
DAYSAV MAN AUTO RAND CLOCK
YEARDATE
MONTH
SKIP
EVENT
MO TU WE TH FR SA SU AM PM
OFF LOC DUSK DAWN
OK MODE PROG ON/OFF
Fig.
19
Press PROG to accept the entire ON event setting.
NOTE: Do not press OK before pressing PROG this final time or the
timer will return to normal operating without accepting the new
setting.
The timer will move on to view the next event screen and you
may continue programming or press OK to return to normal
operating.
Programming an OFF Event
While viewing an event screen, press
PROG. The SKIP display (or ON or OFF, if
the timer has been programmed) will
begin flashing (Fig.13).
Turn the selector knob until the screen
displays the event setting you desire:
OFF only — for turning off at a preset time
OFF and DUSK — for turning off at sunset
OFF and DAWN — for turning off at sunrise
NOTE: The settings with SKIP or ON are used for disabling an
event or programming an ON event.
Press PROG to accept the event setting.
The Days Of Week (DOW) display will
begin to flash (Fig. 14).
Turn the selector knob until the screen
displays the DOW setting you desire:
MO TU WE TH FR SA SU — for an event
that occurs every day
MO TU WE TH FR — for a weekday event
SA SU — for a weekend event
MO (or TU, or WE, etc.) — for a single day event
Press PROG to accept the DOW setting. If you have chosen DAWN
or DUSK, skip to step 19. If you have chosen a preset time, the first
two digits of the Time Of Day (TOD) will begin to flash.
Turn the selector knob until the desired hour is reached and press
PROG. The last two digits of the Time Of Day (TOD) will begin to
flash.
Turn the selector knob until the desired minutes are reached.
Press PROG to accept the entire OFF event setting.
NOTE: Do not press OK before pressing PROG this final time or the
timer will return to normal operating without accepting the new
setting.
The timer will move on to view the next event screen and you
may continue programming or press OK to return to normal
operating.
10.
11.
12.
13.
-
-
-
14.
15.
-
-
-
-
16.
17.
18.
19.
20.
ON
DAYSAV MAN AUTO RAND CLOCK
YEARDATE
MONTH
SKIP
EVENT
MO TU WE TH FR SA SU AM PM
OFF LOC DUSK DAWN
OK MODE PROG ON/OFF
Fig.
13
ON
DAYSAV MAN AUTO RAND CLOCK
YEARDATE
MONTH
SKIP
EVENT
MO TU WE TH FR SA SU AM PM
OFF LOC DUSK DAWN
OK MODE PROG ON/OFF
Fig.
13
ON
DAYSAV MAN AUTO RAND CLOCK
YEARDATE
MONTH
SKIP
EVENT
MO TU WE TH FR SA SU AM PM
OFF LOC DUSK DAWN
OK MODE PROG ON/OFF
Fig.
14
ON
DAYSAV MAN AUTO RAND CLOCK
YEARDATE
MONTH
SKIP
EVENT
MO TU WE TH FR SA SU AM PM
OFF LOC DUSK DAWN
OK MODE PROG ON/OFF
Fig.
14
Once set up, you have three choices for operating the digital timer.
The screen will display MANual, AUTO or RANDom and you may choose
between them by pressing the MODE button.
AUTO — uses the timer settings you have programmed.
RANDom — gives your home a “lived-in” look by varying your
settings by random 5-minute increments of ±30 minutes.
MANual — makes the switch into a standard ON/OFF switch
without timer settings. Press the ON/OFF button to operate
plugged-in devices.
NOTE: While in AUTO or RANDom and you may override the timer by
pressing the ON/OFF button.
If the timer has a device turned on, pressing the ON/OFF button will
turn it off and leave it off until the next ON event.
If the timer has a device turned off, pressing the ON/OFF button will
turn it on and leave it on until the next OFF event.
•
•
•
•
•
6 – Select AUTO, RANDom or MANual Operation
ON
DAYSAV MAN AUTO RAND CLOCK
YEARDATE
MONTH
SKIP
EVENT
MO TU WE TH FR SA SU AM PM
OFF LOC DUSK DAWN
OK MODE PROG ON/OFF
Fig.
15
Mount timer to a wall or post at least 36" (90 cm) from ground
using holes on back of timer case.
Mount upright so outlets face downward.
•
•
7 – Mount Timer

4
158-00565
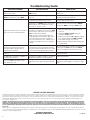
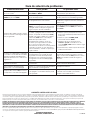
Observed Problem Possible Cause What to Do
Digital timer does not switch on/off but
display looks normal.
Digital timer is not set in AUTO, RANDom, or
MANual mode.
Press MODE to select the operational mode you
want to use.
Digital timer won’t enter AUTO or
RANDom mode when you press MODE.
The time of day or timer settings have not
been set.
Make sure the time of day and at least one
scheduled activity have been set.
Digital timer switches at incorrect times or
skips some of the programmed times.
Programmed schedule(s) are incorrect.
Press PROG to review the settings and revise them
as necessary. See instructions.
Digital timer is in RANDom mode, which varies
switching times up to ±30 minutes (to give
your home a “lived-in” look).
If you don’t want to keep the timer in RANDom
mode, press MODE to change to AUTO mode.
The Astronomic and exact switching times are
in conflict. For example, you’ve set on to DUSK
and off at 8 pm, and due to seasonal changes,
DUSK has advanced to 8:30 pm.
NOTE: Your timer automatically skips any
conflicting ON event as summer approaches
to prevent unwanted operation of lights or
other controlled devices. See “What to Do” if
you want to identify and remove conflicting
settings.
Complete the steps for setting the Time and
Date, then temporarily change the date to
June 21st.
Review the DAWN and DUSK settings by
pushing the PROG button.
Make sure the specific ON or OFF time settings
won’t interfere with these DAWN and DUSK
times. Make changes as necessary.
When finished, change the Date setting back
to today’s date.
1.
2.
3.
4.
The lights or controlled devices don’t
match the programmed on/off status
immediately after setting the time or
programming a schedule.
Digital timer does not “catch up”
automatically to the programmed load state.
The status of the timer will remain as is until it
comes to the next programmed on/off time.
After programming your events or the time, then
returning to the AUTO mode, push the ON/OFF
button to change the load state if necessary.
The load turns off immediately after being
turned on.
The timer is not functioning properly. If the problem persists, contact Intermatic
Customer Service.
The digital timer operation is sluggish or
not switching on/off at all.
Though the low battery indicator is not being
displayed, the batteries are getting weak.
Replace the batteries.
Timer shows ON but the light or other
controlled device is off.
The light or controlled device itself may be
switched off or the light bulb may be burned
out.
Make sure the light or controlled device is
switched on and plugged in or replace the light
bulb.
Troubleshooting Guide
LIMITED LIFETIME WARRANTY
If within the warranty period specified, this product fails due to a defect in material or workmanship, Intermatic Incorporated will repair or replace it, at its sole option, free of charge. This warranty is extended to
the original household purchaser only and is not transferable. This warranty does not apply to: (a) damage to units caused by accident, dropping or abuse in handling, acts of God or any negligent use; (b) units
which have been subject to unauthorized repair, opened, taken apart or otherwise modified; (c) units not used in accordance with instructions; (d) damages exceeding the cost of the product; (e) sealed lamps
and/or lamp bulbs, LED’s and batteries; (f) the finish on any portion of the product, such as surface and/or weathering, as this is considered normal wear and tear; (g) transit damage, initial installation costs,
removal costs, or reinstallation costs.
INTERMATIC INCORPORATED WILL NOT BE LIABLE FOR INCIDENTAL OR CONSEQUENTIAL DAMAGES. SOME STATES DO NOT ALLOW THE EXCLUSION OR LIMITATION OF INCIDENTAL OR CONSEQUENTIAL
DAMAGES, SO THE ABOVE LIMITATION OR EXCLUSION MAY NOT APPLY TO YOU. THIS WARRANTY IS IN LIEU OF ALL OTHER EXPRESS OR IMPLIED WARRANTIES. ALL IMPLIED WARRANTIES, INCLUDING
THE WARRANTY OF MERCHANTABILITY AND THE WARRANTY OF FITNESS FOR A PARTICULAR PURPOSE, ARE HEREBY MODIFIED TO EXIST ONLY AS CONTAINED IN THIS LIMITED WARRANTY, AND SHALL
BE OF THE SAME DURATION AS THE WARRANTY PERIOD STATED ABOVE. SOME STATES DO NOT ALLOW LIMITATIONS ON THE DURATION OF AN IMPLIED WARRANTY, SO THE ABOVE LIMITATION MAY NOT
APPLY TO YOU.
This warranty service is available by either (a) returning the product to the dealer from whom the unit was purchased, or (b) mailing the product, along with proof of purchase, postage prepaid to the authorized
service center listed below. This warranty is made by: Intermatic Incorporated/After Sales Service/7777 Winn Rd., Spring Grove, Illinois 60081-9698/815-675-7000 http://www.intermatic.com Please be sure to wrap
the product securely to avoid shipping damage.
INTERMATIC INCORPORATED
SPRING GROVE, ILLINOIS 60081-9698

5
Botón Reset
Día de la semana (DOW): Se pueden programar eventos para
sólo un día de la semana, todos los días de la semana, sólo días
de semana o sólo fines de semana.
Evento: En el temporizador se pueden programar hasta un total
de 28 eventos de encendido/apagado por semana.
Modo: El temporizador puede mostrar varios modos durante
la configuración y la programación, y tres modos durante
el funcionamiento: MANual, AUTO y RANDom. MANual permite
la operación manual de los dispositivos enchufados, AUTO
(Automático) usa los ajustes exactos del temporizador y
RANDom (Aleatorio) usa los ajustes del temporizador variando
aleatoriamente en incrementos de 5 minutos cada ±30 minutos.
Indicador de estado de salida: Éste es el indicador de encendido/
apagado. Cuando está encendida la luz verde, significa que el
foco o el artefacto debe estar encendido. Si no es así, la bombilla
debe estar quemada o el dispositivo puede estar apagado en el
foco o el artefacto.
NOTA: Puede configurar y programar el temporizador antes de
enchufarlo. Tenga en cuenta que mientras está desenchufado, se
apagará la pantalla para conservar energía si no hay actividad en
los botones durante algunos minutos. Si esto sucede, simplemente
presione cualquier botón para volver a encender la pantalla.
7.
8.
9.
10.
11.
Temporizador digital para exteriores
Entrada: 102 a 132 V CA 60 Hz, 2.5 W máx.
Salida: 15 amperios/1800 W resistivos, 12 amperios inductivos,
1000 W de tungsteno, 1/3 HP
•
•
Instrucciones para el usuario y la instalación
Serie de MODELO HB800
El temporizador viene con dos
baterías LR44 instaladas.
Retire la lengüeta para conectar
las baterías instaladas.
La pantalla se inicializará, luego
parpadeará “12:00 AM” en el
modo CLOCK (Reloj) (Fig. 1).
NOTA: Si no se ilumina la pantalla, las baterías están agotadas.
Reemplace las baterías antes de usar el temporizador digital.
1.
2.
ON
DAYSAV MAN AUTO RAND CLOCK
YEARDATE
MONTH
SKIP
EVENT
MO TU WE TH FR SA SU AM PM
OFF LOC DUSK DAWNON
DAYSAV MAN AUTO RAND CLOCK
YEARDATE
MONTH
SKIP
EVENT
MO TU WE TH FR SA SU AM PM
OFF LOC DUSK DAWN
Enchufe el cable de alimentación del temporizador en un interruptor del
circuito de fallos de conexión a tierra solamente.
No exceda la capacidad de 15 amperios.
Inserte los enchufes completamente.
No está diseñado para su uso con herramientas eléctricas como cortadores
de setos, hierba y césped.
Debido a que el cable de alimentación se mezcla entre el pasto y el follaje,
tenga cuidado al operar el equipo para césped cerca del cable.
Mantenga alejados a los niños.
•
•
•
•
•
•
ADVERTENCIA: Riesgo de incendio o descarga eléctrica
Siga los códigos eléctricos locales durante su uso.
Guárdelo en interiores cuando no esté en uso.
Elimine inmediatamente las baterías usadas según los reglamentos locales.
•
•
•
AVISO
Es poco probable que su nuevo temporizador digital tenga
alguna programación existente, pero para asegurarse, use este
procedimiento antes de ajustar la hora.
Ubique el botón Reset (Reinicio). Es el orificio pequeño y
redondo adyacente al teclado. Necesitará un lápiz o un sujetador
de papel para presionar este botón.
Presione y mantenga presionado el botón ON/OFF (Encendido/
Apagado).
Presione el botón Reset durante 3 segundos y suéltelo. Se
iluminará la pantalla y quedará en blanco.
Suelte el botón ON/OFF.
NOTA: Al presionar el botón Reset sin mantener presionado el
botón ON/OFF borrará la hora, pero no borrará la memoria no volátil
(programación).
1.
2.
3.
4.
NOTA: El siguiente procedimiento se debe realizar completamente,
lo que incluye los ajustes, para que las funciones Astronomic
(Astronómica) y Daylight (Hora de verano) automáticas funcionen
correctamente.
Ajuste de hora
Asegúrese de que el temporizador esté en el modo CLOCK (Fig. 1).
Si no es así, presione el botón MODE (Modo) un par de veces
(pasando por MANual, AUTO y RANDom) hasta que se muestre
CLOCK en el área de visualización de modo, y luego presione
OK (Aceptar).
Gire la perilla selectora hasta que se muestre la hora correcta
en los dos primeros dígitos de la hora del día (TOD), junto con
la opción de AM y PM correcta. Tenga en cuenta que AM y PM se
alternarán a medida que la hora pase las 12.
Presione el botón OK para ajustar la hora. Comenzarán a
parpadear los últimos dos dígitos de TOD (minutos).
Gire la perilla selectora hasta que se
muestre la hora correcta en minutos.
Presione el botón OK para ajustar
los minutos. Se mostrarán MONTH
(Mes), DATE (Fecha) y YEAR (Año)
en el área de visualización de
modo, con los dígitos de YEAR
parpadeando (Fig. 3).
1.
2.
3.
4.
5.
Fig.
3
ON
DAYSAV MAN AUTO RAND CLOCK
YEARDATE
MONTH
SKIP
EVENT
MO TU WE TH FR SA SU AM PM
OFF LOC DUSK DAWN
OK MODE PROG ON/OFF
Fig.
3
ON
DAYSAV MAN AUTO RAND CLOCK
YEARDATE
MONTH
SKIP
EVENT
MO TU WE TH FR SA SU AM PM
OFF LOC DUSK DAWN
OK MODE PROG ON/OFF
Fig.
1
Fig.
2
Compartimiento de baterías
(parte posterior de la
unidad): (parte posterior
de la unidad): Dos baterías
LR44 mantienen la hora
durante un máximo de tres
meses sin alimentación.
Indicador de batería baja:
Los datos programados se
almacenan en la memoria
no volátil, de forma que no
se pierden cuando se retiran
las baterías.
NOTA: Reemplace las
baterías tan pronto sea
posible después de que
aparezca el indicador de
batería baja.
Hora del día (TOD, por
sus siglas en inglés): El
temporizador ajustará
1.
2.
3.
automáticamente la hora de verano (DST, por sus siglas en
inglés) y cambiará las horas de amanecer y atardecer para su
ubicación (función astronómica).
Botones
Dos tomacorrientes temporizados conectados a tierra
Perilla selectora
4.
5.
6.
+
MO TU WE TH FR SA SU
EVENT
MONTH
ON OFF LOC DUSK DAWN
DATE YEAR
AM PM
MAN AUTO RAND CLOCK
SKIP
DAYSAV
OK MODE
PROG
ON/OFF
1 2
4
3
6
5
7
8
9
10
11
2 – Familiarícese con las funciones del temporizador
3 – Borre cualquier programación existente
4 – Ajuste la hora, fecha y ubicación
Capacidades
1 – Active las baterías

6
Ajuste de fecha
Gire la perilla selectora hasta que se muestre el año actual y
presione el botón OK. Comenzarán a parpadear los dígitos de
MONTH.
Gire la perilla selectora hasta que se muestre el mes actual y
presione el botón OK. Comenzarán a parpadear los dígitos de
DATE.
Gire la perilla selectora hasta que se muestre la fecha
actual y presione el botón OK. El temporizador determinará
automáticamente y mostrará el día de la semana.
NOTA: “00” indica 2000.
Ajuste de hora de verano
Se mostrará DAYSAV (Hora de ver.) y
AUTO en el área de visualización de
modo (Fig. 4). El temporizador ajustará
automáticamente la hora para hora de
verano (DST) cuando se ajuste AUTO
aquí. Si no desea que el temporizador
haga esto, gire la perilla selectora hasta
que se muestre MANual.
Después de elegir AUTO o MANual,
presione el botón OK. La fecha de
inicio del temporizador para DST se
mostrará en pantalla en la forma de
MES y semana (Fig. 5).
Se pueden cambiar las fechas de inicio
y término para DST. Los próximos
cuatro pasos le permiten cambiarlas para su ubicación. Si los
ajustes del temporizador para DST ya están correctos, presione el
botón OK inmediatamente, de lo contrario:
Primero, gire la perilla selectora para elegir el mes correcto
(01 a 12) para su fecha de inicio de DST y presione el botón
OK.
Gire nuevamente la perilla selectora y cambie la semana (01 =
primera, 02 = segunda, 03 = tercera, 04 = cuarta, 0L = última)
para su fecha de inicio de DST y presione el botón OK.
Luego, gire la perilla selectora para elegir el mes correcto para
su fecha de término de DST y presione el botón OK.
Gire la perilla selectora nuevamente para cambiar la semana
para su fecha de término de DST y presione el botón OK.
Ajuste de ubicación
El temporizador ahora mostrará
LOC (Ubicación), el estado y el país
predeterminados (Alabama, United
States [Alabama, Estados Unidos])
(Fig. 6). La ubicación se debe ajustar
para que funcione la función
Astronomic.
Primero, gire la perilla selectora para elegir el estado y
presione el botón OK.
Gire la perilla selectora nuevamente para cambiar del país a la
sección, si es necesario. Su estado puede tener de una a nueve
secciones para elegir (NE, NW, CTR [NE, NO, centro], etc.).
Presione el botón OK para aceptar la ubicación.
El temporizador ahora mostrará LOC,
“TZ” y el huso horario seleccionado
para su ubicación (Fig. 7). Si la
selección del temporizador es
correcta, presione inmediatamente el
botón OK, de lo contrario, gire la perilla
selectora hasta que se muestre el
huso horario correcto en la pantalla y
presione el botón OK.
Ajuste de amanecer y atardecer
El temporizador ahora mostrará DAWN
(Amanecer) y la hora de salida del sol
calculada para su ubicación (Fig. 8).
Acepte la hora de salida del sol
calculada o gire la perilla selectora
hasta que se muestre la hora correcta
en la pantalla, y luego presione el
botón OK.
6.
7.
8.
9.
10.
11.
a.
b.
c.
d.
12.
a.
b.
c.
13.
14.
ON
DAYSAV MAN AUTO RAND CLOCK
YEARDATE
MONTH
SKIP
EVENT
MO TU WE TH FR SA SU AM PM
OFF LOC DUSK DAWN
OK MODE PROG ON/OFF
Fig.
4
ON
DAYSAV MAN AUTO RAND CLOCK
YEARDATE
MONTH
SKIP
EVENT
MO TU WE TH FR SA SU AM PM
OFF LOC DUSK DAWN
OK MODE PROG ON/OFF
Fig.
4
ON
DAYSAV MAN AUTO RAND CLOCK
YEARDATE
MONTH
SKIP
EVENT
MO TU WE TH FR SA SU AM PM
OFF LOC DUSK DAWN
OK MODE PROG ON/OFF
Fig.
5
ON
DAYSAV MAN AUTO RAND CLOCK
YEARDATE
MONTH
SKIP
EVENT
MO TU WE TH FR SA SU AM PM
OFF LOC DUSK DAWN
OK MODE PROG ON/OFF
Fig.
5
ON
DAYSAV MAN AUTO RAND CLOCK
YEARDATE
MONTH
SKIP
EVENT
MO TU WE TH FR SA SU AM PM
OFF LOC DUSK DAWN
OK MODE PROG ON/OFF
Fig.
6
ON
DAYSAV MAN AUTO RAND CLOCK
YEARDATE
MONTH
SKIP
EVENT
MO TU WE TH FR SA SU AM PM
OFF LOC DUSK DAWN
OK MODE PROG ON/OFF
Fig.
6
ON
DAYSAV MAN AUTO RAND CLOCK
YEARDATE
MONTH
SKIP
EVENT
MO TU WE TH FR SA SU AM PM
OFF LOC DUSK DAWN
OK MODE PROG ON/OFF
Fig.
7
ON
DAYSAV MAN AUTO RAND CLOCK
YEARDATE
MONTH
SKIP
EVENT
MO TU WE TH FR SA SU AM PM
OFF LOC DUSK DAWN
OK MODE PROG ON/OFF
Fig.
7
ON
DAYSAV MAN AUTO RAND CLOCK
YEARDATE
MONTH
SKIP
EVENT
MO TU WE TH FR SA SU AM PM
OFF LOC DUSK DAWN
OK MODE PROG ON/OFF
Fig.
8
ON
DAYSAV MAN AUTO RAND CLOCK
YEARDATE
MONTH
SKIP
EVENT
MO TU WE TH FR SA SU AM PM
OFF LOC DUSK DAWN
OK MODE PROG ON/OFF
Fig.
8
El temporizador ahora mostrará DUSK
(Atardecer) y la hora de puesta de sol
calculada para su ubicación (Fig. 9).
Acepte la hora de puesta de sol
calculada o gire la perilla selectora hasta
que se muestre la hora correcta en la
pantalla, y luego presione el botón OK.
El temporizador ahora pasará al modo MANual.
15.
16.
Puede programar hasta 28 eventos en el temporizador digital. Un
ajuste de tiempo para encendido (a una hora específica, DAWN o
DUSK) se considera un evento de encendido. Un ajuste de tiempo
para apagado (a una hora específica, DAWN o DUSK) se considera
un evento de apagado.
NOTA: Debe visualizar una pantalla de evento antes de programar.
Visualización de un evento
Asegúrese de que el temporizador esté en el modo de
funcionamiento normal, presionando el botón MODE, si es
necesario, hasta que aparezca MANual, AUTO o RANDom en el área
de visualización de modo.
Presione el botón PROG (Programar)
para visualizar la primera pantalla de
evento (Fig. 10). Si se borró toda la
programación, el temporizador mostrará
SKIP (Omitir) sobre el evento (“01”),
indicando que el primer evento no está
programado y “--:--” reemplazará la
hora.
NOTA: Desde cualquier pantalla de visualización de eventos (sin
visualizaciones parpadeando), puede:
Presionar OK para volver al modo de funcionamiento normal
sin hacer ningún cambio.
Girar la perilla selectora para ver la siguiente pantalla de
evento.
Presionar PROG para ajustar o cambiar el evento que está
visualizando. Parpadeará el número del evento.
Programación de un evento de encendido
Presione nuevamente PROG. SKIP
(u ON u OFF, si el temporizador se ha
programado) comenzará a parpadear
(Fig. 11).
Gire la perilla selectora hasta que la
pantalla muestre el ajuste de evento
que desee:
ON solamente: Para encender a una hora predeterminada
ON y DUSK: Para encender a la puesta de sol
ON y DAWN: Para encender a la salida del sol
NOTA: Los ajustes con SKIP u OFF se usan para desactivar un
evento o para programar un evento de apagado.
Presione PROG para aceptar el ajuste
de evento. DOW (Día de la semana)
comenzará a parpadear (Fig. 12).
Gire la perilla selectora hasta que la
pantalla muestre el ajuste de DOW que
desee:
MO TU WE TH FR SA SU (Lu, ma, mi, ju,
vi, sá, do): Para un evento que ocurre todos los días
MO TU WE TH FR: Para un evento en días de semana
SA SU: Para un evento de fin de semana
MO (o TU o WE, etc.): Para un evento de un solo día
Presione PROG para aceptar el ajuste de DOW. Si eligió DAWN
o DUSK, vaya al paso 10. Si eligió una hora predeterminada,
comenzarán a parpadear los primeros dos dígitos de la hora del
día (TOD).
Gire la perilla selectora hasta que se alcance la hora que desee y
presione PROG. Comenzarán a parpadear los últimos dos dígitos
de la hora del día (TOD).
Gire la perilla selectora hasta que se alcancen los minutos que
desee.
Presione PROG para aceptar el ajuste de evento de encendido
completo.
1.
2.
-
-
-
3.
4.
-
-
-
5.
6.
-
-
-
-
7.
8.
9.
10.
ON
DAYSAV MAN AUTO RAND CLOCK
YEARDATE
MONTH
SKIP
EVENT
MO TU WE TH FR SA SU AM PM
OFF LOC DUSK DAWN
OK MODE PROG ON/OFF
Fig.
10
ON
DAYSAV MAN AUTO RAND CLOCK
YEARDATE
MONTH
SKIP
EVENT
MO TU WE TH FR SA SU AM PM
OFF LOC DUSK DAWN
OK MODE PROG ON/OFF
Fig.
10
ON
DAYSAV MAN AUTO RAND CLOCK
YEARDATE
MONTH
SKIP
EVENT
MO TU WE TH FR SA SU AM PM
OFF LOC DUSK DAWN
OK MODE PROG ON/OFF
Fig.
11
ON
DAYSAV MAN AUTO RAND CLOCK
YEARDATE
MONTH
SKIP
EVENT
MO TU WE TH FR SA SU AM PM
OFF LOC DUSK DAWN
OK MODE PROG ON/OFF
Fig.
11
OK MODE PROG ON/OFF
ON
DAYSAV MAN AUTO RAND CLOCK
YEARDATE
MONTH
SKIP
EVENT
MO TU WE TH FR SA SU AM PM
OFF LOC DUSK DAWN
Fig.
12
OK MODE PROG ON/OFF
ON
DAYSAV MAN AUTO RAND CLOCK
YEARDATE
MONTH
SKIP
EVENT
MO TU WE TH FR SA SU AM PM
OFF LOC DUSK DAWN
Fig.
12
ON
DAYSAV MAN AUTO RAND CLOCK
YEARDATE
MONTH
SKIP
EVENT
MO TU WE TH FR SA SU AM PM
OFF LOC DUSK DAWN
OK MODE PROG ON/OFF
Fig.
9
4 – Ajuste la hora, fecha y ubicación (continuación)
5 – Ajuste el par de eventos iniciales de encendido y apagado

7
El voltaje de las baterías se monitorea
continuamente. Si se detecta bajo voltaje,
se mostrará el indicador de batería baja
(Fig. 15).
El temporizador requiere dos baterías
LR44 para mantener la hora durante un
máximo de tres meses sin alimentación.
Reemplace las baterías tan pronto sea posible después de que
aparezca el indicador de batería baja.
Cambie las baterías a un minuto de desenchufar para mantener
los ajustes de hora y fecha. Posteriormente, si la pantalla tiene
errores o parpadea “12:00 AM”, restablezca la hora y la fecha.
Todos los otros ajustes (su programación de encendido y
apagado) permanecen en memoria indefinidamente sin batería o
alimentación de CA.
Mientras el temporizador esté sin baterías, éste apagará la pantalla
para conservar energía.
Elimine inmediatamente las baterías usadas de acuerdo con los
reglamentos locales. Mantenga las baterías lejos de los niños.
•
•
•
•
•
•
Para conservar la energía de las baterías, tan pronto la configuración,
la programación y el montaje estén completos, enchufe los
dispositivos que desee en el temporizador y enchufe el temporizador
a un tomacorriente debidamente conectado a tierra.
Omisión de un evento de encendido o apagado
Use estos pasos para desactivar un evento de encendido o apagado
que ya no desee (por ejemplo, ajustes especiales de una vacación).
Asegúrese de que el temporizador esté en el modo de
funcionamiento normal, presionando el botón MODE, si es
necesario, hasta que aparezca MANual, AUTO o RANDom en el área
de visualización de modo.
Presione el botón PROG para visualizar la
primera pantalla de evento (“01”).
Gire la perilla selectora hasta que se
muestre la pantalla de evento que desee.
Presione nuevamente PROG. ON u OFF
estará parpadeando (Fig.16).
Gire la perilla selectora hasta que se
muestre SKIP en la pantalla y “-- --”
reemplace la hora (Fig. 17), luego
presione PROG para aceptar el nuevo
ajuste.
Continúe presionando PROG hasta que
se visualice el siguiente evento.
Continúe programando o presione el
botón OK para volver al funcionamiento normal.
Modificación de un evento de encendido o apagado
Use estos pasos para modificar un evento de encendido o apagado
existente.
Asegúrese de que el temporizador esté en el modo de
funcionamiento normal, presionando el botón MODE, si es
necesario, hasta que aparezca MANual, AUTO o RANDom en el área
de visualización de modo.
Presione el botón PROG para visualizar
la primera pantalla de evento (“01”).
Gire la perilla selectora hasta que se
muestre la pantalla de evento que
desee.
Presione PROG tantas veces como sea
necesario para mostrar el ajuste que
desee modificar, por ejemplo, DOW
(Fig. 18).
Gire la perilla selectora hasta que
alcance el ajuste de DOW que desee
(Fig. 19) y presione PROG para aceptar el
nuevo ajuste.
Continúe presionando PROG hasta que
se visualice el siguiente evento.
Continúe programando o presione el
botón OK para volver al funcionamiento normal.
1.
2.
3.
4.
5.
6.
7.
1.
2.
3.
4.
5.
6.
7.
ON
DAYSAV MAN AUTO RAND CLOCK
YEARDATE
MONTH
SKIP
EVENT
MO TU WE TH FR SA SU AM PM
OFF LOC DUSK DAWN
OK MODE PROG ON/OFF
Fig.
16
ON
DAYSAV MAN AUTO RAND CLOCK
YEARDATE
MONTH
SKIP
EVENT
MO TU WE TH FR SA SU AM PM
OFF LOC DUSK DAWN
OK MODE PROG ON/OFF
Fig.
16
ON
DAYSAV MAN AUTO RAND CLOCK
DATE
MONTH
SKIP
EVENT
MO TU WE TH FR SA SU AM PM
OFF LOC DUSK DAWN
OK MODE PROG ON/OFF
Fig.
17
ON
DAYSAV MAN AUTO RAND CLOCK
DATE
MONTH
SKIP
EVENT
MO TU WE TH FR SA SU AM PM
OFF LOC DUSK DAWN
OK MODE PROG ON/OFF
Fig.
17
OK MODE PROG ON/OFF
ON
DAYSAV MAN AUTO RAND CLOCK
YEARDATE
MONTH
SKIP
EVENT
MO TU WE TH FR SA SU AM PM
OFF LOC DUSK DAWN
Fig.
18
OK MODE PROG ON/OFF
ON
DAYSAV MAN AUTO RAND CLOCK
YEARDATE
MONTH
SKIP
EVENT
MO TU WE TH FR SA SU AM PM
OFF LOC DUSK DAWN
Fig.
18
ON
DAYSAV MAN AUTO RAND CLOCK
YEARDATE
MONTH
SKIP
EVENT
MO TU WE TH FR SA SU AM PM
OFF LOC DUSK DAWN
OK MODE PROG ON/OFF
Fig.
19
ON
DAYSAV MAN AUTO RAND CLOCK
YEARDATE
MONTH
SKIP
EVENT
MO TU WE TH FR SA SU AM PM
OFF LOC DUSK DAWN
OK MODE PROG ON/OFF
Fig.
19
NOTA: No presione OK antes de presionar PROG esta última vez o el
temporizador volverá al funcionamiento normal sin aceptar el nuevo
ajuste.
El temporizador pasará a la visualización de la siguiente pantalla
de evento y puede continuar programando o presione OK para
volver al funcionamiento normal.
Programación de un evento de apagado
Mientras visualiza una pantalla de
evento, presione PROG. SKIP (u ON u OFF,
si el temporizador se ha programado)
comenzará a parpadear (Fig. 13).
Gire la perilla selectora hasta que la
pantalla muestre el ajuste de evento
que desee:
OFF solamente: Para apagar a una hora predeterminada
OFF y DUSK: Para apagar a la puesta de sol
OFF y DAWN: Para apagar a la salida del sol
NOTA: Los ajustes con SKIP u ON se usan para desactivar un
evento o para programar un evento de encendido.
Presione PROG para aceptar el ajuste
de evento. DOW (Día de la semana)
comenzará a parpadear (Fig. 14).
Gire la perilla selectora hasta que la
pantalla muestre el ajuste de DOW que
desee:
MO TU WE TH FR SA SU (Lu, ma, mi, ju,
vi, sá, do): Para un evento que ocurre todos los días
MO TU WE TH FR: Para un evento en días de semana
SA SU: Para un evento de fin de semana
MO (o TU o WE, etc.): Para un evento de un solo día
Presione PROG para aceptar el ajuste de DOW. Si eligió DAWN
o DUSK, vaya al paso 19. Si eligió una hora predeterminada,
comenzarán a parpadear los primeros dos dígitos de la hora del
día (TOD).
Gire la perilla selectora hasta que se alcance la hora que desee y
presione PROG. Comenzarán a parpadear los últimos dos dígitos
de la hora del día (TOD).
Gire la perilla selectora hasta que se alcancen los minutos que
desee.
Presione PROG para aceptar el ajuste de evento de apagado
completo.
NOTA: No presione OK antes de presionar PROG esta última vez o el
temporizador volverá al funcionamiento normal sin aceptar el nuevo
ajuste.
El temporizador pasará a la visualización de la siguiente pantalla
de evento y puede continuar programando o presione OK para
volver al funcionamiento normal.
11.
12.
13.
-
-
-
14.
15.
-
-
-
-
16.
17.
18.
19.
20.
ON
DAYSAV MAN AUTO RAND CLOCK
YEARDATE
MONTH
SKIP
EVENT
MO TU WE TH FR SA SU AM PM
OFF LOC DUSK DAWN
OK MODE PROG ON/OFF
Fig.
13
ON
DAYSAV MAN AUTO RAND CLOCK
YEARDATE
MONTH
SKIP
EVENT
MO TU WE TH FR SA SU AM PM
OFF LOC DUSK DAWN
OK MODE PROG ON/OFF
Fig.
13
ON
DAYSAV MAN AUTO RAND CLOCK
YEARDATE
MONTH
SKIP
EVENT
MO TU WE TH FR SA SU AM PM
OFF LOC DUSK DAWN
OK MODE PROG ON/OFF
Fig.
14
ON
DAYSAV MAN AUTO RAND CLOCK
YEARDATE
MONTH
SKIP
EVENT
MO TU WE TH FR SA SU AM PM
OFF LOC DUSK DAWN
OK MODE PROG ON/OFF
Fig.
14
Una vez que esté configurado, tiene tres opciones para operar el
temporizador digital. La pantalla mostrará MANual, AUTO o RANDom, y
puede elegir entre ellas presionando el botón MODE.
AUTO: Usa los ajustes del temporizador que programó.
RANDom: Le otorga un aspecto de estar “habitado” a su hogar
variando sus ajustes a incrementos aleatorios de 5 minutos cada
±30 minutos.
MANual: Convierte el interruptor en un interruptor de encendido/
apagado sin ajustes de temporizador. Presione el botón ON/OFF
para operar dispositivos enchufados.
NOTA: Mientras está en AUTO o RANDom puede anular el
temporizador presionando el botón ON/OFF.
Si el temporizador tiene un dispositivo encendido, al presionar
el botón ON/OFF lo apagará y lo dejará apagado hasta el próximo
evento de encendido.
Si el temporizador tiene un dispositivo apagado, al presionar el
botón ON/OFF lo encenderá y lo dejará encendido hasta el próximo
evento de apagado.
•
•
•
•
•
ON
DAYSAV MAN AUTO RAND CLOCK
YEARDATE
MONTH
SKIP
EVENT
MO TU WE TH FR SA SU AM PM
OFF LOC DUSK DAWN
OK MODE PROG ON/OFF
Fig.
15
Monte el temporizador a una pared o un poste al menos a 90 cm
(36”) del piso usando los orificios de la parte posterior de la
carcasa del temporizador.
Monte en posición vertical de forma que los tomacorrientes miren
hacia abajo.
•
•
7 – Monte el temporizador
Sobre las baterías
8 – Enchufe el temporizador
Cambio de horas de programa
6 – Seleccione el funcionamiento AUTO, RANDom o MANual

8
Problema observado Causa posible Lo que debe hacer
El temporizador digital no enciende/apaga
pero se ve normal.
El temporizador digital no está en el modo
AUTO, RANDom o MANual.
Presione MODE para seleccionar el modo de
funcionamiento que desea usar.
El temporizador no ingresa al modo AUTO
o RANDom al presionar MODE.
No se ha configurado la hora del día o los
ajustes del temporizador.
Asegúrese de que se hayan configurado la hora
del día y al menos una actividad programada.
El temporizador digital enciende o apaga
a horas incorrectas u omite algunas de las
horas programadas.
Las programaciones son incorrectas.
Presione PROG para revisar los ajustes y
modificarlos, según sea necesario. Consulte las
instrucciones.
El temporizador digital está en el modo
RANDom, el cual varía las horas de encendido
y apagado hasta en ±30 (para otorgarle a su
hogar un aspecto de estar “habitado”).
Si no desea mantener el temporizador en el
modo RANDom, presione MODE para cambiar al
modo AUTO.
La función astronómica y las horas exactas de
encendido y apagado están en conflicto. Por
ejemplo, ha ajustado encendido para DUSK y
apagado a las 8 pm, y debido a los cambios
estacionales, DUSK avanzó a las 8:30 pm.
NOTA: Su temporizador omite
automáticamente cualquier evento de
encendido que tenga conflicto a medida
que se acerca el verano para evitar el
funcionamiento de faroles u otros dispositivos
controlados. Consulte “Lo que debe hacer”
si desea identificar y eliminar los ajustes que
tengan conflicto.
Realice los pasos para ajustar la hora y la
fecha, luego cambie temporalmente la fecha a
21 de junio.
Revise los ajustes de DAWN y DUSK
presionando el botón PROGR.
Asegúrese de que los ajustes de horas
encendido o apagado no interfieran con las
horas de DAWN y DUSK. Realice cambios según
sea necesario.
Cuando termine, cambie el ajuste de fecha de
vuelta a la fecha actual.
1.
2.
3.
4.
Los faroles o los dispositivos controlados
no coinciden con el estado de encendido/
apagado programado inmediatamente
después de ajustar la hora o realizar una
programación.
El temporizador digital no se “pone al día”
automáticamente con el estado de carga
programado. El estado del temporizador
permanecerá como está hasta que llegue
a la siguiente hora de encendido/apagado
programada.
Después de programar sus eventos o la hora,
luego, al volver al modo AUTO, presione el botón
ON/OFF para cambiar el estado de carga si es
necesario.
La carga se apaga inmediatamente
después de encenderla.
El temporizador no está funcionando
correctamente.
Si el problema persiste, comuníquese con
Atención al Cliente de Intermatic.
El funcionamiento del temporizador
digital es lento o no enciende/apaga.
Aunque no se muestra el indicador de batería
baja, las baterías se están agotando.
Reemplace las baterías.
El temporizador muestra ON pero el farol
o el dispositivo controlado está apagado.
El farol o el dispositivo controlado pueden
estar apagados o la bombilla del farol puede
estar quemada.
Asegúrese de que el farol o el dispositivo
controlado esté encendido y enchufado o
reemplace la bombilla del farol.
Guía de solución de problemas
GARANTÍA LIMITADA DE POR VIDA
Si dentro del período de garantía especificado, este producto falla debido a un defecto del material o de mano de obra, Intermatic Incorporated lo reparará o lo reemplazará, a su exclusivo criterio, libre de
cargo. Esta garantía se extiende sólo al comprador doméstico original y no es transferible. Esta garantía no se aplica a: (a) daño a las unidades causado por accidente, caída o uso indebido en su manipulación,
casos fortuitos o cualquier uso negligente; (b) unidades que hayan sido reparadas, abiertas, desmontadas o modificadas de otra forma sin autorización; (c) unidades que no se hayan usado de acuerdo con las
instrucciones; (d) daños que excedan el costo del producto; (e) focos o bombillas sellados, LED y baterías; (f) el acabado de cualquier parte del producto, como la superficie o la alteración por exposición a la
intemperie, puesto que se considera como desgaste natural; (g) daño en el transporte, costos de instalación inicial, costos de retiro o costos de reinstalación.
INTERMATIC INCORPORATED NO SERÁ RESPONSABLE POR DAÑOS INDIRECTOS O EMERGENTES. ALGUNOS ESTADOS NO PERMITEN LA EXCLUSIÓN O LIMITACIÓN DE DAÑOS INDIRECTOS O EMERGENTES,
DE MODO QUE LA LIMITACIÓN O EXCLUSIÓN ANTERIOR PODRÍA NO APLICARSE A SU CASO. ESTA GARANTÍA REEMPLAZA TODAS LAS DEMÁS GARANTÍAS EXPRESAS O IMPLÍCITAS. TODAS LAS
GARANTÍAS IMPLÍCITAS, INCLUIDA LA GARANTÍA DE COMERCIABILIDAD E IDONEIDAD DEL PRODUCTO PARA UN PROPÓSITO EN PARTICULAR, POR MEDIO DEL PRESENTE QUEDAN MODIFICADAS PARA
TENER VALIDEZ SÓLO COMO SE INDICA EN ESTA GARANTÍA LIMITADA Y TENDRÁN LA MISMA DURACIÓN DEL PERÍODO DE GARANTÍA ESTIPULADO ANTERIORMENTE. ALGUNOS ESTADOS NO PERMITEN
LIMITACIONES A LA DURACIÓN DE UNA GARANTÍA IMPLÍCITA, DE MODO QUE LA LIMITACIÓN ANTERIOR PODRÍA NO APLICARSE A SU CASO.
Este servicio de garantía está disponible (a) devolviendo el producto al concesionario en que se compró o (b) enviando por correo el producto con un comprobante de compra y franqueo pagado al centro de
servicio técnico autorizado mencionado más adelante. Esta garantía la otorga: Intermatic Incorporated/Servicios de Posventa/7777 Winn Rd., Spring Grove, Illinois 60081-9698/815-675-7000 http://www.intermatic.
com Asegúrese de envolver el producto de manera segura para evitar daños de transporte.
INTERMATIC INCORPORATED
SPRING GROVE, ILLINOIS 60081-9698
158-00565
-
 1
1
-
 2
2
-
 3
3
-
 4
4
-
 5
5
-
 6
6
-
 7
7
-
 8
8


Intermatic HB800 Series Installation And User Instructions Manual
- Tipo
- Installation And User Instructions Manual
- Este manual también es adecuado para
en otros idiomas
- English: Intermatic HB800 Series
Artículos relacionados
-
Intermatic DT620 Manual de usuario
-
-
Intermatic DT620 Series Instrucciones de operación
-
-
-
-
Intermatic EJ600 Series Installation And User Instructions Manual
-
-
Otros documentos
-
 Utilitech UTTNDIW7D Instrucciones de operación
-
GE SunSmart 15312 Instrucciones de operación
-
 Utilitech UTDT9IW7 Quick Use Manual
-
Defiant 49808 Manual de usuario
-
Sylvania SA 170 User Instructions
-
-
-
 Utilitech TM-074 Instrucciones de operación
-
-
 myTouchSmart 33861-T1 Manual de usuario


