
TB121C DIGITAL TIMER INSTRUCTIONS
Thank you for purchasing the TB121C Digital Timer.
Features:
• Easy set up
• 2 on /2 off settings
• 5 FT. cord
• Can be used for incandescent lights up to 300 Watts
• Manual Override
Set Up:
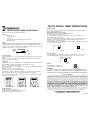
Batteries Activation-The timer is shipped with 2 batteries (L1154/SR44/LR44) installed.
Pull the protective strip from the battery carrier (See Fig 1). The display will flash 12:00AM.
(Note: To conserve battery power, if the timer is not plugged in and no button is pushed,
the display will go blank. To restore, press any button).
Clock (See Fig 2):
1)Press SET button once. The display will advance to TIME mode and the time will be
flashing.
2)Press + or – button until time of day is displayed. Holding either button down will
increase the speed of the setting.
On/Off Time:
1)After the time is set, press SET button once. The display will now show EVENT 1 ON
mode. EVENT 1 ON will be flashing with a blank display. (See Fig. 3)
2)Press + or – to advance to the ON time.
3)Once the ON time is set, press SET button once. The display will now show EVENT 1
OFF. (See Fig 4)
4)Press + or – to advance to the OFF time.
5)Repeat Steps 1-4 for the 2nd ON/OFF settings.
6)When timer events are completed, press SET once. This will put the timer in RUN
mode. The display will show the time of day entered, with the colon flashing.
Note: To clear an event time, push + and – buttons at the same time while in the ON or
OFF mode that you want to clear
Lamp Connection:
1)Turn lamp switch to ON position.
2)Plug lamp into the receptacle located on the cord.
3)Plug the Timer Cord into the wall outlet.
:
:
BATTERY
HOLDER
DOOR
PULL
TAB
FIG. 1
FIG. 2
FIG. 3 FIG. 4
TB121C DIGITAL TIMER INSTRUCTIONS
Manual Override:
To override the ON or OFF settings, press ON/OFF button. The override setting will
change at the next timed event.
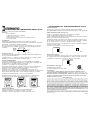
Battery Replacement (See Fig 5 and 6):
When the batteries are running out, LO will be displayed.
1) Remove the timer from the wall socket.
2) Using a small flat screwdriver, pry the battery holder open. The TB121C uses 2
model L1154, SR44 or LR44 batteries.
3) Remove the old batteries (you have one minute to replace the batteries once the old
batteries are removed without losing the existing programs) and replace the new
batteries with the + facing the terminals.
4) When the batteries are in place, press the battery holder back into its original position.
5) Plug the timer into the wall socket.
Reset (See Fig 7):
To quickly delete the time and event settings, at one time, using the point of a pencil,
press the RESET button found above the battery holder on the rear of the timer.
Ratings:
8.3 Amp Resistive, and Inductive
300 Watt Tungsten, 120VAC, 60Hz
WARNINGS:
1) DO NOT USE THE TIMER TO TURN OFF POWER FOR MAINTENANCE (repairs,
removing broken bulbs, etc.). ALWAYS TURN POWER OFF AT THE SERVICE PANEL
BY REMOVING A FUSE OR CIRCUIT BREAKER BEFORE DOING ANY CIRCUIT REPAIRS.
LIMITED ONE YEAR WARRANTY
If within one (1) year from the date of purchase, this product fails due to a defect in material or workmanship, Intermatic
Incorporated will repair or replace it, at its sole option, free of charge. This warranty is extended to the original household pur-
chaser only and is not transferable. This warranty does not apply to: (a) damage to units caused by accident, dropping or abuse
in handling, acts of God or any negligent use; (b) units which have been subject to unauthorized repair, opened, taken apart or oth-
erwise modified; (c) units not used in accordance with instructions; (d) damages exceeding the cost of the product; (e) sealed
lamps and/or lamp bulbs, LED’s an batteries; (f) the finish on any portion of the product, such as surface and/or weathering, as
this is considered normal wear and tear; (g) transit damage, initial installation costs, removal costs, or reinstallation costs.
INTERMATIC INCORPORATED WILL NOT BE LIABLE FOR INCIDENTAL OR CONSEQUENTIAL DAMAGES. SOME STATES DO NOT
ALLOW THE EXCLUSION OR LIMITATION OF INCIDENTAL OR CONSEQUENTIAL DAMAGES, SO THE ABOVE LIMITATION OR
EXCLUSION MAY NOT APPLY TO YOU. THIS WARRANTY IS IN LIEU OF ALL OTHER EXPRESS OR IMPLIED WARRANTIES. ALL
IMPLIED WARRANTIES, INCLUDING THE WARRANTY OF MERCHANTABILITY AND THE WARRANTY OF FITNESS FOR A PAR-
TICULAR PURPOSE, ARE HEREBY MODIFIED TO EXIST ONLY AS CONTAINED IN THIS LIMITED WARRANTY, AND SHALL BE OF
THE SAME DURATION AS THE WARRANTY PERIOD STATED ABOVE. SOME STATES DO NOT ALLOW LIMITATIONS ON THE
DURATION OF AN IMPLIED WARRANTY, SO THE ABOVE LIMITATION MAY NOT APPLY TO YOU.
This warranty gives you specific legal rights and you may also have other rights which vary from state to state. Warranty service
is available by mailing postage prepaid to: Intermatic Incorporated/After Sales Service/7777 Winn Rd., Spring Grove, IL 60081-
9698/815-675-7000 http://www.intermatic.com Please be sure to wrap the product securely to avoid shipping damage.
INTERMATIC INCORPORATED
SPRING GROVE, ILLINOIS 60081-9698
158TB11465
RESET
BUTTON
FIG. 5
FIG. 6
FIG. 7

INSTRUCCIONES DEL TEMPORIZADOR DIGITAL TB121C
Gracias por comprar el temporizador digital TB121C
Funciones:
• Fácil configuración
• 2 ajustes de encendido y 2 de apagado
• Cordón eléctrico de 5 pies
• Puede usarse para luces incandescentes de hasta 300 vatios
• Cancelación manual
Configuración:
Activación de las baterías: El temporizador viene de fábrica con 2 baterías
(L1154/SR44/LR44) instaladas. Jale la tira protectora del compartimiento de las baterías
(Véase la Fig. 1). Destellará "12:00 AM" en la pantalla.
(Nota: Para conservar la energía de las baterías, si el temporizador no se conecta y no
se oprime ningún botón, la pantalla se pone en blanco. Oprima cualquier botón para
restaurarla.)
Reloj (Véase la Fig. 2):
1) Oprima una vez el botón SET (Ajuste). La pantalla avanzará al modo TIME (Hora) y
ésta se mostrará intermitentemente.
2) Oprima el botón + ó – hasta que se muestre la hora correcta. Si mantiene oprimido
cualquiera de los botones, aumentará la velocidad del ajuste.
Hora de encendido/apagado:
1) Después de ajustar la hora, oprima una vez el botón SET (Ajuste). La pantalla
mostrará ahora el modo EVENT 1 ON (Evento 1 encendido). Aparecerá "EVENT 1 ON"
intermitentemente en la pantalla en blanco. (Véase la Fig. 3)
2) Oprima + ó – para avanzar a la hora ON (Encendido).
3) Después de ajustar la hora de encendido, oprima una vez el botón SET (Ajuste). La
pantalla mostrará ahora EVENT 1 OFF (Evento 1 apagado). (Véase la Fig. 4)
4) Oprima + ó – para avanzar a la hora OFF (Apagado).
5) Repita los pasos 1-4 para ajustar el encendido/apagado del segundo evento.
6) Cuando haya completado los eventos del temporizador, oprima una vez el botón SET
(Ajuste). Esto pondrá al temporizador en modo RUN (Funcionamiento). La pantalla
mostrará la hora del día introducida, con los dos puntos destellando.
Nota: Para borrar la hora de un evento, oprima los botones + y – al mismo tiempo,
mientras está en el modo ON/OFF (Encendido/Apagado) que desea borrar.
Conexión de la lámpara:
1) Mueva el interruptor de la lámpara a la posición ON (Encendido).
2) Enchufe la lámpara en el receptáculo localizado en el cordón.
3) Enchufe el cordón del temporizador en el tomacorriente de la pared.
INSTRUCCIONES DEL TEMPORIZADOR DIGITAL TB121C
Cancelación manual:
Para cancelar los ajustes de encendido y apagado, oprima el botón ON/OFF
(Encendido/Apagado). El ajuste de cancelación cambiará al siguiente evento programado.
Cambio de baterías (Véanse las Figs. 5 y 6):
Cuando se están acabando las baterías, se mostrará LO en la pantalla.
1) Quite el temporizador del tomacorriente de la pared.
2) Con un desarmador de punta plana, abra el compartimiento de las baterías. El modelo
TB121C usa dos baterías L1154, SR44 ó LR44.
3) Extraiga las baterías viejas (dispone de un minuto para cambiar las baterías una vez
que ha extraído las baterías viejas, para no perder la programación actual) y reempláce-
las por las baterías nuevas, con el signo + apuntando hacia las terminales.
4) Cuando las baterías estén en su lugar, presione la tapa del compartimiento para que
vuelva a su posición original.
5) Enchufe el temporizador en el tomacorriente de la pared.
Reinicio (Véase la Fig. 7):
Para eliminar rápidamente los ajustes de hora y eventos al mismo tiempo, use la punta
de un lápiz para presionar el botón RESET (Reinicio), ubicado en la parte superior del
compartimiento de baterías que encontrará en el dorso del temporizador.
Especificaciones de la carga:
8.3 Amp Resistiva, y Inductiva
300 Vatios de Tungsteno, 120 VCA, 60 Hz
ADVERTENCIA:
1) NO UTILICE EL TEMPORIZADOR PARA DESACTIVAR LA ENERGÍA A FIN DE
REALIZAR LABORES DE MANTENIMIENTO (reparaciones, retiro de focos rotos, etc.).
DESACTIVE SIEMPRE LA ENERGÍA EN EL TABLERO DE SERVICIO RETIRANDO UN
FUSIBLE O UN INTERRUPTOR DE CIRCUITO ANTES DE REALIZAR CUALQUIER
REPARACIÓN EN EL CIRCUITO.
GARANTÍA LIMITADA DE UN AÑO
Si en un plazo de uno (1) año contados a partir de la fecha de compra, el producto falla debido a un defecto de material o mano de obra, Intermatic
Incorporated lo reparará o reemplazará, a opción propia, de forma gratuita. Esta garantía se aplica solamente al comprador particular original y no es
transferible. Esta garantía no se aplica en los casos siguientes: (a) daños en unidades causados por accidente, caídas o abuso durante su manipulación,
fuerza mayor o cualquier uso negligente; (b) unidades que hayan sido sometidas a una reparación no autorizada, abiertas, desmontadas o modificadas
de otra forma; (c) unidades que no se hayan usado según las instrucciones; (d) daños que excedan el costo del producto; (e) lámparas selladas y bom-
billas, LED y pilas; (f) el acabado de cualquier parte del producto, tal como la superficie y el desgaste debido a la intemperie, ya que esto se considera
como un desgaste natural; (g) daños durante el transporte, costos de instalación iniciales, costos de desmontaje o costos de reinstalación.
INTERMATIC INCORPORATED NO SERÁ RESPONSIBLE DE LOS DAÑOS EMERGENTES O CONCOMINATES. ALGUNOS ESTADOS NO PERMITEN LA
EXCLUSIÓN O LIMITACIÓN DE LOS DAÑOS EMERGENTES O CONCOMITANTES, POR LO QUE ES POSIBLE QUE NO SE APLIQUE EN SU CASO LA
LIMITACIÓN O EXCLUSIÓN ANTERIOR. ESTA GARANTÍA ES EN LUGAR DE LAS DEMÁS GARANTÍAS EXPLÍCITAS O IMPLÍCITAS. TODAS LAS
GARANTÍAS IMPLÍCITAS, INCLUIDA LA GARANTÍA DE COMERCIABILIDAD Y LA GARANTÍA DE IDONEIDAD PARA CIERTO FIN, SE MODIFICAN AQUÍ
PARA EXISTIR SÓLO SEGÚN ESTÁN CONTENIDAS EN ESTA GARANTÍA LIMITADA, Y DEBEN TENER LA MISMA DURACIÓN QUE EL PERÍODO DE
GARANTÍA INDICADO ARRIBA. ALGUNOS ESTADOS NO PERMITEN LIMITACIONES DE LA DURACIÓN DE UNA GARANTÍA IMPLÍCITA, POR LO QUE ES
POSIBLE QUE LA LIMITACIÓN ANTERIOR NO SE APLIQUE EN SU CASO.
Esta garantía le da unos derechos específicos y es posible que también tenga otros derechos, que pueden variar de un estado a otro. El servicio de la
garantía está disponible enviando el producto por correo con franqueo pagado con anterioridad a: Intermatic Incorporated/ After Sales
Service/7777/Winn Rd., Spring Grove, IL 60081-9698/815-675-7000 http://www.intermatic.com Asegúrese de envolver bien el producto para evitar
daños durante el transporte.
158TB11465
BATTERY
HOLDER
DOOR
PULL
TAB
FIG. 1
:
:
FIG. 2
FIG. 3 FIG. 4
FIG. 5
FIG. 6
RESET
BUTTON
FIG. 7
-
 1
1
-
 2
2


Intermatic DT121C Instrucciones de operación
- Tipo
- Instrucciones de operación
- Este manual también es adecuado para
en otros idiomas
Artículos relacionados
-
Intermatic DT500CH Series Installation And User Instructions Manual
-
-
-
-
-
-
-