GE SunSmart 15312 Instrucciones de operación
- Tipo
- Instrucciones de operación

The screen will show DUSK (Sunset) and a time with the hour blinking. This is the timers
preset time for DUSK. If the hour is not correct use the + or – buttons to adjust the hour to
match DUSK for your area. Press “ENTER” to confirm. If the hour is correct press “ENTER” to
move to the next step. The minutes are now blinking. If the minutes are not correct use the
+ or – buttons to adjust the minutes to match DUSK for your area. Press “ENTER” to confirm.
If the minutes are correct press “ENTER” to move to the next step.
12. The screen will now say “SAVE.” Press “ENTER” to save data to the timer.
Programming ON/OFF Events:
1. Press “SETUP” twice to begin programming times.
2. P1 (Program 1) ON should be blinking. Press “ENTER” to begin setting P1 ON time. You may
also use the + or – buttons to scroll through all 7 programs.
3. The screen will show SET, if you wish to set a time press “ENTER” to confirm. You may also
use the + or – button to scroll to DEL. If you press “Enter” on DEL you will delete the program
you are on.
If you pushed “ENTER” at SET for P1 the screen will show PRG, P1 ON and the days of the week
will be blinking. Use the + or – buttons to scroll through the options in which the timer will be
active. The options are:
• S, S • M, T, W, F • M through S: Individual days • T, TH • M, W, F • S, M, T, W, Th, F, S (default)
Choose the days you want the program to be active and press “ENTER.”
Now that you have chosen the days the timer will function the next step is to choose the time.
The screen should show DAWN blinking. There are 3 options to choose from when selecting the
program ON time. Use the + or – to scroll through the options. • DAWN • DUSK • TIME (to set
custom time).
If you would like the timer to turn on at the Pre Set time for DAWN press “ENTER” and move to
P1 OFF setting.
If you would like the timer to turn on at the Pre Set time for DUSK use the + or – buttons to
change the option on the screen to DUSK and press “ENTER” and move to P1 OFF setting
If you would like choose a custom time other than DAWN or DUSK use the + or – buttons to
change the option on the screen to TIME and press “ENTER”. The hour should be blinking. Use
the + or – to set the correct hour. If you pass 11 to 12 you will change the AM to PM. Once the
correct hour is found press “ENTER” to confirm. The Minute should be blinking. Use the + or – to
set the correct minute. Press “Enter” to confirm.
The screen will show PRG, P1 OFF and the days of the week will be blinking. Choose the days
you want the program to be active and press “ENTER”. Now that you have chosen the days the
timer will function the next step is to choose the time the program will turn off. There are 3
options to choose from when selecting the program OFF time. Use the + or – to scroll through
the options. • DAWN • DUSK • TIME
If you would like the timer to turn off at the Pre Set time for DAWN press “Enter” .
If you would like the timer to turn off at the Pre Set time for DUSK use the + or – buttons to
change the option on the screen to DUSK and press “ENTER” .
If you would like choose a custom time other than DAWN or DUSK use the + or – buttons to
change the option on the screen to TIME and press “ENTER”. The hour should be blinking. Use
the + or – to set the correct hour. If you pass 11 to 12 you will change the AM to PM. Once the
correct hour is found press “ENTER” to confirm. The Minute should be blinking. Use the + or – to
set the correct minute. Press “ENTER” to confirm. The screen will now say “SAVE” Press “ENTER”
to save program 1 to the timer. P2 (Program 2) ON should be blinking. Press “ENTER” to begin
setting P2 ON. You may also use the + or– buttons to scroll through all 7 programs or push
AUTO to complete the programming.
Random Security Option:
The random feature will turn lights on and off using the programmed times + or – 30 minutes,
giving the house a more lived in appearance while occupant is away.
1. Push RND (Random) button to activate the Random feature. The screen will change from
AUTO to RDM.
2. Push AUTO button to de-activate the Random feature and return the timer to its current
programming.
Note: The timer will automatically return to the clock mode if a button is not pushed for 20
seconds. Push the setup button once to return to program mode if this happens.
Initial Setup:
Setting the Calendar, Clock, DST, Zone
1. Using a paper clip or pen press firmly and hold the reset button for 3 seconds or until you
see the word “RESET” scroll across the screen. Release the “RESET” button and the screen will
be flashing 12:00 AM
2. Press the “SETUP” button and CAL will be flashing on the screen. Press “Enter” to begin
setting the Calendar.
3. The Year will be flashing: Use the + or – buttons until the year is correct. Press “ENTER”
to confirm.
4. The Month will be flashing: Use the + or – buttons to find the current month is correct. Press
“ENTER” to confirm.
5. The Day will be flashing: Use the + or – buttons to find the current day. Press “ENTER”
to confirm.
6. The screen should be blinking CLK for Clock. Press “ENTER” to begin setting the clock.
7. The hour should be blinking. Use the + or – to set the correct hour. If you pass 11 to 12 you
will change the AM to PM. Once the correct hour is found press “ENTER” to confirm.
8. The Minute should be blinking. Use the + or – to set the correct minute. Press “ENTER”
to confirm
9. The Screen should be blinking DST for “Daylight Savings Time” Press “ENTER” to set DST.
10. DST is either “ON” or “OFF”. DST will automatically reset the times in the timer to match the
time change. Use the + or – button to change DST setting in the timer and press “ENTER”
to confirm.
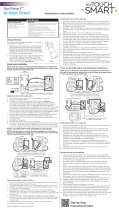
11. The screen should show the word ZONE blinking. Press “ENTER” to set your ZONE.
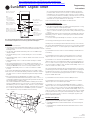
Look at the map below and determine which zone best fits your location. Use the + or – to
scroll through the available zones in the timer and stop when you find the zone where the
timer is being installed. Press “ENTER” to confirm.
The screen will show DAWN (Sunrise) and a time with the hour blinking. This is the timers
preset time for DAWN. If the hour is not correct use the + or – buttons to adjust the hour to
match DAWN for your area. Press “ENTER” to confirm. If the hour is correct press “ENTER”
to move to the next step. The minutes are now blinking. If the minutes are not correct use
the + or – buttons to adjust the minutes to match DAWN for your area. Press “ENTER” to
confirm. If the minutes are correct press “ENTER” to move to the next step.
15312
12-17-2010
www.jascoproducts.com
SunSmart
TM
Digital Timer
Programming
Instructions
NORTH
ALASKA
HAWAII
NORTH
CENTRAL
CENTRAL
SOUTH
SOUTH
AUTO
ENTER
SETUP
RESET
+
-
RND
ON/OFF - Timer Override
(Push to turn ON/OFF)
SETUP
- Push once to set
Calendar/Clock.
- Push twice to set or
change programming.
RESET - Hold firmly for 3
seconds to clear all settings
and program timer.
AUTO - Push when
programming is complete
to activate timer.
UP/DOWN - Use to scroll
through menu options.
TIMER DOOR
- Close after programing.
- Push to turn ON/OFF.
(Timer Override)
ENTER - Push to
confirm settings
during programming.
RANDOM - Push once after
program is set to randomly
vary ON/OFF timers within 30
minutes of programmed times.
http://waterheatertimer.org/GE-timers-and-manuals.html
http://waterheatertimer.org/How-to-wire-GE-15312-timer.html

Temporizador Digital SunSmart
TM
Instrucciones
de programación
Aparecerá DUSK (atardecer) y una hora parpadeando en la pantalla. Se trata de la hora preestablecida
de los temporizadores para DUSK. Si la hora no es la correcta, utilice los botones + o - para ajustar la
hora de manera que coincida con DUSK de su zona. Presione el botón ENTER para confirmar. Si la hora es
correcta, presione ENTER para avanzar al siguiente paso. Ahora los minutos parpadearán. Si los minutos
no son correctos, utilice los botones + o - para ajustar los minutos de manera que coincidan con DUSK
de su zona. Presione ENTER para confirmar. Si los minutos son correctos, presione ENTER para avanzar al
siguiente paso.
12. Aparecerá ahora “SAVE” en esta pantalla. Presione ENTER para guardar los datos del temporizador.
Programación de eventos de encendido y apagado:
1. Presione SETUP dos veces para comenzar las horas de programación.
2. Deberá aparecer P1 ON (encendido del programa 1), parpadeando en la pantalla. Presione ENTER
para comenzar a configurar la hora de encendido de P1. También puede utilizar los botones + o - para
desplazarse por los siete programas.
3. Ahora aparecerá SET en la pantalla. Si desea ajustar una hora, presione ENTER para confirmar. También
puede utilizar los botones + o - para desplazarse hasta DEL. Si presiona ENTER cuando la pantalla
muestre DEL, se eliminará el programa en que se encuentra.
Si usted presionó ENTER en SET para P1, la pantalla mostrará PRG, P1 ON y parpadearán los días de la
semana. Utilice los botones + o - para desplazarse por las opciones en las que el temporizador estará activo.
Las opciones son:
• S, S (sábado, domingo) • M, T, W, F (lunes, martes, miércoles, viernes) • M through S (lunes a domingo): días
individuales • T, TH (martes, jueves) • M, W, F (lunes, miércoles, viernes) • S, M, T, W, Th, F, S (domingo, lunes,
martes, miércoles, jueves, viernes, sábado): por defecto.
Elija los días en que desea que el programa se active y presione ENTER.
Ahora que ha elegido los días en que funcionará el temporizador, el siguiente paso es elegir la hora. En la
pantalla deberá aparecer DAWN, parpadeando. Al seleccionar la hora de encendido del programa, hay tres
opciones. Utilice los botones + o - para desplazarse por dichas opciones para ajustar la hora personalizada: •
DAWN (amanecer) • DUSK (atardecer) • TIME (hora).
Si desea que el temporizador se encienda a la hora preestablecida para DAWN, presione ENTER y pase a la
configuración de apagado de P1.
Si desea que el temporizador se encienda a la hora preestablecida para DUSK, utilice los botones + o - para
cambiar la opción en la pantalla para DUSK y presione ENTER y pase a la configuración de apagado de P1.
Si desea elegir una hora personalizada diferente a DAWN o DUSK, utilice los botones + o - para cambiar la
opción en la pantalla para TIME y presione ENTER. Deberá parpadear la hora. Utilice los botones + o - para
ajustar la hora correcta. Si pasa de 11 a 12, se cambia de AM a PM. Una vez que encuentre la hora correcta,
presione ENTER para confirmar. Deberán parpadear los minutos. Utilice los botones + o - para ajustar los
minutos correctos. Presione ENTER para confirmar.
En la pantalla aparecerá PRG, P1 OFF y parpadearán los días de la semana. Elija los días en que desea que
el programa se active y presione ENTER. Ahora que ha elegido los días en que funcionará el temporizador,
el siguiente paso es elegir la hora en que se apagará el programa. Al seleccionar la hora de apagado del
programa, hay tres opciones. Utilice los botones + o - para desplazarse por dichas opciones: • DAWN
(amanecer) • DUSK (atardecer) • TIME (hora).
Si desea que el temporizador se apague a la hora preestablecida para DAWN, presione ENTER.
Si desea que el temporizador para apague a la hora preestablecida para DUSK, utilice el botones + o - para
cambiar la opción en la pantalla para DUSK y presione ENTER.
Si desea elegir una hora personalizada diferente a DAWN o DUSK, utilice los botones + o - para cambiar la
opción en la pantalla para TIME y presione ENTER. Deberá parpadear la hora. Utilice los botones + o - para
ajustar la hora correcta. Si pasa de 11 a 12, se cambia de AM a PM. Una vez que encuentre la hora correcta,
presione ENTER para confirmar. Deberán parpadear los minutos. Utilice los botones + o - para ajustar los
minutos correctos. Presione ENTER para confirmar. Ahora aparecerá en la pantalla SAVE. Presione ENTER
para guardar el programa 1 en el temporizador. Deberá parpadear P2 ON (encendido del programa 2).
Presione ENTER para comenzar a configurar el encendido de P2. También puede utilizar los botones + o-para
desplazarse por los siete programas o presione AUTO para completar la programación.
Opción aleatoria de seguridad:
La función aleatoria encenderá y apagará las luces según los tiempos programados + o - 30 minutos, lo que
le da a la vivienda una mejor apariencia de estar habitada, mientras que los ocupantes no se encuentran.
1. Presione RND (RANDOM) para activar la función aleatoria. La pantalla cambiará de AUTO a RDM.
2. Presione el botón AUTO para desactivar la función aleatoria y regresar el temporizador a su
programación actual.
Nota: El temporizador regresará automáticamente al modo de reloj si no se ha presionado ningún
botón durante veinte segundos. Si esto sucede, presione el botón de configuración (SETUP) una vez para
regresar al modo de programa.
Configuración inicial:
Ajuste del calendario, reloj, horario de verano, zona
1. Con el uso de un clip de papel o bolígrafo, mantenga presionado firmemente el botón de reinicio (RESET)
durante tres segundos o hasta que aparezca en la pantalla la palabra “RESET”. Suelte el botón RESET y la
pantalla parpadeará 12:00 a.m.
2. Presione el botón SETUP y parpadeará “CAL” en la pantalla. Presione ENTER para empezar a configurar
el calendario.
3. Parpadeará el año: Utilice los botones + o - hasta que el año sea el correcto. Presione ENTER para
confirmar.
4. Parpadeará el mes: Utilice los botones + o – hasta que el mes sea el correcto. Presione ENTER para
confirmar.
5. Parpadeará el día: Utilice los botones + o – hasta que el día sea el correcto. Presione ENTER para
confirmar.
6. Deberá parpadear CLK para el reloj en la pantalla. Presione ENTER para comenzar a ajustar el reloj.
7. Deberá parpadear la hora. Utilice los botones + o - para ajustar la hora correcta. Al pasar de 11 a 12, se
cambia de AM a PM. Una vez que encuentre la hora correcta, presione ENTER para confirmar.
8. Deberán parpadear los minutos. Utilice los botones + o - para ajustar los minutos correctos. Presione el
botón ENTER para confirmar.
9. Deberá parpadear DST para “horario de verano” en la pantalla. Presione el botón ENTER para ajustar el
horario de verano.
10. El horario de verano está “activado” o “desactivado”. El horario de verano reiniciará automáticamente las
horas del temporizador para que coincidan con el cambio de hora. Utilice los botones + o - para cambiar
el ajuste del horario de verano en el temporizador y presione ENTER para confirmar.
11. Deberá aparecer la palabra ZONE parpadeando en la pantalla. Presione ENTER para ajustar su zona.
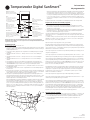
Mire el siguiente mapa y determine cuál es la mejor zona para su ubicación. Utilice los botones + o - para
desplazarse por las zonas disponibles del temporizador y deténgase cuando encuentre la zona para
instalar el temporizador. Presione ENTER para confirmar.
Aparecerá DAWN (amanecer) y una hora parpadeando en la pantalla. Se trata de la hora preestablecida
de los temporizadores para DAWN. Si la hora no es la correcta, utilice los botones + o - para ajustar
la hora de manera que coincida con DAWN de su zona. Presione el botón ENTER para confirmar. Si la
hora es correcta, presione ENTER para avanzar al siguiente paso. Ahora los minutos parpadearán. Si los
minutos no son correctos, utilice los botones + o - para ajustar los minutos de manera que coincidan con
DAWN de su zona. Presione ENTER para confirmar. Si los minutos son correctos, presione ENTER para
avanzar al siguiente paso.
15312
12-17-2010
www.jascoproducts.com
NORTE
ALASKA
HAWAII
NORTE
CENTRO
CENTRO
SUR
SUR
AUTO
ENTER
SETUP
RESET
+
-
RND
ENCENDIDO/APAGADO:
Anulación del temporizador
(Presione para encender/apagar)
SETUP
- Presione dos veces para
programar o cambiar la
programación.
- Presione una vez para ajustar
el calendario o el reloj.
RESET
Mantenga firmemente
durante tres segundos
para borrar todas las
configuraciones y programar
el temporizador.
AUTO
Presione al completar la
programación para activar el
temporizador.
ARRIBA/ABAJO
Use para desplazarse por las
opciones de menú.
Tapa del temporizador
- Cierre después de programar.
- Presione para encender
y apagar. (Anulación del
temporizador).
ENTER
Presione para confirmar las
configuraciones durante la
programación.
RND (RANDOM)
Presione una vez después de
programar para variar aleatoriamente
los temporizadores de encendido y
apagado + o - treinta minutos de las
horas programadas.

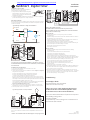
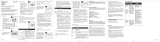
Changing the color of the timer
This device includes a Light Almond Faceplate. To
switch faceplates proceed as follows:
1. Gently remove the White Faceplate using a flat
head screwdriver. Starting at the top left corner
gently pry the faceplate loose. Work around the
faceplate until it pops off.
2. Find the Light Almond Faceplate in the package. Place the new faceplate into
position and carefully push until it snaps into position.
Multi-Switch Installations
When combining controls in a wall box, remove all inner side sections prior to wiring.
Use pliers to bend side section up and down until it breaks off. Repeat for each side
section to be removed.
If you are unsure or unclear about this installation or if the wires in your box do
not match the manual (not all switch boxes have neutral wires), contact a qualified
licensed electrician.
Installation Instruction (Single Pole)
1. Turn OFF the main power at the circuit breaker or fuse box.
2. Remove the existing switch.
3. Connect the wires of the timer to the wall box as shown in Figure 1 and Figure 2
using the wire nuts provided.
a) Connect the hot/live wire of line to the black wire from Timer.
b) Connect the hot/live wire of load to the blue wire from Timer.
c) Connect the ground wire to the green wire from Timer.
d) Connect the neutral wire to the white wire from the timer. Often the neutral
(white) wire can be found in the back of the wire box connected with a wire nut.
There may be several neutral wires bound together. Add the neutral to all neutral
wires bound together making sure wire nut is tight.
e) For single pole installation attach wire nut to red (traveler) wire from the back
of the timer. This wire is not needed in the single pole installation.
Note: Be sure that all wire nuts are secure.
4. Tuck the wires into the wall box leaving room for the timer. Using the screws
provided, mount the timer to the wall box being careful not to crush any wires.
5. Turn main power ON at the circuit breaker.
Typical 3-Way Wiring: In a typical 3-way application there are two 3-way switches.
The switch on the “HOT” side has the common terminal tied to 120VAC. The switch
on the “LOAD” side has the common tied to the lamp/load the switches turn OFF
and ON.
Common = Screw terminals found on the back single pole or 3-way toggle switch.
Existing 3-Way Installation Load Side
(The maximum distance between timer and 3-way switch is 100ft)
If timer is installed on the line side and all lamps burn out the timer will make a
ticking sound. (See Troubleshooting)
Switch on Line Side
1. Remove power from the circuit by turning off the circuit breaker
or removing fuse.
2. Remove the 3way switch from the hot/line side. Remove and label the common
wire and remove one of the other wires.
3. Using the supplied wire nuts connect the wire removed from the common, the
supplied jumper, and the other removed wire (1) together.
4. Connect the jumper back to the common connection of the switch.
5. If the two wires wire (1) and wire (5) on the switch are colored or marked so you
can tell them apart record their markings for use later.
6. Tuck the wires into box leaving room for switch.
7. Install switch into the box.
Timer on Load Side
1. Remove the load side 3-way switch and remove the 3 wires, labeling
the common wire.
2. Connect the removed common wire to the timer blue wire.
3. Connect wire (1) to the timer black (line) wire.
4. Connect wire (5) to the timer red (traveler) wire.
5. Connect the white wire (1) of the timer to the white wire in the switch box
(neutral). The neutral wires may be bundled in the back of the switch box with a
wire nut. There may be several neutral wires bound together. Add the neutral
to all neutral wires bound together making sure the wire nut is tight.
6. Connect the green wire (3) of the timer to ground in the switch box.
7. Tuck the wires into the switch box leaving room for the timer.
8. Use the supplied screws to install timer being careful not to crush
or pinch the wires.
9. Restore power at the circuit breaker or fuse box.
10. If the timer display does not turn on, you may need to swap wire (1) and wire (5).
This can be done at the timer or toggle switch, after removing power from the
circuit at the fuse box or circuit breaker.
11. Verify that the load turns ON and OFF when you manually turn the timer ON
and OFF. Perform this test with the remote switch in both positions. You should
hear the timer relay click ON/OFF. If you hear the relay click but the load does
not turn ON/OFF properly, check your wiring.
15312
12-17-2010
www.jascoproducts.com
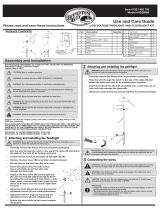
Typical Wiring Schematic for Single Pole Installation
Black
Black
Load
WhiteWhite
White
Blue
Line
= Wiring Nut
Ground
Green
Timer
Figure 1
SunSmart
TM
Digital Timer
Installation
Instructions
Figure 2
RED
GREEN
BLUE
WHITE
BLACK
Load SideHot Side
Line
Neutral
HH HH
CC
Typical Wiring Schematic for 3-Way Installation
2
1
5
3
2
5
1
3
4
RED
GREEN
BLUE
GROUND
WHITE
BLACK
C
Typical Wiring Digram for 3-way installation
with timer on load side
LoadLine
1 = Line
2 = Neutral
3 = Ground
4 = Load
5 = Traveler
C = Common
Troubleshooting
Timer display is blank
• Circuit breaker or fuse has tripped.
• Neutral is not wired correctly.
Ticking can occur in 3-way application when timer is
installed on the line side and all lamps/bulbs on this
line are burnt out (or removed from the fixture)
• Turn other switch (load side) to off position to stop timer
from making ticking sound.
• Install a new bulb
• To permanently correct ticking issue re-install timer on
the load side. (See manual)
http://waterheatertimer.org/How-to-wire-GE-15312-timer.html

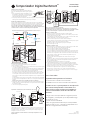
Cambiar el color del temporizador
Este dispositivo incluye una placa frontal color almendra
claro. Para cambiar las placas frontales siga los siguientes
pasos:
1. Retire cuidadosamente la placa frontal blanca con un
destornillador de cabeza plana. Comenzando desde la
esquina superior izquierda, afloje ligeramente la placa
frontal haciendo palanca hasta retirarla.
2. Busque la placa frontal color almendra claro dentro del paquete. Coloque la nueva placa
frontal y presione cuidadosamente hasta que encaje en su lugar.
Instalación de múltiples interruptores
Cuando combine controles en una caja de embutir, retire todas las secciones laterales
internas antes de realizar la conexión. Utilice pinzas para mover la sección lateral de arriba
hacia abajo hasta quebrarla. Repita el procedimiento con cada sección lateral que retire.
Si no está seguro o tiene dudas sobre esta instalación, o si los cables de su caja no
coinciden con los que se indican en el manual (no todas las cajas de interruptores tienen
conductores neutros), contacte a un electricista profesional capacitado.
Instrucciones de instalación (un solo polo)
1. Desconecte la electricidad principal del disyuntor o caja de fusibles.
2. Retire el interruptor existente.
3. Conecte los cables del temporizador a la caja de embutir como se muestra en las Figuras
1 y 2, utilice los empalmes de cable provistos.
a) Conecte el cable electrizado/con corriente de la línea al cable negro del temporizador.
b) Conecte el cable electrizado/con corriente de carga al cable azul del temporizador.
c) Conecte el cable de conexión a tierra al cable verde del temporizador.
d) Conecte el cable neutro al cable blanco del temporizador. Muchas veces, el cable
neutro (blanco) se puede encontrar en la parte trasera de la caja de embutir conectado
con un empalme de cable. Puede haber varios cables neutros amarrados. Incluya el
neutro a todos los cables neutros amarrados asegurándose de que el empalme de cable
esté ajustado.
e) Para la instalación de un solo polo, fije un empalme de cable al cable rojo (conmutador)
de la parte trasera del temporizador. Este cable no es necesario para la instalación de un
solo polo.
Nota: Asegúrese de que todos los empalmes de cable estén ajustados.
4. Introduzca el cable en la caja de embutir, dejando espacio para el temporizador. Use los
tornillos provistos para instalar el temporizador en la caja de embutir, teniendo cuidado
de no apretar los cables.
5. Conecte la corriente principal del disyuntor.
Cableado típico de 3 vías: En una aplicación típica de 3 vías hay dos interruptores de 3 vías.
El interruptor del lado con “CORRIENTE” tiene el terminal común conectado a 120 VCA. El
interruptor del lado de “CARGA” tiene el terminal común fijado a la lámpara/carga que los
interruptores conectan o desconectan.
Común = Terminales con tornillos ubicados en el interruptor de palanca de 3 vías o
unipolar trasero.
Instrucciones
de instalación
Lado de carga de instalación de 3 vías existente
(la distancia máxima entre el temporizador y el interruptor de 3 vías es de 100 pies)
Si el temporizador emite un sonido de tic-tac, el temporizador está instalado en el lado
de la línea y todas las lámparas se quemarán. (Vea Solución de problemas)
Interruptor en el lado de cable
1. Desconecte el circuito desactivando el disyuntor o retirando el fusible.
2. Retire el interruptor de 3 vías del lado de cable con corriente. Retire y marque el cable
común y quite uno de los otros cables.
3. Con los empalmes de cable suministrados conecte el cable que retiró del cable común,
el puente suministrado y el otro cable que haya retirado (1).
4. Conecte nuevamente el puente a la conexión común del interruptor.
5. Si los dos cables (1) y (5) en el interruptor están coloreados o marcados para que pueda
distinguirlos, registre las marcas para usarlos más adelante.
6. Introduzca los cables en la caja dejando espacio para el interruptor.
7. Instale el interruptor en la caja.
Temporizador en el lado de carga
1. Retire el interruptor de 3 vías del lado de carga y los 3 cables y marque el cable común.
2. Conecte el cable común que retiró al cable azul del temporizador.
3. Conecte el cable (1) al cable (línea) negro del temporizador.
4. Conecte el cable (5) al cable (conmutador) rojo del temporizador.
5. Conecte el cable blanco (1) del temporizador al cable blanco en la caja de interruptores
(neutro). Los cables neutros Pueden estar amarrados en la parte trasera de la caja de
interruptores con un empalme de cable. Puede haber varios cables neutros amarrados.
Incluya el neutro a todos los cables neutros amarrados asegurándose de que el
empalme del cable esté ajustado.
6. Conecte el cable verde (3) del temporizador a la conexión a tierra en la caja de
interruptores.
7. Introduzca los cables en la caja de interruptores dejando espacio para el temporizador.
8. Utilice los tornillos provistos para instalar el temporizador teniendo cuidado de no
apretar o pellizcar los cables.
9. Restablezca la electricidad desde el disyuntor o caja de fusibles.
10. Si la pantalla del temporizador no se enciende, es posible que deba intercambiar
el cable (1) y (5). Esto puede realizarse en el temporizador o interruptor de palanca,
después de desconectar la electricidad del circuito desde el disyuntor o caja de fusibles.
11. Verifique que la carga se conecte y desconecte cuando enciende y apaga
manualmente el temporizador. Realice esta prueba con el interruptor remoto en
ambas posiciones. Debe escuchar un “clic” cuando el relé del temporizador se
enciende y apaga. Si escucha el “clic” del relé pero la carga no se enciende ni apaga
correctamente, revise el cableado.
15312
12-17-2010
www.jascoproducts.com
Esquema de cableado típico para la instalación de un solo polo
Negro
Negro
Carga
BlancoBlanco
Blanco
Azul
Cable
= Empalme
de cable
Conexión
a tierra
Verde
Temporizador
Figura 1
Temporizador Digital SunSmart
TM
ROJO
VERDE
AZUL
BLANCO
NEGRO
Figura 2
2
1
5
3
2
5
1
3
4
C
CargaCable
1 = Cable
2 = Neutro
3 = Conexión
a tierra
4 = Carga
5 = Conmutador
C = Común
Diagrama de cableado típico para la instalación de
3 vías con temporizador en la línea del lado de carga
VERDE
AZUL
ROJO
BLANCO
NEGRO
CONEXIÓN A TIERRA
Lado de cargaLado con corriente
Cable
Neutro
HH HH
CC
Esquema de cableado típico para la instalación de 3 vías
Corrección de fallas
La pantalla del temporizador está en blanco
• El cortacircuitos o fusible se ha accionado..
• El alambre neutro no está conectado correctamente.
El sonido “tic-tac” se puede producir en una aplicación
triple cuando el temporizador está instalado en el
lado de la línea y todas las lámparas / bombillas de
esa línea están fundidas (o han sido removidas del
artefacto).
• Ponga el otro interruptor (lado de carga) a la posición
de “apagado”, para impedir que el temporizador haga
el sonido de “tic-tac”.
• Instale una nueva bombilla
• Para corregir permanentemente que el temporizador
haga el sonido “tic-tac”, reinstale el temporizador en el
lado de la carga. (Consulte el Manual).
-
 1
1
-
 2
2
-
 3
3
-
 4
4


GE SunSmart 15312 Instrucciones de operación
- Tipo
- Instrucciones de operación
en otros idiomas
Artículos relacionados
Otros documentos
-
Jasco 15312 Manual de usuario
-
 myTouchSmart 33861-T1 Guía de instalación
-
-
Defiant 49808 Manual de usuario
-
Intermatic HB800 Series Installation And User Instructions Manual
-
-
Intermatic EJ600 Series Installation And User Instructions Manual
-
 Utilitech TM-074 Instrucciones de operación
-
 Hampton Bay HD28906AGB Guía de instalación
-


