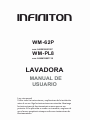
Infiniton WM-62P El manual del propietario
- Categoría
- Lavadoras
- Tipo
- El manual del propietario

WM-62
P
ean: 8445639001097
WM-
P
L8
ean: 8445639001110
LAVADORA
MANUAL DE
USUARIO


INSTRUCCIONES DE SEGURIDAD
■
í �
Í 7
L
2

INSTRUCCIONES DE SEGURIDAD
. -
¡Riesgo para los niños!
3

INSTRUCCIONES DE SEGURIDAD
J
Caution!
r
4
®@


INSTRUCCIONES DE SEGURIDAD
Esta marca indica que este producto no debe desecharse
con otros desechos domésticos en toda la UE. Para evitar
posibles daños al medio ambiente o la salud humana
debido a la eliminación incontrolada de desechos, recíclelo
de manera responsable para promover la reutilización
sostenible de los recursos materiales. , utilice los sistemas
de recogida o póngase en contacto con el distribuidor
donde compró el producto. Ellos regresan y pueden llevar
este producto para un reciclaje seguro para el medio
ambiente.
6


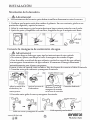
INSTALACIÓN
■Instalación
w
8

INSTALACIÓN
�
Raise Lower
9

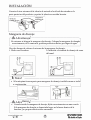
INSTALACIÓN
10
®@

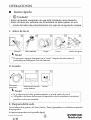
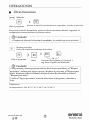
OPECIONES
Inicio rápido
Antes de lavarlo, asegúrese de que esté instalado correctamente.
Antes de lavar por primera vez, la lavadora se debe operar en una
ronda de todos los procedimientos sin ropa de la siguiente manera.
Abrir válvula
Main
wash
11
S'ner
Prewash

OPECIONES
■ Antes de cada lavado
º
º
º
12
®@

OPECIONES
■ Dispensador de detergente
1 Detergente de prelavado
11 Detergente de lavado principal
Suavizante
11
®
J L• Solo es necesario agregar detergente en el "caso I" después de seleccionar
el prelavado para máquinas con esta nción.
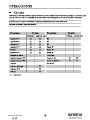
Programa 1 11 © Programa 11 ©
o • o • o
o • o • o
o • o • o
o • o • o
o • o • o
o • o • o
• o
o • o • o
o • o • o
• o
• o
o
e
•
•
13
®@

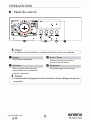
■
,o•f
=
ColdWash
d« ColdWa 8 e
+
Rinse&Spin � ECO -
T \
� Nota!
El producto está apagado.
8
Esto le permite seleccionar una
nción adicional y se iluminará
cuando se seleccione.
Presione el botón para iniciar o
pausar el ciclo de lavado.
Disponible según el tipo de ropa.
� Nota!
l •
14
3
1
2
4


OPECIONES
■Otras funciones
)Prewash
tl�
Presslsec
Cuidado!
)
Start
Cuidado!
Extra �
�
16


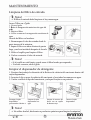
MANTENIMIENTO
■ Limpieza y mantenimiento
• Antes de que comience el mantenimiento, desenchu la máquina y cierre el gri.
El mantenimiento adecuado de la lavadora puede prolongar su
vida útil. La supercie se puede limpiar con diluido
detergentes neutros no abrasivos cuando sea necesario. Si hay
algún desbordamiento de agua, use el paño húmedo para
limpiarlo inmediatamente. No se permiten objetos alados.
• El ácido rmico y sus disolventes diluidos o equivalentes están
prohibidos, como alcohol, disolventes o productos químicos, etc.
Las oxidaciones que hayan dejado los artículos metálicos en el interior del
tambor se eliminarán inmediatamente con detergentes sin cloro.
Nunca use lana de acero.
• No ponga ropa en la lavadora durante la limpieza del tambor.
----------
Limpiar el cristal y sellar después de cada
lavado.
para quitar pelusas y manchas. Si se acumula
pelusa, pueden producirse gas.
Retire las monedas, botones y otros objetos
del sello después de cada lavado.
20
®@

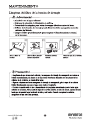
MANTENIMIENTO
Limpieza del ltro de entrada
� Nota!
1� �
P
� Nota!
Limpiar el dispensador de detergente
Eraiga el cajón
dispensador
Limpiar el cajón
dispensador con
presionando el botón A agua
� Nota!
Limpiar el interior del
hueco con un cepillo
de dientes viejo.
Inserte el cajón
dispensador
®@


MANTENIMIENTO
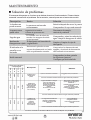
■Solución de problemas
1
1
í í Descripción Causa Solución
1 ii í
!
í í i
i
1
í í
i i (tiempo de
1
23


PROCEDIMIENTO EN CASO DE AVERÍA DE UN PRODUCTO INFINITON
Estimados clientes, para solicitar la asistencia técnica o reparación de su producto Infiniton,
disponen de nuestra página web, funcionando las 24 horas al día y 7 días a la semana:
Alternativamente, si lo desean, pueden solicitar la asistencia técnica vía correo electrónico:
Para agilizar todos los trámites, siempre se deben de indicar los siguientes datos:
•Nombre y apellidos
•Teléfono 1
•Teléfono 2
•Dirección completa
•Código postal
•Población
•Marca
•Modelo del producto
•Número de serie
•Avería que presenta el producto
Si lo desean, pueden solicitar la asistencia técnica a través del número 958 087 169,
disponible únicamente para los productos de gama blanca (a excepto microondas de libre
instalación).

Washing Machine
OWNER'S MANUAL
WM-62
P
ean: 8445639001097
WM-
P
L8
ean: 8445639001110

CONTENTS
SAFETY INSTRUCTIONS
Safety Instructions ..................................................
INSTALLATION
Product Description ................................................
Installation ...........................................................
OPERATION
Quick Start .............................................................
Before Each Washing ..............................................
Detergent Dispenser ...............................................
Control Panel .........................................................
Programmes............................................................
Option....................................................................
MAINTENANCE
Cleaning and Care .................................................
Trouble Shooting ....................................................
Technical Specifications .........................................
Product Fiche ........................................................
2
9
10
13
14
15
17
18
24
26
29
30
31
1

Please read the following safety information thoroughly and follow it
strictly to minimize the risk of fire or explosion, electric shock and to
prevent property damage, personal injury or loss of life. Failing to follow
these instructions shall void any warranty.
its service agent or similarly qualified persons in order to avoid a hazard.
•If the machine is damaged, it must not be operated unless repaired by
the manufacturer, its service agent or similarly qualified persons.
Risk of electric shock!
•If the supply cord is damaged, it must be replaced by the manufacturer,
ELECTRIC SHOCK HAZARD
SAFETY INSTRUCTIONS
Safety Instructions
a potentially dangerous situation which may result in
death or serious injuries unless it’s avoided.
This combination of symbol and signal word indicates
Warning!
!
a potentially dangerous situation which may result in
slight or minor injuries.
This combination of symbol and signal word indicates
Note!
a potentially dangerous situation which may result in
slight or minor injuries or damage to property and the
environment.
This combination of symbol and signal word indicates
Caution!
Warning!
!
2

SAFETY INSTRUCTIONS
•The appliance can be used by children aged from 8 years and above
and persons with reduced physical, sensory or mental capabilities or
lack of experience and knowledge if they have been given
supervision or instruction concerning use of the appliance in a safe
way and understand the hazards involved. Children shall not play
with the appliance. Cleaning and user maintenance shall not be
made by children without supervision.
•Children should be supervised that they do not play with the
appliance.
•Children 3 years and under shall be kept away from the appliance
or continuously supervised.
•Animals and children may climb into the machine. Check the
machine before every operation.
•Do not climb or sit on the appliance.
INSTALLATION LOCATION AND SURROUNDING
•All washing and additional substances are to be kept in a safe place
out of the reach of children.
•Do not install the machine on a carpet floor. The obstruction of the
openings by a carpet can damage the machine.
•Keep the appliance clear from heating sources and direct sunlight
to avoid plastic and rubber parts to corrode.
•Do not use the appliance in humid environments or rooms
containing explosive or caustic gas. In case of water leakage or
water splashes let the appliance dry in the open air.
•The appliance must not be installed behind a lockable door, a
sliding door or a door with a hinge on the opposite side to that of the
washing machine.
3

SAFETY INSTRUCTIONS
•Do not operate the machine in rooms with a temperature of below
5°C. This can cause damages to parts of it. If it is unavoidable, make
sure to drain the water completely from the appliance after every
use (see „Maintenance - Cleaning of drain pump filter“) to avoid
damages caused by frost.
•Never use flammable sprays or substances in the immediate
proximity of the appliance.
INSTALLATION
•Remove all packaging material and transport bolts before using the
appliance. Otherwise, serious damage may result.
•This appliance is equipped with a single inlet valve and can be
connected to the cold water supply only.
•Mains plug must be accessible after installation.
•Before washing clothes for the first time, the product shall be
operated once throughout all the procedures without any clothes
inside.
•Before using the washing machine, the product shall be calibrated.
•Do not put any excessively heavy objects on the appliance, like
water containers or heating devices.
•The new hose-sets supplied with the appliance are to be used and
that old hose-sets should not be reused.
•Max. Inlet water pressure 1 MPa. Min. inlet water pressure 0.05
MPa.
ELECTRICAL CONNECTION
•Make sure the supply cable is not trapped by the machine, it can get
damaged.
•Connect the product to a grounded outlet protected by a fuse
complying with the values in the “ Technical specifications“ table.
The grounding installation has to be made by a qualified electrician.
Ensure that the machine is installed in accordance with the local
regulations.
4

SAFETY INSTRUCTIONS
•Water and electrical connections must be carried out by a qualified
technician in accordance with the manufacturer‘s instructions and
local safety regulations.
•Don´t use multiple plugs or extension cords.
•The appliance must not have an external switching device such as a timer or
connected to a circuit that is regularly switched on and off.
•Do not pull the plug out of the mains outlet if there is flammable gas around.
•Never pull out power plug with wet hands.
•Always pull at the plug, not at the cable.
•Always unplug the appliance if it is not being used.
Warning!
!
WATER CONNECTIONS
•Check the connections of the water inlet tubes, the water tap and
the outlet hose for possible problems due to changes of water
pressure. If the connections loosen or leak close the water tap and
get it repaired. Do not use the appliance before the pipes and hoses
are installed properly by qualified persons.
•Glass door may become very hot during the operation. Keep
children and pets far away from the machine while it is operating.
•The water inlet and outlet hoses have to be safely installed and
remain undamaged. Otherwise, water leakage can occur.
•Do not remove the drain pump filter while there is still water in the
appliance. Big quantities of water can leak out, and there is a risk of
scalding due to hot water.
5

SAFETY INSTRUCTIONS
OPERATION AND MAINTENANCE
•Never use any flammable, explosive or toxic solvents. Do not use
gasoline and alcohol etc. as detergents. Only select detergents that
are suitable for machine washing.
•Make sure that all pockets are emptied. Sharp and rigid items such
as coins, brooches, nails, screws, stones etc. may cause serious
damages to this machine.
•Remove all objects from pockets such as lighters and matches
before use the appliance.
•Thoroughly rinse items that have been washed by hand.
•Items that have been soiled with substances such as cooking oil,
acetone, alcohol, petrol, kerosene, spot removers, turpentine, wax
and wax removers should be washed in hot with an extra amount of
detergent before being dried in the appliance.
•Items containing foam rubber (latex foam), shower caps, water
proof textiles, rubber backed articles and clothes or pillows fitted
with foam rubber pads should not be dried in the machine
•Fabric softeners or similar products should be used as
recommended in their instructions.
•Never try to open the door forcefully. The door will unlock shortly
after the end of a cycle.
•Please do not close the door with excessive force. If it is found
difficult to close the door, please check if the clothes are properly
inserted and distributed.
6

SAFETY INSTRUCTIONS
•Always unplug the appliance and close the water tap before
cleaning and maintenance and after each use.
•Never pour water over the appliance for cleaning purpose. Risk of
electric shock!
•Repairs shall only be carried out by the manufacturer, its service
agent or similarly qualified persons in order to avoid a hazard. The
producer will not be responsible for damages caused by the
intervention of not authorized persons.
TRANSPORT
•Before Transport:
-Bolts shall be reinstalled to the machine by a specialized person
-Accumulated water shall be drained out of the machine
•This appliance is heavy. Transport with care. Never hold any
protruding part of the machine when lifting. The machine door
cannot be used as a handle.
INTENDED USE
The product is intended only for home use and for textiles in
household amounts suitable for machine washing and drying. This
appliance is for indoor use only and not intended for built in use.
Only use according to these instructions. The appliance is not
intended for commercial use.
Any other use is considered as improper use. The producer is not
responsible for any damage or injuries that may result of it.
•This appliance is intended to be used in household and similar
applications such as:
-Staff kitchen areas in shops, offices and other working environments;
-Farm houses;
-By clients in hotels, motels and other residential type environments;
-Bed and breakfast type environments;
-Areas for communal use in blocks of flats or in launderettes.
7

SAFETY INSTRUCTIONS
This marking indicates that this product should not be
disposed with other household wastes throughout the
EU.To prevent possible harm to the environment or
human health from uncontrolled waste disposal,recycle
it responsibly to promote the sustainable reuse of
material resources.To return your used device, please use
the collection systems or contact the retailer where the
product was purchased. They return and can take this
product for environmental safe recycling.
Packaging/Old appliance
8

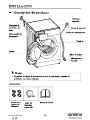
INSTALLATION
Accessories
Product Description
4 x Cover caps 1 x Supply hose
cold water
• The product picture is for illustration only, please refer to real product as
reference.
Note!
Drum
Power supply cord
Control panel
Detergent dispenser
Service flap
Door
Water supply hose
Top cover
Drain hose
1 x Owner’s manual
9

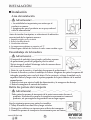
INSTALLATION
Installation
Before installing the machine, the location characterized
as follows shall be selected:
1.Rigid, dry, and level surface
2.Avoid direct sunlight
3.Sufficient ventilation
4.Room temperature is above 0°C
5.Keep far away from the heat sources such as coal or gas burning appliances.
Unpacking the washing machine
1. Remove the cardboard box and styrofoam packing.
2. Lift the washing machine and remove the base packaging.Make sure the small triangle
foam (a) is removed with the bottom packaging together. If not, lay the unit down on
the side surface and remove it manually.
4. Remove the inlet hose from the drum.
3. Remove the tape securing the power supply cord and drain hose.
• Stability is important to prevent the product from
wandering! Make sure the machine is standing leveled and
stable.
• Make sure that the product does not stand onto the power
cord.
• Make sure to maintain the minimum distances from the
walls as shown in the picture
Warning!
!
• Packaging material (e.g. Films, Styrofoam) can be
dangerous for children.
• There is a risk of suffocation ! Keep all packaging
well away from children.
Warning!
!
w
w
W> 20mm
Installation area
a
10

INSTALLATION
Remove transport bolts
• You must remove the transport bolts from the backside before using the product.
Warning!
!
Loosen the 4 transport
bolts with a spanner.
Remove the bolts
including the rubber parts
and keep them for future
use.
Close the holes using the
cover caps.
Levelling the washing machine
• The lock nuts on all four feet must be screwed tightly against the housing.
Warning!
!
1. Loosen the lock nut.
2. Turn the foot until it reaches the floor.
3. Adjust the legs and lock the nuts with a
spanner. Make sure the machine is level and
steady.
Connect the water supply hose
To prevent leakage or water damage, follow the instructions in this chapter
• Do not kink, crush or modify water inlet hose.
Warning!
!
Connect the water supply hose
to the water inlet valve and a
water tap with cold water as
indicated.
• Connect manually, do not use tools. Check if the connections are tight.
Note!
11

INSTALLATION
Drain Hose
There are two ways to place the end of drain hose:
1.Put it into the water trough. 2.Connect it to the branch drain pipe of
the trough.
•
• Position drain hose properly ,otherwise damage might result of water leakage.
Do not kink or protract the drain hose.
Warning!
!Warning!
!
12

• Before washing, please make sure the washing machine is installed properly.
• Your appliance was thoroughly checked before it left the factory. To remove
any residual water and to neutralize potential odors, it’s recommended to
clean your appliance before first use. For this reason, start the Cotton program
at 90°C without laundry and detergent.
Quick Start
Caution!
OPERATION
2. Washing
Select programme
Select function or
remain default
settings
Press
Start/Pause to
start the program
Buzzer beep and “End” on display.
3. After Washing
1. Before Washing
Open tap
Load
Close door
Plug in
Add detergent
• Detergent need to be added in compartment I if the pre-wash function is selected.
1 2 3 4 5
Note!
Main
wash
Prewash
Softener
earth
terminal
1 2 3
13

• Do not wash or dry articles that have been cleaned in, washed in, soaked in,
or dabbed with combustible or explosive substances like wax, oil, paint,
gasoline, alcohol, kerosene, and other flammable materials.
• Washing single clothes items may easily create big eccentricity and cause
alarm due to unbalance. Therefore it is suggested to add one or two more
laundry items to the wash so that spin can be done smoothly.
• The ambient temperature of the washing machine should be 5-40°C. If used under
0°C, the inlet valve and draining system may be damaged. If the machine is
installed under freezing conditions, it should be transferred to normal ambient
temperature to ensure the water supply hose and drain hose can unfreeze before
use.
• Please check your laundry care labels and the detergent use instructions before
wash. Use non-foaming or less-foaming detergent suitable for machine
washing properly.
Tie together long textile
strips and belts, close zips
and button
Take all items out of the
pockets
Put small items into a
laundry bag
Check the care label
Before Each Washing
Turn easy-pilling and
long-pile fabric inside out
Sort laundry according to
color and textile type
Warning!
!
OPERATION
1 2 3
4 5 6
14

Detergent Dispenser
Caution!
• Detergent only need to be added in "compartment I “after selecting
pre-wash function.
OPERATION
Pre wash
Main wash
Softener
II
I
Release button to
pull out the dispenser
Means must ○ Means optional
Programme
Cotton 30 °C
Cotton 40 °C
Cotton 60 °C
Cotton 90 °C
Synthetic
Synthetic 40 °C
Drum Clean
Spin Only
Drain Only
Rinse&Spin
Cold Wash
Cold Wash 20 °C
Programme
Delicate 30 °C
Delicate
Ends in 9H
Ends in 6H
Ends in 3H
Quick Wash 45'
Quick Wash 30'
Quick Wash 15'
ECO 40-60
Cotton Intensive 40 °C
Cotton Intensive 60 °C
15

Detergent Recommendation
OPERATION
Agglomerating or ropy detergent or additive can be diluted in some water
before pouring it into the detergent dispenser, to avoid its inlet to get blocked
and thus cause a water overflow.
• Please choose the suitable type of detergent to get a maximum of washing
performance and a minimum of water and energy consumption
• To achieve the best cleaning result a proper detergent dosing is important.
• Use a reduced detergent amount if the drum is not filled completely.
• Always adjust the amount of detergent to the water hardness, if your tap
water is soft, use less detergent.
• Dose according to how dirty your laundry is, less dirty clothes require less
detergent.
• Highly concentrated (compact detergent) requires particularly accurate
dosing.
Following symptoms are a sign of detergent overdosing:
- heavy foam formation
- poor washing and rinsing result
Following symptoms are a sign of detergent underdosing:
- laundry turns grey
- built-up of limescale deposits on the drum, the heating element and/or the
laundry
•
Note!
Recommended washing
detergent
Heavy-duty detergent with
bleaching agents and
optical brighteners
Colour detergent without
bleaching agent and optical
brighteners
Color or mild detergent
without optical brighteners
Mild washing detergent
Wash cycles
Cotton,ECO 40-60
Cotton,ECO40-60,
Cold Wash
Cold Wash,Synthetic
Synthetic
Washing
temp.
30 40
60
/ /
Cold/40
Type of laundry and textile
White laundry made from
boil-proof cotton or linen
Coloured laundry made
from cotton or linen
Coloured laundry made
from easy care fibres or
synthetic materials
Delicate textiles, silk,
viscose
Cold/20/
30/40
Cold/20/
40
16

OPERATION
On/Off
Turn the appliance on and off.
Start/Pause
Start or pause your programme.
Programmes
Available according to the laundry type.
Option
This allows you to select additional
functions and will light when selected.
1
1
3
1
2
4
Display
The display shows settings, estimated
remaining time, options and status
messages.
5
Control Panel
3
1
2
4
17

• The parameters in this table are only for user's reference. The actual parameters may be
different with the parameters in above mentioned table.
Note!
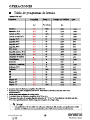
Programme
Load(kg)
Synthetic
Synthetic
Ends in 6H
Ends in 3H
40℃
Cold Wash
Cold Wash 20℃
Cotton 30℃
Cotton 40℃
Cotton 60℃
Cotton 90℃
ECO 40-60
Cotton Intensive 40℃
Cotton Intensive 60℃
Drum Clean
Spin Only
Drain Only
Rinse&Spin
Delicate 30℃
Delicate
Ends in 9H
Quick Wash 45’
Quick Wash 30’
Quick Wash 15’
Model:WM-62P
6.0
3.0
3.0
6.0
6.0
6.0
6.0
6.0
6.0
6.0
6.0
6.0
-
6.0
-
6.0
2.5
2.5
6.0
6.0
6.0
2.0
2.0
2.0
6.0
2:20
2:20
1:00
1:01
2:40
2:40
2:45
2:50
3:16
4:04
4:08
1:18
0:12
0:01
0:20
0:50
0:48
0:59
0:59
0:59
0:45
0:30
0:15
Display Time
Programmes
OPERATION
18

OPERATION
Programmes
• The above data is for reference only, and the data may change due to different
actual use conditions.
• The valves given for programmes other than the ECO 40-60 programme
are indicative only.
• The new EU energy efficiency class is E
Energy test program: ECO 40-60. Speed: the highest speed; Other as the default.
Half load for 6.0Kg machine:3.0Kg.
Quarter load for 6.0Kg machine: 1.5Kg.
The old EU energy efficiency class is A+
Energy test program: Cotton Intensive 60°C/40°C.Speed: the highest speed; Other as the default.
Half load for 6.0Kg machine:3.0Kg.
19
WM-62P

OPERATION
Programmes
Programme
Load(kg)
Synthetic
Synthetic
Ends in 6H
Ends in 3H
40℃
Cold Wash
Cold Wash 20℃
Cotton 30℃
Cotton 40℃
Cotton 60℃
Cotton 90℃
ECO 40-60
Cotton Intensive 40℃
Cotton Intensive 60℃
Drum Clean
Spin Only
Drain Only
Rinse&Spin
Delicate 30℃
Delicate
Ends in 9H
Quick Wash 45’
Quick Wash 30’
Quick Wash 15’
Model:WM-PL8
8.0
4.0
4.0
8.0
8.0
8.0
8.0
8.0
8.0
8.0
8.0
8.0
-
8.0
-
8.0
2.5
2.5
8.0
8.0
8.0
2.0
2.0
2.0
8.0
2:20
2:20
1:00
1:01
2:40
2:40
2:45
2:50
3:29
3:49
3:52
1:18
0:12
0:01
0:20
0:50
0:48
0:59
0:59
0:59
0:45
0:30
0:15
Display Time
• The parameters in this table are only for user's reference. The actual parameters may be
different with the parameters in above mentioned table.
Note!
20

OPERATION
Programmes
• The above data is for reference only, and the data may change due to different
actual use conditions.
• The valves given for programmes other than the ECO 40-60 programme
are indicative only.
• The new EU energy efficiency class is E
Energy test program: ECO 40-60. Speed: the highest speed; Other as the default.
Half load for 8.0Kg machine:4.0Kg.
Quarter load for 8.0Kg machine: 2.0Kg.
The old EU energy efficiency class is A+++
Energy test program: Cotton Intensive 60°C/40°C.Speed: the highest speed; Other as the default.
Half load for 8.0Kg machine:4.0Kg.
21
WM-PL8

OPERATION
1) The highest temperature reached by the laundry in the wash cycle for at least 5
minutes.
2) Residual moisture after the wash cycle in water content percent and the spin speed at
which this was achieved.
3) The ECO 40-60 programme is able to clean normally soiled cotton laundry declared to
be washable at 40°C or 60°C, together in the same cycle. This programme is used to
assess the compliance with the regulation (EU) 2019/2023.
The most efficient programmes in terms of energy consumption are generally those that
perform at lower temperatures and longer duration.
Loading the household washing machine up to the capacity indicated for the respective
programmes will contribute to energy and water savings.
Noise and remaining moisture content are influenced by the spinning speed: the higher
the spinning speed in the spinning phase, the higher the noise and the lower the
remaining moisture content.
Caution!
• If there is any break in the power supply while the machine is operating, a
special memory stores the selected programme. The machine will continue
the programme when the power supply is re-established.
22

OPERATION
Programmes
Synthetic
Delicate
Drum Clean
Spin Only
Rinse&Spin
Drain Only
Wash synthetic articles, for example: shirts, coats, blending.
While washing the knitting textiles, detergent quantity shall be
reduced due to its loose string construction and easily forming
bubbles.
For delicate, washable textiles, e.g. made of silk, satin, synthetic
fibres or blended fabrics.
It applys 90 °C high temperature sterilization to make the
clothes washing more green. When this procedure is performed,
the clothes or other washing cannot be added. When proper
amount of chlorine bleaching agent is put in,the barrel cleaning
effect will be better. The customer can use this programme
regularly according to the need.
Extra rinse with spin.
Drain off the water.
Extra spin with selectable spin speed.
Programmes are available according to the laundry type.
Programmes
Quick Wash15'
To increase the washing effects, washing time is increased.
ECO 40-60 Default 40℃,not selectable,suitabale for laundry washing at about
40℃-60℃.
Cold Wash Cold water to wash clothes.
Cotton
It is suitable for washing few and not very dirty clothes quickly.
Cotton Intensive
Hard-wearing textiles, heat-resistant textiles made of cotton or
linen.
The function can be set with this programme,the total time
including washing time and delaying time is 3h,6h or 9h.
Ends in
23

OPERATION
Option
Synthetic
Synthetic 40℃
Cold Wash
Cold Wash 20℃
Cotton 30℃
Cotton 40℃
Cotton 60℃
Cotton 90℃
ECO 40-60
Cotton Intensive 40℃
Cotton Intensive 60℃
Drum Clean
Spin Only
Drain Only
Rinse&Spin
Delicate 30℃
Delicate
Ends in 3H/6H/9H
Quick Wash 45’
Quick Wash 30’
Quick Wash 15’
Cold
40
Cold
20
30
40
60
90
60
40
60
90
-
-
-
30
Cold
40
40
30
Cold
Default
Temp.(℃)
For the maximum spin speed, program time, and other details of the
ECO 40-60 program, please refer to the content on the Product Fiche page.
• The table shows which cycle offers which options for adjustment. If an
adjustment is not possible for a cycle.
•
Note!
Pre Wash,Extra Rinse
Pre Wash,Extra Rinse
Pre Wash,Extra Rinse
Pre Wash,Extra Rinse
Pre Wash,Extra Rinse
Pre Wash,Extra Rinse
Pre Wash,Extra Rinse
Pre Wash,Extra Rinse
Extra Rinse
Extra Rinse
Extra Rinse
Delay
24

OPERATION
Pre Wash
Extra washing function before the main washing cycle starts to increase the washing
performance.
Note: Detergent needs to be added to the compartment I.
Extra Rinse
The laundry will undergo an extra rinse after selecting this function.
No Spin
It will not spin if you choose this function.
No Spin
Child Lock
This function is meant to keep children from misusing the controls.
Press [Extra Rinse] and [No Spin] simultaneously for 3 sec
until the buzzer beep. The child lock indicator switches on.
Mute the buzzer
To act the buzzer function, press the button again for 3 seconds. The setting
until the next reset.
will be kept
• MuAfter ting the buzzer function, the sounds will not be activated any more.
Caution!
Choose the Programme
Extra
Rinse
No
Spin
• Only press and hold the two button can release “Child Lock”, even power off,
switch off and program end, the “Child Lock” will lock all buttons except
power button and “Child Lock“ button.
• Please release “Child Lock“ before selecting program and starting washing.
Caution!
Press the [Prewash]button for 3sec.the
buzzer is mute.
Prewash
Press 3 sec.
25

• Always unplug the appliance and close the water tap before cleaning and
maintenance.
Cleaning the Cabinet
Cleaning the Drum
• Keep any laundry away from the machine while cleaning the drum.
Cleaning the Door Seal and Glass
Warning!
!
Note!
Cleaning and Care
Any rust stains left inside the drum by metal articles must be removed immediately
using chlorine-free detergents. Never use steel wool for cleaning the drum!
Proper maintenance on the washing machine can extend its
working life. The surface can be cleaned with diluted
non-abrasive neutral detergents when necessary. If there is
any water overflow, use a cloth to wipe it off immediately.
Never use sharp items to clean the appliance.
MAINTENANCE
Caution!
• Never use abrasive or caustic agents. formic acids or its diluted solvents or
similar substances, like alcohol or chemical products.
Wipe the glass and seal after each wash
to remove lint and stains. If lint builds up it
can cause leakages.
Remove any coins, buttons and other objects
from the seal after each wash.
Clean the Door Seal and Glass every month to
ensure the normal operation of the appliance.
26

MAINTENANCE
1. Close the tap and remove the water supply
hose from it.
2. Clean the filter with a brush.
3. Unscrew the water supply hose from the
backside of the machine. Pull out the filter
with long nose pliers.
4. Use a brush to clean the filter.
5. Reinstall the filter to the water inlet and
reconnect the water supply hose.
6. Clean the Inlet filter every 3 months
to ensure the normal operation of the
appliance.
Cleaning the Inlet Filter
• Diminishing water flow is a sign that the filter need to be cleaned.
Note!
Clean The Detergent Dispenser
• Do not use abrasive or caustic agents to clean plastic parts.
• Clean the detergent dispenser every 3 months to ensure the normal operation of the
appliance.
Press the release and
remove the dispenser
drawer
Clean the dispenser
drawer and the softener
cover under water
Clean the recess with
an soft brush
Insert the dispenser
drawer
Note!
1. Press down the release [ ] on the softener cover and pull the dispenser
drawer out of the recess. Clean the inside of the recess with a brush.
2. Lift the softener cover off the dispenser drawer and wash both items with water.
3. Restore the softener cover and push the drawer back into the recess.
134
2
1 2
3 4
27

MAINTENANCE
Cleaning the Drain Pump Filter
Open the lower cover cap Open the filter by turning
to the counter clockwise
Remove extraneous matter
1
Close the lower cover cap
4
3
2
•
and unplug it before cleaning the drain pump filter.
• Be careful of hot water. Allow the water to cool down. Risk of scalding!
• Clean the filter periodically every 3 months to ensure the normal operation of the
appliance.
Make sure that the machine has finished the washing cycle and is empty. Switch it off
Warning!
•
be hot water in the pump. Never remove the pump cover during a wash cycle, always
wait until the appliance has finished the cycle, and is empty. When replacing the
cover, ensure it is securely re-tightened.
When the appliance is in use and depending on the programme selected there can
Caution!
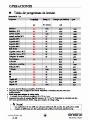
28

Trouble Shooting
Whenever there is a problem with the appliance, check if you can solve it following
the tables below. If the problem persists, please contact the customer service.
Description Possible cause Solution
Close the door properly and
restart.
Check the laundry.
Door is not closed properly.
Clothes are stuck.
Safety protection
is activated.
Disconnect the power and
restart.
Water leakage Connections are
not tight enough.
Check and fasten the water inlet
pipe.
Check and clean the outlet hose.
Clean and wipe the detergent
dispenser dry.
Abnormal noise Check if the fixing bolts have
been removed
Make sure the appliance is
installed on a solid and level
floor.
Indicator or display
does not work
PC board or harness have
connection problems.
Switch off the power and check
if the mains plug is connected
properly.
Appliance does
not start
Detergent residues
in the detergent
dispenser
Detergent is damp
and/or clotted.
MAINTENANCE
Door can´t be
opened
Fixing bolts still in place.
Floor is not solid or level.
Error Codes
Description
Off
Off
Flash
Flash
Off
Off
Off
Off
Off
Flash
Off
Off
Off
Off
Off
Flash
Off
Off
Prewash
Extra Rinse
No Spin
Pause/Start
Flash
Off
Off
Off
Off
Off
Possible cause Solution
Door is not closed properly
Water injecting
problem during
wash cycle.
Overtime water draining
Water overflow
Others
Close the door properly and
restart.
Check if the water pressure
is high enough.
Straighten the water pipe.
Clean the inlet valve filter.
Check the drain hose for blockage.
Restart the appliance.
Restart the appliance. If problem persists,
please contact the customer service.
29

MAINTENANCE
Technical Specifications
MAX.Current
Standard Water Pressure
10A
0.05MPa~1MPa
Power Supply 220-240V~,50Hz
H
W
D
Customer service
In case of questions please contact our customer service at:
Risk of electric shock
• Never try repair an appliance which is defective of presumed to be defective.
You may put your own and future users' lives in danger.Only authorised specialists are
allowed to carry out this repair work.
• Improper repair will void the warranty and subsequent damages can't be recogniced!
Warning!
!
Spare part for your appliance are available for a minimum of 10 years.
Transport
IMPORTANT STEPS WHEN MOVING THE APPLIANCE
•
• Check, if the door and the detergent dispenser are closed properly.
• Remove the water inlet pipe and the outlet hose from the house installations.
• Let the water drain completely from the appliance (see “Maintenance Cleaning the
drain pump filter”)
• Important: Re-install the 4 transport bolts in the back of the appliance.
• This appliance is heavy. Transport with care. Never hold any protruding part of the
machine when lifting. The machine door cannot be used as a handle.
Unplug the appliance and close the water inlet tap.
595*400*850
WM-62P
Dimension
(W*D*Hmm)
6.0kg
Rated PowerNet WeightWashing
Capacity
Model
52kg 2000W
WM-PL8 8.0kg
595*565*850 68kg 2000W
30

MAINTENANCE
31
WM-62P

Product Information Sheet acc. regulation (EU) 2019/2023
38
33
1400
1400
1400
80
8.0
0.827 48
25
53
53
53
B
3 38:
2 48:
2:48
57
60
N/A
MAINTENANCE
32
WM-PL8

1) The actual energy consumption will depend on how the appliance is used.
2) The actual water consumption will depend on how the appliance is used and on the
hardness of the water.
3) Delivery of the spare parts within 15 working days after having received the order.
Product Data Sheet concerning (EU) 2019/2014
The product data sheet for your appliance can be found online.
Go to https://eprel.ec.europe.eu and enter the model identifier for your appliance to
download the data sheet.
The model identifier for your appliance can be found in the technical specifications
section.
MAINTENANCE
33

PROCEDURE IN CASE OF FAILURE OF AN INFINITON PRODUCT
Dear customers, to request technical assistance or repair of your Infiniton product, you
have our website, operating 24 hours a day and 7 days a week:
Alternatively, if they wish, they can request technical assistance via email:
To streamline all procedures, the following information should always be indicated:
•Name and surname
•Telephone 1
• Telephone 2
•Full address
•Postal Code
•Population
•Brand
• Product model
•Serial number
• Failure presented by the product
If they wish, they can request technical assistance through the number 958 087 169,
available only for white range products (except for free-standing microwaves).

Lavadoura
MANUAL DE
USUÁRIO
a
WM-62
P
ean: 8445639001097
WM-
P
L8
ean: 8445639001110


■ Instruóes de segurana
7
a
J
2
®@

L Risco para as crian�as!
3
®@


5

-
a a
6


INSTALAGÁO
■
4. A temperatura ambiente está acima de O ºC
w
Remove transport bolts
8

INSTALAGÁO
• As porcas de seguran�a em todos os quatro pés devem ser aparasadas rmemente contra o alojamento.
a1se
5mm
clamp nut
9

INSTALAGÁO
a
� Note!
10

OPEóES
Comeo rápido
11
1

OPEóES
■Antes de cada lavagem
º º
º
Warning!
12

OPEóES
■
11
®
r Caution ! J L•
1
o
o
o
o
o
o
o
o
o
� Note!
11 ©
•o
•o
•o
•o
•o
•o
•o
•o
o
opcional
11 ©
----
----
• o
----
---- º
----
13

OPEóES
■Control Panel
45
H
!: O Q
� O
O
ntrga
400rpm
• •
• •
8 &
• •
0000
� Note!
0 Off
8 Op�ao
o
L � Note!
J
14
3
1
2
4

OPEóES
■Opao
a
º o o
º o
º o
º o o
o o
º o
º o o
º º o o
o
º
o
opcional
15

OPEóES
■Outras funóes
1
)Prewash
tl�
Presslsec
O
Caution!
Caution!
)
�
º º º º º
16

OPEóES
■Programas
a
Enxágüe extra com centrga�o.
17


MANUTENGO ES
■
&
20
----------

MANUTENGO ES
21

MANUTENGO ES
Abra o tro de servio Abra o tro girando no Remover matéria
sentido anti-horário estranha
Feche a tampa inrior
22

■
O
O
O
O
O
O
� Note!
23


PROCEDIMENTO EM CASO DE FALHA DE UM PRODUTO INFINITON
Caros clientes, para solicitar assistência técnica ou conserto do seu produto Infiniton, você
tem nosso site, funcionando 24 horas por dia e 7 dias por semana:
Alternativamente, se desejarem, podem solicitar assistência técnica por e-mail:
Para agilizar todos os procedimentos, as seguintes informações devem ser sempre indicadas:
•Nomes e sobrenomes
•Telefone 1
•Telefone 2
•Endereço completo
•Código postal
•População
•Marca
•Modelo de produto
•Número de série
•Falha do produto
Se desejarem, podem solicitar assistência técnica através dos números 958 087 169,
disponíveis apenas para produtos da linha branca (exceto micro-ondas autônomo).

LAVE LINGE
MANUEL D'UTILISATION
Lisez ce Manuel
Utilisez toutes les instructions et explications de l'installation avant utilisation. Suivez
attentivement les instructions. Gardez les instructions d'utilisation à portée de main pour
une utilisation ultérieure. Si l'appareil est vendu ou transmis, assurez-vous que le nouveau
propriétaire reçoive toujours ces instructions d'utilisation.
WM-62
P
ean: 8445639001097
WM-
P
L8
ean: 8445639001110

CONTENU
INSTRUCTIONS DE SECURITE
■
Instructions de sécurité.......................................... 2
INSTALLATION
■
Description du produit........................................ . . . . 7
■
Installation ........................................................... 8
UTILISATION
Quick Start ...................................................................11
Avant chaque lavage................................................12
Bac à lessive .................................................................13
Panneau de configuration ...................................................14
■
Option .................................................................... 15
Autres Fonctions ........................................................16
■
Programmes ..............................................................18
Programmes de lavage.......................................... 19
ENTRETIEN
■
Nettoyage et entretien........................................... 20
■
Panne et anomalies............................................... 23
■
Spécifications techniques....................................... 24
Fiche produit .............................................................. 25

INSTRUCTIONS DE SECURITE
■
Instructions de sécurité
Pour votre sécurité, les informations contenues dans ce manuel
doivent être suivies afin de minimiser les risques d'incendie ou
d'explosion, de choc électrique ou pour éviter des dommages
matériels, des blessures corporelles ou la mort. Explication des
symboles:
/! ATTENTION
Cette combinaison de symbole et de mot d'avertissement
indique une situation potentiellement dangereuse qui peut
entraîner la mort ou des blessures graves à moins qu'elle ne
soit évitée.
/! DANGER
Cette combinaison de symbole et de mot d'avertissement
indique une situation potentiellement dangereuse qui peut
entraîner des blessures légères ou mineures ou des
dommages matériels et environnementaux.
Note
Cette combinaison de symbole et de mot d'avertissement
indique une situation potentiellement dangereuse qui peut
entraîner des blessures légères ou mineures.
/! ATTENTION
[ Choc électrique
•Si le cordon d'alimentation est endommagé, il doit être remplacé par
le fabricant, son agent de service ou des personnes de qualification
similaire afin d'éviter tout danger.
2

INSTRUCTIONS DE SECURITE
•Les nouveaux ensembles de flexibles fournis avec l'appareil doivent
être utilisés et les anciens ensembles de flexibles ne doivent pas être
réutilisés.
•Avant tout entretien de l'appareil, débranchez l'appareil du secteur.
•Débranchez toujours la machine et coupez l'alimentation en eau après
utilisation. Le max. pression d'eau d'entrée, en pascals. Le min.
pression d'eau d'entrée, en pascals.
•Pour assurer votre sécurité, la fiche d'alimentation doit être
insérée dans une prise tripolaire mise à la terre. Vérifiez
soigneusement et assurez-vous que votre prise est correctement
et de manière fiable mise à la terre.
•Assurez-vous que l'eau et les appareils électriques doivent être
connectés par un technicien qualifié conformément aux
instructions du fabricant et aux réglementations de sécurité
locales.
[_ Risque pour les enfants !
•FR pays: l'appareil peut être utilisé par des enfants âgés de 8 ans
et plus et des personnes ayant des capacités physiques,
sensorielles ou mentales réduites ou un manque d'expérience et de
connaissances s'ils ont reçu une surveillance ou des instructions
concernant l'utilisation de l'appareil en toute sécurité et comprendre
les dangers impliqués. Les enfants ne doivent pas jouer avec
l'appareil. Le nettoyage et l'entretien par l'utilisateur ne doivent pas
être effectués par des enfants sans surveillance.
•Les enfants de moins de 3 ans doivent être surveillés pour s'assurer
qu'ils ne jouent pas avec l'appareil.
•Les animaux et les enfants peuvent grimper dans la machine.
Vérifiez la machine avant chaque opération.
•Les enfants doivent être surveillés afin qu'ils ne jouent pas avec
l'appareil.
3

INSTRUCTIONS DE SECURITE
•La porte vitrée peut être très chaude pendant l'opération. Tenez les
enfants et les animaux éloignés de la machine pendant le fonctionnement
dans des pièces très humides ainsi que dans les pièces contenant des gaz
explosifs ou caustiques.
•Retirez tous les emballages et les boulons de transport avant
d'utiliser l'appareil. Sinon, des dommages graves pourraient en
résulter.
•La prise doit être accessible après l'installation.
[ /! Risque d'explosion !
•Ne pas laver ou sécher des articles qui ont été nettoyés, lavés,
imbibés ou tamponnés avec des substances combustibles ou
explosives (comme la cire, l'huile, la peinture, l'essence, les
dégraissants, les solvants de nettoyage à sec, le kérosène, etc.).
provoquer un incendie ou une explosion.
•Rincer soigneusement les articles à la main avant le lavage .
[ Installation de la machine
•Ce lave-linge est destiné à un usage intérieur uniquement.
•Il n'est pas destiné à une utilisation intégrée.
•Les ouvertures ne doivent pas être obstruées par un tapis.
•Le lave-linge ne doit pas être installé dans la salle de bain ou les pièces
très humides ainsi que dans les pièces contenant des gaz explosifs ou
caustiques.
•Le lave-linge avec une seule vanne d'entrée peut uniquement être
raccordé à l'alimentation en eau froide. Le produit avec des vannes
d'entrée doubles doit être correctement connecté à l'alimentation en
eau chaude et en eau froide.
•La prise doit être accessible après l'installation.
4
Attention

INSTRUCTIONS DE SECURITE
•Retirez tous les emballages et les boulons de transport avant
d'utiliser l'appareil. Sinon, des dommages graves pourraient en
résulter.
[ Risque d'endommagement de l'appareil!
•Votre produit est uniquement destiné à un usage domestique et
est uniquement conçu pour les textiles adaptés au lavage en
machine.
•Ne montez pas et ne vous asseyez pas sur le capot supérieur de la
machine.
•Ne vous appuyez pas contre la porte de la machine.
•Précautions lors de la manipulation de la machine:
1. Les boulons de transport doivent être réinstallés sur la machine
par une personne spécialisée.
2. L'eau accumulée doit être évacuée de la machine.
3. Manipulez la machine avec soin. Ne tenez jamais chaque partie
saillante de la machine pendant le levage. La porte de la machine ne peut
pas être utilisée comme poignée pendant le transport.
4. Cet appareil est lourd. Transportez avec précaution.
•Veuillez ne pas fermer la porte avec des forces excessives. S'il est difficile
de fermer la porte, veuillez vérifier si les vêtements sont bien placés ou bien
distribués.
•Il est interdit de laver les tapis.
[ Utilisation de l'appareil
J
•Avant de laver les vêtements pour la première fois, le produit doit être
utilisé en un tour de toutes les procédures sans les vêtements à
l'intérieur.
•Les solvants inflammables et explosifs ou toxiques sont interdits.
L'essence et l'alcool, etc. ne doivent pas être utilisés comme
détergents. Veuillez sélectionner uniquement les détergents
adaptés au lavage en machine, en particulier pour le tambour.
5

INSTRUCTIONS DE SECURITE
-
•Assurez-vous que toutes les poches sont vides. Les objets pointus et
rigides tels que les pièces de monnaie, les broches, les clous, les vis
ou les pierres, etc. peuvent causer de graves dommages à cette
machine.
•Veuillez vérifier si l'eau à l'intérieur du tambour a été vidangée
avant d'ouvrir sa porte. Veuillez ne pas ouvrir la porte s'il y a de
l'eau visible.
•Faites attention à ne pas brûler lorsque le produit évacue l'eau de
lavage chaude.
•Ne remplissez jamais l'eau à la main pendant le lavage.
•Une fois le programme terminé, veuillez attendre deux minutes pour
ouvrir la porte.
Ce marquage indique que ce produit ne doit pas être éliminé avec
d'autres déchets ménagers dans toute l'UE. Afin de prévenir
d'éventuels dommages à l'environnement ou à la santé humaine
résultant d'une élimination incontrôlée des déchets, recyclez-les de
manière responsable pour promouvoir la réutilisation durable des
ressources matérielles. Pour retourner votre appareil usagé, veuillez
utiliser les systèmes de collecte ou contacter le revendeur où le
produit a été acheté. Ils reviennent et peuvent emporter ce produit
pour un recyclage écologique.
6
Emballage / Ancien appareil


INSTALLATION
■
Installation
Zone d'installation
/! Attention
•
•
La stabilité est importante pour empêcher le produit
d'errer!
Assurez-vous que le produit ne doit pas reposer sur
le cordon d'alimentation.
Avant d'installer la machine, l'emplacement caractérisé
comme suit doit être sélectionné:
1. Surface rigide, sèche et plane
2. Évitez la lumière directe du soleil
3. ventilation suffisante
4. La température ambiante est supérieure à O° C
5. Tenez-vous loin des sources de chaleur telles que le charbon ou le gaz.
Déballer le lave linge
/!
Attention
• Les matériaux d'emballage (par ex. Films, polystyrène)
peuvent être dangereux pour les enfants.
• Il y a risque d'étouffement! Gardez tous les emballages hors
de la portée des enfants.
w
1. Retirez la boîte en carton et l'emballage en polystyrène.
2. Soulevez le lave-linge et retirez l'emballage de base. Assurez-vous que le petit triangle en mousse est
retiré avec celui du bas ensemble. Si ce n'est pas le cas, posez l'appareil avec la surface latérale, puis
retirez manuellement la petite mousse du bas de l'appareil.
3. Retirez le ruban adhésif fixant le cordon d'alimentation et le tuyau de vidange.
4. Retirez le tuyau d'arrivée du tambour.
Retirer les boulons de transport
-/!
Attention
• V ous devez retirer les boulons de transport de l'arrière avant d'utiliser le produit.
•Vous aurez à nouveau besoin des boulons de transport si vous déplacez le produit, alors assurez-vous
de les conserver dans un endroit sûr.
Veuillez suivre les étapes suivantes pour retirer les boulons:
1. Desserrez 4 boulons avec une clé, puis retirez-les.
2. Bouchez les trous avec des bouchons de transport.
3. Conservez correctement les boulons de transport pour une utilisation future.
8

INSTALLATION
Mise à niveau du lave-linge
Attention !
•Les contre-écrous des quatre pieds doivent être vissés fermement contre le boîtier.
1.Vérifiez si les pieds sont étroitement attachés à l'armoire. Sinon, veuillez les tourner vers
leurs positions d'origine resserrent les écrous.
2. desserrez le contre-écrou, tournez les pieds jusqu'à ce qu'il entre en contact étroit avec le sol.
3.Ajustez les pieds et verrouillez-les avec une clé, assurez-vous que la machine est stable.
.l Élever Baisser
Connectez le tuyau d'alimentation en eau
Attention !
• Pour éviter les fuites ou les dégâts d'eau, suivez les instructions de ce chapitre!
• Ne pas plier, écraser, modifier ou sectionner le tuyau d'arrivée d'eau.
• Pour le modèle équipé d'une vanne chaude, connectez-le au robinet d'eau chaude avec un tuyau
d'alimentation en eau chaude. La consommation d'énergie diminuera automatiquement pour certains
programmes.
Connectez le tuyau d'entrée comme indiqué. Il existe deux façons de connecter le tuyau d'entrée. 1.Connexion entre
le robinet ordinaire et le tuyau d'entrée.
Desserrez l'écrou de serrage et Serrez l'écrou de serrage Appuyez sur la bague Connection terminée
les quatre boulons coulissante, insérer le
tuyau d'arrivée dans la
base de raccordement
2.Connexion entre le robinet à vis et le tuyau d'arrivée.
Robinet avec filetage et tuyau d'arrivée Robinet spécial pour machine à laver
9

INSTALLATION
Connectez l'autre extrémité du tuyau d'entrée à la vanne d'entrée à l'arrière du
produit et fixez fermement le tuyau dans le sens des aiguilles d'une montre.
Tuyau de drainage
Attention !
• Ne pliez pas et ne prolongez pas le tuyau de vidange.
• Positionnez correctement le tuyau de vidange, sinon des dommages pourraient résulter d'une fuite
d'eau.
Il existe deux façons de placer l'extrémité du tuyau de vidange:
2. connectez-le au tuyau de vidange de
dérivation de l'auge.
1.Mettez-le dans le bac à eau.
Note!
•Si la machine a un support de tuyau de vidange, veuillez
l'installer comme suit.
Attention !
•Lors de l'installation du tuyau de vidange, fixez-le correctement avec une corde.
•Si le tuyau de vidange est trop long, ne le forcez pas dans la machine à laver car
cela entraînerait des bruits anormaux.
10

UTILISATION
■Quick Start
Danger
• Avant le lavage, veuillez vous assurer qu'il est correctement installé.
• Avant le premier lavage, la machine à laver doit être utilisée en un tour
de toutes les procédures sans vêtements comme suit.
1. Avant le lavage
Brancher Ouvrir le robinet Charger Fermer le hublot
Note!
lessive
adoucissant
Prelavage
Ajouter la lessive
•Le détergent doit être ajouté dans le «cas I» après avoir sélectionné le prélavage
pour les machines avec cette fonction.
2. Lavage
Choisir Programme Choisir fonction ou Lancer
par défaut
Note! ------------------
• Si la valeur par défaut est sélectionnée, l'étape 2 peut être ignorée.
• 2.Le graphique linéaire des boutons de fonction est pour référence uniquement,
veuillez vous référer au produit réel en standard.
3. Après lavage
Le verrou de la porte et les voyants [Start I Pause] clignotent avec un bip sonore ou deux petits
les points clignotent sur l'écran numérique.
11

UTILISATIONS
■Avant chaque lavage
• L'état de fonctionnement de la laveuse doit être de (0-40) 0C. Si utilisé à moins de 0° C, la vanne
d'entrée et le système de vidange peuvent être endommagés. Si la machine est placée dans des
conditions de 0° C ou moins, elle doit être transférée à la température ambiante normale pour s'assurer
que le tuyau d'alimentation en eau et le tuyau de vidange ne sont pas gelés avant utilisation.
• Veuillez vérifier les étiquettes et l'explication de l'utilisation du détergent avant le lavage. Utilisez un
détergent non moussant ou moins moussant adapté au lavage en machine correctement.
Vérifiez l'étiquette
Mettez les petits vêtements
dans une housse d'oreiller.
Attention !
Videz les poches de vos
vêtements
Retournez les tissus à poils
longs et facile à boulocher
Fermez les longs lacets
et les fermetures éclaires.
Séparés les vêtements
selon différentes textures.
• Lors du lavage d'un seul linge, cela peut facilement provoquer une grande excentricité
et donner l'alarme en raison d'un déséquilibre important. Par conséquent, il est suggéré
d'ajouter un ou deux vêtements supplémentaires à laver ensemble afin que l'égouttage
puisse se faire en douceur.
• Ne lavez pas les vêtements en contact avec du kérosène, de l'essence, de l'alcool ou
d'autres matières inflammables.
12


45
H
!
: O
Q
� O
O
ntrga
400rpm
• •
• •
8 &
• •
0000
UTILISATION
■Panneau de configuration
Note!
Le tableau est pour référence seulement, veuillez vous référer au produit réel en standard.
1
Off
Le produit est éteint.
3
Option
Cela vous permet de sélectionner une
fonction supplémentaire et s'allumera
une fois sélectionnée.
2
Start/Pause
Appuyez sur le bouton pour démarrer ou
interrompre le cycle de lavage.
4, Programmes
Disponible selon le type de linge.
Note!
Lorsque le programme est terminé, les voyants Pause / Départ et Verrouillage de la porte clignotent
14

UTILISATION
■Option
Prélavage: La fonction de prélavage peut obtenir un lavage supplémentaire avant le lavage principal.Elle convient au lavage du
la poussière monte à la surface des vêtements; vous devez mettre du détergent dans l'étui (I) lorsque vous le sélectionnez.
Rinçage supplémentaire: Le linge subira un rinçage supplémentaire une fois que vous l'avez sélectionné.
No Spin: Je ne tournerai pas si vous choisissez cette fonction.
Programme Programme
Option
Prélavage Extra Rinçage
0 0
Fini dans 9H
0 0
Fini dans 6H
0 0
Fini dans 3H
Coton 30
°
C
C oton 40
°
C
Coton 60
°
C
Coton 90
°
C
0 0
Lavage Rapide 45'
0 0
Lavage Rapide 30'
0 0
Lavage Rapide 15'
Rotation uniqiement
Lavage Froid
Lavage Froid 20
°
ECO 40-60
0
0
Synthétique
Synthétique 40
°
C
N ettoyage du tambour
Coton Intense 40
°
C
Cotton Intensive 60
°C
Essorage uniquement
R incer&Essorer
Délicat 30
°
C
Délicat
0
0
Optionel
15
0 0
0 0
Option
Prélavage Extra Rinçage

UTILISATIONS
■Autres Fonctions
Couper le buzzer
)
Prewash
l(ltl
Presslsec
Choisissez le programme Appuyez sur le bouton [Prélavage] pendant 3 secondes, le buzzer est
coupé.
Pour activer la fonction buzzer, appuyez à nouveau sur le bouton pendant 3 secondes. Le réglage
sera conservé jusqu'à la prochaine réinitialisation.
Attention !
•Après avoir désactivé la fonction buzzer, les sons ne seront plus activés.
Sécurité enfant
Pour éviter toute mauvaise utilisation par les enfants.
Choisir le
Programme
Danger !
Start
Extra
Rinse
Appuyez sur [Extra Rinse] et [No Spin] pendant
3 secondes. jusqu'au bip sonore.
• Seule une pression prolongée sur les deux boutons peut débloquer le «verrouillage enfant»,
même la mise hors tension, la mise hors tension et la fin du programme, le «verrouillage enfant»
verrouille tous les boutons sauf le bouton d'alimentation et le bouton «verrouillage enfant».
• Veuillez relâcher «Sécurité enfants» avant de sélectionner le programme et de démarrer le
lavage.
Temp.
La température est :Cold,20
°
C,30
°
C, 40
°
C,60
°
C,90
°
C
16

UTILISATIONS
■Programmes
Les programmes sont disponibles en fonction du type de linge.
Programmes
Synthétique
Délicat
Nettoyage
du tambour
Essorage uniquement
Rinçage&Essorage
Vidange seulement
Lavage Rapide 15'
Coton Intense
ECO 40-60
Lavage Froid
Coton
Finis dans
Lavez les articles synthétiques, par exemple: chemises, manteaux,
mélanges.
Lors du lavage des textiles à tricoter, la quantité de détergent doit être
réduite en raison de sa construction en fil lâche et de la formation de
bulles faciles.
Pour les textiles délicats et lavables, par ex. en soie, satin, fibres
synthétiques ou tissus mélangés.
Il applique une stérilisation à haute température à 90 ° C pour rendre le
lavage des vêtements plus vert. Lorsque cette procédure est effectuée, les
vêtements ou autre linge ne peuvent pas être ajoutés. Lorsqu'une quantité
appropriée d'agent de blanchiment au chlore est mise dans le baril, l'effet de
nettoyage sera meilleur.
Le client peut utiliser ce programme régulièrement en fonction des besoins.
Essorage supplémentaire avec vitesse d'essorage sélectionnable.
Rinçage supplémentaire avec essorage.
Égouttez l'eau.
Il convient pour laver rapidement des vêtements peu et pas très sales.
Pour augmenter les effets de lavage, le temps de lavage est augmenté.
Par défaut 40 ° C, non sélectionnable, convient au lavage du linge à
environ 40 ° C-60 ° C.
De l'eau froide pour laver les vêtements.
Textiles résistants, textiles résistants à la chaleur en coton ou en lin.
La fonction peut être réglée avec ce programme, le temps total, y compris le
temps de lavage et le temps de retard, est de 3h, 6h ou 9h.
17


ENTRETIEN
■
Nettoyage et entretien
Attention !
•Avant de commencer la maintenance, veuillez débrancher la machine et
fermer le robinet.
Nettoyage de l'armoire
Un bon entretien du lave-linge peut prolonger sa durée de vie.
La surface peut être nettoyée avec dilué
détergents neutres non abrasifs si nécessaire. S'il y a un
débordement d'eau, utilisez le chiffon humide pour l'essuyer
immédiatement. Aucun objet pointu n'est autorisé.
Note!
•L'acide formique et ses solvants dilués ou équivalents sont interdits,
tels que l'alcool, les solvants ou les produits chimiques, etc.
Nettoyage du tambour
Les rouilles laissées à l'intérieur du tambour par les objets métalliques
doivent être éliminées immédiatement avec des détergents sans chlore.
N'utilisez jamais de laine d'acier.
Note!
•Ne mettez pas de linge dans la machine à laver pendant le nettoyage
du tambour.
Nettoyage du joint de porte et de la vitre
Essuyez le verre et scellez après chaque
lavage
pour enlever les peluches et les taches. Si des
peluches s'accumulent, elles peuvent
provoquer des fuites.
Retirez toutes les pièces, boutons et autres
objets du sceau après chaque lavage.
20

ENTRETIEN
Nettoyage du filtre d'entrée
Note!
•Le filtre d'entrée doit être nettoyé s'il y a moins d'eau.
Lavage du filtre au robinet
1. Fermez le robinet.
2. Retirez le tuyau d'alimentation en eau du
robinet.
3. Nettoyez le filtre.
4. Rebranchez le tuyau d'alimentation en eau.
Lavage du filtre dans la machine à laver:
1. dévisser le tuyau d'entrée par l'arrière
de la machine.
2. sortez le filtre avec une pince à long bec
et réinstallez-le après avoir été lavé.
3.Utilisez la brosse pour nettoyer le filtre.
4.Reconnectez le tuyau d'entrée.
Note!
• Si la brosse n'est pas propre, vous pouvez retirer le filtre lavé séparément;
• Reconnectez-vous, ouvrez le robinet.
Nettoyer le distributeur de détergent
1.Press down the arrow location on softener cover inside the dispenser drawer.
2. Soulevez le clip et retirez le couvercle de l'adoucisseur et lavez toutes les
rainures avec de l'eau.
3. Remettez le couvercle de l'adoucisseur en place et poussez le tiroir en place.
Retirez le distributeur
tiroir avec presse le
A
Note!
Nettoyez l'intérieur du
renfoncement avec une
vieille brosse à dents
Insérez le tiroir
distributeur
N'utilisez pas d'alcool, de solvants ou de produits chimiques pour nettoyer la
machine.
21
Nettoyez le tiroir
distributeur sous l'eau

ENTRETIEN
Nettoyage du filtre de la pompe de vidange
Attention !
•Faites attention à l'eau chaude!
•Laisser refroidir la solution détergente.
•Débranchez la machine pour éviter les chocs électriques avant le lavage.
•Le filtre de la pompe de vidange peut filtrer les fils et les petits corps
étrangers du linge.
•Nettoyez régulièrement le filtre pour garantir le fonctionnement normal
du lave-linge.
Ouvrez le filtre Service Supprimer les
matières étrangères
Danger !
Fermer le capuchon inférieur
• Assurez-vous que le capuchon de valve et le tuyau de vidange d'urgence sont
réinstallés correctement, les plaques de capuchon doivent être insérées en s'alignant sur
les plaques à trous sinon de l'eau pourrait fuir;
• Certaines machines n'ont pas de tuyau de vidange d'urgence, faites pivoter le
couvercle inférieur directement pour faire couler l'eau dans le bassin.
• Lorsque l'appareil est en cours d'utilisation et selon le programme sélectionné, il peut
y avoir de l'eau chaude dans la pompe. Ne retirez jamais le couvercle de la pompe
pendant un cycle de lavage, attendez toujours que l'appareil ait terminé le cycle et soit
vide. Lors du remplacement du couvercle, assurez-vous qu'il est solidement resserré.
22
Ouvrez le filtre en
tournant dans le
sens antihoraire

ENTRETIEN
■Pannes
Le démarrage de l'appareil ne fonctionne pas ou il s'arrête pendant le fonctionnement.
Essayez d'abord de trouver une solution au problème, sinon contactez le centre de service.
Description Cause
La porte n'est pas fermée
correctement
Le lave-linge ne peut
pas démarrer
La porte ne
s'ouvre pas
La protection de sécurité de la
laveuse fonctionne
Solution
Redémarrez après la fermeture de la
porte Vérifiez si les vêtements sont collés
Débranchez l'alimentation,
redémarrez le produit
Fuite d'eau
La connexion entre le tuyau
d'entrée ou le tuyau de sortie
n'est pas étanche
Vérifiez et fixez les conduites d'eau
Nettoyer le tuyau de sortie
Résidus de détergent
dans la boîte
Le détergent est
humidifié ou aggloméré
L'indicateur ou
l'affichage ne
s'allume pas
Débranchez l'alimentation
La carte électronique ou le faisceau
a un problème de connexion
Bruit anormal
Nettoyez et essuyez la boîte
de détergent
Vérifiez si l'alimentation est coupée
et que la fiche d'alimentation est
correctement branchée
Vérifiez si les fixations
(boulons) ont été retirées
Vérifiez qu'il est installé sur
un sol solide et de niveau
Description Causes
La porte n'est pas fermée
correctement
Problème d'injection d'eau lors
du lavage
Vidange de l'eau pendant les
heures supplémentaires
Trop-plein d'eau
Autres
Solution
Redémarrez après la fermeture de la
porte Vérifiez si les vêtements sont collés
Vérifiez si la pression de l'eau est trop bas
Redressez la conduite d'eau
Vérifiez si le filtre de la soupape d'admission
est bloqué
Vérifiez si le tuyau de vidange est bloqué
Redémarrez le lave-linge
Veuillez réessayer d'abord, appelez la
ligne de service s'il y a toujours des
problèmes
Note!
•Après le contrôle, activez l'appareil. Si le problème se reproduit,
contactez le service.
23


ENTRETIEN
Note!
• Réglage du programme pour les tests conformément à la norme applicable
En 60456.
• Lors de l'utilisation des programmes de test, laver la charge spécifiée en
utilisant la vitesse d'essorage maximale.
• Les paramètres réels dépendront de la manière dont l'applicateur est utilisé,
et peuvent être différents des paramètres du tableau mentionné ci-dessus.

CERTIFICACION CE
Se ha determinado que este producto cumple con la Directiva de Baja Tension (2014/35/EU), la Directiva
de Compatibilidad Electromagnetica (2014/30/EU) y la Directiva RoHS (2011/65/EU).
Para más información relacionada con las declaraciones y certificados de conformidad, póngase
con nosotros a través del correo: [email protected]
INFORMACIÓN SOBRE EL PRODUCTO
Si tiene alguna pregunta o duda relacionada con su dispositivo, póngase en contacto con nosotros:
SERVICIO TÉCNICO
También puede ponerse en contacto con nuestro servicio técnico oficial:
tel.:(+34) 958 087 169
e-mail reparaciones: info@infiniton.es
www.infiniton.es
Recuerda que en nuestra web tenemos un apartado de preguntas frecuentes y un formulario de
dudas para resolver cualquier consulta relacionada con tu producto Infiniton.

Síguenos en nuestras
redes sociales y accede a
contenido exclusivo
Resumen de Declaración de conformidad
INFINITON declara, bajo su responsabilidad, que este aparato cumple con lo dispuesto en la
Directiva 99/05/CE del Parlamento Europeo y del Consejo de 9 de Marzo de 1999, traspuesta a
la legislación española mediante el Real Decreto 1890/2000, de 20 de Noviembre.
Para más información relacionada con las declaraciones y ceicados de conformidad,
póngase con nosotros a través del correo info@inniton.es
Copyright ©2022 Todos los derechos reservados

y
SERVICIO TÉCNICO OFICIAL
C/Baza, 349, nave 4
18220 Albolote (Granada)
inniton.es
y
SERVICIO TÉCNICO OFICIAL
C/Baza, 349, nave 4
18220 Albolote (Granada)
inniton.es

WORLD ELERONIC
-
 1
1
-
 2
2
-
 3
3
-
 4
4
-
 5
5
-
 6
6
-
 7
7
-
 8
8
-
 9
9
-
 10
10
-
 11
11
-
 12
12
-
 13
13
-
 14
14
-
 15
15
-
 16
16
-
 17
17
-
 18
18
-
 19
19
-
 20
20
-
 21
21
-
 22
22
-
 23
23
-
 24
24
-
 25
25
-
 26
26
-
 27
27
-
 28
28
-
 29
29
-
 30
30
-
 31
31
-
 32
32
-
 33
33
-
 34
34
-
 35
35
-
 36
36
-
 37
37
-
 38
38
-
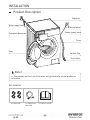 39
39
-
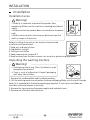 40
40
-
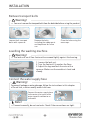 41
41
-
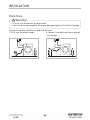 42
42
-
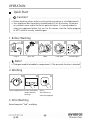 43
43
-
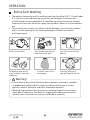 44
44
-
 45
45
-
 46
46
-
 47
47
-
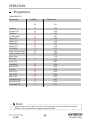 48
48
-
 49
49
-
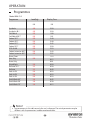 50
50
-
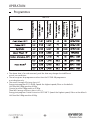 51
51
-
 52
52
-
 53
53
-
 54
54
-
 55
55
-
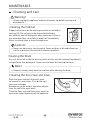 56
56
-
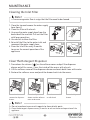 57
57
-
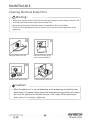 58
58
-
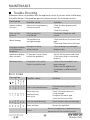 59
59
-
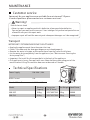 60
60
-
 61
61
-
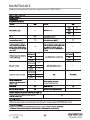 62
62
-
 63
63
-
 64
64
-
 65
65
-
 66
66
-
 67
67
-
 68
68
-
 69
69
-
 70
70
-
 71
71
-
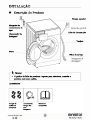 72
72
-
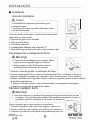 73
73
-
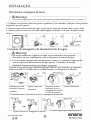 74
74
-
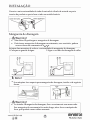 75
75
-
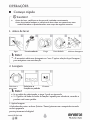 76
76
-
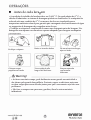 77
77
-
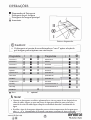 78
78
-
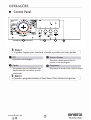 79
79
-
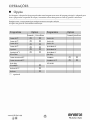 80
80
-
 81
81
-
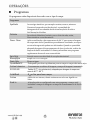 82
82
-
 83
83
-
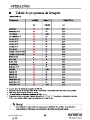 84
84
-
 85
85
-
 86
86
-
 87
87
-
 88
88
-
 89
89
-
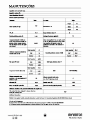 90
90
-
 91
91
-
 92
92
-
 93
93
-
 94
94
-
 95
95
-
 96
96
-
 97
97
-
 98
98
-
 99
99
-
 100
100
-
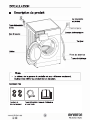 101
101
-
 102
102
-
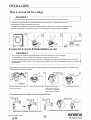 103
103
-
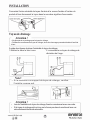 104
104
-
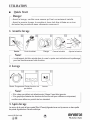 105
105
-
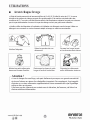 106
106
-
 107
107
-
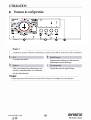 108
108
-
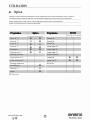 109
109
-
 110
110
-
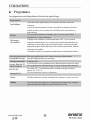 111
111
-
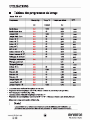 112
112
-
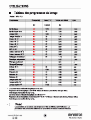 113
113
-
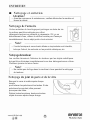 114
114
-
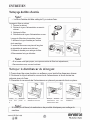 115
115
-
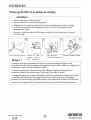 116
116
-
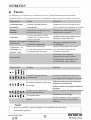 117
117
-
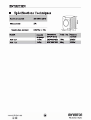 118
118
-
 119
119
-
 120
120
-
 121
121
-
 122
122
-
 123
123
-
 124
124
-
 125
125


Infiniton WM-62P El manual del propietario
- Categoría
- Lavadoras
- Tipo
- El manual del propietario
en otros idiomas
- français: Infiniton WM-62P Le manuel du propriétaire
- English: Infiniton WM-62P Owner's manual
- português: Infiniton WM-62P Manual do proprietário
Artículos relacionados
-
Infiniton WM-841S El manual del propietario
-
-
-
Infiniton WM-D812 El manual del propietario
-
-
-
-
-
-
Otros documentos
-
Becken BWD4348 MAQ LAVAR SECAR ROUPA 6 8 KG El manual del propietario
-
-
-
Küppersbusch W6810.0W Manual de usuario
-
EAS ELECTRIC EMWT752S1 Manual de usuario
-
-
LG WD22VTS6 El manual del propietario
-
LG WM5000HVA El manual del propietario
-
-