Zanussi ZYB591WQ Manual de usuario
- Categoría
- Cocinas
- Tipo
- Manual de usuario
Este manual también es adecuado para

User
manual
Built-in oven
Información
para el usuario
Horno
empotrado
ZYB 591

2 electrolux
2
Thank you for selecting our appliance
We wish you lots of enjoyment with your new appliance and we hope that you will consider our brand
again when purchasing household appliances.
Please read this user manual carefully and keep it throughout the product life cycle as a reference
document. The user manual should be passed on to any future owner of the appliance.

electrolux 3
3
Warnings and Important Safety Information .................................................................................... 4
Description of the appliance ........................................................................................................... 6
Control panel................................................................................................................................ 7
When the oven is first installed ....................................................................................................... 8
Function Symbols ........................................................................................................................ 11
Using the Oven .......................................................................................................................... 12
Programming the Oven............................................................................................................... 18
Safety and Energy Saving Functions .......................................................................................... 20
Baking and Roasting Tables ....................................................................................................... 23
Cleaning and Maintenance ......................................................................................................... 25
If something is wrong .................................................................................................................. 35
Technical Data ............................................................................................................................ 36
Instructions for the Installer .......................................................................................................... 37
Instructions fo Building In ............................................................................................................. 38
Service and spare parts ............................................................................................................. 39
European Warranty .................................................................................................................... 40
Safety instructions
Step by step instructions
Hints and Tips
Guide to using the user instructions
)
Contents
This appliance conforms with the following ECC Directives:
- 2006/95 (Low Voltage Directive);
- 89/336 (EMC Directive);
- 93/68 (General Directive);
and subsequent modifications.
MANUFACTURER:
ELECTROLUX HOME PRODUCTS ITALY S.p.A.
Viale Bologna 298
47100 FORLÌ (Italy)

4 electrolux
4
Warnings and Important Safety Information
Always keep these user instructions with the appliance. Should the appliance be passed on
to third persons or sold, or if you leave this appliance behind when you move house, it is
very important that the new user has access to these user instructions and the accompanying
information.
These warnings are provided for the safety of the users and those living with them. So read
them carefully before connecting and/or using the appliance.
Installation
• The installation must be performed by a
qualified person in accordance with the rules
and regulations in force. The individual op-
erations for installing the appliance are de-
scribed under the instructions for the installer.
• Have the appliance installed and connected
by a qualified person with specialist knowl-
edge, who will carry it out in accordance
with the directives.
• If any modifications to the power supply are
required because of the installation, these
should also be carried out by a qualified
electrician.
Operation
• This oven is designed for cooking foodstuffs;
never use it for other purposes.
• When opening the oven door during or at
the end of cooking be careful of the stream
of hot air, which comes out of the oven.
• Be very careful when using the cooker. The
extreme heat of the heating elements makes
the shelves and other parts very hot.
• If you should for whatever reason use alu-
minium foil to cook food in the oven, never
allow it to come into direct contact with the
floor of the oven.
• When cleaning the oven, proceed with care:
never spray anything onto the grease filter
(if fitted), the heating elements and the ther-
mostat sensor.
• If is dangerous to make modifications of any
kind to this appliance or to its specifications.
• During the baking, roasting and grilling pro-
cess, the oven window and the other parts
of the appliance get hot, so children should
be kept away from the appliance. Take care,
if connecting electrical appliances to sock-
ets near the oven, that cables do not come
into contact with hot rings or get caught in
the oven door.
• Always use oven gloves to take hot oven-
proof dishes or pots out of the oven.
• Regular cleaning prevents the surface ma-
terial from deteriorating.
• Before cleaning the oven, either turn the
power off or pull the mains plug out.
• Make sure that the oven is in the “OFF”
position, when the oven is no longer being
used.
• This oven was made as a single appliance
or as a combination appliance with electri-
cal hotplate, depending on the model, for
single-phase connection to 230 V.
• The appliance must not be cleaned with a
superheated steam cleaner or a steam jet
cleaner.
• Do not use abrasive cleaners or sharp metal
scrapers. These can scratch the glass in the
oven door, which may result in the shattering
of the glass.
English

electrolux 5
5
People Safety
• This appliance is intended for use by adults. It
is dangerous to allow children to use it or play
with it.
• Children should be kept away while the oven
is working. Also, after you have switched the
oven off, it remains hot for a long time.
• This appliance is not intended for use by chil-
dren or other persons whose physical, sen-
sory or mental capabilities or lack of experi-
ence and knowledge prevents them from us-
ing the appliance safely without supervision
or instruction by a responsible person to
ensure that they can use the appliance safely.
Customer Service
• Have checks and/or repairs carried out by
the manufacturer’s service department or by
a service department authorised by the manu-
facturer and use only original spare parts.
• Do not attempt to repair the appliance yourself
in the event of malfunctions or damage. Re-
pairs carried out by untrained persons may
cause damage or injury.
The symbol on the product or its packaging
indicates that this product is not to be treated as
normal household waste. Instead it must be handed
over to a collection point for the recycling of electrical
and electronic equipment. The correct disposal of
this product will help to protect the environment and
human health. Environment and health are
endangered by incorrect disposal. For more detailed
information about recycling of this product, please
contact your local town hall, your household waste
disposal service or the shop where you purchased
the product.

6 electrolux
6
Description of the appliance
1. Control Panel
2. Electronic programmer
3. Air Vents for Cooling Fan
4. Grill
5. Oven light
6. Oven Fan
7. Rating plate
Oven accessories
1
5
4
7
2
3
6
Dripping pan
2 x Anti-tip shelf
Cake tray
Replaceable
telescopic runners

electrolux 7
7
Control panel
Push buttons
1. ON / OFF
2. Oven Function Control
3. Fast Heat Up Function
4. Pyrolytic Function
5. Decreasing Control “ “ (Time or Temperature)
6. Increasing Control “ “ (Time or Temperature)
7. Minute minder / Cooking duration function / End of cooking function
Cooking
function
Time display
Temperature display
NOTE
In the event of a power failure, the programmer
will keep all the settings (time of day, programme
setting or programme in operation) for about 3
minutes. If power fails for a longer time, all the
settings will be cancelled. When the power is
restored, the numbers in the display will flash, and
the clock/timer has to be reset.
All the oven functions are controlled by an
electronic programmer.
You can select any combination of cooking function,
cooking temperature and automatic timing.
1 2 3 4 5 6 7

8 electrolux
8
To set the correct time of day:
a) press button and, while the symbol
is flashing, set the correct time of day by pressing
buttons
“ “
or
“ “ (Fig. 1)
.
The time arrow symbol will disappear about
5 seconds after the correct time is displayed.
b) if the symbol is not flashing anymore,
press button
twice.
Then, proceed as described in point a).
Before first use
The oven should be heated without food.
To do that, proceed as follows:
— press button to switch on the oven.
— press button twice and select the
"Conventional Cooking" function
(Fig. 2).
— set the temperature to 250 °C using the
increasing push button
“ “
.
— Allow the oven to run empty for
approximately 45 minutes.
— open a window for ventilation.
This procedure should be repeated with the
"Fan Cooking" and "Full Grill"
function for approximately 5-10 minutes.
Remove all packaging, both inside and
outside the oven, before using the oven.
When the oven is first connected to the electrical
supply, the display will automatically show 12:00
and the
symbol
will flash.
Ensure the correct time of day is set before using
the oven.
When the oven is first installed
Fig. 1
Fig. 2

electrolux 9
9
During this time, an unpleasant odour
may be emitted. This is absolutely
normal, and is caused by residues of
manufacturing.
Once this operation is carried out, let
the oven cool down, then clean the
oven cavity with a soft cloth soaked in
warm water
to which a little mild washing-
up liquid has been added.
Before cooking for the first time,
carefully wash the shelves and the
baking tray.
To open the oven door, always hold
the handle in the centre (Fig. 5).
Fig.3
"On/Off" Push Button
The oven must be switched on before setting any
cooking function or programme. When button
is pressed, the oven symbol will appear in the
display, and the oven light will switch on (Fig. 4).
To switch off the oven, you can press button at
any time. Any cooking function or programme will
stop, the oven light will switch off and the time display
will show the time of day only.
It is possible to switch off the oven at any time.
How to select a Cooking Function
1) Switch on the oven by pressing the button.
2) Press button to select the required oven
function. Each time button is pressed, a
cooking symbol will
appear in
the display and the
corresponding cooking function number will
appear
to the left of the currently selected cooking function
symbol (Fig. 5).
3) If the pre-set temperature is not suitable, press
button
“ “
or
“ “
to adjust the temperature in 5
degree steps.
- as soon as the oven heats up, the thermometer
symbol rises slowly , indicating the degree to
which the oven is currently heated;
Fig. 5
Fig.4

10 electrolux
10
When the required temperature is reached, an
acoustic alarm will sound for a short time and the
thermometer symbol will illuminate permanently.
How to set the temperature and cooking
time
Press button “ “ and “ “ to increase or decrease
the pre-set temperature while the “°” symbol is
flashing (Fig. 6). The maximum temperature is
250°C.
Press button “ “ and “ “ to increase or decrease
the pre-set cooking time while the symbol is
flashing.
Safety Thermostat
To prevent dangerous overheating (through
incorrect use of the appliance or defective
components), the oven is fitted with a safety
thermostat, which interrupts the power supply. The
oven switches back on again automatically, when
the temperature drops.
Should the safety thermostat trigger due to incorrect
use of the appliance, it is enough to remedy the error
after the oven has cooled down; if on the other hand,
the thermostat triggers because of a defective
component, please contact Customer Service.
The cooling fan
The cooling fan is designed to cool the the oven
and the control panel. The fan switches on
automatically after a few minutes of cooking. Warm
air is blown out through the aperture near the
oven door handle. When the oven is switched off,
the fan may run on after the oven is switched off to
keep the controls cool. This is quite normal.
The action of the cooling fan will depend
on how long the oven has been used and
at what temperature. It may not switch in at
all at lower temperature settings nor run
on where the oven has only been used
for a short time.
Fig. 6

electrolux 11
11
Function Symbols
Fan cooking - This setting allows you
to roast or roast and bake
simultaneously using any shelf, without
flavour transference. Pre-set tempe-
rature: 175 °C
Conventional cooking - The heat
comes from both the top and bottom
element, ensuring even heating inside
the oven. Pre-set temperature: 200 °C
Full Grill - The full grill element will be
on. Recommended for large quantities.
Pre-set temperature: 250 °C
Inner Grill - can be used for grilling
small quantities. Pre-set temperature:
250 °C
Thermal Grilling - This function offers
an alternative method of cooking food
items, normally associated with
conventional grilling. The grill element
and the oven fan operate together,
circulating hot air around the food. Pre-
set temperature: 180 °C
Select a maximum temperature of
200°C.
Pizza Oven - The bottom element
provides direct heat to the base of
pizzas, quiches or pies, while the fan
ensures air is circulated to cook the
pizza toppings or pie fillings.
Pre-set temperature: 175 °C
Bottom heating element - The heat
comes from the bottom of the oven only,
to allow you to finish your dishes. Pre-
set temperature: 250 °C
Top heating element - The heat
comes from the top of the oven only, to
allow you to finish your dishes. Pre-set
temperature: 250 °C
1
2
3
4
5
6
7
8
9
Defrosting – The oven fan operates
without heat and circulates the air, at
room temperature, inside the oven.
This function is particularly suitable for
defrosting delicate food which could
be damaged by heat, e.g. cream filled
gateaux, iced cakes, pastries, bread
and other yeast products.
Pyrolitic Cleaning - This function
allows you to clean thoroughly the
oven cavity.
10

12 electrolux
12
Using the oven
The oven is supplied with an exclusive system
which produces a natural circulation of air and the
constant recycling of steam.
This system makes it possible to cook in a steamy
environment and keep the dishes soft inside and
crusty outside. Moreover, the cooking time and
energy consumption are reduced to a minimum.
During cooking steam may be produced which
can be released when opening the oven door.
This is absolutely normal.
However, always stand back from the oven
when opening the oven door during
cooking or at the end of it to allow any build
up of steam or heat to release.
Attention! - Do not place objects on the
oven base and do not cover any part of
the oven with aluminium foil while cooking,
as this could cause a heat build-up which
would affect the baking results and damage
the oven enamel. Always place pans,
heat-resisting pans and aluminium trays
on the shelf which has been inserted in the
shelf runners.When food is heated, steam
is created, like in a kettle. When the steam
comes into contact with the glass in the
oven door, it condenses and creates water
droplets.
To reduce condensation, always preheat the
empty oven for 10 minutes.
We recommend you wipe the water droplets away
after every cooking process.
Always cook with the oven door
closed. Stand clear when opening the
drop down oven door. Do not allow it to
fall open - support the door using the door
handle, until it is fully open.
4
3
2
1
The oven has four shelf levels.
The shelf positions are counted from the
bottom of the oven as shown in the
diagram.
It is important that these shelves are
correctly positioned as shown in the
diagram.
Do not place cookware directly on the oven
base.

electrolux 13
13
Stop
element
1
2
Place the telescopic runner with the locking system
on the chosen level as shown in the side pictures.
The „stop elements“ at the
extremities of the runner MUST face
upwards.
It is possible to buy telescopic runners separately.
Each level can be fitted with telescopic runners
to allow for an easier operation when inserting or
removing the shelves.
- Pull the right and left hand telescopic shelf
supports completely out, as shown in the
picture.
- Place the shelf or the grill pan on the telescopic
shelf supports, then gently push them all inside
the oven (see the picture).
Do not attempt to close the oven door
if the telescopic shelf supports are
not completely inside the oven. This
could damage the door enamel and
glass.
Telescopic shelf supports and other
accessories get very hot; use oven
gloves or similar.
Make sure that both the telescopic
runners are placed on parallel levels.
Replaceable telescopic runners
°C
°C

14 electrolux
14
Fan cooking
The air inside the oven is heated by the element
around the fan situated behind the back panel.
The fan circulates hot air to maintain an even
temperature inside the oven.
The advantages of cooking with this function
are:
-
Faster Preheating
As the fan oven quickly reaches temperature,
it is not usually necessary to preheat the oven
although you may find that you need to allow
an extra 5-7 minutes on cooking times. For
recipes which require higher temperatures,
best results are achieved if the oven is
preheated first, e.g. bread, pastries, scones,
souffles, etc.
-
Lower Temperatures
Fan oven cooking generally requires lower
temperatures than conventional cooking.
Follow the temperatures recommended in the
cooking chart. Remember to reduce
temperatures by about 20-25 °C for your own
recipes which use conventional cooking.
-
Even Heating for Baking
The fan oven has uniform heating on all shelf
positions. This means that batches of the same
food can be cooked in the oven at the same
time. However, the top shelf may brown
slightly quicker than the lower one.
This is quite usual. There is no mixing of
flavours between dishes.
How to use the fan oven
1. Switch the oven on.
2. Press the Oven Function Control button and
select the “Fan Cooking” function.
Conventional Cooking
- The middle shelf position allows for the best
heat distribution. To increase base browning
simply lower the shelf position. To increase
top browning, raise the shelf position.
- The material and finish of the baking trays
and dishes used will affect base browning.
Enamelware, dark, heavy or non-stick utensils
increase base browning, while oven
glassware, shiny aluminium or polished steel
trays reflect the heat away and give less base
browning.
- Always place dishes centrally on the shelf to
ensure even browning.
- Stand dishes on suitably sized baking trays to
prevent spillage onto the base of the oven
and make cleaning easier.
- Do not place dishes, tins or baking trays
directly on the oven base as it becomes very
hot and damage will occur.When using this
setting, heat comes from both the top and bottom
elements. This allows you to cook on a single
level and is particularly suitable for dishes
which require extra base browning such as
quiches and flans.
Gratins, lasagnes and hotpots which require extra
top browning also cook well in the conventional
oven.
How to use the conventional oven
1. Switch the oven ON.
2. Select the Conventional Oven Function by
pressing the Oven Function control button
until the symbol appears in the display.
Top oven element only
This function is suitable for finishing cooked dishes,
e.g. lasagne, shepherds pie, cauliflower cheese
etc.
Bottom oven element only
This function is particularly useful when blind-
baking pastry. It may also be used to finish off
quiches or flans to ensure the base pastry is cooked
through.

electrolux 15
15
Grilling
- Most foods should be placed on the grid in the
grill pan to allow maximum circulation of air
and to lift the food out of the fats and juices.
Food such as fish, liver and kidneys may be
placed directly on the grill pan, if preferred.
- Food should be thoroughly dried before grilling
to minimise splashing. Brush lean meats and
fish lightly with a little oil or melted butter to
keep them moist during cooking.
- Accompaniments such as tomatoes and
mushrooms may be placed underneath the
grid when grilling meats
- When toasting bread, we suggest that the top
runner position is used.
- The food should be turned over during
cooking, as required.
How to use the Full Grill
1. Switch the oven ON.
2. Select the Full Grill function by pressing the Oven
Function control button until the symbol
appears in the display.
3. If necessary adjust temperature setting using the
“ “ or “ “ buttons.
4. Adjust the grid and grill pan runner position to
allow for different thicknesses of food. Position the
food close to the element for faster cooking and
further away for more gentle cooking.
Preheat the grill on a full setting for a few minutes before
sealing steaks or toasting. Adjust the heat setting and
the shelf as necessary, during cooking.
During cooking, the cooling fan and the thermostat
control light will operate in the same way as described
for the fan oven function.
How to use the Inner Grill Element
The inner grill provides quick direct heat to the
central area of the grill pan. By using the inner grill
element for cooking small quantities, it can help to
save energy.
1. Switch the oven ON.
2. Select the Inner Grill Element by pressing the
Oven Function control button until the symbol
appears on the display.
3. If necessary adjust temperature setting using the
“ “ or “ “ buttons.
4. Adjust the grid and grill pan runner position to allow
for different thicknesses of food and follow the
instructions for grilling.
How to Use the Thermal Grill
Thermal grilling offers an alternative method of
cooking food items normally associated with
conventional grilling. The grill element and the
oven fan operate alternately, circulating hot air
around the food. The need to check and turn the
food is reduced. Thermal grilling helps to minimise
cooking smells in the kitchen.
With the exception of toast and rare steaks, you
can thermally grill all the foods you would normally
cook under a conventional grill. Cooking is more
gentle, therefore food generally takes a little longer
to cook with thermal grilling compared with
conventional grilling. One of the advantages is that
larger quantities can be cooked at the same time.
1. Switch the oven ON.
2. Select the Thermal Grill Oven Function by
pressing the Oven Function control button
until the symbol appears on the
display.
3. If necessary, press “ “ or “ “ buttons. to
adjust the temperature setting.
4. Adjust the grid and grill pan runner position to
allow for different thicknesses of food and
follow the instructions for grilling.
Pizza Oven
The bottom element provides direct heat to the
base of pizzas, quiches or pies, while the fan

16 electrolux
16
ensures air is circulated to cook the pizza toppings
or pie fillings. To obtain the best results use the
lower shelf levels.
1. Switch the oven ON.
2. Select the Pizza Oven Function by pressing
the Oven Function control button until the
symbol appears on the display.
3. If necessary, press “ “ or “ “ buttons to
adjust the temperature setting.
Defrosting
The oven fan operates without heat and circulates
the air, at room temperature, inside the oven. This
increases the speed of defrosting. However,
please note that the temperature of the kitchen will
influence the speed of defrosting. This function is
particularly suitable for defrosting delicate food
which could be damaged by heat, e.g. cream filled
gateaux, iced cakes, pastries, bread and other
yeast products.
How to Use Defrosting
1) Switch the oven on by pressing button .
2) Select the Defrosting Oven Function by pressing
the Oven Function control button until the
symbol appears in the display.
3) The display will show the indication “def”.
Hints and Tips
On baking:
Cakes and pastries usually require a medium
temperature (150°C-200°C) and therefore it is
necessary to preheat the oven for about 10
minutes.
Do not open the oven door before 3/4 of the baking
time has elapsed.
Shortcrust pastry is baked in a springform tin or on
a tray for up to 2/3 of the baking time and then
garnished before being fully baked. This further
baking time depends on the type and amount of
topping or filling. Sponge mixtures must separate
with difficulty from the spoon. The baking time would
be unnecessarily extended by too much liquid.
If two baking trays with pastries or biscuits are
inserted into the oven at the same time, a shelf
level must be left free between the trays.
If two baking trays with pastries or biscuits are
inserted into the oven at the same time, the trays
must be swapped and turned around after about
2/3 of the baking time.
On Roasting:
Do not roast joints smaller than 1 kg. Smaller pieces
could dry out when roasting. Dark meat, which is
to be well done on the outside but remain medium
or rare inside, must be roasted at a higher tem-
perature (200°C-250°C).
White meat, poultry and fish, on the other hand,
require a lower temperature (150°C-175°C). The
ingredients for a sauce or gravy should only be
added to the roasting pan right at the beginning if
the cooking time is short. Otherwise add them in
the last half hour.
You can use a spoon to test whether the meat is
cooked: if it cannot be depressed, it is cooked
through. Roast beef and fillet, which is to remain
pink inside, must be roasted at a higher tempera-
ture in a shorter time.
If cooking meat directly on the oven shelf, insert

electrolux 17
17
the roasting pan in the shelf level below to catch
the juices.
Leave the joint to stand for at least 15 minutes, so
that the meat juices do not run out.
To reduce the build up of smoke in the oven, it is
recommended to pour a little water in the roasting
pan. To prevent condensation forming, add water
several times. The plates can be kept warm in the
oven at minimum temperature until serving.
Caution!
Do not line the oven with aluminium
foil and do not place a roasting pan
or baking tray on the floor, as other-
wise the oven enamel will be dam-
aged by the heat build-up.
Cooking times
Cooking times can vary according to the different
composition, ingredients and amounts of liquid in
the individual dishes.
Note the settings of your first cooking or roasting
experiments to gain experience for later prepara-
tion of the same dishes.
Based upon your own experiences you will be
able to alter the values given in the tables.

18 electrolux
18
Programming the Oven
How to set the minute minder
1) Press button to select the Minute Minder
function. The relevant symbol will flash
and the control panel will display "0.00".
(Fig. 7)
2) Press button “ “ to select the required time.
Maximum time is 23 hours 59 minutes. After it
has been set, the Minute Minder will wait 3
seconds and then start running.
3) When the programmed time has elapsed, an
acoustic alarm will be heard.
4) To switch off the acoustic alarm, press any
button.
The oven will NOT switch off if in use.
The Minute Minder function can also
be used as well when the oven is off.
To use or to change the Minute Minder
setting:
press button until the symbols and flash.
It is now possible to change the Minute Minder
setting by pressing button “ “ or “ “.
To cancel the Minute Minder:
press button until the symbols and flash.
Press button “ “ to decrease the time until "0.00"
is displayed (Fig. 8).
To programme the Oven to switch
off
1) Place food in the oven, switch on the oven,
select a cooking function and adjust the
cooking temperature, if required.
2) Press button to select the "Cooking
Duration" function (Fig. 9). The "Cooking
Duration" symbol will flash and the
control panel will display "0.00". (Fig 9).
Fig. 7
Fig. 8
Fig. 9

electrolux 19
19
3) While the symbol is flashing, press button
“ “ to select the required time. Maximum time
is 23 hours 59 minutes. The programmer will
wait 3 seconds and then start running.
4) When cooking time is over, the oven will be
switched off automatically and an acoustic alarm
will be heard while the control panel will display
"0.00".
5) To switch off the acoustic alarm, press any
button.
To cancel the Cooking Duration Time:
- press button until the symbol will flash.
-
press button “ “ to decrease the time until
"0.00" is displayed (Fig. 10).
To Programme the Oven to Switch On
and Off
1) Carry out the "Cooking Duration" setting as
described in the relevant chapter.
2) Press button until the "End of Cooking"
function is selected and the relevant
symbol flashes. The control panel will display
the end of cooking time (that is, the actual time
+ cooking duration time - Fig. 11).
3) Press button “ “ to select the required end of
cooking time.
4) After this is set, the programmer will wait 3
seconds and then start running.
5) The oven will switch on and off automatically.
The end of cooking will be marked by an
acoustic alarm.
6) To switch off the acoustic alarm, press any
button.
To cancel the programme, simply cancel the
Duration Time.
Fig. 10
Fig. 11

20 electrolux
20
Safety and Energy Saving Functions
Safety Cut-Off Function
The oven will switch off automatically if any
change of setting is made, according to the table
below (Fig. 12).
If temperature setting is: the oven will switch off:
250°C after 3 hours
from 200 up to 245°C after 5,5 hours
from 120 up to 195°C after 8,5 hours
less than 120°C after 12 hours
Residual Heat Function
When a Cooking Duration time is set, the oven will
automatically switch off a few minutes before the end
of the programmed time, and use the residual heat
to finish your dishes without energy consumption. All
current settings will be displayed until the Cooking
Duration time is over.
This function will not operate when the Cooking
Duration time is less than 15 minutes.
Child Safety Function
To avoid children switching on the oven, it is
possible to lock the oven controls.
1) Turn off the oven by pressing button .
2) Press buttons and “ “ at the same time
and keep them pressed for about 3 seconds.
An acoustic signal will be emitted and the
indication ‘SAFE’ will appear on the display
(Fig. 13).
3) The oven is now locked. Neither oven
functions nor temperatures can be selected.
Fig. 12
Fig. 13

electrolux 21
21
To unlock the oven:
Press buttons and “ “ at the same time and
keep them pressed for about 3 seconds. An acoustic
signal will be emitted and the indication ‘SAFE’ will
go off. The oven can now be operated.
"Fast Heat Up" function
After a cooking function has been selected and the
temperature has been adjusted, the cavity will
gradually heat up until the selected temperature is
reached. This will take from 10 to 15 minutes,
depending on selected function and temperature.
If it is necessary to reach the required temperature
in a shorter time, the "Fast Heat Up" Function can
be used.
1) Switch the oven on by pressing button .
2) Set the required cooking function and
temperature as explained in the previous pages.
3) Set the temperature by pressing button
“ “
or
“ “. The temperature will appear on the
display.
4) Press button
B
. The temperature display will
show "FHU" (Fig. 14).
5) press button
and the symbol
“°”
will flash
for approximately 10 seconds. Now it is possible
to select the required temperature by pressing
button
“ “
or
“ “.
6) When the required temperature is reached,
an acoustic alarm will sound for a short time,
and the temperature display will revert to the
set temperature.
This function can be used with any cooking function
or temperature.
Fig. 14

22 electrolux
22
Demo mode
This mode is intended to be used in shops to
demonstrate the oven functionality without any
power consumption except the interior light, the
display and the fan. This function can only be
switched on when the appliance is first connected.
If there is a power failure, when the power supply
is restored again, the Demo function can only be
switched on if in the display 12:00 and the symbol
are flashing automatically.
1.
Press the button for approximately 2
seconds.
An acoustic alarm will sound for a
short time.
2.
Press the
and “ ”buttons at the same
time. A short acoustic alarm will be heard
and the time
12:00
will appear in the display
(Fig. 15)
.
When the oven is switched on
the
symbol
appears in the display.
This means that the Demo
function is activated.
All oven functions can be selected.
The oven is not really working and the heating
elements do not switch on.
Switch off the oven and follow the procedure
described above to switch off the demo mode
again.
The Demo function remains saved in the
programme in the event of a power failure.
Error code
The electronic programmer does a continuous
diagnostic check of the system. If some parameters
are not correct, the control unit will stop the
activated functions and it will show on the display
the corresponding error code (Fig. 16).
For further details, refer to chapter "Something
not working“.
Fig. 15
Fig. 16

electrolux 23
23
Baking and Roasting Table
Conventional Cooking and Fan Cooking
Timings do not include pre-heating.
The empty oven should always be pre-heated for 10 minutes.
(*)
If you cook more than one dish at the same time, we recommend you place them on the levels quoted
between brackets.
CAKES
Whisked recipies 2 170 2 (1and3)* 160 45-60 In cake mould
Shortbread dough 2 170 2 (1and3)* 160 20-30 In cake mould
Butter-milk cheese cake 1 175 2 165 60-80 In cake mould
Apple cake (Apple pie) 1 170 2lef+righ. 160 90-120 In cake mould
Strudel 2 180 2 160 60-80 In baking tray
Jam- tart 2 190 2(1and3)* 180 40-45 In cake mould
Fruit cake 2 170 2 150 60-70 In cake mould
Sponge cake 1 170 2(1and3)* 165 30-40 In cake mould
Christmas cake 1 150 2 150 120-150 In cake mould
Plum cake 1 175 2 160 50-60 In bread tin
Small cake 3 170 2 160 20-35 In baking tray
Biscuits 2 160 2(1and3)* 150 20-30 In baking tray
Meringues 2 135 2(1and3)* 150 60-90 In baking tray
Buns 2 200 2 190 12~20 In baking tray
Pastry: Choux 2 or 3 210 2(1and3)* 170 25-35 In baking tray
Plate tarts 2 180 2 170 45-70 In cake mould
BREAD AND PIZZA
White bread 1 195 2 185 60-70
Rye bread 1 190 1 180 30-45 In bread tin
Bread rolls 2 200 2(1and3)* 175 25-40 In baking tray
Pizza 2 200 2 200 20-30 In baking tray
FLANS
Pasta flan 2 200 2(1and3)* 175 40-50 In mould
Vegetable flan 2 200 2(1and3)* 175 45-60 In mould
Quiches 1 210 1 190 30-40 In mould
Lasagne 2 200 2 200 25-35 In mould
Cannelloni 2 200 2 200 25-35 In mould
MEAT
Beef 2 190 2 175 50-70 On grid
Pork 2 180 2 175 100-130 On grid
Veal 2 190 2 175 90-120 On grid
English roast beef
rare 2 210 2 200 50-60 On grid
medium 2 210 2 200 60-70 On grid
well done 2 210 2 200 70-80 On grid
Shoulder of pork 2 180 2 170 120-150 With rind
Shin of pork 2 180 2 160 100-120 2 pieces
Lamb 2 190 2 175 110-130 Leg
Chicken 2 190 2 200 70-85 Whole
Turkey 2 180 2 160 210-240 Whole
Duck 2 175 2 220 120-150 Whole
Goose 2 175 1 160 150-200 Whole
Rabbit 2 190 2 175 60-80 Cut in pieces
Hare 2 190 2 175 150-200 Cut in pieces
Pheasant 2 190 2 175 90-120 Whole
Meat loaf 2 180 2 170 tot.150 in bread pan
FISH
Trout/Sea bream 2 190 2(1and3)* 175 40-55 3-4 fishes
Tuna fish/Salmon 2 190 2(1and3)* 175 35-60 4-6 fillets
TYPE OF DISH
Conventional Cooking Fan Cooking
temp °C
temp
°C
4
3
2
1
4
3
2
1
Cooking times in
minutes
NOTES

24 electrolux
24
Rolled joints (turkey) 1 1000 3 200 30~40 20~30
Chicken ( cut in two) 2 1000 3 200 25~30 20~30
Chicken legs 6 -- 3 200 15~20 15~18
Quail 4 500 3 200 25~30 20~25
Vegetable gratin -- -- 3 200 20~25 --
St. Jacques shells -- -- 3 200 15~20 --
Mackerel 2-4 -- 3 200 15~20 10~15
Fish slices 4-6 800 3 200 12~15 8~10
Fillet steaks 4 800 3 250 12~15 12~14
Beef-steaks 4 600 3 250 10~12 6~8
Sausages 8 / 3 250 12~15 10~12
Pork chops 4 600 3 250 12~16 12~14
Chicken (cut in two) 2 1000 3 250 30~35 25~30
Kebabs 4 / 3 250 10~15 10~12
Chicken (breast) 4 400 3 250 12~15 12~14
Hamburger* 6 600 2 250 20-30
*
Preheat 5’00'’
Fish (fillets) 4 400 3 250 12~14 10~12
Sandwiches 4~6 / 3 250 5~7 /
Toast 4~6 / 3 250 2~4 2~3
Timings do not include pre-heating.
The empty oven should always be pre-heated for 10 minutes.
Conventional Grilling
Thermal Grilling
Pizza Function
The temperatures quoted are guidelines. The temperatures may have to be adapted to personal
requirements.
1st side
temp.°CPieces g.
Quantity
Cooking time in
minutes
2nd side
Grilling -
4
3
2
1
TYPE OF DISH
1st side
temp.°CPieces g.
Quantity
Cooking time in
minutes
2nd side
Thermal Grilling
4
3
2
1
TYPE OF DISH
temp.°C
Cooking time in
minutes
Pizza Function
4
3
2
1
TYPE OF DISH
NOTES
With Fan Cooking plus set a maximum temperature of 200°C.
Pizza , large 1 200 15~25 on baking tray
Pizza , small 1 200 10~20
on baking tray or on grid
Bread rolls 1 200 15~25 on baking tray

electrolux 25
25
Before cleaning switch the oven off
and let it cool down.
The appliance must not be cleaned
with a superheated steam cleaner or
a steam jet cleaner.
Important: Before carrying out any cleaning
operation, the appliance must be disconnected from
the power supply.
To ensure a long life for your appliance, it is
necessary to perform the following cleaning
operations regularly:
- Only perform when the oven has cooled down.
- Clean the enamelled parts with soapy water.
- Do not use abrasive cleaners.
- Dry the stainless steel parts and glass with a
soft cloth.
- If there are stubborn stains, use commercially
available for stainless steel or warm vinegar.
The oven’s enamel is extremely durable and highly
impermeable. The action of hot fruit acids (from
lemons, plums or similar) can however leave
permanent, dull, rough marks on the surface of the
enamel. However such marks in the brightly
polished surface of the enamel does not affect the
operation of the oven. Clean the oven thoroughly
after every use. This is the easiest way to clean
dirt off. It prevents dirt being burnt on.
Cleaning materials
Before using any cleaning materials on your oven,
check that they are suitable and that their use is
recommended by the manufacturer.
Cleaners that contain bleach should NOT be used
as they may dull the surface finishes. Harsh
abrasives should also be avoided.
Cleaning and Maintenance
External cleaning
Regularly wipe over the control panel, oven door
and door seal using a soft cloth well wrung out in
warm water to which a little liquid detergent has
been added.
To prevent damaging or weakening the door glass
panels avoid the use of the following:
• Household detergent and bleaches
• Impregnated pads unsuitable for non-stick
saucepans
• Steel wool pads
• Chemical oven pads or aerosols
• Rust removers
• Bath/Sink stain removers
Clean the outer and inner door glass using warm
soapy water. Should the inner door glass become
heavily soiled it is recommended that a cleaning
product such as Hob Brite is used. Do not use
paint scrapers to remove soilage.
Oven Cavity
The enamelled base of the oven cavity is best
cleaned whilst the oven is still warm.
Wipe the oven over with a soft cloth soaked in
warm soapy water after each use. From time to
time it will be necessary to do a more thorough
cleaning, using a proprietary oven cleaner.

26 electrolux
26
Oven Shelves and Shelf Supports
To clean the oven shelves, soak in warm soapy water
and remove stubborn marks with a well wetted soap
impregnated pad.
Rinse well and dry with a soft cloth.
The side rails with telescopic pull-out runners can be
completely removed for cleaning.
Proceed as follows:
1. remove the front screw while keeping the shelf
support in position with the other hand;
2. disengage the rear hook and take off the shelf
support;
3. once the cleaning is carried out, refit the shelf
supports following the procedure in reverse.
Please, ensure the retaining nuts are secure when
refitting the shelf support.
It is possible to remove the telescopic runners
only, unlocking the elements as shown on
page 13.
The telescopic runners must not be cleaned
in the dishwasher.
Do not attempt to remove the telescopic
runners until the oven has cooled down.
Do not pull out the telescopic runners to
remove them from the side rails.
Sharp edges could cause injuries.
Attention, the rollers must not be greased.

electrolux 27
27
Pyrolytic cleaning
The oven cavity is coated with a special enamel
resistant to high temperatures.
During the pyrolytic cleaning operation, the tempe-
rature inside the oven can reach about 500 °C thus
burning food residuals.
For your security, during the pyrolytic cleaning
operation, the oven door automatically locks when
the temperature inside the oven approaches about
300 °C.
Upon completion of the cleaning operation,
the oven door will be locked until the oven
cavity has cooled down.
The cooling fan operates during cooking until the
oven has cooled down. After cooking, it is
advisable to remove all the food residues with a
wet sponge.
However, from time to time, it will be necessary to
do a more complete and thorough cleaning, using
the pyrolytic cleaning function. You can select two
different levels of pyrolytic cleaning depending on
how dirty the oven is.
If the oven cavity is not very dirty, we recommend
that you select the pyrolytic 1 function (P I) in the
programmer display.
It is advisable to wipe the oven over with a soft
sponge soaked in warm water after each pyrolytic
cleaning cycle is carried out.
If the oven cavity is very dirty, we advise you to
select the pyrolytic 2 function (P 2) in the programmer
display.
During the pyrolytic cleaning function, it is not
possible to use the oven for 2 hours when selecting
the Pyr 1 function and up to 2 1/2 hours when the
Pyr 2 function is active.
After a significant number of cooking, the
cleaning reminder suggests to activate a
pyrolytic cleaning cycle.
An acoustic signal will be emitted, the
„Pyro“ message will appear in the display
for about 15 seconds, followed by another
acoustic signal.
Select the type of pyrolytic cycle
depending on how dirty the oven is.
The reminder message will be displayed
each time the oven is switched off until a
complete pyrolytic cleaning cycle is
performed.

28 electrolux
28
How to use the pyrolytic cleaning
function
Before activating the pyrolytic cleaning
function, remove any excessive spillage
and make sure that the oven is empty. Do
not leave anything inside it (e.g. pans,
grids, baking tray, dripping pan, etc.) as
this could heavily damage them.
Ensure that the oven door is closed before
activating the pyrolytic cleaning function.
When the pyrolytic cleaning function is on,
it is advisable not to use the hob as this
could cause overheating and damage the
appliance.
During the pyrolytic cleaning cycle the
oven door becomes hot. Children should
be kept away until it has cooled.
Choose this function to clean the oven by pyrolysis.
The following pyro levels are available:
Pyrolytic 1 (P I) time : 2 h = 30 min heat-up +1 h
at 480°C + 30 min cooling down.
Pyrolytic 2 (P 2) time : 2 h 30 min. = 30 min heat-
up +1 h 30 min at 480°C + 30 min cooling down.
The pyro duration time cannot be changed.
To activate the pyrolytic cleaning function proceed
as follows:
1. Press button to switch on the oven. Press
the button as often as necessary, until the
“Pyro“ function symbol (level 1 - P I)
will appear in the display (Fig. 17).
Simultaneously, the symbol and the
“Pyro” writing will flash in the display and an
acoustic signal will be emitted (Fig. 18).
This means that, before activating the pyrolytic
cleaning function, you have to remove all the
oven accessories.
Fig. 17
Fig. 18

electrolux 29
29
2. The Cooking Duration symbol will flash
for 5 seconds; during this time push ' ' or ' '
buttons to select the pyrolytic 1 (P I) or pyrolytic
2 (P 2) function (Fig. 19).
3. Once you have chosen the desired pyrolytic
function, the “Pyro” writing will flash in the
display waiting for confirmation to start the pyro
cleaning function.
4. To confirm which pyrolytic function you desire,
press button . The “Pyro” writing will stop
flashing and the symbol will
disappear, the acoustic signal will stop, the oven
lamp will switch off and the pyrolytic cleaning
cycle starts (Fig. 20).
As soon as the oven heats up, the thermometer
symbol rises slowly , indicating that the
temperature inside the oven is increasing.
Fig. 20
Fig. 19

30 electrolux
30
To programme the pyrolytic cleaning
cycle (delayed start, automatic stop)
If you desire, you can programme the starting and
ending time of the pyrolytic cleaning cycle.
1. Press button to switch on the oven. Press
the button as often as necessary, until the
“Pyro“ function symbol (level 1 - P I)
appears in the display.
Simultaneously the “Pyro” writing and the
symbol will flash in the display and
an acoustic signal will be emitted. This means
that, before activating the pyrolytic cleaning
function, you have to remove all the oven
accessories.
2. The Cooking Duration symbol will flash
for some seconds; during this time push ' '
or ' ' buttons to select the pyrolytic 1 (P I) or
pyrolytic 2 (P 2) function.
3. Once you have chosen the desired pyrolytic
function, “Pyro” will flash in the display waiting
for confirmation to start the pyrolytic cleaning
function.
At this time, push the time function button
(Fig. 22). The "End of Cooking"
symbol and the arrow symbol will
flash. The control panel will display the end
of the cleaning cycle (that is, the actual time +
cooking duration time).
Push ' ' or ' ' buttons to select the required
end of cycle time (Fig. 22). After a few seconds,
the “Pyro” writing and the symbol
will stop flashing, the acoustic signal will stop
while the Cooking Duration symbol will
flash until the pyrolytic cleaning cycle start.
4. After some time, the door lock will be activated
and the related symbol will be displayed.
At the end of the pyrolytic cleaning process, the
display shows the time of day. The oven door is
locked.
Once the oven has cooled down, an acoustic signal
will be emitted and the door will unlock.
To stop the pyrolytic cleaning cycle at any time,
press button .
Fig. 21
Fig. 22

electrolux 31
31
Fig. 23
Fig. 24
Fig. 25
Cleaning the oven door
The oven door is made up of four glasses.
It is possible to remove them for easier cleaning.
Warning - The oven door may bang shut
if you try to extract the inner glasses when
the oven door is still fitted to the oven.
Before cleaning the oven door, we recommend
you to remove it from the oven.
Proceed as follows:
1. open the oven door completely and locate the
two hinges which link the door to the oven (Fig.
23).
2. Unlock and turn the small levers located on the
two hinges (Fig. 24).
3. Handle the door by its left- and right-hand
sides, then slowly turn it towards the oven until
it is half-closed; at this point, gently pull the oven
door away from the oven frame
(Fig. 25).
)

32 electrolux
32
Fig. 29
Fig. 27
Fig. 28
Fig. 26
4. Place the oven door on a solid surface, being
careful to avoid the glass becoming scratched.
Then remove the two screws located on the
sides of the oven door (Fig. 26).
5. Extract the inner glass support (Fig. 27).
6. Before extracting the inner glasses, remove
the rubber distance holder as shown in the
picture (Fig. 28).
7. Gently extract the three inner glasses, starting
with the uppermost one first (Fig. 29).
Clean the oven door glass with warm water and a
soft cloth only. Never use harsh abrasives as they
could damage the special heat-resistant surface of
the inner glasses.
8. Once the cleaning is carried out, refit the oven
door, following the procedure in reverse (Fig.
30).
The two glasses in the middle are special
glasses that have been treated to resist heat.
They are marked with a small dot located on
a corner and a black frame respectively.
It is important that, when refitting the oven
door, the inner glasses are fixed in the right
position (Fig.30).
9. To check if this operation has been carried out
correctly, when inserting the glass, make sure
that the surface of the glass marked with a
black frame looks upwards and that the dot is
located on the upper left corner of the glass
(see Fig. 31).

electrolux 33
33
Fig. 30
Fig. 32
Fig. 33
Fig. 34
Fig. 31
DO NOT clean the oven door while
the glass panels are warm. If this
precaution is not observed the glass
panels may shatter.
If the door glass panels become
chipped or have deep scratches, the
glasses will be weakened and must
be replaced to prevent the possibility
of the panel shattering. Contact your
local Service Force Centre who will
be pleased to advise further.
10. As soon as the inner glasses are inserted in
the oven door, fix the rubber distance holder
(see Fig. 32).
11. Insert the inner glass support (Fig. 33).
12. Fix the two screws located on the sides of the
oven door (Fig. 34).

34 electrolux
34
Replacing The Oven Light
Disconnect the appliance
If the oven bulb needs replacing, it must comply
with the following specifications:
- Electric power: 40 W,
- Electric rate: 230 V (50 Hz),
- Resistant to temperatures of 300°C,
- Connection type: E14.
These bulbs are available from your local Service
Force Centre.
To replace the faulty bulb:
1. Ensure the oven is isolated from the electrical
supply.
2. Push in and turn the glass cover anticlockwise.
3. Remove the faulty bulb and replace with the
new one.
4. Refit the glass cover and restore the electrical
supply.

electrolux 35
35
If the appliance is not working correctly, please check the following before contacting the Electrolux
Service Centre:
If something is wrong
SOLUTION
Press the
control
, then select a cooking
function.
or
Has the fuse in the domestic electrical installation
been tripped?
or
Is the child safety device or the automatic On/Off cut-
off function switched on?
or
Was the Demo function accidentally activated?
or
Check whether the appliance is correctly connected
and the socket switch or the mains supply to the oven
is ON.
Set the oven function dial to a function.
or
Buy a new oven light bulb; if necessary, order from
the Electrolux Service Centre and install according
to the instructions in these User Instructions.
Following the advice contained in these instructions,
especially the section “Using the Oven“.
When the cooking process is completed, do not
leave the dishes standing in the oven for longer than
15-20 minutes.
Please take note of the error code and pass to our
nearest Customer Service office.
PROBLEM
The oven is not switching on.
The oven light does not come on.
It takes too long to cook the dishes or
they cook too quickly.
Steam and condensation settle on the
food and in the oven cavity.
The error code “F.. appears in the
display “.

36 electrolux
36
Technical Data
Heating element ratings
Bottom oven element 1000 W
Top heating element 800 W
Full oven (Top+Bottom) 1800 W
Grill 1650 W
Full grill 2450 W
Thermal grill 1680 W
Fan Cooking heating 2000 W
Pizza function 2000 W
Pyro cleaning function 2450 W
Oven light 40 W
Hot air fan motor 25 W
Cooling fan motor 25 W
Total rating 2515 W
Operating voltage (50 Hz)
230 V
Appliance class
3
Dimensions of the recess
Height under top mm 593
in column mm 580
Width mm 560
Depth mm 550
Oven
Height mm 335
Width mm 395
Depth mm 400
Oven capacity 53 l

electrolux 37
37
Instructions for the Installer
Installation and connection must be
done in compliance with the
regulations in force. Any
interventions must be carried out
when the appliance is switched off.
Only accredited engineers may work
on the appliance.
The manufacturer disclaims any
liability if the safety measures are not
observed.
Connecting to the electrical supply
Before connecting to the electrical supply,
please make sure:
- The fuse and the domestic electrical installa-
tion must be designed for the max. load of the
appliance (see rating plate).
- The domestic electrical installation must be
equipped with a proper earth connection in
accordance with the regulations in force.
- The socket or the multi-pole off switch must be
easy to access after the appliance has been
installed.
This appliance is delivered with an electric
supply cable.
A proper plug, according to the electric load
specified on the rating plate, must be fitted to the
cable. The plug is to be inserted into a suitable wall
socket. If you require a direct connection to the
electric network (mains), it will be necessary to fit
between the appliance and the mains an omnipole
switch, with a minimum gap between contacts of 3
mm, suitable for the required load and in
compliance with rules in force. The green & yellow
ground wire must not be interrupted by the switch
and it should be 2-3 cm. longer than the other
cables.
The mains cable and plug as supplied are to
be connected to a shockproof socket (230 V~, 50
Hz). The shockproof socket must be installed in
accordance with the regulations.
The following types of mains cable are
suitable, taking the necessary rated cross section
into account: H07 RN-F, H05 RN-F, H05 RR-F,
H05 VV-F, H05 V2V2-F (T90), H05 BB-F.
The connection cable must in any case be laid
out so that at no point does it reach 50°C (over
room temperature).
After the connection has been carried out, the
heating elements must be tested by being
operated for about 3 minutes.
Terminal block
The oven is fitted with an easily accessible terminal
block which is designed to operate with a single-
phase power supply of 230 V.
Letter L - Live terminal
Letter N- Neutral terminal
or E - Earth terminal

38 electrolux
38
Instructions for Building In
For problem-free functioning of the built-in
appliance, the kitchen unit or the recess into which
the appliance is built must have suitable
dimensions.
In accordance with the regulations in force, all parts
which ensure the shock protection of live and
insulated parts must be fastened in such a way that
they cannot be undone without tools.
These also include the fixing of any end walls at
the beginning or end of a line of built-in units.
The shock protection must in any case be ensured
by the building in of the appliance.
The appliance can be placed with its back or a
side wall against higher kitchen units, appliances
or walls. However, only other appliances or units
of the same height as the appliance can be placed
against the other side wall.
Oven dimensions (Fig. A)
Instructions for Building In
For problem-free functioning of the built-in
appliance, the kitchen unit or the recess into which
the appliance is built must have suitable
dimensions (Fig. B-C).
Securing the Appliance to the Cabinet
- Open the oven door;
- fasten the oven to the cabinet placing the four
distance holders provided with the appliance
(Fig.D - A) which fit exactly into the holes in the
frame and then fit four wood screws (Fig. D -
B).
When installing a hob over the oven, the hob
electrical connection and the oven one have
to be carried out separately for security
reasons and to let the oven be taken off the
cabinet easier, if necessary. Any extensions
must be made with cables suitable for the
required power.
Fig. D
Fig. A
Fig. B
550 M
IN
593
560 - 570
80÷100
Fig. C

electrolux 39
39
If after the checks listed in the chapter "If something
is wrong", the appliance still does not work
correctly, contact your local Service Centre,
specifying the type of malfunctioning, the appliance
model (Mod.), the product number (Prod. No.)
and the serial number (Ser. No.) marked on the
identification plate. This plate is placed on the front
external edge of the oven cavity.
Original spare parts, certified by the product
manufacturer and carrying this symbol, are only
available at our Service Centre and authorized
spare parts shops.
Service and spare parts

40 electrolux
40
European Guarantee
This appliance is guaranteed by Electrolux in each of the countries listed at the back of this user
manual, for the period specified in the appliance guarantee or otherwise by law. If you move from
one of these countries to another of the countries listed below the appliance guarantee will move
with you subject to the following qualifications:-
••
••
• The appliance guarantee starts from the date you first purchased the appliance which will be
evidenced by production of a valid purchase document issued by the seller of the appliance.
••
••
• The appliance guarantee is for the same period and to the same extent for labour and parts as
exists in your new country of residence for this particular model or range of appliances.
••
••
• The appliance guarantee is personal to the original purchaser of the appliance and cannot be
transferred to another user.
••
••
• The appliance is installed and used in accordance with instructions issued by Electrolux and is
only used within the home, i.e. is not used for commercial purposes.
••
••
• The appliance is installed in accordance with all relevant regulations in force within your new
country of residence.
The provisions of this European Guarantee do not affect any of the rights granted to you by law.

electrolux 41
41

42 electrolux
42

electrolux 43
43

electrolux
44
Gracias por elegir nuestro electrodoméstico
Esperamos que disfrute con él y que vuelva a tener en cuenta nuestra marca al adquirir nuevos
aparatos para el hogar.
Lea atentamente este manual de instrucciones y manténgalo como documento de referencia
mientras conserve el aparato. El manual de instrucciones debe transferirse al nuevo usuario en
caso de que el aparato cambie de propietario.

electrolux
45
Instrucciones de seguridad
Instrucciones detalladas
Consejos y sugerencias
Guía para las instrucciones de uso
)
Índice
Este aparato es conforme con las siguientes directivas CEE:
- 2006/95 (directiva de baja tensión);
- 89/336 (directiva de compatibilidad electromagnética);
- 93/68 (directiva general); y subsecuentes modificaciones.
Advertencias e información importante sobre seguridad .............................................................. 46
Descripción del aparato ............................................................................................................... 48
El panel de controles .................................................................................................................. 49
Después de la instalación ........................................................................................................... 50
Primera puesta en funcionamiento............................................................................................... 50
Cómo encender y apagar el horno............................................................................................. 51
Funciónes de cocción ................................................................................................................. 53
Cómo programar el Horno .........................................................................................................54
Funciones especiales ................................................................................................................. 57
Uso del horno ............................................................................................................................ 61
Consejos y sugerencias ............................................................................................................. 63
Tablas de cocción....................................................................................................................... 65
Cuidado y limpieza ..................................................................................................................... 67
Limpieza pirolítica ........................................................................................................................ 69
Limpieza de la puerta del horno .................................................................................................. 74
Ante la aparición de un problema................................................................................................78
Datos técnicos ............................................................................................................................ 79
Instrucciones para el instalador ................................................................................................... 80
Instrucciones para el empotrado ................................................................................................. 81
Garantía/Servicio técnico ............................................................................................................ 82
Garantía europea ....................................................................................................................... 83
FABRICANTE:
ELECTROLUX HOME PRODUCTS ITALY S.p.A.
Viale Bologna 298
47100 FORLÌ (Italia)

electrolux
46
Advertencias e información importante sobre seguridad
Guarde siempre estas instrucciones de uso con el aparato. Si el aparato se vende o transfiere
a terceros, o si lo deja en su antigua vivienda al mudarse, es muy importante que el nuevo
usuario disponga de estas instrucciones de uso y de la información adjunta.
Estas advertencias se suministran para la seguridad del usuario y de las personas que le
rodean. Por tanto, debe leerlas atentamente antes de conectar y/o usar el aparato.
Instalación
• La instalación debe realizarla personal
competente de acuerdo con la normativa
vigente. Las diferentes tareas de instala-
ción se describen en las instrucciones
para el instalador.
• Encomiende la instalación y la conexión
a un profesional que las realice de acuer-
do con las directivas correspondientes.
• Dado el caso, también se deben enco-
mendar a un profesional las modificacio-
nes que sea necesario realizar en el su-
ministro eléctrico a consecuencia de la
instalación.
Funcionamiento
• Este horno ha sido diseñado para cocinar
alimentos; no lo utilice nunca para otros
fines.
• Al abrir la puerta del horno, durante la coc-
ción o al final de ella, tenga cuidado con la
corriente de aire caliente que sale del hor-
no.
• Proceda con la máxima precaución duran-
te la utilización del horno. Las bandejas y
otras piezas se calientan mucho debido
al intenso calor de los elementos térmi-
cos.
• Si, por el motivo que sea, desea utilizar
papel de aluminio para cocinar alimentos
en el horno, no deje nunca que entre en
contacto directo con la base del horno.
• Para limpiar el horno, proceda con sumo
cuidado: no rocíe nunca el filtro de grasa
(si está instalado), los elementos térmi-
cos ni el sensor del termostato.
• Es peligroso realizar modificaciones de
cualquier tipo en el aparato o sus especi-
ficaciones.
• Durante el proceso de horneado, asado y
gratinado, la ventana del horno y las de-
más partes del aparato se calientan, por
lo que debe mantener alejados a los ni-
ños. Si conecta aparatos eléctricos a to-
mas cercanas al horno, debe comprobar
que los cables no entren en contacto con
zonas de cocción calientes ni queden
atascados en la puerta del horno.
• Utilice siempre guantes adecuados para
retirar fuentes o cazuelas refractarias ca-
lientes del horno.
• Una limpieza periódica evita el deterioro
del material de la superficie.
• Antes de limpiar el horno, desconecte la
corriente o desenchufe el aparato de la
red.
• Asegúrese de dejar el horno apagado al
terminar de utilizarlo.
• Este horno se ha fabricado como aparato
individual o combinado con placa eléctri-
ca, según la versión correspondiente, para
su conexión a un suministro eléctrico
monofásico de 230 V.
Español

electrolux
47
• El aparato no se debe limpiar con vapor
caliente ni chorro de vapor.
• No utilice productos abrasivos ni rascadores
de metal afilados. Podrían deteriorar el cristal
de la puerta y provocar su ruptura.
Seguridad de los niños
• Este aparato se ha diseñado para ser utiliza-
do por personas adultas. Es peligroso dejar
que los niños lo manejen o jueguen con él.
• Mantenga alejados a los niños mientras el
horno se encuentre en funcionamiento. La
puerta permanece caliente durante bastante
tiempo una vez desconectado el horno.
• Este aparato no se ha diseñado para que lo
utilicen niños ni otras personas cuya capaci-
dad física, sensorial o mental, o su falta de
experiencia y conocimientos, les impidan
utilizarlo de forma segura sin supervisión o
sin las instrucciones de una persona respon-
sable que les permitan utilizarlo sin riesgos.
Servicio técnico
• Encomiende los trabajos de comprobación y/
o las reparaciones al servicio técnico del
fabricante o a un servicio técnico autorizado
por el fabricante y utilice sólo repuestos origi-
nales.
• No intente reparar por su cuenta el aparato si
se producen desperfectos o daños. Las
reparaciones realizadas por personas inex-
pertas pueden causar daños o lesiones.
El símbolo que aparece en el producto o en
su embalaje indica que este producto no puede
tratarse como residuo doméstico. Por lo tanto,
debe depositarse en el punto de recogida indica-
do para el reciclado de productos eléctricos y
electrónicos. Al asegurarse de que este produc-
to se desecha correctamente, contribuye a pro-
teger el medio ambiente y la salud pública. Si
este producto no se desecha de forma adecua-
da, se ponen en peligro el medio ambiente y la
salud. Si desea más información sobre el reciclaje
de este producto, solicítela a las autoridades
municipales, al servicio de eliminación de dese-
chos domésticos o al comercio donde lo adqui-
rió.

electrolux
48
Descripción del aparato
1. Panel de mandos
2. Programador electrónico
3. Aberturas de ventilación para el ventilador de
refrigeración
4. Gratinador
5. Luz del horno
6. Ventilador del horno
7. Placa de datos técnicos
Accesorios del horno
Bandeja para hornear
Bandeja colectora
11
11
1
55
55
5
44
44
4
77
77
7
33
33
3
66
66
6
Estante
Carriles
telescópicos
reemplazables
22
22
2

electrolux
49
El panel de controles
ATENCIÓN
Si se interrumpe la alimentación
eléctrica, el programador conserva
los datos en la memoria durante 3
minutos. Si la alimentación no se
restablece en ese lapso, es necesario
volver a programarlos.
Las funciones de cocción son controladas por un
programador electrónico.
Es posible seleccionar cualquier función,
temperatura y duración de cocción.
Fig. 1
12 34 567
Teclas de control
1. Interruptor ENCENDIDO / APAGADO
2. Tecla para seleccionar las funciones de
cocción
3. Tecla para seleccionar la función de
calentamiento rápido
4. Limpieza pirolítica
5. Tecla "atrás"
6. Tecla "adelante"
7. Programación del cuentaminutos, de la
duración y de la hora en la que termina
el ciclo de cocción
FUNCIONES
DE COCCIÓN
RELOJ
TEMPERATURA

electrolux
50
Fig. 3
Fig. 2
Después de la instalación
Cuando el horno se conecta por primera vez a la
red eléctrica, en el display aparecen las cifras
“12.00” y el símbolo parpadea.
Para utilizar el horno es necesario programar la
hora actual.
Para programar la hora actual
1. Pulsar la tecla ; mientras el símbolo
parpadea (Fig. 2), hay que establecer la hora
con las teclas " " o " ". El símbolo
desaparece a los 5 segundos.
2. Si el símbolo deja de parpadear, hay que
pulsar dos veces la tecla .
Proceder como se indica en el punto 1.
Es posible programar la hora actual
sólo cuando el horno está apagado.
Primera puesta en funcionamiento
Quite todos los materiales del embalaje,
dentro y fuera el horno, antes de utilizarlo.
Será posible utilizar el horno sólo si la
hora actual se ha programada.
Antes el primer uso, el horno se debe
calentar vacío.
En los primeros minutos de funcionamiento
ES NORMAL que el horno emita humo y
mal olor. Esto se debe al calentamiento
del aislamiento térmico y de los residuos
de comida.
1. Encender el horno pulsando la tecla .
2. Pulsar dos veces la tecla y seleccionar la
función "Cocción tradicional" (Fig. 3).
3. Con la tecla " " regular la temperatura en
250°C.

electrolux
51
4. Hacer funcionar el horno VACÍO 45 minutos.
También es posible programar un ciclo de esa
duración.
5. Airear el ambiente durante toda la operación.
Se aconseja repetir el procedimiento con las
funciones "Cocción ventilada" y "Grill
doble" durante 5-10 minutos.
Tras 45 minutos hay que dejar enfriar el
horno y limpiar el interior con agua caliente
y un detergente suave.
Antes del primer ciclo de cocción hay que
lavar cuidadosamente la REJILLA y la
GRASERA (bandeja de metal esmaltada
con bordes altos que se encuentra dentro
del horno).
Para abrir la puerta, coja la manilla
siempre en la parte central (Fig. 4).
Fig. 4
Cómo encender y apagar el horno
Fig. 5
Es necesario encender el horno antes de
seleccionar una función o un programa de cocción.
Pulsar la tecla . En el display aparece el
símbolo del horno, y la luz del horno se enciende
(Fig. 5).
Es posible apagar el horno en cualquier
momento.
Para apagar el horno hay que pulsar la tecla
: todas las funciones o programas de cocción
se interrumpen, la luz del horno se apaga y el
display visualiza la hora actual.

electrolux
52
Fig. 6
Cómo seleccionar una función de
cocción
1. Encender el horno pulsando la tecla .
2. Pulsar la tecla para seleccionar una función.
Se enciende el símbolo de la función que está
activa en ese momento. Al lado del símbolo de
la función seleccionada aparece el número de
la misma (Fig. 6).
3. El display visualiza la temperatura programada
para cada una de las funciones de cocción.
Para modificar la temperatura hay que pulsar
las teclas " " y " ".
La temperatura se regula de cinco en cinco
grados. El símbolo del termómetro " " indica
el nivel de temperatura del horno;
Cuando la temperatura del horno alcanza el valor
programado, el programador emite una breve
señal acústica y el símbolo del termómetro " "
deja de parpadear.
Fig. 7
Cómo modificar la temperatura y el
tiempo de cocción
1. Utilizar las teclas " " o " " para modificar la
temperatura programada mientras el símbolo
“°” parpadea (Fig. 7).
2. Utilizar las teclas " " o " " para modificar el
tiempo y la duración del ciclo de cocción
mientras el símbolo parpadea.

electrolux
53
6
5
10
9
8
7
4
3
2
1
Cocción ventilada - El calor se
distribuye de manera uniforme
gracias a la acción del ventilador.
La temperatura preestablecida es
175°C.
Cocción tradicional - El calor
llega de arriba y de abajo. La
temperatura preestablecida es
200°C.
Grill doble - El horno emite calor
intenso sólo desde arriba. La
temperatura preestablecida es
250°C.
Grill - El horno emite calor sólo
desde arriba. La temperatura
preestablecida es 250°C.
Grill ventilado - El calor llega sólo
desde arriba y es distribuido por el
ventilador. La temperatura
preestablecida es 180°C.
Durante la cocción al grill
ventilado, nunca fije una tem-
peratura superior a 200°C.
Cocción pizza - La acción
combinada del calor de abajo y el
aire caliente distribuido por el
ventilador cocina pizzas y tortas
saladas de manera uniforme. La
temperatura preestablecida es
175°C.
Los siguientes símbolos indican las funciones de cocción disponibles.
Funciónes de cocción
Cocción inferior - El horno emite
calor moderado sólo desde abajo.
La temperatura preestablecida es
250°C.
Cocción superior - El horno emite
calor moderado sólo desde arriba.
La temperatura preestablecida es
250°C.
Descongelación - El ventilador
hace circular aire frío para acelerar
la descongelación de alimentos
ultracongelados.
Pirólisis - En este proceso se
queman restos de suciedad en el
horno que se peuden eliminar con
un trapo una vez que el horno esté
enfriado. El horno se calienta a
aprox. 500°C.

electrolux
54
Fig. 8
Fig. 9
Cómo programar el Horno
Cómo utilizar el cuentaminutos
1. Pulsar la tecla para activar la función
"Cuentaminutos" (Fig. 8). El símbolo
empieza a parpadear y en el display
aparecen las cifras "0.00"
2. Programar el tiempo con la tecla " ". El
tiempo máximo que se puede programar es
23 horas 59 minutos.
3. Una vez programado, el cuentaminutos
espera 3 segundos antes de empezar a
funcionar.
4. Finalizado el tiempo, se dispara una señal
acústica que se puede interrumpir pulsando
cualquier tecla.
ATENCIÓN: el cuentaminutos NO
apaga automáticamente el horno.
Para acceder o modificar la
programación del cuentaminutos:
Pulsar repetidas veces la tecla , hasta que el
símbolo y el símbolo empiece a parpadear.
En este momento, es posible modificar la
programación del cuentaminutos usando las
teclas " " o " ".
Para borrar la programación del
cuentaminutos:
Pulsar repetidas veces la tecla , hasta que el
símbolo y el símbolo empiece a parpadear.
Pulsar la tecla " " hasta que el display visualice
las cifras "0.00" (Fig. 9).

electrolux
55
Fig. 10
Cómo programar el apagado del
horno
1. Colocar la comida en el horno y seleccionar
la función de cocción y la temperatura.
2. Pulsar la tecla para activar la función
"Tiempo de cocción" (Fig. 10). El símbolo
"Tiempo de cocción" parpadea y el
display visualiza las cifras "0.00"
3. Mientras el símbolo parpadea hay que
programar el tiempo con la tecla " ". El
tiempo máximo que se puede programar es
23 horas 59 minutos.
4. Una vez establecido el tiempo, el
programador espera 3 segundos antes de
empezar a funcionar.
5. Finalizado el tiempo, se apaga el horno y se
dispara una señal acústica. En el display
aparecen las cifras "0.00".
6. La señal acústica se puede interrumpir pul-
sando cualquier tecla.
Para borrar el tiempo de cocción:
— Pulsar la tecla hasta que el símbolo
empiece a parpadear.
— Pulsar la tecla " " hasta que el display
visualice las cifras "0.00" (Fig. 11).
Fig. 11

electrolux
56
Fig. 12
Cómo programar el encendido y el
apagado del horno
1. Programar el “Tiempo de cocción” como se
indica en la página anterior.
2. Pulsar la tecla y seleccionar la función
“Duración de la cocción”, cuyo símbolo
empezará a parpadear. En el display aparece
la hora en que termina el ciclo de cocción (es
decir, la hora actual más el tiempo de cocción
programado - Fig. 12).
3. Regular la hora del fin de la cocción con la tecla
" ".
4. Una vez establecido el tiempo, el
programador espera 3 segundos antes de
empezar a funcionar.
5. El horno se enciende y se apaga
automáticamente, e indica el fin de la cocción
con una señal acústica, que se puede
interrumpir pulsando cualquier tecla.
Para borrar el tiempo de cocción hay que
seguir las instrucciones de la página ante-
rior.

electrolux
57
Fig. 13
Fig. 14
Funciones especiales
Apagado automático
Si el usuario olvida apagar el horno, éste se
apaga automáticamente después de un tiempo
que varía de acuerdo con la temperatura
programada (Fig. 13).
Si la temperatura es: el horno se apaga
después de:
250° 3 horas
200 a 245° 5,5 horas
120 a 195° 8,5 horas
menos de 120° 12 horas
Bloqueo de seguridad para niños
Es posible bloquear los mandos del horno para
impedir que los niños jueguen con el mismo.
1. Apagar el horno con la tecla .
2. Mantener pulsadas las teclas y " " 3
segundos.Se oirá una breve señal acústica y
en el display aparecerá el mensaje 'SAFE'
(Fig. 14).
3. El horno está protegido. No es posible
seleccionar ninguna función de cocción.
Para quitar el bloqueo de seguridad:
Mantener pulsadas las teclas y " " 3
segundos. Se oirá una breve señal acústica,
desaparecerá el mensaje ‘SAFE’ y será posible
volver a utilizar el horno.

electrolux
58
Calentamiento rápido
Una vez seleccionadas la función y la temperatura
de cocción, el horno empieza a calentarse.
El calentamiento dura de 10 a 15 minutos, según
la función de cocción y la temperatura.
Si se desea alcanzar la temperatura programada
en menos tiempo, se puede utilizar la función
‘Calentamiento rápido’.
1. encender el horno pulsando la tecla ;
2. seleccionar la función de cocción como se
indica en las páginas anteriores;
3. seleccionar la temperatura con las teclas " "
y " ". El valor de la temperatura parpadea
en el display;
4. pulsar la tecla . Aparece el mensaje
"FHU" (Fig. 15).
5. pulsar la tecla ; el símbolo de la
temperatura “°” parpadea unos 10 segundos,
durante los cuales es posible volver a
modificar la temperatura con las teclas " " y
" ".
6. cuando el horno alcanza la temperatura
seleccionada, el programador emite una
breve señal acústica y el display visualiza el
valor de la temperatura.
Esta función se puede utilizar con cualquier función
y temperatura de cocción.
Aprovechamiento del calor residual
Si se programa el apagado automático, el horno
se apaga con algunos minutos de anticipación
para ahorrar energía. Como la cocción se
completa con el calor residual, se ahorra energía.
El display permanece encendido hasta que
termina el tiempo de cocción programado.
Esta función especial no se activa si el tiempo de
cocción programado es inferior a 15 minutos.
Fig. 15

electrolux
59
Fig. 16
Función demo
Este modo sirve para mostrar las funciones del
horno en tiendas especializadas sin consumir
más energía que la que se necesita para la
iluminación interior, el display y el ventilador.
Esta función sólo se puede activar cuando se
conecta por primera vez.
Si se produce un fallo de corriente, cuando se
restablece el suministro eléctrico sólo se puede
activar la función demo si en el display
parpadean automáticamente la indicación 12:00
y el símbolo .
1. Pulse la tecla durante aprox. 2
segundos. Se escucha una breve señal
acústica.
2. Pulse al mismo tiempo las teclas y “ ”.
Se escucha una breve señal acústica y en
el display aparece la hora 12:00 (Fig. 16).
Cuando se conecta el horno, aparece el
símbolo en el display, lo que significa que
la función demo está activada.
Es posible seleccionar cualquier función del
horno.
El horno no se encuentra realmente en
funcionamiento y los elementos de
calentamiento no se encienden.
Apague el horno y siga las explicaciones
anteriores para volver a desconectar el modo
demo.
La función demo se conserva en el
programa si se produce un fallo de
corriente.

electrolux
60
Fig. 17
Señal acústica de las teclas
Usted puede ajustar el horno para que siempre
se escuche una señal acústica al pulsar uno de
las teclas.
Esta función sólo se puede activar con el horno
apagado.
1. Pulse las teclas y “ ” al mismo tiempo
durante aprox. 3 segundos. La señal acústica
se escucha una vez (Fig. 17).
Cómo desactivar la señal acústica de las teclas:
1. Pulse la tecla con el horno encendido
para apagar el horno.
2. Pulse las teclas y “ ” al mismo tiempo
durante aprox. 3 segundos. La señal acústica
se escucha una vez.
Códigos de error
La memoria electrónica de programa realiza
continuamente un diagnóstico del sistema. Si los
parámetros no son correctos, las funciones
activadas se detienen y aparece el código de
error correspondiente (la letra “F”, seguida de
cifras).
Si se visualiza un código de error en el panel
electrónico de teclas del horno, también se
enciende el luminoso.
Para más detalles, consulte el capítulo “Qué hacer
cuando algo no funciona”.

electrolux
61
Uso del horno
El horno cuenta con un sistema exclusivo que
genera una circulación natural del aire y el reciclado
constante del vapor.
Este sistema permite cocinar en un entorno de
vapor y mantener los alimentos tiernos por dentro
y dorados por fuera. Además, el tiempo y la
energía para la cocción se reducen al mínimo. Es
posible que durante la cocción surja vapor, que
saldrá al exterior al abrir la puerta del horno. Esto
es absolutamente normal.
Sin embargo, retroceda al abrir el horno
durante la cocción o al final de la misma
para que salga el vapor o calor
acumulado.
¡Importante! - No coloque objetos en la
base del horno ni recubra parte alguna
del horno con papel de aluminio durante
la cocción, ya que podría provocar la
acumulación de calor y afectar a los
resultados de la cocción y dañar el esmalte
del horno. Coloque siempre recipientes,
bandejas refractarias y bandejas de
aluminio en el estante que se ha colocado
en las guías. Al calentarse el alimento se
genera vapor, como si fuera una caldera.
Cuando el vapor entra en contacto con el
cristal de la puerta del horno, se condensa
y aparecen gotas de agua.
Para reducir la condensación, caliente
siempre previamente el horno vacío durante
10 minutos.
Se recomienda limpiar las gotas de agua después
de cada proceso de cocción.
Cocine siempre con la puerta del horno
cerrada. Aléjese cuando abra la puerta
abatible del horno. No deje que la puerta
caiga por su peso; sosténgala por el asa
hasta que se abra por completo.
Termostato de seguridad
Para evitar un sobrecalentamiento peligroso (de-
bido a un uso indebido del aparato o a compo-
nentes defectuosos), el horno está equipado con
un termostato de seguridad que interrumpe el su-
ministro eléctrico. El horno se reconecta
automáticamente cuando desciende la temperatu-
ra.
Si el termostato de seguridad se activa debido a
un uso indebido del aparato, basta con eliminar la
causa del error una vez enfriado el horno; en
cambio, si el termostato se activa debido a un com-
ponente defectuoso, debe acudir al servicio técni-
co.
Ventilador de refrigeración
Sirve para refrigerar los componentes eléctricos,
las teclas de los interruptores y la manilla de la
puerta.
El ventilador se conecta y desconecta
automáticamente cuando se acciona el selector.
Para evitar un sobrecalentamiento peligroso, el
ventilador de refrigeración continúa funcionando
una vez apagado el horno hasta que la tempera-
tura haya alcanzado valores normales.
4
3
2
1

electrolux
62
Coloque el carril lateral con guía telescópica
usando el sistema de bloqueo en el nivel
elegido como se muestra en las figuras.
Los “topes” de los extremos de la
guía DEBEN quedar hacia arriba.
Los carriles telescópicos se pueden adquirir
por separado.
Los carriles telescópicos se pueden instalar
en todos los niveles para facilitar las
operaciones de introducción y extracción de
las bandejas.
- Saque completamente los soportes
telescópicos de la derecha y la izquierda,
como se muestra en la figura.
- Coloque la bandeja o parrilla en los
soportes telescópicos y luego empuje
suavemente para introducirlos en el horno
(consulte la figura).
No intente cerrar la puerta del horno
si los soportes telescópicos no se
han introducido por completo, ya
que podría dañar el esmalte y el
cristal de la puerta.
Como los soportes telescópicos
y otros accesorios se calientan
mucho, es preciso utilizar
guantes, manoplas o algo similar.
Asegúrese que ambos carriles
telescópicos son colocados
paralelamente.
Carriles telescópicos reemplazables
Tope
1
2
°C
°C

electrolux
63
Consejos y sugerencias
Cuando se cuecen alimentos, se debe
mantener siempre cerrada la puerta del
horno.
Este horno está equipado con un sistema exclusivo
de cocción que genera una corriente natural de
aire y mantiene continuamente en circulación los
vapores de cocción.
Por tanto, los alimentos se cuecen en un entorno
siempre húmedo, tiernos por dentro y crujientes
por fuera. Los tiempos de cocción y el consumo
de energía se reducen al mínimo. Durante la
cocción se genera vapor que puede salir al abrir
la puerta.
Esto ocurre con frecuencia.
Al abrir la puerta del horno, durante la
cocción o al final de ésta, preste atención a
la corriente de aire caliente que sale del
horno.
Cuando se calientan alimentos, se genera
vapor de la misma manera que en una
cacerola. Cuando el vapor entra en
contacto con el cristal de la puerta del
horno, se condensa y aparecen gotas de
agua.
Para reducir la condensación, caliente siempre
previamente el horno vacío durante 10 minutos.
Recomendamos limpiar las gotas de agua después
de cada proceso de cocción.
Calor superior e inferior
Calor por arriba y por abajo. Se recomienda uti-
lizar la guía intermedia. Si el alimento necesita más
calor por arriba o por abajo, utilice las guías supe-
riores o inferiores, respectivamente.
Funcionamiento con aire caliente
El calor se transmite a través del aire caliente que
pone en circulación la aspas del ventilador situa-
da en la pared posterior del horno (convección
forzada).
De este modo, el calor se distribuye por el horno
de manera uniforme y rápida. Por ello, se pueden
cocer al mismo tiempo varios alimentos en los dife-
rentes niveles (Fig.). Debido al movimiento
continuo del aire, no se transmite ningún olor ni
sabor, incluso si se están cociendo diferentes ali-
mentos.
En el funcionamiento con aire caliente se pueden
introducir hasta 2 bandejas de bollería al mismo tiem-
po. Cuando se cuece en un solo nivel, se recomien-
da utilizar las guías inferiores para obtener una me-
jor visión. El funcionamiento con aire caliente tam-
bién resulta ideal para esterilizar y secar setas o
fruta.
Asar
Todas las clases de carne son adecuadas para
asar, con la única excepción de la carne de caza y
el asado de carne picada. La carne y el pescado se
untan con Aceite antes de asarlos.
Cuanto más planos sean los alimentos, más cerca
se asarán del grill y viceversa.
La parrilla se puede introducir con la curvatura ha-
cia arriba o hacia abajo. Para conseguir un buen
dorado, la parrilla se coloca en la 4ª guía, es decir,
justo debajo del grill.
La limpieza se facilita colocando un poco de agua en
la bandeja recogedora de grasa. Introduzca la ban-
deja recogedora de grasa en la primera guía desde
Funcionamiento con aire caliente

electrolux
64
abajo. La puerta del horno debe permanecer ce-
rrada durante todos los procesos de cocción, asado
o grill.
La luz del horno permanece encendida durante el
funcionamiento del horno.
Grill con aire caliente
Para el grill con aire caliente, ajuste
una temperatura máxima de 200 °C.
Después, comienzan a funcionar de forma alternativa
el grill y el ventilador (modo de convección). Este
modo de funcionamiento permite una penetración
uniforme del calor en el alimento sin exponer la
superficie a la radiación directa del grill durante
demasiado tiempo.
Esta función resulta ideal para:
cocinar grandes trozos de carne, aves y pescados
enteros como truchas, caballas o lisas.
Consejos
Para cocer:
Los alimentos requieren normalmente una
temperatura moderada (150°C-200°C) y, por tanto,
es necesario precalentar el horno durante aprox.
10 minutos.
No abra la puerta del horno antes de transcurrir 3/
4 del tiempo de cocción.
La pastaflora se cuece en el molde de pastelería o
en la bandeja hasta 2/3 del tiempo de cocción y,
después, se adorna antes de que termine de cocer.
Este tiempo de cocción adicional depende del tipo y
la cantidad del adorno. Las masas batidas se tienen
que desprender con dificultad de la cuchara. El
tiempo de cocción se prolongaría innecesariamente
si se añade demasiado líquido.
Si se introducen al mismo tiempo dos bandejas lisas
con repostería en el horno, se debe dejar una guía
libre entre las bandejas.
Si se introducen al mismo tiempo dos bandejas lisas
con repostería en el horno, las bandejas se deben
intercambiar de arriba a abajo y girar al cabo de
aprox. 2/3 del tiempo de cocción.
Para asar:
No utilice menos de 1 kg de asado, ya que, si emplea
trozos más pequeños, éstos se podrían resecar
durante el asado. La carne roja, que debe cocer
bien por el exterior, pero quedar poco hecha o en
su punto en el interior, se debe asar a una mayor
temperatura (200°C-250°C).
En cambio, la carne blanca, las aves y el pescado
requieren una temperatura inferior (150°C-175°C).
Los ingredientes de la salsa se incorporan a la
bandeja de asar cuando lleva poco tiempo de
cocción; de lo contrario, se añaden en la última media
hora.
Con una cuchara puede comprobar si la carne está
hecha: si no puede introducir la cuchara, es que
está asada. El roast beef y el filete, que deben quedar
en su punto en el interior, se deben asar a una
mayor temperatura y en menos tiempo.
Cuando se hacen carnes directamente en la parrilla,
introduzca la bandeja recogedora de grasa en la
guía inferior para recoger el jugo.
Antes de cortarlo, deje reposar el asado durante
como mínimo 15 minutos para que no se salga el
jugo de la carne.
Para reducir la formación de humo en el horno, se
recomienda verter un poco de agua en la bandeja
recogedora de grasa. Para evitar la formación de
condensación, añada varias veces agua. Los platos
se pueden mantener calientes en el horno a
temperatura mínima hasta que se sirvan.
¡Precaución!
No coloque papel de aluminio en el
horno ni deposite ningún recipiente,
bandeja recogedora de grasa o
bandeja lisa en la base, ya que, de lo
contrario, el esmalte del horno
resultará dañado debido a la
acumulación de calor resultante.
Tiempos de cocción
Los tiempos de cocción pueden variar debido a la
diferente composición y a la cantidad de ingredientes
y de líquido de los alimentos.
Recuerde los datos de ajuste de los primeros procesos
de cocción o asado con el fin de adquirir experiencia
para cocinar los mismos alimentos posteriormente.
Usted puede modificar individualmente los valores
indicados basándose en su propia experiencia.

electrolux
65
Tablas de cocción
Calor superior e inferior y aire caliente
Calor superior e
inferior
Peso (gr.)
TIPO DE ALIMEN-
TO
Nivel
Aire caliente
NOTAS
minutos
temp.
°C
Nivel
temp.
°C
(*)
Si cuece más de un alimento al mismo tiempo, es conveniente que los coloque en los niveles que se indican
entre paréntesis.
REPOSTERÍA
Masa batida 1 170 2 (1y3)* 160 45-60 molde de pastelería
Pastaflora 2 170 2 (1y3)* 160 20-30 molde de pastelería
Leche batida-
tarta de queso 1 160 2 150 60-80
molde de pastelería
Tarta de manzana 1 180 2(1y3)* 170 40-60 molde de pastelería
Strudel 2 175 2 150 60-80 molde de pastelería
Tarta de mermelada 2 175 2(1y3)* 160 30-40 molde de pastelería
Pan de huevos 175 2 160 45-60 molde de pastelería
Tarta de bizcocho 1 175 2 (1y3)* 160 30-40 molde de pastelería
Bizcocho 1 170 2 160 50-60 molde de pastelería
Galletas 3 160 2 (1y3)* 150 20-30 en bandeja
Merengue 2 100 2 (1y3)* 100 90-120 en bandeja
Bollos 2 190 2 (1y3)* 180 12-20 en bandeja
Buñuelos/petisú 2 200 2 (1y3)* 190 15-25 en bandeja
PAN Y PIZZA
1000 Pan blanco 1 190 2 180 40-60 1-2 piezas
500 Pan de centeno 2 190 2 180 30-45 en molde de pan
500 Panecillos 2 200 2 (1y3)* 175 20-35 6-8 panecillos
FLANES
Flan de pasta 2 200 2(1y3)* 175 40-50 molde de pastelería
Budín de verdura 2 200 2(1y3)* 175 45-60 molde de pastelería
Quiche 2 200 2(1y3)* 180 35-45 molde de pastelería
Lasaña 2 180 2 160 45-60 molde de pastelería
CARNES
1000 Vaca 2 190 2 175 50-70 en la parrilla
1200 Cerdo 2 180 2 175 100-130 en la parrilla
1000 Ternera 2 190 2 175 90-120 en la parrilla
1500
Roast beef, poco hecho
2 210 2 200 50-60 en la parrilla
1500
Roast beef, en su punto
2 210 2 200 60-70 en la parrilla
1500
Roast beef, muy hecho
2 210 2 200 70-80 en la parrilla
2000 Lacón 2 180 2 175 120-150 con corteza
1200 Cordero 2 190 2 175 110-130 pierna
1000 Pollo 2 190 2 175 60-80 entero
5000 Pavo 2 180 2 160 210-240 entero
1500 Pato 2 175 2 160 120-150 entero
3000 Ganso 2 175 2 160 150-200 entero
1200 Conejo 2 190 2 175 60-80 en piezas
1200 Codillo 2 180 2 160 100-120 2 piezas
Asado de carne picada
2 180 2 160 40-60 en molde de pan
CAZA
1500 Lomo de conejo 2 190 2 175 150-200 en piezas
800 Faisán 2 190 2 175 90-120 entero
PESCADO
1200 Trucha de río 2 190 2(1y3)* 175 30-40 3-4 truchas
1500 Bonito/salmón 2 190 2(1y3)* 175 25-35 4-6 piezas
Tiempo de
cocción
en
Los tiempos de cocción no incluyen
el tiempo de precalentamiento.
Precalentar siempre el horno vacío
durante 10 minutos.
4
3
2
1
4
3
2
1

electrolux
66
Redondo
(pava) 1 1000 3 200 30-40 20-30
P
ollo 2 800 3 200 25-30 20-25
P
ollo, (cortado
e
n dos) 2 1000 3 200 32-30 20-30
Muslos de ave 6 — 3 200 15-20 15-18
Codorniz
4 500 3 200 25-30 20-25
Gratinado de verdura - — 3 200 20-25 —
San jacobos 6 — 3 200 15-20 —
Caballa 2-4 — 3 200 15-20 10-15
Filete de pescado 4-6 800 3 200 12-18 8-10
Grill convencional
1er lado
°C
temp.
Piezas
Gramos
Cantidad
Tiempo de cocción
en
minutos
2º lado
Grill -
Bistec 4 800 3 máx. 12-15 12-14
Filete de vaca 4 600 3 máx. 10-12 6-8
Salchichas 8
—
3 máx. 8-10 4-6
Bistec de cuello de cerdo 4 600 3 máx. 12-16 12-14
Hamburguesas 6 600 3 máx. 10-15 8-10
P
echugas de pollo 4 400 3
máx. 12-15 12-14
P
ollo, (cortado
e
n dos) 2 1000 3
máx. 30-35 25-30
Pinchos 4
—
3 máx. 10-15 10-12
Filete de pescado (lenguado)
4 400 3 máx. 12-14 10-12
Bocadillos de pan tostado 4-6
—
3 máx. 5-7
—
Rodaj
as de pan blanco
4-6
—
3 máx. 2-4 2-3
TIPO DE ALIMENTO
Nivel
4
3
2
1
Grill con aire caliente
Grill con aire caliente
TIPO DE
ALIMENTO
Lado superior
Temp. °C
Piezas
Gramos
Cantidad
Tiempo de cocción
en
minutos
Lado inferior
Nivel
Temp.
NOTAS
Peso
(GR.)
Tiempo de
cocción en
minutos
TIPO DE
ALIMENTO
Nivel
°C
1000 Pizza,
(grande)
1 200 15-25 en molde de pan
500 Pizza, (pequeña) 1 200 10-20
molde de pastelería/
en la parrilla
500 Panecillos 1 200 15-25
molde de pastelería
Función pizza
Función pizza
Los tiempos de cocción no incluyen el tiempo de precalentamiento.
Precalentar siempre el horno vacío durante 10 minutos.
En el funcionamiento con aire caliente, se debe ajustar una temperatura
máxima de 200°C.
Las temperaturas indicadas son valores orientativos. Es posible que las temperaturas
se tengan que adaptar a las necesidades de cada persona.

electrolux
67
Antes de limpiar el horno, apáguelo y
déjelo enfriar.
El aparato no se debe limpiar con
vapor caliente ni chorro de vapor.
Importante: Antes de realizar tareas de limpieza,
desenchufe el aparato de la red eléctrica.
Para garantizar la durabilidad del aparato, es
necesario realizar periódicamente las siguientes
tareas de limpieza:
- Estas tareas sólo se deben realizar con el
horno frío.
- Limpie las partes esmaltadas con agua
jabonosa.
- No utilice productos abrasivos.
- Seque las piezas de acero inoxidable y de
cristal con un paño suave.
- En el caso de manchas difíciles, utilice
detergentes convencionales para acero inoxi-
dable o vinagre templado.
El esmalte del horno es muy duradero e imper-
meable. Sin embargo, los ácidos calientes de al-
gunas frutas (limones, ciruelas, etc.) pueden de-
jar manchas persistentes y opacas en la superfi-
cie del esmalte. No obstante, esas manchas en la
superficie brillante del esmalte no afectan al fun-
cionamiento del horno. Limpie siempre el horno
después de utilizarlo. Es la manera más fácil de
eliminar la suciedad. Además, evita que la sucie-
dad se queme.
Productos de limpieza
Antes de aplicar un producto de limpieza al horno,
compruebe que es adecuado y que el fabricante
recomienda su uso.
El empleo de limpiadores que contengan lejía po-
dría opacar el acabado de la superficie. Evite el
uso de abrasivos agresivos.
Cuidado y limpieza
Limpieza del exterior
Limpie periódicamente el panel de mandos, la
puerta del horno y el cierre hermético de la puer-
ta con un paño suave empapado en agua tem-
plada, a la que se haya añadido un poco de
detergente líquido.
Para no causar daños ni el desgaste de los pa-
neles de cristal de la puerta, evite el uso de lo
siguiente:
• Detergente de uso doméstico y lejía
• Estropajos impregnados que no son aptos
para cacerolas antiadherentes
• Lana de acero
• Estropajos o aerosoles químicos para horno
• Desoxidantes
• Quitamanchas domésticos
Utilice agua templada con jabón para limpiar el
cristal interior y exterior de la puerta. Cuando el
cristal interior está muy sucio, se recomienda
emplear un producto de limpieza para placas
de cerámica. No emplee rascadores para elimi-
nar la suciedad.

electrolux
68
Placas y portaplacas del horno
Para limpiar las placas del horno, sumérjalas en
agua templada con jabón y elimine las manchas
difíciles con un estropajo mojado y jabón.
Después enjuague bien las placas y séquelas
con un paño suave.
La posibilidad de extraer los portaplacas facilita la
limpieza.
Realice lo siguiente:
1) Quite el tornillo delantero mientras sujeta el
portaplacas en posición con la otra mano.
2) Desenganche el gancho posterior y saque el
portaplacas.
3) Una vez que termine de limpiar, vuelva a
instalar los portaplacas realizando el
procedimiento a la inversa.
Asegúrese de fijar las tuercas de retenida
cuando vuelva a instalar el portaplacas.
Sólo es posible quitar los carriles
telescópicos. Para ello, desbloquee los
topes como se muestra en la página 62.
No lave los carriles telescópicos en el
lavavajillas.
Cuando limpie los portaplacas, tenga
cuidado de no eliminar la grasa
lubricante de detrás de las guías
telescópicas, ya que garantiza su
buen funcionamiento.
No intente quitar a los carriles telescópicos
hasta que el horno se haya enfriado.
No saque completamente los carriles
telescópicos para quitarlos de los soportes
laterales. Bordes cortantes podrían
causar heridas
)

electrolux
69
Limpieza pirolítica
La cavidad del horno está revestida con un esmalte
especial que resiste altas temperaturas.
Durante la operación de limpieza pirolítica, el inte-
rior del horno puede alcanzar una temperatura de
500°C, capaz de calcinar los restos de comida.
Cuando el interior del horno alcanza una
temperatura aproximada de 300°C durante esta
operación, la puerta del horno se bloquea
automáticamente por razones de seguridad.
Una vez terminada la operación de limpieza,
la puerta del horno permanece bloqueada
hasta que la cavidad se enfría.
El ventilador de refrigeración funciona durante la
cocción hasta que el horno se enfría. Se aconseja
eliminar los restos de comida con una esponja
húmeda una vez terminado el proceso de cocción.
Sin embargo, es necesario realizar una limpieza
más completa y eficaz de vez en cuando mediante
la función de limpieza pirolítica. Existen dos niveles
distintos de limpieza pirolítica que puede seleccionar
en función de la suciedad del horno.
Cuando la cavidad del horno no está muy sucia,
se recomienda seleccionar la función pirolítica 1 (P
I) en el indicador de programación.
Tras cada ciclo de limpieza pirolítica se aconseja
pasar una esponja suave humedecida con agua
templada por el horno.
La función pirolítica 2 (P 2) es la que debe elegirse
en el indicador de programación cuando la cavidad
del horno está muy sucia.
Mientras se realiza la función de limpieza pirolítica,
el horno no se puede utilizar durante 2 horas, si ha
seleccionado P 1, y hasta 2 horas y media después
si ha elegido P 2.
Los niveles de pirólisis disponibles son los
siguientes:
> Duración de la función pirolítica 1
(P I): 2 horas = 30 minutos de
calentamiento +1 hora a 480 °C + 30
minutos de enfriamiento.
> Duración de la función pirolítica 2
(P 2): 2 horas 30 minutos = 30 minutos
de calentamiento +1 hora 30 minutos a
480 °C + 30 minutos de enfriamiento.
La duración de la función
pirolítica no se puede cambiar.
Despues de un numero de cocciones
realizadas ,se recuerda la sugerencia de
limpiar el horno mediante la activación de
un ciclo del sistema de pirolisis.
Se emitirá una señal acústica y el mensaje
„Pyro“ aparecerá en pantalla durante
aproximadamente 15 segundos,seguido
de otra señal acústica.
Seleccione a continuación el ciclo
pyrolytic,dependiendo de lo sucio que
este el horno.
El mensaje recordatorio se mostrará cada
vez que se el horno se apage hasta que
se haya realizado un ciclo completo de
limpieza pyrolytic.

electrolux
70
Fig. 18
Fig. 20
Fig. 19
Uso de la función de limpieza pirolítica
Antes de activar la función de limpieza
pirolítica, elimine cualquier acumulación
excesiva de líquidos y cerciórese de que
el horno está vacío. No deje ningún com-
ponente en el interior del horno (por
ejemplo, cacerolas, parrillas, bandeja
lisa, bandeja de goteo, etc.), ya que
podrían sufrir graves desperfectos.
Asegúrese que la puerta del horno está
cerrada antes de activar la función de
limpieza pirolítica.
Se aconseja no utilizar la placa de
cocción mientras esta función está
activada, ya que el electrodoméstico
podría calentarse en exceso y averiarse.
La puerta del horno se calienta durante
el ciclo de limpieza pirolítica. No permita
que los niños SE ACERQUEN hasta que se
haya enfriado.
Para activar la función de limpieza pirolítica, realice
lo siguiente:
1. Pulse el botón para encender el horno.
Luego pulse el botón tantas veces como
sea necesario, hasta que el símbolo “P1”
(nivel 1 - P I) aparezca en el indicador
(Fig. 18).
Cuando haya realizado esta operación, el
símbolo y el texto “Pyro” empiece
a parpadear en el indicador y se emite una
señal acústica (Fig. 19).
Retire todos los accesorios de horno de la
cavidad antes de activar la función de
limpieza pirolítica.
2. El símbolo de duración de cocción
parpadea durante 5 segundos. Mientras el
símbolo parpadea, pulse el botón ‘ ' o ' '
para seleccionar la función pirolítica 1 (P I) o
la función pirolítica 2 (P 2) (Fig. 20).

electrolux
71
3. Una vez que haya elegido la función
pirolítica, el mensaje “Pyro” parpadeará en
el indicador en espera de que confirme el
inicio de la función.
4. Para activar la función pirolítica, pulse el botón
. El texto “Pyro” deja de parpadear, el
símbolo y la señal acústica
desaparecerán, la luz del horno se apaga y
el ciclo de limpieza pirolítica se pone en
funcionamiento (Fig. 21).
Cuando el horno se calienta, el símbolo del
termómetro aumenta levemente para indicar
el incremento de temperatura en el interior del
horno.
5. Tras un breve intervalo de tiempo, el bloqueo
de la puerta se activa y aparece el símbolo
correspondiente (Fig. 22). El botón
deja de estar activo.
Al final del proceso de limpieza pirolítica, el indicador
muestra la hora. La puerta del horno sigue
bloqueada.
Cuando el horno se enfría, se emite una señal
acústica, el símbolo desaparece y la puerta
se desbloquea.
Para detener el ciclo de limpieza pirolítica, pulse el
botón en cualquier momento.
NOTA: En la indicación de tiempo se incluye el
intervalo de enfriamiento.
Fig. 21
Fig. 22
El ciclo de limpieza pirolítica se interrumpe
cuando se selecciona una función de
cocción mientras el ciclo se encuentra
activado.
Mientras el bloqueo de la puerta del horno
sigue activo, resulta imposible seleccionar
una función de cocción hasta que la puerta
de desbloquea.

electrolux
72
Para programar el ciclo de limpieza
pirolítica (inicio retardado, parada
automática)
Si lo desea, puede programar el momento de inicio
y fin del ciclo de limpieza pirolítica.
1. Pulse el botón para encender el horno.
Luego pulse el botón tantas veces como
sea necesario, hasta que el símbolo “Pyro“
(nivel 1 - P I) aparezca en el indicador.
Cuando haya realizado esta operación, el
símbolo y el texto “Pyro” empiece a
parpadear en el indicador y se emite una señal
acústica.
Retire todos los accesorios de horno de la
cavidad antes de activar la función de limpieza
pirolítica.
2. El símbolo de duración de cocción
parpadea durante algunos segundos.
Mientras el símbolo parpadea, pulse el botón
' ' o ‘ ' para seleccionar la función pirolítica
1 (P I) o la función pirolítica 2 (P 2).
3. Una vez que haya elegido la función pirolítica,
el mensaje “Pyro” parpadeará en el indicador
en espera de que confirme el inicio de la
función.
Pulse el botón de la función de duración
en este momento (Fig. 23). El símbolo
de “Fin de cocción” y el símbolo de
flecha parpadean. En el panel de mandos
se indica el final del ciclo de limpieza (es
decir, la hora actual + la duración de la
cocción).
Pulse el botón ' ' o ' ' para seleccionar el
final de la duración del ciclo (Fig. 23).
Después, el texto “Pyro” y el símbolo
dejan de parpadear, la señal
acústica desaparece mientras el símbolo de
duración de cocción parpadea hasta
Fig. 23

electrolux
73
que se pone en funcionamento el ciclo de
limpieza pirolítica a la hora programada.
4. Tras un breve intervalo de tiempo, el bloqueo
de la puerta se activa y aparece el símbolo
correspondiente .
Al final del proceso de limpieza pirolítica, el indicador
muestra la hora. La puerta del horno está
bloqueada.
Cuando el horno se enfría, se emite una señal
acústica y la puerta se desbloquea.
Para detener el ciclo de limpieza pirolítica, pulse
el botón en cualquier momento.
Sustitución de la bombilla del horno
Desconecte el aparato
Cuando sea necesario cambiar la bombilla, de-
berá utilizar un repuesto con las siguientes es-
pecificaciones:
- Potencia eléctrica: 40 W
- Especificación eléctrica: 230 V (50 H)
- Resistente a temperaturas de 300 °C
- Tipo de conexión: E14.
Este tipo de bombillas se encuentra disponible en
los centros de servicio locales.
Para cambiar una bombilla averiada:
1. Compruebe que el horno está desconectado
del suministro eléctrico.
2. Empuje y gire la cubierta de cristal hacia la
izquierda (Fig. 24).
3. Quite la bombilla averiada y cámbiela por otra
nueva.
4. Vuelva a instalar la cubierta de cristal y co-
necte el suministro eléctrico.
Fig. 24

electrolux
74
Fig. 25
Fig. 26
Fig. 27
La puerta del horno está compuesta por cuatro
cristales.
Los cristales se pueden quitar para facilitar la
limpieza.
Advertencia: La puerta del horno se
puede cerrar de golpe si se intenta
extraer los cristales internos con la
puerta instalada en el horno.
Antes de limpiar la puerta del horno, se recomienda
desmontarla.
Para ello, realice lo siguiente:
1. Abra la puerta por completo y localice las dos
bisagras que sujetan la puerta al horno (Fig.25).
2. Desbloquee y gire las dos pequeñas palancas
que hay en ambas bisagras (Fig. 26).
3. Sujete la puerta por los laterales derecho e
izquierdo, gírela lentamente hacia el horno
hasta que quede medio cerrada y, en esa
posición, tire con suavidad para sacarla
(Fig.27).
Limpieza de la puerta del horno

electrolux
75
Fig. 28
Fig. 29
Fig. 30
4. Coloque la puerta en una superficie estable y
extraiga los dos tornillos laterales de la puerta
(Fig.28).
5. Extraiga el soporte de cristal interior (Fig.29).
6. Antes de retirar los cristales internos, extraiga
el soporte distanciador de caucho como puede
ver en el dibujo (Fig.30).
7. Saque con cuidado los tres cristales internos,
empezando por el que se encuentra en la parte
superior (Fig.31).
Fig. 31

electrolux
76
Fig. 32
Fig. 34
Para limpiar el cristal de la puerta, utilice solamente
agua templada y un paño suave. No utilice abrasivos
ásperos, ya que podría dañar la superficie
termoestable especial de los cristales internos.
8. Una vez que haya limpiado la puerta, vuelva
a instalarla mediante el procedimiento descrito,
pero a la inversa (Fig.32).
Los dos cristales internos están marcados
con un pequeño punto, en una esquina, y
un cuadro negro, respectivamente (Fig. 33).
Cuando se monta de nuevo la puerta, es
importante instalar los cristales en la
posición correcta.
Si quiere cerciorarse de haber realizado esta
operación correctamente, cuando inserte el
cristal, asegúrese que la superficie del cristal
marcada con un cuadro negro queda
orientada hacia arriba y que el punto está en
la esquina superior derecha del cristal (Fig.
33).
9. Después de montar los cristales, inserte
correctamente el soporte distanciador como
puede ver en el dibujo (Fig.34).
Fig. 33

electrolux
77
Fig. 35
Fig. 36
10. Inserte el soporte de cristal interior (Fig.35).
11. Coloque los dos tornillos laterales de la
puerta(Fig.36).
NO limpie la puerta del horno
mientras los paneles de cristal estén
calientes. Con esta medida de
precaución evitará que los paneles
de cristal se resquebrajen.
La existencia de una superficie
picada o de arañazos profundos en
el cristal indica un proceso de
desgaste que exige su sustitución
para evitar que se resquebraje. Para
obtener más información, póngase
en contacto con el centro local de
servicio.

electrolux
78
Si el aparato no funciona correctamente, compruebe lo siguiente antes de llamar al servicio técnico
de Electrolux:
Ante la aparición de un problema
Solución
Compruebe que ha seleccionado la función de
cocción y el ajuste de temperatura
o bien
Compruebe que el aparato está conectado
correctamente y que el interruptor de la toma o de la
red está activado.
o bien
Compruebe que no está activado el seguro contra
la manipulación por niños o la conexión/
desconexión automática
o bien
Compruebe que no ha activado accidentalmente la
función demo
Pulse la tecla
o bien
Revise la bombilla y cámbiela si es necesario
(consulte “Cuidado y limpieza”)
Puede ser necesario ajustar la temperatura
o bien
Consulte el contenido de estas instrucciones y, en
particular, la sección sobre consejos.
Una vez finalizado el proceso de cocción, no deje
los alimentos más de 15-20 minutos en el horno.
Anote el código de error e indíqueselo a nuestro
centro de servicio técnico más cercano.
PROBLEMA
El horno no se enciende.
La luz del horno no se enciende.
La cocción tarda mucho o es
demasiado rápida.
El vapor y la condensación se
asientan en los alimentos y en la
cavidad del horno.
En el display aparece el código de
error “F.. “.

electrolux
79
Datos técnicos
Potencia calorífica
Elemento de la solera 1000 W
Elemento de la bóveda 800 W
Horno (solera + bóveda)(1000 + 800) 1800 W
Elemento Grill Simple 1650 W
Elemento Grill Doble 2450 W
Elemento de calor a convención 2000 W
Función Grill Ventilado 1680 W
Función “Pizza” 2000 W
Función de limpieza pirolítica 2450 W
Ventilador enfriar 25 W
Ventilador convención 25 W
Lámpara del horno 40 W
Potencia max absorbida 2515 W
Tensión de utilización (50 Hz) 230 V
Medidas de la cavidad
Altura bajo parte superior 593 mm
en columna 580 mm
Anchura 560 mm
Fondo 550 mm
Horno
Altura 335 mm
Anchura 395 mm
Fondo 400 mm
Capacidad del horno 53 l

electrolux
80
Instrucciones para el instalador
El montaje y la instalación se deben
realizar respetando estrictamente la
normativa vigente. Cualquier tarea
que se realice se debe llevar a cabo
con el aparato desconectado. Sólo
deben intervenir técnicos
profesionales.
El fabricante declina toda
responsabilidad si no se respetan las
medidas de seguridad.
Conexión a la red eléctrica
Antes de conectar el aparato, tenga en cuenta lo
siguiente:
- El fusible y la instalación eléctrica de la
vivienda deben soportar el consumo máximo
del aparato (consulte la placa de datos
técnicos).
- La instalación doméstica debe disponer de
una conexión a tierra adecuada conforme a
la normativa vigente.
- Una vez instalado el aparato, el enchufe o el
interruptor de desconexión de la red debe
quedar fácilmente accesible.
Este aparato se suministra con un cable de
alimentación eléctrica.
El cable debe contar con un enchufe
adecuado, apto para la potencia eléctrica
especificada en la placa de datos técnicos. El
enchufe se debe conectar a una toma de pared
adecuada. Si necesita conexión directa a la red
eléctrica, es necesario instalar un interruptor
omnipolar entre el aparato y la red, con una
holgura mínima entre contactos de 3 mm, adecuado
para la potencia necesaria y acorde con la
normativa vigente. El interruptor no debe interferir
en el cable de conexión a tierra verde y amarillo,
que debe ser de 2 a 3 cm más largo que los
demás cables.
El cable de conexión a red con enchufe
suministrado se debe conectar a una toma con
conexión a tierra (230 V~, 50 Hz). La toma con
conexión a tierra debe estar instalada de acuerdo
con la normativa vigente.
Los siguientes cables de conexión a la red
son adecuados, siempre que se tenga en cuenta
la capacidad adecuada de su sección transversal:
H07 RN-F, H05 RN-F, H05 RR-F, H05 VV-F,
H05 V2V2-F (T90), H05 BB-F.
El cable de conexión debe colocarse de tal
forma que no alcance 50 °C (sobre la temperatura
ambiente) en ningún punto.
Una vez establecida la conexión, se deben
comprobar los elementos térmicos haciéndolos
funcionar durante unos tres minutos.
Bloque de conexión
El horno cuenta con un bloque de conexión de
fácil acceso, diseñado para funcionar con
alimentación eléctrica monofásica de 230 V.
Letra L - Terminal activo
Letra N - Terminal neutro
o E - Terminal a tierra

electrolux
81
Instrucciones para el empotrado
Para el correcto funcionamiento del aparato
empotrado, el mueble de cocina o el hueco en
que se coloca debe tener unas medidas
adecuadas.
Según las normas vigentes, todas las piezas que
garantizan la protección contra descargas
eléctricas de piezas activas y aisladas se deben
fijar de tal modo que no puedan retirarse sin
herramientas.
Esto incluye también la fijación de terminaciones
al principio o al final de una serie de aparatos
empotrados.
En todo caso, la protección contra descargas
eléctricas tiene que estar garantizada por el
montaje del aparato.
El aparato se puede instalar con la parte
posterior o lateral situada contra unidades de
cocina, aparatos o muros más elevados. No
obstante, en la otra pared lateral sólo se deben
colocar otros aparatos o muebles con la misma
altura que el aparato.
Medidas del horno (Fig. A)
Instrucciones para el empotrado
Para el correcto funcionamiento del aparato
empotrado, el mueble de cocina o el hueco en
que se coloca debe tener unas medidas
adecuadas. (Fig. B-C).
Fijación del horno al mueble
- Abra la puerta del horno;
- Fije el horno al mueble mediante los cuatro
separadores suministrados con el aparato
(Fig. D - A), que encajan exactamente en los
orificios del marco y, a continuación, coloque
los cuatro tornillos para madera (Fig. D - B).
Fig. A
Fig. B
Fig. D
Fig. C

electrolux
82
Garantía/Servicio postventa
Condiciones de Garantía: ELECTROLUX HOME PRODUCTS ESPAÑA, S.A. garantiza al
usuario del aparato cuyos datos de identificación figuran en el presente documento, durante el
plazo de dos (2) años desde la fecha de su entrega, la reparación totalmente gratuita de las averías
que experimente el aparato, incluyendo la presente garantía tanto el coste de las piezas de
recambio como el de la mano de obra y, en su caso, el del desplazamiento del personal técnico
del Servicio Oficial de la Marca al domicilio del usuario.
En el supuesto de que el producto, por su tamaño y movilidad, fuera susceptible de ser
trasportado por el usuario al Taller Oficial de la Marca, éste quedará liberado de la obligación de
trasladar su personal técnico al domicilio del usuario.
Para hacer uso del derecho de garantía aquí reconocido, será requisito necesario que el
aparato se destine al uso privado. También será necesario presentar al personal técnico de la
marca, antes de su intervención, la factura o tique de compra del aparato o el albarán de entrega
correspondiente si éste fuera posterior, en unión del presente documento.
Exclusiones: La presente garantía no cubre la instalación, nivelación, instrucciones de uso
del aparato ni sustitución de lámparas. No quedan cubiertas por esta garantía y por tanto la misma
quedará sin efecto en los casos de averías producidas como consecuencia de:
- Fuerza mayor (fenómenos atmosféricos, geológicos, etc.)
- Uso inadecuado o no acorde con las instrucciones del fabricante.
- Falta de mantenimiento y limpieza: filtros con objetos tales como botones, monedas, etc;
condensadores con polvo, pelusa u otros elementos que impidan la libre circulación del aire;
cubetas de detergente con residuos, etc.
- Uso de productos de limpieza abrasivos que causen daños en chapa, pintura y plásticos.
- La rotura accidental de componentes de plástico y vidrio.
- La instalación y/o conexión incorrectas o no reglamentarias (voltaje, presión de gas o agua,
conexión eléctrica o hidráulica no adecuadas).
- Los daños estéticos no denunciados en el momento de la entrega.
La garantía no tendrá efecto en caso de manipulación de la placa de características del aparato
o de los datos que figuren en la factura, tique de compra o albarán de entrega de aquél o de los
consignados en este documento. Tampoco producirá efecto si se produjesen intervenciones de
personal técnico no autorizado o no perteneciente al Servicio Oficial de la marca.
Se informa al usuario que, además de la garantía reconocida en este documento, tiene la
protección que le concede la Ley 23/2003, de 10 de julio, respecto de la exigencia de que el bien
adquirido sea conforme con el contrato de compraventa, pudiendo reclamar al vendedor, en caso
de disconformidad, por las faltas que se pongan de manifiesto en el plazo de dos (2) años desde
la entrega. En ese supuesto, tendrá derecho a solicitar la reparación gratuita del bien o a la
sustitución de éste, salvo que una de esas opciones resulte imposible o desproporcionada.

electrolux
83
ELECTROLUX HOME PRODUCTS ESPAÑA, S.A.-Sociedad Unipersonal
Albacete, n 3C - 28027 MADRID - CIF A08145872
Central Servicio Técnico
Ctra. M-300 km, 29,900
Apdo. 119
28802 Alcalá de Henares (Madrid)
Recepción de Llamadas
Averías 902 116 388
Atención Usuarios:
e-mail: [email protected]
Para España:
Puede comprar recambios y accesorios on-line entre en
http://www.service.electrolux.com y seleccione Tienda Virtual
Este aparato está garantizado por Electrolux en cada uno de los países indicados en la parte
posterior de este manual durante el periodo especificado en la garantía del aparato o el periodo
que prevea la ley. Si usted se traslada de uno de estos países a otro de los países abajo indicados,
la garantía del aparato se desplazará con usted siempre que se cumplan los siguientes requisitos:
• La garantía entra en vigor el día en que usted compre el aparato, que se demostrará median-
te un justificante de compra válido emitido por el vendedor del aparato.
• La garantía del aparato tendrá el mismo periodo de validez y cubrirá las mismas piezas y mano
de obra que las garantías emitidas en su nuevo país de residencia para ese modelo o gama
de aparatos en concreto.
• La garantía del aparato es personal del comprador original e intransferible.
• El aparato deberá ser instalado y utilizado según las instrucciones de Electrolux y es
únicamente de uso doméstico, lo que significa que no podrá ser utilizado con fines comerciales.
• El aparato deberá ser instalado observando todas las normativas relevantes que estén en vigor
en su nuevo país de residencia.
Las disposiciones de esta Garantía Europea no afectan a los derechos que le correspondan
por ley.
Garantía Europea

electrolux
84

electrolux
85

electrolux
86

electrolux
87

electrolux
88
356996002 05/08 R.A
www.zanussi.com.es
-
 1
1
-
 2
2
-
 3
3
-
 4
4
-
 5
5
-
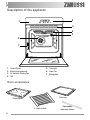 6
6
-
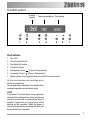 7
7
-
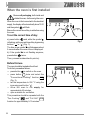 8
8
-
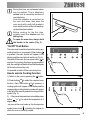 9
9
-
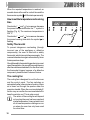 10
10
-
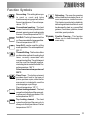 11
11
-
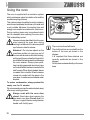 12
12
-
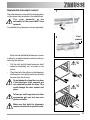 13
13
-
 14
14
-
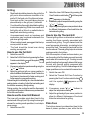 15
15
-
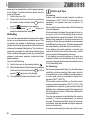 16
16
-
 17
17
-
 18
18
-
 19
19
-
 20
20
-
 21
21
-
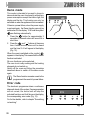 22
22
-
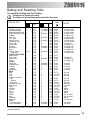 23
23
-
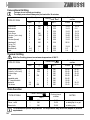 24
24
-
 25
25
-
 26
26
-
 27
27
-
 28
28
-
 29
29
-
 30
30
-
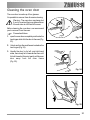 31
31
-
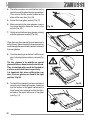 32
32
-
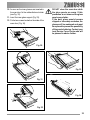 33
33
-
 34
34
-
 35
35
-
 36
36
-
 37
37
-
 38
38
-
 39
39
-
 40
40
-
 41
41
-
 42
42
-
 43
43
-
 44
44
-
 45
45
-
 46
46
-
 47
47
-
 48
48
-
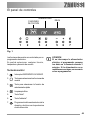 49
49
-
 50
50
-
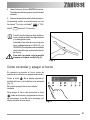 51
51
-
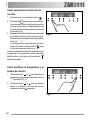 52
52
-
 53
53
-
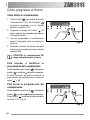 54
54
-
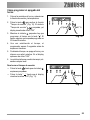 55
55
-
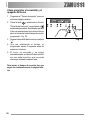 56
56
-
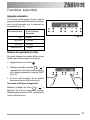 57
57
-
 58
58
-
 59
59
-
 60
60
-
 61
61
-
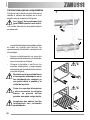 62
62
-
 63
63
-
 64
64
-
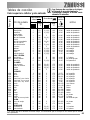 65
65
-
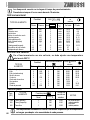 66
66
-
 67
67
-
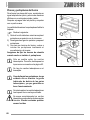 68
68
-
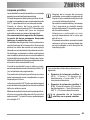 69
69
-
 70
70
-
 71
71
-
 72
72
-
 73
73
-
 74
74
-
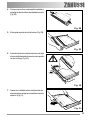 75
75
-
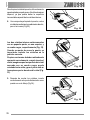 76
76
-
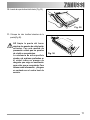 77
77
-
 78
78
-
 79
79
-
 80
80
-
 81
81
-
 82
82
-
 83
83
-
 84
84
-
 85
85
-
 86
86
-
 87
87
-
 88
88


Zanussi ZYB591WQ Manual de usuario
- Categoría
- Cocinas
- Tipo
- Manual de usuario
- Este manual también es adecuado para
en otros idiomas
- English: Zanussi ZYB591WQ User manual
Artículos relacionados
Otros documentos
-
Hoover HOZ6901IN/E Manual de usuario
-
-
Electrolux EOB66712X Manual de usuario
-
-
-
-
-
-
Electrolux EOC56200W Manual de usuario
-