
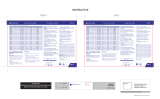
TECHNICAL DATA
IMAGES / LINKS
SOFTWARE: Illustrator CC
MAC & PC Platform compatible
16.8 x 28 cm
HFDB
INKS & die cuts
Packaging:
Dimensions:
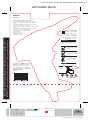
CUT-LINE
(Do not print)
C M Y K
“Condential Information property of Truper, S.A. de C.V."
VERY STRONG CARDBOARD MUST BE USED AS IN THE SAMPLE. USE U.V. LACQUERS FINISH.
IMPORTANT: The materials must match the Pantone colors AFTER the requested nish is applied.
ARTWORK BACK
Importado por Truper, S.A. de
C.V. Parque Industrial 1, Parque
Industrial Jilotepec, Jilotepec,
Edo. de Méx. C.P. 54257 Made
in/Hecho en China, Tel.: 76 1782 9100.
www.truper.com
02-2022
ESPECIFICACIONES
127 V~ 60 Hz 40 W
Para un mejor desempeño de su
cautín tipo pistola, sólo utilice
repuestos y accesorios TRUPER®.
Utilice puntas de repuesto modelo
R-CAU-50 marca Truper®.
102142
CAU-50
Lea las siguientes instrucciones de uso:
1.- Limpie perfectamente la superficie a soldar
removiendo cualquier residuo de oxido, pintura o
grasa.
2.- No utilice fundentes (pasta de soldar) agresivos.
3. Haga uso de fundentes adecuados.
4. Use siempre el cautín con la capacidad adecuada al
trabajo.
5.- Aplique el fundente directamente en el punto
de soldadura, no en la punta de soldar.
6. Presione el botón 1 minuto MÁXIMO
cada 5 minutos.
Utilícelo solo para el
calentamiento rápido o la
recuperación térmica.
Véase instructivo
y garantía anexos.
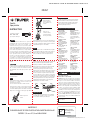
DIAGRAMA
GUÍA RÁPIDA
1. Limar cualquier suciedad, óxido o
pintura en la parte que desea
soldar
2. Calentar la pieza con el
soldador
3. Aplique soldadura a
base de colofonia a la
pieza y derrítala con el
soldador.
4. Espere a que la
soldadura se enfríe y
se endurezca antes de
mover la pieza soldada
LED
R
Punta
K
127 V~ 60 Hz
B
FOLIO 14953-R1 / LEVEL B / VERSION 02-2022 / PAGE 3 of 12

“Condential Information property of Truper, S.A. de C.V."
El cambio o la limpieza de la punta debe realizarse únicamente
cuando el cautín esté a temperatura ambiente o inferior.
La punta puede cambiarse o sustituirse simplemente
desenroscando la tuerca estriada de la resistencia. El cautín
debe apagarse y dejarse enfriar antes y durante esta
operación, ya que pueden producirse daños si se deja el
sistema encendido sin la punta insertada. Después de retirar la
punta, elimine el polvo de óxido que pueda haberse formado
en la zona de retención de la punta el cautín. Tenga cuidado
de que no le entre polvo en los ojos. Vuelva a colocar la punta
y enrosque la tuerca estriada de retención del barril utilizando
sólo la presión de la mano para apretar. Sólo se deben utilizar
alicates para apretar la tuerca si se afloja cuando la plancha
está caliente para evitar quemarse los dedos. No apriete
demasiado ya que esto dañaría el elemento.
NOTA
Esta garantía aplica para:
Modelo: CAU-50 Código: 102142
Póliza de garantía
Garantía. Duración: 1 año. Cobertura: piezas, componentes y
mano de obra contra defectos de fabricación o funcionamiento,
excepto si se usó en condiciones distintas a las normales;
cuando no fue operado conforme instructivo; fue alterado o
reparado por personal no autorizado por Truper®. Para hacer
efectiva la garantía presente el producto, póliza sellada o
factura o recibo o comprobante, en el establecimiento donde
lo compró o en Corregidora 22, Centro, Cuauhtémoc, CDMX,
06060, donde también podrá adquirir partes, componentes,
consumibles y accesorios. Incluye los gastos de transportación
del producto que deriven de su cumplimiento de su red de
servicio. Tel. 800-018-7873. Made in/Hecho en China.
Importador Truper, S.A. de C.V. Parque Industrial 1, Parque
Industrial Jilotepec, Jilotepec, Edo. de Méx. C.P. 54257, Tel. 761
782 9100. 02-2022
Sello del establecimiento comercial.
Fecha de entrega:
Reemplazo de la punta
Cautín
tipo pistola
INSTRUCTIVO
Características eléctricas:
127 V~ 60 Hz 40 W
Tipo de sujeta-cables tipo: Y
ATENCIÓN
Durante el primer uso, el cautín puede producir humo. Esto
es debido a que la grasa utilizada en su fabricación se quema.
Esto es normal y debería durar solamente 10 minutos
aproximadamente. No es dañino para el producto o para el
usuario.
Lugares donde hacer válida la garantía
BAJA CALIFORNIA |
SUCURSAL TIJUANA
AV. LA ENCANTADA, LOTE #5,
PARQUE INDUSTRIAL EL
FLORIDO II, C.P 22244,
TIJUANA, B.C.
TEL.: 66 4969 5100
CHIHUAHUA | SUCURSAL
CHIHUAHUA
AV. SILVESTRE TERRAZAS
#128-11, PARQUE INDUSTRIAL
BAFAR, CARRETERA MÉXICO
CUAUHTÉMOC,
C.P. 31415, CHIHUAHUA, CHIH.
TEL. 61 4434 0052
COAHUILA | SUCURSAL
TORREÓN
CALLE METAL MECÁNICA #280,
PARQUE INDUSTRIAL ORIENTE,
C.P. 27278, TORREÓN, COAH.
TEL.: 87 1209 6823
ESTADO DE MÉXICO |
SUCURSAL CENTRO
JILOTEPEC
AV. PARQUE INDUSTRIAL #1-A,
C.P. 54257, JILOTEPEC, EDO. DE
MÉX. TEL: 76 1782 9101 EXT.
5728 Y 5102
JALISCO | SUCURSAL
GUADALAJARA
AV. ADOLFO B. HORN # 6800,
COL: SANTA CRUZ DEL VALLE,
C.P.: 45655, TLAJOMULCO DE
ZUÑIGA, JAL. TEL.: 33 3606
5285 AL 90
Si el cable de alimentación está dañado, debe ser sustituido
por el fabricante o su agente de servicio o por una persona
con conocimientos similares para evitar riesgos.
Mantenimiento
El cautín puede limpiarse con un paño húmedo utilizando
pequeñas cantidades de detergente líquido. No sumerja
nunca la unidad en líquido ni permita que entre ningún
líquido en la carcasa de la estación. No utilice nunca
disolventes para limpiar la carcasa.
Limpieza general
Punta Tuerca estriada Cautín
NUEVO LEÓN | SUCURSAL
MONTERREY
CARRETERA LAREDO #300, 1B
MONTERREY PARKS, COLONIA
PUERTA DE ANÁHUAC, C. P.
66052, ESCOBEDO, NUEVO
LEÓN, N.L. TEL.: 81 8352 8791 /
81 8352 8790
PUEBLA | SUCURSAL PUEBLA
AV PERIFÉRICO #2-A, SAN
LORENZO ALMECATLA, C.P.
72710, CUAUTLACINGO, PUE.
TEL.: 22 2282 8282 / 84 / 85 /
86
SINALOA | SUCURSAL
CULIACÁN
AV. JESÚS KUMATE SUR #4301,
COL. HACIENDA DE LA MORA,
C.P. 80143, CULIACÁN, SIN.
TEL.: 66 7173 9139 / 66 7173
8400
TABASCO | SUCURSAL
VILLAHERMOSA
CALLE HELIO LOTES 1, 2 Y 3 MZ.
#1, COL. INDUSTRIAL, 2A
ETAPA, C.P. 86010,
VILLAHERMOSA, TAB.
TEL.: 99 3353 7244
YUCATÁN | SUCURSAL
MÉRIDA
CALLE 33 #600 Y 602,
LOCALIDAD ITZINCAB Y
MULSAY, MPIO. UMÁN, C.P.
97390, MÉRIDA, YUC.
TEL.: 99 9912 2451
Instructivo de operación
ENCENDIDO / APAGADO
1 minuto / 5 minutos
Antes de utilizar la pistola, asegúrese de que el voltaje y la
frecuencia de la corriente eléctrica coinciden con la
información técnica anterior.
Conecte el enchufe a una toma de corriente adecuada.
NOTA
Calentar la pieza con el
soldador.
Aplique soldadura a
base de colofonia a la
pieza y derrítala con el
soldador.
Espere a que la
soldadura se enfríe y
se endurezca antes de
mover la pieza soldada.
No lime la punta de soldar, o se dañará. Nunca toque la punta
de soldar caliente. Permita que el cautín se enfríe después de
usarlo. El cautín no debe sumergirse en agua. Durante las
pausas, el cautín debe colocarse en la rejilla de sujeción.
Sujete la pistola por el mango, coloque la punta de soldadura
en el punto que desea soldar. Presione el gatillo y la luz LED
se encenderá. Estañe la punta de soldar caliente con soldadura;
limpie el exceso de soldadura con una esponja o paño húmedo.
La pistola debe usarse en ciclos que se encienda 1 minuto y se
apaga en 5 minutos. Después de usarla, desconecte la pistola
de la fuente de alimentación. Limpie la punta de soldar en la
esponja húmeda después de cada soldadura.
NOTA
IMPORTANT:
PLEASE ENSURE TO PRINT INSTRUCTION SHEET ON REGULAR
PAPER 21,2 cm x 21,5 cm IN BLACK INK
FRONT
Instructive
Fold the instructive
sheet and put it inside
the packaging.
INSTRUCTIVE
Lea cuidadosamente las instrucciones de operación y
mantenimiento antes de usar su cautín. Un mal uso de la
herramienta puede causar serios accidentes, como:
quemaduras en el cuerpo y ojos, choques eléctricos, daños a
la salud, daños a la herramienta, provocar fuego o explosiones.
Algunos cautines TRUPER® incluyen soldadura. Esta soldadura
puede contener componentes tóxicos, no respire el humo o
polvo que provenga de esta soldadura. El aparato no está
previsto para su utilización por personas (incluidos los niños)
cuyas capacidades físicas, sensoriales o mentales son
reducidas, o por personas sin experiencia o conocimientos,
salvo si éstas se encuentran vigiladas por una persona
responsable de su seguridad o han recibido instrucciones
previas sobre el uso del aparato. Los niños deben de estar
bajo supervisión para cerciorarse de que no jueguen con el
aparato.
ATENCIÓN
FOLIO 14953-R1 / LEVEL B / VERSION 02-2022 / PAGE 9 of 12

Changing or cleaning the tip should only be done when the
soldering iron is at or below room temperature.
The tip can be changed or replaced by simply unscrewing the
knurled nut on the resistor. The soldering iron must be turned
off and allowed to cool before and during this operation, as
damage can occur if the system is left on without the tip
inserted. After removing the tip, remove any oxide dust that
may have formed in the tip retention area of the soldering
iron. Be careful not to get dust in your eyes. Replace the tip
and thread the barrel retaining knurled nut using only hand
pressure to tighten. Pliers should only be used to tighten the
nut if it loosens when the iron is hot to avoid burning your
fingers. Do not over-tighten as this will damage the element.
This guarantee applies to:
Model: CAU-50 Code: 102142
Guarantee Policy
Warranty. Duration: 1 year. Coverage: Parts, components, and
labor against defects in workmanship or operation, except if
used in other than normal conditions; when it was not operated
according to instructions; was altered or repaired by personnel
not authorized by Truper®. To make the guarantee effective,
present the product, sealed policy or invoice or receipt or
receipt, at the establishment where it was purchased or at
Corregidora 22, Centro, Cuauhtémoc, CDMX, 06060, where you
can also purchase parts, components, consumables and
accessories. It includes the transportation expenses of the
product that derive from its fulfillment of its service network.
call 800-690-6990. Made in China. Imported by Truper, S.A.
de C.V. Parque Industrial 1, Parque Industrial Jilotepec,
Jilotepec, Edo. de Méx. C.P. 54257.
02-2022
Stamp of the commercial establishment.
Date of delivery:
Tip replacement
Soldering iron gun
INSTRUCTIVE
Electrical characteristics:
127 V~ 60 Hz 40 W
Type of cable tie type: Y
Places to validate the warranty
BAJA CALIFORNIA |
SUCURSAL TIJUANA
AV. LA ENCANTADA, LOTE #5,
PARQUE INDUSTRIAL EL
FLORIDO II, C.P 22244,
TIJUANA, B.C.
TEL.: 66 4969 5100
CHIHUAHUA | SUCURSAL
CHIHUAHUA
AV. SILVESTRE TERRAZAS
#128-11, PARQUE INDUSTRIAL
BAFAR, CARRETERA MÉXICO
CUAUHTÉMOC,
C.P. 31415, CHIHUAHUA, CHIH.
TEL. 61 4434 0052
COAHUILA | SUCURSAL
TORREÓN
CALLE METAL MECÁNICA #280,
PARQUE INDUSTRIAL ORIENTE,
C.P. 27278, TORREÓN, COAH.
TEL.: 87 1209 6823
ESTADO DE MÉXICO |
SUCURSAL CENTRO
JILOTEPEC
AV. PARQUE INDUSTRIAL #1-A,
C.P. 54257, JILOTEPEC, EDO. DE
MÉX. TEL: 76 1782 9101 EXT.
5728 Y 5102
JALISCO | SUCURSAL
GUADALAJARA
AV. ADOLFO B. HORN # 6800,
COL: SANTA CRUZ DEL VALLE,
C.P.: 45655, TLAJOMULCO DE
ZUÑIGA, JAL. TEL.: 33 3606
5285 AL 90
If the power cord is damaged, it must be replaced by the
manufacturer or its service agent or a person with similar
knowledge to avoid risks.
Maintenance
The soldering iron can be cleaned with a damp cloth using
small amounts of liquid detergent. Never immerse the unit in
liquid or allow any liquid to enter the station housing. Never
use solvents to clean the case.
General cleaning
NUEVO LEÓN | SUCURSAL
MONTERREY
CARRETERA LAREDO #300, 1B
MONTERREY PARKS, COLONIA
PUERTA DE ANÁHUAC, C. P.
66052, ESCOBEDO, NUEVO
LEÓN, N.L. TEL.: 81 8352 8791 /
81 8352 8790
PUEBLA | SUCURSAL PUEBLA
AV PERIFÉRICO #2-A, SAN
LORENZO ALMECATLA, C.P.
72710, CUAUTLACINGO, PUE.
TEL.: 22 2282 8282 / 84 / 85 /
86
SINALOA | SUCURSAL
CULIACÁN
AV. JESÚS KUMATE SUR #4301,
COL. HACIENDA DE LA MORA,
C.P. 80143, CULIACÁN, SIN.
TEL.: 66 7173 9139 / 66 7173
8400
TABASCO | SUCURSAL
VILLAHERMOSA
CALLE HELIO LOTES 1, 2 Y 3 MZ.
#1, COL. INDUSTRIAL, 2A
ETAPA, C.P. 86010,
VILLAHERMOSA, TAB.
TEL.: 99 3353 7244
YUCATÁN | SUCURSAL
MÉRIDA
CALLE 33 #600 Y 602,
LOCALIDAD ITZINCAB Y
MULSAY, MPIO. UMÁN, C.P.
97390, MÉRIDA, YUC.
TEL.: 99 9912 2451
Heat the part with the
soldering iron.
Apply rosin-based solder
to the part and melt it
with the soldering iron.
Wait for the solder to cool
and harden before moving
the solder.
The gun should be used in cycles that are always on 1 minute
and off 5 minutes or less. After use, disconnect the gun from
the power source. Clean the soldering tip on the damp sponge
after each soldering.
IMPORTANT:
PLEASE ENSURE TO PRINT INSTRUCTION SHEET ON REGULAR
PAPER 21,2 cm x 21,5 cm IN BLACK INK
BACK
Read the operating and maintenance instructions carefully
before using your soldering iron. Misuse of the tool can
cause serious accidents, such as: burns to the body and
eyes, electric shocks, damage to health, damage to the
tool, cause fire or explosions. Some TRUPER® soldering
irons include solder. This solder may contain toxic
components, do not breathe the smoke or dust that comes
from this solder. The appliance is not intended for use by
people (including children) whose physical, sensory or
mental capacities are reduced, or by people without
experience or knowledge, unless they are supervised by a
person responsible for their safety or have received
instructions. prior information on the use of the appliance.
Children must be supervised to make sure they do not play
with the appliance.
CAUTION
NOTICE
Do not file the soldering tip, or it will be damaged. Never
touch the hot soldering tip. Allow soldering iron to cool after
use. The soldering iron must not be immersed in water.
During breaks, the soldering iron should be placed on the
holding rack.
NOTICE
“Condential Information property of Truper, S.A. de C.V."
Instructive
Fold the instructive
sheet and put it inside
the packaging.
INSTRUCTIVE
Tip Knurled nut Soldering iron gun
CAUTION
During first use, the soldering iron may produce smoke. This
is because the grease used in its manufacture is burned. This
is normal and should only last about 10 minutes. It is not
harmful to the product or the user.
Operating instructions
ON / OFF
1 minute / 5 minutes
Before using the gun, make sure that the voltage and
frequency of the electrical current match the technical
information above.
Connect the plug to a suitable outlet.
NOTE
Hold the gun by the handle, place the welding tip on the point
you want to weld. Press the trigger and the LED light will turn
on. Tin the hot soldering tip with solder; Wipe off excess solder
with a damp sponge or cloth.
FOLIO 14953-R1 / LEVEL B / VERSION 02-2022 / PAGE 10 of 12
-
 1
1
-
 2
2
-
 3
3


en otros idiomas
- English: Truper CAU-50 Owner's manual
Artículos relacionados
Otros documentos
-
Volteck CAGU-4 El manual del propietario
-
 Volteck Lait ARB-100S El manual del propietario
-
 Volteck Lait ARB-002L El manual del propietario
-
-
URREA CAU50 El manual del propietario
-
Surtek 112504 El manual del propietario
-
 Volteck Lait PLA-214L El manual del propietario
-
-
 Volteck Lait EMP-112S El manual del propietario
-
 Volteck Lait COL-101L El manual del propietario


