HoMedics SS-7000 Instruction book
- Categoría
- Relojes de alarma
- Tipo
- Instruction book

© 2006 HoMedics, Inc. y sus compañías afiliadas, reservados todos los derechos.
HoMedics® es una marca registrada de HoMedics, Inc. y sus compañías afiliadas.
iSoundSpa™ es una marca comercial de HoMedics Inc. y sus compañías afiliadas.
Reservados todos los derechos.
iPod es una marca registrada de Apple Computer, Inc., registrada en los EE.UU. y otros países.
IB-SS7000E
GARANTÍA LIMITADA POR UN AÑO
(Válida únicamente en los EE.UU.)
HoMedics vende sus productos con la intención de que no tengan defectos de fabricación ni de
m
ano de obra por un plazo de un año a partir de la fecha de compra original, con las siguientes
excepciones. HoMedics garantiza que sus productos no tendrán defectos de material ni de
mano de obra bajo condiciones de uso y servicio normales.
P
ara obtener servicio para su producto HoMedics, envíe por correo el producto y su recibo de
compra fechado (como comprobante de compra), con franqueo pago, a la siguiente dirección:
HoMedics Service Center, Dept. 168, 3000 Pontiac Trail, Commerce Township, MI 48390. No se
aceptarán pagos contra reembolso.
HoMedics no autoriza a nadie, incluyendo, pero sin limitarse a, distribuidores, posteriores
consumidores compradores del producto a un distribuidor, o compradores remotos, a obligar
a HoMedics de forma alguna más allá de las condiciones aquí establecidas.
La garantía de este producto no cubre daños causados por uso inadecuado o abuso, accidente,
conexión de accesorios no autorizados, alteración del producto, instalación inadecuada,
reparaciones o modificaciones no autorizadas, uso inadecuado de la fuente de
energía/electricidad, cortes de energía, caída del producto, funcionamiento incorrecto o daño de
una pieza de funcionamiento debido al no cumplimiento del mantenimiento recomendado por el
fabricante, daños durante el transporte, robo, descuido, vandalismo, condiciones climáticas,
pérdida de uso en el período durante el cual el producto está en una instalación de reparación
o a la espera de piezas o reparación, o cualquier otra condición, sin importar cual sea, que se
encuentre fuera del control de HoMedics.
Esta garantía es válida únicamente si el producto es comprado y operado en los Estados
Unidos de América. Un producto que requiera modificaciones o adaptación para habilitar
su funcionamiento en cualquier país que no sea aquél para el que fue diseñado, fabricado,
aprobado y/o autorizado, o la reparación de productos dañados por estas modificaciones
no
están cubiertos bajo esta garantía.
LA GARANTÍA AQUÍ ESTABLECIDA SERÁ LA ÚNICA Y EXCLUSIVA GARANTÍA. NO HABRÁ
NINGUNA OTRA GARANTÍA EXPRESA NI IMPLÍCIT
A, INCLUYENDO NINGUNA GARANTÍA
DE COMERCIALIZACIÓN O APTITUD NI NINGUNA OTRA OBLIGACIÓN POR PARTE DE
LA COMPAÑÍA CON RESPECTO A PRODUCTOS CUBIERTOS POR ESTA GARANTÍA.
HOMEDICS NO TENDRÁ RESPONSABILIDAD ALGUNA POR NINGÚN DAÑO INCIDENTAL,
CONSECUENTE NI ESPECIAL
. BAJO NINGÚN CONCEPTO EST
A GARANTÍA REQUERIRÁ
MÁS QUE LA REPARACIÓN O CAMBIO DE ALGUNA PIEZA O PIEZAS QUE SE HALLEN
DEFECTUOSAS DENTRO DEL PERÍODO DE VIGENCIA DE ESTA GARANTÍA. NO SE
EFECTU
ARÁN REEMB
OLSOS. SI NO HA
Y PIEZAS DE REPUESTO DISPONIBLES PARA
L
OS
MATERIALES DEFECTUOSOS, HOMEDICS SE RESERVA EL DERECHO DE REALIZAR
SUSTITUCIONES EN VEZ DE REPARAR O CAMBIAR.
Esta garantía no se extiende a la compra de productos abiertos, usados, embalados otra vez
y
o
abiertos y vueltos a cerrar, incluyendo entre otras cosas la venta de dichos productos en
sitios de remate por Internet y/o la venta de dichos productos por revendedores o mayoristas.
Todas y cada una de las garantías cesarán y terminarán inmediatamente con respecto
a
cualquier producto o pieza del mismo que estén alterados o modificados sin el consentimiento
previo explícito y por escrito de HoMedics.
Esta garantía le proporciona derechos legales específicos. Es posible que usted tenga derechos
adicionales que pueden variar de un estado a otro. Debido a las regulaciones de ciertos
estados, es posible que algunas de las limitaciones y exclusiones no se apliquen en su caso.
HoMedics Service Center
1.800.466.3342
8:30 – 5:00 p.m. (EST) M – F
Dirección postal:
HoMedics
Consumer Relations
Service Center Dept. 168
3000 Pontiac Trail
Commerce Township, MI
48390
Correo electrónico:
Instruction Manual and
Warranty Information
SS-7000
El manual en español empieza
a la página 19
SoundSoundSpa
™
sound machine | projection alarm clock radio | docking station for iPod

2
3
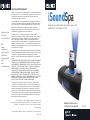
Create your perfect sleep environment.
Thank you for purchasing iSoundSpa, the HoMedics ultimate sound dock and
relaxation machine. This, like the entire HoMedics product line, is built with high-
quality craftsmanship to provide you years of dependable service. We hope you will
find it to be the finest product of its kind.
iSoundSpa helps create your perfect sleep environment. Fall asleep to any of the six
calming sounds, then wake to iPod, sounds, radio, or beep tone. iSound Spa can
also mask distractions to improve your concentration while you read, work or study.
IMPORTANT SAFETY INSTRUCTIONS:
When using an electrical appliance, basic precautions should always be followed,
including the following:
READ ALL INSTRUCTIONS BEFORE USING
DANGER
- To reduce the risk of electric shock:
• Always unplug the appliance from the electrical outlet immediately after using
and before cleaning.
• Do not reach for an appliance that has fallen into water. Unplug it immediately.
• Do not place or store appliance where it can fall or be pulled into a tub or sink.
Do not place in or drop into water or other liquid.
WARNING
- To reduce the risk of burns, fire, electric shock or injury to persons:
• Close supervision is necessary when this appliance is used by or near children,
invalids or disabled persons.
• Use this appliance only for its intended use as described in this manual. Do not
use attachments not recommended by HoMedics; specifically any attachments
not provided with the unit.
• Never operate this appliance if it has a damaged cord, plug, cable or housing.
If it is not working properly, if it has been dropped or damaged, return it to
Homedics Service Center for examination and repair.
• Keep cord away from heated surfaces.
• Never drop or insert any object into any opening.
• Do not operate where aerosol (spray) products are being used or where oxygen
is being administered.
• Do not carry this appliance by supply cord or use cord as
handle.
• To disconnect, remove plug from outlet.
• This appliance is designed for indoor use only. Do not use
outdoors.
• Only set on dry surfaces. Do not place on surface wet from
water or cleaning solvents.
SAVE THESE INSTRUCTIONS
C
C
a
a
u
u
t
t
i
i
o
o
n
n
–
–
P
P
l
l
e
e
a
a
s
s
e
e
r
r
e
e
a
a
d
d
a
a
l
l
l
l
i
i
n
n
s
s
t
t
r
r
u
u
c
c
t
t
i
i
o
o
n
n
s
s
c
c
a
a
r
r
e
e
f
f
u
u
l
l
l
l
y
y
b
b
e
e
f
f
o
o
r
r
e
e
o
o
p
p
e
e
r
r
a
a
t
t
i
i
n
n
g
g
.
.
• Never leave the appliance unattended, especially if
children are present.
• Never cover the appliance when it is in operation.
• This unit should not be used by children without
adult supervision.
• Always keep the cord away from high temperature
and fire.
• Do not lift, carry, hang, or pull the product by the
power cord.
• If the adaptor sustains damage, you must stop using
this product immediately and contact the HoMedics Service
Center. (See the warranty section for the HoMedics address.)
Caution: All
servicing of
this product
must be
performed by
authorized
HoMedics
Service
Personnel only.

pm
al1
al2
i
Pod
radio
aux
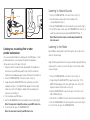
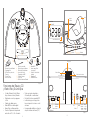
Alarm Icons
5
4
• 6 Nature Sounds: Night, Ocean, Brook,
Sunrise, Rain and Water Fall
• Charging docking station for iPod
• Premium quality speakers
• AM/FM radio with digital tuner
• Dual Alarm with Snooze
• Nap – Auto timer options 15, 30, 45
or 60 minutes
• Four wake options - iPod, radio,
beep or nature sound
• Easy-to-read clock with
LCD display
• Projection feature projects
time on the wall or ceiling in
a soothing blue light
• Factory preset time with DST
adjustment feature
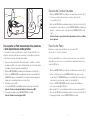
Figure 1
Figure 4
Figure 3
PM Indicator
Audio Mode Icons
Focus Knob
T
ime R
otation Knob
Alarm Settings
Projector On/Off
Dimmer Hi/Lo
DST
AM/FM
iSoundSpa Clock Radio Features
Projector Tube
AM/FM Antennas
Figure 2
Time Set
DC Jack
Aux
Insert
Locking Tab
1
2
3
12
4
5
6
14
11
10
9
8
7
13
15 16
17
1 Set +/-
2 Nature Sound Buttons
3 iPod Dock
4 LED Timer& Nap Lights
5 Timer Button
6 Audio Button
7 Power Button
8 Alarm Set Button
9 Alarm Mode Button
10 LED Wake Mode Lights
11 Volume Knob
12 Projection
13 Snooze/Nap Button
14 LCD Display
15 iPod Inserts (7 Included)
16 Aux Connection Cable
17 DC Adaptor
18 AM Antenna
Recess Dock
2
18

Getting Started
Setting Clock Time
1. Press the TIME SET BUTTON located on the back of the unit (Fig. 4);
hour digit will begin flashing. Turn the SET +/- KNOB until the current
hour is displayed. Remember to set the correct AM or PM (an icon in
the upper left of the time display is the PM INDICATOR; there is no AM
indicator) (Fig. 2).
2. Press the TIME SET BUTTON again; minute digits will begin flashing.
Turn the SET +/- KNOB until the current minute is displayed.
3. Press the TIME SET BUTTON again to exit the clock setting mode or
after 5 seconds the display will stop flashing to indicate the time is set.
Replace Backup Battery
One lithium backup battery is already installed prior to shipping.There is a
plastic strip under the lithium battery to prevent battery drain in shipping.
Remove the plastic strip before setting clock time.
1. Make sure the DC adaptor is connected. Otherwise the time setting
may be lost during battery replacement.
2. Open the battery compartment cover located on the bottom of the unit.
3. Insert one 3-volt lithium battery (Model#: CR2025), checking that the
positive polarity faces toward you.
4. Close the compartment cover.
6 7
Before You Begin
The iSoundSpa uses a backup battery system to provide continuous
alarm and clock settings in the event of a power failure. When the Backup
Battery is installed – In the event of a power failure or the DC cord is
accidentally disconnected, the LCD display will not remain lit, but the
current time and alarm time settings will be temporarily maintained.
One lithium backup battery is already installed prior to shipping. There is a
plastic strip under the lithium battery to prevent battery drain in shipping.
Remove the plastic strip before setting clock time.

8 9
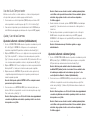
Charging your iPod
®
1. Select the correct insert for your particular iPod
®
model from among the
7 different inserts included (Fig. 1). Each insert is labeled with the name
and/or size of an iPod model. Place the selected insert in the docking area
so that the iPod 30-pin connector passes through the opening in the insert.
Note: Make sure you are using the correct insert for your iPod
®
(see chart) and that it is properly docked into the iSoundSpa.
Failure to do so may damage your iPod
®
.
WARNING: INSERTS ARE DESIGNED FOR APPLE iPOD MUSIC
PLAYERS ONLY. ATTEMPTING TO ATTACH OR FORCE ANY
NON- iPOD MUSIC PLAYER INTO ANY OF THE ENCLOSED INSERTS
WILL
DAMAGE AND EVEN DESTROY YOUR DEVICE.
2. Slide locking tab into front recess and gently press the insert downward
into the dock (Fig. 3).
3. Carefully place your iPod into the docking area so that the 30-pin
connector in the dock is fully connected to the 30-pin socket on the
bottom of your iPod. (The iPod must not be in a case or “skin”). The
blue LED light under the insert will illuminate to indicate the iPod is
docked properly.
Note: When you dock your iPod
®
it recharges (until fully charged).
4. To remove/replace an insert, first remove your iPod, then grip the insert
and pull gently upwards.
Important: The iPod
®
Shuffle will NOT charge or dock.
Listening to Your iPod
®
1. Press the POWER BUTTON on the iSoundSpa to turn it on (Fig. 1).
2. Toggle through the AUDIO BUTTON to play the iPod (Fig. 1). The IPOD
ICON will appear on the LCD display in the lower right hand corner to
indicate that the iPod mode has been selected (Fig. 2).
Note: When the iPod is docked and in standby mode, it will
automatically begin playing once the iPod mode is selected on the
unit.
3. Press the PLAY/PAUSE button on your iPod to pause play; press again
to resume play.
4. Turn the VOLUME KNOB on the unit to adjust the system volume (Fig. 1).
5. Press the or on your iPod to go to the next or previous track.
6. To turn off the unit, press the POWER BUTTON. The iPod will continue
charging in the dock.
Insert Label
iPods
Shuffle Rest
iPod Shuffle (iSoundSpa will not charge the iPod Shuffle)
iPod mini
iPod mini
iPod nano
iPod nano
iPod w/video (30GB)
iPod w/video(30GB)
iPod w/video (60 & 80GB)
iPod w/video(60GB, 80GB)
Thin iP
ods
3G iPod(10GB, 15GB, 20GB), 4G iPod(20GB), U2 iPod(20GB),
iPod photo(20GB,30GB), Color U2 iPod(20GB), Color Display(20GB)
Thick iPods
3G iPod(30GB,40GB), 4G iPod(40GB), iPod photo(40GB,60GB),
Color Display (60GB)

10
Listening to a non-docking iPod
®
or other
portable audio devices
If you are using an iPod without a docking port, other MP3 player, or other
portable audio device, you can play it through the iSoundSpa via
the Aux Jack located on the back of the unit.
1. Plug one end of the Connection Cable (included) into the headphone or
line-out jack on your MP3 device and the other end of the Connection
Cable into the iSoundSpa Aux jack, located on the back of the unit (Fig. 5).
2. Press the POWER BUTTON on the unit to turn it on (Fig. 1).
3. Toggle through the AUDIO BUTTON on the unit until you reach the
auxiliary mode (Fig. 1). The AUX ICON will appear in the lower right
hand corner on the LCD display to indicate that the auxiliary mode
has been selected (Fig. 2).
4. Turn on and play your MP3 device.
5. Use the VOLUME KNOB on the unit to adjust the system volume (Fig. 1).
Note: You may need to adjust the volume on your MP3 device too.
6. To turn off the unit, press the POWER BUTTON.
Note: You also need to turn off your MP3 device too.
Listening to Nature Sounds
1. Press the POWER BUTTON on the unit to turn it on (Fig. 1).
2. Select the nature sound you wish to listen to and press the
corresponding button (Fig. 1).
3. Turn the VOLUME KNOB on the unit to adjust the system volume (Fig. 1).
4. To turn off the nature sounds, press the POWER BUTTON to turn it off, or
switch the audio mode by pressing the AUDIO BUTTON (Fig. 1).
Note: When the unit is turned on, it will always default to the
last mode used.
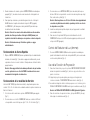
Listening to the Radio
Extend FM wire antenna fully for best FM reception (do not strip, alter or
attach to other antennas).
Snap the AM loup antenna into the base provided. Next, plug the AM loop
antenna into the connecter located on the back of the unit for best AM
reception (Fig 5a).
1. Press the POWER BUTTON on the unit to turn it on (Fig. 1).
2. Toggle through the AUDIO BUTTON to play the radio (Fig. 1). The
RADIO ICON will appear in the lower right hand corner on the LCD
display to indicate that the radio is on (Fig. 2).
3. Slide the AM/FM SWITCH located on the back of the unit to select
AM or FM band (Fig. 4).
4. Turn the SET +/- KNOB on the unit to tune in the desired station (Fig. 1).
5. Turn the VOLUME KNOB on the unit to adjust the system volume (Fig. 1).
6. To turn off the unit, press the POWER BUTTON.
11
Figure 5
iPod
®
Shuffle
C
onnection
Cable
Aux
Figure 5a

Using Auto-Timer
While listening to your iPod, the nature sounds, or the radio, you may set a
timer so the unit will automatically turn off.
1. Toggle through the TIMER BUTTON until the corresponding blue LED light
illuminates next to the time of your choice, 15, 30, 45, or 60 minutes (Fig. 1).
2. To cancel the timer, toggle through the TIMER BUTTON until the blue
LED light is not illuminated, which indicates you are at the off position.
Setting And Using The Alarms
Setting Alarm1 or Alarm2 (Individually)
1. Slide the ALARM SWITCH located on the back of the unit to AL1or
AL2 (Fig. 4). The AL1 or AL2 ICON will appear in the upper left hand
corner on the LCD display to indicate which alarm is activated (Fig. 2).
2. Press the AL SET BUTTON twice; hour digits will begin flashing (Fig. 1).
Turn the SET +/- KNOB until the desired hour is displayed (Fig. 1).
Remember to set the correct AM or PM (an icon to the left of the time
display is the PM INDICATOR; there is no AM indicator) (Fig. 2).
3. Press the AL SET BUTTON again; minute digits will begin flashing. Turn
the SET +/- KNOB until the desired minute is displayed.
4. Press the AL SET BUTTON again to exit the alarm setting mode or after
5 seconds the display will stop flashing to indicate the alarm is set.
Note: You can press the AL SET BUTTON at any time to review the
alarm setting.
5. Toggle through the AL MODE BUTTON until the corresponding blue
LED light illuminates next to the wake mode of your choice, iPod,
sound, radio, or beep (Fig. 1).
Note: To wake to iPod, your iPod must be properly docked in the
unit, or it will default to beep wake mode.
Note: When using the sound mode, the unit will set to the last
sound you listened to. If you wish to change it, first, turn the power
on, then press the sound you wish to wake to. Lastly, turn the
power off.
6. When the alarm is sounding, press the POWER BUTTON on the unit to
turn the alarm OFF (Fig. 1). The alarm will come on again the next day
at the same time.
7. To stop the alarm from coming on the next day, slide the ALARM SWITCH
located on the back of the unit to the OFF position. The AL1 or AL2 ICON
will disappear on the LCD display to indicate the alarm is disarmed.
Note: If the alarm sounds for 30 minutes continuously it will
automatically turn off.
Setting Alarm1 and Alarm2 (Together)
1. Slide the ALARM SWITCH located on the back of the unit to
BOTH (Fig. 4). The AL1 and AL2 ICON will appear on the LCD
display to indicate both alarms are activated (Fig. 2).
Note: You cannot change the alarm time when BOTH is selected.
If you need to change the alarm time for either alarm, follow step 1
under Setting Alarm 1 or Alarm 2 (Individually).
2. Toggle through the AL MODE BUTTON until the corresponding blue LED
light illuminates next to the wake mode of your choice, iPod, sound, radio,
or beep (Fig. 1). Both AL1 & AL2 must wake to the same mode.
Note: To wake to iPod, your iPod must be properly docked in the
unit, or it will default to beep wake mode.
Note: When using the sound mode, the unit will set to the last
sound you listened to. If you wish to change it, first, turn the
power on, then press the sound you wish to wake to. Lastly,
turn the power off.
12 13

3. When the alarm is sounding, press the POWER BUTTON on the unit
to turn the alarm OFF (Fig. 1). The alarm will come on again the next day
at the same time.
4. To stop the alarm from coming on the next day, slide the ALARM
SWITCH located on the back of the unit to the OFF position. The AL1
and AL2 ICONS will disappear on the LCD display to indicate the
alarms are disarmed.
Note: If one of the alarm users still needs their alarm set, you will
need to slide the ALARM SWITCH located on the back of the unit to
the alarm that corresponds to their wake time.
Note: If the alarm sounds for 30 minutes continuously it will
automatically turn off.
Snooze Operation
1. Press the SNOOZE/NAP BUTTON on the unit while the alarm is sounding
(Fig. 1). The alarm will go off temporarily and will go on again in approx.
9 minutes. You may use this feature until you turn the alarm off.
Note: To turn off the snooze function prior to the alarm activating,
press the POWER BUTTON twice. The alarm will come on again the
next day at the same time.
Nap Operation
The NAP TIMER FUNCTION will wake you after a nap of 15, 30, 45, or 60
minutes without the need to change your regular Alarm 1 or Alarm 2 settings.
1. If the system is playing, press the POWER BUTTON to off (Fig. 1).
2. Toggle through the SNOOZE/NAP BUTTON until the corresponding
blue LED light illuminates next to the time of your choice, 15, 30, 45,
or 60 minutes (Fig. 1).
3. Toggle through the AL MODE BUTTON until the corresponding blue
LED light illuminates next to the wake mode of your choice, iPod,
sound, radio, or beep (Fig. 1).
Note: To wake to iPod, your iPod must be properly docked in the
unit, or it will default to beep wake mode.
4. The alarm will sound to wake you up after the selected amount of
minutes has passed.
5. To cancel the NAP TIMER, press the SNOOZE/NAP BUTTON, until the blue
LED light is not illuminated, which indicates you are at the off position.
Dimmer Control
1. Press the DIMMER HI/LO BUTTON located on the back of the unit to
adjust the backlight intensity of the LCD display & the lights located
in the docking area (Fig. 4).
Using the Projection Feature
1. To turn on the projection feature, press the PROJECTOR ON/OFF
BUTTON located on the back of the unit (Fig. 4). The time is now
projected on the wall or ceiling.
2. The angle of the projector can be adjusted to angle on the ceiling or wall
by moving the PROJECTOR TUBE forward or backward (Fig. 4).
3. To turn the angle of the time that appears on the wall of ceiling,
rotate the TIME ROTATION KNOB until you have reached your
desired result (Fig. 4).
Note: The TIME ROTATION KNOB will rotate up to 350 degrees.
4. To focus the time on the wall or ceiling rotate the FOCUS KNOB until
you have reached your desired result (Fig. 4).
14 15

Maintenance
To Store
You may leave the unit on display, or you can store it in its box
in a cool, dry place.
To Clean
Use only a soft dry cloth to clean the enclosure of the unit.
NEVER use liquids or abrasive cleaner to clean.
Modifications not authorized by the manufacturer may void users authority
to operate this device.
Note: This equipment has been tested and found to comply with the limits
for a Class B digital device, pursuant to Part 15 of the FCC Rules. These
limits are designed to provide reasonable protection against harmful
interference in a residential installation. This equipment generates, uses
and can radiate radio frequency energy and, if not installed and used in
accordance with the instructions, may cause harmful interference to radio
communications. However, there is no guarantee that interference will not
occur in a particular installation. If this equipment does cause harmful
interference to radio or television reception, which can be determined by
turning the equipment off and on, the user is encouraged to try to correct
the interference by one or more of the following measures:
• Reorient or relocate the receiving antenna.
• Increase the separation between the equipment and receiver.
• Connect the equipment into an outlet on a circuit different
from that to which the receiver is connected.
• Consult the dealer or an experienced radio/TV technician for help
Note: The manufacturer is not responsible for any radio or TV interference
caused by unauthorized modifications to this equipment. Such
modifications could void the users authority to operate the equipment.
16 17

©2006 HoMedics, Inc. and its affiliated companies, all rights reserved.
HoMedics® is a registered trademark of HoMedics, Inc. and its affiliated companies.
iSoundSpa™ is a trademark of HoMedics, Inc. and its affiliated companies.
All rights reserved.
iPod is a trademark of Apple Computer, Inc., registered in the U.S. and other countries.
IB-SS7000E
ONE YEAR LIMITED WARRANTY
HoMedics sells its products with the intent that they are free of defects in manufacture and
workmanship for a period of one year from the date of original purchase, except as noted
below. HoMedics warrants that its products will be free of defects in material and
workmanship under normal use and service.
To obtain warranty service on your HoMedics product, mail the product and your dated sales
receipt (as proof of purchase), postpaid, to the following address: HoMedics Service Center,
Dept. 168, 3000 Pontiac Trail, Commerce Township, MI 48390. No COD's will be accepted.
HoMedics does not authorize anyone, including, but not limited to, Retailers, the
subsequent consumer purchaser of the product from a Retailer or remote purchasers, to
obligate HoMedics in any way beyond the terms set forth herein.
This warranty does not cover damage caused by misuse or abuse; accident; the
attachment of any unauthorized accessory; alteration to the product; improper installation;
unauthorized repairs or modifications; improper use of electrical/power supply; loss of
power; dropped product; malfunction or damage of an operating part from failure to
provide manufacturers recommended maintenance; transportation damage; theft; neglect;
vandalism; or environmental conditions; loss of use during the period the product is at a
repair facility or otherwise awaiting parts or repair; or any other conditions whatsoever that
are beyond the control of HoMedics.
This warranty is effective only if the product is purchased and operated in the United States of
America. A product that requires modifications or adoption to enable it to operate in any other
country than the country for which it was designed, manufactured, approved and/or
authorized, or repair of products damaged by these modifications is not covered under this
warranty.
THE WARRANTY PROVIDED HEREIN SHALL BE THE SOLE AND EXCLUSIVE WARRANTY.
THERE SHALL BE NO OTHER WARRANTIES EXPRESS OR IMPLIED INCLUDING ANY
IMPLIED WARRANTY OF MERCHANTABILITY OR FITNESS OR ANY OTHER OBLIGATION
ON THE PART OF THE COMP
ANY WITH RESPECT TO PRODUCTS COVERED BY THIS
WARRANTY. HOMEDICS SHALL HAVE NO LIABILITY FOR ANY INCIDENTAL,
CONSEQUENTIAL OR SPECIAL DAMAGES. IN NO EVENT SHALL THIS WARRANTY
REQUIRE MORE THAN THE REP
AIR OR REPLACEMENT OF ANY P
ART OR P
ARTS
WHICH ARE FOUND TO BE DEFECTIVE WITHIN THE EFFECTIVE PERIOD OF THE
WARRANTY. NO REFUNDS WILL BE GIVEN. IF REPLACEMENT PARTS FOR DEFECTIVE
MATERIALS ARE NOT AVAILABLE, HOMEDICS RESERVES THE RIGHT TO MAKE
PRODUCT SUB
STITUTIONS IN LIEU OF REP
AIR OR REPLACEMENT
.
This warranty does not extend to the purchase of opened, used, repackaged and/or
resealed products, including but not limited to sale of such products on Internet auction
sites and/or sales of such products by surplus or bulk resellers. Any and all warranties or
guarantees shall immediately cease and terminate as to any products or parts thereof
which are altered, or modified, without the prior express and written consent of HoMedics.
This warranty provides you with specific legal rights. Y
ou may have additional rights which
may vary from state to state. Because of individual state regulations, some of the above
limitations and exclusions may not apply to you.
HoMedics Service Center
1.800.466.3342
8:30 – 5:00 p.m. (EST) M – F
Mail To:
HoMedics
Consumer Relations
Ser
vice Center Dept. 168
3000 Pontiac T
rail
Commerce Township, MI
48390
e-mail:
Manual de instrucciones
e Información de garantía
SS-7000
SoundSoundSpa
™
dispositivo de sonido | radio reloj alarma de proyección |
plataforma de conexión para el iPod

20
21
Cree su ambiente perfecto para dormir.
Gracias por su compra del iSoundSpa, el más avanzado dispositivo de HoMedics
para la relajación y la conexión de sonido. Éste, al igual que toda la línea de
productos HoMedics, está fabricado con mano de obra de alta calidad para
brindarle años de servicio confiable. Esperamos que lo encuentre como el mejor
producto de su clase.
iSoundSpa ayuda a crear su ambiente perfecto para dormir. Duérmase con
cualquiera de sus seis sonidos calmantes, luego despiértese con el sonido del
iPod, del radio o del pitido. El iSoundSpa puede también encubrir distracciones
para mejorar su concentración mientras lee, trabaja o estudia.
IMPORTANTES INSTRUCCIONES DE SEGURIDAD:
Cuando se utiliza un artefacto eléctrico, siempre se deben seguir ciertas
precauciones básicas, incluyendo lo siguiente:
LEA TODAS LAS INSTRUCCIONES ANTES DE USAR
PELIGRO
- Para reducir el riesgo de choque eléctrico:
• Siempre desenchufe el artefacto del tomacorriente, inmediatamente después
de usar y antes de limpiarlo.
• No intente tomar un artefacto que haya caído al agua. Desenchúfelo de
inmediato.
• No coloque ni guarde el artefacto en donde pueda caerse o ser tirado en una
tina o pileta. No lo coloque ni lo deje caer en agua ni en ningún otro líquido.
ADVERTENCIA
- Para reducir el riesgo de quemaduras, incendio, choque eléctrico
o lesiones a las personas:
• Se requiere una supervisión estricta cuando este artefacto es usado por o cerca
de niños, personas minusválidas o incapacitadas.
• Utilice este artefacto sólo para el uso para el cual está diseñado y como se
describe en este manual. No use accesorios no recomendados por HoMedics,
específicamente ningún accesorio no proporcionado con la unidad.
• Nunca haga funcionar este aparato si tiene el cordón, el enchufe, el cable o el
armazón dañado. Si no está funcionando adecuadamente, si se ha caído
o dañado, envíelo al Centro de servicio de HoMedics para que sea examinado
y reparado.
• Mantenga el cable alejado de superficies calientes.
• Nunca lo deje caer ni inserte ningún objeto en ninguna
abertura.
• No lo haga funcionar donde se utilizan productos de rociado
por aerosol o donde se está administrando oxígeno.
• No lleve este artefacto tomado del cable, ni use el cable como
manija.
• Para desconectarlo, retire el enchufe del tomacorriente.
• Este artefacto está diseñado para uso al interior
exclusivamente. No lo use en exteriores.
• Coloque esta unidad sólo sobre superficies secas. No coloque
esta unidad sobre superficies mojadas con agua o solventes
para limpieza.
GUARDE ESTAS INSTRUCCIONES
P
P
r
r
e
e
c
c
a
a
u
u
c
c
i
i
ó
ó
n
n
-
-
L
L
e
e
a
a
t
t
o
o
d
d
a
a
s
s
l
l
a
a
s
s
i
i
n
n
s
s
t
t
r
r
u
u
c
c
c
c
i
i
o
o
n
n
e
e
s
s
c
c
o
o
n
n
a
a
t
t
e
e
n
n
c
c
i
i
ó
ó
n
n
a
a
n
n
t
t
e
e
s
s
d
d
e
e
p
p
o
o
n
n
e
e
r
r
e
e
n
n
f
f
u
u
n
n
c
c
i
i
o
o
n
n
a
a
m
m
i
i
e
e
n
n
t
t
o
o
.
.
• Nunca deje el artefacto sin vigilancia, especialmente si hay
niños presentes.
• Nunca cubra el artefacto mientras está en funcionamiento.
• Esta unidad no debe ser usada por niños sin la supervisión
de un adulto.
• Mantenga siempre el cordón alejado de temperaturas
elevadas y de llamas.
• No levante, lleve, cuelgue ni tire de la unidad tomándola
del cable de corriente
• Si el adaptador se daña, debe suspender el uso de este
aparato de inmediato y contactar el Centro de servicio
de HoMedics. (Ver la dirección de Homedics en la Sección
de Garantía).
Precaución:
Todo el
servicio de
este producto
debe ser
realizado
únicamente
por Personal
de servicio
autorizado
de HoMedics.

23
22
• 6 Sonidos Naturales: Noche, Océano,
Arroyo, Amanecer, Lluvia y Cataratas
• Plataforma de conexión y carga para
el iPod
• Parlantes de calidad superior
• Radio AM/FM con sintonía digital
• Alarma Dual con Alarma repetida
• Dormitar – Opciones de temporizador
automático de 15, 30, 45 o 60 minutos
• Cuatro opciones de despertador –
iPod, radio, pitido o sonido natural
• Reloj de fácil lectura con pantalla LCD
• La función de proyección proyecta la
hora en la pared o el cielorraso con luz
azul suave
• Hora preajustada de fábrica con función
de ajuste de Horario de Verano (DST)
Funciones del Equipo CD
y Radio Reloj Sound Spa
Figura 1
1
2
3
12
4
5
6
14
11
10
9
8
7
13
2
pm
al1
al2
i
Pod
radio
aux
Iconos de Alarma
Figura 4
Figura 3
Indicador PM
Iconos de Modo de Sonido
Perilla de Enfoque
P
erilla de r
otación de la hora
Ajustes de Alarma
Pr
oyector
Encendido
/ Apagado
(On/Off)
Reductor
de luz
Alta/Baja
(Hi/Lo)
DST
AM/FM
Tubo proyector
Antena FM/AM en aro
Figura 2
Configuración
de
la hora
Enchufe CC
Aux
Inserir
Lengüeta
de Bloqueo
Retr
oceder
Plataforma
15 16
17
18
1 Ajuste +/-
2 Botones de Sonido Natural
3 Plataforma iPod
4 LED del Timer y Luces de
Dormitar
5 Tecla del Timer
6 Botón de Sonido
7 Botón de encendido
8 Botón de Ajuste de Alarma
9 Botón de Modo de Alarma
10 Luces de Modo de
Despertador del LED
11 Perilla de Volumen
12
Proyección
13 Botón de Cabecear/Dormitar
14 Pantalla LCD
15 Insertos para el iPod
(se incluyen 7)
16 Cable de Conexión Aux
(auxiliar)
17 Adaptador CD
18
Antena AM en aro

Para Empezar
Ajuste de la Hora del Reloj
1. Oprima el BOTÓN TIME SET (ajuste de la hora), ubicado al respaldo de la
unidad (Fig. 4); el dígito de la hora empieza a destellar. Gire la perilla SET +/-
hasta que la hora actual quede en pantalla. Acuérdese de ajustar correctamente
AM o PM (el indicador de PM es un icono en la esquina superior izquierda de la
pantalla de la hora; no hay indicador de AM) (Fig. 2).
2. Oprima el BOTÓN TIME SET otra vez; los dígitos de los minutos empiezan
a destellar. Gire la perilla SET +/- hasta que los minutos actuales queden
en pantalla.
3. Oprima nuevamente el BOTÓN TIME SET para salir del modo de ajuste del reloj
o la pantalla dejará de destellar después de 5 segundos, para indicar que la
hora ha quedado ajustada
Reemplazo de la Pila de Respaldo
Una pila de litio de respaldo viene instalada de fábrica. Debajo de la batería de litio
se encuentra una cinta plástico que impide que la batería se descargue durante el
transporte. Retire la cinta plástico antes de ajuste de la hora del reloj.
1. Asegúrese de que el adaptador de CD esté conectado. De otra forma, el ajuste
de la hora puede perderse durante el reemplazo de la pila.
2. Abra la tapa del compartimiento de la pila ubicada al fondo de la unidad.
3. Inserte una pila de litio de 3 voltios (Modelo #: CR2025), asegurándose de que
la polaridad positiva quede hacia usted.
4. Cierre la tapa del compartimiento.
24 25
Antes de comenzar
El iSoundSpa emplea un sistema de pila de respaldo para proporcionar la hora y
alarma en caso de una falla del servicio de electricidad. Cuando la Pila de
Respaldo está instalada – En el caso de una falla del servicio eléctrico o si el
cordón de corriente directa viene desconectado accidentalmente, la pantalla LCD
no permanecerá encendida, pero la hora y el ajuste de alarma actual permanecen
temporalmente activos.
Una pila de litio de respaldo viene instalada de fábrica. Debajo de la batería de litio
se encuentra una cinta plástico que impide que la batería se descargue durante el
transporte. Retire la cinta plástico antes de ajuste de la hora del reloj.

26 27
Para cargar su iPod
®
1. Seleccione el inserto correcto para el modelo particular de su iPod
®
entre los
7 diferentes insertos incluidos (Fig. 1). Cada inserto lleva una etiqueta con el
nombre y/o el tamaño de un modelo de iPod. Coloque el inserto seleccionado
en el área de conexión en forma que el conector de 30 agujas del iPod pase por
el abertura en el inserto. Atención: Asegúrese de usar el inserto correcto para
sui Pod
®
(ver la tabla) y de que esté insertado correctamente en el
iSoundSpa. De no hacerlo así podría dañar su iPod
®
.
ADVERTENCIA: LOS INSERTOS ESTÁN CONCEBIDOS SÓLO PARA
EQUIPOS DE MÚSICA iPOD DE APPLE. EL INTENTAR SUJETAR O FORZAR
CUALQUIER EQUIPO DE MÚSICA QUE NO SEA iPOD EN CUALQUIERA DE
LOS INSERTOS ADJUNTOS CAUSARÁ EL DAÑO O LA DESTRUCCIÓN DE
ESTE DISPOSITIVO.
2. Deslice la lengüeta de bloqueo en el receso del frente y presione suavemente
el inserto hacia abajo en la plataforma (Fig. 3).
3. Coloque cuidadosamente su iPod en la plataforma de manera que el conector
de 30 agujas en la plataforma haga contacto completo con el receptor de
30 agujas al fondo del iPod. (El iPod no debe estar en su estuche o funda).
La luz LED azul bajo el inserto se ilumina para indicar que el iPod está
correctamente conectado.
Atención: Cuando coloca su iPod
®
en la plataforma, éste se recarga
(hasta quedar completamente cargado).
4. Para retirar/reemplazar un inserto, primero quite el iPod, luego agarre el inserto
y hálelo suavemente hacia arriba.
Importante: El iPod
®
Shuffle NO puede cargarse ni conectarse
a la plataforma.
Para escuchar su iPod
®
1. Oprima el BOTÓN POWER (encendido) del iSoundSpa para encenderlo (Fig. 1).
2. Alterne en distintas posiciones del BOTÓN AUDIO (sonido) para escuchar el
iPod (Fig. 1). El ICONO IPOD aparece el la pantalla LCD en la esquina a la
derecha abajo, para indicar que el modo del iPod ha sido seleccionado (Fig. 2).
Atención: Cuando el iPod está conectado a la plataforma en modo de
espera (standby), empieza a producir sonido automáticamente una vez que
el modo iPod queda seleccionado.
3. Oprima el botón PLAY/PAUSE (sonido/pausa) del iPod para cortar el sonido;
oprima otra vez para resumir el sonido.
4. Gire la perilla VOLUME en la unidad para ajustar el volumen del sistema (Fig. 1).
5. Oprima el o de sui Pod para ir a la pista magnética siguiente o anterior.
6. Para apagar la unidad, oprima la tecla POWER (encendido). El iPod seguirá
cargándose en la plataforma.
Etiqueta del Inserto
iPods
Shuffle Rest
iPod Shuffle (iSoundSpa no carga el iPod Shuffle)
iP
od mini
iPod mini
iPod nano
iPod nano
iPod w/video (30GB)
iPod w/video(30GB)
iPod w/video (60 & 80GB)
iPod w/video(60GB, 80GB)
Thin iPods
3G iPod(10GB, 15GB, 20GB), 4G iPod(20GB), U2 iPod(20GB),
iPod photo(20GB,30GB), Color U2 iPod(20GB), Color Display(20GB)
Thick iPods
3G iPod(30GB,40GB), 4G iPod(40GB), iPod photo(40GB,60GB),
Color Display (60GB)

28 29
Para escuchar un iPod
®
desconectado de la plataforma,
u otros dispositivos de sonido portátiles
Si está usando un iPod si la plataforma de conexión, otro dispositivo MP3, u otro
dispositivo de sonido portátil, puede escucharlo por el iSoundSpa por medio del
enchufe Aux Jack ubicado al respaldo de la unidad.
1. Conecte un extremo del Cable de Conexión (incluido) en el audífono o el enchufe
de salida de su MP3 y el otro extremo del Cable de Conexión en el enchufe Aux del
iSoundSpa, ubicado al respaldo de la unidad (Fig. 5).
2. Oprima el BOTÓN POWER (encendido) del iSoundSpa para encenderlo (Fig. 1).
3. Alterne con el BOTÓN AUDIO en la unidad hasta alcanzar el modo auxiliar (Fig. 1).
El ICONO AUX aparece el la pantalla LCD en la esquina a la derecha abajo, para
indicar que el modo auxiliar ha sido seleccionado (Fig. 2).
4. Encienda y escuche su MP3.
5. Use la perilla VOLUME en la unidad para ajustar el volumen del sistema (Fig. 1).
Atención: Puede necesitar ajustar también el volumen de su MP3.
6. Para apagar la unidad, oprima el BOTÓN POWER (encendido).
Atención: También necesita apagar su MP3.
Escucha de Sonidos Naturales
1. Oprima el BOTÓN POWER (encendido) del iSoundSpa para encenderlo (Fig. 1).
2. Seleccione el sonido natural que desea escuchar y oprima el botón
correspondiente (Fig. 1).
3. Gire la perilla VOLUME en la unidad para ajustar el volumen del sistema (Fig. 1).
4. Para apagar los sonidos naturales, oprima el BOTÓN POWER (encendido) para
apagarlo, o cambie al modo de sonido oprimiendo el BOTÓN AUDIO (sonido)
(Fig. 1).
Atención: Cuando se prende la unidad, ésta queda por defecto en el último
modo empleado.
Escucha del Radio
Extienda por completo la antena FM para la mejor recepción FM
(no pele, altere o conecte otras antenas).
Presione la antena AM en aro en la base que se proporciona. Luego, enchufe la
antena AM en aro en el conector en el respaldo de la unidad para lograr la mejor
recepción AM (Fig. 5a).
1. Oprima el BOTÓN POWER (encendido) del iSoundSpa para encenderlo (Fig. 1).
2. Alterne en distintas posiciones del BOTÓN AUDIO (sonido) para escuchar
el radio (Fig. 1). El ICONO RADIO aparece el la pantalla LCD en la esquina a la
derecha abajo, para indicar que el radio está encendido(Fig. 2).
3. Deslice el INTERRUPTOR AM/FM ubicado al respaldo de la unidad para
seleccionar la banda AM o FM (Fig. 4).
4. Gire la perilla SET +/- de la unidad para sintonizar la emisora deseada (Fig. 1).
5. Gire la perilla VOLUME en la unidad para ajustar el volumen del sistema (Fig. 1).
6. Para apagar la unidad, oprima el BOTÓN POWER (encendido).
Figura 5
iPod
®
Shuffle
Conexión por
Cable
Aux
Figura 5a

Uso del Auto-Temporizador
Mientras escucha su iPod, los sonidos naturales, o el radio, usted puede ajustar
un temporizador para que la unidad se apague automáticamente.
1. Presione varias veces el botón temporizador (TIMER) hasta que se ilumine el LED
azul correspondiente cerca del tiempo que eligió, 15, 30, 45 ó 60 minutos (Fig. 1).
2. Para cancelar el temporizador, presione alternativamente el botón TIMER hasta que
la luz LED azul quede apagada, que indica que está en la posición OFF (apagado).
Ajuste y Uso de las Alarmas
Ajuste de la Alarma1 o Alarma2 (individualmente)
1. Deslice el INTERRUPTOR ALARM ubicado al respaldo de la unidad a la posición
AL1 o AL2 (Fig. 4). El ICONO AL1 o AL2 aparece en la esquina superior
izquierda de la pantalla LCD para indicar cuál alarma está activada (Fig. 2).
2. Oprima el BOTÓN AL SET dos veces; los dígitos de la hora empiezan a destellar
(Fig. 1). Gire la perilla SET +/- hasta que la hora deseada quede en pantalla
(Fig. 1). Acuérdese de ajustar correctamente AM o PM (el indicador de PM es un
icono a la izquierda de la pantalla de la hora; no hay indicador de AM) (Fig. 2).
3. Oprima el BOTÓN AL SET otra vez; los dígitos de los minutos empiezan a destellar.
Gire la perilla SET +/- hasta que los minutos deseados queden en pantalla.
4. Oprima nuevamente el BOTÓN Al SET para salir del modo de ajuste del reloj
o la pantalla dejará de destellar después de 5 segundos, para indicar que la
alarma ha quedado ajustada.
Atención: Usted puede oprimir el BOTÓN AL SET en cualquier momento
para revisar el ajuste de la alarma.
5. Presione varias veces el BOTÓN AL MODE (modo de alarma) hasta que se
ilumine el LED azul correspondiente cerca de la hora de despertarse que eligió,
iPod, sonido, radio o pitido (Fig. 1).
Atención: Para despertarse con el iPod, su iPod debe estar apropiadamente
conectado a la plataforma en la unidad, o quedará por defecto en el modo
de despertarse con el pitido.
Atención: Cuando se usa el modo de sonido, la unidad quedará ajustada
con el último sonido que usted ha escuchado. Si desea cambiarlo, primero
enciéndalo, luego oprima el sonido con el cual desea despertarse.
Por último, apáguelo.
6. Cuando la alarma esté sonando, oprima el BOTÓN POWER en la unidad para
apagarla (Fig. 1). La alarma volverá a sonar nuevamente el día siguiente a la
misma hora.
7. Para impedir que la alarma se prenda al día siguiente, deslice el interruptor
ALARM ubicado al respaldo de la unidad en la posición OFF (apagado).
El ICONO AL1 o AL2 desaparece de la pantalla LCD para indicar que la alarma
ha sido desactivada.
Atención: Si la alarma suena por 30 minutos seguidos, se apaga
automáticamente.
Ajuste de la Alarma1 o Alarma2 (juntas)
1. Deslice el INTERRUPTOR ALARM ubicado al respaldo de la unidad a la posición
BOTH (ambas) (Fig. 4). El ICONO AL1 y AL2 aparecen aparece en la pantalla
LCD para indicar que ambas alarmas han sido activadas (Fig. 2).
Atención: Usted no puede cambiar la hora de la alarma cuando la
modalidad BOTH (ambas) ha sido seleccionada. Si desea cambiar la hora
de la alarma para cualquiera de las dos alarmas, siga el paso 1 en la
sección Ajuste de la Alarma 1 o Alarma 2 (individualmente).
2. Presione varias veces el BOTÓN AL MODE (modo de alarma) hasta que se ilumine
el LED azul correspondiente cerca de la hora de despertarse que eligió, iPod,
sonido, radio o pitido (Fig. 1). Ambas, AL1 y AL2 deben activarse actuando en el
mismo modo.
Atención: Para despertarse con el iPod, su iPod debe estar apropiadamente
conectado a la plataforma en la unidad, o quedará por defecto en el modo
de despertarse con el pitido.
Atención: Cuando se usa el modo de sonido, la unidad quedará ajustada
con el último sonido que usted ha escuchado. Si desea cambiarlo, primero
enciéndalo, luego oprima el sonido con el cual desea despertarse.
Por último, apáguelo.
30 31

3. Cuando la alarma esté sonando, oprima el BOTÓN POWER en la unidad para
apagarla (Fig. 1). La alarma volverá a sonar nuevamente el día siguiente a la
misma hora.
4. Para impedir que la alarma se prenda al día siguiente, deslice el interruptor
ALARM ubicado al respaldo de la unidad en la posición OFF (apagado).
Los ICONOS AL1 y AL2 desaparecen de la pantalla LCD para indicar que
las alarmas ha sido desactivadas.
Atención: Si uno de los usuarios de la alarma todavía necesita su alarma
ajustada, usted tiene que deslizar el interruptor ALARM (alarma) en el
respaldo de la unidad a la alarma que corresponde a su hora de despertar.
Atención: Si la alarma suena por 30 minutos seguidos, se apaga
automáticamente.
Funcionamiento de Alarma Repetida
1. Oprima el BOTÓN SNOOZE/NAP (alarma repetida/dormitar) en la unidad mientras
la alarma esté sonando (Fig. 1). La alarma se apaga momentáneamente y vuelve
a prenderse otra vez en cerca de 9 minutos. Usted puede usar esta función hasta
apagar la alarma..
Atención: Para apagar la función de alarma repetida antes de que la alarma
se active, oprima dos veces el botón POWER. La alarma volverá a sonar
nuevamente el día siguiente a la misma hora.
Funcionamiento de la modalidad de Dormitar
La Función NAP TIMER (temporizador de dormitar) le despertará después de una
siesta de 15, 30, 45 o 60 minutos sin necesidad de cambiar los ajustes normales de su
Alarma 1 o Alarma 2.
1. Si el sistema está tocando música, oprima el BOTÓN POWER para apagarlo
(Fig. 1).
2. Presione varias veces el botón SNOOZE/NAP hasta que se ilumine el LED azul
correspondiente cerca del tiempo que eligió, 15, 30, 45 ó 60 minutos (Fig. 1).
3. Presione varias veces el BOTÓN AL MODE (modo de alarma) hasta que se
ilumine el LED azul correspondiente cerca de la hora de despertarse que eligió,
iPod, sonido, radio o pitido (Fig. 1).
Atención: Para despertarse con el iPod, su iPod debe estar apropiadamente
conectado a la plataforma en la unidad, o quedará por defecto en el modo
de despertarse con el pitido.
4. La alarma sonará para despertarle después de que haya pasado la cantidad
seleccionada de minutos.
5. Para cancelar el temporizador NAP, presione alternativamente el botón
SNOOZE/NAP hasta que la luz LED azul quede apagada, que indica que está
en la posición OFF (apagado).
Control del Reductor de Luz (dimmer)
1. Presione el BOTÓN DIMMER HI/LO ubicado al respaldo de la unidad para
ajustar la intensidad de la luz de fondo de la pantalla LCD y las luces ubicadas
en el área de la plataforma (Fig. 4).
Uso de la Función de Proyección
1. Para activar la función de proyección, oprima el BOTÓN PROJECTOR ON/OFF
ubicado al respaldo de la unidad (Fig. 4). La hora se proyecta entonces en la
pared o el cielorraso.
2. El ángulo del proyector puede ajustarse para la proyección angular en el
cielorraso moviendo el TUBO PROYECTOR hacia delante o atrás (Fig. 4).
3. Para cambiar el ángulo de visión de la hora que aparece en el cielorraso, gire la
PERILLA DE ROTACIÓN DE LA HORA hasta lograr el resultado deseado (Fig. 4).
Atención: La PERILLA DE ROTACIÓN DE LA HORA gira hasta 350 grados.
4. Para enfocar la hora en la pared el cielorraso, gire la perilla FOCUS (enfoque)
hasta lograr el resultado deseado (Fig. 4).
32 33

Mantenimiento
Para guardar
Puede dejar la unidad en exhibición o puede guardarla en su caja o en un lugar
fresco y seco.
Para limpiar
Para limpiar la carcasa de la unidad use sólo un paño suave y seco.
NUNCA use líquidos o limpiadores abrasivos para limpiar la unidad.
Las modificaciones no autorizadas por el fabricante pueden invalidar el derecho
del usuario a operar este dispositivo.
Atención: Este equipo ha sido ensayado y probado y se ha comprobado que
cumple con los límites de los dispositivos digitales de la Clase B, según la
Sección 15 de las Normas FCC. Estos límites han sido dispuestos para
proporcionar una protección razonable contra las interferencias dañinas en las
instalaciones domésticas. Este equipo genera, usa y puede irradiar energía de
radiofrecuencia y, si no se instala y usa según las recomendaciones, puede causar
interferencias dañinas a las comunicaciones radio. Sin embargo, no hay garantías
de que dichas interferencias no se produzcan en una instalación particular. Si este
equipo causara interferencias dañinas a la recepción de radio o televisión, lo que
puede determinarse encendiendo y apagando el equipo, se anima el usuario a que
trate de corregir la interferencia con uno o más de los siguientes procedimientos:
• Volver a orientar y ubicar la antena receptora.
• Aumentar la distancia entre el equipo y el receptor.
• Conectar el equipo a un tomacorriente eléctrico de un circuito diferente de aquel
donde está conectado el receptor.
• Consultar con el representante o con un técnico experto de radio/TV para recibir
ayuda.
Atención: El fabricante no es responsable por ninguna interferencia de radio o TV
causada por modificaciones no autorizadas de este equipo. Dichas
modificaciones pueden anular el derecho del usuario al uso de este equipo.
34 35
-
 1
1
-
 2
2
-
 3
3
-
 4
4
-
 5
5
-
 6
6
-
 7
7
-
 8
8
-
 9
9
-
 10
10
-
 11
11
-
 12
12
-
 13
13
-
 14
14
-
 15
15
-
 16
16
-
 17
17
-
 18
18


HoMedics SS-7000 Instruction book
- Categoría
- Relojes de alarma
- Tipo
- Instruction book
En otros idiomas
- English: HoMedics SS-7000
Documentos relacionados
-
HoMedics SS-7000A-RT Instruction book
-
-
-
-
-
-
-
-
-
Otros documentos
-
RCA 7-4813 Manual de usuario
-
Denver CRL-310 Manual de usuario
-
The Singing Machine ISM-370 Manual de usuario
-
Sharper Image EC-B145 Manual de usuario
-
-
Sound Oasis S-6000 Manual de usuario
-