Kenwood KM082 El manual del propietario
- Categoría
- Mezcladores
- Tipo
- El manual del propietario

KM080 series
TYPE KM08
instructions
istruzioni
instrucciones
Bedienungsanleitungen
gebruiksaanwijzing

E
nglish 4 - 18
N
ederlands 19 - 35
Français 36 - 52
Deutsch 53 - 68
Italiano 69 - 84
Português 85 - 100
Español 101 - 116
Ekkgmij 117 - 132

know your Kenwood Cooking Chef Kitchen Machine
safety
●
Read these instructions carefully and retain for future
reference.
●
Remove all packaging and any labels.
important note - electronic medical implants
●
Like all induction heating products, this appliance generates short-range
magnetic fields. If any user or person in close proximity has a
pacemaker or other active implants, please consult a doctor before use,
concerning any possible incompatibility to prevent any risk to health.
●
Switch off and unplug the appliance before fitting or removing
tools/attachments, after use and before cleaning.
●
Keep body parts, jewellery and loose clothing away from moving parts
and fitted attachments.
●
Never put your fingers etc., into the hinge mechanism.
●
Never leave the appliance on unattended.
●
Never use a damaged appliance. Get it checked or repaired: see
‘service and customer care’, page 16.
●
Never use an unauthorised attachment or more than one attachment at
once.
●
Never exceed the maximum capacities on page 15 and when using the
induction heater never exceed the 3 litre maximum fill level marked on
the inside of the bowl.
●
When using an attachment, read the safety and usage instructions that
come with it.
●
Take care when lifting this appliance as it is heavy. Ensure the head is
locked and that the bowl, tools, outlet covers and cord are secure before
lifting.
●
Never let the cord hang down where a child could grab it.
●
Never let the power unit, cord or plug get wet.
●
Be careful when handling or touching any part of the appliance when
being used in the cook mode or after cooking, IN PARTICULAR THE
BOWL, SPLASHGUARD AND TOOLS as they will remain HOT long
after the appliance has been switched off. Use the handles to remove
and carry the bowl. Use oven gloves when handling the hot bowl and
hot mixing tools.
●
The underside of the bowl will remain hot long after the heating has
stopped. Use caution when handling and use the work surface
protection mat when placing the bowl on heat sensitive surfaces.
●
Be careful of steam escaping from the mixer bowl particularly when
opening the lid in the splashguard or when raising the mixer head.
●
If transferring hot food from the mixer to the liquidiser, always allow the
ingredients to cool to room temperature before placing in the liquidiser.
●
Only use the bowl and tools supplied with this appliance. Never use the
bowl with any other heat source.
●
Never operate the appliance in the cook mode with the bowl empty.
4
English

5
●
Never insert anything through the air vents.
●
When using this appliance ensure it is positioned on a level surface
away from the edge. Make sure it is at least 10 cm from walls and
ensure that the vents are not blocked. Do not position below
overhanging cupboards.
●
For the correct and safe operation of the induction cooker ensure that
the bowl base and temperature sensors are clean and dry before
cooking.
●
As with all induction cooking appliances do not place credit cards,
magnetic media or sensitive electronic equipment near to the appliance
when in use.
●
Do not use the appliance for deep frying foods.
●
Always ensure food is thoroughly cooked before eating.
●
Food should be eaten shortly after cooking or allowed to cool quickly
and then refrigerated as soon as possible.
●
Misuse of your appliance can result in injury.
●
Appliances can be used by persons with reduced physical, sensory or
mental capabilities or lack of experience and knowledge if they have
been given supervision or instruction concerning use of the appliance in
a safe way and if they understand the hazards involved.
●
Children should be supervised to ensure that they do not play with the
appliance.
●
This appliance shall not be used by children. Keep the appliance and its
cord out of reach of children.
●
Only use the appliance for its intended domestic use. Kenwood will not
accept any liability if the appliance is subject to improper use, or failure
to comply with these instructions.

6
before plugging in
●
Make sure your electricity supply is the same as the one shown on the underside of your machine.
●
WARNING: THIS APPLIANCE MUST BE EARTHED.
●
This appliance conforms to EC directive 2004/108/EC on Electromagnetic Compatibility and EC regulation no.
1935/2004 of 27/10/2004 on materials intended for contact with food.
b
efore using for the first time
Wash the parts: see ‘care and cleaning’ page 16.
introduction
T
hank you for buying this Kenwood Cooking Chef Kitchen Machine, we hope you will enjoy many years use.
Kenwood has nearly 60 years of experience and expertise in developing our Kitchen Machines and their wide
variety of attachments. Kenwood Chef Kitchen Machines are renowned for being more than just a food mixer.
I
n the development of Cooking Chef we have taken the well-known versatility of the Chef a step further by
i
ntroducing integrated Induction Cooking directly beneath the mixing bowl. You can now enjoy all of the benefits
of everyday ‘cold bowl’ planetary mixing when preparing your favourite cakes, pastries and dough, plus the
added advantage of heating and cooking directly in the bowl combined with planetary mixing. The opportunities
are endless.
The Kenwood Cooking Chef with its range of optional attachments truly is the complete food preparation system.
Strong, Reliable, Versatile, Kenwood.
What is Induction Cooking and how does it work?
Induction cooking is an advanced cooking method that employs the principles of electromagnetic induction.
When an electric current is passed through a copper coil in the induction cooking area it creates an electro-
magnetic field. When the Cooking Chef bowl is locked into position the circuit is completed by a special layer of
stainless steel in the bowl base. In turn this creates a large amount of thermal energy that passes through to the
contents of the bowl, thus heating the food.
Induction cooking is extremely energy efficient because it only produces heat in the base of the bowl. Other
heating methods such as gas hobs waste almost 50% of the heat energy around the sides of the pan. Indeed
the Induction cooking area on your Cooking Chef only feels hot during and immediately after cooking because of
the heat transferred back from the contents of the bowl. All of this means that Induction cooking is very efficient,
very safe and very clean.
The cooking functionality of your Kenwood Cooking Chef is similar to using a saucepan on your cooker hob. The
added advantage is that the Chef will automatically stir your food and regulate the cooking temperature to your
precise requirements, leaving you free to confidently perform other tasks in your kitchen.
The Cooking Chef uses induction heating technology which is extremely efficient. When compared to cooking on
a gas or electric hob, you may find that cooking times are reduced or that you need to cook on a lower
temperature.This should be considered when using your appliance for the first time or when experimenting with a
new recipe. Make sure that if you start cooking at a high temperature, you keep watching and reduce the heat
when necessary to stop food burning and sticking to the bowl, just as you would with your saucepan. Generally
the Cooking Chef will automatically heat the food to your desired temperature in the quickest possible time. It is
therefore not necessary to set the temperature higher than you require in order to reduce cooking times. At this
stage you should also pay attention to the frequency of the stir settings. When cooking at higher temperatures
you may find it necessary to stir constantly using stir setting . Stir settings and are useful in
maintaining the consistency of your food during longer cooking periods on a low simmer.

Selection of the correct bowl tool is also important at this stage. Further on in this book we have suggested the
most appropriate uses for each tool and with experience you will quickly understand which is best for each task.
When cooking you will find that the high temperature flexible beater is best used to obtain a very smooth
c
onsistency for sauces and creams, whereas the stirring tool is better when cooking foods that need to maintain
a
more solid consistency, such as stews, casseroles, ragouts etc. Our recipe book recommends the best tools
for each recipe, and you may also find that changing the tool for different processes during your meal preparation
gives better results.
D
uring cooking and immediately afterwards, the bowl, splashguard and bowl tool will be hot – just as your
saucepan would be. Please take care when touching any of these. It is important to also remember that the
cooking process will generate steam and condensation so take care when looking into the bowl, lifting the food
chute lid or the Cooking Chef/machine head to view or access the bowl. You should also warn others when the
machine is cooking or hot so they will also be careful. When touching or removing hot parts it is advised to use
o
ven gloves and only carry the bowl using the handles provided. You may also find the work surface protection
mat useful to protect heat sensitive surfaces.
When heating liquids or food with a high water content, the accuracy of the temperature reading is usually within
+
/- 5°C. The accuracy of the temperature display and control will vary depending upon the consistency of your
b
owl contents, the volume of your bowl contents, the frequency of stirring and the bowl tool that is used. Again
this is similar to cooking on a hob, for example, where a large quantity of food in a large saucepan is heated but
not stirred thoroughly. The food will be hot at the base of the saucepan, or even burnt, whereas the food near the
top will be much cooler.
In addition to the temperature display the machine has a small blue LED. This will flash until the machine has
reached the selected temperature. Once the required temperature is reached the light will stop flashing. However,
you should note that when you add further ingredients to the bowl the blue LED will begin to flash again as the
temperature of the bowl contents will be reduced by cold ingredients. You may also notice the static light begin
to flash if the mixing frequency is increased.
You will quickly find that your Kenwood Cooking Chef is simple to use and will help make your everyday food
preparation easy.
7

know your Kenwood Cooking Chef
To buy an attachment not included in your pack, see service and
customer care.
a
ttachment outlets
h
igh speed outlet
medium speed outlet
s
low speed outlet
tool socket
the mixer
medium/high speed outlet cover
m
ixer head
slow speed outlet cover
s
low speed outlet lever
cooking chef bowl
head - lift lever
s
peed control
air vents
bowl pedestal/induction area
drain hole
temperature sensors
s
tainless steel K beater
high temperature flexible beater
whisk
d
ough hook
stirring tool
high temperature spatula
heat shield
rubber seal
splashguard
feed chute lid
work surface protection mat
spanner
8

9
control panel
timer/temperature display
timer decrease button
t
imer increase button
t
emperature control
pulse button/high speed, high temperature whisk button
speed control
timer/temperature selector button
t
emperature indicator light
fold button
speed control indicator light

adjusting the height of the tools
Please refer to page 11 on how to assemble the mixer.
whisk, stainless steel K beater, stirring tool
For best performance the whisk, K beater and stirring tool should be
a
lmost touching the bottom of the bowl
.
If necessary adjust the height
using the spanner provided.
Here’s how:
1
Unplug the appliance.
2
Raise the mixer head and insert the whisk, beater or stirring tool.
3 Lower the mixer head. If the clearance needs to be adjusted, raise the
mixer head and remove the tool.
4 Using the spanner provided loosen the nut
sufficiently to allow
a
djustment of the shaft
.
To lower the tool closer to the bottom of the
b
owl, turn the shaft anti-clockwise. To raise the tool away from the bottom
of the bowl turn the shaft clockwise.
5 Re-tighten the nut.
6 Fit the tool to the mixer and lower the mixer head. (Check its position see
p
oints above).
7 Repeat the above steps as necessary until the tool is set correctly. Once
this is acheived tighten the nut securely.
high temperature flexible beater - this tool should just touch the
bottom of the bowl.
dough hook - this tool is set at the factory and should require no
adjustment.
to fit and use your splashguard
assembly
The splashguard assembly consists of 2 pieces: the heat shield and the
splashguard.
The heat shield must be fitted during cooking operations
otherwise the mixer will not operate and error code E:03 will
be displayed. The heat shield is to protect the mixer head from steam
produced during the cooking process.
If necessary both the heat shield and the splashguard can be fitted to retain
ingredients in the bowl e.g. when mixing light ingredients such as flour and
icing sugar, or when cooking ingredients where moisture needs to be
retained in the bowl. The splashguard should not be fitted to the bowl
unless used in conjunction with the heat shield.
1 Raise the mixer head until it locks.
2 Push the heat shield upwards onto the underside of the mixer head
until
fully located. The heat shield must never be used without the rubber seal
correctly fitted.
3 Fit the bowl onto the base.
4 Lower the mixer head.
5 Rest the splashguard on the bowl rim and then slide forward until fully
located
.
●
During mixing, ingredients can be added directly to the bowl via the feed
chute.
6 To remove the splashguard simply slide it away from the appliance.
7 To remove the heat shield, raise the mixer head until it locks. Remove the
tool, then pull the heat shield downwards from the underside of the mixer
head.
Note: Only fit or remove the splashguard when the mixer head is in the
locked position.
10

the mixer
t
he mixing tools and some of their uses
K
-beater
●
F
or making cakes, biscuits, pastry, icing, fillings, éclairs and mashed
potato.
whisk
●
For eggs, cream, batters, fatless sponges, meringues, cheesecakes,
mousses, soufflés. Don’t use the whisk for heavy mixtures (e.g. creaming
f
at and sugar) - you could damage it.
d
ough hook
●
F
or yeast mixtures only.
high temperature flexible beater
●
Suitable for many cooking operations in particular cooking custards,
scrambled eggs and sauces. Ideal for scraping mixes both hot and cold
from the sides of the bowl during mixing. Also suitable to sauté vegetables.
s
tirring tool
●
S
uitable to use during cooking to maintain the consistency of food
e.g. chicken, fish, vegetables and fruit.
to use your mixer
B
efore using the mixer ensure the temperature and speed controls are
switched to the off ‘O’ positions.
1 Turn the head-lift lever clockwise
and raise the mixer head until it locks.
to fit a tool 2 Place the tool in the socket, locating the shaft pin in the groove and then
turn to lock into position .
s
tirring tool - to fit the stirring tool, insert the shaft into the socket, then
line up the slot on the extension so that it is located beneath the metal pin on
the underside of the mixer head. Hold the paddle and turn so that the shaft
pin is below the groove then push up and turn to lock into position
.
3 Fit the bowl onto the base - press down and turn clockwise .
4 To lower the mixer head, raise it slightly, then turn the head lift lever clockwise.
Lower into the locked position.
to remove a tool
●
Reverse step 2 above. (Always use oven gloves to remove tools after
cooking).
5 Connect the mixer to the power supply. The speed and temperature
indicator lights will illuminate briefly. The display will show and then
clear leaving the power on indicator illuminated .
6 Turn the speed control to the desired setting (see page 12 for
recommendations), the mixer will start and the speed control indicator light
will flash. The timer will count up in 1 second intervals. The speed can be
changed at any time whilst the mixer is operating.
7 Stop the mixer by returning the speed control to the off ‘O’ position.
Important - If at any time, the mixer head is raised during an operation,
the mixer will automatically stop and beep and it will not re-start when the
mixer head is lowered. To re-start the mixer turn the speed control to the
off ‘O’ position and then re-select a speed.
pulse button
The pulse button can only be used when the speed control is in the off ‘O’
position.
To select pulse, press the pulse button and the mixer will run at maximum
speed for as long as the button is held in this position. If the bowl contents
are above 60°C, the speed will increase gradually. This will be accompanied
by a beeping sound and the speed and temperature indicator lights will flash
quickly.
fold button
Press and release the fold button and the mixer will automatically
operate on minimum speed for 2 revolutions and then stop. The button
can be pressed for a longer operation or pressed repeatedly as needed to
combine ingredients.
Note: If the fold button is pressed whilst the motor is running it will perform
the standard fold function and then return to the selected speed.
P
11

sp
eed control
The following speeds are a guide only and will vary depending upon the
quantity and the temperature of the ingredients being mixed etc.
Turn the speed control clockwise to obtain speeds ‘min’ through to ‘max’.
K-beater
●
creaming fat and sugar start on min, gradually increasing to ‘max’.
●
beating eggs into creamed mixtures 4 - ‘max’.
●
folding in flour, fruit etc min - 1
●
a
ll in one cakes start on min speed, gradually increase to max.
●
r
ubbing fat into flour min - 2.
high temperature flexible beater
●
creaming fat and sugar start on min, gradually increasing to 3.
●
scraping mixes both hot and cold from the sides of the
bowl start on min gradually increasing to 3.
●
s
auteing vegetables, stirring risotto and polenta etc.,
use .
whisk
●
Gradually increase to ‘max’.
dough hook
●
Start on ‘min’, gradually increasing to 1.
stirring tool
●
Use with the stir settings only
,
,
.
stir settings
T
o select the stir settings turn the speed control anti-clockwise These are most suitable when the mixer
is used in the cook mode. Please note, to use the stir speeds all outlet covers must be fitted.
– Use this setting when a constant slow speed is required e.g. stirring sauces.
– When the speed control is set to this position, the mixer will intermittently operate on a slow
speed once every 5 seconds for approximately 2 revolutions.
– When the speed control is set to this position, the mixer will intermittently operate on a slow
speed once every 30 seconds, making it suitable for stirring casseroles etc.
Return the speed control to the off ‘O’ position to stop the operation.
Note:
●
Whenever a speed is selected, the speed indicator light will flash.
●
A high pitched sound may be heard from the appliance when in use. This is normal.
to use the mixer to cook food
IMPORTANT
●
Make sure the induction area, temperature sensors and external surface of the bowl base are clean.
Failure to do this will affect the heat sensor, resulting in poor cooking performance.
●
Check that all the outlet covers including the heat shield are fitted. If they are not correctly fitted the
heating function will not operate.
●
Always use oven gloves to remove the bowl and tools after cooking.
1 Assemble the mixer following the instructions on page 11.
2 Turn the temperature control to the required temperature.
●
Heating will not commence unless a speed is selected.
3 Turn the speed control to the desired speed which will switch on the motor and the heater. Both
indicator lights will flash.
4 Once the set temperature is reached, the temperature indicator light will illuminate continuously.
However, during cooking the light will start to flash if the temperature changes indicating that the mixer
is trying to maintain the set temperature (please read introduction page 6).
●
If the bowl temperature exceeds 60°C, for safety reasons the speed is automatically limited even if a
higher speed has been selected. The speed will not automatically increase when the temperature drops
below 60°C. The speed control must be switched off first and the desired speed reselected.
●
Note: Each time the timer/temperature selector button is pressed, the display will alternate between the
timer display and the temperature of the bowl contents.
5 To stop or pause the mixing and heating process, return the speed control to the off ‘O’ position. To
resume the operation select a speed.
12

13
hints
●
Some recipes, in particular those with a high water content, will not be able to reach a
cooking temperature above 100°C (as this is the boiling point of water).
●
W
hen adding ingredients to the bowl during cooking, turn the speed down and add the ingredients slowly and
e
venly.
●
To heat sauces quickly use a continuous stir setting .
●
You may find changing the tool for different processes during your meal preparation gives better results e.g. use
the high temperature flexible beater to fry vegetables and then the stirring tool whilst cooking pieces of meat or
p
oultry.
●
If using the splashguard during cooking, always remove it before lifting the mixer head. Be aware of condensation
formed on the splashguard and heat shield.
●
When lifting the mixer head lift it slowly to allow any liquid on the underside of the heat shield to flow back into
the bowl.
●
T
hree stir functions are available which enable you to select the appropriate amount of stirring for individual
recipes. Some recipes will require constant stirring to stop ingredients from sticking to the bottom of the bowl,
whereas others will benefit from intermittent stirring to maintain the consistency of the food.
●
For optimum performance adjust the tool heights see page 10.
●
T
he maximum cooking time is 3 hours after which time the mixer will automatically switch off.
●
I
t is possible to heat food without a tool in position, however a speed must be selected. This may be
advantageous when melting foods e.g. butter, chocolate.
●
Each time the timer/temperature selector button is pressed the display will alternate between displaying the
cooking time and the temperature reached at that point.
High speed, high temperature whisk control
To whisk at high speed at temperatures above 60°C, turn the speed control to the desired whisking speed and
then press and hold the pulse button. This will be accompanied by a beeping sound and the speed and
temperature indicator lights will flash quickly. The whisking speed will slowly increase to the selected speed.
Repeat the procedure to increase the speed further. You can reduce the whisking speed or turn off the mixer as
normal.
This function MUST only be used with the whisk. You should not exceed the maximum
cooking capacity of 3 litres and you must ensure the splashguard is fitted. The machine
must not be left unattended.
after cooking
●
Be careful when handling or touching any part of the mixer when being used in the cook mode or after cooking,
IN PARTICULAR THE BOWL, SPLASHGUARD AND TOOLS as they will remain HOT long after the appliance has
been switched off. Use the handles to remove and carry the bowl. Use oven gloves when handling the hot bowl
and hot mixing tools.
●
The underside of the bowl will remain hot long after the heating has stopped. Use caution when handling and
use the work surface protection mat provided to protect heat sensitive surfaces.

14
display
For your safety the mixer is fitted with 5 separate safety sensors which will operate when using the mixer in the
cooking mode. If the mixer is switched on and a safety sensor activated, the timer/temperature display will show
a
n error message e.g. ‘E:01’. This will be accompanied by a beeping sound and the mixer will not work. Check
t
he following error messages:-
If these or any other error codes continue to appear on the display contact Kenwood Customer Care.
to use the countdown timer
The timer can be used in both the cooking and non cooking modes. If a countdown time is not selected, the
timer will automatically count up in 1 second intervals whilst the mixer is in operation. The maximum running time
is 3 hours.
1 Connect the mixer to the power supply. The display will briefly show and then clear leaving the power on
indicator visible .
2 Press either the + or – button and 0:00 will appear in the display.
3 Press either the + or – button until the desired time is displayed. The timer will count up in 5 second intervals. If
the button is pressed continuously the numbers will change more quickly the longer it is held down. A maximum
time of 3 hours can be set.
Note: If the + button is pressed when the timer is at 3:00 the displayed time will change to 0:00. If the – button is
pressed when the timer is at 0:00 the displayed time will change to 3:00.
4 Turn the speed control to the desired speed, the mixer will start and the timer will count down in 1 second
intervals.
●
The mixer operation can be paused at any time by turning the speed control to the off ‘O’ position. This will also
pause the timer. The timer will continue to count down when the mixer is re-started.
5 The mixing process will automatically stop when the total time has elapsed and audible beeps will be emitted for
3 seconds. The display will flash for 5 seconds and then clear showing the power on indicator .
to reset the timer
1 Zero the timer by pressing the + and – buttons at the same time (the speed control must be in the off ‘O’ position).
●
If the machine has been idle for 10 minutes, the LCD display and backlight will enter ‘sleep mode’ and all the
displays will turn off. If any button or control knob is activated, the display will resume its previous format.
Error Message Description Solution
The head of the machine is in the raised position. Close the head. Turn the speed control
When the head is lifted, a safety sensor disables to the ‘O’ position and then select the
E:01
t
he motor and heater. If the speed control is desired speed.
turned to any setting other than the Off ‘O’
position when the head is raised, this message
is displayed and the motor will not switch on.
T
he Cooking Chef Bowl is not fitted. The heating Ensure that the Cooking Chef bowl is
function will only work if the Cooking bowl is being used. Check that the bowl
E:02 being used. This bowl must also be correctly is fitted correctly. Turn the speed
fitted. Safety sensors will detect an incorrect control to “0” and then select desired
bowl or the correct bowl incorrectly fitted. speed.
The heat shield is not fitted. The heating function Ensure the heat shield is fitted
E:03 will be disabled if the heat shield is not correctly correctly. Turn the speed control to ‘O’
fitted. and then select desired speed.
T
he slow speed outlet and high speed/medium Ensure that all covers are fitted correctly.
s
peed outlet covers are not fitted. These covers Turn the speed control to ‘O’ and then
are fitted with safety sensors. If the covers are select desired speed.
E:04 not fitted correctly the heating will switch off and
if stir functions are selected, the motor will run
continuously. Mixing speeds min to max will
run continuously.
Temperature sensor problem. If the heater Turn the speed control to ‘O’, unplug the
control detects a bowl temperature higher than machine and allow to cool. Check
E:09 expected during normal use, the motor and that the bowl base and temperature
heater will automatically switch off. sensors are clean. Replace plug and
switch on as normal.
Motor speed or overheat problem. If the motor Turn the speed control to ‘O’ and unplug
E:10
stalls or gets too hot, the control system will the machine. Remove any obstructions
automatically switch off the motor and heater. causing the motor to stall. Ensure all
the air vents are clear of obstructions.
Plug in and switch on.

15
maximum capacities
shortcrust pastry
●
Flour weight: 910g - 2lb
stiff yeast dough
●
Flour weight: 1.5kg - 3lb 5oz
●
T
otal weight: 2.4kg - 5lb 5oz
s
oft yeast dough
●
F
lour weight: 2.6kg - 5lb 12oz
●
Total weight: 5kg - 11lb
fruit cake mix
●
Total weight: 4.55kg - 10lb
egg whites
●
16
c
ooking mode
●
3
litres
general hints
●
Stop mixing and scrape down the bowl with the spatula frequently.
●
Eggs at room temperature are best for whisking.
●
Before whisking egg whites, make sure there’s no grease or egg yolk on the whisk or bowl.
●
U
se cold ingredients for pastry unless your recipe says otherwise.
points for bread making
important
●
Never exceed the maximum capacities stated - you’ll overload the machine.
●
I
f you hear the machine labouring, switch off, remove half the dough and do each half separately.
●
T
he ingredients mix best if you put the liquid in first.
trouble shooting guide when cooking
P
roblem Cause Solution
The mixer will not operate in the heat mode One of the safety sensors has been activated. See the table referring to error messages page 14.
and displays an error message and gives a • Ensure the head is lowered and locked.
warning beep. • Ensure all outlet covers are correctly fitted.
• Ensure the heat shield is correctly fitted.
• Ensure the cooking chef bowl is corrected fitted.
A temperature has been selected but the A speed has not been selected. Select a speed.
bowl contents do not heat (the temperature
indicator light is not illuminated).
The mixer changes speed during cooking. The speed is automatically limited when the This is a safety feature.
bowl contents reach 60°C.
Food burning on the base of the bowl. 1 The temperature setting selected may be 1 Reduce the temperature on the dial or cook at
too high. a lower temperature.
2 Incorrect tool being used. 2 Check the most suitable tool is being used.
3 The stir function is too slow. 3 Increase the frequency of the stir function or
increase to a continuous operation.
4 The tool may not be low enough in 4 Adjust the tool.
the bowl.
5 The timer has been set for too long. 5 Cook for a shorter length of time (ensure food is
thoroughly cooked).
6 The sensor and/or the underside of bowl 6 Ensure that these areas are kept clean and dry.
may not be clean.
Consistency of food not maintained. 1 Temperature selected too high. 1 Reduce temperature.
2 Stir function too fast. 2 Reduce stir speed.
3 Ingredients cooked for too long. 3 Reduce the cooking time (ensure food is
thoroughly cooked).
4 Incorrect tool being used. 4 Check the most suitable tool is being used.
Inconsistent mixing speed. 1 Ingredients too large, hard or too firm. 1 Cut food into smaller pieces, remove stones
from fruit, slowly melt ingredients without a tool
in position (but ensure a speed has been
selected).
2 Add ingredients after the head is lowered.
3 Check the most suitable tool is being used.
Cold ingredients have been added to a If the bowl contents are not thoroughly 1 Allow time for the ingredients to be thoroughly
hot mixture but the temperature display stirred then there will be varying food mixed.
does not respond quickly. temperatures throughout the bowl. 2 Increase the stir speed.
Difficult to shut mixer head with food in bowl. Firm ingredients such as chocolate in the Add ingredients after the mixer head is lowered.
bottom of the bowl prevent the mixer head
from locking down.
Mixer runs continuously when stir or Outlet covers are incorrectly fitted. Ensure the outlet covers are correctly fitted.
stir are selected.
Motor speed is limited when using Hot bowl fitted. Remove the bowl, or cool the bowl to below
attachments 60°C.

cleaning and service
c
are and cleaning
●
Always switch off and unplug before cleaning.
●
A little grease may appear at outlet when you first use
it. This is normal - just wipe it off.
●
T
he metal surfaces of the temperature sensors may show signs of wear
d
uring normal use. this does not affect the performance of the product.
●
Do not leave the high temperature flexible beater fitted to the mixer
when not in use.
a
ppliance, outlet covers
●
W
ipe with a damp cloth, then dry.
●
Never use abrasives or immerse in water.
high temperature flexible beater
●
Always remove the flexible wiper blade from the tool before
cleaning.
●
W
ash the flexible wiper blade and tool in hot soapy water, then
d
ry thoroughly. Alternatively the parts can be washed in
a dishwasher.
N
ote: Please inspect the condition of the tool body before and after
u
se and also regularly inspect the condition of the wiper blade and
replace it if there are any signs of wear.
bowl, tools, splashguard
●
Wash by hand, then dry thoroughly or wash in the dishwasher.
●
Never use a wire brush, steel wool or bleach to clean your
stainless steel bowl. Use vinegar or a suitable descaler to remove
limescale.
●
If food sticks or burns on the inside of the bowl, remove as much as
possible using the spatula provided. Fill the bowl with warm soapy water
and allow to soak. Remove any stubborn deposits using a nylon brush.
●
Any discolouration of the bowl will not affect its performance.
drain hole
●
Ensure this area is free from food. If necessary use a pipe cleaner
or cotton bud to clean.
temperature sensors
●
Wipe with a damp cloth then dry thoroughly. Never use abrasives or
sharp instruments to clean the sensors.
service and customer care
●
If the cord is damaged it must, for safety reasons, be replaced
by KENWOOD or an authorised KENWOOD repairer.
If you need help with:
●
using your machine
●
servicing or repairs
Contact the shop where you bought your machine.
●
Designed and engineered by Kenwood in the UK.
●
Made in China.
IMPORTANT INFORMATION FOR CORRECT DISPOSAL OF THE
PRODUCT IN ACCORDANCE WITH EC DIRECTIVE
2002/96/EC.
At the end of its working life, the product must not be disposed of as
urban waste.
It must be taken to a special local authority differentiated waste collection
centre or to a dealer providing this service.
Disposing of a household appliance separately avoids possible negative
consequences for the environment and health deriving from inappropriate
disposal and enables the constituent materials to be recovered to obtain
significant savings in energy and resources. As a reminder of the need to
dispose of household appliances separately, the product is marked with a
crossed-out wheeled dustbin.
16

recipes
See important points for bread making on page 15.
ingredients
method
method
●
●
●
●
●
1
2
3
4
5
6
7
8
●
●
●
●
●
●
●
●
1
2
3
4
5
6
7
8
●
white bread
s
tiff yeast dough
1.36kg (3lb) strong plain flour
15ml (3tsp) salt
25g (1oz) fresh yeast; or 15g/20ml (
1
⁄2oz) dried yeast + 5ml (1tsp) sugar
750m
l (
1
1
⁄4p
ts) warm water:
43˚C (110˚F)
. Use a thermometer or add
250m
l
(
9fl oz) boiling water to
500m
l (18fl oz) cold water
25g (1oz) lard
dried yeast (the type that needs reconstituting): pour the warm water into
the bowl. Then add the yeast and the sugar and leave to stand for about 10
m
inutes until frothy.
fresh yeast: crumble into the flour.
other types of yeast: follow the manufacturer’s instructions.
Pour the liquid into the bowl. Then add the flour (with fresh yeast if used),
salt and lard.
K
nead at minimum speed for
45 - 60 s
econds. Then increase to speed 1,
adding more flour if necessary, until a dough has formed.
Knead for
3 - 4 more minutes at speed 1 until the dough is smooth, elastic
and leaves the sides of the bowl clean.
Put the dough into a greased polythene bag or a bowl covered with a tea
t
owel. Then leave somewhere warm until doubled in size.
Re-knead for
2 minutes at speed 1.
Half fill four
450g (1lb) greased tins with the dough, or shape it into rolls.
Then cover with a tea towel and leave somewhere warm until doubled in
size.
Bake at 230˚C/450˚F/Gas Mark 8 for 30 - 35 minutes
for loaves
or 10 - 15
minutes
for rolls
.
When ready, the bread should sound hollow when tapped on the base.
white bread
soft yeast dough
2.6kg (5lb 12oz) ordinary plain flour
1.3 litre (2
1
⁄4pts) milk
300g (10oz) sugar
450g (1lb) margarine
100g (4oz) fresh yeast or 50g (2oz) dried yeast
6 eggs, beaten
5 pinches salt
Melt the margarine in the milk and bring to 43˚C (110˚F).
dried yeast (the type that needs reconstituting): add the yeast and sugar
to the milk and leave to stand for about 10 minutes until frothy.
fresh yeast: crumble into the flour and add the sugar.
other types of yeast: follow the manufacturer’s instructions.
Pour the milk into the bowl. Add the beaten eggs and 2kg (4lb 6oz) flour.
Mix at minimum speed for 1 minute, then at speed 1 for a further minute.
Scrape down.
Add the remaining flour and mix at minimum speed for 1 minute, then at
speed
1 for 2 - 3 minutes until smooth and evenly mixed.
Half fill some
450g (1lb) greased tins with the dough, or shape it into rolls.
Then cover with a tea towel and leave somewhere warm until doubled in
size.
Bake at
200˚C/400˚F/Gas Mark 6 for 20 - 25 minutes
for loaves
or 15
minutes
for rolls
.
When ready, the bread should sound hollow when tapped on the base.
Makes about 10 loaves.
17

recipes
continued
ingredients: sponge
f
illing and decoration
method
ingredients
method
ingredients
hint
method
strawberry and apricot gâteau
3 eggs
75g
(
3o
z) caster sugar
75g
(
3o
z) plain flour
150ml (
1
⁄4pt) double cream
Sugar to taste
225g (8oz) strawberries
225g
(
8o
z) apricots
H
alve the apricots and remove the stones. Cook gently in very little water, adding
sugar to taste, until soft.
Wash and halve the strawberries.
To make the sponge, whisk the eggs and sugar at maximum speed until very pale
a
nd thick.
Remove the bowl and the whisk. Fold in the flour by hand using a large metal spoon -
do this carefully to keep the sponge light.
Put the mixture into two
18cm (7”) greased and lined sandwich tins.
Bake at 180˚C/350˚F/Gas Mark 4 for about 20 minutes until the cake springs back
w
hen lightly touched.
Turn out onto a wire rack.
Whisk the cream at maximum speed until stiff. Add sugar to taste.
Roughly chop the apricots and a third of the strawberries. Fold them into half the
cream.
Spread this over one of the sponges, then put the other sponge on top.
Spread the remaining cream on top and decorate with the remaining strawberries.
meringues
4 egg whites
250g (9oz) icing sugar, sieved
Line your baking tray with non-stick baking parchment.
Whisk the egg whites and sugar at maximum speed for about 10 minutes until it
stands in peaks.
Spoon the mixture onto the baking tray (or use a piping bag with a 2.5cm (1”) star
nozzle).
Bake at 110˚C/225˚F/Gas Mark
1
⁄4 for about 4 - 5 hours until firm and crisp. If they start
to brown, leave the oven door slightly ajar.
Store meringues in an airtight tin.
shortcrust pastry
450g (1lb) flour, sieved with the salt
5ml (1tsp) salt
225g (8oz) fat (mix lard and margarine straight from the fridge)
About 80ml (4tbsp) water
Don’t overmix
Put the flour into the bowl. Chop the fat up roughly and add to the flour.
Using the stainless steel K beater mix at speed 1 until it resembles breadcrumbs.
Stop before it looks greasy.
Add the water and mix at minimum speed. Stop as soon as the water is
incorporated.
Cook at around
200˚C/400˚F/Gas Mark 6, depending on the filling.
●
●
●
●
●
●
●
1
2
3
4
5
6
7
8
9
1
0
11
●
●
1
2
3
●
●
●
●
●
●
1
2
3
4
chilli marinade
Ingredients
●
200g (7oz) cold clear honey (refrigerated overnight)
●
1 green chilli (whole)
●
5ml (1 tsp) crunchy peanut butter
●
seasoning
method
1 Place all the ingredients into the mini chopper/mill.
2 Fit the attachment to the mixer and allow the ingredients to settle around the blade.
3 Switch to pulse for 10 seconds.
4 Use as required.
18

ken uw Kenwood Cooking Chef keukenmachine
veiligheid
●
Lees deze instructies zorgvuldig door en bewaar ze voor
toekomstig gebruik.
●
Verwijder alle verpakking en labels.
belangrijke mededeling – elektronisch-medische
implantaten
●
Net als andere inductieverwarmingsproducten genereert dit apparaat
magnetische velden met beperkt bereik. Gebruikers of andere personen
met een pacemaker of ander actief implantaat dienen voor gebruik een
arts te raadplegen over eventuele incompatibiliteit, zodat eventueel
gevaar voor de gezondheid kan worden voorkomen.
●
Schakel het apparaat uit en haal de stekker uit het stopcontact voordat
u hulpstukken installeert of verwijdert, na het gebruik en voordat u het
apparaat reinigt.
●
Houd lichaamsdelen, sieraden en loszittende kleding uit de buurt van
bewegende delen en geïnstalleerde hulpstukken.
●
Steek uw vingers, enz. nooit in het scharniermechanisme.
●
Laat het apparaat nooit onbeheerd aanstaan.
●
Gebruik nooit een beschadigd apparaat. Laat het nakijken of repareren:
zie 'onderhoud en klantenservice' op pagina 32.
●
Gebruik nooit een ongeautoriseerd hulpstuk of meer dan één hulpstuk
tegelijkertijd.
●
Overschrijdt de maximum capaciteit (zie pagina 30) niet en vul het
apparaat bij gebruik van de inductieverwarming nooit meer dan het
maximum vulniveau van 3 liter dat aan de binnenkant van de kom wordt
aangegeven.
●
Lees bij het gebruik van een hulpstuk de veiligheids- en
gebruiksinformatie die erbij wordt geleverd.
●
Wees voorzichtig wanneer u dit apparaat optilt, omdat het zwaar is.
Zorg dat de kop vergrendeld is en dat de kom, hulpstukken, afdekking
van de aansluitpunten en het snoer vastzitten voordat u het apparaat
optilt.
●
Laat het snoer nooit naar beneden hangen waar een kind erbij kan.
●
Laat de motor, het snoer of de stekker nooit nat worden.
●
Wees voorzichtig als u enig deel van het apparaat vastpakt of aanraakt
terwijl het in de kookmodus wordt gebruikt en na het koken. DIT
GELDT MET NAME VOOR DE KOM, HET SPATDEKSEL EN DE
HULPSTUKKEN omdat deze nog lange tijd nadat het apparaat is
uitgeschakeld HEET blijven. Gebruik de handgrepen om de kom te
verwijderen en te dragen. Gebruik ovenhandschoenen om de hete kom
en menghulpstukken aan te pakken.
●
De onderkant van de kom blijft nog lange tijd nadat de verwarming is
uitgeschakeld heet. Wees voorzichtig als u de kom vastpakt en gebruik
de beschermmat voor het werkoppervlak als u de kom op een
warmtegevoelige ondergrond plaatst.
19
Nederlands

20
●
Pas op voor stoom die uit de mengkom kan komen, met name als u
het deksel van het spatdeksel verwijdert of de mixerkop omhoog zet.
●
Als heet voedsel van de mixer wordt overgebracht naar de blender, laat
u de ingrediënten tot kamertemperatuur afkoelen voor u ze in de
blender plaatst.
●
Gebruik alleen de kom en hulpstukken die bij dit apparaat worden
geleverd. Gebruik de kom met geen enkele andere hittebron.
●
Laat het apparaat nooit werken in de kookmodus als de kom leeg is.
●
Steek nooit iets in de ventilatiegaten.
●
Zorg dat dit apparaat tijdens het gebruik niet te dicht bij de rand en op
een vlakke ondergrond staat. Zorg dat het ten minste 10 cm verwijderd
is van de muur en dat de ventilatiegaten niet worden geblokkeerd.
Plaats het apparaat niet onder overhangende keukenkastjes.
●
Voor een juiste en veilige werking van de inductiekoker dient u ervoor te
zorgen dat de kombasis en temperatuursensors schoon en droog zijn
voordat u gaat koken.
●
Net als voor andere inductieverwarmende apparaten geldt dat u geen
creditcards, magnetische media of gevoelige elektronische apparatuur
in de buurt van het apparaat mag plaatsen wanneer dit in gebruik is.
●
Gebruik het apparaat niet om te frituren.
●
Zorg dat het voedsel voldoende gekookt is voordat u gaat eten.
●
Voedsel dient kort na bereiding te worden gegeten of moet snel worden
afgekoeld en zo snel mogelijk in de koelkast worden bewaard.
●
Misbruik van uw apparaat kan tot letsel leiden.
●
Dit apparaat kan worden gebruikt door personen met verminderde
lichamelijke, sensorische of geestelijke capaciteiten of gebrek aan
ervaring en kennis mits ze onder toezicht staan of instructie hebben
gekregen over het veilig gebruik van het apparaat en de betrokken
risico's begrijpen.
●
Op kinderen moet toezicht gehouden worden om er zeker van te zijn
dat ze niet met het apparaat spelen.
●
Dit apparaat mag niet door kinderen worden gebruikt. Houd het
apparaat en het snoer buiten het bereik van kinderen.
●
Gebruik het apparaat alleen voor het huishoudelijke gebruik waarvoor
het is bedoeld. Kenwood kan niet aansprakelijk worden gesteld in het
geval dat het apparaat niet correct is gebruikt, of waar deze instructies
niet worden opgevolgd.

vóór u de stekker in het stopcontact steekt
●
Z
org dat de elektriciteitsvoorziening dezelfde spanning heeft als op de onderkant van het apparaat wordt
aangegeven.
●
W
AARSCHUWING: DIT APPARAAT MOET GEAARD ZIJN.
●
D
it apparaat voldoet aan de EC-richtlijn 2004/108/EC betreffende de elektromagnetische compatibiliteit en EC-
b
epaling 1935/2004 van 27/10/2004 betreffende materialen die bestemd zijn voor contact met voedsel.
vóór het eerste gebruik
W
as de onderdelen: zie 'onderhoud en reiniging' op pagina 32.
inleiding
Hartelijk dank voor uw aankoop van deze Kenwood Cooking Chef keukenmachine. We hopen dat u er vele jaren
van kunt genieten.
K
enwood heeft bijna 60 jaar ervaring en expertise met de ontwikkeling van onze keukenmachines en het grote
aantal verschillende hulpstukken. Kenwood Chef keukenmachines staan erom bekend meer te zijn dan een mixer.
Bij de ontwikkeling van de Cooking Chef hebben we de veelzijdigheid van de Chef verder uitgebreid door een
g
eïntegreerde inductieverwarming direct onder de mengkom te installeren. U kunt bij de bereiding van uw
favoriete cakes, gebak en deeg nu genieten van alle voordelen van de planetaire mengbeweging en u hebt het
extra voordeel dat u de ingrediënten in de kom direct met de planetaire mengbeweging kunt verwarmen en
koken. De mogelijkheden zijn eindeloos.
De Kenwood Cooking Chef kan met zijn scala aan optionele hulpstukken een volledig voedselbereidingssysteem
worden genoemd.
Sterk, betrouwbaar, veelzijdig, Kenwood.
Wat is inductiekoken en hoe werkt het?
Inductiekoken is een geavanceerde kookmethode die gebruik maakt van de beginselen van elektromagnetische
inductie. Als elektrische stroom door een koperen spoel gaat, ontstaat een elektromagnetisch veld in het
inductiegebied. Als de kom van de Cooking Chef op zijn plaats is vergrendeld, wordt het circuit gesloten door
een speciale roestvrij stalen laag in de bodem van de kom. Hierdoor wordt een grote hoeveelheid thermische
energie gecreëerd die door de inhoud van de kom wordt geleid en het voedsel verhit.
Inductiekoken bespaart enorm veel energie omdat het alleen warmte produceert in de kombodem. Bij andere
verwarmingsmethoden zoals gaspitten wordt bijna 50% van de warmte-energie verspild aan de zijkanten van de
pan. Het inductiegebied van uw Cooking Chef voelt inderdaad alleen heet aan tijdens en onmiddellijk na het
koken omdat de warmte overgebracht wordt naar de inhoud van de kom. Dit alles betekent dat inductiekoken
erg efficiënt, erg veilig en erg schoon is.
De kookfunctie op uw Kenwood Cooking Chef lijkt sterk op het gebruik van een steelpan op uw kookplaat. Het
bijkomende voordeel is dat de Chef uw voedsel automatisch roert en de kooktemperatuur regelt naar uw
precieze eisen, waardoor u zonder zorgen andere taken in uw keuken kunt uitvoeren.
De Cooking Chef maakt gebruik van uiterst efficiënte inductieverwarmingstechnologie. U zult zien dat de
kooktijden vergeleken met koken op gas of elektrisch korter zijn en dat u bij een lagere temperatuur kunt koken.
Houd dit in gedachten als u uw apparaat voor de eerste keer gebruikt of als u experimenteert met een nieuw
recept. Zorg dat als u bij een hoge temperatuur begint te koken, u blijft kijken en de hitte zo nodig verlaagt om te
voorkomen dat het voedsel aanbrandt of aankoekt, net als u zou doen met uw steelpan. De Cooking Chef
verwarmt het voedsel in het algemeen zo snel mogelijk tot de gewenste temperatuur. U hoeft de temperatuur
daarom niet hoger in te stellen om de kooktijd te verkorten. In deze fase moet u ook aandacht schenken aan de
instelling voor de roerfrequentie. Als u bij een hogere temperatuur kookt, kan het nodig zijn voortdurend te blijven
roeren met behulp van de roerfunctie . De roerinstellingen en zijn een goed hulpmiddel om de textuur
van uw voedsel in stand te houden als u het voedsel gedurende langere tijd laag laat pruttelen.
21

In deze fase is de keuze van het juiste hulpstuk ook belangrijk. Het meest geschikte gebruik van ieder hulpstuk
wordt later in dit boek behandeld en de ervaring leert welk hulpstuk het best voor iedere taak kan worden
gebruikt. U zult zien dat de flexibele klopper voor hoge temperaturen het best kan worden gebruikt om gladde
s
auzen en crèmes te maken, terwijl het roerhulpstuk beter kan worden gebruikt bij de bereiding van voedsel dat
e
en vastere structuur moet houden, zoals stoofschotels, eenpansgerechten, ragout, enz. Ons receptenboek geeft
aan welk hulpstuk het best voor ieder recept kan worden gebruikt en u zult zien dat het gebruik van verschillende
hulpstukken voor verschillende bereidingsprocessen tijdens uw maaltijdbereiding tot betere resultaten leidt.
T
ijdens en onmiddellijk na het koken zijn de kom, het spatdeksel en het hulpstuk heet, net als uw steelpan zou
zijn. Pas op als u een van deze onderdelen aanraakt. Vergeet niet dat het kookproces stoom en condensatie
genereert; pas op als u in de kom kijkt, het deksel van de vulopening optilt of de kop van de Cooking Chef-
machine omhoog zet om in de kom te kijken of toegang wilt hebben tot de kom. Waarschuw anderen als de
machine werkt of heet is zodat zij zich niet branden. We raden u aan ovenhandschoenen te gebruiken als u hete
o
nderdelen aanraakt of verwijdert en de handgrepen te gebruiken om de kom te dragen. De beschermingsmat
voor het werkoppervlak kan warmtegevoelige oppervlakken beschermen.
Als vloeistoffen of voedsel met een hoog watergehalte worden verhit, is de temperatuuraflezing gewoonlijk
n
auwkeurig binnen +/- 5 °C. De nauwkeurigheid van de temperatuurweergave en –regeling is afhankelijk van de
t
extuur van de kominhoud, de volume van de kominhoud, de frequentie waarmee wordt geroerd en het gebruikte
hulpstuk. Dit lijkt opnieuw op het koken op een kookplaat wanneer een grote hoeveelheid voedsel in een grote
steelpan wordt verhit, maar niet goed wordt geroerd. Het voedsel onderin de steelpan is heet, of zelfs
aangebrand, terwijl het voedsel bovenin de pan aanzienlijk kouder is.
Naast de temperatuurweergave heeft de machine een kleine blauwe LED. Deze LED knippert tot de machine de
geselecteerde temperatuur heeft bereikt. Als de gewenste temperatuur is bereikt, houdt het lampje op met
knipperen. Merk op dat als u meer ingrediënten aan de kom toevoegt, de blauwe LED opnieuw begint te
knipperen omdat de temperatuur van de kominhoud door de koude ingrediënten wordt afgekoeld. U ziet
misschien ook dat het continu brandende lampje begint te knipperen als de mengfrequentie wordt verhoogd.
U zult snel merken dat uw Kenwood Cooking Chef gemakkelijk in het gebruik is en uw dagelijkse
voedselbereiding vergemakkelijkt.
22

ken uw Kenwood Cooking Chef
A
ls u een hulpstuk wilt aanschaffen dat niet bij uw apparaat meegeleverd
is, kunt u de sectie service en onderhoud raadplegen.
aansluitpunten voor hulpstukken
hoge snelheidaansluitpunt
medium snelheidaansluitpunt
lage snelheidaansluitpunt
f
itting voor hulpstukken
de mixer
afdekking medium/hoog snelheidaansluitpunt
mixerkop
afdekking lage snelheidaansluitpunt
h
endel lage snelheidaansluitpunt
k
om van cooking chef
kop - hefhendel
snelheidsknop
ventilatiegaten
k
ombasis/inductiegebied
d
rainopening
temperatuursensors
roestvrij stalen K-klopper
flexibele klopper voor hoge temperatuur
g
arde
deeghaak
roerhulpstuk
spatel voor hoge temperatuur
hittescherm
rubber afdichting
spatdeksel
deksel vulopening
beschermmat werkoppervlak
moersleutel
23

bedieningspaneel
t
imer/temperatuurdisplay
timer knop omlaag
timer knop omhoog
temperatuurregeling
pulseerknop/hoge snelheid, hoge temperatuur gardetoets
s
nelheidsknop
timer/temperatuurselectietoets
temperatuurlampje
vouwtoets
i
ndicatielampje snelheidsknop
24

de hoogte van de hulpstukken
aanpassen
Z
ie pagina 26 voor informatie over de montage van de mixer.
garde, roestvrij stalen K-klopper, roerhulpstuk
V
oor de beste prestaties moeten de garde, K-klopper en het roerhulpstuk
de bodem van de kom bijna aanraken
. U kunt de hoogte zo nodig met
de meegeleverde moersleutel bijstellen.
Ga als volgt te werk:
1
Haal de stekker uit het stopcontact.
2 Zet de mixerkop omhoog en bevestig de garde, de klopper of het
roerhulpstuk.
3 Laat de kop weer zakken. Als de tussenruimte moet worden aangepast,
laat u de kop van de mixer omhoog komen en verwijdert u het hulpstuk.
4
Gebruik de meegeleverde sleutel om de moer
v
oldoende los te draaien
en de steel bij te stellen
. Om het hulpstuk dichter bij de bodem van de
kom te krijgen, draait u de steel naar links. Om het hulpstuk verder van de
bodem van de kom te verwijderen, draait u de steel naar rechts.
5
Draai de moer weer vast.
6
Zet het hulpstuk in de mixer en laat de mixerkop zakken. (Controleer de
positie, zie bovenstaande punten).
7 Herhaal zo nodig de bovengenoemde stappen tot het hulpstuk zich in de
juiste positie bevindt. Vervolgens draait u de moer goed vast.
flexibele klopper voor hoge temperaturen – dit hulpstuk moet de
bodem van de kom net aanraken.
deeghaak – dit hulpstuk is in de fabriek ingesteld en hoeft verder niet te
worden aangepast.
het spatdeksel/hittescherm op het
apparaat bevestigen en gebruiken
Het spatdeksel bestaat uit 2 delen: het hittescherm en het spatdeksel.
Het hittescherm moet tijdens het koken worden bevestigd
omdat de mixer anders niet werkt en foutcode E:03 wordt
weergegeven. Het hittescherm dient om de mixerkop te beschermen
tegen de stoom die tijdens het kookproces wordt geproduceerd.
Het hittescherm en het spatdeksel kunnen zo nodig worden bevestigd om
de ingrediënten in de kom te houden, bijvoorbeeld als lichte ingrediënten
zoals bloem en poedersuiker worden verwerkt, of wanneer ingrediënten
worden gekookt waarbij de vloeistof in de kom moet blijven. Het spatdeksel
mag alleen in combinatie met het hittescherm op de kom worden
bevestigd.
1 Til de mixerkop op tot hij is vergrendeld.
2 Duw het hittescherm op de onderkant van de mixerkop
tot hij goed
vastzit. Het hittescherm mag nooit worden gebruikt zonder dat de rubber
afdichting goed is bevestigd.
3 Zet de kom op de basis.
4 Laat de kop weer zakken.
5 Zet het spatdeksel op de komrand en schuif hem vervolgens naar voren tot
hij volledig is geplaatst
.
●
Tijdens het mixen kunnen ingrediënten via de vulopening rechtstreeks aan
de kom worden toegevoegd.
6 Om het spatdeksel te verwijderen, schuift u hem van het apparaat af.
7 Om het hittescherm te verwijderen, tilt u de mixerkop op tot hij is
vergrendeld. Verwijder het hulpstuk en trek het hittescherm vervolgens van
de onderkant van de mixerkop naar onderen.
NB: Bevestig en verwijder het spatdeksel alleen als de mixerkop
vergrendeld is.
25

de mixer
de hulpstukken van de mixer en enkele gebruiksmogelijkheden
K-klopper
●
Voor het maken van cakes, biscuits, gebak, galzuur, vullingen, soezen en
aardappelpuree.
g
arde
●
V
oor eieren, room, beslag, vetvrij biscuitdeeg, schuimgebak, kwarktaart,
mousse en soufflé. Gebruik de garde niet voor zware mengsels (bv. voor het
kloppen van boter en suiker) – de garde kan hierdoor worden beschadigd.
deeghaak
●
Alleen voor gistmengsels.
f
lexibele klopper voor hoge
●
G
eschikt voor veel kookbewerkingen, met name voor de bereiding van
t
emperatuur pudding, roereieren en sauzen. Ideaal om warme en koude mengsels tijdens
het mixen van de zijkanten van de kom te schrapen. Ook geschikt om
groenten te bakken.
roerhulpstuk
●
Geschikt voor gebruik tijdens het koken om de textuur van het voedsel, zoals
k
ip, vis, groenten en fruit in stand te houden.
het gebruik van uw mixer
Zorg dat de temperatuur- en snelheidsknopen vóór gebruik in de uitstand
s
taan ('O').
1
Draai de hefhendel voor de kop naar rechts
e
n til de kop van de mixer op
tot hij vergrendeld is.
een hulpstuk bevestigen 2 Steek het hulpstuk in de fitting, waarbij u de pin op de steel in de groef zet
en draai het hulpstuk om het in positie te vergrendelen
.
roerhulpstuk – om het roerhulpstuk te bevestigen, steekt u de steel in de
fitting en lijnt de opening op de verlenging zo uit dat het zich onder de
metalen pin aan de onderkant van de mixerkop bevindt. Houd het roerblad
vast en draai het zo dat de pin op de steel onder de groef zit; duw omhoog
en draai om het op zijn plaats te vergrendelen
.
3 Zet de kom op de basis – druk hem naar beneden en draai naar rechts .
4 Om de mixerkop te laten zakken, tilt u hem enigszins op en draait de
hefhendel vervolgens naar rechts
Laat hem in de vergrendelde positie zakken.
Een hulpstuk verwijderen
●
Voer stap 2 in omgekeerde volgorde uit. (Gebruik altijd ovenhandschoenen
om de hulpstukken na het koken te verwijderen).
5 Steek de stekker van de mixer in het stopcontact. De lampjes van de
snelheid- en temperatuurindicator gaan kort branden. De display geeft
weer en is daarna leeg; alleen het indicatielampje voor Aan/uit blijft
branden .
6 Draai de snelheidsknop naar de gewenste instelling (zie pagina 27 voor
aanbevelingen), de mixer begint te werken en het lampje van de
snelheidtoets gaat knipperen. De timer laat de tijd zien in intervallen van 1
seconde. De snelheid kan op ieder gewenst moment terwijl de mixer
aanstaat, worden gewijzigd.
7 Stop de mixer door de snelheidsknop tot de uitstand 'O' te draaien.
Belangrijk – Als de mixerkop op enig moment opgetild wordt terwijl hij in
bedrijf is, stopt de mixer automatisch en geeft een pieptoon; hij gaat niet
opnieuw werken wanneer de kop weer omlaag wordt gebracht. Om de mixer
opnieuw op te starten, draait u de knop naar de uitstand ('O') en selecteert
de snelheid opnieuw.
pulseerknop
De pulseerknop kan alleen worden gebruikt als de snelheidsknop uit staat
('O').
Om pulseren te selecteren, drukt u op de pulseerknop en de mixer draait
op maximum snelheid zo lang de knop in deze stand wordt gehouden. Als
de inhoud van de kom warmer is dan 60 °C, neemt de snelheid geleidelijk
toe. Er klinkt er een pieptoon en de snelheids- en
temperatuurindicatorlampjes gaan snel knipperen.
vouwtoets
Druk de vouwtoets in en laat hem los en de mixer werkt gedurende 2-3
omwentelingen automatisch op de minimumsnelheid, waarna hij stopt. De
toets kan langer worden ingedrukt voor een langere werking of kan
herhaaldelijk worden ingedrukt om ingrediënten te combineren.
NB: Als de vouwtoets wordt ingedrukt terwijl de motor draait, wordt de
standaard vouwfunctie uitgevoerd en keert het apparaat terug naar de
geselecteerde snelheid.
P
26

snelheidsknop
De volgende snelheden zijn slechts richtlijnen; de snelheid is afhankelijk van
de hoeveelheid voedsel in de kom en de ingrediënten die worden gemengd,
enz.
D
raai de snelheidsknop naar rechts om de snelheid van 'min' tot 'max' te
v
eranderen.
K-klopper
●
vet en suiker kloppen begin op min en schakel geleidelijk over
naar max.
●
e
ieren tot een roomachtig mengsel kloppen 4 - max.
●
bloem, fruit enz invouwen min - 1
●
kant-en-klaar cakes begin op min en verhoog de snelheid geleidelijk tot
max.
●
vet in bloem wrijven min - 2.
f
lexibele klopper voor hoge
●
v
et en suiker kloppen begin op min en snelheid geleidelijk verhogen tot 3.
temperatuur
●
hete en koude mengsels van de zijkant van de kom schrapen begin op min en snelheid
geleidelijk verhogen tot 3.
●
groenten bakken, risotto en polenta roeren, enz. gebruik .
garde
●
Snelheid geleidelijk verhogen tot max.
d
eeghaak
●
B
egin op min en verhoog de snelheid geleidelijk tot 1.
roerhulpstuk
●
Alleen met roerinstellingen
,
en gebruiken.
roerinstellingen
Om de roerinstellingen te selecteren, draait u de snelheidsknop naar links. De roerinstellingen kunnen
het best worden gebruikt als de mixer in kookmodus wordt gebruikt. Om de roerinstellingen te
gebruiken, moeten alle afdekkingen van de aansluitpunten zijn aangebracht.
– gebruik deze instelling als een constante lage snelheid nodig is, bijv om een saus te roeren.
– Als de snelheidsknop in deze positie wordt ingesteld, werkt de mixer afwisselend iedere 5
seconden gedurende 2 omwentelingen op een lage snelheid.
– Als de snelheidsknop in deze positie wordt ingesteld, werkt de mixer afwisselend iedere 30
seconden op een lage snelheid voor het omroeren van stoofschotels, enz.
Draai de snelheidsknop naar de uitstand ('O') om de mixer te stoppen.
NB:
●
Wanneer een snelheid wordt geselecteerd, knippert het indicatorlampje.
●
Als het apparaat in gebruik is, kunt u een hoge toon horen. Dit is normaal.
de mixer gebruiken om voedsel te koken
BELANGRIJK
●
Zorg dat het inductiegebied, de temperatuursensors en het externe oppervlak van de kombodem
schoon zijn. Als dit niet gebeurt, wordt de temperatuursensor beïnvloed en krijgt u een slecht
kookresultaat.
●
Controleer of alle afdekkingen van de aansluitpunten, met inbegrip van het hittescherm, zijn
aangebracht. Als ze niet juist zijn aangebracht, werkt de verwarmingsfunctie niet.
●
Gebruik altijd ovenhandschoenen om de kom en hulpstukken na het koken te verwijderen.
1 Zet de mixer volgens de instructies op pagina 26 in elkaar.
2 Draai de temperatuurknop tot de gewenste temperatuur.
●
Het apparaat verwarmt pas als een snelheid is geselecteerd.
3 Draai de snelheidsknop tot de gewenste snelheid; hierdoor worden de motor en de verwarming
ingeschakeld. Beide lampjes gaan knipperen.
4 Zodra de ingestelde temperatuur is bereikt, blijft het indicatielampje voor de temperatuur branden.
Tijdens het koken begint het lampje te knipperen als de temperatuur verandert; hiermee wordt
aangegeven dat de mixer probeert de ingestelde temperatuur te handhaven (lees de inleiding op
pagina 21).
●
Als de komtemperatuur hoger is dan 60 °C wordt de snelheid om veiligheidsredenen automatisch
beperkt, zelfs als een hogere snelheid geselecteerd is. De snelheid neemt niet automatisch toe als de
temperatuur onder 60 °C zakt. Eerst moet de snelheidsknop worden uitgeschakeld en moet de
gewenste snelheid worden geselecteerd.
27

●
NB: Telkens wanneer op de timer/temperatuurselectieknop wordt gedrukt, worden afwisselend de timer en de
temperatuur van de kominhoud weergegeven.
5 Om het mengen en verwarmen te stoppen, zet u de snelheidsknop in de uitstand ('O'). Om de werking te
h
ervatten, selecteert u een snelheid.
tips
●
In sommige recepten, met name recepten met een hoog watergehalte, kan de kooktemperatuur
niet boven 100 °C uitstijgen (dit is het kookpunt van water).
●
A
ls u tijdens het koken ingrediënten wilt toevoegen, draait u de snelheid omlaag en voegt de ingrediënten
langzaam en gelijkmatig toe.
●
Om sauzen snel te verwarmen, gebruikt een u continue roerinstelling .
●
U zult zien dat het gebruik van verschillende hulpstukken voor verschillende bereidingsprocessen tijdens uw
maaltijdbereiding tot betere resultaten leidt. Gebruik de flexibele klopper voor hoge temperatuur om groenten te
b
raden en vervolgens het roerhulpstuk om stukken vlees of gevogelte te bereiden.
●
Als u het spatdeksel gebruikt tijdens het koken, dient u dit altijd te verwijderen voordat u de mixerkop optilt.
Vergeet niet dat het spatdeksel en hittescherm condensatie bevatten.
●
Til de mixerkop langzaam op zodat eventuele vloeistof aan de onderkant van het hittescherm terug in de kom
k
an vallen.
●
E
r zijn drie roerfuncties waarmee u de juiste roerfrequentie voor de verschillende recepten kunt selecteren. Voor
sommige recepten moet constant worden geroerd om te voorkomen dat de ingrediënten aan de bodem van de
kom aankoeken, terwijl voor andere recepten zo nu en dan moet worden geroerd om de textuur van het voedsel
te bewaren.
●
V
oor de beste prestaties dient u de hoogte van het hulpstuk aan te passen (zie pagina 25).
●
De maximale kooktijd is 3 uur; daarna schakelt de mixer automatisch uit.
●
U kunt voedsel zonder hulpstuk verwarmen, maar u moet wel altijd een snelheid selecteren. Dit kan handig zijn bij
het smelten van bijvoorbeeld boter of chocolade.
●
Telkens wanneer op de timer/temperatuurselectieknop wordt gedrukt, worden afwisselend de kooktijd en de op
dat moment bereikte temperatuur weergegeven.
Garde voor hoge snelheid en hoge temperatuur
Als u de garde wilt gebruiken bij hoge snelheid en een temperatuur boven 60 °C, draait u de snelheidsknop naar
de gewenste klopsnelheid en houdt de pulseerknop vervolgens ingedrukt. Er klinkt er een pieptoon en de
snelheids- en temperatuurindicatorlampjes gaan snel knipperen. De klopsnelheid neemt langzaam toe tot de
geselecteerde snelheid.
Herhaal de procedure om de snelheid verder te verhogen. U kunt de klopsnelheid normaal verlagen en de mixer
op de gebruikelijke wijze uitschakelen.
Deze functie mag ALLEEN worden gebruikt met de garde. U mag de maximale kookcapaciteit
van 3 liter niet overschrijden en moet ervoor zorgen dat het spatdeksel bevestigd is. De
machine mag niet alleen worden gelaten.
na het koken
●
Wees voorzichtig als u enig deel van de mixer hanteert of aanraakt terwijl het in de kookmodus wordt gebruikt en
na het koken. DIT GELDT MET NAME VOOR DE KOM, HET SPATDEKSEL EN DE HULPSTUKKEN omdat deze
nog lange tijd nadat het apparaat is uitgeschakeld HEET blijven. Gebruik de handgrepen om de kom te
verwijderen en te dragen. Gebruik ovenhandschoenen om de hete kom en menghulpstukken aan te pakken.
●
De onderkant van de kom blijft nog lange tijd nadat de verwarming is uitgeschakeld heet. Wees voorzichtig als u
de kom vastpakt en gebruik de bijgeleverde beschermmat voor het werkoppervlak om een warmtegevoelige
ondergrond te beschermen.
28

29
display
V
oor uw veiligheid is de mixer uitgerust met 5 afzonderlijke veiligheidssensors die zijn ingeschakeld als u de mixer
in kookmodus gebruikt. Als de mixer wordt ingeschakeld en een veiligheidssensor wordt geactiveerd, geeft de
timer/temperatuurdisplay een foutmelding weer, bijv. E:01. De weergave van een foutmelding wordt vergezeld van
een pieptoon en de mixer werkt niet. Controleer de volgende foutmeldingen:
Als deze of andere foutmeldingen blijven verschijnen, dient u contact op te nemen met de klantenservice
van Kenwood.
Foutmelding Beschrijving Oplossing
De kop van de machine is omhoog gericht. Als Draai de kop naar beneden. Draai de
de kop wordt opgetild, schakelt een snelheidsknop naar de 'O'-stand en
veiligheidssensor de motor en de verwarming selecteer de gewenste snelheid.
E:01
u
it. Als de snelheidsknop in een andere stand
w
ordt geplaatst dan de uitstand ('O'), terwijl de
kop wordt opgetild, wordt dit bericht
weergegeven en kan de motor niet worden
ingeschakeld.
De kom van de Cooking Chef zit niet op zijn Zorg dat de kom van de Cooking Chef
p
laats. De verwarmingsfunctie werkt alleen als wordt gebruikt. Controleer of de kom op
d
e kookkom wordt gebruikt. Deze kom moet de juiste manier is geplaatst. Draai de
E:02 ook op de juiste manier zijn geplaatst. De snelheidsknop naar 'O' en selecteer de
veiligheidssensors merken dat de verkeerde kom gewenste snelheid.
is gebruikt of dat de juiste kom op de verkeerde
manier is geplaatst.
Het hittescherm is niet bevestigd. De Zorg dat het hittescherm op de juiste
v
erwarmingsfunctie wordt uitgeschakeld als het manier is geplaatst. Draai de
E:03
hittescherm niet op de juiste manier is bevestigd. snelheidsknop naar 'O' en selecteer
vervolgens de gewenste snelheid.
De afdekkingen voor de lage snelheid- en Zorg dat alle afdekkingen juist zijn
hoge/medium snelheidaansluitpunten zijn niet aangebracht. Draai de snelheidsknop
aangebracht. Deze afdekkingen zijn voorzien van naar 'O' en selecteer vervolgens de
veiligheidssensors. Als de afdekkingen niet juist gewenste snelheid.
E:04 zijn aangebracht, wordt de verwarming
uitgeschakeld en als een roerfunctie is
geselecteerd, blijft de motor continu draaien. De
mengsnelheden min tot max blijven continu
werken.
Probleem met temperatuursensor. Als de Draai de snelheidsknop naar 'O', trek de
warmteregeling een hogere komtemperatuur stekker uit het stopcontact en laat de
E:09
detecteert dan tijdens normaal gebruik kan machine afkoelen. Controleer of de
worden verwacht, worden de motor en de kombasis en temperatuursensors
verwarming automatisch uitgeschakeld. schoon zijn. Steek de stekker weer in
het stopcontact en schakel de machine
zoals gewoonlijk in.
Probleem met de motorsnelheid of oververhitting. Draai de snelheidsknop naar 'O' en trek
Als de motor afslaat of te heet wordt, schakelt de stekker uit het stopcontact. Verwijder
E:10
het reguleringssysteem de motor en de alle obstructies die de motor doen
verwarming uit. afslaan. Zorg dat de ventilatiegaten vrij
zijn van obstructies. Steek de stekker in
het stopcontact en schakel de machine
in.

gebruik van het aftelmechanisme
D
e timer kan worden gebruikt in de kook- en niet-kookmodi. Als geen afteltijd is geselecteerd, telt de timer
automatisch omhoog met 1 seconde terwijl de mixer in bedrijf is. De maximale bedrijfsduur is 3 uur.
1 Steek de stekker van de mixer in het stopcontact. De display geeft kort weer en is daarna leeg; alleen
het indicatielampje voor Aan/uit blijft branden.
2 Druk op de + of – toets en de display geeft 0:00 weer.
3
Druk op de + of – toets tot de gewenste tijd wordt weergegeven. De timer laat de tijd zien in intervallen van 5
seconden. Als de toetsen continu worden ingedrukt, veranderen de cijfers sneller naarmate de knoppen langer
worden ingedrukt. De maximale tijd die kan worden ingesteld is 3 uur.
NB: Als de + toets wordt ingedrukt als de timer op 3:00 staat, verandert de weergegeven tijd in 0:00. Als de –
t
oets wordt ingedrukt als de timer op 0:00 staat, verandert de weergegeven tijd in 3:00.
4
Draai de snelheidsknop naar de gewenste snelheid; de mixer begint te werken en de timer telt met een interval
van 1 seconde af.
●
De werking van de mixer kan op ieder gewenst moment worden onderbroken door de snelheidsknop naar de
'O'-stand te draaien. De timer wordt hierdoor ook onderbroken. De timer gaat verder met aftellen als de werking
v
an de mixer wordt hervat.
5
Het mixproces stopt automatisch als de tijd geheel is verstreken en u hoort gedurende 3 seconden een pieptoon.
De display knippert gedurende 5 seconden en is daarna leeg; vervolgens wordt het Aan/uit-lampje
weergegeven.
de timer opnieuw instellen
1 Stel de timer op nul door tegelijkertijd op de + en - toets te drukken (de snelheidsknop moet in de 'O'-stand
staan).
●
Als de machine 10 minuten inactief is, gaan de LCD-display en de achterverlichting in de slaapmodus en worden
alle displays uitgeschakeld. Als een toets of regelknop wordt geactiveerd, komt de display terug in het vorige
formaat.
maximum capaciteit
kruimeldeeg
●
Bloem: 910 g
stijf gistdeeg
●
Bloem: 1,5 kg
●
Totaalgewicht: 2,4 kg
zacht gistdeeg
●
Bloem: 2,6 kg
●
Totaalgewicht: 5 kg
vruchtentaartmix
●
Totaalgewicht: 4,55 kg
eiwitten
●
16
kookmodus
●
3 liter
algemene aanwijzingen
●
Stop de mixer en schraap de kom regelmatig schoon met de spatel.
●
Eieren kunnen het best op kamertemperatuur worden geklopt.
●
Voordat u eiwitten begint te kloppen, dient u te zorgen dat er geen vet of eigeel aanwezig is op de garde of de
kom.
●
Voor deeg gebruikt u koude ingrediënten tenzij uw recept iets anders aangeeft.
aanwijzingen voor het maken van brood
belangrijk
●
U mag de aangegeven maximum capaciteit nooit overschrijden - de machine raakt dan overbelast.
●
Als u hoort dat de machine te hard moet werken, schakelt u hem uit, verwijdert de helft van het deeg en verwerkt
iedere helft afzonderlijk.
●
De ingrediënten worden het best vermengd als u de vloeistof eerst in de kom doet.
30

31
probleemoplossingsgids voor tijdens het koken
Probleem Oorzaak Oplossing
D
e mixer werkt niet in de verwarmingsmodus Een van de veiligheidssensors is geactiveerd. Zie de tabel met foutmeldingen op pagina 29.
e
n geeft een foutmelding en een
●
C
ontroleer of de kop omlaag is gebracht en is
waarschuwingstoon weer. vergrendeld.
●
Zorg dat alle afdekkingen van de aansluitpunten
juist zijn aangebracht.
●
Zorg dat het hittescherm op de juiste manier is
geplaatst.
●
Z
org dat de kom van de cooking chef juist is
g
eplaatst.
Er is een temperatuur geselecteerd, maar de Er is geen snelheid geselecteerd. Selecteer een snelheid.
kominhoud wordt niet verwarmd (het
temperatuurlampje brandt niet).
De mixer verandert van snelheid tijdens De snelheid wordt automatisch beperkt als de Dit is een veiligheidskenmerk.
h
et koken. kominhoud 60 °C bereikt.
V
oedsel brandt aan op de bodem van de 1 De geselecteerde temperatuurinstelling kan te 1 Verlaag de temperatuur of kook bij een lagere
kom. hoog zijn. temperatuur.
2 Onjuist hulpstuk gebruikt. 2 Controleer of het meest geschikte hulpstuk
wordt gebruikt.
3 De roerfunctie is te traag. 3 Verhoog de roerfrequentie of schakel over op
een continue roerfunctie.
4
Het hulpstuk is misschien niet laag genoeg 4 Stel de hoogte van het hulpstuk bij.
in de kom bevestigd.
5 De timer is voor een te lange tijdsduur 5 Kook het voedsel korter (maar zorg wel dat het
ingesteld. gaar is).
6 De sensor en/of de onderkant van de kom 6 Zorg dat deze gebieden schoon en droog blijven.
zijn misschien niet schoon.
Textuur van het voedsel niet bewaard 1 De temperatuur is te hoog ingesteld. 1 Verlaag de temperatuur.
gebleven. 2 De roerfunctie is te snel. 2 Gebruik een lagere roersnelheid.
3 De ingrediënten zijn te lang gekookt. 3 Verkort de kooktijd (maar zorg wel dat het
voedsel gaar is).
4 Onjuist hulpstuk gebruikt. 4 Controleer of het meest geschikte hulpstuk
wordt gebruikt.
Onregelmatige mengsnelheid. 1 Ingredienten te groot, te hard of te stevig. 1 Snij het voedsel in kleinere stukken, verwijder de
pitten uit het fruit, smelt ingrediënten langzaam
zonder gebruik te maken van een hulpstuk (maar
zorg wel dat een snelheid is geselecteerd).
2 Voeg de ingrediënten toe nadat de kop omlaag
is gebracht.
3 Controleer of het meest geschikte hulpstuk
wordt gebruikt.
Koude ingrediënten zijn aan een heet Als de kominhoud niet goed wordt geroerd, 1 Zorg dat er voldoende tijd is om de ingrediënten
mengsel toegevoegd, maar de bevat het voedsel in de kom verschillende goed te mengen.
temperatuurdisplay reageert niet snel temperaturen. 2 Verhoog de roersnelheid.
genoeg.
De mixerkop kan met moeite worden Als er stevige ingrediënten zoals chocola op Voeg de ingrediënten toe nadat de kop omlaag
gesloten als er voedsel in de kom zit. de bodem van de kom liggen, kan de is gebracht.
mixerkop niet worden vergrendeld.
De mixer werkt onafgebroken als De afdekkingen van aansluitpunten zijn onjuist Zorg dat alle afdekkingen van de aansluitpunten
roerinstelling of geselecteerd is. aangebracht. juist zijn aangebracht.
De motorsnelheid wordt beperkt als De kom is heet. Verwijder de kom of koel de kom af tot
hulpstukken worden gebruikt. onder 60 °C.

reiniging en onderhoud
onderhoud en reiniging
●
Schakel het apparaat altijd uit en haal de stekker uit het stopcontact voor
u het gaat reinigen.
●
B
ij het eerste gebruik kan een beetje vet bij het aansluitpunt
z
itten.
Dit is normaal. U kunt het gewoon wegvegen.
●
De metalen oppervlakken van de temperatuursensors kunnen tijdens
normaal gebruik tekenen van slijtage vertonen. Dit heeft geen invloed
o
p de prestaties van het product.
●
L
aat de flexibele klopper voor hoge temperatuur niet op de mixer
zitten als het apparaat niet in gebruik is.
a
pparaat, afdekkingen
a
ansluitpunten
●
M
et een vochtige doek afvegen en vervolgens afdrogen.
●
Nooit in water onderdompelen of schuurmiddelen gebruiken.
flexibele klopper voor
●
Verwijder het flexibele vegerblad altijd van het hulpmiddel voordat u het
hoge temperatuur reinigt.
●
W
as het flexibele vegerblad en hulpstuk in heet zeepsop en droog ze
v
ervolgens goed af. De onderdelen kunnen ook in de afwasmachine
worden gewassen.
N
B: Inspecteer de conditie van het hoofddeel van het hulpstuk vóór en na
g
ebruik en controleer verder regelmatig de conditie van het vegerblad;
vervang het als er tekenen van slijtage zijn.
kom, hulpstukken, spatdeksel
●
Met de hand afwassen en goed afdrogen, of in de afwasmachine wassen.
●
Gebruik nooit een staalborstel, staalwol of bleekmiddel om uw roestvrij
stalen kom te reinigen. Gebruik azijn of een geschikt ontkalkingsmiddel om
kalkaanslag te verwijderen.
●
Als voedsel aan de binnenkant van de kom aankoekt of aanbrandt,
verwijdert u zo veel mogelijk met de meegeleverde spatel. Vul de kom met
warm zeepsop en laat hem weken. Verwijder hardnekkige resten met een
nylon borstel.
●
Verkleuring van de kom heeft geen invloed op de prestaties ervan.
drainopening
●
Zorg dat zich geen voedsel in de buurt van deze opening bevindt. gebruik
zo nodig een pijpenrager of wattenstaafje om de opening te reinigen.
temperatuursensors
●
Met een vochtige doek afvegen en vervolgens goed afdrogen. Gebruik
nooit schuurmiddelen of scherpe instrumenten om de sensors te reinigen.
onderhoud en klantenservice
●
Als het snoer beschadigd is, moet het om veiligheidsredenen door
Kenwood of een door Kenwood geautoriseerd reparatiebedrijf vervangen
worden.
Als u hulp nodig hebt met:
●
het gebruik van uw apparaat of
●
onderhoud en reparatie
kunt u contact opnemen met de winkel waar u het apparaat gekocht hebt.
●
Ontworpen en ontwikkeld door Kenwood in het VK.
●
Vervaardigd in China.
32

33
BELANGRIJKE INFORMATIE VOOR DE CORRECTE
VERWERKING VAN HET PRODUCT IN OVEREENSTEMMING
M
ET DE EUROPESE RICHTLIJN 2002/96/EC
Aan het einde van de levensduur van het product mag het niet samen met
het gewone huishoudelijke afval worden verwerkt. Het moet naar een
speciaal centrum voor gescheiden afvalinzameling van de gemeente
worden gebracht, of naar een verkooppunt dat deze service verschaft. Het
a
part verwerken van een huishoudelijk apparaat voorkomt mogelijke
gevolgen voor het milieu en de gezondheid die door een ongeschikte
verwerking ontstaan en zorgt ervoor dat de materialen waaruit het
apparaat bestaat, teruggewonnen kunnen worden om een aanmerkelijke
b
esparing van energie en grondstoffen te verkrijgen. Om op de verplichting
t
ot gescheiden verwerking van elektrische huishoudelijke apparatuur te
wijzen, is op het product het symbool van een doorgekruiste vuilnisbak
aangebracht.

recepten
Zie belangrijke aanwijzingen voor het maken van brood op pagina 30.
witbrood stijf gistdeeg
ingrediënten
●
1,36 kg sterke patentbloem
●
3 theelepels zout
●
2
5 g verse gist of 15 g gedroogde gist + 1 theelepel suiker
●
7
50 ml warm water: 43 °C. Gebruik een thermometer of voeg 250 ml kokend water toe
aan 500 ml koud water
●
25 g vet
bereiding 1 gedroogde gist (het soort gist dat moet worden opgelost): giet het warme water in de
k
om. Voeg de gist en de suiker toe en laat het ongeveer 10 minuten staan tot het
schuimt.
verse gist: in de bloem verkruimelen.
andere soorten gist: volg de aanwijzingen van de fabrikant.
2 Giet de vloeistof in de kom. Voeg vervolgens de bloem (met verse gist indien gebruikt),
h
et zout en het vet toe.
3 45-60 seconden bij de minimum snelheid kneden. De snelheid vervolgens tot 1 verhogen,
zo nodig meer bloem toevoegen tot een deeg is gevormd.
4 3-4 minuten langer kneden op snelheid 1 tot het deeg soepel en elastisch is en de zijkant
v
an de kom schoon blijft.
5
Leg het deeg in een ingevette polytheen zak of een kom die met een theedoek is
afgedekt. Laat het deeg vervolgens op een warme plek rijzen tot het in volume is
verdubbeld.
6 Kneed het deeg vervolgens nogmaals 2 minuten op snelheid 1.
7 Vul vier ingevette blikken van 450 g voor de helft met deeg of vorm er broodjes van.
Dek deze af met een theedoek en laat ze vervolgens op een warme plek rijzen tot ze in
volume zijn verdubbeld.
8 Op 230 °C/gasstand 8 gedurende 30 – 35 minuten bakken voor broden of 10 – 15
minuten voor broodjes.
●
Als het gaar is, moet het brood hol klinken als u op de onderkant tikt.
witbrood zacht gistdeeg
ingrediënten
●
2,6 kg gewone patentbloem
●
1,3 liter melk
●
300 g suiker
●
450 g margarine
●
100 g verse gist of 50 g gedroogde gist
●
6 eieren, geslagen
●
5 snufjes zout
bereiding 1 Smelt de margarine in de melk en breng het geheel op een temperatuur van 43 °C.
2 gedroogde gist (het soort gist dat moet worden opgelost): voeg de gist en de suiker
aan de melk toe en laat het ongeveer 10 minuten staan tot het schuimt.
verse gist: in de bloem verkruimelen en suiker toevoegen
andere soorten gist: volg de aanwijzingen van de fabrikant.
3 Giet de melk in de kom. Voeg de geslagen eieren en 2 kg bloem toe.
4 Bij minimum snelheid gedurende 1 minuut mixen en vervolgens nog een minuut op
snelheid 1.
De binnenkant van de kom afschrapen.
5 Voeg de rest van de bloem toe en mix gedurende 1 minuut op de minimum snelheid en
vervolgens gedurende 2-3 minuten op snelheid 1 tot u een glad en gelijkmatig deeg hebt
verkregen.
6 Vul enkele ingevette blikken van 450 g voor de helft met deeg of vorm er broodjes van.
Dek deze af met een theedoek en laat ze vervolgens op een warme plek rijzen tot ze in
volume zijn verdubbeld.
7 Op 200°C/gasstand 6 gedurende 20–25 minuten bakken voor broden of 15 minuten voor
broodjes.
8 Als het gaar is, moet het brood hol klinken als u op de onderkant tikt.
●
Voor ongeveer 10 broden.
34

recepten vervolg
taart met aardbeien en abrikozen
ingrediënten: biscuitdeeg
●
3 eieren
●
7
5 g basterdsuiker
●
75 g patentbloem
vulling en versiering
●
150 ml volle room
●
Suiker naar smaak
●
2
25 g aardbeien
●
2
25 abrikozen
bereiding 1 Halveer de abrikozen en verwijder de pitten. Kook ze voorzichtig in erg weinig water met
naar smaak een beetje suiker tot ze zacht zijn.
2 Was en halveer de aardbeien.
3
Voor het biscuitdeeg klopt u de eieren en suiker op maximum snelheid tot ze erg bleek
e
n dik zijn.
4 Verwijder de kom en garde. Vouw de bloem er met een grote metalen lepel met de hand
door; doe dit voorzichtig om het deeg licht te houden.
5 Doe het mengsel in twee ingevette en beklede blikken van 16 cm.
6
Bak ze bij 180 °C/gasstand 4 gedurende 20 minuten tot de taart terugveert als u hem
zachtjes aanraakt.
7 Keer de blikken om op een rooster.
8 Klop de room op maximum snelheid tot hij stijf is. Voeg suiker naar smaak toe.
9 Hak de abrikozen en een derde van de aardbeien grof in stukken. Vouw ze in de helft
van de room.
10 Spreid dit uit over een van de taarten en leg vervolgens de andere taart er bovenop.
11 Smeer de resterende room over de bovenkant en versier dit met de resterende
aardbeien.
schuimpjes
ingrediënten
●
4 eiwitten
●
250 g poedersuiker, gezeefd
●
Bekleed uw bakplaat met niet-klevend bakpapier.
bereiding 1 Klop de eiwitten en suiker op maximum snelheid gedurende ongeveer 10 minuten tot
zich pieken hebben gevormd.
2 Schep het mengsel met een lepel op de bakplaat (of gebruik een spuitzak met een
stervormige spuitmond van 2,5 cm).
3 Op 110 °C/gasstand 1⁄4 gedurende ongeveer 4-5 uur bakken tot de schuimpjes stevig
en knapperig zijn. Als ze bruin beginnen te worden, kunt u de deur van de oven
enigszins open laten staan.
●
Bewaar de schuimpjes in een luchtdichte container.
kruimeldeeg
ingrediënten
●
450 g bloem, gezeefd met het zout
●
1 theelepel zout
●
225 g vet (meng reuzel en margarine uit de koelkast)
●
Ongeveer 80 ml water
●
Niet te lang mixen
tip 1 Doe de bloem in de kom. Hak het vet grof en voeg het aan de bloem toe.
bereiding 2 Gebruik de K-klopper op snelheid 1 en mix tot het er als fijn broodkruim uitziet.
Stop voordat het mengsel er vettig begint uit te zien.
3 Voeg het water toe en mix op minimum snelheid. Stop zodra het water is opgenomen.
4 Afhankelijk van de vulling bij ongeveer 200 °C/gasstand 6 bakken.
chilimarinade
ingrediënten
●
200 g koude, heldere honing (gedurende de nacht gekoeld)
●
1 groene chili (heel)
●
5 ml (1 tl) knapperige pindakaas
●
peper en zout
bereiding 1 Plaats alle ingrediënten in het mini-hakhulpstuk / de molen.
2 Bevestig het hulpstuk aan de mixer en laat de ingrediënten zich rondom het mes
bezinken.
3 Draai de knop gedurende 10 seconden naar pulseren.
4 Gebruik het mengsel naar wens.
35

faites connaissance avec votre robot de cuisine
multifonctions Kenwood Chef
sécurité
●
Lisez et conservez soigneusement ces instructions pour
pouvoir vous y référer ultérieurement.
●
Retirez tous les éléments d’emballage et les étiquettes.
remarque importante – implants médicaux électroniques
●
Comme tous les produits de cuisson par induction, cet appareil génère
des champs magnétiques à ondes courtes. Si l’utilisateur ou une
personne se tenant à proximité de l’appareil porte un pacemaker ou
tout autre implant actif, il est recommandé de consulter un médecin
avant utilisation au sujet d’une possible incompatibilité afin de prévenir
tout risque pour la santé.
●
Éteignez et débranchez l’appareil avant de fixer ou de retirer les
éléments, après utilisation et avant de le nettoyer.
●
N’approchez pas des parties de votre corps, bijoux ou vêtements
amples des parties en mouvement et des accessoires attachés.
●
Ne mettez pas les doigts dans le mécanisme de charnière.
●
Ne laissez jamais l’appareil allumé sans surveillance.
●
N’utilisez jamais un appareil endommagé. Faites-le vérifier et réparer :
voir rubrique "service après-vente", page 49.
●
N’utilisez jamais d’accessoire non prévu pour cet appareil ou plus d’un
accessoire à la fois.
●
N’excédez jamais les capacités maximales indiquées page 47 ; quand
vous utilisez la cuisson par induction, n’excédez jamais le niveau de
remplissage maximum de 3 litres indiqué à l’intérieur du bol.
●
Quand vous utilisez un accessoire supplémentaire, lisez les instructions
d’utilisation qui l’accompagnent.
●
Faites attention en soulevant cet appareil car il est assez lourd. Assurez-
vous que la tête est verrouillée et que le bol, les accessoires, les
couvercles et le cordon sont bien attachés avant de soulever l’appareil.
●
Ne laissez jamais le cordon pendre de sorte qu’un enfant puisse
l’attraper.
●
Ne laissez jamais le bloc moteur, le cordon d’alimentation ou la prise se
mouiller.
●
Faites attention en manipulant ou en touchant toute partie de l’appareil
quand il est utilisé en mode cuisson ou après la cuisson, EN
PARTICULIER, LE BOL, LE COUVERCLE ANTI PROJECTIONS ET LES
ACCESSOIRES car ils restent CHAUDS longtemps après que l’appareil
a été éteint. Utilisez les poignées pour retirer et porter le bol. Utilisez un
gant anti-chaleur pour manipuler le bol et les accessoires de mélange
chauds.
●
Le dessous du bol restera chaud longtemps après la fin de la cuisson.
Faites attention en manipulant le bol et protégez votre plan de travail ou
les surfaces sensibles à la chaleur.
●
Prenez garde à la vapeur s’échappant du bol, particulièrement en ôtant
le couvercle ou en soulevant la tête du batteur.
36
Français

37
●
Si vous transférez des ingrédients chauds du batteur au mixeur,
laissez-les refroidir à température ambiante avant de les placer dans le
mixeur.
●
N’utilisez que le bol et les accessoires fournis avec cet appareil.
N’utilisez jamais le bol avec une autre source de chaleur.
●
Ne jamais faire fonctionner l’appareil en mode cuisson si le bol est vide.
●
Ne rien insérer dans les grilles de ventilation.
●
Quand vous utilisez cet appareil, posez-le sur une surface plane loin du
bord. Placez-le à au moins 10 cm des murs et assurez-vous que la
ventilation n’est pas bloquée. Ne pas placer l’appareil sous un placard
saillant.
●
Pour une utilisation correcte et sûre du cuiseur par induction, assurez-
vous que la base du bol et les capteurs de température sont propres et
secs avant de lancer la cuisson.
●
Comme pour tous les appareils de cuisson par induction, ne placez pas
de cartes de crédit, appareils magnétiques ou électroniques sensibles à
proximité de l’appareil pendant son utilisation.
●
N’utilisez pas l’appareil pour frire des aliments.
●
Assurez-vous toujours que les ingrédients sont complètement cuits
avant de les consommer.
●
Il est recommandé de consommer les aliments peu de temps après leur
préparation ou de les refroidir rapidement et de les réfrigérer le plus vite
possible.
●
Une mauvaise utilisation de votre appareil peut provoquer des
blessures.
●
Les appareils peuvent être utilisés par des personnes dont les capacités
physiques, sensorielles ou mentales sont diminuées, ou qui ne
disposent pas des connaissances ou de l’expérience nécessaires, si
elles ont été formées et encadrées pour l’utilisation de l'appareil
concerné en toute sécurité et si elles comprennent les risques
impliqués.
●
Les enfants doivent être surveillés afin qu'ils ne puissent pas jouer avec
cet appareil.
●
Cet appareil n’est pas destiné à être utilisé par des enfants. Conservez
l'appareil et son cordon hors de portée des enfants.
●
N’employez l’appareil qu’à la fin domestique prévue. Kenwood décline
toute responsabilité dans les cas où l’appareil est utilisé incorrectement
ou que les présentes instructions ne sont pas respectées.

38
avant de brancher l’appareil
●
A
ssurez-vous que le courant électrique que vous utilisez est le même que celui indiqué sur la partie inférieure de
l’appareil.
●
A
VERTISSEMENT : CET APPAREIL DOIT ÊTRE RELIÉ À LA TERRE
●
Cet appareil est conforme à la directive 2004/108/CE de la CE sur la compatibilité électromagnétique, et au
règlement 1935/2004 de la CE du 27/10/2004 sur les matériaux destinés au contact alimentaire.
avant d’utiliser votre appareil pour la première fois
L
avez les différents éléments : voir "nettoyage" page 49.
introduction
Merci d’avoir acheté ce robot de cuisine Kenwood, nous espérons qu’il vous sera utile pendant de longues
années.
K
enwood a près de 60 ans d’expérience et d’expertise dans le développement de nos robots de cuisine et leur
large gamme d’accessoires. Les robots de cuisine Kenwood Chef sont renommés pour être bien plus qu’un
simple batteur.
N
ous avons poussé un peu plus loin la polyvalence du robot Chef en y intégrant la cuisson par induction
directement sous le bol mélangeur. Vous pouvez maintenant profiter de tous les avantages du mélange à froid
avec mouvement planétaire pour préparer vos gâteaux préférés, pâtisseries et beignets, avec la possibilité
supplémentaire de réchauffer et de cuire directement dans le bol tout en mélangeant par mouvement planétaire.
Les opportunités sont illimitées.
Le robot de cuisine Kenwood Chef avec sa gamme d’accessoires en option est véritablement le système de
préparation culinaire complet.
Solide, Fiable, Polyvalent. Kenwood.
La cuisson par induction est une méthode de cuisson de pointe qui emploie les principes de
l’induction électromagnétique.
Quand un courant électrique passe dans une bobine de cuivre dans la zone de cuisson par induction, il se crée
un champ électromagnétique. Quand le bol du robot est verrouillé, le circuit est complété par une couche
spéciale d’inox sur la base du bol. Il se crée une grande quantité d’énergie thermique qui traverse le contenu du
bol, réchauffant ainsi les ingrédients.
La cuisson par induction est énergétiquement très efficace car elle ne produit de chaleur qu’à la base du bol. Les
autres méthodes de cuisson, comme la cuisson au gaz, gaspillent 50% de la chaleur sur les côtés de la
casserole. De fait, la zone de cuisson par induction de votre robot est chaude seulement pendant et
immédiatement après la cuisson, car la chaleur du contenu du bol est retransférée. Tout ceci signifie que la
cuisson par induction est très efficace, sûre et propre.
Utiliser la fonction cuisson de votre robot Kenwood Chef est similaire à utiliser une casserole sur votre gazinière.
L’avantage supplémentaire, c’est que le robot peut automatiquement mélanger les ingrédients et réguler la
température de cuisson selon vos exigences précises, vous permettant ainsi d’effectuer en même temps d’autres
tâches dans votre cuisine.
Le robot Chef utilise la technologie de la chaleur par induction qui est extrêmement efficace. Comparé à la
cuisson au gaz ou sur une plaque électrique, vous verrez que les temps de cuisson sont réduits ou que vous
pouvez cuisiner à température plus basse. Tenez-en compte quand vous utilisez votre robot pour la première fois
ou quand vous essayez une nouvelle recette. Commencez la cuisson à température élevée, surveillez la cuisson
et réduisez la température si nécessaire pour empêcher les aliments de brûler ou de coller au bol, exactement
comme vous le feriez avec une casserole. En général, le robot Chef fait chauffer les ingrédients à la température
désirée le plus rapidement possible. Il n’est donc pas nécessaire de régler la température à un niveau plus élevé
pour réduire le temps de cuisson. Faites également attention au réglage de la fréquence des battements du
mélangeur. Quand vous cuisinez à haute température, il vous sera peut-être nécessaire d’utiliser le réglage
mélange en continu. Les réglages de sont utiles pour maintenir la consistance de vos ingrédients
pendant une longue période de cuisson à feu doux.

Sélectionner le bon accessoire est également important à ce stade. Un peu plus loin dans ce manuel, nous
suggérons les usages les plus appropriés pour chacun des accessoires, et avec l’expérience, vous comprendrez
vite lequel est le mieux indiqué pour chaque tâche. En cuisinant, vous vous rendrez compte que le batteur souple
s
pécial haute température est parfait pour obtenir une consistance fluide pour les sauces et les crèmes, tandis
q
ue l’outil mélangeur est plus approprié pour les aliments à consistance solide, comme les ragoûts, casseroles,
etc… Notre livre de recettes recommande les meilleurs outils pour chaque recette et vous trouverez peut-être
que changer d'accessoire pour différentes procédures au cours de votre préparation peut donner de meilleurs
résultats.
Pendant la cuisson et immédiatement après, le bol et le couvercle anti-projection seront chauds – tout comme le
serait votre casserole. Faites attention lorsque vous les touchez. Il est également important de se souvenir que le
processus de cuisson génère de la vapeur et de la condensation. Faites donc attention en regardant dans le bol,
en soulevant le couvercle ou la tête du robot pour avoir accès au bol. Prévenez aussi les autres de faire faire
a
ttention quand le robot est en cours de cuisson ou quand il est chaud. Pour toucher ou retirer les parties
chaudes, il est conseillé d’utiliser un gant à four et de porter le bol par les poignées. Utilisez le tapis de protection
pour protéger les surfaces sensibles à la chaleur.
Q
uand vous chauffez des liquides ou des ingrédients à forte teneur en eau, la mesure de la température a une
m
arge d’erreur de plus ou moins 5°C. L’exactitude de la température affichée varie selon la consistance du
contenu du bol, son volume, la fréquence à laquelle il est mélangé et l’accessoire utilisé. C’est la même chose
que lorsque vous cuisinez sur un feu à gaz, par exemple. Si une grande quantité de nourriture est chauffée sans
être bien mélangée, celle-ci sera chaude à la base, voire brûlée, mais ce qui se trouve sur le dessus sera plus
f
roid.
En plus de l’indicateur de température, le robot dispose d’un petit LED bleu qui clignote jusqu’à ce qu’il ait atteint
la température sélectionnée. Une fois cette température atteinte, la lumière cesse de clignoter. Cependant,
lorsque vous ajoutez d’autres ingrédients dans le bol, la lumière bleue se remet à clignoter car la température du
contenu du bol a baissé avec l’ajout d’ingrédients froids. Vous remarquerez aussi que la lumière statique se met à
clignoter si la vitesse du mélange est augmentée.
Vous vous rendrez compte rapidement que votre robot Kenwood Chef est simple à utiliser et vous facilitera la
tâche pour votre cuisine de tous les jours.
39

faites connaissance avec votre robot de cuisine Kenwood Chef
O
rifices de branchement
s
ortie ultra-rapide
sortie moyenne
sortie lente
sortie planétaire
le batteur couvercle des sorties ultra-rapide et moyenne
t
ête du batteur
couvercle de la sortie lente
levier de la sortie lente
bol
t
ête – levier pour soulever
c
ontrôle de la vitesse
ventilation
socle du bol/ zone de cuisson par induction
orifice d’écoulement
c
apteurs de température
b
atteur K en inox
batteur souple haute température
fouet
crochet de pétrissage
m
élangeur
spatule haute température
protège-chaleur
joint en caoutchouc
couvercle anti-projections
couvercle de la cheminée d’alimentation
tapis de protection du plan de travail
clé de serrage
40

41
commandes
a
ffichage minuteur/température
bouton diminuer la minuterie
bouton augmenter la minuterie
contrôle de la température
bouton pulse/vitesse haute, fouet haute température
r
églage de la vitesse
bouton de sélection minuteur/température
voyant indicateur de température
bouton ‘fold’
v
oyant indicateur de vitesse

ajuster la hauteur des accessoires
Veuillez vous référer à la page 43 pour l’assemblage du batteur.
Fouet, batteur K en inox, mélangeur
Pour une meilleure performance, le fouet, le batteur K et le mélangeur
d
oivent presque toucher le fond du bol
.
Si nécessaire, ajuster la
hauteur à l'aide de la clé de serrage fournie.
Voici comment :
1
Débrancher l’appareil.
2
Soulever la tête du batteur et insérer le fouet, le batteur ou le mélangeur.
3 Abaisser la tête du batteur. Si la hauteur doit être ajustée, soulever la tête
du batteur et retirer l’accessoire.
4 Utiliser la clé pour desserrer l’écrou
afin de pouvoir ajuster l’axe .
P
our baisser l’accessoire, tourner l’axe dans le sens inverse des aiguilles
d
’une montre. Pour le lever par rapport au fond du bol, tourner l’axe dans
le sens des aiguilles d’une montre.
5 Resserrer l’écrou.
6 Insérer l’accessoire dans la tête du batteur. (Vérifier sa position, voir ci-
d
essus).
7 Répétez les étapes précédentes jusqu’à ce que l’accessoire soit
correctement placé. Resserrer alors l’écrou fermement.
batteur souple haute température – cet accessoire doit toucher le
fond du bol.
crochet de pétrissage – cet outil est réglé en usine et ne devrait pas
nécessiter d’ajustement.
Installation et utilisation du couvercle
anti-projections
L’ensemble du couvercle anti-projection consiste de deux éléments : le
protège-chaleur et le couvercle anti-éclaboussures.
Le protège-chaleur doit être installé pendant les opérations
de cuisson sinon le batteur ne pourra pas fonctionner et le
code d’erreur E:03 sera affiché. Le protège-chaleur protège la tête
du batteur de la vapeur produite par la cuisson.
Si nécessaire, le protège-chaleur et le couvercle anti-projections peuvent
être installés pour empêcher les ingrédients de sortir du bol, par exemple
quand vous mélangez des ingrédients légers comme de la farine ou du
sucre glace, ou quand vous cuisez des aliments pour lesquels la vapeur
doit rester dans le bol. Le couvercle ne doit pas être installé sur le bol sans
le protège-chaleur.
1 Levez la tête du batteur jusqu’en position verrouillée.
2 Poussez le protège-chaleur vers le haut sur la partie inférieure de la tête du
batteur
jusqu’à sa mise en place. Le protège-chaleur ne doit s’utiliser
que si le joint en caoutchouc est correctement installé.
3 Installez le bol sur le socle.
4 Abaissez la tête du batteur.
5 Placez le couvercle anti-projections sur le bord du bol et faites-le glisser
vers l’avant jusqu’à sa mise en place complète.
.
• Pendant la préparation du mélange, on peut ajouter des ingrédients
directement dans le bol par la cheminée d’alimentation.
6 Pour retirer le couvercle, faites-le simplement glisser vers vous.
7 Pour retirer le protège-chaleur, levez la tête du batteur jusqu’en position
verrouillée. Retirez l’accessoire, puis tirez le protège-chaleur vers le bas de
la partie inférieure de la tête du batteur.
Note : Ne mettre ou retirer le protège-chaleur que lorsque la tête du batteur
est en position verrouillée.
42

le batteur
les accessoires du batteur et quelques-unes de leurs utilisations
possibles
batteur K
●
Pour la confection de gâteaux, biscuits, pâtes, glaçages, garnitures, éclairs
e
t purée de pommes de terre.
fouet
●
Pour les œufs, les crèmes, les pâtes à frire, les gâteaux (type génoise) sans
matière grasse, les meringues, les cheese-cakes, les mousses, les soufflés.
N’utilisez pas le fouet pour les mélanges épais (comme par exemple pour
t
ravailler les matières grasses et le sucre) car vous pourriez l’endommager.
c
rochet de pétrissage
●
P
our les mélanges à base de levure.
batteur souple
●
Convient à de nombreuses préparations, en particulier la crème anglaise, les
haute température œufs brouillés et les sauces. Idéal pour racler les mélanges chauds ou froids
sur les côtés du bol pendant le mélange. Convient également pour les
l
égumes sautés.
m
élangeur
●
U
tile pendant la cuisson pour maintenir la consistance des ingrédients, par
ex. poulet, poisson, légumes et fruits.
pour utiliser le batteur
A
vant d’utiliser le batteur, assurez-vous que la vitesse et la température sont
réglées sur ‘O’.
1 Tournez la manette pour soulever la tête du batteur dans le sens des aiguilles
d’une montre
et relevez la tête du batteur jusqu’à ce qu’elle s’enclenche
en position.
pour insérer un accessoire 2 Placer l’accessoire dans l’orifice, localisez le sillon dans lequel il s’insère puis
tourner jusqu’à ce qu’il se verrouille en position
.
mélangeur – pour installer le mélangeur, insérez son axe dans la prise, puis
alignez la fente sur l’extension de sorte à le mettre au-dessous du crochet de
métal sur la partie inférieure de la tête du batteur. Tenez la partie en forme de
rame et tournez jusqu’à ce que l’encoche de l’axe se trouve sous le sillon,
puis poussez vers le haut et tournez pour verrouiller en position
.
3 Posez le bol sur la base, appuyez et tournez dans le sens des aiguilles d’une
montre .
4 Pour abaisser la tête du batteur, soulevez-la légèrement, puis tournez la
manette dans le sens des aiguilles d’une montre. Abaissez dans la position
verrouillée.
pour retirer un accessoire
●
Effectuez l’étape 2 ci-dessus à l’envers. (Utilisez des gants à four pour retirer
les accessoires après la cuisson).
5 Branchez le robot. Les voyants indicateurs de vitesse et de température
s’allument brièvement. L’écran affichera puis se videra, laissant
l’indicateur de marche allumé .
6 Réglez la vitesse désirée (voir les vitesses recommandées en page 44). Le
batteur s’allume et le voyant indicateur de la vitesse clignote. Le minuteur
compte en secondes. La vitesse peut être changée à tout moment pendant
que le batteur fonctionne.
7 Arrêtez le batteur en tournant le bouton de réglage des vitesses sur la
position ‘O’.
Important – Si la tête du batteur est relevée pendant le fonctionnement, le
batteur s’arrête automatiquement et émet un bip. Il ne redémarrera pas
quand la tête du batteur sera abaissée. Pour relancer le robot, tournez le
bouton de vitesse en position ‘O’ puis re-sélectionnez une vitesse.
bouton ‘pulse’
Le bouton ‘pulse’ ne peut être utilisé que lorsque la vitesse est réglée
sur ‘O’.
Appuyez sur le bouton ‘pulse’ et le batteur fonctionnera à la vitesse
maximum tant que vous appuierez sur le bouton. Si le contenu du bol est à
une température supérieure à 60°C, la vitesse augmentera graduellement.
L’appareil émettra un bip et les voyants indicateurs de vitesse et de
température clignoteront rapidement.
bouton ‘fold’
Si vous appuyez brièvement sur le bouton ‘fold’ , le batteur se mettra
automatiquement en vitesse minimum pour deux battements, puis s’arrêtera.
Vous pouvez appuyer longuement sur le bouton pour prolonger l’opération,
ou appuyer plusieurs fois si nécessaire pour mélanger les ingrédients.
Remarque : Si vous appuyez sur le bouton ‘fold’ pendant que le moteur
fonctionne, l’appareil accomplira la fonction ‘fold’ standard puis se remettra à
la vitesse sélectionnée.
P
43

contrôle de la vitesse
Les vitesses suivantes sont indicatives et peuvent varier suivant la quantité et
la température des ingrédients à mélanger.
Tournez le bouton des vitesses dans le sens des aiguilles d’une montre pour
p
asser de la vitesse minimum à la vitesse maximum.
batteur K
●
travailler les matières grasses en crème avec le sucre
commencez sur ‘min’, augmentez progressivement jusqu’au ‘max’.
●
incorporer les œufs à une crème 4 - ‘max’.
●
i
ncorporer la farine, les fruits, etc min - 1
●
battre tous les ingrédients d’un gâteau commencez à la vitesse ‘min'
et augmentez progressivement jusqu’au ‘max’.
●
incorporer les matières grasses à la farine min - 2.
batteur souple haute température
●
travailler les matières grasses en crème avec le sucre commencez sur ‘min’, augmentez
p
rogressivement jusqu’à 3.
●
racler les mélanges chauds ou froids sur les côtés du bol commencez sur ‘min’, augmentez
progressivement jusqu’à 3.
●
faire sauter des légumes, mélanger un risotto, une polenta, etc, sélectionnez .
fouet
●
augmentez progressivement jusqu’au ‘max’.
c
rochet de pétrissage
●
c
ommencez sur ‘min’, augmentez progressivement jusqu’à 1.
mélangeur
●
utilisez seulement les réglages
,
, .
réglages de mélange
Pour sélectionner les réglages de mélange, tournez le bouton de contrôle des vitesses dans le sens
inverse des aiguilles d’une montre. Ces réglages conviennent surtout quand le robot est en mode
cuisson. Remarque : pour utiliser ces réglages, tous les couvercles de l’appareil doivent être installés.
– Utilisez ce réglage pour une vitesse lente constante, par exemple, pour les sauces.
– Le batteur fonctionne par intermittence à vitesse lente toutes les 5 secondes pour environ 2 tours.
– Le batteur fonctionne par intermittence à vitesse lente toutes les 30 secondes, par exemple, pour
mélanger des casserolées.
Remettre le bouton sur la position ‘O’ pour arrêter l’opération.
Note:
●
Quand une vitesse est sélectionnée, le voyant indicateur de vitesse clignote.
●
L’appareil peut émettre un bip quand il fonctionne. C’est normal.
utiliser le robot pour cuisiner
IMPORTANT
●
Vérifiez que la zone d’induction, les capteurs de température et la surface de la base du bol sont
propres. A défaut, le capteur de température fonctionnera mal, produisant une mauvaise cuisson.
●
Vérifiez que tous les couvercles de l’appareil y compris le protège-chaleur sont installés. S’ils ne sont
pas correctement placés, la fonction cuisson ne marchera pas.
●
Utilisez des gants à four pour retirer le bol et les accessoires après la cuisson.
1 Assemblez le batteur suivant les instructions en page 43.
2 Tournez le bouton de réglage de la température au niveau souhaité.
●
La cuisson ne commencera pas avant qu’une vitesse ne soit sélectionnée.
3 Réglez la vitesse souhaitée, ce qui allumera le moteur et la plaque chauffante. Les deux voyants
lumineux clignoteront.
4 Une fois la température atteinte, le voyant indicateur de température restera allumé continuellement.
Cependant, durant la cuisson, le voyant se mettra à clignoter si la température change, indiquant que
l’appareil essaie de maintenir la température souhaitée (veuillez lire l’introduction page 38).
●
Si la température du bol excède les 60°C, la vitesse sera automatiquement limitée pour des raisons de
sécurité même si une vitesse supérieure a été sélectionnée. La vitesse n’augmentera pas
automatiquement quand la température retombera sous les 60°C. Le bouton de contrôle de vitesse
doit d’abord être éteint et la vitesse désirée re-sélectionnée.
●
Remarque : chaque fois que le bouton de sélection de température/minuteur est appuyé, l’écran affiche
alternativement le temps et la température du contenu du bol.
5 Pour arrêter ou interrompre le processus de mélange et de cuisson, remettre le réglage de la vitesse en
position ‘O’. Pour reprendre l’opération, sélectionner une vitesse.
44

45
astuces
●
Certaines recettes, en particulier à forte teneur en eau, ne pourront pas atteindre une
température de cuisson supérieure à 100°C (la température d’ébullition de l’eau).
●
Pour ajouter des ingrédients dans le bol pendant la cuisson, diminuez la vitesse et ajoutez les ingrédients
lentement et régulièrement.
●
Pour chauffer rapidement une sauce, utilisez le réglage de mélange continuel .
●
V
ous obtiendrez peut-être de meilleurs résultats en changeant d’accessoire pour différentes procédures au cours
de votre préparation d’un repas. Par exemple, utilisez le batteur souple haute température pour frire des légumes
puis le mélangeur pour cuisiner des morceaux de viande ou de volaille.
●
Si vous utilisez le couvercle anti-projections pendant la cuisson, enlevez-le toujours avant de soulever la tête du
b
atteur. Faites attention à la condensation qui se forme sur le couvercle et le protège-chaleur.
●
S
oulevez la tête du batteur lentement pour permettre au liquide se trouvant sous le protège-chaleur de couler
dans le bol.
●
Il existe trois fonctions de mélange vous permettant de choisir le bon rythme de mélange pour chaque recette.
Certaines recettes demandent un mélange constant pour éviter que les ingrédients ne collent au fond du bol,
a
lors que d’autres demandent un mélange intermittent pour maintenir la consistance des ingrédients.
●
P
our une performance optimale, ajustez la hauteur des accessoires (voir page 42).
●
Le temps de cuisson maximal est de trois heures, après quoi le batteur s’éteindra automatiquement.
●
Il est possible de cuire des aliments sans accessoire installé, mais une vitesse doit être sélectionnée. Cela peut
être utile pour faire fondre des ingrédients, comme le beurre ou le chocolat.
●
C
haque fois que le bouton de sélection de température/minuteur est appuyé, l’écran affiche alternativement le
temps de cuisson et la température du contenu du bol
Contrôle du fouet à température et vitesse haute
Pour mélanger au fouet à haute vitesse et à une température supérieure à 60°C, réglez la vitesse désirée puis
appuyez sur le bouton ‘pulse’ et maintenez-le appuyé. L'appareil émet un bip et les voyants indicateurs de
température et de vitesse clignotent rapidement. La vitesse du fouet augmente lentement jusqu’à atteindre la
vitesse désirée. Répétez la procédure pour augmenter davantage la vitesse. Vous pouvez ensuite réduire la
vitesse du fouet ou éteindre le batteur normalement.
Cette fonction DOIT s’utiliser uniquement avec le fouet. N’excédez pas la capacité maximale de
3 litres et assurez-vous que le couvercle anti-projections est en place. L’appareil ne doit pas
rester sans surveillance.
après la cuisson
●
Faites attention en manipulant ou en touchant toute partie de l’appareil quand il est utilisé en mode cuisson ou
après la cuisson, EN PARTICULIER, LE BOL, LE COUVERCLE ANTI PROJECTIONS ET LES ACCESSOIRES car
ils restent CHAUDS longtemps après que l’appareil a été éteint. Utilisez les poignées pour retirer et porter le bol.
Utilisez un gant anti-chaleur pour manipuler le bol et les accessoires chauds.
●
Le dessous du bol restera chaud longtemps après la fin de la cuisson. Faites attention en manipulant le bol et
utilisez le tapis de protection pour protéger les surfaces sensibles à la chaleur.

46
Affichage
P
our votre sécurité, le batteur est équipé de 5 capteurs de sécurité séparés qui fonctionnent quand le robot est
en mode cuisson. Si le batteur est allumé et qu’un capteur de sécurité est activé, l’écran indiquant le temps ou la
température affichera un message d’erreur, par ex : ‘E:01’. L’appareil émettra un bip et le batteur ne fonctionnera
pas. Consultez les messages d’erreur suivants :-
Si ces codes d’erreur ou d’autres continuent de s’afficher, contactez le service après-vente Kenwood.
Message Description Solution
d
’erreur
L
a tête du batteur est en position relevée. Abaissez la tête. Mettez le bouton de
Quand la tête est relevée, un capteur désactive contrôle de la vitesse en position ‘O’,
E:01
le moteur et la cuisson. Si la vitesse est réglée puis sélectionnez la vitesse désirée.
sur autre chose que la position éteinte ‘O’ quand
la tête est relevée, ce message s’affiche et le
m
oteur ne démarre pas.
L
e bol n’est pas en place. La fonction cuisson Assurez-vous que vous utilisez bien le
ne marche que si l’on utilise le bol. Le bol doit bol du robot Kenwood Chef. Vérifiez que
E:02 aussi être correctement installé. Les capteurs le bol est bien installé. Mettez le bouton
de sécurité détectent si le bol fourni n’est pas de contrôle de la vitesse en position ‘O’,
utilisé ou s’il est mal installé. puis sélectionnez la vitesse désirée.
Le protège-chaleur n’est pas installé. La fonction Assurez-vous que le protège-chaleur est
c
uisson est désactivée si le protège-chaleur correctement installé. Mettez le bouton
E:03
n’est pas correctement installé. de contrôle de la vitesse en position ‘O’,
puis sélectionnez la vitesse désirée.
Les couvercles de la sortie lente et des sorties Assurez-vous que tous les couvercles
ultra-rapide et moyenne ne sont pas installés. sont correctement installés. Mettez le
Ces couvercles sont munis de capteurs de bouton de contrôle de la vitesse en
sécurité. Si les couvercles ne sont pas position ‘O’, puis sélectionnez la vitesse
E:04 correctement installés, la plaque chauffante désirée.
s’éteint, et si des fonctions de mélange sont
sélectionnées, le moteur se met à tourner en
continu. Les vitesses de mélange du minimum
au maximum fonctionneront en continu.
Problème des capteurs de température. Si le Mettez le bouton de contrôle de la
système de contrôle de la chaleur détecte une vitesse en position ‘O’, débranchez
E:09
température du bol plus élevée que prévu l’appareil et laissez-le refroidir. Vérifiez
pendant une utilisation normale, le moteur et la que la base du bol et les capteurs de
plaque chauffante s’éteignent automatiquement. températures sont propres. Rebranchez
et allumez l’appareil comme d’habitude.
Problème de vitesse du moteur ou de surchauffe. Mettez le bouton de contrôle de la
Si le moteur cale ou devient trop chaud, le vitesse en position ‘O’ et débranchez
système de contrôle éteint automatiquement le l’appareil. Retirez tout ce qui pourrait
E:10 moteur et la plaque chauffante. faire obstruction et faire caler le moteur.
Assurez-vous que toutes les grilles de
ventilation ne sont pas obstruées.
Rebranchez et allumez.

47
utiliser le minuteur
L
e minuteur peut être utilisé en mode cuisson ou sans cuisson. Si aucune durée n’est sélectionnée, le minuteur
compte automatiquement en intervalles d’une seconde pendant que le batteur fonctionne. La durée maximale
d’utilisation est de trois heures.
1 Branchez l’appareil. L’écran affiche brièvement puis se vide, laissant l’indicateur de marche allumé .
2 Appuyez sur l’un de bouton + ou – et 0:00 s’affichera à l’écran.
3
Appuyez sur l’un de bouton + ou – jusqu’à ce que le temps désiré s’affiche. Le minuteur compte en intervalles de
5 secondes. Si l’on appuie sur le bouton de manière continue, les chiffres changeront plus rapidement. Une
durée maximum de trois heures peut être programmée.
Remarque : Si l’on appuie sur le bouton + quand le minuteur est sur 3:00, le temps affiché passe à 0:00. Si l’on
a
ppuie sur le bouton – quand le minuteur est sur 0:00, le temps affiché passe à 3:00.
4
Réglez la vitesse désirée, le batteur se mettra en route et le minuteur comptera à rebours par intervalles d’une
seconde.
●
L’opération de mélange peut être interrompue à tout moment en tournant le bouton de contrôle de la vitesse en
position ‘O’. Cela mettra également le minuteur en pause. Le minuteur reprendra son compte à rebours quand le
b
atteur sera remis en marche.
5
L’opération de mélange s’arrête automatiquement une fois le temps écoulé et des bips sont émis pendant trois
secondes. L’écran clignote pendant cinq secondes puis se vide, laissant l’indicateur de marche allumé .
pour reprogrammer le minuteur
1
Remettez le minuteur à zéro en appuyant sur les boutons + et – en même temps (la vitesse doit être réglée en
position ‘O’).
●
Si l’appareil n’est pas utilisé pendant dix minutes, l’écran LCD et la veilleuse se mettent en ‘mode sommeil’ et
tous les écrans s’éteignent. Si un bouton ou un réglage est activé, l’écran reprend son aspect initial.
capacités maximales
pâte brisée
●
Quantité de farine : 910 g
pâte levée
●
Quantité de farine : 1,5 kg
●
Poids total : 2,4 kg
pâte levée sucrée
●
Quantité de farine : 2,6 kg
●
Poids total : 5 kg
mélange pour
cake aux fruits
●
Poids total : 4,55 kg
blancs d’œuf
●
16
mode cuisson
●
3 litres
astuces
●
Eteignez l’appareil et raclez fréquemment le bol avec la spatule.
●
Pour battre des œufs, il est conseillé d’utiliser des œufs à température ambiante.
●
Avant de monter les blancs en neige, vérifiez qu’il n’y a pas de restes de graisse et de jaune d’œuf sur le fouet
ou dans le bol.
●
Utilisez des ingrédients froids pour la pâte, sauf indication contraire de votre recette.
points importants pour la fabrication du pain
important
●
Ne dépassez jamais les capacités maximales car vous risqueriez de surcharger l’appareil.
●
Si vous entendez l’appareil forcer, éteignez-le, retirez la moitié de la pâte et travaillez chaque moitié séparément.
●
Les ingrédients se mélangeront mieux si vous mettez les liquides en premier.

48
guide de dépannage en mode cuisson
Problème Cause Solution
L
e batteur ne fonctionne pas en mode Un des capteurs de sécurité a été activé. Voir le tableau des messages d’erreur en
c
uisson, l’appareil affiche un message page 46.
d’erreur et émet un bip. • Vérifiez que la tête du batteur est abaissée et
verrouillée.
• Vérifiez que tous les couvercles sont
correctement installés
• Vérifiez que le protège-chaleur est correctement
installé.
•
Vérifiez que le bol du robot est correctement
installé.
U
ne température a été sélectionnée, mais le La vitesse n’a pas été sélectionnée. Sélectionner une vitesse.
c
ontenu du bol ne chauffe pas (le voyant
indicateur de température n’est pas allumé).
Le batteur change de vitesse pendant La vitesse est automatiquement limitée C’est une mesure de sécurité.
la cuisson. quand le contenu du bol atteint les 60°C.
Des ingrédients brûlent au fond du bol. 1 La température sélectionnée est peut-être 1 Réduire la température sélectionnée ou cuire à
t
rop élevée. température plus basse.
2
Un accessoire incorrect est utilisé. 2 Vérifiez que l’accessoire le plus approprié est
utilisé.
3 La fonction mélange est trop lente. 3 Augmentez la fréquence de la fonction mélange
ou passez à un brassage continu.
4 L’accessoire n’est peut-être pas positionné 4 Ajustez l’accessoire.
assez bas dans le bol.
5 Le minuteur a été réglé sur une durée 5 Cuire pendant moins longtemps (assurez-vous
trop longue. que les aliments soient bien cuits)
6 Le capteur et/ou le dessous du bol ne 6 Vérifiez que ces zones sont propres et sèches.
sont peut-être pas propres.
Les aliments ne gardent pas leur consistance. 1 Température sélectionnée trop élevée. 1 Réduisez la température
2 Fonction mélange trop rapide. 2 Réduisez la vitesse de mélange.
3 Les ingrédients ont cuit trop longtemps. 3 Réduisez le temps de cuisson (assurez-vous que
les aliments soient bien cuits)
4 Accessoire incorrect utilisé. 4 Vérifiez que l’accessoire le plus approprié est
utilisé.
Vitesse de mélange irrégulière. 1 Ingrédients trop gros ou trop durs. 1 Coupez les ingrédients en plus petits morceaux,
dénoyautez les fruits, mélangez doucement les
ingrédients sans accessoire (mais sélectionnez
une vitesse).
2 Ajoutez les ingrédients une fois la tête du batteur
rabaissée.
3 Vérifiez que l’accessoire le plus approprié est
utilisé.
Des ingrédients froids ont été ajoutés à un Si le contenu du bol n’est pas mélangé 1 Laissez le temps aux ingrédients d’être bien
mélange chaud, mais l’affichage de la uniformément, il y aura des variations de mélangés.
température ne répond pas rapidement. température à l’intérieur du bol. 2 Augmentez la vitesse de mélange.
Difficulté à fermer la tête du batteur avec Des ingrédients durs, comme du chocolat Ajoutez les ingrédients une fois la tête du batteur
des ingrédients dans le bol. au fond du bol empêchent la tête du rabaissée.
batteur de se verrouiller.
Le batteur fonctionne en continu quand Couvercles des sorties mal installés. Vérifiez que les couvercles de l’appareil sont
mélange ou mélange sont bien installés.
sélectionnés.
La vitesse du moteur est limitée quand on Bol chaud installé. Retirez le bol ou laissez le bol refroidir en
ajoute des accessoires. dessous de 60°C.

nettoyage de l’appareil et service
après-vente
entretien et nettoyage
●
Eteignez et débranchez toujours votre appareil avant de le nettoyer.
●
Un peu de graisse peut apparaître à l’orifice lors de la première
utilisation. C’est normal, il vous suffit de l’essuyer.
●
L
es surfaces en métal des capteurs de température peuvent montrer des
signes d’usure lors d’une utilisation normale. Cela n’affecte pas les
performances de l’appareil.
●
Ne laissez pas le batteur souple haute température installé dans le
mixeur quand celui-ci n’est pas utilisé.
robot, couvercles des sorties
●
Essuyez avec un chiffon humide, puis séchez.
●
N’utilisez jamais d’abrasifs et ne les plongez jamais dans l’eau.
batteur souple haute température
●
Retirez toujours la lame du batteur souple de l’accessoire avant le
n
ettoyage.
●
Lavez la lame du batteur souple et l’accessoire dans de l’eau chaude
savonneuse, puis séchez minutieusement. Autrement, les pièces peuvent
être passées au lave-vaisselle.
Remarque : Veuillez inspecter l’état du corps de l’accessoire avant et
après utilisation ; vérifiez aussi régulièrement l’état de la lame du fouet et
remplacez-la en cas de signe d’usure.
bol, accessoires, couvercle
●
Lavez à la main puis essuyez, ou lavez en lave-vaisselle.
anti-projections
●
N’utilisez jamais de brosse métallique, de paille de fer ou de chlore pour
nettoyer votre bol en inox. Utilisez du vinaigre pour enlever le calcaire.
●
Si des ingrédients sont restés collés ou brûlés au fond, enlevez le
maximum à l’aide de la spatule fournie. Remplissez le bol d’eau chaude
savonneuse et laissez tremper. Retirez les dépôts récalcitrants à l’aide
d’une brosse en nylon.
●
Toute décoloration du bol n’affecte pas sa performance.
orifice d’écoulement
●
Vérifiez que cet endroit n’est pas obstrué par des déchets. Si nécessaire,
nettoyez-le avec un goupillon ou un coton-tige.
capteurs de température
●
Essuyez avec un chiffon humide, puis séchez minutieusement. N’utilisez
jamais d’abrasifs ou d’instruments pointus pour nettoyer les capteurs.
service après-vente
●
Si le cordon est endommagé, il doit être remplacé, pour des raisons de
sécurité, par Kenwood ou par un réparateur agréé Kenwood.
Si vous avez besoin d’aide concernant :
●
l’utilisation de votre appareil
●
l’entretien ou les réparations
Contactez le magasin où vous avez acheté votre appareil.
●
Conçu et développé par Kenwood au Royaume-Uni.
●
Fabriqué en Chine.
49

50
A
VERTISSEMENTS POUR L'ÉLIMINATION CORRECTE DU
P
RODUIT AUX TERMES DE LA DIRECTIVE EUROPÉENNE
2002/96/EC.
Au terme de son utilisation, le produit ne doit pas être éliminé avec les
déchets urbains.
L
e produit doit être remis à l'un des centres de collecte sélective prévus
par l'administration communale ou auprès des revendeurs assurant ce
service.
Éliminer séparément un appareil électroménager permet d'éviter les
retombées négatives pour l'environnement et la santé dérivant d'une
é
limination incorrecte, et permet de récupérer les matériaux qui le
composent dans le but d'une économie importante en termes d'énergie et
de ressources.Pour rappeler l'obligation d'éliminer séparément les
appareils électroménagers, le produit porte le symbole d'un caisson à
o
rdures barré.

recettes
Voir points importants pour la fabrication du pain en page 47.
Pain blanc pâte levée
ingrédients
●
1,3 kg de farine
●
15 ml (3 cc) sel
●
25 g de levure fraîche (levure de boulanger) ou 15 g/20 ml de levure sèche + 5 ml (1 cc) de sucre
●
7
50 ml d’eau chaude à 40°C. Utilisez un thermomètre ou ajoutez 250 ml d’eau bouillante à 500 ml d’eau froide.
●
2
5 g de saindoux
méthode 1 levure sèche (à reconstituer) : versez l’eau chaude dans le bol. Puis ajoutez la levure et le sucre et laissez
reposer pendant environ 10 minutes jusqu’à ce que le mélange obtenu soit mousseux.
levure fraîche : émietter dans la farine.
a
utres types de levure : reportez-vous aux instructions du fabricant.
2 Versez le liquide dans le bol. Puis ajoutez la farine (avec la levure fraîche le cas échéant), le sel et le saindoux.
3 Travaillez à vitesse minimum pendant 45 à 60 secondes, puis passez à la vitesse 1, ajoutant de la farine si
nécessaire, jusqu’à ce qu’une pâte soit formée.
4 Pétrir pendant encore 3 à 4 minutes à vitesse 1 jusqu’à ce que la pâte soit lisse et élastique et laisse les côtés du
b
ol propres.
5 Versez la pâte dans un moule en polyéthylène préalablement beurré ou dans un bol et recouvrez d’un torchon.
Laissez reposer dans un endroit chaud jusqu’à ce que la pâte ait doublé de volume.
6 Retravaillez pendant 2 minutes à vitesse 1.
7
Remplissez à moitié quatre moules de 450 g préalablement beurrés ou roulez la pâte en petits pains.
R
ecouvrez d’un torchon et laissez reposer dans un endroit chaud jusqu’à ce que la pâte ait doublé de volume.
8 Faites cuire à 230°C/Thermostat 8 pendant 30 à 35 minutes pour les miches ou 10 à 15 minutes pour les petits
pains.
●
Lorsque le pain est cuit, il doit sonner creux quand on le tapote sur sa base.
pain blanc pâte levée sucrée
ingrédients
●
2,6 kg de farine ordinaire
●
1,3 litre de lait
●
300 g de sucre
●
450 g de margarine
●
100 g de levure fraîche ou 50 g de levure sèche
●
6 œufs battus
●
5 pincées de sel
méthode 1 Fondre la margarine dans le lait et porter à 40°C.
2 levure sèche (à reconstituer) : Ajoutez la levure et le sucre au lait et laissez reposer pendant environ 10
minutes jusqu’à ce que le mélange obtenu soit mousseux.
levure fraîche : émietter dans la farine et ajouter le sucre.
autres types de levure : reportez-vous aux instructions du fabricant.
3 Versez le lait dans le bol. Ajoutez les œufs battus et 2 kg de farine.
4 Mélangez à la vitesse minimum pendant une minute puis à la vitesse 1 pendant une minute supplémentaire.
Raclez la pâte.
5 Ajoutez le reste de la farine et mélangez le tout à la vitesse minimum pendant une minute, puis à la vitesse 1
pendant 2 à 3 jusqu’à ce que le mélange soit bien homogène.
6 Remplissez à moitié des moules de 450 g préalablement beurrés ou roulez la pâte en petits pains.
Recouvrez d’un torchon et laissez reposer dans un endroit chaud jusqu’à ce que la pâte ait doublé de volume.
7 Faites cuire à 200°C/Thermostat 6 pendant 20 à 25 minutes pour les miches ou 15 minutes pour les petits pains.
8 Lorsque le pain est cuit, il doit sonner creux quand on le tapote sur sa base.
●
Pour environ 10 miches.
51

recettes suite
gâteau aux fraises et aux abricots
ingrédients : gâteau type génoise
●
3 œufs
●
75 g de sucre en poudre
●
7
5 g de farine ordinaire
garniture et décoration
●
150 ml de crème fraîche épaisse
●
Sucre selon votre goût
●
225 g de fraises
●
2
25 g d’abricots
m
éthode 1 Coupez les abricots en deux et retirez les noyaux. Faites-les cuire à petit feu dans très peu d’eau, en ajoutant du
sucre selon votre goût, jusqu’à ce qu’ils soient moelleux.
2 Lavez et coupez les fraises en deux.
3 Pour la génoise, battez les œufs et le sucre à la vitesse maximum, jusqu’à ce que le mélange soit de couleur
p
âle et épais.
4
Retirez le bol et le fouet. Incorporez la farine à la main à l’aide d’une grande cuillère métallique – procédez
délicatement pour préserver la légèreté de la génoise.
5 Mettez le mélange obtenu dans deux moules à manqué de 18 cm préalablement beurrés.
6 Faites cuire à 180°C/Thermostat 4 pendant environ 20 minutes jusqu’à ce que le gâteau soit de consistance
f
erme et élastique lorsque vous le touchez légèrement.
7 Démoulez le gâteau et laissez-le refroidir sur une grille.
8 Fouettez la crème à la vitesse maximale jusqu’à ce qu’elle prenne une consistance ferme. Sucrez selon votre
goût.
9 Coupez grossièrement les abricots et un tiers des fraises puis incorporez-les lentement dans la moitié de la
crème.
10 Etalez cette préparation sur l’un des biscuits et placez l’autre au-dessus.
11 Recouvrez le gâteau avec le reste de crème et décorez avec les fraises restantes.
meringues
ingrédients
●
4 blancs d’œufs
●
250 g de sucre glace, tamisé
●
Recouvrez votre plaque de four de papier de cuisson non collant
méthode 1 Battez les blancs d’œufs et le sucre à la vitesse maximum pendant environ 10 minutes jusqu’à ce que le
mélange fasse des pics à la surface quand vous en retirez le fouet.
2 A l’aide d’une cuillère, déposez le mélange sur la plaque (ou utilisez un sac à douille en étoile de 2,5 cm).
3 Faites cuire à 110°C/Thermostat 1⁄4 pendant environ 4 à 5 heures jusqu’à ce que les meringues soient fermes
et croustillantes. Si elles commencent à brunir, laissez la porte du four légèrement entrouverte.
●
Conservez les meringues dans une boîte hermétique.
pâte brisée
ingrédients
●
450 g de farine tamisée avec du sel
●
5 ml (1cc) de sel
●
225 g de matière grasse (mélange de saindoux et de margarine directement sortis du réfrigérateur)
●
Environ 80 ml d’eau (4 cs)
●
Ne mélangez pas pendant trop longtemps
astuce 1 Mettez la farine dans le bol. Découpez la matière grasse en morceaux grossiers et ajoutez-la à la farine.
méthode 2 Avec le batteur K en inox, mélangez à vitesse 1 jusqu’à ce que le mélange ressemble à des miettes de pain.
Arrêtez avant d’obtenir une apparence grasse.
3 Ajoutez l’eau et mélangez à vitesse minimum. Arrêtez dès que l’eau est incorporée au mélange.
4 Faites cuire à 200°C/Thermostat 6, selon la garniture.
marinade au piment
Ingrédients
●
200g de miel liquide froid (réfrigéré pendant la nuit)
●
1 piment vert (entier)
●
5ml (1 cuiller á café) de beurre de cacahuètes
●
sel, poivre
méthode 1 Placez tous les ingrédients dans le mini mixeur/moulin.
2 Attachez l’accessoire au mixeur et laissez les ingrédients se répandre autour de la lame.
3 Appuyez sur Pulse pendant 10 secondes.
4 Utilisez la marinade comme vous le souhaitez.
52

Ihre Cooking Chef Küchenmaschine von Kenwood
Sicherheit
●
Lesen Sie diese Anleitung sorgfältig durch und bewahren
Sie diese zur späteren Benutzung auf.
●
Entfernen Sie jegliches Verpackungsmaterial und alle Aufkleber.
Wichtiger Hinweis zu elektronischen medizinischen
Implantaten
●
Wie alle Induktionsheizprodukte erzeugt dieses Gerät Magnetfelder in
seiner unmittelbaren Umgebung. Benutzer oder Personen mit
Herzschrittmachern oder anderen aktiven Implantaten sollten ärztlichen
Rat einholen, bevor sie in Berührung mit dem Gerät kommen, um
etwaige Gesundheitsrisiken aufgrund von Unverträglichkeit zu
verhindern.
●
Das Gerät vor dem Anbringen von Rührelementen/Zubehör, nach
Gebrauch und vor dem Reinigen ausschalten und den Netzstecker
ziehen.
●
Körperteile, Schmuck und lockere Kleidung von beweglichen Teilen und
angebrachtem Zubehör fernhalten.
●
Niemals Ihre Finger o.ä. in den Klappmechanismus stecken.
●
Das Gerät niemals unbeaufsichtigt lassen.
●
Niemals ein beschädigtes Gerät benutzen. Überprüfen oder reparieren
lassen. Siehe „Kundendienst und Service“ auf Seite 66.
●
Niemals unzulässiges Zubehör oder mehr als ein Zubehörteil gleichzeitig
benutzen.
●
Niemals die auf Seite 64 angegebenen Höchstmengen überschreiten
und bei Verwendung des Induktionsheizers die Schüssel immer nur bis
zu ihrer innen angezeigten 3-Liter-Markierung füllen.
●
Beim Verwenden eines Zubehörteils die entsprechenden Sicherheits-
und Gebrauchsanweisungen lesen.
●
Vorsicht beim Anheben dieses Geräts, es ist schwer. Vor dem Anheben
sicherstellen, dass der Maschinenkopf verriegelt ist und Schüssel,
Rührelemente, Anschlussdeckel und Kabel fest sitzen bzw. gut verstaut
sind.
●
Niemals das Kabel so herabhängen lassen, dass ein Kind danach
greifen könnte.
●
Antriebseinheit, Netzkabel und Netzstecker niemals nass werden
lassen.
●
Vorsicht bei der Berührung irgendwelcher Teile der Maschine im
Kochmodus oder nach dem Kochen. Dies gilt INSBESONDERE FÜR
DIE SCHÜSSEL, DEN SPRITZSCHUTZ UND DIE RÜHRELEMENTE, da
diese noch lange nach Ausschalten des Geräts HEISS bleiben.
Schüssel zum Abnehmen und Tragen an ihren Griffen anfassen. Zum
Handhaben der heißen Schüssel und Rührelemente Topflappen
verwenden.
53
Deutsch

54
●
Die Unterseite der Schüssel bleibt noch lange nach dem Erhitzen heiß.
Seien Sie daher vorsichtig im Umgang damit und verwenden Sie die
Schutzmatte, wenn Sie die Schüssel auf hitzeempfindlichen
Oberflächen absetzen.
●
Vorsicht mit heißem Dampf, der aus der Schüssel austreten kann,
insbesondere beim Öffnen des Spritzschutzes oder Aufklappen des
Maschinenkopfes.
●
Heißes Mischgut beim Umfüllen vom Rührsystem in den Blender immer
erst auf Raumtemperatur abkühlen lassen.
●
Nur die Schüssel und das Zubehör benutzen, die zum Lieferumfang
dieses Geräts gehören. Die Schüssel niemals mit einer anderen
Hitzequelle verwenden.
●
Das Gerät niemals im Kochmodus bei leerer Schüssel betreiben.
●
Niemals irgendwelche Gegenstände in die Entlüftungsschlitze einführen.
●
Bei Gebrauch dieses Geräts sicherstellen, dass es auf einer ebenen
Oberfläche und nicht zu nah an der Kante steht. Darauf achten, dass
ein Abstand von mindestens 10 cm zu den Wänden besteht und die
Entlüftungsschlitze nicht blockiert sind. Nicht unter Hängeschränken
aufstellen.
●
Zum ordnungsgemäßen und sicheren Betrieb des Induktionskochers
vor dem Kochen sicherstellen, dass Schüsselboden und
Temperaturfühler sauber und trocken sind.
●
Wie bei allen Induktionskochern während des Gebrauchs keine
Kreditkarten, magnetischen Medien oder empfindlichen elektronischen
Geräte in der Nähe platzieren.
●
Das Gerät nicht zum Frittieren benutzen.
●
Vor dem Verzehr immer sicherstellen, dass die Speisen gar sind.
●
Speisen sollten kurz nach dem Kochen verzehrt oder schnell abgekühlt
und so bald wie möglich in den Kühlschrank gestellt werden.
●
Unsachgemäßer Gebrauch Ihres Geräts kann zu Verletzungen führen.
●
Geräte können von Personen mit körperlichen, sensorischen oder
geistigen Behinderungen oder von Personen mit mangelnder Erfahrung
oder Kenntnis verwendet werden, sofern diese beaufsichtigt oder in die
sichere Verwendung des Geräts eingewiesen wurden und sofern sie die
damit verbundenen Gefahren verstehen.
●
Kinder müssen überwacht werden, damit sie mit dem Gerät nicht
spielen.
●
Dieses Gerät darf nicht von Kindern verwendet werden. Gerät und
Netzkabel müssen für Kinder unzugänglich sein.
●
Verwenden Sie das Gerät nur für seinen vorgesehenen Zweck im
Haushalt. Bei unsachgemäßer Benutzung oder Nichteinhaltung dieser
Anweisungen übernimmt Kenwood keinerlei Haftung.

Vor dem Netzanschluss
●
S
icherstellen, dass die Netzspannung mit den Angaben auf der Unterseite Ihrer Küchenmaschine übereinstimmt.
●
WARNUNG: DIESES GERÄT MUSS GEERDET SEIN.
●
Das Gerät entspricht der EG-Richtlinie 2004/108/EG und der EG-Verordnung Nr. 1935/2004 vom 27/10/2004
ü
ber Materialien und Gegenstände, die dazu bestimmt sind, mit Lebensmitteln in Berührung zu kommen.
Vor erstmaligem Gebrauch
Die Teile waschen: Siehe „Pflege und Reinigung“ auf Seite 66.
Einführung
Vielen Dank, dass Sie sich zum Kauf der Küchenmaschine Cooking Chef von Kenwood entschieden haben. Wir
hoffen, dass sie Ihnen viele Jahre lang Freude bereiten wird.
K
enwood besitzt fast 60 Jahre Erfahrung und Fachkenntnisse in der Entwicklung von Küchenmaschinen und
e
iner Riesenauswahl von Zubehör. Die Kenwood Chef Küchenmaschinen sind für ihre vielseitigen
Einsatzmöglichkeiten bekannt.
Bei der Entwicklung von Cooking Chef sind wir noch einen Schritt weiter gegangen als sonst und haben einen
I
nduktionskocher direkt unter der Rührschüssel integriert. Sie können nun alle Vorteile eines planetarischen
„Kaltschüssel“-Rührsystems für die Zubereitung Ihrer Lieblingskuchen, Rühr- und Knetteige genießen und
außerdem Ihre Schüssel zum Erwärmen und Kochen von Speisen verwenden. Die Möglichkeiten sind
unbegrenzt.
Mit seinem Sortiment von optionalem Zubehör bietet der Kenwood Cooking Chef wirklich ein komplettes System
zur Zubereitung von Speisen.
Leistungsstark, zuverlässig, vielseitig, Kenwood.
Was ist Induktionskochen und wie funktioniert es?
Induktionskochen ist eine fortgeschrittene Kochmethode unter Anwendung elektromagnetischer Induktion.
Hierbei wird elektrischer Strom durch eine Kupferspule im Induktionskochbereich geleitet und ein
elektromagnetisches Feld erzeugt. Bei Einrasten der Cooking Chef Schüssel wird der Stromkreis durch eine
besondere Schicht aus Edelstahl im Boden der Schüssel geschlossen. Dies setzt eine große Menge
Wärmeenergie frei, die durch den Inhalt der Schüssel passiert und so die Zutaten erhitzt.
Induktionskochen ist extrem energiesparend, da es lediglich Wärme im Schüsselboden erzeugt. Bei anderen
Erhitzungsmethoden wie etwa Gasherden gehen fast 50% der Wärmeenergie an den Seiten des Topfes verloren.
Bei Ihrem Cooking Chef fühlt sich der Induktionskochbereich nur während des Kochvorgangs und direkt danach
heiß an, da die Hitze vom Inhalt der Schüssel zurückgeleitet wird. Das Induktionskochen ist also sehr effizient,
sehr sicher und sehr sauber.
Die Kochfunktion Ihres Kenwood Cooking Chef ist ähnlich wie die eines Topfes auf Ihrem Herd. Der zusätzliche
Vorteil besteht jedoch darin, dass der Cooking Chef ihr Kochgut automatisch umrührt und die Kochtemperatur
genau nach Ihren Wünschen reguliert, so dass Sie sich anderen Aufgaben in Ihrer Küche widmen können.
Der Cooking Chef bedient sich einer höchst effizienten Induktionstechnologie. Sie werden feststellen, dass die
Kochzeiten im Vergleich zu Gas- oder Elektroherden kürzer sind oder Sie bei niedrigeren Temperaturen kochen
können. Daran sollten Sie denken, wenn Sie das Gerät zum ersten Mal benutzen oder ein neues Rezept
ausprobieren. Wenn Sie mit einer hohen Kochtemperatur starten, müssen Sie den Kochvorgang beobachten und
genau wie beim herkömmlichen Kochen gegebenenfalls die Wärmezufuhr reduzieren, um zu verhindern, dass Ihre
Speisen verbrennen oder an der Schüssel kleben bleiben. Im Allgemeinen erhitzt der Cooking Chef das Kochgut
automatisch in der schnellstmöglichen Zeit auf die gewünschte Temperatur. Es ist daher nicht notwendig, eine
höhere Temperatur als erforderlich zu wählen, um die Kochzeiten zu verkürzen. Zu diesem Zeitpunkt sollten Sie
auch die Häufigkeit der Rührintervalle einstellen. Bei höheren Kochtemperaturen müssen Sie u.U. die Einstellung
für kontinuierliches Rühren wählen. Rühreinstellungen und sorgen dafür, dass die Konsistenz Ihres
Kochguts auch bei längeren Garzeiten mit niedrigen Temperaturen gewahrt bleibt.
55

Ein weiterer wichtiger Punkt ist die Auswahl des richtigen Rührelements. In einem späteren Abschnitt dieses
Handbuchs finden Sie Empfehlungen zu den Einsatzmöglichkeiten der verschiedenen Rührelemente, und Sie
werden schnell lernen, welches Rührelement Sie für welche Aufgabe wählen sollten. So eignet sich beispielsweise
d
er Hochtemperatur-Flexirührer besonders gut für sehr geschmeidige Saucen und Cremes, während Sie zum
K
ochen von dickeren Speisen wie Eintöpfen, Ragouts usw. eher das Rührpaddel verwenden sollten. Unser
Rezeptbuch empfiehlt das beste Zubehör für das jeweilige Rezept. Manchmal erzielen Sie auch bessere
Ergebnisse, wenn Sie die Rührelemente je nach Zubereitungsaufgabe auswechseln.
W
ährend des Kochens und direkt danach sind Schüssel, Spritzschutz und Rührelemente heiß (genau wie bei
einem Topf). Seien Sie also vorsichtig beim Berühren dieser Teile. Denken Sie auch daran, dass der Kochvorgang
Dämpfe und Kondensation erzeugt. Seien Sie daher vorsichtig, wenn Sie in die Schüssel schauen, den Deckel
des Füllschachts abnehmen oder den Cooking Chef/Maschinenkopf anheben, um Zugang zur Schüssel zu
erhalten. Warnen Sie auch andere Personen davor, dass die Küchenmaschine kocht oder heiß ist. Verwenden Sie
z
um Anfassen oder Abnehmen heißer Teile Topflappen und tragen Sie die Schüssel nur an ihren Griffen. Benutzen
Sie auch die Arbeitsflächen-Schutzmatte, um hitzeempfindliche Oberflächen zu schützen.
Beim Erhitzen von Flüssigkeit oder Speisen mit hohem Wassergehalt schwankt die Genauigkeit der
T
emperaturangabe gewöhnlich zwischen +/- 5°C. Ihre Genauigkeit hängt von der Konsistenz und dem Volumen
I
hres Schüsselinhalts, der Häufigkeit der Rührintervalle und dem gewählten Rührelement ab. Dies ist wieder mit
dem Kochen auf einem konventionellen Herd vergleichbar, wenn z.B. eine große Menge Kochgut in einem großen
Topf erhitzt, aber nicht gut durchgerührt wird. Das Kochgut ist am Boden des Topfes sehr heiß oder sogar
verbrannt, nach oben hin jedoch weitaus kälter.
Neben der Temperaturanzeige verfügt die Maschine über eine kleine blaue LED. Diese blinkt so lange, bis die
ausgewählte Temperatur erreicht wurde. Wurde diese erreicht, hört die LED auf zu blinken. Beachten Sie jedoch,
dass beim Hinzugeben weiterer Zutaten in die Schüssel die LED wieder zu blinken beginnt, da die Temperatur
des Kochguts durch das Hinzugeben kalter Zutaten sinkt. Möglicherweise blinkt die LED auch wieder bei
häufigerem Rühren.
Sie werden schnell herausfinden, dass Ihr Kenwood Cooking Chef einfach zu benutzen ist und Ihnen die tägliche
Essenszubereitung erheblich erleichtert.
56

Komponenten Ihres Kenwood Cooking Chef
Z
um Kauf von Zubehör, das nicht zum Lieferumfang der Maschine gehört,
wenden Sie sich bitte an den Wartungs- und Kundendienst.
Z
ubehör-Anschlüsse
H
ochgeschwindigkeits-Anschluss
Mittelgeschwindigkeits-Anschluss
Niedriggeschwindigkeits-Anschluss
S
teckplatz für Rührelemente
Küchenmaschine Deckel für Mittel-/Hochgeschwindigkeits-Anschlüsse
Maschinenkopf
D
eckel für Niedriggeschwindigkeits-Anschluss
Hebel für Niedriggeschwindigkeits-Anschluss
Cooking Chef Schüssel
M
aschinenkopf - Lifthebel
Geschwindigkeitsregler
Entlüftungsschlitze
S
chüsselsockel/Induktionsbereich
Abflussöffnung
Temperaturfühler
K
-Haken aus Edelstahl
Hochtemperatur-Flexirührer
Schneebesen
K
nethaken
Rührpaddel
Hochtemperatur-Spatel
Hitzeschild
Gummidichtung
Spritzschutz
Füllschachtdeckel
Arbeitsflächen-Schutzmatte
Schraubenschlüssel
57

Bedienfeld
Z
eitschaltuhr-/Temperaturanzeige
Zeitschaltuhr – Plus-Taste
Zeitschaltuhr – Minus-Taste
Temperaturregler
Puls-/Hochgeschwindigkeitstaste, Hochtemperatur-Rührtaste
G
eschwindigkeitsregler
Zeitschaltuhr-/Temperaturwahlschalter
Temperatur-LED
Unterheb-Taste
G
eschwindigkeitsregler-LED
58

Höheneinstellung von Rührelementen
Z
um Zusammenbau der Küchenmaschine siehe Seite 60.
Schneebesen, K-Haken aus Edelstahl, Rührpaddel
Die beste Leistung des Schneebesens, K-Hakens und Rührpaddels erzielen
Sie, wenn diese den Boden der Schüssel fast berühren . Verändern Sie
bei Bedarf die Höhe mit dem Schraubenschlüssel (im Lieferumfang).
G
ehen Sie dazu wie folgt vor:
1 Ziehen Sie den Netzstecker.
2 Klappen Sie den Maschinenkopf hoch und führen Sie den Schneebesen,
den K-Haken oder das Rührpaddel ein.
3
Klappen Sie den Kopf nach unten. Wenn Sie den Abstand ändern müssen,
k
lappen Sie den Maschinenkopf wieder hoch und nehmen Sie das
Rührelement ab.
4 Lösen Sie die Mutter
mit dem beiliegenden Schraubenschlüssel
genügend, um die Höhe des Schafts zu verstellen. Zum Senken des
R
ührelements drehen Sie den Schaft gegen den Uhrzeigersinn. Zum
Anheben des Rührelements drehen Sie den Schaft im Uhrzeigersinn.
5 Ziehen Sie die Mutter wieder fest.
6 Bringen Sie das Rührelement erneut am Maschinenkopf an und klappen
Sie ihn nach unten. (Prüfen Sie seine Position – siehe obige Punkte.)
7 Wiederholen Sie die oben genannten Schritte nach Bedarf, bis das
Rührelement richtig sitzt. Ziehen Sie daraufhin die Mutter wieder fest an.
Hochtemperatur-Flexirührer: Dieses Rührelement sollte den
Schüsselboden gerade berühren.
Knethaken – dieses Rührelement wird im Werk eingestellt und sollte
keine Anpassung benötigen.
Anbringen und Verwendung des
Spritzschutzes
Die Spritzschutzeinheit besteht aus zwei Teilen: dem Hitzeschild und dem
Spritzschutz.
Das Hitzeschild muss für Kochvorgänge angebracht werden.
Ansonsten funktioniert das Rührsystem nicht und es wird der
Fehlercode E:03 angezeigt. Das Hitzeschild schützt den
Maschinenkopf vor dem Dampf, der sich beim Kochvorgang entwickelt.
Bei Bedarf können sowohl das Hitzeschild als auch der Spritzschutz
angebracht werden, damit kein Füllgut aus der Schüssel tritt –z.B. beim
Mischen von leichten Zutaten wie Mehl und Puderzucker oder beim
Kochen von Zutaten mit viel Flüssigkeit. Der Spritzschutz sollte nur in
Kombination mit dem Hitzeschild angebracht werden.
1 Klappen Sie den Maschinenkopf nach oben, bis er einrastet.
2 Schieben Sie das Hitzeschild nach oben auf die Unterseite des
Maschinenkopfes
, bis es fest einrastet. Das Hitzeschild niemals ohne
ordnungsgemäß angebrachte Gummidichtung verwenden.
3 Setzen Sie die Schüssel auf den Sockel.
4 Klappen Sie den Kopf nach unten.
5 Setzen Sie den Spritzschutz auf den Schüsselrand und schieben Sie ihn
nach vorne, bis er komplett einrastet
.
●
Während des Rührvorgangs können Zutaten direkt über den Füllschacht
hinzugegeben werden.
6 Zum Entfernen des Spritzschutzes schieben Sie diesen einfach vom Gerät
weg.
7 Zum Abnehmen des Hitzeschilds klappen Sie den Maschinenkopf hoch, bis
er einrastet. Entfernen Sie das Rührelement und ziehen Sie dann das
Hitzeschild von der Unterseite des Maschinenkopfes nach unten.
Hinweis: Den Spritzschutz nur anbringen oder abnehmen, wenn der der
Maschinenkopf eingerastet ist.
59

Das Rührsystem
Die Rührelemente und einige ihrer Einsatzmöglichkeiten
K-Haken
●
Zur Zubereitung von Kuchen, Plätzchen, Gebäck, Zuckerguss, Füllungen,
B
randteig und Kartoffelpüree.
Schneebesen
●
Für Eier, Sahne, Rührteig, Biskuitteig ohne Fett, Baisers, Käsekuchen,
Schaumspeisen und Soufflés. Den Schneebesen nicht für schwere
Mischungen (z.B. zum Schaumigschlagen von Fett und Zucker) verwenden –
e
r könnte dadurch beschädigt werden.
K
nethaken
●
N
ur für Hefeteig.
Hochtemperatur-Flexirührer
●
Für viele Kochvorgänge geeignet, insbesondere für die Zubereitung von
Eiercremes, Rühreiern und Saucen. Ideal zum Abkratzen heißer und kalter
Mischungen von den Schüsselwänden beim Verrühren. Auch zum Anbraten
v
on Gemüse geeignet.
R
ührpaddel
●
G
eeignet zur Beibehaltung der Konsistenz von Kochgut wie Hähnchen,
Fisch, Gemüse und Obst.
Verwendung Ihres Rührsystems
S
tellen Sie vor Gebrauch der Rührsystems sicher, dass Temperatur- und
Geschwindigkeitsregler auf die Position „O“ (Aus) geschaltet sind.
1 Drehen Sie den Hebel zum Anheben des Maschinenkopfes im Uhrzeigersinn
und klappen Sie den Maschinenkopf hoch, bis er einrastet.
Rührelemente anbringen 2 Führen Sie das Rührelement in den Steckplatz ein, so dass der Schaftstift in
der Kerbe sitzt, und drehen Sie das Element dann, bis es einrastet .
Rührpaddel: Führen Sie zum Anbringen des Rührpaddels den Schaft in
den Steckplatz ein und richten Sie dann den Schlitz am Schaft so aus, dass
er sich unter dem Metallstift auf der Unterseite des Maschinenkopfes
befindet. Halten Sie das Paddel fest und drehen Sie es, so dass sich der
Schaftstift unter der Kerbe befindet, und schieben Sie den Schaft dann nach
oben, bis er einrastet
.
3 Setzen Sie die Schüssel auf den Sockel, drücken Sie sie nach unten und
drehen Sie sie im Uhrzeigersinn .
4 Klappen Sie den Maschinenkopf herunter, indem Sie ihn zunächst leicht
anheben und dann den Lifthebel im Uhrzeigersinn drehen.
Klappen Sie den Kopf herunter, damit er einrastet.
Rührelemente entfernen
●
Kehren Sie den oben beschriebenen Schritt 2 um. (Zum Entfernen von
Rührelementen nach dem Kochen grundsätzlich TopfIappen verwenden.)
5 Schließen Sie das Gerät an den Netzstrom an. Die Geschwindigkeits- und
Temperatur-LEDs leuchten kurz auf. Auf der Anzeige erscheint und
verschwindet dann wieder, so dass nur noch die Betriebsanzeige
aufleuchtet.
6 Drehen Sie den Geschwindigkeitsregler zur gewünschten Einstellung (siehe
Empfehlungen auf Seite 61). Das Rührsystem wird in Betrieb genommen und
die LED-Anzeige des Geschwindigkeitsreglers blinkt. Die Zeitschaltuhr zählt
in 1-Sekunden-Schritten aufwärts. Die Geschwindigkeit lässt sich bei
laufender Maschine jederzeit ändern.
7 Zum Stoppen des Rührsystems drehen Sie den Geschwindigkeitsregler
zurück auf „O“ (Aus).
Wichtig – Wird der Maschinenkopf während des Betriebs hochgeklappt,
stoppt das Rührsystem automatisch und es ertönt ein Piepsignal. Es startet
erst wieder, wenn der Kopf heruntergeklappt wird. Zum erneuten Betrieb des
Rührsystems stellen Sie den Geschwindigkeitsregler auf „O“ (Aus) und
wählen Sie dann eine neue Geschwindigkeit aus.
Pulstaste
Die Pulstaste lässt sich nur bedienen, wenn der Geschwindigkeitsregler auf
„O“ (Aus) gestellt ist. Zur Auswahl der Pulsfunktion drücken Sie die Pulstaste
nach unten. Das Rührsystem läuft so lange auf Höchstgeschwindigkeit,
wie Sie Taste nach unten gedrückt halten. Wenn der Schüsselinhalt heißer
als 60°C ist, nimmt die Geschwindigkeit stufenweise zu. Es ertönt ein
Piepsignal und die Geschwindigkeitsregler-/Temperatur-LEDs beginnen
schnell zu blinken.
P
60

Unterheb-Taste
W
enn Sie die Unterheb-Taste kurz gedrückt halten, läuft die Maschine automatisch für 2 Drehungen
bei minimaler Geschwindigkeit und stoppt dann. Sie können die Taste zum Unterheben von Zutaten
auch je nach Bedarf für längere Zeit gedrückt halten oder mehrmals hintereinander drücken.
Hinweis: Wird die Unterheb-Taste bei laufendem Motor gedrückt, führt die Maschine die
standardmäßige Unterheb-Funktion aus und kehrt dann zur ausgewählten Geschwindigkeit zurück.
Geschwindigkeitsregler
Die folgenden Geschwindigkeitsangaben dienen lediglich als Richtlinien, da sie
j
e nach Menge und Temperatur des Mischguts usw. unterschiedlich sein
k
önnen.
Drehen Sie den Geschwindigkeitsregler im Uhrzeigersinn, um
Geschwindigkeiten von „min“ bis „max“ zu erzielen.
K
-Haken
●
Z
um Schaumigschlagen von Fett und Zucker: Mit „min“ starten
u
nd stufenweise auf „max“ erhöhen.
●
Zum Einrühren von Eiern in cremige Mischungen: „4“ – „max“.
●
Zum Unterheben von Mehl, Früchten usw.: „min“ – „1“
●
Für Kuchenteig (alle Zutaten gleichzeitig): Mit „min“ starten und
s
tufenweise auf „max“ erhöhen.
●
Verkneten von Fett und Mehl: „min“ – „2“.
Hochtemperatur-Flexirührer
●
Zum Schaumigschlagen von Fett und Zucker: Mit „min“ starten und stufenweise auf „3“
erhöhen.
●
Zum Abschaben heißer und kalter Mischungen von den Schüsselwänden: Mit „min“
starten und stufenweise auf „3“ erhöhen.
●
Zum Anbraten von Gemüse, Rühren von Risotto und Polenta usw.: Einstellung
benutzen.
Schneebesen
●
Stufenweise auf „max“ erhöhen.
Knethaken
●
Mit „min“ starten und stufenweise auf „1“ erhöhen.
Rührpaddel
●
Nur mit Rühreinstellungen verwenden –
, ,
.
Rühreinstellungen
Zur Auswahl der Rühreinstellungen drehen Sie den Geschwindigkeitsregler gegen den Uhrzeigersinn.
Diese Funktionen sind am geeignetsten, wenn Sie Ihr Rührsystem im Kochmodus verwenden. Beachten
Sie, das zum Benutzen der Rührgeschwindigkeiten alle Anschlussdeckel angebracht sein müssen.
– Verwenden Sie diese Einstellung, wenn eine konstante niedrige Geschwindigkeit erforderlich ist –
z.B. zum Rühren von Saucen.
– Bei Auswahl dieser Einstellung vollführt das Rührsystem einmal alle 5 Sekunden circa zwei
Drehungen bei langsamer Geschwindigkeit.
– Bei Auswahl dieser Einstellung wird der Rührvorgang bei langsamer Geschwindigkeit alle 30
Sekunden eingeschaltet. Sie eignet sich somit besonders zum Rühren von Eintöpfen usw.
Zum Stoppen der Funktion stellen Sie den Geschwindigkeitsregler zurück auf „O“ (Aus).
Hinweis:
●
Bei Auswahl einer neuen Geschwindigkeit blinkt jeweils die Geschwindigkeits-LED.
●
Ferner ertönt u.U. ein hoher Signalton. Das ist völlig normal.
Verwendung des Rührsystems zum Kochen
WICHTIG
●
Sicherstellen, dass Induktionsbereich, Temperaturfühler und Oberfläche des Schüsselsockels sauber
sind. Ansonsten könnte der Temperaturfühler beeinträchtigt werden, was zu mangelhaften
Kochergebnissen führt.
●
Überprüfen, dass alle Anschlussdeckel und das Hitzeschild angebracht sind. Wenn dies nicht der Fall
ist, funktioniert der Kochmodus nicht.
●
Zum Entfernen von Schüssel und Rührelementen nach dem Kochen grundsätzlich TopfIappen
verwenden.
1 Bauen Sie die Küchenmaschine gemäß den Anleitungen auf Seite 60 zusammen.
2 Stellen Sie den Temperaturregler auf die gewünschte Temperatur ein.
61

●
Die Kochfunktion startet nur, wenn eine Geschwindigkeit ausgewählt wurde.
3 Stellen Sie den Geschwindigkeitsregler auf die gewünschte Geschwindigkeit. Dadurch werden Motor und
Heizelement eingeschaltet. Beide LED-Anzeigen blinken.
4
Nachdem die eingestellte Temperatur erreicht wurde, leuchtet die Temperatur-LED kontinuierlich.
S
ie beginnt jedoch während des Kochvorgangs wieder zu blinken, sobald sich die Temperatur ändert. Dies zeigt
an, dass die Maschine versucht, die eingestellte Temperatur zu bewahren (siehe Einführung Seite 55).
●
Übersteigt die Schüsseltemperatur 60°C, wird die Geschwindigkeit aus Sicherheitsgründen automatisch
eingeschränkt, selbst dann, wenn eine höhere Temperatur gewählt wurde. Fällt die Temperatur unter 60°C, wird
d
ie Geschwindigkeit nicht automatisch erhöht. Dazu muss zunächst der Geschwindigkeitsregler ausgeschaltet
und eine neue Geschwindigkeit ausgewählt werden.
●
Hinweis: Bei jeder Betätigung des Zeitschaltuhr-/Temperaturwahlschalters wechselt die Anzeige zwischen
Zeitschaltuhr und der aktuellen Temperatur des Schüsselinhalts.
5 Zum Stoppen oder Unterbrechen des Rühr- und Erhitzungsvorgangs stellen Sie den Geschwindigkeitsregler
z
urück auf „O“ (Aus). Zum erneuten Betrieb wählen Sie eine Geschwindigkeit.
Hinweise
●
Einige Rezepte, insbesondere solche mit hohem Flüssigkeitsgehalt, können keine
Kochtemperaturen von über 100°C erreichen, da dies der Siedepunkt für Wasser ist.
●
U
m Zutaten während des Kochens in die Schüssel zu geben, reduzieren Sie die Geschwindigkeit und fügen Sie
die Zutaten langsam und gleichmäßig hinzu.
●
Wählen Sie zum schnellen Erhitzen von Saucen eine kontinuierliche Rühreinstellung .
●
Sie können u.U. bessere Ergebnisse erzielen, wenn Sie die Rührelemente je nach Zubereitungsaufgabe
a
uswechseln. Verwenden Sie z.B. den Hochtemperatur-Flexirührer zum Braten von Gemüse und dann das
Rührpaddel beim Kochen von Fleisch- oder Geflügelteilen.
●
Wenn Sie den Spritzschutz beim Kochen verwenden, entfernen Sie diesen immer, bevor Sie den Maschinenkopf
anheben. Denken Sie daran, dass sich auf Spritzschutz und Hitzeschild Kondensation bilden kann.
●
Klappen Sie den Maschinenkopf grundsätzlich langsam nach oben, damit etwaige Flüssigkeit an der Unterseite
des Hitzeschilds in die Schüssel ablaufen kann.
●
Ihnen stehen drei Rühreinstellungen für verschiedene Rezepte zur Auswahl. Einige Rezepte erfordern ständiges
Rühren, damit die Zutaten nicht am Schüsselboden kleben bleiben, während bei anderen das Rühren
unterbrochen werden muss, um die Konsistenz des Kochguts zu wahren.
●
Wählen Sie zum Erzielen optimaler Leistungen die richtige Höhe für das jeweilige Rührelement (siehe Seite 59).
●
Die maximale Kochzeit beiträgt 3 Stunden. Danach schaltet sich das Rührsystem automatisch ab.
●
Sie können Ihr Kochgut auch ohne Rührelemente erhitzen. Dazu müssen Sie jedoch eine Geschwindigkeit
auswählen. Dies kann sehr nützlich sein, wenn Sie etwa Zutaten wie Butter oder Schokolade schmelzen.
●
Bei jeder Betätigung des Zeitschaltuhr-/Temperaturwahlschalters wechselt die Anzeige zwischen Kochzeit und
der aktuellen Temperatur des Schüsselinhalts.
Verwendung des Schneebesens bei hoher Geschwindigkeit und Temperatur
Zum Verwenden des Schneebesens bei hoher Geschwindigkeit und Temperaturen über 60°C drehen Sie den
Geschwindigkeitsregler zur gewünschten Einstellung und halten Sie dann die Pulstaste gedrückt. Es ertönt ein
Piepsignal und die Geschwindigkeitsregler-/Temperatur-LEDs beginnen schnell zu blinken. Die
Rührgeschwindigkeit erhöht sich langsam auf die gewählte Einstellung.
Wiederholen Sie den Vorgang zur weiteren Geschwindigkeitserhöhung. Sie können die Rührgeschwindigkeit wie
gewohnt reduzieren oder ausschalten.
Diese Funktion darf NUR mit dem Schneebesen verwendet werden. Bitte die maximale
Füllmenge von 3 Litern nicht überschreiten und sicherstellen, dass der Spritzschutz angebracht
ist. Die Maschine nicht unbeaufsichtigt lassen.
Nach dem Kochvorgang
●
Vorsicht bei der Berührung irgendwelcher Teile der Maschine im Kochmodus oder nach dem Kochen. Dies gilt
INSBESONDERE FÜR DIE SCHÜSSEL, DEN SPRITZSCHUTZ UND DIE RÜHRELEMENTE, da diese noch lange
nach Ausschalten des Geräts HEISS bleiben. Schüssel zum Abnehmen und Tragen an ihren Griffen anfassen.
Zum Handhaben der heißen Schüssel und Rührelemente Topflappen verwenden.
●
Die Unterseite der Schüssel bleibt noch lange nach dem Erhitzen heiß. Seien Sie daher vorsichtig im Umgang
damit und verwenden Sie die Schutzmatte, wenn Sie die Schüssel auf hitzeempfindlichen Oberflächen absetzen.
62

63
Anzeige
Z
u Ihrer Sicherheit ist die Küchenmaschine mit 5 getrennten Sicherheitsfühlern ausgestattet, die bei Verwendung
des Kochmodus aktiv sind. Wenn die Küchenmaschine eingeschaltet ist und ein Sicherheitsfühler aktiviert wird,
erscheint auf der Zeitschaltuhr-/Temperaturanzeige eine Fehlermeldung, beispielsweise „E:01“. Zugleich ertönt ein
Piepsignal und die Küchenmaschine kann nicht betrieben werden. Prüfen Sie die folgenden Fehlermeldungen:
Wenn diese oder andere Fehlercodes weiterhin auf der Anzeige erscheinen, wenden Sie sich bitte an den
Kenwood Kundendienst.
Fehlermeldung Beschreibung Lösung
Der Maschinenkopf befindet sich in Den Maschinenkopf herunterklappen.
hochgeklappter Position. Wird der Maschinenkopf Den Geschwindigkeitsregler auf „O“
hochgeklappt, deaktiviert ein Sicherheitsfühler stellen und dann die gewünschte
E:01
d
en Motor und das Heizelement. Wenn der Geschwindigkeit wählen.
G
eschwindigkeitsregler beim Anheben des
Maschinenkopfes auf einer anderen Position als
„O“ (Aus) steht, erscheint diese Meldung und der
Motor lässt sich nicht einschalten.
Die Cooking Chef Schüssel ist nicht aufgesetzt. Sicherstellen, dass die Cooking Chef
D
er Kochmodus funktioniert nur mit korrekt Schüssel aufgesetzt ist. Sicherstellen,
E:02
a
ufgesetzter Cooking Chef Schüssel. dass die Schüssel korrekt sitzt. Den
Sicherheitsfühler stellen eine falsche Schüssel Geschwindigkeitsregler auf „O“ (Aus)
oder falsche Positionierung fest. stellen und dann die gewünschte
Geschwindigkeit wählen.
Das Hitzeschild ist nicht angebracht. Die Sicherstellen, dass das Hitzeschild
Kochfunktion ist deaktiviert, wenn das Hitzeschild korrekt angebracht ist. Den
E:03 n
icht korrekt angebracht ist. Geschwindigkeitsregler auf „O“ (Aus)
stellen und dann die gewünschte
Geschwindigkeit wählen.
Die Deckel für den Niedriggeschwindigkeits- und Sicherstellen, dass alle Deckel korrekt
Hoch-/Mittelgeschwindigkeits-Anschluss sind angebracht sind. Den
nicht aufgesetzt. Diese Deckel sind mit Geschwindigkeitsregler auf „O“ (Aus)
Sicherheitsfühlern versehen. Falls sie nicht korrekt stellen und dann die gewünschte
E:04 aufgesetzt sind, schaltet sich das Heizelement Geschwindigkeit wählen.
aus und bei der Auswahl von Rührfunktionen läuft
der Motor ununterbrochen. Die
Rührgeschwindigkeiten „min“ bis „max“ laufen
ununterbrochen.
Problem mit dem Temperaturfühler. Misst der Den Geschwindigkeitsregler auf „O“ (Aus)
Heizregler eine höhere Schüsseltemperatur als bei stellen, Maschine vom Netz trennen und
normalem Betrieb zu erwarten, schalten sich abkühlen lassen. Sicherstellen, dass
E:09 Motor und Heizelement automatisch aus. Schüsselsockel und Temperaturfühler
sauber sind. Maschine wieder ans Netz
anschließen und wie gewohnt
einschalten.
Problem mit Motorgeschwindigkeit oder Den Geschwindigkeitsregler auf „O“
Überhitzung. Wenn der Motor zum Stillstand (Aus) stellen und Maschine vom Netz
kommt oder heißläuft, schaltet das Steuersystem trennen. Etwaige Blockierungen
E:10
den Motor und das Heizelement automatisch aus. beseitigen, die den Motor zum Stillstand
gebracht haben. Sicherstellen, dass alle
Entlüftungsschlitze frei liegen.
Maschine wieder ans Netz anschließen
und einschalten.

Verwendung der Countdown-Uhr
D
ie Zeitschaltuhr lässt sich im Kochmodus wie auch in anderen Modi verwenden. Wird keine Countdown-Zeit
eingestellt, zählt die Zeitschaltuhr automatisch in 1-Sekunden-Schritten weiter, solange die Küchenmaschine in
Betrieb ist. Die maximale Laufzeit beträgt 3 Stunden.
1 Schließen Sie das Gerät an den Netzstrom an. Auf der Anzeige erscheint und verschwindet dann wieder,
so dass nur noch die Betriebsanzeige sichtbar ist.
2
Drücken Sie die Plus- oder Minus-Taste. Auf der Anzeige erscheint 0:00.
3 Drücken Sie die Plus- oder Minus-Taste, bis die gewünschte Zeit angezeigt wird. Die Zeitschaltuhr zählt in 5-
Sekunden-Schritten hoch. Je länger Sie die Taste gedrückt halten, desto schneller läuft die Zeitanzeige weiter. Sie
können maximal 3 Stunden einstellen.
H
inweis: Wenn die Anzeige auf 3:00 steht und Sie die Plus-Taste drücken, wechselt die Anzeige zu 0:00. Steht
d
ie Anzeige auf 0:00 und Sie drücken die Minus-Taste, wechselt die Anzeige zu 3:00.
4 Stellen Sie den Geschwindigkeitsregler auf die gewünschte Geschwindigkeit ein. Die Küchenmaschine startet und
die Zeitschaltuhr zählt in 1-Sekunden-Schritten nach unten.
●
Der Betrieb der Küchenmaschine lässt sich jederzeit unterbrechen, indem Sie den Geschwindigkeitsregler auf „O“
(
Aus) stellen. Dadurch wird auch die Zeitschaltuhr angehalten. Sie läuft weiter, sobald die Küchenmaschine ihren
B
etrieb wieder aufnimmt.
5 Der Rührvorgang stoppt automatisch, wenn die eingestellte Zeit abgelaufen ist. Dabei ertönt 3 Sekunden lang ein
Piepsignal. Die Anzeige blinkt 5 Sekunden lang und ist dann leer, so dass nur noch die Betriebsanzeige
sichtbar ist.
Zurücksetzen der Zeitschaltuhr
1 Um die Zeitschaltuhr auf Null zu setzen, drücken Sie gleichzeitig die Plus- und die Minus-Taste (der
Geschwindigkeitsregler muss auf „O“ (Aus) gestellt sein).
●
Wenn die Maschine 10 Minuten lang nicht in Betrieb ist, gehen LCD-Anzeige und Hintergrundbeleuchtung in den
„Schlafmodus“ über und alle Anzeigen erlöschen. Bei Betätigung einer Taste oder eines Reglers kehrt die Anzeige
zum ursprünglichen Format zurück.
Maximale Mengen
Knetteig
●
Mehlgewicht: 910 g
Fester Hefeteig
●
Mehlgewicht: 1,5 kg
●
Gesamtgewicht: 2,4 kg
Weicher Hefeteig
●
Mehlgewicht: 2,6 kg
●
Gesamtgewicht: 5 kg
Rührteig
●
Gesamtgewicht: 4,55 kg
Eiweiß
●
16
Kochmodus
●
3 Liter
Allgemeine Hinweise
●
Maschine regelmäßig stoppen und Mischgut mit dem Spatel von den Schüsselwänden nach unten schaben.
●
Eier sollten zum Schlagen am besten Raumtemperatur haben.
●
Vor dem Zubereiten von Eischnee sicherstellen, dass sich keine Spuren von Fett oder Eigelb an Schneebesen
oder Schüssel befinden.
●
Beim Zubereiten von Teig kalte Zutaten verwenden (wenn nicht im Rezept anders angegeben).
Hinweise zu Brotteigen
Wichtig
●
Niemals die angegebenen Höchstmengen überschreiten – Sie würden die Maschine überlasten.
●
Wenn Sie hören, dass die Maschine überlastet ist: Gerät ausschalten, die Hälfte des Teiges entnehmen und die
halben Mengen separat verarbeiten.
●
Die Zutaten vermengen sich am besten, wenn Sie zuerst die Flüssigkeit eingeben.
64

65
Fehlerbehebung beim Kochen
Problem Ursache Lösung
D
ie Küchenmaschine arbeitet nicht im Einer der Sicherheitsfühler wurde aktiviert. Siehe Tabelle der Fehlermeldungen auf Seite 63.
K
ochmodus. Sie zeigt eine Fehlermeldung
●
S
icherstellen, dass Maschinenkopf
an und gibt einen Warnton aus. heruntergeklappt und eingerastet ist.
●
Sicherstellen, dass alle Anschlussdeckel korrekt
aufgesetzt sind.
●
Sicherstellen, dass das Hitzeschild korrekt
angebracht ist.
●
S
icherstellen, dass die Cooking Chef Schüssel
k
orrekt aufgesetzt ist.
Es wurde eine Temperatur ausgewählt, aber Es wurde keine Geschwindigkeit eingestellt. Eine Geschwindigkeit einstellen.
der Schüsselinhalt wird nicht warm
(Temperaturanzeige leuchtet nicht auf).
Die Küchenmaschine ändert beim Kochen Die Geschwindigkeit wird automatisch begrenzt, Dies ist eine Sicherheitsfunktion.
i
hre Geschwindigkeit. wenn der Schüsselinhalt 60°C erreicht.
D
as Mischgut brennt auf dem 1 Die ausgewählte Temperatur könnte zu hoch 1 Die Temperatur am Regler reduzieren oder mit
Schüsselboden an. sein. einer niedrigeren Temperatur kochen.
2 Es wird ein falsches Rührelement verwendet. 2 Überprüfen, dass das richtige Rührelement
verwendet wird.
3 Die Rührfunktion ist zu langsam. 3 Häufigere Rührintervalle einstellen oder
Dauerbetrieb wählen.
4
Das Rührelement sitzt vielleicht nicht tief 4 Position des Rührelements korrigieren.
genug in der Schüssel.
5 Die Zeitschaltuhr wurde auf eine zu lange Zeit 5 Kochdauer verkürzen (sicherstellen, dass
eingestellt. Speisen gar werden).
6 Der Fühler und/oder die Unterseite der 6 Diese Bereiche sauber und trocken halten.
Schüssel sind eventuell nicht sauber.
Die Konsistenz des Mischguts bleibt nicht 1 Die ausgewählte Temperatur ist zu hoch. 1 Temperatur reduzieren.
erhalten. 2 Die Rührfunktion ist zu schnell. 2 Rührgeschwindigkeit reduzieren.
3 Zutaten werden zu lange gekocht. 3 Kochdauer reduzieren (sicherstellen, dass
Speisen gar werden).
4 Es wird ein falsches Rührelement verwendet. 4 Überprüfen, dass das richtige Rührelement
verwendet wird.
Ungleichmäßige Rührgeschwindigkeit. 1 Zutaten sind zu groß, zu hart oder zu fest. 1 Zutaten in kleinere Stücke schneiden, Obststeine
entfernen, Zutaten langsam ohne Rührelement
(aber mit eingestellter Geschwindigkeit)
schmelzen.
2 Zutaten nach dem Herunterklappen des
Maschinenkopfes in die Schüssel geben.
3 Überprüfen, dass das richtige Rührelement
verwendet wird.
Dem heißen Mischgut wurden kalte Zutaten Falls der Schüsselinhalt nicht ausreichend 1 Warten, bis die Zutaten gründlich vermischt sind.
zugegeben, aber die Temperaturanzeige verrührt wird, ist das Mischgut unterschiedlich 2 Rührgeschwindigkeit erhöhen.
reagiert nicht schnell darauf. warm.
Probleme beim Herunterklappen des Feste Zutaten wie Schokolade auf dem Zutaten nach dem Herunterklappen des
Maschinenkopfes, wenn sich Mischgut in Schüsselboden hindern den Maschinenkopf Maschinenkopfes in die Schüssel geben.
der Schüssel befindet. daran, in heruntergeklappter Position
einzurasten.
Küchenmaschine läuft ununterbrochen, Anschlussdeckel sind nicht korrekt aufgesetzt. Sicherstellen, dass die Anschlussdeckel korrekt
wenn Rühreinstellung oder aufgesetzt sind.
ausgewählt ist.
Motorgeschwindigkeit ist bei Verwendung Es ist eine heiße Schüssel aufgesetzt. Schüssel entfernen oder auf unter 60°C
von Aufsätzen begrenzt. abkühlen.

Reinigung und Wartung
Pflege und Reinigung
●
Das Gerät vor dem Reinigen immer ausschalten und den Netzstecker ziehen.
●
Beim ersten Gebrauch erscheint u.U. ein wenig Schmierfett an Anschluss .
D
ies ist normal – einfach abwischen.
●
Die Metalloberflächen der Temperaturfühler können im Verlauf des normalen
Gebrauchs Verschleißerscheinungen aufweisen. Dies beeinträchtigt die
Leistung des Produkts in keiner Weise.
●
D
en Hochtemperatur-Flexirührer abnehmen, wenn die Maschine
n
icht benutzt wird.
Gerät, Anschlussdeckel
●
Mit einem feuchten Tuch abwischen und trocknen lassen.
●
N
iemals Scheuermittel benutzen oder in Wasser eintauchen.
H
ochtemperatur-Flexirührer
●
N
ehmen Sie das Flexischaberblatt zum Reinigen grundsätzlich vom
Rührelement ab.
●
Waschen Sie Flexischaberblatt und Rührelement in heißem Wasser und
Spülmittel und trocken Sie beides gründlich ab. Die Teile lassen sich auch
i
n der Geschirrspülmaschine waschen.
Hinweis: Bitte überprüfen Sie den Zustand des Gerätekörpers vor und
nach Gebrauch. Überprüfen Sie außerdem regelmäßig das Schaberblatt
u
nd ersetzen Sie es, wenn es Verschleißerscheinungen aufweist.
S
chüssel, Rührelemente,
Spritzschutz
●
Von Hand spülen und gründlich abtrocknen oder in die Spülmaschine geben.
●
Die Schüssel aus Edelstahl niemals mit einer Drahtbürste, Stahlwolle oder Bleichmittel
reinigen. Zum Entfernen von Kalk Essig oder einen geeigneten Entkalker verwenden.
●
Wenn Zutaten am Innern der Schüssel kleben oder einbrennen, diese so bald wie möglich
mit dem Spatel (im Lieferumfang) abschaben. Die Schüssel mit warmem Seifenwasser füllen
und einweichen. Alle hartnäckigen Reste mit einer Nylonbürste entfernen.
●
Eine Verfärbung der Schüssel führt nicht zu einer Beeinträchtigung ihrer Leistung.
Abflussöffnung
●
Sicherstellen, dass der Bereich frei von Mischgutresten ist. Wenn erforderlich, mit einem
Pfeifenreiniger oder Wattestäbchen reinigen.
Temperaturfühler
●
Mit einem feuchten Tuch abwischen und gründlich trocknen lassen. Niemals Scheuermittel oder
scharfe Gegenstände zum Reinigen der Fühler verwenden.
Kundendienst und Service
●
Ein beschädigtes Netzkabel darf aus Sicherheitsgründen nicht selbst repariert werden,
sondern muss von KENWOOD oder einer autorisierten KENWOOD-Kundendienststelle
ausgetauscht werden.
Hinweise zur:
●
Verwendung Ihres Kenwood Gerätes
●
Wartung oder Reparatur
Bitte setzen Sie sich mit Ihrem Händler in Verbindung, bei dem Sie das Gerät gekauft haben.
●
Gestaltet und entwickelt von Kenwood GB.
●
Hergestellt in China.
WICHTIGER HINWEIS FÜR DIE KORREKTE ENTSORGUNG DES PRODUKTS IN
ÜBEREINSTIMMUNG MIT DER EG-RICHTLINIE 2002/96/EG.
Am Ende seiner Nutzungszeit darf das Produkt NICHT mit dem Hausmüll entsorgt werden.
Es muss zu einer örtlichen Sammelstelle für Sondermüll oder zu einem Fachhändler gebracht
werden, der einen Rücknahmeservice anbietet.
Die getrennte Entsorgung eines Haushaltsgerätes vermeidet mögliche negative Auswirkungen
auf die Umwelt und die menschliche Gesundheit, die durch eine nicht vorschriftsmäßige
Entsorgung bedingt sind. Zudem ermöglicht dies die Wiederverwertung der Materialien, aus
denen das Gerät hergestellt wurde, was erhebliche Einsparungen an Energie und Rohstoffen
mit sich bringt.
66

Rezepte
Siehe „Hinweise zu Brotteigen“ auf Seite 64 .
Weißbrot – fester Hefeteig
Zutaten
●
1,36 kg Mehl zum Brotbacken
●
15 g (3 Teel.) Salz
●
15 g frische Hefe oder 15 g Trockenhefe + 5 g (1 Teel.) Zucker
●
7
50 ml warmes Wasser 43°C. Ein Thermometer benutzen oder 250 ml kochendes
W
asser mit 500 ml kaltem Wasser mischen
●
15 g Schmalz
Zubereitung 1 Trockenhefe (muss aufbereitet werden): Warmes Wasser in die Schüssel geben. Hefe und
den Zucker hinzugeben und 10 Minuten stehen lassen, bis die Mischung schaumig wird.
F
rische Hefe: Zerbröckeln und zum Mehl geben.
Andere Hefearten: Den Anleitungen des Herstellers folgen.
2 Flüssigkeit in die Schüssel gießen. Dann das Mehl (gegebenenfalls mit frischer Hefe), Salz
und Schmalz dazugeben.
3 45 - 60 Sekunden lang bei minimaler Geschwindigkeit durchkneten. Dann auf
G
eschwindigkeitsstufe 1 erhöhen und nach Bedarf mehr Mehl dazu geben, bis sich ein
fester Teig bildet.
4 3 - 4 Minuten (oder länger) auf Geschwindigkeitsstufe 1 durchkneten, bis der Teig glatt
und geschmeidig ist und sich von den Schüsselwänden löst.
5
Teig in eine eingefettete Plastiktüte packen oder in eine Schüssel geben und mit einem
G
eschirrtuch zudecken. An einem warmen Ort stehen lassen, bis sich die Teigmasse
verdoppelt hat.
6 Erneut 2 Minuten lang auf Geschwindigkeitsstufe 1 durchkneten.
7 4 eingefettete 450g-Formen zur Hälfte mit Teig füllen oder diesen zu Brötchen formen.
Mit einem Geschirrtuch zudecken und an einem warmen Ort stehen lassen, bis sich die
Teigmasse verdoppelt hat.
8 Bei 230°C/Gasstufe 8 rund 30 - 35 Minuten für Brot und 10 – 15 Minuten für Brötchen
backen.
●
Gebackenes Brot sollte beim Klopfen auf die Unterseite hohl klingen.
Weißbrot – weicher Hefeteig
Zutaten
●
2,6 kg normales Mehl
●
1,3 l Milch
●
300 g Zucker
●
450 g Margarine
●
100 g frische Hefe oder 50 g Trockenhefe
●
6 verquirlte Eier
●
5 Prisen Salz
Zubereitung 1 Margarine in der Milch schmelzen lassen und auf 43°C erhitzen.
2 Trockenhefe (muss aufbereitet werden): Die Hefe und den Zucker in die Milch geben
und 10 Minuten stehen lassen, bis die Mischung schaumig wird.
Frische Hefe: In das Mehl bröckeln und Zucker dazugeben.
Andere Hefearten: Den Anleitungen des Herstellers folgen.
3 Die Milch in die Schüssel gießen. Die verquirlten Eier und 2 kg Mehl dazugeben.
4 Bei minimaler Geschwindigkeit eine Minute lang mischen und dann eine weitere Minute
bei Geschwindigkeitsstufe 1.
Nach unten abschaben.
5 Restliches Mehl dazugeben, bei minimaler Geschwindigkeit verrühren und dann 2 – 3
Minuten auf Geschwindigkeitsstufe 1 kneten, bis der Teil glatt und gleichmäßig ist.
6 Eingefettete 450g-Formen zur Hälfte mit Teig füllen oder diesen zu Brötchen formen.
Mit einem Geschirrtuch zudecken und an einem warmen Ort stehen lassen, bis sich die
Teigmasse verdoppelt hat.
7 Bei 200°C (Gas Stufe 6) 20 - 25 Minuten für Brot oder 15 Minuten für Brötchen backen.
8 Gebackenes Brot sollte beim Klopfen auf die Unterseite hohl klingen.
●
Ergibt circa 10 Brotlaibe.
67

Rezepte - Fortsetzung
Erdbeer- und Aprikosentorte
Zutaten: Biskuitteig
●
3 Eier
●
75 g Streuzucker
●
7
5 g Mehl
Füllung und Verzierung
●
150 ml Doppelsahne
●
Zucker nach Geschmack
●
225 g Erdbeeren
●
2
25 g Aprikosen
Z
ubereitung 1 Aprikosen halbieren und Steine entfernen. In sehr wenig Wasser sieden, bis sie weich
sind. Zucker nach Geschmack hinzugeben.
2 Erdbeeren waschen und halbieren.
3 Für den Biskuitteig Eier und Zucker bei maximaler Geschwindigkeit schlagen, bis die
M
ischung sehr hell und dick wird.
4
Schüssel und Schneebesen entfernen. Mehl von Hand mit einem großen Metalllöffel
sorgfältig unterheben, damit der Teig luftig bleibt.
5 Mischung in zwei eingefettete Kuchenformen von 18 cm Durchmesser füllen.
6 Bei 180°C/Gasstufe 4 circa 20 Minuten lang backen, bis die Oberfläche des Kuchens
b
ei leichter Berührung zurückspringt.
7 Auf ein Drahtrost stürzen.
8 Sahne bei maximaler Geschwindigkeit steif schlagen. Mit Zucker abschmecken.
9 Aprikosen und ein Drittel der Erdbeeren grob in Stücke schneiden. Unter die Hälfte der
Sahne heben.
10 Die Mischung auf einem Biskuitboden verteilen und den anderen Boden daraufsetzen.
11 Die restliche Sahne oben auf der Torte verteilen und mit den restlichen Erdbeeren
garnieren.
Baisers
Zutaten
●
4 Eiweiß
●
250 g Puderzucker (gesiebt)
●
Backblech mit Backpapier auskleiden.
Zubereitung 1 Eiweiß und Zucker bei maximaler Geschwindigkeit circa 10 Minuten schlagen, bis der
Eischnee Spitzen bildet.
2 Die Mischung mit einem Löffel oder Spritzbeutel (Sterndüse 2,5 cm) auf dem Backblech
verteilen.
3 Bei 110°C/Gasstufe 1⁄4 für circa 4 - 5 Stunden backen, bis die Masse fest und knusprig
ist. Falls die Baisers zu bräunen beginnen, die Ofentür leicht geöffnet lassen.
●
Baisers in einer luftdichten Dose lagern.
Mürbeteig
Zutaten
●
450 g Mehl (gesiebt, mit Salz)
●
15 g Salz
●
225 g Fett (Mischung aus Margarine und Schmalz direkt aus dem Kühlschrank)
●
Circa 80 ml (4 Essl.) Wasser
Tipp:
●
Nicht zu sehr verrühren
Zubereitung 1 Mehl in die Schüssel geben. Das Fett grob würfeln und zum Mehl geben.
2 Zutaten mit dem K-Haken aus Edelstahl bei maximaler Geschwindigkeit zu
„Brotkrümeln“ verarbeiten.
Den Teig nicht zu fettig werden lassen.
3 Wasser dazugeben und bei maximaler Geschwindigkeit verkneten. Stoppen, sobald das
Wasser eingearbeitet ist.
4 Bei circa 200°C/Gasstufe 6 backen (je nach Füllung).
Chili-Marinade
Zutaten
●
200 g kalter klarer Honig (über Nacht gekühlt)
●
1 grüne Chili (ganz)
●
5 ml grobe Erdnussbutter
●
Gewürze nach Geschmack
Zubereitung 1 Alle Zutaten in die Multimühle geben.
2 Den Aufsatz an der Küchenmaschine anbringen und die Zutaten um die Klinge herum
absinken lassen.
3 Pulsfunktion 10 Sekunden lang einschalten.
4 Nach Bedarf verwenden.
68

per conoscere il vostro Kenwood Cooking Chef
sicurezza
●
Leggere attentamente le presenti istruzioni e conservarle
come futuro riferimento.
●
Rimuovere la confezione e le etichette.
Importante – impianti medici elettronici
●
Come tutti i prodotti generanti riscaldamento a induzione, questo
apparecchio genera campi magnetici a corto raggio. Se l’utilizzatore o
una persona nelle immediate vicinanze dell’apparecchio ha un
pacemaker o altro impianto medico attivo, prima dell’uso si prega di
consultare il medico per escludere eventuali incompatibilità e rischi per
la salute.
●
Spegnere l’apparecchio e disinserire la spina dalla presa elettrica prima
di montare o staccare utensili/accessori, dopo l’uso e prima della
pulizia.
●
Tenere lontano il corpo, gli articoli di gioielleria/bigiotteria e gli indumenti
larghi dalle parti in movimento e dagli accessori installati.
●
Non inserire mai le dita ecc. nel meccanismo della cerniera.
●
Non lasciare mai l’apparecchio incustodito dopo averlo acceso.
●
Non usare mai un accessorio danneggiato. Farlo controllare o riparare:
vedere alla sezione ‘manutenzione e assistenza tecnica’, pag. 82.
●
Non usare mai un accessorio non approvato, oppure più di un
accessorio alla volta.
●
Non superare mai le capacità massime indicate a pag. 80. Inoltre,
quando si utilizza la cottura ad induzione, non superare mai il livello
massimo di 3 litri indicato all’interno del recipiente.
●
Se viene usato un accessorio, leggere le istruzioni di sicurezza e di
impiego che lo corredano.
●
Fare attenzione nel sollevare questo apparecchio, per via del peso.
Verificare che la testa sia bloccata in posizione e che recipiente, utensili,
coperchi degli attacchi e cavo elettrico siano ben saldi prima di
sollevare l'apparecchio.
●
Non lasciare mai che il cavo penzoli da dove un bambino potrebbe
afferrarlo.
●
Non lasciare mai che corpo motore, il filo o la spina elettrica si bagnino.
●
Attenzione nel maneggiare o toccare qualsiasi parte dell’apparecchio
durante o dopo la cottura, IN PARTICOLARE IL RECIPIENTE, IL
PARASPRUZZI E GLI UTENSILI, che continueranno a SCOTTARE
anche diverso tempo dopo che l'apparecchio è stato spento. Per
estrarre e spostare il recipiente, servirsi dei manici. Usare guanti da
forno al momento di maneggiare il recipiente caldo e gli utensili per
miscelare.
●
La base del recipiente continua a scottare anche parecchio tempo
dopo il termine della cottura. Fare attenzione nel maneggiare il
recipiente e usare il tappetino di protezione prima di appoggiarlo a
superfici sensibili al calore.
69
Italiano

70
●
Fare attenzione al vapore che fuoriesce dal recipiente di Kenwood
Cooking Chef, in particolare nell’aprire il coperchio del paraspruzzi,
oppure al momento di sollevare la testa di Kenwood Cooking Chef.
●
Se si desidera versare alimenti caldi da Kenwood Cooking Chef nel
frullatore, prima lasciarli sempre raffreddare a temperatura ambiente.
●
Usare solo il recipiente e gli utensili in dotazione con questo
apparecchio. Non utilizzare mai il recipiente con altre sorgenti di calore.
●
Non azionare mai l’apparecchio nella modalità di cottura se il recipiente
è vuoto.
●
Non cercare di inserire nulla attraverso le bocchette per l'aria.
●
Prima di usare questo apparecchio, verificare di collocarlo in piano,
lontano dal bordo del piano di lavoro. Assicurarsi che vi sia una distanza
di almeno 10 cm dalle pareti, e che le bocchette dell’aria non siano
ostruite. Non collocare l’apparecchio sotto a una credenza.
●
A garanzia dell’uso corretto e sicuro della piastra ad induzione,
controllare che la base del recipiente e i sensori della temperatura siano
puliti ed asciutti prima di avviare la cottura.
●
Come per qualunque apparecchio per cottura a induzione, evitare di
collocare carte di credito, supporti magnetici o altri apparecchi
elettronici sensibili vicino all’apparecchio dopo averlo acceso.
●
Non usare questo apparecchio per friggere i cibi.
●
Controllare sempre che i cibi siano ben cotti prima di mangiarli.
●
Consumare i cibi entro breve tempo dopo averli cotti; in alternativa, farli
raffreddare velocemente e poi refrigerarli non appena possibile.
●
Un utilizzo scorretto dell'apparecchio può provocare serie lesioni fisiche.
●
L'uso degli apparecchi può essere consentito a persone con ridotte
capacità psico-fisico-sensoriali o con esperienza e conoscenze
insufficienti, a patto che siano attentamente sorvegliate e istruite sull'uso
degli apparecchi e comprendano i potenziali rischi.
●
Sorvegliare i bambini, assicurandosi che non giochino con
l’apparecchio.
●
Non consentire l'uso dell'apparecchio a dei bambini. Tenere
l'apparecchio e il cavo lontano dalla portata dei bambini.
●
Utilizzare l'apparecchio solo per l'uso domestico per cui è stato
realizzato. Kenwood non si assumerà alcuna responsabilità se
l'apparecchio viene utilizzato in modo improprio o senza seguire le
presenti istruzioni.

71
prima di collegare l’apparecchio alla rete elettrica
●
A
ccertarsi che la tensione della vostra rete sia la stessa di quella indicata sulla base dell’apparecchio.
●
ATTENZIONE: L'APPARECCHIO DEVE ESSERE MESSO A TERRA.
●
Questo apparecchio è conforme alla direttiva 2004/108/CE sulla Compatibilità Elettromagnetica, ed al
r
egolamento (EC) No. 1935/2004 del 27/10/2004 sui materiali in contatto con alimenti.
prima dell’uso
Lavare i componenti: vedere la sezione ‘cura e pulizia’, pag. 82.
introduzione
Grazie per aver acquistato Kenwood Cooking Chef, che speriamo userete per molti anni con un rendimento
ottimale.
K
enwood vanta quasi 60 anni di esperienza e competenza nello sviluppo dei propri prodotti e del loro ampio
a
ssortimento di accessori. Kenwood Chef è molto più di un semplice impastatore.
Nel realizzare il nuovo Kenwood Chef per cottura, abbiamo abbinato la sua tradizionale a un nuovo
perfezionamento: la possibilità di cuocere a induzione gli alimenti direttamente nel recipiente di Kenwood Cooking
C
hef. Ora potrete avere tutti i vantaggi della consueta miscelazione con movimento planetario ‘nel recipiente a
freddo’ per preparare le torte, pastafrolle e gli impasti che preferite, ma in più riscaldarli e cuocerli direttamente nel
recipiente dell’apparecchio. Le possibilità sono davvero infinite.
Kenwood Cooking Chef, con la sua gamma di opzionali, è veramente il sistema più completo per la preparazione
degli alimenti.
Robusto, Affidabile, Versatile, Kenwood.
Che cos’è la cottura a induzione e come funziona?
La cottura a induzione è un metodo avanzato per cuocere gli alimenti, che si avvale dei principi dell'induzione
elettromagnetica. Con il passaggio della corrente elettrica attraverso una serpentina in rame, all’interno dell’area
destinata alla cottura a induzione, si viene a creare un campo elettromagnetico. Inserendo e fermando in
posizione il recipiente di Kenwood Cooking Chef, il circuito viene completato da uno speciale strato di acciaio
inox all'interno della base per il recipiente. A sua volta, questo genera molta energia termica che si trasmette al
contenuto del recipiente, che viene così riscaldato.
La cottura a induzione usa energia in modo molto efficiente, in quanto genera calore solo nella base del
recipiente. Altri metodi di cottura, come i fornelli a gas, sprecano invece quasi il 50% dell’energia termica attorno
ai lati della pentola. Anzi, l’area del vostro Kenwood Cooking Chef destinata alla cottura ad induzione scotta solo
durante e immediatamente la cottura, per via del calore che si ritrasferisce dal contenuto del recipiente. Tutto
questo significa che la cottura ad induzione è molto efficiente, sicura e pulita.
La funzione di cottura di Kenwood Cooking Chef è simile all'uso di una pentola su un normale fornello. Tuttavia, il
vantaggio supplementare consiste nel fatto che Kenwood Cooking Chef mescolerà automaticamente i cibi e
regolerà la temperatura di cottura in base alle vostre esatte preferenze, lasciandovi liberi di occuparvi di altro in
cucina.
Kenwood Cooking Chef usa la tecnologia di riscaldamento ad induzione, che è estremamente efficiente. Rispetto
alla cottura su un fornello a gas o elettrico, può darsi che richiederà meno tempo, o che sarà possibile cuocere a
una temperatura più bassa. Considerare questi fattori al momento di usare l’apparecchio per la prima volta, o di
provare una nuova ricetta. Se iniziate la cottura a una temperatura elevata, controllate regolarmente e, se
necessario, abbassatela per evitare che i cibi si brucino e aderiscano al recipiente – proprio come fareste con una
normale pentola. In generale, Kenwood Cooking Chef riscalda in modo automatico gli ingredienti alla vostra
temperatura desiderata, nel minor tempo possibile. Di conseguenza, non è necessario impostare una
temperatura più alta del necessario solo per ridurre i tempi di cottura. A questo punto, occorre prestare
attenzione anche alla frequenza della miscelazione. Cuocendo ad alta temperatura, è possibile che i cibi debbano
essere mescolati di continuo, usando l’impostazione . Le impostazioni e sono utili per mantenere la
consistenza dei cibi in caso di tempi lunghi di cottura a bassa temperatura.

A questo stadio è anche importante scegliere l’utensile corretto per il recipiente. Più avanti in queste istruzioni
presenteremo dei suggerimenti per l'uso ottimale di ciascun utensile, e con l’esperienza capirete presto quale
sarà l'utensile migliore per ciascuna procedura. Durante la cottura scoprirete che la frusta flessibile per alta
t
emperatura dà risultati migliori se desiderate una consistenza molto uniforme per salse e creme, mentre l’utensile
p
er mescolare è preferibile per alimenti la cui consistenza deve rimanere più solida, ad esempio spezzatini,
pasticci, ragù, ecc. Il nostro ricettario elenca gli utensili consigliati per ciascuna ricetta, e forse scoprirete che
cambiando utensili per le varie procedure durante la preparazione è possibile ottenere risultati migliori.
D
urante e immediatamente dopo la cottura, il recipiente, il paraschizzi e l'utensile per il recipiente scotteranno,
proprio come una normale pentola. Fare quindi attenzione nel toccarli. È anche importante tenere presente che la
cottura produce vapore e condensa. Attenzione, quindi, a quando controllate l’interno del recipiente, o sollevate il
coperchio dal tubo introduttore degli alimenti o la testa Kenwood Cooking Chef macchina per esaminare o
accedere al recipiente. Avvertite anche le altre persone dei pericoli durante la cottura, o quando l'apparecchio
s
cotta, in modo che facciano attenzione. Al momento di toccare o di estrarre componenti caldi, è consigliabile
usare guanti da forno e spostare il recipiente servendosi esclusivamente degli appositi manici. Potreste trovare
utile anche il tappetino di protezione, per evitare di danneggiare le superfici sensibili al calore.
N
el riscaldare liquidi, o cibi che contengono molta acqua, normalmente la precisione della temperatura indicata
r
ientra in +/- 5ºC. La precisione del display e del controllo della temperatura varia a seconda della consistenza e
del volume dei cibi nel recipiente, della frequenza con cui vengono mescolati e dell'utensile usato per il recipiente.
Anche tutti questi fattori sono simili alla cottura su fornello; ad esempio, riscaldando ma non mescolando bene
una grossa pentola che contiene un'elevata quantità di ingredienti il cibo risulta molto caldo, o addirittura
b
ruciato, sul fondo della pentola, ma molto meno caldo nella parte superiore.
Oltre al display per la temperatura, l’apparecchio ha una piccola spia luminosa blu. Questa spia lampeggia fino a
quando l’apparecchio non raggiunge la temperatura selezionata. Una volta ottenuta la temperatura richiesta, la
spia smette di lampeggiare. Tuttavia, aggiungendo nuovi ingredienti al recipiente la spia blu ricomincia a
lampeggiare, visto che la temperatura si riduce per via dell’introduzione di ingredienti freddi. Inoltre, potreste
anche notare che la spia inizia a lampeggiare quando la frequenza di miscelazione viene aumentata.
Ben presto, capirete che il vostro Kenwood Cooking Chef è molto semplice da usare e vi faciliterà la
preparazione dei piatti di tutti i giorni.
72

per conoscere il vostro Kenwood Cooking Chef
P
er acquistare un accessorio non in dotazione, vedere la sezione
‘manutenzione e assistenza tecnica’.
attacchi per gli accessori
attacco ad alta velocità
attacco a media velocità
attacco a bassa velocità
a
ttacco per utensili
Kenwood Cooking Chef
coperchio dell'attacco a media/alta velocità
testa della macchina
coperchio dell’attacco a bassa velocità
l
eva dell’attacco a bassa velocità
c
iotola di Kenwood Cooking Chef
levetta alza-testa
selettore della velocità
bocchette per l’aria
p
iedistallo del recipiente/area ad induzione
f
oro di scarico
sensori della temperatura
frusta K in acciaio inox
frusta flessibile per alta temperatura
f
rusta a fili grossi
gancio impastatore
utensile per mescolare
spatola per alta temperatura
protezione termica
tenuta di gomma
paraschizzi
coperchio dell’introduttore per alimenti
tappetino di protezione per piano
di lavoro
chiave
73

74
pannello di controllo
d
isplay per timer/temperatura
tasto timer -
tasto timer +
controllo della temperatura
tasto Funzione Pulse , per montare ad alta velocità
c
ontrollo della velocità
selettore per timer/temperatura
spia di controllo della temperatura
tasto per amalgamare
s
pia di controllo della velocità

come regolare l’altezza degli utensili
Per le istruzioni relative al montaggio di Kenwood Cooking Chef ,
v
edere pag. 75.
frusta a fili grossi, frusta in acciaio inox, utensile per mescolare
P
er ottenere i migliori risultati, il frusta a fili grossi, la frusta e l’utensile per
mescolare devono quasi fare contatto con il fondo del recipiente
. Se
necessario, regolare la loro altezza con la chiave in dotazione.
E
cco come farlo:
1
Disinserire la spina dell’apparecchio dalla presa elettrica.
2 Sollevare la testa della macchina e inserire la frusta a fili, la frusta o
l’utensile per mescolare.
3 Abbassare la testa della macchina. Se occorre regolare il gioco, sollevare la
t
esta e staccare l’utensile.
4
Usando la chiave fornita, allentare a sufficienza il dado
p
er consentire la
regolazione dell’alberino
. Per abbassare l’utensile verso il fondo del
recipiente, ruotare in senso antiorario l'alberino. Per sollevare l’utensile
allontanandolo dal fondo del recipiente, ruotare l’alberino in senso orario.
5
Ristringere il dado.
6 Montare l’utensile sul mixer e abbassare la testa dell’apparecchio.
(Controllare la sua posizione – vedi i punti suddetti).
7 Se necessario, ripetere questa procedura fino a quando l’utensile è regolato
in modo corretto. A questo punto, ristringere a fondo il dado.
frusta flessibile per alta temperatura – questo utensile deve
toccare appena il fondo del recipiente.
gancio impastatore – questo utensile è regolato in fabbrica e non
dovrebbe essere necessario modificarne l’impostazione.
come montare e usare il gruppo del
paraschizzi
Il gruppo del paraschizzi comprende 2 componenti: la protezione termica e
il paraschizzi.
La protezione termica deve essere installata durante la cottura,
altrimenti il mixer non entra in funzione e il display mostra il
codice di errore E:03. La protezione termica protegge la testa del mixer
dal vapore generato in fase di cottura.
Se necessario, è possibile installare sia la protezione termica che il
paraschizzi, per mantenere gli ingredienti all’interno del recipiente (es.
quando si miscelano ingredienti leggeri, come farina e zucchero a velo,
dove occorre mantenere l’umidità all’interno del recipiente). Il paraschizzi
non va installato sul recipiente se non è usato insieme alla protezione
termica.
1 Sollevare la testa del mixer fino a quando non si blocca.
2 Spingere verso l'alto la protezione termica, sulla parte sottostante della
testa del mixer
, fino a inserirla a fondo. Non usare mai la protezione
termica senza inserire correttamente la tenuta di gomma.
3 Ora inserire il recipiente sulla base.
4 Abbassare la testa del mixer.
5 Appoggiare il paraschizzi sul bordo del recipiente e poi spostarlo in avanti
fino a inserirlo bene
.
• Durante la miscelazione è possibile aggiungere gli ingredienti direttamente
nel recipiente, utilizzando l’introduttore.
6 Per estrarre il paraschizzi basta semplicemente allontanarlo
dall’apparecchio.
7 Per togliere la protezione termica, sollevare la testa del mixer finché non si
blocca. Estrarre l’utensile, quindi spingere la protezione termica verso il
basso per staccarla dalla base della testa del mixer.
NB: Installare od estrarre il paraschizzi solo quando la testa del mixer si
trova in posizione bloccata.
75

il mixer
utensili per miscelare e possibili usi
frusta a K
●
Per preparare torte, biscotti, pastafrolla, glassa, farciture, bignè e purè di
patate.
f
rusta a fili grossi
●
P
er uova, panna, pastelle, pan di Spagna senza grassi, meringhe, torte
alla ricotta, mousse, soufflé. Non usare la frusta a fili grossi per miscele
dense (es. per amalgamare burro/margarina e zucchero), altrimenti si rischia
di danneggiarlo.
g
ancio impastatore
●
S
olo per miscele a lievitazione.
f
rusta flessibile per
●
I
donea per molte operazioni di cottura, in particolare per cuocere crema
alta temperatura pasticciera, uova strapazzate e salse. Ideale per staccare miscele calde e
fredde dalle pareti del recipiente, durante la miscelazione. Adatta anche per
le verdure saltate.
u
tensile per mescolare
●
I
doneo in fase di cottura, per mantenere la consistenza dei cibi es.pollo,
p
esce, verdure e frutta.
come usare il mixer
P
rima di utilizzare il mixer, verificare che i controlli per temperatura e velocità
s
iano in posizione spenta ‘O’.
1 Ruotare la leva alza-testa in senso orario
e sollevare la testa del mixer fino
a bloccarla in posizione.
come installare un utensile 2 Inserire l’utensile nell’attacco, con il perno dell’alberino all’interno della
scanalatura, poi ruotare per bloccarlo in posizione .
utensile per mescolare – per montare l’utensile per mescolare, inserire il
suo alberino nell’attacco, allineare la fessura sull’estensione, affinché venga a
trovarsi sotto il perno metallico sul lato sottostante della testa del mixer.
Tenere la paletta e ruotare fino a quando il perno dell’alberino risulta sotto la
scanalatura, quindi spingere verso l’alto e ruotare per bloccare in posizione
.
3 Collocare il recipiente sulla base, premerlo verso il basso e ruotare in senso
orario .
4 Per abbassare la testa del mixer, sollevarla leggermente e poi ruotare in
senso orario la leva alza-testa. Abbassare nella posizione bloccata.
come estrarre un utensile
●
Invertire lo stadio 2 suddetto. (Usare sempre dei guanti da forno per estrarre
gli utensili dopo la cottura).
5 Collegare il mixer all’alimentazione elettrica. Ora le spie indicatrici di velocità e
temperatura si accendono per qualche istante. Nel display appare e
poi scompare, lasciando acceso l'indicatore di alimentazione .
6 Impostare il controllo della velocità sulla posizione desiderata (vedere pag. 77
per i consigli). Ora il mixer entra in funzione e la spia indicatrice del controllo
della velocità lampeggia. Il timer parte, contando a intervalli di 1 secondi. La
velocità può essere variata in qualunque momento durante l'uso del mixer.
7 Fermare il mixer riportando il controllo della velocità sulla posizione
spenta ‘O’.
Importante – Se la testa del mixer viene sollevata in qualsiasi momento
durante l’uso, l’apparecchio si ferma automaticamente e non riparte quando
la testa viene riabbassata. Per fare ripartire il mixer, spostare il controllo della
velocità sulla posizione spenta ‘O’ e poi selezionare nuovamente una
velocità.
Funzione Pulse
La funzione Pulse è utilizzabile solo con il controllo della velocità in posizione
spenta ‘O’.
Per selezionare la funzione Pulse, premere il tasto Pulse . Ora il mixer
funziona a velocità massima fino a quando si continua a tenere premuto il
tasto in questa posizione. Se i cibi nel recipiente hanno una temperatura di
oltre 60ºC, la velocità aumenta in modo graduale. Questo è accompagnato
da un segnale acustico e dalle spie indicatrici di velocità e temperatura che
lampeggiano in modo rapido.
tasto per mescolare a bassissima velocità
Premendo e rilasciando il tasto per amalgamare , il mixer funziona
automaticamente a velocità minima per 2 giri e poi si ferma. Questo tasto
può essere tenuto premuto più a lungo, oppure premuto ripetutamente,
come necessario per amalgamare gli ingredienti.
NB: Se il tasto per amalgamare viene premuto mentre il motore gira,
l'apparecchio amalgama gli ingredienti in modo consueto e poi si ripristina
sulla velocità selezionata.
P
76

controllo della velocità
Le velocità seguenti sono a semplice titolo di guida e variano a seconda della
quantità e della temperatura degli ingredienti miscelati, ecc.
Ruotare in senso orario il controllo della velocità per avere velocità da 'min'
f
ino a 'max'.
frusta
●
per amalgamare burro/margarina e zucchero iniziare al min. e
passare gradualmente a ‘max’.
●
p
er sbattere le uova 4 - ‘max’.
●
p
er incorporare farina, frutta ecc. min - 1
●
miscele per torte iniziare a velocità min. e passare gradualmente a max.
●
per incorporare burro/margarina nella farina min - 2.
frusta flessibile per
●
per amalgamare burro/margarina e zucchero iniziare al min. e
a
lta temperatura passare gradualmente a 3.
●
per staccare miscele calde e fredde dalle pareti del recipiente
iniziare al min. e passare gradualmente a 3.
●
per saltare verdure, mescolare risotti e polenta, ecc. usare .
frusta a fili grossi
●
Aumentare gradualmente fino a ‘max’.
g
ancio impastatore
●
I
niziare al ‘min’ e passare gradualmente a 1.
utensile per mescolare
●
Usare solo con le impostazioni per mescolare
,
e .
impostazioni per mescolare
Per scegliere le impostazioni per mescolare, ruotare in senso antiorario il controllo della velocità. Queste
impostazioni sono più idonee quando il mixer è usato nella modalità di cottura. Si ricorda che per usare
le impostazioni per mescolare, tutti i coperchi degli attacchi devono essere installati.
– Usare questa impostazione se si richiede una bassa velocità costante, es. per mescolare le salse.
– Impostando il controllo della velocità in questa posizione, il mixer funziona a intermittenza a bassa
velocità ogni 5 secondi, per 2 giri circa.
– Impostando il controllo della velocità in questa posizione, il mixer funziona a intermittenza a bassa
velocità ogni 30 secondi, per mescolare pasticci, ecc.
Per fermare la procedura, rispostare il controllo della temperatura sulla posizione spenta ‘O’.
NB:
●
Ogni volta che si seleziona una velocità, la spia indicatrice della velocità lampeggia.
●
Durante l’uso è possibile che l’apparecchio produca un segnale acustico penetrante. Questo è normale.
come usare il mixer per cucinare
IMPORTANTE
●
Controllare che l’area ad induzione, i sensori della temperatura e l'esterno della base del recipiente
siano puliti. In caso contrario, il sensore termico viene compromesso e si avrà una cottura scadente.
●
Verificare che tutti i coperchi degli attacchi, compresa la protezione termica, siano installati. Se non
sono stati montati correttamente, la funzione di riscaldamento non si attiva.
●
Usare sempre dei guanti da forno per estrarre gli utensili dopo la cottura.
1 Montare il mixer come spiegato a pag. 76.
2 Ruotare il controllo della temperatura fino all’impostazione desiderata.
●
L’apparecchio non inizia a riscaldare se prima non viene selezionata una velocità.
3 Ruotare il controllo della velocità fino alla velocità desiderata: ora il motore e il riscaldatore si accendono.
Entrambe le spie indicatrici iniziano a lampeggiare.
4 Una volta raggiunta la temperatura impostata, la spia indicatrice della temperatura rimane accesa.
Tuttavia, nel corso della cottura inizia a lampeggiare se la temperatura cambia, per indicare che il mixer
sta cercando di mantenere la temperatura selezionata (si prega di leggere l'introduzione a pag. 71).
●
Se la temperatura nel recipiente supera 60ºC, per ragioni di sicurezza la velocità viene automaticamente
limitata, anche se l'utilizzatore imposta una velocità superiore. La velocità non aumenta in modo
automatico quando la temperatura scende a meno di 60ºC. Prima, infatti, occorre spegnere il controllo
della velocità e riselezionare la velocità desiderata.
●
NB: Ogni volta che si preme il selettore per timer/temperatura, il display alterna fra la visualizzazione del
timer e quella della temperatura del contenuto del recipiente.
5 Per fermare o mettere in pausa la procedura di miscelazione e riscaldamento, riportare il controllo delle
velocità alla posizione spenta ‘O’. Per proseguire, selezionare una velocità.
77

78
consigli
●
Per alcune ricette, in particolare quelle ad alto contenuto di acqua, non sarà possibile
raggiungere temperature di cottura oltre 100ºC (ossia il punto di ebollizione dell’acqua).
●
Quando si desidera aggiungere ingredienti nel recipiente in fase di cottura, ridurre la velocità e versarli in modo
lento e continuo.
●
Per riscaldare velocemente le salse, mescolarle in modo continuo .
●
C
ambiando l’accessorio per svolgere diversi trattamenti nella preparazione dei vostri piatti potreste ottenere
risultati migliori, per esempio usando la frusta flessibile per alta temperatura per friggere verdure e poi l’utensile
per mescolare per la cottura di carne rossa o pollame.
●
Se durante la cottura viene utilizzato il paraschizzi, toglierlo sempre prima di sollevare la testa del mixer.
A
ttenzione alla condensa che si forma sul paraschizzi e sulla protezione termica.
●
S
ollevare la testa del mixer lentamente, per consentire all’eventuale liquido presente sulla parte sottostante della
protezione termica di rifluire nel recipiente.
●
Sono disponibili tre diverse impostazioni per mescolare, consentendovi di scegliere la funzione più idonea per
ciascuna ricetta. Infatti, per alcune ricette occorre mescolare di continuo gli ingredienti, per evitare che si
a
ttacchino sul fondo del recipiente, mentre per altre basta mescolare in modo intermittente, per meglio
m
antenere la consistenza dei cibi.
●
Per un rendimento ottimale, regolare l’altezza degli utensili – vedere pag. 75.
●
Il tempo massimo di cottura è 3 ore. In seguito, il mixer si spegne in modo automatico.
●
È possibile riscaldare i cibi senza installare alcun utensile, ma occorre sempre selezionare una velocità. Questo
p
uò risultare utile nel fondere alimenti come burro o cioccolato.
●
Ogni volta che si preme il selettore per timer/temperatura, il display alterna fra la visualizzazione del tempo di
cottura e quella della temperatura raggiunta in quel momento.
funzione per montare ad alta velocità e ad alta temperatura
Per frullare ad alta velocità a temperature oltre 60ºC, ruotare il controllo della velocità fino all’impostazione
desiderata, poi premere e tenere premuto il tasto Pulse. Questo è accompagnato da un segnale acustico e dalle
spie indicatrici di velocità e temperatura che lampeggiano in modo rapido. La velocità della lavorazione degli
ingredienti aumenta lentamente, fino alla velocità selezionata.
Ripetere la procedura per aumentare ulteriormente la velocità. È possibile ridurre la velocità o spegnere il mixer
nel modo consueto.
Questa funzione DEVE essere usata solo con la frusta a fili grossi. Non superare la massima
capacità di cottura di 3 litri e controllare che il paraschizzi sia installato. Non lasciare
incustodito l’apparecchio.
dopo la cottura
●
Attenzione nel maneggiare o toccare qualsiasi parte del mixer, quando viene usato nella modalità di cottura o
dopo la cottura, IN PARTICOLARE IL RECIPIENTE, IL PARASCHIZZI E GLI UTENSILI, che continueranno a
SCOTTARE anche diverso tempo dopo che l'apparecchio è stato spento. Per estrarre e spostare il recipiente,
servirsi dei manici. Usare guanti da forno al momento di maneggiare il recipiente caldo e gli utensili per miscelare.
●
La base del recipiente continua a scottare anche parecchio tempo dopo il termine della cottura. Fare attenzione
nel maneggiare il recipiente e usare il tappetino di protezione prima di appoggiarlo a superfici sensibili al calore.

79
display
P
er vostra sicurezza, il mixer è dotato di 5 sensori separati di sicurezza, che entrano in funzione quando il mixer
viene usato nella modalità di cottura. Se il mixer viene acceso e un sensore di sicurezza si attiva, il display per
timer/temperatura mostra un messaggio di errore, ad es. ‘E:01’. Inoltre, l’apparecchio genera un segnale acustico
e il mixer non entra in funzione. Controllare i messaggi di errore che seguono:
Se questi o altri codici di errore continuano ad apparire nel display, contattare l’Assistenza tecnica Kenwood.
Messaggio Descrizione Soluzione
d
i errore
C
on la testa sollevata, un sensore di sicurezza Abbassare la testa. Ruotare il controllo
impedisce al motore e al riscaldatore di della velocità alla posizione ‘O’ e poi
E:01
attivarsi. Se il controllo della velocità non è in selezionare la velocità desiderata.
posizione spenta ('O’) quando la testa viene
sollevata, il display indica questo messaggio e il
m
otore non si accende.
I
l recipiente di Kenwood Cooking Chef non Verificare che venga utilizzato il recipiente
è installato. La funzione di riscaldamento si di Kenwood Cooking Chef. Controllare
attiva solo utilizzando il recipiente per la cottura. che il recipiente sia montato in modo
E:02 Inoltre, il recipiente deve essere inserito in modo corretto. Ruotare il controllo della
corretto. Sensori di sicurezza rilevano un velocità su ‘O’ e poi selezionare la
recipiente diverso, oppure l’errato inserimento del velocità desiderata.
r
ecipiente per cottura.
La protezione termica non è stata installata. Se Verificare che la protezione termica sia
la protezione termica non è installata montata in modo corretto. Ruotare il
E:03
correttamente, la funzione di riscaldamento controllo della velocità su ‘O’ e poi
rimane disattivata. selezionare la velocità desiderata.
Non vi sono coperchi sull'attacco a bassa Verificare che tutti i coperchi siano
velocità e su quello a alta/media velocità. Questi installati in modo corretto.
coperchi sono provvisti di sensori di sicurezza. Ruotare il controllo della velocità su ‘O’ e
Se i coperchi non sono installati in modo poi selezionare la velocità desiderata.
E:04 corretto, il riscaldamento si spegne; se
l’utilizzatore seleziona una funzione per mescolare
i cibi, il motore funziona in modo continuo. Le
velocità di miscelazione da min a max funzionano
continuamente.
Problema con un sensore della temperatura. Ruotare il controllo della velocità su ‘O’,
il termostato rileva una temperatura del disinserire la spina dell’apparecchio dalla
recipiente maggiore del previsto durante l’uso presa elettrica e lasciarlo raffreddare.
E:09 normale, motore e sistema di riscaldamento Controllare che la base del recipiente e i
si spegneranno automaticamente. sensori della temperatura siano puliti.
Reinserire la spina e accendere
l’apparecchio come di consueto.
Problema di velocità o surriscaldamento del Ruotare il controllo della velocità su ‘O’ e
motore. Se il motore stalla o si surriscalda, il poi selezionare la velocità desiderata.
sistema di controllo spegne automaticamente Eliminare le eventuali ostruzioni che
E:10
motore e sistema di riscaldamento. causano lo stallo del motore. Controllare
che tutte le bocchette dell’aria non
presentino ostruzioni.
Inserire la spina dell’apparecchio nella
presa elettrica e accenderlo.

80
per usare il conto alla rovescia con timer
I
l timer può essere usato sia in modalità di cottura che senza la cottura. Se l’utilizzatore non seleziona un tempo
per il conto alla rovescia, il timer conta automaticamente in intervalli di 1 secondo durante il funzionamento del
mixer. Il tempo massimo è 3 ore.
1 Collegare il mixer all’alimentazione elettrica. Nel display appare brevemente e poi scompare, lasciando
visibile l'indicatore di alimentazione .
2
Premere il tasto + o -: ora nel display appare 0:00.
3 Premere i tasti + e – fino a visualizzare il tempo desiderato. Il timer parte, contando a intervalli di 5 secondi. Se il
tasto viene premuto continuamente, più a lungo lo si preme e più velocemente i numeri cambiano. È possibile
impostare un tempo massimo di 3 ore.
N
B: Premendo il tasto + quando il timer indica 3:00, il tempo sul display passa a 0:00. Premendo il tasto –
q
uando il timer indica 0:00, il tempo il display passa a 3:00.
4 Ruotare il controllo della velocità fino all'impostazione desiderata; ora il mixer entra in funzione e il timer avvia il
conto alla rovescia in intervalli di 1 secondo.
●
Il mixer può essere messo in pausa in qualunque momento, ruotando il controllo della velocità in posizione
s
penta (‘O’). In tal modo, anche il timer entra in pausa. Il timer prosegue il conto alla rovescia quando il mixer
v
iene riacceso.
5 Il sistema di miscelazione si ferma automaticamente allo scadere del tempo totale e l’apparecchio emette segnali
acustici per 3 secondi. Il display lampeggia per 5 secondi e poi visualizza l'indicatore di alimentazione .
come azzerare il timer
1 Azzerare il timer premendo simultaneamente i tasti + e – (il controllo della velocità deve trovarsi in posizione
spenta, ossia ‘O’).
●
Se l’apparecchio non viene usato per 10 minuti, il display a LCD e la retroilluminazione entrano nel modo
‘stand by’ e tutti i display si spengono. Azionando un tasto o una manopola, il display torna al formato
precedente.
capacità massime
pastafrolla
●
Peso totale impasto: 910g
impasto lievitato duro
●
Peso totale impasto: 1,5kg
●
Peso totale: 2,4kg
impasto lievitato soffice
●
Peso totale impasto: 2,6kg
●
Peso totale: 5kg
miscela per torta di frutta
●
Peso totale: 4,55kg
albumi
●
16
modalità di cottura
●
3 litri
consigli generali
●
Fermare frequentemente l’apparecchio e staccare con la spatola gli ingredienti aderiti al recipiente.
●
Per frullare è preferibile usare uova a temperatura ambiente.
●
Prima di montare gli albumi, controllare che sulla frusta a fili o nel recipiente non vi siano residui di grasso o di
tuorlo d’uovo.
●
Per la pastafrolla usare ingredienti dal frigorifero, salvo indicato diversamente nella ricetta.
promemoria per fare il pane
importante
●
Non superare mai le capacità massime indicate, altrimenti l’apparecchio verrà sovraccaricato.
●
Se l’apparecchio impasta a fatica spegnerlo, togliere metà dell’impasto e impastare in due volte.
●
Gli ingredienti si impastano meglio aggiungendo per primi i liquidi.

81
guida alla localizzazione dei problemi in fase di cottura
Problema Causa Soluzione
I
l mixer non funziona nella modalità di Uno dei sensori di sicurezza si è attivato. Vedere la tabella dei messaggi di errore, a pag. 79.
r
iscaldamento; visualizza un messaggio di • Controllare che la testa sia abbassata e
errore e genera un tono di avvertimento. bloccata.
• Verificare che tutti i coperchi degli attacchi siano
correttamente inseriti.
• Verificare che la protezione termica sia montata
in modo corretto.
•
Controllare che il recipiente di Kenwood Cooking
C
hef sia ben inserito.
È stata selezionata una temperatura, ma il Non è stata selezionata una velocità. Selezionare una velocità.
contenuto del recipiente non si riscalda (la
spia indicatrice della temperatura non
è accesa).
I
l mixer cambia velocità durante la cottura. La velocità viene limitata in modo automatico Questo è un accorgimento di sicurezza.
q
uando il contenuto del recipiente giunge
a 60ºC.
I cibi si bruciano sul fondo del recipiente. 1 La temperatura impostata potrebbe essere 1 Ridurre la temperatura sulla manopola, oppure
eccessiva. cucinare a una temperatura inferiore.
2 Viene usato l’utensile sbagliato. 2 Verificare che l’utensile usato sia quello più
adatto.
3
La funzione di miscelazione è troppo lenta. 3 Alzare la frequenza di miscelazione, oppure
mescolare in modo continuo.
4 L’utensile potrebbe non raggiungere la parte 4 Regolare l’utensile.
bassa del recipiente.
5 Il tempo impostato per il timer è troppo 5 Cuocere per meno tempo (ma verificare che
lungo. i cibi non siano crudi).
6 Il sensore e/o la base del recipiente 6 Controllare che queste aree vengano tenute
possono non essere puliti. pulire e asciutte.
La consistenza dei cibi non viene mantenuta. 1 La temperatura selezionata è eccessiva. 1 Ridurre la temperatura.
2 La funzione di miscelazione è troppo veloce. 2 Ridurre la velocità di miscelazione.
3 Gli ingredienti sono stati cotti per 3 Ridurre il tempo di cottura (controllando che i
troppo tempo. cibi non siano crudi).
4 Viene usato l’utensile sbagliato. 4 Verificare che l’utensile usato sia quello
più adatto.
La velocità di miscelazione non è uniforme. 1 Ingredienti troppo grossi, troppo duri o 1 Tagliare gli ingredienti a pezzetti più piccoli,
troppo solidi. asportare i noccioli dalla frutta, fondere
lentamente gli ingredienti senza usare alcun
utensile (ma verificare di aver selezionato una
velocità).
2 Aggiungere gli ingredienti dopo aver abbassato
la testa.
3 Verificare che l’utensile usato sia quello più
adatto.
Sono stati aggiunti ingredienti freddi a una Se i cibi all’interno del recipiente non 1 Lasciare tempo per la miscelazione completa
miscela calda, ma il display della temperatura vengono mescolati bene, la loro degli ingredienti.
non risponde in modo rapido. temperatura potrebbe variare. 2 Aumentare la velocità di miscelazione.
È difficile abbassare la testa del mixer con Ingredienti duri, come il cioccolato, sul fondo Aggiungere gli ingredienti dopo aver abbassato
i cibi all’interno del recipiente. del recipiente possono impedire alla testa del la testa.
mixer di bloccarsi in posizione abbassata.
Il mixer funziona in modo continuo I coperchi sono montati in modo non corretto Verificare che tutti i coperchi degli attacchi siano
selezionando la funzione o sugli attacchi. correttamente inseriti.
per mescolare.
L’uso degli accessori limita la velocità È stato inserito un recipiente caldo. Estrarre il recipiente, oppure lasciarlo raffreddare
del motore. fino a 60°C.

pulizia e assistenza tecnica
cura e pulizia
●
Spegnere sempre l’apparecchio e togliere la spina dalla presa elettrica prima di pulirlo.
●
Con il primo uso, dall’attacco potrebbe essere visibile un poco di grasso.
Q
uesto è normale – asportare i residui.
●
L
e superfici metalliche dei sensori della temperatura possono mostrare segni
di usura durante l’uso normale. Tuttavia, questo non
compromette il rendimento del prodotto.
●
N
on lasciare la frusta flessibile ad alta temperatura montata
sull’apparecchio quando non viene utilizzata.
A
pparecchio e copriprese
●
P
assarli con un panno umido e poi asciugare.
●
Non usare mai prodotti abrasivi né immergere in acqua questi
componenti.
f
rusta flessibile ad
●
R
imuovere sempre la lama dell’aletta flessibile prima di pulire.
alta temperatura
●
Lavare la lama dell’aletta flessibile e l’accessorio con acqua calda e
detergente, poi asciugare bene, oppure le parti possono essere lavate
in lavastoviglie.
NB: Si prega di verificare le condizioni del corpo dell’accessorio prima
e dopo l’uso e di verificare regolarmente le condizioni della lama dell’aletta
flessibile e di sostituirla nel caso siano evidenti segni di usura.
recipiente, utensili, paraschizzi
●
Lavarli a mano e asciugarli a fondo, oppure lavarli in lavastoviglie
●
Non usare spazzole metalliche, pagliette o candeggina per pulire il recipiente in
acciaio inox. Per asportare il calcare, utilizzare aceto o un prodotto idoneo.
●
Se i cibi aderiscono o si bruciano nel recipiente, asportarli per quanto possibile usando la
spatola in dotazione. Riempire il recipiente di acqua calda saponata e lasciare a bagno.
Asportare i residui più ostinati con una spazzola in nylon.
●
L’eventuale scolorimento del recipiente non ne compromette il rendimento.
foro di scarico
●
Controllare che non vi siano residui di alimenti. Se necessario, pulire con uno spazzolino
per tubature o con un bastoncino di cotone idrofilo.
sensori della temperatura
●
Passarli con un panno umido e poi asciugare. Non usare mai prodotti abrasivi o utensili
appuntiti per pulire i sensori.
manutenzione e assistenza tecnica
●
In caso il cavo sia danneggiato, per ragioni di sicurezza deve esser sostituito solo dal
fabbricante oppure da un Centro Assistenza KENWOOD autorizzato alle riparazioni.
Se si ha bisogno di assistenza riguardo:
●
uso dell’apparecchio o
●
manutenzione o riparazioni
Contattare il negozio dove si è acquistato l’apparecchio.
●
Disegnato e progettato da Kenwood nel Regno Unito.
●
Prodotto in Cina.
IMPORTANTI AVVERTENZE PER IL CORRETTO SMALTIMENTO DEL PRODOTTO
AI SENSI DELLA DIRETTIVA EUROPEA 2002/96/EC.
Alla fine della sua vita utile il prodotto non deve essere smaltito insieme ai rifiuti urbani.
Deve essere consegnato presso gli appositi centri di raccolta differenziata predisposti dalle
amministrazioni comunali, oppure presso i rivenditori che offrono questo servizio.
Smaltire separatamente un elettrodomestico consente di evitare possibili conseguenze
negative per l’ambiente e per la salute derivanti da un suo smaltimento inadeguato e
permette di recuperare i materiali di cui è composto al fine di ottenere notevoli risparmi in
termini di energia e di risorse.
Per rimarcare l’obbligo di smaltire separatamente gli elettrodomestici, sul prodotto è
riportato il simbolo del bidone a rotelle barrato.
82

ricette
Vedere il promemoria per fare il pane, a pag. 80.
pane bianco impasto duro con lievito
ingredienti
●
1,36kg di farina per pane
●
15ml (3 cucchiaini) di sale
●
2
5g di lievito di birra fresco, oppure 15g/20ml di lievito di birra in polvere + 5ml (1 cucchiaino) di zucchero
●
7
50ml di acqua tiepida: 43ºC. Usare un termometro oppure aggiungere 250ml di acqua bollente a 500ml di
acqua fredda.
●
25g di strutto
metodo 1 lievito di birra in polvere (il tipo che occorre ricostituire): versare l'acqua tiepida nel recipiente. Ora
a
ggiungere lievito e zucchero e lasciare agire per circa 10 minuti, fino a quando non fa schiuma.
lievito di birra fresco: sbriciolarlo nella farina.
lievito di altro tipo: seguire le istruzioni del produttore.
2 Versare il liquido nel recipiente. Ora aggiungere la farina (con il lievito fresco, se usato), il sale e lo strutto.
3 Impastare a velocità minima per 45 – 60 secondi. Ora portare la velocità a 1, se necessario aggiungendo altra
f
arina sino a formare un impasto.
4 Lavorare per altri 3 – 4 minuti a velocità 1, fino a quando l’impasto risulta morbido, elastico e non aderisce ai lati
del recipiente.
5 Mettere l’impasto in un sacchetto di plastica leggermente imburrato o in una pirofila coperta da uno strofinaccio.
L
asciare lievitare al caldo, fino a quando l’impasto raddoppia in dimensioni.
6
Impastare nuovamente per 2 minuti a velocità 1.
7 Riempire a metà quattro teglie imburrate da 450g con l’impasto, oppure fare dei panini.
Coprire con uno strofinaccio e lasciare lievitare al caldo fino a quando l’impasto raddoppia in dimensioni.
8 Infornare a 230ºC per 30 – 35 minuti per le pagnotte, o per 10 - 15 minuti per i panini.
●
Quando è pronto, il pane deve dare un suono cavo se picchiettato sul fondo.
pane bianco impasto morbido con lievito
ingredienti
●
2,6kg di normale farina
●
1,3 litri di latte
●
300g di zucchero
●
450g di margarina
●
100g di lievito di birra fresco o 50g di lievito di birra in polvere
●
6 uova sbattute
●
5 pizzichi di sale
metodo 1 Sciogliere la margarina nel latte e portare a 43ºC.
2 lievito di birra in polvere (il tipo che occorre ricostituire): aggiungere lievito e zucchero al latte e lasciare agire
per 10 minuti circa, fino a quando non si vede schiuma.
lievito di birra fresco: sbriciolare nella farina e aggiungere lo zucchero.
lievito di altro tipo: seguire le istruzioni del produttore.
3 Versare il latte nel recipiente. Aggiungere le uova sbattute e 2kg di farina.
4 Lavorare a velocità minima per 1 minuto, poi a velocità 1 per un altro minuto.
Staccare l’impasto dalle pareti del recipiente.
5 Aggiungere la restante farina e lavorare a velocità minima per 1 minuto, quindi a velocità 1 per 2-3 minuti, fino ad
avere un impasto uniforme e ben amalgamato.
6 Riempire a metà quattro teglie imburrate da 450g con l’impasto, oppure fare dei panini.
Coprire con uno strofinaccio e lasciare lievitare al caldo fino a quando l’impasto raddoppia in dimensioni.
7 Infornare a 200ºC per 20 – 25 minuti per le pagnotte, o per 10 – 15 minuti per i panini.
8 Quando è pronto, il pane deve dare un suono cavo se picchiettato sul fondo.
●
Per 10 pagnotte circa.
83

ricette continuaz.
torta di fragole e albicocche
I
ngredienti: pan di Spagna
●
3
uova
●
75g di zucchero semolato
●
75g di farina
farcitura e decorazione
●
150ml di panna da cucina
●
Zucchero, secondo i gusti
●
2
25g di fragole
●
225g di albicocche
metodo 1 Dimezzare le albicocche e privarle dei noccioli. Cuocere a bassa temperatura in pochissima acqua, aggiungendo
zucchero secondo le preferenze, fino a quando le albicocche non sono ben morbide.
2
Lavare e dimezzare le fragole.
3
Per fare il pan di Spagna, montare uova e zucchero a velocità massima, fino ad avere una miscela molto chiara e
densa.
4 Togliere il recipiente e il frullino dall'apparecchio. Incorporare la farina a mano, usando un grosso cucchiaio di
metallo (procedere con attenzione, per avere un pan di Spagna leggero).
5
Versare la miscela in due teglie quadrate, imburrate e rivestite di carta da forno, misuranti 18cm.
6
Infornare a 180ºC per circa 20 minuti, fino a quando la torta non risulta elastica premendola leggermente.
7 Capovolgere e raffreddare su una griglia.
8 Montare la panna a velocità massima, fino a quando non si indurisce. Aggiungere zucchero secondo le
preferenze.
9 Spezzettare grossolanamente le albicocche e un terzo delle fragole. Incorporarle in metà della panna.
10 Distribuire su una metà della torta, poi sovrapporre l'altra metà.
11 Spalmare la panna rimasta sulla torta e decorare con le restanti fragole.
meringhe
ingredienti
●
4 albumi
●
250g di zucchero a velo, setacciato
●
Rivestire una teglia con carta da forno antiaderente.
metodo 1 Frullare gli albumi con lo zucchero a velocità massima per circa 10 minuti, fino a quando non formano picchi.
2 Con un cucchiaio, distribuire la miscela sulla teglia (oppure usare una sacca da pasticceria con beccuccio da
2,5cm).
3 Infornare a 110ºC per circa 4 – 5 ore, fino ad avere meringhe consistenti e croccanti. Se iniziano a dorarsi,
lasciare leggermente accostato lo sportello del forno.
●
Conservare le meringhe in un contenitore ermetico.
pastafrolla
ingredienti
●
450g di farina, setacciata insieme al sale
●
5ml (1 cucchiaino) di sale
●
225g di grasso (miscelare strutto e margarina direttamente dal frigorifero)
●
Circa 80ml (4 cucchiai) di acqua
consiglio
●
Non lavorare eccessivamente gli ingredienti
metodo 1 Versare la farina nel recipiente. Tagliare grossolanamente strutto e margarina a pezzetti e aggiungerli alla farina.
2 Usare la frusta a K in acciaio inox e miscelare a velocità 1, fino ad avere la consistenza di briciole di pane.
Fermarsi prima che l’impasto assuma un aspetto unto.
3 Aggiungere l’acqua e miscelare a velocità minima. Fermarsi non appena l'acqua è stata incorporata.
4 Cuocere a circa 200ºC, a seconda del ripieno.
marinata al peperoncino
ingredienti
●
200g di miele freddo (lasciato in frigorifero tutta la notte prima)
●
1 peperoncino verde (intero)
●
5ml (1c) di burro d’arachidi con pezzetti
●
condimento
metodo 1 Mettere tutti gli ingredienti nel minisminuzzatore/macinino
2 Montare l’accessorio dell’apparecchio e lasciare adagiare gli ingredienti lungo la lama.
3 Premere il tasto a impulso per 10 secondi.
4 Usare a piacimento.
84

conhecer a sua Máquina de Cozinha
Kenwood Cooking Chef
segurança:
●
Leia atentamente estas instruções e guarde-as para
consulta futura.
●
Retire todas as embalagens e eventuais etiquetas.
nota importante – implantes médicos electrónicos
●
Tal como todos os produtos de aquecimento por indução, este
aparelho gera campos magnéticos de curto alcance. Se algum
utilizador ou pessoa que esteja próximo tem um pacemaker ou outros
implantes activos, deve consultar um médico antes de utilizar este
aparelho, para se informar de alguma possível incompatibilidade e
poder prevenir qualquer risco para a saúde.
●
Desligue o aparelho e retire-o da tomada antes de o levantar ou retirar
qualquer acessórios, depois de utilizar e antes de limpar.
●
Mantenha os dedos, cabelo, jóias, roupa larga, etc. e utensílios
afastados das partes móveis e dos acessórios colocados.
●
Nunca meta os seus dedos, etc., na dobradiça.
●
Nunca deixe o aparelho a funcionar sem vigilância.
●
Nunca utilize um acessório ou o aparelho danificado. Mande-o
examinar ou reparar: ver “serviço e cuidados ao cliente”, página 98.
●
Nunca utilize um acessório não autorizado ou mais do que um
acessório ao mesmo tempo.
●
Nunca exceda as capacidades máximas da página 96 e quando utilizar
o aquecimento por indução nunca exceda o nível máximo de
enchimento de 3 litros, marcado no interior da taça.
●
Quando utilizar um acessório, leia as instruções de utilização e de
segurança, que acompanham o aparelho.
●
Este aparelho é pesado, tenha cuidado quando o levantar. Confirme
que a cabeça do aparelho está presa e que a taça, acessórios, tampa
das entrada e cabo estão também seguros antes de levantar o
aparelho.
●
Nunca deixe o cabo eléctrico pendurado de forma a que uma criança o
possa puxar.
●
Nunca deixe a unidade motriz, o cabo eléctrico ou a ficha eléctrica
apanharem humidade.
●
Tenha cuidado quando manusear ou tocar em qualquer parte do
aparelho, quando estes estão a ser usados no modo de cozinhar ou
após cozinhar, EM PARTICULAR A TAÇA, O RESGUARDO CONTRA
SALPICOS E OS ACESSÓRIOS, uma vez que eles continuam
QUENTES muito depois do aparelho ter sido desligado. Utilize as
pegas para remover e transportar a taça. Utilize luvas para forno
quando manusear a taça quente ou acessórios de mistura que estejam
quentes.
85
Português

86
●
A parte de baixo da taça continua quente muito depois do
aquecimento ter sido parado. Tenha cuidado quando manusear e
utilizar o tapete de protecção da superfície de trabalho quando colocar
a taça em superfícies sensíveis ao calor.
●
Tenha cuidado com o vapor que sai da taça em especial quando abre
a tampa no resguardo contra salpicos ou quando levanta a cabeça da
misturadora.
●
Se transferir alimentos quentes da misturadora para o liquidificador,
deixe sempre que os alimentos arrefeçam até à temperatura ambiente,
antes de os colocar no liquidificador.
●
Utilize apenas a taça e os acessórios fornecidos com o aparelho.
Nunca utilize a taça noutra fonte de aquecimento.
●
Nunca opere o aparelho no modo de cozinhar, com a taça vazia.
●
Nunca insira nada através dos respiradores.
●
Quando utilizar este aparelho assegure-se que este se encontra numa
superfície lisa e afastado de qualquer extremidade. Assegure-se que
está pelo menos a mais de 10 cm afastado das paredes e que os
respiradores não estão bloqueados. Não posicione o aparelho por
baixo dos armários superiores da cozinha.
●
Para utilizar de forma correcta e segura o aparelho de cozinhar por
indução, assegure-se que a base da taça e os sensores de
temperatura estão limpos e secos, antes de começar a cozinhar.
●
Assim como com todos os aparelhos de cozinhar por indução, não
coloque cartões de crédito, aparelhos magnéticos, computadores,
discos de armazenamento, etc., ou equipamento electrónico sensível,
perto do aparelho quando está a ser utilizado.
●
Não utilize este aparelho para fritura de alimentos por emersão.
●
Assegure-se sempre que os alimentos estão completamente
cozinhados antes de os consumir.
●
Os alimentos devem ser consumidos pouco tempo depois da cozedura
ou então devem ser cozinhados de forma rápida e depois congelados
o mais depressa possível.
●
O uso inapropriado do seu electrodoméstico pode resultar em
ferimentos.
●
Os electrodomésticos podem ser utilizados por pessoas com
capacidades mentais, sensoriais ou físicas reduzidas, ou com falta de
experiência ou conhecimento, se forem supervisionadas ou instruídas
sobre o uso do electrodoméstico de forma segura e se
compreenderem os riscos envolvidos.
●
As crianças devem ser vigiadas para garantir que não brincam com o
electrodoméstico.
●
Este electrodoméstico não pode ser usado por crianças. Mantenha o
electrodoméstico e o respectivo fio eléctrico fora do alcance de
crianças.
●
Use o aparelho apenas para o fim doméstico a que se destina. A
Kenwood não se responsabiliza caso o aparelho seja utilizado de forma
inadequada, ou caso estas instruções não sejam respeitadas.

antes de ligar à corrente:
●
C
ertifique-se que a sua corrente eléctrica tem a mesma potência que a mostrada na parte de baixo da sua
máquina.
●
A
VISO: ESTE APARELHO DEVE SER LIGADO A UMA TOMADA COM LIGAÇÃO À TERRA.
●
E
ste aparelho está em conformidade com a directiva 2004/108/EC da CEE sobre Compatibilidade
E
lectromagnética e o regulamento da CEE nº. 1935/2004 de 27/10/2004 sobre materiais concebidos para
estarem em contacto com alimentos.
antes de utilizar pela primeira vez:
Lave todos os componentes: ver “cuidados e limpeza” página 98.
introdução
Obrigado por ter adquirido esta Máquina de Cozinha Kenwood Cooking Chef e esperamos que tenha o prazer
d
e a utilizar por muitos anos.
A Kenwood tem quase 60 anos de experiência e especialização no desenvolvimento das nossas Máquinas de
Cozinha e a sua grande variedade de acessórios. As Máquinas de Cozinha Kenwood Chef Kitchen são famosas
por serem muito mais do que uma simples misturadora de alimentos.
No desenvolvimento da Cooking Chef pegámos na muito conhecida versatilidade da Chef avançou um passo
mais ao integrar uma Cozedura por Indução, directamente por baixo da taça de mistura. Pode agora desfrutar
de todos os benefícios de uma mistura planetária quotidiana em “taça fria”, quando preparar os seus bolos,
confeitaria e massa para pão, favoritos, mais a vantagem suplementar de aquecer e cozinhar directamente na
taça, combinada com um misturador planetário. As possibilidades são infinitas.
A Kenwood Cooking Chef com o seu leque de acessórios opcionais é um verdadeiro sistema completo de
preparação de alimentos.
Forte, Confiável, Versátil, Kenwood.
O que é a Cozedura por Indução e como funciona?
A cozedura por indução é um método avançado de cozedura que emprega os princípios da indução
electromagnética. Quando uma corrente eléctrica é passada através de uma resistência em cobre na zona de
cozedura por indução, cria-se um campo electromagnético. Quando a taça da Cooking Chef é colocada, o
circuito é completado através de uma camada de aço inoxidável que se encontra na base da taça. Isto cria
assim uma grande quantidade de energia térmica que passa através dos componentes da taça, aquecendo
desta forma os alimentos.
A cozedura por indução tem uma elevada eficácia energética porque apenas produz calor na base da taça.
Outros métodos de aquecimento tal como os fogões a gás, desperdiçam quase 50% da energia calorífica à
volta dos lados da panela. De facto, a área de cozedura por indução da sua Cooking Chef apenas tem calor
durante e imediatamente após a cozedura porque o calor é reabsorvido dos componentes da taça. Tudo isto
significa que a cozedura por indução é muito eficiente, muito segura e muito limpa.
A funcionalidade de cozedura da sua Kenwood Cooking Chef é similar à utilização de uma caçarola no seu
fogão. A vantagem adicional é que a Chef mexe automaticamente os seus alimentos e regula a temperatura de
cozedura de acordo com as suas exigências específicas, deixando-a livre para, com toda a confiança, poder
desempenhar descansada outras tarefas na sua cozinha.
A Cooking Chef utiliza tecnologia de aquecimento por indução que é extremamente eficiente. Quando
comparada com cozinhar num fogão a gás ou eléctrico, pode comprovar que os tempos de cozedura são
reduzidos ou que precisa de cozinhar a uma temperatura mais baixa. Este facto deve ser levado em
consideração quando utiliza o seu aparelho pela primeira vez ou quando experimenta uma nova receita.
Certifique-se que, quando começa a cozinhar a uma temperatura elevada, vigia e reduz o aquecimento sempre
que necessário para impedir que os alimentos se queimem e/ou se peguem à taça, tal como faria com uma
caçarola. Geralmente a Cooking Chef aquecerá automaticamente os alimentos à temperatura que você desejar e
no mais curto espaço de tempo. Não é portanto necessário estabelecer uma temperatura mais elevada do que a
necessária para reduzir o tempo de cozedura. Nesta altura deve também ter atenção à frequência da regulação
para mexer os alimentos. Quando cozinhar a altas temperaturas pode precisar de mexer constantemente
utilizando o mecanismo de mexer os alimentos . A regulação para mexer e são úteis para manter a
consistência dos alimentos durante longos períodos de cozedura em lume brando.
87

A selecção do acessório correcto para a taça é também importante nesta altura. Mais à frente neste livro
sugerimos as utilizações mais apropriadas para cada acessório e com experiência vai aprender rapidamente qual
é a melhor para cada tarefa. Quando cozinhar vai ver que a varinha flexível para alta temperatura é a melhor para
o
bter uma consistência macia para molhos e cremes, enquanto que a varinha para mexer é melhor quando
c
ozinha alimentos que precisam de manter uma consistência mais sólida, tais como os gizados, estufados, etc.
O nosso livro de receitas recomenda as melhores ferramentas para cada receita, e pode também descobrir que
mudar o acessório para os diferentes processos durante a preparação das suas refeições lhe dará melhores
resultados.
Durante a cozedura e imediatamente após, a taça, o resguardo contra salpicos e o acessório dentro da taça,
ficarão quentes – tal como a sua caçarola ou panela ficariam. Tenha por favor cuidado quando tocar em
qualquer destes objectos. É também importante lembrar que o processo de cozedura vai gerar vapor e
condensação, devendo portanto ter cuidado quando olhar para o interior da taça, quando levantar a tampa de
a
limentação ou a cabeça da Cooking Chef para ver ou aceder à taça. Deve também avisar outras pessoas que
estejam por perto, para que tenham também cuidado, quando a sua máquina está a trabalhar ou está quente.
Quando tocar ou remover partes da máquina, é aconselhável utilizar luvas apropriadas para forno e transportar a
taça sempre pelas pegas. Vai também notar que o tapete de protecção de superfícies é muito útil para proteger
s
uperfícies sensíveis ao calor.
Quando aquecer líquidos ou alimentos com grande quantidade de água, a exactidão da leitura da temperatura
encontra-se normalmente entre +/- 5°C. A exactidão do ecrã e controlo de temperatura vai variar dependendo
da consistência e do volume do conteúdo da taça, da frequência do mexer e do acessório da taça que está a
u
sar. Mais uma vez, isto é idêntico a cozinhar num fogão, por exemplo, quando uma grande quantidade de
alimentos são aquecidos numa panela grande mas não são mexidos de forma sistemática. Os alimentos estarão
quentes na base da panela ou mesmo a queimar, enquanto que os alimentos mais à superfície estarão mais
frios.
Adicionalmente ao ecrã da temperatura, a máquina possui um pequeno LED azul. Este pisca até a máquina
atingir a temperatura seleccionada. Uma vez a temperatura requerida ser atingida, a luz pára de piscar. Deve,
contudo, tomar atenção a que se adicionar mais tarde alimentos à taça, o LED azul volta a piscar, uma vez que
a temperatura no interior da taça será reduzida pelos ingredientes frios. Vai também notar que a luz estática
começa a piscar se a frequência do mexer aumentar.
Vai também descobrir depressa que a sua Kenwood Cooking Chef é simples de utilizar e que vai ajudá-la a
preparar de forma fácil as suas refeições do dia-a-dia.
88

conhecer a sua Kenwood Cooking Chef
P
ara comprar um acessório não incluído na sua embalagem, ver “serviço
e cuidados ao cliente”.
entradas para acessórios
entrada de alta velocidade
entrada de média velocidade
entrada de baixa velocidade
e
ncaixe para acessório
tampa da misturadora
das entradas de velocidade alta/média
cabeça da misturadora
tampa da entrada de baixa velocidade
a
lavanca da entrada de baixa velocidade
t
aça da cooking chef
alavanca para levantar a cabeça
controlo de velocidade
respiradores
b
ase para a taça/área de indução
r
anhura para drenagem
sensores de temperatura
varinha em K em aço inoxidável
varinha flexível para alta temperatura
b
atedora de varetas
batedor de gancho
varinha para mexer os alimentos
espátula para altas temperaturas
protecção contra o aquecimento
vedante em borracha
resguardo contra salpicos
tampa de alimentação
tapete de protecção da superfície
de trabalho
chave de bocas
89

painel de controlo
t
emporizador/ecrã de temperatura
botão temporizador de diminuição de tempo
botão temporizador de aumento de tempo
controlo de temperatura
botão de impulso/alta velocidade, batedora de varetas para alta temperatura
c
ontrolo de velocidade
temporizador/botão selector de temperatura
luz indicadora de temperatura
botão de envolver ingredientes
l
uz indicadora de controlo de velocidade
90

ajustar a altura dos acessórios
C
onsulte por favor a pág. 92 sobre como montar a misturadora
batedora de varetas, varinha em K em aço inoxidável, varinha
para mexer alimentos
Para um melhor desempenho a batedora de varetas, a varinha em K e a
varinha de mexer devem quase tocar o fundo da taça . Se necessário
a
juste a altura do acessório utilizando a chave de bocas.
Eis como:
1 Desligue o aparelho da corrente.
2 Levante a cabeça da misturadora e insira a batedora de varetas, a varinha
o
u a varinha de mexer.
3 Baixe a cabeça da misturadora. Se a folga precisar de ser reajustada,
levante a cabeça da misturadora e remova o acessório.
4 Utilizando a chave de bocas fornecida, liberte um pouco a porca
para
poder reajustar o eixo . Para baixar o acessório mais para o fundo da
t
aça, gire o eixo na direcção contrária à dos ponteiros do relógio. Para
levantar o acessório de forma a que este não toque no fundo da taça, gire
o eixo na direcção dos ponteiros do relógio.
5 Volte a apertar a porca.
6
Coloque o acessório na misturadora e baixe a cabeça desta. (Confirme a
p
osição, ver ponto abaixo).
7 Repita, se necessário, os passos anteriores até que o acessório esteja na
posição correcta. Uma vez conseguida a posição correcta do acessório,
aperte a porca de forma segura.
varinha flexível para alta temperatura – este acessório deverá
estar quase a tocar o fundo da taça.
batedor de gancho – este acessório é fixo de fábrica e não precisa de
ajuste.
para inserir e utilizar o seu resguardo
contra salpicos montagem
A montagem do resguardo contra salpicos é constituído por duas peças: a
protecção contra o aquecimento e o resguardo contra salpicos.
A protecção contra o aquecimento deve ser colocado durante
a operação de preparação da refeição, caso contrário a
misturadora não funcionará e será mostrado o código de erro
E:03. A protecção contra o aquecimento serve para proteger a cabeça da
misturadora contra o vapor produzido durante o processo de cozedura.
Se necessário, tanto a protecção contra o aquecimento como o resguardo
contra salpicos podem ser inseridos para reter os ingredientes na taça, ex.
quando misturar ingredientes leves como a farinha e açúcar em pó, ou
quando cozinha alimentos cuja humidade precisa de ser retida na taça. O
resguardo contra salpicos não deve ser colocado na taça a não ser
quando utilizado conjuntamente com a protecção contra o aquecimento.
1 Levante a cabeça da misturadora até prender.
2 Empurre a protecção contra o aquecimento para cima na direcção da
parte de baixo da cabeça da misturadora
até fixar completamente.
Nunca deve usar a protecção contra o aquecimento sem o selo em
borracha estar correctamente colocado.
3 Coloque a taça na base.
4 Baixe a cabeça da misturadora.
5 Coloque o resguardo contra salpicos no rebordo da taça e deslize-o para a
frente até fixar completamente
.
●
Enquanto o seu aparelho mistura, podem ser adicionados ingredientes
directamente à taça através da tampa de alimentação.
6 Para remover o resguardo deslize-o simplesmente no sentido contrário ao
aparelho.
7 Para remover a protecção contra o aquecimento, levante a cabeça da
misturadora até prender. Remova o acessório, depois puxe a protecção
contra o aquecimento para baixo na direcção contrária à parte de baixo da
cabeça da misturadora.
Nota: Coloque ou remova o resguardo apenas quando a cabeça da
misturadora estiver na posição presa.
91

a misturadora
os acessórios de bater ou misturar e algumas das suas
utilizações:
varinha em K
●
Para fazer bolos, biscoitos, massa, glacê, recheios, éclairs e puré de batata.
b
atedora de varetas
●
P
ara ovos, natas, massa para crepes, pão-de-ló sem gordura, suspiros,
cheesecakes, mousses, soufflés. Não utilize a batedora de varetas para
misturas pesadas (ex. bater natas gordas e açúcar) – pode danificá-la.
batedor de gancho
●
Apenas para misturas com fermento.
v
arinha flexível para
●
A
propriada para muitas operações de cozedura, em particular o creme de
a
lta temperatura ovos ou leite creme, ovos mexidos e molhos. Ideal para rapar misturas, quer
quentes quer frias, dos lados da taça durante a mistura. É também
apropriada para vegetais salteados.
varinha de mexer
●
Apropriada para usar durante a cozedura para manter a consistência dos
a
limentos, ex. galinha, peixe, vegetais e frutos.
como usar a sua misturadora:
Antes de utilizar a sua misturadora assegure-se que os controlos de
t
emperatura e de velocidade estão nas posições “O” de desligado.
1
Gire a alavanca para levantar a cabeça no sentido dos ponteiros do relógio
e levante a cabeça da misturadora até prender.
para inserir um acessório 2 Meta o acessório no encaixe, colocando o eixo na ranhura e depois gire
para prender na posição .
varinha de mexer – para colocar a varinha de mexer, insira o eixo no
encaixe, alinhando ao mesmo tempo a ranhura com o pino saliente do lado
e por baixo da cabeça da misturadora. Segure a vara e gire para que o pino
se posicione por baixo da ranhura, depois empurre e gire para prender na
posição
.
3 Coloque a taça na base – carregue para baixo e gire na direcção dos
ponteiros do relógio .
4 Para baixar a cabeça da misturadora, levante-a ligeiramente, depois gire a
alavanca de levantar a cabeça, no sentido dos ponteiros do relógio.
Baixe para prender na posição
para remover um acessório
●
Faça no sentido contrário o passo 2 descrito acima. (Utilize sempre luvas de
forno para remover os acessórios após cozedura).
5 Ligue a misturadora à corrente eléctrica. As luzes indicadoras de velocidade
e temperatura vão acende-se brevemente. O ecrã vai mostrar e
depois limpa-se deixando a luz indicadora acesa .
6 Gire o controlo de velocidade para o parâmetro desejado (ver pág. 93 para
recomendações), a misturadora começa a trabalhar e a luz indicadora do
controlo de velocidade vai piscar. O temporizador fará a contagem com
intervalos de 1 segundo. A velocidade pode ser mudada em qualquer altura
enquanto a misturadora está a funcionar.
7 Pare a misturadora girando o controlo de velocidade para a posição “O” de
desligado.
Importante – Se em qualquer altura a cabeça da misturadora for
levantada enquanto trabalha, a misturadora parará automaticamente e
produz um bip, e não reiniciará quando a cabeça for baixada. Para reiniciar a
misturadora gire o controlo de velocidade para a posição “O” de desligado e
depois re-seleccione a velocidade.
botão de impulso
O botão de impulso pode apenas ser usado quando o controlo de
velocidade está na posição “O” de desligado.
Para seleccionar o impulso, carregue no botão de impulso e a
misturadora trabalhará à velocidade máxima enquanto o botão for mantido
nesta posição. Se o conteúdo da taça estiver acima dos 60°C, a velocidade
vai aumentar gradualmente. Este processo vai ser acompanhado por um bip
e as luzes indicadoras de velocidade e temperatura vão piscar com rapidez.
botão de envolver ingredientes
Pressione e liberte o botão de envolver os ingredientes e a misturadora
vai trabalhar automaticamente na velocidade mínima durante 2 voltas e
depois pára. O botão pode ser pressionado para trabalhar mais tempo ou
pressionado repetidamente conforme o necessário para unir os ingredientes.
Nota: Se o botão de envolver ingredientes é pressionado enquanto o motor
está a funcionar, este vai realizar a função normal de envolvimento e depois
regressa à velocidade seleccionada.
P
92

controlo de velocidade
As seguintes velocidades são apenas indicativos e variarão de acordo com a
quantidade e a temperatura dos ingredientes que estão a ser misturados etc.
Gire o controlo de velocidade no sentido dos ponteiros do relógio para obter
v
elocidades do “Min.” até ao “Max.”.
varinha em K
●
bater gordura e açúcar inicie em “Min.”, aumentando gradualmente até à
velocidade “Max.”.
●
b
ater ovos em misturas cremosas 4 – “Max.”.
●
i
ncorporar farinha, frutos, etc. Min. - 1
●
tudo num só bolo inicie em velocidade “Min.”, aumente gradualmente até
ao “Max.”.
●
envolver gordura em farinha “Min.” - 2.
f
lexível para alta temperatura
●
b
ater gordura e açúcar inicie em “Min.”, aumentando gradualmente até 3.
varinha
●
rapar misturas, quer quentes quer frias, dos lados da taça inicie em “Min.” Aumentando
gradualmente até 3.
●
saltear vegetais, mexer arroz e polenta, etc., utilize .
batedora de varetas
●
Gradualmente aumente até ao “Max.”.
b
atedor de gancho
●
C
omece no “Min.”, aumente gradualmente até 1.
varinha de mexer
●
Utilize apenas com a regulação para mexer
, ,
.
regulação para mexer
Para seleccionar a regulação de mexer os alimentos rode o controlo de velocidade no sentido contrário
ao dos ponteiros do relógio. Estes são mais apropriados quando a misturadora é utilizada no modo de
cozinhar. Note por favor, que para utilizar as velocidades de mexer, todas as tampas das entradas
devem estar colocadas.
- Use esta regulação quando for preciso manter uma velocidade lenta constante, ex. mexer
molhos.
- Quando o controlo de velocidade está regulado nesta posição, a misturadora vai funcionar
intermitentemente numa velocidade lenta a cada 5 segundos durante 2 voltas.
- Quando o controlo de velocidade está regulado nesta posição, a misturadora vai funcionar
intermitentemente numa velocidade lenta a cada 30 segundos, sendo esta regulação conveniente
para mexer estufados, etc..
Volte a pôr o controlo de velocidade na posição “O” de desligado para parar a operação.
Nota:
●
Sempre que uma velocidade é seleccionada, a luz indicadora de velocidade, pisca.
●
Pode ser ouvido um som agudo quando o aparelho está a funcionar. Isto é normal.
para usar a misturadora para cozinhar alimentos
IMPORTANTE
●
Assegure-se que a área de indução, os sensores de temperatura e a superfície exterior da base da
taça estão limpos e secos, antes de começar a cozinhar. Caso contrário, o sensor será afectado,
resultando num desempenho fraco do aparelho.
●
Confira que todas as tampas que cobrem as entradas, incluindo a protecção contra o aquecimento,
estão bem colocada. Caso contrário, a função de aquecimento não vai funcionar.
●
Utilize sempre luvas de forno para remover a taça e os acessórios após cozinhar.
1 Monte a misturadora seguindo as instruções da pág. 92.
2 Gire o controlo de temperatura para a temperatura exigida.
●
O aquecimento não começa a não ser que uma velocidade seja seleccionada.
3 Gire o controlo de velocidade para a velocidade desejada, o que vai ligar o motor e o aquecimento.
Ambos os indicadores de luz piscam.
4 Uma vez a temperatura requerida ser atingida, a luz indicadora de temperatura vai manter-se sempre
acesa. Contudo, enquanto cozinha a luz começa a piscar se a temperatura muda, indicando que a
misturadora está a tentar manter a temperatura estabelecida (leia por favor a introdução na pág. 87).
●
Se a temperatura da taça exceder 60°C, por razões de segurança a velocidade é automaticamente
limitada, mesmo se tiver sido seleccionada uma velocidade alta. A velocidade não aumentará
automaticamente quando a temperatura baixa dos 60°C. O controlo de velocidade deve ser desligado
primeiro e depois seleccionado novamente para a velocidade desejada.
93

●
Nota: Cada vez que o botão de seleccionar o temporizador/temperatura for pressionado, o ecrã alternará entre o
ecrã temporizador e o do temperatura do conteúdo da taça.
5 Para parar ou pausar a mistura ou o processo de aquecimento, gire o controlo de velocidade para a posição “O”
d
e desligado. Para retomar a operação seleccione uma velocidade.
dicas
●
Algumas receitas, em particular aquelas que têm um alto teor de água, não conseguirão atingir
uma temperatura acima dos 100°C (a temperatura do ponto de ebulição da água).
●
Q
uando adicionar ingredientes à taça enquanto cozinha, ponha a velocidade mais lenta e adicione os
ingredientes de forma uniforme e lenta.
●
Para aquecer molhos rapidamente use continuamente a regulação para mexer .
●
Pode verificar que a mudança de acessório para os diferentes processos de preparação das suas refeições, lhe
dará melhores resultados, por ex.: use a varinha flexível para alta temperatura para fritar vegetais e o acessório
d
e mexer para cozinhar pedaços de carne ou aves.
●
Se usar o resguardo contra salpicos enquanto cozinha, retire-o sempre antes de levantar a cabeça do aparelho.
Cuidado com a condensação que se forma no resguardo e na protecção.
●
Quando levantar a cabeça da misturadora, faça-o lentamente para permitir que o líquido que se encontra na
p
arte de baixo da protecção escorra para a taça.
●
E
stão disponíveis três funções de mexer, o que lhe permite seleccionar a quantidade apropriada de vezes que
quer mexer, em cada receita. Algumas receitas precisam de ser mexidas constantemente para impedir que os
ingredientes se colem ao fundo da taça, enquanto que outras receitas beneficiarão mais se forem mexidas
ocasionalmente para manterem a consistência dos alimentos.
●
P
ara um desempenho óptimo, ajuste a altura do acessório, ver pág. 91.
●
O tempo máximo de cozedura é de 3 horas, após o qual a misturadora se desliga automaticamente.
●
É possível aquecer comida sem que nenhum acessório esteja colocado. Contudo deve ser seleccionada uma
velocidade. Isto pode ser vantajoso quando derrete alimentos, como por exemplo manteiga ou chocolate.
●
Cada vez que o botão de seleccionar o temporizador/temperatura for pressionado, o ecrã alternará entre o ecrã
temporizador e o do temperatura atingida nesse momento.
Alta velocidade, controlo da alta temperatura da batedora de varetas
Para bater a uma velocidade e temperatura acima dos 60°C, gire o controlo de velocidade para a velocidade
desejada e depois mantenha carregado o botão de impulso. Este processo vai ser acompanhado por um bip e
as luzes indicadoras de velocidade e temperatura vão piscar com rapidez. A velocidade de bater vão aumentar
lentamente até à velocidade seleccionada. Repita o procedimento para aumentar mais a velocidade. Pode
reduzir a velocidade de bater ou desligar normalmente a misturadora.
Esta função pode APENAS ser utilizada com a batedora de varetas. Não deve exceder a
capacidade máxima de 3 litros e deve assegurar-se que o resguardo está colocado. A máquina
não deve ser deixada sem vigilância.
depois de cozinhar
●
Tenha cuidado quando manusear ou tocar em qualquer parte do aparelho, quando este está a ser usado no
modo de cozinhar ou após cozinhar, EM PARTICULAR A TAÇA, O RESGUARDO CONTRA SALPICOS E OS
ACESSÓRIOS, uma vez que eles continuam QUENTES muito depois do aparelho ter sido desligado. Utilize as
pegas para remover e transportar a taça. Utilize luvas para forno quando manusear a taça quente ou acessórios
de mistura que estejam quentes.
●
A parte de baixo da taça continua quente muito depois do aquecimento ter sido parado. Tenha cuidado quando
manusear e utilizar o tapete de protecção da superfície de trabalho quando colocar a taça em superfícies
sensíveis ao calor.
94

ecrã
P
ara sua segurança a misturadora foi fabricada com 5 sensores independentes de segurança, que funcionam
quando a utiliza em modo de cozinhar. Se a misturadora é ligada e o sensor de segurança activado, o ecrã
temporizador/temperatura mostrará uma mensagem de erro, ex. ‘E:01’. Isto será acompanhado por um bip e a
misturadora não funcionará. Confirme as seguintes mensagens de erro: -
Se estes ou qualquer outro código de erro continua a aparecer no ecrã, contacte o Serviço Cuidados ao Cliente
da Kenwood.
para usar o temporizador em contagem regressiva
O temporizador pode ser usado tanto no modo de cozinhar como no modo de não cozinhar. Se não for
seleccionada uma contagem regressiva, o temporizador vai contar automaticamente para a frente em intervalos
de 1 segundo enquanto a misturadoras estiver a funcionar. O tempo máximo de funcionamento é de 3 horas.
1 Ligue a misturadora à corrente eléctrica. O ecrã vai mostrar brevemente e depois limpa-se deixando a
luz indicadora acesa .
2 Pressione o botão “+” ou “–” e aparecerá no ecrã “0:00”.
3 Pressione o botão “+” ou “–” até o tempo desejado aparecer no ecrã. O temporizador fará a contagem com
intervalos de 5 segundo. Se o botão for pressionado continuamente, os números mudam tanto mais
rapidamente quanto mais tempo estiver a pressionar. Pode ser programado um máximo de 3 horas.
Nota: Se o botão “+” é pressionado, quando o temporizador já está em “3:00”, o tempo mostrado no ecrã muda
para “0:00”. Se o botão “–” é pressionado, quando o temporizador já está em “0:00”, o tempo mostrado no ecrã
muda para “3:00”.
4 Gire o controlo de velocidade para a velocidade desejada, a misturadora vai iniciar e o temporizador conta para
trás em intervalos de 1 segundo.
●
Pode pausar a misturadora em qualquer altura, girando o controlo de velocidade para a posição “O” de
desligado. Isto também vai pausar o temporizador. O temporizador continua a contagem decrescente quando a
misturadora é reiniciada.
5 O processo de mistura pára automaticamente quando decorreu o tempo total e a máquina emite bips durante 3
segundos. O ecrã vai piscar durante 5 segundos e depois limpa-se mostrando o indicador .
Mensagem Descrição: Solução:
de Erro
A
cabeça da máquina está levantada. Quando Baixe a cabeça da misturadora. Ponha o
a cabeça está levantada, o sensor de segurança controlo de velocidade na posição “O”
desliga o motor e o aquecimento. Se o controlo de desligado e depois seleccione a
E:01
de velocidade está configurado em qualquer velocidade desejada.
velocidade que não seja a posição ‘O’ de
d
esligado quando a cabeça está levantada,
e
sta mensagem é mostrada e o motor não liga.
A taça da Cooking Chef não está colocada na Assegure-se que é a taça da Cooking
base. A função de aquecimento só funciona se Chef que está colocada na base.
a taça de cozinhar estiver a ser usada. Esta taça Verifique que a taça está correctamente
E:02
deve também estar bem colocada. Os sensores colocada. Ponha o controlo de
de segurança detectarão uma taça errada ou velocidade na posição “0” e depois
m
al colocada. seleccione a velocidade desejada.
A protecção contra o aquecimento não está Verifique que a protecção do
colocada. A função de aquecimento será aquecimento está correctamente
E:03
desligada se a protecção contra o aquecimento colocada. Ponha o controlo de
não estiver correctamente colocada. velocidade na posição “O” e depois
seleccione a velocidade desejada.
A entrada de baixa velocidade e a tampa da Verifique que todas as tampas estão
entrada de alta/média velocidades, não está correctamente colocadas. Ponha o
colocada. Estas tampas têm sensores de controlo de velocidade na posição “O” e
segurança. Se as tampas não estão bem depois seleccione a velocidade
E:04 colocadas, a função de aquecimento não vai desejada.
funcionar e se as funções de mexer forem
seleccionadas o motor vai trabalhar
continuamente, As velocidades de misturar
“Min.” até ao “Max.” trabalharão continuamente.
Problema com o sensor de temperatura Se o Ponha o controlo de velocidade na
controlo de aquecimento detecta que a posição “O”, desligue a máquina da
E:09 temperatura da taça é superior à desejada corrente eléctrica e deixe arrefecer.
durante uma utilização normal, o motor e o Verifique que os sensores da base da
aquecimento desligam-se automaticamente. taça e da temperatura estão limpos.
Ligue novamente à corrente eléctrica e
ligue normalmente.
Problema com a velocidade do motor ou Ponha o controlo de velocidade na
sobreaquecimento. Se o motor perde velocidade posição “O” e desligue a máquina da
E:10
ou aquece, o sistema de controlo desliga corrente eléctrica. Remova qualquer
automaticamente o motor e o aquecimento. obstrução que leva o motor a perder
velocidade. Assegure-se que todos os
respiradores estão desobstruídos. Ligue
à corrente eléctrica e ligue.
95

para reiniciar o temporizador
1
Ponha o temporizado a zeros, pressionando ao mesmo tempo os botões “+” e “–” (o controlo de velocidade
deve estar na posição “O” de desligado).
●
Se a máquina estiver inactiva durante 10 minutos, o ecrã LCD e a luz de fundo entram em ‘modo de hibernação’
e todas as mensagens do ecrã se desligam. Se qualquer botão ou botão de comando for activado, o ecrã
retoma o seu precedente formato.
capacidades máximas:
massa quebrada
●
Farinha: 910g
massa levedada dura
●
Farinha: 1,5kg
●
P
eso total: 2,4kg
m
assa levedada macia
●
F
arinha: 2,6kg
●
Peso total: 5kg
mistura para bolo de frutas
●
Peso total: 4,55kg
claras de ovos
●
16
m
odo de cozedura
●
3
litros
dicas gerais:
●
Pare de mexer e rape frequentemente a taça para dentro desta com a espátula.
●
Os ovos mexem-se melhor se estiverem à temperatura ambiente.
●
Antes de bater as claras de ovo, certifique-se que não existe gordura ou gema de ovo na batedora de varetas ou
n
a taça.
●
Use ingredientes frios para a massa a não ser que a receita diga o contrário.
indicações para fazer pão
importante
●
Nunca exceda as capacidades máximas mencionadas – vai sobrecarregar a máquina.
●
Se sentir que a batedeira está a funcionar com dificuldade, desligue e remova metade do preparado e bata cada
metade em separado.
●
Os ingredientes misturam-se melhor se colocar em primeiro lugar o líquido.
96

97
guia para detectar problemas quando cozinha
Problema: Causa: Solução:
A
misturadora não funciona no modo de Um dos sensores de segurança foi activado. Ver o quadro referente a mensagens de erro na
a
quecimento, o ecrã mostra uma mensagem pág. 95.
de erro e produz um bip de aviso. • Certifique-se que a cabeça está baixada e
presa.
• Verifique que todas as tampas das entradas
estão correctamente colocadas.
• Verifique que a protecção do aquecimento está
c
orrectamente colocada.
•
Verifique que a taça da Chef está correctamente
colocada.
A temperatura foi seleccionada mas os Não foi seleccionada uma velocidade. Seleccione uma velocidade.
conteúdos da taça não aquecem (a luz do
indicador de temperatura não está acesa)
A
misturadora muda de velocidade A velocidade é automaticamente limitada Isto é uma característica de segurança.
e
nquanto cozinha. quando o conteúdo da taça atinge os 60ºC.
Os alimentos estão a queimar-se no 1 A regulação de temperatura seleccionada 1 Reduza a temperatura no mostrador ou cozinhe
fundo da taça. pode ser muito alta. a uma temperatura mais baixa.
2 Está a ser usado o acessório errado. 2 Confirme que está a usar o acessório mais
apropriado.
3 A função de mexer é muito lenta. 3 Aumente a frequência da função de mexer ou
m
ude para operar continuamente.
4 O acessório pode não estar suficientemente 4 Ajuste o acessório.
baixo na taça.
5 O temporizador foi regulado para 5 Cozinhe num espaço de tempo mais curto
demasiado tempo. (certifique-se que os alimentos estão bem
cozinhados).
6 O sensor e/ou a parte de baixo da taça 6 Verifique que estas áreas estão limpas e secas.
podem não estar limpos.
A consistência dos alimentos não é mantida. 1 A temperatura seleccionada é muito alta. 1 Reduza a temperatura.
2 A função de mexer é muito rápida. 2 Reduza a velocidade do mexer.
3 Os ingredientes foram cozinhados 3 Reduza o tempo de cozedura (certifique-se que
demasiado tempo. os alimentos estão bem cozinhados).
4 Está a ser usado o acessório errado. 4 Confirme que está a usar o acessório mais
apropriado.
A velocidade de mistura não é consistente. 1 Ingredientes demasiado grandes, duros 1 Corte os alimentos em pedaços pequenos, retire
ou sólidos. os caroços da fruta, derreta devagar os
ingredientes sem que nenhum acessório esteja
colocado (mas confirme que seleccionou uma
velocidade).
2 Adicione ingredientes depois de ter baixado a
cabeça da máquina.
3 Confirme que está a usar o acessório mais
apropriado.
Foram adicionados ingredientes frios à Se o conteúdo da taça não for mexido 1 Dê tempo para que os ingredientes sejam
mistura quente mas o ecrã de temperatura meticulosamente, então existirão cuidadosamente misturados.
não responde depressa. temperaturas diferentes nos vários 2 Aumente a velocidade do mexer.
alimentos que estão na taça.
Dificuldade em fechar a cabeça quando há Os ingredientes sólidos como o chocolate Adicione ingredientes depois de ter baixado a
alimentos na taça. no fundo da taça impedem que a cabeça da cabeça da máquina.
misturadora se prenda em baixo.
A misturadora trabalha continuamente As tampa das entradas não estão bem Verifique que todas as tampas das entradas
quando o modo de mexer ou estão colocadas. estão correctamente colocadas.
seleccionados.
A velocidade do motor é limitada quando Colocada a taça quente. Remova a taça ou arrefeça-a abaixo dos 60ºC
se usam acessórios.

limpeza e assistência técnica.
cuidados e limpeza:
●
Desligue sempre e retire o cabo eléctrico da tomada antes de limpar.
●
Pode aparecer alguma gordura na entrada quando a usar pela primeira vez.
I
sto é normal – limpe-a simplesmente.
●
As superfícies de metal dos sensores de temperatura podem mostrar sinais
de desgaste durante a sua utilização normal. Isto não afecta o desempenho
do produto.
●
N
ão deixe a varinha flexível para alta temperatura colocada na
m
isturadora quando esta não estiver em utilização.
aparelho e tampas das entradas
●
Limpe com um pano húmido e seque em seguida.
●
N
unca submerja em água ou use abrasivos.
v
arinha flexível para alta
●
R
emova sempre a lâmina da vareta flexível da ferramenta antes de
temperatura limpar.
●
Lave a lâmina da vareta flexível e a ferramenta em água quente com sabão
e seque. Em alternativa, estes acessórios podem ser lavados na máquina de
l
avar louça.
Nota: Inspeccione regularmente o estado de conservação do acessório antes
e depois de utilizar e inspeccione regularmente o estado de conservação da
l
âmina da vareta e substitua-a se existirem quaisquer sinais de uso.
t
aça, acessórios, resguardo
●
L
avam-se à mão ou na máquina da loiça, secando-se em seguida
contra salpicos cuidadosamente.
●
Nunca use uma escova metálica, esfregão de aço ou lixívia para
limpar a sua taça de aço inoxidável. Utilize vinagre ou um destartarizador apropriado para remover calcário.
●
Se os alimentos se queimaram ou pegaram ao fundo da taça, remova o máximo possível utilizando a espátula.
Encha a taça com água morna e detergente e deixe repousar. Remova qualquer depósito que não sai
facilmente, com uma escova de nylon.
●
Qualquer descoloração da taça não afectará o seu desempenho.
ranhura para drenagem
●
Assegure-se que esta área não tem comida. Se necessário use uma escova de limpar garrafas ou um cotonete
para limpar.
sensores de temperatura
●
Limpe com um pano húmido e seque em seguida. Nunca utilize abrasivos ou instrumentos afiados para limpar
os sensores.
assistência e cuidados do cliente
●
Caso o fio se encontre danificado, deverá, por motivos de segurança, ser substituído pela Kenwood ou por um
reparador Kenwood autorizado.
Caso necessite de assistência para:
●
utilizar o seu electrodoméstico ou
●
assistência ou reparações
Contacte o estabelecimento onde adquiriu o electrodoméstico.
●
Concebido e projectado no Reino Unido pela Kenwood.
●
Fabricado na China.
ADVERTÊNCIAS PARA A ELIMINAÇÃO CORRECTA DO PRODUTO NOS TERMOS DA DIRECTIVA
EUROPEIA 2002/96/EC.
No final da sua vida útil, o produto não deve ser eliminado conjuntamente com os resíduos urbanos.
Pode ser depositado nos centros especializados de recolha diferenciada das autoridades locais, ou junto dos
revendedores que prestem esse serviço. Eliminar separadamente um electrodomésticos permite evitar as
possíveis consequências negativas para o ambiente e para a saúde pública resultantes da sua eliminação
inadequada, além de permitir reciclar os materiais componentes, para, assim se obter uma importante economia
de energia e de recursos.
Para assinalar a obrigação de eliminar os electrodomésticos separadamente, o produto apresenta a marca de
um contentor de lixo com uma cruz por cima.
98

receitas
Ver indicações importantes para fazer pão, na pág. 96.
pão branco de massa levedada dura
ingredientes:
●
1,36kg de farinha clara sem levedura
●
15ml (3c.c.) de sal
●
2
5g de fermento de padeiro; ou 15g/20ml de fermento de padeiro seco + 5ml (1c.c.) de
a
çúcar
●
750ml de água morna: 43°C Use um termómetro ou adicione 250ml de água a ferver a
500ml de água fria
●
25g de banha
p
reparação: 1 fermento de padeiro seco (o tipo que precisa de ser preparado): verse a água
morna na taça. Adicione o fermento e o açúcar e deixe repousar cerca de 10 minutos
até espumar.
fermento de padeiro fresco: esfarele-o para a farinha.
outros tipos de fermento de padeiro: siga as instruções do fabricante.
2
Verse o líquido na taça. Adicione depois a farinha (com o fermento fresco se utilizado), o
sal e a banha.
3 Amasse na velocidade mínima durante 45 a 60 segundos. Depois aumente para a
velocidade 1, adicionando mais farinha se necessário, até formar uma massa de pão.
4
Amasse durante mais 3 a 4 minutos à velocidade 1 até que massa esteja macia, elástica
e
deixe limpos os lados da taça.
5 Ponha a massa num saco plástico untado com gordura ou numa taça coberta com um
pano de cozinha. Deixe levedar num local morno até duplicar de tamanho.
6 Volte a amassar na velocidade 1 mais dois minutos.
7 Encha com a massa até ao meio 4 formas de 450g untadas com gordura, ou forme em
pãezinhos.
Cubra novamente com o pano de cozinha e deixe levedar num local morno até duplicar
de tamanho.
8 Coza a 230°C (em forno a gás no termóstato 8), durante 30 a 35 minutos para o pão na
forma ou 10 a 15 minutos para os pãezinhos.
●
Quando está pronto, o pão deve ter o som de oco quando se bate na base deste.
pão branco de massa levedada macia
●
2,6kg de farinha normal sem levedura
●
1,3 litro de leite
●
300g de açúcar
●
450g de margarina
●
100g de fermento de padeiro fresco ou 50g de fermento de padeiro seco
●
6 ovos batidos
●
5 pitadas de sal
preparação: 1 Derreta a margarina no leite e aqueça até aos 43ºC.
2 fermento de padeiro seco (o tipo que precisa de ser preparado): adicione o
fermento e açúcar ao leite e deixe repousar cerca de 10 minutos até espumar.
fermento de padeiro fresco: esfarele-o para a farinha e junte o açúcar.
outros tipos de fermento de padeiro: siga as instruções do fabricante.
3 Verse o leite na taça. Adicione os ovos batidos e 2kg de farinha.
4 Misture na velocidade mínima durante 1 minuto e depois mais 1 minuto na velocidade 1.
Rape a taça para baixo com a espátula.
5 Adicione o resto da farinha e misture na velocidade mínima durante 1 minuto e depois
mais 2 a 3 minutos na velocidade 1 até ficar macia e mais misturada.
6 Encha com a massa até ao meio, 4 formas de 450g untadas com gordura, ou forme em
pãezinhos.
Cubra novamente com o pano de cozinha e deixe levedar num local morno até duplicar
de tamanho.
7 Coza a 200°C (em forno a gás no termóstato 6), durante 20 a 25 minutos para o pão na
forma ou 15 minutos para os pãezinhos.
8 Quando está pronto, o pão deve ter o som de oco quando se bate na base deste.
●
Faz cerca de 10 formas.
99

receitas (continuação)
bolo de morangos e alperces
i
ngredientes: pão-de-ló
●
3
ovos
●
75g de açúcar em pó
●
75g de farinha sem levedura para o bolo e decoração
●
150ml de natas espessas (com alto teor de gordura)
●
A
çúcar a gosto
●
225g de morangos
●
225g de alperces
p
reparação: 1 Corte os alperces a meio e retire os caroços. Coza em pouca água até ficarem moles,
a
dicionando açúcar a gosto.
2 Lave e corte os morangos a meio.
3 Para fazer o pão-de-ló, bata os ovos e o açúcar à velocidade máxima até a mistura fixar
m
uito clara e pegajosa.
4 Remova a taça e a batedora de varetas. Envolva a farinha usando uma colher grande de
metal – tenha cuidado em manter a massa ligeira.
5 Coloque a mistura em duas formas rectangulares de 18cm, untadas.
6
Coza a 180°C (em forno a gás no termóstato 4), durante 20 minutos até que o bolo
volte para baixo lhe tocar ligeiramente.
7 Desforme-o numa base de rede com pés.
8 Bata as natas à velocidade máxima até engrossar. Junte açúcar a gosto.
9
Corte rudemente os alperces e um terço dos morangos. Envolva-os em metade das
natas.
10 Espalhe este preparado por cima do pão-de-ló, e depois ponha o outro pão-de-ló por
cima.
11 Espalhe restantes as natas por cima e decore com os morangos restantes.
suspiros:
ingredientes:
●
4 claras de ovos
●
250g de açúcar em pó peneirado
●
Forre o seu tabuleiro de cozer com papel de cozinha anti-aderente.
preparação: 1 Bata as claras com o açúcar à velocidade máxima cerca de 10 minutos até ficarem em
castelo.
2 Deite colheradas do preparado num tabuleiro de ir ao forno (ou use um saco de
pasteleiro com 2,5cm com bico em forma de estrela).
3 Coza a 110°C (em forno a gás a 1/4 no termóstato), durante 4 a 5 horas até ficarem
formes e crocantes. Se os suspiros começarem a ganhar cor, deixe a porta do forno
ligeiramente entreaberta.
●
Guarde os suspiros numa embalagem hermética.
massa quebrada
ingredientes:
●
450g de farinha peneirada com o sal
●
5ml (1c.c.) de sal
●
225g de gordura (mistura de banha com margarina directamente do frigorífico)
●
Cerca de 80ml (4 c.s.) de água
dicas
●
Não amasse demasiado
preparação: 1 Coloque a farinha na taça. 1 Corte a gordura em pedaços e junte à farinha.
2 Usando a varinha em K de aço inoxidável, misture à velocidade 1 até parecer migalhas
de pão.
Pare antes de parecer gorduroso.
3 Adicione a água e misture à velocidade mínima. Pare logo que a água esteja
incorporada.
4 Coza a cerca de 200°C, em forno a gás o termóstato no 6 dependendo do enchimento
da forma.
marinada picante
ingredientes
●
200g mel líquido claro (no frigorífico do dia anterior)
●
1 piri-piri verde (inteiro)
●
5ml (1 c.c.) de manteiga de amendoim crocante
●
tempero (especiarias, sal, etc.)
preparação: 1 Coloque todos os ingredientes na mini picadora/moinho.
2 Coloque o acessório ma misturadora e permita que os ingredientes se concentrem em
volta da lâmina.
3 Ligue em impulso durante 10 segundos.
4 Utilize a gosto.
100

conozca su Robot de Cocina Cooking Chef Kenwood
seguridad
●
Lea estas instrucciones atentamente y guárdelas para
poder utilizarlas en el futuro.
●
Quite todo el embalaje y las etiquetas.
nota importante - implantes médicos electrónicos
●
Al igual que todos los productos de calentamiento por inducción, este
aparato genera campos magnéticos de corto alcance. Si cualquier
usuario o persona cerca del aparato lleva un marcapasos u otros
implantes activos, debe consultar con un médico antes de su uso, por
si existe alguna incompatibilidad, a fin de evitar cualquier riesgo para la
salud.
●
Desconecte y desenchufe el aparato antes de acoplar o quitar
utensilios/accesorios, después de su uso y antes de limpiarlo.
●
Mantenga las joyas, partes del cuerpo y ropa amplia lejos de las partes
móviles y de los accesorios acoplados.
●
No ponga nunca los dedos, etc, en el mecanismo de bisagra.
●
Nunca deje el aparato desatendido cuando lo esté utilizando.
●
Nunca utilice un aparato dañado. Para solicitar que la revisen o la
reparen: consulte “servicio técnico y atención al cliente”, página 114.
●
Nunca utilice un accesorio no autorizado o más de un accesorio a la
vez.
●
Nunca sobrepase las capacidades máximas indicadas en la página 112
y, al utilizar el calentador de inducción, no sobrepase nunca el nivel de
llenado máximo de 3 litros marcado en el interior del bol.
●
Al usar un accesorio, lea las instrucciones de uso y de seguridad que
se adjuntan.
●
Tenga cuidado al levantar este aparato ya que pesa mucho. Asegúrese
de que el cabezal esté bloqueado y de que el bol, los utensilios, las
tapas de los accesos de salida y el cable estén fijos antes de levantarlo.
●
Nunca deje que el cable de alimentación eléctrica cuelgue de un lugar
donde un niño pueda cogerlo.
●
No permita que se mojen la unidad de potencia, el cable o el enchufe.
●
Tenga cuidado al manejar o tocar cualquier parte del aparato cuando
se esté utilizando en el modo de cocción o después de cocinar, EN
ESPECIAL EL BOL, EL ANTISALPICADURAS Y LOS UTENSILIOS ya
que permanecen CALIENTES durante mucho tiempo después de que
el aparato se haya desconectado. Use las asas para quitar y llevar el
bol. Use guantes para horno al manejar el bol caliente y los utensilios
de mezclado calientes.
●
La parte inferior del bol permanecerá caliente durante mucho tiempo
después de que el proceso de calentamiento se haya detenido. Sea
prudente y utilice el posafuentes protector de la superficie de trabajo
cuando coloque el bol en superficies sensibles al calor.
●
Tenga cuidado con el vapor que sale del bol para mezclas,
especialmente al abrir la tapa en el antisalpicaduras o al levantar el
cabezal de la mezcladora.
101
Español

102
●
Al transferir comida caliente de la mezcladora a la licuadora, deje
siempre que los ingredientes se enfríen hasta que alcancen la
temperatura ambiente antes de ponerlos en la licuadora.
●
Utilice sólo el bol y los utensilios que se facilitan con este aparato.
Nunca utilice el bol con ninguna otra fuente de calor.
●
Nunca ponga el aparato en marcha en el modo de cocción con el bol
vacío.
●
Nunca inserte nada a través de las salidas de aire.
●
Al utilizar este aparato, asegúrese de que esté colocado sobre una
superficie plana alejado de cualquier borde. Asegúrese de que esté al
menos a 10 cm de las paredes y compruebe que las aberturas no
estés obstruidas. No lo ponga debajo de armarios colgantes.
●
Para el funcionamiento correcto y seguro de la cocina de inducción,
compruebe que la base del bol y los sensores de temperatura estén
limpios y secos antes de cocinar.
●
Al igual que con todos los aparatos de cocción por inducción, no
coloque tarjetas de crédito, soportes magnéticos ni equipo electrónico
sensible cerca del aparato cuando esté en marcha.
●
No utilice el aparato para alimentos que se deban freír en abundante
aceite.
●
Compruebe siempre que los alimentos estén bien cocidos antes de
comer.
●
Los alimentos se deben comer poco después de haberlos cocinado o
dejar que se enfríen rápidamente y luego refrigerarlos lo antes posible.
●
El uso incorrecto de su aparato puede producir lesiones.
●
Este aparato puede ser utilizado por personas con capacidades físicas,
sensoriales o mentales disminuidas o con falta de experiencia o
conocimientos si han recibido instrucciones o supervisión en relación
con el uso del aparato de forma segura y si entienden los peligros que
ello implica.
●
Los niños deben ser vigilados para asegurarse de que no juegan con el
aparato.
●
Este aparato no debe ser utilizado por niños. Mantenga el aparato y su
cable fuera del alcance de los niños.
●
Utilice este aparato únicamente para el uso doméstico al que está
destinado. Kenwood no se hará cargo de responsabilidad alguna si el
aparato se somete a un uso inadecuado o si no se siguen estas
instrucciones.

antes de enchufar el aparato
●
A
segúrese de que la corriente eléctrica sea la misma que la que figura en la parte inferior del aparato.
●
ADVERTENCIA: ESTE APARATO DEBE CONECTARSE A TIERRA.
●
Este dispositivo cumple con la Directiva 2004/108/CE sobre Compatibilidad Electromagnética, y con el
r
eglamento (CE) nº 1935/2004, de 27 de octubre de 2004, sobre los materiales y objetos destinados a entrar en
c
ontacto con alimentos.
antes de utilizar el aparato por primera vez
●
P
ara lavar las piezas: consulte “cuidado y limpieza”, página 114.
introducción
Gracias por comprar este Robot de Cocina Cooking Chef Kenwood, esperamos que lo disfrute durante muchos
años.
K
enwood tiene casi 60 años de experiencia y conocimientos en el desarrollo de aparatos de cocina y su amplia
variedad de accesorios. Los Robots de Cocina Chef de Kenwood tienen fama de ser algo más que una simple
mezcladora de alimentos.
E
n el desarrollo del Cooking Chef hemos llevado la famosa versatilidad del Chef un paso más allá introduciendo
la cocción por inducción integrada directamente bajo el bol para mezclas. Ahora puede disfrutar de todas las
ventajas del mezclado planetario “bol frío” diario al preparar sus galletas, pastelitos y masa favoritos, más la
ventaja añadida de calentar y cocinar directamente en el bol combinado con el mezclado planetario. Las
oportunidades son infinitas.
El Cooking Chef Kenwood, con su gama de accesorios opcionales, es verdaderamente el sistema completo de
preparación de comida.
Fuerte, fiable, versátil, Kenwood.
¿Qué es la cocción por inducción y cómo funciona?
La cocción por inducción es un método de cocina avanzado que emplea los principios de la inducción
electromagnética. Cuando una corriente eléctrica pasa a través de una bobina de cobre en la zona de cocción
por inducción, crea un campo electromagnético. Cuando el bol del Cooking Chef está bien sujeto en su
posición, el circuito es completado por una capa de acero inoxidable en la base del bol. A su vez, esto crea una
gran cantidad de energía térmica que pasa a través del contenido del bol y, de este modo, se calienta la comida.
La cocción por inducción ahorra mucha energía ya que sólo produce calor en la base del bol. Otros métodos de
calentamiento, como los hornillos de gas, gastan casi un 50% del calor en los lados de la cacerola. De hecho, la
zona de cocción por inducción en su Cooking Chef sólo está caliente durante e inmediatamente después de la
cocción debido al calor transferido desde el contenido del bol. Todo esto significa que la cocción por inducción
es muy eficaz, muy segura y muy limpia.
La funcionalidad de la cocción de su Cooking Chef Kenwood es similar a usar una cacerola en su cocina
eléctrica. La ventaja añadida es que el Chef removerá su comida y regulará la temperatura de cocción
automáticamente según sus necesidades precisas, dejándole libertad para realizar otras tareas tranquilamente en
la cocina.
El Cookig Chef utiliza la tecnología de calentamiento por inducción que es muy eficaz. Al compararlo con la
cocción en una cocina de gas o eléctrica, puede encontrar que los tiempos de cocción se reducen o que
necesita cocinar a una temperatura más baja. Esto debe tenerse en cuenta al usar su aparato por primera vez o
al experimentar con una receta nueva. Si empieza a cocinar a una temperatura alta, esté atento y reduzca el
calor cuando sea necesario para evitar que la comida se queme o se pegue al bol, igual que haría con su
cacerola. Generalmente, el Cooking Chef calentará la comida automáticamente a la temperatura que usted
desee en el período de tiempo más rápido posible. Por lo tanto, no es necesario ajustar a una temperatura más
alta de lo que usted necesita para reducir los tiempos de cocción. En esta fase, también debe prestar atención a
la frecuencia de los ajustes de la función remover. Al cocinar a temperaturas más elevadas, tal vez sea necesario
remover constantemente usando la función remover . Los ajustes de la función remover y son útiles
para mantener la consistencia de su comida durante períodos de cocción más largos al cocer a fuego lento.
103

La selección del utensilio correcto del bol también es importante en esta fase. Más adelante en este libro, hemos
sugerido los usos más apropiados para cada utensilio y, con la experiencia, entenderá rápidamente lo que es
mejor para cada tarea. Al cocinar, encontrará que el batidor flexible para temperaturas elevadas es mejor para
o
btener una consistencia muy suave para salsas y cremas, mientras que el utensilio para remover es mejor
c
uando los alimentos que se están cociendo necesitan mantener una consistencia más sólida, como los
estofados, guisos, ragús, etc. Nuestro libro de recetas recomienda los mejores utensilios para cada receta, y
también puede encontrar que cambiar el utensilio para los diferentes procesos durante la preparación de sus
comidas ofrece mejores resultados.
Durante la cocción e inmediatamente después, el bol, el antisalpicaduras y el utensilio del bol estarán calientes,
al igual que lo estaría su cacerola. Tenga cuidado al tocar alguno de estos elementos. También es importante
recordar que el proceso de cocción generará vapor y vaho, así que tenga cuidado al mirar dentro del bol, al
levantar la tapa del tubo de alimentación o el cabezal de la máquina/Cooking Chef para ver o acceder al bol.
T
ambién debe avisar a los demás cuando la máquina esté cocinando o caliente para que ellos también tengan
cuidado. Al tocar o quitar partes calientes, es aconsejable usar guantes para horno y llevar el bol utilizando sólo
las asas que se facilitan. El posafuentes protector de la superficie de trabajo también puede ser útil para proteger
las superficies sensibles al calor.
A
l calentar líquidos o alimentos con un alto contenido de agua, la precisión de la lectura de la temperatura es
normalmente de +/- 5°C. La precisión del control y la pantalla de temperatura variará dependiendo de la
consistencia del contenido del bol, del volumen del contenido del bol, de la frecuencia con la que se remuevan
los alimentos y del utensilio del bol que se utilice. De nuevo, es similar a cocinar en una cocina de gas, por
e
jemplo, donde una gran cantidad de comida en una cacerola grande se calienta pero no se remueve bien. La
comida estará caliente en la base de la cacerola, o incluso se quemará, mientras que la comida cerca de la parte
superior estará mucho más fría.
Además de la pantalla de temperatura, la máquina tiene un pequeño LED azul. Este LED parpadeará hasta que
la máquina haya alcanzado la temperatura seleccionada. Una vez que se haya alcanzado la temperatura
deseada, la luz dejará de parpadear. Sin embargo, debe tener en cuenta que, al añadir más ingredientes al bol,
el LED azul empezará a parpadear otra vez ya que la temperatura del contenido del bol se reducirá por los
ingredientes fríos. También debe tener en cuenta que la luz estática empieza a parpadear si la frecuencia de
mezclado se incrementa.
Enseguida se dará cuenta de que el Cooking Chef Kenwood es muy fácil de usar y que le ayudará a simplificar la
preparación diaria de la comida.
104

conozca su Cooking Chef Kenwood
P
ara comprar un accesorio que no esté incluido en su paquete, consulte
“servicio técnico y atención al cliente”.
salidas de los accesorios
salida de alta velocidad
salida de velocidad media
salida de baja velocidad
t
oma de los utensilios
la mezcladora
tapa de la salida de velocidad media/alta
cabezal de la mezcladora
tapa de la salida de baja velocidad
p
alanca de la salida de baja velocidad
b
ol del Cooking Chef
palanca para levantar el cabezal
control de velocidad
salidas de aire
p
edestal del bol/zona de inducción
a
gujero de drenaje
sensores de temperatura
batidor K de acero inoxidable
batidor flexible para temperaturas elevadas
b
atidor de varillas
gancho de amasar
utensilio para remover
espátula para temperatura elevada
pantalla térmica
obturador de caucho
antisalpicaduras
tapa del tubo de alimentación
posafuentes protector de la superficie
de trabajo
llave inglesa
105

panel de control
p
antalla de temperatura/temporizador
botón para reducir el tiempo
botón para aumentar el tiempo
control de temperatura
botón intermitente/botón del batidor de varillas de alta temperatura, alta velocidad
c
ontrol de velocidad
botón selector de temperature/temporizador
luz indicadora de la temperatura
botón de batido lento
l
uz indicadora del control de velocidad
106

ajustar la altura de los utensilios
R
emítase a la página 108 para consultar cómo se monta la mezcladora.
batidor de varillas, batidor K de acero inoxidable, utensilio para
remover
Para obtener el mejor resultado, el batidor de varillas, el batidor K y el
utensilio para remover casi deben tocar el fondo del bol . Si es
n
ecesario, ajuste la altura con la llave inglesa que se facilita.
A continuación, se indica cómo hacerlo:
1 Desenchufe el aparato.
2 Levante el cabezal de la mezcladora e inserte el batidor de varillas, el
b
atidor K o el utensilio para remover.
3 Baje el cabezal de la mezcladora. Si hay que ajustar el espacio libre,
levante el cabezal de la mezcladora y quite el utensilio.
4 Con la llave inglesa facilitada, afloje la tuerca
lo bastante para permitir el
ajuste del eje . Para bajar el utensilio más cerca del fondo del bol, gire el
e
je en sentido contrario a las agujas del reloj. Para subir el utensilio hacia
arriba y alejarlo del fondo del bol, gire el eje en el sentido de las agujas del
reloj.
5 Vuelva a apretar la tuerca.
6
Acople el utensilio a la mezcladora y baje el cabezal. (Compruebe su
p
osición, consulte los puntos que se indican arriba)
7 Repita los pasos anteriores, en caso necesario, hasta que el utensilio esté
colocado correctamente. Una vez conseguido, apriete bien la tuerca.
batidor flexible para temperaturas elevadas – este utensilio
debería casi tocar el fondo del bol.
gancho de amasar – este utensilio se regula en la fábrica y no debería
necesitar ningún ajuste.
para acoplar y utilizar el montaje del
antisalpicaduras
El montaje del antisalpicaduras consta de 2 piezas: la pantalla térmica y el
antisalpicaduras.
La pantalla térmica se debe colocar durante las operaciones
de cocción, de lo contrario, la mezcladora no funcionará y
aparecerá el código de error E:03 en la pantalla. La pantalla
térmica es para proteger el cabezal de la mezcladora del vapor producido
durante el proceso de cocción.
En caso necesario, se pueden colocar tanto la pantalla térmica como el
antisalpicaduras para retener los ingredientes en el bol, por ejemplo, al
mezclar ingredientes ligeros como harina y azúcar glasé, o al cocinar
ingredientes donde sea necesario conservar la humedad en el bol. El
antisalpicaduras no se debe acoplar al bol a menos que se utilice junto con
la pantalla térmica.
1 Levante el cabezal de la mezcladora hasta que quede bloqueado.
2 Empuje la pantalla térmica hacia arriba en la parte inferior del cabezal de la
mezcladora
hasta que esté totalmente colocada. La pantalla térmica
nunca se debe utilizar sin que el obturador de caucho esté correctamente
ajustado.
3 Ajuste el bol sobre la base.
4 Baje el cabezal de la mezcladora.
5 Apoye el antisalpicaduras en el borde del bol y, a continuación, deslícelo
hacia adelante hasta que esté completamente colocado
.
●
Durante el proceso de mezclado, los ingredientes se pueden añadir
directamente al bol a través del tubo de alimentación.
6 Para quitar el antisalpicaduras, simplemente, deslícelo hacia atrás para
apartarlo del aparato.
7 Para quitar la pantalla térmica, levante el cabezal de la mezcladora hasta
que quede bloqueado. Retire el utensilio, a continuación, tire de la pantalla
térmica hacia abajo desde la parte inferior del cabezal de la mezcladora.
Nota: únicamente, coloque o retire el antisalpicaduras cuando el cabezal
de la mezcladora esté en posición de bloqueo.
107

la mezcladora
los utensilios de mezclado y algunos de sus usos
batidor K
●
Para hacer tartas, galletas, pastelitos, glaseado, rellenos, pastelitos rellenos
de crema y puré de patata.
b
atidor de varillas
●
P
ara huevos, crema, pasta para rebozar, bizcochos sin grasa, merengues,
tartas de queso, mousses, suflés. No utilice el batidor de varillas para
mezclas pesadas (por ejemplo, batir manteca y azúcar), ya que podría
dañarlo.
g
ancho de amasar
●
S
ólo para mezclas de levadura.
b
atidor flexible para
●
A
decuado para muchas tareas, en particular, preparar natillas, huevos
temperaturas elevadas revueltos y salsas. Ideal para quitar las mezclas tanto calientes como frías de
los lados del bol durante el proceso de mezclado. Adecuado también para el
salteado de verduras.
u
tensilio para remover
●
A
decuado para usarlo durante la cocción para mantener la consistencia de
l
os alimentos, por ejemplo, pollo, pescado, verduras y fruta.
para usar la mezcladora
A
ntes de usar la mezcladora, compruebe que los controles de temperatura y
v
elocidad estén en las posiciones de desconexión “O”.
1 Gire la palanca para levantar el cabezal en el sentido de las agujas del reloj
y levante el cabezal de la mezcladora hasta que quede bloqueado.
para acoplar un utensilio 2 Coloque el utensilio en la toma, poniendo la clavija del eje en la ranura y,
luego, gire para que quede ajustado en su posición .
utensilio para remover – para acoplar el utensilio para remover, inserte
el eje en la toma, luego, alinee la ranura en la extensión de manera que esté
situada por debajo de la clavija de metal en la parte inferior del cabezal de la
mezcladora. Sujete la paleta y gírela de manera que la clavija del eje esté
debajo de la ranura, luego, empuje hacia arriba y gire para que quede
ajustada en su posición
.
3 Coloque el bol sobre la base, apriete hacia abajo y gire en el sentido de las
agujas del reloj .
4 Para bajar el cabezal de la mezcladora, levántelo ligeramente y, luego, gire la
palanca para levantar el cabezal en el sentido de las agujas del reloj.
Bajar hasta que esté en posición de bloqueo.
para quitar un utensilio
●
Invierta el paso 2 de arriba. (Utilice siempre guantes para horno para quitar
utensilios después de cocinar).
5 Conecte la mezcladora a la toma de corriente. Las luces indicadoras de
temperatura y velocidad se iluminarán brevemente. La pantalla mostrará
y, luego, se despejará y dejará el indicador de encendido iluminado
.
6 Gire el control de velocidad al ajuste deseado (consulte la página 109 para
las recomendaciones), la mezcladora se pondrá en marcha y la luz
indicadora del control de velocidad parpadeará. El temporizador contará a
intervalos de 1 segundo. La velocidad se puede cambiar en cualquier
momento mientras la mezcladora está en marcha.
7 Pare la mezcladora girando el control de velocidad a la posición de
desconexión “O”.
Importante – Si en cualquier momento, el cabezal de la mezcladora se
levanta mientras está en funcionamiento, la máquina se parará
automáticamente y emitirá un pitido, y no se volverá a poner en marcha
cuando se baje el cabezal. Para volver a poner en marcha la mezcladora,
gire el control de velocidad a la posición de desconexión “O” y, a
continuación, vuelva a seleccionar una velocidad.
botón intermitente
El botón intermitente sólo se puede usar cuando el control de velocidad
esté en la posición de desconexión “O”.
Para seleccionar esta función, apriete el botón intermitente y la
mezcladora funcionará a máxima velocidad durante el tiempo que el botón
se mantenga apretado. Si el contenido del bol está por encima de los 60°C,
la velocidad aumentará gradualmente. Esto irá acompañado de un pitido y
las luces indicadoras de temperatura y velocidad parpadearán de forma
rápida.
P
P
108

botón de batido lento
Apriete y suelte el botón de batido lento y la mezcladora funcionará automáticamente a velocidad
mínima durante 2 revoluciones y luego se parará. El botón se puede mantener apretado para una
o
peración más larga o se puede apretar de forma repetida, según sea necesario, para combinar
i
ngredientes.
Nota: si el botón de batido lento se aprieta mientras el motor está en marcha, realizará la función de
batido lento estándar y, después, volverá a la velocidad seleccionada.
control de velocidad
Las siguientes velocidades son sólo una guía y variarán de acuerdo con la
cantidad y la temperatura de los ingredientes que se estén mezclando, etc.
Gire el control de velocidad en el sentido de las agujas del reloj para obtener
velocidades de “min” a “max”.
batidor K
●
batir manteca y azúcar empiece en “min” y aumente gradualmente
hasta “max”.
●
batir huevos en mezclas cremosas 4 – “max”.
●
a
ñadir harina, fruta, etc min - 1
●
m
ezclar a la vez todos los ingredientes de un pastel empiece
en la velocidad “min” e increméntela gradualmente hasta “max”.
●
mezclar manteca y harina min - 2.
batidor flexible para
●
batir manteca y azúcar empiece en “min” y aumente gradualmente hasta 3.
t
emperatura elevada
●
q
uitar las mezclas tanto calientes como frías de los lados del bol empiece en “min” y
aumente gradualmente hasta 3.
●
saltear verduras, remover risotto y polenta etc., use .
batidor de varillas
●
Aumente gradualmente hasta “max”.
gancho de amasar
●
Empiece en “min” e incremente gradualmente hasta 1.
utensilio para remover
●
Utilícelo sólo con los ajustes de la función remover , , .
ajustes de la función remover
Para seleccionar los ajustes de la función remover, gire el control de velocidad en sentido contrario a
las agujas del reloj. Estos ajustes son más apropiados cuando la mezcladora se utiliza en el modo de
cocción. Tenga en cuenta que, para utilizar las velocidades para remover, todas las tapas de las salidas
deben estar colocadas.
– Use este ajuste cuando se necesite una velocidad lenta constante, por ejemplo, para remover
salsas.
– Cuando el control de velocidad esté ajustado en esta posición, la mezcladora funcionará de
forma intermitente a una velocidad lenta una vez cada 5 segundos durante aproximadamente 2
revoluciones.
– Cuando el control de velocidad esté ajustado en esta posición, la mezcladora funcionará de
forma intermitente a una velocidad lenta una vez cada 30 segundos, haciendo que sea apropiado
para remover guisos, etc.
Para detener el funcionamiento, gire el control de velocidad a la posición de desconexión “O”.
Nota:
●
Siempre que se seleccione una velocidad, la luz indicadora de velocidad parpadeará.
●
Al utilizar este ajuste, se puede oír una sonido fuerte y agudo procedente del aparato. Esto es normal.
usar la mezcladora para cocinar alimentos
IMPORTANTE
●
Compruebe que la zona de inducción, los sensores de temperatura y la superficie externa de la base
del bol estén limpios. Si no se sigue esta indicación, el sensor de calor se verá afectado, lo que tendrá
como resultado un rendimiento de cocción pobre.
●
Compruebe que todas las tapas de las salidas, incluyendo la pantalla térmica, estén colocadas. Si no
están correctamente colocadas, la función de calentamiento no funcionará.
●
Utilice siempre guantes para horno para quitar el bol y los utensilios después de cocinar.
1 Monte la mezcladora siguiendo las instrucciones de la página 108.
2 Gire el control de temperatura a la temperatura requerida.
109

●
El proceso de calentamiento no comenzará a menos que se seleccione una velocidad.
3 Gire el control de velocidad hacia la velocidad deseada, lo cual hará que se encienda el motor y el calentador.
Los dos luces indicadoras parpadearán.
4
Cuando se alcance la temperatura preseleccionada, la luz indicadora de la temperatura se iluminará de forma
p
ermanente.
Sin embargo, durante la cocción, la luz empezará a parpadear si la temperatura cambia, lo que indica que la
mezcladora está tratando de mantener la temperatura preseleccionada (lea la introducción en la página 103).
●
Si la temperatura del bol sobrepasa los 60°C, por razones de seguridad, la velocidad se limita automáticamente,
a
unque se haya seleccionado una velocidad más alta. La velocidad no aumentará automáticamente cuando la
temperatura descienda por debajo de 60°C. El control de velocidad se debe desconectar primero y, luego, volver
a seleccionar la velocidad deseada.
●
Nota: cada vez que se apriete el botón selector de temperatura/temporizador, la pantalla alternará entre la
visualización del tiempo y de la temperatura del contenido del bol.
5
Para parar o hacer una pausa en el proceso de mezclado y de calentamiento, gire el control de velocidad a la
posición de desconexión “O”. Para reanudar el funcionamiento, seleccione una velocidad.
consejos
●
Algunas recetas, en particular, las que tienen un alto contenido de agua, no podrán alcanzar
una temperatura de cocción por encima de los 100°C (ya que éste es el punto de ebullición del
agua).
●
Al añadir ingredientes al bol durante la cocción, baje la velocidad y añada los ingredientes de forma lenta y
uniforme.
●
P
ara calentar salsas de forma rápida, use un ajuste continuo de la función remover .
●
Quizá encuentre que cambiar el utensilio para los diferentes procesos durante la preparación de su comida da
mejores resultados, por ejemplo, usar el batidor flexible para temperaturas elevadas para freír verduras y, luego,
el utensilio para remover al cocinar trozos de carne o de ave.
●
Si utiliza el antisalpicaduras durante la cocción, quítelo siempre antes de levantar el cabezal de la mezcladora.
Tenga cuidado con el vaho que se forma en el antisalpicaduras y la pantalla térmica.
●
Cuando levante el cabezal de la mezcladora, levántelo lentamente para dejar que cualquier líquido en la parte
inferior de la pantalla térmica vuelva a caer en el bol.
●
Hay disponibles tres funciones para remover los alimentos que le permiten elegir si desea remover más o menos
los alimentos según cada receta. Algunas recetas necesitarán que los alimentos se remuevan constantemente
para evitar que algunos ingredientes se peguen en el fondo del bol, mientras que para otras recetas será mejor
que los alimentos se remuevan de forma intermitente para mantener la consistencia de la comida.
●
Para obtener un rendimiento óptimo, ajuste las alturas de los utensilios; consulte la página 107.
●
El tiempo máximo de cocción es de 3 horas; después de este período de tiempo, la mezcladora se
desconectará automáticamente.
●
Se pueden calentar alimentos sin que haya un utensilio colocado, sin embargo, se debe seleccionar una
velocidad. Esto puede ser ventajoso para derretir alimentos, por ejemplo, mantequilla o chocolate.
●
Cada vez que se apriete el botón selector de temperatura/temporizador, la pantalla alternará entre la visualización
del tiempo de cocción y la temperatura alcanzada en ese punto.
Control del batidor de varillas de alta temperatura, alta velocidad
Para batir a velocidad alta y a temperaturas por encima de los 60°C, gire el control de velocidad a la velocidad
de batido deseada y luego apriete y mantenga apretado el botón intermitente. Esto irá acompañado de un pitido,
y las luces indicadoras de temperatura y velocidad parpadearán de forma rápida. La velocidad de batido se
incrementará lentamente hasta alcanzar la velocidad seleccionada.
Repita el procedimiento para aumentar más la velocidad. Puede reducir la velocidad de batido o apagar la
mezcladora como de costumbre.
Esta función SOLAMENTE se debe utilizar con el batidor de varillas. No debe sobrepasar la
capacidad de cocción máxima de 3 litros, y debe comprobar que el antisalpicaduras esté
colocado. La máquina no se debe dejar desatendida.
después de cocinar
●
Tenga cuidado al manejar o tocar cualquier parte de la mezcladora cuando se esté utilizando en el modo de
cocción o después de cocinar, EN ESPECIAL EL BOL, EL ANTISALPICADURAS Y LOS UTENSILIOS ya que
permanecen CALIENTES durante mucho tiempo después de que el aparato se haya desconectado. Use las
asas para quitar y llevar el bol. Use guantes para horno al manejar el bol caliente y los utensilios de mezclado
calientes.
●
La parte inferior del bol permanecerá caliente durante mucho tiempo después de que el calentamiento se haya
detenido. Sea prudente y utilice el posafuentes protector de la superficie de trabajo facilitado para proteger las
superficies sensibles al calor.
110

111
pantalla
P
ara su seguridad, la mezcladora está equipada con 5 sensores de seguridad separados que funcionarán al
utilizar la mezcladora en el modo de cocción. Si la mezcladora se conecta y hay un sensor de seguridad
activado, la pantalla de temperatura/temporizador mostrará un mensaje de error, por ejemplo, “E:01”. Esto irá
acompañado de un pitido y la mezcladora no funcionará. Compruebe el siguiente mensajes de error:-
Si éstos o cualquier otro código de error siguen apareciendo en la pantalla, póngase en contacto con el servicio
de atención la cliente de Kenwood.
Mensaje de error Descripción Solución
El cabezal de la máquina está levantado. Cierre el cabezal. Gire el control de
Cuando se levanta el cabezal, un sensor de velocidad a la posición “O” y, a
E:01
seguridad desactiva el motor y el calentador. Si continuación, seleccione la velocidad
e
l control de velocidad se gira hacia cualquier deseada.
a
juste distinto de la posición de desconexión
“O” al levantar el cabezal, aparece este mensaje
en la pantalla y el motor no se conectará.
El bol del Cooking Chef no está acoplado. La Compruebe que se esté utilizando el bol
función de calentamiento sólo funcionará si se del Cooking Chef. Compruebe que el bol
u
tiliza el bol del Cooking Chef. Este bol también esté correctamente acoplado. Gire el
E:02
d
ebe estar correctamente acoplado. Los control de velocidad a “O” y, a
sensores de seguridad detectarán un bol continuación, seleccione la velocidad
incorrecto o el bol correcto pero mal acoplado. deseada.
La pantalla térmica no está acoplada. La función Compruebe que la pantalla térmica esté
de calentamiento se desactivará si la pantalla correctamente acoplada. Gire el control
E:03
térmica no está correctamente acoplada. de velocidad a “O” y, a continuación,
s
eleccione la velocidad deseada.
La tapa de la salida de velocidad lenta y las Compruebe que todas las tapas estén
tapas de las salidas de velocidad media/velocidad correctamente acopladas. Gire el control
alta no están acopladas. Estas tapas se acoplan de velocidad a “O” y, a continuación,
por motivos de seguridad. Si las tapas no están seleccione la velocidad deseada.
E:04
correctamente acopladas, el calentamiento se
desconectará, y si hay alguna función de remover
los alimentos seleccionada, el motor funcionará
de forma continua. Mezclar velocidades min a
max hará que el motor funcione de forma
continua.
Problema del sensor de temperatura. Si el Gire el control de velocidad a “O”,
control del calentador detecta una temperatura desenchufe la máquina y deje que se
del bol más alta de lo esperado durante el uso enfríe. Compruebe que la base del bol y
E:09
normal, el motor y el calentador se los sensores de temperatura estén
desconectarán automáticamente. limpios. Vuelva a enchufar y conectar la
máquina como de costumbre.
Problema de sobrecalentamiento o velocidad del Gire el control de velocidad a “O” y
motor. Si el motor se ahoga o se calienta desenchufe la máquina. Retire cualquier
demasiado, el sistema de control desconectará obstrucción que haga que el motor se
E:10
el motor y el calentador automáticamente. ahogue. Compruebe que ninguna salida
de aire esté obstruida. Enchufe y
conecte.

para usar el temporizador de cuenta atrás
E
l temporizador se puede usar tanto en el modo de cocción como de no cocción. Si no hay un tiempo de
cuenta atrás seleccionado, el temporizador contará automáticamente hacia adelante a intervalos de 1 segundo
mientras la mezcladora esté en funcionamiento. El tiempo máximo de funcionamiento es de 3 horas.
1 Conecte la mezcladora a la toma de corriente. La pantalla mostrará brevemente y, luego, se despejará y
dejará el indicador de encendido visible .
2
Apriete el botón + o el botón – y 0:00 aparecerá en la pantalla.
3 Apriete el botón + o el botón – hasta que se muestre el tiempo deseado. El temporizador contará hacia delante a
intervalos de 5 segundo. Si el botón se aprieta de forma continua, los números cambiarán más deprisa cuanto
más tiempo se mantenga apretado. Se puede seleccionar un tiempo máximo de 3 horas.
N
ota: si el botón + se aprieta cuando el temporizador esté en 3:00, el tiempo mostrado en la pantalla cambiará a
0
:00. Si el botón - se aprieta cuando el temporizador esté en 0:00, el tiempo mostrado en la pantalla cambiará a
3:00.
4 Gire el control de velocidad a la velocidad deseada, la mezcladora se pondrá en marcha y el temporizador
contará hacia atrás a intervalos de 1 segundo.
●
E
l funcionamiento de la mezcladora se puede detener en cualquier momento girando el control de velocidad a la
p
osición de desconexión “O”. Esto detendrá también el temporizador. El temporizador seguirá contando hacia
atrás cuando la mezcladora se vuelva a poner en marcha.
5 El proceso de mezclado se parará automáticamente cuando el tiempo total haya transcurrido y se emitirá un
pitido durante 3 segundos. La pantalla parpadeará durante 5 segundos y, luego, se despejará y mostrará el
i
ndicador de encendido .
para reiniciar el temporizador
1 Ponga el temporizador a cero apretando los botones + y – al mismo tiempo (el control de velocidad debe estar
en la posición de desconexión “O”).
●
Si la mezcladora ha estado inactiva durante 10 minutos, la pantalla LCD y la luz posterior entrarán en “modo de
espera” y todas las pantallas se apagarán. Si se activa cualquier botón o botón de control, la pantalla volverá a
su formato previo.
capacidades máximas
pasta quebrada
●
Peso de la harina: 910 g
masa de levadura dura
●
Peso de la harina: 1,5 kg
●
Peso total: 2,4 kg
masa de levadura blanda
●
Peso de la harina: 2,6 kg
●
Peso total: 5 kg
preparado para tartas
de frutas
●
Peso total: 4,55 kg
claras de huevo
●
16
modo de cocción
●
3 litros
consejos generales
●
Apague la mezcladora y limpie el bol con la espátula con frecuencia.
●
Los huevos se baten mejor si están a temperatura ambiente.
●
Antes de batir claras de huevo, compruebe que no haya grasa ni yema de huevo en el batidor de varillas o en el
bol.
●
Utilice ingredientes fríos para las pastas a menos que su receta indique lo contrario.
puntos para hacer pan
importante
●
Nunca sobrepase las capacidades máximas establecidas, de lo contrario, sobrecargará el aparato.
●
Si oye que la máquina se ahoga, desconéctela, retire la mitad de la masa y trabaje cada mitad por separado.
●
Los ingredientes se mezclan mejor si se pone primero el líquido.
112

113
guía para la solución de problemas al cocinar
Problema Causa Solución
L
a mezcladora no funciona en el modo calor Uno de los sensores de seguridad ha sido Consulte la tabla relativa a los mensajes de error
y
muestra un mensaje de error y emite un activado. en la página 111.
pitido de aviso. • Compruebe que el cabezal esté bajado y
bloqueado.
• Compruebe que todas las tapas de las salidas
estén correctamente acopladas.
• Compruebe que la pantalla térmica esté
c
orrectamente acoplada.
•
Compruebe que el bol del Cooking Chef esté
correctamente acoplado.
Se ha seleccionado una temperatura pero el No se ha seleccionado ninguna velocidad. Seleccione una velocidad.
contenido del bol no se calienta (la luz
indicadora de la temperatura no está iluminada).
L
a mezcladora cambia de velocidad durante La velocidad se limita automáticamente Esto es una función de seguridad.
e
l proceso de cocción. cuando el contenido del bol alcanza los 60°C.
La comida se quema en la base del bol. 1 Puede que el ajuste de temperatura 1 Reduzca la temperatura en el dial o cocine a una
seleccionado sea demasiado alto. temperatura más baja.
2 Se está utilizando un utensilio incorrecto. 2 Compruebe que se esté utilizando el utensilio
más adecuado.
3 La función remover es demasiado lenta. 3 Aumente la frecuencia de la función remover o
a
umente a un funcionamiento continuo.
4 Puede que el utensilio no esté lo 4 Ajuste el utensilio.
suficientemente cerca del fondo del bol.
5 El temporizador se ha configurado para un 5 Cocine durante un período de tiempo más corto
tiempo demasiado prolongado. (compruebe que la comida esté bien cocida).
6 Puede que el sensor y/o la parte inferior 6 Compruebe que estas zonas estén limpias y
del bol no estén limpios. secas.
No se mantiene la consistencia de los 1 La temperatura seleccionada es demasiado 1 Reduzca la temperatura.
alimentos. alta.
2 La función remover va demasiado deprisa. 2 Reduzca la velocidad de la función remover.
3 Ingredientes cocidos durante demasiado 3 Reduzca el tiempo de cocción (compruebe que
tiempo. la comida esté bien cocida).
4 Se está utilizando un utensilio incorrecto. 4 Compruebe que se esté utilizando el utensilio
más adecuado.
Velocidad de mezclado inconstante. 1 Los ingredientes son demasiado grandes, 1 Corte los alimentos en trozos más pequeños,
duros o demasiado firmes. quite los huesos de la fruta, funda lentamente
los ingredientes sin que haya un utensilio
colocado (pero compruebe que se haya
seleccionado una velocidad).
2 Añada los ingredientes después de haber
bajado el cabezal.
3 Compruebe que se esté utilizando el utensilio
más adecuado.
Se han añadido ingredientes fríos a una mezcla Si el contenido del bol no se remueve bien, 1 Deje tiempo para que los ingredientes se
caliente pero la pantalla de la temperatura no habrá distintas temperaturas por todo el bol. mezclen bien.
responde enseguida. 2 Aumente la velocidad de la función remover.
Dificultad para cerrar el cabezal de la Los ingredientes firmes como el chocolate Añada los ingredientes después de haber bajado
mezcladora con comida en el bol. en el fondo del bol impiden que el cabezal el cabezal de la mezcladora.
de la mezcladora se cierre bien.
La mezcladora funciona continuamente Las tapas de las salidas no están Compruebe que las tapas de las salidas estén
cuando la función remover o la función correctamente acopladas. correctamente acopladas.
remover están seleccionadas.
La velocidad del motor está limitada cuando El bol acoplado está caliente. Quite el bol o enfríe el bol a menos de 60°C.
se usan accesorios.

limpieza y servicio técnico
cuidado y limpieza
●
Apague y desenchufe siempre el aparato antes de proceder a su limpieza.
●
Quizá aparezca un poco de grasa en la salida la primera vez que use el aparato.
E
sto es algo normal – límpiela sin más.
●
Las superficies de metal de los sensores de temperatura pueden mostrar
signos de desgaste durante el uso normal. Esto es normal y no afecta al
rendimiento del producto.
●
N
o deje el batidor flexible para temperaturas elevadas acoplado
a
la mezcladora cuando no la utilice.
aparato, tapas de las salidas
●
Límpielos con un paño húmedo y, a continuación, séquelos.
●
N
unca los sumerja en agua ni utilice productos abrasivos.
b
atidor flexible para
●
Q
uite siempre la escobilla del limpiador flexible del utensilio antes
temperaturas elevadas de proceder a la limpieza.
●
Lave la escobilla del limpiador flexible y el utensilio en agua caliente con
jabón, y luego seque bien. También se pueden lavar las piezas en el
l
avavajillas.
Nota: revise el estado del cuerpo del utensilio antes y después de su
uso; revise también regularmente el estado de la escobilla del limpiador
y
sustitúyala si hay signos de desgaste.
b
ol, utensilios, antisalpicaduras
●
L
ave a mano y luego seque bien o lave en el lavavajillas.
●
No utilice nunca un cepillo metálico, un estropajo de aluminio ni lejía para limpiar su
bol de acero inoxidable. Use vinagre o un producto antical adecuado para eliminar las
incrustaciones de cal.
●
Si se pega o se quema comida dentro del bol, quite todo lo que pueda con la espátula que se
facilita. Llene el bol con agua templada con jabón y déjelo en remojo. Elimine los depósitos
rebeldes con un cepillo de nylon.
●
Cualquier cambio de color del bol no afectará a su rendimiento.
agujero de drenaje
●
Asegúrese de que esta zona esté libre de comida. En caso necesario, use un limpiador de
tubos o un bastoncillo de algodón para limpiarlo.
sensores de temperatura
●
Límpielos con un paño húmedo y, a continuación, séquelos bien. Nunca utilice productos
abrasivos ni instrumentos afilados para limpiar los sensores.
servicio técnico y atención al cliente
●
Si el cable está dañado, por razones de seguridad, debe ser sustituido por Kenwood o por un
técnico autorizado por Kenwood.
Si necesita ayuda sobre:
●
el uso del aparato o
●
el servicio técnico o reparaciones
Póngase en contacto con el establecimiento en el que compró el aparato.
●
Diseñado y creado por Kenwood en el Reino Unido.
●
Fabricado en China.
ADVERTENCIAS PARA LA ELIMINACIÓN CORRECTA DEL PRODUCTO SEGÚN
ESTABLECE LA DIRECTIVA EUROPEA 2002/96/CE.
Al final de su vida útil, el producto no debe eliminarse junto a los desechos urbanos.
Puede entregarse a centros específicos de recogida diferenciada dispuestos por las
administraciones municipales, o a distribuidores que faciliten este servicio. Eliminar por
separado un electrodoméstico significa evitar posibles consecuencias negativas para el medio
ambiente y la salud derivadas de una eliminación inadecuada, y permite reciclar los materiales
que lo componen, obteniendo así un ahorro importante de energía y recursos. Para subrayar la
obligación de eliminar por separado los electrodomésticos, en el producto aparece un
contenedor de basura móvil tachado.
114

recetas
Consulte los puntos importantes para hacer pan en la página 112.
pan blanco masa de levadura dura
ingredientes
●
1,36 kg de harina normal fuerte
●
15 ml (3 cucharaditas) de sal
●
2
5 g de levadura fresca; o 15 g/20 ml de levadura seca + 5 ml (1 cucharadita) de azúcar
●
7
50 ml de agua caliente: 43°C. Use un termómetro o añada 250 ml de agua hirviendo a
500 ml de agua fría
●
25g de manteca
preparación 1 levadura seca (de la clase que necesita reconstitución): vierta el agua caliente en el
b
ol. A continuación, añada la levadura y el azúcar y déjelo durante unos 10 minutos
hasta que se haga una espuma.
levadura fresca: desmenúcela en la harina.
otros tipos de levadura: siga las instrucciones del fabricante.
2 Vierta el líquido en el bol. Luego, añada la harina (con levadura fresca si la utiliza), sal y
m
anteca.
3 Amase a velocidad mínima durante 45 – 60 segundos. Luego, aumente a velocidad 1,
añadiendo más harina si es necesario, hasta que se haya formado una masa.
4 Amase durante 3 – 4 minutos más a velocidad 1 hasta que la masa sea homogénea,
e
lástica y deje los lados del bol limpios.
5
Ponga la masa en una bolsa de polietileno untada con mantequilla o en un bol tapado
con un paño de cocina. Déjela en un sitio templado hasta que haya doblado su tamaño.
6 Vuelva a amasar durante 2 minutos a velocidad 1.
7 Llene por la mitad cuatro moldes de 450 g untados con grasa con la masa, o déles
forma de bollos.
Luego, cúbralos con un paño de cocina y déjelos en un sitio templado hasta que hayan
doblado su tamaño.
8 Hornee a 230°C/Marca de gas 8 durante 30 - 35 minutos para las hogazas o 10 - 15
minutos si se trata de bollos.
●
Una vez listo, el pan tiene que sonar hueco al darle golpecitos en la base.
pan blanco masa de levadura blanda
ingredientes
●
2,6 kg de harina normal
●
1,3 litros de leche
●
300 g azúcar
●
450 g de margarina
●
100 g de levadura fresca o 50 g de levadura seca
●
6 huevos, batidos
●
5 pizcas de sal
preparación 1 Derrita la margarina en la leche y caliéntela hasta 43°C.
2 levadura seca (de la clase que necesita reconstitución): añada la levadura y el azúcar a
la leche y déjelo durante unos 10 minutos hasta que se haga una espuma.
levadura fresca: desmenúcela en la harina y añada el azúcar.
otros tipos de levadura: siga las instrucciones del fabricante.
3 Vierta la leche en el bol. Añada los huevos batidos y 2 kg de harina.
4 Mezcle a velocidad mínima durante 1 minuto, luego a velocidad 1 durante un minuto
más.
Limpie los restos de masa del bol.
5 Añada el resto de la harina y mezcle a velocidad mínima durante 1 minuto, luego a
velocidad 1 durante 2 – 3 minutos hasta que la mezcla sea suave y homogénea.
6 Llene por la mitad algunos moldes de 450 g untados con grasa con la masa, o déles
forma de bollos.
Luego, cúbralos con un paño de cocina y déjelos en un sitio templado hasta que hayan
doblado su tamaño.
7 Hornee a 200°C/Marca de gas 6 durante 20 - 25 minutos para las hogazas o 15 minutos
si se trata de bollos.
8 Una vez listo, el pan tiene que sonar hueco al darle golpecitos en la base.
●
Para unas 10 hogazas.
115

recetas continuación
tarta de fresa y albaricoque
Ingredientes: bizcocho
●
3 huevos
●
75 g de azúcar lustre
●
7
5 g de harina normal
relleno y decoración
●
150 ml de nata para montar
●
Azúcar al gusto
●
225 g de fresas
●
2
25 g de albaricoques
p
reparación 1 Corte los albaricoques por la mitad y quite los huesos. Cocínelos a fuego lento con muy
poco agua, añadiendo azúcar al gusto, hasta que estén blandos.
2 Lave y corte las fresas por la mitad.
3 Para hacer el bizcocho, bata los huevos y el azúcar a velocidad máxima hasta que la
m
ezcla tenga un color muy pálido y esté espesa.
4
Quite el bol y el batidor de varillas. Mezcle la harina a mano con una cuchara grande de
metal (con cuidado para que el bizcocho quede ligero).
5 Ponga la mezcla en dos moldes de tarta de 18 cm, untados con mantequilla y forrados.
6 Hornee a 180°C/Marca de gas 4 durante unos 20 minutos hasta que la tarta ceda un
p
oco al tacto sin perder su forma al ser ligeramente presionada.
7 Páselos a una bandeja de rejilla para que se enfríen.
8 Bata la nata a la velocidad máxima hasta que se monte. Añada azúcar al gusto.
9 Trocee los albaricoques y una tercera parte de las fresas. Échelos en la mitad de la nata.
10 Esparza esto en uno de los bizcochos, luego ponga el otro encima.
11 Esparza el resto de la nata por encima y decore con el resto de las fresas.
merengues
ingredientes
●
4 claras de huevo
●
250 g de azúcar glasé, tamizado
●
Forre la bandeja con papel de horno antiadherente.
preparación 1 Bata las claras de los huevos y el azúcar a la velocidad máxima durante unos 10
minutos hasta que forme picos.
2 Ponga la mezcla en la bandeja con una cuchara (o utilice una manga pastelera con una
boquilla de estrella de 2,5 cm).
3 Hornee a 110°C/Marca de gas 1⁄4 durante unas 4 - 5 horas hasta que estén firmes y
crujientes. Si se empiezan a dorar demasiado, deje la puerta del horno un poquito
entreabierta.
●
Conserve los merengues en un recipiente hermético.
pasta quebrada
ingredientes
●
450 g de harina, tamizada con la sal
●
5 ml (una cucharadita) de sal
●
225 g de grasa (mezcle manteca y margarina recién sacadas del frigorífico)
●
Unos 80 ml (4 cucharadas) de agua
consejo
●
No mezcle demasiado
preparación 1 Ponga la harina en el bol. Corte la grasa en trozos iguales y añádala a la harina.
2 Con el batidor K de acero inoxidable mezcle a velocidad 1 hasta que adquiera un
aspecto similar al del pan rallado.
Deje de mezclar antes de que tenga un aspecto grasiento.
3 Añada el agua y mezcle a velocidad mínima. Pare tan pronto como el agua se haya
ligado.
4 Cocine a unos 200°C/Marca de gas 6, dependiendo del relleno.
adobo de chili
ingredientes
●
200 g de miel líquida fría (refrigerada durante la noche)
●
1 chili verde (entero)
●
5 ml (1 cucharadita) de mantequilla de cacahuete crujiente
●
condimento
preparación 1 Ponga todos los ingredientes en la minipicadora/molinillo.
2 Acople el accesorio a la mezcladora y deje que los ingredientes se depositen alrededor
de la cuchilla.
3 Pulse el botón intermitente durante 10 segundos.
4 Úselo como sea necesario.
116

γνωρίστε την κουζινοµηχανή Cooking Chef της Kenwood
ασφάλεια
●
iabrse pqorejsij atsy siy ogcey jai utknse siy cia
lekkomsij amauoq.
●
Auaiqrse sg rtrjetara jai siy esijsey.
σηµαντική σηµείωση – ηλεκτρονικά ιατρικά εµφυτεύµατα
●
Όπως όλα τα προϊόντα επαγωγικής θέρµανσης, έτσι και αυτή η
συσκευή δηµιουργεί µαγνητικά πεδία µικρής εµβέλειας. Αν κάποιος
χρήστης ή κάποιο άλλο άτοµο κοντά στη συσκευή έχει βηµατοδότη ή
άλλα ενεργά εµφυτεύµατα, θα πρέπει, πριν από τη χρήση, να
συµβουλευτεί ιατρό σχετικά µε το ενδεχόµενο ασυµβατότητας
προκειµένου να µην υπάρξει κίνδυνος για την υγεία του.
●
Απενεργοποιήστε τη συσκευή και βγάλτε την από την πρίζα πριν να
τοποθετήσετε ή να αφαιρέσετε εξαρτήµατα, µετά τη χρήση και πριν να
τα καθαρίσετε.
●
∆ιατηρείτε τα µέλη του σώµατος, τα κοσµήµατα και τις πτυχές των
ρούχων σας µακριά από τα κινούµενα µέρη και τα αποσπώµενα
εξαρτήµατα.
●
Μην τοποθετείτε τα δάχτυλά σας κ.λπ. στα σηµεία σύνδεσης.
●
Μην αποµακρύνεστε από τη συσκευή ενώ βρίσκεται σε λειτουργία.
●
Μην χρησιµοποιείτε τη συσκευή εάν είναι χαλασµένη. Πηγαίνετε τη
συσκευή για έλεγχο ή επισκευή: ανατρέξτε στην ενότητα «σέρβις και
εξυπηρέτηση πελατών», σελίδα 130.
●
Μην χρησιµοποιείτε µη εξουσιοδοτηµένο εξάρτηµα ή περισσότερα από
ένα εξαρτήµατα ταυτόχρονα.
●
Μην υπερβαίνετε τις µέγιστες τιµές που αναφέρονται στη σελίδα 128
και µην υπερβαίνετε την ανώτατη ένδειξη χωρητικότητας 3 λίτρων που
υπάρχει στο εσωτερικό του µπολ όταν χρησιµοποιείτε την επαγωγική
θέρµανση.
●
Όταν χρησιµοποιείτε ένα εξάρτηµα, να διαβάζετε τις οδηγίες
ασφάλειας και χρήσης που το συνοδεύουν.
●
Να σηκώνετε τη συσκευή µε προσοχή γιατί είναι βαριά. Πριν να την
σηκώσετε, βεβαιωθείτε ότι η κεφαλή είναι ασφαλισµένη και ότι το
µπολ, τα εξαρτήµατα, τα καλύµµατα των υποδοχών και το καλώδιο
είναι σε ασφαλή θέση.
●
Μην αφήνετε το καλώδιο να κρέµεται σε χώρο κοντά σε παιδιά.
●
Μην αφήνετε να βραχεί η µονάδα τροφοδοσίας, το καλώδιο ή το
βύσµα.
●
Να είστε προσεκτικοί όταν χειρίζεστε ή όταν ακουµπάτε οποιοδήποτε
τµήµα της συσκευής όταν χρησιµοποιείται σε λειτουργία µαγειρέµατος
ή µετά το µαγείρεµα, ΕΙ∆ΙΚΑ ΤΟ ΜΠΟΛ, ΤΟ ΠΡΟΣΤΑΤΕΥΤΙΚΟ ΓΙΑ
ΤΟ ΠΙΤΣΙΛΙΣΜΑ ΚΑΙ ΤΑ ΕΞΑΡΤΗΜΑΤΑ διότι εξακολουθούν να είναι
ΖΕΣΤΑ ακόµα και αφού απενεργοποιήσετε τη συσκευή.
Χρησιµοποιήστε τα χερούλια για να αφαιρέσετε και να µεταφέρετε το
µπολ. Χρησιµοποιήστε γάντια κουζίνας για να πιάσετε το ζεστό µπολ
και τους ζεστούς αναδευτήρες.
117
Ekkgmij

118
●
Το κάτω µέρος του µπολ παραµένει ζεστό αρκετή ώρα αφού έχει
σταµατήσει η θέρµανση. Να είστε προσεκτικοί στον χειρισµό και να
χρησιµοποιείτε το προστατευτικό σουπλά όταν τοποθετείτε το µπολ σε
επιφάνειες που είναι ευαίσθητες σε καυτά σκεύη.
●
Φροντίζετε πάντα να µην χυθεί µίγµα από το µπολ του µίξερ ειδικά
όταν ανοίγετε το καπάκι του προστατευτικού για το πιτσίλισµα ή όταν
σηκώνετε την κεφαλή του µίξερ.
●
Αν µεταφέρετε ζεστό φαγητό από το µίξερ στο µπλέντερ, να αφήνετε
τα συστατικά να κρυώσουν σε θερµοκρασία δωµατίου πριν να τα
τοποθετήσετε στο µπλέντερ.
●
Χρησιµοποιείτε µόνο το µπολ και τα εξαρτήµατα που συνοδεύουν τη
συσκευή. Μην χρησιµοποιείτε το µπολ µε άλλη πηγή θερµότητας.
●
Μην χρησιµοποιείτε τη συσκευή στη λειτουργία µαγειρικής όταν το
µπολ είναι άδειο.
●
Μην τοποθετείτε αντικείµενα στα ανοίγµατα αερισµού.
●
Όταν χρησιµοποιείτε τη συσκευή, φροντίζετε να είναι τοποθετηµένη σε
επίπεδη επιφάνεια και στο κέντρο του πάγκου εργασίας. Βεβαιωθείτε
ότι απέχει τουλάχιστον 10 εκ. από τους τοίχους και ότι δεν υπάρχει
εµπόδιο µπροστά στα ανοίγµατα αερισµού. Μην την τοποθετείτε κάτω
από κρεµαστά ντουλάπια κουζίνας.
●
Για τη σωστή και ασφαλή λειτουργία της επαγωγικής κουζινοµηχανής
βεβαιωθείτε ότι η βάση του µπολ και οι αισθητήρες θερµοκρασίας
είναι καθαροί και στεγνοί πριν το µαγείρεµα.
●
Όπως ισχύει και για όλες τις επαγωγικές συσκευές µαγειρικής δεν
πρέπει να τοποθετείτε πιστωτικές κάρτες, µαγνητικά µέσα ή ευαίσθητο
ηλεκτρονικό εξοπλισµό κοντά στη συσκευή όταν βρίσκεται σε
λειτουργία.
●
Μην χρησιµοποιείτε τη συσκευή σαν φριτέζα για τηγάνισµα.
●
Φροντίζετε πάντα το φαγητό να έχει µαγειρευτεί καλά πριν να το
καταναλώσετε.
●
Το φαγητό πρέπει να καταναλώνεται αµέσως µετά το µαγείρεµα ή να
κρυώνει γρήγορα και, στη συνέχεια, να καταψύχεται το συντοµότερο
δυνατόν.
●
Η κακή χρήση της συσκευής σας μπορεί να προκαλέσει τραυματισμό.
●
Οι συσκευές μπορούν να χρησιμοποιούνται από άτομα με μειωμένες
σωματικές, αισθητηριακές ή νοητικές ικανότητες ή έλλειψη εμπειρίας
και γνώσης, εφόσον βρίσκονται υπό επίβλεψη ή τους έχουν δοθεί
οδηγίες για την ασφαλή χρήση της συσκευής και εφόσον κατανοούν
τους σχετικούς κινδύνους.
●
a ad a a a aa,
a daaa d a .
●
Αυτή η συσκευή δεν πρέπει να χρησιμοποιείται από παιδιά.
Φυλάσσετε τη συσκευή και το καλώδιό της μακριά από παιδιά.
●
vqgrilopoiese sg rtrjet lmo cia sgm oijiaj
. Kenwood de uqei opoiadpose ethmg am g rtrjet
le kamharlmo sqpo
.

πριν συνδέσετε τη συσκευή στην πρίζα
●
Βεβαιωθείτε ότι η παροχή ρεύµατος αντιστοιχεί στις ενδείξεις που βρίσκονται στο κάτω µέρος της συσκευής.
●
Π
Π
Ρ
Ρ
Ο
Ο
Ε
Ε
Ι
Ι
Δ
Δ
Ο
Ο
Π
Π
Ο
Ο
Ι
Ι
Η
Η
Σ
Σ
Η
Η
:
:
Α
Α
Υ
Υ
Τ
Τ
Η
Η
Η
Η
Σ
Σ
Υ
Υ
Σ
Σ
Κ
Κ
Ε
Ε
Υ
Υ
Η
Η
Π
Π
Ρ
Ρ
Ε
Ε
Π
Π
Ε
Ε
Ι
Ι
Ν
Ν
Α
Α
Ε
Ε
Ι
Ι
Ν
Ν
Α
Α
Ι
Ι
Γ
Γ
Ε
Ε
Ι
Ι
Ω
Ω
Μ
Μ
Ε
Ε
Ν
Ν
Η
Η
●
a a 2004/108/ a
aa a a ’ a 1935/2004 27/10/2004 a
a a a‹ a.
πριν να χρησιµοποιήσετε τη συσκευή για πρώτη φορά
Πλύνετε τα εξαρτήµατα: ανατρέξτε στην ενότητα «φροντίδα και καθαριότητα», σελίδα 130.
εισαγωγή
Σ
ας ευχαριστούµε που αγοράσατε την κουζινοµηχανή Cooking Chef της Kenwood και ευχόµαστε να
απολαύσετε τη χρήση της για πολλά χρόνια.
Η Kenwood έχει σχεδόν 60 χρόνια εµπειρίας και βαθιάς γνώσης στον σχεδιασµό κουζινοµηχανών και µεγάλης
π
οικιλίας εξαρτηµάτων. Οι κουζινοµηχανές Chef της Kenwood είναι φηµισµένες επειδή δεν αποτελούν ένα απλό
µίξερ τροφίµων.
Στον σχεδιασµό της συσκευής Cooking Chef αξιοποιήσαµε ακόµα περισσότερο τη γνωστή ευελιξία της
κουζινοµηχανής Chef ενσωµατώνοντας τη δυνατότητα επαγωγικής µαγειρικής κάτω ακριβώς από το µπολ
ανάµιξης Μπορείτε πλέον να απολαµβάνετε όλα τα πλεονεκτήµατα ενός απλού «κρύου µπολ» µε πλανητική
ανάδευση ενώ φτιάχνετε τα αγαπηµένα σας κέικ, γλυκά και ζύµες συν το επιπλέον πλεονέκτηµα θέρµανσης και
µαγειρέµατος απευθείας µέσα στο µπολ σε συνδυασµό µε πλανητική ανάδευση. Οι δυνατότητες είναι
αµέτρητες.
Η κουζινοµηχανή Cooking Chef της Kenwood µε µια ποικιλία από προαιρετικά εξαρτήµατα είναι πραγµατικά ένα
πλήρες σύστηµα παρασκευής φαγητού.
Ισχυρό, αξιόπιστο, ευέλικτο, Kenwood.
Τι είναι η επαγωγική µαγειρική και πώς λειτουργεί;
Η επαγωγική µαγειρική είναι ένας προηγµένος τρόπος µαγειρέµατος που χρησιµοποιεί τις αρχές της
ηλεκτροµαγνητικής επαγωγής. Όταν το ηλεκτρικό ρεύµα διέρχεται µέσα από ένα χάλκινο πηνίο στην περιοχή
επαγωγικής µαγειρικής δηµιουργεί ένα ηλεκτροµαγνητικό πεδίο. Όταν το µπολ της κουζινοµηχανής Cooking
Chef είναι ασφαλισµένο στη θέση του, το κύκλωµα ολοκληρώνεται από µια ειδική στρώση από ανοξείδωτο
ατσάλι στη βάση του µπολ. Έτσι δηµιουργείται στη συνέχεια µια τεράστια ποσότητα θερµικής ενέργειας που
διέρχεται µέσα από το περιεχόµενο του µπολ και ζεσταίνει το φαγητό.
Η επαγωγική µαγειρική εξοικονοµεί πολλή ενέργεια επειδή παράγει θερµότητα µόνο στη βάση του µπολ. Οι
άλλοι τρόποι θέρµανσης όπως οι εστίες αερίου καταναλώνουν περίπου 50% της θερµικής ενέργειας γύρω από
τις πλευρές του σκεύους. Στην πραγµατικότητα, η περιοχή επαγωγικής µαγειρικής στη συσκευή Cooking Chef
παραµένει ζεστή µόνο κατά τη διάρκεια του µαγειρέµατος και λίγο µετά επειδή µεταφέρεται ξανά θερµότητα
από το περιεχόµενο του µπολ. Όλα αυτά καθιστούν την επαγωγική µαγειρική πολύ αποδοτική, ασφαλή και
καθαρή.
Οι λειτουργίες µαγειρέµατος της συσκευής Cooking Chef της Kenwood είναι παρόµοιες µε τον τρόπο
µαγειρέµατος µε µια κατσαρόλα στην εστία της κουζίνας σας. Το επιπλέον πλεονέκτηµα είναι ότι η συσκευή
Chef θα ανακατέψει αυτόµατα το φαγητό σας και θα ρυθµίσει τη θερµοκρασία µαγειρέµατος ακριβώς όπως
θέλετε, δίνοντάς σας την ελευθερία να κάνετε άνετα άλλες δουλειές στην κουζίνα.
Η συσκευή Cooking Chef χρησιµοποιεί την τεχνολογία επαγωγικής θέρµανσης, η οποία είναι πάρα πολύ
αποδοτική. Αν την συγκρίνετε µε το µαγείρεµα σε εστία αερίου ή σε ηλεκτρική εστία, θα ανακαλύψετε ότι ο
χρόνος µαγειρέµατος είναι λιγότερος ή ότι η θερµοκρασία που πρέπει να χρησιµοποιήσετε για το µαγείρεµα
είναι χαµηλότερη. Αυτό είναι κάτι που πρέπει να έχετε υπόψη σας όταν χρησιµοποιείτε τη συσκευή για πρώτη
φορά ή όταν δοκιµάζετε µια νέα συνταγή. Αν ξεκινήσετε να µαγειρεύετε σε υψηλή θερµοκρασία, πρέπει να
προσέχετε και να µειώνετε την ένταση όταν χρειάζεται για να µην καεί το φαγητό και κολλήσει στο µπολ, όπως
κάνετε και στην κατσαρόλα σας. Γενικά, η συσκευή Cooking Chef θερµαίνει το φαγητό αυτόµατα στη
θερµοκρασία που θέλετε στο συντοµότερο δυνατό διάστηµα. Έτσι δεν είναι απαραίτητο να ρυθµίζετε τη
θερµοκρασία παραπάνω από όσο χρειάζεται προκειµένου να µειώσετε τον χρόνο µαγειρέµατος. Σε αυτήν τη
φάση πρέπει επίσης να προσέξετε τη συχνότητα της ρύθµισης ανάδευσης. Όταν µαγειρεύετε σε υψηλές
θερµοκρασίες ίσως χρειάζεται να αναδεύετε συνεχώς χρησιµοποιώντας τη ρύθµιση ανάδευσης . Η ρύθµιση
ανάδευσης είναι χρήσιµη καθώς διατηρεί την οµοιογένεια του φαγητού σας για µεγάλο διάστηµα ενώ
µαγειρεύετε σε σιγανή φωτιά.
119

Η επιλογή του σωστού εξαρτήµατος για το µπολ είναι επίσης σηµαντική σε αυτό το στάδιο. Στη συνέχεια, θα
εξηγήσουµε τη χρήση για την οποία είναι κατάλληλο κάθε εξάρτηµα και µε την εµπειρία θα µπορείτε κι εσείς να
επιλέγετε το σωστό για κάθε περίπτωση. Μαγειρεύοντας θα δείτε ότι ο εύκαµπτος αναδευτήρας υψηλής
θ
ερµοκρασίας είναι κατάλληλος για να πετύχετε απαλή υφή σε σάλτσες και κρέµες, ενώ ο γάντζος ανάδευσης
α
νάδευσης είναι κατάλληλος όταν µαγειρεύετε φαγητά που πρέπει να έχουν πιο συµπαγή υφή, όπως ραγού,
κατσαρόλας κ.λπ. Το βιβλίο συνταγών µας προτείνει τα καλύτερα εξαρτήµατα στα διάφορα στάδια της
παρασκευής του φαγητού θα έχετε καλύτερα αποτελέσµατα.
Κ
ατά το µαγείρεµα και αµέσως µετά, το µπολ, το προστατευτικό για το πιτσίλισµα και το εξάρτηµα του µπολ θα
είναι πολύ ζεστά, όπως θα ήταν και η κατσαρόλα σας. Να προσέχετε όταν τα αγγίζετε. Επίσης σηµαντικό είναι
να θυµάστε ότι κατά τη διαδικασία του µαγειρέµατος δηµιουργούνται υδρατµοί και πρέπει να είστε προσεκτικοί
όταν κοιτάζετε µέσα στο µπολ, όταν ανασηκώνετε το καπάκι για να προσθέσετε υλικά ή την κεφαλή της
κουζινοµηχανής Cooking Chef για να δείτε το µπολ ή για να έχετε πρόσβαση σε αυτό. Πρέπει να
π
ροειδοποιήσετε όσους βρίσκονται κοντά στη συσκευή, ώστε να είναι προσεκτικοί όταν η κουζινοµηχανή
µαγειρεύει ή όταν είναι ζεστή. Όταν πιάνετε ή όταν αφαιρείτε ζεστά εξαρτήµατα συνιστάται να φοράτε γάντια
κουζίνας και να µεταφέρετε το µπολ κρατώντας το µόνο από τα χερούλια του. Καλό είναι επίσης να
χρησιµοποιήσετε το προστατευτικό σουπλά σε επιφάνειες που είναι ευαίσθητες σε καυτά σκεύη.
Όταν θερµαίνετε υγρά ή φαγητά µε υψηλή περιεκτικότητα σε νερό, η ακρίβεια της ένδειξης της θερµοκρασίας
είναι συνήθως +/- 5°C. Η ακρίβεια της ένδειξης οθόνης και του χειριστηρίου θερµοκρασίας ποικίλει ανάλογα µε
την υφή του περιεχοµένου του µπολ, τον όγκο του περιεχοµένου, τη συχνότητα ανάδευσης και το εξάρτηµα που
χρησιµοποιείται. Και σε αυτήν την περίπτωση ισχύει το ίδιο µε το µαγείρεµα σε εστία, όταν, για παράδειγµα,
θ
ερµαίνεται µεγάλη ποσότητα φαγητού σε µεγάλη κατσαρόλα αλλά δεν ανακατεύεται καλά. Το φαγητό θα
ζεσταθεί στη βάση της κατσαρόλας ή µπορεί ακόµα και να καεί, ενώ το φαγητό που είναι πάνω-πάνω θα είναι
κρύο.
Εκτός από την οθόνη θερµοκρασίας, η συσκευή έχει και µια µικρή µπλε λυχνία. Η λυχνία αναβοσβήνει µέχρι η
συσκευή να φτάσει στην επιλεγµένη θερµοκρασία. Μόλις φτάσει στην απαραίτητη θερµοκρασία, η λυχνία
σταµατάει να αναβοσβήνει. Ωστόσο, πρέπει να έχετε υπόψη ότι όταν προσθέτετε επιπλέον συστατικά στο µπολ,
η µπλε λυχνία ξεκινάει ξανά να αναβοσβήνει καθώς η θερµοκρασία του µπολ µειώνεται από τα κρύα υλικά.
Μπορεί επίσης να παρατηρήσετε ότι αναβοσβήνει αν αυξηθεί η συχνότητα ανάδευσης.
Πολύ γρήγορα θα ανακαλύψετε ότι η κουζινοµηχανή Cooking Chef της Kenwood είναι εύκολη στη χρήση και
θα σας διευκολύνει στην καθηµερινή παρασκευή του φαγητού σας.
120

γνωρίστε την κουζινοµηχανή Cooking Chef της Kenwood
Γ
ια να αγοράσετε ένα εξάρτηµα που δεν περιλαµβάνεται στη συσκευασία
σας, ανατρέξτε στην ενότητα «σέρβις και εξυπηρέτηση πελατών».
υ
ποδοχές εξαρτηµάτων
υ
ποδοχή υψηλής ταχύτητας
υποδοχή µέσης ταχύτητας
υποδοχή χαµηλής ταχύτητας
υ
ποδοχή εξαρτήµατος
το µίξερ κάλυµµα υποδοχής µέσης/υψηλής ταχύτητας
κεφαλή µίξερ
κ
άλυµµα υποδοχής χαµηλής ταχύτητας
µοχλός υποδοχής χαµηλής ταχύτητας
µπολ cooking chef
µοχλός ανύψωσης κεφαλής
χ
ειριστήριο ταχύτητας
ανοίγµατα αερισµού
βάση του µπολ/περιοχή επαγωγής
ο
πή αποστράγγισης
αισθητήρες θερµοκρασίας
αναδευτήρας σχήµατος K από ανοξείδωτο ατσάλι
ε
ύκαµπτος αναδευτήρας υψηλής θερµοκρασίας
συρµάτινος αναδευτήρας
αναδευτήρας ζύµης
γ
άντζος ανάδευσης
σπάτουλα υψηλής θερµοκρασίας
προστατευτικό θερµότητας
ελαστική µόνωση
προστατευτικό για το πιτσίλισµα
καπάκι ανοίγµατος προσθήκης υλικών
προστατευτικό σουπλά
κλειδί
121

πίνακας ελέγχου
ο
θόνη χρονοµέτρου/θερµοκρασίας
κουµπί µείωσης χρονοµέτρου
κουµπί αύξησης χρονοµέτρου
χειριστήριο θερµοκρασίας
κ
ουµπί παλµικής λειτουργίας/κουµπί ανάδευσης µε συρµάτινο αναδευτήρα υψηλής
ταχύτητας, υψηλής θερµοκρασίας
χειριστήριο ταχύτητας
κουµπί επιλογής χρονοµέτρου/θερµοκρασίας
ε
νδεικτική λυχνία θερµοκρασίας
κ
ουµπί σύντοµης λειτουργίας
ενδεικτική λυχνία χειριστηρίου ταχύτητας
122

ρύθµιση του ύψους των εξαρτηµάτων
Α
νατρέξτε στη σελίδα 124 για τη συναρµολόγηση του µίξερ.
συρµάτινος αναδευτήρας, αναδευτήρας σχήµατος K από ανοξείδωτο
ατσάλι, γάντζος ανάδευσης
Για καλύτερη απόδοση, ο συρµάτινος αναδευτήρας, ο αναδευτήρας
σχήµατος K και ο γάντζος ανάδευσης πρέπει σχεδόν να ακουµπάνε στο
κάτω µέρος του µπολ
. Αν χρειάζεται, ρυθµίστε το ύψος
χρησιµοποιώντας το κλειδί της συσκευασίας.
Η διαδικασία είναι η εξής:
1 Αποσυνδέστε τη συσκευή από την πρίζα.
2 Ανασηκώστε την κεφαλή του µίξερ και τοποθετήστε τον συρµάτινο
αναδευτήρα, τον αναδευτήρα σχήµατος Κ ή τον γάντζο.
3 Κατεβάστε την κεφαλή του µίξερ. Αν χρειάζεται να ρυθµίσετε το ύψος,
α
νασηκώστε την κεφαλή του µίξερ και αφαιρέστε το εξάρτηµα.
4
Χρησιµοποιήστε το κλειδί της συσκευασίας για να ξεσφίξετε το παξιµάδι
έτσι ώστε να µπορείτε να ρυθµίσετε τον άξονα . Για να χαµηλώσετε
το εξάρτηµα και να πλησιάσει το κάτω µέρος του µπολ, στρίψτε
αριστερόστροφα τον άξονα. Για να ανεβάσετε το εξάρτηµα και να
αποµακρυνθεί από το κάτω µέρος του µπολ, στρίψτε δεξιόστροφα τον άξονα.
5 Σφίξτε ξανά το παξιµάδι.
6
Τοποθετήστε το εξάρτηµα στο µίξερ και κατεβάστε την κεφαλή. (Ελέγξτε
τ
η θέση ώστε να είναι στραµµένη προς τα πάνω).
7 Επαναλάβατε τα παραπάνω βήµατα κατά περίπτωση µέχρι να τοποθετηθεί
σωστά το εξάρτηµα. Όταν το εξάρτηµα τοποθετηθεί σωστά, σφίξτε καλά
το παξιµάδι.
εύκαµπτος αναδευτήρας υψηλής ταχύτητας – αυτό το εξάρτηµα πρέπει
να ακουµπάει στο κάτω µέρος του µπολ.
αναδευτήρας ζύµης – αυτό το εξάρτηµα έχει ρυθµιστεί στο εργοστάσιο
και δεν χρειάζεται ρύθµιση.
τοποθέτηση και χρήση του
προστατευτικού για το πιτσίλισµα
Για να συναρµολογήσετε το προστατευτικό για το πιτσίλισµα χρειάζεστε 2
εξαρτήµατα: το προστατευτικό θερµότητας και το προστατευτικό για το
πιτσίλισµα.
Το προστατευτικό θερµότητας πρέπει να είναι τοποθετηµένο όταν
µαγειρεύετε, διαφορετικά το µίξερ δεν λειτουργεί και εµφανίζεται ο
κωδικός σφάλµατος E:03. Το προστατευτικό θερµότητας προστατεύει
την κεφαλή του µίξερ από τον ατµό που παράγεται κατά το µαγείρεµα.
Αν χρειάζεται µπορεί να τοποθετηθεί και το προστατευτικό θερµότητας και
το προστατευτικό για το πιτσίλισµα για να συγκρατούνται τα υλικά µέσα στο
µπολ, για παράδειγµα, όταν αναµιγνύετε ελαφριά συστατικά όπως το αλεύρι
και η ζάχαρη άχνη ή όταν µαγειρεύετε και δεν θέλετε να εξατµιστούν τα
υγρά. Το προστατευτικό για το πιτσίλισµα δεν πρέπει να τοποθετείται στο
µπολ αν δεν έχει τοποθετηθεί και το προστατευτικό θερµότητας.
1 Ανασηκώστε την κεφαλή του µίξερ µέχρι να ασφαλίσει.
2 Σπρώξτε το προστατευτικό θερµότητας προς τα πάνω κάτω από την
κεφαλή του µίξερ
µέχρι να τοποθετηθεί κανονικά. Το προστατευτικό
θερµότητας δεν πρέπει να χρησιµοποιείται ποτέ χωρίς να έχει εφαρµόσει
σωστά η ελαστική µόνωση.
3 Τοποθετήστε το µπολ πάνω στη βάση.
4 Κατεβάστε την κεφαλή του µίξερ.
5 Ακουµπήστε το προστατευτικό για το πιτσίλισµα πάνω στο χείλος του µπολ
και, στη συνέχεια, σπρώξτε προς τα εµπρός µέχρι να τοποθετηθεί
κανονικά
.
●
Κατά την ανάµιξη, µπορείτε να προσθέτετε συστατικά απευθείας στο µπολ
από το άνοιγµα προσθήκης υλικών.
6 Για να αφαιρέσετε το προστατευτικό για το πιτσίλισµα, σύρετέ το για να
βγει από τη συσκευή.
7 Για να αφαιρέσετε το προστατευτικό θερµότητας, ανασηκώστε την κεφαλή
του µίξερ µέχρι να ασφαλίσει. Αφαιρέστε το εξάρτηµα και τραβήξτε το
προστατευτικό θερµότητας προς τα κάτω, κάτω από την κεφαλή του µίξερ.
Σηµείωση: Τοποθετείτε ή αφαιρείτε το προστατευτικό για το πιτσίλισµα
όταν η κεφαλή του µίξερ είναι ασφαλισµένη.
123

το µίξερ
οι αναδευτήρες και µερικές από τις χρήσεις τους
σ
χήµατος K
●
Γ
ια να φτιάχνετε κέικ, µπισκότα, γλυκά, γλάσο, γέµιση, εκλέρ και πουρέ
πατάτας.
συρµάτινος
●
Για αυγά, κρέµα, κουρκούτι, παντεσπάνι χωρίς λιπαρά, µαρέγκα, τσίζκεϊκ,
µους, σουφλέ. Μην χρησιµοποιείτε τον συρµάτινο αναδευτήρα σε βαρύ
µ
ίγµα (π.χ. κρέµα βουτύρου και ζάχαρη) – µπορεί να χαλάσει.
α
ναδευτήρας ζύµης
●
Μ
όνο για ζύµη.
εύκαµπτος αναδευτήρας υψηλές
●
Κατάλληλος για πολλά είδη µαγειρικής και ειδικά για την παρασκευή
θερµοκρασίες κρέµας, για χτυπητά αυγά και σάλτσες. Ιδανικός για να αφαιρείτε µίγµα
ζεστό ή και κρύο από τα τοιχώµατα του µπολ ενώ αναµιγνύετε. Κατάλληλος
ε
πίσης για λαχανικά σοτέ.
γάντζος ανάδευσης
●
Κατάλληλος για χρήση κατά το µαγείρεµα ώστε να διατηρείται η υφή του
φαγητού
π.χ. σε κοτόπουλο, ψάρι, λαχανικά και φρούτα.
χρήση του µίξερ σας
Πριν να χρησιµοποιήσετε το µίξερ, βεβαιωθείτε ότι τα χειριστήρια
θερµοκρασίας και ταχύτητας είναι απενεργοποιηµένα στις θέσεις «Ο».
1 Στρίψτε δεξιόστροφα τον µοχλό ανύψωσης κεφαλής και ανασηκώστε
τ
ην κεφαλή του µίξερ µέχρι να ασφαλίσει.
τοποθέτηση εξαρτήµατος 2 Τοποθετήστε το εξάρτηµα στην υποδοχή, µε τον πείρο του άξονα µέσα στην
εντοµή και ασφαλίστε το στη θέση του
.
γάντζος ανάδευσης – για να τοποθετήσετε τον γάντζο, εισαγάγετε τον
άξονα στην υποδοχή και ευθυγραµµίστε την εγκοπή στην επέκταση, ώστε
να βρίσκεται κάτω από τον µεταλλικό πείρο που είναι κάτω από την κεφαλή
του µίξερ. Κρατήστε τη λαβή και στρίψτε την ώστε ο πείρος του άξονα να
είναι κάτω από την εντοµή και ύστερα σπρώξτε προς τα πάνω και
ασφαλίστε το στη θέση του
.
3 Τοποθετήστε το µπολ πάνω στη βάση, πιέστε προς τα κάτω και στρίψτε
δεξιόστροφα .
4 Για να κατεβάσετε την κεφαλή του µίξερ, ανασηκώστε την λίγο και ύστερα
στρίψτε τον µοχλό ανύψωσης της κεφαλής δεξιόστροφα.
Κατεβάστε την µέχρι να ασφαλίσει.
Για να αφαιρέσετε ένα εξάρτηµα
●
Ακολουθήστε αντίστροφα το βήµα 2 παραπάνω. (Όταν αφαιρείτε
εξαρτήµατα µετά το µαγείρεµα, χρησιµοποιείτε πάντα γάντια κουζίνας).
5 Συνδέστε το µίξερ στην πρίζα. Οι ενδεικτικές λυχνίες ταχύτητας και
θερµοκρασίας ανάβουν στιγµιαία. Η οθόνη δείχνει και ύστερα
µένει χωρίς ενδείξεις ενώ ανάβει η λυχνία λειτουργίας .
6 Στρίψτε το χειριστήριο ταχύτητας στη ρύθµιση που θέλετε (ανατρέξτε στη
σελίδα 125 για προτάσεις), το µίξερ θα ξεκινήσει και θα αναβοσβήσει η
ενδεικτική λυχνία του χειριστηρίου ταχύτητας. Το χρονόµετρο µετράει ανά 1
δευτερόλεπτα. Η ταχύτητα µπορεί να αλλάξει ανά πάσα στιγµή ενώ το µίξερ
λειτουργεί.
7 Σταµατήστε τη λειτουργία του µίξερ γυρνώντας ξανά το χειριστήριο
ταχύτητας στη θέση απενεργοποίησης «Ο».
Σηµαντικό – Αν οποιαδήποτε στιγµή ανασηκωθεί η κεφαλή του µίξερ κατά
τη διάρκεια της λειτουργίας, το µίξερ θα σταµατήσει αυτόµατα και θα
ακουστεί ένα ηχητικό σήµα. ∆εν θα ξεκινήσει ξανά αν προηγουµένως δεν
κατεβάσετε την κεφαλή. Για να ξεκινήσει ξανά το µίξερ, στρίψτε το
χειριστήριο ταχύτητας στη θέση απενεργοποίησης «Ο» και επιλέξτε νέα
ταχύτητα.
κουµπί παλµικής λειτουργίας
Το κουµπί παλµικής λειτουργίας µπορεί να χρησιµοποιηθεί µόνο όταν το
χειριστήριο ταχύτητας βρίσκεται στη θέση απενεργοποίησης «Ο».
Για να επιλέξετε την παλµική λειτουργία, πιέστε το κουµπί παλµικής
λειτουργίας και το µίξερ θα λειτουργήσει στη µέγιστη ταχύτητα για όσο
διάστηµα κρατήσετε πατηµένο το κουµπί. Αν το περιεχόµενο του µπολ είναι
σε θερµοκρασία πάνω από 60°C, η ταχύτητα θα αυξηθεί σταδιακά. Θα
ακουστεί ένα ηχητικό σήµα και θα αναβοσβήσουν γρήγορα οι ενδεικτικές
λυχνίες ταχύτητας και θερµοκρασίας.
PP
min
sec
124

κουµπί σύντοµης λειτουργίας
Πιέστε και αφήστε το κουµπί σύντοµης λειτουργίας και το µίξερ θα λειτουργήσει αυτόµατα µε
ελάχιστη ταχύτητα για 2 στροφές και ύστερα θα σταµατήσει. Το κουµπί µπορεί να πατηθεί και για
λ
ειτουργία µεγαλύτερης διάρκειας ή να πατηθεί επανειληµµένα κατά περίπτωση για να συνδυάσετε
υ
λικά.
Σηµείωση: Αν το κουµπί σύντοµης λειτουργίας πατηθεί ενώ λειτουργεί το µοτέρ, θα εκτελέσει την
κανονική σύντοµη λειτουργία και ύστερα θα επανέλθει η επιλεγµένη ταχύτητα.
χειριστήριο ταχύτητας
Οι παρακάτω ταχύτητες είναι ενδεικτικές και ποικίλουν ανάλογα µε την
ποσότητα και τη θερµοκρασία των συστατικών που αναµιγνύονται κ.λπ.
Στρίψτε το χειριστήριο ταχύτητας δεξιόστροφα για να ορίσετε ταχύτητα από
το «min» (ελάχιστο) έως το «max» (µέγιστο).
σχήµατος K
●
κρέµα βουτύρου και ζάχαρη ξεκινήστε από το min και σταδιακά αυξήστε
στο max.
●
χτύπηµα αυγών για κρεµώδη µίγµατα 4 - max.
●
σ
ταδιακή προσθήκη αλευριού, φρούτων κ.λπ. min - 1
●
γρήγορα κέικ ξεκινήστε την ταχύτητα από το min και σταδιακά αυξήστε στο
max.
●
προσθήκη βουτύρου στο αλεύρι min - 2.
εύκαµπτος αναδευτήρας
●
κρέµα βουτύρου και ζάχαρη ξεκινήστε από το min και σταδιακά αυξήστε στο 3.
υ
ψηλής ταχύτητας
●
γ
ια να αφαιρείτε µίγµα ζεστό ή και κρύο από τα τοιχώµατα του µπολ ξεκινήστε από το min και
σταδιακά αυξήστε στο 3.
●
για λαχανικά σοτέ, για να ανακατέψετε ριζότο και πολέντα κ.λπ., χρησιµοποιήστε το .
συρµάτινος
●
Σταδιακά αυξήστε στο max.
αναδευτήρας ζύµης
●
Ξεκινήστε από το min και σταδιακά αυξήστε στο 1.
γάντζος ανάδευσης
●
Χρησιµοποιήστε τον µόνο µε τις ρυθµίσεις ανάδευσης ,,.
ρυθµίσεις ανάδευσης
Για να επιλέξετε ρυθµίσεις ανάδευσης, στρίψτε το χειριστήριο ταχύτητας αριστερόστροφα. Αυτές οι
ρυθµίσεις είναι κατάλληλες όταν το µίξερ χρησιµοποιείται σε λειτουργία µαγειρικής. Έχετε υπόψη ότι
για να χρησιµοποιήσετε τις ταχύτητες ανάδευσης, πρέπει να έχουν τοποθετηθεί όλα τα καλύµµατα
υποδοχών.
– Χρησιµοποιήστε αυτήν τη ρύθµιση όταν απαιτείται συνεχής και χαµηλή ταχύτητα π.χ. όταν
ανακατεύετε σάλτσες.
– Όταν το χειριστήριο ταχύτητας είναι σε αυτήν τη θέση, το µίξερ θα λειτουργεί µε παύσεις σε
χαµηλή ταχύτητα κάθε 5 δευτερόλεπτα για περίπου 2 στροφές.
– Όταν το χειριστήριο ταχύτητας είναι σε αυτήν τη θέση, το µίξερ θα λειτουργεί µε παύσεις σε
χαµηλή ταχύτητα κάθε 30 δευτερόλεπτα. Η ρύθµιση είναι κατάλληλη για να ανακατεύετε φαγητά
κατσαρόλας κ.λπ.
Στρίψτε ξανά το χειριστήριο ταχύτητας στη θέση «Ο» για να σταµατήσετε τη λειτουργία.
Σηµείωση:
●
Όταν έχει επιλεγεί ταχύτητα, αναβοσβήνει η ενδεικτική λυχνία ταχύτητας.
●
Ίσως ακούσετε έναν θόρυβο από τη συσκευή όταν είναι σε χρήση. Είναι φυσιολογικό.
χρήση του µίξερ για µαγειρική
ΣΗΜΑΝΤΙΚΟ
●
Βεβαιωθείτε ότι έχετε καθαρίσει την περιοχή επαγωγής, τους αισθητήρες θερµοκρασίας και την
εξωτερική επιφάνεια της βάσης του µπολ. Σε αντίθετη περίπτωση θα επηρεαστεί ο αισθητήρας
θερµότητας και δεν θα εκτελεστεί σωστά το µαγείρεµα.
●
Βεβαιωθείτε ότι έχουν τοποθετηθεί όλα τα καλύµµατα υποδοχών καθώς και το προστατευτικό
θερµότητας. Αν δεν έχουν τοποθετηθεί σωστά, δεν ξεκινάει η λειτουργία θέρµανσης.
●
Χρησιµοποιείτε πάντα γάντια κουζίνας όταν αφαιρείτε το µπολ και τα εξαρτήµατα µετά το µαγείρεµα.
1 Συναρµολογήστε το µίξερ ακολουθώντας τις οδηγίες στη σελίδα 124.
2 Στρίψτε το χειριστήριο θερµότητας στην απαραίτητη θερµοκρασία.
●
Η θέρµανση δεν ξεκινάει αν δεν έχει επιλεγεί ταχύτητα.
min
sec
125

3 Στρίψτε το χειριστήριο ταχύτητας στην ταχύτητα που θέλετε για να ενεργοποιηθεί το µοτέρ και να ξεκινήσει η
θέρµανση. Αναβοσβήνουν και οι δύο ενδεικτικές λυχνίες.
4 Μόλις η συσκευή φτάσει στην καθορισµένη θερµοκρασία, η ενδεικτική λυχνία θερµοκρασίας παραµένει
α
ναµµένη.
Ω
στόσο, κατά το µαγείρεµα η λυχνία θα αρχίσει να αναβοσβήνει αν η θερµοκρασία αλλάξει, δηλώνοντας έτσι
ότι το µίξερ προσπαθεί να διατηρήσει την καθορισµένη θερµοκρασία (ανατρέξτε στην εισαγωγή στη
σελίδα 119).
●
Αν η θερµοκρασία στο µπολ υπερβεί τους 60°C, η ταχύτητα περιορίζεται αυτόµατα για λόγους ασφάλειας
α
κόµα και αν έχετε επιλέξει υψηλότερη ρύθµιση. Η ταχύτητα δεν θα αυξηθεί αυτόµατα όταν η θερµοκρασία
µειωθεί κάτω από 60°C. Πρέπει πρώτα να κλείσετε το χειριστήριο ταχύτητας και ύστερα να επιλέξετε ταχύτητα
ξανά.
●
Σηµείωση: Κάθε φορά που πιέζετε το κουµπί επιλογής χρονοµέτρου/θερµοκρασίας, η οθόνη εµφανίζει εναλλάξ
τις ενδείξεις του χρονοµέτρου και τις ενδείξεις θερµοκρασίας του περιεχοµένου του µπολ.
5
Για να σταµατήστε ή να διακόψετε προσωρινά τη λειτουργία ανάµιξης ή θέρµανσης, στρίψτε το χειριστήριο
ταχύτητας στη θέση απενεργοποίησης «Ο». Για να συνεχίσετε τη λειτουργία, επιλέξτε ταχύτητα.
συµβουλές
●
Μ
ερικές συνταγές, ειδικά όσες χρειάζονται µεγάλη περιεκτικότητα σε νερό, δεν θα φτάσουν σε θερµοκρασία
µαγειρέµατος πάνω από 100°C (το σηµείο βρασµού του νερού).
●
Όταν προσθέτετε συστατικά στο µπολ στη διάρκεια του µαγειρέµατος, µειώστε την ταχύτητα και προσθέστε τα
συστατικά αργά και οµοιόµορφα.
●
Για να ζεστάνετε σάλτσες γρήγορα, χρησιµοποιήστε µια ρύθµιση συνεχούς ανάδευσης .
●
Θ
α διαπιστώσετε ότι αν αλλάζετε εξάρτηµα σε διαφορετικά στάδια της παρασκευής του φαγητού, θα έχετε
καλύτερα αποτελέσµατα, π.χ. χρησιµοποιήστε τον εύκαµπτο αναδευτήρα για υψηλές θερµοκρασίες για να
τηγανίσετε λαχανικά και ύστερα τον γάντζο για να µαγειρέψετε κοµµάτια από κρέας ή πουλερικά.
●
Αν χρησιµοποιείτε το προστατευτικό για το πιτσίλισµα ενώ µαγειρεύετε, να το αφαιρείτε πριν να ανασηκώσετε
τη κεφαλή του µίξερ. Προσέχετε τους υδρατµούς που σχηµατίζονται στο προστατευτικό για το πιτσίλισµα και
στο προστατευτικό θερµότητας.
●
Όταν ανασηκώνετε την κεφαλή του µίξερ, να το κάνετε αργά, ώστε αν υπάρχουν υγρά στο κάτω µέρος του
προστατευτικού θερµότητας να πέσουν µέσα στο µπολ.
●
Υπάρχουν τρεις λειτουργίες ανάδευσης για να επιλέξετε την κατάλληλη ένταση ανάδευσης για κάθε συνταγή.
Σε µερικές συνταγές απαιτείται συνεχής ανάδευση για να µην κολλήσουν τα συστατικά στο κάτω µέρος του
µπολ, ενώ σε κάποιες άλλες χρειάζεται ανάδευση κατά διαστήµατα για να διατηρείται η υφή του φαγητού.
●
Για καλύτερη απόδοση ρυθµίστε το ύψος των εξαρτηµάτων, ανατρέξτε στη σελίδα 123.
●
Ο µέγιστος χρόνος µαγειρέµατος είναι 3 ώρες, µετά το µίξερ απενεργοποιείται αυτόµατα.
●
Μπορείτε να ζεστάνετε φαγητό χωρίς να τοποθετήσετε εξάρτηµα, αλλά πρέπει να επιλέξετε ταχύτητα. Αυτό
µπορεί να φανεί χρήσιµο όταν λιώνετε υλικά, π.χ. βούτυρο ή σοκολάτα.
●
Κάθε φορά που πιέζετε το κουµπί επιλογής χρονοµέτρου/θερµοκρασίας, η οθόνη εµφανίζει εναλλάξ τον χρόνο
µαγειρέµατος και την τρέχουσα θερµοκρασία.
Ρύθµιση συρµάτινου αναδευτήρα υψηλής ταχύτητας, υψηλής θερµοκρασίας
Για ανάδευση µε συρµάτινο αναδευτήρα σε υψηλή ταχύτητα σε θερµοκρασία πάνω από 60°C, στρίψτε το
χειριστήριο ταχύτητας στη θέση που θέλετε και κρατήστε πατηµένο το κουµπί παλµικής λειτουργίας. Θα
ακουστεί ένα ηχητικό σήµα και θα αναβοσβήσουν γρήγορα οι ενδεικτικές λυχνίες ταχύτητας και θερµοκρασίας.
Η ταχύτητα ανάδευσης µε συρµάτινο αναδευτήρα θα αυξηθεί σιγά-σιγά µέχρι να φτάσει την επιλεγµένη
ταχύτητα. Επαναλάβατε τη διαδικασία για να αυξήσετε ακόµα περισσότερο την ταχύτητα. Μπορείτε να µειώσετε
την ταχύτητα ανάδευσης µε συρµάτινο αναδευτήρα ή να απενεργοποιήσετε κανονικά το µίξερ,
Αυτή η λειτουργία ΠΡΕΠΕΙ να χρησιµοποιείται µόνο µε τον συρµάτινο αναδευτήρα. ∆εν πρέπει να
υπερβαίνετε τη µέγιστη χωρητικότητα των 3 λίτρων στο µαγείρεµα και πρέπει να βεβαιώνεστε ότι έχει
τοποθετηθεί το προστατευτικό για το πιτσίλισµα. Μην αποµακρύνεστε από τη συσκευή ενώ βρίσκεται σε
λειτουργία.
µετά το µαγείρεµα
●
Να είστε προσεκτικοί όταν χειρίζεστε ή όταν ακουµπάτε οποιοδήποτε τµήµα του µίξερ όταν χρησιµοποιείται σε
λειτουργία µαγειρέµατος ή µετά το µαγείρεµα, ΕΙ∆ΙΚΑ ΤΟ ΜΠΟΛ, ΤΟ ΠΡΟΣΤΑΤΕΥΤΙΚΟ ΓΙΑ ΤΟ ΠΙΤΣΙΛΙΣΜΑ
ΚΑΙ ΤΑ ΕΞΑΡΤΗΜΑΤΑ διότι εξακολουθούν να είναι ΖΕΣΤΑ ακόµα και αφού απενεργοποιήσετε τη συσκευή.
Χρησιµοποιήστε τα χερούλια για να αφαιρέσετε και να µεταφέρετε το µπολ. Χρησιµοποιήστε γάντια κουζίνας
για να πιάσετε το ζεστό µπολ και τους ζεστούς αναδευτήρες.
●
Το κάτω µέρος του µπολ παραµένει ζεστό αρκετή ώρα αφού έχει σταµατήσει η θέρµανση. Να είστε προσεκτικοί
στον χειρισµό και να χρησιµοποιείτε το προστατευτικό σουπλά της συσκευασίας σε επιφάνειες που είναι
ευαίσθητες σε καυτά σκεύη.
126

127
οθόνη
Γ
ια την ασφάλειά σας, το µίξερ διαθέτει 5 ξεχωριστούς αισθητήρες ασφαλείας που λειτουργούν όταν
χρησιµοποιείτε το µίξερ στη λειτουργία µαγειρέµατος. Αν το µίξερ απενεργοποιηθεί και ενεργοποιηθεί ένας
αισθητήρας ασφαλείας, στην οθόνη χρονοµέτρου/θερµοκρασίας θα εµφανιστεί ένας κωδικός σφάλµατος, π.χ.
«E:01». Θα ακουστεί ένα ηχητικό σήµα και θα σταµατήσει η λειτουργία του µίξερ. Ελέγξτε τα παρακάτω
µ
ηνύµατα σφάλµατος:-
Αν εξακολουθούν να εµφανίζονται στην οθόνη ή παραπάνω κωδικοί σφάλµατος ή αν εµφανιστούν άλλοι,
απευθυνθείτε στο τµήµα εξυπηρέτησης πελατών της Kenwood.
Μήνυµα σφάλµατος Περιγραφή Λύση
Η
κεφαλή της συσκευής είναι ανασηκωµένη. Κλείστε την κεφαλή. Στρίψτε το
Ό
ταν η κεφαλή είναι ανασηκωµένη, ο χειριστήριο ταχύτητας στη θέση «Ο»
αισθητήρας ασφαλείας απενεργοποιεί το µοτέρ και, στη συνέχεια, επιλέξτε την ταχύτητα
E
:01
και τη θέρµανση. Αν το χειριστήριο ταχύτητας που θέλετε.
είναι σε οποιαδήποτε ρύθµιση και όχι στη θέση
«Ο» όταν η κεφαλή είναι ανασηκωµένη,
ε
µφανίζεται αυτό το µήνυµα και το µοτέρ δεν
ε
νεργοποιείται.
∆εν έχει τοποθετηθεί το µπολ της Βεβαιωθείτε ότι χρησιµοποιείτε το µπολ
κουζινοµηχανής Cooking Chef. Η λειτουργία της κουζινοµηχανής Cooking Chef.
θέρµανσης λειτουργεί µόνο όταν χρησιµοποιείται Βεβαιωθείτε ότι το µπολ είναι σωστά
το µπολ µαγειρικής. Το µπολ πρέπει να τοποθετηµένο. Στρίψτε το χειριστήριο
E:02 τοποθετηθεί σωστά. Οι αισθητήρες ασφαλείας ταχύτητας στη θέση «Ο» και ύστερα
θ
α εντοπίσουν αν δεν έχετε τοποθετήσει το επιλέξτε την ταχύτητα που θέλετε.
κατάλληλο µπολ ή αν το µπολ είναι κατάλληλο
αλλά δεν είναι καλά τοποθετηµένο.
∆εν έχει τοποθετηθεί το προστατευτικό Βεβαιωθείτε ότι το προστατευτικό
θερµότητας. Η λειτουργία θέρµανσης θερµότητας είναι σωστά τοποθετηµένο.
E:03 απενεργοποιείται αν δεν έχει τοποθετηθεί σωστά Στρίψτε το χειριστήριο ταχύτητας στη
το προστατευτικό θερµότητας. θέση «Ο» και ύστερα επιλέξτε την
ταχύτητα που θέλετε.
∆εν έχουν τοποθετηθεί τα καλύµµατα υποδοχών Βεβαιωθείτε ότι όλα τα καλύµµατα είναι
χαµηλής ταχύτητας και υψηλής/µέσης ταχύτητας. σωστά τοποθετηµένα. Στρίψτε το
Τα καλύµµατα διαθέτουν αισθητήρες ασφαλείας. χειριστήριο ταχύτητας στη θέση «Ο»
Αν δεν τοποθετηθούν σωστά τα καλύµµατα, και ύστερα επιλέξτε την ταχύτητα που
E:04 απενεργοποιείται η θέρµανση και αν έχουν θέλετε.
επιλεγεί λειτουργίες ανάδευσης, το µοτέρ θα
λειτουργεί συνεχώς. Οι ταχύτητες ανάµιξης από
την τιµή min έως την τιµή max θα λειτουργούν
συνεχώς.
Πρόβληµα στον αισθητήρα θερµοκρασίας. Αν Στρίψτε το χειριστήριο ταχύτητας στη
η ρύθµιση θέρµανσης εντοπίσει θερµοκρασία θέση «Ο», αποσυνδέστε τη συσκευή
στο µπολ πάνω από το αναµενόµενο σε κανονική από την πρίζα και αφήστε την να
E:09 χρήση, απενεργοποιείται αυτόµατα το µοτέρ και κρυώσει Βεβαιωθείτε ότι έχετε
η θέρµανση. καθαρίσει τη βάση του µπολ και τους
αισθητήρες θερµοκρασίας. Συνδέστε τη
συσκευή ξανά στην πρίζα και
ενεργοποιήστε την.
Πρόβληµα στην ταχύτητα του µοτέρ ή πρόβληµα Στρίψτε το χειριστήριο ταχύτητας στη
υπερθέρµανσης. Αν το µοτέρ σταµατήσει θέση «Ο» και αποσυνδέστε τη συσκευή
ή υπερθερµανθεί, το σύστηµα ελέγχου από την πρίζα. Αποµακρύνετε τα
E:10
απενεργοποιεί αυτόµατα το µοτέρ και τη εµπόδια που µπορεί να σταµατούν το
θέρµανση. µοτέρ. Βεβαιωθείτε ότι δεν υπάρχουν
εµπόδια στα ανοίγµατα αερισµού.
Συνδέστε τη συσκευή στην πρίζα και
ενεργοποιήστε την.

χρήση του χρονοµέτρου
Μ
πορείτε να χρησιµοποιήσετε το χρονόµετρο τόσο στο µαγείρεµα όσο και στις υπόλοιπες λειτουργίες. Εάν δεν
επιλέξετε χρόνο αντίστροφης µέτρησης, το χρονόµετρο θα µετράει ανά 1 δευτερόλεπτο ενώ το µίξερ βρίσκεται
σε λειτουργία. Ο µέγιστος χρόνος λειτουργίας είναι 3 ώρες.
1 Συνδέστε το µίξερ στην πρίζα. Η οθόνη εµφανίζει σύντοµα και ύστερα µένει χωρίς ενδείξεις ενώ
α
νάβει η λυχνία λειτουργίας .
2 Πιέστε το κουµπί + ή – και θα εµφανιστεί στην οθόνη η ένδειξη 0:00.
3 Πιέστε το κουµπί + ή – έως ότου εµφανιστεί στην οθόνη ο χρόνος που επιθυµείτε. Το χρονόµετρο µετράει ανά
5 δευτερόλεπτα. Εάν πατάτε το κουµπί συνεχόµενα, οι αριθµοί θα αλλάζουν πιο γρήγορα όσο περισσότερο το
κ
ρατάτε πατηµένο. Μπορείτε να ορίσετε µέγιστο χρόνο 3 ωρών.
Σ
ηµείωση: Εάν πιέσετε το κουµπί + όταν η ένδειξη του χρονοµέτρου είναι 3:00, ο χρόνος που εµφανίζεται θα
αλλάξει σε 0:00. Εάν πιέσετε το κουµπί – όταν η ένδειξη του χρονοµέτρου είναι 0:00, ο χρόνος που εµφανίζεται
θα αλλάξει σε 3:00.
4 Στρίψτε το χειριστήριο ταχύτητας στην ταχύτητα που θέλετε. Το µίξερ θα ξεκινήσει και το χρονόµετρο θα
α
ρχίσει να µετρά αντίστροφα ανά 1 δευτερόλεπτο.
●
Μ
πορείτε να σταµατήσετε τη λειτουργία του µίξερ οποιαδήποτε στιγµή γυρνώντας ξανά το χειριστήριο
ταχύτητας στη θέση απενεργοποίησης «Ο». Με αυτό τον τρόπο διακόπτεται και η λειτουργία του χρονοµέτρου.
Το χρονόµετρο θα συνεχίσει να µετρά αντίστροφα όταν ξεκινήσετε ξανά το µίξερ.
5 Η διαδικασία ανάµιξης θα σταµατήσει αυτόµατα όταν παρέλθει ο χρόνος και ακουστεί ένα ηχητικό σήµα για 3
δ
ευτερόλεπτα. Η οθόνη θα αναβοσβήσει για 5 δευτερόλεπτα και ύστερα θα µείνει χωρίς ενδείξεις ενώ ανάβει η
λυχνία λειτουργίας .
µηδενισµός του χρονοµέτρου
1 Μπορείτε να µηδενίσετε το χρονόµετρο πιέζοντας τα κουµπιά + και – ταυτόχρονα (το χειριστήριο ταχύτητας
πρέπει να βρίσκεται στη θέση απενεργοποίησης «Ο».
●
Εάν η συσκευή παραµείνει αδρανής για 10 λεπτά, η οθόνη LCD και ο οπίσθιος φωτισµός θα τεθούν σε
«λειτουργία αδράνειας» και όλες οι ενδείξεις θα σβήσουν. Εάν είναι ενεργοποιηµένο κάποιο κουµπί ή µοχλός
χειριστηρίου, θα επανέλθει η προηγούµενη ένδειξη.
µέγιστες ποσότητες
ζύµη για τάρτες
●
Βάρος αλευριού: 910g
σφιχτή ζύµη µε µαγιά
●
Βάρος αλευριού: 1,5kg
●
Συνολικό βάρος: 2,4kg
µαλακή ζύµη µε µαγιά
●
Βάρος αλευριού: 2,6kg
●
Συνολικό βάρος: 5kg
µίγµα για κέικ φρούτου
●
Συνολικό βάρος: 4,55kg
ασπράδια αβγών
●
16
λειτουργία µαγειρέµατος
●
3 λίτρα
γενικές συµβουλές
●
∆ιακόπτετε συχνά την ανάµιξη και αφαιρείτε το µίγµα από τα τοιχώµατα του µπολ µε µια σπάτουλα.
●
Για το χτύπηµα αυγών προτιµάτε τα αυγά να βρίσκονται σε θερµοκρασία δωµατίου.
●
Πριν να χτυπήσετε τα ασπράδια, βεβαιωθείτε ότι δεν υπάρχει λίπος ή κρόκος αβγού στον αναδευτήρα ή στο
µπολ.
●
Για ζύµες τα υλικά σας θα πρέπει να είναι κρύα, εκτός εάν ορίζεται διαφορετικά στη συνταγή σας.
οδηγίες για την παρασκευή ψωµιού
σηµαντικό
●
Μην υπερβαίνετε ποτέ τις µέγιστες συνιστώµενες ποσότητες, γιατί υπάρχει κίνδυνος υπερφόρτωσης της
συσκευής.
●
Εάν η συσκευή παράγει ήχους που δείχνουν ότι δεν λειτουργεί σωστά λόγω µεγάλης ποσότητας υλικών,
απενεργοποιήστε την, αφαιρέστε τη µισή ποσότητα της ζύµης και επεξεργαστείτε κάθε µέρος χωριστά.
●
Τα υλικά αναµιγνύονται καλύτερα εάν τοποθετήσετε πρώτα τα υγρά υλικά.
min
s
ec
min
s
ec
128

129
οδηγός επίλυσης προβληµάτων κατά το µαγείρεµα
Πρόβληµα Αιτία Λύση
Το µίξερ δεν λειτουργεί στη λειτουργία Έχει ενεργοποιηθεί ένας από τους αισθητήρες Ανατρέξτε στον πίνακα που αναφέρει τα
θέρµανσης, εµφανίζει ένα µήνυµα ασφαλείας. µηνύµατα σφάλµατος, στη σελίδα 127.
σφάλµατος και εκπέµπει ένα
●
Βεβαιωθείτε ότι έχετε κατεβάσει την κεφαλή και
π
ροειδοποιητικό ηχητικό σήµα. ότι έχει κλειδώσει στη θέση της.
●
Β
εβαιωθείτε ότι όλα τα καλύµµατα των
υποδοχών είναι σωστά τοποθετηµένα.
●
Βεβαιωθείτε ότι το προστατευτικό θερµότητας
είναι σωστά τοποθετηµένο.
●
Βεβαιωθείτε ότι το µπολ cooking chef είναι
σωστά τοποθετηµένο.
Έ
χετε επιλέξει µια θερµοκρασία αλλά το ∆εν έχετε επιλέξει ταχύτητα. Επιλέξτε µια ταχύτητα.
π
εριεχόµενο του µπολ δεν θερµαίνεται (η
ενδεικτική λυχνία θερµοκρασίας δεν ανάβει).
Η ταχύτητα του µίξερ αλλάζει κατά τη Η ταχύτητα περιορίζεται αυτόµατα όταν 60°C. Πρόκειται για µια λειτουργία ασφαλείας.
διάρκεια του µαγειρέµατος. η θερµοκρασία του περιεχοµένου του µπολ
φτάσει τους
Τ
ο φαγητό κολλάει στη βάση του µπολ. 1 Η ρύθµιση θερµοκρασίας που έχετε επιλέξει 1 Μειώστε τη θερµοκρασία ή µαγειρέψτε σε
ε
νδεχοµένως να είναι υπερβολικά υψηλή. χαµηλότερη θερµοκρασία.
2 Το εργαλείο που χρησιµοποιείται δεν είναι 2 Βεβαιωθείτε ότι χρησιµοποιείτε το
το κατάλληλο. καταλληλότερο εργαλείο για την περίπτωση.
3 Η λειτουργία ανάδευσης είναι υπερβολικά 3 Αυξήστε τη συχνότητα της λειτουργίας
αργή. ανάδευσης ή αυξήστε την σε συνεχιζόµενη
λειτουργία.
4 Ενδεχοµένως το εργαλείο να µην είναι 4 Προσαρµόστε το εργαλείο.
αρκετά χαµηλά µέσα στο µπολ.
5 Η ρύθµιση του χρονοµέτρου είναι υπερβολικά 5 Μαγειρέψτε για λιγότερο χρόνο (βεβαιωθείτε
µεγάλη. ότι το φαγητό έχει µαγειρευτεί σωστά).
6 Ο αισθητήρας ή/και το κάτω µέρος του µπολ 6 Βεβαιωθείτε ότι αυτές οι περιοχές διατηρούνται
ενδεχοµένως να µην είναι καθαρά. καθαρές και στεγνές.
Το φαγητό δεν έχει οµοιογενή υφή. 1 Η επιλεγµένη θερµοκρασία είναι υπερβολικά 1 Μειώστε τη θερµοκρασία.
υψηλή.
2 Η λειτουργία ανάδευσης είναι υπερβολικά 2 Μειώστε την ταχύτητα ανάδευσης.
γρήγορη.
3 Το µαγείρεµα των υλικών έχει διαρκέσει 3 Μειώστε το χρόνο µαγειρέµατος (βεβαιωθείτε
υπερβολικά πολύ. ότι το φαγητό έχει µαγειρευτεί σωστά).
4 Το εργαλείο που χρησιµοποιείται δεν είναι 4 Βεβαιωθείτε ότι χρησιµοποιείτε το
το κατάλληλο. καταλληλότερο εργαλείο για την περίπτωση.
Η ταχύτητα ανάµιξης δεν είναι οµοιογενής. 1 Τα υλικά είναι πολύ µεγάλα, πολύ σκληρά 1 Κόψτε το φαγητό σε µικρότερα κοµµάτια,
ή πολύ συµπαγή. αφαιρέστε τα κουκούτσια των φρούτων, λιώστε
αργά τα υλικά χωρίς κάποιο εργαλείο (αλλά
βεβαιωθείτε ότι έχετε επιλέξει µια ταχύτητα).
2 Προσθέστε υλικά αφού κατεβάσετε την κεφαλή.
3 Βεβαιωθείτε ότι χρησιµοποιείτε το
καταλληλότερο εργαλείο.
Στο ζεστό µίγµα έχουν προστεθεί κρύα Εάν τα περιεχόµενα του µπολ δεν 1 Αφήστε λίγο χρόνο έως ότου αναµιχθούν καλά
υλικά αλλά η ένδειξη της θερµοκρασίας ανακατεύονται καλά, τότε η θερµοκρασία του όλα τα υλικά.
δεν αλλάζει αµέσως. φαγητού δεν θα είναι οµοιογενής σε όλο το 2 Αυξήστε την ταχύτητα ανάδευσης.
µπολ.
∆υσκολία κλεισίµατος της κεφαλής του Αυξήστε την ταχύτητα ανάδευσης. Προσθέστε υλικά αφού κατεβάσετε την κεφαλή
µίξερ όταν υπάρχει φαγητό µέσα στο µπολ. του µίξερ.
Το µίξερ λειτουργεί συνεχώς όταν είναι Τα καλύµµατα των υποδοχών δεν έχουν Βεβαιωθείτε ότι τα καλύµµατα των υποδοχών
επιλεγµένες οι λειτουργίες ανάδευσης τοποθετηθεί σωστά. είναι σωστά τοποθετηµένα.
ή .
Η ταχύτητα του µοτέρ περιορίζεται κατά τη Το µπολ που έχει τοποθετηθεί είναι ζεστό. Αφαιρέστε το µπολ ή αφήστε το να κρυώσει
χρήση εξαρτηµάτων έως κάτω από τους 60°C.

καθαριότητα και συντήρηση
φροντίδα και καθαριότητα
●
Πριν καθαρίσετε τη συσκευή, θα πρέπει πάντα να την απενεργοποιείτε και να την
αποσυνδέετε από την πρίζα.
●
Την πρώτη φορά που θα χρησιµοποιήσετε τη συσκευή, ενδέχεται να υπάρξει λίγο
λ
ιπαντικό υλικό στην υποδοχή
.
Αυτό είναι φυσιολογικό. Απλώς σκουπίστε
την υποδοχή.
●
Οι µεταλλικές επιφάνειες των αισθητήρων θερµοκρασίας ενδεχοµένως
να εµφανίσουν ενδείξεις φθοράς κατά τη χρήση. Αυτό δεν επηρεάζει
τ
ην απόδοση του προϊόντος.
●
Μην αφήνετε τον εύκαμπτο αναδευτήρα για υψηλές θερμοκρασίες
στο μίξερ, όταν δεν τον χρησιμοποιείτε.
σ
υσκευή, καλύµµατα υποδοχών
●
Σ
κουπίστε τα µε ένα νωπό πανί και έπειτα µε ένα στεγνό.
●
Μην χρησιµοποιείτε στιλβωτικά και µην βυθίζετε τη συσκευή στο νερό.
εύκαμπτος αναδευτήρας υψηλές
●
Αφαιρείτε πάντα την εύκαμπτη λεπίδα από το εργαλείο πριν από τον
θερμοκρασίες καθαρισμό.
●
Π
λένετε την εύκαμπτη λεπίδα και το εργαλείο σε ζεστή σαπουνάδα και
τα στεγνώνετε πολύ καλά. Εναλλακτικά, τα μέρη μπορούν να πλυθούν
σε πλυντήριο πιάτων.
Σημείωση: Ελέγχετε την κατάσταση του εργαλείου πριν και μετά τη χρήση
και, επίσης, ελέγχετε συχνά την κατάσταση της εύκαμπτης λεπίδας και
αντικαταστήστε την εάν υπάρχουν σημάδια φθοράς.
µ
πολ, εργαλεία, προστατευτικό
●
Π
λύνετε τα στο χέρι και, στη συνέχεια, σκουπίστε τα καλά ή πλύνετέ τα
για το πιτσίλισµα στο πλυντήριο πιάτων.
●
Μην χρησιµοποιείτε ποτέ συρµάτινη βούρτσα, σφουγγάρι από ατσάλι ή λευκαντικό για να
πλύνετε το µπολ από ανοξείδωτο ατσάλι. Χρησιµοποιήστε ξύδι ή ένα κατάλληλο καθαριστικό
κατά των αλάτων για να αφαιρέσετε τα άλατα.
●
Εάν κολλήσει φαγητό στο εσωτερικό του µπολ, αφαιρέστε όσο το δυνατό περισσότερη
ποσότητα χρησιµοποιώντας την σπάτουλα που σας παρέχεται. Γεµίστε το µπολ µε ζεστό
σαπουνόνερο και αφήστε το να µουλιάσει. Αφαιρέστε τα επίµονα υπολείµµατα χρησιµοποιώντας
µια πλαστική βούρτσα.
●
Η αλλοίωση του χρώµατος του µπολ δεν θα επηρεάσει την απόδοσή του.
οπή αποστράγγισης
●
Φροντίζετε ώστε να µην υπάρχουν υπολείµµατα τροφίµων σε αυτή την περιοχή. Εάν χρειάζεται,
για να καθαρίσετε την οπή, χρησιµοποιήστε ένα καθαριστικό σωλήνων ή µια µπατονέτα.
αισθητήρες θερµοκρασίας
●
Σκουπίστε τα µε ένα νωπό πανί και έπειτα µε ένα στεγνό. Μην χρησιµοποιείτε στιλβωτικά ή
αιχµηρά αντικείµενα για να καθαρίσετε τους αισθητήρες.
a a
●
a , , a aaa, a aaaa a
KENWOOD a KENWOOD.
a :
●
●
aa a aa a.
●
a aa a Kenwood a.
●
aa a.
P a a a
a 2002/96/
, a aa a a
aaa.
P a a a a a
a, a a a.
a a a a a a
a a a aa a a aa
a a a aa a a a a a .
a a a
a aa a.
130

συνταγές
∆είτε χρήσιµες συµβουλές για την παρασκευή ψωµιού στη σελίδα 128.
άσπρο ψωµί σφιχτή ζύµη µε µαγιά
υ
λικά
●
1
,36kg (3lb) δυνατό αλεύρι για όλες τις χρήσεις
●
15ml (3 κουταλάκια του γλυκού) αλάτι
●
25g (1oz) φρέσκια µαγιά, ή 15g/20ml (1⁄2oz) ξερή µαγιά + 5ml (1 κουταλάκι του
γλυκού) ζάχαρη
●
7
50ml (11⁄4pts) ζεστό νερό: 43°C (110°F). Χρησιµοποιήστε θερµόµετρο ή προσθέστε
2
50ml (9fl oz) βραστό νερό σε 500ml (18fl oz) κρύο νερό
●
25g (1oz) λάδι
εκτέλεση 1 ξερή µαγιά: ρίξτε το ζεστό νερό µέσα στο µπολ. Στη συνέχεια, προσθέστε τη µαγιά και
τη ζάχαρη και αφήστε την να σταθεί για περίπου 10 λεπτά έως ότου αφρίσει.
φ
ρέσκια µαγιά: θρυµµατίστε την µέσα στο αλεύρι.
ά
λλοι τύποι µαγιάς: ακολουθήστε τις οδηγίες που υπάρχουν στη συσκευασία.
2 Ρίξτε το υγρό µέσα στο µπολ. Στη συνέχεια, προσθέστε το αλεύρι (µε τη φρέσκια
µαγιά), αλάτι και λάδι.
3 Ζυµώστε στη µικρότερη ταχύτητα για 45 - 60 δευτερόλεπτα. Στη συνέχεια, αυξήστε την
τ
αχύτητα στο 1, προσθέτοντας περισσότερο αλεύρι, εάν χρειάζεται, έως ότου γίνει ζύµη.
4 Ζυµώστε για 3 - 4 λεπτά ακόµη στην ταχύτητα 1, έως ότου η ζύµη είναι µαλακή,
ελαστική και αφήνει τα τοιχώµατα του µπολ καθαρά.
5 Τοποθετήστε τη ζύµη σε µια λαδωµένη σακούλα για τρόφιµα ή σε ένα µπολ καλυµµένο
µε µια πετσέτα κουζίνας. Στη συνέχεια, αφήστε τη ζύµη σε ένα ζεστό µέρος έως ότου
διπλασιαστεί σε όγκο.
6 Ζυµώστε ξανά για 2 λεπτά στην ταχύτητα 1.
7 Τοποθετήστε ζύµη µέχρι τη µέση σε τέσσερα λαδωµένα ταψάκια των 450g (1lb) ή
φτιάξτε ψωµάκια.
Στη συνέχεια, καλύψτε µε µια πετσέτα κουζίνας και αφήστε τα σε ένα ζεστό µέρος έως
ότου διπλασιαστούν σε όγκο.
8 Ψήστε στους 230°C/450°F/Με αέριο στο 8 για 30 - 35 λεπτά για καρβέλια ή 10 - 15
λεπτά για ψωµάκια.
●
Όταν είναι έτοιµο, το ψωµί θα ακούγεται σαν να είναι κούφιο όταν το χτυπάτε από κάτω.
άσπρο ψωµί µαλακή ζύµη µε µαγιά
υλικά
●
2,6kg (5lb 12oz) απλό αλεύρι για όλες τις χρήσεις
●
1,3 λίτρο (21⁄4pts) γάλα
●
300g (10oz) ζάχαρη
●
450g (1lb) µαργαρίνη
●
100g (4oz) φρέσκια µαγιά, ή 50g (2oz) ξερή µαγιά
●
6 αβγά, χτυπηµένα
●
5 πρέζες αλάτι
εκτέλεση 1 Λιώστε τη µαργαρίνη στο γάλα και ζεστάνετε έως ότου το µίγµα φτάσει τους 43°C
(110°F).
2 ξερή µαγιά: Προσθέστε τη µαγιά και τη ζάχαρη στο γάλα και αφήστε την να σταθεί για
περίπου 10 λεπτά έως ότου αφρίσει.
φρέσκια µαγιά: θρυµµατίστε την µέσα στο αλεύρι και προσθέστε τη ζάχαρη.
άλλοι τύποι µαγιάς: ακολουθήστε τις οδηγίες που υπάρχουν στη συσκευασία.
3 Ρίξτε το γάλα µέσα στο µπολ. Προσθέστε τα χτυπηµένα αβγά και 2kg (4lb 6oz) αλεύρι.
4 Ανακατέψτε στη µικρότερη ταχύτητα για 1 λεπτό και, στη συνέχεια, στην ταχύτητα 1 για
ακόµη ένα λεπτό.
Αφαιρείτε τη ζύµη από τα τοιχώµατα µε µια σπάτουλα.
5 Προσθέστε το υπόλοιπο αλεύρι και ανακατέψτε στη µικρότερη ταχύτητα για 1 λεπτό. Στη
συνέχεια, ανακατέψτε στην ταχύτητα 1 για ακόµη 2-3 λεπτά έως ότου το µίγµα είναι
απαλό και οµοιογενές.
6 Τοποθετήστε ζύµη µέχρι τη µέση σε µερικά λαδωµένα ταψάκια των 450g (1lb) ή πλάστε
ψωµάκια.
Στη συνέχεια, καλύψτε µε µια πετσέτα κουζίνας και αφήστε τα σε ένα ζεστό µέρος έως
ότου διπλασιαστούν σε όγκο.
7 Ψήστε στους 200°C/400°F/Με αέριο στο 6 για 20 - 25 λεπτά για καρβέλια ή 15 – 15
λεπτά για τα ψωµάκια
8 Όταν είναι έτοιµο, το ψωµί θα ακούγεται σαν να είναι κούφιο όταν το χτυπάτε από κάτω.
●
Μπορείτε να κάνετε περίπου 10 καρβέλια.
131

συνταγές συνέχεια
γλυκό µε φράουλες και βερίκοκα
υ
λικά: παντεσπάνι
●
3
αβγά
●
75g (3oz) ζάχαρη άχνη
●
75g (3oz) αλεύρι
γέµιση και διακόσµηση
●
150ml (1⁄4pt) κρέµα γάλακτος
●
Ζ
άχαρη ανάλογα την προτίµηση
●
2
25g (8oz) φράουλες
●
225g (8oz) βερίκοκα
εκτέλεση 1 Κόψτε τα βερίκοκα στη µέση και αφαιρέστε τα κουκούτσια. Μαγειρέψτε απαλά
χρησιµοποιώντας πολύ λίγο νερό, προσθέτοντας όση ζάχαρη προτιµάτε, έως ότου
µ
αλακώσουν.
2 Πλύνετε και κόψτε στη µέση τις φράουλες.
3 Για το παντεσπάνι, χτυπήστε τα αβγά και τη ζάχαρη στη µέγιστη ταχύτητα έως ότου το
µίγµα γίνει πολύ σφιχτό.
4 Αφαιρέστε το µπολ και τον αναδευτήρα. Προσθέστε σταδιακά το αλεύρι µε το χέρι
χ
ρησιµοποιώντας ένα µεγάλο µεταλλικό κουτάλι. Κάντε το προσεχτικά για να
διατηρήσετε το παντεσπάνι ελαφρύ.
5 Τοποθετήστε το µίγµα σε δύο λαδωµένα ταψιά 18cm (7”).
6 Ψήστε στους 180°C/350°F/Με αέριο στο 4 για 20 λεπτά περίπου. Όταν το παντεσπάνι
θα είναι έτοιµο θα πρέπει να είναι αφράτο και να επανέρχεται όταν το πιέζετε.
7 Αναποδογυρίστε το πάνω σε µια µεταλλική σχάρα.
8 Χτυπήστε την κρέµα στη µέγιστη ταχύτητα έως ότου γίνει σφιχτή. Προσθέστε ζάχαρη
ανάλογα µε την προτίµησή σας.
9 Κόψτε τα βερίκοκα και ένα τρίτο από τις φράουλες σε µικρά κοµµάτια. Προσθέστε τα
σταδιακά στη µισή κρέµα.
10 Απλώστε το µίγµα πάνω από τα παντεσπάνια, στη συνέχεια, τοποθετήστε το άλλο
παντεσπάνι από πάνω.
11 Απλώστε την υπόλοιπη κρέµα επάνω και διακοσµήστε µε τις υπόλοιπες φράουλες.
µαρέγκες
υλικά
●
4 ασπράδια αβγών
●
250g (9oz) κρυσταλλική ζάχαρη, κοσκινισµένη
●
Απλώστε αντικολλητικό χαρτί στο ταψί.
εκτέλεση 1 Χτυπήστε τα ασπράδια και τη ζάχαρη στη µέγιστη ταχύτητα για περίπου 10 λεπτά έως
ότου να στέκεται.
2 Με ένα κουτάλι τοποθετήστε το µίγµα στο ταψί (ή χρησιµοποιήστε µια σακούλα
ζαχαροπλαστικής µε ακροφύσιο σε σχήµα αστεριού διαµέτρου 2,5cm (1”)).
3 Ψήστε στους 110°C/225°F/Με αέριο στο 4 για 4 - 5 ώρες έως ότου γίνουν σκληρές και
τραγανές. Εάν αρχίσουν να µαυρίζουν, αφήστε την πόρτα του φούρνου λίγο ανοιχτή.
●
Αποθηκεύστε τις µαρέγκες σε ένα αεροστεγές δοχείο.
ζύµη για τάρτες
υλικά
●
450g (1lb) αλεύρι, κοσκινισµένο µε αλάτι
●
5ml (1 κουταλάκι του γλυκού) αλάτι
●
225g (8oz) λίπος (ανακατέψτε λάδι και µαργαρίνη κατευθείαν από το ψυγείο)
●
Περίπου 80ml (4tbsp) νερό
συµβουλή
●
Μην ανακατέψετε το µίγµα υπερβολικά πολύ
εκτέλεση 1 Βάλτε το αλεύρι στο µπολ. Κόψτε το βούτυρο σε κοµµάτια και προσθέστε το στο
αλεύρι.
2 Χρησιµοποιώντας τον αναδευτήρα σχήµατος K ανακατέψτε στην ταχύτητα 1 έως ότου
η ζύµη να γίνει σαν ψίχουλα.
Σταµατήστε το ανακάτεµα πριν αρχίσει να φαίνεται πολύ λιπαρή.
3 Προσθέστε το νερό και ανακατέψτε στην ελάχιστη ταχύτητα. Σταµατήστε µόλις το νερό
ενσωµατωθεί στο µίγµα.
4 Ψήστε τη ζύµη στους 200°C/400°F/Με αέριο στο 6, ανάλογα µε τη γέµιση.
μμααρριιννάάδδαα μμεε ττσσίίλλιι
υλικά
●
200g (7oz) κρύο διαυγές μέλι (να έχει μείνει στο ψυγείο όλη τη νύχτα)
●
1 πράσινη πιπερίτσα τσίλι (ολόκληρη)
●
5ml (1 κουταλάκι του γλυκού) φυστικοβούτυρο με κομματάκια φυστικιού
●
καρυκεύματα
εκτέλεση 1 Τοποθετήστε όλα τα υλικά μέσα στον μίνι κόφτη/μύλο.
2 Τοποθετήστε το εξάρτημα στο μίξερ και αφήστε τα υλικά να «καθίσουν» γύρω από τη
λεπίδα.
3 Επιλέξτε τη λειτουργία παλμού για 10 δευτερόλεπτα.
4 Συνοδεύστε με ό,τι θέλετε.
132


HEAD OFFICE: Kenwood Limited, 1-3 Kenwood Business Park, New Lane, Havant, Hampshire PO9 2NH
KW00800145/3
-
 1
1
-
 2
2
-
 3
3
-
 4
4
-
 5
5
-
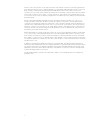 6
6
-
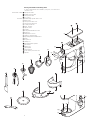 7
7
-
 8
8
-
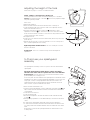 9
9
-
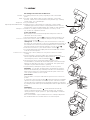 10
10
-
 11
11
-
 12
12
-
 13
13
-
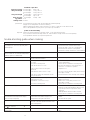 14
14
-
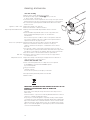 15
15
-
 16
16
-
 17
17
-
 18
18
-
 19
19
-
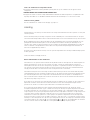 20
20
-
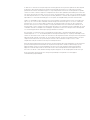 21
21
-
 22
22
-
 23
23
-
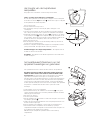 24
24
-
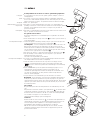 25
25
-
 26
26
-
 27
27
-
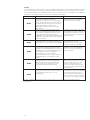 28
28
-
 29
29
-
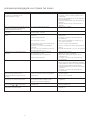 30
30
-
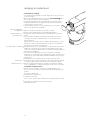 31
31
-
 32
32
-
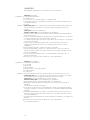 33
33
-
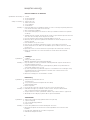 34
34
-
 35
35
-
 36
36
-
 37
37
-
 38
38
-
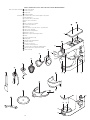 39
39
-
 40
40
-
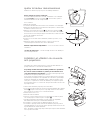 41
41
-
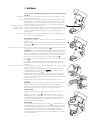 42
42
-
 43
43
-
 44
44
-
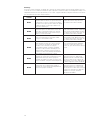 45
45
-
 46
46
-
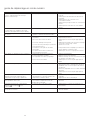 47
47
-
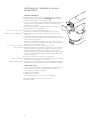 48
48
-
 49
49
-
 50
50
-
 51
51
-
 52
52
-
 53
53
-
 54
54
-
 55
55
-
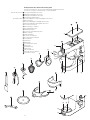 56
56
-
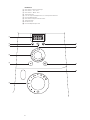 57
57
-
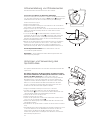 58
58
-
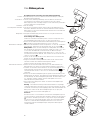 59
59
-
 60
60
-
 61
61
-
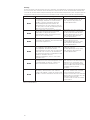 62
62
-
 63
63
-
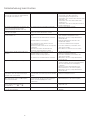 64
64
-
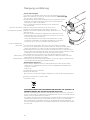 65
65
-
 66
66
-
 67
67
-
 68
68
-
 69
69
-
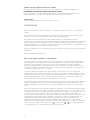 70
70
-
 71
71
-
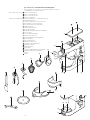 72
72
-
 73
73
-
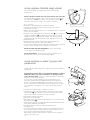 74
74
-
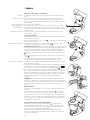 75
75
-
 76
76
-
 77
77
-
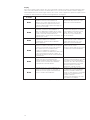 78
78
-
 79
79
-
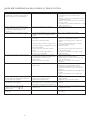 80
80
-
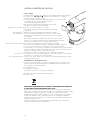 81
81
-
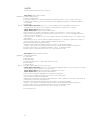 82
82
-
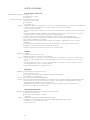 83
83
-
 84
84
-
 85
85
-
 86
86
-
 87
87
-
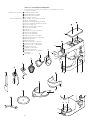 88
88
-
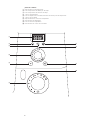 89
89
-
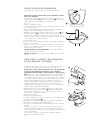 90
90
-
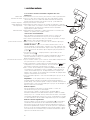 91
91
-
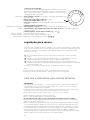 92
92
-
 93
93
-
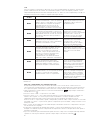 94
94
-
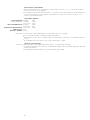 95
95
-
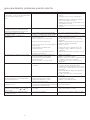 96
96
-
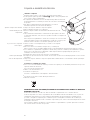 97
97
-
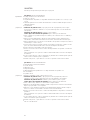 98
98
-
 99
99
-
 100
100
-
 101
101
-
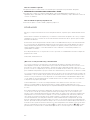 102
102
-
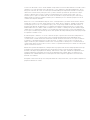 103
103
-
 104
104
-
 105
105
-
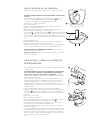 106
106
-
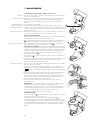 107
107
-
 108
108
-
 109
109
-
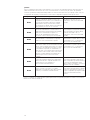 110
110
-
 111
111
-
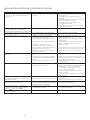 112
112
-
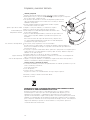 113
113
-
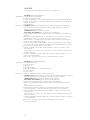 114
114
-
 115
115
-
 116
116
-
 117
117
-
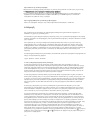 118
118
-
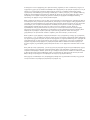 119
119
-
 120
120
-
 121
121
-
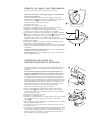 122
122
-
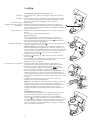 123
123
-
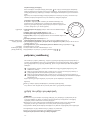 124
124
-
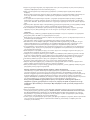 125
125
-
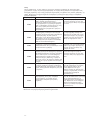 126
126
-
 127
127
-
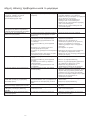 128
128
-
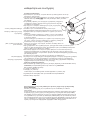 129
129
-
 130
130
-
 131
131
-
 132
132
-
 133
133


Kenwood KM082 El manual del propietario
- Categoría
- Mezcladores
- Tipo
- El manual del propietario
En otros idiomas
- français: Kenwood KM082 Le manuel du propriétaire
- italiano: Kenwood KM082 Manuale del proprietario
- Deutsch: Kenwood KM082 Bedienungsanleitung
- Nederlands: Kenwood KM082 de handleiding
- português: Kenwood KM082 Manual do proprietário
Documentos relacionados
-
Kenwood KCC9060S El manual del propietario
-
Kenwood KCC9040S El manual del propietario
-
Kenwood KCC9068S El manual del propietario
-
Kenwood KM096 El manual del propietario
-
Kenwood KMC570 El manual del propietario
-
Kenwood KM082 El manual del propietario
-
-
Kenwood KMM040 El manual del propietario
-
Kenwood KM 336 El manual del propietario
-