CANGAROO Baby crib Connect us beige Instrucciones de operación
- Categoría
- Muebles de bebe
- Tipo
- Instrucciones de operación

'͗ʦʤʮʻʽ͊ʿˀʽˋʫ˃ʫ˃ʫʦʻʰʺʤ˃ʫʸʻʽʰʯʤʿʤʯʫ˃ʫʯʤʥˎʪʫˍʰˁʿˀʤʦʶʰ
EN: IMPORTANT! READ CAREFULLY AND KEEP FOR FUTURE REFERENCE
DE: t/,d/'͊>^E^//Et/^hE'E^KZ'&౾>d/'hZ,͕sKZ^/^WZKh<d
sZtEE͕hEt,ZE^//^hD^W౾dZEE,^,>'Eh&
EL: ɇɅɃɉȴȰȻɃɇ! ȴȻȰȲȰɇɈȵɅɆɃɇȵȾɈȻȾȰȰɉɈȵɇɈȻɇɃȴȸȳȻȵɇɅɆȻɁɈȸɁɍɆȸɇȸɈɃɉɅɆɃȻɃɁɈɃɇȾȰȻ
ȾɆȰɈȸɇɈȵȳȻȰɀȵȿȿɃɁɈȻȾɃȵȿȵȳɍɃɇȵȵɉȾɃȿȰɅɆɃɇȲȰɇȻɀɃȾȰȻȰɇɌȰȿȵɇɇȸɀȵȻɃ
^͗͋/DWKZdEd͊͋Ed^h^Z>WZKhdK>>^/E^dZh/KE^h/K^DEdz
'hZ>^WZ&hdhZ^KE^h>d^EhE>h'Z/>z^'hZK
ZK͗/DWKZdEd͊/d/f/hdEf/c/W^dZf/WEdZhZ&Z/Efs/dKZIALE
Zh͗ʦʤʮʻʽ͊ʿˀʽˋʰ˃ʤʱ˃ʫʦʻʰʺʤ˃ʫʸːʻʽʰˈˀʤʻʰ˃ʫʪʸ˔ʪʤʸːʻʫʱˌʫʧʽʰˁʿʽʸːʯʽʦʤʻʰ˔
IT: IMPORTANTE! SI PREGA DI LEGGERE ATTENTAMENTE QUESTE ISTRUZIONI PRIMA DI USARE IL
PRODOTTO E DI CONSERVARLE PER UN RIFERIMENTO FUTURO IN UN POSTO FACILMENTE ACCESSIBILE E
SICURO
FR: IMPORTANT! LISEZ ATTENTIVEMENT LES INSTRUCTIONS ET CONSERVEZ->^E>/h^kZWKhZ^
KE^h>dd/KE^h>dZ/hZʫ^
SR: VANO! PALJIVO ITAJTE I SAUVAJTE ZA BUDUE REFERENCE
NL: BELANGRIJK! ZORGVULDIG LEZEN EN OPSLAAN VOOR TOEKOMSTIGE REFERENTIES
BG: ʰʻˁ˃ˀ˄ʶˉʰ˔ʯʤ˄ʿʽ˃ˀʫʥʤʻʤ ʥʫʥʫˌʶʽʶˀʫʦʤ˃ˋʫCONNECT US ʤˀ˃ʰʶ˄ʸʫʻζ BL11872
EN: MANUAL OF BABY CRIB CONNECT US ITEM N0 BL11872
DE: 'Zh,^E>/dhE'&mZ^zddCONNECT US ARTIKEL NR. BL11872
EL: ɃȴȸȳȻȵɇɍɆȸɇȸɇɈɃɉȲɆȵɌȻȾɄȾɆȵȲȱɈȻCONNECT US ȰɆȻȺɀɄɇɅɆɃȽɄɁɈɃɇBL11872
ES: /E^dZh/KE^h^K>DCONNECT US EjDZKZd1h>KBL11872
ZK͗/E^dZhf/hE/hd/>/ZPAT DE BEBELUc CONNECT US NR. ARTICOL BL11872
RU: ʰʻˁ˃ˀ˄ʶˉʰ˔ʿʽˑʶˁʿʸ˄ʤ˃ʤˉʰʰʪʫ˃ˁʶʽʱʶˀʽʦʤ˃ʶʰCONNECT US ʻʽʺʫˀʤˀ˃. BL11872
IT: ISTRUZIONI PER L'USO DEL LETTINO PER BAMBINI CONNECT US NUMERO DI ARTICOLO BL11872
FR: DKΖDW>K/h>/dCONNECT US EhDZK͛Zd/> BL11872
SR: UPUTSTVO ZA UPOTREBU BEBI KREVEA CONNECT US ARTIKL BL11872
NL: GEBRUIKSAANWIJZING VAN HET BABYBED CONNECT US Zd/<>ζBL11872

247
47
De veerpen klikt op zijn plaats zodra deze aan beide zijden stevig vastzit. Zorg ervoor dat de
bouten goed vastziƩen en dat de mand stevig aan de wiegstandaard is bevesƟgd.
Aĩeeldingen D, E - De verplaatsbare scheidingswand verwijderen en opƟůůen. Open de rits,
die zich onder de gewĂƩeerde bovenrail bevindt. Til de verplaatsbare scheidingswand van de
mand op zodat deze loskomt van de basis en bevesƟg de zakkende kant aan de onderkant van
de mand. Sluit het zijpaneel tot u een klikgeluid hoort en sluit de rits aan beide kanten. Als u de
verwijderbare scheidingswand wilt opƟllen, maak deze los en bevesƟg ze aan beide zijden weer
aan de onderkant van de mand. Gebruik de zijritsen om volledig te sluiten. Gebruik de metalen
ring om de twee ritsen met elkaar te verbinden zodat ze niet kunnen opengaan. Het wiegje is
klaar om als bed te worden gebruikt.
Aĩeelding F - De babywieg verplaatsen. Om het wiegje te verplaatsen, Ɵl de achterkant van
het wiegje op en verplaats het naar de gewenste plaats met behulp van de vooraf gemonteerde
bevesƟgingen aan beide poten. De poten van de wieg zijn uitgerust met een reminrichƟng
(stoppers) die voorkomen dat het wiegje ongewenst gaat bewegen en die het wiegje stevig
vergrendeld houden.
Aĩeelding G - Hoogteverstelling en anƟreŇuxfuncƟe. Het product kan in 5 standen op hoogte
worden versteld. Om de hoogte aan te passen, druk op de instelknop en ga naar de gewenste
posiƟĞ. Om ongemak en versƟkking van het kind te voorkomen, kan de bodem van de mand op
maximaal 30° worden gebruikt. Het babywiegje kan gekanteld worden met een maximaal
hoogteverschil van 2 standen. (voorbeeld: de rechtervoet is op posiƟĞ 3 en de linker is op posiƟe
1). AANDACHT! De anƟreŇuxfuncƟĞ kan alleen worden gebruikt als het wiegje als bed wordt
gebruikt. Het hoofd van het kind moet alƟjd aan de hoogste kant zijn.
Aĩeelding H - BevesƟging van de wieg aan het ouderlijke bed. Verwijder de scheidingswand
door de ritsen aan beide kanten los te knopen en maak deze vast aan de onderkant van de wieg.
Gebruik de twee veiligheidsgordels in de set om de wieg aan het ouderlijke bed te bevesƟgen.
Vergrendel de gespen onder de wieg aan beide kanten, maak vervolgens de riemen vast rond
de structuur van het ouderlijke bed. Begin van onder naar boven en trek tensloƩe de gespen
onder het bed aan. Om de wieg vast te zeƩen wanneer deze naast het ouderlijke bed staat, trek
nogmaals aan de riemen om ervoor te zorgen dat de wieg stevig aan het ouderlijke bed vastzit.
Reinig de kunststof- en de metalen onderdelen van het product met een zachte katoenen doek
of spons met water of een mild schoonmaakmiddel. Gebruik geen bleekmiddel, sterke
reinigingsmiddelen of schurende deeltjes om het product te reinigen. Alle texƟĞle onderdelen
en stoīen mogen alleen met de hand worden gewassen, volg hierbij de instrucƟĞs op het eƟket.
Laat het wiegje na het schoonmaken goed drogen voordat u het weer gaat gebruiken. Vouw of
demonteer de wieg niet voordat deze helemaal droog is. Stel het product niet gedurende lange
Ɵjd bloot aan direct zonlicht en aan extreme temperaturen die de kleur van de blootgestelde
onderdelen kunnen veranderen of deze kunnen beschadigen. Wacht na langdurige blootstelling
aan hoge temperaturen een paar minuten af voordat u het kind erin legt. Plaats geen
voorwerpen in of op het product om beschadiging van de structuur en/of de bekleding te
voorkomen. Bewaar het product op een schone en droge plaats.
Gemaakt voor Cangaroo in de VRC, Fabrikant en importeur: Moni Trade Ltd.,
Adres: Bulgarije, SoĮa, Trebich, 1 Dolo Str.,
Telefoonnummer: 003592/936 07 90, website: www.cangaroo-bg.com
RICHTLIJNEN VOOR REINIGING EN ONDERHOUD
2
A
.
X4
4x

3 46
46
De babywieg die is aangesloten op het bed van de ouders mag nooit schuin worden
gebruikt. Bij deze funcƟĞ moeten beide poten alƟjd op dezelfde hoogte worden
afgesteld.
Om versƟkkingsgevaar door beknelling te voorkomen, als u de funcƟĞ 'bevesƟging aan
het ouderlijke bed' gebruikt, moet de wieg correct aan het ouderlijke bed worden
bevesƟgd met behulp van het bevesƟgingssysteem.
Gebruik enkel en alleen het bevesƟgingssysteem dat bij dit product is geleverd.
Controleer voor elk gebruik de sterkte van het bevesƟgingssysteem door de wieg aan
het bed van de ouders te trekken.
Gebruik het product niet u een opening tussen de wieg en het ouderlijke bed vaststelt.
Vul de openingen niet op met kussens, dekens of andere voorwerpen.
WAARSCHUWING - Om te voorkomen dat de nek van het kind bekneld raakt in het
bovenframe aan de zijkant naast het ouderlijke bed, mag het bovenframe niet hoger
zijn dan de matras van het ouderlijke bed.
WAARSCHUWING - Om het risico van wurging van uw kind te voorkomen, moet het
bedbevesƟgingssysteem voor het bevesƟgen van het wiegje op het ouderlijke bed
alƟjd uit de buurt de wieg worden gehouden.
GEVAAR! Til de uitklapzijde alƟjd helemaal op als de wieg niet aan het ouderlijke bed
is bevesƟgd!
De montage, de op- en de uitvouwing van het product mag UITSLUITEND door een
volwassene worden uitgevoerd.
Om toegang tot kleine en gedemonteerde onderdelen te voorkomen, houd kinderen
onder de 3 jaar niet in de buurt voordat het product volledig is gemonteerd.
Om versƟkkingsgevaar te voorkomen moeten alle kunststofverpakkingen moeten
worden verwijderd, vernieƟgd of buiten het bereik van kinderen worden gehouden.
Breng geen wijzigingen of verbeteringen aan in het ontwerp van de wieg, omdat dit
kan leiden tot schade aan de wieg en het risico op letsel voor het kind kan verhogen.
BELANGRIJK! De tekeningen en de aĩeeldingen in deze instrucƟĞ zijn louter illustraƟĞf en
indicaƟef. Controleer na elke handeling of de onderdelen goed zijn bevesƟgd.
Onderdelen - aĩeeldingʤ
Pak het product uit en controleer of alle onderdelen van aĩeelding A aanwezig zijn.
Montage van de construcƟe
AANDACHT! Volg strikt de instrucƟĞƐ en de volgorde voor de montage van het product zoals
weergegeven in de diagrammen.
Aĩeelding B - Monteer de bedstandaard door de hoofdsteunbuis "C" in de verbindingsdelen
(gaten) van de twee zijframes (poten) "A" en "B" in de richƟng van de pijlen te plaatsen. Elk
zijframe is uitgerust met twee bouten om de hoofdsteunbuis aan het bed te bevesƟgen. Gebruik
een zeskant om de bouten met de klok mee vast te draaien. AANDACHT! Zorg ervoor dat het
frame goed gespannen en stabiel is. Dit is het dragende onderdeel van de wieg en zorgt voor de
veiligheid van je kindje.
Aĩeelding C - BevesƟg de slaapmand aan de gemonteerde standaard door het verbindingsdeel
van het frame van de mand aan de bovenkant van de twee zijframes "A" en "B" te bevesƟgen.
RICHTLIJNEN VOOR MONTAGE
3
D
B
.
ˁ

45
4
4
E
F
G
45
Dit product voldoet aan de vereisten van de Europese richtlijn 2001/98/EG inzake de
algemene productveiligheid, de Wet op de consumentenbescherming en de Europese norm
BDS EN 1130:2019.
WAARSCHUWING!
Lees eerst de gebruikershandleiding vooraleer u dit product gaat gebruiken.
Het babybedje is ontworpen voor kinderen tot 12 maanden en 11 kg.
Gebruik het product niet meer zodra het kind in staat is om zelfstandig te ziƩen,
knielen of opstaan.
Het toevoegen van bijkomende elementen aan het product kan versƟkking
veroorzaken.
Plaats het product niet in de buurt van een ander product dat versƟkkings- of
versƟkkingsgevaar kan opleveren, zoals touwtjes, rolluik-/gordijnkoorden, enz.
Gebruik slechts een matras in het product.
Gebruik alleen de matras die bij dit babywiegje werd geleverd, gebruik geen tweede
matras, versƟkkingsgevaar!
Het product moet op een horizontale vloer worden geplaatst.
Jonge kinderen mogen niet zonder toezicht in de buurt van het wiegje spelen.
Het wiegje moet in een vaste posiƟĞ worden vergrendeld wanneer het kind zonder
toezicht wordt achtergelaten.
Alle Įƫngen moeten alƟjd correct worden vastgedraaid en men moet erop dat er
geen losse schroeven zijn, omdat het kind lichaamsdelen of texƟĞle elementen (bijv.
bandjes, linten, fopspeensluiƟngen) kan vast pakken dat een risico op versƟkking zou
kunnen vormen. Controleer regelmaƟg om er zeker van te zijn dat er geen losse,
beschadigde of ontbrekende onderdelen zijn.
De maximale binnenmaat van het babywiegje waarvoor de matras bedoeld is, is
900/590 mm. De lengte en de breedte van de matras moeten zodanig zijn dat de
maximale afstand tussen de matras en de zijkanten en de randen van de wieg niet
groter is dan 2,5 cm.
Om ongemak en een versƟkking van het kind te voorkomen, plaats de bodem van de
wieg op maximaal 30°.
Gebruik de wieg NIET in geval van ontbrekende, beschadigde of gebroken onderdelen.
Neem indien nodig contact op met MONI TRADE voor reserveonderdelen en
instrucƟĞƐ. Vervang GEEN onderdelen.
Het gebruik van een babywiegje met de funcƟĞ "bevesƟging aan het ouderlijke bed"
is alleen toegestaan bij een standaard bedsoort en/of een rechtwandig matras. Het
gebruik van het product met ronde bedden en/of matrassen, waterbedden of
opblaasbare matrassen is NIET TOEGESTAAN!
AANDACHT! Gebruik de wiegvergrendeling niet als de hoogte van de wieg minder dan
45 cm of meer dan 60 cm boven de vloer is.
NL
BELANGRIJK! LEES ZORGVULDIG EN BEWAAR VOOR LATERE RAADPLEGING.

44 5
44
Slike D, E - Skidanje i podizanje pokretne pregrade. Otvorite patent zatvaraē, koji se nalazi ispod
podstavljene gornje šine. Podignite pokretnu pregradu košare tako da se odvoji od osnove i
priēvrsƟte stranu koja pada na dno košare. Zatvorite boēnu ploēu dok ne ēujete klik i zatvorite
patentni zatvaraē sa obe strane. Ako ǎelite da podignete pokretnu pregradu, odvojite je i ponovo
je priēvrsƟte na dno košare sa obe strane. KorisƟte boēne patentne zatvaraēe da potpuno
zatvorite. KorisƟte metalni prsten da spojite dva rajsferšlusa tako da se ne mogu otvoriƟ.
KreveƟđ je spreman za upotrebu kao poseban krevet.
Slika F - Premeštanje bebeđeg kreveƟđa. Da bi pomerili kreveƟđa podignite zadnju stranu
kreveƟđa, a zaƟm ga pomerite na ǎeljeno mesto pomođu reĜaja koji su fabriēki monƟrani na obe
noge. Noge kreveƟđa su opremljene kŽēionim ureĜajem (stoperima) koji zaustavljaju kretanje
kreveƟđa i dƌǎĞ ga ēvrsto zakljuēanim.
Slika G – Podešavanje visine i anƟreŇuksna funkcija. Visinu moǎete podesiƟ u 5 poloǎaja. Da
biste je podesili priƟsnite taster za podešavanje i pomerite u ǎeljenom poloǎaju. Postolje košare
moǎe da se korsƟ sa nagibom do 30 stepeni radi spreēavanja nelagodnosƟ i gušenja deteta.
Djeēji kreveƟđ se moǎe nagnuƟ sa maksimalnom razlikom od 2 poloǎaja u visini. (Primer: desna
noga je pozicija 3, a leva pozicija 1). PANJA! AnƟreŇuks funkcija moǎe se korisƟƟ samo kada se
kreveƟđ korisƟ kao poseban krevet. Detetova glava uvek treba da bude na najvišoj strani.
Slika H – Prŝēvršđivanje kreveƟđa na krevet roditelja. Uklonite pregradu tako što đete otkopēaƟ
rajsferšluse sa obe strane i priēvrsƟƟ je za dno kreveƟđa. KorisƟte dva sigurnosna pojasa koja se
nalaze u kompletu da priēvrsƟte kreveƟđ za krevet roditelja. Zakljuēajte kopēe ispod kreveƟđa
sa obe strane, zaƟm priēvrsƟte kaiševe oko konstrukcije roditeljskog kreveta, poēevši od dna i
iduđi nagore, i na kraju zategnite kopēe ispod kreveta. Da biste priēvrsƟli kreveƟđ kada je pored
roditeljskog kreveta, još jednom povucite trake da biste bili sigurni da je krevetac dobro
priēvršđen za roditeljski krevet.
PlasƟēne ili metalne delove proizvoda ēisƟte mekom pamuēnom krpom ili sunĜerom,
namođenim vodom ili blagim deterĜentom. Za ēišđenje proizvoda nemojte korisƟƟ izbelivaē,
jake deterĜente ili sredstva za ēišđenje sa abrazivnim ēesƟcama. TeksƟlne delove i tkanine perite
samo ruēno, prateđi uputstva sa eƟkeƟ. Posle ēišđenja ostavite kreveƟđ da se dobro osuši pre
upotrebe. Ne sklapajte i ne demonƟrajte kreveƟđa pre nego što se dobro osuši. Ne izlaǎite
proizvod direktnoj sunēevoj svetlosƟ u duǎem vremenskom periodu i ekstremnim
temperaturama koje mogu promeniƟ boju i ošteƟƟ izloǎene delove. Posle duǎeg izlaganja
visokim temperaturama, saēekajte nekoliko minuta pre nego što stavite dete u njemu. Ne
stavljajte predmete u ili na proizvod da biste izbegli ošteđenje strukture i/ili presvlake. SkldišƟte
proizvod na ēistom i suvom mestu.
Napravljeno za Canguroo u NRK
ProizvoĜaē i uvoznik: Moni Trade doo,
Adresa: Bugarska, SoĮja, Trebiē, ul. Dolo 1,
Telefon: 003592/936 07 90, veb stranica: www.cangaroo-bg.com
PREPORUKE ZA IŠENJE I KZAVANJE
5
H

643
6
43
Kada korisƟte funkciju proizvoda ΗĮksiranje na roditeljskom krevetu", da biste spreēili
rizik od gušenja usled zaglavljivanja kreveƟđ mora biƟ pravilno priēvršđen za krevet za
odrasle pomođu sistema za priēvršđivanje.
ʻ̨̨̨̨̛̛̖̥̠̯̖̪̖̹̯̪̬̔̌̏̌̏̔̚ ̨̛̛̪̥̖̬̯̌̐̌ ̡̌̔̌ ̠̖̖̯̖̱̦̱̯̬̔̌
Uvek korisƟte jedino sistem za priēvršđivanje koji ste dobili uz ovog proizvoda.
Pre svake upotrebe proveravajte ēvrstođu sistema za priēvršđivanje tako što đete
povuđi kreveƟđ dalje od roditeljskog kreveta.
Nemojte korisƟƟ proizvod, ako postoji razmak izmeĜu bebeđeg kreveƟđa i kreveta
roditelja.
Ne treba popunjavaƟ razmak izmeĜu kreveƟđa i kreveta roditelja jastucima, đebeƟma
ili drugim predmeƟma.
UPOZORENJE - Da biste izbegli rizik od zahvatanja vrata deteta u gornji okvir stranice
koja je pored roditeljskog kreveta, gornji okvir ne sme biƟ viši oda madraca kreveta za
odrasle.
UPOZORENJE - Da biste izbegli rizik da vaše dete bude zadavljeno, sistem za vezivanje
za krevet za odrasle uvek treba dƌǎaƟ dalje od i van kreveta.
OPASNOST! Kada kreveƟđ nije priēvršđen na roditeljsi krevet pokretna stranica mora
uvek biƟ potpuno podignuta.
Sastavljanje, rasklapanje i sklapanje proizvoda treba da obavlja JEDINO odrasla osoba.
Nemojte dozvoliƟ da deca mlaĜa od 3 godine budu prisutna pre potpunog sklapanja
proizvoda da biste izbegli pristup malim i rastavljenim delovima.
Sva najlonska pakovanja treba da se uklone, da se unište ili da se dƌǎĞ dalje od dece
da bi se izbegao rizik od gušenja.
Nemojte praviƟ nikakve izmene ili poboljšanja u dizajnu kreveƟđa, jer to moǎe dovesƟ
do ošteđenja kreveta i predstavlja rizik od povrede deteta.
VANO! Šeme i slike u ovom priruēniku su samo ilustraƟvne i usmeƌĂǀĂũƵđĞ. Posle svake radnje
proveravajte da li su delovi dobroĮŬsirani.
Sastavni delovi – ilustracija ʤ
Nakon raspakiranja uverite se da su svi elemenƟ sa ilustracije A tu.
Zglabanje konstrukcije i eksploataciju
PANJA! Strogo praƟte uputstva i redosled za sastavljanje proizvoda kao što je prikazano na
dijagramima.
Slika B – Sastavite postolje kreveƟđa tako što đete glavnu potpornu cev „C“ postaviƟ u spojne
delove (rupe) na dva boēna okvira (noge) „A“ i „B“ u pravcu strelica. Svaki boēni okvir je
opremljen sa dva vijka za priēvršđivanje glavne potporne cevi za krevet. KorisƟte heksodekadni
kljuē za zatezanje zavrtnja u smeru kazaljke na satu. PANJA! Uverite se da je okvir ēvrst i
stabilan. Ovo je potporni deo kreveƟđa i obezbeĜuje bezbednost vašeg deteta.
Slika C – PriēvrsƟte košaru za spavanje na monƟrano postolje tako što đete spojni deo okvira
košare priēvrsƟƟ na vrh dva boēna okvira „A“ i „B“. ut đete klik kada je opruǎni šƟŌ bezbedno
priēvršđen sa obe strane. OPREZ! Uverite se da su zavrtnji zategnuƟ i da je košara dobro
priēvršđena za postolje kreveƟđa.
UPUTSTVA ZA SASTAVLJANJE I EKSPLOATACIJU

742
42
Ovaj proizvod je proizveden u skladu sa zahtevima Evropske DirekƟve 2001/98/EC o opštoj
bezbednosƟ proizvoda, Zakona o zašƟƟ potrošaēa i Evropskog standarda BDS EN 1130: 2019.
PANJA!
Nemojte korisƟƟ ovog proizvoda, ako pre toga niste proēitali instrukcije za upotrebu.
Bebeđeg kreveƟđa namenjen je za decu uzrasta od 0 do 12 meseci teǎinom do 11 kg.
Prestanite da korisƟte ovog proizvoda kada Vaše dete moǎe da sedi samostalno ili da
ēuēi na kolenima, ili da se samo ispravlja na nogama.
Postavljanje dodatnih elemenata u proizvodu moǎe prouzrokoǀĂƟ gušenje.
Ne postavljajte proizvod u blizini predmeta koji mogu izazǀĂƟ rizik od gušenja kao
naprimer ǎice, šnurovi za roletne/zavese itd.
Nemojte korisƟƟ više od jednog madraca.
KorisƟte samo madrac sa kojim se kreveƟđ prodaje, nemojte dodavaƟ drugi madrac
zbog opasnosi od gušenja.
Proizvod treba postaviƟ na horizontalnom podu.
Ne dozvolite deci da se igraju bez nadzora u blizini kreveƟđa.
Kada je dete ostavljeno bez nadzora kreveƟđ treba da bude zakljuēan u nepokretnom
stanju.
Svi okovi uvek moraju biƟ pravilno zategnuƟ i pazite da se vijci ne olabave, jer dete
moǎe da zahǀĂƟ delove tela ili teksƟlne elemente (npr. kravate, trake, kopēe za dude),
što moǎe predstavljaƟ opasnost od gušenja. Izvršite ruƟnske provere da biste bili
sigurni da nema labavih, ošteđenih ili nedostajuđih delova.
Maksimalna unutrašnja dimenzija kreveƟđa za kojeg je namenjen madrac je 900/590
mm. Duǎina i širina madraca treba da budu takve da maksimalni razmak izmeĜu
madraca i stranice i ivice kreveƟđa ne sme biƟǀĞđŝod 2,5 cm.
Drǎite proizvod dalje od upaljenih cigareta, otvorenog plamena i drugih izvora visoke
toplote kao što su elekƟēke i plinske grejallice.
Postolje košare moǎete korisƟƟ sa nagibom do 30°, radi spreēavanja nelagodnosƟ i
gušenja deteta.
Nemojte korisƟƟ bebeđeg kreveƟđa ako neki delovi nedostaju ili su polomljeni. Ako je
potrebno, kontakƟrajte MONI TREJD DOO za rezervne delove ili uputstva. Ne menjate
delove neoriginalnima.
Upotreba deēijeg kreveƟđa sa funkcijom ΗĮksiranje na roditeljski krevet" je dozvoljena
samo sa standardnim Ɵpom kreveta i/ili madracem sa ravnim zidovima. Upotreba
proizvoda sa okruglim kreveƟma i/ili madracima ili sa madracima na naduvavanje NIJE
DOZVOLJENA.
PANJA! Nemojte korisƟƟ funkciju za Įksiranje bebeđek kreveƟđa na roditeljskom
krevetu, ako visina Vašeg kreveta je manja ot 45 cm iliǀĞđĂod 60 cm iznad poda.
Krevetac povezan sa krevetom roditelja nikada ne treba korisƟƟ u nagnutom poloǎaju.
Sa ovom funkcijom, obe noge moraju uvek biƟ podešene na istu visinu.
SR
VNO! PALJIVO ITAJTE I SAUVAJTE ZA BUDUE REFERENCE
7
BG ʰʻˁ˃ˀ˄ʶˉʰ˔ʯʤ˄ʿʽ˃ˀʫʥʤ ʻʤ ʥʫʥʫˌʶʽ ʶˀʫʦʤ˃ˋʫ CONNECT US ……………………………………………...…………….......8
EN MANUAL OF BABY CRIB CONNECT US …………………………………………………………………………………………………………..…….15
DE GEBRAUCHSANLEITUNG FÜR DAS BABYBETT CONNECT US …………………………………………………………………..…….....…..18
EL ɃȴȸȳȻȵɇɍɆȸɇȸɇ ɈɃɉ ȲɆȵɌȻȾɄȾɆȵȲȱɈȻ CONNECT US ………………………………………………………………………………………..21
ES INSTRUCCIONES DE USO DE CUNA DE BEBÉ CONNECT US ……………………………………………………………………..………..…..24
RO INSTRUCfIUNI DE UTILIZARE A PAT DE BEBELUc CONNECT US …………………….………………………………..…………………….27
RU ʰʻˁ˃ˀ˄ʶˉʰ˔ ʿʽ ˑʶˁʿʸ˄ʤ˃ʤˉʰʰʪʫ˃ˁʶʽʱ ʶˀʽʦʤ˃ʶʰ CONNECT US ……………………………………………..……..........30
IT ISTRUZIONI PER L'USO DEL LETTINO PER BAMBINI CONNECT US…………………………………….………………………...………....33
FR MODE D'EMPLOI DU LIT BÉBÉ CONNECT US………………………………………………………………………………………….……………..36
SR UPUTSTVO ZA UPOTREBU BEBEEG KREVETIA CONNECT US ………………………………………………..…………………..………39
NL GEBRUIKSAANWIJZING VAN HET BABYBED CONNECT US………………………………………………………………………………......42

841
41
IllustraƟons D, E - ReƟrer et soulever la cloison mobile. Ouvrez la fermeture éclair située sous
le rail supérieur rembourré. Soulevez la cloison mobile du panier pour qu'il se détache de la base
et Įxez le côté déroulant au bas du panier. Fermez le panneau latéral jusqu'à ce que vous
entendiez un déclic et fermez la fermeture éclair des deux côtés. Si vous souhaitez soulever la
cloison mobile, détachez-la et rattachez-la à la base du panier des deux côtés. UƟůŝsez les
fermetures éclair latérales pour fermer complètement. UƟůisez l'anneau métallique pour relier
les deux fermetures éclair ĂĮn qu'elles ne puissent pas s'ouvrir. Le lit est prêt à être uƟlisé
comme lit séparé.
IllustraƟon F - Déplacement du lit bébé. Pour déplacer le lit bébé, soulevez l'arrière du lit, puis
déplacez-le à l'emplacement souhaité à l'aide des disposiƟfs à deux pieds montées en usine. Les
pieds du lit bébé sont équipés d'un dispositif de freinage (arrêts) qui arrête le mouvement du lit
et le mainƟent fermemenƚĮxé.
IllustraƟon G - Réglage de la hauteur et foncƟon anƟ-reŇux. La hauteur peut être réglée en 5
posiƟons. Pour régler la hauteur, appuyez sur le bouton de réglage et déplacez à la posiƟon
souhaitée. La base du panier peut être uƟlisée avec une inclinaison allant jusqu'à 30°, pour éviter
l'inconfort et contre l'étouīement de l'enfant. Le lit bébé peut être incliné avec une diīérence
de hauteur maximale de 2 posiƟons. (Exemple : le pied droit est en posiƟon 3 et le pied gauche
en posiƟon 1). ATTENTION ! La foncƟon anƟ-reŇux ne peut être uƟlisée que lorsque le lit est
uƟlisé comme lit séparé. La tête de l'enfant doit toujours être du côté le plus haut.
Illustration H - FixaƟon du lit bébé au lit parental. ReƟrez la cloison en déboutonnant les
fermetures éclair des deux côtés et enůĂĮxant au bas du lit bébé. UƟůŝsez les deux ceintures de
sécurité fournies dans le kit pour Įxer le lit bébé au lit parental. Verrouillez les boucles sous le
lit bébé des deux côtés, puis Įxez les ceintures autour de la structure du lit parental, en
commençant par le bas et en remontant, et enĮn resserez les boucles sous le lit. Pour Įxer le lit
bébé lorsqu'il est à côté du lit parental, Ɵrez les ceintures encore une fois pour vous assurer que
le lit bébé est solidemenƚĮxé au lit parental.
NeƩoyez les parƟes en plasƟque ou en métal du produit avec un chiīon doux en coton ou une
éponge humidiĮée avec de l'eau ou un détergent doux. N'uƟlisez pas d'eau de Javel, de
détergents puissants ou tels de parƟcules abrasives pour neƩoyer le produit. Toutes les pièces
texƟles et les Ɵssus doivent être lavés à la main uniquement, en suivant les instrucƟons sur
l'éƟqueƩe. Après le neƩoyage, laissez bien sécher le lit bébé avant de l'uƟliser. Ne pliez pas et
ne démontez pas le lit bébé avant qu'il ne soit complètement sec. N'exposez pas le produit à la
lumière directe du soleil pendant de longues périodes et à des températures extrêmes qui
pourraient changer la couleur et endommager les pièces exposées. Après une exposiƟon
prolongée à des températures élevées, aƩendez quelques minutes avant d'y placer l'enfant. Ne
placez pas d'objets dans ou sur le produit pour éviter d'endommager la structure et/ou le
rembourrage. Stocker le produit dans un endroit propre et sec.
Conçu pour Cangaroo en RPC
Fabricant et importateur : Moni Trade Ltd.,
Adresse : Bulgarie, SoĮa, Trebich, 1 Dolo Str.,
Téléphone: 003592/936 07 90, site internet : www.cangaroo-bg.com
NETTOYAGE ET ENTRETIENT
8
˃̨̛̚ ̨̡̪̬̱̯̔ ̖ ̨̛̪̬̖̖̦̏̔̚ ̏ ̨̛̭̻̯̖̯̭̯̖̏̏ ̭ ̡̛̛̛̭̦̯̏̌́̌̚ ̨̡̦̖̬̪̖̜̭̯̌̏̌̌ ʪ̡̛̛̬̖̯̏̌
2001/98/ʫʽ ̌̚ ̨̨̨̺̖̪̭̦̭̯̍̌̍̌̚ ̦̌ ̨̡̛̪̬̱̯̯̖̔, ʯ̡̨̦̌̌ ̌̚ ̛̺̯̌̌̚ ̦̌ ̨̛̛̪̯̬̖̯̖̣̯̖̍ ̛
̨̡̛̖̬̪̖̜̭̏́ ̭̯̦̬̯̌̔̌ ʥʪˁʫN 1130:2019.
ʿˀʫ˄ʿˀʫʮʪʫʻʰʫ!
ʻ̖ ̨̨̨̡̛̛̪̣̜̯̖̯̪̬̱̯̏̌̔̚̚̚, ̸̨̨̖̪̻̬̪̬̖̯̖̯̖̍̏̔̌̚ ̶̡̛̛̛̦̭̯̬̱̯̖ ̨̱̪̯̬̖̌̍̌̚.
ʥ̡̨̨̨̖̖̹̯̣̖̣̍̐ ̸̨̖̪̬̖̦̦̖̦̔̌̌̚ ̶̨̖̌̔̌̔̚ 12 ̶̛̥̖̭̖̌ ̨̨̭̯̖̣̐̔ ϭϭ̡̐.
ˁ̪̬̖̯̖ ̔̌ ̨̛̪̣̯̖̏̌̚̚ ̨̡̪̬̱̯̔̌ ̖̦̏̔̌̐̌ ̨̺̥ ̨̖̯̖̯̔ ̨̥̙̖ ̔̌ ̛̭̖̔ ̛̛̣ ̔̌ ̸̡̨̛̛̣̖̦,
̛̛̣̔̌ ̭̖ ̨̛̪̬̦̬̖̌̏́̌̐̚.
ʿ̨̨̨̛̛̭̯̦̖̯̦̪̻̣̦̯̖̣̦̌̏́̌̔ ̨̡̨̛̖̣̖̥̖̦̯̪̬̱̯̥̙̖̏̔̌̔̌ ̸̛̛̛̪̬̦ ̱̹̦̖̌̔̌̏̌̚.
ʻ̖ ̨̪̭̯̜̯̖̌̏́ ̨̡̪̬̱̯̔̌ ̏ ̨̛̣̭̯̍̚ ̨̔ ̬̱̔̐ ̨̡̪̬̱̯̔, ̡̨̨̜̯ ̨̥̙̖ ̔̌ ̪̬̖̭̯̣̔̌̏́̏̌
̨̨̪̭̦̭̯̌ ̨̯ ̱̹̦̖̌̔̌̏̌̚ ̛̛̣ ̱̱̹̦̖̔̌̏̌, ̡̨̯̌ ̛̦̪̬̥̖̬̌ ̛̭̯̬̱̦, ̨̹̦̱̬̖̏ ̌̚
̨̛̺̬/̛̖̭̌̏̚ ̛̛̬̱̔̐.
ʻ̖ ̸̨̨̛̪̣̜̯̖̪̖̖̏̌̏̚̚ ̨̛̯̖̦̔ ̡̥̯̬̌̌ ̨̡̪̬̱̯̏̔̌.
ʰ̨̪̣̜̯̖̏̌̚̚ ̨̭̥̌ ̡̥̯̬̌̌̌,̨̨̡̨̨̪̬̦̭̯̖̯̭̣̖̣̔̌̏̌̏̌̔̐,̨̨̛̦̖̜̯̖̯̬̔̍̌̏́̏ ̡̥̯̬̌̌
̡̨̛̻̥̯̚, ̨̨̪̭̦̭̯̌ ̨̯̱̹̦̖̌̔̌̏̌̚!
ʿ̨̡̬̱̯̻̯̯̬̔́̍̏̌ ̔̌ ̵̨̨̨̨̛̻̖̪̭̯̖̦̦̬̦̯̣̖̦̪̍̔̌̏̌̌̔̚͘
ʻ̌ ̡̛̥̣̯̖̌ ̶̖̔̌ ̦̖ ̯̬́̍̏̌ ̔̌ ̭̖ ̨̨̪̣̏́̏̌̚ ̔̌ ̛̬̯̐̌́ ̖̍̚ ̨̦̬̌̔̚ ̏ ̨̛̣̭̯̍̚ ̨̔ ̨̨̣̖̣̯̐.
ʸ̨̨̖̣̯̐ ̯̬́̍̏̌ ̔̌ ̭̖ ̸̡̛̣̌̀̚ ̏ ̨̨̛̦̖̪̙̦̔̏ ̨̨̛̪̣̙̖̦̖, ̡̨̨̯̐̌ ̨̖̯̖̯̔ ̖ ̨̨̭̯̖̦̌̏ ̖̍̚
̨̦̬̌̔̚.
ˉ̛̖̣̯́ ̨̥̦̯̙̖̦̌ ̨̡̨̍̏ ̯̬́̍̏̌ ̛̛̦̏̌̐ ̔̌ ̭̖ ̯̌́̐̌̚ ̨̛̪̬̣̦̌̏ ̛ ̔̌ ̭̖ ̛̦̥̏̌̏̌ ̔̌ ̦̥́̌
̵̛̬̣̖̦̌̌̍̚ ̨̛̦̯̖̏̏, ̯̻̜ ̡̨̯̌ ̨̖̯̖̯̔ ̨̥̙̖ ̔̌ ̵̦̖̏̌ ̸̛̭̯̌ ̨̯ ̡̨̬̪̱̭̌ ̛̛̣ ̡̛̛̯̖̭̯̣̦
̛̖̣̖̥̖̦̯ (̛̦̪̬̥̖̬̌ ̡̛̬̻̏̚, ̡̛̪̦̖̣̌̔, ̸̡̨̡̛̪̣̌̌̚ ̨̛̛̖̬̦̌̍̍̚-̡̛̣̻̣̌̐̌̚), ̡̨̨̖̯ ̛̍
̨̪̬̖̭̯̣̣̔̌̏́̏̌ ̡̛̬̭ ̨̯ ̱̹̦̖̌̔̌̏̌̚. ʰ̻̬̹̜̯̖̏̏̌̚ ̛̛̬̱̯̦̦ ̨̡̛̪̬̖̬̏, ̌̚ ̔̌ ̭̖
̛̱̖̬̯̖̏,̸̵̛̖̦̥̬̣̖̦́̌̌̌̍̚, ̨̛̪̬̖̖̦̏̔ ̸̛̛̛̛̛̣̣̪̭̺̭̯̏̌̌.
ʺ̡̛̭̥̣̦̯̌̌̌̌ ̻̯̬̖̹̦̏̌ ̨̛̣̖̥̦̐̌ ̦̌ ̡̨̨̖̖̹̯̍̍ ̸̡̬̖̯̖̏̌, ̌̚ ̡̨̨̖̯ ̖ ̸̪̬̖̦̦̖̦̔̌̌̚
̡̥̯̬̻̯͕̌̌ ̖ 900/590 ̥̥. ʪ̛̻̣̙̦̯̌̌ ̛ ̛̛̹̬̦̯̌̌ ̦̌ ̡̥̯̬̌̌̌ ̯̬́̍̏̌ ̔̌ ̻̯̍̔̌ ̡̛̯̌̏̌,
̸̖ ̡̨̨̛̥̭̥̣̦̯̌̌ ̨̛̬̭̯̦̖̌́̚ ̥̖̙̱̔ ̡̛̥̯̬̌̌̌ ̛̭̯̬̦̯̖̌ ̛ ̸̡̡̨̛̬̺̯̦̬̖̯̖̯̌̌̌̌̏̌̔̌
̛̦̖̦̹̯̌̔̏̌̏̌ 2,5 ̭̥.
ʿ̨̡̬̱̯̻̯̔ ̔̌ ̭̖ ̛̻̬̙̔ ̦̌ ̨̛̬̭̯̦̖̌́̚ ̛ ̸̣̖̔̌ ̨̯ ̛̪̣̖̦̌̌̚ ̶̛̛̬̐̌, ̨̡̛̯̬̯ ̨̻̦̐ ̛ ̛̬̱̔̐
̸̶̨̛̛̛̯̦̦̌̚ ̨̛̛̭̣̦̯̪̣̦̌̌, ̡̨̯̌ ̸̡̡̛̛̖̣̖̯̬̖̭ ̸̨̡̛̛̛̪̖̐̌̏̚.
ʽ̨̭̦̯̏̌̌ ̦̌ ̸̡̨̨̹̖̯ ̨̥̙̖ ̔̌ ̭̖ ̨̪̣̏̌̚ ̭ ̡̨̦̣̦̌ ̨̔ 30°, ̌̚ ̨̪̬̖̯̬̯̦̖̔̏̌́̏̌ ̦̌
̴̡̨̨̨̛̛̛̭̥̬̯̪̬̯̦̖̔̏̌̔̌̏́̚ ̨̦̖̯̖̯̌̔.
ʻʫ ̨̛̪̣̜̯̖̏̌̚̚ ̡̨̨̖̖̹̯̍̍ ̸̡̬̖̯̖̏̌, ̡̨̌ ̡̡̛̦́̌̏ ̸̛̭̯̌ ̛̣̪̭̯̏̌, ̨̛̪̬̖̖̦̏̔ ̭̌ ̛̛̣ ̭̌
̸̛̭̱̪̖̦. ʤ̡̨ ̖ ̵̨̨̨̛̦̖̥̍̔, ̭̻̬̙̖̯̖̏ ̭̖ ̭ ʺʽʻʰ ˃ˀʫʱʪ ̌̚ ̛̬̖̖̬̦̏̚ ̸̛̭̯̌ ̛
̶̡̛̛̛̦̭̯̬̱. ʻʫ ̸̛̥̖̭̯̜̯̖̭̯̌̏̌̌̚.
ʰ̨̨̪̣̦̖̯̏̌̚̚ ̦̌ ̡̨̨̖̖̹̯̍̍ ̨̣̖̣̐ ̭ ̴̶̡̛̱̦́ „̴̡̛̛̭̬̦̖̌ ̡̻̥ ̨̡̨̨̛̬̯̖̣̭̯̔ ̨̣̖̣̐“ ̖
̨̬̬̖̹̖̦̌̚ ̨̭̥̌ ̭̻̭ ̭̯̦̬̯̖̦̌̔̌ ̛̯̪ ̣̖̣̐̌ ̛/̛̛̣ ̡̥̯̬̌̌ ̭ ̛̪̬̌̏ ̛̭̯̖̦. ʰ̨̨̪̣̦̖̯̏̌̚̚
̦̌ ̨̡̪̬̱̯̔̌ ̭ ̡̛̬̻̣̐ ̣̖̣̐̌ ̛/̛̛̣ ̡̥̯̬̌̌, ̨̛̦̏̔ ̣̖̣̐̌ ̛̛̣ ̛̦̱̖̥̌̔̏̌ ̶̛̥̯̬̌̌ ʻʫ ʫ
ˀʤʯˀʫˌʫʻʽ!
BG
ʦʤʮʻʽ͊ ʿˀʽˋʫ˃ʫ˃ʫ ʦʻʰʺʤ˃ʫʸʻʽʰʯʤʿʤʯʫ˃ʫʯʤʥˎʪʫˍʰˁʿˀʤʦʶʰ

940
9
ʦʻʰʺʤʻʰʫ! ʻ̖ ̨̛̪̣̜̯̖̏̌̚̚ ̴̶̡̛̱̦̯́̌ ̌̚ ̴̡̛̛̭̬̦̖̌ ̦̌ ̡̨̨̖̖̹̯̍̍ ̸̡̬̖̯̖̏̌ ̡̻̥
̨̡̨̨̛̬̯̖̣̭̯̔ ̨̣̖̣͕̐ ̡̨̌ ̸̨̛̛̭̦̯̏̌̌ ̦̌ ̨̨̣̖̣̯̐ ʦ̛ ̖ ̨̪-̡̥̣̌̌ ̨̯ 45 ̭̥ ̛̛̣ ̸̨̪̖̖̏ ̨̯
60 ̨̭̥̦̪̌̔̔̌͘
ʥ̡̨̨̨̖̖̹̯̣̖̣͕̍̐ ̨̭̻̬̦̏̌̚ ̨̨̨̛̛̭̣̖̣̯̦̬̯̖̣̯̖̐̌̔,̡̨̛̦̦̖̐̌ ̯̬́̍̏̌ ̔̌ ̭̖ ̨̛̪̣̏̌̚̚
̏ ̡̨̨̦̣̦̖̦̌ ̨̨̛̪̣̙̖̦̖. ʿ̛̬ ̛̯̌̚ ̴̶̡̛̱̦́ ̯̔̏̌̌ ̡̡̬̌̌ ̯̬́̍̏̌ ̛̛̦̏̌̐ ̔̌ ̻̯̍̔̌
̛̛̛̬̖̱̣̬̦̦̖̦̐̌̌̔̌ ̸̨̛̛̭̻̺̭̦̌̏̌͘
ʻ̖ ̨̡̨̛̛̬̖̱̣̬̜̯̖̪̬̱̯̦̖̪̬̖̥̖̭̯̜̯̖̐̌̔̌̐̏̌, ̡̨̨̨̯̖̯̖̯̐̌̔ ̖̻̯̬̖̏.
ʶ̨̨̯̐̌ ̨̛̪̣̯̖̏̌̚̚ ̴̶̡̛̱̦̯́̌ ̦̌ ̨̡̪̬̱̯̔̌ „̴̡̛̛̭̬̦̖̌ ̡̻̥ ̨̡̨̨̛̬̯̖̣̭̯̔ ̨̣̖̣̐“, ̌̚ ̔̌
̭̖ ̨̛̪̬̖̯̬̯̔̏̌ ̨̨̪̭̦̭̯̌ ̨̯ ̱̹̦̖̌̔̌̏̌̚ ̏ ̬̖̱̣̯̯̌̚ ̨̯ ̡̣̖̺̦̖̌̏̌̚, ̡̨̨̖̖̹̯̍̍
̸̡̬̖̯̖̏̌ ̯̬́̍̏̌ ̔̌ ̻̖̍̔ ̨̛̪̬̣̦̌̏ ̡̨̬̖̪̖̦̌̚ ̡̻̥ ̨̨̣̖̣̯̐ ̌̚ ̛̻̬̭̯̦̏̌̚ ̸̬̖̚
̨̛̛̪̣̦̖̦̭̭̯̖̥̯̏̌̌̌̌̌̚̚̚ ̡̬̖̪̦̖̌̏̌̚.
ʦ̛̛̦̌̐ ̨̛̪̣̜̯̖̏̌̚̚ ̨̭̥̌ ̛ ̨̛̖̦̭̯̖̦̔̏ ̛̭̭̯̖̥̯̌̌ ̌̚ ̡̬̖̪̦̖̌̏̌̚, ̨̪̬̖̭̯̖̦̔̌̏̌ ̭ ̨̛̯̚
̨̡̪̬̱̯̔͘
ʿ̨̬̖̬̜̯̖̏́̏̌ ̛̬̦̯̔̌̏̌̌̚ ̦̌ ̛̭̭̯̖̥̯̌̌ ̌̚ ̡̬̖̪̦̖̌̏̌̚ ̛̪̬̖̔ ̡̭̏́̌ ̨̱̪̯̬̖̍̌, ̡̨̯̌
̛̻̬̪̯̖̔̌̚ ̸̸̡̨̨̬̖̯̖̯̣̖̯̏̌̔̌ ̨̨̨̛̣̖̣̯̦̬̯̖̣̐̌̔́.
ʻ̖ ̨̛̪̣̜̯̖̏̌̚̚ ̨̡̪̬̱̯̔̌, ̡̨̌ ̛̥̌ ̨̡̪̬̣̱̌ ̥̖̙̱̔ ̡̨̨̖̖̹̯̍̍ ̨̣̖̣̐ ̛ ̨̨̣̖̣̯̐ ̦̌
̨̛̛̬̯̖̣̯̖̔.
ʿ̨̡̛̬̣̱̯̖̦̖̯̬́̍̏̌ ̔̌ ̭̖ ̶̛̛̪̻̣̯̭̻̣̦̌̏̌̏̐̌̏̚̚, ̨̖̣̔́̌ ̛̛̛̛̣̬̱̪̬̖̥̖̯̔̐̔.
ʿˀʫʪ˄ʿˀʫʮʪʫʻʰʫ – ʯ̌ ̔̌ ̭̖ ̛̖̦̖̍̐̚ ̨̨̪̭̦̭̯̌ ̨̯ ̵̺̦̖̌̏̌̌̚ ̦̌ ̬̯̏̌̌ ̦̌ ̨̖̯̖̯̔ ̏
̨̬̦̯̐̌̌ ̶̬̌̐̌ ̦̌ ̶̛̭̯̬̦̯̌̌̌, ̡̨̨̯́ ̨̔ ̨̨̣̖̣̯̐ ̌̚ ̻̬̭̯̖̦͕̏̌̚ ̨̬̦̯̐̌̌ ̶̬̌̐̌ ̦̖ ̯̬́̍̏̌
̔̌ ̨̖̪-̨̡̛̭̏̌ ̨̯ ̡̨̨̥̯̬̦̣̖̣̯̌̌̌̌̐ ̻̬̭̯̖̦̌̏̌̚̚͘
ʿˀʫʪ˄ʿˀʫʮʪʫʻʰʫ - ʯ̌ ̔̌ ̭̖ ̛̖̦̖̍̐̚ ̡̛̬̭̻̯ ̨̹̖̯̏̌ ̖̯̖̔ ̔̌ ̻̖̍̔ ̨̱̱̹̖̦̔, ̛̭̭̯̖̥̯̌̌
̌̚ ̡̬̖̪̦̖̌̏̌̚ ̡̻̥ ̨̨̣̖̣̯̐ ̛̦̻̬̭̯̦̌̏̌́̚ ̯̬́̍̏̌ ̛̛̦̏̌̐ ̔̌ ̭̖ ̛̻̬̙̔ ̸̣̖̔̌ ̨̯ ̡̨̨̖̯̭̯̔
̸̡̬̖̯̖̏̌ ̛ ̨̛̻̦̦̖̏̐̚.
ʽʿʤˁʻʽˁ˃! ʦ̛̛̦̌̐ ̨̛̪̜̯̖̏̔̐̌ ̨̦̪̻̣̦̌ ̪̺̯̌̔̌̌̌ ̶̛̭̯̬̦̌̌, ̡̨̨̯̐̌ ̡̨̨̖̖̹̯̍̍
̸̡̬̖̯̖̦̖̏̌ ̡̨̛̖̪̬̬̖̪̖̦ ̡̻̥ ̨̨̛̣̖̣̯̦̻̬̭̯̦̐̌̏̌́̚!
ˁ̨̨̣̦̖̯̐̍́̏̌, ̨̬̻̦̖̯̌̐̏̌̚ ̛ ̨̭̻̦̖̯̐̏̌ ̦̌ ̨̡̪̬̱̯̔̌ ̔̌ ̭̖ ̛̻̬̹̏̏̌̚ ˁʤʺʽ ̨̯
̻̬̭̯̖̦̏̌̚͘
ʻ̖ ̨̡̪̱̭̜̯̖̔̌ ̛̛̪̬̭̻̭̯̖̏ ̦̌ ̶̖̔̌ ̨̪̔ 3 ̨̛̛̦̐̔, ̛̪̬̖̔ ̔̌ ̭̯̖ ̨̛̛̭̣̣̐̍ ̨̡̪̬̱̯̔̌
̨̦̪̻̣̦̌, ̨̨̛̖̦̖̯̖̭̯̻̪̌̔̌̍̐̔̔̚̚ ̛̬̖̦̔̍ ̛ ̸̨̛̛̬̣̖̦̭̯̌̐̍̌̚.
ʦ̡̭́̌ ̨̨̦̜̣̦̌̏̌ ̨̡̨̡̪̌̏̌ ̯̬́̍̏̌ ̔̌ ̭̖ ̨̛̯̭̯̬̦̌, ̨̛̛̱̦̺̙ ̛̛̣ ̛̻̬̙̔ ̸̣̖̔̌ ̨̯ ̶̖̔̌,
̭̖̌̔̌̚ ̛̖̦̖̍̐̚ ̡̛̬̭ ̨̯̱̹̦̖̌̔̌̏̌̚.
ʻ̡̡̨̛̛̛̖̪̬̖̯̖̦̪̬̥̖̦̌̏̌̏ ̛ ̨̨̛̪̬̖̦̔̍́ ̨̪ ̶̡̨̡̛̦̭̯̬̱̯́̌ ̸̡̨̦̬̖̯̖̯̌̏̌,̯̻̜ ̡̨̯̌
̨̨̨̨̯̥̙̖̖̖̏̌̔̌̔̏̔̔ ̨̪̬̖̏̔̌ ̸̡̨̦̬̖̯̖̯̌̏̌ ̛ ̡̛̬̭ ̨̨̯̦̬̦̦̖̦̖̯̖̯̌̌́̏̌̌̔.
ʦʤʮʻʽ! ˁ̵̛̖̥̯̖ ̛ ̴̛̛̱̬̯̖̐ ̏ ̛̯̌̚ ̶̡̛̛̦̭̯̬̱́ ̭̌ ̨̭̥̌ ̛̛̛̣̭̯̬̯̦̀̌̏ ̛ ̸̨̛̦̭̺̌̏̌.
ʿ̨̬̖̬̖̯̖̏ ̴̨̡̨̛̛̛̭̱̬̦̭̯̯̦̭̬̦̖̯̐̌̌̌ ̡̛̛̭̣̖̪̻̣̦̖̦̖̦̭̔̌̏́̌̚ ̶̨̛̪̖̬̌́.
ˁ̛̻̭̯̦̌̏ ̸̛̭̯̌ – ̶̛̛̣̭̯̬̀̌́ʤ
ˁ̣̖̔ ̨̡̨̬̪̦̖̌̌̏̌̚ ̭̖ ̱̖̬̖̯̖̏, ̸̖ ̸̡̛̛̭̏ ̛̖̣̖̥̖̦̯ ̭̌ ̸̛̛̦̣̦̌: ʶ̨̹ ̌̚ ̭̪̦̖̌, ʺ̡̯̬̌̌,
ˋ̦̯̌̌ ̌̚ ̪̬̖̦̭̦̖̌́, ˁ̸̛̛̯̬̦̦̌ ̡̛̬̥̌ (̡̡̬̌̌Ϳ, ʽ̨̭̦̦̏̌ ̨̨̪̬̦̌ ̯̬̻̍̌, ʶ̨̛̣̦̌, 4 ̬̍.
̨̨̣̯̖̍̏, ϭ̬̍. ̨̹̖̭̯̬̥̐̌.
˄ʶʤʯʤʻʰ˔ ʯʤ ˁʧʸʽʥ˔ʦʤʻʫ ʰ ʫʶˁʿʸʽʤ˃ʤˉʰ˔
40
Lors de l'uƟlisaƟon de la foncƟon produit "FixaƟon au lit parental", pour éviter le risque
d'étouīement dû au coincement, le lit bébé doit être correctement Įxé au lit adulte à l'aide
du système deĮxaƟon.
UƟůŝsez toujours uniquement le système deĮxaƟon fourni avec ce produit.
VériĮez la solidité du système de ĮxaƟon avant chaque uƟlisaƟon en éloignant le lit bébé
du lit des parents.
N'uƟlisez pas le produit s'il y a un espace entre le lit bébé du lit des parents.
Il ne faut pas remplir les espaces vides avec des oreillers, des couvertures ou d'autres
objets.
ATTENTION - Pour éviter le risque de coincement du cou de l'enfant dans le cadre supérieur
de la page à côté du lit adulte, le cadre supérieur ne doit pas être plus haut que le matelas
du lit adulte.
AVERTISSEMENT - Pour éviter le risque d'étouīement de votre enfant, le système de
ĮxaƟon au lit adulte doit toujours être éloigné et hors du lit bébé.
DANGER ! Relevez toujours complètement la page déroulante lorsque le lit bébé n'est pas
ĂƩĂĐŚé au lit adulte !
L'assemblage, le dépliage et le pliage du produit doivent être eīectués UNIQUEMENT par
un adulte.
Ne permeƩez pas aux enfants de moins de 3 ans d'être présents avant d'assembler
complètement le produit pour éviter l'accès aux peƟtes pièces démontées.
Tout emballage plasƟque doit être reƟré, détruit ou tenu hors de portée des enfants pour
éviter tout risque d'étouffement.
N'apportez aucune modiĮĐĂƟon ou amélioraƟon à la structure du lit bébé, car cela pourrait
endommager le lit bébé et risquer de blesser l'enfant.
IMPORTANT ! Les diagrammes et les Įgures de ceƩe instrucƟon ne sont qu’illustraƟfs et
indicaƟfs. VériĮer la ĮxaƟon de laĮxaƟon après chaque opéraƟon.
Composants – Figureʤ
Après le déballage, assurez-vous que tous les éléments deůĂĮgure A sont disponibles.
Montage de la structure et exploitaƟon
ATTENTION ! Suivez strictement les instrucƟons et l’ordre d’assemblage du produit comme
indiqué dans les diagrammes.
IllustraƟon B - Assemblez le support du lit en plaçant le tube de support principal « C » dans les
parƟes de raccordement (trous) des deux cadres latéraux (pieds) « A » et « B » dans le sens des
Ňèches. Chaque cadre latéral est équipé de deux boulons pour Įxer le tube de support principal
au lit. Pour serrer les boulons dans le sens des aiguilles d'une montre, uƟůŝsez une clé
hexagonale. ATTENTION ! Assurez-vous que le cadre est serré et stable. C'est la parƟe portante
du lit bébé qui assure la sécurité de votre enfant.
IllustraƟon C - Fixez le panier à coucher au support monté en Įxant la parƟĞ de connexion du
cadre du panier au sommet des deux cadres latéraux « A » et « B ». La goupille à ressort
s'enclenchera une fois qu'elle sera solidement Įxée des deux côtés. ATTENTION ! Assurez-vous
que les boulons sont bien serrés et que le panier est solidement Įxé au support du lit bébé.
INSTRUCTIONS DE MONTAGE ET D’UTILISATION

39
10
39
Ce produit est fabriqué conformément aux exigences de la DirecƟve européenne 2001/98/CE
relaƟve à la sécurité générale des produits, de la Loi sur la protecƟon des consommateurs et
de la norme européenne BDS EN 1130 : 2019.
AVERTISSEMENT !
N'uƟlisez pas ce produit sans avoir lu au préalable les instrucƟons d'uƟlisaƟon.
Le produit est prévu pour des enfants à l’âge de 0 à 12 mois et avec un poids maximum de
11 kg.
Arrêtez d'uƟliser le produit dès que l'enfant peut s'asseoir, s'agenouiller ou se lever.
Placer d'éléments supplémentaires au dedans du produit peut provoquer une suīocaƟon.
Ne placez pas le produit à proximité d'un autre produit pouvant présenter un risque
d'étouīement ou de suīocaƟon, tel que des cordes, des cordons de stores/rideaux, etc.
N'uƟlisez pas plus d'un matelas dans ce produit.
N'uƟlisez que le matelas vendu avec ce lit, ne rajoutez pas de deuxième matelas à celui-ci,
risque d'étouīement !
Le produit doit être placé sur un sol horizontal.
Il ne faut pas laisser les peƟts enfant jouer près du lit sans surveillance.
Le lit doit être verrouillé en posiƟonĮxe lorsque l'enfant est laissé sans surveillance.
Tous les raccords doivent toujours être serrés correctement et il faut veiller à ne pas
desserrer les vis, car l'enfant pourrait s'accrocher des parƟes du corps ou des éléments
texƟles (par exemple des cravates, des rubans, des ĂƩĂĐhes de téƟnes), ce qui pourrait
présenter un risque d'étouīement. Eīectuez des vériĮĐĂƟons de rouƟne pour vous assurer
qu'il n'y a pas de pièces desserrées, endommagées ou manquantes.
La taille intérieure maximale du lit auquel le matelas est desƟné est de 900/590 mm. La
longueur et la largeur du matelas doivent être telles que la distance maximale entre le
matelas et les côtés et bords du lit ne dépasse pas 2,5 cm.
Gardez le produit à l'écart de cigareƩes allumées, de ŇĂŵŵes nues et d'autres sources de
chaleur élevée, telles que les cuisinières électriques et à gaz.
La base du panier peut être uƟlisée avec une inclinaison allant jusqu'à 30°, pour éviter
l'inconfort et contre l'étouīement de l'enfant.
N'UTILISEZ PAS le li en cas de pièces manquantes, endommagées ou cassées. Si nécessaire,
contactez la MONI TRADE pour les pièces de rechange et les instrucƟons. NE REMPLACEZ
PAS des pièces.
L'uƟlisaƟon du lit bébé avec la foncƟon ΗĮxaƟon au lit parental" n'est autorisée qu'avec un
type de lit standard et/ou matelas à parois droites. L'uƟlisaƟon du produit avec des lits
ronds et/ou matelas ronds, des lits à eau ou des matelas gonŇables n'est PAS AUTORISÉE !
ATTENTION! N'uƟlisez pas la foncƟon deĮxaƟon du lit bébé au lit parental si la hauteur de
votre lit est inférieure à 45 cm ou supérieure à 60 cm au-dessus du sol.
Le lit bébé Įxé au lit parental ne doit jamais être uƟlisé en posiƟon inclinée. Avec ceƩe
foncƟon, les deux pieds doivent toujours être réglés à la même hauteur.
Ne pas régler le produit et le déplacer lorsque l'enfant est à l'intérieur
FR
IMPORTANT ! À LIRE ATTENTIVEMENT ET À CONSERVER POUR RÉFÉRENCE ULTÉRIEURE.
10
ˁ̶̨̡̨̡̛̣̦̖̦̦̭̯̬̱̯̐̍́̏̌̌́̌ ̛ ̶̡̨̛̖̭̪̣̯̌̌́
ʦʻʰʺʤʻʰʫ! ˁ̣̖̜̯̖̔̏̌ ̸̨̨̯̦ ̡̛̱̦̯̌̌́̌̚ ̛ ̨̨̨̪̭̣̖̯̖̣̦̭̯̯̔̏̌̌ ̌̚ ̨̭̣̦̖̐̍́̏̌ ̛
̨̨̡̛̪̣̦̖̦̪̬̱̯̏̌̌̔̌̚̚ ̶̨̨̡̡̛̛̛̛̯̪̬̣̙̖̦̯̖̦̭̯̬̱̯̯̖̭̯̏́̌ ̛ ̶̛̛̛̣̭̯̬̀̌.
ʰ̶̛̣̭̯̬̀̌́ ʦ- ˁ̨̣̖̯̖̐̍ ̨̡̭̯̜̯̌̌ ̦̌ ̨̨̣̖̣̯̐, ̡̨̯̌ ̨̛̪̭̯̯̖̌̏ ̨̨̭̦̦̯̏̌̌ ̨̨̪̬̦̌ ̯̬̻̍̌ „ˁ“
̏ ̛̛̛̭̻̖̦̯̖̣̦̯̖̔ ̸̛̭̯̌ (̨̨̛̯̬̏) ̦̌ ̖̯̖̔̏ ̸̛̛̭̯̬̦̦̌ ̡̛̬̥̌ (̡̡̬̌̌) ͣʤ͞ ̛ „B“ ̨̪ ̨̨̡̪̭̌ ̦̌
̡̛̭̯̬̖̣̯̖. ʦ̡̭́̌ ̸̛̭̯̬̦̦̌̌ ̡̬̥̌̌ ̖ ̨̨̬̱̦̍̔̏̌̌ ̭ ̔̏̌ ̨̣̯̍̌ ̌̚ ̡̬̖̪̦̖̌̏̌̚ ̦̌ ̨̨̭̦̦̯̏̌̌
̨̨̨̨̪̬̦̯̬̻̦̣̖̣̯̌̍̌̌̐.ʰ̨̪̣̜̯̖̏̌̚̚ ̨̹̖̭̯̬̥̐̌, ̌̔̌̚ ̨̨̨̯̖̦̖̯̖̣̯̖̯̖̪̌̐̍̏̚ ̨̨̡̪̭̦̌̌
̸̨̡̨̛̭̦̯̌̏̏̌̌ ̡̭̯̬̖̣̌. ʦʻʰʺʤʻʰʫ! ˄̖̬̖̯̖̏ ̭̖ ̸̖ ̡̬̥̯̌̌̌ ̖ ̨̬̖̔̍ ̯̖̦̯̌̐̌̌̚ ̛ ̛̭̯̣̦̌̍̌.
˃̸̸̨̨̡̨̖̦̭̖̺̯̭̯̦̬̖̯̖̯̏̌̌̌̌̌̏̌ ̨̨̨̨̛̛̪̭̱̬̖̪̭̦̭̯̯̦̹̖̯̖̯̖̔̐́̏̌̍̌̌̌̏̌̔̚.
ʰ̶̛̣̭̯̬̀̌́ ˁ - ʿ̡̛̬̬̖̪̖̯̖ ̡̨̹̌ ̌̚ ̭̪̦̖̌ ̡̻̥ ̨̛̥̦̯̬̦̯̌̌̌ ̨̡̭̯̜̌, ̡̨̯̌ ̴̡̛̛̭̬̯̖̌
̛̛̭̻̖̦̯̖̣̦̯̔̌̌ ̸̭̯̌ ̦̌ ̡̬̥̯̌̌̌ ̦̌ ̡̨̹̌ ̡̻̥ ̨̬̦̯̐̌̌ ̸̭̯̌ ̦̌ ̖̯̖̔̏ ̸̛̛̭̯̬̦̦̌ ̡̛̬̥̌ ͣʤ͞ ̛
„B”. ʿ̛̛̬̱̙̦̦̯́ ̴̛̺̯ ̺̖ ̡̺̬̦̖̌ ̦̌ ̨̨̥̭̯̯́ ̛̭, ̭̣̖̔ ̡̨̯̌ ̻̖̍̔ ̨̬̖̔̍ ̡̬̖̪̖̦̌̚ ̨̯ ̖̯̖̔̏
̛̭̯̬̦̌. ʦʻʰʺʤʻʰʫ! ˄̖̬̖̯̖̏ ̭̖, ̸̖ ̨̨̣̯̖̯̖̍̏ ̭̌ ̛̯̖̦̯̌̐̌̚ ̨̬̖̔̍ ̛ ̸̡̨̨̹̖̯ ̖ ̡̨̬̖̪̖̦̌̚
̨̛̭̯̣̦̌̍ ̡̻̥ ̸̨̡̡̨̭̯̜̯̦̬̖̯̖̯̌̌̌̏̌.
ʰ̶̛̛̣̭̯̬̀̌ D, ʫ - ˁ̣̦̖̏̌́ ̛ ̨̛̪̦̖̏̔̐̌ ̦̌ ̨̛̪̙̦̯̔̏̌̌ ̪̬̖̬̯̐̌̔̌̌͘ ʽ̨̯̬̖̯̖̏ ̶̛̪̌, ̡̨̨̜̯
̭̖ ̛̦̥̬̌̌ ̨̪̔ ̨̪̪̣̯̖̦̯̔̌̌̌ ̨̬̦̐̌ ̬̖̣̭̌͘ ʿ̨̛̦̖̯̖̏̔̐ ̨̛̪̙̦̯̔̏̌̌ ̪̬̖̬̐̌̔̌ ̦̌ ̸̡̨̨̹̖̯,
̡̯̌̌ ̸̖ ̔̌ ̭̖ ̸̨̡̛̯̌ ̨̯ ̨̨̭̦̯̏̌̌, ̛ ̡̛̪̬̬̖̪̖̯̖ ̪̺̯̌̔̌̌̌ ̭̯̬̦̌̌ ̏ ̨̣̦̯̔̌̌ ̸̭̯̌ ̦̌ ̸̡̨̨̹̖̯.
ʯ̨̯̬̖̯̖̌̏ ̸̛̛̭̯̬̦̦̌́ ̪̦̖̣̌ ̨̡̨̯̔̌ ̸̱̖̯̖ ̡̱̏̚ ̨̯ ̡̺̬̦̖̌̏̌ ̛ ̨̯̬̖̯̖̌̏̚ ̨̯ ̖̯̖̔̏ ̛̭̯̬̦̌ ̭
̶̛̪̌͘ ʤ̡̨ ̡̛̭̯̖̌ ̔̌ ̛̦̖̯̖̏̔̐ ̨̛̪̙̦̯̔̏̌̌ ̪̬̖̬̐̌̔̌, ̸̨̡̯̖̯̖̌ ́ ̛ ́ ̡̬̖̪̖̯̖̌̚ ̨̨̨̯̦̏ ̡̻̥
̨̨̭̦̯̏̌̌ ̦̌ ̸̡̨̨̹̖̯ ̨̯ ̖̯̖̔̏ ̛̭̯̬̦̌. ʰ̨̪̣̜̯̖̏̌̚̚ ̸̛̛̭̯̬̦̦̯̖̌ ̶̨̛̪̖̏, ̌̚ ̔̌ ̨̛̯̬̯̖̌̏̚
̨̦̪̻̣̦̌. ʰ̨̪̣̜̯̖̏̌̚̚ ̛̥̖̯̣̦̌́ ̛̬̦͕̐ ̌̚ ̔̌ ̭̻̬̙̖̯̖̏ ̯̔̏̌̌ ̶̛̪̌ ̨̖̦̌̔̚, ̡̯̌̌ ̸̖ ̔̌ ̦̖
̨̥̯̭̖̐̌̔̌ ̨̨̯̬̯̏́͘ʶ̸̨̬̖̯̖̯̏̌ ̨̨̨̖̯̐̏̔̌ ̭̖ ̨̡̨̛̪̣̯̏̌̌̚̚ ̨̨̨̨̭̥̭̯̯̖̣̦̣̖̣̌́̐.
ʰ̶̛̣̭̯̬̀̌́ F - ʿ̬̖̥̖̭̯̦̖̏̌ ̦̌ ̡̨̨̖̖̹̯̍̍ ̨̣̖̣̐. ʯ̌ ̔̌ ̛̪̬̖̥̖̭̯̯̖ ̸̡̨̬̖̯̖̯̏̌,
̨̛̪̦̖̯̖̏̔̐ ̦̯̌̔̌̌̚ ̭̯̬̦̌̌ ̦̌ ̨̨̣̖̣̯̐, ̭̣̖̔ ̡̨̨̖̯ ̨̐ ̪̬̖̥̖̭̯̖̯̖ ̦̌ ̨̨̙̖̣̦̯̌ ̨̥̭̯́ ̭
̨̨̪̥̺̯̌ ̦̌ ̴̸̨̛̬̦̌̍ ̨̛̛̥̦̯̬̦̯̖̌ ̡̻̥ ̯̔̏̌̌ ̡̡̬̌̌ ̨̛̛̪̬̭̪̣̖̦̍́. ʶ̸̬̖̯̯̌̌̌ ̦̌
̸̡̨̬̖̯̖̯̏̌ ̭̌ ̨̨̛̬̱̦̍̔̏̌ ̭̻̭ ̸̨̛̭̪̬̦̌ ̨̨̱̭̯̬̜̭̯̏ (̨̛̭̯̪̖̬), ̡̨̨̛̯ ̛̭̪̬̯̌ ̨̛̛̙̖̦̖̯̔̏ ̦̌
̸̡̨̬̖̯̖̯̏̌ ̨̨̨̛̪̻̬̙̯̬̐̔̔̌̔̌̏̚ ̨̨̨̭̯̪̬̖̦̌̚.
ʰ̶̛̣̭̯̬̀̌́ G - ˀ̛̖̱̣̬̦̖̐̌ ̦̌ ̸̨̛̛̭̦̯̏̌̌ ̛ ̴̡̛̦̯̬̖̣̱̭̦̌̌ ̴̶̡̛̱̦́. ʦ̸̨̛̛̭̦̯̌̌ ̨̥̙̖
̔̌ ̭̖ ̛̬̖̱̣̬̐̌ ̏6 ̶̨̛̛̛̪̚. ʯ̌̔̌ ̛̬̖̱̣̬̯̖̐̌ ̸̨̛̛̭̦̯̏̌̌, ̛̦̯̭̦̖̯̖̌ ̛̛̬̖̱̣̬̺̐̌́ ̨̱̯̦̍ ̛
̶̨̨̛̛̪̬̖̥̖̭̯̖̯̖̦̙̖̣̦̯̯̭̪̌̌̌̌̏̌́̚. ʽ̨̭̦̯̏̌̌ ̸̡̨̨̦̹̖̯̌ ̨̥̙̖̔̌ ̨̭̖̪̣̏̌̚ ̡̨̭̦̣̦̌
̨̔ 30° ̬̱̭̐̌̔̌, ̌̚ ̨̪̬̖̯̬̯̦̖̔̏̌́̏̌ ̦̌ ̴̡̨̨̛̭̥̬̯̔ ̛ ̨̛̪̬̯̏ ̦̖̌̔̌̏́̚ ̦̌ ̨̖̯̖̯̔.
ʥ̡̨̨̖̖̹̯̍ ̸̡̬̖̯̖̏̌ ̨̥̙̖ ̔̌ ̻̖̍̔ ̡̨̨̦̣̦̖̦̌ ̭ ̡̛̬̣̌̌̚ ̡̛̥̭̥̱̥̌ 2 ̶̨̛̛̛̪̚ ̦̌ ̸̨̛̛̭̦̏̌.
(ʿ̛̬̥̖̬: ̛̖̭̦̔́ ̡̡̬̌ ̖ ̶̨̛̛̪́̚ 3 ̛ ̛̣̖̏́ ̖ ̶̨̛̛̪́̚ 1). ʦʻʰʺʤʻʰʫ! ʤ̴̡̛̦̯̬̖̣̱̭̦̯̌̌
̴̶̡̛̱̦́ ̨̥̙̖ ̔̌ ̭̖ ̛̪̬̣̌̐̌ ̨̭̥̌ ̛ ̨̛̖̦̭̯̖̦̔̏, ̡̨̨̯̐̌ ̨̛̪̣̯̖̏̌̚̚ ̡̨̨̖̯̭̯̔ ̸̡̬̖̯̖̏̌ ̡̨̯̌
̨̨̨̭̥̭̯̯̖̣̦̌́ ̨̣̖̣̐. ʧ̣̯̌̏̌̌ ̦̌ ̨̖̯̖̯̔ ̛̛̦̏̌̐ ̯̬́̍̏̌ ̔̌ ̻̖̍̔ ̨̨̬̪̣̙̖̦̌̌̚ ̨̯ ̦̜̌-
̨̡̛̭̯̭̯̬̦̏̌̌̌̌͘
ʰ̶̛̣̭̯̬̀̌́ H - ˇ̡̛̛̭̬̦̖̌ ̦̌ ̡̨̨̖̯̭̯̔ ̸̡̬̖̯̖̏̌ ̡̻̥ ̨̨̣̖̣̯̐ ̦̌ ̨̛̬̯̖̣̔́. ˁ̣̖̯̖̏̌
̪̬̖̬̯̐̌̔̌̌ ̡̨̯̌ ̸̡̨̬̪̖̯̖̌̌̚ ̶̨̛̪̖̯̖̏ ̨̯ ̖̯̖̔̏ ̛̭̯̬̦̌ ̛ ́ ̡̬̖̪̖̯̖̌̚ ̏ ̨̣̦̯̔̌̌ ̸̭̯̌ ̦̌
̸̡̨̬̖̯̖̯̏̌. ʯ̌ ̴̡̛̛̭̬̦̖̌ ̦̌ ̸̡̨̬̖̯̖̯̏̌ ̡̻̥ ̨̨̣̖̣̯̐ ̦̌ ̨̛̬̯̖̣̔́ ̨̛̪̣̜̯̖̏̌̚̚ ̯̔̏̌̌
̨̨̛̛̖̪̭̯̖̣̦̍̌̚ ̡̨̣̦̌̌, ̨̛̪̬̖̭̯̖̦̔̌̏ ̏ ̡̨̡̥̪̣̖̯̌. ʯ̨̨̭̯̪̬̖̯̖̌ ̡̛̯̬̥̯̖̌̌̌ ̨̪̔
̸̡̨̬̖̯̖̯̏̌ ̨̯ ̖̯̖̔̏ ̛̭̯̬̦̌, ̭̣̖̔ ̡̨̨̖̯ ̴̡̛̛̭̬̜̯̖̌ ̡̨̛̣̦̯̖̌ ̨̡̨̨̣ ̶̡̨̡̛̦̭̯̬̱̯́̌ ̦̌
̨̨̣̖̣̯̐ ̦̌ ̨̛̬̯̖̣̔́, ̡̨̯̌ ̸̨̪̦̖̯̖̌̚ ̨̯ ̦̜̌-̨̣̱̔ ̛ ̛̻̬̯̖̏̏ ̨̦̬̖̌̐ ̛ ̡̦̬̌̌́ ̯̯̖̌́̐̌̚
̡̛̯̬̥̯̖̌̌̌ ̨̪̔ ̨̨̣̖̣̯̐. ʯ̌ ̔̌ ̨̛̛̪̭̱̬̯̖̔̐ ̸̡̨̬̖̯̖̯̏̌, ̡̨̨̯̐̌ ̖ ̨̔ ̨̨̣̖̣̯̐ ̦̌ ̨̛̬̯̖̣̔́,
̬̻̪̦̖̯̖̔ ̡̡̛̛̹̯̖̌ ̨̺̖ ̖̦̻̙̏̔, ̌̚ ̔̌ ̭̖ ̛̱̖̬̯̖̏, ̸̖ ̸̡̨̬̖̯̖̯̏̌ ̖ ̨̬̔̌̏̚ ̡̨̬̖̪̖̦̌̚ ̌̚
̨̨̨̛̣̖̣̯̦̬̯̖̣̐̌̔́.

1138
11
ʿ̨̛̣̭̯̥̭̯̖̌̌̏ ̛̛̣ ̛̥̖̯̣̦̯̖̌ ̸̛̭̯̌ ̨̯ ̨̡̪̬̱̯̔̌ ̸̨̛̪̭̯̜̯̖̏̌ ̭ ̡̥̖̌ ̸̪̥̱̦̌̌ ̡̻̬̪̌ ̛̛̣
̻͕̐̍̌ ̛̦̣̙̦̖̦̌̏̌ ̭ ̨̏̔̌ ̛̛̣ ̡̥̖ ̪̬̖̪̬̯̌̌͘ ʻ̖ ̨̛̪̣̜̯̖̏̌̚̚ ̛̖̣̦͕̍̌ ̛̛̭̣̦ ̸̨̛̛̪̭̯̺̏̌
̛̪̬̖̪̬̯̌̌ ̛ ̛̪̬̖̪̬̯̌̌ ̭ ̛̛̬̦̌̍̌̏̚ ̸̶̛̛̭̯̌, ̌̚ ̔̌ ̸̨̛̛̪̭̯̯̖ ̨̡̪̬̱̯̔̌͘ ʦ̸̡̛̛̭ ̡̛̛̯̖̭̯̣̦
̸̛̭̯̌ ̛ ̛̛̥̯̖̬̌ ̔̌ ̭̖ ̪̖̬̯̌ ̨̭̥̌ ̦̌ ̡̬̻̌, ̡̛̭̪̜̌̏̌̚ ̡̛̱̦̯̌̌́̌̚, ̸̨̨̛̪̭̖̦ ̦̌ ̡̛̖̯̖̯̌͘ ˁ̣̖̔
̸̨̛̪̭̯̦̖̏̌ ̨̭̯̖̯̖̌̏ ̸̡̨̬̖̯̖̯̏̌ ̔̌ ̵̛̭̻̦̖̚ ̨̬̖̔̍ ̛̪̬̖̔ ̔̌ ̨̐ ̨̛̪̣̯̖̏̌̚̚. ʻ̖ ̭̻̜̯̖̐̏̌ ̛
̦̖ ̨̛̖̥̦̯̬̜̯̖̔̌ ̡̨̨̖̖̹̯̍̍ ̨̣̖̣̐ ̛̪̬̖̔ ̔̌ ̖ ̨̦̪̻̣̦̌ ̵̨̛̭̻̦̣̌̚. ʻ̖ ̛̣̜̯̖̌̐̌̚ ̨̡̪̬̱̯̔̌
̦̌ ̡̪̬́̌ ̸̭̣̻̦̖̏̌ ̛̭̖̯̣̦̏̌ ̌̚ ̨̛̪̬̻̣̙̯̖̣̖̦̔ ̨̛̪̖̬̔ ̨̯ ̬̖̥̖̏ ̛ ̦̌ ̡̛̖̭̯̬̖̥̦
̛̯̖̥̪̖̬̯̱̬̌, ̡̨̨̛̯ ̨̥̯̐̌ ̔̌ ̨̖̯̔̏̔̌ ̨̔ ̨̪̬̥̦́̌ ̦̌ ̶̖̯̏̌ ̛ ̨̔ ̨̪̬̖̏̔̌ ̦̌ ̨̛̛̣̙̖̦̯̖̚
̸̛̭̯̌. ˁ̣̖̔ ̨̨̛̪̬̻̣̙̯̖̣̦̔ ̛̣̦̖̌̐̌̚ ̦̌ ̨̡̪̬̱̯̔̌ ̦̌ ̨̡̛̛̭̏ ̛̯̖̥̪̖̬̯̱̬̌, ̸̡̛̜̯̖̌̌̚
̡̨̡̨̦̣́ ̛̛̥̦̱̯, ̛̪̬̖̔ ̔̌ ̨̛̪̭̯̯̖̌̏ ̨̖̯̖̯̔ ̏ ̨̦̖̐. ʻ̖ ̨̪̭̯̜̯̖̌̏́ ̛̖̺̏ ̛ ̛̪̬̖̥̖̯̔ ̏
̨̡̪̬̱̯̔̌ ̛̛̣ ̵̻̬̱̏ ̨̦̖̐, ̌̚ ̔̌ ̦̖ ̨̛̪̬̖̯̖̏̔ ̶̡̨̡̛̦̭̯̬̱̯́̌ ̛̛̣/̛ ̡̥̭̯̔̌̌̌̌.
ˁ̵̸̨̡̨̛̻̬̦̜̯̖̪̬̱̯̦̭̯̌́̏̌̔̌̌ ̛ ̵̨̭̱ ̨̥̭̯́.
ʿ̨̨̛̬̖̖̦̏̔̌̚̚ Cangaroo ̏ʶʻˀ
ʿ̨̨̛̛̬̯̖̣̏̔̚ ̨̛̛̦̭̯̖̣̏: ʺ̨̛̦˃̬̖̜̔ ʽʽʪ,
ʤ̬̖̭̔: ʥ̛̻̣̬̐̌́, ̬̐. ˁ̴̨̛́,̡̏.˃̸̛̬̖̍, ̱̣. ʪ̨̨̣ 1,
˃̴̨̨̖̣̖̦̖̦̦̥̖̬: 02/ 936 07 90, ̱̖̭̜̯̍̌: www.cangaroo-bg.com
˄ʶʤʯʤʻʰ˔ ʯʤ ʿʽˋʰˁ˃ʦʤʻʫʰ ʿʽʪʪˀˎʮʶʤ
38
una volta Įssato correƩamente su entrambi i laƟ. ATTENZIONE! Assicurarsi che i bulloni siano
ben serraƟ e che il cesto sia Įssato saldamente al montante del leƫno.
Figure D, ʫ -Abbassamento e sollevamento del divisorio mobile. Aprire la cerniera che si trova
soƩo la barra superiore imboƫta. Sollevare il divisorio rimovibile del contenitore in modo che
si sganci dalla base e Įssare il lato abbassabile sul fondo del cesto. Chiudere il pannello laterale
Įno a senƟre un clic e chiudere i laƟ con la cerniera. Se si desidera sollevare il divisorio rimovibile,
sganciarlo e riĂƩĂĐcarlo alla base del cesto su entrambi i laƟ. UƟlizzare le cerniere laterali per
chiudere completamente. UƟůŝzzare l'anello metallico per collegare le due cerniere tra di esse in
modo che non possano aprirsi. Il leƫno è pronto per essere uƟlizzato come leƫno singolo.
Figura F - Spostamento del leƫno per bambini. Per spostare il leƫno, sollevare la parte
posteriore del leƫno, quindi spostarlo nella posizione desiderata uƟůŝzzando gli ĂƩĂĐchi montaƟ
da fabbrica su entrambe le gambe. Le gambe della culla sono dotate di un disposiƟvo di frenata
(lo stopper) che impedisce alla culla di muoversi e la manƟĞne saldamente bloccata in posizione.
Figura G - Regolazione dell'altezza e funzione anƟreŇusso. L'altezza può essere regolata in 5
posizioni. Per regolare l'altezza, premere la manopola di regolazione e spostarla nella posizione
desiderata. La base del cesƟno può essere uƟlizzata con un'inclinazione Įno a 30° per evitare il
disagio e il soīocamento del bambino. Il leƫno può essere inclinato al massimo di 2 posizioni
in altezza (esempio: la gamba destra è in posizione 3 e la gamba sinistra è in posizione 1).
ATTENZIONE! La funzione anƟreŇusso può essere applicata solo quando il leƫno si uƟlizza
come leƩo indipendente. La testa del bambino deve essere sempre posizionata sul lato più alto.
Figura H - Fissare il leƫno al leƩo del genitore. Rimuovere il divisorio aprendo le cerniere su
entrambi i laƟ e Įssarlo sul fondo del leƫno. UƟůŝzzare le due cinture di sicurezza in dotazione
per Įssare il leƫno al leƩo del genitore. Fissare le Įbbie soƩo il leƫno su entrambi i laƟ, quindi
Įssare l'imbracatura intorno alla struƩura del leƩone del genitore, iniziando dal basso verso
l'alto e stringendo inĮne le Įbbie soƩo il leƩo. Per Įssare il leƫno quando è vicino al leƩo del
genitore, Ɵrare ancora una volta le cinghie per assicurarsi che il leƫno sia Įssato saldamente al
leƩo del genitore.
Pulire le parƟ del prodoƩo in plasƟca o metallo con un panno di cotone morbido o una spugna
inumidita con acqua o un detergente delicato. Per la pulizia del prodoƩo non uƟůŝzzare
candeggina, detergenƟ forƟ o con parƟcelle abrasive. TuƩe le parƟ tessili e i tessuƟ devono
essere lavaƟ esclusivamente a mano, seguendo le istruzioni riportate sull'eƟcheƩĂ͘ Dopo la
pulizia, lasciare asciugare bene il leƫno prima di uƟlizzarlo. Non piegare o smontare il leƫno
prima che sia completamente asciuƩo. Non esporre il prodoƩo alla luce direƩa del sole per
periodi di tempo prolungaƟ o a temperature estreme che potrebbero causare lo scolorimento
e danneggiare le parƟ esposte. Dopo un'esposizione prolungata ad alte temperature, ĂƩendere
qualche minuto prima di meƩerci il bambino. Non collocare oggeƫ all'interno o sopra il
prodoƩo per evitare di danneggiare la struttura e/o il rivesƟmento. Conservare il prodoƩo in un
luogo pulito e asciuƩo.
Realizzato per Cangaroo nella RPC
ProduƩore e importatore: Moni Trade Ltd.,
Indirizzo: Bulgaria, SoĮa, Trebich, 1 Dolo Str.,
Numero di telefono: 003592/936 07 90, sito web: www.cangaroo-bg.com
ISTRUZIONI PER LA PULIZIA E LA MANUTENZIONE

12 37
37
Il leƩo per bambini collegato al leƩo dei genitori non deve mai essere uƟlizzato in posizione
inclinata. Con questa funzione, entrambe le gambe devono essere regolate sempre alla
stessa altezza.
Non regolare il prodoƩo né spostarlo mentre il bambino è all'interno.
Quando si uƟůŝzza la funzione "Įssaggio al leƩo dei genitori", per evitare il rischio di
soīocamento dovuto all'intrappolamento, il leƫno deve essere Įssato correƩamente al
leƩo degli adulƟ uƟůŝzzando il sistema di ancoraggio.
UƟůŝzzare sempre e solo il sistema diĮssaggio fornito con questo prodotto.
Controllare la resistenza del sistema di Įssaggio prima di ogni uƟlizzo, allontanando il
leƫno dal leƩo del genitore.
Non uƟlizzare il prodoƩo se si forma uno spazio tra il leƩo del bambino e il leƩo dei genitor i.
Gli spazi vuoƟ non devono essere riempiƟ con cuscini, coperte o altri oggeƫ.
AVVERTENZA - Per evitare il rischio che il collo di un bambino rimanga impigliato nel giunto
superiore del lato accanto al leƩo per adulƟ, il giunto superiore non deve essere più alto
del materasso del leƩo per adulƟ.
AVVERTENZA - Per evitare il rischio di strangolamento del bambino, il sistema di aggancio
al leƩo per adulƟ deve essere sempre tenuto lontano dal leƫno e fuori dal leƫno.
PERICOLO! Sollevare sempre completamente la spondina abbassabile quando il leƫno non
èĂƩĂccato al leƩo dell'adulto!
Il montaggio, lo spiegamento e la piegatura del prodoƩo devono essere eseguiƟ SOLO da
un adulto.
Non consenƟre la presenza di bambini di età inferiore ai 3 anni prima di aver assemblato
completamente il prodoƩo, per evitare l'accesso alle parƟ piccole e smontate.
Qualsiasi confezione di plasƟca deve essere rimossa, distruƩĂ o tenuta lontana dai bambini
per evitare il rischio di soīocamento.
Non apportare alcuna modiĮĐĂ o miglioramenƟ alla struƩura del leƫno per non
danneggiare il leƫno e rischiare di ferire il bambino.
AVVERTENZE! Gli schemi e le Įgure in queste istruzioni sono solo a Ɵtolo illustraƟvo ed
indicaƟvo. Controllare la stabilita` delĮssaggio dopo ogni operazione eseguita.
ComponenƟ – illustrazione ʤ
Dopo aver disimballato, assicurarsi che tuƫ gli elemenƟ della Figura A siano disponibili.
Assemlaggio della struƩura
AVVERTENZE! Seguire scrupolosamente le istruzioni e la sequenza di montaggio del prodoƩo
come mostrato agli schemi.
Figura ʦ - Assemblare il supporto leƫno inserendo il tubo di sostegno principale "C" negli
incastri (fori) dei due telai laterali (gambe) "A" e "B" in direzione delle frecce. Ogni telaio laterale
è dotato di due bulloni per poter Įssare il tubo di supporto principale al leƫno. UƟůŝzzare una
chiave esadecimale per serrare i bulloni in senso orario. ATTENZIONE! Assicurarsi che il telaio
sia ben serrato e stabile. È la parte di sostegno del leƫno e garanƟsce la sicurezza del bambino.
Figura ˁ - Fissare il cesƟno al supporto montatoĮssando la parte di collegamento del telaio del
cesƟno alla parte superiore dei due telai laterali "A" e "B". Il perno a mollĂƐĐĂƩerà in posizione
ISTRUZIONI DI MONTAGGIO ʫ PER L'USO
12
„
M̨̛̦ ˃̬̖̜̔͞ ʽʽʪ ̔̌̏̌ ̶̛̬̦̐̌̌́ ̦̌ ̸̨̛̪̻̬̦̣̦̏̌̌́ ̡̬̖̦̌ ̨̛̪̯̬̖̯̖̣̍ ̦̌ ̨̭̏́ ̨̡̪̬̱̯̔,
̸
̖ ̭̻̺̯̌̌ ̦̥́̌ ̴̡̛̖̖̯̔ ̏ ̛̛̥̯̖̬̣̯̖̌̌ ̛ ̨̡̛̬̯̯̌̍̌̌̚͘ ˁ ̨̨̨̦̭̯̺̯̌́ ̥̖̔̌̏̌ ̶̛̬̦̐̌̌́ ̌̚
ʿ
̨̡̬̱̯̔̌ ̭̬̖̺̱ ̴̡̛̖̖̯̔ ̏ ̛̛̥̯̖̬̣̯̖̌̌ ̛ ̨̡̛̬̯̯̌̍̌̌̚ ̛̪̬ ̨̡̨̛̦̖̦̍̏̌ ̨̡̛̪̯̬̖̯̖̣̭̍̌
̱̪
̨̯̬̖̍̌ ̡̻̥ ̨̥̥̖̦̯̌ ̦̌ ̨̡̡̪̱̪̯̌̌ ̛ ̌̚ ̨̛̪̖̬̔ ̨̯ 2 ̨̛̛̦̐̔ ̭̣̖̔ ̯̯̔̌̌̌ ̦̌ ̨̡̭̯̯̔̌̏̌̌.
ʤ
̡̨ ʿ̨̡̬̱̯̻̯̔ ̨̡̪̙̖̌ ̴̡̛̖̖̯̔ ̨̪ ̬̖̥̖̏ ̦̌ ̶̨̛̛̬̦̦̦̐̌̌́ ̨̛̪̖̬̔, ʦ̛̖ ̭̣̖̔̏̌ ̔̌
̛
̛̪̻̣̦̯̖̚ ̡̛̱̦̯̌̌́̌̚ ̌̚ ̨̬̻̺̦̖̯̏̌ ̥̱, ̛̖̦̔̌̔ ̨̯ ̦̭͕̌ ̛ ̛̦̖ ̺̖ ̛̪̬̖̪̬̖̥̖̥̔ ̨̖̦̔ ̨̯
̭
̛̛̣̖̦̯̖̖̜̭̯̔̔̏́:
1.
ˍ̨̨̛̖̪̥̖̦̥̐̔ ̭̻̭ ̛̭̻̺́ ̛̛̣ ̨̨̨̡̨̛̬̦̭̯̖̦̪̬̱̯̦̯̌̏̔̌̚, ̡̨̱̪̖̦̯̌̚ʦ̭̌;
2.
ˍ̨̨̛̖̪̪̬̥̐̌̏;
3.
ˍ̖ ʦ̛ ̻̬̦̖̥̏ ̶̨̛̣́̚ ̛̛̣ ̸̸̨̛̭̯̦̌ ̨̡̪̱̪̦̯̌̌ ̶̖̦̌ ̦̌ ʿ̨̡̬̱̯̔̌͘ ʿ̨̛̬̌̔ ̡̦̪̬̖̻̌̔̌ ̏
̯
̵̨̨̛̛̖̦̣̯̖̐ ̛ ̨̛̭̻̯̖̯̦̯̖̏ ̨̡̨̛̪̬̱̯̔̏ ̸̨̛̛̦̣̦̭̯̌, ʿ̨̡̬̱̯̻̯͕̔ ̡̨̨̜̯ ʦ̛ ̛̛̪̬̯̥̌̚ ̡̨̯̌
̪
̨̥̦̔́̌, ̨̥̙̖ ̔̌ ̛̥̌ ̡̛̥̣̌ ̡̛̛̬̣̌̚ ̛̛̣ ̨̪-̡̛̦̭̌ ̨̪̬̙̦̔̌̌ ̶̖̦̌ ̨̯ ̨̛̛̛̬̦̣̦̐̌́
ʿ
̨̡̬̱̯̔, ̡̨̨̜̯ ̭̯̖ ̡̛̛̱̪̣̌̚.
ʤ
̡̨ ʿ̨̡̬̱̯̻̯̔ ̨̡̪̙̖̌ ̴̡̛̖̖̯̔ ̨̪ ̬̖̥̖̏ ̦̌ ̶̨̛̛̬̦̦̦̐̌̌́ ̨̛̪̖̬̔, ̨̯ ̵̨̛̬̯̖̌̔̚ ̨̪
̏
̨̬̻̺̦̖̯̌ ̦̌ ̴̡̛̖̖̯̬̣̯̔̌̌̌ ̸̭̯̌ ̨̔ ̡̭̣̌̔ ̦̌ ʺ̨̛̦ ˃̬̖̜̔ ʽʽʪ ̖ ̌̚ ̡̭̥̖̯̌ ̦̌
̪
̨̛̯̬̖̯̖̣̍́. ʿ̨̨̛̛̬̯̖̣̯̏̔́̚ ̦̖ ̨̪̖̥̌ ̡̡̛̛̦̌̏ ̵̨̛̬̌̔̚, ̡̨̨̛̯ ̨̥̯̐̌ ̔̌ ̡̛̻̦̦̯̏̌̚ ̨̪̔
̴
̨̬̥̯̌̌ ̦̌ ̱̬̖̙̦̖̏̔̌ ̦̌ ̨̡̪̬̱̯̔̌ ̛̛̣ ̨̬̱̔̐ ̨̛̥̱̺̖̭̯̏ ̨̪ ̬̖̥̖̏ ̦̌ ̨̯̬̦̭̪̬̯̌ ̡̻̥ ̨̦̖̐.
ʶ
̸̱̪̱̻̯̏̌, ̦̌ ̨̭̜̏ ̡̛̬̭ ̛ ̌̚ ̨̭̭̯̖̦̍̏̌ ̡̭̥̖̯̌, ̛̪̬̺̌̌̚ ̨̔ ̨̨̛̛̪̬̯̖̣̏̔́̚ ̌̚ ̶̨̡̖̦̌ ̦̌
̨
̵̯̍̏̌̌ ̦̌ ̶̛̬̦̯̐̌̌́̌ ̛ ̨̬̖̥̦̯ ̦̌ ̨̡̪̬̱̯̔̌͘ ʿ̨̡̬̱̯̻̯̔ ̺̖ ̻̖̍̔ ̻̬̦̯̏̌ ̦̌ ̸̡̱̪̱̏̌̌ ̌̚
̦
̨̖̐̏̌ ̡̭̥̖̯̌. ʺ̨̛̦ ˃̬̖̜̔ ʽʽʪ, ̨̪ ̨̭̜̏ ̨̛̬̍̚, ̺̖ ̨̛̪̪̬̌̏ ̛̛̣ ̛̥̖̦̌̚ ̸̛̭̯̌ ̨̯ ̨̡̪̬̱̯̔̌,
̡
̨̨̛̯ ̭̌ ̨̡̨̦̔̌̌̚ ̴̡̛̖̖̯̦̔, ̨̛̪̬̌̔ ̛̦̖̪̬̣̦̌̏̌ ̴̸̛̬̦̌̍̌ ̨̡̛̬̯̌̍̌̚ ̛̛̣ ̛̛̥̯̖̬̣̌̌.
ʿ̨
̛̪̬̖̦̯̖̌̏ ̸̛̭̯̌ ̛̛̣ ̨̛̦̯̖̏ ̨̛̪̥̖̦̖̦̔ ̡̛̯̌̏̌ ̺̖ ̭̖ ̨̪̬̖̭̯̯̔̌̏́ ̨̯ ʺ̨̛̦ ˃̬̖̜̔ ʽʽʪ
̏
̥̦̌́̌̚ ̦̌ ̴̡̛̖̖̯̦̯̖̔ ̛ ̺̖ ̻̯̍̔̌ ̛̛̣ ̨̛̦̏, ̛̛̣ ̴̶̛̛̛̛̪̬̖̭̖̬̯̬̦̌ ̌̚ ̨̱̪̯̬̖̍̌.
ʽ
̸̛̬̦̖̦̯̐̌̌̌ ̶̛̬̦̐̌̌́ ̦̖ ̵̨̺̍̏̌̌ ̛̺̖̯, ̸̛̛̛̪̬̦̖̦ ̦̌ ̨̡̪̬̱̯̔̌ ̏ ̬̖̱̣̯̯̌̚ ̦̌
̦
̛̖̪̬̣̦̌̏̌ ̨̱̪̯̬̖̍̌, ̶̛̛̦̖̦̯̔, ̨̨̣̱̪̯̬̖̍̌̚, ̨̛̛̪̬̬̦̔ ̛̖̭̯̍̔̏́, ̸̨̛̛̦̖̜̦̍̌
̥
̵̸̛̛̖̦̦̌ ̨̛̱̭̣̏́ ̛̛̣ ̨̨̛̛̪̬̯̖̭̯̖̭̯̖̦̏̏ ̨̛̱̭̣̏́ ̦̌ ̨̡̨̣̦̯̌̌ ̭̬̖̔̌, ̛̛̣ ̦̖̬̬̖̹̖̦̌̚
̖̥̔
̨̦̯̙͕̌ ̨̬̖̥̦̯ ̛̛̣ ̴̶̨̡̛̛̛̥̔̌́, ̸̡̨̛̣̯̖̣̦̏̀ ̛ ̨̛̬̖̥̦̯ ̛ ̴̶̨̡̛̛̛̛̥̔̌ ̛̛̻̬̹̖̦̏̚
̏
̛̭̖̬̏̚ ̸̛̬̣̖̦̌̚ ̨̯ ̨̨̛̛̛̯̬̬̦̌́̚. ʻ̨̭̯̺̯̌́̌̌ ̸̨̛̬̦̖̦̐̌̌ ̶̛̬̦̐̌̌́ ̦̖ ̛̙̏̌ ̨̭̻̺ ̛ ̌̚
̪
̨̡̛̬̱̯̔, ̡̨̨̛̯ ̭̌ ̨̛̪̬̖̦̔̌̔ ̡̨̯̌ ̨̡̛̭̯ ̨̯̬̏̌ ̨̱̪̯̬̖̍̌͘ ʧ̶̨̛̛̬̦̦̦̯̌̌́ ̨̛̪̖̬̔ ̸̨̪̌̏̌̚
̔̌
̸̯̖̖ ̨̯ ̨̥̥̖̦̯͕̌ ̏ ̡̨̨̜̯ ̖ ̦̪̬̖̦̌̌̏̌ ̨̡̭̯̯̔̌̏̌̌ ̨̔ ̡̛̣̖̦̯̌ ̛̛̣ ̨̯ ̨̥̥̖̦̯͕̌ ̏ ̡̨̨̜̯
̡̣
̛̖̦̯̻̯ ̖ ̡̛̱̪̣̌̚ ̛ ̖̣̏̚ ̭̻̭ ̭̖̖̍ ̛̭ ̨̡̪̬̱̯̔̌ ̨̯ ̛̖̦̔̌̔́ ̨̛̛̭̯̬̱̯̬̔̍. ʦ̡̛̭̖ ̨̦̏ ̨̡̪̬̱̯̔
̖
̛̺̯̖̦̌̌̚ ̭ ̶̛̬̦̐̌̌́ ̨̯ ̴̡̛̖̖̯̔ ̦̌ ̛̥̯̖̬̣̌̌̌ ̛/̛̛̣ ̨̡̛̭̌̏̔̚ ̴̡̛̖̖̯̔ ̏ ̨̛̪̬̻̣̙̖̦̖̔
̦̌
2 ̨̛̛̦̐̔. ˃̨̏̌ ̸̨̖̍̌ ̦̖ ̸̡̣̏̀̏̌ ̨̨̨̦̬̥̣̦̯̌ ̨̛̦̭̦̖̏̌̚ ̛̛̣ ̨̪̬̖̙̦̖̏̔̌ ̛̭̣̖̭̯̖̏̔̏ ̦̌
̦
̛̖̪̬̣̦̌̏̌ ̶̡̨̛̖̭̪̣̯̌̌́. ʧ̶̛̬̦̯̌̌́̌ ̦̖ ̨̡̛̪̬̏̌ ̡̨̨̛̥̪̦̖̦̯̯̖, ̨̛̛̦̭̖̦̚ ̛/̛̛̣
̪
̨̛̬̖̖̦̏̔ ̛̭̣̖̭̯̖̏̔̏ ̦̌ ̛̦̖̪̬̣̦̌̏̌ ̨̱̪̯̬̖̍̌, ̸̡̨̛̣̯̖̣̦̏̀ ̡̨̨̛̬́̚, ̨̡̛̭̣̦̖́̏̌, ̛̺̖̯,
̪
̸̛̛̛̬̦̖̦ ̨̯ ̨̏̔̌, ̡̡̨̯̌ ̛ ̨̯ ̨̱̥̬̌ ̦̌ ̛̥̯̖̬̣͕̌̌̌ ̨̛̪̬̖̏̔ ̛̛̣ ̛̱̌̐̍̚ ̸̛̛̛̪̬̦̖̦
̏
̛̭̣̖̭̯̖̔̏ ̦̌ ̶̛̛̦̖̦̯̔, ̛̦̖̪̬̣̦̌̏̌ ̨̱̪̯̬̖̍̌, ̦̖̥̬̦̖̌̌́̏̌̚, ̨̨̣̱̪̯̬̖̍̌̚, ̡̬̙̌̍̌ ̛̛̣
̦
̖̭̪̦̖̌̏̌̚ ̦̌ ̶̡̛̛̛̦̭̯̬̱̯̖ ̛/̛̛̣ ̛̪̬̖̱̪̬̖̙̖̦̯̔̔́̌, ̸̨̨̛̪̭̖̦ ̏ ̡̨̨̨̨̬̻̭̯̯̏̔̏ ̌̚
̱̪
̨̯̬̖̍̌͘ ˍ̛̖̯, ̸̛̛̛̪̬̦̖̦ ̏ ̛̭̣̖̭̯̖̔̏ ̦̌ ̨̱̥̬̌ ̦̌ ̛̥̯̖̬̣̌̌̌, ̭̌ ̡̛̪̬̦̌̚, ̸̖ ̨̭̻̯̖̯̦̯̏̌̌
̸̭̯̌
̖ ̛̣̍̌ ̨̨̪̬̖̹̦̐ ̨̛̪̣̦̏̌̌̚̚͘ ʽ̨̨̨̯̬̦̭̯̐̏ ̖ ̦̌ ̡̛̭̖̏ ̨̡̛̭̭̯̖̦̍̏ ̸̨̨̛̛̪̖̬̦̔ ̔̌
̪
̬̖̣̖̙̐̔̌ ̨̡̪̬̱̯̔̌ ̨̨̭̻̬̦̍̌̚ ̬̖̣̦̯̌̌̌ ̡̡̛̪̬̯̌̌ ̛ ̨̡̛̪̬̖̪̬̻, ̸̨̨̛̪̭̖̦ ̏ ̨̱̪̻̯̦̖̯̏̌.
ʤ
̡̨ ̛̬̖̹̯̖ ̔̌ ̨̛̪̪̬̯̖̌̏ ̛̭̥̌ ̴̡̖̖̯̦̔̌ ̸̭̯̌ ̛̛̣ ̔̌ ̨̛̪̣̯̖̏̌̚̚ ̨̨̛̛̦̖̯̬̬̦̌̚ ̛̭̖̬̏̚ ̛̛̣
ʧʤˀʤʻˉʰʽʻʻʰ˄ˁʸʽʦʰ˔
37
Il leƩo per bambini collegato al leƩo dei genitori non deve mai essere uƟlizzato in posizione
inclinata. Con questa funzione, entrambe le gambe devono essere regolate sempre alla
stessa altezza.
Non regolare il prodoƩo né spostarlo mentre il bambino è all'interno.
Quando si uƟůŝzza la funzione "Įssaggio al leƩo dei genitori", per evitare il rischio di
soīocamento dovuto all'intrappolamento, il leƫno deve essere Įssato correƩamente al
leƩo degli adulƟ uƟůŝzzando il sistema di ancoraggio.
UƟůŝzzare sempre e solo il sistema diĮssaggio fornito con questo prodotto.
Controllare la resistenza del sistema di Įssaggio prima di ogni uƟlizzo, allontanando il
leƫno dal leƩo del genitore.
Non uƟlizzare il prodoƩo se si forma uno spazio tra il leƩo del bambino e il leƩo dei genitor i.
Gli spazi vuoƟ non devono essere riempiƟ con cuscini, coperte o altri oggeƫ.
AVVERTENZA - Per evitare il rischio che il collo di un bambino rimanga impigliato nel giunto
superiore del lato accanto al leƩo per adulƟ, il giunto superiore non deve essere più alto
del materasso del leƩo per adulƟ.
AVVERTENZA - Per evitare il rischio di strangolamento del bambino, il sistema di aggancio
al leƩo per adulƟ deve essere sempre tenuto lontano dal leƫno e fuori dal leƫno.
PERICOLO! Sollevare sempre completamente la spondina abbassabile quando il leƫno non
èĂƩĂccato al leƩo dell'adulto!
Il montaggio, lo spiegamento e la piegatura del prodoƩo devono essere eseguiƟ SOLO da
un adulto.
Non consenƟre la presenza di bambini di età inferiore ai 3 anni prima di aver assemblato
completamente il prodoƩo, per evitare l'accesso alle parƟ piccole e smontate.
Qualsiasi confezione di plasƟca deve essere rimossa, distruƩĂ o tenuta lontana dai bambini
per evitare il rischio di soīocamento.
Non apportare alcuna modiĮĐĂ o miglioramenƟ alla struƩura del leƫno per non
danneggiare il leƫno e rischiare di ferire il bambino.
AVVERTENZE! Gli schemi e le Įgure in queste istruzioni sono solo a Ɵtolo illustraƟvo ed
indicaƟvo. Controllare la stabilita` delĮssaggio dopo ogni operazione eseguita.
ComponenƟ – illustrazione ʤ
Dopo aver disimballato, assicurarsi che tuƫ gli elemenƟ della Figura A siano disponibili.
Assemlaggio della struƩura
AVVERTENZE! Seguire scrupolosamente le istruzioni e la sequenza di montaggio del prodoƩo
come mostrato agli schemi.
Figura ʦ - Assemblare il supporto leƫno inserendo il tubo di sostegno principale "C" negli
incastri (fori) dei due telai laterali (gambe) "A" e "B" in direzione delle frecce. Ogni telaio laterale
è dotato di due bulloni per poter Įssare il tubo di supporto principale al leƫno. UƟůŝzzare una
chiave esadecimale per serrare i bulloni in senso orario. ATTENZIONE! Assicurarsi che il telaio
sia ben serrato e stabile. È la parte di sostegno del leƫno e garanƟsce la sicurezza del bambino.
Figura ˁ - Fissare il cesƟno al supporto montatoĮssando la parte di collegamento del telaio del
cesƟno alla parte superiore dei due telai laterali "A" e "B". Il perno a mollĂƐĐĂƩerà in posizione
ISTRUZIONI DI MONTAGGIO ʫ PER L'USO
12
„M̨̛̦ ˃̬̖̜̔͞ ʽʽʪ ̔̌̏̌ ̶̛̬̦̐̌̌́ ̦̌ ̸̨̛̪̻̬̦̣̦̏̌̌́ ̡̬̖̦̌ ̨̛̪̯̬̖̯̖̣̍ ̦̌ ̨̭̏́ ̨̡̪̬̱̯̔,
̸̖ ̭̻̺̯̌̌ ̦̥́̌ ̴̡̛̖̖̯̔ ̏ ̛̛̥̯̖̬̣̯̖̌̌ ̛ ̨̡̛̬̯̯̌̍̌̌̚͘ ˁ ̨̨̨̦̭̯̺̯̌́ ̥̖̔̌̏̌ ̶̛̬̦̐̌̌́ ̌̚
ʿ̨̡̬̱̯̔̌ ̭̬̖̺̱ ̴̡̛̖̖̯̔ ̏ ̛̛̥̯̖̬̣̯̖̌̌ ̛ ̨̡̛̬̯̯̌̍̌̌̚ ̛̪̬ ̨̡̨̛̦̖̦̍̏̌ ̨̡̛̪̯̬̖̯̖̣̭̍̌
̨̱̪̯̬̖̍̌ ̡̻̥ ̨̥̥̖̦̯̌ ̦̌ ̨̡̡̪̱̪̯̌̌ ̛ ̌̚ ̨̛̪̖̬̔ ̨̯ 2 ̨̛̛̦̐̔ ̭̣̖̔ ̯̯̔̌̌̌ ̦̌ ̨̡̭̯̯̔̌̏̌̌.
ʤ̡̨ ʿ̨̡̬̱̯̻̯̔ ̨̡̪̙̖̌ ̴̡̛̖̖̯̔ ̨̪ ̬̖̥̖̏ ̦̌ ̶̨̛̛̬̦̦̦̐̌̌́ ̨̛̪̖̬̔, ʦ̛̖ ̭̣̖̔̏̌ ̔̌
̛̛̪̻̣̦̯̖̚ ̡̛̱̦̯̌̌́̌̚ ̌̚ ̨̬̻̺̦̖̯̏̌ ̥̱, ̛̖̦̔̌̔ ̨̯ ̦̭͕̌ ̛ ̛̦̖ ̺̖ ̛̪̬̖̪̬̖̥̖̥̔ ̨̖̦̔ ̨̯
̛̛̭̣̖̦̯̖̖̜̭̯̔̔̏́:
1. ˍ̨̨̛̖̪̥̖̦̥̐̔ ̭̻̭ ̛̭̻̺́ ̛̛̣ ̨̨̨̡̨̛̬̦̭̯̖̦̪̬̱̯̦̯̌̏̔̌̚, ̡̨̱̪̖̦̯̌̚ʦ̭̌;
2. ˍ̨̨̛̖̪̪̬̥̐̌̏;
3. ˍ̖ ʦ̛ ̻̬̦̖̥̏ ̶̨̛̣́̚ ̛̛̣ ̸̸̨̛̭̯̦̌ ̨̡̪̱̪̦̯̌̌ ̶̖̦̌ ̦̌ ʿ̨̡̬̱̯̔̌͘ ʿ̨̛̬̌̔ ̡̦̪̬̖̻̌̔̌ ̏
̵̨̨̛̛̯̖̦̣̯̖̐ ̛ ̨̛̭̻̯̖̯̦̯̖̏ ̨̡̨̛̪̬̱̯̔̏ ̸̨̛̛̦̣̦̭̯̌, ʿ̨̡̬̱̯̻̯͕̔ ̡̨̨̜̯ ʦ̛ ̛̛̪̬̯̥̌̚ ̡̨̯̌
̨̪̥̦̔́̌, ̨̥̙̖ ̔̌ ̛̥̌ ̡̛̥̣̌ ̡̛̛̬̣̌̚ ̛̛̣ ̨̪-̡̛̦̭̌ ̨̪̬̙̦̔̌̌ ̶̖̦̌ ̨̯ ̨̛̛̛̬̦̣̦̐̌́
ʿ̨̡̬̱̯̔, ̡̨̨̜̯ ̭̯̖ ̡̛̛̱̪̣̌̚.
ʤ̡̨ ʿ̨̡̬̱̯̻̯̔ ̨̡̪̙̖̌ ̴̡̛̖̖̯̔ ̨̪ ̬̖̥̖̏ ̦̌ ̶̨̛̛̬̦̦̦̐̌̌́ ̨̛̪̖̬̔, ̨̯ ̵̨̛̬̯̖̌̔̚ ̨̪
̨̬̻̺̦̖̯̏̌ ̦̌ ̴̡̛̖̖̯̬̣̯̔̌̌̌ ̸̭̯̌ ̨̔ ̡̭̣̌̔ ̦̌ ʺ̨̛̦ ˃̬̖̜̔ ʽʽʪ ̖ ̌̚ ̡̭̥̖̯̌ ̦̌
̨̛̪̯̬̖̯̖̣̍́. ʿ̨̨̛̛̬̯̖̣̯̏̔́̚ ̦̖ ̨̪̖̥̌ ̡̡̛̛̦̌̏ ̵̨̛̬̌̔̚, ̡̨̨̛̯ ̨̥̯̐̌ ̔̌ ̡̛̻̦̦̯̏̌̚ ̨̪̔
̴̨̬̥̯̌̌ ̦̌ ̱̬̖̙̦̖̏̔̌ ̦̌ ̨̡̪̬̱̯̔̌ ̛̛̣ ̨̬̱̔̐ ̨̛̥̱̺̖̭̯̏ ̨̪ ̬̖̥̖̏ ̦̌ ̨̯̬̦̭̪̬̯̌ ̡̻̥ ̨̦̖̐.
ʶ̸̱̪̱̻̯̏̌, ̦̌ ̨̭̜̏ ̡̛̬̭ ̛ ̌̚ ̨̭̭̯̖̦̍̏̌ ̡̭̥̖̯̌, ̛̪̬̺̌̌̚ ̨̔ ̨̨̛̛̪̬̯̖̣̏̔́̚ ̌̚ ̶̨̡̖̦̌ ̦̌
̵̨̯̍̏̌̌ ̦̌ ̶̛̬̦̯̐̌̌́̌ ̛ ̨̬̖̥̦̯ ̦̌ ̨̡̪̬̱̯̔̌͘ ʿ̨̡̬̱̯̻̯̔ ̺̖ ̻̖̍̔ ̻̬̦̯̏̌ ̦̌ ̸̡̱̪̱̏̌̌ ̌̚
̨̦̖̐̏̌ ̡̭̥̖̯̌. ʺ̨̛̦ ˃̬̖̜̔ ʽʽʪ, ̨̪ ̨̭̜̏ ̨̛̬̍̚, ̺̖ ̨̛̪̪̬̌̏ ̛̛̣ ̛̥̖̦̌̚ ̸̛̭̯̌ ̨̯ ̨̡̪̬̱̯̔̌,
̡̨̨̛̯ ̭̌ ̨̡̨̦̔̌̌̚ ̴̡̛̖̖̯̦̔, ̨̛̪̬̌̔ ̛̦̖̪̬̣̦̌̏̌ ̴̸̛̬̦̌̍̌ ̨̡̛̬̯̌̍̌̚ ̛̛̣ ̛̛̥̯̖̬̣̌̌.
ʿ̨̛̪̬̖̦̯̖̌̏ ̸̛̭̯̌ ̛̛̣ ̨̛̦̯̖̏ ̨̛̪̥̖̦̖̦̔ ̡̛̯̌̏̌ ̺̖ ̭̖ ̨̪̬̖̭̯̯̔̌̏́ ̨̯ ʺ̨̛̦ ˃̬̖̜̔ ʽʽʪ
̏ ̥̦̌́̌̚ ̦̌ ̴̡̛̖̖̯̦̯̖̔ ̛ ̺̖ ̻̯̍̔̌ ̛̛̣ ̨̛̦̏, ̛̛̣ ̴̶̛̛̛̛̪̬̖̭̖̬̯̬̦̌ ̌̚ ̨̱̪̯̬̖̍̌.
ʽ̸̛̬̦̖̦̯̐̌̌̌ ̶̛̬̦̐̌̌́ ̦̖ ̵̨̺̍̏̌̌ ̛̺̖̯, ̸̛̛̛̪̬̦̖̦ ̦̌ ̨̡̪̬̱̯̔̌ ̏ ̬̖̱̣̯̯̌̚ ̦̌
̛̦̖̪̬̣̦̌̏̌ ̨̱̪̯̬̖̍̌, ̶̛̛̦̖̦̯̔, ̨̨̣̱̪̯̬̖̍̌̚, ̨̛̛̪̬̬̦̔ ̛̖̭̯̍̔̏́, ̸̨̛̛̦̖̜̦̍̌
̵̸̛̛̥̖̦̦̌ ̨̛̱̭̣̏́ ̛̛̣ ̨̨̛̛̪̬̯̖̭̯̖̭̯̖̦̏̏ ̨̛̱̭̣̏́ ̦̌ ̨̡̨̣̦̯̌̌ ̭̬̖̔̌, ̛̛̣ ̦̖̬̬̖̹̖̦̌̚
̨̖̥̦̯̙͕̔̌ ̨̬̖̥̦̯ ̛̛̣ ̴̶̨̡̛̛̛̥̔̌́, ̸̡̨̛̣̯̖̣̦̏̀ ̛ ̨̛̬̖̥̦̯ ̛ ̴̶̨̡̛̛̛̛̥̔̌ ̛̛̻̬̹̖̦̏̚
̏ ̛̭̖̬̏̚ ̸̛̬̣̖̦̌̚ ̨̯ ̨̨̛̛̛̯̬̬̦̌́̚. ʻ̨̭̯̺̯̌́̌̌ ̸̨̛̬̦̖̦̐̌̌ ̶̛̬̦̐̌̌́ ̦̖ ̛̙̏̌ ̨̭̻̺ ̛ ̌̚
̨̡̛̪̬̱̯̔, ̡̨̨̛̯ ̭̌ ̨̛̪̬̖̦̔̌̔ ̡̨̯̌ ̨̡̛̭̯ ̨̯̬̏̌ ̨̱̪̯̬̖̍̌͘ ʧ̶̨̛̛̬̦̦̦̯̌̌́ ̨̛̪̖̬̔ ̸̨̪̌̏̌̚
̔̌ ̸̯̖̖ ̨̯ ̨̥̥̖̦̯͕̌ ̏ ̡̨̨̜̯ ̖ ̦̪̬̖̦̌̌̏̌ ̨̡̭̯̯̔̌̏̌̌ ̨̔ ̡̛̣̖̦̯̌ ̛̛̣ ̨̯ ̨̥̥̖̦̯͕̌ ̏ ̡̨̨̜̯
̡̛̣̖̦̯̻̯ ̖ ̡̛̱̪̣̌̚ ̛ ̖̣̏̚ ̭̻̭ ̭̖̖̍ ̛̭ ̨̡̪̬̱̯̔̌ ̨̯ ̛̖̦̔̌̔́ ̨̛̛̭̯̬̱̯̬̔̍. ʦ̡̛̭̖ ̨̦̏ ̨̡̪̬̱̯̔
̖ ̛̺̯̖̦̌̌̚ ̭ ̶̛̬̦̐̌̌́ ̨̯ ̴̡̛̖̖̯̔ ̦̌ ̛̥̯̖̬̣̌̌̌ ̛/̛̛̣ ̨̡̛̭̌̏̔̚ ̴̡̛̖̖̯̔ ̏ ̨̛̪̬̻̣̙̖̦̖̔
̦̌ 2 ̨̛̛̦̐̔. ˃̨̏̌ ̸̨̖̍̌ ̦̖ ̸̡̣̏̀̏̌ ̨̨̨̦̬̥̣̦̯̌ ̨̛̦̭̦̖̏̌̚ ̛̛̣ ̨̪̬̖̙̦̖̏̔̌ ̛̭̣̖̭̯̖̏̔̏ ̦̌
̛̦̖̪̬̣̦̌̏̌ ̶̡̨̛̖̭̪̣̯̌̌́. ʧ̶̛̬̦̯̌̌́̌ ̦̖ ̨̡̛̪̬̏̌ ̡̨̨̛̥̪̦̖̦̯̯̖, ̨̛̛̦̭̖̦̚ ̛/̛̛̣
̨̛̪̬̖̖̦̏̔ ̛̭̣̖̭̯̖̏̔̏ ̦̌ ̛̦̖̪̬̣̦̌̏̌ ̨̱̪̯̬̖̍̌, ̸̡̨̛̣̯̖̣̦̏̀ ̡̨̨̛̬́̚, ̨̡̛̭̣̦̖́̏̌, ̛̺̖̯,
̸̛̛̛̪̬̦̖̦ ̨̯ ̨̏̔̌, ̡̡̨̯̌ ̛ ̨̯ ̨̱̥̬̌ ̦̌ ̛̥̯̖̬̣͕̌̌̌ ̨̛̪̬̖̏̔ ̛̛̣ ̛̱̌̐̍̚ ̸̛̛̛̪̬̦̖̦
̛̭̣̖̭̯̖̏̔̏ ̦̌ ̶̛̛̦̖̦̯̔, ̛̦̖̪̬̣̦̌̏̌ ̨̱̪̯̬̖̍̌, ̦̖̥̬̦̖̌̌́̏̌̚, ̨̨̣̱̪̯̬̖̍̌̚, ̡̬̙̌̍̌ ̛̛̣
̦̖̭̪̦̖̌̏̌̚ ̦̌ ̶̡̛̛̛̦̭̯̬̱̯̖ ̛/̛̛̣ ̛̪̬̖̱̪̬̖̙̖̦̯̔̔́̌, ̸̨̨̛̪̭̖̦ ̏ ̡̨̨̨̨̬̻̭̯̯̏̔̏ ̌̚
̨̱̪̯̬̖̍̌͘ ˍ̛̖̯, ̸̛̛̛̪̬̦̖̦ ̏ ̛̭̣̖̭̯̖̔̏ ̦̌ ̨̱̥̬̌ ̦̌ ̛̥̯̖̬̣̌̌̌, ̭̌ ̡̛̪̬̦̌̚, ̸̖ ̨̭̻̯̖̯̦̯̏̌̌
̸̭̯̌ ̖ ̛̣̍̌ ̨̨̪̬̖̹̦̐ ̨̛̪̣̦̏̌̌̚̚͘ ʽ̨̨̨̯̬̦̭̯̐̏ ̖ ̦̌ ̡̛̭̖̏ ̨̡̛̭̭̯̖̦̍̏ ̸̨̨̛̛̪̖̬̦̔ ̔̌
̪̬̖̣̖̙̐̔̌ ̨̡̪̬̱̯̔̌ ̨̨̭̻̬̦̍̌̚ ̬̖̣̦̯̌̌̌ ̡̡̛̪̬̯̌̌ ̛ ̨̡̛̪̬̖̪̬̻, ̸̨̨̛̪̭̖̦ ̏ ̨̱̪̻̯̦̖̯̏̌.
ʤ̡̨ ̛̬̖̹̯̖ ̔̌ ̨̛̪̪̬̯̖̌̏ ̛̭̥̌ ̴̡̖̖̯̦̔̌ ̸̭̯̌ ̛̛̣ ̔̌ ̨̛̪̣̯̖̏̌̚̚ ̨̨̛̛̦̖̯̬̬̦̌̚ ̛̭̖̬̏̚ ̛̛̣
ʧʤˀʤʻˉʰʽʻʻʰ˄ˁʸʽʦʰ˔

1336
13
̡̨̌ ̨̛̪̣̯̖̏̌̚̚ ̸̭̯̌, ̡̨̨̯́ ̦̖ ̖ ̨̪̬̖̭̯̖̦̔̌̏̌ ̨̯ ʺ̨̛̦ ˃̬̖̜̔ ʽʽʪ, ̨̨̛̛̪̬̯̖̣̯̏̔́̚, ̡̡̨̯̌
̛ ̸̡̛̛̭̏ ̛̛̪̬̖̭̯̯̖̣̔̌̏, ̦̥́̌ ̔̌ ̨̦̭̯́ ̨̨̨̨̯̬̦̭̯̐̏, ̏ ̸̭̣̱̜̌ ̸̖ ̛̦̭̯̻̪̌ ̨̪̬̖̏̔̌ ̛̛̣
̨̨̡̣̪̣̱̌̚͘ʧ̶̛̛̛̬̦̯̖̦̖̣̦̪̬̌̌́̌̏̌̔̌:
1.ʿ̨̛̬̖̏̔, ̸̛̛̛̪̬̦̖̦ ̏ ̬̖̱̣̯̯̌̚ ̦̌ ̨̨̣̱̪̯̬̖̍̌̚, ̦̖̭̪̦̖̌̏̌̚ ̦̌ ̶̡̛̛̛̦̭̯̬̱̯̖ ̌̚
̨̱̪̯̬̖̍̌͘
2.ˍ̛̖̯,̸̨̨̛̛̛̛̪̬̦̖̦̪̦̖̪̬̖̪̣̭̯̔̌̏̚ ̨̛̛̛̣̱̥̹̣̖̦.
3.ˍ̛̖̯,̸̨̛̛̛̪̬̦̖̦̪ ̨̨̨̛̛̛̬̖̥̖̦̬̖̥̦̯̦̖̯̬̬̦̭̖̬̏̌̏̌̏̚̚ ̛̛̣ ̸̶̨̨̛̯̭̯̦̣̖̌.
4.ʻ̨̨̡̨̡̖̻̥̙̦̭̯̻̖̪̬̖̭̯̖̦̭̖̣̖̙̏̔̌̍̔̔̌̏̌̌̏̌̍̌̚ ̛̛̣ ̴̡̨̡̡̯̱̬̪̱̪̌̌̌̌̚͘
5.ˀ̸̛̛̖̖̬̦̭̯̏̌̚ ̛ ̡̨̨̛̥̪̦̖̦̯ ̨̨̨̛̛̛̦̭̖̦̪̬̦̬̥̣̦̱̪̯̬̖̌̌̍̌̚͘
ϲ͘ʧ̶̨̡̨̛̛̛̬̦̯̦̖̪̬̦̖̪̬̣̦̌̌́̌̏̌̌̏ ̨̭̣̦̖̐̍́̏̌ ̨̡̛̛̛̣̦̖̪̬̣̦̪̬̻̙̌̏̌̔̔̌͘
ʿ̨̡̬̱̯̻̯̔ ̖ ̸̪̬̖̦̦̖̦̔̌̌̚ ̌̚ ̨̱̪̯̬̖̍̌ ̨̭̥̌ ̨̯ ̨̖̦̔ ̖̯̖̔. ʧ̶̨̛̛̬̦̦̦̯̖̌̌ ̨̛̱̭̣̏́ ̭̖
̡̪̬̖̬̯̯̌́̏̌ ̛̪̬ ̦̖̔̌̏̌ ̦̌ ̨̡̪̬̱̯̔̌ ̨̪̔ ̦̖̥͕̌ ̛̪̬ ̨̪̬̙̔̌̍̌ ̦̌ ̨̯̬̏̌ ̨̱̪̯̬̖̍̌ ̛̛̣ ̛̪̬
̨̪̬̖̯̬̦̖̏̌̏̌. ʪ̴̡̛̖̖̯, ̸̨̛̪̣̱̖̦ ̛̪̬ ̨̨̪̦̔̍̌ ̨̱̪̯̬̖̍̌ ̦̖ ̭̖ ̨̭̣̱̙̯̍̏̌ ̡̨̯̌
̶̨̛̛̬̦̦̦̐̌̌ ̛ ̭̌ ̶̨̛̣́̚ ̌̚ ̡̭̥̖̯̌ ̦̌ ̡̛̣̖̦̯̌͘ ʦ ̡̛̯̌̏̌ ̸̛̭̣̱̌, ̡̛̣̖̦̯̻̯ ̨̛̦̭ ̶̨̛̣́̚
̨̨̨̨̯̬̦̭̯̐̏ ̌̚ ̸̡̛̛̭̏ ̡̨̛̬̭̖̏ ̨̯ ̛̦̬̦̦̌̌́̏̌́ ̛ ̨̛̪̬̖̏̔, ̡̨̨̛̯ ̨̥̯̐̌ ̔̌ ̡̛̻̦̦̯̏̌̚ ̛̪̬
̨̨̪̦̔̍̌ ̨̱̪̯̬̖̍̌͘ ʧ̶̨̛̬̦̦̖̦̌̌ ̨̡̭̬ ̛ ̶̨̛̛̬̦̦̦̐̌̌ ̪̬̌̏̌ – ̨̪ ̨̨̛̯̦̹̖̦̖ ̦̌ ̨̛̯̚
̨̡̪̬̱̯̔ʦ̛̖ ̶̨̡̛̛̥̯̖̯̻̬̭̬̦̌̐̏̌̐̌̌́ ̨̯Ϯϰ ̶̥̖̭̖̌͘
1. ʰ̨̛̬̖̦̯̖̍̚ ̏ ̨̦̭̯̺̯̌́̌̌ ̶̨̛̬̦̦̦̐̌̌̌ ̡̬̯̌̌ ̪̬̌̏̌ ̨̥̯̐̌ ̔̌ ̻̯̍̔̌ ̛̱̪̬̙̦̖̦̌ ̏ ̡̛̬̥̯̖̌
̸̶̨̨̨̨̡̛̛̦̪̭̖̦̬̦̦̖̦̭̬̌́̐̌̌͘
2. ʧ̶̨̛̛̬̦̦̦̯̌̌́ ̨̡̭̬ ̸̨̪̌̏̌̔̌̚ ̸̯̖̖ ̨̯ ̖̦̔́, ̡̨̨̯̐̌ ̨̡̭̯̯̌̌ ̭̖ ̪̬̖̖̔̌̔ ̦̌ ̨̛̪̯̬̖̯̖̣̍́
̛̛̣ ̨̯ ̡̨̪̱̭̦̖̯̌ ̦̌ ̨̡̭̯̯̌̌ ̏ ̶̡̨̛̖̭̪̣̯̌̌́, ̡̨̌ ̨̯ ̖ ̨̛̻̬̹̖̦̏̚ ̨̯ ˃̶̨̻̬̖̐̏̌ ̛̛̣ ̨̯ ̨̦̖̐̏
̛̭̣̱̙̯̖̣ ̡̨̯̯̯̌̔̌̌̌ ̸̸̨̨̨̛̛̭̖̪̭̬̦̏̌̏̚ʧ̶̨̡̛̬̦̦̦̯̬̯̌̌̌̌̌̌͘
3. ˁ̨̪̬̖̔ ̸̣. 112 ʯʯʿ ̛̪̬ ̨̛̦̖̭̻̯̖̯̭̯̖̏̏ ̦̌ ̨̡̛̪̯̬̖̯̖̣̭̯̍̌̌ ̨̡̭̯̌ ̭ ̨̨̨̬̔̐̏̌ ̌̚
̨̪̬̙̔̌̍̌ ̨̛̪̯̬̖̯̖̣̯̍́ ̛̥̌ ̨̪̬̌̏ ̔̌ ̛̪̬̖̔́̏ ̶̡̛̬̖̣̥̌̌́, ̡̨̯̌ ̨̡̛̪̭̌ ̨̯ ˃̶̨̻̬̖̐̏̌ ̔̌
̛̪̬̖̖̏̔ ̨̡̭̯̯̌̌̏ ̨̛̭̻̯̖̯̭̯̖̏̏ ̭ ̨̨̨̬̔̐̏̌ ̌̚ ̨̪̬̙̔̌̍̌. ʦ ̨̛̯̚ ̸̭̣̱̜̌ ̨̛̪̯̬̖̯̖̣̯̍́ ̨̥̙̖
̔̌ ̛̛̬̍̌̚ ̥̖̙̱̔ ̛̻̬̹̦̖̦̏̏̌̌̚ ̨̬̖̥̦̯ ̦̌ ̨̡̭̯̯̌̌ ̛̛̣ ̥̦̯̌́̌̌̚ ̜ ̭ ̨̦̏̌, ̨̭̖̦̏ ̡̨̌ ̨̯̏̌
̖ ̨̨̦̖̻̥̙̦̏̚ ̛̛̣ ̛̛̬̦̯̍̌́̚ ̨̯ ̨̦̖̐ ̸̛̦̦̌ ̌̚ ̨̛̖̺̖̯̖̦̖̍̚ ̖ ̶̨̨̨̛̦̖̪̬̪̬̦̣̖̦̌ ̏
̛̭̬̦̖̦̖̌̏ ̭ ̛̬̱̔̐́. ʿ̛̬̖̥̌ ̭̖, ̸̖ ̖̦̔̌̔ ̸̛̦̦̌ ̌̚ ̨̖̺̖̯̦̖̍́̏̌̚ ̦̌ ̨̛̪̯̬̖̯̖̣̍́ ̖
̶̨̨̨̛̦̖̪̬̪̬̦̣̖̦͕̌ ̡̨̌ ̨̨̨̦̖̯̐̏ ̨̛̪̣̦̖̏̌̚̚ ̦̣̌̌̐̌ ̵̨̛̬̌̔̚ ̦̌ ˃̶̨̻̬̖̐̏̌, ̡̨̨̛̯ ̏
̛̭̬̦̖̦̖̌̏ ̭ ̛̬̱̔̐́ ̸̛̦̦̌ ̦̌ ̨̖̺̖̯̦̖̍́̏̌̚ ̭̌ ̛̦̖̬̱̥̦̌̚, ̡̨̯̌ ̭̖ ̖̥̯̏̌̚ ̛̪̬̖̔̏̔͗ -
̨̨̭̯̜̦̭̯̯̌ ̦̌ ̨̡̛̪̯̬̖̯̖̣̭̯̍̌̌ ̨̡̭̯̌, ̡̨̌ ̦̥̹̖́̌ ̛̣̪̭̌ ̦̌ ̨̛̦̖̭̻̯̖̯̭̯̖̏̏; -̸̨̛̦̥̭̯̯̌̌̚
̦̌ ̨̨̛̦̖̭̻̯̖̯̭̯̖̯̏̏; -̨̨̻̥̙̦̭̯̯̏̌̚ ̔̌ ̭̖ ̨̛̪̬̖̣̙̔ ̦̌ ̨̛̪̯̬̖̯̖̣̍́ ̬̱̔̐ ̸̛̦̦̌ ̦̌
̨̖̺̖̯̦̖̍́̏̌̚, ̡̨̨̜̯̦̖ ̖ ̸̨̛̛̭̻̬̦̭̻̭̦̯̖̣̦̦̖̱̭̯̏̌̌̔̍̏̌̚̚ ̨̦̖̌̐̚.
4. ˁ̨̪̬̖̔ ̸̣. 113 ʯʯʿ, ̡̨̨̯̐̌ ̨̡̛̪̯̬̖̯̖̣̭̯̍̌̌ ̨̡̭̯̌ ̦̖ ̨̭̻̯̖̯̭̯̏̏̌ ̦̌ ̨̨̨̬̔̐̏̌ ̌̚
̨̪̬̙̔̌̍̌, ˃̶̨̨̛̛̻̬̖̻̯̖̣̻̙̖̦̪̬̖̖̭̻̯̖̯̭̯̖̐̏̔̔̌́̏̔̏̏̏ ̨̨̨̨̭̬̪̬̙̔̐̏̌̌̔̌̍̌̚͘
4.1. ʿ̨̛̬̖̙̦̖̯̏̔̌ ̦̌ ̨̡̛̪̯̬̖̯̖̣̭̯̍̌̌ ̨̡̭̯̌ ̏ ̨̛̭̻̯̖̯̭̯̖̏̏ ̭ ̨̨̨̬̔̐̏̌ ̌̚ ̨̪̬̙̔̌̍̌
̯̬́̍̏̌ ̔̌ ̭̖ ̛̛̻̬̹̏̚ ̏ ̡̛̬̥̯̖̌ ̦̌ ̛̖̦̔ ̶̥̖̭̖, ̸̨̛̭̯̦̌ ̨̯ ̨̪̬̖̦̖̯̔́̏́̏̌ ̦̌
̶̡̨̨̛̛̬̖̣̥̯̯̪̯̬̖̯̖̣̌̌́̌̍́.
4.2. ˁ̣̖̔ ̸̨̛̛̯̦̖̯̌̚ ̦̌ ̨̡̭̬̌ ̨̪ ̯͘ 4.1. ̨̛̪̯̬̖̯̖̣̯̍́ ̛̥̌ ̨̪̬̌̏ ̔̌ ̛̬̣̌̏̌̚ ̨̨̨̛̬̔̐̏̌ ̔̌
̥̱ ̻̖̍̔ ̨̻̭̯̦̖̦̏̌̏̌̚ ̪̣̯̖̦̯̌̌̌̌̚ ̭̱̥̌ ̛̛̣ ̔̌ ̡̛̭̌ ̦̥̣̦̖̌̌́̏̌ ̦̌ ̶̖̦̯̌̌ ̦̌
̨̡̨̡̛̪̯̬̖̯̖̣̭̯̭̯̍̌̌̌ ̨̭̻̣̭̦̯̐̌͘ϱ
4.3. ʿ̨̛̬̖̙̦̖̯̏̔̌ ̦̌ ̨̡̛̪̯̬̖̯̖̣̭̯̍̌̌ ̨̡̭̯̌ ̏ ̨̛̭̻̯̖̯̭̯̖̏̏ ̭ ̨̨̨̬̔̐̏̌ ̌̚ ̨̪̬̙̔̌̍̌ ̖
̨̖̪̣̯̦̍̌̚ ̌̚ ̨̛̪̯̬̖̯̖̣̍́. ˃̨̜ ̦̖ ̛̻̣̙̔ ̵̨̛̬̌̔̚ ̌̚ ̡̛̖̭̪̖̬̦̖̔̌ ̦̌ ̨̡̛̪̯̬̖̯̖̣̭̯̍̌̌
̨̡̭̯̌ ̛̛̣ ̌̚ ̛̛̥̯̖̬̣̌̌ ̛ ̯̬̱̔, ̛̭̻̬̦̏̌̚ ̭ ̨̬̖̥̦̯̌ ̜, ̛ ̦̖ ̯̬́̍̏̌ ̔̌ ̨̪̦̭̌́ ̸̛̛̦̯̖̣̦̌̚
̨̦̖̱̭̯̔̍̏̌͘
36
Questo prodoƩo è fabbricato in conformità ai requisiƟ della Direƫva Europea 2001/98/CE
sulla sicurezza generale dei prodoƫ, la Legge sulla protezione dei consumatori e lo Standard
Europeo BDS EN 1130:2019.
ʤTTENZIONE!
Non uƟlizzare questo prodoƩo senza aver prima leƩo le istruzioni per l'uso.
Il prodoƩo è progeƩato per bambini di età compresa tra 0 e 12 mesi di pesoĮno a 11 kg.
SmeƩere di usare il prodoƩo non appena il bambino è in grado di sedersi, inginocchiarsi o
alzarsi.
L'inserimento di altri oggeƫ nel prodoƩo può causare il soīocamento.
Non collocare il prodoƩo in prossimità di altri prodoƫ che possono rappresentare un
rischio di soīocamento o strangolamento, come corde, corde di tende, ecc.
Non uƟlizzare più di un materasso nel prodoƩo.
UƟůŝzzare solo il materasso venduto con questo leƫno, non aggiungere un secondo
materasso a questo, pericolo di soīocamento!
Il prodoƩo deve essere collocato su un pavimento orizzontale.
I bambini piccoli non devono essere lasciati giocare senza supervisione vicino al leƫno.
Il leƫno deve essere bloccato in posizione bloccata, quando il bambino è lasciato
incustodito.
Tuƫ i raccordi devono essere sempre serraƟ correƩamente e occorre prestareĂƩenzione
che non vi siano viƟ allentate, in quanto il bambino potrebbe aīerrare parƟ
dell'alloggiamento o elemenƟ tessili (ad es. lacci, nastri, chiusure per il ciuccio) che
potrebbero rappresentare un rischio di soīocamento. Eseguire i controlli di rouƟne per
veriĮĐĂƌe che non vi siano parƟ allentate, danneggiate o mancanƟ.
La dimensione interna massima del leƫno per cui è stato progeƩato il materasso è di
900/590 mm. La lunghezza e la larghezza del materasso devono essere tali che la distanza
massima tra il materasso e i laƟ e i bordi del leƫno non superi i 2,5 cm.
Tenere il prodoƩo lontano da sigareƩe accese, ĮĂŵŵe libere e altre fonƟ di calore intenso
come stufe eleƩriche e a gas.
La base del cesƟno può essere uƟlizzata con un'inclinazioneĮno a 30° per evitare il disagio
e il soīocamento del bambino.
NON uƟlizzare il leƫno se alcune parƟ sono mancanƟ, danneggiate o roƩe. Se necessario,
contaƩare MONI TRADE LTD per oƩenere parƟ di ricambio e istruzioni. NON sosƟtu ire le
parƟ.
L'uso del leƫno per bambini con funzione di ΗĮssaggio al leƩo dei genitori" è consenƟto
solo con Ɵpi di leƫ standard e/o materassi con pareƟ diriƩe. L'uso del prodoƩo con leƫ
e/o materassi rotondi, leƫ ad acqua o materassi ad aria NON E` CONSENTITO!
ATTENZIONE! Non uƟlizzare la funzione di Įssaggio della culla al leƩo dei genitori se
l'altezza del leƩo è inferiore a 45 cm o superiore a 60 cm dal pavimento.
IT
IMPORTANTE! LEGGERE ATTENTAMENTE E CONSERVARE PER FUTURO RIFERIMENTO.

14 35
35
̸̨̡̛̛̭̯ ̛̛̖̣̔́̚. ʦ̡̛̛̭̖̯̖̭̯̣̦̼̖̖̯̣̽̔̌ ̡̛̛̯̦̌ ̸̨̡̨̛̭̣̖̱̖̯̭̯̬̯̯̣̬̱̦̱͕̭̣̖̱̔̌̽̽̏̀̔́
̶̡̛̛̦̭̯̬̱̥́ ̦̌ ̡̡̛̯̖̯̖̾. ʿ̨̭̣̖ ̸̨̡̛̛̭̯ ̜̯̖̔̌ ̡̨̡̬̯̖̏̌ ̵̨̨̨̬̹ ̵̨̼̭̦̱̯̏̽, ̪̬̖̙̖̔ ̸̖̥
̨̨̛̭̪̣̯̽̏̌̽̚ ̖̖. ʻ̖ ̡̭̣̼̜̯̖̌̔̏̌ ̛ ̦̖ ̛̭̦̥̜̯̖̌ ̡̨̡̬̯̱̏̌, ̨̡̪̌ ̨̦̌ ̨̨̪̣̦̭̯̽̀ ̦̖
̵̨̼̭̦̖̯̏͘ ʻ̖ ̨̪̖̬̜̯̖̔̏̐̌ ̛̛̖̣̖̔̚ ̨̛̣̯̖̣̦̥̱̔̽ ̨̛̖̜̭̯̏̔̏̀̚ ̵̪̬̥̼́ ̸̵̨̭̣̦̖̦̼ ̸̣̱̖̜ ̛
̵̡̭̯̬̖̥̣̦̼̾̌̽ ̯̖̥̪̖̬̯̱̬̌, ̡̨̨̯̬̼̖ ̨̥̱̯̐ ̛̛̥̖̦̯̽̚ ̶̖̯̏ ̛ ̨̛̪̬̖̯̏̔̽ ̨̡̯̬̼̯̼̖ ̸̛̭̯̌.
ʿ̨̭̣̖ ̨̨̛̣̯̖̣̦̔̽̐ ̨̛̖̜̭̯̏̔̏́̚ ̵̨̡̛̼̭̏ ̯̖̥̪̖̬̯̱̬̌ ̨̨̛̪̙̯̖̔̔ ̡̨̡̨̦̖̭̣̽ ̛̥̦̱̯͕ ̪̬̖̙̖̔
̸̖̥ ̨̪̥̖̺̯̌̽ ̏ ̨̦̖̐ ̡̬̖̖̦̍̌. ʻ̖ ̡̛̣̯̖̌̔ ̪̬̖̥̖̯̼̔ ̦̱̯̬̏̽ ̛̛̣ ̦̌ ̛̛̖̣̖̔̚, ̸̨̯̼̍ ̦̖
̨̛̪̬̖̯̏̔̽ ̶̡̨̡̛̛̦̭̯̬̱̀/̛̛̣ ̨̡̛̱̍̏͘ˈ̛̬̦̯̖̌ ̨̖̐ ̸̨̛̭̯̥̏ ̵̨̭̱̥ ̥̖̭̯̖.
ˁ̨̖̣̦̔̌ ̣̔́ Cangaroȍʶʻˀ
ʿ̨̨̨̛̛̛̛̬̯̖̣̥̪̬̯̖̬̏̔̽̚: ʽʽʽ «ʺ̨̛̦˃̬̖̜̔»,
ʤ̬̖̭̔: ʥ̨̛̣̬̐̌́, ˁ̴̨̛́,˃̸̛̬̖̍, ̱̣. ʪ̨̨̣ 1,
˃̴̨̖̣̖̦: 003592/936 07 90,̖̏̍-̭̜̯̌͗www.cangaroo-bg.com
14
4.4. ʿ̨̛̯̬̖̯̖̣̯̍́ ̨̥̙̖ ̔̌ ̡̛̭̌ ̛ ̨̛̖̺̖̯̖̦̖̍̚ ̌̚ ̛̪̬̖̯̻̬̪̖̦̯̖ ̛̭̣̖̭̯̖̏̔̏ ̦̌
̨̨̛̛̦̖̭̻̯̖̯̭̯̖̯̬̖̏̏̏̔.
5. ˁ̨̪̬̖̔ ̸̣. 114 ʯʯʿ ̛̪̬ ̨̛̦̖̭̻̯̖̯̭̯̖̏̏ ̦̌ ̨̡̛̪̯̬̖̯̖̣̭̯̍̌̌ ̨̡̭̯̌ ̭ ̨̨̨̬̔̐̏̌ ̌̚
̨̪̬̙̔̌̍̌ ̛ ̡̨̨̯̐̌ ̨̛̪̯̬̖̯̖̣̯̍́ ̦̖ ̖ ̨̨̱̣̖̯̬̖̦̔̏̏ ̨̯ ̨̬̖̹̦̖̯̌̏̌ ̦̌ ̶̡̛̬̖̣̥̯̌̌́̌ ̨̪ ̯͘
4, ̨̯̜ ̛̥̌ ̨̪̬̌̏ ̨̛̦̬̌̍̚ ̥̖̙̱̔ ̖̦̔̌ ̨̯ ̛̭̣̖̦̯̖̔ ̨̨̛̻̥̙̦̭̯̏̚: -̬̣̦̖̌̏̌́̚ ̦̌ ̨̨̨̬̔̐̏̌
̨̨̨̛̻̭̯̦̦̖̦̪̣̯̖̦̯̯̦̖̏̌̏́̏̌̌̌̌̌̌̐̚̚ ̭̱̥͖̌- ̦̥̣̦̖̌̌́̏̌ ̶̦̖̦̯̌̌̌͘
5.1. ʿ̨̛̯̬̖̯̖̣̯̍́ ̦̖ ̨̥̙̖ ̔̌ ̛̪̬̖̯̖̦̬̔̌ ̌̚ ̨̻̭̯̦̦̖̏̌̏́̏̌̚ ̦̌ ̪̣̯̖̦̯̌̌̌̌̚ ̭̱̥̌ ̛̛̣ ̌̚
̦̥̣̦̖̌̌́̏̌ ̶̖̦̯̌̌ ̦̌ ̨̡̭̯̯̌̌, ̡̨̨̯̐̌ ̶̨̯̻̬̖̻̯̐̏ ̭̖ ̛̭̻̣̭̐̌ ̔̌ ̻̖̍̔ ̛̻̬̹̖̦̏̌̚ ̥̦̌́̌̚ ̦̌
̨̡̛̪̯̬̖̯̖̣̭̯̍̌̌ ̨̡̭̯̌ ̭ ̨̦̏̌ ̛̛̣ ̔̌ ̭̖ ̨̛̪̪̬̌̏ ̨̡̭̯̯̌̌ ̏ ̡̛̬̥̯̖̌ ̦̌ ̛̖̦̔ ̶̥̖̭̖ ̨̯
̪̬̖̦̖̔́̏́̏̌ ̶̡̛̦̬̖̣̥̯̌̌̌́̌ ̨̨̛̯̪̯̬̖̯̖̣̍́.
5.2. ˃̶̨̻̬̖̻̯̐̏ ̖ ̣̻̙̖̦̔ ̔̌ ̨̨̛̱̣̖̯̬̔̏̏ ̡̛̭̦̖̌ ̌̚ ̬̣̦̖̌̏̌́̚ ̦̌ ̨̨̨̬̔̐̏̌ ̛ ̔̌ ̨̛̻̭̯̦̏̌̏̚
̪̣̯̖̦̯̌̌̌̌̚ ̨̯ ̨̛̪̯̬̖̯̖̣̍́ ̭̱̥̌, ̡̨̨̯̐̌ ̭̣̖̔ ̡̨̯̌ ̖ ̨̨̛̱̣̖̯̬̣̔̏̏ ̛̯̬ ̶̡̛̛̬̖̣̥̌̌ ̦̌
̨̛̪̯̬̖̯̖̣̍́ ̸̬̖̚ ̛̻̬̹̦̖̏̏̌̚ ̦̌ ̨̬̖̥̦̯ ̦̌ ̖̦̔̌ ̛ ̭̻̺̌ ̨̡̭̯̌, ̏ ̡̛̬̥̯̖̌ ̦̌ ̨̡̭̬̌ ̦̌
̶̛̬̦̯̐̌̌́̌ ̨̪ ̸̣. 115 ʯʯʿ ̖ ̶̛̦̣̖̌ ̭̣̖̺̔̏̌̌ ̨̪́̏̌ ̦̌ ̨̛̦̖̭̻̯̖̯̭̯̖̏̏ ̦̌ ̨̡̭̯̯̌̌ ̭
̨̨̨̨̬̪̬̙̔̐̏̌̌̔̌̍̌̚͘
5.3. ʿ̨̛̯̬̖̯̖̣̯̍́ ̦̖ ̨̥̙̖ ̔̌ ̛̪̬̖̯̖̦̬̔̌ ̌̚ ̬̣̦̖̌̏̌́̚ ̦̌ ̨̨̨̬̔̐̏̌, ̡̨̌ ̨̨̛̦̖̭̻̯̖̯̭̯̖̯̏̏
̨̡̨̡̛̦̪̯̬̖̯̖̣̭̯̭̯̌̍̌̌̌ ̭ ̨̨̨̬̖̔̐̏̌ ̸̨̛̦̖̦̯̖̣̦̌̚.
ϲ͘ˁ̸̨̪̬̖̣̔. 115 ʯʯʿ ̨̨̛̪̯̬̖̯̖̣̯̥̙̖̍́ ̔̌ ̨̨̛̱̪̬̙̦̪̬̯̌̌̏ ̛̭̦̌ ̶̡̛̬̖̣̥̌̌́ ̏ ̨̡̭̬ ̨̔
̖̔̏ ̨̛̛̦̐̔, ̸̨̛̭̯̦̌ ̨̯ ̨̪̬̖̦̖̯̔̌̏̌ ̦̌ ̨̡̛̪̯̬̖̯̖̣̭̯̍̌̌ ̨̡̭̯̌ ̛̛̣ ̨̯ ̡̨̪̱̭̦̖̯̌ ̦̌ ̨̡̭̯̯̌̌
̶̡̨̛̖̭̪̣̯̏̌̌́,̡̨̨̯̌ ̖ ̨̛̻̬̹̖̦̏̚ ̨̯˃̶̨̻̬̖̐̏̌ ̛̛̣ ̨̨̯̦̖̐̏ ̛̭̣̱̙̯̖̣.
6.1. ˁ̨̡̨̬̻̯̪ ̯. 6 ̛̭̪̬̌ ̔̌ ̸̯̖̖ ̪̬̖̚ ̨̬̖̥̖̯̏, ̵̨̨̨̛̦̖̥̍̔ ̨̡̪̪̬̯̌̌̏̌̌̚ ̛̛̣ ̥̦̯̦̌́̌̌̌̚
̨̡̛̪̯̬̖̯̖̣̭̯̍̌̌ ̨̡̭̯̌ ̛̛̣ ̌̚ ̨̛̪̭̯̦̖̐̌ ̦̌ ̨̛̭̪̬̱̥̖̦̖̌̚ ̥̖̙̱̔ ˃̶̨̻̬̖̐̏̌ ̨̛̛̪̯̬̖̯̖̣̍́
̨̬̖̹̦̖̦̭̪̬̌̌̏̌̌̌̚͘
6.2. ˄̨̪̬̙̦̦̖̯̌́̏̌ ̦̌ ̨̨̪̬̯̦̌̏̌ ̨̛̪̯̬̖̯̖̣̍́ ̨̪ ̯. 6 ̦̖ ̖ ̨̨̻̬̦̍̏̌̚ ̭ ̡̡̛̦̻̌̏ ̬̱̔̐ ̨̡̭̬
̡̛̪̬̖̦̖̦̭̌̔́̏́̏̌̌̚, ̸̨̨̡̨̛̬̣̖̦̯̭̬̪̌̌̚ ̯. 6.
˃̨̡̻̬̭̯̐̏̌̌ ̶̛̬̦̐̌̌́ ̦̖ ̨̡̌̏̌̚ ̛̛̣̦̖̏́ ̵̻̬̱̏ ̪̬̯̌̏̌̌ ̦̌ ̨̛̛̪̯̬̖̯̖̣̯̖̍. ʻ̨̛̛̖̭̥̌̏̚ ̨̯
̨̡̯̻̬̭̯̐̏̌̌ ̶̛̬̦̐̌̌́ ̸̨̪̬̻̯̔̌̏̌ ̨̨̯̬̐̏̌́ ̌̚ ̛̣̪̭̯̌̌ ̦̌ ̨̛̭̻̯̖̯̭̯̖̏̏ ̦̌ ̨̡̭̯̯̌̌ ̭
̨̨̨̬̔̐̏̌ ̨̪̬̙̌̔̌̍̌̚ ̸̨̭̻̣̭̦̣̐̌.119 ʯʯʿ.
ʰ̡̛̥̖̦̣̖̦̯̌̌͗͘͘͘..................................................ʤ̬̖̭̔.............................................................
ʰ̨̡̛̥̖̦̯̻̬̭̌̐̏́ ̨̡̖̯̍͗͘................................. ʰ̨̥̖̦̥̖̣̌̔̌͗͘...............................................
ʪ̨̯̦̪̬̙̌̌̌̔̌̍̌: .................. ʿ̨̛̪̭̔ ̸̸̨̛̪̖̯̦̪̬̌̌̔̌̏̌̌: ..................................................
ʰ̶̨̨̛̻̬̹̖̦̬̦̦̖̦̬̖̥̦̯̏̐̌̌̚͘͘͘...........................ʽ̛̛̪̭̦̖̦̌̌ ̨̪̬̖̯̏̔̌̌: ...........................
ʰ̛̻̬̹̣̏̚ ̨̬̖̥̦̯̌͗͘͘͘....................................................................ʪ̯̌̌͗͘͘....................................

1534
34
ˀ̨̡̛̭̱̦ B - ˁ̨̛̖̬̯̖̍ ̨̡̪̭̯̱̔̌̏ ̣̔́ ̡̨̛̬̯̏̌, ̛̭̯̏̌̏̏ ̨̨̭̦̦̱̏̀ ̨̨̪̬̦̱̀ ̯̬̱̱̍ «C» ̏
̨̛̛̭̖̦̯̖̣̦̼̖̔̽ ̛̖̯̣̔̌ (̨̛̯̖̬̭̯̏́) ̵̱̔̏ ̵̨̡̨̼̍̏ ̬̥̌ (̨̡̦̙̖) «A» ̛ «B» ̏ ̛̛̦̪̬̣̖̦̌̌̏,
̡̨̱̦̦̥̌̌̚ ̡̛̭̯̬̖̣̥̌. ʶ̙̌̔̌́ ̨̡̨̍̏̌́ ̬̥̌̌ ̨̭̦̺̖̦̌̌ ̱̥̔̏́ ̨̛̣̯̥̍̌ ̣̔́ ̡̛̬̖̪̣̖̦́
̨̨̨̭̦̦̜̏ ̨̨̨̪̬̦̜ ̯̬̱̼̍ ̡ ̡̨̡̬̯̖̏̌. ˁ ̨̨̪̥̺̽̀ ̡̛̛̹̖̭̯̬̦̦̐̌̌ ̛̯̦̯̖̌́̚ ̨̣̯̼̍ ̨̪
̸̨̨̭̜̌̏ ̡̭̯̬̖̣̖͘ ʦʻʰʺʤʻʰʫ! ˄̛̖̯̖̭̍̔̽, ̸̨̯ ̬̥̌̌ ̦̯̦̱̯̌́̌ ̛ ̸̨̛̱̭̯̜̏̌. ˑ̨̯ ̨̨̪̬̦̌́
̸̡̨̡̛̭̯̬̯̌̽̏̌ ̛ ̸̨̛̖̭̪̖̖̯̍̏̌ ̨̨̨̖̪̭̦̭̯̹̖̍̌̽̏̌̐̚ ̡̬̖̖̦̍̌͘
ˀ̨̡̛̭̱̦ C - ʿ̡̛̛̬̬̖̪̯̖ ̭̪̣̦̼̜̌̽ ̨̡̣̍ ̡ ̨̨̱̭̯̦̣̖̦̦̜̌̏ ̨̡̭̯̜̖, ̡̛̬̖̪̌̏̚
̨̛̛̭̖̦̯̖̣̦̱̔̽̀ ̸̭̯̌̽ ̬̥̼̌ ̡̨̛̬̦̼̚ ̏ ̵̖̬̦̖̜̏ ̸̛̭̯̌ ̵̱̔̏ ̵̨̡̨̼̍̏ ̬̥̌ ͨʤͩ ̛ «ʦͩ͘
ʿ̛̬̱̙̦̦̼̜ ̴̛̹̯̯ ̭̯̦̖̯̏̌ ̦̌ ̨̥̖̭̯, ̡̡̌ ̨̡̨̯̣̽ ̨̦ ̱̖̯̍̔ ̨̦̖̙̦̌̔ ̡̬̖̪̣̖̦̌̚ ̭ ̵̨̛̖̍
̨̨̭̯̬̦͘ ʦʻʰʺʤʻʰʫ! ˄̛̖̯̖̭̍̔̽, ̸̨̯ ̨̣̯̼̍ ̯̦̱̯̼͕̌́̚ ̌ ̨̡̣̍ ̨̦̖̙̦̌̔ ̡̛̪̬̬̖̪̣̖̦ ̡
̨̡̪̭̯̖̣̔̌̏̔́ ̡̨̡̛̬̯̏̌.
ˀ̡̛̛̭̱̦ D, E - ˁ̛̛̦̥̯̖ ̛ ̨̛̛̪̦̥̯̖̔ ̨̛̪̙̦̱̔̏̀ ̨̨̡̪̖̬̖̬̱̐̔. ˀ̛̭̭̯̖̦̯̖̌̐ ̨̛̥̣̦̀,
̨̨̬̭̪̣̙̖̦̦̱̌̀ ̨̪̔ ̡̨̥̜́̐ ̵̖̬̦̖̜̏ ̨̬̖̣̭̜̽. ʿ̨̛̛̦̥̯̖̔ ̨̛̪̙̦̱̔̏̀ ̨̨̡̪̖̬̖̬̱̐̔
̨̨̭̪̣̦̌̽̐ ̨̡̣̍̌ ̡̯̌, ̸̨̯̼̍ ̨̦ ̨̛̯̖̣̣̭̔́ ̨̯ ̨̨̛̭̦̦̏̌́, ̛ ̡̛̛̪̬̬̖̪̯̖ ̨̡̪̱̭̺̱̭̌̀̀́
̨̨̭̯̬̦̱ ̡̨ ̦̱̔ ̨̨̭̪̣̦̌̽̐ ̨̡̣̍̌͘ ʯ̡̨̬̜̯̖̌ ̨̡̨̱̍̏̀ ̪̦̖̣̌̽, ̨̡̪̌ ̦̖ ̛̱̭̣̼̹̯̖ ̸̨̡̺̖̣, ̛
̛̭̯̖̦̯̖̌̐̚ ̨̛̥̣̦̀ ̭ ̵̨̛̖̍ ̨̨̭̯̬̦͘ ʫ̛̭̣ ̼̏ ̵̨̛̯̯̖ ̨̪̦̯̔́̽ ̭̻̖̥̦̱̀ ̨̨̡̪̖̬̖̬̱̐̔,
̨̨̛̛̯̭̖̦̯̖̔ ̖̖ ̛ ̨̭̦̏̌ ̡̛̛̪̬̬̖̪̯̖ ̡ ̨̨̛̭̦̦̏̌̀ ̨̨̭̪̣̦̌̽̐ ̨̡̣̍̌ ̭ ̵̨̛̖̍ ̨̨̭̯̬̦.
ʰ̨̭̪̣̱̜̯̖̽̚ ̨̡̨̼̖̍̏ ̨̛̛̥̣̦, ̸̨̯̼̍ ̨̨̪̣̦̭̯̽̀ ̡̬̼̯̌̽̚. ʰ̨̭̪̣̱̜̯̖̽̚ ̸̡̨̛̥̖̯̣̣̖̭̖̌
̶̡̨̨̣̽, ̸̨̯̼̍ ̨̛̛̭̖̦̯̔̽ ̖̔̏ ̨̛̛̥̣̦ ̥̖̭̯̖̏, ̸̨̯̼̍ ̨̛̦ ̦̖ ̨̛̥̣̐ ̨̡̯̬̼̯̭̽́. ʪ̡̖̯̭̌́
̡̨̡̨̨̡̬̯̯̏̌̌̐̏̌ ̨̨̡̡̛̛̭̪̣̦̽̏̌̀̌̚ ̨̯̖̣̦̔̽̌́ ̡̨̬̯̏̌̽͘
ˀ̨̡̛̭̱̦ F - ʿ̛̖̬̖̥̖̺̖̦̖ ̡̨̡̛̬̯̏̌͘ ˋ̨̯̼̍ ̛̪̖̬̖̥̖̭̯̯̽ ̡̨̡̬̯̱̏̌, ̨̛̛̪̦̥̯̖̔ ̡̛̭̪̦̱
̡̨̛̬̯̏̌, ̌ ̯̖̥̌̚ ̛̪̖̬̖̥̖̭̯̯̖ ̖̖ ̏ ̨̦̱̙̦̖ ̨̥̖̭̯ ̭ ̨̨̪̥̺̽̀ ̵̨̡̱̦̙̖̔̏, ̵̨̱̭̯̦̣̖̦̦̼̌̏ ̦̌
̨̖̌̏̔̚͘ ʻ̨̡̛̙ ̡̨̡̛̬̯̏̌ ̨̭̦̺̖̦̼̌ ̨̨̛̯̬̥̦̼̥̚ ̨̛̱̭̯̬̜̭̯̥̏̌ (̨̨̛̭̯̪̬̥̌), ̡̨̨̯̬̼̖
̨̛̛̛̭̯̦̣̯̙̖̦̖̌̌̏̏̌̀̔̏ ̡̨̡̛̬̯̏̌ ̨̨̨̛̛̛̛̱̖̬̙̯̖̖̦̖̙̦̥̪̣̙̖̦̔̏̌̀̏̌̔.
ˀ̨̡̛̭̱̦ G. ˀ̨̡̛̖̱̣̬̐̏̌ ̨̼̭̯̼̏ ̛ ̴̡̛̦̯̬̖̣̭̦̌̀̌́ ̴̶̡̛̱̦́. ʦ̨̼̭̯̌ ̛̬̖̱̣̬̱̖̯̭̐́ ̏ 5
̵̨̨̛̪̣̙̖̦́. ˋ̨̯̼̍ ̨̨̛̯̬̖̱̣̬̯̐̏̌̽ ̨̼̭̯̱̏, ̛̦̙̥̯̖̌ ̡̨̡̦̪̱ ̨̡̛̛̬̖̱̣̬̐̏ ̛ ̛̪̖̬̖̥̖̭̯̯̖
̖̖ ̏ ̨̦̱̙̦̖ ̨̨̛̪̣̙̖̦̖. ʽ̨̛̭̦̦̖̏̌ ̨̨̭̪̣̦̌̽̐ ̨̡̣̍̌ ̨̨̥̙̦ ̨̨̛̭̪̣̯̽̏̌̽̚ ̭ ̡̨̨̦̣̦̥̌ ̨̔
30° ̣̔́ ̨̛̪̬̖̯̬̺̖̦̔̏̌́ ̴̡̨̨̛̭̥̬̯̔̌ ̛ ̱̱̹̔̽́ ̡̬̖̖̦̍̌. ʪ̡̖̯̭̱̀ ̡̨̡̬̯̱̏̌ ̨̨̥̙̦
̡̨̛̦̣̦̯̌̽ ̭ ̡̨̛̥̭̥̣̦̜̌̌̽ ̶̛̬̦̖̜̌̚ ̏ 2 ̨̨̛̪̣̙̖̦́ ̨̪ ̨̼̭̯̖̏. (ʿ̛̬̥̖̬: ̪̬̌̏̌́ ̨̦̐̌
̵̨̛̦̯̭̌̔́ ̏ ̶̨̛̛̛̪̚ 3, ̌ ̣̖̏̌́ — ̏ ̶̨̛̛̛̪̚ 1). ʦʻʰʺʤʻʰʫ! ʤ̴̡̛̦̯̬̖̣̭̦̱̀̀ ̴̶̡̛̱̦̀
̨̨̥̙̦ ̨̨̛̭̪̣̯̽̏̌̽̚ ̨̡̨̯̣̽ ̛̪̬ ̨̨̛̛̛̭̪̣̦̽̏̌̚ ̡̨̡̛̬̯̏̌ ̡̡̌ ̨̨̯̖̣̦̜̔̽ ̡̨̛̬̯̏̌. ʧ̨̨̣̏̌
̵̡̨̨̨̨̡̨̛̬̖̖̦̭̖̣̙̦̦̯̭̦̭̥̜̼̭̜̍̌̏̐̔̌̔̌̌̔̽́̌̌̏ ̨̨̭̯̬̦̖.
ˀ̨̡̛̭̱̦ H – ʶ̡̨̡̡̡̨̛̛̛̬̖̪̣̖̦̖̬̯̬̯̏̌̏̌ ̨̛̬̯̖̣̖̜̔. ˁ̨̨̡̛̛̦̥̯̖̪̖̬̖̬̱̐̔, ̬̭̭̯̖̦̱̌̐̏
̨̛̛̥̣̦ ̭ ̵̨̛̖̍ ̨̨̭̯̬̦ ̛ ̡̛̬̖̪̌̏̚ ̖̖ ̦̌ ̦̖̔ ̡̨̡̛̬̯̏̌. ʰ̨̭̪̣̱̜̯̖̽̚ ̔̏̌ ̬̖̥̦́
̨̨̛̖̪̭̦̭̯̍̌̚, ̵̨̛̺̖̏̔́ ̏ ̡̨̡̥̪̣̖̯, ̸̨̯̼̍ ̡̛̛̪̬̬̖̪̯̽ ̡̨̡̬̯̱̏̌ ̡ ̡̨̛̬̯̏̌ ̨̛̬̯̖̣̖̜̔.
ʯ̛̭̯̖̦̯̖̌̐ ̡̛̪̬̙́ ̨̪̔ ̡̨̡̨̬̯̜̏̌ ̭ ̵̨̛̖̍ ̨̨̭̯̬̦͕ ̯̖̥̌̚ ̡̛̬̖̪̯̖̌̚ ̛̬̖̥̦ ̨̡̬̱̏̐
̶̡̨̡̛̛̦̭̯̬̱ ̨̡̨̛̬̯̖̣̭̜̔̽ ̡̨̛̬̯̏̌, ̸̛̦̦̌̌́ ̛̭̦̱̚ ̛ ̨̛̪̦̥̭̔̌́̽ ̵̖̬̏̏, ̛, ̶̡̨̦̦̖̌,
̛̯̦̯̖̌́̚ ̡̛̪̬̙́ ̨̪̔ ̡̨̬̯̏̌̽̀. ˋ̨̯̼̍ ̡̛̬̖̪̯̌̽̚ ̡̨̡̬̯̱̏̌ ̨̬̥́̔ ̭ ̡̨̬̯̏̌̽̀ ̨̛̬̯̖̣̖̜̔,
̖̺̖ ̬̌̚ ̨̛̪̯̦̯̖́ ̌̚ ̡̛̣̥́, ̸̨̯̼̍ ̛̱̖̯̭̍̔̽́, ̸̨̯ ̡̨̡̬̯̏̌̌ ̨̦̖̙̦̌̔ ̡̛̪̬̬̖̪̣̖̦̌ ̡ ̡̨̛̬̯̏̌
̨̛̬̯̖̣̖̜̔.
ʽ̸̛̛̭̯̯̖ ̡̨̛̪̣̭̯̼̖̌̏ ̛̛̣ ̸̡̛̛̥̖̯̣̣̖̭̖̌ ̸̛̭̯̌ ̛̛̖̣̔́̚ ̡̨̥̜́̐ ̵̸̨̨̨̣̪̯̱̥̙̦̜̌̍̌
̡̯̦̌̽̀ ̛̛̣ ̡̨̱̜̐̍, ̸̨̨̭̥̖̦̦̜ ̨̨̜̏̔ ̛̛̣ ̡̛̥̥́̐ ̨̛̥̺̥̀ ̨̭̬̖̭̯̥̔̏. ʻ̖ ̨̛̭̪̣̱̜̯̖̽̚
̨̛̛̯̖̣̯̖̣̍̏̌, ̨̛̛̭̣̦̖̜̭̯̱̺̖̽̔̏̀ ̨̛̥̺̖̀ ̭̬̖̭̯̔̏̌ ̛̛̣ ̛̬̦̼̖̌̍̌̏̚ ̸̶̛̭̯̼̌ ̣̔́
ʰʻˁ˃ˀ˄ʶˉʰʰ ʿʽˋʰˁ˃ʶʫʰʿʽʪʪʫˀʮʶʫ
15
This product is manufactured in accordance with the requirements of the European DirecƟve
2001/98/EC on General Product Safety, the Consumer ProrecƟon Act and the European
Standard EN 1130: 2019.
WARNING!
Do not use this product without reading the instrucƟons for useĮrst.
The product is intended for children aged between 0 and 12 months, weighted up to 11 kg.
Stop using the product as soon as the child can sit or kneel or pull itself up.
Placing addiƟonal items in the product may cause suīocaƟon.
Do not place the product close to another product, which could present a danger of
suīocaƟon or strangulaƟon, e.g. strings, blind/curtain cords, etc.
Do not use more than oneŵĂƩress in the product.
Only use the maƩress sold with this crib, do not add a second ŵĂƩress on this one,
suīocaƟon hazards!
The product should be placed on a horizontalŇoor.
The young children should not be allowed to play unsupervised in the vicinity of the crib.
The crib should be locked in the Įxed posiƟon when the child is leŌunĂƩended.
All assembly Įƫngs should always be Ɵghtened properly and that care should be taken
that no screws are loose, because a child could trap parts of the body or clothing (e.g.
strings, necklaces, ribbons for babies’ dummies, etc.) which would pose a risk of
strangulaƟon. Perform rouƟne checks to make sure there are no loose, damaged or missing
parts.
The maximum internal size of the crib the ŵĂƩress is intended for is 900/590 mm. The
length and width shall be such that the maximum gap between the mattress and sides and
ends does not exceed 2,5 cm.
The product shall be kept away from burning cigareƩes, open Įres and other sources of
strong heat, such as electric bar Įres and gas Įres.
The base of the crib can be Ɵlted up to 30° to prevent any discomfort and danger of
suīocaƟon of the child.
DO NOT use the crib if any parts are missing, damaged or broken. Contact MONI TRADE for
replacement parts and instrucƟonal literature, if needed. DO NOT subsƟtute parts.
Using the product as Įxed to the adult’s bed is only permiƩed with beds and/or maƩress
with straight sides. Use of the product with round beds and/or mĂƩress or water beds or
inŇĂƚĂbleŵĂƩress IS NOT PERMITTED!
ATTENTION! Do not use the “Co-sleeping funcƟon” of the crib if the height of the adult’s
bed is less than 45 cm or more than 60 cm above the Ňoor.
Bedside sleepers shall never be used in an inclined posiƟon. In co-sleeping funcƟon the 2
legs of the crib must always be set to the same height posiƟon.
Do not adjust the product or move it while the child is inside.
EN
IMPORTANT! READ CAREFULLY AND KEEP FOR FUTURE REFERENCE

16 33
32
ʪ̦̦̼̜̌ ̨̡̪̬̱̯̔ ̨̨̛̯̣̖̦̐̏̚ ̏ ̨̨̛̛̭̯̖̯̭̯̏̏ ̭ ̨̛̛̯̬̖̦̥̍̏̌́ ʫ̨̡̨̬̪̖̜̭̜̏ ʪ̡̛̛̬̖̯̼̏
ϮϬϬϭͬϵϴͬʫˁ̨̪ ̶̨̨̨̨̡̛̛̛̺̖̜̖̪̭̦̭̯̪̬̱͕̍̍̌̔̚ʯ̡̨̦̌̌ ̨ ̛̺̯̖̪̬̌̌̏̚ ̨̛̛̪̯̬̖̯̖̣̖̜̍
̨̡̨̨̖̬̪̖̜̭̭̯̦̬̯̏̐̌̔̌̌ʥʪˁEϭϭϯϬ͗ϮϬϭϵ͘
ʦʻʰʺʤʻʰʫ͊
x ʻ̖ ̨̛̭̪̣̱̜̯̖̽̚ ̨̯̯̾ ̨̡̪̬̱̯̔ ̖̍̚ ̨̨̛̪̬̖̬̯̖̣̦̔̏̌̽̐ ̸̨̛̪̬̯̖̦́ ̶̡̛̛̛̦̭̯̬̱ ̨̪
̛̛̪̬̥̖̦̖̦̀͘
x ʿ̸̨̡̨̨̬̱̯̪̬̖̦̦̖̦̣̖̯̖̜̬̭̯̖̯̔̔̌̌̔́̔̏̏̌̚̚0 ̨̔12 ̶̨̨̥̖̭̖̖̭̥́̏̏̔11 ̡̐͘
x ʿ̡̨̨̡̡̨̡̨̨̡̛̛̛̛̛̬̖̬̯̯̖̭̪̣̦̖̖̣͕̯̣̬̖̖̦̌̽̏̌̔́̌̽̍̚̚ ̸̨̛̛̦̱̯̭̭̖̯͕̭̯̯̦̌́̔̽́̽̌
̸̵̡̛̛̖̯̖̬̖̦̣̭̯̯̏̽̌̏̌̏̌̽͘
x ʪ̵̨̨̨̨̡̨̡̨̛̛̣̖̦̖̪̣̦̯̖̣̦̼̪̬̖̥̖̯̪̬̱̯̱̥̙̖̯̼̯̱̱̹̖̍̌̏̔̽̔̏̔̏̏̌̽̔̽̚͘
x ʻ̖ ̬̥̖̺̜̯̖̌̌̚ ̛̛̖̣̖̔̚ ̨̬̥́̔ ̭ ̛̬̱̥̔̐ ̛̛̖̣̖̥͕̔̚ ̡̨̨̨̯̬̖ ̨̥̙̖̯ ̪̬̖̭̯̣̯̔̌̏́̽
̨̨̡̨̨̡̛̛̛̛̛̛̪̭̦̭̯̱̱̹̣̱̱̹̖̦͕̦̪̬̥̖̬̖̬̖̥͕̹̦̱̬̥̣̹̯̬̦̖̭̌̽̔̽́̔́̌̏̏̌̌̔́ͬ̌̌̏̚
̛̯̔͘͘
x ʻ̨̨̨̨̨̛̛̛̛̖̭̪̣̱̜̯̖̖̣̣̖̖̦̥̯̬̭̽̏̔̍̔̐̌̌̌̚̚͘
x ʰ̨̨̡̨̨̡̨̨̨̡̨̡̭̪̣̱̜̯̖̯̣̯̯̥̯̬̭͕̯̬̼̜̪̬̖̯̭̥̪̣̖̯̖̽̽̌̌̔̌́̏̚ ̨̡̨̡̨̭̯̜̬̯̜͕̦̖̾̏̌
̨̨̨̡̨̡̛̣̜̯̖̯̬̜̥̯̬̭̯̥̱͕̬̭̱̱̹̔̍̌̏́̏̌̌̾̔̽́͊
x ʰ̨̨̨̨̨̨̨̛̛̖̣̖̣̙̦̼̯̬̥̖̺̖̦̦̬̦̯̣̦̥̪̣̱̔̔̍̽̌̌̐̌̽̚̚̚͘
x ʺ̡̨̨̨̨̡̨̛̛̛̛̣̖̦̥̖̯̥̦̖̣̪̣̯̬̯̖̪̬̭̥̯̬̣̖̬̯̌̽̔́̽́̏́̽̐̌̽̍̌̏̏̌̚̚̚̚͘
x ʶ̨̬̯̏̌̽ ̨̣̙̦̔̌ ̼̯̍̽ ̴̡̨̛̛̭̬̦̌̏̌̌̚ ̏ ̨̨̛̦̖̪̙̦̥̔̏ ̨̨̛̛̪̣̙̖̦͕ ̡̨̐̔̌ ̨̡̬̖̖̦̍
̨̨̛̭̯̖̯̭̖̪̬̭̥̯̬̌́̍̌̚͘
x ʦ̭̖ ̴̛̛̛̯̦̐ ̭̖̏̐̔̌ ̨̣̙̦̼̔ ̼̯̍̽ ̨̛̪̬̣̦̌̏̽ ̯̦̱̯̼͕̌́̚ ̛ ̵̨̨̨̛̦̖̥̍̔ ̨̭̣̯̍̀̔̌̽
̸̶̸̨̨̨̨̨̨̡̡̡̨̡̨̛̛̛̛̭̯̬̙̦̭̯͕̯̼̦̖̭̣̯̦̯̼͕̯̬̖̖̦̥̙̖̯̖̪̯̭̭̯̽̍̌̍̽̏̌̌̍̌̽́̌̌̚̚
̡̨̬̪̱̭̌ ̛̛̣ ̌̚ ̡̛̯̖̭̯̣̦̼̖̽ ̣̖̥̖̦̯̼̾ ;̛̦̪̬̥̖̬͕̌ ̡̛̖̬̖͕̏̏ ̣̖̦̯̼͕ ̡̛̭̯̖̙̌̚ ̣̔́
̡̪̱̭̯̼̹̖Ϳ͕ ̸̨̯ ̨̥̙̖̯ ̛̛̪̬̖̭̯̏ ̡ ̱̱̹̔̽̀͘ ʦ̨̼̪̣̦̜̯̖́ ̨̪̣̦̼̖̌̏ ̨̡̛̪̬̖̬͕̏ ̸̨̯̼̍
̵̵̵̨̡̨̨̛̛̛̛̛̛̱̖̯̭̯̭̱̯̭̯̦̖̬̖̪̣̖̦̦̼͕̪̬̖̙̖̦̦̼̣̯̭̱̯̭̯̱̺̖̯̣̖̜̍̔̽́̏̏̌̏̔̏̀̔̌̚͘
x ʺ̡̛̭̥̣̦̼̜̌̌̽ ̛̦̱̯̬̖̦̦̜̏ ̬̥̖̬̌̚ ̡̨̡̛̬̯͕̏̌ ̣̔́ ̡̨̨̨̯̬̜ ̸̪̬̖̦̦̖̦̔̌̌̚ ̥̯̬̭͕̌̌
ϵϬϬͬϱϵϬ ̥̥͘ ʪ̛̣̦̌ ̛ ̛̛̹̬̦̌ ̥̯̬̭̌̌̌ ̨̣̙̦̼̔ ̼̯̍̽ ̡̛̛̯̥͕̌ ̸̨̯̼̍ ̡̨̛̥̭̥̣̦̖̌̌̽
̨̨̨̡̡̨̡̨̛̛̛̛̛̛̬̭̭̯̦̖̥̖̙̱̥̯̬̭̥̬̯̥̬̥̬̯̦̖̪̬̖̼̹̣̌́̔̌̌̍̌̌́̏̌̏̌Ϯ͕ϱ̭̥͘
x ʪ̵̵̸̨̨̡̨̨̨̨̡̨̛̛̛̛̛̛̛̛̛̖̬̙̯̖̖̣̖̣̯̙̙̖̦̦̼̭̬̖̯͕̯̬̼̯̦̬̱̭̯̦̔̏̔̌̌̐̌̐̐́̔̐̏̚̚
̵̸̨̡̨̡̡̡̡̡̨̛̛̛̛̛̼̭̜̯̖̥̪̖̬̯̱̬̼͕̯̣̖̯̬̖̭̖̼̖̪̣̯̼̏̌̌̌̾̐̌̏̚͘
x ʽ̨̛̭̦̦̖̏̌ ̨̨̭̪̣̦̌̽̐ ̨̡̣̍̌ ̨̨̥̙̦ ̨̨̛̭̪̣̯̽̏̌̽̚ ̭ ̡̨̨̦̣̦̥̌ ̨̔ ϯϬΣ ̣̔́
̴̨̡̨̨̡̛̛̛̪̬̖̯̬̺̖̦̭̥̬̯̱̱̹̬̖̖̦̔̏̌́̔̌̔̽́̍̌͘
x ʻʫ ̨̛̭̪̣̱̜̯̖̽̚ ̡̨̡̬̯̱͕̏̌ ̛̖̭̣ ̡̡̛̖̌-̨̛̣̍ ̛̖̯̣̔̌ ̨̯̭̱̯̭̯̱̯͕̏̀ ̨̪̬̖̙̖̦̼̏̔ ̛̛̣
̨̭̣̥̦̼̌͘ ʿ̛̬ ̵̨̨̨̛̛̦̖̥̭̯̍̔ ̨̬̺̜̯̖̭̍̌̌̽ ̏ ʺʽʻʰ ˃ˀʫʱʪ ʽʽʪ ̌̚ ̸̛̪̭̯̥̌̌́̚ ̛
̶̡̛̛̛̦̭̯̬̱̥́͘ʻʫ̛̥̖̦̜̯̖̖̯̣̌́̔̌̚͘
x ʰ̚-̌̚ ̴̶̡̛̛̱̦ ̸̡̛̦̌̌́ ̡̨̡̬̯̱̏̌ ̭̣̖̱̖̯̔ ̨̬̭̪̣̯̌̌̐̌̽ ̡̛̯̥̌ ̨̨̬̥͕̍̌̚ ̸̨̯̼̍
̸̡̡̨̡̨̡̡̡̨̛̛̛̛̛̛̭̣̯̬̭̱̬̬̱̱̥̖̖̣̣̬̖̖̦̬̭̬̯̀̽̔̌̌̔̐̀̍̽̍̌̌̌̏̌͘
x ʰ̨̨̛̭̪̣̦̖̽̏̌̚ ̡̨̖̯̭̜̔ ̡̨̡̛̬̯̏̌ ̭ ̴̶̡̛̱̦̖̜ ̴̶̡̛̛̭ͨ̌́ ̡ ̨̡̨̛̬̯̖̣̭̜̔̽ ̡̨̛̬̯̏̌ͩ
̨̡̪̱̭̖̯̭̔̌́ ̨̡̨̯̣̽ ̨̭ ̭̯̦̬̯̦̼̥̌̔̌ ̨̛̯̪̥ ̡̨̛̬̯̏̌ ̛̛̛̣ͬ ̨̥̯̬̭̥̌̌ ̭ ̛̪̬̥̼̥́
RU
ʦʤʮʻʽ͊ʿˀʽˋʰ˃ʤʱ˃ʫʦʻʰʺʤ˃ʫʸːʻʽʰˁʽˈˀʤʻʰ˃ʫʪʸ˔ʥ˄ʪ˄ˍʰˈˁʿˀʤʦʽʶ
33
̡̛̭̯̖̦̥̌͘ ʰ̨̨̛̭̪̣̦̖̽̏̌̚ ̛̛̖̣̔́̚ ̭ ̡̛̬̱̣̼̥̐ ̡̨̛̬̯̥̏̌́ ̛̛̛̣ͬ ̛̥̯̬̭̥͕̌̌̌
̨̡̨̛̛̛̛̛̛̦̼̥̬̯̥̣̦̱̦̼̥̥̯̬̭̥̏̔́̏̌́̌̔̏̌̌̌ʯʤʿˀʫˍʫʻʽ͊
x ʦʻʰʺʤʻʰʫ͊ ʻ̖ ̨̛̭̪̣̱̜̯̖̽̚ ̴̶̡̛̱̦̀ ̨̡̨̡̛̛̣̬̍̏ ̡̨̡̛̬̯͕̏̌ ̛̖̭̣ ̨̼̭̯̏̌ ̹̖̜̏̌
̡̨̡̛̬̯̥̖̦̖̖̏̌ϰϱ̨̛̛̭̥̣̣̖̖̍ϲϬ̨̨̭̥̦̪̣̥̌̔͘
x ʪ̡̡̨̡̨̡̨̨̡̨̨̨̛̛̛̛̖̯̭̱̬̯̱͕̭̖̦̖̦̦̱̭̬̯̬̯̖̣̖̜͕̦̦̖̣̭̪̣̯̀̏̌̔̀̏̌̽̀̔̐̔̌̽́̽̏̌̽̚̚
̡̨̨̨̨̛̛̦̣̦̦̥̪̣̙̖̦̏̌͘ʿ̴̶̨̨̨̡̨̨̡̨̛̛̛̛̛̛̛̬̭̪̣̦̯̜̱̦̖̦̙̭̖̣̙̦̼̽̏̌̾̍̏̐̔̌̔̚
̨̨̨̡̨̨̛̛̼̯̯̬̖̱̣̬̦̼̦̦̱̼̭̯̱̍̽̐̏̌̌̔̌̏̀̏͘
x ʻ̵̨̨̡̨̨̡̛̛̛̛̛̛̖̬̖̱̣̬̱̜̯̖̖̣̖̦̖̪̖̬̖̥̖̺̜̯̖̖͕̪̦̱̯̬̦̯̭̬̖̖̦̐̔̌̐̌̏̌̔́̍̚͘
x ʿ̴̶̨̨̡̨̡̛̛̛̛̛̛̬̭̪̣̦̱̦̪̬̱̯̽̏̌̔̌ͨ̚ʶ̸̡̨̡̨̡̨̨̛̛̛̬̖̪̣̖̦̖̬̯̖̣̭̜̬̯͕̯̼̔̽̏̌ͩ̍
̨̛̪̬̖̯̬̯̯̔̏̌̽ ̡̛̬̭ ̱̱̹̔̽́ ̛̚-̌̚ ̛̺̖̥̣̖̦͕̌́̚ ̡̨̡̬̯̏̌̌ ̨̣̙̦̔̌ ̼̯̍̽ ̨̛̪̬̣̦̌̏̽
̵̡̡̡̨̨̨̨̡̛̛̛̛̪̬̬̖̪̣̖̦̬̯̣̬̭̣̼̭̪̥̺̭̭̯̖̥̼̬̖̪̣̖̦̌̏̌̔́̏̽̀́̚͘
x ʦ̨̨̡̨̡̨̨̡̨̛̛̛̛̭̖̭̪̣̱̜̯̖̯̣̭̭̯̖̥̱̬̖̪̣̖̦͕̪̭̯̣̖̥̱̭̯̥̪̬̱̯̥̐̔̌̽̽́̌̏́̀̾̔̚͘
x ʿ̖̬̖̔ ̡̙̼̥̌̔ ̨̨̛̛̭̪̣̦̖̥̽̏̌̚ ̨̪̬̖̬̜̯̖̏́ ̨̦̖̙̦̭̯̌̔̽ ̛̭̭̯̖̥̼ ̡̛̬̖̪̣̖̦͕́
̨̡̨̡̨̡̨̨̛̛̛̯̯̬̯̱̯̬̯̬̯̖̣̖̜́̐̏̌́̏̌̏̌̔͘
x ʻ̨̡̨̡̨̡̨̡̨̨̛̛̛̛̛̛̖̭̪̣̱̜̯̖̖̣̖͕̖̭̣̥̖̙̱̖̯̭̜̬̯̜̬̯̬̯̖̣̖̜̖̭̯̽̔̔̔̏̌̏̌̽̀̔̽̚̚
̨̬̌̚̚͘
x ʯ̨̨̨̡̨̛̛̛̛̛̛̛̬̼̦̖̭̣̖̱̖̯̪̣̦̯̪̱̹̥͕̖̣̥̣̬̱̥̪̬̖̥̖̯̥̌̔̌́̽̔̌̔́̌̔̐̔̌̚̚͘
x ʦʻʰʺʤʻʰʫ - ˋ̨̯̼̍ ̛̖̙̯̍̌̽̚ ̡̛̬̭̌ ̛̺̖̥̣̖̦̌́̚ ̛̹̖ ̡̬̖̖̦̍̌ ̵̖̬̦̖̜̏ ̨̬̥̜̌
̶̵̨̨̨̨̡̨̨̛̭̯̬̦̼̬̥̭̬̭̣̜̬̯͕̖̬̦̬̥̦̖̣̙̦̼̯̼̹̖̥̯̬̭̌́̔̏̏̌̽̀̏́́̌̌̔̌̍̽̏̌̌̌̚
̨̨̡̨̛̬̭̣̜̬̯̏̏̌̚͘
x ʿˀʫʪ˄ʿˀʫʮʪʫʻʰʫ͘ʦ̴̶̨̡̨̡̡̛̛̛̛̛̛̛̛̖̙̦̖̬̭̱̱̹̖̦̹̖̬̖̖̦̭̭̯̖̥̱̭̍̌̌̔́̏̌̐̍̌̌̚
̵̡̨̨̨̨̡̨̡̛̛̛̬̯̣̬̭̣̼̭̖̭̣̖̱̖̯̖̬̙̯̪̣̹̖̯̬̯̦̖̖̖̏̌̔́̏̏̐̔̌̔̔̌̽̔̌̽̏̌̏̚͘
x ʽʿʤˁʻʽˁ˃ː͊ʦ̶̨̨̨̡̨̡̨̡̛̛̭̖̪̣̦̭̯̪̦̥̜̯̖̼̪̺̱̭̯̬̦̱͕̬̯̐̔̌̽̀̔̌̏̌̔̌̀̀̌̐̔̌̏̌̌
̡̡̡̨̨̨̨̛̛̦̖̪̬̬̖̪̣̖̦̬̯̬̭̣̌̏̌̏̐͊̚
x ˁ̨̡̬̱͕̍ ̡̛̬̭̣̼̦̖̌̌̔̏̌ ̛ ̡̛̭̣̼̦̖̌̔̏̌ ̛̛̖̣̔́̚ ̨̣̙̖̦̔ ̨̨̛̛̪̬̯̏̔̽̚ ˃ʽʸːʶʽ
̨̬̭̣̼̜̏̚͘
x ʻ̨̨̖̪̣̜̯̖̖̯̥̥̣̹̖̏́̔́̌̔̚ϯ̨̨̨̨̡̨̨̛̛̛̣̖̯̪̬̭̱̯̭̯̯̪̖̬̖̪̣̦̜̭̬̜̖̣̏̏̌̽̔̍̔́̏̚
̨̡̡̨̛̛̛̛̖̙̦̖̭̯̱̪̥̖̣̥̬̬̦̦̼̥̖̯̣̥̍̌̔̌̌̍̌̔̌́͊̚̚
x ʸ̀̍̌́ ̡̨̛̪̣̭̯̌̏̌́ ̡̨̡̱̪̌̏̌ ̨̣̙̦̔̌ ̼̯̍̽ ̱̣̖̦͕̔̌̌ ̸̨̛̱̦̯̙̖̦̌ ̛̛̣ ̵̛̬̦̯̭̌̽́ ̏
̨̨̨̡̛̛̛̦̖̭̯̱̪̦̥̣̖̯̖̜̥̖̭̯̖̖̙̦̖̬̭̱̱̹̔̔́̔̏̍̌̌̔̽́̚͘
x ʻ̖ ̨̛̦̭̯̖̏ ̵̡̡̛̛̦̌ ̛̛̥̖̦̖̦̜̚ ̛ ̸̛̱̣̱̹̖̦̜ ̏ ̶̡̨̡̛̦̭̯̬̱̀ ̡̨̡̛̬̯͕̏̌ ̡̯̌ ̡̡̌ ̨̯̾
̨̡̨̡̨̡̡̨̡̛̛̛̛̛̛̛̛̥̙̖̯̪̬̖̭̯̪̬̖̙̖̦̬̯̬̭̱̯̬̥̬̦̬̖̖̦̏̏̔̀̏̌̌̏̏̌́̍̌͘
ʦʤʮʻʽ͊ ʪ̛̬̥̥̼̌̐̌ ̡̛̛̛̬̭̱̦̏ ̶̨̡̨̡̨̛̛̛̯̜̦̭̯̬̱̣̯̭̯̣̾́̏́̀́̽ ̛̛̛̛̣̣̭̯̬̯̦̼̥̀̌̏
̸̨̨̨̛̛̛̬̖̦̯̬̦̼̥̏͘ʿ̴̶̶̨̨̡̨̡̨̨̛̛̛̛̛̬̖̬̜̯̖̦̖̙̦̭̯̭̪̭̣̖̙̜̪̖̬̏́̌̔̽̌̌̔̌͘
ʶ̨̨̥̪̦̖̦̯̼- ̶̛̛̣̣̭̯̬̀̌́
ʿ̸̶̨̡̨̡̨̨̡̛̛̛̛̛̭̣̖̬̭̪̱̖̯̖̭͕̯̭̖̣̖̥̖̦̯̼͕̪̦̦̼̖̦̣̣̭̯̬̌̌̏̍̔̽̏̾̌̌̌̀̌̚,
̨̭̯̱̪̦̼̔: ˃̨̡̨̡̛̖̣̬̯͖̏̌Ϯ͘ʺ̯̬̭̌̌ϯ͘ˁ̡̨̡̛̱̥̣̪̖̬̖̦̭͖̌̔́ϰ͘ʥ̨̡̨̨̡̪̭̯͖̏̌́̔̌̏̌ϱ͘
ʿ̨̡̛̖̬̙̺̯̬̱͖̔̔̏̌̀̌́̍̌ϲ͘ʿ̬̬̖̥̦̖̜͖̌̌ϳ͘ʧ̸̸̡̖̦̼̜̣͖̌̀ϴ͘ʦ̛̦̯džϰ
ˁ̶̨̡̡̨̡̛̛̬̦̭̯̬̱̍̌
ʦʻʰʺʤʻʰʫ͊ ˁ̨̨̯̬̐ ̨̭̣̜̯̖̍̀̔̌ ̶̡̛̛̛̛̦̭̯̬̱ ̨̨̨̪̭̣̖̯̖̣̦̭̯̔̏̌̽̽ ̨̡̛̭̬̍ ̛̛̖̣͕̔́̚ ̡̡̌
̵̵̨̡̨̪̦̦̭̖̥̌̌̌̌̚͘
ʰʻˁ˃ˀ˄ʶˉʰ˔ʿʽ ˁʥʽˀʶʫ ʰ ˑʶˁʿʸ˄ʤ˃ʤˉʰʰ
16
x When using the product at “Co-sleeping function”, to prevent a suffocation hazard from
entrapment, the bedside sleeper shall be properly secured to the adult bed using the
attachment system.
x Always use the attachment system provided with this product.
x Check the tightness of the attachment system before each use by pulling the bedside
sleeper in a direction away from adult bed.
x If there is any gap between the bedside sleeper and adult bed DO NOT use the product.
x Gaps should not be filled with pillows, blankets or other items.
x WARNING – To avoid hazards from the child’s neck being caught on the top rail on the side
that is next to the adult bed, the top rail must not be higher than the adult bed mattress.
x WARNING – To avoid the risk of your child being strangled the attachment system to the
adult’s bed shall always be kept away from and out of the crib.
x DANGER! Always completely raise the drop side when not attached to the adult’s bed!
x Assemble, unfold and fold the product ONLY by an adult.
x Do not allow children under 3 years of age till fully assemble the product to avoid access to
small and disassembled parts.
x Any plastic cover should be removed , destroyed or kept away from children to avoid
suffocation.
x Do not make any changes or improvements to the design of the crib, as this may damage
the crib and risk injury to the child.
IMPORTANT! The diagrams and figures in this instruction are illustrative and indicative only.
Follow exactly the instructions and sequence for assembling and operating with the product.
Check the securing of the fixation after each operation.
Components - illustration A
After unpacking, make sure that all elements of illustration A are available: Crib basket; Crib
mattress; Carry bag, Side frames (legs); Main support frame; Belts; 4 pcs bolts; 1 tool.
Assembly and operation
ATTENTION! Follow exactly the instructions and sequence for assembling and using the product,
described in the text and illustrations attached to the instructions.
Figure B - Assemble the bed stand by placing the main support frame "C" in the connecting
parts (holes) of the two side frames (legs) "A" and "B" in the direction of the arrows as showed
in the illustration. Each side frame is equipped with two bolts to secure the main support frame
to the bed. Use a hexagon to tighten the bolts clockwise. ATTENTION! Make sure the frame is
tight and stable. This is the supporting part of the crib and ensures the safety of your child.
Figure C - Attach the crib basket to the mounted stand by fixing the connecting part of the
basket frame to the top of the two side frames "A" and "B". The spring pin will snap into place
once it is securely fastened on both sides. CAUTION! Make sure the bolts are tight and the bin
is firmly attached to the crib stand.
Figures D, E - Lowering and lifting the drop side. Open the zipper, which is located under the
padded upper rail. Lift the drop side of the crib so that it detaches from the base, and attach the
falling side to the bottom of the crib. Close the side panel until you hear a clicking sound and
close the zipper on both sides. If you want to lift the drop side of the crib, detach it and reattach
ASSEMBLY AND OPERATING INSTRUCTIONS
17
it to the base of the crib on both sides. Use the side zippers to close completely. Use the metal
ring to connect the two zippers together so that they cannot open. The cot is ready to use as a
separate bed.
Figure F - Moving the crib. To move the crib, lift the back of the bed, then move it to the desired
location using the factory-fitted two-legged fixtures. The legs of the crib are equipped with a
braking device (stoppers) that stop the movement of the crib and keep it firmly locked.
Figure G - Height adjustment and antireflux function. The height can be adjusted in 5 positions.
To adjust the height, press the adjustment button and release it when the desired position is
reached. The base of the basket can be used with an inclination of up to 30 ° to prevent
discomfort and danger of suffocation of the child. The baby cot can be tilted with a difference
of maximum 2 positions in height. (Example: the right foot is in a position 3 and the left is in a
position 1). ATTENTION! The anti-reflux function can be applied only when the crib is used as a
separate bed. The child's head should always be on the highest side.
Figure H - Attaching the crib to the adult's bed. Remove the drop side by unbuttoning the
zippers on both sides and securing it to the bottom of the crib. Use the two seat belts provided
in the kit to secure the crib to the parent's bed. Lock the buckles under the crib on both sides,
then secure the belts around the structure of the parent's bed, starting at the bottom and going
up, and finally tightening the buckles under the bed. To secure the crib when it is next to the
parent's bed, pull the straps once more to make sure the crib is securely attached to the parent's
bed.
Clean the plastic or metal parts of the product with a soft cotton cloth or sponge moistened with
water or a mild detergent. Do not use bleach, agressive detergents or abrasive products to clean
the product. All textile parts and fabrics should be washed only by hand, following the
instructions on the label. After cleaning, allow the crib to dry well before using it. Do not fold or
remove the crib before it is completely dry. Do not expose the product to direct sunlight for
extended periods of time and to extreme temperatures that may change color and damage
exposed parts. After prolonged exposure to high temperatures, wait a few minutes before
placing the child in it. Do not place objects in or on the product to avoid damaging the structure
and / or upholstery. Store the product in a clean and dry place.
Manufactured for Cangaroo in PRC
Manufacturer and Importer: Moni Trade Ltd.
Address: Bulgaria, Sofia, Trebich, 1 Dolo Str.,
Phone number: 003592/936 07 90
Website: www.cangaroo-bg.com
INSTRUCTIONS FOR MAINTENANCE AND CLEANING

1732
32
ʪ̦̦̼̜̌ ̨̡̪̬̱̯̔ ̨̨̛̯̣̖̦̐̏̚ ̏ ̨̨̛̛̭̯̖̯̭̯̏̏ ̭ ̨̛̛̯̬̖̦̥̍̏̌́ ʫ̨̡̨̬̪̖̜̭̜̏ ʪ̡̛̛̬̖̯̼̏
ϮϬϬϭͬϵϴͬʫˁ̨̪ ̶̨̨̨̨̡̛̛̛̺̖̜̖̪̭̦̭̯̪̬̱͕̍̍̌̔̚ʯ̡̨̦̌̌ ̨ ̛̺̯̖̪̬̌̌̏̚ ̨̛̛̪̯̬̖̯̖̣̖̜̍
̨̡̨̨̖̬̪̖̜̭̭̯̦̬̯̏̐̌̔̌̌ʥʪˁEϭϭϯϬ͗ϮϬϭϵ͘
ʦʻʰʺʤʻʰʫ͊
x ʻ̖ ̨̛̭̪̣̱̜̯̖̽̚ ̨̯̯̾ ̨̡̪̬̱̯̔ ̖̍̚ ̨̨̛̪̬̖̬̯̖̣̦̔̏̌̽̐ ̸̨̛̪̬̯̖̦́ ̶̡̛̛̛̦̭̯̬̱ ̨̪
̛̛̪̬̥̖̦̖̦̀͘
x ʿ̸̨̡̨̨̬̱̯̪̬̖̦̦̖̦̣̖̯̖̜̬̭̯̖̯̔̔̌̌̔́̔̏̏̌̚̚0 ̨̔12 ̶̨̨̥̖̭̖̖̭̥́̏̏̔11 ̡̐͘
x ʿ̡̨̨̡̡̨̡̨̨̡̛̛̛̛̛̬̖̬̯̯̖̭̪̣̦̖̖̣͕̯̣̬̖̖̦̌̽̏̌̔́̌̽̍̚̚ ̸̨̛̛̦̱̯̭̭̖̯͕̭̯̯̦̌́̔̽́̽̌
̸̵̡̛̛̖̯̖̬̖̦̣̭̯̯̏̽̌̏̌̏̌̽͘
x ʪ̵̨̨̨̨̡̨̡̨̛̛̣̖̦̖̪̣̦̯̖̣̦̼̪̬̖̥̖̯̪̬̱̯̱̥̙̖̯̼̯̱̱̹̖̍̌̏̔̽̔̏̔̏̏̌̽̔̽̚͘
x ʻ̖ ̬̥̖̺̜̯̖̌̌̚ ̛̛̖̣̖̔̚ ̨̬̥́̔ ̭ ̛̬̱̥̔̐ ̛̛̖̣̖̥͕̔̚ ̡̨̨̨̯̬̖ ̨̥̙̖̯ ̪̬̖̭̯̣̯̔̌̏́̽
̨̨̡̨̨̡̛̛̛̛̛̛̪̭̦̭̯̱̱̹̣̱̱̹̖̦͕̦̪̬̥̖̬̖̬̖̥͕̹̦̱̬̥̣̹̯̬̦̖̭̌̽̔̽́̔́̌̏̏̌̌̔́ͬ̌̌̏̚
̛̯̔͘͘
x ʻ̨̨̨̨̨̛̛̛̛̖̭̪̣̱̜̯̖̖̣̣̖̖̦̥̯̬̭̽̏̔̍̔̐̌̌̌̚̚͘
x ʰ̨̨̡̨̨̡̨̨̨̡̨̡̭̪̣̱̜̯̖̯̣̯̯̥̯̬̭͕̯̬̼̜̪̬̖̯̭̥̪̣̖̯̖̽̽̌̌̔̌́̏̚ ̨̡̨̡̨̭̯̜̬̯̜͕̦̖̾̏̌
̨̨̨̡̨̡̛̣̜̯̖̯̬̜̥̯̬̭̯̥̱͕̬̭̱̱̹̔̍̌̏́̏̌̌̾̔̽́͊
x ʰ̨̨̨̨̨̨̨̛̛̖̣̖̣̙̦̼̯̬̥̖̺̖̦̦̬̦̯̣̦̥̪̣̱̔̔̍̽̌̌̐̌̽̚̚̚͘
x ʺ̡̨̨̨̨̡̨̛̛̛̛̣̖̦̥̖̯̥̦̖̣̪̣̯̬̯̖̪̬̭̥̯̬̣̖̬̯̌̽̔́̽́̏́̽̐̌̽̍̌̏̏̌̚̚̚̚͘
x ʶ̨̬̯̏̌̽ ̨̣̙̦̔̌ ̼̯̍̽ ̴̡̨̛̛̭̬̦̌̏̌̌̚ ̏ ̨̨̛̦̖̪̙̦̥̔̏ ̨̨̛̛̪̣̙̖̦͕ ̡̨̐̔̌ ̨̡̬̖̖̦̍
̨̨̛̭̯̖̯̭̖̪̬̭̥̯̬̌́̍̌̚͘
x ʦ̭̖ ̴̛̛̛̯̦̐ ̭̖̏̐̔̌ ̨̣̙̦̼̔ ̼̯̍̽ ̨̛̪̬̣̦̌̏̽ ̯̦̱̯̼͕̌́̚ ̛ ̵̨̨̨̛̦̖̥̍̔ ̨̭̣̯̍̀̔̌̽
̸̶̸̨̨̨̨̨̨̡̡̡̨̡̨̛̛̛̛̭̯̬̙̦̭̯͕̯̼̦̖̭̣̯̦̯̼͕̯̬̖̖̦̥̙̖̯̖̪̯̭̭̯̽̍̌̍̽̏̌̌̍̌̽́̌̌̚̚
̡̨̬̪̱̭̌ ̛̛̣ ̌̚ ̡̛̯̖̭̯̣̦̼̖̽ ̣̖̥̖̦̯̼̾ ;̛̦̪̬̥̖̬͕̌ ̡̛̖̬̖͕̏̏ ̣̖̦̯̼͕ ̡̛̭̯̖̙̌̚ ̣̔́
̡̪̱̭̯̼̹̖Ϳ͕ ̸̨̯ ̨̥̙̖̯ ̛̛̪̬̖̭̯̏ ̡ ̱̱̹̔̽̀͘ ʦ̨̼̪̣̦̜̯̖́ ̨̪̣̦̼̖̌̏ ̨̡̛̪̬̖̬͕̏ ̸̨̯̼̍
̵̵̵̨̡̨̨̛̛̛̛̛̛̱̖̯̭̯̭̱̯̭̯̦̖̬̖̪̣̖̦̦̼͕̪̬̖̙̖̦̦̼̣̯̭̱̯̭̯̱̺̖̯̣̖̜̍̔̽́̏̏̌̏̔̏̀̔̌̚͘
x ʺ̡̛̭̥̣̦̼̜̌̌̽ ̛̦̱̯̬̖̦̦̜̏ ̬̥̖̬̌̚ ̡̨̡̛̬̯͕̏̌ ̣̔́ ̡̨̨̨̯̬̜ ̸̪̬̖̦̦̖̦̔̌̌̚ ̥̯̬̭͕̌̌
ϵϬϬͬϱϵϬ ̥̥͘ ʪ̛̣̦̌ ̛ ̛̛̹̬̦̌ ̥̯̬̭̌̌̌ ̨̣̙̦̼̔ ̼̯̍̽ ̡̛̛̯̥͕̌ ̸̨̯̼̍ ̡̨̛̥̭̥̣̦̖̌̌̽
̨̨̨̡̡̨̡̨̛̛̛̛̛̛̬̭̭̯̦̖̥̖̙̱̥̯̬̭̥̬̯̥̬̥̬̯̦̖̪̬̖̼̹̣̌́̔̌̌̍̌̌́̏̌̏̌Ϯ͕ϱ̭̥͘
x ʪ̵̵̸̨̨̡̨̨̨̨̡̨̛̛̛̛̛̛̛̛̛̖̬̙̯̖̖̣̖̣̯̙̙̖̦̦̼̭̬̖̯͕̯̬̼̯̦̬̱̭̯̦̔̏̔̌̌̐̌̐̐́̔̐̏̚̚
̵̸̨̡̨̡̡̡̡̡̨̛̛̛̛̛̼̭̜̯̖̥̪̖̬̯̱̬̼͕̯̣̖̯̬̖̭̖̼̖̪̣̯̼̏̌̌̌̾̐̌̏̚͘
x ʽ̨̛̭̦̦̖̏̌ ̨̨̭̪̣̦̌̽̐ ̨̡̣̍̌ ̨̨̥̙̦ ̨̨̛̭̪̣̯̽̏̌̽̚ ̭ ̡̨̨̦̣̦̥̌ ̨̔ ϯϬΣ ̣̔́
̴̨̡̨̨̡̛̛̛̪̬̖̯̬̺̖̦̭̥̬̯̱̱̹̬̖̖̦̔̏̌́̔̌̔̽́̍̌͘
x ʻʫ ̨̛̭̪̣̱̜̯̖̽̚ ̡̨̡̬̯̱͕̏̌ ̛̖̭̣ ̡̡̛̖̌-̨̛̣̍ ̛̖̯̣̔̌ ̨̯̭̱̯̭̯̱̯͕̏̀ ̨̪̬̖̙̖̦̼̏̔ ̛̛̣
̨̭̣̥̦̼̌͘ ʿ̛̬ ̵̨̨̨̛̛̦̖̥̭̯̍̔ ̨̬̺̜̯̖̭̍̌̌̽ ̏ ʺʽʻʰ ˃ˀʫʱʪ ʽʽʪ ̌̚ ̸̛̪̭̯̥̌̌́̚ ̛
̶̡̛̛̛̦̭̯̬̱̥́͘ʻʫ̛̥̖̦̜̯̖̖̯̣̌́̔̌̚͘
x ʰ̚-̌̚ ̴̶̡̛̛̱̦ ̸̡̛̦̌̌́ ̡̨̡̬̯̱̏̌ ̭̣̖̱̖̯̔ ̨̬̭̪̣̯̌̌̐̌̽ ̡̛̯̥̌ ̨̨̬̥͕̍̌̚ ̸̨̯̼̍
̸̡̡̨̡̨̡̡̡̨̛̛̛̛̛̛̭̣̯̬̭̱̬̬̱̱̥̖̖̣̣̬̖̖̦̬̭̬̯̀̽̔̌̌̔̐̀̍̽̍̌̌̌̏̌͘
x ʰ̨̨̛̭̪̣̦̖̽̏̌̚ ̡̨̖̯̭̜̔ ̡̨̡̛̬̯̏̌ ̭ ̴̶̡̛̱̦̖̜ ̴̶̡̛̛̭ͨ̌́ ̡ ̨̡̨̛̬̯̖̣̭̜̔̽ ̡̨̛̬̯̏̌ͩ
̨̡̪̱̭̖̯̭̔̌́ ̨̡̨̯̣̽ ̨̭ ̭̯̦̬̯̦̼̥̌̔̌ ̨̛̯̪̥ ̡̨̛̬̯̏̌ ̛̛̛̣ͬ ̨̥̯̬̭̥̌̌ ̭ ̛̪̬̥̼̥́
RU
ʦʤʮʻʽ͊ʿˀʽˋʰ˃ʤʱ˃ʫʦʻʰʺʤ˃ʫʸːʻʽʰˁʽˈˀʤʻʰ˃ʫʪʸ˔ʥ˄ʪ˄ˍʰˈˁʿˀʤʦʽʶ
33
̡̛̭̯̖̦̥̌͘ ʰ̨̨̛̭̪̣̦̖̽̏̌̚ ̛̛̖̣̔́̚ ̭ ̡̛̬̱̣̼̥̐ ̡̨̛̬̯̥̏̌́ ̛̛̛̣ͬ ̛̥̯̬̭̥͕̌̌̌
̨̡̨̛̛̛̛̛̛̦̼̥̬̯̥̣̦̱̦̼̥̥̯̬̭̥̏̔́̏̌́̌̔̏̌̌̌ʯʤʿˀʫˍʫʻʽ͊
x ʦʻʰʺʤʻʰʫ͊ ʻ̖ ̨̛̭̪̣̱̜̯̖̽̚ ̴̶̡̛̱̦̀ ̨̡̨̡̛̛̣̬̍̏ ̡̨̡̛̬̯͕̏̌ ̛̖̭̣ ̨̼̭̯̏̌ ̹̖̜̏̌
̡̨̡̛̬̯̥̖̦̖̖̏̌ϰϱ̨̛̛̭̥̣̣̖̖̍ϲϬ̨̨̭̥̦̪̣̥̌̔͘
x ʪ̡̡̨̡̨̡̨̨̡̨̨̨̛̛̛̛̖̯̭̱̬̯̱͕̭̖̦̖̦̦̱̭̬̯̬̯̖̣̖̜͕̦̦̖̣̭̪̣̯̀̏̌̔̀̏̌̽̀̔̐̔̌̽́̽̏̌̽̚̚
̡̨̨̨̨̛̛̦̣̦̦̥̪̣̙̖̦̏̌͘ʿ̴̶̨̨̨̡̨̨̡̨̛̛̛̛̛̛̛̬̭̪̣̦̯̜̱̦̖̦̙̭̖̣̙̦̼̽̏̌̾̍̏̐̔̌̔̚
̨̨̨̡̨̨̛̛̼̯̯̬̖̱̣̬̦̼̦̦̱̼̭̯̱̍̽̐̏̌̌̔̌̏̀̏͘
x ʻ̵̨̨̡̨̨̡̛̛̛̛̛̛̖̬̖̱̣̬̱̜̯̖̖̣̖̦̖̪̖̬̖̥̖̺̜̯̖̖͕̪̦̱̯̬̦̯̭̬̖̖̦̐̔̌̐̌̏̌̔́̍̚͘
x ʿ̴̶̨̨̡̨̡̛̛̛̛̛̛̬̭̪̣̦̱̦̪̬̱̯̽̏̌̔̌ͨ̚ʶ̸̡̨̡̨̡̨̨̛̛̛̬̖̪̣̖̦̖̬̯̖̣̭̜̬̯͕̯̼̔̽̏̌ͩ̍
̨̛̪̬̖̯̬̯̯̔̏̌̽ ̡̛̬̭ ̱̱̹̔̽́ ̛̚-̌̚ ̛̺̖̥̣̖̦͕̌́̚ ̡̨̡̬̯̏̌̌ ̨̣̙̦̔̌ ̼̯̍̽ ̨̛̪̬̣̦̌̏̽
̵̡̡̡̨̨̨̨̡̛̛̛̛̪̬̬̖̪̣̖̦̬̯̣̬̭̣̼̭̪̥̺̭̭̯̖̥̼̬̖̪̣̖̦̌̏̌̔́̏̽̀́̚͘
x ʦ̨̨̡̨̡̨̨̡̨̛̛̛̛̭̖̭̪̣̱̜̯̖̯̣̭̭̯̖̥̱̬̖̪̣̖̦͕̪̭̯̣̖̥̱̭̯̥̪̬̱̯̥̐̔̌̽̽́̌̏́̀̾̔̚͘
x ʿ̖̬̖̔ ̡̙̼̥̌̔ ̨̨̛̛̭̪̣̦̖̥̽̏̌̚ ̨̪̬̖̬̜̯̖̏́ ̨̦̖̙̦̭̯̌̔̽ ̛̭̭̯̖̥̼ ̡̛̬̖̪̣̖̦͕́
̨̡̨̡̨̡̨̨̛̛̛̯̯̬̯̱̯̬̯̬̯̖̣̖̜́̐̏̌́̏̌̏̌̔͘
x ʻ̨̡̨̡̨̡̨̡̨̨̛̛̛̛̛̛̖̭̪̣̱̜̯̖̖̣̖͕̖̭̣̥̖̙̱̖̯̭̜̬̯̜̬̯̬̯̖̣̖̜̖̭̯̽̔̔̔̏̌̏̌̽̀̔̽̚̚
̨̬̌̚̚͘
x ʯ̨̨̨̡̨̛̛̛̛̛̛̛̬̼̦̖̭̣̖̱̖̯̪̣̦̯̪̱̹̥͕̖̣̥̣̬̱̥̪̬̖̥̖̯̥̌̔̌́̽̔̌̔́̌̔̐̔̌̚̚͘
x ʦʻʰʺʤʻʰʫ - ˋ̨̯̼̍ ̛̖̙̯̍̌̽̚ ̡̛̬̭̌ ̛̺̖̥̣̖̦̌́̚ ̛̹̖ ̡̬̖̖̦̍̌ ̵̖̬̦̖̜̏ ̨̬̥̜̌
̶̵̨̨̨̨̡̨̨̛̭̯̬̦̼̬̥̭̬̭̣̜̬̯͕̖̬̦̬̥̦̖̣̙̦̼̯̼̹̖̥̯̬̭̌́̔̏̏̌̽̀̏́́̌̌̔̌̍̽̏̌̌̌̚
̨̨̡̨̛̬̭̣̜̬̯̏̏̌̚͘
x ʿˀʫʪ˄ʿˀʫʮʪʫʻʰʫ͘ʦ̴̶̨̡̨̡̡̛̛̛̛̛̛̛̛̖̙̦̖̬̭̱̱̹̖̦̹̖̬̖̖̦̭̭̯̖̥̱̭̍̌̌̔́̏̌̐̍̌̌̚
̵̡̨̨̨̨̡̨̡̛̛̛̬̯̣̬̭̣̼̭̖̭̣̖̱̖̯̖̬̙̯̪̣̹̖̯̬̯̦̖̖̖̏̌̔́̏̏̐̔̌̔̔̌̽̔̌̽̏̌̏̚͘
x ʽʿʤˁʻʽˁ˃ː͊ʦ̶̨̨̨̡̨̡̨̡̛̛̭̖̪̣̦̭̯̪̦̥̜̯̖̼̪̺̱̭̯̬̦̱͕̬̯̐̔̌̽̀̔̌̏̌̔̌̀̀̌̐̔̌̏̌̌
̡̡̡̨̨̨̨̛̛̦̖̪̬̬̖̪̣̖̦̬̯̬̭̣̌̏̌̏̐͊̚
x ˁ̨̡̬̱͕̍ ̡̛̬̭̣̼̦̖̌̌̔̏̌ ̛ ̡̛̭̣̼̦̖̌̔̏̌ ̛̛̖̣̔́̚ ̨̣̙̖̦̔ ̨̨̛̛̪̬̯̏̔̽̚ ˃ʽʸːʶʽ
̨̬̭̣̼̜̏̚͘
x ʻ̨̨̖̪̣̜̯̖̖̯̥̥̣̹̖̏́̔́̌̔̚ϯ̨̨̨̨̡̨̨̛̛̛̣̖̯̪̬̭̱̯̭̯̯̪̖̬̖̪̣̦̜̭̬̜̖̣̏̏̌̽̔̍̔́̏̚
̨̡̡̨̛̛̛̛̖̙̦̖̭̯̱̪̥̖̣̥̬̬̦̦̼̥̖̯̣̥̍̌̔̌̌̍̌̔̌́͊̚̚
x ʸ̀̍̌́ ̡̨̛̪̣̭̯̌̏̌́ ̡̨̡̱̪̌̏̌ ̨̣̙̦̔̌ ̼̯̍̽ ̱̣̖̦͕̔̌̌ ̸̨̛̱̦̯̙̖̦̌ ̛̛̣ ̵̛̬̦̯̭̌̽́ ̏
̨̨̨̡̛̛̛̦̖̭̯̱̪̦̥̣̖̯̖̜̥̖̭̯̖̖̙̦̖̬̭̱̱̹̔̔́̔̏̍̌̌̔̽́̚͘
x ʻ̖ ̨̛̦̭̯̖̏ ̵̡̡̛̛̦̌ ̛̛̥̖̦̖̦̜̚ ̛ ̸̛̱̣̱̹̖̦̜ ̏ ̶̡̨̡̛̦̭̯̬̱̀ ̡̨̡̛̬̯͕̏̌ ̡̯̌ ̡̡̌ ̨̯̾
̨̡̨̡̨̡̡̨̡̛̛̛̛̛̛̛̛̥̙̖̯̪̬̖̭̯̪̬̖̙̖̦̬̯̬̭̱̯̬̥̬̦̬̖̖̦̏̏̔̀̏̌̌̏̏̌́̍̌͘
ʦʤʮʻʽ͊ ʪ̛̬̥̥̼̌̐̌ ̡̛̛̛̬̭̱̦̏ ̶̨̡̨̡̨̛̛̛̯̜̦̭̯̬̱̣̯̭̯̣̾́̏́̀́̽ ̛̛̛̛̣̣̭̯̬̯̦̼̥̀̌̏
̸̨̨̨̛̛̛̬̖̦̯̬̦̼̥̏͘ʿ̴̶̶̨̨̡̨̡̨̨̛̛̛̛̛̬̖̬̜̯̖̦̖̙̦̭̯̭̪̭̣̖̙̜̪̖̬̏́̌̔̽̌̌̔̌͘
ʶ̨̨̥̪̦̖̦̯̼- ̶̛̛̣̣̭̯̬̀̌́
ʿ̸̶̨̡̨̡̨̨̡̛̛̛̛̛̭̣̖̬̭̪̱̖̯̖̭͕̯̭̖̣̖̥̖̦̯̼͕̪̦̦̼̖̦̣̣̭̯̬̌̌̏̍̔̽̏̾̌̌̌̀̌̚,
̨̭̯̱̪̦̼̔: ˃̨̡̨̡̛̖̣̬̯͖̏̌Ϯ͘ʺ̯̬̭̌̌ϯ͘ˁ̡̨̡̛̱̥̣̪̖̬̖̦̭͖̌̔́ϰ͘ʥ̨̡̨̨̡̪̭̯͖̏̌́̔̌̏̌ϱ͘
ʿ̨̡̛̖̬̙̺̯̬̱͖̔̔̏̌̀̌́̍̌ϲ͘ʿ̬̬̖̥̦̖̜͖̌̌ϳ͘ʧ̸̸̡̖̦̼̜̣͖̌̀ϴ͘ʦ̛̦̯džϰ
ˁ̶̨̡̡̨̡̛̛̬̦̭̯̬̱̍̌
ʦʻʰʺʤʻʰʫ͊ ˁ̨̨̯̬̐ ̨̭̣̜̯̖̍̀̔̌ ̶̡̛̛̛̛̦̭̯̬̱ ̨̨̨̪̭̣̖̯̖̣̦̭̯̔̏̌̽̽ ̨̡̛̭̬̍ ̛̛̖̣͕̔́̚ ̡̡̌
̵̵̨̡̨̪̦̦̭̖̥̌̌̌̌̚͘
ʰʻˁ˃ˀ˄ʶˉʰ˔ʿʽ ˁʥʽˀʶʫ ʰ ˑʶˁʿʸ˄ʤ˃ʤˉʰʰ
16
x When using the product at “Co-sleeping function”, to prevent a suffocation hazard from
entrapment, the bedside sleeper shall be properly secured to the adult bed using the
attachment system.
x Always use the attachment system provided with this product.
x Check the tightness of the attachment system before each use by pulling the bedside
sleeper in a direction away from adult bed.
x If there is any gap between the bedside sleeper and adult bed DO NOT use the product.
x Gaps should not be filled with pillows, blankets or other items.
x WARNING – To avoid hazards from the child’s neck being caught on the top rail on the side
that is next to the adult bed, the top rail must not be higher than the adult bed mattress.
x WARNING – To avoid the risk of your child being strangled the attachment system to the
adult’s bed shall always be kept away from and out of the crib.
x DANGER! Always completely raise the drop side when not attached to the adult’s bed!
x Assemble, unfold and fold the product ONLY by an adult.
x Do not allow children under 3 years of age till fully assemble the product to avoid access to
small and disassembled parts.
x Any plastic cover should be removed , destroyed or kept away from children to avoid
suffocation.
x Do not make any changes or improvements to the design of the crib, as this may damage
the crib and risk injury to the child.
IMPORTANT! The diagrams and figures in this instruction are illustrative and indicative only.
Follow exactly the instructions and sequence for assembling and operating with the product.
Check the securing of the fixation after each operation.
Components - illustration A
After unpacking, make sure that all elements of illustration A are available: Crib basket; Crib
mattress; Carry bag, Side frames (legs); Main support frame; Belts; 4 pcs bolts; 1 tool.
Assembly and operation
ATTENTION! Follow exactly the instructions and sequence for assembling and using the product,
described in the text and illustrations attached to the instructions.
Figure B - Assemble the bed stand by placing the main support frame "C" in the connecting
parts (holes) of the two side frames (legs) "A" and "B" in the direction of the arrows as showed
in the illustration. Each side frame is equipped with two bolts to secure the main support frame
to the bed. Use a hexagon to tighten the bolts clockwise. ATTENTION! Make sure the frame is
tight and stable. This is the supporting part of the crib and ensures the safety of your child.
Figure C - Attach the crib basket to the mounted stand by fixing the connecting part of the
basket frame to the top of the two side frames "A" and "B". The spring pin will snap into place
once it is securely fastened on both sides. CAUTION! Make sure the bolts are tight and the bin
is firmly attached to the crib stand.
Figures D, E - Lowering and lifting the drop side. Open the zipper, which is located under the
padded upper rail. Lift the drop side of the crib so that it detaches from the base, and attach the
falling side to the bottom of the crib. Close the side panel until you hear a clicking sound and
close the zipper on both sides. If you want to lift the drop side of the crib, detach it and reattach
ASSEMBLY AND OPERATING INSTRUCTIONS
17
it to the base of the crib on both sides. Use the side zippers to close completely. Use the metal
ring to connect the two zippers together so that they cannot open. The cot is ready to use as a
separate bed.
Figure F - Moving the crib. To move the crib, lift the back of the bed, then move it to the desired
location using the factory-fitted two-legged fixtures. The legs of the crib are equipped with a
braking device (stoppers) that stop the movement of the crib and keep it firmly locked.
Figure G - Height adjustment and antireflux function. The height can be adjusted in 5 positions.
To adjust the height, press the adjustment button and release it when the desired position is
reached. The base of the basket can be used with an inclination of up to 30 ° to prevent
discomfort and danger of suffocation of the child. The baby cot can be tilted with a difference
of maximum 2 positions in height. (Example: the right foot is in a position 3 and the left is in a
position 1). ATTENTION! The anti-reflux function can be applied only when the crib is used as a
separate bed. The child's head should always be on the highest side.
Figure H - Attaching the crib to the adult's bed. Remove the drop side by unbuttoning the
zippers on both sides and securing it to the bottom of the crib. Use the two seat belts provided
in the kit to secure the crib to the parent's bed. Lock the buckles under the crib on both sides,
then secure the belts around the structure of the parent's bed, starting at the bottom and going
up, and finally tightening the buckles under the bed. To secure the crib when it is next to the
parent's bed, pull the straps once more to make sure the crib is securely attached to the parent's
bed.
Clean the plastic or metal parts of the product with a soft cotton cloth or sponge moistened with
water or a mild detergent. Do not use bleach, agressive detergents or abrasive products to clean
the product. All textile parts and fabrics should be washed only by hand, following the
instructions on the label. After cleaning, allow the crib to dry well before using it. Do not fold or
remove the crib before it is completely dry. Do not expose the product to direct sunlight for
extended periods of time and to extreme temperatures that may change color and damage
exposed parts. After prolonged exposure to high temperatures, wait a few minutes before
placing the child in it. Do not place objects in or on the product to avoid damaging the structure
and / or upholstery. Store the product in a clean and dry place.
Manufactured for Cangaroo in PRC
Manufacturer and Importer: Moni Trade Ltd.
Address: Bulgaria, Sofia, Trebich, 1 Dolo Str.,
Phone number: 003592/936 07 90
Website: www.cangaroo-bg.com
INSTRUCTIONS FOR MAINTENANCE AND CLEANING

18 31
30
x ATENTIE! Nu utilizati functia de fixare a patutului pentru bebelusi de patul parintilor daca
inaltimea patului dumneavoastra este mai mica de 45 cm sau mai mare de 60 cm deasupra
podelei.
x Atunci cand utilizati functia produsului „ fixare de patul parintilor”, pentru a preveni riscul
de sufocare ca urmare a prinderii, patutul pentru bebelusi trebuie conectat in mod
corespunzator de patul pentru adulti prin utilizarea sistemul de fixare.
x EƵƌĞŐůĂƜŝƉƌŽĚƵƐƵůƕŝŶƵŠůŵƵƚĂƜŝŠŶƚŝŵƉĐĞĐŽƉŝůƵůĞƐƚĞŠŶĉƵŶƚƌƵ͘
x Utilizati intotdeauna numai si doar sistemul de fixare furnizat cu acest produs.
x Verificati rezistenta sistemului de fixare inainte de fiecare utilizare, tragand patutul pentru
bebelusi departe de patul parintilor.
x Nu utilizati produsul daca exista un spatiu intre patutul pentru bebelusi si patul parintilor.
x Golurile nu trebuie completate cu perne, paturi sau alte obiecte.
x AVERTISMENT – Pentru a evita riscul de prindere a gatului copilului in cadrul superior din
partea de langa patul pentru adulti, cadrul superior nu trebuie sa fie mai inalt decat
salteaua de pe patul pentru adulti.
x AVERTISMENT – Pentru a evita riscul copilul dumneavoastra sa fie sugrumat, sistemul de
fixare la patul pentru adulti trebuie tinut intotdeauna departe de patutul pentru bebelusi
si in afara acestuia.
x PERICOL ! Ridicati intotdeauna partea derulanta in mod complet, atunci cand patutul
pentru bebelusi nu este fixat de patul adultului !
x Asamblarea, deplierea si plierea produsului trebuie efectuate NUMAI de catre un adult.
x Nu permiteti prezenta copiilor sub 3 ani inainte de a fi asamblat in mod complet produsul,
pentru a evita accesul copiilor la piesele mici si dezasamblate.
x Orice ambalaj din plastic trebuie indepartat, distrus sau tinut departe de copii pentru a
evita riscul de sufocare.
x Nu faceti nicio modificare si imbunatatire asupra constructiei patutului, deoarece acest
lucru poate duce la deteriorarea patutului si riscul de ranire a copilului.
IMPORTANT ! Schemele si figurile din aceasta instructiune sunt doar ilustrative si orientative.
Verificati siguranta de fixare dupa executarea fiecarei operatiuni.
Componente – figura ʤ
Dupa despachetare, asigurati-va ca toate elementele din figura A sunt disponibile.
Asamblarea constructiei
ATENTIE! Urmati cu strictete instructiunile si succesiunea de asamblare a produsului, asa cum
este aratat in scheme.
Ilustratia B – Asamblati suportul patutului introducand tubul principal de sustinere „C” in
piesele de legatura (orificiile) ale celor doua cadre laterale (picioare) „A” si „B” in directia
sagetilor. Fiecare cadru lateral este echipat cu doua suruburi de fixare de tubul principal de
sprijin al patutului. Utilizati un hexagon pentru a strange suruburile in sensul acelor de ceasornic.
ATENTIE! Asigurati-va ca cadrul este bine strans si stabil. Aceasta este partea de sustinere a
patutului si asigura siguranta copilului dumneavoastra.
Ilustratia C – Atasati cosul de dormit la suportul montat, fixand partea de conectare a cadrului
ĐŽƐƵůƵŝĚĞƉĂƌƚĞĂƐƵƉĞƌŝŽĂƌĂĂĐĞůŽƌĚŽƵĂĐĂĚƌĞůĂƚĞƌĂůĞͣ͟Ɛŝͣ͘͟^ƚŝĨƚƵůĐƵĂƌĐƐĞǀĂĨŝdžĂŝŶ
INSTRUCTIUNI DE ASAMBLARE ci DE EXPLOATARE
31
pozitie odata ce va fi fixat bine pe ambele parti. ATENTIE! Asigurati-va ca suruburile sunt bine
stranse si cosul este fixat ferm de suportul patutului.
Ilustratii D, E – Coborarea si ridicarea laturii mobile. Deschideti fermoarul, care se afla sub sina
superioara captusita. Ridicati latura mobila a cosului, astfel incat sa se desprinda de baza si
atasati partea cazatoare in partea inferioara a cosului. Inchideti panoul lateral pana cand veti
auzi un sunet clic si inchideti prin intermediul fermoarului pe ambele parti. Daca doriti sa ridicati
latura mobila, detasati si atasati din nou la baza cosului pe ambele parti. Folositi fermoarele
laterale pentru a se inchide in mod complet. Folositi inelul metalic pentru a conecta cele doua
fermoare impreuna, astfel incat acestea sa nu se poata deschida. Patutul este gata pentru a fi
utilizat ca pat separat.
Ilustratia F – Mutarea patutului pentru bebelusi. Pentru a muta patutul, ridicati partea din spate
a patutului, dupa care mutati in locul dorit prin intermediul dispozitivelor montate din fabrica
pe ambele picioare. Picioarele patutului sunt echipate cu un dispozitiv de franare (opritoare)
care opresc deplasarea patutului si il mentin blocat.
Ilustratia G – Reglarea inaltimii si a functiei antireflux. Inaltimea poate fi reglata in 5 pozitii.
Pentru a regla inaltimea, apasati butonul de reglare si mutati in pozitia dorita. Baza cosului poate
fi folosita cu o inclinare de pana la 30° grade, pentru prevenirea disconfortului si impotriva
sufocarii copilului. Patutul pentru bebelusi poate fi inclinat cu o diferenta de maxim 2 pozitii in
inaltime. (Exemplu: piciorul drept este pozitia 3 si cel stang este pozitia 1). ATENTIE! Functia anti-
reflux poate fi aplicata numai si doar atunci cand se utilizeaza patutul pentru bebelusi ca pat
individual. Capul copilului trebui sa fie intotdeauna situat in partea cea mai inalta.
Ilustratia H – Fixarea patutului pentru bebelusi de patul parintilor. Indepartati latura
despartitoare deschizand fermoarele de pe ambele parti si fixati pe partea inferioara a patutului.
Utilizati cele doua centuri de siguranta furnizate in kit pentru a fixa patutul de patul parintilor.
Fixati cataramele sub patut pe ambele parti, apoi fixati curelele in jurul structurii patului
parintilor, incepand de jos in sus si in final strangeti cataramele aflate sub pat. Pentru a fixa
patutul, atunci cand este langa patul parintilor, trageti din nou de curele pentru a va asigura ca
patutul este atasat bine de patul parintilor.
Curatati componentele din plastic sau metal ale produsului cu o carpa moale de bumbac sau
burete umezit cu apa sau detergent. Nu utilizati inalbitor, detergenti puternici si preparate cu
particule abrazive pentru a curata produsul. Toate partile si materiile textile trebuie spalate
numai manual, urmand instructiunile mentionate pe eticheta. Dupa curatare lasati patutul sa se
usuce bine inainte de a-l folosi. Nu pliati si nu demontati patutul inainte ca acesta sa fie complet
uscat. Nu expuneti produsul la lumina directa a soarelui pentru perioade lungi de timp si la
temperaturi extreme care pot duce la schimbarea culorii si pot deteriora partile expuse. Dupa
expunerea prelungita a produsului la temperaturi ridicate, asteptati cateva minute inainte de a
pune copilul in el. Nu asezati obiecte si bunuri in sau pe produs, pentru a evita deteriorarea
structurii si/sau a tapiteriei. Depozitati produsul intr-un loc curat si uscat.
Fabricat pentru Cangaroo în RPC
Producator si importator: Moni Trade Ltd.,
Adresa: Bulgaria, Sofia, Trebich, Str. Dolo nr. 1,
EƵŵĉƌĚĞ telefon: 003592/936 07 90, site: www.cangaroo-bg.com
INSTRUCTIUNI DE CURATARE SI INTRETINERE
18
Dieses Produkt wurde in Übereinstimmung mit den Anforderungen der europäischen
Richtlinie 2001/98/EG über die allgemeine Produktsicherheit, dem Verbraucherschutzgesetz
und der europäischen Norm BDS EN 1130:2019 hergestellt.
WARNUNG!
x Verwenden Sie dieses Produkt nicht, ohne vorher die Gebrauchsanweisung gelesen zu
haben.
x Babybett ist für Kinder im Alter von 0 bis 12 Monaten mit einem Gewicht von bis zu 11kg
konzipiert.
x Verwenden Sie das Produkt nicht mehr, sobald das Kind sitzen, knien oder aufstehen kann.
x Das Hinzufügen zusätzlicher Artikel zum Produkt kann zum Ersticken führen.
x Platzieren Sie das Produkt nicht in der Nähe anderer Produkte, die eine Erstickungs- oder
Würgegefahr darstellen können, wie z. B. Schnüre, Jalousien-/Vorhangschnüre usw.
x Verwenden Sie nicht mehr als eine Matratze in dem Produkt.
x Verwenden Sie nur die mit diesem Kinderbett verkaufte Matratze, fügen Sie dieser keine
zweite Matratze hinzu, Erstickungsgefahr!
x Das Produkt sollte auf einem waagerechten Boden aufgestellt werden.
x Kleine Kinder sollten nicht unbeaufsichtigt in der Nähe des Bettes spielen.
x Das Bett muss in einer stationären Position verriegelt werden, wenn das Kind
unbeaufsichtigt ist.
x Alle Beschläge müssen immer fest angezogen sein und s muss darauf geachtet werden,
dass sich die Schrauben nicht lösen, da das Kind sich an Körperteilen oder textilen
Elementen (z. B. Schnüre, Bänder, Schnuller) verfangen könnte, die eine Erstickungsgefahr.
x Die maximale Innengröße des Babybettes, für die die Matratze bestimmt ist, beträgt
900/590 mm. Die Länge und Breite der Matratze sollte solche Abmessungen haben, dass
der maximale Abstand zwischen der Matratze und den Seiten und Kanten des Kinderbetts.
x Halten Sie das Produkt von brennenden Zigaretten, offenen Flammen und anderen
Hitzequellen wie Elektro- und Gasherden fern.
x Der Boden des Korbes kann mit einer Neigung von bis zu 30 °verwendet werden, um
Umwohlsein und Erstickungsgefahren zu vermeiden.
x Verwenden Sie das Kinderbett NICHT, wenn Teile fehlen, beschädigt oder gebrochen sind.
Wenden Sie sich bei Bedarf für Ersatzteile und Anweisungen an MONI TRADE. KEINE Teile
ersetzen.
x Die Nutzung des Babybettes mit der Funktion „Am Elternbett befestigen“ ist nur mit einem
Standardbetttyp und/oder einer Matratze mit geraden Wänden erlaubt. Die Verwendung
des Produkts mit runden Betten und/oder Matratzen, Wasserbetten oder.
x ACHTUNG! Verwenden Sie die Krippenverriegelungsfunktion nicht, wenn die Höhe Ihres
Bettes weniger als 45 cm oder mehr als 60 cm über dem Boden beträgt.
DE
WICHTIG! BITTE SORGFÄLTIG LESEN UND FÜR SPÄTERES NACHLESEN AUFBEWAHREN.
19
x Das mit dem Elternbett verbundene Kinderbett sollte niemals in Schräglage verwendet
werden. Bei dieser Funktion müssen beide Füße immer auf die gleiche Höhe eingestellt
werden.
x Stellen Sie das Produkt nicht ein und bewegen Sie es nicht, während sich das Kind darin
befindet.
x Bei Verwendung der Produktfunktion „Am Elternbett fixieren“ muss das Kinderbett zur
Vermeidung von Erstickungsgefahr durch Einklemmen ordnungsgemäß mit dem
Rückhaltesystem am Erwachsenenbett befestigt werden.
x Überprüfen Sie vor jedem Gebrauch die Sicherheit des Befestigungssystems, indem Sie das
Kinderbett vom Bett der Eltern wegziehen.
x Verwenden Sie das Produkt nicht, wenn zwischen dem Kinderbett und dem Elternbett eine
Lücke besteht.
x Verwenden Sie das Produkt nicht, wenn zwischen dem Kinderbett und dem Elternbett eine
Lücke besteht.
x Lücken sollten nicht mit Kissen, Decken oder anderen Gegenständen ausgefüllt werden.
x WARNUNG - Um zu vermeiden, dass der Hals des Kindes im oberen Rahmen der Seite
neben dem Erwachsenenbett eingeklemmt wird, sollte der obere Rahmen nicht höher sein
als die Matratze des Erwachsenenbetts.
x WARNUNG - Um das Risiko zu vermeiden, dass Ihr Kind stranguliert wird, sollte das System
zur Befestigung am Bett für Erwachsene immer fern und außerhalb des Kinderbetts
gehalten werden.
x GEFAHR! Heben Sie die Klappseite immer vollständig an, wenn das Kinderbett nicht am
Erwachsenenbett befestigt ist!
x Das Zusammenbauen, Auseinanderklappen und Zusammenklappen des Produkts sollte
NUR von einem Erwachsenen durchgeführt werden.
x Lassen Sie Kinder unter 3 Jahren nicht anwesend sein, bevor Sie das Produkt vollständig
zusammengebaut haben, um den Zugang zu kleinen und zerlegten Teilen zu vermeiden.
x Jegliche Kunststoffverpackungen sollten entfernt, zerstört oder von Kindern ferngehalten
werden, um eine Erstickungsgefahr zu vermeiden.
x Nehmen Sie keine Änderungen oder Verbesserungen am Design des Bettes vor, da dies zu
Schäden am Bett und zu einer Verletzungsgefahr für das Kind führen kann.
WICHTIG! Die Abbildungen und Zeichnungen in dieser Anweisung sind nur beispielhaft und
richtungweisend. Überprüfen Sie nach jeder Operation die Sicherung der Fixierung.
Bestandteile - Abbildung A
Stellen Sie nach dem Auspacken sicher, dass alle Elemente laut Abbildung A verfügbar sind:
Schlafkorb, Matratze, Seitenteile (Beine), Hauptstützrohr, Gurte, 4 Stk. Bolzen, 1 Stk.
Hexagramm.
Montage der Konstruktion und Bedienungsanleitun
Befolgen Sie strikt die Anweisungen und die Reihenfolge für den Zusammenbau des Produkts,
wie in den Abbildungen vorgegeben.
Abbildung B - Montieren Sie das Bettgestell, indem Sie das Hauptstützrohr "C" in den
Verbindungsteilen (Löchern) der beiden Seitenrahmen (Füße ) "A" und "B" in Pfeilrichtung
MONTAGEANLEITUNG UND BEDIENUNGSANLEITUN

1930
30
x ATENTIE! Nu utilizati functia de fixare a patutului pentru bebelusi de patul parintilor daca
inaltimea patului dumneavoastra este mai mica de 45 cm sau mai mare de 60 cm deasupra
podelei.
x Atunci cand utilizati functia produsului „ fixare de patul parintilor”, pentru a preveni riscul
de sufocare ca urmare a prinderii, patutul pentru bebelusi trebuie conectat in mod
corespunzator de patul pentru adulti prin utilizarea sistemul de fixare.
x EƵƌĞŐůĂƜŝƉƌŽĚƵƐƵůƕŝŶƵŠůŵƵƚĂƜŝŠŶƚŝŵƉĐĞĐŽƉŝůƵůĞƐƚĞŠŶĉƵŶƚƌƵ͘
x Utilizati intotdeauna numai si doar sistemul de fixare furnizat cu acest produs.
x Verificati rezistenta sistemului de fixare inainte de fiecare utilizare, tragand patutul pentru
bebelusi departe de patul parintilor.
x Nu utilizati produsul daca exista un spatiu intre patutul pentru bebelusi si patul parintilor.
x Golurile nu trebuie completate cu perne, paturi sau alte obiecte.
x AVERTISMENT – Pentru a evita riscul de prindere a gatului copilului in cadrul superior din
partea de langa patul pentru adulti, cadrul superior nu trebuie sa fie mai inalt decat
salteaua de pe patul pentru adulti.
x AVERTISMENT – Pentru a evita riscul copilul dumneavoastra sa fie sugrumat, sistemul de
fixare la patul pentru adulti trebuie tinut intotdeauna departe de patutul pentru bebelusi
si in afara acestuia.
x PERICOL ! Ridicati intotdeauna partea derulanta in mod complet, atunci cand patutul
pentru bebelusi nu este fixat de patul adultului !
x Asamblarea, deplierea si plierea produsului trebuie efectuate NUMAI de catre un adult.
x Nu permiteti prezenta copiilor sub 3 ani inainte de a fi asamblat in mod complet produsul,
pentru a evita accesul copiilor la piesele mici si dezasamblate.
x Orice ambalaj din plastic trebuie indepartat, distrus sau tinut departe de copii pentru a
evita riscul de sufocare.
x Nu faceti nicio modificare si imbunatatire asupra constructiei patutului, deoarece acest
lucru poate duce la deteriorarea patutului si riscul de ranire a copilului.
IMPORTANT ! Schemele si figurile din aceasta instructiune sunt doar ilustrative si orientative.
Verificati siguranta de fixare dupa executarea fiecarei operatiuni.
Componente – figura ʤ
Dupa despachetare, asigurati-va ca toate elementele din figura A sunt disponibile.
Asamblarea constructiei
ATENTIE! Urmati cu strictete instructiunile si succesiunea de asamblare a produsului, asa cum
este aratat in scheme.
Ilustratia B – Asamblati suportul patutului introducand tubul principal de sustinere „C” in
piesele de legatura (orificiile) ale celor doua cadre laterale (picioare) „A” si „B” in directia
sagetilor. Fiecare cadru lateral este echipat cu doua suruburi de fixare de tubul principal de
sprijin al patutului. Utilizati un hexagon pentru a strange suruburile in sensul acelor de ceasornic.
ATENTIE! Asigurati-va ca cadrul este bine strans si stabil. Aceasta este partea de sustinere a
patutului si asigura siguranta copilului dumneavoastra.
Ilustratia C – Atasati cosul de dormit la suportul montat, fixand partea de conectare a cadrului
ĐŽƐƵůƵŝĚĞƉĂƌƚĞĂƐƵƉĞƌŝŽĂƌĂĂĐĞůŽƌĚŽƵĂĐĂĚƌĞůĂƚĞƌĂůĞͣ͟Ɛŝͣ͘͟^ƚŝĨƚƵůĐƵĂƌĐƐĞǀĂĨŝdžĂŝŶ
INSTRUCTIUNI DE ASAMBLARE ci DE EXPLOATARE
31
pozitie odata ce va fi fixat bine pe ambele parti. ATENTIE! Asigurati-va ca suruburile sunt bine
stranse si cosul este fixat ferm de suportul patutului.
Ilustratii D, E – Coborarea si ridicarea laturii mobile. Deschideti fermoarul, care se afla sub sina
superioara captusita. Ridicati latura mobila a cosului, astfel incat sa se desprinda de baza si
atasati partea cazatoare in partea inferioara a cosului. Inchideti panoul lateral pana cand veti
auzi un sunet clic si inchideti prin intermediul fermoarului pe ambele parti. Daca doriti sa ridicati
latura mobila, detasati si atasati din nou la baza cosului pe ambele parti. Folositi fermoarele
laterale pentru a se inchide in mod complet. Folositi inelul metalic pentru a conecta cele doua
fermoare impreuna, astfel incat acestea sa nu se poata deschida. Patutul este gata pentru a fi
utilizat ca pat separat.
Ilustratia F – Mutarea patutului pentru bebelusi. Pentru a muta patutul, ridicati partea din spate
a patutului, dupa care mutati in locul dorit prin intermediul dispozitivelor montate din fabrica
pe ambele picioare. Picioarele patutului sunt echipate cu un dispozitiv de franare (opritoare)
care opresc deplasarea patutului si il mentin blocat.
Ilustratia G – Reglarea inaltimii si a functiei antireflux. Inaltimea poate fi reglata in 5 pozitii.
Pentru a regla inaltimea, apasati butonul de reglare si mutati in pozitia dorita. Baza cosului poate
fi folosita cu o inclinare de pana la 30° grade, pentru prevenirea disconfortului si impotriva
sufocarii copilului. Patutul pentru bebelusi poate fi inclinat cu o diferenta de maxim 2 pozitii in
inaltime. (Exemplu: piciorul drept este pozitia 3 si cel stang este pozitia 1). ATENTIE! Functia anti-
reflux poate fi aplicata numai si doar atunci cand se utilizeaza patutul pentru bebelusi ca pat
individual. Capul copilului trebui sa fie intotdeauna situat in partea cea mai inalta.
Ilustratia H – Fixarea patutului pentru bebelusi de patul parintilor. Indepartati latura
despartitoare deschizand fermoarele de pe ambele parti si fixati pe partea inferioara a patutului.
Utilizati cele doua centuri de siguranta furnizate in kit pentru a fixa patutul de patul parintilor.
Fixati cataramele sub patut pe ambele parti, apoi fixati curelele in jurul structurii patului
parintilor, incepand de jos in sus si in final strangeti cataramele aflate sub pat. Pentru a fixa
patutul, atunci cand este langa patul parintilor, trageti din nou de curele pentru a va asigura ca
patutul este atasat bine de patul parintilor.
Curatati componentele din plastic sau metal ale produsului cu o carpa moale de bumbac sau
burete umezit cu apa sau detergent. Nu utilizati inalbitor, detergenti puternici si preparate cu
particule abrazive pentru a curata produsul. Toate partile si materiile textile trebuie spalate
numai manual, urmand instructiunile mentionate pe eticheta. Dupa curatare lasati patutul sa se
usuce bine inainte de a-l folosi. Nu pliati si nu demontati patutul inainte ca acesta sa fie complet
uscat. Nu expuneti produsul la lumina directa a soarelui pentru perioade lungi de timp si la
temperaturi extreme care pot duce la schimbarea culorii si pot deteriora partile expuse. Dupa
expunerea prelungita a produsului la temperaturi ridicate, asteptati cateva minute inainte de a
pune copilul in el. Nu asezati obiecte si bunuri in sau pe produs, pentru a evita deteriorarea
structurii si/sau a tapiteriei. Depozitati produsul intr-un loc curat si uscat.
Fabricat pentru Cangaroo în RPC
Producator si importator: Moni Trade Ltd.,
Adresa: Bulgaria, Sofia, Trebich, Str. Dolo nr. 1,
EƵŵĉƌĚĞ telefon: 003592/936 07 90, site: www.cangaroo-bg.com
INSTRUCTIUNI DE CURATARE SI INTRETINERE
18
Dieses Produkt wurde in Übereinstimmung mit den Anforderungen der europäischen
Richtlinie 2001/98/EG über die allgemeine Produktsicherheit, dem Verbraucherschutzgesetz
und der europäischen Norm BDS EN 1130:2019 hergestellt.
WARNUNG!
x Verwenden Sie dieses Produkt nicht, ohne vorher die Gebrauchsanweisung gelesen zu
haben.
x Babybett ist für Kinder im Alter von 0 bis 12 Monaten mit einem Gewicht von bis zu 11kg
konzipiert.
x Verwenden Sie das Produkt nicht mehr, sobald das Kind sitzen, knien oder aufstehen kann.
x Das Hinzufügen zusätzlicher Artikel zum Produkt kann zum Ersticken führen.
x Platzieren Sie das Produkt nicht in der Nähe anderer Produkte, die eine Erstickungs- oder
Würgegefahr darstellen können, wie z. B. Schnüre, Jalousien-/Vorhangschnüre usw.
x Verwenden Sie nicht mehr als eine Matratze in dem Produkt.
x Verwenden Sie nur die mit diesem Kinderbett verkaufte Matratze, fügen Sie dieser keine
zweite Matratze hinzu, Erstickungsgefahr!
x Das Produkt sollte auf einem waagerechten Boden aufgestellt werden.
x Kleine Kinder sollten nicht unbeaufsichtigt in der Nähe des Bettes spielen.
x Das Bett muss in einer stationären Position verriegelt werden, wenn das Kind
unbeaufsichtigt ist.
x Alle Beschläge müssen immer fest angezogen sein und s muss darauf geachtet werden,
dass sich die Schrauben nicht lösen, da das Kind sich an Körperteilen oder textilen
Elementen (z. B. Schnüre, Bänder, Schnuller) verfangen könnte, die eine Erstickungsgefahr.
x Die maximale Innengröße des Babybettes, für die die Matratze bestimmt ist, beträgt
900/590 mm. Die Länge und Breite der Matratze sollte solche Abmessungen haben, dass
der maximale Abstand zwischen der Matratze und den Seiten und Kanten des Kinderbetts.
x Halten Sie das Produkt von brennenden Zigaretten, offenen Flammen und anderen
Hitzequellen wie Elektro- und Gasherden fern.
x Der Boden des Korbes kann mit einer Neigung von bis zu 30 °verwendet werden, um
Umwohlsein und Erstickungsgefahren zu vermeiden.
x Verwenden Sie das Kinderbett NICHT, wenn Teile fehlen, beschädigt oder gebrochen sind.
Wenden Sie sich bei Bedarf für Ersatzteile und Anweisungen an MONI TRADE. KEINE Teile
ersetzen.
x Die Nutzung des Babybettes mit der Funktion „Am Elternbett befestigen“ ist nur mit einem
Standardbetttyp und/oder einer Matratze mit geraden Wänden erlaubt. Die Verwendung
des Produkts mit runden Betten und/oder Matratzen, Wasserbetten oder.
x ACHTUNG! Verwenden Sie die Krippenverriegelungsfunktion nicht, wenn die Höhe Ihres
Bettes weniger als 45 cm oder mehr als 60 cm über dem Boden beträgt.
DE
WICHTIG! BITTE SORGFÄLTIG LESEN UND FÜR SPÄTERES NACHLESEN AUFBEWAHREN.
19
x Das mit dem Elternbett verbundene Kinderbett sollte niemals in Schräglage verwendet
werden. Bei dieser Funktion müssen beide Füße immer auf die gleiche Höhe eingestellt
werden.
x Stellen Sie das Produkt nicht ein und bewegen Sie es nicht, während sich das Kind darin
befindet.
x Bei Verwendung der Produktfunktion „Am Elternbett fixieren“ muss das Kinderbett zur
Vermeidung von Erstickungsgefahr durch Einklemmen ordnungsgemäß mit dem
Rückhaltesystem am Erwachsenenbett befestigt werden.
x Überprüfen Sie vor jedem Gebrauch die Sicherheit des Befestigungssystems, indem Sie das
Kinderbett vom Bett der Eltern wegziehen.
x Verwenden Sie das Produkt nicht, wenn zwischen dem Kinderbett und dem Elternbett eine
Lücke besteht.
x Verwenden Sie das Produkt nicht, wenn zwischen dem Kinderbett und dem Elternbett eine
Lücke besteht.
x Lücken sollten nicht mit Kissen, Decken oder anderen Gegenständen ausgefüllt werden.
x WARNUNG - Um zu vermeiden, dass der Hals des Kindes im oberen Rahmen der Seite
neben dem Erwachsenenbett eingeklemmt wird, sollte der obere Rahmen nicht höher sein
als die Matratze des Erwachsenenbetts.
x WARNUNG - Um das Risiko zu vermeiden, dass Ihr Kind stranguliert wird, sollte das System
zur Befestigung am Bett für Erwachsene immer fern und außerhalb des Kinderbetts
gehalten werden.
x GEFAHR! Heben Sie die Klappseite immer vollständig an, wenn das Kinderbett nicht am
Erwachsenenbett befestigt ist!
x Das Zusammenbauen, Auseinanderklappen und Zusammenklappen des Produkts sollte
NUR von einem Erwachsenen durchgeführt werden.
x Lassen Sie Kinder unter 3 Jahren nicht anwesend sein, bevor Sie das Produkt vollständig
zusammengebaut haben, um den Zugang zu kleinen und zerlegten Teilen zu vermeiden.
x Jegliche Kunststoffverpackungen sollten entfernt, zerstört oder von Kindern ferngehalten
werden, um eine Erstickungsgefahr zu vermeiden.
x Nehmen Sie keine Änderungen oder Verbesserungen am Design des Bettes vor, da dies zu
Schäden am Bett und zu einer Verletzungsgefahr für das Kind führen kann.
WICHTIG! Die Abbildungen und Zeichnungen in dieser Anweisung sind nur beispielhaft und
richtungweisend. Überprüfen Sie nach jeder Operation die Sicherung der Fixierung.
Bestandteile - Abbildung A
Stellen Sie nach dem Auspacken sicher, dass alle Elemente laut Abbildung A verfügbar sind:
Schlafkorb, Matratze, Seitenteile (Beine), Hauptstützrohr, Gurte, 4 Stk. Bolzen, 1 Stk.
Hexagramm.
Montage der Konstruktion und Bedienungsanleitun
Befolgen Sie strikt die Anweisungen und die Reihenfolge für den Zusammenbau des Produkts,
wie in den Abbildungen vorgegeben.
Abbildung B - Montieren Sie das Bettgestell, indem Sie das Hauptstützrohr "C" in den
Verbindungsteilen (Löchern) der beiden Seitenrahmen (Füße ) "A" und "B" in Pfeilrichtung
MONTAGEANLEITUNG UND BEDIENUNGSANLEITUN

20 29
28
Figuras D, E - Como bajar y levantar la barrera móvil. Abrir la cremallera, que se encuentra
debajo del riel superior acolchado. Levantar la barrera móvil del capazo para que se separe de
la base y fije la pared móvil en la parte inferior del capazo. Cerrar el panel lateral hasta que se
escuche un clic y cerrar la cremallera en ambos lados. Si desea levantar la barrera móvil,
separarla y volver a colocarla en la base del capazo en ambos lados. Usar las cremalleras
laterales para cerrar completamente. Usar la anilla de metal para conectar las dos cremalleras
para que no se puedan abrir. La cuna está lista para usar como cama individual.
Figura F - Como mover la cuna de bebé. Para trasladar la cuna, levantar la parte trasera de la
cuna y luego moverla al punto deseado utilizando los accesorios de las dos patas instalados de
fábrica. Las patas de la cuna están equipadas con un dispositivo de frenado (topes) que detienen
el movimiento de la cuna y la mantienen bien bloqueada.
Figura G - Ajuste de la altura y la función antireflujo. La altura puede ajustarse en 5 posiciones.
Para ajustar la altura, presionar el botón de ajuste y cambiar a la posición deseada. La base de
la cuna se puede usar inclinada a hasta 30° para prevenir la incomodidad y que el niño se
atragante. La cuna de bebé puede inclinarse en posiciones con una diferencia entre las alturas
de máx. 2 posiciones. (Ejemplo: la para derecha en posición 3 mientras la para izquierda en
posición 1). ¡PRECAUCIÓN! La función antireflujo puede aplicarse solo y únicamente cuando usa
la cuna de bebé como una cama separada. La cabeza del bebé tiene que estar siempre en el lado
más alto.
Figura H - Fijación de la cuna de bebé a la cama de los padres. Retirar la barrera desabrochando
las cremalleras de ambos lados y fijándola en la parte inferior de la cuna. Usar los dos cinturones
de seguridad provistos en el kit para fijar la cuna a la cama de los padres. Bloquear las hebillas
debajo de la cuna en ambos lados, después de lo cual asegurar los cinturones alrededor de la
estructura de la cama de los padres, comenzando por abajo y subiendo, y finalmente apretando
las hebillas por debajo de la cama. Para asegurar la cuna cuando esté al lado de la cama de los
padres, tire de las correas una vez más para asegurarse de que la cuna esté bien fijada a la cama
de los padres.
Limpiar las partes de plástico o metal del producto con un paño de algodón suave o una esponja
humedecida con agua o un detergente suave. No usar lejía, detergentes fuertes, así como
detergentes con partículas abrasivas para limpiar el producto. Todas las partes textiles y tejidos
deben lavarse únicamente a mano, siguiendo las instrucciones dadas en la etiqueta. Después de
limpiar la cuna, dejarla secarse bien antes de volver a utilizarla de nuevo. No plegar y no
desmontar la cuna de bebé antes de que esté completamente seca. No exponer el producto a
la luz solar directa durante períodos prolongados ni a temperaturas extremas que puedan llevar
a cambio de color y daños en las partes expuestas. Después de una exposición prolongada a
altas temperaturas, esperar unos minutos antes de colocar al niño en el producto. No colocar
objetos dentro o sobre el producto para evitar daños a la estructura y/o la tapicería. Guardar el
producto en un lugar limpio y seco.
Hecho para Cangaroo en la RPC
Fabricante e importador: Moni Trade Ltd.,
Dirección: Bulgaria, Sofía, Trebich, 1 Dolo Str.,
Número de teléfono: 003592/936 07 90, sitio web: www.cangaroo-bg.com
INSTRUCCIONES DE LIMPIEZA Y MANTENIMIENTO
29
Acest produs este fabricat in conformitate cu cerintele Directivei europene 2001/98/EC
privind siguranta generala a produselor, Legea privind protectia consumatorilor si standardul
european BDS EN 1130:2019.
AVERTISMENT!
x Nu folositi acest produs inainte d’a fi citit in prealabil instructiunile de utilizare.
x Produsul este destinat pentru copiii cu varsta cuprinsa intre 0 si 12 de luni, cu o greutate
de pana le 11 kg.
x Opriti utilizarea produsului de indata ce copilul poate sa stea, sa ingenuncheze sau sa se
ridice in picioare.
x Atasarea articolelor suplimentare la produs poate provoca sufocare.
x Nu amplasati produsul in apropierea unui alt produs care poate prezenta un pericol de
sufocare sau strangulare, cum ar fi sfori, snururi de jaluzele/draperii etc.
x Nu folositi mai mult de o saltea in produs.
x Folositi doar salteaua achizitionata cu acest patut pentru bebelusi, nu adaugati o a doua
saltea acestuia, risc de sufocare!
x Produsul trebuie amplasat pe o podea orizontala.
x Copiii mici nu trebuie lasati sa se joace nesupravegheati in apropierea patutului.
x Patutul trebuie blocat in pozitie stationara, atunci cand copilul este lasat nesupravegheat.
x Toate elementele de fixare trebuie stranse intotdeauna in mod corect si trebuie sa aveti
grija sa nu existe suruburi slabite, deoarece copilul se poate prinde de anumite
componente ale carcasei sau elemente textile (ex. snururi, panglici, elemente pandative
pentru suzete), fapt care ar putea prezenta un risc de sufocare. Efectuati verificari de rutina
pentru a va asigura ca nu exista piese slabite, deteriorate sau lipsa.
x Dimensiunea maxima interioara a patutului pentru bebelusi, pentru care este destinata
salteaua, este de 900/590 mm. Lungimea si latimea saltelei trebuie sa fie astfel incat
distanta maxima dintre saltea si partile laterale si marginile patutului sa nu depaseasca 2,5
cm.
x Tineti produsul la distanta si departe de tigari aprinse, flacari deschise si alte surse
puternice de caldura, cum ar fi aragaze electrice si pe gaz.
x Baza cosului poate fi folosita cu o inclinare de pana la 30° grade, pentru a preveni
disconfortul si impotriva sufocarii copilului.
x NU folositi patutul pentru bebelusi daca anumite parti lipsesc, sunt deteriorate sau rupte.
Daca este necesar, contactati MONI TRADE OOD pentru piese de schimb si instructiuni. NU
inlocuiti piese.
x Utilizarea patutului pentru bebelusi cu functia „fixare de patul parintilor” este permisa doar
cu tipul standard de paturi si/sau saltea cu pereti drepti. Folosirea produsului cu paturi
rotunde si/sau saltea, paturi cu apa sau saltele gonflabile NU ESTE PERMISA!
RO
/DWKZdEd͊/d/Ԑ/hdEԐ/b/W^dZԐ/^dKhDEdWEdZhKE^h>dZ
h>dZ/KZ͘
20
platzieren. Jeder Seitenrahmen ist mit zwei Schrauben ausgestattet, um das Hauptstützrohr am
Bett zu befestigen. Verwenden Sie einen Sechskant, um die Schrauben im Uhrzeigersinn
festzuziehen. ACHTUNG! Stellen Sie sicher, dass der Rahmen fest und stabil ist. Dies ist der
tragende Teil des Bettes und sorgt für die Sicherheit Ihres Kindes.
Abbildung C - Befestigen Sie den Schlafkorb am montierten Ständer, indem Sie das
Verbindungsteil des Korbrahmens oben an den beiden Seitenrahmen "A" und "B" befestigen.
Der Spannstift rastet ein, wenn er auf beiden Seiten sicher befestigt ist ACHTUNG Stellen Sie
sicher, dass die Schrauben fest angezogen sind und der Korb fest am Bettgestell befestigt ist.
Abbildungen D, E - Die bewegliche Trennwand entfernen und anheben. Öffnen Sie den
Reißverschluss, der sich unter der gepolsterten oberen Schiene befindet. Heben Sie die
bewegliche Trennwand des Korbes an, sodass sie sich von der Grundlage löst, und befestigen
Sie die herunterfallende Seite am Boden des Korbes. Schließen Sie die Seitenwand, bis Sie ein
Klickgeräusch hören, und ziehen Sie den Reißverschluss auf beiden Seiten zu. Wenn Sie die
herausnehmbare Trennwand anheben möchten, lösen Sie sie und bringen Sie sie auf beiden
Seiten wieder am Boden des Korbes an. Verwenden Sie die seitlichen Reißverschlüsse, um
vollständig zu schließen. Verwenden Sie den Metallring, um die beiden Reißverschlüsse
miteinander zu verbinden, damit sie sich nicht öffnen können. Das Kinderbett ist als separates
Bett einsatzbereit.
Abbildung F - Bewegen des Kinderbettes. Um das Kinderbett zu bewegen, heben Sie die
Rückseite des Bettes an und bewegen Sie es dann mit den werkseitig montierten zweibeinigen
Halterungen an die gewünschte Stelle. Die Füße des Kinderbetts sind mit einer
Bremsvorrichtung (Stopper) ausgestattet, die die Bewegung des Kinderbetts einstellen und es
fest fixiert halten.
Abbildung G – Höhenverstellung und Antirefluxfunktion. Die Höhe kann in 5 Positionen
eingestellt werden. Um die Höhe einzustellen, drücken Sie die Einstelltaste und bewegen Sie sie
in die gewünschte Position. Der Boden des Korbes kann mit einer Neigung von bis zu 30 °
verwendet werden, um Unwohlsein zu vermeiden und das Kind vor Erstickungsgefahren zu
schützen. Das Babybett kann mit einem maximalen Höhenunterschied von 2 Positionen gekippt
werden. (Beispiel: der rechte Fuß ist Position 3 und der linke Position 1). ACHTUNG! Die
Antirefluxfunktion kann nur verwendet werden, wenn das Kinderbett als separates Bett
verwendet wird. Der Kopf des Kindes sollte immer auf der höchsten Seite sein.
Abbildung H - Befestigung des Kinderbetts am Elternbett. Nehmen Sie die Trennwand ab,
indem Sie die Reißverschlüsse auf beiden Seiten öffnen und befestigen Sie die Trennwand am
Boden des Kinderbetts. Verwenden Sie die beiden im Set enthaltenen Sicherheitsgurte, um das
Kinderbett am Bett der Eltern zu befestigen. Verriegeln Sie die Schnallen auf beiden Seiten unter
dem Kinderbett, befestigen Sie dann die Gurte um die Struktur des Elternbetts, beginnen Sie
von unten nach oben, und ziehen Sie schließlich die Schnallen unter dem Bett fest. Um das
Kinderbett zu sichern, wenn es neben dem Elternbett steht, ziehen Sie noch einmal an den
Gurten, um sicherzustellen, dass das Kinderbett sicher am Elternbett befestigt ist.
Reinigen Sie die Kunststoff- oder Metallteile des Produkts mit einem weichen Baumwolltuch
oder Schwamm, das mit Wasser oder einem milden Reinigungsmittel angefeuchtet ist.
Verwenden Sie keine Bleichmittel, starke Reinigungsmittel oder Scheuermittel, um das Produkt
zu reinigen. Alle Textilteile und Stoffe sollten nur von Hand gewaschen werden, gemäß den
ANWEISUNGEN FÜR REINIGUNG UND INSTANDHALTUNG
21
Anweisungen auf dem Etikett. Lassen Sie das Kinderbett nach der Reinigung gut trocknen, bevor
Sie es verwenden. Falten oder entfernen Sie das Kinderbett nicht, bevor es vollständig trocken
ist. Setzen Sie das Produkt nicht für längere Zeit direktem Sonnenlicht und extremen
Temperaturen aus, die die Farbe verändern und freiliegende Teile beschädigen können. Warten
Sie nach längerer Einwirkung hoher Temperaturen einige Minuten, bevor Sie das Kind
hineinlegen. Stellen Sie keine Gegenstände in oder auf das Produkt, um eine Beschädigung der
Struktur und/oder Polsterung zu vermeiden. Lagern Sie das Produkt an einem sauberen und
trockenen Ort.
Hergestellt für Cangaroo in der KNR
Hersteller und Importeur: Moni Trade Ltd.,
Adresse: Bulgarien, Sofia, Trebich, Dolo Str. 1,
Telefonnummer: 003592/936 07 90, Website: www.cangaroo-bg.com

2128
28
Figuras D, E - Como bajar y levantar la barrera móvil. Abrir la cremallera, que se encuentra
debajo del riel superior acolchado. Levantar la barrera móvil del capazo para que se separe de
la base y fije la pared móvil en la parte inferior del capazo. Cerrar el panel lateral hasta que se
escuche un clic y cerrar la cremallera en ambos lados. Si desea levantar la barrera móvil,
separarla y volver a colocarla en la base del capazo en ambos lados. Usar las cremalleras
laterales para cerrar completamente. Usar la anilla de metal para conectar las dos cremalleras
para que no se puedan abrir. La cuna está lista para usar como cama individual.
Figura F - Como mover la cuna de bebé. Para trasladar la cuna, levantar la parte trasera de la
cuna y luego moverla al punto deseado utilizando los accesorios de las dos patas instalados de
fábrica. Las patas de la cuna están equipadas con un dispositivo de frenado (topes) que detienen
el movimiento de la cuna y la mantienen bien bloqueada.
Figura G - Ajuste de la altura y la función antireflujo. La altura puede ajustarse en 5 posiciones.
Para ajustar la altura, presionar el botón de ajuste y cambiar a la posición deseada. La base de
la cuna se puede usar inclinada a hasta 30° para prevenir la incomodidad y que el niño se
atragante. La cuna de bebé puede inclinarse en posiciones con una diferencia entre las alturas
de máx. 2 posiciones. (Ejemplo: la para derecha en posición 3 mientras la para izquierda en
posición 1). ¡PRECAUCIÓN! La función antireflujo puede aplicarse solo y únicamente cuando usa
la cuna de bebé como una cama separada. La cabeza del bebé tiene que estar siempre en el lado
más alto.
Figura H - Fijación de la cuna de bebé a la cama de los padres. Retirar la barrera desabrochando
las cremalleras de ambos lados y fijándola en la parte inferior de la cuna. Usar los dos cinturones
de seguridad provistos en el kit para fijar la cuna a la cama de los padres. Bloquear las hebillas
debajo de la cuna en ambos lados, después de lo cual asegurar los cinturones alrededor de la
estructura de la cama de los padres, comenzando por abajo y subiendo, y finalmente apretando
las hebillas por debajo de la cama. Para asegurar la cuna cuando esté al lado de la cama de los
padres, tire de las correas una vez más para asegurarse de que la cuna esté bien fijada a la cama
de los padres.
Limpiar las partes de plástico o metal del producto con un paño de algodón suave o una esponja
humedecida con agua o un detergente suave. No usar lejía, detergentes fuertes, así como
detergentes con partículas abrasivas para limpiar el producto. Todas las partes textiles y tejidos
deben lavarse únicamente a mano, siguiendo las instrucciones dadas en la etiqueta. Después de
limpiar la cuna, dejarla secarse bien antes de volver a utilizarla de nuevo. No plegar y no
desmontar la cuna de bebé antes de que esté completamente seca. No exponer el producto a
la luz solar directa durante períodos prolongados ni a temperaturas extremas que puedan llevar
a cambio de color y daños en las partes expuestas. Después de una exposición prolongada a
altas temperaturas, esperar unos minutos antes de colocar al niño en el producto. No colocar
objetos dentro o sobre el producto para evitar daños a la estructura y/o la tapicería. Guardar el
producto en un lugar limpio y seco.
Hecho para Cangaroo en la RPC
Fabricante e importador: Moni Trade Ltd.,
Dirección: Bulgaria, Sofía, Trebich, 1 Dolo Str.,
Número de teléfono: 003592/936 07 90, sitio web: www.cangaroo-bg.com
INSTRUCCIONES DE LIMPIEZA Y MANTENIMIENTO
29
Acest produs este fabricat in conformitate cu cerintele Directivei europene 2001/98/EC
privind siguranta generala a produselor, Legea privind protectia consumatorilor si standardul
european BDS EN 1130:2019.
AVERTISMENT!
x Nu folositi acest produs inainte d’a fi citit in prealabil instructiunile de utilizare.
x Produsul este destinat pentru copiii cu varsta cuprinsa intre 0 si 12 de luni, cu o greutate
de pana le 11 kg.
x Opriti utilizarea produsului de indata ce copilul poate sa stea, sa ingenuncheze sau sa se
ridice in picioare.
x Atasarea articolelor suplimentare la produs poate provoca sufocare.
x Nu amplasati produsul in apropierea unui alt produs care poate prezenta un pericol de
sufocare sau strangulare, cum ar fi sfori, snururi de jaluzele/draperii etc.
x Nu folositi mai mult de o saltea in produs.
x Folositi doar salteaua achizitionata cu acest patut pentru bebelusi, nu adaugati o a doua
saltea acestuia, risc de sufocare!
x Produsul trebuie amplasat pe o podea orizontala.
x Copiii mici nu trebuie lasati sa se joace nesupravegheati in apropierea patutului.
x Patutul trebuie blocat in pozitie stationara, atunci cand copilul este lasat nesupravegheat.
x Toate elementele de fixare trebuie stranse intotdeauna in mod corect si trebuie sa aveti
grija sa nu existe suruburi slabite, deoarece copilul se poate prinde de anumite
componente ale carcasei sau elemente textile (ex. snururi, panglici, elemente pandative
pentru suzete), fapt care ar putea prezenta un risc de sufocare. Efectuati verificari de rutina
pentru a va asigura ca nu exista piese slabite, deteriorate sau lipsa.
x Dimensiunea maxima interioara a patutului pentru bebelusi, pentru care este destinata
salteaua, este de 900/590 mm. Lungimea si latimea saltelei trebuie sa fie astfel incat
distanta maxima dintre saltea si partile laterale si marginile patutului sa nu depaseasca 2,5
cm.
x Tineti produsul la distanta si departe de tigari aprinse, flacari deschise si alte surse
puternice de caldura, cum ar fi aragaze electrice si pe gaz.
x Baza cosului poate fi folosita cu o inclinare de pana la 30° grade, pentru a preveni
disconfortul si impotriva sufocarii copilului.
x NU folositi patutul pentru bebelusi daca anumite parti lipsesc, sunt deteriorate sau rupte.
Daca este necesar, contactati MONI TRADE OOD pentru piese de schimb si instructiuni. NU
inlocuiti piese.
x Utilizarea patutului pentru bebelusi cu functia „fixare de patul parintilor” este permisa doar
cu tipul standard de paturi si/sau saltea cu pereti drepti. Folosirea produsului cu paturi
rotunde si/sau saltea, paturi cu apa sau saltele gonflabile NU ESTE PERMISA!
RO
/DWKZdEd͊/d/Ԑ/hdEԐ/b/W^dZԐ/^dKhDEdWEdZhKE^h>dZ
h>dZ/KZ͘
20
platzieren. Jeder Seitenrahmen ist mit zwei Schrauben ausgestattet, um das Hauptstützrohr am
Bett zu befestigen. Verwenden Sie einen Sechskant, um die Schrauben im Uhrzeigersinn
festzuziehen. ACHTUNG! Stellen Sie sicher, dass der Rahmen fest und stabil ist. Dies ist der
tragende Teil des Bettes und sorgt für die Sicherheit Ihres Kindes.
Abbildung C - Befestigen Sie den Schlafkorb am montierten Ständer, indem Sie das
Verbindungsteil des Korbrahmens oben an den beiden Seitenrahmen "A" und "B" befestigen.
Der Spannstift rastet ein, wenn er auf beiden Seiten sicher befestigt ist ACHTUNG Stellen Sie
sicher, dass die Schrauben fest angezogen sind und der Korb fest am Bettgestell befestigt ist.
Abbildungen D, E - Die bewegliche Trennwand entfernen und anheben. Öffnen Sie den
Reißverschluss, der sich unter der gepolsterten oberen Schiene befindet. Heben Sie die
bewegliche Trennwand des Korbes an, sodass sie sich von der Grundlage löst, und befestigen
Sie die herunterfallende Seite am Boden des Korbes. Schließen Sie die Seitenwand, bis Sie ein
Klickgeräusch hören, und ziehen Sie den Reißverschluss auf beiden Seiten zu. Wenn Sie die
herausnehmbare Trennwand anheben möchten, lösen Sie sie und bringen Sie sie auf beiden
Seiten wieder am Boden des Korbes an. Verwenden Sie die seitlichen Reißverschlüsse, um
vollständig zu schließen. Verwenden Sie den Metallring, um die beiden Reißverschlüsse
miteinander zu verbinden, damit sie sich nicht öffnen können. Das Kinderbett ist als separates
Bett einsatzbereit.
Abbildung F - Bewegen des Kinderbettes. Um das Kinderbett zu bewegen, heben Sie die
Rückseite des Bettes an und bewegen Sie es dann mit den werkseitig montierten zweibeinigen
Halterungen an die gewünschte Stelle. Die Füße des Kinderbetts sind mit einer
Bremsvorrichtung (Stopper) ausgestattet, die die Bewegung des Kinderbetts einstellen und es
fest fixiert halten.
Abbildung G – Höhenverstellung und Antirefluxfunktion. Die Höhe kann in 5 Positionen
eingestellt werden. Um die Höhe einzustellen, drücken Sie die Einstelltaste und bewegen Sie sie
in die gewünschte Position. Der Boden des Korbes kann mit einer Neigung von bis zu 30 °
verwendet werden, um Unwohlsein zu vermeiden und das Kind vor Erstickungsgefahren zu
schützen. Das Babybett kann mit einem maximalen Höhenunterschied von 2 Positionen gekippt
werden. (Beispiel: der rechte Fuß ist Position 3 und der linke Position 1). ACHTUNG! Die
Antirefluxfunktion kann nur verwendet werden, wenn das Kinderbett als separates Bett
verwendet wird. Der Kopf des Kindes sollte immer auf der höchsten Seite sein.
Abbildung H - Befestigung des Kinderbetts am Elternbett. Nehmen Sie die Trennwand ab,
indem Sie die Reißverschlüsse auf beiden Seiten öffnen und befestigen Sie die Trennwand am
Boden des Kinderbetts. Verwenden Sie die beiden im Set enthaltenen Sicherheitsgurte, um das
Kinderbett am Bett der Eltern zu befestigen. Verriegeln Sie die Schnallen auf beiden Seiten unter
dem Kinderbett, befestigen Sie dann die Gurte um die Struktur des Elternbetts, beginnen Sie
von unten nach oben, und ziehen Sie schließlich die Schnallen unter dem Bett fest. Um das
Kinderbett zu sichern, wenn es neben dem Elternbett steht, ziehen Sie noch einmal an den
Gurten, um sicherzustellen, dass das Kinderbett sicher am Elternbett befestigt ist.
Reinigen Sie die Kunststoff- oder Metallteile des Produkts mit einem weichen Baumwolltuch
oder Schwamm, das mit Wasser oder einem milden Reinigungsmittel angefeuchtet ist.
Verwenden Sie keine Bleichmittel, starke Reinigungsmittel oder Scheuermittel, um das Produkt
zu reinigen. Alle Textilteile und Stoffe sollten nur von Hand gewaschen werden, gemäß den
ANWEISUNGEN FÜR REINIGUNG UND INSTANDHALTUNG
21
Anweisungen auf dem Etikett. Lassen Sie das Kinderbett nach der Reinigung gut trocknen, bevor
Sie es verwenden. Falten oder entfernen Sie das Kinderbett nicht, bevor es vollständig trocken
ist. Setzen Sie das Produkt nicht für längere Zeit direktem Sonnenlicht und extremen
Temperaturen aus, die die Farbe verändern und freiliegende Teile beschädigen können. Warten
Sie nach längerer Einwirkung hoher Temperaturen einige Minuten, bevor Sie das Kind
hineinlegen. Stellen Sie keine Gegenstände in oder auf das Produkt, um eine Beschädigung der
Struktur und/oder Polsterung zu vermeiden. Lagern Sie das Produkt an einem sauberen und
trockenen Ort.
Hergestellt für Cangaroo in der KNR
Hersteller und Importeur: Moni Trade Ltd.,
Adresse: Bulgarien, Sofia, Trebich, Dolo Str. 1,
Telefonnummer: 003592/936 07 90, Website: www.cangaroo-bg.com

22 27
26
Este producto está fabricado en conformidad con los requisitos de la Directiva europea
2001/98/CE relativa a la seguridad general de los productos, La Ley de protección al
ĐŽŶƐƵŵŝĚŽƌLJĞůĞƐƚĄŶĚĂƌĞƵƌŽƉĞŽ^ʫE 1130:2019.
¡ADVERTENCIA!
x No usar este producto antes de leer las instrucciones de uso.
x El producto está destinado a niños de 0 a 12 meses con un peso de máx. hasta 11 kg.
x Dejar de usar el producto de forma inmediata una vez que el niño ya pueda sentarse o
ponerse de rodillas, así como si puede levantarse.
x Poner elementos adicionales en el producto puede causar asfixia.
x No colocar el producto cerca de otros productos que pueden crear riesgo de asfixia o
estragulación, como son las cuerdas, cordones de persianas/cortinas, entre otras.
x No usar más de un colchón en el producto.
x ¡Usar solo el colchoncito que viene con esta cuna y no añadir otro colchón sobre el primero
porque habrá riesgo de asfixia!
x El producto debe ponerse en suelos horizontales.
x A los niños pequeños no se les debe permitir jugar sin supervisión cerca de la cuna.
x La cuna debe bloquearse en una posición estancada cuando el niño no esté supervisado.
x Todos los accesorios de montaje siempre deben apretarse correctamente y se debe tener
cuidado de no dejar tornillos aflojados, porque el niño puede agarrar partes de la estructura
o elementos textiles (por ejemplo, cordones, cintas, sujetadores de chupetes y tetinas), lo
que creará riesgo de asfixia. Realizar comprobaciones regulares para asegurarse de que no
haya piezas flojas, dañadas o faltantes.
x Las dimensiones interiores máximas de la cuna para la que está destinado el colchón son
de 900/590 mm. La longitud y el ancho del colchón deben ser tal que la distancia máxima
entre el colchón y las paredes y bordes de la cuna no supere los 2,5 cm.
x Mantener el producto alejado de cigarrillos encendidos, hogares abiertos y otras fuentes
de calor intenso, como son las estufas eléctricas y las de gas.
x La base de la cuna se puede usar inclinada a hasta 30° para prevenir la incomodidad y que
el niño se atragante.
x NO usar la cuna de bebé si hay partes faltantes, dañadas o rotas. Si es necesario, ponerse
en contacto con MONI TRADE OOD, para partes de repuesto e instrucciones. NO
reemplazar las piezas.
x El uso de la cuna con función de "fijación a la cama de los padres" solo está permitido con
tipos de cama estándar y/o un colchón de paredes rectas. ¡NO ESTÁ PERMITIDO el uso del
producto con camas y/o colchones redondos, camas de agua o colchones inflables!
x ¡PRECAUCIÓN! No usar la función de fijación de la cuna de bebé a la cama de los padres si
la altura de su cama es inferior a 45 cm o superior a 60 cm desde el suelo.
x Nunca debe usar la cuna, fijada a la cama parental, cuando esté en posición inclinada. En
esta función las dos patas siempre deben estar ajustadas en la misma altura.
ES
͋/DWKZdEd͊ LEER DETENIDAMENTE Y MANTENERLAS PARA FUTURAS CONSULTAS.
27
x Cuando usa la función del producto "fijación a la cama parental", para evitar el riesgo de
asfixia por atrapamiento, la cuna debe estar correctamente fijada a la cama del adulto
mediante el sistema de sujeción.
x No ajuste el producto ni lo mueva mientras el niño esté dentro.
x Siempre usar solo y únicamente el sistema de sujeción que va con este producto.
x Antes de cada uso, compruebe la resistencia del sistema de sujeción tirando de la cuna
para ver si se va a separar de la cama parental.
x No usar el producto si hay un espacio entre la cuna y la cama parental.
x No debe llenar los espacios con almohadas, mantas u otros objetos.
x PRECAUCIÓN - Para evitar el riesgo de que el cuello del niño se atrape en el marco superior
de la pared cuando esté al lado de la cama de adulto, el marco superior no debe ser más
alto que el colchón de la cama de adulto.
x PRECAUCIÓN - Para evitar el riesgo de que su niño se estrangule, el sistema de sujeción a
la cama para adultos debe estar siempre lejos de la cuna de bebé y fuera de ella.
x ¡PELIGRO! ¡Siempre levantar por completo la pared cuando la cuna de bebé no esté fijada
a la cama para adultos!
x El armado, desplegado y plegado del producto se deben hacer SOLO por un adulto.
x No permitir la presencia de niños menores de 3 años de edad antes de completar el armado
del producto, para evitar que tengan acceso a partes pequeñas y desmontadas.
x Todos los envases de plástico deben retirarse, destruirse o mantenerse fuera del alcance
de los niños para evitar el riesgo de asfixia.
x No realizar cambios ni mejoras en la estructura de la cuna, porque esto puede causar daños
en la cuna y riesgo de lesiones para el niño.
¡IMPORTANTE! Los esquemas y figuras en estas instrucciones sirven solo para ilustrar y dar
información. Compruebe la seguridad de la fijación después de completar cada operación.
Partes - figura A
Después del desembalaje, asegúrese de que todos los elementos presentes en la figura A estén
disponibles.
Montaje de la estructura
¡PRECAUCIÓN! Seguir las exactas instrucciones y el orden de montaje del producto, según los
esquemas.
&ŝŐƵƌĂʦ- Armar el soporte de la cuna, ŝŶƐĞƌƚĂŶĚŽĞůƚƵďŽƉƌŝŶĐŝƉĂůĚĞƐŽƉŽƌƚĞΗˁΗĞŶůŽƐŽƌŝĨŝĐŝŽƐ
ĚĞĐŽŶĞdžŝſŶĚĞĂŵďŽƐŵĂƌĐŽƐůĂƚĞƌĂůĞƐ;ƉĂƚĂƐͿΗʤΗ̛ΗΗĞŶƐĞŶƚŝĚŽĚĞůĂƐĂŐƵũĂƐĚĞůƌĞůŽũ͘ĂĚĂ
marco lateral está equipado con dos pernos para fijar el tubo de soporte principal a la cama.
Usar un destornillador hexagonal para apretar los pernos en el sentido de las agujas del reloj.
¡PRECAUCIÓN! Asegúrese de que el marco esté ajustado y estable. Esta es la parte de apoyo de
la cuna y garantiza la seguridad de su hijo.
Figura C: Fijar el capazo de dormir al soporte montado fijando la parte de conexión del marco
del capazo a la parte superior de los dos marcos laterales "A" y "B". El pasador con muelle
encajará en su lugar una vez que esté bien sujeto por ambos lados. ¡PRECAUCIÓN! Asegúrese
de que los pernos estén apretados y que el capazo esté firmemente sujeto al soporte de la cuna.
INSTRUCCIONES DE MONTAJE Y FUNCIONAMIENTO
22
Ȱʐʏʊ ʏʉ ʋʌʉʁʊʆ ʃɲʏɲʍʃɸʐɳʍʏɻʃɸ ʍʑʅʔʘʆɲ ʅɸ ʏɿʎ ɲʋɲɿʏɼʍɸɿʎ ʏɻʎ ȵʐʌʘʋɲʁʃɼʎ Ƀɷɻɶʀɲʎ
ϮϬϬϭͬϵϴͬȵȵ ɶɿɲ ʏɻʆ ɶɸʆɿʃɼ ɲʍʔɳʄɸɿɲ ʏʘʆ ʋʌʉʁʊʆʏʘʆ͕ ʏʉʐ Ɂʊʅʉʐ ʋɸʌʀ ʋʌʉʍʏɲʍʀɲʎ ʏʘʆ
ʃɲʏɲʆɲʄʘʏʙʆʃɲɿʏʉʐȵʐʌʘʋɲʁʃʉʑʋʌʉʏʑʋʉʐɼʏʉɿʏʉʐȵɽʆɿʃʉʑɅʌʊʏʐʋʉʐʏɻʎȲʉʐʄɶɲʌʀɲʎ
1130:2019.
ɅɆɃȵȻȴɃɅɃȼȸɇȸ!
x ɀɻʆʖʌɻʍɿʅʉʋʉɿɸʀʏɸɲʐʏʊʏʉʋʌʉʁʊʆʖʘʌʀʎʆɲɷɿɲɴɳʍɸʏɸɸʃʏʘʆʋʌʉʏɹʌʘʆʏɿʎʉɷɻɶʀɸʎ
ʖʌɼʍɻʎ͘
x ɈʉʋʌʉʁʊʆʋʌʉʉʌʀɺɸʏɲɿɶɿɲʋɲɿɷɿɳɻʄɿʃʀɲʎϬɹʘʎϭϮʅɻʆʙʆʅɸɴɳʌʉʎɹʘʎϭϭʃɿʄɳ͘
x ɇʏɲʅɲʏɼʍʏɸʆɲʖʌɻʍɿʅʉʋʉɿɸʀʏɸʏʉʋʌʉʁʊʆɲʅɹʍʘʎʊʏɲʆʏʉʋɲɿɷʀʅʋʉʌɹʍɸɿʆɲʃɳɽɸʏɲɿɼ
ʆɲɶʉʆɲʏʀɺɸɿɼʆɲʍɻʃʙʆɸʏɲɿɸʋɳʆʘ͘
x ȸʏʉʋʉɽɹʏɻʍɻʍʐʅʋʄɻʌʘʅɲʏɿʃʙʆʍʏʉɿʖɸʀʘʆʍʏʉʋʌʉʁʊʆʅʋʉʌɸʀʆɲʋʌʉʃɲʄɹʍɸɿʋʆɿɶʅʊ͘
x ɀɻʆɲʔɼʆɸʏɸʏʉʋʌʉʁʊʆʃʉʆʏɳʍɸɳʄʄʉʋʌʉʁʊʆ͕ʏʉʉʋʉʀʉʅʋʉʌɸʀʆɲɲʋʉʏɸʄɹʍɸɿ ʃʀʆɷʐʆʉʎ
ʋʆɿɶʅʉʑɼɲʍʔʐʇʀɲʎ͕ʊʋʘʎɶɿɲʋɲʌɳɷɸɿɶʅɲʖʉʌɷɹʎ͕ɿʅɳʆʏɸʎɶɿɲʍʏʊʌɿɲͬʃʉʐʌʏʀʆɸʎʃ͘ɲ͘
x ɀɻʆʖʌɻʍɿʅʉʋʉɿɸʀʏɸʋɸʌɿʍʍʊʏɸʌɲʏʉʐɸʆʊʎʍʏʌʙʅɲʏɲʍʏʉʋʌʉʁʊʆ͘
x ɍʌɻʍɿʅʉʋʉɿɼʍʏɸʅʊʆʉʏʉʍʏʌʙʅɲ͕ʏʉʉʋʉʀʉʋʘʄɸʀʏɲɿʅ͛ɲʐʏʊʏʉʋɲɿɷɿʃʊʃʌɸɴɲʏɳʃɿ͕ʅɻʆ
ʋʌʉʍɽɹʏɸʏɸɷɸʑʏɸʌʉʍʏʌʙʅɲʍ͛ɲʐʏʊ͕ʐʋɳʌʖɸɿʃʀʆɷʐʆʉʎʋʆɿɶʅʉʑ͊
x Ɉʉʋʌʉʁʊʆʋʌɹʋɸɿʆɲʏʉʋʉɽɸʏɻɽɸʀʍɸʉʌɿɺʊʆʏɿʉʋɳʏʘʅɲ͘
x ɀɻʆɸʋɿʏʌɹʋɸʏɸʍʏɲʅɿʃʌɳʋɲɿɷɿɳʆɲʋɲʀɺʉʐʆʖʘʌʀʎɸʋʀɴʄɸʗɻʃʉʆʏɳʍʏʉʃʌɸɴɳʏɿ͘
x Ɉʉ ʃʌɸɴɳʏɿ ʋʌɹʋɸɿ ʆɲ ɲʍʔɲʄɿʍʏɸʀ ʍɸ ɲʃʀʆɻʏɻ ɽɹʍɻ͕ ʊʏɲʆ ʏʉ ʋɲɿɷʀ ɲʔɹɽɻʃɸ ʖʘʌʀʎ
ɸʋʀɴʄɸʗɻ͘
x Ʉʄɲ ʏɲ ɸʇɲʌʏɼʅɲʏɲ ʍʐʆɲʌʅʉʄʊɶɻʍɻʎ ʋʌɹʋɸɿ ʋɳʆʏɲ ʆɲ ʍʔʀɶɶʉʆʏɲɿ ʍʘʍʏɳ ʃɲɿ ʆɲ
ʋʌʉʍɹʖɸʏɸʆɲʅɻʆʐʋɳʌʖʉʐʆʖɲʄɲʌɹʎɴʀɷɸʎ͕ɸʋɸɿɷɼʏʉʋɲɿɷʀʅʋʉʌɸʀʆɲʋɿɳʍɸɿɹʆɲʅɹʌʉʎ
ʏʉʐʋɸʌɿɴʄɼʅɲʏʉʎɼʏɲʐʔɲʍʅɳʏɿʆɲʍʏʉɿʖɸʀɲ;ʋ͘ʖ͘ʃʉʌɷʊʆɿɲ͕ʃʉʌɷɹʄɸʎ͕ʃʉʐʅʋʙʅɲʏɲɶɿɲ
ʅʋɿʅʋɸʌʊ-ʋɿʋʀʄɸʎͿ͕ ʏʉ ʉʋʉʀʉ ɲʋʉʏɸʄɸʀ ʃʀʆɷʐʆʉ ʋʆɿɶʅʉʑ͘ Ʌʌʉɴɲʀʆɸʏɸ ʍɸ ɸʄɹɶʖʉʐʎ
ʌʉʐʏʀʆɲʎ͕ɶɿɲʆɲɴɸɴɲɿʘɽɸʀʏɸ͕ʊʏɿɷɸʆʐʋɳʌʖʉʐʆʖɲʄɲʌɳʅɹʌɻ͕ʅɹʌɻʅɸɴʄɳɴɸʎɼʅɹʌɻ
ʋʉʐʄɸʀʋʉʐʆ͘
x Ɉʉʅɹɶɿʍʏʉɸʍʘʏɸʌɿʃʊʅɹɶɸɽʉʎʏʉʐɴʌɸʔɿʃʉʑʃʌɸɴɲʏɿʉʑ͕ɶɿɲʏʉʉʋʉʀʉʋʌʉʉʌʀɺɸʏɲɿʏʉ
ʍʏʌʙʅɲ͕ ɸʀʆɲɿ ϵϬϬͬϵϱϬ ʖɿʄ͘ Ɉʉ ʅɼʃʉʎ ʃɲɿ ʏʉ ʋʄɳʏʉʎ ʏʉʐ ʍʏʌʙʅɲʏʉʎ ʋʌɹʋɸɿ ʆɲ ɸʀʆɲɿ
ʏɹʏʉɿɲ͕ʋʉʐɻʅɹɶɿʍʏɻɲʋʊʍʏɲʍɻʅɸʏɲʇʑʏʉʐʍʏʌʙʅɲʏʉʎʃɲɿʏʘʆʋʄɲʁʆʙʆʃɲɿʏʘʆɳʃʌʘʆ
ʏʉʐʃʌɸɴɲʏɿʉʑʆɲʅɻʆʐʋɸʌɴɲʀʆɸɿϮ͕ϱɸʃ͘
x Ⱦʌɲʏɼʍʏɸ ʏʉ ʋʌʉʁʊʆ ʅɲʃʌɿɳ ɲʋʊ ɲʆɲʅʅɹʆɲ ʏʍɿɶɳʌɲ͕ ɲʆʉɿʖʏɼ ʔʄʊɶɲ ʃɲɿɳʄʄɸʎ ʋɻɶɹʎ
ɹʆʏʉʆɻʎɽɸʌʅʊʏɻʏɲʎ͕ʊʋʘʎɻʄɸʃʏʌɿʃɹʎʍʊʅʋɸʎʃɲɿʍʊʅʋɸʎɲɸʌʀʉʐ͘
x ȸ ɴɳʍɻ ʏʉʐ ʃɲʄɲɽɿʉʑ ʅʋʉʌɸʀ ʆɲ ʖʌɻʍɿʅʉʋʉɿɻɽɸʀ ʅɸ ʃʄʀʍɻ ɹʘʎ ϯϬΣ ʅʉɿʌʙʆ͕ ɶɿɲ ʆɲ
ɲʋʉʔʑɶɸʏɸʏɻʆɷʐʍʔʉʌʀɲʃɲɿʃɲʏɳʋʆɿɶʅʉʑʏʉʐʋɲɿɷɿʉʑ͘
x ɀȸɁʖʌɻʍɿʅʉʋʉɿɸʀʏɸʏʉɴʌɸʔɿʃʊʃʌɸɴɲʏɳʃɿ͕ʍɸʋɸʌʀʋʏʘʍɻʋʉʐʃɳʋʉɿɲʅɹʌɻʄɸʀʋʉʐʆ͕
ʋɲʌʉʐʍɿɳɺʉʐʆ ɴʄɳɴɻ ɼ ɸʀʆɲɿ ʃʉʅʅɹʆɲ͘ ȵɳʆ ɸʀʆɲɿ ɲʋɲʌɲʀʏɻʏʉ͕ ɸʋɿʃʉɿʆʘʆɼʍʏɸ ʅɸ ʏɻ
ɀɃɁȻɈɆȵȽɁɈȵɅȵɶɿɲɲʆʏɲʄʄɲʃʏɿʃɳʃɲɿʉɷɻɶʀɸʎ͘ɀȸɁɲʆʏɿʃɲɽɿʍʏɳʏɸɲʆʏɲʄʄɲʃʏɿʃɳ͘
EL
ɇȸɀȰɁɈȻȾɃ͊ȴȻȰȲȰɈȵɅɆɃɇȵȾɈȻȾȰɈȻɇɃȴȸȳȻȵɇȾȰȻɌɉȿȰɂɈȵɈȵɇȳȻȰɈȻɀɅɃɆȵȻɁȰɈȻɇ
ɍɆȵȻȰɇɈȵȻɈȵɇɈɃɀȵȿȿɃɁ͘
23
x ȸʖʌɼʍɻʏʉʐɴʌɸʔɿʃʉʑʃʌɸɴɲʏɿʉʑʅɸʄɸɿʏʉʐʌɶʀɲͨʍʏɲɽɸʌʉʋʉʀɻʍɻʍʏʉʃʌɸɴɳʏɿɶʉʆɹɲͩ
ɸʋɿʏʌɹʋɸʏɲɿʅʊʆʉʅɸʃʌɸɴɳʏɿɲʃɲʆʉʆɿʃʉʑʏʑʋʉʐʃɲɿͬɼʍʏʌʙʅɲʅɸʊʌɽɿɲʏʉɿʖʙʅɲʏɲ͘ȸ
ʖʌɼʍɻ ʏʉʐ ʋʌʉʁʊʆʏʉʎ ʅɸ ʍʏʌʊɶɶʐʄɳ ʃʌɸɴɳʏɿɲ ʃɲɿͬɼ ʍʏʌʙʅɲ͕ ʃʌɸɴɳʏɿɲ ʆɸʌʉʑ ɼ
ʔʉʐʍʃʘʏɳʍʏʌʙʅɲʏɲȴȵɁȵɅȻɈɆȵɅȵɈȰȻ͊
x ɅɆɃɇɃɍȸ͊ɀɻʆʖʌɻʍɿʅʉʋʉɿɸʀʏɸʏɻʄɸɿʏʉʐʌɶʀɲʍʏɲɽɸʌʉʋʉʀɻʍɻʎʏʉʐɴʌɸʔɿʃʉʑʃʌɸɴɲʏɿʉʑ
ʍʏʉʃʌɸɴɳʏɿɶʉʆɹɲ͕ʍɸʋɸʌʀʋʏʘʍɻʋʉʐʏʉʑʗʉʎʏʉʐʃʌɸɴɲʏɿʉʑʍɲʎɸʀʆɲɿʅɿʃʌʊʏɸʌʉɲʋʊ
ϰϱɸʃ͘ɼʋɸʌɿʍʍʊʏɸʌʉɲʋʊϲϬɸʃ͘ʋɳʆʘɲʋʊʏʉʋɳʏʘʅɲ͘
x Ɉʉ ɴʌɸʔɿʃʊ ʃʌɸɴɳʏɿ͕ ʍʐʆɷɸɷɸʅɹʆʉ ʅɸ ʏʉ ʃʌɸɴɳʏɿ ɶʉʆɹɲ͕ ʋʉʏɹ ɷɸʆ ʋʌɹʋɸɿ ʆɲ
ʖʌɻʍɿʅʉʋʉɿɸʀʏɲɿʍɸɸʋɿʃʄɿʆɼɽɹʍɻ͘ɀ͛ɲʐʏɼʏɻʄɸɿʏʉʐʌɶʀɲʏɲɷʑʉʋʊɷɿɲʋʌɹʋɸɿʋɳʆʏɲʆɲ
ʌʐɽʅʀɺʉʆʏɲɿʍʏʉʀɷɿʉʑʗʉʎ͘
x ɀɻʆʋʌʉʍɲʌʅʊɺɸʏɸʏʉʋʌʉʁʊʆʃɲɿʅɻʆʏʉʅɸʏɲʃɿʆɸʀʏɸʊʏɲʆʏʉʋɲɿɷʀɸʀʆɲɿʅɹʍɲ.
x Ʉʏɲʆʖʌɻʍɿʅʉʋʉɿɸʀʏɸʏɻʄɸɿʏʉʐʌɶʀɲʏʉʐʋʌʉʁʊʆʏʉʎͨʍʏɲɽɸʌʉʋʉʀɻʍɻʍɸʃʌɸɴɳʏɿɶʉʆɹɲ͕ͩ
ɶɿɲ ʆɲ ɲʋʉʔʑɶɸʏɸ ʏʉʆ ʃʀʆɷʐʆʉ ʋʆɿɶʅʉʑ ʘʎ ɲʋʉʏɹʄɸʍʅɲ ʍʔɻʆʙʅɲʏʉʎ͕ ʏʉ ʋɲɿɷɿʃʊ
ʃʌɸɴɲʏɳʃɿ ʋʌɹʋɸɿ ʆɲ ʍʏɲɽɸʌʉʋʉɿɻɽɸʀ ʍʘʍʏɳ ʍʏʉ ʃʌɸɴɳʏɿ ɶʉʆɹɲ ʅɹʍʘ ʖʌɼʍɻʎ ʏʉʐ
ʍʐʍʏɼʅɲʏʉʎʍʏɼʌɿʇɻʎ͘
x Ʌɳʆʏɲ ʖʌɻʍɿʅʉʋʉɿɼʍʏɸ ʅʊʆʉ ʃɲɿ ʅʉʆɲɷɿʃɳ ʏʉ ʍʑʍʏɻʅɲ ʍʏɼʌɿʇɻʎ͕ ʏʉ ʉʋʉʀʉ
ʋɲʌɲʖʘʌɼɽɻʃɸʅ͛ɲʐʏʊʏʉʋʌʉʁʊʆ͘
x ȵʄɹɶʖɸʏɸ ʏɻʆ ɲʆʏʉʖɼ ʏʉʐ ʍʐʍʏɼʅɲʏʉʎ ʍʏɼʌɿʇɻʎ ʋʌɿʆ ɲʋʊ ʃɳɽɸ ʖʌɼʍɻ͕ ʏʌɲɴʙʆʏɲʎ ʏʉ
ʃʌɸɴɲʏɳʃɿʅɲʃʌɿɳɲʋʊʏʉʃʌɸɴɳʏɿɶʉʆɹɲ͘
x ɀɻʖʌɻʍɿʅʉʋʉɿɸʀʏɸʏʉʋʌʉʁʊʆ͕ɸɳʆʐʋɳʌʖɸɿʃɸʆʊʅɸʏɲʇʑʏʉʐɴʌɸʔɿʃʉʑʃʌɸɴɲʏɿʉʑʃɲɿʏʉʐ
ʃʌɸɴɲʏɿʉʑɶʉʆɹɲ͘
x Ɉɲʃɸʆɳɷɸʆʋʌɹʋɸɿʆɲʍʐʅʋʄɻʌʙʆʉʆʏɲɿʅɸʅɲʇɿʄɳʌɿɲ͕ʃʉʐɴɹʌʏɸʎɼɳʄʄɲɲʆʏɿʃɸʀʅɸʆɲ͘
x ɅɆɃȵȻȴɃɅɃȻȸɇȸ– ȳɿɲʆɲɲʋʉʔʑɶɸʏɸʏʉʆʃʀʆɷʐʆʉʍʔɻʆʙʅɲʏʉʎʏʉʐʄɲɿʅʉʑʏʉʐʋɲɿɷɿʉʑ
ʍʏʉɳʆʘʋʄɲʀʍɿʉʏʉʐʋʄɲʁʆʉʑ͕ɷʀʋʄɲʍʏʉʃʌɸɴɳʏɿɸʆɼʄɿʃʉʐ͕ʏʉɳʆʘʋʄɲʀʍɿʉɷɸʆʋʌɹʋɸɿ
ʆɲɸʀʆɲɿʐʗɻʄʊʏɸʌʉɲʋʊʏʉʍʏʌʙʅɲʏʉʐʃʌɸɴɲʏɿʉʑɸʆɼʄɿʃʉʐ͘
x ɅɆɃȵȻȴɃɅɃȻȸɇȸ– ȳɿɲʆɲɲʋʉʔɸʐʖɽɸʀʉʃʀʆɷʐʆʉʎʏʉʋɲɿɷʀʍɲʎʆɲʋʆɿɶɸʀ͕ʏʉʍʑʍʏɻʅɲ
ʍʏɼʌɿʇɻʎ ʍʏʉ ʃʌɸɴɳʏɿ ɸʆɻʄʀʃʉʐ ʋʌɹʋɸɿ ʋɳʆʏɲ ʆɲ ʃʌɲʏɿɹʏɲɿ ʅɲʃʌɿɳ ɲʋʊ ʏʉ ʋɲɿɷɿʃʊ
ʃʌɸɴɳʏɿʃɲɿɹʇʘɲʋʊɲʐʏʊ͘
x ȾȻɁȴɉɁɃɇ͊ Ʌɳʆʏɲ ʍɻʃʙʆɸʏɸ ʋʄɼʌʘʎ ʏʉ ɲʆɲʃʄɿʆʊʅɸʆʉ ʋʄɲʁʆʊ͕ ʊʏɲʆ ʏʉ ɴʌɸʔɿʃʊ
ʃʌɸɴɲʏɳʃɿɷɸʆʍʏɻʌʀʖɽɻʃɸʍʏʉʃʌɸɴɳʏɿɸʆɻʄʀʃʉʐ͊
x ȸ ʍʐʆɲʌʅʉʄʊɶɻʍɻ͕ ɻ ɲʆɳʋʏʐʇɻ ʃɲɿ ʏʉ ʃʄɸʀʍɿʅʉ ʏʉʐ ʋʌʉʁʊʆʏʉʎ ʆɲ ʋʌɲɶʅɲʏʉʋʉɿɸʀʏɲɿ
ɀɃɁɃɲʋʊɸʆɼʄɿʃʉɳʏʉʅʉ͘
x ɀɻʆɸʋɿʏʌɹʋɸʏɸʏɻʆʋɲʌʉʐʍʀɲʋɲɿɷɿʙʆʃɳʏʘʏʘʆϯɸʏʙʆ͕ʋʌɿʆɹʖɸʏɸʍʐʆɲʌʅʉʄʉɶɼʍɸɿ
ʋʄɼʌʘʎʏʉʋʌʉʁʊʆ͕ɶɿɲʆɲɲʋʉʔʑɶɸʏɸʏɻʆʋʌʊʍɴɲʍɻʍɸʅɿʃʌɳʃɲɿɲʋʉʍʐʆɲʌʅʉʄʉɶɻʅɹʆɲ
ʅɹʌɻ͘
x Ⱦɳɽɸʆɳɿʄʉʆʍʐʍʃɸʐɲʍʀɲʋʌɹʋɸɿʆɲɲʔɲɿʌɸɽɸʀ͕ʆɲʃɲʏɲʍʏʌɲʔɸʀʃɲɿʆɲʃʌɲʏɿɹʏɲɿʅɲʃʌɿɳ
ɲʋʊʋɲɿɷɿɳ͕ʋʌʉʃɸɿʅɹʆʉʐʆɲɲʋʉʔɸʐʖɽɸʀʉʃʀʆɷʐʆʉʎʋʆɿɶʅʉʑ.
x ɀɻʆʋʌɲɶʅɲʏʉʋʉɿɸʀʏɸʃɲʅʀɲʅɸʏɲɴʉʄɼ ʃɲɿ ɴɸʄʏʀʘʍɻʏɻʎʃɲʏɲʍʃɸʐɼʎʏʉʐʃʌɸɴɲʏɿʉʑ͕
ɸʋɸɿɷɼɲʐʏʊʅʋʉʌɸʀʆɲʉɷɻɶɼʍɸɿʍɸɴʄɳɴɻʏʉʐʃʌɸɴɲʏɿʉʑʃɲɿʍɸʃʀʆɷʐʆʉʏʌɲʐʅɲʏɿʍʅʉʑ
ʏʉʐʋɲɿɷɿʉʑ͘

2326
26
Este producto está fabricado en conformidad con los requisitos de la Directiva europea
2001/98/CE relativa a la seguridad general de los productos, La Ley de protección al
ĐŽŶƐƵŵŝĚŽƌLJĞůĞƐƚĄŶĚĂƌĞƵƌŽƉĞŽ^ʫE 1130:2019.
¡ADVERTENCIA!
x No usar este producto antes de leer las instrucciones de uso.
x El producto está destinado a niños de 0 a 12 meses con un peso de máx. hasta 11 kg.
x Dejar de usar el producto de forma inmediata una vez que el niño ya pueda sentarse o
ponerse de rodillas, así como si puede levantarse.
x Poner elementos adicionales en el producto puede causar asfixia.
x No colocar el producto cerca de otros productos que pueden crear riesgo de asfixia o
estragulación, como son las cuerdas, cordones de persianas/cortinas, entre otras.
x No usar más de un colchón en el producto.
x ¡Usar solo el colchoncito que viene con esta cuna y no añadir otro colchón sobre el primero
porque habrá riesgo de asfixia!
x El producto debe ponerse en suelos horizontales.
x A los niños pequeños no se les debe permitir jugar sin supervisión cerca de la cuna.
x La cuna debe bloquearse en una posición estancada cuando el niño no esté supervisado.
x Todos los accesorios de montaje siempre deben apretarse correctamente y se debe tener
cuidado de no dejar tornillos aflojados, porque el niño puede agarrar partes de la estructura
o elementos textiles (por ejemplo, cordones, cintas, sujetadores de chupetes y tetinas), lo
que creará riesgo de asfixia. Realizar comprobaciones regulares para asegurarse de que no
haya piezas flojas, dañadas o faltantes.
x Las dimensiones interiores máximas de la cuna para la que está destinado el colchón son
de 900/590 mm. La longitud y el ancho del colchón deben ser tal que la distancia máxima
entre el colchón y las paredes y bordes de la cuna no supere los 2,5 cm.
x Mantener el producto alejado de cigarrillos encendidos, hogares abiertos y otras fuentes
de calor intenso, como son las estufas eléctricas y las de gas.
x La base de la cuna se puede usar inclinada a hasta 30° para prevenir la incomodidad y que
el niño se atragante.
x NO usar la cuna de bebé si hay partes faltantes, dañadas o rotas. Si es necesario, ponerse
en contacto con MONI TRADE OOD, para partes de repuesto e instrucciones. NO
reemplazar las piezas.
x El uso de la cuna con función de "fijación a la cama de los padres" solo está permitido con
tipos de cama estándar y/o un colchón de paredes rectas. ¡NO ESTÁ PERMITIDO el uso del
producto con camas y/o colchones redondos, camas de agua o colchones inflables!
x ¡PRECAUCIÓN! No usar la función de fijación de la cuna de bebé a la cama de los padres si
la altura de su cama es inferior a 45 cm o superior a 60 cm desde el suelo.
x Nunca debe usar la cuna, fijada a la cama parental, cuando esté en posición inclinada. En
esta función las dos patas siempre deben estar ajustadas en la misma altura.
ES
͋/DWKZdEd͊ LEER DETENIDAMENTE Y MANTENERLAS PARA FUTURAS CONSULTAS.
27
x Cuando usa la función del producto "fijación a la cama parental", para evitar el riesgo de
asfixia por atrapamiento, la cuna debe estar correctamente fijada a la cama del adulto
mediante el sistema de sujeción.
x No ajuste el producto ni lo mueva mientras el niño esté dentro.
x Siempre usar solo y únicamente el sistema de sujeción que va con este producto.
x Antes de cada uso, compruebe la resistencia del sistema de sujeción tirando de la cuna
para ver si se va a separar de la cama parental.
x No usar el producto si hay un espacio entre la cuna y la cama parental.
x No debe llenar los espacios con almohadas, mantas u otros objetos.
x PRECAUCIÓN - Para evitar el riesgo de que el cuello del niño se atrape en el marco superior
de la pared cuando esté al lado de la cama de adulto, el marco superior no debe ser más
alto que el colchón de la cama de adulto.
x PRECAUCIÓN - Para evitar el riesgo de que su niño se estrangule, el sistema de sujeción a
la cama para adultos debe estar siempre lejos de la cuna de bebé y fuera de ella.
x ¡PELIGRO! ¡Siempre levantar por completo la pared cuando la cuna de bebé no esté fijada
a la cama para adultos!
x El armado, desplegado y plegado del producto se deben hacer SOLO por un adulto.
x No permitir la presencia de niños menores de 3 años de edad antes de completar el armado
del producto, para evitar que tengan acceso a partes pequeñas y desmontadas.
x Todos los envases de plástico deben retirarse, destruirse o mantenerse fuera del alcance
de los niños para evitar el riesgo de asfixia.
x No realizar cambios ni mejoras en la estructura de la cuna, porque esto puede causar daños
en la cuna y riesgo de lesiones para el niño.
¡IMPORTANTE! Los esquemas y figuras en estas instrucciones sirven solo para ilustrar y dar
información. Compruebe la seguridad de la fijación después de completar cada operación.
Partes - figura A
Después del desembalaje, asegúrese de que todos los elementos presentes en la figura A estén
disponibles.
Montaje de la estructura
¡PRECAUCIÓN! Seguir las exactas instrucciones y el orden de montaje del producto, según los
esquemas.
&ŝŐƵƌĂʦ- Armar el soporte de la cuna, ŝŶƐĞƌƚĂŶĚŽĞůƚƵďŽƉƌŝŶĐŝƉĂůĚĞƐŽƉŽƌƚĞΗˁΗĞŶůŽƐŽƌŝĨŝĐŝŽƐ
ĚĞĐŽŶĞdžŝſŶĚĞĂŵďŽƐŵĂƌĐŽƐůĂƚĞƌĂůĞƐ;ƉĂƚĂƐͿΗʤΗ̛ΗΗĞŶƐĞŶƚŝĚŽĚĞůĂƐĂŐƵũĂƐĚĞůƌĞůŽũ͘ĂĚĂ
marco lateral está equipado con dos pernos para fijar el tubo de soporte principal a la cama.
Usar un destornillador hexagonal para apretar los pernos en el sentido de las agujas del reloj.
¡PRECAUCIÓN! Asegúrese de que el marco esté ajustado y estable. Esta es la parte de apoyo de
la cuna y garantiza la seguridad de su hijo.
Figura C: Fijar el capazo de dormir al soporte montado fijando la parte de conexión del marco
del capazo a la parte superior de los dos marcos laterales "A" y "B". El pasador con muelle
encajará en su lugar una vez que esté bien sujeto por ambos lados. ¡PRECAUCIÓN! Asegúrese
de que los pernos estén apretados y que el capazo esté firmemente sujeto al soporte de la cuna.
INSTRUCCIONES DE MONTAJE Y FUNCIONAMIENTO
22
Ȱʐʏʊ ʏʉ ʋʌʉʁʊʆ ʃɲʏɲʍʃɸʐɳʍʏɻʃɸ ʍʑʅʔʘʆɲ ʅɸ ʏɿʎ ɲʋɲɿʏɼʍɸɿʎ ʏɻʎ ȵʐʌʘʋɲʁʃɼʎ Ƀɷɻɶʀɲʎ
ϮϬϬϭͬϵϴͬȵȵ ɶɿɲ ʏɻʆ ɶɸʆɿʃɼ ɲʍʔɳʄɸɿɲ ʏʘʆ ʋʌʉʁʊʆʏʘʆ͕ ʏʉʐ Ɂʊʅʉʐ ʋɸʌʀ ʋʌʉʍʏɲʍʀɲʎ ʏʘʆ
ʃɲʏɲʆɲʄʘʏʙʆʃɲɿʏʉʐȵʐʌʘʋɲʁʃʉʑʋʌʉʏʑʋʉʐɼʏʉɿʏʉʐȵɽʆɿʃʉʑɅʌʊʏʐʋʉʐʏɻʎȲʉʐʄɶɲʌʀɲʎ
1130:2019.
ɅɆɃȵȻȴɃɅɃȼȸɇȸ!
x ɀɻʆʖʌɻʍɿʅʉʋʉɿɸʀʏɸɲʐʏʊʏʉʋʌʉʁʊʆʖʘʌʀʎʆɲɷɿɲɴɳʍɸʏɸɸʃʏʘʆʋʌʉʏɹʌʘʆʏɿʎʉɷɻɶʀɸʎ
ʖʌɼʍɻʎ͘
x ɈʉʋʌʉʁʊʆʋʌʉʉʌʀɺɸʏɲɿɶɿɲʋɲɿɷɿɳɻʄɿʃʀɲʎϬɹʘʎϭϮʅɻʆʙʆʅɸɴɳʌʉʎɹʘʎϭϭʃɿʄɳ͘
x ɇʏɲʅɲʏɼʍʏɸʆɲʖʌɻʍɿʅʉʋʉɿɸʀʏɸʏʉʋʌʉʁʊʆɲʅɹʍʘʎʊʏɲʆʏʉʋɲɿɷʀʅʋʉʌɹʍɸɿʆɲʃɳɽɸʏɲɿɼ
ʆɲɶʉʆɲʏʀɺɸɿɼʆɲʍɻʃʙʆɸʏɲɿɸʋɳʆʘ͘
x ȸʏʉʋʉɽɹʏɻʍɻʍʐʅʋʄɻʌʘʅɲʏɿʃʙʆʍʏʉɿʖɸʀʘʆʍʏʉʋʌʉʁʊʆʅʋʉʌɸʀʆɲʋʌʉʃɲʄɹʍɸɿʋʆɿɶʅʊ͘
x ɀɻʆɲʔɼʆɸʏɸʏʉʋʌʉʁʊʆʃʉʆʏɳʍɸɳʄʄʉʋʌʉʁʊʆ͕ʏʉʉʋʉʀʉʅʋʉʌɸʀʆɲɲʋʉʏɸʄɹʍɸɿ ʃʀʆɷʐʆʉʎ
ʋʆɿɶʅʉʑɼɲʍʔʐʇʀɲʎ͕ʊʋʘʎɶɿɲʋɲʌɳɷɸɿɶʅɲʖʉʌɷɹʎ͕ɿʅɳʆʏɸʎɶɿɲʍʏʊʌɿɲͬʃʉʐʌʏʀʆɸʎʃ͘ɲ͘
x ɀɻʆʖʌɻʍɿʅʉʋʉɿɸʀʏɸʋɸʌɿʍʍʊʏɸʌɲʏʉʐɸʆʊʎʍʏʌʙʅɲʏɲʍʏʉʋʌʉʁʊʆ͘
x ɍʌɻʍɿʅʉʋʉɿɼʍʏɸʅʊʆʉʏʉʍʏʌʙʅɲ͕ʏʉʉʋʉʀʉʋʘʄɸʀʏɲɿʅ͛ɲʐʏʊʏʉʋɲɿɷɿʃʊʃʌɸɴɲʏɳʃɿ͕ʅɻʆ
ʋʌʉʍɽɹʏɸʏɸɷɸʑʏɸʌʉʍʏʌʙʅɲʍ͛ɲʐʏʊ͕ʐʋɳʌʖɸɿʃʀʆɷʐʆʉʎʋʆɿɶʅʉʑ͊
x Ɉʉʋʌʉʁʊʆʋʌɹʋɸɿʆɲʏʉʋʉɽɸʏɻɽɸʀʍɸʉʌɿɺʊʆʏɿʉʋɳʏʘʅɲ͘
x ɀɻʆɸʋɿʏʌɹʋɸʏɸʍʏɲʅɿʃʌɳʋɲɿɷɿɳʆɲʋɲʀɺʉʐʆʖʘʌʀʎɸʋʀɴʄɸʗɻʃʉʆʏɳʍʏʉʃʌɸɴɳʏɿ͘
x Ɉʉ ʃʌɸɴɳʏɿ ʋʌɹʋɸɿ ʆɲ ɲʍʔɲʄɿʍʏɸʀ ʍɸ ɲʃʀʆɻʏɻ ɽɹʍɻ͕ ʊʏɲʆ ʏʉ ʋɲɿɷʀ ɲʔɹɽɻʃɸ ʖʘʌʀʎ
ɸʋʀɴʄɸʗɻ͘
x Ʉʄɲ ʏɲ ɸʇɲʌʏɼʅɲʏɲ ʍʐʆɲʌʅʉʄʊɶɻʍɻʎ ʋʌɹʋɸɿ ʋɳʆʏɲ ʆɲ ʍʔʀɶɶʉʆʏɲɿ ʍʘʍʏɳ ʃɲɿ ʆɲ
ʋʌʉʍɹʖɸʏɸʆɲʅɻʆʐʋɳʌʖʉʐʆʖɲʄɲʌɹʎɴʀɷɸʎ͕ɸʋɸɿɷɼʏʉʋɲɿɷʀʅʋʉʌɸʀʆɲʋɿɳʍɸɿɹʆɲʅɹʌʉʎ
ʏʉʐʋɸʌɿɴʄɼʅɲʏʉʎɼʏɲʐʔɲʍʅɳʏɿʆɲʍʏʉɿʖɸʀɲ;ʋ͘ʖ͘ʃʉʌɷʊʆɿɲ͕ʃʉʌɷɹʄɸʎ͕ʃʉʐʅʋʙʅɲʏɲɶɿɲ
ʅʋɿʅʋɸʌʊ-ʋɿʋʀʄɸʎͿ͕ ʏʉ ʉʋʉʀʉ ɲʋʉʏɸʄɸʀ ʃʀʆɷʐʆʉ ʋʆɿɶʅʉʑ͘ Ʌʌʉɴɲʀʆɸʏɸ ʍɸ ɸʄɹɶʖʉʐʎ
ʌʉʐʏʀʆɲʎ͕ɶɿɲʆɲɴɸɴɲɿʘɽɸʀʏɸ͕ʊʏɿɷɸʆʐʋɳʌʖʉʐʆʖɲʄɲʌɳʅɹʌɻ͕ʅɹʌɻʅɸɴʄɳɴɸʎɼʅɹʌɻ
ʋʉʐʄɸʀʋʉʐʆ͘
x Ɉʉʅɹɶɿʍʏʉɸʍʘʏɸʌɿʃʊʅɹɶɸɽʉʎʏʉʐɴʌɸʔɿʃʉʑʃʌɸɴɲʏɿʉʑ͕ɶɿɲʏʉʉʋʉʀʉʋʌʉʉʌʀɺɸʏɲɿʏʉ
ʍʏʌʙʅɲ͕ ɸʀʆɲɿ ϵϬϬͬϵϱϬ ʖɿʄ͘ Ɉʉ ʅɼʃʉʎ ʃɲɿ ʏʉ ʋʄɳʏʉʎ ʏʉʐ ʍʏʌʙʅɲʏʉʎ ʋʌɹʋɸɿ ʆɲ ɸʀʆɲɿ
ʏɹʏʉɿɲ͕ʋʉʐɻʅɹɶɿʍʏɻɲʋʊʍʏɲʍɻʅɸʏɲʇʑʏʉʐʍʏʌʙʅɲʏʉʎʃɲɿʏʘʆʋʄɲʁʆʙʆʃɲɿʏʘʆɳʃʌʘʆ
ʏʉʐʃʌɸɴɲʏɿʉʑʆɲʅɻʆʐʋɸʌɴɲʀʆɸɿϮ͕ϱɸʃ͘
x Ⱦʌɲʏɼʍʏɸ ʏʉ ʋʌʉʁʊʆ ʅɲʃʌɿɳ ɲʋʊ ɲʆɲʅʅɹʆɲ ʏʍɿɶɳʌɲ͕ ɲʆʉɿʖʏɼ ʔʄʊɶɲ ʃɲɿɳʄʄɸʎ ʋɻɶɹʎ
ɹʆʏʉʆɻʎɽɸʌʅʊʏɻʏɲʎ͕ʊʋʘʎɻʄɸʃʏʌɿʃɹʎʍʊʅʋɸʎʃɲɿʍʊʅʋɸʎɲɸʌʀʉʐ͘
x ȸ ɴɳʍɻ ʏʉʐ ʃɲʄɲɽɿʉʑ ʅʋʉʌɸʀ ʆɲ ʖʌɻʍɿʅʉʋʉɿɻɽɸʀ ʅɸ ʃʄʀʍɻ ɹʘʎ ϯϬΣ ʅʉɿʌʙʆ͕ ɶɿɲ ʆɲ
ɲʋʉʔʑɶɸʏɸʏɻʆɷʐʍʔʉʌʀɲʃɲɿʃɲʏɳʋʆɿɶʅʉʑʏʉʐʋɲɿɷɿʉʑ͘
x ɀȸɁʖʌɻʍɿʅʉʋʉɿɸʀʏɸʏʉɴʌɸʔɿʃʊʃʌɸɴɲʏɳʃɿ͕ʍɸʋɸʌʀʋʏʘʍɻʋʉʐʃɳʋʉɿɲʅɹʌɻʄɸʀʋʉʐʆ͕
ʋɲʌʉʐʍɿɳɺʉʐʆ ɴʄɳɴɻ ɼ ɸʀʆɲɿ ʃʉʅʅɹʆɲ͘ ȵɳʆ ɸʀʆɲɿ ɲʋɲʌɲʀʏɻʏʉ͕ ɸʋɿʃʉɿʆʘʆɼʍʏɸ ʅɸ ʏɻ
ɀɃɁȻɈɆȵȽɁɈȵɅȵɶɿɲɲʆʏɲʄʄɲʃʏɿʃɳʃɲɿʉɷɻɶʀɸʎ͘ɀȸɁɲʆʏɿʃɲɽɿʍʏɳʏɸɲʆʏɲʄʄɲʃʏɿʃɳ͘
EL
ɇȸɀȰɁɈȻȾɃ͊ȴȻȰȲȰɈȵɅɆɃɇȵȾɈȻȾȰɈȻɇɃȴȸȳȻȵɇȾȰȻɌɉȿȰɂɈȵɈȵɇȳȻȰɈȻɀɅɃɆȵȻɁȰɈȻɇ
ɍɆȵȻȰɇɈȵȻɈȵɇɈɃɀȵȿȿɃɁ͘
23
x ȸʖʌɼʍɻʏʉʐɴʌɸʔɿʃʉʑʃʌɸɴɲʏɿʉʑʅɸʄɸɿʏʉʐʌɶʀɲͨʍʏɲɽɸʌʉʋʉʀɻʍɻʍʏʉʃʌɸɴɳʏɿɶʉʆɹɲͩ
ɸʋɿʏʌɹʋɸʏɲɿʅʊʆʉʅɸʃʌɸɴɳʏɿɲʃɲʆʉʆɿʃʉʑʏʑʋʉʐʃɲɿͬɼʍʏʌʙʅɲʅɸʊʌɽɿɲʏʉɿʖʙʅɲʏɲ͘ȸ
ʖʌɼʍɻ ʏʉʐ ʋʌʉʁʊʆʏʉʎ ʅɸ ʍʏʌʊɶɶʐʄɳ ʃʌɸɴɳʏɿɲ ʃɲɿͬɼ ʍʏʌʙʅɲ͕ ʃʌɸɴɳʏɿɲ ʆɸʌʉʑ ɼ
ʔʉʐʍʃʘʏɳʍʏʌʙʅɲʏɲȴȵɁȵɅȻɈɆȵɅȵɈȰȻ͊
x ɅɆɃɇɃɍȸ͊ɀɻʆʖʌɻʍɿʅʉʋʉɿɸʀʏɸʏɻʄɸɿʏʉʐʌɶʀɲʍʏɲɽɸʌʉʋʉʀɻʍɻʎʏʉʐɴʌɸʔɿʃʉʑʃʌɸɴɲʏɿʉʑ
ʍʏʉʃʌɸɴɳʏɿɶʉʆɹɲ͕ʍɸʋɸʌʀʋʏʘʍɻʋʉʐʏʉʑʗʉʎʏʉʐʃʌɸɴɲʏɿʉʑʍɲʎɸʀʆɲɿʅɿʃʌʊʏɸʌʉɲʋʊ
ϰϱɸʃ͘ɼʋɸʌɿʍʍʊʏɸʌʉɲʋʊϲϬɸʃ͘ʋɳʆʘɲʋʊʏʉʋɳʏʘʅɲ͘
x Ɉʉ ɴʌɸʔɿʃʊ ʃʌɸɴɳʏɿ͕ ʍʐʆɷɸɷɸʅɹʆʉ ʅɸ ʏʉ ʃʌɸɴɳʏɿ ɶʉʆɹɲ͕ ʋʉʏɹ ɷɸʆ ʋʌɹʋɸɿ ʆɲ
ʖʌɻʍɿʅʉʋʉɿɸʀʏɲɿʍɸɸʋɿʃʄɿʆɼɽɹʍɻ͘ɀ͛ɲʐʏɼʏɻʄɸɿʏʉʐʌɶʀɲʏɲɷʑʉʋʊɷɿɲʋʌɹʋɸɿʋɳʆʏɲʆɲ
ʌʐɽʅʀɺʉʆʏɲɿʍʏʉʀɷɿʉʑʗʉʎ͘
x ɀɻʆʋʌʉʍɲʌʅʊɺɸʏɸʏʉʋʌʉʁʊʆʃɲɿʅɻʆʏʉʅɸʏɲʃɿʆɸʀʏɸʊʏɲʆʏʉʋɲɿɷʀɸʀʆɲɿʅɹʍɲ.
x Ʉʏɲʆʖʌɻʍɿʅʉʋʉɿɸʀʏɸʏɻʄɸɿʏʉʐʌɶʀɲʏʉʐʋʌʉʁʊʆʏʉʎͨʍʏɲɽɸʌʉʋʉʀɻʍɻʍɸʃʌɸɴɳʏɿɶʉʆɹɲ͕ͩ
ɶɿɲ ʆɲ ɲʋʉʔʑɶɸʏɸ ʏʉʆ ʃʀʆɷʐʆʉ ʋʆɿɶʅʉʑ ʘʎ ɲʋʉʏɹʄɸʍʅɲ ʍʔɻʆʙʅɲʏʉʎ͕ ʏʉ ʋɲɿɷɿʃʊ
ʃʌɸɴɲʏɳʃɿ ʋʌɹʋɸɿ ʆɲ ʍʏɲɽɸʌʉʋʉɿɻɽɸʀ ʍʘʍʏɳ ʍʏʉ ʃʌɸɴɳʏɿ ɶʉʆɹɲ ʅɹʍʘ ʖʌɼʍɻʎ ʏʉʐ
ʍʐʍʏɼʅɲʏʉʎʍʏɼʌɿʇɻʎ͘
x Ʌɳʆʏɲ ʖʌɻʍɿʅʉʋʉɿɼʍʏɸ ʅʊʆʉ ʃɲɿ ʅʉʆɲɷɿʃɳ ʏʉ ʍʑʍʏɻʅɲ ʍʏɼʌɿʇɻʎ͕ ʏʉ ʉʋʉʀʉ
ʋɲʌɲʖʘʌɼɽɻʃɸʅ͛ɲʐʏʊʏʉʋʌʉʁʊʆ͘
x ȵʄɹɶʖɸʏɸ ʏɻʆ ɲʆʏʉʖɼ ʏʉʐ ʍʐʍʏɼʅɲʏʉʎ ʍʏɼʌɿʇɻʎ ʋʌɿʆ ɲʋʊ ʃɳɽɸ ʖʌɼʍɻ͕ ʏʌɲɴʙʆʏɲʎ ʏʉ
ʃʌɸɴɲʏɳʃɿʅɲʃʌɿɳɲʋʊʏʉʃʌɸɴɳʏɿɶʉʆɹɲ͘
x ɀɻʖʌɻʍɿʅʉʋʉɿɸʀʏɸʏʉʋʌʉʁʊʆ͕ɸɳʆʐʋɳʌʖɸɿʃɸʆʊʅɸʏɲʇʑʏʉʐɴʌɸʔɿʃʉʑʃʌɸɴɲʏɿʉʑʃɲɿʏʉʐ
ʃʌɸɴɲʏɿʉʑɶʉʆɹɲ͘
x Ɉɲʃɸʆɳɷɸʆʋʌɹʋɸɿʆɲʍʐʅʋʄɻʌʙʆʉʆʏɲɿʅɸʅɲʇɿʄɳʌɿɲ͕ʃʉʐɴɹʌʏɸʎɼɳʄʄɲɲʆʏɿʃɸʀʅɸʆɲ͘
x ɅɆɃȵȻȴɃɅɃȻȸɇȸ– ȳɿɲʆɲɲʋʉʔʑɶɸʏɸʏʉʆʃʀʆɷʐʆʉʍʔɻʆʙʅɲʏʉʎʏʉʐʄɲɿʅʉʑʏʉʐʋɲɿɷɿʉʑ
ʍʏʉɳʆʘʋʄɲʀʍɿʉʏʉʐʋʄɲʁʆʉʑ͕ɷʀʋʄɲʍʏʉʃʌɸɴɳʏɿɸʆɼʄɿʃʉʐ͕ʏʉɳʆʘʋʄɲʀʍɿʉɷɸʆʋʌɹʋɸɿ
ʆɲɸʀʆɲɿʐʗɻʄʊʏɸʌʉɲʋʊʏʉʍʏʌʙʅɲʏʉʐʃʌɸɴɲʏɿʉʑɸʆɼʄɿʃʉʐ͘
x ɅɆɃȵȻȴɃɅɃȻȸɇȸ– ȳɿɲʆɲɲʋʉʔɸʐʖɽɸʀʉʃʀʆɷʐʆʉʎʏʉʋɲɿɷʀʍɲʎʆɲʋʆɿɶɸʀ͕ʏʉʍʑʍʏɻʅɲ
ʍʏɼʌɿʇɻʎ ʍʏʉ ʃʌɸɴɳʏɿ ɸʆɻʄʀʃʉʐ ʋʌɹʋɸɿ ʋɳʆʏɲ ʆɲ ʃʌɲʏɿɹʏɲɿ ʅɲʃʌɿɳ ɲʋʊ ʏʉ ʋɲɿɷɿʃʊ
ʃʌɸɴɳʏɿʃɲɿɹʇʘɲʋʊɲʐʏʊ͘
x ȾȻɁȴɉɁɃɇ͊ Ʌɳʆʏɲ ʍɻʃʙʆɸʏɸ ʋʄɼʌʘʎ ʏʉ ɲʆɲʃʄɿʆʊʅɸʆʉ ʋʄɲʁʆʊ͕ ʊʏɲʆ ʏʉ ɴʌɸʔɿʃʊ
ʃʌɸɴɲʏɳʃɿɷɸʆʍʏɻʌʀʖɽɻʃɸʍʏʉʃʌɸɴɳʏɿɸʆɻʄʀʃʉʐ͊
x ȸ ʍʐʆɲʌʅʉʄʊɶɻʍɻ͕ ɻ ɲʆɳʋʏʐʇɻ ʃɲɿ ʏʉ ʃʄɸʀʍɿʅʉ ʏʉʐ ʋʌʉʁʊʆʏʉʎ ʆɲ ʋʌɲɶʅɲʏʉʋʉɿɸʀʏɲɿ
ɀɃɁɃɲʋʊɸʆɼʄɿʃʉɳʏʉʅʉ͘
x ɀɻʆɸʋɿʏʌɹʋɸʏɸʏɻʆʋɲʌʉʐʍʀɲʋɲɿɷɿʙʆʃɳʏʘʏʘʆϯɸʏʙʆ͕ʋʌɿʆɹʖɸʏɸʍʐʆɲʌʅʉʄʉɶɼʍɸɿ
ʋʄɼʌʘʎʏʉʋʌʉʁʊʆ͕ɶɿɲʆɲɲʋʉʔʑɶɸʏɸʏɻʆʋʌʊʍɴɲʍɻʍɸʅɿʃʌɳʃɲɿɲʋʉʍʐʆɲʌʅʉʄʉɶɻʅɹʆɲ
ʅɹʌɻ͘
x Ⱦɳɽɸʆɳɿʄʉʆʍʐʍʃɸʐɲʍʀɲʋʌɹʋɸɿʆɲɲʔɲɿʌɸɽɸʀ͕ʆɲʃɲʏɲʍʏʌɲʔɸʀʃɲɿʆɲʃʌɲʏɿɹʏɲɿʅɲʃʌɿɳ
ɲʋʊʋɲɿɷɿɳ͕ʋʌʉʃɸɿʅɹʆʉʐʆɲɲʋʉʔɸʐʖɽɸʀʉʃʀʆɷʐʆʉʎʋʆɿɶʅʉʑ.
x ɀɻʆʋʌɲɶʅɲʏʉʋʉɿɸʀʏɸʃɲʅʀɲʅɸʏɲɴʉʄɼ ʃɲɿ ɴɸʄʏʀʘʍɻʏɻʎʃɲʏɲʍʃɸʐɼʎʏʉʐʃʌɸɴɲʏɿʉʑ͕
ɸʋɸɿɷɼɲʐʏʊʅʋʉʌɸʀʆɲʉɷɻɶɼʍɸɿʍɸɴʄɳɴɻʏʉʐʃʌɸɴɲʏɿʉʑʃɲɿʍɸʃʀʆɷʐʆʉʏʌɲʐʅɲʏɿʍʅʉʑ
ʏʉʐʋɲɿɷɿʉʑ͘

24 25
24
ɅɆɃɇɃɍȸ͊Ɉɲʍʖɸɷɿɲɶʌɳʅʅɲʏɲʃɲɿʉɿɸɿʃʊʆɸʎʍ͛ɲʐʏɹʎʏɿʎʉɷɻɶʀɸʎɸʀʆɲɿʅʊʆʉʋʌʉʎɲʋɸɿʃʊʆɿʍɻ
ʃɲɿʋɲʌʉʖɼʃɲʏɸʐɽʑʆʍɸʘʆ͘ȵʄɹɶʇʏɸʏɻʆɲʍʔɳʄɸɿɲʏɻʎʍʏɲɽɸʌʉʋʉʀɻʍɻʎʅɸʏɳʏɻʆɸʃʏɹʄɸʍɻʃɳɽɸ
ʍʐʆɲʌʅʉʄʊɶɻʍɻʎ͘
ɇʐʍʏɲʏɿʃɳʅɹʌɻ– ɸɿʃʊʆɲʤ
ɀɸʏɳʏɻʆɲʔɲʀʌɸʍɻʏɻʎ ʍʐʍʃɸʐɲʍʀɲʎɴɸɴɲɿʘɽɸʀʏɸ͕ ʊʏɿʊʄɲ ʏɲʍʏʉɿʖɸʀɲʏɻʎ ɸɿʃʊʆɲʎ Ȱ ɸʀʆɲɿ
ɷɿɲɽɹʍɿʅɲ͗ɇʃɸʄɸʏʊʎʏʉʐʃʌɸɴɲʏɿʉʑ͖ɇʏʌʙʅɲ͖ɇɳʃʉʎɶɿɲʅɸʏɲʔʉʌɳ͖Ʌʄɳɶɿɲɴɳʍɻ͖ɇʘʄɼʆɲʎ
ʍʏɼʌɿʇɼʎ͖ȷɸʐɶɳʌɿɿʅɳʆʏɸʎ͖Ⱦʄɸɿɷʀɶɿɲʋɲʇɿʅɳɷɿɲ͖Ȳʀɷɲ̵ϰ
ɇʐʆɲʌʅʉʄʊɶɻʍɻʏɻʎʃɲʏɲʍʃɸʐɼʎ
ɅɆɃɇɃɍȸ! Ȱʃʉʄʉʐɽɼʍʏɸ ɲʐʍʏɻʌɳ ʏɿʎ ʉɷɻɶʀɸʎ ʃɲɿ ʏɻʆ ɲʃʉʄʉʐɽʀɲ ʍʐʆɲʌʅʉʄʊɶɻʍɻʎ ʏʉʐ
ʋʌʉʁʊʆʏʉʎ͕ʊʋʘʎʐʋʉɷɸɿʃʆʑɸʏɲɿʍʏɲʍʖɸɷɿɲɶʌɳʅʅɲʏɲ͘
ȵɿʃʊʆɲ Ȳ – ɇʐʆɲʌʅʉʄʉɶɼʍʏɸ ʏɻʆ ɴɳʍɻ ʏʉʐ ʃʌɸɴɲʏɿʉʑ͕ ʊʋʘʎ ʏʉʋʉɽɸʏɼʍɸʏɸ ʏʉʆ ʍʘʄɼʆɲ
ʍʏɼʌɿʇɻʎ ͨͩ ʍʏɲ ʅɹʌɻ ɹʆʘʍɻʎ ;ʉʋɹʎͿ ʏʘʆ ɷʑʉ ʋʄɲʁʆʙʆ ʋʄɲɿʍʀʘʆ ;ʋʊɷɿɲͿ ͨȰͩ ʃɲɿ ͨȲͩ ʅɸ
ʃɲʏɸʑɽʐʆʍɻʍʏɻʃɲʏɸʑɽʐʆʍɻʏʘʆɴɸʄʙʆ͘Ⱦɳɽɸʋʄɲʁʆʊʋʄɲʀʍɿʉɸʀʆɲɿɸʇʉʋʄɿʍʅɹʆʉʅɸɷʑʉɴʀɷɸʎ
ʍʏɸʌɹʘʍɻʎʏʉʐɴɲʍɿʃʉʑʍʘʄɼʆɲʍʏɼʌɿʇɻʎʏʉʐʃʌɸɴɲʏɿʉʑ͘ɍʌɻʍɿʅʉʋʉɿɼʍʏɸȱʄɸʆɶɿɲʆɲʍʔʀʇɸʏɸ
ʏɿʎ ɴʀɷɸʎ ʍɸ ʃɲʏɸʑɽʐʆʍɻ ʏʉʐ ɷɸʀʃʏɻ ʏʉʐ ʌʉʄʉɶɿʉʑ͘ ɅɆɃɇɃɍȸ͊ Ȳɸɴɲɿʘɽɸʀʏɸ͕ ʊʏɿ ʏʉ ʋʄɲʀʍɿʉ
ʍʔʀʖɽɻʃɸ ʃɲʄɳ ʃɲɿ ʊʏɿ ɸʀʆɲɿ ʍʏɲɽɸʌʊ͘ Ȱʐʏʊʎ ɸʀʆɲɿ ʉ ʔɹʌʘʆ ʉʌɶɲʆɿʍʅʊʎ ʏʉʐ ʃʌɸɴɲʏɿʉʑ ʃɲɿ
ɸʇɲʍʔɲʄʀɺɸɿɲʍʔɳʄɸɿɲʏʉʐʋɲɿɷɿʉʑʍɲʎ͘
ȵɿʃʊʆɲ– ɇʏɻʌʀʇʏɸʏʉʃɲʄɳɽɿʑʋʆʉʐ ʍʏɻʆʍʐʆɲʌʅʉʄʉɶɻʅɹʆɻɴɳʍɻ͕ʊʋʘʎʍʏɲɽɸʌʉʋʉɿɼʍɸʏɸʏʉ
ʅɹʌʉʎ ɹʆʘʍɻʎ ʏʉʐ ʋʄɲɿʍʀʉʐ ʍʏʉ ɳʆʘ ʅɹʌʉʎ ʏʘʆ ɷʑʉ ʋʄɲʁʆʙʆ ʋʄɲɿʍʀʘʆ ͨȰͩ ʃɲɿ ͨȲͩ͘ Ɉʉ
ɸʄɲʏɻʌɿʘʏʊʋɸɿʌɳʃɿɽɲɲʍʔɲʄɿʍʏɸʀʍʏɻʆɽɹʍɻʏʉʐ͕ɲʔʉʑʍʏɻʌɿʖɽɸʀʃɲʄɳɲʋʊʏɿʎɷʑʉʋʄɸʐʌɹʎ͘
ɅɆɃɇɃɍȸ͊Ȳɸɴɲɿʘɽɸʀʏɸ͕ʊʏɿʉɿɴʀɷɸʎʍʔʀʖɽɻʃɲʆʃɲʄɳʃɲɿʊʏɿʏʉʃɲʄɳɽɿʍʏɸʌɸʙɽɻʃɸʍʏɲɽɸʌɳ
ʍʏɻʆɴɳʍɻʃʌɸɴɲʏɿʉʑ͘
ȵɿʃʊʆɸʎ͕– Ȱʔɲʀʌɸʍɻʃɲɿɲʆʑʗʘʍɻ ʏʉʐɲʔɲɿʌʉʑʅɸʆʉʐʔʌɳʖʏɻ͘Ȱʆʉʀʇʏɸʏʉʔɸʌʅʉʐɳʌ͕ʋʉʐ
ɴʌʀʍʃɸʏɲɿ ʃɳʏʘ ɲʋʊ ʏɻʆ ɸʆɿʍʖʐʅɹʆɻ ɳʆʘ ʌɳɶɲ͘ ɇɻʃʙʍʏɸ ʏʉʆ ɲʔɲɿʌʉʑʅɸʆʉ ʔʌɳʖʏɻ ʏʉʐ
ʃɲʄɲɽɿʉʑ͕ʅɸʏʌʊʋʉʋʉʐʆɲʇɸʃʉʐʅʋʘɽɸʀɲʋʊʏɻʆɴɳʍɻ͕ʃɲɿʍʏɻʌʀʇʏɸʏʉʅɹʌʉʎʋʉʐʋɹʔʏɸɿʍʏʉ
ʃɳʏʘʅɹʌʉʎʏʉʐʃɲʄɲɽɿʉʑ͘Ⱦʄɸʀʍʏɸʏʉʋʄɲʁʆʊʋɳʆɸʄʅɹʖʌɿʆɲɲʃʉʑʍɸʏɸɼʖʉʃʄɿʃʃɲɿʃʄɸʀʍʏɸɲʋʊ
ʏɿʎɷʑʉ ʋʄɸʐʌɹʎʅɸʏʉʔɸʌʅʉʐɳʌ͘ɇɸʋɸʌʀʋʏʘʍɻʋʉʐ ɽɹʄɸʏɸʆɲʍɻʃʙʍɸʏɸʏʉʆ ɲʔɲɿʌʉʑʅɸʆʉ
ʔʌɳʃʏɻ͕ ɲʔɲɿʌɹʍʏɸ ʏʉʆ ʃɲɿ ʍʏɻʌʀʇʏɸ ʇɲʆɳ ʍʏɻʆ ɴɳʍɻ ʏʉʐ ʃɲʄɲɽɿʉʑ ɲʋʊ ʏɿʎ ɷʑʉ ʋʄɸʐʌɹʎ͘
ɍʌɻʍɿʅʉʋʉɿɼʍʏɸʏɲʋʄɲʁʆɳʔɸʌʅʉʐɳʌɶɿɲʆɲʃʄɸʀʍɸʏɸɸʆʏɸʄʙʎ͘ɍʌɻʍɿʅʉʋʉɿɼʍʏɸʏʉʆʅɸʏɲʄʄɿʃʊ
ʃʌʀʃʉ͕ɶɿɲʆɲʍʐʆɷɹʍɸʏɸʏɲɷʑʉʔɸʌʅʉʐɳʌʅɲɺʀ͕ʅɸʏʌʊʋʉʋʉʐʆɲʅɻʆʅʋʉʌʉʑʆʆɲɲʆʉʀʇʉʐʆ͘Ɉʉ
ʃʌɸɴɲʏɳʃɿɸʀʆɲɿɹʏʉɿʅʉʆɲʖʌɻʍɿʅʉʋʉɿɻɽɸʀɲʐʏʊʆʉʅɲʘʎʃʌɸɴɳʏɿ͘
ȵɿʃʊʆɲ&– ɀɸʏɲʃʀʆɻʍɻʏʉʐɴʌɸʔɿʃʉʑʃʌɸɴɲʏɿʉʑ͘ȳɿɲʆɲʅɸʏɲʃɿʆɼʍɸʏɸʏʉʃʌɸɴɲʏɳʃɿ͕ʍɻʃʙʍʏɸ
ʏɻʆʋʀʍʘʋʄɸʐʌɳʏʉʐʃʌɸɴɲʏɿʉʑʃɲɿʍʏɻʆʍʐʆɹʖɸɿɲʅɸʏɲʔɹʌɸʏɸʍʏɻʆɸʋɿɽʐʅɻʏɼɽɹʍɻʅɸʏɻʆ
ɴʉɼɽɸɿɲ ʏʘʆ ʋʌʉʍɲʌʏɻʅɳʏʘʆ ʋʉʐ ʍʐʆɲʌʅʉʄʉɶɼɽɻʃɲʆ ɸʌɶʉʍʏɲʍɿɲʃɳ ʍʏɲ ɷʑʉ ʋʊɷɿɲ͘ Ɉɲ
ʋʉɷɲʌɳʃɿɲʏʉʐʃʌɸɴɲʏɿʉʑɸʀʆɲɿɸʇʉʋʄɿʍʅɹʆɲʅɸʅɻʖɲʆɿʍʅʊʔʌɹʆʘʆ;ʍʏʉʋͿ͕ʋʉʐʔʌɸʆɳʌʉʐʆʏɻʆ
ʃʀʆɻʍɻʏʉʐʃʌɸɴɲʏɿʉʑʃɲɿʏʉɷɿɲʏɻʌʉʑʆʍʏɲɽɸʌʊ͘
ȵɿʃʊʆɲ'– Ɇʑɽʅɿʍɻʏʉʐʑʗʉʐʎʃɲɿʄɸɿʏʉʐʌɶʀɲʃɲʏɳʏɻʎʋɲʄɿʆɷʌʊʅɻʍɻʎ͘ Ɉʉʑʗʉʎʅʋʉʌɸʀʆɲ
ʌʐɽʅɿʍʏɸʀʍɸϱɽɹʍɸɿʎ͘ȳɿɲʆɲʌʐɽʅʀʍɸʏɸʏʉʑʗʉʎ͕ʋɲʏɼʍʏɸʏʉʃʉʐʅʋʀʌʑɽʅɿʍɻʎʃɲɿʅɸʏɲʔɹʌɸʏɸ
ʍʏɻʆ ɸʋɿɽʐʅɻʏɼ ɽɹʍɻ͘ ȸ ɴɳʍɻ ʏʉʐ ʃɲʄɲɽɿʉʑ ʅʋʉʌɸʀ ʆɲ ʖʌɻʍɿʅʉʋʉɿɻɽɸʀ ʅɸ ʃʄʀʍɻ ɹʘʎ ϯϬΣ
ʅʉɿʌʙʆ͕ɶɿɲʆɲɲʋʉʔʑɶɸʏɸʏɻʆɷʐʍʔʉʌʀɲʃɲɿʃɲʏɳʋʆɿɶʅʉʑʏʉʐʋɲɿɷɿʉʑ͘Ɉʉɴʌɸʔɿʃʊʃʌɸɴɲʏɳʃɿ
ʅʋʉʌɸʀʆɲɶʐʌʀʍɸɿʅɸɷɿɲʔʉʌɳʏʉʅɹɶɿʍʏʉɴɲɽʅʊϮɽɹʍɸʘʆʍɸʑʗʉʎ͘;Ʌɲʌɳɷɸɿɶʅɲ͗ʏʉɷɸʇʀʋʊɷɿ
ɸʀʆɲɿ ʍʏɻʆ ɽɹʍɻ ϯ ʃɲɿ ʏʉ ɲʌɿʍʏɸʌʊ ɸʀʆɲɿ ʍʏɻʆ ɽɹʍɻ ϭͿ͘ ɅɆɃɇɃɍȸ͊ ȸ ʄɸɿʏʉʐʌɶʀɲ ʃɲʏɳ ʏɻʎ
ʋɲʄɿʆɷʌʊʅɻʍɻʎ ʅʋʉʌɸʀ ʆɲ ɸʔɲʌʅʉʍʏɸʀ ʅʊʆʉ ʃɲɿ ʅʉʆɲɷɿʃɳ͕ ʊʏɲʆ ʖʌɻʍɿʅʉʋʉɿɸʀʏɸ ʏʉ ʋɲɿɷɿʃʊ
ɃȴȸȳȻȵɇɇɉɁȰɆɀɃȿɃȳȸɇȸɇ
25
ʃʌɸɴɲʏɳʃɿʘʎɲʐʏʊʆʉʅʉʃʌɸɴɳʏɿ͘Ɉʉʃɸʔɳʄɿʏʉʐʋɲɿɷɿʉʑʋʌɹʋɸɿʆɲɸʀʆɲɿʋɳʆʏɲʍʏɻʆʋɿʉʐʗɻʄɼ
ʋʄɸʐʌɳ͘
ȵɿʃʊʆɲ H – ɇʏɲɽɸʌʉʋʉʀɻʍɻ ʏʉʐ ʋɲɿɷɿʃʉʑ ʃʌɸɴɲʏɿʉʑ ʍʏʉ ʃʌɸɴɳʏɿ ɶʉʆɹɲ͘ Ȱʔɲɿʌɹʍʏɸ ʏʉʆ
ʔʌɳʃʏɻ ʊʋʘʎ ʇɸʃʉʐʅʋʙʍɸʏɸ ʏɲ ʔɸʌʅʉʐɳʌ ɲʋʊ ʏɿʎ ɷʑʉ ʋʄɸʐʌɹʎ ʃɲɿ ʍʏɻʌʀʇʏɸ ʏʉʆ ʍʏʉ ʃɳʏʘ
ʅɹʌʉʎʏʉʐʃʌɸɴɲʏɿʉʑ͘ȳɿɲʆɲʍʏɲɽɸʌʉʋʉɿɼʍɸʏɸʏʉʃʌɸɴɳʏɿʍʏʉʃʌɸɴɳʏɿɶʉʆɹɲʖʌɻʍɿʅʉʋʉɿɼʍʏɸ
ʏɿʎɷʑʉɺʙʆɸʎɲʍʔɲʄɸʀɲʎ͕ʋʉʐɸʇɲʍʔɲʄʀʍʏɻʃɲʆʍʏʉʍɸʏ͘ɇʏɲɽɸʌʉʋʉɿɼʍʏɸʏɿʎʋʊʌʋɸʎʃɳʏʘɲʋʊ
ʏʉʃʌɸɴɲʏɳʃɿɲʋʊʏɿʎɷʑʉʋʄɸʐʌɹʎʃɲɿʍʏɻʆʍʐʆɹʖɸɿɲʍʏɲɽɸʌʉʋʉɿɼʍʏɸʏɿʎɺʙʆɸʎɶʑʌʘɲʋʊʏɻʆ
ʃɲʏɲʍʃɸʐɼʏʉʐʃʌɸɴɲʏɿʉʑɶʉʆɹɲ͕ɲʌʖʀɺʉʆʏɲʎɲʋʊʏɻʆʋɿʉʃɳʏʘɽɹʍɻʃɲɿʋʌʉʖʘʌɳʏɸʋʌʉʎʏɲ
ɸʋɳʆʘʃɲɿʍʏʉʏɹʄʉʎʍʔʀʇʏɸʏɿʎʋʊʌʋɸʎʃɳʏʘɲʋʊʏʉʃʌɸɴɳʏɿ͘ȳɿɲʆɲɲʍʔɲʄʀʍɸʏɸʏʉʃʌɸɴɲʏɳʃɿ͕
ʊʏɲʆ ɴʌʀʍʃɸʏɲɿ ɷʀʋʄɲ ʍʏʉ ʃʌɸɴɳʏɿ ɶʉʆɹɲ͕ ʏʌɲɴɼʇʏɸ ʏɲ ʄʉʐʌɿɳ ɲʃʊʅɻ ʅɿɲ ʔʉʌɳ͕ ɶɿɲ ʆɲ
ɴɸɴɲɿʘɽɸʀʏɸ͕ʊʏɿʏʉʃʌɸɴɲʏɳʃɿʍʏɻʌʀʖɽɻʃɸɶɸʌɳʍʏʉʃʌɸɴɳʏɿɶʉʆɹɲ͘
Ⱦɲɽɲʌʀɺɸʏɸ ʏɲ ʋʄɲʍʏɿʃɳ ɼ ʏɲ ʅɸʏɲʄʄɿʃɳ ʅɹʌɻ ʏʉʐ ʋʌʉʁʊʆʏʉʎ ʅɸ ʅɲʄɲʃʊ ɴɲʅɴɲʃɸʌʊ ʋɲʆʀ ɼ
ʍʔʉʐɶɶɳʌɿ͕ɴʌɸɶʅɹʆʉʅɸʆɸʌʊɼʅɸɲʋɲʄʊʃɲɽɲʌɿʍʏɿʃʊ͘ɀɻʆʖʌɻʍɿʅʉʋʉɿɸʀʏɸʖʄʘʌʀʆɻ͕ɹʆʏʉʆɲ
ʃɲɽɲʌɿʍʏɿʃɳʃɲɿʃɲɽɲʌɿʍʏɿʃɳʅɸʍʘʅɲʏʀɷɿɲɲʋʊʇɸʍɻʎ͕ɶɿɲʆɲʃɲɽɲʌʀʍɸʏɸʏʉʋʌʉʁʊʆ͘Ʉʄɲʏɲ
ʐʔɲʍʅɳʏɿʆɲʅɹʌɻʃɲɿʑʄɸʎʋʌɹʋɸɿʆɲʋʄɹʆʉʆʏɲɿʅʊʆʉʍʏʉʖɹʌɿ͕ɲʃʉʄʉʐɽʙʆʏɲʎʏɿʎʉɷɻɶʀɸʎ͕ʉɿ
ʉʋʉʀɸʎ ɲʆɲʔɹʌʉʆʏɲɿʍʏɻʆɸʏɿʃɹʏɲ͘ɀɸʏɳ ʏʉʆʃɲɽɲʌɿʍʅʊɲʔɼʍʏɸ ʏʉʃʌɸɴɲʏɳʃɿ ʆɲʍʏɸɶʆʙʍɸɿ
ʃɲʄɳ ʋʌɿʆ ʏʉ ʖʌɻʍɿʅʉʋʉɿɼʍɸʏɸ͘ ɀɻʆ ʃʄɸʀʆɸʏɸ ʃɲɿ ʅɻʆ ɲʋʉʍʐʆɲʌʅʉʄʉɶɸʀʏɸ ʏʉ ɴʌɸʔɿʃʊ
ʃʌɸɴɲʏɳʃɿʋʌɿʆʍʏɸɶʆʙʍɸɿɸʆʏɸʄʙʎ͘ɀɻʆɸʃɽɹʏɸʏɸʏʉʋʌʉʁʊʆʍɸɳʅɸʍɻɻʄɿɲʃɼɲʃʏɿʆʉɴʉʄʀɲɶɿɲ
ʅɸɶɳʄʉʖʌʉʆɿʃʊɷɿɳʍʏɻʅɲɼʍɸɲʃʌɲʀɸʎɽɸʌʅʉʃʌɲʍʀɸʎ͕ʋʉʐɽɲʅʋʉʌʉʑʍɲʆɲʉɷɻɶɼʍʉʐʆʍɸ
ɲʄʄɲɶɼʏʉʐʖʌʙʅɲʏʉʎʃɲɿʍɸɴʄɳɴɻʏʘʆɸʃʏɸɽɸɿʅɹʆʘʆʅɸʌʙʆ͘ɀɸʏɳɲʋʊɷɿɲʌʃɼɹʃɽɸʍɻʏʉʐ
ʋʌʉʁʊʆʏʉʎ ʍɸ ʐʗɻʄɹ ɽɸʌʅʉʃʌɲʍʀɸʎ͕ ʋɸʌɿʅɹʆɸʏɸ ʅɸʌɿʃɳ ʄɸʋʏɳ͕ ʋʌɿʆ ɲʔɼʍɸʏɸ ʏʉ ʋɲɿɷʀ ɸʆʏʊʎ
ɲʐʏʉʑ͘ɀɻʆʏʉʋʉɽɸʏɸʀʏɸɲʆʏɿʃɸʀʅɸʆɲʍʏʉʋʌʉʁʊʆɼʋɳʆʘʍʏʉʋʌʉʁʊʆɶɿɲʆɲʅɻʆʋʌʉʃɲʄɹʍɸʏɸ
ɴʄɳɴɻ ʏɻʎ ʃɲʏɲʍʃɸʐɼʎ ʃɲɿͬɼ ʏɻʎ ɸʋɹʆɷʐʍɻʎ͘ ȴɿɲʏɻʌɼʍʏɸ ʏʉ ʋʌʉʁʊʆ ʍɸ ʃɲɽɲʌʊ ʃɲɿ ʍʏɸɶʆʊ
ʅɹʌʉʎ͘
ȾɲʏɲʍʃɸʐɲʍʅɹʆʉɶɿɲĂŶŐĂƌŽŽʍʏɻȿȴȾ͕
Ⱦɲʏɲʍʃɸʐɲʍʏɼʎʃɲɿɸɿʍɲɶʘɶɹɲʎ͗DŽŶŝdƌĂĚĞ>ƚĚ͕͘
ȴɿɸʑɽʐʆʍɻ͗Ȳʉʐʄɶɲʌʀɲ͕ɇʊʔɿɲ͕dƌĞďŝĐŚ͕ϭŽůŽ^ƚƌ͕͘
Ɉɻʄɹʔʘʆʉ͗ϬϬϯϱϵϮͬϵϯϲϬϳϵϬ͕ɿʍʏʉʍɸʄʀɷɲ͗www.cangaroo-bg.com
ɃȴȸȳȻȵɇȾȰȺȰɆȻɇɀɃɉȾȰȻɇɉɁɈȸɆȸɇȸɇ
-
 1
1
-
 2
2
-
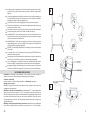 3
3
-
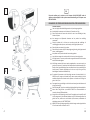 4
4
-
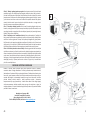 5
5
-
 6
6
-
 7
7
-
 8
8
-
 9
9
-
 10
10
-
 11
11
-
 12
12
-
 13
13
-
 14
14
-
 15
15
-
 16
16
-
 17
17
-
 18
18
-
 19
19
-
 20
20
-
 21
21
-
 22
22
-
 23
23
-
 24
24


CANGAROO Baby crib Connect us beige Instrucciones de operación
- Categoría
- Muebles de bebe
- Tipo
- Instrucciones de operación
en otros idiomas
Artículos relacionados
Otros documentos
-
Brevi Side bed crib Vicino El manual del propietario
-
-
Chicco NeXt 2 me Guía del usuario
-
mothercare Sleepi™ Crib/Bed Guía del usuario
-
Graco Contour Bassinet Manual de usuario
-
-
Graco CONTOUR PRESTIGE El manual del propietario
-
-