Carel compactSteam CH Series Guía de inicio rápido
- Tipo
- Guía de inicio rápido

NO
C
NC
ALARMEXT FAN
N2
GND
N1
AB
AB
GND
IN
C
NO
GND
24V
5 G0
6 G
7 AOUT
8 G0
9 NTCE
10 DIN
1
2
compactSteam
clima
set point
(SPH)
Differ ential
(d FH)
10 V
0 V
%rH
+050001732- rel. 1.2 - 01.02.2008
Convention
“set point” indicates the level of humidity to be achieved.
General features
The compactSteam and clima kit lets you automatically regulate room humidity. The humidity gauge turns the
humidifier on/off based on two periods (DAY and NIGHT) and regulates humidifying in two different ways:
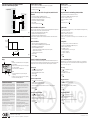
proportional regulation (default): The control algorithm works as shown in Fig. 2 diagram where humidity •
request is at maximum (10 V on output on terminal 7 AOUT in fig. 1) until the “set point – differential” range
threshold is reached. After this threshold is reached, the clima output signal gradually lowers within the set
differential to 0 V when the set point is reached;
ON/OFF regulation: The control algorithm works as shown in Fig. 4 diagram where the humidity request is •
turned on (the relay closes contacts 1 and 2 in fig. 3) when humidity is under the “set point – differential” range
and is turned off (the relay opens contacts 1 and 2 in fig. 3) when the set point is reached.
Set point and differential are set on the Clima humidity gauge to define the relative humidity operating range.
Factory settings
Clima ADCD000110: Humidity gauge with proportional humidity regulation, in winter mode (humidify), with
dip-switch SW1=ON, SW2=OFF, SW3=OFF, SW4=ON. Humidity set point 50%rH, differential 5.
compactSteam CH******H*: Humidifier, set to be controlled by an external proportional regulator 0 to 10 V
(parameter P1=1).
Installation
install the two devices following the instructions in the respective installation manuals;•
leave the front panels open: connection terminals in both devices must be visible;•
turn off the two devices;•
prepare the supplied wire.•
Note:
wire is not long enough to cover the distance between the devices, use 10 m with minimum
0.5 mm
2
section wires.
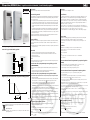
Connections between clima and compactSteam for proportional regulation
(DEFAULT)
The two devices are already set for proportional humidity regulation. Proceed as follows to connect:
connect the two devices with the supplied wire as shown in Fig. 1 diagram;1.
continue following the instructions in paragraph “Programming operations”.2.
Connections between clima and compactSteam for ON/OFF regulation
To change the default setting, it is necessary to set compactSteam for ON/OFF regulation:
1. Turn compactSteam off.
2. Turn compactSteam on again, while holding the two buttons, “reset/sel” and “drain”, until the display
shows“00” and the spanner symbol
flashes; then release the two buttons.
3. Then hold the “reset/sel” button to scroll the numeric parameters on the display. Hold “reset/sel” for a few
seconds until the display shows “02”.
WARNING: If the display shows a value higher than “02” do not confirm, but rather press “reset/sel” until the
display returns to normal operating mode and start again from point 1.
4. Press the “drain” button for at least 1 second to confirm the value: the display will show “P1” for 1 second and
then the value of parameter P1 currently set will be displayed alongside.
5. Pressing “reset/sel” switches the value of P1 between “0” and “1”: 0 = humidistat; 1 = external 0 to 10 V
modulating signal
6. Press the “drain” button for at least 1 second to confirm the new value of parameter P1 and return to normal
operating mode.
7. Turn compactSteam off: now clima can be connected, following the diagramm in Fig. 3 using shielded cables
with a minimum cross-section of 0.5 mm² (not included).
Note: If no selection is made within 3 s, the software automatically returns to normal operating mode.
clima programming operations
Regardless of the type of connection, it is necessary to turn on the clima and define the following:
desired humidity (set point);•
differential;•
periods (to turn regulation on/off during certain hours of the day);•
turn on Clima: •
appears on the display.
Note
If the humidity value is lower than set point less the differential, also appears on the display.
CH (compactSteam) ADCD000110 (clima) - Regulación controlada de la humedad / Controlled humidity regulation
Fig. 2
Fig. 1
CHF CH0
CLIMA
Convención
Con “punto de consigna” se entiende como la humedad que se desea alcanzar.
Características generales
El kit compactSteam y clima permite regular de forma automática la humedad del ambiente. El humidostato puede
habilitar/deshabilitar el humidificador en base a dos franjas horarias (DIA y NOCHE) y puede regular la humecta-
ción en dos modos distintos:
Con regulación proporcional (predeterminado): el algoritmo de control funciona como en el diagrama de la Fig. •
2 en el que la demanda de humectación es máxima (10 V en la salida en el terminal 7 AOUT en la fig. 1) hasta
alcanzar el umbral del intervalo “punto de consigna – diferencial”. Tras alcanzar dicho umbral la señal de salida
de Clima disminuye gradualmente en el intervalo del diferencial ajustado hasta llegar a 0 V al alcanzar el punto de
consigna;
Con regulación Todo/Nada: el algoritmo de control funciona como en el diagrama de la Fig. 4 en el que la demanda de •
humectación se activa (el relé cierra los contactos 1 y 2 en la fig. 3) cuando el valor de la humedad está por debajo
del intervalo “punto de consigna – diferencial” y se desactiva (el relé abre los contactos 1 y 2 en la fig. 3) cuando se
alcanza el punto de consigna.
Por medio del humidostato Clima se ajusta el punto de consigna y el diferencial para determinar el intervalo de
humedad relativa dentro del cual se desea hacer trabajar al humidificador.
Ajustes de fábrica
Clima ADCD000110: Humidostato, con regulación proporcional de la humedad, en modo Invierno (humectación),
con microinterruptores SW1= ON, SW2= OFF, SW3= OFF, SW4= ON. Punto de consigna de humedad 50% Hr,
diferencial 5.
CompactSteam CH******H*: humidificador, preparado para ser controlado por un regulador proporcional externo
0…10 V (parámetro P1= 1).
Instalación
Instalar los dos dispositivos siguiendo las instrucciones de los respectivos manuales de instalación;•
Dejar abiertos los paneles frontales: ambos dispositivos deben tener los terminales de conexión visibles;•
Apagar los dos dispositivos;•
Preparar el cablecillo suministrado.•
Nota:
Si el cablecillo suministrado no cubre la distancia entre los dispositivos, utilizar cables con longitud no superior a 10
m, con hilos de sección no inferior a 0,5 mm².
Conexión entre clima y compactSteam para una regulación proporcional
(PREDETERMINADA)
Los dos dispositivos ya están ajustados para regular la humedad de forma proporcional, se puede proceder con la
conexión:
Conectar los dos dispositivos con el cablecillo suministrado siguiendo el esquema de la Fig. 1;1.
Proseguir haciendo referencia al párrafo “Programar el funcionamiento”.2.
Conexión entre clima y compactSteam para una regulación Todo/Nada
Si se desea cambiar el ajuste predeterminado es necesario ajustar el compactSteam para la regulación Todo/Nada:
Apagar el compactSteam.1.
Volver a encender el compactSteam manteniendo pulsados los dos botones “reset/sel” y “drain” (vaciado) hasta 2.
que el display indica “00” y el símbolo de la llave inglesa
parpadea; luego soltar ambos botones.
En este punto manteniendo pulsada la tecla “reset/sel” se verá desplazar por el display los pará-3.
metros numéricos. Pulsar “reset/sel” durante algunos segundos hasta que el display indica “02”.
ADVERTENCIA: En caso de que se visualice un valor superior a “02” no confirmar, sino pulsar “reset/sel” hasta
que el display vuelva al modo de funcionamiento normal y volver a comenzar desde el punto 1.
Pulsar la tecla “drain” (vaciado) durante al menos 1 segundo para confirmar: el display indicará “P1” durante 1 4.
segundo y luego el valor del parámetro P1 ajustado actualmente será visualizado al lado.
Pulsando “reset/sel” el valor de P1 conmutará entre “0” y “1”: 0 = humidostato; 1 = señal externa modulante 0...10 V.5.
Pulsar la tecla “drain” (vaciado) durante al menos 1 segundo, una vez terminada la selección para confirmar el 6.
nuevo valor del parámetro P1 y volver al modo de funcionamiento normal.
Apagar el compactSteam: en este punto es posible proceder a la conexión del Clima siguiendo el esquema de 7.
la Fig. 3 con hilos de sec. 0,5 mm
2
(no suministrado).
Nota: Si en 3 s no se realiza o se confirma alguna selección el software vuelve al modo de funcionamiento normal.
Programar el funcionamiento del Clima
Independientemente del tipo de conexión adoptado, es necesario encender el Clima y definir:
La humedad deseada (punto de consigna);•
El diferencial;•
Las franjas horarias (si se desea habilitar/deshabilitar la regulación en ciertas horas del día);•
En el display aparece el símbolo •
.
Nota:
Si el valor de humedad es inferior al punto de consigna menos el diferencial, también aparece en el display el
símbolo
.
Conexión para regulación proporcional de la humedad
Connection for proportional humidity regulation
Regulación proporcional de la humedad / Proportional humidity regulation
Desechado del producto
El aparato (o el producto) debe ser objeto de recogida separada de acuerdo con la normativa local
vigente en materia de desechos.
Disposal of the product
The appliance (or the product) must be disposed of separately in accordance with the local waste
disposal legislation in force.
LEA Y GUARDE
ESTAS INSTRUCCIONES
READ AND SAVE
THESE INSTRUCTIONS

CAREL S.p.A.
Via dell’Industria, 11 - 35020 Brugine - Padova (Italy)
Tel. (+39) 0499716611 – Fax (+39) 0499716600 http://www.carel.com – e-mail: [email protected]
+050001732- rel. 1.2 - 01.02.2008
NO
C
NC
ALARMEXT FAN
N2
GND
N1
AB
AB
GND
IN
C
NO
GND
24V
5 G0
6 G
7 AOUT
8 G0
9 NTCE
10 DIN
1
2
compactSteam
clima
set po int
(SPH)
Differential
(d FH)
%rH
1
2
3
CAREL si riserva la possibilità di apportare modifiche o cambiamenti ai propri prodotti senza alcun preavviso. / CAREL reserves the right to modify the features of its products without prior notice.
Setting the set point
press either • or : the set point [2] blinks;
to set, press either • or
to confirm, press •
PRG
.
Setting the differential to start humidity regulation/modulation
to enter programming mode, press and hold down SET for at least 5 s;•
scroll parameters using • and until the dFH [2] parameter appears;
press SET: the currently set value appears [1];•
to change the differential value, press • or ;
press SET;•
to exit programming mode, press •
PRG
.
Regulation mode
Once on compactSteam is be turned, with the start key is posibile to enable/disable the humidity regulation using
clima in three modes and in two periods:
regulation always on (default, parameter SFH= 0);•
regulation on in DAY mode (parameter SFH= 1);•
regulation on in NIGHT mode (parameter SFH= 2).•
It is possible to connect to compactsteam a remote management contact. For the installation, refrer to compact-
steam user manual.
Operating mode
To enter programming mode, press and hold down 1. SET for at least 5 s;
Scroll parameters using 2. and until the SFH parameter appears;
Press 3. SET: the currently set value appears;
Press to 4. or set the value to:
0: Humidity regulation always on, periods are ignored;•
1: Regulation on in DAY mode;•
2: Regulation on in NIGHT mode;•
Press 5. SET;
Press 6.
PRG
.
How to set DAY/NIGHT periods
Humidity regulation can be set in defined time intervals using this mode. Clima lets you set a DAY and NIGHT
period. First set the starting time for the two intervals and then indicated whether humidity regulation should be
turned on or off in one or the other periods.
Clock settings
press 1.
PRG
: the hour and RTC parameter appear;
press SET: minutes appear;2.
press to 3. or set the current time;
press SET;4.
press 5.
PRG
.
Setting DAY time interval
press 1.
PRG
: the hour and RTC parameter appear;
press 2. and until the DAY parameter appears;
press SET: minutes appear;3.
press 4. and to increase/decrease the DAY period start time;
press SET;5.
press 6.
PRG
.
Setting NIGHT time interval
press 1.
PRG
: the hour and RTC parameter appear;
press 2. and until the n9T parameter appears;
Press SET: minutes appear;3.
press 4. and to increase/decrease the NIGHT period start time;
press SET;5.
press 6.
PRG
.
Fig. 3
Fig. 4
Fig. 5
Display
IMPORTANT WARNINGS
The CAREL product is a state-of-the-art product, whose operation is
specified in the technical documentation supplied with the product or
can be downloaded, even prior to purchase, from the website
www.carel.com.
The client (builder, developer or installer of the final equipment)
assumes every responsibility and risk relating to the phase of
configuration the product in order to reach the expected results in
relation to the specific final installation and/or equipment. The lack of
such phase of study, which is requested/indicated in the user manual,
can cause the final product to malfunction of which CAREL can not be
held responsible.
The final client must use the product only in the manner described in
the documentation related to the product itself.
The liability of CAREL in relation to its own product is regulated by
CAREL’s general contract conditions edited on the website www.carel.
com and/or by specific agreements with clients.
Regulación Todo/Nada de la humedad / ON/OFF humidity regulation
Conexiones para la regulación Todo/Nada de la humedad
Connections for ON/OFF humidity regulation
Leyenda:
1. Campo largo: % de humedad medida o, si se está en programación,
valor del parámetro;
2. Campo corto: valor del punto de consigna o, si se está en programa-
ción, nombre del parámetro;
3. indicación modo invierno, con regulación activa.
Legenda:
1. large field: % humidity measured or parameter settings while
programming;
2. small field: set point value or parameter name while programming;
3. winter mode indication with regulation ON.
ADVERTENCIAS IMPORTANTES
El producto CAREL es un producto avanzado, cuyo funcionamiento está
especificado en la documentación técnica suministrada con el producto
o descargable, incluso antes de la compra, desde el sitio de Internet www.
carel.com. El cliente (fabricante, proyectista o instalador del equipamiento
final) asume toda la responsabilidad y riesgo en relación a la fase de
configuración del producto para el alcance de los resultados previstos en
relación a la instalación y/o el equipamiento final específico.
La falta de dicha fase de estudio, como se indica en el manual, puede
generar malos funcionamientos en los productos finales de los cuales
CAREL S.p.A. no será responsable.
El cliente final debe usar el producto solo en los modos descritos en la
documentación relativa al propio producto.
La responsabilidad de CAREL en relación a su producto está regulada
por las condiciones generales del contrato CAREL editadas en el sitio
www.carel.com y/o por los acuerdos específicos con los clientes.
Ajuste del punto de consigna
Pulsar una cualquiera de las teclas • o : el valor del punto de consigna [2] parpadea;
Para ajustar el valor deseado, pulsar las teclas • o ;
Para confirmar, pulsar la tecla •
PRG
.
Ajuste del diferencial para el inicio de las regulaciones/modulaciones de la
humedad
Para entrar en la programación, pulsar • SET durante al menos 5 s;
Recorrer los parámetros con • y hasta que aparezca el parámetro dFH [2];
Pulsar • SET: aparece el valor ajustado actualmente [1];
Para cambiar el valor del diferencial, pulsar • o ;
Pulsar la tecla • SET;
Para salir de la programación, pulsa la tecla •
PRG
.
Modo de habilitación de la regulación
Una vez encendido el compactSteam, con la tecla de encendido es posible habilitar/deshabilitar la regulación de la
humedad a través del Clima en tres modos y respecto a dos franjas horarias:
Regulación siempre habilitada (predeterminado, parámetro SFH= 0);•
Regulación habilitada en modo DIA (parámetro SFH= 1);•
Regulación habilitada en modo NOCHE (parámetro SFH= 2).•
Es posible conectar al compactSteam un contacto de habilitación remota. Para la instalación hacer referencia al
manual del compactSteam.
Modo de habilitación
Para entrar en programación, pulsar 1. SET durante al menos 5 s;
Recorrer los parámetros con 2. o hasta que aparezca el parámetro SFH;
Pulsar 3. SET: aparece el valor ajustado actualmente;
Pulsar las teclas 4. o para ajustar el valor a:
0: Regulación de la humedad siempre habilitada, las franjas horarias son ignoradas;•
1: Regulación activa en el modo DIA;•
2: Regulación activa en el modo NOCHE;•
Pulsar la tecla 5. SET;
Pulsar la tecla 6.
PRG
.
Ajuste de las franjas horarias DIA/NOCHE
En este modo es posible habilitar/deshabilitar la regulación de la humedad en determinadas franjas horarias. El
Clima permite el ajuste de una franja DIA y NOCHE. Se define primero la hora de inicio de las dos franjas horarias y
después se indica si en una o en la otra franja se debe habilitar o deshabilitar la regulación de la humedad.
Ajuste del reloj
Pulsar 1.
PRG
: aparece la hora y el parámetro RTC;
Pulsar 2. SET: también aparecen los minutos;
Pulsar las teclas 3. o para ajustar la hora actual;
Pulsar la tecla 4. SET;
Pulsar la tecla 5.
PRG
.
Ajuste de la franja horaria DIA
Pulsar 1.
PRG
: aparece la hora y el parámetro RTC;
Pulsar 2. o hasta que aparezca el parámetro DAY;
Pulsar la tecla 3. SET: también aparecen los minutos;
Pulsar las teclas 4. o para incrementar/decrementar la hora de inicio de la franja horaria DIA
Pulsar la tecla SET;5.
Pulsar la tecla 6.
PRG
.
Ajuste de la franja horaria NOCHE
Pulsar 1.
PRG
: aparece la hora y el parámetro RTC;
Pulsar 2. y hasta que aparezca el parámetro n9T;
Pulsar la tecla SET: también aparecen los minutos;3.
Pulsar las teclas 4. y para incrementar/decrementar la hora de inicio de la franja horaria NOCHE;
Pulsar la tecla SET;5.
Pulsar la tecla 6.
PRG
.
relé cerrado
realy closed
relé abierto
realy open
-
 1
1
-
 2
2


