Silvercrest SRR 3.7 B2 Operating Instructions Manual
- Categoría
- Afeitadoras de hombre
- Tipo
- Operating Instructions Manual
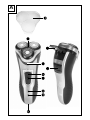
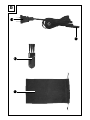
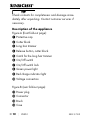
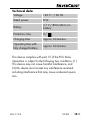
La Silvercrest SRR 3.7 B2 es una afeitadora rotativa que ofrece un afeitado apurado y cómodo. Cuenta con tres cabezales flotantes que se adaptan a los contornos de tu rostro y un recortador de pelo largo incorporado para recortar patillas y bigotes. La afeitadora es recargable y se puede utilizar tanto con cable como sin él. También cuenta con un indicador de carga LED para que puedas ver fácilmente el estado de la batería.
La Silvercrest SRR 3.7 B2 es una afeitadora rotativa que ofrece un afeitado apurado y cómodo. Cuenta con tres cabezales flotantes que se adaptan a los contornos de tu rostro y un recortador de pelo largo incorporado para recortar patillas y bigotes. La afeitadora es recargable y se puede utilizar tanto con cable como sin él. También cuenta con un indicador de carga LED para que puedas ver fácilmente el estado de la batería.


-
 1
1
-
 2
2
-
 3
3
-
 4
4
-
 5
5
-
 6
6
-
 7
7
-
 8
8
-
 9
9
-
 10
10
-
 11
11
-
 12
12
-
 13
13
-
 14
14
-
 15
15
-
 16
16
-
 17
17
-
 18
18
-
 19
19
-
 20
20
-
 21
21
-
 22
22
-
 23
23
-
 24
24
-
 25
25
-
 26
26
-
 27
27
-
 28
28
-
 29
29
-
 30
30
-
 31
31
-
 32
32
-
 33
33
-
 34
34
-
 35
35
-
 36
36
-
 37
37
-
 38
38
-
 39
39
-
 40
40
-
 41
41
-
 42
42
-
 43
43
-
 44
44
-
 45
45
-
 46
46
-
 47
47
-
 48
48
-
 49
49
-
 50
50
-
 51
51
-
 52
52
-
 53
53
-
 54
54
-
 55
55
-
 56
56
-
 57
57
-
 58
58


Silvercrest SRR 3.7 B2 Operating Instructions Manual
- Categoría
- Afeitadoras de hombre
- Tipo
- Operating Instructions Manual
La Silvercrest SRR 3.7 B2 es una afeitadora rotativa que ofrece un afeitado apurado y cómodo. Cuenta con tres cabezales flotantes que se adaptan a los contornos de tu rostro y un recortador de pelo largo incorporado para recortar patillas y bigotes. La afeitadora es recargable y se puede utilizar tanto con cable como sin él. También cuenta con un indicador de carga LED para que puedas ver fácilmente el estado de la batería.
en otros idiomas
- English: Silvercrest SRR 3.7 B2
Artículos relacionados
-
Silvercrest 340531 El manual del propietario
-
-
Silvercrest SRR 3.7 C4 Operating Instructions Manual
-
-
-
-
Silvercrest 277761 Instrucciones de operación
-
-
-