
OWNER’S MANUAL
AIR
CONDITIONER
TYPE : WINDOW
EN ENGLISH SP ESPAÑOL
Read this owner's manual thoroughly before operating the
appliance and keep it handy for reference at all times.
MODELS
W121CE SL0
W122CE SL0
*MFL70643102*
MFL70643102
Rev.02_091520
www.lg.com
Copyright © 2018 - 2020 LG Electronics Inc. All Rights Reserved.

2
TABLE OF CONTENTS
TABLE OF CONTENTS
3 SAFETY INSTRUCTIONS
4 IMPORTANT SAFETY INSTRUCTIONS
12 PRODUCT OVERVIEW
12 Exterior Parts
12 Interior Parts
13 INSTALLATION
13 Circuit Breaker Installation
14 Preparation of the Cabinet
14 Drainage (Optional)
15 Installation of the Cabinet
15 Space for Outside Air Flow
16 Installations of the unit into the Cabinet
17 OPERATION
17 Control Panel and Remote Control
18 Wireless Remote Control
19 Ventilation
19 Air Direction
19 Slinger Fan
13 Installation Overview
14 How to Install the Unit
21 TROUBLESHOOTING
21 Before Calling for Service
21 Normal Sounds You May Hear
20 MAINTENANCE
20 Air Filter

3
SAFETY INSTRUCTIONS
SAFETY INSTRUCTIONS
READ ALL INSTRUCTIONS BEFORE USE
Your safety and the safety of others are very important.
We have provided many important safety messages in this manual and on your appliance. Always
read and follow all safety messages.
This is the safety alert symbol.
This symbol alerts you to potential hazards that can kill or injure you and others.
All safety messages will follow the safety alert symbol and either the word WARNING or
CAUTION.
These words mean:
WARNING
You may be killed or seriously injured if you do not follow instructions.
CAUTION
You may be injured or cause damage to the product if you do not follow instructions.
All safety messages will tell you what the potential hazard is, tell you how to reduce
the chance of injury, and tell you what may happen if the instructions are not followed.
EN
The following symbols are displayed on units.
This symbol indicates that this appliance uses a flammable refrigerant. If the refrigerant is
is leaked and exposure to an external ignition source, there is a risk of fire.
This symbol indicates that the Operation Manual should be read carefully.
This symbol indicates that a service personnel should be handling this equipment with
reference to the Installation Manual.
This symbol indicates that information is available such as the Operating Manual or
Installation Manual.

4
SAFETY INSTRUCTIONS
●When the power cord is to be replaced, replacement work shall be performed by authorized
personnel only using only genuine replacement parts.
and authorized personnel only.
●Connect to a properly rated, protected, and sized power circuit to avoid electrical overload.
●Always plug into a grounded outlet.
●Do not under any circumstances, cut or remove the third (ground) prong from the power cord.
●When installing or moving the appliance, be careful not to pinch, crush, or damage the power
cord.
●Plug in the power plug properly.
●Do not modify or extend the power cord.
●Do not start/stop operation by plugging/unplugging the power cord.
●If the supply cord is damaged, it must be replaced by the manufacturer, its service agent or
similarly qualified person in order to avoid a hazard.
●Do not turn on the circuit breaker or power under condition that front grille, cabinet, control box
are removed or opened. Otherwise, it may cause fire, electric shock, explosion or death.
●Use a dedicated circuit.
●Do not disassemble or modify the product.
●Adhere to all industry recommended safety procedures including the use of long-sleeved gloves
and safety glasses.
●Use care when unpacking and installing. The edges of the product may be sharp.
●Disconnect the power cord or circuit breaker before installing or servicing the appliance.
●Keep packaging materials out of the reach of children. These materials can pose a suffocation
risk to children.
●Store and install the product where it will not be exposed to temperatures below freezing or
exposed to outdoor weather conditions.
other appliance.
IMPORTANT SAFETY INSTRUCTIONS
WARNING
injury to persons when using this product, follow basic precautions,
including the following:
INSTALLATION
●Before use, the appliance must be properly installed as described in this manual.
●Contact the authorized service technician for repair or maintenance of this unit.
●Contact the installer for installation of this unit.
●The air conditioner is not intended for use by young children or invalids without supervision.
●Keep any required ventilation openings clear of obstruction.
●Compliance with national gas regulations shall be observed

5
SAFETY INSTRUCTIONS
●If water enters the product, turn off the power at the main circuit, then unplug the product and call
for service.
●If the product has been submerged, contact the LG Electronics Customer Information Center for
instructions before resuming use.
●Unplug the product when unused for long periods.
●Unplug the product before cleaning.
●In the event of a gas leak (propane gas, etc.) do not operate this or any other appliance. Open a
window or door to ventilate the area immediately.
●This appliance is not intended for use by persons (including children) with reduced physical,
sensory or mental capabilities, or lack of experience and knowledge, unless they have been
given supervision or instruction concerning the use of the appliance by a person responsible for
their safety. Children should be supervised to ensure that they do not play with the appliance.
●The interior of the product must only be cleaned by a LG Electronics Customer Information
Center or a dealer.
●Do not use solvent-based detergent on the product. Doing so can cause corrosion or damage,
GROUNDING INSTRUCTIONS
●The power cord of this appliance is equipped with a three-prong (grounding) plug. Use this with
a standard three-slot (grounding) wall power outlet to minimize the hazard of electric shock. The
sure the receptacle is properly grounded. DO NOT CUT OR REMOVE THE THIRD (GROUND)
PRONG FROM THE POWER PLUG.
●Attaching the adapter ground terminal to the wall receptacle cover screw does not ground the
appliance unless the cover screw is metal, and not insulated, and the wall receptacle is grounded
to make sure the receptacle is properly grounded.
●Disconnect the power cord from the adapter, using one hand on each. Otherwise, the adapter
ground terminal might break. Do not use the appliance with a broken adapter plug.
- Situations when the appliance will be disconnected often; Do not use an adapter plug in these
situations. Unplugging the power cord frequently can lead to an eventual breakage of the
ground terminal. The wall power outlet should be replaced by a three-slot (grounding) outlet
instead.
ytefas laitnetop fo esuaceB ;yllanoisacco detcennocsid eb lliw ecnailppa eht nehw snoitautiS-
hazards, we strongly discourage the use of an adapter plug.
EN
OPERATION
●Use this appliance only for its intended purpose.
●Never attempt to operate this appliance if it is damaged, malfunctioning, partially disassembled,
or has missing or broken parts, including a damaged cord or plug.
●Repair or immediately replace all power cords that have become frayed or otherwise damaged.
Do not use a cord that shows cracks or abrasion damage along its length or at either end.
●Do not run cord under carpets or mats where it could be stepped on and damaged.
●Keep the cord out from under heavy objects like tables or chairs.
●Do not place the power cord near a heat source.
●Do not use an adaptor or plug the product into a shared outlet.
●Do not tamper with controls.
●If you detect a strange sound, a chemical or burning smell, or smoke coming from the appliance,
unplug it immediately, and contact an LG Electronics Customer Information Center.
straight out from the outlet.
●Do not grasp the power cord or touch the appliance controls with wet hands.

6
SAFETY INSTRUCTIONS
CAUTION
To reduce the risk of minor or moderate injury to persons, malfunction, or
damage to the product or property when using this product, follow basic
precautions, including the following:
INSTALLATION
●Take care when installing the product that exhaust or condensation does not damage nearby
property.
●Follow installation instructions exactly to avoid excessive vibration or water leakage.
OPERATION
●This appliance is not intended for use as a precision refrigeration system. Do not use it for special
purposes such as maintaining pets, food, precision machinery, or art objects.
●When installing or moving the appliance, be careful not to pinch, crush, or damage the power
cord.
●Make sure the air inlet and outlet are free from obstructions.
●Use a soft cloth to clean the appliance. Do not use waxes, thinners, or harsh detergents.
●Do not step on or place heavy objects on top of the appliance.
●Do not drink water drained from the appliance.
are used simultaneously.
●Remove the batteries if the remote control is not to be used for an extended period of time.
●Never mix different types of batteries, or old and new batteries for the remote control.
consult a doctor.
●Do not recharge or disassemble the batteries.
MAINTENANCE
●Never use strong cleaning agents or solvents when cleaning the air conditioner or spray water.
Use a smooth cloth.
●Do not install the appliance in an area where it is directly exposed to sea air (salt spray).
− Saline conditions are a cause of corrosion. (Particularly, corrosion of the condenser and
●Set up windbreak in front of the outdoor unit if installing it in coastal areas.
− Avoid direct exposure to salt winds.
− Install a firm and stiff concrete-wind shield that can withstand salt winds.
evaporator can damage the appliance or impair its performance.)

7
SAFETY INSTRUCTIONS
Prior to beginning work on systems containing flammable refrigerants, safety checks are necessary to ensure
that the risk of ignition is minimised. For repair to the refrigerating system, the following precautions shall be
complied with prior to conducting work on the system.
IMPORTANT SAFETY INSTRUCTIONS
WARNING
Checks to the area
Work shall be undertaken under a controlled procedure so as to minimise the risk of a flammable gas or
vapour being present while the work is being performed.
Work procedure
All maintenance staff and others working in the local area shall be instructed on the nature of work being
carried out. Work in confined spaces shall be avoided. The area around the workspace shall be sectioned off.
Ensure that the conditions within the area have been made safe by control of flammable material.
General work area
The area shall be checked with an appropriate refrigerant detector prior to and during work, to ensure the
technician is aware of potentially flammable atmospheres. Ensure that the leak detection equipment being
used is suitable for use with flammable refrigerants, i.e. non-sparking, adequately sealed or intrinsically safe.
Checking for presence of refrigerant
If any hot work is to be conducted on the refrigeration equipment or any associated parts, appropriate fire
extinguishing equipment shall be available to hand. Have a dry powder or CO2 fire extinguisher adjacent to
the charging area.
Presence of fire extinguisher
No person carrying out work in relation to a refrigeration system which involves exposing any pipe work that
contains or has contained flammable refrigerant shall use any sources of ignition in such a manner that it may
lead to the risk of fire or explosion. All possible ignition sources, including cigarette smoking, should be kept
sufficiently far away from the site of installation, repairing, removing and disposal, during which flammable
refrigerant can possibly be released to the surrounding space. Prior to work taking place, the area around the
equipment is to be surveyed to make sure that there are no flammable hazards or ignition risks.
“No Smoking” signs shall be displayed.
No ignition sources
Ensure that the area is in the open or that it is adequately ventilated before breaking into the system or
conducting any hot work. A degree of ventilation shall continue during the period that the work is carried out.
The ventilation should safely disperse any released refrigerant and preferably expel it externally into the
atmosphere.
Ventilated area
Where electrical components are being changed, they shall be fit for the purpose and to the correct
specification. At all times the manufacturer’s maintenance and service guidelines shall be followed. If in doubt
consult the manufacturer’s technical department for assistance.
The following checks shall be applied to installations using flammable refrigerants:
– The actual refrigerant charge is in accordance with the room size within which the refrigerant containing
parts are installed.
– The ventilation machinery and outlets are operating adequately and are not obstructed.
– If an indirect refrigerating circuit is being used, the secondary circuit shall be checked for the presence
of refrigerant.
– Marking to the equipment continues to be visible and legible. Markings and signs that are illegible shall be
corrected.
– Refrigeration pipe or components are installed in a position where they are unlikely to be exposed to any
substance which may corrode refrigerant containing components, unless the components are constructed of
materials which are inherently resistant to being corroded or are suitably protected against being so corroded.
Checks to the refrigeration equipment
Repair and maintenance to electrical components shall include initial safety checks and component inspection
procedures. If a fault exists that could compromise safety, then no electrical supply shall be connected to the
circuit until it is satisfactorily dealt with. If the fault cannot be corrected immediately but it is necessary to
continue operation, an adequate temporary solution shall be used. This shall be reported to the owner of the
equipment so all parties are advised.
Checks to electrical devices
EN

8
SAFETY INSTRUCTIONS
Initial safety checks shall include:
– Capacitors are discharged: this shall be done in a safe manner to avoid possibility of sparking.
– No live electrical components and wiring are exposed while charging, recovering or purging the system.
– Continuity of earth bonding.
During repairs to sealed components, all electrical supplies shall be disconnected from the equipment being
worked upon prior to any removal of sealed covers, etc.
Particular attention shall be paid to the following to ensure that by working on electrical components, the
casing is not altered in such a way that the level of protection is affected.
This shall include damage to cables, excessive number of connections, terminals not made to original
specification, damage to seals, incorrect fitting of glands, etc.
Ensure that apparatus is mounted securely.
Ensure that seals or sealing materials have not degraded such that they no longer serve the purpose of
preventing the ingress of flammable atmospheres.
Replacement parts shall be in accordance with the manufacturer’s specifications.
If it is absolutely necessary to have an electrical supply to equipment during servicing, then a permanently
operating form of leak detection shall be located at the most critical point to warn of a potentially hazardous
situation.
Repairs to sealed components
When breaking into the refrigerant circuit to make repairs – or for any other purpose – conventional procedures
shall be used. However, it is important that best practice is followed since flammability is a consideration.
The following procedure shall be adhered to:
– Remove refrigerant.
– Purge the circuit with inert gas.
– Evacuate.
– Purge again with inert gas.
– Open the circuit by cutting or brazing.
Do not apply any permanent inductive or capacitance loads to the circuit without ensuring that this will not
exceed the permissible voltage and current permitted for the equipment in use.
Intrinsically safe components are the only types that can be worked on while live in the presence of a flammable
atmosphere.
The test apparatus shall be at the correct rating.
Replace components only with parts specified by the manufacturer.
Other parts may result in the ignition of refrigerant in the atmosphere from a leak.
Repair to intrinsically safe components
Cabling will not be subject to wear, corrosion, excessive pressure, vibration, sharp edges or any other adverse
environmental effects. The check shall also take into account the effects of ageing or continual vibration from
sources such as compressors or fans.
Cabling Check
Under no circumstances shall potential sources of ignition be used in the searching for or detection of
refrigerant leaks. A halide torch (or any other detector using a naked flame) shall not be used.
Detection of flammable refrigerants
The following leak detection methods are deemed acceptable for systems containing flammable refrigerants.
Ensure that the detector is not a potential source of ignition and is suitable for the refrigerant used.
If a leak is suspected, all naked flames shall be removed/extinguished.
Oxygen free nitrogen (OFN) shall then be purged through the system both before and during the brazing process.
If a leakage of refrigerant is found which requires brazing, all of the refrigerant shall be recovered from the
system, or isolated (by means of shut off valves) in a part of the system remote from the leak.
Leak detection fluids are suitable for use with most refrigerants but the use of detergents containing chlorine
shall be avoided as the chlorine may react with the refrigerant and corrode the copper pipe-work.
Leak detection equipment shall be set at a percentage of the LFL of the refrigerant and shall be calibrated to the
refrigerant employed and the appropriate percentage of gas (25 % maximum) is confirmed.
Electronic leak detectors shall be used to detect flammable refrigerants, but the sensitivity may not be adequate,
or may need re-calibration. (Detection equipment shall be calibrated in a refrigerant-free area.)
Leak detection methods
Removal and evacuation

9
SAFETY INSTRUCTIONS
– Ensure that contamination of different refrigerants does not occur when using charging equipment. Hoses or
lines shall be as short as possible to minimise the amount of refrigerant contained in them.
– Cylinders shall be kept upright.
– Ensure that the refrigeration system is earthed prior to charging the system with refrigerant.
– Label the system when charging is complete (if not already).
– Extreme care shall be taken not to overfill the refrigeration system. Prior to recharging the system it shall be
pressure tested with OFN. The system shall be leak tested on completion of charging but prior to
commissioning. A follow up leak test shall be carried out prior to leaving the site.
The refrigerant charge shall be recovered into the correct recovery cylinders. The system shall be “flushed” with
OFN to render the unit safe. This process may need to be repeated several times. Compressed air or oxygen
shall not be used for this task. Flushing shall be achieved by breaking the vacuum in the system with OFN and
continuing to fill until the working pressure is achieved, then venting to atmosphere, and finally pulling down to a
vacuum. This process shall be repeated until no refrigerant is within the system. When the final OFN charge is
used, the system shall be vented down to atmospheric pressure to enable work to take place. This operation is
absolutely vital if brazing operations on the pipe-work are to take place. Ensure that the outlet for the vacuum
pump is not close to any ignition sources and there is ventilation available.
In addition to conventional charging procedures, the following requirements shall be followed.
Charging procedures
Before carrying out this procedure, it is essential that the technician is completely familiar with the equipment
and all its detail.
It is recommended good practice that all refrigerants are recovered safely.
Prior to the task being carried out, an oil and refrigerant sample shall be taken in case analysis is required
prior to re-use of reclaimed refrigerant. It is essential that electrical power is available before the task is
commenced.
a) Become familiar with the equipment and its operation.
b) Isolate system electrically.
d) Pump down refrigerant system, if possible.
f ) Make sure that cylinder is situated on the scales before recovery takes place.
g) Start the recovery machine and operate in accordance with manufacturer's instructions.
h) Do not overfill cylinders. (No more than 80 % volume liquid charge).
i ) Do not exceed the maximum working pressure of the cylinder, even temporarily.
k) Recovered refrigerant shall not be charged into another refrigeration system unless it has been cleaned
and checked.
j ) When the cylinders have been filled correctly and the process completed, make sure that the cylinders
and the equipment are removed from site promptly and all isolation valves on the equipment are closed off.
e) If a vacuum is not possible, make a manifold so that refrigerant can be removed from various parts of
the system.
c) Before attempting the procedure ensure that:
Decommissioning
Equipment shall be labelled stating that it has been de-commissioned and emptied of refrigerant. The
label shall be dated and signed. Ensure that there are labels on the equipment stating the equipment
contains flammable refrigerant.
Labelling
EN

10
SAFETY INSTRUCTIONS
When removing refrigerant from a system, either for servicing or decommissioning, it is recommended
good practice that all refrigerants are removed safely.
When transferring refrigerant into cylinders, ensure that only appropriate refrigerant recovery cylinders are
employed. Ensure that the correct number of cylinders for holding the total system charge are available.
All cylinders to be used are designated for the recovered refrigerant and labelled for that refrigerant
(i.e. special cylinders for the recovery of refrigerant). Cylinders shall be complete with pressure relief valve
and associated shut-off valves in good working order. Empty recovery cylinders are evacuated and, if
possible, cooled before recovery occurs. The recovery equipment shall be in good working order with a set
of instructions concerning the equipment that is at hand and shall be suitable for the recovery of flammable
refrigerants. In addition, a set of calibrated weighing scales shall be available and in good working order.
Hoses shall be complete with leak-free disconnect couplings and in good condition. Before using the
recovery machine, check that it is in satisfactory working order, has been properly maintained and that any
associated electrical components are sealed to prevent ignition in the event of a refrigerant release. Consult
manufacturer if in doubt. The recovered refrigerant shall be returned to the refrigerant supplier in the correct
recovery cylinder, and the relevant Waste Transfer Note arranged. Do not mix refrigerants in recovery units
and especially not in cylinders. If compressors or compressor oils are to be removed, ensure that they have
been evacuated to an acceptable level to make certain that flammable refrigerant does not remain within the
lubricant. The evacuation process shall be carried out prior to returning the compressor to the suppliers.
Only electric heating to the compressor body shall be employed to accelerate this process. When oil is
drained from a system, it shall be carried out safely.
Recovery

11
SAFETY INSTRUCTIONS
REFRIGERANT (FOR R32 ONLY)
WARNING
●Do not use means to accelerate the defrosting process or to clean, other than those
recommended by the manufacturer.
●The appliance shall be stored in a room without continuously operating open flames (for example
●Servicing shall only be performed as recommended by the equipment manufacturer.
●The appliance shall be stored so as to prevent mechanical damage from occurring.
an operating gas appliance) and ignition sources (for example an operating electric heater).
●The appliance shall be stored in a well-ventilated area where the room size corresponds to the
room area as specified for operation.
current valid certificate from an industry-accredited assessment authority, which authorises their
Technical Safety
●Any person who is involved with working on or breaking into a refrigerant circuit should hold a
competence to handle refrigerants safely in accordance with an industry recognised assessment
specification.
Maintenance and repair requiring the assistance of other skilled personnel shall be carried out
under the supervision of the person competent in the use of flammable refrigerants.
EN

12
PRODUCT OVERVIEW
PRODUCT OVERVIEW
Exterior Parts Interior Parts
8
6
2
3
1
4
5
7
3
4
5
6
7
1
2
1
Evaporator
2
Air Guide
3
4
Brace
5
Compressor
6
Condenser
Vertical Air Deflector (Horizontal Louver)
Horizontal Air Deflector (Vertical Louver)
7
Base Pan
Power Cord
1
Control Panel
2
Remote Control
3
Air Filter
4
5
6
Front Grille
7
8
Cabinet
Air Outlet

13
INSTALLATION
EN
Circuit Breaker Installation
Installation Overview
Drain pan
Screw
(For Front Grille, L: 10 mm, 2 EA)
( )
Foam
(L: 30 mm, 5 EA )
Tools Needed
Phillips-head
screwdriver
Flat-blade screwdriver LevelPencil
Tape measure Cutting knife Scissors
Main Power source
Circuit Breaker
Use a circuit breaker
or time delay fuse.
Read thoroughly and follow all directions provided.
A circuit breaker must be installed between the power source and the unit if the plug is not used
(see illustration below).
NOTE
INSTALLATION
Model Voltage Frequency
W121CE SL0 115 V~ 60 Hz 20 A
W122CE SL0 220 V~ 60 Hz 15 A
Circuit Breaker

14
INSTALLATION
How to Install the Unit
Preparation of the Cabinet
1
Remove 4 screws which fasten the cabinet
at both sides and at the back. (Keep the
screws for later use.)
1
Measure the space for installation to assure
a good fit. The air conditioner must be
2
Avoid exposure to direct sunlight.
installed firmly into place to prevent vibration
and noise.
1
Remove the rubber cap from the hole under
the base-pan.
cabinet with 2-4 screws.
2
Install the drain pan over the corner of the
on the bottom of the drain pan. (You can
3
Connect the drain hose to the outlet located
satisfy your particular needs. Drain hose is not
supplied)
purchase the drain hose or tubing locally to
There must be at least 50 cm (20 in.) of
cleared space around the rear of the unit.
Obstacles restricting the airflow may reduce
the cooling efficiency of the unit.
3
Remove all obstacles from the rear of the unit.
towards the outside to allow condensed water
to drain. (About 10~15 mm or 1/4 bubble with
Level)
4
The unit should be installed with a slight tilt
Shipping
Fence
Awning
Heat
radiation
Cooled air
Screws
2
Slide the unit from the cabinet by gripping
the base pan handle and pulling forward
while bracing the cabinet.
CAUTION
●The unit is heavy. To prevent injury, use
proper lifting techniques when pulling unit
forward from cabinet. Obtain assistance
from another person if possible.
CAUTION
●The external grille must be exposed outside
for air discharge.
10~15 mm
Over 50 cm
Foam
70-150 cm
Level
1/4 Bubble
Drainage (Optional)
To drain the excess water, remove the drain cap
The base-pan may overflow due to high humidity.
from the base pan of the unit and secure the Drain
Pan.
Cabinet
Drain Hose
Screw
Drain Pan

15
INSTALLATION
Installation of the Cabinet Space for Outside Air Flow
NOTE
bottom of the cabinet is well supported,
the top has minimum clearace and the
air inlet louveres have clearance as
shown. Holes from the outside through
to the cavity should be sealed. The
cabinet should slope down towards
the rear by about 10~15 mm to allow
water formed during operation to drain.
1
Prepare the hole in the wall so that the
secure. Ensure the foam seals are not
damaged. Flash, seal or fill gaps around
the inside and outside to provide
satisfactory appearance and protection
against the weather, insects and rodents.
2
Install the cabinet into the wall and
●Unit may be supported by a solid frame from
below or by a hanger from a solid overhead
support.
FLASH OR SEAL AROUND EXTERNAL
WALL FRAME OR ARCHITRAVE
STURDY TIMBER
FRAME ALL ROUND
UNIT
DRAIN CHUTE
EXTERNAL SUPPORT
FRAME AT BALANCE
POINT OF RAC
Preferred method of installation into
a timber framed wall, partition or window.
ALTERNATIVELY, BRACKETS
AS ILLUSTRATED BELOW
MAY BE USED.
TIMBER FRAMED
WALL OR PARTITION
100 mm minimum
AIR IN
AIR IN
AIR OUT
OPTION A
100 mm
100 mm
LOUVRE
FRONT
45° BRICK CUT AWAY
TO CLEAR LOUVRES
45° BRICK CUT AWAY
TO CLEAR LOUVRES
BRICK
WALL
AIR INAIR IN
BRICK
WALL
AIR OUT
TOP
VIEW
OPTION B
EN

16
INSTALLATION
1
Slide the air conditioner into the case.
Reinstall the 2 screws removed earlier
on each side of the case.
2
Stuff the foam around the unit to prevent air
and insects from getting into the room.
3
Before installing the front grille, pull out the
vent control lever located above the unit
control knobs, as shown. (for some models)
CAUTION
●The unit is heavy. Use an assistant to help
lift the unit and set it in place. Lifting and
maneuvering the unit by yourself could
result in injury.
Screw
Screw
The Foam
4
Connect the wire harness from the front
grille assembly to the air conditioner.
5
Attach the front grille assembly to the
cabinet by inserting the grille tabs into the
slots on the front of the cabinet. Push the
grille in until it snaps into place.
NOTE
●Carefully guide the vent control lever
through the grille as you push the grille in.
6
Remove air filter from the front grille by
pulling the filter forward and then up
slightly.
Insert 2 type A screws through the front
grille.
Installations of the unit into
the Cabinet

17
OPERATION
OPERATION
Control Panel and Remote Control
EN
Remote Control
1
Power
Press to turn the air conditioner ON or OFF.
2
Fan Speed
Press to set the fan speed to Low (Bajo) (F1),
Medium (Medio) (F2) or High (Alto) (F3).
3
Delay ON/OFF Timer
Delay ON - When the air conditioner is off,
set it to automatically turn on from 1 to 24
hours later, at its previous mode and fan
settings.
Delay OFF - When the air conditioner is on,
set it to automatically turn off from 1 to 24
hours later.
NOTE
●Each press of the Timer (Control Tiempo
)
,
button advances the timer by 1 hour. After
the last press the display returns to the
temperature setting.
4
Operation Mode
Press the Mode (Modo) button to cycle
between 4 types of air conditioner operation:
Energy Saver (Ahorro Energía) / Cool (Frío) /
Fan (Vent.) / Dry (Deshum).
Cool (Frío)
Fan (Vent.) - In this mode the fan circulates
air but the compressor does not run. Use
the Fan Speed (Nivel Vent.) button to set
speed to High, Medium or Low. In this mode,
you cannot adjust the set temperature.
Dry (Deshum) - This mode is ideal for rainy
and damp days to dehumidify the room rather
than cooling it significantly. Humidity is
removed from the room by the combination
of compressor operation and the fan speed
fixed at Low. The compressor and fan turn
off once the set temperature is reached.
Fan speed cannot be adjusted in Dry (Deshum)
mode.
1
4
2
5
3
- This mode is ideal on hot days
to cool and dehumidify the room quickly. Use
the Temp
buttons to set the desired
room temperature and use the Fan Speed
(Nivel Vent.)
button to set the desired fan
circulation speed.
Energy Saver (Ahorro Energía) - In this
the compressor and fan turn off when the
set temperature is achieved. Approximately
every 3 minutes the fan turns on to allow
the unit sensor to accurately determine if
more cooling is needed.
7
1234
5
6

18
OPERATION
Wireless Remote Control
Inserting Battery
1
Push out the cover on the back of the
remote control with your thumb.
2
With the plus and minus poles facing as
marked, and insert one new AAA 1.5 V
battery.
3
Reattach the cover.
NOTE
●One new battery are supplied with the air
conditioner for use in the remote control.
●Do not use a rechargeable battery. Make sure
that the battery is new.
●In order to prevent discharge, remove the
battery from the remote control if the air
conditioner is not going to be used for an
extended period of time.
●Keep the remote control away from extremely
hot or humid places.
●To maintain optimal operation of the remote
control, the remote sensor should not be
exposed to direct sunlight.
5
Temperature Control
The thermostat monitors room temperature
to maintain the desired temperature. The
thermostat can be set between 16 °C–30 °C
(60 °F–86 °F). Press
or
arrows to
increase or decrease temperature setting.
6
Remote Control Sensor
Clean Filter
The Clean Filter (Limpieza Filtro) LED lights
up to notify you that the filter needs to be
cleaned. After cleaning the filter, press
Temp
and together on the control
panel to turn off the Clean Filter (Limpieza
Filtro) light.
NOTE
control panel, not the remote control.
●
●
This feature is a reminder to clean the air
light turns on after 250 hours of operation.
filter for more efficient operation. The LED
The filter reset must be done using the
7
NOTE
●Auto Restart: If the air conditioner turns off due
to a power outage, it will restart automatically
once the power is restored, with the same
settings as were set before the unit turned off.
●Energy Saver (Ahorro Energía) : The unit
defaults to the Energy Saver (Ahorro Energía)
mode each time the unit is switched on except
in Fan (Vent.) mode or when power is restored
after an electrical power outage.
●The remote control will not function properly if
the AC infrared sensor is exposed to direct light
or if there are obstacles between the remote
controller and the air conditioner.
.

19
OPERATION
EN
Close Open
Air Direction
Ventilation
Push the ventilation lever in to the closed position
to maintain the best cooling performance. Pull
the ventilation lever out to open the vent and
draw fresh air into the room.
of the air conditioner’s louvers.
Direction
levers of the vertical louvers to the left or right.
Direction
up or down.
NOTE
●When the weather is extremely hot, the unit
may turn off automatically to protect the
compressor.
Slinger Fan
This air conditioner is equipped with a slinger
fan. (See drawing.)
The fan’s outer ring picks up the condensed
water from the base pan if the water level gets
high enough. The water is then picked up by the
fan and expelled through the condenser, making
the air conditioner more efficient.
Ring

20
MAINTENANCE
MAINTENANCE
WARNING
Before cleaning or performing maintenance,
disconnect the power supply and wait until
the fan stops.
Air Filter
Check the air filter at least twice a month to see
if cleaning is necessary. Trapped particles in the
filter can build up and block the airflow, reducing
cooling capacity and causing an accumulation of
frost on the evaporator.
Cleaning the Air Filter
Cleaning the Air Conditioner
●Wipe the front grille and inlet grille with a cloth
dampened in a mild detergent solution.
●Wash the cabinet with mild soap or detergent
and lukewarm water, then polish using liquid
appliance wax.
NOTE
●
condenser coils (outside of unit) should be
To ensure continued peak efficiency, the
checked periodically and cleaned if clogged
with soot or dirt from outside air.
●For repair and maintenance, contact a
LG Electronics Customer Information Center.
See the warranty card for details or call
55-5321-1919. Have your model number and
serial number available.
2
Wash the filter using lukewarm water below
40 °C (104 °F).
Remove the air filter from the front grille by
pulling the filter forward and then up slightly.
3
Gently shake the excess water from the
filter and replace.
1

21
TROUBLESHOOTING
EN
TROUBLESHOOTING
Before Calling for Service
The appliance is equipped with an automatic error-monitoring system to detect and diagnose problems
at an early stage. If the appliance does not function properly or does not function at all, check the
following before you call for service.
Normal Sounds You May Hear
1
2
Sound of Rushing Air
At the front of the unit, you may hear the sound of rushing air being moved by the fan.
Today’s high efficiency compressors may have a high pitched chatter during the cooling cycle.
3
Gurgle/Hiss
Gurgling or hissing noise may be heard due to refrigerant passing through evaporator during
normal operation.
4
Vibration
Unit may vibrate and make noise because of poor wall or window construction or incorrect
installation.
5
Pinging or Swishing
Droplets of water hitting condenser during normal operation may cause pinging or swishing
sounds.
1
2
3
4
5
High Pitched Chatter

Airflow is restricted.
• Make sure there are no curtains, blinds, or furniture blocking the front of
the air conditioner.
22
TROUBLESHOOTING
Problem Possible Causes & Corrective Action
Air conditioner
does not start.
Air conditioner
freezing up.
Water drips
outside.
Air conditioner
does not cool as it
should.
The air conditioner is unplugged.
• Make sure the air conditioner plug is pushed completely into the outlet.
The fuse is blown/circuit breaker is tripped.
• Check the house fuse/circuit breaker box and replace the fuse or reset the
breaker.
restored, wait 3 minutes to restart the air conditioner to prevent ng of the
Power failure.
• If power failure occurs, turn the mode control to off. When power is
compressor overload.
The air filter is dirty.
• Clean the filter at least every 2 weeks. See the 'MAINTENANCE (Cleaning
the Air Filter)' section.
The cooling coils are iced over.
• Ice may block the air flow and obstruct the air conditioner from properly
cooling the room. Set the Fan Speed High at Fan or Cool mode.
The temp control may not be set correctly.
• Set the desired temperature to a level lower than the current temperature.
Cold air is escaping.
• Check for open fumace floor registers and cold air returns.
Cooling coils have iced up.
• See 'Air conditioner freezing up' below.
Hot, humid weather.
• This is normal.
room to cool down.
The room may have been hot.
• When the air conditioner is first turned on, you need to allow time for the

NOTE
●If you see "CH" in the display, please call 55-5321-1919.
Noise when unit is
cooling.
Outside temperature extremely hot.
• Refer to installation instructions or check with installer.
Problem Possible Causes & Corrective Action
Water collects in
base pan.
Air conditioner
turns on and off
rapidly.
Water drips
indoors.
The air conditioner is not tilted to the outside.
• For proper water disposal, make sure the air conditioner slants slightly
Moisture removed from air and drains into base pan.
• This is normal for a short period in areas with little humidity; normal for
a longer period in very humid areas.
from the cabinet front to the rear.
Dirty air filter - air restricted.
• Clean air filter.
Noise when unit is
Room too cold.
cooling.
Window vibration - poor installation.
• Refer to installation instructions or check with installer.
Air movement sound.
• This is normal. If too loud, set to lower FAN Speed.
Remote control not located within range.
• Place remote control within 6.1 m & 120° radius of the front of the unit.
Remote control signal obstructed.
• Remove obstruction.
Set temperature too low.
• Increase set temperature.
Model Voltage Frequency
Cooling
Power
W121CE SL0 115 V~ 60 Hz
Nor. 1,040 W
Max. 1,760 W
Nor. 9.7 A
Max.15.1 A
- -
Current Power Current
Heating
W122CE SL0 220 V~ 60 Hz
Nor. 1,040 W
Max. 1,530 W
Nor. 4.8 A
Max. 7.6 A
- -
23
TROUBLESHOOTING
EN

24
MEMO
Memo

www.lg.com
MANUAL DEL PROPIETARIO
AIRE
ACONDICIONADO
Copyright © 2018 - 2020 LG Electronics Inc. Todos los derechos reservados.
TIPO : VENTANA
MODELS
W121CE SL0
W122CE SL0
Lea este manual del propietario detenidamente antes de
operar el aparato y consérvelo a su alcance para consultarlo en
cualquier momento.

2
TABLA DE CONTENIDO
TABLA DE CONTENIDO
3 INSTRUCCIONES DE
SEGURIDAD
DEL PRODUCTO
4 INSTRUCCIONES IMPORTANTES DE
SEGURIDAD
12 DESCRIPCIÓN GENERAL
12 Partes exteriores
12 Partes interiores
13 INSTALACIÓN
13 Instalación de disyuntores
14 Preparación de la cubierta
14 Drenaje (Opcional)
15 Instalación de la cubierta
15 Espacio para el flujo de aire exterior
16 Instalaciones de la unidad en la cubierta
17 FUNCIONAMIENTO
17 Panel de control y control remoto
18 Control remoto inalámbrico
19 Ventilación
19 Dirección del aire
19 Ventilador Slinger
13 Descripción general de la instalación
14 Cómo instalar la unidad
21 SOLUCIÓN DE PROBLEMAS
21 Antes de llamar al servicio técnico
21 Sonidos normales que puede oír
20 MANTENIMIENTO
20 Filtro de aire

3
INSTRUCCIONES DE SEGURIDAD
INSTRUCCIONES DE SEGURIDAD
LEA TODAS LAS INSTRUCCIONES ANTES DE USAR
Su seguridad y la de los demás son muy importantes.
Hemos provisto de muchos mensajes de seguridad importantes en este manual y en su equipo.
Lea y siga siempre todos los mensajes de seguridad.
Este es el símbolo de alerta de seguridad.
Este símbolo le avisa de los peligros potenciales que pueden causar la muerte o lesiones
a usted o a otras personas.
fuga de refrigerante y este queda expuesto a una fuente de ignición externa, existe riesgo
de incendio.
Todos los mensajes de seguridad irán después del símbolo de alerta de seguridad y la
palabra ADVERTENCIA o PRECAUCIÓN.
Estas palabras significan:
ADVERTENCIA
Usted puede morir o resultar seriamente lesionado si no sigue las instrucciones.
PRECAUCIÓN
Puede lesionarse o causar daños en el aparato si no sigue las instrucciones.
Todos los mensajes de seguridad le indicarán cuál es el peligro potencial, cómo reducir
la posibilidad de lesiones y qué puede suceder si no se siguen las instrucciones.
SP
Los siguientes símbolos se muestran en las unidades.
Este símbolo indica que este aparato utiliza un refrigerante inflamable. Si se produce una
indicado en el Manual de instalación.
Este símbolo indica que el personal de servicio debe manipular este equipo según lo
Manual de instalación.
Este símbolo indica que existe información disponible, como la del Manual de uso o el
Este símbolo indica que el Manual de uso debe leerse atentamente.

4
INSTRUCCIONES DE SEGURIDAD
●Cuando se requiera sustituir el cable de alimentación, el trabajo debe llevarse a cabo únicamente
por personal autorizado, usando únicamente piezas de repuesto originales.
realizarse únicamente por personal autorizado.
El trabajo de instalación debe realizarse de acuerdo con el Código Eléctrico Nacional, y debe
●Conéctelo a un circuito de alimentación de capacidad, protección y tamaño adecuado para evitar
sobrecargas eléctricas.
eléctrica.
●Conéctelo siempre a una toma de corriente con conexión a tierra.
●Nunca, bajo ninguna circunstancia, corte o quite la tercera clavija (tierra) del cable de corriente
●Al instalar o mover el equipo, tenga cuidado de no pellizcar, aplastar o dañar el cable de
alimentación.
●Conecte el enchufe de alimentación correctamente.
●No modifique ni extienda el cable de corriente eléctrica.
●No arrancar/parar el funcionamiento conectando/desconectando el cable de corriente eléctrica.
●Si el cable de corriente eléctrica está dañado, debe ser sustituido por el fabricante, su agente de
servicio o el personal calificado para evitar situaciones de peligro.
●No encienda el interruptor o la corriente eléctrica en condiciones en que la rejilla delantera, la
cubierta y la caja de control se hayan quitado o estén abiertos. De lo contrario, puede provocar
incendios, descargas eléctricas, explosión o la muerte.
●Use un circuito especializado.
●No desarme ni modifique el producto.
●Respete todos los procedimientos de seguridad recomendados por la industria, incluido el uso
de guantes largos y gafas de seguridad.
●Tenga cuidado al desempacar e instalar. Los bordes del producto pueden estar afilados.
●Desconecte el cable de corriente eléctrica o el interruptor antes de instalar o reparar el aparato.
●Mantenga los materiales de empaque fuera del alcance de los niños. Estos materiales pueden
representar un riesgo de asfixia para ellos.
●Guarde e instale el producto en lugares donde no quede expuesto a temperaturas por debajo
No almacene ni use gasolina u otros líquidos y vapores inflamables cerca de este o cualquier otro
del punto de congelación, ni donde quede expuesto a condiciones climáticas exteriores.
equipo.
INSTRUCCIONES IMPORTANTES DE SEGURIDAD
ADVERTENCIA
quemaduras o lesiones a las personas al usar este producto, siga las
Para reducir el riesgo de explosión, incendio, muerte, descarga eléctrica,
siguientes precauciones básicas:
INSTALACIÓN
●Antes de usar el equipo, debe estar correctamente instalado según lo descrito en este manual.
●Póngase en contacto con el servicio técnico autorizado para la reparación o el mantenimiento
de esta unidad.
●Póngase en contacto con el instalador para la instalación de esta unidad.
●El aire acondicionado no está destinado para su uso sin supervisión, por parte de niños o
discapacitados.
●Mantenga todas las aberturas de ventilación requeridas libres de cualquier obstrucción.
●Se observará el cumplimiento de las regulaciones nacionales de gas.

5
INSTRUCCIONES DE SEGURIDAD
●
Si llegara a entrar agua en el producto, apague el interruptor, después desconecte el producto y llame
al servicio técnico.
●
Si el producto ha sido sumergido, contacte al Centro de Servicio al Cliente de LG Electronics para
recibir instrucciones antes de seguir con su uso.
●
Desconecte el producto cuando no lo use durante largos períodos de tiempo.
●
Desconecte el producto antes de su limpieza.
●
En caso de una fuga de gas propano no haga funcionar éste ni ningún otro equipo. Abra una ventana
o puerta para ventilar el área inmediatamente.
●
Este electrodoméstico no está diseñado para ser usado por personas (incluyendo niños) con
capacidades físicas, sensoriales o mentalmente limitadas, o que carezcan de experiencia y
conocimiento, a menos que hayan recibido supervisión o instrucciones sobre el uso del equipo
por parte de una persona responsable por su seguridad. Asegúrese de que los niños no jueguen
con el equipo.
●
El interior del producto solo debe ser limpiado por el Centro de Servicio al cliente de LG Electronics
o un distribuidor autorizado.
●
No use detergentes de base solvente en el producto. Hacerlo podría causar corrosión o daños,
fallas en el producto, descargas eléctricas, o un incendio.
INSTRUCCIONES DE CONEXIÓN A TIERRA
●
El cable de corriente de este producto está equipado con un enchufe de tres clavijas (conexión a
tierra). Use éste con una toma de corriente de pared estándar de tres ranuras (conexión a tierra)
para minimizar el riesgo de descarga eléctrica. El cliente debe hacer que un electricista calificado
revise el receptáculo de pared y el circuito para asegurarse de que el receptáculo esté correctamente
conectado a tierra. NO CORTE NI QUITE LA TERCERA PUNTA (CONEXIÓN A TIERRA) DEL
ENCHUFE DE ALIMENTACIÓN.
●
Fijar la conexión del adaptador de terminal tierra al tornillo del contacto eléctrico, no conecte a tierra
el equipo a menos que este tornillo sea de metal y no esté aislado, y el contacto eléctrico en la pared
calificado revise el circuito para asegurarse de que el contacto esté correctamente conectado a tierra.
esté conectado a tierra a través del cableado de la casa. El cliente debe hacer que un electricista
●
Desconecte el cable de corriente del adaptador, usando una mano en cada uno de ellos. De lo
contrario, la terminal de tierra del adaptador podría romperse. No use el aparato con un enchufe roto.
Situaciones en las que el equipo se desconectará con frecuencia; no use un enchufe en estas
-
situaciones. Desenchufar el cable de corriente con frecuencia puede llevar a una posible rotura
de la terminal de tierra. La toma de corriente de pared debe reemplazarse por una toma de
corriente de tres ranuras (conexión a tierra).
Situaciones en las que el aparato se desconectará de forma ocasional; debido a posibles riesgos
-
de seguridad, no recomendamos el uso de un adaptador.
SP
FUNCIONAMIENTO
●
Use este equipo únicamente para su fin previsto.
●
Nunca intente usar este equipo si está dañado, defectuoso, parcialmente desarmado, le faltan piezas o
están rotas, incluido el cable o enchufe dañado.
●
Repare o reemplace inmediatamente todos los cables de corriente eléctrica que se hayan desgastado
o dañado. No use un cable que muestre grietas o daños por abrasión (desgaste por fricción) a lo largo
del mismo o en algún extremo.
●
No meta el cable debajo de alfombras o tapetes donde éste se pueda pisar o dañar.
●
Mantenga el cable alejado de objetos pesados como mesas o sillas.
●
No coloque el cable de corriente eléctrica cerca de fuentes de calor.
●
No use un adaptador ni conecte el producto a una toma de corriente compartida.
●
No manipule los controles.
●
Si detecta un sonido extraño, un olor a químico o a quemado, u observa humo saliendo del equipo,
desconéctelo de inmediato, y contacte al Centro de Servicio al Cliente de LG Electronics.
firmemente y tire de él directamente desde la toma de corriente.
Nunca desconecte el equipo tirando del cable de corriente eléctrica. Sujete siempre el enchufe
●
No sujete el cable de corriente eléctrica ni toque los controles del equipo con las manos mojadas.

6
INSTRUCCIONES DE SEGURIDAD
PRECAUCIÓN
Para reducir el riesgo de lesiones leves o moderadas en las personas,
funcionamiento erróneo, o daños al producto o en la propiedad al usarlo,
siga las siguientes instrucciones básicas de seguridad:
INSTALACIÓN
●Tenga cuidado al instalar el producto para que el escape o la condensación no dañen la
propiedad cercana.
de agua.
●Siga exactamente las instrucciones de instalación para evitar vibraciones excesivas o fugas
− Las condiciones salinas son una causa de oxidación. (Particularmente, la corrosión del
●No instale el electrodoméstico en un área expuesta directamente al aire del mar (rocío salino).
condensador y evaporador puede dañar el aparato o afectar su funcionamiento.)
− Evite la exposición directa a vientos salinos.
●Instale un cortavientos frente a la unidad exterior si la instalará en un área costal.
− Instale un escudo de viento rígido que pueda soportar los vientos salinos.
FUNCIONAMIENTO
●Este equipo no ha sido diseñado para ser usado como un sistema de refrigeración de precisión.
No lo use para fines especiales como el mantenimiento de mascotas, alimentos, maquinaria de
precisión u objetos artísticos.
●Al instalar o mover el equipo, tenga cuidado de no pellizcar, aplastar o dañar el cable de corriente
eléctrica.
●Asegúrese de que la entrada y salida de aire estén libres de obstáculos.
●Use un paño suave para limpiar el equipo. No use ceras, disolventes, o detergentes duros.
●No pise ni coloque objetos pesados sobre la parte superior del equipo.
No haga funcionar el equipo sin el filtro correctamente instalado.
●No beba agua que haya sido drenada del equipo.
aparato de calefacción, como un calentador.
Asegúrese de ventilar lo suficiente cuando se usen simultáneamente el aire acondicionado y un
peligroso para su salud.
expuestas a la fuga del fluido de una pila, enjuáguese con agua limpia.
Deje de usar el control remoto si hay una fuga de fluido en la pila. Si su ropa o piel han sido
●Quite las pilas si el control remoto no se va a usar durante un periodo de tiempo prolongado.
Estar expuesto al flujo de aire directo durante un período prolongado de tiempo puede ser
●Nunca mezcle diferentes tipos de pilas, o pilas viejas y nuevas para el control remoto.
consulte con un médico.
Si el líquido de la batería ha sido ingerida, enjuage profundamente la parte interior de la boca y
●No recargue ni desarme las pilas.
MANTENIMIENTO
●No use productos de limpieza agresivos o disolventes sobre el aparato de aire acondicionado,
Nunca toque las partes metálicas del aire acondicionado cuando retire el filtro de aire.
Limpie el filtro cada dos semanas.
ni rocíe agua. Use un trapo suave.

7
INSTRUCCIONES DE SEGURIDAD
aparato que utiliza un refrigerante inflamable:
controles de seguridad para garantizar que el riesgo de ignición se reduzca al mínimo. Para la reparación
– Tubería o componentes de refrigeración se instalan en una posición en la que es poco probable que estén
expuestos a cualquier sustancia que pueda corroer los componentes que contienen refrigerante, a menos
que los componentes se construyan de materiales que son inherentemente resistente a la corrosión o se
INSTRUCCIONES IMPORTANTES DE SEGURIDAD
ADVERTENCIA
Información sobre el servicio
El personal de servicio debe capacitarse para realizar lo siguiente cuando se ponga en funcionamiento un
Comprobación de la zona
Antes de comenzar a trabajar en sistemas que contienen refrigerantes inflamables, son necesarios los
del sistema de refrigeración, deben cumplirse las siguientes precauciones antes de realizar trabajos en el
sistema.
Procedimiento de trabajo
Se lleva a cabo el trabajo bajo un procedimiento controlado con el fin de minimizar el riesgo de un gas o
vapor inflamable este presente mientras se realice el trabajo.
Área de trabajo general
Todo el personal de mantenimiento y otros relacionados que trabajan en el área deben capacitarse sobre
la manera en realizar el trabajo. Debe evitarse el trabajo en espacios confinados. La zona que rodea el
área de trabajo debe dividirse en partes. Debe asegurarse de que las condiciones dentro de la zona han
sido aseguradas por el control de los materiales inflamables.
Comprobación de la presencia de refrigerante
La superficie debe inspeccionarse con un detector de refrigerante idóneo antes y durante el trabajo, para
asegurar de que el técnico esta consiente de la atmosfera potencialmente inflamable. Asegurarse de que
el equipo de detección de fugas que se utiliza es idóneo para uso con refrigerantes inflamables, es decir,
anti chispa, sellado de forma idónea o de seguridad intrínseca.
Presencia de extintores
Si cualquier trabajo en caliente se va a realizar en los equipos de refrigeración o de las partes asociadas,
debe disponerse de equipo de extinción de incendios apropiado a la mano. Debe tenerse un extintor de
polvo seco CO
cerca de la zona de carga.
No hay fuentes de ignición
No hay persona que lleve a cabo el trabajo en relación con un sistema de refrigeración que consiste en
exponer cualquier trabajo de tubería que contiene o ha contenido refrigerante inflamable debe utilizar
cualquier fuente de ignición de una manera que pueda dar lugar al riesgo de incendio o explosión. Todas
las fuentes de ignición posibles, incluyendo el fumar cigarrillos, deben mantenerse a una distancia
suficiente desde el sitio de instalación, reparación, eliminación y disposición, con la finalidad de liberar el
refrigerante inflamable en un espacio circundante. Antes de realizar un trabajo, debe examinarse el área
alrededor del equipo para asegurarse de que no hay peligros inflamables o riesgos de ignición. Deben
señalizarse leyendas de “No fumar”.
Área ventilada
Debe asegurarse que el área es el área libre o que se ventile de manera idónea antes de irrumpir en el
sistema o realizar cualquier trabajo en caliente. Un grado de ventilación debe dispersar de forma segura
cualquier refrigerante que se libere y preferiblemente expulsar de forma externa a la atmosfera.
Cuando se cambian los componentes eléctricos, estos deben ajustarse para el propósito y la especificación
correcta. En todo momento deben seguirse las pautas de mantenimiento y servicio del fabricante. En caso
de duda consulte con el departamento técnico del fabricante para obtener ayuda.
Comprobación de los equipos de refrigeración
Se aplican a las instalaciones que se utilizan refrigerantes inflamables los controles siguientes:
– El tamaño de la carga sea de acuerdo con el tamaño de la habitación en la que se instalan las piezas
– La maquinaria y medios de ventilación funcionen de manera adecuada y no se obstruyan;
– Se utiliza un circuito de refrigeración indirecta, debe comprobarse el circuito secundario para la presencia
Que el marcado en el equipo siga siendo visible y legible. Las marcas y signos que son ilegibles deben
protejan de manera idónea para evitar ser corroídos.
que contengan refrigerante;
del refrigerante;
corregirse;
SP

8
INSTRUCCIONES DE SEGURIDAD
Comprobación de los dispositivos electrónicos
La reparación y el mantenimiento de los componentes eléctricos deben incluir comprobaciones iniciales de
seguridad y los procedimientos de inspección de componentes. Si existe una falla que pueda comprometer
la seguridad, entonces no debe haber suministro eléctrico hasta que esta sea corregida satisfactoriamente.
Los controles de seguridad iniciales deben comprobar lo siguiente:
– Que los condensadores se descargan: esto se hará de manera segura para evitar la posibilidad de chispas;
Si la falla no se puede solucionar de inmediato, pero es necesario continuar con la operación, debe utilizarse
una solución temporal adecuada. Esto debe notificarse al propietario del equipo de modo que todas las
partes sean avisadas.
– Que no hay componentes eléctricos energizados y que el cableado este expuesto con carga, recobrando o
– Que hay continuidad de la unión a tierra.
purgando el sistema;
Reparaciones de componentes sellados
Durante reparación de los componentes sellados, deben desconectarse todos los suministros eléctricos de
los equipos que están operando antes de cualquier remoción de las tapas selladas, etc. Si es absolutamente
necesario contar con un suministro de energía eléctrica para los equipos durante el servicio, entonces debe
localizarse una forma de operación permanentemente de detección de fuga, en el punto más crítico para
advertir de una situación potencialmente peligrosa.
Debe prestarse particular atención a lo siguiente para asegurarse de que, al trabajar en componentes
eléctricos, la carcasa no se altera de manera que se afecte el nivel de protección. Esto debe incluir daños a
los cables, el número excesivo de conexiones, terminales que no se fabrican para la especificación original,
daños a los sellos, montaje incorrecto de las glándulas, etc.
Asegúrese de que el aparato se monte de forma segura.
Asegúrese de que los sellos o materiales de sellado no se degradan de manera que ya no cumplan el
propósito de prevenir el ingreso de atmosferas inflamables. Las piezas de repuesto deben estar de acuerdo
con las especificaciones de fábrica.
Nota: el uso de sellador de silicona pueda inhibir la eficacia de algunos tipos de equipos de detección de
fugas. Los componentes intrínsecamente seguros no tienen que aislarse antes de trabajar en ellos.
Reparación de los componentes de seguridad intrínseca
No aplicar cargas inductivas o capacitancias permanentes al circuito sin asegurarse de que esto no va a
exceder la tensión admisible y corriente que se permite para el equipo en uso.
Solo pueden ponerse a trabajar los componentes de tipo intrínsecamente seguros mientras se energizan
en presencia de una atmosfera inflamable. El aparato de prueba debe ser para la tensión correcta.
Reemplazar los componentes solo con las partes que se especifican de fábrica. Otras partes pueden dar
lugar a la ignición del refrigerante en la atmosfera de una fuga.
Cableado
Compruebe que el cableado no se somete a desgaste, presión, vibración, bordes cortantes o cualquier
otro efecto ambiental adverso.
La comprobación debe considerar también los efectos del envejecimiento o vibración continua de fuentes
como compresores o ventiladores.
Detección de los refrigerantes inflamables
Se consideran aceptables para los sistemas que contienen refrigerantes inflamables los métodos de
Los detectores de fuga electrónicos deben utilizarse para detectar los refrigerantes inflamables, pero la
sensibilidad puede no ser adecuada, o puede necesitarse calibrar nuevamente el equipo. (El equipo de
detección debe calibrarse en una zona libre de refrigerante.) asegurarse de que el detector no es una
fuente potencial de ignición y que es adecuado para el refrigerante utilizado. Los equipos de detección
de fugas deben establecerse en un porcentaje del LFL del refrigerante y deben calibrarse en función del
refrigerante que se emplea y confirmar el porcentaje de gas adecuado (25% máximo).
Los fluidos de detección de fugas son idóneos para su uso con la mayoría de los refrigerantes, pero el
uso de detergentes que contienen cloro debe evitarse ya que el cloro puede reaccionar con el refrigerante
y corroer el tubo de cobre.
detección de fugas siguientes:
Si se sospecha de una fuga, deben eliminarse/extinguirse todas las llamas. Si se encuentra una fuga de
refrigerante que requiera soldadura, todo el refrigerante debe recuperarse del sistema, o aislarse (por medio
de válvulas de cierre) en la parte del sistema de la fuga. El oxígeno libre de nitrógeno (OFN) debe a través
del sistema tanto antes como durante el proceso de soldadura fuerte.

9
INSTRUCCIONES DE SEGURIDAD
Eliminación y evacuación
Cuando se abre el circuito de refrigeración para realizar reparaciones- o para cualquier otro propósito- deben
utilizarse procedimientos convencionales. Sin embargo, es importante que la mejor practica se siga desde
que la inflamabilidad es una consideración. El siguiente procedimiento se adhiere a:
– Retirar el refrigerante;
– Purgar el circuito con gas inerte;
– Evacuar;
– Purgar de nuevo con gas inerte;
– Abrir el circuito de corte o soldadura.
La carga de refrigerante debe recuperarse en los cilindros de recuperación correctos. El sistema debe lavarse
con OFN para hacer segura la unidad. Puede ser necesario repetir varias veces este proceso. No debe
utilizarse el aire comprimido u oxígeno para esta tarea.
El nivel debe lograrse al romper el vacío en el sistema con la OFN y continuando hasta alcanzar la presión de
trabajo, después de la ventilación a la atmosfera y finalmente derribar a un vacío. Este proceso debe repetirse
hasta que no quede refrigerante dentro del sistema. Cuando se utiliza la carga final OFN, el sistema debe
ventilarse a presión atmosférica para permitir el trabajo a realizarse. Esta operación es absolutamente vital si
las operaciones de soldadura en la tubería de trabajo se llevan a cabo.
Asegurarse de que la salida de la bomba de vacío no está cerca de cualquier fuente de ignición y no exista
ventilación disponible.
Procedimientos de carga
Además de los procedimientos convencionales de carga, deben seguirse los siguientes requisitos.
– Debe asegurarse que la contaminación de los diferentes refrigerantes no se produce al utilizar un equipo de
carga. Las mangueras o líneas deben ser tan cortas como sea posible para reducir al mínimo la cantidad de
refrigerante que se contiene en ellas;
– Los cilindros deben mantenerse en posición vertical;
– Debe asegurarse que el sistema de refrigeración se conecte a atierra antes de cargar el sistema con
– Etiquetar el sistema cuando finalice la carga (si no está previamente etiquetado);
– Debe tenerse cuidado extremo de no llenar demasiado el sistema de refrigeración.
refrigerante;
Desmantelamiento
Antes de llevar a cabo este procedimiento es esencial que el técnico este totalmente familiarizado con el
equipo y todos sus detalles. Se recomienda una buena práctica que todos los refrigerantes se recuperen de
manera segura. Antes de la tarea a realizar, debe tomarse una muestra de aceite y refrigerante en caso de
requerir análisis de volver a utilizar el refrigerante que se recupera. Es esencial que la energía eléctrica
esté disponible antes de que se inicie la tarea.
a) Familiarizarse con el equipo y su funcionamiento.
b) Aislar el sistema eléctrico.
c) Antes de efectuar la operación asegurarse que:
– El equipo de elevación y manipulación está disponible, si es necesario, para el manejo de refrigerantes
– Todo el equipo de protección personal esté disponible y se utiliza correctamente;
– El proceso de recuperación es supervisado en todo momento por una persona competente;
– Equipo de la recuperación y los cilindros se ajustan a las normas apropiadas.
d) Si es posible, evacuar el sistema de refrigeración.
e) Si el vacío no es posible, hacer un colector de refrigerante de manera que se pueda quitar de diversas
partes del sistema.
f ) Asegurarse de que el cilindro se encuentra en la balanza antes de realizar la recuperación.
g) Iniciar la máquina de recuperación y operar de acuerdo con las instrucciones de fábrica.
h) No sobrellenar los cilindros. (no más de 80% en volumen de carga liquida).
i ) No exceda la presión máxima de trabajo del cilindro, aunque sea de manera temporal.
cilindros;
j ) Después de llenar los cilindros de manera correcta y de completar el proceso, asegúrese de que los
cilindros y los equipos se retiran de sitio rápidamente y todas las válvulas de aislamiento de los quipos
se cierran.
k) El refrigerante que se recupera no debe cargarse en otro sistema de refrigeración si este no se limpia y
revisa.
SP

10
INSTRUCCIONES DE SEGURIDAD
Etiquetado
El equipo debe etiquetarse indicando que se ha descargado y vaciado de refrigerante. La etiqueta debe
fecharse y firmarse. Asegurar de que haya etiquetas sobre el equipo que indiquen que el equipo contiene
refrigerante inflamable.
Recuperación
Cuando la eliminación de refrigerante de un sistema, ya sea para el servicio o el cierre definitivo, se
recomienda una buena práctica que todos los refrigerantes se eliminan de forma segura.
Cuando se transfiere refrigerante dentro de los cilindros, asegurar que se emplean solo cilindros de
recuperación apropiados. Asegurar que este disponible el numero correcto de cilindros para colocar el total
de la carga del sistema que esté disponible. Todos los cilindros que se utilizan se designan y etiquetan
para el refrigerante que se recupera (por ejemplo, cilindros especiales para la recuperación de refrigerante).
Los cilindros deben estar completos con válvula de alivio de presión y válvulas de cierre en buen estado de
funcionamiento. Los cilindros de recuperación vacíos son evacuados y, si es posible, se enfriaron antes de
que ocurra la recuperación.
El equipo de recuperación debe encontrarse en buen estado de funcionamiento, con una serie de
instrucciones sobre el equipo que está a la mano y debe ser adecuado para la recuperación de refrigerante
inflamable. Además, un conjunto de balanzas calibradas debe estar disponible y en buen estado de
funcionamiento. Las mangueras deben completarse con acoplamientos de desconexión sin fugas y en
buenas condiciones. Antes de utilizar la máquina de recuperación, comprobar que se encuentra en estado
de funcionamiento satisfactorio, se mantiene de forma correcta y que todos los componentes eléctricos
asociados están sellados para evitar la ignición en el caso de una fuga de refrigerante. Consultar con el
fabricante en caso de duda.
El refrigerante que se recupera debe devolverse al proveedor de refrigerante en el cilindro de recuperación
adecuado, y al correspondiente contenedor de desecho. No mezclar refrigerantes en las unidades de
recuperación y sobre todo no en los cilindros.
un nivel aceptable para asegurarse de que el refrigerante inflamable no se queda en el lubricante. El
proceso de evacuación se lleva a cabo antes de devolver el compresor a los distribuidores. Solo debe
emplearse calefacción eléctrica en el cuerpo del compresor para acelerar este proceso. Cuando el
aceite se drena de un sistema, esto debe realizarse de forma segura.
Si los aceites de compresores o compresores deben retirarse, asegurarse de que han sido evacuados a

11
INSTRUCCIONES DE SEGURIDAD
REFRIGERANTE (SOLO PARA R32)
ADVERTENCIA
●No use otros medios para acelerar el proceso de descongelación o para limpiar distintos a los
recomendados por el fabricante.
●El equipo deberá almacenarse en una habitación sin presencia de equipos de gas en
●El mantenimiento solo se realizará según lo recomendado por el fabricante del equipo.
●El equipo debe almacenarse para evitar daños mecánicos.
funcionamiento, y/o fuentes de ignición (por ejemplo, un calentador eléctrico en funcionamiento).
olor.
No lo perfore ni lo queme. Tenga en cuenta que los refrigerantes inflamables pueden no tener
●El equipo debe almacenarse en un área bien ventilada donde el tamaño de la habitación
corresponda al área según lo especificado para el funcionamiento.
refrigerante, debe poseer un certificado vigente válido de una autoridad de evaluación acreditada
Seguridad técnica
●Cualquier persona que esté involucrada en trabajar o entrar en contacto con un circuito
por la industria, que autorice su competencia para manejar refrigerantes de manera segura de
acuerdo con una especificación de evaluación reconocida por la industria.
El mantenimiento y reparación que requieran la asistencia de otro personal calificado, se
efectuará bajo la supervisión de la persona competente en el uso de refrigerantes inflamables.
SP

12
DESCRIPCIÓN GENERAL DEL PRODUCTO
DESCRIPCIÓN GENERAL DEL PRODUCTO
Partes exteriores Partes interiores
8
6
2
3
1
4
5
7
3
4
5
6
7
1
2
1
Vaporizador
2
Conducto de aire
3
4
Abrazadera
5
Compresor
6
Condensador
Deflector de aire Vertical (Rejilla horizontal)
Deflector de aire horizontal (Rejilla vertical)
7
Panel base
Cable de corriente
1
Panel de control
2
Control remoto
3
Filtro de aire
4
5
6
Reja frontal
7
8
Cubierta
Salida de aire

Instalación de disyuntores
Descripción general de la instalación
Bandeja de drenaje
Tornillo
(Para la reja frontal, L: 10 mm, 2 EA)
Espuma
(L: 30 mm, 5 EA )
Herramientas necesarias
13
INSTALACIÓN
Destornillador
Phillips
Desarmador plano NivelLápiz
Cinta métrica Navaja Tijeras
Fuente principal de corriente
Interruptor
Use un interruptor o fusible
de retardo de tiempo.
Lea cuidadosamente y siga todas las instrucciones proporcionadas.
Se debe instalar un disyuntor entre la fuente de alimentación y la unidad si no se usa el enchufe
(consulte la ilustración a continuación).
INSTALACIÓN
SP
( )
NOTA
Modelo Voltaje Frecuencia
W121CE SL0 115 V~ 60 Hz 20 A
W122CE SL0 220 V~ 60 Hz 15 A
Interruptor

14
INSTALACIÓN
Cómo instalar la unidad
Preparación de la cubierta
1
Retire los 4 tornillos que sujetan la cubierta en
ambos lados y en la parte trasera. (Guarde los
tornillos para usarlos después.)
1
Mida el espacio para la instalación para asegurar
un buen ajuste. El aire acondicionado deberá
2
Evite la exposición directa al sol.
instalarse fijamente en un lugar para evitar
vibraciones y ruido.
1
Remueva la tapa de goma del orificio debajo del
panel base.
de la cubuerta con 2-4 tornillos.
2
Instale el panel de drenaje por encima de la esquina
en la parte de abajo del panel de drenaje. (Puede
3
Conecte la manguera de drenaje a la salida ubicada
para satisfacer sus necesidades particulares. La
manguera de drenaje no viene incluida)
comprar la manguera o tubería de drenaje localmente
la unidad. Debe haber al menos 50 cm (20 in.) de
espacio libre alrededor de la parte trasera de la
unidad. Los obstáculos que estén restringiendo el
flujo de aire pueden reducir la eficiencia del
enfriamiento de la unidad.
3
Retire todos los obstáculos de la parte trasera de
y apuntando al frente (aprox. 3°) para que permita
que el agua condensada drene. (Unos 10~15 mm,
o bien 1/4 de burbuja empleando un nivel)
4
La unidad deberá instalarse ligeramente inclinada
Tornillos de
Reja
Toldo
Radiación
de calor
Aire enfriado
seguridad
2
Deslice la unidad desde la cubierta sujetando el
mango del panel base y subiéndolo mientras
sostiene el armario.
PRECAUCIÓN
●
La unidad es pesada. Para evitar lesiones, use
las técnicas adecuadas de levantamiento cuando
suba la unidad desde la cubierta. Consiga la
ayuda de otra persona, si es posible.
PRECAUCIÓN
●
La rejilla externa debe quedar expuesta al
exterior para la descarga de aire.
10~15 mm
Más de 50 cm
Espuma
70-150 cm
Nivel
1/4 de Burbuja
Drenaje (Opcional)
de humedad. Para drenar el agua en exceso, remueva la
El panel base se podría sobrellenar debido a un alto nivel
tapa del panel base de la unidad y asegure el panel de
drenaje.
Cubierta
Manguera de drenaje
Tornillo
Bandeja de drenaje

15
INSTALACIÓN
Instalación de la cubierta
exterior
Espacio para el flujo de aire
NOTA
inferior de la cubierta esté bien apoyada, la
parte superior tenga una holgura libre mínima y
las rejillas de admisión de aire tengan holgura
como se muestra en la figura. Los orificios
deberán estar sellados desde el exterior y a
través de la cavidad . La cubierta deberá tener
una inclinación hacia abajo de la parte trasera
de unos 10~15 mm para permitir que el agua
que se acumule durante la operación drene.
1
Prepare el orificio en la pared para que la parte
Asegúrese de que los sellos de espuma no
estén dañados. Aísle, selle o rellene los
espacios alrededor del interior y exterior para
mejorar la apariencia y protección contra el mal
tiempo, insectos y roedores.
2
Instale la cubierta en la pared y asegúrelo.
●
La unidad debe estar fijada con un marco sólido
desde la parte de abajo, o bien con un soporte que
cuelgue desde arriba.
AÍSLE O SELLE ALREDEDOR DEL MURO
EXTERIOR O DEL ARQUITRABE
MARCO DE MADERA
ROBUSTO ALREDE
DOR DE LA UNIDAD
CANAL DE DRENAJE
MARCO DE SOPORTE
EXTERNO EN EL PUNTO
DE EQUILIBRIO DEL RAC
Método preferido de instalación en una
madera enmarcada, mampara o ventana.
ALTERNATIVAMENTE, PUEDEN
USARSE LOS SOPORTES
ILUSTRADOS A CONTINUACIÓN.
MADERA ENMARCADA
O MAMPARA
100 mm mínimo
ENTRADA DE AIRE
ENTRADA DE AIRE
SALIDA DE AIRE
OPCIÓN A
100 mm
100 mm
REJILLA
FRENTE
CORTE TRANSVERSAL DEL
LADRILLO A 45° PARA LIBERAR
ESPACIO EN LAS REJILLAS
CORTE TRANSVERSAL DEL
LADRILLO A 45° PARA LIBERAR
ESPACIO EN LAS REJILLAS
ENTRADA
DE AIRE
ENTRADA
DE AIRE
MURO DE
LADRILLOS
MURO DE
LADRILLOS
SALIDA DE AIRE
VISTA
SUPERIOR
OPCIÓN B
SP

16
INSTALACIÓN
1
Deslice el aire acondicionado en el compartimiento.
Reinstale los 2 tornillos que se retiraron antes en
cada lado del compartimiento.
2
Llene con la espuma alrededor de la unidad
para evitar que tanto el aire como insectos se
metan en la habitación.
3
Antes de instalar la rejilla frontal, levante la
palanca del controlador de ventilación ubicada
encima de los botones de control de la unidad,
como se muestra. (para algunos modelos)
PRECAUCIÓN
●
La unidad es pesada. Pida ayuda a un asistente
para levantar la unidad y colocarla en su lugar.
Levantar y maniobrar la unidad usted solo podría
causarle lesiones.
Tornillo
Tornillo
La espuma
4
Conecte el arnés de cableado de la rejilla frontal
hasta el aire acondicionado.
5
Fije el montaje de la rejilla frontal con la cubierta
insertando las lengüetas en las ranuras de la rejilla
de la parte frontal de la cubierta. Empujar la rejilla
hasta que encaje en su lugar.
NOTA
●
Inserte con cuidado la palanca del controlador
de ventilación a través de la rejilla, mientras la
empuja hacia adentro.
6
Quite el filtro de aire de la rejilla delantera
tirando del él hacia adelante y, a continuación,
ligeramente hacia arriba.
Fijarlo con 2 Tipo Unos tornillos a través de la
rejilla frontal.
Instalaciones de la unidad en
la cubierta

17
FUNCIONAMIENTO
FUNCIONAMIENTO
SP
Panel de control y control remoto
Control remoto
1
Potencia
Presione para ENCENDER (ON) o APAGAR
(OFF) el aire acondicionado.
2
3
Retraso en el temporizador de
ENCENDIDO (ON) / APAGADO (OFF)
Retraso ENCENDIDO (ON) - cuando el aire
acondicionado está apagado (off), configúrelo
para que se encienda automáticamente de 1 a
24 horas más tarde, en su modo anterior y en la
configuración del ventilador.
Retraso APAGADO (OFF) - Cuando el aire
acondicionado está encendido (on), configúrelo
para que se apague automáticamente de 1 a 24
horas más tarde.
NOTA
●
Cada vez que presiona el botón
Timer
(Control Tiempo
)
,
éste avanza 1 hora.
Después de la última pulsación, la pantalla
vuelve al ajuste de temperatura.
4
Modo de funcionamiento
Presione el botón Modo para alternar entre 4 tipos
de operación del aire acondicionado: Ahorro Energía /
Frio / Vent. / Deshum.
- En este modo, el ventilador hace circular
Fan Speed (Nivel Vent.)
- Este modo es ideal para días
5
3
1
2
4
Vent.
el aire, pero el compresor no funciona.
Utilice el botón de para
ajustar la velocidad del ventilador en alta, media o
baja. En este modo, no puede ajustar la temperatura.
Deshum
lluviosos y húmedos para deshumidificar la
habitación en lugar de enfriarla significativamente.
Se elimina la humedad de la habitación por la
combinación del funcionamiento del compresor y la
velocidad del ventilador fijada en baja. El compresor
y el ventilador se apagan una vez que se alcanza la
temperatura establecida. No se puede ajustar la
velocidad del ventilador en el modo seco.
Velocidad del ventilador
Púlselo para establecer la velocidad del
ventilador en
Bajo (F1), Medio (F2) o
Alto (F3).
Fan Speed (Nivel Vent.)
Frío
enfriar y deshumidificar la habitación rápidamente.
Use los botones
para configurar la velocidad
de circulación del ventilador deseada.
temperatura ambiente deseada y use el botón
- este modo es ideal en los días de calor para
- En este modo, el compresor y Ahorro Energía
el ventilador se apagan cuando se alcanza la
temperatura establecida. Aproximadamente cada
3 minutos, el ventilador se enciende para permitir
que el sensor de la unidad determine con
precisión si se necesita más refrigeración.
Temp
para configurar la
7
1234
5
6

18
FUNCIONAMIENTO
5
6
7
Temp
y juntos en el panel de
control para apagar la luz de Limpieza filtro.
Las luces LED de Limpieza filtro se iluminan
para notificarle que es necesario limpiar el
filtro. Después de limpiar el filtro, pulse
NOTA
●
● Esta característica es un recordatorio para
limpiar el filtro de aire para un funcionamiento
más eficiente. La luz LED se enciende tras
250 horas de funcionamiento.
El restablecimiento del filtro debe hacerse
mediante el panel de control, no del control
remoto.
Sensor Del Control Remoto
Limpieza filtro
Control de temperatura
El termostato controla la temperatura de la
habitación para mantener la temperatura
deseada. El termostato se puede ajustar
entre 16 °C a 30 °C (60 °F-86 °F). Presione
las flechas
o para aumentar o
disminuir la temperatura.
NOTA
●
Auto Restart (Reinicio automático): si el aire
acondicionado se apaga debido a un corte de energía,
se reiniciará automáticamente una vez que se
restablezca la energía eléctrica, con los mismos
valores que se establecieron antes de que la unidad
se apagara.
●
Ahorro Energía (Ahorro de energía) la unidad pasa
al modo Ahorro de energía cada vez que se enciende,
excepto en el modo Ventilador o cuando se restablece
la energía después de un corte de energía eléctrica.
●
El control remoto no funcionará correctamente si el
sensor infrarrojo del AC está expuesto a la luz directa
o si hay obstáculos entre el control remoto y el aire
acondicionado.
1
2
Preste atención a la polaridad e inserte dos
nuevas batería AAA 1,5 Vcc.
3
Vuelva a colocar la cubierta.
Control remoto inalámbrico
Colocación de las pilas
Quite la tapa de la parte posterior del control
remoto.
NOTA
●
Las pilas nuevas se suministran con el aparato
de aire acondicionado para su uso en el control
remoto.
●
No use pilas recargables. Asegúrese de que las
pilas sean nuevas.
●
Para evitar la descarga, extraiga las pilas del
control remoto si el aire acondicionado no se va a
usar durante un período prolongado de tiempo.
●
Mantenga el control remoto alejado de lugares
extremadamente cálidos o húmedos.
●
Para mantener el funcionamiento óptimo del
control remoto, el sensor remoto no debe estar
expuesto a la luz solar directa.

19
FUNCIONAMIENTO
Ventilación
Empuje la palanca de ventilación en la posición
cerrada para mantener el mejor rendimiento de
refrigeración. Tire de la palanca de ventilación
hacia afuera para abrir la ventilación y extraer
aire fresco hacia la habitación.
Dirección del aire
de las rejillas del aire acondicionado.
de las persianas verticales a la izquierda o a la derecha.
El flujo de aire se puede ajustar cambiando la dirección
El flujo de aire horizontal se ajusta moviendo las palancas
de aire
Ajuste de dirección vertical del flujo
flujo de aire
Ajuste de dirección horizontal del
NOTA
●
Cuando el clima es extremadamente caliente, la
unidad se apagará automáticamente para proteger
el compresor.
Ventilador Slinger
Este aire acondicionado está equipado con un ventilador
slinger. (Ver dibujo).
El anillo exterior del ventilador recoge el agua
condensada de la bandeja base si el nivel de agua está
lo suficientemente alto. Después, el ventilador recoge
el agua y la expulsa a través del condensador, lo que
hace que el aire acondicionado sea más eficiente.
Anillo
aire hacia arriba o hacia abajo.
Toque las persianas horizontales para ajustar el flujo de
SP
Close Open

20
MANTENIMIENTO
MANTENIMIENTO
ADVERTENCIA
Antes de limpiar o realizar labores de
mantenimiento, desconecte el aparato de la red
y espere hasta que el ventilador se pare.
Filtro de aire
para ver si es necesario limpiarlo. Las partículas
atrapadas en el filtro pueden acumularse y bloquear el
Revisar el filtro de aire al menos dos veces al mes
flujo de aire, reduciendo la capacidad de enfriamiento
y provocando la acumulación de escarcha en el
evaporador.
Limpieza del aire acondicionado
●
Limpie la rejilla delantera y la rejilla de entrada de
aire con un paño humedecido en una solución de
detergente suave.
●
Lave la cubierta con jabón suave o detergente y
agua tibia, luego pula con cera líquida para equipos.
NOTA
●
bobinas del condensador (fuera de la unidad) deben
Para asegurar una eficiencia máxima continua, las
revisarse periódicamente y limpiarse si están
obstruidas con hollín o suciedad del aire exterior.
●
Para la reparación y mantenimiento, póngase en
contacto con un Centro de Servicio al Cliente de LG
Electronics. Consulte la tarjeta de garantía para
obtener más detalles o llame al 55 5321 1919.
Tenga a mano su número de modelo y número de
serie.
Limpieza del filtro de aire
3
2
exceso de agua y vuelva a colocarlo.
Sacuda suavemente el filtro para eliminar el
1
tirando de él hacia adelante y, a continuación,
Quite el filtro de sire de la rejilla delantera
ligeramente hacia arriba.
(104 °F).
Lave el filtro con agua tibia por debajo de 40 °C

21
SOLUCIÓN DE PROBLEMAS
SOLUCIÓN DE PROBLEMAS
Antes de llamar al servicio técnico
Este aparato está equipado con un sistema de monitoreo automático de errores para detectar y diagnosticar los
Los compresores de alta eficiencia de hoy en día pueden tener una vibración aguda durante el ciclo de
problemas en una fase temprana. Si el equipo no funciona correctamente o no funciona en absoluto, compruebe
lo siguiente antes de llamar al servicio técnico.
Sonidos normales que puede oír
1
Vibración aguda
2
Sonido de un torrente de aire
En la parte frontal de la unidad, puede oír el sonido de un torrente de aire siendo movido por el ventilador.
3
Gorgoteo/silbido
Se pueden oír gorgoteos o silbidos debido al refrigerante que pasa a través del evaporador durante el
funcionamiento normal.
4
Vibración
La unidad puede vibrar y generar ruidos debido a la mala calidad de la pared o ventana de construcción
o por instalación incorrecta.
enfriamiento.
5
Tintineo o silbido
Las gotitas de agua golpeando el condensador durante el funcionamiento normal pueden causar
sonidos de tintineo o silbido.
SP
1
2
3
4
5

22
SOLUCIÓN DE PROBLEMAS
El flujo de aire está restringido.
•
Asegúrese de que no haya cortinas, persianas o muebles que bloqueen el frente
del aire acondicionado.
Problema Causas posibles & Acción correctiva
El aire acondicionado está desconectado.
•
Asegúrese de que el enchufe del aire acondicionado esté completamente
El fusible está quemado/el interruptor ha fallado.
•
Verifique la caja de fusibles/interruptor de la casa y reemplace el fusible o reinicie
el interruptor.
insertado en el contacto.
Cuando se restablezca la alimentación, espere 3 minutos para reiniciar el aparato
Fallo de alimentación.
•
Si se produce un fallo de alimentación, cambie el modo de control a apagado.
de aire acondicionado para evitar la sobrecarga del compresor.
El filtro de aire está sucio.
•
Limpie el filtro al menos cada 2 semanas. Consulte la sección 'MANTENIMIENTO
(Limpieza del filtro de aire)".
Las bobinas de enfriamiento están congeladas.
•
El hielo puede bloquear el flujo de aire e impedir que el aire acondicionado enfríe
adecuadamente la habitación. Establezca la velocidad del ventilador alta en el
modo ventilador o enfriamiento.
El control de temperatura puede no estar configurado correctamente.
•
Ajuste la temperatura deseada a un nivel inferior a la temperatura actual.
Se escapa el aire frío.
•
Verifique los registros abiertos de la puerta del generador y los retornos de aire frío.
Las bobinas de enfriamiento están heladas.
•
Consulte "Congelación del aire acondicionado" a continuación.
Clima caluroso y húmedo.
•
Esto es normal.
para que la habitación se enfríe.
La habitación pudo haber estado caliente.
•
Cuando el aire acondicionado se enciende por primera vez, debe dejar tiempo
El aire
acondicionado no
se inicia.
El aire
acondicionado no
enfría como debería.
Aire acondicionado
congelado.
Gotea agua hacia
afuera.

NOTA
●
Si ve "CH" en la pantalla, por favor llame al 55 5321 1919
El sensor remoto
se desactiva de
manera prematura
Temperatura exterior extremadamente caliente.
•
Consulte las instrucciones de instalación o consulte con el instalador.
El aire acondicionado no está inclinado hacia el exterior.
•
Para una correcta disposición de agua, asegúrese de que el aire acondicionado
Elimina la humedad del aire y se drena en el panel base.
•
Esto es normal durante un corto período de tiempo en zonas con poca humedad;
normal durante un período más largo en las zonas muy húmedas.
esté inclinado ligeramente desde la parte delantera hacia la parte trasera de la
cubierta.
Filtro de aire sucio: aire restringido.
•
Limpiar el filtro de aire.
Vibración de la ventana: mala instalación.
•
Consulte las instrucciones de instalación o consulte con el instalador.
VENTILADOR.
Sonido de movimiento de aire.
•
Esto es normal. Si es demasiado ruidoso, ajústelo para reducir la velocidad del
El control remoto no está en el rango de alcance.
•
Ubique el control remoto dentro de un rango de 6,1 m y en un ángulo de 120º
desde el frontal de la unidad.
La señal del control remoto está obstruida.
•
Remueva la obstrucción.
La temperatura establecida es demasiado baja.
•
Aumentar la temperatura establecida.
Gotas de agua en el
interior.
El agua se acumula
en el panel base.
El aire acondicionado
se enciende y apaga
rápidamente.
Ruido cuando la
unidad se está
enfriando.
Habitación demasiado
fría.
Problema Causas posibles & Acción correctiva
23
SOLUCIÓN DE PROBLEMAS
SP
Modelo Voltaje Frecuencia
Refrigeración
Potencia
W121CE SL0 115 V~ 60 Hz
Nor. 1 040 W
Máx. 1 760 W
Nor. 9,7 A
Máx.15,1 A
- -
Corriente Potencia Corriente
Calefacción
W122CE SL0 220 V~ 60 Hz
Nor. 1 040 W
Máx. 1 530 W
Nor. 4,8 A
Máx. 7,6 A
- -

Sor Juana Inés de la Cruz No. 555
Col. San Lorenzo Industrial
Tlalnepantla de Baz, Estado de México C.P. 54033
Página web http://www.lg.com.mx
Tel. 55-5321-1919
-
 1
1
-
 2
2
-
 3
3
-
 4
4
-
 5
5
-
 6
6
-
 7
7
-
 8
8
-
 9
9
-
 10
10
-
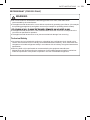 11
11
-
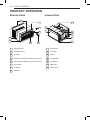 12
12
-
 13
13
-
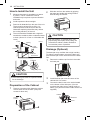 14
14
-
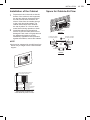 15
15
-
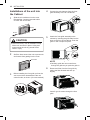 16
16
-
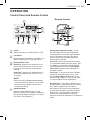 17
17
-
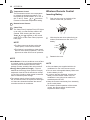 18
18
-
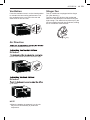 19
19
-
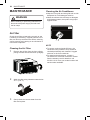 20
20
-
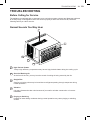 21
21
-
 22
22
-
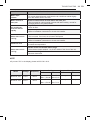 23
23
-
 24
24
-
 25
25
-
 26
26
-
 27
27
-
 28
28
-
 29
29
-
 30
30
-
 31
31
-
 32
32
-
 33
33
-
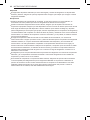 34
34
-
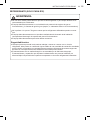 35
35
-
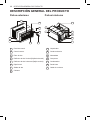 36
36
-
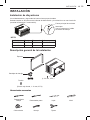 37
37
-
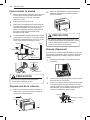 38
38
-
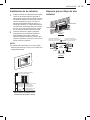 39
39
-
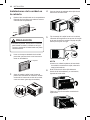 40
40
-
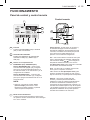 41
41
-
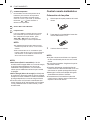 42
42
-
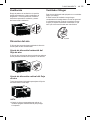 43
43
-
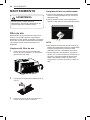 44
44
-
 45
45
-
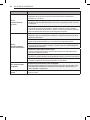 46
46
-
 47
47
-
 48
48


LG W122CE El manual del propietario
- Tipo
- El manual del propietario
- Este manual también es adecuado para
en otros idiomas
- English: LG W122CE Owner's manual
Artículos relacionados
Otros documentos
-
Hisense R32 Air Conditioner Manual de usuario
-
Rowenta RWAC9000C Manual de usuario
-
 Inventor M3GHP290-12 Portable Air Conditioning Systems Manual de usuario
-
Comfee AMBRA 6C/8C/9C/10C El manual del propietario
-
Panasonic WHSDC0305J3E5 Instrucciones de operación
-
Amazon B07XMRCXJ7 Manual de usuario
-
-
Panasonic CU2Z50TBE Instrucciones de operación
-
Panasonic CS-ME18PB4EA El manual del propietario
-
Danby DAC050MB2WDB El manual del propietario
