Web WABSORBFPR Instrucciones de operación
- Tipo
- Instrucciones de operación

Absorber
WEB Products, Inc
P.O. Box 3911
Kansas City, Kansas 66103
1-800-875-3212
www.webproducts.com
©2004 WEB Products
Made in USA
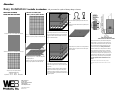
Filter Parts included/
Piezas del filtro incluidas
one green filter pad / una almohadilla filtrante verde
one black carbon pad / una almohadilla e carbon negro
one plastic grid / una rejilla de plástico
five plastic fasteners/ cinco sujentadores de plástico
A: Measure & cut filter parts/
Mida y corte las piezas del filtro
1
Measure your old filter as a guide for filter size.
Mida el filtro viejo como guía para el tamaño adecuado.
2
Using heavy-duty scissors - cut filter pads and plastic
grid to appropriate size.
Use tijeras comunes para cortar las almohadillas fil-
trantes y la rejilla de plástico al tamaño adecuado.
3
Use pointed end of heavy-duty scissors to punch two
holes through both pads in the corner of the filter pads.
Con la punta aguda de las tijeras comunes perfore dos
agujeros a través de ambas almohadills en la esquina
de las almohadillas filtrantes.
4
Insert the plastic fastener: open the fastener by spread-
ing the two round ends apart. Thread the two round
ends down through the holes in pads, and around plas-
tic grid line.
Introduzca el sujetador de plástico: ábralo separando
ambas puntas redondas. Haga pasar las dos puntas
redondas hacia abajo a través de los agujeros perfora-
dos en las almohadillas y alrededor de los filamentos de
la rejilla de plástico.
5
Close the fastener by twisting around the two round
ends.
Retuerza las puntas redondas de los sujetadores para
cerrarlos.
6
Repeat steps 3-5 to position four remaining fasteners.
Repita los pasas 3 a 5 para colocar los cuatro sujeta-
dores restantes.
7
Verify airflow direction of system before installing filter.
Place the filter in your furnace/ac system. Make sure to
insert the filter so that airflow enters the green side first.
Air should exit the filter through the black carbon pad
and lastly the plastic grid. Plastic grid faces furnace.
Antes de instalar el filtro, verifique la dirección del flujo
de aire del sistema. Coloque el filtro en su sistema de
calefacción/aire acondicionado. Asegúrese de colocar el
filtro de modo que el flujo de aire ingrese primero por el
lado verde. El aire debe salir del filtro por la almohadilla
de carbon negro y últimamente por la rejilla de plástico.
La rejilla de plástico estará orientada hacia el cale-
factor.
Remember to replace filter at least every 90 days.
Recuerde reemplazar el filtro cada 90 días como míni-
mo.
Easy Installation: Installs in minutes. All you need is a pair of heavy-duty scissors.
Transcripción de documentos
Absorber Easy Installation: Installs in minutes. A: Measure & cut filter parts/ Mida y corte las piezas del filtro Filter Parts included/ Piezas del filtro incluidas All you need is a pair of heavy-duty scissors. 3 5 7 1 Close the fastener by twisting around the two round ends. Retuerza las puntas redondas de los sujetadores para cerrarlos. Use pointed end of heavy-duty scissors to punch two holes through both pads in the corner of the filter pads. one green filter pad / una almohadilla filtrante verde Measure your old filter as a guide for filter size. Mida el filtro viejo como guía para el tamaño adecuado. Con la punta aguda de las tijeras comunes perfore dos agujeros a través de ambas almohadills en la esquina de las almohadillas filtrantes. 6 2 4 Repeat steps 3-5 to position four remaining fasteners. Repita los pasas 3 a 5 para colocar los cuatro sujetadores restantes. one black carbon pad / una almohadilla e carbon negro Using heavy-duty scissors - cut filter pads and plastic grid to appropriate size. Use tijeras comunes para cortar las almohadillas filtrantes y la rejilla de plástico al tamaño adecuado. five plastic fasteners/ cinco sujentadores de plástico WEB Products, Inc P.O. Box 3911 Kansas City, Kansas 66103 1-800-875-3212 www.webproducts.com ©2004 WEB Products Made in USA Antes de instalar el filtro, verifique la dirección del flujo de aire del sistema. Coloque el filtro en su sistema de calefacción/aire acondicionado. Asegúrese de colocar el filtro de modo que el flujo de aire ingrese primero por el lado verde. El aire debe salir del filtro por la almohadilla de carbon negro y últimamente por la rejilla de plástico. La rejilla de plástico estará orientada hacia el calefactor. Remember to replace filter at least every 90 days. Insert the plastic fastener: open the fastener by spreading the two round ends apart. Thread the two round ends down through the holes in pads, and around plastic grid line. Introduzca el sujetador de plástico: ábralo separando ambas puntas redondas. Haga pasar las dos puntas redondas hacia abajo a través de los agujeros perforados en las almohadillas y alrededor de los filamentos de la rejilla de plástico. one plastic grid / una rejilla de plástico Verify airflow direction of system before installing filter. Place the filter in your furnace/ac system. Make sure to insert the filter so that airflow enters the green side first. Air should exit the filter through the black carbon pad and lastly the plastic grid. Plastic grid faces furnace. Recuerde reemplazar el filtro cada 90 días como mínimo.-
 1
1

Web WABSORBFPR Instrucciones de operación
- Tipo
- Instrucciones de operación
en otros idiomas
Artículos relacionados


Otros documentos
-
GE 49-80388 12-05 JR Manual de usuario
-
-
-
GE Profile JGP989BCBB El manual del propietario
-
NuTone Fresh Air System ERV90HCT Installation Instructions Manual
-
ELICA EVR636SS Guía de instalación
-
-
GE JGBS09PEFWW El manual del propietario
-
Hotpoint RGB780DEH2CC El manual del propietario