La página se está cargando...

User Manual
Bedienungsanleitung
Manuel de l’utilisateur
Manual del Usuario
Manuale d’istruzione
Brugerhåndbog
PAM Standard System
PAM Standarsystem / Système Standard PAM /
Sistema Standard PAM / Sistema Estándar PAM /
PAM standard system
2-10 channel through-beam Photo amplifier system
Lichtschrankenverstärker für 2-10 Einweglichschranken /
Système amplificateur photoélectrique 2-10 canaux à rayon
traversant / Amplificador de fotocélulas de barrera de 2 a 10
canales / Amplificatore 2-10 ch per fotocellule a barriera /
2-10 kanals through-beam foto forstærker system

ENGLISHDEUTSCHFRANÇAISESPAÑOLITALIANODANSK
Page 3
Seite 10
Page 16
Página 22
Pagina 28
Side 34

3
Photoelectrics
Amplifier, µ-Processor Controlled
Type PAM, up to 10 Inputs/10 Transistor Outputs
Page
Operation diagram 4
Mode of operation 4
Signal inputs on Basic Module 7
Expansion Kit 8
Relay module 9
Specifications 40
Basic Module and Sensor Module 42
Wiring Diagram 43
Dimensions 43
ENGLISH
FRANÇAIS
ESPAÑOL
ITALIANO
DANSK DEUTSCH
• From 2 to 10 sets of photoelectric sensor heads
• Independent transistor outputs
• Manual or automatic adjustment for each channel
• High light immunity
• Multiplexed system, no crosstalk
• Self test and diagnostics
• Alignment help, 0-10 VDC output, bargraph or buzzer
• External settings and control functions
Contents

4
ENGLISHDEUTSCHFRANÇAISESPAÑOLITALIANODANSK
Operation diagram
Signal strength
Time
Object present
Signal quality
Output NO
Mode of operation
Power up
When power is connected to the system, the Basic Module (BM) will
search and identify all the other modules in the system. All LEDs on the
sensor modules turn ON for approximately 1.5 seconds. The system is
operational after 1.5 seconds.
Indication during operation
A yellow output LED ”Y” and a red level LED ”R” are present for each
sensor channel. A green power LED ”G” and a red alarm LED are
present on the Basic Module.
Basic module Sensor module Function
Green Red Yellow Red
ON - - - Power
- - ON - Sensor output activated,
signal sufficient
- - ON ON Sensor output activated,
signal insufficient
- - - ON Sensor output deactivated,
signal insufficient
- - - - No signal
- ON - ON When any of the red LEDs on the sensor
module is activated constantly for more
than 2.5 seconds, the alarm LED on the
Basic Module turns on. LED and buzzer
flash with 2 Hz.

5
ENGLISH
FRANÇAIS
ESPAÑOL
ITALIANO
DANSK DEUTSCH
Test button (identical function can be reached by test input)
The Basic Module features a push button to activate system test and
alignment help.
System test: Press and release push button once
Alignment: Press and release once more for alignment on
channel one. (Step through each channel by
pressing the push button several times, the
yellow LED indicates the channel being aligned).
Exit: Press and hold for more than 3 seconds and all
sensor module LED’s turn ON for approximately
1.5 seconds.
NB! Output is off during test or alignment.
System test (for activating see ”Test button”)
The system is tested as well as the sensors and sensor connection
cables. Test mode is indicated by all sensor module LED’s being on
for approximately one second. After one second each LED indicates
diagnostics.
Alignment (for activating see ”Test button”)
The signal strength is indicated by:
Bargrap -indicates the signal strength by lighting up the LED’s. One
LED is weak signal, 10 LED’s is strong signal.
Buzzer - if activated the buzzer changes repetition frequency
according to the signal strength, continuous frequency is
strong signal.
Sensor module Function
Yellow Red
Constantly on - All tests OK
Flashing - Emitter fault
- Flashing Receiver fault
Constantly on Constantly on Sensors not correctly paired
Flashing alternately Signal insufficient
Flashing simultaneously Emitter and receiver fault

6
ENGLISHDEUTSCHFRANÇAISESPAÑOLITALIANODANSK
Alignment output - the alignment output source is a 0 - 10 VDC
voltage reflecting the signal strength where 10
VDC is strong signal.
Outputs (See indication during operation, yellow LED sensor
module)
Transistor output
The NPN or PNP output is a standard normally open (make switching)
output.
Alarm output (See indication during operation, red LED B. module)
The NPN or PNP alarm output is a normally open (make swiching)
output.
DIP switches (identical function for Channel A or B)
Gain settings
Manual: by turning the potentiometer away from minimum
position, the emitter power is regulated by the
potentiometer.
Automatic: by setting the potentiometer to minimum position, the
emitter power is regulated automatically when the ”Auto
Adjust Input” is activated.
Gain 100% / 25% Description
ON - The setting of the channel can be
set to 100% by the gain overrule
input.
OFF - The Gain overrule is disabled
- ON Maximum emitter power is 100%
- OFF Maximum emitter power is 25%

7
ENGLISH
FRANÇAIS
ESPAÑOL
ITALIANO
DANSK DEUTSCH
Signal inputs at the Basic Module
Test input (see test button)
The test input function as a remote test button. An active signal will
activate the input.
Gain overrule input (see DIP switches)
An active signal will set all channels, with gain function enabled, to
100% power.
Auto adjust input (see gain settings)
An active signal of at least 50 ms will activate the automatic Gain ad-
justment function on all channels with potentiometer set to minimum
position. The automatic gain adjust sequence lasts approximately three
seconds.

8
ENGLISHDEUTSCHFRANÇAISESPAÑOLITALIANODANSK
It is possible to extend the number of channels up to 10 channels (5
sensor modules). When having a 6 channel amplifier and an expansion
kit, the procedure is as described below.
1) Remove the label in the right upper corner of the cover.
2) Place the expansion kit close to the right side of the amplifier.
3) Connect the cable which is delivered together with the expansion
kit between the amplifier and the expansion kit.
4) Check the positions of the “BUS” jumpers; must be “OUT”
on the amplifier and “IN” on the expansion kit (factory default
setting).
Expansion Kit

9
ENGLISH
FRANÇAIS
ESPAÑOL
ITALIANO
DANSK DEUTSCH
It is possible to add an 6 channel relay module.
When having a standard amplifier and an relay module, the procedure
is shown on the following photos.
1) Remove the label in the right upper corner of the cover.
2) Place the relay module close to the right side of the amplifier.
3) Connect the cable which is delivered together with the relay
module between the amplifier and the expansion kit.
Relay module

10
ENGLISHDEUTSCHFRANÇAISESPAÑOLITALIANODANSK
Fotoelektrische Schalter
Verstärker, µ-Prozessorgesteuert
Typ PAM, 10 Eingänge/10 Transistorausgänge
Signaleingänge am Grund Seite
Betriebsdiagramm 11
Betriebsarten 11
Signaleingänge am Grundmodul 14
Erweiterungsmodule 14
Relaismodul 15
Technische Daten 40
Grundmodul and Sensormodule 42
Schaltbild 43
Abmessungen 43
• 2 bis 10 Lichtschranken (Empfänger + Receiver) anschließbar
• unabhängige Transistor-Ausgänge je Lichtschranke
• manuelle oder automatische Einstellung für jeden Kanal
• hohe Immunität gegenüber Fremdlicht
• Multiplexsystem, keine gegenseitige Beeinflussung der Kanäle
• Selbsttest und Selbstdiagnose
• Ausrichthilfen, 0-10 VDC Ausgang, Balkenanzeige oder Summer
• Steuereingänge
Inhaltsverzeichnis

11
ENGLISH
FRANÇAIS
ESPAÑOL
ITALIANO
DANSK DEUTSCH
Betriebsdiagramm
Betriebsarten
Signal strength
Time
Object present
Signal quality
Output NO
Signalstärke
Zeit
Objekt vorhanden
Signalqualitåt
Schließer-Ausgang
Inbetriebsetzung
Nach Anlegen der Betriebsspannung sucht das Grundmodul (BM)
nach allen im System angeschlossenen Sensormodulen. Alle LEDs der
Sensormodule leuchten nach dem Anlegen der Betriebsspannung für ca.
1,5s bis alle Module erkannt sind.
Das System ist nach etwa 1,5 s funktionsbereit.
Anzeige
Sensormodule: gelbe LED Y (Ausgang) / rote LED R (Signal)
Grundmodul: grüne LED G (Betriebsspannung) und rote LED R (Alarm).
Grundmodul Sensormodul Funktion
Grün Rot Gelb Rot
EIN - - - Betriebsspannung
- - EIN - Kanalausgang aktiviert,
Signal ausreichend
- - EIN EIN Kanalausgang aktiviert,
Signal nicht ausreichend
- - - EIN Kanalausgang nicht aktiviert,
Signal nicht ausreichend
- - - - Kein Signal
- EIN - EIN Falls eine der roten Alarm-LEDs auf einem
Sensormodul länger als 2,5s ein ist, geht
die Alarm-LED auf dem Grundmodul an.
Die LED und der Summer takten mit 2 Hz.

12
ENGLISHDEUTSCHFRANÇAISESPAÑOLITALIANODANSK
Prüftaste
Das Grundmodul hat eine Taste für die Aktivierung von der System-
überprüfung und der Abgleichhilfe.
Systemtest: Wird die Taste einmal betätigt und wieder losgelassen,
dann wird die „Systemüberprüfung” aktiviert.
Abgleich: Die zweite Betätigung aktiviert die „Abgleichhilfe” für
Kanal 1, wiederholtes Betätigen aktiviert „Abgleichhilfe”
für Kanal 2, usw.
Beenden: Halten Sie die Taste länger als 3s bis alle LED für ca.
1,5s leuchten. Damit werden die Systemüberwachung
und die Abgleichhilfe beendet und in den Normalbetrieb
zurückgekehrt.
Anmerkung! Alle Ausgänge sind während Test und Abgleich deaktiviert.
Systemtest (Aktivierung siehe „Prüftaste” weiter oben)
Sowohl das System als auch alle angeschlossenen Sensoren und deren
Anschlussleitungen werden überprüft.
Der Testbetrieb wird dadurch angezeigt, dass alle LEDs etwa 1 s leuch-
ten. Danach zeigt die LED für jeden Kanal die Diagnose:
Abgleichhilfe (Aktivierung siehe „Prüftaste” weiter oben)
Balkenanzeige: Anzeige der Signalstärke mittels LEDs. Das Leuchten
nur einer LED bedeutet „schwaches Signal”. Alle LEDs
Ein zeigt „starkes Signal”
Sensormodul Funktion
Gelb Rot
Andauernd - alle Test erfolgreich
leuchtend
Blinkend - Fehler Sender
- Blinkend Fehler Empfänger
Andauernd Andauernd Sender / Empfänger zwischen
leuchtend leuchtend Kanälen vertauscht
Abwechselnd blinkend Kein ausreichendes Signal
Gleichzeitig blinkend Fehler Sender und Empfänger

13
ENGLISH
FRANÇAIS
ESPAÑOL
ITALIANO
DANSK DEUTSCH
Summer: Die Taktfrequenz des Tones ändert sich in Abhängigkeit
von der Signalstärke. Geringe Frequenz heißt
„schwaches Signal”, anhaltender Ton bedeutet
„starkes Signal”.
Ausgänge (siehe „Anzeige” Sensormodul gelbe LED)
NPN oder PNP Transistorausgang für jeden Kanal als Schließer (hell-
schaltend).
Alarmausgang (siehe „Anzeige” Grundmodul rote LED)
Der Alarmausgang wird bei niedrigem Signal auf einem der Kanäle
oder als Ergebnis einer Funktionsprüfung aktiviert. Der Alarmtongeber
(Summer) und die LED blinkt mit 2 Hz.
DIP-Schalter auf Sensormodul (je Kanal)
Der 25% DIP-Schalter ermöglicht eine Reduktion des Bereiches, um
bei kurzen Reichweiten die Einstellung zu verbessern.
Der DIP-Schalter „Gain” aktiviert Steuereingang für 100%
Senderleistung.
Einstellung Senderleistung
Die Einstellung der Senderleistung erfolgt durch ein Potentiometer auf
dem Sensormodul.
Manuell: Durch verstellen des Potentiometers oberhalb der
Minimum-Position wird die Leistung des Senders
eingestellt
Automatik: Wenn dass Potentiometer auf Minimum-Position
gestellt wird und der Eingang „Auto Adjust” aktiviert ist,
wird die Senderleistung automatisch geregelt.
Gain 100% / 25% Beschreibung
EIN - Durch Aktivierung am Eingang “Gain”
am Grundmodul werden Sender auf
100% Leistung gesetzt
AUS - Eingang „Gain” 100% Signal deaktiviert
- EIN Senderleistung kann bis auf 100%
eingestellt werden
- AUS Senderleistung kann bis auf 25%
eingestellt werden

14
ENGLISHDEUTSCHFRANÇAISESPAÑOLITALIANODANSK
Die Anzahl der Kanäle kann auf bis zu 10 erweitert werden (5
Sensormodule). Die Vorgehensweise für einen 6-Kanal-Verstärker und
ein Erweiterungskit wird im Folgenden beschrieben.
1) Entfernen Sie den Aufkleber in der rechten oberen Ecke der
Abdeckung.
2) Platzieren Sie das Erweiterungsmodul direkt rechts neben den
Grundmodul
3) Verbinden Sie das Grundmodul und das Erweiterungsmodul mit
dem mitgelieferten Kabel
4) Prüfen Sie die Positionen der „BUS“-Jumper. Der Jumper am
Verstärker muss auf „OUT“, der Jumper am Erweiterungskit auf
„IN“ gestellt sein (werkseitige Standardeinstellung).
Erweiterungsbausatz
Signaleingänge am Grundmodul
Testeingang (siehe Testtaster)
Der Testeingang arbeitet als entfernter Testtaster. Ein aktives Signal
aktiviert den Eingang.
Aufhebungseingang für die Verstärkung (siehe DIP-Schalter)
Ein aktives Signal setzt alle Kanäle mit aktivierter Verstärkungsfunktion
auf eine Leistung von 100 %.
Eingang für die automatische Einstellung
(siehe Verstärkungseinstellungen)
Ein aktives Signal von mindestens 50 ms aktiviert die Funktion zur
automatischen Einstellung der Verstärkung bei allen Kanälen, deren
Potenziometer sich in Minimalstellung befindet. Die Sequenz zur auto-
matischen Einstellung der Verstärkung dauert etwa drei Sekunden.

15
ENGLISH
FRANÇAIS
ESPAÑOL
ITALIANO
DANSK DEUTSCH
Das System kann um ein 6-Kanal-Relaismodul ergänzt werden.
Die Vorgehensweise für einen Standardverstärker und ein Relaismodul
wird im Folgenden beschrieben.
1) Entfernen Sie den Aufkleber in der rechten oberen Ecke der
Abdeckung.
2) Platzieren Sie das Relaismodul direkt rechts neben den
Grundmodul
3) Verbinden Sie das Grundmodul und das Relaismodul mit dem
mitgelieferten Kabel
Relaismodul

16
ENGLISHDEUTSCHFRANÇAISESPAÑOLITALIANODANSK
Cellules photoélectriques
Amplificateur contrôlé par µ-Processeur
Type PAM, jusqu’à 10 entrées /10 sorties transistorisées
Page
Diagramme de Fonctionnement 17
Principe de Fonctionnement 17
Entrées des signaux sur le Module de Base 20
Kit d’extension 20
Module de relais 21
Caractéristiques Techniques 40
Module de base et Module capteur 42
Diagramma de Conexiones 43
Dimensions 43
• De 2 à 10 jeux de têtes de détection photoélectriques
• Sorties transistor séparées
• Réglage manuel ou automatique par canal
• Haute immunité à la lumière
• Système multiplexé, pas de diaphonie
• Auto tests et diagnostics
• Aide à l’alignement, sortie 0-10 VCC, indicateur graphique à
barres ou ronfleur
• Réglages externes et fonctions de contrôle
Contents

17
ENGLISH
FRANÇAIS
ESPAÑOL
ITALIANO
DANSK DEUTSCH
Principe de Fonctionnement
Mise sous tension
Une fois l’alimentation raccordée au système, le Module de Base (BM)
recherche et identifie tout autre module qui se trouve dans le système.
A la mise sous tension toutes les LED s’allument sur les modules de
détection puis s’éteignent dès que le BM a identifié le ou les modules.
Le système est opérationnel en 1,5 seconde environ.
Signalisation
Les lettres Y et R respectivement éclairées par des LED jaune et rouge
matérialisent chaque canal. Le module de base comporte un G (LED
verte) et une LED rouge.
Diagramme de Fonctionnement
Signal strength
Time
Object present
Signal quality
Output NO
Présence objet
Qualité du signal
Sortie NO
Temps
Force du signal
Mod. de base Module capteur Functionnement
Verde Rouge Jaune Rouge
ON - - - Alimentation
- - ON - Sortie de capteur activée,
signal suffisant
- - ON ON Sortie de capteur activée,
signal insuffisant
- - - ON Sortie de capteur inactivée,
signal insuffisant
- - - - Pas de signal
- ON - ON Pour tout canal, la LED de niveau active
la sortie alarme ainsi que la LED rouge
d’alarme du Module de Base si ce dernier
reste actif au cours d’une période
prolongée.

18
ENGLISHDEUTSCHFRANÇAISESPAÑOLITALIANODANSK
Bouton de test
Le Module de Base comporte un bouton poussoir d’activation du
système et d’aide à l’alignement. En appuyant et en relâchant une fois,
on active le “test système”. En appuyant et en relâchant deux fois de
suite, on active la fonction « aide à l’alignement Canal 1 », etc.
Pour quitter le Test Système et l’Aide à l’Alignement et revenir en Mode
Normal, maintenir le bouton appuyé plus de trois secondes.
LED alarme
Lorsque le signal reçu d’un ou plusieurs canaux est inférieur au seuil
d’alarme, la LED d’alarme du Module de Base (BM) s’allume.
Mode Test
Lorsqu’on appuie une fois sur le bouton du Module de Base, on active
le mode test. Dans ce mode, le système et les capteurs sont raccordés.
Lors de l’entrée en mode test toutes les LED s’allument pendant 1 s
environ. Ensuite, pour chaque canal, l’état de la LED correspond au
diagnostic suivant:
Au cours du test, les sorties sont désactivées.
Pour quitter le mode test, maintenir le bouton appuyé pendant 3 se-
condes jusqu’à ce que toutes les LED s’allument.
Aide d’alignement
En mode de test, le bouton sert à passer d’un canal à l’autre et à sélec-
tionner le canal à aligner.
La LED jaune du canal sélectionnée est allumée.
La sortie alignement ou le bargraph indiquent la valeur du signal reçu.
Module de capt. Fonctionnement
jaune Rouge
Alumée en fixe - Tous les tests sont OK
Clignotante - Défaut émetteur
- Clignotante Défaut récepteur
Alumée en fixe Alumée en fixe Canaux mal appaires
Clignotantes en alternance Signal suffisant
Clignotantes en stimultanément Défaut émetteur et récepteur

19
ENGLISH
FRANÇAIS
ESPAÑOL
ITALIANO
DANSK DEUTSCH
Sorties
Sortie transistor NPN ou PNP pour chaque canal, rebouclant à
l’alimentation 24 VCC du système par commutation travail (NO).
Sortie alarme
La sortie alarme est active lors de la présence d’un signal de bas ni-
veau sur l’un ou l’autre canal ou suite à une fonction test. Fréquence de
fonctionnement du BIP et/ou de la LED : 2 Hz.
Le DIP switch de l’alarme sonore permet de désactiver le Bip.
DIP switch
Le DIP switch 25%, permet de diminuer la distance de détection afin
d’améliorer le réglage sur les distances courtes. Le DIP switch GAIN
permet d’augmenter le gain.
Potentiomètre de réglage de gain
Ce potentiomètre permet de régler le gain. Pour activer la fonction
Réglage Auto, régler ce potentiomètre en permanence en position mini.
Fonctions d’Alignement
Sortie 0-10 V
Signal analogique 0-10 indiquant la force du signal. Une transfor-
mation spéciale du signal détecte même les signaux les plus faibles,
tout en permettant d’ajuster les signaux les plus forts. Cette fonction
facilite le réglage des détecteurs à faisceau étroit même sur de longues
distances.
BIP
Signal d’alignement acoustique/optique, le temps d’activité/d’inacti-
vité du “Bip” ou de la LED varient en fonction du signal d’alignement.
Gan. 100% / 25% Description
ON - Une entrée “forçage gain” permet de
régler le gain du canal à 100 %
OFF - Entrée forçage gain désactivée
- ON La puissance maxi de l’émetteur est
de100 %
- OFF Puissance maxi de l’émetteur est de
25 %

20
ENGLISHDEUTSCHFRANÇAISESPAÑOLITALIANODANSK
Le “Bip” continu ou la LED allumée en fixe indiquent une intensité
maximale du signal.
Bargraph
Signal d’alignement LED 0-10 = 0-10 V.
On peut augmenter le nombre de canaux jusqu’à 10 (modules à 5 cap-
teurs). L’utilisation d’un amplificateur standard avec kit d’extension est
décrite ci-dessous.
1) Déposer l’extrémité du boîtier ouvert.
2) Installer la carte CI.
3) Remonter l’extrémité du boîtier ouvert.
4) Ne pas omettre de raccorder la nouvelle carte CI au bloc de
shunts.
4) Contrôle des réglages : les cavaliers « BUS » doivent être
réglés sur « OUT » sur l’amplificateur et sur « IN » sur le kit
d’extension (réglage d’usine par défaut).
Kit d’extension
Entrées des signaux sur le Module de Base
Entrée Test (voir § Bouton Test)
L’entrée Test permet de démarrer le test à distance. L’activation de
l’entrée se fait par un signal actif.
Entrée Dépassement de Gain (voir sélecteurs DIP)
Lorsque la fonction Dépassement de Gain est active, un signal actif
règle tous les canaux à 100 % de puissance.
Entrée Réglage auto (Voir Réglage de gain)
Lorsque le potentiomètre est en position minimale, un signal actif d’une
durée de 50 ms minimum active la fonction Réglage Automatique
du Gain sur tous les canaux. La durée de la séquence de Réglage
Automatique du Gain est de 3 s environ.

21
ENGLISH
FRANÇAIS
ESPAÑOL
ITALIANO
DANSK DEUTSCH
Il est possible d’ajouter un relais à 6 canaux.
L’utilisation d’un amplificateur standard avec un relais est décrite
ci-dessous.
1) Déposer l’étiquette aposée à l’angle supérieur droit du capot
2) Positionner le module de relais à droite, à côté de l’amplificateur.
3) Raccorder le câble fourni avec le module de relais entre
l’amplificateur et le kit d’extension.
Module de relais

22
ENGLISHDEUTSCHFRANÇAISESPAÑOLITALIANODANSK
Fotocélulas
Amplificador, Controlado por Microprocesador
Modelo PAM, hasta 10 Entradas/10 Salidas de Transistor
Página
Diagrama de Funcionamiento 23
Modo de Funcionamiento 23
Entrada de señal del Módulo Básico 26
Kit de Ampliación 26
Módulo de relé 27
Especificaciones 40
Módulo básico y Módulo de sensor 42
Diagrama de Conexiones 43
Dimensiones 43
• De 2 a 10 fotocélulas de barrera
• Salidas de transistor independientes
• Ajuste manual o automático de cada canal
• Alta inmunidad contra la luz ambiente
• Multiplexado para evitar diafonía
• Autoverificación y diagnósticos
• Ayuda de alineación, salida de 0-10 VCC,
gráfico de barras o zumbador
• Ajustes externos y funciones de control
Índice

23
ENGLISH
FRANÇAIS
ESPAÑOL
ITALIANO
DANSK DEUTSCH
Diagrama de Funcionamiento
Modo de Funcionamiento
Activación
Una vez conectada la alimentación del sistema, el módulo básico
buscará e identificará todos los demás módulos del sistema. Todos
los LED de los sensores se activarán durante aproximadamente 1,5
segundos. El sistema está listo para funcionar después de 1,5 segundos.
Indicaciones durante el funcionamiento
Para cada canal de sensor hay un LED amarillo “Y” para la salida y un
led rojo ”R” para el nivel. En el módulo básico hay un LED verde “G”
para la alimentación y un LED rojo para la alarma.
Signal strength
Time
Object present
Signal quality
Output NO
Objeto presente
Calidad señal
Salida NA
Tiempo
Potencia de la señal
Módulo básico Módulo de sensor Función
Verde Rojo Amarillo Rojo
ON - - - Potencia
- - ON - Salida de sensor activada, señal suficiente
- - ON ON Salida de sensor activada, señal
insuficiente
- - - ON Salida de sensor inactivada, señal
insuficiente
- - - - Ninguna señal
- ON - ON Cuando cualquiera de los LED rojos del
sensor están activados constantemente
durante más de 2,5 segundos, se activará
el LED de alarma del módulo básico. El
LED y el zumbador parpadearán con 2 Hz.

24
ENGLISHDEUTSCHFRANÇAISESPAÑOLITALIANODANSK
Botón de verificación (se pueden obtener funciones idénticas a
través de entradas de prueba)
En el Módulo Básico (MB) hay un botón para activar una verificación
del sistema y ayuda de alineación.
Verificación del sistema: Presione y suelte el botón una vez
Alineación: Presione y suelte otra vez para realizar una
alineación del canal uno. (Presionando el
botón, pasa al canal siguiente. El LED
amarillo indica qué canal se está alineando).
Salir: Mantenga el botón presionado durante 3
segundos; se encenderán todos los LED de
los sensores durante aproximadamente 1,5
segundos.
Nota: Las salidas están desactivadas durante la verificación o
alineación.
Verificación del sistema (véase ”Botón de prueba” para activación)
Se realiza una prueba del sistema, de los sensores y de las conexiones de
los sensores. Cuando todos los LED de los módulos se activan a la vez
durante aproximadamente un segundo, indica modo de prueba. Después
de un segundo cada LED indica diagnóstico.
Alineación (véase ”Botón de prueba” para activación)
La potencia de la señal queda indicada por:
Gráfico de barras -indica la potencia de la señal a través de la
luz de los LED. Un LED indica una señal débil,
10 LED indican una señal fuerte.
Módulo de sensor Función
Amarillo Rojo
Perm. activado - Todas las pruebas OK
Parpadea - Fallo de emisor
- Parpadea Fallo de receptor
Perm. activado Perm. activado Sensores mal emparejados
Parpadean alternativamente Señal insuficiente
Parpadean simultáneamente Fallo de emisor y receptor

25
ENGLISH
FRANÇAIS
ESPAÑOL
ITALIANO
DANSK DEUTSCH
Zumbador - al activar el zumbador, éste cambia su
frecuencia de repetición según la potencia de
la señal. Una frecuencia continua representa
una señal fuerte.
Salida de alineación la señal de salida de la alineación es una
tensión de 0 a 10 VCC reflejando la potencia
de la señal, donde 10 VCC representa una
señal fuerte.
Salidas (Véase la indicación durante la operación, LED amarillo)
Salida de transistor
La salida NPN o PNP es una salida estándar NA (normalmente abierta).
Salida de alarma (Véase la indicación durante la operación, sensor
de LED rojo)
La salida NPN o PNP es una salida NA (normalmente abierto).
Interruptores DIP (funciones idénticas para canales A o B)
Ajuste de ganancia
Manual: al girar el potenciómetro alejándolo de la posición
mínima, la potencia del emisor es regulada por el
potenciómetro.
Automático: ajustando el potenciómetro en su posición mínima, la
potencia del emisor es regulada automáticamente al
activar la ”Entrada de autoajuste”.
Gan. 100% / 25% Descripción
ON - Se puede ajustar el canal al 100% a
través de la entrada de anulación de
ganancia.
OFF - Anulación de ganancia inhabilitada
- ON Potencia máxima de emisión 100%
- OFF Potencia máxima de emisión 25%

26
ENGLISHDEUTSCHFRANÇAISESPAÑOLITALIANODANSK
Es posible ampliar el número de canales hasta 10 (5 módulos de sen-
sor). Cuando se tiene un amplificador de 6 canales y un kit de amplia-
ción, se debe seguir el procedimiento descrito a continuación.
1) Quite la etiqueta de la esquina superior derecha de la tapa.
2) Coloque el kit de ampliación cerca del lado derecho del
amplificador.
3) Conecte el cable suministrado junto con el kit de ampliación
entre el amplificador y el kit de expansión.
4) Compruebe las posiciones de los puentes del “BUS”; deben
estar “OUT” en el amplificador e “IN” en el kit de expansión
(ajuste por defecto de fábrica).
Kit de Ampliación
Entrada de señal del Módulo Básico
Entrada de prueba (véase el botón de prueba)
La entrada de prueba funciona como un botón de prueba remoto. Una
señal activa activará la entrada.
Entrada de anulación de ganancia (véase interruptores DIP)
Una señal activa ajustará todos los canales con la función de ganancia
habilitada al 100% de potencia.
Entrada de autoajuste (véase ajuste de ganancia)
Una señal activa de al menos 50 ms. activará la función de ajuste au-
tomático de la ganancia para todos los canales con el potenciómetro
ajustado a la posición mínima. La secuencia de ajuste automático de la
ganancia tarda aproximadamente tres segundos.

27
ENGLISH
FRANÇAIS
ESPAÑOL
ITALIANO
DANSK DEUTSCH
Es posible añadir un módulo de relé de 6 canales.
Cuando se tiene un amplificador estándar y un módulo de relé, se debe
seguir el procedimiento descrito a continuación.
1) Quite la etiqueta de la esquina superior derecha de la tapa.
2) Coloque el módulo de relé cerca del lado derecho del
amplificador.
3) Conecte el cable suministrado junto con el módulo de relé entre
el amplificador y el kit de expansión.
Módulo de relé

28
ENGLISHDEUTSCHFRANÇAISESPAÑOLITALIANODANSK
Amplificatore per fotocellule
A µ-processore
Modello PAM,
fino a 10 ingressi/10 uscite a transistor
Pagina
Diagramma di Funzionamento 29
Modalitá di Funzionamento 29
Ingressi sul modulo base 31
Kit di espansione 32
Modulo a relé 33
Caratteristiche Tecniche 40
Modulo base e Modulo sensore 42
Collegamenti Elettrici 43
Dimensioni 43
• Da 2 a 10 coppie di fotocellule
• Uscite indipendenti a transistor
• Sensibilitá manuale o automatica per ogni canale
• Alta immunitá alla luce
• Sistema multiplexato, no crosstalk
• Autotest e sistema di autodiagnostica
• Auto allineamento, uscita 0-10 V, bargraph o buzzer sonoro
• Regolazione esterna e funzioni di controllo
Indice

29
ENGLISH
FRANÇAIS
ESPAÑOL
ITALIANO
DANSK DEUTSCH
Diagramma di Funzionamento
Potenza del segnale
Tempo
Oggetio presente
Qualità del segnale
Uscita na
Modalità di Funzionamento
Attivazione
Dopo che l’alimentazione è stata collegata al sistema, il modulo base
(MB) provvederà alla ricerca ed identificazione di tutti gli altri moduli
del sistema. Tutti i LED del modulo sensore si accendono per circa 1,5
secondi. Il sistema sarà quindi operativo dopo 1,5 secondi.
Indicazioni durante il funzionamento
Il sistema è dotato di un LED di uscita giallo ”Y” ed un LED di livello
rosso ”R” per ciascun canale del sensore. Sul modu lo base si trova un
LED di alimentazione verde ”G” ed un LED di allarme rosso.
Modulo base Modulo sensore Funzione
Verde Rosso Giallo Rosso
ON - - - Alimentazione
- - ON - Uscita sensore attivata, segnale sufficiente
- - ON ON Uscita sensore attivata, segnale insufficiente
- - - ON Uscita sensore inattivata, segnale
insufficiente
- - - - Nessun segnale
- ON - ON Se uno dei LED rossi del modulo sensore
è attivato costantemente per più di 2,5
secondi, l’ indicazione di allarme a LED del
modulo base si accende. Il LED lampeg-
gerà ed il dispositivo acustico emetterà
segnali con la frequenza di circa 2 Hz.

30
ENGLISHDEUTSCHFRANÇAISESPAÑOLITALIANODANSK
Pulsante di prova (la medesima funzione si può ottenere con
l’ingresso di prova)
Il modulo base comprende un pulsante per l’attivazione del dispositivo
di prova del sistema e della guida all’allineamento.
Prova del sistema: Premere e lasciare il pulsante una volta
Allineamento: Premere e lasciare il pulsante una seconda
volta per l’allineamento sul canale uno (agire su
ciascun canale premendo il pulsante più volte;
il LED giallo indica che il canale è in corso di
allineamento).
Esci: Per uscire premere il pulsante e mante nerlo
premuto per più di 3 secondi; tutti i LED del
modulo sensore si accendono per circa 1,5
secondi.
NB! L’uscita è disattivata durante la prova o l’allineamento.
Prova del sistema (per l’attivazione vedere ”Pulsante di prova”)
Il sistema viene verificato insieme ai sensori ed ai cavi di connessione
dei sensori. La modalità test viene segnalata dall’accensione di tutti
i LED del modulo sensore per ca. 1 secondo; dopo di che ogni LED
indicherà i seguenti dati diagnostici:
Allineamento (per l’attivazione vedere ”Pulsante di prova”)
L’intensità del segnale è indicata da:
Indicatore a scala - indica l’intensità del segnale per mezzo dei
LED illuminati. Un LED indica segnale debole,
10 LED indicano segnale forte.
Dispositivo acustico - se attivato il dispositivo acustico cambia la
frequenza di ripetizione in funzione dell’inten-
sità del segnale; se la frequenza è continua
allora il segnale è a forte intensità.
Uscita di allineamento. - L’uscita di allineamento ha una tensione di
0 - 10 VCC che riflette l’intensità del segnale
in modo che 10 VCC indica il segnale a forte
intensità.
Funzionamento del modulo sensore
Giallo Rosso
Costantemente on - Tutte le verifiche ok
Lampeggiamento - Errore dell’emettitore
- Lampeggiamento Errore del ricevitore
Costantemente on Constantemente on Sensori non accoppiati bene
Lampeggiamento alternato Segnale insufficiente
Lampeggiamento simultaneo Errore di emettitore e ricevitore

31
ENGLISH
FRANÇAIS
ESPAÑOL
ITALIANO
DANSK DEUTSCH
Uscite (vedere indicazione durante il funzionamento, LED giallo
modulo sensore)
Uscita a transistor
L’uscita NPN o PNP è preimpostata normalmente aperta (NA).
Uscita di allarme (vedere indicazione durante il funzionamento,
LED rosso modulo base)
L’uscita di allarme NPN o PNP è normalmente aperta (NA).
DIP switch (identica funzione per il canale A o B)
Impostazione di guadagno
Manuale: ruotando il potenziometro a partire dal minimo
si può regolare la potenza dell’emettitore.
Automatica: impostando il potenziometro al minimo, la
potenza dell’emettitore viene regolata automa-
ticamente se l’ ”ingresso di ottimizzazione” è
attivato.
Ingresso di prova (vedere ”Pulsante di prova”)
L’ingresso di prova funziona come un pulsante di prova a distanza.
L’ingresso viene attivato da un segnale attivo.
Ingresso di annullamento di guadagno (vedere DIP switch)
L’attivazione di un segnale porrà tutti i canali con funzione di guadagno
attivata ad alimentazione del 100%.
Ingresso di ottimizzazione (vedere impostazione di guadagno)
L’attivazione di un impulso di almeno 50 ms attiva la funzione di ottimiz-
zazione del guadagno su tutti i canali, se il potenziometro di guadagno
è impostato sul minimo. La sequenza di ottimizzazione del guadagno
viene eseguita in ca. 3 secondi.
Guadagno 100% / 25% Descrizione
ON - Il canale può essere impostato a 100% per mezzo
dell’ingresso di annullamento di guadagno.
OFF - La funzione di annullamento di guadagno è
disattivata
- ON Max. dell’emettitore di potenza 100%
- OFF Max. dell’emettitore di potenza 25%
Ingressi sul modulo base

32
ENGLISHDEUTSCHFRANÇAISESPAÑOLITALIANODANSK
E’ possibile estendere il numero dei canali fino a raggiungere 10 canali
(5 moduli sensore). Nel caso di un amplificatore a 6 canali ed un kit di
espansione, seguire la procedura descritta qui di seguito.
1) Rimuovere l’etichetta nell’angolo superiore destro della calotta.
2) Posizionare il kit di espansione al lato destro dell’amplificatore.
3) Connettere il cavo fornito insieme al kit di espansione tra
l’amplificatore ed il kit stesso.
4) Controllare che il ponticello “BUS” sia “OUT” sull’amplificatore e
“IN” sul kit di espansione (settaggio di fabbrica).
Kit di espansione

33
ENGLISH
FRANÇAIS
ESPAÑOL
ITALIANO
DANSK DEUTSCH
E’ possibile aggiungere un modulo a relé a 6 canali.
Nel caso di un amplificatore standard ed un modulo a relé, seguire la
procedura descritta qui di seguito.
1) Rimuovere l’etichetta nell’angolo superiore destro della calotta.
2) Posizionare il modulo a relé al lato destro dell’amplificatore.
3) Connettere il cavo fornito insieme al modulo a relé tra
l’amplificatore ed il kit di espansione.
Modulo a relé

34
ENGLISHDEUTSCHFRANÇAISESPAÑOLITALIANODANSK
Fotoceller
Forstærker, Mikroprocessorstyret
Type PAM, 10 indgange/10 transistorudgange
Side
Funktionsdiagram 35
Funktionsbeskrivelse 35
Signalindgang på grundmodul 38
Udvidelses sæt 38
Relay modul 39
Specifikationer 40
Basis modul og Sensor modul 42
Forbindelsesdiagram 43
Dimensioner 43
• Fra 2 til 10 sæt af fotoelektriske sensor hoveder
• Uafhængige transistor udgange
• Manuel eller automatisk justering af hver kanal.
• Lille lyspåvirkning
• Multipleks-system, ingen krydstale
• Selvtest og diagnose
• Indstillingshjælp, 0-10 VDC udgang, søjledisplay eller summer
• Eksterne opsætnings og kontrol funktioner
Indhold

35
ENGLISH
FRANÇAIS
ESPAÑOL
ITALIANO
DANSK DEUTSCH
Funktionsdiagram
Signal strength
Time
Object present
Signal quality
Output NO
Funktionsbeskrivelse
Opstart
Når forsyningen sluttes til systemet, vil grundmodulet (GM) søge efter og
identificere alle andre moduler i systemet. På fotocellemodulerne aktive-
res alle lysdioder efter opstart, og de deaktiveres, når GM har identificeret
mo dulet. Systemet er driftklart efter ca. 1,5 sek.
Indikation
Der findes en gul Y og en rød R lysdiode for hver kanal samt en grøn G
og en rød lysdiode på grundmodulet.
Signalstyrke
Emne til stede
Signal kvalitet
Udgang, normalt
åben (NO)
Tid
Basis modul Sensor modul Funktion
Grøn Rød Gul Rød
ON - - - Tændt
- - ON - Sensor udgang aktiveret,
signal tilstrækkeligt
- - ON ON Sensor udgang aktiveret,
signal utilstrækkeligt
- - - ON Sensor udgang deaktiveret,
signal utilstrækkeligt
- - - - Intet signal
- ON - ON Hvis en af de røde lysdioder på sensor
modulet er tændt i mere end 2,5 sekunder,
vil alarm lysdioden på basis modulet blive
tændt. Lysdiode og summer blinker med
2 Hz.

36
ENGLISHDEUTSCHFRANÇAISESPAÑOLITALIANODANSK
Testknap
Grundmodulet indeholder en trykknap, der aktiverer en systemtest og
justerings hjælp.
Hvis knappen trinaktiveres (trykkes ned og slippes) én gang, ak-
tiveres ”Systemtest”, hvis den trinaktiveres to gange, aktiveres
”Justeringshjælp” for kanal 1 osv.
Hvis knappen holdes nede i mere end 3 sek., afsluttes systemtest, og
systemet vender tilbage til normalfunktionen.
Alarmlysdiode
Når det modtagne signal fra en eller flere kanaler ligger under
”alarm-værdien”, aktiveres alarmlysdioden på GM.
Testfunktion
Ved at trykke på knappen på GM én gang aktiveres testfunktionen,
hvorved systemet og de tilsluttede fotoceller afprøves.
Testfunktionen angives ved, at alle lysdioder aktiveres i ca. 1 sek.
Derefter angiver lysdioden for hver enkelt kanal følgende diagnostik:
Udgangene er deaktiveret under afprøvningen.
Testfunktionen afsluttes ved at trykke på knappen og holde den nede i 3
sek., indtil alle lysdioder er aktiveret.
Justeringshjælp
I testfunktionen anvendes knappen til at vælge den kanal, der skal ju-
steres, ved at gennemgå kanalerne trinvist.
Den gule lysdiode for den valgte kanal er aktiveret.
Justeringsudgangen eller søjledisplayet viser det modtagne signals
værdi.
Sensor modul Funktion
Gul Rød
Konstant tændt - All test OK
Blinker - Sender fejl
- Blinker Modtager fejl
Konstant tændt Konstant tændt Sensorerne er ikke korrekt paret
Blinker skiftevis Signal utilstrækkeligt
Blinker samtidigt Sender og modtager fejl

37
ENGLISH
FRANÇAIS
ESPAÑOL
ITALIANO
DANSK DEUTSCH
Udgange
NPN- eller PNP-transistorudgang for hver kanal, med reference til sy-
stemforsyningen på 24 V DC som en sluttefunktion (NO, normalt åben).
Alarmudgang
Alarmudgangen aktiveres, hvis der er en lav signalværdi på en af ka-
nalerne, eller som resultat af en funktions test. Summeren/lysdioden
blinker med 2 Hz.
Alarmsummerens DIP-switch deaktiverer alarmsummeren.
DIP-switches
Med DIP-switchen til 25 % kan området nedbringes for at forbedre
justeringen over korte afstande.
DIP-switchen til forstærk ning (GAIN) aktiverer forstærkningsoverstyrings-
funktionen.
Potentiometerjustering
Potentiometeret til “Emitter Power adjust” an ven des til at justere for-
stærkningen. Hvis det bliver stående i minimumindstillingen, aktiveres den
automatiske justeringsfunktion.
Gain 100% / 25% Beskrivelse
ON - Indstillingen af kanalen kan sættes til
100% ved at aktivere “gain” input.
OFF - “Gain” input er spærret.
- ON Maximal sendestyrke er 100%
- OFF Maximal sendestyrke er 25%

38
ENGLISHDEUTSCHFRANÇAISESPAÑOLITALIANODANSK
Det er muligt at udvide antallet af kanaler op til ti kanaler (fem
fotocellemo duler). Proceduren for en 6-kanals forstærker og et udvidel-
sessæt beskrives således:
1) Fjern etiketten i øverste højre hjørne af æsken.
2) Plaser udvidelses sættet tæt ved højre side af forstærkeren.
3) Forbind kablet, som er leveret sammen med udvidelsessættet,
mellem forstærkeren og udvidelsessættet (se billede).
4) Kontroller placeringen af ”BUS”-jumperne. De skal være ” u d e ”
på forstærkeren og ”inde” på udvidelsessættet (standardind-
stilling).
Signalindgange på grundmodul
Testindgang (se test-knap)
Testindgangsfunktionen som fjerntestknap. Indgangen aktiveres af et
aktivt signal.
Forstærkningsindgang (se DIP switche)
Når forstærkningsfunktionen er aktiveret, vil et aktivt signal sætte styrken
på alle kanaler til 100%.
Automatisk justering (se forstærkningsindstillinger)
Et aktivt signal på mindst 50 ms aktiverer den automatiske forstærk-
ningsfunktion på alle kanaler med potentiometeret sat på minimal positi-
on. Den automatiske forstærkningsjustering varer ca. tre sekunder.
Udvidelsessæt

39
ENGLISH
FRANÇAIS
ESPAÑOL
ITALIANO
DANSK DEUTSCH
Det er muligt at tilføje et 6 kanals relæmodul.
Proceduren for en 6-kanals forstærker og et 6-kanals relæmodul beskri-
ves således:
1) Fjern etiketten i øverste højre hjørne af æsken.
2) Plaser relæmodulet tæt ved højre side af forstærkeren.
3) Forbind kablet, som er leveret sammen med relæmodulet,
mellem forstærkeren og relæmodulet (se billede).
Relæ modul

40
Power supply / Betriebsspannung / Alimentation / Alimentación /
Alimentazione / Forsyning
18 - 33 VDC (18 - 33 VCC)
Rated operational power / Leistungsaufnahme /
Puissance nom. de fonct. / Potencia nominal /
Assorbimento / Egetforbrug
Max. 13 W
Transistor output
/ Transistorausgang
/ Transistor de
Sortie
/ Salida
de transistor
/ Uscita
a transistor
/ Transistorudgang
Max. 20 mA
Auto adjustment input / Aut. Einst. Eingang / Entrée réglage auto / Entrada
de autoajuste / Ingresso di ottimizzazione / Testindgang
≤ 6 V not active
(NPN or PNP) ≥ 14 V active
not active / nicht aktiv / non active / no activada / non attivato / ikke aktiv
active / aktiv / active / activada / attivato / aktiv
Gain overrule input / Ansteuereingang für die Verstärkung / Entrée forçage
gain / Ent. de anulación de ganancia / Ingresso annullamento guadagno /
Indgang til forstærkningsoverst.
≤ 6 V not active
(NPN or PNP) ≥ 14 V max. gain
not active / nicht aktiv / non active / no activada / non attivato / ikke aktiv
max. gain / max. Verstärkung / gain maxi. / ganancia máx. / max. guadagno /
maks. forstærkning
Specifications / Technische Daten / Caractéristiques Techniques / Especificaciones / Caratteristiche Tecniche / Specifikationer
ENGLISHDEUTSCHFRANÇAISESPAÑOLITALIANODANSK

41
Specifications / Technische Daten / Caractéristiques Techniques / Especificaciones / Caratteristiche Tecniche / Specifikationer
Response time
/
Ansprechzeit / Temps de résponse /
Tiempo de resp. /
Tempo di rusposta/ Reaktionstid
OFF-ON (tON) 7.5 ms (2 channels)
15.0 ms (4 channels)
22.5 ms (6 channels)
30.0 ms (8 channels)
45.0 ms (10 channels)
ON-OFF (tOFF) 7.5 ms (2 channels)
15.0 ms (4 channels)
22.5 ms (6 channels)
30.0 ms (8 channels)
45.0 ms (10 channels)
Power ON delay
/
Einschaltverzögerung nach Anlegen der Betriebsspannung
/ Temps de mise sous tension / Retardo a la conexión
/ Ritardo all’accensione /
Indkoblingsforsinkelse
Typ. 1 s
Temperature, operating
/
Umgebungstemperatur, Betrieb /
Température en fonctionnement /
temp. de funcionamiento /
Temperatura di funzionamento / Omgivelsestemperatur, drift
-20°C
-->
+50°C
(-4°F --> +122°F)
Temperature, storage
/
Umgebungstemperatur, Lager /
Température de stockage /
Temp. de almacenamiento /
Temperatura di immagazzinaggio / Omgivelsestemperatur, lager
-50°C --> +85 °C (-58°F --> +185°F)
Degree of protection / Schutzart / Indice de protection /
Grado de protección / Grado di protezione / Tæthedsgrad
IP 20
ENGLISH
FRANÇAIS
ESPAÑOL
ITALIANO
DANSK DEUTSCH

42
ENGLISHDEUTSCHFRANÇAISESPAÑOLITALIANODANSK
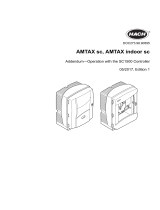
Power LED
Alarm LED
Buzzer on/off
Bargraph
Test button
Channel B
Emitter Power adjust
Output
100/25% CH A
100/25% CH B
Channel A
Emitter Power adjust
Level
GAIN CH B
GAIN CH A
Basic Module
Grundmodul
Module de base
Módulo básico
Modulo base
Basis modul
Sensor Module
Sensormodul
Module capteur
Módulo de sensor
Modulo sensore
Sensor modul
Basic Module and Sensor Module / Grundmodul und
Sonsormodule / Module de base et Module capteur / Módulo bási-
co y Módulo de sensor / Modulo base e Modulo sensore / Basis
modul og Sensor modul
Power LED / LED Betriebsspannung / LED de Alimentation / LED de potencia /
LED alimentazione / Forsynings LED
Alarm LED / LED Alarm / LED d’alarrme / LED de alarma / LED Allarme / Alarm LED
Buzzer on/off / Summer Ein/Aus / Marche/arrêt ronfleur / Zumbador on/off /
Cicalino on/off / Summer til/fra
Bargraph / Balkenanzeige / Bargraph / Código de barras / Bargraph / Søjledisplay
Test button / Prüftaste / Bouton de test / Botón de prueba / Pulsante di test /
Testknap
Channel / Kanal / Canaux / Canal / Canale / Kanal
Emitter Power adjust / Einstellung Senderleistung / Réglage de puissance de
l’émetteur / Ajuste potencia emisor / Regolazione potzenza emettitore / Justering af
sende-styrke
Level / Signal / Niveau / Nivel / Livello / Niveau
Output / Ausgang / Sortie / Salido / Uscita / Udgang
GAIN / Gain / Gain / GAN / Guadagno / Forstærkning

43
Sensor
module
Basic
module
CH 1
CH 2
CH 3
CH 4
CH 5
CH 6
Alarm
Gnd
PNP
connection
Gnd
NPN
V+
Com.
A.adj.
Test
Gain
PNP
connection
NPN
V+
Wiring Diagram / Schaltbild / Schéma de Câblage
/ Diagrama de Conexiones / Collegamenti Elettrici /
Forbindelsesdiagram
Dimensions / Abmessungen / Dimensions / Dimensiones /
Dimensioni / Dimensioner
ENGLISH
FRANÇAIS
ESPAÑOL
ITALIANO
DANSK DEUTSCH
2 channel / 2 Kanäle / 2 canaux / 48x69x60 mm
2 canales / 2 canali / 2 kanaler
4 channel / 4 Kanäle / 4 canaux / 71x69x60 mm
4 canales / 4 canali / 4 kanaler
6 channel / 6 Kanäle / 6 canaux / 93x69x60 mm
6 canales / 6 canali / 6 kanaler
8 channel / 8 Kanäle / 8 canaux / 119x69x60 mm
8 canales / 8 canali / 8 kanaler
10 channel / 10 Kanäle / 10 canaux / 141x69x60 mm
10 canales / 10 canali / 10 kanaler
Connection /Anschluss /
Raccordement / Conexión /
Connessione / Tilslutning
GND / Masse / Masse / Tierra /
Collegamento di terre / Jord
Load / Last / Charga / Carga /
Carico / Belastning
Basic module / Grundmodul /
Module de base / Módulo básico /
Modulo base / Basis modul
Sensor module / Sensormodul /
Module capteur / Módulo sensor /
Modulo sensore / Sensormodul
Alignment / Abgleich / Alignement /
Alineación / Allineamento / Justering
Supply / Betriebsspannung /
Alimentation / Alimentación /
Alimentazione / forsyning

CARLO GAVAZZI INDUSTRI A/S
www.gavazziautomation.com
Certified in accordance with ISO 9001
Gerätehersteller mit dem ISO 9001/EN 29 001 Zertifikat
Une société qualifiée selon ISO 9001
Empresa que cumple con ISO 9001
Certificato in conformità con l’IS0 9001
Kvalificeret i overensstemmelse med ISO 9001
MAN PAM06AN3A0 MUL rev.12 - 12.16 15-029-80-1
/