Zanussi ZCB770X Manual de usuario
- Categoría
- Hornos
- Tipo
- Manual de usuario

EN
User manual 2
ES
Manual de instrucciones 27
Steam oven
Horno de vapor
ZCB 770

Contents
Safety information _ _ _ _ _ _ _ _ _ _ _ _ _ _ _ _ 2
Product description _ _ _ _ _ _ _ _ _ _ _ _ _ _ _ _ 3
Operation _ _ _ _ _ _ _ _ _ _ _ _ _ _ _ _ _ _ _ _ _ 6
Helpful hints and tips _ _ _ _ _ _ _ _ _ _ _ _ _ _ 10
Cooking tables _ _ _ _ _ _ _ _ _ _ _ _ _ _ _ _ _ 12
Care and cleaning _ _ _ _ _ _ _ _ _ _ _ _ _ _ _ _ 18
What to do if… _ _ _ _ _ _ _ _ _ _ _ _ _ _ _ _ _ 22
Technical data _ _ _ _ _ _ _ _ _ _ _ _ _ _ _ _ _ _ 23
Installation instructions _ _ _ _ _ _ _ _ _ _ _ _ _ 24
Technical Assistance and Spare Parts _ _ _ _ _ _ _ 25
Environment concerns _ _ _ _ _ _ _ _ _ _ _ _ _ _ 26
Subject to change without notice
Safety information
Warning! Always keep these user instructions with
the appliance. Should the appliance be passed on
to third persons or sold, or if you leave this appliance
behind when you move house, it is very important that the
new user has access to these user instructions and the
accompanying information.
These warnings are provided for the safety of the users
and those living with them. So read them carefully before
connecting and/or using the appliance.
Installation
• The installation must be performed by a qualified per-
son in accordance with the rules and regulations in
force. The individual operations for installing the ap-
pliance are described under the instructions for the
installer.
• Have the appliance installed and connected by a quali-
fied person with specialist knowledge, who will carry
it out in accordance with the directives.
• If any modifications to the power supply are required
because of the installation, these should also be carried
out by a qualified electrician.
Operation
• This oven is designed for cooking foodstuffs; never
use it for other purposes.
• Always cook with the oven door closed, even when
grilling.
• When opening the oven door during or at the end of
cooking be careful of the stream of hot air, which comes
out of the oven.
• Be very careful while using the appliance. The extreme
heat of the heating elements makes the shelves and
other parts very hot.
• If you should for whatever reason use aluminium foil
to cook food in the oven, never allow it to come into
direct contact with the floor of the oven.
• When cleaning the oven, proceed with care: never
spray anything onto the grease filter (if fitted), the
heating elements and the thermostat sensor.
• If is dangerous to make modifications of any kind to
this appliance or to its specifications.
• During the baking, roasting and grilling process, the
oven window and the other parts of the appliance get
hot, so children should be kept away from the appli-
ance. Take care, if connecting electrical appliances to
sockets near the oven, that cables do not come into
contact with hot rings or get caught in the oven door.
• Always use oven gloves to take hot ovenproof dishes
or pots out of the oven.
• Regular cleaning prevents the surface material from
deteriorating.
• Before cleaning the oven, either turn the power off or
pull the mains plug out.
• Make sure that the oven is in the “OFF” position, when
the oven is no longer being used.
• This oven was made as a single appliance or as a
combination appliance with electrical hotplate, de-
pending on the model, for single-phase connection to
230 V.
• The appliance must not be cleaned with a superheated
steam cleaner or a steam jet cleaner.
• Do not use abrasive cleaners or sharp metal scrapers.
These can scratch the glass in the oven door, which
may result in the shattering of the glass.
People Safety
• This appliance is intended for use by adults. It is dan-
gerous to allow children to use it or play with it.
2

• Children should be kept away while the oven is work-
ing. Also, after you have switched the oven off, it re-
mains hot for a long time.
• This appliance is not intended for use by children or
other persons whose physical, sensory or mental ca-
pabilities or lack of experience and knowledge prevents
them from using the appliance safely without super-
vision or instruction by a responsible person to ensure
that they can use the appliance safely.
Customer Service
• Have checks and/or repairs carried out by the manu-
facturer’s service department or by a service depart-
ment authorised by the manufacturer and use only
original spare parts.
• Do not attempt to repair the appliance yourself in the
event of malfunctions or damage. Repairs carried out
by untrained persons may cause damage or injury.
Product description
6
7
11 12
14 15
3
4
5
8
9
10
1
2
13
1 Control panel
2 Oven lamp
3 Grill
4 Fan
5 Rating plate
6 Water tank indicators
7 Water tank
8 Steam intake
9 Water outlet valve
10 Water outlet probe
11 Thermostat knob
12 Electronic timer
13 Oven function control knob
14 Thermostat control indicator
15 Mains on indicator
3

Oven accessories
Cake tray Dripping pan
Shelf
Controls
Push-Pull control knobs
The appliance is provided with push-pull control knobs.
These knobs can be completely sunken inside the control
panel when the oven is not working.
Thermostat control knob
Turn the temperature control knob clockwise, to select
temperatures between 50°C and 250°C
Oven functions
Oven off
Oven lamp
Conventional cooking
Fan forced cooking
Bottom heat
Full grill
Thermal grill
Fan cooking
Pizza
Steam cooking
4

Mains on Indicator
The mains on light comes on when the oven function
control knob is set.
Thermostat Control Indicator
The thermostat control indicator will come on when the
thermostat control knob is turned. The indicator will re-
main on until the correct temperature is reached. It will
then cycle on and off to show the temperature is being
maintained.
Safety Thermostat
To prevent dangerous overheating (through incorrect use
of the appliance or defective components), the oven is
fitted with a safety thermostat, which interrupts the power
supply. The oven switches back on again automatically,
when the temperature drops.
Should the safety thermostat trigger due to incorrect use
of the appliance, it is enough to remedy the error after the
oven has cooled down; if on the other hand, the thermostat
triggers because of a defective component, please contact
Customer Service.
The cooling fan
The cooling fan is designed to cool the oven and the con-
trol panel. The fan switches on automatically after a few
minutes of cooking. Warm air is blown out through the
aperture near the oven door handle. When the oven is
switched off, the fan will remain on in order to cool the
oven and kitchen cabinets properly, after which it switches
off automatically.
How to use the water tank
1
Select the "STEAM" func-
tion
Pull the tank outwards as
shown in the figure.
2
Continue to extract it as
far as it will come.
3
Fill the tank with water
until the "Tank full" warn-
ing light comes on. Then
start to close the tank by
pressing on the centre of
the lid.
4
To close the tank, press
it down until it returns to
its original position.
Warning! Use only drinking water as liquid to fill
the water tank. DO NOT use filtered water, distilled
water, demineralized water or other liquids.
Do not pour inflammable or alcoholic liquids (grappa,
whisky,cognac, etc.) in the loading drawer.
Remove all packaging, both inside and outside the
oven, before using the oven.
The oven works only if the time has been set.
5

When using the oven for the first time, set the current time
with the programmer (refer to the instructions in the sec-
tion "Electronic programmer").
When switching the oven on for the first time:
1. Set the thermostat to position 250 ;
2.
Turn the selector to the symbol
3. Heat the oven EMPTY for about 45 minutes;
4. Ensure the room is ventilated during the entire oper-
ation.
During the first minutes of operation, IT IS ABSOLUTELY
NORMAL for the oven to produce unpleasant odours and
fumes. This is due to heating of insulation and manufac-
turing residues.
After 45 minutes, allow the oven to cool, then clean the
interior with warm water and delicate detergent.
It is advisable to repeat the above procedure selecting the
dual grill function
and ventilated cooking for about
5-10 minutes.
To open the oven door, always grip the handle in
the middle.
Before cooking for the first time, carefully wash the
GRILL and DRIP-TRAY (i.e. the enamelled metal
tray with raised edges located inside the oven).
Operation
The timer
21 3
8
4567
1
“Cooking Duration” pilot lamp
2 Display - "
3
“Minute minder” pilot lamp
4
“Time of day” pilot lamp
5 Increasing control button " + "
6
Push button for selecting a function
7 Decreasing control button " - "
8
“End of cooking” pilot lamp
The oven will only work if the time of day has been
set. However, the oven can also be operated without
any programme.
In the event of a power failure, all the settings (time
of day, programme setting or programme in oper-
ation) will be cancelled. When the power is restored, the
numbers in the display will flash, and the clock/timer has
to be reset.
Setting the time
As soon as the appliance is electrically connected, or after
a power failure, the "Time of day" indicator flashes.
To set the clock:
1. Push the buttons" - " or " + " to set the time.
2. Wait 5 seconds: the "Time of day" indicator goes off
and the set time appears on the display.
To change the time:
1. Push Selector button repeatedly until the "Time of
day" indicator flashes on the display.
6

The time can only be changed if automatic functions
have not been set "Cooking time" or "End of cook-
ing" ).
2. Wait 5 seconds: the "Time of day" indicator goes off
and the set time appears on the display.
Warning!
In the event of a power failure, the data entered in the
programmer is deleted and must be newly entered when
the current returns.
Cooking Duration function
This function allows the oven to automatically switch off
at the end of a programmed cooking duration time. Place
food in the oven, select a cooking function and adjust the
cooking temperature. Press button
repeatedly to select
the “Cooking Duration” function. The relevant pilot lamp
will start flashing. Then, proceed as follows:
To set the duration time
1. Press button " + " or " - ".
2. After the setting is carried out, wait for 5 seconds: the
"Cooking Duration" pilot lamp
will come on and
the display will revert to the time of day.
3. When cooking time is over, the oven will be switched
off automatically and an acoustic alarm will be heard,
while the pilot lamp will start flashing. Turn the oven
function and the thermostat control knob to zero.
To switch off the acoustic alarm, press any button.
Turning the acoustic alarm off will reset the oven to
manual, and if the oven function and the thermostat knobs
are not set to zero the oven will start to heat again.
To cancel the duration time
1.
Press button
repeatedly to select the “Cooking
Duration” function. The relevant pilot lamp
will
flash and the display will show the remaining cooking
time.
2. Press button " - " until the display shows “0:00”. After
5 seconds the pilot lamp will go out and the display
will revert to the time of day.
End of cooking
With this function, you can set the oven to switch off au-
tomatically when a programmed end of cooking time is
over. Place food in the oven, select a cooking function
and adjust the cooking temperature. Press button
re-
peatedly to select the “End of cooking” function. The rel-
evant pilot lamp
will start flashing.
To set the End of cooking time
1. Press button " + " or " - ".
2. After the setting is carried out, wait for 5 seconds: the
“End of cooking” pilot lamp
will come on and the
display will revert to the time of day.
3. When cooking time is over, the oven will be switched
off automatically and an acoustic alarm will be heard,
and the pilot lamp will start flashing. Turn the oven
function and the thermostat control knob to zero.
To switch off the acoustic alarm, press any button.
Turning the acoustic alarm off will reset the oven to
manual, and if the oven function and the thermostat knobs
are not set to zero the oven will start to heat again.
To cancel the End of cooking time
1.
Press button
repeatedly to select the “End of
cooking” function. The relevant pilot lamp
will
flash and the display will show the programmed End
of cooking time.
2. Press button " - "until the display shows the current
time of day. The programmer will beep and the pilot
lamp will go out.
7

Cooking duration and End of cooking time
combined
The functions “Cooking duration” and “End of cooking
time” can be used simultaneously to set the oven to switch
on and off automatically at a later time.
1.
With the “Cooking duration” function
(carry out
the cooking duration setting as described in the rel-
evant chapter) set the duration time. Then, press but-
ton
and the display will show the programmed
setting.
2.
With the “End of cooking time” function
(carry
out the End of cooking setting as described in the
relevant chapter) set the end of cooking time.
The relevant pilot lamps will come on and the display
will show the time of day. The oven will switch on and
off according to the set programmes.
Minute minder
The minute minder alarm will sound at the end of a timed
period, but the oven will remain on, if it is in use.
To set the minute minder
1.
Press button repeatedly to select the “Minute
minder” function. The relevant pilot lamp
will start
flashing.
2. Press button " + "or " - " (maximum: 2 hours, 30
minutes).
3. After the setting is carried out, wait for 5 seconds: the
“Minute minder” pilot lamp
will come on.
4. At the end of the timed period, the pilot lamp will start
flashing and an acoustic alarm will be heard. To
switch off the acoustic alarm, press any button.
To cancel the minute minder
1.
Press button
repeatedly to select the “Minute
minder” function. The relevant pilot lamp
will
flash and the display will show the remaining time.
2. Press button " - " until the display shows “0:00”. After
5 seconds the pilot lamp will go out and the display
will revert to the time of day.
How to prepare the oven for steam cooking
Fill the water tank before every steam cooking.
"Tank empty" indicator
The indicator shows that the tank is empty and you
need to refill the tank.
"Tank full" indicator
The indicator shows that the oven is ready for steam
cooking.
Pull out the water tank and fill it with water until the "tank
full"
indicator comes on. The maximum capacity of
the water tank is 0,8 l. It is enough for about 40/45 minutes
cooking.
After that press the water tank back to its original position.
Now the oven is ready for steam cooking.
If you fill the water tank with maximum capacity (0,8
l) and the "tank empty" indicator remains on, the
failure requires a technical assistance.
8

If you pour too much water into the water tank, a
safety outlet pours it back into the bottom of the
oven. Mop up this excess water with a sponge or cloth.
How to use Steam cooking
For steam cooking, proceed as follows:
1. Before every steam cooking, fill the water tank. To fill
the water tank, refer to "How to prepare the oven for
Steam cooking".
2. Prepare the food in pots suitable for oven use. Place
them on the grill on the level suggested in the cooking
tables. The 2nd level from the bottom usually gives
the best results.
3. Turn the oven function control knob to the Steam
function
4. Set the temperature between 140 and 230 °C. Steam
cooking does not give very good results in temper-
atures above 230° C.
Steam appears when the oven reaches the set tem-
perature.
5. Empty the water tank after each steam cooking (refer
to "Emptying the water tank")
Warning! Wait at least 30 minutes after every steam
cooking in order to avoid hot water exit from water
outlet valve.
Advice and suggestions for steam cooking
• Do not cover the pots with lids as this prevents the
steam coming into contact with the food.
• You can also cook your dishes directly on the grill. In
this case remember to pour a little water into the drip-
tray and to slide it into position beneath the grill.
• The drip-tray will collect the fats melted during cook-
ing, and the water prevents the fats from burning and
producing unpleasant odours or smoke
• If you wish to open the door to check the cooking
process, remember to disconnect the STEAM function.
After you have checked the food, close the door and
select the steam cooking function once more.
The possible formation of condensate on the oven
door glass, walls and bottom does not affect oven
operation. We recommend you wipe away condensation
after each use of the oven.
Take care when opening the oven door as the steam
will immediately pour out.
Accessories for steam cooking
The accessories for steam cooking (available in a separate
kit) offer the opportunity to expand the field of steam
cooking and allow you, for example, to experiment with
specific ways of cooking vegetables, fish, etc.
The accessories include:
• a dietary baking-pan consisting of two half-shells
made out of special glass with a recess for the passage
of a steam injector (Fig. 1);
• a small grill to place inside the dietary baking pan to
keep the food raised;
• 2 injectors for steam cooking;
• a special probe for using with the two steam cooking
injectors, the latter are inserted into the former and
used as shown in figures 1 and 2.
9

Fig. 1
Steam cooking in the dietary baking dish is particularly
suited for vegetables: it heightens the flavours without
watering them down and maintains the nutrient properties
of the foods intact.
Direct vapour cooking (Fig. 2) which uses the perforated
injector is ideal for chickens and turkeys. The flesh is
cooked on the inside thanks to the vapour while on the
outside it browns through fan cooking, and ends up being
delicate, soft and very tasty. The holes in the injector must
not be blocked; this is why the injector must always be
placed inside the empty part of the chicken and turkey, as
shown in Fig. 2.
Fig. 2
The end of the probe with the metal element is in-
serted into the steam outlet hole. The two injectors
must be inserted into the other end of the probe.
Helpful hints and tips
The oven has four shelf levels. Count the shelf levels from
the bottom of the oven floor.
Warning! Take care not to damage the enamelled
parts of the oven when inserting and removing the
accessories..
Warning! Always cook with the oven door closed,
ever while grilling.
• Always use oven gloves to remove and place food in
the oven.
• The oven cooks at temperatures of 30°C to 250°C.
Therefore, use recipients able to withstand such tem-
peratures (e.g. metal pans, heatproof dishes, oven-
ware).
• This oven is equipped with an exclusive cooking sys-
tem that generates natural air circulation and contin-
uously recovers cooking steam. This allows for cook-
ing in a constantly humid environment, keeping food
soft on the inside and crisp on the outside. Moreover,
cooking time and energy consumption are reduced to
a minimum. During cooking, steam may be generated
and released from an opening in the oven door. This
is quite normal.
• Never place objects on the bottom of the oven or cover
it with aluminium foil while cooking, since this may
damage the enamel and spoil the food being cooked.
Always place recipients, ovenware and aluminium foil
on the grill specially inserted in the oven guides.
• When cooking with fats or oils (e.g. fried foods), make
sure the sauces do not overheat: in fact, these sub-
stances can catch fire if brought to high temperatures.
• Therefore, when introducing or removing food from the
oven, make sure the sauces (oil, juices, melted fats)
do not spill in considerable quantities on the bottom .
In which case, carefully clean the bottom of the oven
before starting other cooking. This will also prevent the
build-up of unpleasant fumes and odours.
•
Warning! Beware of the hot air coming from the
oven when opening the door during or at the end of
cooking. When steam deposits on the oven door it then
condensates. To reduce the build-up of condensation,
heat the oven for about 10 minutes before cooking. We
recommend you to wipe away condensation after each use
of the oven.
10

Baking cakes
• The best temperature for baking cakes is between 150
°C and 200 °C.
• Preheat the oven for approximately 10 minutes before
baking.
• Do not open the oven door before 3/4 of the set cooking
time is up.
• If you use two baking trays at the same time, keep one
level empty between them.
Cooking meat and fish
• Do not cook meat with weight below 1 kg. Cooking too
small quantities makes the meat too dry.
• To keep the red meat well cooked outside and juicy
inside set the temperature between 200 °C-250 °C.
• For white meat, poultry and fish set the temperature
between 150°C-175°C.
• Use a dripping pan for very fat food to prevent the oven
from stains that can be permanent.
• Leave the meat for approximately 15 minutes before
carving so that the juice does not seep out.
• To avoid too much smoke in the oven during roasting,
pour a little water into the dripping pan.
• To avoid too much steam in the oven during roasting,
add a little bit more after the original amount dries up.
Hints and tips when using the grill
• Most foods should be placed on the grid in the grill
pan to allow maximum circulation of air and to lift the
food out of the fats and juices.
• Adjust the grid and grill pan runner position to allow
for different thicknesses of food.
• Position the food close to the element for faster cook-
ing and further away for gentler cooking.
• Food should be thoroughly dried before grilling to
minimise splashing. Brush lean meats and fish lightly
with a little oil or melted butter to keep them moist
during cooking.
• Accompaniments such as tomatoes and mushrooms
may be placed underneath the grid when grilling meats.
• When toasting bread, use the shelf in the top position
with the grid in the ‘high’ position.
• Preheat the grill on a full setting for a few minutes
before sealing steaks or toasting. Adjust the heat set-
ting and the shelf as necessary during cooking.
• The food should be turned over during cooking as re-
quired.
• When using the centre section grill, ensure food is
placed centrally on the grilling grid directly beneath
the grill element.
Conventional cooking
Turn the selector to the corresponding symbol and
set the thermostat to the required temperature.
In this way, heat is emitted from both above and below
and the food is cooked evenly.
: The heat is only emitted from the bottom. This func-
tion can be used to finish cooking or to reheat the under-
side of food. Adjust the shelf with the special oven guides
fitted nearest the bottom.
Grill
Turn the selector to the corresponding symbol (dual
grill) and set the thermostat to the required temperature.
When the selector is set at the dual grill position, the
maximum grill temperature is reached.
Cooking with pizza function
Turn the selector to the corresponding symbol and
set the thermostat to the required temperature. Cooking
with the pizza function includes the operation of the lower
heating element, the grill and hot air distributed by the
fan. This function is particularly suitable for cooking pizza
and buns. For the best cooking results, it is advisable to
place the oven side rails in the first or second guide from
the bottom, depending on how thick the food is.
Fan cooking
Turn the selector to the corresponding symbol and
set the thermostat to the required temperature. In this type
of cooking, heat is emitted from a circular heating element
at the rear of the oven and a fan circulates hot air. This
enables you to cook different dishes at the same time by
placing them on different shelves. To cook two dishes at
the same time, it is advisable to use the first and third
guide from the bottom.
For best results when using the oven for only one dish,
use the oven guides nearest the bottom.
Thermal grill
Turn the selector to the corresponding symbol and
set the thermostat to the required temperature. Ventilated
grilling is obtained by alternating grill and fan functions.
In this way, food is heated gradually and not subjected to
long periods of direct grilling.
11

Ventilated grilling is particularly suitable for thick pieces
of meat, poultry or whole fish (trout, mackerel, mullet).
Warning! When cooking with the ventilated grill,
select a temperature not higher than 200°C.
Cooking tables
Baking and roasting table
CAKES
TYPE OF DISH
Conventional
cooking
Fan cooking
Fan forced cook-
ing
Cooking
time [min]
Notes
Level
Temp
[°C]
Level
Temp
[°C]
Level
Temp
[°C]
Whisked recip-
ies
2 170 2 (1
and 3)
160 2 (1
and 3)
165 45-60 In cake mould
Shortbread
dough
2 170 2 (1
and 3)
160 2 (1
and 3)
160 24-34 In cake mould
Butter-milk
cheese cake
1 170 2 160 2 165 60-80 In cake mould 26 cm
Apple cake
(Apple pie)
1 170 2 left +
right
160 2 left +
right
160 100-120 2 cake moulds of 20 cm
on the oven shelf
Strudel 2 175 2 150 2 150 60-80 On baking tray
Jam- tart 2 170 2 160 2 left +
right
160 30-40 In cake mould 26 cm
Fruit cake 2 170 2 155 2 155 60-70 In cake mould 26 cm
Sponge cake
(Fatless
sponge cake)
2 170 2 160 2 160 35-45 In cake mould 26 cm
Christmas
cake/Rich fruit
cake
2 170 2 160 2 160 50-60 In cake mould 20 cm
Plum cake 2 170 2 160 2 165 50-60
In bread tin
1)
Small cakes 3 170 3 (1
and 3)
160 3 (1
and 3)
165 20-30 On baking tray
Biscuits 3 150 3 150 3 (1
and 3)
140 20-30
On baking tray
1)
Meringues 3 100 3 100 3 115 90-120 On baking tray
Buns 3 190 3 180 3 180 15-20
On baking tray
1)
Choux 3 190 3 180 3 (1
and 3)
180 25-35
On baking tray
1)
Plate tarts 3 180 2 170 2 170 45-70 In cake mould 20 cm
12

TYPE OF DISH
Conventional
cooking
Fan cooking
Fan forced cook-
ing
Cooking
time [min]
Notes
Level
Temp
[°C]
Level
Temp
[°C]
Level
Temp
[°C]
Victoria sand-
wich
1 or 2 180 2 170 2 170 40-55 Left + right in cake mould
20 cm
1) Preheat for 10 minutes.
BREAD AND PIZZA
TYPE OF DISH
Conventional
cooking
Fan cooking
Fan forced cook-
ing
Cooking
time [min]
Notes
Level
Temp
[°C]
Level
Temp
[°C]
Level
Temp
[°C]
White bread 1 190 1 190 1 195 60-70 1-2 pieces, 500 gr one
piece
1)
Rye bread 1 190 1 180 1 190 30-45 In bread tin
Bread rolls 2 190 2 (1
and 3)
180 2 (1
and 3)
180 25-40
6-8 rolls on baking tray
1)
Pizza 1 190 1 190 1 190 20-30
On dripping pan
1)
Scones 3 200 2 190 2 190 10~20
On baking tray
1)
1) Preheat for 10 minutes.
FLANS
TYPE OF DISH
Conventional
cooking
Fan cooking
Fan forced cook-
ing
Cooking
time [min]
Notes
Level
Temp
[°C]
Level
Temp
[°C]
Level
Temp
[°C]
Pasta flan 2 180 2 180 2 180 40-50 In mould
Vegetable flan 2 200 2 175 2 200 45-60 In mould
Quiches 1 190 1 190 1 190 40-50 In mould
Lasagnes 2 200 2 200 2 200 25-40 In mould
Cannelloni 2 200 2 190 2 200 25-40 In mould
Yorkshire pud-
ding
2 200 2 210 2 210 20-30 6 pudding mould
13

MEAT
TYPE OF DISH
Conventional
cooking
Fan cooking
Fan forced cook-
ing
Cooking
time [min]
Notes
Level
Temp
[°C]
Level
Temp
[°C]
Level
Temp
[°C]
Beef 2 200 2 190 2 190 50-70 On grid and drip pan
Pork 2 180 2 180 2 180 90-120 On grid and drip pan
Veal 2 190 2 175 2 175 90-120 On grid and drip pan
English roast
beef rare
2 210 2 200 2 200 44-50 On grid and drip pan
English roast
beef medium
2 210 2 200 2 200 51-55 On grid and drip pan
English roast
beef well done
2 210 2 200 2 200 55-60 On grid and drip pan
Shoulder of
pork
2 180 2 170 2 170 120-150 On drip pan
Shin of pork 2 180 2 160 2 160 100-120 2 pieces on drip pan
Lamb 2 190 2 190 2 190 110-130 Leg
Chicken 2 200 2 200 2 200 70-85 Whole on drip pan
Turkey 1 180 1 160 1 160 210-240 Whole on drip pan
Duck 2 175 2 160 2 160 120-150 Whole on drip pan
Goose 1 175 1 160 1 160 150-200 Whole on drip pan
Rabbit 2 190 2 175 2 175 60-80 Cut in pieces
Hare 2 190 2 175 2 175 150-200 Cut in pieces
Pheasant 2 190 2 175 2 175 90-120 Whole on drip pan
FISH
TYPE OF DISH
Conventional
cooking
Fan cooking
Fan forced cook-
ing
Cooking
time [min]
Notes
Level
Temp
[°C]
Level
Temp
[°C]
Level
Temp
[°C]
Trout/Sea
bream
2 190 2 (1
and 3)
175 2 (1
and 3)
2 (1
and 3)
175 40-55 3-4 fishes
Tuna fish/Sal-
mon
2 190 2 (1
and 3)
175 2 (1
and 3)
175 35-60 4-6 fillets
14

Timings do not include pre-heating. The empty
oven should always be pre-heated for 10 minutes.
Grilling
TYPE OF DISH Quantity Grilling Cooking time in minutes
Pieces g. temp.°C 1st side 2nd side
Fillet steaks 4 800 3 250 12~15 12~14
Beef-steaks 4 600 3 250 10~12 6~8
Sausages 8 / 3 250 12~15 10~12
Pork chops 4 600 3 250 12~16 12~14
Chicken (cut in
two)
2 1000 3 250 30~35 25~30
Kebabs 4 / 3 250 10~15 10~12
Chicken (breast) 4 400 3 250 12~15 12~14
Hamburger
1)
6 600 2 250 20-30
Fish (fillets) 4 400 3 250 12~14 10~12
Sandwiches 4~6 / 3 250 5~7 /
Toast 4~6 / 3 250 2~4 2~3
1) Preheat 5’00'’
Warning! With thermal grilling select a maximum
temperature of 200°C.
Thermal grilling
TYPE OF DISH Quantity (gr.) Shelf level Temp. °C Cooking time in minutes
lower side upper side
Rolled joints (tur-
key)
1000 3 200 30 ~ 40 20 ~ 30
Chicken (cut in
two)
1000 3 200 25 ~ 30 20 ~ 30
Chicken legs — 3 200 15 ~ 20 15 ~ 18
Quail 500 3 200 25 ~ 30 20 ~ 25
Vegetable gratin — 3 200 20 ~ 25 —
St. Jacques shells — 3 200 15 ~ 20 —
Mackerel — 3 200 15 ~ 20 10 ~ 15
Fish slices 800 3 200 12 ~ 15 8 ~ 10
15

The oven temperatures are intended as a guide only.
It may be necessary to increase or decrease the
temperatures to suit individual preferences and require-
ments.
Pizza Function
TYPE OF DISH Pizza Function Cooking time in minutes NOTES
temp.°C
Pizza , large 1 200 15~25 on baking tray
Pizza , small 1 200 10~20 on baking tray or on grid
Bread rolls 1 200 15~25 on baking tray
The temperatures quoted are guidelines. The tem-
peratures may have to be adapted to personal re-
quirements.
Cooking with the "Steam" function
According to the cooking time reported in the table,
it is necessary to fill the tank more than one time
during the cooking process. When the water tank is empty
the "Tank empty" indicator goes on. To refill the water tank
refer to "How to prepare the oven for steam cooking".
CAKES AND PASTRIES
FOOD TYPES "Steam" function Cooking times in mi-
nutes
NOTES
Shelf position temperature °C
Apple cake
1)
2 160 90-120 in 20cm. cake tin
Tarts 2 175 30-40 in 26cm. cake tin
Fruit cake 2 160 80-90 in 26cm cake tin
Sponges 1 160 40-45 in 26cm. cake tin
Yeast Plait
1)
2 150 100-110 in 20cm. cake tin
Fruit cake
1)
2 160 40-50 in bread tin
Small cakes 3 165 30-35 on baking sheet
Biscuits 3 150 20-35 on baking sheet
Yeast buns
1)
2 200 12-20 on baking sheet
Brioches
1)
3 180 20-30 on baking sheet
1) Cooking times do not include preheating time. The oven should be preheated for 10 minutes before cooking.
16

BREAD AND PIZZA
FOOD TYPES WEIGHT IN GR. "Steam" function Cooking times in
minutes
NOTES
Shelf position temperature °C
White bread
1)
1000 g 2 190 40-60 1-2 loaves gr.
500
Rolls
1)
500 g 2 190 20-30 6-8 rolls on bak-
ing sheet
Pizza 1 200 20-30 on baking sheet
1) Cooking times do not include preheating time. The oven should be preheated for 10 minutes before cooking.
FLANS
FOOD TYPES "Steam" function Cooking times in mi-
nutes
NOTES
Shelf position temperature °C
with vegetables 1 175 30-40 Pyrex dish
Quiches 2 200 50-60 in mould
Lasagna 2 190 45-60 Pyrex dish
Steamed potatoes 1 180 32-42 Pyrex dish
Potato gratin 1 185 50-60 Pyrex dish
MEAT
FOOD TYPES WEIGHT IN GR. "Steam" function Cooking times in
minutes
NOTES
Shelf position temperature °C
Roast pork 1000 g 2 180 80-90 Cooked on shelf
Veal 1000 g 2 180 90-100 Cooked on shelf
English roast
beef (rare)
1000 g 2 210 53-55 Cooked on shelf
Roast beef medi-
um
1000 g 2 210 61-65 Cooked on shelf
Roast beef well
done
1000 g 2 210 65-70 Cooked on shelf
Lamb 1000 g 2 175 120-150 Leg
Chicken 1000 g 2 200 50-60 Whole
Turkey 4000 g 1 175 150-180 Whole
Duck 1 175 150-180 Whole
Goose 3000 g 1 160 120-150 Whole
Rabbit 2 180 90-120 Cut in pieces
17

FISH
FOOD TYPES WEIGHT IN GR. "Steam" function Cooking times in
minutes
NOTES
Shelf position temperature °C
Trout 1500 g 2 180 30-45 3-4 fish
Tuna 1200 g 2 180 35-60 4-6 fillets
Hake 2 210 20-30
Care and cleaning
Warning! Before cleaning switch the oven off and
let it cool down.
The appliance must not be cleaned with a superheated
steam cleaner or a steam jet cleaner.
Important: Before carrying out any cleaning operation, the
appliance must be disconnected from the power supply.
To ensure a long life for your appliance, it is necessary to
perform the following cleaning operations regularly:
• Only perform when the oven has cooled down.
• Clean the enamelled parts with soapy water.
• Do not use abrasive cleaners.
• Dry the stainless steel parts and glass with a soft cloth.
• If there are stubborn stains, use commercially available
for stainless steel or warm vinegar.
The oven’s enamel is extremely durable and highly im-
permeable. The action of hot fruit acids (from lemons,
plums or similar) can however leave permanent, dull,
rough marks on the surface of the enamel. However such
marks in the brightly polished surface of the enamel does
not affect the operation of the oven. Clean the oven thor-
oughly after every use. This is the easiest way to clean dirt
off. It prevents dirt being burnt on.
Cleaning materials
Before using any cleaning materials on your oven, check
that they are suitable and that their use is recommended
by the manufacturer.
Cleaners that contain bleach should NOT be used as they
may dull the surface finishes. Harsh abrasives should also
be avoided.
External cleaning
Regularly wipe over the control panel, oven door and door
seal using a soft cloth well wrung out in warm water to
which a little liquid detergent has been added.
To prevent damaging or weakening the door glass panels
avoid the use of the following:
• Household detergent and bleaches.
• Impregnated pads unsuitable for non-stick saucepans.
• Brillo/Ajax pads or steel wool pads.
• Chemical oven pads or aerosols.
• Rust removers.
• Bath/Sink stain removers.
Clean the outer and inner door glass using warm soapy
water. Should the inner door glass become heavily soiled
it is recommended that a cleaning product such as Hob
Brite is used. Do not use paint scrapers to remove soilage.
Oven Cavity
The enamelled base of the oven cavity is best cleaned
whilst the oven is still warm.
Wipe the oven over with a soft cloth soaked in warm soapy
water after each use. From time to time it will be necessary
to do a more thorough cleaning, using a proprietary oven
cleaner.
Oven door
The oven door consists of two glass panels. The door can
be removed from its hinges and the panels extracted for
easy cleaning.
Warning! Warning - the oven door must be removed
before cleaning. The oven door can suddenly slam
shut if you try to pull the internal panel from the suspended
door.
18

Dismount as follows.
1
Open the door as far as
it will go.
Pass on to the two hinges.
2
Lift the hinge lever and
tip forwards.
3
Holding the door by
the two outer edges, close
it approximately 45°.
Pull the door forwards and
out of its housing.
4
Lay the door on a sta-
ble surface and protect the
surface of the handle with
a soft cloth.
90°
5
Use the bolts to re-
move the inner panels.
90°
6
Turn both toggles 90°
and remove from their
housings.
1
2
7
Carefully lift the top
panel slightly and remove
the panel which is framed
on all 4 sides by an orna-
mental border.
Clean the oven door with warm water and a soft cloth. Do
not clean the door with metallic sponges, iron wool,
scouring or acid pad, as these might damage the special
heat reflecting surfaces of the inner glass panels.
To do this, proceed as follows:
• The inner sheet with the ornamental frame on 4 sides
must be installed so that the screen printing faces the
outside of the oven. To ensure that the glass is correctly
inserted, brush the visible surface with your fingers to
check that the screen printed surface is smooth.
The inner panel must be inserted in position as shown in
the figure 8. After inserting the glass panels in the oven
door, fix them as described in point 6 in reverse to ensure
they are locked.
8
Warning! Never clean the oven door when it is hot,
as the glass could shatter. If you notice any
scratches or flaws on the glass panel, contact Customer
Services immediately and arrange for a replacement.
Stainless steel and aluminium models:
Clean stainless steel and aluminium doors and control
panels with a damp sponge and dry carefully with a soft
19

cloth. Do not clean with metal sponges, iron wool, acid
or scouring pads as these might scratch the surfaces.
Cleaning the oven door seal
Warning! Check the condition of the seal regularly.
Clean the seal when necessary, without using
objects or abrasive materials. If the seal is damaged,
contact your nearest Customer Services immediately. Do
not use the oven until the seal has been replaced.
Oven Shelves and Shelf Supports
The shelf support rails on the left and right hand sides of
the oven can be removed for cleaning the side walls.
Removing the shelf support rails
1
Pull the rails away
from the oven wall at the
front.
1
2
2
Then unhook the rails
at the back.
Fitting the shelf support rails
1
2
To install, first reattach the rails at the back, then put them
into position at the front and press them into place.To
clean the shelf support rails, soak in warm soapy water
and remove stubborn marks with a well wetted soap im-
pregnated pad. Rinse well and dry with a soft cloth.
Replacing the oven light
Disconnect the appliance from the electrical supply.
If the oven lamp needs replacing, it must comply with the
following specifications:
• Electric power: 15 W/25 W;
• Electric rate: 230 V (50 Hz);
• Resistant to temperatures of 300°C;
• Connection type: E14.
To replace the oven lamp
1. Ensure the oven is isolated from the electrical supply.
2. Push in and turn the glass cover anticlockwise.
3. Remove the faulty lamp and replace with the new one.
4. Refit the glass cover and restore the electrical supply.
Emptying the water tank
Warning! Make sure the appliance has cooled down
before you proceed with emptying .
A
B
1
Prepare the probe for
the water outlet. Fix the
connector, marked in the
figure with the letter (A), at
one end.
A
C
2
Place the other end of
the discharge probe into a
container of some sort. In-
sert the connector (A) into
the outlet valve (C).
20

C
3
Insert the connector
into the valve by slightly
forcing it in the direction
shown in the figure. Drain
out the water.
C
4
When all of the water
is drained out, detach the
connector from the valve.
Warning! Do not use the drained water to refill
steam tank again.
Warning! Even if tank empty light
is on it does
not mean tank is completely empty. Wait till water
flow from water outlet valve stops.
Tank cleaning
Warning! Do not pour water into the drawer during
the cleaning cycle.
During cleaning cycle some water could drop from
steam inlet in oven's cavity. Is advisable to insert
dripping pan on the shelf level just below the steam inlet
in order to avoid water fall directly on oven cavity bottom.
As with all apparatus that use water (for example, irons),
it is entirely normal that lime deposits should form in your
oven. After having used it for steam cooking a number of
times, lime deposited in the tank may cause a reduction
in steam. After some operations it is likely that a certain
quantity of lime will have deposited. It is therefore advis-
able to proceed with a thorough cleaning of the parts of
the oven that generate the steam.
In which case, proceed as follows:
Empty the tank after each steam cooking (follow the pro-
cedure given in the section "Emptying the water tank").
In this case, proceed as follows:
• After having emptied the water from the tank, prepare
a solution with 500 cc. of water and 50 - 60 grams (five
heaped teaspoons) of citric acid or the coffee machine
descaling solutions that can be purchased in super-
markets or household appliance shops.
Citric acid is a nutritionally approved substance;
and comes in small white granules similar to sugar.
It is usually used in the food industry and may be pur-
chased from shops selling wine , in well-stocked grocery
shops and also in some chemists
• Pour this solution into the loading drawer.
• Allow the citric acid solution to rest in the tank for about
60 minutes, in a cold oven.
• Turn the oven on and select the steam function with a
temperature between 140°C and 230°C. After 20-25
minutes, switch it off.
• Allow the oven to cool for 5-10 minutes.
• Turn the oven on and select the steam function with a
temperature between 140°C and 230°C. After 10 mi-
nutes, switch it off.
Allow the oven to cool down, then proceed with the
removal of the tank contents following the procedure
described earlier.
• Once the operation is completed, rinse the tank a few
times, pouring the water from the load drawer and al-
lowing it to flow out of the outlet probe, until the water
coming out no longer shows any lime residue. Remove
any lime residue from the inside of the oven with a
cloth.
During this operation, the oven and the surrounding area
will be filled with the typical lemon scent. If you don't
envisage using the oven for a period of more than 2-3
weeks, we suggest you empty the water residue remaining
in the oven tank.
Cleaning the discharge probe
At the end of each cleaning operation, clean the probe
thoroughly. It can be washed by hand in luke warm water
with usual "dish washing" detergents. Do not use acids,
sprays, or similar substances on the parts of the steam
probe so as not to damage it.
21

Advice on the various different types of water
If one uses natural mineral waters, or at least waters with
a low lime content, the cleaning cycles can be drastically
reduced (for example, every 100, 150 uses). If your do-
mestic water supply is equipped with a purifier or water
sweetener, then tap water may be used without any prob-
lems.
The use of harder waters (meaning waters with a
high lime content) leads to the cleaning operations
having to be performed more often but it doesn't jeop-
ardize in any way the overall performance of the equip-
ment.
CALCIUM QUANTITY TABLE INDICATED FROM W.H.O.
(World Health Organization)
Calcium deposit
Water hardness
(French degrees)
Water hardness
(German degrees)
Water classification
Run decalcification
every
0-60 mgl 0-6 0-3 Sweet of soft
150 cycles -2,5
months
60-120 mgl 6-12 3-7 Medium hardness
100 cycles -2
months
120-180 mgl 12-18 8-10 Hard or calcareous
75 cycles -1,5
months
over 180 mgl over 18 over 10 Very hard 60 cycles -1 month
What to do if…
Some operating problems are due to lack of simple main-
tenance or oversights, and can easily be fixed without
calling out a service engineer.
SYMPTOM SOLUTION
THE OVEN DOES NOT WORK Make sure the control knobs are correctly set for cooking and repeat the oper-
ations given in the handbook.
or
Check the electrical system safety switches ("protection switch"). If the fault
concerns the system, contact an electrician.
THE OVEN LIGHT DOES NOT
COME ON
Turn the selector to a function.
or
Purchase a lamp for high temperatures from an Assistance Centre and fit it
following the instructions given in the relevant section.
THE THERMOSTAT LIGHT DOES
NOT COME ON
Turn the thermostat to a temperature.
or
Turn the selector to a function.
THE OVEN TAKES TOO LONG TO
COOK OR COOKS TOO FAST.
Consult this handbook (the section "Helpful hints and tips").
MOISTURE FORMS ON THE
FOOD AND INSIDE THE OVEN
Do not leave food in the oven for more than 15-20 minutes after cooking.
22

SYMPTOM SOLUTION
THE DISPLAY SHOWS "12.00". Set the time (see the section "Setting the clock").
THERE IS WATER INSIDE THE
OVEN
You have poured too much water in the tank. Disconnect all oven functions,
then mop up all the water that has spilled out with a sponge or a cloth.
"TANK FULL" LIGHT OFF Check that the oven knob is set to corresponding symbol or
Pour water into the tank until the light comes on. If water starts to issue from
the inside of the oven, and the "tank full" light is still off, call for a technician.
"TANK EMPTY" LIGHT ON
Fill the tank. If after having poured about a litre of water, the warning light
remains on, the problem can only be solved by a specialised technician.
THE STEAM DOESN'T WORK Ensure that the steam function is selected
Close the oven door securely.
Fill the water tank.
Clean the tank out with water (as described in the paragraph concerned).
The steam inlet hole may be obstructed. Remove the lime that obstructs the
hole.
• IT TAKES MORE THAN THREE
MINUTES TO EMPTYING WA-
TER TANK.
• WATER LEAKAGE FROM CAV-
ITY STEAM INLET
Run tank cleaning process (as described in the paragraph concerned).
Technical data
Heating element power
Bottom heating element 1000 W
Top and bottom heating elements 1800 W
Dual grill heating element 2450 W
Rear heating element 2000 W
Ventilated grill element 1650 W
"Steam" function 2825 W
"Pizza" function 3025 W
Oven light 25 W
Oven fan 25 W
Cooling fan 25 W
Total maximum power 3075 W
Power supply (50 Hz) 230 V
Min. dimensions of installation compartment
height in column: 587 mm
23

undercounter height: 600 mm
width 560 mm
depth 550 mm
Useful dimensions of oven recess
height 335 mm
width 395 mm
depth 400 mm
useful volume 53 ltr
Installation instructions
Installation and connection must be done in compliance
with the regulations in force. Any interventions must be
carried out when the appliance is switched off. Only ac-
credited engineers may work on the appliance.
The manufacturer disclaims any liability if the safety
measures are not observed.
Connecting to the electrical supply
Before connecting to the electrical supply, please make
sure:
• The fuse and the domestic electrical installation must
be designed for the max. load of the appliance (see
rating plate).
• The domestic electrical installation must be equipped
with a proper earth connection in accordance with the
regulations in force.
• The socket or the multi-pole off switch must be easy
to access after the appliance has been installed.
This appliance is delivered with an electric supply cable.
A proper plug, according to the electric load specified on
the rating plate, must be fitted to the cable. The plug is to
be inserted into a suitable wall socket. If you require a
direct connection to the electric network (mains), it will
be necessary to fit between the appliance and the mains
an omnipole switch, with a minimum gap between con-
tacts of 3 mm, suitable for the required load and in com-
pliance with rules in force. The green & yellow ground
wire must not be interrupted by the switch and it should
be 2-3 cm. longer than the other cables.
The mains cable and plug as supplied are to be connected
to a shockproof socket (230 V~, 50 Hz). The shockproof
socket must be installed in accordance with the regula-
tions.
The following types of mains cable are suitable, taking the
necessary rated cross section into account: H07 RN-F,
H05 RN-F, H05 RR-F, H05 VV-F, H05 V2V2-F (T90), H05
BB-F.
The connection cable must in any case be laid out so that
at no point does it reach 50°C (over room temperature).
After the connection has been carried out, the heating
elements must be tested by being operated for about 3
minutes.
Terminal block
The oven is fitted with an easily accessible terminal block
which is designed to operate with a singlephase power
supply of 230 V.
Letter L Live terminal
Letter N Neutral terminal
or E
Earth terminal
Instructions for Building In
For problem-free functioning of the built-in appliance, the
kitchen unit or the recess into which the appliance is built
must have suitable dimensions.
24

In accordance with the regulations in force, all parts which
ensure the shock protection of live and insulated parts
must be fastened in such a way that they cannot be undone
without tools.
These also include the fixing of any end walls at the be-
ginning or end of a line of built-in units.
The shock protection must in any case be ensured by the
building in of the appliance.
The appliance can be placed with its back or a side wall
against higher kitchen units, appliances or walls. How-
ever, only other appliances or units of the same height as
the appliance can be placed against the other side wall.
Overall oven dimensions
560
570
540
20
590
594
7
In column building-in
The recess must have the dimensions shown in the picture
below.
50
550
min
587
560-570
Building-in under a kitchen counter
The recess must have the dimensions shown in the picture
below.
550 min
600
560-570
80÷100
Securing the appliance to the cabinet
1. Open the oven door.
2. Fasten the oven to the cabinet placing the four dis-
tance holders provided with the appliance ( A ) which
fit exactly into the holes in the frame and then fit four
wood screws ( B ).
When installing a hob over the oven, the hob electrical
connection and the oven one have to be carried out sep-
arately for security reasons and to let the oven be taken
off the cabinet easier, if necessary.
Any extensions must be made with cables suitable for the
required power.
A
B
Technical Assistance and Spare Parts
If the checks suggested in "What to do if..." section are
not useful for solving the problem, contact the nearest
authorised Technical Assistance Centre, specifying the
type of fault, appliance model (Mod.), product number
(Prod. no.) and serial number (Ser. No.) given on the oven
dataplate. The dataplate is located on the outside of the
oven and is visible, opening the door, in the place shown
in the Figure.
25

Original spare parts, certified by the product manufactur-
er, and identified by this mark, are only available at our
Technical Assistance Centres and Authorised Spare Parts
Shops.
Disposal of the appliance
• To prevent the risk of physical injury or damage
– Disconnect the appliance from the power supply.
– Cut off the mains cable and discard it.
– Discard the door catch. This prevents children or
small animals from being closed inside of the ap-
pliance. There is the risk of suffocation.
Environment concerns
The symbol on the product or on its packaging
indicates that this product may not be treated as
household waste. Instead it should be taken to the
appropriate collection point for the recycling of electrical
and electronic equipment. By ensuring this product is
disposed of correctly, you will help prevent potential
negative consequences for the environment and human
health, which could otherwise be caused by inappropriate
waste handling of this product. For more detailed
information about recycling of this product, please
contact your local council, your household waste disposal
service or the shop where you purchased the product.
Packaging material
The packaging materials are environmentally
friendly and can be recycled. The plastic compo-
nents are identified by markings, e.g. >PE<, >PS<, etc.
Please dispose of the packaging materials in the appro-
priate container at the community waste disposal facili-
ties.
26

Índice de materias
Información sobre seguridad _ _ _ _ _ _ _ _ _ _ _ 27
Descripción del producto _ _ _ _ _ _ _ _ _ _ _ _ 28
Funcionamiento _ _ _ _ _ _ _ _ _ _ _ _ _ _ _ _ _ 31
Consejos útiles _ _ _ _ _ _ _ _ _ _ _ _ _ _ _ _ _ 35
Tablas de cocción _ _ _ _ _ _ _ _ _ _ _ _ _ _ _ _ 37
Mantenimiento y limpieza _ _ _ _ _ _ _ _ _ _ _ _ 44
Qué hacer si… _ _ _ _ _ _ _ _ _ _ _ _ _ _ _ _ _ 48
Datos técnicos _ _ _ _ _ _ _ _ _ _ _ _ _ _ _ _ _ _ 49
Instrucciones de instalación _ _ _ _ _ _ _ _ _ _ _ 50
Asistencia técnica y recambios _ _ _ _ _ _ _ _ _ _ 52
Aspectos medioambientales _ _ _ _ _ _ _ _ _ _ _ 52
Salvo modificaciones
Información sobre seguridad
Advertencia Guarde siempre las instrucciones de
uso que se suministran con este aparato. Si el
aparato se vende o transfiere a terceros, o si deja el aparato
en su antigua vivienda al mudarse, es muy importante que
el nuevo usuario disponga de estas instrucciones de uso
y advertencias.
Estas advertencias están hechas en beneficio de la
seguridad del usuario y de las personas que le rodean.
Por tanto, debe leerlas atentamente antes de conectar o
usar el aparato.
Instalación
• La instalación debe ser efectuada por personal com-
petente de acuerdo con las regulaciones vigentes. Los
diferentes trabajos de instalación se describen des-
pués de las advertencias para el instalador.
• Encomiende la instalación y la conexión a un espe-
cialista con conocimientos técnicos sobre las direc-
trices correspondientes a aplicar.
• Dado el caso, también se deben encargar a un electri-
cista cualificado las modificaciones en el suministro
eléctrico que resulten necesarias para la instalación.
Funcionamiento
• Este horno ha sido diseñado para cocinar alimentos;
así pues, no lo utilice jamás para otros fines.
• Cocine siempre con la puerta cerrada, incluso cuando
gratine alimentos.
• Cuando abra la puerta del horno durante la cocción o
al final de ésta, preste atención a la corriente de aire
caliente que sale del horno.
• Proceda con la máxima precaución cuando utilice el
horno. Las bandejas y otras piezas están muy calientes
debido al intenso calor de las resistencias de calenta-
miento.
• Si, por el motivo que sea, desea utilizar papel de alu-
minio para cocinar alimentos en el horno, no deje
nunca que entre en contacto directo con la base del
horno.
• Cuando limpie el horno, proceda con cuidado: no rocíe
nunca el filtro de grasa (si está instalado), las resis-
tencias de calentamiento ni la sonda del termostato.
• Es peligroso alterar las características o modificar el
aparato de cualquier forma.
• Durante el proceso de cocción, asado y grill, la ventana
del horno y el resto de piezas del aparato se calientan,
por lo que debe mantener alejados a los niños del
mismo. Si conecta aparatos eléctricos a cajas de en-
chufe cercanas al horno, debe comprobar que los ca-
bles de conexión no entren en contacto con zonas de
cocción calientes ni queden atascados en la puerta
caliente del horno.
• Utilice siempre guantes adecuados para retirar fuentes
o cazuelas refractarias calientes del horno.
• Una limpieza periódica evita el deterioro del material
de la superficie.
• Antes de limpiar el horno, desconecte la corriente o
desenchufe el aparato de la red.
• No olvide apagar el horno cuando termine de utilizarlo.
• Este horno se ha fabricado como aparato individual o
combinado con placa eléctrica, según la versión co-
rrespondiente, para su conexión a un suministro eléc-
trico monofásico de 230 V.
• El aparato no se debe limpiar con un limpiador de va-
por caliente o chorro de vapor.
• No utilice productos abrasivos o rascadores de metal
afilados. Éstos podrían arañar los cristales de la puerta
y provocar la rotura de los mismos.
27

Seguridad personal
• Este aparato ha sido diseñado para ser utilizado por
personas adultas. Es peligroso dejar que los niños lo
manejen o jueguen con él.
• Mantenga alejados a los niños mientras el horno se
encuentre en funcionamiento. La puerta permanece
caliente durante bastante tiempo una vez desconectado
el horno.
• Los niños o personas que, debido a sus capacidades
físicas, sensoriales o mentales o a su inexperiencia o
desconocimiento, no puedan utilizar el aparato de for-
ma segura no deben manejar dicho aparato sin la su-
pervisión o instrucción de una persona responsable.
Servicio técnico
• Encomiende los trabajos de comprobación y/o repa-
ración al servicio técnico del fabricante o a un servicio
técnico autorizado por el fabricante, y utilice sólo re-
cambios originales.
• No intente reparar por su cuenta el aparato si se pro-
ducen anomalías funcionales o daños. Recuerde que
las reparaciones por parte de personas no capacitadas
pueden ser causa de daños o lesiones.
Descripción del producto
6
7
11 12
14 15
3
4
5
8
9
10
1
2
13
1 Panel de mandos
2 Bombilla del horno
3 Grill
4 Ventilador
5 Placa de datos técnicos
6 Indicadores del depósito de agua
7 Depósito de agua
8 Entrada de vapor
9 Válvula de desagüe
10 Sonda de desagüe
11 Mando del termostato
12 Programador electrónico
13 Mando selector de las funciones del horno
14 Indicador de control del termostato
15 Indicador de conexión a la red
28

Accesorios de horno
Bandeja para hornear Grasera
Rejilla
Mandos
Mandos de control empujar/tirar
Este aparato va provisto de mandos de control de tipo
empujar/tirar, que se hunden totalmente en el panel de
control cuando el horno no está en funcionamiento.
Mando del termostato
Gire el mando de control de la temperatura a la derecha,
y seleccione la temperatura apropiada entre 50 °C y 250
°C
Funciones de horno
Horno apagado
Bombilla del horno
Cocción convencional
Cocción por aire caliente forzado
Calor inferior
Grill potente
Grill + ventilador
Turbo
Pizza
Vapor
29

Indicador de alimentación activada
Se enciende cuando se ajusta el mando de control de
funcionamiento del horno.
Indicador de control del termostato
El indicador de control del termostato se activará cuando
se gire el mando de control del termostato. El indicador
permanecerá activado hasta que se alcance la temperatura
correcta. Después, se activará y desactivará para indicar
que se está manteniendo la temperatura.
Termostato de seguridad
Para evitar que se produzca un calentamiento excesivo
peligroso, el horno cuenta con un termostato de seguri-
dad que interrumpe el suministro de energía eléctrica
cuando se realiza un uso incorrecto del aparato o cuando
hay un componente defectuoso. El horno se vuelve a co-
nectar automáticamente cuando desciende la temperatu-
ra.
Si el termostato de seguridad se activa debido a un uso
indebido del aparato, basta con eliminar la causa del error
una vez enfriado el horno; en cambio, si el termostato se
activa debido a un componente defectuoso, debe acudir
al servicio técnico.
Ventilador de refrigeración
Refrigera el horno y el panel de mandos. Este ventilador
se enciende automáticamente tras unos minutos de coc-
ción. El aire caliente se expulsa a través de la abertura
cercana a la empuñadura de la puerta del horno. Cuando
se apaga el horno, el ventilador sigue funcionando hasta
enfriar el aparato y se desconecta automáticamente.
Cómo utilizar el depósito de agua
1
Seleccione la función “va-
por"
Extraiga el depósito en la
dirección que muestra la
figura.
2
Extraiga el depósito
hasta el final de carrera.
3
Llene el depósito de
agua hasta que el “Indica-
dor de depósito lleno” se
encienda. Cierre el depó-
sito presionando la tapa
en el centro.
4
Empuje el depósito
hasta que éste regrese a su
posición original.
Advertencia Llene el depósito sólo con agua
potable. NO utilice agua filtrada, destilada o
desmineralizada ni cualquier otro líquido.
No vierta líquidos inflamables ni bebidas alcohólicas
(vodka, whisky, brandy, etc.) en el cajetín de carga.
30

Retire todo el material de embalaje del interior y el
exterior del horno antes de utilizarlo.
El horno funciona únicamente si está ajustada la
hora.
Ajuste la hora actual con el programador antes de utilizar
el horno por primera vez (consulte el apartado "Progra-
mador electrónico").
Cuando encienda el horno por primera vez:
1. Coloque el termostato en 250 ;
2.
Gire el selector hasta el símbolo
3. Caliente el horno en VACÍO durante 45 minutos:
4. Asegúrese de que la cocina esté bien ventilada du-
rante toda la operación.
Durante los primeros minutos de funcionamiento, ES
ABSOLUTAMENTE NORMAL que el horno genere humos
y malos olores. Ello se debe al calentamiento de los restos
de materiales aislantes y de fabricación.
Tras 45 minutos, espere a que el horno se enfríe y límpielo
por dentro con agua caliente y detergente no abrasivo.
Se recomienda repetir este mismo procedimiento cuando
seleccione la función de grill doble
y aire caliente
durante 5 ó 10 minutos.
Si desea abrir la puerta del horno, agarre siempre
la manilla por su parte central.
Lave a fondo la PARRILLA y el COLECTOR DE
GRASAS antes utilizarlas por primera vez (es decir,
la bandeja de metal esmaltado con bordes elevados que
encontrará dentro del horno).
Funcionamiento
Temporizador
21 3
8
4567
1
Piloto indicador de la "Duración de cocción"
2 Pantalla - "
3
Piloto indicador del "Minutero"
4
Piloto indicador del "Reloj"
5 Tecla de aumento " + "
6
Selector de funciones
7 Tecla de disminución " - "
8
Piloto indicador de "Fin de cocción"
El horno sólo funcionará después de ajustar la hora.
No obstante, puede funcionar aunque no se ajuste
ningún programa.
En caso de corte en el suministro eléctrico, se bo-
rran todos los ajustes (hora y programa seleccio-
nado o en marcha). Cuando se restablece, los números
del visor parpadean y es preciso volver a ajustar el reloj
y el temporizador.
Ajuste de la hora
Al enchufar el equipo y siempre que se produce un corte
en el suministro eléctrico, el piloto del "Reloj" parpadea.
Para ajustar la hora:
1. Pulse las teclas " - " o " + " como sea conveniente.
2. Espere 5 segundos: Se apaga el piloto de control
"Reloj" y el visor digital muestra la hora ajustada.
31

Para modificar la hora:
1. Pulse varias veces la tecla del selector hasta que el
indicador "Reloj" parpadee en el visor digital.
tLa hora sólo se puede modificar si no se ha ajustado
ninguna función automática "Tiempo de cocción" o
"Fin de cocción".
2. Espere 5 segundos: Se apaga el piloto de control
"Reloj" y el visor digital muestra la hora ajustada.
Advertencia
En caso de corte en el suministro eléctrico, los datos in-
troducidos en el programador se borrarán y será nece-
sario configurarlos de nuevo cuando se restablezca el
suministro.
Función Duración de cocción
Si se selecciona esta función, el horno se desconecta
automáticamente una vez transcurrido el tiempo de coc-
ción programado. Coloque los alimentos en el horno,
seleccione una función de cocción y regule la tempera-
tura. Pulse varias veces la tecla
para seleccionar la
función “Duración de cocción”. La luz piloto
corres-
pondiente empezará a parpadear. A continuación, proce-
da como sigue:
Si desea programar la duración de la cocción
1. Pulse la tecla " + " o " - ".
2. Tras efectuar el ajuste, espere 5 segundos: se en-
cenderá el piloto indicador de la "Duración de coc-
ción"
y la pantalla volverá a mostrar la hora.
3. Al terminar el tiempo de cocción programado, el hor-
no se apagará automáticamente y emitirá una señal
acústica al tiempo que el piloto indicador comienza
a parpadear. Gire el mando de función del horno y el
termostato a la posición cero.
Pulse cualquier tecla para desactivar la señal acústica
de alarma.
La desactivación de la señal acústica activa la función
manual del horno; si los mandos de función y del
termostato no están en la posición cero, el horno
comenzará a calentar de nuevo.
Si desea cancelar el tiempo de duración
1.
Pulse varias veces la tecla
para seleccionar la
función “Duración de cocción”. La luz del piloto in-
dicador
parpadeará y la pantalla mostrará el tiem-
po de cocción que queda.
2. Pulse la tecla " - " hasta que la pantalla muestre
“0:00”. Transcurridos 5 segundos, el piloto indicador
se apagará y la pantalla volverá a mostrar la hora.
Fin de la cocción
Si se selecciona esta función, el horno se apagará auto-
máticamente al terminarse el periodo de la cocción. Co-
loque los alimentos en el horno, seleccione una función
de cocción y regule la temperatura. Pulse varias veces la
tecla
para seleccionar la función “Fin de cocción”. La
luz piloto
correspondiente empezará a parpadear.
Si desea programar la hora de Fin de cocción
1. Pulse la tecla " + " o " - ".
2. Tras efectuar el ajuste, espere 5 segundos: Se en-
cenderá el piloto indicador de “Fin de cocción”
y
la pantalla volverá a mostrar la hora.
3. Al finalizar el tiempo de cocción, el horno se apagará
automáticamente y emitirá una señal acústica al tiem-
po que el piloto de control comienza a parpadear.
Gire el mando de función del horno y el termostato a
la posición cero.
Pulse cualquier tecla para desactivar la señal acústica
de alarma.
La desactivación de la señal acústica activa la función
manual del horno; si los mandos de función y del
termostato no están en la posición cero, el horno
comenzará a calentarse de nuevo.
32

Para cancelar la hora de Fin de cocción
1.
Pulse varias veces la tecla
para seleccionar la
función “Fin de cocción”. La luz del piloto indicador
parpadeará y la pantalla presentará el tiempo de
Fin de cocción programado.
2. Pulse la tecla " - " hasta que la pantalla muestre la
hora actual. El programador emitirá un pitido y se
apagará la luz del piloto indicador.
Duración de cocción y Fin de cocción
combinados
Es posible utilizar simultáneamente las funciones "Dura-
ción de cocción" y "Fin de cocción" para que el horno se
encienda y apague automáticamente en un momento da-
do.
1. Ajuste la duración con la función "Duración de coc-
ción"
(con el procedimiento descrito en el apar-
tado correspondiente). Pulse luego la tecla
para
que el visor digital muestre el ajuste programado.
2. Programe la hora de cocción con la función "Fin de
cocción"
(con el procedimiento descrito en el
apartado correspondiente).
Las luces de los pilotos de control se encienden y el
visor muestra la hora. El horno se encenderá y se
apagará automáticamente según los tiempos progra-
mados.
Minutero
La alarma del avisador sonará al finalizar el tiempo pro-
gramado, pero el horno seguirá en funcionamiento, si lo
estaba.
Si desea ajustar el avisador
1.
Pulse varias veces la tecla para seleccionar la
función “Avisador”. La luz piloto
correspondiente
empezará a parpadear.
2. Pulse la tecla " + " o " - " (máximo: 2 horas, 30 mi-
nutos).
3. Tras efectuar el ajuste, espere 5 segundos: Se en-
cenderá el piloto indicador del "Avisador"
.
4. Al finalizar el tiempo, la luz del piloto indicador co-
menzará a parpadear y se emitirá una señal acústica.
Pulse cualquier tecla para desactivar la señal acústica
de alarma.
Si desea cancelar el Avisador
1.
Pulse varias veces la tecla
para seleccionar la
función “Avisador”. La luz del piloto indicador
parpadeará y la pantalla mostrará el tiempo que que-
da.
2. Pulse la tecla " - " hasta que la pantalla muestre
“0:00”. Transcurridos 5 segundos, el piloto indicador
se apagará y la pantalla volverá a mostrar la hora.
Preparación del horno para cocción al vapor
Llene el depósito de agua antes de iniciar la coc-
ción.
Indicador de "Depósito vacío"
Señala que el depósito está vacío y es necesario
volver a llenarlo.
Indicador de "Depósito lleno"
Señala que el horno está preparado para cocinar al
vapor.
Extraiga el depósito y llénelo de agua hasta que se en-
cienda el indicador "depósito lleno"
. La capacidad
máxima del depósito es de 0,8 litros de agua, y es sufi-
ciente para 40/45 minutos de cocción.
33

Una vez lleno, empuje el depósito hasta su posición ori-
ginal. El horno ya está listo para cocinar al vapor.
Si después de llenar el depósito hasta su capacidad
máxima (0,8 l) el indicador "Depósito vacío" sigue
encendido, solicite asistencia técnica.
Si llena demasiado el depósito, el agua sobrante
circulará hacia la parte inferior del horno por el de-
sagüe de seguridad. Seque inmediatamente el agua con
una esponja o un paño.
Para usar la cocción al vapor
Proceda como se indica a continuación:
1. Llene el depósito de agua antes de iniciar la cocción.
Consulte las instrucciones de "Preparación del horno
para cocción al vapor".
2. Coloque los alimentos en recipientes apropiados pa-
ra el horno. Coloque los recipientes sobre la parrilla
en el nivel indicado en las tablas de cocción. El 2°
nivel inferior suele garantizar los mejores resultados.
3.
Gire el mando de control a la función Vapor
4. Regule la temperatura entre 140 °C y 230 °C. La
cocción al vapor no da buenos resultados a tempe-
raturas superiores a 230 °C.
El vapor empieza a salir cuando el horno alcanza la
temperatura programada.
5. Vacíe el depósito al terminar la cocción (consulte
"Cómo vaciar el depósito de agua").
Advertencia Después de cada cocción al vapor,
espere un mínimo de 30 minutos para que el agua
caliente no escape por la válvula de desagüe.
Consejos y sugerencias para la cocción al vapor
• No cubra los recipientes con tapas que impidan al va-
por entrar en contacto con los alimentos.
• Los alimentos se pueden cocinar directamente sobre
la parrilla. En tal caso, no olvide poner un poco de agua
en la grasera y colocarla en las guías por debajo de la
parrilla.
• La grasera recoge la grasa derretida al cocinar, mien-
tras que el agua impide que la grasa se queme y genere
humos y malos olores
• Antes de abrir la puerta para controlar la cocción, de-
sactive la función VAPOR. Al terminar, cierre la puerta
y vuelva a seleccionar la cocción al vapor.
La posible condensación de agua en el cristal de la
puerta, paredes laterales y fondo del horno no afecta
a su funcionamiento. Se recomienda eliminar los restos
de condensación del horno después de cada uso.
Abra con cuidado la puerta del horno ya que al ha-
cerlo se libera vapor.
Accesorios para la cocción al vapor
Los accesorios para la cocción al vapor (incluidos en un
kit aparte) permiten ampliar el campo de cocción al vapor
y probar distintas formas de cocinar verduras, pescados,
etc.
Los accesorios incluyen:
• una fuente dietética formada por dos recipientes de
cristal especial con una ranura para pasar el inyector
de vapor (Fig. 1);
• una pequeña parrilla que mantiene los alimentos en
alto dentro de la fuente dietética;
• 2 inyectores para cocción al vapor;
34

• una sonda especial para la cocción al vapor con dos
tipos distintos de inyectores que se introducen en la
sonda como muestran las figuras 1 y 2.
Figura 1
La cocción al vapor en la fuente dietética es ideal para
cocinar verdura: potencia los sabores sin aguarlos y
mantiene inalteradas las propiedades nutritivas de los
alimentos.
La cocción al vapor directo (Fig. 2) con el inyector per-
forado es ideal para asar pollos y pavos. El vapor cocina
la carne por dentro y el ventilador de aire caliente la dora
por fuera, de lo que resulta un acabado delicado, tierno y
sabroso. Los orificios del inyector no deben estar obs-
truidos; por eso siempre debe colocarse dentro de la parte
hueca del pollo o pavo, como se muestra en la Fig. 2.
Figura 2
El extremo de la sonda que contiene el elemento
metálico debe introducirse en el orificio de salida
del vapor. Los dos inyectores se deben insertar en el otro
extremo de la sonda.
Consejos útiles
El horno tiene cuatro niveles, contados desde la parte
inferior a la superior.
Advertencia Preste atención para no dañar las
partes esmaltadas del horno al introducir o retirar
los accesorios.
Advertencia Cocine siempre con la puerta cerrada,
incluso cuando gratine alimentos.
• Utilice siempre guantes adecuados para colocar o re-
tirar los alimentos del horno.
• El horno alcanza temperaturas de cocción entre 30 °C
y 250 °C. Por lo tanto, utilice recipientes capaces de
soportar dichas temperaturas (por ejemplo, fuentes
metálicas, platos refractarios y moldes para horno).
• El horno va equipado con un sistema exclusivo de
cocción que genera una corriente natural de aire y re-
cupera el vapor de cocción. De modo que los alimentos
se cocinen en un entorno de humedad constante que
los mantiene tiernos por dentro y crujientes por fuera.
Además, el tiempo de cocción y el consumo de energía
se reducen al mínimo. El vapor que se genera al cocinar
los alimentos se puede eliminar abriendo la puerta del
horno. Esto es totalmente normal.
• No apoye ningún tipo de objeto sobre el fondo del
horno ni lo cubra con papel de aluminio durante la
cocción para no dañar el esmalte ni deteriorar los ali-
mentos cocinados. Coloque las fuentes y recipientes
de hornear o el papel de aluminio en las rejillas situa-
das entre las guías.
• Al cocinar con grasas o aceites (por ejemplo, al freír),
preste atención para evitar que se calienten en exceso:
de hecho, estas sustancias pueden arder si llegan a
alcanzar temperaturas elevadas.
• Por lo tanto, al introducir o retirar alimentos del horno,
preste atención para evitar que la salsa (aceite, jugos
o grasa derretida) gotee . Si llegara a ocurrir, limpie
cuidadosamente la parte inferior del horno antes de
cocinar otros alimentos. De este modo también evitará
que se acumulen suciedad y olores desagradables.
•
35

Advertencia Al abrir la puerta del horno durante la
cocción o al final de la misma, preste atención al
aire caliente procedente del interior. El vapor se condensa
cuando entra en contacto con el cristal de la puerta del
horno. Para reducir la formación de condensación,
caliente el horno durante unos 10 minutos antes de
cocinar. Se recomienda eliminar los restos de
condensación del horno después de cada uso.
Repostería
• La temperatura ideal para hornear repostería es entre
150 °C y 200 °C.
• Precaliente el horno durante unos 10 minutos antes de
utilizarlo.
• No abra la puerta del horno antes de que transcurran
3/4 partes del tiempo de cocción.
• Si utiliza dos bandejas al mismo tiempo, deje un nivel
libre entre ambas.
Carnes y pescados
• No cocine carnes de menos de 1 kg para evitar que
quede demasiado seca.
• Si desea que la carne roja quede bien hecha en el ex-
terior y en su punto en el interior, regule la temperatura
entre 200 °C y 250 °C.
• Para carnes blancas, aves y pescados, regule la tem-
peratura entre 150 °C y 175 °C.
• Utilice un colector si los alimentos son muy grasos
para que el horno no quede irreversiblemente man-
chado.
• Antes de trinchar la carne, déjela reposar unos 15 mi-
nutos, como mínimo, para que retenga los jugos.
• Para evitar que se forme mucho humo en el horno,
vierta un poco de agua en el colector de la grasa.
• Para evitar el exceso de vapor durante el asado, añada
un poco más de agua cuando se haya agotado la can-
tidad original.
Consejos y sugerencias al utilizar el grill
• La mayoría de los alimentos se debe colocar sobre la
rejilla en la bandeja de grill para facilitar la máxima
circulación de aire y extraer la grasa y el jugo de los
alimentos.
• Ajuste la posición de la guía en la que vaya a colocar
la rejilla y la bandeja de grill según los distintos gro-
sores de los alimentos.
• Coloque los alimentos cerca de la resistencia para que
se cocinen más rápido, o lejos de ella para una cocción
más suave.
• Seque bien los alimentos que va a cocinar al grill para
reducir al mínimo las salpicaduras. Unte ligeramente
las carnes y pescados magros con un poco de aceite
o mantequilla derretida para que se mantengan jugo-
sos durante la cocción.
• La guarnición, como tomates y setas, se puede colocar
debajo de la rejilla al hacer la carne.
• Para tostar pan, utilice la parte superior de la guía con
la rejilla en su posición "alta".
• Caliente el horno al máximo durante unos minutos
antes de introducir filetes de carne o alimentos para
tostar. Durante la cocción ajuste el calor y la bandeja
como sea necesario.
• Durante la cocción, gire los alimentos para que se ha-
gan por igual.
• Cuando utilice la sección central del grill, asegúrese
de que los alimentos quedan bien centrados con res-
pecto a la resistencia.
Calor superior e inferior
Gire el selector hasta el símbolo y ajuste el termostato
de la temperatura.
De esta forma, el calor se emite simultáneamente desde
las zonas superior e inferior para cocinar los alimentos
de manera uniforme.
: Calor sólo en la parte inferior. Utilice esta función
para acabar la cocción o recalentar los alimentos desde
abajo. Ajuste la rejilla con las guías especiales más cer-
canas a la parte inferior.
Grill
Gire el selector hasta el símbolo (grill doble) y ajuste
el termostato a la temperatura adecuada. Cuando el se-
lector está en la posición de gratinador doble, el grill al-
canza la máxima temperatura.
Pizza
Gire el selector hasta el símbolo y ajuste el termostato
a la temperatura que desee. Cuando se utiliza la función
pizza, se enciende la resistencia inferior, el grill y el ven-
tilador que distribuye el aire caliente. Esta función es es-
pecialmente útil para cocinar pizza y pan. Para optimizar
la cocción, se recomienda colocar las parrillas en la pri-
mera o segunda guía inferior, en función del espesor de
los alimentos.
36

Aire caliente
Gire el selector hasta el símbolo y ajuste el termostato
a la temperatura que desee. En este tipo de cocción, el
calor procede de la resistencia circular situada en la parte
trasera del horno y el ventilador se encarga de distribuir
el aire caliente. Permite cocinar al mismo tiempo varios
platos colocados en las distintas rejillas. Para cocinar dos
platos al mismo tiempo, utilice las rejillas primera y ter-
cera, contando desde abajo.
Para obtener los mejores resultados al cocinar un solo
plato, utilice las guías más cercanas a la parte inferior.
Grill + ventilador
Gire el selector hasta el símbolo y ajuste el termostato
a la temperatura que desee. Cuando se utiliza la función
grill con aire caliente, el grill y el ventilador funcionan de
manera alterna. Gracias a ello, el calor penetra gradual-
mente en los alimentos sin exponer sus superficies a la
acción directa del grill durante demasiado tiempo.
La función grill con aire caliente es especialmente apta
para cocinar grandes piezas de carne, aves o pescados
enteros (trucha, caballa, mújol).
Advertencia Si utiliza la función grill con aire
caliente, seleccione una temperatura máxima de
200 °C.
Tablas de cocción
Tabla para hornear y asar
REPOSTERÍA
TIPO DE ALI-
MENTO
Cocción con-
vencional
Turbo
Cocción por aire
caliente forzado
Tiempo de
cocción
(min)
Notas
Nivel
Temp.
(°C)
Nivel
Temp.
(°C)
Nivel
Temp.
(°C)
Masas batidas 2 170 2 (1 y
3)
160 2 (1 y
3)
165 45-60 En molde de repostería
Masa con
mantequilla
2 170 2 (1 y
3)
160 2 (1 y
3)
160 24-34 En molde de repostería
Tarta de queso 1 170 2 160 2 165 60-80 En molde de repostería
(26 cm)
Tarta de man-
zana
1 170 2 iz-
quier-
da +
dere-
cha
160 2 iz-
quier-
da +
dere-
cha
160 100-120 2 moldes de repostería de
20 cm en la bandeja del
horno
Strudel 2 175 2 150 2 150 60-80 Bandeja horneado
Tarta de mer-
melada
2 170 2 160 2 iz-
quier-
da +
dere-
cha
160 30-40 En molde de repostería
(26 cm)
Tarta de frutas 2 170 2 155 2 155 60-70 En molde de repostería
(26 cm)
37

TIPO DE ALI-
MENTO
Cocción con-
vencional
Turbo
Cocción por aire
caliente forzado
Tiempo de
cocción
(min)
Notas
Nivel
Temp.
(°C)
Nivel
Temp.
(°C)
Nivel
Temp.
(°C)
Bizcocho (biz-
cocho sin gra-
sa)
2 170 2 160 2 160 35-45 En molde de repostería
(26 cm)
Pastel de Navi-
dad/tarta de
frutas
2 170 2 160 2 160 50-60 En molde de repostería
(20 cm)
Tarta de cirue-
las
2 170 2 160 2 165 50-60
En molde de pan
1)
Pastelillos 3 170 3 (1 y
3)
160 3 (1 y
3)
165 20-30 Bandeja horneado
Galletas 3 150 3 150 3 (1 y
3)
140 20-30
Bandeja horneado
1)
Merengues 3 100 3 100 3 115 90-120 Bandeja horneado
Bollos 3 190 3 180 3 180 15-20
Bandeja horneado
1)
Pasta Choux 3 190 3 180 3 (1 y
3)
180 25-35
Bandeja horneado
1)
Tartaletas 3 180 2 170 2 170 45-70 En molde de repostería
(20 cm)
Bizcocho
sándwich (Vic-
toria)
1 o 2 180 2 170 2 170 40-55 Izquierda + derecha en
molde de repostería de 20
cm
1) Precalentar durante 10 minutos.
PAN Y PIZZA
TIPO DE ALI-
MENTO
Cocción con-
vencional
Turbo
Cocción por aire
caliente forzado
Tiempo de
cocción
(min)
Notas
Nivel
Temp.
(°C)
Nivel
Temp.
(°C)
Nivel
Temp.
(°C)
Pan blanco 1 190 1 190 1 195 60-70 1-2 piezas, 500 gr cada
pieza
1)
Pan de centeno 1 190 1 180 1 190 30-45 En molde de pan
Panecillos 2 190 2 (1 y
3)
180 2 (1 y
3)
180 25-40 6-8 panecillos en bandeja
de repostería
1)
Pizza 1 190 1 190 1 190 20-30
En la grasera
1)
Galletas 3 200 2 190 2 190 10~20
Bandeja horneado
1)
1) Precalentar durante 10 minutos.
38

FLANES
TIPO DE ALI-
MENTO
Cocción con-
vencional
Turbo
Cocción por aire
caliente forzado
Tiempo de
cocción
(min)
Notas
Nivel
Temp.
(°C)
Nivel
Temp.
(°C)
Nivel
Temp.
(°C)
Flan de pasta 2 180 2 180 2 180 40-50 En molde
Flan de verdu-
ras
2 200 2 175 2 200 45-60 En molde
Tartas saladas 1 190 1 190 1 190 40-50 En molde
Lasañas 2 200 2 200 2 200 25-40 En molde
Canelones 2 200 2 190 2 200 25-40 En molde
Pudin Yorkshi-
re
2 200 2 210 2 210 20-30 6 moldes de pudin
CARNES
TIPO DE ALI-
MENTO
Cocción con-
vencional
Turbo
Cocción por aire
caliente forzado
Tiempo de
cocción
(min)
Notas
Nivel
Temp.
(°C)
Nivel
Temp.
(°C)
Nivel
Temp.
(°C)
Carne de vaca 2 200 2 190 2 190 50-70 En la rejilla y la grasera
Carne de cerdo 2 180 2 180 2 180 90-120 En la rejilla y la grasera
Ternera 2 190 2 175 2 175 90-120 En la rejilla y la grasera
Rosbif poco
hecho
2 210 2 200 2 200 44-50 En la rejilla y la grasera
Rosbif en su
punto
2 210 2 200 2 200 51-55 En la rejilla y la grasera
Rosbif inglés
muy hecho
2 210 2 200 2 200 55-60 En la rejilla y la grasera
Paleta de cerdo 2 180 2 170 2 170 120-150 En la grasera
Pierna de cer-
do
2 180 2 160 2 160 100-120 2 piezas en la grasera
Cordero 2 190 2 190 2 190 110-130 Muslo
Pollo 2 200 2 200 2 200 70-85 Todo en la grasera
Pavo 1 180 1 160 1 160 210-240 Todo en la grasera
Pato 2 175 2 160 2 160 120-150 Todo en la grasera
Ganso 1 175 1 160 1 160 150-200 Todo en la grasera
Conejo 2 190 2 175 2 175 60-80 Troceado
39

TIPO DE ALI-
MENTO
Cocción con-
vencional
Turbo
Cocción por aire
caliente forzado
Tiempo de
cocción
(min)
Notas
Nivel
Temp.
(°C)
Nivel
Temp.
(°C)
Nivel
Temp.
(°C)
Liebre 2 190 2 175 2 175 150-200 Troceado
Faisán 2 190 2 175 2 175 90-120 Todo en la grasera
PESCADO
TIPO DE ALI-
MENTO
Cocción con-
vencional
Turbo
Cocción por aire
caliente forzado
Tiempo de
cocción
(min)
Notas
Nivel
Temp.
(°C)
Nivel
Temp.
(°C)
Nivel
Temp.
(°C)
Trucha/Besu-
go
2 190 2 (1 y
3)
175 2 (1 y
3) 2 (1
y 3)
175 40-55 3-4 pescados
Atún/Salmón 2 190 2 (1 y
3)
175 2 (1 y
3)
175 35-60 4-6 filetes
Los tiempos de cocción no incluyen el tiempo de
precalentamiento. Precalentar siempre el horno va-
cío durante 10 minutos.
Asado a la parrilla
TIPO DE ALIMEN-
TO
Cantidad Asado a la parrilla Tiempo de cocción (minutos)
Piezas gramos temp. °C Primer lado Segundo lado
Filetes de ternera 4 800 3 250 12 ~ 15 12 ~ 14
Bistecs 4 600 3 250 10 ~ 12 6 ~ 8
Salchichas 8 / 3 250 12 ~ 15 10 ~ 12
Chuleta de cerdo 4 600 3 250 12 ~ 16 12 ~ 14
Pollo (cortado en
dos)
2 1000 3 250 30 ~ 35 25 ~ 30
Brochetas 4 / 3 250 10 ~ 15 10 ~ 12
Pechuga de pollo 4 400 3 250 12 ~ 15 12 ~ 14
Hamburguesa
1)
6 600 2 250 20 - 30
Pescado (filetes) 4 400 3 250 12 ~ 14 10 ~ 12
Sándwiches 4 ~ 6 / 3 250 5 ~ 7 /
40

TIPO DE ALIMEN-
TO
Cantidad Asado a la parrilla Tiempo de cocción (minutos)
Piezas gramos temp. °C Primer lado Segundo lado
Tostadas 4 ~ 6 / 3 250 2 ~ 4 2 ~ 3
1) Precalentar 5'00''
Advertencia Con esta función, seleccione una
temperatura máxima de 200 °C.
Grill + ventilador
TIPO DE ALIMEN-
TO
Cantidad (gr.) Nivel Temp. °C Tiempo de cocción (minutos)
Lado inferior Lado superior
Rollos de carne
(pavo)
1000 3 200 30 ~ 40 20 ~ 30
Pollo (cortado en
dos)
1000 3 200 25 ~ 30 20 ~ 30
Muslos de pollo — 3 200 15 ~ 20 15 ~ 18
Codorniz 500 3 200 25 ~ 30 20 ~ 25
Gratinado de ver-
duras
— 3 200 20 ~ 25 —
Almejas S. Jac-
ques
— 3 200 15 ~ 20 —
Caballas — 3 200 15 ~ 20 10 ~ 15
Pescado en roda-
jas
800 3 200 12 ~ 15 8 ~ 10
Las temperaturas se indican sólo como referencia.
Se pueden aumentar o reducir según las preferen-
cias personales o las necesidades del alimento.
Función pizza
TIPO DE ALIMENTO Función pizza Tiempo de cocción (mi-
nutos)
Notas
temp. °C
Pizza, grande 1 200 15 ~ 25 en bandeja de repostería
Pizza, pequeña 1 200 10 ~ 20 en bandeja de hornear o
parrilla
Panecillos 1 200 15 ~ 25 en bandeja de repostería
41

Las temperaturas indicadas son orientativas. Pue-
den adaptarse a cada caso concreto como sea ne-
cesario.
Cocción con la función "Vapor"
Según el tiempo de cocción indicado en las tablas,
puede ser necesario llenar el depósito más de una
vez. Cuando se queda sin agua, se enciende el indicador
"Depósito vacío". Rellene el depósito con las instruccio-
nes de "Preparación del horno para cocción al vapor".
REPOSTERÍA
TIPO DE ALIMENTO Función "Vapor" Tiempo de cocción
(minutos)
NOTAS
Nivel temperatura °C
Tarta de manzana
1)
2 160 90 - 120 en molde para repos-
tería de 20 cm
Tartas 2 175 30 - 40 en molde para repos-
tería de 26 cm
Tarta de frutas 2 160 80 - 90 Molde de tarta de 26
cm
Bizcocho 1 160 40 - 45 en molde para repos-
tería de 26 cm
Hojaldre trenzado
1)
2 150 100 - 110 en molde para repos-
tería de 20 cm
Tarta de frutas
1)
2 160 40 - 50 en molde para pan
Pastelillos 3 165 30 - 35 en bandeja de repos-
tería
Galletas 3 150 20 - 35 en bandeja de repos-
tería
Panecillos de leva-
dura
1)
2 200 12 - 20 en bandeja de repos-
tería
Brioches
1)
3 180 20 - 30 en bandeja de repos-
tería
1) En los tiempos de cocción de la tabla no se incluye el precalentamiento. Es necesario precalentar el horno durante 10 minutos
antes de iniciar la cocción.
PAN Y PIZZA
TIPO DE ALI-
MENTO
PESO EN GRA-
MOS
Función "Vapor" Tiempo de coc-
ción (minutos)
NOTAS
Nivel temperatura °C
Pan blanco
1)
1.000 g 2 190 40 - 60 1 o 2 unidades de
500 g
42

TIPO DE ALI-
MENTO
PESO EN GRA-
MOS
Función "Vapor" Tiempo de coc-
ción (minutos)
NOTAS
Nivel temperatura °C
Panecillos
1)
500 g 2 190 20 - 30 6 - 8 panecillos
en bandeja de re-
postería
Pizza 1 200 20 - 30 en bandeja de re-
postería
1) En los tiempos de cocción de la tabla no se incluye el precalentamiento. Es necesario precalentar el horno durante 10 minutos
antes de iniciar la cocción.
FLANES
TIPO DE ALIMENTO Función "Vapor" Tiempo de cocción
(minutos)
NOTAS
Nivel temperatura °C
De verdura 1 175 30 - 40 recipiente de pyrex
Tartas saladas 2 200 50 - 60 Molde
Lasañas 2 190 45 - 60 recipiente de pyrex
Patatas al vapor 1 180 32 - 42 recipiente de pyrex
Patata gratinada 1 185 50 - 60 recipiente de pyrex
CARNES
TIPO DE ALI-
MENTO
PESO EN GRA-
MOS
Función "Vapor" Tiempo de coc-
ción (minutos)
NOTAS
Nivel temperatura °C
Redondo de cer-
do
1.000 g 2 180 80 - 90 A la parrilla
Ternera 1.000 g 2 180 90 - 100 A la parrilla
Rosbif (poco he-
cho)
1.000 g 2 210 53 - 55 A la parrilla
Rosbif (en su
punto)
1.000 g 2 210 61 - 65 A la parrilla
Rosbif (muy he-
cho)
1.000 g 2 210 65 - 70 A la parrilla
Cordero 1.000 g 2 175 120 - 150 Muslo
Pollo 1.000 g 2 200 50 - 60 Entero
Pavo 4.000 g 1 175 150 - 180 Entero
Pato 1 175 150 - 180 Entero
Ganso 3.000 g 1 160 120 - 150 Entero
Conejo 2 180 90 - 120 Troceado
43

PESCADO
TIPO DE ALI-
MENTO
PESO EN GRA-
MOS
Función "Vapor" Tiempo de coc-
ción (minutos)
NOTAS
Nivel temperatura °C
Trucha 1.500 g 2 180 30 - 45 3 - 4 piezas
Atún 1.200 g 2 180 35 - 60 4 - 6 filetes
Pescadilla 2 210 20 - 30
Mantenimiento y limpieza
Advertencia Antes de limpiar el horno, apáguelo y
deje que se enfríe.
El aparato no se debe limpiar con un limpiador de vapor
caliente o chorro de vapor.
Importante: Antes de realizar cualquier trabajo de limpie-
za, se debe desconectar el suministro eléctrico del apa-
rato.
Para que el aparato tenga una larga vida útil, es necesario
realizar las siguientes operaciones de limpieza con
regularidad:
• Estos trabajos sólo se deben realizar con el horno frío.
• Limpie las partes esmaltadas con agua con jabón.
• No utilice productos abrasivos.
• Seque las piezas de acero inoxidable y los cristales
con un paño suave.
• En el caso de manchas difíciles, utilice detergentes
convencionales para acero inoxidable o vinagre ca-
liente.
El esmalte del horno es muy resistente e impermeable.
Sin embargo, los ácidos calientes de algunas frutas (li-
mones, ciruelas, etc.) pueden dejar manchas ásperas y
opacas en la superficie del esmalte. No obstante, estas
manchas en la superficie brillante del esmalte no afectan
al funcionamiento del horno. Limpie siempre el horno
después de utilizarlo. Es la manera más fácil de eliminar
la suciedad. Además, evitará que se quemen los restos
de suciedad.
Productos de limpieza
Antes de aplicar un producto de limpieza al horno, com-
pruebe que es adecuado y que el fabricante recomienda
su uso.
El empleo de limpiadores que contengan lejía podría ha-
cer opaco el acabado de la superficie. Evite el uso de
productos abrasivos o agresivos.
Limpieza del exterior
Limpie periódicamente el panel de mandos, la puerta del
horno y el cierre hermético de la puerta con un paño suave
empapado en agua templada, a la que se haya añadido
un poco de detergente líquido.
Para no causar daños ni el desgaste de los paneles de
cristal de la puerta, evite el uso de lo siguiente:
• Detergente de uso doméstico y lejía.
• Estropajos impregnados que no son aptos para cace-
rolas antiadherentes.
• Estropajos abrillantadores (Ajax) o estropajos de ace-
ro.
• Estropajos o aerosoles químicos para horno.
• Desoxidantes.
• Quitamanchas domésticos.
Utilice agua templada con jabón para limpiar el cristal
interior y exterior de la puerta. Cuando el cristal interior
está muy sucio, se recomienda emplear un producto de
limpieza para placas de cerámica. No emplee rascadores
para eliminar la suciedad.
Cámara de cocción
La base esmaltada del interior del horno se limpia mejor
con el horno aún caliente.
Pase por el horno un paño suave humedecido con agua
jabonosa templada tras cada uso. De vez en cuando será
necesario realizar una limpieza más a fondo utilizando un
producto de limpieza para hornos.
Puerta del horno
La puerta del horno está compuesta por dos paneles de
vidrio. A fin de facilitar su limpieza la puerta del horno se
puede desenganchar para desmontarlos.
Advertencia Atención: La puerta del horno se debe
desmontar antes de limpiarla. La puerta podría
cerrarse bruscamente al intentar desmontar su panel
interno cuando está suspendida.
44

Si desea desmontarla, proceda como sigue.
1
Abra por completo la
puerta.
Localice las dos bisagras
de la puerta.
2
Levante la palanca de
las dos bisagras y abátala
hacia delante.
3
Sujete la puerta del
horno por los laterales con
ambas manos y cierre la
puerta parcialmente a un
ángulo de aprox. 45º.
Extraiga la puerta de su
alojamiento.
4
Coloque la puerta so-
bre un suelo firme y pro-
teja la superficie de la ma-
nilla con un paño suave.
90°
5
Accione el sistema de
bloqueo para retirar los
paneles internos.
90°
6
Gire los dos topes bas-
culantes en 90° y extrái-
galos de su asiento.
1
2
7
Levante ligeramente y
con cuidado el panel su-
perior y extraiga el que es-
tá enmarcado en los cua-
tro lados.
Limpie la puerta del horno con agua templada y un paño
suave. No utilice estropajos metálicos o abrasivos, ni
productos ácidos que puedan dañar las superficies te-
morreflectantes especiales de los paneles de vidrio inte-
riores.
A tal efecto, realice lo siguiente:
• La plancha interior enmarcada con un embellecedor
por los 4 lados se debe montar de tal manera que las
caras serigrafíadas miren al exterior del horno. A fin
de asegurarse de que ha colocado el vidrio correcta-
mente, pase los dedos por la superficie visible para
comprobar la lisura de la serigrafía.
El panel interno debe colocarse en su asiento tal como se
especifica en la figura 8. Tras colocar los paneles de vidrio
en la puerta del horno, sujételos siguiendo el orden in-
verso de la explicación del punto 6 para asegurarse de
que están bloqueados.
8
Advertencia No limpie nunca la puerta del horno
mientras está caliente porque los vidrios podrían
romperse. Si detecta arañazos o grietas en el vidrio, llame
de inmediato al servicio técnico y disponga su cambio.
45

Modelos de acero inoxidable o aluminio:
Limpie las puertas y paneles de mandos de acero inoxi-
dable y aluminio con un estropajo mojado y, seguida-
mente, séquelos detenidamente con un paño suave. No
utilice estropajos metálicos ni productos ácidos o deter-
gentes abrasivos que puedan rayar las superficies.
Limpieza de la junta de la puerta del horno
Advertencia Revise periódicamente el estado de la
junta y límpiela siempre que sea necesario, pero sin
utilizar objetos ni productos abrasivos. Si la junta está
dañada, diríjase inmediatamente al servicio técnico más
cercano. No utilice el horno hasta que la junta no haya
sido sustituida.
Bandejas y soportes del horno
Los carriles de apoyo situados a izquierda y derecha del
horno se pueden retirar para limpiar las paredes laterales.
Retirar los carriles de apoyo
1
Separe los carriles de
la pared del horno por la
parte delantera.
1
2
2
Desenganche los ca-
rriles por la parte poste-
rior.
Colocar los carriles de apoyo
1
2
Para instalar los carriles, acóplelos de nuevo en la parte
trasera; a continuación, colóquelos en su posición en la
parte delantera y presione. Para limpiar los carriles de
apoyo, sumérjalos en agua jabonosa caliente y elimine
las manchas difíciles con una esponja bien enjabonada.
Enjuáguelos bien y séquelos con un paño suave.
Sustitución de la luz del horno
Desconecte el aparato de la red eléctrica.
Si necesita cambiar la bombilla, utilice un repuesto con
las siguientes especificaciones:
• Potencia eléctrica: 15 W/25 W;
• Tensión eléctrica: 230 V (50 H);
• Resistente a temperaturas de 300 °C;
• Tipo de conexión: E14.
Para cambiar la bombilla
1. Asegúrese de que el horno está desenchufado de la
corriente.
2. Empuje la tapa de cristal y gírela hacia la izquierda.
3. Quite la bombilla defectuosa y cámbiela por otra
nueva.
4. Vuelva a colocar la tapa de cristal y enchufe el aparato
a la corriente eléctrica.
Cómo vaciar el depósito de agua
Advertencia Asegúrese de que el electrodoméstico
se ha enfriado antes de vaciar el depósito.
A
B
1
Prepare la sonda de
desagüe. Conecte el racor,
indicado con la letra (A) en
la figura, a uno de los ex-
tremos.
A
C
2
Coloque el otro extre-
mo de la sonda de desa-
güe en un recipiente. In-
troduzca el racor (A) en la
válvula de salida (C).
46

C
3
Para introducir el racor
en la válvula, ejerza un po-
co de presión en la direc-
ción que se indica en la fi-
gura. Vacíe el agua.
C
4
Cuando deje de salir
agua, desconecte el racor
de la válvula.
Advertencia No utilice el agua drenada para rellenar
el depósito.
Advertencia El hecho de que se encienda la luz del
indicador
"depósito vacío", no significa que el
depósito esté totalmente vacío. Espere hasta que el agua
deje de salir por la válvula.
Limpieza del depósito
Advertencia No vierta agua en el cajetín durante el
ciclo de limpieza.
Durante el ciclo de limpieza podría caer agua del
orificio de entrada del vapor en el interior del horno.
Se recomienda colocar la bandeja en el nivel exactamente
inferior a la entrada de vapor a fin de evitar que caiga agua
directamente en la parte inferior del horno.
Como en todos los equipos que funcionan con agua (por
ejemplo, la plancha), es absolutamente normal que en el
horno a vapor se formen depósitos de cal. Con el uso del
horno, la cal que se acumula dentro del depósito puede
reducir la producción de vapor. Tras varios usos, es po-
sible que se deposite cierta cantidad de cal , por lo que
se recomienda limpiar a fondo todas las piezas del horno
que generan vapor.
Siga estas instrucciones:
Vacíe el depósito al terminar la cocción (siga las instruc-
ciones de la sección "Para vaciar el depósito de agua").
Proceda como se indica a continuación:
• Después de haber vaciado el depósito, prepare una
solución con 500 cc de agua y 50 - 60 gramos (cinco
cucharadas) de ácido cítrico o un producto antical para
máquinas de café de venta en supermercados y en
tiendas de electrodomésticos .
El ácido cítrico es una sustancia para uso alimen-
tario; se presenta en forma de pequeños granos
blancos como el azúcar. Suele utilizarse en la industria
alimentaria y se puede comprar en las tiendas de vino ,
de well-stocked ultramarinos y en algunas farmacias
• Vierta dicha solución en el cajón de carga.
• Deje reposar la solución de ácido cítrico en el depósito
durante unos 60 minutos con el horno frío.
• Encienda el horno y seleccione la función del vapor a
una temperatura entre 140 °C y 230 °C. Apáguelo tras
20-25 minutos.
• Espere 5-10 minutos a que se enfríe el horno.
• Encienda el horno y seleccione la función del vapor a
una temperatura entre 140 °C y 230 °C. Apáguelo tras
10 minutos.
Espere a que el horno se enfríe y vacíe el depósito como
se ha descrito.
• Aclare varias veces el depósito; para ello, llene el cajón
de carga con agua y elimínela con la sonda de desagüe
hasta que deje de haber restos de cal en el agua. Limpie
el interior el horno con un paño suave para eliminar
cualquier resto de cal.
Durante esta operación, el horno despide un caracterís-
tico olor a limón. Si no va a utilizar el horno durante más
de 2 o 3 semanas es aconsejable eliminar el agua con-
tenida en el depósito del horno.
Limpieza de la sonda de desagüe
Al final de cada lavado, limpie a fondo la sonda. Se puede
lavar a mano con agua templada y detergente normal "para
vajillas". No utilice productos ácidos, aerosoles ni sus-
tancias similares para lavar los componentes de la sonda
de vapor para no dañarlos.
47

Consejos sobre los tipos de agua
Si se utilizan aguas minerales naturales o agua con bajo
contenido de cal, la frecuencia de los ciclos de limpieza
se reduce considerablemente (por ejemplo, cada 100 -
150 ciclos de cocción). Si la instalación de la vivienda
dispone de un depurador o descalcificador de agua, podrá
utilizar el agua del grifo sin problemas.
El uso de aguas duras (es decir, con alto contenido
de cal) hace aumentar la frecuencia de los ciclos de
lavado, pero no perjudica al funcionamiento general del
equipo.
TABLA DE CONCENTRACIÓN DE CALCIO SEGÚN LA O.M.S.
(Organización Mundial de la Salud)
Depósito de calcio
Dureza del agua
(Grados franceses)
Dureza del agua
(Grados alemanes)
Clasificación del
agua
Realice una descal-
cificación cada
0 - 60 mg/l 0-6 0-3 Corriente o suave
150 ciclos -2,5 me-
ses
60 - 120 mg/l 6-12 3-7 Dureza media 100 ciclos -2 meses
120 - 180 mg/l 12-18 8-10 Dura o calcárea 75 ciclos -1,5 meses
más de 180 mg/l más de 18 más de 10 Muy dura 60 ciclos -1 mes
Qué hacer si…
Algunos problemas de funcionamiento se reducen sim-
plemente a una falta de mantenimiento o a un descuido,
y pueden solventarse fácilmente sin tener que llamar a un
técnico.
PROBLEMA SOLUCIÓN
EL HORNO NO FUNCIONA Compruebe que los mandos estén en la posición de cocción correcta y repita
las operaciones indicadas en el manual.
o
Compruebe los interruptores de seguridad ("magnetotérmicos") de la instala-
ción eléctrica. En caso de avería en la instalación eléctrica, póngase en contacto
con un electricista.
NO SE ENCIENDE LA LUZ INTE-
RIOR DEL HORNO
Gire el selector hacia una función.
o
Compre en un centro de asistencia técnica una bombilla resistente a altas tem-
peraturas y móntela siguiendo las instrucciones del apartado específico.
NO SE ENCIENDE EL INDICADOR
DEL TERMOSTATO
Gire el termostato hacia una temperatura.
o
Gire el selector hacia una función.
EL HORNO COCINA LOS ALI-
MENTOS DEMASIADO LENTO O
DEMASIADO RÁPIDO.
Consulte este manual (la sección "Consejos útiles").
SE FORMA HUMEDAD SOBRE
LOS ALIMENTOS Y DENTRO DEL
HORNO
No deje los alimentos ya cocinados más de 15 o 20 minutos dentro del horno.
48

PROBLEMA SOLUCIÓN
EL INDICADOR MUESTRA
"12.00".
Ajuste la hora (véase la sección "Ajuste de la hora").
DENTRO DEL HORNO HAY AGUA Ha llenado excesivamente el depósito de agua. Desactive todas las funciones
del horno y recoja el agua con una esponja o un paño.
INDICADOR "DEPÓSITO LLENO"
APAGADO
Compruebe que el mando del horno se encuentra en el símbolo o
llene el depósito del agua hasta que el indicador se encienda. Si el horno
empieza a llenarse de agua y el indicador “depósito lleno” sigue apagado,
póngase en contacto con el servicio técnico.
INDICADOR "DEPÓSITO VACÍO"
ENCENDIDO
Llene el depósito. Si el indicador sigue encendido después de haber llenado el
depósito con un litro de agua, póngase en contacto con el servicio técnico.
EL VAPOR NO FUNCIONA Compruebe que la función Vapor esté seleccionada
Cierre correctamente la puerta del horno.
Llene el depósito de agua.
Limpie el depósito de agua (como se describe en el apartado específico).
Es posible que el orificio de entrada del vapor esté obstruido. Elimine los de-
pósitos de cal que obstruyen el orificio.
• EL DEPÓSITO DE AGUA TAR-
DA MÁS DE TRES MINUTOS
EN VACIARSE.
• SALIDA DE AGUA POR EL ORI-
FICIO DE ENTRADA DE VAPOR
A LA CAVIDAD
Inicie el proceso de limpieza del depósito (como se describe en el apartado
específico).
Datos técnicos
Potencia de las resistencias
Resistencia inferior 1000 W
Elementos de cocción superior + inferior 1800 W
Elemento de cocción grill doble 2450 W
Resistencia trasera 2000 W
Elemento grill con aire caliente 1650 W
Función "Vapor" 2825 W
Función "Pizza" 3025 W
Bombilla del horno 25 W
Ventilador del horno 25 W
Ventilador de refrigeración 25 W
Potencia total máxima 3075 W
Tensión de alimentación (50 Hz) 230 V
49

Medidas mínimas del mueble para encastre
altura en columna: 587 mm
altura bajo encimera: 600 mm
Anchura 560 mm
Fondo 550 mm
Medidas útiles del interior del horno
Altura 335 mm
Anchura 395 mm
Fondo 400 mm
volumen útil 53 l
Instrucciones de instalación
El montaje y la instalación se deben realizar respetando
estrictamente las normativas que se encuentren en vigor
en cada momento. Cualquier intervención se debe llevar
a cabo con el aparato desconectado. Sólo deben intervenir
técnicos reconocidos.
El fabricante declina toda responsabilidad si no se res-
petan las medidas de seguridad.
Conexión eléctrica
Antes de conectar el aparato, tenga en cuenta lo siguiente:
• El fusible y la instalación eléctrica doméstica deben
estar diseñados para soportar la carga máxima del
aparato (consulte la placa de datos técnicos).
• La instalación doméstica debe disponer de una cone-
xión a tierra adecuada conforme a las normativas vi-
gentes.
• Es necesario poder acceder con facilidad a la toma de
corriente o al interruptor de desactivación de polo
múltiple una vez instalado el aparato.
Este aparato se suministra con un cable de alimentación
eléctrica.
El cable debe contar con un enchufe adecuado, apto para
la potencia eléctrica especificada en la placa de datos
técnicos. El enchufe se debe conectar a una toma de co-
rriente de la pared adecuada. Si necesita conexión directa
a la red eléctrica, es necesario instalar un interruptor om-
nipolar entre el aparato y la red, con una holgura mínima
entre contactos de 3 mm, adecuado para la potencia ne-
cesaria y acorde con la normativa vigente. El interruptor
no debe interferir en el cable de conexión a tierra verde y
amarillo, que debe ser de 2 a 3 cm más largo que los
demás cables.
El cable de conexión a la red disponible con enchufe se
debe conectar a una caja de enchufe con puesta a tierra
(230 V~, 50 Hz). La caja de enchufe con puesta a tierra
debe estar instalada debidamente.
Los siguientes tipos de cable de conexión a la red son
adecuados, teniendo en cuenta la sección transversal no-
minal necesaria: H07 RN-F, H05 RN-F, H05 RR-F, H05
VV-F, H05 V2V2-F (T90) y H05 BB-F.
El cable de conexión debe estar diseñado de tal forma que
no alcance 50°C (sobre la temperatura ambiente) en nin-
gún punto.
Una vez realizada la conexión, se deben comprobar las
resistencias poniéndolas en funcionamiento durante
unos 3 minutos.
Bloque de terminales
El horno dispone de un bloque de terminales de fácil ac-
ceso diseñado para funcionar con un suministro de ener-
gía eléctrica monofásico de 230 V.
Letra L Terminal con energía apli-
cada
Letra N Terminal del cable neutro
o E
Terminal de conexión a
tierra
50

Instrucciones de montaje
Para el correcto funcionamiento del aparato empotrado,
el módulo de cocina o el hueco en el que se empotra el
aparato deben tener las dimensiones adecuadas.
De acuerdo con las normas en vigor, todas las piezas que
aseguran la protección contra descargas eléctricas de
componentes con corriente y aislados se deben fijar de
forma que no se puedan aflojar sin utilizar herramientas.
Esto incluye también la fijación de posibles terminaciones
al principio o al final de una línea de montaje.
La protección contra descargas eléctricas tiene que estar
garantizada en cualquier caso a través del montaje.
El aparato se puede instalar con la parte posterior o una
pared lateral contra módulos de cocina, aparatos o pare-
des más altos. No obstante, en la otra pared lateral sólo
se deben colocar otros aparatos o muebles con la misma
altura que el aparato.
Dimensiones generales del horno
560
570
540
20
590
594
7
Montaje en columna
El hueco de instalación debe tener las dimensiones que
se indican en la figura siguiente.
50
550
min
587
560-570
Montaje bajo una encimera
El hueco de instalación debe tener las dimensiones que
se indican en la figura siguiente.
550 min
600
560-570
80÷100
Fijación del horno al mueble
1. Abra la puerta del horno.
2. Para fijar el horno al mueble, coloque los cuatro so-
portes distanciadores suministrados con el aparato
( A ), que encajan exactamente en los orificios del
marco, y luego inserte los cuatro tornillos de madera
( B ).
Cuando se instale una encimera sobre el horno, las co-
nexiones eléctricas de ambos tendrán que realizarse por
separado por motivos de seguridad. Esto también per-
mitirá separar el horno del mueble con facilidad cuando
sea necesario.
Utilice cables prolongadores de potencia adecuada.
A
B
51

Asistencia técnica y recambios
Si tras consultar la sección "Qué hacer si..." no consigue
resolver el problema, diríjase al centro de asistencia téc-
nica autorizado más cercano e indique el fallo, el modelo
de aparato (Mod.), el número de producto (Prod. no.) y
el número de serie (Ser. No.) que aparecen en la placa de
datos del horno. La placa de datos es visible desde el
exterior del horno, al abrir la puerta, en la posición que
muestra la figura.
Los recambios originales, certificados por el fabricante
del producto y con marca sólo se distribuyen en nuestros
centros de asistencia técnica y en comercios de recam-
bios autorizados.
Desecho del aparato
• A fin de evitar riesgos de lesiones y daños
– Desconecte el aparato de la toma de red.
– Corte el cable de conexión a la red y deséchelo.
– Deseche el cierre de la puerta. Esto evitará que los
niños o los animales domésticos se queden ence-
rrados en el interior del aparato. Existe riesgo de
asfixia.
Aspectos medioambientales
El símbolo que aparece en el aparato o en su
embalaje, indica que este producto no se puede tratar
como un residuo normal del hogar. Se deberá entregar,
sin coste para el poseedor, bien al distribuidor, en el acto
de la compra de un nuevo producto similar al que se
deshecha, bien a un punto municipal de recolección
selectiva de equipos eléctricos y electrónicos para su
reciclaje. Al asegurarse de que este producto se desecha
correctamente, usted ayudará a evitar posibles
consecuencias negativas para el medio ambiente y la
salud pública, lo cual podría ocurrir si este producto no
se gestionara de forma adecuada. Para obtener
información más detallada sobre el reciclaje de este
producto, póngase en contacto con el Ayuntamiento de
su Municipio, ó con la tienda donde lo compró.
Material de embalaje
Los materiales de embalaje son ecológicos y se
pueden reciclar. Los componentes plásticos se
identifican con marcas; por ejemplo, >PE<, >PS<, etc.
Deseche los materiales de embalaje en los contenedores
municipales destinados a tal efecto.
52

53

54

55

www.zanussi.com/shop
359071601-A-042010
-
 1
1
-
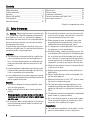 2
2
-
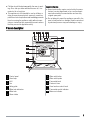 3
3
-
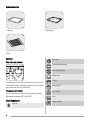 4
4
-
 5
5
-
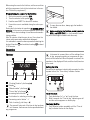 6
6
-
 7
7
-
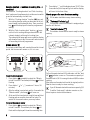 8
8
-
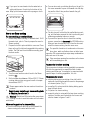 9
9
-
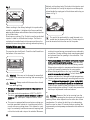 10
10
-
 11
11
-
 12
12
-
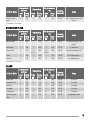 13
13
-
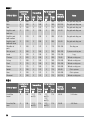 14
14
-
 15
15
-
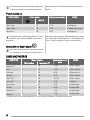 16
16
-
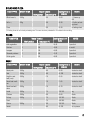 17
17
-
 18
18
-
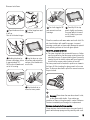 19
19
-
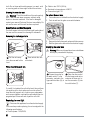 20
20
-
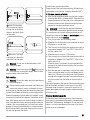 21
21
-
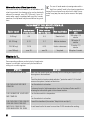 22
22
-
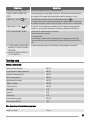 23
23
-
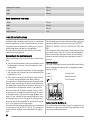 24
24
-
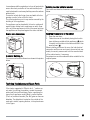 25
25
-
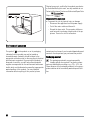 26
26
-
 27
27
-
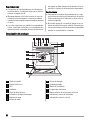 28
28
-
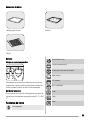 29
29
-
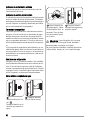 30
30
-
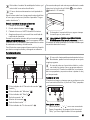 31
31
-
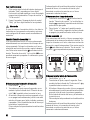 32
32
-
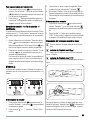 33
33
-
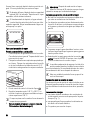 34
34
-
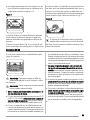 35
35
-
 36
36
-
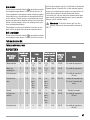 37
37
-
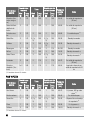 38
38
-
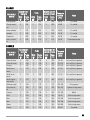 39
39
-
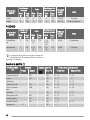 40
40
-
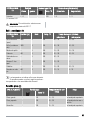 41
41
-
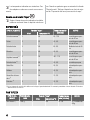 42
42
-
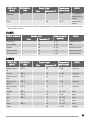 43
43
-
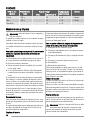 44
44
-
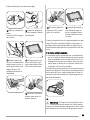 45
45
-
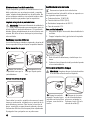 46
46
-
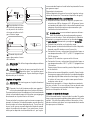 47
47
-
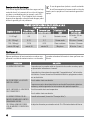 48
48
-
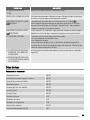 49
49
-
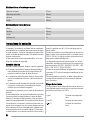 50
50
-
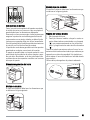 51
51
-
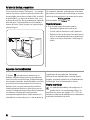 52
52
-
 53
53
-
 54
54
-
 55
55
-
 56
56


Zanussi ZCB770X Manual de usuario
- Categoría
- Hornos
- Tipo
- Manual de usuario
en otros idiomas
- English: Zanussi ZCB770X User manual
Artículos relacionados
Otros documentos
-
Electrolux EOC96000X Manual de usuario
-
Candy FCTS615X Manual de usuario
-
Electrolux EOZ3430AOX Manual de usuario
-
Infiniton HN-870N El manual del propietario
-
AEG BSK788380M Manual de usuario
-
Foster KS multifunzione PP 60x46 Manual de usuario
-
Avanti Range DE 2402 SC Manual de usuario
-
M-system Elite MEO-60 IX El manual del propietario
-
-
Chattanooga M2 Manual de usuario