APRILIA MX 125 El manual del propietario
- Categoría
- Motocicletas
- Tipo
- El manual del propietario
Este manual también es adecuado para

aprilia part# 8104766
use+maintenancebook
MX
125
MX125_S.book Page 1 Wednesday, October 15, 2003 11:04 AM

uso y mantenimiento MX 125
2
© 2003 aprilia s.p.a. - Noale (VE)
Primera edición: Octubre 2003
Nueva edición:
Producido e impreso por:
DECA s.r.l.
Via Risorgimento, 23/1 - Lugo (RA) - Italia
Tel. +39 - 0545 35235
Fax +39 - 0545 32844
E-mail: deca@decaweb.it
www.decaweb.it
por cuenta de:
aprilia s.p.a.
via G. Galilei, 1 - 30033 Noale (VE) - Italy
Tel. +39 - (0)41 58 29 111
Fax +39 - (0)41 44 10 54
www.aprilia.com
MENSAJES DE SEGURIDAD
Los mensajes de aviso descritos a conti-
nuación se utilizan en todo el manual para
indicar lo siguiente:
Símbolo de aviso relativo a la se-
guridad. Cuando este símbolo
está presente en el vehículo o en el ma-
nual, tenga cuidado con los riesgos po-
tenciales de lesiones. La inobservancia
de lo indicado en los avisos precedidos
por este símbolo puede perjudicar la se-
guridad: ¡de Usted, de los demás y del
vehículo!
PELIGRO
Indica un riesgo potencial de lesiones
graves o muerte.
ATENCIÓN
Indica un riesgo potencial de lesiones
ligeras o daños al vehículo.
IMPORTANTE El término ≈IMPOR-
TANTE∆ en el presente manual precede
importantes instrucciones o información.
INFORMACIONES TÉCNICAS
Las operaciones precedidas por
este símbolo deben ser repetidas
también en el lado opuesto del vehículo..
De no resultar expresamente descrito, los
grupos deben ser instalados siguiendo el
orden inverso de las operaciones realiza-
das para el desmontaje.
Los términos ≈derecha∆ e ≈izquierda∆ se re-
fieren al piloto sentado sobre el vehículo
en la posición normal de conducción.
ADVERTENCIA-PRECAUCIONES
AVISOS GENERALES
Antes de arrancar el motor, lea con cuida-
do este manual y en particular el capítulo
≈CONDUCCI‡N SEGURA∆.
Su seguridad y la de los otros no depende
sólo de su prontitud de reflejos y agilidad,
sino también del conocimiento del vehícu-
lo, de su estado de buen funcionamiento y
del conocimiento de las reglas fundamen-
tales para una CONDUCCI‡N SEGURA.
Por lo tanto, le aconsejamos que se fami-
liarice con el vehículo de manera que pue-
da moverse con habilidad y seguridad en-
tre el tráfico de la carretera.
IMPORTANTE Procúrese y manten-
ga en el equipo base del vehículo una
bombilla de cada tipo (véase datos técni-
cos).
+
MX125_S.book Page 2 Wednesday, October 15, 2003 11:04 AM

3
uso y mantenimiento MX 125
IMPORTANTE Este manual debe
considerarse como parte integrante del ve-
hículo y siempre debe acompañarlo incluso
en caso de reventa.
aprilia ha realizado este manual poniendo
el máximo cuidado en la exactitud y actuali-
dad de la información facilitada. Sin embar-
go, como los productos aprilia están suje-
tos a continuas mejoras de planeamiento,
puede producirse una ligera discrepancia
entre las características del vehículo que
Ud. posee y las que se describen en el pre-
sente manual. Para cualquier aclaración so-
bre la información contenida en el manual,
diríjase a su aprilia Concesionario Oficial.
Para las operaciones de control y las repa-
raciones que no se describen explícitamen-
te en esta publicación, la compra de re-
puestos originales aprilia, de accesorios y
de otros productos, así como para el aseso-
ramiento específico, diríjase exclusivamen-
te a los Concesionarios Oficiales y Centros
de Asistencia aprilia, que garantizan un
servicio esmerado y rápido.
Le damos las gracias por haber elegido
aprilia y le deseamos una conducción
agradable.
A todos los países se les reserva los dere-
chos de memorización electrónica, de re-
producción y de adaptación total y parcial,
con cualquier vehículo.
IMPORTANTE En algunos países la
legislación en vigor requiere el respeto de
normas anticontaminación y antirruido y la
realización de comprobaciones periódicas.
El usuario que utiliza el vehículo en estos
países debe:
√ dirigirse a un aprilia Concesionario Ofi-
cial para la sustitución de los componen-
tes en cuestión con otros homologados
para el país correspondiente;
√ realizar las comprobaciones periódicas
requeridas.
IMPORTANTE Al comprar el vehícu-
lo, indique en la figura que aparece a con-
tinuación los datos de identificación pre-
sentes en la ETIQUETA DE
IDENTIFICACI‡N REPUESTOS. Esta eti-
queta está situada en el bastidor debajo
del sillín; para leerla es necesario desmon-
tar el sillín, véase.
Estos datos identifican:
√ YEAR = año de producción (Y, 1, 2, ...);
√ I.M. = índice de modificación (A, B, C, ...);
√ SIGLAS DE LOS PAISES = país de homo-
logación (I, UK, A, ...).
y deben facilitarse al aprilia Concesiona-
rio Oficial como referencia para la compra
de piezas de repuesto o accesorios espe-
cíficos para el modelo que Uds. poseen:
En este manual las variantes se indican
con los siguientes símbolos:
VERSIÓN:
7 opcional
versión potencia libre (Free Power)
Italia Singapore
Regno
Unito
Slovenia
Austria Israele
Portogallo Corea del Sud
Finlandia Malaysia
Belgio Cile
Germania Croazia
Francia Australia
Spagna
Stati Uniti
d’America
Grecia Brasile
Olanda
Repubblica del
Sud Africa
Svizzera Nuova
Zelanda
Danimarca Canada
Giappone
I
SGP
UK
SLO
A
IL
P ROK
SF
MAL
B
RCH
D
HR
AUS
E
USA
GR
BR
NL
RSA
CH
NZ
DK
CDN
J
MX125_S.book Page 3 Wednesday, October 15, 2003 11:04 AM

uso y mantenimiento MX 125
4
INDICE GENERAL
INFORMACIONES TÉCNICAS............................ 2
CONDUCCIÓN SEGURA..................................... 5
REGLAS FUNDAMENTALES DE SEGURIDAD .. 6
ROPA.................................................................... 9
ACCESORIOS.................................................... 10
CARGA ............................................................... 10
UBICACION ELEMENTOS PRINCIPALES...... 12
UBICACION INSTRUMENTOS.......................... 14
INSTRUMENTOS E INDICADORES................. 15
TABLA INSTRUMENTOS E INDICADORES ..... 16
COMPUTADORA MULTIFUNCI‡N ................... 17
SUSTITUCI‡N BATER‹A ................................... 31
MANDOS PRINCIPALES INDIVIDUALES ....... 32
MANDOS EN EL LADO IZQUIERDO DEL
MANILLAR .......................................................... 32
INTERRUPTOR DE ENCENDIDO ..................... 33
SEGURO DE DIRECCION ................................. 33
EQUIPO AUXILIAR ............................................. 34
VANO PORTADOCUMENTOS / KIT
HERRAMIENTAS ............................................... 34
ENGANCHE PARA EL CASCO.......................... 34
HERRAMIENTAS ESPECIALES
- .................. 35
COMPONENTES PRINCIPALES...................... 36
COMBUSTIBLE .................................................. 36
ACEITE CAMBIO................................................ 36
DEPOSITO ACEITE MEZCLADOR.................... 37
LIQUIDO FRENOS - recomendaciones.............. 38
FRENOS DE DISCO........................................... 38
FRENO DELANTERO ........................................ 39
FRENO TRASERO ............................................. 40
REGULACION EN ALTURA PALANCA FRENO
TRASERO........................................................... 41
REGULACION EMBRAGUE............................... 42
NEUMATICOS.................................................... 43
LIQUIDO REFRIGERANTE ................................ 44
SILENCIADOR.................................................... 46
NORMAS PARA EL USO................................... 47
TABLA CONTROLES PRELIMINARES ............. 47
ARRANQUE........................................................ 48
SALIDA Y CONDUCCION ................................. 50
RODAJE............................................................. 53
PARADA ............................................................ 53
APARCAMIENTO .............................................. 54
COLOCACION DEL VEHICULO
SOBRE EL CABALLETE ................................... 54
SUGERENCIAS CONTRA LOS ROBOS........... 54
MANTENIMIENTO............................................... 55
FICHA DE MANTENIMIENTO PERIODICO...... 56
FICHA DE RECONOCIMIENTO ........................ 58
DESMONTAJE
PANELES LATERALES..................................... 58
FILTRO AIRE ..................................................... 59
COMPROBACION NIVEL ACEITE CAMBIO Y
RELLENO .......................................................... 60
SUSTITUCION ACEITE CAMBIO...................... 61
RUEDA DELANTERA ........................................ 62
RUEDA TRASERA............................................. 64
CADENA DE TRANSMISION ............................ 66
INSPECCION SUSPENSION
DELANTERA Y TRASERA ................................ 68
SUSPENSION TRASERA.................................. 69
COMPROBACION
DESGASTE PASTILLAS ................................... 70
AJUSTE MANDO ARRANQUE EN FRIO (
).. 70
AJUSTE DEL RALENTI ..................................... 71
AJUSTE MANDO ACELERADOR ..................... 71
BUJIA ................................................................. 72
BATERIA............................................................ 73
LARGA INACTIVIDAD
DE LA BATERIA ................................................ 73
CONTROL Y LIMPIEZA TERMINALES Y
BORNES ............................................................ 74
DESMONTAJE BATERIA .................................. 74
CONTROL
NIVEL ELECTROLITO BATERIA ...................... 75
RECARGA BATERIA ......................................... 75
INSTALACION BATERIA................................... 75
SUSTITUCION FUSIBLES ................................ 76
CONTROL CABALLETE LATERAL................... 77
CONTROL INTERRUPTORES.......................... 77
REGULACION VERTICAL
HAZ LUMINOSO................................................ 78
BOMBILLAS....................................................... 78
SUSTITUCION BOMBILLAS
FARO DELANTERO .......................................... 79
SUSTITUCION
BOMBILLAS SALPICADERO ............................ 80
SUSTITUCION BOMBILLAS
INDICADORES DE DIRECCION
DELANTEROS Y TRASEROS........................... 81
SUSTITUCION
BOMBILLA FARO TRASERO............................ 81
TRANSPORTE..................................................... 82
EVACUACION DEL COMBUSTIBLE DEL
DEPOSITO......................................................... 82
LIMPIEZA ............................................................. 83
PERIODOS
DE LARGA INACTIVIDAD ................................. 84
EL USO TRAS EL PERIODO
DE INACTIVIDAD............................................... 84
FICHA TECNICA.................................................. 85
TABLA DE LUBRIFICANTES............................. 88
CONCESIONARIOS OFICIALES Y CENTROS
DE ASISTENCIA ................................................ 89
IMPORTADORES .............................................. 90
IMPORTADORES .............................................. 91
IMPORTADORES .............................................. 92
IMPORTADORES .............................................. 93
ESQUEMA ELÉCTRICO - MX 125 .................... 94
LEYENDA ESQUEMA ELECTRICO - MX 125 .. 95
MX125_S.book Page 4 Wednesday, October 15, 2003 11:04 AM

conducción segura
CONDUCCI‡N SEGURA
MX125_S.book Page 5 Wednesday, October 15, 2003 11:04 AM

uso y mantenimiento MX 125
6
REGLAS FUNDAMENTALES
DE SEGURIDAD
Para conducir el vehículo es necesario po-
seer todos los requisitos previstos por la
ley (carnet de conducir, edad mínima, ido-
neidad psico-física, seguro, impuestos gu-
bernativos, matrícula etc.).
Se aconseja que se familiarice y que tome
confianza gradualmente con el vehículo,
en zonas de baja densidad de circulación
y/o en propiedades particulares.
La ingestión de algunas medicinas, alcohol
y sustancias estupefacientes o psicofár-
macos aumenta notablemente el riesgo de
accidentes. Asegúrese de que sus condi-
ciones psico-físicas resulten idóneas para
conducir, y sobre todo tenga mucho cuida-
do con el cansancio físico y con la somno-
lencia.
La mayor parte de los accidentes se debe
a la inexperiencia del piloto.
NO preste NUNCA el vehículo a principian-
tes, y de todas formas, asegúrese de que
el piloto reúna todos los requisitos necesa-
rios para conducir.
MX125_S.book Page 6 Wednesday, October 15, 2003 11:04 AM

7
uso y mantenimiento MX 125
Respete rigurosamente las señales y las
normas del tráfico rodado nacional y local.
Evite maniobras repentinas y peligrosas
para los demás y para sí mismo (por ejem-
plo: empinadas, inobservancia de los lími-
tes de velocidad, etc.), además, juzgue y
tome en consideración las condiciones del
firme, de la visibilidad, etc.
No choque contra obstáculos que puedan
dañar el vehículo o llevar a la pérdida del
control del mismo.
No se quede en la zaga del vehículo que le
preceda para aumentar su velocidad.
PELIGRO
Conduzca siempre con ambas manos
sobre el manillar y los pies sobre el es-
tribo (o sobre los estribos del piloto),
según la posición correcta de conduc-
ción.
En absoluto evite levantarse de pie du-
rante la conducción o estirarse.
MX125_S.book Page 7 Wednesday, October 15, 2003 11:04 AM

uso y mantenimiento MX 125
8
El piloto nunca tiene que distraerse, o de-
jarse distraer o afectar por personas, obje-
tos, acciones (no tiene que fumar, comer,
beber, leer, etc.) durante la conducción del
vehículo.
Utilice combustible y lubricantes específi-
cos para el vehículo, del tipo señalado en
la "TABLA LUBRICANTES"; controle a
menudo que el vehículo mantenga los ni-
veles prescritos de combustible, de aceite
y de líquido refrigerante.
Si el vehículo ha sufrido un accidente, fíje-
se que no hayan sido dañadas las palan-
cas de mando, los tubos, los cables, el sis-
tema de frenado y las partes vitales.
Eventualmente, lleve el vehículo a un Con-
cesionario Oficial aprilia para que contro-
le, sobre todo, el bastidor, el manillar, las
suspensiones, los órganos de seguridad y
los dispositivos de los que el usuario no
consigue valorar su integridad.
Señale toda mala función para facilitar las
operaciones de los técnicos y/o mecáni-
cos.
No conduzca jamás el vehículo si el daño
sufrido puede comprometer su seguridad.
COOLER
OIL
MX125_S.book Page 8 Wednesday, October 15, 2003 11:04 AM

9
uso y mantenimiento MX 125
No modifique jamás la posición, la inclina-
ción o el color de: matrícula, indicadores
de dirección, dispositivos de alumbrado y
la bocina.
Modificaciones del vehículo comportan la
anulación de la garantía.
Cualquier modificación que se aporte al
vehículo y el cambio de piezas originales,
pueden comprometer las prestaciones del
mismo y bajar, por lo tanto, el nivel de se-
guridad o, incluso, volverlo ilegal.
Se aconseja respetar todas las disposicio-
nes legales y las normas nacionales y lo-
cales en materia de equipamiento del vehí-
culo.
De manera especial hay que evitar las mo-
dificaciones técnicas para aumentar las
prestaciones o alterar las características
originales del vehículo.
Evite en absoluto las competiciones con
otros vehículos.
ROPA
Antes de empezar a conducir, acuérdese
de ponerse y de abrocharse siempre y co-
rrectamente el casco. Asegúrese de que
esté homologado, íntegro, de su medida y
que tenga la visera limpia.
Lleve ropa protectora, especialmente de
colores claros y/o reflectantes. De tal ma-
nera puede hacerse visible a los demás
conductores, reduciendo notablemente el
riesgo de accidentes; además estará más
protegido en caso de caída.
La ropa tiene que estar muy ajustada y ce-
rrada en las extremidades; los cordones,
los cinturones y las corbatas no deben col-
gar; evite que éstos u otros objetos interfie-
ran durante la conducción, enredándose
en objetos en movimiento o en otros órga-
nos de conducción.
ONLY ORIGINALS
A12
345
MX125_S.book Page 9 Wednesday, October 15, 2003 11:04 AM

uso y mantenimiento MX 125
10
No guarde en el bolsillo objetos que pue-
dan resultar peligrosos en caso de caída,
por ejemplo: objetos con punta como lla-
ves, bolígrafos, recipientes de cristal, etc.
(las mismas precauciones están dirigidas
también al eventual pasajero).
ACCESORIOS
El usuario es personalmente responsable
de la elección, de la instalación y del uso
de accesorios. Al instalar el accesorio se le
recomienda que éste no vaya a cubrir los
dispositivos de señalización acústica y lu-
minosa o que comprometa su funciona-
miento, que no limite la carrera de las sus-
pensiones y el ángulo de viraje, que no
obstaculice la puesta en función de los
mandos y que no reduzca la altura del sue-
lo y el ángulo de inclinación en la curva.
Evite el uso de accesorios que puedan
obstaculizar el acceso a los mandos, en
cuanto pueden alargar los tiempos de re-
acción en caso de urgencia. Los carena-
dos y los parabrisas de grandes dimensio-
nes, instalados en el vehículo, pueden dar
lugar a fuerzas aerodinámicas que pueden
comprometer la estabilidad del vehículo
durante su carrera. Compruebe que el
equipo esté fijado muy firmemente al vehí-
culo y que no resulte peligroso durante la
conducción. No añada ni modifique los dis-
positivos eléctricos que superen la capaci-
dad de carga del vehículo, porque esto po-
dría causar la parada repentina del mismo
y una falta peligrosa de corriente necesaria
para el funcionamiento de los dispositivos
de señalización acústica y luminosa.
aprilia aconseja el uso de accesorios ori-
ginales (aprilia genuine accessories).
CARGA
Sea prudente y moderado al cargar el
equipaje. Es necesario que ponga el equi-
paje lo más cerca posible del baricentro
del vehículo y que distribuya de manera
uniforme la carga en ambos lados para re-
ducir a lo mínimo cada tipo de desajuste.
Compruebe, además, que la carga esté fi-
jada firmemente al vehículo, sobre todo
durante viajes de largo recorrido.
MX125_S.book Page 10 Wednesday, October 15, 2003 11:04 AM

11
uso y mantenimiento MX 125
No sujete jamás objetos voluminosos, pe-
sados y/o peligrosos en el manillar, en los
guardabarros, y en las horquillas: esto
causaría una respuesta del vehículo más
lenta en las curvas y comprometería, de
manera inevitable, la manejabilidad del
mismo.
No ponga a los lados del vehículo un equi-
paje demasiado voluminoso o el casco en
el gancho correspondiente, ya que podrían
ir a chocar contra personas u obstáculos,
causando la pérdida de control del vehícu-
lo.
No transporte ningún tipo de equipaje que
no esté fijado firmemente al vehículo.
No transporte equipaje que sobresalga ex-
cesivamente del maletero o que cubra los
dispositivos de alumbrado y de señaliza-
ción acústica y visual.
No transporte animales o a niños sobre el
portadocumentos o sobre el maletero.
No supere el límite maximo de peso trans-
portable por cada maletero.
La sobrecarga del vehículo podría compro-
meter su estabilidad y su manejabilidad.
KG!
MX125_S.book Page 11 Wednesday, October 15, 2003 11:04 AM

uso y mantenimiento MX 125
12
UBICACION ELEMENTOS PRINCIPALES
LEYENDA
1) Radiador izquierdo líquido refrigerante
2) Tapón depósito combustible
3) Depósito combustible
4) Batería
5) Vano portadocumentos/kit herramien-
tas
6) Portafusibles
7) Manija pasajero
8) Estribo izquierdo pasajero (de resorte,
cerrado/abierto)
9) Caballete lateral
10) Estribo izquierdo piloto (con muelle,
siempre abierto)
11) Tapón de vaciado aceite cambio
12) Palanca mando cambio
13) Tapón de llenado aceite cambio
14) Palanca arranque
1 765432
8
913 1214 10
11
MX125_S.book Page 12 Wednesday, October 15, 2003 11:04 AM

13
uso y mantenimiento MX 125
LEYENDA
1) Tapón depósito aceite mezclador
2) Depósito aceite mezclador
3) Filtro aire
4) Depósito líquido freno trasero
5) Grifo combustible
6) Depósito líquido frenos
(freno delantero)
7) Interruptor de encendido/seguro
de dirección
8) Tapón radiador líquido refrigerante
9) Radiador derecho líquido refrigerante
10) Claxon
11) Palanca mando freno trasero
12) Estribo derecho piloto
(con resorte, siempre abierto)
13) Bomba freno trasero
14) Cadena de transmisión
15) Estribo derecho pasajero
(de resorte, cerrado/abierto)
16) Enganche para el casco
16
15
32
9
8
12 101314
1 4 5 6 7
11
MX125_S.book Page 13 Wednesday, October 15, 2003 11:04 AM

uso y mantenimiento MX 125
14
UBICACION INSTRUMENTOS
LEYENDA
1) Interruptor indicadores de dirección
(
( )
2) Pulsador bocina ( )
3) Desviador luces (
- )
4) Pulsador ráfagas (
)
5) Retrovisor izquierdo
6) Palanca mando embrague
7) Palanca para el arranque en frío (
)
8) Instrumentos e indicadores
9) Interruptor de encendido / seguro de di-
rección (
- - + )
10) Palanca freno delantero
11) Retrovisor derecho
12) Puño de gas
43
12
5 6 7 8 9 10 11
12
MX125_S.book Page 14 Wednesday, October 15, 2003 11:04 AM

15
uso y mantenimiento MX 125
INSTRUMENTOS E INDICADORES
LEYENDA
1) Testigo luz de cruce ( ) color verde
2) Display digital multifunción
3) Luz testigo indicador cambio en punto muerto (
) color verde
4) Luz testigo indicadores de dirección (
( ) color verde
5) Luz indicadora reserva aceite mezclador (
) color rojo
6) Luz testigo luz larga ( ) color azul
1
6
2 3 4
5
MX125_S.book Page 15 Wednesday, October 15, 2003 11:04 AM

uso y mantenimiento MX 125
16
TABLA INSTRUMENTOS E INDICADORES
Descripcion Funcion
Luz indicadora
reserva aceite mezclador (
)
Se enciende, por unos 0,5 segundos, cada vez que se pone el interruptor de encendido en
≈∆, efectuando, de tal forma, un control del funcionamiento del led.
Si la bombilla durante esta fase no se enciende, diríjase a un Concesionario Oficial aprilia.
Si la luz indicadora se enciende durante el funcionamiento
normal del motor, significa que el nivel del aceite mezclador
está en reserva; en este caso restaure el aceite mezclador, véase pág. 37 (DEPOSITO
ACEITE MEZCLADOR).
Luz testigo indicador
cambio en punto muerto
()
Se enciende cuando el cambio está en posición de punto muerto.
Luz testigo
indicadores de dirección (
()
Centellea cuando está en función la señal de viraje.
Luz testigo luz larga (
) Se enciende cuando la luz del faro delantero está en posición de luz larga o cuando se ac-
ciona el pulsador de ráfagas.
Testigo luz de cruce (
) Se enciende cuando la luz del faro delantero está en posición luz de cruce.
ATENCI
Ó
N
MX125_S.book Page 16 Wednesday, October 15, 2003 11:04 AM

17
uso y mantenimiento MX 125
COMPUTADORA MULTIFUNCI‡N
ATENCIÓN
El display está dotado con función de
apagado automático. Si el vehículo y el
display no son utilizados por lo menos
durante treinta minutos, el display se
desactiva automáticamente mantenien-
do memorizados los datos pre-estable-
cidos. El display se activa automática-
mente presionando un pulsador o
utilizando el vehículo.
LEYENDA
ATENCIÓN
La computadora multifunción permite
memorizar dos tipos diferentes de vehí-
culo (bike 1 y bike 2) estableciendo la
circunferencia de la rueda delantera.
Display izquierdo: Selección vehículo (1),
distancia total recorrida (2), distancia par-
cial recorrida (3), funciones de manteni-
miento (4);
Display central: Tiempo de recorrido total
y parcial (5), cuentakilómetros parcial (6);
Display derecho: Velocidad (9), velocidad
promedio (7), velocidad máxima (8) y co-
rriente selector Km / mi (10).
Selección vehículo
KM/H - MPH
Selección de km o mi
SPD
Velocidad
AS
Velocidad promedio
MS
Velocidad máxima
TT
Cuentakilómetros parcial
RT
Tiempo de recorrido parcial
ART
Tiempo de recorrido total
00:00:00
Horario 12h ó 24h
DST
Distancia parcial recorrida
ODO
Distancia total recorrida
Aviso de lubricación
Aviso de mantenimiento
Retroiluminación display
Batería agotada
1 2
LO
1 2
DSTODO
888
88
88
1 2
DSTODO
888
88
88
321 4
AR TT
88:88:88
88:88
888
65
AS SPD MS
KM/H
LO
8
88
KM/H
7 8 9
10
10
101010
MX125_S.book Page 17 Wednesday, October 15, 2003 11:04 AM

uso y mantenimiento MX 125
18
PROGRAMACIONES INICIALES
Cambio sistema métrico (KM/H o MPH)
◆
Presione contemporáneamente los tres
pulsadores por aprox. 2 seg., luego pre-
sione cualquiera para comenzar.
◆
Presione el pulsador izquierdo para
cambiar la unidad de medida de ≈km∆ a
≈mi∆ (KM/H a MPH) o viceversa.
◆
Para confirmar, presione el pulsador
central ≈MODE∆ por aprox. 1,5 seg. y
pase al ajuste del diámetro de la rueda
≈WS∆.
ATENCIÓN
En cuanto se presiona el pulsador MO-
DE, en el display de la izquierda, apare-
ce el diámetro de la rueda actual y
el primer dato destellante.
MODE
KM/H
MODE
M/H
MODE
55
21
1
MX125_S.book Page 18 Wednesday, October 15, 2003 11:04 AM

19
uso y mantenimiento MX 125
Programación diámetro rueda “WS”
◆
Para modificar el valor del dato deste-
llante, presione el pulsador de la izquier-
da.
◆
Presione el pulsador de la derecha para
pasar al próximo valor y presione nueva-
mente el pulsador de la izquierda para
modificar dicho valor.
Valor de ajuste 1850.
◆
Para confirmar, presione el pulsador
central ≈MODE∆ por aprox. 1,5 seg. y
pase a la regulación de la hora.
ATENCIÓN
En cuanto se presiona el pulsador MO-
DE, en el display central destella el tipo
de visualización de la hora (24h ó 12h).
MODE
55
1111
1
KM/H
MODE
55
1111
1
KM/H
MODE
55
1919
1
KM/H
MODE
MX125_S.book Page 19 Wednesday, October 15, 2003 11:04 AM

uso y mantenimiento MX 125
20
Programación horas
◆
Presionando el pulsador izquierdo se se-
lecciona el tipo de visualización de la
hora (24h ó 12h).
◆
Presione el pulsador de la derecha para
pasar al ajuste ≈hora∆. Presione el pulsa-
dor de la izquierda para modificar el va-
lor.
◆
Presione el pulsador de la derecha para
pasar al ajuste ≈minutos∆. Use nueva-
mente el pulsador de la izquierda para
modificar dicho valor.
◆
Para confirmar, presione el pulsador
central ≈MODE∆ por aprox. 1,5 seg. y
pase al control lubricación preventiva.
ATENCIÓN
En cuanto se presiona el pulsador MODE,
en el display de la izquierda destella el
símbolo lubricación con el número de in-
tervenciones preventivas a realizar.
MODE
12:00:- -
12H
MODE
12:00:- -
24H
MODE
17:50:- -
24H
MODE
1
00
00
1
MX125_S.book Page 20 Wednesday, October 15, 2003 11:04 AM

21
uso y mantenimiento MX 125
Control lubricación preventiva
ATENCIÓN
El período programado de lubricación
preventiva ya está establecido a 100 km
(60 mi) para el vehículo 1 y 300 km (200
mi) para el vehículo 2.
Si se desea modificar el período de lu-
bricación ver pág. pág. 25 (PROGRA-
MACIONES ESTÁNDAR).
◆
Presionando el pulsador izquierdo se
modifica el valor del dato.
◆
Presione el pulsador de la derecha para
pasar al próximo valor.
◆
Para confirmar, presione el pulsador
central ≈MODE∆ por aprox. 1,5 seg. y
pase al control mantenimiento preventi-
vo.
ATENCIÓN
Si la función de control lubricación no
se utiliza, establezca todos los valores
iguales en cero.
ATENCIÓN
En cuanto se presiona el pulsador MO-
DE, en el display de la izquierda destella
el símbolo mantenimiento con el núme-
ro de intervenciones preventivas a reali-
zar.
ATENCIÓN
Controles a criterio del usuario. No con-
fundirse con los mantenimientos pro-
gramados.
MODE
2
00
00
1
MODE
2
00
00
1
MODE
3
00
00
MX125_S.book Page 21 Wednesday, October 15, 2003 11:04 AM

uso y mantenimiento MX 125
22
Control mantenimiento preventivo
ATENCIÓN
El período programado de manteni-
miento preventivo ya está establecido a
300 km (200 mi) para el vehículo 1 y 990
km (600 mi) para el vehículo 2.
Si se desea modificar el período de
mantenimiento ver pág. pág. 25 (PRO-
GRAMACIONES ESTÁNDAR).
◆
Presionando el pulsador izquierdo se
modifica el valor del dato.
◆
Presione el pulsador de la derecha para
pasar al próximo valor.
◆
Para confirmar, presione el pulsador
central ≈MODE∆ por aprox. 1,5 seg. y
pase al ajuste de la distancia total
(ODO).
ATENCIÓN
En cuanto se presiona el pulsador MO-
DE, en el display de la izquierda apare-
ce la inscripción ODO.
ATENCIÓN
Controles a criterio del usuario. No con-
fundirse con los mantenimientos
programados.
MODE
4
00
00
1
MODE
4
00
00
1
MODE
00
00
1
000
ODO
MX125_S.book Page 22 Wednesday, October 15, 2003 11:04 AM

23
uso y mantenimiento MX 125
Control distancia total (ODO)
◆
Presionando el pulsador izquierdo se
modifica el valor del dato.
◆
Presione el pulsador de la derecha para
pasar al próximo valor.
◆
Para confirmar, presione el pulsador
central ≈MODE∆ por aprox. 1,5 seg. y
pase al ajuste tiempo de recorrido total
(ART).
ATENCIÓN
En cuanto se presiona el pulsador MODE,
en el display central aparece la inscrip-
ción ART
.
MODE
00
00
1
300
ODO
MODE
00
00
1
300
ODO
MODE
ART
00:00
00
MX125_S.book Page 23 Wednesday, October 15, 2003 11:04 AM

uso y mantenimiento MX 125
24
Control tiempo de recorrido total (ART)
◆
Presionando el pulsador izquierdo se
modifica el valor del dato.
◆
Presione el pulsador de la derecha para
pasar al próximo valor.
◆
Para confirmar, presione el pulsador
central ≈MODE∆ por aprox. 2 seg. y finali-
ce las programaciones iniciales.
MODE
ART
00:00
20
MODE
ART
00:00
20
MODE
1
DST SPD
KM/H
11:53:48
0
00
00
0
RT
0:00
MX125_S.book Page 24 Wednesday, October 15, 2003 11:04 AM

25
uso y mantenimiento MX 125
Programación segundo vehículo
Presionando por aprox. 5 seg. la tecla dere-
cha, en el display de la izquierda, aparecerá
el diámetro de la rueda ≈WS∆ relativo al se-
gundo vehículo; luego de unos segundos, au-
tomáticamente se activa el menú relativo al
segundo vehículo.
ATENCIÓN
Presionando los dos pulsadores externos
por aprox. 2 seg. se activa el programa de
modificación de las PROGRAMACIONES
ESTÁNDAR relativas al segundo vehículo
(bike 2).
PROGRAMACIONES ESTŸNDAR
ATENCIÓN
Presionando los dos pulsadores exter-
nos por aprox. 2 seg. se activa el pro-
grama de modificación de las PROGRA-
MACIONES ESTÁNDAR.
Desde este menú se modifica el diámetro
de la rueda, la programación de la hora, el
aviso de lubricación y mantenimiento del
vehículo, la distancia total recorrida (ODO)
y el tiempo de recorrido total (ART).
El cambio del sistema métrico KM/H a
MPH o viceversa, se realiza solo activando
el menú PROGRAMACIONES INICIA-
LES.
1
DST SPD
KM/H
11:53:48
0
00
00
0
RT
0:00
MODE
2
50
20
MODE
1
DST SPD
KM/H
11:53:48
0
00
00
0
RT
0:00
MODE
55
21
1
WS
CLOCK ODO ART WS
MX125_S.book Page 25 Wednesday, October 15, 2003 11:04 AM

uso y mantenimiento MX 125
26
PROGRAMACI‡N/VISUALIZACI‡N
PARŸMTROS
ATENCIÓN
Presionando el pulsador central MODE
aparecen las distintas pantallas para las
programaciones.
Durante el funcionamiento, el display vi-
sualiza la pantalla (A), mostrando la distan-
cia recorrida desde la última puesta en
cero (TT), la velocidad, la hora y el tiempo
de recorrido parcial (RT).
Presionando el pulsador central ≈MODE∆
se pasará a la pantalla (B) y si se presiona
nuevamente a la pantalla (C).
ATENCIÓN
Las pantallas (B y C) permanecerán visua-
lizadas sólo por 5 seg. para luego mostrar
nuevamente la pantalla (A).
MODE
1
A
DST
RT
SPD
KM/H
11:53:48
0:00
0
00
0
0
1
DST
0
MODE
A
RT
SPD
KM/H
11:53:56
0:00
0
00
0
MODE
1
B
DST
TT
AS
KM/H
11:53:49
0:00
0
00
00
0
1
MODE
C
ODO
ART
MS
KM/H
11:53:50
0:00
0
00
00
0
MX125_S.book Page 26 Wednesday, October 15, 2003 11:04 AM

27
uso y mantenimiento MX 125
Presionando contemporáneamente el pulsa-
dor central ≈MODE∆ y el pulsador derecho por
aprox. 2 seg. se pasará a la pantalla (D) con-
trol mantenimiento preventivo y, si se presio-
na nuevamente a la pantalla (E) control lubri-
cación preventiva.
ATENCIÓN
Las pantallas (D y E) permanecerán visua-
lizadas por 5 seg., si no se presiona nin-
gún pulsador, para luego mostrar nueva-
mente la pantalla (A).
MODE
1
DST SPD
KM/H
11:49:08
7
96
53
30
A
RT
30:42
1
MODE
1
SPD
KM/H
11:49:10
8
02
47
35
D
RT
30:44
1
1
SPD
KM/H
11:49:12
8
04
47
35
E
RT
30:46
1
MX125_S.book Page 27 Wednesday, October 15, 2003 11:04 AM

uso y mantenimiento MX 125
28
DESACTIVACI‡N DE LAS INTERVEN-
CIONES PROGRAMADAS
Cuando se superan los límites estableci-
dos para las intervenciones programadas
de mantenimiento o de lubricación, en el
display de la izquierda aparece el dato
destellante.
Para apagarlo, se presiona contemporá-
neamente, por aprox. 2 seg., el pulsador
izquierdo y derecho.
◆
Presione por aprox. 1,5 seg. la tecla cen-
tral ≈MODE∆ para pasar a la pantalla de
diámetro de la rueda.
◆
Presione nuevamente por aprox. 1,5
seg. la tecla central ≈MODE∆ para pasar
a la pantalla de programación hora y co-
menzar la programación control lubrica-
ción preventiva.
◆
Presione el pulsador izquierdo para
cambiar el valor del dato.
◆
Presione el pulsador derecho para confir-
mar dicho valor y pasar al próximo dato.
◆
Presione la tecla central ≈MODE∆ por
aprox. 1,5 seg. para confirmar los datos
relativos a la lubricación preventiva y pa-
sar a la próxima operación.
◆
Presione el pulsador izquierdo para
cambiar el valor del dato.
◆
Presione el pulsador derecho para con-
firmar dicho valor y pasar al próximo da-
to.
◆
Presione nuevamente el pulsador dere-
cho por aprox. 2 seg. para que no apa-
rezca nuevamente la pantalla inicial (A).
MODE
MODE
1
55
21
1
00
00
1
MODE MODE MODE
1
00
00
2
1
00
00
2
1
00
00
3
MODE
1
00
00
4
MODE
1
00
00
4
MODE
1
DST SPD
KM/H
11:49:08
7
96
53
30
RT
30:42
1
MX125_S.book Page 28 Wednesday, October 15, 2003 11:04 AM

29
uso y mantenimiento MX 125
A
B
A
B
MODE
1
DST
RT
SPD
KM/H
11:49:08
1
30:42
7
96
53
36
MODE
1
DST
RT
SPD
KM/H
11:49:09
1
30:43
7
97
53
36
MODE
1
DST
TT
AS
KM/H
11:49:14
0:05
8
98
53
34
1
DST
TT
AS
KM/H
11:49:16
0:07
8
05
54
34
CRON‡METRO
La computadora multifunción está dotada
de un sistema de cronometraje, que se
puede visualizar en la pantalla (B) como el
cuentakilómetros parcial (TT).
◆
Para activar el cronómetro presione el
pulsador izquierdo.
◆
Presione el pulsador central ≈MODE∆
para visualizar la pantalla (B).
◆
Presione nuevamente el pulsador iz-
quierdo para finalizar el cronómetro.
MX125_S.book Page 29 Wednesday, October 15, 2003 11:04 AM

uso y mantenimiento MX 125
30
C
A
B
MODE
1
DST
RT
SPD
KM/H
11:49:08
1
30:42
7
96
53
36
MODE
1
DST
RT
SPD
KM/H
11:53:48
1
30:42
7
96
53
36
MODE
1
DST
RT
KM/H
11:53:49
0:00
0
00
0
30
SPD
MODE
1
ODO
ART
MS
KM/H
88:88:88
0:98
0
58
82
0
MODE
1
DST
TT
KM/H
11:53:49
0:00
0
00
0
00
AS
PUESTA EN CERO DATOS PARCIALES
Por medio de esta función es posible po-
ner en cero los datos parciales registrados
en la computadora; dichos datos son:
√ Distancia parcial recorrida (DST)
√ Cuentakilómetros parcial (TT)
√ Tiempo de recorrido parcial (RT)
√ Velocidad máxima (MS)
√ Velocidad promedio (AS)
◆
Presione contemporáneamente por
aprox. 2 seg. el pulsador izquierdo y el
pulsador central ≈MODE∆.
Aparecerá la pantalla (A) con los relati-
vos datos en cero.
◆
Presione el pulsador central ≈MODE∆
para pasar a la pantalla (B) y poner en
cero los datos.
◆
Presione nuevamente el pulsador cen-
tral ≈MODE∆ para pasar a la pantalla (C)
y poner en cero los datos.
ATENCIÓN
Las pantallas (B y C) permanecerán vi-
sualizadas sólo por 5 seg. para luego
mostrar nuevamente la pantalla (A).
MX125_S.book Page 30 Wednesday, October 15, 2003 11:04 AM

31
uso y mantenimiento MX 125
MODE
1
DST
RT
SPD
KM/H
11:49:13
1
30:47
0
64
54
0
MODE
MODE
1
64
54
1
74
54
1
54
54
DST
DST
DST
MODE
1 2
DSTODO
AR TT
ASS PD MS
KM/H
LO
88:88:88
88:88
8
888
888
88
88
88
3
3
ALINEACI‡N DATOS PARCIALES (TRIP)
La distancia parcial recorrida (DST) puede
ser modificada aumentando o disminuyen-
do el valor visualizado en el display; dicha
función puede ser utilizada durante even-
tos deportivos para alinear el valor indica-
do en el display con el relativo al recorrido.
ATENCIÓN
No utilizar esta función para poner en cero
el valor (DST); para poner en cero los da-
tos parciales ver pág pág. 30 (PUESTA EN
CERO DATOS PARCIALES).
◆
Presione el pulsador central ≈MODE∆ por
aprox. 3 seg.
◆
Presione el pulsador derecho para aumen-
tar el valor.
◆
Presione el pulsador izquierdo para dismi-
nuir el valor.
◆
Luego de aprox. 3 seg. el display visualiza la
pantalla (A) con las relativas modificaciones
.
RETROILUMINACI‡N
◆
Presionando la tecla derecha se activa la
retroiluminación del display. La luz se
apaga automáticamente luego de 4 se-
gundos
SUSTITUCI‡N BATER‹A
◆
Desmonte la cúpula porta-faro delante-
ro.
◆
Destornille los dos tornillos en cruz que
mantienen unida la carcasa porta-instru-
mento a la placa metálica.
◆
Desconecte el conector de dos vías del
reenvío taquímetro.
◆
Extraiga el instrumento digital de la car-
casa haciendo una leve presión del lado
del display lcd.
◆
Desconecte la "corredera" del cuerpo del
instrumento digital.
◆
Destornille el tapón cubre batería colo-
cado en el retro del instrumento digital.
◆
Sustituya la batería "CR2032".
MX125_S.book Page 31 Wednesday, October 15, 2003 11:04 AM

uso y mantenimiento MX 125
32
MANDOS PRINCIPALES INDIVIDUALES
MANDOS EN EL LADO IZQUIERDO DEL MANILLAR
ATENCIÓN
Los componentes eléctricos funcionan sólo si el interruptor
de encendido está en posición "
".
1) PULSADOR RÁFAGAS (
)
Permite utilizar la ráfaga en caso de peligro o de emergencia.
2) PALANCA PARA EL ARRANQUE EN FRIO (
)
Girando la palanca ≈
∆ en sentido antihorario (Pos. A), se
pone en función el starter para el arranque en frío del motor.
Para desactivar el starter, vuelva a poner la palanca ≈
∆ en su
posición inicial.
3) INTERRUPTOR INDICADORES DE DIRECCION (
( )
Desplace el interruptor hacia la izquierda, para señalar el giro a
la izquierda; desplace el interruptor hacia la derecha, para indi-
car el giro a la derecha.
Apriete el interruptor en el centro para desactivar el indicador
de dirección.
4) PULSADOR BOCINA (
)
Al apretarlo se acciona la bocina.
5) CONMUTADOR LUCES (
- )
Si el conmutador de luces se encuentra en posición ≈
∆, se
acciona la luz de carretera; si se encuentra en posición ≈
∆,
se acciona la luz de cruce.
2
1
4
5
3
MX125_S.book Page 32 Wednesday, October 15, 2003 11:04 AM

33
uso y mantenimiento MX 125
INTERRUPTOR DE ENCENDIDO
El interruptor de encendido (1) se encuen-
tra sobre la placa superior del manguito de
la dirección.
ATENCIÓN
La llave acciona el interruptor de encen-
dido/seguro de dirección.
Con el vehículo se entregan dos llaves
(una de reserva).
SEGURO DE DIRECCION
PELIGRO
No gire nunca la llave en posición "+"
durante la marcha, porque se puede
perder el control del vehículo.
FUNCIONAMIENTO
Para bloquear la dirección:
◆
Gire el manillar completamente hacia la
izquierda.
◆
Gire la llave en posición "".
ATENCIÓN
Gire la llave y el manillar simultánea-
mente.
◆
Presione y gire la llave en sentido anti-
horario (hacia la izquierda) y gire despa-
cio el manillar hasta poner la llave en ≈+∆.
◆
Extraiga la llave.
Posición Función
Extracción
llave
+
Seguro de
dirección
La direc-
ción está
bloqueada.
No es posi-
ble arrancar
ni encender
las luces.
Es posible
quitar la llave.
No se
puede
arrancar ni
accionar las
luces.
Es posible
quitar la llave.
Se puede
arrancar y
accionar las
luces.
No es posi-
ble quitar la
llave.
MX125_S.book Page 33 Wednesday, October 15, 2003 11:04 AM

uso y mantenimiento MX 125
34
2 1
4
2 3
EQUIPO AUXILIAR
VANO PORTADOCUMENTOS / KIT
HERRAMIENTAS
El vano portadocumentos/kit herramientas
se encuentra debajo del panel lateral iz-
quierdo; para acceder al mismo:
◆
Desmonte el panel lateral izquierdo, véa-
se pág. 58 (DESMONTAJE PANELES
LATERALES).
◆
Gire 1/4 de vuelta en el sentido contrario
a las agujas del reloj el tornillo (1) de fija-
ción rápida.
◆
Extraiga el compartimiento (2) del aloja-
miento.
◆
Extraiga por atrás el cierre del comparti-
miento (3).
IMPORTANTE Durante el montaje,
introduzca correctamente el perno (4) de
posicionamiento.
El kit de herramientas (2) incluye:
√ n° 1 funda para recoger las herramientas
√ n° 1 llave Allen hexagonal curvada 4 mm
√ n° 1 llave Allen hexagonal curvada 5 mm
√ n° 1 llave Allen hexagonal curvada 6 mm
√ n° 1 llave Allen hexagonal curvada 8 mm
√ n° 1 llave de horquilla doble 7x8 mm
√ n° 1 llave de horquilla doble 10x13 mm
√ n° 1 llave de horquilla simple 19 mm
√ n° 1 llave tubular doble 21x24 mm
√ n° 1 destornillador de cruz/corte
√ n° 1 mango para destornillador
√ n° 1 destornillador de cruz 3x70 mm
Peso máximo permitido: 1,5 kg
ENGANCHE PARA EL CASCO
Gracias al uso del enganche no hace falta
llevarse el casco cada vez que se aparque
el vehículo.
PELIGRO
No conduzca con el casco colgado del
portacasco en cuanto esto podría perju-
dicar las condiciones de seguridad du-
rante la conducción.
Para colgar el casco:
◆
Introduzca la llave en la cerradura (5).
◆
Gire la llave en sentido horario.
◆
Pase la presilla del casco a través del
enganche (6).
◆
Gire la llave en sentido antihorario.
ATENCIÓN
Asegúrese de que el enganche (6) esté
cerrado correctamente.
6
5
MX125_S.book Page 34 Wednesday, October 15, 2003 11:04 AM

35
uso y mantenimiento MX 125
HERRAMIENTAS ESPECIALES -
Para efectuar algunas intervenciones es-
pecíficas, utilice las siguientes herramien-
tas especiales (pedirlas a un Concesiona-
rio Oficial aprilia).
Herramienta Operaciones Pag.
Llave de sec-
tor con nariz
cuadrada (3)
Regulación tuerca
amortiguador tra-
sero.
42
Llave espe-
cial (tubular)
(4)
Ajuste juego
embrague 69
MX125_S.book Page 35 Wednesday, October 15, 2003 11:04 AM

uso y mantenimiento MX 125
36
COMPONENTES PRINCIPALES
COMBUSTIBLE
PELIGRO
El combustible utilizado para la propul-
sión de los motores de explosión es
muy inflamable y puede volverse explo-
sivo en algunas condiciones. Es opor-
tuno reponer gasolina y realizar las ope-
raciones de mantenimiento en una zona
ventilada y con el motor apagado. No
fume durante la provisión de gasolina y
cerca de los vapores del combustible;
de todas formas evite absolutamente el
contacto con llamas libres, chispas y
cualquier otra fuente que podría causar
el encendido o la explosión. Además,
evite la salida del combustible de la
boca de llenado, ya que podría incen-
diarse al llegar a contacto con las su-
perficies muy calientes del motor. En
caso de que se vertiera accidentalmen-
te algo de gasolina, controle que la
zona esté completamente seca; antes
de arrancar asegúrese de que no haya
quedado nada de combustible en el
manguito de la boca de llenado. La ga-
solina se dilata con el calor y bajo la ac-
ción de los rayos solares. Por lo tanto
no llene nunca el depósito hasta el to-
pe.
Una vez que se haya terminado la ope-
ración de provisión de gasolina, cierre
con cuidado el tapón.
Evite el contacto del combustible con la
piel, la inhalación de vapores, la inges-
tión y el trasiego de un recipiente a otro
por medio de un tubo.
NO ESPARZA EL COMBUSTIBLE EN EL
AMBIENTE.
MANTENGASE LEJOS DEL ALCANCE
DE LOS NIÑOS
Utilice gasolina super sin plomo según DIN
51 607, número octano mínimo 95
(N.O.R.M) y 85 (N.O.M.M.).
CAPACIDAD DEPOSITO
(reserva incluida): 11
l
RESERVA DEPOSITO:
1,3
l (reserva mecánica)
Para repostar:
◆
Desenrosque y quite el tapón depósito
combustible (1).
◆
Reposte.
◆
ACEITE CAMBIO
Controle cada 4000 km el nivel del aceite
cambio, véase pág. 60 (COMPROBACION
NIVEL ACEITE CAMBIO Y RELLENO).
Sustituya el aceite del cambio al final del
rodaje y luego cada 12000 km pág. 61
(SUSTITUCION ACEITE CAMBIO).
ATENCIÓN
Utilice aceites con buena calidad de
gradación 75W-90, véase pág. 88 (TA-
BLA DE LUBRIFICANTES).
PELIGRO
El aceite del motor puede dañar grave-
mente a la piel si es manejado durante
mucho tiempo y diariamente. Se acon-
seja lávarse las manos con mucho cui-
dado tras haberlo manejado.
No esparza el aceite en el ambiente.
Se aconseja llevarlo en un recipiente
sellado a la estación de servicio donde
lo compra normalmente o a un centro
de recogida de aceites.
En caso de intervenciones de manteni-
miento, se aconseja el uso de guantes
de látex.
MX125_S.book Page 36 Wednesday, October 15, 2003 11:04 AM

37
uso y mantenimiento MX 125
DEPOSITO ACEITE MEZCLADOR
Rellene el depósito aceite mezclador cada
500 km.
El vehículo está provisto de mezclador se-
parado, que permite la mezcla de la gasoli-
na con aceite para la lubricación del motor,
véase pág. 88 (TABLA DE LUBRIFICAN-
TES).
La entrada en reserva se indica por el en-
cendido de la luz indicadora reserva aceite
mezclador ≈∆ situada en el salpicadero,
véase pág. 15 (INSTRUMENTOS E INDI-
CADORES).
PELIGRO
La utilización del vehículo sin aceite
mezclador ocasiona graves daños al
motor.
En el caso de que acabe el aceite conte-
nido en el depósito mezclador o se sa-
que el tubo aceite mezclador, es preciso
dirigirse a un Concesionario Oficial
aprilia, que efectuará la purga.
Esta operación es indispensable, en
cuanto el funcionamiento del motor con
aire en la instalación del aceite mezcla-
dor podría causar graves daños al pro-
pio motor.
Para introducir el aceite mezclador en el
depósito:
◆
Desmonte el panel lateral derecho, véa-
se pág. 58 (DESMONTAJE PANELES
LATERALES)
◆
Quite el tapón (1).
CAPACIDAD DEP‡SITO
(incluida reseva): 1,25 l
RESERVA DEPOSITO: 0,5 l
PELIGRO
Lávese las manos con mucho cuidado
tras haber manejado el aceite.
No esparza el aceite en el ambiente.
MANTENGASE LEJOS DEL ALCANCE
DE LOS NIÑOS.
MX125_S.book Page 37 Wednesday, October 15, 2003 11:04 AM

uso y mantenimiento MX 125
38
LIQUIDO FRENOS -
recomendaciones
ATENCIÓN
Este vehículo está equipado con frenos
de disco delantero y trasero, con circui-
tos hidráulicos separados. Las siguien-
tes informaciones se refieren a un solo
sistema de frenado, pero tienen validez
incluso para ambos sistemas.
PELIGRO
Variaciones imprevistas del juego o una
resistencia elástica sobre la palanca del
freno, se deben a defectos en el sistema
hidráulico. Diríjase a un Concesionario
Oficial aprilia si tiene dudas sobre el
funcionamiento perfecto del sistema de
frenado, y si no se encuentra en la posi-
bilidad de efectuar las operaciones nor-
males de control.
PELIGRO
Ponga mucho cuidado en que los dis-
cos de los frenos no estén untados o
engrasados, sobre todo tras las opera-
ciones de mantenimiento o de control.
Controle que los tubos de los frenos no
resulten pellizcados o rozados.
Tenga cuidado con que agua o polvo no
entren accidentalmente en el interior
del circuito.
En caso de intervenciones de manteni-
miento en el circuito hidráulico, se
aconseja el uso de guantes de látex.
El líquido de los frenos podría causar
irritaciones si llega a contacto con la
piel o con los ojos.
Lávese con mucho cuidado las partes
del cuerpo que hayan estado en contac-
to con el líquido, y, además, diríjase a
un oculista o a un médico si el líquido
llegara a contacto con los ojos.
No esparza el líquido en el ambiente.
MANTENGASE LEJOS DEL ALCANCE
DE LOS NIÑOS.
PELIGRO
Utilizando el líquido de los frenos, tenga
cuidado con no verterlo sobre las par-
tes de plástico y pintadas porque podría
dañarlas irreparablemente.
FRENOS DE DISCO
PELIGRO
Los frenos son los órganos que garanti-
zan mayormente la seguridad, por lo
tanto hay que conservarlos siempre en
perfecta eficacia y controlarlos antes de
cada viaje.
Hay que sustituir el líquido de los fre-
nos una vez cada año en un Concesio-
nario Oficial aprilia.
Utilice líquido frenos del tipo señalado
en la tabla lubricantes, véase pág. 88
(TABLA DE LUBRIFICANTES).
Al gastárse las pastillas del freno, el nivel
del líquido dentro del depósito disminuye
para compensar automáticamente el des-
gaste.
El depósito líquido freno delantero se en-
cuentra cerca del pivote palanca freno de-
lantero.
El depósito líquido freno trasero se en-
cuentra en el lado derecho del vehículo an-
teriormente a la caja filtro aire.
Controle periódicamente el nivel del líquido
de los frenos en los depósitos, véase
pág. 39 (FRENO DELANTERO), pág. 40
(FRENO TRASERO) y el desgaste de las
pastillas, véase pág. 70 (COMPROBA-
CION DESGASTE PASTILLAS).
MX125_S.book Page 38 Wednesday, October 15, 2003 11:04 AM

39
uso y mantenimiento MX 125
FRENO DELANTERO
Lea con cuidado pag. 38 (LIQUIDO FRE-
NOS - recomendaciones) y (FRENOS
DE DISCO).
CONTROL
ATENCIÓN
Coloque el vehículo sobre un suelo fir-
me y llano.
Para controlar el nivel:
◆
Coloque el vehículo sobre el caballete.
◆
Gire el manillar hacia la izquierda, de
modo que el líquido contenido en el depó-
sito líquido frenos (1) sea paralelo a la re-
ferencia ≈MIN∆ presente sobre el cristal
(2).
◆
Controle que el líquido frenos contenido
en el depósito supere la referencia "MIN"
indicada en el cristal (2).
◆
En caso contrario rellene.
RELLENO
PELIGRO
Peligro de salida del líquido de los fre-
nos. No accione la palanca freno si los
tornillos (3) están aflojados o, sobre to-
do, si se ha quitado la tapa del depósito
del líquido de los frenos.
◆
Destornille y quite los dos tornillos (3).
◆
Desmonte la tapa (4).
PELIGRO
Mantenga el líquido en el depósito para-
lelo al borde del depósito; de tal forma
se evitan salidas peligrosas del líquido
durante el relleno.
◆
Quite la junta (5).
◆
Llene el depósito con líquido para frenos,
véase pág. 88 (TABLA DE LUBRIFI-
CANTES), hasta cubrir del todo el cristal.
◆
Vuelva a colocar correctamente la junta
(5) en su posición.
◆
Vuelva a poner la tapa (4).
◆
Atornille y apriete los dos tornillos (3).
PELIGRO
Controle la eficacia del frenado. De re-
sultar necesario, diríjase a un Conce-
sionario Oficial aprilia. En caso de una
carrera excesiva de la palanca del fre-
no, de excesiva elasticidad o en caso de
presencia de burbujas de aire en el cir-
cuito, diríjase a un Concesionario Ofi-
cial aprilia, porque podría resultar ne-
cesario efectuar la purga del aire del
sistema.
MX125_S.book Page 39 Wednesday, October 15, 2003 11:04 AM

uso y mantenimiento MX 125
40
FRENO TRASERO
Lea con cuidado pag. 38 (LIQUIDO FRE-
NOS - recomendaciones) y (FRENOS
DE DISCO).
CONTROL
ATENCIÓN
Coloque el vehículo sobre un suelo fir-
me y llano.
◆
Mantenga el vehículo en posición verti-
cal de manera que el líquido contenido
en el depósito (1) quede paralelo al ta-
pón (2).
◆
Compruebe que el líquido contenido en
el depósito supere la referencia "MIN" .
◆
Si el líquido no llega por lo menos hasta
la referencia "MIN" , rellene enseguida.
RELLENO
PELIGRO
Peligro de salida líquido.
No accione la palanca del freno trasero
si se ha aflojado o quitado el tapón del
depósito líquido frenos.
◆
Destornille el tornillo de fijación (3) y qui-
te el depósito del freno dejándolo conec-
tado al tubo del sistema de freno trasero.
◆
Desenrosque y quite el tapón (2).
ATENCIÓN
Para no verter el líquido de los frenos
durante el relleno, se recomienda man-
tenga el líquido en el depósito paralelo
al borde del depósito (en posición hori-
zontal).
◆
Quite la junta (4).
◆
Con la ayuda de una jeringa, rellene el
depósito (1) con líquido frenos, véase
pág. 88 (TABLA DE LUBRIFICANTES),
hasta la referencia ≈MAX∆.
◆
Coloque correctamente la junta (4); ator-
nille nuevamente el tapón (2).
◆
Fije el depósito del líquido de freno tra-
sero con el tornillo de fijación (3) con la
relativa arandela.
PELIGRO
Controle la eficacia de frenado. Si nece-
sario, diríjase a un Concesionario Ofi-
cial aprilia.
En caso de una carrera excesiva de la
palanca del freno, de excesiva elastici-
dad o en caso de presencia de burbujas
de aire en el circuito, diríjase a un Con-
cesionario Oficial aprilia, porque po-
dría resultar necesario efectuar la purga
del aire del sistema.
3
2
1
4
2
1
MX125_S.book Page 40 Wednesday, October 15, 2003 11:04 AM

41
uso y mantenimiento MX 125
REGULACION EN ALTURA
PALANCA FRENO TRASERO
La palanca freno es colocada ergonómica-
mente en fase de ensamblaje del vehículo.
Si es necesario, se puede personalizar la
posición de la palanca freno en altura:
◆
Afloje la contratuerca (1).
◆
Destornille del todo el tensor del freno (2).
◆
Atornille del todo la contratuerca (3) so-
bre la varilla mando bomba (4).
◆
Atornille del todo la varilla mando bomba
(4), luego desenrósquela dándole 3 - 4
vueltas.
◆
Destornille el tensor freno (2) hasta que
la palanca freno (5) alcance la altura de-
seada.
◆
Bloquee el tensor del freno (2) por medio
de la contratuerca (1).
◆
Desenrosque la varilla mando bomba (4)
y llévela a contacto con el pistón bomba.
◆
Enrosque la varilla para garantizar un
juego mínimo de 0,5 ÷ 1 mm entre la va-
rilla mando bomba (4) y el pistón bomba.
PELIGRO
Asegurarse que haya juego entre la va-
rilla del mando bomba (4) y el pistón de
la bomba, para evitar que el freno per-
manezca accionado causando un des-
gaste prematuro de los elementos de
freno.
Varilla mando bomba y pistón bomba:
0,5 ÷ 1 mm.
◆
Bloquee la varilla mando bomba por me-
dio de la contratuerca (3).
PELIGRO
Controle la eficacia de frenado.
De resultar necesario, diríjase a un
Concesionario Oficial aprilia.
Después del ajuste, al soltar el freno
controle que la rueda gire libremente.
MX125_S.book Page 41 Wednesday, October 15, 2003 11:04 AM

uso y mantenimiento MX 125
42
REGULACION EMBRAGUE
Regule el embrague cuando el motor se para
o cuando el vehículo intenta avanzar con la
palanca del embrague accionada y la marcha
puesta, o si el embrague "resbala" causando
un retraso de la aceleración con respecto al
número de revoluciones del motor.
Las regulaciones de menor entidad pueden
efectuarse mediante el regulador (1):
◆
Extraiga el elemento de protección (2).
◆
Afloje (atornillándola) la tuerca (3).
◆
Gire el regulador (1) hasta que la carrera
vacía en la extremidad de la palanca em-
brague resulte de unos 10…15 mm (véase
figura).
◆
Apriete (destornillándola) la tuerca (3), blo-
queando el regulador (1).
◆
Controle la carrera vacía en la extremidad
de la palanca embrague.
◆
Vuelva a instalar el elemento de protección
(2).
Si el regulador (1) está completamente atorni-
llado, completamente destornillado o no se
puede obtener la carrera vacía correcta:
◆
Extraiga el elemento de protección (2).
◆
Atornille completamente la tuerca (3) en el
regulador (1).
◆
Atornille completamente el regulador (1).
◆
Con un destornillador de corte (o una mo-
neda) desenrosque y quite el tapón (4).
ATENCIÓN
La llave especial (5) se encuentra en los
Concesionarios Oficiales aprilia.
◆
Introduzca la llave especial (5) y afloje la
tuerca interior (6).
◆
Introduzca un destornillador de corte (7) en
la llave especial (5) y atornille completa-
mente el tornillo de regulación (8).
◆
Afloje el tornillo de regulación (8) dándole
media vuelta, correspondiente a 3…4 mm
de carrera de la palanca (9).
◆
Por medio del destornillador (7) mantenga
bloqueado el tornillo de regulación (8), ac-
túe sobre la llave especial (5) y apriete la
tuerca interior (6).
◆
Vuelva a enroscar el tapón (4).
◆
Controle la carrera vacía en la extremidad
de la palanca embrague (10…15 mm).
◆
Ponga en marcha el motor.
◆
Accione del todo la palanca embrague y
ponga la primera marcha.
Controle que el motor no se pare, que el ve-
hículo no intente avanzar, que el embrague
no "resbale" durante la fase de aceleración
o durante la marcha.
PELIGRO
De no resultar posible conseguir una regu-
lación correcta, o en caso de funciona-
miento irregular del embrague, diríjase a
un Concesionario Oficial aprilia.
ATENCIÓN
Controle la integridad del cable embrague:
no debe presentar aplastamientos o des-
gaste de la vaina en toda su longitud.
◆
Lubrique periódicamente el cable del em-
brague con un lubricante adecuado, véase
pág. 88 (TABLA DE LUBRIFICANTES),
para evitar su desgaste prematuro y corro-
sión.
10÷15 mm10÷15 mm
MX125_S.book Page 42 Wednesday, October 15, 2003 11:04 AM

43
uso y mantenimiento MX 125
NEUMATICOS
Este vehículo está equipado con neumáti-
cos con cámara.
PELIGRO
Controle periódicamente la presión de
hinchado de los neumáticos a tempera-
tura ambiente, véase pág. 85 (FICHA
TECNICA).
Si los neumáticos están calientes, la
medición no es correcta.
Mida la presión de hinchado sobre todo
antes y después de cada largo viaje.
Si la presión del hinchado es demasia-
do alta, las irregularidades del terreno
no llegan a amortiguarse y se transmi-
ten al manillar, comprometiendo por lo
tanto el confort de marcha y reduciendo
también la adherencia a la carretera en
curva.
Si, al revés, la presión del hinchado es
insuficiente, los flancos de los neumáti-
cos trabajan en exceso y podría darse
el deslizamiento de la goma sobre la
llanta, o su despegue con consiguiente
pérdida de control del vehículo.
En caso de frenazos abruptos, los neu-
máticos podrían salirse de las llantas.
En las curvas, además, el vehículo po-
dría perder adherencia.
Controle las condiciones de las superfi-
cies y del desgaste, porque una mala
condición de los neumáticos puede
comprometer su adherencia a la carre-
tera y la maniobrabilidad del vehículo.
Sustituya el neumático si está desgas-
tado o si un eventual pinchazo en la
zona de la banda de rodadura resulta
más ancho de 5 mm.
Tras haber reparado un neumático, eje-
cute el equilibrado de las ruedas. Utilice
exclusivamente neumáticos según las
medidas indicadas por la empresa, véa-
se pág. 85 (FICHA TECNICA).
Controle que las válvulas de hinchado es-
tén siempre equipadas con taponcitos
para evitar un repentino deshinchamien-
to de los neumáticos.
Las operaciones de sustitución, de re-
paración, de mantenimiento y de equili-
brado son muy importantes, deben eje-
cutarse con equipos adecuados y con
la experiencia indispensable.
Por esta razón le aconsejamos diríjase
a un o a un servicio especializado para
ejecutar las operaciones anteriores.
Si los neumáticos son nuevos pueden
estar cubiertos de una substancia res-
baladiza, por lo tanto conduzca con cui-
dado durante los primeros kilómetros.
No engrase los neumáticos con un lí-
quido no adecuado.
Si los neumáticos son viejos, aunque
no están desgastados del todo, pueden
endurecerse y no garantizar el agarre
en carretera.
En este caso sustituya los neumáticos.
MX125_S.book Page 43 Wednesday, October 15, 2003 11:04 AM

uso y mantenimiento MX 125
44
1
LIQUIDO REFRIGERANTE
PELIGRO
No utilice el vehículo si el líquido refri-
gerante está por debajo del nivel míni-
mo.
IMPORTANTE Cumpla las operacio-
nes de mantenimiento a intervalos deme-
diados si se utiliza el vehículo en zonas llu-
viosas, polvorientas, con firme malo o en
caso de conducción deportiva.
Antes de salir controle el nivel del líquido
refrigerante, véase pág. 45 (CONTROL Y
RELLENO); hágalo sustituir cada dos
años, dirigiéndose a un Concessionario
Ufficiale aprilia.
PELIGRO
El líquido refrigerante es nocivo si es
tragado; si llega a contacto con la piel o
con los ojos podría causar irritaciones.
Si el líquido llegara a contacto con la
piel o los ojos, lávelos con mucha agua
y diríjase a un médico.
De tragarlo accidentalmente, produzca
el vómito, enjuáguese la boca y la gar-
ganta con mucha agua y diríjase inme-
diatamente a un médico.
MANTENGASE LEJOS DEL ALCANCE
DE LOS NIÑOS.
PELIGRO
Tenga cuidado con no verter el líquido
refrigerante sobre las piezas candentes
del motor; podría incendiarse emitiendo
llamas invisibles.
En caso de intervenciones de manteni-
miento, se aconseja use guantes de lá-
tex.
Para la sustitución, diríjase a un Conce-
sionario Oficial aprilia
La solución del líquido refrigerante está
compuesta por 50% de agua y por 50% de
anticongelante.
Esta mezcla es ideal para casi todas las
temperaturas de funcionamiento y garanti-
za una buena protección contra la corro-
sión.
Se aconseja mantenga la misma mezcla
incluso durante el verano porque, de tal
forma, se reducen las pérdidas por evapo-
ración y la necesidad de frecuentes relle-
nos.
De tal manera disminuyen las incrustacio-
nes de sales minerales, dejadas en el ra-
diador por el agua evaporada y se conser-
va inalterada la eficacia del sistema de
refrigeración.
En caso de que la temperatura exterior
esté por debajo de cero grados centígra-
dos, controle frecuentemente el circuito de
refrigeración añadiendo, si necesario, una
mayor concentración de anticongelante
(hasta un máximo de 60%).
Para la solución refrigerante use agua des-
tilada, para no dañar el motor.
PELIGRO
No quite el tapón (1) del radiador con el
motor aún caliente, porque el líquido re-
frigerante está bajo presión y a tempe-
ratura elevada.
MX125_S.book Page 44 Wednesday, October 15, 2003 11:04 AM

45
uso y mantenimiento MX 125
CONTROL Y RELLENO
PELIGRO
Realice las operaciones de control y de
relleno del líquido refrigerante con el
motor frío.
◆
Pare el motor y espere a que se enfríe.
ATENCIÓN
Coloque el vehículo sobre un suelo fir-
me y llano.
◆
Mantenga el vehículo en posición verti-
cal con las dos ruedas apoyadas sobre
el suelo.
◆
Gire, en sentido antihorario y por un pa-
so, el tapón radiador (1).
◆
Espere unos segundos para permitir la
purga de la eventual presión presente en
la instalación.
◆
Gire otra vez en sentido antihorario el ta-
pón radiador (1) y quítelo.
◆
Controle que el líquido cubra completa-
mente las placas del radiador.
◆
Si es necesario, rellene con líquido refri-
gerante, véase pág. 88 (TABLA DE LU-
BRIFICANTES), hasta cubrir completa-
mente las placas del radiador.
PELIGRO
No supere este nivel porque, en caso con-
trario, puede haber una salida del líquido
durante el funcionamiento del motor.
PELIGRO
El líquido refrigerante es nocivo si es
tragado; si llega a contacto con la piel o
con los ojos podría causar irritaciones.
No introduzca los dedos u otros objetos
para comprobar la presencia de líquido
refrigerante.
ATENCIÓN
No añada aditivos u otras sustancias al
líquido.
Si se utiliza un embudo u otro instru-
mento, asegúrese de que estén perfec-
tamente limpios.
◆
Vuelva a instalar el tapón radiador (1).
PELIGRO
En caso de un excesivo consumo de lí-
quido refrigerante y en caso de que el
depósito quede vacío, controle que no
haya pérdidas en el circuito.
Para la reparación, diríjase a un Conce-
sionario Oficial aprilia.
1
MX125_S.book Page 45 Wednesday, October 15, 2003 11:04 AM

uso y mantenimiento MX 125
46
SILENCIADOR
PELIGRO
Evite aparcar el vehículo cerca de ar-
bustos u hojas secas o en lugares acce-
sibles a lo niños, porque el silenciador
catalítico alcanza durante su uso tem-
peraturas muy elevadas; preste la máxi-
ma atención y evite cualquier tipo de
contacto hasta que se enfrie completa-
mente.
El vehículo está dotado de un silenciador
con catalizador metálico de tipo ≈bi-valente
al platino-rodio∆.
Este dispositivo desempeña la funcion de
oxidar el CO (óxido de carbono) y los HC
(hidrocarburos incombustos) presentes en
los gases de escape, transformándolos
respectivamente en gas carbónico y vapor
de agua.
La temperatura elevada alcanzada por los
gases de escapes, por efecto de la reac-
ción catalítica, consigue quemar, además,
las partículas de aceite, conservando por
lo tanto el silenciador limpio y eliminando
los humos de escape.
Para el funcionamiento correcto y continuo
del catalizador y para reducir eventuales
problemas de suciedad en el grupo térmi-
co y el escape, evite recorrer largos tramos
con régimen de rotación del motor cons-
tantemente muy bajo.
Resultará suficiente alternar a estos mo-
mentos un régimen de rotación del motor
algo elevado, aunque sea durante pocos
segundos, con tal que esto se efectúe fre-
cuentemente.
Lo que se ha dicho anteriormente adquiere
especial importancia cada vez que se
pone en marcha el motor en frío; en este
caso, para poder alcanzar un régimen de
rotación que permita "la activación" de la
reacción catalítica, será suficiente compro-
bar que la temperatura del grupo térmico
haya alcanzado como mínimo los 50°C, lo
cual generalmente se realiza pocos segun-
dos tras el arranque.
PELIGRO
No utilice gasolina con plomo ya que
destruye el catalizador.
MX125_S.book Page 46 Wednesday, October 15, 2003 11:04 AM

47
uso y mantenimiento MX 125
NORMAS PARA EL USO
PELIGRO
Antes de salir, efectúe siempre un con-
trol preliminar del vehículo para una co-
rrecta y segura funcionalidad (véase
"TABLA CONTROLES PRELIMINA-
RES"). El hecho de no realizar las si-
guientes operaciones puede causar
graves lesiones personales o daños
graves al vehículo.
No dude en dirigirse a un Concesiona-
rio Oficial aprilia si no comprende el
funcionamiento de unos mandos o si
nota o sospecha la presencia de algu-
nas anomalías en el funcionamiento.
El tiempo necesario para un control es
muy limitado, mientras que resulta no-
table la seguridad obtenida.
TABLA CONTROLES PRELIMINARES
Detalle Control Detalle
Freno delantero y trase-
ro de disco
Controle el funcionamiento, la carrera en vacío de las pa-
lancas de mando, el nivel del líquido y eventuales pérdidas.
Compruebe el desgaste de las pastillas. Si es necesario
efectúe la restauración del nivel del líquido.
38-39-
40-70
Acelerador Controle que funcione suavemente y que pueda abrirse y
cerrarse completamente en todas las posiciones de la di-
rección. Ajuste y/o lubrique si es necesario.
71
Aceite mezclador /
aceite cambio
Controle y/o rellene si es necesario.
36-37-
60-61
Ruedas/neumáticos Controle las condiciones de las superficies de los neumáti-
cos, la presión de hinchado, el desgaste y daños eventua-
les.
43
Palancas de los frenos Controle que funcionen suavemente. Engrase las articula-
ciones y ajuste la carrera si es necesario.
39-40
Embrague La carrera en vacío hasta la extremidad de la palanca em-
brague debe ser de unos 10 mm; el embrague debe funcio-
nar sin tirones/o resbalamientos.
42
Dirección Controle que la rotación sea homogénea, suave, sin jue-
gos o aflojamientos.
ƒ
Caballete lateral
Controle que funcionen suavemente, y que la tensión de
los muelles vuelva a ponerlo en su posición normal.
Lubrique juntas y articulaciones si es necesario.
77
Elementos de fijación Compruebe que los elementos de fijación no estén aflo-
jados. Si necesario, ajústelos o apriételos
.
ƒ
Cadena de trasmisión Controle el juego.
66-67
Depósito combustible Controle el nivel y reposte si es necesario. Controle pérdi-
das eventuales u oclusiones del circuito.
36-82
Líquido refrigerante Controle el nivel.
44-45
Luces, luces de aviso,
bocina y dispositivos
eléctricos
Controle el funcionamiento correcto de los dispositivos
acústicos y visuales. Sustituya las bombillas o intervenga
en caso de avería.
78…81
MX125_S.book Page 47 Wednesday, October 15, 2003 11:04 AM

uso y mantenimiento MX 125
48
ARRANQUE
PELIGRO
No coloque objetos dentro de la cúpula
(entre el manillar y el salpicadero), para
evitar obstaculizar la rotación del mani-
llar y la visión del salpicadero.
IMPORTANTE Antes de arrancar el
motor, lea atentamente el capítulo ≈con-
ducción segura∆, véase pág. 5 (CONDUC-
CION SEGURA).
PELIGRO
Los gases de escape contienen mo-
nóxido de carbono, sustancia extrema-
damente nociva si inhalada por el orga-
nismo. Evite arrancar en los locales
cerrados o sin aire suficiente.
La inobservancia de esta advertencia
podría causar una pérdida de los senti-
dos hasta llegar a la muerte por asfixia.
◆
Coloque el vehículo sobre el caballete.
◆
Póngase en el lado izquierdo del vehículo.
O bien:
◆
Recoja el caballete.
◆
Suba a la posición de conducción del ve-
hículo.
Luego:
◆
Gire la palanca grifo combustible (1) en
posición ≈ON∆.
◆
Asegúrese de que el desviador luces (2)
esté en posición ≈
∆.
◆
Gire la llave (3) y ponga en ≈∆ el inte-
rruptor de encendido.
A este punto, en el salpicadero:
√ se enciende la luz indicadora roja re-
serva aceite mezclador ≈
∆, véase
pág. 15 (INSTRUMENTOS E INDICA-
DORES).
◆
Bloquee la rueda delantera, accionando
la palanca freno delantero (4).
◆
Ponga la palanca mando cambio (5) en
punto muerto (luz indicadora verde ≈
∆
encendida).
◆
Si el arranque se realiza con el motor
frío, gire en sentido antihorario (Pos. A)
la palanca para el arranque en frío ≈∆
(6).
◆
Gire hacia el exterior el pedal de arran-
que (7).
PELIGRO
No actúe sobre el pedal de arranque
cuando el motor está encendido.
◆
Actúe con decisión sobre el pedal de
arranque (7) y déjelo de inmediato.
Repita, si necesario, la operación hasta
arancar el motor.
◆
Mantenga accionada la palanca freno
delantero (4) y no acelere hasta que no
inicie la marcha.
6
2
3
4
MX125_S.book Page 48 Wednesday, October 15, 2003 11:04 AM

49
uso y mantenimiento MX 125
PELIGRO
No efectúe salidas repentinas con el
motor frío. Para reducir la emisión de
sustancias contaminantes en el aire y el
consumo de combustible, se aconseja
caliente el motor conduciendo a una ve-
locidad limitada durante los primeros
kilómetros de recorrido.
◆
Una vez que el motor se haya calentado,
gire en sentido horario (Pos. B) la palan-
ca para el arranque en frío ≈∆ (6).
Arranque con el motor inundado
En caso de que no se realice correctamen-
te el procedimiento de arranque, o en caso
de un exceso de combustible en los tubos
de admisión, el motor podría inundarse.
Para limpiar el motor inundado:
◆
Ejecute las doce primeras operaciones
del procedimiento de arranque.
◆
Gire completamente el puño de gas (8)
(Pos. C).
PELIGRO
No actúe sobre el pedal de arranque
cuando el motor está encendido.
◆
Actúe sobre el pedal de arranque (7) con
decisión por algunas veces y déjelo de in-
mediato.
Arranque en frío
En caso de temperatura ambiente baja (cerca
o inferior a 0°C) podrían surgir algunas dificul-
tades durante el primer arranque.
En este caso:
◆
Gire en sentido antihorario (Pos. A) la
palanca para el arranque en frío ≈
∆ (6).
PELIGRO
No actúe sobre el pedal de arranque
cuando el motor está encendido.
◆
Gire moderadamente el puño de gas (8)
y simultáneamente actúe por algunas
veces con decisión sobre el pedal de
arranque (7), luego déjelo de inmediato.
Si el motor se pone en marcha
◆
Suelte el puño de gas (8).
◆
Gire en sentido horario (Pos. B) la pa-
lanca para el arranque en frío ≈∆ (6).
En caso de que el ralentí resulte inesta-
ble, actúe sobre el puño de gas (8) dán-
dole pequeñas y frecuentes vueltas.
Si el motor no se pone en marcha
Espere unos segundos y vuelva a realizar
el procedimiento de arranque.
ARRANQUE
TRAS LARGA INACTIVIDAD
Si el vehículo ha quedado inactivo durante
mucho tiempo, actúe sobre el pedal de
arranque (7) con decisión por algunas ve-
ces sin acelerar, permitiendo, de esta ma-
nera, que el circuito de alimentación com-
bustible se llene.
Para poner en marcha el motor, acelere
moderadamente y realice el procedimiento
de arranque.
7
5
8
MX125_S.book Page 49 Wednesday, October 15, 2003 11:04 AM

uso y mantenimiento MX 125
50
SALIDA Y CONDUCCION
PELIGRO
No coloque objetos dentro de la cúpula
(entre el manillar y el salpicadero), para
evitar obstaculizar la rotación del mani-
llar y la visión del salpicadero.
IMPORTANTE Antes de arrancar el
motor, lea atentamente el capítulo ≈con-
ducción segura∆, véase pág. 5 (CONDUC-
CION SEGURA).
Si durante la marcha se agota la cantidad
"estándar" de combustible, ponga en
"RES" la palanca del grifo del combustible
(1) para accionar la reserva combustible.
Reserva combustible: 1,3
l
(serva mecáni-
ca).
ATENCIÓN
Reposte lo antes posible, véase pag. 36
(COMBUSTIBLE).
PELIGRO
Viajando sin pasajero, controle que los es-
tribos traseros estén cerrados. Durante la
conducción mantenga las manos firme-
mente sobre el manillar y los pies sobre
los estribos. NO CONDUZCA NUNCA EN
POSICIONES DIFERENTES. En caso de
conducción con pasajero, instruya a la
persona que se transporta de manera que
no haya problemas durante las manio-
bras.
Para ponerse en marcha:
◆
Ajuste correctamente la inclinación de
los retrovisores.
PELIGRO
Con el vehículo parado, familiarícese
con el uso de los retrovisores.
◆
Arranque el motor, vea pág. 48
(ARRANQUE).
◆
Durante los primeros kilómetros conduz-
ca a velocidad moderada para calentar
el motor.
◆
Con el puño de gas (2) suelto (Pos. A)
y el motor al ralentí, accione del todo la
palanca del embrague (3).
◆
Ponga la primera marcha empujando ha-
cia abajo la palanca mando cambio (4).
◆
Suelte la palanca freno (accionada al
arrancar).
PELIGRO
Al iniciar la marcha no suelte de manera
demasiado brusca o rápida la palanca del
embrague para evitar que el motor se pare
y que el vehículo dé tirones. Al soltar la pa-
lanca del embrague no acelere brusca-
mente o excesivamente para que el em-
brague no "resbale" (desembrague lento)
o para que la rueda no se levante (empi-
nándose) (desembrague rápido).
◆
Suelte despacio la palanca del embrague
(3) y simultáneamente acelere girando
moderadamente el puño de gas (2)
(Pos. B). El vehículo empieza a avanzar.
PELIGRO
No supere el número de revoluciones y
las velocidades aconsejados, véase
pag. 53 (RODAJE).
◆
Aumente la velocidad girando gradual-
mente el puño de gas (2) (Pos. B), sin
superar las velocidades máximas por
marcha (y el número de revoluciones
aconsejado), véase pag. 53 (RODAJE).
MX125_S.book Page 50 Wednesday, October 15, 2003 11:04 AM

51
uso y mantenimiento MX 125
Para poner la segunda marcha:
PELIGRO
Opere bastante rápidamente.
No conduzca el vehículo con un número
de revoluciones demasiado bajo.
◆
Suelte el puño de gas (2) (Pos. A) , ac-
cione la palanca del embrague (3) y le-
vante la palanca mando cambio (4).
Suelte la palanca del embrague (3) y
acelere.
◆
Repita las dos últimas operaciones y
pase a las marchas superiores.
El pasaje de una marcha superior a otra in-
ferior, llamado "reduccion", se efectúa:
◆
En los tramos en bajada y en caso de fre-
nazos, para aumentar la acción de frena-
do utilizando la compresión del motor.
◆
En los tramos en subida, cuando la marcha
que se ha puesto no corresponde a la velo-
cidad (marcha alta, velocidad moderada) y
el número de revoluciones disminuye.
PELIGRO
Reduzca una marcha a la vez; la reduc-
cion simultánea de varias marchas pue-
de causar la superación del régimen de
potencia máxima "sobre-regimen".
Antes y durante la "reduccion" de una
marcha reduzca la velocidad soltando
el acelerador para evitar "sobre regi-
men".
Para efectuar la "reduccion":
◆
Suelte el puño de gas (2) (Pos. A) .
◆
Si es necesario, accione moderadamen-
te las palancas del freno y reduzca la ve-
locidad del vehículo.
◆
Accione la palanca del embrague (3) y
baje la palanca mando cambio (4) para
meter la marcha inferior.
◆
Si se han accionado las palancas del fre-
no, suéltelas.
◆
Suelte la palanca del embrague y acele-
re moderadamente.
PELIGRO
Si la luz indicadora reserva aceite mez-
clador “
” se enciende durante el fun-
cionamiento normal del motor, significa
que el nivel del aceite mezclador está
en reserva; en este caso restaure el
aceite mezclador, véase
pág. 37 (DEPO-
SITO ACEITE MEZCLADOR)
.
MX125_S.book Page 51 Wednesday, October 15, 2003 11:04 AM

uso y mantenimiento MX 125
52
PELIGRO
No acelere y decelere a menudo y conti-
nuamente porque inadvertidamente se
podría perder el control del vehículo.
Para frenar, decelere y accione ambos
frenos para conseguir una deceleración
uniforme, dosificando la presión sobre
los dispositivos de frenado de manera
apropiada.
Accionando sólo el freno delantero o
sólo el trasero, se reduce notablemente
la fuerza de frenado, con el riesgo de
bloquear una rueda con consiguiente
pérdida de adherencia.
Si tiene que pararse en subida, decelere
completamente y utilice sólo los frenos
para mantener parado el vehículo.
El embrague puede sobrecalentarse si
se usa el motor para mantener parado
el vehículo.
PELIGRO
Antes de iniciar una curva, reduzca la
velocidad o frene recorriendo la misma
con velocidad moderada y constante o
con ligera aceleración; evite frenar al lí-
mite: las posibilidades de deslizar re-
sultarían demasiado elevadas.
Utilizando continuamente los frenos en
los tramos en bajada, puede darse el re-
calentamiento de las pastillas con suce-
siva reducción de la eficacia de los fre-
nos.
Aproveche la compresión del motor re-
duciendo la marcha y utilizando ambos
frenos de manera intermitente.
En los tramos en bajada no conduzca
con el motor apagado.
PELIGRO
Ponga cuidado en todo tipo de obstácu-
lo o variación de la geometría del firme
de la carretera. Las carreteras estropea-
das, los carriles, los sumideros, las se-
ñales de indicación pintadas en el firme
de la carretera, las chapas de las obras
cuando llueve se vuelven resbaladizos
y, por lo tanto, hay que adelantarlos
muy prudentemente, conduciendo de
manera suave e inclinando el vehículo
lo menos posible.
Señale siempre los cambios de carril o
de dirección por medio de los dispositi-
vos adecuados y con oportuno adelan-
to, evitando maniobras repentinas y pe-
ligrosas.
Desactive los dispositivos inmediata-
mente después del cambio de direc-
ción.
Mientras está adelantando o es adelan-
tado por otros vehículos, ponga el
máximo cuidado.
En caso de lluvia, la nube de agua pro-
ducida por los grandes vehículos redu-
ce la visibilidad; el desplazamiento de
aire puede causar la pérdida de control
del vehículo.
MX125_S.book Page 52 Wednesday, October 15, 2003 11:04 AM

53
uso y mantenimiento MX 125
RODAJE
El rodaje del motor es fundamental para
garantizar una duración larga y el correcto
funcionamiento. Recorra, si es posible, ca-
rreteras con muchas curvas y/o onduladas
para someter el motor, las suspensiones y
los frenos a un rodaje más eficaz.
Durante el rodaje, varíe la velocidad de
conducción para permitir ≈cargar∆ el trabajo
de los componentes y sucesivamente
≈descargarlo∆, enfriando las piezas del mo-
tor. Aunque sea importante solicitar los
componentes del motor durante el rodaje,
ponga mucho cuidado en no exagerar.
ATENCIÓN
Sólo tras los primeros 1500 km de roda-
je se pueden obtener las mejores pres-
taciones del vehículo.
Siga las siguientes indicaciones:
◆
No acelere bruscamente y del todo
cuando el motor está en función con un
bajo régimen de revoluciones, sea du-
rante que después del rodaje.
◆
Durante los primeros 100 km, actúe con
cuidado sobre los frenos y evite frenazos
repentinos y prolongados.
Todo esto para permitir un ajuste correc-
to del material de fricción de las pastillas
sobre los discos del freno.
◆
Durante los primeros 800 km de recorrido,
jamás supere la mitad de la apertura del
acelerador.
PELIGRO
Después de los primeros 1000 km de
funcionamiento, realice los controles
señalados en la columna "fin rodaje" de
la "FICHA DE MANTENIMIENTO PERIO-
DICO", véase pág. 56 (FICHA DE MAN-
TENIMIENTO PERIODICO), para evitar
daños a los demás, a sí mismo y/o al ve-
hículo.
◆
Entre los 800 y los 1500 km de recorrido,
conduzca más agresivamente, varíe la
velocidad y use la aceleración máxima
sólo por breves momentos, para permitir
un mejor acoplamiento de los compo-
nentes; no supere los 3/4 de la apertura
del acelerador.
◆
Tras los primeros 1500 km se pueden
exigir del motor mayores prestaciones;
sin embargo, no se deben superar las
velocidades máximas indicadas en la ta-
bla y las revoluciones del motor no han
de superar el régimen de potencia máxi-
ma.
PARADA
PELIGRO
Evite, si es posible, parar bruscamente
el vehículo, reducir de repente la veloci-
dad y frenar al límite.
◆
Suelte el puño de gas (1) (Pos. A), ac-
cione gradualmente los frenos y simultá-
neamente reduzca las marchas para dis-
minuir la velocidad, véase pág. 50
(SALIDA Y CONDUCCION).
Tras haber reducido velocidad, antes de
parar totalmente el vehículo:
◆
Accione la palanca del embrague (2)
para que el motor no se apague.
Con el vehículo parado:
◆
Ponga la palanca cambio en punto muer-
to (luz testigo verde "
" encendida).
◆
Suelte la palanca del embrague (2).
◆
Durante la parada momentánea, man-
tenga accionado por lo menos un freno.
Apertura máxima del acelerador
durante el rodaje
Km recorridos Apertura acelerador
0…800 1/2
800…1500 3/4
oltre 1500 4/4
MX125_S.book Page 53 Wednesday, October 15, 2003 11:04 AM

uso y mantenimiento MX 125
54
APARCAMIENTO
PELIGRO
Aparque el vehículo sobre suelo sólido
y llano para que no caiga. No apoye el
vehículo en los muros, ni lo apoye tam-
poco por el suelo. Asegúrese de que el
vehículo y, sobre todo, las partes muy
calientes del mismo no sean peligrosas
para las personas y para los niños. No
deje el vehículo sin vigilancia y con el
motor en marcha o con la llave introdu-
cida en el interruptor de encendido. No
debe sentarse sobre el vehículo cuando
está apoyado en el caballete.
◆
Pare el vehículo, véase pág. 53 (PARADA).
◆
Gire la llave (1) y ponga en "" el inte-
rruptor de encendido (2).
◆
Ponga en "OFF" la palanca del grifo
combustible (3).
◆
Coloque el vehículo sobre el caballete,
véase abajo (COLOCACION DEL VEHI-
CULO SOBRE EL CABALLETE).
PELIGRO
No deje la llave introducida en el inte-
rruptor de encendido.
◆
Bloquee la dirección, véase pág. 33 (SE-
GURO DE DIRECCION) y extraiga la lla-
ve (1).
COLOCACION DEL VEHICULO
SOBRE EL CABALLETE
Lea con cuidado al lado (APARCAMIEN-
TO).
◆
Empuñe la manecilla izquierda (4) y el
asa pasajero (5).
◆
Empuje el caballete lateral con el pie de-
recho, extendiéndolo del todo (6).
◆
Incline el vehículo hasta apoyar el caba-
llete sobre el suelo.
ATENCIÓN
Asegúrese de la estabilidad del vehículo.
SUGERENCIAS CONTRA LOS
ROBOS
No deje NUNCA la llave de encendido in-
troducida y utilice siempre el seguro de di-
rección.
Aparque el vehículo en un lugar seguro y,
si es posible, en un garaje o en un lugar vi-
gilado.
Controle que los documentos y los impues-
tos estén en orden.
Escriba en este manual sus datos y su nú-
mero de teléfono, para facilitar la identifica-
ción en caso de hallazgo después del ro-
bo.
APELLIDOS:..............................................
NOMBRE: ..................................................
DIRECCION:..............................................
...................................................................
N. TELEFONO:..........................................
ATENCIÓN
En muchos casos los vehículos roba-
dos han sido identificados gracias a los
datos indicados en el manual de
uso/mantenimiento.
MX125_S.book Page 54 Wednesday, October 15, 2003 11:04 AM

55
uso y mantenimiento MX 125
MANTENIMIENTO
PELIGRO
Peligro de incendio.
El combustible y otras sustancias infla-
mables no deben ser acercados a los
componentes eléctricos.
Antes de comenzar con cualquier tipo
de mantenimiento o inspección del ve-
hículo, apague el motor y quite la llave,
espere a que el motor y el sistema de
escape se hayan enfriado y levante el
vehículo con un equipo adecuado, so-
bre una superficie sólida y plana.
Antes de seguir adelante controle que
el lugar donde trabaja tenga un adecua-
do cambio de aire.
Ponga cuidado sobre todo en las partes
aún calientes del motor y del sistema de
escape, para evitar quemaduras.
ATENCIÓN
No utilice la boca para sostener piezas
mecánicas u otras partes del vehículo:
ningún componente es comestible, me-
jor dicho algunos de ellos son nocivos
o incluso tóxicos.
De no resultar expresamente descrito,
los grupos deben ser instalados si-
guiendo el orden inverso de las opera-
ciones realizadas para el desmontaje.
En caso de intervenciones de manteni-
miento, se aconseja el uso de guantes
de látex.
Normalmente el usuario puede realizar las
operaciones de mantenimiento ordinario,
pero a veces éstas necesitan un equipo
específico y una preparación técnica ade-
cuada.
En caso de que se necesite asistencia o un
asesoramiento técnico para el manteni-
miento periódico, diríjase a un Concessio-
nario Ufficiale aprilia que garantizará un
servicio esmerado y rápido.
Se aconseja que pida al Concessionario
Ufficiale aprilia que le haga probar el vehí-
culo en la carretera tras una intervención
de reparación o de mantenimiento periódi-
co.
Sin embargo, efectúe personalmente los
≈Controles Preliminares∆ tras una interven-
ción de mantenimiento, véase pág. pág. 47
(TABLA CONTROLES PRELIMINARES).
MX125_S.book Page 55 Wednesday, October 15, 2003 11:04 AM

uso y mantenimiento MX 125
56
FICHA DE MANTENIMIENTO
PERIODICO
INTERVENCIONES A REALIZAR POR
EL Concesionario Oficial aprilia (QUE
PUEDEN EFECTUARSE POR EL USUA-
RIO).
Pie de la figura
c = controle, limpie, ajuste, lubrique o
sustituya si es necesario;
d = limpie;
e = sustituya;
f = ajuste.
(*) = utilizar grasa MOLYCOTE 6 Rapi-
dplus
IMPORTANTE Realice las operacio-
nes de mantenimiento a intervalos deme-
diados si se utiliza el vehículo en zonas llu-
viosas, polvorientas, sobre recorridos
accidentados o en caso de conducción so-
bre pista.
Componentes
Final de rodaje
(luego de 1
mes) o 1000 Km
(625 mi)
Cada 12 meses
o 4000 Km
(2500 mi)
Cada 24 meses
o 8000 Km
(5000 mi)
Batería / ajuste bornes cc -
Bujía dde
Filtro aire cd -
Juego embrague ff -
Instalación luces cc -
Líquido frenos - c -
Líquido refrigerante cada 3 meses: c
Nivel aceite mezclador controlar antes de cada uso: c
Aceite cambio eccada 12000 Km
(7500 mi): e
Orientación faro delantero - funcionamiento - c -
Perno palanca arranque
-
c lubricar con
grasa repelente
al agua (*)
-
Régimen mínimo de revoluciones del motor fc -
Ruedas/neumáticos y presión de inflado cada mes: c
Tensado y lubricación cadena de transmisión cada mes: c
Desgaste pastillas de freno delantero y trasero c cada mes: c
MX125_S.book Page 56 Wednesday, October 15, 2003 11:04 AM

57
uso y mantenimiento MX 125
INTERVENCIONES A REALIZAR POR
EL Concesionario Oficial aprilia.
Pie de la figura
c = controle, limpie, ajuste, lubrique o
sustituya si es necesario (según las
especificaciones del manual de ta-
ller);
d = limpie;
e = sustituya;
f = ajuste.
IMPORTANTE Realice las operacio-
nes de mantenimiento a intervalos deme-
diados si se utiliza el vehículo en zonas llu-
viosas, polvorientas, sobre recorridos
accidentados o en caso de conducción so-
bre pista.
Componentes
Final de rodaje
(luego de 1
mes) o 1000 Km
(625 mi)
Cada 12 meses
o 4000 Km
(2500 mi)
Cada 24 meses
o 8000 Km
(5000 mi)
Amortiguador trasero - - c
Carburador - - d
Cables transmisión y mandos cc -
Central RAVE c - f
Centrado ruedas - c -
Cojinetes tubo de dirección y juego de dirección cc -
Cojinetes ruedas - c -
Discos de freno cc -
Filtro aceite mezclador - - d
Funcionamiento general del vehículo cc -
Sistemas de frenado cc -
Instalación de refrigeración cc -
Líquido frenos cada año: e
Líquido refrigerante cada 2 años: e
Silenciador/silenciador de escape
-
c -
Aceite horquilla y retén aceite cada 2 años: e
Pistón y anillos cada 2 años: c / cada 4 años: e
Bomba mezclador y purga aire c - f
Grifo combustible cc -
Ruedas/neumáticos y presión de inflado cc -
Apriete tornillos cc -
Ajustes bornes batería cc -
Luz indicadora reserva aceite mezclador cc -
Tensado final (cadena, corona, piñón)
-
c -
Tubos combustible - c cada 4 años: e
Tubos del sistema de - c cada 4 años: e
Tubos aceite mezclador - c cada 4 años: e
Desgaste embrague - c -
Válvula de escape cd + f cada 4 años: e
MX125_S.book Page 57 Wednesday, October 15, 2003 11:04 AM

uso y mantenimiento MX 125
58
FICHA DE RECONOCIMIENTO
Resulta recomendable escribir los núme-
ros del bastidor y del motor en el espacio
reservado expresamente en este manual.
El número del bastidor puede utilizarse
para la compra de repuestos.
ATENCIÓN
La alteración de los números de identifi-
cación puede provocar graves sancio-
nes penales y administrativas; en parti-
cular, la alteración del número del
bastidor produce la anulación inmedia-
ta de la garantía.
NUMERO DEL MOTOR
El número de motor (1) está impreso sobre
la base del cárter motor lado derecho.
Motor n≥
NUMERO BASTIDOR
El número del bastidor (2) está impreso en
el manguito de la dirección, lado derecho.
Bastidor n≥
DESMONTAJE
PANELES LATERALES
Lea con cuidado pág. 55 (MANTENI-
MIENTO).
◆
Coloque el vehículo sobre el caballete.
ATENCIÓN
Las siguientes operaciones se refieren
a un solo panel, pero tienen validez
para los dos.
◆
Gire en sentido antihorario el tornillo (3)
de fijación rápido dándole 1/4 de vuelta.
PELIGRO
Opere con precaución. No dañe las len-
güetas y/o los alojamientos de acopla-
miento correspondientes.
Maneje con cuidado los componentes
de plástico para no rayarlos o dañarlos.
◆
Extraiga y saque el panel lateral (4).
4
3
MX125_S.book Page 58 Wednesday, October 15, 2003 11:04 AM

59
uso y mantenimiento MX 125
FILTRO AIRE
PELIGRO
No use gasolina o disolventes inflama-
bles para lavar el elemento filtrante,
para evitar el riesgo de incendios o ex-
plosiones. Lea con cuidado pág. 55
(MANTENIMIENTO).
Limpie y controle las condiciones del filtro del
aire cada mes o cada 4000 km, según las
condiciones de uso. De utilizar el vehículo en
carreteras polvorientas o mojadas, las opera-
ciones de limpieza tendrán que efectuarse
con mayor frecuencia. Hay que sacar el filtro
aire del vehículo para limpiarlo.
DESMONTAJE
◆
Desmonte el panel lateral derecho, véa-
se pág. 58 (DESMONTAJE PANELES
LATERALES).
◆
Destornille y quite los tres tornillos (1) y
guarde las arandelas correspondientes.
◆
Saque la tapa caja filtro (2).
ATENCIÓN
Limpie el interior de la caja filtro antes
de extraer el elemento filtrante para im-
pedir la entrada de polvo y cuerpos ex-
traños en el colector de aspiración.
◆
Limpie con un paño el interior de la caja
filtro y el interior de la tapa caja filtro (2).
◆
Extraiga el elemento filtrante (3) equipa-
do con redecillas de contención (4) y (5).
LIMPIEZA
PELIGRO
Para no deformar las redecillas de con-
tención NO fuerce sus partes laterales.
◆
Agarre la parte central de ambas redecillas
de contención (4) y (5), tire y sepárelas.
◆
Suelte el elemento filtrante (3) de la re-
decilla de contención (4).
◆
Lave el elemento filtrante (3) con disol-
ventes limpios, no inflamables ni con un
elevado punto de volatilidad y déjelo se-
car perfectamente.
◆
Extienda en toda su superficie un aceite
para filtros o un aceite espeso (SAE
80W - 90), luego exprímalo para eliminar
el aceite sobrante.
ATENCIÓN
El elemento filtrante (3) debe estar em-
bebido bien, pero sin gotear.
SUSTITUCION
◆
Sustituya el elemento filtrante (3) con
otro nuevo del mismo tipo.
◆
Controle la integridad de la junta (8); de
resultar dañada sustitúyala.
Durante la instalación:
ATENCIÓN
Asegúrese de que la forma del elemento
filtrante coincida con las redecillas de
contención.
◆
Introduzca correctamente el elemento fil-
trante (3) en las dos espigas (6).
◆
Acople la redecilla de contención (5).
◆
Empuje ambas espigas en correspon-
dencia con las espigas (6).
ATENCIÓN
Las dos aletas (7) impiden la incorrecta
introducción del elemento filtrante en la
caja filtro.
◆
Introduzca el elemento filtrante, equipa-
do con redecillas, en las guías de la caja
filtro.
MX125_S.book Page 59 Wednesday, October 15, 2003 11:04 AM

uso y mantenimiento MX 125
60
COMPROBACION NIVEL ACEITE
CAMBIO Y RELLENO
Lea con cuidado pág. 36 (ACEITE CAM-
BIO) y pág. 55 (MANTENIMIENTO).
Controlar el nivel del aceite del cambio
cada 4000 km, sustituirlo al final de rodaje
y sucesivamente cada 12000km, vea
pág. 61 (SUSTITUCION ACEITE CAM-
BIO).
CONTROL
ATENCIÓN
Coloque el vehículo sobre un suelo
firme y llano.
◆
Pare el motor y déjelo enfriar unos diez
minutos por lo menos para permitir el
drenaje del aceite en el cárter y el enfria-
miento del aceite mismo.
◆
Mantenga el vehículo en posición verti-
cal con las dos ruedas apoyadas sobre
el suelo.
ATENCIÓN
De no realizar las operaciones anteri-
ores la medición del nivel puede resul-
tar no correcta.
◆
Asegúrese de que el nivel del aceite esté
comprendido entre un cuarto (MIN) y mi-
tad (MAX) cristal (1).
ATENCIÓN
El nivel no debe superar nunca la mitad
del cristal, ni tampoco ser inferior a un
cuarto del mismo.
En el primer caso se produciría una sal-
ida del aceite en exceso; en el segundo
caso se podría dañar gravemente el mo-
tor.
RELLENO
Si es necesario efectuar el relleno:
◆
Desenrosque y quite el tapón de llenado
(2).
◆
Coloque una pequeña cantidad de acei-
te, vea pág. 88 (TABLA DE LUBRIFI-
CANTES) y espere aprox. un minuto
para que el aceite fluya uniformemente
dentro del cárter.
◆
Asegúrese que el nivel (1) del aceite sea
mayor a un cuarto (MIN).
◆
Si así no sucediere, repita el llenado con
pequeñas cantidades de aceite y contro-
le a través del visor (1).
◆
Al término de la operación enrosque y
apriete el tapón de llenado (2).
PELIGRO
Cierre con cuidado el tapón de llenado
y controle que el aceite no se salga.
Controle periódicamente que no haya
pérdidas en correspondencia con la
junta de la tapa del cárter.
No utilice el vehículo con lubricación in-
suficiente o con lubrificantes contami-
nados o no adecuados, porque aceleran
el desgaste de las partes en movimiento
y pueden crear daños irreparables.
2
1
MX125_S.book Page 60 Wednesday, October 15, 2003 11:04 AM

61
uso y mantenimiento MX 125
SUSTITUCION ACEITE CAMBIO
Lea con cuidado pág. 36 (ACEITE CAM-
BIO) y pág. 55 (MANTENIMIENTO).
Controlar el nivel del aceite del cambio
cada 4000 km, sustituirlo al final de rodaje
y sucesivamente cada 12000km, vea
pág. 61 (SUSTITUCION ACEITE CAM-
BIO).
Para la sustitución:
◆
Recorra algunos kilómetros hasta alcan-
zar la temperatura normal de funciona-
miento.
ATENCIÓN
Coloque el vehículo sobre un suelo
firme y llano.
◆
Pare el motor y déjelo enfriar unos 10
minutos por lo menos para permitir el
drenaje del aceite en el cárter y el enfria-
miento del aceite mismo.
PELIGRO
El motor caliente contiene aceite a altas
temperaturas, ponga cuidado en no
quemarse mientras se efectúan las op-
eraciones sucesivas.
◆
Coloque el vehículo sobre el caballete.
◆
Coloque un recipiente (1), con capaci-
dad superior a 600 cm> en correspon-
dencia con el tapón de vaciado (2).
◆
Desenrosque y quite el tapón de vaciado
(2).
◆
Desenrosque y quite el tapón de llenado
(3).
◆
Vacíe y deje gotear el aceite dentro del
recipiente (1) por algunos minutos.
◆
Limpie los residuos metálicos pegados
al imán del tapón de vaciado (2).
◆
Controle y si acaso sustituya la arandela
de estanqueidad del tapón de vaciado (2).
Sustituya la arandela de estanqueidad
del tapón de vaciado (2) cada 12000 km
(o cada dos veces que se sustituye el
aceite motor).
◆
Enrosque y apriete el tapón de vaciado
(2).
Par de apriete tapón de vaciado (2):
27 Nm (2,7 kgm).
◆
Vierta por la abertura de llenado (3) unos
550 cm> de aceite cambio, véase
pág. 88 (TABLA DE LUBRIFICANTES).
◆
Enrosque el tapón de llenado (3).
◆
Ponga en marcha el motor, véase
pág. 48 (ARRANQUE) y déjelo funcionar
al ralentí por un minuto más o menos
para que el circuito aceite motor se llene.
Controle el nivel del aceite y rellene, si
necesario, véase pág. 60 (COMPROBA-
CION NIVEL ACEITE CAMBIO Y RELLE-
NO).
PELIGRO
Cierre con cuidado el tapón de llenado
y controle que el aceite no se salga.
Controle periódicamente que no haya
pérdidas en correspondencia con la
junta de la tapa del cárter.
No utilice el vehículo con lubricación in-
suficiente o con lubrificantes contami-
nados o no adecuados, porque aceleran
el desgaste de las partes en movimiento
y pueden crear daños irreparables.
MX125_S.book Page 61 Wednesday, October 15, 2003 11:04 AM

uso y mantenimiento MX 125
62
RUEDA DELANTERA
PELIGRO
Las operaciones de desmontaje e insta-
lación de la rueda delantera podrían re-
sultar algo difíciles y complejas para el
operador inexperto. En caso de necesi-
dad, diríjase a un Concesionario Oficial
aprilia.
Si, de todas formas, desea seguir ade-
lante personalmente, siga las sigu-
ientes instrucciones.
Lea con cuidado pág. 55 (MANTENI-
MIENTO).
Durante el desmontaje ponga cuidado
en no dañar los tubos, el disco y las
pastillas del freno. Deje enfriar el motor
y el silenciador hasta que alcancen la
temperatura ambiente antes de realizar
las sucesivas operaciones, para evitar
posibles quemaduras.
DESMONTAJE
◆
Coloque el vehículo sobre el caballete.
PELIGRO
A causa del peso y del espacio que
ocupa el vehículo la operación que
sigue a continuación necesita la inter-
vención de un segundo operador. Siga
adelante con cuidado y compruebe si
puede soportar el peso del vehículo.
ATENCIÓN
Peso del vehículo (en orden de
marcha): 126 kg.
◆
Levante la parte delantera y coloque un
soporte adecuado (1) (con altura 400
mm) por debajo del motor, de manera
que la rueda delantera tenga espacio su-
ficiente para moverse libremente y para
evitar la caída del vehículo.
PELIGRO
Peligro de caída del vehículo. Provea a
equilibrar el vehículo para que no caiga.
◆
Coloque y fije un peso de aprox. 40 kg
en la parte trasera para sostener la parte
delantera del vehículo.
PELIGRO
Compruebe la estabilidad del vehículo.
◆
Coloque por debajo del neumático un
soporte (2) para mantener la rueda en
posición tras haberla soltado.
◆
Bloquee el manillar en posición de mar-
cha de manera que la dirección quede
bloqueada.
◆
Afloje los dos tornillos (3) de la brida del
eje de la rueda.
◆
Destornille completamente el eje rueda
(4).
ATENCIÓN
Para facilitar la extracción del eje de la
rueda, levante moderadamente la rue-
da.
◆
Aguante la rueda delantera y extraiga
manualmente el eje rueda (4).
5
MX125_S.book Page 62 Wednesday, October 15, 2003 11:04 AM

63
uso y mantenimiento MX 125
ATENCIÓN
Controle la disposición del separador
(5) para poder montarlo correctamente.
◆
Extraiga la rueda poniendo cuidado al
sacar el disco de la pinza freno.
◆
Guarde el distanciador (5).
PELIGRO
No accione la palanca del freno delantero
tras haber extraído la rueda porque en
caso contrario los émbolos de la pinza del
freno podrían salirse de sus sedes,
causando la pérdida del líquido de los
frenos. En este caso diríjase a un Conce-
sionario Oficial aprilia que realizará una
intervención de mantenimiento.
INSTALACION
Lea con cuidado pág. 55 (MANTENI-
MIENTO).
PELIGRO
Durante la instalación ponga cuidado
en no dañar los tubos, el disco y las
pastillas del freno.
◆
Coloque la rueda entre las barras de la
horquilla, sobre el soporte (2), sin intro-
ducir el disco en la pinza freno.
ATENCIÓN
Engrase moderadamente los alojamien-
tos exteriores del cubo rueda.
◆
Introduzca el diámetro menor del distan-
ciador (5) en el alojamiento cubo rueda
(lado izquierdo sentido de marcha).
ATENCIÓN
Opere con precaución al introducir el
disco en la pinza freno.
◆
Desplace la rueda e introduzca con cui-
dado el disco en la pinza freno.
ATENCIÓN
Aplique, de manera uniforme, una reduc-
ida cantidad de grasa sobre el eje rueda.
◆
Introduzca parcialmente el eje rueda (4)
en el lado derecho del vehículo (sentido
de marcha).
◆
Empuje el eje rueda y, simultáneamente,
mueva la rueda (para alinear los ejes y la
rueda), hasta introducir completamente
el eje rueda.
◆
Enrosque y apriete el eje rueda (4).
Par de apriete eje rueda (4):
80 Nm (8 kgm).
PELIGRO
A causa del peso y del espacio que
ocupa el vehículo la operación que
sigue a continuación necesita la inter-
vención de un segundo operador. Siga
adelante con cuidado y compruebe si
puede soportar el peso del vehículo.
ATENCIÓN
Peso del vehículo (en orden de
marcha): 126 kg.
◆
Levante la parte delantera del vehículo y
desplace el soporte colocado por debajo
del motor durante el desmontaje.
◆
Baje el vehículo y colóquelo sobre el ca-
ballete
◆
Con la palanca del freno delantero accio-
nada, presione varias veces sobre el ma-
nillar empujando hacia el fondo la horqui-
lla. De tal forma las barras de la horquilla
se ajustarán de manera apropiada.
◆
Apriete los dos tornillos (3) de la brida
del eje de la rueda.
Par de apriete tornillos (3) brida eje rue-
da: 10 Nm (1 kgm).
PELIGRO
Tras haber instalado la rueda, accione
varias veces la palanca del freno de-
lantero y controle el funcionamiento
correcto del sistema de frenado.
Controle el centrado de la rueda.
Se aconseja llevar a controlar los pares
de apriete, el centrado y el equilibrado
rueda en un Concesionario Oficial
aprilia, para evitar inconvenientes que
podrían causar daños graves a los de-
más y a sí mismo.
MX125_S.book Page 63 Wednesday, October 15, 2003 11:04 AM

uso y mantenimiento MX 125
64
RUEDA TRASERA
PELIGRO
Las operaciones de desmontaje e insta-
lación de la rueda trasera podrían resul-
tar difíciles y complejas para el opera-
dor inexperto. En caso de necesidad,
diríjase a un Concesionario Oficial
aprilia.
Si, de todas formas, desea seguir ade-
lante personalmente, siga las sigu-
ientes instrucciones.
Lea con cuidado pág. 55 (MANTENI-
MIENTO).
Antes de realizar las operaciones que
siguen a continuación, deje enfriar el
motor y el silenciador hasta que alcan-
cen la temperatura ambiente para evitar
posibles quemaduras.
PELIGRO
Durante el desmontaje y la instalación
ponga cuidado en no dañar los tubos, el
disco y las pastillas del freno.
Conducir con llantas dañadas compro-
mete la seguridad del piloto, de otros y
del vehículo.
Controle las condiciones de la llanta, si
está dañada, sustitúyala.
DESMONTAJE
◆
Coloque el vehículo sobre el caballete.
◆
Destornille y quite los dos tornillos (1).
◆
Saque el cubrecadena (2).
◆
Afloje la tuerca rueda (3).
Par de apriete tuerca rueda (3):
100 Nm (10 kgm).
PELIGRO
Durante la instalación, antes de apretar
la tuerca rueda (3) controle la tensión
de la cadena, véase pág. 66 (CADENA
DE TRANSMISION). A causa del peso y
del espacio que ocupa el vehículo la op-
eración que sigue a continuación
necesita la intervención de un segundo
operador. Siga adelante con cuidado y
compruebe si puede soportar el peso
del vehículo.
Peso del vehículo (en orden de mar-
cha): 126 kg.
◆
Levante la parte trasera del vehículo y
coloque un soporte adecuado (4) (con
altura 400 mm) por debajo del motor de
manera que la rueda trasera tenga espa-
cio suficiente para moverse libremente y
para evitar la caída del vehículo.
8
3
7
6 9
2
1 1
4 5
MX125_S.book Page 64 Wednesday, October 15, 2003 11:04 AM

65
uso y mantenimiento MX 125
PELIGRO
Peligro caída del vehículo. Provea a
equilibrar el vehículo para que no caiga.
Compruebe la estabilidad del vehículo.
◆
Coloque por debajo del neumático un
soporte (5) para mantener la rueda en
posición tras haberla soltado.
ATENCIÓN
Haga bajar la cadena (6) fuera de la co-
rona dentada (7).
PELIGRO
No introduzca los dedos entre la cadena
y la corona dentada.
◆
Haga avanzar completamente la rueda;
extraiga la cadena en el lado superior gi-
rando, en el sentido inverso al de mar-
cha, la rueda trasera.
ATENCIÓN
Durante la instalación, introduzca la ca-
dena por el lado inferior girando en el
sentido de marcha la rueda trasera.
◆
Destornille y quite la tuerca rueda (3) y
guarde la arandela (8).
ATENCIÓN
Para facilitar la extracción del eje rueda,
levante moderadamente la rueda.
◆
Aguante la rueda trasera y extraiga ma-
nualmente el eje rueda (9).
ATENCIÓN
El separador izquierdo (10) y el separa-
dor derecho (11) permanecen coloca-
dos en los respectivos alojamientos de
la rueda; en el caso en que sobresalier-
an, colocarlos correctamente (vea
MONTAJE).
◆
Extraiga desde la parte trasera la rueda
del basculante, poniendo cuidado al ex-
traer el disco de la pinza del freno.
PELIGRO
No accione la palanca del freno trasero
tras haber extraído la rueda, en caso
contrario el émbolo de la pinza del freno
podría salirse de su sede, causando la
pérdida del líquido de los frenos. En
este caso diríjase a un Concesionario
Oficial aprilia que realizará una inter-
vención de mantenimiento.
ATENCIÓN
Controle la colocación de los distancia-
dores (10) y (11) para poder volver a in-
stalarlos correctamente.
◆
Guarde el distanciador izquierdo (10).
◆
Guarde el distanciador derecho (11).
Durante la instalación:
◆
Engrase moderadamente los alojamien-
tos exteriores del cubo rueda.
◆
Introduzca los distanciadores (10) (11)
con el diámetro mayor hacia el exterior
del vehículo.
◆
Aplique, de manera uniforme, una redu-
cida cantidad de grasa sobre el eje rue-
da.
PELIGRO
Tras la instalación, accione varias vec-
es la palanca del freno trasero y con-
trole el funcionamiento correcto del sis-
tema de frenado.
Controle el centrado de la rueda.
Se aconseja llevar a controlar los pares
de apriete, el centrado y el equilibrado
rueda en un Concesionario Oficial
aprilia, para evitar inconvenientes que
podrían causar daños graves a los de-
más y a sí mismo.
Controle el tensado de la cadena.
11
10
MX125_S.book Page 65 Wednesday, October 15, 2003 11:04 AM

uso y mantenimiento MX 125
66
CADENA DE TRANSMISION
Lea con cuidado pág. 55 (MANTENI-
MIENTO).
El vehículo está equipado con una cadena
de tipo con eslabón de unión. En caso de
desmontaje y reensamblaje de la cadena,
asegúrese de que la horquilla (1) del esla-
bón de unión sea instalada con la parte
abierta orientada en la dirección opuesta a
la de avance (véase figura).
PELIGRO
La cadena, si está excesivamente floja,
puede salir del piñón, causando un ac-
cidente o daños graves al vehículo.
Controle periódicamente el juego, y
proceda al ajuste si resultara necesario,
véase pág. 67 (AJUSTE). Para sustituir
la cadena, diríjase exclusivamente a un
Concesionario Oficial aprilia , que ga-
rantizará un servicio detallado y rápido.
PELIGRO
De no realizar correctamente el manten-
imiento, se puede causar el desgaste
prematuro de la cadena o dañar el
piñón y/o la corona.
Realice las intervenciones de manten-
imiento más frecuentemente si utiliza el
vehículo en condiciones difíciles o so-
bre carreteras polvorientas y/o con bar-
ro.
CONTROL DEL JUEGO
Para controlar el juego:
◆
Pare el motor.
◆
Coloque el vehículo sobre el caballete.
◆
Ponga la palanca del cambio en punto
muerto.
◆
Controle que la oscilación vertical, en un
punto intermedio entre el piñón y la coro-
na en el tramo inferior de la cadena, sea
de unos 30 ÷ 35 mm.
◆
Desplace el vehículo hacia adelante, o
gire la rueda, de manera que pueda con-
trolar la oscilación vertical de la cadena
aun cuando la rueda gira; el juego debe
permanecer constante durante todas las
fases de la rotación de la rueda.
PELIGRO
De presentarse un juego superior en al-
gunas posiciones, significa que hay es-
labones aplastados o agarrotados, en
este caso diríjase a un Concesionario
Oficial aprilia . Para prevenir el riesgo
de agarrotamiento, lubrique frecuente-
mente la cadena, véase pág. 67 (LUBRI-
CACION Y LIMPIEZA).
Si el juego resulta uniforme pero superior o
inferior a 30 ÷ 35 mm, ejecute el ajuste,
véase pág. 67 (AJUSTE).
54
1
2
MX125_S.book Page 66 Wednesday, October 15, 2003 11:04 AM

67
uso y mantenimiento MX 125
AJUSTE
Si tras el control resultara necesario ajus-
tar la tensión de la cadena:
◆
Coloque el vehículo en el caballete.
◆
Afloje completamente la tuerca (1).
IMPORTANTE Para el centrado de
la rueda han sido predispuestas referen-
cias fijas (2-3), que se encuentran dentro
de los alojamientos de los patines tensa-
cadena en los brazos del basculante, de-
lante del perno de la rueda.
◆
Afloje las dos contratuercas (4).
◆
Opere en los dispositivos de ajuste (5) y
regule el juego de la cadena controlando
que de ambos lados del vehículo, corre-
spondan las mismas referencias (2-3).
◆
Ajuste las dos contratuercas (4).
◆
Ajuste la tuerca (1).
Par de apriete tuerca rueda (1):
100 Nm (10 kgm).
◆
Compruebe el juego de la cadena, véase
pág. 66 (CONTROL DEL JUEGO).
CONTROL DEL DESGASTE DE LA CA-
DENA, DEL PIÑON Y DE LA CORONA
Controle, además, las siguientes partes y
asegúrese de que la cadena y el piñón y la
corona no presenten:
◆
Rodillos dañados.
◆
Pernos aflojados.
◆
Eslabones secos, oxidados, aplastados
o agarrados.
◆
Desgaste excesivo.
◆
Falta de juntas tóricas.
◆
Dientes del piñón o de la corona excesi-
vamente desgastados o dañados.
PELIGRO
Hay que sustituir todo el grupo cadena
(piñón, corona y cadena) si los rodillos
de ésta resultan dañados, si los pernos
están aflojados y/o si las juntas tóricas
están dañadas o faltan.
◆
Compruebe el desgaste del patín ojo ca-
dena (6) y de la ruedecilla del tensor de
cadena (7).
◆
Por último, compruebe el desgaste del
patín de protección del basculante.
PELIGRO
Lubrique la cadena frecuentemente, so-
bre todo si se notan partes secas u oxi-
dadas. Hay que lubricar y volver a pon-
er en condiciones de trabajo los
eslabones aplastados o agarrados.
De no ser posible esto, diríjase a un
Concesionario Oficial aprilia , que re-
alizará la sustitución.
LUBRICACION Y LIMPIEZA
PELIGRO
Ponga mucho cuidado en ajustar, lu-
bricar, lavar y sustituir la cadena.
Lubrique la cadena después de cada
500 km y cada vez que resulte necesario.
Lubrique la cadena exclusivamente con
grasa spray para cadenas, véase pág. 88
(TABLA DE LUBRIFICANTES).
No lave nunca la cadena con chorros de
agua caliente, chorros de vapor, chorros
de agua a presión elevada ni tampoco con
disolventes con elevado grado de inflama-
bilidad.
3 5 4
MX125_S.book Page 67 Wednesday, October 15, 2003 11:04 AM

uso y mantenimiento MX 125
68
INSPECCION SUSPENSION
DELANTERA Y TRASERA
PELIGRO
Para sustituir el aceite de la horquilla
delantera, diríjase a un Concesionario
Oficial aprilia, que garantizará un serv-
icio detallado y rápido.
Lea con cuidado pág. 55 (MANTENI-
MIENTO).
Sostituya el aceite de la horquilla delantera
cada 15000 km o cada 2 años.
Controle el aceite cada 8000 km y, de re-
sultar sucio, sustitúyalo.
Sustituya el aceite de la horquilla con ma-
yor frecuencia si se utiliza el vehículo en
carreteras polvorientas, mojadas o en todo
terreno.
Además realice los siguientes controles:
◆
Con la palanca del freno delantero accio-
nada, presione varias veces sobre el
manillar de manera que la horquilla se
hunda. La carrera debe ser suave y no
debe haber rastro de aceite sobre las
barras.
◆
Controle el apriete de todos los órganos
y la funcionalidad de las articulaciones
de la suspensión delantera y trasera.
PELIGRO
En caso de que se notaran anomalías
en el funcionamiento o se necesitara la
intervención de personal especializado,
diríjase a un Concesionario Oficial
aprilia.
MX125_S.book Page 68 Wednesday, October 15, 2003 11:04 AM

69
uso y mantenimiento MX 125
SUSPENSION TRASERA
La suspensión trasera se compone de un
grupo muelle-amortiguador, conectado por
medio de silent-block al bastidor y por me-
dio de los mecanismos de palanca al bas-
culante trasero.
Para determinar el ajuste del vehículo, re-
gular la precarga (A) del muelle, destorni-
llar la contravirola (2) y regular la virola (1)
Calibrado estándar: 245 mm.
Precarga máxima: 240 mm.
AJUSTE PRECARGA
AMORTIGUADOR TRASERO
El ajuste estándar del amortiguador trase-
ro está previsto para satisfacer la mayoría
de las condiciones de conducción a veloci-
dad moderada o elevada, tanto con poca
carga como con carga máxima del vehícu-
lo. Sin embargo, se puede personalizar el
ajuste según el empleo del vehículo.
◆
Utilizando la llave (3) - correspondien-
te, destornille moderadamente la tuerca
de fijación (2).
◆
Actúe sobre la tuerca de ajuste (1) (ajus-
te precarga del muelle amortiguador)
(véase tabla).
◆
Una vez alcanzadas las condiciones óp-
timas de arreglo, apriete completamente
la tuerca de fijación (2).
Tuerca
de ajuste
(1)
Atornillándola Destornillándola
Función Aumento de
la precarga
del muelle
Reducción de
la precarga del
muelle
Tipo de
ajuste
El arreglo del
vehículo es
más rígido
El arreglo del
vehículo es
más suave
Tipo de
carretera
aconsejado
Carreteras
lisas o
normales
Carreteras con
firme
estropeado
Notas Conducción
con pasajero
Conducción
sin pasajero
A
MX125_S.book Page 69 Wednesday, October 15, 2003 11:04 AM

uso y mantenimiento MX 125
70
COMPROBACION
DESGASTE PASTILLAS
Lea con cuidado pág. 38 (LIQUIDO FRE-
NOS - recomendaciones), pág. 38 (FRE-
NOS DE DISCO), pág. 55 (MANTENI-
MIENTO). Las siguientes informaciones
se refieren a un solo sistema de frenado
pero tienen validez incluso para ambos.
Controle el desgaste de las pastillas del
freno al final del rodaje y luego los prime-
ros 1000 km, luego cada 4000 km.
El desgaste de las pastillas del freno de
disco depende del uso, del tipo de conduc-
ción y de la carretera.
El desgaste es mayor cuando se conduce
sobre carreteras polvorientas, mojadas o
en todo terreno.
PELIGRO
Controle las pastillas de los frenos
antes de cada viaje.
Para realizar un control rápido del desgas-
te de las pastillas hay que:
◆
Coloque el vehículo sobre el caballete.
◆
Efectúe un control visual entre la pinza
del freno y las pastillas, actuando:
√ desde arriba en la parte delantera
para la pinza freno delantero (1);
√ desde arriba en la parte trasera para
la pinza freno trasero (2).
◆
Si el espesor del material de fricción (in-
cluso de una sola pastilla) queda reduci-
do al valor aproximado de 1 mm, sustitu-
ya ambas pastillas.
PELIGRO
Para la sustitución, diríjase a un Conce-
sionario Oficial aprilia.
AJUSTE MANDO ARRANQUE EN
FRIO (
)
Lea con cuidado pág. 55 (MANTENI-
MIENTO).
El juego óptimo del mando arranque en
frío ha de ser de unos 2 … 3 mm.
Para el ajuste:
◆
Coloque el vehículo sobre el caballete.
◆
Póngase en el lado izquierdo del vehículo.
ATENCIÓN
NO extraiga el elemento de protección
del cable acelerador (3).
◆
Extraiga el elemento de protección (4).
◆
Afloje (atornillándola) la tuerca (5).
◆
Actúe sobre el regulador (6), situado en
el carburador.
Tras haber realizado el ajuste:
◆
Apriete (destornillándola) la tuerca (5)
bloqueando el regulador (6) y coloque el
elemento de protección (4).
MX125_S.book Page 70 Wednesday, October 15, 2003 11:04 AM

71
uso y mantenimiento MX 125
AJUSTE DEL RALENTI
Lea con cuidado pág. 55 (MANTENI-
MIENTO).
Realice la regulación del régimen del ra-
lentí al final del rodaje y cada vez que re-
sulte irregular.
Para realizar esta operación:
◆
Recorra algunos kilómetros hasta alcan-
zar la temperatura normal de funciona-
miento, luego pare el motor.
◆
Coloque el vehículo sobre el caballete.
ATENCIÓN
Opere en el lado derecho del vehículo.
◆
Conecte un cuentarrevoluciones electró-
nico al cable bujía.
◆
Ponga en marcha el motor.
El régimen de rotación mínimo del motor ten-
drá que ser de unas 1500 Ø 100 rpm.
Si es necesario:
◆
Actúe sobre el tornillo de regulación (1)
colocado sobre el carburador.
ATORNILLANDO (en sentido horario) el
número de las revoluciones aumenta.
DESTORNILLANDO (en sentido antihora-
rio) el número de las revoluciones disminu-
ye.
◆
Actuando sobre el puño de gas, acelere
y decelere algunas veces para controlar
el funcionamiento correcto y si el ralentí
queda estable.
ATENCIÓN
No actúe sobre el tornillo de regulación
aire para evitar variaciones en la regu-
lación de la carburación.
PELIGRO
En caso de necesidad, diríjase a un Con-
cesionario Oficial aprilia.
AJUSTE MANDO ACELERADOR
Lea con cuidado pág. 55 (MANTENI-
MIENTO).
El mando acelerador ha de tener un juego
de unos 2-3 mm, que pueden medirse en
el puño de gas.
Para ajustar el juego:
◆
Coloque el vehículo sobre el caballete.
◆
Extraiga el elemento de protección (2).
◆
Afloje (atornillándola) la tuerca (3).
◆
Actúe sobre el regulador (4) colocado en
la entrada del cable mando acelerador.
Tras haber realizado el ajuste:
◆
Apriete (destornillándola) la tuerca (3)
bloqueando el regulador (4) y coloque el
elemento de protección (2).
MX125_S.book Page 71 Wednesday, October 15, 2003 11:04 AM

uso y mantenimiento MX 125
72
BUJIA
Lea con cuidado pág. 55 (MANTENI-
MIENTO).
Controle la bujía al final del rodaje y luego
cada 4000 km; sustitúyala cada 8000 km.
Desmonte periódicamente la bujía, límpie-
la de las incrustaciones de carbonilla y
sustitúyala si es necesario.
Para acceder a la bujía:
◆
Coloque el vehículo sobre el caballete.
ATENCIÓN
Opere en el lado derecho del vehículo.
Para el desmontaje y la limpieza:
◆
Desconecte la pipeta de la bujía (1).
◆
Limpie muy bien la base de la bujía, lue-
go destorníllela utilizando la llave que
forma parte del equipamiento base del
kit herramientas y extráigala de su sede,
teniendo cuidado que polvo u otras sus-
tancias no entren en el interior del cilin-
dro.
◆
Controle que sobre el electrodo y sobre
la porcelana central de la bujía no haya
costras de carbonilla u otros signos de
corrosión. Eventualmente, limpie con los
limpiadores adecuados para bujías, con
un alambre y/o con un cepillo metálico.
◆
Sople muy fuerte con un chorro de aire
para evitar que residuos removidos en-
tren en el motor.
Hay que sustituir la bujía si ésta presen-
ta hendiduras en el aislador, electrodos
oxidados o incrustaciones excesivas.
◆
Controle la distancia entre los electrodos
por medio de un calibre de espesor.
Esta tiene que ser de 0,5 ÷ 0,6 mm, si
acaso ajústela curvando con cuidado el
electrodo de masa.
◆
Compruebe que la arandela esté en bue-
nas condiciones.
Con la arandela instalada, atornille del
todo la bujía a mano para no dañar la
rosca.
◆
Apriete con la llave del kit herramientas
del equipamiento base, dándole 1/2
vuelta a la bujía, para comprimir la aran-
dela.
Par de apriete bujía: 20 Nm (2 kgm).
PELIGRO
Hay que atornillar muy bien la bujía
para que el motor no se sobrecaliente,
dañándose gravemente.
Utilice sólo bujías del tipo aconsejado,
véase pag. 85 (FICHA TECNICA) para no
perjudicar el rendimiento y la duración
del motor.
◆
Instale correctamente la pipeta de la bu-
jía (1) de manera que no se desconecte
con las vibraciones del motor.
MX125_S.book Page 72 Wednesday, October 15, 2003 11:04 AM

73
uso y mantenimiento MX 125
BATERIA
Lea con cuidado pág. 55 (MANTENI-
MIENTO).
Al final del rodaje y luego cada 4000 km ó 6
meses, controle el nivel del electrolito y el
ajuste de los bornes.
PELIGRO
El electrolito de la batería es tóxico,
cáustico y en contacto con la epidermis
puede causar quemaduras por contener
ácido sulfúrico. Lleve ropa protectora,
una máscara para la cara y/o gafas pro-
tectoras en caso de mantenimiento.
Si algo del líquido electrolítico viniera a
contacto con la piel, lávese con abun-
dante agua fría.
De llegar a contacto con los ojos, láve-
se con abundante agua durante quince
minutos, luego diríjase enseguida a un
oculista.
De tragarlo accidentalmente, beba mu-
cha agua o leche, siga con leche de
magnesia o aceite vegetal, luego diríja-
se enseguida a un médico.
La batería emana gases explosivos, por
lo tanto es conveniente mantener lejos
llamas, chispas, cigarrillos y cualquier
otra fuente de calor.
Durante la recarga o el uso, provea a
una ventilación adecuada del local y
evite la inhalación de gases emitidos
durante la recarga de la misma.
MANTENGASE LEJOS DEL ALCANCE
DE LOS NIÑOS.
PELIGRO
No invierta nunca la conexión de los ca-
bles de la batería.
Ponga cuidado en no inclinar demasia-
do el vehículo, para evitar salidas peli-
grosas del líquido de la batería.
Conecte y desconecte la batería con el
interruptor de encendido en posición
“
”.
Conecte antes el cable positivo (+) y
luego el negativo (–).
Desconecte siguiendo el orden contra-
rio.
El líquido de la batería es corrosivo.
No lo vierta ni lo esparza sobre todo so-
bre las partes de plástico.
LARGA INACTIVIDAD
DE LA BATERIA
En caso de que el vehículo quede inactivo
durante una larga temporada:
◆
Desmonte la batería, véase pág. 74
(DESMONTAJE BATERIA) y colóquela
en un lugar fresco y seco.
◆
Recárguela completamente, usando una
recarga lenta, véase pág. 75 (RECARGA
BATERIA).
Si la batería queda en el vehículo, desco-
necte los cables de los terminales.
Es importante controlar la carga periódica-
mente (más o menos una vez cada mes)
durante el invierno o cuando el vehículo se
queda parado, para evitar que pueda de-
gradarse.
MX125_S.book Page 73 Wednesday, October 15, 2003 11:04 AM

uso y mantenimiento MX 125
74
CONTROL Y LIMPIEZA
TERMINALES Y BORNES
Lea con cuidado pág. 73 (BATERIA).
◆
Desmonte el panel lateral izquierdo, véa-
se pág. 58 (DESMONTAJE PANELES
LATERALES).
◆
Controle que los terminales (1) de los
cables y los bornes (2) de la batería es-
tén:
√ en buenas condiciones (sin corrosión
o incrustaciones);
√ recubiertos con grasa especial o vase-
lina.
Si necesario:
◆
Desmonte la batería, véase al lado
(DESMONTAJE BATERIA).
◆
Elimine con una escobilla de alambre
metálico todo residuo de corrosión.
◆
Vuelva a conectar antes el cable negati-
vo (+) y luego el positivo (√).
◆
Recubra los terminales y los bornes con
grasa especial o vaselina.
◆
Vuelva a instalar la batería, véase
pag. 75 (INSTALACION BATERIA).
DESMONTAJE BATERIA
Lea con cuidado pág. 73 (BATERIA).
◆
Asegúrese de que el interruptor de en-
cendido esté en posición ≈
∆.
◆
Desmonte el panel lateral izquierdo, véa-
se pág. 58 (DESMONTAJE PANELES
LATERALES).
◆
Destornille y quite el tornillo (3) del borne
negativo (√).
◆
Desplace lateralmente el cable negativo
(√) (4).
◆
Destornille y quite el tornillo (5).
◆
Saque la tapa (6).
◆
Desmonte parcialmente la batería de su
alojamiento.
◆
Destornille y quite el tornillo (7) del borne
positivo (+).
◆
Desplace lateralmente el cable positivo
(+) (8).
◆
Extraiga el tubo respiradero (9).
PELIGRO
Una vez desmontada, hay que colocar
la batería en un lugar seguro y lejos del
alcance de los niños.
◆
Desmonte la batería de su alojamiento y
colóquela sobre una superficie llana en
un lugar fresco y seco.
MX125_S.book Page 74 Wednesday, October 15, 2003 11:04 AM

75
uso y mantenimiento MX 125
CONTROL
NIVEL ELECTROLITO BATERIA
Lea con cuidado pág. 73 (BATERIA).
ATENCIÓN
Coloque el vehículo sobre un suelo só-
lido y llano.
◆
Desmonte el panel lateral izquierdo, véa-
se pág. 58 (DESMONTAJE PANELES
LATERALES).
◆
Mantenga el vehículo en posición verti-
cal con las dos ruedas apoyadas sobre
el suelo.
ATENCIÓN
De no realizar las operaciones anteri-
ores, la medición del nivel puede resul-
tar incorrecta.
◆
Controlar que el nivel del líquido esté en-
tre las dos muescas "MIN∆ y "MAX∆,
impresas sobre el lado de la batería.
Eventualmente:
◆
Desmonte la batería de su alojamiento,
véase pag. 74 (DESMONTAJE BATE-
RIA).
◆
Destornille y quite los tapones de los ele-
mentos.
PELIGRO
Para restaurar el nivel del electrolito
utilice exclusivamente agua destilada.
No supere la referencia "MAX∆, ya que
el nivel aumenta durante la recarga.
◆
Restaure el nivel del líquido añadiendo
agua destilada.
RECARGA BATERIA
Lea con cuidado pág. 73 (BATERIA).
◆
Desmonte la batería de su alojamiento,
véase pag. 74 (DESMONTAJE BATE-
RIA).
◆
Desenrosque y quite los tapones de los
elementos.
◆
Controle el nivel del electrolito bateria,
véase al lado (CONTROL NIVEL ELEC-
TROLITO BATERIA).
◆
Conecte la batería a un carga-baterías.
◆
Se aconseja una recarga utilizando un
amperaje de 1/10 de la capacidad de la
misma batería.
◆
Tras haber realizado la recarga, vuelva a
controlar el nivel del electrolito y de re-
sultar necesario rellene con agua desti-
lada.
◆
Apriete los tapones de los elementos.
PELIGRO
Vuelva a instalar la batería sólo 5-10
minutos tras haber desconectado el
cargador, ya que la batería sigue pro-
duciendo, durante un breve periodo de
tiempo, gas hidrógeno muy inflamable.
INSTALACION BATERIA
Lea con cuidado pag. 73 (BATERIA).
◆
Conecte el tubo respiradero (1).
PELIGRO
Conecte siempre el respiradero de la
batería para evitar que los vapores del
ácido sulfúrico, al salir del respiradero,
puedan corroer la instalación eléctrica,
las partes pintadas, las piezas de goma
o las juntas.
◆
Conecte en este orden el cable positivo
(+) y el negativo (√).
◆
Recubra los terminales y los bornes con
grasa especial o vaselina.
◆
Coloque la batería en su alojamento.
◆
Vuelva a instalar el tapones (2).
◆
Atornille y apriete el tornillo (3).
◆
Vuelva a instalar el panel lateral izquier-
do, véase pág. 58 (DESMONTAJE PA-
NELES LATERALES).
MX125_S.book Page 75 Wednesday, October 15, 2003 11:04 AM

uso y mantenimiento MX 125
76
SUSTITUCION FUSIBLES
Lea con cuidado pág. 55 (MANTENI-
MIENTO).
PELIGRO
No repare fusibles dañados. No utilice
nunca fusibles diferentes de los indica-
dos para no causar daños al sistema
eléctrico o incluso un incendio en caso
de cortocircuito.
ATENCIÓN
Cuando el fusible se estropea frecuen-
temente es posible que haya un corto-
circuito o una sobrecarga. En este caso
consulte un Concesionario Oficial
aprilia.
Si se da cuenta de que un componente
eléctrico no funciona o funciona de manera
no correcta, o de que el motor no se pone
en marcha, es necesario que controle los
fusibles.
Para el control:
◆
Ponga en "" el interruptor de encendi-
do, para evitar un cortocircuito accidental.
◆
Desmonte el panel lateral izquierdo, véa-
se pág. 58 (DESMONTAJE PANELES
LATERALES).
◆
Extraiga un fusible a la vez y controle si el
filamento (7) está interrumpido.
◆
Antes de sustituir el fusible, encuentre, si
es posible, la causa que ha ocasionado
la avería.
◆
Sustituya el fusible, si resulta dañado,
con otro del mismo amperaje.
ATENCIÓN
Si se utiliza un fusible de reserva (4) (5)
(6), proceda a introducir otro igual en la
sede correspondiente.
COLOCACION FUSIBLES
Fusible de 20A (1)
De batería a: interruptor de encendido, re-
gulador de tensión.
Fusible de 15A (2)
De interruptor de encendido a: todas las
cargas luz y bocina.
Fusible de 7,5A (3)
Desde el interruptor de encendido a: en-
cendido.
MX125_S.book Page 76 Wednesday, October 15, 2003 11:04 AM

77
uso y mantenimiento MX 125
CONTROL CABALLETE LATERAL
Lea con cuidado pág. 55 (MANTENI-
MIENTO) y pág. 77 (CONTROL INTE-
RRUPTORES).
ATENCIÓN
El vehículo está dotado de caballete
con retorno automático.
El caballete lateral (1) ha de girar libremen-
te.
Realice los siguientes controles:
◆
Los muelles (2) no tienen que estar da-
ñados, desgastados, oxidados o afloja-
dos.
◆
El caballete ha de girar libremente, si
acaso engrase la articulación, véase
pág. 88 (TABLA DE LUBRIFICANTES).
CONTROL INTERRUPTORES
Lea con cuidado pág. 55 (MANTENI-
MIENTO).
En el vehículo se encuentran dos interrup-
tores:
◆
Interruptor luz freno (1) sobre palanca
mando freno trasero.
◆
Interruptor luz freno (2) sobre palanca
mando freno delantero.
Para el control:
◆
Interruptores (1) y (2): extraiga el ele-
mento de protección.
◆
Controle que sobre el interruptor no haya
suciedad o barro, etc.
◆
Controle que los cables estén conecta-
dos correctamente.
MX125_S.book Page 77 Wednesday, October 15, 2003 11:04 AM

uso y mantenimiento MX 125
78
REGULACION VERTICAL
HAZ LUMINOSO
Para comprobar rápidamente la orienta-
ción correcta del haz luminoso delantero,
coloque el vehículo a diez metros de dis-
tancia de una pared vertical, asegurándo-
se de que el suelo esté llano.
Encienda la luz de cruce, siéntese sobre el
vehículo y compruebe que el haz luminoso
proyectado en la pared esté muy poco por
debajo de la recta horizontal del proyector
(unos 9/10 de la altura total).
Para regular el haz luminoso:
◆
Actúe con un destornillador sobre el tor-
nillo correspondiente (1).
ATORNILLANDO (sentido horario) el
haz luminoso se levanta.
DESTORNILLANDO (en sentido antiho-
rario) el haz luminoso baja.
BOMBILLAS
Lea con cuidado página pág. 55 (MAN-
TENIMIENTO).
PELIGRO
Antes de sustituir una bombilla,
coloque el vehículo sobre el caballete y
el interruptor de encendido en la pos-
ición “
”. Sustituya la bombilla utili-
zando guantes limpios o un trapo limpio
y seco.
No deje huellas sobre la bombilla, ya
que podrían causar el sobrecalentami-
ento y, por lo tanto, su ruptura.
Si toca la bombilla con las manos sin
protección, límpiela con alcohol de
eventuales huellas, para evitar que se
funda frecuentemente.
NO FUERCE LOS CABLES ELECTRI-
COS
MX125_S.book Page 78 Wednesday, October 15, 2003 11:04 AM

79
uso y mantenimiento MX 125
SUSTITUCION BOMBILLAS
FARO DELANTERO
Lea con cuidado pág. 78 (BOMBILLAS).
ATENCIÓN
Antes de sustituir una bombilla, controle
los fusibles, véase pág. 76 (SUSTITUCION
FUSIBLES).
En el faro delantero están alojadas:
◆
Una bombilla luz de posición (1).
◆
Una bombilla luz de cruce / luz larga (2).
Para la sustitución:
PELIGRO
La cúpula (4) equipada con faro delantero
queda conectada a los cables eléctricos;
no tire de ellos.
◆
Quite las dos abrazaderas elásticas (3), de
las horquillas, usadas para bloquear la cú-
pula al vehículo.
PELIGRO
Maneje con cuidado los componentes de
plástico para no rayarlos o dañarlos.
◆
Extraiga hacia abajo la cúpula (4) equipada
con faro delantero desconectándola de la
espiga (5) obtenida en el salpicadero.
BOMBILLA DE POSICION
ATENCIÓN
Para extraer el casquillo portalámparas no
tire de los cables eléctricos.
◆
Agarre el casquillo portalámparas (6), estí-
relo y desconéctelo de su alojamiento.
◆
Extraiga la bombilla de posición (1) y susti-
túyala con otra del mismo tipo.
BOMBILLA LUZ DE CRUCE / LUZ LARGA
ATENCIÓN
Para extraer el conector eléctrico bombil-
la, no tire de los cables eléctricos.
◆
Agarre el conector eléctrico bombilla (7), tire
de ello y desconéctelo de la bombilla (8).
◆
Quite la protección (9) del alojamiento de la
parábola y de los terminales de la lámpara
◆
Gire en el sentido contrario a las agujas del
reloj el porta-lámpara (8) y extráigalo de su
alojamiento en la parábola
◆
Extraiga la lámpara (2) de su alojamiento
Para la instalación:
◆
Coloque el porta-lámpara (6) en el aloja-
miento de la parábola y gírelo en el sentido
de las agujas del reloj.
◆
Introduzca correctamente la protección (9)
en los terminales de la lámpara y en el alo-
jamiento de la parábola.
◆
Conecte el conector eléctrico de la lámpara
(7).
1
2
9
8
7
6
2
8
9
MX125_S.book Page 79 Wednesday, October 15, 2003 11:04 AM

uso y mantenimiento MX 125
80
SUSTITUCION
BOMBILLAS SALPICADERO
Lea con cuidado pág. 78 (BOMBILLAS).
ATENCIÓN
Antes de sustituir una bombilla, con-
trole los fusibles, véase pág. 76 (SUS-
TITUCION FUSIBLES).
En el salpicadero están alojadas:
◆
Las bombillas luces de aviso.
◆
La luz de alumbrado salpicadero.
Para la sustitución:
PELIGRO
La cúpula (2) equipada con faro delante-
ro queda conectada a los cables eléctri-
cos; no tire de ellos.
◆
Destornille y quite los dos tornillos (1).
ATENCIÓN
Maneje con cuidado los componentes
de plástico para no rayarlos o dañarlos.
◆
Extraiga hacia abajo la cúpula (2) equi-
pada con faro delantero desconectándo-
la de la espiga (3) obtenida en el salpica-
dero.
LUCES DE AVISO
PELIGRO
Extraiga un casquillo portalámparas a
la vez para evitar emplazarlos de man-
era incorrecta durante la instalación.
◆
Extraiga el casquillo portalámparas co-
rrespondiente:
◆
Extraiga y sustituya la bombilla con otra
del mismo tipo.
LUZ DE ALUMBRADO SALPICADERO
◆
Extraiga el casquillo portalámparas (9).
◆
Extraiga y sustituya la bombilla con otra
del mismo tipo.
Pos. Luz de aviso Color
6
Reserva aceite
mezclador (
)
rojo
7
Indicadores
de dirección (
()
verde
8
Indicador cambio
en punto muerto (
)
verde
9 Luz de cruce (
) verde
10 Luz larga () azul
10
9
6
7
8
MX125_S.book Page 80 Wednesday, October 15, 2003 11:04 AM

81
uso y mantenimiento MX 125
SUSTITUCION BOMBILLAS
INDICADORES DE DIRECCION
DELANTEROS Y TRASEROS
Lea con cuidado pág. 78 (BOMBILLAS).
ATENCIÓN
Antes de sustituir una bombilla, con-
trole los fusibles, véase pág. 76 (SUS-
TITUCION FUSIBLES).
◆
Destornille y quite el tornillo (1).
PELIGRO
Durante el reensamblaje, apriete con cui-
dado y moderadamente el tornillo (1) para
evitar dañar la pantalla de protección.
◆
Quite la pantalla de protección (2).
◆
Presione moderadamente la bombilla (3)
y gírela en sentido antihorario.
◆
Extraiga la bombilla de su alojamiento.
ATENCIÓN
Introduzca la bombilla en el casquillo
portalámparas, haciendo coincidir las
dos espigas guía con las correspondi-
entes guías en el casquillo portalámpar-
as.
◆
Instale correctamente una bombilla del
mismo tipo.
SUSTITUCION
BOMBILLA FARO TRASERO
PELIGRO
Antes de sustituir una bombilla, con-
trole los fusibles, véase pág. 76 (SUS-
TITUCION FUSIBLES) y la eficacia de
los interruptores luces freno, véase
pág. 77 (CONTROL INTERRUPTORES).
Lea con cuidado pág. 78 (BOMBILLAS).
◆
Destornille y quite los dos tornillos (4).
PELIGRO
Durante el reensamblaje, apriete con
cuidado y moderadamente los dos tor-
nillos (4) para evitar dañar la pantalla de
protección.
◆
Quite la pantalla de protección (5).
◆
Presione moderadamente la bombilla (6)
y gírela en sentido antihorario.
◆
Extraiga la bombilla de su alojamiento.
ATENCIÓN
Introduzca la bombilla en el casquillo
portalámparas, haciendo coincidir las
dos espigas bombilla con las corre-
spondientes guías en el casquillo por-
talámparas.
◆
Instale correctamente una bombilla del
mismo tipo.
MX125_S.book Page 81 Wednesday, October 15, 2003 11:04 AM

uso y mantenimiento MX 125
82
TRANSPORTE
ATENCIÓN
Antes de transportar el vehículo, es
necesario vaciar con cuidado el depósi-
to combustible y el carburador, véase
abajo (EVACUACION DEL COMBUSTI-
BLE DEL DEPOSITO), controlando que
éstos estén bien secos.
Durante el desplazamiento, el vehículo
debe conservar la posición vertical,
para evitar eventuales pérdidas de
aceite, de líquido refrigerante y de líqui-
do de la batería.
Debe estar anclado firmemente y se
debe poner la 1ª marcha.
PELIGRO
En caso de avería no remolque el vehíc-
ulo, sino requiera la intervención de un
automóvil-grúa de socorro.
EVACUACION DEL COMBUSTIBLE
DEL DEPOSITO
Lea con cuidado pág. 36 (COMBUSTI-
BLE).
PELIGRO
Peligro de incendio.
Espere a que el motor y los silencia-
dores de escape se hayan enfriado del
todo.
PELIGRO
Los vapores del combustible perjudi-
can la salud.
Antes de seguir adelante controle que
el lugar donde trabaja tenga un adecua-
do cambio de aire.
No inhale los vapores de combustible.
No fume ni utilice llamas libres. No es-
parza el combustible en el ambiente.
◆
Coloque el vehículo sobre el caballete.
◆
Pare el motor y espere a que el vehículo
se haya enfriado.
◆
Prepare un recipiente, con capacidad su-
perior a la cantidad de combustible pre-
sente en el depósito, y colóquelo sobre el
suelo por el lado izquierdo del vehículo.
◆
Saque el tapón depósito combustible.
◆
Vacíe el depósito del combustible utili-
zando una bomba manual o un sistema
semejante.
PELIGRO
Al término de la evacuación, cierre el
tapón del depósito.
Para vaciar del todo el carburador:
◆
Coloque el grifo combustible (1) en
≈RES∆.
◆
Ponga en marcha el vehículo, véase
pág. 48 (ARRANQUE).
◆
Acelere algunas veces hasta que el mo-
tor se apague por agotamiento del com-
bustible.
En caso de necesidad, diríjase a un
Concesionario Oficial aprilia.
MX125_S.book Page 82 Wednesday, October 15, 2003 11:04 AM

83
uso y mantenimiento MX 125
OK!
OK!
LIMPIEZA
Limpie frecuentemente el vehículo si lo utiliza
en zonas polvorientas o en condiciones de:
◆
Contaminación atmosférica (ciudad y zo-
nas industriales).
◆
Salinidad y humedad en la atmósfera (zo-
nas de mar, clima caluroso y húmedo).
◆
Condiciones del ambiente y según las tem-
poradas (el uso de sal, productos químicos
anticongelantes sobre carreteras durante el
invierno).
◆
Hay que poner mucho cuidado en que so-
bre la carrocería no queden residuos de
polvos industriales y contaminantes, man-
chas de alquitrán, insectos muertos, excre-
mentos de pájaros, etc.
◆
Evite el aparcar el vehículo debajo de árbo-
les porque, en algunas temporadas, de los
árboles caen residuos, gomas, frutos u ho-
jas que contienen sustancias químicas que
dañan la pintura.
PELIGRO
Después del lavado del vehículo la efica-
cia de los frenos podría resultar compro-
metida temporalmente, por la presencia de
agua en las superficies de fricción del sis-
tema de frenado. Hay que prever largas
distancias de frenado para evitar acci-
dentes. Accione varias veces los frenos
para restablecer las condiciones nor-
males. Efectúe los controles preliminares,
véase pág. pág. 49 (TABLA CONTROLES
PRELIMINARES).
Para quitar la parte sucia y el barro de las
superficies pintadas, es necesario utilizar
un chorro de agua de presión baja, mojar
las partes sucias con cuidado, quitar barro
y suciedad con una esponja blanda para
carrocería impregnada en mucha agua y
jabón (2 … 4% partes de jabón en agua).
Luego enjuague con mucha agua y seque
con piel gamuzada. Para limpiar las partes
exteriores del motor, utilice detergente
desgrasante, pinceles y trapos.
ATENCIÓN
Le recordamos que hay que restaurar el
brillo con ceras con silicona tras haber la-
vado el vehículo. No realice el lavado a
pleno sol, sobre todo en verano, con la
carrocería aún caliente, en cuanto el jabón
secándose antes del enjuague podría
dañar el pintado.
ATENCIÓN
No dirija chorros de agua o de aire de
presión elevada, o chorros de vapor so-
bre las siguientes partes: cubos de las
ruedas, mandos colocados en el lado
derecho e izquierdo del manillar, bom-
bas de los frenos, instrumentos e indi-
cadores, escape del silenciador de es-
cape, vano portadocumentos/kit
herramientas, interruptor de encendi-
do/seguro de dirección. Para la limpieza
de las partes de goma y plástico y del
sillín no utilice alcohol o disolventes
sino agua y jabón neutro.
No aplique ceras de protección al sillín,
para evitar deslizar sobre el mismo.
MX125_S.book Page 83 Wednesday, October 15, 2003 11:04 AM

uso y mantenimiento MX 125
84
PERIODOS
DE LARGA INACTIVIDAD
Hay que adoptar algunas precauciones
para evitar las consecuencias por no haber
utilizado el vehículo.
Además es necesario realizar las repara-
ciones y un control general antes del perío-
do de inactividad, para no olvidarse de rea-
lizarlas posteriormente.
Actúe de la siguiente manera:
◆
Vacíe completamente el depósito com-
bustible y el carburador, véase pág. 82
(EVACUACION DEL COMBUSTIBLE
DEL DEPOSITO).
◆
Saque la bujía, véase pág. 54 (BUJIA).
◆
Vierta en el cilindro una cucharilla (5 …
10 cm
3
) de aceite para motores.
◆
Ponga en ≈∆ el interruptor de encendi-
do (1).
◆
Actúe por algunas veces sobre la palan-
ca de arranque (2) para distribuir el acei-
te de manera uniforme sobre las superfi-
cies del cilindro.
◆
Vuelva a instalar la bujía, véase pág. 72
(BUJIA).
◆
Saque la batería, véase pág. 74 (DES-
MONTAJE BATERIA).
◆
Lave y seque el vehículo, véase pág. 83
(LIMPIEZA).
◆
Aplique algo de cera sobre las superfi-
cies pintadas.
◆
Hinche los neumáticos, véase pág. 43
(NEUMATICOS).
◆
Coloque el vehículo de manera que am-
bos neumáticos estén levantados del
suelo, utilizando un soporte adecuado.
◆
Coloque el vehículo en un local fresco,
sin humedad, al amparo de los rayos de
sol y donde las variaciones de tempera-
tura resulten mínimas.
◆
Cubra el vehículo evitando el uso de ma-
teriales plásticos o impermeables.
EL USO TRAS EL PERIODO
DE INACTIVIDAD
◆
Descubra y limpie el vehículo, véase
pág. 83 (LIMPIEZA).
◆
Controle el nivel del electrolito de la ba-
tería, e instálela, véase pag. 75 (CON-
TROL NIVEL ELECTROLITO BATERIA)
y pag. 75 (INSTALACION BATERIA).
◆
Reponga combustible en el depósito,
véase pág. 36 (COMBUSTIBLE).
◆
Efectúe los controles preliminares, véa-
se pág. 47 (TABLA CONTROLES PRE-
LIMINARES).
PELIGRO
Recorra algunos kilómetros de prueba a
velocidad moderada en una zona lejos
del tránsito.
2
MX125_S.book Page 84 Wednesday, October 15, 2003 11:04 AM

85
uso y mantenimiento MX 125
FICHA TECNICA
MEDIDAS Longitud máx
(con prolongación guardabarros delantero). 2165 mm
Anchura máx................................................ 840 mm
Altura máx (hasta la cúpula) ........................ 1170 mm
Altura hasta el sillín...................................... 870 mm
Distancia entre los ejes................................ 1480 mm
Altura libre mínima del suelo ....................... 290 mm
Peso en orden de marcha ........................... 126 kg
MOTOR Tipo.............................................................. Monocilíndrico de 2 tiempos con aspiración laminar. Lubricación
separada con mezclador automático de flujo variable (1,0 √ 3,0%).
Número cilindros.......................................... 1
Cilindrada total............................................. 124,82 cm>
Diámetro y carrera ....................................... 54 mm / 54,5 mm
Relación de compresión .............................. 12,5 ± 0,5 : 1
Arranque ...................................................... por pedal
N° revoluciones del motor al ralentí............. 1200 ± 100 rpm
Embrague .................................................... multidisco en baño de aceite con mando manual en el lado izquierdo
del manillar.
Refrigeración ............................................... por liquido
CAPACIDAD Combustible (reserva incluida) ....................
11
l
Reserva combustible ...................................
1,3
l (reserva mecánica)
Aceite cambio .............................................. 600 cm>
Líquido refrigerante......................................
0,8
l (50% agua + 50% anticongelante con glicol etilénico)
Aceite mezclador (reserva incluida).............
1,25 l
Reserva aceite mezclador ...........................
0,5
l
Asientos ....................................................... 2
Máx. carga vehículo
(piloto + pasajero + equipaje) ...................... 336 kg
MX125_S.book Page 85 Wednesday, October 15, 2003 11:04 AM

uso y mantenimiento MX 125
86
CAMBIO Tipo .............................................................. mecánico con 6 relaciones con mando de pedal en el lado izquierdo
del motor
RELACIONES
DE TRANSMISION
Relación Primaria Secundaria
1≤ 19/63 = 1 : 3,315 10 / 30 = 1: 3,000
2≤ 14 / 29 = 1: 2,071
3≤ 17 / 27 = 1: 1,588
4≤ 19 / 25 = 1: 1,316
5≤ 21 / 23 = 1: 1,095
6≤ 22 / 21 = 1: 0,954
Relación final Relación total
16 / 45 = 1 : 2,81 R1 x R2 x R3 = 1 : 27,976
R1 x R2 x R3 = 1 : 19,317
R1 x R2 x R3 = 1 : 14,81
R1 x R2 x R3 = 1 : 12,270
R1 x R2 x R3 = 1 : 10,213
R1 x R2 x R3 = 1 : 8,901
CARBURADOR Número......................................................... 1
Modelo.......................................................... DELL»ORTO PHBH 28
ALIMENTACION Combustible ................................................. Gasolina super sin plomo según DIN 51 607, mínimo octano 95
(N.O.R.M) y 85 (N.O.M.M.)
BASTIDOR Tipo .............................................................. Monoviga de doble cuna en tubos de acero de resistencia elevada
Ÿngulo inclinación dirección......................... 28°
Lanzamiento................................................. 127 mm
SUSPENSIONES Delantera...................................................... Upside down Æ40
Carrera ......................................................... 260 mm
Trasera......................................................... Monoamortiguador a gas
Carrera ......................................................... 280 mm
FRENOS Delantera...................................................... De disco - Æ 320 mm - con transmisión hidráulica
Trasera......................................................... De disco - Æ 220 mm -con transmisión hidráulica
MX125_S.book Page 86 Wednesday, October 15, 2003 11:04 AM

87
uso y mantenimiento MX 125
LLANTAS RUEDAS Tipo.............................................................. de aluminio a radios
Delantera ..................................................... 3,00 x 17∆
Trasera ........................................................ 4,25 x 17∆
NEUMATICOS DELANTERO............................................... 110/70 ZR 17 54W
Presión de hinchado sólo piloto:..................
Presión de hinchado piloto y pasajero:........
180 kPa (1,8 bar)
180 Ø 10 kPa (1,8 Ø 0,1 bar)
TRASERA.................................................... 150/60 ZR 17 66W
Presión de hinchado sólo piloto:..................
Presión de hinchado piloto y pasajero:........
200 kPa (2 bar)
230 Ø 10 kPa (2,3 Ø 0,1 bar)
ENCENDIDO Tipo.............................................................. CDI
Avance de encendido .................................. 12° Ø 2° antes del P.M.S.
BUJIAS Estándar ...................................................... NGK R BR8 ES
Distancia electrodo bujía ............................. 0,5…0,6 mm
INSTALACION
ELECTRICA
Batería ......................................................... 12 V - 4 Ah
Fusibles (general) ........................................ 20 A
Fusibles (central) ......................................... 15 A
Fusibles (servicios) ...................................... 7,5 A
Generador ................................................... 12 V - 180 W
BOMBILLAS Luz de cruce/luz larga (halógena) ............... 12 V - 35/35 W
Luz de posición delantera............................ 12 V - 5 W
Luz indicadores de dirección ....................... 12 V - 10 W
Luz de posición trasera / matrícula / freno... 12 V - 5 / 21 W
Alumbrado salpicadero................................ 12 V - 2 W
LUCES DE AVISO Cambio en punto muerto ............................. 12 V - 1,2 W
Indicadores de dirección.............................. 12 V - 1,2 W
Luces largas ................................................ 12 V - 1,2 W
Reserva aceite mezclador ........................... 12 V - 1,2 W
Luz de cruce ................................................ 12 V - 1,2 W
MX125_S.book Page 87 Wednesday, October 15, 2003 11:04 AM

uso y mantenimiento MX 125
88
TABLA DE LUBRIFICANTES
Aceite cambio (aconsejado): F.C., SAE 75W - 90
o GEAR SYNTH, SAE 75W - 90.
Alternativamente al aceite aconsejado, pueden utilizarse aceites de marca con prestaciones conformes o superiores a las especificacio-
nes A.P.I. GL-4.
Aceite mezclador (aconsejado): MAX 2T COMPETITION
o SPEED 2T.
Utilice aceites de marca con prestaciones conformes o superiores a las especificaciones ISO-L-ETC ++, A.P.I. TC ++.
Aceite horquilla (aconsejado): aceite para horquillas
F.A. 5W o F.A. 20W; alternativamente FORK 5W o
FORK 20W.
En caso de que se quiera disponer de un comportamiento intermedio entre los ofrecidos por F.A. 5W y por F.A. 20W o por
FORK 5W
y por FORK 20W, se pueden mezclar los productos según lo indicado a continuación:
SAE 10W = F.A. 5W 67% del volumen + F.A. 20W 33% del volumen, o
FORK 5W 67% del volumen + FORK 20W 33% del volumen.
SAE 15W = F.A. 5W 33% del volumen + F.A. 20W 67% del volumen, o
FORK 5W 33% del volumen + FORK 20W 67% del volumen.
Cojinetes y otros puntos de lubricación (aconsejado): AUTOGREASE MP o GREASE 30.
Alternativamente al producto aconsejado, utilise grasa de marca para cojinetes rodantes, campo de temperatura util: -30°C... + 140°C,
punto de goteo 150°C...230°C, elevada protección antioxidante, buena resistencia al agua y a la oxidación.
Protección polos batería: Grasa neutra o vaselina.
Grasa spray para cadenas (aconsejada): CHAIN SPRAY
o CHAIN LUBE.
PELIGRO
Utilice sólo líquido frenos nuevo. No mezcle diferentes marcas o tipos de aceite sin controlar la compatibilidad de las bases.
Líquido frenos (aconsejado): F.F., DOT 4
(Compatible DOT 5) o BRAKE 5.1 DOT 4 (Compatible DOT 5).
PELIGRO
Utilice sólo anticongelante y antioxidante sin nitrito que garantice una protección por lo menos a los -35°C.
Líquido refrigerante del motor (aconsejado): ECOBLU - 40°C o
COOL.
MX125_S.book Page 88 Wednesday, October 15, 2003 11:04 AM

89
uso y mantenimiento MX 125
CONCESIONARIOS OFICIALES Y CENTROS DE ASISTENCIA
EL VALOR DE LA ASISTENCIA
Gracias a las continuas actualizaciones técnicas y a los programas de formación específica de los productos aprilia, sólo los
mecánicos de la Red Oficial aprilia conocen a fondo este vehículo y disponen de las herramientas especiales necesarias para la
correcta ejecución de los trabajos de mantenimiento y reparación.
La fiabilidad del vehículo depende también de las condiciones mecánicas del mismo. El control previo a la utilización, el regular
mantenimiento y el uso exclusivo de Recambios Originales aprilia, ∑son factores esenciales !
Para tener informaciones del Concesionario Oficial y/o Centro de Asistencia más cercano, buscar en las Páginas Amarillas o
directamente en el mapa de nuestro Sitio Internet Oficial :
www.aprilia.com
Solicitando Recambios Originales aprilia se dispondrá un producto estudiado y probado desde la fase de diseño del vehículo. Los
Recambios Originales aprilia son sistemáticamente sometidos a procedimientos de control de calidad, para garantizar fiabilidad total y
duración en el tiempo.
MX125_S.book Page 89 Wednesday, October 15, 2003 11:04 AM

90
uso y mantenimiento MX 125
UK
D
NL
E
F
CZ
SLO
IRL
A
N
HR
I
APRILIA via G. Galilei, 1 - 30033 Noale (VE) Italy
Tel. +39(0)41 5829111 - Fax +39(0)41 441054 - Servizio Clienti aprilia +39(0)41 5079821
APRILIA WORLD SERVICE UK branch 15 Gregory Way - SK5 7ST Stockport - Cheshire
Tel. 0044-161 475 1800 - Fax 0044-161 475 1825 - Email: [email protected] -
Customer service dep. 0845-6014514
APRILIA MOTORRAD Am Seestern 3 - D-40547 - Dusseldorf
Tel. 0049-211-59018-00 - Fax 0049-211-5901819 - Kunden service 0180-3000791
APRILIA WORLD SERVICE B.V. Nikkelstraat 1 - 4823 - Ae Breda (NL)
Tel. (076) 5431640 - Fax (076) 5431649 - Klanten service 020-2036699
APRILIA WORLD SERVICE Edificio América, Av.da de Arangòn, 334 - 28022 Madrid
Succursale en Espana Tel. 0034-91-7460066 - Fax 0034-91-7460065- Atencion al cliente 901-810075
APRILIA WORLD SERVICE z.a. Central Parc - 255 Blv. R. Ballanger B.P. 77 - 93421- Villepinte
Succursale en France Tel. 0033-1-49634747 - Fax 0033-1-49638750 - Relations clienteles 0820-027915
A. SPIRIT A.S. Saldova 38 - 180 00 - Praha 8 - Karlin
A. SPIRIT A.S. (Sede operativa) Bubenska 43 - 170 00 - Praha 7
Tel. 0042-02-96547142 - Fax 0042-02-96547145 - Email: [email protected]
AVTO TRIGLAV d.o.o. Baragova 5 - 1113 - Ljubljana
Tel. 00386-1-5883 421 - Fax. 00386-1-5883465 - Email: ziga.martincic@avto-triglav.si
GINZINGER IMPORT GmbH & CO. Frankenburgerstrasse 19 - 4910 - Ried im Innkreis
Tel. 0043-7752-88077 - Fax. 0043-7752-70684 - Email: [email protected]
ING-KART d.o.o. Samoborska cesta 258 - 10000 - Zagreb
Tel. 00385-1-3498000 - Fax. 00385-1-3499111 - Email: [email protected]
K.D.I. Kawasaki Distributor IRL. LTD: no. 1 Long Mile Road - Dublin 12
Tel. 00353-1-4566222 - Fax. 00353-1-4756461 - Email:sales@bikeworld.ie
HARO SKANDINAVIA A.S. Kjorbekkdalen 6 - 3735- Skien
Tel. 0047-35506780 - Fax. 0047-35506781 - E-mail:[email protected]
Importadores
MX125_S.book Page 90 Wednesday, October 15, 2003 11:04 AM

91
uso y mantenimiento MX 125
Importadores
MOTOMAX MOTORLU ARACLAR Kore Sehitleri Cad. No. 42 - 80300 - Zincirlikuyu - Istanbul
SAN. VE TIC. A.S. Tel. 0090-212-3360058 - Fax. 0090-212-3360057- Email:[email protected]
MILLE MOTOR KFT. (sede operativa) Hold utca 23 - H-1054 - Budapest
Tel. 0036-1-3329938 - Fax. 0036-1-2693044 - Email: Zsoldos.lajos@elender.hu
MILFA IMPORTAÇÃO EXPORTAÇÃO LDA. Av. Da Republica 692 - 4450 - Matosinhos
Tel. 00351-229382450 - Fax. 00351-229371305 - Email: milfa@milfa.pt
APRILIA HELLAS Rizareiou 4 - 15233 - Halandri
Tel. 0030-210-6898290 - Fax. 0030-210-6898056 - Email: aprilia@otermail.gr
MOHAG A.G. Bernerstrasse Nord 202 - 8064 - Zurigo
Tel. 0041-1-4348686 - Fax 0041-1-434 8606 - Email: [email protected]
N.V./S.A. RAD Landegemstraat 4 - Industriegebied - B-9031 - Drongen-Baarle
Tel. 0032-9-2829410 - Fax. 0032-9-2810012 - Email: [email protected]
T.M.P. Hammervej 32 - 7900 - Nikobing Mors
Tel. 0045-97-722233 - Fax. 0045-97-722143/33 - Email: [email protected]
TUONTI NAKKILA OY P.o.B. 18 - 29250 - Nakkila
Tel. 00358-2-5352500 - Fax. 00358-2-5372793 - Email: [email protected]
RO GROUP INT.(sede operativa) Str. Depozitelor 41-43 Jud. Arges - Pitesti
Tel. 0040-248211004 -Fax. 0040-248211004 - Email: [email protected]
Z.A.O. ITALMOTO (sede operativa) Ul. Preobragenskaya 5/7 - 107076 - Mo - Moscow
Tel. 007-095-780 4294 - Fax. 007-095-208 3228 - Email: [email protected]
APRILIA U.S.A., INC. (Sede operativa) 109 Smoke Hill Lane Suite 190 - GA 30188 - Woodstock
Tel. 001-770-592-2261 - Fax. 001-770-592-4878
APRILIA JAPAN CORP.
SHINYOKOHAMAMEGURO BLDG. 3-22-5 SHINYOKOHAMA KOUHOKU-KU 222-0033
YOKOHAMA-SHI KANAGAWA (J) -Tel. 0081-454772632 - Fax 0081-454772605 - Email: [email protected].jp
JOHN SAMPLE GROUP PTY LTD. 8 Sheridan Close - NSW 2214 - Milperra - Sydney
Tel. 0061-2-97722666 - Fax. 0061-2-97742321 - Email: [email protected]
P
H
CH
GR
TR
B
DK
SF
USA
CSI
J
R
AUS
MX125_S.book Page 91 Wednesday, October 15, 2003 11:04 AM

92
uso y mantenimiento MX 125
Importadores
NZ
RSA
MEX
RP
HK
RC
RL
RI
ROK
KWT
SGP
CDN
MOTORCYCLING DOWNUNDER LTD. 35, Manchester Street - P.o.B. 22416 - Christchurch
Tel. 0064-3-3660129 - Fax. 0064-3-3667580 - Email: [email protected].nz
MOTOVELO S.A. Old Pretoria Road - Wynberg - Johannesburg
Tel. 0027-11-7868486 - Fax. 0027-11-7868482 - Email: motov[email protected]
APRILIA DE MEXICO, SA. de CV. San Jeromino - 64640 - 552 Monterrey N.L.
Tel. 0052-8333-4493 - Fax. 0052-8348-9398 - sbertuEmail: [email protected]
BIKE KOREA CO. LTD. YeungSoo Bldg. 302 #206-25, Ohjang-Dong, Chung-Ku Seoul
Tel. 0082-2-22756130 - Fax 0082-2-22756132 - Email: kukbike@yahoo.co.kr
ULTRA BIKERS NETWORK INC. Bldg. 7294 cn Recto Highway - Pampanga
Tel. 00632-7524450 - Fax 00632-7505764 - Email: ultrabykes@mydestiny.net
CYCLENET PTE TLD 1179 Serangoon Road - 328232 - Singapore
Tel. 0065 6299 6251 - Fax. 0065 6297 5684 - Email: jeorjb@yahoo.com
AH LAM MOTORCYCLE CO. LTD. 29 Hak Po Street - Mongkok Kowloon - Hong Kong
Tel. 00852-23859229 - Fax. 00852-23857920 - Email: [email protected]
PERFECT MOTORS COMPANY LIMITED No. 281 Jungshing North Street - Sanchung City - 241 - Taipei
Tel. 00886-2-85111156 - Fax. 00886 2 85111148 - Email: [email protected]
AL-RADWAN INTERNATIONAL GROUP Block 1, Street 13, Plot 107 45703 - Shuwaikh Industrial
Tel. 00965-4828072 - Fax. 00965-4828073 - Email: [email protected]
ACCESS INTERNATIONAL FOR Diamond Tower, 10th Floor P.O.B. 13 - Verdun, near Mandarine Beirut
PT. MOTOR MEGA PERFORMA JI. Keutamaan no. 75 - Jakarta Barat
Tel. 0062 21 63333929 - Fax. 0062 21 6337889 - Email: [email protected]
BARRETT MARKETING GROUP ltd. 9060 300 Lockhart Mill Road - E7M 5C3 - Woodstock
Tel. 001-5063281315 - Fax. 001-5063281582 - Email: joshb@barrettgroup.com
MX125_S.book Page 92 Wednesday, October 15, 2003 11:04 AM

93
uso y mantenimiento MX 125
Importadores
IND
GCA
AZG
BERMUDA INTERNATIONAL LTD. 235, Middle Road - Southampton
Tel. 001-4412385050 - Email: [email protected]
MAJESTIC AUTO LIMITED 10th KM Stone - G.T. Road - P.O.Dujana - 203207 Dadri - Ghaziabad UP
Tel. 0091-98100-19315 - Fax. 0091-98100-19300
MOTO TECNICA S.A. Avenia Petapa - 38-78 - Local B Zona12 - Guatemala
Tel. 0050-2-3606815 - Fax. 0050-2-3327847
DUARTE BASTOS & CASTENDO, LDA Rua Dr.António José de Almeida n˚238- Benguela
Tel. 00244-7-232669 - Fax 00244-7-235106 - Email: [email protected]
MX125_S.book Page 93 Wednesday, October 15, 2003 11:04 AM

uso y mantenimiento MX 125
94
ESQUEMA ELÉCTRICO - MX 125
16
19 18 14
20 21
27
28
23
15 13
12
11
10
9
28 28
28
876
28
4
5
29
2828
32
3122
28
27
31
26 25
28
24
28
34
33
231
MX125_S.book Page 94 Wednesday, October 15, 2003 11:04 AM

95
uso y mantenimiento MX 125
LEYENDA ESQUEMA ELECTRICO - MX 125
1) Generador
2) Bobina
3) Regulador de tensión
4) Fusibles
5) Batería
6) Interruptor freno delantero
7) Interruptor freno trasero
8) Sensor nivel de aceite
9) Indicador de dirección trasero izquierdo
10) Faro trasero
11) Indicador de dirección trasero derecho
12) Intermitencia
13) Interruptor de encendido/seguro de dirección
14) Luz testigo cambio en punto muerto
15) Desviador luces izquierdo
16) Salpicadero
17) Testigo luz de cruce
18) Bombilla alumbrado salpicadero
19) Luz testigo luz larga
20) Luz testigo indicadores de dirección
21) Testigo nivel de aceite
22) Interruptor cambio en punto muerto
23) Bocina
24) Indicador de dirección delantero derecho
25) Bombilla luz de cruce/luz larga
26) Bombilla luz de posición delantera
27) Indicador de dirección delantero izquierdo
28) Conectores múltiples
29) Bujía
30) Faro delantero
31) CDI
32) Pick up
33) Central rave electrónica
34) Solenoide
COLORES DE LOS CABLES
Ar naranja
Az azul claro
B azul marino
Bi blanco
G amarillo
Gr gris
M marrón
N negro
R rojo
V verde
Vi violeta
MX125_S.book Page 95 Wednesday, October 15, 2003 11:04 AM

uso y mantenimiento MX 125
96
La Sociedad aprilia s.p.a. queda agradecida a sus Clientes por haber elegido
el vehículo y les recomienda:
√ No esparzan aceite, combustible, sustancias y componentes contaminantes
en el ambiente.
√ No mantengan el motor encendido si no es necesario.
√ Eviten ruidos molestos.
√ Respeten la naturaleza.
MX125_S.book Page 96 Wednesday, October 15, 2003 11:04 AM

aprilia part# 8104766
use+maintenancebook
MX
125
MX125_GR.book Page 1 Tuesday, October 14, 2003 7:17 PM

χρήση και συντήρηση MX 125
2
© 2003 aprilia s.p.a. - Noale (VE)
Πρώτη έκδοση : οκτώβριος 2003
Ανατύπωση:
Παραγωγή και εκτύπωση:
DECA s.r.l.
Via Risorgimento, 23/1 - Lugo (RA) - Ιταλία
Τηλ. +39 - 0545 35235
Fax +39 - 0545 32844
E-mail: deca@decaweb.it
www.decaweb.it
για λογαριασµό:
aprilia s.p.a.
via G. Galilei, 1 - 30033 Noale (VE) - Ιταλία
Τηλ. +39 - (0)41 58 29 111
Fax +39 - (0)41 44 10 54
www.aprilia.com
ΜΗΝΥΜΑΤΑ ΑΣΦΑΛΕΙΑΣ
Τα ακόλουθα µηνύµ ατα σήµανσης
χρησιµοποιούνται σε όλο το εγχειρίδιο για
να δείξουν τα παρακάτω:
Σύµ βολο σχετικό µε την
ασφάλεια. Όταν υπάρχει αυτό το
σύµβολο στο δίκυκλο ή στο εγχειρίδιο,
δώστε προσοχή σε πιθανούς
κινδύνους τραυµατισµού.Η µη τήρηση
όσων αναφέρονται στις
προειδοποιήσεις που ακολουθούν
αυτό το σύµβολο µπορεί να θέσει σε
κίνδυνο τη δική σας ασφάλεια, την
ασφάλεια άλλων ή του δικύκλου!
Υποδεικνύει µεγάλο κίνδυνο για
σοβαρό τραυµατισµό ή θάνατο.
Υποδεικνύει µεγάλο κίνδυνο για
ελαφρύ τραυµατισµό ή ζηµιά στο
δίκυκλο.
ΣΗΜΑΝΤΙΚΟ Ο όρος
“ΣΗΜΑΝΤΙΚΟ” στο παρόν εγχειρίδιο
προηγείται σοβαρών πληροφοριών ή
οδηγιών.
ΤΕΧΝΙΚΕΣ ΠΛΗΡΟΦΟΡΙΕΣ
Οι εργασίες πριν από τις οποίες
υπάρχει αυτό το σύµβολο πρέπει να
επαναλαµβάνονται και από την άλλη
πλευρά του δικύκλου.
Αν δεν περιγράφεται επακριβώς, η
επανασυναρµολόγηση των τµηµάτων
ακολουθεί την αντίστροφη σειρά της
συναρµολόγησης.
Οι όροι “δεξί” και “αριστερό”
χρησιµοποιούνται λαµβάνοντας υπόψη ότι
ο οδηγός βρίσκεται καθισµένος στο
δίκυκλο σε θέση οδήγησης.
ΠΡΟΕΙ∆ΟΠΟΙΗΣΕΙΣ - ΠΡΟΦΥΛΑΞΕΙΣ
- ΠΡΟΕΙ∆ΟΠΟΙΗΣΕΙΣ ΓΕΝΙΚΑ
Πριν βάλετε εµπρός τον κινητήρα διαβάστε
µε προσοχή αυτό το εγχειρίδιο, και
ειδικότερα το κεφάλαιο “ΑΣΦΑΛΗΣ
Ο∆ΗΓΗΣΗ”.
Η ασφάλειά σας καθώς και η ασφάλεια των
άλλων δεν εξαρτάται µόνο από την
ετοιµότητά σας, τα αντανακλαστικά και τη
σβελτάδα σας, αλλά και από τη γνώση του
οχήµατος, από την κατάσταση που
βρίσκεται και από τη γνώση των βασικών
κανόνων για την ΑΣΦΑΛΗ Ο∆ΗΓΗΣΗ.
Γι’αυτό σας συνιστούµε να εξοικειωθείτε µε
το δίκυκλο µε τέτοιον τρόπο ώστε να
κινήστε στην οδική κυκλοφορία µε σιγουριά
και ασφάλεια.
ΣΗΜΑΝΤΙΚΟ Φροντίστε να έχετε
επάνω στο δίκυκλο µια λάµπα ανά τύπο
(βλ. τεχνικά στοιχεία).
H
MX125_GR.book Page 2 Tuesday, October 14, 2003 7:17 PM

3
χρήση και συντήρηση MX 125
ΣΗΜΑΝΤΙΚΟ Το παρόν εγχειρίδιο
πρέπει να θεωρείται αναπόσπαστο τµήµα του
οχήµατος και πρέπει να συνοδεύει το όχηµα
ακόµα και σε περίπτωση µεταπώλησης.
Η aprilia πραγµατοποίησε το παρόν
εγχειρίδιο δίνοντας ιδιαίτερη προσοχή για την
ακρίβεια των πληροφοριών που παρέχονται.
Παρ’ όλα αυτά, λαµβάνοντας υπόψη το
γεγονός ότι τα προϊόντα της aprilia
υπόκεινται σε συνεχείς αναβαθµίσεις, µπορεί
να υπάρξουν µικρές διαφορές ανάµεσα στα
χαρακτηριστικά του δικύκλου σας και σε αυτά
που περιγράφονται στο παρόν εγχειρίδιο.
Για οποιαδήποτε διευκρίνηση σχετικά µε τις
πληροφορίες που παρέχονται στο παρόν
εγχειρίδιο, επικοινωνήστε µε έναν Επίσηµο
Αντιπρόσωπο της aprilia.
Για τις επεµβάσεις ελέγχου και τις επισκευές
που δεν περιγράφονται λεπτοµερώς σε αυτή
την έκδοση, για αγορά γνήσιων
ανταλλακτικών aprilia, αξεσουάρ ή άλλων
προϊόντων, καθώς και για οποιαδήποτε
συµβουλή, απευθυνθείτε αποκλειστικά στους
Επίσηµους Αντιπροσώπους και στα Κέντρα
Εξυπηρέτησης της aprilia, που εγγυώνται
ένα προσεγµένο και άµεσο σέρβις.
Σας ευχαριστούµε που επιλέξατε την aprilia
και σας ευχόµαστε µία ευχάριστη οδήγηση.
Με την επιφύλαξη των δικαιωµάτων
ηλεκτρονικής αποθήκευσης, ολικής και
µερικής αναπαραγωγής ή προσαρµογής, µε
οποιοδήποτε µέσο για όλες τις Χώρες.
ΣΗΜΑΝΤΙΚΟ Σε κάποιες χώρες η
ισχύουσα νοµοθεσία επιβάλλει την τήρηση
των κανονισµών που αφορούν στη ρύπανση
και την ηχορύπανση και προβλέπουν την
πραγµατοποίηση περιοδικών ελέγχων.Ο
χρήστης που χρησιµοποιεί το δίκυκλο σε
αυτές τις χώρες πρέπει:
– να απευθύνεται στον Επίσηµο
Αντιπρόσωπο της aprilia για την
αντικατάσταση των συγκεκριµένων
εξαρτηµ άτων µε άλλα που είναι
εγκεκριµένα στη συγκεκριµένη χώρα.
– να πραγµατοποιεί τους απαιτούµενους
περιοδικούς ελέγχους.
ΣΗΜΑΝΤΙΚΟ Κατά την αγορά του
δικύκλου, γράψτε στην εικόνα που
ακολουθεί, τα στοιχεία αναγνώρισης που
αναγράφονται στην ΕΤΙΚΕΤΑ
ΑΝΑΓΝΩΡΙΣΗΣ ΑΝΤΑΛΛΑΚΤΙΚΩΝ. Η
ετικέτα αυτή βρίσκεται στο πλαίσιο κάτω
από τη σέλα. Για να την διαβάσετε, πρέπει
να βγάλετε τη σέλα του οδηγού.
Τα στοιχεία αυτά προσδιορίζουν:
– έτος κατασκευής (Y, 1, 2, ...),
– δείκτη µετατροπής (A, B, C, ...),
– χώρα έγκρισης (I, UK, A, ...).
και πρέπει να παρέχονται στον Επίσηµο
Αντιπρόσωπο της aprilia ως αναφορά για
την αγορά ανταλλακτικών ή αξεσουάρ για
το µοντέλο που έχετε αποκτήσει.
Στο παρόν εγχειρίδιο οι παραλλαγές των
εκδόσεων σηµειώνονται µε τα ακόλουθα
σύµβολα:
ΕΚ∆ΟΣΗ ΓΙΑ:
7
προαιρετικό
έκδοση ελεύθερη ισχύς (Free Power)
Ιταλία Σιγκαπούρη
Αγγλία Σλοβενία
Αυστρία Ισραήλ
Πορτογαλία Ν. Κορέα
Φινλανδία Μαλαισία
Βέλγιο Χιλή
Γερµανία Κροατία
Γαλλία Αυστραλία
Ισπανία Ην. Πολιτ.
Αµερικής
Ελλάδα Βραζιλία
Ολλανδία Νοτ. Αφρική
Ελβετία Ν.Ζηλανδία
∆ανία Καναδάς
Ιαπωνία
I
SGP
UK
SLO
A
IL
P ROK
SF
MAL
B
RCH
D
HR
F
AUS
E
USA
GR
BR
NL
RSA
CH
NZ
DK
CDN
J
MX125_GR.book Page 3 Tuesday, October 14, 2003 7:17 PM

χρήση και συντήρηση MX 125
ΠΕΡΙΕΧΟΜΕΝΑ
ΜΗΝΥΜΑΤΑ ΑΣΦΑΛΕΙΑΣ ................................... 2
ΤΕΧΝΙΚΕΣ ΠΛΗΡΟΦΟΡΙΕΣ................................. 2
ΠΡΟΕΙ∆ΟΠΟΙΗΣΕΙΣ - ΠΡΟΦΥΛΑΞΕΙΣ -
ΠΡΟΕΙ∆ΟΠΟΙΗΣΕΙΣ ΓΕΝΙΚΑ .............................. 2
ΠΕΡΙΕΧΟΜΕΝΑ.................................................... 4
ΑΣΦΑΛΗΣ Ο∆ΗΓΗΣΗ ΒΑΣΙΚΟΙ ΚΑΝΟΝΕΣ
ΑΣΦΑΛΕΙΑΣ.......................................................... 6
ΕΝ∆ΥΣΗ ............................................................... 9
ΑΞΕΣΟΥΑΡ......................................................... 10
ΦΟΡΤΙΟ.............................................................. 10
ΘΕΣΗ ΒΑΣΙΚΩΝ ΣΤΟΙΧΕΙΩΝ ............................ 12
ΘΕΣΗ ΟΡΓΑΝΩΝ................................................ 14
ΟΡΓΑΝΑ ΚΑΙ ∆ΕΙΚΤΕΣ...................................... 15
ΠΙΝΑΚΑΣ ΟΡΓΑΝΩΝ ΚΑΙ ∆ΕΙΚΤΩΝ .................. 16
ΨΗΦΙΑΚΗ ΟΘΟΝΗ ΠΟΛΛΑΠΛΩΝ
ΛΕΙΤΟΥΡΓΙΩΝ .................................................... 17
ΑΡΧΙΚΕΣ ΡΥΘΜΙΣΕΙΣ ........................................ 18
ΑΝΤΙΚΑΤΑΣΤΑΣΗ ΜΠΑΤΑΡΙΑΣ ......................... 31
ΒΑΣΙΚΑ ΧΕΙΡΙΣΤΗΡΙΑ ΜΟΝΗΣ ΛΕΙΤΟΥΡΓΙΑΣ 32
ΧΕΙΡΙΣΤΗΡΙΑ ΣΤΗΝ ΑΡΙΣΤΕΡΗ ΠΛΕΥΡΑ ΤΟΥ
ΤΙΜΟΝΙΟΥ .......................................................... 32
∆ΙΑΚΟΠΤΗΣ ΕΚΚΙΝΗΣΗΣ.................................. 33
ΚΛΕΙ∆ΑΡΙΑ ΤΙΜΟΝΙΟΥ ...................................... 33
ΒΟΗΘΗΤΙΚΟΣ ΕΞΟΠΛΙΣΜΟΣ ΘΗΚΗLL.......... 34
ΜΙΚΡΟΑΝΤΙΚΕΙΜΕΝΩΝ / ΚΙΤ ΕΡΓΑΛΕΙΩΝ ....... 34
ΓΑΝΤΖΟΣ ΚΡΑΝΟΥΣ ......................................... 34
ΕΙ∆ΙΚΑ ΕΡΓΑΛΕΙΑ
- ....................................... 35
ΒΑΣΙΚΑ ΜΕΡΗ..................................................... 36
ΚΑΥΣΙΜΟ............................................................ 36
ΛΑ∆ΙΑ ΚΙΒΩΤΙΟΥ ΤΑΧΤΗΤΩΝ ........................... 36
ΡΕΖΕΡΒΟΥΑΡ ΛΑ∆ΙΟΥ ΜΙΞΗΣ ......................... 37
ΥΓΡΟ ΦΡΕΝΩΝ - συστάσεις .............................. 38
∆ΙΣΚΟΦΡΕΝΑ..................................................... 38
ΦΡΕΝΟ ΕΜΠΡΟΣ............................................... 39
ΦΡΕΝΟ ΠΙΣΩ ..................................................... 40
ΡΥΘΜΙΣΗ ΜΑΝΕΤΑΣ ΠΙΣΩ ΦΡΕΝΟΥ ΩΣ
ΠΡΟΣ ΤΟ ΥΨΟΣ................................................. 41
ΡΥΘΜΙΣΗ ΣΥΜΠΛΕΚΤΗ .................................... 42
ΛΑΣΤΙΧΑ............................................................. 43
ΥΓΡΟ ΨΥΞΗΣ .................................................... 44
ΣΙΛΑΝΣΙΕ........................................................... 46
ΚΑΝΟΝΕΣ ΧΡΗΣΗΣ............................................ 47
ΠΙΝΑΚΑΣ ΠΡΟΚΑΤΑΡΚΤΙΚΩΝ ΕΛΕΓΧΩΝ........ 47
ΕΚΚΙΝΗΣΗ......................................................... 48
ΕΚΚΙΝΗΣΗ ΚΑΙ Ο∆ΗΓΗΣΗ................................ 50
ΣΤΡΩΣΙΜΟ......................................................... 53
ΣΤΑΜΑΤΗΜΑ..................................................... 53
ΣΤΑΘΜΕΥΣΗ..................................................... 54
ΤΟΠΟΘΕΤΗΣΗ ΤΟΥ ∆ΙΚΥΚΛΟΥ ΣΤΟ ΣΤΑΝΤ.. 54
ΣΥΜΒΟΥΛΕΣ ΠΡΟΣΤΑΣΙΑΣ ΑΠΟ ΚΛΟΠΗ....... 54
ΣΥΝΤΗΡΗΣΗ........................................................ 55
ΠΙΝΑΚΑΣ ΠΕΡΙΟ∆ΙΚΗΣ ΣΥΝΤΗΡΗΣΗΣ (ΣΕΡΒΙΣ) 56
ΣΤΟΙΧΕΙΑ ΑΝΑΓΝΩΡΙΣΗΣ................................. 58
ΑΦΑΙΡΕΣΗ ΠΛΑΪΝΑ ΦΕΡΙΝΓΚ.......................... 58
ΦΙΛΤΡΟ ΑΕΡΑ................................................... 59
ΕΛΕΓΧΟΣ ΣΤΑΘΜΗΣ ΛΑ∆ΙΟΥ ΣΤΟ ΚΙΒΩΤΙΟ
ΤΑΧΥΤΗΤΩΝ ΚΑΙ ΣΥΜΠΛΗΡΩΜΑ .................... 60
ΑΝΤΙΚΑΤΑΣΤΑΣΗ ΛΑ∆ΙΑ ΚΙΒΩΤΙΟΥ
ΤΑΧΥΤΗΤΩΝ ..................................................... 61
ΕΜΠΡΟΣ ΤΡΟΧΟΣ............................................ 62
ΠΙΣΩ ΤΡΟΧΟΣ................................................... 64
ΑΛΥΣΙ∆Α ΜΕΤΑ∆ΟΣΗΣ..................................... 66
ΕΛΕΓΧΟΣ ΑΝΑΡΤΗΣΗΣ
ΕΜΠΡΟΣ ΚΑΙ ΠΙΣΩ ........................................... 68
ΑΝΑΡΤΗΣΗ ΠΙΣΩ .............................................. 69
ΕΛΕΓΧΟΣ ΦΘΟΡΑΣ ΣΤΑ ΤΑΚΑΚΙΑ .................. 70
ΡΥΘΜΙΣΗ ΧΕΙΡΙΣΤΗΡΙΟΥ
ΕΚΚΙΝΗΣΗΣ ΜΕ ΚΡΥΟ (
).............................. 70
ΡΥΘΜΙΣΗ ΡΕΛΑΝΤΙ .......................................... 71
ΡΥΘΜΙΣΗ ΓΚΑΖΙΟΥ........................................... 71
ΜΠΟΥΖΊ............................................................. 72
ΜΠΑΤΑΡΙΑ......................................................... 73
ΜΕΓΑΛΗ ΠΕΡΙΟ∆ΟΣ Α∆ΡΑΝΕΙΑΣ ΤΗΣ
ΜΠΑΤΑΡΙΑΣ....................................................... 73
ΕΛΕΓΧΟΣ ΚΑΙ ΚΑΘΑΡΙΣΜΟΣ ΑΚΡΟ∆ΕΚΤΩΝ
ΚΑΙ ΣΦΙΓΚΤΗΡΩΝ ............................................. 74
ΑΦΑΙΡΕΣΗ ΜΠΑΤΑΡΙΑΣ ................................... 74
ΕΛΕΓΧΟΣ ΣΤΑΘΜΗΣ
ΗΛΕΚΤΡΟΛΥΤΗΣ ΜΠΑΤΑΡΙΑΣ......................... 75
ΕΠΑΝΑΦΟΡΤΙΣΗ ΜΠΑΤΑΡΙΑΣ ......................... 75
ΤΟΠΟΘΕΤΗΣΗ ΜΠΑΤΑΡΙΑΣ ............................ 75
ΑΝΤΙΚΑΤΑΣΤΑΣΗ ΑΣΦΑΛΕΙΩΝ ........................ 76
ΕΛΕΓΧΟΣ ΠΛΕΥΡΙΚΟΥ ΣΤΑΝΤ ........................ 77
ΕΛΕΓΧΟΣ ∆ΙΑΚΟΠΤΩΝ..................................... 77
ΚΑΤΑΚΟΡΥΦΗ ΡΥΘΜΙΣΗ ∆ΕΣΜΗΣ ΦΩΤΟΣ ... 78
ΛΑΜΠΤΗΡΕΣ ..................................................... 78
ΑΝΤΙΚΑΤΑΣΤΑΣΗ
ΛΑΜΠΤΗΡΩΝ ΕΜΠΡΟΣΘΙΟΥ ΦΑΝΟΥ ............. 79
ΑΝΤΙΚΑΤΑΣΤΑΣΗ
ΛΑΜΠΤΗΡΕΣ ΤΑΜΠΛΟ..................................... 80
ΑΝΤΙΚΑΤΑΣΤΑΣΗ ΛΑΜΠΤΗΡΩΝ ΦΛΑΣ
ΕΜΠΡΟΣ ΚΑΙ ΠΙΣΩ............................................ 81
ΑΝΤΙΚΑΤΑΣΤΑΣΗ ΛΑΜΠΑΣ ΠΙΣΩ ΦΑΝΟΥ ...... 81
ΜΕΤΑΦΟΡΑ......................................................... 82
Α∆ΕΙΑΣΜΑ ΚΑΥΣΙΜΟΥ ΑΠΟ ΤΟ ΡΕΖΕΡΒΟΥΑΡ 82
ΚΑΘΑΡΙΣΜΟΣ...................................................... 83
ΜΕΓΑΛΕΣ ΠΕΡΙΟ∆ΟΙ Α∆ΡΑΝΕΙΑΣ................... 84
ΜΕΤΑ ΤΗΝ ΑΠΟΘΗΚΕΥΣΗ............................... 84
ΤΕΧΝΙΚΑ ΣΤΟΙΧΕΙΑ............................................ 85
ΠΙΝΑΚΑΣ ΛΙΠΑΝΤΙΚΩΝ..................................... 88
ΕπίΣΗΜΟΙ ΑΝΤΙπΡάΣΩπΟΙ ΚΑΙ ΚέΝΤΡΑ
ΤΕχΝΙΚή ΥπΟΣΤήΡΙΞΗ ................................ 89
ΕΙΣΑΓΩΓΕΙΣ ....................................................... 90
ΕΙΣΑΓΩΓΕΙΣ ....................................................... 91
ΕΙΣΑΓΩΓΕΙΣ ....................................................... 92
ΕΙΣΑΓΩΓΕΙΣ ....................................................... 93
ΗΛΕΚΤΡΙΚΟ ΣΧΕ∆ΙΑΓΡΑΜΜΑ - MX 125 .......... 94
ΥΠOΜΝΗΜΑ ΗΛΕΚΤΡΙΚΟΥ
ΣΧΕ∆ΙΑΓΡΑΜΜΑΤΟΣ - MX 125......................... 95
MX125_GR.book Page 4 Tuesday, October 14, 2003 7:17 PM

áóöáëÞò ïäÞãçóç
áóöáëÞò ïäÞãçóç
GUIDA SICURA
MX125_GR.book Page 5 Tuesday, October 14, 2003 7:17 PM

χρήση και συντήρηση MX 125
6
ΑΣΦΑΛΗΣ Ο∆ΗΓΗΣΗ ΒΑΣΙΚΟΙ
ΚΑΝΟΝΕΣ ΑΣΦΑΛΕΙΑΣ
Για να οδηγήσετε το δίκυκλο, πρέπει να
ικανοποιείτε όλες τις απαιτήσεις του νόµου
(δίπλωµα, ελάχιστη ηλικία, ψυχοφυσική
καταλληλότητα, ασφάλεια, άδεια
κυκλοφορίας, πινακίδα, κλπ.).
συνιστάται να εξοικειωθείτε και να
αποκτήσετε σιγουριά µε το δίκυκλο, σε
περιοχές µε χαµηλή κυκλοφοριακή κίνηση
και/ή σε ιδιόκτητους χώρους
Η λήψη ορισµ ένων φαρµ άκων,
οινοπνεύµατος και ναρκωτικών ουσιών ή
ψυχοφαρµάκων, αυξάνει σηµαντικά τον
κίνδυνο ατυχηµάτων.
Βεβαιωθείτε ότι η ψυχοφυσική σας
κατάσταση είναι κατάλληλη για οδήγηση,
δίνοντας ιδιαίτερη προσοχή στη φυσική
κόπωση και στην υπνηλία.
Τα περισσότερα ατυχήµατα οφείλονται
στην έλλειψη πείρας του οδηγού.
ΠΟΤΕ µη δανείζετε το δίκυκλο σε
αρχάριους και, σε κάθε περίπτωση, να
βεβαιώνεστε ότι ο οδηγός διαθέτει όλες τις
απαραίτητες προϋποθέσεις για την
οδήγηση.
MX125_GR.book Page 6 Tuesday, October 14, 2003 7:17 PM

7
χρήση και συντήρηση MX 125
Τηρείτε αυστηρά τη σήµανση και τον
Κώδικα Οδικής Κυκλοφορίας.
Αποφεύγετε απότοµους και επικίνδυνους
ελιγµούς για εσάς και για τους άλλους
(παράδειγµα: σούζες, µη τήρηση των
ορίων ταχύτητας, κλπ.),
καθώς και να αξιολογείτε και να λαµβάνετε
υπόψη σας τις συνθήκες του
οδοστρώµατος, την ορατότητα, κλπ.
Μην προσκρούετε σε εµπόδια που θα
µπορούσαν να προκαλέσουν ζηµιά στο
δίκυκλο και να σας κάνουν να χάσετε τον
έλεγχό του.
Μην παραµένετε πίσω από οχήµατα που
προηγούνται για να αυξήσετε την ταχύτητά
σας.
Οδηγείτε πάντα και µε τα δύο χέρια
πάνω στο τιµόνι και τα πόδια στο
µαρσπιέ (ή στα υποπόδια του οδηγού),
στη σωστή θέση οδήγησης.
Αποφεύγετε να σηκώνεστε όρθιοι ή να
τεντώνεστε κατά την οδήγηση.
MX125_GR.book Page 7 Tuesday, October 14, 2003 7:17 PM

χρήση και συντήρηση MX 125
8
Ο οδηγός δεν πρέπει ποτέ να αποσπά την
προσοχή του από την οδήγηση, να
αποσπάται από άλλους ή να επηρεάζεται
από άτοµα, πράγµατα ή άλλες ενέργειες,
(µην καπνίζετε, τρώτε, πίνετε, διαβάζετε,
κλπ.) όταν οδηγεί το δίκυκλο.
Χρησιµοποιείτε καύσιµα και λιπαντικά, που
είναι κατάλληλα για το δίκυκλο αυτό, του
τύπου που αναφέρονται στον “ΠΙΝΑΚΑ
ΛΙΠΑΝΤΙΚΩΝ” και να ελέγχετε
επανειληµµένα τη στάθµ η που
προβλέπεται για το καύσιµο, τα λάδια και
το υγρό ψύξης.
Αν εµπλακείτε σε κάποιο ατύχηµα ή
χτυπήσετε ή πέσετε µε το δίκυκλο,
βεβαιωθείτε ότι οι µανέτες ελέγχου, οι
σωλήνες, τα καλώδια, το σύστηµα φρένων
και τα ζωτικά µέρη δεν έχουν υποστεί
ζηµιά.
Πηγαίνετε το δίκυκλο για έλεγχο σε έναν
Επίσηµο Αντιπρόσωπο της aprilia,
ζητώντας να δοθεί ιδιαίτερη προσοχή στο
σκελετό, το τιµόνι, τις αναρτήσεις, τα
όργανα ασφάλειας και εκείνα τα
εξαρτήµατα την ακεραιότητα των οποίων
δεν είναι σε θέση να αξιολογήσει ο
χρήστης.
Αναφέρατε οποιαδήποτε ζηµιά έτσι ώστε
να διευκολύνετε την εργασία των τεχνικών
και/ή των µηχανικών.
Μην οδηγείτε το δίκυκλο αν η ζηµιά που
υπέστη θέτει σε κίνδυνο την ασφάλειά του.
COOLER
OIL
MX125_GR.book Page 8 Tuesday, October 14, 2003 7:17 PM

9
χρήση και συντήρηση MX 125
Μην τροποποιείτε τη θέση, την κλίση ή το
χρώµα: της πινακίδας, των φλας, των
εξαρτηµάτων φωτισµού και της κόρνας.
Οποιαδήποτε τροποποίηση στο δίκυκλο
µπορεί να επιφέρει την ακύρωση της
εγγύησης.
Οποιαδήποτε τροποποίηση του δικύκλου ή
αφαίρεση γνησίων ανταλλακτικών, µπορεί
να µειώσει τις επιδόσεις του και το επίπεδο
ασφάλειάς του ή ακόµ α και να το
καταστήσει παράνοµο.
Σας συµβουλεύουµε να τηρείτε πάντα όλες
τις διατάξεις του νόµου καθώς και τους
εθνικούς και τοπικούς κανονισµούς σε
θέµατα εξοπλισµού του δικύκλου.
Ειδικότερα, πρέπει να αποφεύγετε τις
τεχνικές τροποποιήσεις µε στόχο την
αύξηση των επιδόσεων ή την µετατροπή
των αρχικών χαρακτηριστικών του
δικύκλου.
Αποφεύγετε το συναγωνισµό µε άλλα
οχήµατα.
Αποφεύγετε να οδηγείτε εκτός δρόµου.
ΕΝ∆ΥΣΗ
Πριν από την οδήγηση, να θυµάστε να
φοράτε και να κουµπώνετε σωστά το
κράνος.
Το κράνος πρέπει να είναι εγκεκριµένο,
ακέραιο, να έχει το σωστό µέγεθος και να
είναι καθαρή η ζελατίνα του.
Να φοράτε προστατευτική ένδυση, αν είναι
δυνατό ανοικτού και/ή αντανακλαστικού
χρώµατος. Έτσι θα είστε ορατοί από τους
άλλους οδηγούς, µειώνοντας σηµαντικά
τον κίνδυνο να σας χτυπήσουν και θα έχετε
µεγαλύτερη προστασία σε περίπτωση
πτώσης. Τα ρούχα πρέπει να είναι κολλητά
επάνω σας και κλεισµένα στις άκρες,
τα κορδόνια, οι ζώνες και οι γραβάτες δεν
πρέπει να κρέµονται.
Αυτά ή άλλα αντικείµενα δεν πρέπει να
εµ ποδίζουν την οδήγηση, ούτε να
µπλέκονται σε κινούµενα εξαρτήµατα ή
όργανα οδήγησης.
ONLY ORIGINALS
A12
345
MX125_GR.book Page 9 Tuesday, October 14, 2003 7:17 PM

χρήση και συντήρηση MX 125
10
Μη βάζετε ποτέ στην τσέπη αντικείµενα
που µπορεί να γίνουν επικίνδυνα σε
περίπτωση πτώσης, για παράδειγµα:
µυτερά αντικείµενα όπως κλειδιά, µολύβια,
γυάλινα δοχεία, κλπ. (οι ίδιες συστάσεις
ισχύουν και για το συνεπιβάτη).
ΑΞΕΣΟΥΑΡ
Ο χρήστης είναι προσωπικά υπεύθυνος για
την επιλογή, την εγκατάσταση και τη χρήση
των αξεσουάρ.
Συνιστάται, κατά την τοποθέτηση, τα
αξεσουάρ, να µην καλύπτουν τα όργανα
οπτικής και ηχητικής σήµανσης ούτε να
θέτουν σε κίνδυνο τη λειτουργία τους, να
µην περιορίζουν την ελεύθερη διαδροµή
των αναρτήσεων και τη γωνία στροφής, να
µην εµποδίζουν τα χειριστήρια και να µη
µειώνουν το ύψος από το έδαφος και τη
γωνία κλίσης σε στροφή.
Αποφεύγετε τη χρήση αξεσουάρ που
εµποδίζουν την πρόσβαση στα χειριστήρια,
επειδή, σε περίπτωση έκτακτης ανάγκης,
µπορεί να αυξήσουν το χρόνο αντίδρασης.
Τα φέρινγκ και τα παρµπρίζ µεγάλων
διαστάσεων, που είναι τοποθετηµένα στο
δίκυκλο, µπορεί να προκαλέσουν
αεροδυναµικές πιέσεις, τέτοιες που να
θέτουν σε κίνδυνο την ισορροπία του
δικύκλου κατά την οδήγηση, ειδικότερα στις
µεγάλες ταχύτητες.
Βεβαιωθείτε ότι όλα τα εξαρτήµατα είναι
καλά στερεωµένα στο δίκυκλο και δεν
ενέχουν κινδύνους κατά την οδήγηση.
Μην προσθέτετε και µην τροποποιείτε τα
ηλεκτρικά εξαρτήµατα του δικύκλου
υπερφορτώνοντας, διότι µε τον τρόπο
αυτό το δίκυκλο µπορεί να σταµατήσει
ξαφνικά ή να µην είναι διαθέσιµη η
αναγκαία ηλεκτρική ισχύς για τη λειτουργία
των οργάνων ηχητικής και οπτικής
σήµανσης.
Η aprilia συνιστά τη χρήση γνήσιων
ανταλλακτικών (aprilia genuine
accessories).
ΦΟΡΤΙΟ
Να είστε προσεκτικοί και συνετοί όταν
φορτώνετε τις αποσκευές.
Είναι απαραίτητο να έχετε τις αποσκευές
όσο το δυνατόν πιο κοντά στο κέντρο
βάρους του δικύκλου και να κατανέµετε
οµοιόµορφα το φορτίο στις δύο πλευρές
για να ελαχιστοποιείται κάθε πιθανότητα
παράκεντρης φόρτωσης.
MX125_GR.book Page 10 Tuesday, October 14, 2003 7:17 PM

11
χρήση και συντήρηση MX 125
Ελέγξτε επίσης αν το φορτίο είναι καλά
δεµένο στο δίκυκλο, κυρίως στα µακρινά
ταξίδια.
Μη στερεώνετε ποτέ αντικείµενα µεγάλων
διαστάσεων, µεγάλου βάρους και/ ή
επικίνδυνα, στο τιµόνι, τα φτερά και τα
πιρούνια: αυτό θα προκαλούσε µία πιο
αργή ανταπόκριση του δικύκλου στις
στροφές και θα επηρέαζε αναπόφευκτα
την ευκολία της οδήγησης.
Μην τοποθετείτε στα πλαϊνά πολύ
ογκώδεις αποσκευές ή το κράνος, επειδή
υπάρχει κίνδυνος να χτυπήσουν πρόσωπα
ή εµπόδια και να προκαλέσουν απώλεια
ελέγχου του δικύκλου.
Μη µεταφέρετε καµία αποσκευή που δεν
είναι καλά στερεωµένη στο όχηµα.
Μη µεταφέρετε αποσκευές που εξέχουν
υπερβολικά από τις µπαγκαζιέρες ή που
καλύπτουν τα εξαρτήµατα φωτισµού και
ηχητικής ή οπτικής σήµανσης.
Μη µεταφέρετε ζώα ή παιδιά στη θήκη
εγγράφων ή την µπαγκαζιέρα.
Μην υπερβαίνετε το ανώτατο
επιτρεπόµενο όριο µεταφερόµενου βάρους
για κάθε µπαγκαζιέρα.
Η υπερφόρτωση θέτει σε κίνδυνο την
ισορροπία και την ευκολία οδήγησης του
οχήµατος.
KG!
MX125_GR.book Page 11 Tuesday, October 14, 2003 7:17 PM

χρήση και συντήρηση MX 125
12
ΘΕΣΗ ΒΑΣΙΚΩΝ ΣΤΟΙΧΕΙΩΝ
ΥΠOΜΝΗΜΑ
1) Αριστερό ψυγείο υγρό ψύξης
2) Τάπα ρεζερβουάρ καυσίµου
3) Ρεζερβουάρ καυσίµου
4) Μπαταρία
5) Θήκη µικροαντικειµένων/κιτ εργαλείων
6) Ασφαλειοθήκη
7) Χειρολαβή συνεπιβάτη
8) Αριστερό µαρσπιέ συνεπιβάτη
(µε αυτόµατο µηχανισµό,
άνοιγµα/κλείσιµο)
9) Πλευρικό σταντ
10) Αριστερό µαρσπιέ οδηγού
(µε ελατήριο, πάντα ανοιχτό)
11) Τάπα εκκένωσης λαδιού κιβωτίου
ταχυτήτων
12) Λεβιές ταχυτήτων
13) Τάπα γέµισης λαδιού κιβωτίου ταχυτήτων
14) λεβιές εκκίνησης
1 765432
8
913 1214 10
11
MX125_GR.book Page 12 Tuesday, October 14, 2003 7:17 PM

13
χρήση και συντήρηση MX 125
ΥΠOΜΝΗΜΑ
1) Τάπα ρεζερβουάρ λαδιού µίξης
2) Ρεζερβουάρ λαδιού µίξης
3) Φίλτρο αέρα
4) Ρεζερβουάρ υγρού πίσω φρένου
5) Στρόφιγγα καυσίµου
6) Ρεζερβουάρ υγρού φρένων
(εµπρόσθιο φρένο)
7) ∆ιακόπτης εκκίνησης/κλειδαριά τιµονιού
8) Τάπα ψυγείου υγρό ψύξης
9) ∆εξί ψυγείο υγρού ψύξης
10) Ακουστικό σήµα
11) Μανέτα πίσω φρένου
12) ∆εξί υποπόδιο οδηγού
(µε ελατήριο, πάντα ανοιχτό)
13) Αντλία φρένου πίσω
14) Αλυσίδα µετάδοσης
15) ∆εξί υποπόδιο συνεπιβάτη
(µε αυτόµατο µηχανισµό,
άνοιγµα/κλείσιµο)
16) Γάντζος κράνους
16
15
32
9
8
12 101314
1 4 5 6 7
11
MX125_GR.book Page 13 Tuesday, October 14, 2003 7:17 PM

χρήση και συντήρηση MX 125
14
ΘΕΣΗ ΟΡΓΑΝΩΝ
ΥΠOΜΝΗΜΑ
1) ∆ιακόπτης φλας (
(
)
2) Κουµπί κόρνας (
)
3) ∆ιακόπτης φώτων (
-
)
4) Κουµπί σινιάλου µεγάλης σκάλας(
)
5) Αριστερός καθρέφτης
6) Μανέτα συµπλέκτη
7) Μανέτα εκκίνησης µε κρύο (
)
8) Όργανα και δείκτες
9) ∆ιακόπτης εκκίνησης / κλειδαριά τιµονιού
(
-
-
+
)
10) Μανέτα εµπρός φρένου
11) ∆εξιός καθρέφτης
12) Χειρόγκαζο
43
12
5 6 7 8 9 10 11
12
MX125_GR.book Page 14 Tuesday, October 14, 2003 7:17 PM

15
χρήση και συντήρηση MX 125
ΟΡΓΑΝΑ ΚΑΙ ∆ΕΙΚΤΕΣ
ΥΠOΜΝΗΜΑ
1) Ενδεικτική λυχνία φώτων µεσαίας σκάλας (
) πράσινου
χρώµατος
2) Ψηφιακή οθόνη πολλαπλών λειτουργιών
3) Ενδεικτική λυχνία νεκράς (
) πράσινου χρώµατος
4) Ενδεικτική λυχνία φλας ( (
) πράσινου χρώµατος
5) Ενδεικτική λυχνία λαδιού µίξης (
) κόκκινου χρώµατος
6) Λυχνία φώτων πορείας (µεσαία σκάλα) (
) µπλε χρώµατος
1
6
2 3 4
5
MX125_GR.book Page 15 Tuesday, October 14, 2003 7:17 PM

χρήση και συντήρηση MX 125
16
ΠΙΝΑΚΑΣ ΟΡΓΑΝΩΝ ΚΑΙ ∆ΕΙΚΤΩΝ
Περιγραφή Λειτουργία
Ενδεικτική λυχνία ρεζέρβας λαδιού
µίξης (
)
Ανάβει, για περίπου 0,5 δευτερόλεπτα, κάθε φορά που γυρίζετε το διακόπτη εκκίνησης στη
θέση “n”, εκτελώντας έτσι έλεγχο λειτουργίας της λάµπας.
Αν κατά τη διάρκεια αυτής της φάσης δεν ανάψει αυτή η ενδεικτική λυχνία, απευθυνθείτε σε
έναν Επίσηµο Αντιπρόσωπο aprilia
Αν η ενδεικτική λυχνία ανάβει κατά τη διάρκεια της κανονικής
λειτουργίας του κινητήρα, σηµαίνει ότι η στάθµη λαδιού µίξης
είναι σε ρεζέρβα.
Στην περίπτωση αυτή προνοήστε για το συµπλήρωµα λαδιού µίξης, βλέπε σελ.37
(ΡΕΖΕΡΒΟΥΑΡ ΛΑ∆ΙΟΥ ΜΙΞΗΣ).
Ενδεικτική λυχνία νεκράς (
) Ανάβει όταν ο µοχλός ταχυτήτων είναι σε νεκρά ταχύτητα.
Ενδεικτική λυχνία φλας (() Αναβοσβήνει όταν λειτουργεί το φλας.
Ενδεικτική λυχνία µεγάλης σκάλας
(
)
Ανάβει όταν είναι αναµµένη η λάµπα της µεγάλης σκάλας του εµπρός φαναριού ή όταν
κάνετε σινιάλο µε τη µεγάλη σκάλα
Ενδεικτική λυχνία µεσαίας σκάλας
φώτων (
)
Ανάβει όταν είναι αναµµένη η λάµπα µεσαίας σκάλας του εµπρός φαναριού.
MX125_GR.book Page 16 Tuesday, October 14, 2003 7:17 PM

17
χρήση και συντήρηση MX 125
ΨΗΦΙΑΚΗ ΟΘΟΝΗ ΠΟΛΛΑΠΛΩΝ
ΛΕΙΤΟΥΡΓΙΩΝ
Η οθόνη είναι εξοπλισµ ένη µε
λειτουργία αυτόµατου σβησίµατος.
Αν δεν γίνει χρήση του δικύκλου και της
οθόνης για τουλάχιστον 30 λεπτά, η
οθόνη απενεργοποιείται αυτόµατα
διατηρώντας στη µνήµ η τις
προεπιλεγµένες ρυθµίσεις.
Η οθόνη επανενεργοποιείται αυτόµατα
πιέζοντας ένα οποιοδήποτε κουµπί ή
χρησιµοποιώντας το δίκυκλο.
ΥΠOΜΝΗΜΑ
Το computer πολλαπλών λειτουργιών
επιτρέπει την καταχώρηση στη µνήµη
δύο διαφορετικών τύπων οχήµατος
(bike 1 και bike 2) επιλέγοντας την
περιφέρεια του εµπρός τροχού.
Αριστερή οθόνη: Επιλογή δικύκλου (1),
συνολική διανυθείσα απόσταση (2), µερική
διανυθείσα απόσταση (3), λειτουργίες
συντήρησης(4);
Κεντρική οθόνη: Χρόνος µερικής και
ολικής διαδροµ ής (5), µερικός
χιλιοµετρητής (6),
∆εξιά οθόνη: Μέση ταχύτητα (7), µέγιστη
ταχύτητα (8) και τρέχουσα ταχύτητα (9),
επιλογέας Km / mi (10).
Επιλογή δικύκλου
KM/H - MPH
Επιλογή χλµ.(km) ή µιλίων (mi)
SPD
Τρέχουσα ταχύτητα
AS
Μέση ταχύτητα
MS
Μέγιστη ταχύτητα
TT
Μερικός χιλιοµετρητής
RT
Μερικός χρονοµετρητής
ART
Ολικός χρονοµετρητής
00:00:00
Ωράριο 12h ή 24h
DST
Μερική διανυθείσα απόσταση
ODO
Συνολική διανυθείσα απόσταση
Υπενθύµιση λίπανσης
Υπενθύµιση συντήρησηςµ
Φωτισµός οθόνης
Εξαντληµένη µπαταρία
1
2
LO
1 2
DSTODO
888
88
88
1 2
DSTODO
888
88
88
321 4
AR TT
88:88:88
88:88
888
65
AS SPD MS
KM/H
LO
8
88
KM/H
7 8 9
10
10
101010
MX125_GR.book Page 17 Tuesday, October 14, 2003 7:17 PM

χρήση και συντήρηση MX 125
18
ΑΡΧΙΚΕΣ ΡΥΘΜΙΣΕΙΣ
Αλλαγή µετρικού συστήµατος
(KM/H ή MPH)
u
Πιέστε ταυτόχρονα τα τρία κουµπιά για
περίπου 2 δ., µετά πιέστε ένα
οποιοδήποτε για να αρχίσετε.
u
Πιέστε το αριστερό κουµπί για αλλαγή
της µονάδας µέτρησης από “km” σε
“mi” (KM/H σε MPH) ή αντίστροφα.
u
Για επιβεβαίωση της επιλογής πιέστε το
κεντρικό κουµπί “MODE” για περίπου
1,5 δ. και συνεχίστε µε τη ρύθµιση της
διαµέτρου του τροχού “WS”.
Αφού πιέσετε το κουµπί MODE, στην
οθόνη αριστερά, ε µ φανίζεται η
διάµετρος του τρέχοντος τροχού και το
πρώτο στοιχείο που αναβοσβήνει.
MODE
KM/H
MODE
M/H
MODE
55
21
1
MX125_GR.book Page 18 Tuesday, October 14, 2003 7:17 PM

19
χρήση και συντήρηση MX 125
Ρύθµιση διαµέτρου τροχού “WS”
u
Για να αλλάξετε την ένδειξη που
αναβοσβήνει, πιέστε το αριστερό
κουµπί.
u
Πιέστε το κουµπί δεξιά για µετάβαση
στην επόµενη τιµή και πιέστε ξανά το
κουµ πί αριστερά για αλλαγή της
ένδειξης.
Τιµή ρύθµισης 1850.
u
Για να επιβεβαιώσετε τη ρύθµιση πιέστε
το κεντρικό κουµπί “MODE” για περίπου
1,5 δ. και συνεχίστε µε τη ρύθµιση της
ώρας.
Αφού πιέσετε το κουµπί MODE, στην
κεντρική οθόνη, εµ φανίζεται να
αναβοσβήνει η ένδειξη της ώρας (24h ή
12h).
MODE
55
1111
1
KM/H
MODE
55
1111
1
KM/H
MODE
55
1919
1
KM/H
MODE
MX125_GR.book Page 19 Tuesday, October 14, 2003 7:17 PM

χρήση και συντήρηση MX 125
20
Επιλογή ώρας
u
Πιέζοντας το κουµπί αριστερά επιλέγετε
τον τρόπο εµφάνισης της ώρας (24h ή
12h).
u
Πιέστε το κουµπί δεξιά για να περάστε
στη ρύθµιση “ώρα”. Πιέστε το κουµπί
αριστερά για να αλλάξετε την
εµφανιζόµενη τιµή.
u
Πιέστε το κουµπί δεξιά για να περάσετε
στη ρύθµιση “λεπτά”. Χρησιµοποιήστε
ξανά το κουµπί αριστερά για αλλαγή της
εµφανιζόµενης τιµής.
u
Για επιβεβαίωση της ρύθµισης πιέστε το
κεντρικό κουµπί “MODE” για περίπου
1,5 δ. και συνεχίστε µε τον προληπτικό
έλεγχο λίπανσης.
Μόλις πιέσετε το κουµπί MODE, στην
οθόνη αριστερά εµ φανίζεται το
σύµβολο λίπανσης και δίπλα, να
αναβοσβήνει, ο αριθµός προληπτικών
επεµβάσεων που πρέπει να γίνουν.
MODE
12:00:- -
12H
MODE
12:00:- -
24H
MODE
17:50:- -
24H
MODE
1
00
00
1
MX125_GR.book Page 20 Tuesday, October 14, 2003 7:17 PM

21
χρήση και συντήρηση MX 125
Προληπτικός έλεγχος λίπανσης
Η προγραµµατισµ ένη περίοδος
προληπτικής λίπανσης έχει ήδη
καθοριστεί στα 100 km (60 mi) για το
δίκυκλο 1 και 300 km (200 mi) για το
δίκυκλο 2.
Για ενδεχόµενη αλλαγή της περιόδου
λίπανσης, δείτε στη σελ.25 (ΡΥΘΜΙΣΕΙΣ
ΣΤΑΝΤΑΡ).
u
Πιέζοντας το κουµπί αριστερα µπορείτε
να αλλάξετε την τιµή του στοιχείου.
u
Πιέστε το κουµπί δεξιά για να περάσετε
στην επόµενη τιµή.
u
Για επιβεβαίωση της ρύθµισης πιέστε το
κεντρικό κουµπί “MODE” για περίπου
1,5 δ. και συνεχίστε µε τον προληπτικό
έλεγχο συντήρησης.
Εάν η λειτουργία ελέγχου λίπανσης δεν
χρησιµοποιείται, επιλέξτε για όλες τις
τιµές το µηδέν.
Μόλις πατήσετε το κουµπί MODE, στην
οθόνη αριστερά, ε µ φανίζεται το
σύµβολο συντήρησης και δίπλα, να
αναβοσβήνει, ο αριθµός προληπτικών
επεµβάσεων που πρέπει να γίνουν.
Έλεγχοι που διαχειρίζεται ο χρήστης.
Να µην συγχέονται µε τα
προγραµµατισµένα σέρβις.
MODE
2
00
00
1
MODE
2
00
00
1
MODE
3
00
00
MX125_GR.book Page 21 Tuesday, October 14, 2003 7:17 PM

χρήση και συντήρηση MX 125
22
Προληπτικός έλεγχος συντήρησης
Η προγραµµατισµ ένη περίοδος
προληπτικής συντήρησης έχει ήδη
καθοριστεί στα 300 km (200 mi) για το
δίκυκλο 1 και στα 990 km (600 mi) για το
δίκυλκλο 2.
Για ενδεχόµενη αλλαγή της περιόδου
λίπανσης, δείτε στη σελ.25 (ΡΥΘΜΙΣΕΙΣ
ΣΤΑΝΤΑΡ).
u
Πιέζοντας το κουµπί αριστερα µπορείτε
να αλλάξετε την τιµή του στοιχείου.
u
Πιέστε το κουµπί δεξιά για να περάσετε
στην επόµενη τιµή.
u
Για επιβεβαίωση της ρύθµισης πιέστε το
κεντρικό κουµπί “MODE” για περίπου
1,5 δ. και συνεχίστε µε τη ρύθµιση της
συνολικής απόστασης (ODO).
Μόλις πιέσετε το κουµπί MODE, στην
οθόνη αριστερά εµφανίζεται η ένδειξη
ODO.
Έλεγχοι που διαχειρίζεται ο χρήστης.
Να µην συγχέονται µε τα
προγραµµατισµένα σέρβις.
MODE
4
00
00
1
MODE
4
00
00
1
MODE
00
00
1
000
ODO
MX125_GR.book Page 22 Tuesday, October 14, 2003 7:17 PM

23
χρήση και συντήρηση MX 125
Έλεγχος συνολικής απόστασης (ODO)
u
Πιέζοντας το κουµπί αριστερα µπορείτε
να αλλάξετε την τιµή του στοιχείου.
u
Πιέστε το κουµπί δεξιά για να περάσετε
στην επόµενη τιµή.
u
Για επιβεβαίωση της ρύθµισης πιέστε το
κεντρικό κουµπί “MODE” για περίπου
1,5 δ. και συνεχίστε µε τη ρύθµιση της
συνολικής διαδροµής (ART).
Μόλις πιέσετε το κουµπί MODE, στην
κεντρική οθόνη εµφανίζεται η ένδειξη
ART.
MODE
00
00
1
300
ODO
MODE
00
00
1
300
ODO
MODE
ART
00:00
00
MX125_GR.book Page 23 Tuesday, October 14, 2003 7:17 PM

χρήση και συντήρηση MX 125
24
Έλεγχος χρόνου συνολικής διαδροµής
(ART)
u
Πιέζοντας το κουµπί αριστερα µπορείτε
να αλλάξετε την τιµή του στοιχείου.
u
Πιέστε το κουµπί δεξιά για να περάσετε
στην επόµενη τιµή.
u
Για επιβεβαίωση της ρύθµισης πιέστε το
κεντρικό κουµπί “MODE” για περίπου 2
δ. και ολοκληρώστε τις αρχικές
ρυθµίσεις.
MODE
ART
00:00
20
MODE
ART
00:00
20
MODE
1
DST SPD
KM/H
11:53:48
0
00
00
0
RT
0:00
MX125_GR.book Page 24 Tuesday, October 14, 2003 7:17 PM

25
χρήση και συντήρηση MX 125
Προγραµµατισµός δεύτερου δικύκλου
Κρατώντας πατηµένο για περίπου 5 δ. το
δεξί κουµπί στην αριστερή οθόνη,
εµφανίζεται η διάµετρος τροχού “WS” του
δευτέρου δικύκλου, µετά από µερικά
δευτερόλεπτα, αυτόµατα ενεργοποιείται το
µενού του δεύτερου δικύκλου.
Πιέζοντας τα δύο εξωτερικά κουµπιά
για περίπου 2 δ. ενεργοποιείται το
πρόγραµµα µετατροπής των ΣΤΑΝΤΑΡ
ΡΥΘΜΙΣΕΩΝ του δευτέρου δικύκλου
(bike 2).
ΡΥΘΜΙΣΕΙΣ ΣΤΑΝΤΑΡ
Πιέζοντας τα δύο εξωτερικά κουµπιά
για περίπου 2 δ. ενεργοποιείται το
πρόγραµµα µετατροπής των ΣΤΑΝΤΑΡ
ΡΥΘΜΙΣΕΩΝ.
Από το µενού αυτό µπορείτε να αλλάξετε
τη διάµετρο του τροχού, τις ρυθµίσεις
ώρας, την υπενθύµιση λίπανσης και
συντήρησης του δικύκλου, τη συνολική
διανυθείσα απόσταση (ODO) και το χρόνο
συνολικής διαδροµής (ART).
Η αλλαγή του µετρικού συστήµατος από
KM/H σε MPH ή αντίστροφα, γίνεται µόνο
µε ενεργοποίηση του µενού ΑΡΧΙΚΕΣ
ΡΥΘΜΙΣΕΙΣ.
1
DST SPD
KM/H
11:53:48
0
00
00
0
RT
0:00
MODE
2
50
20
MODE
1
DST SPD
KM/H
11:53:48
0
00
00
0
RT
0:00
MODE
55
21
1
WS
CLOCK ODO ART WS
MX125_GR.book Page 25 Tuesday, October 14, 2003 7:17 PM

χρήση και συντήρηση MX 125
26
ΡΥΘΜΙΣΗ/ΕΜΦΑΝΙΣΗ ΠΑΡΑΜΕΤΡΩΝ
ΣΤΗΝ ΟΘΟΝΗ
Πιέζοντας το κεντρικό κουµπί MODE
εµφανίζονται διαδοχικά οι διάφορες
οθόνες ρύθµισης.
Κατά τη διάρκεια λειτουργίας, εµφανίζεται
η οθόνη (A), δείχνοντας την διανυθείσα
απόσταση από τον τελευταίο µηδενισµό
(TT), την ταχύτητα, την ώρα και το χρόνο
µερικής διαδροµής (RT).
Πιέζοντας το κεντρικό κουµπί “MODE”
εµφανίζεται η οθόνη (B) και, εφόσον
ξαναπατηθεί, η οθόνη (C).
Οι οθόνες (B και C) παραµένουν ορατές
µ όνο για 5 δ. και στη συνέχεια
επενέρχεται η οθόνη (A).
MODE
1
A
DST
RT
SPD
KM/H
11:53:48
0:00
0
00
0
0
1
DST
0
MODE
A
RT
SPD
KM/H
11:53:56
0:00
0
00
0
MODE
1
B
DST
TT
AS
KM/H
11:53:49
0:00
0
00
00
0
1
MODE
C
ODO
ART
MS
KM/H
11:53:50
0:00
0
00
00
0
MX125_GR.book Page 26 Tuesday, October 14, 2003 7:17 PM

27
χρήση και συντήρηση MX 125
Πιέζοντας ταυτόχρονα το κεντρικό κουµπί
“MODE” και το δεξί κουµπί για περίπου 2
δ. εµφανίζεται η οθόνη (D) προληπτικός
έλεγχος συντήρησης και, εφόσον
ξαναπατηθεί, η οθόνη (E) προληπτικός
έλεγχος λίπανσης.
Οι οθόνες (D και E) παραµένουν ορατές
για 5 δ. και αν δεν πατηθεί κανένα
κουµπί επανέρχεται η οθόνη (A).
MODE
1
DST SPD
KM/H
11:49:08
7
96
53
30
A
RT
30:42
1
MODE
1
SPD
KM/H
11:49:10
8
02
47
35
D
RT
30:44
1
1
SPD
KM/H
11:49:12
8
04
47
35
E
RT
30:46
1
MX125_GR.book Page 27 Tuesday, October 14, 2003 7:17 PM

χρήση και συντήρηση MX 125
28
ΑΠΕΝΕΡΓΟΠΟΙΗΣΗ
ΠΡΟΓΡΑΜΜΑΤΙΣΜΕΝΩΝ ΕΠΕΜΒΑΣΕΩΝ
Όταν ξεπεραστούν τα προεπιλεγµένα όρια
προγραµµατισµ ένων επεµ βάσεων
συντήρησης και λίπανσης, το στοιχείο στην
αριστερή οθόνη αναβοσβήνει.
Για να σβήσει κρατήστε πατηµ ένα
ταυτόχρονα για περίπου 2 δ.
το αριστερό και το δεξί κουµπί.
u
Πιέστε για περίπου 1,5 δ. το κεντρικό
κουµπί “MODE” για να προσπεράσετε
την οθόνη διαµέτρου του τροχού.
u
Πιέστε ξανά για περίπου 1,5 δ. το
κεντρικό κουµπί “MODE” για να
προσπεράσετε την οθόνη ρύθµισης της
ώρας και να αρχίσετε τη ρύθµ ιση
προληπτικής συντήρησης.
u
Πιέστε το αριστερό κουµπί για να
αλλάξετε την τιµή του στοιχείου.
u
Πιέστε το δεξί κουµπί για επιβεβαίωση
της επιλεγµένης τιµής και µετάβαση στο
επόµενο στοιχείο.
u
Πιέστε το κεντρικό πλήκτρο “MODE” για
περίπου 1,5 δ. για επιβεβαίωση των
στοιχείων για την προληπτική λίπανση
και µετάβαση στην επόµενη ρύθµιση.
u
Πιέστε το αριστερό κουµπί για να
αλλάξετε την τιµή του στοιχείου.
u
Πιέστε το δεξί κουµπί για επιβεβαίωση
της επιλεγµένης τιµής και µετάβαση στο
επόµενο στοιχείο.
u
Πιέστε ξανά το δεξί κουµπί µέχρι,
περίπου 2 δ., να εµφανιστεί ξανά η
αρχική οθόνη (A).
MODE
MODE
1
55
21
1
00
00
1
MODE MODE MODE
1
00
00
2
1
00
00
2
1
00
00
3
MODE
1
00
00
4
MODE
1
00
00
4
MODE
1
DST SPD
KM/H
11:49:08
7
96
53
30
RT
30:42
1
MX125_GR.book Page 28 Tuesday, October 14, 2003 7:17 PM

29
χρήση και συντήρηση MX 125
A
B
A
B
MODE
1
DST
RT
SPD
KM/H
11:49:08
1
30:42
7
96
53
36
MODE
1
DST
RT
SPD
KM/H
11:49:09
1
30:43
7
97
53
36
MODE
1
DST
TT
AS
KM/H
11:49:14
0:05
8
98
53
34
1
DST
TT
AS
KM/H
11:49:16
0:07
8
05
54
34
ΧΡΟΝΟΜΕΤΡΟ
Το computer πολλαπλών λειτουργιών είναι
εφοδιασµένο µε σύστηµα χρονοµέτρησης
που εµφανίζεται στην οθόνη (B) µε τον ίδιο
τρόπο όπως και ο µερικός χιλιοµετρητής
(TT).
u
Για ενεργοποίηση του χρονόµετρου
πιέστε το αριστερό κουµπί.
u
Πιέστε το κεντρικό κουµπί “MODE” για
εµφάνιση της οθόνης (B).
u
Πιέστε ξανά το αριστερό κουµπί για να
σταµατήσει η χρονοµέτρηση.
MX125_GR.book Page 29 Tuesday, October 14, 2003 7:17 PM

χρήση και συντήρηση MX 125
30
C
A
B
MODE
1
DST
RT
SPD
KM/H
11:49:08
1
30:42
7
96
53
36
MODE
1
DST
RT
SPD
KM/H
11:53:48
1
30:42
7
96
53
36
MODE
1
DST
RT
KM/H
11:53:49
0:00
0
00
0
30
SPD
MODE
1
ODO
ART
MS
KM/H
88:88:88
0:98
0
58
82
0
MODE
1
DST
TT
KM/H
11:53:49
0:00
0
00
0
00
AS
ΜΗ∆ΕΝΙΣΜΟΣ ΜΕΡΙΚΩΝ ΣΤΟΙΧΕΙΩΝ
Με αυτή τη λειτουργία µπορείτε να
µηδενίσετε τα µερικά στοιχεία που έχουν
καταχωρηθεί στο computer,
τα στοιχεία αυτά είναι:
– Μερική διανυθείσα απόσταση (DST)
– Μερικός χιλιοµετρητής (TT)
– Μερικός χρόνος διαδροµής (RT)
– Μέγιστη ταχύτητα (MS)
– Μέση ταχύτητα (AS)
u
Πιέστε ταυτόχρονα για περίπου 2 δ. το
αριστερό κουµπί και το κεντρικό κουµπί
“MODE”.
Εµφανίζεται η οθόνη (A) µε τα αντίστοιχα
στοιχεία µηδενισµένα.
u
Πιέστε το κεντρικό κουµπί “MODE” για
για να εµφανιστεί η οθόνη (B) και να
µηδενίσετε τα στοιχεία.
u
Πιέστε ξανά το κεντρικό κουµπί “MODE”
για να εµφανιστεί η οθόνη (C) και να
µηδενίσετε τα στοιχεία.
Οι οθόνες (B και C) παραµένουν ορατές
µ όνο για 5 δ. και στη συνέχεια
επενέρχεται η οθόνη (A).
MX125_GR.book Page 30 Tuesday, October 14, 2003 7:17 PM

31
χρήση και συντήρηση MX 125
MODE
1
DST
RT
SPD
KM/H
11:49:13
1
30:47
0
64
54
0
MODE
MODE
1
64
54
1
74
54
1
54
54
DST
DST
DST
MODE
1 2
DSTODO
AR TT
ASS PD MS
KM/H
LO
88:88:88
88:88
8
888
888
88
88
88
3
3
ΕΥΘΥΓΡΑΜΜΙΣΗ ΤΩΝ ΜΕΡΙΚΩΝ
ΣΤΟΙΧΕΙΩΝ (TRIP)
Η µερική διανυθείσα απόσταση (DST)
µπορεί να µεταβληθεί αυξάνοντας ή
µειώνοντας την εµφανιζόµενη τιµή στην
οθόνη.
Η λειτουργία αυτή µπορεί να
χρησιµ οποιηθεί κατά τη διάρκεια
αθλητικών εκδηλώσεων για την
επανευθυγράµµιση της τιµ ής που
εµφανίζεται στην οθόνη µε την τιµή σχετική
µε τη διαδροµή.
Μη χρησιµοποιείτε αυτή τη λειτουργία
για το µηδενισµό της τιµής (DST), για το
µηδενισµό των στοιχείων δείτε στη
σελ. 30 (ΜΗ∆ΕΝΙΣΜΟΣ ΜΕΡΙΚΩΝ
ΣΤΟΙΧΕΙΩΝ).
u
Πιέστε το κεντρικό κουµπί “MODE” για
περίπου 3 δ.
u
Πιέστε το δεξί κουµπί για αύξηση της
τιµής.
u
Πιέστε το αριστερό κουµπί για µείωση
της τιµής.
u
Μετά από 3 δ. εµφανίζεται η οθόνη (Α)
µε τις αντίστοιχες µεταβολές.
ΦΩΤΙΣΜΟΣ
u
Πιέζοντας το το δεξί κουµπί
ενεργοποιείται ο φωτισµός της οθόνης.
Το φως σβήνει αυτόµατα µετά από 4
δευτερόλεπτα.
ΑΝΤΙΚΑΤΑΣΤΑΣΗ ΜΠΑΤΑΡΙΑΣ
u
Αποσυναρµολογήστε το εµπρός φέρινγκ
στερέωσης του φαναριού.
u
Ξεβιδώστε τις 2 βίδες (1) που
συγκρατούν το καπάκι (2) της βάσης
οργάνου στην µεταλλική πλάκα.
u
Αποσυνδέστε τον διοδικό συνδετήρα του
ταχύµετρου.
u
Αφαιρέστε το ψηφιακό όργανο (3) από το
κέλυφος (2) που το συγκρατεί πιέζοντας
ελαφρά στην πλευρά της οθόνης υγρών
κρυστάλλων.
u
Αποσυνδέστε τη βάση από το σώµα του
ψηφιακού οργάνου.
u
Ξεβιδώστε την τάπα κάλυψης της
µπαταρίας (4) που βρίσκεται πίσω από
το ψηφιακό όργανο.
u
Αντικαταστήστε τη µπαταρία “CR2032”.
MX125_GR.book Page 31 Tuesday, October 14, 2003 7:17 PM

χρήση και συντήρηση MX 125
32
ΒΑΣΙΚΑ ΧΕΙΡΙΣΤΗΡΙΑ ΜΟΝΗΣ ΛΕΙΤΟΥΡΓΙΑΣ
ΧΕΙΡΙΣΤΗΡΙΑ ΣΤΗΝ ΑΡΙΣΤΕΡΗ ΠΛΕΥΡΑ ΤΟΥ ΤΙΜΟΝΙΟΥ
Τα ηλεκτρικά εξαρτήµατα λειτουργούν µόνο όταν ο
διακόπτης εκκίνησης είναι στη θέση “
”.
1) ΚΟΥΜΠΙ ΣΙΝΙΑΛΟΥ ΜΕΓΑΛΗΣ ΣΚΑΛΑΣ (
)
Σας επιτρέπει να κάνετε σινιάλο µε τη µεγάλη σκάλα σε
περίπτωση κινδύνου ή έκτακτης ανάγκης.
2) ΜΑΝΕΤΑ ΕΚΚΙΝΗΣΗΣ ΜΕ ΚΡΥΟ (
)
Περιστρέφοντας αριστερόστροφα (Θέση A) το λεβιέ “
”,
τίθεται σε λειτουργία το τσοκ για την εκκίνηση του κρύου
κινητήρα.
Για να απενεργοποιήσετε το τσοκ, επαναφέρατε το µοχλό “
”
στην αρχική του θέση.
3) ∆ΙΑΚΟΠΤΗΣ ΦΛΑΣ (
( )
Μετακινήστε το διακόπτη αριστερά για να δείξετε ότι θέλετε να
στρίψετε αριστερά.
Μετακινήστε το διακόπτη δεξιά για να δείξετε ότι θέλετε να
στρίψετε δεξιά.
Πιέστε το διακόπτη για απενεργοποίηση των φλας.
4) ΚΟΥΜΠΙ ΚΟΡΝΑΣ (
)
Όταν το πιέζουµε ενεργοποιεί την κόρνα.
5) ∆ΙΑΚΟΠΤΗΣ ΦΩΤΩΝ ( - )
Όταν βρίσκεται στη θέση “
”, ανάβει η µεγάλη σκάλα φώτων.
Όταν βρίσκεται στη θέση “
”, ανάβει η µεσαία σκάλα φώτων.
2
1
4
5
3
MX125_GR.book Page 32 Tuesday, October 14, 2003 7:17 PM

33
χρήση και συντήρηση MX 125
∆ΙΑΚΟΠΤΗΣ ΕΚΚΙΝΗΣΗΣ
Ο διακόπτης εκκίνησης (1) βρίσκεται στο
πάνω τµήµα του λαιµού του τιµονιού.
Το κλειδί ενεργοποιεί το διακόπτη
εκκίνησης/κλειδαριά τιµονιού.
µε το δίκυκλο προµηθεύονται δύο
κλειδιά (ένα εφεδρικό).
ΚΛΕΙ∆ΑΡΙΑ ΤΙΜΟΝΙΟΥ
Ποτέ µη γυρίζετε το κλειδί στη θέση “+”
ενώ οδηγείτε, για να µη χάσετε τον
έλεγχο του δικύκλου.
ΛΕΙΤΟΥΡΓΙΑ
Για κλείδωµα του τιµονιού:
u
γυρίστε το τιµόνι εντελώς αριστερά.
u
Βάλτε το κλειδί στη θέση “
”.
Γυρίστε το κλειδί και ταυτόχρονα
γυρίστε το τιµόνι.
u
Πιέστε το κλειδί και γυρίστε το
αριστερόστροφα, γυρίστε ελαφρά το
τιµόνι µέχρι να βάλετε το κλειδί στη θέση
“
+
”.
u
Βγάλτε το κλειδί.
Θεση Λειτουργία
Αφαίρεση
κλειδιούs
+
Κλειδαριά
τιµονιού
Το τιµόνι
είναι
κλειδωµένο.
∆εν µπορείτε
να βάλετε
εµπρός τον
κινητήρα
ούτε να
ανάψετε τα
φώτα.
Μπορείτε να
βγάλετε το
κλειδί.
Ο κινητήρας
και τα φώτα
δεν µπορούν
να τεθούν σε
λειτουργία.
Μπορείτε να
βγάλετε το
κλειδί.
Ο κινητήρας
και τα φώτα
µπορούν να
τεθούν σε
λειτουργία.
∆εν µπορείτε
να βγάλετε το
κλειδί
MX125_GR.book Page 33 Tuesday, October 14, 2003 7:17 PM

χρήση και συντήρηση MX 125
34
2 1
4
2 3
ΒΟΗΘΗΤΙΚΟΣ ΕΞΟΠΛΙΣΜΟΣ ΘΗΚΗLL
ΜΙΚΡΟΑΝΤΙΚΕΙΜΕΝΩΝ / ΚΙΤ
ΕΡΓΑΛΕΙΩΝ
Η θήκη µικροαντικειµ ένων/ κιτ
εργαλείωνκάτω από το πλαϊνό φέρινγκ. Για
πρόσβαση σ’αυτό:
u
Αφαιρέστε το αριστερό πλαϊνό φέρινγκ,
βλέπε σελ.58 (ΑΦΑΙΡΕΣΗ ΠΛΑΪΝΑ
ΦΕΡΙΝΓΚ).
u
περιστρέψτε αριστερόστροφα κατά 1/4
της στροφής τη βίδα (1) ταχείας
στερέωσης.
u
Αφαιρέστε τη θήκη από την υποδοχή
στερέωσης (2).
u
Τραβήξτε από την πίσω πλευρά το
καπάκι της θήκης (3).
ΣΗΜΑΝΤΙΚΟ Κατά την
επανασυναρµολόγηση τοποθετήστε
σωστά τον πείρο (4).
Το κιτ εργαλείων (2) περιέχει:
–1 θήκη
–1 εξαγωνικό λυγισµένο κλειδί 4 mm
–1 εξαγωνικό λυγισµένο κλειδί 5 mm
–1 εξαγωνικό λυγισµένο κλειδί 6 mm
–1 εξαγωνικό λυγισµένο κλειδί 8 mm
–1 γερµανικό κλειδί 7x8 mm
–1 γερµανικό κλειδί 10x13 mm
–1 κλειδί γερµανικό κλειδί 19 mm
–1 διπλό σωληνωτό κλειδί 21x24 mm
–1 διπλό κατσαβίδι ίσιο/σταυρωτό
–1 λαβή για κατσαβίδι
–1 σταυροκατσάβιδο 3x70 mm
Μέγιστο επιτρεπόµενο βάρος: 1,5 kg
ΓΑΝΤΖΟΣ ΚΡΑΝΟΥΣ
Χάρη στο γάντζο δεν είναι αναγκαίο να
µεταφέρετε το κράνος οπουδήποτε όταν
σταθµεύετε το δίκυκλο.
Μην οδηγείτε µε το κράνος κρεµασµένο
στο γάντζο. Αυτό µπορεί να θέσει σε
κίνδυνο την ασφάλεια κατά την οδήγηση.
Για να κρεµάσετε το κράνος:
u
Βάλτε το κλειδί στην κλειδαριά (5).
u
Περιστρέψτε το κλειδί δεξιόστροφα.
u
Περάστε το λουράκι του κράνους µέσα
από το γάντζο (6).
u
Περιστρέψτε το κλειδί αριστερόστροφα.
Βεβαιωθείτε ότι κλείσατε καλά το
γάντζο (6).
6
5
MX125_GR.book Page 34 Tuesday, October 14, 2003 7:17 PM

35
χρήση και συντήρηση MX 125
ΕΙ∆ΙΚΑ ΕΡΓΑΛΕΙΑ -
Για την εκτέλεση κάποιων ειδικών
εργασιών, χρησιµοποιήστε τα ακόλουθα
ειδικά εργαλεία (ζητήστε τα από τον
Επίσηµο Αντιπρόσωπο της aprilia)
Εργαλείο Εργασίες Σελ
Κλειδί a
settore µε την
nasello
πινακασ (3)
Ρύθµιση
δακτυλίου πίσω
αµορτισέρ
42
Ειδικό κλειδί
(σωληνωτό)
(4)
Ρύθµιση διακένου
συµπλέκτη 69
MX125_GR.book Page 35 Tuesday, October 14, 2003 7:17 PM

χρήση και συντήρηση MX 125
36
ΒΑΣΙΚΑ ΜΕΡΗ
ΚΑΥΣΙΜΟ
Το χρησιµοποιούµενο καύσιµο για τη
λειτουργία των κινητήρων εσωτερικής
καύσης είναι εξαιρετικά εύφλεκτο και
µπορεί να γίνει εκρηκτικό κάτω από
ορισµένες συνθήκες. Ενδείκνυται να
κάνετε τον ανεφοδιασµ ό και τις
εργασίες συντήρησης σε αεριζόµενο
χώρο και µε σβηστό τον κινητήρα. Μην
καπνίζετε κατά τον ανεφοδιασµό και
κοντά σε αναθυµιάσεις καυσίµου, σε
κάθε περίπτωση να αποφεύγετε
τελείως την επαφή µε ελεύθερες
φλόγες, σπινθήρες και οποιαδήποτε
άλλη πηγή που θα µπορούσε να
προκαλέσει την ανάφλεξη ή την έκρηξη.
Επίσης, αποφεύγετε τη διαρροή
καυσίµου από το στόµιο, επειδή µπορεί
να αναφλεγεί όταν έρθει σε επαφή µε
επιφάνειες του κινητήρα που έχουν
υψηλές θερµοκρασίες.
Στην περίπτωση που κατά λάθος χυθεί
βενζίνη, πριν βάλετε εµπρός, ελέγξτε αν
η περιοχή είναι εντελώς στεγνή. Η
βενζίνη διαστέλλεται µε τη θερµότητα
και όταν εκτίθεται στην ηλιακή
ακτινοβολία.
Γι’αυτό το λόγο µην υπερχειλίζετε το
ρεζερβουάρ.
Κλείνετε καλά την τάπα µετά τον
ανεφοδιασµό. Αποφεύγετε την επαφή
του δέρµατος µε το καύσιµο, την
εισπνοή αναθυµιάσεων, την κατάποση
και τη µετάγγιση από ένα δοχείο σε
άλλο χρησιµοποιώντας ένα σωλήνα.
ΜΗΝ ΧΥΝΕΤΕ ΤΟ ΚΑΥΣΙΜΟ ΣΤΟ
ΠΕΡΙΒΑΛΛΟΝ.
ΦΥΛΑΞΤΕ ΤΟ ΜΑΚΡΙΑ ΑΠΟ ΤΑ ΠΑΙ∆ΙΑ
Χρησιµοποιήστε αµόλυβδη βενζίνη κατά
DIN 51 607, ελάχιστος αριθµός οκτανίων
95 (N.O.R.M.) και 85 (N.O.M.M.).
ΧΩΡΗΤΙΚΟΤΗΤΑ ΡΕΖΕΡΒΟΥΑΡ
(µαζί µε τη ρεζέρβα): 11 λίτρα
ΡΕΖΕΡΒΑ ΡΕΖΕΡΒΟΥΑΡ
1,3 λίτρα (µηχανική ρεζέρβα)
Για τον ανεφοδιασµό καυσίµου:
u
Ξεβιδώστε και βγάλτε την τάπα του
ρεζερβουάρ (1).
u
Κάντε ανεφοδιασµό καυσίµου.
u
ΛΑ∆ΙΑ ΚΙΒΩΤΙΟΥ ΤΑΧΤΗΤΩΝ
Να ελέγχετε κάθε 4000 km τη στάθµη
λαδιού του κιβωτίου ταχυτήτων, βλέπε
σελ.60 (ΕΛΕΓΧΟΣ ΣΤΑΘΜΗΣ ΛΑ∆ΙΟΥ
ΣΤΟ ΚΙΒΩΤΙΟ ΤΑΧΥΤΗΤΩΝ ΚΑΙ
ΣΥΜΠΛΗΡΩΜΑ).
Αλλάξτε τα λάδια του κιβωτίου ταχυτήτων
αµ έσως µετά το στρώσιµ ο και στη
συνέχεια κάθε 12000 km, βλέπε σελ.61
(ΑΝΤΙΚΑΤΑΣΤΑΣΗ ΛΑ∆ΙΑ ΚΙΒΩΤΙΟΥ
ΤΑΧΥΤΗΤΩΝ).
Χρησιµ οποιήστε λάδια καλής
ποιότητας και βαθµών 75W-90, βλέπε
σελ. 88 (ΠΙΝΑΚΑΣ ΛΙΠΑΝΤΙΚΩΝ).
Το λάδι µπορείνα προκαλέσει σοβαρές
ζηµιές στο δέρµα αν χρησιµοποιείται
για µεγάλο χρονικό διάστηµα και σε
καθηµερινή βάση. Μετά από κάθε
χρήση συνιστάται να πλένετε τα χέρια
σας. nΜην διασκορπίζετε το λάδι στο
περιβάλλον.
Συνιστάται, αφού το βάλετε σε ένα καλά
κλεισµένο δοχείο, να το παραδώσετε
στο βενζινάδικο από το οποίο το
αγοράζετε συνήθως ή σεένα
εξουσιοδοτηµένο κέντρο συλλογής
λαδιών. Όταν κάνετε συντήρηση,
συνιστάται η χρήση γαντιών από λατέξ.
MX125_GR.book Page 36 Tuesday, October 14, 2003 7:17 PM

37
χρήση και συντήρηση MX 125
ΡΕΖΕΡΒΟΥΑΡ ΛΑ∆ΙΟΥ ΜΙΞΗΣ
Συµπληρώστε λάδι µίξης στο ρεζερβουάρ
κάθε 500 km.
Το δίκυκλο διαθέτει ξεχωριστό σύστηµα
µίξης που επιτρέπει την ανάµιξη της
βενζίνης µε το λάδι για τη λίπανση του
κινητήρα, βλέπε σελ. 88 (ΠΙΝΑΚΑΣ
ΛΙΠΑΝΤΙΚΩΝ).
Όταν µπείτε σε ρεζέρβα ανάβει η
ενδεικτική λυχνία ρεζέρβας λαδιού µίξης
“
” που υπάρχει στο ταµπλό, βλέπε
σελ.15 (ΟΡΓΑΝΑ ΚΑΙ ∆ΕΙΚΤΕΣ).
Η χρήση του δικύκλου χωρίς λάδι µίξης
προκαλεί σοβαρές ζηµ ιές στον
κινητήρα.
Στην περίπτωση εξάντλησης του
λαδιού µίξης ή εάν αφαιρεθεί ο
σωλήνας λαδιού µίξης, πρέπει να
απευθυνθείτε σε έναν Επίσηµ ο
Αντιπρόσωπο της aprilia, ο οποίος και
θα προνοήσει για την εκκένωση.
Η επέµβαση αυτή είναι απαραίτητη
δεδοµ ένου ότι η λειτουργία του
κινητήρα µε αέρα µέσα στο σύστηµα
λαδιού µίξης µπορεί να προκαλέσει
σοβαρή ζηµιά στον ίδιο τον κινητήρα.
Για την εισαγωγή του λαδιού µίξης στο
ρεζερβουάρ:
u
Αφαιρέστε το αριστερί πλαϊνό φέρινγκ,
βλέπε σελ.58 (ΑΦΑΙΡΕΣΗ ΠΛΑΪΝΑ
ΦΕΡΙΝΓΚ).
u
Αφαιρέστε την τάπα (1).
ΧΩΡΗΤΙΚΟΤΗΤΑ ΡΕΖΕΡΒΟΥΑΡ
(µαζί µε τη ρεζέρβα): 1,25 λίτρα
ΡΕΖΕΡΒΑ ΡΕΖΕΡΒΟΥΑΡ: 0,5 λίτρα
Μετά από κάθε χρήση λαδιού να
πλένετε καλά τα χέρια σας.
Μην διασκορπίζετε το λάδι στο
περιβάλλον.
ΦΥΛΑΞΤΕ ΤΟ ΜΑΚΡΙΑ ΑΠΟ ΤΑ ΠΑΙ∆ΙΑ
MX125_GR.book Page 37 Tuesday, October 14, 2003 7:17 PM

χρήση και συντήρηση MX 125
38
ΥΓΡΟ ΦΡΕΝΩΝ - συστάσεις
Αυτό το δίκυκλο είναι εφοδιασµένο µε
εµπρός και πίσω δισκόφρενο, µε
ξεχωριστά υδραυλικά κυκλώµατα.
Οι παρακάτω πληροφορίες
αναφέρονται σε ένα µόνο υδραυλικό
κύκλωµα φρένων, αλλά ισχύουν και για
τα δύο.
Ξαφνικές αλλαγές του διάκενου ή
µεγάλη ελαστικότητα στη µανέτα του
φρένου, οφείλονται σε προβλήµατα στο
υδραυλικό κύκλωµα.
Σε περίπτωση αµφιβολιών για την καλή
λειτουργία του κυκλώµ ατος των
φρένων και στην περίπτωση που δεν
είστε σε θέση να εκτελέσετε τις
συνήθεις εργασίες ελέγχου,
απευθυνθείτε σε έναν Επίσηµ ο
Αντιπρόσωπο της aprilia.
Τα δισκόφρενα και τα τακάκια δεν
πρέπει να είναι λερωµένα µε λάδι ή
γράσο, ειδικά µετά την εκτέλεση των
εργασιών συντήρησης ή ελέγχου.
Βεβαιωθείτε ότι τα σωληνάκια των
φρένων δεν είναι στριµµένα ή
φθαρµένα.
Προσέξτε να µην εισέλθει κατά λάθος
νερό ή σκόνη στο εσωτερικό του
κυκλώµατος.
Στην περίπτωση επεµ βάσεων
συντήρησης στο υδραυλικό κύκλωµα,
συνιστάται η χρήση γαντιών από λατέξ.
Τα υγρά των φρένων µπορεί να
προκαλέσουν ερεθισµούς αν έλθουν σε
επαφή µε το δέρµα ή τα µάτια.
Πλύντε καλά τα µέρη του σώµατος που
ενδεχοµένως ήρθαν σε επαφή µε τα
υγρά. Επίσης απευθυνθείτε σε έναν
οφθαλµίατρο ή ένα γιατρό αν τα υγρά
έρθουν σε επαφή µε τα µάτια.
Μη διασκορπίζετε τα υγρά στο
περιβάλλον.
ΦΥΛΑΞΤΕ ΤΟ ΜΑΚΡΙΑ ΑΠΟ ΤΑ ΠΑΙ∆ΙΑ
Χρησιµ οποιώντας τα υγρά των
φρένων, προσέξτε να µη χυθούν στα
πλαστικά και τα βαµµένα µέρη, γιατί
µπορεί να τα καταστρέψουν.
∆ΙΣΚΟΦΡΕΝΑ
Τα φρένα είναι όργανα απαραίτητα για
την ασφάλειά σας, γι’αυτό πρέπει να
διατηρούνται σε άριστη κατάσταση. Να
κάνετε έλεγχο πριν από κάθε ταξίδι.
Αντικαταστήστε τα υγρά φρένων κάθε
δύο χρόνια απευθυνόµενοι σε έναν
Επίσηµο Αντιπρόσωπο της aprilia.
Χρησιµοποιείτε υγρά φρένων του
τύπου που καθορίζεται στον πίνακα
λιπαντικών, βλέπε σελ.88 (ΠΙΝΑΚΑΣ
ΛΙΠΑΝΤΙΚΩΝ).
Με την φθορά των τακακιών, η στάθµη του
υγρού στο εσωτερικό του ρεζερβουάρ
αρχίζει να πέφτει για να αντισταθµίσει
αυτόµατα τη φθορά.
Το δοχείο υγρών εµπρός φρένου βρίσκεται
κοντά στο σύνδεσµο της µανέτας του
εµπρός φρένου.
Το δοχείο υγρών του πίσω φρένου
βρίσκεται στη δεξιά πλευρά του δικύκλου
µπροστά από το φίλτρο αέρα.
Να ελέγχετε κατά διαστήµατα τη στάθµη
των υγρών φρένων, βλέπε σελ.39
(ΦΡΕΝΟ ΕΜΠΡΟΣ), σελ.40 (ΦΡΕΝΟ
ΠΙΣΩ) καθώς και τη φθορά στα τακάκι,
βλέπε σελ. 70 (ΕΛΕΓΧΟΣ ΦΘΟΡΑΣ ΣΤΑ
ΤΑΚΑΚΙΑ).
MX125_GR.book Page 38 Tuesday, October 14, 2003 7:17 PM

39
χρήση και συντήρηση MX 125
ΦΡΕΝΟ ΕΜΠΡΟΣ
∆ιαβάστε προσεκτικά στη σελ.38
(ΥΓΡΟ ΦΡΕΝΩΝ - συστάσεις) και
(∆ΙΣΚΟΦΡΕΝΑ).
ΕΛΕΓΧΟΣ
Τοποθετήστε το δίκυκλο σε στερεό και
επίπεδο έδαφος.
Για τον έλεγχο της στάθµης:
u
Τοποθετήστε το δίκυκλο στο σταντ.
u
Στρίψτε το τιµόνι δεξιά, µε τρόπο ώστε το
υγρό που υπάρχει στο ρεζερβουάρ
υγρών φρένων (1) να είναι παράλληλο
µε την ένδειξη “MIN” που υπάρχει στο
τζαµάκι (2).
u
Ελέγξτε αν το υγρό που περιέχει το
δοχείο ξεπερνά την ένδειξη “MIN” που
υπάρχει στο τζαµάκι (2).
u
Σε αντίθετη περίπτωση συµπληρώστε λάδι.
ΣΥΜΠΛΗΡΩΜΑ
Κίνδυνος διαρροής υγρών φρένων.
Μην τραβάτε τη µανέτα του φρένου
όταν οι βίδες (3) είναι χαλαρές ή
προπαντός όταν έχει αφαιρεθεί το
καπάκι του δοχείου υγρών φρένων.
u
Ξεβιδώστε τις βίδες (3).
u
Βγάλτε το καπάκι (4).
∆ιατηρήστε το υγρό στο ρεζερβουάρ
παράλληλο µε το χείλος του
ρεζερβουάρ. Με τον τ΄ροπο αυτό
αποφεύγετε επικίνδυνες διαρροές κατά
το συµπλήρωµα.
u
Αφαιρέστε την τσιµούχα (5).
u
Γεµίστε το ρεζερβουάρ µε υγρό φρένων,
σελ.88 (ΠΙΝΑΚΑΣ ΛΙΠΑΝΤΙΚΩΝ), µέχρι
να καλύψετε εντελώς το τζαµάκι.
u
Επαβατοποθετήστε σωστά την τσιµούχα
(5) στην υποδοχή.
u
Ξαναβάλτε το καπάκι (4).
u
Βιδώστε και σφίξτε τις βίδες (3).
Ελέγξτε την αποτελεσµατικότητα του
φρεναρίσµ ατος. Σε περίπτωση
ανάγκης, απευθυνθείτε σε έναν
Επίσηµο Αντιπρόσωπο της aprilia. Σε
περίπτωση µεγάλης διαδροµής της
µανέτας του φρένου, υπερβολικής
ελαστικότητας ή σε περίπτωση που
υπάρχουν φυσαλλίδες στο κύκλωµα,
απευθυνθείτε σε έναν Επίσηµ ο
Αντιπρόσωπο της aprilia, διότι µπορεί
να χρειάζεται να γίνει εξαέρωση του
κυκλώµατος.
MX125_GR.book Page 39 Tuesday, October 14, 2003 7:17 PM

χρήση και συντήρηση MX 125
40
ΦΡΕΝΟ ΠΙΣΩ
∆ιαβάστε προσεκτικά στη σελ.38
(ΥΓΡΟ ΦΡΕΝΩΝ - συστάσεις) και
(∆ΙΣΚΟΦΡΕΝΑ).
Τοποθετήστε το δίκυκλο σε στερεό και
επίπεδο έδαφος.
u
Στηρίξτε το δίκυκλο σε κάθετη θέση, µε
τρόπο ώστε το υγρό που υπάρχει στο
ρεζερβουάρ υγρών φρένων (1) να είναι
παράλληλο µε την τάπα (2).
u
Ελέγξτε αν το υγρό που περιέχει το
δοχείο ξεπερνά την ένδειξη “MIN”.
u
Αν το υγρό δεν φτάνει τουλάχιστον µέχρι
την ένδειξη “MIN”, συµπληρώστε το.
ΣΥΜΠΛΗΡΩΜΑ
Κίνδυνος διαρροής υγρών φρένων.
Μην τραβάτε τη µανέτα του πίσω
φρένου όταν έχει αφαιρεθεί το καπάκι
του δοχείου υγρών φρένων.
u
Ξεβιδώστε τη βίδα στερέωσης (3) και
αφαιρέστε το ρεζερβουάρ φρένου
αφήνοντάς το συνδεδεµένο µε το
σωλήνα τυ κυκλώµατος πίσω φρένου.
u
Ξεβιδώστε και αφαιρέστε την τάπα (2).
Για να µην χυθεί υγρό φρένων όταν
συµ πληρώνετε, συνιστάται να
διατηρήσετε το υγρό στο ρεζερβουάρ
παράλληλο µε το χείλος του
ρεζερβουάρ (σε οριζόντια θέση) και να
µην αναποδογυρίζετε το ρεζερβουάρ.
u
Αφαιρέστε την τσιµούχα (4).
u
Με µια σύριγγα προσθέστε υγρά φρένων
στο ρεζερβουάρ (1), βλέπε σελ.88
(ΠΙΝΑΚΑΣ ΛΙΠΑΝΤΙΚΩΝ), µέχρι την
ένδειξη “MAX”.
u
Τοποθετήστε σωστά την τσιµούχα (4) και
ξαναβιδώστε την τάπα (2).
u
Στερεώστε το ρεζερβουάρ υγρών πίσω
φρένου µε τη βίδα στερέωσης (3) χωρίς
να ξεχάσετε να βάλετε τη σχετική ροδέλα.
Ελέγξτε την αποτελεσµατικότητα του
φρεναρίσµ ατος. Σε περίπτωση
ανάγκης, απευθυνθείτε σε έναν
Επίσηµο Αντιπρόσωπο της aprilia.
Σε περίπτωση µεγάλης διαδροµής της
µανέτας του φρένου, υπερβολικής
ελαστικότητας ή σε περίπτωση που
υπάρχουν φυσαλλίδες στο κύκλωµα,
απευθυνθείτε σε έναν Επίσηµ ο
Αντιπρόσωπο της aprilia, διότι µπορεί
να χρειάζεται να γίνει εξαέρωση του
κυκλώµατος.
3
2
1
4
2
1
MX125_GR.book Page 40 Tuesday, October 14, 2003 7:17 PM

41
χρήση και συντήρηση MX 125
ΡΥΘΜΙΣΗ ΜΑΝΕΤΑΣ ΠΙΣΩ ΦΡΕΝΟΥ ΩΣ
ΠΡΟΣ ΤΟ ΥΨΟΣ
Η µανέτα φρένου τοποθετείται σε
εργονοµική θέση κατά τη συναρµολόγηση
του δικύκλου.
Αν χρειάζεται µπορείτε να ρυθµίσετε τη
θέση της µανέτας φρένου ως προς το
ύψος:
u
Ξεσφίξτε το κοντραπαξιµάδι (1).
u
Βιδώστε εντελώς το ρεγουλαδόρο του
φρένου (2).
u
Βιδώστε εντελώς το κοντραπαξιµάδι (3)
στη ράβδο ελέγχου αντλίας (4).
u
Βιδώστε εντελώς τη ράβδο ελέγου
αντλίας (4) και στη συνέχεια ξεβιδώστε
3-4 στροφές.
u
Βιδώστε τον ρεγουλαδόρο του φρένου
(2) µέχρι να έρθει η µανέτα φρένου (5)
στο επιθυµητό ύψος
u
Μπλοκάρετε το ρεγουλαδόρο του
φρένου (2) µε το κοντραπαξιµάδι (1).
u
Ξεβιδώστε τη ράβδο χειρισµού αντλίας
(4) και µετακινήστε την µέχρι να έρθει σε
επαφή µε το έµβολο της αντλίας.
u
Ξεβιδώστε τη ράβδο ελέγχου αντλίας (5)
για να εξασφαλίσετε το ελάχιστο διάκενο
0,5 ÷ 1 mm µεταξύ της ράβδου ελέγχου
αντλίας και του εµβόλου αντλίας.
Βεβαιωθείτε ότι υπάρχει διάκενο
ανάµεσα στη ράβδο ελέγχου αντλίας (4)
και το έµβολο της αντλίας, για να µην
παραµ ένει πατηµ ένο το φρένο
προκαλώντας πρόωρη φθορά στα
εξαρτήµατα φρεναρίσµατος.
Ράβδος ελέγχου αντλίας και έµβολο
αντλίας: 0,5 χ 1 mm.
u
Μπλοκάρετε τη ράβδο ελέγχου αντλίας
µε το κοντραπαξιµάδι (3).
Ελέγξτε την αποτελεσµατικότητα του
φρεναρίσµατος.
Σε περίπτωση ανάγκης, απευθυνθείτε
σε έναν Επίσηµο Αντιπρόσωπο της
aprilia.
Μετά τη ρύθµιση, ελέγξτε αν ο τροχός
περιστρέφεται ελεύθερα µόλις αφήσετε
το φρένο.
MX125_GR.book Page 41 Tuesday, October 14, 2003 7:17 PM

χρήση και συντήρηση MX 125
42
ΡΥΘΜΙΣΗ ΣΥΜΠΛΕΚΤΗ
Η ρύθµιση του συµπλέκτη γίνεται όταν το
δίκυκλο σταµατάει ή τείνει να κινείται ακόµα
και µε πατηµένο το συµπλέκτη και µε
εισηγµένη ταχύτητα ή όταν ο συµπλέκτης
δεν “πιάνει” επιβραδύνοντας την επιτάχυνση
σε σχέση µε τις στροφές του κινητήρα.
Οι µικρότερες ρυθµίσεις µπορούν να
γίνουν µέσω του ρεγουλαδόρου (1):
u
Αφαιρέστε το προστατευτικό καπάκι (2).
u
Ξεσφίξτε (βιδώνοντας) το παξιµάδι (3).
u
Περιστρέψτε το ρεγουλαδόρο (1), µέχρι
το σηµείο όπου η κενή διαδροµή του
άκρου της µανέτας του συµπλέκτη να
είναι περίπου 10÷15 mm (βλέπε εικόνα).
u
Σφίξτε (ξεβιδώνοντας) το παξιµάδι (3),
µπλοκάροντας το ρεγουλαδόρο (1).
u
Ελέγξτε το διάκενο στο άκρο της µανέτας
του συµπλέκτη.
u
Επανατοποθετήστε το προστατευτικό
καπάκι (2).
Αν ο ρεγουλαδόρος (1) είναι εντελώς
βιδωµένος, εντελώς ξεβιδωµένος ή αν δεν
µπορείτε να επιτύχετε τη σωστή κενή
διαδροµή:
u
Αφαιρέστε το προστατευτικό καπάκι (2).
u
Βιδώστε εντελώς το παξιµάδι (3) στο
ρεγουλαδόρο (1).
u
Βιδώστε εντελώς το ρεγουλαδόρο (1).
u
Με ένα κατσαβίδι ίσιο (ή ένα νόµισµα)
ξεβιδώστε και αφαιρέστε την τάπα (4).
Το ειδικό κλειδί (5) µπορείτε να το
ζητήσετε στους Επίσηµους
Αντιπροσώπους της aprilia.
u
Τοποθετήστε το ειδικό κλειδί (5) και
ξεβιδώστε το εσωτερικό παξιµάδι (6).
u
Τοποθετήστε τώρα ένα κατσαβίδι ίσιο (7)
στο ειδικό κλειδί (5) και βιδώστε εντελώς
τη βίδα ρύθµισης (8).
u
Ξεσφίξτε τη βίδα ρύθµισης (8) κατά µισή
στροφή, που αντιστοιχεί σε 3χ4 mm
διαδροµής της µανέτας (9).
u
Με το κατσαβίδι (7) κρατήστε
µπλοκαρισµένη τη βίδα ρύθµισης (8) και µε
το ειδικό κλειδί (5) σφίξτε το εσωτερικό
παξιµάδι (6).
u
Ξαναβιδώστε την τάπα (4).
u
Ελέγξτε την κενή διαδροµή στο άκρο της
µανέτας του συµπλέκτη (10χ15 mm).
u
Εκκινήστε τον κινητήρα.
u
Πατήστε εντελώς το συµπλέκτη και
βάλτε πρώτη ταχύτητα.
u
Βεβαιωθείτε ότι ο κινητήρας δεν
σταµατάει, το δίκυκλο δεν τείνει να
κινηθεί και ο συµπλέκτης δεν “γλιστράει”
κατά την επιτάχυνση ή κατά την κίνηση.
Αν δεν µπορείτε να κάνετε σωστή
ρύθµ ιση ή σε περίπτωση που ο
συµπλέκτης δεν λειτουργεί κανονικά,
απευθυνθείτε σε έναν Επίσηµ ο
Αντιπρόσωπο της aprilia.
Ελέγξτε την ακεραιότητα της ντίζας του
συµπλέκτη: δεν πρέπει να παρουσιάζει
φθορές του καλύµµατος σε όλο του το
µήκος.
u
Λιπάνετε κατά διαστήµατα τη ντίζα του
συµπλέκτη µε το κατάλληλο λιπαντικό,
βλέπε σελ.88 (ΠΙΝΑΚΑΣ ΛΙΠΑΝΤΙΚΩΝ),
για για να αποφύγετε την πρόωρη φθορά ή
διάβρωση.
10÷15 mm10÷15 mm
MX125_GR.book Page 42 Tuesday, October 14, 2003 7:17 PM

43
χρήση και συντήρηση MX 125
ΛΑΣΤΙΧΑ
Αυτό το δίκυκλο είναι εφοδιασµένο µε
ελαστικά µε αεροθάλαµο.
Ελέγχετε κατά διαστήµατα την πίεση
των ελαστικών σε θερµ οκρασία
περιβάλλοντος, βλέπε σελ.85
(ΤΕΧΝΙΚΑ ΣΤΟΙΧΕΙΑ).
Αν τα ελαστικά είναι ζεστά, η µέτρηση
δεν θα είναι σωστή.
Η µέτρηση της πίεσης πρέπει να γίνεται
κυρίως πριν και µετά από µεγάλα
ταξίδια.
Αν η πίεση είναι πολύ υψηλή, οι
ανωµ αλίες του εδάφους δεν
απορροφούνται και γι’αυτό
µεταφέρονται στο τιµόνι, επηρεάζοντας
έτσι την άνεση του ταξιδιού, και
µειώνεται το κράτηµα στις στροφές.
Αν αντίθετα, η πίεση των ελαστικών δεν
είναι επαρκής, οι πλευρές των
ελαστικών (1) δουλεύουν περισσότερο
και µπορεί να γλιστρήσουν στις ζάντες
ή ακόµα και να αποκολληθούν από
αυτές, µε αποτέλεσµα να χάσετε τον
έλεγχο του δικύκλου.
Σε απότοµα φρεναρίσµατα, τα ελαστικά
µπορεί να βγουν από τις ζάντες.
Στις στροφές, τέλος, το δίκυκλο µπορεί
να ανατραπεί.
Ελέγχετε την κατάσταση της επιφάνειας
και τη φθορά, διότι αν τα ελαστικά είναι
σε κακή κατάσταση αυτό µπορεί να
θέσει σε κίνδυνο το κράτηµά τους στο
δρόµο και τον έλεγχο της οδήγησης.
Αντικαταστήστε το ελαστικό αν είναι
φθαρµένο ή αν υπάρχει σκίσιµο στο
πέλµα µεγαλύερο από 5 mm.
Μετά την επιδιόρθωση του ελαστικού
κάντε ζυγοστάθµιση στον τροχό.
Τα ελαστικά πρέπει να αντικαθίστανται
µε άλλα του τύπου που προτείνει ο
οίκος κατασκευής, βλέπε σελ.85
(ΤΕΧΝΙΚΑ ΣΤΟΙΧΕΙΑ).
Ελέγχετε αν οι βαλβίδες των ελαστικών
είναι πάντα εφοδιασµένες µε καπάκι για
να αποφύγετε κάποιο ξαφνικό
ξεφούσκωµ α των ελαστικών. Οι
εργασίες επιδιόρθωσης, συντήρησης
και ζυγοστάθµ ισης είναι πολύ
σηµαντικές και πρέπει να εκτελούνται
µε κατάλληλα εργαλεία και µε την
απαραίτητη πείρα.
Γι’ αυτό το λόγο, συνιστάται να
απευθύνεστε σε έναν Επίσηµ ο
Αντιπρόσωπο της aprilia για την
εκτέλεση των παραπάνω εργασιών ή
σε ένα εξειδικευµένο βουλκανιζατέρ. Αν
τα ελαστικά είναι καινούργια, µπορεί να
είναι καλυµµένα µε µια ολισθηρή
επίστρωση: οδηγείτε προσεκτικά για τα
πρώτα χιλιόµετρα. Μην αλείφετε τα
ελαστικά µε ακατάλληλα υγρά.
Αν τα ελαστικά είναι παλαιά, ακόµα και
αν δεν είναι εντελώς φθαρµένα, µπορεί
να σκληρύνουν και να µην
εξασφαλίζουν το κράτηµα στο δρόµο.
Σε αυτή την περίπτωση αντικαταστήστε
τα ελαστικά.
MX125_GR.book Page 43 Tuesday, October 14, 2003 7:17 PM

χρήση και συντήρηση MX 125
44
1
ΥΓΡΟ ΨΥΞΗΣ
Μη χρησιµοποιείτε το δίκυκλο αν η
στάθµη του υγρού είναι κάτω από το
ελάχιστο όριο.
ΣΗΜΑΝΤΙΚΟ Εκτελέστε τις
εργασίες συντήρησης σε συντοµότερα
χρονικά διαστήµ ατα αν το δίκυκλο
χρησιµοποιείται σε περιοχές µε συχνή
βροχή, σκόνη ή σε χωµατόδροµους ή όταν
γίνεται χρήση του δικύκλου σε αγώνες.
Πριν ξεκινήσετε να ελέγχετε τη στάθµη του
υγρού ψύξης, βλ. σελ.45 (ΕΛΕΓΧΟΣ ΚΑΙ
ΣΥΜΠΛΗΡΩΜΑ), να το αλλάζετε κάθε δύο
χρόνια απευθυνόµενοι σε έναν Επίσηµο
Αντιπρόσωπο aprilia.
Το υγρό ψύξης είναι τοξικό αν
καταποθεί. Η επαφή µε το δέρµα ή τα
µ άτια µπορεί να προκαλέσει
ερεθισµούς.
Αν το υγρό έρθει σε επαφή µε το δέρµα
ή τα µάτια ξεπλύντε καλά µε αρκετό
νερό και συµβουλευτείτε ένα γιατρό. Αν
καταποθεί, προκαλέστε εµετό, ξεπλύντε
µε µπόλικο νερό το στόµα και το λαιµό
και συµβουλευτείτε αµέσως ένα γιατρό.
ΦΥΛΑΞΤΕ ΤΟ ΜΑΚΡΙΑ ΑΠΟ ΤΑ ΠΑΙ∆ΙΑ
Προσέξτε µη χύσετε το υγρό ψύξης σε
καυτά µέρη του κινητήρα. Μπορεί να
προκληθεί φωτιά µε αόρατες φλόγες.
Όταν κάνετε συντήρηση, συνιστάται η
χρήση γαντιών από λατέξ.
Για την αντικατάστασή του
απευθυνθείτε σε έναν Επίσηµ ο
Αντιπρόσωπο της aprilia.
Το διάλυµα του υγρού ψύξης αποτελείται
από 50% νερό και 50% αντιψυκτικό.
Αυτό το µίγµα είναι ιδανικό για το
µεγαλύτερο φάσµα των θερµοκρασιών
λειτουργίας και εξασφαλίζει καλή
προστασία από τη διάβρωση.
Συµφέρει να διατηρείτε το ίδιο µίγµα και τις
ζεστές εποχές διότι έτσι µειώνονται οι
απώλειες λόγω της εξάτµισης και η ανάγκη
για συχνές συµπληρώσεις.
Με αυτό τον τρόπο µειώνονται οι
επικαθίσεις αλάτων, που το εξατµισµένο
νερό αφήνει µέσα στο ψυγείο και
διατηρείται η απόδοση του συστήµατος
ψύξης.
Σε περίπτωση που η εξωτερική
θερµοκρασία είναι κάτω από το µηδέν, να
ελέγχετε πιο συχνά το κύκλωµα ψύξης
προσθέτοντας, αν χρειάζεται, αντιψυκτικό
σε µεγαλύτερη αναλογία (το πολύ έως
60%).
Για το διάλυµα ψύξης χρησιµοποιείτε
αποσταγµ ένο νερό, για να µην
καταστραφεί ο κινητήρας.
Μη βγάζετε την τάπα (1) του ψυγείου
όταν ο κινητήρας είναι ζεστός, διότι το
υγρό ψύξης είναι υπό πίεση και σε
υψηλή θερµοκρασία.
MX125_GR.book Page 44 Tuesday, October 14, 2003 7:17 PM

45
χρήση και συντήρηση MX 125
ΕΛΕΓΧΟΣ ΚΑΙ ΣΥΜΠΛΗΡΩΜΑ
Πραγµατοποιείτε τις εργασίες ελέγχου
και συµπλήρωσης υγρού ψύξης µε τον
κινητήρα κρύο.
u
Σβήστε τον κινητήρα και περιµένετε να
κρυώσει.
Τοποθετήστε το δίκυκλο σε στερεό και
επίπεδο έδαφος.
u
Κρατήστε το δίκυκλο σε κατακόρυφη
θέση µε τους δύο τροχούς να
ακουµπούν στο έδαφος.
u
Περιστρέψτε κατά µία στροφή την τάπα
του ψυγείου (1) αριστερόστροφα.
u
Περιµένετε µερικά δευτερόλπετα για να
εξαερωθεί η ενδεχόµενη πίεση του
κυκλώµατος.
u
Περιστρέψτε ξανά την τάπα του ψυγείου
(1) δεξιόστροφα και αφαιρέστε την.
u
Βεβαιωθείτε ότι το υγρό καλύπτει
εντελώς τις πλάκες του ψυγείου.
u
Αν χρειάζεται, συµπληρώστε µε ψυκτικό
υγρό, βλ. σελ. 88 (ΠΙΝΑΚΑΣ
ΛΙΠΑΝΤΙΚΩΝ), µέχρι να καλυφθούν
εντελώς οι πλάκες του ψυγείου.
Μην ξεπερνάτε αυτή τη στάθµη, αλλιώς
θα προκληθεί διαρροή του υγρού κατά
τη λειτουργία του κινητήρα.
Το υγρό ψύξης είναι τοξικό αν
καταποθεί, η επαφή µε το δέρµα ή τα
µ άτια µπορεί να προκαλέσει
ερεθισµούς. Μην εισάγετε τα δάκτυλα ή
άλλα αντικείµενα για να ελέγξετε την
ύπαρξη υγρού ψύξης.
Μη βάζετε προσθετικά ή άλλες ουσίες
στα υγρά. Αν πρόκειται να
χρησιµοποιηθεί χωνί ή κάτι άλλο,
βεβαιωθείτε ότι είναι εντελώς καθαρό.
u
ξαναβάλτε την τάπα του ψυγείου (1).
Σε περίπτωση µεγάλης κατανάλωσης
υγρού ψύξης, ελέγξτε αν υπάρχει
διαρροή στο κύκλωµ α. Για την
επισκευή, απευθυνθείτε σε έναν
Επίσηµο Αντιπρόσωπο της aprilia.
1
MX125_GR.book Page 45 Tuesday, October 14, 2003 7:17 PM

χρήση και συντήρηση MX 125
46
ΣΙΛΑΝΣΙΕ
Αποφεύγετε να παρκάρετε το δίκυκλο
κοντά σε ξερά χόρτα ή σε χώρους
κοντά σε παιδιά γιατί η καταλυτική
εξάτµιση κατά τη χρήση φτάνει σε πολύ
υψηλές θερµοκρασίες. Συνεπώς,
πρέπει να δίνεται µεγάλη προσοχή και
να αποφεύγετε οποιαδήποτε επαφή
πριν κρυώσει εντελώς.
Το δίκυκλο εξοπλίζεται µε ένα σιλανσιέ µε
µεταλλικό καταλύτη “δισθενή από πλατίνα-
ρόδιο”.
Η διάταξη αυτή οξειδώνει το CO
(µονοξείδιο του άνθρακα) και τους HC
(άκαυστους υδρογονάνθρακες) που
υπάρχουν στα καυσαέρια και τα
µετατρέπει αντίστοιχα σε ανθρακικό
ανυδρίτη και υδρατµό.
Η υψηλή θερµοκρασία στην οποία φτάνουν
τα καυσαέρια λόγω της καταλυτικής
αντίδρασης επιτρέπει να καούν τα
µικροσωµατίδια λαδιού διατηρώντας έτσι το
σιλανσιέ καθαρό ενώ ταυτόχρονα µειώνει
και τους καπνούς από τα καυσαέρια.
Για τη σωστή και διαρκή λειτουργία του
καταλύτη, καθώς και για να
ελαχιστοποιηθεί η πιθανότητα να λερωθεί
το σύστηµ α καύσης και εξαγωγής
καυσαερίων, αποφεύγετε να οδηγείτε για
µεγάλες αποστάσεις µε σταθερά χαµηλό
επίπεδο στροφών.
Θα είναι αρκετό, για το σκοπό αυτό, να
εναλλάσσετε τη λειτουργία µε περιόδους
λειτουργίας µε µέτρια ανεβασµ ένες
στροφές, ακόµα και για µερικά
δευτερόλεπτα, αρκεί αυτό να συµβαίνει
συχνά.
Όσα αναφέρονται παραπάνω αποκτούν
ιδιαίτερη σηµασία σε κάθε εκκίνηση του
κινητήρα όταν είναι κρύος και σ’αυτήν την
περίπτωση, για να φτάσει σε επίπεδο
στροφών που να επιτρέπει το “ξεκίνηµα”
της καταλυτικής αντίδρασης, αρκεί να
βεβαιωθείτε ότι η θερµοκρασία του του
συστήµατος έφτασε τους 50 °C, Αυτό
συµβαίνει συνήθως µερικά δευτερόλεπτα
µετά την εκκίνηση.
Μη χρησιµοποιήτε απλή βενζίνη, γιατί
προκαλεί την καταστροφή του
καταλύτη.
MX125_GR.book Page 46 Tuesday, October 14, 2003 7:17 PM

47
χρήση και συντήρηση MX 125
ΚΑΝΟΝΕΣ ΧΡΗΣΗΣ
Πριν ξεκινήσετε, κάνετε πάντα έναν
προκαταρκτικό έλεγχο του δικύκλου για
µία σωστή και ασφαλή λειτουργία,
βλέπε “ΠΙΝΑΚΑΣ ΠΡΟΚΑΤΑΡΚΤΙΚΩΝ
ΕΛΕΓΧΩΝ”).
Η µη εκτέλεση των ακόλουθων
εργασιών µπορεί να προκαλέσει
σοβαρό τραυµατισµό σε εσάς ή ζηµιά
στο δίκυκλο.
Μη διστάσετε να απευθυνθείτε σε έναν
Επίσηµο Συνεργάτη της aprilia, σε
περίπτωση που δεν έχετε κατανοήσει
µ ερικές λειτουργίες ή όταν
παρουσιαστούν ανωµ αλίες στη
λειτουργία.
Ο απαραίτητος χρόνος για έναν έλεγχο
είναι εξαιρετικά µικρός ενώ η ασφάλεια
που θα εξασφαλίσετε είναι πολύ
σηµαντική.
ΠΙΝΑΚΑΣ ΠΡΟΚΑΤΑΡΚΤΙΚΩΝ ΕΛΕΓΧΩΝ
Εξάρτηµα Ελεγχος Σελίδα
Εµ πρός και πίσω
δισκόφρενο
Ελέγξτε τη λειτουργία, τη διαδροµή της µανέτας και του
πεντάλ, τη στάθµη των υγρών και τυχόν διαρροές.
Ελέγξτε τη φθορά των τακακιών.
Αν χρειάζεται συµπληρώστε λίγα υγρά.
38-39-
40-70
Γκάζι Ελέγξτε αν λειτουργεί οµαλά και αν µπορεί να ανοίξει και
να κλείσει εντελώς, σε όλες τις θέσεις του τιµονιού.
Ρυθµίστε ή λιπάνετε αν χρειάζεται.
71
Λάδι µίξης / λάδια
κιβωτίου ταχυτήτων
Ελέγξτε και/ή συµπληρώστε αν χρειάζεται. 36-37-
60-61
Τροχοί/ελαστικά Ελέγξτε την κατάσταση του πέλµατος των ελαστικών, την
πίεση, τη φθορά και τυχόν ζηµιές.
43
Μανέτες φρένων Ελέγξτε αν λειτουργούν οµαλά. Λαδώστε τις αρθρώσεις
και ρυθµίστε τη διαδροµή αν χρειάζεται.
39-40
Συµπλέκτης Ελέγξτε τη λειτουργία, το διάκενο στην άκρη της µανέτας
πρέπει να είναι 10 mm Ο συµπλέκτης πρέπει να
λειτουργεί χωρίς τραβήγµατα και/ή γλιστρήµατα.
42
Τιµόνι Ελέγξτε αν στρίβει οµοιόµορφα, χωρίς να παρουσιάζει
διάκενο ή χαλαρότητα.
—
Πλαϊνό σταντ Ελέγξτε τη διαδροµή και αν η τάση των ελατηρίων το
επαναφέρει στη θέση του. Λαδώστε τους συνδέσµους και
τις αρθρώσεις αν χρειάζεται.
77
Εξαρτήµατα στερέωσης Βεβαιωθείτε ότι τα εξαρτήµατα στερέωσης δεν έχουν
ξεσφίξει. Ενδεχοµένως, κάντε ρεγουλάρισµα ή σφίξτε τα.
—
Αλυσίδα µετάδοσης
κίνησης
Ελέγξτε το διάκενο. 66-67
Ρεζερβουάρ καυσίµου Ελέγξτε τη στάθµη και συµπληρώστε αν χρειάζεται.
Ελέγξτε για διαρροές και εµφράξεις στο κύκλωµα.
36-82
Υγρό ψύξης Ελέγξτε τη στάθµη. 44-45
Φώτα, ενδ. λυχνίες,
κόρνα και ηλεκτρικά
εξαρτήµατα
Ελέγξτε τη σωστή λειτουργία των ακουστικών και οπτικών
συστηµάτων. Αντικαταστήστε τα λαµπάκια ή επισκευάστε
τυχόν βλάβη.
78÷81
MX125_GR.book Page 47 Tuesday, October 14, 2003 7:17 PM

χρήση και συντήρηση MX 125
48
ΕΚΚΙΝΗΣΗ
Μην τοποθετείτε αντικείµενα στο
εσωτερικό της µάσκας (µεταξύ τιµονιού
και ταµπλό), για να µην εµποδίζεται η
περιστροφή του τιµονιού και η οπτική
επαφή µε το ταµπλό.
ΣΗΜΑΝΤΙΚΟ Πριν βάλετε εµπρός
τον κινητήρα, διαβάστε προσεκτικά το
κεφάλαιο “ασφαλής οδήγηση”, βλέπε σελ.
5 (ΑΣΦΑΛΗΣ Ο∆ΗΓΗΣΗ).
Τα καυσαέρια περιέχουν µονοξείδιο του
άνθρακα, που είναι εξαιρετικά
δηλητηριώδες αν το εισπνεύσετε.
Αποφεύγετε την εκκίνηση του κινητήρα
σε κλειστούς ή µη επαρκώς
αεριζόµενους χώρους. Η µη τήρηση
αυτής της σύστασης µπορεί να
επιφέρει την απώλεια των αισθήσεων ή
ακόµα και το θάνατο από ασφυξία.
u
Τοποθετήστε το δίκυκλο στο σταντ.
u
Πηγαίνετε στην αριστερή πλευρά του
δικύκλου.
Ή:
u
κλείστε το σταντ.
u
Αναιβείτε στο δίκυκλο σε θέση οδήγησης.
Στη συνέχεια:
u
Περιστρέψτε τη στρόφιγγα καυσίµου (1)
στη θέση “ON”.
u
Βεβαιωθείτε ότι ο διακόπτης φώτων (2)
βρίσκεται στη θέση “
”.
u
Γυρίστε το κλειδί (3) και βάλτε το
διακόπτη εκκίνησης στη θέση “
”.
Στο σηµείο αυτό στο ταµπλό:
– ανάβει η κόκκινη ενδεικτική λυχνία
ρεζέρβουας λαδιού µίξης “
”, βλέπε .
σελ. 15 (ΟΡΓΑΝΑ ΚΑΙ ∆ΕΙΚΤΕΣ).
u
Μπλοκάρετε τον εµπρός τροχός, µε το
εµπρός φρένο (4).
u
Τοποθετήστε το λεβιέ ταχυτήτων (5) σε
νεκρά (πράσινη ενδεικτική λυχνία “
”
αναµµένη).
u
Αν η εκκίνηση γίνεται µε κρύο τον
κινητήρα, περιστρέψτε αριστερόστροφα
(Θέση A)το λεβιέ εκκίνησης µε κρύο “
”
(6).
u
Γυρίστε προς τα έξω το πεντάλ
εκκίνησης (7).
Μην πατάτε το πεντάλ εκκίνησης όταν
ο κινητήρας λειτουργεί.
u
Πατήστε δυνατά το πεντάλ εκκίνησης (7),
αφήνοντας το µετά ελεύθερο.
Επαναλάβατε την ίδια ενέργεια, αν
χρειαστεί, µέχρι την εκκίνηση του
κινητήρα.
u
Κρατήστε πατηµένη τη µανέτα του
εµπρός φρένου (4) και µην πατάτε το
γκάζι µέχρι τη στιγµή που θα ξεκινήσετε.
6
2
3
4
MX125_GR.book Page 48 Tuesday, October 14, 2003 7:17 PM

49
χρήση και συντήρηση MX 125
Μην κάνετε απότοµες εκκινήσεις µε
κρύο τον κινητήρα.
ια να περιορίσετε την εκποµ πή
µ ολυσµ ατικών ουσιών στην
ατµόσφαιρα και την κατανάλωση
καυσίµου, συνιστάται να ζεστάνετε τον
κινητήρα προχωρώντας µε χαµηλή
ταχύτητα για τα πρώτα χιλιόµετρα.
u
Όταν ζεσταθεί ο κινητήρας, γυρίστε
δεξιόστροφα (Θέση B) το λεβιέ
εκκίνησης µε κρύο “
” (6).
Εκκίνηση µε µπουκωµένο κινητήρα
Σε περίπτωση που δεν εκτελεστεί σωστά η
διαδικασία εκκίνησης, ή σε περίπτωση
υπερβολικού καυσίµου στους αγωγούς
αναρρόφησης του καρµπυρατέρ, ο
κινητήρας µπορεί να µπουκώσει.
Για να τον ξεµπουκώσετε:
u
Εκτελέστε τις πρώτες δώδεκα ενέργειες
της διαδικασίας εκκίνησης.
u
Περιστρέψτε εντελώς τη µανέτα γκαζιού
(8) (Θέση. C).
Μην πατάτε το πεντάλ εκκίνησης όταν
ο κινητήρας λειτουργεί.
u
Πατήστε µερικές φορές αποφασιστικά το
πεντάλ εκκίνησης (7) αφήνοντας το
αµέσως µετά.
Εκκίνηση µε κρύο
Σε περίπτωση χαµηλών θερµοκρασιών
περιβάλλοντος (κοντά ή κάτω από 0 °C)
µπορεί να παρουσιαστούν δυσκολίες κατά
την εκκίνηση.
Στην περίπτωση αυτή:
u
Περιστρέψτε αριστερόστροφα (Θέση A)
το µοχλό εκκίνησης µε κρύο “
“ (6).
Μην πατάτε το πεντάλ εκκίνησης όταν
ο κινητήρας λειτουργεί.
u
Περιστρέψτε ελαφρά το γκάζι (8) και
ταυτόχρονα πατήστε µετικές φορές
αποφασιστικά το πεντάλ εκκίνησης (7)
αφήνοντάς το αµέσως µετά.
Αν εκκινηθεί ο κινητήρας
u
Αφήστε το γκάζι (8).
u
Περιστρέψτε δεξιόστροφα (Θέση B) το
λεβιέ εκκίνησης µε κρύο “
“ (6).
Αν το ρελαντί είναι ασταθές, ανοίξτε λίγο το
γκάζι (8) µε µικρές συχν΄λες περιστροφές.
Αν ο κινητήρας δεν εκκινείται
Περιµένετε µερικά δευτερόλεπτα και
επαναλάβετε τη διαδικασία εκκίνησης.
ΕΚΚΙΝΗΣΗ ΜΕΤΑ ΑΠΟ
ΠΑΡΑΤΕΤΑΜΕΝΗ Α∆ΡΑΝΕΙΑ
Αν το δίκυκλο έχει µείνει σε αδράνεια για
µεγάλη χρονική περίοδο, πατήστε το
πεντάλ εκκίνησης (7) αποφασιστικά
µερικές φορές χωρίς να ανοίγετε το γκάζι,
επιτρέποντας έτσι να γεµίσει το κύκλωµα
τροφοδοσίας καυσίµου.
Για εκκίνηση του κινητήρα, ανοίξτε ελαφρά
το γκάζι και εκτελέστε τη διαδικασία
εκκίνησης.
7
5
8
MX125_GR.book Page 49 Tuesday, October 14, 2003 7:17 PM

χρήση και συντήρηση MX 125
50
ΕΚΚΙΝΗΣΗ ΚΑΙ Ο∆ΗΓΗΣΗ
Μην τοποθετείτε αντικείµενα στο
εσωτερικό της µάσκας (µεταξύ τιµονιού
και ταµπλό), για να µην εµποδίζεται η
περιστροφή του τιµονιού και η οπτική
επαφή µε το ταµπλό.
ΣΗΜΑΝΤΙΚΟ Πριν βάλετε εµπρός
τον κινητήρα, διαβάστε προσεκτικά το
κεφάλαιο “ασφαλής οδήγηση”, βλέπε σελ.
5 (ΑΣΦΑΛΗΣ Ο∆ΗΓΗΣΗ).
Αν κατά τη διάρκεια οδήγησης µειωθεί η
“κανονική” ποσότητα καυσίµου, περιστρέψτε
τη στρόφιγγα καυσίµου (1) στη θέση “RES”
για να τροφοδοτηθεί από τη ρεζέρβα.
Ρεζέρβα καυσίµου: 1,3 λίτρα (µηχανική
ρεζέρβα).
Φροντίστε το συντοµότερο δυνατό να
κάνετε ανεφοδιασµό καυσίµου, βλέπε
σελ. 36 (ΚΑΥΣΙΜΟ).
Οδηγώντας χωρίς συνεπιβάτη,
βεβαιωθείτε ότι τα µαρσπιέ συνεπιβάτη
είναι κλειστά. Κατά την οδήγηση
κρατάτε τα χέρια σταθερά στις
χειρολαβές και τα πόδια στα µαρσπιέ.
ΜΗΝ Ο∆ΗΓΕΙΤΕ ΠΟΤΕ ΣΕ
∆ΙΑΦΟΡΕΤΙΚΕΣ ΘΕΣΕΙΣ.
Σε περίπτωση που οδηγείτε µε
συνεπιβάτη, φροντίστε να µάθει να µην
εµποδίζει κατά τους ελιγµούς.
Για να ξεκινήσετε:
u
Ρυθµίστε σωστά την κλίση των
καθρεπτών.
Με το δίκυκλο σταµ ατηµ ένο
εξοικειωθείτε µε τη χρήση των
καθρεπτών.
u
Εκκινήστε τον κινητήρα, βλέπε σελ.48
(ΕΚΚΙΝΗΣΗ).
u
Στα πρώτα χιλιόµετρα της διαδροµής,
οδηγείτε µε χαµηλή ταχύτητα για να
ζεσταθεί ο κινητήρας.
u
Με τη µανέτα γκαζιού (2) ελεύθερη
(Θέση A) και τον κινητήρα στο ρελαντί,
πατήστε εντελώς το συµπλέκτη (3).
u
Βάλτε την πρώτη ταχύτητα πατώντας
προς τα κάτω το µοχλό ταχυτήτων (4).
u
Αφήστε το φρένο (που έχετε πατήσει
κατά την εκκίνηση).
Κατά την εκκίνηση, αν αφήσετε
γρήγορα ή απότοµα το συµπλέκτη
µπορεί να σβήσει ο κινητήρας και να
σηκωθεί ο εµπρός τροχός.
Μην επιταχύνετε απότοµα ή
υπερβολικά, ενώ αφήνετε το συµπλέκτη,
αποφεύγοντας έτσι το πατινάρισµα του
συµπλέκτη (αργή απελευθέρωση) ή το
σήκωµα του εµπρός τροχού “σούζα”
(γρήγορη απελευθέρωση).
u
Αφήστε αργά το συµπλέκτη (3) και
ταυτόχρονα επιταχύνετε ανοίγοντας
οµαλά το γκάζι (2) (Θέση B).
Το δίκυκλο θα αρχίσει να επιταχύνει.
Μην υπερβαίνετε τον συνιστώµενο
αριθµό στροφών και ταχύτητας, βλ.
σελ. 53 (ΣΤΡΩΣΙΜΟ).
u
Αυξήστε την ταχύτητα ανοίγοντας
σταδιακά το γκάζι (2) (Θέση B), χωρίς
να ξεπερνάτε τη µέγιστη ταχύτητα
κίνησης (και τον συνιστώµενο αριθµό
στροφών), βλ. σελ. 53 (ΣΤΡΩΣΙΜΟ).
MX125_GR.book Page 50 Tuesday, October 14, 2003 7:17 PM

51
χρήση και συντήρηση MX 125
Για να βάλετε τη δεύτερη ταχύτητα:
Ενεργήστε γρήγορα.
Μην οδηγείτε το δίκυκλο µε υπερβολικά
χαµηλό αριθµό στροφών.
u
Αφήστε το γκάζι (2) (Θέση A), τραβήξτε
τη µανέτα του συµ πλέκτη (3) και
σηκώστε το µοχλό ταχυτήτων (4).
Αφήστε το συµ πλέκτη (3) και
επιταχύνετε.
u
Επαναλάβατε τις τελευταίες δύο
ενέργειες για να περάσετε στις
υπόλοιπες ταχύτητες.
Η αλλαγή από µεγάλη σε µικρή ταχύτητα,
δηλαδή το γνωστό “κατέβασµα”, εκτελείται:
u
Σε κατηφόρες και σε φρεναρίσµατα, για
να αυξήσετε την ενέργεια φρεναρίσµατος
χρησιµοποιώντας τη συµπίεση του
κινητήρα
u
Σε ανηφόρες, όταν η σχέση που έχετε
βάλει δεν είναι η κατάλληλη σχέση
(υψηλή σχέση, χαµηλή ταχύτητα) και ο
αριθµός στροφών του κινητήρα πέφτει.
Κατεβάζετε µία σχέση κάθε φορά. Το
κατέβασµα περισσότερων σχέσεων
ταυτόχρονα µπορεί να προκαλέσει την
“υπέρβαση” του µέγιστου αριθµού των
στροφών.
ριν και κατά το “κατέβασµα” µίας
σχέσης χαµηλώστε ταχύτητα
αφήνοντας το γκάζι για να αποφύγετε
την “υπέρβαση” του µέγιστου αριθµού
των στροφών.
Για να κάνετε ένα “κατέβασµα”:
u
Αφήστε το γκάζι (2) (Θέση A).
u
Αν χρειάζεται, πατήστε ελαφρά το φρένο
για να χαµηλώσετε την ταχύτητα του
δικύκλου.
u
Τραβήξτε το συµπλέκτη (3) και
κατεβάστε το µοχλό ταχυτήτων (4) για να
κατεβάσετε ταχύτητα.
u
Αφήστε το φρένο αν το ενεργοποιήσατε.
u
Αφήστε το συµπλέκτη και επιταχύνετε
ελαφρά.
Αν η ενδεικτική λυχνία ρεζέρβας λαδιού
µίξης “
” ανάβει κατά τη διάρκεια της
κανονικής λειτουργίας του κινητήρα,
σηµαίνει ότι η στάθµη λαδιού µίξης είναι
σε ρεζέρβα. Στην περίπτωση αυτή
προνοήστε για το συµπλήρωµα λαδιού
µίξης, βλέπε σελ.37 (ΡΕΖΕΡΒΟΥΑΡ
ΛΑ∆ΙΟΥ ΜΙΞΗΣ).
MX125_GR.book Page 51 Tuesday, October 14, 2003 7:17 PM

χρήση και συντήρηση MX 125
52
Μην ανοίγετε και κλείνετε, επανειληµµένα
και συνεχώς, το γκάζι, γιατί µπορεί
ξαφνικά να χάσετε τον έλεγχο του
δικύκλου.
Σε περίπτωση φρεναρίσµατος, αφήστε
το γκάζι και πατήστε και τα δύο φρένα για
να έχετε µια οµοιόµορφη επιβράδυνση,
πιέζοντας τη µανέτα και το πεντάλ των
φρένων µε κατάλληλο τρόπο.
Πατώντας µόνο το εµπρός ή µόνο το
πίσω φρένο, µειώνεται σηµαντικά η
ισχύς του φρεναρίσµατος και υπάρχει
κίνδυνος να µπλοκάρει ο ένας τροχός
µε αποτέλεσµα να χαθεί η πρόσφυση.
Σε περίπτωση στάθµ ευσης σε
ανηφόρα, επιβραδύνετε εντελώς και
χρησιµοποιείτε µόνο τα φρένα για να
διατηρήσετε ακίνητο το δίκυκλο.
Η χρήση του κινητήρα για να
διατηρήσετε ακίνητο το δίκυκλο µπορεί
να προκαλέσει υπερθέρµανση του
συµπλέκτη.
Πριν µπείτε σε µία στροφή, µειώστε την
ταχύτητα και φρέναρετε ώστε να
στρίψετε µε χαµ ηλή και σταθερή
ταχύτητα ή µε µικρή επιτάχυνση.
Αποφεύγετε να φρενάρετε οριακά:
υπάρχει υψηλός κίνδυνος να
γλυστρήσετε.
Χρησιµοποιώντας συνεχώς τα φρένα
στις κατηφόρες, µπορεί να
υπερθερµανθούν τα υλικά τριβής µε
επακόλουθο τη µείωση της απόδοσης
φρεναρίσµατος. Εκµεταλλευτείτε τη
συµπίεση του κινητήρα κατεβάζοντας
ταχύτητα µε την ενδιάµεση χρήση και
των δύο φρένων.
Στις κατηφόρες µην οδηγείτε µε τον
κινητήρα σβηστό.
Να προσέχετε οποιοδήποτε εµπόδιο ή
αλλαγή της γεωµετρίας του
οδοστρώµατος.
Οι ανώµαλοι δρόµοι, οι γραµµές του
τρένου, οι σχάρες του δικτύου
αποχέτευσης, οι διαχωριστικές
γραµµές στην επιφάνεια του δρόµου, οι
µεταλλικές πλάκες στα εργοτάξια
γίνονται πολύ ολισθηρές όταν βρέχει.
Γι’αυτό το λόγο πρέπει να τα περνάτε
µε µεγάλη προσοχή οδηγώντας αργά
και γέρνοντας το δίκυκλο όσο το
δυνατόν λιγότερο.
Να προειδοποιείτε πάντα νωρίτερα για
την αλλαγή λωρίδας µε τα φλας,
αποφεύγοντας απότοµ ους και
επικίνδυνους ελιγµούς.
Σβήστε τα φλας µόλις αλλάξετε
κατεύθυνση.
Να προσέχετε πολύ όταν προσπερνάτε
ή σας προσπερνούν.
Σε περίπτωση βροχής, το νεφέλωµα
νερού που προκαλείται από τα µεγάλα
οχήµατα µειώνει την ορατότητα. Οι
δίνες του αέρα µπορεί να προκαλέσουν
την απώλεια ελέγχου του δικύκλου.
MX125_GR.book Page 52 Tuesday, October 14, 2003 7:17 PM

53
χρήση και συντήρηση MX 125
ΣΤΡΩΣΙΜΟ
Το στρώσιµο του κινητήρα είναι βασικό για
την εξασφάλιση της µεγάλης διάρκειας
ζωής και της σωστής λειτουργίας.
Οδηγείτε, αν είναι δυνατόν, σε δρόµους µε
πολλές στροφές και/ή µε ανηφόρες, όπου ο
κινητήρας, οι αναρτήσεις και τα φρένα
υποβάλλονται σε καλύτερο στρώσιµο.
Αυξοµειώνετε την ταχύτητα του δικύκλου
κατά το στρώσιµο. Με αυτό τον τρόπο
επιτρέπεται η “φόρτωση” και “αποφόρτωση”,
ψύχοντας τα µέρη του κινητήρα.
Παρόλο που είναι σηµαντικό το στρώσιµο
των εξαρτηµάτων, δεν πρέπει όµως να
καταπονούνται πολύ.
Μόνο µετά τα πρώτα 1500 χιλιόµετρα
στρωσίµ ατος είναι δυνατό να
επιτευχθούν οι καλύτερες επιδόσεις του
δικύκλου.
Τηρήστε τις παρακάτω οδηγίες:
u
Μην ανοίγετε ξαφνικά και εντελώς το
γκάζι όταν ο κινητήρας λειτουργεί σε
χαµ ηλές στροφές, τόσο κατά το
στρώσιµο όσο και µετά.
u
Στα πρώτα 100 km (62 mi) να πατάτε µε
προσοχή τα φρένα και να αποφεύγετε
απότοµα και µεγάλα φρεναρίσµατα.
Αυτό επιτρέπει σωστή προσαρµογή του
υλικού τριβής των τακακιών στους
δίσκους του φρένου.
u
Στα πρώτα 800 km ποτέ µην ξεπερνάτε
το µισό της διαδροµή ανοίγµατος του
γκαζιού.
Μετά τα πρώτα 1000 km λειτουργίας,
κάντε τους ελέγχους που
προβλέπονται στη στήλη “τέλος
στρωσίµ ατος” του ΠΙΝΑΚΑ
ΠΕΡΙΟ∆ΙΚΗΣ ΣΥΝΤΗΡΗΣΗΣ, βλ. σελ.56
(ΠΙΝΑΚΑΣ ΠΕΡΙΟ∆ΙΚΗΣ ΣΥΝΤΗΡΗΣΗΣ
(ΣΕΡΒΙΣ)), για να αποφύγετε ζηµιές σε
εσάς τους ίδιους, σε άλλους και/ή στο
δίκυκλο.
u
Μεταξύ των 800 και 1500 km να οδηγείτε
πιο ζωηρά, να µεταβάλετε την ταχύτητα
και να επιταχύνετε στο µέγιστο µόνο για
µικρά χρονικά διαστήµατα για καλύτερη
προσαρµογή των µηχανικών µέρών.
Μην ξεπερνάτε τα 3/4 του ανοίγµατος
του γκαζιού.
u
Μετά τα πρώτα 1500 km µπορείτε να
απαιτήσετε µεγαλύτερες επιδόσεις από
τον κινητήρα, χωρίς ωστόσο να
ξεπερνάτε τις µέγιστες ταχύτητες που
αναγράφονται στον πίνακα και φέρνετε
τον κινητήρα πάνω από το µέγιστο
επίπεδο στροφών.
ΣΤΑΜΑΤΗΜΑ
Αποφεύγετε, όσο είναι δυνατό,
απότοµα σταµατήµατα και οριακά
φρεναρίσµατα.
u
Αφήστε το γκάζι (1) (Θέση Α) και
σταµατήστε το δίκυκλο πατώντας
σταδιακά και τα δύο φρένα και
ταυτόχρονα κατεβάζοντας τις σχέσεις,
βλέπε σελ. 50 (ΕΚΚΙΝΗΣΗ ΚΑΙ
Ο∆ΗΓΗΣΗ).
Οταν µειωθεί η ταχύτητα, πριν το πλήρες
σταµάτηµα του δικύκλου:
u
Τραβήξτε τη µανέτα του συµπλέκτη (2)
εντελώς, ώστε να µη σβήσει ο κινητήρας.
Με το δίκυκλο σταµατηµένο:
u
Βάλτε το µοχλό ταχυτήτων σε νεκρά
(πράσινη ενδ. λυχνία “
” αναµµένη).
u
Αφήστε τη µανέτα του συµπλέκτη (2).
u
Κατά το σταµάτηµα, να πατάτε
τουλάχιστον το ένα φρένο.
Μέγιστος αριθµός στροφών κατά
το στρώσιµο
∆ιαδροµή km Αριθµός στροφών
0÷800 1/2
800÷1500 3/4
πάνω από 1500 4/4
MX125_GR.book Page 53 Tuesday, October 14, 2003 7:17 PM

χρήση και συντήρηση MX 125
54
ΣΤΑΘΜΕΥΣΗ
Να σταθµεύετε το δίκυκλο σε στέρεο και
επίπεδο έδαφος για να µην πέσει. Μην
το ακουµπάτε σε τοίχους και µην το
ξαπλώνετε στο έδαφος. Βεβαιωθείτε ότι
το δίκυκλο και ειδικά τα καυτά µέρη του,
δεν αποτελούν κίνδυνο για τα άτοµα και
τα παιδιά. Μην αφήνετε το δίκυκλο
αφύλακτο µε τον κινητήρα αναµµένο ή
µε το κλειδί στην κλειδαριά. Μην κάθεστε
στο δίκυκλο όταν είναι στο σταντ.
u
Σταµατήστε το δίκυκλο, βλέπε σελ.53
(ΣΤΑΜΑΤΗΜΑ).
u
Περιστρέψτε το κλειδί (1) και γυρίστε το
διακόπτη εκκίνησης (2) στη θέση “
”.
u
Γυρίστε τη στρόφιγγα καυσίµου (3) στη
θέση “OFF”.
u
Τοποθετήστε το δίκυκλο στο σταντ,
βλέπε κάτω (ΤΟΠΟΘΕΤΗΣΗ ΤΟΥ
∆ΙΚΥΚΛΟΥ ΣΤΟ ΣΤΑΝΤ).
Μην αφήνετε το κλειδί στο διακόπτη
εκκίνησης.
u
Κλειδώστε το τιµόνι, βλ. σελ.33
(ΚΛΕΙ∆ΑΡΙΑ ΤΙΜΟΝΙΟΥ) και βγάλτε το
κλειδί (1).
ΤΟΠΟΘΕΤΗΣΗ ΤΟΥ ∆ΙΚΥΚΛΟΥ ΣΤΟ
ΣΤΑΝΤ
∆ιαβάστε προσεκτικά δίπλα
(ΣΤΑΘΜΕΥΣΗ).
u
Πιάστε την αριστερή µανέτα (4) και τη
χειρολαβή του συνεπιβάτη (5).
u
Σπρώξτε το πλευρικό σταντ µε το δεξί
πόδι, κατεβάζοντάς το εντελώς (6).
u
Γείρετε το δίκυκλο µέχρι το σταντ να
ακουµπήσει στο έδαφος.
Βεβαιωθείτε για τη σταθερότητα του
δικύκλου.
ΣΥΜΒΟΥΛΕΣ ΠΡΟΣΤΑΣΙΑΣ ΑΠΟ ΚΛΟΠΗ
Μην αφήνετε ΠΟΤΕ το κλειδί στην
κλειδαριά και κλειδώνετε πάντα το τιµόνι.
Παρκάρετε το δίκυκλο σε ασφαλές µέρος,
αν είναι δυνατόν σε γκαράζ ή σε
φυλασσόµενο χώρο.
Ελέγξτε αν τα χαρτιά σας και η άδεια
κυκλοφορίας σας είναι εντάξει.
Γράψτε τα στοιχεία σας και τον αριθµό του
τηλεφώνου σας στο παρόν εγχειρίδιο, για
να διευκολύνετε την εξακρίβωση του
ιδιοκτήτη, σε περίπτωση ανεύρεσης µετά
από κλοπή.
ΕΠΙΘΕΤΟ:.................................................
ΟΝΟΜΑ: ...................................................
∆ΙΕΎΘΥΝΣΗ: ...........................................
..................................................................
ΤΗΛΕΦΩΝΟ: ............................................
Σε πολλές περιπτώσεις τα κλεµµένα
δίκυκλα αναγνωρίζονται από τα
στοιχεία που αναγράφονται στο
εγχειρίδιο χρήσης/συντήρησης.
MX125_GR.book Page 54 Tuesday, October 14, 2003 7:17 PM

55
χρήση και συντήρηση MX 125
ΣΥΝΤΗΡΗΣΗ
Κίνδυνος πυρκαγιάς.
Καύσιµα ή άλλες εύφλεκτες ουσίες δεν
πρέπει να βρίσκονται κοντά στα
ηλεκτρικά εξαρτήµατα.
Πριν αρχίσετε οποιαδήποτε εργασία
συντήρησης ή επιθεώρησης στο
δίκυκλο, σβήστε τον κινητήρα, βγάλτε
το κλειδί, περιµένετε να κρυώσει ο
κινητήρας και η εξάτµιση, ανυψώστε το
δίκυκλο µε τον κατάλληλο εξοπλισµό,
σε ένα στέρεο και επίπεδο έδαφος.
Βεβαιωθείτε, πριν προχωρήσετε, ότι ο
χώρος που θα εργαστείτε έχει καλό
εξαερισµό.
∆ώστε ιδιαίτερη προσοχή στα καυτά
µέρη του κινητήρα και στην εξάτµιση
για να αποφύγετε εγκαύµατα.
Μη χρησιµοποιείτε το στόµα για να
συγκρατήσετε µηχανικά ή άλλα
εξαρτήµ ατα του δικύκλου: κανένα
εξάρτηµα δεν είναι βρώσιµο, ενώ
πολλά από αυτά είναι επιβλαβή ή
τοξικά.
Αν δεν περιγράφεται επακριβώς, η
επανασυναρµολόγηση των τµηµάτων
ακολουθεί την αντίστροφη σειρά της
συναρµολόγησης.
Όταν κάνετε συντήρηση, συνιστάται η
χρήση γαντιών από λατέξ.
Συνήθως, οι εργασίες τακτικής
συντήρησης µπορούν να γίνουν από τον
κάτοχο του δικύκλου και µερικές φορές
µπορεί να απαιτούν τη χρήση ειδικών
εργαλείων και µια τεχνική προετοιµασία.
Σε περίπτωση περιοδικής συντήρησης,
επισκευής, τεχνικής συµ βουλής,
απευθυνθείτε σε έναν Επίσηµ ο
Αντιπρόσωπο της aprilia, που θα σας
εγγυηθεί ένα ταχύτατο και προσεγµένο
σέρβις.
Συνιστάται να ζητάτε από τον Επίσηµο
Αντιπρόσωπο της aprilia να δοκιµάζει το
δίκυκλο µετά από την επισκευή ή την
περιοδική συντήρηση.
Παρόλα αυτά να κάνετε εσείς τους
“Προκαταρκτικούς Ελέγχους” µετά τη
συντήρηση, βλέπε σελ.47 (ΠΙΝΑΚΑΣ
ΠΡΟΚΑΤΑΡΚΤΙΚΩΝ ΕΛΕΓΧΩΝ).
MX125_GR.book Page 55 Tuesday, October 14, 2003 7:17 PM

χρήση και συντήρηση MX 125
56
ΠΙΝΑΚΑΣ ΠΕΡΙΟ∆ΙΚΗΣ ΣΥΝΤΗΡΗΣΗΣ
(ΣΕΡΒΙΣ)
ΕΠΕΜΒΑΣΕΙΣ ΜΕ ΦΡΟΝΤΙ∆Α ΤΟΥ
Επίσηµου Αντιπροσώπου της aprilia
(ΠΟΥ ΜΠΟΡΟΥΝ ΝΑ ΓΙΝΟΥΝ ΑΠΟ ΤΟΝ
ΚΑΤΟΧΟ ΤΟΥ ∆ΙΚΥΚΛΟΥ).
Υπόµνηµα
= ελέγξτε και καθαρίστε, ρυθµίστε,
λιπάνετε ή αντικαταστήστε αν
χρειάζεται,
= καθαρίστε,
= αντικαταστήστε,
= ρυθµίστε.
(*) = χρησιµοποιήστε γράσσο MOLYCOTE
6 Rapidplus
ΣΗΜΑΝΤΙΚΟ Εκτελέστε τις
εργασίες συντήρησης σε συντοµότερα
χρονικά διαστήµ ατα αν το δίκυκλο
χρησιµοποιείται σε περιοχές µε συχνή
βροχή, σκόνη ή σε χωµατόδροµους ή όταν
γίνεται χρήση του δικύκλου σε αγώνες.
Εξαρτήµατα
Τέλος
στρωσίµατος
(µετά από
1 µήνα) ή
1000 Km
(625 mi)
Κάθε 12 µήνες
ή 4000 Km
(2500 mi)
Κάθε 24 µήνες
ή 8000 Km
(5000 mi)
Μπαταρία / σφίξιµο σφιγκτήρων -
Μπουζί
Φίλτρο αέρα
-
∆ιάκενο συµπλέκτη
-
Φώτα
-
Υγρό φρένων -
-
Υγρό ψύξης Κάθε 3 µήνες:
Στάθµη λαδιού µίξης ελέγξτε κάθε φορά πριν από τη χρήση
Λάδι κιβωτίου ταχυτήτων Κάθε 12000 Km
(7500 mi)
Προσανατολισµός εµπρόσθιου φανού -
λειτουργία
- -
Στροφείο µοχλού εκκίνησης
-
Και λιπάνετε
µε αδιάβροχο
γράσσο (*)
-
Ρελαντι κινητήρα -
Τροχοί/Λάστιχα και πίεση ελαστικών κάθε µήνα
Τέντωµα και λίπανση αλυσίδας µετάδοσης κάθε µήνα
Φθορά στα τακάκια φρένων εµπρός πίσω κάθε µήνα
MX125_GR.book Page 56 Tuesday, October 14, 2003 7:17 PM

57
χρήση και συντήρηση MX 125
ΕΠΕΜΒΑΣΕΙΣ ΜΕ ΦΡΟΝΤΙ∆Α ΤΟΥ
Επίσηµου Αντιπροσώπου aprilia.
Υπόµνηµα
c
= ελέγξτε και καθαρίστε, ρυθµίστε,
λιπάνετε ή αντικαταστήστε αν
χρειάζεται,
d
= καθαρίστε,
e
= αντικαταστήστε,
f
= ρυθµίστε.
ΣΗΜΑΝΤΙΚΟ Εκτελέστε τις
εργασίες συντήρησης σε συντοµότερα
χρονικά διαστήµ ατα αν το δίκυκλο
χρησιµοποιείται σε περιοχές µε συχνή
βροχή, σκόνη ή σε χωµατόδροµους ή όταν
γίνεται χρήση του δικύκλου σε αγώνες
.
Εξαρτήµατα
Τέλος
στρωσίµατος
(µετά από
1 µήνα) ή
1000 Km
(625 mi)
Κάθε 12 µήνες ή
4000 Km
(2500 mi)
Κάθε 24 µήνες ή
8000 Km
(5000 mi)
Αµορτισέρ πίσω --c
Καρµπυρατέρ --d
Ντίζες µετάδοσης και χειριστηρίων cc-
Κεντρική µονάδα RAVE c - f
Κεντράρισµα τροχών - c -
Έδρανα και διάκενο τιµονιού cc-
Ρουλεµάν τροχών - c -
∆ίσκοι φρένων cc-
Φίλτρο λαδιού µίξης --d
Γενική λειτουργία δικύκλου cc-
Κύκλωµα φρένων cc-
Κύκλωµα ψύξης cc-
Υγρό φρένων κάθε χρόνο: e
Υγρό ψύξης κάθε 2 χρόνια: e
Εξάτµιση/σιλανσιέ
-
c -
Λάδι πηρουνιού κάθε 2 χρόνια: e
Έµβολο και κολάρα κάθε 2 χρόνια: c / κάθε 4 χρόνια: e
Αντλία µίξης και εξαέρωση c - f
Στρόφιγγα καυσίµου cc-
Τροχοί/ελαστικά και πίεση ελαστικών cc-
Σφίξιµο µπουλονιών cc-
Σφίξιµο πόλων µπαταρίας cc-
Ενδεικτική λυχνία ρεζέρβας λαδιού µίξης cc-
Τελική µετάδοση -
c -
Σωληνάκια καυσίµου - c κάθε 4 χρόνια: e
Σωληνάκια κυκλώµατος φρένων - c κάθε 4 χρόνια: e
Σωληνάκια λαδιού µίξης - c κάθε 4 χρόνια: e
Φθορά συµπλέκτη - c -
Βαλβίδα εξαέρωσης cdf κάθε 4 χρόνια:e
Greco-01.fm Page 57 Wednesday, October 15, 2003 9:30 AM

χρήση και συντήρηση MX 125
58
ΣΤΟΙΧΕΙΑ ΑΝΑΓΝΩΡΙΣΗΣ
Σας συµβουλεύουµε να γράψετε τους
αριθµούς πλαισίου και κινητήρα στον
ειδικό χώρο που υπάρχει στο παρόν
εγχειρίδιο.
Ο αριθµ ός πλαισίου µπορεί να
χρησιµ οποιηθεί για την αγορά
ανταλλακτικών.
Η τροποποίηση των αριθµ ών
αναγνώρισης µπορεί να επιφέρει
σοβαρές ποινικές και αστικές κυρώσεις,
ιδιαίτερα η τροποποίηση του αριθµού
πλαισίου επιφέρει την άµεση ακύρωση
της εγγύησης.
ΑΡΙΘΜΟΣ ΚΙΝΗΤΗΡΑ
Ο αριθµός κινητήρα (1) είναι χαραγµένος
στη δεξιά πλευρά του µπλοκ του κάρτερ
του κινητήρα.
Αρ. κινητήρα ______________________
ΑΡΙΘΜΟΣ ΠΛΑΙΣΙΟΥ
Ο αριθµός πλαισίου (2) είναι χαραγµένος
στο λαιµό του τιµονιού, στη δεξιά πλευρά.
Αρ. Πλαισίου ______________________
ΑΦΑΙΡΕΣΗ ΠΛΑΪΝΑ ΦΕΡΙΝΓΚ
∆ιαβάστε προσεκτικά στη σελ.55
(ΣΥΝΤΗΡΗΣΗ).
u
Τοποθετήστε το δίκυκλο στο σταντ.
Οι παρακάτω ενέργειες αναφέρονται σε
ένα φέρινγκ, αλλά ισχύουν και για τα
δύο.
u
περιστρέψτε αριστερόστροφα κατά 1/4
της στροφής τη βίδα (3) ταχείας
στερέωσης.
Ενεργήστε µε προσοχή. Προσπαθήστε
να µην προκαλέσετε ζηµιά στα
γλωσάκια και/ ή στις υποδοχές
κουµπώµατος. Χειριστείτε προσεκτικά
τα πλαστικά εξαρτήµατα ώστε να µην
χαραχτούν ή να φθαρούν.
u
Αφαιρέστε το αριστερί πλαϊνό φέρινγκ (4).
4
3
MX125_GR.book Page 58 Tuesday, October 14, 2003 7:17 PM

59
χρήση και συντήρηση MX 125
ΦΙΛΤΡΟ ΑΕΡΑ
Μη χρησιµοποιείτε βενζίνη ή
εύφλεκτους διαλύτες όταν πρόκειται να
πλύνετε το φίλτρο, για να αποφύγετε
τον κίνδυνο πυρκαγιάς ή έκρηξης.
∆ιαβάστε προσεκτικά στη σελ.55
(ΣΥΝΤΗΡΗΣΗ).
Ο καθαρισµ ός και ο έλεγχος της
κατάστασης του φίλτρου αέρα πρέπει να
γίνεται κάθε µήνα ή κάθε 4000 km (3750
µίλια), ανάλογα µε τις συνθήκες χρήσης.
Αν το δίκυκλο χρησιµοποιείται σε δρόµους
µ ε πολύ σκόνη ή βρεγµ ένους, ο
καθαρισµός και η αντικατάσταση πρέπει να
γίνεται πιο συχνά.
Για να καθαρίσετε το φίλτρο πρέπει να το
βγάλετε.
ΑΦΑΙΡΕΣΗ
u
Αφαιρέστε το δεξιό πλαϊνό φέρινγκ,
σελ.58 (ΑΦΑΙΡΕΣΗ ΠΛΑΪΝΑ ΦΕΡΙΝΓΚ).
u
Ξεβιδώστε και βγάλτε τις τρεις βίδες (1)
και τις αντίστοιχες ροδέλλες.
u
Αφαιρέστε το καπάκι της θήκης του
φίλτρου (2).
Πριν βγάλετε το φίλτρο, καθαρίστε το
εσωτερικό της θήκης του φίλτρου για να
µην εισχωρήσουν στην πολλαπλή
εισαγωγής σκόνη και ξένα σώµατα.
u
Καθαρίστε µε ένα πανί το εσωτερικό της
θήκης του φίλτρου και το εσωτερικό του
καπακιού (2).
u
Αφαιρέστε το φίλτρο (3) µαζί µε τα
πλέγµατα (4) και (5).
ΚΑΘΑΡΙΣΜΟΣ
Για να µην παραµορφωθούν τα πλέγµατα
ΜΗΝ πιέζετε τα πλαϊνά τµήµατα.
u
Πιάστε το κεντρικό τµήµα και των δύο
πλεγµάτων (4) και (5) και τραβήξτε για
να τις χωρίσετε.
u
Ελευθερώστε το φίλτρο (3) από το
πλέγµα (4).
u
Πλύνετε το φίλτρο (3) µε καθαρούς
διαλύτες, όχι εύφλεκτους ή µε υψηλό
σηµείο πτητικότητας και αφήστε το να
στεγνώσει καλά.
u
Επαλείψτε όλη την επιφάνεια µε λάδι για
φίλτρα µε πηκτό λάδι (SAE 80W - 90),
και στη συνέχεια στίψτε το για να φύγει
το επιπλέον λάδι.
Το φίλτρο (3) πρέπει να είναι καλά
εµποτισµένο αλλά να µην στάζει.
ΑΝΤΙΚΑΤΑΣΤΑΣΗ
u
Αντικαταστήστε το φίλτρο (3) µε ένα
καινούργιο ίδιου τύπου.
u
Ελέγξτε την ακαιρεότητα της τσιµούχας
(8), αν είναι φθαρµένη αντικαταστήστε την.
Κατά την επανατοποθέτηση:
Προσοχή στη µορφή του φίλτρου και
στα πλέγµ ατα που πρέπει να
συµπίπτουν.
u
Τοποθετήστε σωστά το φίλτρο (3) στις
δύο ακίδες (6).
u
Προσαρµόστε το πλέγµα (5).
u
Πιέστε και τα δύο πλέγµατα στα σηµεία
των ακίδων (6).
Τα δύο γλωσσάκια (7) εµποδίζουν τη
λανθασµένη τοποθέτηση του φίλτρου
στη θήκη του.
u
Τοποθετήστε το φίλτρο, µαζί µε το πλέγµα,
στους οδηγούς της θήκης φίλτρου.
MX125_GR.book Page 59 Tuesday, October 14, 2003 7:17 PM

χρήση και συντήρηση MX 125
ΕΛΕΓΧΟΣ ΣΤΑΘΜΗΣ ΛΑ∆ΙΟΥ ΣΤΟ
ΚΙΒΩΤΙΟ ΤΑΧΥΤΗΤΩΝ ΚΑΙ
ΣΥΜΠΛΗΡΩΜΑ
∆ιαβάστε προσεκτικά στη σελ.36
(ΛΑ∆ΙΑ ΚΙΒΩΤΙΟΥ ΤΑΧΤΗΤΩΝ) και
σελ. 55 (ΣΥΝΤΗΡΗΣΗ).
Έλεγχος στάθµης λαδιού στο κιβώτιο
ταχυτήτων κάθε 4000 km, αλλάξτε το µετά
το στρώσιµο και στη συνέχεια κάθε 12000
km , βλέπε σελ. 61 (ΑΝΤΙΚΑΤΑΣΤΑΣΗ
ΛΑ∆ΙΑ ΚΙΒΩΤΙΟΥ ΤΑΧΥΤΗΤΩΝ).
ΕΛΕΓΧΟΣ
Τοποθετήστε το δίκυκλο σε στερεό και
επίπεδο έδαφος.
u
Σταµατήστε τον κινητήρα και αφήστε τον
να κρυώσει για τουλάχιστον δέκα λεπτά
για να µπορέσει να αποστραγγιστεί όλο
το λάδι του κάρτερ και να κρυώσει.
u
Κρατήστε το δίκυκλο σε κατακόρυφη
θέση µε τους δύο τροχούς να
ακουµπούν στο έδαφος.
Αν δεν εκτελούνται οι παραπάνω
ενέργειεςυπάρχει κίνδυνος
λανθασµένης µέτρησης της στάθµης.
u
Βεβαιωθείτε (1) ότι η στάθµη λαδιού είναι
υψηλότερη κατά ένα τέταρτο (MIN).
Η στάθµη δεν πρέπει ποτέ να ξεπερνάει
τη µέση στο τζαµάκι ούτε να είναι κάτω
από το ένα τέταρτο. Στην πρώτη
περίπτωση θα προκληθεί διαρροή
λαδιού λόγω υπερβολικής ποσότητας.
στη δεύτερη µπορεί να προκληθεί
σοβαρή ζηµιά στον κινητήρα.
ΣΥΜΠΛΗΡΩΜΑ
Αν χρειάζεται συµπληρώστε.
u
Ξεβιδώστε και βγάλτε την τάπα γέµισης
(2).
u
Προσθέστε µικρή ποσότητα λαδιού,
κλέπε σελ.88 (ΠΙΝΑΚΑΣ ΛΙΠΑΝΤΙΚΩΝ)
και περιµένετε περίπου ένα λεπτό µέχρι
να διοχετευτεί το λάδι οµοιόµορφα στο
εσωτερικό του κάρτερ.
u
Βεβαιωθείτε (1) ότι η στάθµη λαδιού είναι
υψηλότερη κατά ένα τέταρτο (MIN).
u
Αν δεν συµβεί αυτό, επαναλάβετε το
συµπλήρωµα µε µικρές ποσότητες
λαδιού ελέγχοντας από το τζαµάκι (1).
u
Στο τέλος βιδώστε και σφίξτε την τάπη
πλήρωσης (2).
Σφίξτε καλά την τάπα πλήρωσης και
βεβαιωθείτε ότι δεν διαρρέει λάδι.
Να ελέγχετε κατά διαστήµατα µήπως
υπάρχει διαρροή στις τσιµούχες του
καπακιού του κάρτερ.
Μη χρησιµοποιείτε το δίκυκλο όταν η
λίπανση είναι ανεπαρκής ή όταν το
λιπαντικό είναι ακάθαρτο ή
ακατάλληλο, γιατί αυτό επιταχύνει τη
φθορά των κινούµενων τµηµάτων και
µπορεί να προκληθεί ανεπανόρθωτη
βλάβη.
2
1
MX125_GR.book Page 60 Tuesday, October 14, 2003 7:17 PM

χρήση και συντήρηση MX 125
ΑΝΤΙΚΑΤΑΣΤΑΣΗ ΛΑ∆ΙΑ ΚΙΒΩΤΙΟΥ
ΤΑΧΥΤΗΤΩΝ
∆ιαβάστε προσεκτικά στη σελ.36
(ΛΑ∆ΙΑ ΚΙΒΩΤΙΟΥ ΤΑΧΤΗΤΩΝ) και
σελ. 55 (ΣΥΝΤΗΡΗΣΗ).
Έλεγχος στάθµης λαδιού στο κιβώτιο
ταχυτήτων κάθε 4000 km, αλλάξτε το µετά
το στρώσιµο και στη συνέχεια κάθε 12000
km , βλέπε σελ. 61 (ΑΝΤΙΚΑΤΑΣΤΑΣΗ
ΛΑ∆ΙΑ ΚΙΒΩΤΙΟΥ ΤΑΧΥΤΗΤΩΝ).
Για την αντικατάσταση:
u
Κάντε µερικά χιλιόµετρα µέχρι να φτάσει
στην κανονική θερµοκρασία λειτουργίας.
Τοποθετήστε το δίκυκλο σε στερεό και
επίπεδο έδαφος.
u
Σταµατήστε τον κινητήρα και αφήστε τον
να κρυώσει για τουλάχιστον δέκα λεπτά
για να µπορέσει να αποστραγγιστεί όλο
το λάδι του κάρτερ και να κρυώσει.
Ο ζεστός κινητήρας περιέχει λάδι σε
υψηλή θερµοκρασία, δώστε ιδιαίτερη
προσοχή να µην καείτε όταν εκτελείται
τις παρακάτω ενέργειες.
u
Τοποθετήστε το δίκυκλο στο σταντ.
u
Τοποθετήστε ένα δοχείο (1), µε
χωρητικότητα µεγαλύτερη από 600 cm3
κάτω από την τάπα εκκένωσης (2).
u
Ξεβιδώστε και βγάλτε την τάπα εκροής
(2).
u
Ξεβιδώστε και βγάλτε την τάπα γέµισης
(3).
u
Αδειάστε το λάδι και αφήστε το να
στραγγίξει για µερικά λεπτά στο δοχείο
(1).
u
Αφαιρέστε τυχόν µεταλλικά υπολείµµατα
που µπορεί να κόλλησαν στο µαγνήτη
της τάπας εκροής (2).
u
Ελέγξτε και ενδεχοµένως
αντικαταστήστε, τη ροδέλα της τάπας
εκροής (2).
Αντικαταστήστε τη ροδέλα
στεγανότητας της τάπας εκροής (2)
κάθε 12000 km (µε κάθε αλλαγή λαδιού)
u
Βιδώστε και σφίξτε την τάπα εκροής (2).
Ροπή σφιξίµατος τάπας εκροής (2): 27
Nm (2,7 kgm).
u
Προσθέστε στο άνοιγµα γέµισης (3) 550
cmC λαδιού για κιβώτιο ταχυτήτων, βλέπε
σελ.88 (ΠΙΝΑΚΑΣ ΛΙΠΑΝΤΙΚΩΝ).
u
Βιδώστε την τάπα πλήρωσης (3).
u
Εκκινήστε τον κινητήρα, βλέπε σελ.48
( ΕΚΚΙΝΗΣΗ) και αφήστε τον να
λειτουργήσει στο ρελαντί για περίπου
ένα λεπτό, ώστε να µπορέσει να γεµίσει
το κύκλωµα λαδιού.
Ελέγξτε τη στάθµ η λαδιού και αν
χρειάζεται συµπληρώστε, βλέπε
σελ.60 (ΕΛΕΓΧΟΣ ΣΤΑΘΜΗΣ ΛΑ∆ΙΟΥ
ΣΤΟ ΚΙΒΩΤΙΟ ΤΑΧΥΤΗΤΩΝ ΚΑΙ
ΣΥΜΠΛΗΡΩΜΑ).
Σφίξτε καλά τις τάπες πλήρωσης και
εκροής και βεβαιωθείτε ότι δεν διαρρέει
λάδι.
Να ελέγχετε κατά διαστήµατα µήπως
υπάρχει διαρροή στις τσιµούχες του
καπακιού του κάρτερ.
Μη χρησιµοποιείτε το δίκυκλο όταν η
λίπανση είναι ανεπαρκής ή όταν το
λιπαντικό είναι ακάθαρτο ή
ακατάλληλο, γιατί αυτό επιταχύνει τη
φθορά των κινούµενων τµηµάτων και
µπορεί να προκληθεί ανεπανόρθωτη
βλάβη.
MX125_GR.book Page 61 Tuesday, October 14, 2003 7:17 PM

χρήση και συντήρηση MX 125
ΕΜΠΡΟΣ ΤΡΟΧΟΣ
Οι ενέργειες συναρµολόγησης και
αποσυναρµολόγησης του εµπρός τροχού
µπορεί να είναι δύσκολες και πολύπλοκες
σε ένα άτοµο χωρίς πείρα. Σε περίπτωση
ανάγκης, απευθυνθείτε σε έναν Επίσηµο
Αντιπρόσωπο της aprilia.
Πάντως, αν θέλετε να προχωρήσετε µόνοι
σας, ακολουθήστε τις παρακάτω οδηγίες.
∆ιαβάστε προσεκτικά στη σελ.55
(ΣΥΝΤΗΡΗΣΗ).
Κατά την αποσυναρµολόγηση και τη
συναρµολόγηση δώστε προσοχή για
να µην προκαλέσετε ζηµ ιά στα
σωληνάκια, στο δίσκο και στα τακάκια
των φρένων.
Πριν εκτελέσετε τις παρακάτω ενέργειες,
αφήστε τον κινητήρα και το σιλανσιέ να
κρυώσουν µέχρι να φτάσουν σε
θερµοκρασία περιβάλλοντος, για να
αποφύγετε πιθανά εγκαύµατα.
ΑΠΟΣΥΝΑΡΜΟΛΟΓΗΣΗ
u
Τοποθετήστε το δίκυκλο στο σταντ.
Λόγω του βάρους και του όγκου του
δικύκλου, η ενέργεια που ακολουθεί
απαιτεί την επέµβαση ενός δεύτερου
ατόµου. προχωρήστε προσεκτικά και
βεβαιωθείτε ότι µπορείτε να κρατήσετε
το βάρος του δικύκλου.
Βάρος δικύκλου (κατά την πορεία):126 kg.
u
Σηκώστε το εµπρός τµήµα και
τακτοποιήστε το κατάλληλο
υποστήριγµα (1) (µε ύψος 400 mm)
κάτω από τον κινητήρα, µε τρόπο ώστε ο
εµπρός τροχός να έχει ελεύθερο χώρο
για να κινείται και το δίκυκλο να είναι
καλά στερεωµένο ώστε να µην πέσει.
Κίνδυνος πτώσης του δικύκλου.
Φροντίστε να ισορροπήσει το δίκυκλο
για να αποφύγετε την πτώση του.
u
Τοποθετήστε και στερεώστε ένα βάρος
περίπου 40 kg στο πίσω µέρος για να
συγκρατεί το εµ πρός τµ ήµ α του
δικύκλου.
Βεβαιωθείτε ότι το δίκυκλο είναι
σταθερό.
u
Τακτοποιήστε κάτω από το λάστιχο ένα
υποστήριγµα (2) για να κρατηθεί ο
τροχός στη θέση του, αφού πρώτα τον
ελευθερώσετε.
u
Σταθεροποιήστε το τιµόνι σε θέση
πορείας µε τρόπο ώστε να παραµένει
µπλοκαρισµένο.
u
Ξεσφίξτε τις δύο βίδες (3) από το
σφιγκτήρα του πείρου του τροχού.
u
ξεβιδώστε εντελώς τον πείρο του τροχού
(4).
Για να διευκολύνετε την εξαγωγή του
πείρου, σηκώστε ελαφρά τον τροχό.
u
Κρατήστε τον εµπρός τροχό και
τραβήξτε µε το χέρι τον πείρο του τροχού
(4).
5
MX125_GR.book Page 62 Tuesday, October 14, 2003 7:17 PM

χρήση και συντήρηση MX 125
Ελέγξτε τη θέση του διαχωριστικού (5)
για να µπορέσετε να το
επανατοποθετήσετε σωστά.
u
Αφαιρέστε προσεκτικά τον τροχό και
δώστε προσοχή κατά την αφαίρεση του
δίσκου από τη δαγκάνα του φρένου.
u
Βγάλτε το διαχωριστικό (5).
Μην πατήσετε το µοχλό του φρένου
εµπρός µετά την εξαγωγή του τροχού,
διαφορετικά τα ε µ βολάκια της
δαγκάνας µπορεί να βγουν από τις
υποδοχές τους, προκαλώντας διαρροή
του υγρού φρένων. Σ’ αυτήν την
περίπτωση απευθυνθείτε σε έναν
Επίσηµο Αντιπρόσωπο της aprilia, ο
οποίος θα φροντίσει να κάνει τη
συντήρηση.
ΕΠΑΝΑΣΥΝΑΡΜΟΛΟΓΗΣΗ
∆ιαβάστε προσεκτικά στη σελ.55
(ΣΥΝΤΗΡΗΣΗ).
Κατά την αποσυναρµολόγηση δώστε
προσοχή για να µην προκαλέσετε ζηµιά
στα σωληνάκια, στο δίσκο και στα
τακάκια των φρένων.
u
Τοποθετήστε τον τροχό ανάµεσα στα
στελέχη του πηρουνιού, επάνω από το
υποστήριγµα (2), χωρίς να βάλετε το
δίσκο στη δαγκάνα του φρένου.
Γρασσάρετε λίγο τις εσωτερικές
υποδοχές της πλήµνης του τροχού.
u
Βάλτε την µικρότερη διάµετρο του
διαχωριστικού (5) στην υποδοχή της
πλήµνης του τροχού (αριστερά µε βάση
την κατεύθυνση πορείας).
Ενεργήστε µε προσοχή κατά τη
διάρκεια εισαγωγής του δίσκου στη
δαγκάνα του φρένου.
u
Μετακινήστε τον τροχό και, µε προσοχή,
βάλτε το δίσκο στη δαγκάνα του φρένου.
Επαλείψτε οµοιόµορφα µια µικρή
ποσότητα γράσσου στον πείρο του
τροχού.
u
Βάλτε λίγο µέσα τον πείρο (4) από τη
δεξιά πλευρά του δικύκλου (µε βάση την
κατεύθυνση πορείας)
u
Πιέστε τον πείρο του τροχού και
ταυτόχρονα κουνήστε τον τροχό (για να
ευθυγραµµιστούν οι άξονες του πείρου
και του τροχού) µέχρι την πλήρη
εισαγωγή του πείρου.
u
Βιδώστε και σφίξτε τον πείρο του τροχού
(4).
Ροπή σύσφιξης πείρου τροχού (4):
80 Nm (8 kgm).
Λόγω του βάρους και του όγκου του
δικύκλου, η ενέργεια που ακολουθεί
απαιτεί την επέµβαση ενός δεύτερου
ατόµου. προχωρήστε προσεκτικά και
βεβαιωθείτε ότι µπορείτε να κρατήσετε το
βάρος του δικύκλου.
Βάρος δικύκλου (κατά την πορεία):126 kg.
u
Σηκώστε το εµπρός τµήµα του δικύκλου
και αφαιρέστε το υποστήριγµα που κατά
την αποσυναρµολόγηση είχατε βάλει
κάτω από τον κινητήρα.
u
Κατεβάστε το δίκυκλο και στηρίξτε το στο
σταντ.
u
Με το µοχλό του εµπρός φρένου πιέστε
επανειληµµένα το τιµόνι για να µπει µέσα
το πηρούνι. Με τον τρόπο αυτό θα
προσαρµοστούν κατάλληλα τα στελέχη
του πηρουνιού.
u
Σφίξτε τις δύο βίες (3) του σφιγκτήρα του
πείρου τροχού.
Ροπή σύσφιξης βιδών (3) σφιγκτήρα
του πείρου τροχού: 10 Nm (1 kgm).
Μετά την επανασυναρµ ολόγηση,
πατήστε επανειληµµένα το µοχλό του
εµπρός φρένου και ελέγξτε τη σωστή
λειτουργία του συστήµατος φρένων.
Έλεγχος κεντραρίσµατος τροχού.
Συνιστάται να απευθυνθείτε για έλεγχο
στις ροπές σύσφιξης, στο κεντράρισµα
και στη ζυγοστάθµιση του τροχού σε
έναν Επίσηµ ο Αντιπρόσωπο της
aprilia για να αποφύγετε τυχόν
προβλήµατα που θα µπορούσαν να
προκαλέσουν σοβαρές ζηµιές σε σας
και/ή σε άλλους.
MX125_GR.book Page 63 Tuesday, October 14, 2003 7:17 PM

χρήση και συντήρηση MX 125
ΠΙΣΩ ΤΡΟΧΟΣ
Οι εργασίες αποσυναρµολόγησης και
επανασυναρµολόγησης του πίσω
τροχού µπορεί να είναι δύσκολες και
πολύπλοκες για ένα άτοµο χωρίς την
αναγκαία εµπειρία. Σε περίπτωση
ανάγκης, απευθυνθείτε σε έναν
Επίσηµο Αντιπρόσωπο της aprilia.
Πάντως, αν θέλετε να προχωρήσετε µόνοι
σας, ακολουθήστε τις παρακάτω οδηγίες.
∆ιαβάστε προσεκτικά στη σελ.55
(ΣΥΝΤΗΡΗΣΗ).
Πριν εκτελέσετε τις παρακάτω ενέργειες,
αφήστε τον κινητήρα και το σιλανσιέ να
κρυώσουν µέχρι να φτάσουν σε
θερµοκρασία περιβάλλοντος, για να
αποφύγετε πιθανά εγκαύµατα.
Κατά την αποσυναρµολόγηση και τη
συναρµολόγηση δώστε προσοχή για
να µην προκαλέσετε ζηµ ιά στα
σωληνάκια, στο δίσκο και στα τακάκια
των φρένων.
Για την αποσυναρµ ολόγηση και
επανασυναρµολόγηση φορέστε ειδικά
γάντια εργασίας που εξασφαλίζουν την
απαιτούµενη προστασία στα δάχτυλα
και στα χέρια.
Η οδήγηση µε κατεστραµµένες ζάντες
θέτει σε κίνδυνο την ασφάλειά σας, την
ασφάλεια άλλων και του δικύκλου.
Ελέγξτε την νκατάσταση της ζάντας και
αν είναι κατεστραµµένη
ανατικαταστήστε την.
ΑΠΟΣΥΝΑΡΜΟΛΟΓΗΣΗ
u
Τοποθετήστε το δίκυκλο στο σταντ.
u
Ξεβιδώστε και αφαιρέστε τις δύο βίδες (1).
u
Αφαιρέστε το κάρτερ αλυσίδας (2).
u
Ξεσφίξτε το παξιµάδι του τροχού (3) .
Ροπή σύσφιξης παξιµαδιού τροχού (3):
100 Nm (10 kgm).
Κατά την επανασυναρµολόγηση, πριν
σφίξετε το παξιµάδι του τροχού (3)
ελέγξτε το τέντωµα της αλυσίδας, βλέπε
σελ. 66 (ΑΛΥΣΙ∆Α ΜΕΤΑ∆ΟΣΗΣ).
Λόγω του βάρους και του όγκου του
δικύκλου, η ενέργεια που ακολουθεί
απαιτεί την επέµβαση ενός δεύτερου
ατόµου. προχωρήστε προσεκτικά και
βεβαιωθείτε ότι µπορείτε να κρατήσετε
το βάρος του δικύκλου.
Βάρος δικύκλου (κατά την πορεία): 126
kg.
u
Σηκώστε το πίσω τµήµα του δικύκλου
και τακτοποιήστε το στο κατάλληλο
υποστήριγµα (4) (µε ύψος 400 mm)
κάτω από τον κινητήρα, µε τρόπο ώστε ο
πίσω τροχός να έχει ελεύθερο χώρο για
να κινείται και το δίκυκλο να είναι καλά
στερεωµένο ώστε να µην υπάρχει
κίνδυνος να πέσει.
8
3
7
6 9
2
1 1
4 5
MX125_GR.book Page 64 Tuesday, October 14, 2003 7:17 PM

χρήση και συντήρηση MX 125
Κίνδυνος πτώσης του δικύκλου.
Φροντίστε να ισορροπήσει το δίκυκλο
για να αποφύγετε την πτώση του.
Βεβαιωθείτε ότι το δίκυκλο είναι σταθερό.
u
Τακτοποιήστε κάτω από το λάστιχο ένα
υποστήριγµα (5) για να κρατηθεί ο
τροχός στη θέση του, αφού πρώτα τον
ελευθερώσετε.
Κατεβάστε την αλυσίδα (6) στην εξωτερική
πλευρά της οδοντωτής κορώνας (7).
Μην βάζετε τα δάχτυλά σας ανάµεσα στην
αλυσίδα και στην οδοντωτή κορώνα.
u
Μετακινήστε εντελώς µπροστά τον
τροχό. Αφαιρέστε την αλυσίδα από την
επάνω πλευρά περιστρέφοντας, σε
αντίθετη φορά από την κανονική φορά
κίνησης, τον πίσω τροχό.
Κατά την επανασυναρµολόγηση, βάλτε
την αλυσίδα από την κάτω πλευρά
περιστρέφοντας τον πίσω τροχό προς
την κατεύθυνση κανονικής πορείας.
u
Ξεβιδώστε και αφαιρέστε το παξιµάδι
του τροχού (3) και τη ροδέλα (8).
Για να διευκολύνετε την εξαγωγή του
πείρου, σηκώστε ελαφρά τον τροχό.
u
Κρατήστε τον πίσω τροχό και τραβήξτε
µε το χέρι τον πείρο του τροχού (9).
Το αριστερό διαχωριστικό (10) και το
δεξί διαχωριστικό (11) παραµένουν στις
αντίστοιχες υποδοχές του τροχού. Εάν
βγουν από τη θέση τους
επανατοποθετήστε τα καταλλήλως
(βλέπε ΕΠΑΝΑΣΥΝΑΡΜΟΛΟΓΗΣΗ).
u
Τραβήξτε έξω τον τροχό από την πίσω
πλευρά του πηρουνιού, προσέχοντας να
µη βγει ο δίσκος του φρένου από τη
δαγκάνα.
Μην πατήσετε το µοχλό του πίσω
φρένου µετά την εξαγωγή του τροχού,
διαφορετικά το εµβολάκι της δαγκάνας
µπορεί να βγει από την υποδοχή του,
προκαλώντας διαρροή του υγρού
φρένων. Σ’ αυτήν την περίπτωση
απευθυνθείτε σε έναν Επίσηµ ο
Αντιπρόσωπο της aprilia, ο οποίος θα
φροντίσει να κάνει τη συντήρηση.
Ελέγξτε τη θέση των διαχωριστικών
(10) και (11) για να µπορέσετε να τα
επανασυναρµολογήσετε σωστά.
u
Βγάλτε το αριστερό διαχωριστικό (10).
u
Βγάλτε το δεξιό διαχωριστικό (11).
Κατά την επανατοποθέτηση:
u
Γρασσάρετε ελαφρώς τις εσωτερικές
υποδοχές της πλήµνης του τροχού.
u
Τοποθετήστε τα διαχωριστικά (10) (11)
µε τη µεγαλύτερη διάµετρος προς την
εξωτερική πλευρά του δικύκλου.
u
Επαλείψτε οµοιόµορφα µια µικρή ποσότητα
γράσσου στον πείρο του τροχού.
Μετά την επανασυναρµ ολόγηση,
πατήστε επανειληµµένα το µοχλό του
πίσω φρένου και ελέγξτε τη σωστή
λειτουργία του συστήµατος φρένων.
Έλεγχος κεντραρίσµατος τροχού.
Συνιστάται να απευθυνθείτε για έλεγχο
στις ροπές σύσφιξης, στο κεντράρισµα
και στη ζυγοστάθµιση του τροχού σε
έναν Επίσηµ ο Αντιπρόσωπο της
aprilia για να αποφύγετε τυχόν
προβλήµατα που θα µπορούσαν να
προκαλέσουν σοβαρές ζηµιές σε σας
και/ή σε άλλους. Ελέγξτε το τέντωµα της
αλυσίδας.
11
10
MX125_GR.book Page 65 Tuesday, October 14, 2003 7:17 PM

χρήση και συντήρηση MX 125
ΑΛΥΣΙ∆Α ΜΕΤΑ∆ΟΣΗΣ
∆ιαβάστε προσεκτικά στη σελ.55
(ΣΥΝΤΗΡΗΣΗ).
Το δίκυκλο είναι εφοδιασµένο µε µια
αλυσίδα µε κύριο σύνδεσµο.
Σε περίπτωση αποσυναρµολόγησης και
συναρµολόγησης της αλυσίδας, δώστε την
απαραίτητη προσοχή ώστε το ελατήρια (1)
του συνδέσµου να τοποθετηθεί µε την
ανοιχτή πλευρά αντίθετα από την
κατεύθυνση πορείας (βλέπε εικόνα).
Η υπερβολική χαλάρωση της αλυσίδας
µπορεί να προκαλέσει την εξαγωγή της
αλυσίδας από το πινιόν προκαλώντας
ατύχηµα ή σοβαρή ζηµιά στο δίκυκλο.
Ελέγχετε περιοδικά το διάκενο, και εν
ανάγκη ρυθµίστε την, βλέπε σελ.67
(ΡΥΘΜΙΣΗ). Για την αντικατάσταση της
αλυσίδας, απευθυνθείτε αποκλειστικά
και µόνο σε έναν Επίσηµ ο
Αντιπρόσωπο της aprilia, που θα σας
εξασφαλίσει άµεση και προσεκτική
εξυπηρέτηση.
Η λανθασµένη συντήρηση µπορεί να
προκαλέσει την πρόωρη φθορά της
αλυσίδας και/ή να προκαλέσει ζηµιά
στο πινιόν και/ ή στην κορώνα.
Εκτελέστε τις εργασίες συντήρησης σε
συντοµότερα χρονικά διαστήµατα αν το
δίκυκλο υπόκειται σε σκληρή
καταπόνηση ή αν χρησιµοποιείται σε
περιοχές µε πολύ σκόνη και/ή λάσπη.
ΕΛΕΓΧΟΣ ∆ΙΑΚΕΝΟΥ
Για τον έλεγχο του διακένου:
u
Σταµατήστε τον κινητήρα.
u
Τοποθετήστε το δίκυκλο στο σταντ.
u
Βάλτε το λεβιέ ταχυτήτων σε νεκρά.
u
Ελέγξτε ώστε η κάθετη ταλάντωση, στο
ενδιάµεσο σηµείο, ανάµεσα στο πινιόν και
στην κορώνα, να είναι περίπου 30-35 mm.
u
Μετακινήστε το δίκυκλο προς τα εµπρός,
ώστε να ελέγξετε την κατακόρυφη
ταλάντωση της αλυσίδας και σε άλλες
θέσεις. Το διάκενο πρέπει να παραµένει
σταθερό σε όλες τις φάσεις περιστροφής
του τροχού.
Αν η ταλάντωση είναι µεγαλύτερη σε
µερικές θέσεις, αυτό σηµαίνει ότι
µ ερικοί κρίκοι έχουν χαλάσει ή
σφηνώσει, και σε αυτή την περίπτωση
απευθυνθείτε στον Επίσηµ ο
Αντιπρόσωπο της aprilia. Για να
αποφύγετε το σφήνωµα, λιπαίνετε
συχνά την αλυσίδα, βλέπε σελ.67
(ΛΙΠΑΝΣΗ ΚΑΙ ΚΑΘΑΡΙΣΜΟΣ).
Αν ο τζόγος είναι οµοιόµορφος, αλλά
µεγαλύτερος ή µικρότερος από 30-35 mm,
εκτελέστε τη ρύθµιση, βλέπε σελ.67
(ΡΥΘΜΙΣΗ).
54
1
2
MX125_GR.book Page 66 Tuesday, October 14, 2003 7:17 PM

χρήση και συντήρηση MX 125
ΡΥΘΜΙΣΗ
Αν µετά τον έλεγχο είναι απαραίτητη η
ρύθµιση της τάσης της αλυσίδας:
u
Τοποθετήστε το δίκυκλο στο σταντ.
u
Ξεσφίξτε εντελώς το παξιµάδι (1).
ΣΗΜΑΝΤΙΚΟ Για το κεντράρισµα
του τροχού έχουν προβλεφθεί ανεξάρτητα
σταθερά σηµεία αναφοράς (2-3) στο
εσωτερικό των εδρών των τεντωτήρων στα
µπράτσα του ψαλιδιού, µπροστά από τον
πείρο τροχού.
u
Ξεσφίξτε τα δύο κόντρα παξιµάδια (4).
u
Με τους ρεγουλαδόρους (5) ρυθµίστε το
διάκενο της αλυσίδας ελέγχοντας ώστε και οι
δυο πλευρές του δικύκλου να αντιστοιχούν
στα ίδια σηµεία αναφοράς (2-3).
u
Σφίξτε τα δύο κοντραπαξιµάδια (4).
u
Σφίξτε το παξιµάδι (1).
Ροπή σύσφιξης παξιµαδιού τροχού (1):
100 Nm (10 kgm).
u
Ελέγξτε το διάκενο της αλυσίδας, βλέπε
σελ.66 (ΕΛΕΓΧΟΣ ∆ΙΑΚΕΝΟΥ).
ΕΛΕΓΧΟΣ ΦΘΟΡΑΣ ΑΛΥΣΙ∆ΑΣ, ΠΙΝΙΟΝ
ΚΑΙ ΚΟΡΩΝΑΣ
Ελέγξτε επίσης τα ακόλουθα σηµεία και
βεβαιωθείτε ότι η αλυσίδα, το πινιόν και η
κορώνα δεν παρουσιάζουν:
u
Ράουλα κατεστραµµένα.
u
Πείρους χαλαρωµένους.
u
Κρίκους στεγνούς ή σκουριασµένους,
χαλασµένους ή σφηνωµένους.
u
Υπερβολική φθορά.
u
∆ακτυλίους συγκράτησης που λείπουν.
u
∆όντια των γραναζιών που είναι
υπερβολικά φθαρµένα ή χαλασµένα.
Αν τα ράουλα της αλυσίδας έχουν πάθει
ζηµιά, οι πείροι είναι χαλαρωµένοι και/ή
οι δακτύλιοι συγκράτησης είναι
χαλασµένοι ή λείπουν, πρέπει να
αντικατασταθεί όλο το σύστηµα της
αλυσίδας (γρανάζια και αλυσίδα).
u
Ελέγξτε τη φθορά του τεντωτήρα της
αλυσίδας (6) και της ροδέλας
τεντώµατος αλυσίδας (7).
u
Τέλος, ελέγξτε τη φθορά του
προστατευτικού ολισθητήρα του
πηρουνιού.
Λιπαίνετε την αλυσίδα συχνά, ιδιαίτερα
αν δείτε ότι υπάρχουν τµήµατα στεγνά
ή σκουριασµένα. Οι χαλασµένοι ή
σφηνωµ ένοι κρίκοι πρέπει να
λιπαίνονται και να επαναφέρονται σε
κατάσταση λειτουργίας. Αν αυτό δεν
είναι δυνατό, απευθυνθείτε σε έναν
Επίσηµο Αντιπρόσωπο της aprilia ο
οποίος θα φροντίσει για την
αντικατάσταση.
ΛΙΠΑΝΣΗ ΚΑΙ ΚΑΘΑΡΙΣΜΟΣ
∆ώστε µεγάλη προσοχή στη ρύθµιση,
λίπανση, πλύσιµο και αντικατάσταση
της αλυσίδας.
Λιπαίνετε την αλυσίδα κάθε 500 km και
κάθε φορά που υπάρχει ανάγκη.
Λιπάνετέ την αλυσίδα µε γράσο σε σπρέι
για αλυσίδες, βλέπε σελ.88 (ΠΙΝΑΚΑΣ
ΛΙΠΑΝΤΙΚΩΝ).
Μην πλένετε εντελώς την αλυσίδα µε
ψεκασµό νερού, ατµού, ψεκασµό νερού σε
υψηλή πίεση και διαλύτες µε υψηλό βαθµό
ευφλεξιµότητας.
3 5 4
MX125_GR.book Page 67 Tuesday, October 14, 2003 7:17 PM

χρήση και συντήρηση MX 125
ΕΛΕΓΧΟΣ ΑΝΑΡΤΗΣΗΣ
ΕΜΠΡΟΣ ΚΑΙ ΠΙΣΩ
Για την αντικατάσταση του λαδιού στο
εµπρός πηρούνι απευθυνθείτε σε έναν
Επίσηµο Αντιπρόσωπο της aprilia ο
οποίος θα σας εξασφαλίσει άµεση και
προσεκτική εξυπηρέτηση.
∆ιαβάστε προσεκτικά στη σελ.55
(ΣΥΝΤΗΡΗΣΗ).
Αντικαταστήστε το λάδι του εµ πρός
πηρουνιού κάθε 15000 km ή κάθε 2
χρόνια.
Ελέγχετε το λάδι κάθε 8000 km και αν είναι
βρώµικο αντικαταστήστε το.
Αντκαταστήστε το λάδι του πηρουνιού πιο
συχνά αν το δίκυκλο χρησιµοποιείται σε
δρόµ ους µε σκόνη, σε βρεγµ ένο
οδόσρωµα και σε ανώµαλο δρόµο.
Κάντε επίσης του παρακάτω ελέγχους:
u
Με το µοχλό του εµπρός φρένου πιέστε
επανειληµµένα το τιµόνι για να µπει µέσα
το πηρούνι.
Η διαδροµή πρέπει να είναι οµαλή και
δεν πρέπει να υπάρχουν ίχνη λαδιού στα
στελέχη.
u
Ελέγξτε το σφίξιµο όλων των οργάνων
και τη λειτουργικότητα των αρθρώσεων
της ανάρτησης εµπρός και πίσω.
Αν παρατηρήσετε ανωµαλίες στη
λειτουργία ή εάν καταστεί αναγκαία
κάποια εξειδικευµένη επέµβαση,
απευθυνθείτε σε έναν Επίσηµ ο
Αντιπρόσωπο της aprilia.
MX125_GR.book Page 68 Tuesday, October 14, 2003 7:17 PM

χρήση και συντήρηση MX 125
ΑΝΑΡΤΗΣΗ ΠΙΣΩ
Η πίσω ανάρτηση αποτελείται από ένα
σύστηµ α ελατηρίου- αµ ορτισέρ,
συνδεδεµένο µέσω ενός σάιλεντ µπλοκ
στο πλαίσιο και µέσω αρθρώσεων στο
πίσω ψαλίδι.
Για να ρυθµίσετε τις αναρτήσεις, ρυθµίστε
την προφόρτιση (A) του ελατηρίου,
ξεβιδώστε τον κοντραδακτύλιο (2) και
ρυθµίστε το δακτύλιο (1).
Ρύθµιση στάνταρ: 245 mm.
Μέγιστη προφόρτιση: 240 mm.
ΡΥΘΜΙΣΗ ΠΡΟΦΟΡΤΙΣΗΣ
ΠΙΣΩ ΑΜΟΡΤΙΣΕΡ
Η ρύθµιση στάνταρ του εµπρός πιρουνιού
έχει γίνει µε τέτοιον τρόπο ώστε να
ικανοποιεί τις συνθήκες οδήγησης µε µικρή
και µεγάλη ταχύτητα, τόσο µε µικρό φορτίο
όσο και µε πλήρες φορτίο.
Είναι όµ ως δυνατό να κάνετε την
προσωπική σας ρύθµιση, ανάλογα µε τη
χρήση του δικύκλου.
u
Χρησιµοποιώντας το κατάλληλο κλειδί
(3)
-
, ξεβιδώστε λίγο το δακτύλιο
εµπλοκής (2).
u
Χρησιµοποιήστε το δακτύλιο ρύθµισης
(1) (ρύθµιση προφόρτισης ελατηρίου
αµορτισέρ) (βλέπε πίνακα).
u
Αφού κάνετε την κατάλληλη ρύθµιση
σφίξτε εντελώς το δακτύλιο εµπλοκής
(2).
∆ακτύλιος
ρύθµ ισης
(1)
Βιδώνοντας Ξεβιδώνοντας
Λειτουργία Αύξησ η
προφόρτισης
ελατηρίου
Μείωση
προφόρτισης
ελατηρίου
Τύπος
ρύθµισης
Πιο σκληρή
ρύθµιση
Πιο µαλακή
ρύθµιση
Συνιστώµε
νος τύπος
δρόµου
Επίπεδοι ή
συνηθισµένοι
δρόµοι
∆ρόµ οι µε
χαλασµένο
οδόστρωµα
Σηµειώσεις Οδήγηση µε
συνεπιβάτη
Οδήγηση
χωρίς
συνεπιβάτη
A
MX125_GR.book Page 69 Tuesday, October 14, 2003 7:17 PM

χρήση και συντήρηση MX 125
ΕΛΕΓΧΟΣ ΦΘΟΡΑΣ ΣΤΑ ΤΑΚΑΚΙΑ
∆ιαβάστε προσεκτικά στη σελ.38
(ΥΓΡΟ ΦΡΕΝΩΝ - συστάσεις), σσελ.38
(∆ΙΣΚΟΦΡΕΝΑ), σελ.55 (ΣΥΝΤΗΡΗΣΗ).
Οι πληροφορίες που ακολουθούν
αναφέρονται σε ένα µόνο κύκλωµα
φρένων αλλά ισχύουν και για τα δύο.
Ελέγξτε τη φθορά στα τακάκια των φρένων
στο τέλος της περιόδου στρωσίµατος ή
µετά τα πρώτα 1000 km και στη συνέχεια
κάθε 4000 km.
Η φθορά των τακακιών του δισκόφρενου
εξαρτάται από τη χρήση, από το στιλ
οδήγησης και από το είδος του δρόµου.
Η φθορά είναι µεγαλύτερη κατά τη χρήση
σε δρόµους µε πολύ σκόνη, βρεγµένους ή
σε ανώµαλο δρόµο.
Ελέγχετε τη φθορά των τακακιών των
φρένων ιδιαίτερα πριν από κάθε ταξίδι.
Για να εκτελέσετε ένα γρήγορο έλεγχο της
φθοράς των τακακιών:
u
Τοποθετήστε το δίκυκλο στο σταντ.
u
Κάντε έναν οπτικό έλεγχο ανάµεσα στη
δαγκάνα του φρένου και τα τακάκια, ως
εξής:
– από επάνω και εµπρός για τη δαγκάνα
του εµπρός φρένου (1),
– από επάνω και πίσω για τη δαγκάνα του
πίσω φρένου (2).
u
Αν το πάχος του υλικού τριβής (ακόµα
και σε ένα µόνο τακάκι) µειωθεί µέχρι να
φτάσει στο 1 mm, αντικαταστήστε και τα
δύο τακάκια.
Για την αντικατάστασή του
απευθυνθείτε σε έναν Επίσηµ ο
Αντιπρόσωπο της aprilia.
ΡΥΘΜΙΣΗ ΧΕΙΡΙΣΤΗΡΙΟΥ
ΕΚΚΙΝΗΣΗΣ ΜΕ ΚΡΥΟ ()
∆ιαβάστε προσεκτικά στη σελ.55
(ΣΥΝΤΗΡΗΣΗ).
Το ιδανικό διάκενο του χειριστηρίου
εκκίνησης µε κρύο πρέπει να είναι 2 χ 3 mm.
Για τη ρύθµιση:
u
Τοποθετήστε το δίκυκλο στο σταντ.
u
Πηγαίνετε στην αριστερή πλευρά του
δικύκλου.
ΜΗΝ αφαιρείτε το προστατευτικό
κάλυµµα της ντίζας γκαζιού (3).
u
Αφαιρέστε το προστατευτικό κάλυµµα (4).
u
Ξεσφίξτε (βιδώνοντας) το παξιµάδι (5).
u
Ρυθµίστε µε το ρεγουλαδόρο (6), που
βρίσκεται στο καρµπυρατέρ.
Στο τέλος της ρύθµισης:
u
Σφίξτε (ξεβιδώνοντας) το παξιµάδι (5),
µπλοκάροντας το ρεγουλαδόρο (6) και
τοποθετήστε το προστατευτικό κάλυµµα
(4).
MX125_GR.book Page 70 Tuesday, October 14, 2003 7:17 PM

χρήση και συντήρηση MX 125
ΡΥΘΜΙΣΗ ΡΕΛΑΝΤΙ
∆ιαβάστε προσεκτικά στη σελ.55
(ΣΥΝΤΗΡΗΣΗ).
Ρυθµίστε το ρελαντί στο τέλος της
περιόδου στρωσίµατος και κάθε φορά που
φαίνεται ότι δεν είναι κανονικό.
Για να κάνετε αυτή τη ρύθµιση:
u
Κάντε µερικά χιλιόµετρα µέχρι να φτάσει
στην κανονική θερµοκρασία λειτουργίας
και στη συνέχεια σταµ ατήστε τον
κινητήρα.
u
Τοποθετήστε το δίκυκλο στο σταντ.
Ενεργήστε από τη δεξιά πλευρά του
δικύκλου.
u
Συνδέστε το ηλεκτρονικό στροφόµετρο
στο καλώδιο του µπουζί.
u
Εκκινήστε τον κινητήρα.
Το επίπεδο στροφών στο ρελαντί πρέπει
να είναι περίπου 1500 ± 100
στροφές/λεπτό.
Αν είναι αναγκαίο:
u
Ρυθµίστε µε τη βίδα ρύθµισης (1) που
υπάρχει στο καρµπυρατέρ.
ΒΙ∆ΩΝΟΝΤΑΣ (δεξιόστροφα) ο αριθµός
στροφών αυξάνεται.
ΞΕΒΙ∆ΩΝΟΝΤΑΣ (αριστερόστροφα) ο
αριθµός στροφών µειώνεται.
u
Με τη µανέτα του γκαζιού, αυξήστε και
µειώστε τις στροφές µερικές φορές για
να επαληθεύσετε τη σωστή λειτουργία
και ότι το ρελαντί παραµένει σταθερό.
Μην επεµβαίνετε στη βίδα ρύθµισης του
αέρα, για να αποφύγετε αλλαγές στη
ρύθµιση της ανάµιξης καυσίµου και
αέρα.
Σε περίπτωση ανάγκης, απευθυνθείτε
σε έναν Επίσηµο Αντιπρόσωπο της
aprilia.
ΡΥΘΜΙΣΗ ΓΚΑΖΙΟΥ
∆ιαβάστε προσεκτικά στη σελ.55
(ΣΥΝΤΗΡΗΣΗ).
Το διάκενο του χειρόγκαζου πρέπει να
είναι 2 - 3 mm, µετρούµ ενα στην
περιφέρεια της χειρολαβής.
Για τη ρύθµιση του διάκενου:
u
Τοποθετήστε το δίκυκλο στο σταντ.
u
Αφαιρέστε το προστατευτικό κάλυµµα
(2).
u
Ξεσφίξτε (βιδώνοντας) το παξιµάδι (3).
u
Ρυθµίστε µε το ρεγουλαδόρο (4), που
βρίσκεται στο σηµείο εισόδου της ντίζας
γκαζιού.
Στο τέλος της ρύθµισης:
u
Σφίξτε (ξεβιδώνοντας) το παξιµάδι (3),
µπλοκάροντας το ρεγουλαδόρο (4) και
τοποθετήστε το προστατευτικό κάλυµµα
(2).
MX125_GR.book Page 71 Tuesday, October 14, 2003 7:17 PM

χρήση και συντήρηση MX 125
ΜΠΟΥΖΊ
∆ιαβάστε προσεκτικά στη σελ.55
(ΣΥΝΤΗΡΗΣΗ).
Ελέγξτε το µπουζί στο τέλος της περιόδου
στρωσίµατος και στη συνέχεια µετά από
4000 km. Αντικαταστήστε κάθε 8000 km.
Κατά διαστήµατα να βγάζετε το µπουζί, να
το καθαρίζετε από τις ανθρακούχες
επικαθίσεις και αν είναι αναγκαίο
αντικαταστήστε το.
Για πρόσβαση στο µπουζί:
u
Τοποθετήστε το δίκυκλο στο σταντ.
Ενεργήστε από τη δεξιά πλευρά του
δικύκλου.
Για αφαίρεση και καθαρισµό:
u
Αφαιρέστε το κάλυµµα (πίπα) από το
µπουζί (1).
u
Αφαιρέστε κάθε ίχνος βρωµιάς από τη
βάση του µπουζί, µεβιδώστε το µε το
προµηθευόµενο κλειδί στο κιτ εργαλείων
και βγάλτε το από τη θήκη του,
φροντίζοντας να µην µπει σκόνη ή άλλες
ουσίες στο εσωτερικό του κυλίνδρου.
u
Ελέγξτε ώστε το ηλεκτρόδιο και η
κεντρική πορσελάνη του µπουζί δεν
έχουν ανθρακούχες επικαθίσεις ή
σηµάδια διάβρωσης. Ενδεχοµένως
καθαρίστε µε το ειδικό καθαριστικό για
µ πουζί, µε ένα σύρµ α και/ή ένα
µεταλλικό βουρτσάκι.
u
Φυσήξτε δυνατά µε αέρα για να µην
µπουν υπολείµµατα ακαθαρσιών στον
κινητήρα. Αν το µονωτικό του µπουζί
είναι σπασµένο, αν τα ηλεκτρόδια είναι
διαβρωµένα ή υπάρχουν πολλές
επικαθίσεις, το µπουζί πρέπει να
αντικατασταθεί.
u
Ελέγξτε το διάκενο των ηλεκτροδίων µε
ένα παχύµετρο. Πρέπει να είναι 0,5÷0,6
mm, ενδεχοµ ένως ρυθµ ίστε το
λυγίζοντας προσεκτικά το ηλεκτρόδιο
γείωσης.
u
Βεβαιωθείτε ότι η ροδέλα είναι σε καλή
κατάσταση.
Με τη ροδέλα τοποθετηµένη, βιδώστε µε
το χέρι το µπουζί για να µην
καταστραφούν τα πάσα.
u
Με το κλειδί που προµηθεύεται µε το κιτ
εργαλείων σφίξτε κατά 1/2 στορφή το
µπουζί για να πιέσει τη ροδέλα.
Ροπή στρέψης µπουζί:
20 Nm (2 kgm).
Το µπουζί πρέπει να είναι καλά
βιδωµένο, διαφορετικά ο κινητήρας
µπορεί να υπερθερµανεθεί και να πάθει
ζηµιά.
Χρησιµ οποιείτε µπουζί του
συνιστώµενου τύπου, βλέπε σελ.85
(ΤΕΧΝΙΚΑ ΣΤΟΙΧΕΙΑ), διαφορετικά
µπορεί να µειωθούν οι επιδόσεις και η
διάρκεια του κινητήρα.
u
Τοποθετήστε σωστά το κάλυµµα του
µπουζί (1) µε τρόπο ώστε να µην βγαίνει
µε τους κραδασµούς του κινητήρα.
MX125_GR.book Page 72 Tuesday, October 14, 2003 7:17 PM

χρήση και συντήρηση MX 125
ΜΠΑΤΑΡΙΑ
∆ιαβάστε προσεκτικά στη σελ.55
(ΣΥΝΤΗΡΗΣΗ).
Στο τέλος της περιόδου στρωσίµατος
και στη συνέχεια κάθε 4000 km ή 6
µ ήνες, ελέγχετε τη στάθµ η του
ηλεκτρολύτη και το σφίξιµ ο των
σφιγκτήρων.
Ο ηλεκτρολύτης της µπαταρίας είναι
τοξικός, καυστικός και αν έρθει σε
επαφή µε το δέρµ α µπορεί να
προκαλέσει εγκαύµατα γιατί περιέχει
θειϊκό οξύ.
Όταν κάνετε συντήρηση να φοράτε
προστετυτικά ρούχα, µια µάσκα για το
πρόσωπο και/ή προστατευτικά γυαλιά.
Αν το υγρό του ηλεκτρολύτη έρθει σε
επαφή µε το δέρµα ξεπλύντε καλά µε
άφθονο νερό και συµβουλευτείτε ένα
γιατρό.
Αν έρθει σε επαφή µε τα µάτια, πλύνετε
µε άφθονο νερό για δεκαπέντε λεπτά
και στη συνέχεια απευθυνθείτε αµέσως
σε έναν οφθαλµίατρο.
Σε περίπτωση τυχαίας κατάποσης,
πιείτε άφθονο νερό ή γάλα και
συνεχίστε µε γάλα ή µαγνήσιο ή φυτικό
λάδι και απευθυνθείτε σε έναν γιατρό.
Από την µπαταρία ανδύονται εκρηκτικά
αέρια, καλό θα είναι να κρατήσετε
µακριά τυχόν φλόγες, σπινθήρες,
τσιγάρα και οποιαδήποτε άλλη πηγή
θερµότητας.
Κατά τη διάρκεια επανφόρτισης ή
χρήσης, προνοήστε για τον κατάλληλο
αερισµό του χώρου για να αποφύγετε
την εισπνοή των αερίων που
εκπέµπονται κατά τη διάρκεια της
επαναφόρτισης.
ΦΥΛΑΞΤΕ ΤΟ ΜΑΚΡΙΑ ΑΠΟ ΤΑ ΠΑΙ∆ΙΑ
Ποτέ µην αντιστρέφετε τη σύνδεση των
καλωδίων της µπαταρίας.
∆ώστε προσοχή ώστε να µην πάρει
υπερβολική κλίση το δίκυκλο για να
αποφύγετε διαρροή του υγρού της
µπαταρίας.
Συνδέστε και αποσυνδέστε τη µπαταρία
νε το διακόπτη εκκίνησης στη θέση
“
”.
Συνέστε πρώτα το θετικό καλώδιο (+)
και µετά το αρνητικό (–). Αποσυνδέστε
ακολουθώντας την αντίθετη σειρά.
Το υγρό της µπαταρίας είναι
διαβρωτικό.
Μην αφήνετε να χυθεί, ιδιαίτερα σε
πλαστικά τµήµατα.
ΜΕΓΑΛΗ ΠΕΡΙΟ∆ΟΣ Α∆ΡΑΝΕΙΑΣ ΤΗΣ
ΜΠΑΤΑΡΙΑΣ
Εάν το δίκυκλο δεν λειτουργήσει για
µεγάλο χρονικό διάστηµα:
u
Αφαιρέστε τη µπαταρία και φυλάξτε την
σε στεγνό και δροσερό χώρο, βλέπε
σελ.74 (ΑΦΑΙΡΕΣΗ ΜΠΑΤΑΡΙΑΣ).
u
Επαναφορτίστε την πλήρως, µε αργή
φόρτιση, βλέπε σελ.75
(ΕΠΑΝΑΦΟΡΤΙΣΗ ΜΠΑΤΑΡΙΑΣ).
Αν η µπαταρία παραµείνει στο δίκυκλο,
αποσυνδέστε τους σφιγκτήρες.
Είναι σηµαντικό να ελέγχζετε τακτικά τη
φόρτιση (περίπου µία φορά το µήνα) κατά
τους χειµερινούς µήνες ή όταν το δίκυκλο
παραµένει ακινητοποιηµένο, για να
αποφύγετε τυχόν φθορά.
MX125_GR.book Page 73 Tuesday, October 14, 2003 7:17 PM

χρήση και συντήρηση MX 125
ΕΛΕΓΧΟΣ ΚΑΙ ΚΑΘΑΡΙΣΜΟΣ
ΑΚΡΟ∆ΕΚΤΩΝ ΚΑΙ ΣΦΙΓΚΤΗΡΩΝ
∆ιαβάστε προσεκτικά στη σελ.73
(ΜΠΑΤΑΡΙΑ)).
u
Αφαιρέστε το αριστερό πλαϊνό φέρινγκ,
βλέπε σελ.58 (ΑΦΑΙΡΕΣΗ ΠΛΑΪΝΑ
ΦΕΡΙΝΓΚ).
u
Ελέγξτε ώστε οι ακροδέκτες (1) των
καλωδίων και οι σφιγκτήρες (2) της
µπαταρίας να είναι:
– σε καλή κατάσταση (και να µην έχουν
διαβρωθεί ή να έχουν επικαθίσεις),
– καλυµµένοι µε ειδικό γράσσο ή βαζελίνη.
Αν είναι αναγκαίο:
u
Αφαιρέστε τη µπαταρία, βλέπε δίπλα
(ΑΦΑΙΡΕΣΗ ΜΠΑΤΑΡΙΑΣ).
u
Με µια συρµάτινη βούρτσα αφαιρέστε
κάθε ίχνος διάβρωσης.
u
Ξανασυνδέστε µε τη σειρά το θετικό
καλώδιο ( +) και το αρνητικό (–).
u
Επικαλύψτε τους ακροδέκτες και τους
σφιγκτήρες µε ειδικό γράσσο ή βαζελίνη.
u
Βάλτε στη θέση της τη µπαταρία, βλέπε
σελ.75 (ΤΟΠΟΘΕΤΗΣΗ ΜΠΑΤΑΡΙΑΣ).
ΑΦΑΙΡΕΣΗ ΜΠΑΤΑΡΙΑΣ
∆ιαβάστε προσεκτικά στη σελ.73
(ΜΠΑΤΑΡΙΑ).
u
Βεβαιωθείτε ότι ο διακόπτης εκκίνησης
είναι στη θέση “
”.
u
Αφαιρέστε το αριστερό πλαϊνό φέρινγκ,
βλέπε σελ.58 (ΑΦΑΙΡΕΣΗ ΠΛΑΪΝΑ
ΦΕΡΙΝΓΚ).
u
Ξεβιδώστε και βγάλτε τη βίδα (3) από
τον αρνητικό πόλο (–).
u
Μετακινήστε πλαγίως το αρνητικό
καλώδιο (–) (4).
u
Ξεβιδώστε και βγάλτε τη βίδα (5).
u
Βγάλτε το καπάκι (6).
u
Αφαιρέστε τη µπαταρία από τη θήκη της,
βλέπε σελ.
u
Ξεβιδώστε και βγάλτε τη βίδα (7) από το
θετικό πόλο (+).
u
Μετακινήστε πλαγίως το θετικό καλώδιο
(+) (8).
u
Αφαιρέστε το σωληνάκι εξαέρωσης (9).
Η µπαταρία πρέπει να φυλάγεται σε
ασφαλή χώρο και µακριά από τα
παιδιά.
u
Βγάλτε τη µπαταρία από τη θήκη της και
τακτοποιήστε την σε µια επίπεδη
επιφάνεια, σε δροσερό και στεγνό µέρος.
MX125_GR.book Page 74 Tuesday, October 14, 2003 7:17 PM

χρήση και συντήρηση MX 125
ΕΛΕΓΧΟΣ ΣΤΑΘΜΗΣ
ΗΛΕΚΤΡΟΛΥΤΗΣ ΜΠΑΤΑΡΙΑΣ
∆ιαβάστε προσεκτικά στη σελ.73
(ΜΠΑΤΑΡΙΑ).
Τοποθετήστε το δίκυκλο σε στερεό και
επίπεδο έδαφος.
u
Αφαιρέστε το αριστερό πλαϊνό φέρινγκ,
βλέπε σελ.58 (ΑΦΑΙΡΕΣΗ ΠΛΑΪΝΑ
ΦΕΡΙΝΓΚ).
u
Κρατήστε το δίκυκλο σε κατακόρυφη
θέση µε τους δύο τροχούς να
ακουµπούν στο έδαφος.
Αν δεν εκτελούνται οι παραπάνω
ενέργειεςυπάρχει κίνδυνος
λανθασµένης µέτρησης της στάθµης.
u
Ελέγξτε ώστε η στάθµη υγρού να
βρίσκεται ανάµεσα στις δύο εγκοπές
“MIN” και “MAX”, που είναι τυπωµένες
στην πλευρά της µπαταρίας.
∆ιαφορετικά:
u
Αφαιρέστε τη µπαταρία από τη θήκη της,
βλέπε σελ. 74 (ΑΦΑΙΡΕΣΗ ΜΠΑΤΑΡΙΑΣ).
u
Ξεβιδώστε και βγάλτε τις τάπες των
στοιχείων.
Για το συµ πλήρωµ α υγρού
ηλεκτρόλυσης, χρησιµοποιήστε µόνο
απεσταγµένο νερό. Μην ξεπερνάτε την
ένδειξη “MAX”, διότι κατά τη φόρτιση η
στάθµη ανεβαίνει.
u
Επαναφέρατε τη στάθµη στο κανονικό
σηµ είο προσθέτωντας µόνο
απεσταγµένο νερό.
ΕΠΑΝΑΦΟΡΤΙΣΗ ΜΠΑΤΑΡΙΑΣ
∆ιαβάστε προσεκτικά στη σελ.73
(ΜΠΑΤΑΡΙΑ).
u
Αφαιρέστε τη µπαταρία από τη θήκη της,
βλέπε σελ. 74 (ΑΦΑΙΡΕΣΗ
ΜΠΑΤΑΡΙΑΣ).
u
Ξεβιδώστε και βγάλτε τις τάπες των
στοιχείων.
u
Ελέγξτε τη στάθµη του ηλεκτρολύτη στη
µπαταρία, βλέπε δίπλα (ΕΛΕΓΧΟΣ
ΣΤΑΘΜΗΣ ΗΛΕΚΤΡΟΛΥΤΗ
ΜΠΑΤΑΡΙΑΣ).
u
Συνδέστε τη µπαταρία σε µιοα συσκευή
φόρτισης.
u
Συνιστάται επαναφόρτιση µε τάση 1/10
της ικανότητας της ίδιας της µπαταρίας.
u
Μετά τη φόρτιση, ελέγξτε τη στάθµη του
ηλεκτρολύτη και ενδεχοµ ένως
προσθέστε απεσταγµένο νερό.
u
Σφίξτε τις τάπες των στοιχείων.
Επανατοποθετήστε τη µπαταρία µόνο
αφού περάσουν 5-10 λεπτά από την
αποσύνδεση της συσκευής φόρτισης,
γιατί η µπαταρία συνεχίζει να παράγει,
για ένα µικρο χρονικό διάστηµα,
υδρογόνο που είναι πολύ εύφλεκτο.
ΤΟΠΟΘΕΤΗΣΗ ΜΠΑΤΑΡΙΑΣ
∆ιαβάστε προσεκτικά στη σελ. 73
(ΜΠΑΤΑΡΙΑ).
u
Συνδέστε το σωληνάκι εξαέρωσης της
µπαταρίας (1).
Να συνδέετε πάντα το σωληνάκι
εξαέρωσης της µπαταρίας για να
αποφευχθεί οι ατµοί του θειικού οξέως,
βγαίνοντας από το σωληνάκι, να
διαβρώσουν το ηλεκτρικό κύκλωµα, τα
βαµµένα τµήµατα, τις λαστιχένιες
λεπτοµέρειες ή τις τσιµούχες.
u
Συνδέστε µε τη σειρά το θετικό καλώδιο
(+) και το αρνητικό (–).
u
Επικαλύψτε τους ακροδέκτες και τους
σφιγκτήρες µε ειδικό γράσσο ή βαζελίνη.
u
Τοποθετήστε τη µπαταρία στη θήκη της.
u
Ξαναβάλτε το καπάκι (2).
u
Βιδώστε και σφίξτε τη βίδα (3).
u
Επανατοποθετήστε το αριστερό πλαϊνό
φέρινγκ, βλέπε σελ.58 (ΑΦΑΙΡΕΣΗ
ΠΛΑΪΝΑ ΦΕΡΙΝΓΚ).
MX125_GR.book Page 75 Tuesday, October 14, 2003 7:17 PM

χρήση και συντήρηση MX 125
ΑΝΤΙΚΑΤΑΣΤΑΣΗ ΑΣΦΑΛΕΙΩΝ
∆ιαβάστε προσεκτικά στη σελ.55
(ΣΥΝΤΗΡΗΣΗ).
Μην επισκευάζετε ελαττωµατικές
ασφάλειες.
Ποτέ µη χρησιµοποιείτε ασφάλειες
διαφορετικές από τις καθορισµένες.
Μπορεί να προκληθούν βλάβες στο
ηλεκτρονικό κύκλωµα ή ακόµα και
πυρκαγιά σε περίπτωση
βραχυκυκλώµατος.
Οταν η ασφάλεια καίγεται συχνά, είναι
πιθανό να υπάρχει κάποιο
βραχυκύκλωµα ή κάποια υπερφόρτιση
στο ηλεκτρικό κύκλωµ α. Στην
περίπτωση αυτή συµβουλευτείτε έναν
Επίσηµο Αντιπρόσωπο της aprilia.
Αν διαπιστωθεί βλάβη ή κακή λειτουργία
ενός ηλεκτρικού εξαρτήµατος ή δεν παίρνει
εµπρός ο κινητήρας, είναι απαραίτητο να
ελέγξετε τις ασφάλειες.
Για τον έλεγχο:
u
Γυρίστε το διακόπτη εκκίνησης στη θέση
“
” για την αποφυγή τυχαίου
βραχυκυκλώµατος.
u
Αφαιρέστε το αριστερό πλαϊνό φέρινγκ,
βλέπε σελ.58 (ΑΦΑΙΡΕΣΗ ΠΛΑΪΝΑ
ΦΕΡΙΝΓΚ).
u
Βγάλτε µία µία τις ασφάλειες και ελέγξτε
αν το συρµατάκι (7) είναι κοµµένο.
u
Πριν αντικαταστήσετε την ασφάλεια,
αναζητήστε την αιτία που προκάλεσε τη
βλάβη.
u
Αντικαταστήστε την καµένη ασφάλεια µε
µια άλλη µε τα ίδια αµπέρ.
Αν χρησιµ οποιηθεί µία από τις
ασφάλειες (4) (5) (6), φροντίστε να
τοποθετήσετε µία ίδια στη θέση της.
∆ΙΑΤΑΞΗ ΑΣΦΑΛΕΙΩΝ
Ασφάλεια 20A (1)
Από τη µπαταρία σε: διακόπτη εκκίνησης,
ρυθµιστής τάσης.
Ασφάλεια 15A (2)
Από το διακόπτη εκκίνησης σε όλα τα
φορτία φώτων και κόρνας.
Ασφάλεια 7,5A (3)
Από το διακόπτη εκκίνησης σε ανάφλεξη.
MX125_GR.book Page 76 Tuesday, October 14, 2003 7:17 PM

χρήση και συντήρηση MX 125
ΕΛΕΓΧΟΣ ΠΛΕΥΡΙΚΟΥ ΣΤΑΝΤ
Το δίκυκλο είναι εξοπλισµένο µε σταντ
µε αυτόµατη επαναφορά.
∆ιαβάστε προσεκτικά στη σελ.55
(ΣΥΝΤΗΡΗΣΗ). και σελ.77 (ΕΛΕΓΧΟΣ
∆ΙΑΚΟΠΤΩΝ).
Η περιστροφή του πλευρικού σταντ (1) δεν
πρέπει να εµποδίζεται.
Κάντε του παρακάτω ελέγχους:
u
Τα ελατήρια (2) δεν πρέπει να είναι
κατεστραµµένα, φθαρµένα,
σκουριασµένα και χαλαρά.
u
Το σταντ πρέπει να µπορεί να
περιστραφεί ελεύθερα, ενδεχοµένως
γρασσάρετε την άρθρωση, βλέπε
σελ.88 (ΠΙΝΑΚΑΣ ΛΙΠΑΝΤΙΚΩΝ).
ΕΛΕΓΧΟΣ ∆ΙΑΚΟΠΤΩΝ
∆ιαβάστε προσεκτικά στη σελ.55
(ΣΥΝΤΗΡΗΣΗ).
Στο δίκυκλο υπάρχουν δύο διακόπτες:
u
∆ιακόπτης φώτων σταµατήµατος (1) στο
µοχλό χειρισµού του πίσω φρένου.
u
∆ιακόπτης φώτων σταµατήµατος (2) στο
µοχλό χειρισµού του εµπρός φρένου.
Για τον έλεγχο:
u
∆ιακόπτες (1) και (2): αφαιρέστε το
προστατευτικό κάλυµµα.
u
Ελέγξτε αν στο διακόπτη υπάρχουν
επικαθίσεις βρωµιάς ή λάσπης, κλπ.
u
Ελέγξτε αν τα καλώδια είναι σωστά
συνδεδεµένα.
MX125_GR.book Page 77 Tuesday, October 14, 2003 7:17 PM

χρήση και συντήρηση MX 125
ΚΑΤΑΚΟΡΥΦΗ ΡΥΘΜΙΣΗ ∆ΕΣΜΗΣ
ΦΩΤΟΣ
Για ένα γρήγορο έλεγχο της σωστής
ρύθµισης της εµπρός δέσµης φωτός,
τοποθετήστε το δίκυκλο σε µια απόσταση
δέκα µέτρων από έναν κατακόρυφο τοίχο,
και βεβαιωθείτε ότι το έδαφος είναι
επίπεδο.
Ανάψτε τα φώτα πορείας, καθίστε στο
δίκυκλο και ελέγξτε αν η φωτεινή δέσµη
φωτίζοντας τον τοίχο είναι λίγο κάτω από
την ευθεία του προβολέα (περίπου 9/10
του ολικού ύψους).
Για να κάνετε ρύθµιση της δέσµης φωτός:
u
Βιδώστε ή ξεβιδώστε µε ένα κατσαβίδι
την ειδική βίδα (1).
ΒΙ∆ΩΝΟΝΤΑΣ (δεξιόστροφα) η δέσµη
φωτός ανεβαίνει.
ΞΕΒΙ∆ΩΝΟΝΤΑΣ (αριστερόστροφα) η
δέσµη φωτός χαµηλώνει.
ΛΑΜΠΤΗΡΕΣ
∆ιαβάστε προσεκτικά στη σελ.55
(ΣΥΝΤΗΡΗΣΗ).
Πριν αντικαταστήσετε κάποιο
λαµπτήρα, στηρίξτε το δίκυκλο στο
σταντ και γυρίστε το διακόπτη
εκκίνησης στη θέση “
”.
Αντικαταστήστε τη λάµπα φορώντας
καθαρά γάντια ή χρησιµοποιώντας ένα
καθαρό και στεγνό πανί.
Μην αφήσετε δακτυλικά αποτυπώµατα
στη λάµπα, διότι µπορεί να
προκαλέσουν υπερθέρµ ανση µε
αποτέλεσµα να σπάσει.
Αν ακουµπήσετε τη λάµπα µε γυµνά
χέρια, καθαρίστε τα αποτυπώµατα µε
οινόπνευµα για να µην καίγεται συχνά.
ΜΗ ΖΟΡΙΖΕΤΕ ΤΑ ΚΑΛΩ∆ΙΑ.
MX125_GR.book Page 78 Tuesday, October 14, 2003 7:17 PM

χρήση και συντήρηση MX 125
ΑΝΤΙΚΑΤΑΣΤΑΣΗ
ΛΑΜΠΤΗΡΩΝ ΕΜΠΡΟΣΘΙΟΥ ΦΑΝΟΥ
∆ιαβάστε προσεκτικά στη σελ.78
(ΛΑΜΠΤΗΡΕΣ).
Πριν αντικαταστήσετε ένα λαµπτήρα
ελέγξτε τις ασφάλειες, βλέπε σελ.76
(ΑΝΤΙΚΑΤΑΣΤΑΣΗ ΑΣΦΑΛΕΙΩΝ).
Στο εµπρός φανάρι βρίσκονται:
u
µια λάµπα µικρής σκάλας (1),
u
Μια λάµπα µεσαίας/µεγάλης σκάλας (2).
Για την αντικατάσταση:
Η µάσκα (4) µαζί µε τον εµπρόσθιο
φανό παραµένει συνδεδεµένο στα
ηλεκτρικά καλώδια, µην τα τραβάτε.
u
Αφαιρέστε τα λάστιχα (3), από τις
διχάλες που χρησιµοποιούνται για τη
στερέωση της µάσκας στο δίκυκλο.
Χειριστείτε προσεκτικά τα πλαστικά
εξαρτήµατα ώστε να µην χαραχτούν ή
να φθαρούν.
u
Τραβήξτε προς τα κάτω τη µάσκα (4), µαζί
µε τον εµπρόσθιο φανό αποσυνδέοντάς
τον από την υποδοχή (5) στο ταµπλό.
ΛΑΜΠΤΗΡΑΣ ΦΩΤΩΝ ΘΕΣΗΣ (ΜΙΚΡΗ
ΣΚΑΛΑ)
Για την εξαγωγή της βάσης του λαµπτήρα
µην τραβάτε τα ηλεκτρικά καλώδια.
u
Πιάστε τη βάση του λαµπτήρα (6), τραβήξτε
και αποσυνδέστε από την υποδοχή.
u
Αφαιρέστε το λµπτήρα φώτων πορείας (1)
και αντικαταστήστε µε έναν καινούργιο ίδιου
τύπου
ΛΑΜΠΑ ΜΕΓΑΛΗΣ / ΜΕΣΑΙΑΣ ΣΚΑΛΑΣ
Για την εξαγωγή της ηλεκτρικής
σύνδεσης του λαµπτήρα, µην τραβάτε
τα ηλεκτρικά καλώδια.
u
Πιάστε την ηλεκτρική σύνδεση του
λαµ πτήρα (7), τραβήξτε την και
αποσυνδέστε το λαµπτήρα από την
υποδοχή στερέωσης (8).
u
Σύρατε έξω το κάλυµµα (9) από το
κάτοπτρο και από τους ακροδέκτες του
λαµπτήρα.
u
Περιστρέψτε αριστερόστροφα τη βάση
του λαµπτήρα (8) και αφαιρέστε την από
το κάτοπτρο.
u
Αφαιρέστε το λαµπτήρα (2) από την
υποδοχή του.
Κατά την επανατοποθέτηση:
ΣΗΜΑΝΤΙΚΟ Βάλτε τη λάµπα στην
υποδοχή στερέωσης, προσαρµόζοντας τις
υποδοχές τοποθέτησης.
u
Τοποθετήστε τη βάση του λαµπτήρα (6)
στην υποδοχή του κατόπτρου και
περιστρέψτε δεξιόστροφα.
u
Προσαρµόστε σωστά το κάλυµµα (9)
στους ακροδέκτες του λαµπτήρα και
στην υποδοχή του κατόπτρου.
u
Ενώστε τον ηλεκτρικό συνδετήρα του
λαµπτήρα (7).
1
2
9
8
7
6
2
8
9
MX125_GR.book Page 79 Tuesday, October 14, 2003 7:17 PM

χρήση και συντήρηση MX 125
ΑΝΤΙΚΑΤΑΣΤΑΣΗ
ΛΑΜΠΤΗΡΕΣ ΤΑΜΠΛΟ
∆ιαβάστε προσεκτικά στη σελ.78
(ΛΑΜΠΤΗΡΕΣ).
Πριν αντικαταστήσετε ένα λαµπτήρα
ελέγξτε τις ασφάλειες, βλέπε σελ.76
(ΑΝΤΙΚΑΤΑΣΤΑΣΗ ΑΣΦΑΛΕΙΩΝ).
Στο ταµπλό υπάρχουν:
u
Οι ενδεικτικές λυχνίες.
u
Ο φωτισµός του ταµπλό.
Για την αντικατάσταση:
Η µάσκα (2) µαζί µε τον εµπρόσθιο
φανό παραµένει συνδεδεµένο στα
ηλεκτρικά καλώδια, µην τα τραβάτε.
u
Ξεβιδώστε και αφαιρέστε τις δύο βίδες
(1).
Χειριστείτε προσεκτικά τα πλαστικά
εξαρτήµατα ώστε να µην χαραχτούν ή
να φθαρούν.
u
Τραβήξτε προς τα κάτω τη µάσκα (2),
µ αζί µε τον ε µ πρόσθιο φανό
αποσυνδέοντάς τον από την υποδοχή
(3) στο ταµπλό.
ΕΝ∆ΕΙΚΤΙΚΕΣ ΛΥΧΝΙΕΣ
Αφαιρέστε µια θήκη τη φορά για να
αποφύγετε λανθασµένη τοποθέτηση
κατά τη συναρµολόγηση.
u
Βγάλτε τη θήκη που σας ενδιαφέρει:
u
Βγάλτε και αντικαταστήστε τη λάµπα µε
µια ίδιου τύπου.
ΦΩΤΙΣΜΟΣ ΤΑΜΠΛΟ
u
Αφαιρέστε τη θήκη της λάµπας (9).
u
Βγάλτε και αντικαταστήστε τη λάµπα µε
µια ίδιου τύπου.
Θέση Ενδ. λυχνία Χρώµα
6 Ρεζέρβα
λαδιού µίξης (
)
κόκκινο
7 Φλας (
(
) πράσινο
8 ∆είκτης νεκράς
ταχύτητας (
)
πράσινο
9 Μεσαία σκάλα φώτων
(
)
πράσινο
10 Μεγάλη σκάλα φώτων
(
)
µπλε
10
9
6
7
8
MX125_GR.book Page 80 Tuesday, October 14, 2003 7:17 PM

χρήση και συντήρηση MX 125
ΑΝΤΙΚΑΤΑΣΤΑΣΗ ΛΑΜΠΤΗΡΩΝ ΦΛΑΣ
ΕΜΠΡΟΣ ΚΑΙ ΠΙΣΩ
∆ιαβάστε προσεκτικά στη σελ.78
(ΛΑΜΠΤΗΡΕΣ).
Πριν αντικαταστήσετε ένα λαµπτήρα
ελέγξτε τις ασφάλειες, βλέπε σελ.76
(ΑΝΤΙΚΑΤΑΣΤΑΣΗ ΑΣΦΑΛΕΙΩΝ).
u
Ξεβιδώστε και βγάλτε τη βίδα (1).
Κατά την επανασυναρµ ολόγηση,
σφίξτε προσεκτικά και λίγο τη βίδα (1)
για να αποφύγετε πρόκληση ζηµιάς στο
προστατευτικό θώρακα.
u
Αφαιρέστε τον προστατευτικό θώρακα (2).
u
Πιέστε λίγο το λαµπτήρα (3) και
περιστρέψτε αριστερόστροφα.
u
Αφαιρέστε το λαµπτήρα από την υποδοχή
του.
Βάλτε τη λάµπα στη θήκη
προσαρµόζοντας τις δύο ακίδες στους
δύο οδηγούς στη θήκη της λάµπας.
u
Τοποθετήστε σωστά µια λάµπα ίδιου
τύπου.
ΑΝΤΙΚΑΤΑΣΤΑΣΗ ΛΑΜΠΑΣ ΠΙΣΩ
ΦΑΝΟΥ
Πριν αντικαταστήσετε ένα λαµπτήρα
ελέγξτε τις ασφάλειες, βλέπε σελ.76
(ΑΝΤΙΚΑΤΑΣΤΑΣΗ ΑΣΦΑΛΕΙΩΝ) και την
αποτελεσµατικότητα των διακοπτών
των στοπ, βλέπε σελ.77 (ΕΛΕΓΧΟΣ
ΠΛΕΥΡΙΚΟΥ ΣΤΑΝΤ).
∆ιαβάστε προσεκτικά στη σελ.78
(ΛΑΜΠΤΗΡΕΣ).
u
Ξεβιδώστε και αφαιρέστε τις δύο βίδες
(4).
Κατά την επανασυναρµολόγηση,
σφίξτε προσεκτικά και λίγο τις δύο
βίδες (4) για να αποφύγετε πρόκληση
ζηµιάς στο προστατευτικό θώρακα.
u
Αφαιρέστε τον προστατευτικό θώρακα
(5).
u
Πιέστε λίγο το λαµπτήρα (6) και
περιστρέψτε αριστερόστροφα.
u
Αφαιρέστε το λαµπτήρα από την
υποδοχή του.
Βάλτε τη λάµ πα στη θήκη
προσαρµόζοντας τις δύο ακίδες στους
δύο οδηγούς στη θήκη της λάµπας.
u
Τοποθετήστε σωστά µια λάµπα ίδιου
τύπου.
MX125_GR.book Page 81 Tuesday, October 14, 2003 7:17 PM

χρήση και συντήρηση MX 125
ΜΕΤΑΦΟΡΑ
Πριν από τη µεταφορά του δικύκλου,
πρέπει να αδειάσετε προσεκτικά το
ρεζερβουάρ καυσίµ ου και το
καρµπυρατέρ, βλέπε κάτω (Α∆ΕΙΑΣΜΑ
ΚΑΥΣΙΜΟΥ ΑΠΟ ΤΟ ΡΕΖΕΡΒΟΥΑΡ),
φροντίζοντας να είναι εντελώς στεγνά.
Κατά τη µετακίνηση, το δίκυκλο πρέπει
να διατηρείται σε κατακόρυφη, για την
αποφυγή διαρροής λαδιού, ψυκτικού
υγρού και υγρών µπαταρίας.
Πρέπει να είναι καλά στερεωµένο και
πρέπει να βάλετε 1η ταχύτητα.
Σε περίπτωση βλάβης µη ρυµουλκείτε
το δίκυκλο αλλά καλέστε την οδική
βοήθεια.
Α∆ΕΙΑΣΜΑ ΚΑΥΣΙΜΟΥ ΑΠΟ ΤΟ
ΡΕΖΕΡΒΟΥΑΡ
∆ιαβάστε προσεκτικά στη σελ.36
(ΚΑΥΣΙΜΟ).
Κίνδυνος πυρκαγιάς.
Περιµ ένετε να κρυώσουν καλά ο
κινητήρας και η εξάτµιση.
Οι ατµοί καυσίµου είναι βλαβεροί για την
υγεία. Βεβαιωθείτε, πριν προχωρήσετε,
ότι ο χώρος που θα εργαστείτε έχει καλό
εξαερισµό. Μην εισπνέετε ατµούς
καυσίµου. Μην καπνίζετε και µην
χρησιµοποιείτε ελεύθερη φλόγα. Μην
χύνετε το καύσιµο στο περιβάλλον.
u
Τοποθετήστε το δίκυκλο στο σταντ.
u
Σβήστε τον κινητήρα και περιµένετε να
κρυώσει.
u
Εφοδιαστείτε µε ένα δοχείο
χωρητικότητας µεγαλύτερης από την
ποσότητα καυσίµου που υπάρχει στο
ρεζερβουάρ και τοποθετήστε το στο
έδαφος στην αριστερή πλευρά του
δικύκλου.
u
Βγάλτε την τάπα του ρεζερβουάρ
καυσίµου.
u
Για το άδειασµα του καυσίµου από το
ρεζερβουάρ, χρησιµ οποιήστε µια
χειροκίνητη αντλία ή κάτι παρόµοιο.
Αφο΄θ ολοκληρώσετε το άδειασµα
κλείστε την τάπα του ρεζερβουάρ.
Για πλήρες άδειασµα του καρµπυρατέρ:
u
Βάλτε τη στρόφιγγα καυσίµου (1) στη
θέση “RES”.
u
Εκκινήστε το δίκυκλο, βλέπε σελ.48
(ΕΚΚΙΝΗΣΗ).
u
Ανοίξτε µερικές φορές το γκάζι µε΄χρι να
σβήσει ο κινητήρας λόγω έλλειψης
καυσίµου.
Σε περίπτωση ανάγκης, απευθυνθείτε
σε έναν Επίσηµο Αντιπρόσωπο της
aprilia.
MX125_GR.book Page 82 Tuesday, October 14, 2003 7:17 PM

χρήση και συντήρηση MX 125
OK!
OK!
ΚΑΘΑΡΙΣΜΟΣ
Καθαρίζετε συχνά το δίκυκλο αν
χρησιµοποιείται σε περιοχές ή σε συνθήκες:
u
Ατµοπσφαιρικής µόλυνσης (πόλεις και
βιοµηχανικές ζώνες).
u
Αλατότητας ή υγρασίας (περιοχές κοντά
στη θάλασσα, µε ζεστό ή υγρό κλίµα)
u
Ιδιαίτερες περιβαλλοντικές/εποχιακές
συνθήκες (χρήση αλατιού, χηµικών
προϊόντων για τον πάγο το χειµώνα
στους δρόµους).
u
Ιδιαίτερη προσοχή πρέπει να δοθεί ώστε
να µην παραµένουν στο αµάξωµα
επικαθίσεις, υπολείµµατα από
βιοµηχανικές, µολυσµατικές σκόνες,
λεκέδες πίσας, έντοµα, κουτσουλιές, κλπ.
u
µην σταθµεύετε το δίκυκλο κάτω από
δέντρα. Πράγµατι σε ορισµένες εποχές,
πέφτουν από τα δέντρα υπολείµµατα,
ρητίνες, φρούτα ή φύλλα που περιέχουν
χηµικές ουσίες που είναι βλαβερές για τη
βαφή.
Μετά το πλύσιµο του δικύκλου, η
απόδοση του φρεναρίσµατος µπορεί
να είναι προσωρινά µειωµένη, εξαιτίας
της παρουσίας νερού στις επιφάνειες
τριβής του συστήαµ τος φρένων.
Πρέπει να προβλέπετε µεγαλύτερες
αποστάσεις φρεναρίσµατος για την
αποφυγή ατυχηµ άτων. Πατήστε
επανειληµµένα τα φρένα, για να
επανέλθουν σε κανονικές συνθήκες.
Κάντε τους προκαταρκτικούς ελέγχους,
βλέπε σελ.47 (ΠΙΝΑΚΑΣ
ΠΡΟΚΑΤΑΡΚΤΙΚΩΝ ΕΛΕΓΧΩΝ).
Για να αφαιρέσετε τη βρωµιά και τη λάσπη
που έχουν επικαθίσει στις βαµµένες
επιφάνειες, να χρησιµοποιήσετε ριπή
νερού µε χαµηλή πίεση, βρέξτε καλά τα
βρώµικα µέρη, αφαιρέστε τη λάσπη και τις
βρωµιές µε ένα µαλακό σφουγγάρι για
αµαξώµατα καλά ποτισµένο µε νερό και
σαµπουάν (2 ÷ 4% µέρη σαµπουάν σε
νερό). Μετά ξεπλύντε καλά µε νερό, και
στεγνώστε µε κατεργασµένο δέρµα. Για να
πλύνετε τα εξωτερικά µέρη του κινητήρα,
χρησιµοποιήστε απορρυπαντικό που να
αφαιρεί τα γράσα καθώς και πινέλα και
κουρέλια.
Υπενθυµίζουµε ότι το γυάλισµα µε κερί
σιλικόνης πρέπει να γίνεται µετά από
καλό καθαρισµό του δικύκλου. Μην
πλένετε το δίκυκλο στον ήλιο, ειδικά το
καλοκαίρι, µε τις µεταλλικές επιφάνειες να
καίνε, διότι το σαµπουάν όταν στεγνώσει
µπορεί να προκαλέσει ζηµιά στο βερνίκι.
Μη χρησιµ οποιείτε υγρά σε
θερµοκρασία πάνω από τους 40°C για
τον καθαρισµ ό των πλαστικών
τµ η µ άτων του δικύκλου. Μη
χρησιµοποιείτε ριπές νερού ή αέρα σε
υψηλή πίεση ή ριπές ατµ ού στα
ακόλουθα µέρη: πλήµνες τροχών,
χειριστήρια στη δεξιά και την αριστερή
πλευρά του τιµονιού, έδρανα, αντλίες
φρένων, όργανα και δείκτες, απόληξη
εξάτµ ισης, θήκη εγγράφων/ κιτ
εργαλείων, διακόπτης
εκκίνησης/κλειδαριά τιµονιού. Για το
καθάρισµ α των επιφανειών από
λάστιχο, πλαστικό και της σέλας, µη
χρησιµοποιείτε οινόπνευµα, βενζίνη ή
διαλύτες, αλλά µόνο νερό και ουδέτερο
απορρυπαντικό. Μην αλείφετε µε
προστατευτικό κερί τη σέλα για να
αποφύγετε το γλίστρηµα.
MX125_GR.book Page 83 Tuesday, October 14, 2003 7:17 PM

χρήση και συντήρηση MX 125
ΜΕΓΑΛΕΣ ΠΕΡΙΟ∆ΟΙ Α∆ΡΑΝΕΙΑΣ
Πρέπει να ληφθούν ορισµένα µέτρα για να
αποφευχθούν τα επακόλουθα της µη
χρήσης του δικύκλου.
Επίσης είναι απαραίτητο να κάνετε τις
επισκευές και ένα γενικό έλεγχο πριν το
θέσετε ξανά σε λειτουργία, διότι µπορεί να
ξεχάσετε να το κάνετε αργότερα.
Κάντε τα ακόλουθα:
u
Αδειάστε εντελώς το ρεζερβουάρ
καυσίµου και το καρµπυρατέρ, βλέπε
σελ.82 (Α∆ΕΙΑΣΜΑ ΚΑΥΣΙΜΟΥ ΑΠΟ
ΤΟ ΡΕΖΕΡΒΟΥΑΡ).
u
Αφαιρέστε τα µπουζί, βλέπε σελ.72
(ΜΠΟΥΖΊ).
u
Ρίξτε στον κύλινδρο ένα κουταλάκι (5 ÷
10 cmC) λάδι κινητήρα.
u
Βάλτε το διακόπτη εκκίνησης (1) στο “
”.
u
Πατήστε το µοχλό εκκίνησης (2) µερικές
φορές για να διοχετευθεί το λάδι
οµ οιόµ ορφα στις επιφάνειες του
κυλίνδρου.
u
Επανατοποθετήστε το µπουζί, σελ.72
(ΜΠΟΥΖΊ).
u
Αφαιρέστε τη µπαταρία, βλέπε σελ.74
(ΑΦΑΙΡΕΣΗ ΜΠΑΤΑΡΙΑΣ).
u
Πλύνετε και στεγνώστε το δίκυκλο,
βλέπε σελ.83 (ΚΑΘΑΡΙΣΜΟΣ).
u
Περάστε µε κερί όλες τις βαµµένες
επιφάνειες.
u
Φουσκώστε τα λάστιχα, βλέπε σελ.43
(ΛΑΣΤΙΧΑ).
u
Τοποθετήστε το δίκυκλο µε τέτοιο τρόπο
ώστε και τα δύο λάστιχα να είναι
ανυψώµενα πάνω από το έδαφος,
χρησιµ οποιώντας το κατάλληλο
υποστήριγµα.
u
Τακτοποιήστε το δίκυκλο σε χώρο χωρίς
θέρµ ανση, χωρίς υγρασία,
προστατευµένο από τις ακτίνες του
ηλίου, στον οποίο οι µεταβολές τις
θερµοκρασίας είναι ελάχιστες.
u
Καλύψτε το δίκυκλο αποφεύγοντας τη
χρήση πλαστικών ή αδιάβροχων υλικών.
ΜΕΤΑ ΤΗΝ ΑΠΟΘΗΚΕΥΣΗ
u
Ξεσκεπάστε και καθαρίστε το δίκυκλο,
βλέπε σελ.83 (ΚΑΘΑΡΙΣΜΟΣ).
u
Ελέγξτε τη στάθµη του ηλεκτρολύτη στη
µπαταρία και τοποθετήστε την στο
δίκυκλο, βλέπε σελ.75 (ΕΛΕΓΧΟΣ
ΣΤΑΘΜΗΣ ΗΛΕΚΤΡΟΛΥΤΗΣ
ΜΠΑΤΑΡΙΑΣ) και σελ.75
(ΕΠΑΝΑΦΟΡΤΙΣΗ ΜΠΑΤΑΡΙΑΣ).
u
Γεµίστε το ρεζερβουάρ µε καύσιµο,
βλέπε σελ.36 (ΚΑΥΣΙΜΟ).
u
Κάντε τους προκαταρκτικούς ελέγχους,
βλέπε σελ. 47 (ΠΙΝΑΚΑΣ
ΠΡΟΚΑΤΑΡΚΤΙΚΩΝ ΕΛΕΓΧΩΝ).
Κάντε µερικά χιλιόµετρα δοκιµής µε
µέτρια ταχύτητα σε περιοχή όπου δεν
έχει πολύ κίνηση.
2
MX125_GR.book Page 84 Tuesday, October 14, 2003 7:17 PM

χρήση και συντήρηση MX 125
ΤΕΧΝΙΚΑ ΣΤΟΙΧΕΙΑ
∆ΙΑΣΤΑΣΕΙΣ Μέγ. µήκος
(µε την προέκταση φτερό πίσω) ........... 2165 mm
Μέγ. πλάτος .......................................... 840 mm
Μέγ. ύψος (στη µάσκα)......................... 1170 mm
Ύψος στη σέλα ..................................... 870 mm
Μεταξόνιο.............................................. 1480 mm
Ελάχιστο ύψος από το έδαφος ............. 290 mm
Βάρος κενού αµαξώµατος .................... 126 kg
ΚΙΝΗΤΗΡΑΣ Τύπος........................................................... Μονοκύλινδρος δίχρονος µε µεταβαλλόµενη αναρρόφηση.
Ξεχωριστή λίπανση µε αυτόµατη µεταβαλλόµενη µίξη (1,0 - 3,0 %).
Αριθµός κυλίνδρων ...................................... 1
Κυβισµός...................................................... 124,82 cmC
∆ιάµετρος / διαδροµή................................... 54 mm / 54,5 mm
Σχέση συµπίεσης......................................... 12,5 ± 0,5 : 1
Εκκίνηση ...................................................... µε πεντάλ
Αρ. στροφών στο ρελαντί ............................ 1200 ± 100 στροφές/λεπτό
Συµπλέκτης.................................................. πολυδίσκος σε λουτρό λαδιού µε µανέτα χειρισµού στην αριστερή
πλευρά του τιµονιού.
Ψύξη ............................................................ υδρόψυκτο
ΧΩΡΗΤΙΚΟΤΗΤΑ Καύσιµο (µαζί µε τη ρεζέρβα) ...................... 11 λίτρα
Ρεζέρβα καυσίµου........................................ 1,3 λίτρα (µηχανική ρεζέρβα)
Λάδι κιβωτίου ταχυτήτων .............................
600 cm
C
Υγρό ψύξης.................................................. 0,8 λίτρα (50% νερό + 50% αντιψυκτικό µε αιθυλαινική γλυκόλη)
Λάδι µίξης (µαζί µε τη ρεζέρβα) ................... 1,25 λίτρα
Ρεζέρβα λαδιού µίξης .................................. 0,5 λίτρα
Θέσεις .......................................................... 2
Μέγιστο φορτίο δικύκλου
(οδηγός + συνεπιβάτης + αποσκευές) ......... 336 kg
MX125_GR.book Page 85 Tuesday, October 14, 2003 7:17 PM

χρήση και συντήρηση MX 125
ΚΙΒΩΤΙΟ
ΤΑΧΥΤΗΤΩΝ
Τύπος µηχανικό 6 σχέσεων µε πεντάλ χειρισµού στην αριστερή πλευρά του
κινητήρα
ΣΧΕΣΕΙΣ
ΜΕΤΑ∆ΟΣΗΣ
Σχέση Αρχική ∆ευτερεύουσα
1η 19/63 = 1 : 3,315 10 / 30 = 1: 3,000
2η 14 / 29 = 1: 2,071
3η 17 / 27 = 1: 1,588
4η 19 / 25 = 1: 1,316
5η 21 / 23 = 1: 1,095
6η 22 / 21 = 1: 0,954
Τελική σχέση Συνολική σχέση
16 / 45 = 1 : 2,81 R1 x R2 x R3 = 1 : 27,976
R1 x R2 x R3 = 1 : 19,317
R1 x R2 x R3 = 1 : 14,81
R1 x R2 x R3 = 1 : 12,270
R1 x R2 x R3 = 1 : 10,213
R1 x R2 x R3 = 1 : 8,901
ΚΑΡΜΠΥΡΑΤΕΡ Αριθµός ........................................................ 1
Μοντέλο........................................................ DELL’ORTO PHBH 28
ΤΡΟΦΟ∆ΟΣΙΑ Καυσίµου Βενζίνη super αµόλυβδη κατά DIN 51 607, ελάχιστος αριθµός
οκτανίων 95 (N.O.R.M.) και 85 (N.O.M.M.)
ΠΛΑΙΣΙΟ Τύπος ........................................................... Μονή δοκός µε διπλή τραβέρσα από χάλυβα υψηλής αντοχής
Γωνία κλίσης τιµονιού................................... 28°
Προπορεία.................................................... 127 mm
ΑΝΑΡΤΗΣΕΙΣ Εµπρός......................................................... Upside down Ψ40
∆ιαδροµή ...................................................... 260 mm
Πίσω ............................................................. Μονό αµορτισέρ αερίου
∆ιαδροµή ...................................................... 280 mm
ΦΡΕΝΑ Εµπρός......................................................... Με δίσκο - Ψ 320 mm - µε υδραυλική µετάδοση
Πίσω ............................................................. Με δίσκο - Ψ 220 mm - µε υδραυλική µετάδοση
ΖΑΝΤΕΣ ΤΡΟΧΩΝ Τύπος ........................................................... αλουµινίου µε ακτίνες
Εµπρός......................................................... 3,00 x 17”
Πίσω ............................................................. 4,25 x 17”
MX125_GR.book Page 86 Tuesday, October 14, 2003 7:17 PM

χρήση και συντήρηση MX 125
ΛΑΣΤΙΧΑ ΕΜΠΡΟΣ ..................................................... 110/70 ZR 17 54W
Πίεση φουσκώµατος µόνο οδηγού
Πίεση φουσκώµατος οδηγού και συνεπιβάτη
180 kPa (1,8 5bar)
180 ± 10 kPa (1,8 ± 0,1 5bar)
ΠΙΣΩ ............................................................ 150/60 ZR 17 66W
Πίεση φουσκώµατος µόνο οδηγού
Πίεση φουσκώµατος οδηγού και συνεπιβάτη
200 kPa (2 5bar)
230 ± 10 kPa (2,3 ± 0,1 5bar)
ΑΝΑΦΛΕΞΗ Τύπος........................................................... CDI
Προπορεία ανάφλεξης ................................. 12° ± 2° πριν από το Α.Ν.Σ.
ΜΠΟΥΖΙ Στάνταρ ........................................................ NGK R BR8 ES
∆ιάκενο ηλεκτροδίου µπουζί ........................ 0,5÷0,6 mm
ΣΥΣΤΗΜΑ Μπαταρία..................................................... 12 V - 4 Ah
ΗΛΕΚΤΡΙΚΟ Ασφάλειες (γενικά) ....................................... 20 A
Ασφάλειες (κεντρική µονάδα)....................... 15 A
Ασφάλειες (λειτουργίες) ............................... 7,5 A
Γεννήτρια (A) ............................................... 12 V - 180 W
ΛΑΜΠΤΗΡΕΣ Μεσαία/Μεγάλη σκάλα ................................ 12 V - 35/35 W
Φώτα πορείας εµπρός ................................. 12 V - 5 W
Φλας ............................................................ 12 V - 10 W
Φώτα θέσης πίσω / πινακίδας/ στοπ .......... 12 V - 5 / 21 W
Φωτισµός ταµπλο ........................................ 12 V - 2 W
ΕΝ∆ΕΙΚΤΙΚΕΣ Κιβώτιο ταχυτήτων σε νεκρά........................ 12 V - 1.2 W
ΛΥΧΝΙΕΣ Φλας ............................................................ 12 V - 1.2 W
Μεγάλη σκάλα προβολέων .......................... 12 V - 1.2 W
Ρεζέρβα λαδιού µίξης................................... 12 V - 1.2 W
Μεσαία σκάλα .............................................. 12 V - 1.2 W
MX125_GR.book Page 87 Tuesday, October 14, 2003 7:17 PM

χρήση και συντήρηση MX 125
ΠΙΝΑΚΑΣ ΛΙΠΑΝΤΙΚΩΝ
Λάδι κιβωτίου ταχυτήτων (συνιστώµενο):
F.C., SAE 75W - 90 ή
GEAR SYNTH, SAE 75W-90.
Εναλλακτικά µε τα συνιστώµενα λάδια, µπορείτε να χρησιµοποιήσετε λάδια µε χαρακτηριστικά ίσα ή ανώτερα από τα τεχνικά
χαρακτηριστικά Α.Ρ.Ι. GL-4.
Λάδι µίξης (συνιστώµενο):
MAX 2T COMPETITION ή
SPEED 2T.
Εναλλακτικά µε τα συνιστώµενα λάδια, µπορείτε να χρησιµοποιήσετε λάδια µάρκας µε χαρακτηριστικά ίσα ή ανώτερα των προτύπων
ISO-L-ETC++,A.P.I. TC ++.
Λάδι πηρουνιού (συνιστώµενο): λάδι για πηρούνια F.A. 5W ή
F.A. 20W /
FORK 5W
ή
FORK 20W
.
Εάν επιθυµείτε ενδιάµεση συµπεριφορά ανάµεσα σ’αυτήν που προσφέρεται από τα
F.A. 5W και από το
F.A. 20W ή
FORK 5W
ή
FORK 20W.
, µπορείτε να αναµίξετε τα προϊόντα µε τον ενδεικνυόµενο τρόπο:
SAE 10W
F.A. 5W 67% του όγκου, + F.A. 20W 33% του όγκου ή
FORK 5W. 67% του όγκου, +
FORK 20W 33% του όγκου.
SAE 15W
F.A. 5W 33% του όγκου, +
F.A. 20W 67% του όγκου ή
FORK 5W. 33% του όγκου +
FORK 20W 67% του όγκου.
Ρουλεµάν και άλλα σηµεία λίπανσης:
AUTOGREASE MP ή GREASE 30.
Εναλλακτικά al συνιστώµενο προϊόν, χρησιµοποιήστε γράσσο για ρουλεµάν, πεδίο ωφέλιµης θερµοκρασίας -30°C…+140°C, σηµείο
σταγονοποίησης 150°C…230°C, υψηλή αντισκωριακή προστασία, καλή ανθεκτικότητα στο νερό και στην οξείδωση.
Προστασία πόλων µπαταρίας: Ουδέτερο γράσσο ή βαζελίνη.
Γράσσο σπρέι για αλυσίδες (συνιστώµενο): CHAIN SPRAY ή CHAIN LUBE.
Χρησιµοποιείτε µόνο καινούργιο υγρό φρένων. Μην αναµιγνύεται διαφορετικές µάρκες και τύπους λαδιών χωρίς να έχετε
επαληθεύσει τη συµβατότητα της βάσης τους.
Υγρό φρένων/συµπλέκτη (συνιστώµενο): F.F., DOT 4 (συµβατό DOT 5) ή
BRAKE 5.1, DOT 4 (Compatibel DOT 5).
Χρησιµοποιείτε µόνο αντιψυκτικό και αντιδιαβρωτικό χωρίς νιτρώδη άλατα, που εξασφαλίζει προστασία τουλάχιστον στους -
35 °C.
Υγρό ψύξης κινητήρα (συνιστώµενο): ECOBLU -40 °C ή
COOL
.
MX125_GR.book Page 88 Tuesday, October 14, 2003 7:17 PM

χρήση και συντήρηση MX 125
Επίσηµοι Αντιπρόσωποι και Κέντρα Τεχνικής Υποστήριξης
Η ΑΞΙΑ ΤΗΣ ΤΕΧΝΙΚΗΣ ΥΠΟΣΤΗΡΙΞΗΣ
Χάρη στη συνεχή τεχνική κατάρτιση και στα προγράµµατα ειδικής εκπαίδευσης πάνω στα προϊόντα aprilia, µόνο οι µηχανικοί του
Επίσηµου ∆ικτύου aprilia γνωρίζουν καλά αυτό το δίκυκλο και διαθέτουν τον ειδικό απαιτούµενο εξοπλισµό για τη σωστή εκτέλεση
επεµβάσεων συντήρησης και επισκευής.
Η αξιοπιστία του οχήµατος εξαρτάται και από τη µηχανική κατάσταση του ίδιου. Ο έλεγχος πριν από την οδήγηση, η τακτική συντήρηση
και η χρήση γνήσιων ανταλλακτικών aprilia αποτελούν ουσιαστικούς παράγοντες!
Για πληροφορίες σχετικά µε τον Επίσηµο Αντιπρόσωπο και/ή το πλησιέστερο Κέντρο Τεχνικής Υποστήριξης, συµβουλευτείτε το Χρυσό
Οδηγό ή κάντε απευθείας αναζήτηση στο χάρτη που υπάρχει στο Επίσηµο Ιστοχώρο:
www.aprilia.com
Μόνο εάν ζητάτε Γνήσια Ανταλλακτικά aprilia θα έχετε ένα προϊόν µελετηµένο και δοκιµασµένο ήδη από τη φάση σχεδιασµού. Τα
Γνήσια Ανταλλακτικά aprilia υπόκεινται συνεχώς σε διαδικασίες ελέγχου ποιότητας, για να εξασφαλιστεί η αξιοπιστία και η διάρκειά
τους στο χρόνο.
MX125_GR.book Page 89 Tuesday, October 14, 2003 7:17 PM

χρήση και συντήρηση MX 125
UK
D
NL
E
F
CZ
SLO
IRL
A
N
HR
I
APRILIA via G. Galilei, 1 - 30033 Noale (VE) Italy
Tel. +39(0)41 5829111 - Fax +39(0)41 441054 - Servizio Clienti aprilia +39(0)41 5079821
APRILIA WORLD SERVICE UK branch 15 Gregory Way - SK5 7ST Stockport - Cheshire
Tel. 0044-161 475 1800 - Fax 0044-161 475 1825 - Email: [email protected] -
Customer service dep. 0845-6014514
APRILIA MOTORRAD Am Seestern 3 - D-40547 - Dusseldorf
Tel. 0049-211-59018-00 - Fax 0049-211-5901819 - Kunden service 0180-3000791
APRILIA WORLD SERVICE B.V. Nikkelstraat 1 - 4823 - Ae Breda (NL)
Tel. (076) 5431640 - Fax (076) 5431649 - Klanten service 020-2036699
APRILIA WORLD SERVICE Edificio América, Av.da de Arangòn, 334 - 28022 Madrid
Succursale en Espana Tel. 0034-91-7460066 - Fax 0034-91-7460065- Atencion al cliente 901-810075
APRILIA WORLD SERVICE z.a. Central Parc - 255 Blv. R. Ballanger B.P. 77 - 93421- Villepinte
Succursale en France Tel. 0033-1-49634747 - Fax 0033-1-49638750 - Relations clienteles 0820-027915
A. SPIRIT A.S. Saldova 38 - 180 00 - Praha 8 - Karlin
A. SPIRIT A.S. (Sede operativa) Bubenska 43 - 170 00 - Praha 7
Tel. 0042-02-96547142 - Fax 0042-02-96547145 - Email: [email protected]
AVTO TRIGLAV d.o.o. Baragova 5 - 1113 - Ljubljana
Tel. 00386-1-5883 421 - Fax. 00386-1-5883465 - Email: ziga.martincic@avto-triglav.si
GINZINGER IMPORT GmbH & CO. Frankenburgerstrasse 19 - 4910 - Ried im Innkreis
Tel. 0043-7752-88077 - Fax. 0043-7752-70684 - Email: [email protected]
ING-KART d.o.o. Samoborska cesta 258 - 10000 - Zagreb
Tel. 00385-1-3498000 - Fax. 00385-1-3499111 - Email: [email protected]
K.D.I. Kawasaki Distributor IRL. LTD: no. 1 Long Mile Road - Dublin 12
Tel. 00353-1-4566222 - Fax. 00353-1-4756461 - Email:sales@bikeworld.ie
HARO SKANDINAVIA A.S. Kjorbekkdalen 6 - 3735- Skien
Tel. 0047-35506780 - Fax. 0047-35506781 - E-mail:[email protected]
ΕΙΣΑΓΩΓΕΙΣ
MX125_GR.book Page 90 Tuesday, October 14, 2003 7:17 PM

χρήση και συντήρηση MX 125
ΕΙΣΑΓΩΓΕΙΣ
MOTOMAX MOTORLU ARACLAR Kore Sehitleri Cad. No. 42 - 80300 - Zincirlikuyu - Istanbul
SAN. VE TIC. A.S. Tel. 0090-212-3360058 - Fax. 0090-212-3360057- Email:[email protected]
MILLE MOTOR KFT. (sede operativa) Hold utca 23 - H-1054 - Budapest
Tel. 0036-1-3329938 - Fax. 0036-1-2693044 - Email: Zsoldos.lajos@elender.hu
MILFA IMPORTAÇÃO EXPORTAÇÃO LDA. Av. Da Republica 692 - 4450 - Matosinhos
Tel. 00351-229382450 - Fax. 00351-229371305 - Email: milfa@milfa.pt
APRILIA HELLAS Rizareiou 4 - 15233 - Halandri
Tel. 0030-210-6898290 - Fax. 0030-210-6898056 - Email: aprilia@otermail.gr
MOHAG A.G. Bernerstrasse Nord 202 - 8064 - Zurigo
Tel. 0041-1-4348686 - Fax 0041-1-434 8606 - Email: [email protected]
N.V./S.A. RAD Landegemstraat 4 - Industriegebied - B-9031 - Drongen-Baarle
Tel. 0032-9-2829410 - Fax. 0032-9-2810012 - Email: [email protected]
T.M.P. Hammervej 32 - 7900 - Nikobing Mors
Tel. 0045-97-722233 - Fax. 0045-97-722143/33 - Email: [email protected]
TUONTI NAKKILA OY P.o.B. 18 - 29250 - Nakkila
Tel. 00358-2-5352500 - Fax. 00358-2-5372793 - Email: [email protected]
RO GROUP INT.(sede operativa) Str. Depozitelor 41-43 Jud. Arges - Pitesti
Tel. 0040-248211004 -Fax. 0040-248211004 - Email: [email protected]
Z.A.O. ITALMOTO (sede operativa) Ul. Preobragenskaya 5/7 - 107076 - Mo - Moscow
Tel. 007-095-780 4294 - Fax. 007-095-208 3228 - Email: [email protected]
APRILIA U.S.A., INC. (Sede operativa) 109 Smoke Hill Lane Suite 190 - GA 30188 - Woodstock
Tel. 001-770-592-2261 - Fax. 001-770-592-4878
APRILIA JAPAN CORP.
SHINYOKOHAMAMEGURO BLDG. 3-22-5 SHINYOKOHAMA KOUHOKU-KU 222-0033
YOKOHAMA-SHI KANAGAWA (J) -Tel. 0081-454772632 - Fax 0081-454772605 - Email: [email protected].jp
JOHN SAMPLE GROUP PTY LTD. 8 Sheridan Close - NSW 2214 - Milperra - Sydney
Tel. 0061-2-97722666 - Fax. 0061-2-97742321 - Email: [email protected]
P
H
CH
GR
TR
B
DK
SF
USA
CSI
J
R
AUS
MX125_GR.book Page 91 Tuesday, October 14, 2003 7:17 PM

χρήση και συντήρηση MX 125
ΕΙΣΑΓΩΓΕΙΣ
NZ
RSA
MEX
RP
HK
RC
RL
RI
ROK
KWT
SGP
CDN
MOTORCYCLING DOWNUNDER LTD. 35, Manchester Street - P.o.B. 22416 - Christchurch
Tel. 0064-3-3660129 - Fax. 0064-3-3667580 - Email: [email protected].nz
MOTOVELO S.A. Old Pretoria Road - Wynberg - Johannesburg
Tel. 0027-11-7868486 - Fax. 0027-11-7868482 - Email: motov[email protected]
APRILIA DE MEXICO, SA. de CV. San Jeromino - 64640 - 552 Monterrey N.L.
Tel. 0052-8333-4493 - Fax. 0052-8348-9398 - sbertuEmail: [email protected]
BIKE KOREA CO. LTD. YeungSoo Bldg. 302 #206-25, Ohjang-Dong, Chung-Ku Seoul
Tel. 0082-2-22756130 - Fax 0082-2-22756132 - Email: kukbike@yahoo.co.kr
ULTRA BIKERS NETWORK INC. Bldg. 7294 cn Recto Highway - Pampanga
Tel. 00632-7524450 - Fax 00632-7505764 - Email: ultrabykes@mydestiny.net
CYCLENET PTE TLD 1179 Serangoon Road - 328232 - Singapore
Tel. 0065 6299 6251 - Fax. 0065 6297 5684 - Email: jeorjb@yahoo.com
AH LAM MOTORCYCLE CO. LTD. 29 Hak Po Street - Mongkok Kowloon - Hong Kong
Tel. 00852-23859229 - Fax. 00852-23857920 - Email: [email protected]
PERFECT MOTORS COMPANY LIMITED No. 281 Jungshing North Street - Sanchung City - 241 - Taipei
Tel. 00886-2-85111156 - Fax. 00886 2 85111148 - Email: [email protected]
AL-RADWAN INTERNATIONAL GROUP Block 1, Street 13, Plot 107 45703 - Shuwaikh Industrial
Tel. 00965-4828072 - Fax. 00965-4828073 - Email: [email protected]
ACCESS INTERNATIONAL FOR Diamond Tower, 10th Floor P.O.B. 13 - Verdun, near Mandarine Beirut
PT. MOTOR MEGA PERFORMA JI. Keutamaan no. 75 - Jakarta Barat
Tel. 0062 21 63333929 - Fax. 0062 21 6337889 - Email: [email protected]
BARRETT MARKETING GROUP ltd. 9060 300 Lockhart Mill Road - E7M 5C3 - Woodstock
Tel. 001-5063281315 - Fax. 001-5063281582 - Email: joshb@barrettgroup.com
MX125_GR.book Page 92 Tuesday, October 14, 2003 7:17 PM

χρήση και συντήρηση MX 125
ΕΙΣΑΓΩΓΕΙΣ
IND
GCA
AZG
BERMUDA INTERNATIONAL LTD. 235, Middle Road - Southampton
Tel. 001-4412385050 - Email: [email protected]
MAJESTIC AUTO LIMITED 10th KM Stone - G.T. Road - P.O.Dujana - 203207 Dadri - Ghaziabad UP
Tel. 0091-98100-19315 - Fax. 0091-98100-19300
MOTO TECNICA S.A. Avenia Petapa - 38-78 - Local B Zona12 - Guatemala
Tel. 0050-2-3606815 - Fax. 0050-2-3327847
DUARTE BASTOS & CASTENDO, LDA Rua Dr.António José de Almeida n˚238- Benguela
Tel. 00244-7-232669 - Fax 00244-7-235106 - Email: [email protected]
MX125_GR.book Page 93 Tuesday, October 14, 2003 7:17 PM

χρήση και συντήρηση MX 125
ΗΛΕΚΤΡΙΚΟ ΣΧΕ∆ΙΑΓΡΑΜΜΑ - MX 125
16
19 18 14
20 21
27
28
23
15 13
12
1
1
1
0
9
28 28
28
876
28
4
5
29
2828
32
3122
28
27
31
26 25
28
24
28
3
4
33
231
MX125_GR.book Page 94 Tuesday, October 14, 2003 7:17 PM

χρήση και συντήρηση MX 125
ΥΠOΜΝΗΜΑ ΗΛΕΚΤΡΙΚΟΥ ΣΧΕ∆ΙΑΓΡΑΜΜΑΤΟΣ - MX 125
1) Γεννήτρια
2) Πηνίο ανάφλεξης
3) Ρυθµιστής τάσης
4) Ασφάλειες
5) Μπαταρία
6) ∆ιακόπτης εµπρόσθιου στοπ
7) ∆ιακόπτης πίσω στοπ
8) Αισθητήρας στάθµης λαδιού
9) Πίσω αριστερό φλας
10) Πίσω φανός
11) Πίσω δεξί φλας
12) Φλασέρ
13) ∆ιακόπτης εκκίνησης/κλειδαριά τιµονιού
14) Ενδεικτική λυχνία νεκράς ταχύτητας
15) ∆ιακόπτης αριστερών φλας
16) Ταµπλό
17) Ενδεικτική λυχνία µεσαίας σκάλας
18) Λαµπτήρας φωτισµού ταµπλό
19) Ενδεικτική λυχνία µεγάλης σκάλας
20) Ενδεικτική λυχνία φλας
21) Λυχνία στάθµης λαδιού
22) ∆ιακόπτης κιβωτίου ταχυτήτων σε νεκρά
23) Ακουστικό σήµα
24) ∆εξί εµπρός φλάς
25) Λαµπτήρας µεσαίας/µεγάλης σκάλας
26) Λαµπτήρας φώτων πορείας εµπρός
27) Εµπρός αριστερό φλας
28) Πολλαπλή φίσα
29) Μπουζί
30) Πίσω φανός
31) CDI
32) Pick Up
33) Κεντρική ηλεκτρονική µονάδα
34) Σωληνοειδές
ΧΡΩΜΑ ΚΑΛΩ∆ΙΩΝ
Ar πορτοκαλί
Az γαλάζιο
B µπλε
Bi λευκό
G κίτρινο
Gr γκρι
M καφέ
N µαύρο
R κόκκινο
V πράσινο
Vi µωβ
MX125_GR.book Page 95 Tuesday, October 14, 2003 7:17 PM

χρήση και συντήρηση MX 125
Η εταιρία aprilia Α.Ε. ευχαριστεί τους πελάτες της για την επιλογή του
δικύκλου και συνιστά:
– Μην διασκορπίζετε τα χρησιµοποιηµένα λάδια, τα καύσιµα, και τις
ρυπογόνες ουσίες στο περιβάλλον.
– Μην αφήνετε αναµµένο τον κινητήρα αν δεν είναι απαραίτητο.
– Αποφεύγετε να κάνετε θόρυβο και να ενοχλείτε.
– Σεβαστείτε τη φύση.
MX125_GR.book Page 96 Tuesday, October 14, 2003 7:17 PM

aprilia part# 8104766
use+maintenancebook
MX
125
MX125_UK.book Page 1 Wednesday, October 15, 2003 11:24 AM

use and maintenance MX 125
2
© 2003 aprilia s.p.a. - Noale (VE)
First edition: October 2003
Reprint:
Produced and printed by:
DECA s.r.l.
Via Risorgimento, 23/1 - Lugo (RA) - Italia
Tel. +39 - 0545 35235
Fax +39 - 0545 32844
E-mail: deca@decaweb.it
www.decaweb.it
On behalf of:
aprilia s.p.a.
via G. Galilei, 1 - 30033 Noale (VE) - Italy
Tel. +39 - (0)41 58 29 111
Fax +39 - (0)41 44 10 54
www.aprilia.com
SAFETY WARNINGS
The following precautionary warnings are
used throughout this manual in order to
convey the following messages:
Safety warning. When you find
this symbol on the vehicle or in
the manual, be careful to the potential
risk of personal injury. Non-compliance
with the indications given in the
messages preceded by this symbol may
result in considerable risks for your and
other people’s safety and for the
vehicle!
WARNING
Indicates a potential hazard which may
result in serious injury or even death.
CAUTION
Indicates a potential hazard which may
result in minor personal injury or
damage to the vehicle.
NOTE The word ≈NOTE∆ in this manual
precedes important information or
instructions.
TECHNICAL INFORMATION
The operations preceded by this
symbol must be repeated also on
the opposite side of the vehicle.
If not expressly indicated otherwise, for the
reassembly of the units repeat the
disassembly operations in reverse order.
The terms ≈right∆ and ≈left∆ are referred to
the rider seated on the vehicle in the
normal riding position.
WARNINGS - PRECAUTIONS -
GENERAL ADVICE
Before starting the engine, carefully read
this manual and in particular the section
≈SAFE DRIVE∆.
Your and other people»s safety depends
not only on your quickness of reflexes and
on your agility, but also on what you know
about the vehicle, on its efficiency and on
your knowledge of the basic information for
≈SAFE DRIVE∆. Therefore, get a thorough
knowledge of the vehicle, in such a way as
to be able to drive in the traffic safely.
NOTE Keep a stock of one bulb per type
with the vehicle (see technical data).
+
MX125_UK.book Page 2 Wednesday, October 15, 2003 11:24 AM

3
use and maintenance MX 125
NOTE This manual must be considered
as an integral part of the vehicle and must
always accompany it, even in case of
resale.
aprilia has prepared this manual with the
maximum attention, in order to supply the
user with correct and updated information.
However, since aprilia constantly
improves the design of its products, there
may be slight discrepancies between the
characteristics of your vehicle and those
described in this manual. For any
clarification concerning the information
contained in this manual, do not hesitate to
contact your aprilia Official Dealer.
For control and repair operations not
expressly described in this publication, for
the purchase of aprilia genuine spare
parts, accessories and other products, as
well as for specific advice, contact
exclusively aprilia Official Dealers and
Service Centers, which guarantee prompt
and accurate assistance.
Thank you for choosing aprilia. We wish
you a nice ride.
All rights as to electronic storage,
reproduction and total or partial adaptation,
with any means, are reserved for all
Countries.
NOTE In some countries the
antipollution and noise regulations in force
require periodical inspections.
The user of the vehicle in these countries
must:
√ contact an aprilia Official Dealer to
have the non-homologated components
replaced with others homologated for
use in the country in question;
√ carry out the required periodical
inspections.
NOTE Soon after purchasing the
vehicle, write down the identification data
indicated on the SPARE PARTS
IDENTIFICATION LABEL in the table here
below. This label is positioned on the
frame, under the saddle; to read it, it is
necessary to remove the saddle.
These data indicate:
√ year of manufacture (Y, 1, 2, ...);
√ modification code (A, B, C, ...);
√ homologation country (I, UK, A, ...).
and are to be supplied to the aprilia
Official Dealer as reference data for the
purchase of spare parts or specific
accessories of the model you have
acquired.
In this manual the various versions are
indicated by the following symbols:
VERSION:
7 optional
Free Power version
Italia Singapore
Regno
Unito
Slovenia
Austria Israele
Portogallo Corea del Sud
Finlandia Malaysia
Belgio Cile
Germania Croazia
Francia Australia
Spagna
Stati Uniti
d’America
Grecia Brasile
Olanda
Repubblica del
Sud Africa
Svizzera Nuova
Zelanda
Danimarca Canada
Giappone
I
SGP
UK
SLO
A
IL
P
ROK
SF
MAL
B
RCH
D
HR
AUS
E
USA
GR
BR
NL
RSA
CH
NZ
DK
CDN
J
MX125_UK.book Page 3 Wednesday, October 15, 2003 11:24 AM

use and maintenance MX 125
4
TABLE OF CONTENTS
SAFETY WARNINGS............................................ 2
TECHNICAL INFORMATION............................... 2
WARNINGS - PRECAUTIONS -
GENERAL ADVICE............................................... 2
SAFE DRIVE .......................................................... 5
SAFETY RULES ................................................... 6
CLOTHING ........................................................... 9
ACCESSORIES .................................................. 10
LOAD .................................................................. 10
ARRANGEMENT OF THE MAIN ELEMENTS. 12
ARRANGEMENT OF THE INSTRUMENTS..... 14
INSTRUMENTS AND INDICATORS ................. 15
INSTRUMENTS AND INDICATORS TABLE...... 16
MULTIFUNCTION COMPUTER ......................... 17
CHANGING THE BATTERY............................... 31
MAIN INDEPENDENT CONTROLS .................. 32
CONTROLS ON THE LEFT SIDE OF THE
HANDLEBAR...................................................... 32
IGNITION SWITCH............................................. 33
STEERING LOCK............................................... 33
AUXILIARY EQUIPMENT................................... 34
GLOVE/TOOL KIT COMPARTMENT ................. 34
CRASH HELMET HOOK .................................... 34
SPECIAL TOOLS
-.......................................... 35
MAIN COMPONENTS......................................... 36
FUEL................................................................... 36
TRANSMISSION OIL.......................................... 36
2 STROKE OIL TANK......................................... 37
BRAKE FLUID - recommendations..................... 38
DISC BRAKES.................................................... 38
FRONT BRAKE .................................................. 39
REAR BRAKE..................................................... 40
ADJUSTING
THE REAR BRAKE LEVER HEIGHT ................. 41
ADJUSTING THE CLUTCH................................ 42
TYRES ................................................................ 43
COOLANT........................................................... 44
SILENCER .......................................................... 46
INSTRUCTIONS FOR USE ................................ 47
PRELIMINARY CHECKING OPERATIONS ...... 47
STARTING ......................................................... 48
DEPARTURE AND DRIVE ................................ 50
RUNNING-IN...................................................... 53
STOPPING......................................................... 53
PARKING ........................................................... 54
POSITIONING THE VEHICLE
ON THE STAND ................................................ 54
SUGGESTIONS
TO PREVENT THEFT........................................ 54
MAINTENANCE................................................... 55
REGULAR SERVICE INTERVALS CHART....... 56
IDENTIFICATION DATA.................................... 58
REMOVING THE SIDE COVERS...................... 58
AIR CLEANER ................................................... 59
CHECKING THE TRANSMISSION OIL LEVEL
AND TOPPING UP ............................................ 60
CHANGING
THE TRANSMISSION OIL................................. 61
FRONT WHEEL................................................. 62
REAR WHEEL ................................................... 64
DRIVE CHAIN .................................................... 66
INSPECTING THE FRONT
AND REAR SUSPENSIONS.............................. 68
REAR SUSPENSION......................................... 69
CHECKING THE BRAKE PAD WEAR............... 70
ADJUSTING THE COLD START
CONTROL (
) .................................................. 70
IDLING ADJUSTMENT ...................................... 71
ADJUSTING
THE ACCELERATOR CONTROL ..................... 71
SPARK PLUG .................................................... 72
BATTERY........................................................... 73
LONG INACTIVITY
OF THE BATTERY ............................................ 73
CHECKING AND CLEANING
THE TERMINALS .............................................. 74
REMOVING THE BATTERY.............................. 74
CHECKING
THE ELECTROLYTE LEVEL............................. 75
RECHARGING THE BATTERY ......................... 75
INSTALLING THE BATTERY ............................ 75
CHANGING THE FUSES................................... 76
CHECKING THE SIDE STAND
AND THE SAFETY SWITCH ............................. 77
CHECKING THE SWITCHES ............................ 77
ADJUSTING THE VERTICAL
HEADLIGHT BEAM............................................ 78
BULBS................................................................ 78
CHANGING
THE HEADLIGHT BULBS.................................. 79
CHANGING THE DASHBOARD BULBS ........... 80
CHANGING THE FRONT AND REAR
DIRECTION INDICATORS ................................ 81
CHANGING THE REAR LIGHT BULB............... 81
TRANSPORT ....................................................... 82
DRAINING THE FUEL TANK............................. 82
CLEANING ........................................................... 83
LONG PERIODS OF INACTIVITY ..................... 84
AFTER A PERIOD OF INACTIVITY................... 84
TECHNICAL DATA ............................................. 85
LUBRICANT CHART.......................................... 88
AUTHORISED DEALERS AND SERVICE
CENTRES .......................................................... 89
IMPORTERS ...................................................... 90
IMPORTERS ...................................................... 91
IMPORTERS ...................................................... 92
Importers ............................................................ 93
WIRING DIAGRAM - MX 125............................. 94
WIRING DIAGRAM KEY- MX 125 ..................... 95
MX125_UK.book Page 4 Wednesday, October 15, 2003 11:24 AM

safe drive
SAFE DRIVE
MX125_UK.book Page 5 Wednesday, October 15, 2003 11:24 AM

use and maintenance MX 125
6
SAFETY RULES
To drive the vehicle it is necessary to be in
possession of all the requirements
prescribed by law (driving licence,
minimum age, psychophysical ability,
insurance, state taxes, vehicle registration,
number plate, etc.).
Gradually get to know the vehicle by
driving it first in areas with low traffic and/or
private areas.
The use of medicins, alcohol and drugs or
psychotropic substances notably increases
the risk of accidents.
Be sure that you are in good
psychophysical conditions and fit for
driving and pay particular attention to
physical weariness and drowsiness.
Most road accidents are caused by the
driver»s lack of experience.
NEVER lend the vehicle to beginners and,
in any case, make sure that the driver has
all the requirements for driving.
MX125_UK.book Page 6 Wednesday, October 15, 2003 11:24 AM

7
use and maintenance MX 125
Rigorously observe all road signs and
national and local road regulations.
Avoid abrupt movements that can be
dangerous for yourself and other people
(for example: rearing up on the back
wheel, speeding, etc.), and give due
consideration to the road surface, visibility
and other driving conditions.
Avoid obstacles that could damage the
vehicle or make you lose control.
Avoid riding in the slipstream created by
preceding vehicles in order to increase
your speed.
WARNING
Always drive with both hands on the
handlebars and both feet on the
footrests (or on the rider’s footboards),
in the correct driving posture.
Avoid standing up or stretching your
limbs while driving.
MX125_UK.book Page 7 Wednesday, October 15, 2003 11:24 AM

use and maintenance MX 125
8
The driver should pay attention and avoid
distractions caused by people, things and
movements (never smoke, eat, drink, read,
etc.) while driving.
Use only the vehicle»s specific fuels and
lubricants indicated in the "LUBRICANT
CHART"; check the oil, fuel and coolant
levels regularly.
If the vehicle has been involved in an
accident, make sure that no damage has
occurred to the control levers, pipes, wires,
braking system and vital parts.
If necessary, have the vehicle inspected by
an aprilia Official Dealer, who should
carefully check the frame, handlebars,
suspensions, safety parts and all the
devices that you cannot check by yourself.
Always remember to report any
malfunction to the technicians to help them
in their work.
Never use the vehicle when the amount of
damage it has suffered endangers your
safety.
COOLER
OIL
MX125_UK.book Page 8 Wednesday, October 15, 2003 11:24 AM

9
use and maintenance MX 125
Never change the position, inclination or
colour of: number plate, direction
indicators, lights and horns.
Any modification of the vehicle will result in
the invalidity of the guarantee.
Any modification of the vehicle and/or the
removal of original components can
compromise vehicle performance levels
and safety or even make it illegal.
We recommend respecting all regulations
and national and local provisions regarding
the equipment of the vehicle.
In particular, avoid all modifications that
increase the vehicle»s performance levels
or alter its original characteristics.
Never race with other vehicles.
CLOTHING
Before starting, always wear a correctly
fastened crash helmet. Make sure that it is
homologated, in good shape, of the right
size and that the visor is clean.
Wear protective clothing, preferably in light
and/or reflecting colours. In this way you
will make yourself more visible to the other
drivers, thus notably reducing the risk of
being knocked down, and you will be more
protected in case of fall.
This clothing should be very tight-fitting
and fastened at the wrists and ankles.
Strings, belts and ties should not be
hanging loose; prevent these and other
objects from interfering with driving by
getting entangled with moving parts or
driving mechanisms.
ONLY ORIGINALS
A12
345
MX125_UK.book Page 9 Wednesday, October 15, 2003 11:24 AM

use and maintenance MX 125
10
Do not keep objects that can be dangerous
in case of fall, for example pointed objects
like keys, pens, glass vials etc. in your
pockets (the same recommendations also
apply to passengers).
ACCESSORIES
The owner of the vehicle is responsible for
the choice, installation and use of any
accessory.
Avoid installing accessories that cover
horns or lights or that could impair their
functions, limit the suspension stroke and
the steering angle, hamper the operation of
the controls and reduce the distance from
the ground and the angle of inclination in
turns.
Avoid using accessories that hamper
access to the controls, since this can
prolong reaction times during an
emergency.
Large fairings and windscreens assembled
on the vehicle can produce aerodynamic
forces capable of compromising the
stability of the vehicle while driving.
Make sure that the equipment is well
fastened to the vehicle and not dangerous
during driving. Do not install electrical
devices and do not modify those already
existing to avoid electrical overloads,
because the vehicle could suddenly stop or
there could be a dangerous current
shortage in the horn and in the lights.
aprilia recommends the use of genuine
accessories (aprilia genuine accessories).
LOAD
Be careful and moderate when loading
your luggage. Keep any luggage loaded as
close as possible to the centre of the
vehicle and distribute the load uniformly on
both sides, in order to reduce imbalance to
the minimum. Furthermore, make sure that
the load is firmly secured to the vehicle,
especially during long trips.
MX125_UK.book Page 10 Wednesday, October 15, 2003 11:24 AM

11
use and maintenance MX 125
Avoid hanging bulky, heavy and/or
dangerous objects on the handlebars,
mudguards and forks, because the vehicle
might respond more slowly in turns and its
manoeuvrability could be unavoidably
impaired.
Do not place bags that are too bulky on the
vehicle sides and do not ride with the crash
helmet hanging from its string, because it
could hit people or obstacles making you
lose control of the vehicle.
Do not carry any bag if it is not tightly
secured to the vehicle.
Do not carry bags which protrude too much
from the luggage rack or which cover the
lights, horn or indicators.
Do not carry animals or children on the
glove compartment or on the luggage rack.
Do not exceed the maximum load allowed
for each side-bag.
When the vehicle is overloaded, its stability
and its manoeuvrability can be
compromised.
KG!
MX125_UK.book Page 11 Wednesday, October 15, 2003 11:24 AM

use and maintenance MX 125
12
ARRANGEMENT OF THE MAIN ELEMENTS
KEY
1) Coolant left radiator
2) Fuel tank plug
3) Fuel tank
4) Battery
5) Glove/tool kit compartment
6) Fuse carrier
7) Passenger grab rail
8) Passenger left footrest
(snapping, closed/open)
9) Side stand
10) Rider left footrest
(with spring, always open)
11) Transmission oil drain plug
12) Shifting lever
13) Transmission oil filling cap
14) Starting lever
1 765432
8
913 1214 10
11
MX125_UK.book Page 12 Wednesday, October 15, 2003 11:24 AM

13
use and maintenance MX 125
KEY
1) 2 stroke oil tank plug
2) 2 stroke oil tank
3) Air cleaner
4) Rear brake fluid tank
5) Fuel cock
6) Brake fluid reservoir (front brake)
7) Ignition switch/steering lock
8) Coolant radiator cap
9) Coolant right radiator
10) Horn
11) Rear brake control lever
12) Rider right footrest
(with spring, always open)
13) Rear brake pump
14) Drive chain
15) Passenger right footrest
(snapping, closed/open)
16) Crash helmet hook
16
15
32
9
8
12 101314
1 4 5 6 7
11
MX125_UK.book Page 13 Wednesday, October 15, 2003 11:24 AM

use and maintenance MX 125
14
ARRANGEMENT OF THE INSTRUMENTS
KEY
1) Direction indicator switch (
( )
2) Horn push button (
)
3) Dimmer switch (
- )
4) High beam signalling push button
( )
5) Left rear-view mirror
6) Clutch lever
7) Cold start lever (
)
8) Instruments and indicators
9) Ignition switch/steering lock
(
- - + )
10) Front brake lever
11) Right rear-view mirror
12) Throttle grip
43
12
5 6 7 8 9 10 11
12
MX125_UK.book Page 14 Wednesday, October 15, 2003 11:24 AM

15
use and maintenance MX 125
INSTRUMENTS AND INDICATORS
KEY
1) Green (
) low beam warning light
2) Multifunction digital display
3) Green neutral indicator warning light ()
4) Green direction indicator warning light ( ( )
5) Red 2 stroke oil reserve warning light ( )
6) Blue high beam warning light ( )
1
6
2 3 4
5
MX125_UK.book Page 15 Wednesday, October 15, 2003 11:24 AM

use and maintenance MX 125
16
INSTRUMENTS AND INDICATORS TABLE
Description Function
2 stroke oil reserve
warning light (
)
Comes on, for about 0.5 seconds, whenever the ignition switch is brought to position ≈
∆,
thus testing the correct operation of the bulb.
If the light does not come on in this phase, contact an Concessionario Ufficiale aprilia.
If the warning light comes on during the normal operation of
the engine, this means that the 2 stroke oil reserve is being
used; in this case, provide for topping up, see pag. 37 (2 STROKE OIL TANK).
Neutral indicator warning light ()
It comes on when the gear is in neutral.
Direction indicator
warning light (
()
Blinks when the direction indicators are on.
High beam warning light (
)
Comes on when the headlight is in "high beam" position or when the high beam signalling is
operated.
Low beam warning light (
)
It comes on when the front low beam bulbs are on.
CAUTION
MX125_UK.book Page 16 Wednesday, October 15, 2003 11:24 AM

17
use and maintenance MX 125
MULTIFUNCTION COMPUTER
CAUTION
The display is provided with an automatic
shutoff function. In case the vehicle or the
display are left unused for more than 30
minutes, the display will be automatically
disabled. All the pre-set data will
nevertheless be stored. The display will
be automatically re-enabled as soon as
one of the push-buttons is pressed or the
vehicle is used again.
KEY
CAUTION
By simply setting the front wheel
circumference, two different types of
vehicles, bike 1 and bike 2, can be stored
inside the multifunction computer
memory.
Left display: Vehicle (1), total distance
covered (2), partial distance covered (3)
and maintenance functions (4) can be
selected;
Centre display: total and partial race time
(5) and trip meter (6) can be selected;
Right display: average (7), max (8) and
current (9) speeds and Km/mi (10)
functions can be selected.
Vehicle selection
KM/H - MPH
Mi or km selection
SPD
Current speed
AS
Average speed
MS
Max. speed
TT
Trip meter
RT
Partial race time
ART
Total race time
00:00:00
Time 12h or 24h
DST
Partial distance covered by the
vehicle
ODO
Total distance covered by the
vehicle
Lubrication warning light
Maintenance warning light
Display backlighting
Low battery
1 2
LO
1 2
DSTODO
888
88
88
1 2
DSTODO
888
88
88
321 4
AR TT
88:88:88
88:88
888
65
AS SPD MS
KM/H
LO
8
88
KM/H
7 8 9
10
10
101010
MX125_UK.book Page 17 Wednesday, October 15, 2003 11:24 AM

use and maintenance MX 125
18
START-UP SETTING
Metric system setting (KM/H or MPH)
◆
Keep the three push buttons
simultaneously pressed for about 2
seconds, then press any of them to start
settings.
◆
Press left push button to change the unit
of measurement from ≈ km∆ to ≈mi∆
(KM/H to MPH) or vice-versa.
◆
Keep centre ≈MODE∆ push button
pressed for about 1.5 seconds to
confirm. Then start wheel diameter ≈WS∆
setting.
CAUTION
As soon as the MODE push button is
pressed, the actual wheel diameter value
and the first flashing datum will appear on
the left display.
MODE
KM/H
MODE
M/H
MODE
55
21
1
MX125_UK.book Page 18 Wednesday, October 15, 2003 11:24 AM

19
use and maintenance MX 125
Setting the “WS” wheel diameter
◆
To change the flashing value, press the left
push button.
◆
Press right push button to go to next value
and then press left push button again to
change this value.
Pre-set value
1850.
◆
Keep centre ≈MODE∆ push button pressed
for about 1.5 seconds to confirm. Then
start time setting.
CAUTION
As soon as the MODE push button is
pressed, time actual setting (24h or 12 h)
will appear on the centre display
.
MODE
55
1111
1
KM/H
MODE
55
1111
1
KM/H
MODE
55
1919
1
KM/H
MODE
MX125_UK.book Page 19 Wednesday, October 15, 2003 11:24 AM

use and maintenance MX 125
20
Time setting
◆
Press left push button to select time
displaying (24h or 12 h).
◆
Press right push button to set the ≈hour∆.
Press left push button to change the
value.
◆
Press right push button to set the
≈minutes∆. Press left push button again
to change the value.
◆
Keep centre ≈MODE∆ push button
pressed for about 1.5 seconds to
confirm. Then start preventative
lubrication check.
CAUTION
As soon as the MODE push button is
pressed, the lubrication symbo - with
the number of preventative services to
be made - will appear and start flashing
on the left display.
MODE
12:00:- -
12H
MODE
12:00:- -
24H
MODE
17:50:- -
24H
MODE
1
00
00
1
MX125_UK.book Page 20 Wednesday, October 15, 2003 11:24 AM

21
use and maintenance MX 125
Preventative lubrication check
CAUTION
The preventative lubrication check is
already pre-set after the first 100 km (60
mi) for vehicle 1 and after the first 300
km (200 mi) for vehicle 2.
To change lubrication interval, refer to
page pag. 25 (STANDARD SETTING).
◆
Press left push button to modify the
value.
◆
Press right push button to shift to next
value.
◆
Keep centre ≈MODE∆ push button
pressed for about 1.5 seconds to
confirm. Then start preventative
maintenance check.
CAUTION
If the lubrication check function is not
used, set all values to zero.
CAUTION
As soon as the MODE push button is
pressed, the maintenance symbol - with
the number of preventative services to
be made - will appear and start flashing
on the left display.
CAUTION
Checks to be managed by the user. Do
not confuse with scheduled
maintenance services.
MODE
2
00
00
1
MODE
2
00
00
1
MODE
3
00
00
MX125_UK.book Page 21 Wednesday, October 15, 2003 11:24 AM

use and maintenance MX 125
22
Preventative maintenance check
CAUTION
The preventative maintenance check is
already pre-set after the first 300 km (200
mi) for vehicle 1 and after the first 990 km
(600 mi) for vehicle 2.
To change maintenance check interval,
refer to page pag. 25 (STANDARD SETTING).
◆
Press left push button to modify the
value.
◆
Press right push button to shift to next
value.
◆
Keep centre ≈MODE∆ push button
pressed for about 1.5 seconds to
confirm. Then start total distance setting
(ODO).
CAUTION
As soon as the MODE push button is
pressed, the ODO wording will appear
on the left display.
CAUTION
Checks to be made by the user. Do not
confuse with scheduled maintenance
services.
MODE
4
00
00
1
MODE
4
00
00
1
MODE
00
00
1
000
ODO
MX125_UK.book Page 22 Wednesday, October 15, 2003 11:24 AM

23
use and maintenance MX 125
Checking the total distance covered
(ODO)
◆
Press left push button to modify the
value.
◆
Press right push button to shift to next
value.
◆
Keep centre ≈MODE∆ push button
pressed for about 1.5 seconds to
confirm. Then start total race time setting
(ART).
CAUTION
As soon as the MODE push button is
pressed, the ART wording will appear
on the centre display.
MODE
00
00
1
300
ODO
MODE
00
00
1
300
ODO
MODE
ART
00:00
00
MX125_UK.book Page 23 Wednesday, October 15, 2003 11:24 AM

use and maintenance MX 125
24
Checking the total race time (ART)
◆
Press left push button to modify the
value.
◆
Press right push button to shift to next
value.
◆
Keep centre ≈MODE∆ push button
pressed for about 2 seconds to confirm.
Start-up setting is now completed.
MODE
ART
00:00
20
MODE
ART
00:00
20
MODE
1
DST SPD
KM/H
11:53:48
0
00
00
0
RT
0:00
MX125_UK.book Page 24 Wednesday, October 15, 2003 11:24 AM

25
use and maintenance MX 125
Programming the second vehicle
Keep the right push button pressed for about
5 seconds. The ≈WS∆ wheel diameter value of
the second vehicle will appear on the left
display. The menu relating to the second
vehicle will be automatically enabled after a
few seconds.
CAUTION
Keep the two outer push buttons
pressed for about 2 seconds to enable
the STANDARD SETTING programme
relating to the second vehicle (bike 2).
STANDARD SETTING
CAUTION
Keep the two outer push buttons
pressed for about 2 seconds to enable
the STANDARD SETTING programme.
This menu will allow you to modify the
wheel diameter, the time setting, the
vehicle lubrication and maintenance
interval, the total distance covered (ODO)
and the total race time (ART).
The metric system setting, KM/H to MPH
or vice-versa, can be modified only from
the START-UP SETTING menu.
1
DST SPD
KM/H
11:53:48
0
00
00
0
RT
0:00
MODE
2
50
20
MODE
1
DST SPD
KM/H
11:53:48
0
00
00
0
RT
0:00
MODE
55
21
1
WS
CLOCK ODO ART WS
MX125_UK.book Page 25 Wednesday, October 15, 2003 11:24 AM

use and maintenance MX 125
26
PARAMETERS SETTING/DISPLAYING
CAUTION
Press the centre MODE push button to
scroll the different setting screens.
During operation, screen (A) - showing the
distance covered after the last resetting
(TT), the current speed, time and partial
race time (RT) - will be displayed.
Press centre push button ≈MODE∆ to shift
to screen (B) and press it again to shift
again to screen (C).
CAUTION
Screens (B and C) will be displayed for 5
seconds only, then screen (A) will appear
again.
MODE
1
A
DST
RT
SPD
KM/H
11:53:48
0:00
0
00
0
0
1
DST
0
MODE
A
RT
SPD
KM/H
11:53:56
0:00
0
00
0
MODE
1
B
DST
TT
AS
KM/H
11:53:49
0:00
0
00
00
0
1
MODE
C
ODO
ART
MS
KM/H
11:53:50
0:00
0
00
00
0
MX125_UK.book Page 26 Wednesday, October 15, 2003 11:24 AM

27
use and maintenance MX 125
Keep centre push button ≈MODE∆ and right
push button simultaneously pressed for
about 2 seconds to shift to screen (D) -
showing the preventative maintenance
check function - and press them again to
shift again to screen (E) showing the
preventative lubrication check function.
CAUTION
Screens (D and E) will be displayed for 5
seconds only. If no other button is
pressed, screen (A) will be displayed
again.
MODE
1
DST SPD
KM/H
11:49:08
7
96
53
30
A
RT
30:42
1
MODE
1
SPD
KM/H
11:49:10
8
02
47
35
D
RT
30:44
1
1
SPD
KM/H
11:49:12
8
04
47
35
E
RT
30:46
1
MX125_UK.book Page 27 Wednesday, October 15, 2003 11:24 AM

use and maintenance MX 125
28
DISABLING THE SCHEDULED
MAINTENANCE SERVICES
Whenever the scheduled maintenance or
lubrication service intervals are not
respected, the relating value will start
flashing on the left display.
To switch this value off, keep the right and
left push button simultaneously pressed for
about 2 seconds.
◆
Keep centre push button ≈MODE∆
pressed for about 1.5 seconds to go to
the wheel diameter screen.
◆
Keep centre push button ≈MODE∆
pressed again for about 1.5 seconds to
go to the time setting screen and to start
setting the preventative lubrication
check.
◆
Press left push button to modify the
value.
◆
Press right push button to confirm this
value and to shift to next value.
◆
Keep centre ≈MODE∆ push button
pressed for about 1.5 seconds to confirm
preventative lubrication values and to
shift to next operation. Press left push
button to modify the value.
◆
Press right push button to confirm this
value and to shift to next value.
◆
Keep right push button pressed again
until, after about 2 seconds, the starting
screen (A) will appear again.
MODE
MODE
1
55
21
1
00
00
1
MODE MODE MODE
1
00
00
2
1
00
00
2
1
00
00
3
MODE
1
00
00
4
MODE
1
00
00
4
MODE
1
DST SPD
KM/H
11:49:08
7
96
53
30
RT
30:42
1
MX125_UK.book Page 28 Wednesday, October 15, 2003 11:24 AM

29
use and maintenance MX 125
A
B
A
B
MODE
1
DST
RT
SPD
KM/H
11:49:08
1
30:42
7
96
53
36
MODE
1
DST
RT
SPD
KM/H
11:49:09
1
30:43
7
97
53
36
MODE
1
DST
TT
AS
KM/H
11:49:14
0:05
8
98
53
34
1
DST
TT
AS
KM/H
11:49:16
0:07
8
05
54
34
CHRONOMETER
The multifunction computer is equipped
with a chronometer, to be displayed on
screen (B) together with trip meter (TT).
◆
Press left push button to enable
chronometer.
◆
Press centre push button ≈MODE∆ to
display screen (B).
◆
Press left push button again to terminate
the chronometer function.
MX125_UK.book Page 29 Wednesday, October 15, 2003 11:24 AM

use and maintenance MX 125
30
C
A
B
MODE
1
DST
RT
SPD
KM/H
11:49:08
1
30:42
7
96
53
36
MODE
1
DST
RT
SPD
KM/H
11:53:48
1
30:42
7
96
53
36
MODE
1
DST
RT
KM/H
11:53:49
0:00
0
00
0
30
SPD
MODE
1
ODO
ART
MS
KM/H
88:88:88
0:98
0
58
82
0
MODE
1
DST
TT
KM/H
11:53:49
0:00
0
00
0
00
AS
RESETTING THE PARTIAL VALUES
This function is used to reset the partial
values stored inside the computer memory.
In particular:
√ Partial distance covered (DST)
√ Trip meter (TT)
√ Partial race time (RT)
√ Maximum speed (MS)
√ Average speed (AS)
◆
Keep the left and the centre ≈MODE∆
push buttons simultaneously pressed for
about 2 seconds.
Screen (A) with the reset values will be
displayed.
◆
Press centre push button ≈MODE∆ to
shift to screen (B) and reset the values.
◆
Press centre push button ≈MODE∆ again
to shift to screen (C) and reset the
values.
CAUTION
Screens (B and C) will be displayed for
5 seconds only, then screen (A) will
appear again.
MX125_UK.book Page 30 Wednesday, October 15, 2003 11:24 AM

31
use and maintenance MX 125
MODE
1
DST
RT
SPD
KM/H
11:49:13
1
30:47
0
64
54
0
MODE
MODE
1
64
54
1
74
54
1
54
54
DST
DST
DST
MODE
1 2
DSTODO
AR TT
ASS PD MS
KM/H
LO
88:88:88
88:88
8
888
888
88
88
88
3
3
ALIGNING THE PARTIAL VALUES (TRIP)
The partial distance covered (DST) can be
modified by increasing or decreasing the
value appearing on the display. This
function can be used during competitions
to make the displayed value match the one
relating to the racetrack.
CAUTION
Do not use this function to reset the
value (DST); to reset partial values refer
to page pag. 30 (RESETTING THE
PARTIAL VALUES).
◆
Keep the centre ≈MODE∆ push button
pressed for about 3 seconds.
◆
Press the right push button to increase
the value.
◆
Press the left push button to decrease
the value.
◆
Screen (A), with the changes made, will
be displayed after about 3 seconds.
BACKLIGHTING
◆
Press right push button to enable display
backlighting, The light will be
automatically switched off after 4
seconds.
CHANGING THE BATTERY
◆
Remove headlight fairing.
◆
Loosen the 2 cross-head screws
between instrument holder and metal
plate.
◆
Disconnect the 2-way connector from
speedometer transmission unit.
◆
To remove the digital instrument from its
holder, slightly press on LCD side.
◆
Disconnect the ≈sliding shoe∆ from the
digital instrument body.
◆
Loosen the battery cover cap behind the
digital instrument.
◆
Change the "CR2032" battery.
MX125_UK.book Page 31 Wednesday, October 15, 2003 11:24 AM

use and maintenance MX 125
32
MAIN INDEPENDENT CONTROLS
CONTROLS ON THE LEFT SIDE OF THE HANDLEBAR
CAUTION
The electrical parts work only when the ignition switch is in
position “
”.
1) HIGH BEAM SIGNALLING PUSH BUTTON (
)
It makes it possible to use the high beam for signalling to
forthcoming vehicles while overtaking and in case of peril
and/or emergency.
2) COLD START LEVER ()
The starter for the cold start of the engine is operated by
rotating the lever ≈∆ anticlockwise (Pos. A).
To disconnect the starter, return the lever ≈
∆ to its initial
position.
3) DIRECTION INDICATOR SWITCH (
( )
To indicate the turn to the left, move the switch to the left; to
indicate the turn to the right, move the switch to the right.
To turn off the direction indicator, press the switch.
4) HORN PUSH BUTTON (
)
The horn is activated when the push button is pressed.
5) DIP SWITCH (
- )
When the dip switch is in the ≈
∆, position, the high beams will
come on; while when the dip switch is in the ≈
∆, position, the
low beams will come on.
2
1
4
5
3
MX125_UK.book Page 32 Wednesday, October 15, 2003 11:24 AM

33
use and maintenance MX 125
IGNITION SWITCH
The ignition switch (1) is positioned on the
upper plate of the steering column.
CAUTION
The key operates the ignition
switch/steering lock.
Two keys are supplied together with the
vehicle (one spare key).
STEERING LOCK
WARNING
Never turn the key to position "+" in
running conditions, in order to avoid
losing control of the vehicle.
OPERATION
To lock the steering:
◆
Turn the handlebar completely leftwards.
◆
Turn the key to position ≈∆.
CAUTION
Turn the key and steer the handlebar at
the same time.
◆
Press and rotate the key anticlockwise
(leftwards), steer the handlebar slowly
until the key reaches position ≈
+∆.
◆
Extract the key.
Position Function
Key
removal
+
Steering
lock
The steer-
ing is
locked.
It is neither
possible to
start the
engine, nor
to switch on
the lights.
It is possi-
ble to
remove the
key.
Neither the
engine, nor
the lights
can be
switched on.
It is possi-
ble to
remove the
key.
The engine
and the
lights can be
switched on.
It is not pos-
sible to
remove the
key.
MX125_UK.book Page 33 Wednesday, October 15, 2003 11:24 AM

use and maintenance MX 125
34
2 1
4
2 3
AUXILIARY EQUIPMENT
GLOVE/TOOL KIT COMPARTMENT
The glove/tool kit compartment is
positioned under the left side cover; to
reach it:
◆
Remove the left side cover, see pag. 58
(REMOVING THE SIDE COVERS)
◆
Turn the quick fastening screw (1) by 1/4
of a turn.
◆
Take compartment (2) out of its location.
◆
Remove the compartment lock (3) from
behind.
NOTE At reassembly, be careful to
properly fit centering pin (4).
The tool kit (2) includes:
√ n° 1 tool case
√ n° 1 4 mm bent Allen spanner
√ n° 1 5 mm bent Allen spanner
√ n° 1 6 mm bent Allen spanner
√ n° 1 8 mm bent Allen spanner
√ n° 1 7x8mm double fork spanner
√ n° 1 10x13 mm double fork spanner
√ n° 1 19 mm fork spanner
√ n° 1 21x24 mm double socket spanner
√ n° 1 cross-/cut-headed screwdriver
√ n° 1 screwdriver handle
√ n° 1 3x70 mm cross-headed screwdriver
Max. allowed weight: 1.5 kg
CRASH HELMET HOOK
Thanks to the crash helmet hook, you no
longer have to carry the crash helmet with you
every time you park the vehicle.
WARNING
Do not ride with the crash helmet
hanging from the hook, as this may
seriously compromise your safety.
To hang the crash helmet, proceed as follows:
◆
Insert the key in the lock (5).
◆
Rotate the key clockwise.
◆
Pass the crash helmet cable through the
hook (6).
◆
Rotate the key anticlockwise.
CAUTION
Make sure that you have correctly closed
the hook (6).
6
5
MX125_UK.book Page 34 Wednesday, October 15, 2003 11:24 AM

35
use and maintenance MX 125
SPECIAL TOOLS -
To perform some specific operations, it is
advisable to use the following special tools
(to be requested to an aprilia Official
Dealer).
Tool Operations Page
Square pin
spanner (3)
Rear shock ab-
sorber ring adjust-
ment.
42
Special soc-
ket spanner
(4)
Clutch clearance
adjustment.
69
MX125_UK.book Page 35 Wednesday, October 15, 2003 11:24 AM

use and maintenance MX 125
36
MAIN COMPONENTS
FUEL
WARNING
The fuel used for internal combustion
engines is extremely inflammable and
in particular conditions it can become
explosive. It is important to carry out
the refuelling and the maintenance
operations in a well-ventilated area,
with the engine off. Do not smoke while
refuelling or near fuel vapours, in any
case avoid any contact with naked
flames, sparks and any other heat
source to prevent the fuel from catching
fire or from exploding. Further, prevent
fuel from flowing out of the fuel filler, as
it could catch fire when getting in
contact with the red-hot surfaces of the
engine.
In case some fuel has accidentally been
spilt, make sure that the area has
completely dried before starting the
vehicle.
Since petrol expands under the heat of
the sun and due to the effects of sun
radiation, never fill the tank to the brim.
Screw the plug up carefully after
refuelling. Avoid any contact of the fuel
with the skin and the inhalation of
vapours; do not swallow fuel or pour it
from a receptacle into another by
means of a tube.
DO NOT DISPOSE OF FUEL
IN THE ENVIRONMENT
KEEP AWAY FROM CHILDREN
Use only unleaded petrol, in conformity
with the DIN 51607 standard, min. O.N. 95
(N.O.R.M.) and 85 (N.O.M.M.).
FUEL TANK CAPACITY
(reserve included): 11
l
TANK RESERVE: 1.3 l (mechanical
reserve)
To refuel, proceed as follows:
◆
Unscrew and remove the fuel tank plug
(1).
◆
Refuel.
TRANSMISSION OIL
Check the transmission oil level every
4000 km, see pag. 60 (CHECKING THE
TRANSMISSION OIL LEVEL AND
TOPPING UP).
Change gearbox oil at the end of the
running-in period, and then every 12,000
km, see pag. 61 (CHANGING THE
TRANSMISSION OIL).
CAUTION
Use high-quality 75W-90 oil, see pag. 88
(LUBRICANT CHART).
WARNING
Engine oil can cause serious damage to
the skin if handled every day and for
long periods.
Wash your hands carefully after using
the oil.
Do not dispose of the oil in the
environment.
Put it in a sealed container and take it to
the filling station where you usually buy
it or to an oil salvage center.
In case any maintenance operation has
to be carried out, it is advisable to use
latex gloves.
MX125_UK.book Page 36 Wednesday, October 15, 2003 11:24 AM

37
use and maintenance MX 125
2 STROKE OIL TANK
Top up the 2 stroke oil tank every 500 km.
The vehicle is provided with a separate
mixer that ensures the mixing of petrol
and oil for the engine lubrication, see
pag. 88 (LUBRICANT CHART).
The 2 stroke oil reserve is indicated by the
coming on of the 2 stroke oil reserve
warning light ≈
∆ positioned on the
dashboard, see pag. 15 (INSTRUMENTS
AND INDICATORS).
WARNING
The use of the vehicle without 2 stroke
oil seriously damages the engine.
If you run out of oil in the 2 stroke oil
tank or if the 2 stroke oil pipe has been
removed, contact an aprilia Official
Dealer, who will provide for bleeding the
system.
This operation is indispensable, since
the running of the engine with air in the
2 stroke oil system may result in
serious damage to the engine.
To introduce the 2 stroke oil in the tank,
proceed as follows:
◆
Remove the right side cover, see pag. 58
(REMOVING THE SIDE COVERS).
◆
Remove the plug (1).
TANK CAPACITY
(reserve included): 1.25
l
TANK RESERVE: 0.5 l
WARNING
Carefully wash your hands after
handling the oil.
Do not dispose of the 2 stroke oil in the
environment.
KEEP AWAY FROM CHILDREN
MX125_UK.book Page 37 Wednesday, October 15, 2003 11:24 AM

use and maintenance MX 125
38
BRAKE FLUID - recommendations
CAUTION
This vehicle is provided with front and
rear disc brakes, with separate
hydraulic circuits.
The following information refers to a
single braking system, but is valid for
both.
WARNING
Sudden resistance or clearance
problems on the brake lever may be due
to troubles in the hydraulic system.
For any doubt regarding the perfect
functioning of the braking system and
in case you are not able to carry out the
usual checking operations, contact
your aprilia Official Dealer .
WARNING
Make sure that the brake discs are
neither oily nor greasy, especially after
maintenance or checking operations.
Check that the brake cables are neither
twisted nor worn out.
Prevent water or dust from accidentally
getting into the circuit.
In case maintenance operations are to
be performed on the hydraulic circuit, it
is advisable to use latex gloves.
If the brake fluid gets in contact with the
skin or the eyes, it can cause serious
irritations.
Carefully wash the parts of your body
that get in contact with the liquid.
Consult a doctor or an oculist if the
liquid gets in contact with your eyes.
Do not dispose of the brake fluid in the
environment.
KEEP AWAY FROM CHILDREN
WARNING
When using the brake fluid, take care
not to spill it on the plastic or painted
parts, since it damages them
irreparably.
DISC BRAKES
WARNING
The brakes are the parts that most
ensure your safety and for this reason
they must always be perfectly working;
check them before every trip.
The brake fluid must be changed once a
year by an aprilia Official Dealer .
Use brake fluid of the type specified in
the lubricant chart, see pag. 88
(LUBRICANT CHART).
When the disc pads wear out, the level of
the fluid inside the reservoir decreases to
automatically compensate for their wear.
The front brake reservoir is positioned near
the front brake lever coupling.
The rear brake reservoir is positioned on
the right side of the vehicle, before the air
filter casing.
Periodically check the brake fluid level in
the tanks, see pag. 39 (FRONT BRAKE),
pag. 40 (REAR BRAKE) and the wear of
the pads, see pag. 70 (CHECKING THE
BRAKE PAD WEAR).
MX125_UK.book Page 38 Wednesday, October 15, 2003 11:24 AM

39
use and maintenance MX 125
FRONT BRAKE
Carefully read pag. 38 (BRAKE FLUID -
recommendations) and (DISC BRAKES).
CHECKING
CAUTION
Position the vehicle on firm and flat
ground.
To check the brake fluid level, proceed as
follows:
◆
Position the vehicle on the stand.
◆
Rotate the handlebar leftwards, so that
the fluid contained in the reservoir (1) is
parallel to the ≈MIN∆ mark stamped on
the glass (2).
◆
Make sure that the level of the brake fluid
contained in the tank exceeds the ≈MIN∆
mark stamped on the glass (2).
◆
If not, provide for topping up.
TOPPING UP
WARNING
The brake fluid may flow out of the
reservoir. Do not operate the brake
lever if the screws (3) are loose or, most
important, if the brake fluid tank cover
has been removed.
◆
Unscrew the two screws (3).
◆
Remove the cover (4).
WARNING
In order not to spill the brake fluid while
topping up, keep the fluid in the
reservoir parallel to the reservoir rim.
◆
Remove the gasket (5).
◆
Fill the tank with brake fluid, see pag. 88
(LUBRICANT CHART), until it covers the
glass completely.
◆
Put back the gasket (5) in its seat
correctly.
◆
Put back the cover (4).
◆
Screw and tighten the two screws (3).
WARNING
Check the braking efficiency. If
necessary, contact your aprilia
Official Dealer.
In case of excessive movement of the
brake lever, of excessive elasticity or in
case there is air in the circuit, contact
your aprilia Official Dealer, since it may
be necessary to bleed the system.
MX125_UK.book Page 39 Wednesday, October 15, 2003 11:24 AM

use and maintenance MX 125
40
REAR BRAKE
Carefully read pag. 38 (BRAKE FLUID -
recommendations) and (DISC BRAKES).
CHECKING
CAUTION
Position the vehicle on firm and flat
ground.
◆
Keep the vehicle in vertical position, so
that the fluid contained in the tank (1) is
parallel to the plug (2).
◆
Make sure that the fluid level exceeds
the "MIN" mark.
◆
If the fluid does not reach the "MIN"
mark, provide for topping up.
TOPPING UP
WARNING
The brake fluid may flow out of the tank.
Do not operate the rear brake lever if the
brake fluid tank plug is loose or has
been removed.
◆
Loosen retaining screw (3), and remove
brake reservoir, but leave it connected to
the rear brake system line.
◆
Unscrew and remove the plug (2).
CAUTION
In order not to spill the brake fluid while
topping up, keep the fluid in the tank
parallel to the tank rim (in horizontal
position).
◆
Remove the gasket (4).
◆
By means of a syringe, top up the brake
fluid reservoir (1), see pag. 88
(LUBRICANT CHART) until reaching the
≈MAX∆ mark.
◆
Take care to correctly position gasket
(4), and refit plug (2).
◆
Secure rear brake system reservoir in
place with retaining screw (3). Do not
forget to fit also the relevant washer.
WARNING
Check the braking efficiency. If
necessary, contact your aprilia Official
Dealer .
In case of excessive stroke of the brake
lever, of excessive elasticity or in case
there is air in the circuit, contact your
aprilia Official Dealer , since it may be
necessary to bleed the system.
3
2
1
4
2
1
MX125_UK.book Page 40 Wednesday, October 15, 2003 11:24 AM

41
use and maintenance MX 125
ADJUSTING
THE REAR BRAKE LEVER HEIGHT
The brake lever is installed in ergonomic
position on assembly of the vehicle.
If necessary, it is possible to adjust the
brake lever height, by proceeding as
follows:
◆
Loosen the lock nut (1).
◆
Unscrew the brake adjuster (2) completely.
◆
Screw the lock nut (3) completely on the
pump control rod (4).
◆
Screw the pump control rod (4)
completely, then unscrew it by giving 3-4
turns.
◆
Unscrew the brake adjuster (2) and
move the brake lever (5) to the desired
height.
◆
Lock the brake adjuster (2) by means of
the lock nut (1).
◆
Unscrew the pump control rod (4) and
bring it in contact with the pump piston.
◆
Screw the rod in order to ensure a
minimum clearance of 0.5÷ 1 mm
between the pump control rod (4) and
the pump piston.
WARNING
Ensure that there is some play between
the master cylinder actuating rod (4)
and piston, or the brake will drag,
leading to early wear of friction
elements.
Play between master cylinder actuating
rod and piston: 0.5 ÷ 1 mm.
◆
Lock the pump control rod by means of
the lock nut (3).
WARNING
Check the braking efficiency.
If necessary, contact an aprilia Official
Dealer .
After the adjustment, make sure that the
wheel rotates freely with released
brake.
MX125_UK.book Page 41 Wednesday, October 15, 2003 11:24 AM

use and maintenance MX 125
42
ADJUSTING THE CLUTCH
Adjust the clutch and if the engine stops or
tends to advance when the clutch lever is
pulled and the gears are engaged, or if the
clutch slips causing a delay in the acceleration
in comparison with the engine speed. Minor
adjustments can be carried out by means of
the adjuster (1):
◆
Withdraw the protection element (2).
◆
Loosen the nut (3) (by screwing it).
◆
Rotate the adjuster (1), until the idle
stroke at the end of the clutch lever is
about 10…15 mm (see figure).
◆
Tighten the nut (3) (by unscrewing it) and
lock the adjuster (1).
◆
Check the idle stroke at the end of the
clutch lever.
◆
Put back the protection element (2).
If the adjuster (1) is completely screwed or
unscrewed, or if it is not possible to obtain
the correct idle stroke:
◆
Withdraw the protection element (2).
◆
Tighten the nut (3) completely on the
adjuster (1).
◆
Tighten the adjuster (1) completely.
◆
Unscrew and remove the plug (4) by means
of a cut-headed screwdriver (or a coin).
CAUTION
The special spanner (5) is available at
any aprilia Official Dealer .
◆
Insert the special spanner (5) and loosen
the inner nut (6).
◆
Insert a cut-headed screwdriver (7) in the
special spanner (5) and tighten the
adjusting screw (8) completely.
◆
Loosen the adjusting screw (8) by giving
it half a turn, which corresponds to 3…4
mm of the lever (9) stroke.
◆
Keep the adjusting screw (8) locked by
means of the screwdriver (7), act on the
special spanner (5) and tighten the inner
nut (6).
◆
Tighten the plug (4) again.
◆
Check the idle stroke at the end of the
clutch lever (10…15 mm).
◆
Start the engine.
◆
Operate the clutch completely and and
engage the 1st gear. Make sure that the
engine does not stop, that the vehicle
does not tend to advance or that the
clutch does not slip during the
acceleration phase or while the vehicle is
running.
WARNING
If it is not possible to obtain a correct
adjustment or if the clutch does not
function properly, contact your aprilia
Official Dealer .
CAUTION
Make sure that the clutch cable is
intact: it must not present flattened
parts and the sheath must not be worn
out in any point.
◆
Periodically lubricate the clutch cable
with a suitable lubricant, see pag. 88
(LUBRICANT CHART), in order to avoid
its untimely wear and corrosion.
10÷15 mm10÷15 mm
MX125_UK.book Page 42 Wednesday, October 15, 2003 11:24 AM

43
use and maintenance MX 125
TYRES
This vehicle is provided with tyres with
inner tube.
WARNING
Periodically check the tyre inflation
pressure at room temperature, see
pag. 85 (TECHNICAL DATA).
If the tyres are hot, the measurement is
not correct.
Carry out the measurement especially
before and after long rides.
If the inflation pressure is too high, the
ground unevenness cannot be
dampened and is therefore transmitted
to the handlebar, thus compromising
the driving comfort and reducing the
road holding during turns.
If, on the contrary, the inflation pressure
is too low, the tyre sides are under
greater stress and the tyre itself may
slip on the rim or it may become loose,
with consequent loss of control of the
vehicle.
In case of sudden braking the tyres
could even get out of the rims.
Further, the vehicle could skid while
turning.
Check the surface and the wear of the
tyres, since tyres in bad conditions can
impair both the grip and the
controllability of the vehicle.
Change the tyre when it is worn out or
in case of puncture on the tread side, if
the puncture is larger than 5 mm.
After repairing a tyre, have the wheels
balanced. Use only tyres in the size
suggested by aprilia, see pag. 85
(TECHNICAL DATA).
Make sure that the tyres always have
their valve sealing caps on, to prevent
them from suddenly going flat.
Change, repair, maintenance and
balancing operations are very important
and should be carried out by qualified
technicians with appropriate tools.
For this reason, it is advisable to have
the above mentioned operations carried
out by an aprilia Official Dealer or by a
qualified tyre repairer.
If the tyres are new, they may still be
covered with a slippery film: drive
carefully for the first miles.
Do not oil the tyres with unsuitable
fluids.
If the tyres are old, even if not
completely worn out, they may become
hard and may not ensure good road
holding.
In this case, replace them.
MX125_UK.book Page 43 Wednesday, October 15, 2003 11:24 AM

use and maintenance MX 125
44
1
COOLANT
WARNING
Do not use the vehicle if the coolant is
below the minimum prescribed level.
NOTE Perform the maintenance
operations with half the frequency
indicated if the vehicle is used in rainy or
dusty areas, on uneven surfaces or on
racetracks.
Before departure, check the coolant level,
see pag. 45 (CHECKING AND TOPPING
UP); have the coolant changed every two
years: for this operation, contact an aprilia
Official Dealer.
WARNING
The coolant is noxious: do not swallow
it; if the coolant gets in contact with the
skin or the eyes, it can cause serious
irritations.
If the coolant gets in contact with your
skin or eyes, rinse with plenty of water
and consult a doctor. If it is swallowed,
induce vomit, rinse mouth and throat
with plenty of water and consult a
doctor without delay.
KEEP AWAY FROM CHILDREN.
WARNING
Be careful not to spill the coolant on the
red-hot parts of the engine: it may catch
fire and send out invisible flames.
In case maintenance operations are to
be performed, it is advisable to use
latex gloves.
Have the coolant changed by an aprilia
Official Dealer .
The coolant is made up of 50% water and
50% antifreeze.
This mixture is ideal for most running
temperatures and ensures good protection
against corrosion.
Ii is advisable to keep the same mixture
also in the hot season, since in this way
losses due to evaporation are reduced and
it is not necessary to top up very
frequently.
The mineral salt deposits left in the radiator
by evaporated water are thus reduced and
the efficiency of the cooling system
remains unchanged.
If the outdoor temperature is below 0°,
check the cooling circuit frequently and if
necessary increase the antifreeze
concentration (up to maximum 60%).
For the cooling solution use distilled water,
in order not to damage the engine.
WARNING
Do not remove the radiator cap (1) when
the engine is hot, since the coolant is
under pressure and its temperature is
high.
MX125_UK.book Page 44 Wednesday, October 15, 2003 11:24 AM

45
use and maintenance MX 125
CHECKING AND TOPPING UP
WARNING
Check the coolant level and top up the
expansion tank with cold engine.
◆
Stop the engine and wait until it has
cooled down.
CAUTION
Position the vehicle on firm and flat
ground.
◆
Keep the vehicle in vertical position, with
the two wheels resting on the ground.
◆
Rotate the radiator cap (1) anticlockwise,
giving it one click.
◆
Wait for a few seconds, in order to permit
the bleeding of any pressure present in
the system.
◆
Rotate the radiator cap (1) anticlockwise
again and remove it.
◆
Check if the coolant covers the radiator
plates completely.
◆
If necessary, top up with coolant, see
pag. 88 (LUBRICANT CHART), until
covering the radiator plates completely.
WARNING
Do not exceed this level, otherwise the
fluid will flow out of the tank when the
engine is running.
WARNING
The coolant is noxious: do not swallow
it; if the coolant gets in contact with the
skin or the eyes, it can cause serious
irritations.
Do not use your fingers or any other
object to check if there is enough
coolant.
CAUTION
Do not put additives or other subtances
into the fluid.
If you use a funnel or other similar
items, make sure that they are perfectly
clean.
◆
Put back the radiator cap (1).
WARNING
In case of excessive consumption of
coolant and in case the tank remains
empty, make sure that there are no
leaks in the circuit.
Have it repaired by an aprilia Official
Dealer.
1
MX125_UK.book Page 45 Wednesday, October 15, 2003 11:24 AM

use and maintenance MX 125
46
SILENCER
WARNING
Do not park the vehicle close to dry
underbrush or within children’s reach
as the catalytic muffler reaches very
high temperatures during use. Take
thus special care and avoid any kind of
contact before it has completely cooled
down.
The vehicle is equipped with a silencer with
ìbivalent rhodium-platinumî metal catalytic
muffler.
This device provides for the oxidation of
the CO (carbon monoxide) and of the HC
(unburned hydrocarbons) contained in the
exhaust gases, changing them into carbon
dioxide and steam, respectively.
Due to the catalytic reaction, the high
temperature reached by the exhaust gases
makes for the burning of the oil particles,
thus keeping the silencer clean and
eliminating the exhaust fumes.
To have the catalytic converter function
correctly and for long and to reduce
possible problems regarding the soiling of
the thermal unit and of the exhaust, it is
necessary to avoid covering long distances
with the engine running at constantly low
rpm.
It is sufficient to alternate these periods
with periods in which the engine runs at
relatively high rpm, even if only for a few
seconds, but rather frequently.
What has been stated above assumes
particular importance for the cold starting
of the engine: in this case, in order to reach
a rpm regime sufficient to enable the
≈priming∆ of the catalytic reaction, just
make sure that the temperature of the
thermal unit has reached at least 50°C,
which generally occurs a few seconds after
starting the engine.
WARNING
Do not use leaded petrol, since it
causes the destruction of the catalytic
converter.
MX125_UK.book Page 46 Wednesday, October 15, 2003 11:24 AM

47
use and maintenance MX 125
INSTRUCTIONS FOR USE
WARNING
Before departure, always carry out a
preliminary checking of the vehicle to
make sure that it functions correctly
and safely, see the following table
(PRELIMINARY CHECKING
OPERATIONS). The non-performance of
these checking operations can cause
severe personal injuries or damages to
the vehicle.
Do not hesitate to consult your aprilia
Official Dealer in case there is
something you do not understand
about the functioning of some controls
or in case you suspect or discover
some irregularities.
It does not take long to carry out a
check-up and this operation ensures
you much more safety.
PRELIMINARY CHECKING OPERATIONS
Component Check Page
Front and rear disc
brakes
Check the functioning, the idle stroke of the control levers,
the fluid level and make sure there are no leaks. Check
the wear of the pads. If necessary, top up the fluid tank.
38-39-
40-70
Accelerator Make sure that it works smoothly and that it is possible to
open and close it completely, in all steering positions.
If necessary, adjust and/or lubricate it.
71
2 stroke oil/
transmission oil
Check and/or top up if necessary.
36-37-
60-61
Wheel/tyres Check the tyre surface, the inflation pressure, wear and
tear and any damage.
43
Brake levers Make sure that they work smoothly. If necessary, lubricate
the articulations and adjust the stroke.
39-40
Clutch The idle stroke at the end of the clutch lever must be
about 10 mm; the clutch must operate without jerking
and/or slipping.
42
Steering Make sure that the steering rotates smoothly, without any
clearance or slackening.
ƒ
Side stand and center
stand
Make sure that it works smoothly and that the spring ten-
sion brings it back to its normal position. If necessary,
lubricate joints and hinges.
77
Fastening elements Make sure that the fastening elements are not loose.
If necessary, adjust or tighten them.
ƒ
Drive chain Check the slack.
66-67
Fuel tank Check the fuel level and top up, if necessary. Make sure
there are no leaks or air bubbles in the circuit.
36-82
Coolant Check level
44-45
Lights, warning lights,
horn and electric
devices
Check the proper functioning of the acoustic and visual
devices. Change the bulbs or intervene in case of failure.
78…81
MX125_UK.book Page 47 Wednesday, October 15, 2003 11:24 AM

use and maintenance MX 125
48
STARTING
WARNING
Do not position any object inside the
front part of the fairing (between the
handlebar and the dashboard), in order
not to hinder the rotation of the
handlebar and visibility toward the
dashboard.
NOTE Before starting the engine,
carefully read chapter ≈safe drive∆, see p. 5
(SAFE DRIVE).
WARNING
Exhaust gases contain carbon
monoxide, which is extremely noxious
if inhaled. Avoid starting the engine in
closed or badly-ventilated rooms.
The non-observance of this warning
may cause loss of consciousness or
even lead to death by asphyxia.
◆
Position the vehicle on the stand.
◆
Move to the left side of the vehicle.
Or:
◆
Let the stand up.
◆
Get on the vehicle.
Then:
◆
Rotate the fuel tap lever (1) to position
≈ON∆.
◆
Make sure that the dimmer switch (2) is
in position ≈
∆.
◆
Rotate the key (3) and move the ignition
switch to position ≈
∆.
At this point:
√ the red 2 stroke oil reserve warning
light ≈
∆ comes on on the dashboard,
see and 15 (INSTRUMENTS AND
INDICATORS).
◆
Lock the front wheel, by pulling the front
brake lever (4).
◆
Position the shifting lever (5) in neutral
(green warning light ≈
∆ on).
◆
If the vehicle is started with cold engine,
rotate the cold start lever ≈
∆ (6)
anticlockwise (Pos. A).
◆
Rotate the start pedal (7) outwards.
WARNING
Do not press the start pedal when the
engine is running.
◆
Press the start pedal (7) with energy and
release it immediately. If necessary,
repeat this operation until the engine
starts.
◆
Keep the front brake lever (4) pulled and
do not accelerate until you start.
6
2
3
4
MX125_UK.book Page 48 Wednesday, October 15, 2003 11:24 AM

49
use and maintenance MX 125
WARNING
Never leave abruptly with cold engine.
To reduce the emission of polluting
substances and the consumption of
fuel, warm the engine up by proceeding
at low speed for the first miles.
◆
After warming up the engine, rotate the
cold start lever ≈
∆ (6) clockwise (Pos.
B).
Starting with flooded engine
If the starting is not carried out properly, or
if there is too much fuel in the intake
ducts, the engine may get flooded.
To clean a flooded engine:
◆
Carry out the first twelve operations
described for the starting procedure.
◆
Rotate the throttle grip (8) completely
(Pos. C).
WARNING
Do not press the start pedal when the
engine is running.
◆
Press the start pedal (7) with energy a
few times and release it immediately.
Starting with cold engine
When the room temperature is low (near
or below 0°C), it may be difficult to start
the engine at the first attempt.
In this case:
◆
Rotate the cold start lever ≈∆ (6)
anticlockwise (Pos. A).
WARNING
Do not press the start pedal when the
engine is running.
◆
Slightly rotate the throttle grip (8) and at
the same time press the start pedal (7)
with energy a few times, releasing it
immediately afterwards.
If the engine starts
◆
Release the throttle grip (8).
◆
Rotate the cold start lever ≈∆ (6)
clockwise (Pos. B).
If the idling is unstable, twist the throttle
grip (8) slightly and frequently.
If the engine does not start
Wait for a few seconds and then repeat the
starting procedure.
STARTING AFTER A LONG PERIOD
OF INACTIVITY
After a long period of inactivity, push the
start pedal (7) with energy for a few times
without accelerating, in order to ensure
the filling of the fuel circuit.
To start the engine, slightly open the
throttle and carry out the starting
procedure.
7
5
8
MX125_UK.book Page 49 Wednesday, October 15, 2003 11:24 AM

use and maintenance MX 125
50
DEPARTURE AND DRIVE
WARNING
Do not position any object inside the
front part of the fairing (between the
handlebar and the dashboard), in order
not to hinder the rotation of the
handlebar and visibility toward the
dashboard.
NOTE Before starting the engine,
carefully read chapter ≈safe drive∆, see p. 5
(SAFE DRIVE).
If you run out of the "standard" fuel quantity
while riding, move the fuel tap lever (1) to
position "RES", in order to use the fuel
reserve.
Fuel reserve: 1.3
l
(mechanical reserve).
CAUTION
Refuel as soon as possible, see pag. 36
(FUEL).
WARNING
If you drive without passenger, make sure
that the passenger footrests are folded.
While riding, keep your hands on the grips
and your feet on the footrests.
NEVER RIDE IN ANY POSITION OTHER
THAN THOSE INDICATED.
If you drive with a passenger, instruct
him/her so that he/she does not create
problems during manouvres.
To leave:
◆
Adjust the inclination of the rear-view
mirrors correctly.
WARNING
With the vehicle at rest, try to get
acquainted with the use of the rear-view
mirrors.
◆
Start the engine, see pag. 48
(STARTING).
◆
Ride at reduced speed for the first miles,
in order to warm the engine up.
◆
With released throttle grip (2) (Pos. A)
and engine idling, pull the clutch lever (3)
completely.
◆
Engage the first gear, by pressing the
shifting lever (4) downwards.
◆
Release the brake lever (pulled on the
starting).
WARNING
On departure, the abrupt release of the
clutch lever may cause the engine to
stall or the vehicle to jerk forwards.
Never accelerate abruptly or
excessively when releasing the clutch
lever, in order to prevent the clutch
from "slipping" (slow release) or the
front wheel from raising “rearing up”
(quick release).
◆
Slowly release the clutch lever (3) and at
the same time accelerate by rotating the
throttle grip moderately (2) (Pos. B).
The vehicle will start moving.
WARNING
Do not exceed the recommended rpm
and speeds, see p. 37 (RUNNING-IN).
◆
Increase the speed by gradually rotating
the throttle grip (2) (Pos. B), without
exceeding the max. speed (and the
recommended rpm) in each gear, see
pag. 53 (RUNNING-IN).
MX125_UK.book Page 50 Wednesday, October 15, 2003 11:24 AM

51
use and maintenance MX 125
To engage the second gear:
WARNING
Proceed quickly.
Never ride the vehicle at too low rpm.
◆
Release the throttle grip (2) (Pos. A),
pull the clutch lever (3) and lift the
shifting lever (4). Release the clutch
lever (3) and accelerate.
◆
Repeat the last two operations and shift
up.
The downshifting should be carried out in
the following situations:
◆
When riding downhill or when braking, in
order to increase the braking action by
using the compression of the engine.
◆
When riding uphill, if the gear engaged is
not suitable to the speed (high gear,
moderate speed) and the engine rpm
decreases.
WARNING
Shift the gears one by one; the
simultaneous downshifting of more
than one gear may make you exceed the
maximum rpm (red line).
Before and during the downshifting,
release the throttle grip and decelerate,
in order to avoid the "red line".
To shift down, proceed as follows:
◆
Release the throttle grip (2) (Pos. A).
◆
If necessary, pull the brake levers
moderately and decrease the speed of
the vehicle.
◆
Pull the clutch lever (3) and lower the
shifting lever (4) to shift down.
◆
If the brake levers are pulled, release
them.
◆
Release the clutch lever and accelerate
moderately.
WARNING
If the 2 stroke oil reserve warning light
"
" comes on while the engine is
running, this means that the 2 stroke oil
reserve is being used; in this case, top
up the 2 stroke oil tank, see pag. 37 (2
STROKE OIL TANK).
MX125_UK.book Page 51 Wednesday, October 15, 2003 11:24 AM

use and maintenance MX 125
52
WARNING
Avoid opening and closing the throttle
grip repeatedly and continuously, so
that you do not accidentally lose control
of the vehicle.
If you have to brake, close the throttle
and put on both brakes in order to
obtain uniform deceleration, properly
exerting pressure on the braking parts.
By putting on the front brake only or the
rear brake only, you reduce the braking
force considerably, thus running the
risk of locking one wheel and
consequently losing grip.
If you stop uphill, decelerate completely
and use the brakes only to keep the
vehicle steady.
The use of the engine to keep the
vehicle steady may cause the
overheating of the clutch.
WARNING
Before beginning to turn, slow down or
brake driving at moderate and constant
speed or accelerating slightly; avoid
braking at the last moment: it would be
very easy to skid.
If the brakes are operated continuously
on downhill stretches, the friction
surfaces may overheat, thus reducing
the braking efficiency.
Exploit the engine compression and
shift down by putting on both brakes
intermittently.
Never drive downhill with the engine
off!
WARNING
Pay the utmost attention to any
obstacle or variation of the ground.
Uneven roads, rails, manhole covers,
indications painted on the road surface,
building site metal plates become rather
slippery by rain. For this reason all
these obstacles have to be carefully
avoided, driving smoothly and bending
the vehicle as little as possible.
Always use the turn indicators in time
when you intend to change lane or
direction, avoiding sharp and
dangerous movements.
Switch off the direction indicators as
soon as you have changed direction.
Be extremely careful when you overtake
other vehicles or are overtaken.
In case of rain, the water cloud created
by big vehicles reduces visibility; the
air shift may make you lose control of
the vehicle.
MX125_UK.book Page 52 Wednesday, October 15, 2003 11:24 AM

53
use and maintenance MX 125
RUNNING-IN
The running-in of the engine is important to
ensure its correct functioning.
If possible, drive on hilly roads and/or
roads with many bends, so that the engine,
the suspensions and the brakes undergo a
more effective running-in.
During running-in, change speed. In this
way the components are first ≈loaded∆ and
then ≈relieved∆ and the engine parts can
thus cool down.
Even if it is important to stress the engine
components during running-in, take care
not to exceed.
CAUTION
Only after the first 1500 km of running-
in you can expect the best performance
levels from the vehicle.
Keep to the following indications:
◆
Do not open the throttle completely if the
speed is low, both during and after the
running-in.
◆
During the first 100 km put on the brakes
with caution, avoiding sharp and
prolonged brakings.
This ensures a correct bedding-in of the
pads on the brake disc.
◆
During the first 800 km, never open
throttles more than half their way.
WARNING
After the first 1000 km, carry out the
checking operations indicated in the
column "After running-in" of the
REGULAR SERVICE INTERVALS
CHART, see pag. 56 (REGULAR
SERVICE INTERVALS CHART), in order
to avoid hurting yourself or other
people and/or damaging the vehicle.
◆
Between the first 800 and 1,500 km ride
the vehicle more lively, change speed
and fully open throttles just for a few
seconds so as to allow parts better
coupling. Do not open throttles more
than 3/4 of their way.
◆
After the first 1,500 km you can expect
better performance from the engine.
However, do not exceed the max.
speeds indicated in the table and the
engine max. rpm.
STOPPING
WARNING
If possible, avoid stopping abruptly,
slowing down suddenly and braking at
the last moment.
◆
Release the throttle grip (1) (Pos. A),
gradually put on the brakes and at the
same time shift down in order to
decrease the speed, see pag. 50
(DEPARTURE AND DRIVE).
Once the speed has decreased, before
stopping the vehicle:
◆
Pull the clutch lever (2) in order to
prevent the stopping of the engine.
When the vehicle has come to rest:
◆
Position the shifting lever in neutral
(green warning light "
" on).
◆
Release the clutch lever (2).
◆
In case of a brief stop, keep at least one
brake on.
Throttles max. opening
during running-in
Mileage km Throttles opening
0…800 1/2
800…1,500 3/4
oltre 1,500 4/4
MX125_UK.book Page 53 Wednesday, October 15, 2003 11:24 AM

use and maintenance MX 125
54
PARKING
WARNING
Park the vehicle on firm and flat ground,
to prevent it from falling down. Neither
lean the vehicle against walls, nor lay it
on the ground. Make sure that the
vehicle and especially its red-hot parts
do not represent a danger for persons
and children. Do not leave the vehicle
unattended when the engine is on or the
key is inserted into the ignition switch.
Do not sit on the vehicle when the stand
is down.
◆
Stop the vehicle, see pag. 53
(STOPPING).
◆
Rotate the key (1) and move the ignition
switch (2) to position "
".
◆
Move the fuel tap lever (3) to position
"OFF".
◆
Position the vehicle on the stand, see
pag. 54 (POSITIONING THE VEHICLE
ON THE STAND).
WARNING
Never leave the key in the ignition
switch.
◆
Lock the steering, see pag. 33
(STEERING LOCK) and extract the key.
POSITIONING THE VEHICLE
ON THE STAND
Carefully read beside (PARKING).
◆
Grasp the left grip (4) and the passenger
grab rail (5).
◆
Press the side stand with your right foot
and extend it completely (6).
◆
Incline the vehicle until the stand rests
on the ground.
CAUTION
Make sure that the vehicle is stable.
SUGGESTIONS
TO PREVENT THEFT
NEVER leave the ignition key inserted and
always use the steering lock.
Park the vehicle in a safe place, possibly in
a garage or a protected place.
Make sure that all documents are in order
and that the road tax has been paid
Write down your personal data and
telephone number in this page, to facilitate
the identification of the owner in case of
finding after theft.
SURNAME:................................................
NAME:........................................................
ADDRESS:.................................................
...................................................................
TELEPHONE NO.:.....................................
CAUTION
Very often stolen vehicles are identified
thanks to the data written in the
use/maintenance manual.
MX125_UK.book Page 54 Wednesday, October 15, 2003 11:24 AM

55
use and maintenance MX 125
MAINTENANCE
WARNING
Risk of fire.
Keep fuel and other flammable
substances away from the electrical
components.
Before beginning any service
operations or inspection of the vehicle,
switch off the engine and remove the
key, wait until the engine and the
exhaust system have cooled down and,
if possible, lift the vehicles with the
proper equipment onto firm and flat
ground.
Before proceeding, make sure that the
room in which you are working is
properly ventilated.
Keep away from the red-hot parts of the
engine and of the exhaust system, in
order to avoid burns.
CAUTION
Do not hold any mechanical piece or
other parts of the vehicle with your
mouth: the components are not edible
and some of them are noxious or even
toxic.
If not expressly indicated otherwise, for
the reassembly of the units repeat the
disassembly operations in reverse
order.
In case any maintenance operation
should be required, it is advisable to
use latex gloves.
Routine maintenance operations can
usually be carried out by the user, but
sometimes specific tools and specific
technical skills may be required.
In case periodic maintenance operations,
assistance or technical advice are needed,
contact an Concessionario Ufficiale aprilia,
who will ensure you prompt and accurate
servicing.
Ask your Concessionario Ufficiale aprilia to
test the vehicle on the road after a repair or
periodic maintenance operation.
In any case, personally carry out the
≈Preliminary checking operations∆ after any
maintenance operation, see p. pag. 47
(PRELIMINARY CHECKING
OPERATIONS)
MX125_UK.book Page 55 Wednesday, October 15, 2003 11:24 AM

use and maintenance MX 125
56
REGULAR SERVICE INTERVALS
CHART
OPERATIONS TO BE CARRIED OUT BY
THE aprilia Official Dealer (WHICH CAN
BE CARRIED OUT EVEN BY THE USER).
Key
c = check and clean, adjust, lubricate or
change, if necessary;
d = clean;
e = change;
f = adjust.
(*) = Use grease MOLYCOTE 6 Rapidplus
NOTE Perform the maintenance
operations with doubled frequency if the
vehicle is used in rainy or dusty areas, on
uneven surfaces or on racetracks.
Component
Post running in
(after 1 month)
or 1000 Km
(625 mi)
Every 12
months or
4000 Km
(2500 mi)
Every 24
months or
8000 Km
(5000 mi)
Battery / terminals tightening cc -
Spark plug dde
Air cleaner cd -
Clutch clearance ff -
Light system cc -
Brake fluid - c -
Coolant every 3 months: c
2 stroke oil level Check before each ride: c
Transmission oil ecevery 12000 Km
(7500 mi): É
Headlamp beam setting √ operation - c -
Start lever pin
-
c Lubricate with
water-repellent
grease (*)
-
Engine idling rpm fc -
Wheels/tyres and inflation pressure every month: c
Drive chain tension and lubrication every month: c
Front and rear brake pads wear c every month: c
MX125_UK.book Page 56 Wednesday, October 15, 2003 11:24 AM

57
use and maintenance MX 125
OPERATIONS TO BE CARRIED OUT BY
THE aprilia Official Dealer.
Key
c = check and clean, adjust, lubricate or
change, if necessary (according to
workshop manual specifications);
d = clean;
e = change;
f = adjust.
NOTE Perform the maintenance
operations with doubled frequency if the
vehicle is used in rainy or dusty areas, on
uneven surfaces or on racetracks.
Component
Post running in
(after 1 month)
or 1000 Km
(625 mi)
Every 12
months or
4000 Km
(2500 mi)
Every 24
months or
8000 Km
(5000 mi)
Rear shock absorber - - c
Carburettor - - d
Transmission cables and controls cc -
RAVE control unit c - f
Wheels balancing - c -
Steering stem bearing and steering play cc -
Wheel bearings - c -
Brake discs cc -
Mixer oil filter - - d
Vehicle general operation cc -
Braking systems cc -
Cooling system cc -
Brake fluid every year: e
Coolant every 2 years: e
Muffler/exhaust silencer -
c -
Fork oil and oil seal every 2 years: e
Piston and piston rings every 2 years: c / every 4 years: e
2 stroke oil pump and air bleeding c - f
Fuel cock cc -
Wheels/tyres and inflation pressure cc -
Nut, bolt, screw tightening cc -
Battery terminals tightening cc -
2 stroke oil reserve warning light cc -
Final tension (chain, front and rear sprockets) -
c -
Fuel line - c every 4 years: e
Brake hose - c every 4 years: e
Mixer oil line - c every 4 years: e
Clutch wear - c -
Exhaust valve cd + f every 4 years: e
MX125_UK.book Page 57 Wednesday, October 15, 2003 11:24 AM

use and maintenance MX 125
58
IDENTIFICATION DATA
It is a good rule to write down the frame
and engine numbers in the space provided
in this manual.
The frame number can be used for the
purchase of spare parts.
CAUTION
Do not alter the identification numbers
if you do not want to incur severe penal
and administrative sanctions. In
particular, the alteration of the frame
number results in the immediate
invalidity of the guarantee.
ENGINE NUMBER
The engine number (1) is stamped on the
right side of the engine casing base.
Engine no.
FRAME NUMBER
The frame number is stamped on the right
side of the steering column.
Frame no.
REMOVING THE SIDE COVERS
Carefully read pag. 55 (MAINTENANCE).
◆
Position the vehicle on the stand.
CAUTION
The description of the following
operations refers to one side cover, but
it is valid for both.
◆
Rotate the quick fastening screw (3)
anticlockwise by giving it 1/4 turn.
WARNING
Proceed with care.
Do not damage the tangs and/or their
seats.
Handle the plastic components with
care and avoid scraping or damaging
them.
◆
Withdraw and remove the side cover (4).
4
3
MX125_UK.book Page 58 Wednesday, October 15, 2003 11:24 AM

59
use and maintenance MX 125
AIR CLEANER
WARNING
Do not use petrol or inflammable
solvents to wash the air cleaner, in
order to avoid fires or explosions.
Carefully read pag. 55 (MAINTENANCE).
Check the conditions of the air cleaner and
clean it monthly or every 4000 km,
depending on the conditions in which the
vehicle is used. If the vehicle is used on
dusty or wet roads, the cleaning operations
and any replacement should be carried out
more frequently. Before the cleaning
operation, it is necessary to remove the air
cleaner from the vehicle.
REMOVAL
◆
Remove the right side cover, see pag. 58
(REMOVING THE SIDE COVERS).
◆
Unscrew and remove the three screws
(1) and take the relevant washers.
◆
Remove the filter casing cover (2).
CAUTION
Clean the inside of the filter casing before
withdrawing the filtering element, in order
to prevent dust and foreign matters from
entering the suction manifold.
◆
Clean the inside of the filter casing and
of the filter casing cover (2) with a cloth.
◆
Withdraw the filtering element (3)
complete with the grids (4) and (5).
CLEANING
WARNING
In order not to deform the grids, DO
NOT force their sides.
◆
Grasp the central part of both grids (4)
and (5), pull and separate them.
◆
Release the filtering element (3) from the
grid (4).
◆
Clean the filtering element (3) with clean,
non-inflammable solvents or solvents with
high volatility point, then let it dry thoroughly.
◆
Apply a filter oil or a thick oil (SAE 80W-
90) on the whole surface of the filtering
element, then squeeze it to eliminate the
oil in excess.
CAUTION
The filtering element (3) must be well
impregnated, though not dripping.
CHANGE
◆
Replace the filtering element (3) with a
new one of the same type.
◆
Check the condition of the gasket (8); if it
is damaged, change it.
Upon reassembly:
CAUTION
Be careful to the shape of the filtering
element and the grids: they must coincide.
◆
Correctly introduce the filtering element
(3) in the two pins (6).
◆
Position the grid (5).
◆
Push both grids in correspondence with
the pins (6).
CAUTION
The two protruding elements (7) avoid the
incorrect insertion of the filtering element
in the filter casing.
◆
Introduce the filtering element, complete
with grids, in the filter casing guides.
MX125_UK.book Page 59 Wednesday, October 15, 2003 11:24 AM

use and maintenance MX 125
60
CHECKING THE TRANSMISSION
OIL LEVEL AND TOPPING UP
Carefully read pag. 36 (TRANSMISSION
OIL) and pag. 55 (MAINTENANCE).
Check gearbox oil level every 4000 km.
Change gearbox oil at the end of the
running in period and every 12000 km
afterwards, see pag. 61 (CHANGING THE
TRANSMISSION OIL).
CHECKING
CAUTION
Position the vehicle on firm and flat
ground.
◆
Stop the engine and let it cool down for
at least ten minutes, in order to allow the
oil to flow back to the oil pan and to cool
down.
◆
Keep the vehicle in vertical position, with
the two wheels resting on the ground.
CAUTION
The non-performance of the operations
described above may result in a wrong
measurement of the level.
◆
Make sure that oil level (1) is above one
fourth of the level (MIN).
CAUTION
The oil level must neither exceed a half
of the height of the glass, nor fall below
one fourth. In the first case the excess
oil would flow out of the oil pan; in the
second case the engine may get
seriously damaged.
TOPPING UP
If it were necessary to top up, proceed as
follows:
◆
Unscrew and remove the filling cap (2).
◆
Pour a small quantity of oil see pag. 88
(LUBRICANT CHART), and wait for
about one minute to allow the oil to
evenly flow inside the casing.
◆
Make sure that oil level (1) is above one
fourth of the level (MIN).
◆
If the oil level is below the specified limit,
top up again with small amounts of oil,
and then check oil level again through
sight glass (1).
◆
Once finished, screw and tighten filler
cap (2) .
WARNING
Tighten the filling cap thoroughly and
make sure that there are no oil leaks.
Periodically check that there are no
leaks in correspondence with the oil
pan cover seal.
Do not use the vehicle with insufficient
lubrication or with contaminated or
unsuitable lubricants, since this would
accelerate the wear of the moving parts
and may also cause irreparable failures.
2
1
MX125_UK.book Page 60 Wednesday, October 15, 2003 11:24 AM

61
use and maintenance MX 125
CHANGING
THE TRANSMISSION OIL
Carefully read pag. 36 (TRANSMISSION
OIL) and pag. 55 (MAINTENANCE).
Check gearbox oil level every 4000 km.
Change gearbox oil at the end of the
running in period and every 12000 km
afterwards, see pag. 61 (CHANGING THE
TRANSMISSION OIL).
To change the oil, proceed as follows:
◆
Drive for a few miles, until the engine
reaches the normal running temperature.
CAUTION
Position the vehicle on firm and flat
ground.
◆
Stop the engine and let it cool down for at
least ten minutes, in order to allow the oil to
flow back to the oil pan and to cool down.
WARNING
When warmed up, the engine contains
hot oil; therefore, while carrying out the
operations described here below be
particularly careful, in order to avoid
burns.
◆
Position the vehicle on the stand.
◆
Put a container (1) with at least 600 cm>
capacity in correspondence with the drain
plug (2).
◆
Unscrew and remove the drain plug (2).
◆
Unscrew and remove the filling plug (3).
◆
Drain the oil and let it drip into the container
(1) for a few minutes.
◆
Remove the metal residues from the drain
plug (2) magnet.
◆
Check and if necessary replace the
sealing washer of the drain plug (2).
Change the sealing washer of the drain
plug (2) every 12000 km (or every
second engine oil change).
◆
Screw and tighten the drain plug (2).
Drain plug (2) driving torque:
27 Nm (2,7 kgm).
◆
Pour about 550 cm> of transmission oil
through the filling opening (3), see
pag. 88 (LUBRICANT CHART).
◆
Tighten the filling plug (3).
◆
Start the engine, see pag. 48
(STARTING) and let it idle for about one
minute, in order to ensure the filling up of
the transmission oil circuit.
Check the oil level and top up if necessary,
see pag. 60 (CHECKING THE
TRANSMISSION OIL LEVEL AND
TOPPING UP).
WARNING
Tighten the filling cap thoroughly and
make sure that there are no oil leaks.
Periodically check that there are no
leaks in correspondence with the oil
pan cover seal.
Do not use the vehicle with insufficient
lubrication or with contaminated or
unsuitable lubricants, since this would
accelerate the wear of the moving parts
and may also cause irreparable failures.
MX125_UK.book Page 61 Wednesday, October 15, 2003 11:24 AM

use and maintenance MX 125
62
FRONT WHEEL
WARNING
The disassembly and reassembly of the
front wheel may be difficult for unskilled
operators. If necessary, contact an
aprilia Official Dealer.
If you want to perform these operations
personally, keep to the following
instructions.
Carefully read pag. 55 (MAINTENANCE).
While disassembling and reassembling
the wheel, be careful not to damage the
brake pipe, the disc and the pads.
Before performing the operations
described here below, let the engine
and the silencer cool down until they
reach room temperature, in order to
avoid burns.
DISASSEMBLY
◆
Position the vehicle on the stand.
WARNING
Due to the weight and dimensions of
the vehicle, the following operation
cannot be performed by one person
only.
Proceed with care and make sure that
you can support the weight of the
vehicle.
CAUTION
Weight of the vehicle (ready for
starting): 126 kg.
◆
Raise the front part of the vehicle and have
a suitable support (1) (the weight of which
should be about 400 mm) placed under the
engine, so that the front wheel can rotate
freely and the vehicle cannot fall down.
WARNING
The vehicle may fall down.
Provide for balancing the vehicle, in
order to prevent it from falling down.
◆
Position and secure a weight of about 40
kg to rear end to support vehicle front
end.
WARNING
Make sure that the vehicle is stable.
◆
Put a support (2) under the tyre, in such
a way as to keep the wheel in its position
after loosening it.
◆
Have the handlebar held still in driving
position, so that the steering is locked.
◆
Loosen the two screws (3) of the wheel
pin clamp.
◆
Unscrew the wheel pin (4) completely.
CAUTION
To facilitate the extraction of the wheel
pin, slightly lift the wheel.
◆
Support the front wheel and manually
withdraw the wheel pin (4).
5
MX125_UK.book Page 62 Wednesday, October 15, 2003 11:24 AM

63
use and maintenance MX 125
CAUTION
Check spacer (5) direction so as not to
mismatch it at reassembly.
◆
Remove the wheel and carefully
withdraw the disc from the brake caliper.
◆
Take the spacer ring (5).
WARNING
Never pull the front brake lever after
removing the wheel, otherwise the
caliper pistons may go out of their
seats, thus causing the outflow of the
brake fluid. In this case consult your
aprilia Official Dealer, who will carry
out the proper maintenance operation.
REASSEMBLY
Carefully read pag. 55 (MAINTENANCE).
WARNING
While reassembling the wheel, be
careful not to damage the brake pipe,
the disc and the pads.
◆
Position the wheel between the fork
rods, on the support (2), without fitting
the disc in the brake caliper.
CAUTION
Moderately grease the outer seats of the
wheel hub.
◆
Insert the shorter diameter of the spacer
ring (5) in the wheel hub seat (left side in
the travelling direction).
CAUTION
When fitting the disc in the brake
caliper, proceed with care.
◆
Move the wheel and carefully fit the disc
in the brake caliper.
CAUTION
Uniformly apply a moderate quantity of
grease on the wheel pin.
◆
Partially insert the wheel pin (4) from the
right side of the vehicle (travelling
direction).
◆
Thrust the wheel pin and at the same
time move the wheel (in such a way as to
align the pin axes and the wheel), until
introducing the wheel pin completely.
◆
Screw and tighten the wheel pin (4).
Wheel pin (4) driving torque:
80 Nm (8 kgm).
WARNING
Due to the weight and dimensions of
the vehicle, the following operation
cannot be performed by one person
only.
Proceed with care and make sure that
you can support the weight of the
vehicle.
CAUTION
Weight of the vehicle (ready for
starting): 126 kg.
◆
Raise the front part of the vehicle and
remove the support positioned under the
engine during disassembly.
◆
Lower the vehicle and position it on the
stand.
◆
With pulled front brake lever, press the
handlebar repeatedly, thrusting the fork
downwards. In this way the fork rods will
settle properly.
◆
Tighten the two wheel pin clamp screws
(3).
Wheel pin clamp screw (3) driving
torque: 10 Nm (1 kgm).
WARNING
After reassembly, pull the front brake
lever repeatedly and check the correct
functioning of the braking system.
Check the wheel centering.
Have the driving torques, centering and
balancing of the wheel checked by your
aprilia Official Dealer, in order to avoid
accidents that may be harmful for you
and/or other people.
MX125_UK.book Page 63 Wednesday, October 15, 2003 11:24 AM

use and maintenance MX 125
64
REAR WHEEL
WARNING
The disassembly and reassembly of the
rear wheel may be difficult for unskilled
operators. If necessary, contact an
aprilia Official Dealer.
If you want to perform these operations
personally, keep to the following
instructions.
Carefully read pag. 55 (MAINTENANCE).
Before carrying out the following
operations, let the engine and the
silencer cool down until they reach
room temperature, in order to avoid
burns.
While disassembling and reassembling
the wheel, be careful not to damage the
brake pipe, the disc and the pads.
WARNING
For the disassembly and reassembly,
use gloves in order to protect your
hands and fingers properly.
Riding with damaged rims may be
dangerous for the rider, other persons
and the vehicle.
Check the conditions of the wheel rim
and change it if it is damaged.
DISASSEMBLY
◆
Position the vehicle on the stand.
◆
Loosen and remove the two screws (1).
◆
Remove the chain casing (2).
◆
Loosen the wheel nut (3) .
Wheel nut (3) driving torque:
100 Nm (10 kgm).
WARNING
Upon reassembly, before tightening the
wheel nut (3), check the chain tension,
see pag. 66 (DRIVE CHAIN).
Due to the weight and dimensions of
the vehicle, the following operation
cannot be performed by one person
only.
Proceed with care and make sure that
you can support the weight of the
vehicle.
CAUTION
Weight of the vehicle (ready for
starting): 126 kg.
◆
Raise the rear part of the vehicle, have a
suitable support (4) (the height of which
should be 400 mm) placed under the
engine, so that the rear wheel can rotate
freely and the vehicle cannot fall down.
8
3
7
6 9
2
1 1
4 5
MX125_UK.book Page 64 Wednesday, October 15, 2003 11:24 AM

65
use and maintenance MX 125
WARNING
The vehicle may fall down.
Provide for balancing the vehicle, in
order to prevent it from falling down.
Make sure that the vehicle is stable.
◆
Place a support (5) under the tyre, in such
a way as to keep the wheel in the correct
position after releasing it.
CAUTION
Lower the drive chain (6) outside the
crown gear (7).
WARNING
Do not introduce your fingers between
the chain and the crown gear.
◆
Move the wheel completely forward;
release the drive chain from above,
rotating the rear wheel anticlockwise.
CAUTION
Upon reassembly, introduce the drive
chain from below, rotating the rear
wheel in the travelling direction.
◆
Unscrew and remove the wheel nut (3)
and take the washer (8).
CAUTION
To facilitate the extraction of the wheel
pin, slightly raise the wheel.
◆
Hold the rear wheel and manually
withdraw the wheel pin (9).
CAUTION
The left (10) and right spacer rings (11)
remain positioned in the respective
seats on the wheel; if they should come
off, reposition them correctly (see
REASSEMBLY).
◆
Withdraw the wheel from the rear fork
from behind, carefully withdrawing the
disc from the brake caliper.
WARNING
Never pull the rear brake lever after
removing the wheel, otherwise the
caliper piston may go out of its seat,
thus causing the outflow of the brake
fluid. In this case consult your aprilia
Official Dealer, who will carry out the
proper maintenance operation.
CAUTION
Left (10) and right (11) spacers remain
into their seats on the wheels; if they
come off, reposition them correctly (see
REASSEMBLY).
◆
Take the left spacer ring (10).
◆
Take the right spacer ring (11).
Upon reassembly:
◆
Moderately grease the outer seats of the
wheel hub.
◆
Fit the spacer rings (10) (11) with the
longer diameter towards the outside of
the vehicle.
◆
Uniformly apply a moderate quantity of
grease on the wheel pin.
WARNING
After reassembly, pull the rear brake
lever repeatedly and check the correct
functioning of the braking system.
Check the wheel centering.
Have the driving torques, centering and
balancing of the wheel checked by your
aprilia Official Dealer, in order to avoid
accidents that may be harmful for you
and/or other people.
Check chain tension.
11
10
MX125_UK.book Page 65 Wednesday, October 15, 2003 11:24 AM

use and maintenance MX 125
66
DRIVE CHAIN
Carefully read pag. 55 (MAINTENANCE).
The vehicle is equipped with a chain with
ring link joint.
In case of disassembly and reassembly of
the chain, make sure that the clip (1) of the
ring link joint has its open side opposite the
travelling direction (see figure).
WARNING
An excessive slackening of the chain
can cause it to come off of the
sprockets, which often results in
accidents or serious damage to the
vehicle. Periodically check the slack
and adjust it if necessary, see pag. 67
(ADJUSTMENT).
To change the chain, contact an
Concessionario Ufficiale aprilia, who
will ensure you prompt and accurate
servicing.
WARNING
Incorrect maintenance may cause the
untimely wear of the chain and/or
damages to the pinion and/or the
crown.
Carry out the maintenance operations
more frequently if you use the vehicle in
difficult conditions or on dusty and/or
muddy roads.
CHECKING THE SLACK
To check the slack, proceed as follows:
◆
Stop the engine.
◆
Position the vehicle on the stand.
◆
Position the shifting lever in neutral.
◆
Make sure that the vertical oscillation, in
an intermediate point between pinion
and crown in the lower part of the chain,
is about 30 ÷ 35 mm.
◆
Move the vehicle forwards, or turn the
wheel, in order to be able to check the
vertical oscillation of the chain even
when the wheel turns; the slack must be
constant in all the rotation phases of the
wheel.
WARNING
If in some positions the slack is higher
than in others, this means that there are
crushed or seized links; in this case,
contact an aprilia Official Dealer.
To prevent the risk of seizures, lubricate
the chain frequently, see pag. 67
(LUBRICATION AND CLEANING).
If the slack is uniform, but higher or lower
than 30 ÷ 35 mm, adjust it, see pag. 67
(ADJUSTMENT).
54
1
2
MX125_UK.book Page 66 Wednesday, October 15, 2003 11:24 AM

67
use and maintenance MX 125
ADJUSTMENT
If after the check it is necessary to adjust
the chain tension, proceed as follows:
◆
Raise vehicle on stand.
◆
Fully loosen nut (1).
NOTE Some fixed reference marks (2-
3), positioned inside the chain tensioner
sliding shoes on the swinging arms on
wheel shaft front side, are used for wheel
truing up.
◆
Loosen the two check nuts (4).
◆
Turn adjusters (5) to set chain play,
making sure that the same reference
marks (2-3) are matching on both sides
of the vehicle.
◆
Tighten the two check nuts (4).
◆
Tighten nut (1).
Wheel nut (1) tightening torque:
100 Nm (10 kgm).
◆
Check chain play pag. 66 (CHECKING
THE SLACK).
CHECKING THE WEAR OF CHAIN,
PINION AND CROWN
Further, check the chain and sprockets
and make sure that they do not present:
◆
Damaged rollers.
◆
Loose pins.
◆
Dry, rusty, crushed or seized links.
◆
Excessive wear.
◆
Lacking O rings.
◆
Sprocket or teeth excessively worn or
damaged.
WARNING
If the chain rollers are damaged, the
pins are loose and/or the O rings are
damaged or lacking, it is necessary to
change the whole chain unit (both
sprockets and chain).
◆
Check the wear of U-shaped chain guide
(6)and of the chain tightening roller (7).
◆
Finally, check the wear of the rear fork
protection shoe.
WARNING
Lubricate the chain frequently,
especially if there are dry or rusty parts.
The crushed or seized links must be
lubricated and made work again.
If this is not possible, contact an aprilia
Official Dealer, who will provide for
changing the chain.
LUBRICATION AND CLEANING
WARNING
Carry out the adjustment, lubrication,
cleaning and change of the chain with
great care.
Lubricate the chain every 500 km or
whenever necessary.
Lubricate the chain with spray grease for
chains only, see pag. 88 (LUBRICANT
CHART).
Never wash the chain with water jets,
steam jets, high-pressure water jets and
highly inflammable solvents.
3 5 4
MX125_UK.book Page 67 Wednesday, October 15, 2003 11:24 AM

use and maintenance MX 125
68
INSPECTING THE FRONT
AND REAR SUSPENSIONS
WARNING
Have the front fork oil changed by an
aprilia Official Dealer, who will ensure
you prompt and accurate servicing.
Carefully read pag. 55 (MAINTENANCE).
Change front fork oil every 15,000 km or
every 2 years.
Check the oil every 8000 km and change it
if it is dirty.
Change the fork oil more frequently if the
vehicle is used on dusty or wet roads or off
road.
Further, carry out the following checking
operations:
◆
With pulled front brake lever, press the
handlebar repeatedly, thrusting the fork
downwards.
The stroke must be gentle and there
must be no trace of oil on the rods.
◆
Check the fastening of all the
components and the functionality of the
front and rear suspension joints.
WARNING
If you notice irregularities in the
operation or if the help of a qualified
technician is necessary, contact your
aprilia Official Dealer.
MX125_UK.book Page 68 Wednesday, October 15, 2003 11:24 AM

69
use and maintenance MX 125
REAR SUSPENSION
The rear suspension consists of a spring-
shock absorber unit, fixed to the frame by
means of silent-blocks and to the rear fork
by means of lever systems.
To change vehicle trim, set spring preload
(A) as follows: loosen the lockring (2) and
turn the adjusting ring (1)
Standard setting: 245 mm.
Max. pre-load: 240 mm.
ADJUSTING THE REAR SHOCK
ABSORBER PRELOAD
The standard setting of the rear shock
absorber is such as to satisfy most driving
conditions at low and high speed, either
with reduced load and full load.
However, it is also possible to adjust the
setting according to the intended use of the
vehicle.
◆
Slightly unscrew the locking ring nut (2) by
means of the appropriate spanner (3)
-.
◆
Act on the adjusting ring nut (1) (shock
absorber spring preload adjustment)
(see figure).
◆
Once the optimal attitude has been
obtained, tighten the locking ring nut (2)
completely.
Adjusting
ring nut
(1)
By
screwing
it
By
unscrewing
it
Function Spring
preload
increase
Spring
preload
decrease
Attitude The vehicle
is more rigid
The vehicle
is less rigid
Recommended
kind of road
Smooth or
normal roads
Roads with
uneven
surface
Notes Rider and
passenger
Solo rider
A
MX125_UK.book Page 69 Wednesday, October 15, 2003 11:24 AM

use and maintenance MX 125
70
CHECKING THE BRAKE PAD WEAR
Carefully read pag. 38 (BRAKE FLUID -
recommendations), pag. 38 (DISC
BRAKES) and pag. 55 (MAINTENANCE).
The following information refer to a
single braking system, but are valid for
both.
Check brake pads wear at the end of the
running-in period or after the first 1,000 km,
and then every 4,000 km.
The wear is greater when the vehicle is
used on dusty or wet roads and off road
WARNING
Check the brake pads before every trip.
To carry out a rapid checking of the wear of
the pads, proceed as follows:
◆
Position the vehicle on the stand.
◆
Carry out a visual checking between the
brake caliper and the pads.Proceed:
√ from the front upper part for the front
brake caliper (1);
√ from the rear upper part for the rear
brake caliper (2).
◆
If the thickness of the friction material
(even of one pad only) has reduced to
about 1 mm, replace both pads.
WARNING
Have the pads changed by your aprilia
Official Dealer.
ADJUSTING THE COLD START
CONTROL (
)
Leggere attentamente Carefully read
pag. 55 (MAINTENANCE).
The ideal slack of the cold start control
should be about 2 … 3 mm.
To adjust the slack, proceed as follows:
◆
Position the vehicle on the stand.
◆
Move to the left side of the vehicle.
CAUTION
DO NOT withdraw the accelera-tor cable
protection element (3).
◆
Withdraw the protection element (4).
◆
Loosen the nut (5)(by screwing it).
◆
Act on the adjuster (6) positioned on the
carburettor.
After the adjustment:
◆
Tighten the nut (5) (by turning it
anticlockwise), thus locking the adjuster (6)
and put back the protection element (4).
MX125_UK.book Page 70 Wednesday, October 15, 2003 11:24 AM

71
use and maintenance MX 125
IDLING ADJUSTMENT
Carefully read pag. 55 (MAINTENANCE).
Adjust idle speed at the end of running-in
period and, anyway, whenever necessary.
To carry out this operation, proceed as
follows:
◆
Drive for a few miles until the engine
reaches the normal running temperature,
then stop the engine.
◆
Position the vehicle on the stand.
CAUTION
Work on the right side of the vehicle.
◆
Connect an electronic revolution counter
to the spark plug cable.
◆
Start the engine.
The minimum speed of the engine (idling)
must be about 1500 ± 100 rpm.
If necessary:
◆
Act on the adjusting screw (1) positioned
on the carburettor.
By SCREWING IT (clockwise), you
increase the engine rpm.
By UNSCREWING IT (anticlockwise), you
decrease the engine rpm.
◆
Twist the throttle grip, accelerating and
decelerating a few times to make sure
that it functions correctly and to check if
the idling speed is constant.
CAUTION
Do not act on the air adjusting screw, to
avoid variations of the carburation
setting.
WARNING
If necessary, contact your aprilia Official
Dealer.
ADJUSTING
THE ACCELERATOR CONTROL
Carefully read pag. 55 (MAINTENANCE).
The ideal slack of the accelerator control
should be about 2-3 mm.
To adjust the slack, proceed as follows:
◆
Position the vehicle on the stand.
◆
Remove the protection element (2).
◆
Loosen the nut (3) (by turning it
clockwise).
◆
Act on the adjuster (4), positioned at the
beginning of the accelerator control
cable.
After the adjustment:
◆
Tighten the nut (3) (by turning it
anticlockwise), thus locking the adjuster
(4) and put back the protection element
(2).
MX125_UK.book Page 71 Wednesday, October 15, 2003 11:24 AM

use and maintenance MX 125
72
SPARK PLUG
Carefully read pag. 55 (MAINTENANCE).
Check spark plug wear at the end of the
running-in period, and then every 4,000
km. Change it every 8,000 km.
Periodically remove the spark plug and
clean it carefully, removing carbon
deposits; change it if necessary.
To reach the spark plug:
◆
Position the vehicle on the stand.
CAUTION
Work on the right side of the vehicle.
To remove and clean the spark plug:
◆
Take off the spark plug cap (1).
◆
Remove all the dirt from the base of the
spark plug, then unscrew it with the
spanner you will find in the tool kit and
extract it from its seat, taking care that
neither dust nor other substances enter
the cylinder.
◆
Make sure that there are neither carbon
deposits, nor corrosion marks on the
electrode and on the central porcelain
part; if necessary, clean them with the
special cleaners for spark plugs, with an
iron wire and/ or a metal brush.
◆
Energetically blow some air, in order to
prevent the removed residues from
getting into the engine.
If the spark plug has crackings on the
insulating material, corroded electrodes
or excessive deposits, it must be
changed.
◆
Check the spark plug gap with a
thickness gauge.
The gap must be 0.5÷0.6 mm, if
necessary adjust it, carefully bending the
earth electrode.
◆
Make sure that the washer is in good
conditions. With the washer on, screw
the spark plug by hand in order not to
damage the thread.
◆
Tighten the spark plug by means of the
spanner you will find in the tool kit, giving
it half a turn to compress the washer.
Spark plug driving torque:
20 Nm (2 kgm).
WARNING
The spark plug must be well tightened,
otherwise the engine may overheat and
be seriously damaged.
Use the recommended type of spark
plug only, see pag. 85 (TECHNICAL
DATA), in order not to compromise the
life and performance of the engine.
◆
Position the spark plug cap (1) correctly,
so that it does not come off due to the
engine vibrations.
MX125_UK.book Page 72 Wednesday, October 15, 2003 11:24 AM

73
use and maintenance MX 125
BATTERY
Carefully read pag. 55 (MAINTENANCE).
Check electrolyte level and battery
terminals tightening at the end of the
running-in period, and then every 4,000 km
or 6 months.
WARNING
The electrolyte in the battery is toxic
and caustic and if it gets in contact with
the skin it can cause burns, since it
contains sulphuric acid.
Wear protection clothes, a face mask
and/or goggles during maintenance
operations.
In case of contact with the skin, rinse
with plenty of water.
In case of contact with the eyes, rinse
with plenty of water for 15 minutes, then
consult an oculist without delay.
If the electrolyte is accidentally
swallowed, drink a lot of water or milk,
then continue drinking milk of
magnesia or vegetable oil and consult a
doctor without delay.
The battery gives off explosive gases;
keep it away from flames, sparks,
cigarettes and any other source of heat.
During the recharging or the use, make
sure that the room is properly ventilated
and avoid inhaling the gases released
during the recharging.
KEEP AWAY FROM CHILDREN
WARNING
Never invert the connection of the
battery cables.
Do not incline the vehicle too much, in
order to avoid dangerous leaks of the
battery fluid.
Connect and disconnect the battery
with the ignition switch in position “”.
Connect first the positive cable (+) and
then the negative cable (–).
Disconnect following the reverse order.
The electrolyte is corrosive.
Do not pour or spill it, especially on the
plastic parts.
LONG INACTIVITY
OF THE BATTERY
If the vehicle remains unused for a long
period:
◆
Remove the battery, see pag. 74
(REMOVING THE BATTERY) and put it
in a cool and dry place.
◆
Recharge it completely, by using a trickle
charge, see pag. 75 (RECHARGING
THE BATTERY).
If the battery remains on the vehicle,
disconnect the cables from the terminals.
It is important to check the charge
periodically (about once a month), during
the winter or when the vehicle remains
unused, in order to prevent the
deterioration of the battery.
MX125_UK.book Page 73 Wednesday, October 15, 2003 11:24 AM

use and maintenance MX 125
74
CHECKING AND CLEANING
THE TERMINALS
Carefully read p. 73 (BATTERY).
◆
Remove the left side cover, see pag. 58
(REMOVING THE SIDE COVERS).
◆
Make sure that the cable terminals (1)
and the battery terminals (2) are:
√ in good conditions (and not corroded
or covered with deposits);
√ covered with special grease or
Vaseline.
If necessary:
◆
Remove the battery, see beside
(REMOVING THE BATTERY).
◆
Eliminate any sign of corrosion with a
wire brush.
◆
Reconnect first the positive (+) and then
the negative cable (√).
◆
Cover the terminals with special grease
or Vaseline.
◆
Reinstall the battery, see p. 57
(INSTALLING THE BATTERY).
REMOVING THE BATTERY
Carefully read p. 73 (BATTERY).
◆
Make sure that the ignition switch is in
position ≈
∆.
◆
Remove the left side cover, see pag. 58
(REMOVING THE SIDE COVERS).
◆
Unscrew and remove the screw (3) from
the negative terminal (√).
◆
Move the negative cable (√) (4) sidewards.
◆
Unscrew and remove the screw (5).
◆
Remove the cover (6).
◆
Partially remove the battery from its
compartment.
◆
Unscrew and remove the screw (7) from
the positive terminal (+).
◆
Move the positive cable (+) (8) sidewards.
◆
Withdraw the breather pipe(9).
WARNING
Once it has been removed, the battery
must be stored in a safe place and kept
away from children.
◆
Remove the battery from its compartment
and put it on a flat surface, in a cool and
dry place.
MX125_UK.book Page 74 Wednesday, October 15, 2003 11:24 AM

75
use and maintenance MX 125
CHECKING
THE ELECTROLYTE LEVEL
Carefully read pag. 73 (BATTERY).
CAUTION
Position the vehicle on firm and flat
ground.
◆
Remove the left side cover, see pag. 58
(REMOVING THE SIDE COVERS).
◆
Keep the vehicle in vertical position, with
the two wheels resting on the ground.
CAUTION
Failure to perform the operations
described above may lead to the wrong
measurement of the level.
◆
Make sure that the fluid level is included
between the two ≈MIN∆ and ≈ MAX∆
notches stamped on the battery side.
Otherwise:
◆
Remove the battery from its
compartment, see pag. 74 (REMOVING
THE BATTERY).
◆
Unscrew and remove the element plugs.
WARNING
Top up with distilled water only. Do not
exceed the “MAX” mark, since the
electrolyte level increases during the
recharge.
◆
Top up by adding distilled water.
RECHARGING THE BATTERY
Carefully read pag. 73 (BATTERY).
◆
Remove the battery from its
compartment, see pag. 74 (REMOVING
THE BATTERY).
◆
Unscrew and remove the element plugs.
◆
Check the electrolyte level, vedi sopra
(CHECKING THE ELECTROLYTE
LEVEL).
◆
Connect the battery with a battery
charger.
◆
A recharge with an amperage equal to
1/10th of the battery capacity is
recommended.
◆
After the recharging operation, check the
electrolyte level again and if necessary
top up with distilled water.
◆
Replace the element plugs.
WARNING
Reinstall the battery only 5-10 minutes
after disconnecting the recharge
equipment, since the battery keeps
sending out extremely inflammable
hydrogen gas for a short lapse of time.
INSTALLING THE BATTERY
Carefully read pag. 73 (BATTERY).
◆
Connect the breather pipe (1).
WARNING
Always connect the battery breather
pipe, to prevent the sulphuric acid
vapours from corroding the electric
system, painted parts, rubber elements
or gaskets when they exit the breather
pipe itself.
◆
Connect, in order, the positive (+) and
negative (√) cable.
◆
Cover the terminals with special grease
or Vaseline.
◆
Put the battery in its container.
◆
Put back the cover (2).
◆
Screw and tighten the screw (3).
◆
Put back the left side cover, see pag. 58
(REMOVING THE SIDE COVERS).
MX125_UK.book Page 75 Wednesday, October 15, 2003 11:24 AM

use and maintenance MX 125
76
CHANGING THE FUSES
Carefully read pag. 55 (MAINTENANCE).
WARNING
Do not repair faulty fuses.
Never use fuses different from the
recommended ones.
The use of unsuitable fuses may cause
damages to the electric system or, in
case of short circuit, even a fire.
CAUTION
If a fuse blows frequently, there
probably is a short circuit or an
overload in the electric system. In this
case it is advisable to consult an
aprilia Official Dealer.
If an electric component does not work or
works irregularly, or if the vehicle fails to
start, it is necessary to check the fuses.
For the checking, proceed as follows:
◆
Turn the ignition switch to position "",
to avoid any accidental short circuit.
◆
Remove the left side cover, see pag. 58
(REMOVING THE SIDE COVERS).
◆
Extract the fuses one by one and check if
the filament (7) is broken.
◆
Before replacing a fuse, try to find out the
cause of the trouble, if possible.
◆
Replace the damaged fuse with a new
one having the same amperage.
CAUTION
If you use one of the spare fuses (4) (5)
(6), put a new fuse in the proper seat.
ARRANGEMENT OF THE FUSES
20A fuse (1)
From the battery to: ignition switch, voltage
regulator.
15A fuse (2)
From the ignition switch to: all light loads
and horn.
7,5A fuse (3)
From ignition switch to: ignition.
MX125_UK.book Page 76 Wednesday, October 15, 2003 11:24 AM

77
use and maintenance MX 125
CHECKING THE SIDE STAND
AND THE SAFETY SWITCH
CAUTION
The vehicle is equipped with automatic
folding stand.
Carefully read pag. 55 (MAINTENANCE)
and pag. 77 (CHECKING THE
SWITCHES).
The side stand (1) must rotate without
hindrances.
Carry out the following checks:
◆
The springs (2) must not be damaged,
worn, rusty or weakened.
◆
The side stand must rotate freely, if
necessary grease the joint, see pag. 88
(LUBRICANT CHART).
CHECKING THE SWITCHES
Carefully read pag. 55 (MAINTENANCE).
The vehicle is fitted with two switches:
◆
Stoplight switch (1) on the rear brake
control lever.
◆
Stoplight switch (2) on the front brake
control lever.
Checking:
◆
Switches (1) and (2): withdraw the
protection element.
◆
Make sure that there are neither dirt, nor
mud deposits on the switch.
◆
Make sure that the cables are connected
correctly.
MX125_UK.book Page 77 Wednesday, October 15, 2003 11:24 AM

use and maintenance MX 125
78
ADJUSTING THE VERTICAL
HEADLIGHT BEAM
To rapidly check the correct direction of the
beam, place the vehicle on flat ground, 10 m
away from a wall.
Turn on the low beam, sit on the vehicle
and make sure that the beam projected on
the wall is slightly under the horizontal line
of the headlight (about 9/10th of the total
height).
To adjust the headlight beam:
◆
Act on the suitable screw (1) by means
of a screwdriver.
By TURNING IT CLOCKWISE, you set
the beam upwards.
By TURNING IT ANTICLOCKWISE, you
set the beam downwards.
BULBS
Carefully read pag. 55 (MAINTENANCE).
WARNING
Before changing a bulb, position the
vehicle on the stand and move the
ignition switch to position “
”.
Change the bulb wearing clean gloves
or using a clean and dry cloth.
Do not leave fingerprints on the bulb,
since these may cause its overheating
and consequent breakage.
If you touch the bulb with bare hands,
remove any fingerprint with alcohol, in
order to prevent it from blowing
frequently.
DO NOT FORCE THE ELECTRIC
CABLES
MX125_UK.book Page 78 Wednesday, October 15, 2003 11:24 AM

79
use and maintenance MX 125
CHANGING
THE HEADLIGHT BULBS
Carefully read pag. 78 (BULBS).
CAUTION
Before changing a bulb, check the
fuses, see pag. 76 (CHANGING THE
FUSES).
The headlight contains:
◆
A parking light bulb (1).
◆
A low beam/high beam bulb
(halogenous) (2).
To change the bulbs, proceed as follows:
WARNING
The front part of the fairing (4), complete
with the headlight, remains connected
to the electric wires; do not pull them.
◆
Remove the two ties (3), used to secure
front fairing to frame, from forks.
WARNING
Handle the plastic components with
care and avoid scraping or damaging
them.
◆
Withdraw the front part of the fairing (4),
complete with the headlight, downwards
and disconnect it from the pin (5)
provided on the dashboard.
PARKING LIGHT BULB
CAUTION
To extract the bulb socket, do not pull
its electric wires.
◆
Grasp the bulb socket (6), pull and
disconnect it from its seat.
◆
Withdraw the parking light bulb (1) and
replace it with one of the same type.
LOW / HIGH BEAM BULB (HALOG-
ENOUS)
CAUTION
To extract the bulb electric connector,
do not pull its electric wires.
◆
Grasp the bulb electric connector (7),
pull it and disconnect it from the bulb (8).
◆
Remove housing (9) from reflector and
from bulb terminals
◆
Turn bulb holder (8) anticlockwise to
remove it from reflector
◆
Remove bulb (2) from its location
For the installation:
NOTE Insert the bulb in the bulb socket,
making the relevant positioning seats
coincide.
◆
Position bulb holder (6) into reflector and
turn it clockwise.
◆
Correctly install housing (9) inside bulb
terminals and reflector.
◆
Connect bulb (7) connector.
1
2
9
8
7
6
2
8
9
MX125_UK.book Page 79 Wednesday, October 15, 2003 11:24 AM

use and maintenance MX 125
80
CHANGING THE DASHBOARD
BULBS
Carefully read pag. 78 (BULBS).
CAUTION
Before changing a bulb, check the
fuses, see pag. 76 (CHANGING THE
FUSES).
The dashboard contains:
◆
The warning light bulbs.
◆
The dashboard lighting bulb.
To change the bulbs, proceed as
follows:
WARNING
The front part of the fairing (2), complete
with headlight, remains connected to
the electric wires; do not pull them.
◆
Unscrew and remove the two screws (1).
CAUTION
Handle the plastic components with
care and avoid scraping or damaging
them.
◆
Withdraw the front part of the fairing (2),
complete with headlight, downwards and
disconnect it from the pin (3) provided on
the dashboard.
WARNING LIGHT BULBS
WARNING
Extract the bulb sockets one by one, in
order not to position them incorrectly
upon reassembly.
◆
Extract the corresponding bulb socket:
◆
Withdraw the bulb and replace it with a
new one of the same type.
DASHBOARD LIGHTING BULB
◆
Extract the bulb socket (9).
◆
Withdraw the bulb and replace it with a
new one of the same type.
Pos. Warning light Colour
6 2 stroke oil reserve ()red
7
Direction
indicators (
()
green
8 Neutral indicator ()green
9 Low beam (
)green
10 High beam ()blue
10
9
6
7
8
MX125_UK.book Page 80 Wednesday, October 15, 2003 11:24 AM

81
use and maintenance MX 125
CHANGING THE FRONT AND REAR
DIRECTION INDICATORS
Carefully read pag. 78 (BULBS).
CAUTION
Before changing a bulb, check the
fuses, see pag. 76 (CHANGING THE
FUSES).
◆
Unscrew and remove the screw (1).
WARNING
Upon reassembly, tighten the screw (1)
carefully and moderately, in order not to
damage the protection screen.
◆
Remove the protection screen (2).
◆
Press the bulb (3) slightly and rotate it
anticlockwise.
◆
Extract the bulb from its seat.
CAUTION
Insert the bulb in the bulb socket,
making the two pins coincide with the
relevant guides on the bulb socket.
◆
Correctly install a new bulb of the same
type.
CHANGING THE REAR LIGHT
BULB
WARNING
Before changing a bulb, check the
fuses, see pag. 76 (CHANGING THE
FUSES) and the efficiency of the
stoplight switches, see pag. 77
(CHECKING THE SWITCHES).
Carefully read pag. 78 (BULBS).
◆
Unscrew and remove the two screws (4).
WARNING
Upon reassembly, tighten the two
screws (4) carefully and moderately, in
order not to damage the protection
screen.
◆
Remove the protection screen (5).
◆
Press the bulb (6) slightly and rotate it
anticlockwise.
◆
Extract the bulb from its seat.
CAUTION
Insert the bulb in the bulb socket,
making the two pins coincide with
the relevant guides on the bulb
socket.
◆
Correctly install a new bulb of the same
type.
MX125_UK.book Page 81 Wednesday, October 15, 2003 11:24 AM

use and maintenance MX 125
82
TRANSPORT
CAUTION
Before transporting the vehicle, it is
necessary to empty the fuel tank and
the carburettor carefully, see below
(DRAINING THE FUEL TANK), making
sure that they are completely dry.
During transport the vehicle must be
kept in vertical position, in order to
avoid any oil, coolant and battery fluid
leakage.
The vehicle must be firmly anchored
with the 1st gear on.
WARNING
In case of failure, do not tow the vehicle,
but have it moved by a maintenance
vehicle.
DRAINING THE FUEL TANK
Carefully read pag. 36 (FUEL).
WARNING
Risk of fire.
Wait until the engine and the exhaust
silencers have completely cooled down.
WARNING
Fuel vapours are noxious for your
health.
Before proceeding, make sure that the
room in which you are working is
properly ventilated.
Do not inhale fuel vapours.
Do not smoke, nor use free flames.
Do not dispose of fuel in the
environment.
◆
Position the vehicle on the stand.
◆
Stop the engine and wait until it has
cooled down.
◆
Prepare a container with capacity
exceeding the fuel quantity present in the
tank and put it on the ground on the left
side of the vehicle.
◆
Remove the fillercap.
◆
Empty the fuel tank by means of a
manual pump or a similar system.
WARNING
After draining the tank, tighten the
fillercap.
To drain the carburettor completely,
proceed as follows:
◆
Position the fuel tap (1) on ≈RES∆.
◆
Start the vehicle, see pag. 48
(STARTING).
◆
Accelerate a few times, until the engine
stops due to lack of fuel.
If necessary, contact an aprilia Official
Dealer.
MX125_UK.book Page 82 Wednesday, October 15, 2003 11:24 AM

83
use and maintenance MX 125
OK!
OK!
CLEANING
Clean the vehicle frequently if it used in
particular areas or conditions, such as:
◆
Polluted areas (cities and industrial
areas).
◆
Areas characterized by an high
percentage of salinity and humidity (sea
areas, hot and humid climates).
◆
Particular conditions (use of salt and
anti-ice chemical products on the roads
during the winter).
◆
Avoid leaving deposits of industrial and
polluting powders, tar spots, dead
insects, bird droppings, etc. on the body.
◆
Avoid parking the vehicle under trees,
since in some seasons residues, resins,
fruits or leaves fall down, which contain
substances that may damage the paint.
WARNING
After the vehicle has been washed, its
braking functions could be temporarily
impaired because of the presence of
water on the grip surfaces. Calculate
long braking distances to avoid
accidents. Brake repeatedly to restore
normal conditions.
Carry out the preliminary checking
operations, see p. pag. 47
(PRELIMINARY CHECKING
OPERATIONS).
To remove dirt and mud from the painted
surfaces use a low- pressure water jet,
carefully wet the dirty parts, remove mud
and filth with a soft car sponge
impregnated with a lot of water and
shampoo (2 … 4% parts of shampoo in
water).
Then rinse with plenty of water and dry with
chamois leather.
To clean the outer parts of the engine use
a degreaser, brushes and wipers.
CAUTION
Polish with silicone wax only after
having carefully washed the vehicle.
Do not wash the vehicle under the sun,
especially during the summer, when the
body is still warm, since if the shampoo
dries before being rinsed away, it can
damage the paint.
Use neither high pressure water/air jets,
nor vapour jets on the following parts:
wheel hubs, controls on the right and
on the left side of the handlebar, brake
pumps, instruments and indicators,
silencer exhaust, glove/tool kit
compartment, ignition switch/steering
lock.
CAUTION
Do not use alcohol or solvents to clean
the rubber and plastic parts and the
saddle: use water and mild soap.
Do not apply protection waxes onto the
saddle, in order not to make it too
slippery.
MX125_UK.book Page 83 Wednesday, October 15, 2003 11:24 AM

use and maintenance MX 125
84
LONG PERIODS OF INACTIVITY
After a long period of inactivity of the
vehicle some precautions are necessary to
avoid any problem.
Further, it is important to carry out the
necessary repairs and a general check up
before the period of inactivity, since you
could forget to carry them out later.
Proceed as follows:
◆
Drain the fuel tank and the carburettor
completely, see pag. 82 (DRAINING
THE FUEL TANK).
◆
Remove the spark plug, see p. 54
(SPARK PLUG).
◆
Pour a teaspoon (5 … 10 cm>) of engine
oil into the cylinder.
◆
Rotate the ignition switch (1) to position
≈
∆.
◆
Press the start lever (2) a few times, to
distribute the oil evenly on the cylinder
surfaces.
◆
Reinstall the spark plug, see pag. 72
(SPARK PLUG).
◆
Remove the battery, see pag. 74
(REMOVING THE BATTERY).
◆
Wash and dry the vehicle, see pag. 83
(CLEANING).
◆
Polish the painted surfaces with wax.
◆
Inflate the tyres, see pag. 43 (TYRES).
◆
By means of a suitable support, position
the vehicle so that both tyres are raised
from the ground.
◆
Place the vehicle in an unheated, not-
humid room, away from sunlight, with
minimum temperature variations.
◆
Cover the vehicle avoiding the use of
plastic or waterproof materials.
AFTER A PERIOD OF INACTIVITY
◆
Uncover and clean the vehicle, see
pag. 83 (CLEANING).
◆
Check the electrolyte level in the battery
and install it, see pag. 75 (CHECKING
THE ELECTROLYTE LEVEL) and
pag. 75 (INSTALLING THE BATTERY).
◆
Refill the fuel tank, see pag. 36 (FUEL).
◆
Carry out the preliminary checking
operations, see pag. 47 (PRELIMINARY
CHECKING OPERATIONS).
WARNING
Have a test ride at moderate speed in a
low-traffic area.
2
MX125_UK.book Page 84 Wednesday, October 15, 2003 11:24 AM

85
use and maintenance MX 125
TECHNICAL DATA
DIMENSIONS Max. length
(with rear mudguard extension) .................. 2165 mm
Max. width................................................... 840 mm
Max. height (front part of the fairing included) 1170 mm
Seat height.................................................. 870 mm
Distance between centres........................... 1480 mm
Min. ground clearance ................................ 290 mm
Weight ready for starting............................. 126 kg
ENGINE Type ............................................................ One-cylinder, 2-stroke with laminar suction. Separate lubrication
with variable strength automatic mixer (1.0 - 3.0 %).
Number of cylinders .................................... 1
Total displacement...................................... 124.82 cm>
Bore / stroke................................................ 54 mm / 54.5 mm
Compression ratio....................................... 12.5 ± 0.5 : 1
Starting........................................................ with pedal
Engine idling rpm ........................................ 1200 ± 100 rpm
Clutch.......................................................... multidisc in oil bath, with manual control on the left side of the hand-
lebar.
Cooling........................................................ liquid-cooled
CAPACITY Fuel (reserve included) ...............................
11
l
Fuel reserve................................................
1.3
l (mechanical reserve)
Transmission oil.......................................... 600 cm>
Coolant........................................................
0.8
l (50% water + 50% antifreeze with ethylene glycol)
2 stroke oil (reserve included).....................
1.25
l
2 stroke oil reserve......................................
0.5
l
Seats........................................................... 2
Vehicle max. load
(driver + passenger + luggage)................... 336 kg
MX125_UK.book Page 85 Wednesday, October 15, 2003 11:24 AM

use and maintenance MX 125
86
TRANSMISSION Type ............................................................. mechanical, 6 gears with foot control on the left side of the engine
GEAR RATIOS
Ratio Primary Secondary
1
st
19/63 = 1 : 3.315 10 / 30 = 1: 3.000
2
nd
14 / 29 = 1: 2.071
3
rd
17 / 27 = 1: 1.588
4
th
19 / 25 = 1: 1.316
5
th
21 / 23 = 1: 1.095
6
th
22 / 21 = 1: 0.954
Final ratio Total ratio
16 / 45 = 1 : 2.81 R1 x R2 x R3 = 1 : 27.976
R1 x R2 x R3 = 1 : 19.317
R1 x R2 x R3 = 1 : 14.81
R1 x R2 x R3 = 1 : 12.270
R1 x R2 x R3 = 1 : 10.213
R1 x R2 x R3 = 1 : 8.901
CARBURETTORS Number......................................................... 1
Model............................................................ DELL»ORTO PHBH 28
FUEL SUPPLY Fuel .............................................................. unleaded petrol according to the DIN 51607 standard, min. O.N. 95
(N.O.R.M.) and 85 (N.O.M.M.)
FRAME Type ............................................................. One-beam with two cradles in high-resistance steel tubes
Steering inclination angle ............................. 28°
Fore stroke ................................................... 127 mm
SUSPENSIONS Front............................................................. Upside down Æ40
Stroke........................................................... 260 mm
Rear.............................................................. Gas-filled monoshock
Stroke........................................................... 280 mm
BRAKES Front ............................................................. Disc brake - Æ 320 mm - with hydraulic transmission
Rear.............................................................. Disc brake - Æ 220 mm - with hydraulic transmission
WHEEL RIMS Type ............................................................. Spoke aluminium
Front............................................................. 3,00 x 17∆
Rear.............................................................. 4,25 x 17∆
MX125_UK.book Page 86 Wednesday, October 15, 2003 11:24 AM

87
use and maintenance MX 125
TYRES FRONT ........................................................ 110/70 ZR 17 54W
Inflation pressure for solo rider:
Inflation pressure for rider and passenger:
180 kPa (1,8 bar)
180 Ø 10 kPa (1,8 Ø 0,1 bar)
REAR........................................................... 150/60 ZR 17 66W
Inflation pressure for solo rider:
Inflation pressure for rider and passenger:
200 kPa (2 bar)
230 Ø 10 kPa (2,3 Ø 0,1 bar)
IGNITION Type............................................................. CDI
Spark advance............................................. 12° Ø 2° before T.D.C.
SPARK PLUG Standard ...................................................... NGK R BR8 ES
Spark plug gap............................................. 0.5…0.6 mm
ELECTRIC Battery ......................................................... 12 V - 4 Ah
SYSTEM Fuses (general)............................................ 20 A
Fuses (control unit)...................................... 15 A
Fuses (service) ............................................ 7,5 A
Generator .................................................... 12 V - 180 W
BULBS Low/high beam ............................................ 12 V - 35/35 W
Front parking light ........................................ 12 V - 5 W
Direction indicators ...................................... 12 V - 10 W
Rear parking light/number plate
light/ stoplight............................................... 12 V - 5 / 21 W
Dashboard ................................................... 12 V - 2 W
WARNING LIGHTS Neutral ......................................................... 12 V - 1.2 W
Direction indicators ...................................... 12 V - 1.2 W
High beam ................................................... 12 V - 1.2 W
2 stroke oil reserve ...................................... 12 V - 1.2 W
Low beam .................................................... 12 V - 1.2 W
MX125_UK.book Page 87 Wednesday, October 15, 2003 11:24 AM

use and maintenance MX 125
88
LUBRICANT CHART
Gearbox oil (recommended): F.C., SAE 75W - 90
or GEAR SYNTH, SAE 75W - 90.
As an alternative to the recommended oil, it is possible to use high-quality oils with characteristics in compliance with or superior to the
A.P.I. GL-4 specifications.
Mixer oil (recommended): MAX 2T COMPETITION
or SPEED 2T.
As an alternative to the recommended oil, use high-quality oils with characteristics in compliance with or superior to the ISO-L-ETC++,
A.P.I. TC++ specifications.
Fork oil (recommended): F.A. 5W or F.A. 20W; an alternative
FORK 5W or FORK 20W fork oil.
If you need an oil with intermediate characteristics in comparison with the F.A. 5W and F.A. 20W or FORK 5W and
FORK 20W
, these can be mixed as indicated below:
SAE 10W = F.A. 5W 67% of the volume + F.A. 20W 33% of the volume, or
FORK 5W 67% of the volume + FORK 20W 33% of the volume .
SAE 15W = F.A. 5W 33% of the volume + F.A. 20W 67% of the volume, or
FORK 5W 33% of the volume + FORK 20W 67% of the volume .
Bearings and other lubrication points (recommended): AUTOGREASE MP or GREASE 30.
As an alternative to the recommended product, use high-quality grease for rolling bearings, working temperature range -30°C.... +140°C,
dripping point 150°C... 230°C, high protection against corrosion, good resistance to water and oxidation.
Protection of the battery poles: neutral grease or vaseline.
Spray grease for chains (recommended): CHAIN SPRAY
or CHAIN LUBE.
WARNING
Use new brake fluid only. Employer uniquement du liquide à freins neuf. Do not mix different makes or types of oil without having
checked bases compatibility.
Brake fluid (recommended): F.F., DOT 4 (DOT 5 compatible) or BRAKE 5.1 DOT 4 (DOT 5 compatible).
WARNING
Use only antifreeze and anticorrosive without nitrite, ensuring protection at -35°C at least.
Engine coolant (recommended): ECOBLU - 40°C or
COOL.
MX125_UK.book Page 88 Wednesday, October 15, 2003 11:24 AM

89
use and maintenance MX 125
Authorised Dealers and Service Centres
THE VALUE OF SERVICE
Thanks to ongoing technical updates and product-specific technical training, aprilia Authorised Network engineers are familiar with every
detail of this motorcycle and have the special equipment required for correct maintenance and repair.
A vehicle kept in sleek running order is a reliable vehicle. Pre-ride checks, proper maintenance at the recommended intervals and using
aprilia
Original Parts only are other key factors !
To find contact information of the Authorised Dealer and/or Service Centre nearest you, please consult the Yellow Pages or
the map provided at our web site:
www.aprilia.com
When you demand aprilia Original Parts, you are purchasing products that have been developed and tested as early as the
vehicle design stage. aprilia Original Parts systematically undergo strict quality control procedures to ensure total reliability
and long service life.
MX125_UK.book Page 89 Wednesday, October 15, 2003 11:24 AM

90
use and maintenance MX 125
UK
D
NL
E
F
CZ
SLO
IRL
A
N
HR
I
APRILIA via G. Galilei, 1 - 30033 Noale (VE) Italy
Tel. +39(0)41 5829111 - Fax +39(0)41 441054 - Servizio Clienti aprilia +39(0)41 5079821
APRILIA WORLD SERVICE UK branch 15 Gregory Way - SK5 7ST Stockport - Cheshire
Tel. 0044-161 475 1800 - Fax 0044-161 475 1825 - Email: [email protected] -
Customer service dep. 0845-6014514
APRILIA MOTORRAD Am Seestern 3 - D-40547 - Dusseldorf
Tel. 0049-211-59018-00 - Fax 0049-211-5901819 - Kunden service 0180-3000791
APRILIA WORLD SERVICE B.V. Nikkelstraat 1 - 4823 - Ae Breda (NL)
Tel. (076) 5431640 - Fax (076) 5431649 - Klanten service 020-2036699
APRILIA WORLD SERVICE Edificio América, Av.da de Arangòn, 334 - 28022 Madrid
Succursale en Espana Tel. 0034-91-7460066 - Fax 0034-91-7460065- Atencion al cliente 901-810075
APRILIA WORLD SERVICE z.a. Central Parc - 255 Blv. R. Ballanger B.P. 77 - 93421- Villepinte
Succursale en France Tel. 0033-1-49634747 - Fax 0033-1-49638750 - Relations clienteles 0820-027915
A. SPIRIT A.S. Saldova 38 - 180 00 - Praha 8 - Karlin
A. SPIRIT A.S. (Sede operativa) Bubenska 43 - 170 00 - Praha 7
Tel. 0042-02-96547142 - Fax 0042-02-96547145 - Email: [email protected]
AVTO TRIGLAV d.o.o. Baragova 5 - 1113 - Ljubljana
Tel. 00386-1-5883 421 - Fax. 00386-1-5883465 - Email: ziga.martincic@avto-triglav.si
GINZINGER IMPORT GmbH & CO. Frankenburgerstrasse 19 - 4910 - Ried im Innkreis
Tel. 0043-7752-88077 - Fax. 0043-7752-70684 - Email: [email protected]
ING-KART d.o.o. Samoborska cesta 258 - 10000 - Zagreb
Tel. 00385-1-3498000 - Fax. 00385-1-3499111 - Email: [email protected]
K.D.I. Kawasaki Distributor IRL. LTD: no. 1 Long Mile Road - Dublin 12
Tel. 00353-1-4566222 - Fax. 00353-1-4756461 - Email:sales@bikeworld.ie
HARO SKANDINAVIA A.S. Kjorbekkdalen 6 - 3735- Skien
Tel. 0047-35506780 - Fax. 0047-35506781 - E-mail:[email protected]
Importers
MX125_UK.book Page 90 Wednesday, October 15, 2003 11:24 AM

91
use and maintenance MX 125
Importers
MOTOMAX MOTORLU ARACLAR Kore Sehitleri Cad. No. 42 - 80300 - Zincirlikuyu - Istanbul
SAN. VE TIC. A.S. Tel. 0090-212-3360058 - Fax. 0090-212-3360057- Email:[email protected]
MILLE MOTOR KFT. (sede operativa) Hold utca 23 - H-1054 - Budapest
Tel. 0036-1-3329938 - Fax. 0036-1-2693044 - Email: Zsoldos.lajos@elender.hu
MILFA IMPORTAÇÃO EXPORTAÇÃO LDA. Av. Da Republica 692 - 4450 - Matosinhos
Tel. 00351-229382450 - Fax. 00351-229371305 - Email: milfa@milfa.pt
APRILIA HELLAS Rizareiou 4 - 15233 - Halandri
Tel. 0030-210-6898290 - Fax. 0030-210-6898056 - Email: aprilia@otermail.gr
MOHAG A.G. Bernerstrasse Nord 202 - 8064 - Zurigo
Tel. 0041-1-4348686 - Fax 0041-1-434 8606 - Email: [email protected]
N.V./S.A. RAD Landegemstraat 4 - Industriegebied - B-9031 - Drongen-Baarle
Tel. 0032-9-2829410 - Fax. 0032-9-2810012 - Email: [email protected]
T.M.P. Hammervej 32 - 7900 - Nikobing Mors
Tel. 0045-97-722233 - Fax. 0045-97-722143/33 - Email: [email protected]
TUONTI NAKKILA OY P.o.B. 18 - 29250 - Nakkila
Tel. 00358-2-5352500 - Fax. 00358-2-5372793 - Email: [email protected]
RO GROUP INT.(sede operativa) Str. Depozitelor 41-43 Jud. Arges - Pitesti
Tel. 0040-248211004 -Fax. 0040-248211004 - Email: [email protected]
Z.A.O. ITALMOTO (sede operativa) Ul. Preobragenskaya 5/7 - 107076 - Mo - Moscow
Tel. 007-095-780 4294 - Fax. 007-095-208 3228 - Email: [email protected]
APRILIA U.S.A., INC. (Sede operativa) 109 Smoke Hill Lane Suite 190 - GA 30188 - Woodstock
Tel. 001-770-592-2261 - Fax. 001-770-592-4878
APRILIA JAPAN CORP.
SHINYOKOHAMAMEGURO BLDG. 3-22-5 SHINYOKOHAMA KOUHOKU-KU 222-0033
YOKOHAMA-SHI KANAGAWA (J) -Tel. 0081-454772632 - Fax 0081-454772605 - Email: [email protected].jp
JOHN SAMPLE GROUP PTY LTD. 8 Sheridan Close - NSW 2214 - Milperra - Sydney
Tel. 0061-2-97722666 - Fax. 0061-2-97742321 - Email: [email protected]
P
H
CH
GR
TR
B
DK
SF
USA
CSI
J
R
AUS
MX125_UK.book Page 91 Wednesday, October 15, 2003 11:24 AM

92
use and maintenance MX 125
Importers
NZ
RSA
MEX
RP
HK
RC
RL
RI
ROK
KWT
SGP
CDN
MOTORCYCLING DOWNUNDER LTD. 35, Manchester Street - P.o.B. 22416 - Christchurch
Tel. 0064-3-3660129 - Fax. 0064-3-3667580 - Email: [email protected].nz
MOTOVELO S.A. Old Pretoria Road - Wynberg - Johannesburg
Tel. 0027-11-7868486 - Fax. 0027-11-7868482 - Email: motov[email protected]
APRILIA DE MEXICO, SA. de CV. San Jeromino - 64640 - 552 Monterrey N.L.
Tel. 0052-8333-4493 - Fax. 0052-8348-9398 - sbertuEmail: [email protected]
BIKE KOREA CO. LTD. YeungSoo Bldg. 302 #206-25, Ohjang-Dong, Chung-Ku Seoul
Tel. 0082-2-22756130 - Fax 0082-2-22756132 - Email: kukbike@yahoo.co.kr
ULTRA BIKERS NETWORK INC. Bldg. 7294 cn Recto Highway - Pampanga
Tel. 00632-7524450 - Fax 00632-7505764 - Email: ultrabykes@mydestiny.net
CYCLENET PTE TLD 1179 Serangoon Road - 328232 - Singapore
Tel. 0065 6299 6251 - Fax. 0065 6297 5684 - Email: jeorjb@yahoo.com
AH LAM MOTORCYCLE CO. LTD. 29 Hak Po Street - Mongkok Kowloon - Hong Kong
Tel. 00852-23859229 - Fax. 00852-23857920 - Email: [email protected]
PERFECT MOTORS COMPANY LIMITED No. 281 Jungshing North Street - Sanchung City - 241 - Taipei
Tel. 00886-2-85111156 - Fax. 00886 2 85111148 - Email: [email protected]
AL-RADWAN INTERNATIONAL GROUP Block 1, Street 13, Plot 107 45703 - Shuwaikh Industrial
Tel. 00965-4828072 - Fax. 00965-4828073 - Email: [email protected]
ACCESS INTERNATIONAL FOR Diamond Tower, 10th Floor P.O.B. 13 - Verdun, near Mandarine Beirut
PT. MOTOR MEGA PERFORMA JI. Keutamaan no. 75 - Jakarta Barat
Tel. 0062 21 63333929 - Fax. 0062 21 6337889 - Email: [email protected]
BARRETT MARKETING GROUP ltd. 9060 300 Lockhart Mill Road - E7M 5C3 - Woodstock
Tel. 001-5063281315 - Fax. 001-5063281582 - Email: joshb@barrettgroup.com
MX125_UK.book Page 92 Wednesday, October 15, 2003 11:24 AM

93
use and maintenance MX 125
Importers
IND
GCA
AZG
BERMUDA INTERNATIONAL LTD. 235, Middle Road - Southampton
Tel. 001-4412385050 - Email: [email protected]
MAJESTIC AUTO LIMITED 10th KM Stone - G.T. Road - P.O.Dujana - 203207 Dadri - Ghaziabad UP
Tel. 0091-98100-19315 - Fax. 0091-98100-19300
MOTO TECNICA S.A. Avenia Petapa - 38-78 - Local B Zona12 - Guatemala
Tel. 0050-2-3606815 - Fax. 0050-2-3327847
DUARTE BASTOS & CASTENDO, LDA Rua Dr.António José de Almeida n˚238- Benguela
Tel. 00244-7-232669 - Fax 00244-7-235106 - Email: [email protected]
MX125_UK.book Page 93 Wednesday, October 15, 2003 11:24 AM

use and maintenance MX 125
94
WIRING DIAGRAM - MX 125
16
19 18 14
20 21
27
28
23
15 13
12
11
10
9
28 28
28
876
28
4
5
29
2828
32
3122
28
27
31
26 25
28
24
28
34
33
231
MX125_UK.book Page 94 Wednesday, October 15, 2003 11:24 AM

95
use and maintenance MX 125
WIRING DIAGRAM KEY- MX 125
1) Generator
2) Coil
3) Voltage regulator
4) Fuses
5) Battery
6) Front stoplight switch
7) Rear stoplight switch
8) Oil level sensor
9) Rear left direction indicator
10) Rear light
11) Rear right direction indicator
12) Blinking
13) Ignition switch/steering lock
14) Neutral warning light
15) Left dimmer switch
16) Dashboard
17) Low beams warning light
18) Dashboard lighting bulb
19) High beam warning light
20) Direction indicator warning light
21) Oil level warning light
22) Neutral switch
23) Horn
24) Front right direction indicator
25) Low/high beam bulb
26) Front parking light bulb
27) Front left direction indicator
28) Multiple connectors
29) Spark plug
30) Headlight
31) CDI
32) Pick up
33) Electronic control unit rave
34) Solenoid valve
CABLE COLOURS
Ar orange
Az light blue
B blue
Bi white
G yellow
Gr grey
M brown
N black
R red
V green
Vi violet
MX125_UK.book Page 95 Wednesday, October 15, 2003 11:24 AM

use and maintenance MX 125
96
aprilia s.p.a. wishes to thank its customers for the purchase of this vehicle.
√ Do not dispose of oil, fuel, polluting substances and components in the envi-
ronment.
√ Do not keep the engine running if it isn»t necessary.
√ Avoid disturbing noises.
√ Respect nature.
MX125_UK.book Page 96 Wednesday, October 15, 2003 11:24 AM
-
 1
1
-
 2
2
-
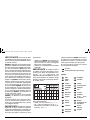 3
3
-
 4
4
-
 5
5
-
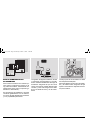 6
6
-
 7
7
-
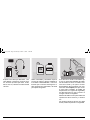 8
8
-
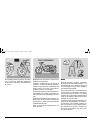 9
9
-
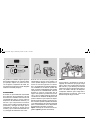 10
10
-
 11
11
-
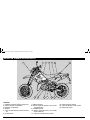 12
12
-
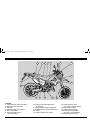 13
13
-
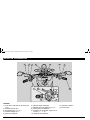 14
14
-
 15
15
-
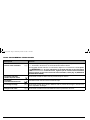 16
16
-
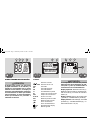 17
17
-
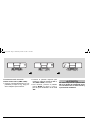 18
18
-
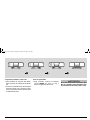 19
19
-
 20
20
-
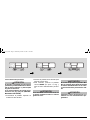 21
21
-
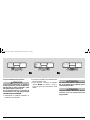 22
22
-
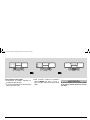 23
23
-
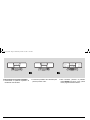 24
24
-
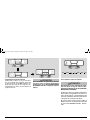 25
25
-
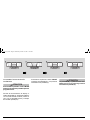 26
26
-
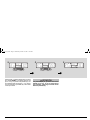 27
27
-
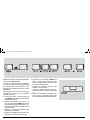 28
28
-
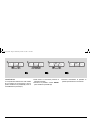 29
29
-
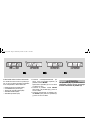 30
30
-
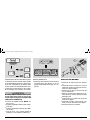 31
31
-
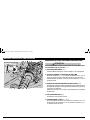 32
32
-
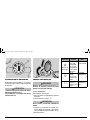 33
33
-
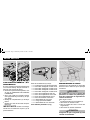 34
34
-
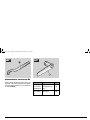 35
35
-
 36
36
-
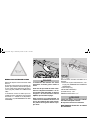 37
37
-
 38
38
-
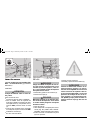 39
39
-
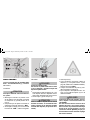 40
40
-
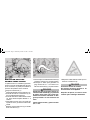 41
41
-
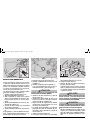 42
42
-
 43
43
-
 44
44
-
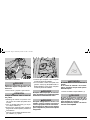 45
45
-
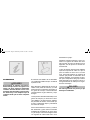 46
46
-
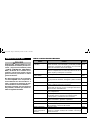 47
47
-
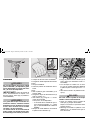 48
48
-
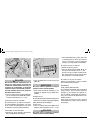 49
49
-
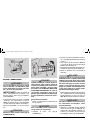 50
50
-
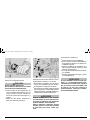 51
51
-
 52
52
-
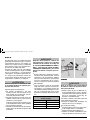 53
53
-
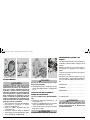 54
54
-
 55
55
-
 56
56
-
 57
57
-
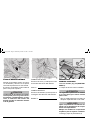 58
58
-
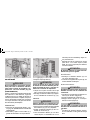 59
59
-
 60
60
-
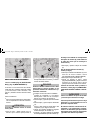 61
61
-
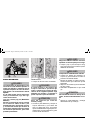 62
62
-
 63
63
-
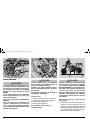 64
64
-
 65
65
-
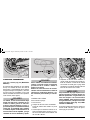 66
66
-
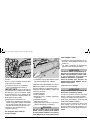 67
67
-
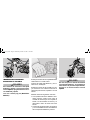 68
68
-
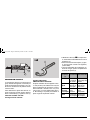 69
69
-
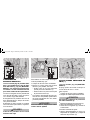 70
70
-
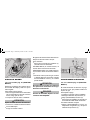 71
71
-
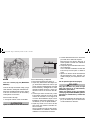 72
72
-
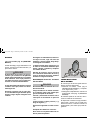 73
73
-
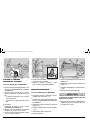 74
74
-
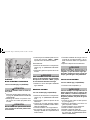 75
75
-
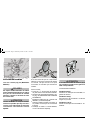 76
76
-
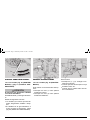 77
77
-
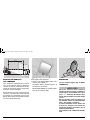 78
78
-
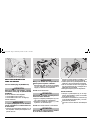 79
79
-
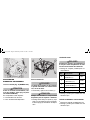 80
80
-
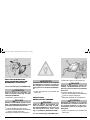 81
81
-
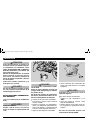 82
82
-
 83
83
-
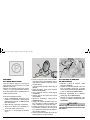 84
84
-
 85
85
-
 86
86
-
 87
87
-
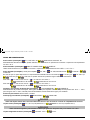 88
88
-
 89
89
-
 90
90
-
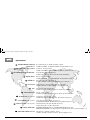 91
91
-
 92
92
-
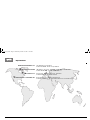 93
93
-
 94
94
-
 95
95
-
 96
96
-
 97
97
-
 98
98
-
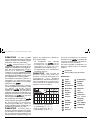 99
99
-
 100
100
-
 101
101
-
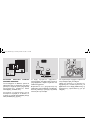 102
102
-
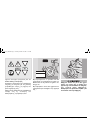 103
103
-
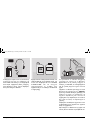 104
104
-
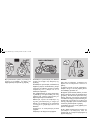 105
105
-
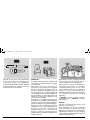 106
106
-
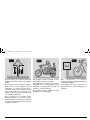 107
107
-
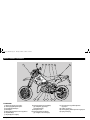 108
108
-
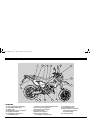 109
109
-
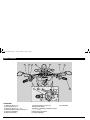 110
110
-
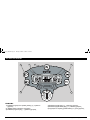 111
111
-
 112
112
-
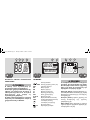 113
113
-
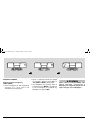 114
114
-
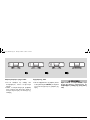 115
115
-
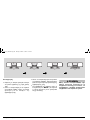 116
116
-
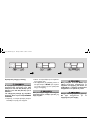 117
117
-
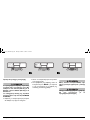 118
118
-
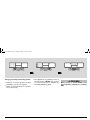 119
119
-
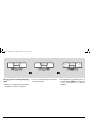 120
120
-
 121
121
-
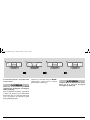 122
122
-
 123
123
-
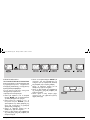 124
124
-
 125
125
-
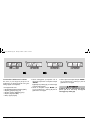 126
126
-
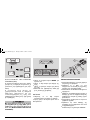 127
127
-
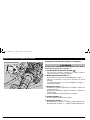 128
128
-
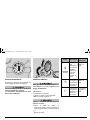 129
129
-
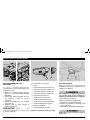 130
130
-
 131
131
-
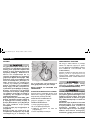 132
132
-
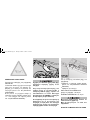 133
133
-
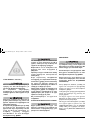 134
134
-
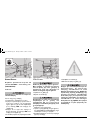 135
135
-
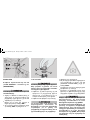 136
136
-
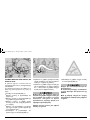 137
137
-
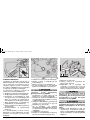 138
138
-
 139
139
-
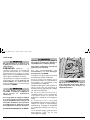 140
140
-
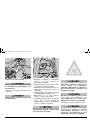 141
141
-
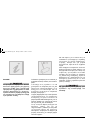 142
142
-
 143
143
-
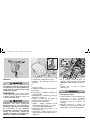 144
144
-
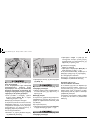 145
145
-
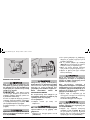 146
146
-
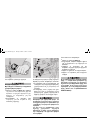 147
147
-
 148
148
-
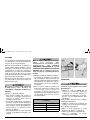 149
149
-
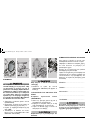 150
150
-
 151
151
-
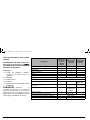 152
152
-
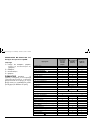 153
153
-
 154
154
-
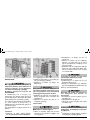 155
155
-
 156
156
-
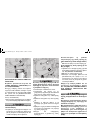 157
157
-
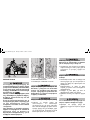 158
158
-
 159
159
-
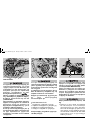 160
160
-
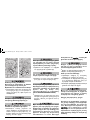 161
161
-
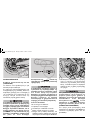 162
162
-
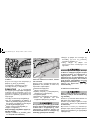 163
163
-
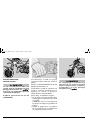 164
164
-
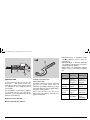 165
165
-
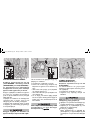 166
166
-
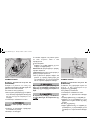 167
167
-
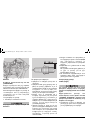 168
168
-
 169
169
-
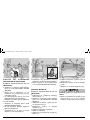 170
170
-
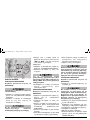 171
171
-
 172
172
-
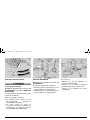 173
173
-
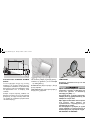 174
174
-
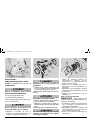 175
175
-
 176
176
-
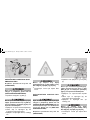 177
177
-
 178
178
-
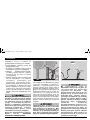 179
179
-
 180
180
-
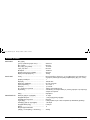 181
181
-
 182
182
-
 183
183
-
 184
184
-
 185
185
-
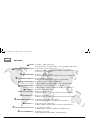 186
186
-
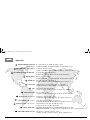 187
187
-
 188
188
-
 189
189
-
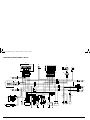 190
190
-
 191
191
-
 192
192
-
 193
193
-
 194
194
-
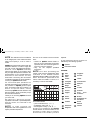 195
195
-
 196
196
-
 197
197
-
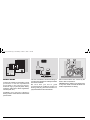 198
198
-
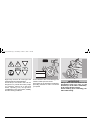 199
199
-
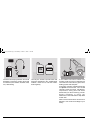 200
200
-
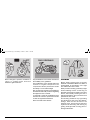 201
201
-
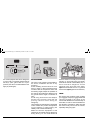 202
202
-
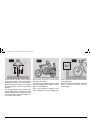 203
203
-
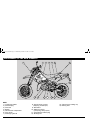 204
204
-
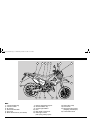 205
205
-
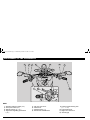 206
206
-
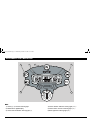 207
207
-
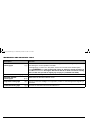 208
208
-
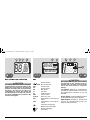 209
209
-
 210
210
-
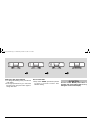 211
211
-
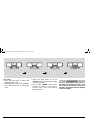 212
212
-
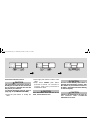 213
213
-
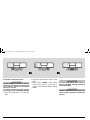 214
214
-
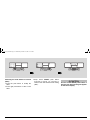 215
215
-
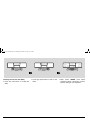 216
216
-
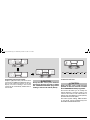 217
217
-
 218
218
-
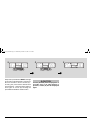 219
219
-
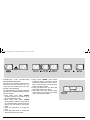 220
220
-
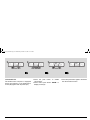 221
221
-
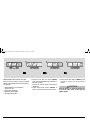 222
222
-
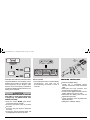 223
223
-
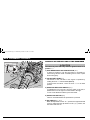 224
224
-
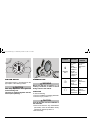 225
225
-
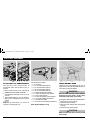 226
226
-
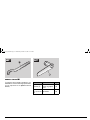 227
227
-
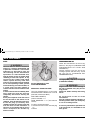 228
228
-
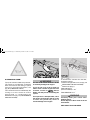 229
229
-
 230
230
-
 231
231
-
 232
232
-
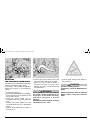 233
233
-
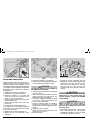 234
234
-
 235
235
-
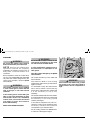 236
236
-
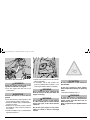 237
237
-
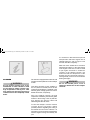 238
238
-
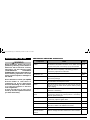 239
239
-
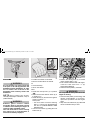 240
240
-
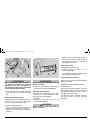 241
241
-
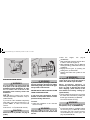 242
242
-
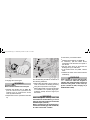 243
243
-
 244
244
-
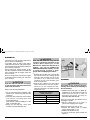 245
245
-
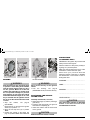 246
246
-
 247
247
-
 248
248
-
 249
249
-
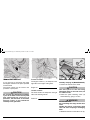 250
250
-
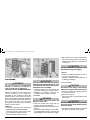 251
251
-
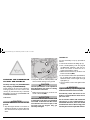 252
252
-
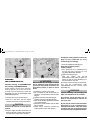 253
253
-
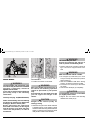 254
254
-
 255
255
-
 256
256
-
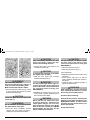 257
257
-
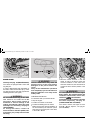 258
258
-
 259
259
-
 260
260
-
 261
261
-
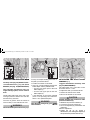 262
262
-
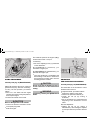 263
263
-
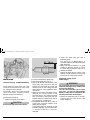 264
264
-
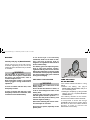 265
265
-
 266
266
-
 267
267
-
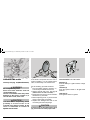 268
268
-
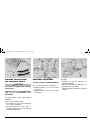 269
269
-
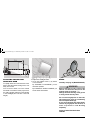 270
270
-
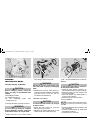 271
271
-
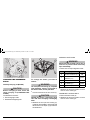 272
272
-
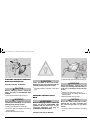 273
273
-
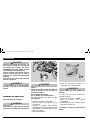 274
274
-
 275
275
-
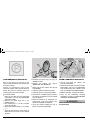 276
276
-
 277
277
-
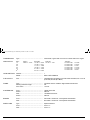 278
278
-
 279
279
-
 280
280
-
 281
281
-
 282
282
-
 283
283
-
 284
284
-
 285
285
-
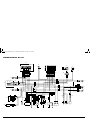 286
286
-
 287
287
-
 288
288


APRILIA MX 125 El manual del propietario
- Categoría
- Motocicletas
- Tipo
- El manual del propietario
- Este manual también es adecuado para
Artículos relacionados
-
APRILIA SR 50 - 2003 Manual de usuario
-
-
-
APRILIA LEONARDO 150 Use And Maintenance Book
-
-
-
-
-
-
APRILIA SX 50 El manual del propietario