Taski Swingo 1655 XD Instrucciones de operación
- Categoría
- Máquina de piso
- Tipo
- Instrucciones de operación
Este manual también es adecuado para


2
Translation of the original instructions of use
Legend:
Content
Safety instructions . . . . . . . . . . . . . . . . . . . . . . . . . . . . . . . . . . . 2
Cleaning products . . . . . . . . . . . . . . . . . . . . . . . . . . . . . . . . . . . 4
Further documents . . . . . . . . . . . . . . . . . . . . . . . . . . . . . . . . . . 4
Structural layout . . . . . . . . . . . . . . . . . . . . . . . . . . . . . . . . . . . . 5
Batteries . . . . . . . . . . . . . . . . . . . . . . . . . . . . . . . . . . . . . . . . . . 6
Prior to commissioning . . . . . . . . . . . . . . . . . . . . . . . . . . . . . . . 8
Beginning work with the machine . . . . . . . . . . . . . . . . . . . . . . . 10
End of operation . . . . . . . . . . . . . . . . . . . . . . . . . . . . . . . . . . . . 11
Service, maintenance and care. . . . . . . . . . . . . . . . . . . . . . . . . 13
Malfunctions . . . . . . . . . . . . . . . . . . . . . . . . . . . . . . . . . . . . . . . 14
Technical data . . . . . . . . . . . . . . . . . . . . . . . . . . . . . . . . . . . . . . 15
Accessories. . . . . . . . . . . . . . . . . . . . . . . . . . . . . . . . . . . . . . . . 15
Transport. . . . . . . . . . . . . . . . . . . . . . . . . . . . . . . . . . . . . . . . . . 16
Disposal. . . . . . . . . . . . . . . . . . . . . . . . . . . . . . . . . . . . . . . . . . . 16
Machine dimensions . . . . . . . . . . . . . . . . . . . . . . . . . . . . . . . . . 16
Intended use
The machine is intended for commercial use (e.g. in hotels,
schools, hospitals, factories, shopping centers, offices, etc.).
Subject to the strict compliance with the instructions of use,
these machines are used for the wet cleaning of hard flooring.
These machines are exclusively designed for use in interior
zones.
Safety instructions
Due to their design and construction, TASKI machines comply
with the relevant essential health and safety requirements of
the EC directives; they therefore have the CE sign.
CAUTION!
Always read the instructions of use and
the safety instructions before using the
machine for the first time.
The instructions of use must be kept in a
safe and well accessible place so that
you can refer to them at any time.
Caution:
This sign designates important informa-
tion. Failure to follow these instructions
may result in danger to persons and/or ex-
tensive damage to property!
Attention:
This sign designates important informa-
tion. Failure to follow these instructions
may result in faults and damage to proper-
ty!
Notice:
This sign designates important information
regarding the efficient use of the product.
Failure to follow these instructions may re-
sult in faults!
It includes instructions for the work steps that
you must carry out in order.
t
Attention:
The machine must not be used for polish-
ing, oiling, the application of wax, carpet
cleaning or dust removal. The wet clean-
ing of parquet and laminate flooring with
this machine is at your own risk.
Caution:
Changes to the machine that have not
been authorized by Diversey will lead to
the expiry of safety marks and CE confor-
mity. Using the machine for purposes oth-
er than the intended purpose can cause
injuries to persons, and damage to the ma-
chine and the working environment. Such
cases will usually result in the termination
of any warranty and possible guarantee
claims.
Caution:
The machine may only be used by per-
sons who are adequately trained for the
use of the machine or who have provided
proof of their skills regarding the use of the
machine and who are explicitly commis-
sioned to use the machine.
Caution:
The machine must not be used by people
with reduced physical, sensory or mental
capacities, including children or people
who lack experience or knowledge.
Children must be supervised to ensure
that they do not play with the machine.
Caution:
Do not use the machine in rooms where
explosive or highly combustible substanc-
es (e.g. gas, solvents, heating fuel, dust,
etc.) are stored or processed.
These substances could be ignited by the
electrical or mechanical components of
the machine.

3
Caution:
Do not use the machine for the vacuum
cleaning of poisonous, harmful, caustic or
irritating substances (e.g. dangerous dust,
etc.). The filter system does not adequate-
ly filter out these kinds of substances.
Possible impacts on the health of the user
or third persons cannot be ruled out.
Caution:
Pay attention to the local situation as well
as to third persons and children! In the vi-
cinity of blind spots such as doors or
curves in particular, it is important to re-
duce speed.
Caution:
Do not transport other persons and objects
with this machine.
Caution:
In case of malfunction or defect or after
collisions or toppling over, the machine
must be inspected by an authorized expert
before restarting. The same applies if the
machine was left outdoors, immersed in
water or subjected to moisture.
Caution:
The machine must be stopped immediate-
ly in case of damage to safety relevant
parts such as brush covers, main cords or
covers that enable access to live parts.
Caution:
The machine must not be stopped, parked
or stored on slopes.
Caution:
The machine must be switched off and the
key must be removed for any work carried
out on the machine.
Caution:
Do not use the machine in rooms with high
electromagnetic interference (electric
smog).
Caution:
The machine must not be used on slopes
>2%. Slopes must be driven on slowly and
using the "turtle mode" in order to ensure
safe stopping.
Sharp cornering on slopes can affect the
stability of the machine and is therefore
prohibited. Danger of accident.
Caution:
The machine may only be used on a fixed,
stable and sufficiently load-bearing sur-
face.
In the case of non-adherence there is a
risk of accidents.
Attention:
The machine must be protected against
unauthorized use. Therefore, always pull
out the key before you move away from
the machine; Or keep them in a locked
room.
Attention:
Operate and keep the machine in a dry
and low-dust environment at temperatures
between +10 and +35 degrees only.
Attention:
Only authorized experts who are familiar
with all safety instructions relevant for this
machine are allowed to repair mechanical
or electrical machine parts.
Attention:
Only tools (brushes, pads or similar) that
are specified in these instructions of use
under accessories, or which have been
recommended by a TASKI consultant,
may be used. Any other brushes might im-
pair the safety and functions of the ma-
chine.
Attention:
National regulations for personal protec-
tion and accident prevention as well as the
manufacturer's instructions for the use of
cleaning solutions must be consistently
observed.
Attention:
In case of foam or liquid leakage from the
machine, the suction unit must be
switched off immediately.
Attention:
Use this machine with suitable batteries
and approved chargers only.
Attention:
TASKI machines and devices are de-
signed such that health risks caused by
noise emissions or vibrations can be ruled
out according to the current state of sci-
ence.
See the Technical Information on page 15.
EN

4
Cleaning products
Further documents
Notice:
TASKI machines are designed in such a
way that optimal cleaning results can be
achieved if TASKI cleaning products are
used.
Other cleaning products may cause mal-
functions and damage to the machine or
the environment.
Therefore, we recommend the exclusive
use of TASKI cleaning products.
Faults caused by inappropriate cleaning
products are not covered by the guaran-
tee.
For further details, please contact your
TASKI service partner.
Notice:
The electric diagram of this machine is
provided in the spare parts list.
Please contact your customer service for
further information.

5
Structural layout
1 Driving switch
2 Driving handle
3 Operating hour counter (option)
4 Drain hose recovery tank (red)
5 Drain hose cleaning solution (blue)
6 Foot pedal tool
7 Foot pedal suction nozzle
8 Suction nozzle
9 Charging plug for external battery charger
10 Lock battery compartment (optional)
11 Tools (brushes, pads, etc.)
12 Brush unit
13 Nozzle holder
14 Suction unit button (ON/OFF)
15 Key switch
16 Cleaning solution supply button (ON/OFF)
17 Cleaning solution supply amount button (+/-)
18 Emergency stop
19 Battery indicator
20 Battery charging level indicator
21 Service display
22 Tool unlocking
23 Recovery tank
24 Dirt sieve
25 Float (Overfill protection recovery tank)
26 Suction filter
27 Fresh water tank
28 Dosage aid
29 Tank cover release
30 Filling level indicator
121201918171615
2
3
4
14
13
12
5
6
7
89 1011
Start
max.60°C
max.140°F
MAX
3/4
1/2
2829
30
22 23
27 26 25 24
EN

6
Batteries
Permissible batteries
Traction batteries are required for the use of this machine (no
starter or device batteries). We recommend the use of pure
traction batteries. Only these batteries guarantee a long ser-
vice life.
Traction batteries are produced as open (wet-cell) batteries or
as maintenance-free (VRLA) batteries (Gel and AGM). The
machine must be adjusted according to each construction
type and manufacturer.
Each battery has a different service life and performance.
The machine must be programmed after the batteries have
been inserted or if the battery type and/or the manufacturer
have been changed as well as prior to starting the machine.
Incorrect adjustment may result in early battery failure.
Safety measures to be taken when handling the batteries
Battery connection diagram
Charging procedure with external battery charger
Each battery type and/or battery manufacturer requires differ-
ent charging characteristics.
Optionally available on-board chargers are adapted to the bat-
tery size and contain several charging characteristics which
are adjusted ex works or by a TASKI service technician for
recommended batteries. This regulation shall also apply for
the use of stationary (external) chargers.
• Batteries contain acid. Always wear
safety goggles for the maintenance,
installation and removal of wet-cell
batteries.
• Rinse acid splashes in your eyes or
on your skin with plenty of clear wa-
ter.
Then immediately consult a doctor.
Wash your clothes with water.
• Explosive gas is generated during
battery charging. Keep away from
open fire or glowing embers.
• Do not smoke!
• Danger of acid burns!
• Attention! The battery poles are al-
ways energized. Therefore do not
deposit any objects on the batteries!
Attention:
Keep batteries clean and dry. Immediately
wipe off leaking acid or water (wet-cell bat-
teries).
Wear protective gloves for this purpose.
Attention:
Batteries may only be installed by service
agencies or experts approved by Di-
versey; they must be installed in compli-
ance with the connection diagram.
Installation and/or connection errors may
result in severe injury, explosion and major
damage to the machine and the environ-
ment.
Attention:
The operating instructions provided by the
battery manufacturer must also be ob-
served.
Attention:
Provide adequate ventilation when
charging the battery.
Attention:
Always disconnect the batteries from the
machine before starting maintenance
work.
Attention:
Incorrect charging characteristics or the
use of inappropriate chargers results in
early failure or the quick destruction of the
batteries.
Attention:
Persistent short-term use with subsequent
battery charging may cause long-term
damage to the batteries. Standard value:
At least approx. 20% of the available ca-
pacity should be used up before recharg-
ing the battery.
Attention:
In order to achieve their max. possible ser-
vice life, traction batteries must undergo
the complete charging cycle (12-16 hours)
twice a week.
6 V
6 V
6 V
6 V
75A
red
Relay
Charger
Power Board
black

7
Charging procedure with external charger
Charging procedure with (optional) on-board charger
After charging
Maintenance and care of open (wet-cell) batteries
Open battery compartment for maintenance
Variant: Machine with wet battery set
After maintenance, carefully tilt the tank back to its initial posi-
tion and lock it.
Attention:
Before decommissioning the machine for
a longer period, the batteries must under-
go a complete charging cycle. After com-
pletion, the charger is disconnected from
the machine and/or mains. Batteries grad-
ually discharge. Depending on the type of
battery, they must be recharged after 3-6
months. Before recommissioning, the bat-
teries should undergo another complete
charging cycle.
• Connect the external battery charger with the battery iso-
lating plug of the machine.
Attention:
Make sure that the plug is inserted up to
the stop in order to ensure a good electri-
cal contact.
Notice:
All machine functions are deactivated
during charging.
• The machine must be switched off.
• Take the power cord and connect it with a socket (with slow
fuse).
Attention:
Switch off the charger before disconnect-
ing the batteries (only for external char-
gers).
Disconnecting the charger while it is still
switched on may result in an explosion in
the battery compartment.
• Stow away the power cord for (optional) on-board chargers
in the provided compartment.
• Store the charging cable in a dry place where it is protected
against damage.
Attention:
Charging cables transfer high currents. Do
not use the charger if there are any signs
of damage to the plug, cable or device
connection.
Notice:
The care for maintenance-free batteries is
limited to the compliance with the correct
charging processes and correct adjust-
ment of the charging curve.
• The machine must be switched off.
Caution:
Before opening the battery compartment
make sure that both tank areas are empty.
• Disconnect the battery from the machine at the battery dis-
connection socket.
• Lower the suction nozzle.
• At the bottom left and right on the
front side of the machine you will find
the battery compartment release.
• Unscrew both screws and remove
them.
• At the bottom left on the front side of
the machine you will find the battery
compartment release.
• Press the release (e.g. with a screw-
driver) into the intended opening and
lift the tank until it locks.
• Tank position before change of posi-
tion.
• Stand behind the machine.
• Carefully open the battery compart-
ment until the driving handle is on the
ground.
• Carefully open the battery compart-
ment until the driving handle is on the
ground.
Notice:
Lift the suction nozzle again
Notice:
Connect the battery with the machine at
the battery disconnection socket.
EN

8
Prior to commissioning
Relocation drive
Brush installation
Before inserting, please check:
• that the brush does not fall below the red marking (bristles)
or 1cm of bristle length.
• the pad for wear and cleanliness before use.
Squeegee assembly
Setting the squeegee
• Switch on the machine (key switch).
The display lights up briefly.
The battery level indicator notifies
you that the machine is ready for op
-
eration. (In case of malfunctions,
please see page 14).
• Take the driving handle and arrange
the height of the driving switches in
such a way that you can work easily
with them.
• By gently pushing the driving switch
into the direction of movement, the
machine is set into motion. If you let
go of the driving switch, the machine
will stop.
Attention:
Do not use brushes which have reached
their wear limit. The wear limit is indicated
by the length of the red bristle. Do not use
worn or contaminated pads. Use original
TASKI brushes only. Failure to observe
these instructions may result in inade-
quate cleaning results or even floor dam-
age.
• Position the brush under the brush unit.
• Switch the machine on.
The indicator elements lights up briefly.
• Unlock the foot pedal and lower the
tool slowly.
While lowering the brush drive will
slowly start to pulse. In this way the
tool is centered and engaged.
The brush drive display lights up.
Notice:
When the brush is down, gently moving
the machine back and forth can make the
clutch easier to engage.
• The machine must be switched off (main switch).
• Position the suction nozzle (2) below
the suction nozzle holder (1).
• Press the foot pedal down until the
suction nozzle holder engages.
• Attach the suction hose to the con-
nector.
Notice:
Depending on the floor characteristics, it is
important to correctly set the squeegee in
order to achieve an ideal suction result.
• Unscrew the nuts (1) on the three setting points.
• Set the height of the squeegee depending on the floor
characteristics.
0: Squeegee in factory setting
-1: Squeegee at lowest point
4: Squeegee at highest point
• Screw down the nuts (1) on the three setting points.
1
1
2
2
1
2

9
Filling the fresh water tank
Dosing:
Dosing examples:
Dosage cup application
Pre-cleaning
Attention:
Max. permissible water temperature
60 °C/140 °F.
Diversey recommends using cold water
since hot water will adjust to the floor tem-
perature as soon as it is in contact with the
floor. Thus there are no advantages to us-
ing hot water.
• The machine must be switched off (main switch).
• Put your hand into the opening be-
tween tank cover and tank.
Palms upwards.
• Open the tank cover until the support engages in the tank
wall.
• Remove the dosage aid.
• Fill the fresh water tank with water.
Maximum filling level (page 5).
• Tip the tank cover back into its original position and press
it down until it locks.
Attention:
Wear gloves, goggles and appropriate
(protective) working clothes when han-
dling chemical products!
Notice:
Use chemical products recommended by
Diversey only and always observe the
product information.
Caution:
Using unsuitable products (e.g. products
containing chlorine, acids or solvents) may
cause harm to health and severe damage
to the machine.
Notice:
For a precise dosage, use the scale in the
dosage cup.
The filling level mark on the tank corre-
sponds to the mark in the dosage cup. The
type of machine is also noted in the dos-
age cup!
Information on
the package of
the product
Tank capacity Dosage cup
0.5% 1/2 1 x 1/2
MAX 1 x MAX
1% 1/2 1 x MAX (2 x 1/2)
MAX 2 x MAX
• Fill the product you have measured
with the dosage cup into the fresh
water tank.
• Slightly lift the tank cover.
• Push the tank cover support slightly inwards.
• Close the tank cover.
• By pushing gently on the front part of the tank cover you
lock the tank.
Notice:
TASKI offers an automatic dosage feature
as an option. It is possible to mount it addi-
tionally. Please contact your customer ser-
vice.
Attention:
Remove any objects (wooden, metal parts
etc.) from the cleaning surface.
The objects could be catapulted by the ro
-
tating tool, and thereby cause injuries to
people and damage to the environment.
EN

10
Beginning work with the machine
Cleaning start
Power off function
During these 5 minutes:
Battery capacity - end of operational readiness
The battery level indicator provides information on the avail-
able operating time.
• If the red indicator begins to flash, approx. 5 minutes of
residual working time are left.
• After that the brush unit is lifted. The red display switches
to continuous light.
• Now 10 more minutes remain for driving the machine to the
charging station. Then the machine is automatically
switched off.
• In order to restart, the batteries must be fully charged.
Cleaning method
Direct working method:
Scrubbing and suction in one work step.
Indirect working method:
Applying the cleaning solution, scrubbing and suction in sev-
eral work steps.
Attention:
Always wear slip-resistant shoes and ap-
propriate working clothes when working
with this machine!
Notice:
Whilst operating the machine always keep
both hands on the steering wheel / driving
handle, so that safe operation is guaran-
teed.
Attention:
Start familiarization with the machine by
making your first driving attempts in a free
area.
Attention:
If there is a danger of falling objects during
use of the machine, the necessary safety
precautions must be taken or adhered to in
accordance with national regulations.
• Lower the suction nozzle.
• Switch on the machine (key switch).
The indicator elements lights up briefly.
• Lower the tool: see variant on page 8.
• Press the Suction unit ON/OFF but-
ton.
The display lights up; the suction en
-
gine starts.
• Press the Cleaning solution supply
ON/OFF button.
The display lights up.
The cleaning solution supply is start
-
ed when the brushes rotate.
• Select the desired dosing by press-
ing the +/- buttons from level 1-6.
Notice:
Diversey recommends sustainable work-
ing by determination of the correct product
dosing quantity. Overdosing or underdos-
ing will lead to unsatisfactory cleaning re-
sults.
Notice:
TASKI offers an automatic dosage feature
as an option. It is possible to mount it addi-
tionally. Please contact your customer ser-
vice.
• By gently pushing the driving switch
into the direction of movement the
machine is set into motion.
Notice:
The machine turns itself off after 5 minutes
when no longer in use.
• the brushes may not be manipulated in any way.
• the user must not leave the machine out of sight.
• sucked in or jammed objects may be cleaned from the
squeegee only.
• the user is only allowed to leave the machine in order to
clear the work space. The user must maintain visual con-
tact.
Notice:
The machine guiding might be impaired in
case of special combinations of flooring/
contamination and cleaning product.
Optionally available wheels can improve
the traction of the machine on the floor.
Please contact your TASKI customer con-
sultant.

11
Replenishing cleaning solvent
Draining dirty water
Recovery tank full:
End of operation
Removing and cleaning the squeegee
Attention:
The flooring may be damaged when work-
ing without cleaning solution.
Notice:
A rattling sound of the pump indicates that
the fresh water tank is empty.
Attention:
The pump must never run dry for an ex-
tended period.
• The machine must be switched off.
• Open the tank lid.
• Fill the fresh water tank with water, see page 9.
• Add the cleaning product using the dosing cup.
• Close the tank lid.
• If the recovery tank is full, the floater
will be sucked onto the suction filter.
This will be indicated by a change of
the noise by increasing the suction
speed as well as residual water at the
bottom.
• Drain the recovery tank, see page 12.
• Press the Brush drive ON/OFF but-
ton.
The cleaning solution supply is
stopped.
• Drive on for a few meters so that the brushes keep on ro-
tating for a short time to avoid dripping.
Very important for TASKI contact pads!
• To lift the tool, push the foot pedal
downwards until it engages.
• Drive on for a few meters in order to absorb the remaining
drain water.
• Lift the suction nozzle.
Allow the suction unit to run on so
that the remaining waste water in the
hose is sucked up.
• Press the Suction unit ON/OFF but-
ton.
The display lights up; the suction en
-
gine stops.
• Switch off the machine.
Attention:
The machine must now be emptied and
cleaned. Switch off the machine (main
switch) and remove the plug from the
mains socket.
• Pull the suction hose from the connector.
• Lift the suction nozzle with your foot.
• Compress the lock springs. The suc-
tion nozzle is released and can be re-
moved from the suction nozzle
holder.
• Clean the suction nozzle under running water using a
brush.
Notice:
Only cleaned and intact blades ensure op-
timal suction results!
EN

12
Empty and clean the recovery tank and fresh water tank
Cleaning the recovery tank and fresh water tank
Cleaning the fresh water tank filter
Clean the fresh water tank filter after the end of operation.
Clogged filters can inhibit the supply of detergents and thus
lead to surface damage.
Removing and cleaning the brush
Cleaning the machine
• Remove the drain water hose (red) from the holder.
• Put the drain hose into the drainage.
• Press the crushing point (1) of the drain hose.
• Pull the lid off the drain hose and
drain the recovery tank.
• Proceed in the same way for draining the fresh water tank.
For that purpose, remove the cleaning solution drain hose
(glue) from the holder.
• Open the tank cover until the support
engages in the tank wall.
• Rinse the recovery tank and the fresh water tank thorough-
ly with clean water.
• Remove the dirt sieve (yellow), emp-
ty it and thoroughly rinse it under run-
ning water.
• Take out the suction filter (yellow)
and remove the dirt with a cloth or a
soft brush.
• Check the float to make sure it is fully
functional and repair any fault
• After you have finished emptying the tanks, screw the red
and blue cover back on and hang the hose on the holder.
Attention:
Clogged suction filters may impair the suc-
tion performance.
• Reassemble the dirt sieve (yellow) and the suction filter.
• Put the drain hoses back into the holder.
1
1
• The machine must be switched off.
• Unscrew the fresh water tank filter
and remove it.
• Rinse the filter thoroughly with clean
water.
Notice:
The filter is lower than the drain hole of the
tank. A rest amount of cleaning solution
will run out only when the filter is removed.
• Put the filter back and twist it closed.
Notice:
Clean the brush whenever cleaning work
is completed.
• The machine must be switched off.
• Push the tool ejector briefly but firmly
with your foot.
• Remove the brushes and clean them under running water.
Attention:
Never clean the machine with a high-pres-
sure cleaner or water jet.
Water ingress in the machine may cause
considerable damage to the mechanical or
electrical parts.
• Wipe the machine with a moist cloth.

13
Storing / parking the machine (not in operation)
Service, maintenance and care
The maintenance of the machine is a prerequisite for impec-
cable operation and a long service life.
Service intervals
TASKI machines are high-quality machines that have been
checked for safety in the factory and by authorized inspectors.
Electrical and mechanical parts are subject to wear and aging
after a longer period of use.
Service center
Please always indicate the type and number of the machine
whenever you contact us for order placing or in case of mal-
functions.
The required data are provided on the nameplate of your ma-
chine. The address of your closest TASKI service partner is
provided on the last page of these instructions of use.
Blade replacement
Notice:
The machine must be switched off and the
key must be removed.
Notice:
Store the machine with a lifted squeegee,
lifted brush and open tank lid. Thus, the
tank can dry,
and the generation of mold and unpleas-
ant odors is prevented.
Attention:
Never store the machine with discharged
batteries. Otherwise, the batteries will be
damaged beyond repair.
Attention:
Use original TASKI parts only; otherwise,
any warranty and liability claims will ex-
pire.
Attention:
In order to rule out unintended machine
functions, before starting maintenance
works the following must always be carried
out
- the machine must be switched off,
- the key can be removed.
Legend:
◊ = whenever cleaning is completed, ◊◊ = every week,
◊◊◊ = every month, ⊗ = service lamp
Activity
◊
◊◊
◊◊◊
⊗
Page
Loading batteries ● 6
Replenishing distilled water (wet-cell
batteries). Observe the service sheet of
the battery supplier!
●7
Draining and cleaning the recovery and
fresh water tank (Flextank)
●12
Clean all yellow marked parts ●
Clean the brushes ● 12
Clean the squeegee, check the blades
for wear and change them, if necessary
●11
Wipe the machine using a damp cloth ● 12
Clean the seals of the tank lid, check
them for cracks and replace them, if
necessary
●
Maintenance and service program car-
ried out by Diversey service techni-
cians
●
• In order to maintain operational safe-
ty and readiness for use, the ma-
chine must be serviced whenever the
maintenance indicator lights up (fac-
tory setting is 550 working hours) or
at least once a year.
Notice:
In case of extraordinary use and/or insuffi-
cient maintenance, shorter intervals are
required.
• Unscrew the four star screws (1) from the squeegee.
• Separate the squeegee body (2) from the squeegee core
(3).
• Remove the blades (4).
• Clean the squeegee body and both squeegee cores under
running water.
• Mount the "turned" or new blades onto the squeegee core.
• Reinsert the squeegee core into the squeegee body.
• Retighten the four star screws.
1
2
3
4
EN

14
Malfunctions
Malfunction Possible causes Troubleshooting Page
Machine without function
Machine is switched off
• Turn the key
5
Battery disconnection socket not
connected
• Connect the battery disconnection
socket with the machine
5
Main fuse is defective
• Check/replace fuse
• Contact your service partner
Immobilizer activated or fault in the
controls
• Stand on the running board
Battery discharged or defective, Bat-
tery charger defective
• Load batteries
• Contact your service partner
8
Batteries defective • Contact your service partner
Brush unit or suction unit cannot be
turned off
Error in the electronic system or in
the control panel
• Stop the machine using emergen-
cy stop
• Contact your service partner
4
Brush does not rotate
Brush drive switched off • Press Brush button 5
Main fuse is defective • Replace fuse
Motor rotates, brush does not
• Drive belt broken
• Contact your service partner
Poor suction performanceFloor re-
mains wetDrain water is not
absorbed
Suction not switched on • Press suction unit button 5
Suction hose not connected • Connect suction hose 8
Squeegee not on the floor
• Check squeegee suspension for
functionality
8
Blades worn out
• Replace blades
13
Hose or squeegee clogged (e.g.
pieces of wood, remnants)
• Remove any foreign matter
Suction filter clogged • Remove any foreign matter 5
Suction unit indicator lights up but
vacuum cleaner is not running
• Check fuse and replace it, if nec-
essary
• Fuse is OK, contact your service
partner
8
Suction unit switches off
Recovery tank full
• Drain recovery tank
• Check battery monitoring
• Check fuse
11
Recovery tank contaminated
• Check recovery tank and clean it, if
necessary
12
Insufficient cleaning solvent supply
Cleaning solvent tank empty • Check cleaning solvent tank 11
Cleaning solvent volume set too low
• Adjust cleaning solvent volume
with +/- buttons
5
Cleaning solvent button switched off • Press cleaning solvent button 5

15
Technical data
Accessories
Machine 1655 1855
Working width 65 85 cm
Suction nozzle width 95 110 cm
Dimensions (LxWxH) 154x69x118 164x88x118 cm
Maximum weight of operational machine 330 347 kg
Rated voltage 24V DC
Rated power, nominal 1200 W
Fresh water tank, nominal +/- 5% 85 l
Values according to IEC 60335-2-72 1655 1855
Machine weight with batteries (transport weight) 245 262 kg
Sound pressure level LpA 61 dB(A)
Uncertainty KpA 2.5 dB(A)
Vibration <2.5 m/s2
Uncertainty K 0.25 m/s2
Splash water guard IPX3
Protection class III
No. Item 1655 1855
7515515 Pad drive harpoon grip 33 cm X
7515516 Scrubbing brush, nylon, 33 cm X
7515518 Scrubbing brush, nylon, abrasive, 33 cm X
7515517 Scrubbing brush, washed concrete, 33 cm X
7517858 Pad drive harpoon grip 43 cm X
7517859 Scrubbing brush, nylon, 43 cm X
7517861 Scrubbing brush, abrasive, 43 cm X
7517860 Scrubbing brush, washed concrete, 43 cm X
8502830 Filling hose with universal water coupling X X
7516240 IntelliDose kit XX
7523390 IntelliTrail XX
7516150 Wet battery set XX
Various pads, (polyester brown, blue, red and contact pad) X X
EN

16
Transport
Disposal
Batteries
Machine dimensions
The dimensions are in centimeters!
swingo 1655
swingo 1855
Attention:
This machine may only be lifted using lift-
ing gear (e.g. hoist, loading ramp, etc.).
Notice:
Transport the machine in an upright posi-
tion.
Notice:
Make sure that the machine is lashed and
secured in the transport vehicle.
Notice:
After withdrawal from service, the machine
and accessory parts must be adequately
disposed of in compliance with the nation-
al regulations. Please contact your Di-
versey service partner for help.
Attention:
Remove all batteries from the machine pri-
or to disposal.
Used batteries must be disposed of in an
environmentally friendly way in compli-
ance with the EC directive 2006/66/EC or
the respective national regulations.
118
154
95
69
118
164
105
88

17
Traducción de las instrucciones originales de uso
Explicación de los símbolos
Índice
Advertencias de seguridad . . . . . . . . . . . . . . . . . . . . . . . . . . . . 17
Productos de limpieza. . . . . . . . . . . . . . . . . . . . . . . . . . . . . . . . 19
Otros documentos. . . . . . . . . . . . . . . . . . . . . . . . . . . . . . . . . . . 19
Vista general de la estructura. . . . . . . . . . . . . . . . . . . . . . . . . . 20
Baterías. . . . . . . . . . . . . . . . . . . . . . . . . . . . . . . . . . . . . . . . . . . 21
Antes de la puesta en marcha . . . . . . . . . . . . . . . . . . . . . . . . . 23
Inicio del trabajo . . . . . . . . . . . . . . . . . . . . . . . . . . . . . . . . . . . . 25
Fin de trabajo . . . . . . . . . . . . . . . . . . . . . . . . . . . . . . . . . . . . . . 26
Servicio, mantenimiento y cuidado . . . . . . . . . . . . . . . . . . . . . . 28
Averías . . . . . . . . . . . . . . . . . . . . . . . . . . . . . . . . . . . . . . . . . . . 29
Datos técnicos. . . . . . . . . . . . . . . . . . . . . . . . . . . . . . . . . . . . . . 30
Accesorio . . . . . . . . . . . . . . . . . . . . . . . . . . . . . . . . . . . . . . . . . 30
Transporte. . . . . . . . . . . . . . . . . . . . . . . . . . . . . . . . . . . . . . . . . 31
Eliminación . . . . . . . . . . . . . . . . . . . . . . . . . . . . . . . . . . . . . . . . 31
Dimensiones de la máquina . . . . . . . . . . . . . . . . . . . . . . . . . . . 31
Uso previsto
Las máquinas deben destinarse para uso comercial, p. ej. en
hoteles, escuelas, hospitales, fábricas, centros comerciales,
pabellones deportivos, entre otros. Teniendo en cuenta estas
instrucciones de uso sirven para la limpieza con líquido de los
revestimientos de suelos. Estas máquinas se planearon ex-
clusivamente para la utilización en el espacio interior.
Advertencias de seguridad
Las máquinas TASKI cumplen por su diseño y estructura los
requisitos de salud y seguridad básicos de la directiva CE y
llevan por eso el símbolo CE.
CUIDADO
Antes de la primera puesta en funciona-
miento es importante que lea este ma-
nual de instrucciones y las indicaciones
de seguridad.
Conserve el manual de instrucciones
cuidadosamente y en un sitio accesible
para poder consultarlo en cualquier mo-
mento.
Peligro:
Este símbolo indica información importan-
te. El incumplimiento de estas indicacio-
nes puede producir peligros para las
personas y/o grandes daños.
Atención:
Este símbolo indica información importan-
te. El incumplimiento de estas indicacio-
nes puede ocasionar averías o daños.
Nota:
Este símbolo indica información importan-
te relacionada con el uso eficiente del pro-
ducto. El incumplimiento de estas
indicaciones puede ocasionar averías.
Incluye indicaciones sobre los pasos de trabajo
que deben seguirse secuencialmente.
t
Atención:
La máquina no debe usarse para el pulido,
el engrasado, el encerado, la limpieza de
alfombras y la aspiración de polvo. La lim-
pieza en mojado de suelos de parqué y la-
minado con esta máquina se realiza bajo
su propio riesgo.
Peligro:
Los cambios a la máquina no autorizados
por parte de Diversey, llevan a la invalida-
ción de los símbolos de seguridad y la
Conformidad CE. Un uso de la máquina
en contra del uso adecuado de la maqui-
naria, puede producir daños a personas,
máquina y el entorno laboral. Dichos ca-
sos conllevan siempre a la perdida de
cualquier derecho de garantía.
Peligro:
La máquina debe usarse solo por perso-
nas que han sido instruidas de forma ade-
cuada sobre su uso o que han demostrado
sus conocimientos con respecto al uso y
se les haya encargado dicho uso explícita-
mente.
Peligro:
La máquina no debe utilizarse por perso-
nas, incluido niños, con capacidades físi-
cas, sensoriales o mentales reducidas, o
falta de experiencia y conocimiento.
Los niños deben estar supervisados para
asegurarse de que no juegan con la má
-
quina.
Peligro:
La máquina no debe usarse en espacios
donde se almacenan o trabajan materiales
con peligro de explosión o fácilmente infla-
mables (por ejemplo: gasolina, disolven-
tes, fuelóleo, polvos, etc.).
Los componentes eléctricos o mecánicos
podrían causar la combustión de este ma
-
terial.
ES

18
Peligro:
La máquina no debe ser utilizada para ab-
sorber materiales tóxicos, dañinos para la
salud, corrosivos o irritantes (por ejemplo:
polvos peligrosos, etc.). Este sistema de
filtrado no retiene suficientemente los ma-
teriales de este tipo.
Podría perjudicar la salud del usuario y de
terceros.
Peligro:
Durante el funcionamiento, preste aten-
ción a su alrededor como por ejemplo ter-
ceras personas y niños. Se debe moderar
la velocidad especialmente cerca de luga-
res con poca visibilidad como por ejemplo
puertas o curvas.
Peligro:
Con esta máquina no deben transportarse
otras personas u objetos.
Peligro:
Si apareciera un fallo en el funcionamien-
to, un defecto así como tras una colisión o
una caída, la máquina deberá ser inspec-
cionada por un profesional autorizado an-
tes de volver a utilizarla. Lo anterior se
aplica también cuando la máquina se deja
en el exterior, se sumerge en el agua o se
expone a la humedad.
Peligro:
En caso de daños en piezas relevantes
para la seguridad como la cubierta del ce-
pillo, el cable principal o las cubiertas que
dan acceso a piezas conductoras, se debe
interrumpir inmediatamente el funciona-
miento de la máquina.
Peligro:
La máquina no debe ajustarse, estacio-
narse o almacenarse en lugares inclina-
dos.
Peligro:
La máquina debe estar desconectada y
con la llave extraída durante todos los tra-
bajos en ella.
Peligro:
La máquina no debe usarse en zonas con
cargas electromagnéticas (electrosmog).
Peligro:
La máquina no debe usarse en lugares
con una inclinación >2 %. Las pendientes
deben transitarse en una marcha lenta y
con el empleo del "modo tortuga" para po-
der asegurar una parada segura.
El cambio agudo en una pendiente puede
perjudicar la estabilidad de la máquina,
por lo que está prohibido. Existe peligro de
accidente.
Peligro:
La máquina solo debe utilizarse en suelos
fuertes, estables y suficientemente firmes.
El incumplimiento da lugar a peligro de ac
-
cidentes.
Atención:
La máquina debe protegerse de usos no
autorizados. Saque las llaves antes de
alejarse de la máquina o guárdelas en una
habitación cerrada.
Atención:
La máquina sólo debe operarse y almace-
narse en un entorno seco y sin polvo a
temperaturas de +10 a +35 grados.
Atención:
Los trabajos de reparación en piezas me-
cánicas o eléctricas de la máquina deben
realizarse solamente por especialistas au-
torizados, que conozcan todas las normas
de seguridad relevantes.
Atención:
Se deben usar exclusivamente herramien-
tas (cepillos, almohadillas o similar), que
hayan sido fijadas dentro de los acceso-
rios de este manual de instrucciones o que
hayan sido recomendadas por un asesor
de TASKI. Otras herramientas pueden
afectar negativamente a la seguridad y las
funciones de la máquina.
Atención:
Las normativas nacionales para la protec-
ción personal y para la prevención de ac-
cidentes como también las indicaciones
del fabricante para el uso de materiales de
limpieza deben ser cumplidas de manera
consecuente.
Atención:
¡Desconecte inmediatamente la unidad de
aspiración, si salieran espuma o líquidos
de la máquina!
Atención:
La máquina debe operarse solo con las
baterías adecuadas y cargadores certifi-
cados.

19
Productos de limpieza
Otros documentos
Atención:
Las máquinas y los dispositivos TASKI es-
tán diseñados de manera que, según el
estado de la tecnología hoy en día, se
pueden excluir peligros para la salud por
las emisiones de ruidos o las vibraciones.
Consulte los datos técnicos en la página
30.
Nota:
Las máquinas TASKI están construidas de
tal forma, que se consiguen obtener resul-
tados de limpieza óptimos con los produc-
tos de limpieza TASKI.
Otros productos de limpieza pueden pro-
vocar averías y daños a las máquinas o el
entorno laboral.
Por esta razón, le recomendamos que use
exclusivamente productos de limpieza
TASKI.
Las averías que se produzcan por el uso
de productos de limpieza incorrectos, no
estarán cubiertas por la garantía.
Para una información más detallada, con-
tacte con el servicio técnico de TASKI.
Nota:
El esquema eléctrico para esta máquina,
se encuentra en la lista de piezas de re-
puesto.
Contacte al servicio de atención al cliente
para más información.
ES

20
Vista general de la estructura.
1 Controlador
2 Timón
3 Contador de horas de servicio (opcional)
4 Manguera de drenaje de agua de recuperación (ro-
ja)
5 Manguera de drenaje de la solución de limpieza
(azul)
6 Pedal de herramienta
7 Pedal de labios
8 Labios
9 Conector del cargador para cargador de batería ex-
terno
10 Cierre del compartimiento de la batería (opcional)
11 Herramienta (cepillos, almohadillas, etc.)
12 Unidad de cepillos
13 Enganche de los labios
14 Llave de la unidad de aspiración (ENCENDIDO/
APAGADO)
15 Llave de contacto
16 Llave de la solución de limpieza (ENCENDIDO/
APAGADO)
17 Llaves de la cantidad de extracción de solución de
limpieza (+ / -)
18 Parada de emergencia
19 Indicador del estado de la batería
20 Indicador de estado de carga de la batería
21 Indicador de servicio
22 Desbloqueo de herramienta
23 Tanque de recuperación
24 Tamiz de la suciedad
25 Flotador (protección contra sobrellenado del tan-
que de recuperación)
26 Filtro de aspiración
27 Tanque de agua limpia
28 Ayuda para la dosificación
29 Desbloqueo de la tapa del depósito
30 Indicador de nivel de llenado
121201918171615
2
3
4
14
13
12
5
6
7
89 1011
Start
max.60°C
max.140°F
MAX
3/4
1/2
2829
30
22 23
27 26 25 24

21
Baterías
Baterías permitidas
Para la operación de ésta máquina son necesarias baterías
de tracción (no baterías de arranque o pilas) Se recomiendan
baterías de tracción limpias. Sólo esto garantiza una larga
vida útil.
Las baterías de tracción se producen como baterías (húme-
das) abiertas o baterías (VRLA) sin mantenimiento (Gel y
AGM). La máquina debe ajustarse según cada tipo de cons-
trucción y de fabricante.
Cada batería ofrece una vida útil diferente y diferentes carac-
terísticas de potencia.
La programación de la máquina debe realizarse después de
instalar las baterías o con el cambio del tipo de batería y/o de-
pendiendo del fabricante y antes de la puesta en marcha.
Un ajuste erróneo puede provocar una avería prematura de
las baterías.
Medidas de seguridad en el manejo de baterías
Esquema de conexión de la batería
Proceso de carga con cargador de batería externo.
Cada tipo de batería y/o fabricante de la batería exigen dife-
rentes procesos de carga.
Los cargadores Onboard que se pueden adquirir de manera
opcional, se adaptan al tamaño de la batería y disponen de
varias curvas de carga, que vienen ajustadas de fábrica o se
deben ajustar por técnicos de servicio de TASKI para las ba-
terías recomendadas. Esta norma es válida incluso para el
uso de cargadores (externos) fijos.
• Las baterías contienen ácidos. Para
el mantenimiento, para el montaje y
el desmontaje de baterías húmedas,
se deben llevar gafas de protección.
• En caso de salpicaduras de ácido en
los ojos o en la piel, enjuague o lave
con agua limpia.
Acuda inmediatamente a un médico.
Enjuague la ropa con agua.
• Durante la carga de las baterías se
forma gas detonante. Mantener ale-
jado del fuego abierto o de objetos
ardientes.
• ¡No fumar!
• ¡Peligro de corrosión!
• ¡Atención! Los polos de las baterías
están siempre bajo tensión, por eso
no se pueden colocar objetos sobre
la batería.
Atención:
Mantenga las baterías limpias y secas.
Limpie inmediatamente los ácidos o agua
que se hayan escapado (baterías húme-
das).
Para ello, lleve guantes de protección.
Atención:
Las baterías deben ser montadas única-
mente por servicios de atención al cliente
permitidos por Diversey y deben instalarse
según el esquema de conexión. Los erro-
res durante el montaje o la conexión pue-
den provocar graves lesiones, una
explosión y grandes daños a la máquina y
al entorno.
Atención:
Preste también atención a las normas
operativas del fabricante de la batería.
Atención:
Durante la carga de la batería, se debe ga-
rantizar suficiente ventilación.
Atención:
Durante el mantenimiento de las baterías,
éstas deben ser extraídas de la máquina.
Atención:
Un proceso de carga incorrecto o el uso de
un cargador inadecuado conllevan a una
avería prematura o una destrucción rápida
de la batería.
Atención:
Los usos breves y continuos con la corres-
pondiente recarga a posteriori, puede per-
judicar la batería. Valor orientativo: Antes
de una recarga se debe realizar una míni-
ma absorción de aprox. 20 % de la capa-
cidad disponible.
Atención:
Para alcanzar la máxima vida útil posible,
se debe iniciar un ciclo completo de carga
para las baterías de tracción 2 veces a la
semana (12 - 16 horas).
6 V
6 V
6 V
6 V
75A
red
Relay
Charger
Power Board
black
ES

22
Proceso de carga con cargador externo
Proceso de carga con cargador Onboard (opcional)
Tras el cierre del proceso de carga
Mantenimiento y cuidado de baterías (húmedas) abiertas
Abrir compartimento de batería para mantenimiento
Variantes: Máquina con el conjunto de baterías de ácido
Cuando termine con la inspección, incline con cuidado el tan-
que en su posición original y ciérrelo con cerrojo.
Atención:
Antes de una parada larga de la máquina,
las baterías deben someterse a un ciclo
de carga completo. A continuación se des-
conecta el cargador de la máquina o de la
red. Las baterías se descargan con el
tiempo. En función del tipo, deberán volver
a cargarse tras 3-6 meses. Antes de la si-
guiente puesta en funcionamiento, las ba-
terías deben realizar de nuevo un ciclo de
carga completo.
• Conecte el cargador de batería externo con el interruptor
de corte de batería de la máquina.
Atención:
Preste atención a que el enchufe esté in-
sertado hasta el final para garantizar un
buen contacto eléctrico.
Nota:
Durante un proceso de carga, se deben
desactivar todas las funciones de la má-
quina.
• La máquina debe estar desconectada.
• Retire el cable de red y conéctelo a un enchufe (seguro).
Atención:
Apague el cargador antes de cortar la co-
nexión con las baterías (solo para carga-
dores externos).
El corte del cargador encendido puede
producir una explosión en el compartimen
-
to de las baterías.
• Coloque el cable de red en cargadores Onboard (opcional)
en la zona prevista.
• Mantenga el cable de carga seco y protegido contra daños.
Atención:
Los cables de carga transfieren alta ten-
sión. En caso de la aparición de daños en
el enchufe, el cable o la conexión del dis-
positivo, no se debe usar el cargador.
Nota:
El cuidado de baterías sin mantenimiento
se limita por el correcto cumplimiento del
proceso de carga correcto y la curva de
carga correctamente ajustada.
• La máquina debe estar desconectada.
Peligro:
Antes de abrir el compartimento de la ba-
tería, debe estar seguro de que las áreas
del depósito estén vacías.
• Interrumpa la conexión entre la batería y la máquina en el
enchufe de desconexión de la batería.
• Baje los labios.
• Encuentre el desbloqueo del com-
partimento de la batería en el lado
delantero inferior derecho e izquier-
do de la máquina.
• Desenrosque ambos tornillos y se-
párelo.
• Encuentre el desbloqueo del com-
partimento de la batería en el lado
delantero inferior izquierdo de la má-
quina.
• Presione el mecanismo de desblo-
queo (p. ej. con un destornillador) en
la abertura designada y levante el
tanque hasta que este encaje.
• Posición del depósito antes del cam-
bio de posición.
• Colóquese detrás de la máquina.
• Abra el compartimento de la batería
con cuidado hasta que el timón se
apoye sobre el suelo.
• Abra el compartimento de la batería
con cuidado hasta que el timón se
apoye sobre el suelo.
Nota:
Vuelva a levantar los labios.
Nota:
Vuelva a unir la batería con el enchufe de
desconexión de la batería.

23
Antes de la puesta en marcha
Dirección de desplazamiento
Colocar la herramienta
Compruebe antes de poner en funcionamiento:
• que el cepillo no esté por debajo de la marca roja (cerdas)
o que la longitud de las cerdas esté por debajo de 1 cm.
• el desgaste y la limpieza del disco.
Monte la boquilla de aspiración
Montar los labios
• Encienda la máquina (llave de con-
tacto).
La pantalla se ilumina brevemente.
El indicador de la batería señala el
estado de servicio de la máquina. (en
caso de avería, consulte la página
29).
• Tome el timón y colóquelo a la altura
del controlador, de manera que pue-
da trabajar con él de forma agrada-
ble.
• Ponga la máquina en funcionamien-
to mediante el interruptor suave del
controlador en el sentido de la mar-
cha; deténgala soltando el controla-
dor.
Atención:
No use cepillos donde se haya alcanzado
el límite de desgaste. Esto se indica a tra-
vés de la longitud de las cerdas rojas. No
utilice discos que estén desgastados o su-
cios. Utilice solo herramientas originales
de TASKI. El incumplimiento puede produ-
cir resultados de limpieza insatisfactorios
e incluso daños en el piso.
• Coloque la herramienta debajo de la unidad de cepillos.
• Conecte la máquina.
Las pantallas se iluminan brevemente.
• Desatranque el control de pie y des-
cienda lentamente la herramienta.
Durante el descenso, comience a
pulsar lentamente la transmisión del
cepillo. Con ello, la herramienta se
centra y se embraga.
La pantalla de funcionamiento de la
herramienta se ilumina.
Nota:
Si el cepillo está debajo, el embrague de la
máquina se alivia para que pueda mover-
se hacia delante y hacia atrás.
• La máquina debe estar desconectada (interruptor princi-
pal).
• Coloque los labios (2) bajo el soporte
de la tobera (1).
• Presione el control de pie hacia aba-
jo hasta que se encaje la tobera de
aspiración.
• Conecte el orificio de la manguera de
succión a la tubuladura de los labios.
Nota:
Es importante que se monten los labios
correctamente según las características
del suelo para poder conseguir un rendi-
miento óptimo.
• Desatornille las tuercas (1) de los tres puntos de ajuste.
• Regule la altura de los labios según las características del
suelo (2).
0: Labios en ajuste de fábrica
-1: Labios en el punto más profundo
4: Labios en el punto más alto
• Atornille las tuercas (1) a los tres puntos de ajuste.
1
1
2
2
1
2
ES

24
Llene el depósito de agua limpia
Dosificación
Ejemplos de dosificación:
Utilización de la taza de dosificación
Limpieza previa
Atención:
Temperatura de agua máxima permitida
de 60°C/140°F.
Diversey recomienda el uso de agua fría,
porque el agua caliente adquiere la tem-
peratura del suelo en cuanto toma contac-
to con él y ésto no aporta ninguna ventaja.
• La máquina debe estar desconectada (interruptor princi-
pal).
• Agarre la abertura entre la tapa del
depósito y el tanque.
Con la palma de la mano hacia arri
-
ba.
• Abra la tapa del depósito hasta que el soporte cuelgue de
la pared del depósito.
• Separe la ayuda para la dosificación.
• Rellene con agua el tanque de agua limpia.
Nivel máximo de llenado permitido (página 20).
• Vuelva a inclinar la tapa del depósito en su posición origi-
nal y apriétela hacia abajo hasta que se bloquee.
Atención:
Durante la manipulación de productos quí-
micos deben usarse guantes, gafas de
protección y ropa de trabajo (de protec-
ción) adecuada.
Nota:
Utilice solo los productos químicos reco-
mendados por Diversey y tenga siempre
en cuenta la información de los productos.
Peligro:
El uso inadecuado de productos inade-
cuados (p. ej. productos con cloro, ácido o
disolventes) puede producir riesgos para
la salud así como daños importantes en la
máquina.
Nota:
Para una dosificación exacta, utilice la es-
cala de la taza de dosificación.
La marca de llenado del tanque corres-
ponde a la marca de la taza de dosifica-
ción. El tipo de máquina aparece en la
taza de dosificación.
Indicaciones en
el embalaje del
producto
Capacidad del
depósito
Taza de dosificación
0.5% 1/2 1 x 1/2
MAX 1 x MAX
1% 1/2 1 x MAX (2 x 1/2)
MAX 2 x MAX
• Añada la cantidad de producto medi-
da con la taza de dosificación al agua
del tanque de agua limpia.
• Eleve ligeramente la tapa del depósito.
• Apriete ligeramente el apoyo de la tapa del depósito hacia
dentro.
• Cierre la tapa del depósito.
• Apriete ligeramente la parte delantera de la tapa del depó-
sito para cerrar el tanque.
Nota:
TASKI le ofrece opcionalmente una dosifi-
cación automática. Ésta puede montarse
también a posteriori. Póngase en contacto
con su asesor de atención al cliente.
Atención:
Elimine los objetos ocasionales (piezas de
metal, madera, etc.) de las superficies de
limpieza.
Los objetos pueden arrojarse por la herra
-
mienta rotatoria, lo que provocaría daños
a personas y al entorno.

25
Inicio del trabajo
Inicio de la limpieza
Temporizador cuando no la use
Durante esos 5 minutos:
Capacidad de la batería - Fin de la disponibilidad de servicio
El indicador del estado de batería da información sobre la
vida útil disponible.
• Si el indicador rojo empieza a parpadear, quedan todavía
aprox. 5 minutos para los trabajos restantes.
• Después se sube la unidad de cepillos. La pantalla roja
cambia a luz continua.
• Entonces quedan 10 minutos para llevar la máquina a la
estación de carga. Luego la máquina se desconecta auto-
máticamente.
• Las baterías deben cargarse completamente para una
nueva puesta en marcha.
Método de limpieza
Método de trabajo directo:
Fregar y aspirar dentro del mismo proceso de trabajo.
Método de trabajo indirecto:
Aplicar solución de limpieza, fregar y aspirar en varios proce-
sos de trabajo.
Atención:
Durante la operación con ésta máquina,
es obligatorio el uso de zapatos de seguri-
dad y ropa de trabajo adecuada.
Nota:
Durante el funcionamiento de la máquina,
coloque ambas manos en el volante / ma-
nillar, para asegurar un correcto agarre.
Atención:
Familiarícese con la máquina en primer lu-
gar mientras comienza una prueba de
conducción en un lugar libre.
Atención:
En caso de que durante el uso de la má-
quina exista el peligro de caída de objetos,
es necesaria una protección que cumpla
con las directrices nacionales.
• Baje los labios.
• Encienda la máquina (llave de contacto).
Las pantallas se iluminan brevemente.
• Baje la herramienta, véase las variantes en la página 23.
• Pulse la llave de la unidad de aspira-
ción ENCENDIDO/APAGADO.
La pantalla se ilumina cuando se ini
-
cia el motor de aspiración.
• Pulse la llave de la extracción de la
solución de limpieza ENCENDIDO/
APAGADO.
La pantalla se ilumina.
El suministro de las soluciones de
limpieza comenzará cuando la herra
-
mienta ruede.
• Seleccione la dosificación deseada
pulsando la llave +/- de los niveles 1
- 6.
Nota:
Diversey recomienda trabajos duraderos
mediante el cálculo de la correcta cantidad
de dosificación del producto. Una dosifica-
ción excesiva o insuficiente podría dar lu-
gar a resultados poco satisfactorios de
limpieza.
Nota:
TASKI le ofrece opcionalmente una dosifi-
cación automática. Ésta puede montarse
también a posteriori. Póngase en contacto
con su asesor de atención al cliente.
• Ponga la máquina en funcionamien-
to mediante el interruptor suave del
controlador en el sentido de la mar-
cha.
Nota:
La máquina se apaga automáticamente
en 5 minutos si no se utiliza.
• no se debe realizar ninguna modificación a los cepillos.
• el usuario no debe dejar la máquina fuera de su alcance vi-
sual.
• los labios de objetos aspirados o atascados solo debe lim-
piarse.
• el usuario solo puede dejar la máquina fuera de su contac-
to visual en caso de movilización del área de trabajo.
Nota:
En ciertas condiciones y en caso de una
combinación especial del revestimiento
del suelo/suciedad y el producto de limpie-
za, se puede ver influenciada negativa-
mente la conducción de la máquina.
Con las ruedas opcionales, la tracción al
suelo de la máquina puede mejorarse.
Póngase en contacto con su asesor de
atención al cliente de TASKI.
ES

26
Relleno de la solución de limpieza
Vacíe el agua sucia
Depósito de agua sucia lleno:
Fin de trabajo
Retire y limpie la tobera de aspiración
Atención:
En los trabajos sin solución de limpieza
pueden producirse daños en los revesti-
mientos.
Nota:
El ruido del traqueteo de la bomba indica
que el depósito de agua fresca se encuen-
tra vacío.
Atención:
La bomba no debe permanecer seca du-
rante mucho tiempo.
• La máquina debe estar desconectada.
• Abra la cubierta del depósito.
• Rellene el depósito de agua limpia con agua, consulte la
página 24.
• Introduzca el producto de limpieza con el vaso de dosifica-
ción.
• Cierre la tapa del depósito.
• Si el depósito de agua sucia se en-
cuentra lleno, el flotador aspira en el
filtro de aspiración.
El cambio del sonido por el aumento
de las revoluciones de aspiración,
así como el encontrarse agua sobre
el suelo.
• Vacíe el depósito de agua sucia, consulte la página 27.
• Pulse la tecla de la solución de lim-
pieza ENCENDIDO/APAGADO.
Se detiene el suministro de la solu
-
ción de limpieza.
• Siga avanzando algunos metros, para que la herramienta
siga girando durante un breve tiempo, de esta forma se
evita un «goteo».
Especialmente importante con los discos de contacto de
TASKI.
• Para elevar la herramienta, apriete el
control de pie hacia abajo hasta que
encaje.
• Siga unos metros para aspirar el agua sucia restante.
• Eleve los labios.
Deje seguir la unidad de aspiración
hasta que el resto del agua sucia sea
absorbida por la manguera.
• Pulse la llave de la unidad de aspira-
ción ENCENDIDO/APAGADO.
La pantalla se ilumina cuando se de
-
tiene el motor de aspiración.
• Desconecte la máquina.
Atención:
Para los siguientes pasos de vaciado y
limpieza, la máquina deberá estar siempre
apagada (interruptor principal).
• Extraiga el orificio de la manguera de succión de la tubula-
dura de los labios.
• Levante los labios con el pie.
• Junte los bloqueos. De esta forma se
desbloquean los labios y se puede
retirar del soporte de la tobera.
• Limpie los labios bajo el agua con ayuda de un cepillo.
Nota:
Solo las cuchillas limpias e intactas consi-
guen un resultado óptimo de aspiración.

27
Vacíe y limpie el tanque de agua sucia y limpia
Limpie el tanque de agua sucia y limpia
Limpie filtro del tanque de agua limpia
Limpie el filtro del tanque de agua limpia cada vez que finalice
la jornada.
Los filtros obstruidos pueden impedir la alimentación inte
-
rior del líquido de limpieza y dar lugar a daños en el piso.
Retire y limpie la herramienta
Limpie la máquina
Almacenaje/ estacionamiento de la máquina (no operativa)
• Retire la manguera de drenaje de agua de recuperación
(roja) del soporte.
• Coloque la manguera de drenaje en un proceso
• Presione el punto de aplastamiento (1) de la manguera de
drenaje.
• Tire la cubierta de la manguera de
drenaje y vacíe el tanque de recupe-
ración.
• El mismo procedimiento que para el vaciado del tanque de
agua limpia. Retire la manguera de drenaje de la solución
de limpieza (azul) del enganche.
• Abra la tapa del depósito hasta que
el soporte encaje de la pared del de-
pósito.
• Enjuague el tanque de agua sucia y de agua limpia a fondo
con agua limpia.
• Retire el tamiz de la suciedad (ama-
rillo), vacíe y lave a fondo con agua
corriente.
• Tome el filtro de aspiración (amarillo)
y elimine la suciedad con un paño o
un cepillo suave.
• Controle el flotador de su capacidad
de funcionamiento.
• Tras el vaciado desenrosque la cubierta azul y roja y vuel-
va a colgar la manguera en el enganche para swingo.
Atención:
Un filtro de aspiración obstruido puede in-
fluenciar negativamente la potencia de as-
piración.
• Vuelva a montar el tamiz de la suciedad (amarillo) el filtro
de aspiración.
• Vuelva a colocar las mangueras de drenaje en el engan-
che para swingo.
1
1
• La máquina debe estar desconectada (interruptor princi-
pal).
• Desenrosque el filtro del tanque de
agua limpia y extráigalo.
• Enjuáguelo a fondo con agua limpia.
Nota:
El filtro se encuentra más profundo que la
salida del tanque. Una cantidad restante
de la solución de limpieza se vacía en el
desenroscado de los filtros.
• Vuelva a colocar el filtro y gírelo.
Nota:
Limpie la herramienta tras finalizar los tra-
bajos de limpieza.
• La máquina debe estar desconectada.
• Apriete un poco con el pie en el blo-
queo de herramientas.
• Retire la herramienta y límpiela bajo el agua corriente.
Atención:
Nunca limpie la máquina con un limpiador
de aire comprimido o con un chorro de
agua.
El agua que penetra en la máquina, puede
producir daños considerables en las pie
-
zas mecánicas o eléctricas.
• Limpie la máquina con un trapo húmedo.
Nota:
La máquina debe estar desconectada y se
debe retirar la llave.
Nota:
Almacene la máquina con la tobera de as-
piración elevada, la herramienta elevada y
la cubierta del depósito abierta. El depósi-
to puede secarse de esta forma.
De esta forma se puede evitar la forma-
ción de moho, hongos y olores desagrada-
bles.
ES

28
Servicio, mantenimiento y cuidado
El mantenimiento de la máquina es una condición para el fun-
cionamiento sin problemas y la larga vida útil.
Intervalos de mantenimiento
Las máquinas TASKI son máquinas de alta calidad, cuya se-
guridad ha sido verificada por inspectores autorizados en fá-
brica. Los componentes eléctricos y mecánicos se ven
sometidos tras un uso prolongado al desgaste y al envejeci-
miento.
Servicio de atención al cliente
En caso de ponerse en contacto con nosotros por una avería
o para realizar un pedido, nómbrenos primero la denomina-
ción del tipo y el número de la máquina.
Estas indicaciones se encuentran en la placa de característi-
cas de la máquina. En la última página de este manual de ins-
trucciones encontrará la dirección de su servicio oficial
TASKI.
Cambio de cuchillas
Atención:
Nunca almacene la máquina con baterías
descargadas. Las baterías pueden provo-
car daños irreparables.
Atención:
Deben usarse sólo piezas originales de
TASKI, si no se pierde cualquier derecho
de garantía y responsabilidad.
Atención:
Para excluir las funciones involuntarias de
la máquina, siempre debe desde el inicio
de los trabajos de mantenimiento
- apagar la máquina
- retirar las llaves.
Explicación de los símbolos:
◊ = para cada fin de limpieza, ◊◊ = cada semana,
◊◊◊ = cada mes, ⊗ = luz de servicio
Actividad
◊
◊◊
◊◊◊
⊗
Página
Cargar baterías ● 21
Rellenar con agua destilada (conjuntos
de baterías de ácido). Cumpla con el
cuaderno de control del fabricante de la
batería.
●22
Vacíe y limpie los tanques de recupera-
ción y de agua limpia
●27
Limpie todas las partes marcadas en
amarillo
●
Limpie la herramienta ● 27
Limpie los labios, compruebe el des-
gaste de las cuchillas y si es necesario
cámbielas.
●26
Limpie la máquina con un trapo húme-
do.
●27
Limpie la junta de la cubierta del depó-
sito y compruebe si hay roturas y si es
necesario, cámbiela.
●
Programa de mantenimiento/servicio
realizados por el técnico de servicio de
Diversey
●
• Para mantener la seguridad en el
funcionamiento y la disponibilidad,
se debe realizar un servicio de man-
tenimiento cuando se encienda la luz
indicadora de servicio (ajuste de fá-
brica 550 horas de trabajo) o al me-
nos una vez al año.
Nota:
En caso de requisitos extraordinarios y/o
un mantenimiento insuficiente deben acor-
tarse los intervalos.
• Desatornille los cuatro tornillos de estrella (1) de la tobera.
• Separe el cuerpo de la tobera (2) del núcleo de la tobera
(3).
• Retire las cuchillas (4).
• Limpie la plataforma de labios de secado y los dos núcleos
de la tobera con agua corriente.
• Monte las láminas «invertidas» o las nuevas láminas en el
núcleo de la tobera.
• Vuelva a colocar el núcleo de la tobera en el cuerpo de la
tobera.
• Vuelva a atornillar los cuatro tornillos de estrella.
1
2
3
4

29
Averías
Avería Posible causa Solución de la avería Página
Las máquinas sin función no pueden
encenderse
Máquina desconectada
• Gire la llave
20
Enchufe de desconexión de la bate-
ría no conectado
• Conecte el enchufe de desco-
nexión de la batería con la máqui-
na
20
Fusible principal defectuoso
• Controle/cambie el fusible
• Contacte con el servicio oficial
Active el inmovilizador o el fallo en el
control
• Colóquelo sobre el estribo
Baterías descargadas o aparato de
carga de baterías defectuoso
• Cargar batería
• Contacte con el servicio oficial
23
Baterías defectuosas • Contacte con el servicio oficial
La unidad de cepillos o la unidad de
aspiración no se pueden desconec-
tar
Error en la electrónica o panel de
control
• Interrumpa la máquina con la pa-
rada de emergencia
• Contacte con el servicio oficial
19
El cepillo no gira
Transmisión del cepillo desconecta-
da
• Pulse la llave del cepillo
20
Fusible principal defectuoso • Cambie el fusible
El motor gira; la herramienta no
• Correas de accionamiento rotas
• Contacte con el servicio oficial
Mala capacidad de aspiraciónEl sue-
lo permanece húmedoEl agua sucia
no se absorbe
El módulo de aspiración no está co-
nectado
• Pulse la tecla del módulo de aspi-
ración
20
Orificio de la manguera de succión
no enchufada
• Enchufe el orificio de la manguera
de succión
23
Los labios no están en el suelo
• Compruebe el correcto funciona-
miento del enganche de la tobera
de aspiración
23
Láminas desgastadas
• Cambiar las láminas
28
Manguera o tobera obstruida (por
ejemplo: trozos de madera, resto de
materiales)
• Retire los cuerpos extraños
Filtro de aspiración obstruido • Retire los cuerpos extraños 20
El indicador del módulo de aspira-
ción se ilumina, pero el aspirador no
funciona
• Controlar el fusible y cámbielo si
fuese necesario
• Si el fusible está bien, póngase en
contacto con el servicio oficial
23
El módulo de aspiración se desco-
necta
Depósito de agua sucia lleno
• Vaciar el depósito de agua sucia
• Controle la supervisión de la bate-
ría
• Controle los fusibles
26
Depósito de agua sucia está sucio
• Contrólelo o si es necesario lím-
pielo.
27
Salida insuficiente de solución de
limpieza
Tanque de la solución de limpieza
vacío
• Controle el tanque de la solución
de limpieza
26
Solución de limpieza ajustado dema-
siado pequeño
• Ajuste la cantidad de la solución
de limpieza con la llave de seguri-
dad +/-
20
Llave de seguridad de la solución de
limpieza desconectada.
• Pulse la llave de seguridad de la
solución de limpieza
20
ES

30
Datos técnicos
Accesorio
Máquina 1655 1855
Ancho de trabajo 65 85 cm
Ancho de los labios 95 110 cm
Dimensiones (L x An x Al) 154x69x118 164x88x118 cm
Peso máximo de la máquina para el funcionamiento 330 347 kg
Tensión nominal 24 V DC
Potencia nominal 1200 W
Tanque de agua limpia nominal +/- 5% 85 l
Valor calculado de acuerdo con IEC 60335-2-72 1655 1855
Peso de la máquina con batería (peso de transporte) 245 262 kg
Nivel de intensidad acústica en LpA 61 dB(A)
Incertidumbre KpA 2.5 dB(A)
Valor total de la vibración <2.5 m/s2
Incertidumbre K 0,25 m/s2
Protección contra salpicaduras IPX3
Clase de protección III
Núm. Artículo 1655 1855
7515515 Placa de guía 33 cm x
7515516 Cepillo de fregar de nylon 33 cm x
7515518 Cepillo de fregar de nylon abrasivo 33 cm x
7515517 Escobilla para hormigón con piedras 33 cm x
7517858 Placa de guía 43 cm x
7517859 Cepillo de fregar de nylon 43 cm x
7517861 Cepillo abrasivo 43 cm x
7517860 Escobilla para hormigón con piedras 43 cm x
8502830 Llenar con agua con Revoflow universal x x
7516240 Juego IntelliDose x x
7523390 IntelliTrail xx
7516150 Juego de conjunto de baterías de ácido x x
Diferentes almohadillas (poliéster marrón, azul, rojo y almohadilla contacto) x x

31
Transporte
Eliminación
Baterías
Dimensiones de la máquina
¡Las dimensiones se realizan en centímetros!
swingo 1655
swingo 1855
Atención:
Esta máquina solo se eleva con materia-
les auxiliares (p. ej. plataforma elevadora,
rampas, etc.)
Nota:
Transporte la máquina de pie.
Nota:
Asegúrese de que la máquina esté correc-
tamente sujeta y asegurada al vehículo de
transporte.
Nota:
La máquina y los accesorios deben des-
echarse de forma profesional según las
normativas nacionales. Su servicio técnico
Diversey puede ayudarle.
Atención:
Las baterías deben sacarse de la máquina
antes de que se realice una eliminación
profesional.
Las baterías usadas se deben eliminar si-
guiendo las directivas de la UE 2006/66/
CE o las correspondientes normativas na-
cionales según la protección del medio
ambiente.
118
154
95
69
118
164
105
88
ES

AT Diversey
Austria Trading GmbH
Guglgasse 7-9
1030 Wien
Tel (43) 1 605 57 0
BE Diversey Belgium BVBA
Haachtsesteenweg 672
1910 Kampenhout
Tel (32) 16 61 77 06
CH Diversey
Europe B.V., Utrecht
Zweigniederlassung
Münchwilen
Eschlikonerstrasse
9542 Münchwilen
Tel (41) 71 969 27 27
CZ Diversey
Ceska republika, s.r.o
K Hájum 1233/2
155 00 Praha 5
Tel (420) 296 357 460
DE Diversey
Deutschland
GmbH & Co. OHG
Mallaustrasse 50-56
68219 Mannheim
Tel (49) 621 875 73 73
DK Diversey Danmark ApS
Teglbuen 10
2990 Nivaa
Tel (45) 70 10 66 11
ES Diversey España S.L.
C/Orense 4, 5 planta
28020 Madrid
Tel (34) 91 394 01 75
FI Diversey
Eliel Saarisentie 2
00400 Helsinki
Tel (358) 20 747 42 00
FR Diversey (France) S.A.S.
9/11, avenue du Val de
Fontenay
94133 Fontenay sous
Bois Cédex
Tel (33) 1 45 14 76 76
GB Diversey Limited
Weston Favell Centre
NN3 8PD Northampton
Tel (44) 1604 405 311
GR Diversey Hellas S.A.
5 Himaras St
15125 Marousi
Tel (30) 210 638 59 00
HU Diversey Ltd.
Puskás Tivadar u. 6.
2040 Budaors
Tel (36) 23 509 100
IE Diversey Hygiene Sales
Limited
Ballyfermot office Westlink
industrial estate Kylemore
road
Dublin 10
Tel (353) 1 626 11 82
IT Diversey S.r.L.
Via Meucci 40
20128 Milano
Tel (39) 02 25 80 32 33
MT Forestals (Appliances)
Ltd.
The Strand
SLM 07 Sliema
Tel (356) 21 344 700-7
NL Diversey B.V.
Maarssenbroeksedijk 2
P.O. Box:40441
3542 DN Utrecht
Tel (31) 30 247 69 11
NO Lilleborg Profesjonell
Postboks 673 - Skøyen
0214 Oslo
Tel (47) 815 36 000
PL Diversey Polska Sp. z.o.o.
Ul.Fabryczna 5a
04-028 Warszawa
Tel (48) 22 516 30 00
PT Diversey Portugal-
Sistemas de Higiene e
Limpeza Unipessoal Lda
Z. Ind.Abrunheira
2714-505 Sintra
Tel (351) 2 191 57 000
RO Diversey Romania S.R.L.
Baneasa Business
Center, Etaj 5
Sos.Bucuresti - Ploiesti
17-21
Sector 1, Bucuresti
Tel (40) 21 233 3894
RU LLC Diversey
125445, Russia,
Moscow,
24D Smolnaya str,
Meridian Commercial
Tower 2d floor
Tel (7) 095 970 17 97
SV Diversey Sverige AB
Liljeholmsvägen 18
Box 47313
10074 Stockholm
Tel (46) 877 99 300
SK Diversey Slovensko s.r.o
Rybničná 40
831 06 Bratislava
Tel (421) 2 4445 4895
SL Diversey d.o.o.
Trzaska cesta 37a
2000 Maribor
Tel (386) 2 320 7000
TR Diversey Sanayi ve
Ticaret A.S.
İçerenköy Mahallesi,
Bahçelerarası Sok.No:43
34752 Ataşehir / İstanbul,
Türkiye
Tel (90) 216 57 86 400
-
 1
1
-
 2
2
-
 3
3
-
 4
4
-
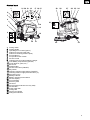 5
5
-
 6
6
-
 7
7
-
 8
8
-
 9
9
-
 10
10
-
 11
11
-
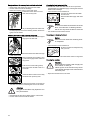 12
12
-
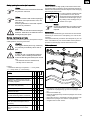 13
13
-
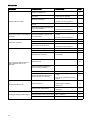 14
14
-
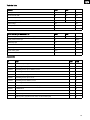 15
15
-
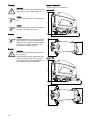 16
16
-
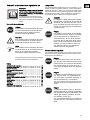 17
17
-
 18
18
-
 19
19
-
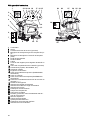 20
20
-
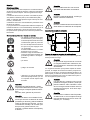 21
21
-
 22
22
-
 23
23
-
 24
24
-
 25
25
-
 26
26
-
 27
27
-
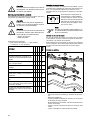 28
28
-
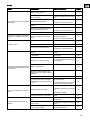 29
29
-
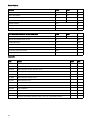 30
30
-
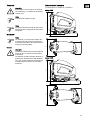 31
31
-
 32
32


Taski Swingo 1655 XD Instrucciones de operación
- Categoría
- Máquina de piso
- Tipo
- Instrucciones de operación
- Este manual también es adecuado para
en otros idiomas
Artículos relacionados
-
diversey TASKI swingo 1660 Instrucciones de operación
-
-
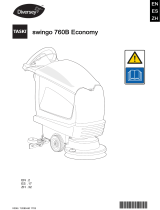 Taski swingo 760B Economy Instrucciones de operación
-
-
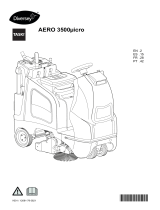 Taski AERO 3500µicro Instrucciones de operación
-
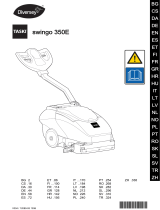 Taski swingo 350E Instrucciones de operación
-
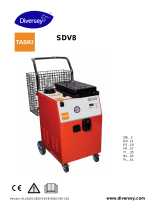 Taski Steam SDV8 Instrucciones de operación
-
-
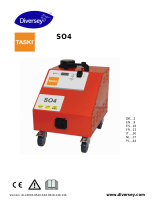 Taski Steam SO4 Instrucciones de operación
-
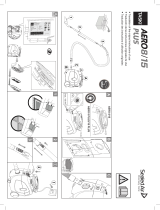 Taski AERO 8/15 PLUS NA Instrucciones de operación


