La página se está cargando...

FTC.S - FTM.S
L8542304
Rev. 10/06/02
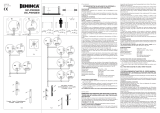
Viti di regolazione
Adjustment screws
Stellschrauben
Vis de réglage
Tornillos de ajuste
Śruby regulacyjne
TX M1: 24Vac (+24Vdc)
M2: 24Vac (-24Vdc)
RX M1: 24Vac (+24Vdc)
M2: 24V ac (-24Vdc)
M3: Comune, COM.
M4: Contatto normalmente aperto, N.O.
M5: Contatto normalmente chiuso, N.C.*
*Con fotocellule alimentate e allineate.
TX M1: 24Vac (+24Vdc)
M2: 24Vac (-24Vdc)
RX M1: 24Vac (+24Vdc)
M2: 24Vac (-24Vdc)
M3: Common, COM.
M4: Normally open contact, N.O.
M5: Normally closed contact, N.C
*With powered and aligned photocells.
TX M1: 24Vac (+24Vdc)
M2: 24Vac (-24Vdc)
RX M1: 24Vac (+24Vdc)
M2: 24Vac (-24Vdc)
M3: Gemeinsam, COM.
M4: Arbeitskontakt, N.O.
M5: Ruhekontakt, N.C.
*Bei gespeisten und angereihten
Fotozellen
TX M1: 24Vac (+24Vdc)
M2: 24Vac (-24Vdc)
RX M1: 24Vac (+24Vdc)
M2: 24Vac (-24Vdc)
M3: Commun, COM
M4: Contact normalement ouvert, N.O.
M5: .Contact normalement fermé, N.C.
*Avec photocellules alimentées
et alignées.
TX M1: 24Vac (+24Vdc)
M2: 24Vac (-24Vdc)
RX M1: 24Vac (+24Vdc)
M2: 24Vac (-24Vdc)
M3: Común, COM.
M4: Contacto normalmente abierto, N.O.
M5: Contacto normalmente cerrado, N.C.
*Con fotocélulas alimentadas y alineadas.
TX M1: 24Vac (+24Vdc)
M2: 24Vac (-24Vdc)
RX M1: 24Vac (+24Vdc)
M2: 24Vac (-24Vdc)
M3: Wspólne, COM.
M4: Styk normalnie otwarty (rozwarty), N.O.
M5: Styk normalnie zamknięty (zwarty), N.Z.
*Przy fotokomórkach zasilanych
i uliniowanych.
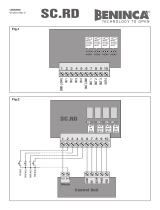
M5M4M3M2M1
N.C.N.O.COM
24Vac/dc
JP2 Open
SYNC OFF
JP2 Open
SYNC OFF
RX
TX
M2M1
24Vac/dc
SYNC SYNC
24Vac/24Vdc
(+) (-)
Fig.1

Regolazione del centraggio
La regolazione del centraggio della fotocellula si
effettua agendo sulle tre viti evidenziate in figura 1.
Lampeggio del LED lento: ricezione debole
Lampeggio del LED veloce: ricezione buona
LED acceso: ricezione ottimale.
Sincronismo
Per evitare interferenze nel caso di utilizzo di due
coppie di fotocellule ravvicinate, attivare il sincro-
nismo chiudendo i jumper JP2 sia sui trasmettitori
sia sui ricevitori.
Il sincronismo funziona esclusivamente con ali-
mentazione 24Vac con polarità invertita tra le 2 o 4
coppie come indicato in Fig. 2.
Adjustment of the alignment
The alignment of the photocell is adjusted by using
the three screws highlighted in the figure 1.
LED flashes slowly : scarce receipt
LED flashes quickly: good receipt
LED on: optimal receipt
Synchronization
To avert any interference when using two pairs of
photocells mounted close together, activate the
synchronization function by closing the jumpers
JP2 on both transmitters and receivers.
The synchronization operates only with 24Vac
power supply and reversed polarity between the 2
or 4 pairs, as shown in Fig. 2.
Regelung der Zentriereung
Die Regelung der Zentrierung der Fotozelle wird
mit Hilfe der drei in der Abbildung 1 dargestellten
Schrauben vorgenommen.
LED blinkt langsam: schwacher Empfang
LED blinkt schnell: guter Empfang
Led ein: optimaler Empfang
Synchronismus
Falls zwei nahliegenden Fotozellenpaare verwendet
werden, den Synchronismus aktivieren, um Störun-
gen zu vermeiden. Dazu die Jumpers JP2 an den
Sendegeräten und an den Empfängern schließen.
Der Synchronismus funktioniert ausschließlich
mit einem Netzgerät 24Vac mit umgetauschten
Polenpaaren, wie in Abb. 2 gezeigt.
Réglage du centrage
Le réglage du centrage de la photocellule a lieu en
agissant sur les trois vis mises en évidence dans
la figure 1.
Clignotement lent du LED:réception faible
Clignotement rapide du LED: bonne réception
LED allumé: réception optimale.
Synchronisme
A fin d’éviter toute interférence en cas d’utilisation de
deux couples de photocellules rapprochées, activez
le synchronisme en fermant les cavaliers JP2 soit sur
les transmetteurs que sur les récepteurs.
Le synchronisme ne marche qu’avec alimentation
24Vac avec polarité inverse entre les 2/4 couples,
(Fig.2).
Ajuste del centrado
El ajuste del centrado de la fotocélula se efectúa
actuando sobre los tres tornillos mostrados en la
figura 1.
Parpadeo del LED lento: recepción débil
Parpadeo del LED rápido: recepción buena
LED encendido: recepción óptima.
Sincronismo
Para evitar interferencias si se utilizan dos parejas
de fotocélulas cercanas, activar el sincronismo cer-
rando los puentes J2 sea en los transmisores que
en los receptores.
El sincronismo funciona exclusivamente con ali-
mentación de 24Vac, con polaridad invertida entre
las 2/4 parejas, como mostrado en la Fig. 2.
Regulacja centrowania
Regulacja centrowania fotokomórki wykonywana jest
przy pomocy trzech śrub wskazanych na rysunku 1.
Błyskanie LED wolne: odbiór słaby
Błyskanie LED szybkie: odbiór dobry
LED zaświecony: odbiór optymalny.
Synchronizm
Aby uniknąć zakłóceń w przypadku używania dwu
par fotokomórek umieszczonych blisko siebie, należy
aktywować synchronizm zamykając jumper J2 zarówno
na nadajnikach, jak i na odbiornikach.
Synchronizm działa wyłącznie przy zasilaniu na
24Vac przy biegunowości odwróconej między obiema
parami tak, jak wskazano na Rys. 2.
/