Troy-Bilt TB45E Manual de usuario
- Categoría
- Podadoras de césped
- Tipo
- Manual de usuario

USER MANUAL Cordless Grass Trimmer
MANUEL DE UTILISATION Toneuse/Tronçonneuse Électrique de gazon
MANUAL DEL USUARIO Recortaador/Cortador de Césped Eléctrico
PN 6096-202B01 Printed in China
U.S.A. Imported by:
Troy Bilt LLC
P.O. Box 361131
Cleveland, OH 44136-0019
Canada Imported by / Importé par:
Troy Bilt PRODUCTS LIMITED
97 Kent Avenue
Kitchener, ON
CANADA N2G 4J1
Made in China / Fabriquè à China / Hecho en China
STOP
ARRÊT
ALTO
For problems or questions, DO NOT return
this product to the store. Contact your
Customer Service Agent .
En cas de problèmes ou pour des questions,
NE PAS retourner ce produit au point de vente. S'adresser
au préposé du Service à la clientèle en composant.
Para problemas o preguntas, NO devolver este producto a la tienda
Contacte a su Agente de Servicio al Cliente.
U.S.A. 1-800-520-5520
CANADA 1-800-668-1238
For Consumer Assistance Please Call
L'Aide Du Consommateur Necessitez S'il Vous Plait
Para La Ayuda Del Consumidor Llame Por Favor
MODEL : TB45E
SAFETY
OPERATION
MAINTENANCE
SECURITE
FONCTIONNEMENT
ENTRETIEN
SEGURIDAD
OPERACION
MANTENIMIENTO
WARNING • PLEASE READ
For your own safety please read this manual before attempting to operate your new unit. Failure to follow instructions can
result in serious personal injury. Spend a few moments to familiarize yourself with your trimmer before each use.
AVERTISSEMENT • LIRE ATTENTIVEMENT
Pour votre sécurité, lisez entièrement ce manuel avant d’utiliser votre nouvel outil. Le non respect des instructions peut
résulter en des accidents graves. Prenez quelques instants pour vous familiariser avec le coupe-herbe avant chaque util-
isation.
ADVERTENCIA • FAVOR DE LEER
Para su propia seguridad, favor de leer este manual antes de intentar operar su unidad nueva. Si no se siguen estas
instrucciones se pueden provocar serias heridas personales. Favor de dedicar un poco de tiempo para familiarizarse cada
vez que se utilice la unidad.

F
R
A
N
C
A
I
S
ALIRE ATTENTIVEMENT
Cher client,
Merci de votre achat d’un produit Troy Bilt. Correctement utilisé et entretenu, il vous procurera des années de satisfaction.
Il est IMPERATIF que vous preniez connaissance de LA TOTALITE du contenu de ce manuel avant d’utiliser l’outil ou de procéder aux
opérations d’entretien.
Conformez-vous scrupuleusement aux instructions et illustrations étape par étape concernant le démarrage, l’utilisation et l’entretien
de votre nouvel outil.
Ce manuel contient également des mises en gardes et informations intitulées: REMARQUE, AVERTISSEMENT /
ATTENTION et GARANTIE.
Une REMARQUE est destinée à fournir des informations complémentaires, éclaircir un point particulier ou expliquer une étape plus en
détail.
Un AVERTISSEMENT ou ATTENTION est utilisé pour identifier une procédure qui, si elle est négligée ou incorrectement exécutée,
peur entraîner des dommages matériels et/ou corporels graves.
Le (SYMBOLE DE GARANTIE) indique que si les procédures ou instructions ne sont pas respectées, les dommages ne seront
pas couverts par la garantie et les réparations seront à la charge du propriétaire.
Les réparations autres que les entretiens à effectuer par l’utilisateur devront être confiées à un Centre de réparation Troy Bilt agréé. La
garantie du fabricant sera nulle en cas de dommages ou de conditions rendant le produit inutilisable à la suite d’un entretien inadéquat.
FOR WARRANTY OR SERVICE CONTACT THE NEAREST TROY BILT AUTHORIZED SERVICE CENTER
BY CALLING THE 1-800# LISTED ON THE BACK COVER.
Troy Bilt LLC
Service de Réparation
E
N
G
L
I
S
H
PLEASE READ
Dear Customer,
Thank you for purchasing a Troy Bilt product. With proper operation and maintenance it will provide you with years of service.
In order to make the best use of your investment, be CERTAIN to familiarize yourself with the contents of the ENTIRE User Manual before
attempting to operate and maintain your unit.
Be sure to carefully follow the step-by-step illustrations in this manual to start, operate and maintain your new product.
In the manual there will be the following call-outs: NOTE, WARNING / CAUTION and WARRANTY.
A NOTE is used to convey additional information, to highlight a particular explanation, or expand a step description.
A WARNING or CAUTION identifies a procedure which, if not undertaken or if improperly done, can result in serious personal injury or
damage to the unit and/or both.
The (WARRANTY SYMBOL) serves notice that unless instructions or procedures are followed, any damage caused will void the war-
ranty and repairs will be at owner’s expense.
Service other than user maintenance should be performed by a Troy Bilt Authorized Service Center. Damage or conditions which render
this product inoperable caused by improper maintenance practices will void the manufacturer’s warranty.
FOR WARRANTY OR SERVICE CONTACT THE NEAREST TROY BILT AUTHORIZED SERVICE CENTER
BY CALLING THE 1-800# LISTED ON THE BACK COVER.
Troy Bilt LLC
Product Service Department
E
S
P
A
Ñ
O
L
FAVOR DE LEER
Estimado Cliente,
Gracias por comprar un producto Troy Bilt. Con una operación y mantenimiento adecuados le proporcionará años de servicio.
Con el objeto de hacer un mejor uso de su inversión, ASEGURESE de familiarizarse con el contenido de TODO el Manual del Usuario
antes de intentar operar o dar mantenimiento a su unidad.
Asegurarse de seguir cuidadosamente las ilustraciones graduales de este manual para poner en marcha, operar y dar mantenimien-
to a su nuevo producto.
En el manual se encontrarán las siguientes señales: NOTA, ADVERTENCIA / PRECAUCION y GARANTIA.
Una NOTA se utiliza para comunicar una información adicional, para enfatizar una explicación particular, o para extender la descrip-
ción de un paso.
Una ADVERTENCIA o PRECAUCION identifica un procedimiento que, si no se lleva a cabo o se hace en forma inadecuada, puede
provocar serias heridas personales o daños a la unidad y/o ambas cosas.
La (SIMBOLO DE GARANTIA) notifica que a menos que se sigan las instrucciones o procedimientos, cualquier daño causado
anulará la garantía y las reparaciones correrán a cuenta del propietario.
Todo el servicio que no sea el mantenimiento del usuario se llevará a cabo en un Centro de Servicio Autorizado Troy Bilt. Los daños
o las condiciones que hagan inoperable este producto debido a las prácticas inadecuadas de mantenimiento anularán la garantía del
fabricante.
FOR WARRANTY OR SERVICE CONTACT THE NEAREST TROY BILT AUTHORIZED SERVICE CENTER
BY CALLING THE 1-800# LISTED ON THE BACK COVER.
Troy Bilt LLC
Departamento de Servicio
1 2
1 - GENERAL INFORMATION - RENSEIGNMENTS GENERAUX -
INFORMACION GENERAL
F
R
A
CARACTERISTIQUES . . . . . . . . . . . . . . . . . . . . . . . . . . . . . .TB45E
Pouissance . . . . . . . . . . . . . . . . . . . . . . . . . . . . . . . . . . . . . . .120V~, 60Hz, 4,5Amp
Vitesse à vide . . . . . . . . . . . . . . . . . . . . . . . . . . . . . . . . . . . . .7,500/min
Diamètre du cercle de coupe . . . . . . . . . . . . . . . . . . . . . . . . . .15” (380mm)
Taille de ligne . . . . . . . . . . . . . . . . . . . . . . . . . . . . . . . . . . . . . .ø0.065” (1.65mm)
Poids Net . . . . . . . . . . . . . . . . . . . . . . . . . . . . . . . . . . . . . . . . .2,9 Kg (6,4 Lbs)
E
N
G
SPECIFICATIONS . . . . . . . . . . . . . . . . . . . . . . . . . . . . . . . . . .TB45E
Input . . . . . . . . . . . . . . . . . . . . . . . . . . . . . . . . . . . . . . . . . . . .120V~, 60Hz, 4.5 Amp
No Load Speed . . . . . . . . . . . . . . . . . . . . . . . . . . . . . . . . . . . .7,500/min
Cutting width . . . . . . . . . . . . . . . . . . . . . . . . . . . . . . . . . . . . . .15” (380mm)
Line Diameter . . . . . . . . . . . . . . . . . . . . . . . . . . . . . . . . . . . . .ø0.065” (1.65mm)
Net Weight . . . . . . . . . . . . . . . . . . . . . . . . . . . . . . . . . . . . . . . .2.9 Kg (6.4 Lbs)
E
S
P
ESPECIFICACIONES . . . . . . . . . . . . . . . . . . . . . . . . . . . . . . .TB45E
Potencia . . . . . . . . . . . . . . . . . . . . . . . . . . . . . . . . . . . . . . . . .120V~, 60Hz, 4,5A
Velocidad no Instalada . . . . . . . . . . . . . . . . . . . . . . . . . . . . . . .7,500/min
-1
/RPM
Diámetro del Círculo de Corte . . . . . . . . . . . . . . . . . . . . . . . . .15” (380mm)
Reserva del la línea . . . . . . . . . . . . . . . . . . . . . . . . . . . . . . . . .ø0.065” (1.65mm)
Peso neto . . . . . . . . . . . . . . . . . . . . . . . . . . . . . . . . . . . . . . . .2,9 Kg (6,4 Lbs)

F
R
A
N
C
A
I
S
ALIRE ATTENTIVEMENT
Cher client,
Merci de votre achat d’un produit Troy Bilt. Correctement utilisé et entretenu, il vous procurera des années de satisfaction.
Il est IMPERATIF que vous preniez connaissance de LA TOTALITE du contenu de ce manuel avant d’utiliser l’outil ou de procéder aux
opérations d’entretien.
Conformez-vous scrupuleusement aux instructions et illustrations étape par étape concernant le démarrage, l’utilisation et l’entretien
de votre nouvel outil.
Ce manuel contient également des mises en gardes et informations intitulées: REMARQUE, AVERTISSEMENT /
ATTENTION et GARANTIE.
Une REMARQUE est destinée à fournir des informations complémentaires, éclaircir un point particulier ou expliquer une étape plus en
détail.
Un AVERTISSEMENT ou ATTENTION est utilisé pour identifier une procédure qui, si elle est négligée ou incorrectement exécutée,
peur entraîner des dommages matériels et/ou corporels graves.
Le (SYMBOLE DE GARANTIE) indique que si les procédures ou instructions ne sont pas respectées, les dommages ne seront
pas couverts par la garantie et les réparations seront à la charge du propriétaire.
Les réparations autres que les entretiens à effectuer par l’utilisateur devront être confiées à un Centre de réparation Troy Bilt agréé. La
garantie du fabricant sera nulle en cas de dommages ou de conditions rendant le produit inutilisable à la suite d’un entretien inadéquat.
FOR WARRANTY OR SERVICE CONTACT THE NEAREST TROY BILT AUTHORIZED SERVICE CENTER
BY CALLING THE 1-800# LISTED ON THE BACK COVER.
Troy Bilt LLC
Service de Réparation
E
N
G
L
I
S
H
PLEASE READ
Dear Customer,
Thank you for purchasing a Troy Bilt product. With proper operation and maintenance it will provide you with years of service.
In order to make the best use of your investment, be CERTAIN to familiarize yourself with the contents of the ENTIRE User Manual before
attempting to operate and maintain your unit.
Be sure to carefully follow the step-by-step illustrations in this manual to start, operate and maintain your new product.
In the manual there will be the following call-outs: NOTE, WARNING / CAUTION and WARRANTY.
A NOTE is used to convey additional information, to highlight a particular explanation, or expand a step description.
A WARNING or CAUTION identifies a procedure which, if not undertaken or if improperly done, can result in serious personal injury or
damage to the unit and/or both.
The (WARRANTY SYMBOL) serves notice that unless instructions or procedures are followed, any damage caused will void the war-
ranty and repairs will be at owner’s expense.
Service other than user maintenance should be performed by a Troy Bilt Authorized Service Center. Damage or conditions which render
this product inoperable caused by improper maintenance practices will void the manufacturer’s warranty.
FOR WARRANTY OR SERVICE CONTACT THE NEAREST TROY BILT AUTHORIZED SERVICE CENTER
BY CALLING THE 1-800# LISTED ON THE BACK COVER.
Troy Bilt LLC
Product Service Department
E
S
P
A
Ñ
O
L
FAVOR DE LEER
Estimado Cliente,
Gracias por comprar un producto Troy Bilt. Con una operación y mantenimiento adecuados le proporcionará años de servicio.
Con el objeto de hacer un mejor uso de su inversión, ASEGURESE de familiarizarse con el contenido de TODO el Manual del Usuario
antes de intentar operar o dar mantenimiento a su unidad.
Asegurarse de seguir cuidadosamente las ilustraciones graduales de este manual para poner en marcha, operar y dar mantenimien-
to a su nuevo producto.
En el manual se encontrarán las siguientes señales: NOTA, ADVERTENCIA / PRECAUCION y GARANTIA.
Una NOTA se utiliza para comunicar una información adicional, para enfatizar una explicación particular, o para extender la descrip-
ción de un paso.
Una ADVERTENCIA o PRECAUCION identifica un procedimiento que, si no se lleva a cabo o se hace en forma inadecuada, puede
provocar serias heridas personales o daños a la unidad y/o ambas cosas.
La (SIMBOLO DE GARANTIA) notifica que a menos que se sigan las instrucciones o procedimientos, cualquier daño causado
anulará la garantía y las reparaciones correrán a cuenta del propietario.
Todo el servicio que no sea el mantenimiento del usuario se llevará a cabo en un Centro de Servicio Autorizado Troy Bilt. Los daños
o las condiciones que hagan inoperable este producto debido a las prácticas inadecuadas de mantenimiento anularán la garantía del
fabricante.
FOR WARRANTY OR SERVICE CONTACT THE NEAREST TROY BILT AUTHORIZED SERVICE CENTER
BY CALLING THE 1-800# LISTED ON THE BACK COVER.
Troy Bilt LLC
Departamento de Servicio
1 2
1 - GENERAL INFORMATION - RENSEIGNMENTS GENERAUX -
INFORMACION GENERAL
F
R
A
CARACTERISTIQUES . . . . . . . . . . . . . . . . . . . . . . . . . . . . . .TB45E
Pouissance . . . . . . . . . . . . . . . . . . . . . . . . . . . . . . . . . . . . . . .120V~, 60Hz, 4,5Amp
Vitesse à vide . . . . . . . . . . . . . . . . . . . . . . . . . . . . . . . . . . . . .7,500/min
Diamètre du cercle de coupe . . . . . . . . . . . . . . . . . . . . . . . . . .15” (380mm)
Taille de ligne . . . . . . . . . . . . . . . . . . . . . . . . . . . . . . . . . . . . . .ø0.065” (1.65mm)
Poids Net . . . . . . . . . . . . . . . . . . . . . . . . . . . . . . . . . . . . . . . . .2,9 Kg (6,4 Lbs)
E
N
G
SPECIFICATIONS . . . . . . . . . . . . . . . . . . . . . . . . . . . . . . . . . .TB45E
Input . . . . . . . . . . . . . . . . . . . . . . . . . . . . . . . . . . . . . . . . . . . .120V~, 60Hz, 4.5 Amp
No Load Speed . . . . . . . . . . . . . . . . . . . . . . . . . . . . . . . . . . . .7,500/min
Cutting width . . . . . . . . . . . . . . . . . . . . . . . . . . . . . . . . . . . . . .15” (380mm)
Line Diameter . . . . . . . . . . . . . . . . . . . . . . . . . . . . . . . . . . . . .ø0.065” (1.65mm)
Net Weight . . . . . . . . . . . . . . . . . . . . . . . . . . . . . . . . . . . . . . . .2.9 Kg (6.4 Lbs)
E
S
P
ESPECIFICACIONES . . . . . . . . . . . . . . . . . . . . . . . . . . . . . . .TB45E
Potencia . . . . . . . . . . . . . . . . . . . . . . . . . . . . . . . . . . . . . . . . .120V~, 60Hz, 4,5A
Velocidad no Instalada . . . . . . . . . . . . . . . . . . . . . . . . . . . . . . .7,500/min
-1
/RPM
Diámetro del Círculo de Corte . . . . . . . . . . . . . . . . . . . . . . . . .15” (380mm)
Reserva del la línea . . . . . . . . . . . . . . . . . . . . . . . . . . . . . . . . .ø0.065” (1.65mm)
Peso neto . . . . . . . . . . . . . . . . . . . . . . . . . . . . . . . . . . . . . . . .2,9 Kg (6,4 Lbs)

1 - GENERAL INFORMATION - RENSEIGNMENTS GENERAUX -
INFORMACION GENERAL
3 4
F
R
A
N
C
A
I
S
LIRE ET CONSERVER CES INSTRUCTIONS
Lorsqu'un appareil électrique est utilisé, des précautions élémentaires doivent toujours être prises pour assurer une sécu-
rité maximum et une performance optimale. Lire cette Notice avant d'assembler et d'utiliser cet appareil. Ne pas se con-
former aux instructions peut causer des secousses électriques, des brûlures, un incendie ou des blessures corporelles.
AVERTISSEMENT
1-1.POUR RÉDUIRE LES RISQUES DE BRÛLURES, D'INCENDIE, DE SECOUSSES
ÉLECTRIQUES OU DE BLESSURES :
1. RESPECTER TOUTES LES MESURES DE SÉCURITÉ figurant dans cette Notice avant et durant l'utilisation du
coupe-herbe.
2. POUR RÉDUIRE LES RISQUES DE SECOUSSES ÉLECTRIQUES, cet équipement est muni d'une fiche polarisée
(une broche est plus large que l'autre). Cette fiche ne peut être branchée que dans un sens et que dans une prise
de courant polarisée. Si la fiche ne peut pas être enfoncée à fond dans la prise de courant, inverser le sens de la
fiche. Ne jamais modifier la fiche de l'appareil.
E
N
G
L
I
S
H
PLEASE READ - SAVE THESE INSTRUCTIONS
When using an electrical appliance, basic precautions should always be followed to assure maximum safety and optimum
performance. Read this manual before assembling and operating this appliance. Failure to comply with instructions may
result in electrical shock, burns, fire, or personal injury.
WARNING
1-1.TO REDUCE THE RISK OF ELECTRIC SHOCK, BURNS, FIRE OR PERSONAL INJURY:
1. FOLLOW ALL SAFETY INSTRUCTIONS listed in this manual before/during operation of this trimmer.
2. TO REDUCE THE RISK OF ELECTRIC SHOCK this equipment has a polarized plug (one blade is wider than the
other). This plug will fit in a polarized extension cord only one way. If the plug does not fit fully in the extension cord,
reverse the plug. Do not change the plug in any way.
E
S
P
A
Ñ
O
L
FAVOR DE LEER - CONSERVE ESTAS INSTRUCCIONES
Al utilizar un aparato eléctrico siempre debe seguir ciertas precauciones básicas para asegurar una protección máx-
ima y un rendimiento óptimo. Lea este manual antes de ensamblar y operar este aparato. Si no sigue las instrucciones
podría provocar el riesgo de incendio, choque eléctrico o heridas personales.
ADVERTENCIA
1-1.PARA REDUCIR EL RIESGO DE CHOQUEN ELECTRICO, INCENDIO O HERIDAS PER-
SONALES:
1. SIGA TODAS LAS INSTRUCCIONES DE SEGURIDAD enlistadas en este manual antes y durante la operación de
esta recortadora.
2. PARA REDUCIR EL RIESGO DE CHOQUE ELECTRICO, este equipo cuenta con un enchufe polarizado (una clav-
ija es más ancha que la otra). Este enchufe embonará en una toma de corriente polarizada de una sola manera. Si
el enchufe no embona por completo, inviértalo. De ninguna manera intente cambiar el enchufe.
IMPORTANT SAFETY INSTRUCTIONS
INSTRUCTIONS DE SECURITE IMPORTANTES
- INSTRUCCIONES DE SEGURIDAD IMPOR-
TANTES
DEBRIS SHIELD
PARE-DEBRIS
PROTECTOR DESECHOS
ASSIST HANDLE
POIGNEE DE MAINTIEN
MANUBRIO AUXILIAR
REAR HANDLE
POIGNEE ARRIERE
MANUBRIO TRASERO
ON/OFF TRIGGER
MANETTE MARCHE/ARRET
GATILLO DE ENCENDIDO/APAGADO
CORD RETAINER
RETENUE DU CORDON
RETENEDOR DEL CABLE
ADJUSTABLE SHAFT
ARBRE DE TRANSMISSION AJUSTABLE
FLECHA AJUSTABLE
AIR OPENINGS
TROUS DE VENTILATION
APERTURAS DE AIRE
SAFETY SWITCH
INTERRUPTEUR DE SÉCURITÉ
INTERRUPTOR DE SEGURIDAD
EDGE GUIDE WING NUT
BOULON À OREILLES DU GUIDE DE BORD
TUERCA DE MARIPOSA DEGUÍA DE
EXTREMO
STRING HEAD
TETE DE COUPE
CABEZA DE HILO
EDGE GUIDE
WHEEL
ROUE DE
GUIDAGE DE
BORD
RUEDA DE GUÍA
DE EXTREMO
PLUG FOR
EXTENSION CORD
PRISE POUR LA CORDE
DE PROLONGATION
ENCHUFE PARA CUERDA
DE LA EXTENSIÓN
SHAFT ADJUSTMENT
BUTTON
BOUTON D’AJUSTEMENT
D’EXE
BOTÓN DEL AJUSTE DEL
EJE
EDGER CONVERSION
BUTTON
BOUTON DE CONVERSION
D’EDGER
BOTÓN DE LA
CONVERSIÓN DE EDGER
La página se está cargando...
La página se está cargando...

7
F
R
A
N
C
A
I
S
8. TENIR LES PIEDS ET LES MAINS À L'ÉCART du fil de coupe en rotation. Ne pas utiliser si le bouclier à debris
n'est pas en place.
9. BIEN S'HABILLER - Toujours porter des pantalons longs, des chaussures et des gants. Ne jamais porter de vête-
ments amples, de bijoux, de shorts ou de sandales. Ne jamais utiliser l'appareil si on est pieds nus.
10. LA ZONE DE TRAVAIL DOIT TOUJOURS ÊTRE DÉGAGÉE - Maintenez chacun, particulièrement les enfants et
les animaux de compagnie partis de l’aire de les pieds de l’opération 50 (15m). Arrêter l'appareil dès que quelqu'un
s'en approche. Ne jamais laisser les enfants utiliser cet appareil en tant que jouet et ne jamais les laisser utiliser l'ap-
pareil sans surveillance.
11. ÉVITER LES MILIEUX DANGEREUX - Pour éviter les risques d'incendie ou d'explosion, ne pas utiliser l'appareil à
proximité de liquides ou de gaz inflammables ou de matériaux en combustion ou dégageant de la fumée. Ne pas
utiliser le coupe-herbe dans les endroits humides ou mouillés, autour des piscines, de cuves à remous, etc. ou
lorsqu'il pleut. Ne pas toucher à la fiche, au cordon électrique ou à l'appareil si on a les mains mouillées.
12. UTILISER ADÉQUATEMENT L'APPAREIL - Utiliser l'appareil exclusivement pour les applications prévues dans
cette Notice. NE PAS UTILISER LE COUPE-HERBE POUR BALAYER - c'est-à-dire déplacer la tête de coupe de
gauche à droite pour nettoyer les débris des trottoirs, des allées, etc. Ce coupe-herbe est un outil puissant qui peut
projeter des débris à plus de 50 pieds et blesser quelqu'un ou endommager les voitures, les fenêtres ou les habita-
tions proches. Inspecter la zone de travail avant de mettre l'appareil en marche et la débarrasser des débris et des
autres objets qui pourraient éventuellement causer des dommages.
13. NE JAMAIS UTILISER D'ACCESSOIRES autres que ceux recommandés et fournis par Troy Bilt. Ne pas utiliser de
fils de coupe métalliques.
E
N
G
L
I
S
H
8. KEEP HANDS AND FEET AWAY from rotating line. Do not operate without debris shield attached.
9. DRESS PROPERLY - Always wear long pants, shoes and gloves. Do not wear loose clothing, jewelry, short pants,
sandals or go barefoot.
10. KEEP AREA CLEAR - Keep everyone, especially children and pets away from the area of operation 50 feet (15m).
Turn off unit immediately if you are approached. Never allow children to operate the appliance to be used as a toy
or to run unattended at any time.
11. AVOID A DANGEROUS ENVIRONMENT - Do not use in the presence of flammable liquids or gases, smoking or
burning materials to avoid creating a fire or explosion. Never operate the trimmer in wet or damp conditions or around
swimming pools, hot tub, etc. Do not use in rain. Do not handle plug, cord or appliance with wet hands.
12. USE APPLIANCE CORRECTLY - Use this appliance only for its intended use as described in this manual. DO NOT
SWEEP WITH TRIMMER - Sweeping refers to tilting stringhead to sweep away debris from walkways, etc. Your trim-
mer is a powerful tool and small stones or other such debris may be hurled 50 feet or more, causing injury or dam-
age to nearby property such as automobiles, homes and windows. Inspect area before starting the appliance to
remove debris and other objects that can cause damage during operation.
13. DO NOT USE ACCESSORIES or attachments except as recommended and provided by Troy Bilt. Do not use any
type of wire or metal cutting line.
E
S
P
A
Ñ
O
L
8. CONSERVE LAS MANOS Y LOS PIES ALEJADOS de la línea giratoria. No opere sin la protección instalada.
9. VISTA ADECUADAMENTE – Use siempre pantalones largos, zapatos y guantes. No opere sin el protector para
residuos instalado.
10. MANTENGA EL AREA LIMPIA – Mantenga cada uno, especialmente los niños y los amimales demésticos ausentes
del área de los pies de la operación 50 (15m). Apague la unidad inmediatamente en caso de que se esté acercando
a ellos. Nunca permita que los niños operen el aparato como si fuera un juguete o que éste funcione desatendido.
11. EVITE UN AMBIENTE PELIGROSO – No lo use en presencia de líquidos o gases inflamables, materiales
humeantes o ardientes, para evitar que produzca un incendio o alguna explosión. Nunca opere su recortadora en
condiciones húmedas o mojadas, alrededor de albercas, etc. No lo use bajo la lluvia. No agarre el enchufe, el cable
o el aparato con las manos mojadas.
12. USE EL APARATO CORRECTO – Use este aparato exclusivamente para lo que fue hecho y como se describe en
este manual. NO BARRA CON LA RECORTADORA - El barrer significa ladear la cabeza de hilo con el fin de quitar
desechos de las banquetas, etc. Su recortadora es una potente herramienta y pequeñas piedras u otros escombros
similares peuden ser lanzados 50 pies o más, causando heridas o daños a propiedades cercanas tales como
automóviles, casas y ventanas. Inspeccione el área antes de encender el aparato para remover desechos y otros
objetos que pueden causar daños durante la operación.
13. NO USE ACCESORIOS o aditamentos con excepción de los recomendados y suministrados por Troy Bilt, No use
ningún tipo de línea cortadora metálica o alámbrica.
8
F
R
A
N
C
A
I
S
14. NE PAS TENIR L'APPAREIL À BOUT DE BRAS. Toujours garder bon pied et un bon équilibre.
15. ÉVITER LES DÉMARRAGES ACCIDENTELS - Ne pas porter l'appareil pendant qu'il est branché et alors qu'on a
le doigt sur la gâchette.
16. DÉBRANCHER l'appareil de la prise de courant quand il n'est pas utilisé ou avant d'entretenir la tête de coupe.
17. REMISER le coupe-herbe à l'intérieur - Lorsqu'il n'est pas utilisé, l'appareil doit être remisé dans un endroit sec, ver-
rouillé ou inaccessible aux enfants.
18. Ne pas saisir les lames de coupe ou les bords de coupe exposés lorsque ous prenez ou tenez l’appareil.
19.Ne pas forcer avec l’appareil - il fonctionnera mieux et il y aura moins de risques d’accident s’il fonctionne à la vitesse
pour laquelle il a été prévu.
1.2. EXPLICATION DES NOTA, AVERTISSEMENTS ET SYMBOLES DE LA GARANTIE
1. Un NOTA est destiné à fournir des informations complémentaires, à éclaircir un point particulier ou à expliquer plus
en détail une étape.
2. Un AVERTISSEMENT identifie une procédure qui risque de causer de graves blessures corporelles ou de graves
dommages à l'appareil et/ou les deux si elle n'est pas respectée ou si elle est mal effectuée.
3. Le (SYMBOLE DE GARANTIE) indique que si les procédures ou instructions n'ont pas été respectées, les dom-
mages causés annuleront la garantie et que les réparations seront à la charge du propriétaire. Pour des services
autres que ceux d'entretien à effectuer par l'utilisateur, s'adresser à un Centre de réparation agréé Troy Bilt. La
garantie du fabricant sera nulle et non avenue si des dommages ou des conditions causés par de mauvaises pra-
tiques d'entretien rendent le produit inutilisable.
E
N
G
L
I
S
H
14. DO NOT OVERREACH - Keep firm footing and balance at all times.
15. AVOID UNINTENTIONAL STARTING - Do not carry plugged in trimmer with your finger on the switch.
16. DISCONNECT trimmer from power supply when not in use and before servicing stringhead.
17. STORE idle trimmer indoors. Appliance should be stored in a dry, high or locked up place - out of the reach of chil-
dren.
18. Don’t grasp the exposed cutting blades or cutting edges when picking up or holding the appliance.
19. Don’t force appliance - it will do the job better and witth less likelihood of a risk of injury at the rate for which it was
designed.
1-2. EXPLANATION OF NOTE, WARNING, and WARRANTY SYMBOL
1. A NOTE is used to convey additional information, or highlight a particular explanation, or to expand a step instruc-
tion.
2. A WARNING identifies a procedure which, if not undertaken or if improperly done, can result in a serious personal
injury or damage to the unit and/or both.
3. (WARRANTY SYMBOL) serves notice that unless instructions or procedures are followed, any damage will void
the warranty and repairs will be at owner’s expense. Service other than user maintenance should be performed by
a Troy Bilt Authorized Service Center. Damage or conditions caused by improper maintenance practices which ren-
der this product inoperablewill void the manufacturer’s warranty.
E
S
P
A
Ñ
O
L
14. NO SE EXTRALIMITE – Conserve una posición y equilibrio firme en todo momento.
15. EVITE UN ENCENDIDO INVOLUNTARIO – No transporte la recortadora conectada con el dedo en el interruptor.
16. DESCONECTE la recortadora de la corriente eléctrica cuando no la use o antes de realizar el servicio de la cabeza
de hilo.
17. ALMACENE la recortadora inactiva en el interior. Este aparato debe ser almacenado en lugares secos, altos y
seguros - fuera del alcance de los niños.
18. No toque las cuchillas de corte expustas ni los bordes de corte cuando tome o levente el aparato.
19. No fuerce el aparato - realizará mejor el trabajo y con menos probabiliada de un riesgo de lesión a la velocidad
para la cual se diseñó.
1-2.EXPLICACION DE NOTA, ADVERTENCIA Y SIMBOLO DE GARANTIA
1. Una NOTA usada para comunicar información adicional, para destacar una explicación particular, o para expander
una instrucción específica.
2. Una ADVERTENCIA identifica un procedimiento que, si no se acomete o se realiza inadecuadamente, puede provo-
car heridas personales y/o daños a la unidad.
3. El (SIMBOLO DE GARANTIA) sirve para notificar que por los menos las instrucciones o procedimientos deben
llevarse al cabo, cualiquier daño invalidará la garantía y los gastos de la reparaciones serán asumidos por el dueño.
Cualquier otro servicio, con excepción del mantenimiento del usuario, deberá ser realizado por un Centro de Servicio
Autorizado Troy Bilt. Los daños o condiciones causadas por practicas de mantenimiento inadecuadas, las cuales
hagan que el producto sea inoperable invalidarán la garantía del fabricante.

E
N
G
L
I
S
H
NOTE: The only assembly required for your trimmer is to install the edge guide wheel, debris shield and adjust the assist
handle.
3-1.EDGE GUIDE WHEEL INSTALLATION
1. Position the edge guide wheel (A) to the front of the motor housing as shown in Fig. 3-1A
2. Tighten the wing nut (B) firmly. (Fig. 3-1B)
3-2.DEBRIS SHIELD INSTALLATION
1. Position the motor housing with string head carrier facing up. (Fig. 3-1C)
2. Slide debris shield over motor housing.
3. Secure it with 4 screws (C). (Fig. 3-1D)
9 10
F
R
A
4. POUR TOUT ENTRETIEN OU SERVICE AU TITRE DE LA GARANTIE, entrez en contact avec la centre commer-
ical autorisé par Troy Bilt le plus proche en appelant 800# sur la couverture arrière.
1-3.SYMBOLES INTERNATIONAUX
1. Lire la Notice d'utilisation (Figure 2-1).
2. Il est fortement recommandé de respecter les consignes de sécurité personnelle pour réduire les risques d'accident
ou de blessures (Figure 2-2).
CONSERVER CES INSTRUCTIONS
E
N
G
4. FOR WARRANTY OR SERVICE contact the nearest Troy Bilt Authorized Service Center by calling 800# on back
cover.
1-3.INTERNATIONAL SYMBOLS
1. Read the User Manual (Figure 2-1).
2. Use of these personal safety items is highly recommended to reduce the risk of accidental injury (Figure 2-2).
SAVE THESE INSTRUCTIONS
E
S
P
4. PARA LA GARANTIA O EL SERVICIO entre en contacto con el centro de servicio autorizado Troy Bilt más cercano
llamando 800# en la cubierta trasera.
1-3.SIMBOLOS INTERNACIONALES
1. Lea el manual del Usuario (Figura 2-1).
2. El uso de estos párrafos sobre seguridad personal es altamente recomendado para reducir el riesgo de heridas acci-
dentales (Figura 2-2).
CONSERVE ESTAS INSTRUCCIONES
Use of these personal safety items is highly recommended to
reduce the risk of accidental injury.
L’utilisation des ces dispostifs de sécurité est foretement
recommandé afim de réduire tout risque de blessures acciden-
telles.
El uso de estos articulos de seguridad personal es altamente
recomendado para reducir el riesgo de lesiones accidentales.
2-INTERNATIONAL SYMBOLS - SYMBOLES INTERNATIONAUX
SIMBOLOS INTERNACIONALES
Read the User Manual.
Lire le manuel d’utilisation.
Lea Manual de Usuario.
2-1
2-2
3 - ASSEMBLY INSTRUCTIONS - INSTRUCTIONS POUR MONTAGE -
INSTRUCCIONES DE ENSEMBLADO
F
R
A
N
C
A
I
S
REMARQUE : Les seules opérations de montage que nécessite votre taille-haies consistent à monter la roue de guidage
de bord, le bouclier à débris, et a regler la poignee d'aide.
3-1.INSTALLATION DE LA ROUE DE GUIDAGE DE BORD
1. Placez la roue du guide de bordure (A) sur l'avant du logement moteur ainsi qu'illustré dans la Fig. 3-1A.
2. Serrez fermement l'écrou à oreilles (B). (Fig. 3-1B)
3-2.INSTALLATION DU BOUCLIER A DEBRIS
1. Placez le logement du moteur de façon à avoir le support de tête de fil tourné vers le haut. (Fig. 3-1C)
2. Faites glisser le bouclier à débris au-dessus du logement du moteur.
3. Fixez avec 4 vis (C). (Fig. 3-1D)
E
S
P
A
Ñ
O
L
NOTA: El único montaje necesario para la recortadora es instalar la rueda de guía del extremo, la protección contra resid-
uos y el mango de asistencia.
3-1. INSTALACIÓN DE LA RUEDA DE GUÍA DEL EXTREMO
1. Coloque la rueda guía de reborde (A) al frente de la carcasa del motor como e muestra en la Fig. 3-1A
2. Apriete la tuerca de mariposa (B) firmemente. (Fig 3-1B)
3-2.INSTALACIÓN DE LA PROTECCIÓN CONTRA RESIDUOS
1. Coloque el compartimento del motor con el portador del cabezal de cuerda mirando hacia arriba. (Fig. 3-1C)
2. Deslice la protección contra residuos sobre el compartimento del motor.
3. Apriétela con 4 tornillos (C). (Fig. 3-1D)
3-1A
3-1B
3-1C
3-1D
A
B
C
C

E
N
G
L
I
S
H
NOTE: The only assembly required for your trimmer is to install the edge guide wheel, debris shield and adjust the assist
handle.
3-1.EDGE GUIDE WHEEL INSTALLATION
1. Position the edge guide wheel (A) to the front of the motor housing as shown in Fig. 3-1A
2. Tighten the wing nut (B) firmly. (Fig. 3-1B)
3-2.DEBRIS SHIELD INSTALLATION
1. Position the motor housing with string head carrier facing up. (Fig. 3-1C)
2. Slide debris shield over motor housing.
3. Secure it with 4 screws (C). (Fig. 3-1D)
9 10
F
R
A
4. POUR TOUT ENTRETIEN OU SERVICE AU TITRE DE LA GARANTIE, entrez en contact avec la centre commer-
ical autorisé par Troy Bilt le plus proche en appelant 800# sur la couverture arrière.
1-3.SYMBOLES INTERNATIONAUX
1. Lire la Notice d'utilisation (Figure 2-1).
2. Il est fortement recommandé de respecter les consignes de sécurité personnelle pour réduire les risques d'accident
ou de blessures (Figure 2-2).
CONSERVER CES INSTRUCTIONS
E
N
G
4. FOR WARRANTY OR SERVICE contact the nearest Troy Bilt Authorized Service Center by calling 800# on back
cover.
1-3.INTERNATIONAL SYMBOLS
1. Read the User Manual (Figure 2-1).
2. Use of these personal safety items is highly recommended to reduce the risk of accidental injury (Figure 2-2).
SAVE THESE INSTRUCTIONS
E
S
P
4. PARA LA GARANTIA O EL SERVICIO entre en contacto con el centro de servicio autorizado Troy Bilt más cercano
llamando 800# en la cubierta trasera.
1-3.SIMBOLOS INTERNACIONALES
1. Lea el manual del Usuario (Figura 2-1).
2. El uso de estos párrafos sobre seguridad personal es altamente recomendado para reducir el riesgo de heridas acci-
dentales (Figura 2-2).
CONSERVE ESTAS INSTRUCCIONES
Use of these personal safety items is highly recommended to
reduce the risk of accidental injury.
L’utilisation des ces dispostifs de sécurité est foretement
recommandé afim de réduire tout risque de blessures acciden-
telles.
El uso de estos articulos de seguridad personal es altamente
recomendado para reducir el riesgo de lesiones accidentales.
2-INTERNATIONAL SYMBOLS - SYMBOLES INTERNATIONAUX
SIMBOLOS INTERNACIONALES
Read the User Manual.
Lire le manuel d’utilisation.
Lea Manual de Usuario.
2-1
2-2
3 - ASSEMBLY INSTRUCTIONS - INSTRUCTIONS POUR MONTAGE -
INSTRUCCIONES DE ENSEMBLADO
F
R
A
N
C
A
I
S
REMARQUE : Les seules opérations de montage que nécessite votre taille-haies consistent à monter la roue de guidage
de bord, le bouclier à débris, et a regler la poignee d'aide.
3-1.INSTALLATION DE LA ROUE DE GUIDAGE DE BORD
1. Placez la roue du guide de bordure (A) sur l'avant du logement moteur ainsi qu'illustré dans la Fig. 3-1A.
2. Serrez fermement l'écrou à oreilles (B). (Fig. 3-1B)
3-2.INSTALLATION DU BOUCLIER A DEBRIS
1. Placez le logement du moteur de façon à avoir le support de tête de fil tourné vers le haut. (Fig. 3-1C)
2. Faites glisser le bouclier à débris au-dessus du logement du moteur.
3. Fixez avec 4 vis (C). (Fig. 3-1D)
E
S
P
A
Ñ
O
L
NOTA: El único montaje necesario para la recortadora es instalar la rueda de guía del extremo, la protección contra resid-
uos y el mango de asistencia.
3-1. INSTALACIÓN DE LA RUEDA DE GUÍA DEL EXTREMO
1. Coloque la rueda guía de reborde (A) al frente de la carcasa del motor como e muestra en la Fig. 3-1A
2. Apriete la tuerca de mariposa (B) firmemente. (Fig 3-1B)
3-2.INSTALACIÓN DE LA PROTECCIÓN CONTRA RESIDUOS
1. Coloque el compartimento del motor con el portador del cabezal de cuerda mirando hacia arriba. (Fig. 3-1C)
2. Deslice la protección contra residuos sobre el compartimento del motor.
3. Apriétela con 4 tornillos (C). (Fig. 3-1D)
3-1A
3-1B
3-1C
3-1D
A
B
C
C

11 12
F
R
A
N
C
A
I
S
4-4.DEMARRAGE
1. A la première utilisation du coupe herbe à fil, vérifier que les fils de Nylon touchent ou sont au-dessus de la lame
coupe-fil; s’ils ne sont pas assez longs, appuyer sur le bouton et tirer les fils de Nylon simultanément. ( Fig. 4-4A)
2. Brancher la prise du coupe herbe au prolongateur et attacher à la poignée.
3. Assurez-vous que la longueur du coupe-herbe et la position de la poignée d'aide sont bien correctes avant utilisa-
tion ; ajustez la longueur du coupe-herbe en appuyant sur le bouton de réglage de l'axe ; ajustez la hauteur de la
poignée d'aide en desserrant la molette de réglage.
4. Attrapez fermement l'extremité du taille-herbe et, sans le laisser entrer en contact avec l'herbe à couper, enfoncez
l'interrupteur de sécurité, puis appuyez sur la gâchette sur la poignée supérieure. Laissez le coupe-herbe à fil tourn-
er pendant quelques secondes, et "cognez" la tête de fil contre le sol. Le fil de nylon sera automatiquement relâché.
La lame de coupe se trouvant dans le bouclier à débris coupera l'excédant de fil.
5. Pour arrêter le coupe herbe, relâcher la gâchette.
E
N
G
L
I
S
H
4-4.STARTING
1. When starting the string-trimmer for the first time, check that the nylon line touch or pass over the wire-cutting blade.
If they are not long enough, press the bump knob and, at the same time, pull the nylon line. (Fig. 4-4A).
2. Adjust the height and cutting position as detailed in adjustment instructions.
3. Make sure the length of grass trimmer and position of assist handle is most applicable before use, adjust the length
of grass trimmer by pressing the shaft adjustment button, adjust the height of assist handle by loosening the adjust-
ment knob.
4. Take a secure hold of the grass trimmer and, without letting it touch the grass to be cut, push up the safety switch,
then press the trigger on the upper handgrip. Let the string trimmer run for a few seconds and “bump” the stringhead
against the lawn. Nylon line will automatically release. The cut-off knife in the debris shield will trim off excess line.
5. To switch off the string trimmer let go of the switch.
E
S
P
A
Ñ
O
L
4-4.ENCENDIDO
1. Antes de encender el orillador de pasto la primera vez , asegúrese que el hilo de naylon toque o exceda la longitud
hacia la navaja que cortara el hilo en la guarda protectora. Si el hilo no es suficientemente largo, presione el botón
del cabezal y al mismo tiempo jale el hilo de naylon (Fig. 4-4A).
2. Conecte la clavija eléctrica a la extensión eléctrica y sujete esta en el maneral.
3. Asegúrese de que la longitud de la recortadora de hierba y la posición del mango de asistencia es la conveniente
antes de su utilización, ajuste la longitud del recortador de hierba pulsando el botón de ajuste del eje, ajuste la altura
del mango de asistencia soltando el botón de ajuste.
4. Sostenga firmemente la cortadora de césped y, sin dejarla tocar el césped que va a cortar, hale el interruptor de
seguridad, luego presione el gatillo del mango superior. Deje que la cortadora de cordel opere por unos pocos
segundos y "choque" el cabezote de cordel contra el césped. El cordel de Nylon se liberará automáticamente. La
cuchilla de corte en la guarda escombros cortará el exceso de cordel.
5. Para apagar la unidad simplemente deje de presionar el interruptor de encendido.
4 - ADJUSTMENT INSTRUCTIONS - INSTRUCTIONS DE RÉGLAGE
INSTRUCCIONES DE AJUSTE
4-1A
A
4-2A 4-2B
B
F
R
A
N
C
A
I
S
4-1.RÉGLAGE DE LA LONGUEUR DU MANCHE
1. Saisir fermement le manche.
2. Pousser le bouton de dégagement rouge du manche vers l’avant et déplacer le manche vers l’avant ou vers l’arrière
à la longueur désirée (Figure 4-1A).
NOTA: Le manche peut être réglé dans le mode coupe-herbe ou taille-bordure.
4-2.TRANSFORMATION EN TAILLE-BORDURE
1. Saisir fermement le manche.
2. Appuyez sur le bouton de bordure (B) et faites pivoter l'ensemble de poignée jusqu'à ce vous entendiez un déclic.
(Fig.4-2A & Fig.4-2B)
3. Ajustez la poignée d'aide selon vos besoins.
4-3.ADJUSTER LA POIGNEE DE MAINTEIN
REMARQUE: La poignée de maintien est attachée au manche mais a été tournée vers le bas pour le transport.
1. Desserrer le bouton de réglage et faire toutner la poignée vers le haut du manche (Figure 4-3).
2. Resserrer fermement le bouton de réglage.
E
N
G
L
I
S
H
4-1.ADJUST SHAFT LENGTH
1. Grip shaft firmly.
2. Push shaft release button (A) and move motor housing forward or backward to
desired length. (Fig. 4-1A)
NOTE: Shaft may be adjusted in trimming or edging mode.
4-2.EDGING CONVERSION
1. Grip shaft firmly.
2. Push edge button (B) and rotate handle assembly until an audible click is heard.
(Fig. 4-2A & Fig. 4-2B)
3. Adjust assist handle as required.
4-3.ADJUST THE ASSIST HANDLE
NOTE: The assist handle is attached to the shaft but has been turned under for packing
1. Loosen adjustment knob and rotate handle to the top of shaft (Figure 4-3).
2. Tighten adjustment knob securely.
E
S
P
A
Ñ
O
L
4-1.AJUSTE LA LONGITUD DEL EJE
1. Agarre el eje firmemente.
2. Presione el botón rojo para liberar el eje hacia adelante y mueva el manubrio hacia atrás a la longitud deseada
(Figura 4-1A).
NOTA: El eje puede ser ajustado ya sea en modo de recortadora o de desorilladora.
4-1.TRANSFORMACION A DESORILLADORA
1. Agarre el eje firmemente.
2. Pulse el botón de extremo (B) y gire el montaje del mango hasta que se oiga un clic. (Fig 4-2A y Fig. 4-2B)
3. Ajuste el mango de asistencia según lo necesite.
4-3.AJUSTE DE EL MENUBRIO AUXILIAR
NOTA: La manija de ayuda está atada al mango pero ha sido girada hacia abajo para empacarse.
1. Afloje la perilla de ajuste y gire la manija hacia arriba del mango (Figura 4-3).
2. Reapriete la perilla de ajuste seguramente.
4-3
4-4A

13 14
F
R
A
AVERTISSEMENT
Un fil abîmé ou trop court ne coupe pas de manière efficace ; afin d’améliorer sa performance, tapoter légèrement le
bouton de la bobine contre le sol pendant que le coupe herbe est en marche. (Fig. 4-4B).
Répéter plusieurs fois avant de commencer le travail pour vous assurer que tout fonctionne correctement et pour vous
familiariser avec le coupe herbe.
Commencer doucement, et avec un peu d’expérience, vous pourrez utiliser le coupe herbe dans tout son potentiel.
E
N
G
CAUTION
A short or worn wire cuts less efficiently so, to improve its operation on subsequent occasions, bump the spool button
lightly on the ground while the trimmer is running.(Fig 4-4B)
These operations should be repeated a few times before starting work to make sure that everything is functioning prop-
erly and to familiarize yourself with the string trimmer.
Start off slowly, when you have gained experience, you will be able to use the grass trimmer to its full potential.
E
S
P
ADVERTENCIA
Un hilo corto o gastado , corta mal, por lo que es necesario que presione el botón del cabezal contra el piso con la
maquina encendida. Esto hara que el hilo salga del cabezal y se cortara automáticamente a la longitud optima con
la cuchilla de la guarda. ( Fig. 4-4B).
Esta operación debe repetirse algunas veces antes de iniciar el trabajo con el fin de asegurarse que todo esta funcio-
nando correctamente y para que usted se familiarice con el orillador de pasto. Inicie lentamente , cuando obtenga
experiencia podrá usar su orillador de pasto a su máxima capacidad.
4-4B
A
5 - OPERATING INSTRUCTIONS - INSTRUCTIONS D’UTILISATION -
INSTRUCCIONES DE OPERACION
5-1
A
F
R
A
N
C
A
I
S
5-1.BRANCHEMENT DU CORDON PROLONGATEUR
1. S'assurer que le cordon prolongateur n'est PAS branché dans une prise de courant avant de procéder à l'opération
suivante.
2. Former une boucle de 20 à 25 cm (8 à 10 pouces) avec l'extrémité du cordon prolongateur.
3. Placez le boucle dans l'orifice (A) sous la poignée arrière et verrouillez en position l'attache-cordon ainsi qu'indiqué
dans Figure 5-1.
4. Brancher le cordon prolongateur sur le du coupe-herbe.
5. Ne brancher le cordon prolongateur dans une prise de courant secteur QUE lorsque l'on est prêt à utiliser l'appareil.
5-2.FONCTIONNEMENT DU COUPE-HERBE
1. COUPE ET TONTE (Fig. 5-2A). Utiliser un mouvement de balancement latéral semblable à celui d’une faux. Ne pas
incliner la tête pendant cette opération. Faire un essai sur la partie à tondre pour vérifier la hauteur de coupe. Garder
la téte de coupe à une hauteur constante pour obtenir une tonte uniforme.
2. POUR TONDRE DE PLUS PRÉS (Fig. 5-2B). Tenir le coupe-herbe droit devant soi et l’inclner légèrement de manière
que le fil de coupe se trouve à l’angle voulu sans que le dessous de la tête de coupe ne touche le sol. Toujours ton-
dre loin de soi, ne jamais amener le coupe-herbe à soi.
E
N
G
L
I
S
H
5-1.CONNECT THE CORD
1. Ensure the cord is NOT plugged into a receptacle before this procedure.
2. Make a loop with 8″ - 10″ (20 - 25cm) of the end of the extension cord.
3. Place the loop into the slot (A) under the rear handle and lock into place on the cord retainer as shown in Figure 5-1.
4. Connect the extension cord to the trimmer.
5. Plug the extension cord into a receptacle ONLY when you are ready to operate the trimmer.
5-2.TRIMMER OPERATION
1. TRIMMING / MOWING (Fig. 5-2A). Swing trimmer with a sickle-like motion from side to side. Do not tilt the string-
head during the procedure. Test area to be trimmed for proper cutting height. Keep stringhead at same level for even
depth of cut.
2. CLOSER TRIMMING (Fig. 5-2B). Position trimmer straight ahead with a slight tilt so bottom of stringhead is above
ground level and string contact occurs at proper cutting point. Always cut away from operator. Do not pull trimmer
in toward operator.
E
S
P
A
Ñ
O
L
4-1.CONECTE EL CABLE
1. Asegúrese de que el cable NO esté conectado en el receptáculo antes de este procedimiento.
2. Haga una lazada con 20-25cm (8-10″) del extremo del cable extensión.
3. Coloque el bucle en la ranura (A) debajo de la manija posterior y asegúrelo en su sitio en el retén de cordel como
se muestra en la Figura 5-1.
4. Conecte el cable de extensión al de la recortadora.
5. Enchufe el cable de extensión en el receptáculo SOLO cuando esté preparado para hacer funcionar la recortadora.
5-2.OPERACIÓN DEL CORTADOR ORILLADOR
1. CORTADOR DE PASTO (Fig. 5-2A). Columpie la unidad de lado a lado. No incline el cabezal en este movimiento.
Haga una prueba para definir la altura de corte. Mantenga el cabezal a una misma altura para un corte parejo.
2. CORTE MAS CERCANO (Fig. 5-2B). Posicione el cabezal un poco inclinado , siempre corte alejado de personas y
del operador.
La página se está cargando...
La página se está cargando...

F
R
A
N
C
A
I
S
6-2.ENTRETIEN
AVERTISSEMENT
Avant de commencer toute maintenance, débrancher la prise du prolongateur.
1. Un entretien et nettoyage réguliers du coupe herbe en assurera son efficacité et sa longévité.
2. Après chaque opération, défaire et enlever la terre et l’herbe des éléments suivants : la bobine et ses encoches,
particulièrement le pare débris.
3. Pendant l’utilisation, garder les ouvertures propres et sans herbe.
4. Pour nettoyer le coupe herbe, utiliser exclusivement un chiffon trempé dans de l’eau chaude et une brosse à poils
doux.
5. Ne pas asperger ou mouiller l’appareil.
6. Ne pas utiliser de détergeants ou dissolvants car ils risquent d’endommager le coupe herbe. Les pièces en plas-
tique sont facilement endommagées par les produits chimiques.
7. Si le fil de coupe ne coupe plus ou se casse, faites-le remplacer pour cela, prenez contact avec un centre de
maintenance agrée.
E
N
G
L
I
S
H
6-2.MAINTENANCE
CAUTION
Before carrying out any maintenance operations, cut off the electric power supply by disconnecting the plug from the
extension cable.
1. Regular cleaning and maintenance of your string trimmer will ensure efficiency and prolong the life of your machine.
2. After each cutting operation, take apart and clean out the grass and soil from: the spool and its slot and in particular
the guard.
3. During operation, keep the air slots clean and free of grass.
4. Only use a cloth soaked with hot water and a soft brush to clean the string trimmer.
5. Do not spray or wet the appliance with water.
6. Do not use detergents or solvents as these could ruin the trimmer. The parts in plastic can easily be damaged by
chemical agents.
7. If the line cutting line no longer cuts or breaks, have this replaced by contacting an authorized service centre.
E
S
P
A
Ñ
O
L
6-2.MAINTENIMIENTO
PRECAUCION
Antes de practicar cualquier procedimiento de mantenimiento de su unidad, corte completamente el suministro de corri-
ente eléctrica de la unidad desconectando la clavija de la extensión eléctrica.
1. Un regular mantenimiento y aseo de su maquina asegurara un funcionamiento mas eficiente y prolongara la vida
de su unidad.
2. Después de cada operación de corte, limpie y quite la tierra y pasto de el cabezal y particularmente de la guarda.
3. Mientras opera la unidad asegúrese de que las ranuras d ventilación están limpias y libres de tierra y pasto.
4. Unicamente utilice un trapo húmedo con agua caliente y un cepillo delgado para limpiar su maquina.
5. No rocÌe o moje su unidad con agua.
6. No utilice detergentes o solventes ya que esto pudiera arruinar su unidad.
7. Si la línea de corte ya no corta o se rompe, reemplácela contactando un centro de servicio autorizado.
F
R
A
N
C
A
I
S
6. Installez le bout du fil dans l’orifice opposé (Fig. 6-1F). Replacez le support transparent (Fig. 6-1G). Tirez le fil de
dessous et le fixez dans l’orifice en dessous du support transparent (Fig. 6-1H) Tirez le fil de dessus et le fixez dans
l’orifice en dessus du support transparent.
7. Insérez le fil dans chaque orifice du support de bobine, et faites glisser la bobine dans ce support (Fig.6-1E & 6-1F)
REMARQUE : Assurez-vous que le fil se trouve bien dans le diviseur ; s'il est en-dehors, le fil ne sera pas alimen-
té.
8. En veillant à bien insérer le ressort, remontez l'ensemble support de bobine et bobine dans le coupe-herbe. Pour ce
faire, poussez sur la tête et tournez l'ensemble dans le sens des aiguilles d'une montre jusqu'à ce qu'il se fixe en
position. (Fig. 6-1G and Fig 6-1H)
9. Pour vérifier que le fil avance bien correctement, poussezle bouton avec votre pouce tout en tirant le fil avec vos
doigts. Le fil doit pouvoir avancer librement. (Fig. 6-1J).
10. Si le fil se casse dans la bobine, répétez l'opération de remplacement.
11. Démarrez le coupe-herbe en suivant les instructions données dans la section "MISE EN MARCHE".
E
N
G
L
I
S
H
6. Lock the ends of the line in opposite slots on the spool (Fig. 6-1F). Place the clear plastic line retainer back over the
line and spool (Fig 6-1G). Pull the lower line up into the lower slot in the clear plastic line retainer (Fig. 6-1H). Pull
the upper line down into the upper slot (Fig 6-1J).
7. Insert the line through each eyelet in the spool carrier and slide the spool into the carrier. (Fig. 6-1K)
NOTE: Ensure that the line is within the clear plastic line retainer. If it's outside of the clear plastic line retainer, the
line will not feed.
8. Make sure to insert the spring, assemble the spool and spool carrier back onto the trimmer. To do so, push the head
on and turn it clockwise until it locks. (Fig.6-1Land Fig 6-1M)
9. To test if the line is advancing properly, push the button with your thumb while pulling the line with your fingers. The
line should advance freely. (Fig. 6-1N).
10. In the event of the line breaking inside the spool, repeat the replacement operation.
11. Start the grass trimmer following the instructions in the “STARTING” section.
E
S
P
A
Ñ
O
L
6. Ajuste los extremos de la línea en las ranuras opuestas en el rotor (Fig. 6-1F) Coloque el retenedor de línea de plás-
tico transparente de nuevo sobre la línea y el rotor (Fig 6-1G) Jale la linea hasta la ranura inferior en el retenedor
de la línea de plástico transparente (Fig. 6-1H) Jala la línea superior hacia la ranura superior (Fig 6-1J)
7. Inserte la línea a través de cara ojal en el portador del rotor y deslice el rotor en el portador. (Fig. 6-1K)
NOTA: Asegúrese que la línea está dentro del retenedor de plástico transparente. Si está fuera del retenedor de
plástico transparente, la línea no avanzara.
8. Asegúrese de insertar el resorte, ensamblar el rotor y el portador de rotor de nuevo en la podadora. Para hacerlo,
empuje la cabeza y gírela hacia la derecha hasta que embone. (Fig.6-1L y Fig 6-1M)
9. Para probar si la línea está avanzando adecuadamente, presione el botón con su pulgar mientras jala la línea con
sus dedos. La línea deberá avanzar libremente. (Fig. 6-1N)
10. En caso de que la línea se rompa dentro del rotor, repita la operación de reemplazo.
11. Encienda el podador de pasto siguiente las instrucciónes en la seccion de “ARRANQUE”.
6-1F 6-1G 6-1H 6-1J
6-1K 6-1L 6-1M 6-1N
17 18

F
R
A
N
C
A
I
S
6-2.ENTRETIEN
AVERTISSEMENT
Avant de commencer toute maintenance, débrancher la prise du prolongateur.
1. Un entretien et nettoyage réguliers du coupe herbe en assurera son efficacité et sa longévité.
2. Après chaque opération, défaire et enlever la terre et l’herbe des éléments suivants : la bobine et ses encoches,
particulièrement le pare débris.
3. Pendant l’utilisation, garder les ouvertures propres et sans herbe.
4. Pour nettoyer le coupe herbe, utiliser exclusivement un chiffon trempé dans de l’eau chaude et une brosse à poils
doux.
5. Ne pas asperger ou mouiller l’appareil.
6. Ne pas utiliser de détergeants ou dissolvants car ils risquent d’endommager le coupe herbe. Les pièces en plas-
tique sont facilement endommagées par les produits chimiques.
7. Si le fil de coupe ne coupe plus ou se casse, faites-le remplacer pour cela, prenez contact avec un centre de
maintenance agrée.
E
N
G
L
I
S
H
6-2.MAINTENANCE
CAUTION
Before carrying out any maintenance operations, cut off the electric power supply by disconnecting the plug from the
extension cable.
1. Regular cleaning and maintenance of your string trimmer will ensure efficiency and prolong the life of your machine.
2. After each cutting operation, take apart and clean out the grass and soil from: the spool and its slot and in particular
the guard.
3. During operation, keep the air slots clean and free of grass.
4. Only use a cloth soaked with hot water and a soft brush to clean the string trimmer.
5. Do not spray or wet the appliance with water.
6. Do not use detergents or solvents as these could ruin the trimmer. The parts in plastic can easily be damaged by
chemical agents.
7. If the line cutting line no longer cuts or breaks, have this replaced by contacting an authorized service centre.
E
S
P
A
Ñ
O
L
6-2.MAINTENIMIENTO
PRECAUCION
Antes de practicar cualquier procedimiento de mantenimiento de su unidad, corte completamente el suministro de corri-
ente eléctrica de la unidad desconectando la clavija de la extensión eléctrica.
1. Un regular mantenimiento y aseo de su maquina asegurara un funcionamiento mas eficiente y prolongara la vida
de su unidad.
2. Después de cada operación de corte, limpie y quite la tierra y pasto de el cabezal y particularmente de la guarda.
3. Mientras opera la unidad asegúrese de que las ranuras d ventilación están limpias y libres de tierra y pasto.
4. Unicamente utilice un trapo húmedo con agua caliente y un cepillo delgado para limpiar su maquina.
5. No rocÌe o moje su unidad con agua.
6. No utilice detergentes o solventes ya que esto pudiera arruinar su unidad.
7. Si la línea de corte ya no corta o se rompe, reemplácela contactando un centro de servicio autorizado.
F
R
A
N
C
A
I
S
6. Installez le bout du fil dans l’orifice opposé (Fig. 6-1F). Replacez le support transparent (Fig. 6-1G). Tirez le fil de
dessous et le fixez dans l’orifice en dessous du support transparent (Fig. 6-1H) Tirez le fil de dessus et le fixez dans
l’orifice en dessus du support transparent.
7. Insérez le fil dans chaque orifice du support de bobine, et faites glisser la bobine dans ce support (Fig.6-1E & 6-1F)
REMARQUE : Assurez-vous que le fil se trouve bien dans le diviseur ; s'il est en-dehors, le fil ne sera pas alimen-
té.
8. En veillant à bien insérer le ressort, remontez l'ensemble support de bobine et bobine dans le coupe-herbe. Pour ce
faire, poussez sur la tête et tournez l'ensemble dans le sens des aiguilles d'une montre jusqu'à ce qu'il se fixe en
position. (Fig. 6-1G and Fig 6-1H)
9. Pour vérifier que le fil avance bien correctement, poussezle bouton avec votre pouce tout en tirant le fil avec vos
doigts. Le fil doit pouvoir avancer librement. (Fig. 6-1J).
10. Si le fil se casse dans la bobine, répétez l'opération de remplacement.
11. Démarrez le coupe-herbe en suivant les instructions données dans la section "MISE EN MARCHE".
E
N
G
L
I
S
H
6. Lock the ends of the line in opposite slots on the spool (Fig. 6-1F). Place the clear plastic line retainer back over the
line and spool (Fig 6-1G). Pull the lower line up into the lower slot in the clear plastic line retainer (Fig. 6-1H). Pull
the upper line down into the upper slot (Fig 6-1J).
7. Insert the line through each eyelet in the spool carrier and slide the spool into the carrier. (Fig. 6-1K)
NOTE: Ensure that the line is within the clear plastic line retainer. If it's outside of the clear plastic line retainer, the
line will not feed.
8. Make sure to insert the spring, assemble the spool and spool carrier back onto the trimmer. To do so, push the head
on and turn it clockwise until it locks. (Fig.6-1Land Fig 6-1M)
9. To test if the line is advancing properly, push the button with your thumb while pulling the line with your fingers. The
line should advance freely. (Fig. 6-1N).
10. In the event of the line breaking inside the spool, repeat the replacement operation.
11. Start the grass trimmer following the instructions in the “STARTING” section.
E
S
P
A
Ñ
O
L
6. Ajuste los extremos de la línea en las ranuras opuestas en el rotor (Fig. 6-1F) Coloque el retenedor de línea de plás-
tico transparente de nuevo sobre la línea y el rotor (Fig 6-1G) Jale la linea hasta la ranura inferior en el retenedor
de la línea de plástico transparente (Fig. 6-1H) Jala la línea superior hacia la ranura superior (Fig 6-1J)
7. Inserte la línea a través de cara ojal en el portador del rotor y deslice el rotor en el portador. (Fig. 6-1K)
NOTA: Asegúrese que la línea está dentro del retenedor de plástico transparente. Si está fuera del retenedor de
plástico transparente, la línea no avanzara.
8. Asegúrese de insertar el resorte, ensamblar el rotor y el portador de rotor de nuevo en la podadora. Para hacerlo,
empuje la cabeza y gírela hacia la derecha hasta que embone. (Fig.6-1L y Fig 6-1M)
9. Para probar si la línea está avanzando adecuadamente, presione el botón con su pulgar mientras jala la línea con
sus dedos. La línea deberá avanzar libremente. (Fig. 6-1N)
10. En caso de que la línea se rompa dentro del rotor, repita la operación de reemplazo.
11. Encienda el podador de pasto siguiente las instrucciónes en la seccion de “ARRANQUE”.
6-1F 6-1G 6-1H 6-1J
6-1K 6-1L 6-1M 6-1N
17 18
La página se está cargando...

USER MANUAL Cordless Grass Trimmer
MANUEL DE UTILISATION Toneuse/Tronçonneuse Électrique de gazon
MANUAL DEL USUARIO Recortaador/Cortador de Césped Eléctrico
PN 6096-202B01 Printed in China
U.S.A. Imported by:
Troy Bilt LLC
P.O. Box 361131
Cleveland, OH 44136-0019
Canada Imported by / Importé par:
Troy Bilt PRODUCTS LIMITED
97 Kent Avenue
Kitchener, ON
CANADA N2G 4J1
Made in China / Fabriquè à China / Hecho en China
STOP
ARRÊT
ALTO
For problems or questions, DO NOT return
this product to the store. Contact your
Customer Service Agent .
En cas de problèmes ou pour des questions,
NE PAS retourner ce produit au point de vente. S'adresser
au préposé du Service à la clientèle en composant.
Para problemas o preguntas, NO devolver este producto a la tienda
Contacte a su Agente de Servicio al Cliente.
U.S.A. 1-800-520-5520
CANADA 1-800-668-1238
For Consumer Assistance Please Call
L'Aide Du Consommateur Necessitez S'il Vous Plait
Para La Ayuda Del Consumidor Llame Por Favor
MODEL : TB45E
SAFETY
OPERATION
MAINTENANCE
SECURITE
FONCTIONNEMENT
ENTRETIEN
SEGURIDAD
OPERACION
MANTENIMIENTO
WARNING • PLEASE READ
For your own safety please read this manual before attempting to operate your new unit. Failure to follow instructions can
result in serious personal injury. Spend a few moments to familiarize yourself with your trimmer before each use.
AVERTISSEMENT • LIRE ATTENTIVEMENT
Pour votre sécurité, lisez entièrement ce manuel avant d’utiliser votre nouvel outil. Le non respect des instructions peut
résulter en des accidents graves. Prenez quelques instants pour vous familiariser avec le coupe-herbe avant chaque util-
isation.
ADVERTENCIA • FAVOR DE LEER
Para su propia seguridad, favor de leer este manual antes de intentar operar su unidad nueva. Si no se siguen estas
instrucciones se pueden provocar serias heridas personales. Favor de dedicar un poco de tiempo para familiarizarse cada
vez que se utilice la unidad.
Transcripción de documentos
STOP ARRÊT ALTO USER MANUAL Cordless Grass Trimmer MANUEL DE UTILISATION Toneuse/Tronçonneuse Électrique de gazon MANUAL DEL USUARIO Recortaador/Cortador de Césped Eléctrico MODEL : TB45E For problems or questions, DO NOT return this product to the store. Contact your Customer Service Agent . En cas de problèmes ou pour des questions, NE PAS retourner ce produit au point de vente. S'adresser au préposé du Service à la clientèle en composant. SAFETY OPERATION MAINTENANCE SECURITE FONCTIONNEMENT ENTRETIEN SEGURIDAD OPERACION MANTENIMIENTO Para problemas o preguntas, NO devolver este producto a la tienda Contacte a su Agente de Servicio al Cliente. U.S.A. Imported by: Troy Bilt LLC P.O. Box 361131 Cleveland, OH 44136-0019 For Consumer Assistance Please Call L'Aide Du Consommateur Necessitez S'il Vous Plait Para La Ayuda Del Consumidor Llame Por Favor Canada Imported by / Importé par: Troy Bilt PRODUCTS LIMITED 97 Kent Avenue Kitchener, ON CANADA N2G 4J1 WARNING • PLEASE READ For your own safety please read this manual before attempting to operate your new unit. Failure to follow instructions can result in serious personal injury. Spend a few moments to familiarize yourself with your trimmer before each use. U.S.A. 1-800-520-5520 CANADA 1-800-668-1238 Made in China / Fabriquè à China / Hecho en China AVERTISSEMENT • LIRE ATTENTIVEMENT Pour votre sécurité, lisez entièrement ce manuel avant d’utiliser votre nouvel outil. Le non respect des instructions peut résulter en des accidents graves. Prenez quelques instants pour vous familiariser avec le coupe-herbe avant chaque utilisation. ADVERTENCIA • FAVOR DE LEER Para su propia seguridad, favor de leer este manual antes de intentar operar su unidad nueva. Si no se siguen estas instrucciones se pueden provocar serias heridas personales. Favor de dedicar un poco de tiempo para familiarizarse cada vez que se utilice la unidad. PN 6096-202B01 Printed in China PLEASE READ Dear Customer, Thank you for purchasing a Troy Bilt product. With proper operation and maintenance it will provide you with years of service. In order to make the best use of your investment, be CERTAIN to familiarize yourself with the contents of the ENTIRE User Manual before attempting to operate and maintain your unit. Be sure to carefully follow the step-by-step illustrations in this manual to start, operate and maintain your new product. In the manual there will be the following call-outs: NOTE, WARNING / CAUTION and WARRANTY. A NOTE is used to convey additional information, to highlight a particular explanation, or expand a step description. A WARNING or CAUTION identifies a procedure which, if not undertaken or if improperly done, can result in serious personal injury or damage to the unit and/or both. E N G L I The (WARRANTY SYMBOL) serves notice that unless instructions or procedures are followed, any damage caused will void the warS ranty and repairs will be at owner’s expense. Service other than user maintenance should be performed by a Troy Bilt Authorized Service Center. Damage or conditions which render H this product inoperable caused by improper maintenance practices will void the manufacturer’s warranty. FOR WARRANTY OR SERVICE CONTACT THE NEAREST TROY BILT AUTHORIZED SERVICE CENTER BY CALLING THE 1-800# LISTED ON THE BACK COVER. Troy Bilt LLC Product Service Department A LIRE ATTENTIVEMENT F R A N C A I S Cher client, Merci de votre achat d’un produit Troy Bilt. Correctement utilisé et entretenu, il vous procurera des années de satisfaction. Il est IMPERATIF que vous preniez connaissance de LA TOTALITE du contenu de ce manuel avant d’utiliser l’outil ou de procéder aux opérations d’entretien. Conformez-vous scrupuleusement aux instructions et illustrations étape par étape concernant le démarrage, l’utilisation et l’entretien de votre nouvel outil. Ce manuel contient également des mises en gardes et informations intitulées: REMARQUE, AVERTISSEMENT / ATTENTION et GARANTIE. Une REMARQUE est destinée à fournir des informations complémentaires, éclaircir un point particulier ou expliquer une étape plus en détail. Un AVERTISSEMENT ou ATTENTION est utilisé pour identifier une procédure qui, si elle est négligée ou incorrectement exécutée, peur entraîner des dommages matériels et/ou corporels graves. 1 - GENERAL INFORMATION - RENSEIGNMENTS GENERAUX INFORMACION GENERAL SPECIFICATIONS . . . . . . . . . . . . . . . . . . . . . . . . . . . . . . . . . .TB45E Input . . . . . . . . E No Load Speed N Cutting width . . G Line Diameter . Net Weight . . . . . . . . . . . . . . . . . . . . . . . . . . . . . . . . . . . . . . . . . . . . . . . . . . . . . . . . . . . . . . . . . . . . . . . . . . . . . . . . . . . . . . . . . . . . . . . . . . . . . . . . . . . . . . . . . . . . . . . . . . . . . . . .120V~, 60Hz, 4.5 Amp . . . . . . . . . . . . . .7,500/min . . . . . . . . . . . . . .15” (380mm) . . . . . . . . . . . . . .ø0.065” (1.65mm) . . . . . . . . . . . . . .2.9 Kg (6.4 Lbs) CARACTERISTIQUES . . . . . . . . . . . . . . . . . . . . . . . . . . . . . .TB45E F R A Pouissance . . . . . . . . . . . . . . . . . . . . . . . . . . . . . . . . . . . . . . .120V~, 60Hz, 4,5Amp Vitesse à vide . . . . . . . . . . . . . . . . . . . . . . . . . . . . . . . . . . . . .7,500/min Diamètre du cercle de coupe . . . . . . . . . . . . . . . . . . . . . . . . . .15” (380mm) Taille de ligne . . . . . . . . . . . . . . . . . . . . . . . . . . . . . . . . . . . . . .ø0.065” (1.65mm) Poids Net . . . . . . . . . . . . . . . . . . . . . . . . . . . . . . . . . . . . . . . . .2,9 Kg (6,4 Lbs) ESPECIFICACIONES . . . . . . . . . . . . . . . . . . . . . . . . . . . . . . .TB45E E S P Potencia . . . . . . . . . . . . . . . . . . . . . . . . . . . . . . . . . . . . . . . . .120V~, 60Hz, 4,5A Velocidad no Instalada . . . . . . . . . . . . . . . . . . . . . . . . . . . . . . .7,500/min-1/RPM Diámetro del Círculo de Corte . . . . . . . . . . . . . . . . . . . . . . . . .15” (380mm) Reserva del la línea . . . . . . . . . . . . . . . . . . . . . . . . . . . . . . . . .ø0.065” (1.65mm) Peso neto . . . . . . . . . . . . . . . . . . . . . . . . . . . . . . . . . . . . . . . .2,9 Kg (6,4 Lbs) Le (SYMBOLE DE GARANTIE) indique que si les procédures ou instructions ne sont pas respectées, les dommages ne seront pas couverts par la garantie et les réparations seront à la charge du propriétaire. Les réparations autres que les entretiens à effectuer par l’utilisateur devront être confiées à un Centre de réparation Troy Bilt agréé. La garantie du fabricant sera nulle en cas de dommages ou de conditions rendant le produit inutilisable à la suite d’un entretien inadéquat. FOR WARRANTY OR SERVICE CONTACT THE NEAREST TROY BILT AUTHORIZED SERVICE CENTER BY CALLING THE 1-800# LISTED ON THE BACK COVER. Troy Bilt LLC Service de Réparation FAVOR DE LEER Estimado Cliente, Gracias por comprar un producto Troy Bilt. Con una operación y mantenimiento adecuados le proporcionará años de servicio. Con el objeto de hacer un mejor uso de su inversión, ASEGURESE de familiarizarse con el contenido de TODO el Manual del Usuario antes de intentar operar o dar mantenimiento a su unidad. Asegurarse de seguir cuidadosamente las ilustraciones graduales de este manual para poner en marcha, operar y dar mantenimiento a su nuevo producto. En el manual se encontrarán las siguientes señales: NOTA, ADVERTENCIA / PRECAUCION y GARANTIA. Una NOTA se utiliza para comunicar una información adicional, para enfatizar una explicación particular, o para extender la descripción de un paso. Una ADVERTENCIA o PRECAUCION identifica un procedimiento que, si no se lleva a cabo o se hace en forma inadecuada, puede provocar serias heridas personales o daños a la unidad y/o ambas cosas. E S P A Ñ La (SIMBOLO DE GARANTIA) notifica que a menos que se sigan las instrucciones o procedimientos, cualquier daño causado O anulará la garantía y las reparaciones correrán a cuenta del propietario. L Todo el servicio que no sea el mantenimiento del usuario se llevará a cabo en un Centro de Servicio Autorizado Troy Bilt. Los daños o las condiciones que hagan inoperable este producto debido a las prácticas inadecuadas de mantenimiento anularán la garantía del fabricante. FOR WARRANTY OR SERVICE CONTACT THE NEAREST TROY BILT AUTHORIZED SERVICE CENTER BY CALLING THE 1-800# LISTED ON THE BACK COVER. Troy Bilt LLC Departamento de Servicio 1 2 PLEASE READ Dear Customer, Thank you for purchasing a Troy Bilt product. With proper operation and maintenance it will provide you with years of service. In order to make the best use of your investment, be CERTAIN to familiarize yourself with the contents of the ENTIRE User Manual before attempting to operate and maintain your unit. Be sure to carefully follow the step-by-step illustrations in this manual to start, operate and maintain your new product. In the manual there will be the following call-outs: NOTE, WARNING / CAUTION and WARRANTY. A NOTE is used to convey additional information, to highlight a particular explanation, or expand a step description. A WARNING or CAUTION identifies a procedure which, if not undertaken or if improperly done, can result in serious personal injury or damage to the unit and/or both. E N G L I The (WARRANTY SYMBOL) serves notice that unless instructions or procedures are followed, any damage caused will void the warS ranty and repairs will be at owner’s expense. Service other than user maintenance should be performed by a Troy Bilt Authorized Service Center. Damage or conditions which render H this product inoperable caused by improper maintenance practices will void the manufacturer’s warranty. FOR WARRANTY OR SERVICE CONTACT THE NEAREST TROY BILT AUTHORIZED SERVICE CENTER BY CALLING THE 1-800# LISTED ON THE BACK COVER. Troy Bilt LLC Product Service Department A LIRE ATTENTIVEMENT F R A N C A I S Cher client, Merci de votre achat d’un produit Troy Bilt. Correctement utilisé et entretenu, il vous procurera des années de satisfaction. Il est IMPERATIF que vous preniez connaissance de LA TOTALITE du contenu de ce manuel avant d’utiliser l’outil ou de procéder aux opérations d’entretien. Conformez-vous scrupuleusement aux instructions et illustrations étape par étape concernant le démarrage, l’utilisation et l’entretien de votre nouvel outil. Ce manuel contient également des mises en gardes et informations intitulées: REMARQUE, AVERTISSEMENT / ATTENTION et GARANTIE. Une REMARQUE est destinée à fournir des informations complémentaires, éclaircir un point particulier ou expliquer une étape plus en détail. Un AVERTISSEMENT ou ATTENTION est utilisé pour identifier une procédure qui, si elle est négligée ou incorrectement exécutée, peur entraîner des dommages matériels et/ou corporels graves. 1 - GENERAL INFORMATION - RENSEIGNMENTS GENERAUX INFORMACION GENERAL SPECIFICATIONS . . . . . . . . . . . . . . . . . . . . . . . . . . . . . . . . . .TB45E Input . . . . . . . . E No Load Speed N Cutting width . . G Line Diameter . Net Weight . . . . . . . . . . . . . . . . . . . . . . . . . . . . . . . . . . . . . . . . . . . . . . . . . . . . . . . . . . . . . . . . . . . . . . . . . . . . . . . . . . . . . . . . . . . . . . . . . . . . . . . . . . . . . . . . . . . . . . . . . . . . . . . .120V~, 60Hz, 4.5 Amp . . . . . . . . . . . . . .7,500/min . . . . . . . . . . . . . .15” (380mm) . . . . . . . . . . . . . .ø0.065” (1.65mm) . . . . . . . . . . . . . .2.9 Kg (6.4 Lbs) CARACTERISTIQUES . . . . . . . . . . . . . . . . . . . . . . . . . . . . . .TB45E F R A Pouissance . . . . . . . . . . . . . . . . . . . . . . . . . . . . . . . . . . . . . . .120V~, 60Hz, 4,5Amp Vitesse à vide . . . . . . . . . . . . . . . . . . . . . . . . . . . . . . . . . . . . .7,500/min Diamètre du cercle de coupe . . . . . . . . . . . . . . . . . . . . . . . . . .15” (380mm) Taille de ligne . . . . . . . . . . . . . . . . . . . . . . . . . . . . . . . . . . . . . .ø0.065” (1.65mm) Poids Net . . . . . . . . . . . . . . . . . . . . . . . . . . . . . . . . . . . . . . . . .2,9 Kg (6,4 Lbs) ESPECIFICACIONES . . . . . . . . . . . . . . . . . . . . . . . . . . . . . . .TB45E E S P Potencia . . . . . . . . . . . . . . . . . . . . . . . . . . . . . . . . . . . . . . . . .120V~, 60Hz, 4,5A Velocidad no Instalada . . . . . . . . . . . . . . . . . . . . . . . . . . . . . . .7,500/min-1/RPM Diámetro del Círculo de Corte . . . . . . . . . . . . . . . . . . . . . . . . .15” (380mm) Reserva del la línea . . . . . . . . . . . . . . . . . . . . . . . . . . . . . . . . .ø0.065” (1.65mm) Peso neto . . . . . . . . . . . . . . . . . . . . . . . . . . . . . . . . . . . . . . . .2,9 Kg (6,4 Lbs) Le (SYMBOLE DE GARANTIE) indique que si les procédures ou instructions ne sont pas respectées, les dommages ne seront pas couverts par la garantie et les réparations seront à la charge du propriétaire. Les réparations autres que les entretiens à effectuer par l’utilisateur devront être confiées à un Centre de réparation Troy Bilt agréé. La garantie du fabricant sera nulle en cas de dommages ou de conditions rendant le produit inutilisable à la suite d’un entretien inadéquat. FOR WARRANTY OR SERVICE CONTACT THE NEAREST TROY BILT AUTHORIZED SERVICE CENTER BY CALLING THE 1-800# LISTED ON THE BACK COVER. Troy Bilt LLC Service de Réparation FAVOR DE LEER Estimado Cliente, Gracias por comprar un producto Troy Bilt. Con una operación y mantenimiento adecuados le proporcionará años de servicio. Con el objeto de hacer un mejor uso de su inversión, ASEGURESE de familiarizarse con el contenido de TODO el Manual del Usuario antes de intentar operar o dar mantenimiento a su unidad. Asegurarse de seguir cuidadosamente las ilustraciones graduales de este manual para poner en marcha, operar y dar mantenimiento a su nuevo producto. En el manual se encontrarán las siguientes señales: NOTA, ADVERTENCIA / PRECAUCION y GARANTIA. Una NOTA se utiliza para comunicar una información adicional, para enfatizar una explicación particular, o para extender la descripción de un paso. Una ADVERTENCIA o PRECAUCION identifica un procedimiento que, si no se lleva a cabo o se hace en forma inadecuada, puede provocar serias heridas personales o daños a la unidad y/o ambas cosas. E S P A Ñ La (SIMBOLO DE GARANTIA) notifica que a menos que se sigan las instrucciones o procedimientos, cualquier daño causado O anulará la garantía y las reparaciones correrán a cuenta del propietario. L Todo el servicio que no sea el mantenimiento del usuario se llevará a cabo en un Centro de Servicio Autorizado Troy Bilt. Los daños o las condiciones que hagan inoperable este producto debido a las prácticas inadecuadas de mantenimiento anularán la garantía del fabricante. FOR WARRANTY OR SERVICE CONTACT THE NEAREST TROY BILT AUTHORIZED SERVICE CENTER BY CALLING THE 1-800# LISTED ON THE BACK COVER. Troy Bilt LLC Departamento de Servicio 1 2 1 - GENERAL INFORMATION - RENSEIGNMENTS GENERAUX INFORMACION GENERAL REAR HANDLE POIGNEE ARRIERE MANUBRIO TRASERO PLUG FOR EXTENSION CORD PRISE POUR LA CORDE DE PROLONGATION ENCHUFE PARA CUERDA DE LA EXTENSIÓN SAFETY SWITCH INTERRUPTEUR DE SÉCURITÉ INTERRUPTOR DE SEGURIDAD ON/OFF TRIGGER MANETTE MARCHE/ARRET GATILLO DE ENCENDIDO/APAGADO CORD RETAINER RETENUE DU CORDON RETENEDOR DEL CABLE ASSIST HANDLE POIGNEE DE MAINTIEN MANUBRIO AUXILIAR EDGER CONVERSION BUTTON BOUTON DE CONVERSION D’EDGER BOTÓN DE LA CONVERSIÓN DE EDGER SHAFT ADJUSTMENT BUTTON BOUTON D’AJUSTEMENT D’EXE BOTÓN DEL AJUSTE DEL EJE ADJUSTABLE SHAFT ARBRE DE TRANSMISSION AJUSTABLE FLECHA AJUSTABLE IMPORTANT SAFETY INSTRUCTIONS INSTRUCTIONS DE SECURITE IMPORTANTES - INSTRUCCIONES DE SEGURIDAD IMPORTANTES PLEASE READ - SAVE THESE INSTRUCTIONS E N G L I S H DEBRIS SHIELD PARE-DEBRIS PROTECTOR DESECHOS STRING HEAD TETE DE COUPE CABEZA DE HILO 3 WARNING 1-1. TO REDUCE THE RISK OF ELECTRIC SHOCK, BURNS, FIRE OR PERSONAL INJURY: 1. 2. FOLLOW ALL SAFETY INSTRUCTIONS listed in this manual before/during operation of this trimmer. TO REDUCE THE RISK OF ELECTRIC SHOCK this equipment has a polarized plug (one blade is wider than the other). This plug will fit in a polarized extension cord only one way. If the plug does not fit fully in the extension cord, reverse the plug. Do not change the plug in any way. LIRE ET CONSERVER CES INSTRUCTIONS F R A N C A I S AIR OPENINGS TROUS DE VENTILATION APERTURAS DE AIRE EDGE GUIDE WHEEL ROUE DE GUIDAGE DE BORD RUEDA DE GUÍA DE EXTREMO When using an electrical appliance, basic precautions should always be followed to assure maximum safety and optimum performance. Read this manual before assembling and operating this appliance. Failure to comply with instructions may result in electrical shock, burns, fire, or personal injury. Lorsqu'un appareil électrique est utilisé, des précautions élémentaires doivent toujours être prises pour assurer une sécurité maximum et une performance optimale. Lire cette Notice avant d'assembler et d'utiliser cet appareil. Ne pas se conformer aux instructions peut causer des secousses électriques, des brûlures, un incendie ou des blessures corporelles. AVERTISSEMENT 1-1. POUR RÉDUIRE LES RISQUES DE BRÛLURES, D'INCENDIE, DE SECOUSSES ÉLECTRIQUES OU DE BLESSURES : 1. 2. RESPECTER TOUTES LES MESURES DE SÉCURITÉ figurant dans cette Notice avant et durant l'utilisation du coupe-herbe. POUR RÉDUIRE LES RISQUES DE SECOUSSES ÉLECTRIQUES, cet équipement est muni d'une fiche polarisée (une broche est plus large que l'autre). Cette fiche ne peut être branchée que dans un sens et que dans une prise de courant polarisée. Si la fiche ne peut pas être enfoncée à fond dans la prise de courant, inverser le sens de la fiche. Ne jamais modifier la fiche de l'appareil. FAVOR DE LEER - CONSERVE ESTAS INSTRUCCIONES E S P A Ñ O L Al utilizar un aparato eléctrico siempre debe seguir ciertas precauciones básicas para asegurar una protección máxima y un rendimiento óptimo. Lea este manual antes de ensamblar y operar este aparato. Si no sigue las instrucciones podría provocar el riesgo de incendio, choque eléctrico o heridas personales. ADVERTENCIA 1-1. PARA REDUCIR EL RIESGO DE CHOQUEN ELECTRICO, INCENDIO O HERIDAS PERSONALES: 1. 2. SIGA TODAS LAS INSTRUCCIONES DE SEGURIDAD enlistadas en este manual antes y durante la operación de esta recortadora. PARA REDUCIR EL RIESGO DE CHOQUE ELECTRICO, este equipo cuenta con un enchufe polarizado (una clavija es más ancha que la otra). Este enchufe embonará en una toma de corriente polarizada de una sola manera. Si el enchufe no embona por completo, inviértalo. De ninguna manera intente cambiar el enchufe. EDGE GUIDE WING NUT BOULON À OREILLES DU GUIDE DE BORD TUERCA DE MARIPOSA DEGUÍA DE EXTREMO 4 1 - GENERAL INFORMATION - RENSEIGNMENTS GENERAUX INFORMACION GENERAL REAR HANDLE POIGNEE ARRIERE MANUBRIO TRASERO PLUG FOR EXTENSION CORD PRISE POUR LA CORDE DE PROLONGATION ENCHUFE PARA CUERDA DE LA EXTENSIÓN SAFETY SWITCH INTERRUPTEUR DE SÉCURITÉ INTERRUPTOR DE SEGURIDAD ON/OFF TRIGGER MANETTE MARCHE/ARRET GATILLO DE ENCENDIDO/APAGADO CORD RETAINER RETENUE DU CORDON RETENEDOR DEL CABLE ASSIST HANDLE POIGNEE DE MAINTIEN MANUBRIO AUXILIAR EDGER CONVERSION BUTTON BOUTON DE CONVERSION D’EDGER BOTÓN DE LA CONVERSIÓN DE EDGER SHAFT ADJUSTMENT BUTTON BOUTON D’AJUSTEMENT D’EXE BOTÓN DEL AJUSTE DEL EJE ADJUSTABLE SHAFT ARBRE DE TRANSMISSION AJUSTABLE FLECHA AJUSTABLE IMPORTANT SAFETY INSTRUCTIONS INSTRUCTIONS DE SECURITE IMPORTANTES - INSTRUCCIONES DE SEGURIDAD IMPORTANTES PLEASE READ - SAVE THESE INSTRUCTIONS E N G L I S H DEBRIS SHIELD PARE-DEBRIS PROTECTOR DESECHOS STRING HEAD TETE DE COUPE CABEZA DE HILO 3 WARNING 1-1. TO REDUCE THE RISK OF ELECTRIC SHOCK, BURNS, FIRE OR PERSONAL INJURY: 1. 2. FOLLOW ALL SAFETY INSTRUCTIONS listed in this manual before/during operation of this trimmer. TO REDUCE THE RISK OF ELECTRIC SHOCK this equipment has a polarized plug (one blade is wider than the other). This plug will fit in a polarized extension cord only one way. If the plug does not fit fully in the extension cord, reverse the plug. Do not change the plug in any way. LIRE ET CONSERVER CES INSTRUCTIONS F R A N C A I S AIR OPENINGS TROUS DE VENTILATION APERTURAS DE AIRE EDGE GUIDE WHEEL ROUE DE GUIDAGE DE BORD RUEDA DE GUÍA DE EXTREMO When using an electrical appliance, basic precautions should always be followed to assure maximum safety and optimum performance. Read this manual before assembling and operating this appliance. Failure to comply with instructions may result in electrical shock, burns, fire, or personal injury. Lorsqu'un appareil électrique est utilisé, des précautions élémentaires doivent toujours être prises pour assurer une sécurité maximum et une performance optimale. Lire cette Notice avant d'assembler et d'utiliser cet appareil. Ne pas se conformer aux instructions peut causer des secousses électriques, des brûlures, un incendie ou des blessures corporelles. AVERTISSEMENT 1-1. POUR RÉDUIRE LES RISQUES DE BRÛLURES, D'INCENDIE, DE SECOUSSES ÉLECTRIQUES OU DE BLESSURES : 1. 2. RESPECTER TOUTES LES MESURES DE SÉCURITÉ figurant dans cette Notice avant et durant l'utilisation du coupe-herbe. POUR RÉDUIRE LES RISQUES DE SECOUSSES ÉLECTRIQUES, cet équipement est muni d'une fiche polarisée (une broche est plus large que l'autre). Cette fiche ne peut être branchée que dans un sens et que dans une prise de courant polarisée. Si la fiche ne peut pas être enfoncée à fond dans la prise de courant, inverser le sens de la fiche. Ne jamais modifier la fiche de l'appareil. FAVOR DE LEER - CONSERVE ESTAS INSTRUCCIONES E S P A Ñ O L Al utilizar un aparato eléctrico siempre debe seguir ciertas precauciones básicas para asegurar una protección máxima y un rendimiento óptimo. Lea este manual antes de ensamblar y operar este aparato. Si no sigue las instrucciones podría provocar el riesgo de incendio, choque eléctrico o heridas personales. ADVERTENCIA 1-1. PARA REDUCIR EL RIESGO DE CHOQUEN ELECTRICO, INCENDIO O HERIDAS PERSONALES: 1. 2. SIGA TODAS LAS INSTRUCCIONES DE SEGURIDAD enlistadas en este manual antes y durante la operación de esta recortadora. PARA REDUCIR EL RIESGO DE CHOQUE ELECTRICO, este equipo cuenta con un enchufe polarizado (una clavija es más ancha que la otra). Este enchufe embonará en una toma de corriente polarizada de una sola manera. Si el enchufe no embona por completo, inviértalo. De ninguna manera intente cambiar el enchufe. EDGE GUIDE WING NUT BOULON À OREILLES DU GUIDE DE BORD TUERCA DE MARIPOSA DEGUÍA DE EXTREMO 4 8. KEEP HANDS AND FEET AWAY from rotating line. Do not operate without debris shield attached. 9. DRESS PROPERLY - Always wear long pants, shoes and gloves. Do not wear loose clothing, jewelry, short pants, sandals or go barefoot. 10. KEEP AREA CLEAR - Keep everyone, especially children and pets away from the area of operation 50 feet (15m). Turn off unit immediately if you are approached. Never allow children to operate the appliance to be used as a toy E or to run unattended at any time. N 11. AVOID A DANGEROUS ENVIRONMENT - Do not use in the presence of flammable liquids or gases, smoking or G burning materials to avoid creating a fire or explosion. Never operate the trimmer in wet or damp conditions or around L swimming pools, hot tub, etc. Do not use in rain. Do not handle plug, cord or appliance with wet hands. I 12. USE APPLIANCE CORRECTLY - Use this appliance only for its intended use as described in this manual. DO NOT SWEEP WITH TRIMMER - Sweeping refers to tilting stringhead to sweep away debris from walkways, etc. Your trimS mer is a powerful tool and small stones or other such debris may be hurled 50 feet or more, causing injury or damH age to nearby property such as automobiles, homes and windows. Inspect area before starting the appliance to remove debris and other objects that can cause damage during operation. 13. DO NOT USE ACCESSORIES or attachments except as recommended and provided by Troy Bilt. Do not use any type of wire or metal cutting line. F R A N C A I S 8. TENIR LES PIEDS ET LES MAINS À L'ÉCART du fil de coupe en rotation. Ne pas utiliser si le bouclier à debris n'est pas en place. 9. BIEN S'HABILLER - Toujours porter des pantalons longs, des chaussures et des gants. Ne jamais porter de vêtements amples, de bijoux, de shorts ou de sandales. Ne jamais utiliser l'appareil si on est pieds nus. 10. LA ZONE DE TRAVAIL DOIT TOUJOURS ÊTRE DÉGAGÉE - Maintenez chacun, particulièrement les enfants et les animaux de compagnie partis de l’aire de les pieds de l’opération 50 (15m). Arrêter l'appareil dès que quelqu'un s'en approche. Ne jamais laisser les enfants utiliser cet appareil en tant que jouet et ne jamais les laisser utiliser l'appareil sans surveillance. 11. ÉVITER LES MILIEUX DANGEREUX - Pour éviter les risques d'incendie ou d'explosion, ne pas utiliser l'appareil à proximité de liquides ou de gaz inflammables ou de matériaux en combustion ou dégageant de la fumée. Ne pas utiliser le coupe-herbe dans les endroits humides ou mouillés, autour des piscines, de cuves à remous, etc. ou lorsqu'il pleut. Ne pas toucher à la fiche, au cordon électrique ou à l'appareil si on a les mains mouillées. 12. UTILISER ADÉQUATEMENT L'APPAREIL - Utiliser l'appareil exclusivement pour les applications prévues dans cette Notice. NE PAS UTILISER LE COUPE-HERBE POUR BALAYER - c'est-à-dire déplacer la tête de coupe de gauche à droite pour nettoyer les débris des trottoirs, des allées, etc. Ce coupe-herbe est un outil puissant qui peut projeter des débris à plus de 50 pieds et blesser quelqu'un ou endommager les voitures, les fenêtres ou les habitations proches. Inspecter la zone de travail avant de mettre l'appareil en marche et la débarrasser des débris et des autres objets qui pourraient éventuellement causer des dommages. 13. NE JAMAIS UTILISER D'ACCESSOIRES autres que ceux recommandés et fournis par Troy Bilt. Ne pas utiliser de fils de coupe métalliques. 8. 9. 10. E S 11. P A Ñ 12. O L 13. 7 CONSERVE LAS MANOS Y LOS PIES ALEJADOS de la línea giratoria. No opere sin la protección instalada. VISTA ADECUADAMENTE – Use siempre pantalones largos, zapatos y guantes. No opere sin el protector para residuos instalado. MANTENGA EL AREA LIMPIA – Mantenga cada uno, especialmente los niños y los amimales demésticos ausentes del área de los pies de la operación 50 (15m). Apague la unidad inmediatamente en caso de que se esté acercando a ellos. Nunca permita que los niños operen el aparato como si fuera un juguete o que éste funcione desatendido. EVITE UN AMBIENTE PELIGROSO – No lo use en presencia de líquidos o gases inflamables, materiales humeantes o ardientes, para evitar que produzca un incendio o alguna explosión. Nunca opere su recortadora en condiciones húmedas o mojadas, alrededor de albercas, etc. No lo use bajo la lluvia. No agarre el enchufe, el cable o el aparato con las manos mojadas. USE EL APARATO CORRECTO – Use este aparato exclusivamente para lo que fue hecho y como se describe en este manual. NO BARRA CON LA RECORTADORA - El barrer significa ladear la cabeza de hilo con el fin de quitar desechos de las banquetas, etc. Su recortadora es una potente herramienta y pequeñas piedras u otros escombros similares peuden ser lanzados 50 pies o más, causando heridas o daños a propiedades cercanas tales como automóviles, casas y ventanas. Inspeccione el área antes de encender el aparato para remover desechos y otros objetos que pueden causar daños durante la operación. NO USE ACCESORIOS o aditamentos con excepción de los recomendados y suministrados por Troy Bilt, No use ningún tipo de línea cortadora metálica o alámbrica. 14. 15. 16. 17. DO NOT OVERREACH - Keep firm footing and balance at all times. AVOID UNINTENTIONAL STARTING - Do not carry plugged in trimmer with your finger on the switch. DISCONNECT trimmer from power supply when not in use and before servicing stringhead. STORE idle trimmer indoors. Appliance should be stored in a dry, high or locked up place - out of the reach of children. E 18. Don’t grasp the exposed cutting blades or cutting edges when picking up or holding the appliance. N 19. Don’t force appliance - it will do the job better and witth less likelihood of a risk of injury at the rate for which it was designed. G EXPLANATION OF NOTE, WARNING, and WARRANTY SYMBOL L 1-2. 1. A NOTE is used to convey additional information, or highlight a particular explanation, or to expand a step instrucI tion. S 2. A WARNING identifies a procedure which, if not undertaken or if improperly done, can result in a serious personal H injury or damage to the unit and/or both. 3. F R A N C A I S (WARRANTY SYMBOL) serves notice that unless instructions or procedures are followed, any damage will void the warranty and repairs will be at owner’s expense. Service other than user maintenance should be performed by a Troy Bilt Authorized Service Center. Damage or conditions caused by improper maintenance practices which render this product inoperablewill void the manufacturer’s warranty. 14. NE PAS TENIR L'APPAREIL À BOUT DE BRAS. Toujours garder bon pied et un bon équilibre. 15. ÉVITER LES DÉMARRAGES ACCIDENTELS - Ne pas porter l'appareil pendant qu'il est branché et alors qu'on a le doigt sur la gâchette. 16. DÉBRANCHER l'appareil de la prise de courant quand il n'est pas utilisé ou avant d'entretenir la tête de coupe. 17. REMISER le coupe-herbe à l'intérieur - Lorsqu'il n'est pas utilisé, l'appareil doit être remisé dans un endroit sec, verrouillé ou inaccessible aux enfants. 18. Ne pas saisir les lames de coupe ou les bords de coupe exposés lorsque ous prenez ou tenez l’appareil. 19.Ne pas forcer avec l’appareil - il fonctionnera mieux et il y aura moins de risques d’accident s’il fonctionne à la vitesse pour laquelle il a été prévu. 1.2. EXPLICATION DES NOTA, AVERTISSEMENTS ET SYMBOLES DE LA GARANTIE 1. 2. 3. Un NOTA est destiné à fournir des informations complémentaires, à éclaircir un point particulier ou à expliquer plus en détail une étape. Un AVERTISSEMENT identifie une procédure qui risque de causer de graves blessures corporelles ou de graves dommages à l'appareil et/ou les deux si elle n'est pas respectée ou si elle est mal effectuée. Le (SYMBOLE DE GARANTIE) indique que si les procédures ou instructions n'ont pas été respectées, les dommages causés annuleront la garantie et que les réparations seront à la charge du propriétaire. Pour des services autres que ceux d'entretien à effectuer par l'utilisateur, s'adresser à un Centre de réparation agréé Troy Bilt. La garantie du fabricant sera nulle et non avenue si des dommages ou des conditions causés par de mauvaises pratiques d'entretien rendent le produit inutilisable. 14. NO SE EXTRALIMITE – Conserve una posición y equilibrio firme en todo momento. 15. EVITE UN ENCENDIDO INVOLUNTARIO – No transporte la recortadora conectada con el dedo en el interruptor. 16. DESCONECTE la recortadora de la corriente eléctrica cuando no la use o antes de realizar el servicio de la cabeza de hilo. 17. ALMACENE la recortadora inactiva en el interior. Este aparato debe ser almacenado en lugares secos, altos y seguros - fuera del alcance de los niños. 18. No toque las cuchillas de corte expustas ni los bordes de corte cuando tome o levente el aparato. 19. No fuerce el aparato - realizará mejor el trabajo y con menos probabiliada de un riesgo de lesión a la velocidad para la cual se diseñó. E S P A 1-2. EXPLICACION DE NOTA, ADVERTENCIA Y SIMBOLO DE GARANTIA 1. Una NOTA usada para comunicar información adicional, para destacar una explicación particular, o para expander Ñ una instrucción específica. O 2. Una ADVERTENCIA identifica un procedimiento que, si no se acomete o se realiza inadecuadamente, puede provocar heridas personales y/o daños a la unidad. L 3. El (SIMBOLO DE GARANTIA) sirve para notificar que por los menos las instrucciones o procedimientos deben llevarse al cabo, cualiquier daño invalidará la garantía y los gastos de la reparaciones serán asumidos por el dueño. Cualquier otro servicio, con excepción del mantenimiento del usuario, deberá ser realizado por un Centro de Servicio Autorizado Troy Bilt. Los daños o condiciones causadas por practicas de mantenimiento inadecuadas, las cuales hagan que el producto sea inoperable invalidarán la garantía del fabricante. 8 8. KEEP HANDS AND FEET AWAY from rotating line. Do not operate without debris shield attached. 9. DRESS PROPERLY - Always wear long pants, shoes and gloves. Do not wear loose clothing, jewelry, short pants, sandals or go barefoot. 10. KEEP AREA CLEAR - Keep everyone, especially children and pets away from the area of operation 50 feet (15m). Turn off unit immediately if you are approached. Never allow children to operate the appliance to be used as a toy E or to run unattended at any time. N 11. AVOID A DANGEROUS ENVIRONMENT - Do not use in the presence of flammable liquids or gases, smoking or G burning materials to avoid creating a fire or explosion. Never operate the trimmer in wet or damp conditions or around L swimming pools, hot tub, etc. Do not use in rain. Do not handle plug, cord or appliance with wet hands. I 12. USE APPLIANCE CORRECTLY - Use this appliance only for its intended use as described in this manual. DO NOT SWEEP WITH TRIMMER - Sweeping refers to tilting stringhead to sweep away debris from walkways, etc. Your trimS mer is a powerful tool and small stones or other such debris may be hurled 50 feet or more, causing injury or damH age to nearby property such as automobiles, homes and windows. Inspect area before starting the appliance to remove debris and other objects that can cause damage during operation. 13. DO NOT USE ACCESSORIES or attachments except as recommended and provided by Troy Bilt. Do not use any type of wire or metal cutting line. F R A N C A I S 8. TENIR LES PIEDS ET LES MAINS À L'ÉCART du fil de coupe en rotation. Ne pas utiliser si le bouclier à debris n'est pas en place. 9. BIEN S'HABILLER - Toujours porter des pantalons longs, des chaussures et des gants. Ne jamais porter de vêtements amples, de bijoux, de shorts ou de sandales. Ne jamais utiliser l'appareil si on est pieds nus. 10. LA ZONE DE TRAVAIL DOIT TOUJOURS ÊTRE DÉGAGÉE - Maintenez chacun, particulièrement les enfants et les animaux de compagnie partis de l’aire de les pieds de l’opération 50 (15m). Arrêter l'appareil dès que quelqu'un s'en approche. Ne jamais laisser les enfants utiliser cet appareil en tant que jouet et ne jamais les laisser utiliser l'appareil sans surveillance. 11. ÉVITER LES MILIEUX DANGEREUX - Pour éviter les risques d'incendie ou d'explosion, ne pas utiliser l'appareil à proximité de liquides ou de gaz inflammables ou de matériaux en combustion ou dégageant de la fumée. Ne pas utiliser le coupe-herbe dans les endroits humides ou mouillés, autour des piscines, de cuves à remous, etc. ou lorsqu'il pleut. Ne pas toucher à la fiche, au cordon électrique ou à l'appareil si on a les mains mouillées. 12. UTILISER ADÉQUATEMENT L'APPAREIL - Utiliser l'appareil exclusivement pour les applications prévues dans cette Notice. NE PAS UTILISER LE COUPE-HERBE POUR BALAYER - c'est-à-dire déplacer la tête de coupe de gauche à droite pour nettoyer les débris des trottoirs, des allées, etc. Ce coupe-herbe est un outil puissant qui peut projeter des débris à plus de 50 pieds et blesser quelqu'un ou endommager les voitures, les fenêtres ou les habitations proches. Inspecter la zone de travail avant de mettre l'appareil en marche et la débarrasser des débris et des autres objets qui pourraient éventuellement causer des dommages. 13. NE JAMAIS UTILISER D'ACCESSOIRES autres que ceux recommandés et fournis par Troy Bilt. Ne pas utiliser de fils de coupe métalliques. 8. 9. 10. E S 11. P A Ñ 12. O L 13. 7 CONSERVE LAS MANOS Y LOS PIES ALEJADOS de la línea giratoria. No opere sin la protección instalada. VISTA ADECUADAMENTE – Use siempre pantalones largos, zapatos y guantes. No opere sin el protector para residuos instalado. MANTENGA EL AREA LIMPIA – Mantenga cada uno, especialmente los niños y los amimales demésticos ausentes del área de los pies de la operación 50 (15m). Apague la unidad inmediatamente en caso de que se esté acercando a ellos. Nunca permita que los niños operen el aparato como si fuera un juguete o que éste funcione desatendido. EVITE UN AMBIENTE PELIGROSO – No lo use en presencia de líquidos o gases inflamables, materiales humeantes o ardientes, para evitar que produzca un incendio o alguna explosión. Nunca opere su recortadora en condiciones húmedas o mojadas, alrededor de albercas, etc. No lo use bajo la lluvia. No agarre el enchufe, el cable o el aparato con las manos mojadas. USE EL APARATO CORRECTO – Use este aparato exclusivamente para lo que fue hecho y como se describe en este manual. NO BARRA CON LA RECORTADORA - El barrer significa ladear la cabeza de hilo con el fin de quitar desechos de las banquetas, etc. Su recortadora es una potente herramienta y pequeñas piedras u otros escombros similares peuden ser lanzados 50 pies o más, causando heridas o daños a propiedades cercanas tales como automóviles, casas y ventanas. Inspeccione el área antes de encender el aparato para remover desechos y otros objetos que pueden causar daños durante la operación. NO USE ACCESORIOS o aditamentos con excepción de los recomendados y suministrados por Troy Bilt, No use ningún tipo de línea cortadora metálica o alámbrica. 14. 15. 16. 17. DO NOT OVERREACH - Keep firm footing and balance at all times. AVOID UNINTENTIONAL STARTING - Do not carry plugged in trimmer with your finger on the switch. DISCONNECT trimmer from power supply when not in use and before servicing stringhead. STORE idle trimmer indoors. Appliance should be stored in a dry, high or locked up place - out of the reach of children. E 18. Don’t grasp the exposed cutting blades or cutting edges when picking up or holding the appliance. N 19. Don’t force appliance - it will do the job better and witth less likelihood of a risk of injury at the rate for which it was designed. G EXPLANATION OF NOTE, WARNING, and WARRANTY SYMBOL L 1-2. 1. A NOTE is used to convey additional information, or highlight a particular explanation, or to expand a step instrucI tion. S 2. A WARNING identifies a procedure which, if not undertaken or if improperly done, can result in a serious personal H injury or damage to the unit and/or both. 3. F R A N C A I S (WARRANTY SYMBOL) serves notice that unless instructions or procedures are followed, any damage will void the warranty and repairs will be at owner’s expense. Service other than user maintenance should be performed by a Troy Bilt Authorized Service Center. Damage or conditions caused by improper maintenance practices which render this product inoperablewill void the manufacturer’s warranty. 14. NE PAS TENIR L'APPAREIL À BOUT DE BRAS. Toujours garder bon pied et un bon équilibre. 15. ÉVITER LES DÉMARRAGES ACCIDENTELS - Ne pas porter l'appareil pendant qu'il est branché et alors qu'on a le doigt sur la gâchette. 16. DÉBRANCHER l'appareil de la prise de courant quand il n'est pas utilisé ou avant d'entretenir la tête de coupe. 17. REMISER le coupe-herbe à l'intérieur - Lorsqu'il n'est pas utilisé, l'appareil doit être remisé dans un endroit sec, verrouillé ou inaccessible aux enfants. 18. Ne pas saisir les lames de coupe ou les bords de coupe exposés lorsque ous prenez ou tenez l’appareil. 19.Ne pas forcer avec l’appareil - il fonctionnera mieux et il y aura moins de risques d’accident s’il fonctionne à la vitesse pour laquelle il a été prévu. 1.2. EXPLICATION DES NOTA, AVERTISSEMENTS ET SYMBOLES DE LA GARANTIE 1. 2. 3. Un NOTA est destiné à fournir des informations complémentaires, à éclaircir un point particulier ou à expliquer plus en détail une étape. Un AVERTISSEMENT identifie une procédure qui risque de causer de graves blessures corporelles ou de graves dommages à l'appareil et/ou les deux si elle n'est pas respectée ou si elle est mal effectuée. Le (SYMBOLE DE GARANTIE) indique que si les procédures ou instructions n'ont pas été respectées, les dommages causés annuleront la garantie et que les réparations seront à la charge du propriétaire. Pour des services autres que ceux d'entretien à effectuer par l'utilisateur, s'adresser à un Centre de réparation agréé Troy Bilt. La garantie du fabricant sera nulle et non avenue si des dommages ou des conditions causés par de mauvaises pratiques d'entretien rendent le produit inutilisable. 14. NO SE EXTRALIMITE – Conserve una posición y equilibrio firme en todo momento. 15. EVITE UN ENCENDIDO INVOLUNTARIO – No transporte la recortadora conectada con el dedo en el interruptor. 16. DESCONECTE la recortadora de la corriente eléctrica cuando no la use o antes de realizar el servicio de la cabeza de hilo. 17. ALMACENE la recortadora inactiva en el interior. Este aparato debe ser almacenado en lugares secos, altos y seguros - fuera del alcance de los niños. 18. No toque las cuchillas de corte expustas ni los bordes de corte cuando tome o levente el aparato. 19. No fuerce el aparato - realizará mejor el trabajo y con menos probabiliada de un riesgo de lesión a la velocidad para la cual se diseñó. E S P A 1-2. EXPLICACION DE NOTA, ADVERTENCIA Y SIMBOLO DE GARANTIA 1. Una NOTA usada para comunicar información adicional, para destacar una explicación particular, o para expander Ñ una instrucción específica. O 2. Una ADVERTENCIA identifica un procedimiento que, si no se acomete o se realiza inadecuadamente, puede provocar heridas personales y/o daños a la unidad. L 3. El (SIMBOLO DE GARANTIA) sirve para notificar que por los menos las instrucciones o procedimientos deben llevarse al cabo, cualiquier daño invalidará la garantía y los gastos de la reparaciones serán asumidos por el dueño. Cualquier otro servicio, con excepción del mantenimiento del usuario, deberá ser realizado por un Centro de Servicio Autorizado Troy Bilt. Los daños o condiciones causadas por practicas de mantenimiento inadecuadas, las cuales hagan que el producto sea inoperable invalidarán la garantía del fabricante. 8 4. FOR WARRANTY OR SERVICE contact the nearest Troy Bilt Authorized Service Center by calling 800# on back cover. E 1-3. INTERNATIONAL SYMBOLS N 1. Read the User Manual (Figure 2-1). G 2. Use of these personal safety items is highly recommended to reduce the risk of accidental injury (Figure 2-2). 3 - ASSEMBLY INSTRUCTIONS - INSTRUCTIONS POUR MONTAGE INSTRUCCIONES DE ENSEMBLADO SAVE THESE INSTRUCTIONS A B 4. F R A POUR TOUT ENTRETIEN OU SERVICE AU TITRE DE LA GARANTIE, entrez en contact avec la centre commerical autorisé par Troy Bilt le plus proche en appelant 800# sur la couverture arrière. 1-3. SYMBOLES INTERNATIONAUX 1. 2. Lire la Notice d'utilisation (Figure 2-1). Il est fortement recommandé de respecter les consignes de sécurité personnelle pour réduire les risques d'accident ou de blessures (Figure 2-2). CONSERVER CES INSTRUCTIONS 4. E S P 3-1B 3-1A PARA LA GARANTIA O EL SERVICIO entre en contacto con el centro de servicio autorizado Troy Bilt más cercano llamando 800# en la cubierta trasera. C 1-3. SIMBOLOS INTERNACIONALES 1. 2. Lea el manual del Usuario (Figura 2-1). El uso de estos párrafos sobre seguridad personal es altamente recomendado para reducir el riesgo de heridas accidentales (Figura 2-2). C CONSERVE ESTAS INSTRUCCIONES 3-1C 2-INTERNATIONAL SYMBOLS - SYMBOLES INTERNATIONAUX SIMBOLOS INTERNACIONALES Use of these personal safety items is highly recommended to reduce the risk of accidental injury. L’utilisation des ces dispostifs de sécurité est foretement recommandé afim de réduire tout risque de blessures accidentelles. El uso de estos articulos de seguridad personal es altamente recomendado para reducir el riesgo de lesiones accidentales. F R A N C A I S Read the User Manual. Lire le manuel d’utilisation. Lea Manual de Usuario. 2-1 9 E N G L I S H 2-2 E S P A Ñ O L 3-1D NOTE: The only assembly required for your trimmer is to install the edge guide wheel, debris shield and adjust the assist handle. 3-1. EDGE GUIDE WHEEL INSTALLATION 1. Position the edge guide wheel (A) to the front of the motor housing as shown in Fig. 3-1A 2. Tighten the wing nut (B) firmly. (Fig. 3-1B) 3-2. DEBRIS SHIELD INSTALLATION 1. Position the motor housing with string head carrier facing up. (Fig. 3-1C) 2. Slide debris shield over motor housing. 3. Secure it with 4 screws (C). (Fig. 3-1D) REMARQUE : Les seules opérations de montage que nécessite votre taille-haies consistent à monter la roue de guidage de bord, le bouclier à débris, et a regler la poignee d'aide. 3-1. INSTALLATION DE LA ROUE DE GUIDAGE DE BORD 1. Placez la roue du guide de bordure (A) sur l'avant du logement moteur ainsi qu'illustré dans la Fig. 3-1A. 2. Serrez fermement l'écrou à oreilles (B). (Fig. 3-1B) 3-2. INSTALLATION DU BOUCLIER A DEBRIS 1. 2. 3. Placez le logement du moteur de façon à avoir le support de tête de fil tourné vers le haut. (Fig. 3-1C) Faites glisser le bouclier à débris au-dessus du logement du moteur. Fixez avec 4 vis (C). (Fig. 3-1D) NOTA: El único montaje necesario para la recortadora es instalar la rueda de guía del extremo, la protección contra residuos y el mango de asistencia. 3-1. INSTALACIÓN DE LA RUEDA DE GUÍA DEL EXTREMO 1. 2. Coloque la rueda guía de reborde (A) al frente de la carcasa del motor como e muestra en la Fig. 3-1A Apriete la tuerca de mariposa (B) firmemente. (Fig 3-1B) 3-2. INSTALACIÓN DE LA PROTECCIÓN CONTRA RESIDUOS 1. 2. 3. Coloque el compartimento del motor con el portador del cabezal de cuerda mirando hacia arriba. (Fig. 3-1C) Deslice la protección contra residuos sobre el compartimento del motor. Apriétela con 4 tornillos (C). (Fig. 3-1D) 10 4. FOR WARRANTY OR SERVICE contact the nearest Troy Bilt Authorized Service Center by calling 800# on back cover. E 1-3. INTERNATIONAL SYMBOLS N 1. Read the User Manual (Figure 2-1). G 2. Use of these personal safety items is highly recommended to reduce the risk of accidental injury (Figure 2-2). 3 - ASSEMBLY INSTRUCTIONS - INSTRUCTIONS POUR MONTAGE INSTRUCCIONES DE ENSEMBLADO SAVE THESE INSTRUCTIONS A B 4. F R A POUR TOUT ENTRETIEN OU SERVICE AU TITRE DE LA GARANTIE, entrez en contact avec la centre commerical autorisé par Troy Bilt le plus proche en appelant 800# sur la couverture arrière. 1-3. SYMBOLES INTERNATIONAUX 1. 2. Lire la Notice d'utilisation (Figure 2-1). Il est fortement recommandé de respecter les consignes de sécurité personnelle pour réduire les risques d'accident ou de blessures (Figure 2-2). CONSERVER CES INSTRUCTIONS 4. E S P 3-1B 3-1A PARA LA GARANTIA O EL SERVICIO entre en contacto con el centro de servicio autorizado Troy Bilt más cercano llamando 800# en la cubierta trasera. C 1-3. SIMBOLOS INTERNACIONALES 1. 2. Lea el manual del Usuario (Figura 2-1). El uso de estos párrafos sobre seguridad personal es altamente recomendado para reducir el riesgo de heridas accidentales (Figura 2-2). C CONSERVE ESTAS INSTRUCCIONES 3-1C 2-INTERNATIONAL SYMBOLS - SYMBOLES INTERNATIONAUX SIMBOLOS INTERNACIONALES Use of these personal safety items is highly recommended to reduce the risk of accidental injury. L’utilisation des ces dispostifs de sécurité est foretement recommandé afim de réduire tout risque de blessures accidentelles. El uso de estos articulos de seguridad personal es altamente recomendado para reducir el riesgo de lesiones accidentales. F R A N C A I S Read the User Manual. Lire le manuel d’utilisation. Lea Manual de Usuario. 2-1 9 E N G L I S H 2-2 E S P A Ñ O L 3-1D NOTE: The only assembly required for your trimmer is to install the edge guide wheel, debris shield and adjust the assist handle. 3-1. EDGE GUIDE WHEEL INSTALLATION 1. Position the edge guide wheel (A) to the front of the motor housing as shown in Fig. 3-1A 2. Tighten the wing nut (B) firmly. (Fig. 3-1B) 3-2. DEBRIS SHIELD INSTALLATION 1. Position the motor housing with string head carrier facing up. (Fig. 3-1C) 2. Slide debris shield over motor housing. 3. Secure it with 4 screws (C). (Fig. 3-1D) REMARQUE : Les seules opérations de montage que nécessite votre taille-haies consistent à monter la roue de guidage de bord, le bouclier à débris, et a regler la poignee d'aide. 3-1. INSTALLATION DE LA ROUE DE GUIDAGE DE BORD 1. Placez la roue du guide de bordure (A) sur l'avant du logement moteur ainsi qu'illustré dans la Fig. 3-1A. 2. Serrez fermement l'écrou à oreilles (B). (Fig. 3-1B) 3-2. INSTALLATION DU BOUCLIER A DEBRIS 1. 2. 3. Placez le logement du moteur de façon à avoir le support de tête de fil tourné vers le haut. (Fig. 3-1C) Faites glisser le bouclier à débris au-dessus du logement du moteur. Fixez avec 4 vis (C). (Fig. 3-1D) NOTA: El único montaje necesario para la recortadora es instalar la rueda de guía del extremo, la protección contra residuos y el mango de asistencia. 3-1. INSTALACIÓN DE LA RUEDA DE GUÍA DEL EXTREMO 1. 2. Coloque la rueda guía de reborde (A) al frente de la carcasa del motor como e muestra en la Fig. 3-1A Apriete la tuerca de mariposa (B) firmemente. (Fig 3-1B) 3-2. INSTALACIÓN DE LA PROTECCIÓN CONTRA RESIDUOS 1. 2. 3. Coloque el compartimento del motor con el portador del cabezal de cuerda mirando hacia arriba. (Fig. 3-1C) Deslice la protección contra residuos sobre el compartimento del motor. Apriétela con 4 tornillos (C). (Fig. 3-1D) 10 4 - ADJUSTMENT INSTRUCTIONS - INSTRUCTIONS DE RÉGLAGE INSTRUCCIONES DE AJUSTE A B 4-4A 4-1A 4-2A 4-4. STARTING 4-2B 1. E N 2. G 3. L I S 4. H 4-1. ADJUST SHAFT LENGTH 1. Grip shaft firmly. 2. Push shaft release button (A) and move motor housing forward or backward to desired length. (Fig. 4-1A) NOTE: Shaft may be adjusted in trimming or edging mode. E N G 4-2. EDGING CONVERSION 1. Grip shaft firmly. L 2. Push edge button (B) and rotate handle assembly until an audible click is heard. I (Fig. 4-2A & Fig. 4-2B) S 3. Adjust assist handle as required. H 4-3. ADJUST THE ASSIST HANDLE NOTE: The assist handle is attached to the shaft but has been turned under for packing 1. Loosen adjustment knob and rotate handle to the top of shaft (Figure 4-3). 2. Tighten adjustment knob securely. 5. 4-4. DEMARRAGE 4-3 4-1. RÉGLAGE DE LA LONGUEUR DU MANCHE F R A N C A I S 1. Saisir fermement le manche. 2. Pousser le bouton de dégagement rouge du manche vers l’avant et déplacer le manche vers l’avant ou vers l’arrière à la longueur désirée (Figure 4-1A). NOTA: Le manche peut être réglé dans le mode coupe-herbe ou taille-bordure. 4-2. TRANSFORMATION EN TAILLE-BORDURE 1. Saisir fermement le manche. 2. Appuyez sur le bouton de bordure (B) et faites pivoter l'ensemble de poignée jusqu'à ce vous entendiez un déclic. (Fig.4-2A & Fig.4-2B) 3. Ajustez la poignée d'aide selon vos besoins. 4-3. ADJUSTER LA POIGNEE DE MAINTEIN REMARQUE: La poignée de maintien est attachée au manche mais a été tournée vers le bas pour le transport. 1. Desserrer le bouton de réglage et faire toutner la poignée vers le haut du manche (Figure 4-3). 2. Resserrer fermement le bouton de réglage. 4-1. AJUSTE LA LONGITUD DEL EJE E S P A Ñ O L 11 When starting the string-trimmer for the first time, check that the nylon line touch or pass over the wire-cutting blade. If they are not long enough, press the bump knob and, at the same time, pull the nylon line. (Fig. 4-4A). Adjust the height and cutting position as detailed in adjustment instructions. Make sure the length of grass trimmer and position of assist handle is most applicable before use, adjust the length of grass trimmer by pressing the shaft adjustment button, adjust the height of assist handle by loosening the adjustment knob. Take a secure hold of the grass trimmer and, without letting it touch the grass to be cut, push up the safety switch, then press the trigger on the upper handgrip. Let the string trimmer run for a few seconds and “bump” the stringhead against the lawn. Nylon line will automatically release. The cut-off knife in the debris shield will trim off excess line. To switch off the string trimmer let go of the switch. 1. Agarre el eje firmemente. 2. Presione el botón rojo para liberar el eje hacia adelante y mueva el manubrio hacia atrás a la longitud deseada (Figura 4-1A). NOTA: El eje puede ser ajustado ya sea en modo de recortadora o de desorilladora. F R A N C A I S 1. 2. 3. 4. 5. 4-4. ENCENDIDO 1. E S 2. P 3. A Ñ O 4. L 4-1. TRANSFORMACION A DESORILLADORA 1. Agarre el eje firmemente. 2. Pulse el botón de extremo (B) y gire el montaje del mango hasta que se oiga un clic. (Fig 4-2A y Fig. 4-2B) 3. Ajuste el mango de asistencia según lo necesite. A la première utilisation du coupe herbe à fil, vérifier que les fils de Nylon touchent ou sont au-dessus de la lame coupe-fil; s’ils ne sont pas assez longs, appuyer sur le bouton et tirer les fils de Nylon simultanément. ( Fig. 4-4A) Brancher la prise du coupe herbe au prolongateur et attacher à la poignée. Assurez-vous que la longueur du coupe-herbe et la position de la poignée d'aide sont bien correctes avant utilisation ; ajustez la longueur du coupe-herbe en appuyant sur le bouton de réglage de l'axe ; ajustez la hauteur de la poignée d'aide en desserrant la molette de réglage. Attrapez fermement l'extremité du taille-herbe et, sans le laisser entrer en contact avec l'herbe à couper, enfoncez l'interrupteur de sécurité, puis appuyez sur la gâchette sur la poignée supérieure. Laissez le coupe-herbe à fil tourner pendant quelques secondes, et "cognez" la tête de fil contre le sol. Le fil de nylon sera automatiquement relâché. La lame de coupe se trouvant dans le bouclier à débris coupera l'excédant de fil. Pour arrêter le coupe herbe, relâcher la gâchette. 5. Antes de encender el orillador de pasto la primera vez , asegúrese que el hilo de naylon toque o exceda la longitud hacia la navaja que cortara el hilo en la guarda protectora. Si el hilo no es suficientemente largo, presione el botón del cabezal y al mismo tiempo jale el hilo de naylon (Fig. 4-4A). Conecte la clavija eléctrica a la extensión eléctrica y sujete esta en el maneral. Asegúrese de que la longitud de la recortadora de hierba y la posición del mango de asistencia es la conveniente antes de su utilización, ajuste la longitud del recortador de hierba pulsando el botón de ajuste del eje, ajuste la altura del mango de asistencia soltando el botón de ajuste. Sostenga firmemente la cortadora de césped y, sin dejarla tocar el césped que va a cortar, hale el interruptor de seguridad, luego presione el gatillo del mango superior. Deje que la cortadora de cordel opere por unos pocos segundos y "choque" el cabezote de cordel contra el césped. El cordel de Nylon se liberará automáticamente. La cuchilla de corte en la guarda escombros cortará el exceso de cordel. Para apagar la unidad simplemente deje de presionar el interruptor de encendido. 4-3. AJUSTE DE EL MENUBRIO AUXILIAR NOTA: La manija de ayuda está atada al mango pero ha sido girada hacia abajo para empacarse. 1. Afloje la perilla de ajuste y gire la manija hacia arriba del mango (Figura 4-3). 2. Reapriete la perilla de ajuste seguramente. 12 4 - ADJUSTMENT INSTRUCTIONS - INSTRUCTIONS DE RÉGLAGE INSTRUCCIONES DE AJUSTE A B 4-4A 4-1A 4-2A 4-4. STARTING 4-2B 1. E N 2. G 3. L I S 4. H 4-1. ADJUST SHAFT LENGTH 1. Grip shaft firmly. 2. Push shaft release button (A) and move motor housing forward or backward to desired length. (Fig. 4-1A) NOTE: Shaft may be adjusted in trimming or edging mode. E N G 4-2. EDGING CONVERSION 1. Grip shaft firmly. L 2. Push edge button (B) and rotate handle assembly until an audible click is heard. I (Fig. 4-2A & Fig. 4-2B) S 3. Adjust assist handle as required. H 4-3. ADJUST THE ASSIST HANDLE NOTE: The assist handle is attached to the shaft but has been turned under for packing 1. Loosen adjustment knob and rotate handle to the top of shaft (Figure 4-3). 2. Tighten adjustment knob securely. 5. 4-4. DEMARRAGE 4-3 4-1. RÉGLAGE DE LA LONGUEUR DU MANCHE F R A N C A I S 1. Saisir fermement le manche. 2. Pousser le bouton de dégagement rouge du manche vers l’avant et déplacer le manche vers l’avant ou vers l’arrière à la longueur désirée (Figure 4-1A). NOTA: Le manche peut être réglé dans le mode coupe-herbe ou taille-bordure. 4-2. TRANSFORMATION EN TAILLE-BORDURE 1. Saisir fermement le manche. 2. Appuyez sur le bouton de bordure (B) et faites pivoter l'ensemble de poignée jusqu'à ce vous entendiez un déclic. (Fig.4-2A & Fig.4-2B) 3. Ajustez la poignée d'aide selon vos besoins. 4-3. ADJUSTER LA POIGNEE DE MAINTEIN REMARQUE: La poignée de maintien est attachée au manche mais a été tournée vers le bas pour le transport. 1. Desserrer le bouton de réglage et faire toutner la poignée vers le haut du manche (Figure 4-3). 2. Resserrer fermement le bouton de réglage. 4-1. AJUSTE LA LONGITUD DEL EJE E S P A Ñ O L 11 When starting the string-trimmer for the first time, check that the nylon line touch or pass over the wire-cutting blade. If they are not long enough, press the bump knob and, at the same time, pull the nylon line. (Fig. 4-4A). Adjust the height and cutting position as detailed in adjustment instructions. Make sure the length of grass trimmer and position of assist handle is most applicable before use, adjust the length of grass trimmer by pressing the shaft adjustment button, adjust the height of assist handle by loosening the adjustment knob. Take a secure hold of the grass trimmer and, without letting it touch the grass to be cut, push up the safety switch, then press the trigger on the upper handgrip. Let the string trimmer run for a few seconds and “bump” the stringhead against the lawn. Nylon line will automatically release. The cut-off knife in the debris shield will trim off excess line. To switch off the string trimmer let go of the switch. 1. Agarre el eje firmemente. 2. Presione el botón rojo para liberar el eje hacia adelante y mueva el manubrio hacia atrás a la longitud deseada (Figura 4-1A). NOTA: El eje puede ser ajustado ya sea en modo de recortadora o de desorilladora. F R A N C A I S 1. 2. 3. 4. 5. 4-4. ENCENDIDO 1. E S 2. P 3. A Ñ O 4. L 4-1. TRANSFORMACION A DESORILLADORA 1. Agarre el eje firmemente. 2. Pulse el botón de extremo (B) y gire el montaje del mango hasta que se oiga un clic. (Fig 4-2A y Fig. 4-2B) 3. Ajuste el mango de asistencia según lo necesite. A la première utilisation du coupe herbe à fil, vérifier que les fils de Nylon touchent ou sont au-dessus de la lame coupe-fil; s’ils ne sont pas assez longs, appuyer sur le bouton et tirer les fils de Nylon simultanément. ( Fig. 4-4A) Brancher la prise du coupe herbe au prolongateur et attacher à la poignée. Assurez-vous que la longueur du coupe-herbe et la position de la poignée d'aide sont bien correctes avant utilisation ; ajustez la longueur du coupe-herbe en appuyant sur le bouton de réglage de l'axe ; ajustez la hauteur de la poignée d'aide en desserrant la molette de réglage. Attrapez fermement l'extremité du taille-herbe et, sans le laisser entrer en contact avec l'herbe à couper, enfoncez l'interrupteur de sécurité, puis appuyez sur la gâchette sur la poignée supérieure. Laissez le coupe-herbe à fil tourner pendant quelques secondes, et "cognez" la tête de fil contre le sol. Le fil de nylon sera automatiquement relâché. La lame de coupe se trouvant dans le bouclier à débris coupera l'excédant de fil. Pour arrêter le coupe herbe, relâcher la gâchette. 5. Antes de encender el orillador de pasto la primera vez , asegúrese que el hilo de naylon toque o exceda la longitud hacia la navaja que cortara el hilo en la guarda protectora. Si el hilo no es suficientemente largo, presione el botón del cabezal y al mismo tiempo jale el hilo de naylon (Fig. 4-4A). Conecte la clavija eléctrica a la extensión eléctrica y sujete esta en el maneral. Asegúrese de que la longitud de la recortadora de hierba y la posición del mango de asistencia es la conveniente antes de su utilización, ajuste la longitud del recortador de hierba pulsando el botón de ajuste del eje, ajuste la altura del mango de asistencia soltando el botón de ajuste. Sostenga firmemente la cortadora de césped y, sin dejarla tocar el césped que va a cortar, hale el interruptor de seguridad, luego presione el gatillo del mango superior. Deje que la cortadora de cordel opere por unos pocos segundos y "choque" el cabezote de cordel contra el césped. El cordel de Nylon se liberará automáticamente. La cuchilla de corte en la guarda escombros cortará el exceso de cordel. Para apagar la unidad simplemente deje de presionar el interruptor de encendido. 4-3. AJUSTE DE EL MENUBRIO AUXILIAR NOTA: La manija de ayuda está atada al mango pero ha sido girada hacia abajo para empacarse. 1. Afloje la perilla de ajuste y gire la manija hacia arriba del mango (Figura 4-3). 2. Reapriete la perilla de ajuste seguramente. 12 5 - OPERATING INSTRUCTIONS - INSTRUCTIONS D’UTILISATION INSTRUCCIONES DE OPERACION A 4-4B A CAUTION E N G A short or worn wire cuts less efficiently so, to improve its operation on subsequent occasions, bump the spool button lightly on the ground while the trimmer is running.(Fig 4-4B) These operations should be repeated a few times before starting work to make sure that everything is functioning properly and to familiarize yourself with the string trimmer. Start off slowly, when you have gained experience, you will be able to use the grass trimmer to its full potential. F R A Un fil abîmé ou trop court ne coupe pas de manière efficace ; afin d’améliorer sa performance, tapoter légèrement le bouton de la bobine contre le sol pendant que le coupe herbe est en marche. (Fig. 4-4B). Répéter plusieurs fois avant de commencer le travail pour vous assurer que tout fonctionne correctement et pour vous familiariser avec le coupe herbe. Commencer doucement, et avec un peu d’expérience, vous pourrez utiliser le coupe herbe dans tout son potentiel. AVERTISSEMENT 5-1 5-1. CONNECT THE CORD 1. Ensure the cord is NOT plugged into a receptacle before this procedure. E 2. Make a loop with 8″ - 10″ (20 - 25cm) of the end of the extension cord. 3. Place the loop into the slot (A) under the rear handle and lock into place on the cord retainer as shown in Figure 5-1. N 4. Connect the extension cord to the trimmer. G 5. Plug the extension cord into a receptacle ONLY when you are ready to operate the trimmer. L 5-2. TRIMMER OPERATION I 1. TRIMMING / MOWING (Fig. 5-2A). Swing trimmer with a sickle-like motion from side to side. Do not tilt the stringhead during the procedure. Test area to be trimmed for proper cutting height. Keep stringhead at same level for even S depth of cut. H 2. CLOSER TRIMMING (Fig. 5-2B). Position trimmer straight ahead with a slight tilt so bottom of stringhead is above ground level and string contact occurs at proper cutting point. Always cut away from operator. Do not pull trimmer in toward operator. ADVERTENCIA E S P Un hilo corto o gastado , corta mal, por lo que es necesario que presione el botón del cabezal contra el piso con la maquina encendida. Esto hara que el hilo salga del cabezal y se cortara automáticamente a la longitud optima con la cuchilla de la guarda. ( Fig. 4-4B). Esta operación debe repetirse algunas veces antes de iniciar el trabajo con el fin de asegurarse que todo esta funcionando correctamente y para que usted se familiarice con el orillador de pasto. Inicie lentamente , cuando obtenga experiencia podrá usar su orillador de pasto a su máxima capacidad. 5-1. BRANCHEMENT DU CORDON PROLONGATEUR F R A N C A I S 1. S'assurer que le cordon prolongateur n'est PAS branché dans une prise de courant avant de procéder à l'opération suivante. 2. Former une boucle de 20 à 25 cm (8 à 10 pouces) avec l'extrémité du cordon prolongateur. 3. Placez le boucle dans l'orifice (A) sous la poignée arrière et verrouillez en position l'attache-cordon ainsi qu'indiqué dans Figure 5-1. 4. Brancher le cordon prolongateur sur le du coupe-herbe. 5. Ne brancher le cordon prolongateur dans une prise de courant secteur QUE lorsque l'on est prêt à utiliser l'appareil. 5-2. FONCTIONNEMENT DU COUPE-HERBE 1. COUPE ET TONTE (Fig. 5-2A). Utiliser un mouvement de balancement latéral semblable à celui d’une faux. Ne pas incliner la tête pendant cette opération. Faire un essai sur la partie à tondre pour vérifier la hauteur de coupe. Garder la téte de coupe à une hauteur constante pour obtenir une tonte uniforme. 2. POUR TONDRE DE PLUS PRÉS (Fig. 5-2B). Tenir le coupe-herbe droit devant soi et l’inclner légèrement de manière que le fil de coupe se trouve à l’angle voulu sans que le dessous de la tête de coupe ne touche le sol. Toujours tondre loin de soi, ne jamais amener le coupe-herbe à soi. 4-1. CONECTE EL CABLE E S P A Ñ O L 13 1. 2. 3. 4. 5. Asegúrese de que el cable NO esté conectado en el receptáculo antes de este procedimiento. Haga una lazada con 20-25cm (8-10″) del extremo del cable extensión. Coloque el bucle en la ranura (A) debajo de la manija posterior y asegúrelo en su sitio en el retén de cordel como se muestra en la Figura 5-1. Conecte el cable de extensión al de la recortadora. Enchufe el cable de extensión en el receptáculo SOLO cuando esté preparado para hacer funcionar la recortadora. 5-2. OPERACIÓN DEL CORTADOR ORILLADOR 1. 2. CORTADOR DE PASTO (Fig. 5-2A). Columpie la unidad de lado a lado. No incline el cabezal en este movimiento. Haga una prueba para definir la altura de corte. Mantenga el cabezal a una misma altura para un corte parejo. CORTE MAS CERCANO (Fig. 5-2B). Posicione el cabezal un poco inclinado , siempre corte alejado de personas y del operador. 14 5 - OPERATING INSTRUCTIONS - INSTRUCTIONS D’UTILISATION INSTRUCCIONES DE OPERACION A 4-4B A CAUTION E N G A short or worn wire cuts less efficiently so, to improve its operation on subsequent occasions, bump the spool button lightly on the ground while the trimmer is running.(Fig 4-4B) These operations should be repeated a few times before starting work to make sure that everything is functioning properly and to familiarize yourself with the string trimmer. Start off slowly, when you have gained experience, you will be able to use the grass trimmer to its full potential. F R A Un fil abîmé ou trop court ne coupe pas de manière efficace ; afin d’améliorer sa performance, tapoter légèrement le bouton de la bobine contre le sol pendant que le coupe herbe est en marche. (Fig. 4-4B). Répéter plusieurs fois avant de commencer le travail pour vous assurer que tout fonctionne correctement et pour vous familiariser avec le coupe herbe. Commencer doucement, et avec un peu d’expérience, vous pourrez utiliser le coupe herbe dans tout son potentiel. AVERTISSEMENT 5-1 5-1. CONNECT THE CORD 1. Ensure the cord is NOT plugged into a receptacle before this procedure. E 2. Make a loop with 8″ - 10″ (20 - 25cm) of the end of the extension cord. 3. Place the loop into the slot (A) under the rear handle and lock into place on the cord retainer as shown in Figure 5-1. N 4. Connect the extension cord to the trimmer. G 5. Plug the extension cord into a receptacle ONLY when you are ready to operate the trimmer. L 5-2. TRIMMER OPERATION I 1. TRIMMING / MOWING (Fig. 5-2A). Swing trimmer with a sickle-like motion from side to side. Do not tilt the stringhead during the procedure. Test area to be trimmed for proper cutting height. Keep stringhead at same level for even S depth of cut. H 2. CLOSER TRIMMING (Fig. 5-2B). Position trimmer straight ahead with a slight tilt so bottom of stringhead is above ground level and string contact occurs at proper cutting point. Always cut away from operator. Do not pull trimmer in toward operator. ADVERTENCIA E S P Un hilo corto o gastado , corta mal, por lo que es necesario que presione el botón del cabezal contra el piso con la maquina encendida. Esto hara que el hilo salga del cabezal y se cortara automáticamente a la longitud optima con la cuchilla de la guarda. ( Fig. 4-4B). Esta operación debe repetirse algunas veces antes de iniciar el trabajo con el fin de asegurarse que todo esta funcionando correctamente y para que usted se familiarice con el orillador de pasto. Inicie lentamente , cuando obtenga experiencia podrá usar su orillador de pasto a su máxima capacidad. 5-1. BRANCHEMENT DU CORDON PROLONGATEUR F R A N C A I S 1. S'assurer que le cordon prolongateur n'est PAS branché dans une prise de courant avant de procéder à l'opération suivante. 2. Former une boucle de 20 à 25 cm (8 à 10 pouces) avec l'extrémité du cordon prolongateur. 3. Placez le boucle dans l'orifice (A) sous la poignée arrière et verrouillez en position l'attache-cordon ainsi qu'indiqué dans Figure 5-1. 4. Brancher le cordon prolongateur sur le du coupe-herbe. 5. Ne brancher le cordon prolongateur dans une prise de courant secteur QUE lorsque l'on est prêt à utiliser l'appareil. 5-2. FONCTIONNEMENT DU COUPE-HERBE 1. COUPE ET TONTE (Fig. 5-2A). Utiliser un mouvement de balancement latéral semblable à celui d’une faux. Ne pas incliner la tête pendant cette opération. Faire un essai sur la partie à tondre pour vérifier la hauteur de coupe. Garder la téte de coupe à une hauteur constante pour obtenir une tonte uniforme. 2. POUR TONDRE DE PLUS PRÉS (Fig. 5-2B). Tenir le coupe-herbe droit devant soi et l’inclner légèrement de manière que le fil de coupe se trouve à l’angle voulu sans que le dessous de la tête de coupe ne touche le sol. Toujours tondre loin de soi, ne jamais amener le coupe-herbe à soi. 4-1. CONECTE EL CABLE E S P A Ñ O L 13 1. 2. 3. 4. 5. Asegúrese de que el cable NO esté conectado en el receptáculo antes de este procedimiento. Haga una lazada con 20-25cm (8-10″) del extremo del cable extensión. Coloque el bucle en la ranura (A) debajo de la manija posterior y asegúrelo en su sitio en el retén de cordel como se muestra en la Figura 5-1. Conecte el cable de extensión al de la recortadora. Enchufe el cable de extensión en el receptáculo SOLO cuando esté preparado para hacer funcionar la recortadora. 5-2. OPERACIÓN DEL CORTADOR ORILLADOR 1. 2. CORTADOR DE PASTO (Fig. 5-2A). Columpie la unidad de lado a lado. No incline el cabezal en este movimiento. Haga una prueba para definir la altura de corte. Mantenga el cabezal a una misma altura para un corte parejo. CORTE MAS CERCANO (Fig. 5-2B). Posicione el cabezal un poco inclinado , siempre corte alejado de personas y del operador. 14 6-2. MAINTENANCE CAUTION 6-1F 6-1G 6-1H 6-1J E N G L I S H Before carrying out any maintenance operations, cut off the electric power supply by disconnecting the plug from the extension cable. 1. Regular cleaning and maintenance of your string trimmer will ensure efficiency and prolong the life of your machine. 2. After each cutting operation, take apart and clean out the grass and soil from: the spool and its slot and in particular the guard. 3. During operation, keep the air slots clean and free of grass. 4. Only use a cloth soaked with hot water and a soft brush to clean the string trimmer. 5. Do not spray or wet the appliance with water. 6. Do not use detergents or solvents as these could ruin the trimmer. The parts in plastic can easily be damaged by chemical agents. 7. If the line cutting line no longer cuts or breaks, have this replaced by contacting an authorized service centre. 6-2. ENTRETIEN AVERTISSEMENT 6-1K 6-1L 6-1M 6-1N 6. Lock the ends of the line in opposite slots on the spool (Fig. 6-1F). Place the clear plastic line retainer back over the line and spool (Fig 6-1G). Pull the lower line up into the lower slot in the clear plastic line retainer (Fig. 6-1H). Pull E the upper line down into the upper slot (Fig 6-1J). 7. Insert the line through each eyelet in the spool carrier and slide the spool into the carrier. (Fig. 6-1K) N NOTE: Ensure that the line is within the clear plastic line retainer. If it's outside of the clear plastic line retainer, the G line will not feed. L 8. Make sure to insert the spring, assemble the spool and spool carrier back onto the trimmer. To do so, push the head I on and turn it clockwise until it locks. (Fig.6-1Land Fig 6-1M) S 9. To test if the line is advancing properly, push the button with your thumb while pulling the line with your fingers. The line should advance freely. (Fig. 6-1N). H 10. In the event of the line breaking inside the spool, repeat the replacement operation. 11. Start the grass trimmer following the instructions in the “STARTING” section. 6. F R A N C A I S Installez le bout du fil dans l’orifice opposé (Fig. 6-1F). Replacez le support transparent (Fig. 6-1G). Tirez le fil de dessous et le fixez dans l’orifice en dessous du support transparent (Fig. 6-1H) Tirez le fil de dessus et le fixez dans l’orifice en dessus du support transparent. 7. Insérez le fil dans chaque orifice du support de bobine, et faites glisser la bobine dans ce support (Fig.6-1E & 6-1F) REMARQUE : Assurez-vous que le fil se trouve bien dans le diviseur ; s'il est en-dehors, le fil ne sera pas alimenté. 8. En veillant à bien insérer le ressort, remontez l'ensemble support de bobine et bobine dans le coupe-herbe. Pour ce faire, poussez sur la tête et tournez l'ensemble dans le sens des aiguilles d'une montre jusqu'à ce qu'il se fixe en position. (Fig. 6-1G and Fig 6-1H) 9. Pour vérifier que le fil avance bien correctement, poussezle bouton avec votre pouce tout en tirant le fil avec vos doigts. Le fil doit pouvoir avancer librement. (Fig. 6-1J). 10. Si le fil se casse dans la bobine, répétez l'opération de remplacement. 11. Démarrez le coupe-herbe en suivant les instructions données dans la section "MISE EN MARCHE". F R A N C A I S Avant de commencer toute maintenance, débrancher la prise du prolongateur. 1. Un entretien et nettoyage réguliers du coupe herbe en assurera son efficacité et sa longévité. 2. Après chaque opération, défaire et enlever la terre et l’herbe des éléments suivants : la bobine et ses encoches, particulièrement le pare débris. 3. Pendant l’utilisation, garder les ouvertures propres et sans herbe. 4. Pour nettoyer le coupe herbe, utiliser exclusivement un chiffon trempé dans de l’eau chaude et une brosse à poils doux. 5. Ne pas asperger ou mouiller l’appareil. 6. Ne pas utiliser de détergeants ou dissolvants car ils risquent d’endommager le coupe herbe. Les pièces en plastique sont facilement endommagées par les produits chimiques. 7. Si le fil de coupe ne coupe plus ou se casse, faites-le remplacer pour cela, prenez contact avec un centre de maintenance agrée. 6-2. MAINTENIMIENTO E S P A Ñ O L PRECAUCION Antes de practicar cualquier procedimiento de mantenimiento de su unidad, corte completamente el suministro de corriente eléctrica de la unidad desconectando la clavija de la extensión eléctrica. 1. Un regular mantenimiento y aseo de su maquina asegurara un funcionamiento mas eficiente y prolongara la vida de su unidad. 2. Después de cada operación de corte, limpie y quite la tierra y pasto de el cabezal y particularmente de la guarda. 3. Mientras opera la unidad asegúrese de que las ranuras d ventilación están limpias y libres de tierra y pasto. 4. Unicamente utilice un trapo húmedo con agua caliente y un cepillo delgado para limpiar su maquina. 5. No rocÌe o moje su unidad con agua. 6. No utilice detergentes o solventes ya que esto pudiera arruinar su unidad. 7. Si la línea de corte ya no corta o se rompe, reemplácela contactando un centro de servicio autorizado. 6. Ajuste los extremos de la línea en las ranuras opuestas en el rotor (Fig. 6-1F) Coloque el retenedor de línea de plástico transparente de nuevo sobre la línea y el rotor (Fig 6-1G) Jale la linea hasta la ranura inferior en el retenedor E de la línea de plástico transparente (Fig. 6-1H) Jala la línea superior hacia la ranura superior (Fig 6-1J) 7. Inserte la línea a través de cara ojal en el portador del rotor y deslice el rotor en el portador. (Fig. 6-1K) S NOTA: Asegúrese que la línea está dentro del retenedor de plástico transparente. Si está fuera del retenedor de P plástico transparente, la línea no avanzara. A 8. Asegúrese de insertar el resorte, ensamblar el rotor y el portador de rotor de nuevo en la podadora. Para hacerlo, empuje la cabeza y gírela hacia la derecha hasta que embone. (Fig.6-1L y Fig 6-1M) Ñ 9. Para probar si la línea está avanzando adecuadamente, presione el botón con su pulgar mientras jala la línea con O sus dedos. La línea deberá avanzar libremente. (Fig. 6-1N) L 10. En caso de que la línea se rompa dentro del rotor, repita la operación de reemplazo. 11. Encienda el podador de pasto siguiente las instrucciónes en la seccion de “ARRANQUE”. 17 18 6-2. MAINTENANCE CAUTION 6-1F 6-1G 6-1H 6-1J E N G L I S H Before carrying out any maintenance operations, cut off the electric power supply by disconnecting the plug from the extension cable. 1. Regular cleaning and maintenance of your string trimmer will ensure efficiency and prolong the life of your machine. 2. After each cutting operation, take apart and clean out the grass and soil from: the spool and its slot and in particular the guard. 3. During operation, keep the air slots clean and free of grass. 4. Only use a cloth soaked with hot water and a soft brush to clean the string trimmer. 5. Do not spray or wet the appliance with water. 6. Do not use detergents or solvents as these could ruin the trimmer. The parts in plastic can easily be damaged by chemical agents. 7. If the line cutting line no longer cuts or breaks, have this replaced by contacting an authorized service centre. 6-2. ENTRETIEN AVERTISSEMENT 6-1K 6-1L 6-1M 6-1N 6. Lock the ends of the line in opposite slots on the spool (Fig. 6-1F). Place the clear plastic line retainer back over the line and spool (Fig 6-1G). Pull the lower line up into the lower slot in the clear plastic line retainer (Fig. 6-1H). Pull E the upper line down into the upper slot (Fig 6-1J). 7. Insert the line through each eyelet in the spool carrier and slide the spool into the carrier. (Fig. 6-1K) N NOTE: Ensure that the line is within the clear plastic line retainer. If it's outside of the clear plastic line retainer, the G line will not feed. L 8. Make sure to insert the spring, assemble the spool and spool carrier back onto the trimmer. To do so, push the head I on and turn it clockwise until it locks. (Fig.6-1Land Fig 6-1M) S 9. To test if the line is advancing properly, push the button with your thumb while pulling the line with your fingers. The line should advance freely. (Fig. 6-1N). H 10. In the event of the line breaking inside the spool, repeat the replacement operation. 11. Start the grass trimmer following the instructions in the “STARTING” section. 6. F R A N C A I S Installez le bout du fil dans l’orifice opposé (Fig. 6-1F). Replacez le support transparent (Fig. 6-1G). Tirez le fil de dessous et le fixez dans l’orifice en dessous du support transparent (Fig. 6-1H) Tirez le fil de dessus et le fixez dans l’orifice en dessus du support transparent. 7. Insérez le fil dans chaque orifice du support de bobine, et faites glisser la bobine dans ce support (Fig.6-1E & 6-1F) REMARQUE : Assurez-vous que le fil se trouve bien dans le diviseur ; s'il est en-dehors, le fil ne sera pas alimenté. 8. En veillant à bien insérer le ressort, remontez l'ensemble support de bobine et bobine dans le coupe-herbe. Pour ce faire, poussez sur la tête et tournez l'ensemble dans le sens des aiguilles d'une montre jusqu'à ce qu'il se fixe en position. (Fig. 6-1G and Fig 6-1H) 9. Pour vérifier que le fil avance bien correctement, poussezle bouton avec votre pouce tout en tirant le fil avec vos doigts. Le fil doit pouvoir avancer librement. (Fig. 6-1J). 10. Si le fil se casse dans la bobine, répétez l'opération de remplacement. 11. Démarrez le coupe-herbe en suivant les instructions données dans la section "MISE EN MARCHE". F R A N C A I S Avant de commencer toute maintenance, débrancher la prise du prolongateur. 1. Un entretien et nettoyage réguliers du coupe herbe en assurera son efficacité et sa longévité. 2. Après chaque opération, défaire et enlever la terre et l’herbe des éléments suivants : la bobine et ses encoches, particulièrement le pare débris. 3. Pendant l’utilisation, garder les ouvertures propres et sans herbe. 4. Pour nettoyer le coupe herbe, utiliser exclusivement un chiffon trempé dans de l’eau chaude et une brosse à poils doux. 5. Ne pas asperger ou mouiller l’appareil. 6. Ne pas utiliser de détergeants ou dissolvants car ils risquent d’endommager le coupe herbe. Les pièces en plastique sont facilement endommagées par les produits chimiques. 7. Si le fil de coupe ne coupe plus ou se casse, faites-le remplacer pour cela, prenez contact avec un centre de maintenance agrée. 6-2. MAINTENIMIENTO E S P A Ñ O L PRECAUCION Antes de practicar cualquier procedimiento de mantenimiento de su unidad, corte completamente el suministro de corriente eléctrica de la unidad desconectando la clavija de la extensión eléctrica. 1. Un regular mantenimiento y aseo de su maquina asegurara un funcionamiento mas eficiente y prolongara la vida de su unidad. 2. Después de cada operación de corte, limpie y quite la tierra y pasto de el cabezal y particularmente de la guarda. 3. Mientras opera la unidad asegúrese de que las ranuras d ventilación están limpias y libres de tierra y pasto. 4. Unicamente utilice un trapo húmedo con agua caliente y un cepillo delgado para limpiar su maquina. 5. No rocÌe o moje su unidad con agua. 6. No utilice detergentes o solventes ya que esto pudiera arruinar su unidad. 7. Si la línea de corte ya no corta o se rompe, reemplácela contactando un centro de servicio autorizado. 6. Ajuste los extremos de la línea en las ranuras opuestas en el rotor (Fig. 6-1F) Coloque el retenedor de línea de plástico transparente de nuevo sobre la línea y el rotor (Fig 6-1G) Jale la linea hasta la ranura inferior en el retenedor E de la línea de plástico transparente (Fig. 6-1H) Jala la línea superior hacia la ranura superior (Fig 6-1J) 7. Inserte la línea a través de cara ojal en el portador del rotor y deslice el rotor en el portador. (Fig. 6-1K) S NOTA: Asegúrese que la línea está dentro del retenedor de plástico transparente. Si está fuera del retenedor de P plástico transparente, la línea no avanzara. A 8. Asegúrese de insertar el resorte, ensamblar el rotor y el portador de rotor de nuevo en la podadora. Para hacerlo, empuje la cabeza y gírela hacia la derecha hasta que embone. (Fig.6-1L y Fig 6-1M) Ñ 9. Para probar si la línea está avanzando adecuadamente, presione el botón con su pulgar mientras jala la línea con O sus dedos. La línea deberá avanzar libremente. (Fig. 6-1N) L 10. En caso de que la línea se rompa dentro del rotor, repita la operación de reemplazo. 11. Encienda el podador de pasto siguiente las instrucciónes en la seccion de “ARRANQUE”. 17 18 STOP ARRÊT ALTO USER MANUAL Cordless Grass Trimmer MANUEL DE UTILISATION Toneuse/Tronçonneuse Électrique de gazon MANUAL DEL USUARIO Recortaador/Cortador de Césped Eléctrico MODEL : TB45E For problems or questions, DO NOT return this product to the store. Contact your Customer Service Agent . En cas de problèmes ou pour des questions, NE PAS retourner ce produit au point de vente. S'adresser au préposé du Service à la clientèle en composant. SAFETY OPERATION MAINTENANCE SECURITE FONCTIONNEMENT ENTRETIEN SEGURIDAD OPERACION MANTENIMIENTO Para problemas o preguntas, NO devolver este producto a la tienda Contacte a su Agente de Servicio al Cliente. U.S.A. Imported by: Troy Bilt LLC P.O. Box 361131 Cleveland, OH 44136-0019 For Consumer Assistance Please Call L'Aide Du Consommateur Necessitez S'il Vous Plait Para La Ayuda Del Consumidor Llame Por Favor Canada Imported by / Importé par: Troy Bilt PRODUCTS LIMITED 97 Kent Avenue Kitchener, ON CANADA N2G 4J1 WARNING • PLEASE READ For your own safety please read this manual before attempting to operate your new unit. Failure to follow instructions can result in serious personal injury. Spend a few moments to familiarize yourself with your trimmer before each use. U.S.A. 1-800-520-5520 CANADA 1-800-668-1238 Made in China / Fabriquè à China / Hecho en China AVERTISSEMENT • LIRE ATTENTIVEMENT Pour votre sécurité, lisez entièrement ce manuel avant d’utiliser votre nouvel outil. Le non respect des instructions peut résulter en des accidents graves. Prenez quelques instants pour vous familiariser avec le coupe-herbe avant chaque utilisation. ADVERTENCIA • FAVOR DE LEER Para su propia seguridad, favor de leer este manual antes de intentar operar su unidad nueva. Si no se siguen estas instrucciones se pueden provocar serias heridas personales. Favor de dedicar un poco de tiempo para familiarizarse cada vez que se utilice la unidad. PN 6096-202B01 Printed in China-
 1
1
-
 2
2
-
 3
3
-
 4
4
-
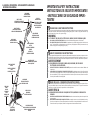 5
5
-
 6
6
-
 7
7
-
 8
8
-
 9
9
-
 10
10
-
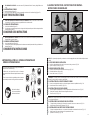 11
11
-
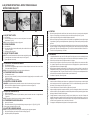 12
12
-
 13
13
-
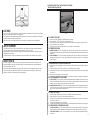 14
14
-
 15
15
-
 16
16
-
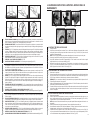 17
17
-
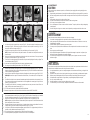 18
18
-
 19
19
-
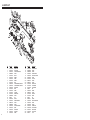 20
20
-
 21
21


Troy-Bilt TB45E Manual de usuario
- Categoría
- Podadoras de césped
- Tipo
- Manual de usuario
en otros idiomas
- français: Troy-Bilt TB45E Manuel utilisateur
- English: Troy-Bilt TB45E User manual
Artículos relacionados
Otros documentos
-
Weed Eater RTE115C El manual del propietario
-
-
McCulloch MCT2027 El manual del propietario
-
-
MTD 769-07255 Typ A Manual de usuario
-
Yard Machines MTD308P Manual de usuario
-
-
Ryobi AC04117 Manual de usuario
-
-