Weed Eater RTE115C El manual del propietario
- Categoría
- Podadoras de césped
- Tipo
- El manual del propietario
Este manual también es adecuado para

Trademark
B
Please do not return unit to retailer.
Por favor, no devuelva el aparato al lugar de compra.
Veuillez ne pas retourner I'outil au ddtaillant.
• 1-800-554-6723
www.weedeater.com
&
Instruction Manual
Manual de Instrucciones
0 us
Manuel d'lnstructions
RTE115 B
WARNING:
Read and follow all Safety Rules and Operating Instructions before
using this product. Read instructionscarefully before assembling.
Failure to do so can result in serious injury.
ADVERTENClA:
Lea el manual del operador y siga todas las advertencias e instruc-
clones de seguridad. Antes de ensamblar el producto lea cuidado-
samente el instructivo. El no hacerlo puede resultar en lesiones gra-
ves,
AVERTISSEMENT:
Veuiflez lire le manuel de I'utilisateur et bien respecter tousles
avertissements et toutes les instructionsde s6curit6. Bien lire les
instructions avant d'assembler I'outil. Tout d6faut de le faire pourrait
entrainer des blessures graves.
Electrolux Home Products, Inc.
250 Bobby Jones Expressway
Augusta, GA 30907
Electrolux Canada Corporation
6150 McLaughlin Road
Mississauga, Ontario L5R 4C2
[]From the Electrolux Group. The world's NO,1 choice.
Copyright 2003 WCI Outdoor Products, inc. 530086748 1/9]03

,d_!_WARNING: When using electric gar-
dening appliances, basic safety precautions
must always be followed to reduce the risk of
fire, electric shock, and serious injury. Read
and follow all instructions.
SAFETY INFORMATION
ON THE UNIT
This power unit can be dangerous! Operator
is responsible for following the warnings and
instructions in this manual and on the unit.
Read entire instruction manuaI before using
unit! Be thoroughly familiar with the controls
and the proper use of the unit. Restnct the use
of this unit to persons who read, understand,
and follow unit and manual warnings and
instructions. Never allow children to operate
this unit. Close attention is necessary when
used near children.
A
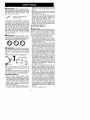
DANGER: Never use blades or flail-
ing devices. Unit is designed for line trimmer
use only. Use of any other accessories or at-
tachments will increase the risk of injury.
@©O
4r;_WARNING: Trimmer line throws ob-
jects violently. You and others can be blinded/
injured. Wear safety glasses, boots, and leg
protection. Keep body parts clear of rotating
iine.
Safety Glasses or similar eye protection
Keep children, bystanders, and animals 50
feet {15 meters) away. If approached stop unit
immediately.
If situations occur which are not covered in
this manual, use care and good judgement. If
you need assistance, call 1-800-554-6723.
OPERATOR SAFETY
• Dress properly. Always wear" safety
glasses or similar eye protection when op-
erating, or performing maintenance on your
unit. (Safety glasses are available.) Always
wear face or dust mask ifoperation is dusty.
Always wear heavy, long pants, long
sleeves, boots, and gloves. Do not go bare-
foot or wear sandals.
• Secure hair above shoulder length. Secure
or remove loose clothing and jewelry or
clothing with loosely hanging ties, straps,
tassels, etc. They can be caught in moving
parts.
• Being fully covered also helps protect you
from debns and pieces of toxic plants
thrown by spinning line.
• Stay Alert. Do not operate unit when you
are tired, ill, upset or under influence of al-
cohol, drugs, or medication. Watch what
you are doing; use common sense.
• Avoid unintentional starting of the unit.
Never carry unit with your finger on the
switch. Be sure the switch is in the OFF
position and never touch the switch when
connecting extension cord.
ELECTRICAL SAFETY
aWARNING: Avoid a dangerous envi-
ronment. TO reduce the risk of electrical
shock, do not use in rain, in damp or wet loca-
tions, or around swimming pools, hot tubs,
etc. Do not expose to snow, rain, or water to
avoid the possibility of electrical shock.
• Use a voltage supply as shown on unit.
• Avoid dangerous situations. Do not use in
the presence of flammable iiquids or gases
to avoid creating a fire or explosion and/or
causing damage to unit.
• To reduce the risk of electrical shock, this
equipment has a polarized plug (one blade
is wider than the other) and will require the
use of a polarized extension cord. The ap-
pliance plug will fit into a polarized exten-
sion cord only one way. If the plug does not
fit fully into the extension cord, reverse the
plug. If the plug still does not fit, obtain a
correct polarized extension cord. A polar-
ized extension cord will require the use of a
polarized wall outlet. This plug will fit into
the polarized wall outlet only one way. If
plug does not fit fully into the wall outlet, re-
verse the piug. If it still does not fit, contact a
qualified electrician to install the proper wall
outlet. Do not change the equipment plug,
extension cord receptacle, or extension
cord plug in any way.
• TOreduce risk of electrical shock, use ex-
tension cords specifically marked as suit-
able for outdoor appliances having electri-
cal rating not less than the rating of unit.
Cord must be marked with suffix "W-A" (in
Canada "W"). Make sure your extension
cord is in good condition. Inspect extension
cord before use and replace if damaged. Do
not use a damaged cord. Cord insulation
must be intact with no cracks or detedora-
tion. Plug connectors must be undamaged.
An undersized extension cord will cause a
drop in line voltage resulting in loss of pow-
erand overheating. Ifindoubt, usethenext
heavier gauge. The lower the gauge num-
ber, the heavier the cord (see SELECT AN
EXTENSION CORD in the OPERATION
section).
• Do not use multiple cords.
2

• Do not abuse cord. Never carry the unit by
the extension cord or yank extension cord
to disconnect unit.
• Use cord retainer to prevent disconnection
of extension cord from unit and possibie
damage to the unit due to plug movement
(see ATTACH THE EXTENSION CORD
TO YOUR TRIMMER in the OPERATION
section).
• Do not use the unit if the switch does not
turn the unit on and off properly. Repairs to
the switch must be made by your autho-
rized service dealer,
• Keep the extension cord clear of operator
and obstacles at all times. Do not expose
cords to heat, oil, water, or sharp edges.
• To avoid the possibility of electric shock,
avoid body contact with any grounded con-
ductor, such as metal fences or pipes.
• Ground Fault Circuit Interrupter (GFCI)
protection should be provided on circuit or
ou6et to be used. Receptacles are avail-
able having built-in GFCl protection and
may be used for this measure of safety.
UNIT SAFETY
• Inspect unit before use. Replace damaged
parts. Make sure all handies, guards, and
fasteners are in place and securely fas-
tened. Parts that are damaged must be re-
paired or replaced by an authorized service
dealer. These include head parts that are
cracked, or chipped, guards, and any other
part that is damaged.
• Do not repair unit yourself.
• Use only 0.065 inch (1.65 ram) diameter
recommended trimmer line (see USER
REPLACEABLE SERVICE PARTS in the
SERVICE AND ADJUSTMENTS section).
Never use wire, rope, string, etc.
• Use specified trimmer spool. Make sure
spool is properly installed and all parts are
securely fastened.
• Use only Weed Eater ® replacement parts
and accessories as recommended.
CUTTING SAFETY
• Inspect area to be cut. Remove objects
(rocks, broken glass, nails, wire, stnng,
etc.) which can be thrown or become en-
tangled in cutting head.
• Do not overreach orstand on unstable sup-
port. Keep firm footing and balance.
• Keep the cutting head below waist level. Do
not raise handles above your waist. Cutting
head can come dangerousiy close to your
body.
• Keep away from cutting head and spinning
line.
• Use unit propedy. Use only for trimming,
edging, scalping, and mowing. Do not
force unit. It wiII do the job better and with
less risk of injury at the rate for which it was
designed.
• Use only in daylight or in good artificial light.
MAINTENANCE SAFETY
E_
din.WARNING: Disconnect unit from the
power supply before performing mainte-
nance, or when changing trimmer line.
• Maintain unit according to recommended
procedures. Keep cutting line at proper
length. Follow instructions for changing
trimmer line.
• Have all service and maintenance not ex-
plained in this manual performed by an au-
thorized service dealer to avoid creating a
hazard.
• Never douse or squirt the unit with water or
any other liquid. Clean unit and decals with
a damp sponge. Keep handles dry, clean,
and fi'ee from oil and grease.
• Keep the air vents clean and free of debris
to avoid overheating the motor. Ciean after
each use.
TRANSPORTING AND STORAGE
• Stop the unit and disconnect the power
source when not in use.
• Carry the unit with motor stopped.
• Store the unit so the line limiter blade (on
underside of shield) cannot cause injury.
• Store unit indoors in a high, dry place out of
the reach of children. Store unit unplugged.
• Do not hang unit so that the trigger switch is
depressed.
DOUBLE INSULATION
CONSTRUCTION
This unit is double insulated to help protect
against electric shock. Double insulation
construction consists of two separate "layers"
of electrical insulation instead of grounding.
Tools built with this insulation system are not
intended to be grounded. No grounding
means is provided on this unit, nor should a
means of grounding be added to this unit. As a
result, the extension cord used with your unit
can be plugged into any standard 120 volt
electrical outlet.
Safety precautions must be observed when
operating any electrical tool. The double in-
sulation system only provides added protec-
tion against injury resulting from an internal
electrical insulation failure.
_t, WAHNINB: All electrical repairs to
this unit, including housing, switch, motor,
etc., must be diagnosed and repaired by qual-
ifled service personnel. Replacement parts
for a double insulated appliance must be rec-
ommended by the manufacturer. A doubie in-
sulated appliance is marked with the words
"double insulation" or"doubie insulated". The
symbol (square within a square)[] may also
be marked on the appliance. Failure to have
the unit repaired by qualified service person-
nel can cause the double insulation construc-
tion to become ineffective and result in seri-
ous injury.
SAVE THESE INSTRUCTIONS
3

_=.WARNING: if received assembled,
review all assembly steps to ensure your unit
is properly assembled and all fasteners are
secure.
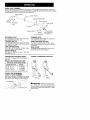
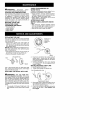
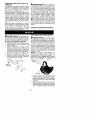
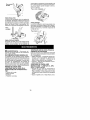
ADJUSTING ASSIST HANDLE
1. Place unit on a flat surface.
2. Loosen and remove wing nut and bolt
from assist handle.
3. Firmly push the assist handle over the
tube. To make installation easier, tilt han-
dle toward trigger housing while pushing
down (see illustration).
4. Reinstall bolt in handle. Thread wing nut
onto bolt.
5. Adjust the handle up or down the tube to a
comfortable position; tighten wing nut se-
curely.
_ As_st handle
Triogger _ _ing_, j_i,_?i._"_
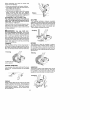
ATTACHING THE SHIELD
41_ WP, I'_I_IIN(.5: The shield must be prop-
erly installed. Ifshield is not properly installed,
damage to unit (including motor failure) will re-
suit. The shield provides partial protection to
the operator and others from the risk of
thrown objects. Your unit is equipped with a
line limiter blade, which cuts excess line to the
proper length while running. The line limiter
blade (on underside of shield) is sharp and
can cut you.
NOTE: If shield is not properly installed, dam-
age to unit (including motor failure) will result.
Edge guide must be positioned on shield prior
to installation on motor housing (see following il-
lustration).
Shield
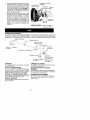
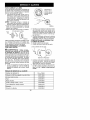
1. Hold shield at angle to the trimmer motor
housing. Align the front locking tab of the
shield with the front notch of the motor
housing (see illustration below).
2. Move shield toward motor housing, en-
suring trimmer head passes through
opening in shield without catching on
shield locking tabs.
3. Tilt front of the shield towards front notch
of motor housing. Push front locking tab
of the shield into the front notch of the mo-
tor housing. An audible snap must be
heard. Ensure the cutting head remains
free to rotate and the line is not caught be-
tween the shield and the motor housing.
4. Push back of the shield toward the motor
housing as illustrated until the rearlocking
tabs snap securely into the rear notches.
Make sure the shield is assembled to the
unit as shown in the illustration below and
in the KNOW YOUR UNIT section of this
manual.
Rear Front Locking Tab
Tnmmer
Locking Front
Tabs Motor
Housing
Rear
Notches
Trimmer
Head
CAUTION: Sharp line Iimiter blade
4

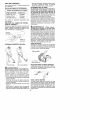
KNOW YOUR TRIMMER
READ THIS INSTRUCTION MANUAL AND SAFETY RULES BEFORE OPERATING YOUR UNIT.
Compare the illustrations with your unit tofamiliarize yourself with the location of the various controls
and adjustments. Save this manual for future reference.
Retainer
Trigger Switch
Assist Handle
Recessed
Plug
Twist and Edge Button
_ Motor Housing
Edge Guide
Air Vents \ "_-4 ,-
Debris Shield_' '_[ Trimmer Head
_1_ with 0.065 inch
\ Trimmer Line
Line Limiter Blade
RECESSED PLUG
The RECESSED PLUG is where you attach
your extension cord to the unit.
TRIGGER SWITCH
The TRIGGER SWITCH is used to turn on the
unit. Squeeze the trigger switch to operate the
unit. Release to stop.
LINE LIMITER BLADE
The LINE LIMITER BLADE cuts the cutting
line to the proper cutting length.
ASSIST HANDLE
The ASSIST HANDLE is used to help hold
and guide the unit.
TRIMMER HEAD
The TRIMMER HEAD holds the cutting line
and rotates during operation.
TWIST AND EDGE BUTTON
The TWIST AND EDGE BUTTON is used to
twist the lower portion of the unit into an edg-
ing position.
EDGE GUIDE
The EDGE GUIDE protects the unit from con-
tacting the ground during edging.
OPERATING INSTRUCTIONS
Use only a voltage supply as specified on
your unit.
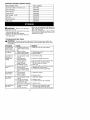
SELECT AN EXTENSION CORD
Extension Cord Gauge Chart
Length of Cord Gauge
25 Ft, (7,5 m) 18 Gauge
50 Ft. (15 m) 16 Gauge
100 Ft. (30 m) i 16 Gauge
Extension cords are available for this unit.
ATTACH THE EXTENSION
CORD TO YOUR TRIMMER
Loop your extension cord through the handle
and around the hook as shown. Insure the
plug and cord are firmly and fully engaged.
Cord Retainer ................. "_ -'-1
,,
Exteos,oncord
CORRECT OPERATING POSITION
Trimming
Edging
,tt
_!k WARNING: Always wear eye protec-
tion. Never lean over the trimmer head.
Rocks or debris can ricochet orbe thrown into
eyes and face and cause blindness or other
serious injury.
5

When operating unit, stand as shown and
check for the following:
• Wear eye protection and heavy clothing.
• Hold trigger handle with right hand and as-
sist handle with Ieft hand.
• Keep unit below waist level.
• Cut only from your right to your left to ensure
debds is thrown away from you. Without
bending over, keep line near and parallel to
the ground (perpendicular when edging) and
not crowded into material being cut.
ADVANCING THE CUTTING LINE
The cutting head advances line automati-
cally. Do not tap head on the ground to ad-
vance line. This may break parts and cause
cutting head to malfunction.
Upon unit start up, the line will advance auto-
matically to the correct cutting path length.
Always keep the shield in place when the tool
is being operated.
Edging
SCALPING
The scalping technique removes unwanted
vegetation. Hold the bottom of the trimmer head
about 3 inches (8 cm) above the ground and at
an angle. Allow the tip of the line to strike the
ground around trees, posts, monuments, etc.
This technique increases line wear.
Z_
Scalping
_IbWARNING: Use only 0.065 inch
(1.65 mm) diameter round line. Other sizes
and shapes of line will not advance properly
and will result in improper cutting head func-
tion or can cause serious injury. Do not use '_
other materials such as wire, string, rope, etc.
Wire can break off during cutting and become
a dangerous missile that can cause serious
injury. See page 2 for warning concerning _e_4_,
other cutting devices.
TRIMMING MOWING
Hold the bottom of the trimmer head about 3
inches (8 cm) above the ground and at an an-
gle. Allow only the tip of the line to make con-
tact. Do not force trimmer line into work area.
Trimming i/
above ground
EDGING POSITION
You can press this button and twist the lower
portion 180 ° counterclockwise into an edging
position.
6
::::::
Button _-_//-_J
EDGING
While edging allow the tip of the line to make
contact. Do not force the line. The edge guard
helps protect the unit and keeps the unit from
contacting the ground. Take extra caution
while edging as objects can be thrown from
the trimmer line.
Your trimmer is ideal for mowing in places
conventional lawn mowers cannot reach, in
the mowing position, keep the line parallel to
the ground. Avoid pressing the head into the
ground as this can scalp the ground and dam-
age the tool.
SWEEPING
The fanning action of the rotating line can be
used for a quick and easy clean up. Keep the
line parallel to and above the surfaces being
swept and move the tooi from side to side.

_tk WARNING: Disconnect power
source before performing maintenance.
GEN ERAL RECOMMEN DATIONS
The warranty on this unit does not cover items
that have been subjected to operator abuse
or negligence. To receive full value from the
warranty, the operator must maintain unit as
instructed in this manual. Vanous adjust-
ments will need to be made periodically to
properly maintain your unit.
BEFORE EACH USE
CHECK FOR LOOSE
FASTENERS AND PARTS
• Housing Screws
• Assist Handle
• Debris Shield
• Edge Guide
CHECK FOR DAMAGED OR
WORN PARTS
Contact an authorized service dealer for re-
placement of damaged or worn parts.
• Trigger Switch - Ensure switch functions
properly by pressing and releasing the trig-
ger switch. Make sure motor stops.
• Debris Shield - Discontinue use of unit if
debris shield is damaged.
AFTER EACH USE
INSPECT AND CLEAN UNIT AND DE-
CALS
• After each use, inspect complete unit for
loose or damaged parts. Clean the unit us-
ing a damp cloth with a mild detergent.
• Wipe off unit with a clean dry cloth.
REPLACING THE LINE
Pre-wound spools offer'the most convenient
method for replacing line and ensuring opti-
mum performance.
• Replacement spools are color-coded to
ensure use of the correct spool with your
unit. Be sure to use the same color spool as
the existing spool.
NOTE: Always clear dirt and debris from cut-
ting head components when performing any
type of maintenance.
• Hold spool and unscrew cap by turning in
the direction shown on top of the cap.
• Remove line guide ring and spool.
Use a pre-wound spool or refill spool with
line. If using a pre-wound spool, removetape
stnp from line and spool.
REFILLING THE SPOOL WITH LINE
Spool
2. Insert one end of line into center cavity of
empty spool. Ensure line will feed into
spool in the direction shown on the spool
(counterclockwise).
3. Continue feeding line into spool, leaving
4 - 6 inches (10 - 15 cm) unwound from
center of spool.
INSTALLING SPOOL WITH LINE
1. Install replacement spool.
2. Thread line through line guide ring.
Line through guide ring
aubWARNING: Use only 0.065 inch
(1.65 mm) diameter round line. Other sizes
and shapes of line will not advance properly
and will result in improper cutting head func-
tion or can cause serious injury. Do not use
other materials such as wire, string, rope, etc.
Wire can break off during cutting and become
a dangerous missile that can cause serious
injury.
1. Cut a length of 25 feet of 0.065 inch (1.65
ram) diameter round Weed Eater@ brand
line.
Replacement Spool
3. Rest guide ring on spool and place line in
slot. Allow line to extend 4 - 6 inches (10 -
15 cm) from center of spool.
4. Ensure line remains in slot while screwing
cap on to the shaft. Only tighten cap
hand tightt
7

USER REPLACEABLE SERVICE PARTS
REPLACEMENT PART PART NUMBER
Spooi with 0.065 inch Trimmer Line 952711602
Line Guide Ring 530403949
Cap Assembly 530403810
Assist Handle 530403805
Bolt Carriage, 1/4-20 530403886
Wing Nut 530016152
Shield Assembty 530403914
Edge Guide 530403824
oWARNING: Perform the following
steps after each use.
• Stop the unit and disconnect the power
source when not in use.
• Carry the unit with motor stopped.
• Store the unit so the line limiter btade can-
not cause injury.
• Store unit and extension cord indoors in a
high, dry place out of the reach of children.
Store unit unplugged.
• Store unit with all guards in place. Position
unit so that any sharp object cannot acci-
dentally cause injury.
TROUBLESHOOTING TABLE
_lk WARNING: Always stop unit and disconnect from the power source before per-
forming all of the recommended remedies below except remedies that require unit to
be operating.
TROUBLE CAUSE REMEDY
Trimmer head 1. Crowding trimmer line 1. Allow tip of line to do the cutting.
stops under a against material being
load or does not cut.
turn when switch 2. Electrical failure. 2. Contact your authorized service dealer.
is pressed. 3. Thrown circuit breaker. 3. Check breaker box.
4. Debris stopping head. 4. Remove debris.
Line does not 1. Line improperly routed 1. Check line routing.
advance or in head.
breaks while 2. Line improperly 2. Rewind line tightly and evenly.
cutting, wound into spool.
3. Incorrect line size 3. Use only 0.065 inch (1.65 mm) dia. line.
4. Not enough line 4. Remove cover and pull 4 inches
outside of head, (10 cm) of line out of head,
5, Dirt buildup on unit, 5, Clean unit.
Line welds onto 1, Line size is incorrect. 1. Use only 0,065 inch (1.65 ram) dia, line,
spool, 2, Incorrect spool, 2. Replace with correct spool,
3, Line is being crowded 3. Cut with tip of line fully extended.
against material being
cut.
Line releases 1. Line improperly 1. Check line routing.
continuously, routed in head.
2. Spool damaged. 2. Replace spool.
Line usage is 1. Line improperly routed 1. Check line routing.
excessive, in head.
2. Line size is incorrect. 2. Replace spool.
3. Crowding line against 3. Cut with tip of line fully extended.
material being cut.
4. Spool worn or damaged 4. Replace spool.
Line pulls back 1. Too little line outside 1. Remove cover and pull 4 inches
into head. of head. (10 cm) of line outside of head.
2. Line size incorrect. 2. Use only 0.065 inch (1.65 mm) dia. line.
8

ELECTROLUX HOME PRODUCTS, INC.,
warrants to the original purchaser that each
new Weed Eatere brand electric or cordless
product is free from defects in material and
workmanship and agrees to repair or replace
under this warranty any defective WeedEat-
er brand electric product within two (2) years
from the original date of purchase.
Ifyour Weed Eater brand electric or cordless
product should fail within the limited warranty
period, return it, complete, prepaid, with proof
of purchase, to the dealer from whom it was
purchased for repair or replacement at the op-
tion of ELECTROLUX HOME PRODUCTS,
INC.
This warranty is not transferable and does not
cover damage or liability caused by improper
handling, improper maintenance or the use of
accessones and/or attachments not specifically
recommended by ELECTROLUX HOME
PRODUCTS, INC., for this electdc product. Ad-
ditionally, this warranty does not cover parts that
will wear and require replacement with reason-
able use during the warranty pedod. This war-
rarity does not cover predelivery set-up or nor-
mal adjustments explained in the instruction
manual.
THIS WARRANTY GIVES YOU SPECIFIC
LEGAL RIGHTS, AND YOU MAY HAVE
OTHER RIGHTS WHICH VARY FROM
STATE TO STATE.
NO CLAIMS FOR CONSEQUENTIAL OR
OTHER DAMAGES WILL BE ALLOWED,
AND THERE ARE NO OTHER EXPRESS
WARRANTIES EXCEPT THOSE EX-
PRESSLY STIPULATED HEREIN.
SOME STATES DO NOT ALLOW LiMiTA-
TIONS ON HOW LONG AN IMPLIED WAR-
RANTY LASTS OR THE EXCLUSION OR
LIMITATIONS OF iNCIDENTAL OR CON-
SEQUENTIAL DAMAGES, SO THE ABOVE
LIMITATIONS OR EXCLUSION MAY NOT
APPLY TO YOU.
ELECTROLUX HOME PRODUCTS, INC.,
policy is to continuously improve its products.
Therefore, ELECTROLUX HOME PROD-
UCTS, INC., reserves the right to change,
modify, or discontinue models, designs,
specifications, and accessories of all prod-
ucts at any time without notice or obligation to
any purchaser.
9

41obADVERTENClA:Siempre que se
use cualquier cortador eI6ctrico, deben ob-
servarse precauciones basicas de seguddad
para reducir el riesgo de incendio, choque
el6ctrico y graves heridas. Lea y cumpta con
todas Ias instrucciones.
INFORMACION DE
SEGURIDAD EN EL
APARATO
iEste aparata de fuerza puede ser peligroso!
El usuario tiene laresponsabilidad de cumpIir
con todae las instrucciones y advertencias en
el aparato yen el manual. Lea el manual de
instrucciones en su totalidad antes de usar el
aparato! Familiaricese completamente con
ios controles y el usa correcto del aparato. Li-
mite el usa de este aparatc a aquellas perso-
nas que lean, comprendan, ycumplan con las
advertencias e instrucciones en eI aparato y
en el manual. Nunca permita a !as niSos que
usen el aparato. Toda su atencion esnecesaria
cuando use este aparato cerca de lugares en
donde haya niSos.
€IbPELIL_RO: Nunca use cuchillas ni
dispositivos desgrandores. Este aparato ha
sido diseSado exclusivamente coma corta-
dora linea. EI usa de cualguier otto accesorio
o pieza incrementar_ el peligro de heridas.
@©O
4Ot,AUVI:I'(II-NL;IA: La linea de carte
arroja objetos violentamente. Los objetos ar-
rojados pueden cegado o herirlo a usted y a
terceros. Use anteojos de seguridad, botas y
proteccion para Ias piernas. Mantenga el
cuerpo alejado de la linea girante.
Anteojos de seguridad o protecci6n similar
de ojos.
Zona de peligro
Mantenga a los niSos, los animales y los es-
pectadores a una distancia minima de 15
metros (50 pies). Pare el aparato inmediata-
mente si alguien se le acerca.
Si acontece alguna situaci6n no prevista en
este manual, tenga cuidado y use buen criter-
ia. si necesita ayuda, Ilame al
1-800-554-6723.
10
SEGURIDAD DEL USUARIO
• Vitese de forma apropiada. Siempre use
anteojos de seguridad o protecci6n de ojos
similar aI hacer usa o mantenimiento del
aparato. (Existen anteojos de seguridad.)
Use siempre mascara protectora de la cara
o mascara anti-polvo al usar el aparato en
ambientea polvorientos. Use siempre pan-
talones largos gruesos, mangas Iargas, bo-
tas y guantes. No use el aparato descalzo
ni con sandalias.
• Mantenga el cabello par encima de los
hombros, atandolo para taI efecto si es ne-
cesario. No use joyas, ropa suelta o ropa
con tiras, corbatas, borlas, etc. que cuel-
guen Iibremente; pueden enredarse en las
piezas en movimiento.
• Siesta completamente tapado, estara mas
protegido de los escombros y pedazos de
plantas t6xicas arrojados par la linea gi-
rante.
• Mant6ngase alerta. No use este aparato
cuando est6 cansado, enfermo, trastomado
o bajo la influencia del alcohol, de drogas o
de remedios. Vigile bien Io que esta hacien-
da; use del sentido comQn.
• Evite los arranques no intenoionales del
motor. AI Ilevar el aparato de un lado a otro,
nunca ponga el dedo en el interruptor.
Asegt]rese de que el interruptor est6 en la
posici6n OFF y nunca que toca el interrup-
tar al conectar el cable de extension.
SEGURIDAD ELECTRICA
oADVERTENCIA: Evite los ambi-
entes peligr_sos. Para redueir el riesgo de eho-
que ei6ctdco, no use los aparatos en lugares
humedos o majados ni cerca de piscinas, de los
hidromasajes, etc. No exponga el aparato a la
nieve, a la Iluvia ni al agua para evitar la posibili-
dad de choque el6ctdco.
• Use el voltaje especificado en eI aparato.
• Evite las situaciones peligrosas. No use eI
aparato en la presencia de gases o liquidos
inflamables para evitar incendios, explo-
siones y/o daSos al aparato.
• Para reducir el riesgo de choque el6ctrico,
este equipo viene con enchufe polarizado
(una aleta es mas ancha que la otra) y re-
querira el usa de un cable de extensi6n po-
larizado. Este enchufe entrara solamente
en una posici6n en el enchufe po]arizado
del cable de extension. Si este enchufe no
entrara completamente dentro del enchufe
del cable de extensi6n, invierta el enchufe.
Si continQa sin entrar, obtenga el cable de
extension polarizado correcto. El enchufe
polarizado del cable de extensi6n requerir_
el usa de un tomacorriente de pared polad-
zado. Ei enchufe poladzado dei cable de
extension entrara en el tomacorriente de
una sola iorma. Si el enchufe no entra com-
pletamente en el tomacorriente de pared,
invierta el enchufe. Si continQa sin entrar,
contacte un electricista autorizado para
que isntale el tomacorriente apropiado. No

cambieelequipodeienchufe,elreceptacu-
Iodelcabledeextensi6noelenchufedel
cabledeextensi6ndeningunamanera.
• Parareducireldesgodechoqueel_ctrico,
usecablesdeextensi6nquevenganes-
pecificamentemarcadoscomoapr'opiados
paraaparatosdeusoenexterioresyqueten-
ganunaclasificacionel6etricanornenorque
ladelaparato.Elcabledeberavenirrnarcado
conel sujifo'_JV-A" ('_/V" en Canada).
Asegt]rese de que el cable de extensi6n est6
en buenas condiciones. Inspeccione el cable
de extensi6n antes de usado y siesta dafia-
do, carnbielo. No utilice una cable de exten-
sion dafiada. El aisiante del cable de la exten-
sion debe set intacto sin las gdetas o la
detedoraci6n. Los conectores de! enchufe
deben ser indemnes. Los cables demasiado
finos causar_n una baja en el voltaje de linea,
io que provocara falta de potencia y exceso
de temperatura. En caso de duda entre dos
cables, use el m_s grueso. Cuanto mas p,e-
queSo es el nt_mero de clasiflcacion, rnas
grueso es el cable (vea SELECCION DEL
CABLE DE EXTENSION en ia secci6n USO
DEL APARATO).
• No utilice m&s de uno los cables de exten-
sion.
• No use el cable indebidamente. Nunca I]eve
el aparato pot el cable de extension ni Iades-
conecte del enchufe tirando del cable.
• Use el retenter de cables para evitar que el
cable de extensi6n se desconecte del apara-
to y cause posible daSo a el aparato debido al
movimiento de! enchufe. Vea ENCHUFE EL
CABLE DE EXTENSION AL APARATO en la
secci6n USO DEL APARATO.
• No use el aparato si el interruptor no Io
prende yapaga correctamente. El distribui-
dor autorizado del servicio debera hacer to-
das las reparaciones al interruptor.
• Mantenga el cable de extensi6n alejado del
usuario y de los obstacuIos en todo me-
mento. No exponga los cables al calor, al
aceite, al agua o a los bordes filosos.
• Evite todo contacto dei cuerpo con los con-
ductores a tierra, tales come las cercas Olos
caSos de metal para evitar la posibilidad de
choque el6ctrico.
• Ei circuito o el tomacorriente que se use
con este aparate debera estar proviste de
proteccion de Interrupter de Fallas en el
Circuito a Tierra (Ground Fault Circuit Inter-
rupter--GFCI). Los tomacorrientes con
protecci6n GFCI incorporada pueden set
usados para esta medida de seguridad.
SEGURIDAD DEL APARATO
• Inspeccione el aparato completamente antes
de cada use. Haga que un distribuider autod-
zado del servicie repare o cambie las piezas
daSadas. Este inciuye las piezas dei cabezal
que esten resquebrajadas e descantilladas,
los protectores y cualquier otra pieza daSada.
• No intente reparar ud. mismo el aparato.
• Use exclusivamente la linea de corte con
diametro de 1,65 mm (0,065 de pulgada)
recomendado(vea PIEZAS DE SERVlClO
AL CLIENTE en la secci6n SERVlClO Y
AJUSTES). Nunca use alambre, soga, hilo,
etc.
• Use la bobina especificada. Asegt)rese
que la bobina est6 correctamente instalada
y que el aro de retenci6n est6 bien fijo.
• Use exclusivamente los repuestos y acce-
sorios recomendados de la marca Weed
Eater%
SEGURIDAD AL CORTAR
• Inspeccione el area a ser cortada. Retire
los objetos (piedras, vidrio roto, clavos,
alambre, hilo, etc.) que puedan ser arroja-
dos o que se puedan enredar en el cabezal
de carte.
• NO se incline excesivamente ni se pare en
superficies inestables. Mantenga el equili-
brio, con los pies en una superficie firme y
estable, en todo momento.
• Mantenga el cabezal de corte pot debajo
del nivel de la cintura. No levante las man-
ijas por encima del nivel de la cintura. El ca-
bezal de corte se le puede aceroar peligro-
samente ai cuerpo.
• Evite de cabezal de corte y la linea girante.
• Use el aparato debidamente. Uselo exclu-
sivamente para recortar y para cortar
c6sped. No sobrecargue el aparato; dara
memor rendimiento con menor probabili-
dad de heridas si se Io hace funcionar al rit-
mo para el cuaI fue diseSado.
• Use el aparato Qnicamente de dia o en Iuz
artificial fuerte.
SEGURIDAD EN EL MANTENIMIENTO
_k ADVERTENCIA: Desconecte el
aparato de la fuente de electricidad antes de
hacer cualquier mantenimiento.
• Haga el mantenimiento dei aparato de
acuerdo a ios procedimientos recornenda-
dos. Mantenga la linea de corte al largo que
corresponde.
• Todo servicio y mantenimiento no explica-
do en este manual debera set efectuado
por el distribuidor autorizado del servicio
para evitar peligros.
• Nunca le heche agua ni ning_n etro liquido al
aparato, nile direccione chorros de agua ni de
ningt3n otro liquido. Limpie el aparate y las
calcomanias y placas con una esponja
ht_meda. Mantenga las manijas secas, lim-
pias y libres de aceite y grasa.
• Mantenga las aberturas de vetilaci6n lim-
pias y libres de escombros para evitar el
calentamiento excesivo del motor. Limpie-
las despu6s de cada uso.
TRANSPORTE Y ALMACENADO
• Pare el motor y desconecte el aparato de la
corriente el6ctrica siempre que no est_ en
USO.
• Cuando cargue el aparato en las manos,
mantenga el motor apagado.
• Guarde el aparate de modo que el cuchilla
limitadora de linea (debajo de la protector)
no pueda causar heridas accidentalmente.
• Guarde el aparato al abrigo de la internper-
ie, desenchufado, en un lugar alto, seco y
fuera del alcance de los niSos.
• No cuelgue ei aparato para no presionar el
gatillo interruptor.
11

CONSTRUCCION CON DOBLE AIS-
LAMIENTO
Este aparato tiene aisIamiento doble para in-
crementar ia protecci6n contra el choque
el_ctrico. El aislamiento dobIe consiste de
dos "capas" separadas de aislamiento
el_ctrico en vez de cable a tierra.
Las herramientas y los electrodom_sticos con
aislamiento doble no necesitan cable a tierra.
No se le ha provisto ningun medio de conexi6n
a tierra a este aparato, tampoco se le debe
agregar ningQn medio de conexi6n a tierra.
Como resultado, el cable de extensi6n usado
con su aparato puede ser enchufado en cualqu-
ier tomacorriente el6ctrico normal de 120 vol-
tios.
Deben observarse precauciones de segud-
dad al trabajar con toda herramienta el6ctri-
ca. Ei sistema de aislamiento doble aola-
mente provee una protecci6n adicional
contra las heridas provocadas pot una falla
en el aisIamiento el6ctrico intemo.
_ ADVERTENCIA: Tododiagn6stico
y reparaci6n de indole el6ctrica a este apara-
to, incluyendo a la caja, el interruptor, el mo-
tor, etc., deber_n ser efectuados pot personal
de servicio capacitado. Los repuestos para
un aparato con aislamiento doble deben set
recomendados por el fabricante. Los apara-
tos con aislamiento dobte vienen marcados
con las palabras "double insulation" (aisla-
miento doble) o "double insulated" (dobte-
mente aislado). Tambi6n puede aparecer el
simbolo (cuadroado dentro de un cuadroado)
[] en el aparato. El aparato debe set repara-
do por un personal de servicio cualificado; de
Io contrario el sistema de aislamiento doble
puede quedar inutilizado, acarreando graves
heridas.
GUARDE ESTAS INSTRUCCIONES
,tt
• ILADVERTENCIA: Si recibio el apara-
to ya armado, repita todos los pasos para ase-
gurar_e de que est_ correctamente armado y
que todos los fijadores est6n bien ajustados.
AJUSTE DEL MANIJA AUXlLIAR
1. Ponga elaparato en una superficie plana.
2. Afloje y remueva la tuerca mariposa de la
manija auxiliar.
3. Empuje flrmemente la manija auxiIiar
para que se fije en el tubo. Para hacer la
instalaci6n mas facil, incIine la manija ha-
cia la caja del acelerador mientras que
empuja hacia abajo (vea la ilustraci6n).
4. Reinstale el tomillo en la manija. Enros-
que la tuerca mariposa en el tomillo.
5. Ajuste la posici6n de la manija hasta
quede c6moda para el usuario; apriete fir-
memente la tuerca mariposa.
M ija auxiliar
Caja del _ J
acelerador _ _J_-;/j-_
- _ Tu bo
PARA INSTALAR EL PROTECTOR
_!kADVERTENCIA: El protector deb-
er_ instalarse correctamente. Si el protector
no esta instalada correctamente, su aparato su-
frira daSos (incluyendo fallas del motor) direc-
tamente. El protector provee proteccion par-
eial hacia eI usuario y terceros contra eI
riesgo de objetos arrojados. Viene equipado
con un cuchilla limitadora de linea de lea que
corta el exceso de linea, dejandolo del largo
adecoado. El cuchilla limitadora de linea (que
queda en la superficie inferior del protector)
es flloso y corta.
AVlSO: Si el protector no esta instalada cor-
rectamente, su aparato sufrira daSos (in-
duyendo fallas del motor) directamente. La
protector de bordes se debe instalar en protec-
tor antes de la instalaci6n en la caja de motor
(yea la ilustraci6n siguiente).
Protector de
bordes
Protector
1. Sostenga el protector en el angulo de la caja
del motor. Alinee Ia lengL)enta de cierre de-
lantera del protector con la muesca delan-
tera de la caja del motor (v6a la ilustraci6n
siguiente).
2. Mueva el protector hacia la caja del motor,
asegurando que el cabezal de corte pase
sobre la rendija del protector sin ser atrapa-
da en la IengLlenta del cierre de! protectolt
12

3. Incline el frente del protector hacia la mues-
ca delantera de Ia caja del motort Empuje la
Ieng0enta de cierre delantera del protector
en la muesca delantera de la caja del motor.
Un broche de presi6n audible se debe oir.
Asegure que el cabezal de corte este libre al
rotary la linea no sea atrapada entre el pro-
tector y la caja del motor.
4. Empuje detras del protector hacia la caja
del motor seg0n Io ilustrado hasta que la
iengQenta de cierre trasera se encaja a
presion con seguridad hacia las muescas
posteriores. AsegQrese de que el protec-
tor est6 conectado con seguridad a la
caja del motor y que sea ensamblado al
aparato como se muestra en la ilustraci6n
abajo yen la seccion CONOZCA SU
APARATO.
CONOZCA SU APARATO
Leng0enta de Cierre
LengLienta de Delantera
Cierre Trasera Muesca Caja del
Delantera Motor
Muescas
Cabezal Posteriores
de Corte
PRECAUCION: Cuchilla limitadora
de linea esfilosa
LEA ESTE MANUAL DE INSTRUCCIONES Y LAS REGLAS DE SEGURIDAD ANTES DE
PONER EL APARATO EN FUNCIONAMIENTO. Compare las ilustraciones a su aparato para
familiarizarse con la ubicacion de los controles y ajustes. Guarde este manual para uso futuro.
Gatillo Interruptor
,/_/ Manija Auxiliar
.... " "> i Boton de Girar
?_/ 0 Cortar Bordes
V/ Caja del Motor
Retentor Enchufe Protector
de Cable de bordes
Aberturas de Ventilaci6n _ *'_ --_\ "-_ _/
Protecter_{ '_I Cabezal de
_ - Corte con kinea
\
de Corte del
Cuchilla kimitadora
de linea diametro 0,065
de pulgada
ENCHUFE
Se conecta el cable de extension al aparato
en el ENCHUFE.
GATILLO INTERRUPTOR
Se usa el GATILLO INTERRUPTOR para
poner el aparato en march& Apriete el gatillo
acelerador para hacerlo funcionar. Suelte el
gatillo interruptor para detener el aparato.
CUCHILLA LIMITADORA DE LINEA
El CUCHILLA LIMITADORA DE LiNEA corta la
linea, dejandola del largo adecuado.
MANIJA AUXlLIAR
Se usa la MANIJA AUXILIAR para sostener y
guiar el aparato.
CABEZAL DE CORTE
El CABEZAL DE CORTE sostiene ia linea de
corte y gira durante el use.
BOTON DE GIRAR O CORTAR
BORDES
El BOTON DE GIRAR OCORTAR BORDES
se usa para girar la parte inferior de la unidad
a Ia posicion de cortar bordes.
PROTECTOR DE BORDES
El PROTECTOR DE BORDES proteje el
aparato contra el contacto con el suelo al re-
cortar bordes.
13

USO DEL APARATO
Use exclusivamente el voltaje especificado
en el aparato.
ELIJA UN CABLE DE EXTENSION
Cuadro de Clasificacibn de Cables
Largo de Cable Clasificacibn
25 pies (7.5 m) 18 Clase
50 pies (15 m) 16 Clase
100 pies (30 m) 16 Clase
Hay cables de extension disponibtes para
este aparato.
ENCHUFE EL CABLE DE EXTEN-
SION AL APARATO
Coloque su cable de extensi6n a tray,s de la
manija y alrededor del gancho segQn Io mos-
trado. Asegure el enchufe y la cable se con-
trata firmemente y comptetamente.
Retentor
de Cable \
j/--
Cable de
extensi6n
POSICION CORRECTA DE USO
tener que inclinarse, mantenga la linea cerca
del suelo y paralela al mismo, sin meterla
dentro del matedal que se esta cortando.
EXTENSION DE LA LINEA
El cabezal de corte hace mover autom_tica-
mente la linea bacia adelante. Para que la
linea de corte se mueva hacia adelante, no
es necesado dar golpes contra el suelo al
cabezal de corte. De Io contrario, esta accion
podria tenet como resultado piezas rotas y e!
funcionamiento defectuoso del cabezaL
Despu6s de que el aparato se haya puesto en
marcha, la linea progresara el largo correcto
para efectuar el corte de manera automatica.
Mantenga siempre el protector en su lugar
cuando la herramienta se encuentre eR fun-
cionamiento.
.,%
4tADVERTENCIA: Utilice exclusi-
vamente linea redonda de 1,65 mm (0,065
de pulgada) de diametro. Otto tipo de ta-
ma_os y formas haran que la linea no gire de
forma apropiada Io que resultar_ en el funcio-
namiento inadecuado del cabezal de corte o
en accidentes de seria gravedad. No utilice
otto tipo de materiales tales como alambre,
hilo, soga, etc. El alambre puede romperse
durante el corte y convertirse en un misil peli-
groso Io que puede causar lesiones de seria
gravedad. Vea la pagina 10 para advertencia
referente a otros dispositivos de code.
PARA RECORTAR
Sostenga el cabezal a unes 8 cm (3 pulgadas)
del suelo yen angulo. Permita Qnicamente que
la punta de la linea haga contacto. No meta ia
linea de corte en el area de trabajo.
Para recortar , _?/'
Para Recortar Para Corta Bordes
41cIbADVERTENCIA: Use siempre pro-
teccion de ojos. Nunca se incline sobre el ca-
bezal: 6ste puede arrojar o hacer rebotar pie-
dras o escombros a los ojos y la cara,
causando ceguera u otras heridas graves.
Cuando aparato de funcionamiento, parese
como se vea en la figura y verifique Iosiguiente:
• Usando anteojos de seguddad y ropa gruesa
como protecci6n.
• Sostenga la manija del gatilIo acelerador
con la mano derecha y manija auxiliar con
la mano izquierda.
• Mantenga el aparato debajo del nivel de la
cintura.
• Corte desde la derecha hacia la izquierda
para que los escombros sean ail'ojados en
direccion contraria a donde esta parado. Sin
POSICION PAPA CORTAR BORDES
Usted puede presionar este bot6n y rotar la
parte inferior 180 grados a la izquierda en una
posici6n de corte para orillas.
::::::
Boton gj_//-_",_
PARA CORTAR BORDES
AI cortar bordes, deje que la punta de la linea
haga contacto. No fuerce la line& El protector
de bordes ayuda a protegar elaparato y Io man-
tiene separado de la tierra. Ponga mucha aten-
ci6n mientras est_ usando la podadora y sea
precabido, ya que la linea de corte puede arrojar
objetos al aire.
14

Para cortar _y -_
bordes
PAPA ESCALPAR
La t6cnica de escalpado retira la vegetaci6n
no deseada. Sostenga el cabezal a unos 8 cm
(3 pulgadas) de la tierra yen angulo. Deje que
Ia punta de la linea go]pee contra la tierra alre-
dedor de arboles, ostes, monumentos, etc.
Esta t6cnica aumenta el desgaste de la line&
ePsa:alpar I I/_'
....
PAPA CORTAR CESPED
El aparato es ideal para cortar c6sped en los
lugares donde no alcanzan las cortadoras de
c6spea convencionales. En la posicion de
cortar pasto se mantiene la linea paralela a la
tierra. Evite presionar el cabezal contra la tier-
ra, ya que hacerlo puede escalpar la tierra y
daSar el aparato.
Para cortar C6sppd///i
PARA BARREN
La accion ventiladora de la linea girante sirve
para hacer una limieza r_pida y facil. Manten-
gala linea paralela a Ia superficie que desea
limpiar y por encima, moviendo el aparato de
un lado al otro.
'"iliLt-:,,
I[_IADVERTENCIA: Desconecte del
recurso de energia antes de dar mantenimi-
ento a este aparato.
RECOMENDAClONES GENERALES
La garantia de este aparato excluye aquellos
articulos que hayan sido sometidos al abuso o a
Ia negligencia pot parte del usuario. Para recibir
el valor comp]eto de la garantia, el usuario deb-
era hacer el mantenimiento del aparato de
acuerdo a las instrucciones en este manual.
Sera necesario hacer vados ajustes ped6dica-
mente para mantener el aparaio debidamente.
ANTES DE CADA USO
VERIFIQUE QUE NO HAYA FIJA-
DORES SUELTOS NI PIEZAS SUEL-
TAS
• Tomillos de la caja
• Manija auxiliar
• Protector
• Protector de bordes
VERIFIQUE QUE NO HAYA PIEZAS A
DAI_IADAS NI GASTADAS
Entre en contacto con el distribuidor autorizado
del servicio para el reemplazo de piezas daSa-
das o desgastadas.
• Gatillo Interruptor - AsegQrese de que el in-
terruptor est6 funcionande debidamente
appretando y soltandolo. Verifique que el
motor se haya detenido por completo.
• Protector - Deje de usar el aparato si el pro-
tector queda daSado.
DESPUES DE CADA USO
INSPECCIONE Y LIMPIAR EL APA-
RATO Y LAS PLACAS
• Despu_s de que cada usa, inspeccione la
aparato completa para saber si hay piezas
flojas o daSadas. Limpie el aparato y las pla-
cas usando un trapo humedo con detergente
suave.
• Seque e! aparato con un trapo limpio y seco.
15

PARA CAMBIAR LA LINEA
El uso de bobinas previamente enrolladas es
el m6todo mas conveniente para reemplazar
la linea de corte y asegurarse que el aparato
rinda un funcionamiento optimo.
Las bobinas de repuesto vienen con co-
dificadas en colores para aseguramos el
uso correcto de la bobina con el aparato
correspondiente. AsegQrese de usar el
mismo color de bobina de repuesto qu el
de la bobina existente.
AVISO: Mantenga siempre el cabezal de
code limpio de escombros y suciedad al
efectuar cualquier tipo de mantenimiento.
• Sujete el bobina y desenrosque la tapa gi-
rando en la direccionilustrada en la parle
superior de la misma.
• Retire el aro que guia la linea y la bobina.
Aro que guia la linea
Utilice una bobina previamente enrollada o vuel-
va a enroscar linea nueva en la bobina exis-
tente. Si utiliza una bobina pre-enrollada, retire
Ia tira adhesiva de la linea y la bobina.
COMO REBOBINAR LA BOBINA-
CON LINEA NUEVA
_kADVERTENCIA: Utilice exclusi-
vamente linea redonda de 1,65 mm (0,065
de pulgada) de diametro. Otro tipo de ta-
mafios y formas haran que la linea no gire de
forma apropiada Io que resultara en el funcio-
namiento inadecuado del cabezal de corte o
en accidentes de seria gravedad. No utilice
otro tipo de materiales tales como alambre,
hilo, soga, etc. El alambre puede romperse
durante el corte y converLirse en un misil peli-
groso Io que puede causar lesiones de seria
gravedad.
1. Corte una Iongitud de 8 metros (25 pies)
de linea redonda de 1,65 mm (0,065 de
pulgada) de di_metro de la marca Weed
Eater@.
Bobina
2. Introduzca un extremo de la linea dentro
de la cavidad central de la bobina vacia.
Aseg0rese de que la linea enrolle en la
bobina en la direcci6n que se ilustra en la
misma (en sentido contrario al de las agu-
jas del reloj).
3. Contin0e enrollando la linea en la bobina,
dejando sin enrolIar de 10 a 15 cm (4 a 6
puIgadas) desde el centro de Ia bobina.
COMO INSTALAR LA BOBINA CON
LA LINEA DE CORTE
1. Instale la bobina de repuesto.
2. Enrolle la linea a tray,s del aro guia.
gui
/
Bobina de Repuesto
3. Coloque el aro guia en la bobina y pase la
linea por la ranura. Permita que la linea
se extienda de 10 a 15 cm (4 a 6 pulga-
das) desde el centro de Ia bobina.
4. Asegure de que la linea permanezca den-
tro de la ranura mientras enrosca la la
tapa en Ia eje. Ajuste la tapa manual-
mente.
PIEZAS DE SERVICIO AL CLIENTE
PIEZAS DE REPUESTO
Cabezal y 0,065 de puIgada Linea de Corte
Aro que Guia la Linea
Tapa
Maniia Auxiliar
Tornillo, Manija Auxiliar, 1/4-20
Tuerca Mariposa, Manija Auxiliar
Protector
Protector de Bordes
N° de PIEZA
952711602
530403949
530403810
530403805
530403886
530016152
530403914
530403824
16

£= _
cIADVERTENL;IA: Realice los si-
guientes pasos despuOs de cada uso:
• Pare el motor y desconecte el aparato de la
corriente elOctrica siempre clue no est6 en
USO.
• Cuando cargue el aparato en las manos,
mantenga el motor apagado.
• Guarde el aparato de modo que el limitador
de linea no pueda causar heridas.
• Guarde el aparato yel cable de extensi6n al
abrigo de la intemperie, desenchufados, en
un lugar alto, seco y fuera del alcance de
los niOos.
• Guarde el aparato con todos los protec-
totes en su lugar correspondiente. Cologue
el aparato de modo que ning0n objeto filoso
pueda causar heridas accidentalmente.
TABLA DIAGNOSTICA
ADVERTENCIA: Siempre desconecte la unidad antes de hacer cualquiera de la!
reparaciones recomendadas que estan listadas siguientemente que no requieran que
aparato este en operaci6n.
SINTOMA CAUSA SOLUCION
El cabezal de 1. Se esta metiendo la linea 1. Corte con la punta de la linea
corte se detiene en el material que se 0nicamente.
bajo carga o no esta cortando.
gira cuando se 2. Falla el0cbica. 2. Entre en contacto con el distribuidor
apreta el gatillo autorizado del servicio.
interruptor. 3. Interruptor de circuito 3. Inspeccione la caja de fusibles.
accionado.
4. Escombros parando el 4. Retire los escombros.
cabezal.
1. Verifique la trayectoria de la line&La linea no
avanza o se
rompe al cortar.
La linea se
funde en la
bobina.
La linea avanza
constantemente.
Uso o desgaste
excesivo de ia
iinea.
La linea retro-
cede al cabe-
zal.
1. Trayectoria incorrecta de
la linea en el cabezaL
2. La linea esta enroscada
de forma incorrecta en la
bobina.
3. Diametro incorrecto de ia
line&
4. Insuficiencia de linea
afuera del cabezaI
5. Acumulaci0n de tierra
tapa.
1. Diametro incorrecto de la
line&
2. Bobina incorrect&
3. Se esta metiendo la Iinea
en el material que se esta
cortando.
1. Trayectoria incorrecta de
la linea en el cabezal.
2. Bobina daOada.
1. Trayectoria incorrecta de
la linea en el cabeal.
2. Diametro incorrecto de la
line&
3. Se esta metiendo la linea
en el material que se
esta cortando.
¢. Los dientes de la bobina
est0n gastados o daOados.
1. Insuficiencia de linea
afuera del cabezal.
2. Diametro incorrecto de
la line&
2. Rebobinado nuevamente la linea de
forma pareja y tirante.
3. Uso s01o linea del diametro correcto
(0,065 de pulgada/1,65 mm).
4. Retire la tapa y saque 10 cm
(4 pulgadas) de linea hacia afuera.
5. Limpie la tap&
1. Uso s01o linea del diametro correcto
(0,065 de pulgada/1,65 mm).
2. Uso la bobina apropiada.
3. Corte con la punta de la linea
plenamente extendida.
1. Verifique la trayectoria de la line&
2. Cambie ia bobina.
1. Verifique la trayectoria de ia iinea.
2. Cambie la bobina.
3. Corte con la punta de la linea
ptenamente extendida.
4. Cambie la bobina.
1. Retire la tapa y saque 10 cm
(4 pulgadas) de linea hacia afuera.
2. Uso sOIo linea del diametro correcto
(0,065 de pulgada/1,65 mm).
17

ELECTROLUX HOME PRODUCTS, INC., le
garantizan aI comprador original que cada pro-
ducto el6ctdco o inalambrico, nuevos, de las
marc.as Weed Eater e, estar_ libre de defectos
en matedal y mano de obra y accede a reparar
o cambiar, bajo esta garantia, cualquier produc-
to el6ctdco o inalambrico de Ias mamas Weed
Eater que se encuentre defectuoso dentro de
los dos (2) aSos despu6s de la fecha original de
compra.
Si su producto el_ctrico o inalambrico de las
marc.as Weed Eater fallara dentro del periodo
de garantia, devu61valo, completo, saldado y
con recibo de compra al agente al que le rue
comprado para reparaci6n o reemplazo a op-
cion de ELECTROLUX HOME PRODUCTS,
INC.
Esta garantJa no es transfedble y no cubre
daSos y responsabilidad causados por el man-
ejo inapropiado, mantenimiento inapropiado, o
el uso de accesorios y/o piezas no especifica-
mente recomendadas por ELECTROLUX
HOME PRODUCTS, INC., para el uso de esta
herramienta. En adicion, esta garantia no cubre
Ias piezas que se deterioren y requieran ser re-
emplazadas pot el uso razonable durante el
periodo de garantia. Esta garantia no cubre
planes de acuerdo de entrega o ajustes nor-
males explicitos en el manual de instrucciones.
ESTA GARANTIA CONFIERE DERECHOS
LEGALES ESPECIFICOS AL PROPIETARIO,
QUE TAL VEZ TENGA ASIMISMO OTROS
DERECHOS QUE VARIAN ENTRE ESTA-
DOS.
NO SE PERMITIRAN RECLAMACIONES
POR CONSECUENCIA O POR OTROS
DANOS, Y NO HAY OTRAS GARANTIAS EX-
PRESADAS EXCEPTUANDO LAS QUE
AQUI SE ESTIPULAN.
ALGUNOS ESTADOS NO PERMITEN LIMI-
TACIONES EN CUANTO AL PERIODO DE
TIEMPO QUE UNA GARANTIA PUEDE DU-
PAR O LA RESTRICCION O LIMITACION DE
DANOS INCIDENTES O CONSECUENTES,
LO QUE IMPLICA QUE LO DICHO ANTE-
RIORMENTE PUEDE QUE NO TENGA NIN-
GUNA VALIDEZ EN EL ESTADO EN DONDE
USTED RESIDE.
La norma de ELECTROLUX HOME PROD-
UCTS, INC., es la de mejorar sus productos de
una forma continua. Por Io tanto, ELECTRO-
LUX HOME PRODUCTS, INC., se reserva el
derecho a cambiar, modificar o descontinuar
modelos, diseSos, especificaciones y acceso-
rios de todos sus pr'oductos, en cualquier mo-
mento y sin previo aviso u obligacion para con
ningQn comprador.
18
-
 1
1
-
 2
2
-
 3
3
-
 4
4
-
 5
5
-
 6
6
-
 7
7
-
 8
8
-
 9
9
-
 10
10
-
 11
11
-
 12
12
-
 13
13
-
 14
14
-
 15
15
-
 16
16
-
 17
17
-
 18
18


Weed Eater RTE115C El manual del propietario
- Categoría
- Podadoras de césped
- Tipo
- El manual del propietario
- Este manual también es adecuado para
en otros idiomas
- English: Weed Eater RTE115C Owner's manual
Otros documentos
-
Craftsman 358.745250 El manual del propietario
-
-
-
-
-
-
-
-
Troy-Bilt TB45E Manual de usuario