
日本語
............ J1
ENGLISH ..... E1
FRANÇAIS .... F1
ESPAÑOL .... S1
SHARP Pen Software
OPERATION MANUAL
MODE D’EMPLOI
MANUAL DE INSTRUCCIONES
バージョン 2.0
Version 2.0

1
J
もくじ
ペンソフトのモードと起動のしかた ………………… 3
終了する ………………………………………………… 4
ツールバーの機能ボタンとはたらき ………………… 6
データを保存する ……………………………………… 7
ホワイトボードファイルを読み込む ………………… 7
編集するシートを変える
(ホワイトボードモード) ……………………………… 8
ペンで描く …………………………………………… 10
描いた線を消す ……………………………………… 11
オブジェクトを編集する …………………………… 12
操作を取り消す・やり直す ………………………… 14
オブジェクトを削除する …………………………… 14
画面を拡大する ……………………………………… 15
ネットワークスキャナツール Lite を使用して
画像を取り込む ……………………………………… 18
ペンソフトのインストール ………………………… 22
ネットワークスキャナツール Lite の
インストール ………………………………………… 23

2
J
はじめに
本ソフトウェアは、会議やプレゼンテーションなどを効果的に行うためのソフトウェアです。
直接文字などを書き込み、画面をホワイトボードのように使用することができます。
任意のドキュメントを画像に変換して取り込み、表示することができます。
複合機から画像を取り込んで表示することができます。
編集中の内容を印刷、保存することができます。
本ソフトウェアは、PN-L601B 用です。
本ソフトウェアは厳重な品質管理と製品検査を経て出荷しておりますが、万一故障または不具合がありましたら、お買いあ
げの販売店までご連絡ください。
お客様もしくは第三者が本ソフトウェアの使用を誤ったことにより生じた故障、不具合、またはそれらに基づく損害につい
ては、法令上の責任が認められる場合を除き、当社は一切その責任を負いませんので、あらかじめご了承ください。
本取扱説明書および本ソフトウェアの内容の全部および一部を、当社に無断で転記、あるいは複製することはお断りします。
本取扱説明書および本ソフトウェアは、改良のため予告なく変更することがあります。
本ソフトウェアは ImageKit7 の技術を使用しています。ImageKit7 Copyright © 2005 Newtone Corp.
画面の設定や OS のバージョンなどによって内容が異なる場合があります。
Windows の基本的な操作は説明していません。
デフォルトのフォルダーにインストールした場合のパスを例に記載しています。インストール時に指定したフォルダーに
よってパスが異なる場合があります。
Microsoft、Windows、Windows Vista は、米国 Microsoft Corporation の米国およびその他の国における商標または
登録商標です。
その他、製品名などの固有名詞は、各社の商標または登録商標です。

3
J
ペンソフトのモードと起動のしかた
セカンダリーディスプレイには対応していません。
ホワイトボードモードと透明ボードモードを同時に起動することはできません。
モードを変えるときは、起動しているモードを終了してから、もう一方のモードを起動してください。
Windows のタスクバーが移動してしまうことを防ぐため、タスクバーは固定してください。
画面をホワイトボードのように使うことができます。
作業領域は「シート」単位で表示されます。シートを変えると、別の画面で編集することができます。
次の方法で起動してください。
デスクトップ上のショートカットアイコン「SHARP ペンソフト」(
)をすばやく 2 度タッチ(ダブルクリック)する。
「スタート」ボタンをクリックし、「すべてのプログラム」→「SHARP ペンソフト」→「SHARP ペンソフト」を選ぶ。
ホワイトボードファイル(SWS 形式の保存ファイル)をすばやく 2 度タッチ(ダブルクリック)する。
ボードが透明のモードです。
作業領域は、単独の画面で構成されています。
画面の上に置かれた透明ボードの上に描画されるので、画面上に表示されているものに直接注釈などを書き入れることができ
ます。ただし、透明ボードの背後に見えている画面を直接操作することはできません。
次の方法で起動してください。
デスクトップ上のショートカットアイコン「SHARP ペンソフト(透明ボード)」(
)をすばやく 2 度タッチ(ダブルクリッ
ク)する。
「スタート」ボタンをクリックし、「すべてのプログラム」→「SHARP ペンソフト」→「SHARP ペンソフト(透明ボード)」
を選ぶ。
起動から終了の流れ

4
J
終了する
「終了」をタッチしてください。
本ソフトウェアが終了します。
確認のダイアログボックスが表示されます。
「保存して終了する」をタッチした場合は、保存先を指定するダイアログボックスが表示されます。保存形式を確認し、保存先
を指定して保存してください。(7 ページ)
「保存せずに終了する」をタッチした場合は、保存せずに終了します。

5
J
機能を切り換えます。(6ページ)
ホワイトボードモードのときに表示されます。
タッチすると、シートの一覧がサムネイルで表示されます。(8 ページ)
ツールバーと反対側の端に表示され、タッチすると、ツールバーが反対側に移動します。(ツールバー移動アイコンとツー
ルバーの位置が入れ替わります。)
作業領域です。文字や線を描いたり、画像を貼り付けたりすることができます。
ボードにはホワイトボードと透明ボードの 2 種類があります。透明ボードの場合は、背景が透けて表示されます。
ホワイトボードモードの背景色やグリッドは、変更することができます。(20 ページ)
ホワイトボードモードのときに表示されます。
シート送りボタンをタッチすると、表示シートを変えることができます。(8 ページ)
中央に表示されているのが、現在のシート(ページ)の番号です。
基本画面の構成

6
J
ツールバーの機能ボタンとはたらき
ツールバーには各機能がボタンで表示されています。各ボタンをタッチすると、その機能が選べます。
ツールバーに表示される機能ボタンは、モードによって異なります。
終了
ペン 1
ペン 3
選択
元に戻す
保存
現在のシートを印刷
データ取り込み
パンウィンドウ
開く
ペン 2
消しゴム
スクリーン
やり直し
SHARP ペンソフトの設定
すべてのシートを印刷
終了
ペン 1
ペン 3
選択
元に戻す
保存
現在のシートを印刷
透明ボード OFF
ペン 2
消しゴム
虫めがね
やり直し
SHARP ペンソフトの設定
終了 本ソフトウェアを終了します。 4
開く
※1
ホワイトボードファイルを開きます。 7
透明ボード OFF
※2
透明ボード機能を無効にします。
一時的にボードの機能を無効にすることで、本ソフトウェア以外の操作(ファイル
の操作や、他アプリケーションソフトの使用など)を行えます。
―
ペン 1 ~ 3 線を描きます。 10
消しゴム 手描きの線を消します。 11
選択 オブジェクトを選びます。 12
スクリーン
※1
ホワイトボードの拡大や、表示位置やページの移動を行います。 8、15
虫めがね
※2
透明ボードモードで画面の一部を拡大表示します。 16
元に戻す ひとつ前の操作を取り消します。 14
やり直し ひとつ前に取り消した操作をやり直します。 14
保存 編集中の内容を保存します。 7
SHARP ペンソフトの設定 本ソフトウェアを使いやすいように設定します。 20
現在のシートを印刷 表示しているシートを印刷します。 19
すべてのシートを印刷
※1
すべてのシートを印刷します。 19
データ取り込み
※1
ペンソフト取り込み用プリンタードライバーや複合機から取り込んだ画像ファイル
をボード上に貼り付けます。
17、18
パンウィンドウ
※1
表示しているシートのサムネイル画像が表示され、ウィンドウ内を操作することで
ボードの拡大や表示位置の移動を行います。
15
※1 ホワイトボードモードのみ表示されます。
※2 透明ボードモードのみ表示されます。

7
J
データを保存する
以下のファイル形式でデータを保存することができます。
ホワイトボードファイル
ホワイトボードのデータを SWS 形式で保存します。本ソフトウェアで再編集することができ
ます。
PDF、BMP、JPEG、PNG
作業中の画面をスクリーンショットで保存します。異なるファイル形式に変換されるため、本
ソフトウェアで再編集することはできません。
すべてのファイル形式で保存できます。
すべてのシートが保存されます。(データがないシートは保存されません。)
BMP、JPEG、PNG では、1 シートが 1 ファイルになります。
PDF、BMP、JPEG、PNG で保存できます。
ホワイトボードファイルを定期的に自動保存する機能です。
(透明ボードは自動バックアップされません。)
自動バックアップの ON / OFF およびバックアップを行う間隔は、変更することができます。(20 ページ)
ホワイトボードファイルを読み込む
ホワイトボードモードを起動すると、新規のホワイトボードファイルが開かれた状態になります。(直接ファイルをタッチして
本ソフトウェアを起動させた場合は、該当するホワイトボードファイルが開かれた状態になります。)
保存したホワイトボードファイルを読み込みたいときは、
「開く」をタッチして、読み込みたいファイルを選んでください。
(未保存の編集内容がある場合は、ファイル保存に関する確認のダイアログボックスが表示されます。)
ファイルの保存と読み込み

8
J
編集するシートを変える(ホワイトボードモード)
ホワイトボードモードでは、画面がシート単位で表示されます。
シートを変えるときは、画面下にあるシート送りボタンをタッチしてください。中央に表示されているのが、現在のシートです。
前のシートを表示します。最初のシートを表示しているときはタッチできません。
次のシートを表示します。最後のシートを表示しているときはタッチできません。
シートの拡大率が 100% のとき、ドラッグ操作でシートを変えることができます。
右方向にドラッグすると、前のシートを表示します。
左方向にドラッグすると、次のシートを表示します。
編集する

9
J
画面左下の「シート一覧」には、各シートのサムネイルが表示され、サムネイルをタッチしてシートを変えることができます。
また、シートの追加、削除、コピー、移動など、シートの編集が行えます。
シートのサムネイルが一覧で表示されます。
画面がタッチしたシートに変わります。
:選んでいるシートの右側に新しいシートを追加する。
:選んでいるシートを削除する。
:選んでいるシートを右側にコピーする。
:選んでいるシートを左側に移動する。
:選んでいるシートを右側に移動する。

10
J
ペンで描く
描いた内容は、タッチペンを放してから 1 秒
※
後に、1 つのオブジェクトとして確定されます。タッチペンを放してから 1 秒
※
経過しないうちに別の図形を描くと、線と線がつながっていなくても 1 つのオブジェクトになります。
※ 数値は変更することができます。(20 ページ)
図形を描く 別の図形を描く 両方の図形が 1 つの
オブジェクトになる
タッチペンの機能ボタン 2 を押すたびに、「ペン 1」~「ペン 3」、「消しゴム」機能を順に変えることができます。
機能ボタン 2 で機能を変える場合は、タッチパネルドライバーの「プロパティ」を選び、「動作設定」タブの「機能ボタン 2」
を「ペンソフト連携」に設定してください。
オブジェクトについては、12 ページを参照してください。
ツールバーのいずれかのボタンがタッチされた場合など、タッチペンを放してから一定の時間が経過しなくても、描いた内
容がオブジェクトとして確定されます。
「ペン 1」~「ペン 3」のパレットで、ペン機能の設定を変更することができます。
パレットは、選択しているペンのボタンを再度タッチすると表示されます。
チェックすると、線が半透明になります。
この設定が有効なときは、ペンのアイコンが変わります。
線の色と太さを設定します。
パレットが閉じます。
パレットの閉じかたは変更することができます。(20 ページ)

11
J
描いた線を消す
動かした部分が消えます。
タッチペンの機能ボタン 2 を押すたびに、「ペン 1」~「ペン 3」、「消しゴム」機能を順に変えることができます。
機能ボタン 2 で機能を変える場合は、タッチパネルドライバーの「プロパティ」を選び、「動作設定」タブの「機能ボタン 2」
を「ペンソフト連携」に設定してください。
消しゴム機能で消せるのは、ペン機能で描いたオブジェクトだけです。貼り付けた画像などは、「消しゴム」で消すことは
できません。また、線の一部を消して太さを細くすることはできません。消して細くした部分の線がすべて消えます。
ペン機能で描いたオブジェクトでも、グループ化されたオブジェクトを消すことはできません。
「ペン/消しゴム機能の自動切換」を設定すると(20 ページ)、「ペン1」~「ペン3」、「消しゴム」選択時にイレーザーや
指で消すことができます。イレーザーまたは指で画面に触れ、カーソルが消しゴムに変わってから動かしてください。
イレーザーや指で消す場合の消しゴムサイズは、画面に触れている範囲、または、パレットで選択している大きさのどちら
かに設定できます。
Windows Vista/7 のとき、透明ボードモードで「消しゴム」を選ぶと、下記のように表示されます。「消しゴム」以外の
機能を選ぶと通常の表示に戻ります。
- 半透明のオブジェクトでも、背景のコンピューター画面が透けません。
- オブジェクトの周りに白線が表示されます。
「消しゴム」のパレットで、消しゴムの大きさを変更することができます。
パレットは、
「消しゴム」を選択している状態で再度タッチすると表示されます。
パレットの閉じかたは変更することができます。(20 ページ)

12
J
オブジェクトを編集する
描いた線やボードに貼り付けた画像などは、「オブジェクト」という単位で扱われます。
オブジェクトを編集するときは、対象となるオブジェクトを選びます。
オブジェクトが選ばれます。
オブジェクトを選んだ状態で、 をタッチすると、拡
張メニューが表示され、以下の編集を行うことができ
ます。
切り取り
コピー
貼り付け
削除
回転
順序
選択解除
グループ化
グループ解除
プロパティ
描画領域をタッチしてくだ
さい。何も描いていない箇
所をタッチしても選べませ
ん。
オブジェクトの範囲が点線
で表示され、頂点と辺にセ
レクトポイントと呼ばれる
記号が表示されます。
ドラッグで範囲を指定すると、その範囲に含まれている複数のオブジェクトを選ぶことができます。(範囲内にオブジェクト全
体が含まれていないものは選べません。)
選ばれている複数のオブジェクトを一つのオブジェクトとして編集することができます。

13
J
選んだオブジェクトをドラッグすると、オブジェクトを
移動することができます。
頂点のセレクトポイントをドラッグすると、比率を
固定したまま拡大/縮小します。
辺のセレクトポイントをドラッグすると、幅または
高さのみを拡大/縮小します。
拡大/縮小しても線の太さは維持されます。
オブジェクトをクリップボードにコピーすることができます。
オブジェクトを切り取ってクリップボードに保存することができます。
クリップボードのオブジェクトをボードに貼り付けるときは、拡張メニューの「貼り付け」を選びます。

14
J
オブジェクトが配置されている順序を変更することができます。
最前面へ移動 :オブジェクトが1番手前へ移動します。
最背面へ移動 :オブジェクトが1番奥へ移動します。
前面へ移動 :オブジェクトが1つ手前へ移動します。
背面へ移動 :オブジェクトが1つ奥へ移動します。
奥にあるオブジェクトは、手前のオブジェクトに重なると、隠れます。隠れている部分を表示させたい場合は、オブジェクト
の順序を変更します。
1 番手前に配置されているオブジェクト
2 番目に配置されているオブジェクト
1 番奥に配置されているオブジェクト
操作を取り消す・やり直す
「元に戻す」をタッチすると、直前の描画や編集を取り消すことができます。
「やり直し」をタッチすると、取り消した操作を再び実行することができます。
最大 50 回まで取り消すことができます。
オブジェクトを削除する
選ばれたオブジェクトが消えます。

15
J
画面を拡大する
画面の拡大方法は、起動しているモードによって異なります。
ダブルクリックするたびに、クリック位置を基準に 100%、150%、200% の順に切り換わります。
200% で表示しているときにダブルクリックすると 100% に戻ります。
「スクリーン」を選択した状態で画面をドラッグすると、表示位置を変更できます。
ツールバーのパンウィンドウには、現在のシートのサムネイルが表示されます。
現在の画面倍率を表示します。
タッチするたびに、100% ~ 400% の間で 50% ずつ画面を拡大/縮小します。
現在のシートのサムネイルが表示されます。ダブルクリックするたびに、クリック位置を基準に 100%、150%、200%
の順に切り換わります。
画面に表示されている領域を示します。表示枠をドラッグすると表示場所が移動します。

16
J
画面の一部を拡大して表示することができます。
タッチした周辺が拡大表示されます。
拡大したい箇所をタッチ 周辺が拡大されます

17
J
ドキュメントを画像で取り込む
(ペンソフト取り込み用プリンタードライバー)
任意のアプリケーションソフトのドキュメントを画像に変換し、ホワイトボードに取り込むことができます。
プリンターに印刷されるのと同様の内容で取り込むことができます。
操作方法はアプリケーションソフトの説明書をご覧ください。
「用紙サイズ」、「用紙の向き」、「解像度」が選べます。
設定が終わったら「OK」をタッチしてください。
印刷したドキュメントが画像に変換され、ペンソフトに転送されます。
画像が転送されると、 「データ取り込み」が点滅します。
画像を取り込んだ最初のシートが表示されます。
アプリケーションソフトによっては、正しく変換できない場合があります。
ペンソフト取り込み用プリンタードライバーの「解像度」は通常 120dpi に設定してください。解像度を高くすると、シー
トの拡大、縮小、スクロールなどがスムーズに動作しない場合があります。

18
J
複合機から画像を取り込む
ペンソフトがインストールされたコンピューターと同一ネットワーク上にシャープ製複合機が接続されている場合、複合機で
読み込んだ画像をホワイトボードに取り込むことができます。
ネットワークスキャナツール Lite 1.21 に対応しています。(2010 年8月現在)
詳細は複合機をお買い上げの販売店にご確認ください。
複合機の操作方法については、複合機の取扱説明書をご覧ください。
ネットワークスキャナツール Lite を使用して画像を取り込む
初めて使用するときは、先にペンソフトがインストールされたコンピューターにネットワークスキャナツール Lite をインス
トールし、ネットワークスキャナツール Lite の設定を行ってください。(23 ページ)
複合機から画像を取り込む際は、お使いのコンピューターでネットワークスキャナツール Lite が起動している必要があります。
スキャン送信時のフォーマットは、JPEG にしてください。
原稿が読み込まれ、ペンソフトに転送されます。
画像が転送されると、 「データ取り込み」が点滅します。
画像を取り込んだ最初のシートが表示されます。

19
J
印刷する
現在表示しているシートだけを印刷するときは、 「現在のシートを印刷」をタッチしてください。
ホワイトボードモードで全てのシートを印刷するときは、
「すべてのシートを印刷」をタッチしてください。
印刷設定はあらかじめ登録しておきます。
ツールバーやタブなど、本ソフトウェアの操作ツールは印刷されません。
ホワイトボードモードでは、データのないシートは印刷されません。
印刷するプリンターを選びます。
プリンターの詳細設定を行います。設定内容はプリンターによって異なります。内容については、プリンターの取扱説明書
を参照してください。
印刷する部数を設定します。
ホワイトボードの背景色を印刷する :ホワイトボードの背景に設定した色を印刷する場合は、チェックします。
(ホワイトボードモード時のみ)
ページ番号を印刷する :ページ番号を印刷する場合はチェックし、「印刷場所」を選びます。
(ホワイトボードモード時のみ)
印刷日を印刷する :日付を印刷する場合はチェックし、「印刷場所」を選びます。
「印刷対象」は変更できません。

20
J
本ソフトウェアに関するさまざまな設定を行うことができます。
設定は、ホワイトボードモード、透明ボードモード共通です。ただし画面の内容は起動しているモードにより異なります。
※ 1 ホワイトボードモードのみ表示されます。
※ 2 透明ボードモードのみ表示されます。
ペンソフトを起動したときの、「ペン 1」~「ペン 3」の色・太さ、「消しゴム」のサイズを設定します。
チェックすると、「ペン 1」~「ペン 3」、「消しゴム」のパレットで、パターンを選んだ時点でパレットを閉じます。
チェックを外すと、
を押してパレットを閉じます。
チェックすると、ペン機能使用時にイレーザーや指で画面に触れると自動的に消しゴムに変わります。
「自動切換時の消しゴムサイズ」で適用する消しゴムサイズを設定してください。
タッチパネルの接触面積に合わせて消す : イレーザー使用時など、約 4cm×4cm 以上の大きさで画面に触れていると
き、画面に接触している範囲に合わせて消します。
パレットで選択されているサイズで消す : 画面に接触している大きさに関わらず、選択されている消しゴムサイズで消
します。
この機能を使用する場合は、タッチパネルドライバーの「プロパティ」を選び、「動作設定」タブの設定を下記のとおり
にしてください。タッチパネルドライバーについては、タッチパネルドライバー取扱説明書をご覧ください。
- 「入力モード設定」を「標準」に設定してください。「標準」以外の設定では、ペン/消しゴムの自動切換機能を使用す
ることはできません。
- 「タッチパネルの接触面積に合わせて消す」を選んだ場合は、「消しゴム領域検出」を「有効」に設定してください。
ペン機能で描くときにカーソルを表示するかどうかを設定します。
印刷の設定を登録します。(19 ページ)
設定をカスタマイズする

21
J
本ソフトウェアのバージョン情報を表示します。
設定を初期値に戻します。
手書き線がオブジェクトとして確定するまでの時間を設定します。
プレビュー:現在設定されているホワイトボードのイメージを表示します。
背景色の変更:ホワイトボードの背景色を設定します。
グリッド線を表示する:チェックすると、ホワイトボードにグリッドを表示します。
ホワイトボードモード時、自動的にバックアップを行うかどうか設定します。
自動バックアップを行う場合は、その間隔を設定します。
拡大表示の大きさや拡大率を設定します。

22
J
管理者権限を持つユーザーで操作してください。
ペンソフトのインストール
ペンソフトを使うコンピューターに .NET Framework 2.0 以降がインストールされている必要があります。
.NET Framework は、Microsoft 社のホームページからダウンロードしてインストールしてください。
32 ビット版 OS の場合:
¥
PenSoftware
¥
jpn
¥
setup.exe
64 ビット版 OS の場合:
¥
PenSoftware
¥
jpn_x64
¥
setup_x64.exe
「ユーザーアカウント制御」画面が表示されたら、「はい」(または「許可」)をクリックしてください。
セキュリティの警告画面(発行元を確認できませんでした。)が表示されたら、「許可」をクリックしてください。
インストールが終わると、デスクトップにホワイトボードモードのショートカットアイコン(
)と、透明ボードモードの
ショートカットアイコン(
)が作成されます。
また、ペンソフト取り込み用プリンタードライバーが追加されます。(17 ページ)
アイコン表示(
クラシック表示)では、「プログラムと機能」をダブルクリックします。
Windows XP のときは、「プログラムの追加と削除」をクリックします。(クラシック表示では、「プログラムの追加と削除」
をダブルクリックしてください。)
Windows XP のときは、「削除」をクリックしてください。
「ユーザーアカウント制御」画面が表示されたら、「続行」をクリックしてください。
これでアンインストールは終了です。
インストール/アンインストールする

23
J
ネットワークスキャナツール Lite のインストール
ネットワークスキャナツール Lite は、同一ネットワークに接続されたシャープ製複合機から画像を取り込む場合に使用します。
ネットワークスキャナツール Lite は、弊社のホームページから入手し、ペンソフトを使うコンピューターにインストールして
ください。対象機種やインストール方法についても弊社のホームページでご確認いただけます。
ネットワークスキャナツール Lite の詳細な使用方法については、ネットワークスキャナツール Lite のユーザーガイドをご覧
ください。
ネットワークスキャナツール Lite の代わりに、複合機やネットワークスキャナ拡張キットに付属のネットワークスキャナ
ツール(バージョン 3.1 以降)を使用することもできます。(すでにインストールされている場合は、再インストールする
必要はありません。)
複合機で読み取った画像を取り込むためのフォルダーを、複合機のアドレス帳に送信先として登録します。
送信先は、ネットワークスキャナツール Lite でペンソフト用のプロファイルを作成することにより登録できます。
プロファイルを作成する際、「ファイルの移動先を設定する」を選択し、「詳細」で画像を取り込むためのフォルダー(下記)
を選んでください。
Windows Vista/7 の場合
起動ディスク :
¥
ProgramData
¥
SHARP
¥
PenSoftware
¥
JPEG
Windows XP の場合
起動ディスク :
¥
Documents and Settings
¥
All Users
¥
Application Data
¥
SHARP
¥
PenSoftware
¥
JPEG
タスクバーからネットワークスキャナツール Lite を終了させ、22 ページを参照してアンインストール画面を表示し、「ネット
ワークスキャナツール Lite」を削除してください。

1
E
Introduction ......................................................................2
Starting and Exiting the Software ..................................3
Pen Software modes and how to start the modes .......3
Exiting the software ......................................................4
Layout of Basic Screen ...................................................5
Toolbar function buttons ...............................................6
Saving and Opening a File ..............................................7
Saving data ..................................................................7
Opening the whiteboard le .........................................7
Edit Operations ................................................................8
Changing the sheet to edit (whiteboard mode) ............8
Drawing with a Pen ....................................................10
Erasing a drawn line ...................................................11
Editing an object .........................................................12
Undoing/redoing operation .........................................14
Deleting an object ......................................................14
Enlarging the view of the screen ...............................15
Importing a Document as an Image (Pen Software
Printer Driver) .................................................................17
Acquiring an Image From a Multifunction Machine ...18
Using the Network Scanner Tool to acquire
an image ....................................................................18
Printing ...........................................................................19
Customizing the Settings ..............................................20
Installing/Uninstalling the Software .............................22
Installing the Pen Software ........................................22
Installing the Network Scanner Tool ...........................23
Contents

2
E
This software is intended to facilitate effective meetings and presentations.
• Letterscanbecreateddirectlysothatthecomputerscreencanbeusedasawhiteboard.
• Anydocumentcanbeconvertedintoanimageandimportedfordisplay.
• Animagecanbeacquiredfromamultifunctionmachinefordisplay.
• Thecontentsbeingeditedcanbeprintedoutorsaved.
ThissoftwareisforthePN-L601B.
Important Information
• Thissoftwarehasbeenshippedafterstrictqualitycontrolandproductinspection.If,however,youndanyfailureor
malfunction,contactyourproductdealer.
• PleaseunderstandthatSHARPCORPORATIONbearsnoresponsibilityforerrorsmadeduringusebythecustomerora
thirdparty,norforanyothermalfunctionsordamagetothissoftwarearisingduringuse,exceptwhereindemnityliabilityis
recognizedunderlaw.
• Transcribingorduplicatingpartorallofthismanualand/orthissoftwarewithoutpermissionfromourcompanyisnot
permitted.
• Asapartofourpolicyofcontinuousimprovement,SHARPreservestherighttomakedesignandspecicationchangesfor
productimprovementwithoutpriornotice.Theperformancespecicationguresindicatedarenominalvaluesofproduction
units.Theremaybesomedeviationsfromthesevaluesinindividualunits.
• ThissoftwareusestheImageKit7technology.ImageKit7Copyright©2005NewtoneCorp.
• ThecontentsordetailsmayvarydependingonthescreencongurationandOSversion,etc.
• OnlyanEnglishversionofthissoftwareisprovided.Thescreensshowninthemanualarethescreensthatappearinthe
EnglishOS.
• ThismanualdoesnotcontainbasicoperatinginstructionsforWindows.
• Thepathsusedinthismanualassumethecasewherethissoftwarebeinginstalledinthedefaultfolder.Theactualpathmay
varydependingonthefolderspeciedduringinstallation.
Trademarks
• Microsoft,Windows,andWindowsVistaareeitherregisteredtrademarksortrademarksofMicrosoftCorporationintheUnited
Statesand/orothercountries.
• Namesofproductsandotherpropernounsaretheregisteredtrademarksortrademarksoftheirrespectivecopyrightholders.
Introduction

3
E
Pen Software modes and how to start the modes
TIPS
• Theuseofasecondarydisplayisnotsupported.
• Whiteboardmodeandtransparentmodecannotbestartedatthesametime.
Tochangemodes,exitthecurrentmodeandstarttheothermode.
• TopreventtheWindowstaskbarfrommoving,lockit.
n
Whiteboard mode
Youcanusethescreenasawhiteboard.
Theworkareaisdisplayedforeach“sheet”.Bychangingthesheet,youcaneditdataonanotherscreen.
Starting whiteboard mode
Followthestepsbelowtostartthesoftware.
• Onthedesktop,touchthe“SHARPPenSoftware”shortcuticon(
)twicequickly(ordouble-clicktheicon).
• Clickthe“Start”button,andthenselect“AllPrograms”-“SHARPPenSoftware”-“SHARPPenSoftware”.
• Touchawhiteboardle(alesavedintheSWSformat)twicequickly(ordouble-clickthele).
n
Transparent mode
Theboardisshownastransparent.
Theworkareaconsistsofasinglescreen.
Yourdrawingwillappearonthetransparentboardplacedoverthescreen,sothatyoucanwritecommentsdirectlyontheitems
displayedonthescreen.Note,however,thatyoucannotoperatethescreenshownbehindthetransparentboard.
Starting transparent mode
Followthestepsbelowtostartthesoftware.
• Onthedesktop,touchthe“SHARPPenSoftware(Transparentboardmode)”shortcuticon(
)twicequickly(ordouble-click
theicon).
• Clickthe“Start”button,andthenselect“AllPrograms”-“SHARPPenSoftware”-“SHARPPenSoftware(Transparentboard
mode)”.
Starting and Exiting the Software

4
E
Exiting the software
Touch the “Quit” button.
When there is no data which is being edited and is not saved
The software is exited.
When there is data which is being edited and is not saved
A conrmation dialog box appears.
When you touch “Exit with save”, a dialog box appears to allow you to specify the destination to save the data. Conrm the
saving format, specify the destination, and save the data. (Page 7)
When you touch “Exit without save”, the software is terminated without saving the data.

5
E
Screen example: Whiteboard mode
(2)
(1)
(4)
(5)
(3)
(1) Toolbar
Used to switch functions. (Page 6)
(2) SHEET LIST
This is displayed only in the whiteboard mode.
Touch this tab to display the list of sheets shown as thumbnail images. (Page 8)
(3) Move toolbar icon
This appears on the side opposite to the toolbar, and can be touched to move the toolbar to that side. (The icon and the
toolbar will switch places.)
(4) Board
Work area. You can write letters, draw lines, and paste images here.
The board can be displayed in two modes: whiteboard mode and transparent mode. The latter is transparent, showing the
background.
TIPS
• The background color and grid used in the whiteboard mode can be changed. (Page 20)
(5) Sheet navigation buttons/Page No.
This is displayed only in the whiteboard mode.
Touch the sheet navigation button to change the displayed sheet. (Page 8)
The number shown at the center is the page No. of the current sheet.
Layout of Basic Screen

6
E
Toolbar function buttons
The functions of the toolbar are shown as buttons. Touch a button to select the function of that button.
The function buttons that appear on the toolbar vary depending on the mode.
Whiteboard mode Transparent mode
Quit
Pen 1
Pen 3
Select
Undo
Save
Print Current Sheet
Insert Image
Pan window
Open
Pen 2
Eraser
Screen
Redo
Settings of SHARP Pen Software
Print All Sheets
Quit
Pen 1
Pen 3
Select
Undo
Save
Print Current Sheet
Transparent mode OFF
Pen 2
Eraser
Magnier
Redo
Settings of SHARP Pen Software
Button Function Page
Quit Exit this software. 4
Open*
1
Open a whiteboard le. 7
Transparent mode OFF*
2
Turn off transparent mode.
By disabling the board function temporarily, you can operate something other than
the software (les, other application software, etc.).
-
Pens 1 to 3 Draw lines. 10
Eraser Erase hand-drawn lines. 11
Select Select an object. 12
Screen*
1
Enlarge the view of the whiteboard, change the display position, and change pages. 8, 15
Magnier*
2
Enlarge part of the screen in transparent mode. 16
Undo Cancel the immediately preceding operation. 14
Redo Redo the immediately preceding canceled operation. 14
Save Save the data being edited. 7
Settings of SHARP Pen
Software
Set this software according to the user’s preference. 20
Print Current Sheet Print the displayed sheet. 19
Print All Sheets*
1
Print all sheets. 19
Insert Image*
1
Paste an image le acquired from the Pen Software printer driver or a multifunction
machine onto the board.
17, 18
Pan window*
1
This shows a thumbnail image of the displayed sheet. Operate inside this window to
enlarge the view of the board or move the display position.
15
*1 Only appears in whiteboard mode.
*2 Only appears in transparent mode.

7
E
Saving data
Data can be saved in the following le formats:
File format Description
Whiteboard le
Data on the whiteboard is saved in the SWS format. The saved data can be re-edited with this
software.
PDF, BMP, JPEG, PNG
The working screen is saved as a screen shot. The data is converted into the different le
format so that it cannot be re-edited with the software.
In the whiteboard mode
Data can be saved in any of the le formats above.
All sheets will be saved. (A sheet without data will not be saved.)
When data is saved in BMP, JPEG, or PNG format, each sheet is saved in a separate le.
In the transparent mode
Data can be saved in PDF, BMP, JPEG, or PNG format.
1. Touch the
“Save” button.
2. Selecttheleformatfromthedrop-downlist.
3. Specify the destination and touch “Save”.
n
Automatic backup
This function automatically backs up the whiteboard le at specied intervals.
(The automatic backup cannot be used for the data in the transparent mode.)
You can change whether to enable/disable the automatic backup and the backup interval time. (Page 20)
Openingthewhiteboardle
When whiteboard mode is started, a new whiteboard le opens. (If you start the software by directly touching a whiteboard le,
the whiteboard le opens.)
To open a saved whiteboard le, touch the
“Open” button and select the le. (If the data being edited is not saved, the le
saving conrmation dialog box appears.)
Saving and Opening a File

8
E
Changing the sheet to edit (whiteboard mode)
In the whiteboard mode, each screen is displayed on a sheet.
To change the sheet, touch the sheet navigation button at the bottom of the screen. The number shown at the center is the page
No. of the current sheet.
(1)
(2)
(3)
(1) Page No. of the current sheet
(2) Sheet navigation button (Previous)
Touch this button to display the previous sheet. When the rst sheet is displayed, this button is disabled.
(3) Sheet navigation button (Next)
Touch this button to display the next sheet. When the last sheet is displayed, this button is disabled.
n
Changing the sheet by dragging the screen
A sheet can be changed by dragging when the zoom (enlargement percentage) is 100%.
1. Touch the
“Screen” button.
2. Drag horizontally with the touch pen.
• Drag to the right to show the previous sheet.
• Drag to the left to show the next sheet.
Right edge of sheet
Edit Operations

9
E
n
Changing the sheet by referring to thumbnail images / Editing the sheet
Thumbnails of each sheet appear in “SHEET LIST” in the bottom left corner of the screen. A thumbnail can be touched to
change to that sheet. The sheets can be edited, including adding, deleting, copying, and moving sheets.
1. Touch “SHEET LIST” in the lower left corner of the screen.
The list of the thumbnail images of the sheets is displayed.
2. Touch the thumbnail image of the sheet you want to display.
The screen changes to the selected sheet.
(1)
(7)
(4)
(5)
(3)
(2)
(6)
(1) SHEET LIST
(2) Currently selected sheet
(3) Thumbnail navigation button (Previous)
(4) Thumbnail images
(5) Thumbnail navigation button (Next)
(6) Touch this button to close the sheet list.
(7)
: Add a new sheet to the right of the selected sheet.
: Delete the selected sheet.
: Copy the selected sheet and insert it on the right of the selected sheet.
: Move the selected sheet one to the left.
: Move the selected sheet one to the right.

10
E
Drawing with a Pen
1. Touch any of the “Pen 1” to “Pen 3” buttons.
2. Draw on the board.
The drawn shape will be determined as an object 1 second* after you lift the touch pen from the board. If you start drawing another
object within 1 second* after you lift the touch pen from the board, the drawn shapes will be determined to be a single object even
though they are separate.
* This period can be changed. (Page 20)
Draw a shape. Draw another shape. Both shapes are determined
as a single object.
Less than
1 second
After
1 second
TIPS
• You can switch through “Pen 1” to “Pen 3” and “Eraser” by repeatedly pressing Function Button 2 of the touch pen.
To change functions using Function Button 2, select the touch panel driver “Properties”, and set “Function Button 2” to “Pen
Software Link” on the “OPERATION SETTING” tab.
• For details about objects, refer to page 12.
• In certain cases, such as when a button on the toolbar is touched, the drawn shape will be xed as an object before the
specied time elapses after the touch pen is lifted from the board.
n
Changing the color and thickness of the pen
The “Pen 1” to “Pen 3” palettes can be used to change the pen function settings.
To display the palette, touch the button of the selected pen once again.
(1)
(2)
(1) Check this box to make the line translucent.
The pen icon changes when this setting is enabled.
Normal Translucent
(2) Set the color and thickness of the line.
The palette is closed.
TIPS
• The method of closing the palette can be changed. (Page 20)

11
E
Erasing a drawn line
1. Touch the “Eraser” button.
2. With the pen touching the screen, move the pen.
The part you move over is erased.
TIPS
• You can switch through “Pen 1” to “Pen 3” and “Eraser” by repeatedly pressing Function Button 2 of the touch pen.
To change functions using Function Button 2, select the touch panel driver “Properties”, and set “Function Button 2” to “Pen
Software Link” on the “OPERATION SETTING” tab.
• The eraser function can erase only the objects drawn with the pen function. You cannot use the “Eraser” button to erase
pasted images. You cannot use it either to erase the edges of a line to make the line thinner. Even if you erase the edges
only, the entire width of the line will be erased.
• An object drawn with the pen function cannot be erased if it is part of a group.
• When “Auto Pen/Eraser Mode Switching” is enabled (page 20), you can erase with the eraser or your nger when one of
“Pen 1” to “Pen 3” or “Eraser” is selected. Touch the screen with the eraser or your nger, and after the cursor changes to the
eraser, move the eraser or your nger. You can set the eraser size for erasing with the eraser or your nger to the touched
area of the screen, or to the size selected on the palette.
When "Erase touch panel contact
area" is selected
When “Erase with size selected on
palette” is selected
• With Windows Vista/7, the display changes as follows when the “Eraser” button is selected in the transparent mode. The
display returns to normal when the function other than the “Eraser” button is selected.
- The computer screen in the background is hidden even by translucent objects.
- An object is surrounded with a white line.
n
Changing the eraser size
The size of the eraser can be changed by selecting it from the palette for the “Eraser” button.
To display the palette, touch the
“Eraser” button again while it is in the selected state.
TIPS
• The method of closing the palette can be changed. (Page 20)

12
E
Editing an object
The drawn lines and the images pasted on the board are handled in the software as an “object”.
n
Selecting an object
You need to select an object before editing it.
1.
Touch the
“Select” button.
2. Touch an object.
The object is selected.
When you select an object and then touch , the
expansion menu appears to allow you the following
edit operations:
• Cut
• Copy
• Paste
• Delete
• Rotate
• Order
• Cancel selection
• Group
• Ungroup
• Property
Select point
Touch an object.
Touch an area where
something is drawn. You
cannot select an object by
touching the area where
nothing is drawn.
Selected object
The area of the object is
indicated with a dotted line,
and symbols called select
points appear on the vertices
and sides of the area.
By specifying an area by dragging, you can select several objects inside the area. (Objects which are not entirely included in the
area are not selected.)
n
Grouping objects
You can edit several selected objects as one object.
1. Select objects to be grouped.
2. Select “Group” from the expansion menu.
Canceling the grouping
1. Select the grouped objects.
2. Select “Ungroup” from the expansion menu.

13
E
n
Moving an object
You can move an object by selecting the object and dragging it.
n
Enlarging/reducing an object
1. Select an object.
2. Drag the select point.
• Dragging the select point on the vertex enlarges/reduces
the object with the same aspect ratio.
• Dragging the select point on the side enlarges/reduces the
object in the direction of either width or height.
• The line width remains the same after the object is
enlarged/reduced.
Select point
n
Rotating an object
1. Select an object.
2. Drag the select point at the center top.
Or, select “Rotate Right”, “Rotate Left” or “Rotate 180
degrees” from “Rotate” in the expansion menu.
Select point
n
Copying an object
You can copy an object to the clipboard.
1. Select an object.
2. Select “Copy” from the expansion menu.
n
Cutting an object
You can cut an object and save it to the clipboard.
1. Select an object.
2. Select “Cut” in the expansion menu.
n
Pasting an object
To paste the object in the clipboard, select “Paste” in the expansion menu.

14
E
n
Changing the order of objects
You can change the order of the object placement.
1. Select an object.
2. Select the object placement from “Order” in the expansion menu.
• Bring to Front : The object moves to the front.
• Send to Back : The object moves to the back.
• Bring forward : The object moves one forward.
• Send backward : The object moves one backward.
Object placement order
When several objects overlap, the objects at the back are hidden behind the objects in front. To show the hidden part, change
the placement order of the objects.
(1)
(2)
(3)
(2)
(3)
(1)
(1) Object placed in front of the other objects
(2) Object placed second from the front object
(3) Object placed at the back of the other objects
Undoing/redoing operation
Touching the “Undo” button cancels the preceding drawing or editing operation.
Touching the
“Redo” button repeats the operation canceled with the “Undo” button.
TIPS
• Up to 50 actions can be undone.
Deleting an object
1. Select an object.
2. Select “Delete” from the expansion menu.
The selected object disappears.

15
E
Enlarging the view of the screen
The steps for enlarging the view of the screen vary depending on the mode.
n
Enlarging the screen in whiteboard mode
Double-clicktoenlargethescreen
1. Touch the
“Screen” button.
2.Quicklytouchthepartoftheboardthatyouwanttoenlargetwice(double-click).
Each time you double-click, the view changes in the order 100% > 150% > 200%, centered on the click position.
Double-clicking at 200% returns the view to 100%.
200%150%
100%
Changing the display position when the view is enlarged
To change the display position, drag on the screen with
“Screen” selected.
Enlarging the view of the screen with the pan window
A thumbnail of the current sheet appears in the pan window on the toolbar.
(2)
(3)
(1)
(4)
(1)Magnication
Shows the current screen magnication.
(2)[-][+]
Touch to enlarge or reduce the view between 100% and 400% in increments of 50%.
(3) Pan window
Shows a thumbnail of the current sheet. Double-click to change the view in the order 100% > 150% > 200%, centered on the
double-click position.
(4) Display frame
Shows the area that is displayed on the screen. To move the area that is displayed, drag the display frame.

16
E
n
Enlarging the screen in transparent mode
You can enlarge part of the screen and display it.
1. Touch the
“Magnier”button.
2. Touch the board.
The area around the touched point is enlarged and displayed.
Touch the point to enlarge. The area around the point is enlarged.

17
E
Importing a Document as an Image
(Pen Software Printer Driver)
A document of any application can be converted into an image and displayed on the whiteboard.
A document is imported as an image similar to an image printed by a printer.
n
In the software application
1. In the software application, open the document that you wish to import.
2. Select the print command and open the print settings screen.
For details, see the manual for the software application.
3. Change the printer to “Send print data to SHARP Pen Software”, and select print settings.
• “Paper Size”, “Orientation”, and “Resolution” can be selected.
• When you have nished selecting settings, touch “OK”.
4. Execute printing.
The printed document will be converted into an image and sent to the Pen Software.
n
In the Pen Software (whiteboard mode)
When the image has been sent, the “Insert Image” button will blink.
5. Touch the
“Insert Image” button.
The rst sheet of the acquired image appears.
TIPS
• It may not be possible to correctly convert documents from some software applications.
• The “Resolution” setting of the Pen Software printer driver should normally be set to 120 dpi. If set to a higher setting,
operations such as enlarging, reducing, and scrolling the sheet may not take place smoothly.

18
E
Acquiring an Image From a Multifunction Machine
If a Sharp multifunction machine is connected to the same network as the computer on which the Pen Software is installed,
an image scanned on the multifunction machine can be acquired onto the whiteboard. There are two ways an image can be
acquired: using the Network Scanner Tool, and using the Sharp OSA function.
TIPS
• Supports the Network Scanner Tool 3.1 or higher (as of August, 2010).
• For details, contact your dealer or nearest authorized service representative for the multifunction machine.
• For the procedures for using the multifunction machine, see the manual for the multifunction machine.
Using the Network Scanner Tool to acquire an image
The rst time you use the Network Scanner Tool, install the Network Scanner Tool on the computer on which the Pen Software
has been installed and congure the Network Scanner Tool settings. (Page 23)
To acquire an image from a multifunction machine, the Network Scanner Tool must be running on your computer.
Use JPEG for the scan send format.
n
In the multifunction machine
1. Place the document in the multifunction machine.
2. Select a destination stored in the Network Scanner Tool.
3. Select JPEG for the scan send format.
4. Execute scanning.
The document will be scanned and sent to the Pen Software.
n
In the Pen Software (whiteboard mode)
When the image has been sent, the “Insert Image” button will blink.
5. Touch the
“Insert Image” button.
The rst sheet of the acquired image appears.

19
E
Printing
To print only the currently displayed sheet, touch the “Print Current Sheet” button.
To print all sheets on the whiteboard, touch the
“Print All Sheets” button. (Whiteboard mode only)
Store the print settings ahead of time.
TIPS
• The operation tools of the software, such as the toolbars and tabs will not be printed.
• In the whiteboard mode, a sheet with no data will not be printed.
n
Register the settings for printing
1. In the “Setting” dialog box (page 20), touch “Print Current Sheet” or “Print All”.
2. Specify the print settings. (See below.)
3. Whenyounishadjustingthesettings,touch“OK”.
(3)
(2)
(1)
(4)
(1) Printer Name
Select the printer to be used for printing.
(2) Properties
Set the printer details. The setting options depend on the printer. For the setting options, refer to the instruction manual of the
printer.
(3) Number of Copies
Specify the number of copies to print.
(4) Options
• Print Background Color : Select this to print the color that is set for the whiteboard background.
(Only when in whiteboard mode)
• Print Sheet Number : Select this to print page numbers, and select the “Position”.
(Only when in whiteboard mode)
• Print Date : Select this to print the print date, and select the “Position”.
TIPS
• “Sheets to Print” cannot be changed.

20
E
You can customize various settings of this software.
The settings are the same in both whiteboard mode and transparent mode. However, the contents of the screen will vary
depending on which mode is started.
1. Touch the “Settings of SHARP Pen Software” button.
2. Set the options as necessary. (See below.)
3. Whenyounishadjustingthesettings,touch“OK”.
(1)
(2)
(3)
(4)
(5)
(6)
(7)
(8)
(9) *
1
(10)
*
1
(11)
*
2
*1 Only appears in whiteboard mode.
*2 Only appears in transparent mode.
(1) Pen/Eraser Default setting
Set the initial color and thickness of “Pen 1” to “Pen 3”, and the initial size of the “Eraser”.
(2) Pen/Eraser palette
Select this to have the palettes of “Pen 1” to “Pen 3” and “Eraser” close when a pattern is selected from a palette.
If the checkmark is removed,
must be clicked to close the palette.
(3) Auto Pen/Eraser Mode Switching
Use auto switching
To use this function, select this to have the pen automatically switch to the eraser when the screen is touched with the eraser
or your nger in pen mode. Set the eraser size that is applied in “Eraser Size”.
• The area you touch (or cover) : When using an eraser or other object and the area of contact on the screen is at
least 1-9/16 inch (4 cm) x 1-9/16 inch (4 cm), erase the area of contact.
• The selected size in Eraser Palette : Erase with the selected eraser size regardless of the amount of contact on the
screen.
IMPORTANT
• To use this function, select the touch panel driver “Properties”, and congure the settings on the “OPERATION SETTING”
tab as shown below. For information on the touch panel driver, see the Touch Panel Driver Operation Manual.
- Set “Input Mode Setting” to “Standard”. If set to other than “Standard”, the pen/eraser auto switching function cannot be
used.
- If you have selected “The area you touch (or cover)”, set “Detect Eraser Area” to “Enable”.
(4) Pen Cursor
Set whether to show a cursor when you draw with the pen function.
(5) Print setting
Register the settings for printing. (Page 19)
Customizing the Settings

21
E
(6) About
The version information of this software is displayed.
(7) Default
Reset the settings to the initial values.
(8) Interval of handwriting character recognition
Set the period until a hand-drawn line is determined as an object.
(9) Setting background of whiteboard
• Preview : The image of the whiteboard with the current setting is displayed.
• Background color : Set the background color of the whiteboard.
• Show the grid lines : Select to show the grid on the whiteboard.
(10)
Automatic backup settings
Specify whether to back up data automatically in the whiteboard mode.
To use the automatic backup, specify the interval.
(11)
Zoom Setting
Specify the size and magnication of the zoom display.

22
E
The operations in this section require administrator privilege.
Installing the Pen Software
n
Installing .NET Framework 2.0 or later
.NET Framework 2.0 or later must be installed on the computer on which the Pen Software will be used.
Download and install .NET Framework from Microsoft’s website.
n
Installing the Pen Software
1. Exit all running software applications.
2. InsertthesuppliedCD-ROMintotheCD-ROMdriveofthecomputer.
3. Double-clickthesetupprogram.
• 32-bit operating system: \PenSoftware\eng\setup.exe
• 64-bit operating system: \PenSoftware\eng_x64\setup_x64.exe
4. For the remainder of the procedure, follow the instructions shown on the screen.
• When the “User Account Control” dialog box appears, click “Yes” (or “Allow”).
• When a security warning screen (The publisher could not be veried.) appears, click “Allow”.
When installation is nished, shortcut icons for whiteboard mode (
) and transparent mode ( ) will be created on the
desktop.
The Pen Software printer driver will also be added. (Page 17)
n
Uninstalling
1. Exit all running software applications.
2. Click the “Start” button and select “Control Panel”.
3. Click “Uninstall a program”.
• If you are using icon view (Classic View), double-click “Programs and Features”.
• When Windows XP is used, click “Add or Remove Programs”. (In the classic view, double-click “Add or Remove
Programs”.)
4. Select “SHARP Pen Software” and click “Uninstall”.
When Windows XP is used, click “Remove”.
5. For the remainder of the procedure, follow the instructions shown on the screen.
When the “User Account Control” dialog box appears, click “Continue”.
This completes the uninstallation process.
Installing/Uninstalling the Software

23
E
Installing the Network Scanner Tool
The Network Scanner Tool is used to acquire an image from a Sharp multifunction machine connected to the same network.
n
Installing the Network Scanner Tool
The Network Scanner Tool is not included on the provided CD-ROM. Use the Network Scanner Tool (Version 3.1 or later) that is
provided with the multifunction machine. (If already installed, there is no need to reinstall.)
For details on installing and using the Network Scanner Tool, see the Network Scanner Tool user’s guide. For questions
on the compatibility of your multifunction machine or the Network Scanner Tool, contact your dealer or authorized service
representative.
n
ConguringsettingsfortheNetworkScannerTool
The folder that will be used to acquire images scanned from the multifunction machine must be stored as a destination in
the multifunction machine’s address book. When creating a prole, select “Move File to Folder”and set the folder (below) for
acquiring images in “Details”.
• Windows Vista/7:
Startup drive:\ProgramData\SHARP\PenSoftware\JPEG
• Windows XP:
Startup drive:\Documents and Settings\All Users\Application Data\SHARP\PenSoftware\JPEG
n
Uninstalling
Exit the Network Scanner Tool from the taskbar, open the uninstall screen as explained on page 22, and remove “Network
Scanner Tool” (or “Sharpdesk”).

1
F
Introduction ......................................................................2
Démarrer et quitter le logiciel .........................................3
Modes Pen Software et démarrage des modes ...........3
Quitter le logiciel ...........................................................4
Disposition de l’écran de base .......................................5
Touches de fonctions de barre d’outils .........................6
Sauvegardeetouvertured’unchier ............................7
Sauvegarde des données ............................................7
Ouverture du chier de tableau blanc ..........................7
Opérations d’édition ........................................................8
Changement de la feuille à éditer
(mode tableau blanc) ...................................................8
Dessin avec un stylet .................................................10
Effacement d’une ligne dessinée ...............................11
Édition d’un objet ........................................................12
Défaire/refaire l’opération ...........................................14
Suppression d’un objet ...............................................14
Agrandissement de la vue de l’écran ........................15
Importation d’un document sous forme d’image
(pilote d’imprimante de Pen Software) ........................17
Acquisition d’une image à partir d’une machine
multifonctions ................................................................18
Utilisation du Network Scanner Tool pour acquérir une
image .........................................................................18
Impression ......................................................................19
Personnalisation des réglages .....................................20
Installation/désinstallation du logiciel .........................22
Installation du Pen Software ......................................22
Installation du Network Scanner Tool .........................23
Table des matières

2
F
Ce logiciel a été conçu pour faciliter la réalisation de réunions et de présentations efcaces.
• Vous pouvez créer directement les lettres de manière à pouvoir utiliser l’écran de l’ordinateur comme un tableau blanc.
• Vous pouvez convertir n’importe quel document en image et l’importer pour l’afcher.
• Vous pouvez acquérir une image à partir d’une machine multifonctions pour l’afcher.
• Vous pouvez imprimer ou sauvegarder le contenu en cours d’édition.
Ce logiciel est destiné au PN-L601B.
Informations importantes
• Ce logiciel a été expédié après avoir subi un contrôle de qualité et une inspection du produit rigoureux. Si toutefois une
panne ou un dysfonctionnement se produisent, contactez le revendeur de votre produit.
• Veuillez bien comprendre que SHARP CORPORATION ne porte aucune responsabilité en cas d’erreurs survenant lors
de l’utilisation par le client ou par un tiers, ou en cas d’autres dysfonctionnements ou dommages de ce logiciel survenant
pendant l’utilisation, sauf quand la responsabilité d’indemnisation est reconnue par la loi.
• Il est interdit de transcrire ou de copier tout ou partie de ce manuel et/ou de ce logiciel sans y avoir été autorisé par notre
société.
• Dans le cadre de notre politique d’amélioration contenue, SHARP se réserve le droit d’effectuer sans préavis des
changements de présentation et de spécications pour améliorer le produit. Les chiffres indiqués pour les spécications
des performances sont des valeurs nominales des unités de production. Il est possible que ces valeurs soient légèrement
différentes de celles des unités individuelles.
• Ce logiciel utilise la technologie ImageKit7. ImageKit7 Droits d’auteur © 2005 Newtone Corp.
• Il est possible que le contenu ou les détails varient selon la conguration de l’écran, la version du système d’exploitation, etc.
• Ce logiciel est fourni en version anglaise seulement. Les écrans montrés dans le manuel sont les écrans qui apparaissent
dans le système d’exploitation anglais.
• Ce manuel ne contient pas d’instructions d’utilisation de base pour Windows.
• Pour les chemins utilisés dans ce manuel, il est supposé que ce logiciel est installé dans le dossier par défaut. Le chemin
réel peut être différent, selon le dossier spécié lors de l’installation.
Marques commerciales
• Microsoft, Windows, et Windows Vista sont des marques déposées ou des marques commerciales de la société Microsoft
aux États-Unis et/ou dans d’autres pays.
• Les noms de produits et les autres noms propres sont des marques commerciales ou des marques déposées de leurs
propriétaires respectifs.
Introduction

3
F
Modes Pen Software et démarrage des modes
Conseils
• L’utilisation d’un afchage secondaire n’est pas prise en charge.
• Il est impossible de démarrer le mode tableau blanc et le mode transparent en même temps.
Pour changer de mode, quittez le mode actuel et démarrez l’autre mode.
• Pour empêcher la barre des tâches de Windows de se déplacer, verrouillez-la.
n
Mode tableau blanc
Vous pouvez utiliser l’écran comme un tableau blanc.
La zone de travail est afchée pour chaque “sheet (feuille)”. En changeant la feuille, vous pouvez éditer les données sur un
autre écran.
Démarrage du mode tableau blanc
Pour démarrer le logiciel, procédez comme suit.
• Sur le bureau, touchez deux fois en succession rapide l’icône de raccourci “SHARP Pen Software” (
) (ou cliquez deux
fois sur l’icône).
• Cliquez sur la touche “Démarrer”, puis sélectionnez “Tous les programmes” - “SHARP Pen Software” - “SHARP Pen
Software”.
• Touchez deux fois en succession rapide un chier de tableau blanc (chier sauvegardé en format SWS) (ou cliquez deux fois
sur le chier).
n
Mode transparent
Le tableau apparaît transparent.
La zone de travail consiste en un seul écran.
Votre dessin apparaîtra sur le tableau transparent placé par-dessus l’écran, de manière que vous puissiez écrire vos
commentaires directement sur les éléments afchés sur l’écran. Notez bien toutefois que vous pouvez pas faire fonctionner
l’écran apparaissant derrière le tableau transparent.
Démarrage du mode transparent
Pour démarrer le logiciel, procédez comme suit.
• Sur le bureau, touchez deux fois en succession rapide l’icône de raccourci “SHARP Pen Software (Transparent board mode)”
(
) (ou cliquez deux fois sur l’icône).
• Cliquez sur la touche “Démarrer”, puis sélectionnez “Tous les programmes” - “SHARP Pen Software” - “SHARP Pen Software
(Transparent board mode)”.
Démarrer et quitter le logiciel

4
F
Quitter le logiciel
Touchez la touche “Quit” .
Lorsqu’aucune donnée n’est en cours d’édition et n’est sauvegardée
Vous quittez le logiciel.
Lorsque des données sont en cours d’édition et ne sont pas sauvegardées
Une boîte de dialogue de conrmation apparaît.
Lorsque vous touchez “Exit with save”, une boîte de dialogue apparaît pour vous permettre de spécier la destination de
sauvegarde des données. Vériez le format de sauvegarde, spéciez la destination, et sauvegardez les données. (Page 7)
Lorsque vous touchez “Exit without save”, le logiciel est arrêté sans que les données soient sauvegardées.

5
F
Exemple d’écran: Mode tableau blanc
(2)
(1)
(4)
(5)
(3)
(1) Barre d’outils
Utilisée pour passer d’une fonction à une autre. (Page 6)
(2) SHEET LIST
Elle est afchée seulement en mode tableau blanc.
Touchez cet onglet pour afcher la liste des feuilles apparaissant sous forme de vignettes. (Page 8)
(3) Icône de déplacement de barre d’outils
Elle apparaît sur le côté opposé à la barre d’outils; vous pouvez la toucher pour déplacer la barre d’outils vers ce côté. (Les
emplacements de l’icône et de la barre d’outils seront permutés.)
(4) Tableau
Zone de travail. Vous pouvez écrire des lettres, dessiner des lignes et coller des images dans cette zone.
Vous pouvez afcher le tableau en deux modes: mode tableau blanc et mode transparent. Ce dernier est transparent; il
laisse apparaître l’arrière-plan.
Conseils
• Vous pouvez changer la couleur et la grille de l’arrière-plan utilisées en mode tableau blanc. (Page 20)
(5) Touches de navigation des feuilles/N° de page
Elle est afchée seulement en mode tableau blanc.
Touchez la touche de navigation des feuilles pour changer la feuille afchée. (Page 8)
Le numéro indiqué au centre est le n° de page de la feuille actuelle.
Disposition de l’écran de base

6
F
Touches de fonctions de barre d’outils
Les fonctions de la barre d’outils apparaissent sous forme de touches. Touchez une touche pour sélectionner la fonction de
cette touche.
Les touches de fonctions qui apparaissent sur la barre d’outils sont différentes selon le mode utilisé.
Mode tableau blanc Mode transparent
Quit
Pen 1
Pen 3
Select
Undo
Save
Print Current Sheet
Insert Image
Fenêtre de pan
Open
Pen 2
Eraser
Screen
Redo
Settings of SHARP Pen Software
Print All Sheets
Quit
Pen 1
Pen 3
Select
Undo
Save
Print Current Sheet
Transparent mode OFF
Pen 2
Eraser
Magnier
Redo
Settings of SHARP Pen Software
Touche Fonction Page
Quit <Quitter> Quitter ce logiciel. 4
Open <Ouvrir>*
1
Ouvrir un chier de tableau blanc. 7
Transparent mode OFF
<Mode transparent OFF>*
2
Arrêter le mode transparent.
En désactivant temporairement la fonction de tableau, vous pouvez faire fonctionner
quelque chose d’autre que le logiciel (chiers, autre logiciel d’application, etc.).
-
Pens 1 to 3
<Stylet 1 à Stylet 3>
Dessiner des lignes. 10
Eraser <Gomme> Effacer des lignes dessinées à la main. 11
Select <Sélectionner> Sélectionner un objet. 12
Screen <Écran>*
1
Agrandir la vue du tableau blanc, changer la position d’afchage et changer les pages.
8, 15
Magnier <Loupe>*
2
Agrandir une partie de l’écran en mode transparent. 16
Undo <Défaire> Annuler l’opération effectuée immédiatement avant. 14
Redo <Refaire> Refaire l’opération annulée immédiatement avant. 14
Save <Sauvegarder> Sauvegarder les données en cours d’édition. 7
Settings of SHARP Pen Software
<Réglages de SHARP Pen Software>
Congurer ce logiciel selon les préférences utilisateur. 20
Print Current Sheet
<Imprimer la feuille actuelle>
Imprimer la feuille afchée. 19
Print All Sheets
<Imprimer toutes les feuilles>*
1
Imprimer toutes les feuilles. 19
Insert Image
<Insérer l’image>*
1
Coller sur le tableau un chier d’image acquis depuis le pilote d’imprimante de Pen
Software ou une machine multifonctions.
17, 18
Fenêtre de pan*
1
Elle fait apparaître une vignette de la feuille afchée. Effectuez les opérations à l’intérieur
de cette fenêtre pour agrandir la vue du tableau ou déplacer la position d’afchage.
15
*1 Apparaît seulement en mode tableau blanc.
*2 Apparaît seulement en mode transparent.

7
F
Sauvegarde des données
Vous pouvez sauvegarder les données dans les formats suivants:
Formatdechier Description
Fichier de tableau blanc
Les données du tableau blanc sont sauvegardées en format SWS. Les données sauvegardées
peuvent être rééditées avec ce logiciel.
PDF, BMP, JPEG, PNG
L’écran de travail est sauvegardé comme capture d’écran. Les données sont converties dans le
format de chier différent, an qu’il soit impossible de les rééditer avec le logiciel.
En mode tableau blanc
Les données peuvent être sauvegardées dans n’importe lequel des formats de chier ci-dessus.
Toutes les feuilles seront sauvegardées. (Une feuille sans données ne sera pas sauvegardée.)
Lorsque les données sont sauvegardées en format BMP, JPEG ou PNG, chaque feuille est sauvegardée dans un chier séparé.
En mode transparent
Les données peuvent être sauvegardées en format PDF, BMP, JPEG ou PNG.
1. Touchez la touche “Save”
.
2. Sélectionnezleformatdechierdanslalistedéroulante.
3. Spéciezladestinationettouchez“Enregistrer”.
n
Sauvegarde de secours automatique
Cette fonction effectue automatiquement une sauvegarde de secours du chier de tableau blanc aux intervalles spéciés.
(Il est impossible d’utiliser la sauvegarde de secours automatique des données en mode transparent.)
Vous pouvez changer l’état d’activation/désactivation de la sauvegarde de secours automatique et le temps de l’intervalle des
sauvegardes de secours. (Page 20)
Ouvertureduchierdetableaublanc
Lorsque le mode de tableau blanc démarre, un nouveau chier de tableau blanc s’ouvre. (Si vous démarrez le logiciel en
touchant directement un chier de tableau blanc, le chier de tableau blanc s’ouvre.)
Pour ouvrir un chier de tableau blanc sauvegardé, touchez la touche “Open”
et sélectionnez le chier. (Si les données en
cours d’édition ne sont pas sauvegardées, la boîte de dialogue de conrmation de sauvegarde de chier apparaît.)
Sauvegardeetouvertured’unchier

8
F
Changement de la feuille à éditer (mode tableau blanc)
En mode tableau blanc, chaque écran apparaît sur une feuille.
Pour changer la feuille, touchez la touche de navigation des feuilles située en bas de l’écran. Le numéro indiqué au centre est le
n° de page de la feuille actuelle.
(1)
(2)
(3)
(1) N° de page de la feuille actuelle
(2) Touche de navigation des feuilles (Précédente)
Touchez cette touche pour faire apparaître la feuille précédente. Lorsque la première feuille est afchée, cette touche est
désactivée.
(3) Touche de navigation des feuilles (Suivante)
Touchez cette touche pour faire apparaître la feuille suivante. Lorsque la dernière feuille est afchée, cette touche est
désactivée.
n
Changement de la feuille en faisant glisser l’écran
Vous pouvez changer une feuille en effectuant un glisser lorsque le zoom (pourcentage d’agrandissement) est à 100%.
1. Touchez la touche “Screen”
.
2. Faites glisser horizontalement avec le stylet.
• Faites glisser vers la droite pour faire apparaître la feuille précédente.
• Faites glisser vers la gauche pour faire apparaître la feuille suivante.
Bord droit de la feuille
Opérations d’édition

9
F
n
Changement de la feuille en se référant aux vignettes / Édition de la feuille
Les vignettes de chaque feuille apparaissent dans “SHEET LIST” dans le coin inférieur gauche de l’écran. Vous pouvez toucher
une vignette pour passer à cette feuille. Vous pouvez éditer les feuilles, y compris les ajouter, les supprimer, les copier et les
déplacer.
1. Touchez “SHEET LIST” dans le coin inférieur gauche de l’écran.
La liste des vignettes des feuilles apparaît.
2. Touchezlavignettedelafeuillequevousvoulezafcher.
L’écran passe à la feuille sélectionnée.
(1)
(7)
(4)
(5)
(3)
(2)
(6)
(1) SHEET LIST
(2) Feuille sélectionnée actuellement
(3) Touche de navigation des vignettes (Précédente)
(4) Vignettes
(5) Touche de navigation des vignettes (Suivante)
(6) Touchez cette touche pour fermer la liste des feuilles.
(7)
: Ajoutez une nouvelle feuille à droite de la feuille sélectionnée.
: Supprimez la feuille sélectionnée.
: Copiez la feuille sélectionnée et insérez-la à droite de la feuille sélectionnée.
: Déplacez la feuille sélectionnée d’une position vers la gauche.
: Déplacez la feuille sélectionnée d’une position vers la droite.

10
F
Dessin avec un stylet
1. Touchez n’importe laquelle des touches “Pen 1” à “Pen 3” .
2. Dessinez sur le tableau.
La forme dessinée sera déterminée comme étant un objet une seconde après que vous avez élevé le stylet du tableau. Si vous
commencez à dessiner un autre objet dans l’intervalle d’une seconde* après avoir élevé le stylet du tableau, les formes dessinées
seront déterminées comme étant un objet unique, même si elles sont séparées.
* Vous pouvez changer la durée de cet intervalle. (Page 20)
Dessiner une forme. Dessiner une autre forme. Les deux formes sont
déterminées comme étant
un objet unique.
Moins de
1 seconde
Après
1 seconde
Conseils
• Vous pouvez commuter entre “Pen 1” à “Pen 3” et “Eraser” en exerçant des pressions répétées sur la touche de fonction 2
du stylet.
Pour changer les fonctions en utilisant la touche de fonction 2, sélectionnez le pilote d’écran tactile “Properties”, puis réglez
“Function Button 2” sur “Pen Software Link” dans l’onglet “OPERATION SETTING”.
• Pour plus de détails concernant les objets, reportez-vous à la page 12.
• Dans certains cas, par exemple lorsque vous touchez une touche de la barre d’outils, la forme dessinée sera xée comme
un objet avant que le temps spécié ne se soit écoulé après que vous avez élevé le stylet au-dessus du tableau.
n
Changement de la couleur et de l’épaisseur du stylet
Vous pouvez utiliser les palettes “Pen 1” à “Pen 3” pour changer les réglages des fonctions de stylets.
Pour faire apparaître la palette, touchez à nouveau la touche du stylet sélectionné.
(1) (2)
(1) Cochez cette case pour rendre la ligne translucide.
L’icône de stylet change lorsque ce réglage est activé.
Normal Translucide
(2) Réglez la couleur et l’épaisseur de la ligne.
La palette est fermée.
Conseils
• Vous pouvez changer la méthode de fermeture de la palette. (Page 20)

11
F
Effacement d’une ligne dessinée
1. Touchez la touche “Eraser” .
2. En laissant le stylet en contact avec l’écran, déplacez le stylet.
La partie par-dessus laquelle vous effectuez le déplacement est effacée.
Conseils
• Vous pouvez commuter entre “Pen 1” à “Pen 3” et “Eraser” en exerçant des pressions répétées sur la touche de fonction 2 du
stylet.
Pour changer les fonctions en utilisant la touche de fonction 2, sélectionnez le pilote d’écran tactile “Properties”, puis réglez
“Function Button 2” sur “Pen Software Link” dans l’onglet “OPERATION SETTING”.
• La fonction de gomme ne peut effacer que les objets dessinés avec la fonction de stylet. Il est impossible d’utiliser la touche
“Eraser” pour effacer les images collées. Il est aussi impossible de l’utiliser pour effacer les bords d’une ligne pour rendre
cette ligne plus ne. Même si vous effacez les bords seulement, toute la largeur de la ligne sera effacée.
• Il est impossible d’effacer un objet dessiné avec la fonction de stylet si cet objet fait partie d’un groupe.
• Lorsque “Auto Pen/Eraser Mode Switching” est activé (page 20), vous pouvez effacer avec la gomme ou avec le doigt
lorsque l’un des éléments “Pen 1” à “Pen 3” ou “Eraser” est sélectionné. Touchez l’écran avec la gomme ou avec le doigt, et
une fois que le curseur s’est changé en gomme, déplacez la gomme ou le doigt. Vous pouvez régler la taille de la gomme
pour l’effacement avec la gomme ou avec le doigt, à la zone touchée de l’écran ou à la taille sélectionnée sur la palette.
Lorsque “Erase touch panel contact
area” est sélectionné
Lorsque “Erase with size selected on
palette” est sélectionné
• Avec Windows Vista/7, l’afchage change comme suit lorsque la touche “Eraser” est sélectionnée en mode transparent.
L’afchage revient à son état normal lorsque vous sélectionnez une fonction autre que celle de la touche “Eraser”.
- L’écran d’arrière-plan de l’ordinateur est masqué même par des objets translucides.
- Un objet est entouré d’une ligne blanche.
n
Changement de la taille de la gomme
Vous pouvez changer la taille de la gomme en la sélectionnant depuis la palette de la touche “Eraser”.
Pour faire apparaître la palette, touchez à nouveau la touche “Eraser”
pendant qu’elle est à l’état sélectionné.
Conseils
• Vous pouvez changer la méthode de fermeture de la palette. (Page 20)

12
F
Édition d’un objet
Les lignes dessinées et les images collées sur le tableau sont traitées dans le logiciel comme un “objet”.
n
Sélection d’un objet
Vous devez sélectionner un objet avant de l’éditer.
1.
Touchez la touche “Select”
.
2. Touchez un objet.
L’objet est sélectionné.
Lorsque vous sélectionnez un objet puis touchez ,
le menu d’extension apparaît pour vous permettre
d’effectuer les opérations d’édition suivantes:
• Cut <Couper>
• Copy <Copier>
• Paste <Coller>
• Delete <Supprimer>
• Rotate <Tourner>
• Order <Ordre>
• Cancel selection <Annuler la sélection>
• Group <Grouper>
• Ungroup <Dégrouper>
• Property <Propriété>
Point de sélection
Touchez un objet.
Touchez une zone
contenant un dessin. Il est
impossible de sélectionner
un objet en touchant une
zone qui ne contient aucun
dessin.
Objet sélectionné
La zone de l’objet est
indiquée par une ligne en
pointillés, et des symboles
appelés points de sélection
apparaissent sur les sommets
et sur les côtés de la zone.
En spéciant une zone par glisser, vous pouvez sélectionner plusieurs objets à l’intérieur de la zone. (Les objets qui ne sont pas
contenus entièrement dans la zone ne sont pas sélectionnés.)
n
Groupage d’objets
Vous pouvez éditer plusieurs objets sélectionnés comme un seul objet.
1. Sélectionnez les objets à grouper.
2. Sélectionnez “Group” dans le menu d’extension.
Annulation du groupage
1. Sélectionnez les objets groupés.
2. Sélectionnez “Ungroup” dans le menu d’extension.

13
F
n
Déplacement d’un objet
Vous pouvez déplacer un objet en sélectionnant et en faisant
glisser cet objet.
n
Agrandissement/réduction d’un objet
1. Sélectionnez un objet.
2. Faites glisser le point de sélection.
• Si vous faites glisser le point de sélection situé au sommet,
l’objet sera agrandi/réduit avec le même rapport d’aspect.
• Si vous faites glisser le point de sélection situé sur le côté,
l’objet sera agrandi/réduit dans le sens de la largeur ou
bien de la hauteur.
• La largeur de la ligne reste identique après que l’objet a
été agrandi/réduit.
Point de sélection
n
Rotation d’un objet
1. Sélectionnez un objet.
2. Faites glisser le point de sélection situé en haut au
centre.
Ou encore, sélectionnez “Rotate Right”, “Rotate Left”
ou “Rotate 180 degrees” depuis “Rotate” dans le menu
d’extension.
Point de sélection
n
Copie d’un objet
Vous pouvez copier un objet sur le presse-papiers.
1. Sélectionnez un objet.
2. Sélectionnez “Copy” dans le menu d’extension.
n
Couper d’un objet
Vous pouvez couper un objet et le sauvegarder sur le presse-papiers.
1. Sélectionnez un objet.
2. Sélectionnez “Cut” dans le menu d’extension.
n
Coller d’un objet
Pour coller l’objet dans le presse-papiers, sélectionnez “Paste” dans le menu d’extension.

14
F
n
Changement de l’ordre des objets
Vous pouvez changer l’ordre de position des objets.
1. Sélectionnez un objet.
2. Sélectionnez la position des objets depuis “Order” dans le menu d’extension.
• Bring to Front : L’objet est déplacé vers l’avant.
• Send to Back : L’objet est déplacé vers l’arrière.
• Bring forward : L’objet est déplacé d’une position vers l’avant.
• Send backward : L’objet est déplacé d’une position vers l’arrière.
Ordre de position des objets
Lorsque plusieurs objets se chevauchent, les objets situés à l’arrière sont masqués derrière les objets situés à l’avant. Pour faire
apparaître la partie masquée, changez l’ordre de position des objets.
(1)
(2)
(3)
(2)
(3)
(1)
(1) Objet placé à l’avant des autres objets
(2) Objet placé en deuxième position par rapport à
l’objet placé à l’avant
(3) Objet placé à l’arrière des autres objets
Défaire/refaire l’opération
Si vous touchez la touche “Undo” , l’opération de dessin ou d’édition précédente sera annulée.
Si vous touchez la touche “Redo”
, l’opération annulée avec la touche “Undo” sera à nouveau effectuée.
Conseils
• Il est possible de défaire 50 actions au maximum.
Suppression d’un objet
1. Sélectionnez un objet.
2. Sélectionnez “Delete” dans le menu d’extension.
L’objet sélectionné disparaît.

15
F
Agrandissement de la vue de l’écran
Les étapes à effectuer pour agrandir la vue de l’écran sont différentes selon le mode utilisé.
n
Agrandissement de l’écran en mode tableau blanc
Cliquez deux fois pour agrandir l’écran
1. Touchez la touche “Screen”
.
2. Touchez deux fois en succession rapide (cliquez deux fois) la partie du tableau que vous voulez agrandir.
À chaque double clic, la vue change dans l’ordre 100% > 150% > 200%, centrée sur la position du clic.
Si vous cliquez deux fois à 200%, la vue revient à 100%.
200%150%
100%
Changementdelapositiond’afchagelorsquelavueestagrandie
Pour changer la position d’afchage, faites glisser sur l’écran avec “Screen”
sélectionné.
Agrandissement de la vue de l’écran avec la fenêtre de pan
Une vignette de la feuille actuelle apparaît dans la fenêtre de pan de la barre d’outils.
(2)
(3)
(1)
(4)
(1) Grossissement
Indique le grossissement de l’écran actuel.
(2)[-][+]
Touchez pour agrandir ou réduire la vue entre 100% et 400% par pas de 50%.
(3) Fenêtre de pan
Fait apparaître une vignette de la feuille actuelle. Cliquez deux fois pour changer la vue dans l’ordre 100% > 150% > 200%,
centrée sur la position du double clic.
(4)Cadred’afchage
Indique la zone qui est afchée sur l’écran. Pour déplacer la zone afchée, faites glisser le cadre d’afchage.

16
F
n
Agrandissement de l’écran en mode transparent
Vous pouvez agrandir une partie de l’écran et l’afcher.
1. Touchezlatouche“Magnier”
.
2. Touchez le tableau.
La zone environnant le point touché est agrandie et afchée.
Touchez le point à agrandir. La zone environnant le point touché
est agrandie.

17
F
Importation d’un document sous forme d’image
(pilote d’imprimante de Pen Software)
Il est possible de convertir un document de n’importe quelle application en image et de l’afcher sur le tableau blanc.
Le document est importé sous forme d’une image identique à une image imprimée par une imprimante.
n
Dans l’application logicielle
1. Dans l’application logicielle, ouvrez le document que vous voulez importer.
2. Sélectionnez la commande d’impression et ouvrez l’écran des réglages d’impression.
Pour plus de détails, reportez-vous au manuel de l’application logicielle.
3. Faites passer l’imprimante à “Send print data to SHARP Pen Software”, puis sélectionnez les réglages d’impression.
• Vous pouvez sélectionner “Paper Size”, “Orientation” et “Resolution”.
• Une fois les réglages sélectionnés, touchez “OK”.
4. Exécutez l’impression.
Le document imprimé sera converti en image et envoyé au Pen Software.
n
Dans le Pen Software (mode tableau blanc)
Une fois l’image envoyée, “Insert Image” se met à clignoter.
5. Touchez la touche “Insert Image”
.
La première feuille de l’image acquise apparaît.
Conseils
• Il pourra être impossible de convertir correctement des documents provenant de certaines applications logicielles.
• Le paramètre “Resolution” du pilote d’imprimante de Pen Software doit être réglé normalement à 120 dpi. S’il est réglé à une
valeur plus grande, les opérations telles que l’agrandissement, la réduction et le délement des feuilles risqueront de ne pas
être effectuées bien régulièrement.

18
F
Acquisition d’une image à partir d’une machine multifonctions
Si une machine multifonctions Sharp est connectée au même réseau que l’ordinateur sur lequel le Pen Software est installé, il
est possible d’acquérir sur le tableau blanc une image numérisée sur la machine multifonctions.
Conseils
• Prend en charge le Network Scanner Tool 3.1 ou version supérieure (en date d’août 2010).
• Prend en charge Sharp OSA 3.5 (en date d’août 2010).
• Pour plus de détails, contactez votre revendeur ou le centre de service après-vente agréé le plus proche pour la machine
multifonctions.
• Pour les procédures d’utilisation de la machine multifonctions, reportez-vous au manuel de la machine multifonctions.
Utilisation du Network Scanner Tool pour acquérir une image
Quand vous utilisez le Network Scanner Tool pour la première fois, installez le Network Scanner Tool sur l’ordinateur dans lequel
le Pen Software a été installé, et congurez les réglages de Network Scanner Tool. (Page 23)
Pour acquérir une image d’une machine multifonctions, il faut que le Network Scanner Tool soit en cours de fonctionnement sur
votre ordinateur.
Utilisez JPEG comme format d’envoi de numérisation.
n
Dans la machine multifonctions
1. Placez le document dans la machine multifonctions.
2. Sélectionnez une destination mémorisée dans le Network Scanner Tool.
3. Sélectionnez JPEG comme format d’envoi de numérisation.
4. Exécutez la numérisation.
Le document sera numérisé et envoyé au Pen Software.
n
Dans le Pen Software (mode tableau blanc)
Une fois l’image envoyée, “Insert Image” se met à clignoter.
5. Touchez la touche “Insert Image”
.
La première feuille de l’image acquise apparaît.

19
F
Impression
Pour imprimer seulement la feuille afchée actuellement, touchez la touche “Print Current Sheet” .
Pour imprimer toutes les feuilles sur le tableau blanc, touchez la touche “Print All Sheets”
. (Mode tableau blanc seulement)
Mémorisez les réglages d’impression à l’avance.
Conseils
• Les outils d’utilisation du logiciel, tels que les barres d’outils et les onglets, ne seront pas imprimés.
• En mode tableau blanc, une feuille sans données ne sera pas imprimée.
n
Enregistrement des réglages d’impression
1. Dans la boîte de dialogue “Setting” (page 20), touchez “Print Current Sheet” ou “Print All”.
2. Spéciezlesréglagesd’impression.(Voirci-dessous.)
3. Unefoislesréglagesaccomplis,touchez“OK”.
(3)
(2)
(1)
(4)
(1) Printer Name
Sélectionnez l’imprimante à utiliser pour l’impression.
(2) Properties
Réglez les détails de l’imprimante. Les options de réglage dépendent de l’imprimante utilisée. Pour les options de réglage,
reportez-vous au mode d’emploi de l’imprimante.
(3) Number of Copies
Spéciez le nombre de copies à imprimer.
(4) Options
• Print Background Color : Sélectionnez ceci pour imprimer la couleur réglée pour l’arrière-plan du tableau blanc.
(Seulement en mode tableau blanc)
• Print Sheet Number : Sélectionnez ceci pour imprimer les numéros de pages, et sélectionnez la “Position”.
(Seulement en mode tableau blanc)
• Print Date : Sélectionnez ceci pour imprimer la date d’impression, et sélectionnez la “Position”.
Conseils
• “Sheets to Print” ne peut pas être changé.

20
F
Vous pouvez personnaliser plusieurs réglages de ce logiciel.
Les réglages sont identiques en mode tableau blanc et en mode transparent. Toutefois, le contenu de l’écran variera selon le
mode que vous démarrez.
1. Touchez la touche “Settings of SHARP Pen Software” .
2. Réglezlesoptionsnécessaires.(Voirci-dessous.)
3. Unefoislesréglagesaccomplis,touchez“OK”.
(1)
(2)
(3)
(4)
(5)
(6)
(7)
(8)
(9) *
1
(10)
*
1
(11)
*
2
*1 Apparaît seulement en mode tableau blanc.
*2 Apparaît seulement en mode transparent.
(1) Pen/Eraser Default setting
Réglez la couleur et l’épaisseur initiales de “Pen 1” à “Pen 3”, et la taille initiale de “Eraser”.
(2) Pen/Eraser palette
Sélectionnez ceci pour que les palettes de “Pen 1” à “Pen 3” et “Eraser” se ferment lorsqu’un modèle est sélectionné à partir
d’une palette.
Si vous supprimez la coche, vous devez cliquer sur
pour fermer la palette.
(3) Auto Pen/Eraser Mode Switching
Use auto switching
Pour utiliser cette fonction, sélectionnez ceci pour faire passer le stylet automatiquement à la gomme lorsque vous touchez
l’écran avec la gomme ou avec le doigt en mode stylet. Réglez la taille de gomme qui est appliquée dans “Eraser Size”.
• The area you touch (or cover) : Lorsque vous utilisez une gomme ou un autre objet et que la zone de contact sur
l’écran est d’au moins 4 cm x 4 cm, effacez la zone de contact.
• The selected size in Eraser Palette : Effacez avec la gomme sélectionnée quelque soit la quantité de contact sur l’écran.
IMPORTANT
• Pour utiliser cette fonction, sélectionnez les “Properties” du pilote d’écran tactile, et congurez les réglages sur l’onglet
“OPERATION SETTING” comme indiqué ci-dessous. Pour plus de détails concernant le pilote d’écran tactile, reportez-
vous au Mode d’emploi d’utilisation du pilote d’écran tactile.
- Réglez “Input Mode Setting” à “Standard”. Si vous établissez un réglage autre que “Standard”, il sera impossible d’utiliser
la fonction de commutation automatique de stylet/gomme.
- Si vous avez sélectionné “The area you touch (or cover)”, réglez “Detect Eraser Area” à “Enable”.
(4) Pen Cursor
Réglez si un curseur apparaît ou non lorsque vous dessinez avec la fonction de stylet.
(5) Print setting
Enregistrez les réglages pour l’impression. (Page 19)
Personnalisation des réglages

21
F
(6) About
Les informations sur la version de ce logiciel sont afchées.
(7) Default
Remettez les réglages à leurs valeurs initiales.
(8) Interval of handwriting character recognition
Réglez l’intervalle de temps au bout duquel une ligne dessinée à la main sera déterminée comme étant un objet.
(9) Setting background of whiteboard
• Preview : L’image du tableau blanc avec le réglage actuel est afchée.
• Background color : Réglez la couleur de l’arrière-plan du tableau blanc.
• Show the grid lines : Sélectionnez pour faire apparaître la grille sur le tableau blanc.
(10)
Automatic backup settings
Spéciez si la sauvegarde de secours des données est effectuée automatiquement ou non en mode tableau blanc.
Pour utiliser la sauvegarde de secours automatique, spéciez l’intervalle.
(11)
Zoom Setting
Spéciez la taille et le grossissement de l’afchage du zoom.

22
F
Pour pouvoir effectuer les opérations décrites dans cette section, vous devez avoir les privilèges d’administrateur.
Installation du Pen Software
n
Installation de .NET Framework 2.0 ou version plus récente
.NET Framework 2.0 ou version plus récente doit être installé sur l’ordinateur dans lequel le Pen Software sera utilisé.
Téléchargez et installez .NET Framework depuis le site Web de Microsoft.
n
Installation du Pen Software
1. Quittez toutes les applications logicielles en cours d’exécution.
2. InsérezleCD-ROMfournidanslelecteurdeCD-ROMdel’ordinateur.
3. Cliquez deux fois sur le programme d’installation.
• Système d’exploitation 32 bits: \PenSoftware\eng\setup.exe
• Système d’exploitation 64 bits: \PenSoftware\eng_x64\setup_x64.exe
4. Pourlerestedelaprocédure,suivezlesinstructionsafchéessurl’écran.
• Lorsque la boîte de dialogue “Contrôle de compte d’utilisateur” apparaît, cliquez sur “Oui” (ou sur “Autoriser”).
• Lorsqu’un écran d’avertissement de sécurité (Impossible de vérier l’éditeur.) apparaît, cliquez sur “Autoriser”.
Une fois l’installation terminée, les icônes de raccourci du mode tableau blanc (
) et du mode transparent ( ) seront
créées sur le bureau.
Le pilote d’imprimante de Pen Software sera aussi ajouté. (Page 17)
n
Désinstallation
1. Quittez toutes les applications logicielles en cours d’exécution.
2. Cliquezsurlatouche“Démarrer”etsélectionnez“Panneaudeconguration”.
3. Cliquez sur “Désinstaller un programme”.
• Si vous utilisez un afchage par icônes (Afchage classique), cliquez deux fois sur “Programmes et fonctionnalités”.
• Si vous utilisez Windows XP, cliquez sur “Ajouter ou supprimer des programmes”. (Dans l’afchage classique, cliquez deux
fois sur “Ajouter ou supprimer des programmes”.)
4. Sélectionnez “SHARP Pen Software” et cliquez sur “Désinstaller”.
• Si vous utilisez Windows XP, cliquez sur “Supprimer”.
5. Pourlerestedelaprocédure,suivezlesinstructionsafchéessurl’écran.
• Lorsque la boîte de dialogue “Contrôle de compte d’utilisateur” apparaît, cliquez sur “Continuer”.
Les opérations de désinstallation sont alors terminées.
Installation/désinstallation du logiciel

23
F
Installation du Network Scanner Tool
Network Scanner Tool est utilisé pour acquérir une image d’une machine multifonctions Sharp connectée au même réseau.
n
Installation du Network Scanner Tool
Le Network Scanner Tool n’est pas inclus dans le CD-ROM fourni. Utilisez le Network Scanner Tool (Version 3.1 ou version plus
récente) fourni avec la machine multifonctions. (S’il est déjà installé, il est inutile de le réinstaller.)
Pour plus de détails concernant l’installation et l’utilisation du Network Scanner Tool, reportez-vous au guide de l’utilisateur de
Network Scanner Tool. Pour toute question concernant la compatibilité de votre machine multifonctions ou du Network Scanner
Tool, contactez votre revendeur ou un centre de service après-vente agréé.
n
CongurationdesréglagesdeNetworkScannerTool
Le dossier qui sera utilisé pour acquérir les images numérisées depuis la machine multifonctions doit être mémorisé comme
destination dans le carnet d’adresses de la machine multifonctions. Lorsque vous créez un prol, sélectionnez “Move File to
Folder” et établissez le dossier (ci-dessous) à utiliser pour acquérir les images dans “Details”.
• Windows Vista/7:
Lecteur de démarrage initial: \ProgramData\SHARP\PenSoftware\JPEG
• Windows XP:
Lecteur de démarrage initial: \Documents and Settings\All Users\Application Data\SHARP\PenSoftware\JPEG
n
Désinstallation
Quittez le Network Scanner Tool depuis la barre des tâches, ouvrez l’écran de désinstallation comme expliqué à la page 22, et
supprimez “Network Scanner Tool” (ou “Sharpdesk”).

1
S
Índice
Introducción .....................................................................2
Iniciando y saliendo del software ..................................3
Modos Pen Software y como iniciar los modos ...........3
Saliendo del software ...................................................4
Disposición de la pantalla básica ..................................5
Botones de funciones de barra de herramientas .........6
Guardando y abriendo un archivo .................................7
Guardando datos .........................................................7
Abriendo el archivo de pizarra .....................................7
Operaciones de edición ..................................................8
Cambiando la hoja a editar (modo de pizarra) .............8
Dibujando con un lápiz ...............................................10
Borrando una línea dibujada ......................................11
Edición de un objeto ...................................................12
Deshacer/rehacer .......................................................14
Borrando un objeto .....................................................14
Agrandando la vista de la pantalla ............................15
Importando un documento como imagen
(Controlador de impresora de Pen Software) .............17
Capturando una imagen de
una máquina multifunción ............................................18
Usando el Network Scanner Tool para capturar
una imagen ................................................................18
Impresión ........................................................................19
Congurando a medida los ajustes .............................20
Instalación/Desinstalación del Software .....................22
Instalación del Pen Software ......................................22
Instalación del Network Scanner Tool ........................23

2
S
Este software de SHARP fue desarrollado para permitir que las reuniones y presentaciones sean más efectivas.
• Se puede escribir letras directamente de manera que la pantalla de la computadora se pueda usar como una pizarra.
• Cualquier documento se puede convertir en una imagen y se puede importar para exhibir.
• Se puede capturar una imagen de una máquina multifunción para exhibir.
• Los contenidos editados se pueden imprimir o guardar.
Este software se usa para el PN-L601B.
Información importante
• Este software salió de fábrica luego de un estricto control de calidad e inspección de producto. Sin embargo, si encuentra
una falla o un malfuncionamiento, consulte al vendedor del producto.
• Comprenda que SHARP CORPORATION no tiene responsabilidad alguna sobre los errores cometidos durante el uso por el
cliente o un tercero, ni por ningún otro malfuncionamiento o daños a este software resultante del uso excepto donde la ley
reconozca una responsabilidad de indemnización.
• La transcripción o duplicación de parte o todo este manual y/o este software sin el permiso de nuestra compañía no está
permitido.
• Como parte de nuestra política de mejoramiento continuo, SHARP se reserva el derecho de realizar cambios en el diseño
y las especicación del producto por mejoras sin previo aviso. Los números de las especicaciones indican los valores
nominales de las unidades de producción. En unidades individuales pueden existir algunas desviaciones de estos valores.
• Este software usa tecnología ImageKit7. ImageKit7 Copyright © 2005 Newtone Corp.
• Los contenidos o detalles pueden variar dependiendo de la conguración en la pantalla o la versión del sistema operativo,
etc.
• Sólo se suministra la versión en inglés de este software. Las pantallas que se muestran en el manual son las pantallas que
aparecen en el sistema operativo en inglés.
• Este manual no contiene instrucciones de funcionamiento básico de Windows.
• Las rutas usadas en este manual asumen que este software fue instalado en la carpeta predeterminada. La ruta real puede
variar dependiendo de la carpeta especicada durante la instalación.
Marcas registradas
• Microsoft, Windows, y Windows Vista son marcas registradas o marcas comerciales de Microsoft Corporation en los Estados
Unidos de América y/u otros países.
• Los nombres de productos y otros nombres propios son marcas registradas o marcas comerciales de los respectivos
propietarios de sus derechos.
Introducción

3
S
Modos Pen Software y como iniciar los modos
CONSEJOS
• No es posible usar una pantalla secundaria.
• No se puede iniciar el modo de pizarra y el modo transparente a la misma vez.
Para cambiar los modos, salga del modo actual e inicie el otro modo.
• Para evitar que la barra de tareas de Windows se mueva, bloquéela.
n
Modo de Pizarra
Puede usar la pantalla como una pizarra.
Se exhibe el área de trabajo para cada “sheet (hoja)”. Cambiando la hoja, puede editar los datos en otra pantalla.
Inicio de modo de pizarra
Siga los pasos a continuación para iniciar el software.
• En el escritorio, toque rápido dos veces el ícono de acceso directo “SHARP Pen Software” (
) dos veces (o haga doble
clic en el ícono).
• Haga clic en el botón “Iniciar”, y luego seleccione “Todos los programas” - “SHARP Pen Software” - “SHARP Pen Software”.
• Toque rápido dos veces el archivo de pizarra (un archivo guardado en el formato SWS)(o haga doble clic en el archivo).
n
Modo Transparente
La pizarra se muestra transparente.
El área de trabajo consiste de una pantalla única.
Su dibujo aparecerá en la pizarra transparente sobre la pantalla, de manera que pueda escribir comentarios directamente en los
elementos exhibidos en la pantalla. Tenga en cuenta, sin embargo, que no puede usar la pantalla indicada detrás de la pizarra
transparente.
Iniciando el modo transparente
Siga los pasos a continuación para iniciar el software.
• En el escritorio, toque rápido dos veces el ícono de acceso directo “SHARP Pen Software (Transparent board mode)”(
) (o
haga doble clic en el ícono).
• Haga clic en el botón “Iniciar”, y luego seleccione “Todos los programas” - “SHARP Pen Software” - “SHARP Pen Software
(Transparent board mode)”.
Iniciando y saliendo del software

4
S
Saliendo del software
Toque el botón “Quit”.
Cuando no haya ningún dato que se esté editando y no se haya guardado
Se sale del software.
Cuando hay datos que se están editando y no se hayan guardado
Aparece un cuadro de diálogo de conrmación.
Cuando toque “Exit with save”, aparecerá un cuadro de diálogo para permitirle especicar el destino donde guardar los datos.
Conrme el formato a guardar, especique el destino, y guarde los datos. (Página 7)
Cuando toque “Exit without save”, se saldrá del software sin guardar los datos.

5
S
Ejemplo de pantalla: Modo de pizarra
(2)
(1)
(4)
(5)
(3)
(1) Barra de herramientas
Se usa para cambiar de funciones. (Página 6)
(2) SHEET LIST
Se exhibe sólo en el modo de pizarra.
Toque esta lengüeta para exhibir la lista de hojas mostradas como imágenes en miniatura. (Página 8)
(3) Mover ícono de barra de herramientas
Este aparece en el lado opuesto a la barra de herramientas, y se puede tocar para mover la barra de herramientas a ese
lado. (El ícono y la barra de herramientas cambiarán de lugares.)
(4) Pizarra
Área de trabajo. Puede escribir, dibujar líneas y pegar imágenes aquí.
Se puede exhibir la pizarra en dos modos: modo de pizarra y modo transparente. El último es transparente, mostrando el
fondo.
CONSEJOS
• Se puede cambiar el color de fondo y la grilla que se usan en el modo de pizarra. (Página 20)
(5) Botones de navegación de hoja/No. de página
Se exhibe sólo en el modo de pizarra.
Toque el botón de navegación de hoja para cambiar la hoja exhibida. (Página 8)
El número mostrado en el centro es el no. de página de la hoja actual.
Disposición de la pantalla básica

6
S
Botones de funciones de barra de herramientas
Las funciones de la barra de herramientas se muestran como botones. Toque un botón para seleccionar la función de ese botón.
Los botones de funciones que aparecen en la barra de herramientas varían dependiendo del modo.
Modo Pizarra Modo Transparente
Quit
Pen 1
Pen 3
Select
Undo
Save
Print Current Sheet
Insert Image
Ventana de paneo
Open
Pen 2
Eraser
Screen
Redo
Settings of SHARP Pen Software
Print All Sheets
Quit
Pen 1
Pen 3
Select
Undo
Save
Print Current Sheet
Transparent mode OFF
Pen 2
Eraser
Magnier
Redo
Settings of SHARP Pen Software
Botón Función Página
Quit <Salir> Salir de este software. 4
Open <Abrir>*
1
Abrir un archivo de pizarra. 7
Transparent mode OFF
<Modo transparente OFF>*
2
Desactivar el modo transparente.
Desactivando temporariamente la función de pizarra, puede usar otra cosa diferente
que el software (archivos, otras aplicaciones, etc.).
-
Pens 1 to 3 <Lápiz 1 a 3> Dibujar líneas. 10
Eraser <Borrador> Borrar líneas escritas a mano. 11
Select <Seleccionar> Seleccionar un objeto. 12
Screen <Pantalla>*
1
Ampliar la vista de la pizarra, cambiar la posición de exhibición, y cambiar las
páginas.
8, 15
Magnier <Lupa>*
2
Ampliar parte de la pantalla en el modo transparente. 16
Undo <Deshacer> Cancelar la operación anterior inmediatamente. 14
Redo <Rehacer> Rehacer la operación cancelada inmediatamente enseguida. 14
Save <Guardar> Guardar los datos que están siendo editados. 7
Settings of SHARP Pen
Software <Ajustes del Pen
Software de SHARP>
Congure este software de acuerdo las preferencias del usuario. 20
Print Current Sheet
<Imprimir hoja actual>
Imprimir la hoja exhibida. 19
Print All Sheets
<Imprimir todas las hojas>*
1
Imprimir todas las hojas. 19
Insert Image
<Insertar imagen>*
1
Pegar en la pizarra un archivo de imagen capturada por el controlador de impresora
de importación Pen Software o una máquina multifunción.
17, 18
Ventana de paneo*
1
Esta muestra una imagen en miniatura de la hoja exhibida. Usar dentro de esta
ventana para ampliar la vista de la pizarra o mover la posición de exhibición.
15
*1 Aparece sólo en el modo de pizarra.
*2 Aparece sólo en el modo transparente.

7
S
Guardando datos
Los datos se pueden guardar en los siguientes formatos de archivos:
Formato de archivo Descripción
Archivo de pizarra
Los datos de la pizarra se guardan en el formato SWS. Los datos guardados se pueden volver
a editar con este software.
PDF, BMP, JPEG, PNG
La pantalla de trabajo se guarda como una captura de pantalla. Los datos son convertidos a un
formato de archivo diferente de manera que no puedan ser vueltos a editar con el software.
En el modo de pizarra
Los datos se pueden guardar en cualquier de los formatos de archivos anteriores.
Se guardarán todas las hojas. (No se podrá guardar una hoja sin datos.)
Cuando se guardan datos en el formato BMP, JPEG o PNG, cada hoja se guarda como un archivo separado.
En el modo transparente
Los datos se pueden guardar en el formato PDF, BMP, JPEG o PNG.
1. Toque el botón
“Save”.
2. Seleccione el formato de archivo de la lista desplegable.
3. Especiqueeldestinoytoque“Guardar”.
n
Respaldo automático
Esta función respalda automáticamente el archivo de pizarra en intervalos especicados.
(El respaldo automático no se puede usar para los datos en el modo transparente.)
Puede cambiar para activar/desactivar el respaldo automático y el tiempo de intervalo de respaldo. (Página 20)
Abriendo el archivo de pizarra
Cuando se inicia el modo de pizarra, se abre un nuevo archivo de pizarra. (Si se inicia el software directamente tocando un
archivo de pizarra, el archivo de pizarra se abrirá.)
Para abrir un archivo de pizarra, toque el botón
“Open” y seleccione el archivo. (Si no se han guardado los datos que se
están editando, aparecerá el cuadro de diálogo de conrmación de guardado de archivo.)
Guardando y abriendo un archivo

8
S
Cambiando la hoja a editar (modo de pizarra)
En el modo de pizarra, cada pantalla se exhibe en una hoja.
Para cambiar la hoja, toque el botón de navegación de hoja en la parte de inferior de la pantalla. El número mostrado en el
centro es el no. de página de la hoja actual.
(1)
(2)
(3)
(1) No. de página de hoja actual
(2) Botón de navegación de hoja (Anterior)
Toque este botón para exhibir la hoja anterior. Cuando se exhibe la primera hoja, este botón está desactivado.
(3) Botón de navegación de hoja (Siguiente)
Toque este botón para exhibir la hoja siguiente. Cuando se exhibe la última hoja, este botón está desactivado.
n
Cambiando la hoja al arrastrar la pantalla
Se puede cambiar una hoja arrastrándola cuando el zoom (porcentaje de ampliación) se 100%.
1. Toque el botón
“Screen”.
2. Arrástrela horizontalmente con el lápiz sensible al tacto.
• Arrastre hacia la derecha para mostrar la hoja anterior.
• Arrastre hacia la izquierda para mostrar la hoja siguiente.
Borde derecho de la hoja
Operaciones de edición

9
S
n
Cambiando la hoja consultando las imágenes en miniatura / Editando la hoja
Las imágenes en miniatura de cada hoja aparecen en “SHEET LIST” en la esquina inferior izquierda de la pantalla. Se puede
tocar un imagen en miniatura para cambiar a esa hoja. Las hojas se pueden editar, incluyendo agregar, borrar, copiar y mover
hojas.
1. Toque “SHEET LIST” en al esquina inferior izquierda de la pantalla.
Se exhibe la lista de imágenes en miniatura de las hojas.
2. Toque la imagen en miniatura de la hoja que desea exhibir.
La pantalla cambia a la hoja seleccionada.
(1)
(7)
(4)
(5)
(3)
(2)
(6)
(1) SHEET LIST
(2) Hoja seleccionada actualmente
(3) Botón de navegación de hoja (Anterior)
(4) Imágenes en miniatura
(5) Botón de navegación de hoja (Siguiente)
(6) Toque este botón para cerrar la lista de hojas.
(7)
: Agregar una hoja nueva a la derecha de la hoja seleccionada.
: Borrar la hoja seleccionada.
: Copiar la hoja seleccionada e insertarla a la derecha de la hoja seleccionada.
: Mover la hoja seleccionada una posición a la izquierda.
: Mover la hoja seleccionada una posición a la derecha.

10
S
Dibujando con un lápiz
1. Toque uno de los botones “Pen 1” a “Pen 3”.
2. Dibuje en la pizarra.
La forma dibujada será determinada como un objeto 1 segundo* después que levanta del lápiz sensible al tacto. Si comienza a
dibujar otro objeto 1 segundo* después de levantar del lápiz sensible al tacto, las formas dibujadas serán consideradas como un
objeto único incluso si están separados.
* Se puede cambiar este período. (Página 20)
Dibujar una forma. Dibujar otra forma. Ambas formas fueron
determinadas como un solo
objeto.
Menos de
1 segundo
Después de
1 segundo
CONSEJOS
•
Puede cambiar entre “Pen 1” a “Pen 3” y “Eraser” presionando repetidamente el botón de función 2 del lápiz sensible al tacto.
Para cambiar las funciones usando el botón de función 2, seleccione “Properties” del controlador del panel sensible al tacto,
y ajuste “Function Button 2” a “Pen Software Link” en la lengüeta “OPERATION SETTING”.
• Por detalles acerca de los objetos, consulte la página 12.
• En algunos casos, como cuando se toca un botón en la barra de herramientas, la forma dibujada será considerada un objeto
en menos del período especicado después de levantar el lápiz sensible al tacto de la pizarra.
n
Cambiando el color y el grosor del lápiz
Se pueden usar las paletas “Pen 1” a “Pen 3” para cambiar los ajustes de la función de lápiz.
Para exhibir la paleta, toque otra vez el botón del lápiz seleccionado.
(1) (2)
(1) Marque esta casilla para hacer que la línea sea translúcida.
El ícono de lápiz cambia cuando se activa este ajuste.
Normal Translúcido
(2) Ajuste el color y el grosor de la línea.
La paleta está cerrada.
CONSEJOS
• Se puede cambiar el método para cerrar la paleta. (Página 20)

11
S
Borrando una línea dibujada
1. Toque el botón “Eraser”.
2. Mueva el lápiz, mientras toca con éste la pantalla.
Se borra la parte por encima de la que se mueve.
CONSEJOS
• Puede cambiar entre “Pen 1” a “Pen 3” y “Eraser” presionando repetidamente el botón de función 2 del lápiz sensible al
tacto.Para cambiar las funciones usando el botón de función 2, seleccione “Properties” del controlador del panel sensible al
tacto, y ajuste “Function Button 2” a “Pen Software Link” en la lengüeta “OPERATION SETTING”.
• La función del borrador puede borrar sólo objetos dibujados con la función de lápiz. No puede usar el botón “Eraser” para
borrar imágenes pegadas. No puede usarla tampoco para borrar los bordes de un línea para hacer la línea más na. Incluso
si borra sólo los bordes, todo el ancho de la línea será borrado.
• Un objeto dibujado con la función de lápiz no se podrá borrar si es parte de un grupo.
• Cuando se activa “Auto Pen/Eraser Mode Switching” (página 20), podrá borrarlo con el borrador o su dedo cuando se
selecciona “Pen 1” a “Pen 3” o “Eraser”. Toque la pantalla con el borrador o su dedo, y después que el cursor cambiará a
borrador, mueva el borrador o su dedo. Puede ajustar el tamaño del borrador para borrar con el borrador o su dedo en el
área que ha tocado en la pantalla, o para el tamaño seleccionado en la paleta.
Cuando se ha seleccionado
“Erase touch panel contact area”
Cuando se ha seleccionado
“Erase with size selected on palette”
• Con Windows Vista/7, la exhibición cambia de la siguiente manera cuando se selecciona el botón “Eraser” en el modo
transparente. La exhibición vuelve a normal cuando se selecciona una función diferente del botón “Eraser”.
- La pantalla es ocultada en el fondo incluso por objetos translúcidos.
- Un objeto es envuelto por una línea blanca.
n
Cambiando el tamaño del borrador
Se puede cambiar el tamaño del borrador seleccionándolo en la paleta por el botón “Eraser”.
Para exhibir la paleta, toque otra vez el botón
“Eraser” mientras se encuentra en el estado seleccionado.
CONSEJOS
• Se puede cambiar el método para cerrar la paleta. (Página 20)

12
S
Edición de un objeto
Las líneas dibujadas y las imágenes pegadas en la pizarra serán manipuladas en el software como un “objeto”.
n
Seleccionando un objeto
Deberá seleccionar un objeto antes de editarlo.
1.
Toque el botón
“Select”.
2. Toque un objeto.
Se selecciona el objeto.
Cuando selecciona un objeto y luego toque , el
menú de expansión aparece para permitirle realizar las
siguientes funciones de edición:
• Cut <Cortar>
• Copy <Copiar>
• Paste <Pegar>
• Delete <Borrar>
• Rotate <Rotar>
• Order <Ordenar>
• Cancel selection <Cancelar selección>
• Group <Agrupar>
• Ungroup <Desagrupar>
• Property <Propiedad>
Punto de selección
Toque un objeto.
Toque un área donde haya
algo dibujado. No podrá
seleccionar un objeto
tocando el área donde no
haya nada dibujado.
Objeto seleccionado
El área del objeto se indica
mediante una línea punteada,
y los símbolos llamados
puntos de selección aparecen
en los vértices y los lados del
área.
Especicando un área arrastrándola, podrá seleccionar varios objetos dentro del área. (No se seleccionarán los objetos que no
estén completamente incluidos en el área.)
n
Agrupando objetos
Podrá editar varios objetos seleccionados como si fueran un objeto.
1. Seleccione los objetos a agrupar.
2. Seleccione “Group” en el menú de expansión.
Cancelando el agrupamiento
1. Seleccione los objetos agrupados.
2. Seleccione “Ungroup” en el menú de expansión.

13
S
n
Moviendo un objeto
Podrá mover un objeto seleccionando el objeto y arrastrándolo.
n
Ampliando/reduciendo un objeto
1. Seleccione un objeto.
2. Arrastre el punto de selección.
• Arrastrando el punto de selección en el vértex amplia/
reduce el objeto en la misma relación de aspecto.
• Arrastrando el punto de selección en el vértex agranda/
reduce el objeto en la misma relación de aspecto.
• El ancho de la línea permanece igual después que se
agranda/reduce el objeto.
Punto de selección
n
Rotando un objeto
1. Seleccione un objeto.
2. Arrastre el punto de selección en la parte superior
central.
O, seleccione “Rotate Right”, “Rotate Left” o “Rotate 180
degrees” en “Rotate” del menú de expansión.
Punto de selección
n
Copiando un objeto
Puede copiar un objeto al portapapeles.
1. Seleccione un objeto.
2. Seleccione “Copy” en el menú de expansión.
n
Cortando un objeto
Puede cortar un objeto y guardarlo en el portapapeles.
1. Seleccione un objeto.
2. Seleccione “Cut” en el menú de expansión.
n
Pegando un objeto
Para pegar el objeto en el portapapeles, seleccione “Paste” en el menú de expansión.

14
S
n
Cambiando el orden de los objetos
Puede cambiar el orden de la ubicación de los objetos.
1. Seleccione un objeto.
2. Seleccione la ubicación del objeto en “Order” del menú de expansión.
• Bring to Front : Se mueve el objeto hacia adelante.
• Send to Back : Se mueve el objeto hacia atrás.
• Bring forward : Se mueve el objeto uno hacia adelante.
• Send backward : Se mueve el objeto uno hacia atrás.
Orden de ubicación del objeto
Cuando se superponen varios objetos, los objetos en el fondo están escondidos detrás de los objetos de adelante. Para mostrar
la parte escondida, cambie el orden de ubicación de los objetos.
(1)
(2)
(3)
(2)
(3)
(1)
(1) Objeto colocado en frente de otros objetos
(2) Objeto ubicado segundo del objeto delantero
(3) Objeto colocado detrás de otros objetos
Deshacer/rehacer
Tocando el botón “Undo” se cancela el dibujo o la escritura realizada anteriormente.
Tocando el botón
“Redo” se repite la operación cancelada con el botón “Undo”.
CONSEJOS
• Se pueden deshacer hasta 50 acciones realizadas.
Borrando un objeto
1. Seleccione un objeto.
2. Seleccione “Delete” en el menú de expansión.
Los objetos seleccionados desaparecen.

15
S
Agrandando la vista de la pantalla
Los pasos para agrandar la vista de la pantalla pueden variar dependiendo del modo.
n
Agrandando la pantalla en el modo de pizarra
Haga doble clic para agrandar la pantalla
1. Toque el botón
“Screen”.
2. Toque rápidamente la parte de la pizarra que desea agrandar dos veces (doble clic).
Cada vez que hace doble clic, la vista cambia en el orden 100% > 150% > 200%, centradas en la posición de clic.
Haciendo doble clic en 200% se vuelve la vista a 100%.
200%150%
100%
Cambiando la posición de exhibición cuando se agranda la vista.
Para cambiar la posición de exhibición, arrastre en la pantalla con
“Screen” seleccionada.
Agrandando la vista de la pantalla con la ventana de paneo
Aparece una imagen en miniatura de la hoja actual en la ventana de paneo en la barra de herramientas.
(2)
(3)
(1)
(4)
(1) Ampliación
Muestra la ampliación de pantalla actual.
(2)[-][+]
Toque para agrandar o reducir la vista entre 100% y 400% en incrementos de 50%.
(3) Ventana de paneo
Muestra una imagen en miniatura de la hoja actual. Haga doble clic para cambiar la vista en el orden 100% > 150% > 200%,
centrado en la posición de doble clic.
(4) Cuadro de exhibición
Muestra el área que se exhibe en la pantalla. Para mover el área que se exhibe, arrastre el cuadro de exhibición.

16
S
n
Agrandando la pantalla en el modo transparente
Puede agrandar parte de la pantalla y exhibirla.
1. Toque el botón
“Magnier”.
2. Toque la pizarra.
El área alrededor del punto tocado se agranda y exhibe.
Toque el punto para agrandar. El área alrededor del punto se agranda.

17
S
Importando un documento como imagen
(Controlador de impresora de Pen Software)
Se puede convertir en una imagen a un documento de cualquier aplicación y se puede exhibirlo en la pizarra.
Se importa un documento como una imagen similar a una imagen impresa en una impresora.
n
En el software
1. En el software, abra el documento que quiere importar.
2. Seleccione el comando de impresión y abra la pantalla de ajustes de impresión.
Por detalles, consulte el manual para el software.
3. Cambie la impresora a "Send print data to SHARP Pen Software", y seleccione los ajustes de impresión.
• Se puede seleccionar “Paper Size”, “Orientation”, y “Resolution”.
• Cuando haya terminado de seleccionar los ajustes, toque “Aceptar”.
4. Imprima.
El documento impreso será convertido a una imagen y enviado al Pen Software.
n
En el Pen Software (modo de pizarra)
Cuando se haya enviado la imagen, destellará la indicación “Insert Image”.
5. Toque el botón
“Insert Image”.
Aparece la primera hoja de las imágenes adquiridas.
CONSEJOS
• Podría no ser posible convertir correctamente los documentos desde algún software.
• El ajuste “Resolution” del controlador de impresora de Pen Software debe estar normalmente ajustado a 120 dpi. Si se
ajusta a un ajuste mayor, las operaciones como agrandando, reduciendo y desplazándose en la hoja podría no realizarse
suavemente.

18
S
Capturando una imagen de una máquina multifunción
Si se conecta una máquina multifunción a la misma red que se ha instalado la computador que tiene el Pen Software, se puede
capturar en la pizarra una imagen escaneada en la máquina multifunción.
CONSEJOS
• Soporta el Network Scanner Tool 3.1 o mayor (a agosto de 2010).
• Por detalles, consulte al vendedor o al representante de servicio autorizado más cercano para la máquina multifunción.
• Por los procedimientos para usar la máquina multifunción, consulte el manual para la máquina multifunción.
Usando el Network Scanner Tool para capturar una imagen
La primera vez que use el Network Scanner Tool, instale el Network Scanner Tool en la computadora en que ha instalado el Pen
Software y congure los ajustes del Network Scanner Tool. (Página 23)
Para capturar una imagen desde una máquina multifunción, el Network Scanner Tool debe estar funcionando en su computadora.
Use JPEG para el formato de envío de escaneo.
n
En la máquina multifunción
1. Coloque el documento en la máquina multifunción.
2. Seleccione un destino de almacenamiento en el Network Scanner Tool.
3. Seleccione JPEG para el formato de envío de escaneo.
4. Escanee.
El documento será escaneado y enviado al Pen Software.
n
En el Pen Software (modo de pizarra)
Cuando se haya enviado la imagen, destellará la indicación “Insert Image”.
5. Toque el botón
“Insert Image”.
Aparece la primera hoja de las imágenes adquiridas.

19
S
Impresión
Para imprimir sólo la hoja que se exhibe actualmente, toque el botón “Print Current Sheet”.
Para imprimir todas las hojas en la pizarra, toque el botón
“Print All Sheets”. (Sólo modo de pizarra)
Guarde los ajustes de impresión antes.
CONSEJOS
• Las herramientas de operación del software, como las barras de herramientas y las lengüetas no se imprimirán.
• En el modo de pizarra, no se imprimirán las hojas sin datos.
n
Registre los ajustes para impresión
1. En el cuadro de diálogo “Setting” (página 20), toque “Print Current Sheet” o “Print All”.
2. Especiquelosajustesdeimpresión.(Consulteacontinuación.)
3. Cuandohayaterminadoderealizarlosajustes,toque“OK”.
(3)
(2)
(1)
(4)
(1) Printer Name
Seleccione la impresora a usar para imprimir.
(2) Properties
Ajuste los detalles de la impresora. Las opciones de ajuste dependen de la impresora. Para las opciones de ajuste, consulte
el manual de instrucciones de la impresora.
(3) Number of Copies
Especique el número de copias a imprimir.
(4) Options
• Print Background Color : Seleccione éste para imprimir el color que se ajusta para el fondo de la pizarra.
(Sólo en el modo de pizarra)
• Print Sheet Number : Seleccione ésto para imprimir los números de páginas, y seleccione “Position”.
(Sólo en el modo de pizarra)
• Print Date : Seleccione ésto para imprimir los datos de impresión, y seleccione “Position”.
CONSEJOS
• No se puede cambiar “Sheets to Print”.

20
S
Puede congurar a medida varios de los ajustes de este software.
Los ajustes son los mismos en el modo de pizarra y el modo transparente. Sin embargo, los contenidos de la pantalla variarán
dependiendo del modo activado.
1. Toque el botón “Settings of SHARP Pen Software”.
2. Ajuste las opciones tal como es necesario. (Consulte a continuación.)
3. Cuandohayaterminadoderealizarlosajustes,toque“OK”.
(1)
(2)
(3)
(4)
(5)
(6)
(7)
(8)
(9) *
1
(10)
*
1
(11)
*
2
*1 Aparece sólo en el modo de pizarra.
*2 Aparece sólo en el modo transparente.
(1) Pen/Eraser Default setting
Ajuste el color inicial y el grosor del “Pen 1” a “Pen 3”, y el tamaño inicial de “Eraser”.
(2) Pen/Eraser palette
Seleccione ésto para que las paletas “Pen 1” a “Pen 3” y “Eraser” se cierren cuando se selecciona un patrón de la paleta.
Si se elimina la marca de vericación, se debe hacer clic en
para cerrar la paleta.
(3) Auto Pen/Eraser Mode Switching
Use auto switching
Para usar esta función, seleccione ésto para que el lápiz se cambie automáticamente a borrador cuando se toca la pantalla
con el borrador o su dedo en el modo de lápiz. Ajuste el tamaño del borrador que se aplica en “Auto Switching Eraser Size”.
• The area you touch (or cover) : Cuando se usa un borrador u otro objeto y el área de contacto en la pantalla es al
menos 4 cm x 4 cm, borre el área de contacto.
• The selected size in Eraser Palette : Borrar con el tamaño del borrador seleccionado sin tener en cuenta la cantidad de
contacto en la pantalla.
IMPORTANTE
• Para usar esta función, seleccione “Properties” del controlador del panel sensible al tacto, y congure los ajustes en la
lengüeta “OPERATION SETTING” tal como se indica a continuación. Por información respectoal controlador del panel
sensible al tacto consulte el Manual de instrucciones del controlador del panel sensible al tacto.
- Ajuste “Input Mode Setting” a “Standard”. Si lo ajusta a algo diferente de “Standard”, no se podrá usar la función de
cambio automático de lápiz/borrador.
- Si ha seleccionado “The area you touch (or cover)”, ajuste “Detect Eraser Area” a “Enable”.
(4) Pen Cursor
Ajuste para mostrar un cursor cuando dibuje con la función de lápiz.
(5) Print setting
Registre los ajustes para impresión. (Página 19)
Congurandoamedidalosajustes

21
S
(6) About
Se exhibe la información de versión de este software.
(7) Default
Repone los ajustes a los valores iniciales.
(8) Interval of handwriting character recognition
Ajuste el período hasta determinar una línea escrita a mano como un objeto.
(9) Setting background of whiteboard
• Preview : Se exhibe la imagen de la pizarra con el ajuste actual.
• Background color : Ajuste el color de fondo de la pizarra.
• Show the grid lines : Seleccione para mostrar la grilla en la pizarra.
(10)
Automatic backup settings
Especique si quiere respaldar los datos automáticamente en el modo de pizarra.
Para usar el respaldo automático, especique el intervalo.
(11)
Zoom Setting
Especique el tamaño y la ampliación de la exhibición con zoom.

22
S
Las operaciones en esta sección requieren acceder como administrador.
Instalación del Pen Software
n
Instalación de .NET Framework 2.0 o mayor
Se debe instalar .NET Framework 2.0 o mayor en la computadora en que se vaya a usar el Pen Software.
Descargue e instale .NET Framework del sitio en Internet de Microsoft.
n
Instalación del Pen Software
1. Cierre todo el software que esté funcionando.
2. InserteelCD-ROMsuministradoenlaunidaddeCD-ROMdelacomputadora.
3. Haga doble clic en el programa de instalación.
• Sistema operativo de 32 bit: \PenSoftware\eng\setup.exe
• Sistema operativo de 64 bit: \PenSoftware\eng_x64\setup_x64.exe
4. Para el resto del procedimiento, siga las instrucciones indicadas en la pantalla.
• Cuando aparezca la pantalla “Control de cuentas de usuario”, haga clic en “Sí” (o “Permitir”).
• Cuando aparezca una pantalla de advertencia de seguridad (No ser vericará el editor.), haga clic en “Permitir”.
Cuando se termina la instalación, se crearán en el escritorio los íconos de acceso directo para el modo de pizarra (
) y el
modo transparente (
).
Se agregará el controlador de impresora de Pen Software. (Página 17)
n
Desinstalación
Abra la pantalla de desinstalación tal como se explica en la página 22, y elimine “ScanToPenSoft”.
1. Cierre todo el software que esté funcionando.
2. Haga clic en “Iniciar” y seleccione “Panel de control”.
3. Haga clic en “Desinstalar un programa”.
• Si usa la vista de ícono (Vista clásica), haga doble clic en “Programas y Características”.
• En Windows XP, haga clic en “Agregar o quitar programas”. (En la vista clásica, haga doble clic en “Agregar o quitar
programas”.)
4. Seleccione “SHARP Pen Software” y haga clic en “Desinstalar”.
En Windows XP, haga clic en “Quitar”.
5. Para el resto del procedimiento, siga las instrucciones indicadas en la pantalla.
Cuando aparezca la pantalla “Control de cuentas de usuario”, haga clic en “Continuar”.
De esta manera se termina la desinstalación.
Instalación/Desinstalación del Software

23
S
Instalación del Network Scanner Tool
El Network Scanner Tool se usa para capturar una imagen de una máquina multifunción de Sharp conectada a la misma red.
n
Instalación del Network Scanner Tool
El Network Scanner Tool no fue incluido en el CD-ROM provisto. Use el Network Scanner Tool (Version 3.1 o mayor) provisto en
la máquina multifunción. (Si ya está instalado, no es necesario volver a instalarlo.)
Por detalles acerca de la instalación y uso del Network Scanner Tool, consulte la guía del usuario del Network Scanner Tool.
Por preguntas sobre la compatibilidad de su máquina multifunción o el Network Scanner Tool, consulte a su vendedor o
representante de servicio autorizado.
n
CongurarcióndelosajustesdelNetworkScannerTool
La carpeta que será usada para capturar las imágenes escaneadas desde la máquina multifunción deben ser guardadas como
un destino en el directorio de la máquina multifunción. Al crear un perl, seleccione “Move File to Folder” y ajuste la carpeta (a
continuación) para adquirir las imágenes en “Details”.
• Windows Vista/7:
Unidad de inicio: \ProgramData\SHARP\PenSoftware\JPEG
• Windows XP:
Unidad de inicio: \Documents and Settings\All Users\Application Data\SHARP\PenSoftware\JPEG
n
Desinstalación
Salir del Network Scanner Tool de la barra de herramientas, abra la pantalla de desinstalación tal como se explica en la página
22, y desinstale “Network Scanner Tool”(o “Sharpdesk”).

V2.0 10H(2)
-
 1
1
-
 2
2
-
 3
3
-
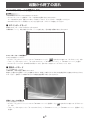 4
4
-
 5
5
-
 6
6
-
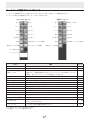 7
7
-
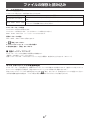 8
8
-
 9
9
-
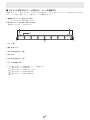 10
10
-
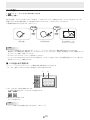 11
11
-
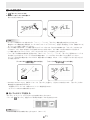 12
12
-
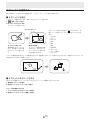 13
13
-
 14
14
-
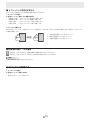 15
15
-
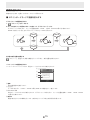 16
16
-
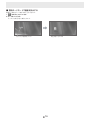 17
17
-
 18
18
-
 19
19
-
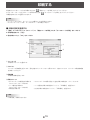 20
20
-
 21
21
-
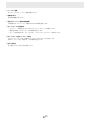 22
22
-
 23
23
-
 24
24
-
 25
25
-
 26
26
-
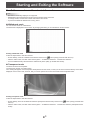 27
27
-
 28
28
-
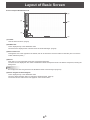 29
29
-
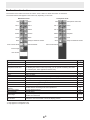 30
30
-
 31
31
-
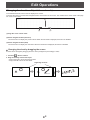 32
32
-
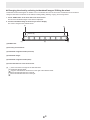 33
33
-
 34
34
-
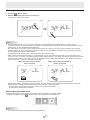 35
35
-
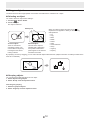 36
36
-
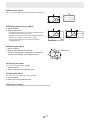 37
37
-
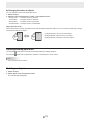 38
38
-
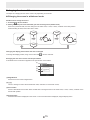 39
39
-
 40
40
-
 41
41
-
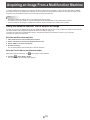 42
42
-
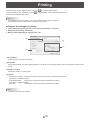 43
43
-
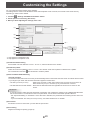 44
44
-
 45
45
-
 46
46
-
 47
47
-
 48
48
-
 49
49
-
 50
50
-
 51
51
-
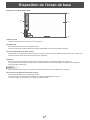 52
52
-
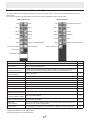 53
53
-
 54
54
-
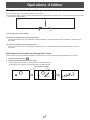 55
55
-
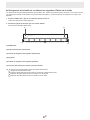 56
56
-
 57
57
-
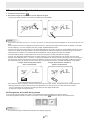 58
58
-
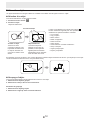 59
59
-
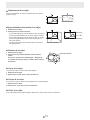 60
60
-
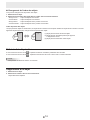 61
61
-
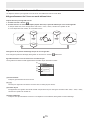 62
62
-
 63
63
-
 64
64
-
 65
65
-
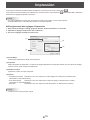 66
66
-
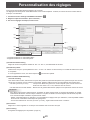 67
67
-
 68
68
-
 69
69
-
 70
70
-
 71
71
-
 72
72
-
 73
73
-
 74
74
-
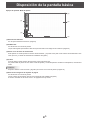 75
75
-
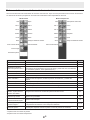 76
76
-
 77
77
-
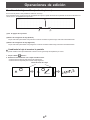 78
78
-
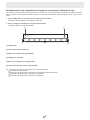 79
79
-
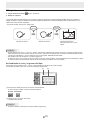 80
80
-
 81
81
-
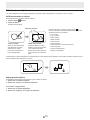 82
82
-
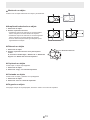 83
83
-
 84
84
-
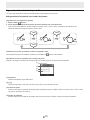 85
85
-
 86
86
-
 87
87
-
 88
88
-
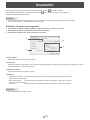 89
89
-
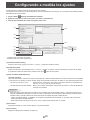 90
90
-
 91
91
-
 92
92
-
 93
93
-
 94
94


Sharp PN-L601B El manual del propietario
- Tipo
- El manual del propietario
en otros idiomas
- français: Sharp PN-L601B Le manuel du propriétaire
- English: Sharp PN-L601B Owner's manual
- 日本語: Sharp PN-L601B 取扱説明書
Artículos relacionados
Otros documentos
-
 Red Dot S312E Guía de instalación
-
Panasonic TYTP42P6S Instrucciones de operación
-
 Baby Lock Palette Manual de usuario
-
Canon LV-WX300USTi Manual de usuario
-
Leica V-Lux 30 Manual de usuario
-
Korg KAOSS PAD KP3+ El manual del propietario
-
Rimage PrismPlus! Guía del usuario
-
myFirst Sketch II Manual de usuario
-
Korg KAOSSILATOR PRO+ El manual del propietario
-
Korg Nautilus Guía de inicio rápido

