Silvercrest 338781 El manual del propietario
- Categoría
- Picadoras
- Tipo
- El manual del propietario

IAN 338781_1910
ELECTRIC FOOD GRINDER
MOLINO DE ALIMENTOS SFW 300 A2
ELECTRIC FOOD GRINDER
Operating instructions MOLINO DE ALIMENTOS
Instrucciones de uso

US - EN Operating instructions Page 1
US - ES Instrucciones de uso Página 27
Before reading, unfold the page containing the illustrations and familiarize yourself with all functions of the
device.
Antes de empezar a leer abra la página que contiene las imágenes y, en seguida, familiarícese con todas
las funciones del dispositivo.

A
B
r e q
5
w
z
t
u
1
2
3
C
o
a
s
p
i
4
08
7
9
6
D
d

SFW 300 A2 US-EN │ 1 ■
Table of Contents
Introduction ...........................................2
Warning types ........................................2
Safety ...............................................3
Safety instructions ............................................... 3
Important cord information ........................................ 5
Intended use ................................................... 5
Items supplied / appliance description .....................6
Unpacking ............................................7
Assembly / Disassembly .................................7
Assembling the meat grinder ...................................... 8
Assembling the sausage stuffer attachment ........................... 9
Assembling the kibbeh attachment .................................10
Assembling the cookie attachments ................................10
Fitting the strainer attachment .....................................11
Operation ...........................................
13
Operating the appliance ........................................13
Processing meat ...............................................14
Processing sausage meat ........................................14
Using the kibbeh attachment .....................................15
Making cookies ...............................................15
Straining tomatoes .............................................16
Malfunction ..........................................
16
Cleaning .............................................
17
Cleaning the motor block ........................................17
Cleaning the accessories ........................................18
Storage .............................................19
Disposal .............................................
20
Disposal of the appliance ........................................ 20
Disposal of the packaging .......................................20
Appendix ............................................
21
Recipes ......................................................21
Technical specifications .........................................24
3 year limited warranty .........................................25
Distributor ....................................................26
IB_338781_SFW300A2_LB9.indb 1 09.01.20 11:14

SFW 300 A2
■ 2 │ US-EN
Introduction
Congratulations on the purchase of your new appliance.
You have selected a high-quality product. The operating instructions
are part of this product. They contain important information about
safety, usage, and disposal. Before using the product, please
familiarize yourself with all operating and safety instructions.
Use the product only as described and for the specified range of
applications. Please also pass these operating instructions on to any
future owner.
Warning types
The following warning types are used in these operating instructions:
This is the safety alert symbol. It is used to alert you to potential
injury hazards. Obey all safety messages that follow this
symbol to avoid possible injury and death.
► WARNING indicates a hazardous situation that, if not avoided,
could result in death or serious injury.
► CAUTION indicates a hazardous situation that, if not avoided,
could result in minor or moderate injury.
► NOTICE indicates information that is considered important, but not
hazardous (e.g. messages related to property damage).
►A “Tip” identifies additional information that will assist you in
using the device.
IB_338781_SFW300A2_LB9.indb 2 09.01.20 11:14

SFW 300 A2 US-EN │ 3 ■
Safety
Safety instructions
This section contains important safety instructions for using the appliance. This
appliance complies with statutory safety regulations. Improper use may result in
personal injury and property damage. To reduce the risk of burns, fire, electric
shock, or injury to persons:
IMPORTANT SAFETY INSTRUCTIONS
When using electrical appliances, basic safety precautions should
always be followed, including the following:
1. READ ALL INSTRUCTIONS.
2. Never immerse the motor block in water or any other liquids!
If you do, you could be subjected to a potentially fatal electric
shock. If the appliance ever falls into any liquid, remove the power
plug from the socket immediately. Stop using the appliance and
contact the customer service hotline.
3. Never touch the appliance and its connecting cable with wet or
moist hands. Ensure that the power cord never gets wet or damp
when the appliance is in use. Do not let the cord hang over edge
of table or counter. Route the cord so that it cannot be trapped or
damaged in any way.
4. Ensure that the appliance, the power cord, and the plug do not come
into contact with heat sources such as hotplates or naked flames.
5. Do not operate any appliance with a damaged cord or plug or
after the appliance malfunctions or has been dropped or damaged
in any manner. Return the appliance to the nearest authorized
service provider for examination, repair or adjustment.
6. Arrange for defective power plugs and/or cords to be replaced
as soon as possible by a qualified technician or by our customer
service department to avoid the risk of injury.
7. Never open the casing. All repairs must be carried out by a quali-
fied technician or by our customer service department. Improper
repairs may put the user at risk. They will also invalidate any
warranty claims.
IB_338781_SFW300A2_LB9.indb 3 09.01.20 11:14

SFW 300 A2
■ 4 │ US-EN
8. This appliance may be used by persons with limited physical,
sensory or mental capabilities or lack of experience and knowledge,
provided that they are under supervision or have been told how
to use the appliance safely and are aware of the potential risks.
9. This appliance may not be used by children.
10. Cleaning and user maintenance tasks may not be carried out by
children unless they are supervised.
11.
The appliance and its connecting cord must be kept away from
children.
12.
Close supervision is necessary when the appliance is used by or
near children.
13. Do not allow children to use the appliance as a toy.
14.
Always remove the plug from the power socket before putting on or
taking off parts, before moving the appliance, in the event of mal-
functions, before cleaning the appliance, and when it is not in use!
Never pull on the power cord; always pull directly on the plug itself.
15.
Do not leave the appliance unsupervised when it is ready for
use. To avoid it being turned on accidentally, always unplug the
appliance after use or during breaks.
16.
To completely disconnect the appliance from the power supply,
the power plug must be unplugged from the power socket. The
appliance should be set up in such a way that you have unre-
stricted access to the power socket at all times and can pull out
the plug immediately in an emergency.
17.
Never put your hand into the openings of the appliance. Do not
insert any objects of any kind into the openings – except for the
appropriate food pusher and the food to be processed. If you
do, there will be a serious risk of accidents!
18. The cross blade is very sharp! Always take care when handling
and cleaning the appliance.
19. Never insert food by hand. Always use the food pusher.
20.
Do not use fingers to scrape food away from discharge disc
while the appliance is operating. Cut injuries may result.
IB_338781_SFW300A2_LB9.indb 4 09.01.20 11:14

SFW 300 A2 US-EN │ 5 ■
21. Never operate the appliance in a no-load condition.
This could irreparably damage the appliance.
22.
The use of attachments not recommended or sold by the manu-
facturer may cause fire, electric shock or injury.
23. Do not use the appliance outdoors.
24.
Do not use the appliance for anything other than its intended use.
Improper use of the appliance can put the user at risk of injury!
25. Avoid contacting moving parts.
26. Unplug before cleaning and assembling or moving parts.
FOR HOUSEHOLD USE ONLY.
SAVE THESE INSTRUCTIONS.
Important cord information
This appliance has a polarized plug (one pin is wider than the other).
To reduce the risk of electric shock, there is only one way this plug is
intended to fit into a polarized outlet. If the plug does not completely
fit into the outlet, reverse the plug. If it still does not fit, contact a quali-
fied electrician. Do not attempt to modify the plug in any way.
Intended use
This appliance is intended only for the preparation of food in quantities
expected in private households:
▯ Mincing fresh meat,
▯ Making sausages with natural or artificial sausage skin,
▯ Making cookies,
▯ Straining tomatoes.
This appliance is not intended for the processing of frozen foods
or other hard foods, e.g. bones or nuts, or for use in commercial or
industrial environments.
IB_338781_SFW300A2_LB9.indb 5 09.01.20 11:14

SFW 300 A2
■ 6 │ US-EN
Items supplied / appliance description
Figure A:
1 Cookie attachment with pattern strips
2 Food pusher
3 Food tray
4 Cord retainer
5 Motor unit
6 Meat grinder casing
7 Locking clamp
8 Tomato outlet
9 Plastic screw
0 Strainer sieve
q Transport screw
w Spring
e Cross blade
r Cutting discs for coarse and fine mincing
tRing clamp
z Sausage stuffer attachment
u Sausage disc
i Kibbeh attachment
Figure B:
o Locking button
Figure C:
p "I" button (On)
a "0" button (Off)
s"<" button (Reverse)
dOn/Off button
IB_338781_SFW300A2_LB9.indb 6 09.01.20 11:14

SFW 300 A2 US-EN │ 7 ■
Unpacking
► Do not allow children to play with packaging materials.
Risk of suffocation!
♦ Remove all parts of the appliance and the operating instructions
from the box.
♦ Remove all packaging materials and any protective foils from the
appliance.
►Check the package for completeness and signs of visible damage.
►If the delivery is incomplete or damage has occurred as a result
of defective packaging or during transport, contact the customer
service hotline (see section about “3 year limited warranty”).
Assembly / Disassembly
► The cross blade e is very sharp! Always take care when handling
the appliance. Risk of injury!
► All accessories are coated with a thin film of oil to protect them
from corrosion. Therefore, carefully clean all of the parts before
using the appliance for the first time, as described in detail in the
"Cleaning" section. After subsequent usage, always apply a light
coating of cooking oil to the metallic components.
►Before using the appliance for the first time, remove the protective
foil from the control panel.
IB_338781_SFW300A2_LB9.indb 7 09.01.20 11:14

SFW 300 A2
■ 8 │ US-EN
Assembling the meat grinder
Unfold the fold-out page. There you will find the step-by-step illustrations
for assembling the appliance.
♦ Place the transport screw q in the meat grinder casing 6.
♦ Place the spring w onto the transport screw q.
♦ Then attach the cross blade e so that the sharp side points away
from the spring w. Ensure that the square opening in the cross
blade e is placed correctly on the square axle.
► The appliance will be damaged if the cross blade e is inserted the
other way around!
♦ Select the appropriate cutting disc r.
♦ Place your selected cutting disc r into the meat grinder casing 6
so that the fixings on the cutting disc r are located in the openings
in the meat grinder casing 6.
♦ After everything has been correctly assembled, screw the ring
clamp t back on hand-tight.
♦ The ready-assembled meat grinder casing 6 is connected by a
bayonet connector to the motor unit 5:
IB_338781_SFW300A2_LB9.indb 8 09.01.20 11:14

SFW 300 A2 US-EN │ 9 ■
–Insert the meat grinder casing 6 into the motor unit 5 so
that the arrow on the meat grinder casing 6 lines up with
the symbol on the motor unit 5. The locking button o is
automatically pressed in (Fig. B).
–Lightly press the meat grinder casing 6 in and at the same
time turn the feeding shaft on the meat grinder casing 6 into
the middle position (Fig. B) so that the arrow on the feeding
shaft points to the symbol .
When the meat grinder casing 6 engages, the locking button o
springs out.
–Finally, place the feeding tray 3 on top of the feeding funnel.
–To dismantle it, press the locking button o and turn the feeding
funnel to the right (Fig. B) . You can now pull the meat grinder
casing 6 out.
Assembling the sausage stuffer attachment
Unfold the fold-out page - there you will find the step-by-step illustra-
tions for assembling the appliance.
♦ Remove the meat grinder casing 6 as described under "Assembling
the meat grinder".
♦ Disassemble all parts that are fitted to/in the meat grinder casing 6
and clean them.
♦ Coat all metal parts with cooking oil.
♦ Put the transport screw q, the spring w and the cross blade e
back into the meat grinder casing 6.
♦ Insert the sausage disc u so that the fixings on the sausage
disc u are located in the openings in the meat grinder casing 6.
♦ Then place the sausage stuffer attachment z before the sausage
disc u.
♦ Screw the ring clamp t on hand-tight.
♦ Assemble the meat grinder casing 6 as described under
"Assembling the meat grinder".
IB_338781_SFW300A2_LB9.indb 9 09.01.20 11:14

SFW 300 A2
■ 10 │ US-EN
Assembling the kibbeh attachment
Unfold the fold-out page. There you will find the step-by-step illustra-
tions for assembling the appliance.
♦ Remove the meat grinder casing 6 as described under
"Assembling the meat grinder".
♦ Disassemble any attachments that might be fitted and clean the
meat grinder casing 6.
►To use the kibbeh attachment i, neither the cross blade e with
the spring w nor a cutting or sausage disc r/u are required!
Remove them from the meat grinder casing 6 if necessary.
♦ Coat all metal parts with cooking oil.
♦ Insert the two plastic parts of the kibbeh attachment i so that the
fixings on the bottom kibbeh attachment i ring are located in the
openings in the meat grinder casing 6.
♦ When everything has been attached correctly, screw the ring
clamp t back on hand-tight.
♦ Assemble the meat grinder casing 6 as described under
"Assembling the meat grinder".
Assembling the cookie attachments
Unfold the fold-out page. There you will find the step-by-step illustra-
tions for assembling the appliance.
♦ Remove the meat grinder casing 6 as described under
"Assembling the meat grinder".
♦ Disassemble any attachments that might be fitted and clean the
meat grinder casing 6.
►To use the cookie attachment 1, neither the cross blade e with
the spring w nor a cutting or sausage disc r/u are required!
Remove them from the meat grinder casing 6 if necessary.
IB_338781_SFW300A2_LB9.indb 10 09.01.20 11:14

SFW 300 A2 US-EN │ 11 ■
♦ Coat all metal parts with cooking oil.
♦ Pull the pattern strips 1 away from the front of the cookie
attachment 1.
♦ First place the plastic disc and then the metal disc of the cookie
attachment 1 into the meat grinder casing 6 (see fold-out side).
Insert the cookie attachment 1, so that the fixings on the cookie
attachment 1 are located in the openings in the meat grinder
casing 6.
♦ After everything has been correctly assembled, screw the ring
clamp t back on hand-tight.
♦ Put the pattern strips 1 back on the front of the cookie attachment
1. Ensure that the grip on the pattern strips 1 points away from
the appliance. If it does not, you will not be able to adjust the
pattern, which is located directly on the grip.
♦ Assemble the meat grinder casing 6 as described under
"Assembling the meat grinder".
♦ To dismantle it, you must first remove the pattern strips 1 before
you can screw the ring clamp t open and take the cookie
attachment 1 back out.
Fitting the strainer attachment
Unfold the fold-out page – it contains the step-by-step illustrations for
assembling the appliance.
♦ Remove the meat grinder casing 6 as described under
"Assembling the meat grinder".
♦ Remove any attachments that might be fitted and clean the meat
grinder casing 6.
►The transport screw q and the cross blade e with the spring w
are not required for the strainer sieve 0! Remove them from the
meat grinder casing 6 if necessary.
♦ Push the plastic screw 9 into the meat grinder casing 6.
IB_338781_SFW300A2_LB9.indb 11 09.01.20 11:14

SFW 300 A2
■ 12 │ US-EN
♦ Push the strainer sieve 0 over the plastic screw 9 so that the tabs
on the strainer sieve 0 fit into the recesses in the meat grinder
casing 6. The holes of the strainer sieve 0 should be facing
downward.
♦ Once everything has been correctly attached, roll the ring clamp
t over the strainer sieve 0 and screw it on hand-tight.
♦ Fit the meat grinder casing 6 as described under "Assembling
the meat grinder".
♦ Release the locking clamp 7 on the tomato outlet 8.
♦ Place the tomato outlet 8 under the strainer sieve 0by pushing
the tip of the strainer sieve 0 through the small hole in the tomato
outlet 8:
♦ Fasten the locking clamp 7 so that it grips the meat grinder casing
6.
♦ Close the locking clamp 7 by flipping the small closure over the
locking clamp 7.
IB_338781_SFW300A2_LB9.indb 12 09.01.20 11:14

SFW 300 A2 US-EN │ 13 ■
Operation
► Minced meat is very prone to bacterial contamination. Therefore
take care to maintain good hygiene when processing meat. If you
do not, it may cause serious health problems.
► Push the food into the feeding shaft only with the round food
pusher 2 – never with your fingers, forks, spoons or similar objects.
That could lead to physical injury and also damage the appliance.
► Do not use the appliance continuously for longer than 15 minutes.
To avoid overheating of the appliance, turn it off after prolonged
use and allow it to cool down for approx. 30 minutes.
► NEVER activate the buttons "I" p or "<" s during a change of
rotation direction, if the appliance motor has not come to a
complete stop. This could damage the motor.
► Do not ever push the food so hard that the motor gets audibly slow-
er. This could overburden the machine and damage it.
Operating the appliance
Once the appropriate attachments have been assembled:
♦ Place the appliance where it will be absolutely stable at all times
and where it could never fall off of the work surface or in any
way come into contact with water (due to vibrations or becoming
snagged in the power cord). Vibration is unavoidable while operat-
ing the appliance.
♦ Put the food to be processed in the feeding tray 3 and place a
collecting container at the front under the exit opening.
♦ First check if the On/Off button d(Fig. D) is set to position "O"
and additionally press the button "0" a to make sure that the
appliance is still turned off. Otherwise there is a risk that the appli-
ance could unintentionally start when the plug is inserted into the
power socket.
IB_338781_SFW300A2_LB9.indb 13 09.01.20 11:14

SFW 300 A2
■ 14 │ US-EN
♦ Then insert the plug into a power socket.
♦ Now set the On/Off button dto position "I".
♦ Press the button "I" p to start the appliance.
Processing meat
♦ Use pieces of meat that fit easily into the feeding funnel. If necessary,
cut the meat to size beforehand. Check that the meat does not have
any bones and or tendons.
♦ When you have read and understood all of the instructions on
the topic "Meat", you can use the appliance as described in the
section "Operating the appliance".
Processing sausage meat
♦ Pass meat through the meat grinder twice before using it as
sausage stuffing.
♦ To make sausage stuffing, add some chopped onions, spices and
other ingredients to the minced meat, as per your recipe, and
knead the mixture well. Refrigerate it for 30 minutes before pro-
cessing it further.
♦ Pull one end of the sausage skin (natural or artificial sausage skin)
onto the sausage stuffer attachment z and tie a knot in the other
end. For 35 oz (1 kg) of the filling, you will need approximately 63
inches (1.60 m) of sausage skin.
►Soak the natural sausage skin in lukewarm water for about 3
hours before using it and wring it out before attaching it. This will
make the natural sausage skin more elastic. Natural sausage skins
are available from butcher suppliers close to slaughter houses or
from your local butcher.
♦ The sausage mixture will be pressed into the sausage skin by the
sausage stuffer attachment z. When it is long enough, turn the
appliance off, press the sausage together at the ends and rotate it
a couple of times along its longitudinal axis.
IB_338781_SFW300A2_LB9.indb 14 09.01.20 11:14

SFW 300 A2 US-EN │ 15 ■
►Sausage meat tends to expand when cooked or frozen. Therefore,
to prevent it from bursting, it is best not to overstuff the sausage.
♦ When you have read and understood all of the instructions on the
topic "Sausage", you can use the appliance as described in the
section "Operating the appliance".
Using the kibbeh attachment
With the kibbeh attachment i food can be processed to form hollow
rolls of meat or vegetables, which can then be stuffed as desired.
♦ First put the meat through the meat grinder twice before pressing it
through the kibbeh attachment i.
♦ When you have read and understood all of the instructions on the
topic "Kibbeh-Attachment", you can use the appliance as described
in the section "Operating the appliance".
Making cookies
After you have made the cookie pastry according to your recipe, and
after having assembled the cookie attachment 1:
♦ Line a small baking tray with greaseproof paper (parchment pa-
per) and place or hold it directly under the exit opening at the front
of the appliance.
♦ Press pastry evenly into the meat grinder casing 6 – the transport
screw qthen pushes it through the selected design on the design
motif strip of the cookie attachment 1.
♦ When the cookie is the required length, stop the appliance and
break the pastry off at the exit opening. Lay the cookies on the
baking tray.
♦ When you have read and understood all of the instructions on the
topic "Cookies", you can use the appliance as described in the
section "Operating the appliance".
IB_338781_SFW300A2_LB9.indb 15 09.01.20 11:14

SFW 300 A2
■ 16 │ US-EN
Straining tomatoes
♦ Place a container under the tomato outlet 8.
♦ Place a container at the front under the strainer sieve 0.
♦ Quarter the tomatoes and push them into the meat grinder
casing 6 slowly and evenly.
The plastic screw 9 pushes the tomatoes through the strainer sieve
0. The strained tomatoes fall into the tomato outlet 8.
The tomato skin is ejected from the strainer sieve 0 at the front
of the appliance.
►If tomato juice starts leaking from the screw joints of the strainer
sieve 0, it may be caused by any of the following:
–You are working too fast.
–You are using too much pressure to press the tomato pieces
into the appliance.
–The tomato pieces are too large.
Try working more slowly, press the tomato pieces gently into the
appliance and cut the tomatoes into smaller pieces.
♦ Once you have read and understood all of the instructions in the
section "Straining tomatoes", you can use the appliance as de-
scribed in the section "Operating the appliance".
Malfunction
If the drive is blocked by accumulated food:
■ Press the button "0" a to stop the meat grinder.
■ Press and hold the button "<" s. The appliance will now run in the
reverse direction. This enables you to transport the food which has
become stuck a short way backward, so the motor can run freely
again.
■ When the drive runs smoothly again, release the "<" s button.
■ Press the button "I" p to restart the meat grinder.
■ If this step does not successfully clear the drive, clean the appli-
ance as described in the section "Cleaning".
IB_338781_SFW300A2_LB9.indb 16 09.01.20 11:14

SFW 300 A2 US-EN │ 17 ■
Should the motor suddenly stop, it could be due to automatic
activation of the internal overload fuse. This is intended to
protect the motor.
■ Turn the appliance off and allow it cool down for approximately
30 minutes before continuing to use it.
■ Should this not work, wait another 15 minutes.
■ If it still does not function at the end of this period, it indicates a
technical problem. In this case, contact the customer service center.
If the power cord is damaged or the accessories are visibly
damaged:
■ Immediately turn the appliance off!
■ If this is not possible without risk to personal safety, disconnect the
plug from the power socket.
■ Arrange for the defective parts to be repaired by customer service
before reusing the appliance.
Cleaning
► Before cleaning the appliance, disconnect the power plug from
the power socket! This helps avert accidents caused by accidental
turning on of the appliance and prevents electric shocks.
Cleaning the motor block
► Never immerse the motor block 5 in water or any other
liquid! Should this occur, you are at risk of a potentially fatal
electric shock if permeating moisture makes contact with the
electrical wiring.
► Never use detergents, abrasive cleaners or solvents. They could
damage the appliance and leave residues on the food.
IB_338781_SFW300A2_LB9.indb 17 09.01.20 11:14

SFW 300 A2
■ 18 │ US-EN
♦ Clean the exterior surfaces and the power cord with a slightly
damp cloth. For stubborn dirt, add mild detergent to the cloth.
Afterwards, wipe it down with a cloth moistened only with fresh
water to ensure that all detergent is removed. Dry the appliance
well before reusing it.
Cleaning the accessories
► The cross blade e is very sharp! Always take care when handling
and cleaning the appliance. Risk of injury!
♦ Clean the accessories that could come in contact with food, with
hot water and a household detergent suitable for use with foods.
►We recommend using a bottle brush to clean the strainer sieve 0.
This makes it easier to clean the small holes.
► The plastic part of the cookie attachment 1, the food
pusher 2, the sausage stuffer attachment z, and the
kibbeh attachment i are dishwasher safe.
►Place the plastic parts in the upper basket of the dishwasher, if
possible, and make sure that none of the parts can get stuck. Oth-
erwise, the plastic parts could become deformed!
♦ Dry all parts thoroughly before reusing the appliance.
►Apply a light coating of cooking oil to all metallic components
after each cleaning. Otherwise, metal parts can discolor!
IB_338781_SFW300A2_LB9.indb 18 09.01.20 11:14

SFW 300 A2 US-EN │ 19 ■
Storage
♦ Wind the power cord clockwise around the cable retainer 4 on
the underside of the appliance and secure it in place as shown
below. This keeps it safe from damage:
♦ After drying the metal attachments, coat them lightly with some
cooking oil – if you are not going to use the appliance immediately.
This will protect them from corrosion.
♦ Store the appliance in a clean and dry location.
IB_338781_SFW300A2_LB9.indb 19 09.01.20 11:14

SFW 300 A2
■ 20 │ US-EN
Disposal
Disposal of the appliance
Electrical appliances may not be thrown away as part of normal
household trash. If you can no longer use your electric appliance,
dispose of it in accordance with the legal provisions applicable in
your state. This will ensure that old electric appliances are recycled
and environmental pollution is kept to a minimum. Further information
about disposal is available on the internet at www.epa.gov.
Disposal of the packaging
The packaging is made of environmentally friendly materials
that can be disposed of at your local recycling center.
Note the marking on the different packaging materials and
separate them as necessary. The packaging materials are
marked with abbreviations (a) and numbers (b) with the
following meanings:
1–7: Plastics
20–22: Paper and cardboard
80–98: Composites
IB_338781_SFW300A2_LB9.indb 20 09.01.20 11:15

SFW 300 A2 US-EN │ 21 ■
Appendix
Recipes
Kibbeh/Kubbe
Ingredients for the mince filling
14 oz (400 g) lean beef or lamb
2 onions
2 cups (0.35 oz / 10 g) flour
0.9 oz (25 g) coarsely chopped pine nuts
½ tsp. each of ground allspice, cinnamon, cumin, caraway,
cloves, nutmeg
Salt and pepper
Ingredients for the shell
17.7 oz (500 g) bulgur wheat (soaked)
17.7 oz (500 g) lean beef or lamb
1 onion
1 pinch black pepper
1 pinch chili powder
Mince filling
Prepare the mince filling first and leave it to cool while you prepare
the shell.
Chop the meat twice with the mincer (using first the coarse, then the
fine perforated disc r). Mix the meat, flour, pine nuts, and spices
well. Chop and sear the onions. Add the mince and mix it with the
onions. Thoroughly fry the mixture, then let it cool.
Shell
Chop the meat for the shell twice with the mincer (using first the
coarse, then the fine perforated disc r) and mix it with the bulgur
wheat, chopped onion and spices. Process the mass twice more using
the mincer. Replace the perforated disc r with the kibbeh attachment
i (see section "Assembling the kibbeh attachment") and make
kibbeh shells of approx. 2.8 inch (7 cm) length.
IB_338781_SFW300A2_LB9.indb 21 09.01.20 11:15

SFW 300 A2
■ 22 │ US-EN
Preparation
Fill each kibbeh shell with the mince mixture as soon as it is made,
pinching the ends together to create small pouches. Deep-fry the
finished kibbeh in hot oil (374 °F / 190 °C) for approximately
3 minutes. They should have a golden brown color.
Meat rolls
Ingredients for the mince shell
16 oz (450 g) of lean lamb, veal or beef
2 cups (5.3 oz / 150 g) flour
1 tsp. pimento (type of pepper)
1 tsp. nutmeg
1 pinch chili powder
1 pinch black pepper
Ingredients for the meat filling
24.7 oz (700 g) lamb
1 ½ tbsp. olive oil
1 ½ tbsp. onions, finely chopped
½ tsp. pimento (type of pepper)
½ tsp. salt
1 ½ tbsp. flour
Preparation
Pass the meat for the wrapping through the meat grinder twice (using
first the medium-sized, then the fine perforated disc r) and then
combine it with the ingredients. Then pass this mixture through the
meat grinder twice. Exchange the cutting disc r for the kibbeh
attachment i (see section "Using the kibbeh attachment").
Shape the kibbeh wrappers with the kibbeh attachment i and then
freeze them.
IB_338781_SFW300A2_LB9.indb 22 09.01.20 11:15

SFW 300 A2 US-EN │ 23 ■
Filling
Pass the meat through the meat grinder twice (using first the medium-
sized, then the fine perforated disc r). Sauté the onions and mix
them well with the meat and other ingredients. Fill the kibbeh
wrappers and fry them until done.
Alternative Fillings:
9 oz (250 g) steamed broccoli
or 9 oz (250 g) steamed zucchini
or 9 oz (250 g) cooked rice
Fresh Sausages
Ingredients
10.6 oz (300 g) lean beef
17.7 oz (500 g) lean pork
7 oz (200 g) shoulder bacon
0.8 oz (20 g) salt
½ tsp. ground white pepper
1 tsp. caraway
½ tsp. nutmeg
Preparation
Pass the beef, pork and bacon through the meat grinder twice.
Add the mixed spices and salt and thoroughly knead for 5 minutes.
Place the sausage filling in the refrigerator for approx. 30 minutes.
Fill the skins with sausage meat as detailed (see section "Processing
sausage meat") and make sausages of approx. 10 inches (25 cm)
in length.
Grill the sausages well and eat them on the same day.
IB_338781_SFW300A2_LB9.indb 23 09.01.20 11:15

SFW 300 A2
■ 24 │ US-EN
Cookies
Ingredients
17.7 oz (500 g) butter
2 cups (17.7 oz / 500 g) sugar
2 - 3 packets of vanilla sugar
1 packet of vanilla custard
1/4 tsp. salt
1 egg
4 egg yolks
28 oz (800 g) plain flour
2 tbsp. baking powder
7 oz (200 g) ground (blanched) almonds
Zest of a lemon
Preparation
Beat the butter until fluffy. Add the remaining ingredients one after
another and knead well into the dough. Cover the finished dough and
allow it to stay for approximately 12 hours in the fridge (e.g. overnight).
Then pass it through the meat grinder with the cookie attachment 1.
Place the cookies on a baking tray lined with parchment paper. Bake
the cookies in a preheated oven at 356 °F (180 °C) for approx. 10 -
15 minutes until golden brown.
Technical specifications
Voltage 120 V ∼ (AC), 60 Hz
Power consumption 300 W
Locked motor power 1000 W
All parts of this appliance that come
into contact with food are food-safe.
Short time duty (maximum load) 15 minutes
Short time duty (maximum load)
The short time duty (maximum load, continuous operation) specifies
how long an appliance may be used without the motor overheating
and becoming damaged. After the appliance has run for this amount
of time, it must be turned off until the motor has cooled down.
IB_338781_SFW300A2_LB9.indb 24 09.01.20 11:15

SFW 300 A2 US-EN │ 25 ■
3 year limited warranty
What does this warranty cover?
The warranty covers:
▯ Damage, breakage or inoperability due to defect.
▯ Damage not caused by normal wear and tear or failure to follow the
safety and maintenance instructions provided in the user manual.
What is not covered by the warranty?
The warranty does not cover damage caused by:
▯ Normal wear and tear of the product, including fragile parts (such
as switches, glass, etc.);
▯ Improper use or transport;
▯ Disregarding safety and maintenance instructions;
▯ Accidents or acts of nature (e.g. lightning, fire, water, etc.);
▯ Tampering with the product (such as removing cover, unscrewing
screws etc.)
Consequential and incidental damages are also not covered under
this warranty. However, some states do not allow the exclusion or
limitation of incidental or consequential damages, so this limitation or
exclusion may not apply to you.
What is the period of coverage and warranty resolution?
The warranty is for 3 years from the date of purchase.
At our discretion, product will either be refunded or replaced.
What will we not do?
We will not:
▯ Start a new warranty period upon product exchange;
▯ Repair product.
IB_338781_SFW300A2_LB9.indb 25 09.01.20 11:15

SFW 300 A2
■ 26 │ US-EN
How to process the warranty?
To initiate, please:
▯ Call customer service at 1 (844) 543-5872
▯ Visit the Website Customer Service Platform at
www.lidl.com/contact-us
or
▯ Visit a LIDL store for further assistance
To ensure the quickest warranty return process, please have the
following available:
▯ The original sales receipt that includes the date purchased;
▯ The product and manual in the original package;
▯ A statement of the problem.
What must you do to keep the warranty in effect?
▯ Retain the original receipt;
▯ Follow all product instructions;
▯ Do not repair or modify the product.
How does state law relate to this warranty?
This warranty gives you specific legal rights, and you may also have
other rights which vary from state to state. All implied warranties are
limited by the duration and terms of this warranty. Some states do not
allow limitations on how long an implied warranty lasts, so the above
limitation may not apply to you.
Distributor
LIDL US LLC.
ARLINGTON
VA 22202
IB_338781_SFW300A2_LB9.indb 26 09.01.20 11:15

SFW 300 A2 US-ES │ 27 ■
Contenido
Introducción ..........................................28
Tipos de advertencias ..................................
28
Seguridad ...........................................
29
Instrucciones de seguridad ....................................... 29
Información importante sobre el cable .............................. 31
Uso previsto ..................................................31
Partes incluidas y descripción del dispositivo ..............32
Desempaque .........................................33
Armado y desarmado .................................
33
Armado del molino de carne .....................................34
Montaje del accesorio de relleno de embutido ......................35
Montaje del accesorio para kibbeh ................................36
Montaje de los accesorios para galletas ............................36
Colocación del accesorio colador .................................37
Operación ...........................................
39
Operación del dispositivo .......................................39
Procesamiento de carne .........................................40
Procesamiento de carne de embutido ..............................40
Uso del accesorio para kibbeh ...................................41
Preparación de galletas .........................................42
Colado de tomates ............................................. 42
Problema ............................................
43
Limpieza ............................................
44
Limpieza del bloque del motor ....................................44
Limpieza de los accesorios ....................................... 45
Almacenamiento ......................................46
Eliminación ..........................................
47
Eliminación del dispositivo .......................................47
Eliminación del empaque ........................................47
Apéndice ............................................
48
Recetas ......................................................48
Especificaciones técnicas ........................................52
Garantía limitada de 3 años .....................................52
Importador ...................................................54
IB_338781_SFW300A2_LB9.indb 27 09.01.20 11:15

SFW 300 A2
■ 28 │ US-ES
Introducción
Felicidades por la compra de su nuevo dispositivo.
Ha seleccionado un producto de alta calidad. El instructivo de opera-
ción es parte de este producto. Contiene información importante sobre
seguridad, uso y eliminación. Antes de usar el producto, familiarícese
con todas las instrucciones de operación y seguridad.
Use el producto solamente como se describe y para la variedad
de aplicaciones especificada. También entregue este instructivo de
operación a cualquier propietario futuro.
Tipos de advertencias
Los siguientes tipos de advertencias se usan en este instructivo de
operación:
Este es el símbolo de alerta de seguridad. Se usa para
alertarle sobre peligros de lesiones potenciales. Obedezca
todos los mensajes de seguridad a continuación de este
símbolo para prevenir posibles lesiones y la muerte.
► ADVERTENCIA indica una situación peligrosa que, si no se evita,
podría provocar la muerte o lesiones graves.
► PRECAUCIÓN indica una situación peligrosa que, si no se evita,
podría provocar lesiones leves o moderadas.
► AVISO indica información que se considera importante, pero no
está relacionada con peligro (por ejemplo, mensajes relacionados
con daños materiales).
►Un consejo indica información adicional que facilita el manejo del
dispositivo.
IB_338781_SFW300A2_LB9.indb 28 09.01.20 11:15

SFW 300 A2 US-ES │ 29 ■
Seguridad
Instrucciones de seguridad
Esta sección contiene instrucciones de seguridad importantes para el uso del
dispositivo. Este dispositivo cumple con las normas de seguridad legales. El uso
inadecuado puede provocar lesiones personales y daños materiales. Para redu-
cir el riesgo de quemaduras, fuego, descarga eléctrica o lesiones a personas:
INSTRUCCIONES IMPORTANTES
DE SEGURIDAD
Al usar dispositivos eléctricos, siempre deben observarse precauciones
básicas de seguridad, entre otras:
1. LEA TODAS LAS INSTRUCCIONES.
2. ¡Nunca sumerja el bloque del motor en agua o cualquier otro líqui-
do! Si lo hace, podría someterse a una descarga eléctrica potencial-
mente fatal. Si el dispositivo cae en cualquier tipo de líquido, retire la
clavija de la toma de corriente inmediatamente. Deje de usar el dis-
positivo y llame a la línea de contacto directo de servicio al cliente.
3. Nunca toque el dispositivo y el cable de conexión con las manos
mojadas o húmedas. Asegúrese de que el cable de alimentación
nunca se moje o humedezca cuando el dispositivo esté en uso. No
permita que el cable cuelgue sobre el borde de una mesa o barra.
Tienda el cable de tal manera que no quede atrapado o resulte
dañado de alguna forma.
4. Asegúrese de que el dispositivo, el cable de alimentación y la
clavija no entren en contacto con fuentes de calor tales como
planchas térmicas o flamas abiertas.
5. No opere ningún dispositivo con el cable o la clavija dañados o
después de que el mismo haya fallado, se haya caído o haya sido
dañado de alguna manera. Devuelva el dispositivo al proveedor de
servicios autorizado más cercano para que lo revise, repare o ajuste.
6. Solicite que un técnico calificado o el departamento de servicio
al cliente sustituya las clavijas y cables de alimentación dañados
tan pronto como sea posible para evitar el riesgo de lesiones.
IB_338781_SFW300A2_LB9.indb 29 09.01.20 11:15

SFW 300 A2
■ 30 │ US-ES
7. Nunca abra la carcasa. Un técnico calificado o nuestro departa-
mento de servicio al cliente debe realizar todas las reparaciones.
Las reparaciones inadecuadas pueden poner en riesgo al usuario.
También invalidarán cualquier derecho de garantía.
8. Este dispositivo puede ser usado por personas con capacidades
físicas, sensoriales o mentales limitadas o falta de experiencia o
conocimiento, con la condición de que sean supervisadas o se les
haya explicado cómo usar el dispositivo en forma segura y estén
conscientes de los riesgos potenciales.
9. Los niños no deben usar este dispositivo.
10.
Los niños no pueden llevar a cabo las tareas de limpieza y
mantenimiento, a menos que sean supervisados.
11.
El dispositivo y su cable de conexión deben mantenerse lejos de
los niños.
12. Se requiere supervisión cercana cuando el dispositivo sea
usado por niños o cerca de ellos.
13. No permita que los niños usen el dispositivo como juguete.
14.
¡Desconecte siempre la clavija de la toma de corriente antes de colo-
car o retirar partes, antes de mover el dispositivo, en caso de mal fun-
cionamiento, antes de limpiarlo y cuando no está en uso! Nunca jale
el cable de alimentación; siempre jale directamente la clavija misma.
15.
No deje el dispositivo sin supervisión cuando esté listo para
usarlo. Para evitar encender el dispositivo accidentalmente,
desconéctelo siempre después de usarlo o entre descansos.
16.
Para desconectar el dispositivo completamente de la alimen-
tación eléctrica, la clavija debe desconectarse de la toma de
corriente. El dispositivo debe colocarse de tal forma que usted
tenga acceso sin restricciones a la toma de corriente en todo
momento y pueda desconectar la clavija inmediatamente en
caso de emergencia.
17. Nunca ponga la mano en las aberturas del dispositivo. Nunca
inserte objetos de ningún tipo en las aberturas, excepto el empu-
jador de alimentos adecuado y los alimentos que va a procesar.
¡Si lo hace, existe un riesgo serio de accidentes!
IB_338781_SFW300A2_LB9.indb 30 09.01.20 11:15

SFW 300 A2 US-ES │ 31 ■
18. ¡El aspa en cruz está muy afilada! Tenga cuidado siempre que
maneje y limpie el dispositivo.
19.
Nunca inserte alimentos con la mano. Use siempre el empujador
de alimentos.
20.
No use los dedos para raspar alimentos del disco de descarga cuan-
do el dispositivo está funcionando. Esto puede causar cortaduras.
21.
Nunca use el dispositivo si no tiene carga. Esto podría causar
daños irreparables al dispositivo.
22.
El uso de accesorios no recomendados ni vendidos por el
fabricante puede provocar incendios, descargas eléctricas o
lesiones.
23. No use el dispositivo en exteriores.
24. No use el dispositivo para ningún otro fin que no sea el previsto.
¡El uso incorrecto del dispositivo puede ocasionar lesiones!
25. Evitar el contacto con partes móviles.
26. Retire el enchufe de la red eléctrica, antes de limpiar, montar o
mover piezas.
EXCLUSIVO PARA USO DOMÉSTICO.
CONSERVE ESTE INSTRUCTIVO.
Información importante sobre el cable
Este dispositivo tiene una clavija polarizada (una patilla es más ancha
que la otra). Para reducir el riesgo de descargas eléctricas, solo hay
una manera en que esta clavija puede introducirse en un contacto
polarizado. Si la clavija no se introduce por completo en el contacto,
inviértala. Si aun así no se introduce, póngase en contacto con un
electricista calificado. No intente modificar el enchufe de ningún modo.
Uso previsto
Este dispositivo está diseñado exclusivamente para preparar alimentos
en cantidades previstas en hogares privados:
▯ Picar carne fresca,
▯ Hacer embutidos con envolturas naturales o artificiales de embutido,
▯ Preparar galletas,
▯ Colar tomates.
IB_338781_SFW300A2_LB9.indb 31 09.01.20 11:15

SFW 300 A2
■ 32 │ US-ES
Este dispositivo no está diseñado para procesar alimentos congelados
u otros alimentos duros como huesos o nueces, ni para usarse en
entornos comerciales o industriales.
Partes incluidas y descripción del dispositivo
Figura A:
1 Accesorio para galletas con tiras de modelos
2 Empujador de alimentos
3 Bandeja de alimentación
4 Retén del cable
5 Unidad del motor
6 Tubo del molino de carne
7 Pinza de bloqueo
8 Salida de tomate
9 Tornillo de plástico
0 Colador
q Tornillo de desplazamiento
w Resorte
e Aspa en cruz
r Discos de corte para picado grueso y fino
tAro de sujeción
z Accesorio de relleno de embutido
u Disco de embutido
i Accesorio para kibbeh
Figura B:
o Botón de bloqueo
Figura C:
p Botón "I" (encendido)
a Botón "0" (apagado)
sB "<" (reversa)
dBotón de encendido/apagado
IB_338781_SFW300A2_LB9.indb 32 09.01.20 11:15

SFW 300 A2 US-ES │ 33 ■
Desempaque
► No permita que los niños jueguen con el material de empaque.
¡Riesgo de asfixia!
♦ Retire todas las partes del dispositivo y el instructivo de operación
de la caja.
♦ Retire todos los materiales de empaque y cualquier película
protectora del dispositivo.
►Verifique que el paquete esté completo y no muestre signos
visibles de daño.
►Si la entrega está incompleta o si ha ocurrido daño debido al
empaque defectuoso o durante el transporte, póngase en con-
tacto con la línea directa de servicio al cliente (vea la sección
“Garantía limitada de 3 años”).
Armado y desarmado
► ¡El aspa en cruz e está muy afilada! Tenga siempre cuidado al
manejar el dispositivo. ¡Riesgo de lesiones!
► Todos los accesorios están recubiertos con una película delgada
de aceite para protegerlos de la corrosión. Por lo tanto, limpie con
cuidado todas las partes antes de usar el dispositivo por primera
vez, como se describe con detalle en la sección "Limpieza".
Después del uso, aplique siempre una capa ligera de aceite de
cocinar en los componentes metálicos.
►Antes de usar el dispositivo por primera vez, retire la película
protectora del panel de control.
IB_338781_SFW300A2_LB9.indb 33 09.01.20 11:15

SFW 300 A2
■ 34 │ US-ES
Armado del molino de carne
Extienda la página desplegable. Ahí encontrará imágenes con los
pasos para armar el dispositivo.
♦ Coloque el tornillo de desplazamiento q en el tubo del molino de
carne 6.
♦ Coloque el resorte w en el tornillo de desplazamiento q.
♦ Luego coloque el aspa en cruz e de manera que el lado afilado
quede opuesto al resorte w. Asegúrese de que la abertura
cuadrada del aspa en cruz e quede colocada correctamente en
el eje cuadrado.
► ¡El dispositivo se dañará si el aspa en cruz e se inserta invertida!
♦ Seleccione el disco de corte adecuado r.
♦ Coloque el disco de corte r seleccionado en el tubo del molino
de carne 6 de manera que los fijadores del disco de corte r que-
den ubicados en las aberturas del tubo del molino de carne 6.
♦ Una vez que todo esté armado correctamente, apriete el aro de
sujeción t nuevamente a mano.
♦ El tubo del molino de carne 6 prearmado está conectado
mediante un conector de bayoneta a la unidad del motor 5:
IB_338781_SFW300A2_LB9.indb 34 09.01.20 11:15

SFW 300 A2 US-ES │ 35 ■
–Inserte el tubo del molino de carne 6 en la unidad del motor 5
de manera que la flecha en el tubo del molino de carne 6
quede alineada con el símbolo en la unidad de motor 5.
El botón de bloqueo o se presiona automáticamente (Fig. B).
–Presione ligeramente el tubo del molino de carne 6 y al
mismo tiempo gire el eje de alimentación del tubo del molino
de carne 6 hacia la posición media (Fig. B) de manera que
la flecha en el eje de alimentación apunte hacia el símbolo .
Cuando el tubo del molino de carne 6 se conecte, el botón
de bloqueo o salta.
–Por último, coloque la bandeja de alimentación 3 sobre el
embudo de alimentación.
–Para desarmarlo, presione el botón de bloqueo o y gire el
embudo de alimentación hacia la derecha (Fig. B) . Ahora
puede extraer el tubo del molino de carne 6.
Montaje del accesorio de relleno de embutido
Extienda la página desplegable; ahí encontrará imágenes con los
pasos para armar el dispositivo.
♦ Retire el tubo del molino de carne 6 como se describe en
"Armado del molino de carne".
♦ Desmonte todas las partes que están colocadas en el tubo del
molino de carne 6 y límpielas.
♦ Recubra todas las partes con aceite de cocinar.
♦ Coloque el tornillo de desplazamiento q, el resorte w y el aspa
en cruz e nuevamente en el tubo del molino de carne 6.
♦ Inserte el disco de embutido u de manera que los fijadores del
disco de embutido u queden colocados en las aberturas del tubo
del molino de carne 6.
♦ Entonces coloque el accesorio de relleno de embutido z antes
que el disco de embutido u.
♦ Apriete el aro de sujeción t a mano.
♦ Arme el tubo del molino de carne 6 como se describe en
"Armado del molino de carne".
IB_338781_SFW300A2_LB9.indb 35 09.01.20 11:15

SFW 300 A2
■ 36 │ US-ES
Montaje del accesorio para kibbeh
Extienda la página desplegable. Ahí encontrará imágenes con los
pasos para armar el dispositivo.
♦ Retire el tubo del molino de carne 6 como se describe en
"Armado del molino de carne".
♦ Desmonte cualquier accesorio que pudiera estar colocado y limpie
el tubo del molino de carne 6.
►¡Para usar el accesorio para kibbeh i, no se necesita el aspa
en cruz e con el resorte w ni un disco de corte o de embutido
r/u! Retírelos del tubo del molino de carne 6 si es necesario.
♦ Recubra todas las partes con aceite de cocinar.
♦ Inserte las dos partes de plástico del accesorio para kibbeh i de
manera que los fijadores en el anillo del accesorio para kibbeh i
inferior queden ubicados en las aberturas del tubo del molino de
carne 6.
♦ Cuando todo se haya colocado correctamente, apriete el aro de
sujeción t nuevamente a mano.
♦ Arme el tubo del molino de carne 6 como se describe en
"Armado del molino de carne".
Montaje de los accesorios para galletas
Extienda la página desplegable. Ahí encontrará imágenes con los
pasos para armar el dispositivo.
♦ Retire el tubo del molino de carne 6 como se describe en
"Armado del molino de carne".
♦ Desmonte cualquier accesorio que pudiera estar colocado y limpie
el tubo del molino de carne 6.
►¡Para usar el accesorio para galletas 1, no se necesita el aspa
en cruz e con el resorte w ni un disco de corte o de embutido
r/u! Retírelos del tubo del molino de carne 6 si es necesario.
IB_338781_SFW300A2_LB9.indb 36 09.01.20 11:15

SFW 300 A2 US-ES │ 37 ■
♦ Recubra todas las partes con aceite de cocinar.
♦ Retire las tiras de modelos 1 de la parte anterior del accesorio
para galletas 1.
♦ Coloque primero el disco de plástico y luego el disco de metal del
accesorio para galletas 1 en el tubo del molino de carne 6 (vea
el lado desplegable). Inserte el accesorio para galletas 1, de
manera que los fijadores del accesorio para galletas 1 queden
ubicados en las aberturas del tubo del molino de carne 6.
♦ Una vez que todo esté armado correctamente, apriete el aro de
sujeción t nuevamente a mano.
♦ Coloque las tiras de modelos 1 nuevamente en la parte anterior
del accesorio para galletas 1. Asegúrese de que la agarradera
de las tiras de modelos 1 apunte en dirección opuesta al disposi-
tivo. Si no lo hace, no podrá ajustar el modelo, que se encuentra
justo sobre la agarradera.
♦ Arme el tubo del molino de carne 6 como se describe en
"Armado del molino de carne".
♦ Para desmontarlo, primero debe retirar las tiras de modelos 1
para poder aflojar el aro de sujeción t y quitar el accesorio para
galletas 1 nuevamente.
Colocación del accesorio colador
Extienda la página desplegable; que contiene imágenes con los
pasos para armar el dispositivo.
♦ Retire el tubo del molino de carne 6 como se describe en
"Armado del molino de carne".
♦ Retire cualquier accesorio que pudiera estar colocado y limpie el
tubo del molino de carne 6.
►¡El tornillo de desplazamiento q y el aspa en cruz e con el
resorte w no se requieren para el colador 0! Retírelos del tubo
del molino de carne 6 si es necesario.
IB_338781_SFW300A2_LB9.indb 37 09.01.20 11:15

SFW 300 A2
■ 38 │ US-ES
♦ Empuje el tornillo de plástico 9 dentro del tubo del molino de
carne 6.
♦ Empuje el colador 0 sobre el tornillo de plástico 9 de manera
que las pestañas del colador 0 entren en las depresiones del
tubo del molino de carne 6. Los agujeros del colador 0 deberán
quedar hacia abajo.
♦ Una vez que todo se ha colocado correctamente, deslice el aro de
sujeción t sobre el colador 0 y atorníllelo a mano.
♦ Coloque el tubo del molino de carne 6 como se describe en
"Armado del molino de carne".
♦ Suelte la pinza de bloqueo 7 en la salida de tomate 8.
♦ Coloque la salida de tomate 8 debajo del colador 0empujan-
do la punta del colador 0 a través del agujero pequeño en la
salida de tomate 8:
♦ Sujete la pinza de bloqueo 7 de manera que agarre el tubo del
molino de carne 6.
♦ Cierre la pinza de bloqueo 7 plegando el cierre pequeño sobre
la pinza de bloqueo 7.
IB_338781_SFW300A2_LB9.indb 38 09.01.20 11:15

SFW 300 A2 US-ES │ 39 ■
Operación
► La carne molida es muy susceptible a la contaminación bacteria-
na. Por lo tanto, tenga cuidado de mantener una higiene acepta-
ble al procesar carne. Si no lo hace, esto puede causar problemas
serios de salud.
► Empuje el alimento hacia el eje de alimentación solamente con el
empujador de alimentos 2 redondeado; nunca use los dedos, te-
nedores, cucharas u objetos similares. Esto podría causar lesiones
y daños al dispositivo.
► No use el dispositivo continuamente durante más de 15 minutos.
Para evitar sobrecalentamiento del dispositivo, apáguelo después
del uso prolongado y permita que se enfríe durante aproximada-
mente 30 minutos.
► NUNCA active los botones "I" p o "<" s durante un cambio de
dirección de rotación si el dispositivo no se ha detenido completa-
mente. Esto podría dañar el motor.
► Nunca empuje el alimento con tanta fuerza que la velocidad del
motor se reduzca de manera audible. Esto podría sobrecargar el
dispositivo y dañarlo.
Operación del dispositivo
Una vez que se hayan colocado los accesorios adecuados:
♦ Coloque el dispositivo donde quede absolutamente estable en
todo momento y donde nunca pueda caerse de la superficie de
trabajo o de ninguna forma hacer contacto con el agua (debido
a vibraciones o a enredarse con el cable de alimentación). La
vibración es inevitable al operar el dispositivo.
♦ Coloque el alimento que va a procesar en la bandeja de alimenta-
ción 3 y coloque un recipiente de recolección en la parte anterior
debajo de la abertura de salida.
IB_338781_SFW300A2_LB9.indb 39 09.01.20 11:15

SFW 300 A2
■ 40 │ US-ES
♦ Revise primero si el botón de encendido/apagado d(Fig. D) está
colocado en la posición "0" y presione además el botón
"0" a para asegurarse de que el dispositivo aún esté apagado.
De lo contrario, existe el riesgo de que el dispositivo pudiera
arrancar accidentalmente cuando la clavija se inserte en la toma
de corriente.
♦ Posteriormente inserte la clavija en una toma de corriente.
♦ Ahora coloque el botón de encendido/apagado den la
posición "I".
♦ Presione el botón "I" p para arrancar el dispositivo.
Procesamiento de carne
♦ Use piezas de carne que quepan fácilmente en el embudo de ali-
mentación. Si es necesario, corte antes la carne según el tamaño
necesario. Asegúrese de que la carne no tenga huesos o tendo-
nes.
♦ Cuando haya leído y entendido todas las instrucciones sobre el
tema "Carne", puede usar el dispositivo como se describe en la
sección "Operación del dispositivo".
Procesamiento de carne de embutido
♦ Pase la carne a través del molino de carne dos veces antes de
usarla como relleno para embutido.
♦ Para hacer relleno para embutido, agregue cebolla picada,
especias y otros ingredientes a la carne picada, según su receta,
y amase bien la mezcla. Refrigere durante 30 minutos antes de
continuar procesándola.
♦ Jale un extremo de la envoltura para el embutido (envoltura para
embutido natural o artificial) hacia el accesorio para relleno de
embutido z y haga un nudo en el otro extremo. Para 35 oz
(1 kg) del relleno, necesitará aproximadamente 63 pulgadas
(1.60 m) de envoltura para embutido.
IB_338781_SFW300A2_LB9.indb 40 09.01.20 11:15

SFW 300 A2 US-ES │ 41 ■
►Enjuague la envoltura para embutido en agua tibia durante unas
3 horas antes de usarla y exprímala antes de adherirla. Esto hará
más elástica la envoltura natural para embutido. Puede encontrar
envolturas naturales para embutido con carniceros que están
ubicados cerca de rastros o con su carnicero local.
♦ La mezcla de embutido se presionará dentro de la envoltura para
embutido con el accesorio para relleno de embutido z. Cuando
este sea suficientemente largo, apague el dispositivo, presione el
embutido por los extremos y gírelo un par de veces a lo largo de
su eje longitudinal.
►La carne de embutido tiende a expandirse cuando se cocina o se
congela. Por lo tanto, para prevenir que estalle, es recomendable
no rellenar en exceso con embutido.
♦ Cuando haya leído y entendido todas las instrucciones sobre el
tema "Embutido", puede usar el dispositivo como se describe en la
sección "Operación del dispositivo".
Uso del accesorio para kibbeh
Con el accesorio para kibbeh i, puede procesarse alimento para
formar rollos huecos de carne o verduras, los cuales pueden rellenar-
se entonces como se desee.
♦ Pase primero la carne por el molino dos veces antes de comprimir-
la a través del accesorio para kibbeh i.
♦ Cuando haya leído y entendido todas las instrucciones sobre el
tema "Accesorio para kibbeh", puede usar el dispositivo como se
describe en la sección "Operación del dispositivo".
IB_338781_SFW300A2_LB9.indb 41 09.01.20 11:15

SFW 300 A2
■ 42 │ US-ES
Preparación de galletas
Una vez que haya preparado la masa para galletas de acuerdo con
su receta, y después de haber colocado el accesorio para galletas 1:
♦ Proteja una bandeja pequeña para hornear con papel resistente al
aceite (papel pergamino) y colóquela o sosténgala justo debajo
de la abertura de salida en frente del dispositivo.
♦ Presione la pasta firmemente dentro del tubo del molino de carne
6; el tornillo de desplazamiento qla empuja entonces a través
del diseño seleccionado en la cinta de modelos del accesorio
para galletas 1.
♦ Cuando la galleta tenga el largo deseado, detenga el dispositivo
y corte la pasta en la abertura de la salida. Coloque las galletas
en la bandeja para hornear.
♦ Cuando haya leído y entendido todas las instrucciones sobre el
tema "Galletas", puede usar el dispositivo como se describe en la
sección "Operación del dispositivo".
Colado de tomates
♦ Coloque un recipiente debajo de la salida de tomate 8.
♦ Coloque un recipiente en la parte anterior debajo del colador 0.
♦ Parta los tomates en cuartos y empújelos hacia el tubo del molino
de carne 6 lentamente y de manera uniforme.
El tornillo de plástico 9 empuja los tomates a través del colador 0.
Los tomates colados caen en la salida de tomates 8. La cáscara
de los tomates es expulsada del colador 0 en la parte anterior del
dispositivo.
►Si el jugo de tomate comienza a gotear por las uniones del tornillo
del colador 0, la causa puede ser una de las siguientes:
–Está usando el dispositivo demasiado rápido.
–Está ejerciendo demasiada presión sobre las piezas de tomate
hacia el dispositivo.
–Las piezas de tomate son demasiado grandes.
IB_338781_SFW300A2_LB9.indb 42 09.01.20 11:15

SFW 300 A2 US-ES │ 43 ■
Intente procesar más lentamente, presione las piezas de tomate
con más suavidad hacia el dispositivo y corte los tomates en
piezas más pequeñas.
♦ Cuando haya leído y entendido todas las instrucciones sobre el
tema "Colado de tomates", puede usar el dispositivo como se
describe en la sección "Operación del dispositivo".
Problema
Si el motor se bloquea debido a acumulación de alimento:
■ Presione el botón "0" a para detener el molino de carne.
■ Presione y sostenga el botón "<" s. El dispositivo funcionará ahora
en dirección inversa. Esto le permite mover el alimento que está
atascado un poco hacia atrás, de manera que el motor vuelva a
funcionar libremente.
■ Cuando el motor vuelva a funcionar sin dificultad, suelte el botón
"<" s.
■ Presione el botón "I" p para reiniciar el molino de carne.
■ Si este paso no libera el motor, limpie el dispositivo como se
describe en la sección "Limpieza".
En caso de que el motor se detenga repentinamente, podría
deberse a la desactivación automática del fusible de sobre-
carga interno. Esto tiene el objetivo de proteger el motor.
■ Apague el dispositivo y permita que se enfríe durante aproxima-
damente 30 minutos antes de usarlo nuevamente.
■ Si esto no resuelve el problema, espere otros 15 minutos.
■ Si aún no funciona al final de este periodo, esto indica que existe
un problema técnico. En este caso, comuníquese con el centro de
servicio al cliente.
IB_338781_SFW300A2_LB9.indb 43 09.01.20 11:15

SFW 300 A2
■ 44 │ US-ES
Si el cable de alimentación está dañado o los accesorios están
visiblemente dañados:
■ ¡Apague el dispositivo de inmediato!
■ Si esto no es posible sin riesgo para la seguridad personal, desco-
necte la clavija de la toma de corriente.
■ Solicite la reparación de las partes defectuosas al servicio al
cliente antes de volver a usar el dispositivo.
Limpieza
► ¡Antes de limpiar el dispositivo, desconecte la clavija de la toma
de corriente! Esto ayuda a prevenir accidentes debido al encendi-
do accidental del dispositivo y evita descargas eléctricas.
Limpieza del bloque del motor
► ¡Nunca sumerja el bloque del motor 5 en agua o cualquier
otro líquido! En caso de que esto ocurra, usted corre riesgo
de sufrir una descarga eléctrica potencialmente fatal si la
humedad que ingresa hace contacto con el cableado
eléctrico.
► Nunca use detergentes, limpiadores abrasivos o solventes. Estos
podrían dañar el dispositivo y dejar residuos en los alimentos.
♦ Limpie las superficies externas y el cable de alimentación con una
tela ligeramente húmeda. Para suciedad difícil, agregue un deter-
gente suave a la tela. Después, frótelas con una tela humedecida
solamente con agua potable para asegurar que se elimine todo el
detergente. Seque el dispositivo adecuadamente antes de volver a
usarlo.
IB_338781_SFW300A2_LB9.indb 44 09.01.20 11:15

SFW 300 A2 US-ES │ 45 ■
Limpieza de los accesorios
► ¡El aspa en cruz e está muy afilada! Tenga cuidado siempre que
maneje y limpie el dispositivo. ¡Riesgo de lesiones!
♦ Limpie todos los accesorios que pudieran entrar en contacto con
los alimentos con agua caliente y un detergente de uso doméstico
adecuado para alimentos.
►Recomendamos usar un cepillo para botellas para limpiar el cola-
dor 0. Esto facilita la limpieza de los agujeros pequeños.
► La parte de plástico del accesorio para galletas 1, el
empujador de alimentos 2, el accesorio para relleno de
embutido z y el accesorio para kibbeh i pueden
lavarse en máquina lavaplatos.
►Coloque las partes de plástico en la canastilla superior de la
máquina a lavaplatos y asegúrese de que ninguna de las partes
quede atrapada. ¡De lo contrario, las partes podrían deformarse!
♦ Seque todas las partes completamente antes de volver a usar el
dispositivo.
►Aplique una capa delgada de aceite para cocinar a todos los
componentes metálicos después de cada limpieza. ¡De lo
contrario, las partes pueden decolorarse!
IB_338781_SFW300A2_LB9.indb 45 09.01.20 11:15

SFW 300 A2
■ 46 │ US-ES
Almacenamiento
♦ Enrolle el cable de alimentación en sentido de las manecillas del
reloj en el retén del cable 4, en la parte inferior del dispositivo
y asegúrelo en su lugar como se muestra en la imagen. Esto lo
protege contra daño:
♦ Después de secar los accesorios de metal, cúbralos ligeramente
con un poco de aceite para cocinar, si no va a usar el dispositivo
inmediatamente. Esto los protegerá contra la corrosión.
♦ Guarde el dispositivo en un lugar limpio y seco.
IB_338781_SFW300A2_LB9.indb 46 09.01.20 11:15

SFW 300 A2 US-ES │ 47 ■
Eliminación
Eliminación del dispositivo
Los dispositivos eléctricos no deben desecharse como parte de la
basura doméstica normal. Si ya no puede usar su dispositivo eléctri-
co, elimínelo de conformidad con las disposiciones legales aplicables
en su estado. Esto asegura que los dispositivos eléctricos usados
sean reciclados y la contaminación ambiental se mantenga a un nivel
mínimo. Puede encontrar más información sobre la eliminación de
desechos en Internet en www.epa.gov.
Eliminación del empaque
Los materiales de empaque están hechos de materiales que
no dañan el medio ambiente y que puede desechar en su
centro de reciclaje local.
Observe las marcas en los diferentes materiales de
empaque y sepárelos según sea necesario. Los materiales
de empaque están marcados con abreviaturas (a) y
números (b) con los siguientes significados:
1–7: Plásticos
20–22: Papel y cartón
80–98: Materiales compuestos
IB_338781_SFW300A2_LB9.indb 47 09.01.20 11:15

SFW 300 A2
■ 48 │ US-ES
Apéndice
Recetas
Kibbeh/Kipe
Ingredientes para el relleno de carne picada
14 oz (400 g) de carne magra de res o cordero
2 cebollas
2 tazas (0.35 oz / 10 g) de harina
0.9 oz (25 g) de nueces picadas gruesas
½ cucharadita de cada una de pimienta inglesa, canela, comino,
alcaravea, clavo de olor y nuez moscada
Sal y pimienta
Ingredientes para la corteza
17.7 oz (500 g) de trigo seco triturado (remojado)
17.7 oz (500 g) de carne magra de res o cordero
1 cebolla
1 pizca de pimienta negra
1 pizca de chile en polvo
Relleno de carne picada
Prepare el relleno de carne picada primero y déjelo enfriar mientras
prepara la corteza.
Muela la carne dos veces con el molino (use primero el disco grueso
y después el fino perforado r). Mezcle bien la carne, la harina, las
nueces y las especias. Pique y dore las cebollas. Agregue la carne
molida y mezcle con las cebollas. Fría completamente la mezcla y
déjela enfriar.
Corteza
Muela la carne para la corteza dos veces con el molino (use primero
el disco grueso y después el fino perforado r) y mezcle con el trigo
seco triturado, la cebolla picada y las especias. Procese la masa dos
veces más con el molino. Reemplace el disco perforado r con el
accesorio para kibbeh i (vea la sección "Montaje del accesorio
para kibbeh") y prepare las cortezas de kibbeh de aproximadamente
2.8 pulgadas (7 cm) de largo.
IB_338781_SFW300A2_LB9.indb 48 09.01.20 11:15

SFW 300 A2 US-ES │ 49 ■
Preparación
Llene cada corteza de kibbeh con la mezcla de carne picada tan
pronto como esté hecha, presionando los extremos para formar bol-
sas pequeñas. Fría en aceite abundante el kibbeh preparado,
en aceite caliente (374 °F / 190 °C) durante aproximadamente
3 minutos. Este deberá adquirir un color marrón dorado.
Rollos de carne
Ingredientes para la corteza de la carne picada
16 oz (450 g) de carne magra de cordero, ternera o res
2 tazas (5.3 oz / 150 g) de harina
1 cucharadita de pimiento morrón
1 cucharadita de nuez moscada
1 pizca de chile en polvo
1 pizca de pimienta negra
Ingredientes para el relleno de carne
24.7 oz (700 g) de carne de cordero
1 ½ cucharada de aceite de oliva
1 ½ cucharada de cebollas, picadas finamente
½ cucharadita de pimiento morrón
½ cucharadita de sal
1 ½ cucharada de harina
Preparación
Pase la carne para la corteza dos veces por el molino de carne (use
primero el disco de tamaño medio y después el fino perforado r)
y luego combínela con los ingredientes. Luego pase dos veces esta
mezcla por el molino de carne. Cambie el disco de corte r por el
accesorio para kibbeh i (vea la sección "Uso del accesorio para
kibbeh").
Dé forma a las cortezas del kibbeh con el accesorio para kibbeh i
y luego congélelas.
IB_338781_SFW300A2_LB9.indb 49 09.01.20 11:15

SFW 300 A2
■ 50 │ US-ES
Relleno
Pase la carne dos veces por el molino de carne (use primero el disco
de tamaño medio y después el fino perforado r). Sofría las cebo-
llas y mézclelas bien con la carne y los otros ingredientes. Llene las
cortezas de kibbeh y fríalas hasta dorarse.
Rellenos alternativos:
9 oz (250 g) de brócoli cocido al vapor
o 9 oz (250 g) de calabacitas cocidas al vapor
o 9 oz (250 g) de arroz cocido
Embutidos frescos
Ingredientes
10.6 oz (300 g) de carne de res magra
17.7 oz (500 g) de carne de cerdo magra
7 oz (200 g) de tocino de paletilla
0.8 oz (20 g) de sal
½ cucharadita de pimienta blanca molida
1 cucharadita de alcaravea
½ cucharadita de nuez moscada
Preparación
Pase dos veces la carne de res, de cerdo y tocino por el molino de
carne.
Agregue las especias mezcladas y sal completamente amasadas
durante 5 minutos.
Ponga el relleno de embutido en el refrigerador durante aproximada-
mente 30 minutos. Llene las envolturas con carne de embutido como
se describió (vea la sección "Procesamiento de carne de embutido")
y haga embutidos de aproximadamente 10 pulgadas (25 cm) de
largo.
Ase a la parrilla bien los embutidos y consúmalos el mismo día.
IB_338781_SFW300A2_LB9.indb 50 09.01.20 11:15

SFW 300 A2 US-ES │ 51 ■
Galletas
Ingredientes
17.7 oz (500 g) de mantequilla
2 tazas (17.7 oz / 500 g) de azúcar
2 a 3 paquetes de azúcar de vainilla
1 paquete de crema de vainilla
1/4 de cucharadita de sal
1 huevo
4 yemas de huevo
28 oz (800 g) de harina común
2 cucharadas de polvo para hornear
7 oz (200 g) de almendras molidas (blanqueadas)
Jugo de un limón
Preparación
Bata la mantequilla hasta formar espuma. Agregue los ingredientes
restantes uno después de otro y amase bien para formar la pasta.
Cubra la pasta terminada y déjela reposar durante aproximadamen-
te 12 horas en el refrigerador (durante la noche). Luego pásela por
el molino de carne con el accesorio para galletas 1. Coloque las
galletas en una bandeja de hornear cubierta con papel pergamino.
Hornee las galletas en un horno precalentado a 356 °F (180 °C)
durante aproximadamente 10 a 15 minutos hasta que adquieran un
color marrón dorado.
IB_338781_SFW300A2_LB9.indb 51 09.01.20 11:15

SFW 300 A2
■ 52 │ US-ES
Especificaciones técnicas
Voltaje 120 V ~ (CA), 60 Hz
Consumo de energía 300W
Potencia del motor
bloqueada 1000W
Todas las partes de este dispositivo que
entran en contacto con los alimentos
son seguras para los mismos.
Operación de tiempo
corto (carga máxima) 15 minutos
Operación de tiempo corto (carga máxima)
La operación de tiempo corto (carga máxima, operación continua)
especifica cuánto tiempo puede usarse un dispositivo sin que el motor
se sobrecaliente y se dañe. Una vez que el dispositivo haya funciona-
do durante este tiempo, debe apagarse hasta que el motor se enfríe.
Garantía limitada de 3 años
¿Lo que cubre la presente garantía?
La garantía incluye:
▯ Daños, quebraduras o incapacidad para funcionar debido a
defectos.
▯ Daños que no hayan sido causados por el desgaste propio del uso
o por no seguir las instrucciones de seguridad y mantención inclui-
das en el manual para el usuario.
¿Lo que no cubre esta garantía?
La garantía no cubre daños causados por:
▯ El desgaste propio del uso del producto, incluidas las partes frági-
les (como interruptores, piezas de vidrio, etc.).
▯ Uso o transporte no indicado del producto.
▯ Desatención a las instrucciones de seguridad y mantención.
▯ Accidentes o causas de fuerza mayor (e.g. relámpagos, incendio,
inundación, etc.).
▯ Manipulación mal intencionada del producto (retirar la cubierta,
tornillos, etc.).
IB_338781_SFW300A2_LB9.indb 52 09.01.20 11:15

SFW 300 A2 US-ES │ 53 ■
La presente garantía tampoco cubre daños indirectos o emergentes.
Sin embargo algunos estados no permiten la exclusión o limitación de
daños indirectos o emergentes, por lo que dicha exclusión o limita-
ción pudiera no aplicarse en su caso.
¿Período de cobertura y resolución de la garantía?
La garantía es válida por 3 años a partir de la fecha de compra. La
empresa, según lo estime conveniente, devolverá el dinero o repon-
drá el producto.
¿La empresa no?
▯ Dará inicio a un nuevo período de garantía al hacerse el cambio del
producto.
▯ Reparará el producto.
¿Cómo se tramita la garantía?
Recomendamos que primero usted:
▯ Llame al Servicio de atención al cliente al 1 (844) 543-5872.
▯ Visite el Portal de atención al cliente en
www.lidl.com/contact-us
▯ Visite una de nuestras tiendas LIDL en caso de cualquier inquietud.
A fin de acelerar el trámite de la garantía, tenga a bien contar con lo
siguiente:
▯ Recibo de venta original que incluya la fecha de compra.
▯ Producto y manual en su empaque original.
▯ Descripción del problema.
¿Qué debe hacer usted para mantener la garantía vigente?
▯ Guardar el recibo original.
▯ Seguir todas las instrucciones para el uso del producto.
▯ No realizar ninguna reparación ni alteración al producto.
IB_338781_SFW300A2_LB9.indb 53 09.01.20 11:15

SFW 300 A2
■ 54 │ US-ES
¿De qué manera influyen las leyes estatales con esta
garantía?
La presente garantía le otorga derechos legales específicos, y pudie-
ra usted contar con otros derechos los cuales varían de un estado a
otro. Todas las garantías implícitas se encuentran limitadas
a la duración y términos de la presente garantía. Algunos estados no
permiten limitaciones al período de tiempo y términos de la garantía
implícita, por lo que dichas limitaciones pudieran no aplicarse en su
caso.
Importador
LIDL US LLC.
ARLINGTON
VA 22202
IB_338781_SFW300A2_LB9.indb 54 09.01.20 11:15

IAN 338781_1910
LIDL US LLC.
ARLINGTON
VA 22202
Made in /Hecho en: China
Last Information Update · Estado de las informaciones:
11 / 2019 · Ident.-No.: SFW300A2-112019-1
9
-
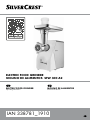 1
1
-
 2
2
-
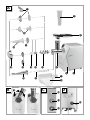 3
3
-
 4
4
-
 5
5
-
 6
6
-
 7
7
-
 8
8
-
 9
9
-
 10
10
-
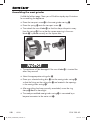 11
11
-
 12
12
-
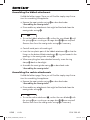 13
13
-
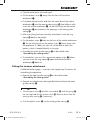 14
14
-
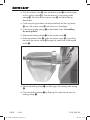 15
15
-
 16
16
-
 17
17
-
 18
18
-
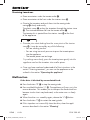 19
19
-
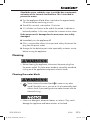 20
20
-
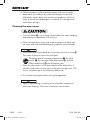 21
21
-
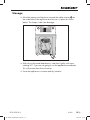 22
22
-
 23
23
-
 24
24
-
 25
25
-
 26
26
-
 27
27
-
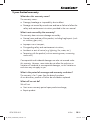 28
28
-
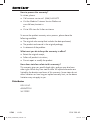 29
29
-
 30
30
-
 31
31
-
 32
32
-
 33
33
-
 34
34
-
 35
35
-
 36
36
-
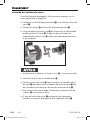 37
37
-
 38
38
-
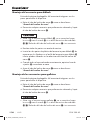 39
39
-
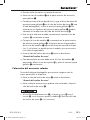 40
40
-
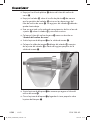 41
41
-
 42
42
-
 43
43
-
 44
44
-
 45
45
-
 46
46
-
 47
47
-
 48
48
-
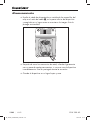 49
49
-
 50
50
-
 51
51
-
 52
52
-
 53
53
-
 54
54
-
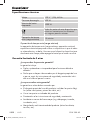 55
55
-
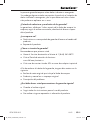 56
56
-
 57
57
-
 58
58


Silvercrest 338781 El manual del propietario
- Categoría
- Picadoras
- Tipo
- El manual del propietario
en otros idiomas
- English: Silvercrest 338781 Owner's manual
Artículos relacionados
-
Silvercrest SFW 350 D2 Instrucciones de operación
-
Silvercrest 302971 Operating Instructions Manual
-
-
-
-
-