
Concealed Overlay Hinges
/ Charnières à recouvrement invisibles
/ Bisagras de superposición ocultas
• For ease of installation, READ through ALL instructions before you begin.
• Pour faciliter l’installation, LISEZ TOUTES les instructions avant de commencer.
• Para facilitar la instalación, LEA TODAS las instrucciones antes de comenzar.
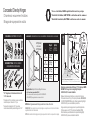
Mark holes on cabinet door. Drill holes 1/2" (12 mm) deep. NOTE:
DO NOT drill through door. Use AlignRight template
AN0192C-G-Q1 for easier installation.
Marquez l’emplacement des trous sur la porte de l’armoire.
Percez des trous de 1/2 po (12 mm) de profondeur. REMARQUE
: NE PAS TRANSPERCER la porte. Utilisez le gabarit AlignRight
AN0192C-G-Q1 pour une installation plus facile.
Haga una marca para los agujeros en la puerta del gabinete.
Perfore agujeros de 1/2” (12 mm) de profundidad. NOTA:
NO atraviese la puerta al taladrar. Use la plantilla AlignRight
AN0192C-G-Q1 para una instalación más fácil.
1/2"
(12 mm)
1/2"
(12 mm)
35 mm35 mm
1
13/16"
(20.5 mm)
13/16"
(20.5 mm)
3/8"
(9.5 mm)
3/8"
(9.5 mm)
Ø 3/32"
Ø 8 mm
Ø 35 mm
Ø 35 mm
1-3/4"
(45 mm)
1-3/4"
(45 mm)
Door
Porte
Puerta
Frame
Cadre
Marco
7/8"
(22 mm)
7/8"
(22 mm)
YY
Y=3-1/2" (89 mm) Industry Standard / Norme de l'industrie
Y = 3-1/2 po (89 mm) / Y = 3-1/2" (89 mm) Estándar Industrial
5/8" (16 mm)
or / ou /o
3/4" (19 mm)
5/8" (16 mm)
or / ou /o
3/4" (19 mm)
Specifications/Spécifications/Especificaciones
• For face-frame type cabinets ONLY.
• Pour les armoires à cadre en façade EXCLUSIVEMENT.
• SOLAMENTE para gabinetes con marco frontal.
XX
105°105°
20"
(508 mm)
20"
(508 mm)
3/32"3/32"
8mm
35 mm35 mm
REQUIRED TOOLS / OUTILS REQUIS /
HERRAMIENTAS NECESARIAS
INCLUDES / COMPREND / INCLUYE
B
x4
x4
C D
x2
A x2
*
X
Weight
Poids
Peso
(A) Qty.
(A) Qté.
(A) Cant.
36"
(914 mm)
9-13 lbs
(4-6 kg)
2
56"
(1422 mm)
14-26 lbs
(6-12 kg)
3
80"
(2032 mm)
27-37 lbs
(12-17 kg)
4
92"
(2337 mm)
30-50 lbs
(14-23 kg)
5
* 1/2" Hinge shown; follow these instructions for
1-1/4" size as well.
* Charnière de 1/2 po illustrée ; suivez ces mêmes
instructions pour celles de 1-1/4 po.
* Se muestra la bisagra de 1/2”; siga estas
instrucciones también para la bisagra de 1-1/4”.
HINGE DATA / INFORMATIONS SUR LES CHARNIÈRES / INFORMACIÓN DE LA BISAGRA
NOTE: More hinges are needed to hang a wider door or door with a mirror.
REMARQUE : pour soutenir une porte plus large ou une porte avec miroir, des charnières
supplémentaires sont nécessaires.
NOTA: Se necesitan más bisagras para colgar una puerta más ancha o una puerta con espejo.
8 mm

Align door to cabinet. Use screw (a) to adjust door
depth, screw (b) to adjust vertically, and screw (c) to
adjust horizontally.
Alignez la porte sur l’armoire. Utilisez la vis (a) pour
régler la profondeur de la porte, la vis (b) pour le réglage
vertical et la vis (c) pour le réglage horizontal.
Alinee la puerta con el gabinete. Use el tornillo (a) para
ajustar la profundidad de la puerta, el tornillo (b) para
ajustarla verticalmente y el tornillo (c) para ajustarla
horizontalmente.
4
a
b
c
Place door in desired vertical placement; mark and drill
3/32" pilot holes on frame. Attach hinges to cabinet
with screw (D).
Placez la porte à l’emplacement désiré : marquez
les trous et percez des avant-trous de 3/32 po sur le
cadre. Fixez les charnières sur l’armoire à l’aide de la
vis (D).
Coloque la puerta en la ubicación vertical deseada;
marque y perfore agujeros piloto de 3/32” en el marco.
Fije las bisagras al gabinete con el tornillo (D).
1
2
3
Dx1
A
Attach hinges (A) to door by pressing the attached
dowels completely in the 8 mm dowel holes.
NOTE: For use hinges with existing non-dowel
mounting, remove screws (B) from dowels (C) and
reuse existing hardware.
Attach hinges (A) to door by pressing the attached
dowels completely in the 8 mm dowel holes.
NOTE: For use hinges with existing non-dowel
mounting, remove screws (B) from dowels (C) and
reuse existing hardware.
Attach hinges (A) to door by pressing the attached
dowels completely in the 8 mm dowel holes.
NOTE: For use hinges with existing non-dowel
mounting, remove screws (B) from dowels (C) and
reuse existing hardware.
1
2
A
REV 9/29/2017CP3253045 ©2017 Liberty Hardware Manufacturing Corporation, A MASCO COMPANY
2
2
-
 1
1
-
 2
2


Everbilt H70223E-NP-U1 Guía de instalación
- Tipo
- Guía de instalación
- Este manual también es adecuado para
en otros idiomas
Artículos relacionados
Otros documentos
-
Liberty H0104AC-CHR-O2 Guía de instalación
-
-
-
 Brainerd H0103BC-SN-O3 Guía de instalación
-
-
Liberty Hardware P42845C-SN-CP Manual de usuario
-
-
-
Ameriwood Home HD45101 Instrucciones de operación
-
ClosetMaid 12140 Guía de instalación
