Samsung BD-P1600A Manual de usuario
- Categoría
- Reproductores de Blu-Ray
- Tipo
- Manual de usuario

imagine the possibilities
Thank you for purchasing this Samsung product.
To receive more complete service,
please register your product at
www.samsung.com/register
Blu-ray Disc Player
user manual
BD-P1600
01783M-BD-P1600-XBG-ENG-NEW.indb1 1 2009-07-21 오전 11:35:07

2_ key features
key features of your blu-ray
disc player
Player Features
Supports a Variety of Disc Types
Blu-ray (BD-ROM, BD-RE, BD-R), DVD Video, DVD-RW/-R (V mode and fi nalized only) discs and Audio CD.
CD-RW/CD-R, DVD-RW/-R and USB memory fl ash stick content such as MP3, JPEG, DivX, MKV and MP4 fi les.
HDMI (High Defi nition Multimedia Interface)
HDMI reduces picture noise by allowing a pure digital video/audio signal path from the player to your TV.
DivX
DivX
®
is a digital video format created by DivX, Inc. This player is an offi cial DivX certifi ed device that plays DivX
video.
Blu-ray Disc Features
Blu-ray Discs support the highest quality HD video available in the industry - Large capacity means no compromise
on video quality. Furthermore, a Blu-ray Disc has the same familiar size and look as a DVD.
* The following Blu-ray Disc features are disc dependant and will vary.
Appearance and navigation of features will also vary from disc to disc.
Not all discs will have the features described below.
Video highlights
The BD-ROM format supports three highly advanced video codecs, including AVC, VC-1 and MPEG-2.
HD video resolutions are also available:
1920 x 1080 High Defi nition
1280 x 720 High Defi nition
For High-Defi nition Playback
To view high-defi nition contents on a Blu-ray Disc, an HDTV (High Defi nition Television) is required.
Some Blu-ray Discs may require using the player's HDMI OUT to view high-defi nition content. The ability to view
high-defi nition content on Blu-ray Discs may be limited depending on the resolution of your TV.
Graphic planes
Two individual, full HD resolution (1920x1080)
video layers are available on top of the HD
video layer.
One layer is assigned to video-related
graphics (like subtitles), and the other layer is
assigned to interactive elements, such as
buttons or menus. Various wipes, fades and
scroll effects may be available on both layers.
•
•
•
•
3 4 5 6 7 8 9 10 11 12 13 14 15
%
PLAY MOVIE LANGUAGES SCENE SELECTIONS PREVIEWS
Graphic
Planes
HD Video
01783M-BD-P1600-XBG-ENG-NEW.indb2 2 2009-07-21 오전 11:35:08

English _3
● KEY FEATURES
Menu graphics
Support full color resolution graphics and animation, thereby greatly surpassing the capabilities of DVD-Video.
Unlike DVD, Menus can be accessed during video playback.
Menu sounds
When you highlight or select a menu option on a disc, sounds can be heard such as button clicks or a voice-over
explaining the highlighted menu choice.
Multi-page/PopUp Menus
Unlike DVD-Video, playback is not interrupted each time a new menu
screen is accessed. Due to Blu-ray Disc's ability to preload data from
the disc without interrupting playback, a menu may consist of several
pages.
You can browse through the menu pages or select different menu
paths, while the audio and video continues playing in the background.
Interactivity
Certain Blu-ray Discs may contain Animated menus and Trivia games.
User Browsable Slideshows
With Blu-ray Discs, you can browse through various still pictures while the audio remains playing.
Subtitles
Depending on what is contained on the Blu-ray Disc, you may be able to select different font styles, sizes and
colors for the subtitles. Subtitles may also be animated, scrolled or faded in and out.
BD-LIVE
You can use a Blu-ray Disc supporting BD-LIVE through network connection to enjoy various contents provided
by the disc manufacturer.
YouTube
This Blu-ray Disc Player enables you to enjoy videos on-demand provided by YouTube through a network
connection.
WHAT’S INCLUDED
Check for the supplied accessories below.
A-B
0
1 2 3
7 8 9
4 5 6
RETURN
POWER
OPEN/CLOSE
AUDIO SUBTITLE REPEAT REPEAT
CANCEL
TV SOURCE
STOP PLAY
BONUSVIEW PAUSE
TV MUTE
ENTER
POPUP MENUDISC MENU
TITLE MENU
A B C D
MENU
EXIT
INFO
TV VOL TV CH
TV
POWER
AK59-00104K
Composite (Video), Audio L/R Cable HDMI Cable
User Manual Quick Guide Remote Control
3 4 5 6 7 8 9 10 11 12 13 14 15
%
PLAY MOVIE LANGUAGES SCENE SELECTIONS PREVIEWS
01783M-BD-P1600-XBG-ENG-NEW.indb3 3 2009-07-21 오전 11:35:10

4_ safety information
safety information
WARNING
TO REDUCE THE RISK OF ELECTRIC SHOCK, DO NOT REMOVE THE COVER(OR BACK).
NO USER-SERVICEABLE PARTS ARE INSIDE. REFER SERVICING TO QUALIFIED SERVICE PERSONNEL.
CAUTION
RISK OF ELECTRIC SHOCK
DO NOT OPEN
The lighting flash and Arrowhead within
the triangle is a warning sign alerting you
of dangerous voltage inside the product.
CAUTION: TO REDUCE THE RISK OF ELECTRIC
SHOCK, DO NOT REMOVE COVER (OR BACK) NO
USER SERVICEABLE PARTS INSIDE. REFER
SERVICING TO QUALIFIED SERVICE PERSONNEL.
The explanation point within the triangle
is a warning sign alerting you of
important instructions accompanying the
product.
WARNING
To reduce the risk of fire or electric shock, do not expose this appliance to rain or moisture.
To prevent injury, this player must be securely attached to the floor/wall in accordance with the installation instructions.
Note to CATV system installer
This reminder is provided to call CATV system installer’s attention to Article 820-40 of the National Electrical Code
(Section 54 of Canadian Electrical Code, Part I) that provides guidelines for proper grounding and, in particular,
specifies that the cable ground shall be connected to the grounding system of the building as close to the point of
cable entry as practical.
FCC NOTE (for U.S.A):
This equipment has been tested and found to comply with the limits for a Class B digital device, pursuant to Part
15 of the FCC rules. These limits are designed to provide reasonable protection against harmful interference in a
residential installation. This equipment generates, uses and can radiate radio frequency energy and, if not installed
and used in accordance with the instructions, may cause harmful interference to radio or television reception,
which can be determined by turning the equipment off and on.
The user is encouraged to try to correct the interference by one or more of the following measures.
Reorient or relocate the receiving antenna.
Increase the separation between the equipment and receiver.
Connect this equipment into an outlet on a circuit different from that to which the receiver is connected.
Consult the dealer or an experienced radio/TV technician for help.
This class B digital player meets all requirements of the Canadian Interference - Causing Equipment Regulations.
CLASS 1 LASER PRODUCT
KLASSE 1 LASER PRODUKT
LUOKAN 1 LASER LAITE
KLASS 1 LASER APPARAT
PRODUCTO LÁSER CLASE 1
CLASS 1 LASER PRODUCT
Use of controls, adjustments or performance of procedures other than those specified herein may result in
hazardous radiation exposure.
CAUTION
THIS PRODUCT UTILIZES A LASER. USE OF CONTROLS OR ADJUSTMENTS OR PERFORMANCE OF
PROCEDURES OTHER THAN THOSE SPECIFIED HEREIN MAY RESULT IN HAZARDOUS RADIATION
EXPOSURE. DO NOT OPEN COVER AND DO NOT REPAIR YOURSELF. REFER SERVICING TO QUALIFIED
PERSONNEL.
•
•
•
•
•
•
01783M-BD-P1600-XBG-ENG-NEW.indb4 4 2009-07-21 오전 11:35:10

English _5
● SAFETY INFORMATION
Note:
This unit can be used only where the power supply is AC 110~240V, 50/60Hz. It cannot be used elsewhere.
This Blu-ray Disc Player is designed and manufactured to respond to the Region Management Information.
If the Region number of a Blu-ray Disc/DVD disc does not correspond to the Region number of this Blu-ray Disc
Player, the Blu-ray Disc Player cannot play the disc.
The product unit accompanying this user manual is licensed under certain intellectual property rights of certain
third parties. This product is covered by one or more of the following U.S. patents:
5,060,220 5,457,669 5,561,649 5,705,762 6,043,912 6,438,099 6,467,061 6,556,521 6,578,163 6,697,307
6,728,474 6,771,891 6,894,963 6,895,593 6,937,815 6,996,327 7,009,926 7,085,221 7,088,649 7,092,327
7,099,566 7,123,564 7,142,493 7,142,495 7,145,861 7,146,624 7,151,729 7,161,879 7,164,647 7,167,437
7,173,891 7,177,250 7,194,187 7,203,891 7,209,423 7,210,067 7,228,062 7,245,566 7,245,567 7,257,065
7,263,045 7,269,110 7,272,086 7,272,106 7,280,460 7,283,729 7,286,454 7,304,938
This product is covered by the following U.S. patents:
US4,930,158 US4,930,160
This license is limited to private non-commercial use by end-user consumers for licensed contents.
No rights are granted for commercial use. The license does not cover any product unit other than this product unit
and the license does not extend to any unlicensed product unit or process conforming to ISO/IEC 11172-3 or ISO/
IEC 13818-3 used or sold in combination with this product unit.
The license only covers the use of this product unit to encode and/or decode audio files conforming to the ISO/IEC
11172-3 or ISO/IEC 13818-3. No rights are granted under this license for product features or functions that do not
conform to the ISO/IEC 11172-3 or ISO/IEC 13818-3.
PRECAUTIONS
Important Safety Instructions
Read these operating instructions carefully before using the unit. Follow all the safety instructions listed below.
Keep these operating instructions handy for future reference.
Read these instructions.
Keep these instructions.
Heed all warnings.
Follow all instructions.
Do not use this player near water.
Clean only with dry cloth.
Do not block any ventilation openings, install in accordance with the manufacturer's instructions.
Do not install near any heat sources such as radiators, heat registers, or other player (including amplifiers)
that produce heat.
The polarized or the grounding type plug has an important safety purpose. A polarized plug has two blades
with one wider than the other. A grounding type plug has two blades and a third grounding prong. The wide
blade or the third prong is provided for your safety. If the provided plug does not fit into your outlet, consult
an electrician for replacement of the obsolete outlet.
Protect the power cord from being deformed or pinched particularly at plugs, convenience receptacles, and
the point where they exit from the player.
Only use attachments/accessories specified by the manufacturer.
Use only with the cart, stand, tripod, bracket, or table specified by the manufacturer, or
sold with the player. When a cart is used, use caution when moving the cart/player
combination to avoid injury from tip-over.
Unplug this player during lightning storms or when unused for long periods of time.
Refer all servicing to a qualified service personnel. Servicing is required when the player has been damaged in
any way, such as power-supply cord or plug is damaged, liquid has been spilled or objects have fallen into the
player, the player has been exposed to rain or moisture, does not operate normally, or has been dropped.
•
•
•
1)
2)
3)
4)
5)
6)
7)
8)
9)
10)
11)
12)
13)
14)
01783M-BD-P1600-XBG-ENG-NEW.indb5 5 2009-07-21 오전 11:35:10

6_ safety information
safety information
Handling Cautions
Before connecting other components to this Blu-ray Disc Player, be sure to turn them all off.
Do not move the Blu-ray Disc Player while a disc is being played as the disc may be scratched or broken, or the
Blu-ray Disc Player’s internal parts may be damaged.
Do not put a flower vase filled with water or any small metal objects on the Blu-ray Disc Player.
Be careful not to put your hand into the disc tray.
Do not place anything other than the disc in the disc tray.
Exterior interferences such as lightning and static electricity can affect the normal operation of this Blu-ray Disc
Player. If this occurs, turn the Blu-ray Disc Player off and on again with the POWER button, or disconnect and
then reconnect the AC power cord to the AC power outlet. The Blu-ray Disc Player will operate normally.
Be sure to remove the disc and turn off the Blu-ray Disc Player after use.
Disconnect the AC power cord from the AC outlet when you don’t intend to use the Blu-ray Disc Player for long
periods of time.
To clean a disc, wipe it in a straight line from the inside to the outside of the disc.
Do not expose the player to any liquid.
When the AC plug is connected to a wall outlet, the player will still draw power (standby mode) when it is turned
off.
Apparatus shall not be exposed to dripping or splashing and no objects filled with liquids, such as vases, shall be
placed on the apparatus.
The Mains plug is used as a disconnect device and shall stay readily operable at any time.
Maintenance of Cabinet
For safety reasons, be sure to disconnect the AC power cord from the AC outlet.
Do not use benzene, thinner, or other solvents for cleaning.
Wipe the cabinet with a soft cloth.
Restrictions on Playback
This player may not respond to all operating commands because some Blu-ray, DVD and CD discs allow
specific or limited operation and features during playback.
Please note that this is not a defect in the player.
Samsung cannot assure that this player will play every disc bearing the Blu-ray Disc, DVD or CD logo because
disc formats evolve, and problems and errors may occur during the creation of Blu-ray Disc, DVD, CD software
and/or the manufacture of discs.
Please contact the SAMSUNG customer care center if you have questions or encounter difficulty in playing
Blu-ray Disc, DVD, CD discs in this player. Also, refer to rest of this Manual for additional information on
playback restrictions.
•
•
•
•
•
•
•
•
•
•
•
•
•
•
•
•
•
01783M-BD-P1600-XBG-ENG-NEW.indb6 6 2009-07-21 오전 11:35:10

English _7
● CONTENTS
contents
KEY FEATURES OF YOUR BLU-RAY
DISC PLAYER
2
3 What’s included
SAFETY INFORMATION
4
4 Warning
5 Precautions
GETTING STARTED
10
10 Before Using the User’s Manual
11 Disc Type and Characteristics
15 Disc Storage & Management
DESCRIPTION
16
16 Front Panel
17 Front Panel Display
18 Rear Panel
REMOTE CONTROL
19
19 Tour of the Remote Control
20 Setting the Remote Control
20 Regarding the Battery
21 Controllable TV Codes
CONNECTIONS
22
22 Connecting to a TV with an HDMI Cable
- BEST QUALITY (RECOMMENED)
24 Connecting to a TV with DVI Cable
- BEST QUALITY (RECOMMENED)
25 Connecting to a TV (Component)
- BETTER QUALITY
26 Connecting to a TV (Video)
- GOOD QUALITY
27 Connecting to an Audio System
(HDMI supported Amplifier)
- BEST QUALITY (RECOMMENED)
28 Connecting to an Audio System
(Dolby Digital, DTS Amplifier)
- BETTER QUALITY
29 Connecting to an Audio System
(2 Channel Amplifier) - GOOD QUALITY
30 Connecting to the Network
BASIC FUNCTIONS OF YOUR
BLU-RAY DISC PLAYER
32
32 Before Playing
33 On-Screen Menu Navigation
33 Playing a Disc
34 Setting the Sound
34 Using the Search and Skip Functions
35 Slow Motion Play/Step Motion Play
01783M-BD-P1600-XBG-ENG-NEW.indb7 7 2009-07-21 오전 11:35:11

8_ contents
contents
SYSTEM SETUP
36
36 Setting the Clock
LANGUAGE SETUP
37
37 Setting up the Language Options
AUDIO SETUP
38
38 Setting up the Audio Options
DISPLAY SETUP
41
41 Setting up the Display Options
HDMI SETUP
45
45 Setting up the HDMI Setup Options
PARENTAL SETUP
48
48 Setting up the Parental Lock
NETWORK SETUP
50
50 Setting up the Network Setup Options
BD DATA MANAGEMENT
55
55 System Device Management
56 DivX(R) Registration
56 DivX(R) Deactivation
SYSTEM UPGRADE
57
57 Firmware Upgrade
59 System Information
59 Firmware Upgrade Notification
01783M-BD-P1600-XBG-ENG-NEW.indb8 8 2009-07-21 오전 11:35:11

English _9
● CONTENTS
WATCHING A MOVIE
60
60 Using the Display Function
61 Using the Disc Menu & Popup/Title Menu
62 Repeat Play
63 Selecting the Audio Language
63 Selecting the Subtitle Language
64 Changing the Camera Angle
65 BONUSVIEW Settings
65 BD-LIVE™
LISTENING TO MUSIC
66
66 Buttons on the Remote Control used for
Audio CD (CD-DA)/MP3 Playback
66 Repeat Audio CD(CD-DA)/MP3
67 Playing an Audio CD(CD-DA)/MP3
PLAYING BACK A PICTURE
70
70 Playing a JPEG disc
USING THE E-CONTENTS
71
71 Using YouTube
APPENDIX
77
77 Troubleshooting
79 Specifications
01783M-BD-P1600-XBG-ENG-NEW.indb9 9 2009-07-21 오전 11:35:11

10_ getting started
getting started
BEFORE USING THE USER’S MANUAL
Make sure to check the following terms before using the user’s manual.
Icons that will be used in this manual
Icon Term Definition
h
BD-ROM This involves a function available on a BD-ROM.
g
BD-RE This involves a function available on a BD-RE.
f
BD-R This involves a function available on a BD-R.
Z
DVD-VIDEO
This involves a function available on DVD-Video or DVD-RW/-R discs that have been
recorded and finalized in Video Mode.
C
DVD-RW This involves a function available on DVD-RW. (V mode and finalized only)
V
DVD-R This involves a function available on DVD-R. (V mode and finalized only)
Audio CD This involves a function available on an audio CD-RW/CD-R (CD-DA format).
A
MP3
This involves a function available on DVD-RW/-R, CD-RW/CD-R discs and USB memory flash sticks.
G
JPEG
This involves a function available on DVD-RW/-R, CD-RW/CD-R discs and USB memory flash sticks.
DivX, MKV, MP4
This involves a function available on DVD-RW/-R, CD-RW/CD-R discs and USB memory flash sticks.
F
USB memory
flash stick
This involves a function available on USB memory flash stick.
M
Note This involves tips or instructions on the page that help each function operate.
About the use of this user’s manual
Be sure to be familiar with Safety Instructions before using this product. (See pages 4~6)
If a problem occurs, check the Troubleshooting section. (See pages 77~78)
Copyright
©2009 Samsung Electronics Co.,Ltd.
All rights reserved; No part or whole of this user’s manual may be reproduced or copied without the
prior written permission of Samsung Electronics Co.,Ltd.
1)
2)
01783M-BD-P1600-XBG-ENG-NEW.indb10 10 2009-07-21 오전 11:35:11

English _11
● GETTING STARTED
DISC TYPE AND CHARACTERISTICS
Disc types that can be played
Disc Types Disc Logo Recorded content Disc Shape Max. Playing minute
BD-ROM
BD-RE/BD-R
AUDIO + VIDEO Single sided
Playing time depends
on the Title
DVD-VIDEO AUDIO + VIDEO
Single sided(5 inches) 240
Double sided(5 inches) 480
Single sided(3 1/2 inches) 80
Double sided(3 1/2 inches) 160
DVD-RW
(V mode and
finalized only)
AUDIO + VIDEO 5 inches (4.7GB)
480
(EX : Extended Play)
DVD-R
(V mode and
finalized only)
AUDIO + VIDEO 5 inches (4.7GB)
480
(EX : Extended Play)
AUDIO-CD AUDIO
Single sided(5 inches) 74
Single sided (3 1/2 inches) 20
DivX DivX Movie
Single sided(5 inches) -
Single sided (3 1/2 inches) -
Logos of Discs that can be played
Blu-ray Disc DTS-HD Master Audio Digital Audio DivX BD-LIVE
Dolby TrueHD
PAL broadcast System in
U.K., France, Germany, etc.
Stereo Java
Discs that cannot be played
Blu-ray Discs with a region code other than “Region A”.
DVD-Video with a region number other than “4” or “ALL”
HD DVD
DVD+RW/+R
DVD-RAM
DVD-RW(VR mode)
•
•
•
•
•
•
3.9 GB DVD-R Disc for Authoring.
DVD-ROM/PD/MV-Disc, etc
Super Audio CD(except CD layer)
CVD/CD-ROM/CDV/CD-G/CD-I/LD
(CDGs play audio only, not graphics.)
•
•
•
•
01783M-BD-P1600-XBG-ENG-NEW.indb11 11 2009-07-21 오전 11:35:13

12_ getting started
getting started
[Note]
Some commercial discs and DVD discs purchased outside your region may not be playable with this
product. When these discs are played, either “This disc can not be played.” or “Please check the
regional code of the disc.” will be displayed.
If a DVD-RW/-R disc has not been recorded properly in DVD video format, it will not be playable.
Region code
Both the Blu-ray Disc Player and the discs are coded by region. These regional codes must match in
order to play the disc. If the codes do not match, the disc will not play.
The Region Number for this Blu-ray Disc Player is described on the rear panel of the Blu-ray Disc Player.
Disc Type Blu-ray DVD-VIDEO
Region code
A
4
Blu-ray Disc Region Code Area
A
North America, Central America, South America, Korea, Japan, Taiwan, Hong Kong and
South East Asia.
B Europe, Greenland, French territories, Middle East, Africa, Australia and New Zealand.
C India, China, Russia, Central and South Asia.
DVD Region Code Area
1 The U.S., U.S. territories and Canada
2 Europe, Japan, the Middle East, Egypt, South Africa, Greenland
3 Taiwan, Korea, the Philippines, Indonesia, Hong Kong
4
Mexico, South America, Central America, Australia, New Zealand, Pacific Islands, Caribbean
5 Russia, Eastern Europe, India, most of Africa, North Korea, Mongolia
6 China
Blu-ray Disc Compatibility
Blu-ray Disc is a new and evolving format. Accordingly, disc compatibility issues are possible. Not all
discs are compatible and not every disc will play back. For additional information, refer to the
Compliance and Compatibility Notice section of this Manual. If you encounter compatibility problems,
please contact the SAMSUNG customer care center.
Playback may not work for some types of discs, or when specific operations, such as angle change and aspect
ratio adjustment, are being performed. Information about the discs is written in detail on the disc box. Please refer
to this if necessary.
Do not allow the disc to become dirty or scratched. Fingerprints, dirt, dust, scratches or deposits of cigarette
smoke on the recording surface may make it impossible to use the disc for playback.
When a BD-J title is played, loading may take longer than a normal title, or some functions may perform slowly.
•
•
M
01783M-BD-P1600-XBG-ENG-NEW.indb12 12 2009-07-21 오전 11:35:13

English _13
● GETTING STARTED
Disc Types
BD-ROM
This Blu-ray disc can only be played back. A BD-ROM disc contains pre-recorded data. Although a
BD-ROM
may contain any form of data, most BD-ROM discs will contain movies in High Definition format
for playback on Blu-ray Disc Player's. This unit can play back pre-recorded commercial BD-ROM discs.
BD-RE/BD-R
Blu-ray Disc Rewritable/Blu-ray Disc Recordable. BD-RE/BD-R is the ideal format for making backups,
or recording personal video.
DVD-Video
A digital versatile disc (DVD) can contain up to 135-minutes of images, 8 audio languages and 32
subtitle languages. It is equipped with MPEG-2 picture compression and Dolby Digital surround,
allowing you to enjoy vivid and clear theatre quality images.
When switching from the first layer to the second layer of a dual-layered DVD Video disc, there
may be momentary distortion in the image and sound. This is not a malfunction of the unit.
Once a DVD-RW/-R recorded in Video Mode is finalized, it becomes DVD-Video. Pre-recorded
(pre-stamped) commercial DVDs with movies are also referred to as DVD-Videos. This unit can
play back pre-recorded commercial DVD discs (DVD-Video discs) with movies.
Audio CD
An audio disc on which 44.1kHz PCM Audio is recorded.
This unit can play back CD-DA format audio CD-RW and CD-R discs.
The unit may not be able to play some CD-RW or CD-R discs due to the condition of the
recording.
CD-RW/CD-R
Use a 700MB(80 minutes) CD-RW/CD-R disc. If possible, do not use a 800MB(90 minutes) or
above disc, as the disc may not play back.
If the CD-RW/CD-R disc was not recorded as a closed session, you may experience delays when
playing back the beginning of the disc or all recorded files may not play.
Some CD-RW/CD-R discs may not be playable with this unit, depending on the device which
was used to burn them. For contents recorded on CD-RW/CD-R media from CDs for your
personal use, playability may vary depending on contents and discs.
DVD-R Disc Playback
Once a DVD-R recorded in Video Mode is finalized, it becomes DVD-Video.
This unit can play back DVD-R discs recorded and finalized with a DVD video recorder. It may not
be able to play some DVD-R discs depending on the disc and the condition of the recording.
DVD-RW Disc Playback
Playback can be performed with DVD-RW discs recorded in the Video Mode and finalized.
Once a DVD-RW recorded in Video Mode is finalized, it becomes DVD-Video. Ability to play back
may depend on recording conditions.
❖
❖
❖
•
•
•
❖
•
•
•
❖
•
•
•
❖
•
•
❖
•
•
01783M-BD-P1600-XBG-ENG-NEW.indb13 13 2009-07-21 오전 11:35:13

14_ getting started
getting started
Disc Format
DVD-RW/-R (V)
This is a format that is used for recording data on a DVD-RW or DVD-R disc. The disc can be
played by this Blu-ray Disc Player once it has been finalized.
DivX
CD-R/-RW, DVD-R/-RW, USB
Video Files with following extensions can be played. : .avi, .divx, .AVI, .DIVX
DivX Video (Codec) Format : DivX 3.11 DivX 4.x DivX 5.x (without QPEL and GMC)
DivX Audio (Codec) Format : MP3, MPEG1 Audio Layer 2, AC3, DTS
Supported subtitle file formats: .smi, .srt, .sub, .psb, .txt, .ass
Maximum resolution : 720x480@30fps
720x576@25fps
Minimum resolution : 16x16
Maximum frame rate for progressive source : 30 frames per second
Maximum field rate for interlace source : 60 fields per second
You cannot play back a disc with a resolution greater than 720 x 576 pixels.
MKV, MP4
CD-R/-RW, DVD-R/-RW, USB
Video Files with following extensions can be played. : .avi, .divx, .mkv, .mp4, .AVI, .DIVX, .MKV, .MP4
AVCHD (Advanced Video Codec High Definition)
This player can playback AVCHD format discs. These discs are normally recorded and used in
camcorders.
The AVCHD format is a high definition digital video camera format.
The MPEG-4 AVC/H.264 format is capable of compressing images at higher efficiency than that
of the conventional image compressing format.
Some AVCHD discs use the “x.v.Color” format.
This player can playback AVCHD discs using “x.v.Color” format.
“x.v.Color” is a trademark of Sony Corporation.
“AVCHD” and the AVCHD logo are trademarks of Matsushita Electronic Industrial Co., Ltd.
and Sony Corporation.
Some AVCHD format discs may not play, depending on the recording condition.
AVCHD format discs need to be finalized.
“x.v.Color” offers a wider color range than normal DVD camcorder discs.
Some DivX, MKV and MP4 format discs may not play, depending on the video resolution and frame rate
condition.
❖
•
❖
•
•
•
•
•
•
•
•
•
•
❖
•
•
❖
•
•
•
•
•
•
•
M
01783M-BD-P1600-XBG-ENG-NEW.indb14 14 2009-07-21 오전 11:35:14

English _15
● GETTING STARTED
DISC STORAGE & MANAGEMENT
Disc Handling
Disc Shape
Use discs with regular shapes. If an irregular disc (a disc with a special
shape) is used, this Blu-ray Disc Player may be damaged.
Holding discs
Avoid touching the surface of a disc where recording is performed.
Blu-ray Discs
If the player is not used for a long period of time, remove the Blu-ray Disc from the player and
store it in its case.
Be careful not to leave fingerprints or scratches on the surface of the Blu-ray Disc.
DVD-RW and DVD-R
Clean with an optional PD disc cleaner (LF-K200DCA1 where available).
Do not use cleaners or cloths for CDs to clean DVD-RW/-R discs.
DVD-Video, Audio-CD
Wipe off dirt or contamination on the disc with a soft cloth.
Cautions on handling discs
Do not write on the printed side with a ball-point pen or pencil.
Do not use record cleaning sprays or antistatic. Also, do not use volatile
chemicals, such as benzene or thinner.
Do not apply labels or stickers to discs. (Do not use discs fixed with exposed
tape adhesive or leftover peeled-off stickers.)
Do not use scratch-proof protectors or covers.
Do not use discs printed with label printers available on the market.
Do not load warped or cracked discs.
Disc Storage
Be careful not to damage the disc because the data on these discs is highly vulnerable to the
environment.
Do not keep under direct sunlight.
Keep in a cool ventilated area.
Store vertically.
Keep in a clean protection jacket.
If you move your Blu-ray Disc Player suddenly from a cold place to a warm place, condensation may
generate on the operating parts and lens and cause abnormal disc playback. If this occurs, wait for
two hours before connecting the plug to the power outlet. Then insert the disc and try to play back
again.
❖
•
❖
•
❖
•
•
❖
•
❖
•
❖
•
•
•
•
•
•
•
•
•
•
•
01783M-BD-P1600-XBG-ENG-NEW.indb15 15 2009-07-21 오전 11:35:14

16_ description
description
FRONT PANEL
DISC TRAY Opens to accept a disc.
DISPLAY Displays the playing status, time, etc.
REMOTE CONTROL SENSOR
Detects signals from the remote control.
OPEN/CLOSE BUTTON Opens and closes the disc tray.
SEARCH/SKIP BUTTONS Goes to the next title/chapter/track or goes back to the previous title/chapter/track.
STOP BUTTON Stops disc playback.
PLAY/PAUSE BUTTON Plays a disc or pauses playback.
POWER BUTTON Turns the Blu-ray Disc Player on and off.
USB HOST
A USB memory flash stick can be connected here and used as storage when connected to
BD-LIVE. It can also be used for firmware upgrades and MP3/JPEG/DivX/MKV/MP4 playback.
You must use the USB HOST on the rear panel of the Blu-ray Disc Player to connect a wireless LAN Adapter.
You cannot use USB memory flash sticks simultaneously in both the front and rear USB ports.
A USB HDD device cannot be used for BD Data storage (BD-LIVE).
M
01783M-BD-P1600-XBG-ENG-NEW.indb16 16 2009-07-21 오전 11:35:15

English _17
● DESCRIPTION
FRONT PANEL DISPLAY
IN DISC INDICATOR Lights when a disc is in the tray.
DISC TYPE INDICATORS Lights to indicate the disc type in the tray.
USB INDICATOR Lights to indicate when USB is connected.
HDMI INDICATOR Lights to indicate when HDMI is connected.
HD INDICATOR Indicates the display output is HD (High Definition).
24F INDICATOR Indicates the current mode is 24Fs (24 frames per second).
STATUS INDICATOR Playing time/current status indicator.
01783M-BD-P1600-XBG-ENG-NEW.indb17 17 2009-07-21 오전 11:35:16

18_ description
description
REAR PANEL
USB HOST
A USB memory flash stick can be connected here and used as storage when
connected to BD-LIVE. It can also be used for firmware upgrades and MP3/JPEG/DivX/
MKV/MP4 playback, as well as for connecting to BD-LIVE with a wireless LAN adapter.
LAN
Can be used for connection to BD-LIVE and YouTube.
It can be also used for firmware upgrades.
COMPONENT
VIDEO OUT
Connects to equipment having Component video input.
DIGITAL AUDIO OUT
(OPTICAL)
Connects to a Receiver.
HDMI OUT
Using an HDMI cable, connect this HDMI output terminal to the HDMI input terminal
on your TV for the best quality picture and to your Receiver for the best quality
sound.
VIDEO OUT Connects the input of external equipment using a video cable.
AUDIO OUT Connects to the audio input of external equipment using audio cables.
Software upgrades using the USB Host jack must be performed with a USB memory flash stick only.
Oversized USB drives may not be able to be inserted when a LAN or HDMI cable is connected.
A USB device consuming more than 500mA requires a separate power supply device for normal operation.
A USB HDD device cannot be used for BD Data storage (BD-LIVE).
M
Fan
The fan always revolves when the power is on.
Ensure a minimum of 4 inches of clear space on
all sides of the fan when installing the product.
01783M-BD-P1600-XBG-ENG-NEW.indb18 18 2009-07-21 오전 11:35:18

English _19
● REMOTE CONTROL
remote control
TOUR OF THE REMOTE CONTROL
Installing batteries in the Remote Control
1. Lift the cover at the back of the remote control
upward as shown.
2. Install two AAA size batteries.
Make sure to match the “+” and “–” ends
of the batteries with the diagram inside the
compartment.
3. Replace the cover.
Assuming typical TV usage, the batteries last for
about one year.
A-B
0
1 2 3
7 8 9
4 5 6
RE
TURN
POWER
OPEN/CLOSE
AUDIO SUBTITLE REPEAT REPEAT
CANCEL
TV SOURCE
STOP PLAY
BONUSVIEW PAUSE
TV MUTE
ENTER
POPUP MENUDISC MENU
TITLE MENU
A B C D
MENU
EXIT
INFO
TV VOL TV CH
TV
POWER
AK59-00104K
OPEN/CLOSE Button
To open and close the disc tray.
POWER Button
SUBTITLE Button
Press this to switch the Blu-ray Disc/DVD’s subtitle
language.
AUDIO Button
Use this to access various audio functions on a disc
(Blu-ray Disc/DVD).
NUMBER Buttons
CANCEL Button
BONUSVIEW Button
Use this to turn the BONUSVIEW function on or off
with supported Blu-ray Discs.
REVERSE/FORWARD SKIP Buttons
Press to skip backwards or forwards.
STOP Button
Press to stop a disc.
REVERSE/FORWARD SEARCH Buttons
Press to search a disc backwards or forwards.
TV VOL Button
TV volume adjustment
TV MUTE Button
Mutes the speakers of your TV.
MENU Button
Brings up the Blu-ray Disc Player’s setup menu.
INFO Button
Displays current setting or disc status.
DISC MENU Button
Use this to enter the disc menu.
TV POWER Button
REPEAT Button
Allows you to repeat a title, chapter, track or disc.
REPEAT A-B Button
Allows you to repeat playback of a certain section.
TV SOURCE Button
After setup, allows you to set the input source on
your TV.
PAUSE Button
Press to pause a disc.
PLAY Button
Press to play a disc.
TV CH Button
Use this to select a TV program.
RETURN Button
ENTER/DIRECTION Buttons
EXIT Button
COLOR Buttons : RED(A), GREEN (B),
YELLOW(C), BLUE(D)
Used to access special features on BD-J discs
(disc dependent).
POPUP MENU/TITLE MENU Button
Use this to enter the popup menu/title menu.
01783M-BD-P1600-XBG-ENG-NEW.indb19 19 2009-07-21 오전 11:35:19

20_ remote control
remote control
SETTING THE REMOTE CONTROL
You can control certain functions of your TV with this remote control.
Control function buttons include : TV POWER, TV CH
,
/
.
, TV VOL +/–, TV MUTE, TV SOURCE
button.
To determine whether your television is compatible, follow the instructions below.
Switch your television on.
Point the remote control towards the television.
Press and hold the TV POWER button and enter the two-fi gure code corresponding to the brand
of your television by pressing the appropriate number buttons. (see the next page for the code list).
If your television is compatible with the remote control, it will switch off.
It is now programmed to operate with the remote control.
If several codes are indicated for your television brand, try each one in turn until you fi nd one that works.
If you replace the remote control's batteries, you must set the brand code again.
You can then control the television using the following buttons after pressing the TV button.
Button Function
TV POWER Used to switch the television on and off.
TV SOURCE Used to select an external source.
TV VOL (+/–) Used to adjust the volume of the television.
TV CH (,/.) Used to select the desired channel.
TV MUTE Used to toggle the sound on and off.
The functions listed above will not necessarily work on all televisions. If you encounter problems, operate the
television directly.
REGARDING THE BATTERY
If the remote does not operate properly:
Check the polarity +/– of the batteries (Dry-Cell)
Check if the batteries are drained.
Check if remote sensor is blocked by obstacles.
Check if there is any fl uorescent lighting nearby.
Dispose of batteries according to local environmental
regulations. Do not put them in the household trash.
1.
2.
3.
M
M
•
•
•
•
01783M-BD-P1600-XBG-ENG-NEW.indb20 20 2009-07-21 오전 11:35:19

English _21
● REMOTE CONTROL
CONTROLLABLE TV CODES
Brand Code
SAMSUNG TV POWER+01, +02, +03, +04, +05, +06, +07, +08, +09
AIWA TV POWER+82
ANAM TV POWER+10, +11, +12, +13, +14, +15, +16, +17, +18
BANG & OLUFSEN TV POWER+57
BLAUPUNKT TV POWER+71
BRANDT TV POWER+73
BRIONVEGA TV POWER+57
CGE TV POWER+52
CONTINENTAL EDISON TV POWER+75
DAEWOO TV POWER+19, +20, +23, +24, +25, +26, +27, +28, +29, +30, +31, +32, +33, +34
EMERSON TV POWER+64
FERGUSON TV POWER+73
FINLUX TV POWER+06, +49, +57
FORMENTI TV POWER+57
FUJITSU TV POWER+84
GRADIENTE TV POWER+70
GRUNDIG TV POWER+49, +52, +71
HITACHI TV POWER+60, +72, +73, +75
IMPERIAL TV POWER+52
JVC TV POWER+61, +79
LG TV POWER+06, +19, +20, +21, +22, +78
LOEWE TV POWER+06, +69
LOEWE OPTA TV POWER+06, +57
MAGNAVOX TV POWER+40
METZ TV POWER+57
MITSUBISHI TV POWER+06, +48, +62, +65
MIVAR TV POWER+52, +77
NEC TV POWER+83
NEWSAN TV POWER+68
NOBLEX TV POWER+66
NOKIA TV POWER+74
NORDMENDE TV POWER+72, +73, +75
PANASONIC TV POWER+53, +54, +74, +75
PHILIPS TV POWER+06, +55, +56, +57
PHONOLA TV POWER+06, +56, +57
PIONEER TV POWER+58, +59, +73, +74
RADIOLA TV POWER+06, +56
RADIOMARELLI TV POWER+57
RCA TV POWER+45, +46
REX TV POWER+74
SABA TV POWER+57, +72, +73, +74, +75
SALORA TV POWER+74
SANYO TV POWER+41, +42, +43, +44, +48
SCHNEIDER TV POWER+06
SELECO TV POWER+74
SHARP TV POWER+36, +37, +38, +39, +48
SIEMENS TV POWER+71
SINGER TV POWER+57
SINUDYNE TV POWER+57
SONY TV POWER+35, +48
TELEAVA TV POWER+73
TELEFUNKEN TV POWER+67, +73, +75, +76
THOMSON TV POWER+72, +73, +75
THOMSON ASIA TV POWER+80, +81
TOSHIBA TV POWER+47, +48, +49, +50, +51, +52
WEGA TV POWER+57
YOKO TV POWER+06
ZENITH TV POWER+63
01783M-BD-P1600-XBG-ENG-NEW.indb21 21 2009-07-21 오전 11:35:20

22_ connections
connections
This section involves various methods of connecting the Blu-ray Disc Player to
other external components such as a TV.
CONNECTING TO A TV WITH AN HDMI CABLE
- BEST QUALITY (RECOMMENED)
Using an HDMI cable, connect the HDMI OUT terminal on the rear of the Blu-ray Disc Player to the HDMI IN
terminal of your TV.
Press the input selector on your TV remote control until the HDMI signal from the Blu-ray Disc Player appears
on your TV screen.
If you have set the remote control to operate your TV (see pages 20~21), press the TV SOURCE button on
the remote control and select HDMI as the external source of the TV.
If the Blu-ray Disc Player is connected to your TV in HDMI 1080p output mode, you must use a High
speed(category2) HDMI cable.
If the HDMI cable is connected or removed during playback of a CD-DA, the player will stop playing.
1.
2.
•
M
HDMI cable
01783M-BD-P1600-XBG-ENG-NEW.indb22 22 2009-07-21 오전 11:35:21

English _23
● CONNECTIONS
HDMI Auto Detection Function
The player's video output will automatically change to HDMI output resolution when connecting an
HDMI cable while power is on (see page 43).
Depending on your TV, certain HDMI output resolutions may not work.
Please refer to the user's manual of your TV.
If an HDMI cable is connected from the player to a TV, the Blu-ray Disc Player’s output is set to HDMI output
resolution automatically within 10 seconds.
If Component and HDMI are both connected, HDMI mode is automatically selected. (See page 43)
When you connect the player to the TV using the HDMI cable for the first time or to a new TV, the HDMI
output resolution will automatically be set to the highest provided by the TV.
If you connect a Samsung TV to the Blu-ray Disc Player using an HDMI cable, the player can be easily
operated using the TV remote control. (This is only available with Samsung TVs that support the Anynet+
feature.) (See pages 45~46)
HDMI (High Definition Multimedia Interface)
HDMI is an interface that enables the digital transmission of video and audio data with just a single
connector.
Using HDMI, the Blu-ray Disc Player transmits a digital video and audio signal and displays a vivid
picture on a TV having an HDMI input jack.
HDMI connection description
HDMI connector - Supports video and digital audio data (LPCM or Bitstream).
- HDMI outputs only a pure digital signal to the TV.
- If your TV does not support HDCP (High-bandwidth Digital Content Protection), random noise
appears on the screen.
Why does Samsung use HDMI?
Analog TVs require an analog video/audio signal. However, when playing a Blu-ray Disc/DVD, the
data transmitted to a TV is digital. Therefore either a digital-to-analog converter (in the Blu-ray Disc
Player) or an analog-to-digital converter (in the TV) is required. During this conversion, the picture
quality is degraded due to noise and signal loss. HDMI technology is superior because it requires no
D/A conversion and is a pure digital signal from the player to your TV.
What is the HDCP?
HDCP (High-band width Digital Content Protection) is a system for protecting Blu-ray Disc/DVD
content outputted via HDMI from being copied. It provides a secure digital link between a video
source (PC, DVD. etc) and a display device (TV, projector. etc). Content is encrypted at the source
device to prevent unauthorized copies from being made.
What is Anynet+?
Anynet+ is a convenient function that offers linked operation of this unit through Samsung TVs with
the Anynet+ feature.
- If your Samsung TV has an
' logo, then it supports the Anynet+ function.
- If you turn on the player and insert a disc, the player will start playing the disc, and the TV will turn
on automatically and switch to HDMI mode.
- If you turn on the player and press the PLAY
button with a disc already inserted, the TV will
immediately turn on and switch to HDMI mode.
What is BD Wise?
BD Wise is Samsung's latest inter-connectivity feature.
- When you connect Samsung products with BD-Wise to each other via HDMI, the optimum
resolution will be set automatically.
M
•
•
•
•
•
•
01783M-BD-P1600-XBG-ENG-NEW.indb23 23 2009-07-21 오전 11:35:21

24_ connections
connections
CONNECTING TO A TV WITH DVI CABLE
- BEST QUALITY (RECOMMENED)
Using an HDMI-DVI cable (not included), connect the HDMI OUT terminal on the rear of the Blu-ray Disc Player
to the DVI IN terminal of your TV.
Using the audio cables, connect the AUDIO (red and white) OUT terminals on the rear of the Blu-ray Disc
Player to the AUDIO (red and white) IN terminals of your TV.
Turn on the Blu-ray Disc Player and TV.
Press the input selector on your TV remote control until the DVI signal from the Blu-ray Disc Player appears on
your TV screen.
If you have set the remote control to operate your TV (see pages 20~21), press the TV SOURCE button on
the remote control and select HDMI as the external source of the TV.
Connecting the HDMI cable while the Blu-ray Disc Player’s power is on will result in the player’s video output being
changed to HDMI mode automatically (see page 43).
Depending on your TV, certain HDMI output resolutions may not work.
Please refer to the user's manual of your TV.
If an HDMI-DVI cable is plugged into the TV, the Blu-ray Disc Player’s output resolution is set to HDMI
automatically within 10 seconds.
If Component and HDMI are both connected, HDMI mode is automatically selected. (See page 43)
When you connect the player to the TV using the HDMI cable for the fi rst time or to a new TV, the HDMI
output resolution will automatically be set to the highest provided by the TV
If the HDMI cable is connected or removed during playback of a CD-DA, the player will stop playing.
1.
2.
3.
•
M
WhiteRed
HDMI-DVI cable
(not included)
Audio cable
01783M-BD-P1600-XBG-ENG-NEW.indb24 24 2009-07-21 오전 11:35:22

English _25
● CONNECTIONS
CONNECTING TO A TV (COMPONENT) - BETTER QUALITY
- Connecting to your TV using Component video cables.
- You will enjoy high quality images with accurate color reproduction. Component video separates the picture
element into black and white(Y), blue(PB) and red(PR) signals to present clear and clean images. (Audio signals are
delivered through the audio output.)
Using Component video cables (not included) , connect the COMPONENT VIDEO OUT terminals on the rear
of the Blu-ray Disc Player to the COMPONENT IN terminals of your TV.
Using the audio cables, connect the AUDIO (red and white) OUT terminals on the rear of the Blu-ray Disc
Player to the AUDIO (red and white) IN terminals of your TV. Turn on the Blu-ray Disc Player and TV.
Press the input selector on your TV remote control until the Component signal from the Blu-ray Disc Player
appears on the TV screen.
If you have set the remote control to operate your TV (see pages 20~21), press the TV SOURCE button on
the remote control and select COMPONENT as the external source of the TV.
Depending on the manufacturer, the component terminals on your TV may be marked “R-Y, B-Y, Y” or “Cr,
Cb, Y” instead of “PB, PR, Y”. The number and position of terminals may vary depending on the TV set.
Please refer to the user's manual of your TV.
You can select from a variety of resolution settings for Blu-ray Discs such as 1080i, 720p, 576p/480p and
576i/480i, depending on the disc type. (See page 43)
The actual resolution may differ from the setting in the SETUP menu if both Component and HDMI cables are
connected. The resolution may also be different depending on the disc. (See page 43)
In DVD playback, if both HDMI and Component jacks are connected and you select the Component 1080p,
1080i or 720p mode, the Display Setup menu will show the output resolution as 1080p, 1080i or 720p in
the menu.
The resolution is actually 576i/480i.
1.
2.
3.
•
M
Audio cable
Component cable
(not included)
White Red Blue Green
(Audio)Red
01783M-BD-P1600-XBG-ENG-NEW.indb25 25 2009-07-21 오전 11:35:24

26_ connections
connections
CONNECTING TO A TV (VIDEO) - GOOD QUALITY
Using video/audio cables, connect the VIDEO (yellow) / AUDIO (red and white) OUT terminals on the rear of
the Blu-ray Disc Player to the VIDEO (yellow) / AUDIO (red and white) IN terminals of your TV.
Turn on the Blu-ray Disc Player and TV.
Press the input selector on your TV remote control until the Video signal from the Blu-ray Disc Player appears
on the TV screen.
If you have set the remote control to operate your TV (see pages 20~21), press the TV SOURCE button on
the remote control and select VIDEO as the external source of the TV.
Noise may be generated if the audio cable is placed too close to the power cable.
If you want to connect to an Amplifi er, please refer to the Amplifi er connection pages. (See pages 27~29)
The number and position of terminals may vary depending on your TV set. Please refer to the user's manual
of your TV.
If there is only one audio input terminal on the TV, connect it to the [AUDIO OUT][left] (white) terminal of the
Blu-ray Disc Player.
The VIDEO source is always output in 576i/480i resolution regardless of the resolution set in the SETUP
menu.
(See page 43)
1.
2.
3.
•
M
WhiteRed Yellow
Audio/Video cable
01783M-BD-P1600-XBG-ENG-NEW.indb26 26 2009-07-21 오전 11:35:25

English _27
● CONNECTIONS
CONNECTING TO AN AUDIO SYSTEM
(HDMI SUPPORTED AMPLIFIER) - BEST QUALITY (RECOMMENED)
Using an HDMI cable, connect the HDMI OUT terminal on the rear of the Blu-ray Disc Player to the HDMI IN
terminal of your Amplifier.
Using an HDMI cable, connect the HDMI OUT terminal of the Amplifier to the HDMI IN terminal of your TV.
Turn on the Blu-ray Disc Player, TV and Amplifier.
Press the input select button of the Amplifier to select the external input in order to hear sound from
the Blu-ray Disc Player. Refer to your Amplifier's user manual to set the Amplifier's audio input.
Please turn the volume down when you turn on the Amplifier. Sudden loud sound may cause damage to the
speakers and your ears.
Please set the audio in the menu screen according to the Amplifier. (See pages 38~40)
The position of HDMI terminals may vary depending on the Amplifier. Please refer to the user's manual of
your Amplifier.
1.
2.
3.
4.
M
HDMI cable
HDMI cable
01783M-BD-P1600-XBG-ENG-NEW.indb27 27 2009-07-21 오전 11:35:27

28_ connections
connections
CONNECTING TO AN AUDIO SYSTEM
(DOLBY DIGITAL, DTS AMPLIFIER) - BETTER QUALITY
Using an optical cable (not included), connect the DIGITAL AUDIO OUT (OPTICAL) terminal on the rear of the
Blu-ray Disc Player to the DIGITAL AUDIO IN (OPTICAL) terminal of your Amplifier.
Using the video signal cable(s), connect the HDMI, COMPONENT or VIDEO OUT terminals on the rear of the
Blu-ray Disc Player to the HDMI, COMPONENT or VIDEO IN terminals of your TV. (see pages 22~26)
Turn on the Blu-ray Disc Player, TV and Amplifier.
Press the input select button of the Amplifier to select the external input in order to hear sound from
the Blu-ray Disc Player. Refer to your Amplifier's user manual to set the Amplifier's audio input.
Please turn the volume down when you turn on the Amplifier. Sudden loud sound may cause damage to the
speakers and your ears.
Please set the audio in the menu screen according to the Amplifier. (See pages 38~40)
The position of terminals may vary depending on the Amplifier. Please refer to the user's manual of your
Amplifier.
When using this connection, discs with LPCM audio soundtracks will only be heard over the front two
channels.
1.
2.
3.
4.
M
Optical cable
(not included)
01783M-BD-P1600-XBG-ENG-NEW.indb28 28 2009-07-21 오전 11:35:28

English _29
● CONNECTIONS
CONNECTING TO AN AUDIO SYSTEM (2 CHANNEL AMPLIFIER)
- GOOD QUALITY
Using the audio cables, connect the AUDIO (red and white) OUT terminals on the rear of the Blu-ray Disc
Player to the AUDIO (red and white) IN terminals of your Amplifi er.
Using the video signal cable(s), connect the HDMI, COMPONENT or VIDEO OUT terminals on the rear of the
Blu-ray Disc Player to the HDMI, COMPONENT or VIDEO IN terminal of your TV. (See pages 22~26)
Turn on the Blu-ray Disc Player, TV and Amplifi er.
Press the input select button of the Amplifi er to select the external input in order to hear sound from
the Blu-ray Disc Player. Refer to your Amplifi er's user manual to set the Amplifi er's audio input.
Manufactured under license from Dolby Laboratories. “Dolby” and the double-D symbol are trademarks of
Dolby Laboratories.
Manufactured under license under U.S. Patent #’s: 5,451,942; 5,956,674; 5,974,380; 5,978,762;
6,226,616; 6,487,535; 7,212,872; 7,333,929; 7,392,195; 7,272,567 & other U.S. and worldwide patents
issued & pending. DTS is a registered trademark and the DTS logos, Symbol, DTS-HD and DTS-HD Master
Audio are trademarks of DTS, Inc. © 1996-2008 DTS, Inc. All Rights Reserved.
1.
2.
3.
4.
M
WhiteRed
Audio cable
2-Channel stereo amp
01783M-BD-P1600-XBG-ENG-NEW.indb29 29 2009-07-21 오전 11:35:29

30_ connections
connections
CONNECTING TO THE NETWORK
To access network service or upgrade the current firmware, you must make one of the following connections.
By connecting to a network, you can access the BD-LIVE, YouTube services and Software upgrades from
Samsung’s update server. We recommend you use an AP or router for the network.
Cable Network
Using the Direct LAN Cable (UTP cable, not included), connect the LAN terminal of the Blu-ray Disc
Player to the LAN terminal of your modem.
Set the network options after connecting the LAN cable.(See pages 50~51)
Internet access to Samsung’s update server may not be allowed, depending on the router you use or the
ISP’s policy.
For more information, contact your ISP (Internet Service Provider).
For DSL users, please use a router to make a network connection.
1.
M
To LAN port
Broadband
service
Broadband modem
(with integrated router)
Router
Connecting using a router
(e.g. DSL)
Broadband modem
To LAN portTo LAN port
Broadband
service
Or
01783M-BD-P1600-XBG-ENG-NEW.indb30 30 2009-07-21 오전 11:35:30

English _31
● CONNECTIONS
Wireless Network
You can connect to network with a Wireless IP sharer.
A wireless AP/IP router is required to make a wireless network connection. Connect the wireless
LAN adapter to the USB port on the rear panel of the Blu-ray Disc Player, and set the wireless
network options. (See pages 51~53)
This unit is compatible with Samsung's Wireless LAN Adapter only. (not included)
(Model name: WIS09ABGN).
- The Samsung Wireless LAN Adapter is sold separately.
- Contact a Samsung Electronics agent or service center for purchasing.
You must use a wireless IP sharer that supports IEEE 802.11 a/b/g/n. (n is recommended for stable
operation of the wireless network.)
Wireless LAN, in its nature, may cause interference, depending on the use condition (AP performance,
distance, obstacle, interference by other radio devices, etc).
Set the wireless IP sharer to Infrastructure mode. Ad-hoc mode is not supported.
When applying the security key for the AP (wireless IP sharer), only the following is supported.
Authentication Mode : WEP, WPAPSK, WPA2PSK
Encryption Type : WEP, TKIP, AES
1.
M
1)
2)
Modem Port
Wireless IP sharer
Modem Cable
Wireless LAN
Adapter
(not included)
01783M-BD-P1600-XBG-ENG-NEW.indb31 31 2009-07-21 오전 11:35:33

32_ basic functions
basic functions of your
blu-ray disc player
This section introduces basic playback functions and playback by disc type.
BEFORE PLAYING
Turn on your TV and set it to the correct Video Input (the input the Blu-ray Disc Player is connected to).
If you connected an external Audio System, turn on your Audio System and set it to the correct Audio Input.
After plugging in the player, the fi rst time you press the POWER button, this screen comes up:
If you want to select a language, press a NUMBER button.
(This screen will only appear when you plug in the player for
the fi rst time.) If the language for the startup screen is not
set, the settings may change whenever you turn the power
on or off. Therefore, make sure that you select the language
you want to use. Once you select a menu language, you
can change it by pressing the SKIP (]) button on the front
panel of the unit for more than 5 seconds with no disc in the
unit. Then the MENU LANGUAGE SELECTION window
appears again where you can reset your preferred
language.
When you connect Blu-ray Disc Player and Samsung TV with Anynet+ feature (HDMI-CEC) using
HDMI cable, the MENU LANGUAGE SELECTION window may disappear quickly. If you want to select
language, please disable a Anynet+ feature (HDMI-CEC) on your TV.
Discs which can be played on this player (For the following discs, the ability to play back may depend on
recording conditions.)
• BD-ROM • BD-RE • BD-R
• DVD-R • DVD-RW (V mode) • CD-RW/CD-R • DivX
• MKV • MP4
• The unit may not play certain CD-RW/CD-R and DVD-R due to the disc type or recording conditions.
Discs which cannot be played on this player.
• HD DVD • DVD+RW/+R • DVD-RAM
• DVD-RW(VR mode) • 3.9 GB DVD-R Disc for Authoring.
• DVD-ROM/PD/MV-Disc, etc • Super Audio CD(except CD layer)
• CVD/CD-ROM/CDV/CD-G/CD-I/LD (CDGs play audio only, not graphics.)
Blu-ray is a new and evolving format. Accordingly, disc compatibility issues with new and existing format
discs are possible. Not all discs are compatible and not every disc will playback.
For additional information, refer to the Disc Type and Characteristics and Compliance and Compatibility
Notice sections of this Manual. If you encounter compatibility problems, please contact SAMSUNG customer
care center.
•
•
M
MENU LANGUAGE SELECTION
Press 1 for English
Pulsar 2 para Español
Prima 3 para Português
Macrovision : BBSXXX
01783M-BD-P1600-XBG-ENG-NEW.indb32 32 2009-07-21 오전 11:35:34

English _33
● BASIC FUNCTIONS
ON-SCREEN MENU NAVIGATION
The GUI (Graphical User Interface) in this manual may differ, depending on the firmware version.
PLAYING A DISC
Press the OPEN/CLOSE button.
Place a disc gently into the tray with the disc’s label facing up.
Press the PLAY button or OPEN/CLOSE button to close the disc tray.
When you stop disc play, the player remembers where you stopped, so when you press the PLAY button
again, it will pick up where you left off. This is called the "Resume" function.
With some BD discs(BD-J), this function may not work.
Press the STOP button twice during playback to disable the Resume function.
To pause the playback, press the PAUSE button during playback.
To resume, press the PLAY button.
If the player is left in the stop mode more than 5 minutes without any user interface, a screen saver will
appear on your TV. If the player is left in the screen saver mode for more than 15 minutes, the power will
automatically turn off except during playback of a CD-DA (Automatic Power-Off Function).
If no buttons are pressed on the unit or remote control for more than 5 minutes when the unit is in Pause
mode, operation will stop (except for some Blu-ray Discs).
❖
1.
2.
3.
M
Audio
Subtitle
Video File Subtitle
Disc Menu
Menu
TV Aspect
Movie Frame (24 Fs)
Resolution
Progressive Mode
Still Mode
Screen Message
Front Display
Network Selection
Cable Network
Wireless Network
Proxy
NTP Server
Network Connection Test
BD-LIVE Internet Connection
Video
Music
Photo
Setup
System
Language
Audio
Display
HDMI
Network
Parental
System Information
Time Zone
Clock Set
Power On/Off sound
Touch Key Sound
BD Data Management
DivX(R) Registration
DivX(R) Deactivation
System Update
Digital Output
PCM Down Sampling
Dynamic Compression
Downmixing mode
Anynet+ (HDMI-CEC)
HDMI Format
BD Wise
Parental Lock
Rating Level
New Password
e-Contents
YouTube
01783M-BD-P1600-XBG-ENG-NEW.indb33 33 2009-07-21 오전 11:35:34

34_ basic functions
basic functions of your
blu-ray disc player
SETTING THE SOUND
Setting the Power On / Off Melody Sound
A Melody sound can be set so it is heard each time you turn the player on or off.
With the unit in Stop mode, press the MENU button.
Press the
$%
buttons to select Setup, then press the
ENTER or
+
button.
Press the
$%
buttons to select System, then press the
ENTER or
+
button.
Press the
▲▼
buttons to select Power On/Off sound,
then press the ENTER or
+
button.
Press the
$%
buttons to select On or Off, then press
the ENTER or
+
button.
Press the MENU button to exit the setup menu.
Setting the Touch Key Sound On / Off
You can set the player so a sound is heard each time a button is pressed on the front panel of the unit.
To setup, follow steps 1 through 3 above.
Press the
$%
buttons to select Touch Key Sound,
then press the ENTER or
+
button.
Press the
$%
buttons to select On or Off, then press
the ENTER or
+
button.
Press the MENU button to exit the setup menu.
USING THE SEARCH AND SKIP FUNCTIONS
During play, you can search quickly through a chapter or track, and use the skip function to jump to the next selection.
Searching through a Chapter or Track hgfZCV
During playback, press the SEARCH (
) button.
Each time you press the SEARCH (
) button, the playback speed will change as follows.
BD-ROM, BD-RE, BD-R, DVD-VIDEO,
DVD-RW, DVD-R
)
X 2
)
X 4
)
X 8
)
X 16
)
X 32
)
X 128
(
X 2
(
X 4
(
X 8
(
X 16
(
X 32
(
X 128
DivX, MKV, MP4
)
X 2
)
X 4
)
X 8
You can scan the program in reverse.
To return to normal speed playback, press the PLAY button.
No sound is heard during search mode.
1.
2.
3.
4.
5.
6.
4.
5.
6.
~
•
M
A Melody sound can be set so it is heard each time you turn the player on or off.
A Melody sound can be set so it is heard each time you turn the player on or off.
A Melody sound can be set so it is heard each time you turn the player on or off.
A Melody sound can be set so it is heard each time you turn the player on or off.
A Melody sound can be set so it is heard each time you turn the player on or off.
System
◄
Language
Audio
Display
HDMI
Network
Parental
System Information
Time Zone
Clock Set
Power On/Off sound : PCM
►
Touch Key Sound : On
BD Data Management
DivX(R) Registration
DivX(R) Deactivation
System Update
✓
On
Off
No disc
Music
Photo
Setup
USING THE SEARCH AND SKIP FUNCTIONS
USING THE SEARCH AND SKIP FUNCTIONS
System
◄
Language
Audio
Display
HDMI
Network
Parental
Time Zone
Clock Set
Power On/Off sound : On
Touch Key Sound : PCM
►
BD Data Management
DivX(R) Registration
DivX(R) Deactivation
System Update
✓
On
Off
No disc
Music
Photo
Setup
01783M-BD-P1600-XBG-ENG-NEW.indb34 34 2009-07-21 오전 11:35:37

English _35
● BASIC FUNCTIONS
Skipping Tracks hgfZCV
During playback, press the SKIP ( ) button.
When playing a Blu-ray Disc/DVD, if you press the SKIP ( ) button, it moves to the next chapter.
If you press the SKIP ( ) button, it moves to the beginning of the chapter. One more press makes it
move to the beginning of the previous chapter.
SLOW MOTION PLAY/STEP MOTION PLAY
Slow Motion Play hgfZCV
In pause mode, press the SEARCH ( ) button.
If you press the SEARCH ( ) button, the playback speed is reduced to
*
1/8
*
1/4
*
1/2
To return to normal speed playback, press the PLAY button.
This ( ) icon indicates an invalid button press.
No sound is heard during slow mode.
Slow motion operates only in the forward direction.
Step Motion Play hgfZCV
In pause mode, press the PAUSE button.
Each time the PAUSE button is pressed a new frame will appear.
To return to normal speed playback, press the PLAY button.
No sound is heard during step mode.
Step motion operates only in the forward direction.
~
•
M
•
•
M
01783M-BD-P1600-XBG-ENG-NEW.indb35 35 2009-07-21 오전 11:35:37

36_ system setup
system setup
For your convenience, you can set this player’s features for the best use in your
home environment.
SETTING THE CLOCK
Choose your time zone
With the unit in Stop mode, press the MENU button.
Press the
▲▼
buttons to select Setup, then press the
ENTER or
+
button.
Press the
▲▼
buttons to select System, then press the
ENTER or
+
button.
Press the
▲▼
buttons to select Time Zone, then press
the ENTER or
+
button.
Use the
_ +
button to place the cursor to the
appropriate time zone for your area and press the
ENTER button.
To set the time automatically, set the NTP server to On (see page 54).
Set the clock
To setup, follow steps 1 through 3 above.
Press the
▲▼
buttons to select Clock Set, then press
the ENTER or
+
button.
Press the
_ +
buttons to move to “Date”, “hr.” (hour),
“min.” (minute). Set the date and time by pressing the
▲▼
buttons, then press the ENTER button.
1.
2.
3.
4.
5.
M
4.
5.
System
◄
Language
Audio
Display
HDMI
Network
Parental
System Information
Time Zone
►
Clock Set
Power On/Off sound : On
Touch Key Sound : On
BD Data Management
DivX(R) Registration
DivX(R) Deactivation
No disc
Music
Photo
Setup
(see page 54).
System
◄
Language
Audio
Display
HDMI
Network
Parental
System Information
Time Zone
►
Clock Set
Power On/Off sound : On
Touch Key Sound : On
BD Data Management
DivX(R) Registration
DivX(R) Deactivation
No disc
Music
Photo
Setup
Time Zone
s Save r Return
◄ GMT + 00:00 ►
London, Lisbon, Casablanca
System
◄
Language
Audio
Display
HDMI
Network
Parental
System Information
Time Zone
Clock Set
►
Power On/Off sound : On
Touch Key Sound : On
BD Data Management
DivX(R) Registration
DivX(R) Deactivation
System Update
No disc
Music
Photo
Setup
System
◄
Language
Audio
Display
y
HDMI
Network
Parental
System Information
Time Zone
Clock Set
►
Power On/Off sound : On
Touch Key Sound : On
BD Data Management
DivX(R) Registration
DivX(R) Deactivation
System Update
No disc
Music
Photo
Setup
Clock Set
s Save r Return
Date
JAN/01/2009
Thursday
hr. min.
01 01
01783M-BD-P1600-XBG-ENG-NEW.indb36 36 2009-07-21 오전 11:35:43

English _37
● LANGUAGE SETUP
language setup
SETTING UP THE LANGUAGE OPTIONS
Once you set the audio, subtitle, disc menu and player menu language options, they will be applied automatically
every time you watch a movie.
If you want to choose a different audio and subtitle language while playing a disc, you can also use the disc
menu to make the selection.
With the unit in Stop mode, press the MENU button.
Press the
▲▼
buttons to select Setup, then press the ENTER or
+
button.
Press the
▲▼
buttons to select Language, then press
the ENTER or
+
button.
Language Setup menu will be displayed.
Press the
▲▼
buttons to select the desired language
option, press the ENTER or
+
button.
Audio : For the disc audio language.
Subtitle : For the disc subtitles.
Video File Subtitle :
For the Video File Subtitle
language by region.
Western
Afrikaans, Basque, Catalan, Danish, Dutch, English, Faeroese, Finnish, French, German,
Icelandic, Indonesian, Italian, Malay, Norwegian, Portuguese, Spanish, Swahili, Swedish
Central
English, Albanian, Croatian, Czech, Hungarian, Polish, Romanian, Serbian(Latin), Slovak,
Slovenian
Cyrillic
English, Azeri, Belarusian, Bulgarian, Kazakh, Macedonian, Russian, Serbian, Tatar, Ukrainian,
Uzbek
Greek English, Greek
Disc Menu : For the disc menu contained on the disc
Menu : For the on-screen menu of your Blu-ray Disc Player.
Press the
▲▼
buttons to select the desired language, then press the ENTER button.
Press the RETURN or _ button to return to the previous menu. Press the MENU button to exit the menu.
The selected language will only appear if it is supported on the disc.
If the subtitle language is displayed in broken fonts, change Video File Subtitle to the appropriate region.
If is still does not work, the format is not supported.
M
1.
2.
3.
4.
•
•
•
•
•
5.
M
ENTER
or
+
or
+
or
button.
System
Language
◄
Audio
Display
HDMI
Network
Parental
Audio : Original
►
Subtitle : Auto
Video File Subtitle : Western
Disc Menu : English
Menu : Auto
No disc
Music
Photo
Setup
System
Language
◄
Audio
Display
HDMI
Network
Parental
Audio : Original
►
Subtitle : Auto
Video File Subtitle : Western
Disc Menu : English
Menu : Auto
✓
Original
English
Français
Deutsch
Español
Italiano
No disc
Music
Photo
Setup
01783M-BD-P1600-XBG-ENG-NEW.indb37 37 2009-07-21 오전 11:35:45

38_ audio setup
audio setup
SETTING UP THE AUDIO OPTIONS
Allows you to set up the Audio device and sound status depending on the audio system being used with the
player.
With the unit in Stop mode, press the MENU button.
Press the
▲▼
buttons to select Setup, then press the
ENTER or
+
button.
Press the
▲▼
buttons to select Audio, then press the
ENTER or
+
button.
Press the
▲▼
buttons to select the desired audio option
from the options described below, then press the
ENTER or
+
button.
Press the
▲▼
buttons to select the desired item, then
press the ENTER button.
Each audio option is described in detail below.
Press the RETURN or _ button to return to the previous
menu. Press the MENU button to exit the menu.
Digital Output
Blu-ray Discs may include three audio streams.
- Primary Audio : Main audio soundtrack of the disc
- Secondary Audio : Provides audio for the BONUSVIEW
window of a Blu-ray Disc.
- Effect Audio : You may hear menu prompt sounds (etc.)
when selecting menu items on a Blu-ray Disc (depending
on the disc).
Digital Output Selections
Setup Defi nition Pro Con Recommended use
PCM
Decodes Primary, Secondary
and Effect audio streams
together into PCM audio.
You can enjoy not only
Primary audio but also
Secondary and Effect audio
together.
This unit can decode Dolby
TrueHD and DTS-HD Master
Audio, the output audio
quality will be same with
Bitstream (audiophile) setup.
If you are using an optical
cable, you may not hear
multichannel surround audio.
Recommended choice if you
have an HDMI receiver.
Bitstream
(Re-encode)
Decodes Primary, Secondary
and Effect audio streams
together into PCM audio, then
re-encodes the PCM audio
into DTS bitstream.
You can enjoy not only
Primary audio, but also
Secondary and Effect audio
together.
Audio quality may be lower
than PCM or Bitstream
(Audiophile) setups when you
are using a receiver with
HDMI or Optical input.
Recommended choice if you
don’t have an HDMI
supported receiver, but have
a receiver with an Optical
input that can decode DTS.
Bitstream
(Audiophile)
Outputs only the Primary
audio soundtrack (main
soundtrack of the main
feature) so that your receiver
can decode the audio
bitstream.
This unit can decode Dolby
TrueHD and DTS-HD Master
Audio, the output audio
quality will be same with PCM
setup.
You will not hear Secondary
and Effect audio.
Recommended choice if you
have an HDMI 1.3 receiver
which has Dolby TrueHD and
DTS-HD Master Audio
decoding capability.
1.
2.
3.
4.
5.
6.
M
buttons to select the desired audio option
System
Language
Audio
►
Display
HDMI
Network
Parental
No disc
Music
Photo
Setup
_
System
Language
Audio
◄
Display
HDMI
Network
Parental
Digital Output : PCM
►
PCM Down Sampling : On
Dynamic Compression : On
Downmixing mode : Normal stereo
No disc
Music
Photo
Setup
System
Language
Audio
◄
Display
HDMI
Network
Parental
Digital Output : PCM
►
PCM Down Sampling : On
Dynamic Compression : On
Downmixing mode : Normal stereo
✓
PCM
Bitstream(Re-encode)
Bitstream(Audiophile)
No disc
Music
Photo
Setup
01783M-BD-P1600-XBG-ENG-NEW.indb38 38 2009-07-21 오전 11:35:49

English _39
● AUDIO SETUP
Be sure to select the correct Digital Output or you will hear no sound or a loud noise.
If the HDMI device (Receiver, TV) is not compatible with compressed formats (Dolby digital, DTS), the audio
signal outputs as PCM.
Secondary and Effect audio will not be heard with regular DVDs.
Some Blu-ray Discs do not have Secondary and Effect audio.
This Digital Output setup does not effect the analog (L/R) audio or HDMI audio output to your TV. It effects
the optical and HDMI audio output when connected to a receiver.
When the player outputs HD audio bitstream(Dolby TrueHD or DTS-HD Master Audio) from the Optical jack to
an HDMI 1.3 receiver, only 2 channel PCM audio will be heard.
If you play MPEG audio soundtracks, audio signal outputs PCM regardless of Digital Output Selections(PCM
or Bitstream).
PCM Down Sampling
On : Select this when the Amplifi er connected to the
player is not 96KHz compatible. 96KHz signals will be
down converted to 48KHz
Off : Select this when the Amplifi er connected to the
player is 96KHz compatible. Signals will be output without
any changes.
Even when PCM Down Sampling is set to Off, some discs will only output downsampled audio through the
optical digital outputs.
HDMI
If your TV is not compatible with compressed multi-channel formats (Dolby Digital, DTS), the unit may
output PCM 2ch downmixed audio even though you set Bitstream(either Re-encode or Audiophile)
on your setup menu.
If your TV is not compatible with PCM sampling rates over 48kHz, the unit may output 48kHz
downsampled PCM audio even though you set "PCM Down Sampling" to Off.
Dynamic Compression
This is only active when a Dolby Digital signal is detected.
On : When Movie soundtracks are played at low volume
or from smaller speakers, the system can apply
appropriate compression to make low-level content more
intelligible and prevent dramatic passages from getting
too loud.
Off : You can enjoy the movie with the standard Dynamic
Range.
M
•
•
M
•
•
•
•
, some discs will only output downsampled audio through the
, some discs will only output downsampled audio through the
System
Language
Audio
◄
Display
HDMI
Network
Parental
Digital Output : PCM
PCM Down Sampling : PCM
►
Dynamic Compression : On
Downmixing mode : Normal stereo
✓
On
Off
No disc
Music
Photo
Setup
System
Language
Audio
◄
Display
HDMI
Network
Parental
Digital Output : PCM
PCM Down Sampling : On
Dynamic Compression : PCM
►
Downmixing mode : Normal stereo
✓
On
Off
No disc
Music
Photo
Setup
01783M-BD-P1600-XBG-ENG-NEW.indb39 39 2009-07-21 오전 11:35:52

40_ audio setup
audio setup
Downmixing mode
This option enable you to compatible with Dolby Pro Logic systems.
Normal stereo : This is for just downmixing into 2ch
audio.It is not compatible with Dolby Surround or Dolby
Surround Pro Logic or Dolby Pro Logic II.
Surround Compatible : The 2/0 Lt/Rt downmix is a two-
channel Dolby Surround compatible output that can be
decoded by Dolby Surround (passive), Dolby Surround
Pro Logic (active) or Dolby Pro Logic II (active) decoders.
This downmix provides backward compatibility with
existing Dolby Surround systems and can be recorded on
two-channel media such as the videotape used by
videocassette recorders.
•
•
This option enable you to compatible with Dolby Pro Logic systems.
This option enable you to compatible with Dolby Pro Logic systems.
This option enable you to compatible with Dolby Pro Logic systems.
System
Language
Audio
◄
Display
HDMI
Network
Parental
Digital Output : PCM
PCM Down Sampling : On
Dynamic Compression : On
Downmixing mode : Normal stereo
►
✓
Normal stereo
Surround
Compatible
No disc
Music
Photo
Setup
01783M-BD-P1600-XBG-ENG-NEW.indb40 40 2009-07-21 오전 11:35:53

English _41
● DISPLAY SETUP
display setup
SETTING UP THE DISPLAY OPTIONS
This function allows you to setup the TV screen settings. This function
depends on the disc or TV type. It may not work with some discs or TVs.
With the unit in Stop mode, press the MENU button.
Press the
▲▼
buttons to select Setup, then press the
ENTER or
+
button.
Press the
▲▼
buttons to select Display, then press the
ENTER or
+
button.
Display Setup menu will be displayed.
Press the
▲▼
buttons to select the desired display option
from the options on the following pages.
Press the
▲▼
buttons to select the desired sub-menu
item from a video display option, then press the ENTER
button.
Each video option is described in detail below.
Press the RETURN or _ button to return to the previous
menu. Press the MENU button to exit the menu.
TV Aspect
Depending on the type of television you have, you may want to adjust the screen setting. (aspect ratio)
• 4:3 Letter Box :
Select when you want to see the total
16:9 ratio screen Blu-ray Disc/DVD
supplies, even though you have a TV with
a 4:3 ratio screen. Black bars will appear
at the top and bottom of the screen.
• 4:3 Pan-Scan :
Select when you want to see the 16:9
video supplied by the Blu-ray Disc/DVD
without the black bars on top and bottom,
even though you have a TV with a 4:3
ratio screen(extreme left and right portion
of the movie picture will be cut off).
• 16:9 Wide :
You can view the full 16:9 picture on your widescreen TV.
• 16:9 Normal :
Certain movies(4:3 source) will be displayed in 4:3 Pillarbox (black bars on sides of picture)
if 16:9 normal is selected.
Depending on the disc type, some aspect ratios may not be available.
If you select an aspect ratio which is different than the aspect ratio of your TV screen, then the picture might
appear to be distorted.
1.
2.
3.
4.
5.
6.
M
M
No disc
No disc
No disc
No disc
No disc
No disc
Music
Photo
Setup
_
System
Language
Audio
Display
►
HDMI
Network
Parental
No disc
No disc
No disc
No disc
No disc
No disc
Music
Photo
Setup
System
Language
Audio
Display
◄
HDMI
Network
Parental
TV Aspect : 16:9 Normal
►
Movie Frame (24 Fs) : Off
Resolution : 1080p
Progressive Mode : Auto
Still Mode : Auto
Screen Message : On
Front Display : Bright
Depending on the type of television you have, you may want to adjust the screen setting. (aspect ratio)
No disc
Depending on the type of television you have, you may want to adjust the screen setting. (aspect ratio)
No disc
No disc
No disc
No disc
No disc
Music
Photo
Setup
System
Language
Audio
Display
◄
HDMI
Network
Parental
TV Aspect : 16:9 Normal
►
Movie Frame (24 Fs) : Off
Resolution : 1080p
Progressive Mode : Auto
Still Mode : Auto
Screen Message : On
Front Display : Bright
4:3 Letter Box
4:3 Pan-Scan
16:9 Wide
✓
16:9 Normal
01783M-BD-P1600-XBG-ENG-NEW.indb41 41 2009-07-21 오전 11:35:59

42_ display setup
display setup
Movie Frame (24 Fs)
Movies are usually fi lmed at 24 frames per second. Some
Blu-ray Discs have the capability of playing back at this
frame rate. Setting the Movie Frame (24Fs) feature to ON
allows you to adjust the Blu-ray Disc Player's HDMI output
to 24 frames per second for improved picture quality.
You can enjoy the Movie Frame (24Fs) feature only on a TV
supporting this frame rate.
This menu can only be selected in 1080i or 1080p HDMI
output resolution modes.
Depending on the disc, two types of frame rates may be included: Movie material (24 frame) and Video
material (30 frame). When the setting switches between Movie (24 frame) and Video (30 frame),
the screen may blink for a few seconds.
Resolution
Sets the output resolution of the Component and HDMI
video signal.
The number in 576p/480p, 576i/480i, 720p, 1080p and
1080i indicates the number of lines of video. The i and p
indicate interlace and progressive scan, respectively.
- BD Wise : Automatically sets the optimal resolution
when connected via HDMI to a TV with the BD Wise
feature.
(The BD Wise menu item appears only if BD Wise is set
to On.)
- 1080p : Outputs 1080 lines of progressive video (HDMI only).
- 1080i : Outputs 1080 lines of interlaced video.
- 720p : Outputs 720 lines of progressive video.
- 576p/480p : Outputs 576/480 lines of progressive video.
- 576i/480i : Outputs 576/480 lines of interlaced video (Component only).
If the connected TV does not support Movie Frame or the
selected resolution, you will see the following message:
If you select Yes and the resolution is not supported, the
TV's screen will be blank. Please wait for 15 seconds and
the resolution will be reverted to the previous value
automatically.
If the screen is blank, press and hold the SKIP (]) button on the front of the player for more than 5
seconds (no disc inserted). All settings are restored to the factory default. Follow the steps on the previous
page to access each mode and select the Display Setup that your TV will support.
When the factory default settings are restored, all the user data stored in the BD data will be deleted.
•
M
Depending on the disc, two types of frame rates may be included: Movie material (24 frame) and Video
Depending on the disc, two types of frame rates may be included: Movie material (24 frame) and Video
System
Language
Audio
Display
◄
HDMI
Network
Parental
TV Aspect : 16:9 Normal
Movie Frame (24 Fs) : PCM
►
Resolution : 1080p
Progressive Mode : Auto
Still Mode : Auto
Screen Message : On
Front Display : Bright
On
✓
Off
No disc
Music
Photo
Setup
System
Language
Audio
Display
◄
HDMI
Network
Parental
TV Aspect : 16:9 Normal
Movie Frame (24 Fs) : Off
Resolution : PCM
►
Progressive Mode : Auto
Still Mode : Auto
Screen Message : On
Front Display : Bright
✓
1080p
1080i
720p
576p/480p
576i/480i
No disc
Music
Photo
Setup
) button on the front of the player for more than 5
) button on the front of the player for more than 5
System
Language
Audio
Display
◄
HDMI
Network
Parental
TV Aspect : 16:9 Normal
Movie Frame (24 Fs) : Off
Resolution : 1080p
►
Progressive Mode : Auto
Still Mode : Auto
Screen Message : On
Front Display : Bright
No disc
Music
Photo
Setup
!
If no pictures are shown after the selection,
please wait for 15 seconds. And then,
the resolution will be reverted
to the previous value automatically.
Would you like to make a selection?
Yes No
01783M-BD-P1600-XBG-ENG-NEW.indb42 42 2009-07-21 오전 11:36:03

English _43
● DISPLAY SETUP
Resolution according to the output mode
Blu-ray Disc playback
Output
Setup
HDMI
Component
(HDMI&Comp. connected / Comp. connected only)
VIDEO
1080p, Movie Frame(24Fs) off 1080p@60F 576i (480i) / 1080i 576i (480i)
1080p/1080i, Movie Frame (24Fs) on
1080p@24F 576i (480i) / 1080i 576i (480i)
1080i, Movie Frame (24Fs) off 1080i 576i (480i) / 1080i 576i (480i)
720p 720p 576i (480i) / 720p 576i (480i)
576p (480p) 576p (480p) 576i (480i) / 576p (480p) 576i (480i)
576i (480i) 576p (480p) 576i (480i) 576i (480i)
DVD playback
Output
Setup
HDMI
Component
(HDMI&Comp. connected / Comp. connected only)
VIDEO
1080p 1080p@60F 576i (480i) / 576p (480p) 576i (480i)
1080i 1080i 576i (480i) / 576p (480p) 576i (480i)
720p 720p 576i (480i) / 576p (480p) 576i (480i)
576p (480p) 576p (480p) 576i (480i) / 576p (480p) 576i (480i)
576i (480i) 576p (480p) 576i (480i) 576i (480i)
In DVD playback, if both HDMI and Component jacks are connected and you select the Component 1080p,
1080i or 720p mode, the Display Setup menu will show the output resolution as 1080p, 1080i or 720p in
the menu.
The resolution is actually 576i/480i.
This player has the HDMI Auto Detect Feature. When the player is fi rst connected to a TV via HDMI, the
player's output will be set automatically to HDMI.
If the HDMI Auto Detection feature does not work, you can't select the 1080p resolution or Movie Frame
(24Fs).
The Blu-ray Disc must have the 24 frame feature in order to use the Movie Frame (24Fs) mode.
Progressive Mode
The Progressive Mode helps to improve picture quality when viewing 480i resolution DVD discs.
Auto : Select this to have the player automatically set the
best picture for the DVD you're watching.
Video : Select this for the best picture from Concert or TV
show DVDs.
❖
•
•
M
•
•
The Progressive Mode helps to improve picture quality when viewing 480i resolution DVD discs.
The Progressive Mode helps to improve picture quality when viewing 480i resolution DVD discs.
The Progressive Mode helps to improve picture quality when viewing 480i resolution DVD discs.
The Progressive Mode helps to improve picture quality when viewing 480i resolution DVD discs.
The Progressive Mode helps to improve picture quality when viewing 480i resolution DVD discs.
System
Language
Audio
Display
◄
HDMI
Network
Parental
TV Aspect : 16:9 Normal
Movie Frame (24 Fs) : Off
Resolution : 1080p
Progressive Mode : PCM
►
Still Mode : Auto
Screen Message : On
Front Display : Bright
✓
Auto
Video
No disc
Music
Photo
Setup
01783M-BD-P1600-XBG-ENG-NEW.indb43 43 2009-07-21 오전 11:36:05

44_ display setup
display setup
Frame & Field bar
Still Mode
Set the Auto, Field or Frame setting for the best possible still
picture (pause mode) from a DVD.
Auto : Select this setting to have the player automatically
display the best Still picture depending on the content.
Field Mode : Select this when pausing a scene with a lot
of action.
Frame Mode : Select this to increase the resolution of the
Still picture.
Screen Message
On : Displays messages related to operation mode.
Off : Does not display messages related to operation
mode.
Front Display
Auto : Display is dim during playback and bright when the
unit is in Stop mode.
Dim : Select to dim the display window.
Bright : Select to brighten the display window.
•
•
•
•
•
•
•
•
Set the Auto, Field or Frame setting for the best possible still
System
Language
Audio
Display
◄
HDMI
Network
Parental
Movie Frame (24 Fs) : Off
Resolution : 1080p
Progressive Mode : Auto
Still Mode : PCM
►
Screen Message : On
Front Display : Bright
✓
Auto
Field
Frame
No disc
Music
Photo
Setup
System
Language
Audio
Display
◄
HDMI
Network
Parental
Resolution : 1080p
Progressive Mode : Auto
Still Mode : Auto
Screen Message : PCM
►
Front Display : Bright
✓
On
Off
No disc
Music
Photo
Setup
System
Language
Audio
Display
◄
HDMI
Network
Parental
Progressive Mode : Auto
Still Mode : Auto
Screen Message : On
Front Display : PCM
►
Auto
Dim
✓
Bright
No disc
Music
Photo
Setup
01783M-BD-P1600-XBG-ENG-NEW.indb44 44 2009-07-21 오전 11:36:09

English _45
● HDMI SETUP
HDMI setup
SETTING UP THE HDMI SETUP OPTIONS
With the unit in Stop mode, press the MENU button.
Press the
▲▼
buttons to select Setup, then press the
ENTER or
+
button.
Press the
▲▼
buttons to select HDMI, then press the
ENTER or
+
button.
HDMI Setup menu will be displayed.
Press the
▲▼
buttons to select the desired display
option, then press the ENTER or
+
button.
Anynet+ (HDMI-CEC) (Samsung products only)
When HDMI is set to on, you can operate the Anynet+
function.
On : Anynet+ functions will work.
Off : Anynet+ function will not work.
What is Anynet+?
Anynet+ is a convenient function that offers linked
operations with other Samsung products with the Anynet+
feature.
You can operate this unit using a Samsung TV remote control or power on your Samsung TV and
Home theater and start disc playback simply by pressing the PLAY button on the TV’s remote.
This function is not available if the HDMI cable does not support CEC.
To use Anynet+
Connect the Blu-ray Disc Player to a Samsung TV with an HDMI cable. (See pages 22~24)
Set the Anynet+ (HDMI-CEC) to “On” on your Blu-ray Disc Player.
Set the Anynet+ function on your TV. (See the TV instruction manual for more information.)
Anynet+ Functions
One touch play
You can power on your Samsung TV and Home Theater, and play the disc in this unit simply by
pressing the PLAY button on the TV’s remote.
One touch watching
Select “Watching Blu-ray Disc Player” or “Connected to Blu-ray Disc Player” (depending on your
TV's menu) in the Anynet+ menu on the TV. The Blu-ray Disc Player will automatically turn on and the
TV will be switched to HDMI mode.
Remote control Link
You can operate this player with your Samsung TV remote control.
Available buttons on the Samsung TV remote: These buttons work the same as this Blu-ray Disc
player's remote control.
- Playback control buttons :
- Menu operation button :
- Numeric buttons : ~
- Color buttons :
1.
2.
3.
4.
•
•
M
1.
2.
3.
•
•
•
•
Language
Audio
Display
HDMI
►
Network
Parental
No disc
Music
Photo
Setup
_
You can operate this unit using a Samsung TV remote control or power on your Samsung TV and
You can operate this unit using a Samsung TV remote control or power on your Samsung TV and
Language
Audio
Display
HDMI
◄
Network
Parental
Anynet+ (HDMI-CEC) : 16:9 Normal
►
HDMI Format : Off
BD Wise : On
✓
On
Off
No disc
Music
Photo
Setup
01783M-BD-P1600-XBG-ENG-NEW.indb45 45 2009-07-21 오전 11:36:12

46_ HDMI setup
HDMI setup
TV Anynet+ Menu
When you press the Anynet+ button on your Samsung TV's
remote control, the following On-Screen Display (OSD) will
be shown.
Blu-ray Disc Player Menu
- When playing a movie : brings up the disc’s menu (same
as DISC MENU button on the Blu-ray Disc Player’s
remote control)
- In Stop mode : brings up the SETUP menu (same as the
MENU button on the Blu-ray Disc Player’s remote
control.)
Blu-ray Disc Player Operation Menu
- When playing a DVD VIDEO, DVD-RW/-R, BD-ROM, BD-RE :
shows INFO OSD (same as INFO button on the player's remote control)
These menus may look different depending on your Samsung TV.
HDMI Format
You can optimize the HDMI output for connection to a TV or Monitor.
TV : Select if connected to a TV via HDMI.
Monitor : Select if connected to a Monitor via HDMI.
If the player is connected to a TV, the Monitor option is
unavailable.
TV or monitor has to be connected to the player before you
select this option.
•
•
M
•
•
M
>
Move
s
Enter
e
Exit
BD Player
n
View TV
Select Device
Record
Menu on Device
Device Operation
Receiver : Off
Setup
You can optimize the HDMI output for connection to a TV or Monitor.
You can optimize the HDMI output for connection to a TV or Monitor.
You can optimize the HDMI output for connection to a TV or Monitor.
Language
Audio
Display
HDMI
◄
Network
Parental
Anynet+ (HDMI-CEC) : On
HDMI Format : PCM
►
BD Wise : On
✓
TV
Monitor
No disc
Music
Photo
Setup
01783M-BD-P1600-XBG-ENG-NEW.indb46 46 2009-07-21 오전 11:36:14

English _47
● HDMI SETUP
BD Wise (Samsung products only)
BD Wise is Samsung's latest inter-connectivity feature.
When you connect Samsung products with BD-Wise to each other via HDMI, the optimum resolution
will be set automatically.
On : The original resolution of the BD/DVD disc will be
output to the TV directly.
Off : The output resolution will be fi xed according to the
Resolution previously set, regardless of the resolution of
the disc.
If you want to change the resolution in BD Wise, you must set BD Wise to Off in advance.
If you set off the BD Wise, the resolution of the connected TV will be adjusted to its maximum resolution
automatically.
If the player is connected to a device that does not support BD Wise, you can not use BD wise function.
For a proper operation of BD Wise, set each BD Wise menu of the player and the TV to On respectively.
•
•
M
If you want to change the resolution in BD Wise, you must set BD Wise to
Off
in advance.
Off in advance.Off
If you want to change the resolution in BD Wise, you must set BD Wise to
Off
in advance.
Off in advance.Off
Language
Audio
Display
HDMI
◄
Network
Parental
Anynet+ (HDMI-CEC) : On
HDMI Format : TV
BD Wise : PCM
►
✓
On
Off
No disc
Music
Photo
Setup
01783M-BD-P1600-XBG-ENG-NEW.indb47 47 2009-07-21 오전 11:36:16

48_ parental setup
parental setup
SETTING UP THE PARENTAL LOCK
The Parental Lock function works in conjunction with Blu-ray Disc/DVDs that have been assigned a rating which
helps you control the types of Blu-ray Disc/DVDs that your family watches. There are up to 8 rating levels on a
disc.
hZ
With the unit in Stop mode, press the MENU button.
Press the
▲▼
buttons to select Setup, then press the
ENTER or
+
button.
Press the
▲▼
buttons to select Parental, then press
the ENTER or
+
button.
When you operate your Blu-ray Disc Player for the fi rst
time, the “Enter New password.” message will be
displayed.
Enter the 4-digit password using the number buttons on
the remote control.
The “Confi rm the password.” message will be displayed.
Enter your password again.
Press the ENTER or
+
button to select Parental Lock.
Press the
▲▼
buttons to select On or Off, then press
the ENTER button.
Press the RETURN or _ button to return to the previous menu. Press the MENU button to exit the menu.
1.
2.
3.
4.
5.
6.
M
Display
HDMI
Network
Parental
►
No disc
Music
Photo
Setup
_
Display
HDMI
Network
Parental
◄
No disc
Music
Photo
Setup
Parental Setup
-
Number
r
Return
Enter New password.
Display
HDMI
Network
Parental
◄
No disc
Music
Photo
Setup
Parental Setup
-
Number
r
Return
Confi rm the password.
button to return to the previous menu. Press the
MENU
button to exit the menu.
button to return to the previous menu. Press the
MENU
button to exit the menu.
Display
HDMI
Network
Parental
◄
Parental Lock : Off
►
Rating Level : 1(Kids)
New Password
No disc
Music
Photo
Setup
01783M-BD-P1600-XBG-ENG-NEW.indb48 48 2009-07-21 오전 11:36:21

English _49
● PARENTAL SETUP
If you forgot your password
Remove the disc.
Press and hold the SKIP (
]
) button on the front panel for 5 seconds or more.
All settings will revert to the factory settings.
When the factory default settings are restored, all the user data stored in the BD data will be deleted.
Setting the Rating Level
Press the
▲▼
buttons to select Rating Level, then
press the ENTER or
+
button.
Press the
▲▼
buttons to select the rating level you
want, then press the ENTER button. For example, if you
select up to Level 6, discs that contain Level 7, 8 will not
play.
A larger number indicates that the program is intended
for adult use only.
Level 1 is the most restrictive and Level 8 is the least.
Changing the Password
Press the
▲▼
buttons to select New Password, then
press the ENTER or
+
button.
Enter the 4-digit password using the number buttons on
the remote control. The “Enter New password.”
message will be displayed.
Enter your password again using the number buttons on
the remote control.
1.
2.
•
M
1.
2.
1.
2.
3.
Display
HDMI
Network
Parental
◄
Parental Lock : Off
Rating Level : Off
►
New Password
8(Adults)
7
6
5
4
3
2
✓
1(Kids)
No disc
Music
Photo
Setup
Display
HDMI
Network
Parental
◄
Parental Lock : Off
Rating Level : 1(Kids)
New Password
►
No disc
Music
Photo
Setup
Display
HDMI
Network
Parental
◄
Parental Lock : Off
Rating Level : 1(Kids)
New Password
►
No disc
Music
Photo
Setup
Parental Setup
-
Number
r
Return
Enter New password.
Display
HDMI
Network
Parental
◄
Parental Lock : Off
Rating Level : 1(Kids)
New Password
►
No disc
Music
Photo
Setup
Parental Setup
-
Number
r
Return
Confi rm the password.
01783M-BD-P1600-XBG-ENG-NEW.indb49 49 2009-07-21 오전 11:36:26

50_ network setup
network setup
SETTING UP THE NETWORK SETUP OPTIONS
To obtain information on the proper settings, check the network settings on your computer or contact
your Internet provider.
To set the network of your Blu-ray Disc player, follow the steps below.
With the unit in Stop mode/No Disc mode, press the
MENU button.
Press the
▲▼
buttons to select Setup, then press the
ENTER or
+
button.
Press the
▲▼
buttons to select Network, then press
the ENTER or
+
button.
Press the
▲▼
buttons to select the desired network
option from the options described below, then press the
ENTER or
+
button.
Press the
▲▼
buttons to select the desired item, then press the ENTER button.
Each network option is described in detail below.
Network Selection
Select Cable or Wireless as the method to connect to
network.
To setup, follow steps 1~3 on page 50.
Press the
▲▼
buttons to select Network Selection,
then press the ENTER or
+
button.
Cable : Select this to connect to the network using a
cable. (see page 30)
Wireless : Select this to connect to the network
wirelessly. (see page 31)
Cable Network
To setup, follow steps 1~3 on page 50.
Press the
▲▼
buttons to select Cable Network, then
press the ENTER or
+
button.
Press the
▲▼
buttons to select DHCP, then press the
ENTER button.
If DHCP is set to On, you can't select IP Address, Subnet
Mask or Gateway.
If DNS is set to Auto, you can’t select Primary/ Secondary
DNS.
1.
2.
3.
4.
5.
4.
•
•
4.
5.
M
To set the network of your Blu-ray Disc player, follow the steps below.
buttons to select the desired item, then press the
ENTER
button.
To set the network of your Blu-ray Disc player, follow the steps below.
buttons to select the desired item, then press the
ENTER
button.
Audio
Display
HDMI
Network
►
Parental
No disc
Music
Photo
Setup
_
Audio
Display
HDMI
Network
_
Parental
Network Selection : Cable
►
Cable Network
Wireless Network
Proxy
NTP Server : Off
Network Connection Test
BD-LIVE Internet
Connection
: Allow (Valid Only)
No disc
Music
Photo
Setup
Audio
Display
HDMI
Network
_
Parental
Network Selection : Cable
Cable Network
►
Wireless Network
Proxy
NTP Server : Off
Network Connection Test
BD-LIVE Internet
Connection
: Allow (Valid Only)
No disc
Music
Photo
Setup
Audio
Display
HDMI
Network
_
Parental
Network Selection :
Cable Network
►
Wireless Network
Proxy
NTP Server : Off
Network Connection Test
BD-LIVE Internet
Connection
: (Valid Only)
No disc
Music
Photo
Setup
Cable Network
s
Select
r
Return
DHCP : On
IP Address : 0 . 0 . 0 . 0
Subnet Mask : 255 . 255 . 255 . 0
Gateway : 0 . 0 . 0 . 0
DNS : Auto
Primary DNS : 0 . 0 . 0 . 0
Secondary DNS : 0 . 0 . 0 . 0
Save Cancel
01783M-BD-P1600-XBG-ENG-NEW.indb50 50 2009-07-21 오전 11:36:31

English _51
● NETWORK SETUP
Press the
▲▼
buttons to select a desired item, then press the ENTER button.
If DHCP is set to Off and, DNS to Manual,
enter your IP Address, Subnet Mask,
Gateway and Primary DNS settings
(Secondary DNS is optional).
If DHCP is set to On and, DNS to Manual,
enter your Primary DNS setting
(Secondary DNS is optional).
If DHCP is set to On and, DNS to Auto,
you don’t need further or additional
settings.
When you select an item, use the number and $%_ + buttons.
If the automatic settings don’t work, contact your ISP.
When done, use the
$%
buttons to select Save, then press the ENTER button.
If you don’t want to save your work, use the
$%_ +
buttons to select Cancel, then press the
ENTER button.
The IP address used in this manual is for illustrative purposes only. You must refer to your network settings
for the actual IP address.
To obtain settings for IP address, Subnet mask, Gateway and Primary DNS, check the network settings in
your computer or contact your internet service provider.
Wireless Network
To setup, follow steps 1~3 on page 50.
Press the
$%
buttons to select Wireless Network,
then press the ENTER or
+
button.
6.
•
•
•
M
7.
8.
M
4.
Audio
Display
HDMI
Network
_
Parental
Network Selection : Wireless
Cable Network
Wireless Network
►
Proxy
NTP Server : Off
Network Connection Test
BD-LIVE Internet
Connection
: Allow (Valid Only)
No disc
Music
Photo
Setup
buttons to select a desired item, then press the
No disc
No disc
No disc
No disc
No disc
No disc
Audio
Display
HDMI
Network
_
Parental
Network Selection :
Cable Network
►
Wireless Network
Proxy
NTP Server :
Network Connection Test
BD-LIVE Internet
BD-LIVE Internet
Connection
: (Valid Only)
Music
Photo
Setup
_
Cable Network
s
Select
r
Return
DHCP : Off
IP Address : 0 . 0 . 0 . 0
Subnet Mask : 255 . 255 . 255 . 0
Gateway : 0 . 0 . 0 . 0
DNS : Manual
Primary DNS : 0 . 0 . 0 . 0
Secondary DNS : 0 . 0 . 0 . 0
Save Cancel
Setup available
No disc
No disc
No disc
No disc
No disc
No disc
Audio
Display
HDMI
Network
_
Parental
Network Selection :
Cable Network
►
Wireless Network
Proxy
NTP Server :
Network Connection Test
BD-LIVE Internet
BD-LIVE Internet
Connection
: (Valid Only)
Music
Photo
Setup
_
Cable Network
s
Select
r
Return
DHCP : On
IP Address : 0 . 0 . 0 . 0
Subnet Mask : 255 . 255 . 255 . 0
Gateway : 0 . 0 . 0 . 0
DNS : Manual
Primary DNS : 0 . 0 . 0 . 0
Secondary DNS : 0 . 0 . 0 . 0
Save Cancel
Setup not available
Setup available
When you select an item, use the number and
No disc
When you select an item, use the number and
$%_ +
buttons.
When you select an item, use the number and
$%_ +
buttons.
No disc
No disc
No disc
No disc
No disc
Audio
Display
HDMI
Network
_
Parental
Network Selection :
Cable Network
►
Wireless Network
Proxy
NTP Server :
Network Connection Test
BD-LIVE Internet
BD-LIVE Internet
Connection
: (Valid Only)
Music
Photo
Setup
_
Cable Network
s
Select
r
Return
DHCP : On
IP Address : 0 . 0 . 0 . 0
Subnet Mask : 255 . 255 . 255 . 0
Gateway : 0 . 0 . 0 . 0
DNS : Auto
Primary DNS : 0 . 0 . 0 . 0
Secondary DNS : 0 . 0 . 0 . 0
Save Cancel
Setup not available
01783M-BD-P1600-XBG-ENG-NEW.indb51 51 2009-07-21 오전 11:36:37

52_ network setup
network setup
Press the
$%
buttons to select DHCP, then press the
ENTER button.
If DHCP is set to On, you can't select IP Address, Subnet
Mask or Gateway.
If DNS is set to Auto, you can’t select Primary/ Secondary
DNS.
Press the
$%
buttons to select a desired item, then press the ENTER button.
Select an Access Point, and then press the ENTER
button to display an available list of APs.
(It may take several seconds to search.)
- When you select an AP and press the ENTER
button, it tries to connect to the designated AP.
- If successful, a notifi cation appears.
(If selected AP shows a Lock icon, you may need to
provide security authentication.)
- Select your appropriate Security Access Point if it is
known. If it is not, select WEP, WPAPSK or
WPA2PSK from the list below and enter in the
password. Keep trying each Security Access Point
and enter the Password until a connection is made.
- Enter in the Password then press the BLUE (D)
button to connect to your access point (Router).
For further details on AP security, refer to the AP’s (Router) user manual.
If DHCP is set to Off and, DNS to Manual,
enter your IP Address, Subnet Mask,
Gateway and DNS Server.
5.
M
6.
•
•
buttons to select a desired item, then press the
ENTER
button.
buttons to select a desired item, then press the
ENTER
button.
Audio
Display
HDMI
Network
_
Parental
Network Selection :
Cable Network
►
Wireless Network
Proxy
NTP Server : Off
Network Connection Test
BD-LIVE Internet
Connection
: (Valid Only)
No disc
Music
Photo
Setup
Wireless Network
s
Select
r
Return
Access Point : Not Selected
DHCP : On
IP Address : 0 . 0 . 0 . 0
Subnet Mask : 255 . 255 . 255 . 0
Gateway : 0 . 0 . 0 . 0
DNS : Auto
DNS Server : 0 . 0 . 0 . 0
Save Cancel
buttons to select a desired item, then press the
ENTER
button.
buttons to select a desired item, then press the
ENTER
button.
ENTER
button.
button.
button.
Audio
Display
HDMI
Network
_
Parental
Network Selection :
Cable Network
►
Wireless Network
Proxy
NTP Server : Off
Network Connection Test
BD-LIVE Internet
Connection
: (Valid Only)
No disc
Music
Photo
Setup
Wireless Network
s
Select
r
Return
Access Point : Not Selected
DHCP : On
IP Address : 0 . 0 . 0 . 0
Subnet Mask : 255 . 255 . 255 . 0
Gateway : 0 . 0 . 0 . 0
DNS : Auto
DNS Server : 0 . 0 . 0 . 0
Save Cancel
Audio
Display
HDMI
Network
_
Parental
Network Selection :
Cable Network
►
Wireless Network
Proxy
NTP Server : Off
Network Connection Test
BD-LIVE Internet
Connection
: (Valid Only)
No disc
Music
Photo
Setup
Access Point – Security
s
Select
r
Return
1 2 3
OPEN
WEP
WPAPSK
WPA2PSK
For further details on AP security, refer to the AP’s (Router) user manual.
For further details on AP security, refer to the AP’s (Router) user manual.
Audio
Display
HDMI
Network
_
Parental
Network Selection :
Cable Network
►
Wireless Network
Proxy
NTP Server : Off
Network Connection Test
BD-LIVE Internet
Connection
: (Valid Only)
No disc
Music
Photo
Setup
Password
-
Number
s
Select
r
Return
A B C D E F G H I J K L M N O P
Q R S T U V W X Y Z a b c d e f
g h i j k l m n o p q r s t u v
w x y z 1 2 3 4 5 6 7 8 9 0 −
_
+ = . ~ ! @ # $ % ^ & ( ) / ? |
a
Back Space
b
Space
c
Clear
d
Connect
_
1 2 3
For further details on AP security, refer to the AP’s (Router) user manual.
No disc
For further details on AP security, refer to the AP’s (Router) user manual.
No disc
No disc
No disc
No disc
Audio
Display
HDMI
Network
_
Parental
Network Selection :
Cable Network
►
Wireless Network
Proxy
NTP Server :
Network Connection Test
BD-LIVE Internet
BD-LIVE Internet
Connection
: (Valid Only)
Music
Photo
Setup
_
Wireless Network
s
Select
r
Return
Access Point : Not Selected
DHCP : Off
IP Address : 0 . 0 . 0 . 0
Subnet Mask : 255 . 255 . 255 . 0
Gateway : 0 . 0 . 0 . 0
DNS : Manual
DNS Server : 0 . 0 . 0 . 0
Save Cancel
Setup available
01783M-BD-P1600-XBG-ENG-NEW.indb52 52 2009-07-21 오전 11:36:45

English _53
● NETWORK SETUP
If DHCP is set to On and, DNS to Manual,
enter your DNS Server.
If DHCP is set to On and, DNS to Auto,
you don’t need further or additional
settings.
When you select an item, use the number and ▲▼_ + buttons.
If the automatic settings don’t work, contact your ISP.
When done, use the
$%
buttons to select Save, then press the ENTER button.
If you don’t want to save your work, use the
$%_ +
buttons to select Cancel, then press the
ENTER button.
The IP address used in this manual is for illustrative purposes only. You must refer to your network settings
for the actual IP address.
To obtain settings for IP address, Subnet mask, Gateway and DNS Server, check the network settings in your
computer or contact your internet service provider.
Proxy Setting
A proxy server services requests by forwarding them to other servers.
If you are required to confi gure the proxy setting, enter the settings specifi ed by the ISP.
To setup, follow steps 1~3 on page 50.
Press the
$%
buttons to select Proxy, then press the
ENTER or
+
button.
Server
Port
User
Password
For more information, contact your ISP (Internet Service Provider).
•
•
M
7.
8.
M
4.
•
•
•
•
M
Audio
Display
HDMI
Network
_
Parental
Network Selection : Cable
Wireless Network
Proxy
NTP Server :
►
Network Connection Test
BD-LIVE Internet
Connection
: A (Valid Only)
No disc
Music
Photo
Setup
Proxy
s
Select
r
Return
Proxy : Off
Server :
Port : 8080
User :
Password :
Save Cancel
No disc
No disc
No disc
No disc
No disc
No disc
Audio
Display
HDMI
Network
_
Parental
Network Selection :
Cable Network
►
Wireless Network
Proxy
NTP Server :
Network Connection Test
BD-LIVE Internet
BD-LIVE Internet
Connection
: (Valid Only)
Music
Photo
Setup
_
Wireless Network
s
Select
r
Return
Access Point : Not Selected
DHCP : On
IP Address : 0 . 0 . 0 . 0
Subnet Mask : 255 . 255 . 255 . 0
Gateway : 0 . 0 . 0 . 0
DNS : Manual
DNS Server : 0 . 0 . 0 . 0
Save Cancel
Setup not available
Setup available
When you select an item, use the number and
No disc
When you select an item, use the number and
▲▼_ +
buttons.
When you select an item, use the number and
▲▼_ +
buttons.
No disc
No disc
No disc
No disc
No disc
Audio
Display
HDMI
Network
_
Parental
Network Selection :
Cable Network
►
Wireless Network
Proxy
NTP Server :
Network Connection Test
BD-LIVE Internet
BD-LIVE Internet
Connection
: (Valid Only)
Music
Photo
Setup
_
Wireless Network
s
Select
r
Return
Access Point : Not Selected
DHCP : On
IP Address : 0 . 0 . 0 . 0
Subnet Mask : 255 . 255 . 255 . 0
Gateway : 0 . 0 . 0 . 0
DNS : Auto
DNS Server : 0 . 0 . 0 . 0
Save Cancel
Setup not available
01783M-BD-P1600-XBG-ENG-NEW.indb53 53 2009-07-21 오전 11:36:51

54_ network setup
network setup
NTP Server (Used to Retrieve Time Information from NTP Server)
To setup, follow steps 1~3 on page 50.
Press the
▲▼
buttons to select NTP Server, then press
the ENTER or
+
button.
On : The player automatically connects to the Internet
server in order to adjust the time setting.
Off : The player does not connect to the Internet
server to adjust the time setting.
Network Connection Test
Use this menu to check whether your network connection is working or not.
To setup, follow steps 1~3 on page 50.
Press the
▲▼
buttons to select Network Connection
Test, then press the ENTER or
+
button.
BD-LIVE Internet Connection
The Blu-ray Disc player supports BD-LIVE which enables you to enjoy a variety of interactive service
contents provided by the disc manufacturer through a network connection. To enjoy this feature, you
must fi rst perform the LAN connection (see page 30) or Wireless LAN adapter connection to the USB
slot.
* You must have a minimum 1 GB USB Memory device inserted in one of the USB slots in order to
download content from BD-LIVE.
The Internet connection may be restricted while you are using BD-LIVE contents.
To setup, follow steps 1~3 on page 50.
Press the
▲▼
buttons to select BD-LIVE Internet
Connection, then press the ENTER or
+
button.
Allow (All) : The Internet connection will be allowed for
all BD-LIVE contents.
Allow (Valid Only) : The Internet connection will be
allowed only for BD-LIVE contents containing a valid
certifi cate.
Prohibit : No Internet connection will be allowed for
any BD-LIVE content.
What is a valid certifi cate? When the Blu-ray Disc player uses BD-LIVE to send the disc data and request
to the server to certify the disc, the server uses the transferred data to check if the disc is valid and sends
the certifi cate back to the player.
The Internet connection may be restricted while you are using BD-LIVE contents.
4.
•
•
4.
4.
•
•
•
M
Audio
Display
HDMI
Network
_
Parental
Cable Network
Wireless Network
Proxy
NTP Server : Cable
►
Network Connection Test
BD-LIVE Internet
Connection
: Allow (Valid Only)
On
✓
Off
No disc
Music
Photo
Setup
Audio
Display
HDMI
Network
_
Parental
Wireless Network
Proxy
NTP Server
Network Connection Test
►
BD-LIVE Internet
Connection
: Allow (Valid Only
Connection
No disc
Music
Photo
Setup
Network Connection Test
r
Return
✔ MAC Address (00:10:18:00:00:70)
✔ IP Address.Subnet Mask.Gateway.DNS Server
✔ Gateway Ping
✔ Internet Service Test
Your network is operating properly
Audio
Display
HDMI
Network
_
Parental
Proxy
NTP Server : Off
Network Connection Test
BD-LIVE Internet
Connection
: Cable ►
Allow(All)
✓
Allow(Valid Only)
Prohibit
No disc
Music
Photo
Setup
01783M-BD-P1600-XBG-ENG-NEW.indb54 54 2009-07-21 오전 11:36:56

English _55
● BD DATA MANAGEMENT
BD data management
BD Data (stored in external USB fl ash memory) is Blu-ray Disc content such as
trailers and other special features downloaded from the BD-LIVE service or Blu-ray
Discs.
* You must have a minimum 1GB USB Memory device inserted in one of the USB slots in order to download
content from BD-LIVE.
SYSTEM DEVICE MANAGEMENT
You can manage user data stored in BD data.
With the unit in Stop mode, press the MENU button.
Press the
▲▼
buttons to select Setup, then press the
ENTER or
+
button.
Press the
▲▼
buttons to select System, then press the
ENTER or
+
button.
Press the
▲▼
buttons to select BD Data Management,
then press the ENTER or
+
button.
- To delete the fl ash memory -
Press the ENTER button to select BD Data Delete.
The message "All BD data will be deleted. Do you want
to continue?" will be displayed.
Press the
_ +
button to select Yes, then press the
ENTER button.
Description of Device(Storage) Information on the
Player
Total Size : Total size of the Device(Storage).
Available Size : Available size of the Device(Storage).
In the external memory mode, disc playback will be stopped if you disconnect the USB device in the middle
of the playback.
Only those USB devices formatted in FAT fi le system (DOS 8.3 volume label) are supported, and it is
recommended to use USB devices that support USB 2.0 protocol, 4 MB/sec or faster read/write speed.
A USB HDD device cannot be used for BD Data storage (BD-LIVE).
The Resume Play function may not work after formatting the storage device.
The total size of BD Data Management may differ, depending on the fi rmware version.
1.
2.
3.
4.
1.
2.
•
•
M
,
,
System
◄
Language
Audio
Display
HDMI
Network
Parental
Clock Set
Power On/Off sound : On
Touch Key Sound : On
BD Data Management
►
DivX(R) Registration
DivX(R) Deactivation
System Update
No disc
Music
Photo
Setup
System
◄
Language
Audio
Display
HDMI
Network
Parental
Clock Set
Power On/Off sound : On
Touch Key Sound : On
BD Data Management
►
DivX(R) Registration
DivX(R) Deactivation
System Update
No disc
Music
Photo
Setup
BD Data Management
s Select r Return
Current Device : External Flash Memory
Total Size : 953MB Available Size : 889MB
BD Data Delete
01783M-BD-P1600-XBG-ENG-NEW.indb55 55 2009-07-21 오전 11:37:01

56_ BD data management
BD data management
DIVX(R) REGISTRATION
Please use the Registration code to register this Blu-ray
Disc Player with the DivX(R) Video On Demand format.
For more information, visit www.divx.com/vod
This option is not activated if you select the OK. To activate this option, please activate the DivX(R)
Deactivation.
DIVX(R) DEACTIVATION
If you want to deactivate the registration code on the
website, please select the Yes. Then, you can get a new
registration code.
This function can be operated when DivX(R) Registration function is available.
DivX
ABOUT DIVX VIDEO: DivX
®
is a digital video format created by DivX, Inc. This is an offi cial DivX
Certifi ed or DivX Ultra Certifi ed device that plays DivX video.
ABOUT DIVX VIDEO-ON-DEMAND: This DivX
®
Certifi ed device must be registered in order to play
DivX Video-on-Demand (VOD) content. First generate the DivX VOD registration code for your device
and submit it during the registration process. [Important: DivX VOD content is protected by a DivX
DRM (Digital Rights Management) system that restricts playback to registered DivX Certifi ed devices.
If you try to play DivX VOD content not authorized for your device, the message “Authorization Error”
will be displayed and your content will not play.] Learn more at www.divx.com/vod
DivX
®
is a registered trademark of DivX, Inc., and is used under license
M
M
❖
System
◄
Language
Audio
Display
HDMI
Network
Parental
Power On/Off sound : On
Touch Key Sound : On
BD Data Management
DivX(R) Registration
►
DivX(R) Deactivation
System Update
No disc
Music
Photo
Setup
DivX(R) Registration
OK
DivX(R) Video On Demand
Your registration code is : XXXXXXXXXX
To learn more visit www.divx.com/vod
System
◄
Language
Audio
Display
HDMI
Network
Parental
Touch Key Sound : On
BD Data Management
DivX(R) Registration
DivX(R) Deactivation
►
System Update
No disc
Music
Photo
Setup
DivX(R) Deactivation
No
DivX(R) Video On Demand
Do you want to deactivate your device?
Yes
01783M-BD-P1600-XBG-ENG-NEW.indb56 56 2009-07-21 오전 11:37:04

English _57
● SYSTEM UPGRADE
system upgrade
Samsung may offer upgrades to your Blu-ray Disc Player's fi rmware in the future. To upgrade this fi rmware you must :
USB : Visit www.samsung.com/bluraysupport, then download and store the latest fi rmware (RUF fi le) into the
USB fl ash drive. Connect the USB fl ash drive to the USB port of Blu-ray Disc Player (disc tray must be empty)
to update the fi rmware, then follow the on-screen instructions.
CD/DVD : Visit www.samsung.com/bluraysupport, download and write the latest fi rmware (RUF fi le) onto a
disc. Insert and play the disc in the Blu-ray Disc Player to start the update, then follow the on-screen
instructions.
Ethernet : If the Blu-ray Disc Player is properly connected to the network by cable or wirelessly, the Blu-ray Disc
Player will automatically connect to our website each time it is turned on and download update fi les if any valid
upgrade exists. follow the steps below.
FIRMWARE UPGRADE
With the unit in Stop mode/No Disc mode, press the MENU button.
Press the
▲▼
buttons to select Setup, then press the ENTER or
+
button.
Press the
▲▼
buttons to select System, then press the ENTER or
+
button.
Press the
▲▼
buttons to select System Update, then press
the ENTER or
+
button.
The player will check the cable or network connection status
automatically. The connection checking window will be
displayed.
If the upgrade is possible : You will see information on the
current and new versions of fi rmware in a message box.
If the upgrade is not possible : You will see the following
description in the message box.
If the cable is not connected :
“Ethernet cable is not connected. Please, check the
Ethernet cable”
If the network connection has failed :
“This system can not connect to internet for update.
Please, check the network setup”
If no latest version is released (the latest version has been
already installed) :
"The latest version of the fi rmware is already installed.
There is no need to update."
1.
2.
3.
1.
2.
3.
4.
5.
@
@
•
•
•
ENTER
or
+
or
+
or
button.
No disc
No disc
No disc
No disc
No disc
No disc
System
◄
Language
Audio
Display
HDMI
Network
Parental
Music
Photo
Setup
BD Data Management
DivX(R) Registration
DivX(R) Deactivation
System Update
+
No disc
No disc
No disc
No disc
No disc
No disc
System
◄
Language
Audio
Display
HDMI
Network
Parental
Music
Photo
Setup
BD Data Management
DivX(R) Registration
DivX(R) Deactivation
System Update
+
System Update
Now, Checking.
Please wait...
1 2 3 4
No disc
No disc
No disc
No disc
No disc
No disc
System
◄
Language
Audio
Display
HDMI
Network
Parental
Music
Photo
Setup
BD Data Management
DivX(R) Registration
DivX(R) Deactivation
System Update
+
System Update
The new update data was found.
Current Version : XXXXX
New Version : XXXXX
Start Cancel
1 2 3 4
No disc
No disc
No disc
No disc
No disc
No disc
System
◄
Language
Audio
Display
HDMI
Network
Parental
Music
Photo
Setup
BD Data Management
DivX(R) Registration
DivX(R) Deactivation
System Update
+
System Update
This system can not connect
to internet for update.
Please, check the network setup.
OK
1 2 3 4
01783M-BD-P1600-XBG-ENG-NEW.indb57 57 2009-07-21 오전 11:37:11

58_ system upgrade
system upgrade
If there is a disc in the player :
"Please maintain "No Disc" state for network update."
This indicates that you must remove all discs from the unit to perform the update.
If the server service is not available :
“ Update Server is under maintenance. Please try again later.”
To perform the system upgrade, press the
_ +
buttons to
select Start and then press the ENTER button.
The system update gets started.
If you select Cancel during the download process, you are
prompted to confi rm your selection in a message box.
If you want to cancel the download, select Yes and press the
ENTER button.
Verifi cation will proceed. When download is done, the fi rmware
update process will begin automatically.
When the installation is done, the player will automatically turn
off in 5 seconds.
All settings will revert to the factory settings the next time you
start the system and you will see the menu language selection
window.
If you want to cancel the upgrade in the process of downloading the upgrade data, press the ENTER button.
You will see a confi rmation message.
Selecting Yes will end the upgrade process, and selecting No will continue the upgrade process.
When the system upgrade is done, check the fi rmware details in the System Upgrade menu.
Do not turn off the player during the System Upgrade, as it may cause the player to not work properly.
•
•
6.
7.
8.
9.
10.
M
No disc
No disc
No disc
No disc
No disc
No disc
System
◄
Language
Audio
Display
HDMI
Network
Parental
Music
Photo
Setup
BD Data Management
DivX(R) Registration
DivX(R) Deactivation
System Update
+
System Update
The new update data was found.
Current Version : XXXXX
New Version : XXXXX
Start Start
1 2 3 4
No disc
No disc
No disc
No disc
No disc
No disc
System
◄
Language
Audio
Display
HDMI
Network
Parental
Music
Photo
Setup
BD Data Management
DivX(R) Registration
DivX(R) Deactivation
System Update
+
System Update
Downloading update data...
Please, do not turn off the power.
Cancel
60%
1 2 3 4
No disc
No disc
No disc
No disc
No disc
No disc
System
◄
Language
Audio
Display
HDMI
Network
Parental
Music
Photo
Setup
BD Data Management
DivX(R) Registration
DivX(R) Deactivation
System Update
+
System Update
Do you want to cancel the update
operation?
Yes No
1 2 3 4
No disc
No disc
No disc
No disc
No disc
No disc
System
◄
Language
Audio
Display
HDMI
Network
Parental
Music
Photo
Setup
BD Data Management
DivX(R) Registration
DivX(R) Deactivation
System Update
+
System Update
Verifying update data
Please wait.
1 2 3 4
start the system and you will see the menu language selection
If you want to cancel the upgrade in the process of downloading the upgrade data, press the
No disc
If you want to cancel the upgrade in the process of downloading the upgrade data, press the
ENTER
button.
If you want to cancel the upgrade in the process of downloading the upgrade data, press the
ENTER
button.
No disc
No disc
No disc
No disc
No disc
System
◄
Language
Audio
Display
HDMI
Network
Parental
Music
Photo
Setup
BD Data Management
DivX(R) Registration
DivX(R) Deactivation
System Update
+
System Update
Firmware Update.
Now, Processing...
Please, do not turn off the power.
The power will be off automatically
after update is fi nished.
1 2 3 4
01783M-BD-P1600-XBG-ENG-NEW.indb58 58 2009-07-21 오전 11:37:21

English _59
● SYSTEM UPGRADE
Do not use USB devices other than USB Flash Drives to do software upgrades using the USB Host jack.
There should be only one fi rmware upgrade fi le in USB fl ash drive for the player to properly perform an
upgrade.
Oversized USB drives may not be able to be inserted when a LAN or HDMI cable is connected.
SYSTEM INFORMATION
When the fi rmware upgrade is done, check the fi rmware details by following the steps below.
With the unit in Stop mode/No Disc mode, press the
MENU button.
Press the
▲▼
buttons to select Setup, then press the
ENTER or
+
button.
Press the
▲▼
buttons to select System, then press the
ENTER or
+
button.
Press the
▲▼
buttons to select System Information,
then press the ENTER or
+
button.
You can see detailed information about the current
fi rmware.
Press the ENTER button to select OK.
System Setup menu will be displayed.
FIRMWARE UPGRADE NOTIFICATION
The popup menu appears when a newer version of the fi rmware is available from SAMSUNG update server than
that of the Blu-ray Disc Player, if the Blu-ray Disc Player is connected to the network and powered on.
Yes
: Select this to upgrade now.
No : Select this if you plan to upgrade later.
1.
2.
3.
4.
5.
•
•
System Update
New Firmware is available.
Do you want to update now?
Yes No
When the fi rmware upgrade is done, check the fi rmware details by following the steps below.
When the fi rmware upgrade is done, check the fi rmware details by following the steps below.
When the fi rmware upgrade is done, check the fi rmware details by following the steps below.
When the fi rmware upgrade is done, check the fi rmware details by following the steps below.
When the fi rmware upgrade is done, check the fi rmware details by following the steps below.
System
►
Language
Audio
Display
HDMI
Network
Parental
No disc
Music
Photo
Setup
_
System
◄
Language
Audio
Display
HDMI
Network
Parental
System Information
►
Time Zone
Clock Set
Power On/Off sound : On
Touch Key Sound : On
BD Data Management
DivX(R) Registration
No disc
Music
Photo
Setup
System
◄
Language
Audio
Display
HDMI
Network
Parental
System Information
►
Time Zone
Clock Set
Power On/Off sound :
Touch Key Sound :
BD Data Management
DivX(R) Registration
No disc
Music
Photo
Setup
System Information
S/W : XXXXXXX
Loader : XXXXXXX
Region : A/4 (BD/DVD)
ESN : XXXX
OK
01783M-BD-P1600-XBG-ENG-NEW.indb59 59 2009-07-21 오전 11:37:26

60_ watching a movie
watching a movie
USING THE DISPLAY FUNCTION
hgfZCV
During playback, press the INFO button on the remote
control.
If the Blu-ray Disc has the BONUSVIEW feature, press
the INFO button in the BONUSVIEW section to display
BONUSVIEW-related information.
Press the
▲▼
buttons to select the desired item.
Press the
_ +
buttons to make the desired setup
change and then press the ENTER button.
You may use the number buttons of the remote
control to directly access a title, chapter or to start the
playback from a desired time.
To make the screen disappear, press the INFO button
again.
If you are playing contents from the info menu, some functions may not be enabled depending on the disc.
Title : To access the desired title when there is more than one in the disc. For example, if there is more than
one movie on a Blu-ray Disc/DVD, each movie will be identifi ed as a Title.
Chapter: Most Blu-ray Disc/DVD discs are recorded in chapters so that you can quickly fi nd a specifi c
chapter.
Playing Time : Allows playback of the fi lm from a desired time. You must enter the starting time
as a reference. The time search function does not operate on some discs.
Audio : Refers to the fi lm's soundtrack language. A Blu-ray Disc can contain up to 32 audio languages and a
DVD up to 8.
Subtitle : Refers to the subtitle languages available in the disc. You will be able to choose the subtitle
languages or, if you prefer, turn them off from the screen. A Blu-ray Disc can contain up to 255 subtitle
languages, and a DVD up to 32.
Angle : When a Blu-ray Disc/DVD contains multiple angles of a particular scene, you can use the ANGLE
function.
BONUSVIEW Video/ BONUSVIEW Audio : You can make BONUSVIEW Video or BONUSVIEW Audio settings if
the current title of a Blu-ray Disc appears in the BONUSVIEW section. The BONUSVIEW Video / BONUSVIEW
Audio options, however, will be disabled with a Blu-ray Disc that does not support the BONUSVIEW feature.
Picture Mode : This function enables you to adjust video quality when you are connected to a TV via HDMI.
- Dynamic : Choose this setting to increase Sharpness.
- Normal : Choose this setting for most viewing applications.
- Movie : This is the best setting for watching movies.
- User : The user can adjust the sharpness and noise reduction function respectively.
1.
•
2.
3.
•
4.
M
BD Info
{
Change
s
Select
Title : 000/034
Chapter : 000/002
Playing Time : 00:00:06
Audio : 1/1 ENG Multi CH
Subtitle : NONE
Angle : 01/01
Picture Mode : Normal
<INFO menu for the BONUSVIEW section>
If you are playing contents from the info menu, some functions may not be enabled depending on the disc.
<INFO menu for the BONUSVIEW section>
BD Info
{ Change s Select
Title : 000/034
Chapter : 000/002
Playing Time : 00:00:06
Audio : 1/1 ENG Multi CH
Subtitle : NONE
Angle : 01/01
BONUSVIEW Video : 01/01
BONUSVIEW Audio : 1/1 ENG 2CH
Picture Mode : Normal
01783M-BD-P1600-XBG-ENG-NEW.indb60 60 2009-07-21 오전 11:37:34

English _61
● WATCHING A MOVIE
USING THE DISC MENU & POPUP/TITLE MENU
Using the Disc Menu hZ
During playback, press the DISC MENU button on the
remote control.
Press the
▲▼_ +
buttons to make the desired
selection, then press the
+
or ENTER button.
The Disc menu setup items may vary from disc to disc.
Depending on the disc, the Disc Menu may not be available.
Using the Title Menu Z
During playback, press the TITLE MENU button on the remote control.
Press the
▲▼_ +
buttons to make the desired selection, then press the ENTER button.
The Title menu setup options may vary from disc to disc.
Depending on the disc, the Title Menu may not be available.
Title Menu will only be displayed if there are at least two titles on the disc.
Playing the Title List gf
With the unit in Stop mode/Playback mode, press the
DISC MENU or TITLE MENU button.
Press the
▲▼
buttons to select an entry you want to
play from Title List, then press the
+
or ENTER button.
The selected entry (title) will be played back.
- Go to Playlist -
To go to the Playlist, press the RED(A) button.
1.
2.
•
M
1.
2.
•
M
1.
2.
3 4 5 6 7 8 9 10 11 12 13 14 15
%
PLAY MOVIE LANGUAGES SCENE SELECTIONS PREVIEWS
BD
RE
Page
Video
Music
Photo
Setup
Title 008 00:04:36
Title 009 00:04:17
Title 010 00:04:11
Title 011 00:04:07
Title 012 00:04:46
Title 013 00:04:21
Title 014 00:03:43
_
Title 007 00:03:32
01783M-BD-P1600-XBG-ENG-NEW.indb61 61 2009-07-21 오전 11:37:37

62_ watching a movie
watching a movie
Using the Popup Menu h
During playback, press the POPUP MENU button on
the remote control.
Press the
▲▼_ +
buttons or ENTER button to select
the desired menu.
The Popup menu setup options may vary from disc to
disc.
Depending on the disc, the Popup Menu may not be available.
REPEAT PLAY
Repeat the current chapter or title.
Repeat playback hgfZCV
During playback, press the REPEAT button on the
remote control. Repeat screen appears.
Press the
▲▼
buttons to select Chapter or Title.
Blu-ray Disc/DVD repeats play by chapter or title.
To return to normal play, press the REPEAT button
again, then press the
▲▼
buttons to select Off.
Depending on the disc, the Repeat function may not be available.
Using the A-B Repeat function hgfZCV
Press the REPEAT A-B button on the remote control
during playback.
Press the REPEAT A-B button at the point where you
want repeat play to start (A).
Press the REPEAT A-B button at the point where you
want repeat play to stop (B).
To return to normal play, press the CANCEL button.
Point B cannot be set until 5 seconds of playback has elapsed from point A.
Depending on the disc, the REPEAT A-B menu may not be available.
1.
2.
•
M
1.
2.
•
3.
M
1.
2.
3.
4.
M
Point B cannot be set until 5 seconds of playback has elapsed from point A.
Point B cannot be set until 5 seconds of playback has elapsed from point A.
Point B cannot be set until 5 seconds of playback has elapsed from point A.
► Repeat A-B
00:18:41 / 01:34:37
REPEAT A B
Off
e
Exit
DVD
Depending on the disc, the Repeat function may not be available.
Repeat Off
Depending on the disc, the Popup Menu may not be available.
3 4 5 6 7 8 9 10 11 12 13 14 15
%
MAIN MENU AUDIO SET UP SUBTITLES SCENE SELECTIONS
01783M-BD-P1600-XBG-ENG-NEW.indb62 62 2009-07-21 오전 11:37:47

English _63
● WATCHING A MOVIE
SELECTING THE AUDIO LANGUAGE hgfZ
You can select a desired audio language quickly and easily with the AUDIO button.
Using the AUDIO button
Press the AUDIO button during playback. The Audio
changes when the button is pressed repeatedly.
The audio languages are represented by abbreviations.
To remove the Audio bar, press the CANCEL or
RETURN button.
Using the INFO button
During playback, press the INFO button on the remote
control.
Press the
▲▼
buttons to select Audio.
Press the
_ +
buttons on the remote control to select the desired audio language.
This function depends on what audio languages are encoded on the disc and may not be available.
A Blu-ray Disc can contain up to 32 audio languages and a DVD up to 8.
Depending on the disc type, you can use the AUDIO button to change the audio soundtrack as well as the
audio language.
Some Blu-ray Discs may allow you to select either the multi-channel LPCM or Dolby digital audio soundtrack
in English.
Information about the primary / secondary mode will be also displayed if the Blu-ray Disc has a BONUSVIEW
section.
Use the _ + button to switch between primary and secondary audio modes.
The _ + indicator will not be displayed on the screen if the BONUSVIEW section does not contain any
BONUSVIEW audio settings.
SELECTING THE SUBTITLE LANGUAGE
You can select a desired subtitle quickly and easily with the SUBTITLE button.
Using the SUBTITLE button hZ
Press the SUBTITLE button. The subtitle changes when
the button is pressed repeatedly. The subtitle languages
are represented by abbreviations.
To remove the Subtitle bar, press the CANCEL or
RETURN button.
1.
•
2.
1.
2.
3.
M
1.
2.
Audio 1/4 ENG Dolby Digital Multi CH
Subtitle NONE
01783M-BD-P1600-XBG-ENG-NEW.indb63 63 2009-07-21 오전 11:37:54

64_ watching a movie
watching a movie
Using the INFO button
During playback, press the INFO button on the remote control.
Press the
▲▼
buttons to select Subtitle.
Press the
_ +
buttons on the remote control to select the desired subtitle language.
Depending on the Blu-ray Disc / DVD, you may be able to change the desired subtitle in the Disc Menu.
Press the DISC MENU button.
This function depends on what subtitles are encoded on the disc and may not be available on all Blu-ray
Discs/DVDs.
A Blu-ray Disc can contain up to 255 subtitle languages and a DVD up to 32.
Information about the primary / secondary mode will be also displayed if the Blu-ray Disc has a BONUSVIEW
section.
This function changes both the primary and secondary subtitles at the same time.
The total number of subtitles is the sum of the primary and secondary ones.
CHANGING THE CAMERA ANGLE
When a Blu-ray Disc/DVD contains multiple angles of a particular scene, you can use the ANGLE function.
Using the ANGLE function hZ
During playback, press the INFO button on the remote
control.
Press the
▲▼
buttons to select Angle.
Press the
_ +
buttons or you can use the number
buttons on the remote control to select the desired
angle.
If the disc has only one angle, this feature won’t work. Currently, very few discs have this feature.
Depending on the disc, these functions may not work.
1.
2.
3.
M
1.
2.
3.
M
BD Info
{
Change
{
Move
Title : 001/500
Chapter : 001/001
Playing Time : 00:00:00
Audio : 1/5 ENG 2CH
Subtitle : NONE
Angle : 01/01
Picture Mode : Normal
01783M-BD-P1600-XBG-ENG-NEW.indb64 64 2009-07-21 오전 11:37:57

English _65
● WATCHING A MOVIE
BONUSVIEW SETTINGS
The BONUSVIEW feature allows you to view additional content (such as commentaries) in a small screen window
while the movie is playing.
Using the BONUSVIEW button h
If the current Blu-ray Disc features the BONUSVIEW
function, you can use the BONUSVIEW button to turn
BONUSVIEW On or Off.
Each time you press the BONUSVIEW button, you can
toggle between BONUSVIEW On and BONUSVIEW Off.
You can change detailed settings of the BONUSVIEW feature in the INFO menu (see page 60: selection of
secondary audio, video stream and subtitle etc.).
If you switch from BONUSVIEW Video, BONUSVIEW Audio will change automatically in accordance with
BONUSVIEW Video.
If the Blu-ray Disc supports only BONUSVIEW Audio, you can just press the BONUSVIEW button to turn the
secondary audio on or off.
BD-LIVE™
The Blu-ray Disc player supports BD-LIVE which enables you to enjoy a variety of interactive service contents
provided by the disc manufacturer through network connection.
Using the BD-LIVE Disc
Connect the network (see pages 30~31) and check the network setup (see pages 50~54).
Insert a Blu-ray disc that supports BD-LIVE.
Select the contents provided by the disc manufacturer to enjoy the BD-LIVE.
The way you use BD-LIVE and the features may differ, depending on the disc.
To use BD-LIVE, you must insert a mimimum 1GB USB memory device into one of the USB slots.
1.
2.
M
1.
2.
3.
M
You can change detailed settings of the BONUSVIEW feature in the INFO menu (see page 60: selection of
You can change detailed settings of the BONUSVIEW feature in the INFO menu (see page 60: selection of
01783M-BD-P1600-XBG-ENG-NEW.indb65 65 2009-07-21 오전 11:38:01

66_ listening to music
listening to music
BUTTONS ON THE REMOTE CONTROL USED FOR
AUDIO CD (CD-DA)/MP3 PLAYBACK
PAUSE button : Pauses playback.
SKIP
( ) button : During playback, moves to the next page
in the Music List or moves to the next track in the Playlist.
PLAY
button : Plays the currently selected track.
▲▼ buttons : Selects a track(song) in the Music List or Playlist.
COLOR
buttons
RED(A)
button : Selects the Play Mode(Repeat) during
playback.
GREEN(B) button : Go to Playlist from Music List.
YELLOW(C) button : Playlist play.
_ + buttons : During the playback, these buttons are not
available.
_ : Returns to the Main menu.
+ : Moves to the track (song) menu.
ENTER
button : Plays the selected track (song).
STOP button : Stops a track(song).
Press the SEARCH ( ) buttons : Fast Play.
SKIP
( ) button : If you press this button after three
seconds of playback, the current track will be replayed from
the beginning. But, if you press this button within three
seconds after playback starts, the previous track will be played.
Alsoused to move to the previous page in the Music List or
Playlist.
REPEAT AUDIO CD(CD-DA)/MP3
During playback, press the REPEAT or RED(A) button repeatedly to select the repeat mode you want.
Audio CD (CD-DA)
➝ ➝ ➝
MP3
➝ ➝ ➝
Normal (Audio CD (CD-DA)/MP3) : Tracks on a disc are played in the order in which they were
recorded on the disc.
Repeat Track (Audio CD (CD-DA)/MP3)
Repeat Folder (MP3)
Random (Audio CD (CD-DA)/MP3) : The random option plays a disc’s track in random order.
Repeat All (Audio CD (CD-DA)) : All tracks are repeated.
- To return to normal playback -
Press the REPEAT or RED(A) button repeatedly to return to normal playback.
1.
2.
3.
4.
5.
•
•
•
6.
7.
8.
9.
10.
❖
❖
•
•
•
•
•
RE
TURN
ENTER
POPUP MENUDISC MENU
A B C D
MENU
EXI
T
INF
O
0
STOP PLAY
BONUSVIEW PAUSE
RE
TU
RN
IN
FO
01783M-BD-P1600-XBG-ENG-NEW.indb66 66 2009-07-21 오전 11:38:03

English _67
● LISTENING TO MUSIC
You can select the data source by pressing the
$%
button in the menu screen.
(CD/DVD/USB memory fl ash stick)
PLAYING AN AUDIO CD(CD-DA)/MP3
AF
Insert an Audio CD(CD-DA) or an MP3 Disc into the disc
tray.
For an Audio CD, the fi rst track will be played
automatically.
For an MP3 disc, press the
▲▼
buttons to select
Music, then press the ENTER button.
(You can listen to mp3 fi les using a USB memory
fl ash stick)
To move to the Music List, press the STOP or RETURN
button.
The Music List screen is displayed on your TV.
Press the
▲▼
buttons to select the track you want to
play, and then press the ENTER button.
Audio CD(CD-DA)/MP3 Screen Elements
Displays the media type.
Current track (song)
Displays the number or title track currently being
played.
Play Status Bar.
Displays the repeat status.
Displays the current play index, total track number.
Current /Total Play Time.
Displays available COLOR buttons.
1.
•
•
2.
3.
❖
CD
►
TRACK 001
1/18
00:02:24 / 00:05:57
a
Play Mode
CD
►
TRACK 001
1/18
00:02:24 / 00:05:57
a
Play Mode
CD
b
Playlist
Page
_
TRACK 001 00:04:08
+
TRACK 002 00:03:41
TRACK 003 00:03:17
TRACK 004 00:03:36
TRACK 005 00:03:47
TRACK 006 00:03:50
TRACK 007 00:03:54
Video
Music
Photo
Setup
01783M-BD-P1600-XBG-ENG-NEW.indb67 67 2009-07-21 오전 11:38:12

68_ listening to music
listening to music
Playlist
AF
You can create a playlist with up to 99 tracks.
Insert an Audio CD(CD-DA) or an MP3 Disc into the disc
tray.
For an Audio CD, the fi rst track will be played
automatically.
For an MP3 disc, press the
▲▼
buttons to select
Music, then press the ENTER button.
(You can listen to mp3 fi les using a USB memory
fl ash stick)
To move to the Music List, press the GREEN(B) or
RETURN button.
The Music List screen is displayed.
Press the GREEN(B) button to go to the Playlist.
Press the
▲▼
buttons to select a track, then press the
ENTER button to add it to the Playlist. Repeat this
procedure to add additional tracks.
If there is an undesired track in the playlist, press the
+▲▼
button to select that track, and then press the
ENTER button.
The selected track will be deleted.
Press the YELLOW(C) button to play the selected
tracks.
When the track is fi nished, the next track will
automatically play.
To edit the Playlist, press the STOP or RETURN button.
To go to the Music List, press the RETURN button.
1.
•
•
2.
3.
4.
5.
•
6.
7.
8.
CD
CD
CD
CD
CD
►
TRACK 001
1/3
00:02:17 / 00:05:57
a
Play Mode
CD
b
Playlist
Page
TRACK 001 00:05:57
TRACK 002 00:04:28
TRACK 003 00:04:08
+
TRACK 004 00:03:41
TRACK 005 00:03:17
TRACK 006 00:03:36
TRACK 007 00:03:47
TRACK 008 00:03:50
TRACK 009 00:03:54
_
Video
Music
Photo
Setup
b
Music List
c
Playlist Play
s
Add
Play
Original Playlist
CD
_
TRACK 001
TRACK 002
TRACK 003
TRACK 004
TRACK 005
TRACK 006
TRACK 007
Video
Music
Photo
Setup
CD
b
Music List
c
Playlist Play
s
Add
Play
01.TRACK 001
02.TRACK 002
03.TRACK 003
Original Playlist
_
TRACK 001
TRACK 002
TRACK 003
TRACK 004
TRACK 005
TRACK 006
TRACK 007
TRACK 008
TRACK 009
Video
Music
Photo
Setup
01783M-BD-P1600-XBG-ENG-NEW.indb68 68 2009-07-21 오전 11:38:36

English _69
● LISTENING TO MUSIC
MP3 & JPEG Simultaneous playback AGF
You can enjoy listening to MP3 fi les while you simultaneously view JPEG fi les.
When you play MP3 fi le, press the BLUE(D) button.
The slide show speed screen will be displayed.
Select the desired slide show speed.
To operate this function, you have to select the folder containing both music and photo fi les.
When you play MP3 and JPEG fi les simultaneously, audio drop may occur according to bitrate of MP3, size
of JPEG image and method of encoding.
1.
2.
M
You can enjoy listening to MP3 fi les while you simultaneously view JPEG fi les.
To operate this function, you have to select the folder containing both music and photo fi les.
To operate this function, you have to select the folder containing both music and photo fi les.
You can enjoy listening to MP3 fi les while you simultaneously view JPEG fi les.
To operate this function, you have to select the folder containing both music and photo fi les.
CD
►
001. SONG01.mp3
1/18
00:02:24 / 00:05:57
a
Play Mode
d
Slide Show
01783M-BD-P1600-XBG-ENG-NEW.indb69 69 2009-07-21 오전 11:38:38

70_ playing back a picture
playing back a picture
PLAYING A JPEG DISC GF
Insert a JPEG disc into the disc tray.
(You can watch the jpeg fi les using a USB memory
fl ash stick)
Press the
▲▼
buttons to select the Photo, and then
press the ENTER or
+
button.
Press the
▲▼
buttons to select the folder you want to
play, and then press the ENTER button.
4
-1
. Press the BLUE(D) button to start slide show.
4
-2
. Press the
▲▼
buttons to select the picture you want to
play, and then press the ENTER button.
You can operate rotation, zoom and slide show
function.
RED(A) button : Each time this button is pressed, the
picture rotates 90 degrees counterclockwise.
GREEN(B) button : Each time this button is pressed,
the picture rotates 90 degrees clockwise.
YELLOW(C) button : Each time this button is pressed, the picture is enlarged up to 4X (Four
times the normal size).
BLUE(D) button : Selects slide show speed.
PLAY button : The picture enters slide show mode.
1.
2.
3.
•
•
•
•
•
buttons to select the picture you want to
button : Each time this button is pressed, the picture is enlarged up to 4X (Four
CD
button : Each time this button is pressed, the picture is enlarged up to 4X (Four
buttons to select the picture you want to
button : Each time this button is pressed, the picture is enlarged up to 4X (Four
CD
CD
CD
#
gun003.jpg
03/100
a 90° b 90° c Zoom d Speed
Slide Show
Video
Music
_
Photo
+
Setup
CD
Video
Music
Photo
Setup
_
..
+
640 jpg 03 JUL 2000
full jpg 03 JUL 2000
CD
Video
Music
Photo
Setup
CD
_
..
+
gun001.jpg 03 JUL 2000 465 KB
gun002.jpg 03 JUL 2000 465 KB
gun003.jpg 03 JUL 2000 465 KB
gun004.jpg 03 JUL 2000 465 KB
gun005.jpg 03 JUL 2000 465 KB
gun006.jpg 03 JUL 2000 465 KB
d Slide Show
01783M-BD-P1600-XBG-ENG-NEW.indb70 70 2009-07-21 오전 11:38:47

English _71
● USING THE E-CONTENTS
using the e-contents
With the Blu-ray Disc Player, you can use the e-Contents service (YouTube, for
example) via the network.
After performing the network connection (see pages 30~31), check the network
setup (see pages 50~54).
According to company policy, the specifi cations are subject to change.
e-Content video playback may pause, stop or buffer, depending on your broadband speed.
USING YOUTUBE
This Blu-ray Disc Player enables you to use the following services provided by YouTube.
With the unit in Stop mode/No Disc mode, press the RED(A) button on the menu screen.
YouTube screen elements
Country Selection Information: Shows a country that
you selected.
Current sorting time: Shows a title list sorted by Time.
(Today, Weekly, Monthly, All)
User Information: Only shown when logging in.
Number of page: The page number of selected title /
Total pages in current list.
Contents List: Shows a Title, Number of views, Ratings,
Runtime and Date.
Navigation Help: Shows available buttons.
Category List: For more detailed information, please
refer to below.
Category List
Most Viewed
Shows the most viewed videos.
Top Rated
Shows the highest rated videos.
Most Popular
Shows a list of popular videos.
Most Discussed
Shows the most discussed videos.
Top Favorites
Shows the videos that are most added to user's Favorites.
Most Linked
Shows the videos that are most linked to other web sites.
Most Responded
Shows the videos that are most responded by web users.
Featured
Shows a list of featured videos.
M
1.
❖
Most viewed
Top rated
Most Popular
Most Discussed
Top Favorites
Most Linked
Most Responded
Featured
Visited History
My Favorites
Today 1/25
YouTube / Worldwide
a
Log Out
b
Change Mode
c
Select
d
Option
[
/
]
Page
You Tube
bkj
abc... 00:06:20
Views : 5969 Rating :
2009-05-21
def... 00:06:20
Views : 5969 Rating :
2009-05-21
ghi... 00:06:20
Views : 5969 Rating :
2009-05-21
jkl... 00:06:20
Views : 5969 Rating :
2009-05-21
01783M-BD-P1600-XBG-ENG-NEW.indb71 71 2009-07-21 오전 11:38:53

72_ using the e-contents
using the e-contents
Visited History
Shows a history of visited videos.
My Favorites
If you have logged into your YouTube account with the Blu-ray Disc Player and added a
video to My Favorites, you can play the video on the Blu-ray Disc Player or a PC that is
synchronized with the YouTube site.
Player Library
You can add videos to the Player Library without logging into your YouTube account.
Search
Select search criteria, and enter a keyword for the video you want to play.
Country Setup
Shows a list of videos for a desired country.
Account Management
Enables you to manage YouTube user names and passwords.
Country Setup
If you select a country in Country Setup, you can view videos from the YouTube site of that country.
Press the $% button to select the Country Setup, then
press the ENTER button.
Press the $%_ + button to select the desired country,
then press the ENTER button.
Log in
If you have logged into your YouTube account with the Blu-ray Disc Player, you can play videos added
to My Favorites.
Press the RED(A) button on the YouTube screen.
Press the $%_ + button to enter the user name, then
press the YELLOW(C) button.
Press the $%_ + button to enter the password, then
press the YELLOW(C) button.
Press the
_ +
button to select OK, then press the
ENTER button.
Press the RED(A) button to log out of your YouTube
account.
1.
2.
1.
2.
3.
4.
M
If you select a country in Country Setup, you can view videos from the YouTube site of that country.
YouTube / Worldwide
a
Log In
You Tube
Player Library
Search
Country Setup
Account Management
Hong Kong
Australia
Brazil
Canada
Czech Republic
France
Germany
Poland
Ireland
Israel
Worldwide
Italy
Japan
Mexico
Netherlands
New Zealand
Russia
South Korea
Spain
Sweden
Taiwan
United Kingdom
India
Most viewed
Top rated
Most Popular
Most Discussed
Top Favorites
Most Linked
Most Responded
Featured
Visited History
My Favorites
Today 1/25
def... 00:06:20
Views : 5969 Rating :
2009-05-21
ghi... 00:06:20
Views : 5969 Rating :
2009-05-21
jkl... 00:06:20
Views : 5969 Rating :
2009-05-21
YouTube / Worldwide
You Tube
abc... 00:06:20
Views : 5969 Rating :
2009-05-21
Username
I
.. @ abc def
ghi jkl mno
pgrs tuv wxyz
Delete
a
a/A/1/
b
Blank
c
Done
abc
(
/
)
Cursor Select
r
Return
1
4
7
Ø
2 3
5 6
8 9
0
Most viewed
Top rated
Most Popular
Most Discussed
Top Favorites
Most Linked
Most Responded
Featured
Visited History
My Favorites
Today 1/1
YouTube / Worldwide
You Tube
bkj
abc... 00:06:20
Views : 5969 Rating :
2009-05-21
def... 00:06:20
Views : 5969 Rating :
2009-05-21
ghi... 00:06:20
Views : 5969 Rating :
2009-05-21
jkl... 00:06:20
Views : 5969 Rating :
2009-05-21
Numeric Password Setting
Please register 4-digit numeric password.
Then you can login YouTube on this player simply
by pressing numeric buttons on the remote control.
OK Skip
01783M-BD-P1600-XBG-ENG-NEW.indb72 72 2009-07-21 오전 11:38:58

English _73
● USING THE E-CONTENTS
Enter the 4-digit numeric password.
You can login YouTube on this Blu-ray Disc Player
simply by pressing numeric buttons.
Playing a video
Press the
$%
button to select the desired category.
Select the current sorting time period (Today, Weekly,
Monthly, All) by pressing the GREEN(B) button.
Press the
+
button to move to the contents list, then press the
$%
button to select the desired title.
Press the ENTER button.
Press the ENTER button to display the video in full screen during playback, and to provide related videos
when it ends.
Depending on Youtube's specifi cations, HD contents may not play clearly.
Press the EXIT button to exit YouTube.
During playback, EXIT button is not available.
5.
1.
2.
3.
4.
M
button to move to the contents list, then press the
button to display the video in full screen during playback, and to provide related videos
YouTube > Most viewed Worldwide
b
Add to Favorites
[
/
]
Skip
_
+
Prev/Next
Full Screen
You Tube
Falling in love
+
00:00:00 / 00:06:23
I love my dogs.
Keywords: dog, love, falling
Views : 196 Ratings:
2009-05-21
Report copyright violations:
http://www.youtube.com/t/copyright_notice
Most viewed
Top rated
Most Popular
Most Discussed
Top Favorites
Most Linked
Most Responded
Featured
Visited History
My Favorites
Today 1/25
YouTube / Worldwide
a
Log In
b
Change Mode
You Tube
abc... 00:06:20
Views : 5969 Rating :
2009-05-21
def... 00:06:20
Views : 5969 Rating :
2009-05-21
ghi... 00:06:20
Views : 5969 Rating :
2009-05-21
jkl... 00:06:20
Views : 5969 Rating :
2009-05-21
Most viewed
Top rated
Most Popular
Most Discussed
Top Favorites
Most Linked
Most Responded
Featured
Visited History
My Favorites
Today 1/1
YouTube / Worldwide
You Tube
bkj
abc... 00:06:20
Views : 5969 Rating :
2009-05-21
def... 00:06:20
Views : 5969 Rating :
2009-05-21
ghi... 00:06:20
Views : 5969 Rating :
2009-05-21
jkl... 00:06:20
Views : 5969 Rating :
2009-05-21
Numeric Password Setting
Enter new password
[0~9] Number
r
Return
Confi rm the password
button to move to the contents list, then press the
$%
button to select the desired title.
Most viewed
Top rated
Most Popular
Most Discussed
Top Favorites
Most Linked
Most Responded
Featured
Visited History
My Favorites
Today 1/1
YouTube / Worldwide
You Tube
abc... 00:06:20
Views : 5969 Rating :
2009-05-21
def... 00:06:20
Views : 5969 Rating :
2009-05-21
ghi... 00:06:20
Views : 5969 Rating :
2009-05-21
jkl... 00:06:20
Views : 5969 Rating :
2009-05-21
Today Weekly Monthly All
01783M-BD-P1600-XBG-ENG-NEW.indb73 73 2009-07-21 오전 11:39:03

74_ using the e-contents
using the e-contents
Searching a video
Press the
$%
button to select Search, then press the
ENTER button.
Press the
_+
buttons to select the search criteria, then
press the ENTER button.
Relevance: Select this if you want to search for similar
videos.
Published: Select this if you want to sort videos by the
created date.
View count: Select this if you want to sort videos by
the view count.
Rating: Select this if you want to sort videos by the rating.
Press the
_+
buttons to select Keyword, then press
the ENTER button.
Press the
$%_ +
button to select a text fi eld.
Press the ENTER button in the text fi eld repeatedly to
select a desired letter, number or icon.
After you have entered in the subject you want to
search, press the YELLOW(C) button on the remote
control.
1.
2.
•
•
•
•
3.
4.
5.
6.
Player Library
Search
Country Setup
Account Management
YouTube / Worldwide
a
Log In
You Tube
Published View Count RatingRelevance
Keyword
Search
My Search History 0/0
Player Library
Search
Country Setup
Account Management
Today 1/25
def... 00:06:20
Views : 5969 Rating :
2009-05-21
ghi... 00:06:20
Views : 5969 Rating :
2009-05-21
jkl... 00:06:20
Views : 5969 Rating :
2009-05-21
YouTube / Worldwide
You Tube
abc... 00:06:20
Views : 5969 Rating :
2009-05-21
Search
I
(
/
)
Cursor Select
r
Return
.. @ abc def
ghi jkl mno
pgrs tuv wxyz
Delete
a
a/A/1/
b
Blank
c
Search
abc
1
4
7
Ø
2 3
5 6
8 9
0
Player Library
Search
Country Setup
Account Management
Today 1/25
def... 00:06:20
Views : 5969 Rating :
2009-05-21
ghi... 00:06:20
Views : 5969 Rating :
2009-05-21
jkl... 00:06:20
Views : 5969 Rating :
2009-05-21
YouTube / Worldwide
You Tube
abc... 00:06:20
Views : 5969 Rating :
2009-05-21
Search
a b I
(
/
)
Cursor Select
r
Return
ab
abc
abcd
abcde
abcdef
.. @ abc def
ghi jkl mno
pgrs tuv wxyz
Delete
a
a/A/1/
b
Blank
c
Search
abc
1
4
7
Ø
2 3
5 6
8 9
0
Player Library
Search
Country Setup
Account Management
1/25
YouTube / Worldwide
a
Log In
c
Select
d
Option
[
/
]
Page
You Tube
ab... 00:06:20
Views : 5969 Rating :
2009-05-21
abc... 00:06:20
Views : 5969 Rating :
2009-05-21
abcd... 00:06:20
Views : 5969 Rating :
2009-05-21
abcde... 00:06:20
Views : 5969 Rating :
2009-05-21
01783M-BD-P1600-XBG-ENG-NEW.indb74 74 2009-07-21 오전 11:39:08

English _75
● USING THE E-CONTENTS
Press the
$%
buttons to select the desired video, then
press ENTER button to play the video.
Pressing ENTER button while you are in the a/A/1/ text fi eld enables you to change the text fi elds to lower
case, upper case, numbers and icons.
My Favorites
If you have logged into your YouTube account with the Blu-ray Disc Player and added a video to My
Favorites, you can play the video on the Blu-ray Disc Player or a PC that is synchronized with the
YouTube site.
Saving a video
Press the GREEN(B) button during playback.
The Storage Path popup appears
Press the
$%
button to select My Favorites, then
press the ENTER button.
Press the ENTER button.
The desired video will be added to my favorites.
Playing a video saved in My Favorites
Press the
$%
button to select the My Favorites in the
category list.
Press the
+
button to move to the contents list, then
press the
$%
button to select the desired video.
Press the ENTER button.
The selected video will be played back.
If you have logged in your YouTube account, you can also play a video which you added to My Favorites
on your PC.
7.
M
1.
2.
3.
1.
2.
3.
M
YouTube > Most viewed Worldwide
You Tube
Falling in love
+
00:00:00 / 00:06:23
I love my dogs.
Keywords: dog, love, falling
Views : 196 Ratings:
2009-05-21
Report copyright vidkslf:
http://www.youtube.com/t/copyright_notice
You can select a fi le storage path.
My Favorites
Player Library
Stores the video in the user account.
You can enjoy it in sync with the Favorites
of the YouTube site.
You can store a video in the TV
regardless of login process.
bkj
text fi eld enables you to change the text fi elds to lower
YouTube > Search Worldwide
b
Add to Favorites
[
/
]
Skip
_
+
Prev/Next
Full Screen
You Tube
abcd
+
00:00:00 / 00:06:23
A wild goose is honking.
Keywords: ab, abc, abcd, abcde
Views : 196 Ratings :
2009-05-21
Report copyright violations:
http://www.youtube.com/t/copyright_notice
1/25
YouTube / Worldwide
a
Log Out
c
Select
d
Option
[
/
]
Page
You Tube
bkj
Most viewed
Top rated
Most Popular
Most Discussed
Top Favorites
Most Linked
Most Responded
Featured
Visited History
My Favorites
abc... 00:06:20
Views : 5969 Rating :
2009-05-21
def... 00:06:20
Views : 5969 Rating :
2009-05-21
ghi... 00:06:20
Views : 5969 Rating :
2009-05-21
jkl... 00:06:20
Views : 5969 Rating :
2009-05-21
01783M-BD-P1600-XBG-ENG-NEW.indb75 75 2009-07-21 오전 11:39:13

76_ using the e-contents
using the e-contents
Player Library
You can add videos to the Player Library without logging into your YouTube account.
Saving a video
Press the GREEN(B) button during the playback.
Press the ENTER button.
The desired video will be added to player library.
Playing a video saved in the Player Library
Press the
$%
button to select the Player Library in the
category list.
Press the
+
button to move to the contents list, then
press the
$%
button to select the desired video.
Press the ENTER button.
The selected video will be played back.
1.
2.
1.
2.
3.
YouTube > Most viewed Worldwide
You Tube
Falling in love
+
00:00:00 / 00:06:23
I love my dogs.
Keywords: dog, love, falling
Views : 196 Ratings:
2009-05-21
Report copyright violations:
http://www.youtube.com/t/copyright_notice
Falling in love added to Player Library.
OK
Playing a video saved in the Player Library
1/1
YouTube / Worldwide
a
Log In
c
Select
d
Option
[
/
]
Page
You Tube
Player Library
Search
Country Setup
Account Management
abc... 00:06:20
Views : 5969 Rating :
2009-05-21
def... 00:06:20
Views : 5969 Rating :
2009-05-21
ghi... 00:06:20
Views : 5969 Rating :
2009-05-21
jkl... 00:06:20
Views : 5969 Rating :
2009-05-21
01783M-BD-P1600-XBG-ENG-NEW.indb76 76 2009-07-21 오전 11:39:15

English _77
● APPENDIX
appendix
TROUBLESHOOTING
Before requesting service, please check the following.
PROBLEM SOLUTION
No operation can be performed with the
remote control.
• Check the batteries in the remote control. They may need replacing.
• Operate the remote control at a distance of no more than 20 feet.
• Remove batteries and hold down one or more buttons for several minutes to drain
the microprocessor inside the remote control to reset it. Reinstall batteries and try
to operate the remote control again.
Disc does not play. • Ensure that the disc is installed with the label side facing up.
• Check the region number of the Blu-ray Disc/ DVD.
Disc Menu does not appear. • Check if the disc has a Menu.
The icon appears on the screen.
• This icon appears when an invalid button is pressed.
• The features or action cannot be completed at this time because :
1. The Blu-ray Disc/ DVD’s software restricts it.
2. The Blu-ray Disc/ DVD’s software doesn’t support the feature (e.g., angles)
3. The feature is not available at the moment.
4. You’ve requested a title or chapter number or search time that is out of range.
Play mode differs from the Setup Menu
selection.
• Some of the functions selected in the Setup Menu may not work properly if the
disc is not encoded with the corresponding function.
The screen ratio cannot be changed. • The Screen Ratio is fixed on your Blu-ray Disc/ DVDs.
• This is not a problem with the player.
No audio. • Make sure you have selected the correct Digital Output in the Audio Options Menu.
The screen is blocked • Press the SKIP (
]
) button (on front panel) for more than 5 seconds with no disc
inside. All settings will revert to the factory settings.
• When the factory default settings are restored, all the user data stored in the
BD data will be deleted.
If the HDMI output is set to a resolution your
TV cannot support (for example, 1080p), you
may not see a picture on your TV.
• Press the SKIP (
]
) button (on front panel) for more than 5 seconds with no disc
inside. All settings will revert to the factory settings.
• When the factory default settings are restored, all the user data stored in the
BD data will be deleted.
Forgot password • Press the SKIP (
]
) button (on front panel) for more than 5 seconds with no disc
inside. All settings including the password will revert to the factory settings.
Don't use this unless absolutely necessary.
• When the factory default settings are restored, all the user data stored in the
BD data will be deleted.
01783M-BD-P1600-XBG-ENG-NEW.indb77 77 2009-07-21 오전 11:39:16

78_ appendix
appendix
PROBLEM SOLUTION
If you experience other problems. • Go to the contents and find the section of the instruction manual that contains the
explanations regarding the current problem, and follow the procedure once again.
• If the problem still cannot be solved, please contact your nearest Samsung
authorized service center.
The picture is noisy or distorted • Make sure that the disc is not dirty or scratched.
• Clean the disc.
No HDMI output. • Check the connection between the TV and the HDMI jack of the Blu-ray Disc
Player.
• Check if your TV supports 576p/480p/720p/1080i/1080p HDMI input resolution.
Abnormal HDMI output screen. • If random noise appears on the screen, it means that TV does not support HDCP
(High-bandwidth Digital Content Protection).
When the factory default settings are restored, all the user data stored in the BD data will be deleted.
M
01783M-BD-P1600-XBG-ENG-NEW.indb78 78 2009-07-21 오전 11:39:16

English _79
● APPENDIX
SPECIFICATIONS
General
Power Requirements AC 110-240V, 50/60Hz
Power Consumption 30 W
Weight 4.8 Ibs
Dimensions 16.9(W) × 8.2(D) × 2.1(H) inches
Operating Temperature Range +41°F to +95°F
Operating Humidity Range 10 % to 75 %
Disc
BD (Blu-ray Disc) Reading Speed : 4.917m/sec
DVD (Digital Versatile Disc)
Reading Speed : 3.49 ~ 4.06 m/sec.
Approx. Play Time (Single Sided, Single Layer Disc) : 135 min.
CD : 5 inches (COMPACT DISC)
Reading Speed : 4.8 ~ 5.6 m/sec.
Maximum Play Time : 74 min.
CD : 3 1/2 inches (COMPACT DISC)
Reading Speed : 4.8 ~ 5.6 m/sec.
Maximum Play Time : 20 min.
Video Output
Composite Video
1 Channel : 1.0 Vp-p (75 Ω load)
Blu-ray/DVD Disc : 576i/480i
Component Video
Y : 1.0 Vp-p (75 Ω load)
PR : 0.70 Vp-p (75 Ω load)
PB : 0.70 Vp-p (75 Ω load)
Blu-ray Disc : 1080i, 720p, 576p/480p, 576i/480i
DVD : 576p/480p, 576i/480i
Video/Audio HDMI
1080p, 1080i, 720p, 576p/480p
PCM multichannel audio, Bitstream audio
Audio Output
2 Channel L(1/L), R(2/R)
Digital Audio Output Optical
*Frequency Response
48 kHz Sampling : 4 Hz to 22 kHz
96 kHz Sampling : 4 Hz to 44 kHz
*S/N Ratio 110 dB
*Dynamic Range 100 dB
*Total Harmonic Distortion 0.003%
*: Nominal specification
- Samsung Electronics Co., Ltd reserves the right to change the specifications without notice.
- Weight and dimensions are approximate.
01783M-BD-P1600-XBG-ENG-NEW.indb79 79 2009-07-21 오전 11:39:16

80_ appendix
appendix
Copy Protection
Because AACS (Advanced Access Content System) is approved as content protection system for Blu-ray Disc
format, similar to use of CSS (Content Scramble System) for DVD format, certain restrictions are imposed on
playback, analog signal output, etc., of AACS protected contents. The operation of this product and restrictions
on this product may vary depending on your time of purchase as those restrictions may be adopted and/or
changed by AACS after the production of this product. Furthermore, BD-ROM Mark and BD+ are additionally
used as content protection system for Blu-ray Disc format, which imposes certain restrictions including playback
restrictions for BD-ROM Mark and/or BD+ protected contents. To obtain additional information on AACS, BD-
ROM Mark, BD+, or this product, please contact SAMSUNG customer care center.
Many Blu-ray Disc/DVD discs are encoded with copy protection. Because of this, you should only connect your
Blu-ray Disc Player directly to your TV, not to a VCR. Connecting to a VCR results in a distorted picture from
copy-protected Blu-ray Disc/DVD discs.
This product incorporates copyright protection technology that is protected by methods claims of certain U.S.
patents and other intellectual property rights owned by Macrovision Corporation and other rights owners. Use of
this copyright protection technology must be authorized by Macrovision Corporation and is intended for home
and other limited viewing uses only, unless otherwise authorized by Macrovision Corporation. Reverse
engineering or disassembly is prohibited.
This device is protected by U.S. Patent Nos. 6,836,549; 6,381,747; 7,050,698; 6,516,132; and 5,583,936.
Under the U.S. Copyright laws and Copyright laws of other countries, unauthorized recording, use, display,
distribution, or revision of television programs, videotapes, Blu-ray Discs, DVDs, and other materials may subject
you to civil and/or criminal liability.
For Blu-ray Disc Players progressive scan output : CONSUMERS SHOULD NOTE THAT NOT ALL HIGH
DEFINITION TELEVISION SETS ARE FULLY COMPATIBLE WITH THIS PRODUCT AND MAY CAUSE
ARTIFACTS TO BE DISPLAYED IN THE PICTURE. IN CASE OF PROGRESSIVE SCAN PICTURE PROBLEMS,
IT IS RECOMMENDED THAT THE USER SWITCH THE CONNECTION TO THE ‘STANDARD DEFINITION’
OUTPUT. IF THERE ARE QUESTIONS REGARDING OUR TV SET COMPATIBILITY WITH THIS PRODUCT,
PLEASE CONTACT OUR CUSTOMER SERVICE CENTER.
Compliance and Compatibility Notice
NOT ALL discs are compatible
Subject to the restrictions described below and those noted throughout this Manual, including the Disc Type and
Characteristics section of this Manual, disc types that can be played are: pre-recorded commercial BD-ROM,
DVD-Video, and Audio CD discs; BD-RE, BD-R, DVD-RW / DVD-R discs; and CD-RW/CD-R discs.
Discs other than the above cannot and/or is not intended to be played by this player. And some of the above
discs may not play due to one or more reasons provided below.
Samsung cannot assure that this player will play every disc bearing the BD-ROM, BD-RE, BD-R, DVD-Video,
DVD-RW/DVD-R and CD-RW/CD-R logos, and this player may not respond to all operating commands or
operate all features of every disc. These and other disc compatibility and player operation issues with new and
existing format discs are possible because:
- Blu-ray is a new and evolving format and this player may not operate all features of Blu-ray Discs because
some features may be optional, additional features may have been added to the Blu-ray Disc format after the
production of this player, and certain available features may be subject to delayed availability;
- not all new and existing disc format versions are supported by this player;
- new and existing disc formats may be revised, changed, updated, improved and/or supplemented;
- some discs are produced in a manner that allows specific or limited operation and feature during playback;
- some features may be optional, additional features may have been added after the production of this player or
certain available features may be subject to delayed availability;
- some discs bearing the BD-ROM, BD-RE, BD-R, DVD-Video, DVD-RW/ DVD-R and CD-RW/CD-R logos may
still be non-standardized discs;
- some discs may not be played depending on their physical state or recording conditions;
-
problems and errors can occur during the creation of Blu-ray Disc, DVD software and/or the manufacture of discs;
- this player operates differently than a standard DVD player or other AV equipment; and/or
- for reasons noted throughout this Manual and for other reason(s) discovered and posted by SAMSUNG
customer care center.
If you encounter disc compatibility or player operation problems, please contact SAMSUNG customer care center.
You may also contact SAMSUNG customer care center for possible updates on this player.
For additional information on playback restrictions and disc compatibility, refer to the Precautions, Before
Reading the User’s Manual, Disc Types and Characteristics, and Before Playing sections of this Manual.
•
•
•
•
•
•
•
•
•
•
•
01783M-BD-P1600-XBG-ENG-NEW.indb80 80 2009-07-21 오전 11:39:16

English _81
● APPENDIX
Network Service Disclaimer
All content and services accessible through this device belong to third parties and are protected by copyright,
patent, trademark and/or other intellectual property laws. Such content and services are provided solely for your
personal noncommercial use. You may not use any content or services in a manner that has not been authorized
by the content owner or service provider. Without limiting the foregoing, unless expressly authorized by the
applicable content owner or service provider, you may not modify, copy, republish, upload, post, transmit,
translate, sell, create derivative works, exploit, or distribute in any manner or medium any content or services
displayed through this device.
THIRD PARTY CONTENT AND SERVICES ARE PROVIDED "AS IS." SAMSUNG DOES NOT WARRANT
CONTENT OR SERVICES SO PROVIDED, EITHER EXPRESSLY OR IMPLIEDLY, FOR ANY PURPOSE.
SAMSUNG EXPRESSLY DISCLAIMS ANY IMPLIED WARRANTIES, INCLUDING BUT NOT LIMITED TO,
WARRANTIES OF MERCHANTABILITY OR FITNESS FOR A PARTICULAR PURPOSE. SAMSUNG DOES NOT
GUARANTEE THE ACCURACY, VALIDITY, TIMELINESS, LEGALITY, OR COMPLETENESS OF ANY CONTENT
OR SERVICE MADE AVAILABLE THROUGH THIS DEVICE AND UNDER NO CIRCUMSTANCES, INCLUDING
NEGLIGENCE, SHALL SAMSUNG BE LIABLE, WHETHER IN CONTRACT OR TORT, FOR ANY DIRECT,
INDIRECT, INCIDENTAL, SPECIAL OR CONSEQUENTIAL DAMAGES, ATTORNEY FEES, EXPENSES, OR ANY
OTHER DAMAGES ARISING OUT OF, OR IN CONNECTION WITH, ANY INFORMATION CONTAINED IN, OR AS
A RESULT OF THE USE OF ANY CONTENT OR SERVICE BY YOU OR ANY THIRD PARTY, EVEN IF ADVISED
OF THE POSSIBILITY OF SUCH DAMAGES.
Third party services may be terminated or interrupted at any time, and Samsung makes no representation or
warranty that any content or service will remain available for any period of time. Content and services are
transmitted by third parties by means of networks and transmission facilities over which Samsung has no control.
Without limiting the generality of this disclaimer, Samsung expressly disclaims any responsibility or liability for any
interruption or suspension of any content or service made available through this device.
Samsung is neither responsible nor liable for customer service related to the content and services. Any question or
request for service relating to the content or services should be made directly to the respective content and service
providers.
01783M-BD-P1600-XBG-ENG-NEW.indb81 81 2009-07-21 오전 11:39:16

This product uses parts of the software from the Independent JPEG Group.
This product uses parts of the software owned by the Freetype Project (www.freetype.org).
This product uses some software programs which are distributed under the GPL/LGPL license.
This Product uses some software programs which are distributed under the OpenSSL license.
Accordingly, the following GPL and LGPL software source codes that have been used in this product can
be provided after asking to vdswmanager@samsung.com.
GPL
software
: Linux Kernel, Busybox, Binutils
LGPL
software
: UClibc, directfb
❖
❖
❖
❖
The GNU General Public License (GPL)
Version 2, June 1991
Copyright (C) 1989, 1991 Free Software Foundation, Inc.
59 Temple Place, Suite 330, Boston, MA 02111-1307 USA
Everyone is permitted to copy and distribute verbatim copies of this license document, but changing it is not allowed.
Preamble
The licenses for most software are designed to take away your freedom to share and change it. By contrast, the
GNU General Public License is intended to guarantee your freedom to share and change free software--to make
sure the software is free for all its users. This General Public License applies to most of the Free Software
Foundation’s software and to any other program whose authors commit to using it. (Some other Free Software
Foundation software is covered by the GNU Library General Public License instead.) You can apply it to your
programs, too.
When we speak of free software, we are referring to freedom, not price. Our General Public Licenses are designed
to make sure that you have the freedom to distribute copies of free software (and charge for this service if you
wish), that you receive source code or can get it if you want it, that you can change the software or use pieces of it
in new free programs; and th at you know you can do these things.
To protect your rights, we need to make restrictions that forbid anyone to deny you these rights or to ask you to
surrender the rights. These restrictions translate to certain responsibilities for you if you distribute copies of the
software, or if you modify it.
For example, if you distribute copies of such a program, whether gratis or for a fee, you must give the recipients all
the rights that you have. You must make sure that they, too, receive or can get the source code. And you must
show them these terms so they know their rights.
We protect your rights with two steps: (1) copyright the software, and (2) offer you this license which gives you
legal permission to copy, distribute and/or modify the software.
Also, for each author’s protection and ours, we want to make certain that everyone understands that there is no
warranty for this free software. If the software is modified by someone else and passed on, we want its recipients
to know that what they have is not the original, so that any problems introduced by others will not reflect on the
original authors’ reputations.
Finally, any free program is threatened constantly by software patents. We wish to avoid the danger that
redistributors of a free program will individually obtain patent licenses, in effect making the program proprietary. To
prevent this, we have made it clear that any patent must be licensed for everyone’s free use or not licensed at all.
The precise terms and conditions for copying, distribution and modification follow.
TERMS AND CONDITIONS FOR COPYING, DISTRIBUTION AND MODIFICATION
0. This License applies to any program or other work which contains a notice placed by the copyright holder
saying it may be distributed under the terms of this General Public License. The “Program”, below, refers to any
such program or work, and a “work based on the Program” means either the Program or any derivative work
under copyright law: that is to say, a work containing the Program or a portion of it, either verbatim or with
modifications and/or translated into another language. (Hereinafter, translation is included without limitation in the
term “modification”.) Each licensee is addressed as “you”.
01783M-BD-P1600-XBG-ENG-NEW.indb82 82 2009-07-21 오전 11:39:16

Activities other than copying, distribution and modification are not covered by this License; they are outside its
scope. The act of running the Program is not restricted, and the output from the Program is covered only if its
contents constitute a work based on the Program (independent of having been made by running the Program).
Whether that is true depends on what the Program does.
You may copy and distribute verbatim copies of the Program’s source code as you receive it, in any medium,
provided that you conspicuously and appropriately publish on each copy an appropriate copyright notice and
disclaimer of warranty; keep intact all the notices that refer to this License and to the absence of any warranty; and
give any other recipients of the Program a copy of this License along with the Program.
You may charge a fee for the physical act of transferring a copy, and you may at your option offer warranty
protection in exchange for a fee.
You may modify your copy or copies of the Program or any portion of it, thus forming a work based on the
Program, and copy and distribute such modifications or work under the terms of Section 1 above, provided that
you also meet all of these conditions:
a) You must cause the modified files to carry prominent notices stating that you changed the files and the date
of any change.
b) You must cause any work that you distribute or publish, that in whole or in part contains or is derived from
the Program or any part thereof, to be licensed as a whole at no charge to all third parties under the terms of
this License.
c) If the modified program normally reads commands interactively when run, you must cause it, when started
running for such interactive use in the most ordinary way, to print or display an announcement including an
appropriate copyright notice and a notice that there is no warranty (or else, saying that you provide a
warranty) and that users may redistribute the program under these conditions, and telling the user how to
view a copy of this License. (Exception: if the Program itself is interactive but does not normally print such an
announcement, your work based on the Program is not required to print an announcement.)
These requirements apply to the modified work as a whole. If identifiable sections of that work are not derived from
the Program, and can be reasonably considered independent and separate works in themselves, then this
License, and its terms, do not apply to those sections when you distribute them as separate works. But when you
distribute the same sections as part of a whole which is a work based on the Program, the distribution of the
whole must be on the terms of this License, whose permissions for other licensees extend to the entire whole, and
thus to each and every part regardless of who wrote it.
Thus, it is not the intent of this section to claim rights or contest your rights to work written entirely by you; rather,
the intent is to exercise the right to control the distribution of derivative or collective works based on the Program.
In addition, mere aggregation of another work not based on the Program with the Program (or with a work based
on the Program) on a volume of a storage or distribution medium does not bring the other work under the scope
of this License.
You may copy and distribute the Program (or a work based on it, under Section 2) in object code or executable
form under the terms of Sections 1 and 2 above provided that you also do one of the following:
a) Accompany it with the complete corresponding machine-readable source code, which must be distributed
under the terms of Sections 1 and 2 above on a medium customarily used for software interchange; or,
b) Accompany it with a written offer, valid for at least three years, to give any third party, for a charge no more
than your cost of physically performing source distribution, a complete machine-readable copy of the
corresponding source code, to be distributed under the terms of Sections 1 and 2 above on a medium
customarily used for software interchange; or,
c) Accompany it with the information you received as to the offer to distribute corresponding source code. (This
alternative is allowed only for noncommercial distribution and only if you received the program in object code
or executable form with such an offer, in accord with Subsection b above.)
The source code for a work means the preferred form of the work for making modifications to it. For an executable
work, complete source code means all the source code for all modules it contains, plus any associated interface
definition files, plus the scripts used to control compilation and installation of the executable. However, as a special
exception, the source code distributed need not include anything that is normally distributed (in either source or
binary form) with the major components (compiler, kernel, and so on) of the operating system on which the
executable runs, unless that component itself accompanies the executable.
1.
2.
3.
01783M-BD-P1600-XBG-ENG-NEW.indb83 83 2009-07-21 오전 11:39:17

If distribution of executable or object code is made by offering access to copy from a designated place, then
offering equivalent access to copy the source code from the same place counts as distribution of the source code,
even though third parties are not compelled to copy the source along with the object code.
You may not copy, modify, sublicense, or distribute the Program except as expressly provided under this
License. Any attempt otherwise to copy, modify, sublicense or distribute the Program is void, and will automatically
terminate your rights under this License. However, parties who have received copies, or rights, from you under this
License will not have their licenses terminated so long as such parties remain in full compliance.
You are not required to accept this License, since you have not signed it. However, nothing else grants you
permission to modify or distribute the Program or its derivative works. These actions are prohibited by law if you do
not accept this License. Therefore, by modifying or distributing the Program (or any work based on the Program),
you indicate your acceptance of this License to do so, and all its terms and conditions for copying, distributing or
modifying the Program or works based on it.
Each time you redistribute the Program (or any work based on the Program), the recipient automatically
receives a license from the original licensor to copy, distribute or modify the Program subject to these terms and
conditions. You may not impose any further restrictions on the recipients’ exercise of the rights granted herein. You
are not responsible for enforcing compliance by third parties to this License.
If, as a consequence of a court judgment or allegation of patent infringement or for any other reason (not limited
to patent issues), conditions are imposed on you (whether by court order, agreement or otherwise) that contradict
the conditions of this License, they do not excuse you from the conditions of this License. If you cannot distribute
so as to satisfy simultaneously your obligations under this License and any other pertinent obligations, then as a
consequence you may not distribute the Program at all. For example, if a patent license would not permit royalty-
free redistribution of the Program by all those who receive copies directly or indirectly through you, then the only
way you could satisfy both it and this License would be to refrain entirely from distribution of the Program.
If any portion of this section is held invalid or unenforceable under any particular circumstance, the balance of the
section is intended to apply and the section as a whole is intended to apply in other circumstances.
It is not the purpose of this section to induce you to infringe any patents or other property right claims or to contest
validity of any such claims; this section has the sole purpose of protecting the integrity of the free software
distribution system, which is implemented by public license practices. Many people have made generous
contributions to the wide range of software distributed through that system in reliance on consistent application of
that system; it is up to the author/donor to decide if he or she is willing to distribute software through any other
system and a licensee cannot impose that choice.
This section is intended to make thoroughly clear what is believed to be a consequence of the rest of this License.
If the distribution and/or use of the Program is restricted in certain countries either by patents or by copyrighted
interfaces, the original copyright holder who places the Program under this License may add an explicit
geographical distribution limitation excluding those countries, so that distribution is permitted only in or among
countries not thus excluded. In such case, this License incorporates the limitation as if written in the body of this
License.
The Free Software Foundation may publish revised and/or new versions of the General Public License from
time to time. Such new versions will be similar in spirit to the present version, but may differ in detail to address
new problems or concerns.
Each version is given a distinguishing version number. If the Program specifies a version number of this License
which applies to it and “any later version”, you have the option of following the terms and conditions either of that
version or of any later version published by the Free Software Foundation. If the Program does not specify a
version number of this License, you may choose any version ever published by the Free Software Foundation.
If you wish to incorporate parts of the Program into other free programs whose distribution conditions are
different, write to the author to ask for permission. For software which is copyrighted by the Free Software
Foundation, write to the Free Software Foundation; we sometimes make exceptions for this. Our decision will be
guided by the two goals of preserving the free status of all derivatives of our free software and of promoting the
sharing and reuse of software generally.
4.
5.
6.
7.
8.
9.
10.
01783M-BD-P1600-XBG-ENG-NEW.indb84 84 2009-07-21 오전 11:39:17

NO WARRANTY
BECAUSE THE PROGRAM IS LICENSED FREE OF CHARGE, THERE IS NO WARRANTY FOR THE
PROGRAM, TO THE EXTENT PERMITTED BY APPLICABLE LAW. EXCEPT WHEN OTHERWISE STATED IN
WRITING THE COPYRIGHT HOLDERS AND/OR OTHER PARTIES PROVIDE THE PROGRAM “AS IS” WITHOUT
WARRANTY OF ANY KIND, EITHER EXPRESSED OR IMPLIED, INCLUDING, BUT NOT LIMITED TO, THE
IMPLIED WARRANTIES OF MERCHANTABILITY AND FITNESS FOR A PARTICULAR PURPOSE. THE ENTIRE
RISK AS TO THE QUALITY AND PERFORMANCE OF THE PROGRAM IS WITH YOU. SHOULD THE PROGRAM
PROVE DEFECTIVE, YOU ASSUME THE COST OF ALL NECESSARY SERVICING, REPAIR OR CORRECTION.
IN NO EVENT UNLESS REQUIRED BY APPLICABLE LAW OR AGREED TO IN WRITING WILL ANY
COPYRIGHT HOLDER, OR ANY OTHER PARTY WHO MAY MODIFY AND/OR REDISTRIBUTE THE PROGRAM
AS PERMITTED ABOVE, BE LIABLE TO YOU FOR DAMAGES, INCLUDING ANY GENERAL, SPECIAL,
INCIDENTAL OR CONSEQUENTIAL DAMAGES ARISING OUT OF THE USE OR INABILITY TO USE THE
PROGRAM (INCLUDING BUT NOT LIMITED TO LOSS OF DATA OR DATA BEING RENDERED INACCURATE OR
LOSSES SUSTAINED BY YOU OR THIRD PARTIES OR A FAILURE OF THE PROGRAM TO OPERATE WITH ANY
OTHER PROGRAMS), EVEN IF SUCH HOLDER OR OTHER PARTY HAS BEEN ADVISED OF THE POSSIBILITY
OF SUCH DAMAGES.
END OF TERMS AND CONDITIONS
How to Apply These Terms to Your New Programs
If you develop a new program, and you want it to be of the greatest possible use to the public, the best way to
achieve this is to make it free software which everyone can redistribute and change under these terms.
To do so, attach the following notices to the program. It is safest to attach them to the start of each source file to
most effectively convey the exclusion of warranty; and each file should have at least the “copyright” line and a
pointer to where the full notice is found.
One line to give the program’s name and a brief idea of what it does.
Copyright (C) <year> <name of author>
This program is free software; you can redistribute it and/or modify it under the terms of the GNU General
Public License as published by the Free Software Foundation; either version 2 of the License, or (at your
option) any later version.
This program is distributed in the hope that it will be useful, but WITHOUT ANY WARRANTY; without even the
implied warranty of MERCHANTABILITY or FITNESS FOR A PARTICULAR PURPOSE. See the GNU General
Public License for more details.
You should have received a copy of the GNU General Public License along with this program; if not, write to
the Free Software Foundation, Inc., 59
Temple Place, Suite 330, Boston, MA 02111-1307 USA
Also add information on how to contact you by electronic and paper mail.
If the program is interactive, make it output a short notice like this when it starts in an interactive mode:
Gnomovision version 69, Copyright (C) year name of author Gnomovision comes with ABSOLUTELY NO
WARRANTY; for details type `show w’. This is free software, and you are welcome to redistribute it under
certain conditions; type `show c’ for details.
The hypothetical commands `show w’ and `show c’ should show the appropriate parts of the General Public
License. Of course, the commands you use may be called something other than `show w’ and `show c’; they
could even be mouse-clicks or menu items--whatever suits your program.
You should also get your employer (if you work as a programmer) or your school, if any, to sign a “copyright
disclaimer” for the program, if necessary. Here is a sample; alter the names:
Yoyodyne, Inc., hereby disclaims all copyright interest in the program `Gnomovision’ (which makes passes at
compilers) written by James Hacker.
signature of Ty Coon, 1 April 1989
Ty Coon, President of Vice
This General Public License does not permit incorporating your program into proprietary programs. If your program
is a subroutine library, you may consider it more useful to permit linking proprietary applications with the library. If
this is what you want to do, use the GNU Library General Public License instead of this License.
11.
12.
01783M-BD-P1600-XBG-ENG-NEW.indb85 85 2009-07-21 오전 11:39:17

GNU Lesser General Public License (LGPL)
Version 2.1, February 1999
Copyright (C) 1991, 1999 Free Software Foundation, Inc. 59 Temple Place, Suite 330, Boston, MA 02111-
1307 USA Everyone is permitted to copy and distribute verbatim copies of this license document, but
changing it is not allowed.
[This is the first released version of the Lesser GPL. It also counts as the successor of the GNU Library Public
License, version 2, hence the version number 2.1.]
Preamble
The licenses for most software are designed to take away your freedom to share and change it. By contrast, the
GNU General Public Licenses are intended to guarantee your freedom to share and change free software--to
make sure the software is free for all its users.
This license, the Lesser General Public License, applies to some specially designated software packages--typically
libraries--of the Free Software Foundation and other authors who decide to use it. You can use it too, but we
suggest you first think carefully about whether this license or the ordinary General Public License is the better
strategy to use in any particular case, based on the explanations below.
When we speak of free software, we are referring to freedom of use, not price. Our General Public Licenses are
designed to make sure that you have the freedom to distribute copies of free software (and charge for this service
if you wish); that you receive source code or can get it if you want it; that you can change the software and use
pieces of it in new free programs; and that you are informed that you can do these things.
To protect your rights, we need to make restrictions that forbid distributors to deny you these rights or to ask you
to surrender these rights. These restrictions translate to certain responsibilities for you if you distribute copies of the
library or if you modify it.
For example, if you distribute copies of the library, whether gratis or for a fee, you must give the recipients all the
rights that we gave you. You must make sure that they, too, receive or can get the source code. If you link other
code with the library, you must provide complete object files to the recipients, so that they can relink them with the
library after making changes to the library and recompiling it. And you must show them these terms so they know
their rights.
We protect your rights with a two-step method: (1) we copyright the library, and (2) we offer you this license, which
gives you legal permission to copy, distribute and/or modify the library.
To protect each distributor, we want to make it very clear that there is no warranty for the free library. Also, if the
library is modified by someone else and passed on, the recipients should know that what they have is not the
original version, so that the original author’s reputation will not be affected by problems that might be introduced
by others.
Finally, software patents pose a constant threat to the existence of any free program. We wish to make sure that a
company cannot effectively restrict the users of a free program by obtaining a restrictive license from a patent
holder. Therefore, we insist that any patent license obtained for a version of the library must be consistent with the
full freedom of use specified in this license.
Most GNU software, including some libraries, is covered by the ordinary GNU General Public License. This license,
the GNU Lesser General Public License, applies to certain designated libraries, and is quite different from the
ordinary General Public License. We use this license for certain libraries in order to permit linking those libraries into
non-free programs.
When a program is linked with a library, whether statically or using a shared library, the combination of the two is
legally speaking a combined work, a derivative of the original library. The ordinary General Public License therefore
permits such linking only if the entire combination fits its criteria of freedom.
The Lesser General Public License permits more lax criteria for linking other code with the library.
We call this license the “Lesser” General Public License because it does Less to protect the user’s freedom than
the ordinary General Public License. It also provides other free software developers Less of an advantage over
competing non-free programs. These disadvantages are the reason we use the ordinary General Public License
for many libraries. However, the Lesser license provides advantages in certain special circumstances.
For example, on rare occasions, there may be a special need to encourage the widest possible use of a certain
library, so that it becomes a de-facto standard. To achieve this, non-free programs must be allowed to use the
library. A more frequent case is that a free library does the same job as widely used non-free libraries. In this case,
there is little to gain by limiting the free library to free software only, so we use the Lesser General Public License.
01783M-BD-P1600-XBG-ENG-NEW.indb86 86 2009-07-21 오전 11:39:17

In other cases, permission to use a particular library in non-free programs enables a greater number of people to
use a large body of free software. For example, permission to use the GNU C Library in non-free programs enables
many more people to use the whole GNU operating system, as well as its variant, the GNU/Linux operating
system.
Although the Lesser General Public License is Less protective of the users’ freedom, it does ensure that the user
of a program that is linked with the Library has the freedom and the wherewithal to run that program using a
modified version of the Library.
The precise terms and conditions for copying, distribution and modification follow. Pay close attention to the
difference between a “work based on the library” and a “work that uses the library”. The former contains code
derived from the library, whereas the latter must be combined with the library in order to run.
TERMS AND CONDITIONS FOR COPYING, DISTRIBUTION AND MODIFICATION
0. This License Agreement applies to any software library or other program which contains a notice placed by the
copyright holder or other authorized party saying it may be distributed under the terms of this Lesser General
Public License (also called “this License”). Each licensee is addressed as “you”.
A “library” means a collection of software functions and/or data prepared so as to be conveniently linked with
application programs (which use some of those functions and data) to form executables.
The “Library”, below, refers to any such software library or work which has been distributed under these terms. A
“work based on the Library” means either the Library or any derivative work under copyright law: that is to say, a
work containing the Library or a portion of it, either verbatim or with modifications and/or translated
straightforwardly into another language. (Hereinafter, translation is included without limitation in the term
“modification”.)
“Source code” for a work means the preferred form of the work for making modifications to it. For a library,
complete source code means all the source code for all modules it contains, plus any associated interface
definition files, plus the scripts used to control compilation and installation of the library.
Activities other than copying, distribution and modification are not covered by this License; they are outside its
scope. The act of running a program using the Library is not restricted, and output from such a program is
covered only if its contents constitute a work based on the Library (independent of the use of the Library in a tool
for writing it). Whether that is true depends on what the Library does and what the program that uses the Library
does.
You may copy and distribute verbatim copies of the Library’s complete source code as you receive it, in any
medium, provided that you conspicuously and appropriately publish on each copy an appropriate copyright notice
and disclaimer of warranty; keep intact all the notices that refer to this License and to the absence of any warranty;
and distribute a copy of this License along with the Library.
You may charge a fee for the physical act of transferring a copy, and you may at your option offer warranty
protection in exchange for a fee.
You may modify your copy or copies of the Library or any portion of it, thus forming a work based on the
Library, and copy and distribute such modifications or work under the terms of Section 1 above, provided that you
also meet all of these conditions:
a) The modified work must itself be a software library.
b) You must cause the files modified to carry prominent notices stating that you changed the files and the date
of any change.
c) You must cause the whole of the work to be licensed at no charge to all third parties under the terms of this
License.
d) If a facility in the modified Library refers to a function or a table of data to be supplied by an application
program that uses the facility, other than as an argument passed when the facility is invoked, then you must
make a good faith effort to ensure that, in the event an application does not supply such function or table, the
facility still operates, and performs whatever part of its purpose remains meaningful.
(For example, a function in a library to compute square roots has a purpose that is entirely well-defined
independent of the application. Therefore, Subsection 2d requires that any application-supplied function or
table used by this function must be optional: if the application does not supply it, the square root function must
still compute square roots.)
1.
2.
01783M-BD-P1600-XBG-ENG-NEW.indb87 87 2009-07-21 오전 11:39:17

These requirements apply to the modified work as a whole. If identifiable sections of that work are not derived
from the Library, and can be reasonably considered independent and separate works in themselves, then this
License, and its terms, do not apply to those sections when you distribute them as separate works. But when
you distribute the same sections as part of a whole which is a work based on the Library, the distribution of the
whole must be on the terms of this License, whose permissions for other licensees extend to the entire whole,
and thus to each and every part regardless of who wrote it.
Thus, it is not the intent of this section to claim rights or contest your rights to work written entirely by you;
rather, the intent is to exercise the right to control the distribution of derivative or collective works based on the
Library.
In addition, mere aggregation of another work not based on the Library with the Library (or with a work based
on the Library) on a volume of a storage or distribution medium does not bring the other work under the scope
of this License.
You may opt to apply the terms of the ordinary GNU General Public License instead of this License to a given
copy of the Library. To do this, you must alter all the notices that refer to this License, so that they refer to the
ordinary GNU General Public License, version 2, instead of to this License. (If a newer version than version 2 of the
ordinary GNU General Public License has appeared, then you can specify that version instead if you wish.) Do not
make any other change in these notices.
Once this change is made in a given copy, it is irreversible for that copy, so the ordinary GNU General Public
License applies to all subsequent copies and derivative works made from that copy.
This option is useful when you wish to copy part of the code of the Library into a program that is not a library.
You may copy and distribute the Library (or a portion or derivative of it, under Section 2) in object code or
executable form under the terms of Sections 1 and 2 above provided that you accompany it with the complete
corresponding machine-readable source code, which must be distributed under the terms of Sections 1 and 2
above on a medium customarily used for software interchange.
If distribution of object code is made by offering access to copy from a designated place, then offering equivalent
access to copy the source code from the same place satisfies the requirement to distribute the source code, even
though third parties are not compelled to copy the source along with the object code.
A program that contains no derivative of any portion of the Library, but is designed to work with the Library by
being compiled or linked with it, is called a “work that uses the Library”. Such a work, in isolation, is not a derivative
work of the Library, and therefore falls outside the scope of this License.
However, linking a “work that uses the Library” with the Library creates an executable that is a derivative of the
Library (because it contains portions of the Library), rather than a “work that uses the library”. The executable is
therefore covered by this License. Section 6 states terms for distribution of such executables.
When a “work that uses the Library” uses material from a header file that is part of the Library, the object code for
the work may be a derivative work of the Library even though the source code is not. Whether this is true is
especially significant if the work can be linked without the Library, or if the work is itself a library. The threshold for
this to be true is not precisely defined by law.
If such an object file uses only numerical parameters, data structure layouts and accessors, and small macros and
small inline functions (ten lines or less in length), then the use of the object file is unrestricted, regardless of whether
it is legally a derivative work. (Executables containing this object code plus portions of the Library will still fall under
Section 6.)
Otherwise, if the work is a derivative of the Library, you may distribute the object code for the work under the terms
of Section 6. Any executables containing that work also fall under Section 6, whether or not they are linked directly
with the Library itself.
As an exception to the Sections above, you may also combine or link a “work that uses the Library” with the
Library to produce a work containing portions of the Library, and distribute that work under terms of your choice,
provided that the terms permit modification of the work for the customer’s own use and reverse engineering for
debugging such modifications.
You must give prominent notice with each copy of the work that the Library is used in it and that the Library and its
use are covered by this License. You must supply a copy of this License. If the work during execution displays
copyright notices, you must include the copyright notice for the Library among them, as well as a reference
directing the user to the copy of this License. Also, you must do one of these things:
3.
4.
5.
6.
01783M-BD-P1600-XBG-ENG-NEW.indb88 88 2009-07-21 오전 11:39:17

a) Accompany the work with the complete corresponding machine-readable source code for the Library
including whatever changes were used in the work (which must be distributed under Sections 1 and 2 above);
and, if the work is an executable linked with the Library, with the complete machinereadable “work that uses
the Library”, as object code and/or source code, so that the user can modify the Library and then relink to
produce a modified executable containing the modified Library. (It is understood that the user who changes the
contents of definitions files in the Library will not necessarily be able to recompile the application to use the
modified definitions.)
b) Use a suitable shared library mechanism for linking with the Library. A suitable mechanism is one that (1)
uses at run time a copy of the library already present on the user’s computer system, rather than copying
library functions into the executable, and (2) will operate properly with a modified version of the library, if the
user installs one, as long as the modified version is interface-compatible with the version that the work was
made with.
c) Accompany the work with a written offer, valid for at least three years, to give the same user the materials
specified in Subsection 6a, above, for a charge no more than the cost of performing this distribution.
d) If distribution of the work is made by offering access to copy from a designated place, offer equivalent
access to copy the above specified materials from the same place.
e) Verify that the user has already received a copy of these materials or that you have already sent this user a
copy.
For an executable, the required form of the “work that uses the Library” must include any data and utility programs
needed for reproducing the executable from it. However, as a special exception, the materials to be distributed
need not include anything that is normally distributed (in either source or binary form) with the major components
(compiler, kernel, and so on) of the operating system on which the executable runs, unless that component itself
accompanies the executable.
It may happen that this requirement contradicts the license restrictions of other proprietary libraries that do not
normally accompany the operating system. Such a contradiction means you cannot use both them and the Library
together in an executable that you distribute.
You may place library facilities that are a work based on the Library side-by-side in a single library together with
other library facilities not covered by this License, and distribute such a combined library, provided that the
separate distribution of the work based on the Library and of the other library facilities is otherwise permitted, and
provided that you do these two things:
a) Accompany the combined library with a copy of the same work based on the Library, uncombined with any
other library facilities. This must be distributed under the terms of the Sections above.
b) Give prominent notice with the combined library of the fact that part of it is a work based on the Library, and
explaining where to find the accompanying uncombined form of the same work.
You may not copy, modify, sublicense, link with, or distribute the Library except as expressly provided under
this License. Any attempt otherwise to copy, modify, sublicense, link with, or distribute the Library is void, and will
automatically terminate your rights under this License. However, parties who have received copies, or rights, from
you under this License will not have their licenses terminated so long as such parties remain in full compliance.
You are not required to accept this License, since you have not signed it. However, nothing else grants you
permission to modify or distribute the Library or its derivative works. These actions are prohibited by law if you do
not accept this License. Therefore, by modifying or distributing the Library (or any work based on the Library), you
indicate your acceptance of this License to do so, and all its terms and conditions for copying, distributing or
modifying the Library or works based on it.
Each time you redistribute the Library (or any work based on the Library), the recipient automatically receives a
license from the original licensor to copy, distribute, link with or modify the Library subject to these terms and
conditions. You may not impose any further restrictions on the recipients’ exercise of the rights granted herein. You
are not responsible for enforcing compliance by third parties with this License.
If, as a consequence of a court judgment or allegation of patent infringement or for any other reason (not
limited to patent issues), conditions are imposed on you (whether by court order, agreement or otherwise) that
contradict the conditions of this License, they do not excuse you from the conditions of this License. If you cannot
distribute so as to satisfy simultaneously your obligations under this License and any other pertinent obligations,
then as a consequence you may not distribute the Library at all. For example, if a patent license would not permit
royalty-free redistribution of the Library by all those who receive copies directly or indirectly through you, then the
only way you could satisfy both it and this License would be to refrain entirely from distribution of the Library.
7.
8.
9.
10.
11.
01783M-BD-P1600-XBG-ENG-NEW.indb89 89 2009-07-21 오전 11:39:18

If any portion of this section is held invalid or unenforceable under any particular circumstance, the balance of the
section is intended to apply, and the section as a whole is intended to apply in other circumstances.
It is not the purpose of this section to induce you to infringe any patents or other property right claims or to contest
validity of any such claims; this section has the sole purpose of protecting the integrity of the free software
distribution system which is implemented by public license practices. Many people have made generous
contributions to the wide range of software distributed through that system in reliance on consistent application of
that system; it is up to the author/donor to decide if he or she is willing to distribute software through any other
system and a licensee cannot impose that choice.
This section is intended to make thoroughly clear what is believed to be a consequence of the rest of this License.
If the distribution and/or use of the Library is restricted in certain countries either by patents or by copyrighted
interfaces, the original copyright holder who places the Library under this License may add an explicit geographical
distribution limitation excluding those countries, so that distribution is permitted only in or among countries not
thus excluded. In such case, this License incorporates the limitation as if written in the body of this License.
The Free Software Foundation may publish revised and/or new versions of the Lesser General Public License
from time to time. Such new versions will be similar in spirit to the present version, but may differ in detail to
address new problems or concerns.
Each version is given a distinguishing version number. If the Library specifies a version number of this License
which applies to it and “any later version”, you have the option of following the terms and conditions either of that
version or of any later version published by the Free Software Foundation. If the Library does not specify a license
version number, you may choose any version ever published by the Free Software Foundation.
If you wish to incorporate parts of the Library into other free programs whose distribution conditions are
incompatible with these, write to the author to ask for permission. For software which is copyrighted by the Free
Software Foundation, write to the Free Software Foundation; we sometimes make exceptions for this. Our decision
will be guided by the two goals of preserving the free status of all derivatives of our free software and of promoting
the sharing and reuse of software generally.
NO WARRANTY
BECAUSE THE LIBRARY IS LICENSED FREE OF CHARGE, THERE IS NO WARRANTY FOR THE LIBRARY,
TO THE EXTENT PERMITTED BY APPLICABLE LAW. EXCEPT WHEN OTHERWISE STATED IN WRITING THE
COPYRIGHT HOLDERS AND/OR OTHER PARTIES PROVIDE THE LIBRARY “AS IS” WITHOUT WARRANTY OF
ANY KIND, EITHER EXPRESSED OR IMPLIED, INCLUDING, BUT NOT LIMITED TO, THE IMPLIED WARRANTIES
OF MERCHANTABILITY AND FITNESS FOR A PARTICULAR PURPOSE. THE ENTIRE RISK AS TO THE QUALITY
AND PERFORMANCE OF THE LIBRARY IS WITH YOU. SHOULD THE LIBRARY PROVE DEFECTIVE, YOU
ASSUME THE COST OF ALL NECESSARY SERVICING, REPAIR OR CORRECTION.
IN NO EVENT UNLESS REQUIRED BY APPLICABLE LAW OR AGREED TO IN WRITING WILL ANY
COPYRIGHT HOLDER, OR ANY OTHER PARTY WHO MAY MODIFY AND/OR REDISTRIBUTE THE LIBRARY AS
PERMITTED ABOVE, BE LIABLE TO YOU FOR DAMAGES, INCLUDING ANY GENERAL, SPECIAL, INCIDENTAL
OR CONSEQUENTIAL DAMAGES ARISING OUT OF THE USE OR INABILITY TO USE THE LIBRARY (INCLUDING
BUT NOT LIMITED TO LOSS OF DATA OR DATA BEING RENDERED INACCURATE OR LOSSES SUSTAINED BY
YOU OR THIRD PARTIES OR A FAILURE OF THE LIBRARY TO OPERATE WITH ANY OTHER SOFTWARE), EVEN
IF SUCH HOLDER OR OTHER PARTY HAS BEEN ADVISED OF THE POSSIBILITY OF SUCH DAMAGES.
END OF TERMS AND CONDITIONS
How to Apply These Terms to Your New Libraries
If you develop a new library, and you want it to be of the greatest possible use to the public, we recommend
making it free software that everyone can redistribute and change. You can do so by permitting redistribution
under these terms (or, alternatively, under the terms of the ordinary General Public License).
To apply these terms, attach the following notices to the library. It is safest to attach them to the start of each
source file to most effectively convey the exclusion of warranty; and each file should have at least the “copyright”
line and a pointer to where the full notice is found.
<one line to give the library’s name and an idea of what it does.> Copyright (C) <year> <name of author>
This library is free software; you can redistribute it and/or modify it under the terms of the GNU Lesser General
Public License as published by the Free Software Foundation; either version 2.1 of the License, or (at your
option) any later version.
12.
13.
14.
15.
16.
01783M-BD-P1600-XBG-ENG-NEW.indb90 90 2009-07-21 오전 11:39:18

This library is distributed in the hope that it will be useful, but WITHOUT ANY WARRANTY; without even the
implied warranty of MERCHANTABILITY or FITNESS FOR A PARTICULAR PURPOSE. See the GNU Lesser
General Public License for more details.
You should have received a copy of the GNU Lesser General Public License along with this library; if not, write
to the Free Software Foundation, Inc., 59
Temple Place, Suite 330, Boston, MA 02111-1307 USA
Also add information on how to contact you by electronic and paper mail.
You should also get your employer (if you work as a programmer) or your school, if any, to sign a “copyright
disclaimer” for the library, if necessary. Here is a sample; alter the names:
Yoyodyne, Inc., hereby disclaims all copyright interest in the library `Frob’ (a library for tweaking knobs) written
by James Random Hacker.
signature of Ty Coon, 1 April 1990
Ty Coon, President of Vice
That’s all there is to it!
OpenSSL License
Copyright (c) 1998-2007 The OpenSSL Project. All rights reserved.
Redistribution and use in source and binary forms, with or without modification, are permitted provided that the
following conditions are met:
Redistributions of source code must retain the above copyright notice, this list of conditions and the following
disclaimer.
Redistributions in binary form must reproduce the above copyright notice, this list of conditions and the
following disclaimer in the documentation and/or other materials provided with the distribution.
All advertising materials mentioning features or use of this software must display the following acknowledgment:
"This product includes software developed by the OpenSSL Project for use in the OpenSSL Toolkit. (http://www.
openssl.org/)"
The names "OpenSSL Toolkit" and "OpenSSL Project" must not be used to endorse or promote products
derived from this software without prior written permission. For written permission, please contact openssl-core@
openssl.org.
Products derived from this software may not be called "OpenSSL" nor may "OpenSSL" appear in their names
without prior written permission of the OpenSSL Project.
Redistributions of any form whatsoever must retain the following acknowledgment: "This product includes
software developed by the OpenSSL Project for use in the OpenSSL Toolkit (http://www.openssl.org/)"
THIS SOFTWARE IS PROVIDED BY THE OpenSSL PROJECT ``AS IS'' AND ANY EXPRESSED OR IMPLIED
WARRANTIES, INCLUDING, BUT NOT LIMITED TO, THE IMPLIED WARRANTIES OF MERCHANTABILITY AND
FITNESS FOR A PARTICULAR PURPOSE ARE DISCLAIMED. IN NO EVENT SHALL THE OpenSSL PROJECT
OR ITS CONTRIBUTORS BE LIABLE FOR ANY DIRECT, INDIRECT, INCIDENTAL, SPECIAL, EXEMPLARY, OR
CONSEQUENTIAL DAMAGES (INCLUDING, BUT NOT LIMITED TO, PROCUREMENT OF SUBSTITUTE GOODS
OR SERVICES; LOSS OF USE, DATA, OR PROFITS; OR BUSINESS INTERRUPTION) HOWEVER CAUSED AND
ON ANY THEORY OF LIABILITY, WHETHER IN CONTRACT, STRICT LIABILITY, OR TORT (INCLUDING
NEGLIGENCE OR OTHERWISE) ARISING IN ANY WAY OUT OF THE USE OF THIS SOFTWARE, EVEN IF
ADVISED OF THE POSSIBILITY OF SUCH DAMAGE.
1.
2.
3.
4.
5.
6.
01783M-BD-P1600-XBG-ENG-NEW.indb91 91 2009-07-21 오전 11:39:18

LIMITED WARRANTY TO ORIGINAL PURCHASER
This SAMSUNG brand product, as supplied and distributed by SAMSUNG ELECTRONICS AMERICA, INC. (SAMSUNG) and delivered
new, in the original carton to the original consumer purchaser, is warranted by SAMSUNG against manufacturing defects in materials and
workmanship for the following limited warranty period:
One (1) Year Parts / Ninety Days (90) Labor
This limited warranty begins on the original date of purchase, and is valid only on products purchased and used in the United States, and
does not include transportation, installation, removal or reinstallation. Warranty repairs must be performed by SAMSUNG’s authorized
service center. To receive warranty service, the original dated bill of sale must be presented upon request as proof of purchase to
SAMSUNG or SAMSUNG’s authorized service center. Transportation to and from the service center is the responsibility of the purchaser.
SAMSUNG will repair or replace this product, at our option and at no charge with new or reconditioned parts, if found to be defective
during the limited warranty period specified above. The product must be returned during the warranty period with transportation charges
prepaid to SAMSUNG’s designated service center. Prior to returning any product for warranty service, the purchaser must contact
SAMSUNG for problem determination and service procedures. SAMSUNG does not warrant uninterrupted or error-free operation of the
product.
All replaced parts and products become the property of SAMSUNG and must be returned to SAMSUNG. Replacement parts and products
assume the remaining original warranty, or ninety (90) days, whichever is longer.
This limited warranty covers manufacturing defects in materials and workmanship encountered in normal, noncommercial use of this
product and shall not apply to the following, including, but not limited to: damage which occurs in shipment; applications and uses for
which this product was not intended; failures or problems which are caused by products or equipment not supplied by SAMSUNG;
accidents, misuse, abuse, neglect, misapplication, fire, water, lightning or other acts of nature; incorrect electrical line voltage, fluctuations
or surges; damage caused by improper or faulty installation; improper connection with any peripheral; product alteration or modification;
improper or unauthorized repair; cosmetic damage or exterior finish; product with altered serial numbers; failure to follow operating
instructions, customer adjustments, maintenance and environmental instructions that are covered and prescribed in the instruction book;
use of non-SAMSUNG or unauthorized parts, supplies, accessories or equipment which damage this product or result in service problems;
failures or problems due to incompatibility with other equipment.
No person, agent, distributor, dealer or company is authorized to change, modify or extend the terms of these warranties in any manner
whatsoever. The time within which an action must be commended to enforce any obligations of SAMSUNG arising under the warranty or
under any statute, or law of the United States or of any state thereof, is hereby limited to ninety (90) days from the date you discovered or
should have discovered the defect. This limitation does not apply to implied warranties arising under state law, if any.
SAMSUNG does not warrant (i) disc compatibility with new and existing format discs or (ii) error free playback in full compliance with
specifications of the compatible disc formats, and SAMSUNG shall not be liable for any data loss recorded in your discs.
SAMSUNG’s responsibility shall be limited to appropriate warranty services during the warranty period through SAMSUNG customer care
center. If you encounter compatibility or data loss problems, please contact SAMSUNG customer care center.
THERE ARE NO EXPRESS WARRANTIES OTHER THAN THOSE LISTED AND DESCRIBED ABOVE, AND NO WARRANTIES WHETHER
EXPRESS OR IMPLIED, INCLUDING, BUT NOT LIMITED TO, ANY IMPLIED WARRANTIES OF MERCHANTABILITY OR FITNESS FOR
A PARTICULAR PURPOSE, SHALL APPLY AFTER THE EXPRESS WARRANTY PERIODS STATED ABOVE, AND NO OTHER EXPRESS
WARRANTY OR GUARANTY GIVEN BY ANY PERSON, FIRM OR CORPORATION WITH RESPECT TO THIS PRODUCT SHALL BE
BINDING ON SAMSUNG. SAMSUNG SHALL NOT BE LIABLE FOR LOSS OF REVENUE OR PROFITS, FAILURE TO REALIZE SAVINGS
OR OTHER BENEFITS, OR ANY OTHER SPECIAL, INCIDENTAL OR CONSEQUENTIAL DAMAGES CAUSED BY THE USE, MISUSE
OR INABILITY TO USE THIS PRODUCT, REGARDLESS OF THE LEGAL THEORY ON WHICH THE CLAIM IS BASED, AND EVEN
IF SAMSUNG HAS BEEN ADVISED OF THE POSSIBILITY OF SUCH DAMAGES. NOR SHALL RECOVERY OF ANY KIND AGAINST
SAMSUNG BE GREATER IN AMOUNT THAN THE PURCHASE PRICE OF THE PRODUCT SOLD BY SAMSUNG AND CAUSING THE
ALLEGED DAMAGE. WITHOUT LIMITING THE FOREGOING, PURCHASER ASSUMES ALL RISK AND LIABILITY FOR LOSS, DAMAGE
OR INJURY TO PURCHASER AND PURCHASER’S PROPERTY AND TO OTHERS AND THEIR PROPERTY ARISING OUT OF THE USE,
MISUSE OR INABILITY TO USE THIS PRODUCT SOLD BY SAMSUNG NOT CAUSED DIRECTLY BY THE NEGLIGENCE OF SAMSUNG.
THIS LIMITED WARRANTY SHALL NOT EXTEND TO ANYONE OTHER THAN THE ORIGINAL PURCHASER OF THIS PRODUCT, IS
NONTRANSFERABLE AND STATES YOUR EXCLUSIVE REMEDY.
Some states do not allow limitations on how long an implied warranty lasts, or the exclusion or limitation of incidental or consequential
damages, so the above limitations or exclusions may not apply to you. This warranty gives you specific legal rights, and you may also have
other rights which vary from state to state.
To obtain warranty service, please contact SAMSUNG customer care center.
01783M-BD-P1600-XBG-ENG-NEW.indb92 92 2009-07-21 오전 11:39:18

Contact SAMSUNG WORLD WIDE
If you have any questions or comments relating to Samsung products, please contact the SAMSUNG customer care
center.
Region Country
Contact Center
Web Site
North America
CANADA 1-800-SAMSUNG(726-7864) www.samsung.com/ca
MEXICO 01-800-SAMSUNG(726-7864) www.samsung.com/mx
U.S.A 1-800-SAMSUNG(726-7864) www.samsung.com/us
Latin America
ARGENTINE 0800-333-3733 www.samsung.com/ar
BRAZIL 0800-124-421, 4004-0000 www.samsung.com/br
CHILE 800-SAMSUNG(726-7864) www.samsung.com/cl
NICARAGUA 00-1800-5077267 www.samsung.com/latin
HONDURAS 800-7919267 www.samsung.com/latin
COSTA RICA 0-800-507-7267 www.samsung.com/latin
ECUADOR 1-800-10-7267 www.samsung.com/latin
EL SALVADOR 800-6225 www.samsung.com/latin
GUATEMALA 1-800-299-0013 www.samsung.com/latin
JAMAICA 1-800-234-7267 www.samsung.com/latin
PANAMA 800-7267 www.samsung.com/latin
PUERTO RICO 1-800-682-3180 www.samsung.com/latin
REP. DOMINICA 1-800-751-2676 www.samsung.com/latin
TRINIDAD & TOBAGO 1-800-SAMSUNG(726-7864) www.samsung.com/latin
VENEZUELA 0-800-100-5303 www.samsung.com/latin
COLOMBIA 01-8000112112 www.samsung.com.co
Europe
BELGIUM 02 201 2418
www.samsung.com/be (Dutch)
www.samsung.com/be_fr (French)
CZECH REPUBLIC 800-SAMSUNG(800-726786) www.samsung.com/cz
DENMARK 8-SAMSUNG(7267864) www.samsung.com/dk
FINLAND 30-6227 515 www.samsung.com/fi
FRANCE 01 4863 0000 www.samsung.com/fr
GERMANY 01805 - SAMSUNG(726-7864 € 0,14/Min) www.samsung.de
HUNGARY 06-80-SAMSUNG(726-7864) www.samsung.com/hu
ITALIA 800-SAMSUNG(726-7864) www.samsung.com/it
LUXEMBURG 02 261 03 710 www.samsung.com/lu
NETHERLANDS 0900-SAMSUNG (0900-7267864) (€ 0,10/Min) www.samsung.com/nl
NORWAY 3-SAMSUNG(7267864) www.samsung.com/no
POLAND 0 801 1SAMSUNG(172678), 022-607-93-33 www.samsung.com/pl
PORTUGAL 80820-SAMSUNG(726-7864) www.samsung.com/pt
SLOVAKIA 0800-SAMSUNG(726-7864) www.samsung.com/sk
SPAIN 902-1-SAMSUNG (902 172 678) www.samsung.com/es
SWEDEN 075-SAMSUNG(726 78 64) www.samsung.com/se
U.K 0845 SAMSUNG (7267864) www.samsung.com/uk
EIRE 0818 717 100 www.samsung.com/ie
AUSTRIA 0810-SAMSUNG(7267864, € 0.07/min) www.samsung.com/at
SWITZERLAND 0848-SAMSUNG(7267864, CHF 0.08/min) www.samsung.com/ch
CIS
RUSSIA 8-800-555-55-55 www.samsung.ru
KAZAKHSTAN 8-10-800-500-55-500 www.samsung.com/kz_ru
UZBEKISTAN 8-10-800-500-55-500 www.samsung.com/kz_ru
KYRGYZSTAN 00-800-500-55-500
TADJIKISTAN 8-10-800-500-55-500
UKRAINE 8-800-502-0000 www.samsung.ua
LITHUANIA 8-800-77777 www.samsung.com/lt
LATVIA 8000-7267 www.samsung.com/lv
ESTONIA 800-7267 www.samsung.com/ee
Asia Pacific
AUSTRALIA 1300 362 603 www.samsung.com/au
NEW ZEALAND 0800 SAMSUNG (0800 726 786) www.samsung.com/nz
CHINA 800-810-5858, 400-810-5858, 010-6475 1880 www.samsung.com/cn
HONG KONG 3698-4698 www.samsung.com/hk
INDIA 3030 8282, 1800 110011, 1-800-3000-8282 www.samsung.com/in
INDONESIA 0800-112-8888 www.samsung.com/id
JAPAN 0120-327-527 www.samsung.com/jp
MALAYSIA 1800-88-9999 www.samsung.com/my
PHILIPPINES
1-800-10-SAMSUNG(726-7864)
1-800-3-SAMSUNG(726-7864), 02-5805777
www.samsung.com/ph
SINGAPORE 1800-SAMSUNG(726-7864) www.samsung.com/sg
THAILAND 1800-29-3232, 02-689-3232 www.samsung.com/th
TAIWAN 0800-329-999 www.samsung.com/tw
VIETNAM 1 800 588 889 www.samsung.com/vn
Middle East &
Africa
TURKEY 444 77 11 www.samsung.com/tr
SOUTH AFRICA 0860-SAMSUNG(726-7864) www.samsung.com/za
U.A.E 800-SAMSUNG (726-7864), 8000-4726 www.samsung.com/ae
01783M-BD-P1600-XBG-ENG-NEW.indb93 93 2009-07-21 오전 11:39:18

AK68-01783M
01783M-BD-P1600-XBG-ENG-NEW.indb94 94 2009-07-21 오전 11:39:19

imagine las posibilidades
Gracias por adquirir este producto Samsung.
Para recibir un servicio más completo,
registre su producto en
www.samsung.com/register.
Reproductor de discos Blu-ray
Manual del usuario
BD-P1600
Para prevenir cualquier mal funcionamiento y evitar daños,
lea detalladamente este manual de instrucciones antes de
conectar y operar el aparato.
Conserve el manual para futuras referencias Gracias.
01783M-BD-P1600-XBG-ES-NEW.indb 1 2009-07-22 오전 11:26:36

2_ características principales
características principales del
reproductor de discos blu-ray
Funciones del reproductor
Admite una variedad de tipos de discos de video
Discos Blu-ray (BD-ROM, BD-RE, BD-R), Video DVD, DVD-RW/-R (sólo modo V y fi nalizado) y CD de audio.
CD-RW/CD-R, DVD-RW/-R y contenido de tarjetas de memoria fl ash USB como archivos MP3, JPEG, DivX, MKV y MP4.
HDMI (Interfaz multimedia de alta defi nición)
HDMI reduce las interferencias en las imágenes posibilitando una ruta de señales de audio/video digital pura
desde el reproductor al TV.
DivX
DivX
®
es un formato de video digital creado por DivX, Inc. Este reproductor es un dispositivo ofi cial DivX Certifi ed
que reproduce video DivX.
Características de los discos Blu-ray
Los discos Blu-ray admiten video con la calidad HD más alta disponible en el sector. Gran capacidad signifi ca no
comprometer la calidad de video. Además, un disco Blu-ray tiene el mismo tamaño y aspecto familiar que un DVD.
* Las siguientes características del disco Blu-ray dependen del disco y pueden variar.
El aspecto y el desplazamiento por las funciones variarán entre discos.
No todos los discos tienen las funciones que se describen a continuación.
Aspectos destacables de video
El formato BD-ROM para la distribución de películas admite tres códecs de video altamente avanzados, incluidos
AVC, VC-1 y MPEG-2.
También están disponibles las resoluciones de video HD:
1920 x 1080 Alta defi nición
1280 x 720 Alta defi nición
Reproducción de alta defi nición
Para ver contenido de alta defi nición en Discos Blu-ray, se requiere HDTV (Televisión de alta defi nición).
Es posible que algunos discos necesiten utilizar el conector HDMI OUT del reproductor para ver el contenido de
alta defi nición. La posibilidad de ver contenido de alta defi nición en Discos Blu-ray puede verse limitada
dependiendo de la resolución del TV.
Planos de gráfi cos
Están disponibles dos capas de video de
resolución de alta defi nición completa
individuales (1920x1080), sobre la capa de
video de alta resolución.
Una capa se ha diseñado para gráfi cos
relacionados con video, (como subtítulos) y la
otra capa se ha asignado a elementos
interactivos, como botones o menús.
En ambas capas están disponibles diversos
efectos de persiana, difuminado y
desplazamiento.
•
•
•
•
3 4 5 6 7 8 9 10 11 12 13 14 15
%
Planos
de
gráfi cos
Video HD
PLAY MOVIE LANGUAGES SCENE SELECTIONS PREVIEWS
01783M-BD-P1600-XBG-ES-NEW.indb 2 2009-07-22 오전 11:26:38

Español _3
● CARACTERÍSTICAS PRINCIPALES
Gráfi cos de menús
Cuando resalte o seleccione una opción de menú en un disco Blu-ray, es posible escuchar sonidos como clic de
botones o voz que explique la opción de menú resaltada.
Sonidos de los menús
Cuando resalte o seleccione una opción de menú en un disco Blu-ray, es posible escuchar sonidos como clic de
botones o voz que explique la opción de menú resaltada.
Menús multipágina/emergentes
Con DVD-Video, la reproducción se interrumpe cada vez que se
accede a la nueva pantalla de menús. Debido a la capacidad de los
discos Blu-ray de cargar datos previos desde el disco sin interrumpir la
reproducción, un menú puede constar de varias páginas.
Puede explorar a través de las páginas de menús o seleccionar
diferentes rutas de menús, mientras que el audio y video seguirán
reproduciéndose en segundo plano.
Interactividad
Algunos discos Blu-ray pueden contener menús animados y juegos Trivia.
Presentaciones explorables por el usuario
Con discos Blu-ray, puede explorar a través de diversas imágenes fi jas mientras el audio sigue reproduciéndose.
Subtítulos
Dependiendo de lo contenido en el disco Blu-ray, es posible que puedan seleccionarse diferentes estilos, tamaños
y colores de fuente, para subtítulos, incluir animaciones en los subtítulos, desplazarse o hacerlos aparecer y
desaparecer de forma atenuada.
BD-LIVE
Puede utilizar un disco Blu-ray que admita BD-LIVE a través de la conexión de red para disfrutar de contenido
diverso facilitad por el fabricante del disco.
YouTube
Este Reproductor de discos Blu-ray permite disfrutar de VOD facilitados por YouTube a través de una conexión de
red.
COMPONENTES
Compruebe los accesorios suministrados que se incluyen a continuación.
A-B
0
1 2 3
7 8 9
4 5 6
RETURN
POWER
OPEN/CLOSE
AUDIO SUBTITLE REPEAT REPEAT
CANCEL
TV SOURCE
STOP PLAY
BONUSVIEW PAUSE
TV MUTE
ENTER
POPUP MENUDISC MENU
TITLE MENU
A B C D
MENU
EXIT
INFO
TV VOL TV CH
TV
POWER
AK59-00104K
Cable Compuesto (Video), Audio L/R Cable de HDMI
Manual del usuario Manual de consulta rápida Mando a distancia
Algunos discos Blu-ray pueden contener menús animados y juegos Trivia.
3 4 5 6 7 8 9 10 11 12 13 14 15
%
PLAY MOVIE LANGUAGES SCENE SELECTIONS PREVIEWS
01783M-BD-P1600-XBG-ES-NEW.indb 3 2009-07-22 오전 11:26:41

4_ información de seguridad
información de seguridad
ADVERTENCIA
PARA REDUCIR EL PELIGRO DE DESCARGA ELÉCTRICA, NO RETIRE LA CUBIERTA.
NO HAY PIEZAS EN EL INTERIOR QUE PUEDA REPARAR EL USUARIO. CONSULTE AL PERSONAL
CUALIFICADO DE SERVICIO TÉCNICO.
PRECAUCIÓN
Riesgo de descarga eléctrica
No abrir
Un triángulo con un rayo y una punta de
flecha es un símbolo de advertencia que
alerta de “voltaje peligroso” dentro del
producto.
PRECAUCIÓN: PARA REDUCIR EL PELIGRO DE DESCARGA
ELÉCTRICA, NO RETIRE LA CUBIERTA. NO HAY PIEZAS EN
EL INTERIOR QUE PUEDA REPARAR EL USUARIO. CONSULTE
AL PERSONAL CUALIFICADO DE SERVICIO TÉCNICO.
Un triángulo con un signo de exclamación
es un símbolo de advertencia que le
alerta de que hay instrucciones
importantes relacionadas con el producto.
ADVERTENCIA
Para reducir el riesgo de incendio o descarga eléctrica, no exponga este aparato a la lluvia ni a la humedad.
Para evitar daños, este aparato debe instalarse de forma adecuada a la pared de acuerdo con las instrucciones de instalación.
Nota para el instalador del sistema CATV
Este recordatorio se facilita para llamar la atención del instalador del sistema CATV sobre el Artículo 820-40 del
Código Eléctrico Nacional (Sección 54 de Código Eléctrico Canadiense, Parte I), que proporciona directrices para
una conexión a tierra apropiada y, en concreto, especifica que la conexión a tierra del cable se conectará al
sistema de conexión a tierra del edificio, lo más cerca posible del punto de entrada del cable.
NOTA DE FCC (para EE.UU.):
Este equipo ha sido probado y cumple con los límites para un dispositivo digital de la Clase B, de acuerdo con la
Parte 15 de las Normas de FCC. Estos límites se han diseñado para proporcionar una protección razonable frente
a interferencias peligrosas en un entorno residencial. Este equipo genera, utiliza y puede radiar energía de
radiofrecuencia y, si no se instala y utiliza de acuerdo con las instrucciones, puede causar interferencias peligrosas
en la recepción de radio y televisión, lo cual puede determinarse apagando y encendiendo el equipo.
El usuario debe intentar corregir las interferencias mediante una de las siguientes medidas.
Reoriente o reubique la antena de recepción.
Aumente la separación entre el equipo y el receptor.
Conecte el equipo en una toma de un circuito diferente al que esté conectado el receptor.
Consulte al distribuidor o a un técnico experimentado de radio / TV para obtener ayuda.
Este Aparato digital de la Clase B cumple todos los requisitos de la Normativa de equipos que causan interferencias de Canadá.
CLASS 1 LASER PRODUCT
KLASSE 1 LASER PRODUKT
LUOKAN 1 LASER LAITE
KLASS 1 LASER APPARAT
PRODUCTO LÁSER CLASE 1
PRODUCTO LÁSER DE LA CLASE 1
El uso de controles, ajustes o la ejecución de procedimientos distintos a los especificados en este documento
pueden dar como resultado la exposición peligrosa a radiaciones.
PRECAUCIÓN
ESTE PRODUCTO UTILIZA UN LÁSER. EL USO DE CONTROLES, AJUSTES O PROCEDIMIENTOS NO
ESPECIFICADOS EN ESTE DOCUMENTO PUEDEN TENER COMO RESULTADO LA EXPOSICIÓN A
RADIACIONES PELIGROSAS. NO ABRA LAS CUBIERTAS NI REALICE REPARACIONES POR SU CUENTA.
CONSULTE AL PERSONAL CUALIFICADO DE SERVICIO TÉCNICO.
•
•
•
•
•
•
01783M-BD-P1600-XBG-ES-NEW.indb 4 2009-07-22 오전 11:26:41

Español _5
● INFORMACIÓN DE SEGURIDAD
Nota:
Esta unidad sólo se puede utilizar con una fuente de alimentación de 110~240V c.a. 60/50Hz. No se puede
utilizar en ningún otro sitio.
Este Reproductor de discos Blu-ray se ha diseñado y fabricado para dar respuesta a la Información de gestión
de región. Si el número de región de un disco Blu-ray/DVD no corresponde con el número de región del
Reproductor de discos Blu-ray, éste no podrá reproducir el disco.
La unidad del producto que incluye este manual del usuario se suministra con licencia y bajo derechos de
propiedad intelectual de terceros. Este producto está cubierto por una de las siguientes patentes de EE.UU.:
5,060,220 5,457,669 5,561,649 5,705,762 6,043,912 6,438,099 6,467,061 6,556,521 6,578,163 6,697,307
6,728,474 6,771,891 6,894,963 6,895,593 6,937,815 6,996,327 7,009,926 7,085,221 7,088,649 7,092,327
7,099,566 7,123,564 7,142,493 7,142,495 7,145,861 7,146,624 7,151,729 7,161,879 7,164,647 7,167,437
7,173,891 7,177,250 7,194,187 7,203,891 7,209,423 7,210,067 7,228,062 7,245,566 7,245,567 7,257,065
7,263,045 7,269,110 7,272,086 7,272,106 7,280,460 7,283,729 7,286,454 7,304,938
Este producto está cubierto por las siguientes patentes en EE.UU.:
US4,930,158 US4,930,160
Esta licencia está limitada al uso no comercial privado de consumidores que sean usuarios finales para contenido
con licencia. La licencia no cubre a ninguna unidad del producto que no sea ésta y la licencia no se extiende a
ninguna unidad del producto o proceso sin licencia en conformidad con el ISO/IEC 11172-3 o ISO/IEC 13818-3
utilizada o vencida en combinación con esta unidad del producto.
La licencia solo cubre el uso de esta unidad para codificar y/o descodificar archivos de audio en conformidad con
el ISO/IEC 11172-3 o ISO/IEC 13818-3. No se otorga ningún derecho bajo esta licencia para características o
funciones del producto que no estén conformes con el ISO/IEC 11172-3 o ISO/IEC 13818-3.
PRECAUCIONES
Instrucciones importantes de seguridad
Lea estas instrucciones de funcionamiento detenidamente antes de utilizar la unidad. Siga las instrucciones de
seguridad que se incluyen a continuación. Tenga estas instrucciones de funcionamiento a mano para referencia futura.
Lea estas instrucciones.
Conserve estas instrucciones.
Preste atención a todas las advertencias.
Siga todas las instrucciones.
No utilice este aparato cerca del agua.
Límpielo sólo con un paño seco.
No obstruya los orificios de ventilación. Instálelo de acuerdo con las instrucciones del fabricante.
No lo instale cerca de ninguna fuente de calor, como radiadores, registradores de calor u otro reproductor
(incluidos amplificadores) que generen calor.
El enchufe polarizado o con toma de tierra tiene un fin de seguridad importante. Un enchufe polarizado tiene
dos puntas con una más ancha que la otra. Un enchufe con toma de tierra tiene dos puntas y una tercera
hoja de toma de tierra. La punta ancha o la tercera hoja existen por motivos de seguridad. Si no cabe en la
toma, consulte a un electricista para sustituir la toma obsoleta.
Proteja el cable de alimentación para que no se deforme ni sufran pinzamientos, especialmente en los
enchufes, en sus respectivos receptáculos ni en los puntos de salida del reproductor.
Utilice únicamente conexiones o accesorios especificados por el fabricante.
Utilice sólo las mesitas con ruedas, soportes, trípodes o mesas recomendadas por el
fabricante o vendidas con el reproductor. Cuando se utiliza una mesita con ruedas, tenga
cuidado al mover la mesita con ruedas junto con el reproductor para evitar daños por vuelco.
Desenchufe este reproductor durante tormentas eléctricas o cuando no se utilice durante largos
períodos de tiempo.
Confíe las reparaciones a personal técnico cualificado. El servicio es necesario cuando el reproductor se
haya dañado de alguna forma, cuando el cable o el enchufe de suministro eléctrico estén dañados, cuando
se haya derramado líquido sobre el reproductor o hayan caído objetos en su interior, el reproductor se haya
expuesto a la lluvia o humedad, no funcione normalmente o se haya caído.
•
•
•
1)
2)
3)
4)
5)
6)
7)
8)
9)
10)
11)
12)
13)
14)
01783M-BD-P1600-XBG-ES-NEW.indb 5 2009-07-22 오전 11:26:42

Precauciones de manejo
Antes de conectar componentes adiciones al Reproductor de discos Blu-ray, compruebe que estén
desconectados.
No mueva el Reproductor de discos Blu-ray mientras se reproduce un disco, ya que el disco puede rayarse o
quebrarse y pueden dañarse componentes internos.
No coloque sobre el Reproductor de discos Blu-ray recipientes con líquido ni objetos pequeños metálicos.
Tenga cuidado de no colocar la mano en la bandeja del disco.
En la bandeja del disco no coloque nada que no sea el disco.
Interferencias externas como rayos y electricidad estática pueden afectar al funcionamiento normal de este
Reproductor de discos Blu-ray. Si esto ocurre, apague el Reproductor de discos Blu-ray y enciéndalo de nuevo
con el botón POWER, o bien desconecte y vuelva a conectar el cable de alimentación de CA en la toma de CA.
El Reproductor de discos Blu-ray funcionará con normalidad.
Asegúrese de retirar el disco y apagar el Reproductor de discos Blu-ray después de utilizarlo.
Desconecte el cable de alimentación de CA de la toma de CA cuando no vaya a utilizar el Reproductor de
discos Blu-ray durante largos períodos de tiempo.
Para limpiar el disco, hágalo en línea recta desde el interior al exterior del disco.
No exponga el reproductor a líquidos.
Cuando el enchufe de CA esté conectado a la toma de corriente, el reproductor seguirá consumiendo energía
(modo espera) cuando esté apagado.
No debe exponerse el reproductor a gotas ni a salpicaduras de líquidos ni a objetos rellenos de líquido, como
jarrones, y no deben colocarse sobre el reproductor.
Para desconectar el reproductor de la toma de alimentación, saque el enchufe de la toma de corriente; el
enchufe de la toma de corriente debe tener un acceso fácil.
No debe exponer el aparato a gotas ni salpicaduras de agua ni a objetos con líquido, como jarrones, evitando
colocarlos sobre el aparato.
El enchufe de corriente se utiliza como un dispositivo de desconexión y debe estar a mano en todo momento.
Mantenimiento del armario
Por razones de seguridad, asegúrese de desconectar la alimentación de CA de la toma de CA.
No utilice benceno, disolventes ni sustancias de este tipo para la limpieza.
Limpie el armario con un paño suave.
Restricciones durante la reproducción
Es posible que este reproductor no responda a todas las ordenes de funcionamiento debido a que algunos
discos Blu-ray, DVD o CD permiten unas operaciones y unas funciones específicas o limitadas durante la
reproducción. Recuerde que no se trata de ningún defecto del reproductor.
Samsung no puede garantizar que este reproductor reproduzca todos los discos que lleven el logotipo de
Blu-ray, DVD y CD, ya que los formatos de disco pueden evolucionar y pueden surgir problemas y errores
durante la creación de software para Blu-ray, DVD y CD y el fabricante de los discos. Póngase en contacto con
el servicio de atención al cliente de SAMSUNG si tiene preguntas o encuentra dificultades al reproducir discos
Blu-ray, DVD o CD en este reproductor. Asimismo, consulte el resto del manual para obtener información
adicional sobre las restricciones de reproducción.
•
•
•
•
•
•
•
•
•
•
•
•
•
•
•
•
•
•
•
6_ información de seguridad
información de seguridad
01783M-BD-P1600-XBG-ES-NEW.indb 6 2009-07-22 오전 11:26:42

índice
CARACTERÍSTICAS PRINCIPALES DEL
REPRODUCTOR DE DISCOS BLU-RAY
2
3 Componentes
INFORMACIÓN DE SEGURIDAD
4
4 Advertencia
5 Precauciones
INTRODUCCIÓN
10
10 Antes de Utilizar el Manual del Usuario
11 Tipo de Disco y Características
15 Almacenamiento y Mane jo de Discos
DESCRIPCIÓN
16
16 Panel Frontal
17 Visor del Panel Frontal
18 Panel Posterior
MANDO A DISTANCIA
19
19 Guía del Mando a Distancia
20 Ajuste del Mando a Distancia
20 Información Sobre la Batería
21 Códigos de TV Controlables
CONEXIONES
22
22 Conexión a un TV con Cable HDMI
- LA MEJOR CALIDAD (RECOMENDADA)
24 Conexión a un TV con un Cable DVI
- LA MEJOR CALIDAD (RECOMENDADA)
25 Conexión a un TV (Componente)
- MEJOR CALIDAD
26 Conexión a un TV (Video)
- BUENA CALIDAD
27 Conexión a un Sistema de Audio
(Amplificador que Admita HDMI)
- LA MEJOR CALIDAD (RECOMENDADA)
28 Conexión a un Sistema de Audio
(Dolby Digital, Amplificador DTS)
- MEJOR CALIDAD
29
Conexión a un Sistema de Audio
(Amplificador de 2 Canales)
- BUENA CALIDAD
30 Conexión a la Red
Español _7
● ÍNDICE
01783M-BD-P1600-XBG-ES-NEW.indb 7 2009-07-22 오전 11:26:42

CONFIGURACIÓN DEL SISTEMA
36
36 Ajuste del Reloj
CONFIGURACIÓN DEL IDIOMA
37
37 Configuración de las Opciones de Idioma
CONFIGURACIÓN DE AUDIO
38
38 Configuración de las Opciones de Audio
CONFIGURACIÓN DE PANTALLA
41
41 Configuración de las Opciones de Pantalla
CONFIGURACIÓN DE HDMI
45
45 Configuración de las Opciones de
Configuración de HDMI
CONTROL PATERNO
48
48 Configuración del Control Paterno
CONFIGURACIÓN DE RED
50
50 Ajustes de las Opciones de Configuración
de Red
FUNCIONES BÁSICAS DEL
REPRODUCTOR DE DISCOS BLU-RAY
32
32 Antes de Reproducir
33 Desplazamiento por el Menú en Pantalla
33 Reproducción de Discos
34 Ajuste del Sonido
34 Funciones de Búsqueda y Salto de
Capítulo o Pista
35 Reproducción a Cámara Lenta /
Reproducción Porfotogramas
8_ índice
índice
01783M-BD-P1600-XBG-ES-NEW.indb 8 2009-07-22 오전 11:26:42

GESTIÓN DE DATOS DE BD
55
55 Gestión de Dispositivos del Sistema
56 DivX(R) Registro
56 Desactivación de DivX(R)
ACTUALIZACIÓN DEL SISTEMA
57
57 Actualización de Firmware
59 Información del Sistema
59 Notificación de Actualización del Firmware
VISUALIZACIÓN DE UNA PELÍCULA
60
60 Uso de la Función de Pantalla
61 Uso del Menú del Disco y Emergente/
Título
62 Repetición de la Reproducción
63 Selección del Idioma de Audio
63 Selección del Idioma de los Subtítulos
64 Modificación del Ángulo de la Cámara
65 Ajustes de Bonusview
65 BD-LIVE™
AUDICIÓN DE MÚSICA
66
66 Botones del Mando a Distancia Utilizados
para Reproducción de CD de Audio
(CD-DA)/MP3
66 Repetición de CD de Audio (CD-DA)/MP3
67 Reproducción de un CD de Audio
(CD-DA)/MP3
REPRODUCCIÓN DE UNA IMAGEN
70
70 Reproducción de un Disco JPEG
UTILIZACIÓN DE E-CONTENIDO
71
71 Utilización de Youtube
Español _9
● ÍNDICE
APÉNDICE
77
77 Solución de Problemas
79 Especificaciones Técnicas
01783M-BD-P1600-XBG-ES-NEW.indb 9 2009-07-22 오전 11:26:42

10_ introducción
introducción
ANTES DE UTILIZAR EL MANUAL DEL USUARIO
Asegúrese de comprobar los siguientes términos antes de usar el manual del usuario.
Iconos que se utilizarán en el manual
Icono Término Definición
h
BD-ROM Implica una función disponible en el BD-ROM.
g
BD-RE Implica una función disponible en el BD-RE.
f
BD-R Implica una función disponible en el BD-R.
Z
DVD-VIDEO
Esto implica una función disponible en discos DVD-Video o DVD-RW/-R grabados y
finalizados en modo Video.
C
DVD-RW Implica una función disponible en DVD-RW. (Modo V y solo finalizado)
V
DVD-R Implica una función disponible en DVD-R. (Modo V y solo finalizado)
CD de audio Esto implica una función disponible en un CD-RW/CD-R de audio (formato CD-DA).
A
MP3
Esto implica una función disponible en discos DVD-RW/-R, CD-RW/CD-R y en tarjetas de
memoria flash USB.
G
JPEG
Esto implica una función disponible en discos DVD-RW/-R, CD-RW/CD-R y en tarjetas de
memoria flash USB.
DivX, MKV, MP4
Esto implica una función disponible en discos DVD-RW/-R, CD-RW/CD-R y en tarjetas de
memoria flash USB.
F
Tarjeta de memoria
flash USB
Esto implica una función disponible en la tarjeta de memoria flash USB.
M
Nota
Esto implica sugerencias o instrucciones en la página que ayudan a utilizar cada
función.
Información sobre el uso de este manual del usuario
Asegúrese de conocer las instrucciones de seguridad antes de utilizar este producto.
(Consulte las páginas 4 y 6.)
Si se produce un problema, compruebe la sección Solución de problemas.
(Consulte las páginas 77 y 78.)
Copyright
©2009 Samsung Electronics Co.,Ltd.
Todos los derechos reservados. Ninguna parte o la totalidad de este manual del usuario pueden
reproducirse o copiarse sin la autorización previa por escrito de Samsung Electronics Co. Ltd.
1)
2)
01783M-BD-P1600-XBG-ES-NEW.indb 10 2009-07-22 오전 11:26:42

Español _11
● INTRODUCCIÓN
TIPO DE DISCO Y CARACTERÍSTICAS
Tipo de disco y características
Tipos de disco
Logotipo
de disco
Contenido grabado Forma del disco
Tiempo máx. de
reproducción
BD-ROM
BD-RE/BD-R
AUDIO + VIDEO Una cara
El tiempo de reproducción
depende del título
DVD-VIDEO AUDIO + VIDEO
Una cara (5 inches) 240
Doble cara (5 inches) 480
Una cara (3 1/2 inches) 80
Doble cara (3 1/2 inches) 160
DVD-RW
(Modo V y sólo
finalizado)
AUDIO + VIDEO 5 inches (4,7GB)
480
(Ej. Reproducción ampliada)
DVD-R
(Modo V y sólo
finalizado)
AUDIO + VIDEO 5 inches (4,7GB)
480
(Ej. Reproducción ampliada)
AUDIO-CD AUDIO
Una cara (5 inches) 74
Una cara (3 1/2 inches) 20
DivX Video DivX
Una cara (5 inches) -
Una cara (3 1/2 inches) -
Logotipos de discos que pueden reproducirse
Disco Blu-ray DTS-HD Master Audio Digital Audio DivX BD-LIVE
Dolby TrueHD
Sistema de emisión PAL en
R.U., Francia, Alemania, etc.
Stereo Java
Discos que no pueden reproducirse
Discos Blu-ray con un código de región que no sea “Región A”.
DVD-Video con un número de región que no sea “4” o “ALL”.
HD DVD
DVD+RW/+R
DVD-RAM
DVD-RW(modo VR)
•
•
•
•
•
•
Disco DVD-R de 3,9 GB de diseño
personalizado.
DVD-ROM/PD/Disco MV, etc
CVD/CD-ROM/CDV/CD-G/CD-I/LD
(Para CDG sólo reproduce audio, no gráficos.)
Super Audio CD (excepto capa CD)
•
•
•
•
01783M-BD-P1600-XBG-ES-NEW.indb 11 2009-07-22 오전 11:26:44

12_ introducción
introducción
[Nota]
Es posible que no puedan reproducirse algunos discos comerciales ni discos DVD adquiridos fuera
de la región. Cuando se reproducen estos discos, aparecerá “No es posible reproducir este disco.”
o “Por favor, consulte el código regional del disco”.
Si no se ha grabado correctamente un disco DVD-RW/-R en formato de video DVD, no se podrá reproducir.
Código de región
Tanto el Reproductor de discos Blu-ray como los discos tienen códigos por región. Estos códigos de
región deben coincidir para reproducir el disco. Si los códigos no coinciden, el disco no se reproducirá.
El código de región de este Reproductor de discos Blu-ray viene indicado en el panel posterior del equipo.
Tipo de disco Blu-ray DVD-VIDEO
Código de región
A
4
Código de región de discos
Blu-ray
Área
A
Norteamérica, Centroamérica, Sudamérica, Corea, Japón, Taiwán, Hong Kong y Sureste de
Asia.
B
Europa, Groenlandia, territorios franceses, Oriente Próximo, África, Australia y Nueva Zelanda.
C India, China, Rusia, Asia Central y Sur.
Código de región de DVD Área
1 EE.UU., territorios de EE.UU. y Canadá
2 Europa, Japón, Oriente Próximo, Egipto, Sudáfrica, Groenlandia
3 Taiwán, Corea, Filipinas, Indonesia, Hong Kong
4
México, Sudamérica, Centroamérica, Australia, Nueva Zelanda, Islas del Pacífico, El Caribe
5 Rusia, Europa del Este, India, mayor parte de África, Corea del Norte, Mongolia
6 China
Compatibilidad de discos Blu-ray
El disco Blu-ray es un nuevo formato en evolución. Por consiguiente, es posible que haya problemas
de compatibilidad de discos. No todos los discos son compatibles no todos los discos se
reproducirán. Para obtener información adicional, consulte la sección sobre el Aviso de conformidad y
compatibilidad de este manual. Si encuentra problemas de compatibilidad, póngase en contacto con
el Centro de atención al cliente de SAMSUNG.
Es posible que la reproducción no funcione en algunos tipos de discos o cuando se estén realizando operaciones
específicas como el cambio de ángulo o el ajuste de relación de altura/anchura. En la caja del disco se incluye
información detallada sobre los discos. Consúltela en caso necesario.
No deje que el disco se ensucie o se raye; huellas, suciedad, polvo, arañazos o restos de humo de cigarrillos en la
superficie de grabación podrían imposibilitar el uso del disco para la grabación.
Cuando se reproduce el título de BD-J, la carga puede tardar más tiempo que un título normal o es posible que
algunas funciones se ejecuten más lentamente. algunas funciones se ejecuten más lentamente.
•
•
M
01783M-BD-P1600-XBG-ES-NEW.indb 12 2009-07-22 오전 11:26:45

Español _13
● INTRODUCCIÓN
Tipo de disco
BD-ROM
Disco Blu-ray con memoria de sólo lectura. Un disco BD-ROM contiene datos pregrabados. Aunque
un BD-ROM puede contener cualquier forma de datos, la mayoría de discos BD-ROM contendrán
video en formato de alta definición para su reproducción en reproductores de discos Blu-ray. Esta
unidad puede reproducir discos BD-ROM comerciales pregrabados con discos BD-ROM.
BD-RE/BD-R
Disco Blu-ray regrabable/Disco Blu-ray grabable. BD-RE/BD-R es el formato ideal para realizar copias
de seguridad o grabación de video personal.
DVD-Video
Un disco versátil digital (DVD) puede contener hasta 135 minutos de imágenes, audio en 8
idiomas y subtítulos en 32 idiomas. Si está equipado con compresión de imágenes MPEG-2 y
Dolby Digital Surround, podrá disfrutar de imágenes vivas con una calidad de cine.
Al cambiar de la primera a la segunda capa de un disco DVD-Video de doble capa, es posible
que se produzca una distorsión momentánea en la imagen y en el sonido. Esto no representa
ninguna avería en la unidad.
Una vez que haya finalizado el DVD-RW/-R en modo Video, pasa a DVD-Video. Los DVD
comerciales pregrabados (presellados) con video también se conocen como DVD-Videos. Esta
unidad puede reproducir discos DVD comerciales pregrabados (discos DVD-Video) con video.
Audio CD
Disco de audio en el que puede grabarse audio PCM a 44,1 kHz.
Esta unidad puede reproducir discos CD-RW y CD-R de audio con formato CD-DA.
Es posible que esta unidad no pueda reproducir algunos discos CD-RW o CD-R debido a la
condición de la grabación.
CD-RW/CD-R
Utilice un disco CD-RW/CD-R de 700 MB (80 minutos). Si es posible, no utilice ningún disco de
800 MB (90 minutos) o mayor, ya que es posible que no se reproduzca el disco.
Si el disco CD-RW/CD-R no se grabó como una sesión cerrada, es posible que se experimenten
demoras en el inicio del disco o es posible que no puedan reproducirse todos los archivos.
Es posible que no puedan reproducirse con esta unidad algunos discos CD-RW/CD-R,
dependiendo del dispositivo que se utilizara para grabarlos. En el caso de contenido grabado en
soporte de CD-RW/CD-R desde un CD para uso personal, la capacidad de reproducción puede
variar dependiendo del contenido y de los discos.
Reproducción de discos DVD-R
Una vez que haya finalizado la grabación de DVD-R en modo Video, pasa a DVD-Video.
Esta unidad puede reproducir discos DVD-R grabados y finalizados con un grabador de video
DVD de Samsung. Es posible que no se puedan reproducir algunos discos DVD-R dependiendo
del disco y de las condiciones de la grabación.
Reproducción de discos DVD-RW
La reproducción se puede realizar con discos DVD-RW grabados en los modos Video y
finalizados.
Una vez que haya finalizado la grabación de DVD-RW en Modo Video, pasa a DVD-Video. La
capacidad de reproducción depende de las condiciones de grabación.
❖
❖
❖
•
•
•
❖
•
•
•
❖
•
•
•
❖
•
•
❖
•
•
01783M-BD-P1600-XBG-ES-NEW.indb 13 2009-07-22 오전 11:26:45

14_ introducción
introducción
Formato de disco
DVD-RW/-R (V)
Este es el formato que se utiliza para grabar datos en un disco DVD-RW o DVD-R. El disco
puede reproducirse en un Reproductor de discos Blu-ray una vez finalizado.
DivX
CD-R/-RW, DVD-R/-RW, USB
Es posible reproducir archivos de video con las siguientes extensiones: .avi, .divx, .AVI, .DIVX
Formato de video DivX (Códec): DivX 3.11 DivX 4.x DivX 5.x (sin QPEL ni GMC)
Formato de audio DivX (Códec): MP3, MPEG1 Audio Layer 2, AC3, DTS
Formatos de archivos de subtítulos admitidos: .smi, .srt, .sub, .psb, .txt, .ass
Resolución máxima : 720x480@30fps
720x576@25fps
Resolución mínima : 16x16
Velocidad de fotogramas máxima para fuente progresiva : 30 fotogramas por segundo
Máxima velocidad de campo para fuente de interlazado : 60 campos por segundo.
No es posible reproducir el disco que tenga una resolución superior a 720 x 576 píxeles.
MKV, MP4
CD-R/-RW, DVD-R/-RW, USB
Es posible reproducir archivos de video con las siguientes extensiones: : .avi, .divx, .mkv, .mp4, .AVI,
.DIVX, .MKV, .MP4
AVCHD (Advanced Video Codec High Definition)
Este reproductor puede reproducir discos con formato AVCHD. Estos discos se graban y se
usan normalmente en videocámaras.
El formato AVCHD es un formato digital de alta resolución para videocámaras.
El formato MPEG-4 AVC/H.264 es capaz de comprimir imágenes con una mayor eficacia que la
del formato de compresión de imágenes convencional.
Algunos discos AVCHD utilizan el formato “x.v.Color”.
Este reproductor puede reproducir discos con formato “x.v.Color”.
“x.v.Color” es una marca comercial de Sony Corporation.
“AVCHD” y el logotipo de AVCHD son marcas comerciales de Matsushita Electronic Industrial
Co., Ltd. y Sony Corporation.
Es posible que algunos discos con formato AVCHD no se reproduzcan, dependiendo de la condición de
grabación.
Los discos con formato AVCHD no tienen que finalizarse.
“x.v.Color” ofrece una gama de colores más amplia que los discos DVD normales para videocámara.
Algunos discos con formato DivX, MKV y MP4 no se pueden reproducir, dependiendo de la resolución de
vídeo y de la configuración de la velocidad de fotogramas.
❖
•
❖
•
•
•
•
•
•
•
•
•
•
❖
•
•
❖
•
•
•
•
•
•
•
M
01783M-BD-P1600-XBG-ES-NEW.indb 14 2009-07-22 오전 11:26:45

Español _15
● INTRODUCCIÓN
ALMACENAMIENTO Y MANE JO DE DISCOS
Manejo de discos
Forma del disco
Utilice discos con formas regulares. Si se utiliza un disco irregular (un
disco con una forma especial), puede causar daños a este Reproductor
de discos Blu-ray.
Sujeción de discos
Evite tocar la superficie del disco en la que se va a realizar la grabación.
Discos Blu-ray
Si no se utiliza el reproductor durante un tiempo prolongado, retire el disco Blu-ray de la unidad y
guárdelo en su caja.
Tenga cuidado de no dejar huellas ni arañazos en la superficie del disco Blu-ray.
DVD-RW y DVD-R
Límpielos con un limpiador de discos PD opcional (LF-K200DCA1 si está disponible).
No utilice limpiadores ni paños para CD para limpiar discos DVD-RW/-R.
DVD-Video, Audio-CD
Elimine con un paño suave la suciedad o la contaminación existente en el disco.
Precauciones sobre el manejo de discos
No escriba en el lado impreso con bolígrafo ni lápiz.
No utilice pulverizadores de limpieza ni antiestáticos. Tampoco utilice productos
químicos volátiles, como benceno o disolvente.
No coloque etiquetas ni pegatinas en los discos. (No utilice discos que tengan
cinta adhesiva expuesta o restos de pegatinas.)
No utilice protectores ni tapas antiarañazos.
No utilice discos impresos con impresoras de etiquetas existentes en el mercado.
No cargue discos deformados ni agrietados.
Almacenamiento de discos
Tenga cuidado de no dañar el disco, ya que los datos de estos discos son enormemente vulnerables
al entorno.
No los exponga a la luz directa del sol.
Guárdelos en un área ventilada fresca.
Guárdelos verticalmente.
Guárdelos en su funda de protección.
Si mueve de forma repentina el Reproductor de discos Blu-ray de un lugar frío a un lugar cálido, es
posible que genere condensación en sus componentes y en la óptica y provoque una reproducción
anormal del disco. En este caso, espere dos horas antes de conectar el enchufe a la toma de
corriente eléctrica. A continuación, inserte el disco e intente reproducirlo de nuevo.
❖
•
❖
•
❖
•
•
❖
•
❖
•
❖
•
•
•
•
•
•
•
•
•
•
•
01783M-BD-P1600-XBG-ES-NEW.indb 15 2009-07-22 오전 11:26:46

16_ descripción
descripción
PANEL FRONTAL
BANDEJA DE DISCO Se abre para introducir un disco.
PANTALLA Muestra el estado de la reproducción, hora, etc.
SENSOR DE L MANDO A
DIST ANCI A
Detecta señales del mando a distancia.
BOTÓN ABRIR/CERRAR Abre y cierra la bandeja del disco.
BOTÓN REPRODUCIR/
PAUSA
Reproduce un disco o detiene temporalmente la reproducción.
BOTÓN ENC./APAG. Enciende y apaga el Reproductor de discos Blu-ray.
BOTÓN PARAR Detiene la reproducción.
BOTONES BUSCAR/SALTAR Va al título, capítulo o pista siguiente o anterior.
USB HOST
Una tarjeta de memoria flash USB se puede conectar aquí y se puede utilizar como
almacenamiento al conectarse a BD-LIVE. También se puede utilizar para
actualizaciones de firmware y reproducción de MP3/JPEG/DivX/MKV/MP4.
Debe utilizar USB HOST en el panel posterior del Reproductor de discos Blu-ray para conectar a un
Adaptador LAN inalámbrico.
No puede utilizar simultáneamente las tarjetas de memoria flash USB en los puertos USB frontal y trasero.
Un dispositivo de DD USB no se puede utilizar para almacenamiento de datos de BD (BD-LIVE).
M
01783M-BD-P1600-XBG-ES-NEW.indb 16 2009-07-22 오전 11:26:48

Español _17
● DESCRIPCIÓN
VISOR DEL PANEL FRONTAL
INDICADOR DE DISCO
INSERTADO
Se ilumina cuando hay un disco en la bandeja.
INDICADORES DE TIPO DE
DISCO.
Se ilumina para indicar el tipo de disco que hay en la bandeja.
INDICADOR USB Se ilumina para indicar cuando USB está conectado.
INDICADOR HDMI Se ilumina para indicar cuando HDMI está conectado.
INDICADOR HD Indica que la salida de visualización es HD (Alta definición).
INDICADOR DE 24F Indica que el modo actual es 24Fs (24 fotogramas por segundo).
INDICADOR DE ESTADO Indicador de tiempo de reproducción y estado actual.
01783M-BD-P1600-XBG-ES-NEW.indb 17 2009-07-22 오전 11:26:48

18_ descripción
descripción
PANEL POSTERIOR
USB HOST
Una tarjeta de memoria flash USB se puede conectar aquí y se puede utilizar como
almacenamiento al conectarse a BD-LIVE. También se puede utilizar para
actualizaciones de firmware y reproducción de MP3/JPEG/DivX/MKV/MP4, así
como para conectar a BD-LIVE con un adaptador de LAN inalámbrica.
LAN
Se puede utilizar para conexión a BD-LIVE y YouTube.
También se puede utilizar para actualizaciones de firmware.
COMPONENT
VIDEO OUT
Se conecta a un equipo que tenga una entrada de video Componente.
DIGITAL AUDIO OUT
(OPTICAL )
Se conecta a un receptor.
HDMI OUT
Utilizando un cable HDMI, conecte este terminal de salida HDMI al terminal de
entrada HDMI del televisor para obtener la mejor calidad de imagen y al receptor
para obtener la mejor calidad de sonido.
VIDEO OUT Conecta la entrada del equipo externo utilizando un cable de video.
AUDIO OUT Se conecta a la entrada de audio del equipo externo con cables de audio.
Las actualizaciones de software que utilizan el terminal USB Host deben realizarse sólo con una tarjeta de
memoria flash USB.
Es posible que las unidades USB sobredimensionadas no se puedan insertar cuando esté conectado un
cable de LAN o HDMI.
Un dispositivo USB que consume más de 500mA requiere un dispositivo de alimentación independiente para
que funcione con normalidad.
Un dispositivo de DD USB no se puede utilizar para almacenamiento de datos de BD (BD-LIVE).
M
Ventilador
El ventilador siempre se pone en funcionamiento
al encender el aparato. Debe asegurarse de que
tiene un espacio libre mínimo de 4 inches.
alrededor del ventilador al instalar el producto.
01783M-BD-P1600-XBG-ES-NEW.indb 18 2009-07-22 오전 11:26:50

Español _19
● MANDO A DISTANCIA
mando a distancia
GUÍA DEL MANDO A DISTANCIA
Instalación de las pilas en el mando a distancia
1. Levante la tapa situada en la parte posterior
del mando a distancia como se muestra..
2. Instale dos pilas de tamaño AAA.
Asegúrese de respetar los extremos “+” y "–"
de las pilas que se indican en el diagrama del
interior del compartimento.
3. Vuelva a colocar la tapa.
Si suponemos que el uso del televisor es el típico,
las pilas duran aproximadamente un año.
A-B
0
1 2 3
7 8 9
4 5 6
RE
TURN
POWER
OPEN/CLOSE
AUDIO SUBTITLE REPEAT REPEAT
CANCEL
TV SOURCE
STOP PLAY
BONUSVIEW PAUSE
TV MUTE
ENTER
POPUP MENUDISC MENU
TITLE MENU
A B C D
MENU
EXIT
INFO
TV VOL TV CH
TV
POWER
AK59-00104K
Botón OPEN/CLOSE
Se presiona para abrir o cerrar la bandeja de discos.
Botón POWER
Botón SUBTITLE
Se presiona para cambiar el idioma de los subtítulos
del Discos Blu-ray/DVD.
Botón AUDIO
Este botón se utiliza para acceder a diversas
funciones de audio en un disco (Discos Blu-ray/DVD).
Botones numéricos
Botón CANCEL
Botón BONUSVIEW
Se utiliza para activar o desactivar BONUSVIEW en
discos Blu-ray que lo admitan.
Botones SALTO ATRÁS/ADELANTE
Se presiona para saltar hacia adelante o hacia atrás.
Botón STOP
Se presiona para detener un disco.
Botones BUSCAR ATRÁS/ADELANTE
Se presiona para buscar adelante o atrás en un disco.
Botón TV VOL
Ajuste del volumen del TV.
Botón TV MUTE
Silencia los parlantes del TV.
Botón MENU
Abre el menú de configuración del Reproductor de
discos Blu-ray.
Botón INFO
Muestra la configuración actual o el estado del disco.
Botón DISC MENU
Este botón se utiliza para entrar en- el menú del
disco.
Botón TV POWER
Botón REPEAT
Permite repetir un título, un capítulo, una pista o un disco.
Botón REPEAT A-B
Permite repetir la reproducción de una sección
concreta.
Botón TV SOURCE
Tras la configuración, es posible establecer la fuente
de entrada en su televisor.
Botón PAUSE
Se presiona para detener temporalmente un disco.
Botón PLAY
Se presiona para reproducir el disco.
Botón TV CH
Se utiliza para seleccionar un programa de TV.
Botón RETURN
Botones ENTER/DIRECCIÓN
Botón EXIT
Botones COLOR: ROJO (A), VERDE (B),
AMARILLO (C), AZUL (D)
Se utiliza para acceder a funciones especiales en
discos BD-J (que dependen del disco).
Botón POPUP MENU/TITLE MENU
Se utiliza para entrar en el menú emergente / menú
de títulos.
01783M-BD-P1600-XBG-ES-NEW.indb 19 2009-07-22 오전 11:26:52

20_ mando a distancia
mando a distancia
AJUSTE DEL MANDO A DISTANCIA
Con este mando a distancia puede controlar algunas funciones de TV.
Los botones de funciones controlables son : botón TV POWER, TV CH
,
/
.
, TV VOL +/–, TV
MUTE, TV SOURCE.
Para determinar si el televisor es compatible, siga las instrucciones que se incluyen a continuación.
Encienda el televisor.
Apunte con el mando a distancia hacia el televisor.
Mantenga presionado el botón TV POWER e introduzca el código de dos cifras correspondiente a
la marca del televisor presionando los botones numéricos apropiados.
(Consulte la página siguiente para ver la lista de códigos.)
Si el televisor es compatible con el mando a distancia, se apagará.
Ahora está programado para que funcione con el mando a distancia.
Si se han indicado varios códigos para la marca del televisor, pruébelos uno tras otro hasta encontrar el que
funciona.
Si cambia las pilas del mando a distancia, debe defi nir de nuevo el código de marca.
A continuación, puede controlar el televisor utilizando los siguientes botones después del botón TV.
Botón Función
TV POWER Para encender y apagar el televisor.
TV SOURCE Para seleccionar una fuente externa.
TV VOL (+/–) Para ajustar el volumen del televisor.
TV CH (,/.) Para seleccionar el canal deseado.
TV MUTE Para activar o desactivar el sonido.
Las diversas funciones no estarán operativas necesariamente en todos los televisores. Si se encuentra con
problemas, opere directamente en el televisor.
INFORMACIÓN SOBRE LA BATERÍA
Si el mando a distancia no funciona adecuadamente:
Compruebe la polaridad +/– de las pilas. (pila seca)
Compruebe si las pilas se han agotado.
Compruebe si el sensor del mando a distancia está obstruido por algún tipo de obstáculo.
Compruebe si hay una luz fl uorescente cerca.
Deshágase de las pilas de acuerdo con la normativa
medioambiental vigente. No las tire a la basura.
1.
2.
3.
M
M
•
•
•
•
01783M-BD-P1600-XBG-ES-NEW.indb 20 2009-07-22 오전 11:26:52

Español _21
● MANDO A DISTANCIA
CÓDIGOS DE TV CONTROLABLES
Marca Código
SAMSUNG TV POWER+01, +02, +03, +04, +05, +06, +07, +08, +09
AIWA TV POWER+82
ANAM TV POWER+10, +11, +12, +13, +14, +15, +16, +17, +18
BANG & OLUFSEN TV POWER+57
BLAUPUNKT TV POWER+71
BRANDT TV POWER+73
BRIONVEGA TV POWER+57
CGE TV POWER+52
CONTINENTAL EDISON TV POWER+75
DAEWOO TV POWER+19, +20, +23, +24, +25, +26, +27, +28, +29, +30, +31, +32, +33, +34
EMERSON TV POWER+64
FERGUSON TV POWER+73
FINLUX TV POWER+06, +49, +57
FORMENTI TV POWER+57
FUJITSU TV POWER+84
GRADIENTE TV POWER+70
GRUNDIG TV POWER+49, +52, +71
HITACHI TV POWER+60, +72, +73, +75
IMPERIAL TV POWER+52
JVC TV POWER+61, +79
LG TV POWER+06, +19, +20, +21, +22, +78
LOEWE TV POWER+06, +69
LOEWE OPTA TV POWER+06, +57
MAGNAVOX TV POWER+40
METZ TV POWER+57
MITSUBISHI TV POWER+06, +48, +62, +65
MIVAR TV POWER+52, +77
NEC TV POWER+83
NEWSAN TV POWER+68
NOBLEX TV POWER+66
NOKIA TV POWER+74
NORDMENDE TV POWER+72, +73, +75
PANASONIC TV POWER+53, +54, +74, +75
PHILIPS TV POWER+06, +55, +56, +57
PHONOLA TV POWER+06, +56, +57
PIONEER TV POWER+58, +59, +73, +74
RADIOLA TV POWER+06, +56
RADIOMARELLI TV POWER+57
RCA TV POWER+45, +46
REX TV POWER+74
SABA TV POWER+57, +72, +73, +74, +75
SALORA TV POWER+74
SANYO TV POWER+41, +42, +43, +44, +48
SCHNEIDER TV POWER+06
SELECO TV POWER+74
SHARP TV POWER+36, +37, +38, +39, +48
SIEMENS TV POWER+71
SINGER TV POWER+57
SINUDYNE TV POWER+57
SONY TV POWER+35, +48
TELEAVA TV POWER+73
TELEFUNKEN TV POWER+67, +73, +75, +76
THOMSON TV POWER+72, +73, +75
THOMSON ASIA TV POWER+80, +81
TOSHIBA TV POWER+47, +48, +49, +50, +51, +52
WEGA TV POWER+57
YOKO TV POWER+06
ZENITH TV POWER+63
01783M-BD-P1600-XBG-ES-NEW.indb 21 2009-07-22 오전 11:26:53

22_ conexiones
conexiones
Esta sección aborda diversos métodos de conexión del Reproductor de discos
Blu-ray a otros componentes externos.
CONEXIÓN A UN TV CON CABLE HDMI
- LA MEJOR CALIDAD (RECOMENDADA)
Con un cable de HDMI, conecte el terminal HDMI OUT de la parte trasera del Reproductor de discos Blu-ray
al terminal HDMI IN del TV.
Presione el selector de entrada en el mando a distancia del TV hasta que aparezca la señal de HDMI del
Reproductor de discos Blu-ray.
Si ha configurado el mando a distancia de forma apropiada para controlar el TV (consulte las páginas
20~21), presione el botón TV SOURCE del mando a distancia y seleccione HDMI como la fuente externa del
televisor.
Si el Reproductor de discos Blu-ray está conectado al televisor en el modo de salida HDMI 1080p, debe
utilizar el cable HDMI de alta velocidad (categoría 2)
Si se conecta o se retira el cable HDMI durante la reproducción de un archivo CD-DA, el reproductor dejará
de reproducir.
1.
2.
•
M
Cable de HDMI
01783M-BD-P1600-XBG-ES-NEW.indb 22 2009-07-22 오전 11:26:54

Español _23
● CONEXIONES
FUNCIÓN DE DETECCIÓN AUTOMÁTICA DE HDMI
La salida de video del reproductor cambia automáticamente al modo HDMI al conectar un cable HDMI
con la unidad encendida (consulte la página 43).
Dependiendo del TV, es posible que no funcionen algunas resoluciones de salida de HDMI.
Consulte el manual del usuario del TV.
Si está conectado un cable HDMI desde el reproductor a un televisor, la salida del Reproductor de discos
Blu-ray se define automáticamente en resolución de salida HDMI transcurridos unos 10 segundos.
Si están conectados Componente y HDMI, el modo HDMI se selecciona automáticamente.
(Consulte la página 43.)
Cuando conecte por primera vez el reproductor al televisor con el cable HDMI o a un nuevo televisor, la
resolución de salida HDMI se definirá automáticamente a la más alta que admita el televisor.
Si conecta un TV Samsung al reproductor de discos Blu-ray utilizando un cable HDMI, el reproductor puede
utilizarse fácilmente con el mando a distancia del TV. (Sólo disponible con televisores Samsung que admitan
la función Anynet+.)
(Consulte la página 45~46)
HDMI (Interfaz multimedia de alta definición)
HDMI es una interfaz que permite la transmisión digital de datos de video y audio con un solo
conector.
Utilizando HDMI, el Reproductor de discos Blu-ray transmite una señal de video y audio digital y
muestra una imagen viva en un TV que tenga un terminal de entrada HDMI.
Descripción de conexión de HDMI
Conector HDMI: admite datos de video y de audio digital (LPCM o Bitstream).
- HDMI genera únicamente una señal digital pura en el TV.
- Si el TV no admite HDCP (protección de contenido digital de ancho de banda alto), aparecen
interferencias en pantalla.
¿Por qué Samsung utiliza HDMI?
Los TV analógicos requieren una señal de audio/video analógica. No obstante, al reproducir un
discos Blu-ray/DVD, los datos transmitidos a un TV son digitales. Por tanto, se necesita un
conversor de digital en analógico (en el Reproductor de discos Blu-ray) o un conversor de analógico
en digital (en el TV). Durante esta conversión, la calidad de imagen se degrada debido al ruido y a la
pérdida de señal. La tecnología HDMI es superior porque no requiere ninguna conversión de D/A y
es una señal digital pura del reproductor al TV.
¿Qué es HDCP?
HDCP (protección de contenido digital de ancho de banda alto, del inglés High-bandwidth Digital
Content Protection) es un sistema de protección de contenido de discos Blu-ray/DVD que se genera
a través de HDMI que impide la realización de copias. Proporciona un enlace digital seguro entre una
fuente de video (PC, DVD. etc.) y un dispositivo de visualización (TV, proyector. etc.). El contenido se
encripta en el dispositivo de origen para evitar la creación de copias no autorizadas.
¿Qué es Anynet+?
Anynet+ es una función práctica que ofrece un funcionamiento enlazado de esta unidad a través de
los televisores Samsung que tengan la función Anynet+.
- Si el televisor Samsung tiene un logotipo
', admite la función Anynet+.
- Si enciende el reproductor e inserta un disco, el reproductor iniciará la reproducción del disco y el
televisor se encenderá automáticamente y cambiará al modo HDMI.
- Si enciende el reproductor y presiona el botón PLAY
con un disco ya insertado, el televisor se
encenderá inmediatamente y cambiará al modo HDM.
¿Qué es BD Wise?
BD Wise es la función de interconectividad más reciente de Samsung.
- Cuando conecta entre sí productos Samsung con BD-Wise a través de HDMI, se ajustará
automáticamente la resolución óptima.
M
•
•
•
•
•
•
01783M-BD-P1600-XBG-ES-NEW.indb 23 2009-07-22 오전 11:26:54

24_ conexiones
conexiones
CONEXIÓN A UN TV CON UN CABLE DVI
- LA MEJOR CALIDAD (RECOMENDADA)
Con un cable de HDMI-DVI (No se incluye), conecte el terminal HDMI OUT de la parte trasera del Reproductor
de discos Blu-ray al terminal DVI IN del TV.
Utilice los cables de audio, para conectar los terminales AUDIO (blanco y rojo) OUT situados en la parte
posterior del Reproductor de discos Blu-ray con los terminales AUDIO (blanco y rojo) IN de su televisor.
Encienda el Reproductor de discos Blu-ray y el TV.
Presione el selector de entrada en el mando a distancia del TV hasta que aparezca la señal de DVI del
Reproductor de discos Blu-ray.
Si ha confi gurado el mando a distancia de forma apropiada para controlar el TV (consulte las páginas
20~21), presione el botón TV SOURCE del mando a distancia y seleccione HDMI como la fuente externa del
televisor.
La conexión del cable de HDMI con el Reproductor de discos Blu-ray encendido, provocará que el modo de
salida de video del reproductor cambie automáticamente al modo HDMI (consulte la página 43).
Dependiendo del TV, es posible que no funcionen algunas resoluciones de salida de HDMI.
Consulte el manual del usuario del TV.
Si el cable HDMI-DVI se enchufa en el TV, la resolución de salida del Reproductor de discos Blu-ray se defi ne
automáticamente en HDMI transcurridos unos 10 segundos.
Si están conectados Componente y HDMI, el modo HDMI se selecciona automáticamente.
(Consulte la página 43.)
Cuando conecte por primera vez el reproductor al televisor con el cable HDMI o a un nuevo televisor, la
resolución de salida HDMI se defi nirá automáticamente a la más alta que admita el televisor.
Si se conecta o se retira el cable HDMI durante la reproducción de un archivo CD-DA, el reproductor dejará
de reproducir.
1.
2.
3.
•
M
BlancoRojo
Cable de HDMI-DVI
(no se incluye)
Cable de audio
01783M-BD-P1600-XBG-ES-NEW.indb 24 2009-07-22 오전 11:26:56

Español _25
● CONEXIONES
CONEXIÓN A UN TV (COMPONENTE) - MEJOR CALIDAD
- Conexión al TV utilizando los cables de video componente.
- Disfrutará de imágenes de gran calidad con reproducción en color precisa. El video componente separa el
elemento de la imagen en señales en blanco y negro (Y), azul (PB), rojo (PR) para presentar imágenes claras y
nítidas. (Las señales de audio se transmiten a través de la salida para audio.)
Utilice cables de video-componente (No se incluye), para conectar los terminas COMPONENT VIDEO OUT situados
en la parte posterior del Reproductor de discos Blu-ray con los terminales COMPONENT IN de su televisor.
Utilice los cables de audio (No se incluye), para conectar los terminales AUDIO (blanco y rojo) OUT situados
en la parte posterior del Reproductor de discos Blu-ray con los terminales AUDIO (blanco y rojo) IN de su
televisor. Encienda el Reproductor de discos Blu-ray y el TV.
Presione el selector de entrada en el mando a distancia del TV hasta que aparezca la señal de componente del
Reproductor de discos Blu-ray.
Si ha confi gurado el mando a distancia de forma apropiada para controlar el TV (páginas 20~21), presione el
botón TV SOURCE del mando a distancia y seleccione COMPONENT como la fuente externa del TV.
Dependiendo del fabricante, los terminales de componentes del TV puede estar marcada como “R-Y, B-Y, Y”
o “Cr, Cb, Y” en vez de “PB, PR, Y”. El número y posición de los terminales puede variar dependiendo del tipo
de televisor. Consulte el manual del usuario del TV.
Puede seleccionar entre una serie de ajustes de resolución para discos Blu-ray como 1080i, 720p,
576p/480p y 576i/480i, dependiendo del tipo de disco. (Consulte la página 43.)
La resolución real puede diferir de los ajustes del menú Confi g. si están conectados los cables Componente
y HDMI. La resolución también puede ser diferente dependiendo del disco. (Consulte la página 43.)
En la reproducción de DVD, si las tomas HDMI y Componente están conectadas y selecciona el modo
Componente 1080p, 1080i o 720p, el menú Opciones pantalla mostrará la resolución de salida como
1080p, 1080i o 720p.
La resolución es realmente 576i/480i.
1.
2.
3.
•
M
Cable de audio
Cable de componentes
(no se incluye)
Blanco Rojo Azul Verde
(Audio)Rojo
01783M-BD-P1600-XBG-ES-NEW.indb 25 2009-07-22 오전 11:26:58

26_ conexiones
conexiones
CONEXIÓN A UN TV (VIDEO) - BUENA CALIDAD
Con cables de video / audio, conecte los terminales de VIDEO OUT (amarillo) / AUDIO OUT (rojo y blanco) en la parte
posterior del Reproductor de discos Blu-ray a los terminales de VIDEO IN (amarillo) / AUDIO IN (rojo y blanco) del TV.
Encienda el Reproductor de discos Blu-ray y el TV.
Presione el selector de entrada en el mando a distancia del TV hasta que aparezca la señal de video del
reproductor de DVD en la pantalla del TV.
Si ha confi gurado el mando a distancia de forma apropiada para controlar el TV (consulte las páginas 20~21),
presione el botón TV SOURCE del mando a distancia y seleccione VIDEO como la fuente externa del televisor.
Si el cable de audio se coloca demasiado cerca del cable de alimentación, puede provocar ruido.
Si desea hacer una conexión a un amplifi cador, consulte la página correspondiente a la conexión de
amplifi cadores. (Consulte las páginas 27 y 29.)
El número y posición de los terminales puede variar dependiendo del equipo de TV. Consulte el manual del
usuario del TV.
Si existe un terminal de entrada de audio en el TV, conéctelo al terminal [AUDIO OUT][izquierda] (blanco) del
Reproductor de discos Blu-ray.
La fuente de VIDEO siempre genera la salida con una resolución 576i/480i independientemente de la
resolución defi nida en el menú Confi g.. (Consulte la página 43.)
1.
2.
3.
•
M
BlancoRojo Amarillo
Cable de audio/video
01783M-BD-P1600-XBG-ES-NEW.indb 26 2009-07-22 오전 11:27:00

Español _27
● CONEXIONES
CONEXIÓN A UN SISTEMA DE AUDIO
(AMPLIFICADOR QUE ADMITA HDMI)
- LA MEJOR CALIDAD (RECOMENDADA)
Con un cable de HDMI, conecte el terminal HDMI OUT de la parte trasera del Reproductor de discos Blu-ray
al terminal HDMI IN del Amplificador.
Con un cable de HDMI, conecte el terminal HDMI OUT del Amplificador al terminal HDMI IN del TV.
Encienda el Reproductor de discos Blu-ray, el TV y el amplificador.
Presione el botón de selección de entrada del amplificador para seleccionar la entrada externa para escuchar
el sonido del Reproductor de discos Blu-ray. Consulte el Manual de usuario de su amplificador para configurar
la entrada de audio del amplificador.
Procure bajar el volumen cuando encienda el amplificador. El sonido fuerte y repentino puede dañar los
parlantes y los oídos.
Ajuste el audio en la pantalla de menú correspondiente al amplificador. (Consulte las páginas 38 y 40.)
La posición de los terminales HDMI puede variar dependiendo del amplificador.
1.
2.
3.
4.
M
Cable de HDMI
Cable de HDMI
01783M-BD-P1600-XBG-ES-NEW.indb 27 2009-07-22 오전 11:27:02

28_ conexiones
conexiones
CONEXIÓN A UN SISTEMA DE AUDIO
(DOLBY DIGITAL, AMPLIFICADOR DTS) - MEJOR CALIDAD
Utilización del cable óptico (no incluido), conecte el terminal DIGITAL AUDIO OUT (OPTICAL) situado en la parte
posterior del Reproductor de discos Blu-ray con el terminal DIGITAL AUDIO IN (OPTICAL) del amplificador.
Utilizando los cables de señales de video, conecte los terminales HDMI, COMPONENT o VIDEO OUT de la
parte trasera del Reproductor de discos Blu-ray al terminal HDMI, COMPONENT o VIDEO IN del TV.
(Consulte las páginas de la 22 a la 26.)
Encienda el Reproductor de discos Blu-ray, el TV y el amplificador.
Presione el botón de selección de entrada del amplificador para seleccionar la entrada externa para escuchar
el sonido del Reproductor de discos Blu-ray. Consulte el manual de usuario de su amplificador para configurar
la entrada de audio del amplificador.
Procure bajar el volumen cuando encienda el amplificador. El sonido fuerte y repentino puede dañar los
parlantes y los oídos.
Ajuste el audio en la pantalla de menú correspondiente al amplificador. (Consulte las páginas 38 y 40.)
La posición de los terminales puede variar dependiendo del amplificador. Consulte el manual del usuario del
amplificador.
Al utilizar esta conexión, los discos Blu-ray con una banda sonora LPCM sólo se oirán en los 2 canales
frontales.
1.
2.
3.
4.
M
Cable óptico
(no se incluye)
01783M-BD-P1600-XBG-ES-NEW.indb 28 2009-07-22 오전 11:27:03

Español _29
● CONEXIONES
CONEXIÓN A UN SISTEMA DE AUDIO (AMPLIFICADOR DE 2 CANALES)
- BUENA CALIDAD
Utilice los cables de audio, para conectar los terminales AUDIO (blanco y rojo) OUT situados en la parte
posterior del Reproductor de discos Blu-ray con los terminales AUDIO (blanco y rojo) IN del amplifi cador.
Utilizando los cables de señales de video, conecte los terminales HDMI, COMPONENT o VIDEO OUT de la
parte trasera del Reproductor de discos Blu-ray al terminal HDMI, COMPONENT o VIDEO IN del TV.
(Consulte las páginas de la 22 a la 26.)
Encienda el Reproductor de discos Blu-ray, el TV y el amplifi cador.
Presione el botón de selección de entrada del amplifi cador para seleccionar la entrada externa para escuchar
el sonido del Reproductor de discos Blu-ray. Consulte el manual de usuario de su amplifi cador para confi gurar
la entrada de audio del amplifi cador.
Fabricado con licencia de Dolby Laboratories. “Dolby” y el símbolo de D doble son marcas comerciales de
Dolby Laboratories.
Fabricado bajo licencia bajo números de patente de EE.UU.: 5,451,942; 5,956,674; 5,974,380; 5,978,762;
6,226,616; 6,487,535; 7,212,872; 7,333,929; 7,392,195; 7,272,567 y otras patentes pendientes en
EE.UU. y otros países. DTS es una marca comercial registrada y los logotipos de Symbol, DTS-HD y DTS-HD
Master Audio son marcas comerciales de DTS, Inc. © 1996-2008 DTS, Inc. Todos los derechos reservados.
1.
2.
3.
4.
M
BlancoRojo
Cable de audio
Amplifi cador
estéreo de 2 canales
01783M-BD-P1600-XBG-ES-NEW.indb 29 2009-07-22 오전 11:27:05

30_ conexiones
conexiones
CONEXIÓN A LA RED
Para acceder al servicio de red o actualizar el firmware actual, debe realizar una de las conexiones.
Al conectar a una red, puede acceder a BD-LIVE. servicios de YouTube y a las actualizaciones de software desde
el servidor de actualizaciones de Samsung. Recomendamos la utilización de un AP o un enrutador para la red.
Red de cable
Con un cable de LAN directo (Cable UTP, no incluido), conecte el terminal LAN del Reproductor de
discos Blu-ray al terminal LAN del módem.
Defina las opciones de red después de conectar el cable LAN. (Consulte las páginas 50 y 51.)
No se permite el acceso a Internet al servidor de actualización de Samsung, dependiendo del enrutador que
utilice o la política del proveedor de servicios de Internet.
Para obtener información adicional, póngase en contacto con el proveedor de servicios de Internet.
Para usuarios de DSL, utilice el enrutador para realizar una conexión de red.
1.
M
A puerto LAN
Servicio de
banda ancha
Módem de banda ancha
(con enrutador integrado)
Enrutador
Conexión utilizando un enrutador
(p. ej.: DSL)
Módem de banda ancha
A puerto LANA puerto LAN
Servicio de
banda ancha
O
01783M-BD-P1600-XBG-ES-NEW.indb 30 2009-07-22 오전 11:27:06

Español _31
● CONEXIONES
Red inalámbrica
Puede conectar a una red con un compartidor de IP inalámbrico.
Se necesita un enrutador AP/IP inalámbrico para realizar una conexión de red inalámbrica.
Conecte el adaptador de LAN inalámbrica al puerto USB del panel posterior del Reproductor de
discos Blu-ray y defi na las opciones de red inalámbrica. (Consulte las páginas de la 51 a la 53.)
Esta unidad es compatible sólo con el Adaptador LAN inalámbrico Samsung. (no se incluye)
(Nombre de modelo: WIS09ABGN).
- El Adaptador LAN inalámbrico Samsung se vende por separado.
-
Póngase en contacto con el representante o centro de servicio técnico de Samsung Electronics para su compra.
Debe utilizar el compartidor de IP inalámbrico que admite IEEE 802.11 a/b/g/n. (n se recomienda para el
funcionamiento estable de la red inalámbrica.)
LAN inalámbrica, por su naturaleza, puede causar interferencias, dependiendo de la condición de uso
(rendimiento AP, distancia, obstáculo, interferencia por otros dispositivos de radio, etc.).
Defi na el compartidor de IP inalámbrico en modo de Infraestructura. No se admite el modo Ad-hoc.
Al aplicar la clave de seguridad para AP (compartidor de IP inalámbrico), sólo se admite lo siguiente.
Modo de autentifi cación: WEP, WPAPSK, WPA2PSK
Tipo de encriptación: WEP, TKIP, AES
1.
M
1)
2)
Puerto de módem
Compartidor de IP
inalámbrico
Cable de módem
Adaptador LAN
inalámbrica
(no se incluye)
01783M-BD-P1600-XBG-ES-NEW.indb 31 2009-07-22 오전 11:27:10

32_ funciones básicas
funciones básicas del
reproductor de discos blu-ray
En esta sección se presentan las funciones básicas de reproducción y la
reproducción por tipo de disco.
ANTES DE REPRODUCIR
Encienda el televisor y defi na la entrada de video correcta (la entrada a la que está conectado el reproductor
Blu-ray).
Si conectó el sistema de audio externo, enciéndalo y ajústelo en el canal de entrada de audio adecuado.
Después de encender el reproductor, cuando presione el botón POWER por primera vez, aparecerá la
siguiente pantalla:
Si desea seleccionar un idioma, presione los botones
NUMÉRICOS. (Esta imagen sólo aparece la primera vez
que encienda el reproductor.) Si no se defi ne el idioma de la
pantalla de inicio, es posible que los ajustes cambien
siempre al encender o apagar. Por tanto, asegúrese de
seleccionar el idioma que desee utilizar. Una vez que
seleccione un idioma de menús, puede cambiarlo
presionando el SALTAR (]) botón en el panel frontal de la
unidad durante más de 5 segundos sin que haya ningún
disco en la unidad. A continuación, aparece de nuevo la
ventana MENU LANGUAGE SELECTION, en la cual puede restablecer el idioma que prefi era.
Cuando conecte el Reproductor de discos Blu-ray y el TV Samsung con función Anynet+ (HDMI-CEC)
utilizando el cable HDMI, es posible que desaparezca rápidamente la ventana MENU LANGUAGE
SELECTION. Para seleccionar el idioma, deshabilite la función Anynet+ (HDMI-CEC) en el TV.
Discos que pueden reproducirse en este reproductor (para los siguientes discos, la posibilidad de reproducir
puede depender de las condiciones de grabación.)
• BD-ROM • BD-RE • BD-R
• DVD-R • DVD-RW (Modo V) • CD-RW/CD-R • DivX
• MKV • MP4
• Es posible que la unidad no reproduzca algunos CD-RW/CD-R y DVD-R debido al tipo de disco o a las
condiciones de grabación.
Discos que no se pueden reproducir en este reproductor:
• HD DVD • DVD+RW/+R • DVD-RAM
• DVD-RW(modo VR) • Disco DVD-R de 3,9 GB de diseño personalizado.
• DVD-ROM/PD/Disco MV, etc. •
CVD/CD-ROM/CDV/CD-G/CD-I/LD (Para CDG sólo reproduce audio, no gráfi cos.)
• Super Audio CD (excepto capa CD)
El disco Blu-ray es un nuevo formato en continua evolución. Por consiguiente, existe la posibilidad de
encontrar problemas de compatibilidad con discos de formato nuevo y existente. No todos los discos son
compatibles no todos los discos se reproducirán. Para obtener información adicional, consulte también las
secciones Tipo de disco y características y Aviso de conformidad y compatibilidad de este Manual.
Si encuentra problemas de compatibilidad, póngase en contacto con el servicio de atención al cliente de
SAMSUNG.
•
•
M
ventana MENU LANGUAGE SELECTION, en la cual puede restablecer el idioma que prefi era.
MENU LANGUAGE SELECTION
Press 1 for English
Pulsar 2 para Español
Prima 3 para Português
Macrovision : BBSXXX
01783M-BD-P1600-XBG-ES-NEW.indb 32 2009-07-22 오전 11:27:10

Español _33
● FUNCIONES BÁSICAS
DESPLAZAMIENTO POR EL MENÚ EN PANTALLA
La GUI (interfaz gráfica de usuario) de este manual puede diferir, dependiendo de la versión del firmware.
REPRODUCCIÓN DE DISCOS
Presione el botón OPEN/CLOSE.
Coloque un disco suavemente en la bandeja, con la etiqueta del disco hacia arriba.
Presione el botón PLAY o el botón OPEN/CLOSE para cerrar la bandeja.
Cuando detenga la reproducción del disco, el reproductor recordará la posición en la que se detuvo, al volver
a presionar el botón PLAY se reanudará la reproducción desde la última posición. Esta función se denomina
"Reanudar".
En algunos discos BD (BD-J), puede prohibirse esta función.
Presione dos veces el botón STOP durante la reproducción para desactivar la función de reanudación (Resume).
Para interrumpir temporalmente la reproducción, presione el botón PAUSE durante la reproducción.
Para reanudar, presione otra vez el botón PLAY.
Si se deja el reproductor en modo de parada (Stop) durante más de 5 minutos sin interacción por parte del
usuario, se activa un protector de pantalla en el TV. Si el reproductor se deja en el modo de protector de
pantalla durante más de 15 minutos, la unidad se apagará automáticamente excepto durante la
reproducción de CD-DA. (Función de apagado automático)
Si no se presiona ningún botón en la unidad o en el mando a distancia durante más de 5 minutos cuando la
unidad está en modo de Pausa, la función se detendrá (excepto en algunos discos Blu-ray).
❖
1.
2.
3.
M
Audio
Subtítulos
Subtítulo archivo video
Menu del disco
Menú
Formato TV
Fotogr. Película (24 Fs)
Resolución
Modo progresivo
Modo de imágenes fijas
Mensaje Pantalla
Panel frontal
Selección de red
Red de cable
Red inalámbrica
Proxy
Servidor NTP
Prueba de conexión de red
Conexión a Internet BD-LIVE
Vídeo
Música
Foto
Config.
Sistema
Idioma
Audio
Pantalla
HDMI
Red
Control Paterno
Información sistema
Zona hor.
Ajuste de reloj
Encender / apagar sonido
Sonido de pulsación de teclas
Gestión de datos de BD
DivX(R) Registro
DivX(R) Desactivación
Actualizac. sistema
Salida Digital
Submuestreo PCM
Compresión Dinámica.
Modo Downmixing
Anynet+ (HDMI-CEC)
Formato HDMI
BD Wise
Bloqueo primario
Nivel Cal.
Creación de contraseña
e-Contents
YouTube
01783M-BD-P1600-XBG-ES-NEW.indb 33 2009-07-22 오전 11:27:11

34_ funciones básicas
funciones básicas del
reproductor de discos blu-ray
AJUSTE DEL SONIDO
Ajuste del Sonido de Melodía de Encendido/apagado
Se puede defi nir que se oiga un sonido de melodía cada vez que se encienda o se apague el reproductor.
Con la unidad en modo de parada, presione el botón MENU.
Presione los botones
$%
hasta seleccionar Confi g. y
presione el botón ENTER o
+
.
Presione los botones
$%
hasta seleccionar Sistema y
presione el botón ENTER o
+
.
Presione los botones
$%
hasta seleccionar Encender /
apagar sonido y presione el botón ENTER o
+
.
Presione los botones
$%
hasta seleccionar Sí u No y
presione el botón ENTER o
+
.
Presione el botón MENU para salir del menú de confi guración.
Activación / desactivación del sonido de pulsación de tecla
Puede defi nir el reproductor de forma que emita un sonido cada vez que se presiona un botón del panel frontal de la unidad.
Para confi gurarlo, siga los pasos del 1 al 3 anteriores.
Presione los botones
$%
hasta seleccionar Sonido de
pulsación de teclas y presione el botón ENTER o
+
.
Presione los botones
$%
hasta seleccionar Sí u No y
presione el botón ENTER o
+
.
Presione el botón MENU para salir del menú de
confi guración.
FUNCIONES DE BÚSQUEDA Y SALTO DE CAPÍTULO O PISTA
Durante la reproducción, puede buscar rápidamente a través de un capítulo o pista o utilizar la función de salto
para pasar a la siguiente selección.
Búsqueda en un capítulo o pista hgfZCV
Presione el botón BUSCAR (
) durante la reproducción.
Cada vez que presione el botón BUSCAR (
), la velocidad de grabación cambiará de la siguiente forma.
BD-ROM, BD-RE, BD-R, DVD-VIDEO,
DVD-RW, DVD-R
)
X 2
)
X 4
)
X 8
)
X 16
)
X 32
)
X 128
(
X 2
(
X 4
(
X 8
(
X 16
(
X 32
(
X 128
DivX, MKV, MP4
)
X 2
)
X 4
)
X 8
Puede rastrear el programa en orden inverso.
Para volver a la reproducción a velocidad normal, presione el botón PLAY.
No se oye nada durante el modo de búsqueda.
1.
2.
3.
4.
5.
6.
4.
5.
6.
~
•
M
Se puede defi nir que se oiga un sonido de melodía cada vez que se encienda o se apague el reproductor.
Se puede defi nir que se oiga un sonido de melodía cada vez que se encienda o se apague el reproductor.
Se puede defi nir que se oiga un sonido de melodía cada vez que se encienda o se apague el reproductor.
Se puede defi nir que se oiga un sonido de melodía cada vez que se encienda o se apague el reproductor.
Se puede defi nir que se oiga un sonido de melodía cada vez que se encienda o se apague el reproductor.
No disc
Sistema
◄
Idioma
Audio
Pantalla
HDMI
Red
Control Paterno
Información sistema
Zona hor.
Ajuste de reloj
Encender / apagar sonido : PCM
►
Sonido de pulsación de teclas
: On
Gestión de datos de BD
DivX(R) Registro
DivX(R) Desactivación
Actualizac. sistema
✓
Sí
No
Música
Foto
Config.
FUNCIONES DE BÚSQUEDA Y SALTO DE CAPÍTULO O PISTA
FUNCIONES DE BÚSQUEDA Y SALTO DE CAPÍTULO O PISTA
No disc
Sistema
◄
Idioma
Audio
Pantalla
HDMI
Red
Control Paterno
Zona hor.
Ajuste de reloj
Encender / apagar sonido : Sí
Sonido de pulsación de teclas
: PCM
►
Gestión de datos de BD
DivX(R) Registro
DivX(R) Desactivación
Actualizac. sistema
✓
Sí
No
Música
Foto
Config.
01783M-BD-P1600-XBG-ES-NEW.indb 34 2009-07-22 오전 11:27:15

Español _35
● FUNCIONES BÁSICAS
Salto de pistas hgfZCV
Presione el botón SALTAR ( ) durante la reproducción.
Cuando se reproduce un Discos Blu-ray/DVD y se presiona el botón SALTAR ( ) se salta al capítulo
siguiente. Si presiona el botón SALTAR ( ), se vuelve al principio del capítulo. Otra pulsación
provocará que se vaya al principio del capítulo anterior.
REPRODUCCIÓN A CÁMARA LENTA / REPRODUCCIÓN POR
FOTOGRAMAS
Reproducción a cámara lenta hgfZCV
En modo de pausa, presione el botón BUSCAR ( ).
Si presiona el botón BUSCAR ( ) , la velocidad de reproducción se reduce a
*
1/8
*
1/4
*
1/2
Para volver a la reproducción a velocidad normal, presione el botón PLAY.
Este icono ( ) indica que se ha presionado un botón no válido.
Durante el modo de cámara lenta no se oye ningún sonido.
La reproducción a cámara lenta sólo está operativa hacia adelante.
Reproducción por fotogramas hgfZCV
En modo de pausa, presione el botón PAUSE.
Cada vez que presione el botón PAUSE, aparecerá un nuevo fotograma.
Para volver a la reproducción a velocidad normal, presione el botón PLAY.
No se oye nada durante el modo de fotograma.
La reproducción por fotogramas sólo está operativa hacia adelante.
~
•
M
•
•
M
01783M-BD-P1600-XBG-ES-NEW.indb 35 2009-07-22 오전 11:27:15

36_ confi guración del sistema
confi guración del sistema
Para mayor conveniencia, es posible confi gurar las funciones de este reproductor
para sacarle mayor rendimiento en el entorno de su hogar.
AJUSTE DEL RELOJ
Selección de la zona horaria
Con la unidad en modo de parada, presione el botón
MENU.
Presione los botones
▲▼
hasta seleccionar Confi g. y
presione el botón ENTER o
+
.
Presione los botones
▲▼
hasta seleccionar Sistema y
presione el botón ENTER o
+
.
Presione los botones
▲▼
hasta seleccionar Zona hor. y
presione el botón ENTER o
+
.
Utilice el botón
_ +
para colocar el cursor el la zona
horaria apropiada para el área y presione el botón
ENTER.
Para ajustar automáticamente la hora, defi na Servidor NTP en Sí (consulte la página 54).
Ajuste del reloj
Para confi gurarla, siga los pasos del 1 al 3 anteriores.
Presione los botones
▲▼
hasta seleccionar Ajuste de
reloj y presione el botón ENTER o
+
.
Presione los botones
_ +
para ir a “d.” (día), “h.” (hora),
“min.”(minuto). Ajuste la fecha y hora presionando los
botones
▲▼
y presione el botón ENTER.
1.
2.
3.
4.
5.
M
4.
5.
No disc
No disc
No disc
No disc
No disc
Sistema
◄
Idioma
Audio
Pantalla
HDMI
Red
Control Paterno
Información sistema
Zona hor.
►
Ajuste de reloj
Encender / apagar sonido : Sí
Sonido de pulsación de teclas
: Sí
Gestión de datos de BD
DivX(R) Registro
DivX(R) Desactivación
Música
Foto
Config.
Para ajustar automáticamente la hora, defi na Servidor NTP en
Sí
(consulte la página 54).
Sí (consulte la página 54).Sí
No disc
Para ajustar automáticamente la hora, defi na Servidor NTP en
Sí
(consulte la página 54).
Sí (consulte la página 54).Sí
No disc
No disc
No disc
No disc
No disc
Sistema
◄
Idioma
Audio
Pantalla
HDMI
Red
Control Paterno
System Information
Time Zone
►
Ajuste de reloj
Encender / apagar sonido : On
Sonido de pulsación de teclas
: On
Gestión de datos de BD
Actualizac. sistema
Música
Foto
Config.
Zona hor.
s Guard. r Volver
◄ GMT + 00:00 ►
Londres, Lisboa, Casablanca
No disc
No disc
No disc
No disc
No disc
No disc
Sistema
◄
Idioma
Audio
Pantalla
HDMI
Red
Control Paterno
Información sistema
Zona hor.
Ajuste de reloj
►
Encender / apagar sonido : Sí
Sonido de pulsación de teclas
: Sí
Gestión de datos de BD
DivX(R) Registro
DivX(R) Desactivación
Actualizac. sistema
Música
Foto
Config.
No disc
No disc
No disc
No disc
No disc
No disc
Sistema
◄
Idioma
Audio
Displa
y Setup
HDMI
Red
Control Paterno
Información sistema
Zona hor.
Ajuste de reloj
►
Pow
er On/Off sound
Sonido de pulsación de teclas
Gestión de datos de BD
DivX(R) Registro
DivX(R) Desactivación
Actualizac. sistema
Música
Foto
Config.
Ajuste de reloj
s Guard. r Volver
d.
ENE/01/2009
Jueves
h. min.
01 01
01783M-BD-P1600-XBG-ES-NEW.indb 36 2009-07-22 오전 11:27:23

Español _37
● CONFIGURACIÓN DEL IDIOMA
confi guración del idioma
CONFIGURACIÓN DE LAS OPCIONES DE IDIOMA
Si defi ne de antemano las opciones de audio, subtítulos, menú de disco y menú del reproductor, aparecerán
automáticamente cada vez que vea una película.
Para elegir un idioma de audio o de subtítulos diferente mientras reproduce un disco, también puede utilizar
el menú del disco para realizar la selección.
Con la unidad en modo de parada, presione el botón MENU.
Presione los botones
▲▼
hasta seleccionar Confi g. y presione el botón ENTER o
+
.
Presione los botones
▲▼
hasta seleccionar Idioma y
presione el botón ENTER o
+
.
Aparecerá el menú de confi guración de Idioma.
Presione los botones
▲▼
hasta seleccionar la opción
del idioma que desee y presione el botón ENTER o
+
.
Audio : para el idioma de audio del disco.
Subtítulos : para los subtítulos del disco.
Subtítulo archivo video : para el idioma de los
subtítulos del archivo de video por región.
Occidental
afrikáans, vasco, catalán, danés, holandés, inglés, faroés, fi nlandés, francés, alemán, islandés,
irlandés, indonesio, italiano, malayo, noruego, portugués, español, suahili, sueco
Central inglés, albanés, croata, checo, húngaro, polaco, rumano, servio (Latino), eslovaco, esloveno
Cirílico inglés, azerí, bielorruso, búlgaro, kazakh, macedonio, ruso, serbio, tatar, ucraniano, uzbek
Griego inglés, griego
Menu del disco : para el menú del disco incluido en el propio disco.
Menú : para el menú en pantalla del Reproductor de discos Blu-ray.
Presione los botones
▲▼
para seleccionar el idioma que desee y presione el botón ENTER.
Presione el botón RETURN o _ para volver al menú anterior. Presione el botón MENU para salir del menú.
El idioma seleccionado sólo aparecería si el disco lo incluyese.
Si el idioma de subtítulos del archivo de video aparece con fuentes dañadas, cambie los subtítulos del
archivo de video a la región apropiada. Si aún así no funciona, no se admite el soporte.
M
1.
2.
3.
4.
•
•
•
•
•
5.
M
y presione el botón
No disc
y presione el botón
No disc
No disc
No disc
No disc
No disc
Música
Foto
Config.
Sistema
Idioma
►
Audio
Pantalla
HDMI
Red
Control Paterno
Audio : Original
►
Subtítulos : Automático
Subtítulo archivo video : Occidental
Menu del disco : Español
Menú : Automático
afrikáans, vasco, catalán, danés, holandés, inglés, faroés, fi nlandés, francés, alemán, islandés,
No disc
afrikáans, vasco, catalán, danés, holandés, inglés, faroés, fi nlandés, francés, alemán, islandés,
No disc
No disc
No disc
No disc
No disc
Música
Foto
Config.
Sistema
Idioma
►
Audio
Pantalla
HDMI
Red
Control Paterno
Audio : Original
►
Subtítulos : Automático
Subtítulo archivo video : Occidental
Menu del disco : English
Menú : Automático
✓
Original
English
Français
Português
Español
Italiano
01783M-BD-P1600-XBG-ES-NEW.indb 37 2009-07-22 오전 11:27:27

38_ confi guración de audio
confi guración de audio
CONFIGURACIÓN DE LAS OPCIONES DE AUDIO
Permite confi gurar el dispositivo de audio y el estado del sonido dependiendo del sistema que se esté utilizando
con el reproductor.
Con la unidad en modo de parada, presione el botón MENU.
Presione los botones
▲▼
hasta seleccionar Confi g. y
presione el botón ENTER o
+
.
Presione los botones
▲▼
hasta seleccionar Audio y
presione el botón ENTER o
+
.
Presione el botón
▲▼
hasta seleccionar la opción de
audio que desee y presione el botón ENTER o
+
.
Presione los botones
▲▼
hasta seleccionar la opción
que desee y presione el botón ENTER.
Cada opción de audio se describe detalladamente a
continuación.
Presione el botón RETURN o _ para volver al menú
anterior. Presione el botón MENU para salir del menú.
Salida Digital
Los discos Blu-ray pueden incluir corrientes de audio.
-
Audio primario: pista de sondo de audio principal del disco
- Audio secundario: proporciona audio para la ventana
BONUSVIEW del disco Blu-ray.
- Efecto de audio: puede escuchar sonidos de mensajes de
menú (etc.) al seleccionar opciones de menú en un disco
Blu-ray. (dependiendo del disco)
Selecciones de salida digital
Confi guración Defi nición Potencia Debilidad Uso recomendado
PCM
Descodifi ca las corrientes de
audio primario, secundario y
de efectos en el audio PCM.
No sólo puede disfrutar de
audio primario sino también de
audio secundario y de efectos.
Esta unidad puede descodifi car
Dolby TrueHD y DTS-HD Master
Audio, la calidad del audio de
salida será la misma con la
confi guración Bitstream
(audiófi los).
Si está utilizando un cable
óptico, es posible que no oiga
el audio Surround multicanal.
Opción recomendada si tiene
un receptor HDMI.
Flujobits
(Recodifi car)
Descodifi ca de forma
conjunto las corrientes de
audio primaria, secundaria y
de efectos en audio PCM y
vuelve a codifi car el audio
PCM en bitstream DTS.
No sólo puede disfrutar de
audio primario sino también
de audio secundario y de
efectos.
La calidad de audio puede
ser inferior a las
confi guraciones de PCM o
Bitstream (audiófi los) cuando
está utilizando un receptor
con entrada HDMI u óptica.
Opción recomendada si no
tiene un receptor que admita
HDMI, pero tiene un receptor
con entrada óptica que pueda
descodifi car DTS.
Flujobits
(Audiophile)
Sólo genera la salida de la
banda sonora de audio
primario (banda sonora
principal de la función
principal) de forma que el
receptor pueda descodifi car
el bitstream de audio.
Esta unidad puede
descodifi car Dolby TrueHD y
DTS-HD Master Audio, la
calidad del audio de salida
será la misma con la
confi guración de PCM.
No oirá ni el audio secundario
ni el de efectos.
Opción recomendada si tiene
un receptor HDMI 1.3 con
capacidad de descodifi cación
Dolby TrueHD y DTS-HD
Master Audio.
1.
2.
3.
4.
5.
6.
M
No disc
No disc
No disc
No disc
No disc
Música
Foto
Config.
◄
Sistema
Idioma
Audio
►
Pantalla
HDMI
Red
Control Paterno
No disc
No disc
No disc
No disc
No disc
No disc
Música
Foto
Config.
Sistema
Idioma
Audio
◄
Pantalla
HDMI
Red
Control Paterno
Salida Digital : PCM
►
Submuestreo PCM : Sí
Compresión Dinámica. : Sí
Modo Downmixing : Estéreo Estándar
- Efecto de audio: puede escuchar sonidos de mensajes de
No disc
No disc
No disc
No disc
No disc
No disc
Música
Foto
Config.
Sistema
Idioma
Audio
◄
Pantalla
HDMI
Red
Control Paterno
Salida Digital : PCM
►
Submuestreo PCM : Sí
Compresión Dinámica. : Sí
Modo Downmixing : Estéreo Estándar
✓
PCM
Flujobits(Recodifi car)
Flujobits(Audiophile)
01783M-BD-P1600-XBG-ES-NEW.indb 38 2009-07-22 오전 11:27:32

Español _39
● CONFIGURACIÓN DE AUDIO
Asegúrese de seleccionar la salida digital correcta o, de lo contrario, no escuchará nada o se oirá un ruido
de alta intensidad.
Si el dispositivo HDMI (Receptor, TV) no es compatible con los formatos comprimidos (Dolby digital, DTS), la
salida de la señal de audio se genera como PCM.
El audio secundario y de efecto no se oirá con DVD normales.
Algunos discos Blu-ray no tienen audio secundario ni de efectos.
Esta confi guración de salida digital no tiene efecto en el audio analógico (I/D) ni en la salida de audio HDMI
en el televisor. Tiene efecto en la salida de audio óptica y HDMI al conectarse a un receptor.
Cuando el reproductor genera la salida de bitstream de audio HD (Dolby TrueHD o DTS-HD Master Audio)
desde el termina óptico a un receptor HDMI 1.3, sólo se oirá el audio PCM de 2 canales.
Si reproduce pistas de audio MPEG, la señal de audio genera PCM independientemente de las selecciones
de salida digital (PCM o Bitstream).
Submuestreo PCM
Sí : seleccione esta opción cuando el amplifi cador
conectado al reproductor no sea compatible con 96 KHz.
Las señales de 96 KHz se convertirán en 48 KHz.
No : seleccione esta opción cuando el amplifi cador
conectado al reproductor sea compatible con 96 KHz.
Las señales se generan sin ningún cambio.
Incluso cuando Submuestreo PCM esté defi nido en No, algunos discos sólo generarán la salida del audio
con muestreo descendente a través de las salidas óptica digital.
HDMI
Si su televisor no es compatible con los formatos multicanal comprimidos (Dolby Digital, DTS), es
posible que la unidad genere una salida de audio PCM mezclados en 2 canales incluso aunque
defi na Bitstream (ya sea Recodifi car o Audiophile) en el menú de confi guración.
Si su televisor no es compatible con las velocidades de muestreo PCM por encima de 48 kHz, es
posible que la unidad genere una salida de audio PCM de submuestreo inferior a 48kHz incluso
aunque defi na “Submuestreo PCM” como No.
Compresión Dinámica
Sólo se activa cuando se detecta una señal de Dolby
Digital.
Sí : cuando se reproducen bandas sonoras de películas
con un volumen bajo o desde parlantes más pequeños, el
sistema puede aplicar la compresión necesaria para que
el contenido de bajo nivel sea más perceptible y para
evitar cambios bruscos del sonido.
No : puede disfrutar de la película con un rango dinámico
estándar.
M
•
•
M
•
•
•
•
, algunos discos sólo generarán la salida del audio
No disc
, algunos discos sólo generarán la salida del audio
No disc
No disc
No disc
No disc
No disc
Música
Foto
Config.
Sistema
Idioma
Audio
◄
Pantalla
HDMI
Red
Control Paterno
Salida Digital : PCM
Submuestreo PCM : PCM
►
Compresión Dinámica. : Sí
Modo Downmixing : Estéreo Estándar
✓
Sí
No
con un volumen bajo o desde parlantes más pequeños, el
No disc
No disc
No disc
No disc
No disc
No disc
Música
Foto
Config.
Sistema
Idioma
Audio
◄
Pantalla
HDMI
Red
Control Paterno
Salida Digital : PCM
Submuestreo PCM : Sí
Compresión Dinámica. : PCM
►
Modo Downmixing : Estéreo Estándar
✓
Sí
No
01783M-BD-P1600-XBG-ES-NEW.indb 39 2009-07-22 오전 11:27:36

40_ confi guración de audio
confi guración de audio
Modo de mezcla
Esta opción le permite compatibilidad con sistemas Dolby Pro Logic.
Estéreo Estándar : Se utiliza para mezclar en 2 canales
de audio. No es compatible con Dolby Surround, Dolby
Surround Pro Logic ni Dolby Pro Logic II.
Compatible con Surround : La mezcla 2/0 Izq./Drcha es
una salida de dos canales Dolby Surround compatible
que se puede decodifi car mediante decodifi cadores
Dolby Surround (pasivo), Dolby Surround Pro Logic
(activo) o Dolby Pro Logic II (activo). Esta mezcla
proporciona compatibilidad inversa con sistemas Dolby
Surround existentes y puede grabarse en soportes de
dos canales como una cinta de vídeo utilizada en grabadores de casetes de vídeo.
•
•
Esta opción le permite compatibilidad con sistemas Dolby Pro Logic.
dos canales como una cinta de vídeo utilizada en grabadores de casetes de vídeo.
Esta opción le permite compatibilidad con sistemas Dolby Pro Logic.
dos canales como una cinta de vídeo utilizada en grabadores de casetes de vídeo.
Esta opción le permite compatibilidad con sistemas Dolby Pro Logic.
Sistema
Idioma
Audio
◄
Pantalla
HDMI
Red
Control Paterno
Salida Digital : PCM
Submuestreo PCM : Sí
Compresión Dinámica. : Sí
Modo Downmixing : Estéreo Estándar
✓
Estéreo Estándar
Compatible
con Surround
No disc
Música
Foto
Config.
01783M-BD-P1600-XBG-ES-NEW.indb 40 2009-07-22 오전 11:27:38

Español _41
● CONFIGURACIÓN DE PANTALLA
confi guración de pantalla
CONFIGURACIÓN DE LAS OPCIONES DE PANTALLA
Esta función permite confi gurar los ajustes de la pantalla de TV. Esta
función depende del tipo de disco o televisor. Es posible que no funcione
con algunos tipos de discos o televisores.
Con la unidad en modo de parada, presione el botón MENU.
Presione los botones
▲▼
hasta seleccionar Confi g. y
presione el botón ENTER o
+
.
Presione los botones
▲▼
hasta seleccionar Pantalla y
presione el botón ENTER o
+
.
Aparecerá el menú de confi guración de video.
Presione los botones
▲▼
para seleccionar la opción de
visualización que desee entre las opciones de las páginas
siguientes.
Presione los botones
▲▼
para seleccionar la opción del
submenú que desee desde una opción de visualización de
video y, a continuación, presione el botón ENTER.
Cada opción de video se describe detalladamente a
continuación.
Presione el botón RETURN o _ para volver al menú anterior. Presione el botón MENU para salir del menú.
Formato TV
Dependiendo del tipo de televisión, se puede ajustar la confi guración de la pantalla. (Relación altura / anchura.)
• 4:3 Buzón :
Seleccione esta opción cuando quiera ver la
dimensión de pantalla completa 16:9 que
ofrece el Discos Blu-ray/DVD, aunque tenga
un televisor con una dimensión de pantalla
de 4:3. Aparecerán unas barras negras en
la parte superior e inferior de la pantalla.
• 4:3 Pan-Scan :
Se selecciona cuando desee ver el video 16:9
suministrado por el disco Blu-ray/DVD sin las
barras negras de las partes superior e inferior,
incluso aunque tenga un televisor con una
relación de pantalla 4:3 (se cortarán los
extremos derecho e izquierdo de la película).
• 16:9 Panorámico :
Podrá ver la imagen 16:9 completa en el TV panorámico.
• 16:9 Normal :
algunos videos (fuente 4:3) pueden verse en formato 4:3 Pillarbox (barras negras a los lados de la
imagen) incluso aunque se seleccione 16:9 normal.
Dependiendo del tipo de disco, es posible que no estén disponibles algunas relaciones de altura/anchura.
Si selecciona una relación de aspecto que sea diferente de la pantalla de televisión, es posible que la
imagen aparezca distorsionada.
1.
2.
3.
4.
5.
6.
M
M
No disc
No disc
No disc
No disc
No disc
No disc
No disc
No disc
No disc
No disc
No disc
Música
Foto
Config.
_
Sistema
Idioma
Audio
Pantalla
►
HDMI
Red
Control Paterno
submenú que desee desde una opción de visualización de
No disc
No disc
No disc
No disc
No disc
Música
Foto
Config.
Sistema
Idioma
Audio
Pantalla
◄
HDMI
Red
Control Paterno
Formato TV : 16:9 Normal
►
Fotogr. Película (24 Fs) : No
Resolución : 1080p
Modo progresivo : Automático
Modo de imágenes fi jas : Automático
Mensaje Pantalla : Sí
Panel frontal : Brillante
Dependiendo del tipo de televisión, se puede ajustar la confi guración de la pantalla. (Relación altura / anchura.)
No disc
Dependiendo del tipo de televisión, se puede ajustar la confi guración de la pantalla. (Relación altura / anchura.)
No disc
No disc
No disc
No disc
No disc
Música
Foto
Config.
Sistema
Idioma
Audio
Pantalla
◄
HDMI
Red
Control Paterno
Formato TV : 16:9 Normal
►
Fotogr. Película (24 Fs) : No
Resolución : 1080p
Modo progresivo : Automático
Modo de imágenes fi jas : Automático
Mensaje Pantalla : Sí
Panel frontal : Brillante
4:3 Buzón
4:3 Pan-Scan
16:9 Panorámico
✓
16:9 Normal
01783M-BD-P1600-XBG-ES-NEW.indb 41 2009-07-22 오전 11:27:44

42_ confi guración de pantalla
confi guración de pantalla
Fotograma de película (24 Fs)
Las películas normalmente se fi lman a 24 fotogramas por segundo.
Algunos discos Blu-ray tienen la capacidad de reproducir a esta
velocidad de fotogramas. Si se activa la función Fotograma video
(24Fs) es posible ajustar la salida HDMI del reproductor Blu-ray en 24
fotogramas por segundo para obtener una mejor calidad de imagen.
Puede disfrutar de la función Fotogr. Película (24Fs) sólo en
un televisor que admita esta velocidad de fotogramas.
Este menú sólo puede seleccionarse en modos de
resolución de salida HDMI 1080i o1080p.
Dependiendo del disco, es posible incluir dos tipos de fuente: material Movie (24 fotogramas) y
material Video (30 fotogramas). Cuando el ajuste cambia entre Película (24 fotogramas) y Video (30
fotogramas), es posible que la pantalla parpadee durante unos segundos.
Resolution
Defi ne la resolución de salida de la señal de video Componente y HDMI.
El número en 576p/480p,576i/480i, 720p, 1080p y 1080i
indica el número de líneas de video. La i y la p indican
respectivamente el rastreo interlazado y progresivo.
- BD Wise : Ajusta automáticamente la resolución óptima
al conectarse a través de HDMI a un TV con la función
BD Wise.
(La opción de menú BD Wise sólo aparece si se activa
BD Wise.)
- 1080p : genera una salida de 1080 líneas de video progresivo. (sólo HDMI).
- 1080i : genera una salida de 1080 líneas de video interlazado.
- 720p : genera una salida de 720 líneas de video progresivo.
- 576p/480p : genera una salida de 576/480 líneas de video progresivo.
- 576i/480i : genera una salida de 576/480 líneas de video interlazado (sólo Componente).
Si el televisor conectado no admite el cuadro de película de
la resolución seleccionada, aparecerá el siguiente mensaje:
Si selecciona Sí y no se admite la resolución, no aparecerá
nada en la pantalla del televisor. Espere 15 segundos y la
resolución volverá automáticamente al valor anterior.
Si la pantalla está en blanco, mantenga presionado el botón SALTAR (]) de la parte frontal del
reproductor durante más de 5 segundos (sin disco insertado). Todos los ajustes recuperan sus valores
predeterminados de fábrica. Siga los pasos de la página anterior para acceder a cada modo y seleccione la
confi guración de pantalla que admita su televisor.
Cuando se recuperan los ajustes predeterminados de fábrica, todos los datos de usuario almacenados la BS
se borrarán.
•
M
Dependiendo del disco, es posible incluir dos tipos de fuente: material Movie (24 fotogramas) y
No disc
Dependiendo del disco, es posible incluir dos tipos de fuente: material Movie (24 fotogramas) y
No disc
No disc
No disc
No disc
No disc
Música
Foto
Config.
Sistema
Idioma
Audio
Pantalla
◄
HDMI
Red
Control Paterno
Formato TV : 16:9 Normal
Fotogr. Película (24 Fs) : PCM
►
Resolución : 1080p
Modo progresivo : Automático
Modo de imágenes fi jas : Automático
Mensaje Pantalla : Sí
Panel frontal : Brillante
Sí
✓
No
No disc
No disc
No disc
No disc
No disc
No disc
Música
Foto
Config.
Sistema
Idioma
Audio
Pantalla
◄
HDMI
Red
Control Paterno
Formato TV : 16:9 Normal
Fotogr. Película (24 Fs) : No
Resolución : 1080p
►
Modo progresivo : Automático
Modo de imágenes fi jas : Automático
Mensaje Pantalla : Sí
Panel frontal : Brillante
!
Si no aparecen imágenes tras seleccionar,
espere 15 segundos. Después la resolución
volverá al valor anterior automáticamente.
¿Desea realizar una selección?
Sí No
- 1080p : genera una salida de 1080 líneas de video progresivo. (sólo HDMI).
No disc
- 1080p : genera una salida de 1080 líneas de video progresivo. (sólo HDMI).
No disc
No disc
No disc
No disc
No disc
Música
Foto
Config.
Formato TV : 16:9 Normal
Fotogr. Película (24 Fs) : No
Resolución : PCM
►
Modo progresivo : Automático
Modo de imágenes fi jas : Automático
Mensaje Pantalla : Sí
Panel frontal : Brillante
✓
1080p
1080i
720p
576p/480p
576i/480i
Sistema
Idioma
Audio
Pantalla
◄
HDMI
Red
Control Paterno
01783M-BD-P1600-XBG-ES-NEW.indb 42 2009-07-22 오전 11:27:50

Español _43
● CONFIGURACIÓN DE PANTALLA
Resolución según el modo de salida
Reproducción de Discos Blu-ray
Salida
Confi g.
HDMI
Component
(HDMI y Comp. conectados/ sólo Comp. conectado)
VIDEO
1080p, Fotogr. Película(24Fs) no 1080p@60F 576i (480i) / 1080i 576i (480i)
1080p/1080i, Fotogr. Película(24Fs) sí
1080p@24F 576i (480i) / 1080i 576i (480i)
1080i, Fotogr. Película(24Fs) no 1080i 576i (480i) / 1080i 576i (480i)
720p 720p 576i (480i) / 720p 576i (480i)
576p (480p) 576p (480p) 576i (480i) / 576p (480p) 576i (480i)
576i (480i) 576p (480p) 576i (480i) 576i (480i)
Reproducción de DVD
Salida
Confi g.
HDMI
Component
(HDMI y Comp. conectados/ sólo Comp. conectado)
VIDEO
1080p 1080p@60F 576i (480i) / 576p (480p) 576i (480i)
1080i 1080i 576i (480i) / 576p (480p) 576i (480i)
720p 720p 576i (480i) / 576p (480p) 576i (480i)
576p (480p) 576p (480p) 576i (480i) / 576p (480p) 576i (480i)
576i (480i) 576p (480p) 576i (480i) 576i (480i)
En la reproducción de DVD, si las tomas HDMI y Componente están conectadas y selecciona el modo
Componente 1080p, 1080i o 720p, el menú Opciones pantalla mostrará la resolución de salida como
1080p, 1080i o 720p.
La resolución es realmente 576i/480i.
Este reproductor tiene la función de detección automática de HDMI (HDMI Auto Detect). Cuando el
reproductor se conecta por primera vez a un televisor a través de HDMI, la salida del reproductor se defi nirá
automáticamente en HDMI.
Si no funciona la detección automática de HDMI, no puede seleccionar la resolución 1080p ni Movie Frame
(24Fs).
El disco Blu-ray debe tener la función de 24 fotogramas para poder utilizar el modo Movie Frame (24Fs).
Modo progresivo
El Modo progresivo ayuda a mejorar la calidad de la imagen al utilizar discos DVD con resolución 480i.
Automático: Se selecciona para tener defi nida
automáticamente en el reproductor la mejor calidad para
el DVD que esté viendo.
Vídeo: Se selecciona para obtener la mejor imagen desde
DVD de conciertos a programas de TV.
❖
•
•
M
•
•
El Modo progresivo ayuda a mejorar la calidad de la imagen al utilizar discos DVD con resolución 480i.
: Se selecciona para obtener la mejor imagen desde
No disc
El Modo progresivo ayuda a mejorar la calidad de la imagen al utilizar discos DVD con resolución 480i.
El Modo progresivo ayuda a mejorar la calidad de la imagen al utilizar discos DVD con resolución 480i.
El Modo progresivo ayuda a mejorar la calidad de la imagen al utilizar discos DVD con resolución 480i.
El Modo progresivo ayuda a mejorar la calidad de la imagen al utilizar discos DVD con resolución 480i.
No disc
No disc
No disc
No disc
No disc
Música
Foto
Config.
Formato TV : 16:9 Normal
Fotogr. Película (24 Fs) : No
Resolución : 1080p
Modo progresivo : PCM
►
Modo de imágenes fi jas : Automático
Mensaje Pantalla : Sí
Panel frontal : Brillante
✓
Automático
Vídeo
Sistema
Idioma
Audio
Pantalla
◄
HDMI
Red
Control Paterno
01783M-BD-P1600-XBG-ES-NEW.indb 43 2009-07-22 오전 11:27:52

44_ confi guración de pantalla
confi guración de pantalla
Barra de marco y campo
Modo de imágenes fi jas
Defi na Automático, Campo o Marco para obtener la
mejores imágenes fi jas posibles (modo pausa) de un DVD.
Automático: Seleccione este ajuste para que el
reproductor muestre automáticamente la mejor imagen
fi ja dependiendo del contexto.
Campo: Seleccione esta opción cuando desee hacer una
pausa en una escena de acción.
Marco: Seleccione esta opción para aumentar la
resolución de la imagen fi ja.
Mensaje Pantalla
Sí : muestra mensajes relacionados con el modo de
funcionamiento.
No : no muestra mensajes relacionados con el modo de
funcionamiento.
Panel frontal
Automático : La pantalla aparece atenuada durante la
reproducción y con brillo cuando la unidad se encuentra
en modo de parada.
Oscuro : se selecciona para oscurecer la ventana de la
pantalla.
Brillante : se selecciona para dar brillo a la ventana de la
pantalla.
•
•
•
•
•
•
•
•
No disc
No disc
No disc
No disc
No disc
Música
Foto
Config.
Sistema
Idioma
Audio
Pantalla
◄
HDMI
Red
Control Paterno
Fotogr. Película (24 Fs) : No
Resolución : 1080p
Modo progresivo : Automático
Modo de imágenes fi jas : PCM
►
Mensaje Pantalla : Sí
Panel frontal : Brillante
✓
Automático
Campo
Marco
No disc
No disc
No disc
No disc
No disc
No disc
Música
Foto
Config.
Resolución : 1080p
Modo progresivo : Automático
Modo de imágenes fi jas : Automático
Mensaje Pantalla : PCM
►
Panel frontal : Brillante
✓
Sí
No
Sistema
Idioma
Audio
Pantalla
◄
HDMI
Red
Control Paterno
No disc
No disc
No disc
No disc
No disc
No disc
Música
Foto
Config.
Sistema
Idioma
Audio
Pantalla
◄
HDMI
Red
Control Paterno
Modo progresivo : Automático
Modo de imágenes fi jas : Automático
Mensaje Pantalla : Sí
Panel frontal : PCM
►
Automático
Oscuro
✓
Brillante
01783M-BD-P1600-XBG-ES-NEW.indb 44 2009-07-22 오전 11:27:58

Español _45
● CONFIGURACIÓN DE HDMI
confi guración de HDMI
CONFIGURACIÓN DE LAS OPCIONES DE CONFIGURACIÓN DE HDMI
Con la unidad en modo de parada, presione el botón MENU.
Presione los botones
▲▼
hasta seleccionar Confi g. y
presione el botón ENTER o
+
.
Presione los botones
▲▼
hasta seleccionar HDMI y
presione el botón ENTER o
+
.
Aparecerá el menú de confi guración de HDMI.
Presione los botones
▲▼
para seleccionar la opción de
visualización que desee. y, a continuación, presione el
botón ENTER o
+
.
Anynet+ (HDMI-CEC) (sólo productos Samsung)
Cuando HDMI se active, podrá utilizar la función Anynet+.
Sí : la función Anynet+ estará operativa.
No : la función Anynet+ no estará operativa.
¿Qué es Anynet+?
Anynet+ es una función práctica que ofrece un
funcionamiento enlazado con otros productos Samsung
que tengan la función Anynet+.
Puede utilizar esta unidad usando un mando a distancia de
un televisor Samsung o encender el televisor Samsung y el sistema de cine en casa e iniciar la
reproducción del disco simplemente presionando el botón PLAY del mando a distancia del televisor.
La función no está disponible si el cable HDMI no admite CEC.
Para utilizar Anynet+
Conecte el Reproductor de discos Blu-ray a un televisor Samsung con un cable HDMI. (Consulte
las páginas 22~24)
Active Anynet+ (HDMI-CEC) en el Reproductor de discos Blu-ray.
Active la función Anynet+ en el televisor. (Consulte el manual de instrucciones del televisor para
más información.)
Funciones de Anynet+
Reproducción con una pulsación
Puede encender el televisor Samsung y el sistema de cine en casa y reproducir el disco de esta
unidad simplemente presionando el botón PLAY del mando a distancia del Reproductor Blu-ray.
Visualización con una pulsación
Seleccione “Watching Blu-ray Disc Player” o “Connected to Blu-ray Disc Player”(dependiendo del
menú de TV que tenga) en el menú Anynet+ del televisor. El Reproductor Blu-Ray se encenderá
automáticamente y el televisor cambiará al modo HDMI.
Enlace de control remoto
Puede controlar este reproductor con el mando a distancia de su televisor Samsung TV.
Botones disponibles en el mando a distancia de un televisor Samsung: estos botones funcionan
igual que los del mando a distancia de este reproductor.
- Botones de control de reproducción :
- Botón de operación del menú :
- Botones numéricos : ~
- Botones de color :
1.
2.
3.
4.
•
•
M
1.
2.
3.
•
•
•
•
No disc
No disc
No disc
No disc
No disc
No disc
Música
Foto
Config.
_
Idioma
Audio
Pantalla
HDMI
►
Red
Control Paterno
un televisor Samsung o encender el televisor Samsung y el sistema de cine en casa e iniciar la
No disc
un televisor Samsung o encender el televisor Samsung y el sistema de cine en casa e iniciar la
No disc
No disc
No disc
No disc
No disc
Música
Foto
Config.
Idioma
Audio
Pantalla
HDMI
◄
Red
Control Paterno
Anynet+ (HDMI-CEC) : 16:9 Normal
►
Formato HDMI : No
BD Wise : Sí
✓
Sí
No
01783M-BD-P1600-XBG-ES-NEW.indb 45 2009-07-22 오전 11:28:02

46_ confi guración de HDMI
confi guración de HDMI
Menú Anynet+ del televisor
Al presionar el botón Anynet+ del mando a distancia
deltelevisor Samsung, aparecerá la siguiente presentación
en pantalla (OSD).
Menú Reproductor de discos Blu-ray
- Al reproducir una película: aparece el menú del disco
(igual que el botón DISC MENU del mando a distancia
del reproductor Blu-ray)
- En modo Parar: aparece el menú CONFIG del disco
(igual que el botón MENU del mando a distancia del
reproductor Blu-ray)
Menú de operaciones del Reproductor de discos Blu-ray
- Al reproducir un DVD VIDEO, DVD-RW/-R, BD-ROM, BD-RE:
muestra la OSD INFO (igual que el botón INFO del mando a distancia del reproductor)
Estos menús pueden tener un aspecto diferente dependiendo del televisor Samsung.
Formato HDMI
Puede optimizar la salida HDMI para la conexión a un televisor o monitor.
TV : Se selecciona si está conectado a un televisor a
través de HDMI.
Monitor : Se selecciona si está conectado a un monitor a
través de HDMI.
Si el reproductor está conectado a un TV, la opción de
Monitor no estará disponible.
El televisor o el monitor tienen que conectarse al
reproductor antes de seleccionar esta opción.
•
•
M
•
•
M
>
Move
s
Enter
e
Exit
BD Player
n
View TV
Select Device
Record
Menu on Device
Device Operation
Receiver : No
Setup
Puede optimizar la salida HDMI para la conexión a un televisor o monitor.
: Se selecciona si está conectado a un monitor a
No disc
Puede optimizar la salida HDMI para la conexión a un televisor o monitor.
Puede optimizar la salida HDMI para la conexión a un televisor o monitor.
No disc
No disc
No disc
No disc
No disc
Música
Foto
Config.
Idioma
Audio
Pantalla
HDMI
◄
Red
Control Paterno
Anynet+ (HDMI-CEC) : Sí
Formato HDMI : PCM
►
BD Wise : Sí
✓
TV
Monitor
01783M-BD-P1600-XBG-ES-NEW.indb 46 2009-07-22 오전 11:28:05

Español _47
● CONFIGURACIÓN DE HDMI
BD Wise (sólo productos Samsung)
BD Wise es la función de interconectividad más reciente de Samsung.
|Cuando conecta entre sí productos Samsung con BD-Wise a través de HDMI, se ajustará
automáticamente la resolución óptima.
Sí: La resolución original del disco BD/DVD se mostrará
directamente en el TV.
No: La resolución de salida se fi jará según la resolución
anteriormente defi nida, independientemente de la
resolución del disco.
Para cambiar la resolución en el modo BD Wise, debe defi nir de antemano BD Wise en No.
Si desactiva BD Wise, la resolución del TV conectado se ajustará automáticamente a su resolución máxima.
Si el reproductor se conecta a un dispositivo que no admite BD Wise, no puede utilizar la función BD Wise.
Para un funcionamiento apropiado de BD Wise, defi na tanto el menú BD Wise del reproductor como del TV
en Sí, respectivamente.
•
•
M
Para cambiar la resolución en el modo BD Wise, debe defi nir de antemano BD Wise en
No
No disc
No disc
No disc
No disc
No disc
Música
Foto
Config.
Idioma
Audio
Pantalla
HDMI
◄
Red
Control Paterno
Anynet+ (HDMI-CEC) : Sí
Formato HDMI : TV
BD Wise : PCM
►
✓
Sí
No
01783M-BD-P1600-XBG-ES-NEW.indb 47 2009-07-22 오전 11:28:07

48_ control paterno
control paterno
CONFIGURACIÓN DEL CONTROL PATERNO
La función de Califi cación está disponible junto con los Discos Blu-ray/DVD que han sido asignados al nivel. Esta
función le ayuda a controlar los tipos de Discos Blu-ray/DVD que su familia ve. Hay hasta 8 niveles de califi cación
en un disco.
hZ
Con la unidad en modo de parada, presione el botón
MENU.
Presione los botones
▲▼
hasta seleccionar Confi g. y
presione el botón ENTER o
+
.
Presione los botones
▲▼
hasta seleccionar Control
Paterno y presione el botón ENTER o
+
.
Cuando utilice el Reproductor de discos Blu-ray por
primera vez, aparecerá el mensaje “Introduzca nueva
contraseña.”.
Introduzca una contraseña de 4 dígitos utilizando los
botones numéricos del mando a distancia.
Aparecerá el mensaje “Confi rme la contraseña.” Vuelva a
introducirla.
Presione el botón ENTER o
+
para seleccionar
Bloqueo primario.
Presione los botones
▲▼
para seleccionar Sí o No y, a
continuación, presione el botón ENTER.
Presione el botón RETURN o _ para volver al menú anterior. Presione el botón MENU para salir del menú.
1.
2.
3.
4.
5.
6.
M
No disc
No disc
No disc
No disc
No disc
Música
Foto
Config.
_
Pantalla
HDMI
Red
Control Paterno
►
No disc
Música
Foto
Config.
Pantalla
HDMI
Red
Control Paterno
◄
No disc
No disc
No disc
No disc
No disc
Música
Foto
Config.
Pantalla
Pantalla
HDMI
Red
Control Paterno
Control Paterno
◄
Control Paterno
-
Número
r
Volver
Introduzca nueva contraseña.
Aparecerá el mensaje “Confi rme la contraseña.” Vuelva a
No disc
No disc
No disc
No disc
No disc
No disc
Música
Foto
Config.
Pantalla
HDMI
Red
Control Paterno
◄
Control Paterno
-
Número
r
Volver
Confi rme la contraseña.
No disc
No disc
No disc
No disc
No disc
No disc
Música
Foto
Config.
Pantalla
HDMI
Red
Control Paterno
◄
Bloqueo primario : No
►
Nivel Cal. : Nivel1 (niños)
Creación de contraseña
01783M-BD-P1600-XBG-ES-NEW.indb 48 2009-07-22 오전 11:28:13

Español _49
● CONTROL PATERNO
Si olvida la contraseña
Retire el disco.
Mantenga presionado el botón SALTAR (
]
) del panel frontal durante 5 segundos o más.
Todos los ajustes volverán a los ajustes de fábrica.
Cuando se recuperan los ajustes predeterminados de fábrica, todos los datos de usuario almacenados la BS
se borrarán.
Confi guración del nivel de control Paterno
Presione los botones
▲▼
para seleccionar Nivel Cal. y
presione el botón ENTER o
+
.
Presione los botones
▲▼
para seleccionar el nivel de
califi cación que desee y presione el botón ENTER.
Por ejemplo, si selecciona hasta el Nivel 6, no se
reproducirán los discos que contengan Nivel 7 y 8.
Un número mayor indica que el programa está
destinado únicamente a adultos.
El nivel 1 es el más restrictivo y el nivel 8 el menos
restrictivo.
Cambio de la contraseña
Presione los botones
▲▼
para seleccionar Creación de
contraseña y presione el botón ENTER o
+
.
Introduzca una contraseña de 4 dígitos utilizando los
botones numéricos del mando a distancia. Aparecerá el
mensaje “Introduzca nueva contraseña.”.
Introduzca de nuevo la contraseña utilizando los botones
numéricos del mando a distancia.
1.
2.
•
M
1.
2.
1.
2.
3.
No disc
No disc
No disc
No disc
No disc
No disc
Música
Foto
Config.
Bloqueo primario : No
Nivel Cal. : No
►
Creación de contraseña
Nivel8 (Adulto)
7
6
5
4
3
2
✓
Nivel1 (niños)
Pantalla
HDMI
Red
Control Paterno
◄
Creación de
No disc
No disc
No disc
No disc
No disc
No disc
Música
Foto
Config.
Pantalla
HDMI
Red
Control Paterno
◄
Bloqueo primario : No
Nivel Cal. : Nivel1 (niños)
Creación de contraseña
►
No disc
No disc
No disc
No disc
No disc
No disc
Música
Foto
Config.
Pantalla
HDMI
Red
Control Paterno
◄
Bloqueo primario : No
Nivel Cal. : Nivel1 (niños)
Creación de contraseña
►
Control Paterno
-
Número
r
Volver
Introduzca nueva contraseña.
Introduzca de nuevo la contraseña utilizando los botones
Introduzca de nuevo la contraseña utilizando los botones
No disc
No disc
No disc
No disc
No disc
No disc
Música
Foto
Config.
Pantalla
HDMI
Red
Control Paterno
◄
Bloqueo primario : No
Nivel Cal. : Nivel1 (niños)
Creación de contraseña
►
Control Paterno
-
Número
r
Volver
Confi rme la contraseña.
01783M-BD-P1600-XBG-ES-NEW.indb 49 2009-07-22 오전 11:28:20

50_ confi guración de red
confi guración de red
AJUSTES DE LAS OPCIONES DE CONFIGURACIÓN DE RED
Para obtener información sobre los ajustes correctos, compruebe la confi guración de red en la PC o
póngase en contacto con el proveedor de Internet.
Para ajustar la red del Reproductor de discos Blu-ray, siga los pasos que se indican a continuación.
Con la unidad en modo Parar / No Disc, presione el
botón MENU.
Presione los botones
▲▼
hasta seleccionar Confi g. y
presione el botón ENTER o
+
.
Presione los botones
▲▼
hasta seleccionar Red y
presione el botón ENTER o
+
.
Presione los botones
▲▼
para seleccionar la opción de
red que desee entre las opciones que se indican a
continuación y presione el botón ENTER o
+
.
Presione los botones
+
para seleccionar la opción que desee y presione el botón ENTER.
Cada opción de red se describe detalladamente a continuación.
Selección de red
Seleccione Cable o Inalámbrica como el método para
conectar a la red.
Para confi gurarla, siga los pasos del 1 al 3 de la página 50.
Presione los botones
▲▼
hasta seleccionar Selección
de red y presione el botón ENTER o
+
.
Cable : Se selecciona para conectar a la red utilizando
un cable. (Consulte la página 30.)
Inalámbrica : Se selecciona esta opción para conectar
a la red de forma inalámbrica. (Consulte la página 31.)
Red de cable
Para confi gurarla, siga los pasos del 1 al 3 de la página 50.
Presione los botones
▲▼
hasta seleccionar Red de
cable y presione el botón ENTER o
+
.
Presione los botones
▲▼
hasta seleccionar DHCP y
presione el botón ENTER.
Si se defi ne activa DHCP, no es posible seleccionar la
Dirección IP, Máscara subred o Puerta de acceso.
Si la DNS se defi ne en Automático, no puede seleccionar
DNS primario / secundario.
1.
2.
3.
4.
5.
4.
•
•
4.
5.
M
Para ajustar la red del Reproductor de discos Blu-ray, siga los pasos que se indican a continuación.
para seleccionar la opción que desee y presione el botón
ENTER
No disc
Para ajustar la red del Reproductor de discos Blu-ray, siga los pasos que se indican a continuación.
para seleccionar la opción que desee y presione el botón
ENTER
Para ajustar la red del Reproductor de discos Blu-ray, siga los pasos que se indican a continuación.
Para ajustar la red del Reproductor de discos Blu-ray, siga los pasos que se indican a continuación.
Para ajustar la red del Reproductor de discos Blu-ray, siga los pasos que se indican a continuación.
No disc
No disc
No disc
No disc
No disc
Música
Foto
Config.
_
Audio
Pantalla
HDMI
Red
►
Control Paterno
: Se selecciona esta opción para conectar
No disc
No disc
No disc
No disc
No disc
No disc
Música
Foto
Config.
Audio
Pantalla
HDMI
Red
◄
Control Paterno
Selección de red : Cable
►
Red de cable
Red inalámbrica
Proxy
Servidor NTP : No
Prueba de conexión de red
Conexión a Internet
BD-LIVE
:
Permitir
(sólo válidas)
No disc
No disc
No disc
No disc
No disc
No disc
Música
Foto
Config.
Audio
Pantalla
HDMI
Red
◄
Control Paterno
Selección de red : Cable
Red de cable
►
Red inalámbrica
Proxy
Servidor NTP : No
Prueba de conexión de red
Conexión a Internet
BD-LIVE
:
Permitir
(sólo válidas)
No disc
No disc
No disc
No disc
No disc
No disc
Música
Foto
Config.
Audio
Pantalla
HDMI
Red
◄
Control Paterno
Selección de red :
Red de cable
►
Red inalámbrica
Proxy
Servidor NTP : No
Prueba de conexión de red
Conexión a Internet
BD-LIVE
:
Permitir
(sólo válidas)
Red de cable
s
Selec.
r
Volver
DHCP : Sí
Dirección IP : 0 . 0 . 0 . 0
Máscara subred : 255 . 255 . 255 . 0
Gateway : 0 . 0 . 0 . 0
DNS : Automático
DNS principal : 0 . 0 . 0 . 0
DNS secundario : 0 . 0 . 0 . 0
Guard. Cancelar
01783M-BD-P1600-XBG-ES-NEW.indb 50 2009-07-22 오전 11:28:27

Español _51
● CONFIGURACIÓN DE RED
Presione los botones
▲▼
para seleccionar el idioma que desee y presione el botón ENTER.
Si DHCP se ha defi nido en No, DNS en
Manual, introduzca la dirección IP,
máscara de subred, puerto de enlace y
DNS primaria (el DNS secundario es
opcional).
Si DHCP se ha defi nido en Sí y DNS en
Manual, introduzca el ajuste de DNS
primario (el DNS secundario es opcional).
Si DHCP se ha defi nido en Sí y DNS en
Automático, no necesita más ajustes.
Cuando seleccione una opción, utilice los botones numéricos y $%_ +.
Si no funcionan los ajustes automáticos, póngase en contacto con su proveedor de servicios de Internet.
Una vez realizado, utilice los botones
$%
para seleccionar Guard. y, a continuación, presione el
botón ENTER.
Si no quiere guardar el trabajo, utilice los botones
$%_ +
para seleccionar Cancelar y, a
continuación, presione el botón ENTER.
La dirección IP utilizada en este manual tiene únicamente fi nes ilustrativos. Debe consultar la confi guración
de red para la dirección IP real.
Para obtener los ajustes de la dirección IP, máscara de subred, puerto de enlace y DNS primario compruebe
los ajustes de red en la PC o póngase en contacto con su proveedor de servicios de Internet.
Red inalámbrica
Para confi gurarla, siga los pasos del 1 al 3 de la página 50.
Presione los botones
▲▼
para seleccionar Red
inalámbrica y presione el botón ENTER o
+
.
6.
•
•
•
M
7.
8.
M
4.
para seleccionar el idioma que desee y presione el botón
ENTER
No disc
para seleccionar el idioma que desee y presione el botón
ENTER
para seleccionar el idioma que desee y presione el botón
para seleccionar el idioma que desee y presione el botón
para seleccionar el idioma que desee y presione el botón
No disc
No disc
No disc
No disc
No disc
Audio
Pantalla
HDMI
Red
◄
Control Paterno
Selección de red :
Red de cable
►
Red inalámbrica
Servidor NTP :
Prueba de conexión de red
BD-LIVE Internet
BD-LIVE Internet
Connection
:
Permitir
(sólo válidas)
Música
Foto
Confi g.
_
Red de cable
s
Selec.
r
Volver
DHCP : No
Dirección IP : 0 . 0 . 0 . 0
Máscara subred : 255 . 255 . 255 . 0
Gateway : 0 . 0 . 0 . 0
DNS : Manual
DNS principal : 0 . 0 . 0 . 0
DNS secundario : 0 . 0 . 0 . 0
Guard. Cancelar
Confi guración
disponible
No disc
No disc
No disc
No disc
No disc
No disc
Audio
Pantalla
HDMI
Red
◄
Control Paterno
Selección de red :
Red de cable
►
Red inalámbrica
Servidor NTP :
Prueba de conexión de red
BD-LIVE Internet
BD-LIVE Internet
Connection
:
Permitir
(sólo válidas)
Música
Foto
Confi g.
_
Red de cable
s
Selec.
r
Volver
DHCP : Sí
Dirección IP : 0 . 0 . 0 . 0
Máscara subred : 255 . 255 . 255 . 0
Gateway : 0 . 0 . 0 . 0
DNS : Manual
DNS principal : 0 . 0 . 0 . 0
DNS secundario : 0 . 0 . 0 . 0
Guard. Cancelar
Confi guración no
disponible
Confi guración
disponible
Cuando seleccione una opción, utilice los botones numéricos y
No disc
Cuando seleccione una opción, utilice los botones numéricos y
$%_ +
Cuando seleccione una opción, utilice los botones numéricos y
$%_ +
No disc
No disc
No disc
No disc
No disc
Audio
Pantalla
HDMI
Red
◄
Control Paterno
Selección de red :
Red de cable
►
Red inalámbrica
Servidor NTP :
Prueba de conexión de red
BD-LIVE Internet
BD-LIVE Internet
Connection
:
Permitir
(sólo válidas)
Música
Foto
Confi g.
_
Red de cable
s
Selec.
r
Volver
DHCP : Sí
Dirección IP : 0 . 0 . 0 . 0
Máscara subred : 255 . 255 . 255 . 0
Gateway : 0 . 0 . 0 . 0
DNS : Automático
DNS principal : 0 . 0 . 0 . 0
DNS secundario : 0 . 0 . 0 . 0
Guard. Cancelar
Confi guración no
disponible
No disc
No disc
No disc
No disc
No disc
No disc
Audio
Pantalla
HDMI
Red
◄
Control Paterno
Selección de red : Inalámbrica
Red de cable
Red inalámbrica
►
Proxy
Servidor NTP : No
Prueba de conexión de red
Conexión a Internet
BD-LIVE
:
Permitir
(sólo válidas)
Música
Foto
Config.
01783M-BD-P1600-XBG-ES-NEW.indb 51 2009-07-22 오전 11:28:33

52_ confi guración de red
confi guración de red
Presione los botones
▲▼
hasta seleccionar DHCP y
presione el botón ENTER.
Si se defi ne activa DHCP, no es posible seleccionar la
Dirección IP, Máscara subred o Puerta de acceso.
Si la DNS se defi ne en Automático, no puede seleccionar
DNS primario / secundario.
Presione los botones
+
para seleccionar la opción que desee y presione el botón ENTER.
Seleccione un Punto de acceso y presione el botón
ENTER para ver la lista de PA disponibles.
(La búsqueda puede tardar varios segundos.)
- Cuando un usuario selecciona un PA y presiona el
botón ENTER, intenta conectar al PA designado.
- Si es satisfactorio, aparece una notifi cación.
(Si se selecciona AP muestra un icono de loqueo, y es opsible
que tenga que facilitar una autentifi cación de seguridad.)
- Seleccione el punto de acceso de seguridad
apropiado si lo conoce. Si no lo conoce, seleccione
WEP, WPAPSK o WPA2PSK en la lista que se incluye
a continuación e introduzca la contraseña. Continúe
intentando cada punto de acceso de seguridad e
introduzca la contraseña hasta que se realice la
conexión.
- Introduzca la contraseña y pulse el botón AZUL(D)
para conectar al punto de acceso (Enrutador).
Para más detalles sobre la seguridad del PA, consulte el manual del usuario del PA.
Si DHCP se defi ne en No y, DNS en
Manual, introduzca la Dirección IP,
Máscara de subred, Puerta de enlace y
Servidor de DNS.
5.
M
6.
•
•
para seleccionar la opción que desee y presione el botón
ENTER
No disc
para seleccionar la opción que desee y presione el botón
ENTER
No disc
No disc
No disc
No disc
No disc
Audio
Pantalla
HDMI
Red
◄
Control Paterno
Selección de red :
Red de cable
►
Red inalámbrica
Proxy
Servidor NTP : No
Prueba de conexión de red
BD-LIVE Internet
Connection
:
Permitir
(sólo válidas)
Música
Foto
Config.
Red inalámbrica
s
Selec.
r
Volver
Punto de acceso : No seleccionado
DHCP : Sí
Dirección IP : 0 . 0 . 0 . 0
Máscara subred : 255 . 255 . 255 . 0
Gateway : 0 . 0 . 0 . 0
DNS : Automático
Servidor DNS : 0 . 0 . 0 . 0
Guard. Cancelar
para seleccionar la opción que desee y presione el botón
ENTER
.
No disc
para seleccionar la opción que desee y presione el botón
ENTER
.
para seleccionar la opción que desee y presione el botón
para seleccionar la opción que desee y presione el botón
para seleccionar la opción que desee y presione el botón
No disc
No disc
No disc
No disc
No disc
Audio
Pantalla
HDMI
Red
◄
Control Paterno
Selección de red :
Red de cable
►
Red inalámbrica
Proxy
Servidor NTP : No
Prueba de conexión de red
BD-LIVE Internet
Connection
:
Permitir
(sólo válidas)
Música
Foto
Config.
Red inalámbrica
s
Selec.
r
Volver
Punto de acceso : No seleccionado
DHCP : Sí
Dirección IP : 0 . 0 . 0 . 0
Máscara subred : 255 . 255 . 255 . 0
Gateway : 0 . 0 . 0 . 0
DNS : Automático
Servidor DNS : 0 . 0 . 0 . 0
Guard. Cancelar
WEP, WPAPSK o WPA2PSK en la lista que se incluye
No disc
No disc
No disc
No disc
No disc
No disc
Audio
Pantalla
HDMI
Red
◄
Control Paterno
Selección de red :
Red de cable
►
Red inalámbrica
Proxy
Servidor NTP : No
Prueba de conexión de red
BD-LIVE Internet
Connection
:
Permitir
(sólo válidas)
Música
Foto
Config.
Punto de acceso - Seguridad
s
Selec.
r
Volver
1 2 3
CONECTAR
WEP
WPAPSK
WPA2PSK
Para más detalles sobre la seguridad del PA, consulte el manual del usuario del PA.
No disc
Para más detalles sobre la seguridad del PA, consulte el manual del usuario del PA.
No disc
No disc
No disc
No disc
No disc
Audio
Pantalla
HDMI
Red
◄
Control Paterno
Selección de red :
Red de cable
►
Red inalámbrica
Proxy
Servidor NTP : No
Prueba de conexión de red
BD-LIVE Internet
Connection
:
Permitir
(sólo válidas)
Música
Foto
Config.
Contraseña
-
Número
s
Selec.
r
Volver
A B C D E F G H I J K L M N O P
Q R S T U V W X Y Z a b c d e f
g h i j k l m n o p q r s t u v
w x y z 1 2 3 4 5 6 7 8 9 0 −
_
+ = . ~ ! @ # $ % ^ & ( ) / ? |
a
Retroceso
b
Espacio
c
Borrar
d
Conecte
_
1 2 3
No disc
No disc
No disc
No disc
No disc
No disc
Audio
Pantalla
HDMI
Red
◄
Control Paterno
Selección de red :
Red de cable
►
Red inalámbrica
Servidor NTP :
Prueba de conexión de red
BD-LIVE Internet
BD-LIVE Internet
Connection
:
Permitir
(sólo válidas)
Música
Foto
Confi g.
_
Red inalámbrica
s
Selec.
r
Volver
Punto de acceso : No seleccionado
DHCP : No
Dirección IP : 0 . 0 . 0 . 0
Máscara subred : 255 . 255 . 255 . 0
Gateway : 0 . 0 . 0 . 0
DNS : Manual
Servidor DNS : 0 . 0 . 0 . 0
Guard. Cancelar
Confi guración
disponible
01783M-BD-P1600-XBG-ES-NEW.indb 52 2009-07-22 오전 11:28:42

Español _53
● CONFIGURACIÓN DE RED
Si DHCP se defi ne en Sí y, DNS en
Manual, introduzca el Servidor de DNS.
Si DHCP se defi ne en Sí y, DNS en
Automático, no necesita más ajustes.
Cuando seleccione una opción, utilice los botones numéricos y ▲▼_ +.
Si no funcionan los ajustes automáticos, póngase en contacto con su proveedor de servicios de Internet.
Una vez realizado, utilice los botones
$%
para seleccionar Guard. y, a continuación, presione el
botón ENTER.
Si no quiere guardar el trabajo, utilice los botones
$%_ +
para seleccionar Cancelar y, a
continuación, presione el botón ENTER.
La dirección IP utilizada en este manual tiene únicamente fi nes ilustrativos. Debe consultar la confi guración
de red para la dirección IP real.
Para obtener los ajustes de la dirección IP, máscara de subred, puerto de enlace y DNS primario compruebe
los ajustes de red en la PC o póngase en contacto con su proveedor de servicios de Internet.
Ajuste de Proxy
Un servidor proxy da servicio a las solicitudes enviándolas a otros servidores.
Si tiene que confi gurar el ajuste de proxy, introduzca los ajustes especifi cados por el proveedor de
servicios de Internet.
Para confi gurarla, siga los pasos del 1 al 3 de la página 50.
Presione los botones
▲▼
hasta seleccionar Proxy y
presione el botón ENTER o
+
.
Servidor
Puerto
Usuario
Contraseña
Para obtener información adicional, póngase en contacto
con el proveedor de servicios de Internet.
•
•
M
7.
8.
M
4.
•
•
•
•
M
No disc
No disc
No disc
No disc
No disc
No disc
Audio
Pantalla
HDMI
Red
◄
Control Paterno
Selección de red :
Red de cable
►
Red inalámbrica
Servidor NTP :
Prueba de conexión de red
BD-LIVE Internet
BD-LIVE Internet
Connection
:
Permitir
(sólo válidas)
Música
Foto
Confi g.
_
Red inalámbrica
s
Selec.
r
Volver
Punto de acceso : No seleccionado
DHCP : Sí
Dirección IP : 0 . 0 . 0 . 0
Máscara subred : 255 . 255 . 255 . 0
Gateway : 0 . 0 . 0 . 0
DNS : Manual
Servidor DNS : 0 . 0 . 0 . 0
Guard. Cancelar
Confi guración no
disponible
Confi guración
disponible
Cuando seleccione una opción, utilice los botones numéricos y
No disc
Cuando seleccione una opción, utilice los botones numéricos y
Cuando seleccione una opción, utilice los botones numéricos y
▲▼_ +
.
No disc
No disc
No disc
No disc
No disc
Audio
Pantalla
HDMI
Red
◄
Control Paterno
Selección de red :
Red de cable
►
Red inalámbrica
Servidor NTP :
Prueba de conexión de red
BD-LIVE Internet
BD-LIVE Internet
Connection
:
Permitir
(sólo válidas)
Música
Foto
Confi g.
_
Red inalámbrica
s
Selec.
r
Volver
Punto de acceso : No seleccionado
DHCP : Sí
Dirección IP : 0 . 0 . 0 . 0
Máscara subred : 255 . 255 . 255 . 0
Gateway : 0 . 0 . 0 . 0
DNS : Automático
Servidor DNS : 0 . 0 . 0 . 0
Guard. Cancelar
Confi guración no
disponible
No disc
No disc
No disc
No disc
No disc
No disc
Audio
Pantalla
HDMI
Red
◄
Control Paterno
Selección de red : Cable
Red inalámbrica
Proxy
Servidor NTP :
►
Prueba de conexión de red
Conexión a Internet
BD-LIVE
:
Permitir
(sólo válidas)
Música
Foto
Config.
Proxy
s
Selec.
r
Volver
Proxy : No
Servidor :
Puerto : 8080
Usuario :
Contraseña :
Guard. Cancelar
01783M-BD-P1600-XBG-ES-NEW.indb 53 2009-07-22 오전 11:28:48

54_ confi guración de red
confi guración de red
Ajuste del Servidor NTP (Utilizado para Recuperar la
Información de Hora desde el Servidor NTP)
Para confi gurarla, siga los pasos del 1 al 3 de la página 50.
Presione los botones
▲▼
hasta seleccionar Servidor
NTP y presione el botón ENTER o
+
.
Sí : El reproductor se conecta automáticamente al
servidor de Internet para ajustar la hora.
No : El reproductor no se conecta al servidor de
Internet para ajustar la hora.
Prueba de conexión de red
Utilice este menú para comprobar si está funcionando o no la conexión de red.
Para confi gurarla, siga los pasos del 1 al 3 de la página 50.
Presione los botones
▲▼
hasta seleccionar Prueba de
conexión de red y presione el botón ENTER o
+
.
Conexión de Internet de BD-LIVE
El reproductor de discos Blu-ray admite BD-LIVE lo que le permite disfrutar de una variedad de
contenido de servicio interactivo proporcionado por el fabricante del disco mediante una conexión de
red. Para disfrutar de esta función, primero debe realizar la conexión LAN (consulte la página 30) o la
conexión del adaptador de LAN inalámbrica a la ranura USB.
* Debe tener un dispositivo de memoria USB con un mínimo de 1 GB insertado en una de las ranuras
USB para poder descargar el contenido de BD-LIVE.
Es posible que se restrinja la conexión a Internet mientras utilice contenidos de BD-LIVE.
Para confi gurarla, siga los pasos del 1 al 3 de la página 50.
Presione los botones
▲▼
hasta seleccionar Conexión a
Internet BD-LIVE y presione el botón ENTER o
+
.
Permitir (todas) : Se permitirá la conexión a Internet
para todos los contenidos de BD-LIVE.
Permitir (Sólo válido) : La conexión a Internet sólo
estará permitida para contenidos de BD-LIVE que
contengan un certifi cado válido.
Restringir : No se permitirá ninguna conexión a
Internet para ningún contenido BD-LIVE.
¿Qué es un certifi cado válido? Cuando el Reproductor de discos Blu-ray utiliza BD-LIVE para enviar los
datos del disco y solicitar al servidor certifi car el disco, el servidor utiliza los datos transferidos para
comprobar si el disco es válido y envía el certifi cado de vuelta al reproductor.
Es posible que se restrinja la conexión a Internet mientras utilice contenidos de BD-LIVE.
4.
•
•
4.
4.
•
•
•
M
No disc
No disc
No disc
No disc
No disc
Audio
Pantalla
HDMI
Red
◄
Control Paterno
Red de cable
Red inalámbrica
Proxy
Servidor NTP : Cable
►
Prueba de conexión de red
Conexión a Internet
BD-LIVE
:
Permitir
(sólo válidas)
Sí
✓
No
Música
Foto
Config.
No disc
No disc
No disc
No disc
No disc
No disc
Audio
Pantalla
HDMI
Red
◄
Control Paterno
Red inalámbrica
Proxy
Servidor NTP
Prueba de conexión de red
►
Conexión a Internet
BD-LIVE
Música
Foto
Config.
Prueba de conexión de red
r
Volver
✔ Dirección MAC (00:10:18:00:00:70)
✔ Dirección IP.Máscara subred.Gateway.Servidor DNS
✔ Ping a puerta de enlace
✔ Prueba de servicio de Internet
La red funciona correctamente
Conexión a
Cuando el Reproductor de discos Blu-ray utiliza BD-LIVE para enviar los
No disc
Cuando el Reproductor de discos Blu-ray utiliza BD-LIVE para enviar los
No disc
No disc
No disc
No disc
No disc
Audio
Pantalla
HDMI
Red
◄
Control Paterno
Proxy
Servidor NTP : No
Prueba de conexión de red
Conexión a Internet
BD-LIVE
: Cable ►
Permitir(todas)
✓
Permitir
(sólo válidas)
Restringir
Música
Foto
Config.
01783M-BD-P1600-XBG-ES-NEW.indb 54 2009-07-22 오전 11:28:53

Español _55
● GESTIÓN DE DATOS DE BD
gestión de datos de BD
Los datos BD (almacenados en la memoria fl ash USB externa) es contenido
de disco Blu-ray, como avances de películas y otras funciones especiales
descargadas desde el servicio BD-LIVE o desde discos Blu-ray.
* Debe tener un dispositivo de memoria USB con un mínimo de 1 GB insertado en una de las ranuras USB para
poder descargar el contenido de BD-LIVE.
GESTIÓN DE DISPOSITIVOS DEL SISTEMA
Es posible gestionar los datos de usuario almacenados en el dispositivo de almacenamiento.
Con la unidad en modo Parar, presione el botón MENU.
Presione los botones
▲▼
hasta seleccionar Confi g. y
presione el botón ENTER o
+
.
Presione los botones
▲▼
hasta seleccionar Sistema y
presione el botón ENTER o
+
.
Presione los botones
▲▼
hasta seleccionar Gestión de
datos de BD y presione el botón ENTER o
+
.
- Para borrar la memoria fl ash -
Presione el botón ENTER para seleccionar Borrar
datos de BD.
Aparecerá el mensaje "Se borrarán todos los datos de
BD. ¿Desea continuar?".
Presione el botón
_ +
para seleccionar Sí y presione el
botón ENTER.
Descripción de la información del dispositivo
(almacenamiento) en el reproductor
Tamaño total : Tamaño total del dispositivo (almacenamiento).
Tamaño disponible : Tamaño total del dispositivo (almacenamiento).
En el modo de memoria externa, la reproducción del disco se detendrá si desconecta el dispositivo USB en
medio de la reproducción.
Sólo se admite un dispositivo USB que tenga un sistema de archivos FAT (etiqueta de volumen de DOS 8.) y
recomendamos utilizar un dispositivo USB con el protocolo USB 2., con una velocidad de lectura/escritura de
4 MB o más.
Un dispositivo de DD USB no se puede utilizar para almacenamiento de datos de BD (BD-LIVE).
Es posible que no esté operativa la función de reanudación de reproducción tras formatear el dispositivo de
almacenamiento.
El tamaño total de la administración de datos de la BD puede diferir, dependiendo de la versión de fi rmware.
1.
2.
3.
4.
1.
2.
•
•
M
Es posible gestionar los datos de usuario almacenados en el dispositivo de almacenamiento.
No disc
Es posible gestionar los datos de usuario almacenados en el dispositivo de almacenamiento.
Es posible gestionar los datos de usuario almacenados en el dispositivo de almacenamiento.
Es posible gestionar los datos de usuario almacenados en el dispositivo de almacenamiento.
Es posible gestionar los datos de usuario almacenados en el dispositivo de almacenamiento.
No disc
No disc
No disc
No disc
No disc
Sistema
◄
Idioma
Audio
Pantalla
HDMI
Red
Control Paterno
Ajuste de reloj
Encender / apagar sonido : Sí
Sonido de pulsación de teclas
: Sí
Gestión de datos de BD
►
DivX(R) Registro
DivX(R) Desactivación
Actualizac. sistema
Música
Foto
Config.
Tamaño total : Tamaño total del dispositivo (almacenamiento).
No disc
Tamaño total : Tamaño total del dispositivo (almacenamiento).
No disc
No disc
No disc
No disc
No disc
Sistema
◄
Idioma
Audio
Pantalla
HDMI
Red
Control Paterno
Ajuste de reloj
Encender / apagar sonido : Sí
Sonido de pulsación de teclas
: Sí
Gestión de datos de BD
►
DivX(R) Registro
DivX(R) Desactivación
Actualizac. sistema
Música
Foto
Config.
Gestión de datos de BD
s Selec. r Volver
Dispositivo actual : Memoria fl ash externa.
Tamaño total : 953MB Tamaño disponible : 889MB
Borrar datos de BD
01783M-BD-P1600-XBG-ES-NEW.indb 55 2009-07-22 오전 11:28:57

56_ gestión de datos de BD
gestión de datos de BD
DIVX(R) REGISTRO
Utilice el código de registro para registrar este Reproductor
de discos Blu-ray con el formato DivX(R) Video On Demand.
Para más información, visite www.divx.com/vod.
Esta opción no se activa si selecciona OK. Para activar esta opción, active Desactivación DivX(R).
DESACTIVACIÓN DE DIVX(R)
Para desactivar el código de registro en el sitio Web,
seleccione Sí. A continuación, podrá obtener un nuevo
código de registro.
Esta función puede utilizarse cuando esté disponible la función Registro DivX(R).
DivX
INFORMACIÓN SOBRE VIDEO DIVX: DivX
®
es un formato de video digital creado por DivX, Inc. Se
trata de un dispositivo ofi cial DivX Certifi ed o DivX Ultra Certifi ed que reproduce video DivX.
INFORMACIÓN SOBRE DIVX VIDEO-ON-DEMAND: Este dispositivo DivX
®
Certifi ed debe registrarse
para poder reproducir contenido DivX Video-on-Demand (VOD). En primer lugar, genere el código de
registro DivX VOD para su dispositivo y envíelo durante el proceso de registro. [Importante: el
contenido DivX VOD está protegido mediante un sistema DivX DRM (Gestión de derechos digitales)
que restringe la reproducción en dispositivos DivX Certifi ed registrados. Si intenta reproducir contenido
DivX VOD no autorizado para su dispositivo, aparecerá el mensaje “Authorization Error” (Error de
autorización) y no se reproducirá el contenido.] Más información en www.divx.com/vod.
DivX
®
es una marca registrada de DivX, Inc., y se utiliza con licencia
M
M
❖
de discos Blu-ray con el formato DivX(R) Video On Demand.
Esta opción no se activa si selecciona OK. Para activar esta opción, active Desactivación DivX(R).
Esta opción no se activa si selecciona OK. Para activar esta opción, active Desactivación DivX(R).
Sistema
◄
Idioma
Audio
Pantalla
HDMI
Red
Control Paterno
Encender / apagar sonido : Sí
Sonido de pulsación de teclas
: Sí
Gestión de datos de BD
DivX(R) Registration
►
DivX(R) Deactivation
System Update
No disc
Música
Foto
Config.
DivX(R) Registro
OK
Posibilidad de DivX(R)
Su código de registro es : XXXXXXXXXX
Para más información visite www.divx.com/vod.
Sistema
◄
Idioma
Audio
Pantalla
HDMI
Red
Control Paterno
Sonido de pulsación de teclas
: Sí
Gestión de datos de BD
DivX(R) Registration
DivX(R) Deactivation
►
System Update
No disc
Música
Foto
Config.
DivX(R) Desactivación
No
Posibilidad de DivX(R)
¿Desea desactivar el dispositivo?
Sí
01783M-BD-P1600-XBG-ES-NEW.indb 56 2009-07-22 오전 11:29:01

Español _57
● ACTUALIZACIÓN DEL SISTEMA
actualización del sistema
Samsung puede ofrecer actualizaciones en el futuro para el fi rmware del reproductor Blu-ray. Para actualizar este fi rmware debe :
USB: visite www.samsung.com/bluraysupport y descargue y guarde el fi rmware (archivo RUF) más reciente en
la unidad fl ash USB. Conecte la unidad fl ash USB al Reproductor de discos Blu-ray (la bandeja de discos debe
estar vacía) para actualizar el fi rmware y, a continuación, siga las instrucciones en pantalla.
CD/DVD: visite www.samsung.com/bluraysupport, descargue y guarde el fi rmware (archivo RUF) más reciente
en el disco. Inserte y reproduzca el disco en el Reproductor de discos Blu-ray para iniciar la actualización y, a
continuación, siga las instrucciones en pantalla.
Ethernet: si el Reproductor de discos Blu-ray está debidamente conectado a la red por cable o de forma inalámbrica,
el Reproductor de discos Blu-ray se conectará automáticamente cada vez que se encienda y se descargue archivos
de actualización si existen actualizaciones válidas. Siga los pasos que se indican a continuación.
ACTUALIZACIÓN DE FIRMWARE
Con la unidad en modo Parar / No Disc, presione el botón MENU.
Presione los botones
▲▼
hasta seleccionar Confi g., y presione el botón ENTER o
+
.
Presione los botones
▲▼
hasta seleccionar Sistema y presione el botón ENTER o
+
.
Presione los botones
▲▼
hasta seleccionar Actualizac.
sistema, y presione el botón ENTER o
+
.
El reproductor comprobará automáticamente el estado del
cable o de la conexión de red. Aparecerá la ventana de
comprobación de la conexión.
Si es posible la actualización : aparecerá información sobre
las versiones actual y nueva del fi rmware en un cuadro de
mensaje.
Si no es posible la actualización : aparecerá la siguiente
descripción en el cuadro de mensaje.
Si el cable no está conectado :
“El cable Ethernet no está conectado. Compruebe el
cable Ethernet.”
Si existe un fallo en la conexión de red :
“Sist. no puede conect. a internet para act. Compruebe la
confi guración de red.”
Si no existe ninguna versión posterior (ya se ha instalado
la versión más reciente) :
"Última versión de fi rmware prin. ya instalada. No necesita
actual."
1.
2.
3.
1.
2.
3.
4.
5.
@
@
•
•
•
y presione el botón
ENTER
o
+
.
No disc
y presione el botón
y presione el botón
No disc
No disc
No disc
No disc
No disc
Sistema
+
Idioma
Audio
Pantalla
HDMI
Red
Control Paterno
Música
Foto
Confi g.
_
Gestión de datos de BD
DivX(R) Registro
DivX(R) Desactivación
Actualizac. sistema
+
No disc
No disc
No disc
No disc
No disc
No disc
Sistema
+
Idioma
Audio
Pantalla
HDMI
Red
Control Paterno
Música
Foto
Confi g.
_
Gestión de datos de BD
DivX(R) Registro
DivX(R) Desactivación
Actualizac. sistema
+
Actualizac. sistema
Comprobando...
Espere
1 2 3 4
No disc
No disc
No disc
No disc
No disc
No disc
Sistema
+
Idioma
Audio
Pantalla
HDMI
Red
Control Paterno
Música
Foto
Confi g.
_
Gestión de datos de BD
DivX(R) Registro
DivX(R) Desactivación
Actualizac. sistema
+
Actualizac. sistema
Se encontró nueva fecha actualiz.
Versión actual : XXXXX
Nueva versión : XXXXX
Inicio Cancelar
1 2 3 4
No disc
No disc
No disc
No disc
No disc
No disc
Sistema
+
Idioma
Audio
Pantalla
HDMI
Red
Control Paterno
Música
Foto
Confi g.
_
Gestión de datos de BD
DivX(R) Registro
DivX(R) Desactivación
Actualizac. sistema
+
Actualizac. sistema
Sist. no puede conect. a
internet para act.
Compruebe la confi guración de red.
OK
1 2 3 4
01783M-BD-P1600-XBG-ES-NEW.indb 57 2009-07-22 오전 11:29:07

58_ actualización del sistema
actualización del sistema
Si hay un disco en el reproductor :
"No inserte el disco durante la actualización de red."
Esto indica que debe retirar todos los discos de la unidad para realizar la actualización.
Si el servicio del servidor no está disponible :
“ Update Server está en mantenimiento. Inténtelo después.”
Para realizar la actualización del sistema, presione los botones
_ +
para seleccionar Inicio y, a continuación, presione el
botón ENTER.
Se inicia la actualización del sistema.
Si selecciona Cancelar durante el proceso de descarga, se le
pide confi rmar la selección en un mensaje.
Para cancelar la descarga, seleccione Sí y presione el botón
ENTER.
Continuará la verifi cación. Una vez realizada la descarga, se
iniciará automáticamente el proceso de actualización del
fi rmware.
Una vez fi nalizada la instalación, el reproductor se apagará
automáticamente durante 5 segundos.
Todos los ajustes volverán a sus valores de fábrica la próxima
vez que inicie el sistema y aparecerá la ventana de selección
del idioma del menú.
Para cancelar la actualización durante el proceso de descarga de los datos de actualización, presione el
botón ENTER. Aparecerá un mensaje de confi rmación.
Si se selecciona Sí, fi nalizará el proceso de actualización y, si se selecciona No, continuará el proceso de actualización.
Una vez fi nalizada la actualización del sistema, compruebe los detalles del fi rmware en el menú Actualización
del sistema.
reproductor durante la actualización del sistema, ya que podría hacer que el reproductor no funcionara correctamente.
•
•
6.
7.
8.
9.
10.
M
No disc
No disc
No disc
No disc
No disc
No disc
Sistema
+
Idioma
Audio
Pantalla
HDMI
Red
Control Paterno
Música
Foto
Confi g.
_
Gestión de datos de BD
DivX(R) Registro
DivX(R) Desactivación
Actualizac. sistema
+
Actualizac. sistema
Se encontró nueva fecha actualiz.
Versión actual : XXXXX
Nueva versión : XXXXX
Inicio Cancelar
1 2 3 4
No disc
No disc
No disc
No disc
No disc
No disc
Sistema
+
Idioma
Audio
Pantalla
HDMI
Red
Control Paterno
Música
Foto
Confi g.
_
Gestión de datos de BD
DivX(R) Registro
DivX(R) Desactivación
Actualizac. sistema
+
Actualizac. sistema
Descargando datos de actualización...
No apague la unidad.
Cancelar
60%
1 2 3 4
No disc
No disc
No disc
No disc
No disc
No disc
Sistema
+
Idioma
Audio
Pantalla
HDMI
Red
Control Paterno
Música
Foto
Confi g.
_
Gestión de datos de BD
DivX(R) Registro
DivX(R) Desactivación
Actualizac. sistema
+
Actualizac. sistema
¿Desea cancelar operación actual.?
Sí No
1 2 3 4
No disc
No disc
No disc
No disc
No disc
No disc
Sistema
+
Idioma
Audio
Pantalla
HDMI
Red
Control Paterno
Música
Foto
Confi g.
_
Gestión de datos de BD
DivX(R) Registro
DivX(R) Desactivación
Actualizac. sistema
+
Actualizac. sistema
Comprobando datos de actualización.
Espere.
1 2 3 4
Para cancelar la actualización durante el proceso de descarga de los datos de actualización, presione el
No disc
Para cancelar la actualización durante el proceso de descarga de los datos de actualización, presione el
Para cancelar la actualización durante el proceso de descarga de los datos de actualización, presione el
No disc
No disc
No disc
No disc
No disc
Sistema
+
Idioma
Audio
Pantalla
HDMI
Red
Control Paterno
Música
Foto
Confi g.
_
Gestión de datos de BD
DivX(R) Registro
DivX(R) Desactivación
Actualizac. sistema
+
Actualizac. sistema
Actualización de microprograma.
Unidad se apagará automát. tras la
actualización.
1 2 3 4
01783M-BD-P1600-XBG-ES-NEW.indb 58 2009-07-22 오전 11:29:15

Español _59
● ACTUALIZACIÓN DEL SISTEMA
No utilice dispositivos USB que no sean unidades Flash USB para realizar las actualizaciones de software
utilizando la toma USB Host.
Debería haber únicamente un archivo de actualización de fi rmware en la unidad fl ash USB para que el
reproductor realice.
Correctamente la actualización. actualización correcta Es posible que las unidades USB sobredimensionadas
no se puedan insertar cuando esté conectado un cable de LAN o HDMI.
INFORMACIÓN DEL SISTEMA
Una vez fi nalizada la actualización del fi rmware, compruebe los detalles del fi rmware siguiendo los pasos que se
incluyen a continuación.
Con la unidad en modo Parar / No Disc, presione el
botón MENU.
Presione los botones
▲▼
hasta seleccionar Confi g., y
presione el botón ENTER o
+
.
Presione los botones
▲▼
hasta seleccionar Sistema, y
presione el botón ENTER o
+
.
Presione los botones
▲▼
hasta seleccionar
Información sistema, y presione el botón ENTER o
+
.
Puede ver información detallada sobre el fi rmware
actual.
Presione el botón ENTER para seleccionar OK.
Aparecerá el menú de confi guración del sistema.
NOTIFICACIÓN DE ACTUALIZACIÓN DEL FIRMWARE
Aparece el menú emergente cuando esté disponible una versión más reciente del fi rmware en el servidor de
actualizaciones de SAMSUNG que la del reproductor de discos Blu-ray, si el reproductor de discos Blu-ray está
conectado a la red y está encendido.
Sí : Se selecciona para actualizar inmediatamente.
No : Se selecciona para actualizar más adelante.
1.
2.
3.
4.
5.
•
•
Actualizac. sistema
Existe un nuevo Firmware disponible.
¿Desea actualizarlo ahora?
Sí No
No disc
No disc
No disc
No disc
No disc
Sistema
►
Idioma
Audio
Pantalla
HDMI
Red
Control Paterno
Música
Foto
Config.
◄
No disc
No disc
No disc
No disc
No disc
No disc
Sistema
◄
Idioma
Audio
Pantalla
HDMI
Red
Control Paterno
Información sistema
►
Zona hor.
Ajuste de reloj
Encender / apagar sonido : Sí
Sonido de pulsación de teclas
: Sí
Gestión de datos de BD
DivX(R) Registro
Música
Foto
Config.
◄
No disc
No disc
No disc
No disc
No disc
No disc
Sistema
◄
Idioma
Audio
Pantalla
HDMI
Red
Control Paterno
System Information
►
Time Zone
Ajuste de reloj
Encender / apagar sonido :
Sonido de pulsación de teclas
:
Gestión de datos de BD
DivX(R) Registro
Música
Foto
Config.
◄
Información sistema
OK
S/W : XXXXXXX
Loader : XXXXXXX
Region : A/4 (BD/DVD)
ESN : XXXX
01783M-BD-P1600-XBG-ES-NEW.indb 59 2009-07-22 오전 11:29:21

60_ visualización de una película
visualización de una película
USO DE LA FUNCIÓN DE PANTALLA
hgfZCV
Durante la reproducción, presione el botón INFO del
mando a distancia.
Si el título actual de un disco Blu-ray tiene una función
BONUSVIEW, presione el botón INFO en BONUSVIEW
para ver la información relacionada con BONUSVIEW.
Presione los botones
▲▼
para seleccionar la opción
que desee.
Presione los botones
_ +
para crear el cambio de la
confi guración que desee y, a continuación, presione el
botón ENTER.
Puede presionar los botones numéricos del mando a
distancia para acceder directamente a un título, a un
capítulo o para iniciar la reproducción desde un
momento deseado.
Vuelva a presionar el botón INFO para que la pantalla
desaparezca.
Si está reproduciendo contenido desde el menú Info, es posible que algunas funciones no estén habilitadas
dependiendo del disco.
Título : Para acceder al título deseado cuando hay más de un disco. Por ejemplo, si hay más de una película
en un Discos Blu-ray/DVD, cada película se identifi cará como un título.
Capítulo : La mayoría de discos Blu-ray/DVD se graban en capítulos para poder encontrar rápidamente un
capítulo específi co.
Tiempo Reprod. : Permite la reproducción de la película desde el momento deseado. Debe introducir el
momento de inicio como referencia. La función de búsqueda de una secuencia concreta no funciona en
algunos discos.
Audio : Hace referencia al idioma de banda sonora de la película. Un disco Blu-ray puede contener hasta 32
idiomas de audio y un DVD hasta 8.
Subtítulos : Se refi ere a los idiomas de los subtítulos disponibles en el disco. Podrá elegir el idioma de los
subtítulos o, si lo prefi ere, quitarlos de la pantalla. Un disco Blu-ray puede contener hasta 255 idiomas para
subtítulos y un DVD hasta 32.
Ángulo : Cuando los Discos Blu-ray/DVD contienen múltiples ángulos de una escena concreta, puede utilizar
la función ANGLE.
Vídeo BONUSVIEW/Audio BONUSVIEW : Puede crear los ajustes de Video BONUSVIEW o de Audio
BONUSVIEW si el título actual de un disco Blu-ray aparece en la sección BONUSVIEW. Las opciones de audio
de Vídeo BONUSVIEW/Audio BONUSVIEW, no obstante, se deshabilitarán con un disco Blu-ray que no admita
la función BONUSVIEW.
Modo de imagen : Esta función permite ajustar la calidad de video cuando está conectado a un TV a través
de HDMI.
- Dinámico : Elija este ajuste para aumentar la nitidez.
- Normal : Elija este ajuste para la mayoría de aplicaciones de visualización.
- Escénico : Este es el mejor ajuste para ver películas.
- Usuario : El usuario puede ajustar la función de nitidez y reducción de ruido respectivamente.
1.
•
2.
3.
•
4.
M
BD Info
{
Camb.
s
Selec.
Título : 000/034
Capítulo : 000/002
Tiempo Reprod. : 00:00:06
Audio : 1/1 ENG Multi CH
Subtítulos : NONE
Ángulo : 01/01
Modo de imagen : Normal
<Menú INFO para BONUSVIEW>
Si está reproduciendo contenido desde el menú Info, es posible que algunas funciones no estén habilitadas
Si está reproduciendo contenido desde el menú Info, es posible que algunas funciones no estén habilitadas
<Menú INFO para BONUSVIEW>
BD Info
{ Camb. s Selec.
Título : 000/034
Capítulo : 000/002
Tiempo Reprod. : 00:00:06
Audio : 1/1 ENG Multi CH
Subtítulos : NONE
Ángulo : 01/01
Vídeo [BONUSVIEW] : 01/01
Audio [BONUSVIEW] : 1/1 ENG 2CH
Modo de imagen : Normal
01783M-BD-P1600-XBG-ES-NEW.indb 60 2009-07-22 오전 11:29:29

Español _61
● VISUALIZACIÓN DE UNA PELÍCULA
USO DEL MENÚ DEL DISCO Y EMERGENTE/TÍTULO
Uso del menú del disco hZ
Durante la reproducción, presione el botón DISC MENU
del mando a distancia.
Presione los botones
▲▼_ +
para realizar la selección
que desee y presione el botón
+
u ENTER.
Las opciones de confi guración del menú de disco
puede variar entre discos.
Dependiendo del disco, es posible que no funcione el Menú Disco.
Uso del menú de título Z
Durante la reproducción, presione el botón TITLE MENU del mando a distancia.
Presione los botones
▲▼_ +
para realizar la selección que desee y presione el botón ENTER.
Las opciones de confi guración del menú de título pueden variar entre discos.
Dependiendo del disco, es posible que no funcione el Menú Título.
El menú de títulos aparecerá solamente si hay por lo menos dos títulos en el disco.
Reproducción de la lista de títulos gf
Con la unidad en modo de parada / reproducción,
presione el botón DISC MENU o TITLE MENU.
Presione los botones
▲▼
hasta seleccionar una entrada
que desea reproducir de la lista de títulos y presione el
botón
+
u ENTER.
Se reproducirá la entrada seleccionada (título).
- Ir a lista de reproducción -
Para ir a la lista de reproducción, presione el botón ROJO(A).
1.
2.
•
M
1.
2.
•
M
1.
2.
Dependiendo del disco, es posible que no funcione el Menú Disco.
3 4 5 6 7 8 9 10 11 12 13 14 15
%
PLAY MOVIE LANGUAGES SCENE SELECTIONS PREVIEWS
BD
RE
Página
Vídeo
Música
Foto
Confi g.
Title 008 00:04:36
Title 009 00:04:17
Title 010 00:04:11
Title 011 00:04:07
Title 012 00:04:46
Title 013 00:04:21
Title 014 00:03:43
_
Title 007 00:03:32
01783M-BD-P1600-XBG-ES-NEW.indb 61 2009-07-22 오전 11:29:33

62_ visualización de una película
visualización de una película
Uso del menú emergente h
Durante la reproducción, presione el botón POPUP
MENU del mando a distancia.
Presione los botones
▲▼_ +
o el botón ENTER para
seleccionar el menú deseado.
as opciones de confi guración del menú emergente
puede variar entre discos.
Dependiendo del disco, es posible que no funcione el Menú emergente.
REPETICIÓN DE LA REPRODUCCIÓN
Repita el capítulo o título actual.
Repetición de reproducción hgfZCV
Durante la reproducción, presione el botón REPEAT del
mando a distancia. Aparece la pantalla de repetición.
Presione los botones
▲▼
para seleccionar Capítulo o
Título.
Discos Blu-ray/DVD repite la reproducción por capítulo
o título.
Para regresar a la reproducción normal, presione
REPEAT de nuevo y presione los botones
▲▼
para
seleccionar No.
Según el disco que utilice, puede que la función Repetición no funcione.
Utilización de la función Repetir A-B hgfZCV
Presione el botón REPEAT A-B del mando a distancia
durante la reproducción.
Presione el botón REPEAT A-B en el punto en el que
desee que se inicie la repetición de la reproducción (A).
Presione el botón REPEAT A-B en el punto en el que
desee que se pare la repetición de la reproducción (B).
Para volver a la reproducción normal, presione el botón
CANCEL.
El punto B puede defi nirse hasta transcurridos 5 segundos de la reproducción desde el punto A.
Dependiendo del disco, es posible que no esté disponible el menú REPETIR A-B.
1.
2.
•
M
1.
2.
•
3.
M
1.
2.
3.
4.
M
► Repetir A-B
00:18:41 / 01:34:37
REPEAT A B
No
e
Salida
DVD
Repetir No
Dependiendo del disco, es posible que no funcione el Menú emergente.
3 4 5 6 7 8 9 10 11 12 13 14 15
%
MAIN MENU AUDIO SET UP SUBTITLES SCENE SELECTIONS
01783M-BD-P1600-XBG-ES-NEW.indb 62 2009-07-22 오전 11:29:42

Español _63
● VISUALIZACIÓN DE UNA PELÍCULA
SELECCIÓN DEL IDIOMA DE AUDIO hgfZ
Puede seleccionar el idioma del audio deseado de forma rápida y sencilla con el botón AUDIO.
Utilización del botón AUDIO
Presione el botón AUDIO durante la reproducción. El Audio
cambia a medida que se presiona el botón sucesivamente.
Los idiomas de audio se representan mediante
abreviaturas.
Para eliminar la barra de Audio, presione el botón
CANCEL o RETURN.
Utilización del botón INFO
Durante la reproducción, presione el botón INFO del
mando a distancia.
Presione los botones
▲▼
para seleccionar Audio.
Presione los botones
_ +
del mando a distancia para seleccionar el idioma de audio que desee.
Esta función depende de los idiomas de audio codifi cados en el disco y puede que no esté disponible.
Un disco Blu-ray puede contener hasta 32 idiomas de audio y un DVD hasta 8.
Dependiendo del tipo de disco, puede utilizar el botón AUDIO para cambiar la banda sonora y el idioma del
audio.
Es posible que algunos discos Blu-ray le permitan seleccionar la pista de sonido de audio multicanal LPCM o
Dolby digital en pistas de sonido en inglés.
La información sobre el modo primario/secundario también aparecerá si el disco Blu-ray tiene una sección
BONUSVIEW.
Utilice el botón _ + para cambiar entre los modos de audio primario y secundario.
El indicador _ + no aparecerá en pantalla si BONUSVIEW no contiene ningún ajuste de audio BONUSVIEW.
SELECCIÓN DEL IDIOMA DE LOS SUBTÍTULOS
Puede seleccionar los subtítulos de forma rápida y sencilla con el botón SUBTITLE.
Utilización del botón SUBTITLE hZ
Presione el botón SUBTITLE. Los subtítulos cambian
cuando se presiona el botón varias veces. Los idiomas
de los subtítulos se representan mediante abreviaturas.
Para eliminar la barra de Subtítulos, presione el botón
CANCEL o RETURN.
1.
•
2.
1.
2.
3.
M
1.
2.
Audio 1/4 ENG Dolby Digital Multi CH
Subtítulos NONE
01783M-BD-P1600-XBG-ES-NEW.indb 63 2009-07-22 오전 11:29:48

64_ visualización de una película
visualización de una película
Utilización del botón INFO
Durante la reproducción, presione el botón INFO del mando a distancia.
Presione los botones
▲▼
para seleccionar Subtítulos.
Presione los botones
_ +
del mando a distancia para seleccionar el idioma de los subtítulos.
Dependiendo del disco Blu-ray / DVD, puede cambiar los subtítulos que desee en el menú de disco.
Presione el botón DISC MENU.
Esta función depende de los subtítulos codifi cados en el disco y no estará operativa en todos los Discos
Blu-ray/DVD.
Un disco Blu-ray puede contener hasta 255 idiomas de subtítulos y un DVD hasta 32.
La información sobre el modo primario/secundario también aparecerá si el disco Blu-ray tiene una sección
BONUSVIEW.
Esta función cambia tanto los subtítulos primarios como secundarios al mismo tiempo.
El número de subtítulos es la suma de los primarios y los secundarios.
MODIFICACIÓN DEL ÁNGULO DE LA CÁMARA
Cuando los BD/DVD contienen múltiples ángulos de una escena concreta, puede utilizar la función ÁNGULO.
Utilización de la función ANGLE hZ
Durante la reproducción, presione el botón INFO del
mando a distancia.
Presione los botones
▲▼
para seleccionar Ángulo.
Presione los botones
_ +
o bien puede utilizar los
botones numéricos del mando a distancia para
seleccionar el ángulo que desee.
Si el disco sólo dispone de un ángulo, esta función no estará operativa. Hoy en día existen muy pocos discos
con esta función.
Dependiendo del disco, es posible que estas funciones no estén operativas.
1.
2.
3.
M
1.
2.
3.
M
Si el disco sólo dispone de un ángulo, esta función no estará operativa. Hoy en día existen muy pocos discos
Si el disco sólo dispone de un ángulo, esta función no estará operativa. Hoy en día existen muy pocos discos
Si el disco sólo dispone de un ángulo, esta función no estará operativa. Hoy en día existen muy pocos discos
BD Info
{
Camb.
{
Mover
Título : 001/500
Capítulo : 001/001
Tiempo Reprod. : 00:00:00
Audio : 1/5 ENG 2CH
Subtítulos : NONE
Ángulo : 01/01
Modo de imagen : Normal
01783M-BD-P1600-XBG-ES-NEW.indb 64 2009-07-22 오전 11:29:52

Español _65
● VISUALIZACIÓN DE UNA PELÍCULA
AJUSTES DE BONUSVIEW
La función BONUSVIEW le permite ver contenido adicional (como comentarios) en una ventana pequeña mientras
se reproduce el vídeo.
Utilización del botón BONUSVIEW h
Si el disco Blu-ray actual incluye ka función
BONUSVIEW, puede utilizar el botón BONUSVIEW para
activar o desactivar BONUSVIEW.
Cada vez que presione el botón BONUSVIEW,
cambiará entre BONUSVIEW Sí y BONUSVIEW No.
Puede cambiar los ajustes detallados de BONUSVIEW en el menú INFO (consulte la página 60: selección de
audio secundario, secuencia de vídeo y subtítulos, etc.).
Si cambia de Video BONUSVIEW, Audio BONUSVIEW cambiará automáticamente de acuerdo con Video
BONUSVIEW.
Si el disco BD sólo admite Audio BONUSVIEW, puede pulsar el botón BONUSVIEW para activar o desactivar
el modo de audio secundario.
BD-LIVE™
El reproductor de discos Blu-ray admite BD-LIVE lo que le permite disfrutar de una variedad de contenido de
servicio interactivo proporcionado por el fabricante del disco mediante una conexión de red.
Utilización del disco BD-LIVE
Conecte la red (consulte las páginas 30~31) y compruebe la confi guración de red (consulte las
páginas 50~54).
Inserte un disco Blu-ray que admita BD-LIVE.
Seleccione el contenido suministrado por el fabricante del disco para disfrutar de BD-LIVE.
La forma de utilizar BD-LIVE y sus funciones puede diferir dependiendo del disco.
Para utilizar BD-LIVE, debe insertar en una de las ranuras USB un dispositivo de memoria USB con un
mínimo de 1 GB.
1.
2.
M
1.
2.
3.
M
01783M-BD-P1600-XBG-ES-NEW.indb 65 2009-07-22 오전 11:29:55

66_ audición de música
audición de música
BOTONES DEL MANDO A DISTANCIA UTILIZADOS PARA
REPRODUCCIÓN DE CD DE AUDIO (CD-DA)/MP3
Botón PAUSE : Hace una pausa en la reproducción.
Botón SKIP ( ) : Durante la reproducción, vaya a la página
siguiente en la Lista de música o vaya a la pista siguiente en la
Lista de reproducción.
Botón PLAY : Reproduce la pista actualmente seleccionada.
Botones▲▼ : Selecciona una pista (canción) o una carpeta en
la lista de música o en la lista de reproducción.
Botón COLOR
Botón ROJO(A) : Selecciona el modo de repetición de
reproducción (Repeat) durante la reproducción.
Botón VERDE(B) : Vaya a Lis rep. en Lista de música.
Botón AMARILLO(C) : Reproducción de la lista de
reproducción.
Botones _ + : Durante la reproducción, estos botones no
están disponibles.
_ : Vuelve al menú anterior.
+ : Va al menú de la pista (canción).
Botón ENTER : Reproduce la pista seleccionada (canción).
Botón STOP : Detiene una pista (canción).
Botones SEARCH ( ) : Reproducción rápida.
Botón SKIP ( ) : Si presiona este botón una vez
transcurridos tres segundos de la reproducción, la pista actual
se reproducirá desde el principio. Pero, si presiona este botón
antes de que pasen tres segundos tras la reproducción, se
reproducirá la pista anterior. Se utiliza para ir a la página
anterior en la Lista de música o Lis rep.
REPETICIÓN DE CD DE AUDIO (CD-DA)/MP3
Durante la reproducción, presione de forma repetida el botón REPEAT o ROJO(A) para seleccionar el
modo de repetición que desee.
Audio CD (CD-DA)
➝ ➝ ➝
MP3
➝ ➝ ➝
Normal (Audio CD (CD-DA)/MP3) : Las pistas de un disco se reproducen en el orden en el que
se grabaron en el disco.
Repetir pista (Audio CD (CD-DA)/MP3)
Repetir carpeta (MP3)
Aleatorio (Audio CD (CD-DA)/MP3) : La opción aleatoria reproduce las pistas de un disco en
orden aleatorio.
Repetir todo (Audio CD (CD-DA)) : Se repiten todas loas pistas.
- Para volver a reproducción normal -
Presione el botón REPEAT o ROJO(A) para volver a la reproducción normal.
1.
2.
3.
4.
5.
•
•
•
6.
7.
8.
9.
10.
❖
❖
•
•
•
•
•
RE
TURN
ENTER
POPUP MENUDISC MENU
A B C D
MENU
EXI
T
INF
O
0
STOP PLAY
BONUSVIEW PAUSE
RE
TURN
01783M-BD-P1600-XBG-ES-NEW.indb 66 2009-07-22 오전 11:29:57

Español _67
● AUDICIÓN DE MÚSICA
Puede seleccionar la fuente de datos presionando el botón
$%
en la pantalla del menú.
(CD/DVD/Tarjeta de memoria fl ash USB)
REPRODUCCIÓN DE UN CD DE AUDIO (CD-DA)/MP3
AF
Introduzca un CD de audio (CD-DA) o un Disco MP3 en
la bandeja del disco.
En un CD de audio, la primera pista se reproducirá
automáticamente.
En un Disco MP3, presione los botones
▲▼
para
seleccionar Música y presione el botón ENTER.
(Puede oír archivos mp3 utilizando una tarjeta de
memoria fl ash USB.)
Para ir a la lista de música, presione el botón STOP o
RETURN.
Aparece en el televisor la pantalla de la lista de música.
Presione los botones
▲▼
para seleccionar la pista que
desee reproducir y, a continuación, presione el botón
ENTER.
Elementos de pantalla del CD de Audio (CD-DA)/MP3
Muestra el tipo de soporte.
Pista actual (canción)
Muestra el número o título de pista que se está
reproduciendo.
Barra de estado de reproducción.
Muestra el estado de repetición.
Muestra el índice de reproducción actual, el número
total de pistas.
Tiempo de reproducción actual/total.
Muestra los botones de COLOR disponibles.
1.
•
•
2.
3.
❖
CD
►
TRACK 001
1/18
00:02:24 / 00:05:57
a
Modo de reproducción
CD
►
TRACK 001
1/18
00:02:24 / 00:05:57
a
Modo de reproducción
CD
b
Lis. rep.
Página
_
TRACK 001 00:04:08
+
TRACK 002 00:03:41
TRACK 003 00:03:17
TRACK 004 00:03:36
TRACK 005 00:03:47
TRACK 006 00:03:50
TRACK 007 00:03:54
Vídeo
Música
Foto
Confi g.
01783M-BD-P1600-XBG-ES-NEW.indb 67 2009-07-22 오전 11:30:04

68_ audición de música
audición de música
Lista de reproducción
AF
Puede crear una lista de reproducción de hasta 99 pistas.
Introduzca un CD de audio (CD-DA) o un Disco MP3 en
la bandeja del disco.
En un CD de audio, la primera pista se reproducirá
automáticamente.
En un Disco MP3, presione los botones
▲▼
para
seleccionar Música y presione el botón ENTER.
(Puede oír archivos mp3 utilizando una tarjeta de
memoria fl ash USB.)
Para ir a la Lista de música, presione el botón
VERDE(B) o RETURN.
Aparece la pantalla Lista de música.
Presione el botón VERDE(B) para ir a la lista de
reproducción.
Presione los botones
▲▼
para seleccionar una pista y, a
continuación, presione el botón ENTER para añadirlo a
la Lista de reproducción. Repita este procedimiento para
añadir pistas adicionales.
Si hay una pista que no desea en la lista de
reproducción, presione el botón
+▲▼
para seleccionar
la pista y, a continuación, presione el botón ENTER.
Se eliminará la pista seleccionada.
Presione el botón AMARILLO(C) para reproducir las
pistas seleccionadas.
Una vez que termine la pista, se reproducirá
automáticamente la pista siguiente.
Para editar la lista de reproducción, presione el botón STOP o RETURN.
Para ir a la Lista de música, presione el botón RETURN.
1.
•
•
2.
3.
4.
5.
•
6.
7.
8.
CD
CD
CD
CD
►
TRACK 001
1/3
00:02:17 / 00:05:57
a
Modo de reproducción
CD
b
Lis. rep.
Página
TRACK 001 00:05:57
TRACK 002 00:04:28
TRACK 003 00:04:08
+
TRACK 004 00:03:41
TRACK 005 00:03:17
TRACK 006 00:03:36
TRACK 007 00:03:47
TRACK 008 00:03:50
TRACK 009 00:03:54
_
Vídeo
Música
Foto
Confi g.
b
Lista de música
c
Lis. rep. Reprod.
s
Añadir
Reprod.
Original Lis. rep.
CD
_
TRACK 001
TRACK 002
TRACK 003
TRACK 004
TRACK 005
TRACK 006
TRACK 007
Vídeo
Música
Foto
Confi g.
para seleccionar una pista y, a
la Lista de reproducción. Repita este procedimiento para
para seleccionar una pista y, a
CD
b
Lista de música
c
Lis. rep. Reprod.
s
Añadir
Reprod.
01.TRACK 001
02.TRACK 002
03.TRACK 003
Original Lis. rep.
_
TRACK 001
TRACK 002
TRACK 003
TRACK 004
TRACK 005
TRACK 006
TRACK 007
TRACK 008
TRACK 009
Vídeo
Música
Foto
Confi g.
01783M-BD-P1600-XBG-ES-NEW.indb 68 2009-07-22 오전 11:30:17

Español _69
● AUDICIÓN DE MÚSICA
REPRODUCCIÓN SIMULTÁNEA DE MP3 Y JPEG AGF
Puede disfrutar con la audición de archivos MP3 mientras de forma simultánea ve archivos JPEG.
Mientras reproduce un archivo MP3, presione el botón
AZUL(D).
Aparecerá la pantalla de velocidad de presentación.
Seleccione la velocidad de presentación que desee.
Para utilizar esta función, tiene que seleccionar la carpeta que contenga tanto los archivos de música como
los de fotos.
Cuando reproduzca simultáneamente archivos MP3 y JPEG, puede que se produzca una pérdida de audio
debido a la velocidad en bits del MP3, al tamaño de la imagen JPEG y al método de codifi cación.
1.
2.
M
Puede disfrutar con la audición de archivos MP3 mientras de forma simultánea ve archivos JPEG.
Para utilizar esta función, tiene que seleccionar la carpeta que contenga tanto los archivos de música como
Para utilizar esta función, tiene que seleccionar la carpeta que contenga tanto los archivos de música como
Para utilizar esta función, tiene que seleccionar la carpeta que contenga tanto los archivos de música como
CD
►
001. SONG01.mp3
1/18
00:02:24 / 00:05:57
a
Modo de reproducción
d
Presentación
01783M-BD-P1600-XBG-ES-NEW.indb 69 2009-07-22 오전 11:30:19

70_ reproducción de una imagen
reproducción de una imagen
REPRODUCCIÓN DE UN DISCO JPEG GF
Inserte un disco JPEG en la bandeja de disco.
(Puede ver archivos jpeg utilizando una tarjeta de
memoria fl ash USB.)
Presione los botones
▲▼
hasta seleccionar Foto y
presione el botón ENTER o
+
.
Presione los botones
▲▼
para seleccionar la carpeta
que desee reproducir y, a continuación, presione el
botón ENTER.
4
-1
. Presione el botón AZUL(D) para iniciar la presentación.
4
-2
. Presione los botones
▲▼
para seleccionar la imagen
que desee y, a continuación, presione el botón ENTER.
Puede utilizar la función de rotación, zoom y
presentación.
Botón ROJO(A) : Cada vez que se presione este
botón, la imagen gira 90 grados hacia la izquierda.
Botón VERDE(B) : Cada vez que se presione este
botón, la imagen gira 90 grados hacia la derecha.
Botón AMARILLO(C) : Cada vez que se presiona este botón, la imagen se amplía hasta 4X
(Cuatro veces el tamaño normal).
Botón AZUL(D) : Selecciona la velocidad de presentación.
Botón PLAY : La imagen entra en modo de presentación.
1.
2.
3.
•
•
•
•
•
: Cada vez que se presiona este botón, la imagen se amplía hasta 4X
CD
: Cada vez que se presiona este botón, la imagen se amplía hasta 4X
: Cada vez que se presiona este botón, la imagen se amplía hasta 4X
CD
CD
CD
#
gun003.jpg
03/100
a 90° b 90° c Zoom d Velocidad
presentación
CD
Vídeo
Música
_
Foto
+
Confi g.
_
..
+
640 jpg 03 JUL 2000
full jpg 03 JUL 2000
CD
Vídeo
Música
Foto
Confi g.
CD
_
..
+
gun001.jpg 03 JUL 2000 465 KB
gun002.jpg 03 JUL 2000 465 KB
gun003.jpg 03 JUL 2000 465 KB
gun004.jpg 03 JUL 2000 465 KB
gun005.jpg 03 JUL 2000 465 KB
gun006.jpg 03 JUL 2000 465 KB
Vídeo
Música
Foto
Confi g.
d Presentación
01783M-BD-P1600-XBG-ES-NEW.indb 70 2009-07-22 오전 11:30:28

Español _71
● UTILIZACIÓN DE E-CONTENIDO
utilización de e-contenido
Con el Reproductor de discos Blu-ray, puede utilizar el servicio e-Contenido
(YouTube, por ejemplo) a través de la red.
Tras realizar la conexión de red (consulte las páginas 30~31), compruebe la
confi guración de red (consulte desde la página 50 a la 54).
De acuerdo con la política de la compañía, las especifi caciones están sujetas a cambio.
La reproducción de video de e-Contenido puede interrumpirse, detenerse o guardarse en memoria intermedia,
dependiendo de la velocidad de banda ancha.
UTILIZACIÓN DE YOUTUBE
Este Reproductor de discos Blu-ray le permite utilizar los siguientes servicios facilitados por YouTube.
Con la unidad en modo Parar / No Disc (Sin disco), presione el botón ROJO (A) de la pantalla del menú.
Elementos de la pantalla de YouTube
Información de selección de país: muestra el país que
seleccione.
Tiempo de clasifi cación actual: muestra una lista de
títulos ordenada por Hora.
(Hoy, Semanal, Mensual, Todo)
Información de usuario: sólo se muestra al iniciar
sesión.
Número de página: número de página del título
seleccionado / páginas totales en la lista actual.
Lista de contenido: muestra un título, número de vistas,
califi caciones, tiempo de ejecución y fecha.
Ayuda de navegación: muestra los botones disponibles.
Lista de categorías: para información más detallada,
consulte a continuación.
Lista de categorías
Los más vistos
Muestra los videos más vistos.
Mejor clasifi cados
Muestra los videos con la califi cación más alta.
Los más populares
Muestra una lista de videos populares.
Los más debatidos
Muestra los videos más debatidos.
Principales favoritos
Muestra los videos más añadidos a los Favoritos de los usuarios.
Los más vinculados
Muestra los videos más vinculados con otros sitios Web.
Los más respondidos
Muestra los videos que más respuestas reciben de usuarios de la Web
M
1.
❖
Los más vistos
Mejor clasifi cados
Los más populares
Los más debatidos
Principales favoritos
Los más vinculados
Los más respondidos
Presentados
Historial visitado
Mis favoritos
Hoy 1/25
YouTube / Todo el mundo
a
Desconexión
b
Cambiar modo
c
Seleccionar
d
Opción
[
/
]
Página
You Tube
bkj
abc... 00:06:20
Vistas : 5969 Clasifi . :
2009-05-21
def... 00:06:20
Vistas : 5969 Clasifi . :
2009-05-21
ghi... 00:06:20
Vistas : 5969 Clasifi . :
2009-05-21
jkl... 00:06:20
Vistas : 5969 Clasifi . :
2009-05-21
01783M-BD-P1600-XBG-ES-NEW.indb 71 2009-07-22 오전 11:30:34

72_ utilización de e-contenido
utilización de e-contenido
Presentados
Muestra una lista de videos presentados.
Historial visitado
Muestra un historial de los videos visitados.
Mis favoritos
Si ha iniciado sesión en una cuenta de YouTube con el Reproductor de discos Blu-ray y se
ha añadido un video a Mis favoritos, puede reproducir el video en el Reproductor de discos
Blu-ray o a una PC que esté sincronizado con el sitio de YouTube.
Biblioteca Reprod.
Puede añadir videos a Biblioteca Reprod. sin iniciar sesión en la cuenta de YouTube.
Buscar
Seleccione criterios de búsqueda e introduzca una palabra clave para el video que desee
reproducir.
Confi guración país
Muestra una lista de videos para el país que desee.
Gestión de cuentas
Le permite administrar nombres y contraseñas de usuario de YouTube.
Confi guración de país
Si selecciona un país en Confi guración país, puede ver videos desde el sitio YouTube de dicho país.
Presione el botón $% para seleccionar Confi guración
país y presione el botón ENTER.
Presione el botón $%_ + para seleccionar el país que
desee y presione el botón ENTER.
Inicio de sesión
Si ha iniciado sesión en su cuenta de YouTube con el Reproductor de discos Blu-ray, puede reproducir
videos añadidos a Mis favoritos.
Presione el botón ROJO (A) en la pantalla de YouTube.
Presione el botón $%_ + para introducir el nombre de
usuario y presione el botón AMARILLO (C).
Presione el botón $%_ + para introducir la contraseña
y presione el botón AMARILLO (C).
Presione el botón _ + para seleccionar OK y, a
continuación, presione el botón ENTER.
Presione el botón ROJO (A) para cerrar la sesión de la
cuenta de YouTube.
1.
2.
1.
2.
3.
4.
M
Si selecciona un país en Confi guración país, puede ver videos desde el sitio YouTube de dicho país.
YouTube / Todo el mundo
a
Conexión
You Tube
Biblioteca Reprod.
Buscar
Confi guración país
Gestión de cuentas
Hong Kong
Australia
Brasil
Canadá
Checa
Francia
Alemania
Polonia
Irlanda
Israel
Todo el mundo
Italia
Japón
México
Países Bajos
Nueva Zelanda
Rusia
Corea del Sur
España
Suecia
Taiwán
Reino Unido
India
Los más vistos
Mejor clasifi cados
Los más populares
Los más debatidos
Principales favoritos
Los más vinculados
Los más respondidos
Presentados
Historial visitado
Mis favoritos
Hoy 1/1
YouTube / Todo el mundo
You Tube
bkj
abc... 00:06:20
Vistas : 5969 Clasifi . :
2009-05-21
def... 00:06:20
Vistas : 5969 Clasifi . :
2009-05-21
ghi... 00:06:20
Vistas : 5969 Clasifi . :
2009-05-21
jkl... 00:06:20
Vistas : 5969 Clasifi . :
2009-05-21
Ajuste de contraseña numérica
Registre una contraseña numérica de 4 dígitos.
A continuación puede iniciar sesión en YouTube
en este reproductor sólo presionando los botones
numéricos del mando a distancia.
Aceptar Omitir
Los más vistos
Mejor clasifi cados
Los más populares
Los más debatidos
Principales favoritos
Los más vinculados
Los más respondidos
Presentados
Historial visitado
Mis favoritos
Hoy 1/25
def... 00:06:20
Vistas : 5969 Clasifi . :
2009-05-21
ghi... 00:06:20
Vistas : 5969 Clasifi . :
2009-05-21
jkl... 00:06:20
Vistas : 5969 Clasifi . :
2009-05-21
YouTube / Todo el mundo
You Tube
abc... 00:06:20
Vistas : 5969 Clasifi . :
2009-05-21
Nombre de usuario
I
.. @ abc def
ghi jkl mno
pgrs tuv wxyz
Borrar
a/A/1/
abc ç
(
/
)
Cursor
Seleccionar
r
Volver
Completado
cb
Blanco
a
01783M-BD-P1600-XBG-ES-NEW.indb 72 2009-07-22 오전 11:30:39

Español _73
● UTILIZACIÓN DE E-CONTENIDO
Introduzca la contraseña numérica de 4 dígitos.
Puede iniciar sesión en YouTube en el Reproductor de
discos Blu-ray presionando simplemente los botones
numéricos.
Reproducción de video
Presione el botón
$%
para seleccionar la categoría que
desee.
Seleccione el período de tiempo de clasifi cación actual
(Hoy, Semanal, Mensual, Todo) presionando el botón
VERDE (B).
Presione el botón
+
para ir a la lista de contenido y presione el botón
$%
para seleccionar el título
que desee.
Presione el botón ENTER.
Presione el botón ENTER para mostrar el video a toda pantalla durante la reproducción y para proporcionar
videos relacionados cuando fi nalice.
Dependiendo de las especifi caciones de YouTube, es posible que el contenido HD no se reproduzca
claramente.
Presione el botón EXIT para salir de YouTube.
Durante la reproducción, el botón EXIT no está disponible.
5.
1.
2.
3.
4.
M
para mostrar el video a toda pantalla durante la reproducción y para proporcionar
YouTube > Los más vistos Todo el mundo
b
Agregar a favoritos
[
/
]
Omitir
_
+
Ant/Sig
Pantalla completa
You Tube
Falling in love
+
00:00:00 / 00:06:23
I love my dogs.
Palabras clave: dog, love, falling
Vistas : 196 Clasifi .:
2009-05-21
Informar sobre violaciones del copyright:
http://www.youtube.com/t/copyright_notice
Los más vistos
Mejor clasifi cados
Los más populares
Los más debatidos
Principales favoritos
Los más vinculados
Los más respondidos
Presentados
Historial visitado
Mis favoritos
Hoy 1/25
YouTube / Todo el mundo
a
Conexión
b
Cambiar modo
You Tube
abc... 00:06:20
Vistas : 5969 Clasifi . :
2009-05-21
def... 00:06:20
Vistas : 5969 Clasifi . :
2009-05-21
ghi... 00:06:20
Vistas : 5969 Clasifi . :
2009-05-21
jkl... 00:06:20
Vistas : 5969 Clasifi . :
2009-05-21
Los más vistos
Mejor clasifi cados
Los más populares
Los más debatidos
Principales favoritos
Los más vinculados
Los más respondidos
Presentados
Historial visitado
Mis favoritos
Hoy 1/1
YouTube / Todo el mundo
You Tube
bkj
abc... 00:06:20
Vistas : 5969 Clasifi . :
2009-05-21
def... 00:06:20
Vistas : 5969 Clasifi . :
2009-05-21
ghi... 00:06:20
Vistas : 5969 Clasifi . :
2009-05-21
jkl... 00:06:20
Vistas : 5969 Clasifi . :
2009-05-21
Ajuste de contraseña numérica
Escribir nueva contraseña
[0~9] Número
r
Volver
Confi rmar contraseña
Los más vistos
Mejor clasifi cados
Los más populares
Los más debatidos
Principales favoritos
Los más vinculados
Los más respondidos
Presentados
Historial visitado
Mis favoritos
Hoy 1/1
YouTube / Todo el mundo
You Tube
abc... 00:06:20
Vistas : 5969 Clasifi . :
2009-05-21
def... 00:06:20
Vistas : 5969 Clasifi . :
2009-05-21
ghi... 00:06:20
Vistas : 5969 Clasifi . :
2009-05-21
jkl... 00:06:20
Vistas : 5969 Clasifi . :
2009-05-21
Hoy Semanal Mensual Todo
01783M-BD-P1600-XBG-ES-NEW.indb 73 2009-07-22 오전 11:30:44

74_ utilización de e-contenido
utilización de e-contenido
Búsqueda de video
Presione el botón
$%
para seleccionar Buscar y, a
continuación, presione el botón ENTER.
Presione los botones
_ +
para seleccionar los criterios
de búsqueda y, a continuación, presione el botón
ENTER.
Relevancia: Se selecciona si desea buscar videos
similares.
Publicado: Se selecciona si desea clasifi car videos
por fecha de creación.
Ver conteo: Se selecciona si desea clasifi car videos por conteo.
Clasifi .: Se selecciona para clasifi car videos por la califi cación.
Presione los botones
_ +
para seleccionar Palabra
clav. y, presione el botón ENTER.
Presione el botón
$%_ +
para seleccionar un campo de texto.
Presione el botón ENTER de forma repetida en el
campo de texto para seleccionar la letra, número o
icono que desee.
Tras haber introducido el asunto que desea buscar,
presione el botón AMARILLO (C) en el mando a
distancia.
1.
2.
•
•
•
•
3.
4.
5.
6.
Biblioteca Reprod.
Buscar
Confi guración país
Gestión de cuentas
1/25
YouTube / Todo el mundo
a
Conexión
c
Seleccionar
d
Opción
[
/
]
Página
You Tube
ab... 00:06:20
Vistas : 5969 Clasifi . :
2009-05-21
abc... 00:06:20
Vistas : 5969 Clasifi . :
2009-05-21
abcd... 00:06:20
Vistas : 5969 Clasifi . :
2009-05-21
abcde... 00:06:20
Vistas : 5969 Clasifi . :
2009-05-21
Biblioteca Reprod.
Buscar
Confi guración país
Gestión de cuentas
Hoy 1/25
def... 00:06:20
Vistas : 5969 Clasifi . :
2009-05-21
ghi... 00:06:20
Vistas : 5969 Clasifi . :
2009-05-21
jkl... 00:06:20
Vistas : 5969 Clasifi . :
2009-05-21
YouTube / Todo el mundo
You Tube
abc... 00:06:20
Vistas : 5969 Clasifi . :
2009-05-21
Buscar
I
(
/
)
Cursor
Seleccionar
r
Volver
.. @ abc def
ghi jkl mno
pgrs tuv wxyz
Borrar
a
a/A/1/
b
Blanco
c
Buscar
abc ç
para seleccionar un campo de texto.
Biblioteca Reprod.
Buscar
Confi guración país
Gestión de cuentas
Hoy 1/25
def... 00:06:20
Vistas : 5969 Clasifi . :
2009-05-21
ghi... 00:06:20
Vistas : 5969 Clasifi . :
2009-05-21
jkl... 00:06:20
Vistas : 5969 Clasifi . :
2009-05-21
YouTube / Todo el mundo
You Tube
abc... 00:06:20
Vistas : 5969 Clasifi . :
2009-05-21
Buscar
a b I
(
/
)
Cursor
Seleccionar
r
Volver
ab
abc
abcd
abcde
abcdef
.. @ abc def
ghi jkl mno
pgrs tuv wxyz
Borrar
a
a/A/1/
b
Blanco
c
Buscar
abc ç
Se selecciona si desea clasifi car videos por conteo.
Biblioteca Reprod.
Buscar
Confi guración país
Gestión de cuentas
YouTube / Todo el mundo
a
Conexión
You Tube
Publicado Ver conteo Clasifi .Relevancia
Buscar
Mi historial de búsquedas 0/0
Palabra clav.
01783M-BD-P1600-XBG-ES-NEW.indb 74 2009-07-22 오전 11:30:50

Español _75
● UTILIZACIÓN DE E-CONTENIDO
Presione los botones
$%
para seleccionar el video que
desee y, a continuación, presione el botón ENTER para
reproducir el video.
Presionar el botón ENTER mientras se encuentra en el campo de texto a/A/1/ le permite cambiar los
campos de texto a minúscula, mayúscula, números e iconos.
Mis favoritos
Si ha iniciado sesión en una cuenta de YouTube con el Reproductor de discos Blu-ray y se ha añadido
un video a Mis favoritos, puede reproducir el video en el Reproductor de discos Blu-ray o a una PC que
esté sincronizado con el sitio de YouTube.
Almacenamiento de un video
Presione el botón VERDE (B) durante la reproducción.
Aparece el mensaje de la ruta de almacenamiento
Presione el botón
$%
para seleccionar Mis favoritos y,
a continuación, presione el botón ENTER.
Presione el botón ENTER.
El video que desee se añadirá en los favoritos.
Reproducción de un video guardado en Mis favoritos
Presione el botón
$%
para seleccionar Mis favoritos
en la lista de categorías.
Presione el botón
+
para ir a la lista de contenido y
presione el botón
$%
para seleccionar el video que
desee.
Presione el botón ENTER.
Se reproducirá el video seleccionado.
Si ha iniciado sesión en su cuenta de YouTube, también puede reproducir un video añadido a Mis favoritos
de la PC.
7.
M
1.
2.
3.
1.
2.
3.
M
YouTube > Los más vistos Todo el mundo
You Tube
Falling in love
+
00:00:00 / 00:06:23
I love my dogs.
Palabras clave: dog, love, falling
Vistas : 196 Clasifi .:
2009-05-21
Report copyright vidkslf:
http://www.youtube.com/t/copyright_notice
Puede seleccionar una ruta para almacenar el archivo.
Mis favoritos
Biblioteca Reprod.
Guarda video en la cuenta del usuario.
Puede verlo sincronizado con los Favoritos
del sitio YouTube.
Puede guardar video en el televisor
independientemente del proceso de inicio
de sesión.
bkj
mientras se encuentra en el campo de texto a/A/1/
le permite cambiar los
YouTube > Buscar Todo el mundo
b
Agregar a favoritos
[
/
]
Omitir
_
+
Ant/Sig
Pantalla completa
You Tube
abcd
+
00:00:00 / 00:06:23
A wild goose is honking.
Palabras clave: ab, abc, abcd, abcde
Vistas : 196 Clasifi . :
2009-05-21
Informar sobre violaciones del copyright:
http://www.youtube.com/t/copyright_notice
Si ha iniciado sesión en su cuenta de YouTube, también puede reproducir un video añadido a Mis favoritos
1/25
YouTube / Todo el mundo
a
Desconexión
c
Seleccionar
d
Opción
[
/
]
Página
You Tube
bkj
Los más vistos
Mejor clasifi cados
Los más populares
Los más debatidos
Principales favoritos
Los más vinculados
Los más respondidos
Presentados
Historial visitado
Mis favoritos
abc... 00:06:20
Vistas : 5969 Clasifi . :
2009-05-21
def... 00:06:20
Vistas : 5969 Clasifi . :
2009-05-21
ghi... 00:06:20
Vistas : 5969 Clasifi . :
2009-05-21
jkl... 00:06:20
Vistas : 5969 Clasifi . :
2009-05-21
01783M-BD-P1600-XBG-ES-NEW.indb 75 2009-07-22 오전 11:30:55

76_ utilización de e-contenido
utilización de e-contenido
Biblioteca Reprod.
Puede añadir videos a Biblioteca Reprod. sin iniciar sesión en la cuenta de YouTube.
Almacenamiento de un video
Presione el botón VERDE (B) durante la reproducción.
Presione el botón ENTER.
El video que desee se añadirá en la biblioteca del
reproductor.
Reproducción de un video guardado en la biblioteca del reproductor
Presione el botón
$%
para seleccionar Biblioteca
Reprod. en la lista de categorías.
Presione el botón
+
para ir a la lista de contenido y
presione el botón
$%
para seleccionar el video que
desee.
Presione el botón ENTER.
Se reproducirá el video seleccionado.
1.
2.
1.
2.
3.
YouTube > Los más vistos Todo el mundo
You Tube
Falling in love
+
00:00:00 / 00:06:23
I love my dogs.
Palabras clave: dog, love, falling
Vistas : 196 Clasifi .:
2009-05-21
Informar sobre violaciones del copyright:
http://www.youtube.com/t/copyright_notice
Agregado a biblioteca reprod.
Aceptar
1/1
YouTube / Todo el mundo
a
Conexión
c
Seleccionar
d
Opción
[
/
]
Página
You Tube
Biblioteca Reprod.
Buscar
Confi guración país
Gestión de cuentas
abc... 00:06:20
Vistas : 5969 Clasifi . :
2009-05-21
def... 00:06:20
Vistas : 5969 Clasifi . :
2009-05-21
ghi... 00:06:20
Vistas : 5969 Clasifi . :
2009-05-21
jkl... 00:06:20
Vistas : 5969 Clasifi . :
2009-05-21
01783M-BD-P1600-XBG-ES-NEW.indb 76 2009-07-22 오전 11:30:58

Español _77
● APÉNDICE
apéndice
SOLUCIÓN DE PROBLEMAS
Antes de solicitar servicio técnico, compruebe lo siguiente.
PROBLEMA SOLUCIÓN
El mando a distancia no funciona. • Compruebe las pilas del mando a distancia. Quizás haya que cambiarlas.
• Utilice el mando a distancia a una distancia no superior a 6 metros.
• Extraiga las pilas y mantenga presionado uno o más botones durante varios
minutos para descargar el microprocesador del mando a distancia y reinicializarlo.
Introduzca las pilas de nuevo y compruebe si funciona el mando a distancia.
El disco no funciona. • Compruebe que el disco está instalado con la cara de la etiqueta hacia arriba.
• Compruebe el número de región del Discos Blu-ray/DVD.
No aparece el menú. • Compruebe si el disco tiene un menú.
En la pantalla aparece el icono . • Este icono aparece cuando se presiona un botón no válido.
• En este momento no puede realizarse la función o acción porque :
1. El software del Discos Blu-ray/DVD la restringe.
2. El software del Discos Blu-ray/DVD no admite la función (ej. ángulos)
3. La función no está disponible en ese momento.
4.
Ha solicitado un título, un número de capítulo o un punto de búsqueda que está fuera de rango.
El modo de reproducción no es el seleccionado
en el menú Configuración.
•
Algunas de las funciones seleccionadas en el Menú Configuración no funcionan
correctamente, si el disco no está codificado con la función correspondiente.
No se puede cambiar la dimensión de la
pantalla.
• La relación altura/anchura de la pantalla está fijada en los Discos Blu-ray/DVD.
• No hay ningún problema con el reproductor.
No hay audio. • Compruebe que ha seleccionado la salida digital correcta en el menú Opciones de
audio.
La pantalla está bloqueada. •
Presione el botón SALTAR (]) (en el panel frontal) durante más de 5 segundos y compruebe
que no haya un disco dentro. Todos los ajustes volverán a los ajustes originales de fábrica.
• Cuando se recuperan los ajustes predeterminados de fábrica, todos los datos de
usuario almacenados la BD se borrarán.
Si la salida HDMI se define en una resolución
que el televisor admita (por ejemplo, 1080p),
es posible que la imagen no se vea en el
televisor.
•
Presione el botón SALTAR (]) (en el panel frontal) durante más de 5 segundos y compruebe
que no haya un disco dentro. Todos los ajustes volverán a los ajustes originales de fábrica.
• Cuando se recuperan los ajustes predeterminados de fábrica, todos los datos de
usuario almacenados la BD se borrarán.
Olvido de la contraseña • Presione el botón SALTAR (
]
) (en el panel frontal) durante más de 5 segundos
y compruebe que no haya un disco dentro. Todos los ajustes que contenían una
contraseña volverán a los ajustes originales de fábrica. No utilice esta opción a
menos que sea absolutamente necesario.
• Cuando se recuperan los ajustes predeterminados de fábrica, todos los datos de
usuario almacenados la BD se borrarán.
01783M-BD-P1600-XBG-ES-NEW.indb 77 2009-07-22 오전 11:30:59

78_ apéndice
apéndice
PROBLEMA SOLUCIÓN
Si se producen otros problemas. • Vaya al contenido y busque la sección del manual de instrucciones con las
explicaciones sobre el problema actual y siga de nuevo el procedimiento.
• Si el problema persiste, póngase en contacto con el centro de servicio técnico
autorizado de Samsung más cercano.
La imagen produce ruidos o está
distorsionada.
• Compruebe si el disco tiene suciedad o está rayado.
• Limpie el disco.
No hay salida de HDMI. • Compruebe la conexión entre el TV y el terminal de HDMI del Reproductor de
discos Blu-ray.
• Compruebe si el TV admite la resolución de entrada de HDMI 576p/480p/720p/
1080i/1080p HDMI.
Pantalla de salida de HDMI anormal. • Si aparecen interferencias en pantalla, significa que el TV no admite HDCP
(protección de contenido digital de ancho de banda alto).
Cuando se recuperan los ajustes predeterminados de fábrica, todos los datos de usuario almacenados la
BD
se borrarán.
M
01783M-BD-P1600-XBG-ES-NEW.indb 78 2009-07-22 오전 11:30:59

Español _79
● APÉNDICE
ESPECIFICACIONES TÉCNICAS
Generales
Requisitos de alimentación 110-240V c.a., 50/60Hz
Consumo energético 30 W
Peso 2,2kg
Dimensiones 430(W) × 209(D) × 54(H) mm
Rango de temperatura de servicio +5°C a +35°C
Rango de humedad de servicio 10 % a 75 %
Disco
BD (Disco Blu-ray) Velocidad de lectura : 4,917 m/seg.
DVD (Disco Versátil Digital)
Velocidad de lectura : 3,49 ~ 4,06 m/seg.
Tiempo de reproducción aprox. (Cara simple, Disco de capa simple) : 135 min.
CD : 12cm (COMPACT DISC)
Velocidad de lectura : 4,8 ~ 5,6 m/seg.
Tiempo máximo de reproducción : 74 min.
CD : 8cm (COMPACT DISC)
Velocidad de lectura : 4,8 ~ 5,6 m/seg.
Tiempo máximo de reproducción : 20 min.
Salida de video
Video compuesto
1 canales : 1,0 Vp-p (75 Ω de carga)
Disco Blu-ray/DVD : 576i/480i
Video componente
Y : 1,0 Vp-p (75 Ω de carga)
PR : 0,70 Vp-p (75 Ω de carga)
PB : 0,70 Vp-p (75 Ω de carga)
Disco Blu-ray : 1080i, 720p, 576p/480p, 576i/480i
DVD : 576p/480p, 576i/480i
Video/Audio HDMI
1080p, 1080i, 720p, 576p/480p
Audio multicanal PCM, audio de serie de bits
Salida de audio
2 canales L(1/L), R(2/R)
Salida de audio digital Óptica
*Respuesta de frecuencias
Muestreo 48 kHz : 4 Hz a 22 kHz
Muestreo 96 kHz : 4 Hz a 44 kHz
*Índice S/N 110 dB
*Rango dinámico 100 dB
*Distorsión armónica total 0.003%
*: Especificación nominal
- Samsung Electronics Co., Ltd se reserva el derecho a cambiar las especificaciones sin previo aviso.
- Los pesos y dimensiones son aproximados.
01783M-BD-P1600-XBG-ES-NEW.indb 79 2009-07-22 오전 11:30:59

80_ apéndice
apéndice
PROTECCIÓN DE COPIA
Debido a que AACS (Advanced Access Content System) es un sistema aprobado como sistema de protección de contenido para
formato Discos Blu-ray, similar al uso de CSS (Content Scramble System) para formato DVD, se imponen algunas restricciones
sobre la reproducción, salida de señal analógica, etc., de contenido protegido mediante AACS. El funcionamiento de esta unidad
y las restricciones pueden variar dependiendo de la fecha de compra ya que dichas restricciones pueden haberse adoptado y/o
modificado mediante AACS tras la producción de este aparato. Además, la marca BD-ROM y BD+ se utilizan adicionalmente
como un sistema de protección de copia para formato Discos Blu-ray, que impone ciertas restricciones incluidas restricciones de
reproducción para la marca BD-ROM y/o el contenido protegido de BD+. Para obtener información adicional sobre AACS, la
marca BD-ROM, BD+ o este producto, póngase en contacto con el servicio de atención al cliente de SAMSUNG.
Muchos discos DVD están codificados con la protección de copia. Por esta razón, sólo debe conectar el Reproductor de discos Blu-ray directamente
al TV, no al VCR. La conexión al video puede causar la distorsión de la imagen proveniente de discos Blu-ray/DVD con protección de copia.
Este producto incorpora tecnología de protección de derechos de reproducción protegidos bajo reclamación de patentes
de EE.UU. y otros derechos de propiedad intelectual propiedad de Macrovision Corporation y otros propietarios de
derechos. La utilización de esta tecnología de protección de derechos de reproducción deberá estar autorizada por
Macrovision Corporation y está limitada al hogar y a otros usos de visualización limitados a menos que Macrovision
Corporation lo autorice explícitamente. La ingeniería inversa o desensamblaje están prohibidos.
Este dispositivo está protegido por las patentes en EE.UU. 6.836.549; 6.381.747; 7.050.698; 6.516.132; y 5.583.936.
Bajo las leyes de Copyright de EE.UU. y las leyes de Copyright de otros países, la grabación, el uso, la distribución o la revisión de programas
de televisión, cintas de video, Discos Blu-ray, DVD, CD y otros materiales no autorizados, pueden estar sujeto a responsabilidad civil o criminal.
Para la salida de barrido progresivo de reproductores de disco Blu-ray :
LOS CONSUMIDORES DEBEN TENER
EN CUENTA QUE NO TODOS LOS EQUIPOS DE TELEVISIÓN SON TOTALMENTE COMPATIBLES CON ESTE
PRODUCTO Y PUEDEN CAUSAR LA APARICIÓN DE INTERFERENCIAS DEN LA IMAGEN. EN CASO DE PROBLEMAS
CON LA IMAGEN DE BARRIDO PROGRESIVO, SE RECOMIENDA QUE EL USUARIO CAMBIE LA CONEXIÓN A UNA
SALIDA CON ‘DEFINICIÓN ESTÁNDAR’. SI TUVIESE ALGUNA DUDA SOBRE LA COMPATIBILIDAD DE NUESTRO
EQUIPO DE TV CON ESTE PRODUCTO, PÓNGASE EN CONTACTO CON EL SERVICIO DE ATENCIÓN AL CLIENTE.
Aviso de conformidad y compatibilidad
NO TODOS los discos son compatibles
Sujeto a las restricciones que se describen a continuación y a las indicadas a lo largo de todo el manual, incluida la sección Tipo
de disco y características de este Manual, los tipos de discos que pueden reproducirse son: discos BD-ROM comerciales
pregrabados, DVD-Video y CD de audio; discos BD-RE, BD-R, DVD-RW/DVD-R; y discos CD-RW/CD-R.
Otros discos diferentes a los anteriores no podrán reproducirse en este reproductor. Y es posible que algunos de los discos
anteriormente mencionados no puedan reproducirse debido a una o más de las razones indicadas a continuación.
Samsung no puede garantizar que este reproductor reproduzca todos los discos que lleven los logotipos de BD-ROM, BD-RE, BD-R,
DVD-Video, DVD-RW/DVD-R y CD-RW/CD-R, y es posible que este reproductor no responda a todas las órdenes de funcionamiento
ni pueda utilizar las funciones de todos los discos. Estos y otros problemas de compatibilidad de disco y funcionamiento del
reproductor con discos con nuevos formatos y con formatos existentes son posibles por las siguientes razones:
- El formato Discos Blu-ray es un formato nuevo en continua evolución y es posible que este reproductor no pueda
comprender todas las funciones de los discos Discos Blu-ray ya que algunas funciones pueden ser opcionales, es
posible que se hayan añadido nuevas funciones al formato Discos Blu-ray tras la producción de este reproductor y
algunas funciones disponibles están sujetas a una disponibilidad ulterior;
- No todas las versiones del nuevo formato y del formato existente del disco están admitidas en este reproductor;
-
Formatos de disco nuevos y existentes pueden ser revisados, modificados, actualizados, mejorados y complementados;
- Algunos discos son producidos de manera que permiten utilizar de forma específica o limitada algunas operaciones y
funciones durante la reproducción;
- Algunas funciones pueden ser opcionales y es posible que se hayan añadido funciones adicionales tras la producción
de este reproductor o ciertas funciones disponibles pueden estar sujetas a disponibilidad ulterior;
- Algunos discos que llevan los logotipos de BD-ROM, BD-RE, BD-R, DVD-Video, DVD-RW / DVD-R y CD-RW / CD-R
puede ser discos aún no estandarizados;
-
Es posible que algunos discos no puedan reproducirse dependiendo de su estado físico o las condiciones de grabación;
- Pueden producirse problemas y errores durante la creación de software para BD, DVD o la fabricación de discos;
-
Este reproductor funciona de forma diferente que el reproductor de DVD estándar u otro equipo de AV; o
- Por las razones reseñadas a lo largo del manual y por otras razones descubiertas y divulgadas por el servicio de atención al cliente
de SAMSUNG.
Si encuentra problemas de compatibilidad en el disco o problemas de funcionamiento del reproductor, póngase en
contacto con el servicio de atención al cliente de SAMSUNG. También puede ponerse en contacto con el servicio de
atención al cliente de SAMSUNG para obtener posibles actualizaciones sobre este reproductor.
Para obtener información adicional sobre las restricciones de reproducción y la compatibilidad de los discos, consulte
las secciones Precauciones, Antes de leer este Manual del usuario, Tipos de discos y características.
•
•
•
•
•
•
•
•
•
•
•
01783M-BD-P1600-XBG-ES-NEW.indb 80 2009-07-22 오전 11:30:59

Español _81
● APÉNDICE
Network Service Disclaimer
All content and services accessible through this device belong to third parties and are protected by copyright,
patent, trademark and/or other intellectual property laws. Such content and services are provided solely for your
personal noncommercial use. You may not use any content or services in a manner that has not been authorized
by the content owner or service provider. Without limiting the foregoing, unless expressly authorized by the
applicable content owner or service provider, you may not modify, copy, republish, upload, post, transmit,
translate, sell, create derivative works, exploit, or distribute in any manner or medium any content or services
displayed through this device.
THIRD PARTY CONTENT AND SERVICES ARE PROVIDED "AS IS." SAMSUNG DOES NOT WARRANT
CONTENT OR SERVICES SO PROVIDED, EITHER EXPRESSLY OR IMPLIEDLY, FOR ANY PURPOSE.
SAMSUNG EXPRESSLY DISCLAIMS ANY IMPLIED WARRANTIES, INCLUDING BUT NOT LIMITED TO,
WARRANTIES OF MERCHANTABILITY OR FITNESS FOR A PARTICULAR PURPOSE. SAMSUNG DOES NOT
GUARANTEE THE ACCURACY, VALIDITY, TIMELINESS, LEGALITY, OR COMPLETENESS OF ANY CONTENT
OR SERVICE MADE AVAILABLE THROUGH THIS DEVICE AND UNDER NO CIRCUMSTANCES, INCLUDING
NEGLIGENCE, SHALL SAMSUNG BE LIABLE, WHETHER IN CONTRACT OR TORT, FOR ANY DIRECT,
INDIRECT, INCIDENTAL, SPECIAL OR CONSEQUENTIAL DAMAGES, ATTORNEY FEES, EXPENSES, OR ANY
OTHER DAMAGES ARISING OUT OF, OR IN CONNECTION WITH, ANY INFORMATION CONTAINED IN, OR AS
A RESULT OF THE USE OF ANY CONTENT OR SERVICE BY YOU OR ANY THIRD PARTY, EVEN IF ADVISED OF
THE POSSIBILITY OF SUCH DAMAGES.
Third party services may be terminated or interrupted at any time, and Samsung makes no representation or
warranty that any content or service will remain available for any period of time. Content and services are
transmitted by third parties by means of networks and transmission facilities over which Samsung has no control.
Without limiting the generality of this disclaimer, Samsung expressly disclaims any responsibility or liability for any
interruption or suspension of any content or service made available through this device.
Samsung is neither responsible nor liable for customer service related to the content and services. Any question or
request for service relating to the content or services should be made directly to the respective content and service
providers.
01783M-BD-P1600-XBG-ES-NEW.indb 81 2009-07-22 오전 11:30:59

Contacte con SAMSUNG WORLD WIDE
Si tiene alguna pregunta o comentario referente a nuestros productos, por favor contacte con nuestro Servicio de
Atención al Cliente.
Región País
Centro de atención al cliente
Sitio Web
North America
CANADA 1-800-SAMSUNG(726-7864) www.samsung.com/ca
MEXICO 01-800-SAMSUNG(726-7864) www.samsung.com/mx
U.S.A 1-800-SAMSUNG(726-7864) www.samsung.com/us
Latin America
ARGENTINE 0800-333-3733 www.samsung.com/ar
BRAZIL 0800-124-421, 4004-0000 www.samsung.com/br
CHILE 800-SAMSUNG(726-7864) www.samsung.com/cl
NICARAGUA 00-1800-5077267 www.samsung.com/latin
HONDURAS 800-7919267 www.samsung.com/latin
COSTA RICA 0-800-507-7267 www.samsung.com/latin
ECUADOR 1-800-10-7267 www.samsung.com/latin
EL SALVADOR 800-6225 www.samsung.com/latin
GUATEMALA 1-800-299-0013 www.samsung.com/latin
JAMAICA 1-800-234-7267 www.samsung.com/latin
PANAMA 800-7267 www.samsung.com/latin
PUERTO RICO 1-800-682-3180 www.samsung.com/latin
REP. DOMINICA 1-800-751-2676 www.samsung.com/latin
TRINIDAD & TOBAGO 1-800-SAMSUNG(726-7864) www.samsung.com/latin
VENEZUELA 0-800-100-5303 www.samsung.com/latin
COLOMBIA 01-8000112112 www.samsung.com.co
Europe
BELGIUM 02 201 2418
www.samsung.com/be (Dutch)
www.samsung.com/be_fr (French)
CZECH REPUBLIC 800-SAMSUNG(800-726786) www.samsung.com/cz
DENMARK 8-SAMSUNG(7267864) www.samsung.com/dk
FINLAND 30-6227 515 www.samsung.com/fi
FRANCE 01 4863 0000 www.samsung.com/fr
GERMANY 01805 - SAMSUNG(726-7864 € 0,14/Min) www.samsung.de
HUNGARY 06-80-SAMSUNG(726-7864) www.samsung.com/hu
ITALIA 800-SAMSUNG(726-7864) www.samsung.com/it
LUXEMBURG 02 261 03 710 www.samsung.com/lu
NETHERLANDS 0900-SAMSUNG (0900-7267864) (€ 0,10/Min) www.samsung.com/nl
NORWAY 3-SAMSUNG(7267864) www.samsung.com/no
POLAND 0 801 1SAMSUNG(172678), 022-607-93-33 www.samsung.com/pl
PORTUGAL 80820-SAMSUNG(726-7864) www.samsung.com/pt
SLOVAKIA 0800-SAMSUNG(726-7864) www.samsung.com/sk
SPAIN 902-1-SAMSUNG (902 172 678) www.samsung.com/es
SWEDEN 075-SAMSUNG(726 78 64) www.samsung.com/se
U.K 0845 SAMSUNG (7267864) www.samsung.com/uk
EIRE 0818 717 100 www.samsung.com/ie
AUSTRIA 0810-SAMSUNG(7267864, € 0.07/min) www.samsung.com/at
SWITZERLAND 0848-SAMSUNG(7267864, CHF 0.08/min) www.samsung.com/ch
CIS
RUSSIA 8-800-555-55-55 www.samsung.ru
KAZAKHSTAN 8-10-800-500-55-500 www.samsung.com/kz_ru
UZBEKISTAN 8-10-800-500-55-500 www.samsung.com/kz_ru
KYRGYZSTAN 00-800-500-55-500
TADJIKISTAN 8-10-800-500-55-500
UKRAINE 8-800-502-0000 www.samsung.ua
LITHUANIA 8-800-77777 www.samsung.com/lt
LATVIA 8000-7267 www.samsung.com/lv
ESTONIA 800-7267 www.samsung.com/ee
Asia Pacific
AUSTRALIA 1300 362 603 www.samsung.com/au
NEW ZEALAND 0800 SAMSUNG (0800 726 786) www.samsung.com/nz
CHINA 800-810-5858, 400-810-5858, 010-6475 1880 www.samsung.com/cn
HONG KONG 3698-4698 www.samsung.com/hk
INDIA 3030 8282, 1800 110011, 1-800-3000-8282 www.samsung.com/in
INDONESIA 0800-112-8888 www.samsung.com/id
JAPAN 0120-327-527 www.samsung.com/jp
MALAYSIA 1800-88-9999 www.samsung.com/my
PHILIPPINES
1-800-10-SAMSUNG(726-7864)
1-800-3-SAMSUNG(726-7864), 02-5805777
www.samsung.com/ph
SINGAPORE 1800-SAMSUNG(726-7864) www.samsung.com/sg
THAILAND 1800-29-3232, 02-689-3232 www.samsung.com/th
TAIWAN 0800-329-999 www.samsung.com/tw
VIETNAM 1 800 588 889 www.samsung.com/vn
Middle East &
Africa
TURKEY 444 77 11 www.samsung.com/tr
SOUTH AFRICA 0860-SAMSUNG(726-7864) www.samsung.com/za
U.A.E 800-SAMSUNG (726-7864), 8000-4726 www.samsung.com/ae
01783M-BD-P1600-XBG-ES-NEW.indb 82 2009-07-22 오전 11:31:00

AK68-01783M
01783M-BD-P1600-XBG-ES-NEW.indb 83 2009-07-22 오전 11:31:00
-
 1
1
-
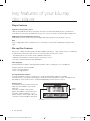 2
2
-
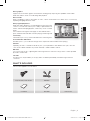 3
3
-
 4
4
-
 5
5
-
 6
6
-
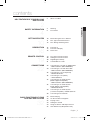 7
7
-
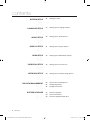 8
8
-
 9
9
-
 10
10
-
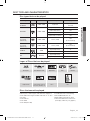 11
11
-
 12
12
-
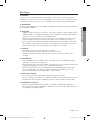 13
13
-
 14
14
-
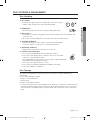 15
15
-
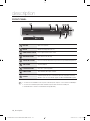 16
16
-
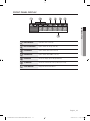 17
17
-
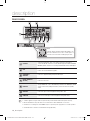 18
18
-
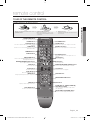 19
19
-
 20
20
-
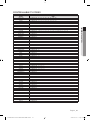 21
21
-
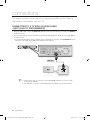 22
22
-
 23
23
-
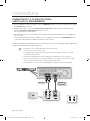 24
24
-
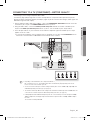 25
25
-
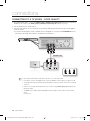 26
26
-
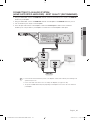 27
27
-
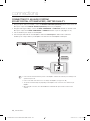 28
28
-
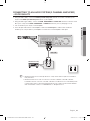 29
29
-
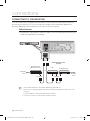 30
30
-
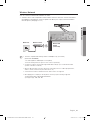 31
31
-
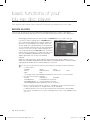 32
32
-
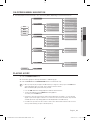 33
33
-
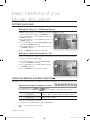 34
34
-
 35
35
-
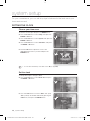 36
36
-
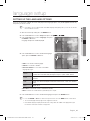 37
37
-
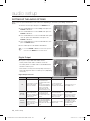 38
38
-
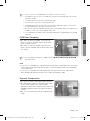 39
39
-
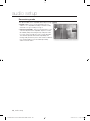 40
40
-
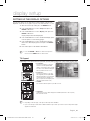 41
41
-
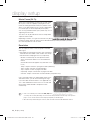 42
42
-
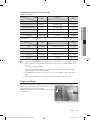 43
43
-
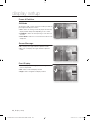 44
44
-
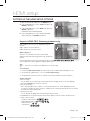 45
45
-
 46
46
-
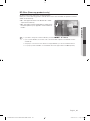 47
47
-
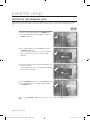 48
48
-
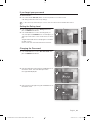 49
49
-
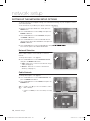 50
50
-
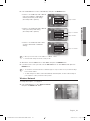 51
51
-
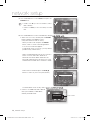 52
52
-
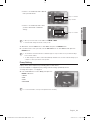 53
53
-
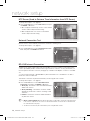 54
54
-
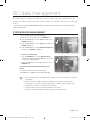 55
55
-
 56
56
-
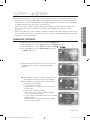 57
57
-
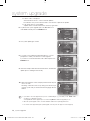 58
58
-
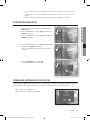 59
59
-
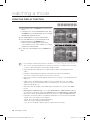 60
60
-
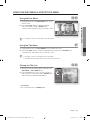 61
61
-
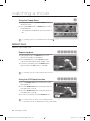 62
62
-
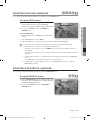 63
63
-
 64
64
-
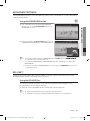 65
65
-
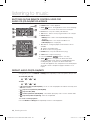 66
66
-
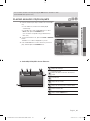 67
67
-
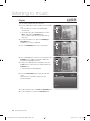 68
68
-
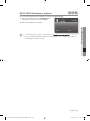 69
69
-
 70
70
-
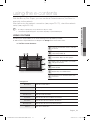 71
71
-
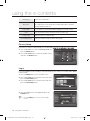 72
72
-
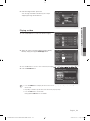 73
73
-
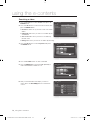 74
74
-
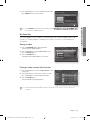 75
75
-
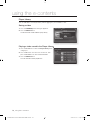 76
76
-
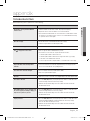 77
77
-
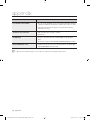 78
78
-
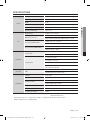 79
79
-
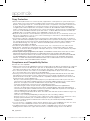 80
80
-
 81
81
-
 82
82
-
 83
83
-
 84
84
-
 85
85
-
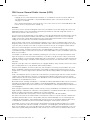 86
86
-
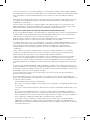 87
87
-
 88
88
-
 89
89
-
 90
90
-
 91
91
-
 92
92
-
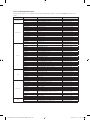 93
93
-
 94
94
-
 95
95
-
 96
96
-
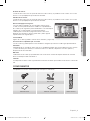 97
97
-
 98
98
-
 99
99
-
 100
100
-
 101
101
-
 102
102
-
 103
103
-
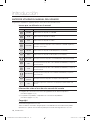 104
104
-
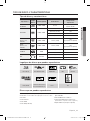 105
105
-
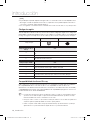 106
106
-
 107
107
-
 108
108
-
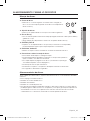 109
109
-
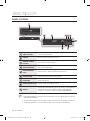 110
110
-
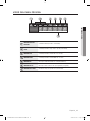 111
111
-
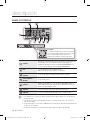 112
112
-
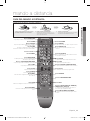 113
113
-
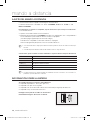 114
114
-
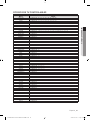 115
115
-
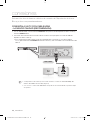 116
116
-
 117
117
-
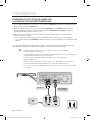 118
118
-
 119
119
-
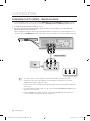 120
120
-
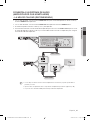 121
121
-
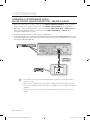 122
122
-
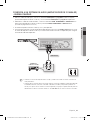 123
123
-
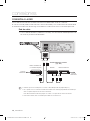 124
124
-
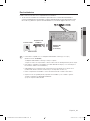 125
125
-
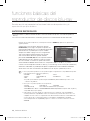 126
126
-
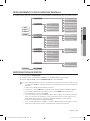 127
127
-
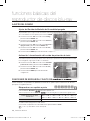 128
128
-
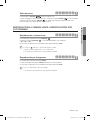 129
129
-
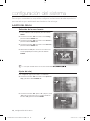 130
130
-
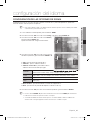 131
131
-
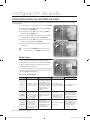 132
132
-
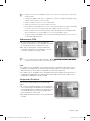 133
133
-
 134
134
-
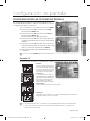 135
135
-
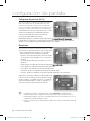 136
136
-
 137
137
-
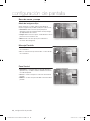 138
138
-
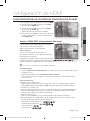 139
139
-
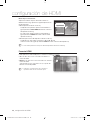 140
140
-
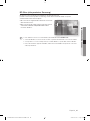 141
141
-
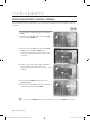 142
142
-
 143
143
-
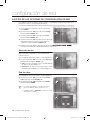 144
144
-
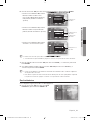 145
145
-
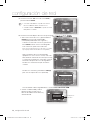 146
146
-
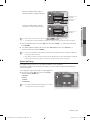 147
147
-
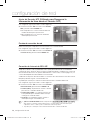 148
148
-
 149
149
-
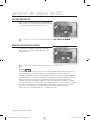 150
150
-
 151
151
-
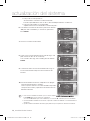 152
152
-
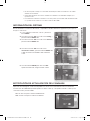 153
153
-
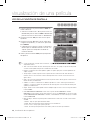 154
154
-
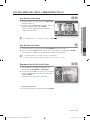 155
155
-
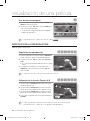 156
156
-
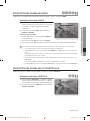 157
157
-
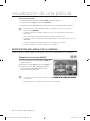 158
158
-
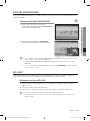 159
159
-
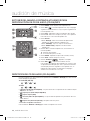 160
160
-
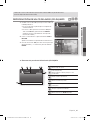 161
161
-
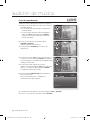 162
162
-
 163
163
-
 164
164
-
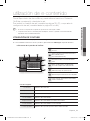 165
165
-
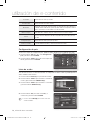 166
166
-
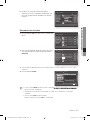 167
167
-
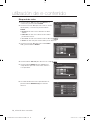 168
168
-
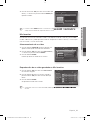 169
169
-
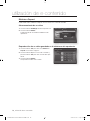 170
170
-
 171
171
-
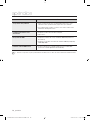 172
172
-
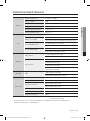 173
173
-
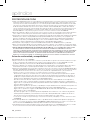 174
174
-
 175
175
-
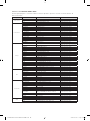 176
176
-
 177
177


Samsung BD-P1600A Manual de usuario
- Categoría
- Reproductores de Blu-Ray
- Tipo
- Manual de usuario
En otros idiomas
- English: Samsung BD-P1600A User manual
Documentos relacionados
-
Samsung BD-P1600A Manual de usuario
-
Samsung BD-P1600 Manual de usuario
-
-
Samsung BD-P1500 Manual de usuario
-
-
-
Samsung RTS-HE20 Manual de usuario
-
Samsung BD-C5900 Manual de usuario
-
Samsung BD-C6500 Manual de usuario
-
Samsung BD-C6900 Manual de usuario