AudioSonic RD-1565 El manual del propietario
- Categoría
- Radios
- Tipo
- El manual del propietario
Este manual también es adecuado para

INSTRUCTIONS DE SÉCURITÉ IMPORTANTES
• Le fabricant ne sera pas tenu responsable de tous dommages si les
consignes de sécurité ne sont pas respectées.
• Si le cordon d'alimentation est endommagé, il doit être remplacé par
le fabricant, son service après-vente ou des techniciens similairement
agréés an d'éviter un danger.
• Ne jamais déplacer l’appareil en tirant sur le cordon et veillez à ce que
ce dernier ne devienne pas entortillé.
• L’appareil doit être posé sur une surface stable et nivelée.
• Ne jamais utiliser l’appareil sans supervision.
• Pour débrancher complètement l'alimentation, débranchez l'adaptateur
CA/CC du secteur, car l'adaptateur sert à débrancher l’appareil.
• Pour protéger les enfants des dangers des appareils électriques, veillez
à ne jamais laisser les appareils sans surveillance. Par conséquent, il
faudra choisir un lieu de rangement pour l’appareil inaccessible aux
enfants. Veillez à ce que le cordon ne pende pas.
• Ne pas immerger le cordon, la prise ou l'appareil dans de l'eau ou autre
liquide an de vous éviter un choc électrique.
• Avertissement : An de réduire le risque de choc électrique, ne pas
retirer le cache (ou l’arrière) Aucune pièce à l’intérieur n’est réparable
par l’utilisateur Conez l’entretien à un personnel technique qualié.
• AVERTISSEMENT : La batterie (batterie ou batteries ou pack de batterie)
ne doit pas être exposée à une chaleur excessive comme les rayons du
soleil, le feu ou autre.
• Attention: Prise de terre ou polarisation. Il faudra prendre des
précautions an que la che la plus large de la prise CA corresponde à
la fente désignée de la 'prise murale'.
• L’appareil ne devrait pas être exposé à des égouttements ou des
éclaboussures et aucun objet rempli de liquide ne devrait être posé sur
l’appareil.
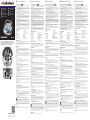
DESCRIPTION DES PIÈCES
Vue avant
1. Écran LCD
Vue du haut
2. Fente USB
3. Vol +/Alarme 1
4. Vol -/Alarme 2
5. Fonction/Mode
6. Avancer +
7. Reculer -
8. Lecture/Pause
9. Sourdine/'Snooze'
10. SD/MMC
11. Touche MEM +/Album +
12. Touche MEM -/Album -
13. Alimentation/Veille
Vue arrière
14. Prise de téléphone
15. Antenne FM
16. Prise Aux-in (Entrée auxiliaire)
17. Cordon d'alimentation CA
AVANT LA PREMIÈRE UTILISATION
• Retirer l’appareil et les accessoires du carton. Retirer les autocollants, le lm
ou le plastique protecteur de l’appareil.
• Posez l’appareil sur une surface plate et stable en laissant 10cm d’espace
libre de chaque côté. Cet appareil ne convient pas à une installation intégrée
ou en extérieur.
SOURCES D'ALIMENTATION
Alimentation CA
Vous pouvez alimenter votre système portable en branchant le cordon CA
amovible dans la prise CA à l'arrière de l'appareil et dans une prise électrique
murale CA. Vériez que la tension nominale de votre appareil correspond à la
tension du secteur. Assurez-vous que le cordon d'alimentation CA est pleine-
ment inséré dans l'appareil.
Alimentation par pile
Insérez 4 piles de taille “C” dans le compartiment à piles. Assurez-vous que les
piles sont insérées correctement pour éviter d'endommager l'appareil. Retirez
toujours les piles lorsque l'appareil n'est pas utilisé pendant de longues pé-
riodes, des fuites de piles pourraient se produire et endommager l'appareil.
UTILISATION
Réveil
• Uniquement disponible en mode ARRET (O).
• L'écran clignotera en maintenant la touche 'Lecture/Pause' (Play/Pause) enfoncée.
• Utilisez les touches 'Avancer +/Reculer -' (Skip +/-) pour sélectionner les
réglages souhaités et utilisez la touche 'Lecture/Pause' (Play/Pause) pour
valider le réglage désiré.
Alarme
• Uniquement disponible en mode ARRET (O).
• L'écran clignotera en maintenant la touche 'Alarme 1/2' enfoncée.
• Utilisez les touches 'Avancer +/Reculer -' (Skip +/-) pour sélectionner les réglages
souhaités et utilisez la touche 'Alarme' pour valider les réglages désirés.
• Après le réglage, l'alarme souhaitée peut être activée ou désactivée en
appuyant une fois sur la touche d'alarme souhaitée en mode 'ARRET' (O).
Utilisation USB/Carte SD
• Appuyez sur la touche 'Veille' pour allumer l'appareil, appuyez sur la touche
'Mode' pour accéder au mode 'USB/SD'.
• Insérez la clé USB ou la carte SD dans la fente, l'appareil commencera
automatiquement la lecture.
• Utilisez les touches 'Avancer +/Reculer-' (Skip +/-) pour choisir la chanson
souhaitée, utilisez la touche 'Album +/ -' pour choisir l'album souhaité.
• Maintenez la touche 'Veille' enfoncée pour éteindre l'appareil.
Répéter
Maintenez la touche 'Mode' enfoncée pendant la lecture, les modes de répéti-
tion suivants changent à chaque appui : Répéter 1 >> Répéter album.
Aux
Branchez le cordon de 3,5 mm à l'appareil et au dispositif externe, appuyez
sur la touche 'Mode' jusqu'à ce que l'appareil accède au mode AUX. Utilisez les
commandes du dispositif externe pour démarrer la lecture.
Fonction 'Veille'
Appuyez sur la touche 'Veille' pour régler l'arrêt automatique du minuteur
(90>80>70>60>50>40>30>20>10>ARRET)
NETTOYAGE ET ENTRETIEN
• Nettoyez l’appareil avec un chion humide. N’utilisez jamais de
nettoyants forts et abrasifs, de tampon à récurer ni de paille de fer, car cela
endommagerait l’appareil.
• N’immergez jamais l’appareil dans l’eau ni aucun autre liquide. L’appareil ne
va pas au lave-vaisselle.
GARANTIE
• Ce produit est garanti pour une période de 24 mois. Votre garantie est
valable si le produit est utilisé selon les instructions et pour l'usage auquel
il est destiné. De plus, la preuve d'achat d'origine (facture, reçu ou ticket de
caisse) doit être présentée, montrant la date d'achat, le nom du détaillant et
le numéro d'article du produit.
• Pour connaître les conditions de garantie détaillées, veuillez consulter notre
site Internet de service: www.service.tristar.eu
DIRECTIVES POUR LA PROTECTION DE L’ENVIRONNEMENT
Cet appareil ne doit pas être jeté aux ordures ménagères à la n de sa
durée de vie, mais doit être rendu à un centre de recyclage d’appareils
ménagers électriques et électroniques. Ce symbole sur l’appareil, La notice
d’emploi et l’emballage attirent votre attention sur ce sujet important. Com-
posants utilisés dans cet appareil sont recyclables. En recyclant les appareils
ménagers. Usagés, vous contribuez à un apport important à la protection de
notre. Environnement. Adressez vous aux autorités locales pour des renseigne-
ments concernant le centre de Recyclage.
SUPPORT
Toutes les informations et les pièces détachées sont disponibles sur
service.tristar.eu !
NL Gebruiksaanwijzing DE Bedienungsanleitung
SAFETY INSTRUCTIONS
• By ignoring the safety instructions the manufacturer can not be hold
responsible for the damage.
• If the supply cord is damaged, it must be replaced by the manufacturer,
its service agent or similarly qualied persons in order to avoid a hazard.
• Never move the appliance by pulling the cord and make sure the cord
can not become entangled.
• The appliance must be placed on a stable, level surface.
• The user must not leave the device unattended while it is connected to
the supply.
• To completely disconnect the power input, the AC/DC adaptor of the
apparatus should be disconnected from the mains, as the disconnected
device is the AC/DC adaptor of apparatus.
• To protect children against the dangers of electrical appliances, please
make sure that you never leave the appliance unattended. Therefore
you have to select a storage place for the appliance where children
are not able to grab it. Make sure that the cable is not hanging in a
downward position.
• To protect yourself against an electric shock, do not immerse the cord,
plug or appliance in the water or any other liquid.
• Warning: To reduce the risk of electric shock, do not remove cover (or
back). No user-serviceable parts inside. Refer servicing to qualied
service personnel.
• WARNING: The battery (battery or batteries or battery pack) shall not be
exposed to excessive heat such as sunshine, re or the like.
• Caution: grounding or polarization. The precautions should be taken so
that the wider blade of the ac-plug must match the slot in receptacle
"wall socket".
• The apparatus should not be exposed to dripping or splashing and no
objects lled with liquids should be placed on the apparatus.
PARTS DESCRIPTION
Front view
1. LCD Display
Top view
2. USB slot
3. Vol + / Alarm 1
4. Vol - / Alarm 2
5. Function/ mode
6. Skip +
7. Skip -
8. Play / Pause
9. Mute/ snooze
10. SD/MMC
11. MEM + / Album + key
12. MEM - / Album - key
13. Power/ sleep
Back view
14. Phone jack
15. FM Antenna
16. Aux- in Jack
17. AC power cord
BEFORE THE FIRST USE
• Take the appliance andaccessoriesoutthebox.Removethe
stickers,protective foilorplasticfrom thedevice.
• Place the device on a at stable surface and ensure a minimum of 10 cm.
free space around the device. This device is not suitable for installation in a
cabinet or for outside use.
POWER SOURCES
AC power
You can power your portable system by plugging the detachable AC power
cord into the AC inlet at the back of the unit and into a wall AC power outlet.
Check that the rated voltage of your appliance matches your local voltage.
Make sure that the AC power cord is fully inserted into the appliance.
Battery power
Insert 4 x “C” size batteries into the battery compartment. Be sure that the batter-
ies are inserted correctly to avoid damage to the appliance. Always remove the
batteries when appliance will not be used for a long period of time, as this will
cause leakage to the batteries and subsequently damage to your appliance.
USE
Clock
• Only available in OFF mode.
• Press and hold the "Play/ pause" button, the sisplay will ash.
• Use the "skip +/-" buttons to select the desired settings and use the "play/
pause" button to conrm the desired setting.
Alarm
• Only available in OFF mode.
• Press and hold the "alarm 1/2" button, the display will ash.
• Use the "skip +/-" buttons to slect the desired settings and use the "alarm"
button to conrm the desired settings.
• After setting, you can turn the desired alarm on or o by press the desired
alarm button once in the OFF mode.
USB/SD-card operation
• Press the "standby" button to switch on the unit, press the "mode" button to
enter the USB/SD mode.
• Connect the USB ash or SD card to the slot, the unit will start playing
automatically.
• Use the "skip +/-" buttons to select the desired track, use the "album +/-"
button to select the desired album.
• Press and hold the "standby" button to switch o the unit.
Repeat
Press and hold the "mode" button during playback, each press switches the
following repaet modes: Repeat 1 >> Repeat album.
Aux
Connect 3.5 mm cable to the unit and the external device, press the "mode"
button until the system entered the AUX mode. Use the controls on the exter-
nal device to start playback.
Sleep function
Press the "standby" button to set the auto switch o timer (90>80>70>60>50>
40>30>20>10>OFF)
CLEANING AND MAINTENANCE
• Clean the appliance with a damp cloth. Never use harsh and abrasive
cleaners, scouring pad or steel wool, which damages the device.
• Never immerse the electrical device in water or any other liquid. The device
is not dishwasher proof.
GUARANTEE
• This product is guaranteed for 24 months granted. Your warranty is valid if
the product is used in accordance to the instructions and for the purpose
for which it was created. In addition, the original purchase (invoice, sales
slip or receipt) is to be submitted with the date of purchase, the name of the
retailer and the item number of the product.
• For the detailed warranty conditions, please refer to our service website:
www.service.tristar.eu
GUIDELINES FOR PROTECTION OF THE ENVIRONMENT
This appliance should not be put into the domestic garbage at the end
of its durability, but must be oered at a central point for the recycling
of electric and electronic domestic appliances. This symbol on the appliance,
instruction manual and packaging puts your attention to this important issue.
The materials used in this appliance can be recycled. By recycling of used
domestic appliances you contribute an important push to the protection of
our environment. Ask your local authorities for information regarding the point
of recollection.
SUPPORT
You can nd all available information and spare parts at service.tristar.eu!
EN Instruction manual FR Mode d'emploi ES Manual de usuario
PRECAUCIONES IMPORTANTES
• Si ignora las instrucciones de seguridad, eximirá al fabricante de toda
responsabilidad por posibles daños.
• Si el cable de alimentación está dañado, para evitar peligros,
corresponde al fabricante, a su representante o a una persona de
cualicación similar su reemplazo.
• No mueva el aparato tirando del cable y asegúrese de que el cable no
se enrolle.
• Este aparato se debe colocar sobre una supercie estable nivelada.
• No utilice el dispositivo sin supervisión.
• Para desconectar completamente la entrada de electricidad, el
adaptador CA/CC del aparato debe estar desconectado de la toma de
pared y también del propio aparato.
• Para proteger a los niños frente a los peligros de los aparatos eléctricos,
asegúrese de no dejar los aparatos sin vigilancia. Elija un lugar de
almacenamiento para el aparato donde los niños no puedan acceder a
él. Asegúrese de que el cable no cuelgue hacia abajo.
• Como medida de protección contra las descargas eléctricas, no sumerja
el cable, el enchufe o el aparato en agua o cualquier otro líquido.
• Advertencia: Para reducir el riesgo de descarga eléctrica, no retire el
armazón (o tapa). No existen partes modicables por el usuario en el
interior. Solicite servicio técnico del personal cualicado.
• ADVERTENCIA: La batería (batería o pilas) no debe exponerse a un calor
excesivo como la luz solar, fuego o similar.
• Precaución: conexión a tierra o polarización. Se deberán tomar medidas
de precaución para que la patilla más ancha del enchufe de CA coincida
con la ranura del receptáculo "toma de pared".
• No se deberá exponer el aparato a goteo o salpicaduras, y no se
deberán colocar objetos llenos de líquido sobre el mismo.
DESCRIPCIÓN DE LAS PIEZAS
Vista frontal
1. Pantalla LCD
Vista superior
2. Ranura USB
3. Vol + / Alarm 1 (Vol + / Alarma 1)
4. Vol - / Alarm 2 (Vol - / Alarma 2)
5. Modo/Función
6. Skip + (Saltar +)
7. Skip - (Saltar -)
8. Play / Pause (Reproducir / Pausa)
9. Silenciar/Repetir alarma
10. SD/MMC
11. Tecla MEM + / Ábum +
12. Tecla MEM - / Ábum -
13. Encender / Apagado automático
Vista trasera
14. Conector auriculares
15. Antena FM
16. Conector Aux-in
17. Cable corriente CA
ANTES DEL PRIMER USO
• Extraiga el aparato y los accesoriosdelacaja.Retirelas pegatinas,el
envoltorio de protecciónoel plásticodeldispositivo.
• Coloque el aparato sobre una supercie plana estable y asegúrese de tener
un mínimo de 10 cm de espacio libre alrededor del mismo. Este aparato no
es apropiado para ser instalado en un armario o para el uso en exteriores.
FUENTES DE ALIMENTACIÓN
Corriente alterna
Puede alimentar su sistema portátil conectando el cable de CA desmontable
en la toma de CA a la parte posterior de la unidad y al enchufe de CA. Com-
pruebe que la tensión nominal de su dispositivo coincide con la tensión local.
Asegúrese de que el cable de CA está totalmente insertado en el dispositivo.
Pilas
Inserte 4 pilas de tamaño "C" en el compartimento de las pilas. Asegúrese de que
inserta las pilas correctamente para evitar dañar el aparato. Extraiga siempre las
pilas si no va a utilizar el aparato durante un largo período de tiempo, ya que
esto provocaría fugas en las pilas y, por consiguiente, se dañaría el aparato.
USO
Reloj
• Solamente disponible en modo DESCONECTADO.
• Presione y mantenga presionado el botón “Reproducir/Pausa”, la pantalla
parpadeará.
• Utilice los botones “pasar +/-“ para seleccionar la conguración deseada y
utilice el botón “reproducir/pausa” para conrmar la conguración deseada.
Alarma
• Solamente disponible en modo DESCONECTADO.
• Presione y mantenga presionado el botón “alarma 1/2”, la pantalla parpadeará.
• Utilice los botones “pasar +/-“ para seleccionar la conguración deseada y
utilice el botón “alarma” para conrmar la conguración deseada.
• Una vez realizada la conguración, puede activar o desactivar la alarma
deseada presionando el botón de alarma correspondiente con la unidad en
modo DESCONECTADO.
Funcionamiento con tarjeta SD/ USB
• Presione el botón “espera” para encender la unidad, y presione el botón
“modo” para entrar en el modo USB/SD.
• Conecte la unidad de memoria USB o la tarjeta SD en la ranura, la unidad
comenzará a reproducir el contenido automáticamente.
• Utilice los botones “pasar +/-“ para seleccionar la pista deseada y utilice el
botón “álbum +/-” para seleccionar el álbum deseado.
• Presione y mantenga presionado el botón “espera” para apagar la unidad.
Repetir
Presione y mantenga presionado el botón “modo” durante la reproducción,
cada vez que presione cambiará a los siguientes modos de repetición: Repetir
1 >> Repetir álbum.
Aux
Conecte el cable de 3,5 mm a la unidad y el dispositivo externo, presione el
botón “modo” hasta que el sistema haya entrado en modo AUX. Utilice los
controles en el dispositivo externo para comenzar la reproducción.
Función de apagado automático
Presione el botón "espera" para congurar el temporizador de desconexión
automática (90>80>70>60>50>40>30>20>10>OFF)
LIMPIEZA Y MANTENIMIENTO
• Limpie el aparato con un paño húmedo. No utilice productos de limpieza
abrasives o fuertes, estropajos o lana metálica porque se podría dañar el
aparato.
• No sumerja nunca el aparato en agua o cualquier otro líquido. Este aparato
no se puede lavar en el lavavajillas.
GARANTÍA
• Este producto cuenta con 24 meses de garantía. Su garantía es válida si el
producto se utilizan de acuerdo con las instrucciones y el propósito para
el que se creó. Además, debe enviarse un justicante de la compra original
(factura, tíquet o recibo) en el que aparezca la fecha de la compra, el nombre
del vendedor y el número de artículo del producto.
• Para más detalles sobre las condiciones de la garantía, consulte la página
web de servicio: www.service.tristar.eu
NORMAS DE PROTECCIÓN DEL MEDIOAMBIENTE
Este aparato no se debe desechar con los residuos domésticos cuando
nalice su durabilidad, sino que se debe ofrecer a un centro de reciclaje
de aparatos eléctricos y electrónicos domésticos. Este símbolo en el aparato,
manual de instrucciones y embalaje le avisa de este aspecto importante.
El los materiales utilizados en este aparato se pueden reciclar. Mediante el
reciclaje de electrodomésticos, usted contribuye a fomentar la protección del
medioambiente. Consulte a sus autoridades locales para obtener información
acerca del punto de recogida.
SOPORTE
Puede encontrar toda la información disponible, así como piezas de repuesto,
en service.tristar.eu!
service.tristar.eu
Tristar Europe B.V. | Jules Verneweg 87
5015 BH Tilburg | The Netherlands
PARTS DESCRIPTION / ONDERDELENBESCHRIJVING / DESCRIPTION DES
PIÈCES / TEILEBESCHREIBUNG / DESCRIPCIÓN DE LAS PIEZAS /
DESCRIÇÃO DOS COMPONENTES / OPIS CZĘŚCI / DESCRIZIONE DELLE PARTI
/ BESKRIVNING AV DELAR / POPIS SOUČÁSTÍ / POPIS SÚČASTÍ
VEILIGHEIDSVOORSCHRIFTEN
• Als de veiligheidsinstructies niet worden opgevolgd, kan de fabrikant
niet verantwoordelijk worden gesteld voor schade die daar eventueel
het gevolg van is.
• Als het snoer beschadigd is, moet het worden vervangen door de fabrikant
zelf, de dealer of erkend technicus om brandgevaar te voorkomen.
• Verplaats het apparaat nooit door aan het snoer te trekken en zorg
ervoor dat het snoer nergens in verstrikt kan raken.
• Het apparaat moet worden geplaatst op een stabiele, vlakke ondergrond.
• Laat het apparaat nooit onbeheerd achter wanneer de stekker in het
stopcontact steekt.
• Om de voeding volledig uit te schakelen, moet de stekker van de AC/
DC-adapter uit het stopcontact worden verwijderd, omdat de AC/DC-
adapter het apparaat van stroom voorziet.
• Om kinderen te beschermen tegen de gevaren van elektrische
apparatuur mag u ze nooit zonder toezicht bij het apparaat laten.
Selecteer daarom een plek voor uw apparaat op dusdanige wijze
dat kinderen er niet bij kunnen. Zorg ervoor dat het snoer niet naar
beneden hangt.
• Dompel het snoer, de stekker en/of het apparaat nooit in het water of een
andere vloeistof, dit om u te beschermen tegen een elektrische schok.
• Waarschuwing: Verwijder de klep (of achterkant) niet, om het risico op
een elektrische schok te reduceren. Er bevinden zich geen onderdelen
binnenin, die door de gebruiker onderhouden kunnen worden. Laat
het onderhoud over aan gekwaliceerd onderhoudspersoneel.
• WAARSCHUWING: De batterij (batterij, batterijen of batterijdoos) dient
niet te worden blootgesteld aan extreme hitte, zoals direct zonlicht,
vlammen en dergelijke.
• Let op: aarding en polarisatie. Zorg ervoor, dat u de stekker op de juiste
manier in het stopcontact steekt, en dat de aarding is aangesloten.
• Het apparaat mag niet worden blootgesteld aan water of spatten, en
plaats geen met vloeistof gevulde voorwerpen op het apparaat.
ONDERDELENBESCHRIJVING
Vooraanzicht
1. LCD-scherm
Bovenaanzicht
2. USB-poort
3. Vol + / Alarm 1
4. Vol - / Alarm 2
5. Functie/ modus
6. Overslaan +
7. Overslaan -
8. Afspelen / Pauze
9. Dempen / sluimer
10. SD/MMC
11. MEM + / Album + toets
12. MEM - / Album - toets
13. Voeding / slapen
Achteraanzicht
14. Koptelefoonaansluiting
15. FM-Antenne
16. Aux-in
17. AC-stroomkabel
VOOR HET EERSTE GEBRUIK
• Haal het apparaat en de accessoires uit de doos. Verwijder eventuele
stickers, beschermfolie of plastic van het apparaat.
• Plaats het apparaat altijd op een vlakke stabiele ondergrond en zorg voor
minimaal 10 cm. vrije ruimte rondom het apparaat. Dit apparaat is niet
geschikt voor inbouw of buitengebruik.
ENERGIEBRONNEN
AC-Stroom
U kunt het apparaat van stroom voorzien door de ontkoppelbare AC-stroom-
kabel in de AC-ingang aan de achterzijde van het apparaat te steken en in het
stopcontact. Controleer of het benodigde voltage van het apparaat overeen-
komt met het lokale voltage. Verzeker u ervan dat de AC-stroomkabel volledig
in het apparaat is gestoken.
Batterijstroom
Plaats 4 C-batterijen in het batterijvak. Verzeker u ervan dat de batterijen
correct zijn geplaatst om beschadiging van het apparaat te voorkomen. Ver-
wijder altijd de batterijen als u het apparaat een langere periode niet gebruikt,
aangezien dit lekkage van de batterijen kan veroorzaken en vervolgens uw
apparaat beschadigt.
GEBRUIK
Klok
• Alleen beschikbaar in de modus UIT.
• De "Weergave/Pauze"-toets ingedrukt houden. Het display gaat knipperen.
• Gebruik de "Skip +/-" toetsen om de gewenste instellingen te selecteren en
gebruik de "Weergave/Pauze"-toets om de gewenste instelling te bevestigen.
Alarm
• Alleen beschikbaar in de modus UIT.
• De "Alarm 1/2"-toets ingedrukt houden. Het display gaat knipperen.
• Gebruik de "Skip +/-" toetsen om de gewenste instellingen te selecteren en
gebruik de "Alarm"-toets om de gewenste instellingen te bevestigen.
• Na het instellen kunt u de gewenste alarm in- of uitschakelen door een keer
op de gewenste alarm-toets te drukken in de UIT-modus.
Gebruik van USB/SD-kaart
• Druk op de "Stand-by"-toets om het apparaat in te schakelen, en druk op de
"Modus"-toets om de USB/SD-modus te openen.
• De USB-ash of SD-kaart in de sleuf plaatsen. Het apparaat begint
automatisch met afspelen.
• Gebruik de "Skip +/-" toetsen om de gewenste track te selecteren, gebruik
dan de "Album +/ " toets om het gewenste album te selecteren.
• De "Stand-by"-toets ingedrukt houden om het apparaat uit te schakelen.
Herhalen
De "Modus"-toets tijdens weergave ingedrukt houden. Elke keer indrukken
resulteert in de volgende herhaalmodi: Herhaal 1 >> Album herhalen.
Aux
Sluit de 3,5 mm kabel aan op het toestel en het externe apparaat. De "Mo-
dus"-toets ingedrukt houden totdat het apparaat in de AUX-modus schakelt.
Gebruik de bedieningselementen op het externe apparaat om het afspelen te
starten.
Slaapfunctie
Druk op de "Stand-by"-toets om de automatische timer in te stellen (90>80>70
>60>50>40>30>20>10>UIT)
REINIGING EN ONDERHOUD
• Reinig het apparaat met een vochtige doek. Gebruik nooit agressieve
en schurende schoonmaakmiddelen, een schuurspons of staalwol; dit
beschadigt het apparaat.
• Dompel het apparaat niet onder in water of in een andere vloeistof en plaats
het apparaat niet in de vaatwasmachine om te reinigen.
GARANTIEVOORWAARDEN
• Op dit product wordt een garantie van 24 maanden verleend. Uw garantie
is geldig wanneer het product is gebruikt in overeenstemming met de
gebruiksaanwijzing en voor het doel waarvoor het gemaakt is. Tevens
dient de originele aankoopbon (factuur, kassabon of kwitantie) overlegd
te worden met daarop de aankoopdatum, de naam van de retailer en het
artikelnummer van het product.
• Voor uitgebreide garantievoorwaarden verwijzen wij u naar onze
servicewebsite: www.service.tristar.eu
AANWIJZINGEN TER BESCHERMING VAN HET MILIEU
Dit product mag aan het einde van zijn levensduur niet bij het normale
huisafval worden gedeponeerd, maar dient bij een speciaal inza-
melpunt voor het hergebruik van elektrische en elektronische apparaten te
worden aangeboden. Het symbool op het artikel, de gebruiksaanwijzing en de
verpakking attendeert u hierop. De gebruikte grondstoen zijn geschikt voor
hergebruik. Met het hergebruik van gebruikte apparaten of grondstoen le-
vert u een belangrijke bijdrage aan de bescherming van ons milieu. Informeer
bij uw lokale overheid naar het bedoelde inzamelpunt.
ONDERSTEUNING
Vind alle beschikbare informatie en onderdelen op service.tristar.eu!
WICHTIGE SICHERHEITSVORKEHRUNGEN
• Beim Ignorieren der Sicherheitshinweise kann der Hersteller nicht für
Schäden haftbar gemacht werden.
• Wenn das Stromkabel beschädigt ist, muss es vom Hersteller,
Kundendienst oder ähnlich qualizierten Personen ersetzt werden, um
Gefahren zu vermeiden.
• Bewegen Sie das Gerät niemals, indem Sie am Kabel ziehen, und achten
Sie darauf, dass das Kabel nicht verwickelt wird.
• Das Gerät muss auf einer ebenen, stabilen Fläche platziert werden.
• Das Gerät darf nicht unbeaufsichtigt bleiben, während es am Netz
angeschlossen ist.
• Um das AC/DC Netzteil komplett von der Stromversorgung zu trennen,
sollte der Netzstecker gezogen werden, weil das abgeklemmte Gerät
das AC/DC Netzteil des Geräts ist.
• Um Kinder vor den Gefahren eines Elektrogeräts zu schützen, müssen
Sie darauf achten, dass das Gerät niemals unbeaufsichtigt ist. Aus
diesem Grund müssen Sie für das Gerät einen Aufbewahrungsort
auswählen, den Kinder nicht erreichen können. Achten Sie darauf, dass
das Kabel nicht herunter hängt.
• Um sich vor einem Stromschlag zu schützen, tauchen Sie das Kabel, den
Stecker oder das Gerät niemals in Wasser oder eine andere Flüssigkeit.
• Warnung: Zur Vermeidung von Stromschlag önen Sie nicht das
Gerätegehäuse. Es benden sich keine vom Verbraucher wartbaren
Komponenten im Gerät. Wenden Sie sich mit Reparaturen stets an
einen autorisierten Kundendienst.
• WARNUNG: Batterien oder Akkus dürfen nicht übermäßiger Hitze,
direkter Sonneneinstrahlung oder Feuer ausgesetzt werden.
• Achtung: Erdung oder Polarisation. Die Vorsichtsmaßnahmen sollten
ergrien werden, so dass der breitere Kontakt des AC-Steckers in die
Buchse der "Wandsteckdose" passt.
• Das Gerät keinen Tropfen oder Spritzern aussetzen und keine mit
Flüssigkeiten gefüllte Gegenstände auf das Gerät stellen.
TEILEBESCHREIBUNG
Frontansicht
1. LCD-Display
Draufsicht
2. USB-Port
3. Vol + / Alarm 1
4. Vol - / Alarm 2
5. Funktion / Modus
6. Skip +
7. Skip -
8. Wiedergabe / Pause
9. Stumm/ Schlummer
10. SD/MMC
11. MEM + / Album + -Taste
12. MEM - / Album - -Taste
13. Power / Sleep
Rückseite
14. Kopfhörerbuchse
15. UKW-Antenne
16. AUX-Eingang
17. Netzkabel
VOR DER ERSTEN VERWENDUNG
• Nehmen Sie das Gerät und das Zubehör aus der Kiste. Entfernen Sie die
Aufkleber, die Schutzfolie oder Plastik vom Gerät.
• Das Gerät immer auf eine ebene und feste Fläche stellen und einen Abstand
von mindestens 10 cm um das Gerät einhalten. Dieses Gerät ist nicht für den
Anschluss oder die Verwendung in einem Schrank oder im Freien geeignet.
SPANNUNGSVERSORGUNG
Netzbetrieb
Sie können das System über das abnehmbare Netzkabel an einer Steckdose
anschließen. Vergewissern Sie sich, dass die Netzspannung mit den Angaben
auf dem Typenschild übereinstimmt. Schließen Sie das Netzkabel ordnungsge-
mäß an.
Batteriebetrieb
Setzen Sie 4 C-Batterien im Batteriefach ein. Achten Sie auf die Polarität. Ent-
nehmen Sie die Batterien, wenn das Gerät für längere Zeit nicht benutzt wird,
um ein Auslaufen der Batterien und Schäden am Gerät zu vermeiden.
ANWENDUNG
Uhr
• Nur im AUS-Modus verfügbar.
• Drücken und halten Sie die Taste "Play/ Pause", dann blinkt das Display.
• Verwenden Sie die Tasten "Skip +/-", um die gewünschten Einstellungen
auszuwählen und die Taste "Play/ Pause", um die gewünschte Einstellung zu
bestätigen.
Alarm
• Nur im AUS-Modus verfügbar.
• Drücken und halten Sie die Taste "Alarm 1/2", dann blinkt das Display.
• Verwenden Sie die Tasten "Skip +/-", um die gewünschten Einstellungen
auszuwählen und die Taste "Alarm", um die gewünschte Einstellung zu bestätigen.
• Nach der Einstellung können Sie den gewünschten Alarm ein- oder
ausschalten, indem Sie die Alarm-Taste einmal im AUS-Modus drücken.
USB/SD-Karten-Option
• Drücken Sie die Taste "Standby", um das Gerät einzuschalten, dann drücken
Sie die Taste "Modus", um in den USB-/SD-Modus zu gelangen.
• Verbinden Sie die USB Flash- oder SD-Karte mit dem Schlitz und das Gerät
beginnt automatisch mit dem Abspiel.
• Verwenden Sie die Tasten "Skip +/-", um den gewünschten Track
auszuwählen und nutzen Sie die Taste "Album +/-", um das gewünschte
Album auszuwählen.
• Drücken und halten Sie die "Standby"-Taste, um das Gerät auszuschalten.
Wiederholen
Drücken und halten Sie während des Abspiels die "Modus"-Taste, jeder Druck
schaltet die folgenden Wiederholungsmodi: 1 Wiederholen >> Album wieder-
holen.
Zus.
Verbinden Sie ein 3,5 mm-Kabel mit dem Gerät und dem externen Gerät, drü-
cken Sie die Taste "Modus", bis das System in den AUX-Modus geht. Verwenden
Sie die Steuerung am externen Gerät, um das Abspiel zu starten.
Sleep-Funktion
Drücken Sie die Taste "Standby", um die automatische Abschaltung des Timers
einzustellen (90>80>70>60>50>40>30>20>10>AUS)
REINIGUNG UND WARTUNG
• Reinigen Sie das Gerät mit einem feuchten Tuch. Verwenden Sie niemals
scharfe oder scheuernde Reiniger, Topfreiniger oder Stahlwolle, die das
Geräte beschädigen würden.
• Tauchen Sie das Gerät niemals in Wasser oder andere Flüssigkeiten. Das
Gerät in nicht spülmaschinenfest.
GARANTIE
• Dieses Produkt wird eine Garantie für 24 Monate gewährt. Ihre Garantie
gilt, wenn das Gerät entsprechend der Bedienungsanleitung für seinen
Bestimmungszweck benutzt wird. Im Garantiefall reichen Sie bitte die
Kaufquittung ein, aus welcher das Kaufdatum, der Name des Fachhändlers
und die Gerätenummer hervorgehen müssen.
• Detaillierte Garantiebedingungen nden Sie auf unserer Website:
www.service.tristar.eu
UMWELTSCHUTZRICHTLINIEN
Dieses Gerät darf am Ende seiner Lebensdauer nicht im Hausmüll
entsorgt werden, sondern muss an einer zentralen Sammelstelle für das
Recycling von elektrischen und elektronischen Haushaltsgeräten abgegeben
werden. Dieses Symbol auf dem Gerät, der Bedienungsanweisung und der
Verpackung lenkt Ihre Aufmerksamkeit auf diesen wichtigen Fakt. Das bei
diesem Gerät verwendete Material kann recycled werden. Durch das Recyclen
gebrauchter Haushaltgeräte leisten Sie einen wichtigen Beitrag zum Umwelt-
schutz. Fragen Sie Ihre örtliche Behörde nach Informationen bezüglich einer
Sammelstelle.
SUPPORT
Sie nden alle erhältlichen Informationen und Ersatzteile auf service.tristar.eu
EN
Instruction Manual
NL
Gebruiksaanwijzing
FR
Mode d’emploi
DE
Bedienungsanleitung
ES
Manual de instrucciones
PT
Manual de Instruções
PL
Instrukcje użytkowania
IT
Istruzioni per l’uso
SV
Bruksanvisning
CS
Návod na použití
SK
Návod na použitie
Stereo radio
USB / SD / MP3 - 2 x 2 Watt RD-1565
14 1615
17
1
6 78
2 10
9
3 11
12
13
4
5
La página se está cargando...
Transcripción de documentos
EN Instruction manual EN NL FR DE ES PT Instruction Manual PL Gebruiksaanwijzing Mode d’emploi Bedienungsanleitung IT SV CS Manual de instrucciones Manual de Instruções SK Instrukcje użytkowania Istruzioni per l’uso Bruksanvisning Návod na použití Návod na použitie RD-1565 PARTS DESCRIPTION / ONDERDELENBESCHRIJVING / DESCRIPTION DES PIÈCES / TEILEBESCHREIBUNG / DESCRIPCIÓN DE LAS PIEZAS / DESCRIÇÃO DOS COMPONENTES / OPIS CZĘŚCI / DESCRIZIONE DELLE PARTI / BESKRIVNING AV DELAR / POPIS SOUČÁSTÍ / POPIS SÚČASTÍ 2 6 10 8 7 3 11 4 12 5 13 9 1 15 14 16 17 VEILIGHEIDSVOORSCHRIFTEN INSTRUCTIONS DE SÉCURITÉ IMPORTANTES WICHTIGE SICHERHEITSVORKEHRUNGEN PRECAUCIONES IMPORTANTES • Le fabricant ne sera pas tenu responsable de tous dommages si les consignes de sécurité ne sont pas respectées. • Si le cordon d'alimentation est endommagé, il doit être remplacé par le fabricant, son service après-vente ou des techniciens similairement agréés afin d'éviter un danger. • Ne jamais déplacer l’appareil en tirant sur le cordon et veillez à ce que ce dernier ne devienne pas entortillé. • L’appareil doit être posé sur une surface stable et nivelée. • Ne jamais utiliser l’appareil sans supervision. • Pour débrancher complètement l'alimentation, débranchez l'adaptateur CA/CC du secteur, car l'adaptateur sert à débrancher l’appareil. • Pour protéger les enfants des dangers des appareils électriques, veillez à ne jamais laisser les appareils sans surveillance. Par conséquent, il faudra choisir un lieu de rangement pour l’appareil inaccessible aux enfants. Veillez à ce que le cordon ne pende pas. • Ne pas immerger le cordon, la prise ou l'appareil dans de l'eau ou autre liquide afin de vous éviter un choc électrique. • Beim Ignorieren der Sicherheitshinweise kann der Hersteller nicht für Schäden haftbar gemacht werden. • Wenn das Stromkabel beschädigt ist, muss es vom Hersteller, Kundendienst oder ähnlich qualifizierten Personen ersetzt werden, um Gefahren zu vermeiden. • Bewegen Sie das Gerät niemals, indem Sie am Kabel ziehen, und achten Sie darauf, dass das Kabel nicht verwickelt wird. • Das Gerät muss auf einer ebenen, stabilen Fläche platziert werden. • Das Gerät darf nicht unbeaufsichtigt bleiben, während es am Netz angeschlossen ist. • Um das AC/DC Netzteil komplett von der Stromversorgung zu trennen, sollte der Netzstecker gezogen werden, weil das abgeklemmte Gerät das AC/DC Netzteil des Geräts ist. • Um Kinder vor den Gefahren eines Elektrogeräts zu schützen, müssen Sie darauf achten, dass das Gerät niemals unbeaufsichtigt ist. Aus diesem Grund müssen Sie für das Gerät einen Aufbewahrungsort auswählen, den Kinder nicht erreichen können. Achten Sie darauf, dass das Kabel nicht herunter hängt. • Um sich vor einem Stromschlag zu schützen, tauchen Sie das Kabel, den Stecker oder das Gerät niemals in Wasser oder eine andere Flüssigkeit. • Si ignora las instrucciones de seguridad, eximirá al fabricante de toda responsabilidad por posibles daños. • Si el cable de alimentación está dañado, para evitar peligros, corresponde al fabricante, a su representante o a una persona de cualificación similar su reemplazo. • No mueva el aparato tirando del cable y asegúrese de que el cable no se enrolle. • Este aparato se debe colocar sobre una superficie estable nivelada. • No utilice el dispositivo sin supervisión. • Para desconectar completamente la entrada de electricidad, el adaptador CA/CC del aparato debe estar desconectado de la toma de pared y también del propio aparato. • Para proteger a los niños frente a los peligros de los aparatos eléctricos, asegúrese de no dejar los aparatos sin vigilancia. Elija un lugar de almacenamiento para el aparato donde los niños no puedan acceder a él. Asegúrese de que el cable no cuelgue hacia abajo. • Como medida de protección contra las descargas eléctricas, no sumerja el cable, el enchufe o el aparato en agua o cualquier otro líquido. PARTS DESCRIPTION Front view 1. LCD Display Top view 2. USB slot 3. Vol + / Alarm 1 4. Vol - / Alarm 2 5. Function/ mode 6. Skip + 7. Skip 8. Play / Pause 9. Mute/ snooze 10. SD/MMC 11. MEM + / Album + key 12. MEM - / Album - key 13. Power/ sleep Back view 14. Phone jack 15. FM Antenna 16. Aux- in Jack 17. AC power cord BEFORE THE FIRST USE • Take the appliance and accessories out the box. Remove the stickers, protective foil or plastic from the device. • Place the device on a flat stable surface and ensure a minimum of 10 cm. free space around the device. This device is not suitable for installation in a cabinet or for outside use. POWER SOURCES AC power You can power your portable system by plugging the detachable AC power cord into the AC inlet at the back of the unit and into a wall AC power outlet. Check that the rated voltage of your appliance matches your local voltage. Make sure that the AC power cord is fully inserted into the appliance. Battery power Insert 4 x “C” size batteries into the battery compartment. Be sure that the batteries are inserted correctly to avoid damage to the appliance. Always remove the batteries when appliance will not be used for a long period of time, as this will cause leakage to the batteries and subsequently damage to your appliance. USE Clock • Only available in OFF mode. • Press and hold the "Play/ pause" button, the sisplay will flash. • Use the "skip +/-" buttons to select the desired settings and use the "play/ pause" button to confirm the desired setting. Alarm • Only available in OFF mode. • Press and hold the "alarm 1/2" button, the display will flash. • Use the "skip +/-" buttons to slect the desired settings and use the "alarm" button to confirm the desired settings. • After setting, you can turn the desired alarm on or off by press the desired alarm button once in the OFF mode. USB/SD-card operation • Press the "standby" button to switch on the unit, press the "mode" button to enter the USB/SD mode. • Connect the USB flash or SD card to the slot, the unit will start playing automatically. • Use the "skip +/-" buttons to select the desired track, use the "album +/-" button to select the desired album. • Press and hold the "standby" button to switch off the unit. Repeat Press and hold the "mode" button during playback, each press switches the following repaet modes: Repeat 1 >> Repeat album. Aux Connect 3.5 mm cable to the unit and the external device, press the "mode" button until the system entered the AUX mode. Use the controls on the external device to start playback. Sleep function Press the "standby" button to set the auto switch off timer (90>80>70>60>50> 40>30>20>10>OFF) GUARANTEE • This product is guaranteed for 24 months granted. Your warranty is valid if the product is used in accordance to the instructions and for the purpose for which it was created. In addition, the original purchase (invoice, sales slip or receipt) is to be submitted with the date of purchase, the name of the retailer and the item number of the product. • For the detailed warranty conditions, please refer to our service website: www.service.tristar.eu GUIDELINES FOR PROTECTION OF THE ENVIRONMENT This appliance should not be put into the domestic garbage at the end of its durability, but must be offered at a central point for the recycling of electric and electronic domestic appliances. This symbol on the appliance, instruction manual and packaging puts your attention to this important issue. The materials used in this appliance can be recycled. By recycling of used domestic appliances you contribute an important push to the protection of our environment. Ask your local authorities for information regarding the point of recollection. SUPPORT You can find all available information and spare parts at service.tristar.eu! Tristar Europe B.V. | Jules Verneweg 87 5015 BH Tilburg | The Netherlands ES Manual de usuario • Als de veiligheidsinstructies niet worden opgevolgd, kan de fabrikant niet verantwoordelijk worden gesteld voor schade die daar eventueel het gevolg van is. • Als het snoer beschadigd is, moet het worden vervangen door de fabrikant zelf, de dealer of erkend technicus om brandgevaar te voorkomen. • Verplaats het apparaat nooit door aan het snoer te trekken en zorg ervoor dat het snoer nergens in verstrikt kan raken. • Het apparaat moet worden geplaatst op een stabiele, vlakke ondergrond. • Laat het apparaat nooit onbeheerd achter wanneer de stekker in het stopcontact steekt. • Om de voeding volledig uit te schakelen, moet de stekker van de AC/ DC-adapter uit het stopcontact worden verwijderd, omdat de AC/DCadapter het apparaat van stroom voorziet. • Om kinderen te beschermen tegen de gevaren van elektrische apparatuur mag u ze nooit zonder toezicht bij het apparaat laten. Selecteer daarom een plek voor uw apparaat op dusdanige wijze dat kinderen er niet bij kunnen. Zorg ervoor dat het snoer niet naar beneden hangt. • Dompel het snoer, de stekker en/of het apparaat nooit in het water of een andere vloeistof, dit om u te beschermen tegen een elektrische schok. CLEANING AND MAINTENANCE • Clean the appliance with a damp cloth. Never use harsh and abrasive cleaners, scouring pad or steel wool, which damages the device. • Never immerse the electrical device in water or any other liquid. The device is not dishwasher proof. service.tristar.eu DE Bedienungsanleitung SAFETY INSTRUCTIONS • WARNING: The battery (battery or batteries or battery pack) shall not be exposed to excessive heat such as sunshine, fire or the like. • Caution: grounding or polarization. The precautions should be taken so that the wider blade of the ac-plug must match the slot in receptacle "wall socket". • The apparatus should not be exposed to dripping or splashing and no objects filled with liquids should be placed on the apparatus. U S B / S D / M P 3 - 2 x 2 Wa t t FR Mode d'emploi • By ignoring the safety instructions the manufacturer can not be hold responsible for the damage. • If the supply cord is damaged, it must be replaced by the manufacturer, its service agent or similarly qualified persons in order to avoid a hazard. • Never move the appliance by pulling the cord and make sure the cord can not become entangled. • The appliance must be placed on a stable, level surface. • The user must not leave the device unattended while it is connected to the supply. • To completely disconnect the power input, the AC/DC adaptor of the apparatus should be disconnected from the mains, as the disconnected device is the AC/DC adaptor of apparatus. • To protect children against the dangers of electrical appliances, please make sure that you never leave the appliance unattended. Therefore you have to select a storage place for the appliance where children are not able to grab it. Make sure that the cable is not hanging in a downward position. • To protect yourself against an electric shock, do not immerse the cord, plug or appliance in the water or any other liquid. • Warning: To reduce the risk of electric shock, do not remove cover (or back). No user-serviceable parts inside. Refer servicing to qualified service personnel. Stereo radio NL Gebruiksaanwijzing • Waarschuwing: Verwijder de klep (of achterkant) niet, om het risico op een elektrische schok te reduceren. Er bevinden zich geen onderdelen binnenin, die door de gebruiker onderhouden kunnen worden. Laat het onderhoud over aan gekwalificeerd onderhoudspersoneel. • WAARSCHUWING: De batterij (batterij, batterijen of batterijdoos) dient niet te worden blootgesteld aan extreme hitte, zoals direct zonlicht, vlammen en dergelijke. • Let op: aarding en polarisatie. Zorg ervoor, dat u de stekker op de juiste manier in het stopcontact steekt, en dat de aarding is aangesloten. • Het apparaat mag niet worden blootgesteld aan water of spatten, en plaats geen met vloeistof gevulde voorwerpen op het apparaat. ONDERDELENBESCHRIJVING Vooraanzicht 1. LCD-scherm Bovenaanzicht 2. USB-poort 3. Vol + / Alarm 1 4. Vol - / Alarm 2 5. Functie/ modus 6. Overslaan + 7. Overslaan 8. Afspelen / Pauze 9. Dempen / sluimer 10. SD/MMC 11. MEM + / Album + toets 12. MEM - / Album - toets 13. Voeding / slapen Achteraanzicht 14. Koptelefoonaansluiting 15. FM-Antenne 16. Aux-in 17. AC-stroomkabel VOOR HET EERSTE GEBRUIK • Haal het apparaat en de accessoires uit de doos. Verwijder eventuele stickers, beschermfolie of plastic van het apparaat. • Plaats het apparaat altijd op een vlakke stabiele ondergrond en zorg voor minimaal 10 cm. vrije ruimte rondom het apparaat. Dit apparaat is niet geschikt voor inbouw of buitengebruik. ENERGIEBRONNEN AC-Stroom U kunt het apparaat van stroom voorzien door de ontkoppelbare AC-stroomkabel in de AC-ingang aan de achterzijde van het apparaat te steken en in het stopcontact. Controleer of het benodigde voltage van het apparaat overeenkomt met het lokale voltage. Verzeker u ervan dat de AC-stroomkabel volledig in het apparaat is gestoken. Batterijstroom Plaats 4 C-batterijen in het batterijvak. Verzeker u ervan dat de batterijen correct zijn geplaatst om beschadiging van het apparaat te voorkomen. Verwijder altijd de batterijen als u het apparaat een langere periode niet gebruikt, aangezien dit lekkage van de batterijen kan veroorzaken en vervolgens uw apparaat beschadigt. GEBRUIK Klok • Alleen beschikbaar in de modus UIT. • De "Weergave/Pauze"-toets ingedrukt houden. Het display gaat knipperen. • Gebruik de "Skip +/-" toetsen om de gewenste instellingen te selecteren en gebruik de "Weergave/Pauze"-toets om de gewenste instelling te bevestigen. Alarm • Alleen beschikbaar in de modus UIT. • De "Alarm 1/2"-toets ingedrukt houden. Het display gaat knipperen. • Gebruik de "Skip +/-" toetsen om de gewenste instellingen te selecteren en gebruik de "Alarm"-toets om de gewenste instellingen te bevestigen. • Na het instellen kunt u de gewenste alarm in- of uitschakelen door een keer op de gewenste alarm-toets te drukken in de UIT-modus. Gebruik van USB/SD-kaart • Druk op de "Stand-by"-toets om het apparaat in te schakelen, en druk op de "Modus"-toets om de USB/SD-modus te openen. • De USB-flash of SD-kaart in de sleuf plaatsen. Het apparaat begint automatisch met afspelen. • Gebruik de "Skip +/-" toetsen om de gewenste track te selecteren, gebruik dan de "Album +/" toets om het gewenste album te selecteren. • De "Stand-by"-toets ingedrukt houden om het apparaat uit te schakelen. Herhalen De "Modus"-toets tijdens weergave ingedrukt houden. Elke keer indrukken resulteert in de volgende herhaalmodi: Herhaal 1 >> Album herhalen. Aux Sluit de 3,5 mm kabel aan op het toestel en het externe apparaat. De "Modus"-toets ingedrukt houden totdat het apparaat in de AUX-modus schakelt. Gebruik de bedieningselementen op het externe apparaat om het afspelen te starten. Slaapfunctie Druk op de "Stand-by"-toets om de automatische timer in te stellen (90>80>70 >60>50>40>30>20>10>UIT) REINIGING EN ONDERHOUD • Reinig het apparaat met een vochtige doek. Gebruik nooit agressieve en schurende schoonmaakmiddelen, een schuurspons of staalwol; dit beschadigt het apparaat. • Dompel het apparaat niet onder in water of in een andere vloeistof en plaats het apparaat niet in de vaatwasmachine om te reinigen. GARANTIEVOORWAARDEN • Op dit product wordt een garantie van 24 maanden verleend. Uw garantie is geldig wanneer het product is gebruikt in overeenstemming met de gebruiksaanwijzing en voor het doel waarvoor het gemaakt is. Tevens dient de originele aankoopbon (factuur, kassabon of kwitantie) overlegd te worden met daarop de aankoopdatum, de naam van de retailer en het artikelnummer van het product. • Voor uitgebreide garantievoorwaarden verwijzen wij u naar onze servicewebsite: www.service.tristar.eu AANWIJZINGEN TER BESCHERMING VAN HET MILIEU Dit product mag aan het einde van zijn levensduur niet bij het normale huisafval worden gedeponeerd, maar dient bij een speciaal inzamelpunt voor het hergebruik van elektrische en elektronische apparaten te worden aangeboden. Het symbool op het artikel, de gebruiksaanwijzing en de verpakking attendeert u hierop. De gebruikte grondstoffen zijn geschikt voor hergebruik. Met het hergebruik van gebruikte apparaten of grondstoffen levert u een belangrijke bijdrage aan de bescherming van ons milieu. Informeer bij uw lokale overheid naar het bedoelde inzamelpunt. ONDERSTEUNING Vind alle beschikbare informatie en onderdelen op service.tristar.eu! • Avertissement : Afin de réduire le risque de choc électrique, ne pas retirer le cache (ou l’arrière) Aucune pièce à l’intérieur n’est réparable par l’utilisateur Confiez l’entretien à un personnel technique qualifié. • AVERTISSEMENT : La batterie (batterie ou batteries ou pack de batterie) ne doit pas être exposée à une chaleur excessive comme les rayons du soleil, le feu ou autre. • Attention : Prise de terre ou polarisation. Il faudra prendre des précautions afin que la fiche la plus large de la prise CA corresponde à la fente désignée de la 'prise murale'. • L’appareil ne devrait pas être exposé à des égouttements ou des éclaboussures et aucun objet rempli de liquide ne devrait être posé sur l’appareil. DESCRIPTION DES PIÈCES Vue avant 1. Écran LCD Vue du haut 2. Fente USB 3. Vol +/Alarme 1 4. Vol -/Alarme 2 5. Fonction/Mode 6. Avancer + 7. Reculer 8. Lecture/Pause 9. Sourdine/'Snooze' 10. SD/MMC 11. Touche MEM +/Album + 12. Touche MEM -/Album 13. Alimentation/Veille Vue arrière 14. Prise de téléphone 15. Antenne FM 16. Prise Aux-in (Entrée auxiliaire) 17. Cordon d'alimentation CA AVANT LA PREMIÈRE UTILISATION • Retirer l’appareil et les accessoires du carton. Retirer les autocollants, le film ou le plastique protecteur de l’appareil. • Posez l’appareil sur une surface plate et stable en laissant 10 cm d’espace libre de chaque côté. Cet appareil ne convient pas à une installation intégrée ou en extérieur. SOURCES D'ALIMENTATION Alimentation CA Vous pouvez alimenter votre système portable en branchant le cordon CA amovible dans la prise CA à l'arrière de l'appareil et dans une prise électrique murale CA. Vérifiez que la tension nominale de votre appareil correspond à la tension du secteur. Assurez-vous que le cordon d'alimentation CA est pleinement inséré dans l'appareil. Alimentation par pile Insérez 4 piles de taille “C” dans le compartiment à piles. Assurez-vous que les piles sont insérées correctement pour éviter d'endommager l'appareil. Retirez toujours les piles lorsque l'appareil n'est pas utilisé pendant de longues périodes, des fuites de piles pourraient se produire et endommager l'appareil. UTILISATION Réveil • Uniquement disponible en mode ARRET (Off ). • L'écran clignotera en maintenant la touche 'Lecture/Pause' (Play/Pause) enfoncée. • Utilisez les touches 'Avancer +/Reculer -' (Skip +/-) pour sélectionner les réglages souhaités et utilisez la touche 'Lecture/Pause' (Play/Pause) pour valider le réglage désiré. Alarme • Uniquement disponible en mode ARRET (Off ). • L'écran clignotera en maintenant la touche 'Alarme 1/2' enfoncée. • Utilisez les touches 'Avancer +/Reculer -' (Skip +/-) pour sélectionner les réglages souhaités et utilisez la touche 'Alarme' pour valider les réglages désirés. • Après le réglage, l'alarme souhaitée peut être activée ou désactivée en appuyant une fois sur la touche d'alarme souhaitée en mode 'ARRET' (Off ). Utilisation USB/Carte SD • Appuyez sur la touche 'Veille' pour allumer l'appareil, appuyez sur la touche 'Mode' pour accéder au mode 'USB/SD'. • Insérez la clé USB ou la carte SD dans la fente, l'appareil commencera automatiquement la lecture. • Utilisez les touches 'Avancer +/Reculer-' (Skip +/-) pour choisir la chanson souhaitée, utilisez la touche 'Album +/ -' pour choisir l'album souhaité. • Maintenez la touche 'Veille' enfoncée pour éteindre l'appareil. Répéter Maintenez la touche 'Mode' enfoncée pendant la lecture, les modes de répétition suivants changent à chaque appui : Répéter 1 >> Répéter album. Aux Branchez le cordon de 3,5 mm à l'appareil et au dispositif externe, appuyez sur la touche 'Mode' jusqu'à ce que l'appareil accède au mode AUX. Utilisez les commandes du dispositif externe pour démarrer la lecture. Fonction 'Veille' Appuyez sur la touche 'Veille' pour régler l'arrêt automatique du minuteur (90>80>70>60>50>40>30>20>10>ARRET) NETTOYAGE ET ENTRETIEN • Nettoyez l’appareil avec un chiffon humide. N’utilisez jamais de nettoyants forts et abrasifs, de tampon à récurer ni de paille de fer, car cela endommagerait l’appareil. • N’immergez jamais l’appareil dans l’eau ni aucun autre liquide. L’appareil ne va pas au lave-vaisselle. GARANTIE • Ce produit est garanti pour une période de 24 mois. Votre garantie est valable si le produit est utilisé selon les instructions et pour l'usage auquel il est destiné. De plus, la preuve d'achat d'origine (facture, reçu ou ticket de caisse) doit être présentée, montrant la date d'achat, le nom du détaillant et le numéro d'article du produit. • Pour connaître les conditions de garantie détaillées, veuillez consulter notre site Internet de service : www.service.tristar.eu DIRECTIVES POUR LA PROTECTION DE L’ENVIRONNEMENT Cet appareil ne doit pas être jeté aux ordures ménagères à la fin de sa durée de vie, mais doit être rendu à un centre de recyclage d’appareils ménagers électriques et électroniques. Ce symbole sur l’appareil, La notice d’emploi et l’emballage attirent votre attention sur ce sujet important. Composants utilisés dans cet appareil sont recyclables. En recyclant les appareils ménagers. Usagés, vous contribuez à un apport important à la protection de notre. Environnement. Adressez vous aux autorités locales pour des renseignements concernant le centre de Recyclage. SUPPORT Toutes les informations et les pièces détachées sont disponibles sur service.tristar.eu ! • Warnung: Zur Vermeidung von Stromschlag öffnen Sie nicht das Gerätegehäuse. Es befinden sich keine vom Verbraucher wartbaren Komponenten im Gerät. Wenden Sie sich mit Reparaturen stets an einen autorisierten Kundendienst. • WARNUNG: Batterien oder Akkus dürfen nicht übermäßiger Hitze, direkter Sonneneinstrahlung oder Feuer ausgesetzt werden. • Achtung: Erdung oder Polarisation. Die Vorsichtsmaßnahmen sollten ergriffen werden, so dass der breitere Kontakt des AC-Steckers in die Buchse der "Wandsteckdose" passt. • Das Gerät keinen Tropfen oder Spritzern aussetzen und keine mit Flüssigkeiten gefüllte Gegenstände auf das Gerät stellen. TEILEBESCHREIBUNG Frontansicht 1. LCD-Display Draufsicht 2. USB-Port 3. Vol + / Alarm 1 4. Vol - / Alarm 2 5. Funktion / Modus 6. Skip + 7. Skip 8. Wiedergabe / Pause 9. Stumm/ Schlummer 10. SD/MMC 11. MEM + / Album + -Taste 12. MEM - / Album - -Taste 13. Power / Sleep Rückseite 14. Kopfhörerbuchse 15. UKW-Antenne 16. AUX-Eingang 17. Netzkabel VOR DER ERSTEN VERWENDUNG • Nehmen Sie das Gerät und das Zubehör aus der Kiste. Entfernen Sie die Aufkleber, die Schutzfolie oder Plastik vom Gerät. • Das Gerät immer auf eine ebene und feste Fläche stellen und einen Abstand von mindestens 10 cm um das Gerät einhalten. Dieses Gerät ist nicht für den Anschluss oder die Verwendung in einem Schrank oder im Freien geeignet. SPANNUNGSVERSORGUNG Netzbetrieb Sie können das System über das abnehmbare Netzkabel an einer Steckdose anschließen. Vergewissern Sie sich, dass die Netzspannung mit den Angaben auf dem Typenschild übereinstimmt. Schließen Sie das Netzkabel ordnungsgemäß an. Batteriebetrieb Setzen Sie 4 C-Batterien im Batteriefach ein. Achten Sie auf die Polarität. Entnehmen Sie die Batterien, wenn das Gerät für längere Zeit nicht benutzt wird, um ein Auslaufen der Batterien und Schäden am Gerät zu vermeiden. ANWENDUNG Uhr • Nur im AUS-Modus verfügbar. • Drücken und halten Sie die Taste "Play/ Pause", dann blinkt das Display. • Verwenden Sie die Tasten "Skip +/-", um die gewünschten Einstellungen auszuwählen und die Taste "Play/ Pause", um die gewünschte Einstellung zu bestätigen. Alarm • Nur im AUS-Modus verfügbar. • Drücken und halten Sie die Taste "Alarm 1/2", dann blinkt das Display. • Verwenden Sie die Tasten "Skip +/-", um die gewünschten Einstellungen auszuwählen und die Taste "Alarm", um die gewünschte Einstellung zu bestätigen. • Nach der Einstellung können Sie den gewünschten Alarm ein- oder ausschalten, indem Sie die Alarm-Taste einmal im AUS-Modus drücken. USB/SD-Karten-Option • Drücken Sie die Taste "Standby", um das Gerät einzuschalten, dann drücken Sie die Taste "Modus", um in den USB-/SD-Modus zu gelangen. • Verbinden Sie die USB Flash- oder SD-Karte mit dem Schlitz und das Gerät beginnt automatisch mit dem Abspiel. • Verwenden Sie die Tasten "Skip +/-", um den gewünschten Track auszuwählen und nutzen Sie die Taste "Album +/-", um das gewünschte Album auszuwählen. • Drücken und halten Sie die "Standby"-Taste, um das Gerät auszuschalten. Wiederholen Drücken und halten Sie während des Abspiels die "Modus"-Taste, jeder Druck schaltet die folgenden Wiederholungsmodi: 1 Wiederholen >> Album wiederholen. Zus. Verbinden Sie ein 3,5 mm-Kabel mit dem Gerät und dem externen Gerät, drücken Sie die Taste "Modus", bis das System in den AUX-Modus geht. Verwenden Sie die Steuerung am externen Gerät, um das Abspiel zu starten. Sleep-Funktion Drücken Sie die Taste "Standby", um die automatische Abschaltung des Timers einzustellen (90>80>70>60>50>40>30>20>10>AUS) REINIGUNG UND WARTUNG • Reinigen Sie das Gerät mit einem feuchten Tuch. Verwenden Sie niemals scharfe oder scheuernde Reiniger, Topfreiniger oder Stahlwolle, die das Geräte beschädigen würden. • Tauchen Sie das Gerät niemals in Wasser oder andere Flüssigkeiten. Das Gerät in nicht spülmaschinenfest. GARANTIE • Dieses Produkt wird eine Garantie für 24 Monate gewährt. Ihre Garantie gilt, wenn das Gerät entsprechend der Bedienungsanleitung für seinen Bestimmungszweck benutzt wird. Im Garantiefall reichen Sie bitte die Kaufquittung ein, aus welcher das Kaufdatum, der Name des Fachhändlers und die Gerätenummer hervorgehen müssen. • Detaillierte Garantiebedingungen finden Sie auf unserer Website: www.service.tristar.eu UMWELTSCHUTZRICHTLINIEN Dieses Gerät darf am Ende seiner Lebensdauer nicht im Hausmüll entsorgt werden, sondern muss an einer zentralen Sammelstelle für das Recycling von elektrischen und elektronischen Haushaltsgeräten abgegeben werden. Dieses Symbol auf dem Gerät, der Bedienungsanweisung und der Verpackung lenkt Ihre Aufmerksamkeit auf diesen wichtigen Fakt. Das bei diesem Gerät verwendete Material kann recycled werden. Durch das Recyclen gebrauchter Haushaltgeräte leisten Sie einen wichtigen Beitrag zum Umweltschutz. Fragen Sie Ihre örtliche Behörde nach Informationen bezüglich einer Sammelstelle. SUPPORT Sie finden alle erhältlichen Informationen und Ersatzteile auf service.tristar.eu • Advertencia: Para reducir el riesgo de descarga eléctrica, no retire el armazón (o tapa). No existen partes modificables por el usuario en el interior. Solicite servicio técnico del personal cualificado. • ADVERTENCIA: La batería (batería o pilas) no debe exponerse a un calor excesivo como la luz solar, fuego o similar. • Precaución: conexión a tierra o polarización. Se deberán tomar medidas de precaución para que la patilla más ancha del enchufe de CA coincida con la ranura del receptáculo "toma de pared". • No se deberá exponer el aparato a goteo o salpicaduras, y no se deberán colocar objetos llenos de líquido sobre el mismo. DESCRIPCIÓN DE LAS PIEZAS Vista frontal 1. Pantalla LCD Vista superior 2. Ranura USB 3. Vol + / Alarm 1 (Vol + / Alarma 1) 4. Vol - / Alarm 2 (Vol - / Alarma 2) 5. Modo/Función 6. Skip + (Saltar +) 7. Skip - (Saltar -) 8. Play / Pause (Reproducir / Pausa) 9. Silenciar/Repetir alarma 10. SD/MMC 11. Tecla MEM + / Ábum + 12. Tecla MEM - / Ábum 13. Encender / Apagado automático Vista trasera 14. Conector auriculares 15. Antena FM 16. Conector Aux-in 17. Cable corriente CA ANTES DEL PRIMER USO • Extraiga el aparato y los accesorios de la caja. Retire las pegatinas, el envoltorio de protección o el plástico del dispositivo. • Coloque el aparato sobre una superficie plana estable y asegúrese de tener un mínimo de 10 cm de espacio libre alrededor del mismo. Este aparato no es apropiado para ser instalado en un armario o para el uso en exteriores. FUENTES DE ALIMENTACIÓN Corriente alterna Puede alimentar su sistema portátil conectando el cable de CA desmontable en la toma de CA a la parte posterior de la unidad y al enchufe de CA. Compruebe que la tensión nominal de su dispositivo coincide con la tensión local. Asegúrese de que el cable de CA está totalmente insertado en el dispositivo. Pilas Inserte 4 pilas de tamaño "C" en el compartimento de las pilas. Asegúrese de que inserta las pilas correctamente para evitar dañar el aparato. Extraiga siempre las pilas si no va a utilizar el aparato durante un largo período de tiempo, ya que esto provocaría fugas en las pilas y, por consiguiente, se dañaría el aparato. USO Reloj • Solamente disponible en modo DESCONECTADO. • Presione y mantenga presionado el botón “Reproducir/Pausa”, la pantalla parpadeará. • Utilice los botones “pasar +/-“ para seleccionar la configuración deseada y utilice el botón “reproducir/pausa” para confirmar la configuración deseada. Alarma • Solamente disponible en modo DESCONECTADO. • Presione y mantenga presionado el botón “alarma 1/2”, la pantalla parpadeará. • Utilice los botones “pasar +/-“ para seleccionar la configuración deseada y utilice el botón “alarma” para confirmar la configuración deseada. • Una vez realizada la configuración, puede activar o desactivar la alarma deseada presionando el botón de alarma correspondiente con la unidad en modo DESCONECTADO. Funcionamiento con tarjeta SD/ USB • Presione el botón “espera” para encender la unidad, y presione el botón “modo” para entrar en el modo USB/SD. • Conecte la unidad de memoria USB o la tarjeta SD en la ranura, la unidad comenzará a reproducir el contenido automáticamente. • Utilice los botones “pasar +/-“ para seleccionar la pista deseada y utilice el botón “álbum +/-” para seleccionar el álbum deseado. • Presione y mantenga presionado el botón “espera” para apagar la unidad. Repetir Presione y mantenga presionado el botón “modo” durante la reproducción, cada vez que presione cambiará a los siguientes modos de repetición: Repetir 1 >> Repetir álbum. Aux Conecte el cable de 3,5 mm a la unidad y el dispositivo externo, presione el botón “modo” hasta que el sistema haya entrado en modo AUX. Utilice los controles en el dispositivo externo para comenzar la reproducción. Función de apagado automático Presione el botón "espera" para configurar el temporizador de desconexión automática (90>80>70>60>50>40>30>20>10>OFF) LIMPIEZA Y MANTENIMIENTO • Limpie el aparato con un paño húmedo. No utilice productos de limpieza abrasives o fuertes, estropajos o lana metálica porque se podría dañar el aparato. • No sumerja nunca el aparato en agua o cualquier otro líquido. Este aparato no se puede lavar en el lavavajillas. GARANTÍA • Este producto cuenta con 24 meses de garantía. Su garantía es válida si el producto se utilizan de acuerdo con las instrucciones y el propósito para el que se creó. Además, debe enviarse un justificante de la compra original (factura, tíquet o recibo) en el que aparezca la fecha de la compra, el nombre del vendedor y el número de artículo del producto. • Para más detalles sobre las condiciones de la garantía, consulte la página web de servicio: www.service.tristar.eu NORMAS DE PROTECCIÓN DEL MEDIOAMBIENTE Este aparato no se debe desechar con los residuos domésticos cuando finalice su durabilidad, sino que se debe ofrecer a un centro de reciclaje de aparatos eléctricos y electrónicos domésticos. Este símbolo en el aparato, manual de instrucciones y embalaje le avisa de este aspecto importante. El los materiales utilizados en este aparato se pueden reciclar. Mediante el reciclaje de electrodomésticos, usted contribuye a fomentar la protección del medioambiente. Consulte a sus autoridades locales para obtener información acerca del punto de recogida. SOPORTE Puede encontrar toda la información disponible, así como piezas de repuesto, en service.tristar.eu!-
 1
1
-
 2
2


AudioSonic RD-1565 El manual del propietario
- Categoría
- Radios
- Tipo
- El manual del propietario
- Este manual también es adecuado para
en otros idiomas
- français: AudioSonic RD-1565 Le manuel du propriétaire
- italiano: AudioSonic RD-1565 Manuale del proprietario
- English: AudioSonic RD-1565 Owner's manual
- Deutsch: AudioSonic RD-1565 Bedienungsanleitung
- Nederlands: AudioSonic RD-1565 de handleiding
- português: AudioSonic RD-1565 Manual do proprietário
- slovenčina: AudioSonic RD-1565 Návod na obsluhu
- polski: AudioSonic RD-1565 Instrukcja obsługi
- čeština: AudioSonic RD-1565 Návod k obsluze
- svenska: AudioSonic RD-1565 Bruksanvisning